Embed Size (px)
Citation preview


This e-book is a collection of articles originally published on http://www.utilizewindows.com. Check for the
latest version of this e-book: http://www.utilizewindows.com/e-books
This e-book is published under Creative Commons Attribution-NonCommercial-ShareAlike 3.0 Unported
License. To view a copy of this license: http://creativecommons.org/licenses/by-nc-sa/3.0
If you would like to contact us: http://www.utilizewindows.com/contact-us
If you would like to support us: http://www.utilizewindows.com/about-us
Disclaimer: While we at the Utilize Windows strive to make the information in this book as timely and accurate
as possible, we make no claims, promises, or guarantees about the accuracy, completeness, or adequacy of the
contents of this book, and expressly disclaim liability for errors and omissions in the contents of this book.
Microsoft Windows® 7 is registered trademark of Microsoft Corporation in the United States and/or other
countries.
Contents Basics ........................................................................................................................................................................................ 1
Introduction to Windows 7 .............................................................................................................................................. 1
Creating a Windows 7 USB Installation Source ........................................................................................................... 4
Upgrading to Windows 7 - Overview ............................................................................................................................ 9
Migrating to Windows 7 using WET ............................................................................................................................ 10
Migrating to Windows 7 using USMT ......................................................................................................................... 15
Networking ............................................................................................................................................................................ 21
Configuring IPv4 in Windows 7 .................................................................................................................................... 21
Configuring IPv6 in Windows 7 .................................................................................................................................... 25
Internet Connection Sharing (ICS) Configuration in Windows 7 ........................................................................... 28
Working With Wireless Network Connections in Windows 7 ................................................................................ 32
Working with Windows Firewall in Windows 7 ......................................................................................................... 38
Configuring Windows Firewall with Advanced Security in Windows 7 ................................................................. 43
Configuring BranchCache in Windows 7 .................................................................................................................... 51
Creating a VPN Connection in Windows 7 ................................................................................................................ 55
DirectAccess Feature in Windows 7 ............................................................................................................................. 59
Deployment ........................................................................................................................................................................... 62
Preparing for Windows 7 Image Capture .................................................................................................................... 62
Mounting and Unmounting Windows 7 Image Using ImageX and DISM ........................................................... 66
Creating WinPE Using WAIK for Windows 7 .......................................................................................................... 76
Windows 7 Image Capture Demonstration................................................................................................................. 80
Windows 7 Image Deployment Demonstration ........................................................................................................ 85
Managing Existing Windows 7 Images ........................................................................................................................ 91
Servicing Windows 7 Image Using DISM ................................................................................................................... 98
Applying Updates to Windows 7 Image Using DISM ............................................................................................ 105
Creating Virtual Hard Disk (VHD) using Disk Management in Windows 7 ...................................................... 108
Creating Virtual Hard Disk (VHD) using Diskpart in Windows 7 ....................................................................... 113
Management ........................................................................................................................................................................ 117
Advanced Driver Management in Windows 7 .......................................................................................................... 117
Staging a Driver in Windows 7 .................................................................................................................................... 125
Using Disk Management and Diskpart to Mange Disks in Windows 7 ............................................................... 128
Disk Quotas in Windows 7 .......................................................................................................................................... 136
Disk Defragmenter Tool in Windows 7 .................................................................................................................... 140
Removable Storage and System Security in Windows 7.......................................................................................... 142
Application Compatibility Issues in Windows 7 ....................................................................................................... 144
UAC Configuration in Windows 7 ............................................................................................................................. 148
Configuring Security Zones in Windows 7 ............................................................................................................... 151
Printer Configuration in Windows 7 .......................................................................................................................... 160
Configuring Power Options in Windows 7 ............................................................................................................... 165
Configuring Offline Files in Windows 7 .................................................................................................................... 172
Managing Services in Windows 7 ................................................................................................................................ 177
Using msconfig in Windows 7 ..................................................................................................................................... 183
Event Viewer in Windows 7 ........................................................................................................................................ 188
Monitoring Performance in Windows 7 .................................................................................................................... 196
Using WinRS and PowerShell for Remote Management in Windows 7 .............................................................. 207
Configuring and Using Remote Desktop in Windows 7 ........................................................................................ 212
Remote Assistance in Windows 7 ............................................................................................................................... 223
System Recovery in Windows 7 .................................................................................................................................. 231
Security ................................................................................................................................................................................. 239
Credential Manager in Windows 7 .............................................................................................................................. 239
Running Apps as Different Users with Run As in Windows 7 ............................................................................. 245
User Account Policies in Windows 7 ......................................................................................................................... 250
Editing NTFS Permissions in Windows 7 ................................................................................................................. 254
Advanced Sharing Settings in Windows 7 ................................................................................................................. 264
Working With Shared Folders in Windows 7 ........................................................................................................... 269
HomeGroups in Windows 7 ........................................................................................................................................ 276
Configuring Auditing in Windows 7 ........................................................................................................................... 280

Encrypting File System in Windows 7 ....................................................................................................................... 285
Configuring BitLocker in Windows 7 ........................................................................................................................ 294
Configuring BitLocker to Go in Windows 7 ............................................................................................................ 300
Windows Defender in Windows 7 .............................................................................................................................. 305
Optimization ........................................................................................................................................................................ 310
Monitoring Resources in Windows 7 ......................................................................................................................... 310
Using Reliability Monitor in Windows 7 .................................................................................................................... 321
Visual Effects and Paging File Options in Windows 7 ........................................................................................... 326
Configuring WSUS and Other Update Options in Windows 7 ............................................................................. 339
Setting Up Backup in Windows 7 ............................................................................................................................... 344
Restoring Data from Backup in Windows 7 ............................................................................................................. 354
www.utilizewindows.com Basics Introduction to Windows 7
1
Basics Introduction to Windows 7 Before you start
Objectives: learn about main features in each Windows 7 edition and what minimum hardware requirements
are
Prerequisites: no prerequisites.
Key terms: windows 7 editions, starter, home basic, home premium, professional, enterprise, ultimate,
hardware requirements, processor architecture.
Windows 7 Editions
There are six different Windows 7 editions:
Starter
Home Basic
Home Premium
Professional
Enterprise
Ultimate
Starter
Windows 7 Starter edition does not support DVD playback, Windows Aero user interface, IIS Web Server,
Internet connection sharing, or Windows Media Center. It also does not support advanced, new features like
AppLocker, Encrypting File System, DirectAccess, BitLocker, BranchCache, and Remote Desktop Host. It
supports only one physical processor.
Home Basic
Window 7 Home Basic does not support domains, Aero user interface, DVD playback, Windows Media
Center, or IIS Web Server. It also does not support enterprise features such as EFS, AppLocker, DirectAccess,
BitLocker, Remote Desktop Host, and BranchCache. It supports only one physical processor. The x86 version
supports a maximum of 4 GB of RAM, whereas the x64 version supports a maximum of 8 GB of RAM.
Home Premium
Windows 7 Home Premium supports the Windows Aero UI, DVD playback, Windows Media Center, Internet
connection sharing, and the IIS Web Server. It does not support domains and it does not support enterprise
features such as EFS, AppLocker, DirectAccess, BitLocker, Remote Desktop Host, and BranchCache. The x86
version of Windows 7 Home Premium supports a maximum of 4 GB of RAM, whereas the x64 version
supports a maximum of 16 GB of RAM. Windows 7 Home Premium supports up to two physical processors.
www.utilizewindows.com Basics Introduction to Windows 7
2
Professional
Windows 7 Professional supports all the features available in Windows Home Premium, and it also supports
domains. It supports EFS and Remote Desktop Host but does not support enterprise features such as
AppLocker, DirectAccess, BitLocker, and BranchCache.
Enterprise
Windows 7 Enterprise and Ultimate Editions support all the features available in all other Windows 7 editions
but also support all the enterprise features such as EFS, Remote Desktop Host, AppLocker, DirectAccess,
BitLocker, BranchCache, and Boot from VHD. Windows 7 Enterprise and Ultimate editions support up to
two physical processors. Windows 7 Enterprise is available only to Microsoft's volume licensing customers, and
Windows 7 Ultimate is available from retailers and on new computers installed by manufacturers.
Although some editions support only one physical processor, they do support an unlimited number of cores on
that processor. For example, all editions of Windows 7 support quad-core CPUs. We can use Remote Desktop
to initiate a connection from any edition of Windows 7, but we can connect to computers running Windows 7
Professional, Windows 7 Ultimate, or Windows 7 Enterprise. We can't use Remote Desktop Connection to
connect to computers running Windows 7 Starter, Windows 7 Home Basic, or Windows 7 Home Premium.
Hardware Requirements Windows 7 Starter and Windows 7 Home Basic have the following minimum hardware requirements:
1 GHz 32-bit (x86) or 64-bit (x64) processor
512 MB of system memory
20-GB (x64) or 16-GB (x86) hard disk drive, traditional or Solid State Disk (SSD), with at least 15 GB
of available space
Graphics adapter that supports DirectX 9 graphics and 32 MB of graphics memory
Windows 7 Home Premium, Professional, Ultimate, and Enterprise editions have the following minimum
hardware requirements:
1 GHz 32-bit (x86) or 64-bit (x64) processor
1 GB of system memory
40-GB hard disk drive (traditional or SSD) with at least 15 GB of available space
Graphics adapter that supports DirectX 9 graphics, has a Windows Display Driver Model (WDDM)
driver, Pixel Shader 2.0 hardware, and 32 bits per pixel and a minimum of 128 MB graphics memory
32-bit versus 64-bit Windows 7 supports two different processor architectures: 32-bit (x86) version, and 64-bit (x64) version. The
main limitation of the x86 version of Windows 7 is that it does not support more than 4 GB of RAM. It is
possible to install the x86 version of Windows 7 on computers that have x64 processors, but the operating

www.utilizewindows.com Basics Introduction to Windows 7
3
system will be unable to utilize any RAM that the computer has beyond 4 GB. We can install the x64 version
of Windows 7 only on computers that have x64-compatible processors. The x64 versions of Windows 7
Professional, Enterprise, and Ultimate editions support up to 128 GB of RAM. The x64 version of Windows 7
Home Basic edition supports 8 GB and the x64 edition of Home Premium supports a maximum of 16 GB.
www.utilizewindows.com Basics Creating a Windows 7 USB Installation Source
4
Creating a Windows 7 USB Installation Source Before you start
Objectives: learn how to create USB installation source by using tools available on your PC.
Prerequisites: you have to have a Windows 7 installation DVD and a USB storage device with at least 4 GB
of free space.
Key terms: command prompt, elevated mode, usb drive preparation, diskpart, diskpart commands, bootable
usb drive, windows 7 installation, source
Procedure
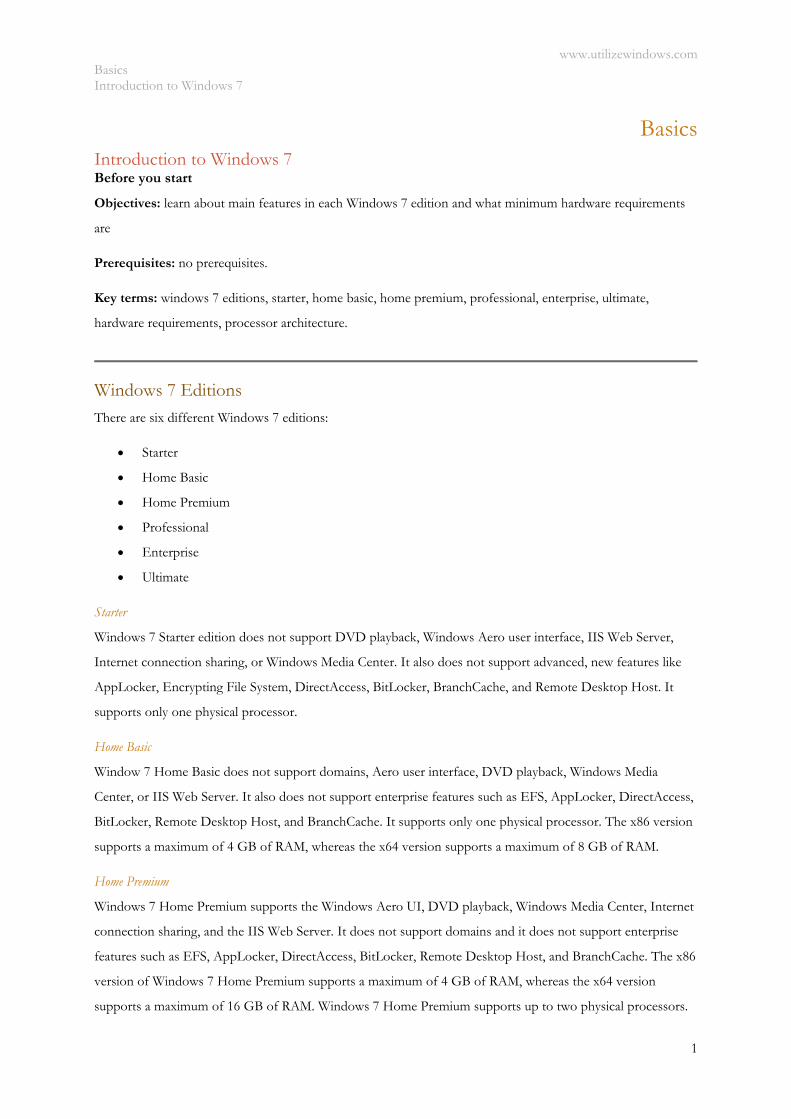
Before we begin keep in mind that during this process USB flash drive will be completely erased, so we have to
make sure that we save any data that it contains. In our example we have a Windows 7 installation DVD
present in our D drive, and a USB flash drive available trough drive E, as shown on the picture.
Figure 1 - Computer Drives
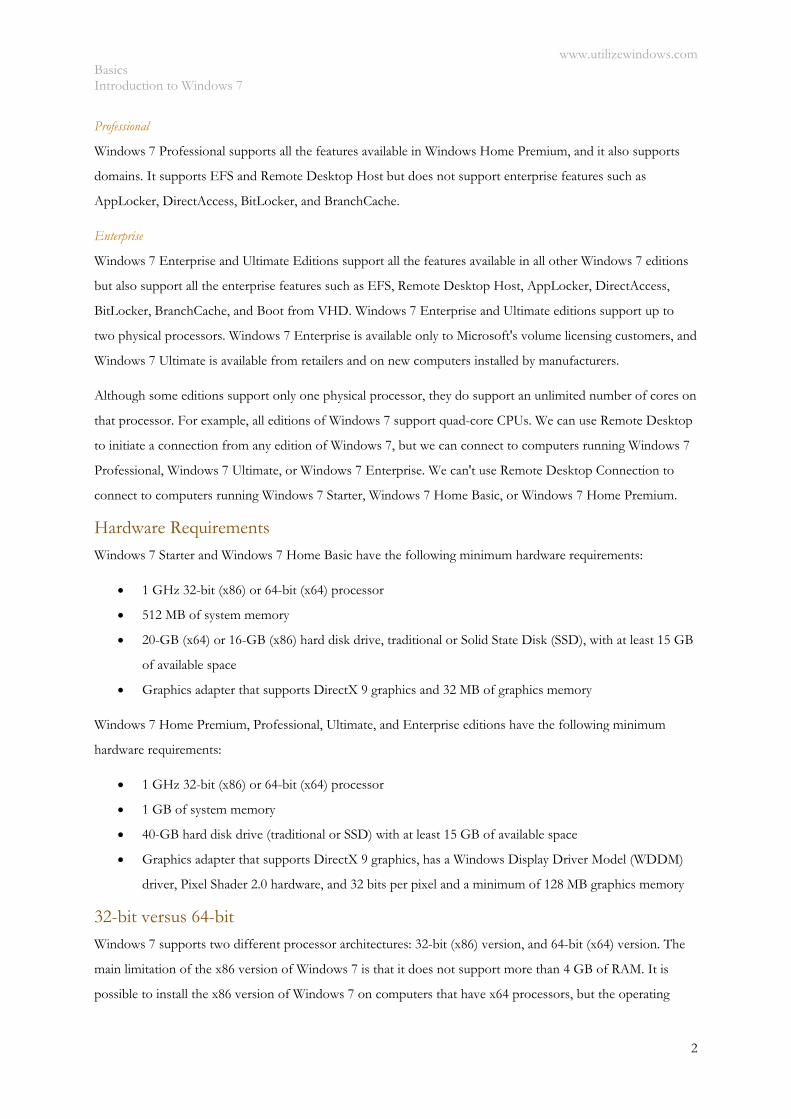
1. Open Command Prompt (CMD)
We will be working with Command Prompt in elevated mode. You can find CMD in: Start menu > All
Programs > Accessories > Command Prompt. To open CMD in elevated mode, right-click on the
Command Prompt and select 'Run as administrator'. Click Yes to confirm.
Figure 2 - Run CMD as Administrator
www.utilizewindows.com Basics Creating a Windows 7 USB Installation Source
5
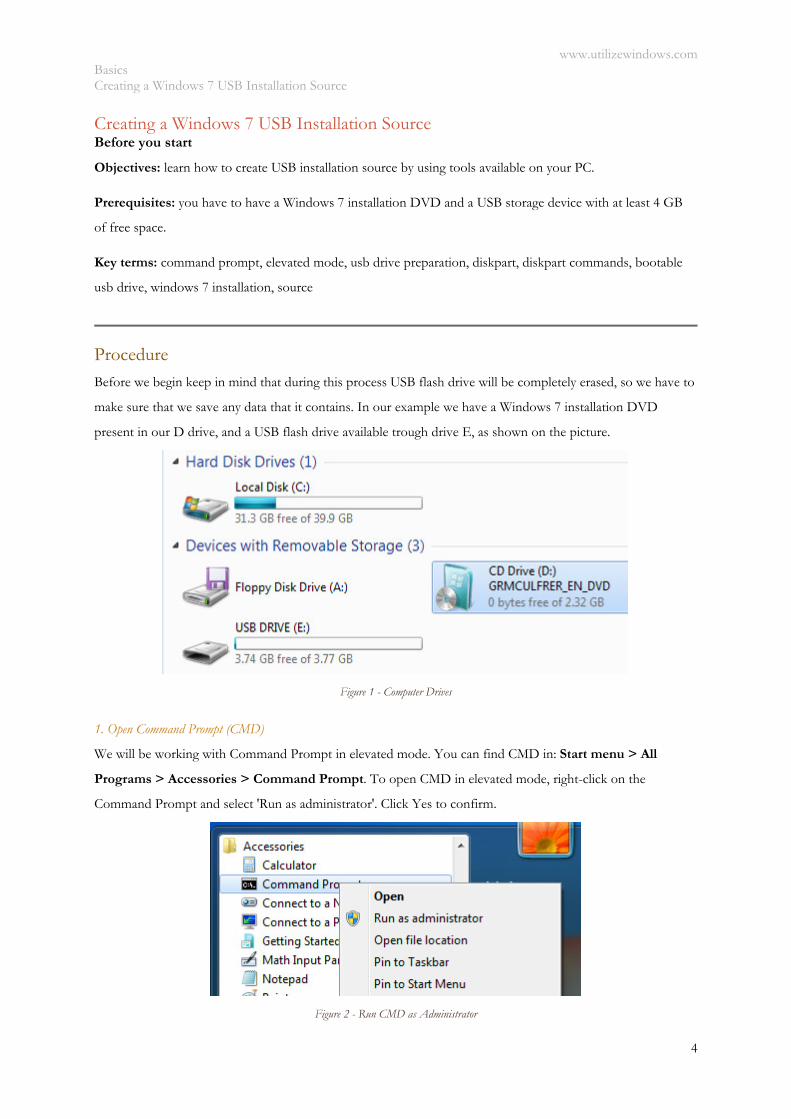
We know that we are running CMD in elevated mode because we have the 'Administrator' in the name of the
CMD window.
Figure 3 - Administrator: Command Prompt
2. Prepare USB drive
We will open the command line utility called diskpart, which is used to manage partitions and drives. To do
that we will simply enterdiskpart in CMD.
Figure 4 - Diskpart
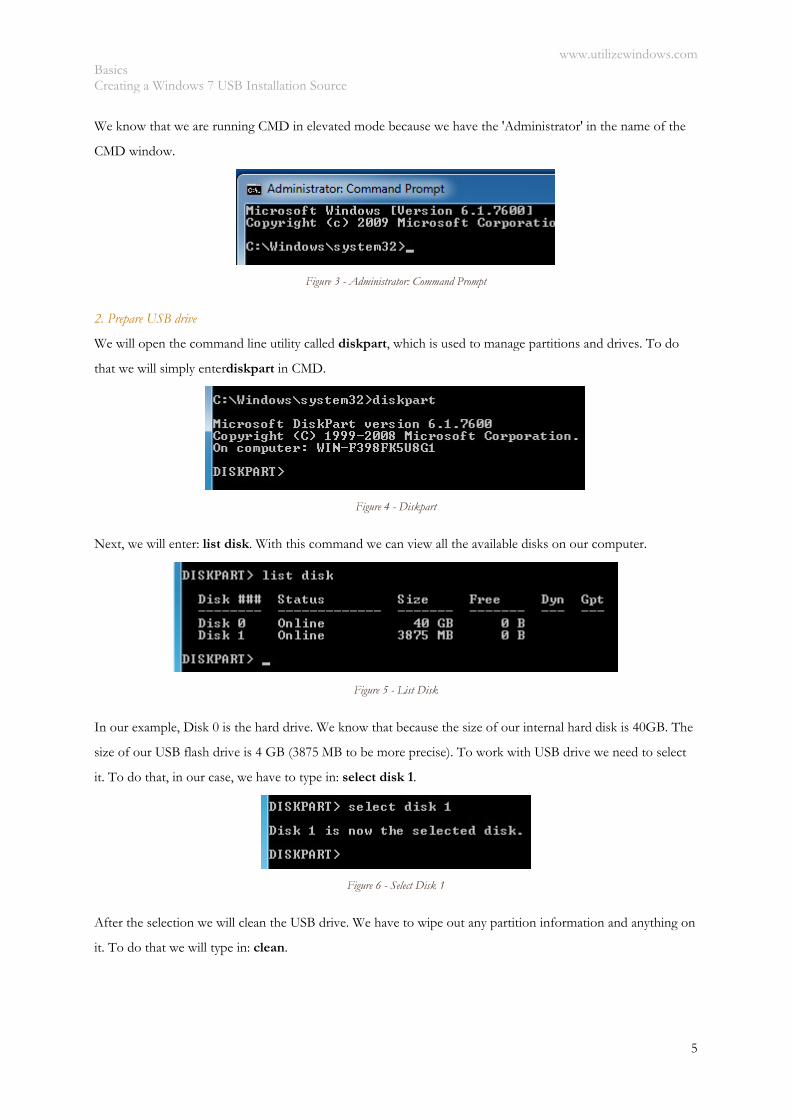
Next, we will enter: list disk. With this command we can view all the available disks on our computer.
Figure 5 - List Disk
In our example, Disk 0 is the hard drive. We know that because the size of our internal hard disk is 40GB. The
size of our USB flash drive is 4 GB (3875 MB to be more precise). To work with USB drive we need to select
it. To do that, in our case, we have to type in: select disk 1.
Figure 6 - Select Disk 1
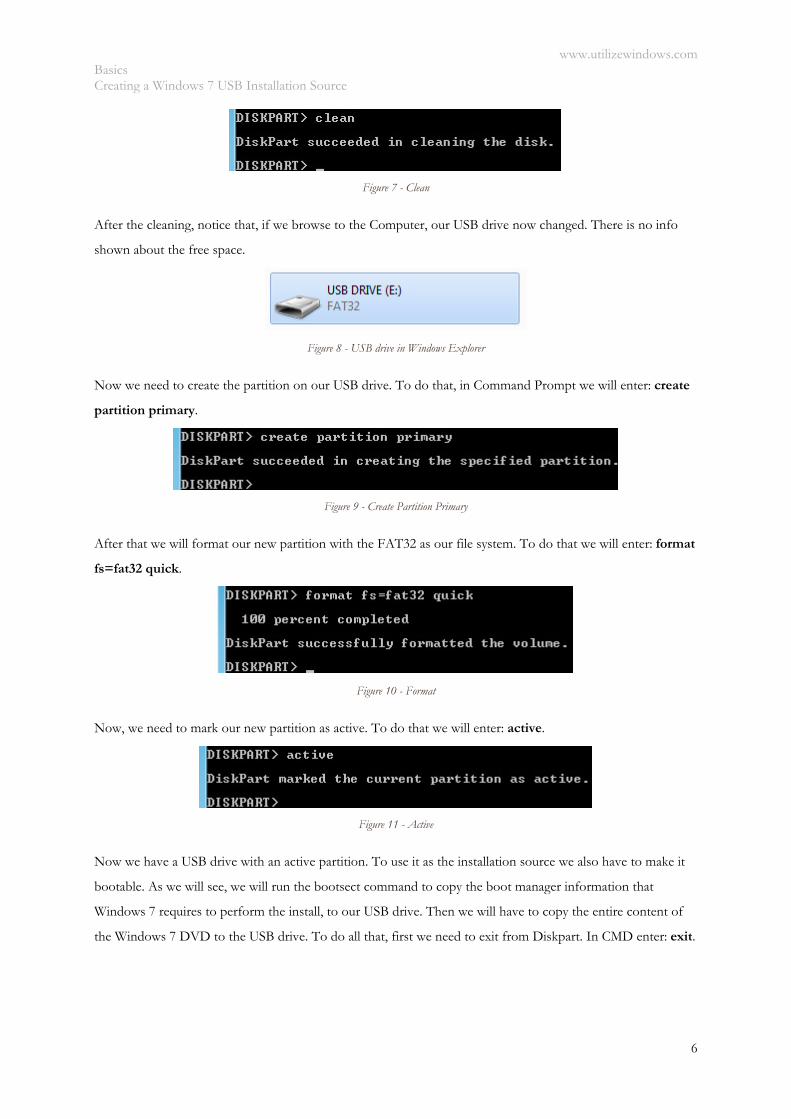
After the selection we will clean the USB drive. We have to wipe out any partition information and anything on
it. To do that we will type in: clean.
www.utilizewindows.com Basics Creating a Windows 7 USB Installation Source
6
Figure 7 - Clean
After the cleaning, notice that, if we browse to the Computer, our USB drive now changed. There is no info
shown about the free space.
Figure 8 - USB drive in Windows Explorer
Now we need to create the partition on our USB drive. To do that, in Command Prompt we will enter: create
partition primary.
Figure 9 - Create Partition Primary
After that we will format our new partition with the FAT32 as our file system. To do that we will enter: format
fs=fat32 quick.
Figure 10 - Format
Now, we need to mark our new partition as active. To do that we will enter: active.
Figure 11 - Active
Now we have a USB drive with an active partition. To use it as the installation source we also have to make it
bootable. As we will see, we will run the bootsect command to copy the boot manager information that
Windows 7 requires to perform the install, to our USB drive. Then we will have to copy the entire content of
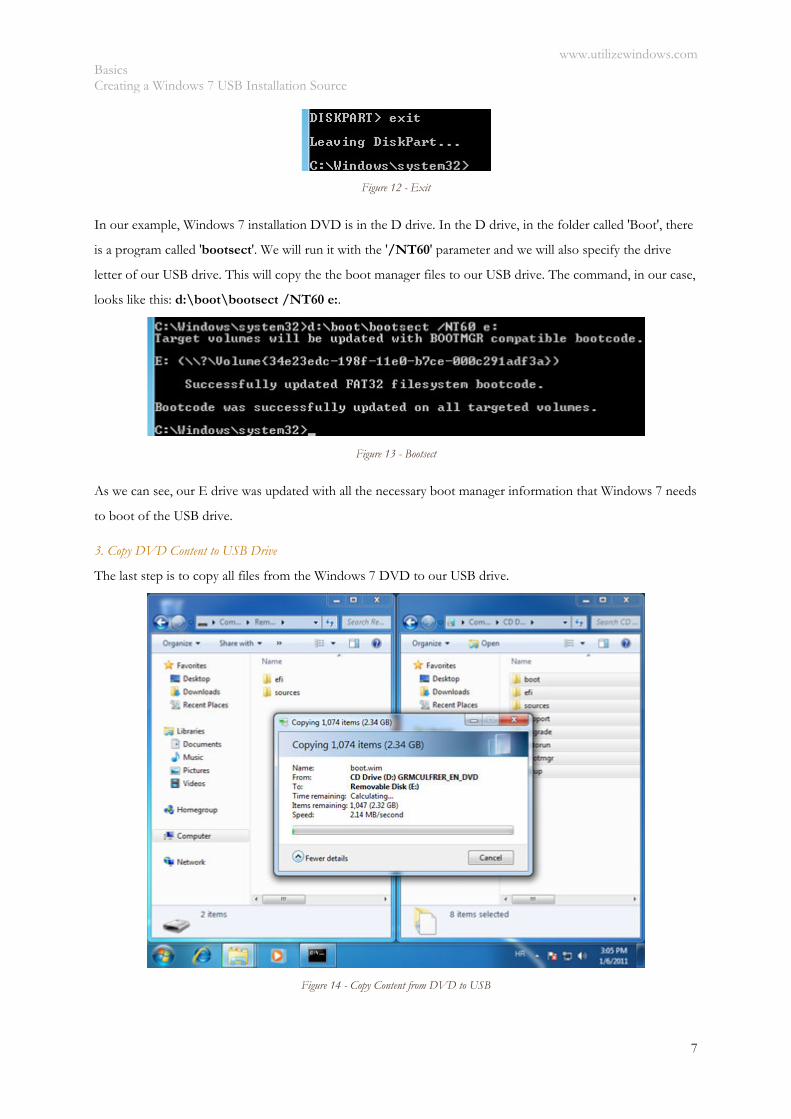
the Windows 7 DVD to the USB drive. To do all that, first we need to exit from Diskpart. In CMD enter: exit.
www.utilizewindows.com Basics Creating a Windows 7 USB Installation Source
7
Figure 12 - Exit
In our example, Windows 7 installation DVD is in the D drive. In the D drive, in the folder called 'Boot', there
is a program called 'bootsect'. We will run it with the '/NT60' parameter and we will also specify the drive
letter of our USB drive. This will copy the the boot manager files to our USB drive. The command, in our case,
looks like this: d:\boot\bootsect /NT60 e:.
Figure 13 - Bootsect
As we can see, our E drive was updated with all the necessary boot manager information that Windows 7 needs
to boot of the USB drive.
3. Copy DVD Content to USB Drive
The last step is to copy all files from the Windows 7 DVD to our USB drive.
Figure 14 - Copy Content from DVD to USB

www.utilizewindows.com Basics Creating a Windows 7 USB Installation Source
8
Once the copy is complete, our USB drive is ready for use. Of course, on the computer on which we want to
perform the installation, we have to go to the BIOS and make sure that the USB device is selected to boot
from. After that the installation will be the same as if we were installing from a DVD.
www.utilizewindows.com Basics Upgrading to Windows 7 - Overview
9
Upgrading to Windows 7 - Overview Before you start
Objectives: learn which Windows versions can be upgraded to Windows 7.
Prerequisites: you should know about different ways to install Windows.
Key terms: edition, version, upgrade, platform, hardware requirements
Different Editions
Edition upgrades can only be performed from a lower edition to a higher edition. It can be performed using
installation media or using the Windows Anytime Upgrade. Windows Anytime Upgrade was introduced in
Windows Vista and it allows us to purchase an edition upgrade for the operating system over the Internet.
Keep in mind that we cannot upgrade 32-bit edition to 64-bit edition of Windows and vice-verca.
Different Platforms To change or migrate to a different platform (32-bit or 64-bit) we can use the Wipe-and-Load or Side-by-side
migration of Windows 7 or use multi boot. We will be required to migrate user data and application settings
between the two installations. This is not upgrade, but migration.
Previous Windows Versions Windows 7 only supports upgrades from computers running Windows Vista with Service Pack 1 installed.
Windows XP installations cannot be upgraded to Windows 7. If we want to upgrade from Windows XP, first
we need to upgrade to Windows Vista SP 1 and then to Windows 7.
Hardware Requirements Before upgrading we need to have at least 15 GB of free hard drive space. Windows Vista and Windows 7 in
general have the same hardware requirements. To check for hardware incompatibilities we can use Windows 7
Upgrade Advisor tool that will inform us of any device or software incompatibilities that our computer might
have. Before running Upgrade Advisor it is recommended to connect all devices to the computer, such as
printers, scanners, cameras and other devices that we will be using on Windows 7.
Recommendations It is recommended to perform full backup of existing installation in case the upgrade fails. Also we should
ensure that we have proper product keys available for Windows or any application or game that is installed on
existing installation.
The biggest benefit in upgrading from an existing installation to Windows 7 is that the users settings and
applications are preserved.
www.utilizewindows.com Basics Migrating to Windows 7 using WET
10
Migrating to Windows 7 using WET Before you start
Objectives: learn where to find WET, how to run it and which options to use in different situations.
Prerequisites: you have to be familiar with migration terms and utilities.
Key terms: wet, migwiz, migration, user profile, example, location, transfer, account
Running Windows Easy Transfer (WET)
In Windows 7 we can run WET by going to Start > All programs > Accessories > Systems Tools >
Windows Easy Transfer. This will actually open migwiz.exe file which is located
in %windir%\system32\migwiz\ folder. We can also find migwiz.exe on every Windows 7 installation
DVD. Just browse to the [DVDdrive]\support\migwiz\ folder and search for migwiz.exe. That is our
Windows Easy Tranfer tool. We can copy migwiz folder to another location, for example, on a network share
to be easily accessible from all computers on the network.
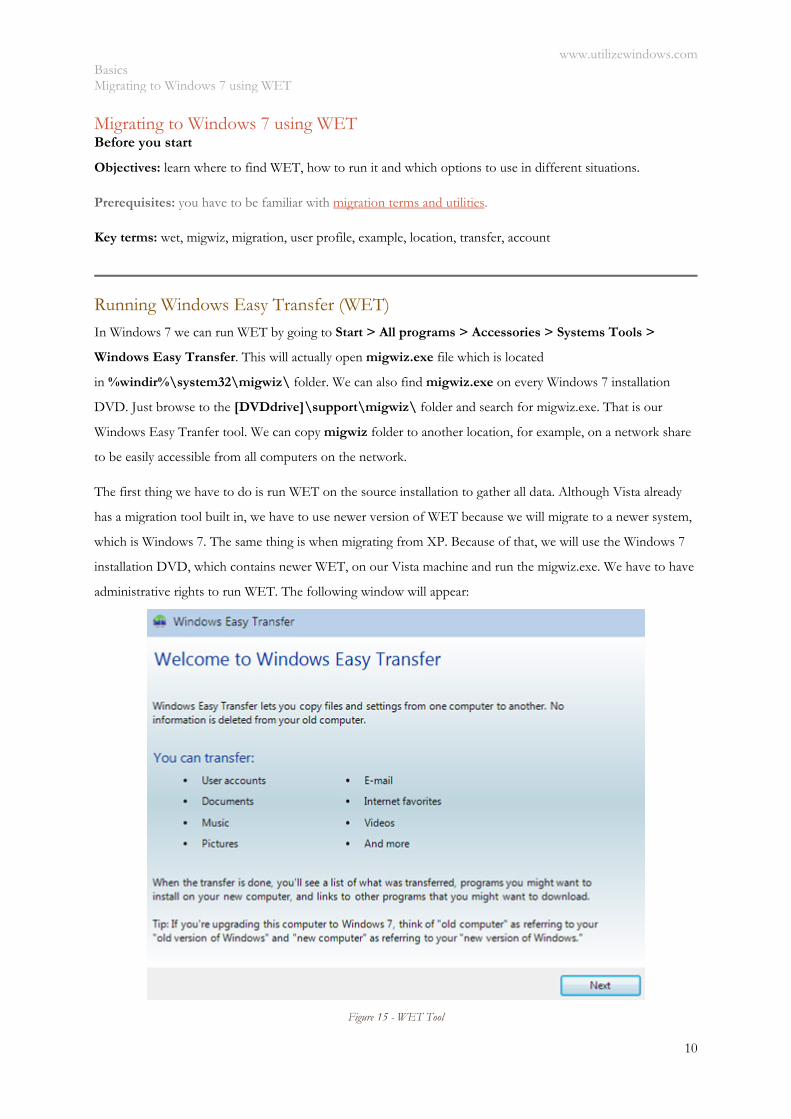
The first thing we have to do is run WET on the source installation to gather all data. Although Vista already
has a migration tool built in, we have to use newer version of WET because we will migrate to a newer system,
which is Windows 7. The same thing is when migrating from XP. Because of that, we will use the Windows 7
installation DVD, which contains newer WET, on our Vista machine and run the migwiz.exe. We have to have
administrative rights to run WET. The following window will appear:
Figure 15 - WET Tool
www.utilizewindows.com Basics Migrating to Windows 7 using WET
11
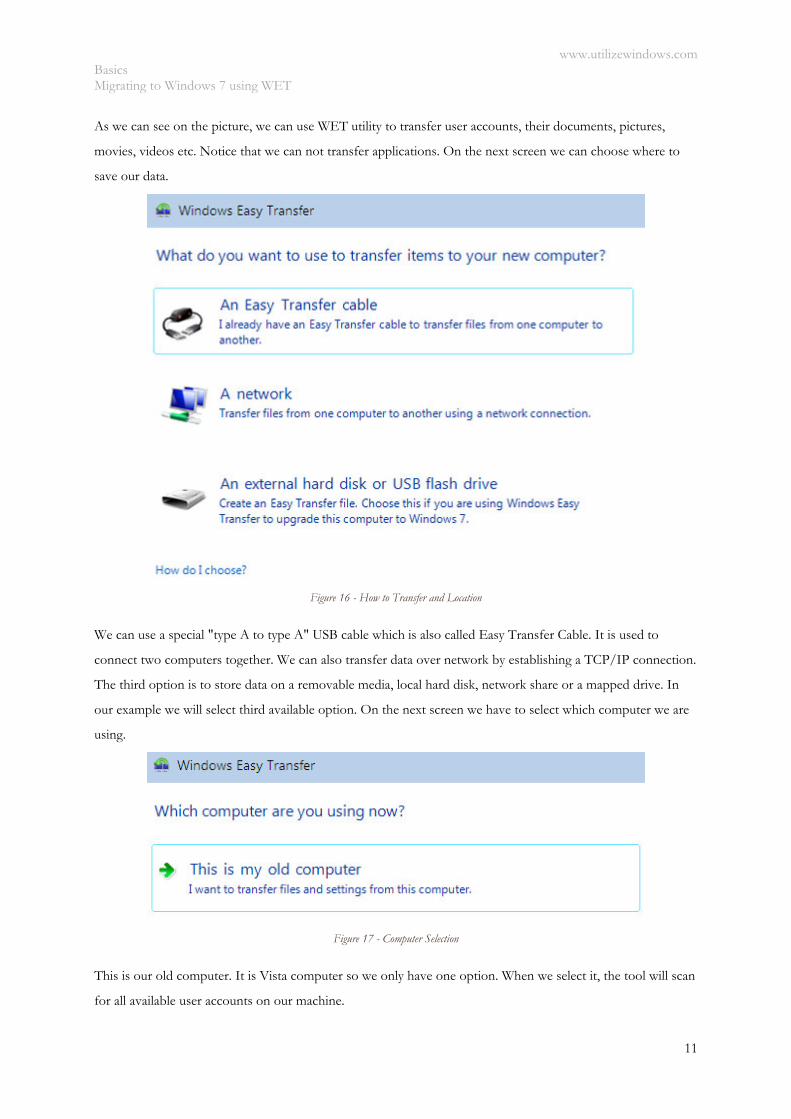
As we can see on the picture, we can use WET utility to transfer user accounts, their documents, pictures,
movies, videos etc. Notice that we can not transfer applications. On the next screen we can choose where to
save our data.
Figure 16 - How to Transfer and Location
We can use a special "type A to type A" USB cable which is also called Easy Transfer Cable. It is used to
connect two computers together. We can also transfer data over network by establishing a TCP/IP connection.
The third option is to store data on a removable media, local hard disk, network share or a mapped drive. In
our example we will select third available option. On the next screen we have to select which computer we are
using.
Figure 17 - Computer Selection
This is our old computer. It is Vista computer so we only have one option. When we select it, the tool will scan
for all available user accounts on our machine.
www.utilizewindows.com Basics Migrating to Windows 7 using WET
12
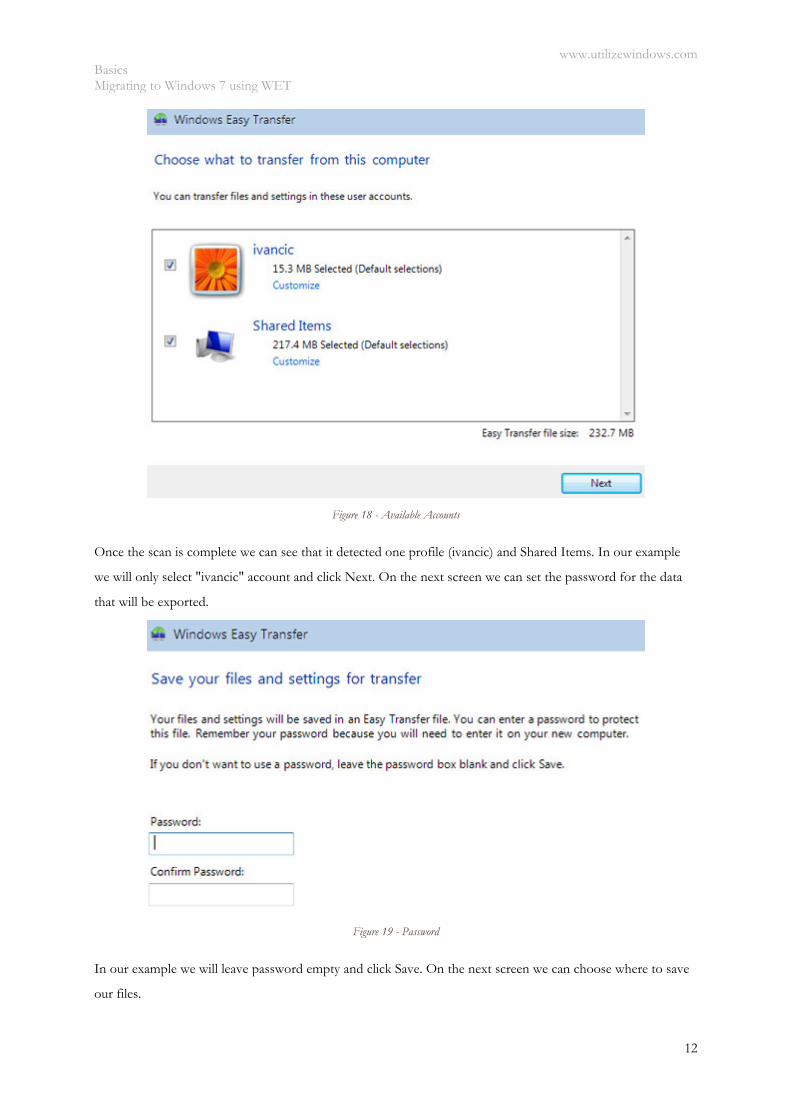
Figure 18 - Available Accounts
Once the scan is complete we can see that it detected one profile (ivancic) and Shared Items. In our example
we will only select "ivancic" account and click Next. On the next screen we can set the password for the data
that will be exported.
Figure 19 - Password
In our example we will leave password empty and click Save. On the next screen we can choose where to save
our files.
www.utilizewindows.com Basics Migrating to Windows 7 using WET
13
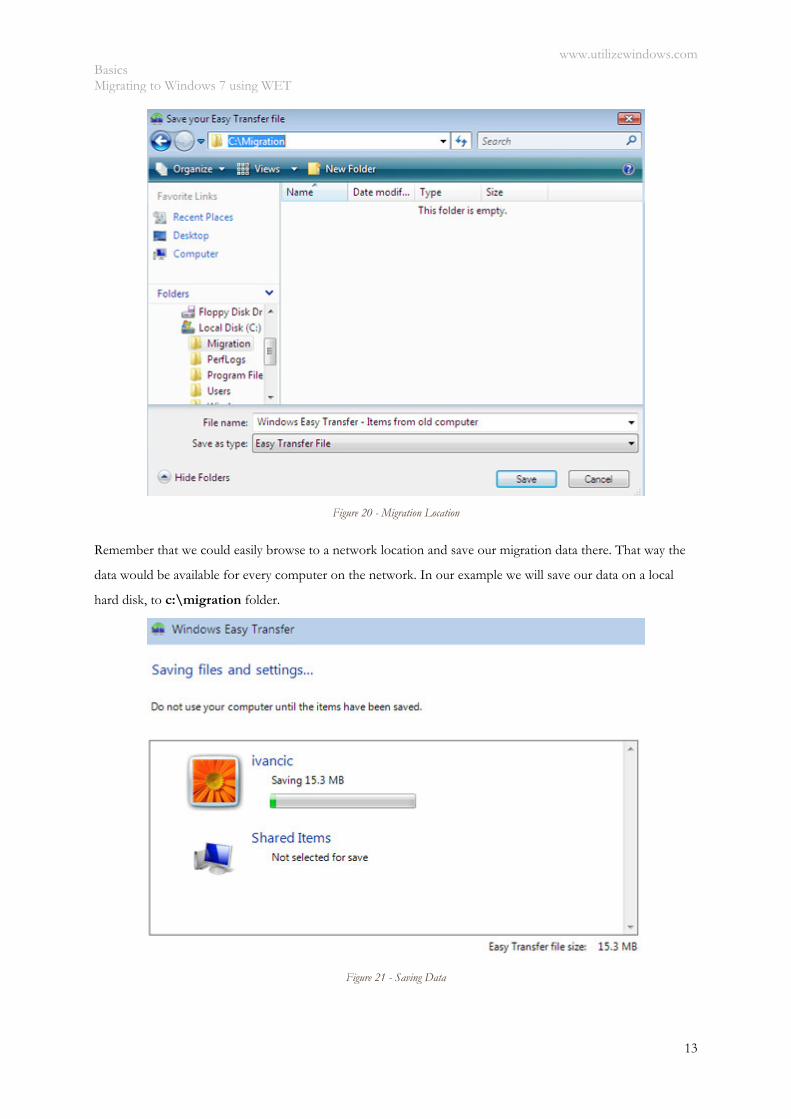
Figure 20 - Migration Location
Remember that we could easily browse to a network location and save our migration data there. That way the
data would be available for every computer on the network. In our example we will save our data on a local
hard disk, to c:\migration folder.
Figure 21 - Saving Data

www.utilizewindows.com Basics Migrating to Windows 7 using WET
14
Our data will be exported with a MIG extension. Now we can copy it to a new Windows 7 computer and run it
by double clicking it or by running migwiz and then importing it.
www.utilizewindows.com Basics Migrating to Windows 7 using USMT
15
Migrating to Windows 7 using USMT Before you start
Objectives: learn where to find USMT and which commands you can use to gather user profiles from source
installation and then apply them to the destination installation. This is demo on how to use USMT to migrate user
profiles from old to new Windows installation (XP to 7 in this case). Although here you can see all steps required to do migration
completely, for more advanced usage of all USMT options you will have to read USMT documentation.
Prerequisites: you have to be familiar with migration concepts in general and with tools which you can use.
Key terms: usmt, user profile, scanstate, loadstate, command, account, cmd, syntax, source, destination
Running USMT on Source Computer USMT is a part of Windows AIK, but it can also be downloaded from Microsoft website as a standalone
application. The thing is, since we will migrate users from XP, we have to have USMT on XP machine. There
are two ways to put USMT on XP. First would be to download UMST from Microsoft site and install it.
During te installation you can choose the installation folder, which you have to remember. The second way
implies that you have Windows AIK installed on your Windows 7 machine. USMT will be located
in C:\Program Files\Windows AIK\Tools\USMT\x86 folder (if you have x64 system you have to use x64
version) which contains all the files needed for user migration. We can copy this folder to a network share to
make it always available. For this demonstration we will simply copy USMT folder to the C: drive of our
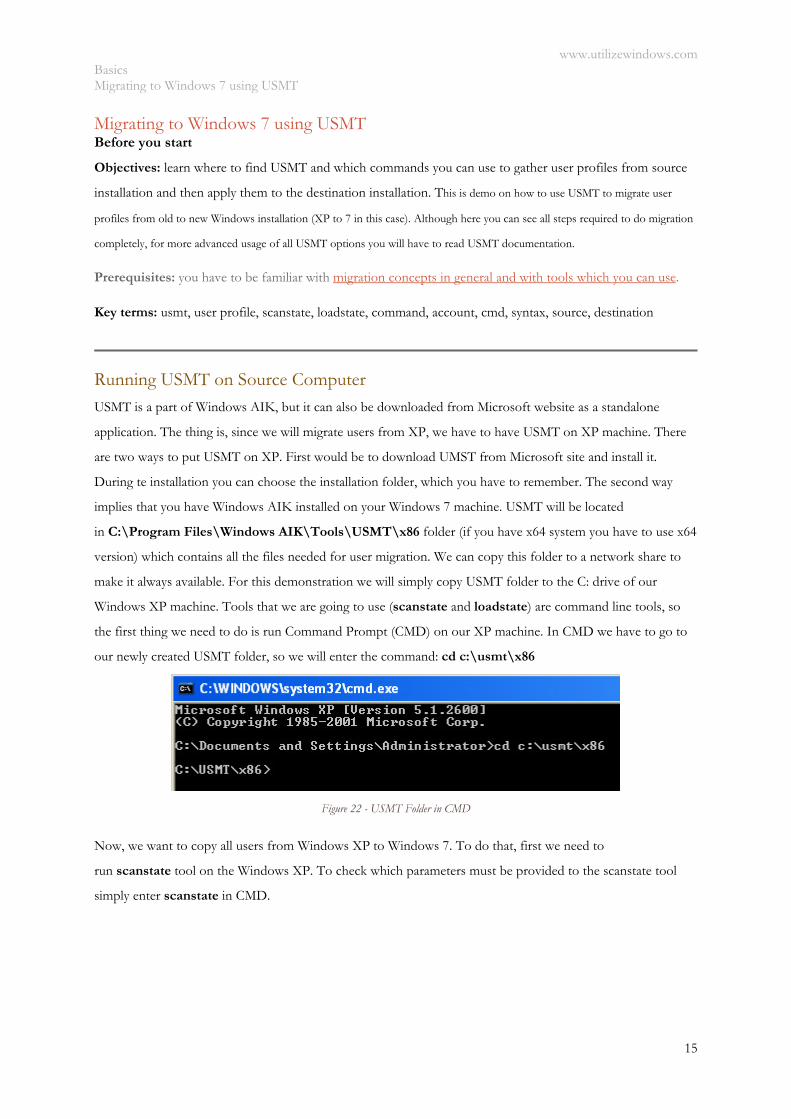
Windows XP machine. Tools that we are going to use (scanstate and loadstate) are command line tools, so
the first thing we need to do is run Command Prompt (CMD) on our XP machine. In CMD we have to go to
our newly created USMT folder, so we will enter the command: cd c:\usmt\x86
Figure 22 - USMT Folder in CMD
Now, we want to copy all users from Windows XP to Windows 7. To do that, first we need to
run scanstate tool on the Windows XP. To check which parameters must be provided to the scanstate tool
simply enter scanstate in CMD.
www.utilizewindows.com Basics Migrating to Windows 7 using USMT
16
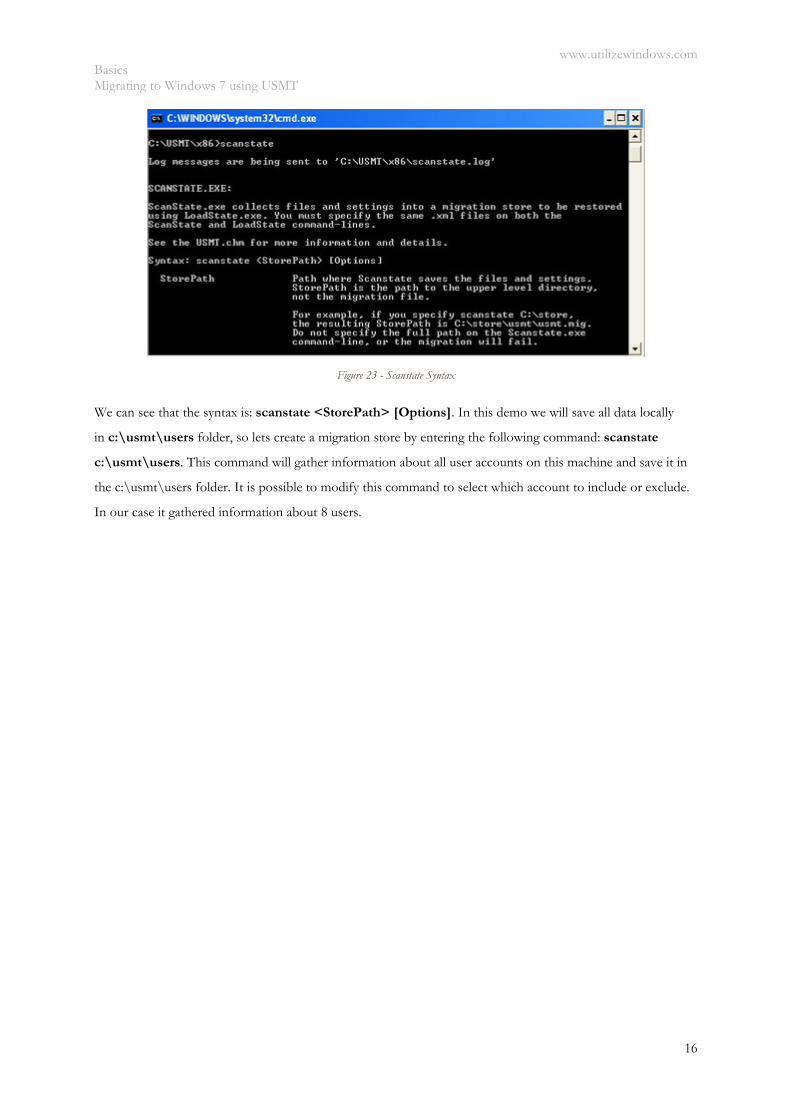
Figure 23 - Scanstate Syntax
We can see that the syntax is: scanstate <StorePath> [Options]. In this demo we will save all data locally
in c:\usmt\users folder, so lets create a migration store by entering the following command: scanstate
c:\usmt\users. This command will gather information about all user accounts on this machine and save it in
the c:\usmt\users folder. It is possible to modify this command to select which account to include or exclude.
In our case it gathered information about 8 users.
www.utilizewindows.com Basics Migrating to Windows 7 using USMT
17
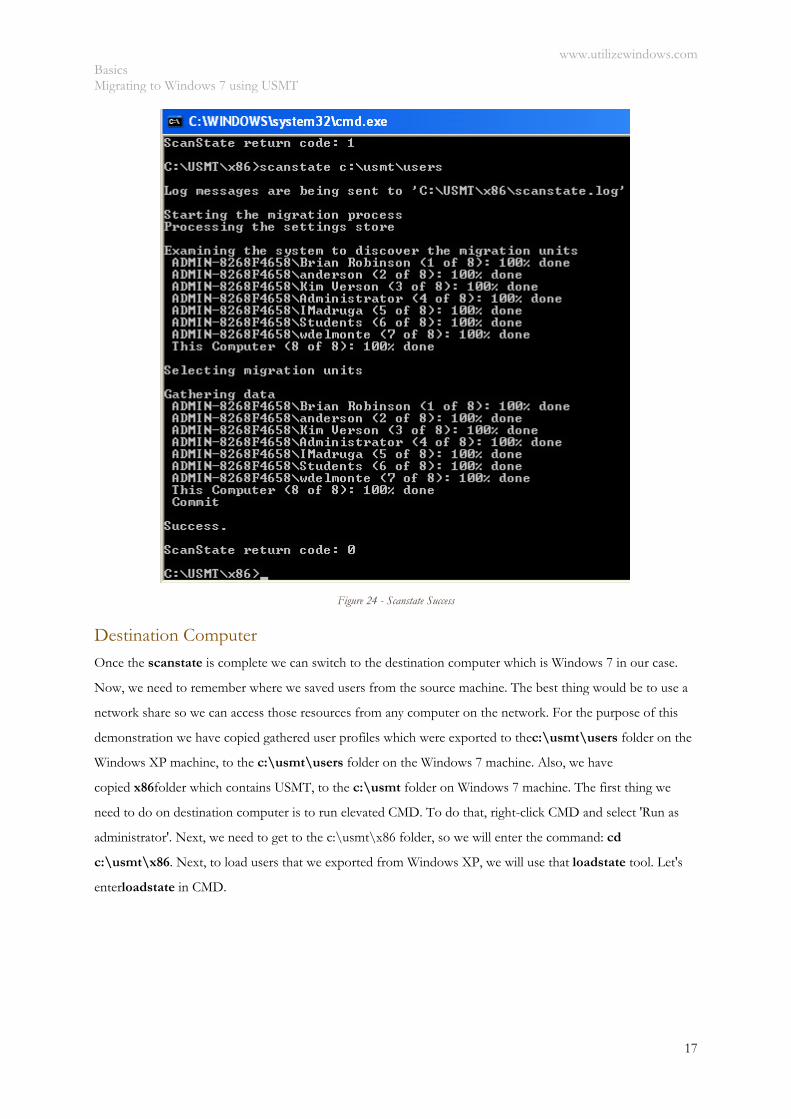
Figure 24 - Scanstate Success
Destination Computer Once the scanstate is complete we can switch to the destination computer which is Windows 7 in our case.
Now, we need to remember where we saved users from the source machine. The best thing would be to use a
network share so we can access those resources from any computer on the network. For the purpose of this
demonstration we have copied gathered user profiles which were exported to thec:\usmt\users folder on the
Windows XP machine, to the c:\usmt\users folder on the Windows 7 machine. Also, we have
copied x86folder which contains USMT, to the c:\usmt folder on Windows 7 machine. The first thing we
need to do on destination computer is to run elevated CMD. To do that, right-click CMD and select 'Run as
administrator'. Next, we need to get to the c:\usmt\x86 folder, so we will enter the command: cd
c:\usmt\x86. Next, to load users that we exported from Windows XP, we will use that loadstate tool. Let's
enterloadstate in CMD.
www.utilizewindows.com Basics Migrating to Windows 7 using USMT
18
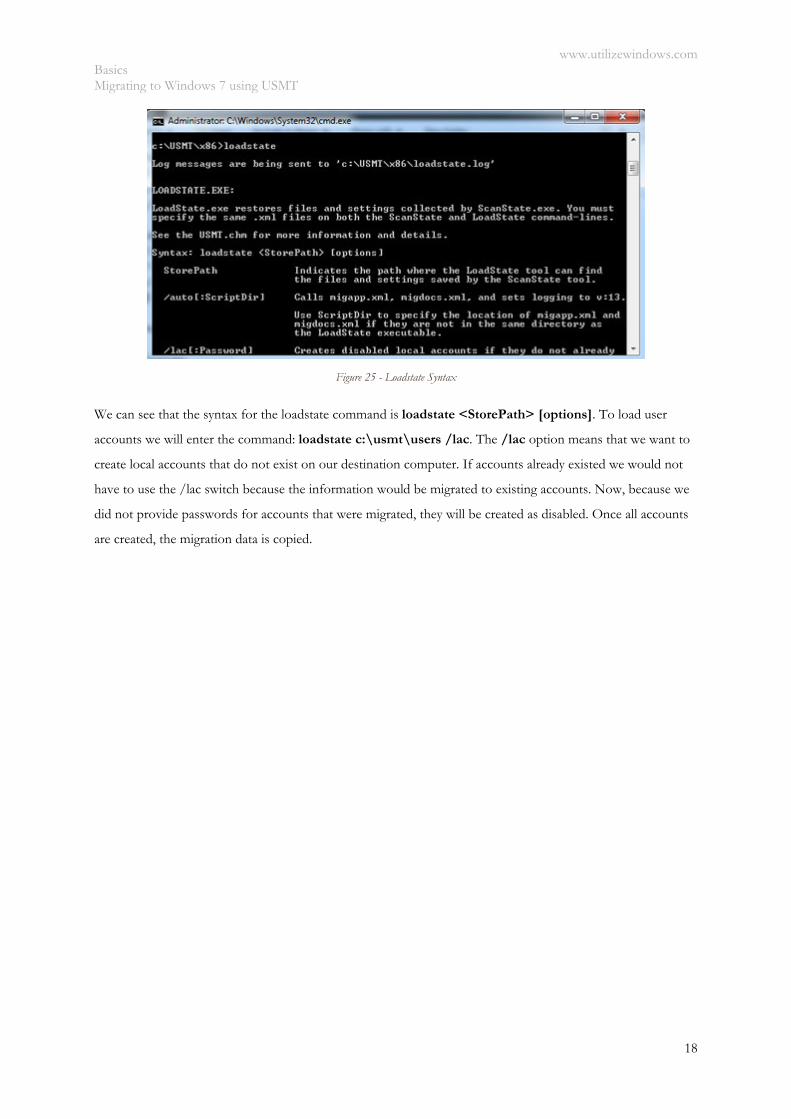
Figure 25 - Loadstate Syntax
We can see that the syntax for the loadstate command is loadstate <StorePath> [options]. To load user
accounts we will enter the command: loadstate c:\usmt\users /lac. The /lac option means that we want to
create local accounts that do not exist on our destination computer. If accounts already existed we would not
have to use the /lac switch because the information would be migrated to existing accounts. Now, because we
did not provide passwords for accounts that were migrated, they will be created as disabled. Once all accounts
are created, the migration data is copied.
www.utilizewindows.com Basics Migrating to Windows 7 using USMT
19
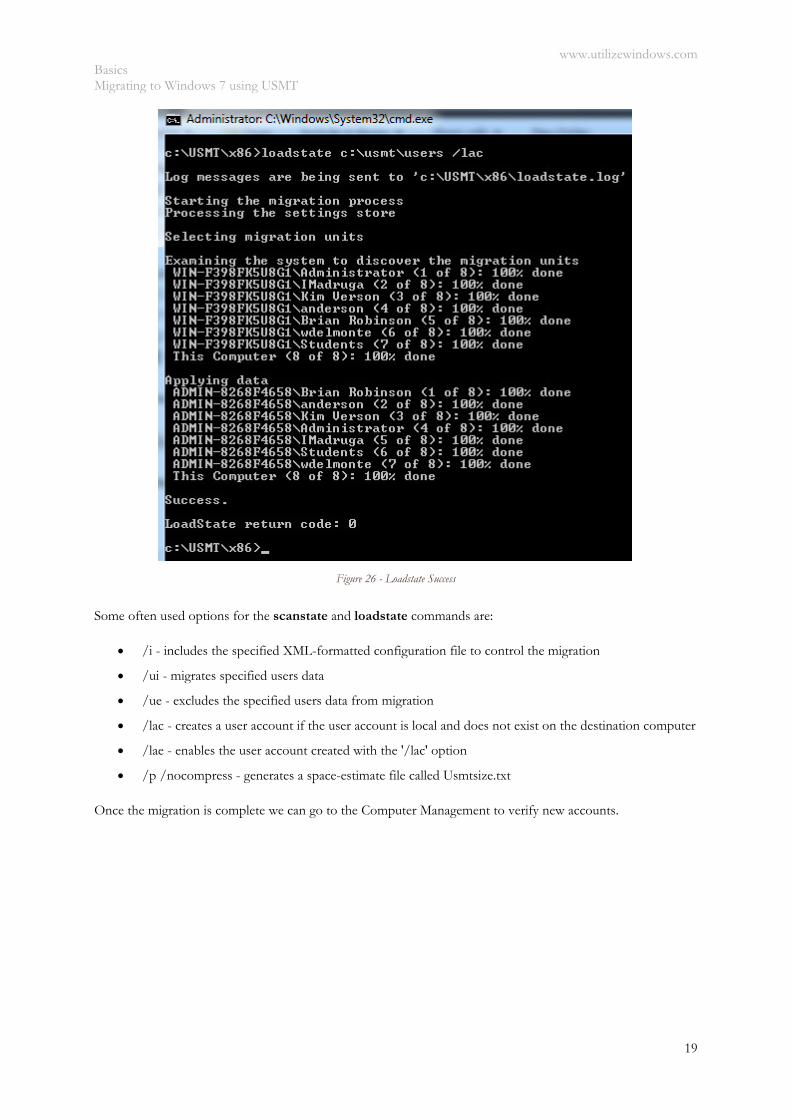
Figure 26 - Loadstate Success
Some often used options for the scanstate and loadstate commands are:
/i - includes the specified XML-formatted configuration file to control the migration
/ui - migrates specified users data
/ue - excludes the specified users data from migration
/lac - creates a user account if the user account is local and does not exist on the destination computer
/lae - enables the user account created with the '/lac' option
/p /nocompress - generates a space-estimate file called Usmtsize.txt
Once the migration is complete we can go to the Computer Management to verify new accounts.
www.utilizewindows.com Basics Migrating to Windows 7 using USMT
20
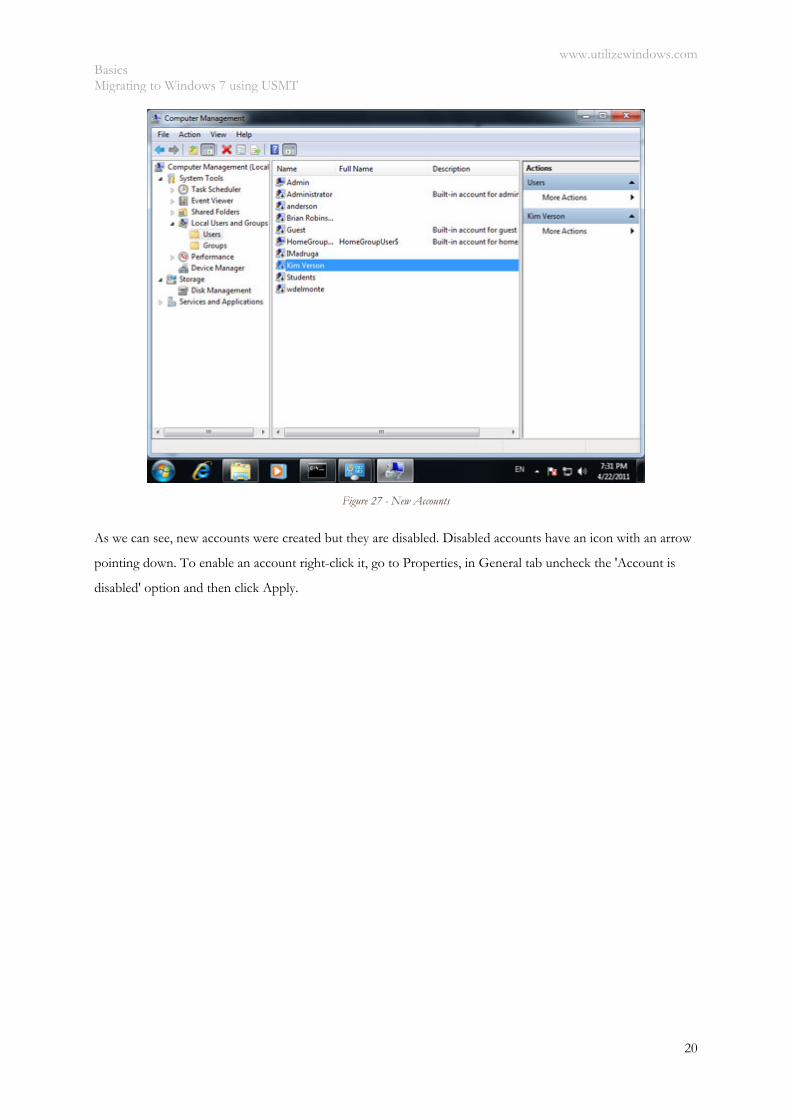
Figure 27 - New Accounts
As we can see, new accounts were created but they are disabled. Disabled accounts have an icon with an arrow
pointing down. To enable an account right-click it, go to Properties, in General tab uncheck the 'Account is
disabled' option and then click Apply.
www.utilizewindows.com Networking Configuring IPv4 in Windows 7
21
Networking Configuring IPv4 in Windows 7 Before you start
Objectives: Learn how to configure IPv4 settings on Windows 7 machine by using GUI and how to
troubleshoot connectivity in command line.
Prerequisites: you should know all about IPv4 address and about different ways to apply network settings.
Key terms: IPv4, network, address, connection, IP, settings, case, center, ping
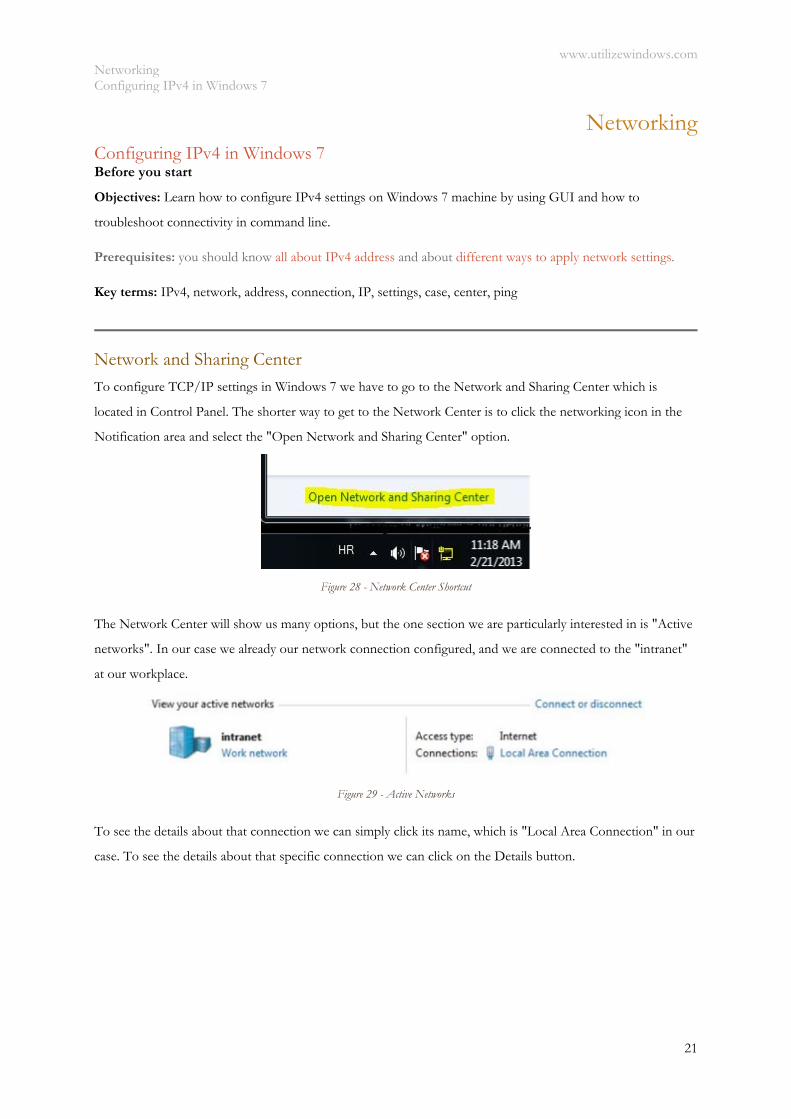
Network and Sharing Center To configure TCP/IP settings in Windows 7 we have to go to the Network and Sharing Center which is
located in Control Panel. The shorter way to get to the Network Center is to click the networking icon in the
Notification area and select the "Open Network and Sharing Center" option.
Figure 28 - Network Center Shortcut
The Network Center will show us many options, but the one section we are particularly interested in is "Active
networks". In our case we already our network connection configured, and we are connected to the "intranet"
at our workplace.
Figure 29 - Active Networks
To see the details about that connection we can simply click its name, which is "Local Area Connection" in our
case. To see the details about that specific connection we can click on the Details button.
www.utilizewindows.com Networking Configuring IPv4 in Windows 7
22
Figure 30 - Connection Details
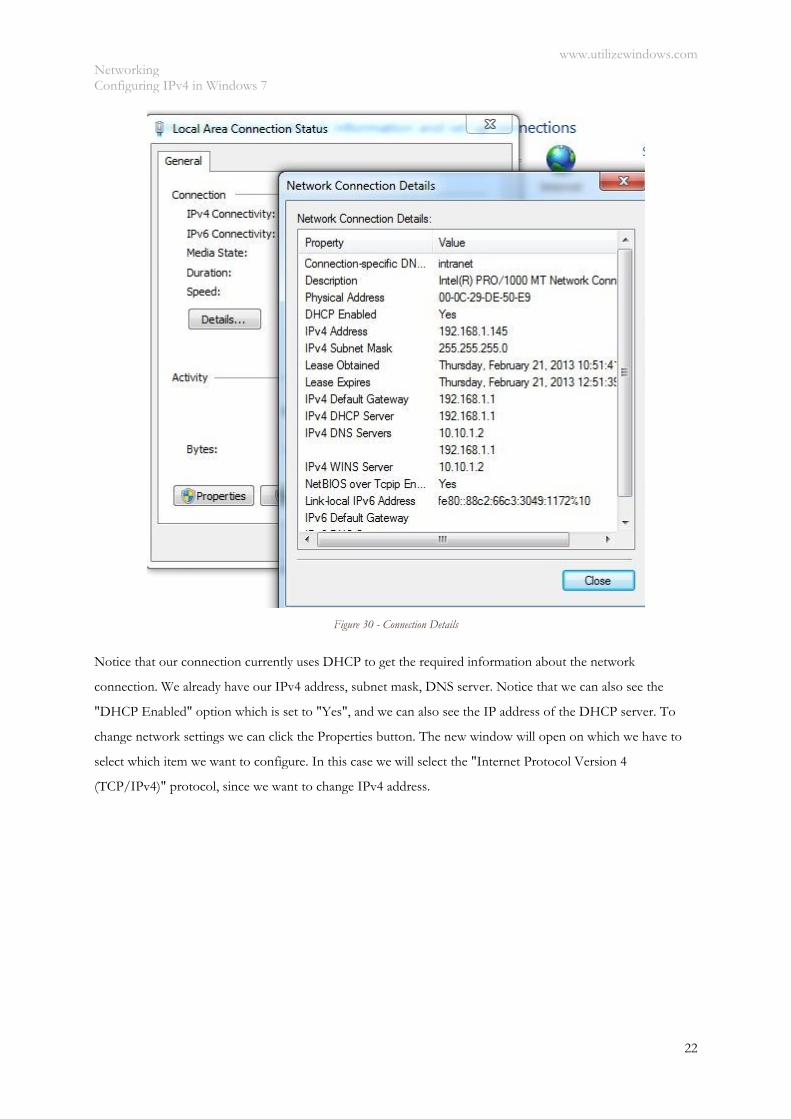
Notice that our connection currently uses DHCP to get the required information about the network
connection. We already have our IPv4 address, subnet mask, DNS server. Notice that we can also see the
"DHCP Enabled" option which is set to "Yes", and we can also see the IP address of the DHCP server. To
change network settings we can click the Properties button. The new window will open on which we have to
select which item we want to configure. In this case we will select the "Internet Protocol Version 4
(TCP/IPv4)" protocol, since we want to change IPv4 address.
www.utilizewindows.com Networking Configuring IPv4 in Windows 7
23
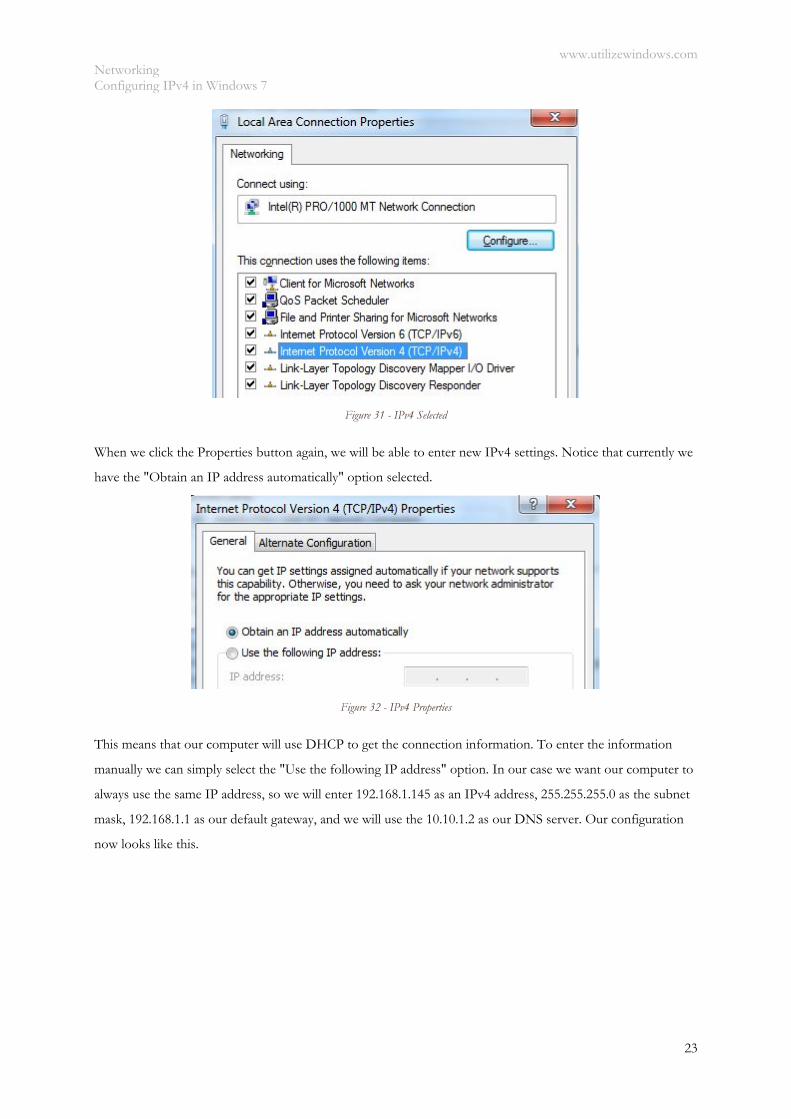
Figure 31 - IPv4 Selected
When we click the Properties button again, we will be able to enter new IPv4 settings. Notice that currently we
have the "Obtain an IP address automatically" option selected.
Figure 32 - IPv4 Properties
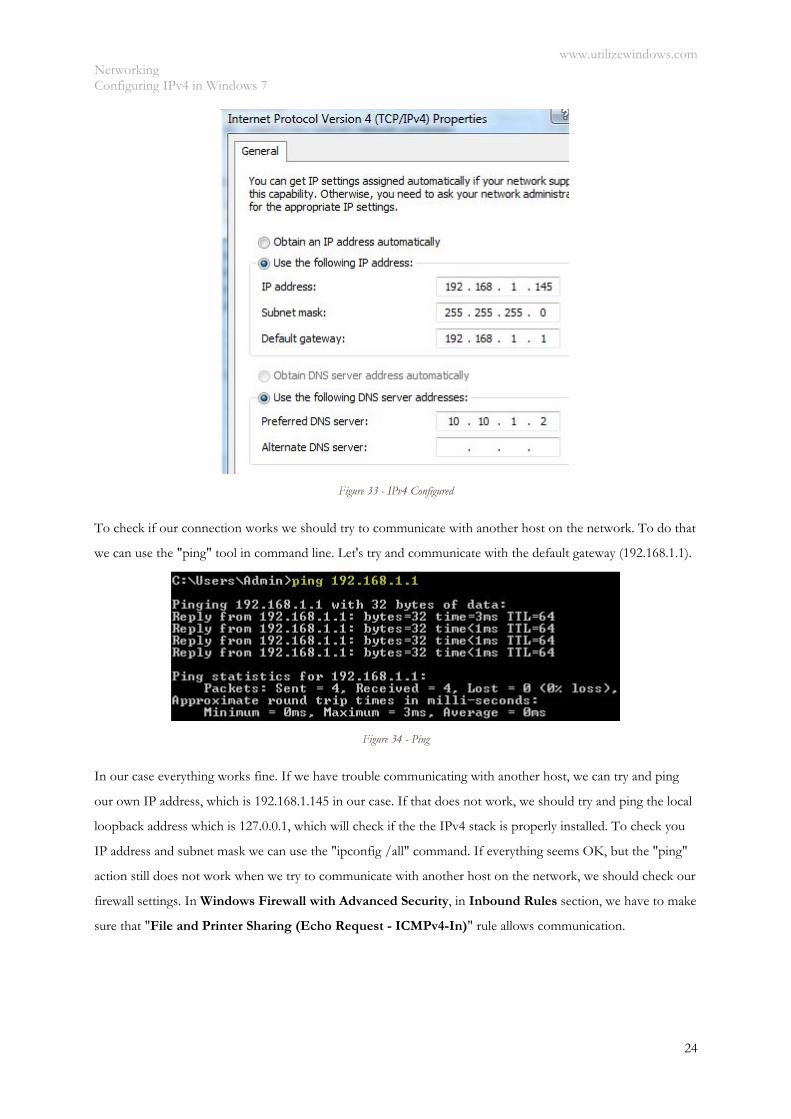
This means that our computer will use DHCP to get the connection information. To enter the information
manually we can simply select the "Use the following IP address" option. In our case we want our computer to
always use the same IP address, so we will enter 192.168.1.145 as an IPv4 address, 255.255.255.0 as the subnet
mask, 192.168.1.1 as our default gateway, and we will use the 10.10.1.2 as our DNS server. Our configuration
now looks like this.
www.utilizewindows.com Networking Configuring IPv4 in Windows 7
24
Figure 33 - IPv4 Configured
To check if our connection works we should try to communicate with another host on the network. To do that
we can use the "ping" tool in command line. Let's try and communicate with the default gateway (192.168.1.1).
Figure 34 - Ping
In our case everything works fine. If we have trouble communicating with another host, we can try and ping
our own IP address, which is 192.168.1.145 in our case. If that does not work, we should try and ping the local
loopback address which is 127.0.0.1, which will check if the the IPv4 stack is properly installed. To check you
IP address and subnet mask we can use the "ipconfig /all" command. If everything seems OK, but the "ping"
action still does not work when we try to communicate with another host on the network, we should check our
firewall settings. In Windows Firewall with Advanced Security, in Inbound Rules section, we have to make
sure that "File and Printer Sharing (Echo Request - ICMPv4-In)" rule allows communication.
www.utilizewindows.com Networking Configuring IPv6 in Windows 7
25
Configuring IPv6 in Windows 7 Before you start
Objectives: Learn where and how to configure IPv6 properties in Windows 7.
Prerequisites: you should know what is IPv6 and about different types of IPv6.
Key terms: IPv6, address, network, configured, center, connection, link-local, bits, details, global-id
Network and Sharing Center
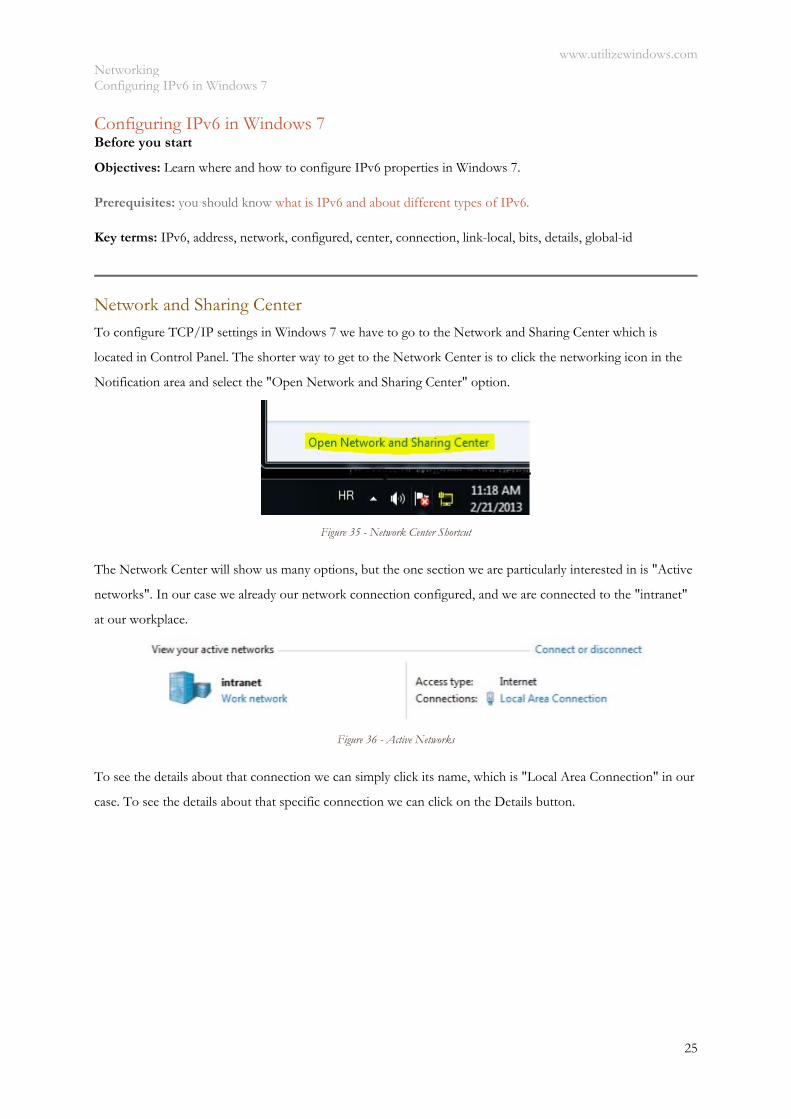
To configure TCP/IP settings in Windows 7 we have to go to the Network and Sharing Center which is
located in Control Panel. The shorter way to get to the Network Center is to click the networking icon in the
Notification area and select the "Open Network and Sharing Center" option.
Figure 35 - Network Center Shortcut
The Network Center will show us many options, but the one section we are particularly interested in is "Active
networks". In our case we already our network connection configured, and we are connected to the "intranet"
at our workplace.
Figure 36 - Active Networks
To see the details about that connection we can simply click its name, which is "Local Area Connection" in our
case. To see the details about that specific connection we can click on the Details button.
www.utilizewindows.com Networking Configuring IPv6 in Windows 7
26
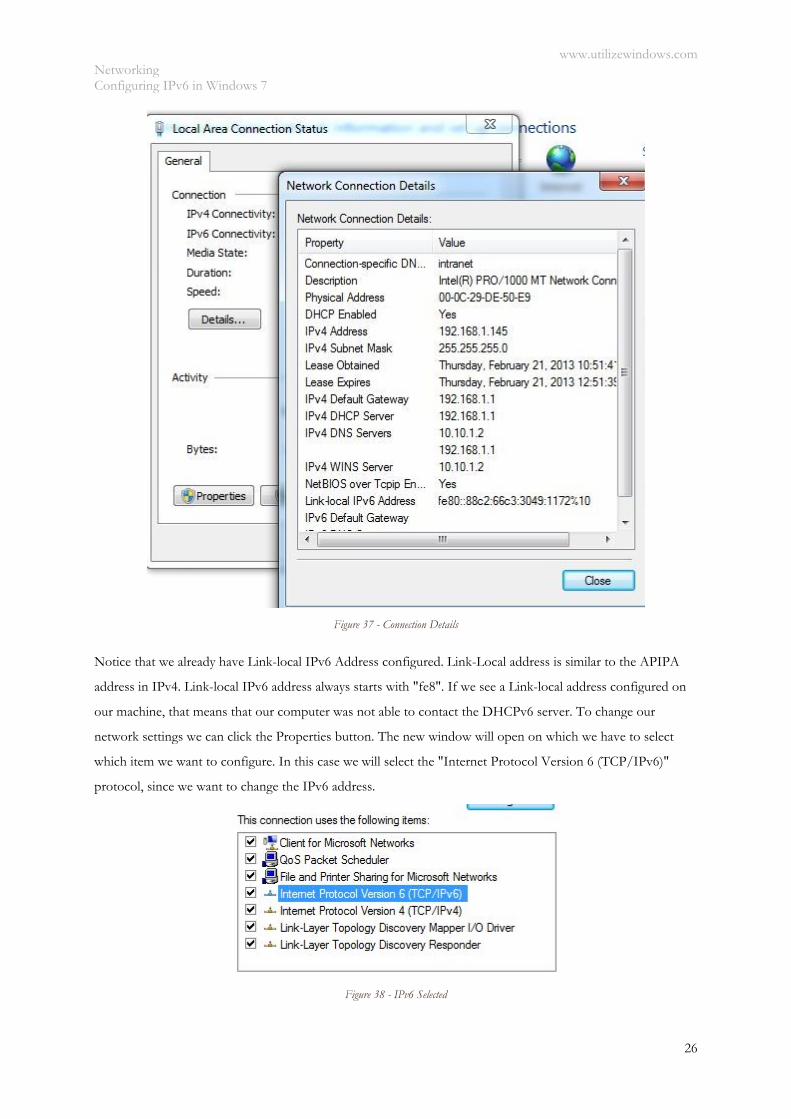
Figure 37 - Connection Details
Notice that we already have Link-local IPv6 Address configured. Link-Local address is similar to the APIPA
address in IPv4. Link-local IPv6 address always starts with "fe8". If we see a Link-local address configured on
our machine, that means that our computer was not able to contact the DHCPv6 server. To change our
network settings we can click the Properties button. The new window will open on which we have to select
which item we want to configure. In this case we will select the "Internet Protocol Version 6 (TCP/IPv6)"
protocol, since we want to change the IPv6 address.
Figure 38 - IPv6 Selected
www.utilizewindows.com Networking Configuring IPv6 in Windows 7
27
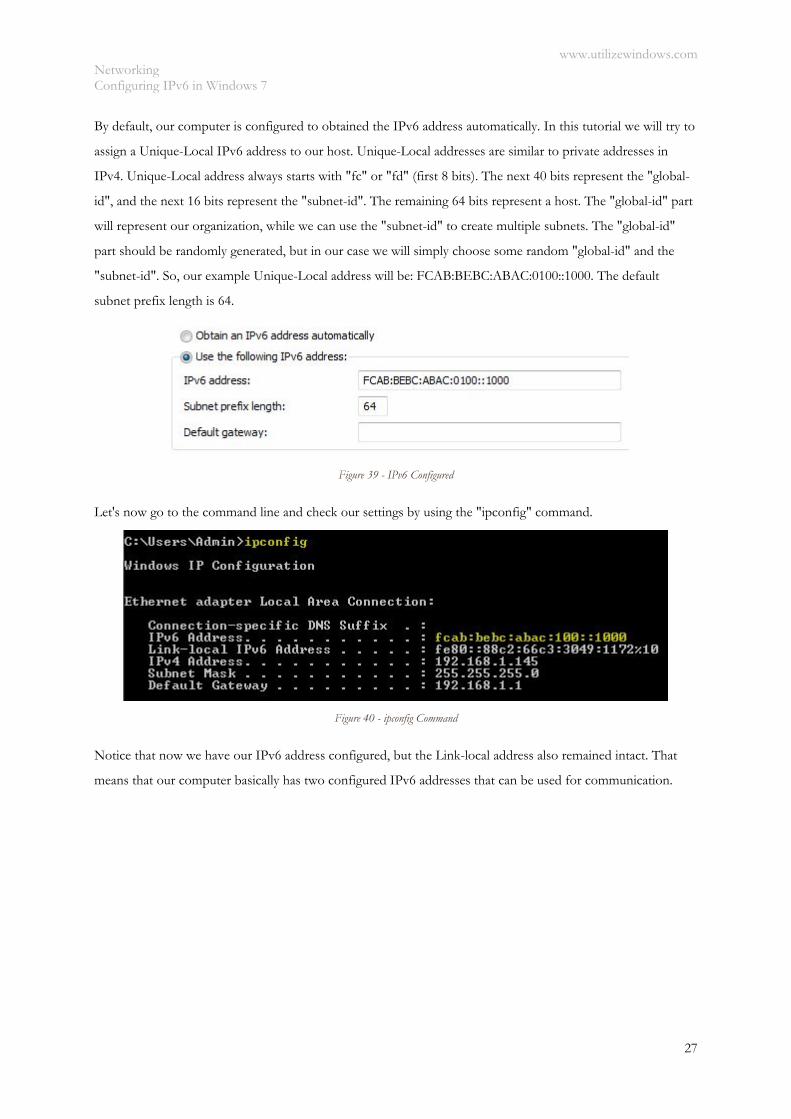
By default, our computer is configured to obtained the IPv6 address automatically. In this tutorial we will try to
assign a Unique-Local IPv6 address to our host. Unique-Local addresses are similar to private addresses in
IPv4. Unique-Local address always starts with "fc" or "fd" (first 8 bits). The next 40 bits represent the "global-
id", and the next 16 bits represent the "subnet-id". The remaining 64 bits represent a host. The "global-id" part
will represent our organization, while we can use the "subnet-id" to create multiple subnets. The "global-id"
part should be randomly generated, but in our case we will simply choose some random "global-id" and the
"subnet-id". So, our example Unique-Local address will be: FCAB:BEBC:ABAC:0100::1000. The default
subnet prefix length is 64.
Figure 39 - IPv6 Configured
Let's now go to the command line and check our settings by using the "ipconfig" command.
Figure 40 - ipconfig Command
Notice that now we have our IPv6 address configured, but the Link-local address also remained intact. That
means that our computer basically has two configured IPv6 addresses that can be used for communication.
www.utilizewindows.com Networking Internet Connection Sharing (ICS) Configuration in Windows 7
28
Internet Connection Sharing (ICS) Configuration in Windows 7 Before you start
Objectives: Learn how to enable and configure ICS in Windows 7.
Prerequisites: you should already know what is ICS in general.
Key terms: network, computer, ICS, connection, Internet, private, enable, server, address, IP, port, settings,
Windows 7
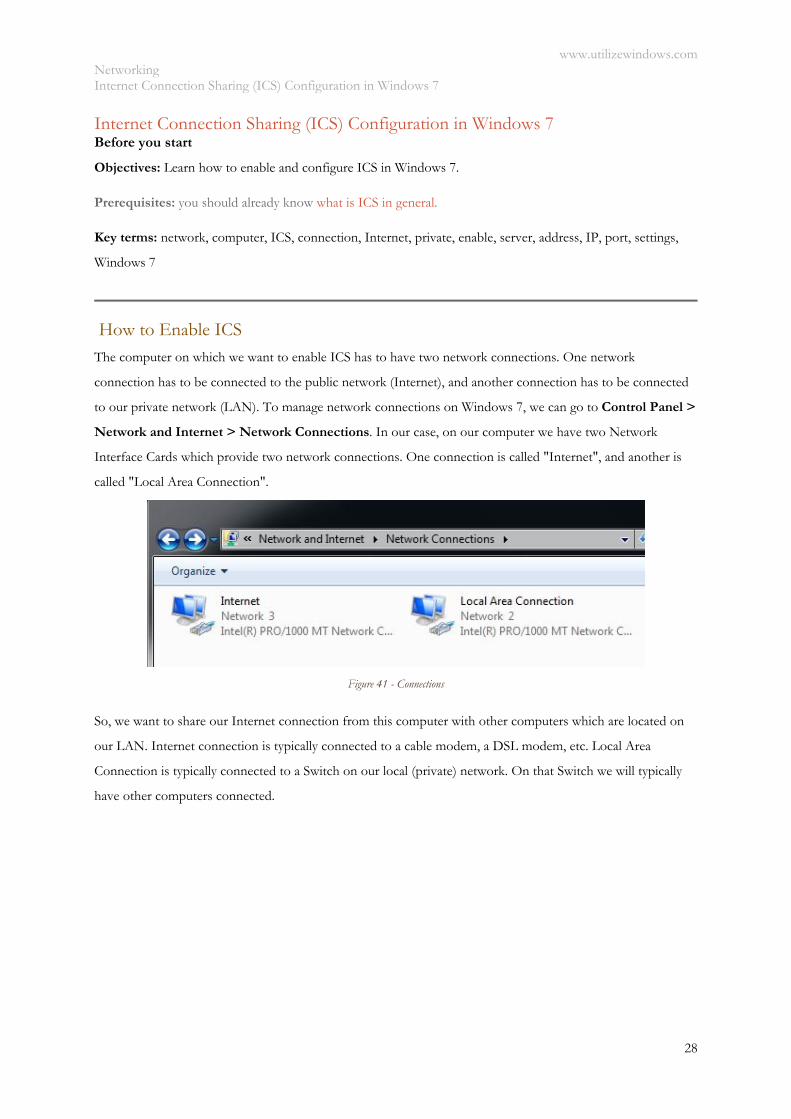
How to Enable ICS The computer on which we want to enable ICS has to have two network connections. One network
connection has to be connected to the public network (Internet), and another connection has to be connected
to our private network (LAN). To manage network connections on Windows 7, we can go to Control Panel >
Network and Internet > Network Connections. In our case, on our computer we have two Network
Interface Cards which provide two network connections. One connection is called "Internet", and another is
called "Local Area Connection".
Figure 41 - Connections
So, we want to share our Internet connection from this computer with other computers which are located on
our LAN. Internet connection is typically connected to a cable modem, a DSL modem, etc. Local Area
Connection is typically connected to a Switch on our local (private) network. On that Switch we will typically
have other computers connected.
www.utilizewindows.com Networking Internet Connection Sharing (ICS) Configuration in Windows 7
29
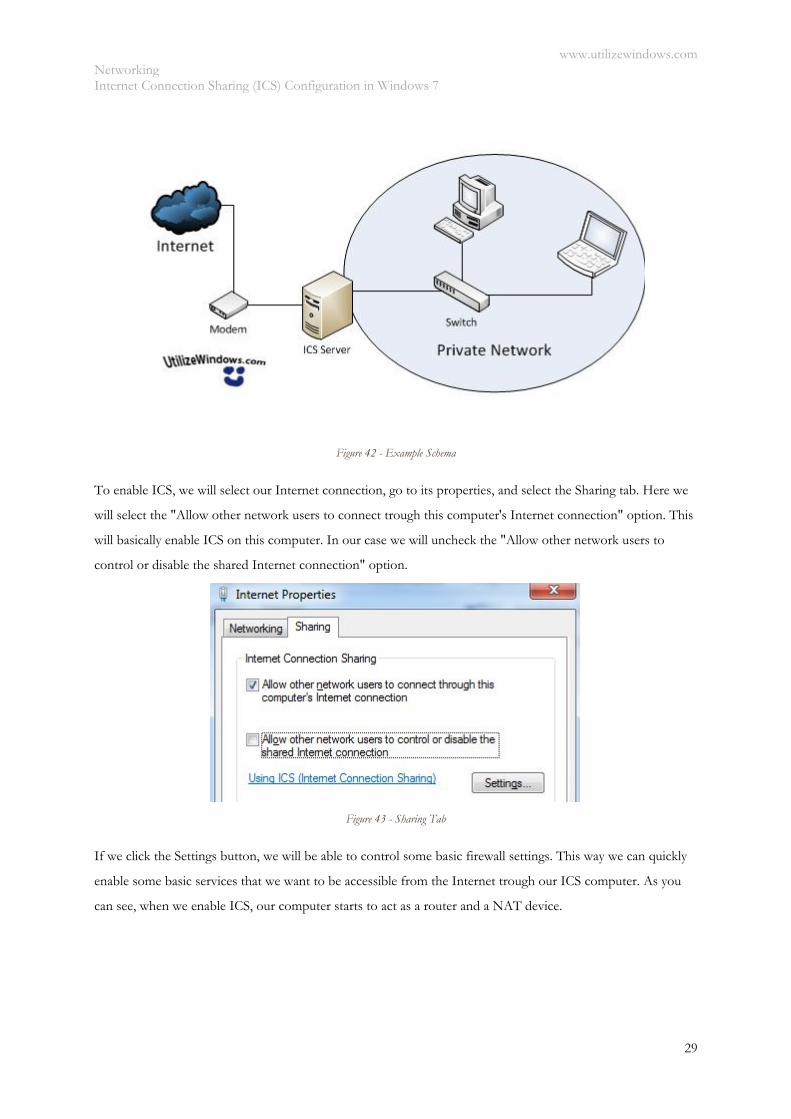
Figure 42 - Example Schema
To enable ICS, we will select our Internet connection, go to its properties, and select the Sharing tab. Here we
will select the "Allow other network users to connect trough this computer's Internet connection" option. This
will basically enable ICS on this computer. In our case we will uncheck the "Allow other network users to
control or disable the shared Internet connection" option.
Figure 43 - Sharing Tab
If we click the Settings button, we will be able to control some basic firewall settings. This way we can quickly
enable some basic services that we want to be accessible from the Internet trough our ICS computer. As you
can see, when we enable ICS, our computer starts to act as a router and a NAT device.
www.utilizewindows.com Networking Internet Connection Sharing (ICS) Configuration in Windows 7
30
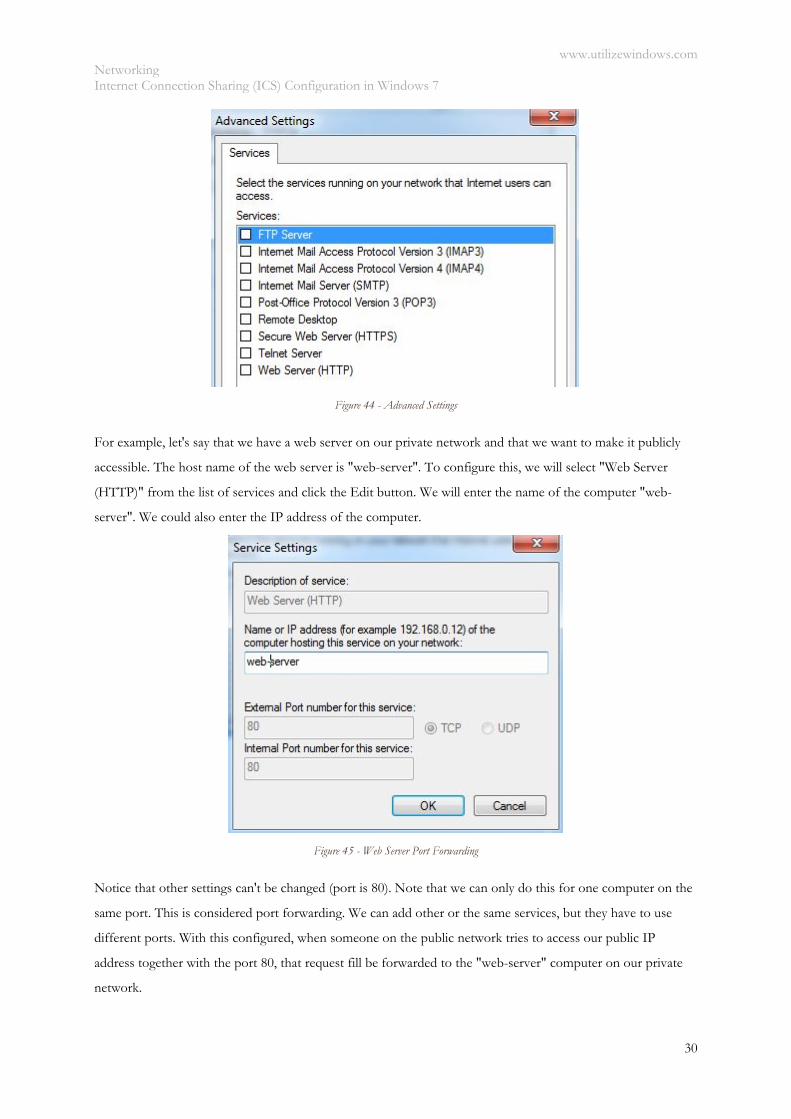
Figure 44 - Advanced Settings
For example, let's say that we have a web server on our private network and that we want to make it publicly
accessible. The host name of the web server is "web-server". To configure this, we will select "Web Server
(HTTP)" from the list of services and click the Edit button. We will enter the name of the computer "web-
server". We could also enter the IP address of the computer.
Figure 45 - Web Server Port Forwarding
Notice that other settings can't be changed (port is 80). Note that we can only do this for one computer on the
same port. This is considered port forwarding. We can add other or the same services, but they have to use
different ports. With this configured, when someone on the public network tries to access our public IP
address together with the port 80, that request fill be forwarded to the "web-server" computer on our private
network.

www.utilizewindows.com Networking Internet Connection Sharing (ICS) Configuration in Windows 7
31
When the ICS is enabled, our network connections will automatically be configured with some specific settings.
First, the Local Area Connection will be configured with the 192.168.137.1 IP address. With ICS, our computer
automatically becomes the gateway for computers on our private network, and the gateway address will be the
address of the LAN interface of the ICS computer. ICS computer will also start to hand out IP addresses and
other information to computers on our private network (it will become the DHCP server). This is why it is
important that the computers on the private network are DHCP enabled. We can use commands "ipconfig
/release" and "ipconfig /renew" to obtain new configuration from the ICS server. If we see an IP address
which starts with "169.254.", this means that the computer was not able to contact the DHCP server.
www.utilizewindows.com Networking Working With Wireless Network Connections in Windows 7
32
Working With Wireless Network Connections in Windows 7 Before you start
Objectives: Learn how to create Ad Hoc wireless network and how to work with infrastructure wireless
networks in Windows 7.
Prerequisites: you should have a basic understanding of wireless networks.
Key terms: network, wireless, ad hoc, connect, security, connection, option, windows 7, SSID
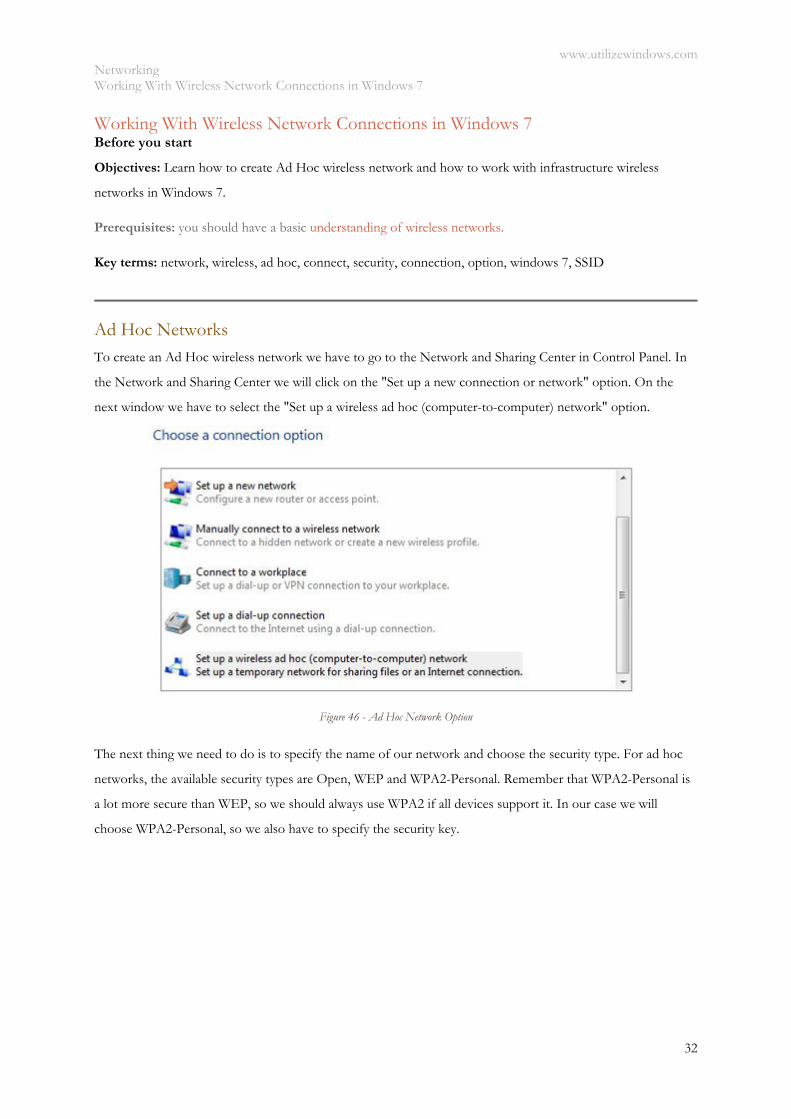
Ad Hoc Networks To create an Ad Hoc wireless network we have to go to the Network and Sharing Center in Control Panel. In
the Network and Sharing Center we will click on the "Set up a new connection or network" option. On the
next window we have to select the "Set up a wireless ad hoc (computer-to-computer) network" option.
Figure 46 - Ad Hoc Network Option
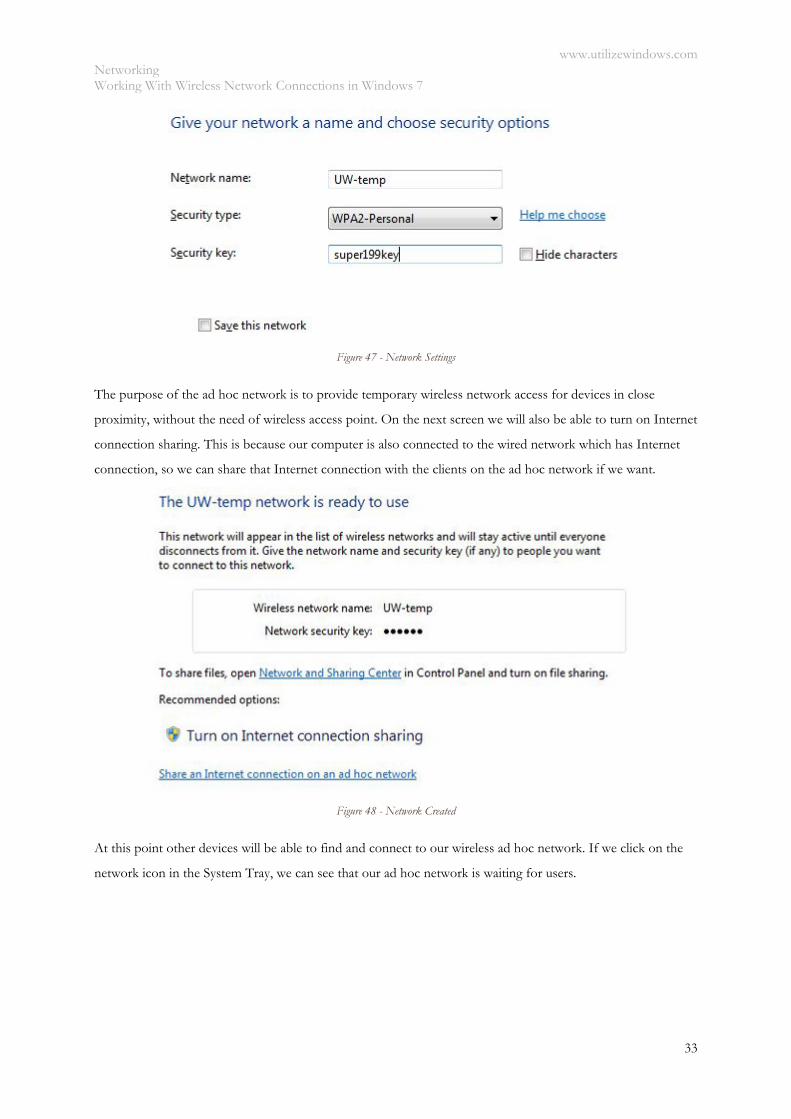
The next thing we need to do is to specify the name of our network and choose the security type. For ad hoc
networks, the available security types are Open, WEP and WPA2-Personal. Remember that WPA2-Personal is
a lot more secure than WEP, so we should always use WPA2 if all devices support it. In our case we will
choose WPA2-Personal, so we also have to specify the security key.
www.utilizewindows.com Networking Working With Wireless Network Connections in Windows 7
33
Figure 47 - Network Settings
The purpose of the ad hoc network is to provide temporary wireless network access for devices in close
proximity, without the need of wireless access point. On the next screen we will also be able to turn on Internet
connection sharing. This is because our computer is also connected to the wired network which has Internet
connection, so we can share that Internet connection with the clients on the ad hoc network if we want.
Figure 48 - Network Created
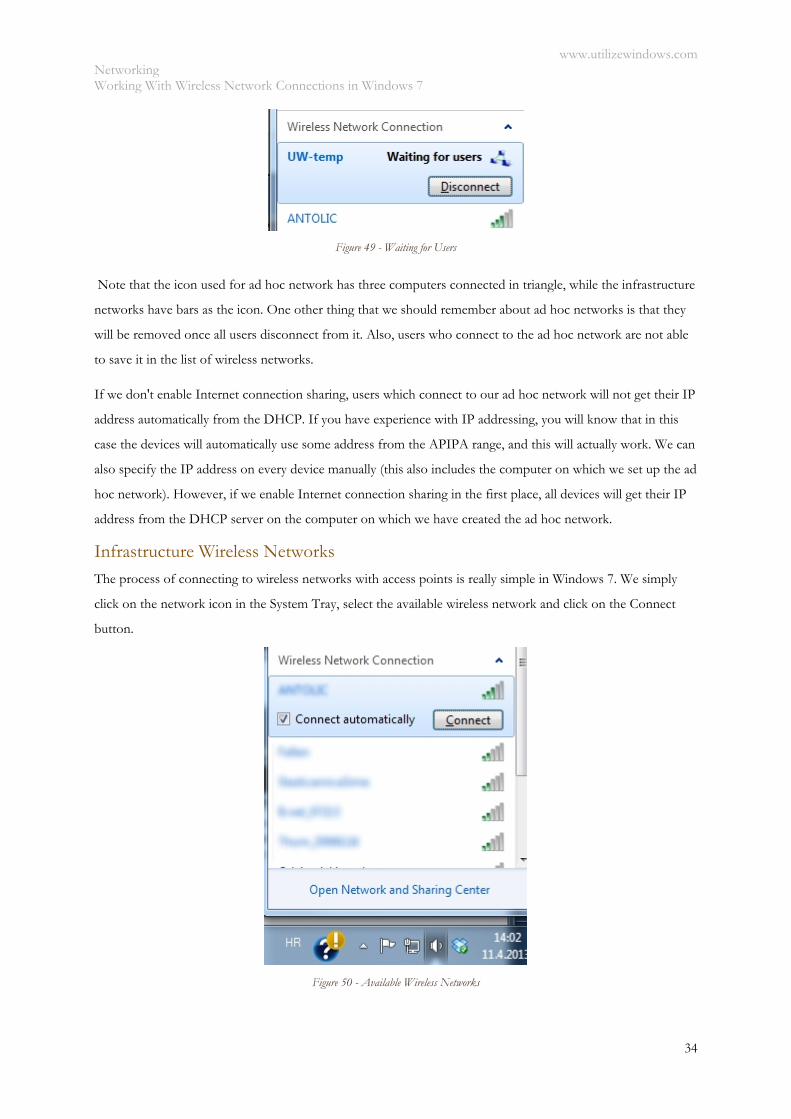
At this point other devices will be able to find and connect to our wireless ad hoc network. If we click on the
network icon in the System Tray, we can see that our ad hoc network is waiting for users.
www.utilizewindows.com Networking Working With Wireless Network Connections in Windows 7
34
Figure 49 - Waiting for Users
Note that the icon used for ad hoc network has three computers connected in triangle, while the infrastructure
networks have bars as the icon. One other thing that we should remember about ad hoc networks is that they
will be removed once all users disconnect from it. Also, users who connect to the ad hoc network are not able
to save it in the list of wireless networks.
If we don't enable Internet connection sharing, users which connect to our ad hoc network will not get their IP
address automatically from the DHCP. If you have experience with IP addressing, you will know that in this
case the devices will automatically use some address from the APIPA range, and this will actually work. We can
also specify the IP address on every device manually (this also includes the computer on which we set up the ad
hoc network). However, if we enable Internet connection sharing in the first place, all devices will get their IP
address from the DHCP server on the computer on which we have created the ad hoc network.
Infrastructure Wireless Networks The process of connecting to wireless networks with access points is really simple in Windows 7. We simply
click on the network icon in the System Tray, select the available wireless network and click on the Connect
button.
Figure 50 - Available Wireless Networks
www.utilizewindows.com Networking Working With Wireless Network Connections in Windows 7
35
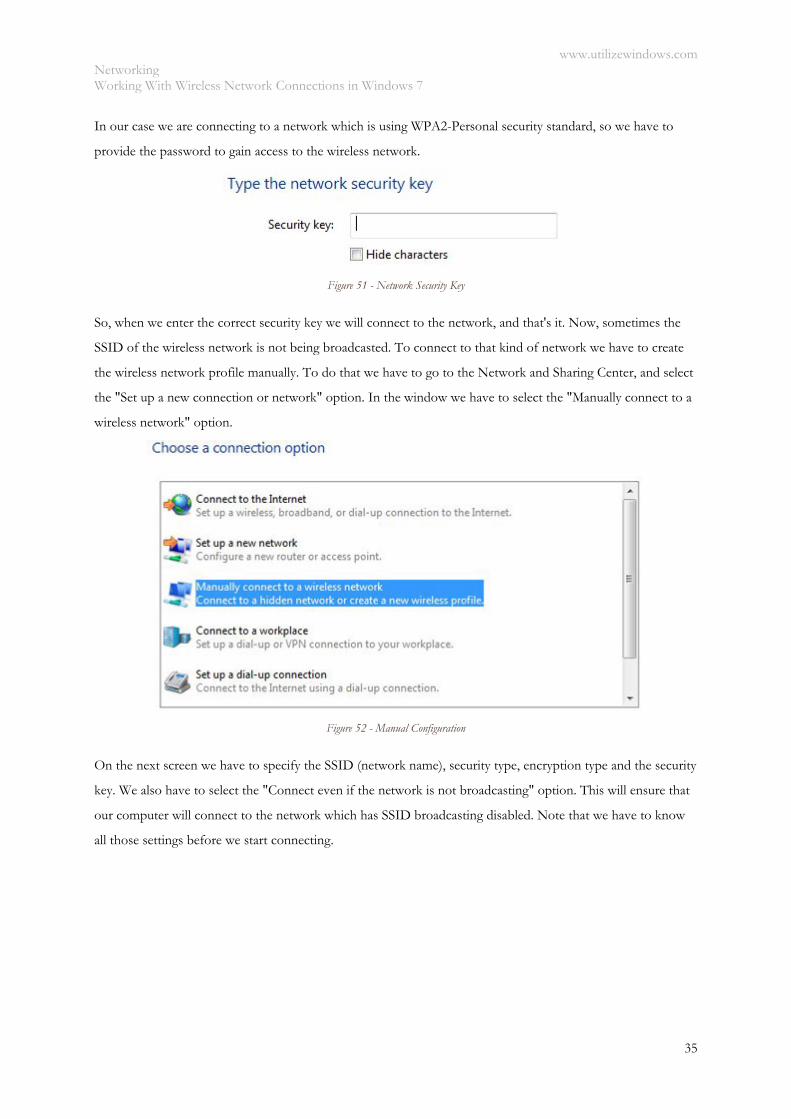
In our case we are connecting to a network which is using WPA2-Personal security standard, so we have to
provide the password to gain access to the wireless network.
Figure 51 - Network Security Key
So, when we enter the correct security key we will connect to the network, and that's it. Now, sometimes the
SSID of the wireless network is not being broadcasted. To connect to that kind of network we have to create
the wireless network profile manually. To do that we have to go to the Network and Sharing Center, and select
the "Set up a new connection or network" option. In the window we have to select the "Manually connect to a
wireless network" option.
Figure 52 - Manual Configuration
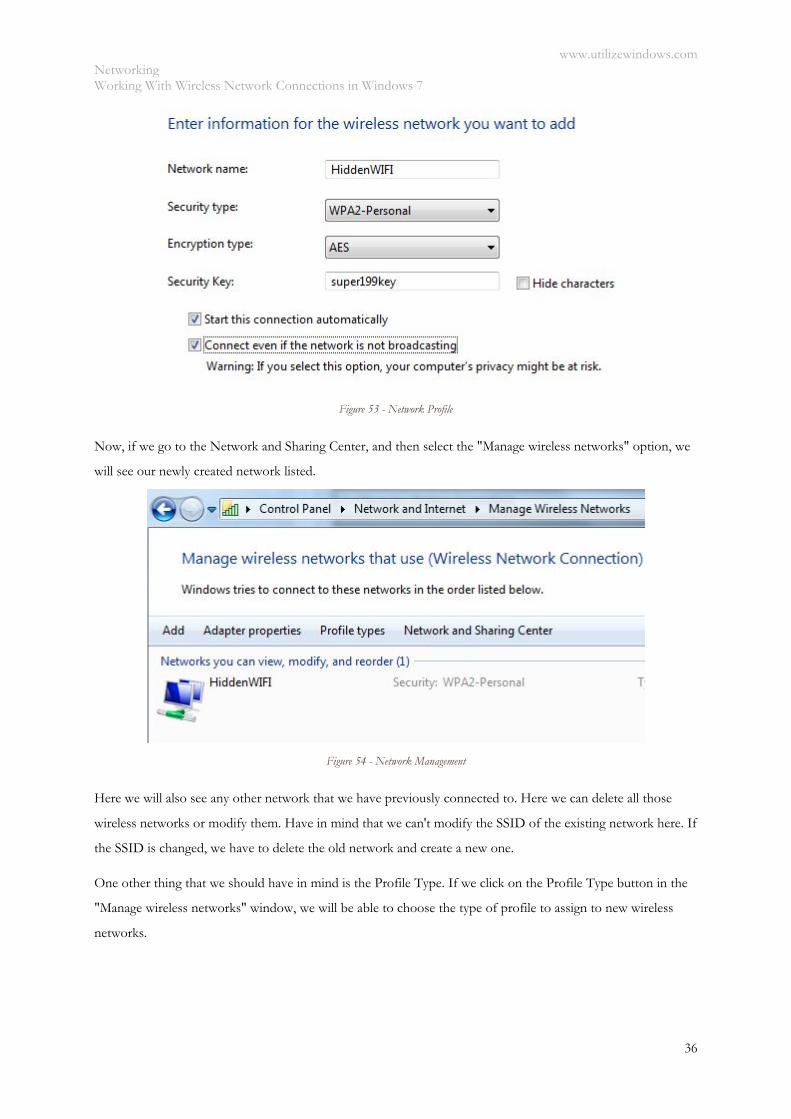
On the next screen we have to specify the SSID (network name), security type, encryption type and the security
key. We also have to select the "Connect even if the network is not broadcasting" option. This will ensure that
our computer will connect to the network which has SSID broadcasting disabled. Note that we have to know
all those settings before we start connecting.
www.utilizewindows.com Networking Working With Wireless Network Connections in Windows 7
36
Figure 53 - Network Profile
Now, if we go to the Network and Sharing Center, and then select the "Manage wireless networks" option, we
will see our newly created network listed.
Figure 54 - Network Management
Here we will also see any other network that we have previously connected to. Here we can delete all those
wireless networks or modify them. Have in mind that we can't modify the SSID of the existing network here. If
the SSID is changed, we have to delete the old network and create a new one.
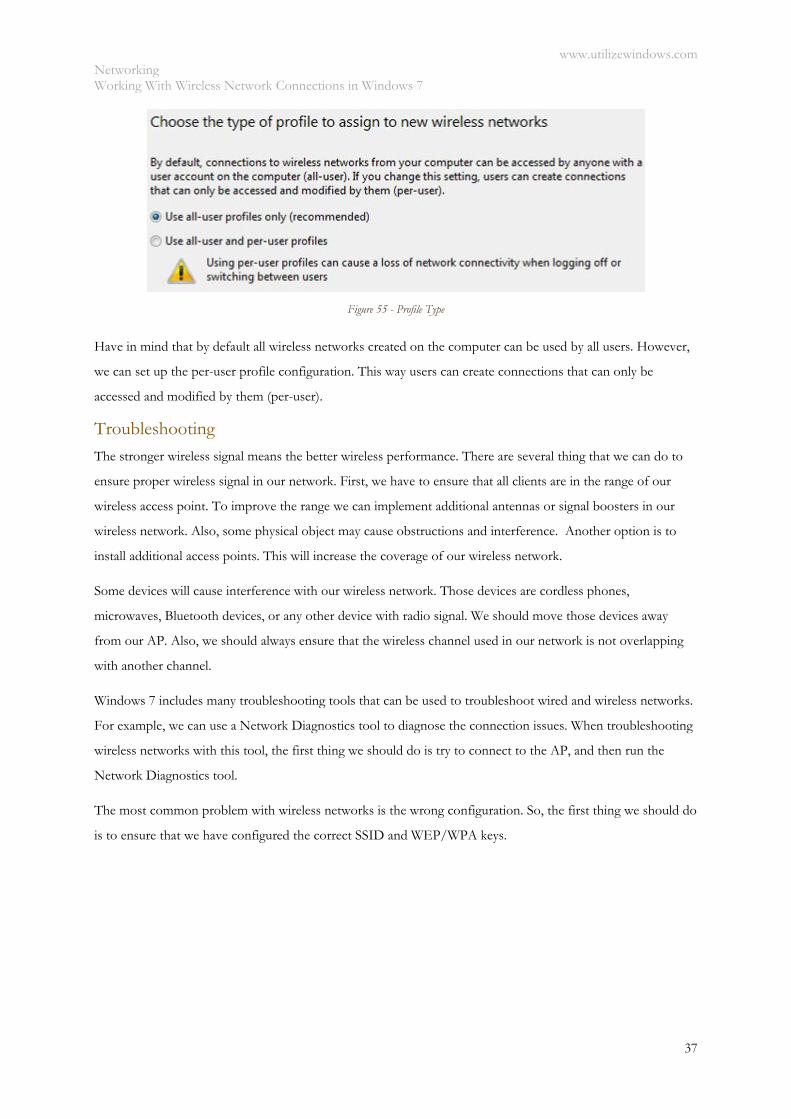
One other thing that we should have in mind is the Profile Type. If we click on the Profile Type button in the
"Manage wireless networks" window, we will be able to choose the type of profile to assign to new wireless
networks.
www.utilizewindows.com Networking Working With Wireless Network Connections in Windows 7
37
Figure 55 - Profile Type
Have in mind that by default all wireless networks created on the computer can be used by all users. However,
we can set up the per-user profile configuration. This way users can create connections that can only be
accessed and modified by them (per-user).
Troubleshooting
The stronger wireless signal means the better wireless performance. There are several thing that we can do to
ensure proper wireless signal in our network. First, we have to ensure that all clients are in the range of our
wireless access point. To improve the range we can implement additional antennas or signal boosters in our
wireless network. Also, some physical object may cause obstructions and interference. Another option is to
install additional access points. This will increase the coverage of our wireless network.
Some devices will cause interference with our wireless network. Those devices are cordless phones,
microwaves, Bluetooth devices, or any other device with radio signal. We should move those devices away
from our AP. Also, we should always ensure that the wireless channel used in our network is not overlapping
with another channel.
Windows 7 includes many troubleshooting tools that can be used to troubleshoot wired and wireless networks.
For example, we can use a Network Diagnostics tool to diagnose the connection issues. When troubleshooting
wireless networks with this tool, the first thing we should do is try to connect to the AP, and then run the
Network Diagnostics tool.
The most common problem with wireless networks is the wrong configuration. So, the first thing we should do
is to ensure that we have configured the correct SSID and WEP/WPA keys.
www.utilizewindows.com Networking Working with Windows Firewall in Windows 7
38
Working with Windows Firewall in Windows 7 Before you start
Objectives: Learn where to find and how to work with Windows Firewall in Windows 7.
Prerequisites: you should know what firewall is in general.
Key terms: firewall, Windows, network, program, allowed, configure, feature, location, service
Firewall in Windows 7
Windows 7 comes with two firewalls that work together. One is the Windows Firewall, and the other
is Windows Firewall with Advanced Security (WFAS). The main difference between them is the complexity
of the rules configuration. Windows Firewall uses simple rules that directly relate to a program or a service. The
rules in WFAS can be configured based on protocols, ports, addresses and authentication. By default, both
firewalls come with predefined set of rules that allow us to utilize network resources. This includes things like
browsing the web, receiving e-mails, etc. Other standard firewall exceptions are File and Printer
Sharing, Network Discovery, Performance Logs and Alerts, Remote Administration, Windows Remote
Management, Remote Assistance, Remote Desktop, Windows Media Player, Windows Media Player Network
Sharing Service.
With firewall in Windows 7 we can configure inbound and outbound rules. By default, all outbound traffic is
allowed, and inbound responses to that traffic are also allowed. Inbound traffic initiated from external sources
is automatically blocked.
Sometimes we will see a notification about a blocked program which is trying to access network resources. In
that case we will be able to add an exception to our firewall in order to allow traffic from the program in the
future.
Windows 7 comes with some new features when it comes to firewall. For example, "full-stealth" feature blocks
other computers from performing operating system fingerprinting. OS fingerprinting is a malicious technique
used to determine the operating system running on the host machine. Another feature is "boot-time filtering".
This features ensures that the firewall is working at the same time when the network interface becomes active,
which was not the case in previous versions of Windows.
When we first connect to some network, we are prompted to select a network location. This feature is know as
Network Location Awareness (NLA). This features enables us to assign a network profile to the connection
based on the location. Different network profiles contain different collections of firewall rules. In Windows 7,
different network profiles can be configured on different interfaces. For example, our wired interface can have
different profile than our wireless interface. There are three different network profiles available:
Public

www.utilizewindows.com Networking Working with Windows Firewall in Windows 7
39
Home/Work - private network
Domain - used within a domain
We choose those locations when we connect to a network. We can always change the location in the Network
and Sharing Center, in Control Panel. The Domain profile can be automatically assigned by the NLA service
when we log on to an Active Directory domain. Note that we must have administrative rights in order to
configure firewall in Windows 7.
Configuring Windows Firewall
To open Windows Firewall we can go to Start > Control Panel > Windows Firewall.
Figure 56 - Windows Firewall
By default, Windows Firewall is enabled for both private (home or work) and public networks. It is also
configured to block all connections to programs that are not on the list of allowed programs. To configure
exceptions we can go to the menu on the left and select "Allow a program or feature through Windows
Firewall" option.

www.utilizewindows.com Networking Working with Windows Firewall in Windows 7
40
Figure 57 - Exceptions
To change settings in this window we have to click the "Change settings" button. As you can see, here we have
a list of predefined programs and features that can be allowed to communicate on private or public networks.
For example, notice that the Core Networking feature is allowed on both private and public networks, while
the File and Printer Sharing is only allowed on private networks. We can also see the details of the items in the
list by selecting it and then clicking the Details button.
Figure 58 - Details
If we have a program on our computer that is not in this list, we can manually add it by clicking on the "Allow
another program" button.
www.utilizewindows.com Networking Working with Windows Firewall in Windows 7
41
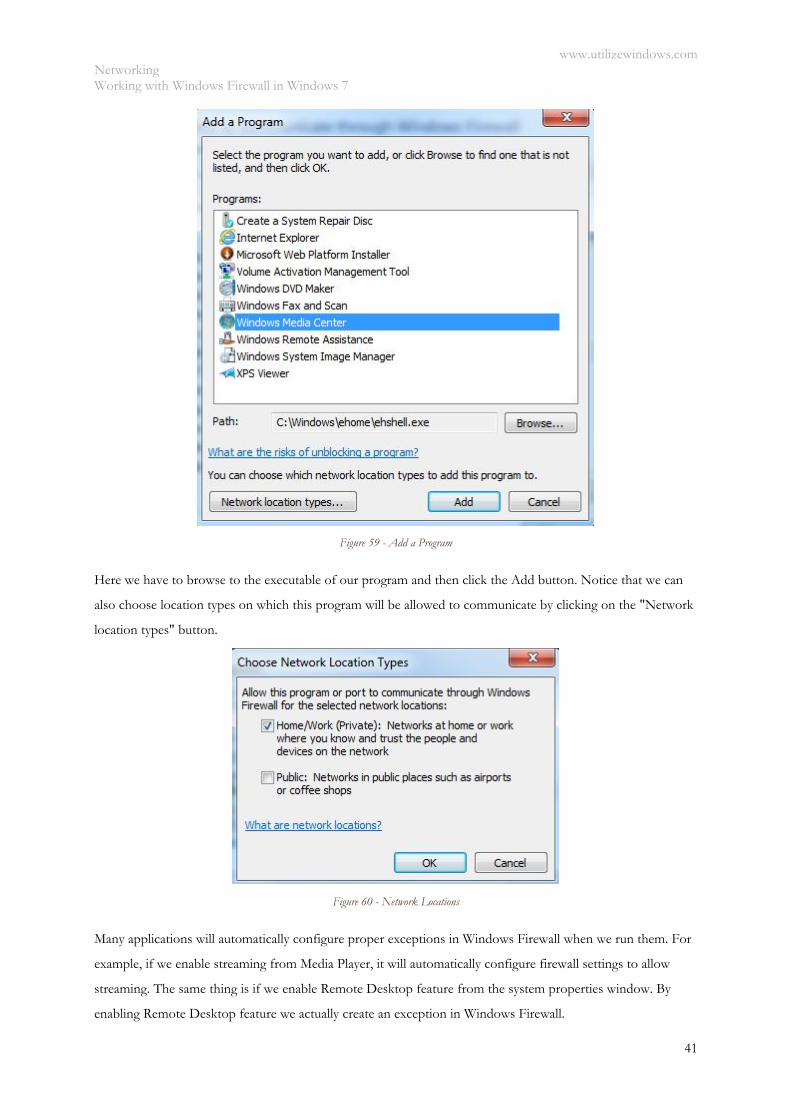
Figure 59 - Add a Program
Here we have to browse to the executable of our program and then click the Add button. Notice that we can
also choose location types on which this program will be allowed to communicate by clicking on the "Network
location types" button.
Figure 60 - Network Locations
Many applications will automatically configure proper exceptions in Windows Firewall when we run them. For
example, if we enable streaming from Media Player, it will automatically configure firewall settings to allow
streaming. The same thing is if we enable Remote Desktop feature from the system properties window. By
enabling Remote Desktop feature we actually create an exception in Windows Firewall.
www.utilizewindows.com Networking Working with Windows Firewall in Windows 7
42
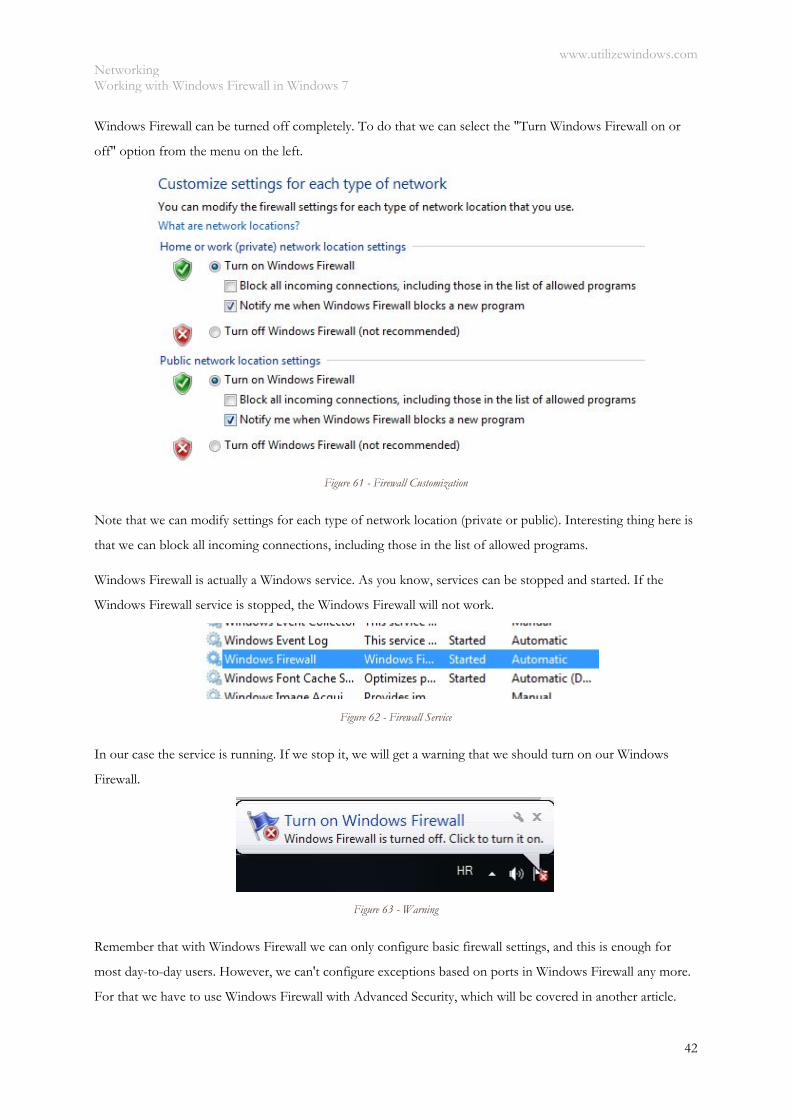
Windows Firewall can be turned off completely. To do that we can select the "Turn Windows Firewall on or
off" option from the menu on the left.
Figure 61 - Firewall Customization
Note that we can modify settings for each type of network location (private or public). Interesting thing here is
that we can block all incoming connections, including those in the list of allowed programs.
Windows Firewall is actually a Windows service. As you know, services can be stopped and started. If the
Windows Firewall service is stopped, the Windows Firewall will not work.
Figure 62 - Firewall Service
In our case the service is running. If we stop it, we will get a warning that we should turn on our Windows
Firewall.
Figure 63 - Warning
Remember that with Windows Firewall we can only configure basic firewall settings, and this is enough for
most day-to-day users. However, we can't configure exceptions based on ports in Windows Firewall any more.
For that we have to use Windows Firewall with Advanced Security, which will be covered in another article.
www.utilizewindows.com Networking Configuring Windows Firewall with Advanced Security in Windows 7
43
Configuring Windows Firewall with Advanced Security in Windows 7 Before you start
Objectives: Learn how to create new rules in Windows Firewall with Advanced Security. We will create
outbound rule in this example, but the principle is the same for the inbound rules.
Prerequisites: you have to know what firewall is in general.
Key terms: rule, IP, address, firewall, port, remote, screen WFAS, example, access, option, outbound
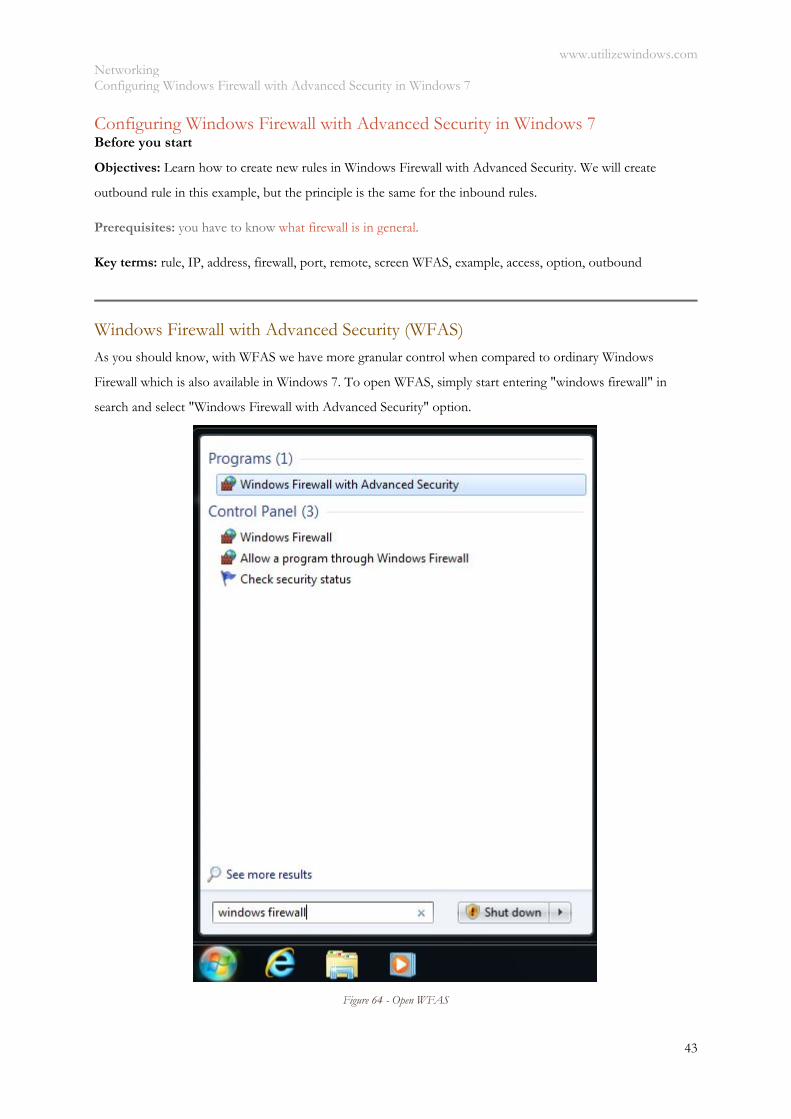
Windows Firewall with Advanced Security (WFAS) As you should know, with WFAS we have more granular control when compared to ordinary Windows
Firewall which is also available in Windows 7. To open WFAS, simply start entering "windows firewall" in
search and select "Windows Firewall with Advanced Security" option.
Figure 64 - Open WFAS
www.utilizewindows.com Networking Configuring Windows Firewall with Advanced Security in Windows 7
44
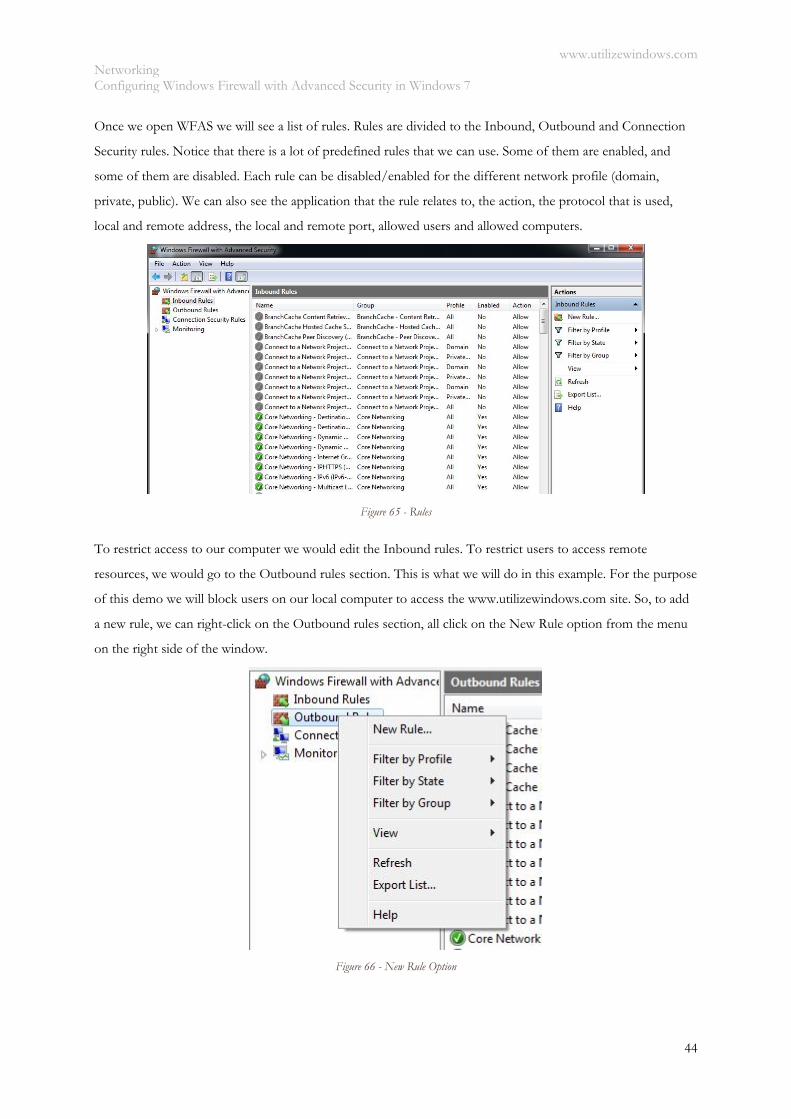
Once we open WFAS we will see a list of rules. Rules are divided to the Inbound, Outbound and Connection
Security rules. Notice that there is a lot of predefined rules that we can use. Some of them are enabled, and
some of them are disabled. Each rule can be disabled/enabled for the different network profile (domain,
private, public). We can also see the application that the rule relates to, the action, the protocol that is used,
local and remote address, the local and remote port, allowed users and allowed computers.
Figure 65 - Rules
To restrict access to our computer we would edit the Inbound rules. To restrict users to access remote
resources, we would go to the Outbound rules section. This is what we will do in this example. For the purpose
of this demo we will block users on our local computer to access the www.utilizewindows.com site. So, to add
a new rule, we can right-click on the Outbound rules section, all click on the New Rule option from the menu
on the right side of the window.
Figure 66 - New Rule Option
www.utilizewindows.com Networking Configuring Windows Firewall with Advanced Security in Windows 7
45
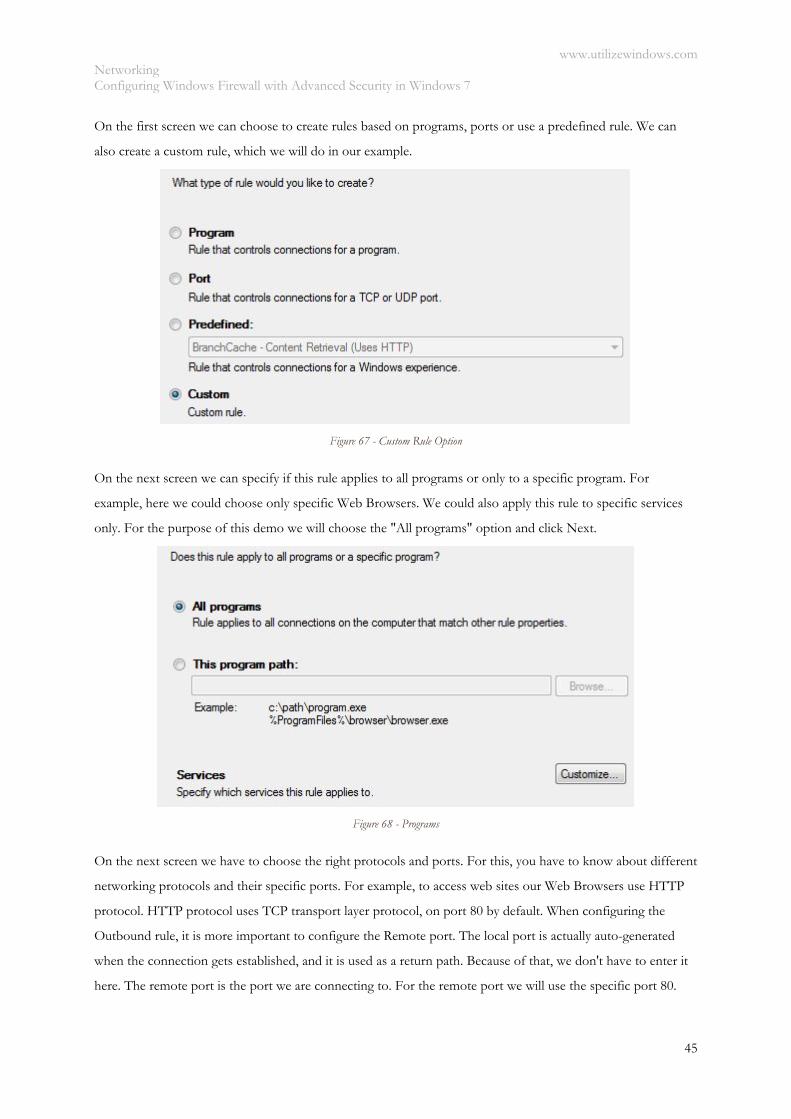
On the first screen we can choose to create rules based on programs, ports or use a predefined rule. We can
also create a custom rule, which we will do in our example.
Figure 67 - Custom Rule Option
On the next screen we can specify if this rule applies to all programs or only to a specific program. For
example, here we could choose only specific Web Browsers. We could also apply this rule to specific services
only. For the purpose of this demo we will choose the "All programs" option and click Next.
Figure 68 - Programs
On the next screen we have to choose the right protocols and ports. For this, you have to know about different
networking protocols and their specific ports. For example, to access web sites our Web Browsers use HTTP
protocol. HTTP protocol uses TCP transport layer protocol, on port 80 by default. When configuring the
Outbound rule, it is more important to configure the Remote port. The local port is actually auto-generated
when the connection gets established, and it is used as a return path. Because of that, we don't have to enter it
here. The remote port is the port we are connecting to. For the remote port we will use the specific port 80.
www.utilizewindows.com Networking Configuring Windows Firewall with Advanced Security in Windows 7
46
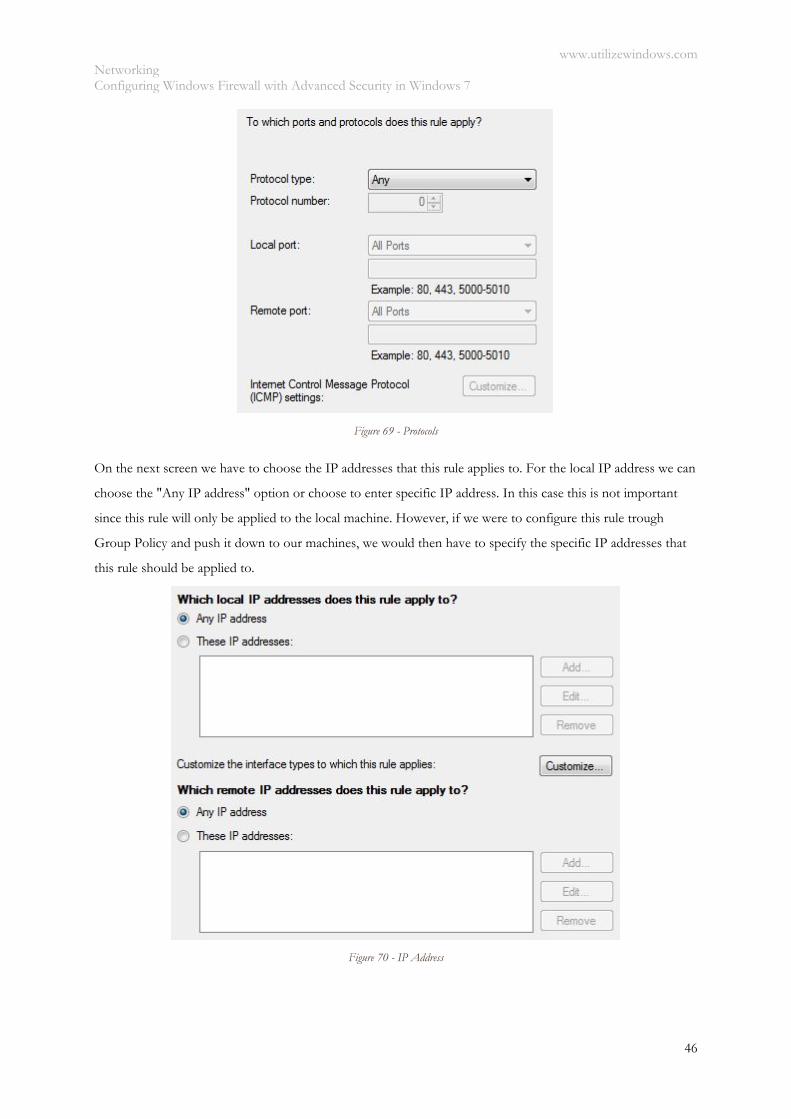
Figure 69 - Protocols
On the next screen we have to choose the IP addresses that this rule applies to. For the local IP address we can
choose the "Any IP address" option or choose to enter specific IP address. In this case this is not important
since this rule will only be applied to the local machine. However, if we were to configure this rule trough
Group Policy and push it down to our machines, we would then have to specify the specific IP addresses that
this rule should be applied to.
Figure 70 - IP Address
www.utilizewindows.com Networking Configuring Windows Firewall with Advanced Security in Windows 7
47
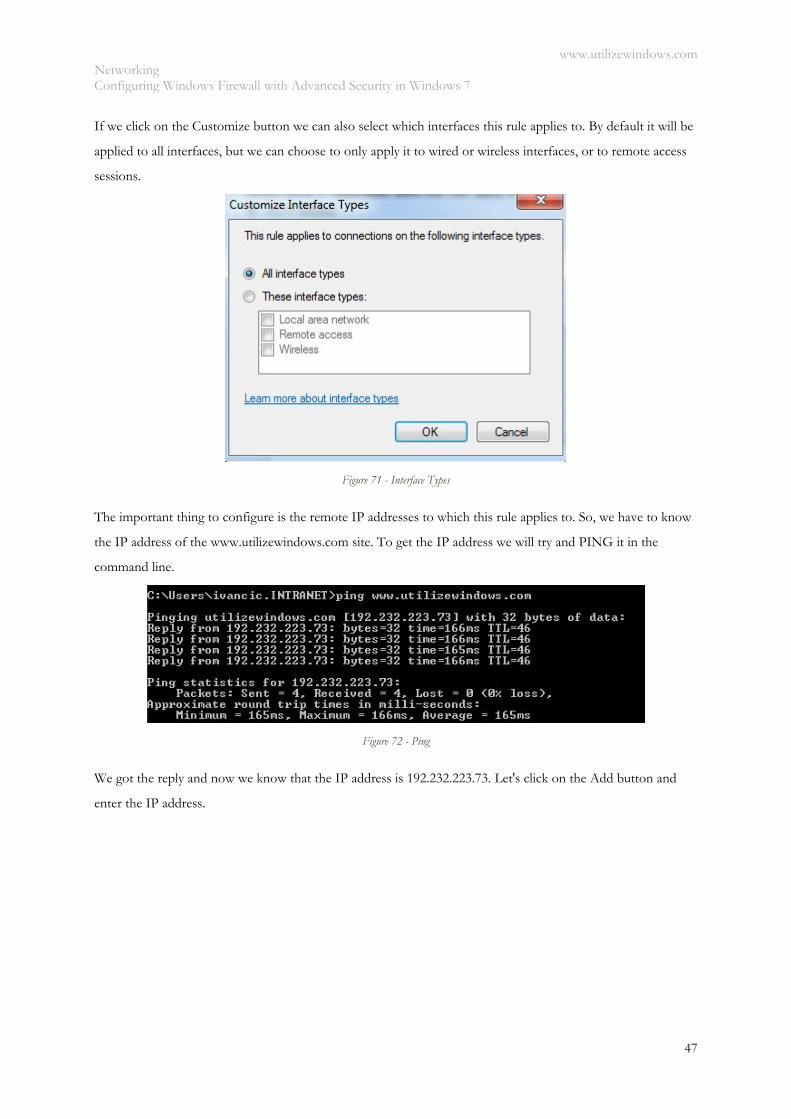
If we click on the Customize button we can also select which interfaces this rule applies to. By default it will be
applied to all interfaces, but we can choose to only apply it to wired or wireless interfaces, or to remote access
sessions.
Figure 71 - Interface Types
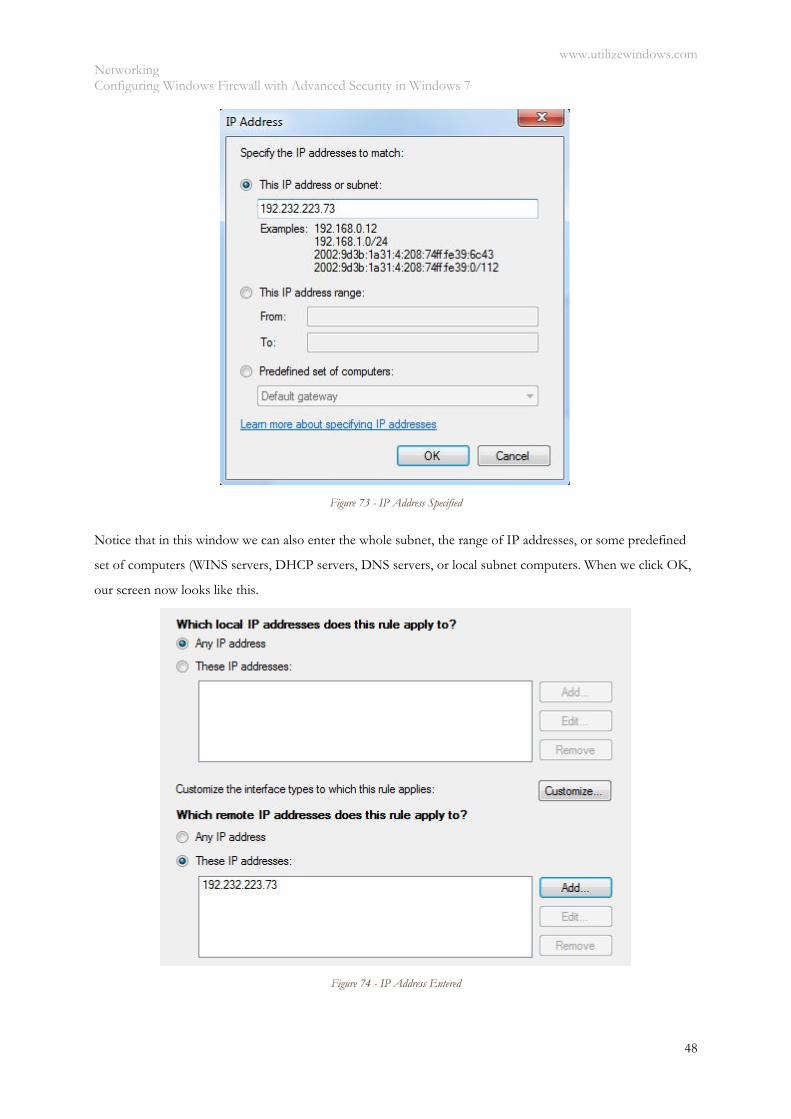
The important thing to configure is the remote IP addresses to which this rule applies to. So, we have to know
the IP address of the www.utilizewindows.com site. To get the IP address we will try and PING it in the
command line.
Figure 72 - Ping
We got the reply and now we know that the IP address is 192.232.223.73. Let's click on the Add button and
enter the IP address.
www.utilizewindows.com Networking Configuring Windows Firewall with Advanced Security in Windows 7
48
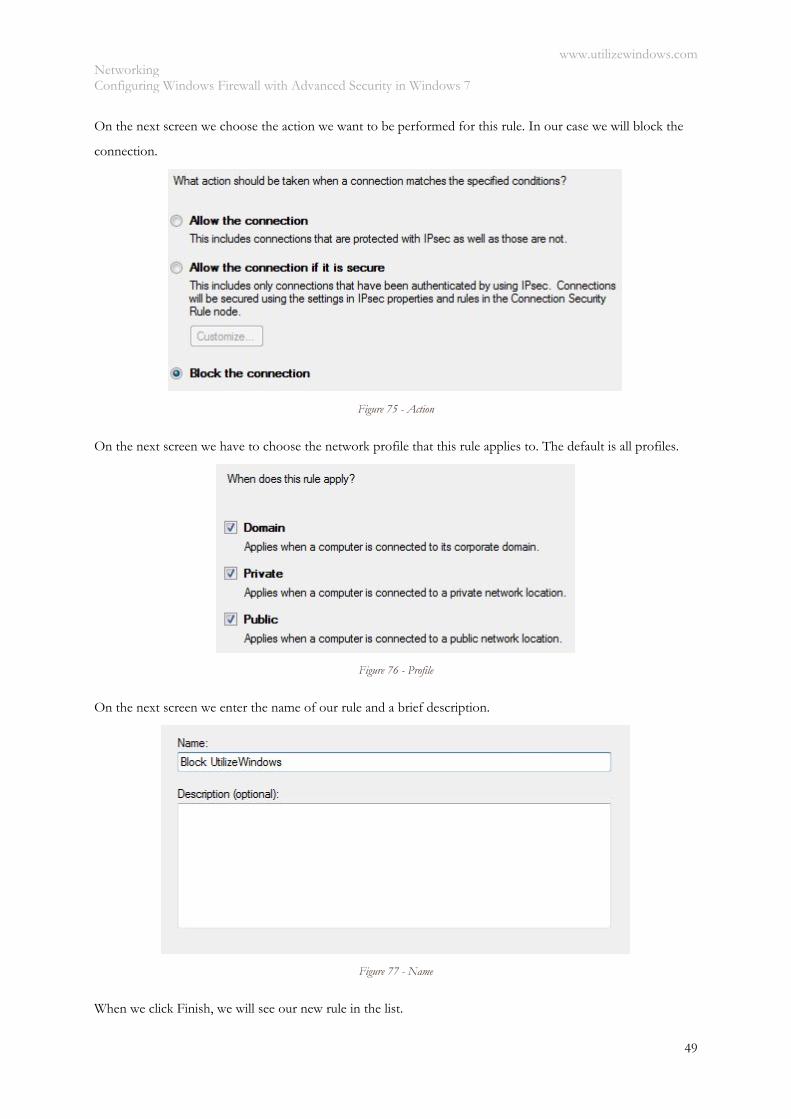
Figure 73 - IP Address Specified
Notice that in this window we can also enter the whole subnet, the range of IP addresses, or some predefined
set of computers (WINS servers, DHCP servers, DNS servers, or local subnet computers. When we click OK,
our screen now looks like this.
Figure 74 - IP Address Entered
www.utilizewindows.com Networking Configuring Windows Firewall with Advanced Security in Windows 7
49
On the next screen we choose the action we want to be performed for this rule. In our case we will block the
connection.
Figure 75 - Action
On the next screen we have to choose the network profile that this rule applies to. The default is all profiles.
Figure 76 - Profile
On the next screen we enter the name of our rule and a brief description.
Figure 77 - Name
When we click Finish, we will see our new rule in the list.

www.utilizewindows.com Networking Configuring Windows Firewall with Advanced Security in Windows 7
50
Figure 78 - Rule Created
When we try to browse to the www.utilizewindows.com now, we will see something like this.
Figure 79 - Site Blocked
Bigger organizations often use multiple IP addresses assigned to multiple servers which all serve the same web
site. For example, facebook.com uses several ranges of IP addresses, and in order to block facebook.com we
have to enter all those IP addresses (or ranges) in our outbound firewall rule in order to block access to
Facebook, for example.
www.utilizewindows.com Networking Configuring BranchCache in Windows 7
51
Configuring BranchCache in Windows 7 Before you start
Objectives: Learn how to enable and configure BranchCache using Group Policy or command line (netsh
command).
Prerequisites: you have to know what BranchCache is.
Key terms: BranchCache, Windows, Group Policy, command line, netsh
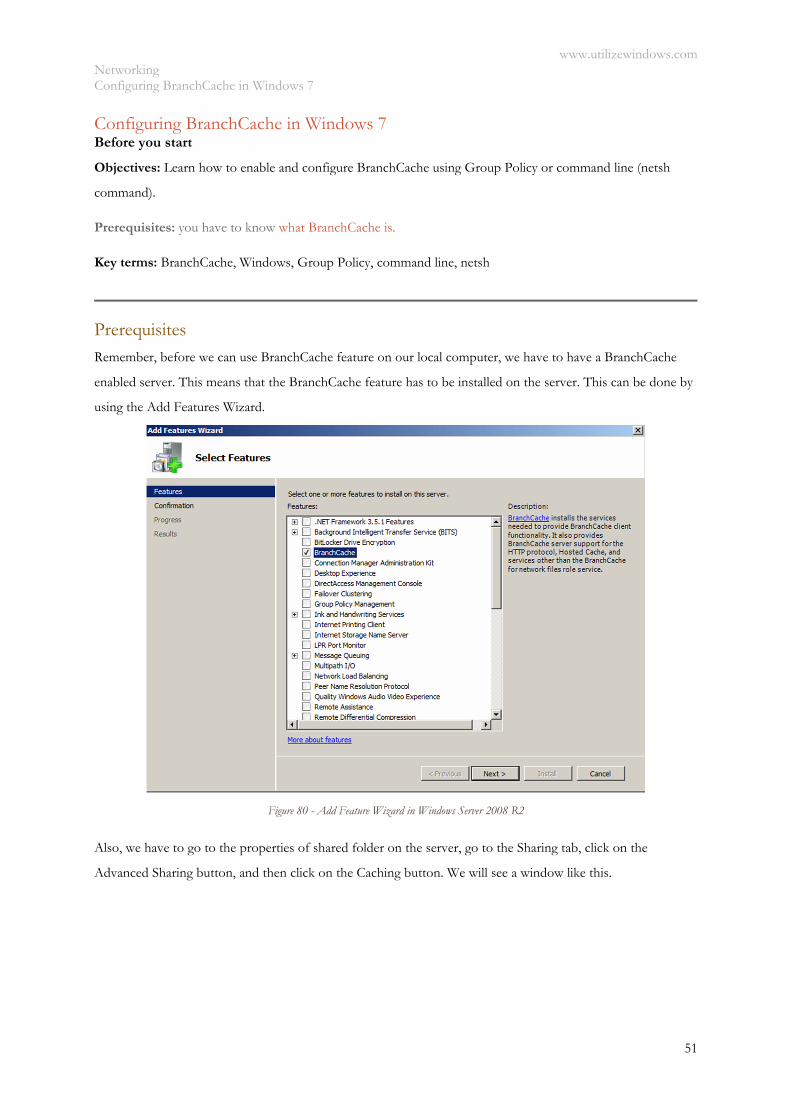
Prerequisites Remember, before we can use BranchCache feature on our local computer, we have to have a BranchCache
enabled server. This means that the BranchCache feature has to be installed on the server. This can be done by
using the Add Features Wizard.
Figure 80 - Add Feature Wizard in Windows Server 2008 R2
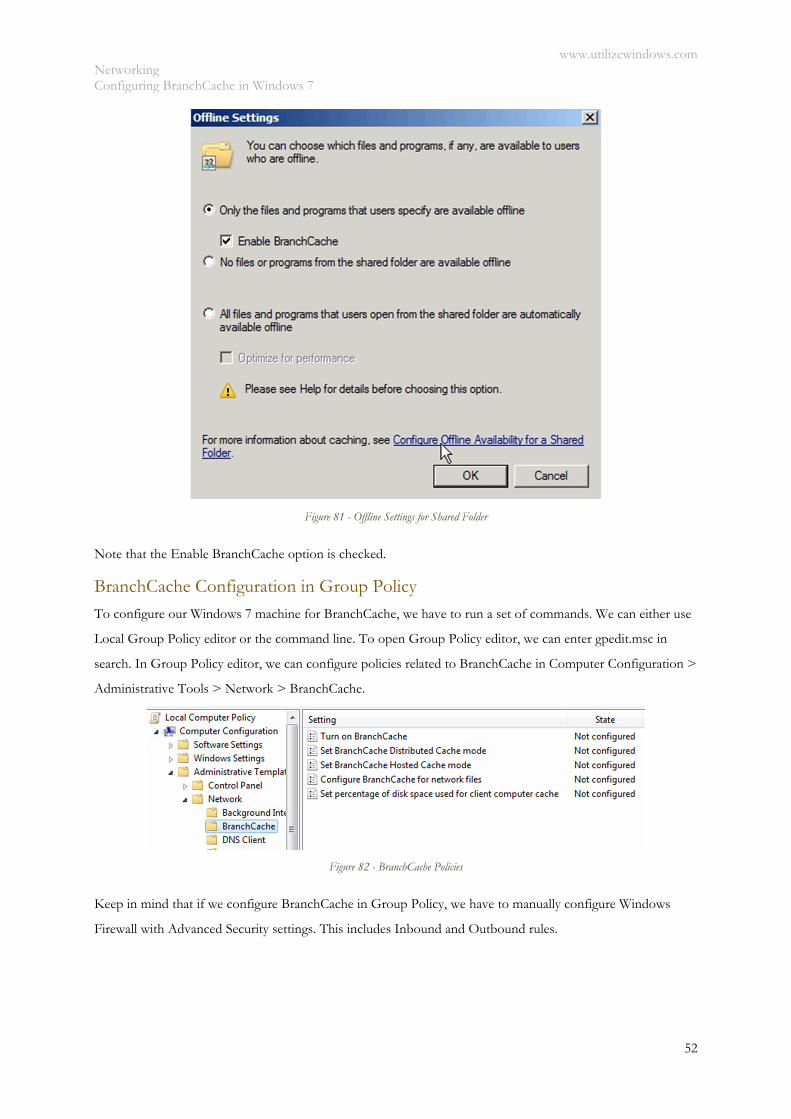
Also, we have to go to the properties of shared folder on the server, go to the Sharing tab, click on the
Advanced Sharing button, and then click on the Caching button. We will see a window like this.
www.utilizewindows.com Networking Configuring BranchCache in Windows 7
52
Figure 81 - Offline Settings for Shared Folder
Note that the Enable BranchCache option is checked.
BranchCache Configuration in Group Policy
To configure our Windows 7 machine for BranchCache, we have to run a set of commands. We can either use
Local Group Policy editor or the command line. To open Group Policy editor, we can enter gpedit.msc in
search. In Group Policy editor, we can configure policies related to BranchCache in Computer Configuration >
Administrative Tools > Network > BranchCache.
Figure 82 - BranchCache Policies
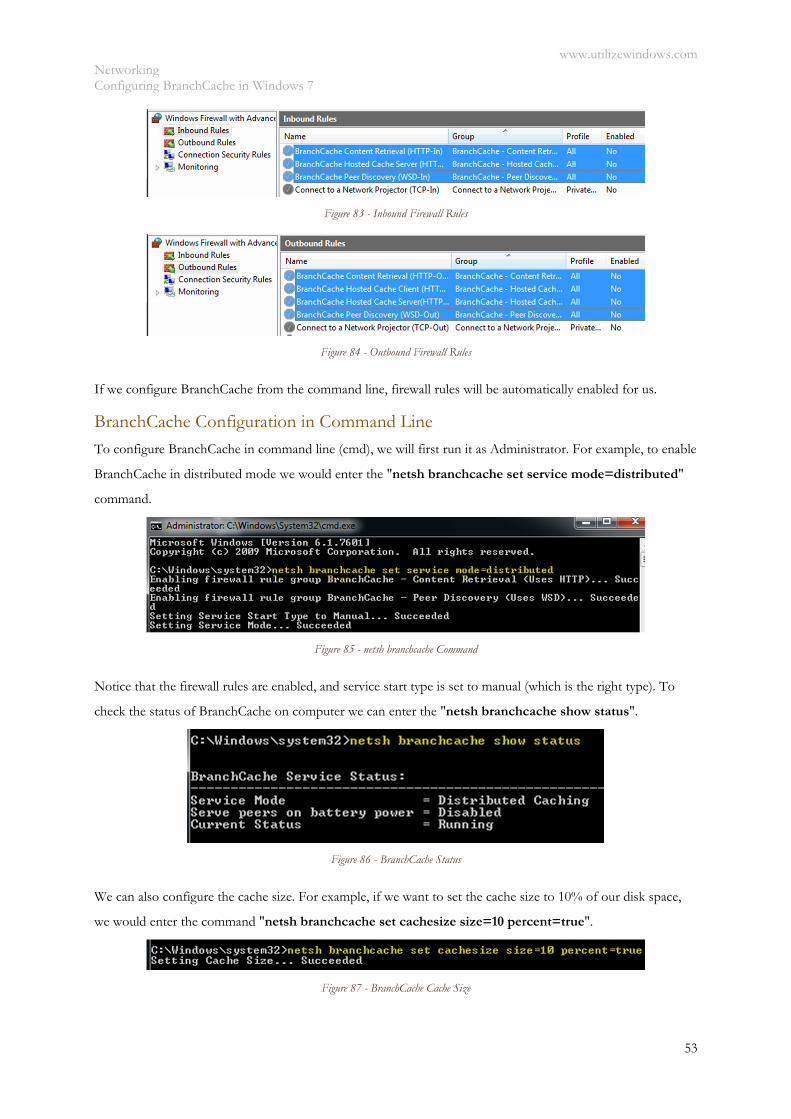
Keep in mind that if we configure BranchCache in Group Policy, we have to manually configure Windows
Firewall with Advanced Security settings. This includes Inbound and Outbound rules.
www.utilizewindows.com Networking Configuring BranchCache in Windows 7
53
Figure 83 - Inbound Firewall Rules
Figure 84 - Outbound Firewall Rules
If we configure BranchCache from the command line, firewall rules will be automatically enabled for us.
BranchCache Configuration in Command Line To configure BranchCache in command line (cmd), we will first run it as Administrator. For example, to enable
BranchCache in distributed mode we would enter the "netsh branchcache set service mode=distributed"
command.
Figure 85 - netsh branchcache Command
Notice that the firewall rules are enabled, and service start type is set to manual (which is the right type). To
check the status of BranchCache on computer we can enter the "netsh branchcache show status".
Figure 86 - BranchCache Status
We can also configure the cache size. For example, if we want to set the cache size to 10% of our disk space,
we would enter the command "netsh branchcache set cachesize size=10 percent=true".
Figure 87 - BranchCache Cache Size

www.utilizewindows.com Networking Configuring BranchCache in Windows 7
54
To see the local cache usage we can enter the "netsh branchcache show localcache".
Figure 88 - BranchCache Local Cache
Notice that here we can also see the location of the cache.
www.utilizewindows.com Networking Creating a VPN Connection in Windows 7
55
Creating a VPN Connection in Windows 7 Before you start
Objectives: Learn how to create VPN connection in Windows 7.
Prerequisites: you have to know what is VPN in general.
Key terms: VPN, connection, Windows 7
Creating VPN Connection
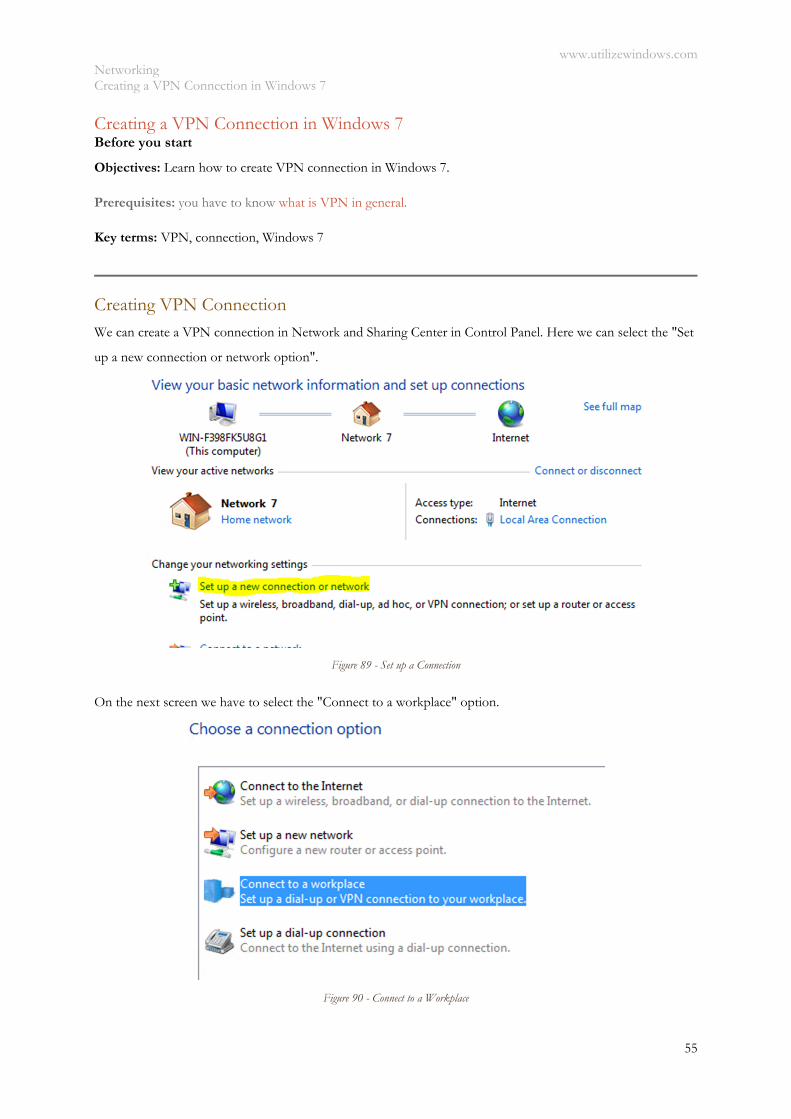
We can create a VPN connection in Network and Sharing Center in Control Panel. Here we can select the "Set
up a new connection or network option".
Figure 89 - Set up a Connection
On the next screen we have to select the "Connect to a workplace" option.
Figure 90 - Connect to a Workplace
www.utilizewindows.com Networking Creating a VPN Connection in Windows 7
56
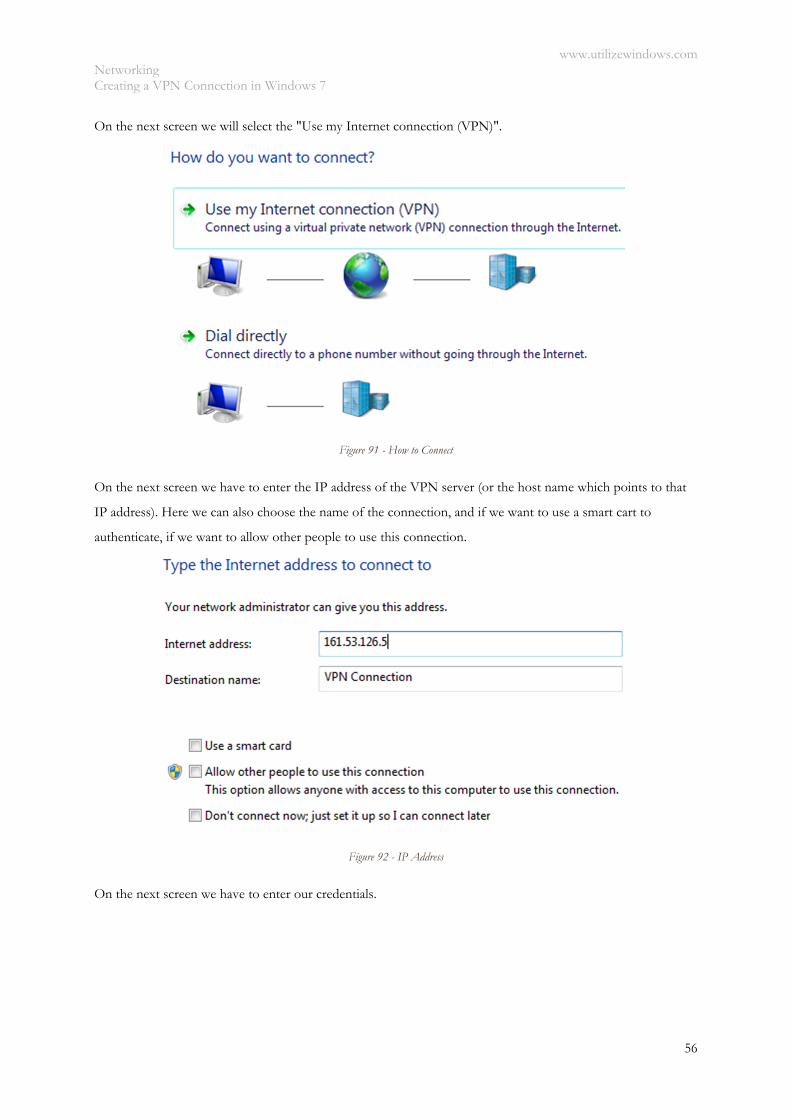
On the next screen we will select the "Use my Internet connection (VPN)".
Figure 91 - How to Connect
On the next screen we have to enter the IP address of the VPN server (or the host name which points to that
IP address). Here we can also choose the name of the connection, and if we want to use a smart cart to
authenticate, if we want to allow other people to use this connection.
Figure 92 - IP Address
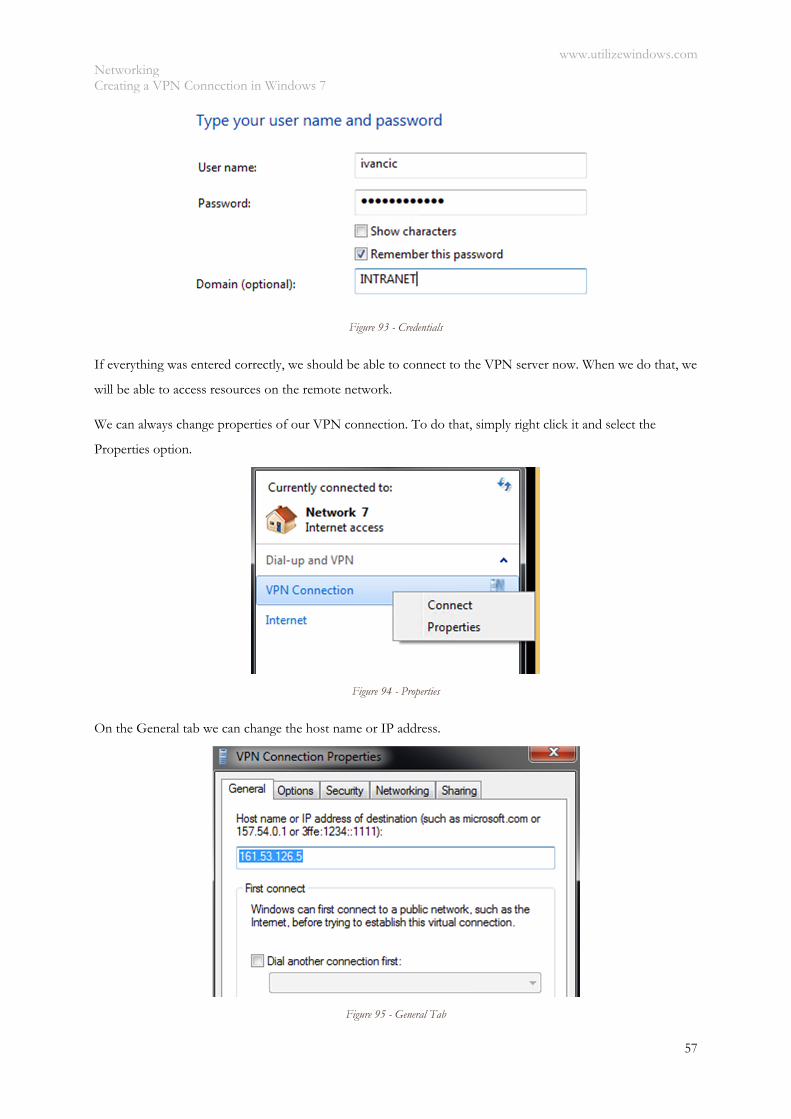
On the next screen we have to enter our credentials.
www.utilizewindows.com Networking Creating a VPN Connection in Windows 7
57
Figure 93 - Credentials
If everything was entered correctly, we should be able to connect to the VPN server now. When we do that, we
will be able to access resources on the remote network.
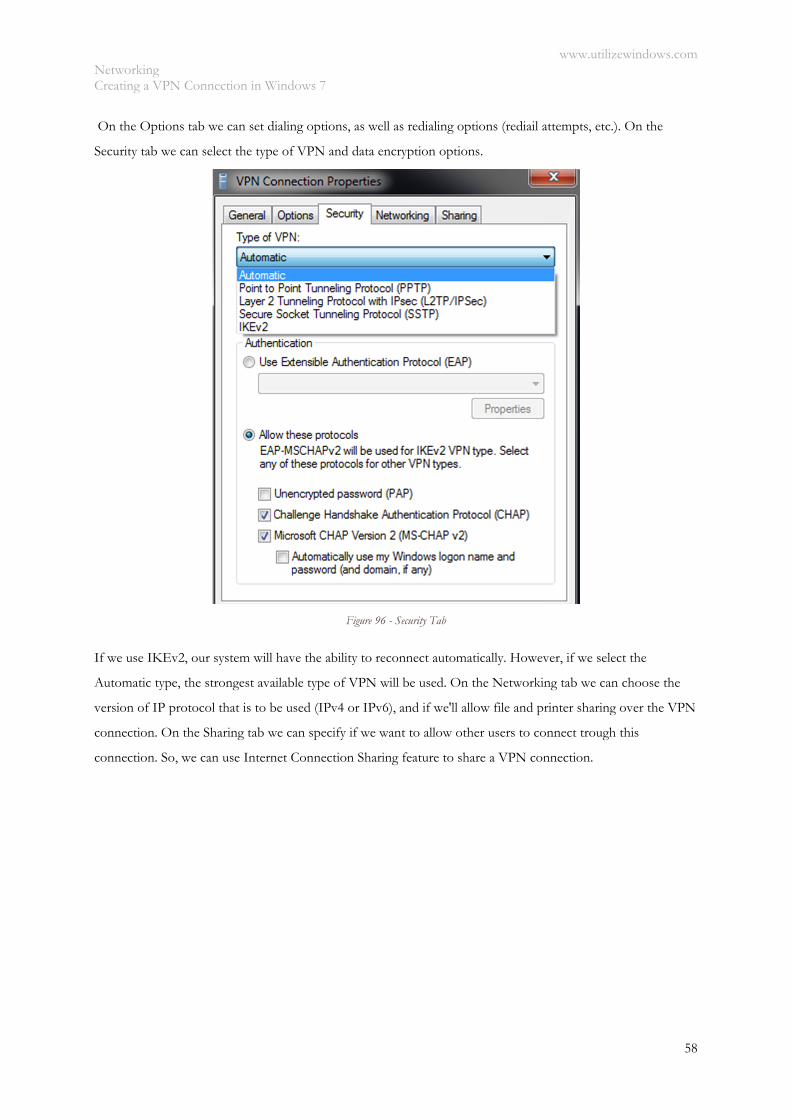
We can always change properties of our VPN connection. To do that, simply right click it and select the
Properties option.
Figure 94 - Properties
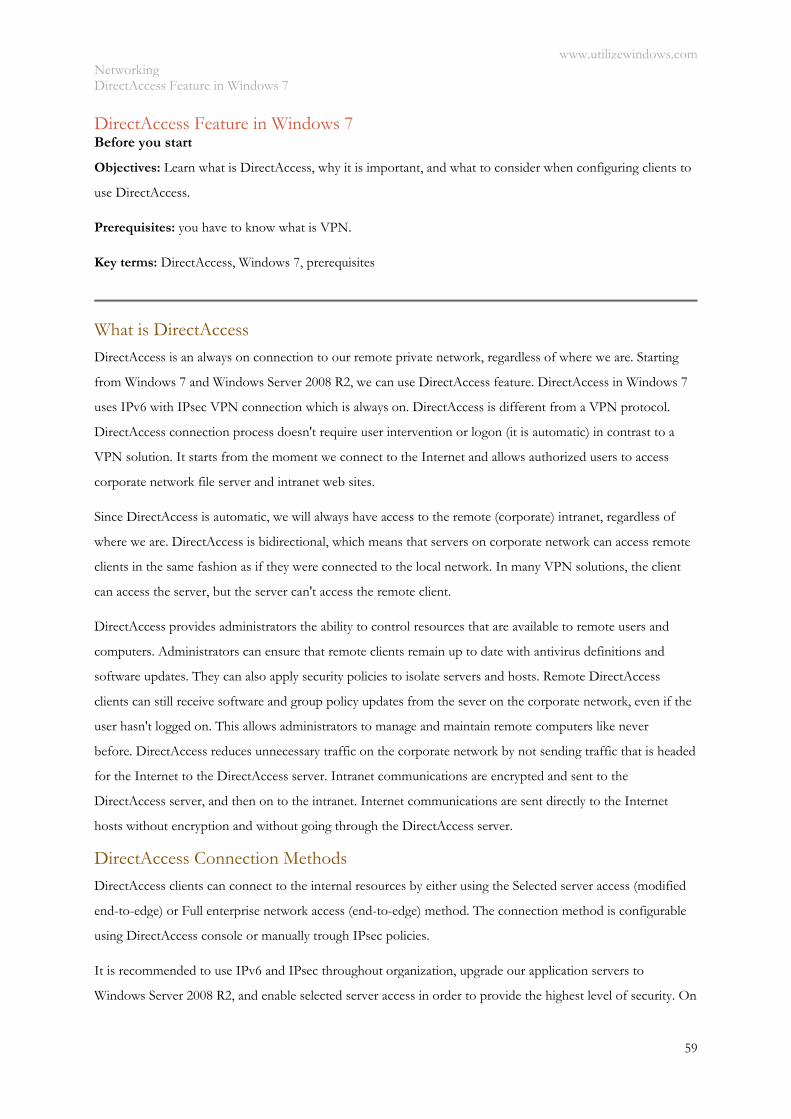
On the General tab we can change the host name or IP address.
Figure 95 - General Tab
www.utilizewindows.com Networking Creating a VPN Connection in Windows 7
58
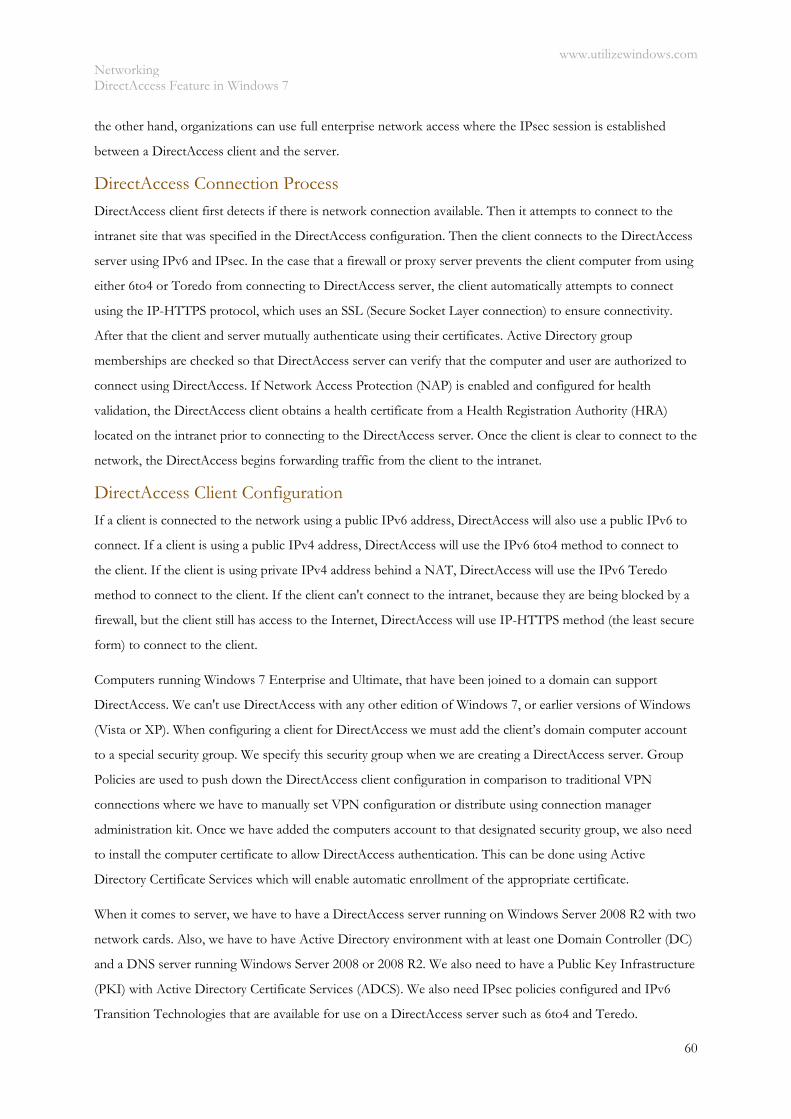
On the Options tab we can set dialing options, as well as redialing options (rediail attempts, etc.). On the
Security tab we can select the type of VPN and data encryption options.
Figure 96 - Security Tab
If we use IKEv2, our system will have the ability to reconnect automatically. However, if we select the
Automatic type, the strongest available type of VPN will be used. On the Networking tab we can choose the
version of IP protocol that is to be used (IPv4 or IPv6), and if we'll allow file and printer sharing over the VPN
connection. On the Sharing tab we can specify if we want to allow other users to connect trough this
connection. So, we can use Internet Connection Sharing feature to share a VPN connection.
www.utilizewindows.com Networking DirectAccess Feature in Windows 7
59
DirectAccess Feature in Windows 7 Before you start
Objectives: Learn what is DirectAccess, why it is important, and what to consider when configuring clients to
use DirectAccess.
Prerequisites: you have to know what is VPN.
Key terms: DirectAccess, Windows 7, prerequisites
What is DirectAccess DirectAccess is an always on connection to our remote private network, regardless of where we are. Starting
from Windows 7 and Windows Server 2008 R2, we can use DirectAccess feature. DirectAccess in Windows 7
uses IPv6 with IPsec VPN connection which is always on. DirectAccess is different from a VPN protocol.
DirectAccess connection process doesn't require user intervention or logon (it is automatic) in contrast to a
VPN solution. It starts from the moment we connect to the Internet and allows authorized users to access
corporate network file server and intranet web sites.
Since DirectAccess is automatic, we will always have access to the remote (corporate) intranet, regardless of
where we are. DirectAccess is bidirectional, which means that servers on corporate network can access remote
clients in the same fashion as if they were connected to the local network. In many VPN solutions, the client
can access the server, but the server can't access the remote client.
DirectAccess provides administrators the ability to control resources that are available to remote users and
computers. Administrators can ensure that remote clients remain up to date with antivirus definitions and
software updates. They can also apply security policies to isolate servers and hosts. Remote DirectAccess
clients can still receive software and group policy updates from the sever on the corporate network, even if the
user hasn't logged on. This allows administrators to manage and maintain remote computers like never
before. DirectAccess reduces unnecessary traffic on the corporate network by not sending traffic that is headed
for the Internet to the DirectAccess server. Intranet communications are encrypted and sent to the
DirectAccess server, and then on to the intranet. Internet communications are sent directly to the Internet
hosts without encryption and without going through the DirectAccess server.
DirectAccess Connection Methods DirectAccess clients can connect to the internal resources by either using the Selected server access (modified
end-to-edge) or Full enterprise network access (end-to-edge) method. The connection method is configurable
using DirectAccess console or manually trough IPsec policies.
It is recommended to use IPv6 and IPsec throughout organization, upgrade our application servers to
Windows Server 2008 R2, and enable selected server access in order to provide the highest level of security. On
www.utilizewindows.com Networking DirectAccess Feature in Windows 7
60
the other hand, organizations can use full enterprise network access where the IPsec session is established
between a DirectAccess client and the server.
DirectAccess Connection Process
DirectAccess client first detects if there is network connection available. Then it attempts to connect to the
intranet site that was specified in the DirectAccess configuration. Then the client connects to the DirectAccess
server using IPv6 and IPsec. In the case that a firewall or proxy server prevents the client computer from using
either 6to4 or Toredo from connecting to DirectAccess server, the client automatically attempts to connect
using the IP-HTTPS protocol, which uses an SSL (Secure Socket Layer connection) to ensure connectivity.
After that the client and server mutually authenticate using their certificates. Active Directory group
memberships are checked so that DirectAccess server can verify that the computer and user are authorized to
connect using DirectAccess. If Network Access Protection (NAP) is enabled and configured for health
validation, the DirectAccess client obtains a health certificate from a Health Registration Authority (HRA)
located on the intranet prior to connecting to the DirectAccess server. Once the client is clear to connect to the
network, the DirectAccess begins forwarding traffic from the client to the intranet.
DirectAccess Client Configuration
If a client is connected to the network using a public IPv6 address, DirectAccess will also use a public IPv6 to
connect. If a client is using a public IPv4 address, DirectAccess will use the IPv6 6to4 method to connect to
the client. If the client is using private IPv4 address behind a NAT, DirectAccess will use the IPv6 Teredo
method to connect to the client. If the client can't connect to the intranet, because they are being blocked by a
firewall, but the client still has access to the Internet, DirectAccess will use IP-HTTPS method (the least secure
form) to connect to the client.
Computers running Windows 7 Enterprise and Ultimate, that have been joined to a domain can support
DirectAccess. We can't use DirectAccess with any other edition of Windows 7, or earlier versions of Windows
(Vista or XP). When configuring a client for DirectAccess we must add the client’s domain computer account
to a special security group. We specify this security group when we are creating a DirectAccess server. Group
Policies are used to push down the DirectAccess client configuration in comparison to traditional VPN
connections where we have to manually set VPN configuration or distribute using connection manager
administration kit. Once we have added the computers account to that designated security group, we also need
to install the computer certificate to allow DirectAccess authentication. This can be done using Active
Directory Certificate Services which will enable automatic enrollment of the appropriate certificate.
When it comes to server, we have to have a DirectAccess server running on Windows Server 2008 R2 with two
network cards. Also, we have to have Active Directory environment with at least one Domain Controller (DC)
and a DNS server running Windows Server 2008 or 2008 R2. We also need to have a Public Key Infrastructure
(PKI) with Active Directory Certificate Services (ADCS). We also need IPsec policies configured and IPv6
Transition Technologies that are available for use on a DirectAccess server such as 6to4 and Teredo.
www.utilizewindows.com Networking DirectAccess Feature in Windows 7
61
When we first configure DirectAccess on a server, it creates a Group Policy Object (GPO) at the domain level
and filters it for us for that specified security group that we create during the installation process. Only clients
that are members of that group get DirectAccess policies and will be able to connect to the DirectAccess
server. Through this Group Policy we can configure settings such as 6-to-4 relay server name, the IP-HTTPS
server to connect to if all other connection methods fail, and weather the Teredo is used for DirectAccess and
the Teredo server address.
We can also configure the DirectAccess from the command line using the netsh command. Have in mind that
all configurations made manually with the netsh utility will be overwritten by corresponding Group Policy
settings.
To determine if the client has made a successful DirectAccess connection, we can connect on the network
connection icon in the system tray. This will open a status of our connection which will say "Internet and
Corporate" access. In that case we know that we have successfully connected to the DirectAccess server. If the
status is "Local and Internet", we know that there is no connection to the DirectAccess server.
As we know, DirectAccess clients use certificate for authentication. If a computer doesn't have a valid
computer certificate, which should be received from ADCS, it can't connect successfully. We can verify client
certificate using the certificate snap-in.
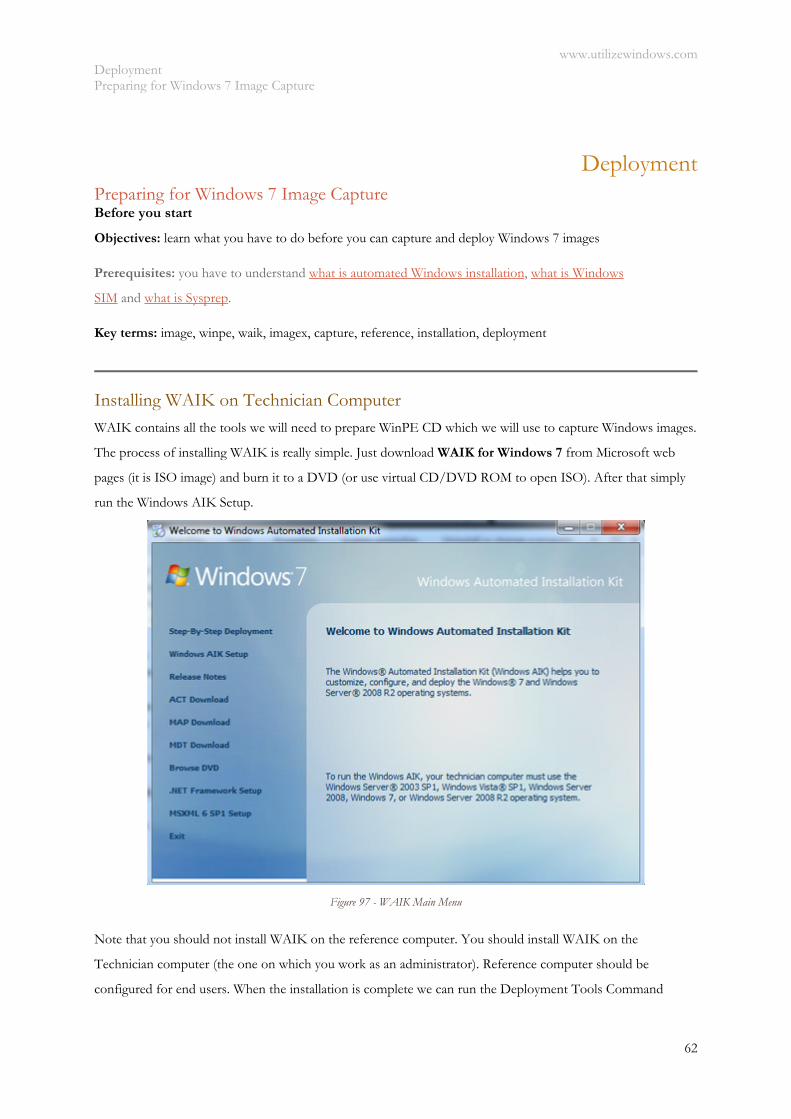
www.utilizewindows.com Deployment Preparing for Windows 7 Image Capture
62
Deployment Preparing for Windows 7 Image Capture Before you start
Objectives: learn what you have to do before you can capture and deploy Windows 7 images
Prerequisites: you have to understand what is automated Windows installation, what is Windows
SIM and what is Sysprep.
Key terms: image, winpe, waik, imagex, capture, reference, installation, deployment
Installing WAIK on Technician Computer
WAIK contains all the tools we will need to prepare WinPE CD which we will use to capture Windows images.
The process of installing WAIK is really simple. Just download WAIK for Windows 7 from Microsoft web
pages (it is ISO image) and burn it to a DVD (or use virtual CD/DVD ROM to open ISO). After that simply
run the Windows AIK Setup.
Figure 97 - WAIK Main Menu
Note that you should not install WAIK on the reference computer. You should install WAIK on the
Technician computer (the one on which you work as an administrator). Reference computer should be
configured for end users. When the installation is complete we can run the Deployment Tools Command
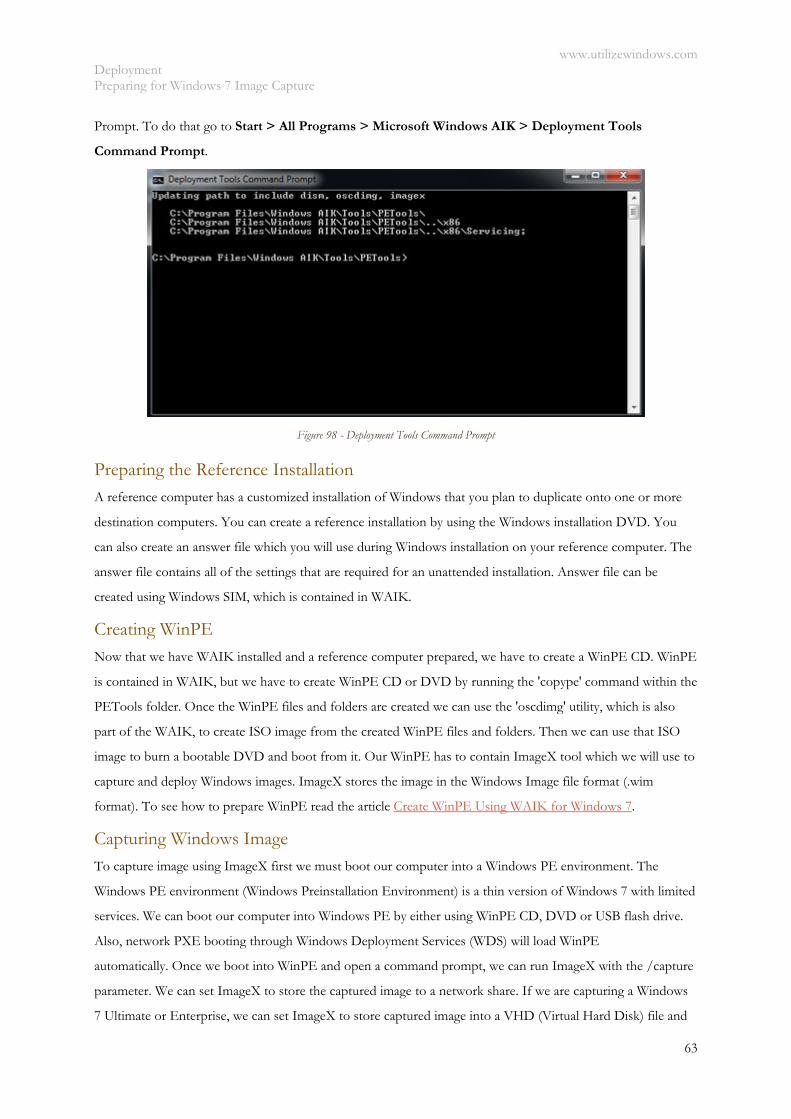
www.utilizewindows.com Deployment Preparing for Windows 7 Image Capture
63
Prompt. To do that go to Start > All Programs > Microsoft Windows AIK > Deployment Tools
Command Prompt.
Figure 98 - Deployment Tools Command Prompt
Preparing the Reference Installation A reference computer has a customized installation of Windows that you plan to duplicate onto one or more
destination computers. You can create a reference installation by using the Windows installation DVD. You
can also create an answer file which you will use during Windows installation on your reference computer. The
answer file contains all of the settings that are required for an unattended installation. Answer file can be
created using Windows SIM, which is contained in WAIK.
Creating WinPE Now that we have WAIK installed and a reference computer prepared, we have to create a WinPE CD. WinPE
is contained in WAIK, but we have to create WinPE CD or DVD by running the 'copype' command within the
PETools folder. Once the WinPE files and folders are created we can use the 'oscdimg' utility, which is also
part of the WAIK, to create ISO image from the created WinPE files and folders. Then we can use that ISO
image to burn a bootable DVD and boot from it. Our WinPE has to contain ImageX tool which we will use to
capture and deploy Windows images. ImageX stores the image in the Windows Image file format (.wim
format). To see how to prepare WinPE read the article Create WinPE Using WAIK for Windows 7.
Capturing Windows Image To capture image using ImageX first we must boot our computer into a Windows PE environment. The
Windows PE environment (Windows Preinstallation Environment) is a thin version of Windows 7 with limited
services. We can boot our computer into Windows PE by either using WinPE CD, DVD or USB flash drive.
Also, network PXE booting through Windows Deployment Services (WDS) will load WinPE
automatically. Once we boot into WinPE and open a command prompt, we can run ImageX with the /capture
parameter. We can set ImageX to store the captured image to a network share. If we are capturing a Windows
7 Ultimate or Enterprise, we can set ImageX to store captured image into a VHD (Virtual Hard Disk) file and
www.utilizewindows.com Deployment Preparing for Windows 7 Image Capture
64
make that VHD bootable. To an example on how to capture Windows 7 installation read the article Windows 7
Image Capture Demonstration
Excluding Files
We can also exclude certain files and folders from being captured. We can do that using configuration files. The
'Wimscript.ini' file is the configuration file that ImageX will use. Withing a 'Wimscript.ini' file we have three
sections of configuration. Those sections are:
ExclusionList
ExclusionException
CompressionExclusionList
The ExclusionList section allows us to define what files and folders are to be excluded from the capture. The
ExclusionException section allows us to override the default exclusion list during the capture process. The
CompressionExclusionList allows us to define files, folders and file types that we want to exclude during the
compression process. ImageX will look for the 'Wimscript.ini' within the same folder that stores the ImageX
tool. Example of Wimscript.ini:
[ExclusionList]
ntfs.log
hiberfil.sys
pagefile.sys
"System Volume Information"
RECYCLER
Windows\CSC
[CompressionExclusionList]
*.mp3
*.zip
*.cab
\WINDOWS\inf\*.pnf
As we see in our example, our wimscript.ini has ExclusionList section. In that section we defined what files and
folders are to be excluded during the ImageX process. We also defined what files, folders and types of files are
to be excluded from compression process. In addition to manually creating an image, ImageX can help us
modify an image without extracting it and also to deploy the captured image to a target computer.

www.utilizewindows.com Deployment Preparing for Windows 7 Image Capture
65
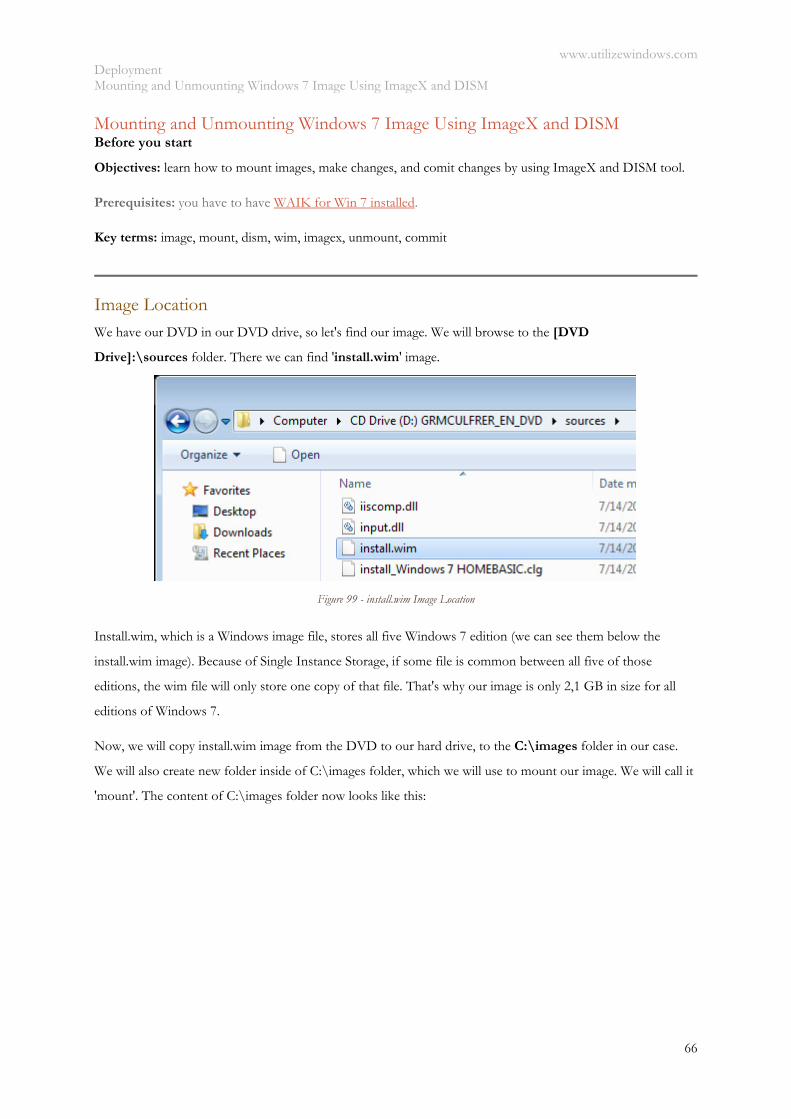
www.utilizewindows.com Deployment Mounting and Unmounting Windows 7 Image Using ImageX and DISM
66
Mounting and Unmounting Windows 7 Image Using ImageX and DISM Before you start
Objectives: learn how to mount images, make changes, and comit changes by using ImageX and DISM tool.
Prerequisites: you have to have WAIK for Win 7 installed.
Key terms: image, mount, dism, wim, imagex, unmount, commit
Image Location
We have our DVD in our DVD drive, so let's find our image. We will browse to the [DVD
Drive]:\sources folder. There we can find 'install.wim' image.
Figure 99 - install.wim Image Location
Install.wim, which is a Windows image file, stores all five Windows 7 edition (we can see them below the
install.wim image). Because of Single Instance Storage, if some file is common between all five of those
editions, the wim file will only store one copy of that file. That's why our image is only 2,1 GB in size for all
editions of Windows 7.
Now, we will copy install.wim image from the DVD to our hard drive, to the C:\images folder in our case.
We will also create new folder inside of C:\images folder, which we will use to mount our image. We will call it
'mount'. The content of C:\images folder now looks like this:
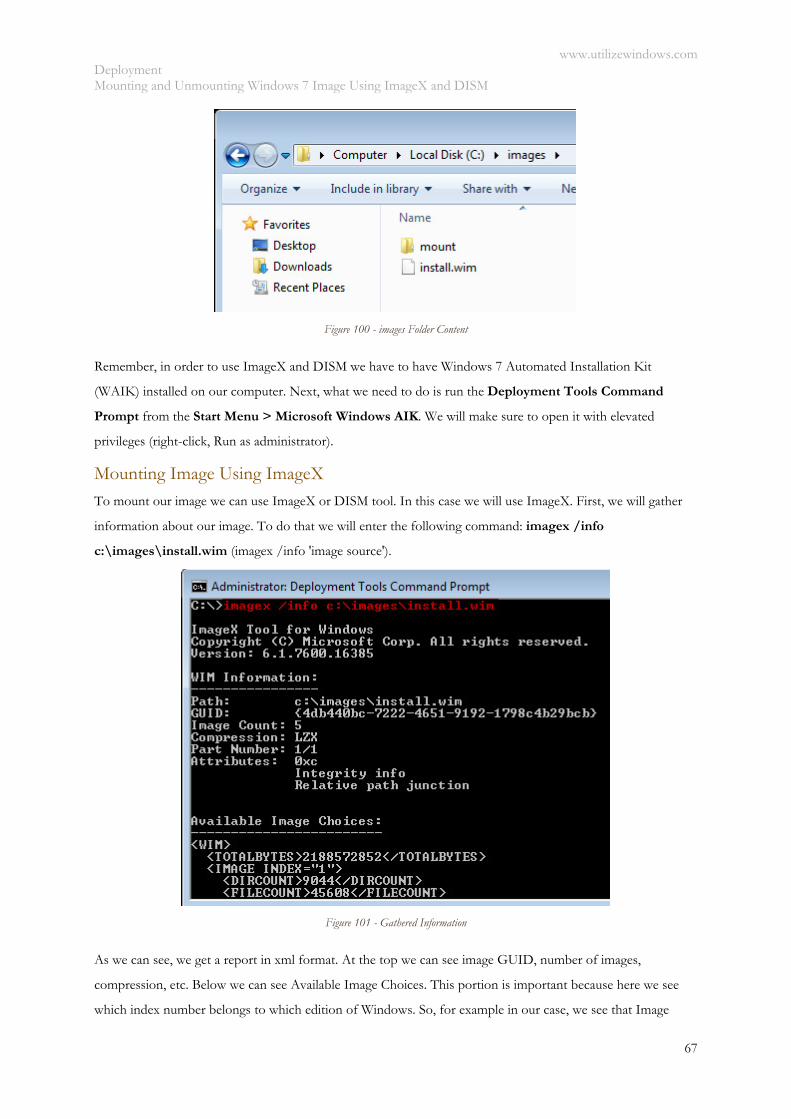
www.utilizewindows.com Deployment Mounting and Unmounting Windows 7 Image Using ImageX and DISM
67
Figure 100 - images Folder Content
Remember, in order to use ImageX and DISM we have to have Windows 7 Automated Installation Kit
(WAIK) installed on our computer. Next, what we need to do is run the Deployment Tools Command
Prompt from the Start Menu > Microsoft Windows AIK. We will make sure to open it with elevated
privileges (right-click, Run as administrator).
Mounting Image Using ImageX To mount our image we can use ImageX or DISM tool. In this case we will use ImageX. First, we will gather
information about our image. To do that we will enter the following command: imagex /info
c:\images\install.wim (imagex /info 'image source').
Figure 101 - Gathered Information
As we can see, we get a report in xml format. At the top we can see image GUID, number of images,
compression, etc. Below we can see Available Image Choices. This portion is important because here we see
which index number belongs to which edition of Windows. So, for example in our case, we see that Image
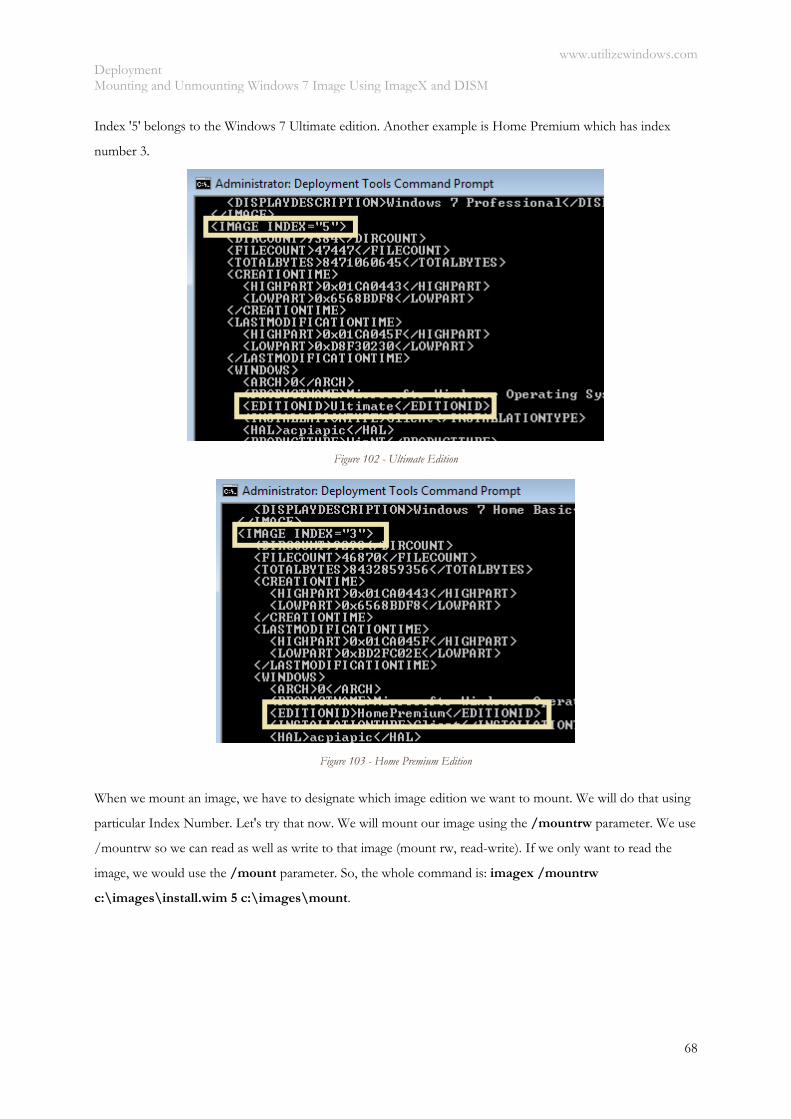
www.utilizewindows.com Deployment Mounting and Unmounting Windows 7 Image Using ImageX and DISM
68
Index '5' belongs to the Windows 7 Ultimate edition. Another example is Home Premium which has index
number 3.
Figure 102 - Ultimate Edition
Figure 103 - Home Premium Edition
When we mount an image, we have to designate which image edition we want to mount. We will do that using
particular Index Number. Let's try that now. We will mount our image using the /mountrw parameter. We use
/mountrw so we can read as well as write to that image (mount rw, read-write). If we only want to read the
image, we would use the /mount parameter. So, the whole command is: imagex /mountrw
c:\images\install.wim 5 c:\images\mount.
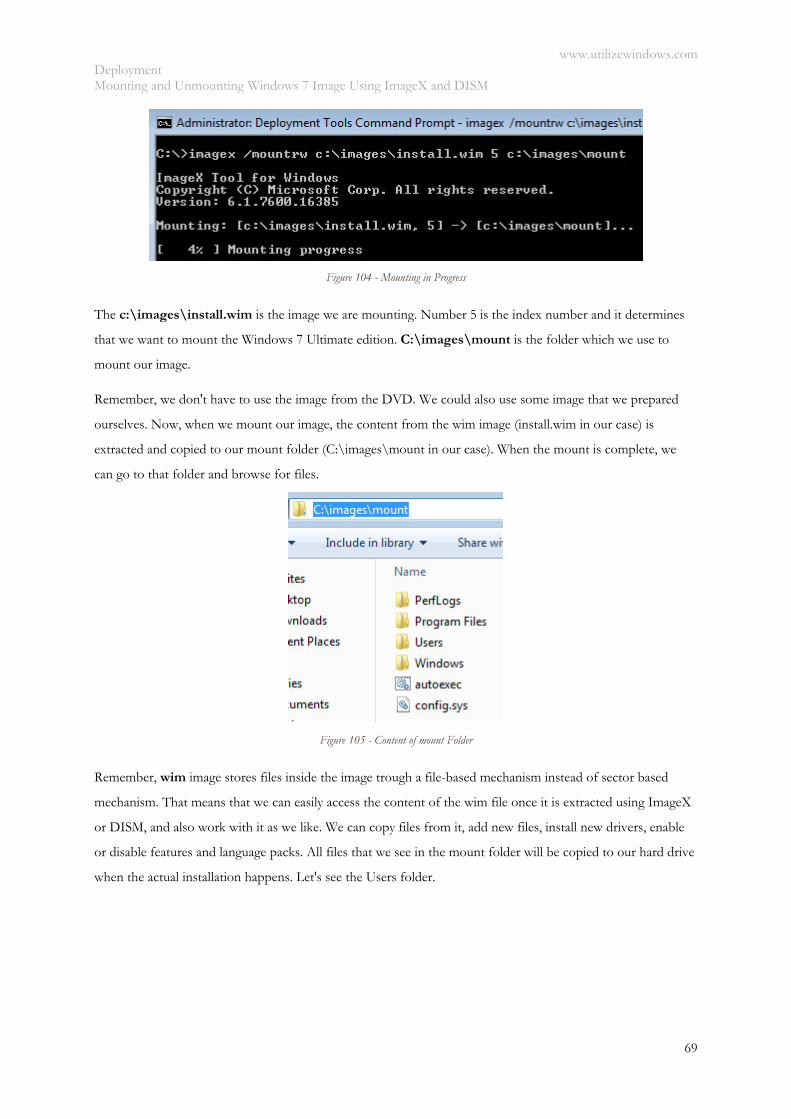
www.utilizewindows.com Deployment Mounting and Unmounting Windows 7 Image Using ImageX and DISM
69
Figure 104 - Mounting in Progress
The c:\images\install.wim is the image we are mounting. Number 5 is the index number and it determines
that we want to mount the Windows 7 Ultimate edition. C:\images\mount is the folder which we use to
mount our image.
Remember, we don't have to use the image from the DVD. We could also use some image that we prepared
ourselves. Now, when we mount our image, the content from the wim image (install.wim in our case) is
extracted and copied to our mount folder (C:\images\mount in our case). When the mount is complete, we
can go to that folder and browse for files.
Figure 105 - Content of mount Folder
Remember, wim image stores files inside the image trough a file-based mechanism instead of sector based
mechanism. That means that we can easily access the content of the wim file once it is extracted using ImageX
or DISM, and also work with it as we like. We can copy files from it, add new files, install new drivers, enable
or disable features and language packs. All files that we see in the mount folder will be copied to our hard drive
when the actual installation happens. Let's see the Users folder.
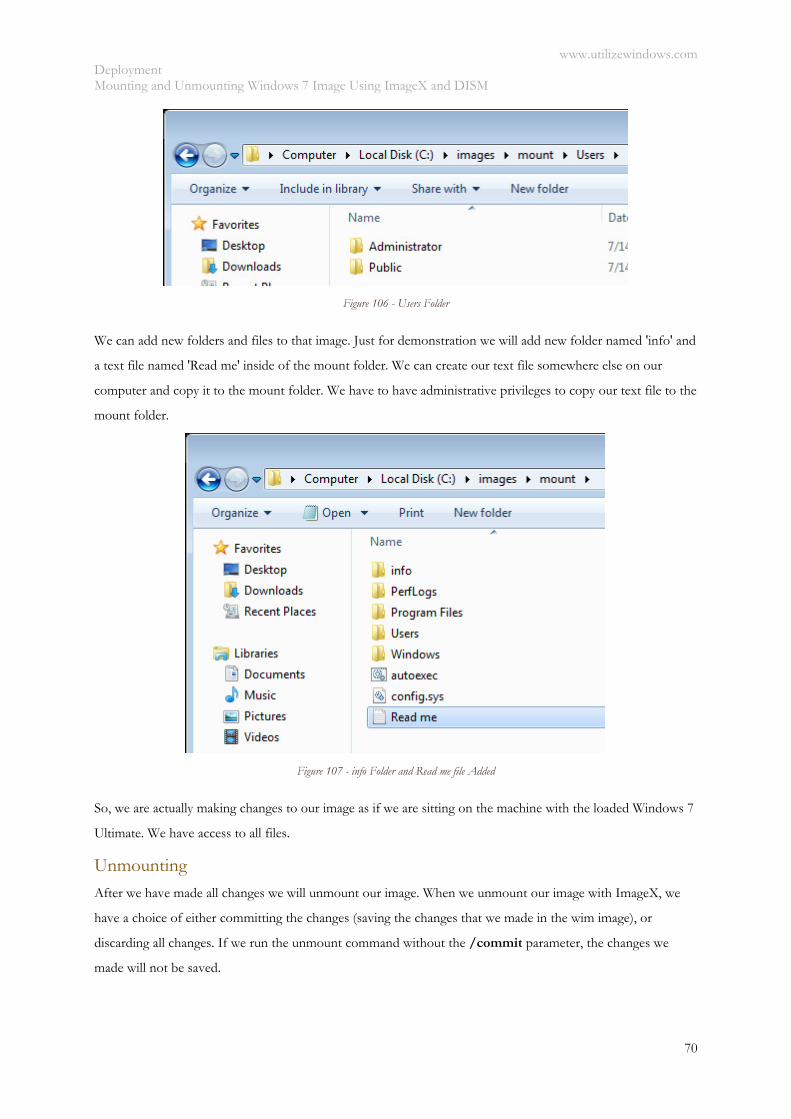
www.utilizewindows.com Deployment Mounting and Unmounting Windows 7 Image Using ImageX and DISM
70
Figure 106 - Users Folder
We can add new folders and files to that image. Just for demonstration we will add new folder named 'info' and
a text file named 'Read me' inside of the mount folder. We can create our text file somewhere else on our
computer and copy it to the mount folder. We have to have administrative privileges to copy our text file to the
mount folder.
Figure 107 - info Folder and Read me file Added
So, we are actually making changes to our image as if we are sitting on the machine with the loaded Windows 7
Ultimate. We have access to all files.
Unmounting
After we have made all changes we will unmount our image. When we unmount our image with ImageX, we
have a choice of either committing the changes (saving the changes that we made in the wim image), or
discarding all changes. If we run the unmount command without the /commit parameter, the changes we
made will not be saved.
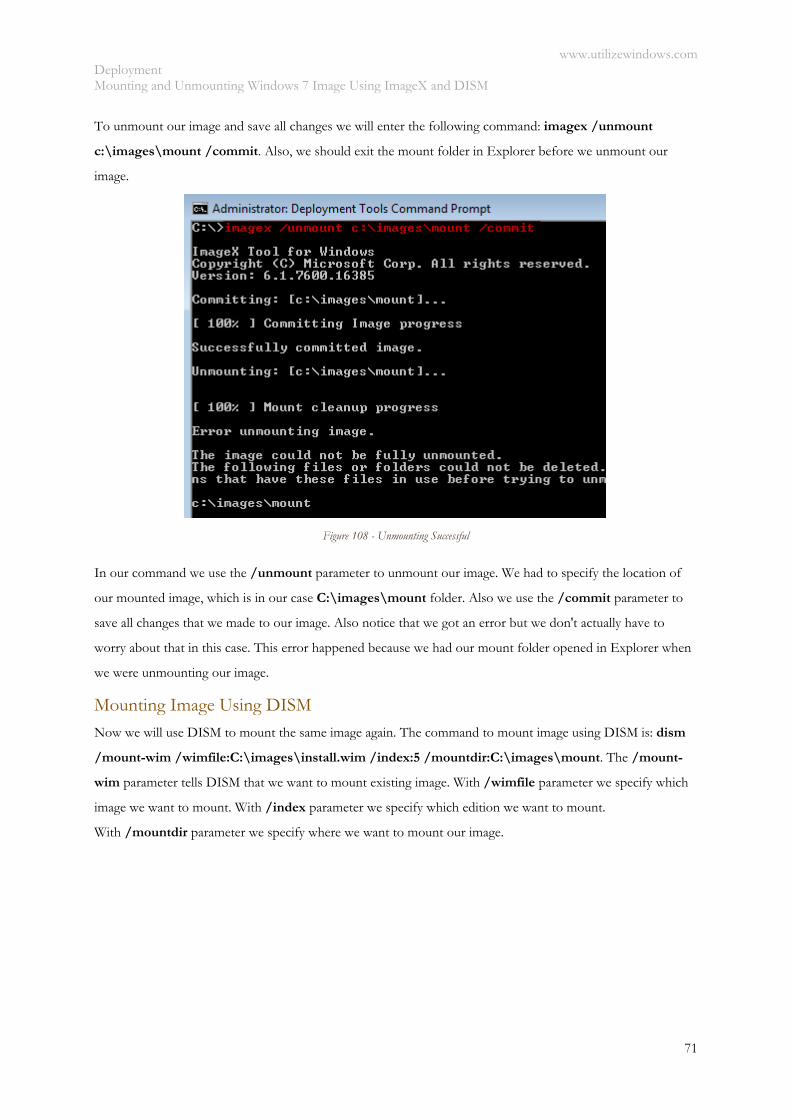
www.utilizewindows.com Deployment Mounting and Unmounting Windows 7 Image Using ImageX and DISM
71
To unmount our image and save all changes we will enter the following command: imagex /unmount
c:\images\mount /commit. Also, we should exit the mount folder in Explorer before we unmount our
image.
Figure 108 - Unmounting Successful
In our command we use the /unmount parameter to unmount our image. We had to specify the location of
our mounted image, which is in our case C:\images\mount folder. Also we use the /commit parameter to
save all changes that we made to our image. Also notice that we got an error but we don't actually have to
worry about that in this case. This error happened because we had our mount folder opened in Explorer when
we were unmounting our image.
Mounting Image Using DISM Now we will use DISM to mount the same image again. The command to mount image using DISM is: dism
/mount-wim /wimfile:C:\images\install.wim /index:5 /mountdir:C:\images\mount. The /mount-
wim parameter tells DISM that we want to mount existing image. With /wimfile parameter we specify which
image we want to mount. With /index parameter we specify which edition we want to mount.
With /mountdir parameter we specify where we want to mount our image.

www.utilizewindows.com Deployment Mounting and Unmounting Windows 7 Image Using ImageX and DISM
72
Figure 109 - Mounting Error
Notice that we got an error. The specified image is already mounted for read/write access. This means that the
image somehow is still mounted. We can try and unmount our image again using ImageX tool, but this time
without the /commit parameter. If we used DISM to mount our image we should try and unmount our image,
without committing changes. Also, to recover from this error we can try and use the imagex
/cleanup command to delete all resources associated with mounted wim image that has been abandoned. If
that doesn't work we can also try and run dism /cleanup-wim command. If that doesn't work, we can try and
restart our machine. If that doesn't work we can try and use another mount folder. If that does not work, we
have to clear all our temporary directories, and also in Registry browse to
"HKEY_LOCAL_MACHINE\SOFTWARE\Microsoft\WIMMount\Mounted Images" and delete any keys
below this.
Errors can occur because of various reasons, like corrupt drivers, viruses, etc. We should always have a backup
of our image, because our images could get corrupt when we are working with it.
Figure 110 - ImageX Cleanup Command
Now let's try to mount our image using DISM again. This time everything works as expected.
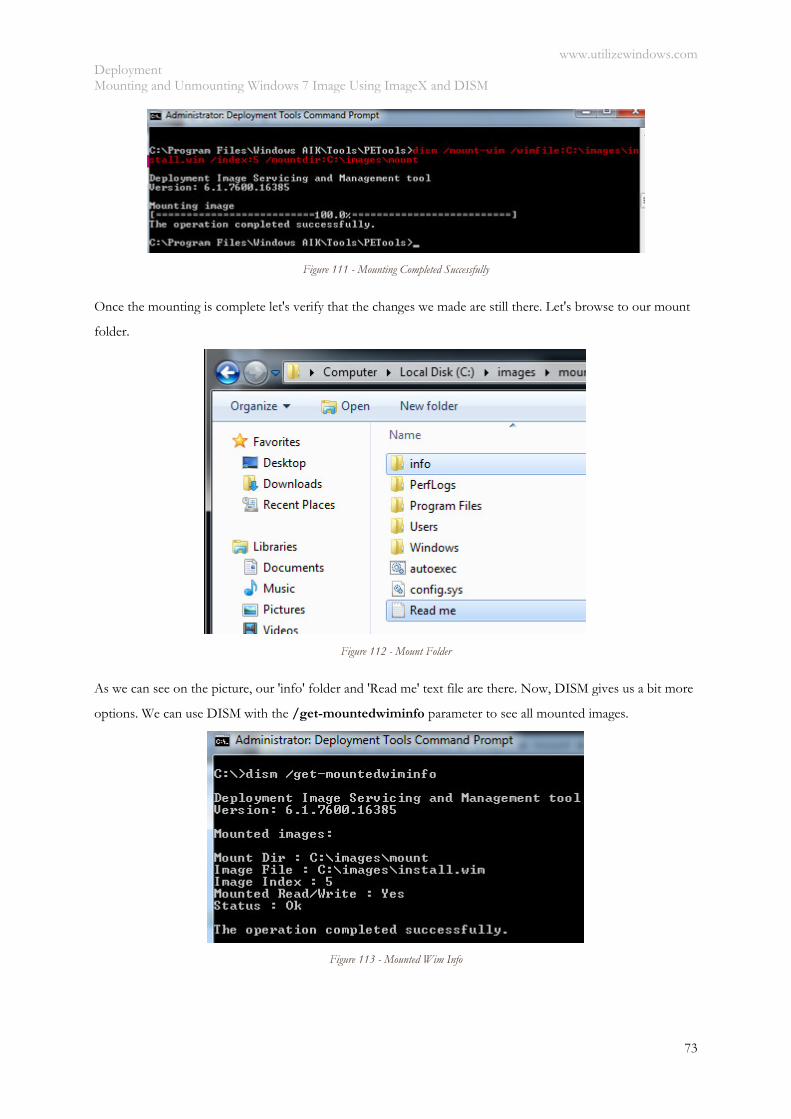
www.utilizewindows.com Deployment Mounting and Unmounting Windows 7 Image Using ImageX and DISM
73
Figure 111 - Mounting Completed Successfully
Once the mounting is complete let's verify that the changes we made are still there. Let's browse to our mount
folder.
Figure 112 - Mount Folder
As we can see on the picture, our 'info' folder and 'Read me' text file are there. Now, DISM gives us a bit more
options. We can use DISM with the /get-mountedwiminfo parameter to see all mounted images.
Figure 113 - Mounted Wim Info
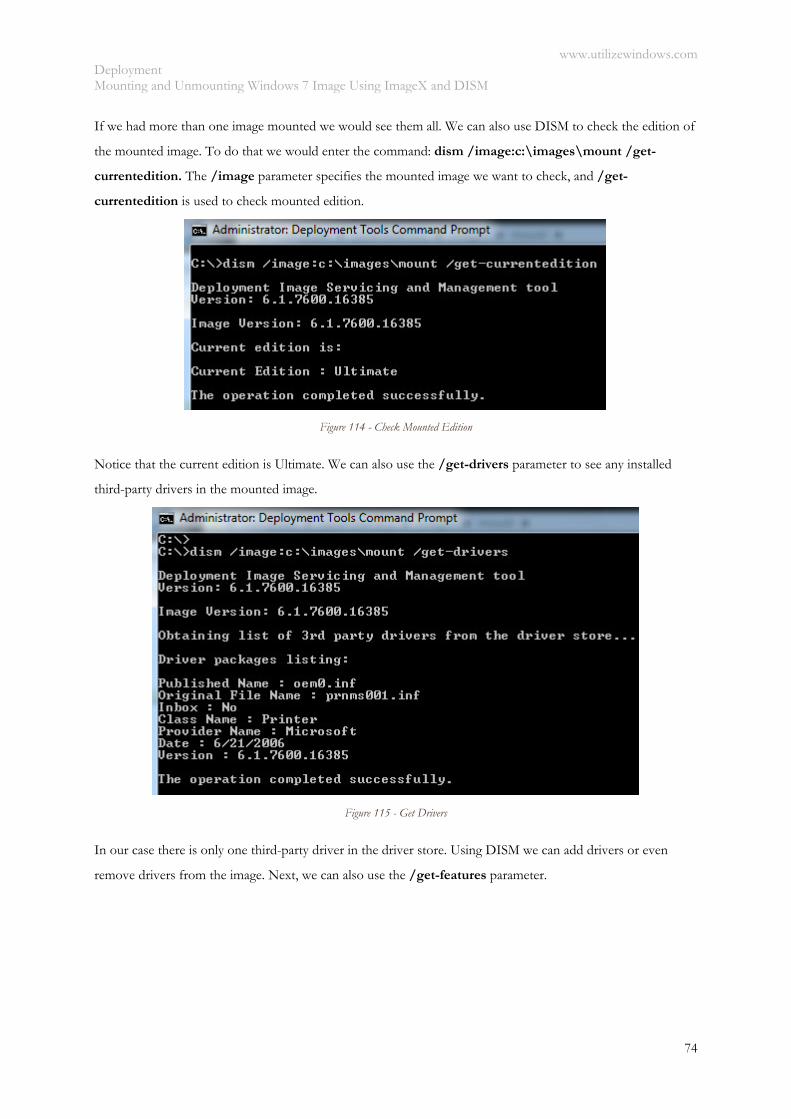
www.utilizewindows.com Deployment Mounting and Unmounting Windows 7 Image Using ImageX and DISM
74
If we had more than one image mounted we would see them all. We can also use DISM to check the edition of
the mounted image. To do that we would enter the command: dism /image:c:\images\mount /get-
currentedition. The /image parameter specifies the mounted image we want to check, and /get-
currentedition is used to check mounted edition.
Figure 114 - Check Mounted Edition
Notice that the current edition is Ultimate. We can also use the /get-drivers parameter to see any installed
third-party drivers in the mounted image.
Figure 115 - Get Drivers
In our case there is only one third-party driver in the driver store. Using DISM we can add drivers or even
remove drivers from the image. Next, we can also use the /get-features parameter.
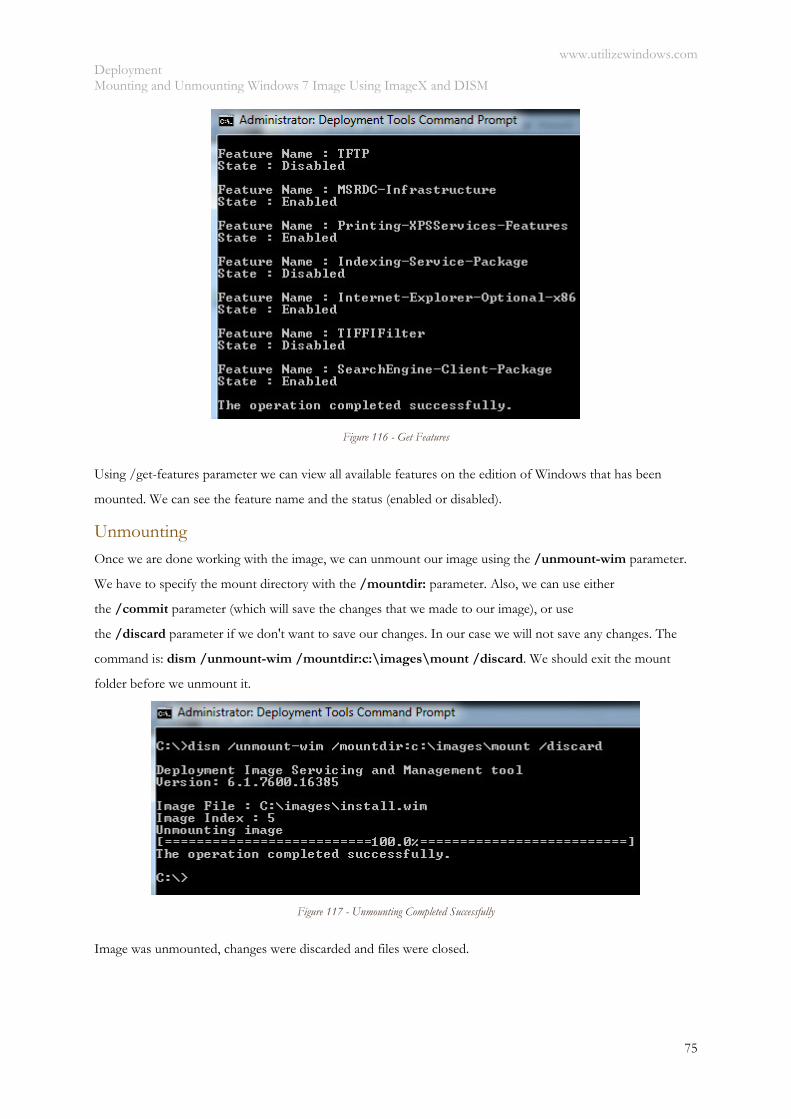
www.utilizewindows.com Deployment Mounting and Unmounting Windows 7 Image Using ImageX and DISM
75
Figure 116 - Get Features
Using /get-features parameter we can view all available features on the edition of Windows that has been
mounted. We can see the feature name and the status (enabled or disabled).
Unmounting Once we are done working with the image, we can unmount our image using the /unmount-wim parameter.
We have to specify the mount directory with the /mountdir: parameter. Also, we can use either
the /commit parameter (which will save the changes that we made to our image), or use
the /discard parameter if we don't want to save our changes. In our case we will not save any changes. The
command is: dism /unmount-wim /mountdir:c:\images\mount /discard. We should exit the mount
folder before we unmount it.
Figure 117 - Unmounting Completed Successfully
Image was unmounted, changes were discarded and files were closed.
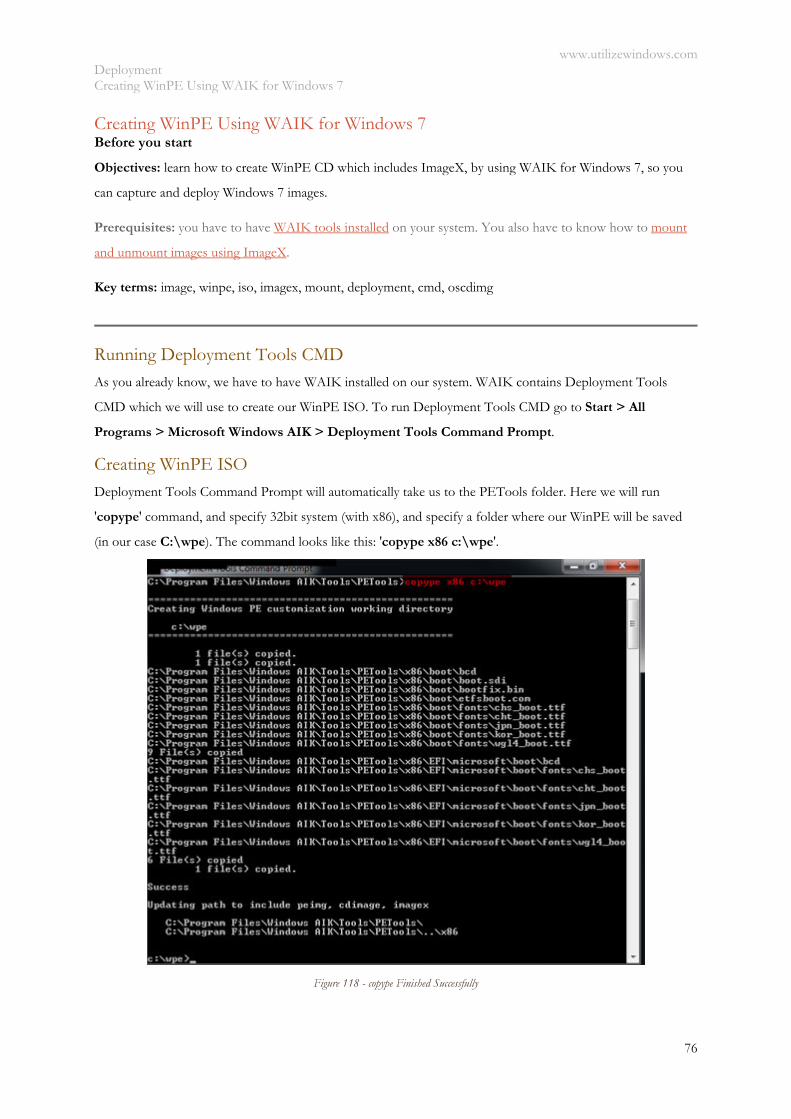
www.utilizewindows.com Deployment Creating WinPE Using WAIK for Windows 7
76
Creating WinPE Using WAIK for Windows 7 Before you start
Objectives: learn how to create WinPE CD which includes ImageX, by using WAIK for Windows 7, so you
can capture and deploy Windows 7 images.
Prerequisites: you have to have WAIK tools installed on your system. You also have to know how to mount
and unmount images using ImageX.
Key terms: image, winpe, iso, imagex, mount, deployment, cmd, oscdimg
Running Deployment Tools CMD
As you already know, we have to have WAIK installed on our system. WAIK contains Deployment Tools
CMD which we will use to create our WinPE ISO. To run Deployment Tools CMD go to Start > All
Programs > Microsoft Windows AIK > Deployment Tools Command Prompt.
Creating WinPE ISO
Deployment Tools Command Prompt will automatically take us to the PETools folder. Here we will run
'copype' command, and specify 32bit system (with x86), and specify a folder where our WinPE will be saved
(in our case C:\wpe). The command looks like this: 'copype x86 c:\wpe'.
Figure 118 - copype Finished Successfully
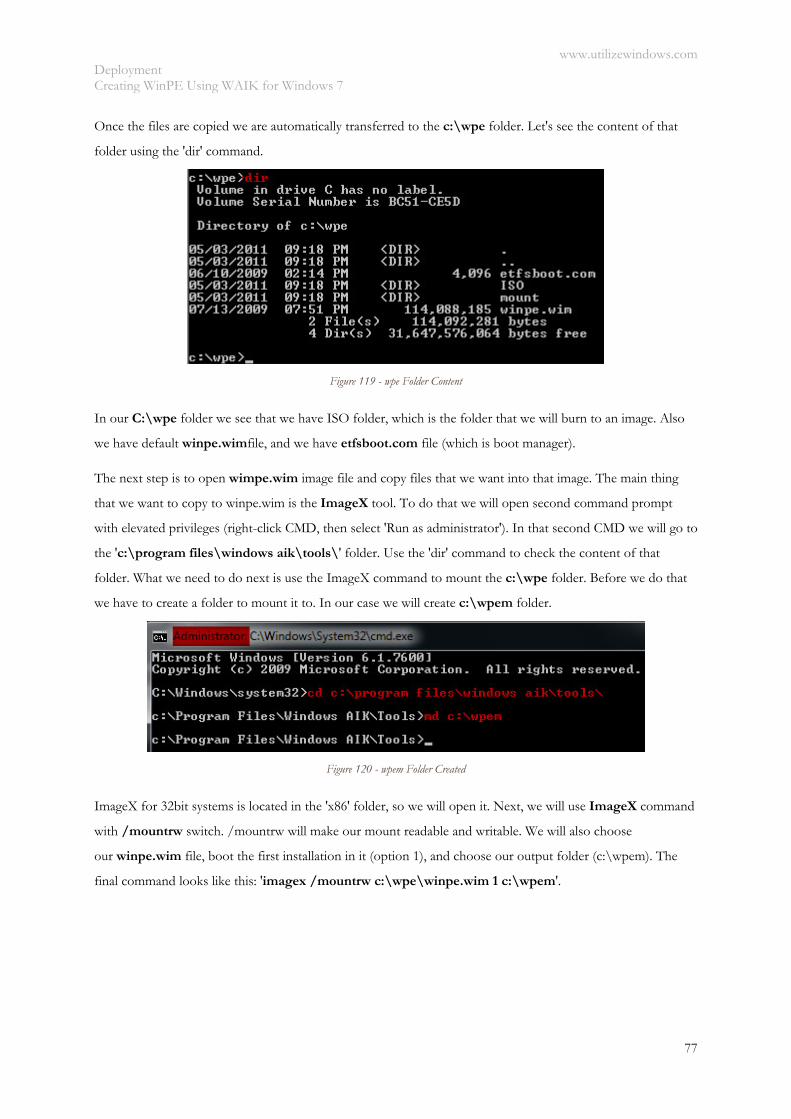
www.utilizewindows.com Deployment Creating WinPE Using WAIK for Windows 7
77
Once the files are copied we are automatically transferred to the c:\wpe folder. Let's see the content of that
folder using the 'dir' command.
Figure 119 - wpe Folder Content
In our C:\wpe folder we see that we have ISO folder, which is the folder that we will burn to an image. Also
we have default winpe.wimfile, and we have etfsboot.com file (which is boot manager).
The next step is to open wimpe.wim image file and copy files that we want into that image. The main thing
that we want to copy to winpe.wim is the ImageX tool. To do that we will open second command prompt
with elevated privileges (right-click CMD, then select 'Run as administrator'). In that second CMD we will go to
the 'c:\program files\windows aik\tools\' folder. Use the 'dir' command to check the content of that
folder. What we need to do next is use the ImageX command to mount the c:\wpe folder. Before we do that
we have to create a folder to mount it to. In our case we will create c:\wpem folder.
Figure 120 - wpem Folder Created
ImageX for 32bit systems is located in the 'x86' folder, so we will open it. Next, we will use ImageX command
with /mountrw switch. /mountrw will make our mount readable and writable. We will also choose
our winpe.wim file, boot the first installation in it (option 1), and choose our output folder (c:\wpem). The
final command looks like this: 'imagex /mountrw c:\wpe\winpe.wim 1 c:\wpem'.
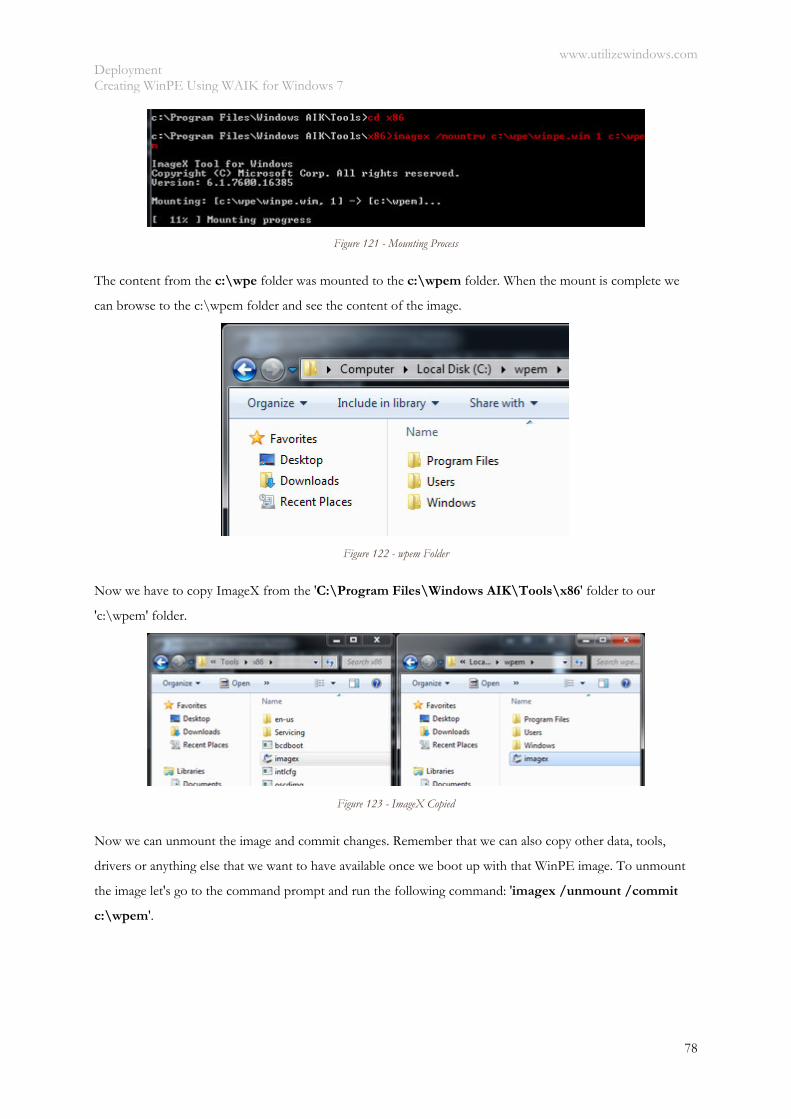
www.utilizewindows.com Deployment Creating WinPE Using WAIK for Windows 7
78
Figure 121 - Mounting Process
The content from the c:\wpe folder was mounted to the c:\wpem folder. When the mount is complete we
can browse to the c:\wpem folder and see the content of the image.
Figure 122 - wpem Folder
Now we have to copy ImageX from the 'C:\Program Files\Windows AIK\Tools\x86' folder to our
'c:\wpem' folder.
Figure 123 - ImageX Copied
Now we can unmount the image and commit changes. Remember that we can also copy other data, tools,
drivers or anything else that we want to have available once we boot up with that WinPE image. To unmount
the image let's go to the command prompt and run the following command: 'imagex /unmount /commit
c:\wpem'.

www.utilizewindows.com Deployment Creating WinPE Using WAIK for Windows 7
79
Figure 124 - Committing Changes and Unmounting
What really happened is that the content of the c:\wpem folder (mount) was saved to the windows image.
Image was then unmounted and saved to the winpe.wim file.
Next, we are going to copy c:\wpe\winpe.wim file to the c:\wpe\ISO\sources folder and change the name
to boot.wim. We can do this using Windows Explorer. The 'sources' folder of every Windows 7 installation
contains two important files: install.wim and boot.wim. The boot.wim is for booting the DVD and starting
the installation. Install.wim stores the actuall installation files. At this poing we can create ISO image from our
prepared folder. The WAIK has a tool called oscdimg (Operating System CD Image) creator which we can
use to create ISO images from data on our hard drive. Let's go back to Deployment Tools Command Prompt
and run the oscdimg command. We will specify -n for long file names, specify the source folder,
specify destination file, and also specify the boot files which will be included in the boot sector (-b), so that
our image will be bootable. The whole command is: 'oscdimg -n c:\wpe\iso c:\wpe\winpe.iso -
b"c:\wpe\etfsboot.com'.
Figure 125 - oscdimg Complete
Once the ISO image is complete we can burn it to a CD or DVD, which we can then use to boot our
computer from.
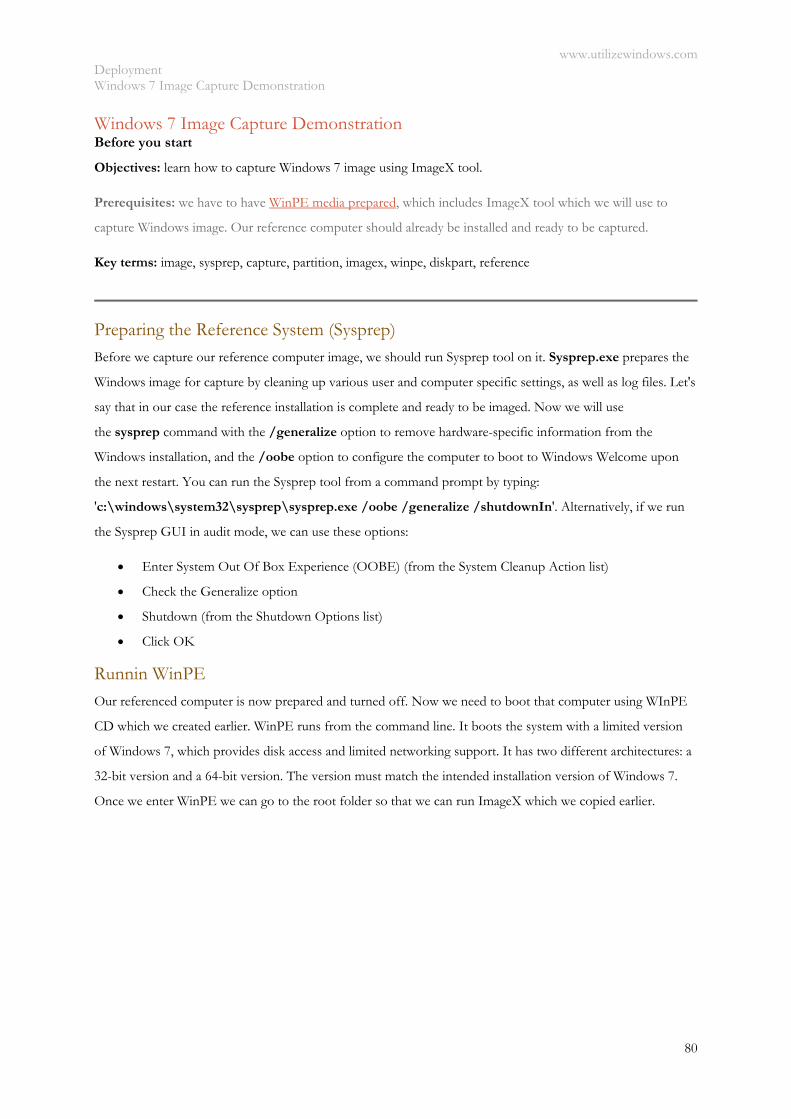
www.utilizewindows.com Deployment Windows 7 Image Capture Demonstration
80
Windows 7 Image Capture Demonstration Before you start
Objectives: learn how to capture Windows 7 image using ImageX tool.
Prerequisites: we have to have WinPE media prepared, which includes ImageX tool which we will use to
capture Windows image. Our reference computer should already be installed and ready to be captured.
Key terms: image, sysprep, capture, partition, imagex, winpe, diskpart, reference
Preparing the Reference System (Sysprep) Before we capture our reference computer image, we should run Sysprep tool on it. Sysprep.exe prepares the
Windows image for capture by cleaning up various user and computer specific settings, as well as log files. Let's
say that in our case the reference installation is complete and ready to be imaged. Now we will use
the sysprep command with the /generalize option to remove hardware-specific information from the
Windows installation, and the /oobe option to configure the computer to boot to Windows Welcome upon
the next restart. You can run the Sysprep tool from a command prompt by typing:
'c:\windows\system32\sysprep\sysprep.exe /oobe /generalize /shutdownIn'. Alternatively, if we run
the Sysprep GUI in audit mode, we can use these options:
Enter System Out Of Box Experience (OOBE) (from the System Cleanup Action list)
Check the Generalize option
Shutdown (from the Shutdown Options list)
Click OK
Runnin WinPE
Our referenced computer is now prepared and turned off. Now we need to boot that computer using WInPE
CD which we created earlier. WinPE runs from the command line. It boots the system with a limited version
of Windows 7, which provides disk access and limited networking support. It has two different architectures: a
32-bit version and a 64-bit version. The version must match the intended installation version of Windows 7.
Once we enter WinPE we can go to the root folder so that we can run ImageX which we copied earlier.
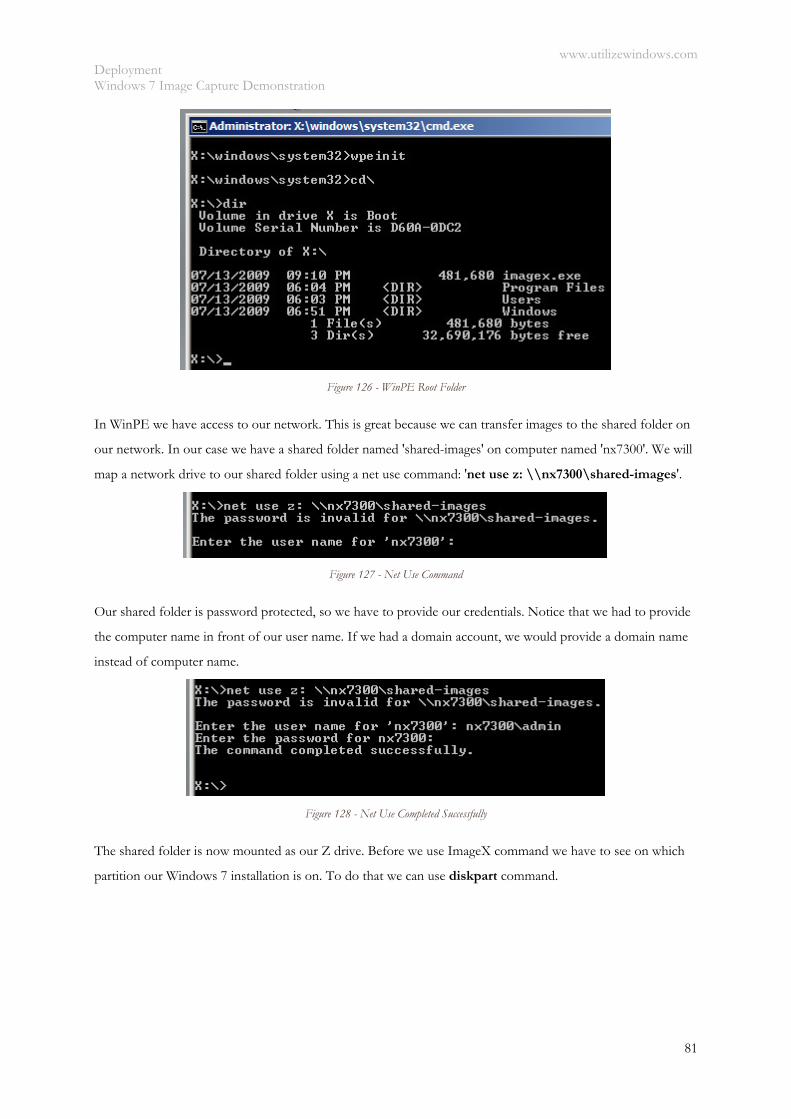
www.utilizewindows.com Deployment Windows 7 Image Capture Demonstration
81
Figure 126 - WinPE Root Folder
In WinPE we have access to our network. This is great because we can transfer images to the shared folder on
our network. In our case we have a shared folder named 'shared-images' on computer named 'nx7300'. We will
map a network drive to our shared folder using a net use command: 'net use z: \\nx7300\shared-images'.
Figure 127 - Net Use Command
Our shared folder is password protected, so we have to provide our credentials. Notice that we had to provide
the computer name in front of our user name. If we had a domain account, we would provide a domain name
instead of computer name.
Figure 128 - Net Use Completed Successfully
The shared folder is now mounted as our Z drive. Before we use ImageX command we have to see on which
partition our Windows 7 installation is on. To do that we can use diskpart command.
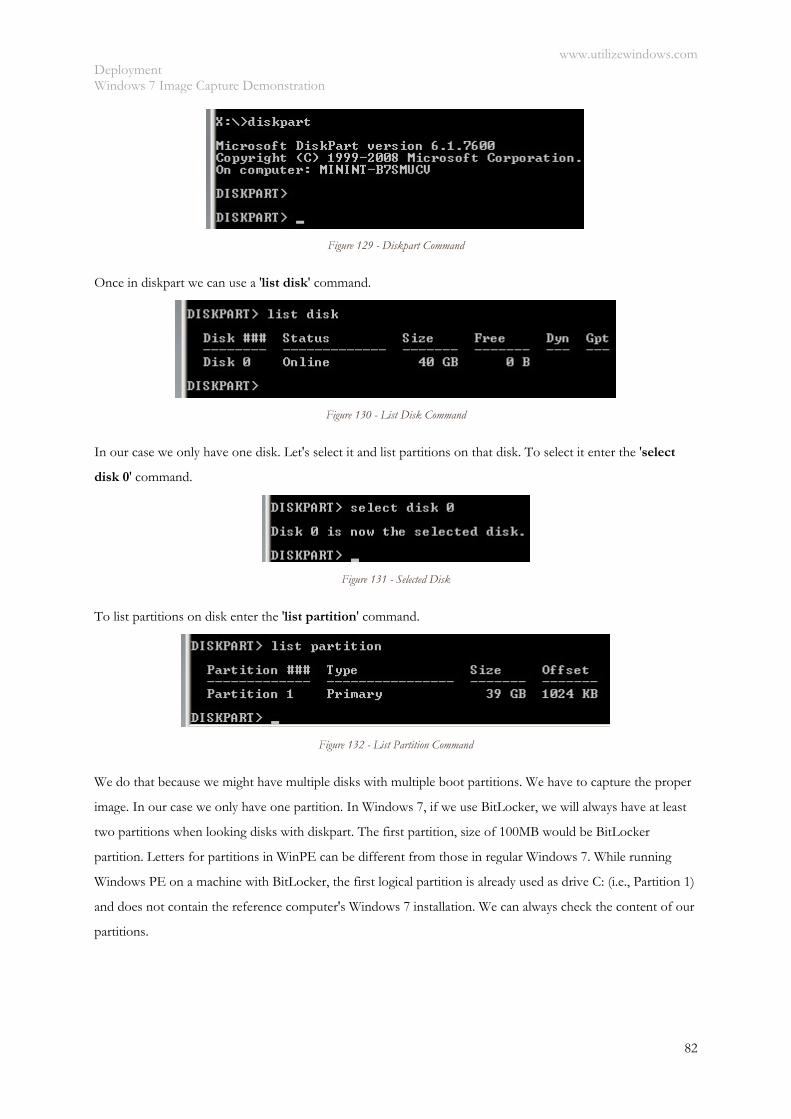
www.utilizewindows.com Deployment Windows 7 Image Capture Demonstration
82
Figure 129 - Diskpart Command
Once in diskpart we can use a 'list disk' command.
Figure 130 - List Disk Command
In our case we only have one disk. Let's select it and list partitions on that disk. To select it enter the 'select
disk 0' command.
Figure 131 - Selected Disk
To list partitions on disk enter the 'list partition' command.
Figure 132 - List Partition Command
We do that because we might have multiple disks with multiple boot partitions. We have to capture the proper
image. In our case we only have one partition. In Windows 7, if we use BitLocker, we will always have at least
two partitions when looking disks with diskpart. The first partition, size of 100MB would be BitLocker
partition. Letters for partitions in WinPE can be different from those in regular Windows 7. While running
Windows PE on a machine with BitLocker, the first logical partition is already used as drive C: (i.e., Partition 1)
and does not contain the reference computer's Windows 7 installation. We can always check the content of our
partitions.
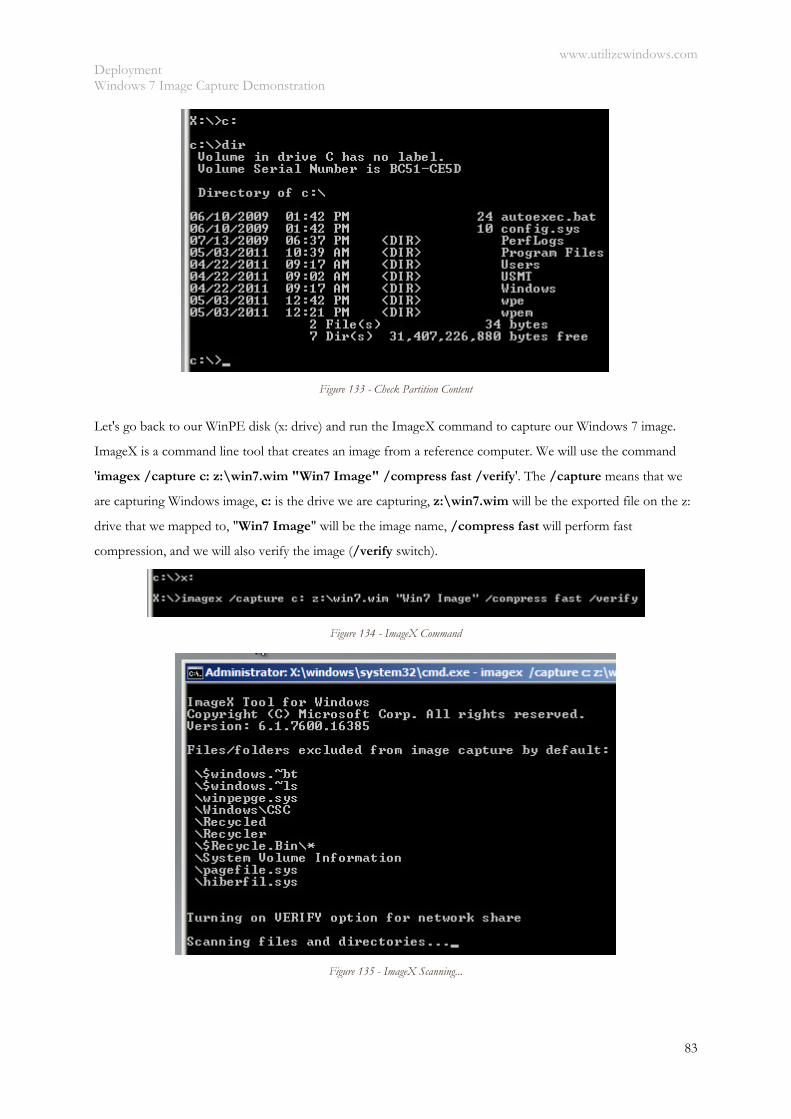
www.utilizewindows.com Deployment Windows 7 Image Capture Demonstration
83
Figure 133 - Check Partition Content
Let's go back to our WinPE disk (x: drive) and run the ImageX command to capture our Windows 7 image.
ImageX is a command line tool that creates an image from a reference computer. We will use the command
'imagex /capture c: z:\win7.wim "Win7 Image" /compress fast /verify'. The /capture means that we
are capturing Windows image, c: is the drive we are capturing, z:\win7.wim will be the exported file on the z:
drive that we mapped to, "Win7 Image" will be the image name, /compress fast will perform fast
compression, and we will also verify the image (/verify switch).
Figure 134 - ImageX Command
Figure 135 - ImageX Scanning...

www.utilizewindows.com Deployment Windows 7 Image Capture Demonstration
84
ImageX will first scan all files that are on our C: partition and then create an image out of all that files. Once
the process is complete we will have win7.wim file which we can deploy to other computers, or which we can
use to perform recovery if our computer brakes down. If we intend to transfer that image to different
computer, we must run Sysprep on the reference computer before we capture the image.
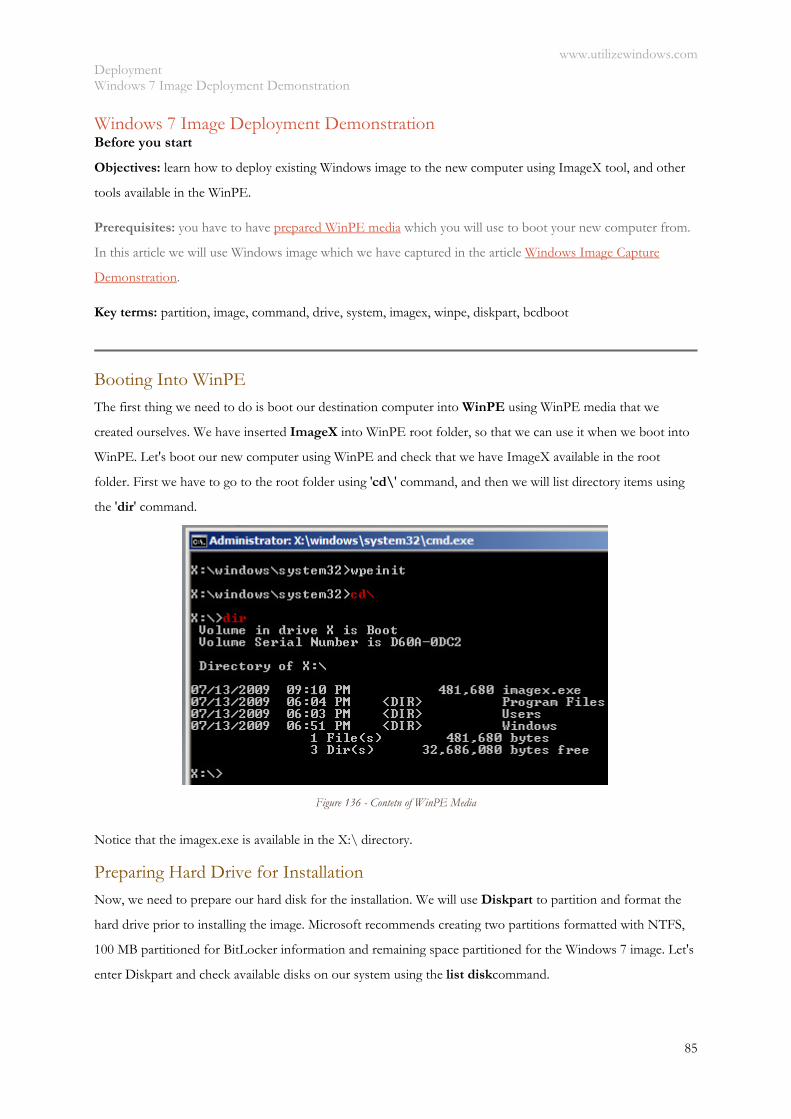
www.utilizewindows.com Deployment Windows 7 Image Deployment Demonstration
85
Windows 7 Image Deployment Demonstration Before you start
Objectives: learn how to deploy existing Windows image to the new computer using ImageX tool, and other
tools available in the WinPE.
Prerequisites: you have to have prepared WinPE media which you will use to boot your new computer from.
In this article we will use Windows image which we have captured in the article Windows Image Capture
Demonstration.
Key terms: partition, image, command, drive, system, imagex, winpe, diskpart, bcdboot
Booting Into WinPE The first thing we need to do is boot our destination computer into WinPE using WinPE media that we
created ourselves. We have inserted ImageX into WinPE root folder, so that we can use it when we boot into
WinPE. Let's boot our new computer using WinPE and check that we have ImageX available in the root
folder. First we have to go to the root folder using 'cd\' command, and then we will list directory items using
the 'dir' command.
Figure 136 - Contetn of WinPE Media
Notice that the imagex.exe is available in the X:\ directory.
Preparing Hard Drive for Installation Now, we need to prepare our hard disk for the installation. We will use Diskpart to partition and format the
hard drive prior to installing the image. Microsoft recommends creating two partitions formatted with NTFS,
100 MB partitioned for BitLocker information and remaining space partitioned for the Windows 7 image. Let's
enter Diskpart and check available disks on our system using the list diskcommand.
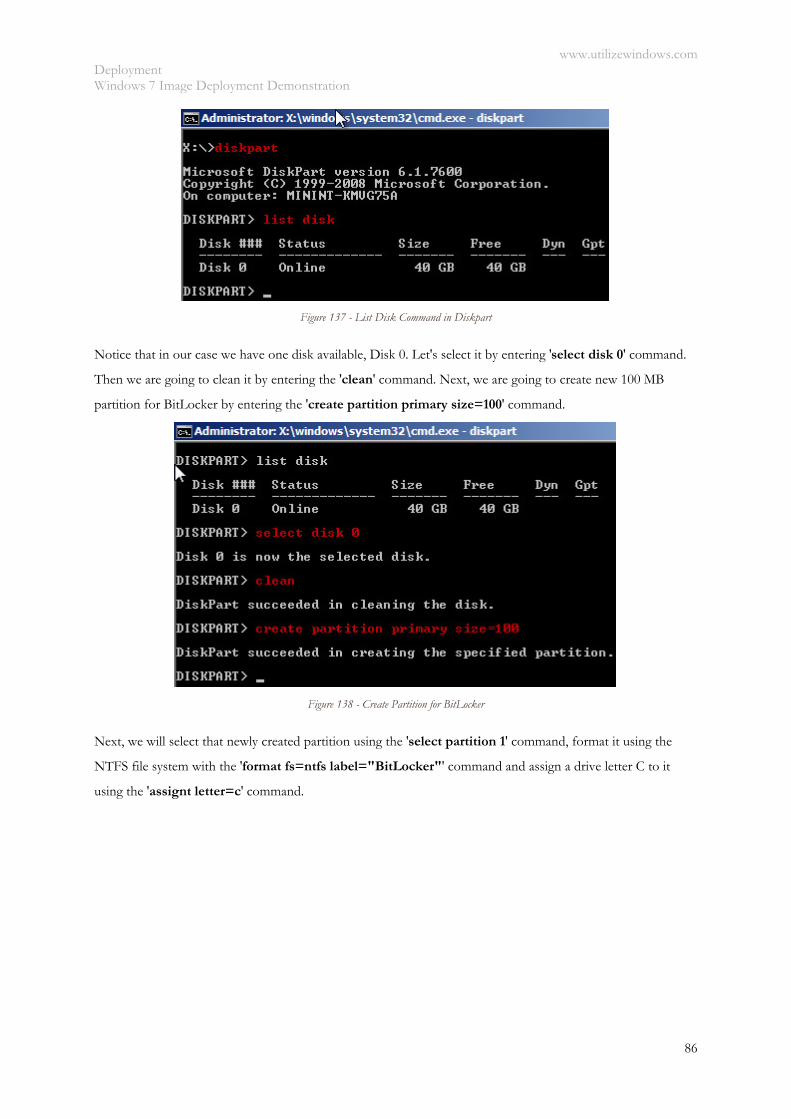
www.utilizewindows.com Deployment Windows 7 Image Deployment Demonstration
86
Figure 137 - List Disk Command in Diskpart
Notice that in our case we have one disk available, Disk 0. Let's select it by entering 'select disk 0' command.
Then we are going to clean it by entering the 'clean' command. Next, we are going to create new 100 MB
partition for BitLocker by entering the 'create partition primary size=100' command.
Figure 138 - Create Partition for BitLocker
Next, we will select that newly created partition using the 'select partition 1' command, format it using the
NTFS file system with the 'format fs=ntfs label="BitLocker"' command and assign a drive letter C to it
using the 'assignt letter=c' command.
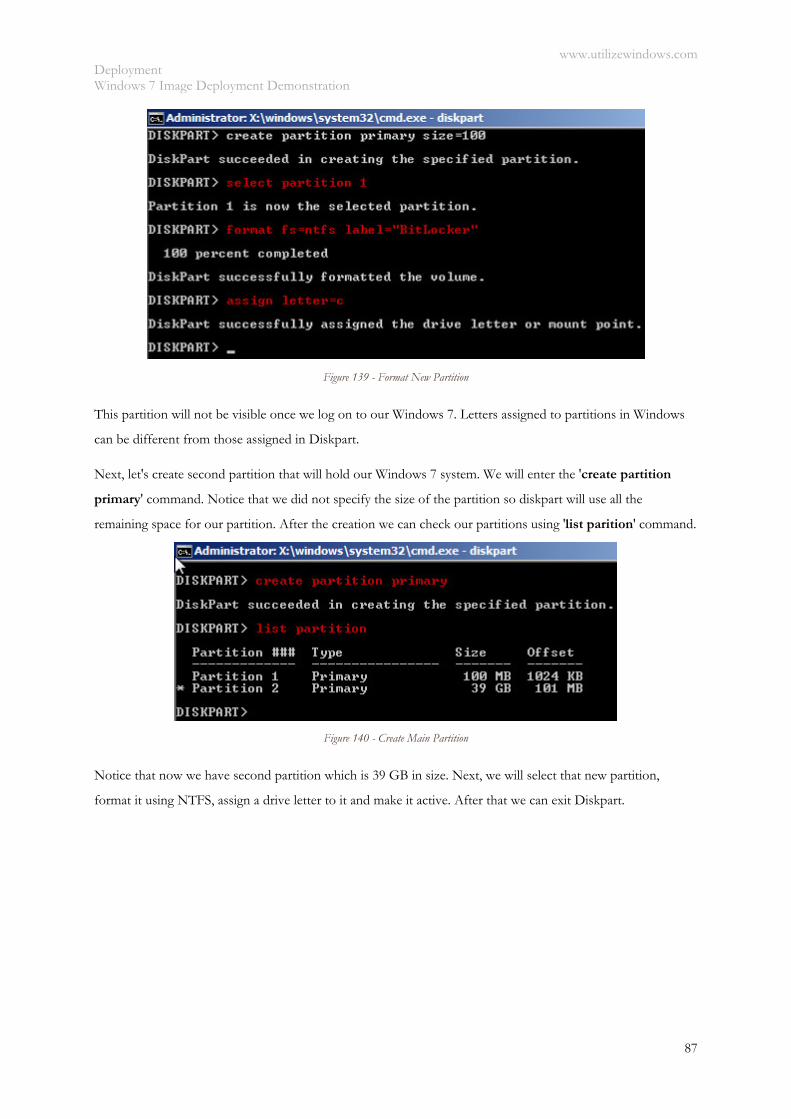
www.utilizewindows.com Deployment Windows 7 Image Deployment Demonstration
87
Figure 139 - Format New Partition
This partition will not be visible once we log on to our Windows 7. Letters assigned to partitions in Windows
can be different from those assigned in Diskpart.
Next, let's create second partition that will hold our Windows 7 system. We will enter the 'create partition
primary' command. Notice that we did not specify the size of the partition so diskpart will use all the
remaining space for our partition. After the creation we can check our partitions using 'list parition' command.
Figure 140 - Create Main Partition
Notice that now we have second partition which is 39 GB in size. Next, we will select that new partition,
format it using NTFS, assign a drive letter to it and make it active. After that we can exit Diskpart.

www.utilizewindows.com Deployment Windows 7 Image Deployment Demonstration
88
Figure 141 - Set Up New Partition
Connecting to a Network Share In our case we have put our prepared Windows 7 image on a network share so we have to connect to it before
we can use prepared image. We have our share available on 'nx7300' computer. The share name is 'shared-
images'. To connect to that share using 'net use' command we have to provide valid credentials. We will map
that share to the Z: drive. The command is 'net use z: \\nx7300\shared-images'. When providing user
name we also have to provide computer name. So the user name in our case is 'nx300\admin', because we will
use credentials from the nx7300 computer in our case.
Figure 142 - Net Use Command
Network share is now available as Z drive. Let's see its content.
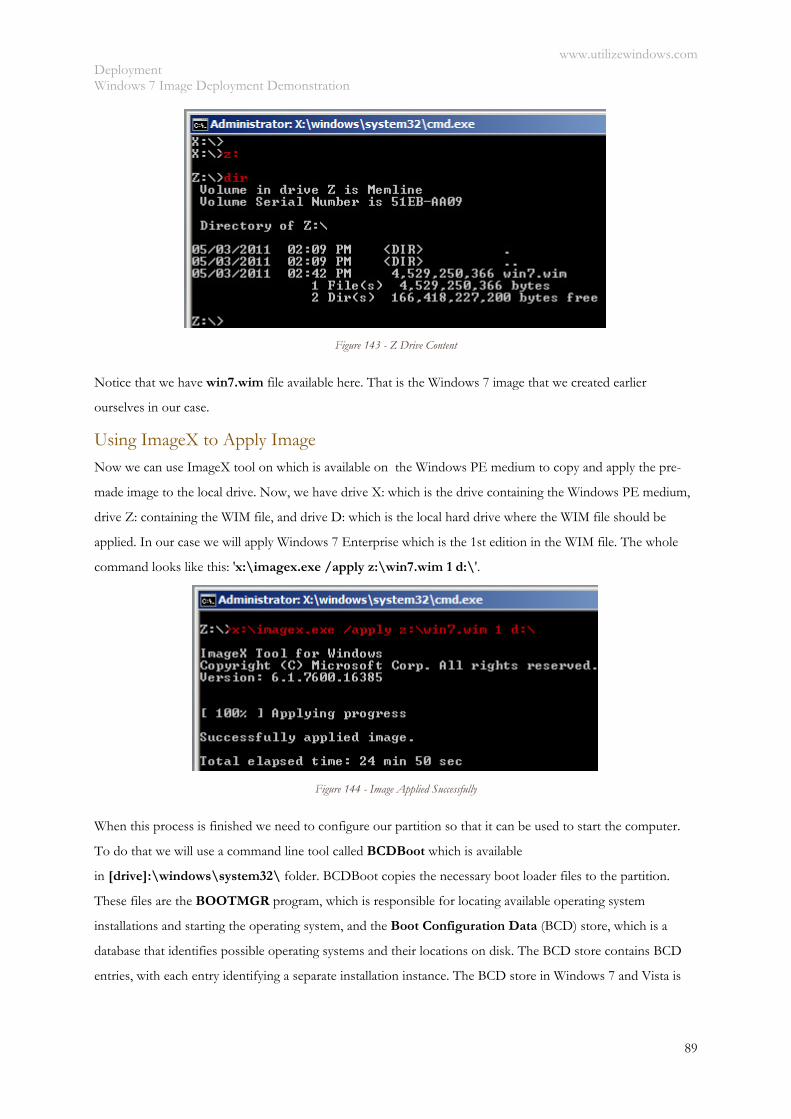
www.utilizewindows.com Deployment Windows 7 Image Deployment Demonstration
89
Figure 143 - Z Drive Content
Notice that we have win7.wim file available here. That is the Windows 7 image that we created earlier
ourselves in our case.
Using ImageX to Apply Image Now we can use ImageX tool on which is available on the Windows PE medium to copy and apply the pre-
made image to the local drive. Now, we have drive X: which is the drive containing the Windows PE medium,
drive Z: containing the WIM file, and drive D: which is the local hard drive where the WIM file should be
applied. In our case we will apply Windows 7 Enterprise which is the 1st edition in the WIM file. The whole
command looks like this: 'x:\imagex.exe /apply z:\win7.wim 1 d:\'.
Figure 144 - Image Applied Successfully
When this process is finished we need to configure our partition so that it can be used to start the computer.
To do that we will use a command line tool called BCDBoot which is available
in [drive]:\windows\system32\ folder. BCDBoot copies the necessary boot loader files to the partition.
These files are the BOOTMGR program, which is responsible for locating available operating system
installations and starting the operating system, and the Boot Configuration Data (BCD) store, which is a
database that identifies possible operating systems and their locations on disk. The BCD store contains BCD
entries, with each entry identifying a separate installation instance. The BCD store in Windows 7 and Vista is

www.utilizewindows.com Deployment Windows 7 Image Deployment Demonstration
90
similar to the Boot.ini file in previous Windows versions. In our case the command will be
'd:\windows\system32\bcdboot d:\windows'.
Figure 145 - BCDBoot Command
www.utilizewindows.com Deployment Managing Existing Windows 7 Images
91
Managing Existing Windows 7 Images Before you start
Objectives: learn which options you can use when servicing existing images using DISM.
Prerequisites: no prerequisites.
Key terms: image, dism, information, driver, wim, imagex, command, offline, options, detailed, edition,
commit, manage, mounts
Facts Image servicing begins by mounting a previously captured image, which makes the contents of the image
accessible to be viewed or modified. Mounting an image does not start the operating system in the file.
Mounting an image as read-only lets us view the image, but not make changes. To save changes made to a
mounted image back to the original image, we must commit the changes before dismounting the image. An
online image is the operating system currently running on a computer; whereas, an offline image is a WIM file.
DISM Tool Imagine how much time would it take us to deploy the the existing image to the computer, make necessary
changes and recapture the new image... To overcome this problem we need a method to update and service our
images offline and without booting them up. Windows 7 introduces a Deployment Image Servicing and
Management (DISM) tool. DISM is a command line tool which is used to manage existing Windows images.
DISM is part of the Windows Automated Installation Kit (Windows AIK). We can use DISM to install
updates, drivers and language packs, to enable or disable Windows features, to perform intra-edition upgrades,
and to customize international settings. With DSIM we can service different platform types, such as 32bit and
64bit. That means that we can service a 64bit image on a 32bit computer. In addition to servicing offline
images, the DISM tool can work with the installation image that is currently online (running Windows). When
we work with an online image, we generally gather information rather than make changes to the image. Any
option used on the online image can be used with the offline image as well. However, not all 'get' options are
available on the online image (for example, get-apps). If we run get-apps on the offline image, we will get info
on all MSI applications on the image. With this tool we can only service existing system images. We cannot
capture a new image. DISM is backwards compatible with older tools in the Windows Vista Automated Installation Toolkit.
Additionally, DISM works with limited functionality on a Windows Vista SP1 image.
Mounting Images Before we can service existing image with DISM, we have to mount or apply the image. The DISM /mount-
wim option mounts the wim file to the directory specified by the mount directory option. If there is more than
one image in the wim file we can use the index option to specify which one we want to mount. We can also
mount an image as read-only by using the /readonly parameter.
www.utilizewindows.com Deployment Managing Existing Windows 7 Images
92
In addition to using DISM, we can use ImageX to mount and unmount images as well. We can use the /mount
option with ImageX to mount image in read-only format to a specified folder. If our wim file has more than
one image we can use the index number of the image to mount that specific image. If we also want to be able
to write to that image we can mount our image using the /mountrw option. Once we have mounted our image
using ImageX and we're done working with it, we can use the /unmount option which will unmount the image
from the specified folder. We can also use the /info option to display information of our wim file with the use
of ImageX. With the use of ImageX and DISM we can take our existing images and update, manipulate and
continue to maintain them without the need of re-creating new images from scratch.
We have a separate article which describes mounting images using ImageX or DISM tool in detail: Mount and
Unmount Windows 7 Image Using ImageX and DISM.
Drivers
We can gather information on existing drivers on the image. We can also add new drivers or remove existing
ones. DISM can only manage drivers in a form of INF files. DISM does not support drivers in the form of
MSI packages or EXE files. It is recommended to place our drivers in a convenient location and properly name
the folders to easier identify them.
DISM has the capability to add a single driver using the /add-driver parameter, and by specifying exact file
name. We can also add multiple drivers by specifying the folder in which they are located. We can also add all
drivers in subfolders of the parent folder if we use the /recurse parameter. If we want to add drivers that are
unsigned, we can use the /forceunsigned option.
DISM can only remove third-party drivers. We can not remove default built-in drivers in a Windows 7 image.
All third party drivers are renamed in a form of OEM[number].inf, for example OEM11.inf. We can use
the /get-drivers option to find the driver we are looking for and then remove it using the /remove-
driver option.
Apps With DISM we can gather information about Windows Installer or MSI applications, and application patches
(MSP files). We can only gather this information from an offline image. Online image does not support
application servicing. We can use the /get-apppatchesoption to list of the application patches in MSI
installations that are available in our image. We can also use the GUID of the application to display
information relevant to only that specific application. The /check-apppatch parameter will show us specific
information about the MSP patches installed in the offline image. We would use the /patchlocation to specify
the path of the MSP patch to gather information about specific MSP file. To gather information about all MSP
patches installed on our image we can use the /get-apppatchinfo parameter. Using the /get-appinfo and
the /productcode parameter we can gather detailed information about a specific MSI application installed on
the image. If the /productcode option is not used, the /get-appinfo returns detailed information about all MSI
www.utilizewindows.com Deployment Managing Existing Windows 7 Images
93
applications. The /get-appsparameter displays all MSI applications installed on the image as well as the GUID
for each of them. Then we can take advantage of the GUID option to check specific information when using
other parameters.
Have in mind that /get-apppatches and /get-apppatchinfo options only work for MSP patches. The /get-
appinfo and the /get-appsoptions only work for MSI installations. DISM cannot be used to obtain
information from EXE, DLL or batch files. Additionally, DISM tool cannot be used to apply and install
patches or MSI applications to an offline image. The Microsoft Deployment Toolkit (MDT 2010) can be used
instead to install applications to an offline image.
Patches
In addition to adding drivers and gathering information about installed applications, DISM can be used to
apply operating system packages and patches. One of the greatest challenges when working with images is to
keep our images updated with the latest security and operating system patches. The most straight forward way
to accomplish this is to boot the image, visit Microsoft updates, install necessary patches and recapture the
image. This method is time-consuming and requires that we 'sysprep' the system again. The easiest way to
update our images is to use DISM. The DISM package servicing options can be used with the mounted offline
image to add, remove or update windows packages provided in the cabinet (CAB) files. We can also use the
package servicing options to install, update or remove Windows update stand-alone installers or MSU files.
Features DISM can also be used to enable or disable Windows features on both offline mounted images and online
Windows installations. Have in mind that DISM commands are not case-sensitive, however, feature or patch
names are case-sensitive.
For example, the /get-packages command will display basic information about all packages on the mounted
image. We can also use the/add-package parameter to install packages on to the system. The package must be
in a form of MSU file. We can use the /remove-package option to remove existing package from the image.
The /get-featureinfo and /enable-feature option can be used to gather information about installed features
on the image, and then enable feature on that image as well. We can use /disable-feature to remove feature
from the image.
International Settings We can use the /get-intl which returns information about the international settings and languages on an online
image. This is the only option which can be used on the online image. We can also use other parameters such
as /set-timezone to change the time zone on offline image.
Editions Using DISM we can list editions that are stored on an image. We can also change the current edition to a
higher edition. When we perform an intra-edition upgrade to an offline image, we do not require product key.
www.utilizewindows.com Deployment Managing Existing Windows 7 Images
94
We can use options such as /get-currentedition,/set-edition or /set-productkey to perform intra-edition
upgrade.
WindowsPE
In addition to the servicing options mentioned, we can also use DISM to service WindowsPE image. DISM
enables us to prepare WindowsPE image, list packages or even enable logging. We also have the ability to
associate the Unattended.XML answer file to the mounted image.
Committing Changes
After making changes to the mounted image, we must commit the changes so that they are saved to the mount
directory before dismounting the image. We can use the /commit-wim parameter to commit the changes to
the folder.
Other DISM Options
The /remount-wim option will remount the image if the mount directory is lost or orphaned. The /cleanup-
wim option cleans up any previously used mounts. If we mount and dismount a lot of images on a daily basis
we might want to run the cleanup option since we may receive errors from leftover resources from the
previous mounts.
The /get-wiminfo option displays information about the images within a win file. If we use the index option,
it will return information about the specific image specified by the index number.
Completion After completing our work with the mounted image, we have to commit the changes and use the /unmount-
wim parameter to dismount and close the image file. To commit changes we can use the /commit-
wim parameter, or use the /unmount-wim together with /commitparameter. This way the changes are
saved.
Advanced DISM Options - Quick Reference
DISM command options that are frequently used are:
/wimfile - specifies the location of the WIM file
/mountdir - specifies the local directory in which to mount the WIM file
/index - specifies the edition if there is more than one edition within a WIM file
/readonly - mounts the WIM file as read only
/commit-wim - saves the changes to the WIM file
/remount-wim - remounts the WIM file if the mount directory is lost or orphaned
/cleanup-wim - cleans up any previously used resources from the previous mounts
/get-wiminfo - displays information about the editions within a WIM file
www.utilizewindows.com Deployment Managing Existing Windows 7 Images
95
/get-mountedwiminfo - lists all the currently-mounted images and information about each image,
such as the mounted path, index, location and read/write permissions
/unmount-wim - dismounts the WIM file
/unmount-wim /discard - reverts all changes made since the last changes were committed and
dismounts the WIM file
/apply-unattend - applies an unattended answer file to an image
We can use the following DISM command options to manage the system image drivers:
/add-driver - adds the driver to the specified image
/add-driver /driver - adds all of the drivers in the directory
/add-driver /driver /recurse - adds all of the drivers in the directory and its subdirectories
/get-drivers - displays basic information about all out-of-box drivers
/get-drivers /all - displays basic information about all drivers, in addition to the all out-of-box
drivers
/get-driverinfo - displays detailed information about a specific driver package
/remove-driver - removes third-party drivers
/forceunsigned - overrides the digital signature requirements for drivers on 64-bit versions of
Windows 7
The driver path must use the driver's published name. Use /get-drivers /all to view the published name. We
cannot remove default drivers. Place your drivers in a convenient location before using DISM to update the
system image drivers. DISM does not support drivers in the form of .msi packages or .exe files. If adding
multiple drivers in the same command, the drivers are installed in the order that they are listed in the
command.
We can use the following DISM command options to manage Windows applications (.msi) and application
patches (.msp files):
/get-apppatches - displays a list of MSP files that are available on the image
/check-apppatch /patchlocation - displays information only if the MSP patches are applicable to
the offline image
/get-apppatchinfo - displays detailed information about all installed MSP patches
/get-appinfo - displays detailed information for all the installed MSI applications
/get-appinfo/productcode - displays detailed information about the specific MSI application
installed on the image
/get-apps - displays all MSI applications installed on the offline image as well as the GUID
www.utilizewindows.com Deployment Managing Existing Windows 7 Images
96
DISM does not retrieve information from .exe or .dll files. The DISM command does not have an /add-apps
option to install applications; use Microsoft Deployment toolkit to install applications to a previously-captured
offline image.
We can use the following dism command options to manage Windows packages provided in a cabinet (.cab) or
Windows Update Stand-alone Installer (.msu) file format:
/get-packages - displays basic information about all the packages that have been installed on the
image
/get-packageinfo /packagename - displays detailed information about a specific .cab package
/get-packageinfo /packagepath - displays detailed information about a specific package
/add-package /packagepath - installs a specific .cab or .msu package to the image, including:
a single .cab or .msu file, a folder containing a single expanded .cab file, a folder containing a single
.msu file and a folder containing multiple .cab or .msu files
/remove-package - removes a .cab installed package
/get-features - displays information about all the features in a package
/get-featureinfo - displays detailed information about the feature
/enable-feature - enables a specific feature on the image
/disable-feature - disables a specific feature on the image
DISM commands are not case-sensitive; however, feature names are case-sensitive. We cannot remove .msu
installations.
We can use the following DISM command options to manage international settings for an offline or online
image:
/get-intl - returns information about the international settings and languages on an online image
/set-uilang - installs a new language on the image
/set-inputlocale - adds a new keyboard layout to the image
/set-timezone - changes the time zone of the mounted offline image
The Windows 7 installation media has a pre-staged package for each Windows 7 edition. This is referred to as
an edition-family image. We can use the following DISM command options to manage and configure the
Windows editions on an offline or online image:
/get-currentedition - identifies the edition of the offline or online image
/set-edition - upgrades the Windows image to a higher edition
/set-productkey - enters the product key for the current edition in an offline Windows image after
you change an offline Windows image to a higher edition.

www.utilizewindows.com Deployment Managing Existing Windows 7 Images
97
The following options revert all pending actions from the previous servicing operations because the actions
might be the cause of a boot failure:
/cleanup-image
/revertpendingactions
ImageX Quick Reference
ImageX is primarily used to capture a Windows 7 installation onto a network share, but it can also mount an
image so that it can be modified. After the image is modified, we can use ImageX to capture the image, append
the image to a WIM file, or export the image as a separate file. If we do not need to capture, append, or export
the image after we modify it, we should use DISM to mount the image instead of using ImageX.
Common ImageX command options are:
/mount - mounts a Read-Only version of the image file to the specified directory
/mountrw - mounts a Read-Write version of the image file
/unmount - dismounts the image file
/commit - saves the changes to the image while dismounting
/info - displays detailed information about the image file
/export - deletes unnecessary resources from the image file, reducing its size
/append - appends files to the image. Appended image files must use the same compression type as
the initial capture
Examples
We have an article on how to service existing images and on how to apply updates to existing image, so be sure
to check them out if you want to see a demo on how to work with images using DISM.
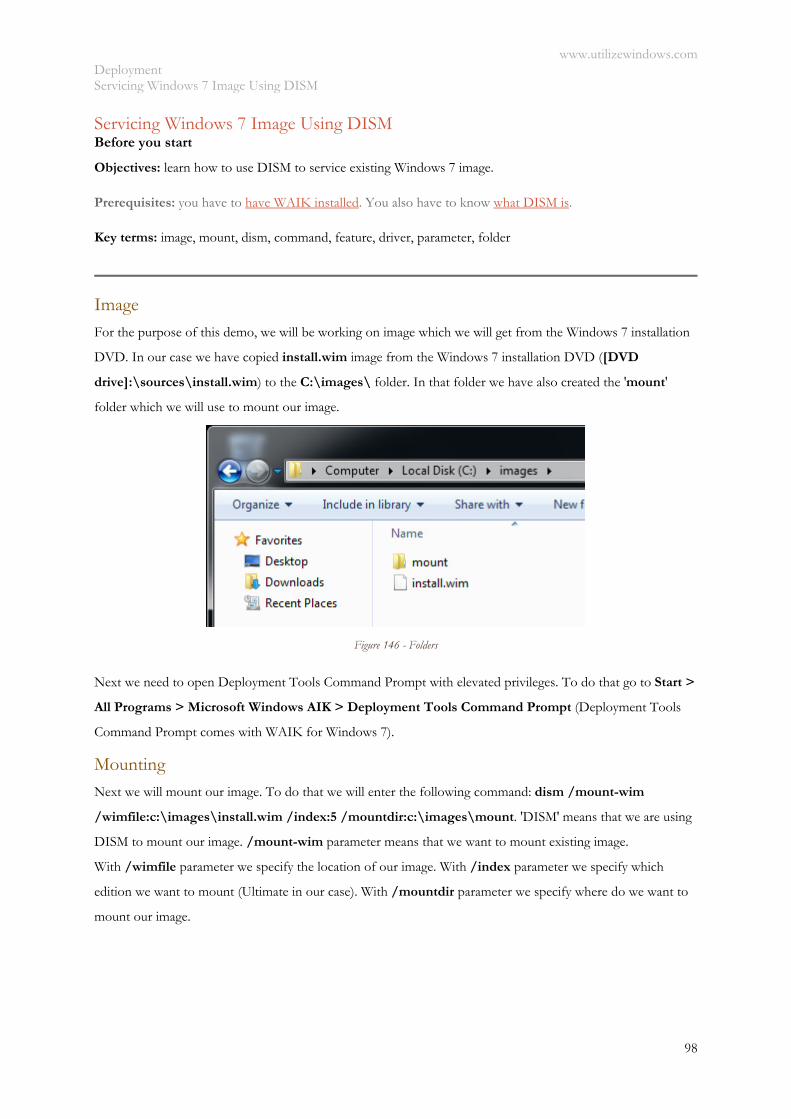
www.utilizewindows.com Deployment Servicing Windows 7 Image Using DISM
98
Servicing Windows 7 Image Using DISM Before you start
Objectives: learn how to use DISM to service existing Windows 7 image.
Prerequisites: you have to have WAIK installed. You also have to know what DISM is.
Key terms: image, mount, dism, command, feature, driver, parameter, folder
Image
For the purpose of this demo, we will be working on image which we will get from the Windows 7 installation
DVD. In our case we have copied install.wim image from the Windows 7 installation DVD ([DVD
drive]:\sources\install.wim) to the C:\images\ folder. In that folder we have also created the 'mount'
folder which we will use to mount our image.
Figure 146 - Folders
Next we need to open Deployment Tools Command Prompt with elevated privileges. To do that go to Start >
All Programs > Microsoft Windows AIK > Deployment Tools Command Prompt (Deployment Tools
Command Prompt comes with WAIK for Windows 7).
Mounting Next we will mount our image. To do that we will enter the following command: dism /mount-wim
/wimfile:c:\images\install.wim /index:5 /mountdir:c:\images\mount. 'DISM' means that we are using
DISM to mount our image. /mount-wim parameter means that we want to mount existing image.
With /wimfile parameter we specify the location of our image. With /index parameter we specify which
edition we want to mount (Ultimate in our case). With /mountdir parameter we specify where do we want to
mount our image.
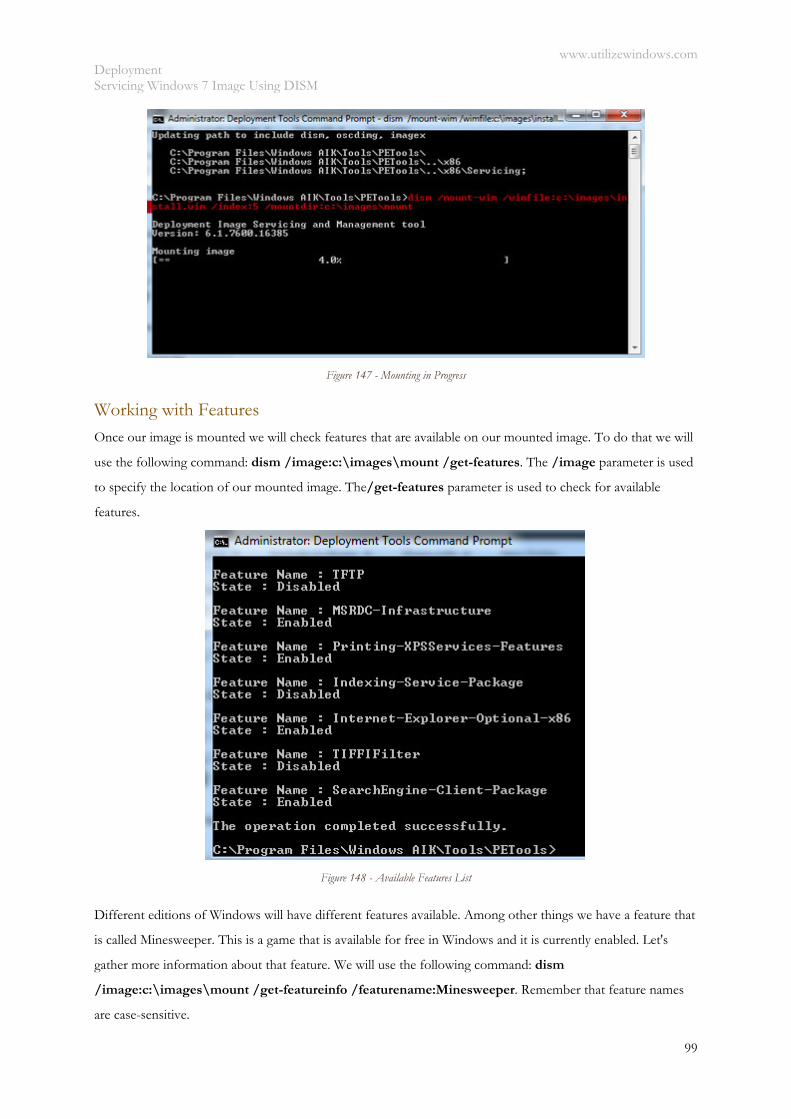
www.utilizewindows.com Deployment Servicing Windows 7 Image Using DISM
99
Figure 147 - Mounting in Progress
Working with Features Once our image is mounted we will check features that are available on our mounted image. To do that we will
use the following command: dism /image:c:\images\mount /get-features. The /image parameter is used
to specify the location of our mounted image. The/get-features parameter is used to check for available
features.
Figure 148 - Available Features List
Different editions of Windows will have different features available. Among other things we have a feature that
is called Minesweeper. This is a game that is available for free in Windows and it is currently enabled. Let's
gather more information about that feature. We will use the following command: dism
/image:c:\images\mount /get-featureinfo /featurename:Minesweeper. Remember that feature names
are case-sensitive.
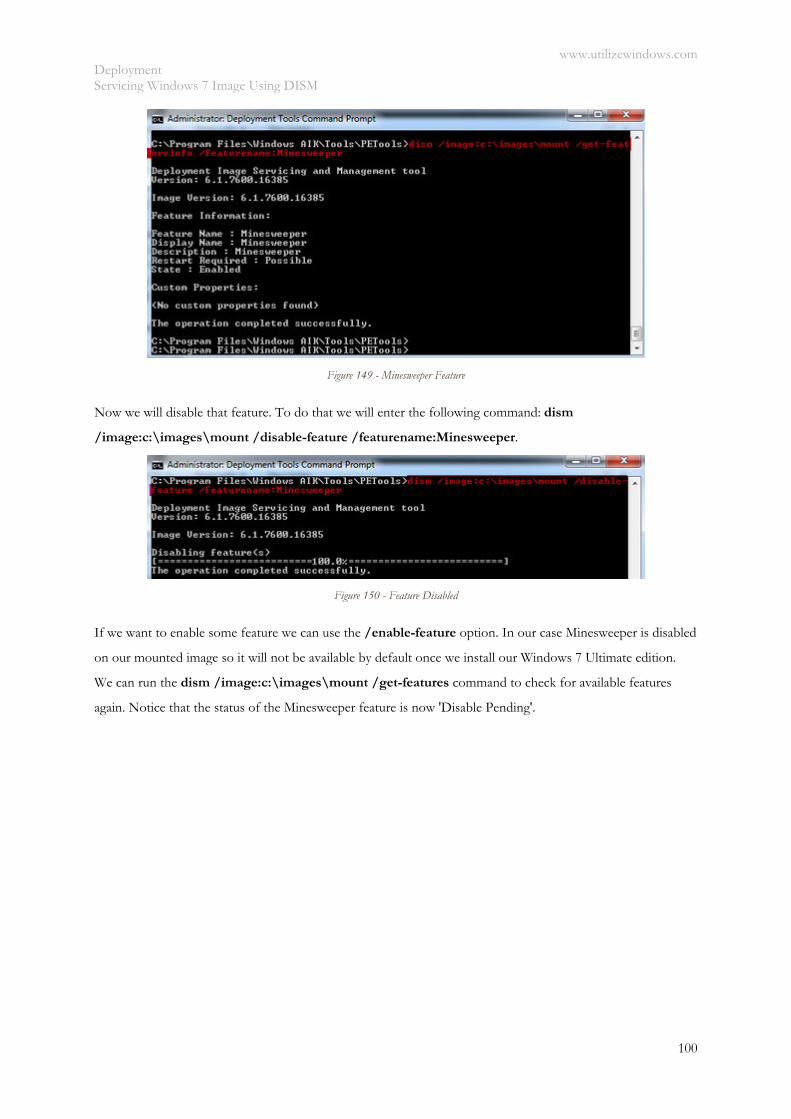
www.utilizewindows.com Deployment Servicing Windows 7 Image Using DISM
100
Figure 149 - Minesweeper Feature
Now we will disable that feature. To do that we will enter the following command: dism
/image:c:\images\mount /disable-feature /featurename:Minesweeper.
Figure 150 - Feature Disabled
If we want to enable some feature we can use the /enable-feature option. In our case Minesweeper is disabled
on our mounted image so it will not be available by default once we install our Windows 7 Ultimate edition.
We can run the dism /image:c:\images\mount /get-features command to check for available features
again. Notice that the status of the Minesweeper feature is now 'Disable Pending'.
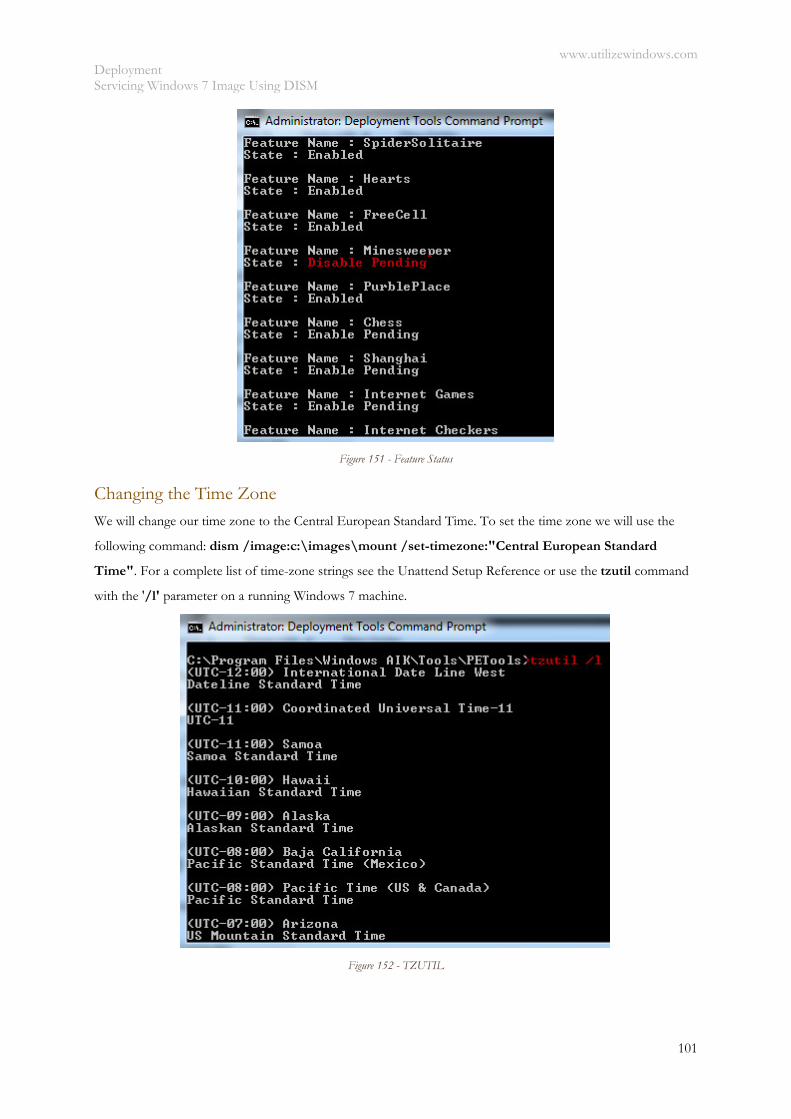
www.utilizewindows.com Deployment Servicing Windows 7 Image Using DISM
101
Figure 151 - Feature Status
Changing the Time Zone We will change our time zone to the Central European Standard Time. To set the time zone we will use the
following command: dism /image:c:\images\mount /set-timezone:"Central European Standard
Time". For a complete list of time-zone strings see the Unattend Setup Reference or use the tzutil command
with the '/l' parameter on a running Windows 7 machine.
Figure 152 - TZUTIL
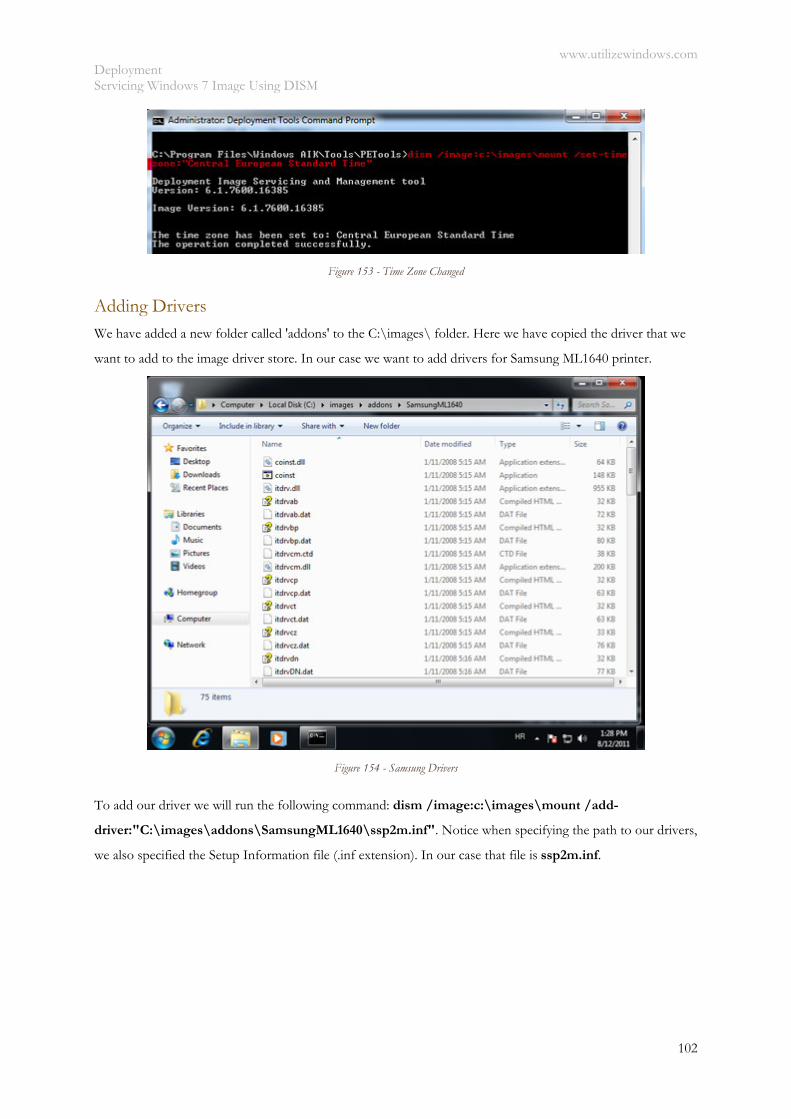
www.utilizewindows.com Deployment Servicing Windows 7 Image Using DISM
102
Figure 153 - Time Zone Changed
Adding Drivers We have added a new folder called 'addons' to the C:\images\ folder. Here we have copied the driver that we
want to add to the image driver store. In our case we want to add drivers for Samsung ML1640 printer.
Figure 154 - Samsung Drivers
To add our driver we will run the following command: dism /image:c:\images\mount /add-
driver:"C:\images\addons\SamsungML1640\ssp2m.inf". Notice when specifying the path to our drivers,
we also specified the Setup Information file (.inf extension). In our case that file is ssp2m.inf.
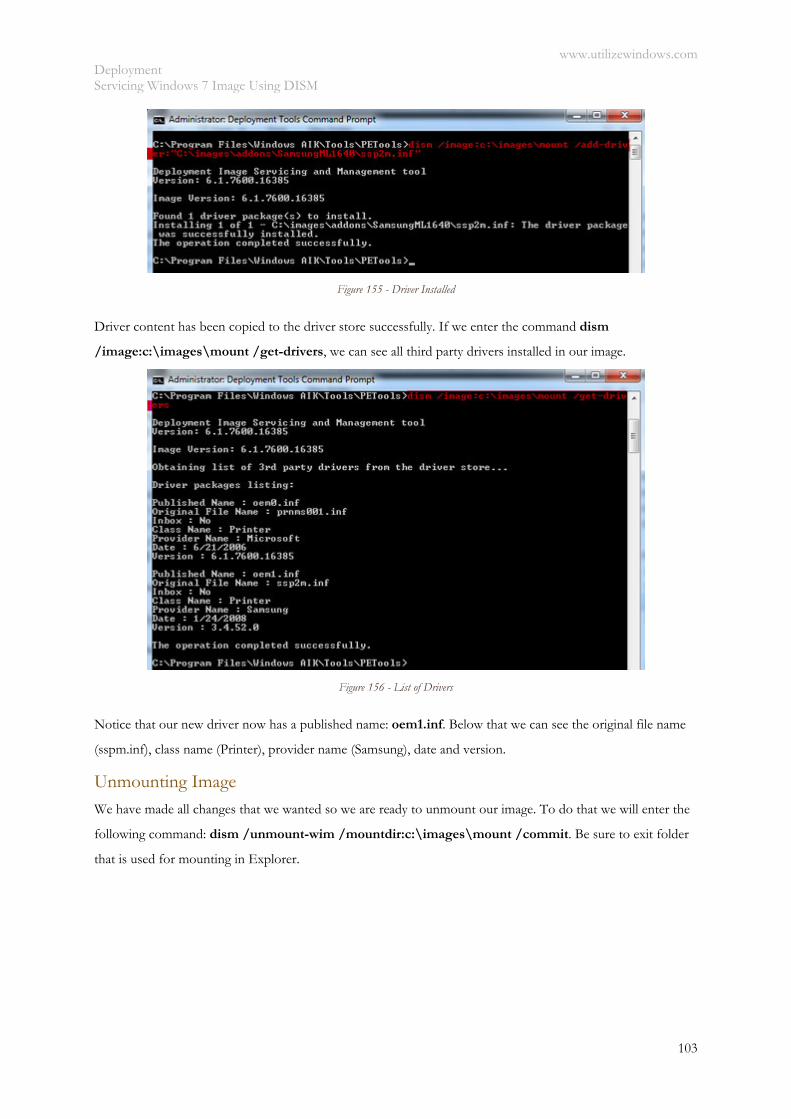
www.utilizewindows.com Deployment Servicing Windows 7 Image Using DISM
103
Figure 155 - Driver Installed
Driver content has been copied to the driver store successfully. If we enter the command dism
/image:c:\images\mount /get-drivers, we can see all third party drivers installed in our image.
Figure 156 - List of Drivers
Notice that our new driver now has a published name: oem1.inf. Below that we can see the original file name
(sspm.inf), class name (Printer), provider name (Samsung), date and version.
Unmounting Image
We have made all changes that we wanted so we are ready to unmount our image. To do that we will enter the
following command: dism /unmount-wim /mountdir:c:\images\mount /commit. Be sure to exit folder
that is used for mounting in Explorer.
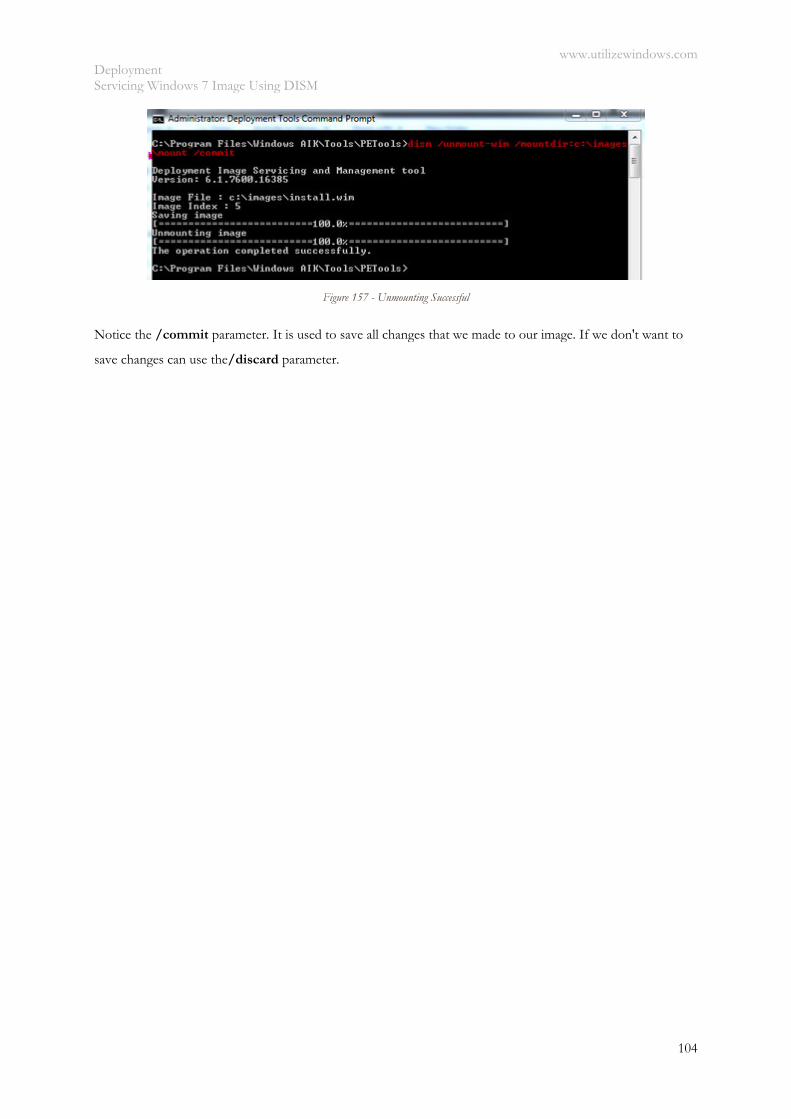
www.utilizewindows.com Deployment Servicing Windows 7 Image Using DISM
104
Figure 157 - Unmounting Successful
Notice the /commit parameter. It is used to save all changes that we made to our image. If we don't want to
save changes can use the/discard parameter.
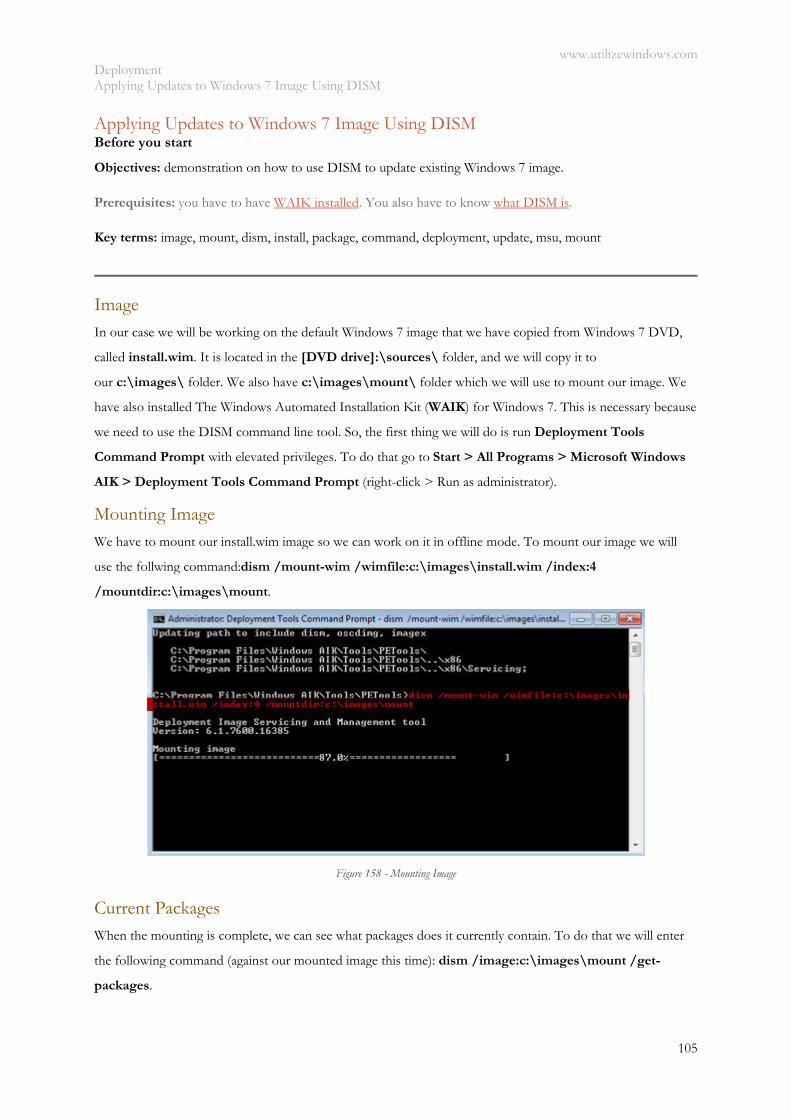
www.utilizewindows.com Deployment Applying Updates to Windows 7 Image Using DISM
105
Applying Updates to Windows 7 Image Using DISM Before you start
Objectives: demonstration on how to use DISM to update existing Windows 7 image.
Prerequisites: you have to have WAIK installed. You also have to know what DISM is.
Key terms: image, mount, dism, install, package, command, deployment, update, msu, mount
Image
In our case we will be working on the default Windows 7 image that we have copied from Windows 7 DVD,
called install.wim. It is located in the [DVD drive]:\sources\ folder, and we will copy it to
our c:\images\ folder. We also have c:\images\mount\ folder which we will use to mount our image. We
have also installed The Windows Automated Installation Kit (WAIK) for Windows 7. This is necessary because
we need to use the DISM command line tool. So, the first thing we will do is run Deployment Tools
Command Prompt with elevated privileges. To do that go to Start > All Programs > Microsoft Windows
AIK > Deployment Tools Command Prompt (right-click > Run as administrator).
Mounting Image
We have to mount our install.wim image so we can work on it in offline mode. To mount our image we will
use the follwing command:dism /mount-wim /wimfile:c:\images\install.wim /index:4
/mountdir:c:\images\mount.
Figure 158 - Mounting Image
Current Packages When the mounting is complete, we can see what packages does it currently contain. To do that we will enter
the following command (against our mounted image this time): dism /image:c:\images\mount /get-
packages.
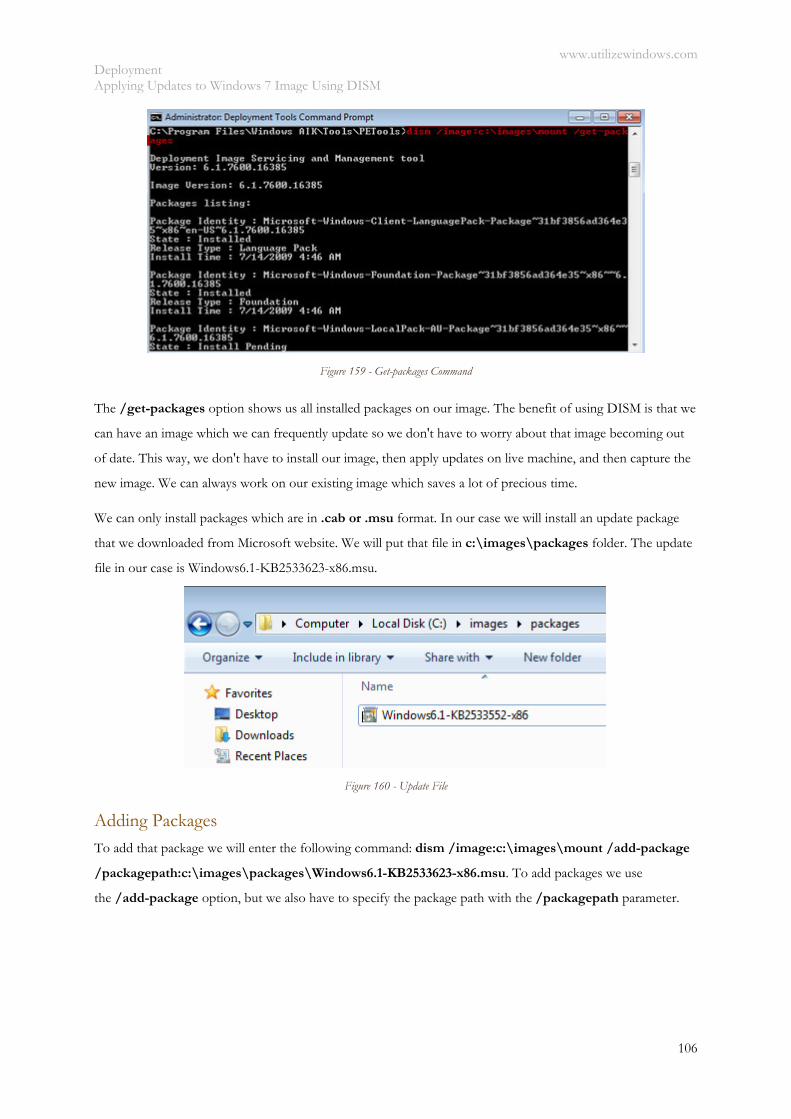
www.utilizewindows.com Deployment Applying Updates to Windows 7 Image Using DISM
106
Figure 159 - Get-packages Command
The /get-packages option shows us all installed packages on our image. The benefit of using DISM is that we
can have an image which we can frequently update so we don't have to worry about that image becoming out
of date. This way, we don't have to install our image, then apply updates on live machine, and then capture the
new image. We can always work on our existing image which saves a lot of precious time.
We can only install packages which are in .cab or .msu format. In our case we will install an update package
that we downloaded from Microsoft website. We will put that file in c:\images\packages folder. The update
file in our case is Windows6.1-KB2533623-x86.msu.
Figure 160 - Update File
Adding Packages To add that package we will enter the following command: dism /image:c:\images\mount /add-package
/packagepath:c:\images\packages\Windows6.1-KB2533623-x86.msu. To add packages we use
the /add-package option, but we also have to specify the package path with the /packagepath parameter.
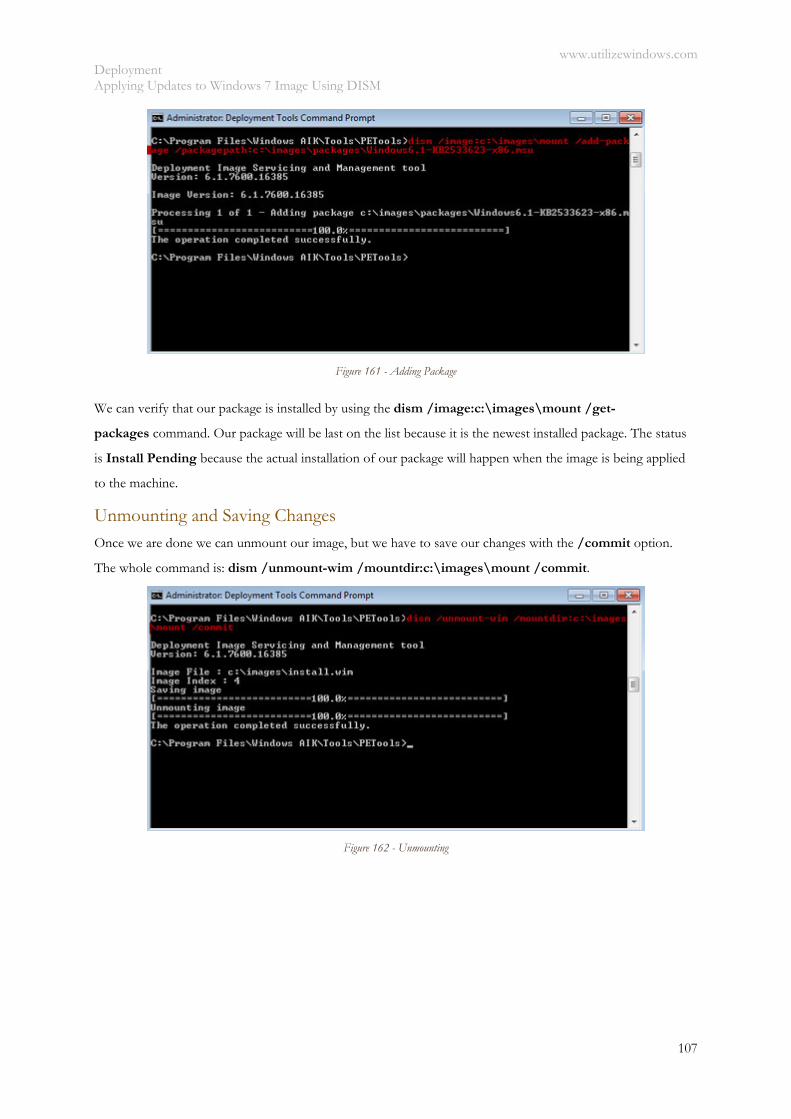
www.utilizewindows.com Deployment Applying Updates to Windows 7 Image Using DISM
107
Figure 161 - Adding Package
We can verify that our package is installed by using the dism /image:c:\images\mount /get-
packages command. Our package will be last on the list because it is the newest installed package. The status
is Install Pending because the actual installation of our package will happen when the image is being applied
to the machine.
Unmounting and Saving Changes Once we are done we can unmount our image, but we have to save our changes with the /commit option.
The whole command is: dism /unmount-wim /mountdir:c:\images\mount /commit.
Figure 162 - Unmounting
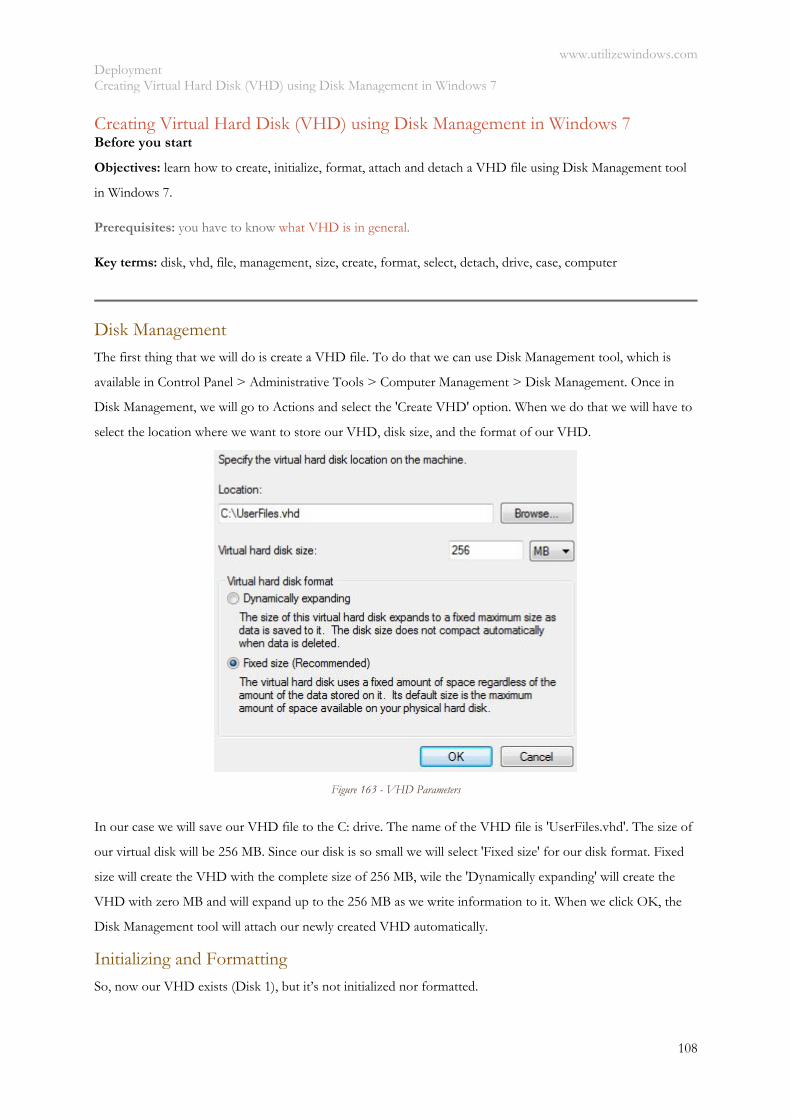
www.utilizewindows.com Deployment Creating Virtual Hard Disk (VHD) using Disk Management in Windows 7
108
Creating Virtual Hard Disk (VHD) using Disk Management in Windows 7 Before you start
Objectives: learn how to create, initialize, format, attach and detach a VHD file using Disk Management tool
in Windows 7.
Prerequisites: you have to know what VHD is in general.
Key terms: disk, vhd, file, management, size, create, format, select, detach, drive, case, computer
Disk Management The first thing that we will do is create a VHD file. To do that we can use Disk Management tool, which is
available in Control Panel > Administrative Tools > Computer Management > Disk Management. Once in
Disk Management, we will go to Actions and select the 'Create VHD' option. When we do that we will have to
select the location where we want to store our VHD, disk size, and the format of our VHD.
Figure 163 - VHD Parameters
In our case we will save our VHD file to the C: drive. The name of the VHD file is 'UserFiles.vhd'. The size of
our virtual disk will be 256 MB. Since our disk is so small we will select 'Fixed size' for our disk format. Fixed
size will create the VHD with the complete size of 256 MB, wile the 'Dynamically expanding' will create the
VHD with zero MB and will expand up to the 256 MB as we write information to it. When we click OK, the
Disk Management tool will attach our newly created VHD automatically.
Initializing and Formatting
So, now our VHD exists (Disk 1), but it’s not initialized nor formatted.
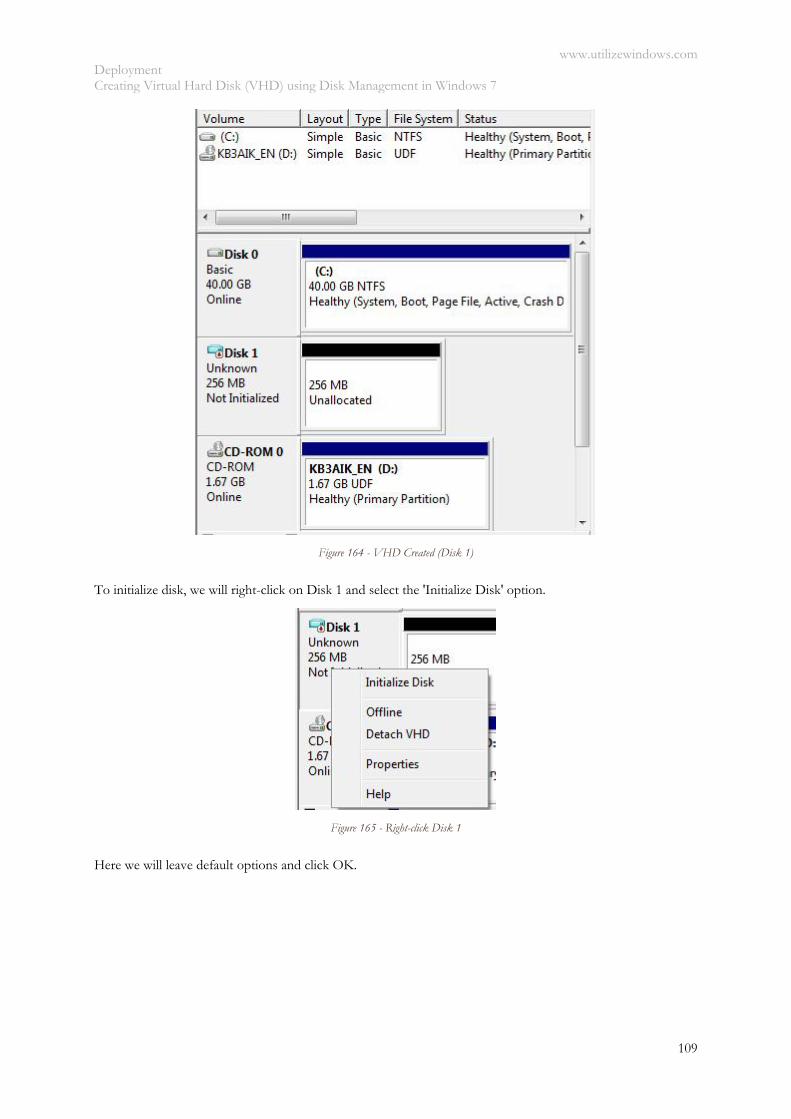
www.utilizewindows.com Deployment Creating Virtual Hard Disk (VHD) using Disk Management in Windows 7
109
Figure 164 - VHD Created (Disk 1)
To initialize disk, we will right-click on Disk 1 and select the 'Initialize Disk' option.
Figure 165 - Right-click Disk 1
Here we will leave default options and click OK.

www.utilizewindows.com Deployment Creating Virtual Hard Disk (VHD) using Disk Management in Windows 7
110
Figure 166 - Initialize Disk
Now we can create new volume on our VHD and specify a drive letter. To do that we will right-click on
unallocated space on our Disk 1 and select the 'New Simple Volume' option.
Figure 167 - Right-click Unallocated Space
The wizard will appear. The wizard will first ask us about the size of the volume. We will leave maximum size
in our case.
Figure 168 - Volume Size
Next, it will ask us about the drive letter. In our case ti is E.
Figure 169 - Drive Letter
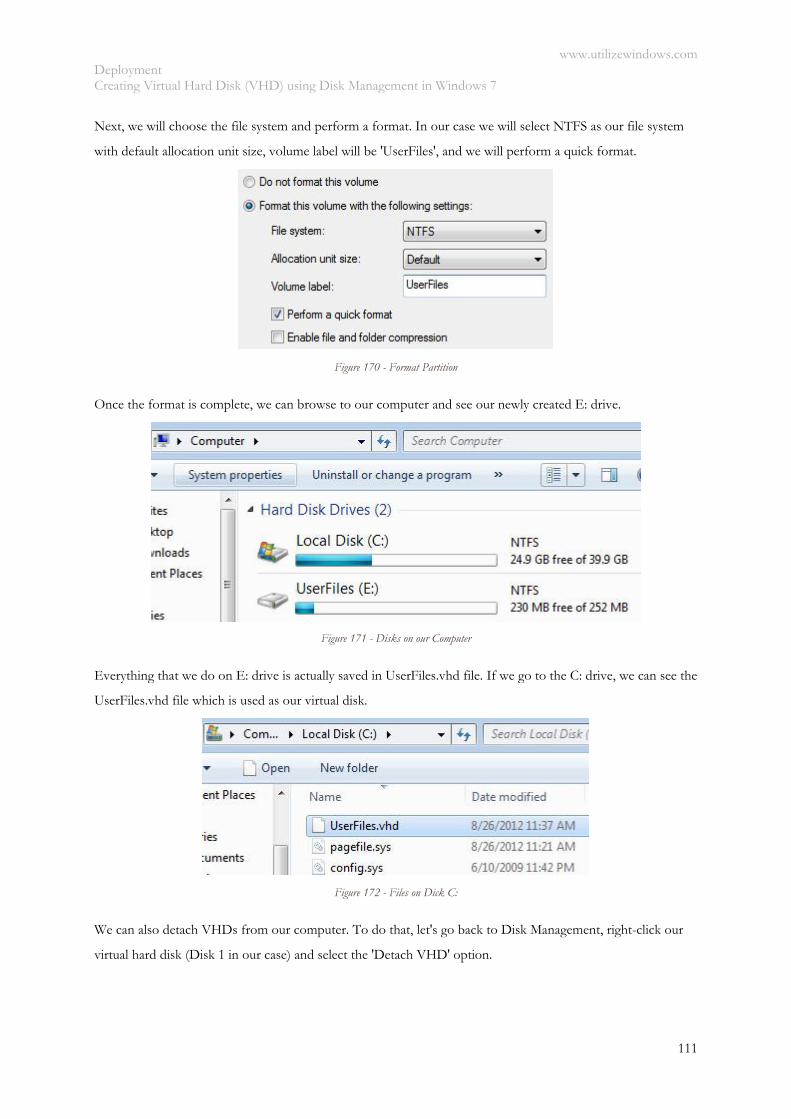
www.utilizewindows.com Deployment Creating Virtual Hard Disk (VHD) using Disk Management in Windows 7
111
Next, we will choose the file system and perform a format. In our case we will select NTFS as our file system
with default allocation unit size, volume label will be 'UserFiles', and we will perform a quick format.
Figure 170 - Format Partition
Once the format is complete, we can browse to our computer and see our newly created E: drive.
Figure 171 - Disks on our Computer
Everything that we do on E: drive is actually saved in UserFiles.vhd file. If we go to the C: drive, we can see the
UserFiles.vhd file which is used as our virtual disk.
Figure 172 - Files on Dick C:
We can also detach VHDs from our computer. To do that, let's go back to Disk Management, right-click our
virtual hard disk (Disk 1 in our case) and select the 'Detach VHD' option.
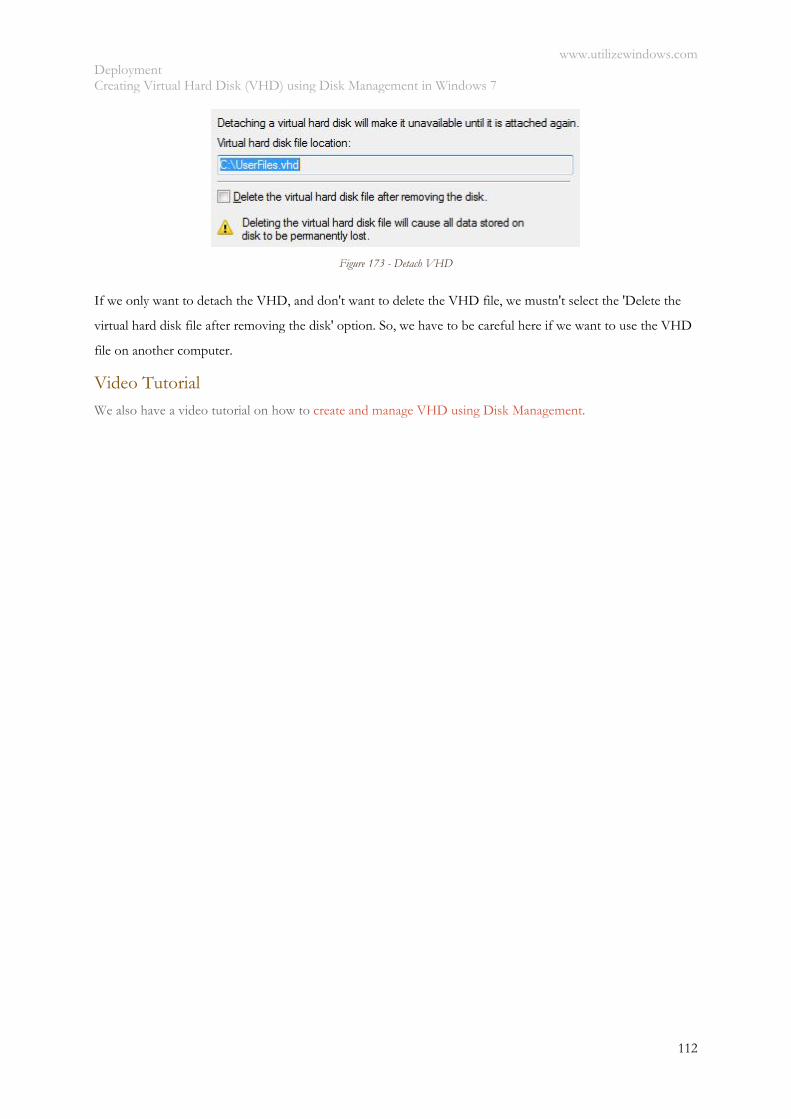
www.utilizewindows.com Deployment Creating Virtual Hard Disk (VHD) using Disk Management in Windows 7
112
Figure 173 - Detach VHD
If we only want to detach the VHD, and don't want to delete the VHD file, we mustn't select the 'Delete the
virtual hard disk file after removing the disk' option. So, we have to be careful here if we want to use the VHD
file on another computer.
Video Tutorial
We also have a video tutorial on how to create and manage VHD using Disk Management.
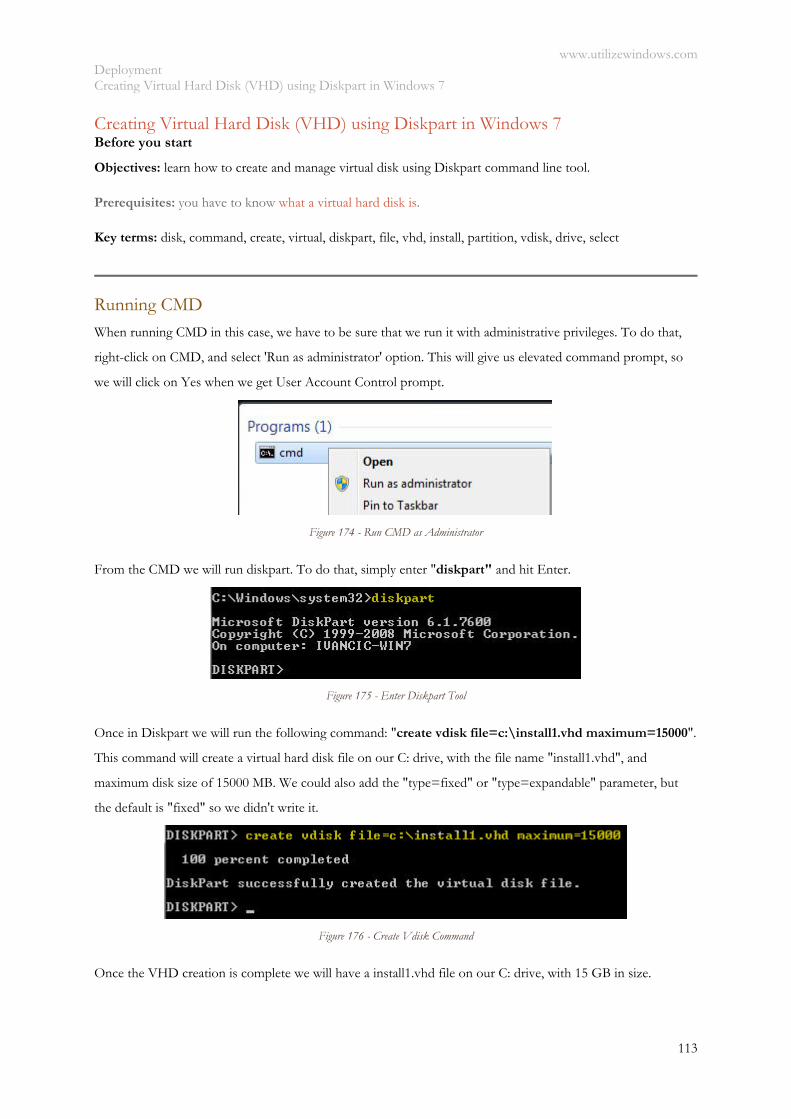
www.utilizewindows.com Deployment Creating Virtual Hard Disk (VHD) using Diskpart in Windows 7
113
Creating Virtual Hard Disk (VHD) using Diskpart in Windows 7 Before you start
Objectives: learn how to create and manage virtual disk using Diskpart command line tool.
Prerequisites: you have to know what a virtual hard disk is.
Key terms: disk, command, create, virtual, diskpart, file, vhd, install, partition, vdisk, drive, select
Running CMD
When running CMD in this case, we have to be sure that we run it with administrative privileges. To do that,
right-click on CMD, and select 'Run as administrator' option. This will give us elevated command prompt, so
we will click on Yes when we get User Account Control prompt.
Figure 174 - Run CMD as Administrator
From the CMD we will run diskpart. To do that, simply enter "diskpart" and hit Enter.
Figure 175 - Enter Diskpart Tool
Once in Diskpart we will run the following command: "create vdisk file=c:\install1.vhd maximum=15000".
This command will create a virtual hard disk file on our C: drive, with the file name "install1.vhd", and
maximum disk size of 15000 MB. We could also add the "type=fixed" or "type=expandable" parameter, but
the default is "fixed" so we didn't write it.
Figure 176 - Create Vdisk Command
Once the VHD creation is complete we will have a install1.vhd file on our C: drive, with 15 GB in size.
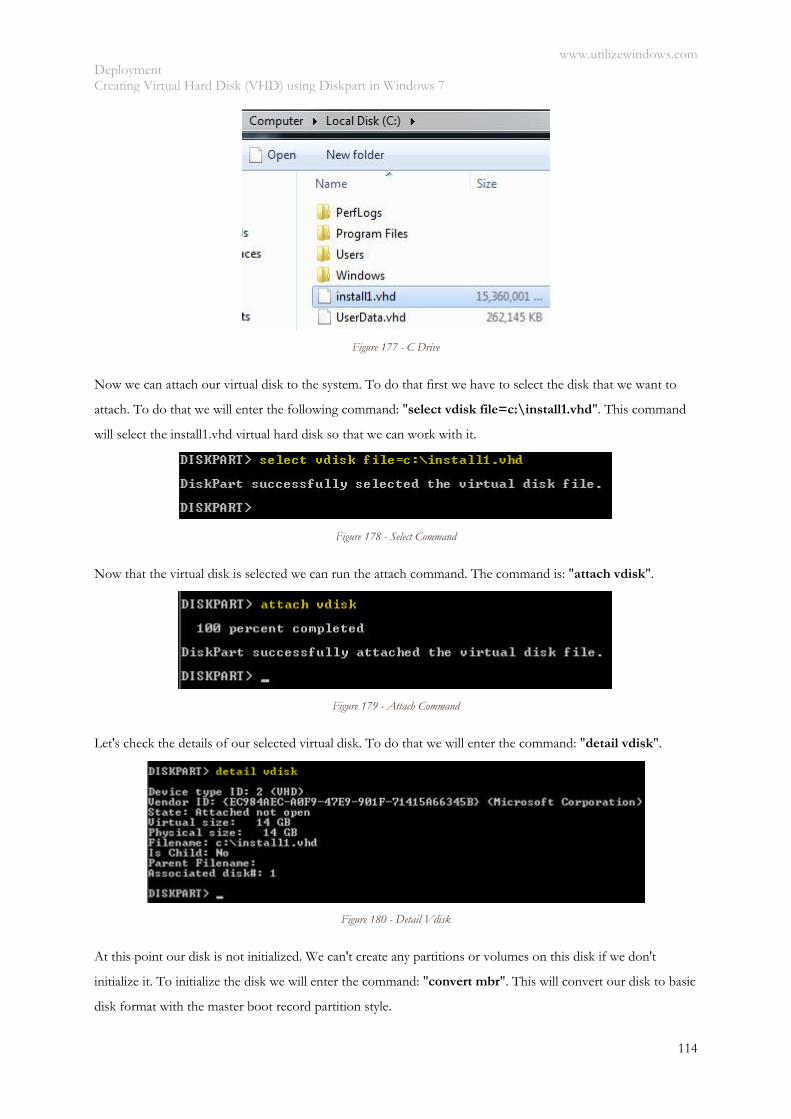
www.utilizewindows.com Deployment Creating Virtual Hard Disk (VHD) using Diskpart in Windows 7
114
Figure 177 - C Drive
Now we can attach our virtual disk to the system. To do that first we have to select the disk that we want to
attach. To do that we will enter the following command: "select vdisk file=c:\install1.vhd". This command
will select the install1.vhd virtual hard disk so that we can work with it.
Figure 178 - Select Command
Now that the virtual disk is selected we can run the attach command. The command is: "attach vdisk".
Figure 179 - Attach Command
Let's check the details of our selected virtual disk. To do that we will enter the command: "detail vdisk".
Figure 180 - Detail Vdisk
At this point our disk is not initialized. We can't create any partitions or volumes on this disk if we don't
initialize it. To initialize the disk we will enter the command: "convert mbr". This will convert our disk to basic
disk format with the master boot record partition style.

www.utilizewindows.com Deployment Creating Virtual Hard Disk (VHD) using Diskpart in Windows 7
115
Figure 181 - Convert Command
Now we can create a partition on the disk. To do that we will use the command: "create partition primary".
We won't specify the size, so the whole unallocated space will be used to create the partition.
Figure 182 - Create Partition
Now we can format our partition. To do that we will use the command: "format fs=ntfs label="install"
quick". This command will format our partition using NTFS file system, label it as "install", and it will use
quick formatting.
Figure 183 - Format Partition
Now we can assign a drive letter to it: "assign letter=e"
Figure 184 - Drive Letter
That's it. We can now use our virtual disk and save files to it. Let's try to make a new directory in it. To do that
we will leave diskpart, and enter few commands.
Figure 185 - Working with E Drive
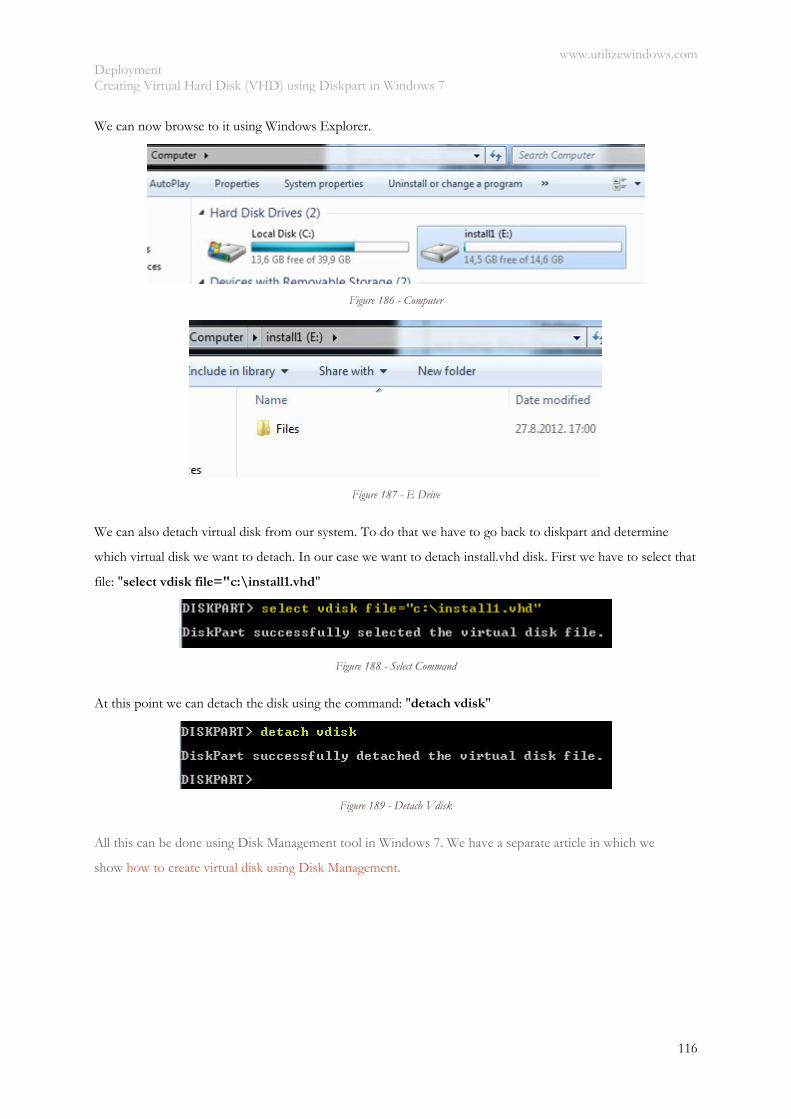
www.utilizewindows.com Deployment Creating Virtual Hard Disk (VHD) using Diskpart in Windows 7
116
We can now browse to it using Windows Explorer.
Figure 186 - Computer
Figure 187 - E Drive
We can also detach virtual disk from our system. To do that we have to go back to diskpart and determine
which virtual disk we want to detach. In our case we want to detach install.vhd disk. First we have to select that
file: "select vdisk file="c:\install1.vhd"
Figure 188 - Select Command
At this point we can detach the disk using the command: "detach vdisk"
Figure 189 - Detach Vdisk
All this can be done using Disk Management tool in Windows 7. We have a separate article in which we
show how to create virtual disk using Disk Management.
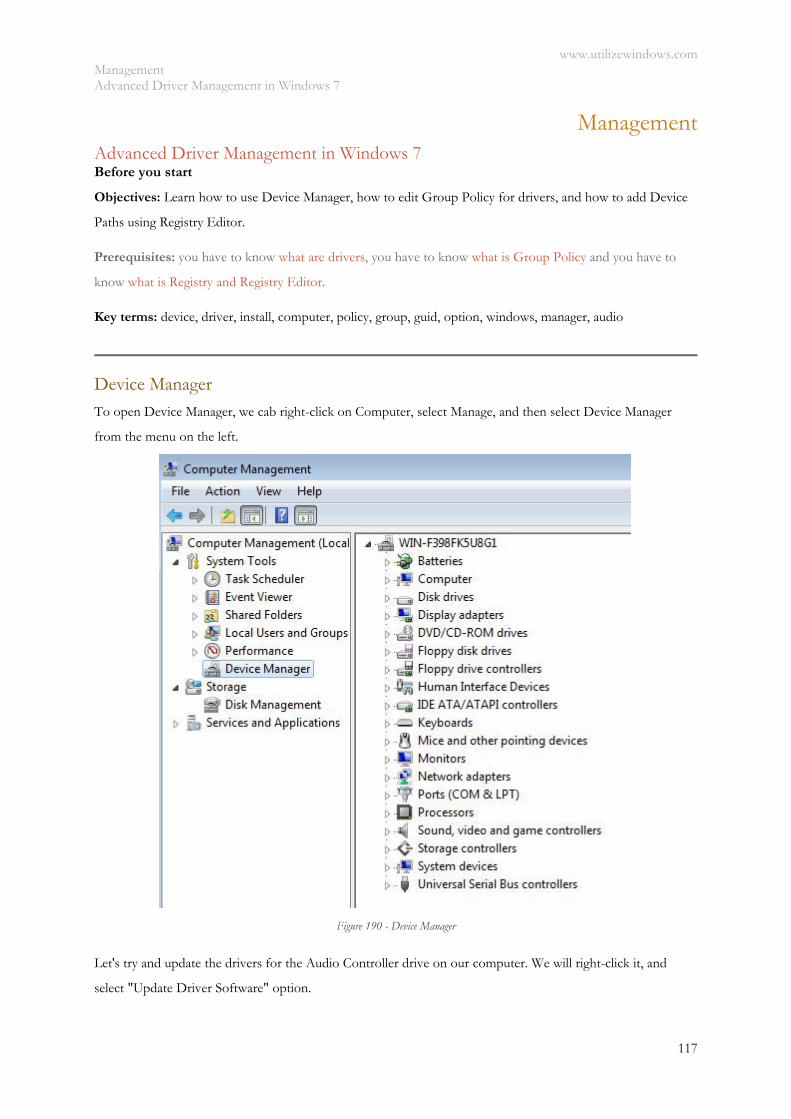
www.utilizewindows.com Management Advanced Driver Management in Windows 7
117
Management Advanced Driver Management in Windows 7 Before you start
Objectives: Learn how to use Device Manager, how to edit Group Policy for drivers, and how to add Device
Paths using Registry Editor.
Prerequisites: you have to know what are drivers, you have to know what is Group Policy and you have to
know what is Registry and Registry Editor.
Key terms: device, driver, install, computer, policy, group, guid, option, windows, manager, audio
Device Manager
To open Device Manager, we cab right-click on Computer, select Manage, and then select Device Manager
from the menu on the left.
Figure 190 - Device Manager
Let's try and update the drivers for the Audio Controller drive on our computer. We will right-click it, and
select "Update Driver Software" option.

www.utilizewindows.com Management Advanced Driver Management in Windows 7
118
Figure 191 - Update Driver Software
On the next screen we will select "Browse my computer for driver software".
Figure 192 - Browse Computer Option
On the next screen we will select the "Let me pick from a list of device drivers on my computer" option.
Figure 193 - Pick Device Option
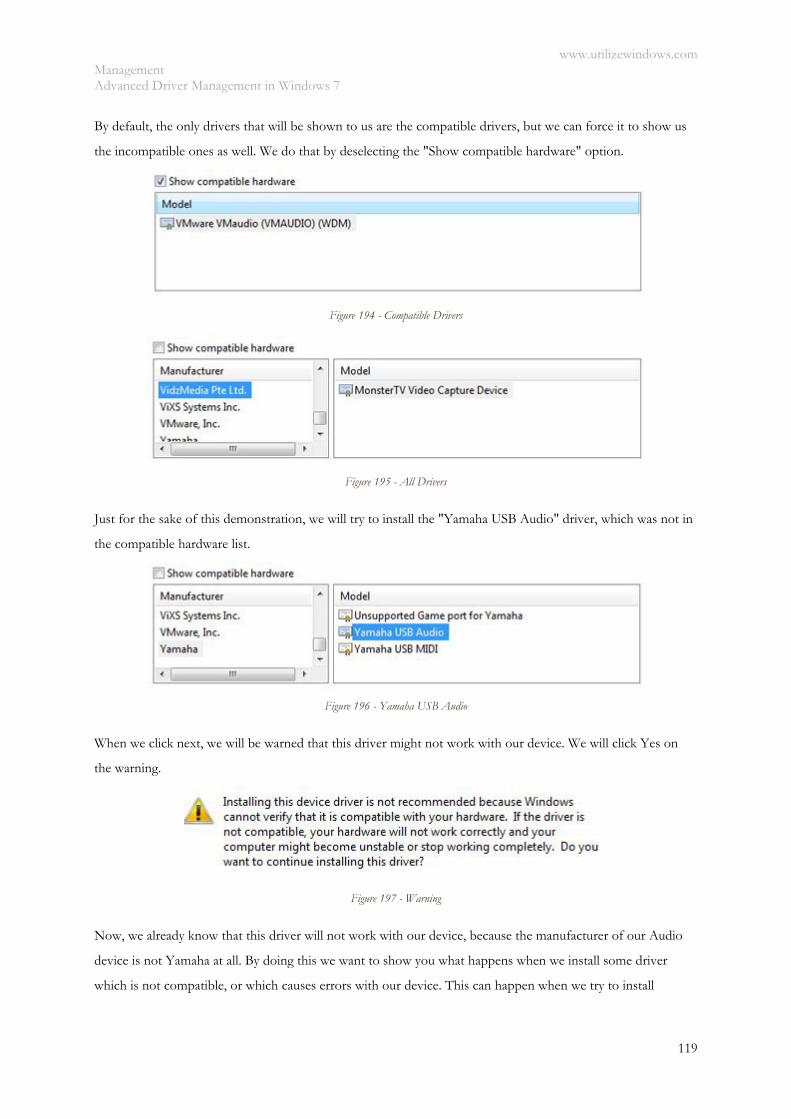
www.utilizewindows.com Management Advanced Driver Management in Windows 7
119
By default, the only drivers that will be shown to us are the compatible drivers, but we can force it to show us
the incompatible ones as well. We do that by deselecting the "Show compatible hardware" option.
Figure 194 - Compatible Drivers
Figure 195 - All Drivers
Just for the sake of this demonstration, we will try to install the "Yamaha USB Audio" driver, which was not in
the compatible hardware list.
Figure 196 - Yamaha USB Audio
When we click next, we will be warned that this driver might not work with our device. We will click Yes on
the warning.
Figure 197 - Warning
Now, we already know that this driver will not work with our device, because the manufacturer of our Audio
device is not Yamaha at all. By doing this we want to show you what happens when we install some driver
which is not compatible, or which causes errors with our device. This can happen when we try to install
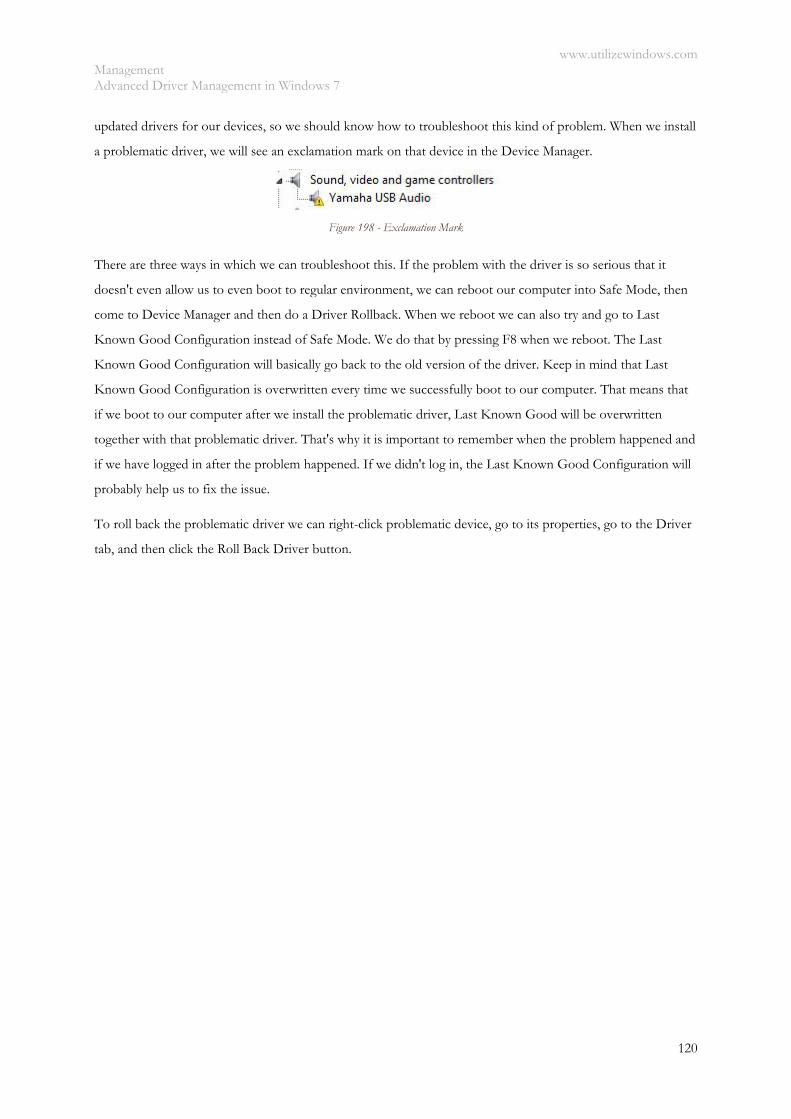
www.utilizewindows.com Management Advanced Driver Management in Windows 7
120
updated drivers for our devices, so we should know how to troubleshoot this kind of problem. When we install
a problematic driver, we will see an exclamation mark on that device in the Device Manager.
Figure 198 - Exclamation Mark
There are three ways in which we can troubleshoot this. If the problem with the driver is so serious that it
doesn't even allow us to even boot to regular environment, we can reboot our computer into Safe Mode, then
come to Device Manager and then do a Driver Rollback. When we reboot we can also try and go to Last
Known Good Configuration instead of Safe Mode. We do that by pressing F8 when we reboot. The Last
Known Good Configuration will basically go back to the old version of the driver. Keep in mind that Last
Known Good Configuration is overwritten every time we successfully boot to our computer. That means that
if we boot to our computer after we install the problematic driver, Last Known Good will be overwritten
together with that problematic driver. That's why it is important to remember when the problem happened and
if we have logged in after the problem happened. If we didn't log in, the Last Known Good Configuration will
probably help us to fix the issue.
To roll back the problematic driver we can right-click problematic device, go to its properties, go to the Driver
tab, and then click the Roll Back Driver button.
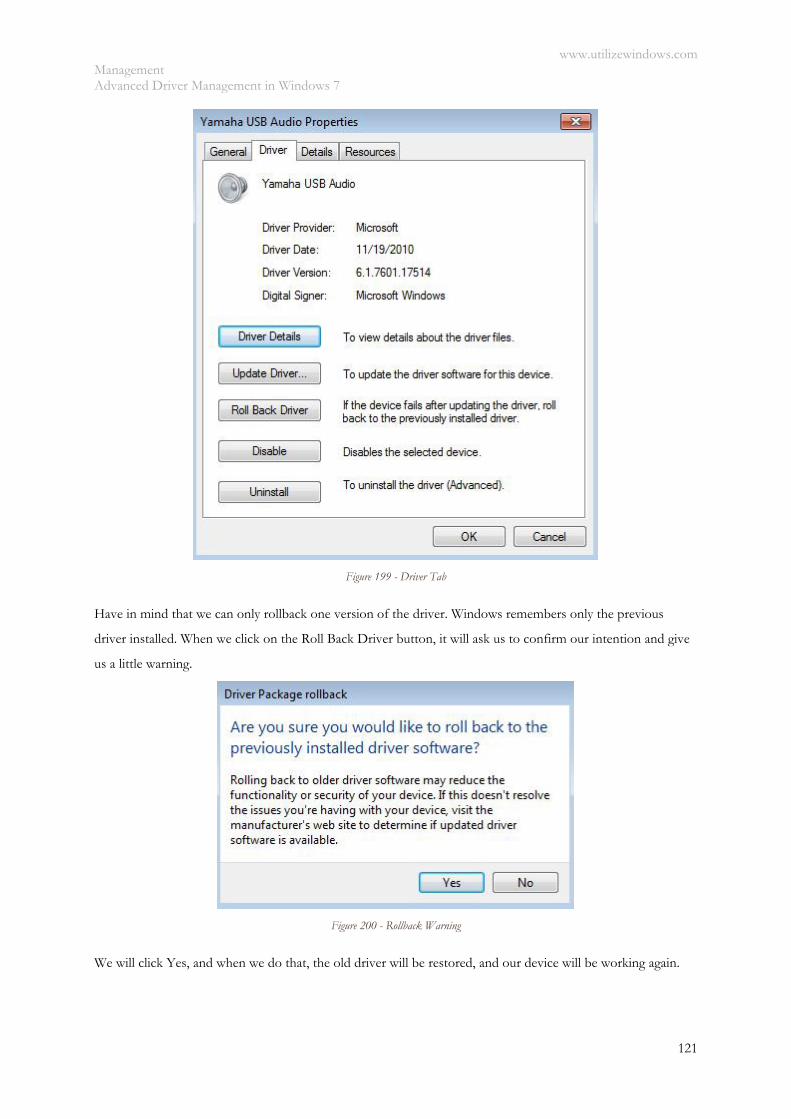
www.utilizewindows.com Management Advanced Driver Management in Windows 7
121
Figure 199 - Driver Tab
Have in mind that we can only rollback one version of the driver. Windows remembers only the previous
driver installed. When we click on the Roll Back Driver button, it will ask us to confirm our intention and give
us a little warning.
Figure 200 - Rollback Warning
We will click Yes, and when we do that, the old driver will be restored, and our device will be working again.
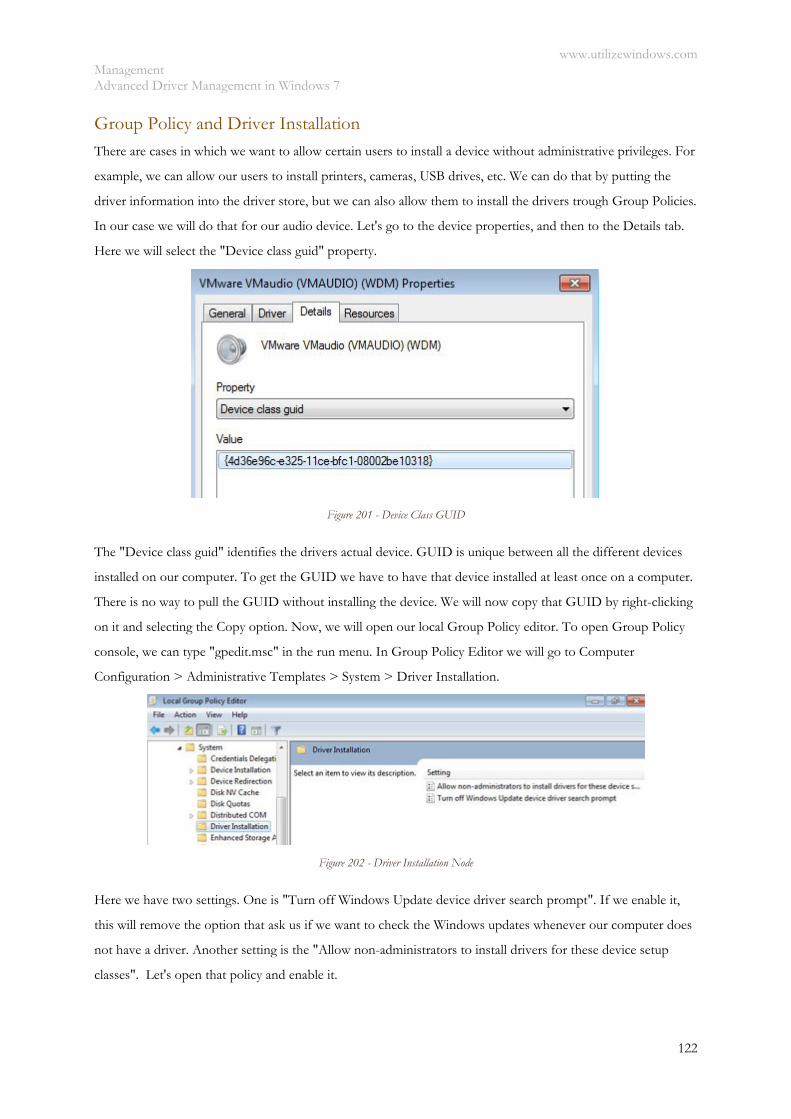
www.utilizewindows.com Management Advanced Driver Management in Windows 7
122
Group Policy and Driver Installation
There are cases in which we want to allow certain users to install a device without administrative privileges. For
example, we can allow our users to install printers, cameras, USB drives, etc. We can do that by putting the
driver information into the driver store, but we can also allow them to install the drivers trough Group Policies.
In our case we will do that for our audio device. Let's go to the device properties, and then to the Details tab.
Here we will select the "Device class guid" property.
Figure 201 - Device Class GUID
The "Device class guid" identifies the drivers actual device. GUID is unique between all the different devices
installed on our computer. To get the GUID we have to have that device installed at least once on a computer.
There is no way to pull the GUID without installing the device. We will now copy that GUID by right-clicking
on it and selecting the Copy option. Now, we will open our local Group Policy editor. To open Group Policy
console, we can type "gpedit.msc" in the run menu. In Group Policy Editor we will go to Computer
Configuration > Administrative Templates > System > Driver Installation.
Figure 202 - Driver Installation Node
Here we have two settings. One is "Turn off Windows Update device driver search prompt". If we enable it,
this will remove the option that ask us if we want to check the Windows updates whenever our computer does
not have a driver. Another setting is the "Allow non-administrators to install drivers for these device setup
classes". Let's open that policy and enable it.
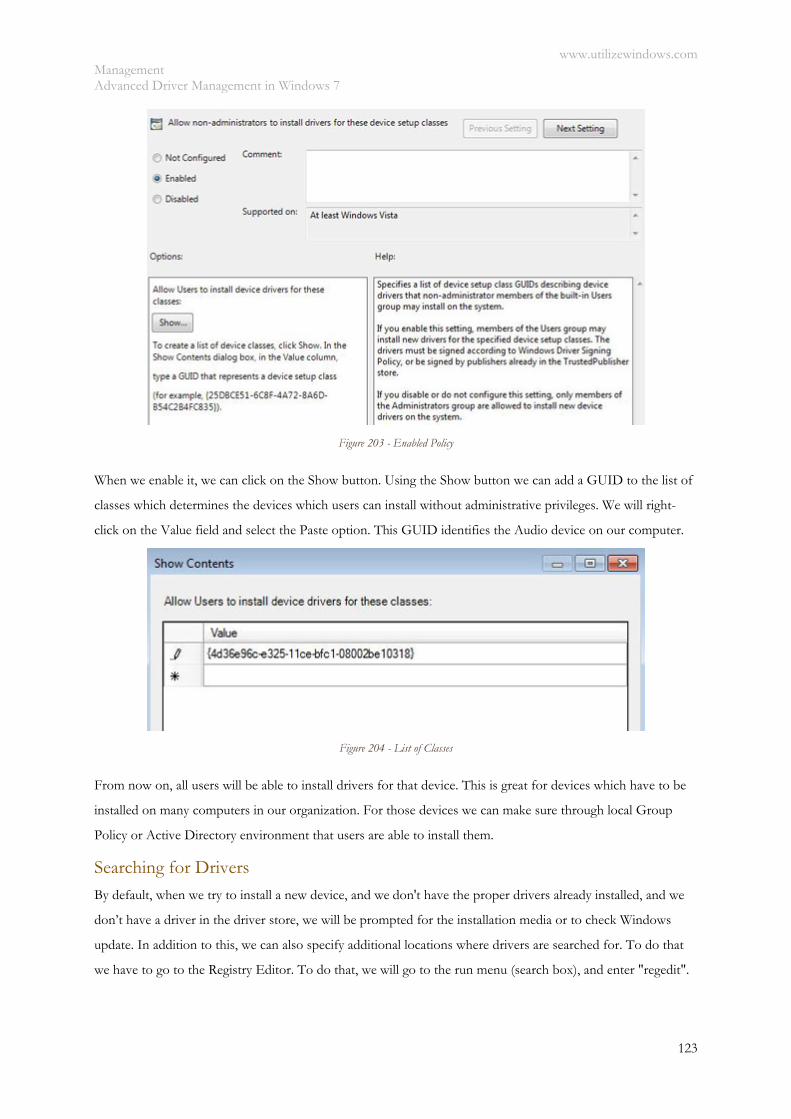
www.utilizewindows.com Management Advanced Driver Management in Windows 7
123
Figure 203 - Enabled Policy
When we enable it, we can click on the Show button. Using the Show button we can add a GUID to the list of
classes which determines the devices which users can install without administrative privileges. We will right-
click on the Value field and select the Paste option. This GUID identifies the Audio device on our computer.
Figure 204 - List of Classes
From now on, all users will be able to install drivers for that device. This is great for devices which have to be
installed on many computers in our organization. For those devices we can make sure through local Group
Policy or Active Directory environment that users are able to install them.
Searching for Drivers
By default, when we try to install a new device, and we don't have the proper drivers already installed, and we
don’t have a driver in the driver store, we will be prompted for the installation media or to check Windows
update. In addition to this, we can also specify additional locations where drivers are searched for. To do that
we have to go to the Registry Editor. To do that, we will go to the run menu (search box), and enter "regedit".
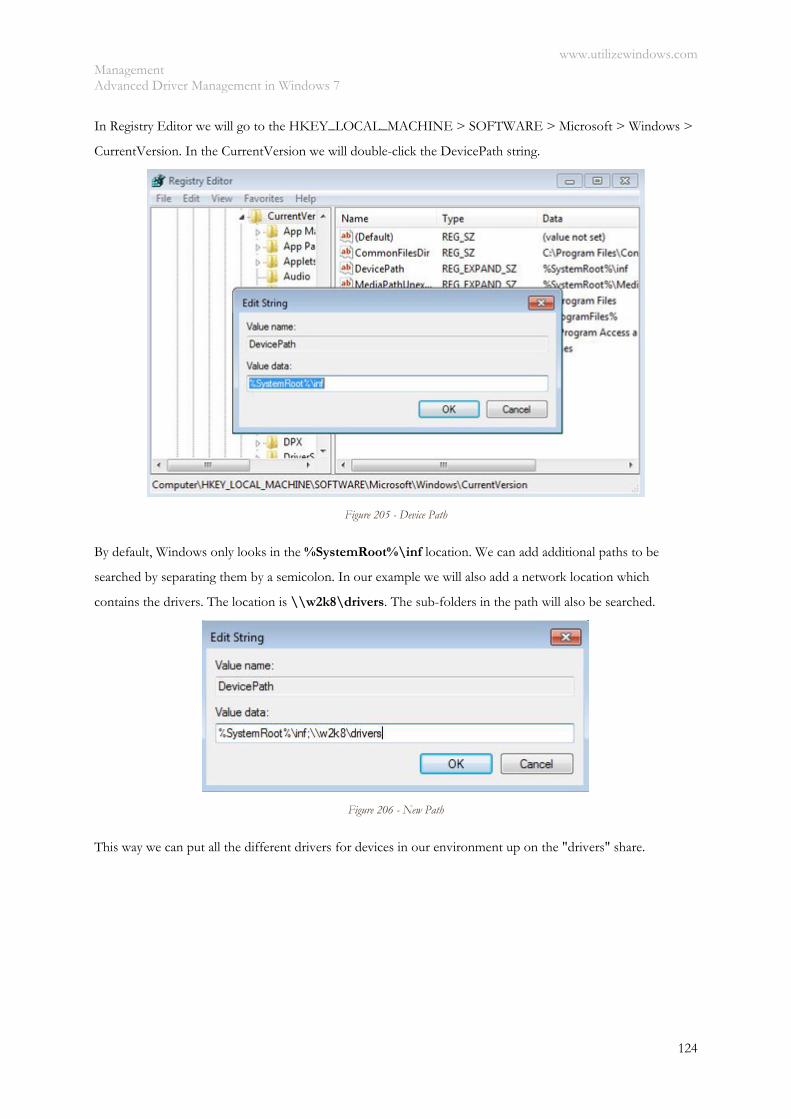
www.utilizewindows.com Management Advanced Driver Management in Windows 7
124
In Registry Editor we will go to the HKEY_LOCAL_MACHINE > SOFTWARE > Microsoft > Windows >
CurrentVersion. In the CurrentVersion we will double-click the DevicePath string.
Figure 205 - Device Path
By default, Windows only looks in the %SystemRoot%\inf location. We can add additional paths to be
searched by separating them by a semicolon. In our example we will also add a network location which
contains the drivers. The location is \\w2k8\drivers. The sub-folders in the path will also be searched.
Figure 206 - New Path
This way we can put all the different drivers for devices in our environment up on the "drivers" share.
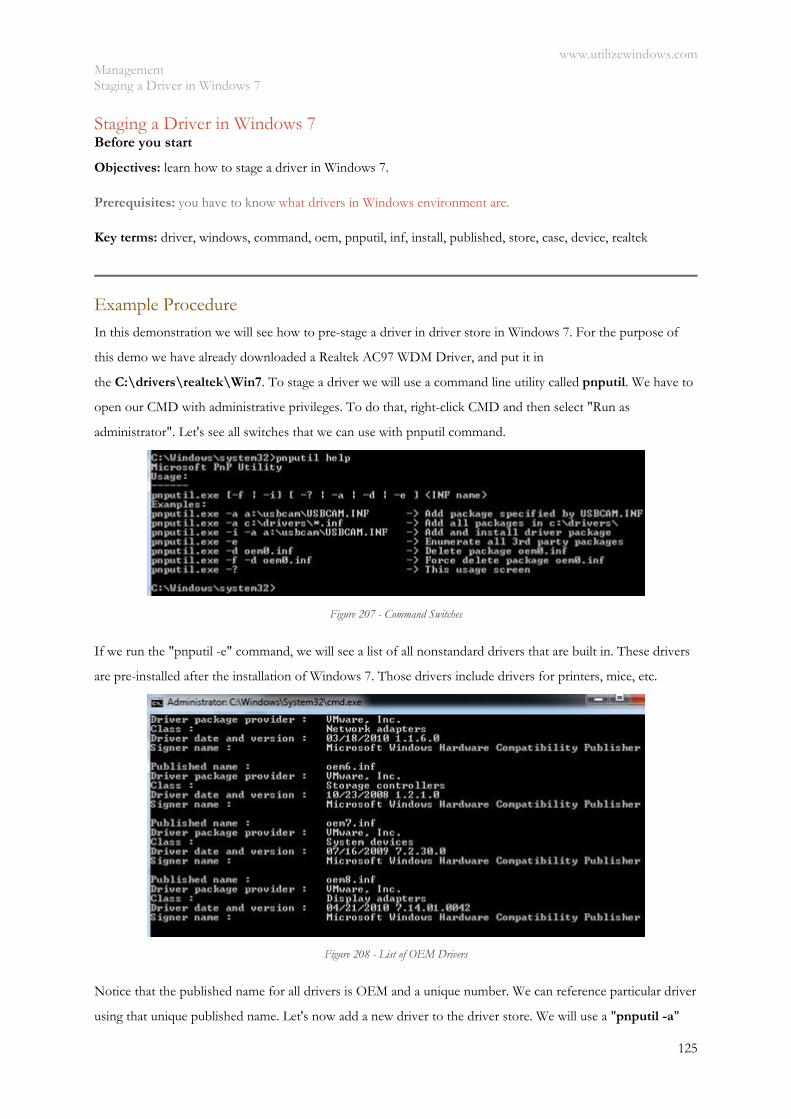
www.utilizewindows.com Management Staging a Driver in Windows 7
125
Staging a Driver in Windows 7 Before you start
Objectives: learn how to stage a driver in Windows 7.
Prerequisites: you have to know what drivers in Windows environment are.
Key terms: driver, windows, command, oem, pnputil, inf, install, published, store, case, device, realtek
Example Procedure
In this demonstration we will see how to pre-stage a driver in driver store in Windows 7. For the purpose of
this demo we have already downloaded a Realtek AC97 WDM Driver, and put it in
the C:\drivers\realtek\Win7. To stage a driver we will use a command line utility called pnputil. We have to
open our CMD with administrative privileges. To do that, right-click CMD and then select "Run as
administrator". Let's see all switches that we can use with pnputil command.
Figure 207 - Command Switches
If we run the "pnputil -e" command, we will see a list of all nonstandard drivers that are built in. These drivers
are pre-installed after the installation of Windows 7. Those drivers include drivers for printers, mice, etc.
Figure 208 - List of OEM Drivers
Notice that the published name for all drivers is OEM and a unique number. We can reference particular driver
using that unique published name. Let's now add a new driver to the driver store. We will use a "pnputil -a"
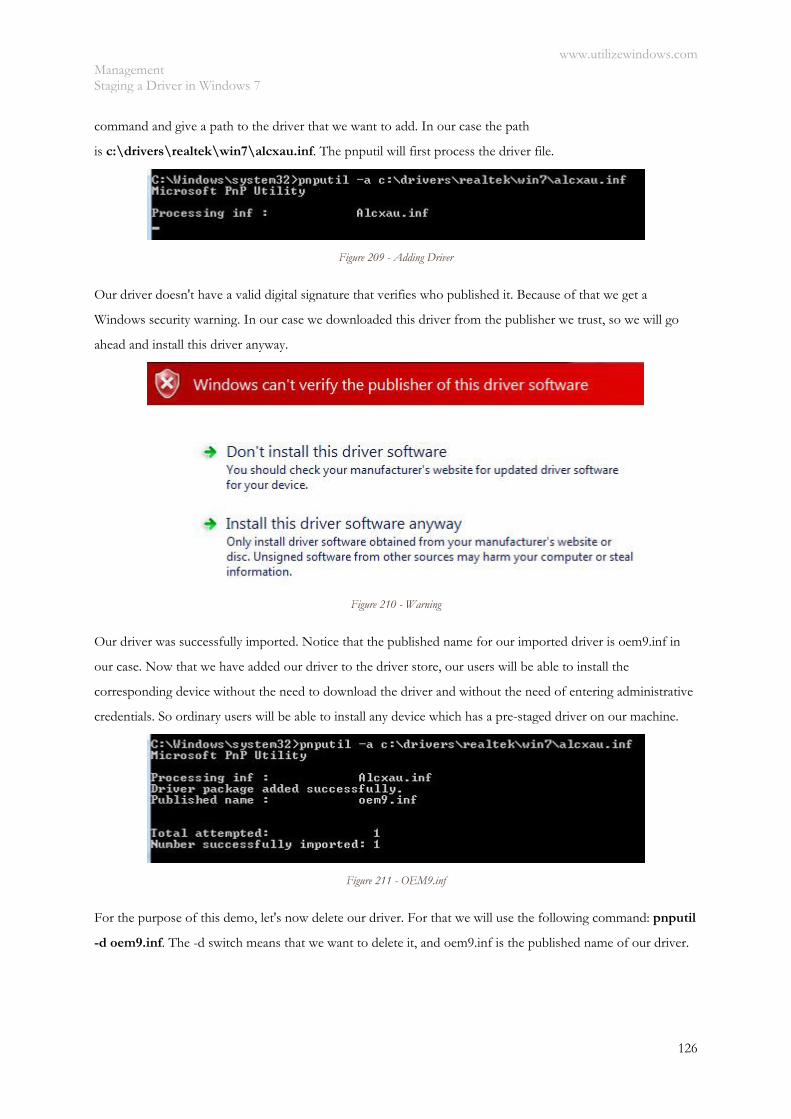
www.utilizewindows.com Management Staging a Driver in Windows 7
126
command and give a path to the driver that we want to add. In our case the path
is c:\drivers\realtek\win7\alcxau.inf. The pnputil will first process the driver file.
Figure 209 - Adding Driver
Our driver doesn't have a valid digital signature that verifies who published it. Because of that we get a
Windows security warning. In our case we downloaded this driver from the publisher we trust, so we will go
ahead and install this driver anyway.
Figure 210 - Warning
Our driver was successfully imported. Notice that the published name for our imported driver is oem9.inf in
our case. Now that we have added our driver to the driver store, our users will be able to install the
corresponding device without the need to download the driver and without the need of entering administrative
credentials. So ordinary users will be able to install any device which has a pre-staged driver on our machine.
Figure 211 - OEM9.inf
For the purpose of this demo, let's now delete our driver. For that we will use the following command: pnputil
-d oem9.inf. The -d switch means that we want to delete it, and oem9.inf is the published name of our driver.

www.utilizewindows.com Management Staging a Driver in Windows 7
127
Figure 212 - Driver Deleted
Our driver was removed successfully. As we can see, we can take advantage of the PnP utility to pre-stage a
driver into our Windows 7 installation. If a standard or nonstandard user tries to install device, they will not be
prompted for the actual driver, since Windows will install it automatically from the driver store.
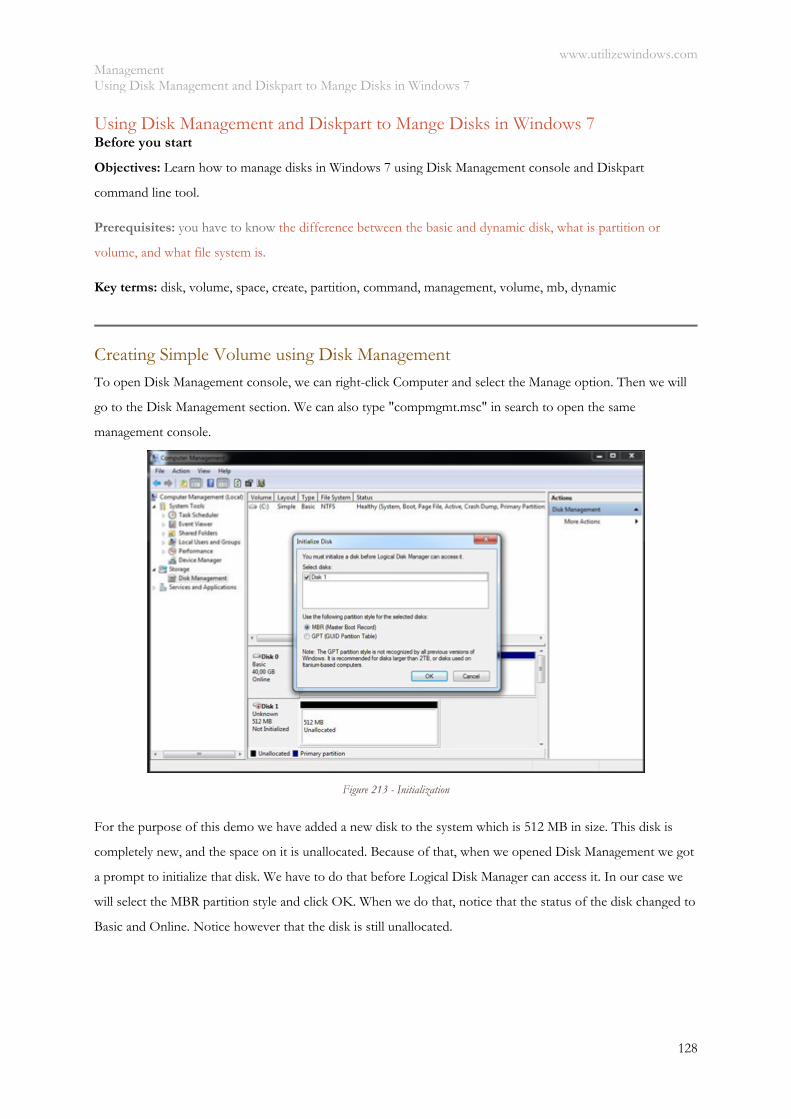
www.utilizewindows.com Management Using Disk Management and Diskpart to Mange Disks in Windows 7
128
Using Disk Management and Diskpart to Mange Disks in Windows 7 Before you start
Objectives: Learn how to manage disks in Windows 7 using Disk Management console and Diskpart
command line tool.
Prerequisites: you have to know the difference between the basic and dynamic disk, what is partition or
volume, and what file system is.
Key terms: disk, volume, space, create, partition, command, management, volume, mb, dynamic
Creating Simple Volume using Disk Management
To open Disk Management console, we can right-click Computer and select the Manage option. Then we will
go to the Disk Management section. We can also type "compmgmt.msc" in search to open the same
management console.
Figure 213 - Initialization
For the purpose of this demo we have added a new disk to the system which is 512 MB in size. This disk is
completely new, and the space on it is unallocated. Because of that, when we opened Disk Management we got
a prompt to initialize that disk. We have to do that before Logical Disk Manager can access it. In our case we
will select the MBR partition style and click OK. When we do that, notice that the status of the disk changed to
Basic and Online. Notice however that the disk is still unallocated.
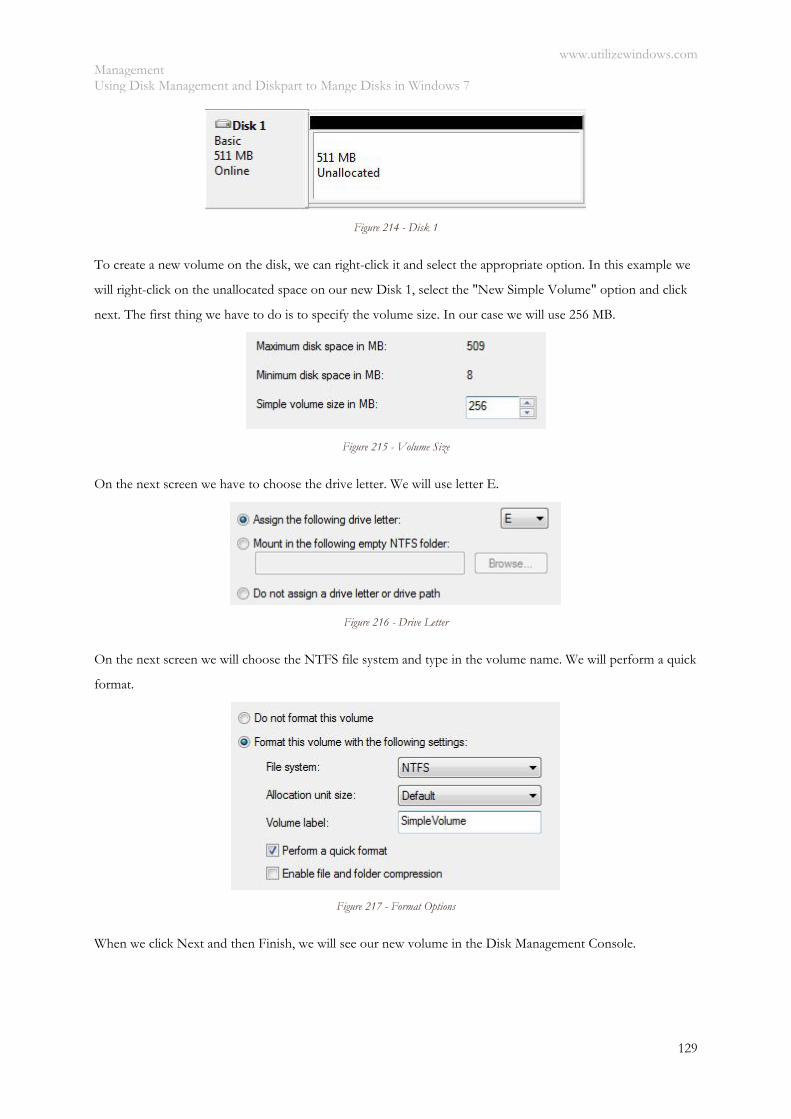
www.utilizewindows.com Management Using Disk Management and Diskpart to Mange Disks in Windows 7
129
Figure 214 - Disk 1
To create a new volume on the disk, we can right-click it and select the appropriate option. In this example we
will right-click on the unallocated space on our new Disk 1, select the "New Simple Volume" option and click
next. The first thing we have to do is to specify the volume size. In our case we will use 256 MB.
Figure 215 - Volume Size
On the next screen we have to choose the drive letter. We will use letter E.
Figure 216 - Drive Letter
On the next screen we will choose the NTFS file system and type in the volume name. We will perform a quick
format.
Figure 217 - Format Options
When we click Next and then Finish, we will see our new volume in the Disk Management Console.
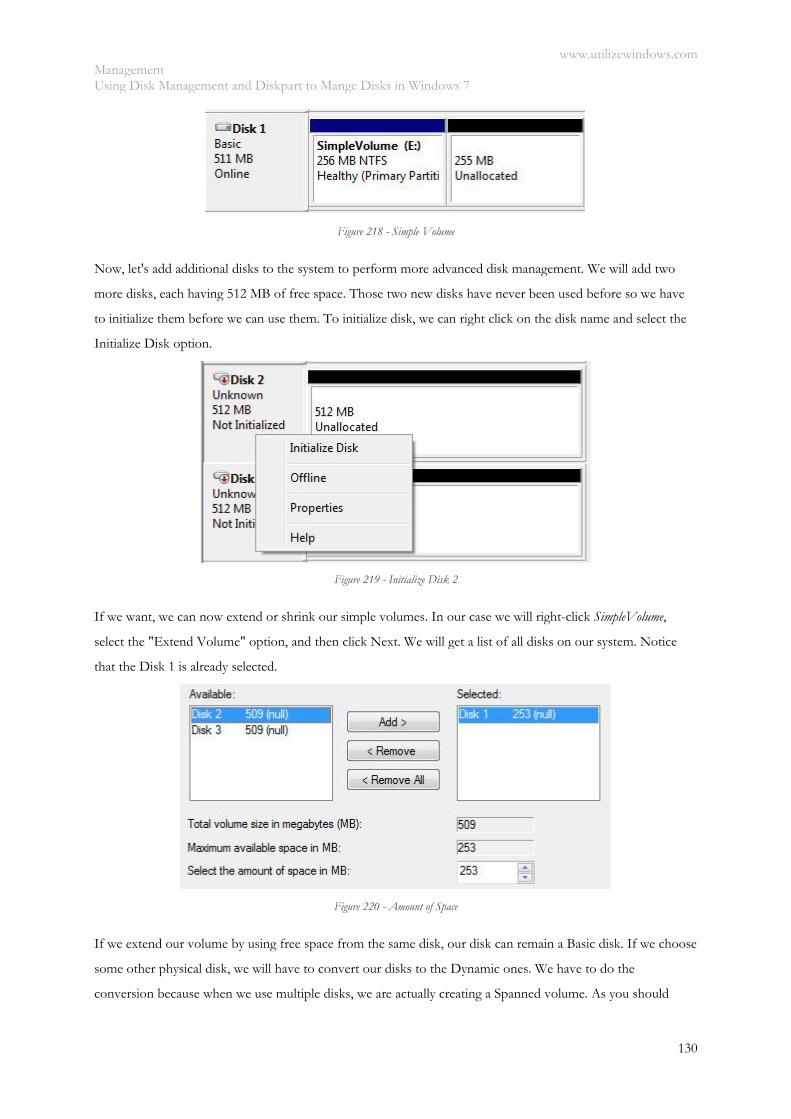
www.utilizewindows.com Management Using Disk Management and Diskpart to Mange Disks in Windows 7
130
Figure 218 - Simple Volume
Now, let's add additional disks to the system to perform more advanced disk management. We will add two
more disks, each having 512 MB of free space. Those two new disks have never been used before so we have
to initialize them before we can use them. To initialize disk, we can right click on the disk name and select the
Initialize Disk option.
Figure 219 - Initialize Disk 2
If we want, we can now extend or shrink our simple volumes. In our case we will right-click SimpleVolume,
select the "Extend Volume" option, and then click Next. We will get a list of all disks on our system. Notice
that the Disk 1 is already selected.
Figure 220 - Amount of Space
If we extend our volume by using free space from the same disk, our disk can remain a Basic disk. If we choose
some other physical disk, we will have to convert our disks to the Dynamic ones. We have to do the
conversion because when we use multiple disks, we are actually creating a Spanned volume. As you should
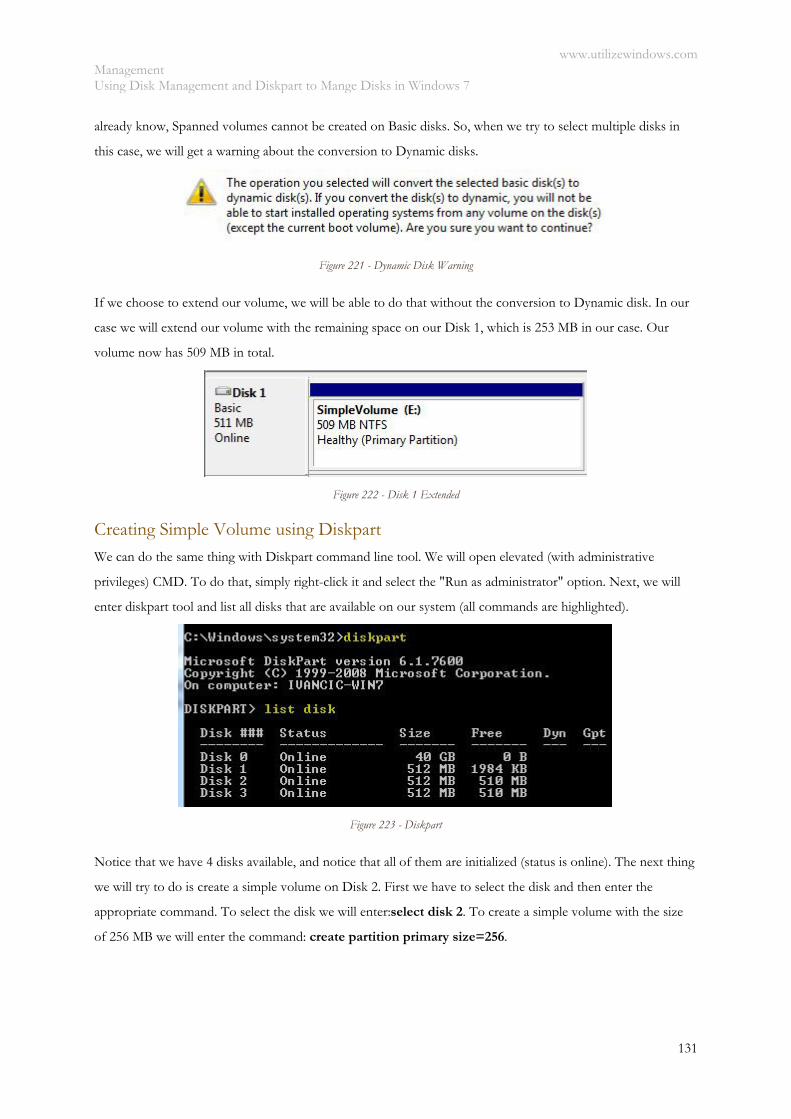
www.utilizewindows.com Management Using Disk Management and Diskpart to Mange Disks in Windows 7
131
already know, Spanned volumes cannot be created on Basic disks. So, when we try to select multiple disks in
this case, we will get a warning about the conversion to Dynamic disks.
Figure 221 - Dynamic Disk Warning
If we choose to extend our volume, we will be able to do that without the conversion to Dynamic disk. In our
case we will extend our volume with the remaining space on our Disk 1, which is 253 MB in our case. Our
volume now has 509 MB in total.
Figure 222 - Disk 1 Extended
Creating Simple Volume using Diskpart We can do the same thing with Diskpart command line tool. We will open elevated (with administrative
privileges) CMD. To do that, simply right-click it and select the "Run as administrator" option. Next, we will
enter diskpart tool and list all disks that are available on our system (all commands are highlighted).
Figure 223 - Diskpart
Notice that we have 4 disks available, and notice that all of them are initialized (status is online). The next thing
we will try to do is create a simple volume on Disk 2. First we have to select the disk and then enter the
appropriate command. To select the disk we will enter:select disk 2. To create a simple volume with the size
of 256 MB we will enter the command: create partition primary size=256.
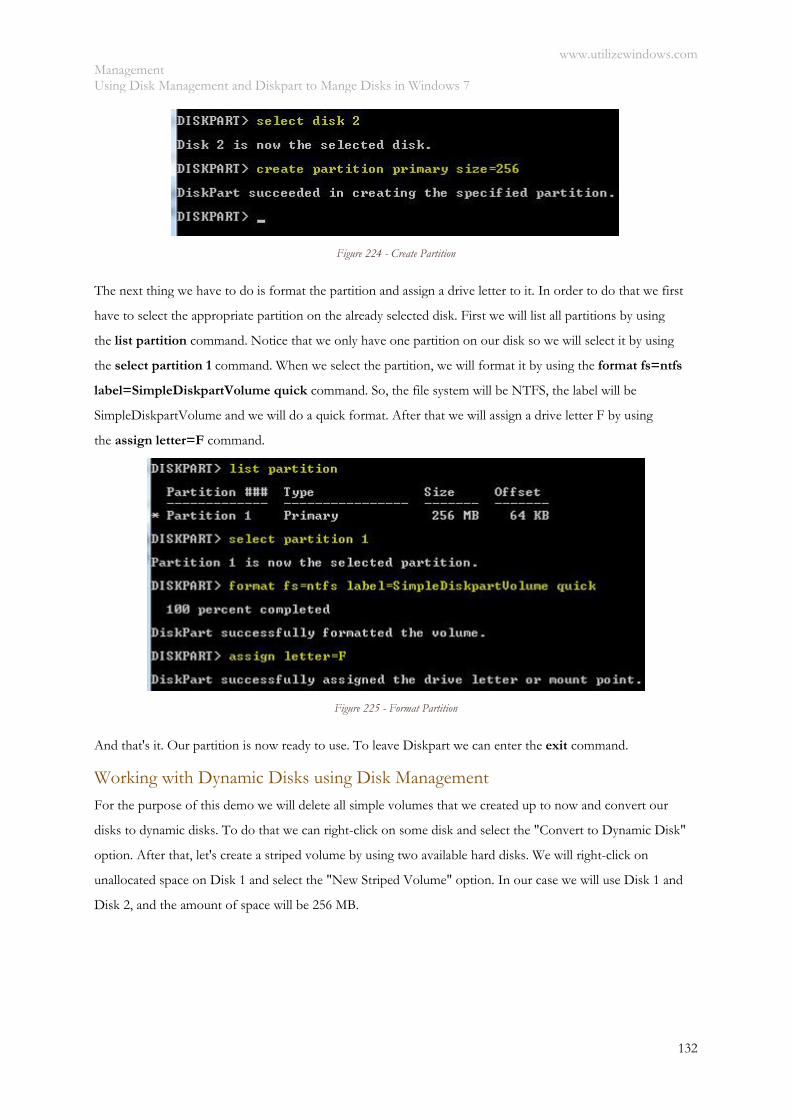
www.utilizewindows.com Management Using Disk Management and Diskpart to Mange Disks in Windows 7
132
Figure 224 - Create Partition
The next thing we have to do is format the partition and assign a drive letter to it. In order to do that we first
have to select the appropriate partition on the already selected disk. First we will list all partitions by using
the list partition command. Notice that we only have one partition on our disk so we will select it by using
the select partition 1 command. When we select the partition, we will format it by using the format fs=ntfs
label=SimpleDiskpartVolume quick command. So, the file system will be NTFS, the label will be
SimpleDiskpartVolume and we will do a quick format. After that we will assign a drive letter F by using
the assign letter=F command.
Figure 225 - Format Partition
And that's it. Our partition is now ready to use. To leave Diskpart we can enter the exit command.
Working with Dynamic Disks using Disk Management
For the purpose of this demo we will delete all simple volumes that we created up to now and convert our
disks to dynamic disks. To do that we can right-click on some disk and select the "Convert to Dynamic Disk"
option. After that, let's create a striped volume by using two available hard disks. We will right-click on
unallocated space on Disk 1 and select the "New Striped Volume" option. In our case we will use Disk 1 and
Disk 2, and the amount of space will be 256 MB.
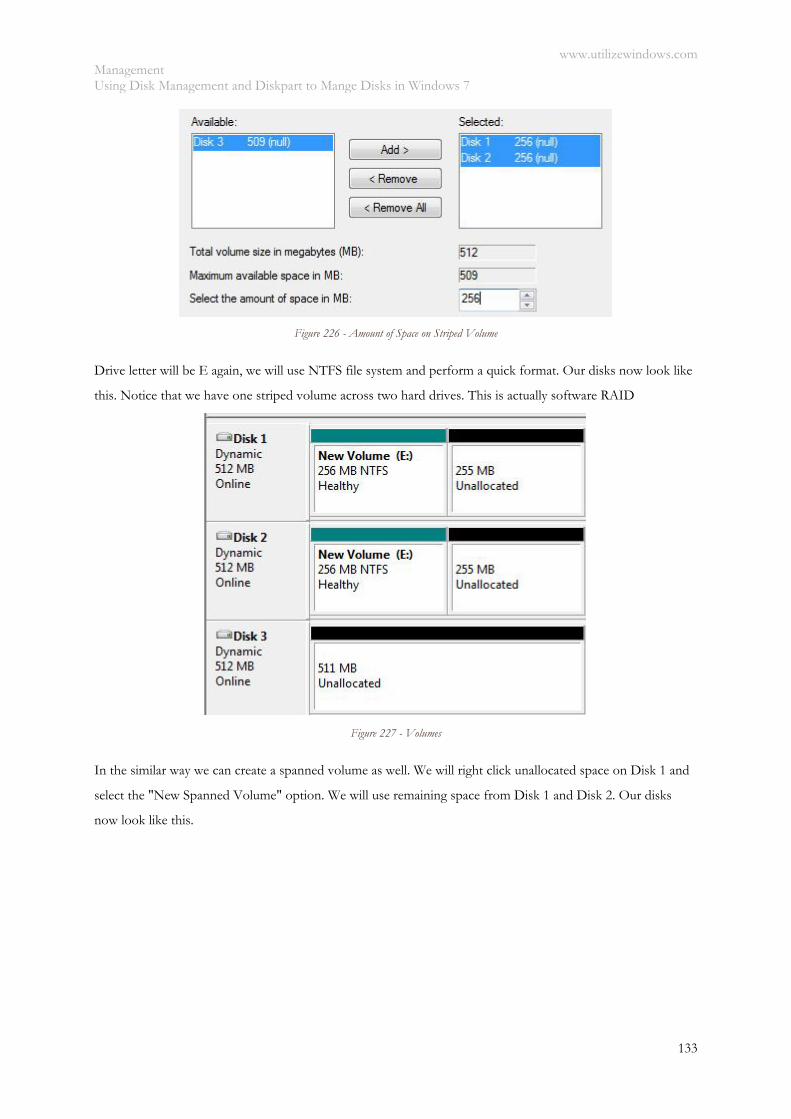
www.utilizewindows.com Management Using Disk Management and Diskpart to Mange Disks in Windows 7
133
Figure 226 - Amount of Space on Striped Volume
Drive letter will be E again, we will use NTFS file system and perform a quick format. Our disks now look like
this. Notice that we have one striped volume across two hard drives. This is actually software RAID
Figure 227 - Volumes
In the similar way we can create a spanned volume as well. We will right click unallocated space on Disk 1 and
select the "New Spanned Volume" option. We will use remaining space from Disk 1 and Disk 2. Our disks
now look like this.

www.utilizewindows.com Management Using Disk Management and Diskpart to Mange Disks in Windows 7
134
Figure 228 - Volumes 2
Let's now create a mirrored volume. As you should know, we have to have two disks available in order to
create this type of volume. We have only one disk left so we will delete our spanned volume for now. Now, we
will select the mirrored volume from the remaining space on Disk 2 and the free space on Disk 3. Notice that
we have to have the same amount of space on both disks. We could not use the whole 512 MB from Disk 3
since we only have 255 MB available on Disk 2. Our disks now look like this (mirrored volume is red).
Figure 229 - Volumes 3
Mirrored volume is fault tolerant. The same information is written to both disks at the same time. That way if
one of the disks dies, we have another one with the same data. Also remember that we can only have two disks
in a mirrored volume. In contrast, striped volume can have more disks.
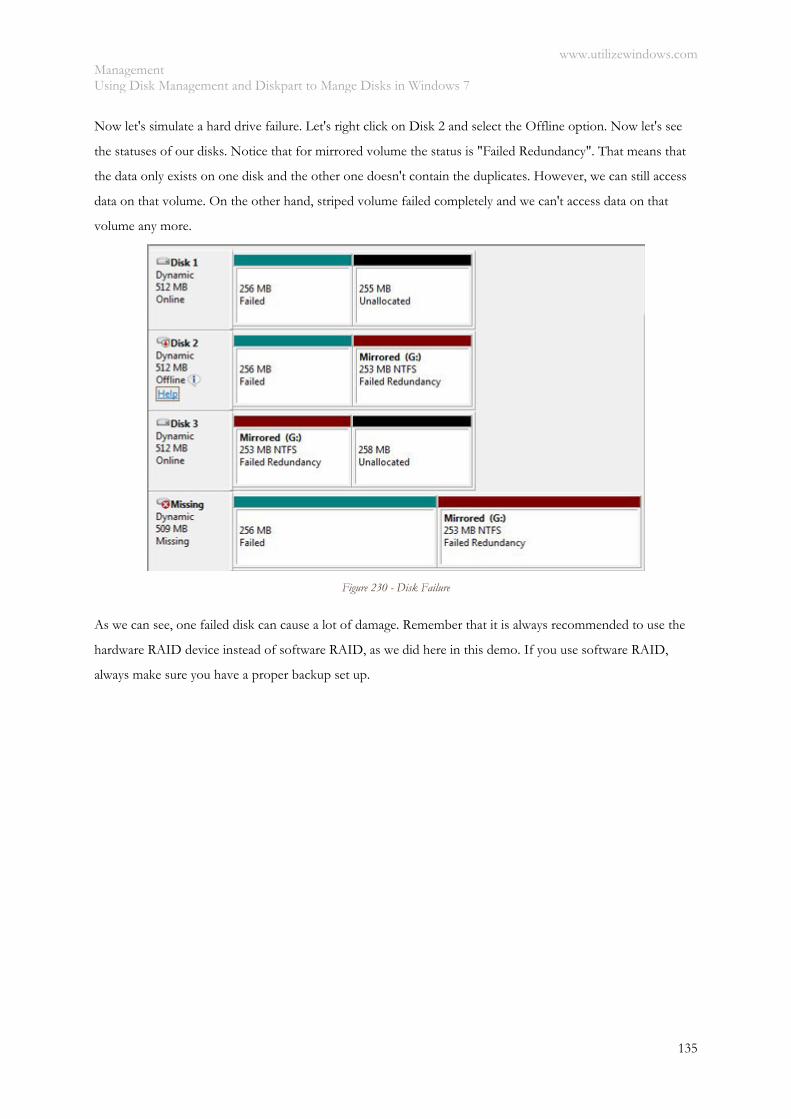
www.utilizewindows.com Management Using Disk Management and Diskpart to Mange Disks in Windows 7
135
Now let's simulate a hard drive failure. Let's right click on Disk 2 and select the Offline option. Now let's see
the statuses of our disks. Notice that for mirrored volume the status is "Failed Redundancy". That means that
the data only exists on one disk and the other one doesn't contain the duplicates. However, we can still access
data on that volume. On the other hand, striped volume failed completely and we can't access data on that
volume any more.
Figure 230 - Disk Failure
As we can see, one failed disk can cause a lot of damage. Remember that it is always recommended to use the
hardware RAID device instead of software RAID, as we did here in this demo. If you use software RAID,
always make sure you have a proper backup set up.
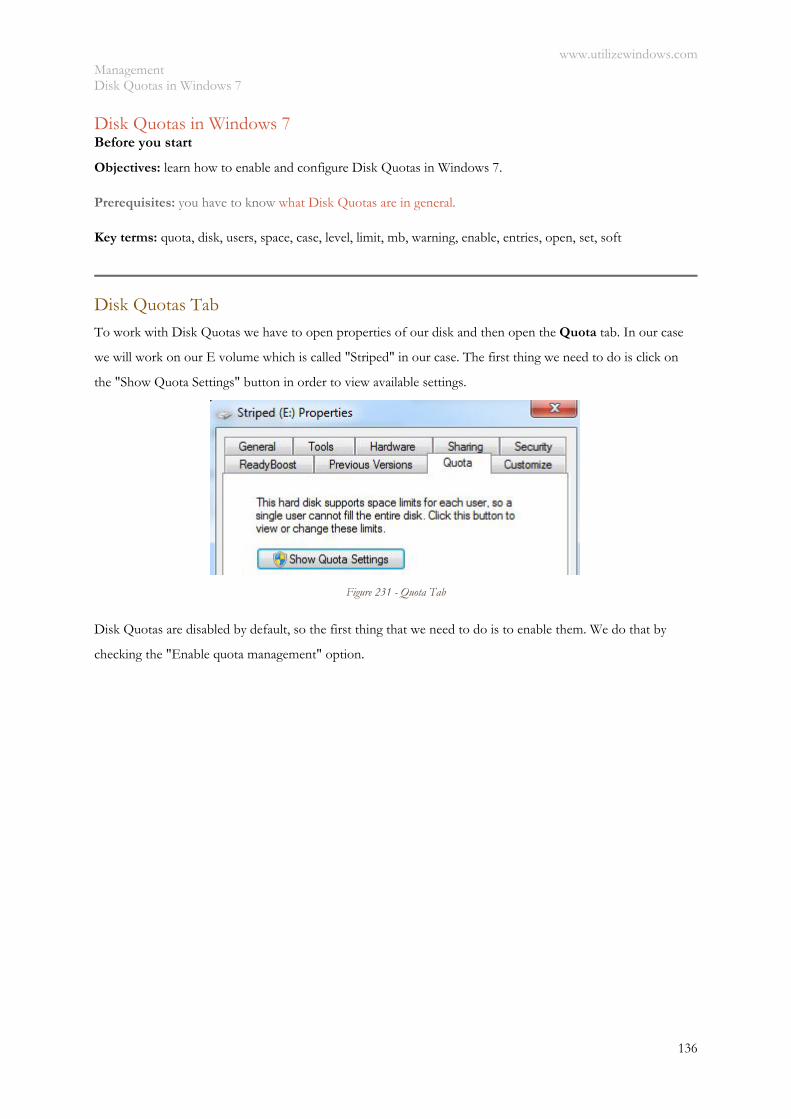
www.utilizewindows.com Management Disk Quotas in Windows 7
136
Disk Quotas in Windows 7 Before you start
Objectives: learn how to enable and configure Disk Quotas in Windows 7.
Prerequisites: you have to know what Disk Quotas are in general.
Key terms: quota, disk, users, space, case, level, limit, mb, warning, enable, entries, open, set, soft
Disk Quotas Tab
To work with Disk Quotas we have to open properties of our disk and then open the Quota tab. In our case
we will work on our E volume which is called "Striped" in our case. The first thing we need to do is click on
the "Show Quota Settings" button in order to view available settings.
Figure 231 - Quota Tab
Disk Quotas are disabled by default, so the first thing that we need to do is to enable them. We do that by
checking the "Enable quota management" option.
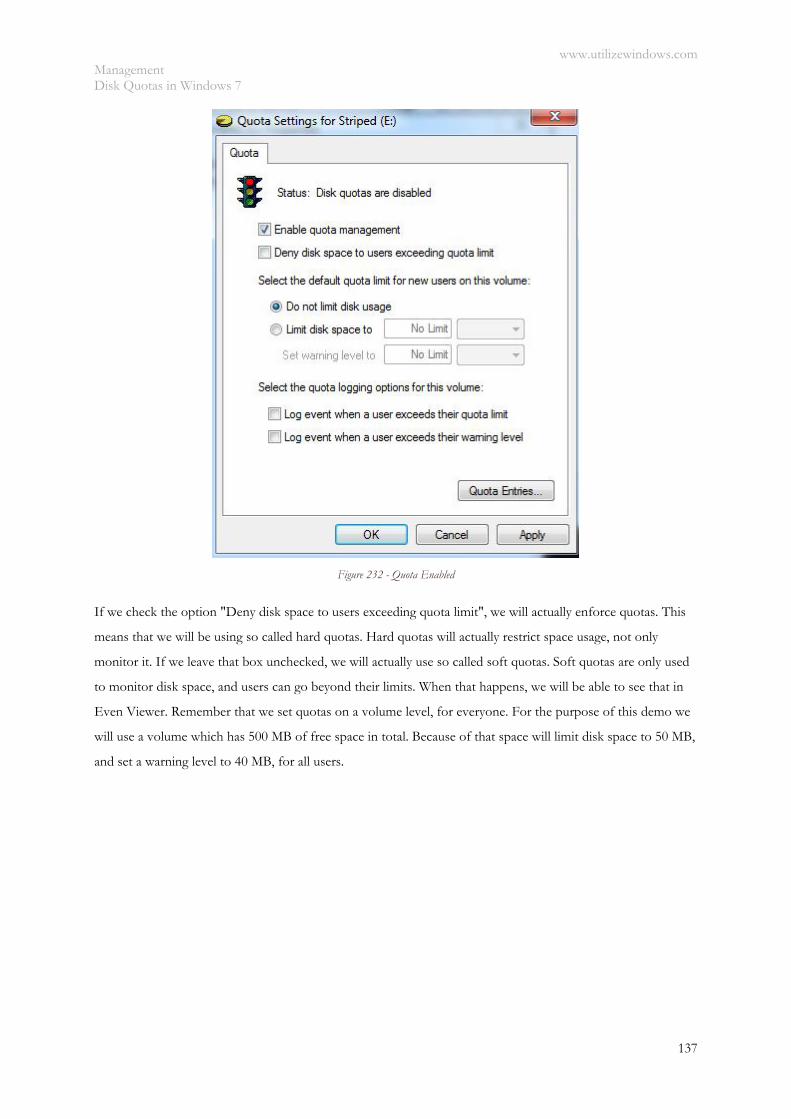
www.utilizewindows.com Management Disk Quotas in Windows 7
137
Figure 232 - Quota Enabled
If we check the option "Deny disk space to users exceeding quota limit", we will actually enforce quotas. This
means that we will be using so called hard quotas. Hard quotas will actually restrict space usage, not only
monitor it. If we leave that box unchecked, we will actually use so called soft quotas. Soft quotas are only used
to monitor disk space, and users can go beyond their limits. When that happens, we will be able to see that in
Even Viewer. Remember that we set quotas on a volume level, for everyone. For the purpose of this demo we
will use a volume which has 500 MB of free space in total. Because of that space will limit disk space to 50 MB,
and set a warning level to 40 MB, for all users.
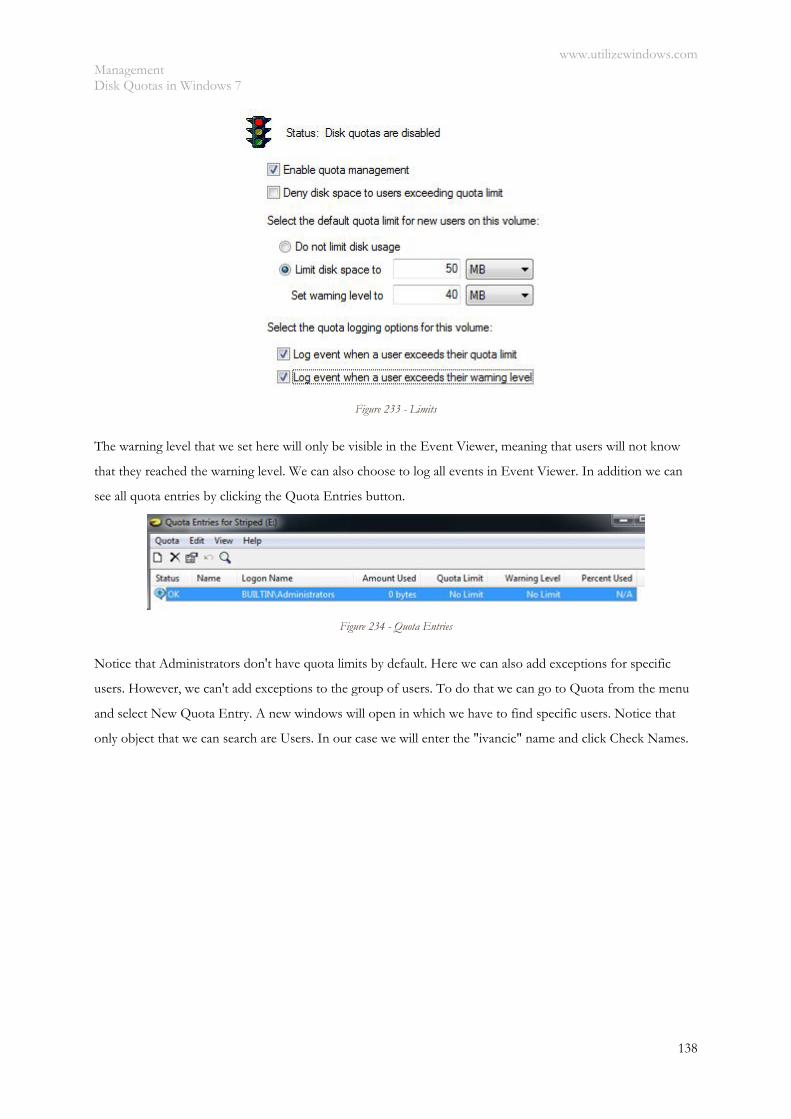
www.utilizewindows.com Management Disk Quotas in Windows 7
138
Figure 233 - Limits
The warning level that we set here will only be visible in the Event Viewer, meaning that users will not know
that they reached the warning level. We can also choose to log all events in Event Viewer. In addition we can
see all quota entries by clicking the Quota Entries button.
Figure 234 - Quota Entries
Notice that Administrators don't have quota limits by default. Here we can also add exceptions for specific
users. However, we can't add exceptions to the group of users. To do that we can go to Quota from the menu
and select New Quota Entry. A new windows will open in which we have to find specific users. Notice that
only object that we can search are Users. In our case we will enter the "ivancic" name and click Check Names.

www.utilizewindows.com Management Disk Quotas in Windows 7
139
Figure 235 - User Selection
When we click OK, we will get a new windows in which we will be able to choose if we want to limit disk
usage or not. In our case we won't limit the disk usage, since this is an exception to the quota limits that we
want to use for other users.
Figure 236 - ivancic Quota Limit
All other, new users will have new disk quotas applied, which is in our case 50 MB (40 MB warning level). Note
that in our case we have enabled soft quotas (tracking only).
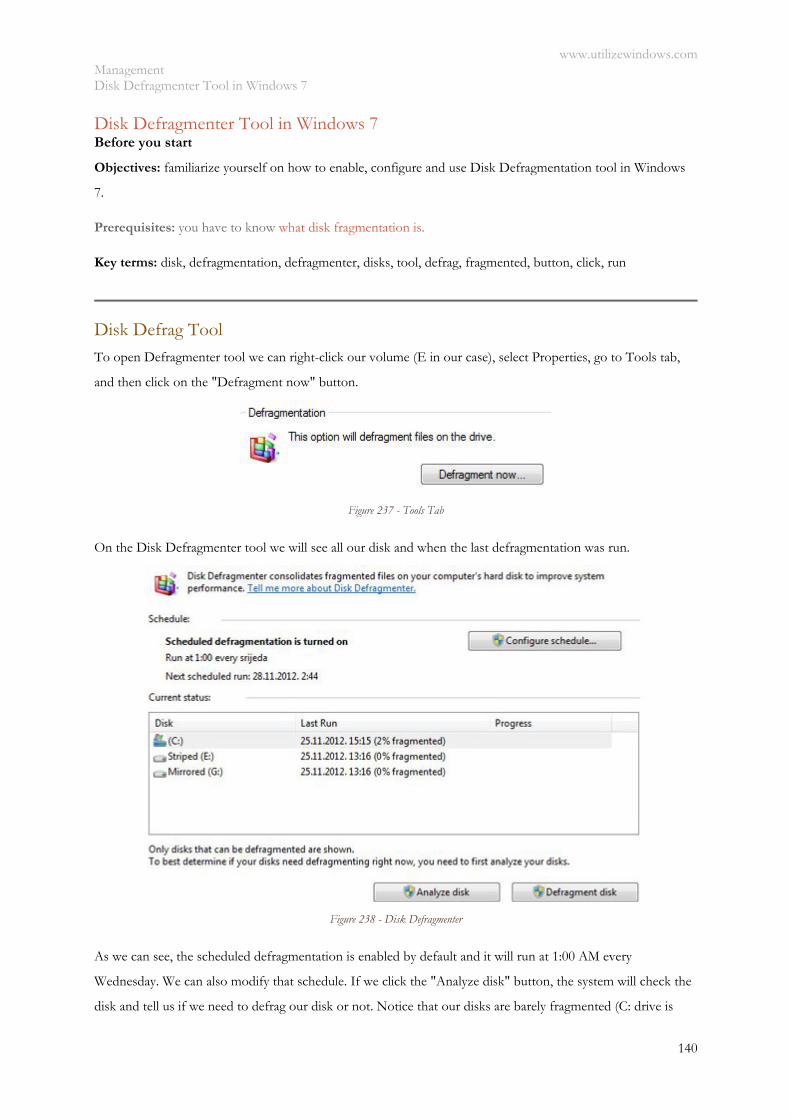
www.utilizewindows.com Management Disk Defragmenter Tool in Windows 7
140
Disk Defragmenter Tool in Windows 7 Before you start
Objectives: familiarize yourself on how to enable, configure and use Disk Defragmentation tool in Windows
7.
Prerequisites: you have to know what disk fragmentation is.
Key terms: disk, defragmentation, defragmenter, disks, tool, defrag, fragmented, button, click, run
Disk Defrag Tool To open Defragmenter tool we can right-click our volume (E in our case), select Properties, go to Tools tab,
and then click on the "Defragment now" button.
Figure 237 - Tools Tab
On the Disk Defragmenter tool we will see all our disk and when the last defragmentation was run.
Figure 238 - Disk Defragmenter
As we can see, the scheduled defragmentation is enabled by default and it will run at 1:00 AM every
Wednesday. We can also modify that schedule. If we click the "Analyze disk" button, the system will check the
disk and tell us if we need to defrag our disk or not. Notice that our disks are barely fragmented (C: drive is

www.utilizewindows.com Management Disk Defragmenter Tool in Windows 7
141
only 2% fragmented), which is great and we don't need to run defragmenter in our case. To defrag the disk we
can simply select it from the list and click on the "Defragment disk" button. Defragmentation can take a very
short time if the fragmentation is small or it can take up to several hours if the disk is big and badly
fragmented.
Remember that some files, like certain system can't be moved during the defragmentation process. Also,
network drives cannot be defragmented. By default, Windows 7 defragments our disks automatically. We can
also use defrag command in command line to defragment our disks.
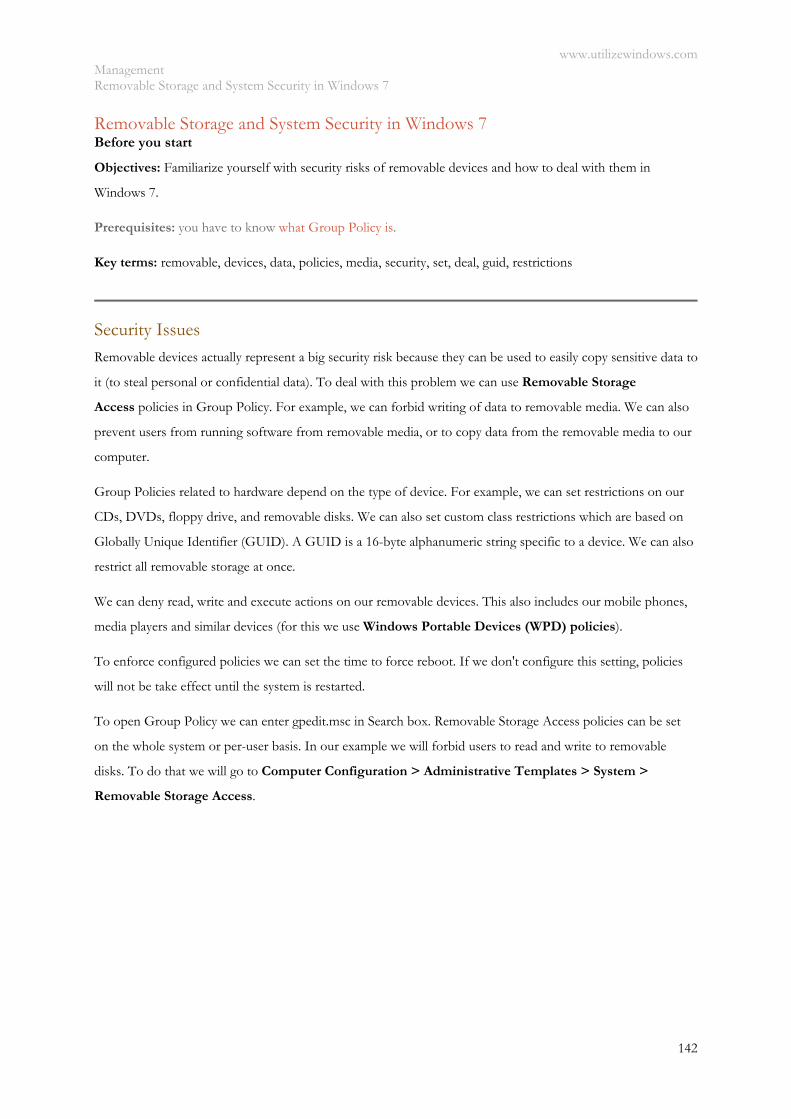
www.utilizewindows.com Management Removable Storage and System Security in Windows 7
142
Removable Storage and System Security in Windows 7 Before you start
Objectives: Familiarize yourself with security risks of removable devices and how to deal with them in
Windows 7.
Prerequisites: you have to know what Group Policy is.
Key terms: removable, devices, data, policies, media, security, set, deal, guid, restrictions
Security Issues Removable devices actually represent a big security risk because they can be used to easily copy sensitive data to
it (to steal personal or confidential data). To deal with this problem we can use Removable Storage
Access policies in Group Policy. For example, we can forbid writing of data to removable media. We can also
prevent users from running software from removable media, or to copy data from the removable media to our
computer.
Group Policies related to hardware depend on the type of device. For example, we can set restrictions on our
CDs, DVDs, floppy drive, and removable disks. We can also set custom class restrictions which are based on
Globally Unique Identifier (GUID). A GUID is a 16-byte alphanumeric string specific to a device. We can also
restrict all removable storage at once.
We can deny read, write and execute actions on our removable devices. This also includes our mobile phones,
media players and similar devices (for this we use Windows Portable Devices (WPD) policies).
To enforce configured policies we can set the time to force reboot. If we don't configure this setting, policies
will not be take effect until the system is restarted.
To open Group Policy we can enter gpedit.msc in Search box. Removable Storage Access policies can be set
on the whole system or per-user basis. In our example we will forbid users to read and write to removable
disks. To do that we will go to Computer Configuration > Administrative Templates > System >
Removable Storage Access.
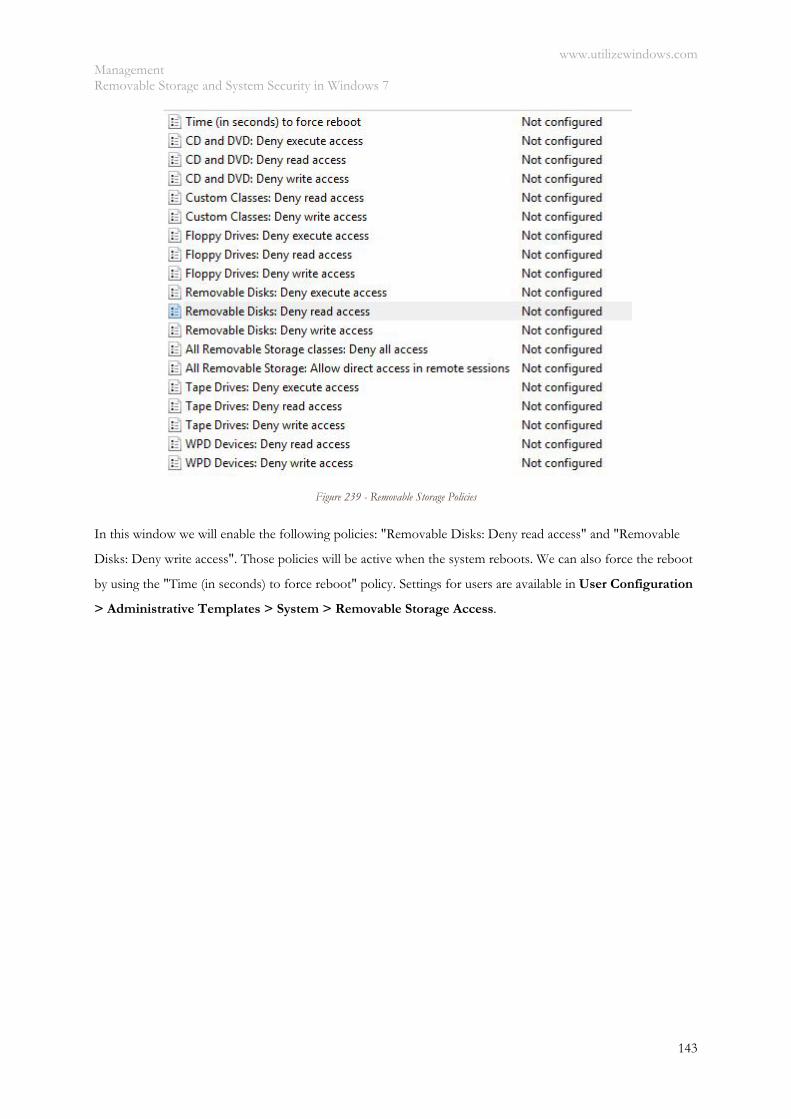
www.utilizewindows.com Management Removable Storage and System Security in Windows 7
143
Figure 239 - Removable Storage Policies
In this window we will enable the following policies: "Removable Disks: Deny read access" and "Removable
Disks: Deny write access". Those policies will be active when the system reboots. We can also force the reboot
by using the "Time (in seconds) to force reboot" policy. Settings for users are available in User Configuration
> Administrative Templates > System > Removable Storage Access.
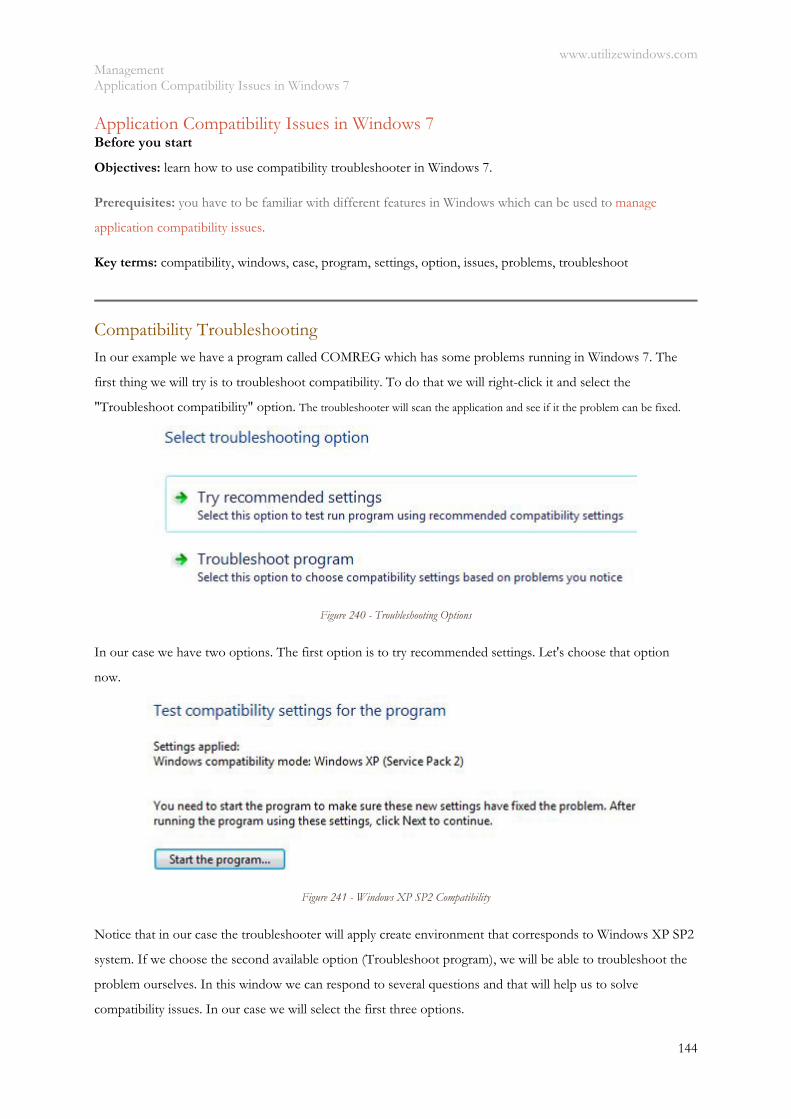
www.utilizewindows.com Management Application Compatibility Issues in Windows 7
144
Application Compatibility Issues in Windows 7 Before you start
Objectives: learn how to use compatibility troubleshooter in Windows 7.
Prerequisites: you have to be familiar with different features in Windows which can be used to manage
application compatibility issues.
Key terms: compatibility, windows, case, program, settings, option, issues, problems, troubleshoot
Compatibility Troubleshooting In our example we have a program called COMREG which has some problems running in Windows 7. The
first thing we will try is to troubleshoot compatibility. To do that we will right-click it and select the
"Troubleshoot compatibility" option. The troubleshooter will scan the application and see if it the problem can be fixed.
Figure 240 - Troubleshooting Options
In our case we have two options. The first option is to try recommended settings. Let's choose that option
now.
Figure 241 - Windows XP SP2 Compatibility
Notice that in our case the troubleshooter will apply create environment that corresponds to Windows XP SP2
system. If we choose the second available option (Troubleshoot program), we will be able to troubleshoot the
problem ourselves. In this window we can respond to several questions and that will help us to solve
compatibility issues. In our case we will select the first three options.
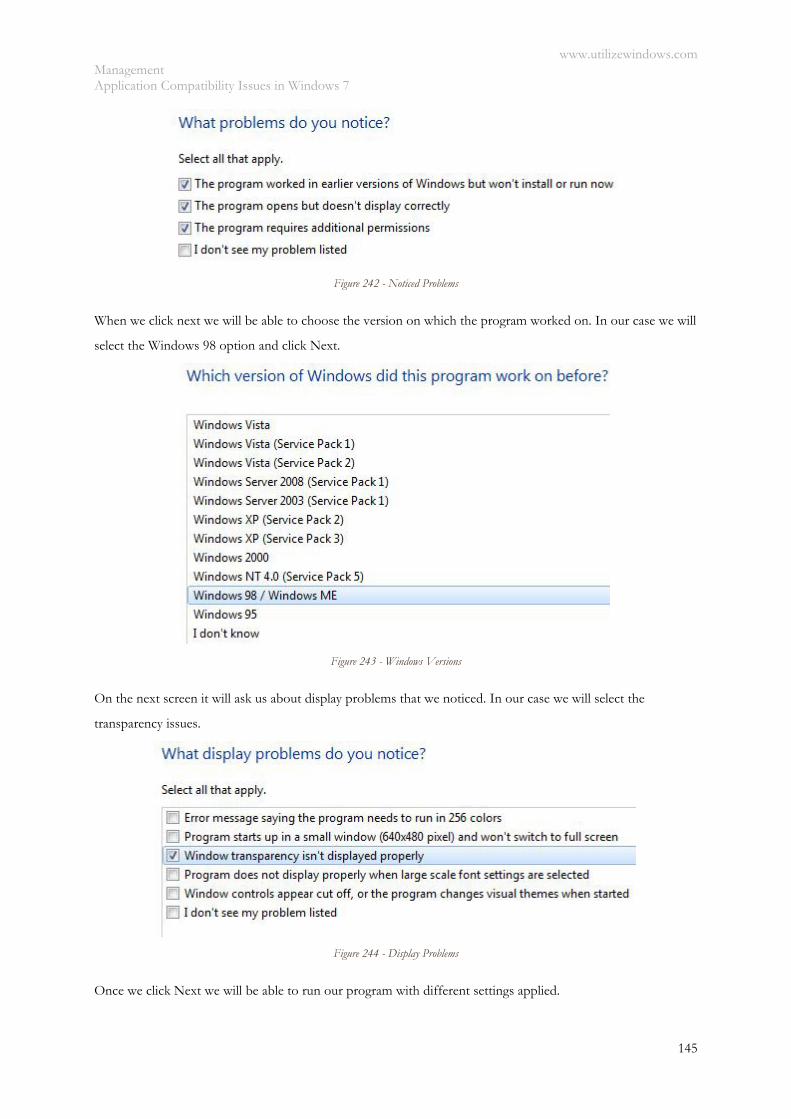
www.utilizewindows.com Management Application Compatibility Issues in Windows 7
145
Figure 242 - Noticed Problems
When we click next we will be able to choose the version on which the program worked on. In our case we will
select the Windows 98 option and click Next.
Figure 243 - Windows Versions
On the next screen it will ask us about display problems that we noticed. In our case we will select the
transparency issues.
Figure 244 - Display Problems
Once we click Next we will be able to run our program with different settings applied.
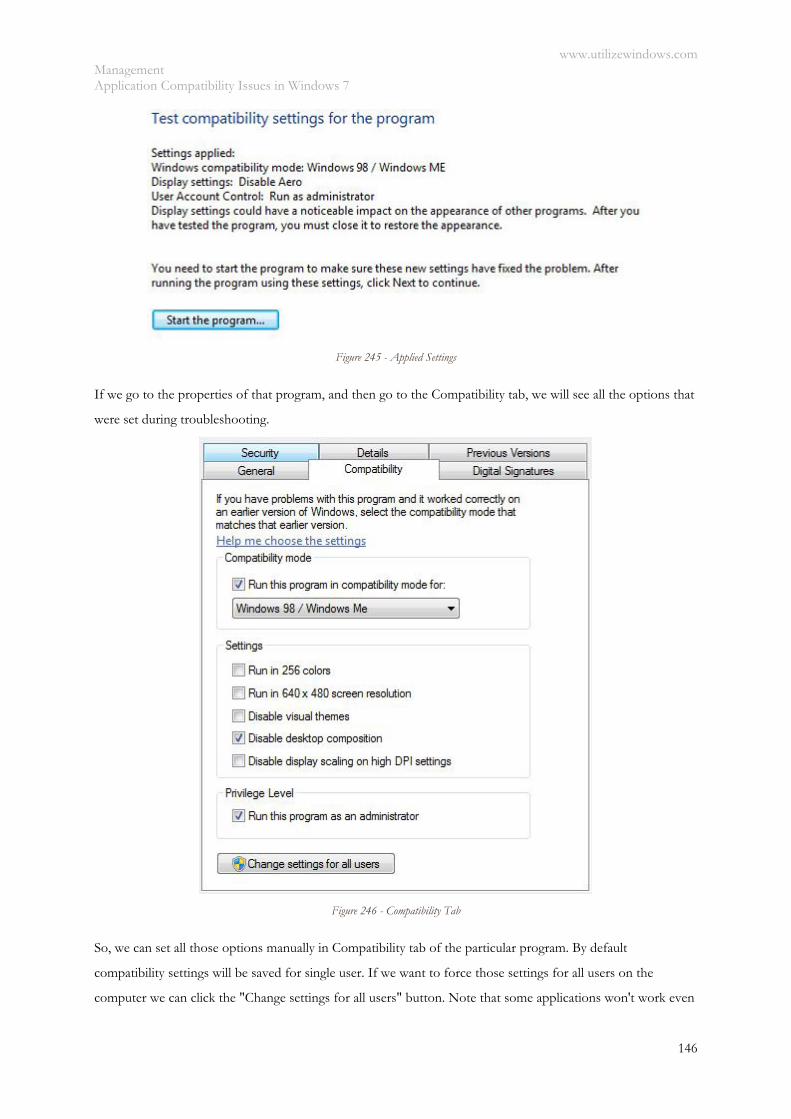
www.utilizewindows.com Management Application Compatibility Issues in Windows 7
146
Figure 245 - Applied Settings
If we go to the properties of that program, and then go to the Compatibility tab, we will see all the options that
were set during troubleshooting.
Figure 246 - Compatibility Tab
So, we can set all those options manually in Compatibility tab of the particular program. By default
compatibility settings will be saved for single user. If we want to force those settings for all users on the
computer we can click the "Change settings for all users" button. Note that some applications won't work even

www.utilizewindows.com Management Application Compatibility Issues in Windows 7
147
if we set compatibility modes. If that is the case we can take advantage of the Windows XP Mode in Windows
7, which is actually a virtual Windows XP machine.
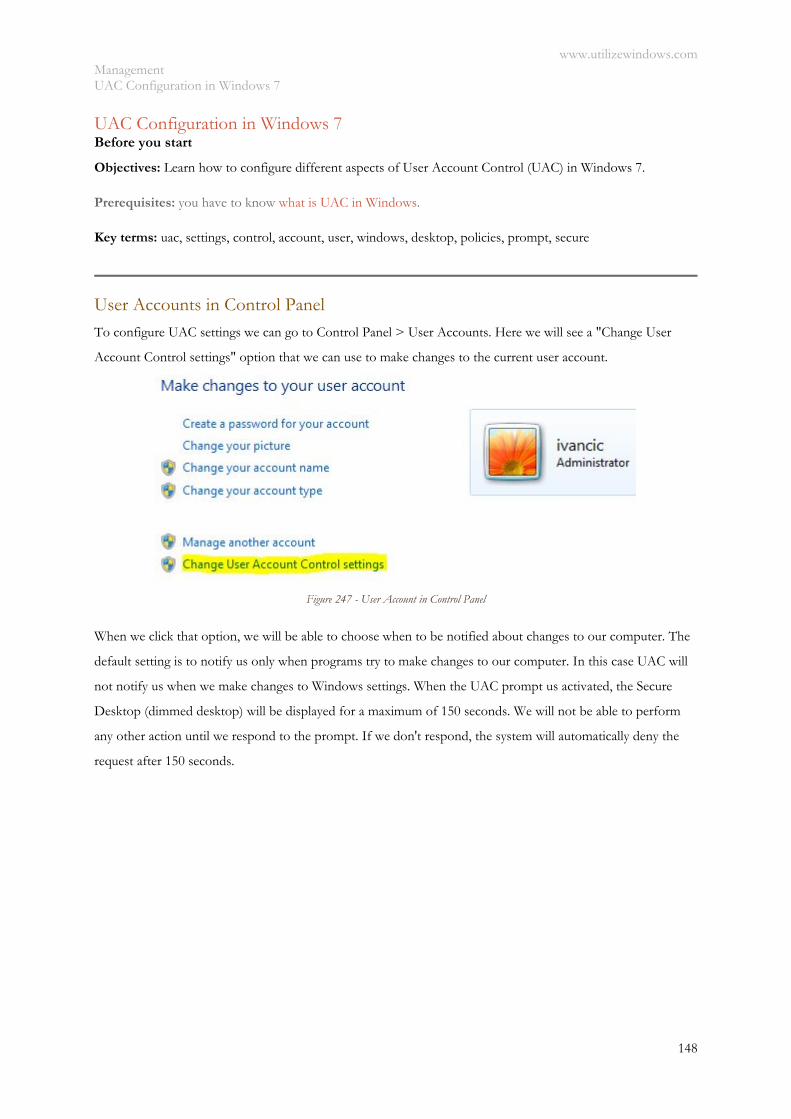
www.utilizewindows.com Management UAC Configuration in Windows 7
148
UAC Configuration in Windows 7 Before you start
Objectives: Learn how to configure different aspects of User Account Control (UAC) in Windows 7.
Prerequisites: you have to know what is UAC in Windows.
Key terms: uac, settings, control, account, user, windows, desktop, policies, prompt, secure
User Accounts in Control Panel
To configure UAC settings we can go to Control Panel > User Accounts. Here we will see a "Change User
Account Control settings" option that we can use to make changes to the current user account.
Figure 247 - User Account in Control Panel
When we click that option, we will be able to choose when to be notified about changes to our computer. The
default setting is to notify us only when programs try to make changes to our computer. In this case UAC will
not notify us when we make changes to Windows settings. When the UAC prompt us activated, the Secure
Desktop (dimmed desktop) will be displayed for a maximum of 150 seconds. We will not be able to perform
any other action until we respond to the prompt. If we don't respond, the system will automatically deny the
request after 150 seconds.
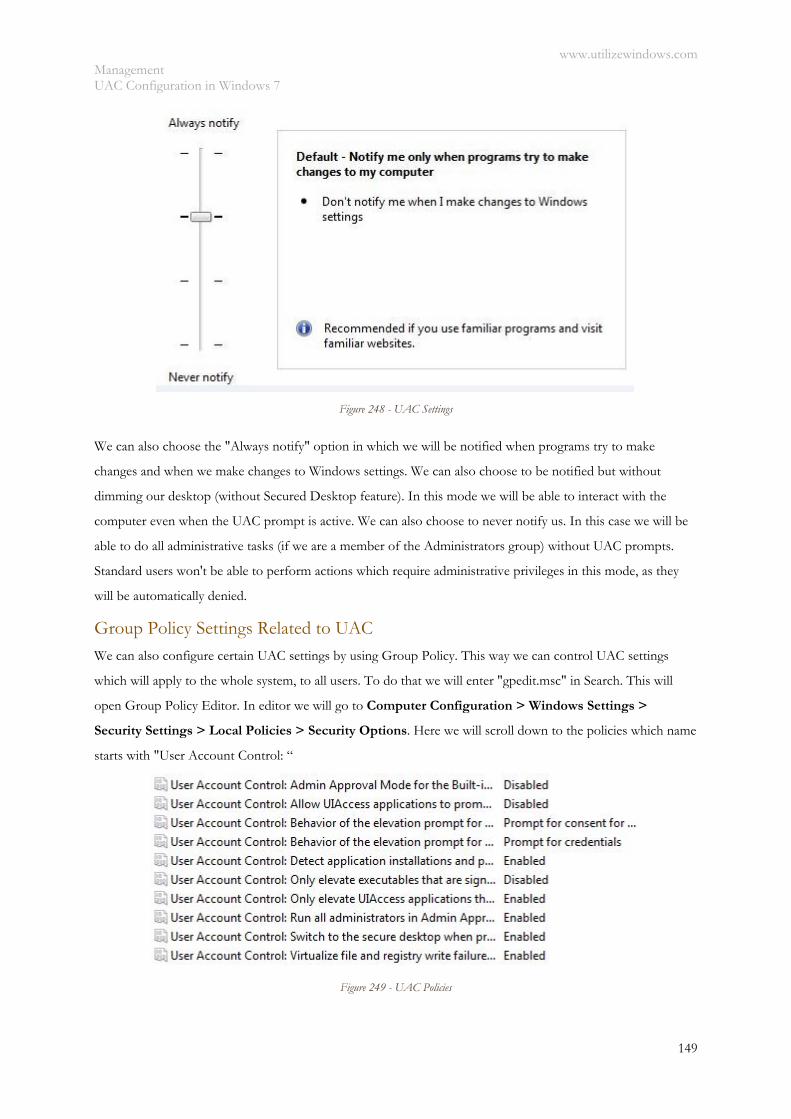
www.utilizewindows.com Management UAC Configuration in Windows 7
149
Figure 248 - UAC Settings
We can also choose the "Always notify" option in which we will be notified when programs try to make
changes and when we make changes to Windows settings. We can also choose to be notified but without
dimming our desktop (without Secured Desktop feature). In this mode we will be able to interact with the
computer even when the UAC prompt is active. We can also choose to never notify us. In this case we will be
able to do all administrative tasks (if we are a member of the Administrators group) without UAC prompts.
Standard users won't be able to perform actions which require administrative privileges in this mode, as they
will be automatically denied.
Group Policy Settings Related to UAC
We can also configure certain UAC settings by using Group Policy. This way we can control UAC settings
which will apply to the whole system, to all users. To do that we will enter "gpedit.msc" in Search. This will
open Group Policy Editor. In editor we will go to Computer Configuration > Windows Settings >
Security Settings > Local Policies > Security Options. Here we will scroll down to the policies which name
starts with "User Account Control: “
Figure 249 - UAC Policies
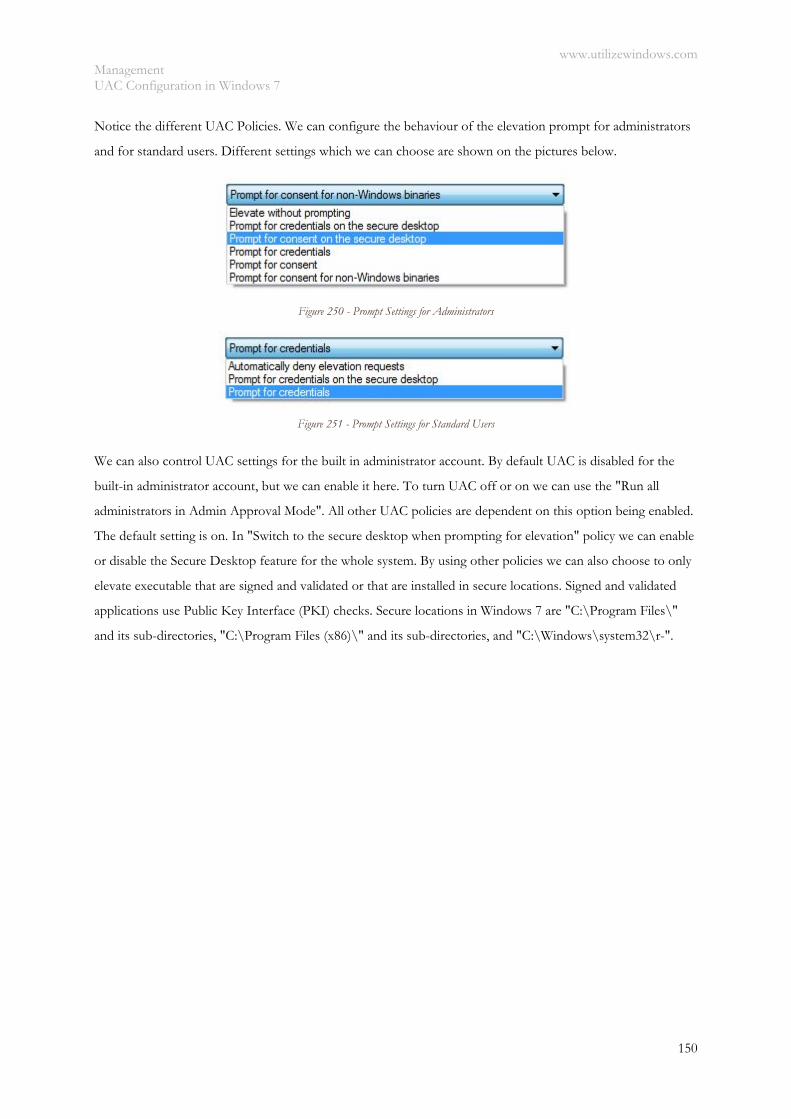
www.utilizewindows.com Management UAC Configuration in Windows 7
150
Notice the different UAC Policies. We can configure the behaviour of the elevation prompt for administrators
and for standard users. Different settings which we can choose are shown on the pictures below.
Figure 250 - Prompt Settings for Administrators
Figure 251 - Prompt Settings for Standard Users
We can also control UAC settings for the built in administrator account. By default UAC is disabled for the
built-in administrator account, but we can enable it here. To turn UAC off or on we can use the "Run all
administrators in Admin Approval Mode". All other UAC policies are dependent on this option being enabled.
The default setting is on. In "Switch to the secure desktop when prompting for elevation" policy we can enable
or disable the Secure Desktop feature for the whole system. By using other policies we can also choose to only
elevate executable that are signed and validated or that are installed in secure locations. Signed and validated
applications use Public Key Interface (PKI) checks. Secure locations in Windows 7 are "C:\Program Files\"
and its sub-directories, "C:\Program Files (x86)\" and its sub-directories, and "C:\Windows\system32\r-".
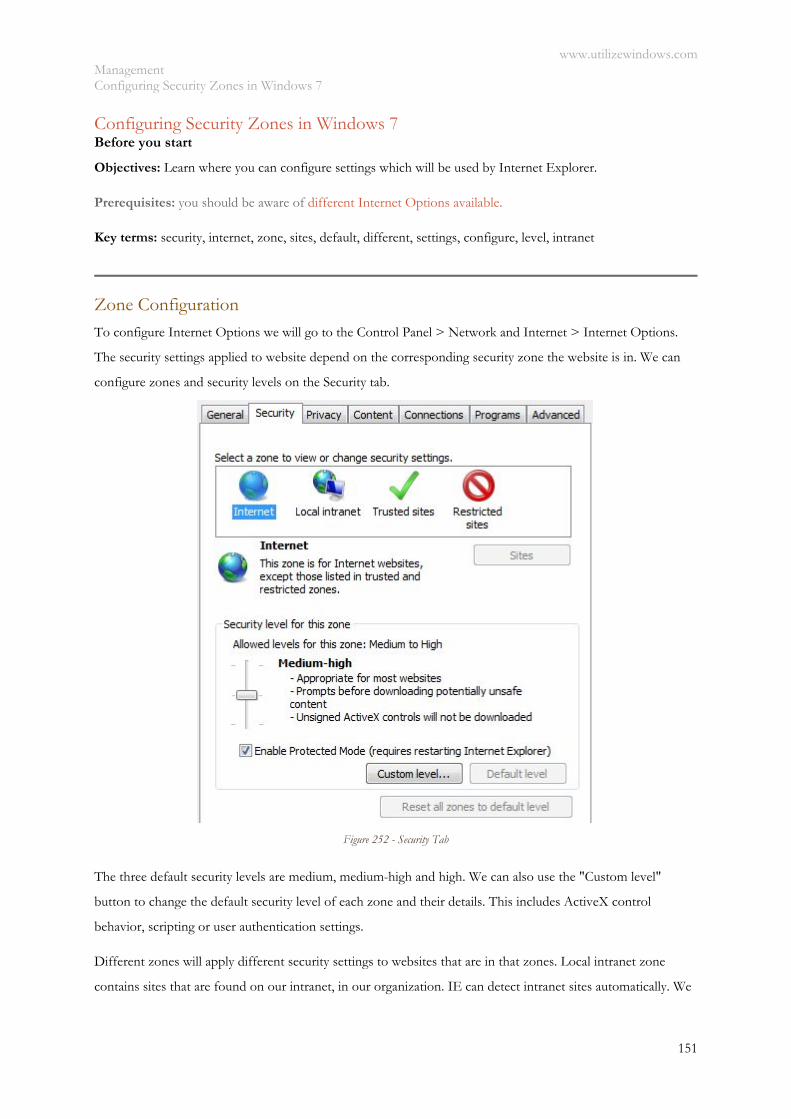
www.utilizewindows.com Management Configuring Security Zones in Windows 7
151
Configuring Security Zones in Windows 7 Before you start
Objectives: Learn where you can configure settings which will be used by Internet Explorer.
Prerequisites: you should be aware of different Internet Options available.
Key terms: security, internet, zone, sites, default, different, settings, configure, level, intranet
Zone Configuration
To configure Internet Options we will go to the Control Panel > Network and Internet > Internet Options.
The security settings applied to website depend on the corresponding security zone the website is in. We can
configure zones and security levels on the Security tab.
Figure 252 - Security Tab
The three default security levels are medium, medium-high and high. We can also use the "Custom level"
button to change the default security level of each zone and their details. This includes ActiveX control
behavior, scripting or user authentication settings.
Different zones will apply different security settings to websites that are in that zones. Local intranet zone
contains sites that are found on our intranet, in our organization. IE can detect intranet sites automatically. We
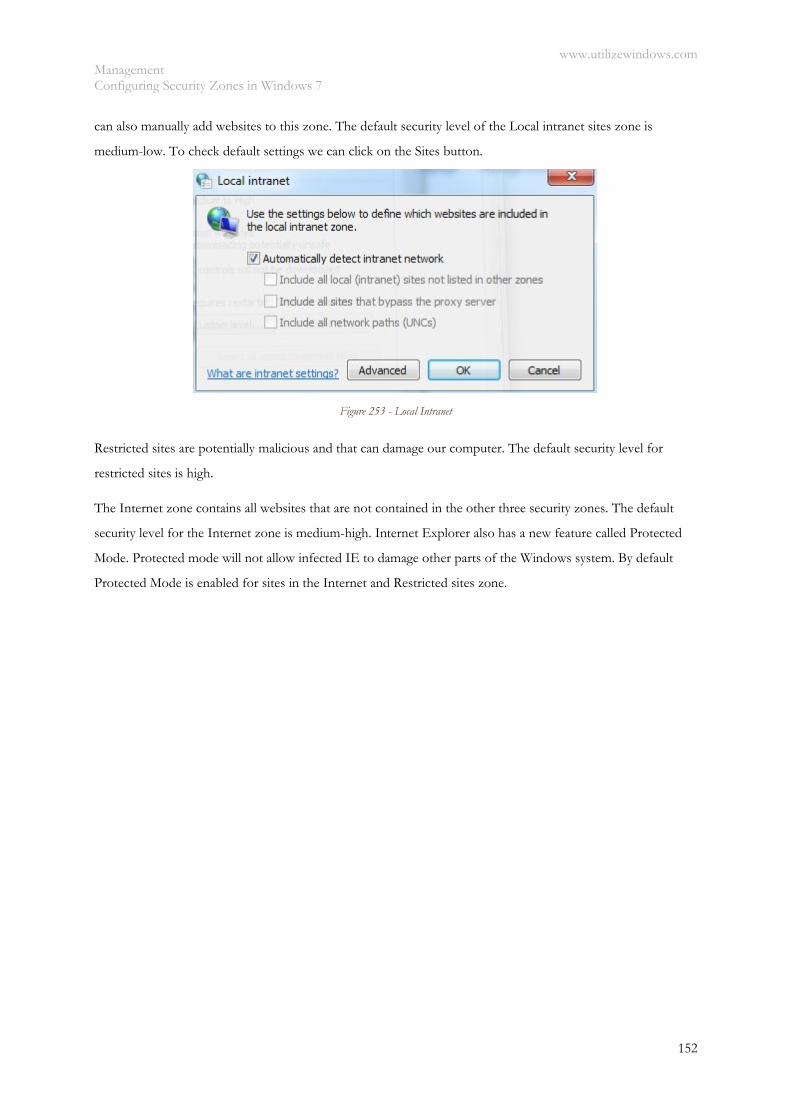
www.utilizewindows.com Management Configuring Security Zones in Windows 7
152
can also manually add websites to this zone. The default security level of the Local intranet sites zone is
medium-low. To check default settings we can click on the Sites button.
Figure 253 - Local Intranet
Restricted sites are potentially malicious and that can damage our computer. The default security level for
restricted sites is high.
The Internet zone contains all websites that are not contained in the other three security zones. The default
security level for the Internet zone is medium-high. Internet Explorer also has a new feature called Protected
Mode. Protected mode will not allow infected IE to damage other parts of the Windows system. By default
Protected Mode is enabled for sites in the Internet and Restricted sites zone.
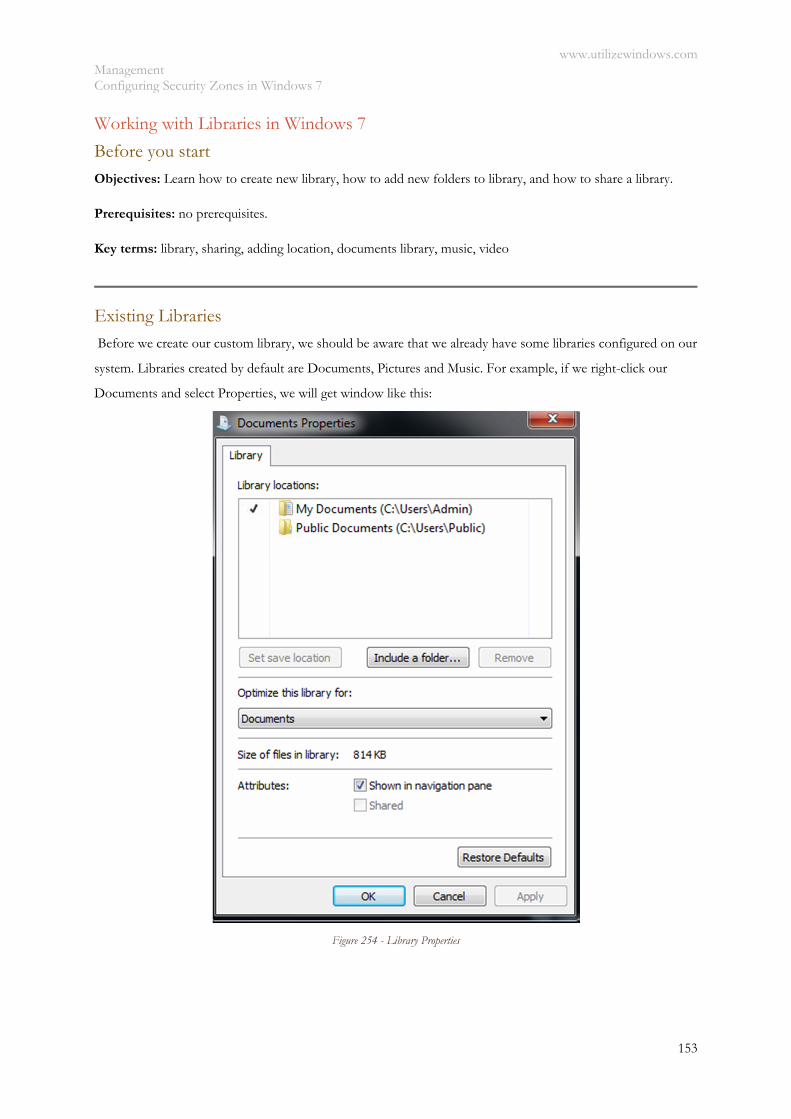
www.utilizewindows.com Management Configuring Security Zones in Windows 7
153
Working with Libraries in Windows 7
Before you start
Objectives: Learn how to create new library, how to add new folders to library, and how to share a library.
Prerequisites: no prerequisites.
Key terms: library, sharing, adding location, documents library, music, video
Existing Libraries Before we create our custom library, we should be aware that we already have some libraries configured on our
system. Libraries created by default are Documents, Pictures and Music. For example, if we right-click our
Documents and select Properties, we will get window like this:
Figure 254 - Library Properties
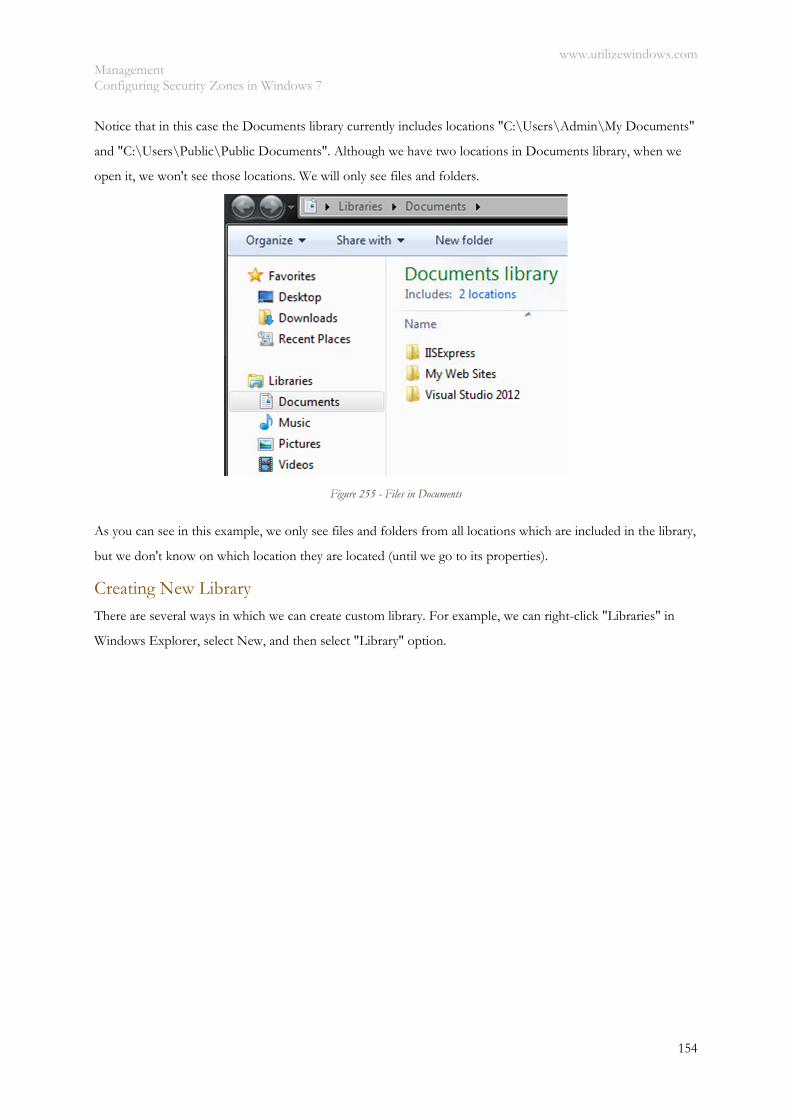
www.utilizewindows.com Management Configuring Security Zones in Windows 7
154
Notice that in this case the Documents library currently includes locations "C:\Users\Admin\My Documents"
and "C:\Users\Public\Public Documents". Although we have two locations in Documents library, when we
open it, we won't see those locations. We will only see files and folders.
Figure 255 - Files in Documents
As you can see in this example, we only see files and folders from all locations which are included in the library,
but we don't know on which location they are located (until we go to its properties).
Creating New Library
There are several ways in which we can create custom library. For example, we can right-click "Libraries" in
Windows Explorer, select New, and then select "Library" option.

www.utilizewindows.com Management Configuring Security Zones in Windows 7
155
Figure 256 - Creating New Library
When we do that, we will be able to change the name of the Library. In our case we will simply leave it New
Library.
Figure 257 - New Library
When the name is set, we can select our new library. Since we didn't include and folders in this library, we will
be prompted to include a folder.
Figure 258 - Include a Folder
The second way to create a library is to right-click some existing folder which we want to have in our library,
and then select the "Include in library" option, and then "Create new library" option. For the purpose of this
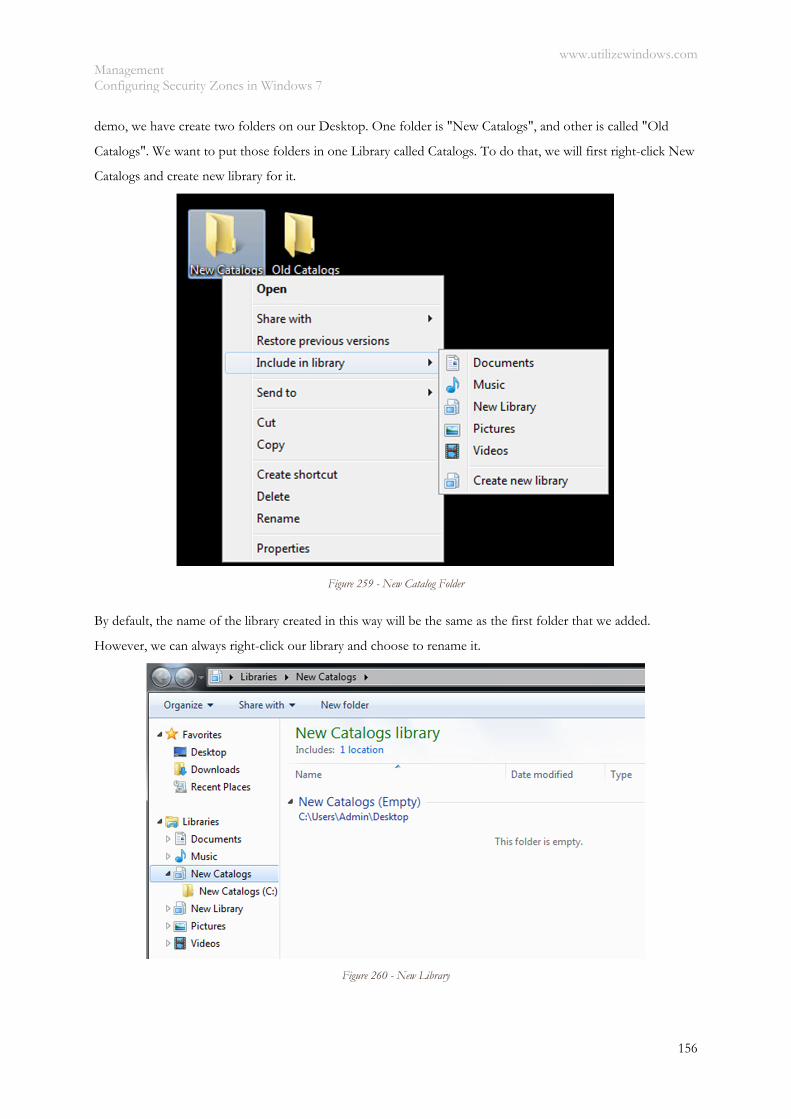
www.utilizewindows.com Management Configuring Security Zones in Windows 7
156
demo, we have create two folders on our Desktop. One folder is "New Catalogs", and other is called "Old
Catalogs". We want to put those folders in one Library called Catalogs. To do that, we will first right-click New
Catalogs and create new library for it.
Figure 259 - New Catalog Folder
By default, the name of the library created in this way will be the same as the first folder that we added.
However, we can always right-click our library and choose to rename it.
Figure 260 - New Library
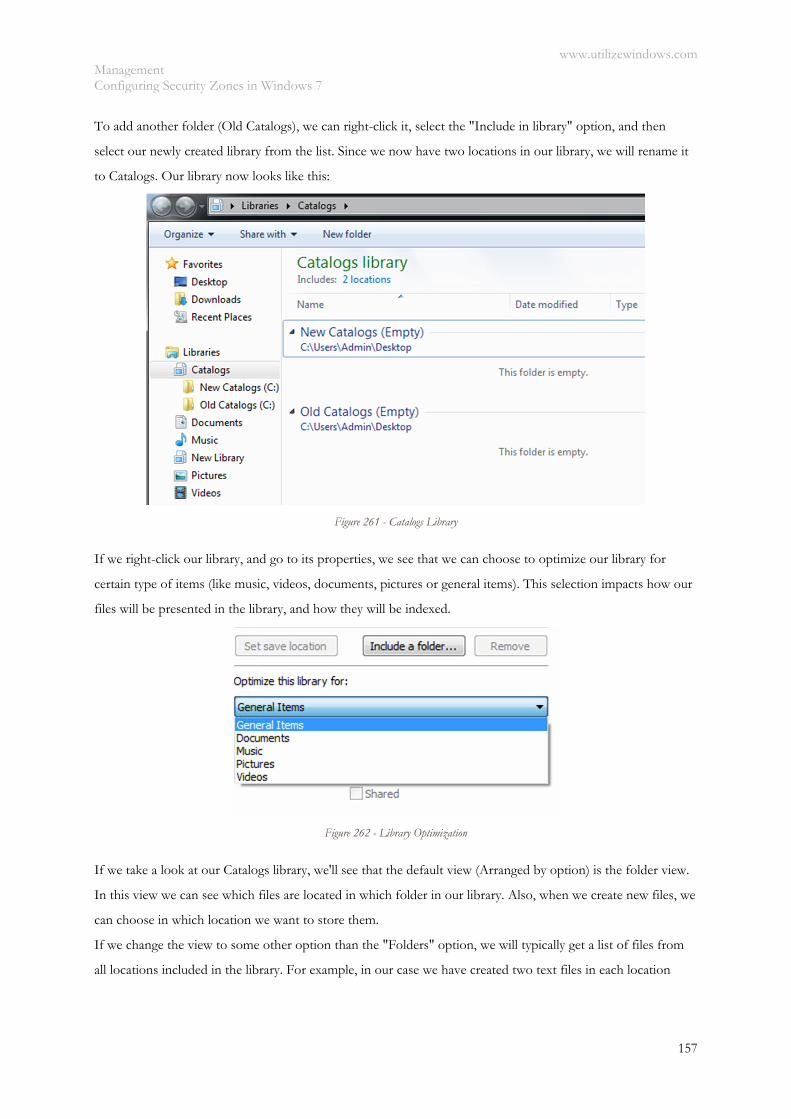
www.utilizewindows.com Management Configuring Security Zones in Windows 7
157
To add another folder (Old Catalogs), we can right-click it, select the "Include in library" option, and then
select our newly created library from the list. Since we now have two locations in our library, we will rename it
to Catalogs. Our library now looks like this:
Figure 261 - Catalogs Library
If we right-click our library, and go to its properties, we see that we can choose to optimize our library for
certain type of items (like music, videos, documents, pictures or general items). This selection impacts how our
files will be presented in the library, and how they will be indexed.
Figure 262 - Library Optimization
If we take a look at our Catalogs library, we'll see that the default view (Arranged by option) is the folder view.
In this view we can see which files are located in which folder in our library. Also, when we create new files, we
can choose in which location we want to store them.
If we change the view to some other option than the "Folders" option, we will typically get a list of files from
all locations included in the library. For example, in our case we have created two text files in each location
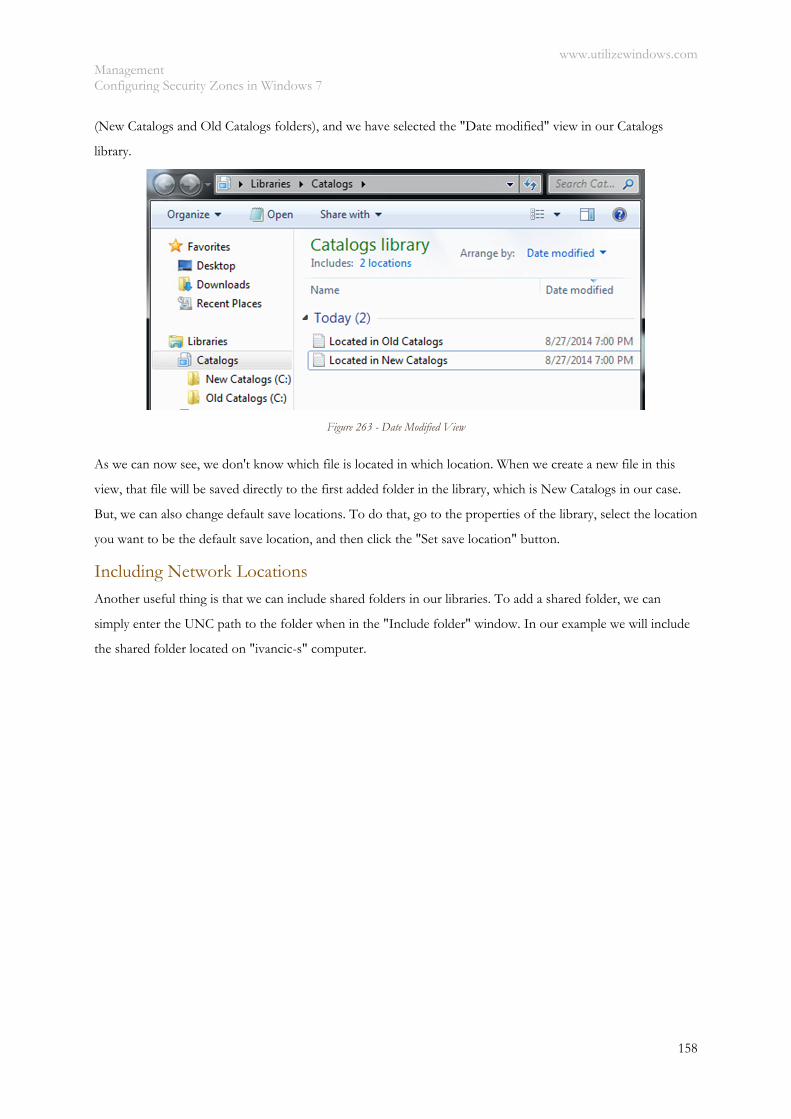
www.utilizewindows.com Management Configuring Security Zones in Windows 7
158
(New Catalogs and Old Catalogs folders), and we have selected the "Date modified" view in our Catalogs
library.
Figure 263 - Date Modified View
As we can now see, we don't know which file is located in which location. When we create a new file in this
view, that file will be saved directly to the first added folder in the library, which is New Catalogs in our case.
But, we can also change default save locations. To do that, go to the properties of the library, select the location
you want to be the default save location, and then click the "Set save location" button.
Including Network Locations Another useful thing is that we can include shared folders in our libraries. To add a shared folder, we can
simply enter the UNC path to the folder when in the "Include folder" window. In our example we will include
the shared folder located on "ivancic-s" computer.
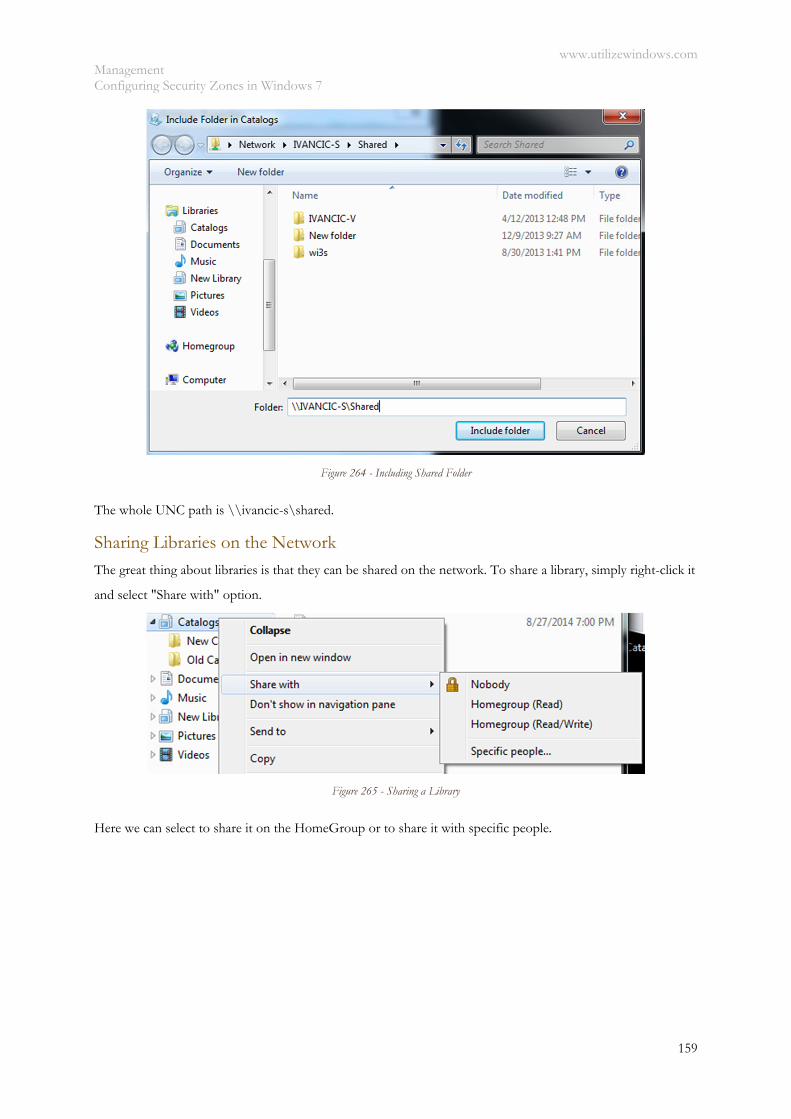
www.utilizewindows.com Management Configuring Security Zones in Windows 7
159
Figure 264 - Including Shared Folder
The whole UNC path is \\ivancic-s\shared.
Sharing Libraries on the Network
The great thing about libraries is that they can be shared on the network. To share a library, simply right-click it
and select "Share with" option.
Figure 265 - Sharing a Library
Here we can select to share it on the HomeGroup or to share it with specific people.
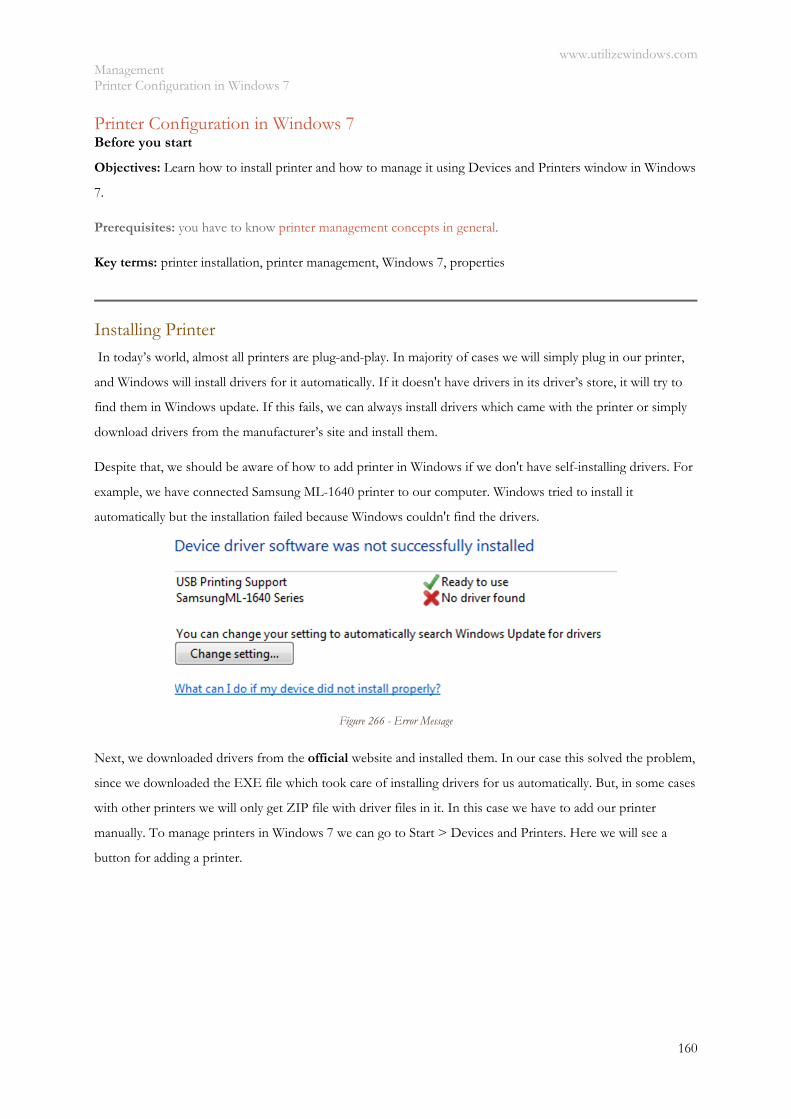
www.utilizewindows.com Management Printer Configuration in Windows 7
160
Printer Configuration in Windows 7 Before you start
Objectives: Learn how to install printer and how to manage it using Devices and Printers window in Windows
7.
Prerequisites: you have to know printer management concepts in general.
Key terms: printer installation, printer management, Windows 7, properties
Installing Printer In today’s world, almost all printers are plug-and-play. In majority of cases we will simply plug in our printer,
and Windows will install drivers for it automatically. If it doesn't have drivers in its driver’s store, it will try to
find them in Windows update. If this fails, we can always install drivers which came with the printer or simply
download drivers from the manufacturer’s site and install them.
Despite that, we should be aware of how to add printer in Windows if we don't have self-installing drivers. For
example, we have connected Samsung ML-1640 printer to our computer. Windows tried to install it
automatically but the installation failed because Windows couldn't find the drivers.
Figure 266 - Error Message
Next, we downloaded drivers from the official website and installed them. In our case this solved the problem,
since we downloaded the EXE file which took care of installing drivers for us automatically. But, in some cases
with other printers we will only get ZIP file with driver files in it. In this case we have to add our printer
manually. To manage printers in Windows 7 we can go to Start > Devices and Printers. Here we will see a
button for adding a printer.

www.utilizewindows.com Management Printer Configuration in Windows 7
161
Figure 267 - Device Manager
When we click on "Add a printer", we will be asked what type of printer do we want to install. We can choose a
local printer or a network printer.
Figure 268 - Type of Printer
If we select a local printer, we will be asked to choose a port. We can select an existing port or we can create a
new port. For the purpose of this demo we will use a USB001 port.
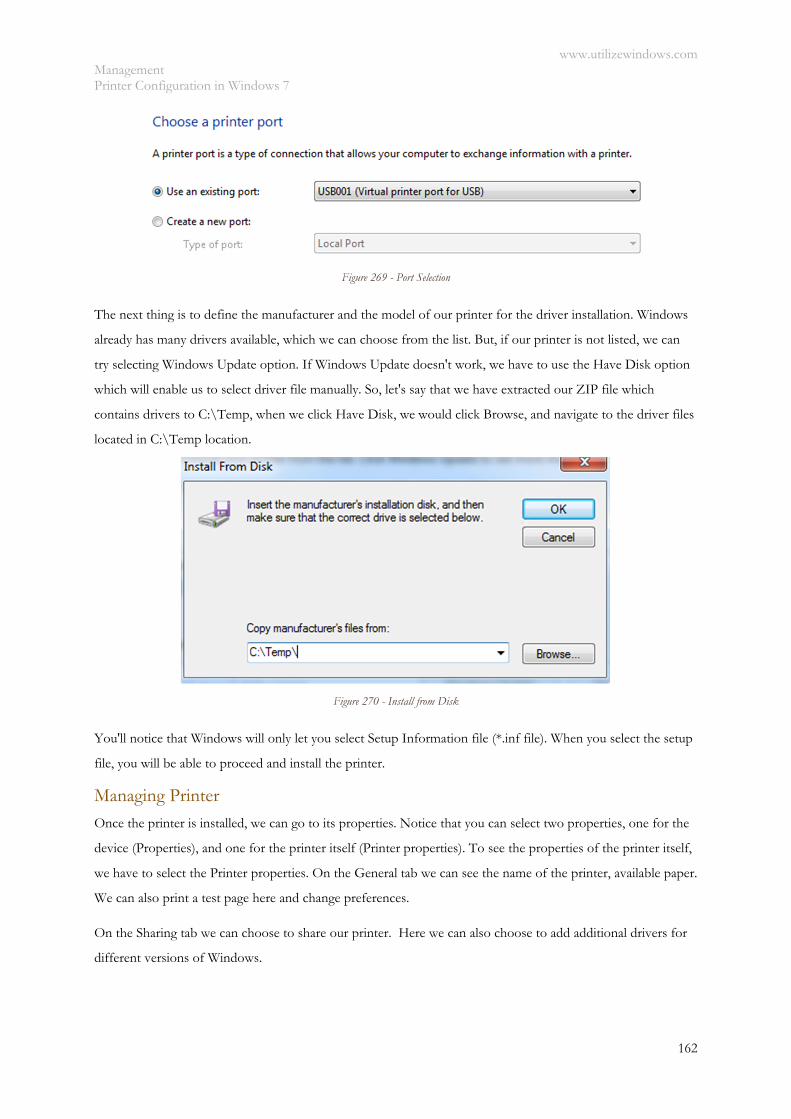
www.utilizewindows.com Management Printer Configuration in Windows 7
162
Figure 269 - Port Selection
The next thing is to define the manufacturer and the model of our printer for the driver installation. Windows
already has many drivers available, which we can choose from the list. But, if our printer is not listed, we can
try selecting Windows Update option. If Windows Update doesn't work, we have to use the Have Disk option
which will enable us to select driver file manually. So, let's say that we have extracted our ZIP file which
contains drivers to C:\Temp, when we click Have Disk, we would click Browse, and navigate to the driver files
located in C:\Temp location.
Figure 270 - Install from Disk
You'll notice that Windows will only let you select Setup Information file (*.inf file). When you select the setup
file, you will be able to proceed and install the printer.
Managing Printer
Once the printer is installed, we can go to its properties. Notice that you can select two properties, one for the
device (Properties), and one for the printer itself (Printer properties). To see the properties of the printer itself,
we have to select the Printer properties. On the General tab we can see the name of the printer, available paper.
We can also print a test page here and change preferences.
On the Sharing tab we can choose to share our printer. Here we can also choose to add additional drivers for
different versions of Windows.
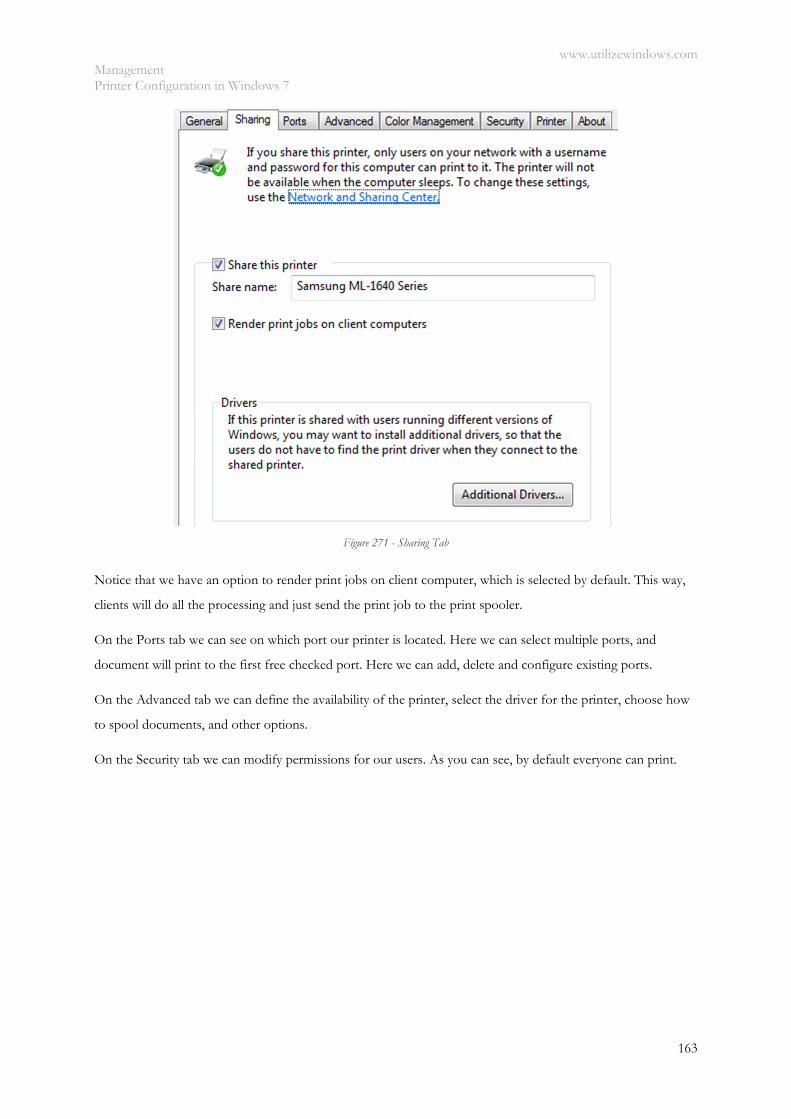
www.utilizewindows.com Management Printer Configuration in Windows 7
163
Figure 271 - Sharing Tab
Notice that we have an option to render print jobs on client computer, which is selected by default. This way,
clients will do all the processing and just send the print job to the print spooler.
On the Ports tab we can see on which port our printer is located. Here we can select multiple ports, and
document will print to the first free checked port. Here we can add, delete and configure existing ports.
On the Advanced tab we can define the availability of the printer, select the driver for the printer, choose how
to spool documents, and other options.
On the Security tab we can modify permissions for our users. As you can see, by default everyone can print.
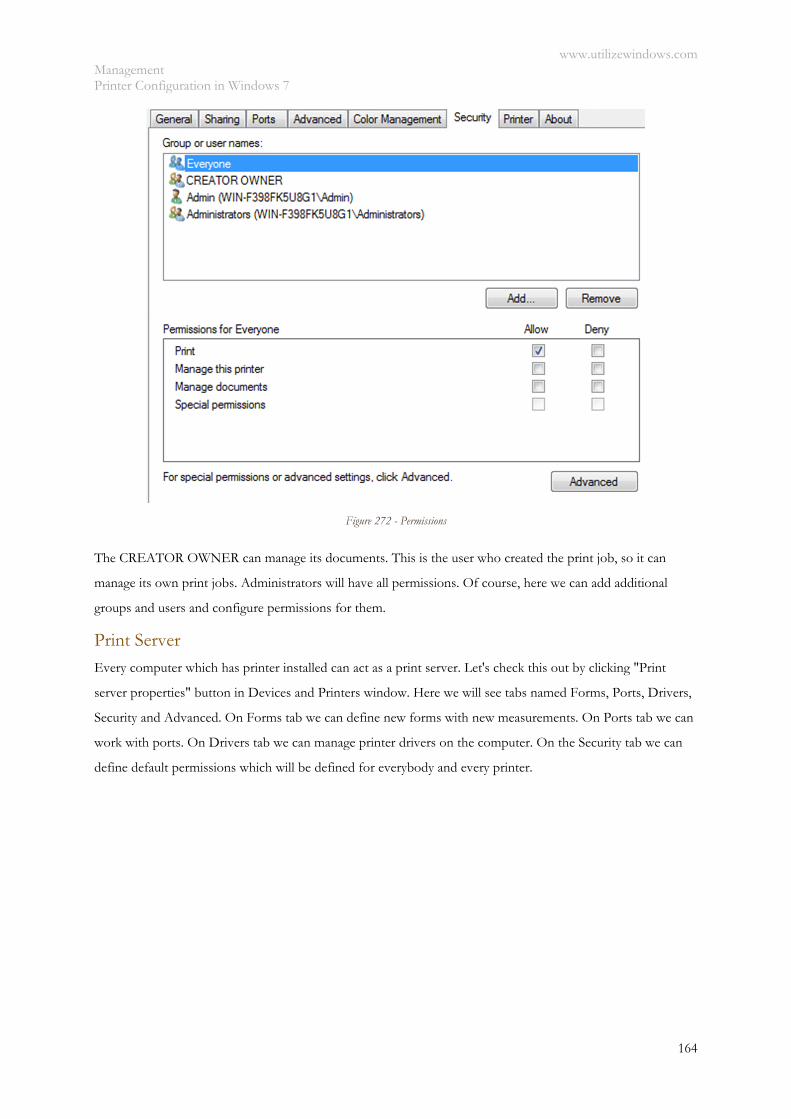
www.utilizewindows.com Management Printer Configuration in Windows 7
164
Figure 272 - Permissions
The CREATOR OWNER can manage its documents. This is the user who created the print job, so it can
manage its own print jobs. Administrators will have all permissions. Of course, here we can add additional
groups and users and configure permissions for them.
Print Server
Every computer which has printer installed can act as a print server. Let's check this out by clicking "Print
server properties" button in Devices and Printers window. Here we will see tabs named Forms, Ports, Drivers,
Security and Advanced. On Forms tab we can define new forms with new measurements. On Ports tab we can
work with ports. On Drivers tab we can manage printer drivers on the computer. On the Security tab we can
define default permissions which will be defined for everybody and every printer.
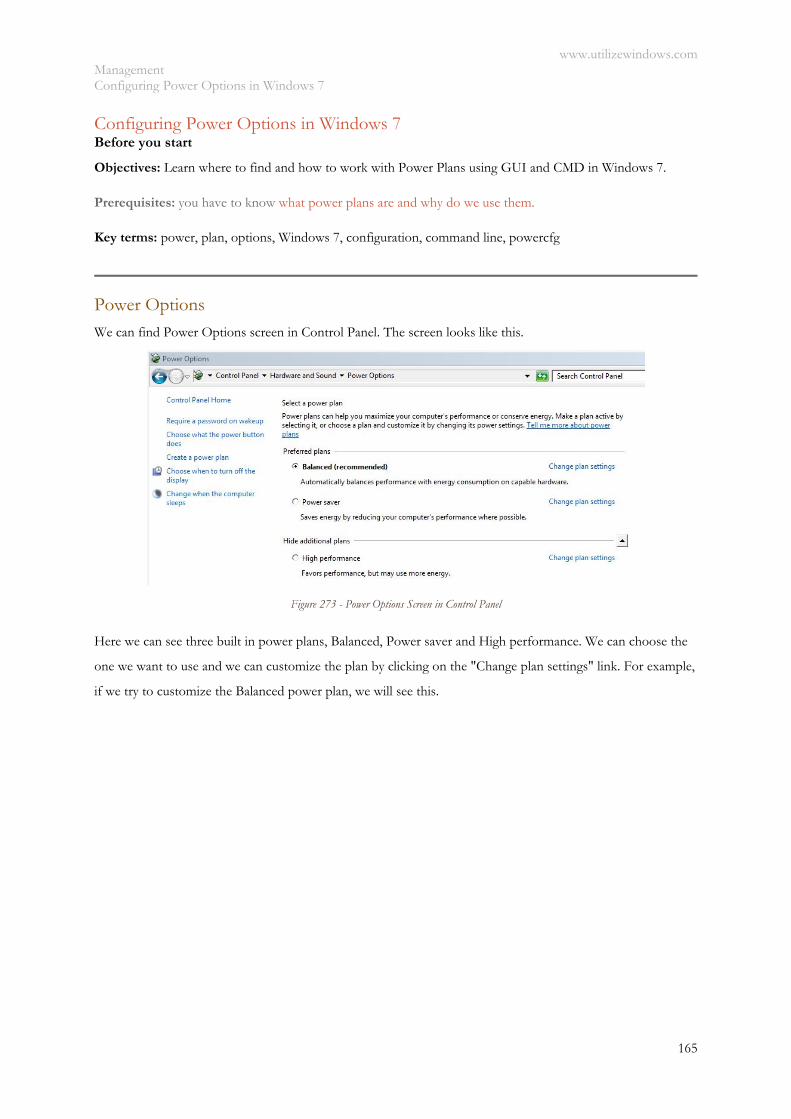
www.utilizewindows.com Management Configuring Power Options in Windows 7
165
Configuring Power Options in Windows 7 Before you start
Objectives: Learn where to find and how to work with Power Plans using GUI and CMD in Windows 7.
Prerequisites: you have to know what power plans are and why do we use them.
Key terms: power, plan, options, Windows 7, configuration, command line, powercfg
Power Options
We can find Power Options screen in Control Panel. The screen looks like this.
Figure 273 - Power Options Screen in Control Panel
Here we can see three built in power plans, Balanced, Power saver and High performance. We can choose the
one we want to use and we can customize the plan by clicking on the "Change plan settings" link. For example,
if we try to customize the Balanced power plan, we will see this.
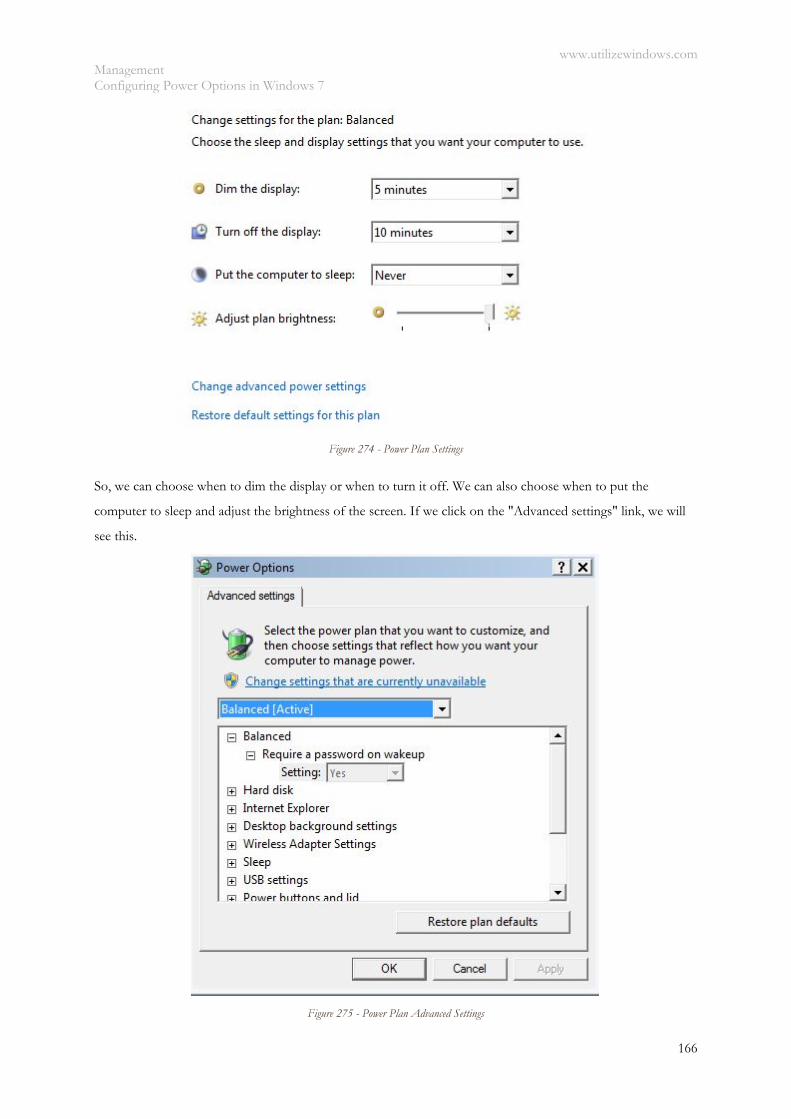
www.utilizewindows.com Management Configuring Power Options in Windows 7
166
Figure 274 - Power Plan Settings
So, we can choose when to dim the display or when to turn it off. We can also choose when to put the
computer to sleep and adjust the brightness of the screen. If we click on the "Advanced settings" link, we will
see this.
Figure 275 - Power Plan Advanced Settings
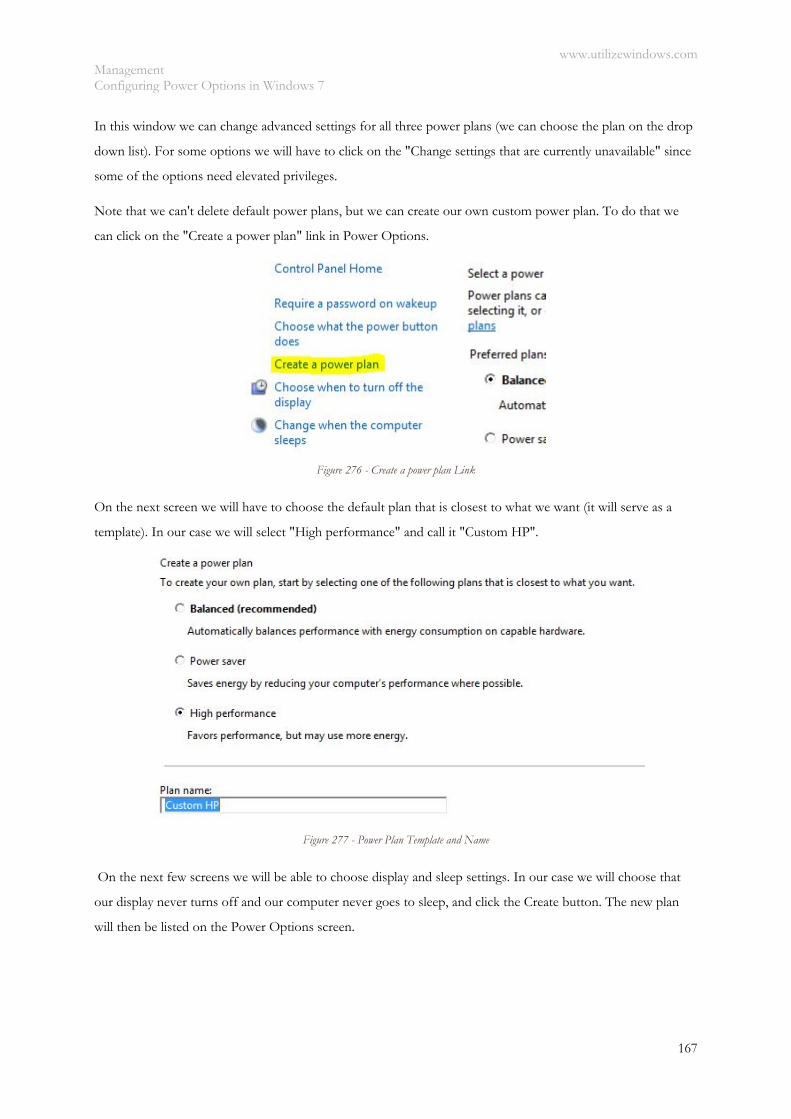
www.utilizewindows.com Management Configuring Power Options in Windows 7
167
In this window we can change advanced settings for all three power plans (we can choose the plan on the drop
down list). For some options we will have to click on the "Change settings that are currently unavailable" since
some of the options need elevated privileges.
Note that we can't delete default power plans, but we can create our own custom power plan. To do that we
can click on the "Create a power plan" link in Power Options.
Figure 276 - Create a power plan Link
On the next screen we will have to choose the default plan that is closest to what we want (it will serve as a
template). In our case we will select "High performance" and call it "Custom HP".
Figure 277 - Power Plan Template and Name
On the next few screens we will be able to choose display and sleep settings. In our case we will choose that
our display never turns off and our computer never goes to sleep, and click the Create button. The new plan
will then be listed on the Power Options screen.

www.utilizewindows.com Management Configuring Power Options in Windows 7
168
Figure 278 - New Power Plan Listed
We can always change settings for our new power plan. For example, if we don't want our hard disks to turn
off, we will enter 0 as a value for minutes.
Figure 279 - Hard Disk Timer

www.utilizewindows.com Management Configuring Power Options in Windows 7
169
Command Line Power Plan Options
We can also manage power options from the command line. We have to run CMD as administrator (right-click
CMD and select "Run as administrator"). From the elevated command line, we can use
the powercfg command. If we want to list all available plans we can use the-list switch.
Figure 280 - Listing Power Plans in CMD
To change to another power plan we can use the -setactive switch. We have to use the GUID of the power
plan we want to change to. So, in our case, if we wanted to switch back to the Balanced power plan, we would
have to enter the following command: "powercfg -setactive 381b4222-f694-41f0-9685-ff5bb260df2e".
We can also export our settings by using the -export switch. We will have to specify the location and name of
the file, and the GUID of the plan we want to export. The command looks like this: "powercfg -export
C:\CustomHP 381b4222-f694-41f0-9685-ff5bb260df2e". Now that we have our plan exported, we can import
it on multiple computers by using a script.
To delete a power plan we can use the -delete switch and specify the GUID of the plan we want to delete, for
example: "powercfg -delete ae6a8d04-daf8-497f-ac3d-68dff990adc6". The plan we are trying to delete mustn't
be active.
So, we have actually deleted the CustomHP power plan that we have created earlier. Let's now try to import the
plan back by using the -import switch. The command looks like this: "powercfg -import C:\CustomHP". If
the import is successful, we will see the new GUID of the imported power plan (it will be different from the
previous, despite of the same name of the plan).
Of course, we can also delete and import power plans from the GUI, and we will see the options to delete the
plan if we try to change settings on the custom power plan which is not active (we can only delete custom
power plans).
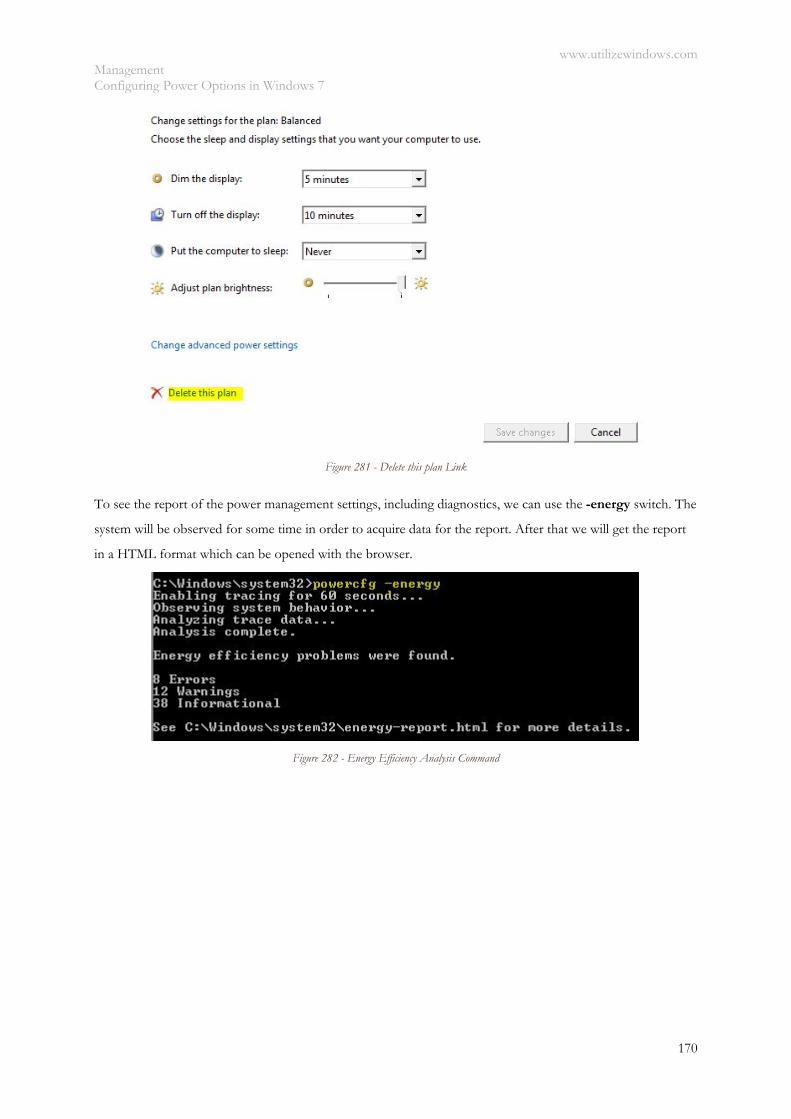
www.utilizewindows.com Management Configuring Power Options in Windows 7
170
Figure 281 - Delete this plan Link
To see the report of the power management settings, including diagnostics, we can use the -energy switch. The
system will be observed for some time in order to acquire data for the report. After that we will get the report
in a HTML format which can be opened with the browser.
Figure 282 - Energy Efficiency Analysis Command
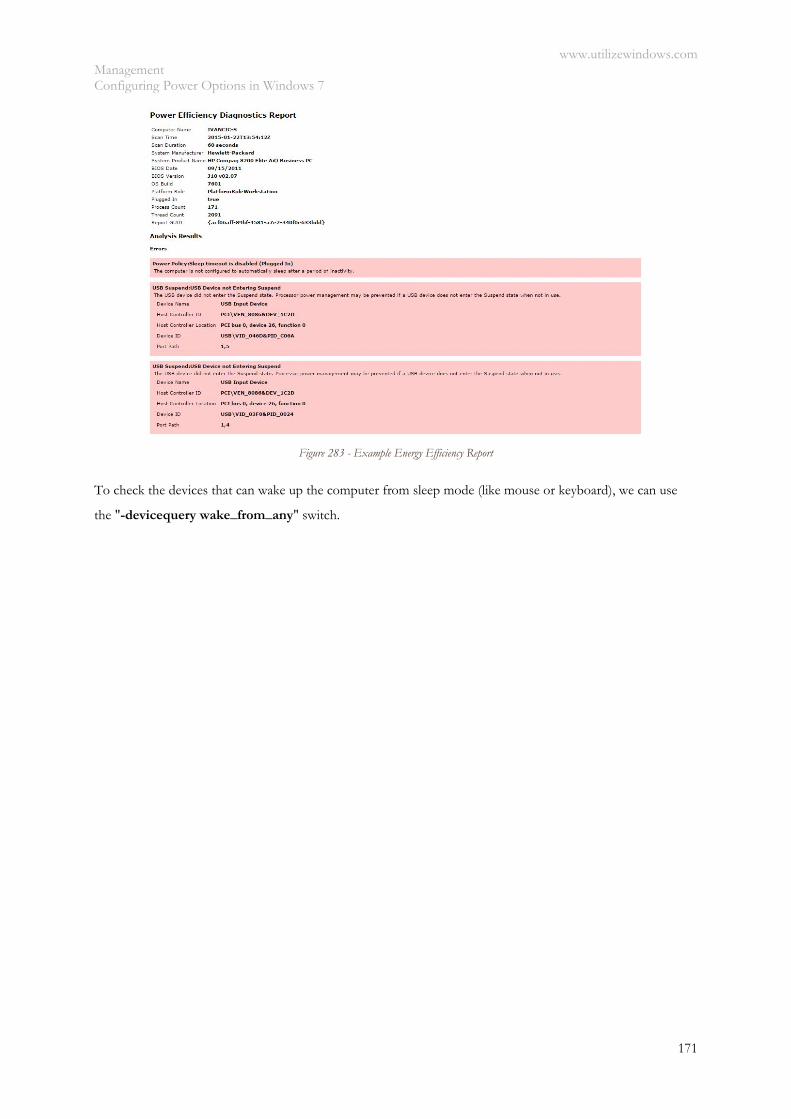
www.utilizewindows.com Management Configuring Power Options in Windows 7
171
Figure 283 - Example Energy Efficiency Report
To check the devices that can wake up the computer from sleep mode (like mouse or keyboard), we can use
the "-devicequery wake_from_any" switch.
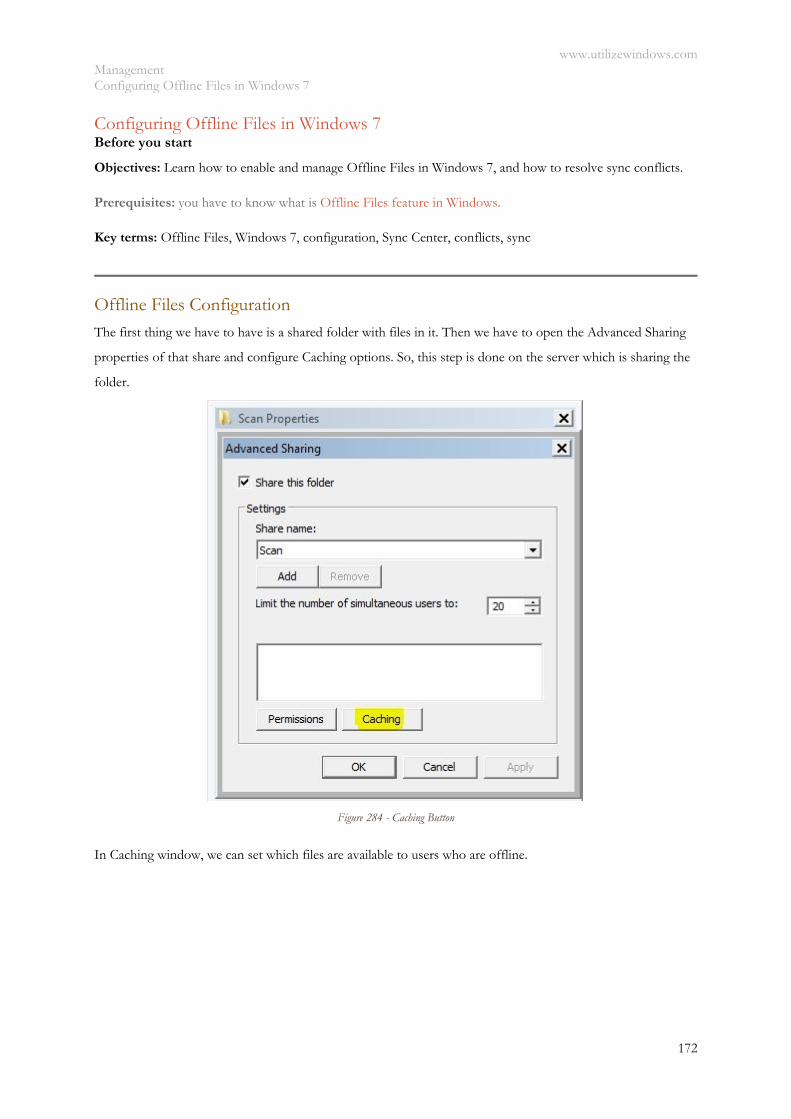
www.utilizewindows.com Management Configuring Offline Files in Windows 7
172
Configuring Offline Files in Windows 7 Before you start
Objectives: Learn how to enable and manage Offline Files in Windows 7, and how to resolve sync conflicts.
Prerequisites: you have to know what is Offline Files feature in Windows.
Key terms: Offline Files, Windows 7, configuration, Sync Center, conflicts, sync
Offline Files Configuration
The first thing we have to have is a shared folder with files in it. Then we have to open the Advanced Sharing
properties of that share and configure Caching options. So, this step is done on the server which is sharing the
folder.
Figure 284 - Caching Button
In Caching window, we can set which files are available to users who are offline.

www.utilizewindows.com Management Configuring Offline Files in Windows 7
173
Figure 285 - Caching Options
The option "Only the files and programs that users specify are available offline" means that we have enabled
manual caching. The option "No files or programs from the shared folder are available offline" means that no
caching is allowed at all. The option "All files and programs that users open from the shared folder are
automatically available offline" means automatic caching. If we choose the "Optimize for performance"
option, executable files from the network share will be cached to the client machine. In our case we will leave it
to manual.
The next step is performed on the client machine. The first thing we should do on the client machine is check
the settings in Control Panel > Sync Center. Important thing to check here is the "Manage offline files" option.
In the window that appears we will be able to disable offline files feature and view our offline files.

www.utilizewindows.com Management Configuring Offline Files in Windows 7
174
Figure 286 - General Tab
On the Disk Usage tab we will see how much disk space is currently used and available for storing offline files.
Figure 287 - Disk Usage
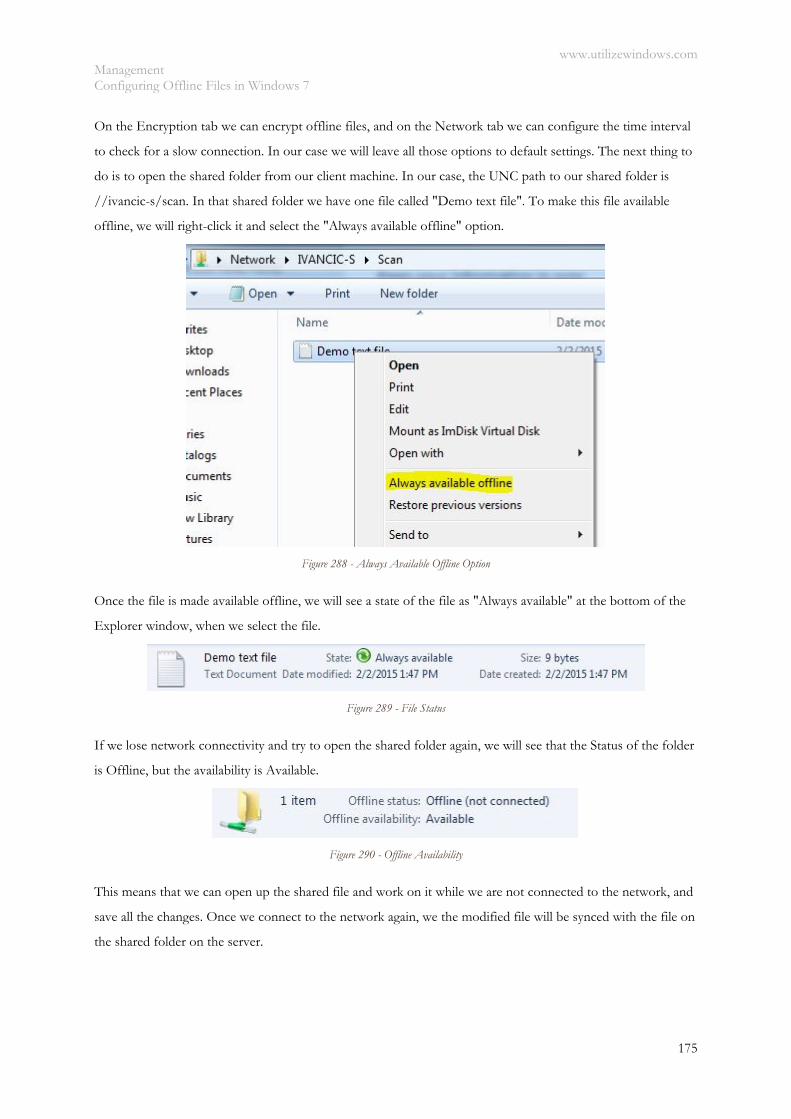
www.utilizewindows.com Management Configuring Offline Files in Windows 7
175
On the Encryption tab we can encrypt offline files, and on the Network tab we can configure the time interval
to check for a slow connection. In our case we will leave all those options to default settings. The next thing to
do is to open the shared folder from our client machine. In our case, the UNC path to our shared folder is
//ivancic-s/scan. In that shared folder we have one file called "Demo text file". To make this file available
offline, we will right-click it and select the "Always available offline" option.
Figure 288 - Always Available Offline Option
Once the file is made available offline, we will see a state of the file as "Always available" at the bottom of the
Explorer window, when we select the file.
Figure 289 - File Status
If we lose network connectivity and try to open the shared folder again, we will see that the Status of the folder
is Offline, but the availability is Available.
Figure 290 - Offline Availability
This means that we can open up the shared file and work on it while we are not connected to the network, and
save all the changes. Once we connect to the network again, we the modified file will be synced with the file on
the shared folder on the server.

www.utilizewindows.com Management Configuring Offline Files in Windows 7
176
Multiple Users
Keep in mind that if multiple users are working on the same files in the shared folder, we might encounter
conflicts when syncing cached files back to the server. If someone else from modifies the same file as we have
modified, we will see a conflict notification in our Sync Center.
Figure 291 - Conflicts
When we click on a specific conflict, we will be asked which version we want to keep.
Figure 292 - Resolve conflicts
We can choose to keep the file on our client machine, keep the file on the server, or to keep both files (one file
will be renamed). So, as we can see, offline files are primarily intended for personal use. If multiple users work
on the same files, there is a chance of overwriting changes on files made by other users, so keep that in mind.
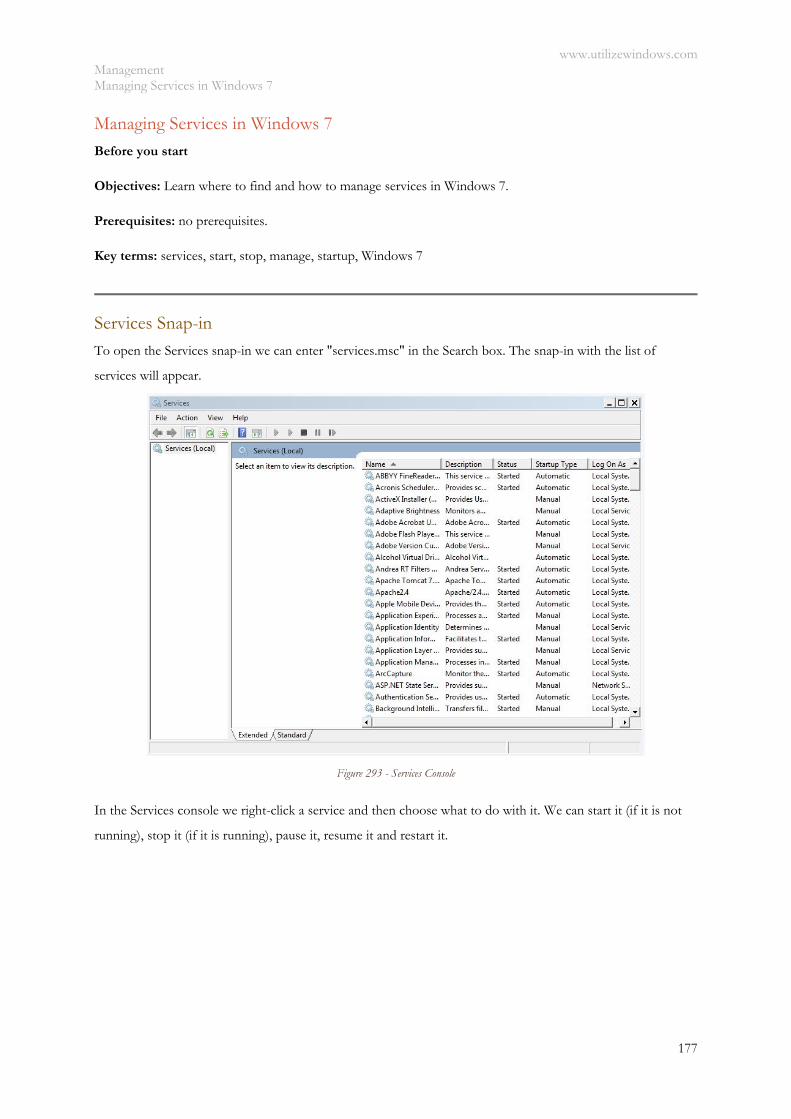
www.utilizewindows.com Management Managing Services in Windows 7
177
Managing Services in Windows 7
Before you start
Objectives: Learn where to find and how to manage services in Windows 7.
Prerequisites: no prerequisites.
Key terms: services, start, stop, manage, startup, Windows 7
Services Snap-in
To open the Services snap-in we can enter "services.msc" in the Search box. The snap-in with the list of
services will appear.
Figure 293 - Services Console
In the Services console we right-click a service and then choose what to do with it. We can start it (if it is not
running), stop it (if it is running), pause it, resume it and restart it.
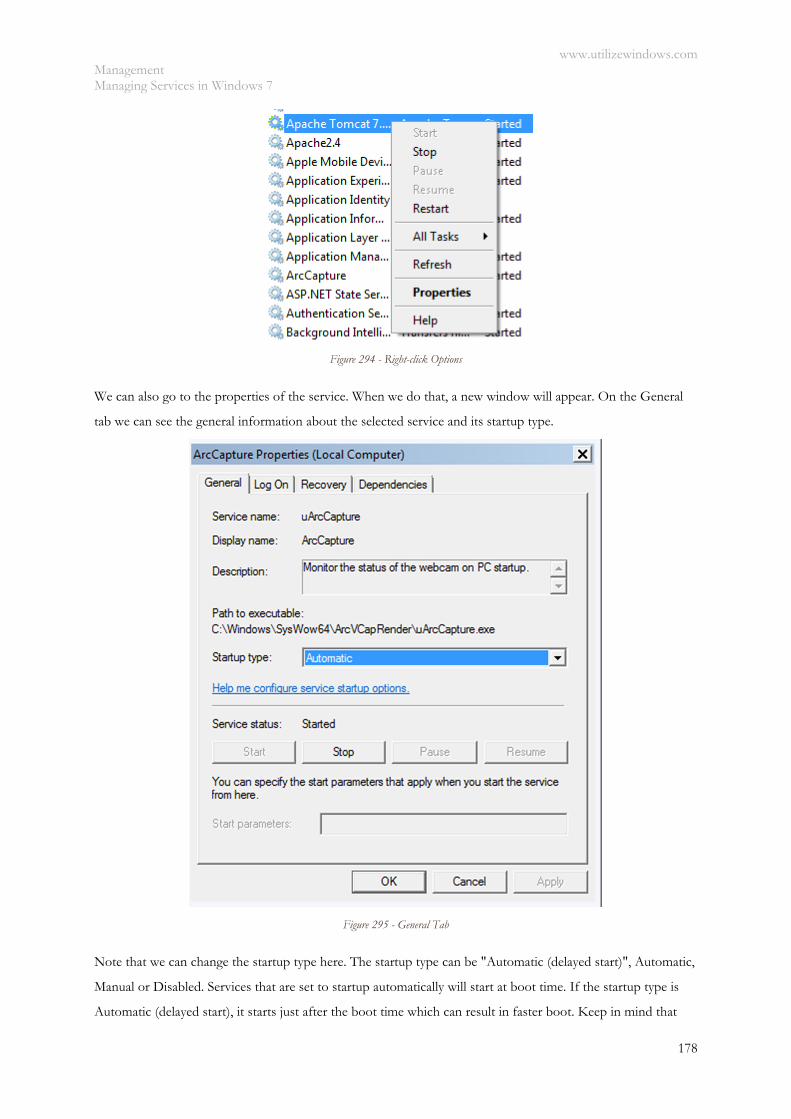
www.utilizewindows.com Management Managing Services in Windows 7
178
Figure 294 - Right-click Options
We can also go to the properties of the service. When we do that, a new window will appear. On the General
tab we can see the general information about the selected service and its startup type.
Figure 295 - General Tab
Note that we can change the startup type here. The startup type can be "Automatic (delayed start)", Automatic,
Manual or Disabled. Services that are set to startup automatically will start at boot time. If the startup type is
Automatic (delayed start), it starts just after the boot time which can result in faster boot. Keep in mind that
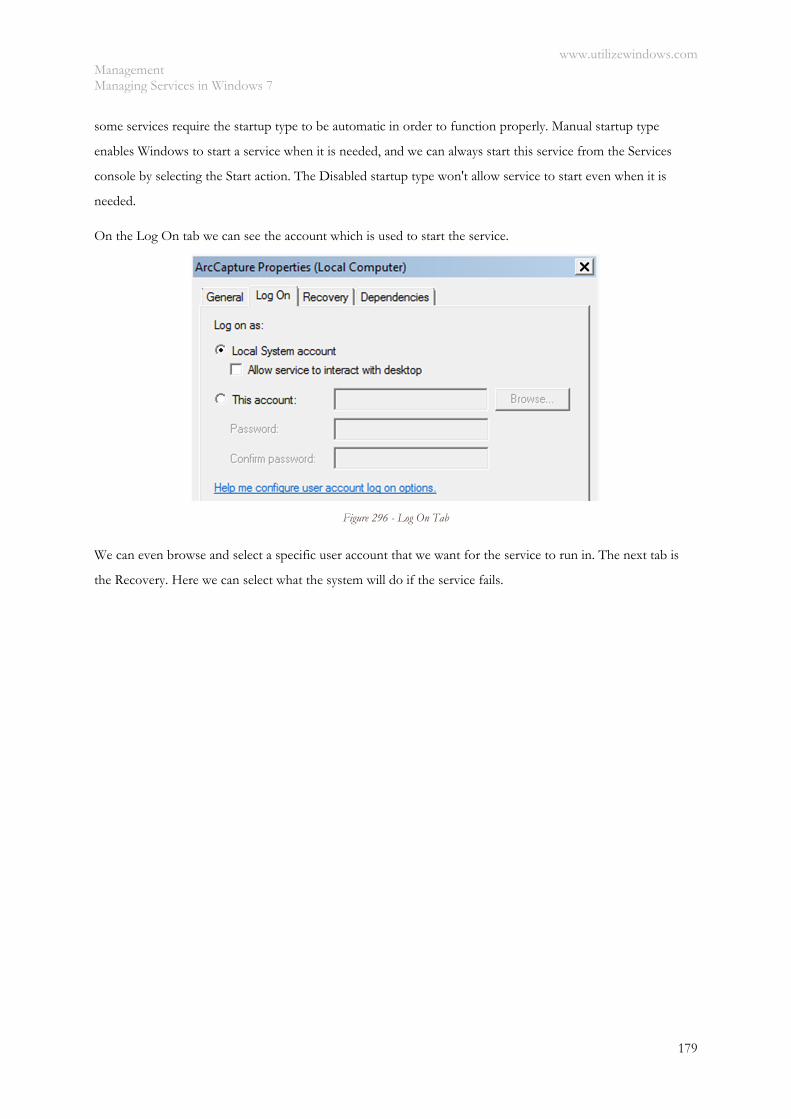
www.utilizewindows.com Management Managing Services in Windows 7
179
some services require the startup type to be automatic in order to function properly. Manual startup type
enables Windows to start a service when it is needed, and we can always start this service from the Services
console by selecting the Start action. The Disabled startup type won't allow service to start even when it is
needed.
On the Log On tab we can see the account which is used to start the service.
Figure 296 - Log On Tab
We can even browse and select a specific user account that we want for the service to run in. The next tab is
the Recovery. Here we can select what the system will do if the service fails.
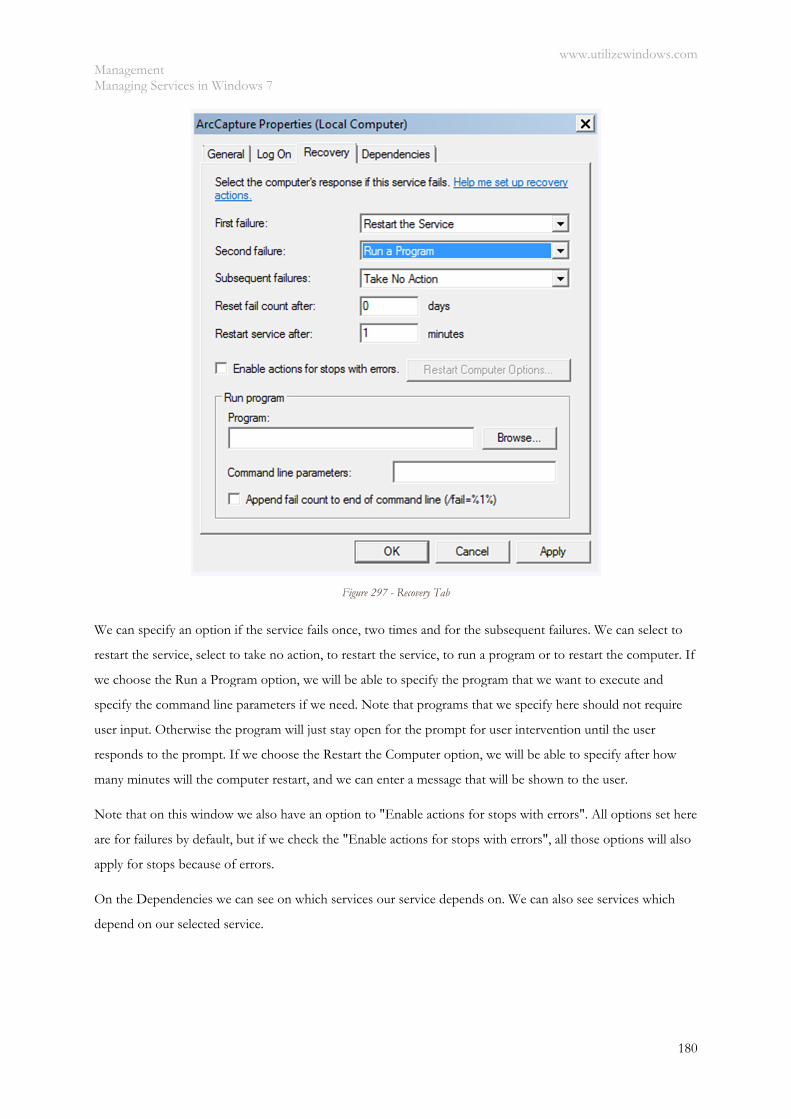
www.utilizewindows.com Management Managing Services in Windows 7
180
Figure 297 - Recovery Tab
We can specify an option if the service fails once, two times and for the subsequent failures. We can select to
restart the service, select to take no action, to restart the service, to run a program or to restart the computer. If
we choose the Run a Program option, we will be able to specify the program that we want to execute and
specify the command line parameters if we need. Note that programs that we specify here should not require
user input. Otherwise the program will just stay open for the prompt for user intervention until the user
responds to the prompt. If we choose the Restart the Computer option, we will be able to specify after how
many minutes will the computer restart, and we can enter a message that will be shown to the user.
Note that on this window we also have an option to "Enable actions for stops with errors". All options set here
are for failures by default, but if we check the "Enable actions for stops with errors", all those options will also
apply for stops because of errors.
On the Dependencies we can see on which services our service depends on. We can also see services which
depend on our selected service.
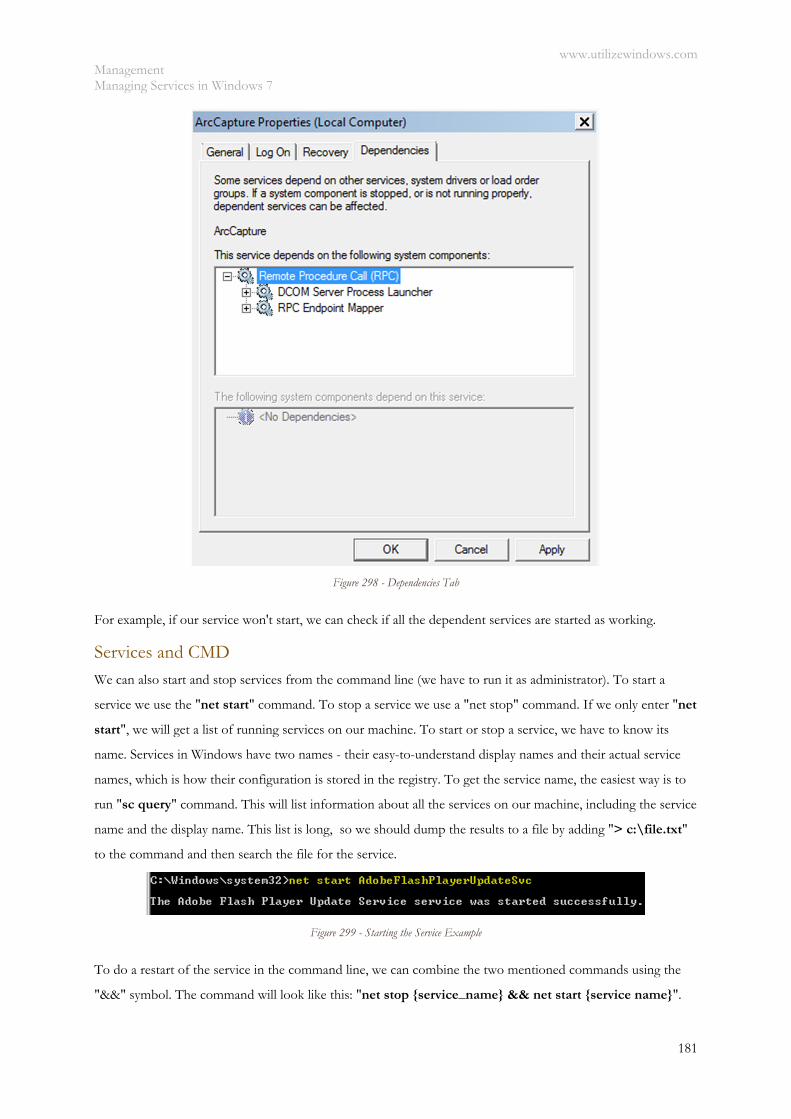
www.utilizewindows.com Management Managing Services in Windows 7
181
Figure 298 - Dependencies Tab
For example, if our service won't start, we can check if all the dependent services are started as working.
Services and CMD
We can also start and stop services from the command line (we have to run it as administrator). To start a
service we use the "net start" command. To stop a service we use a "net stop" command. If we only enter "net
start", we will get a list of running services on our machine. To start or stop a service, we have to know its
name. Services in Windows have two names - their easy-to-understand display names and their actual service
names, which is how their configuration is stored in the registry. To get the service name, the easiest way is to
run "sc query" command. This will list information about all the services on our machine, including the service
name and the display name. This list is long, so we should dump the results to a file by adding "> c:\file.txt"
to the command and then search the file for the service.
Figure 299 - Starting the Service Example
To do a restart of the service in the command line, we can combine the two mentioned commands using the
"&&" symbol. The command will look like this: "net stop {service_name} && net start {service name}".

www.utilizewindows.com Management Managing Services in Windows 7
182
Another command we can use to start or stop a service is "sc start" and "sc stop". For example, to start a
service named Apache2.4, we would enter the command "sc start Apache2.4". To stop it, we would enter "sc
stop Apache2.4".
Figure 300 - Stopping the Service Example
We can also use "sc" to do many other actions with Services. To see other available actions, enter "sc" in CMD
and hit enter.
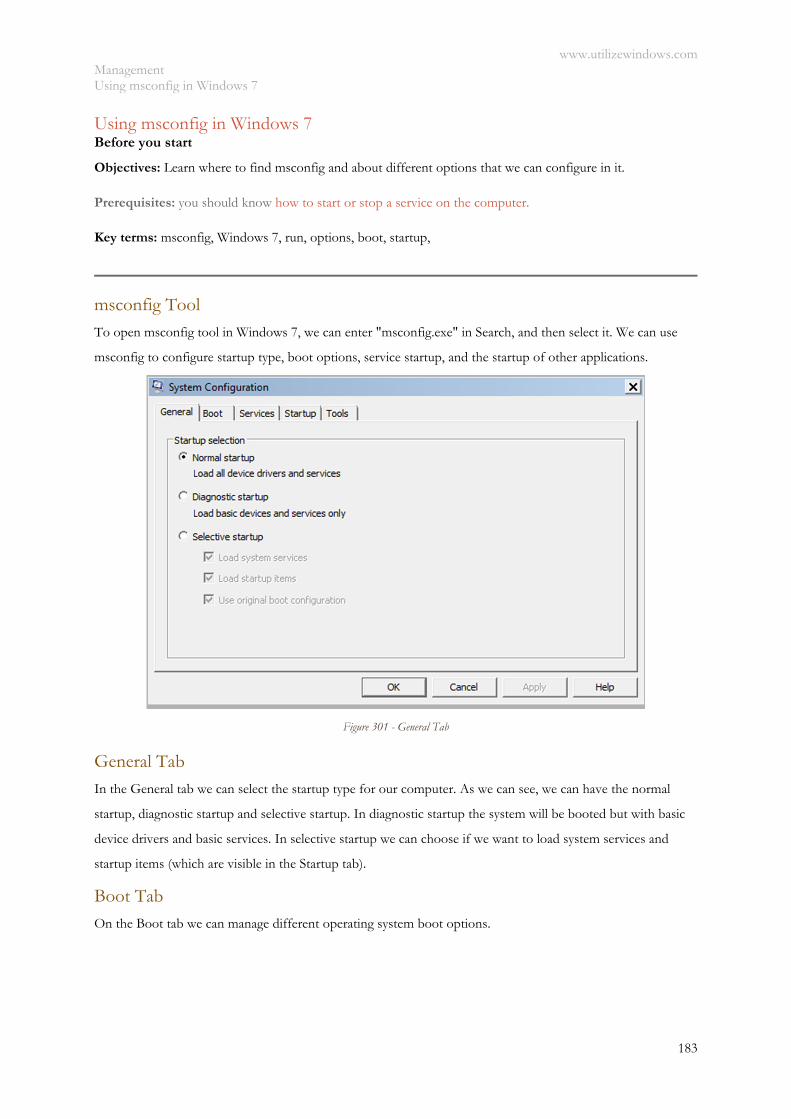
www.utilizewindows.com Management Using msconfig in Windows 7
183
Using msconfig in Windows 7 Before you start
Objectives: Learn where to find msconfig and about different options that we can configure in it.
Prerequisites: you should know how to start or stop a service on the computer.
Key terms: msconfig, Windows 7, run, options, boot, startup,
msconfig Tool
To open msconfig tool in Windows 7, we can enter "msconfig.exe" in Search, and then select it. We can use
msconfig to configure startup type, boot options, service startup, and the startup of other applications.
Figure 301 - General Tab
General Tab
In the General tab we can select the startup type for our computer. As we can see, we can have the normal
startup, diagnostic startup and selective startup. In diagnostic startup the system will be booted but with basic
device drivers and basic services. In selective startup we can choose if we want to load system services and
startup items (which are visible in the Startup tab).
Boot Tab On the Boot tab we can manage different operating system boot options.
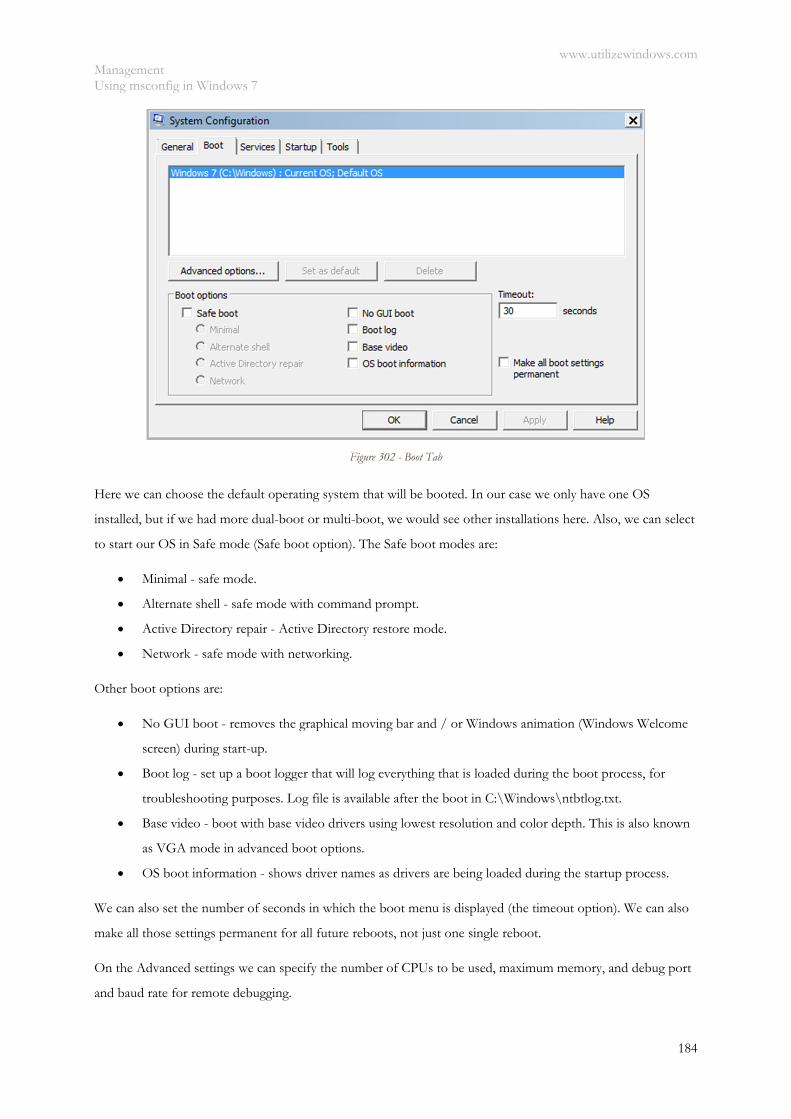
www.utilizewindows.com Management Using msconfig in Windows 7
184
Figure 302 - Boot Tab
Here we can choose the default operating system that will be booted. In our case we only have one OS
installed, but if we had more dual-boot or multi-boot, we would see other installations here. Also, we can select
to start our OS in Safe mode (Safe boot option). The Safe boot modes are:
Minimal - safe mode.
Alternate shell - safe mode with command prompt.
Active Directory repair - Active Directory restore mode.
Network - safe mode with networking.
Other boot options are:
No GUI boot - removes the graphical moving bar and / or Windows animation (Windows Welcome
screen) during start-up.
Boot log - set up a boot logger that will log everything that is loaded during the boot process, for
troubleshooting purposes. Log file is available after the boot in C:\Windows\ntbtlog.txt.
Base video - boot with base video drivers using lowest resolution and color depth. This is also known
as VGA mode in advanced boot options.
OS boot information - shows driver names as drivers are being loaded during the startup process.
We can also set the number of seconds in which the boot menu is displayed (the timeout option). We can also
make all those settings permanent for all future reboots, not just one single reboot.
On the Advanced settings we can specify the number of CPUs to be used, maximum memory, and debug port
and baud rate for remote debugging.
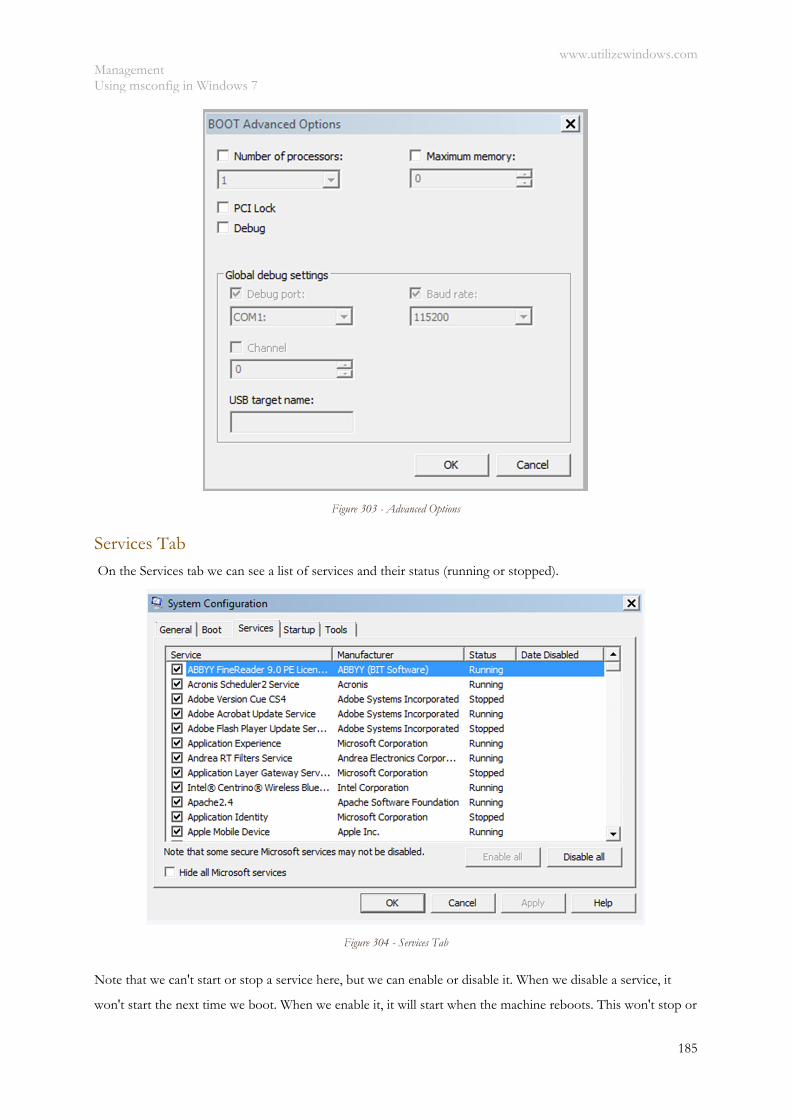
www.utilizewindows.com Management Using msconfig in Windows 7
185
Figure 303 - Advanced Options
Services Tab On the Services tab we can see a list of services and their status (running or stopped).
Figure 304 - Services Tab
Note that we can't start or stop a service here, but we can enable or disable it. When we disable a service, it
won't start the next time we boot. When we enable it, it will start when the machine reboots. This won't stop or
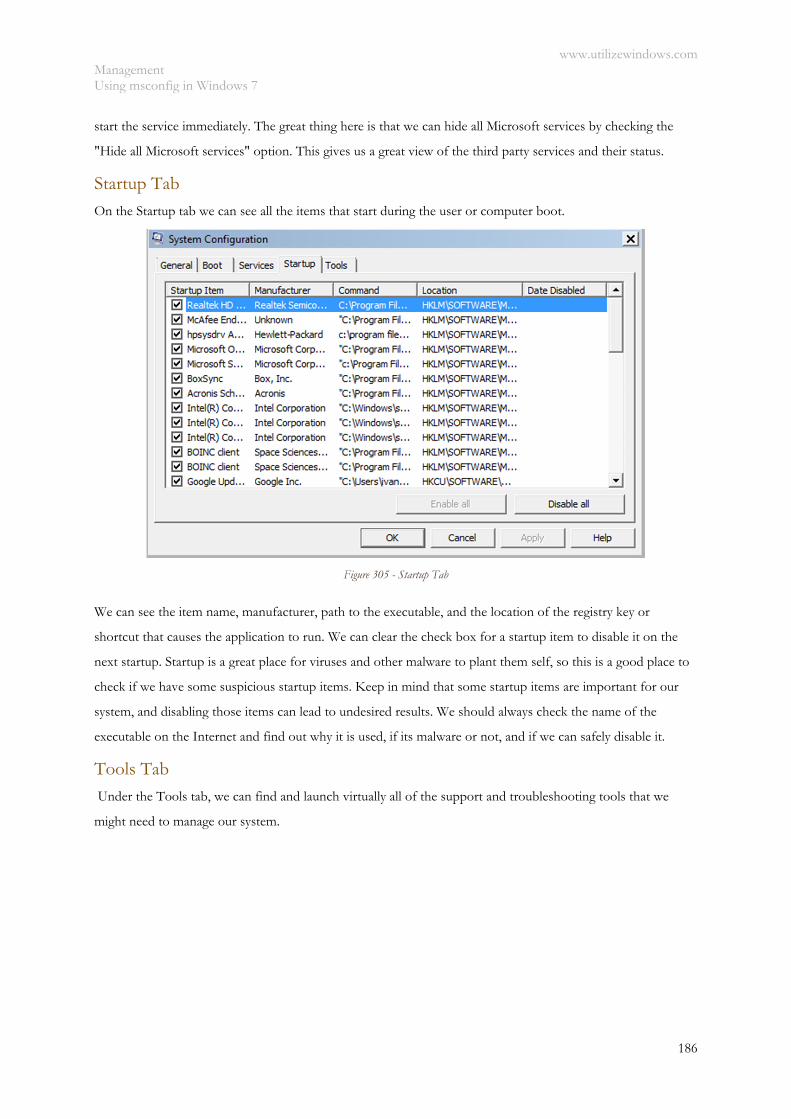
www.utilizewindows.com Management Using msconfig in Windows 7
186
start the service immediately. The great thing here is that we can hide all Microsoft services by checking the
"Hide all Microsoft services" option. This gives us a great view of the third party services and their status.
Startup Tab
On the Startup tab we can see all the items that start during the user or computer boot.
Figure 305 - Startup Tab
We can see the item name, manufacturer, path to the executable, and the location of the registry key or
shortcut that causes the application to run. We can clear the check box for a startup item to disable it on the
next startup. Startup is a great place for viruses and other malware to plant them self, so this is a good place to
check if we have some suspicious startup items. Keep in mind that some startup items are important for our
system, and disabling those items can lead to undesired results. We should always check the name of the
executable on the Internet and find out why it is used, if its malware or not, and if we can safely disable it.
Tools Tab Under the Tools tab, we can find and launch virtually all of the support and troubleshooting tools that we
might need to manage our system.
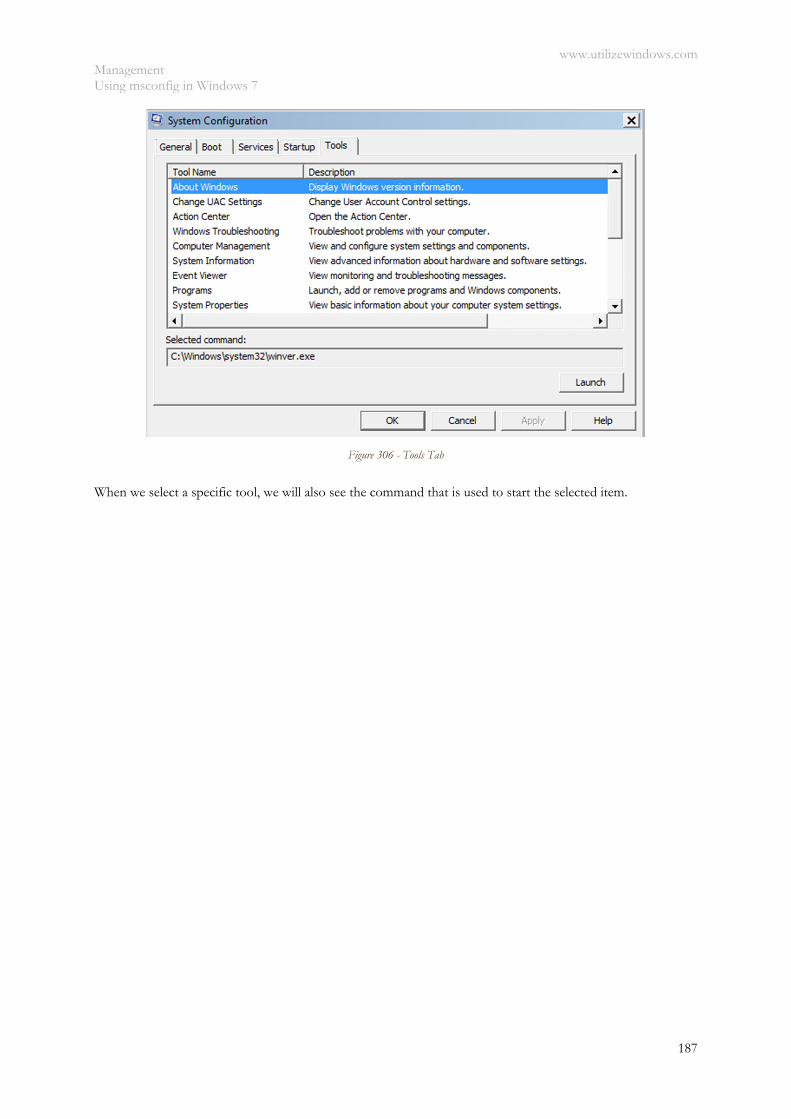
www.utilizewindows.com Management Using msconfig in Windows 7
187
Figure 306 - Tools Tab
When we select a specific tool, we will also see the command that is used to start the selected item.
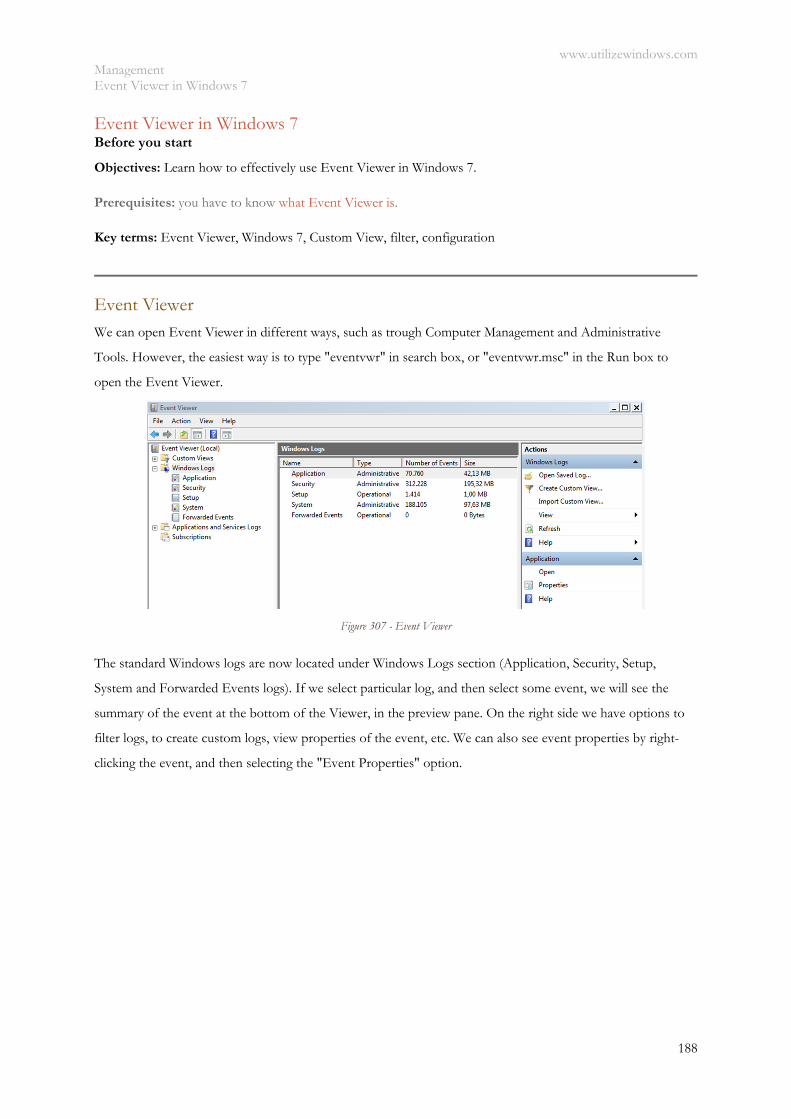
www.utilizewindows.com Management Event Viewer in Windows 7
188
Event Viewer in Windows 7 Before you start
Objectives: Learn how to effectively use Event Viewer in Windows 7.
Prerequisites: you have to know what Event Viewer is.
Key terms: Event Viewer, Windows 7, Custom View, filter, configuration
Event Viewer
We can open Event Viewer in different ways, such as trough Computer Management and Administrative
Tools. However, the easiest way is to type "eventvwr" in search box, or "eventvwr.msc" in the Run box to
open the Event Viewer.
Figure 307 - Event Viewer
The standard Windows logs are now located under Windows Logs section (Application, Security, Setup,
System and Forwarded Events logs). If we select particular log, and then select some event, we will see the
summary of the event at the bottom of the Viewer, in the preview pane. On the right side we have options to
filter logs, to create custom logs, view properties of the event, etc. We can also see event properties by right-
clicking the event, and then selecting the "Event Properties" option.
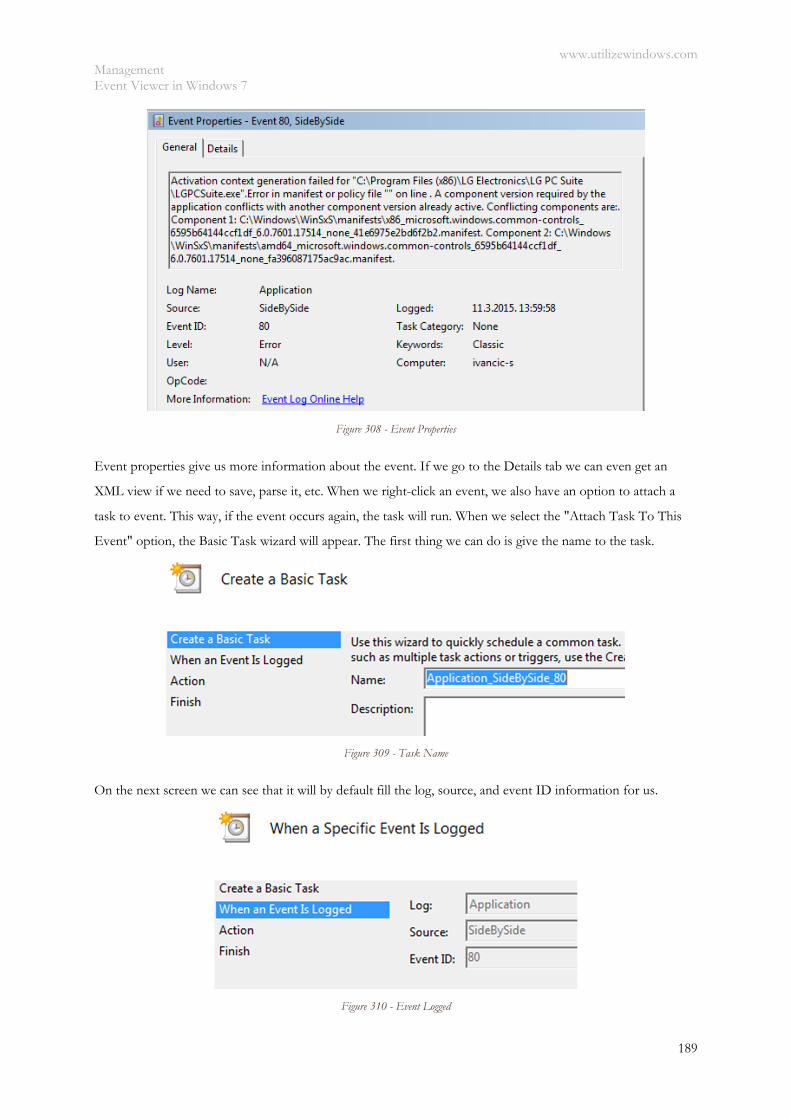
www.utilizewindows.com Management Event Viewer in Windows 7
189
Figure 308 - Event Properties
Event properties give us more information about the event. If we go to the Details tab we can even get an
XML view if we need to save, parse it, etc. When we right-click an event, we also have an option to attach a
task to event. This way, if the event occurs again, the task will run. When we select the "Attach Task To This
Event" option, the Basic Task wizard will appear. The first thing we can do is give the name to the task.
Figure 309 - Task Name
On the next screen we can see that it will by default fill the log, source, and event ID information for us.
Figure 310 - Event Logged
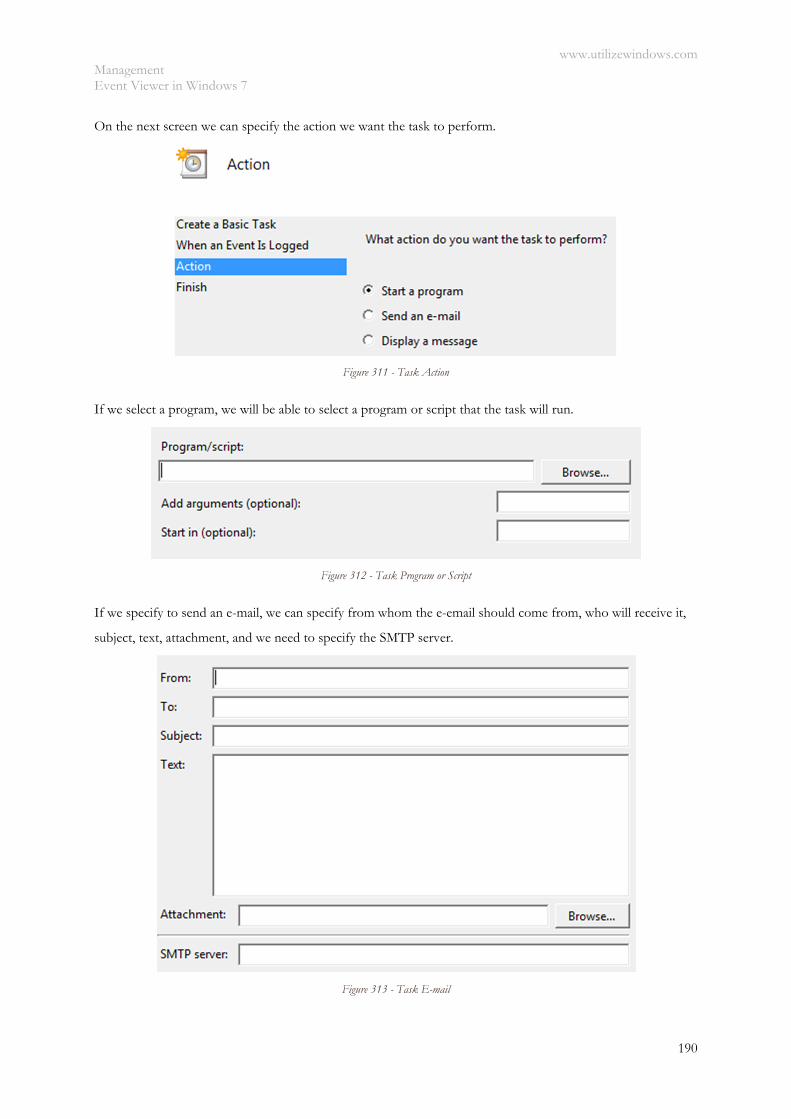
www.utilizewindows.com Management Event Viewer in Windows 7
190
On the next screen we can specify the action we want the task to perform.
Figure 311 - Task Action
If we select a program, we will be able to select a program or script that the task will run.
Figure 312 - Task Program or Script
If we specify to send an e-mail, we can specify from whom the e-email should come from, who will receive it,
subject, text, attachment, and we need to specify the SMTP server.
Figure 313 - Task E-mail
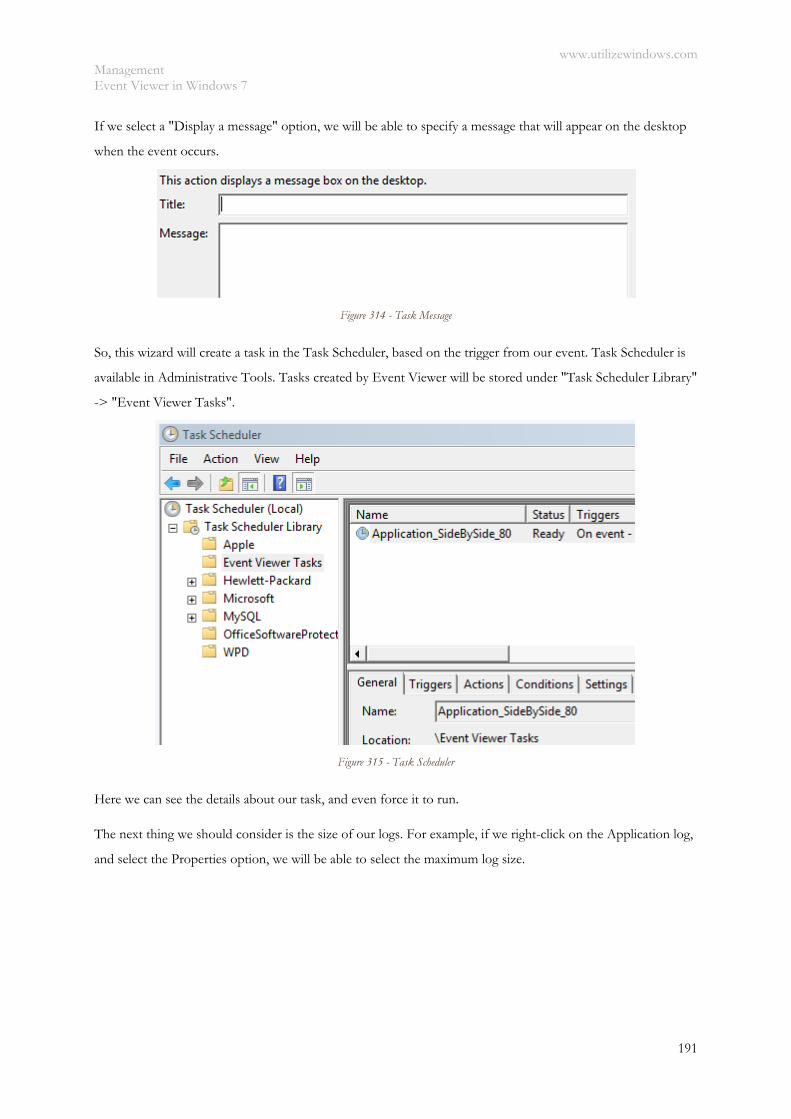
www.utilizewindows.com Management Event Viewer in Windows 7
191
If we select a "Display a message" option, we will be able to specify a message that will appear on the desktop
when the event occurs.
Figure 314 - Task Message
So, this wizard will create a task in the Task Scheduler, based on the trigger from our event. Task Scheduler is
available in Administrative Tools. Tasks created by Event Viewer will be stored under "Task Scheduler Library"
-> "Event Viewer Tasks".
Figure 315 - Task Scheduler
Here we can see the details about our task, and even force it to run.
The next thing we should consider is the size of our logs. For example, if we right-click on the Application log,
and select the Properties option, we will be able to select the maximum log size.
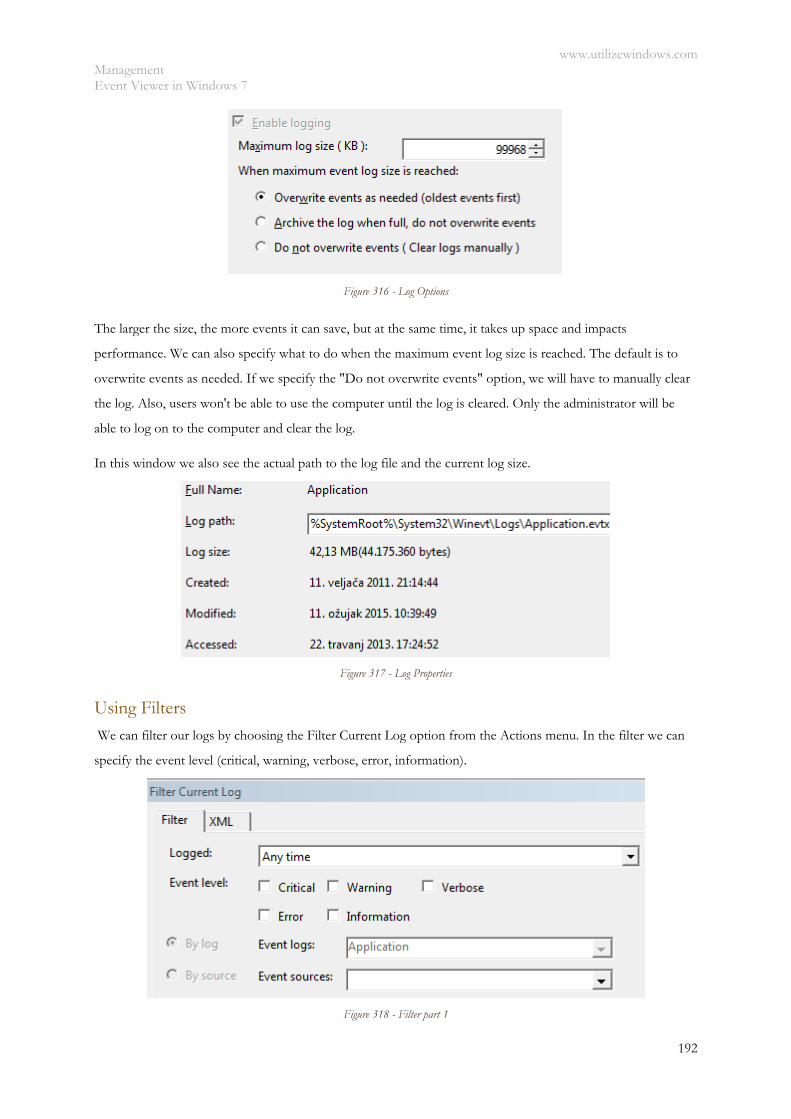
www.utilizewindows.com Management Event Viewer in Windows 7
192
Figure 316 - Log Options
The larger the size, the more events it can save, but at the same time, it takes up space and impacts
performance. We can also specify what to do when the maximum event log size is reached. The default is to
overwrite events as needed. If we specify the "Do not overwrite events" option, we will have to manually clear
the log. Also, users won't be able to use the computer until the log is cleared. Only the administrator will be
able to log on to the computer and clear the log.
In this window we also see the actual path to the log file and the current log size.
Figure 317 - Log Properties
Using Filters
We can filter our logs by choosing the Filter Current Log option from the Actions menu. In the filter we can
specify the event level (critical, warning, verbose, error, information).
Figure 318 - Filter part 1
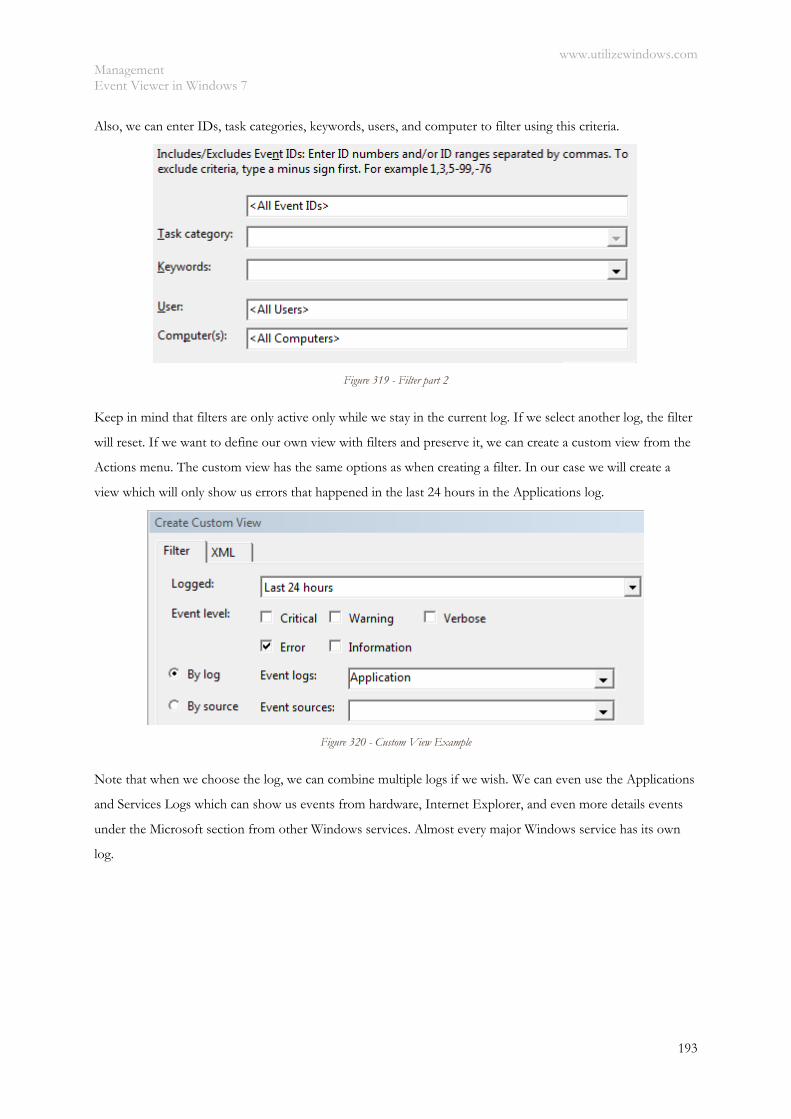
www.utilizewindows.com Management Event Viewer in Windows 7
193
Also, we can enter IDs, task categories, keywords, users, and computer to filter using this criteria.
Figure 319 - Filter part 2
Keep in mind that filters are only active only while we stay in the current log. If we select another log, the filter
will reset. If we want to define our own view with filters and preserve it, we can create a custom view from the
Actions menu. The custom view has the same options as when creating a filter. In our case we will create a
view which will only show us errors that happened in the last 24 hours in the Applications log.
Figure 320 - Custom View Example
Note that when we choose the log, we can combine multiple logs if we wish. We can even use the Applications
and Services Logs which can show us events from hardware, Internet Explorer, and even more details events
under the Microsoft section from other Windows services. Almost every major Windows service has its own
log.
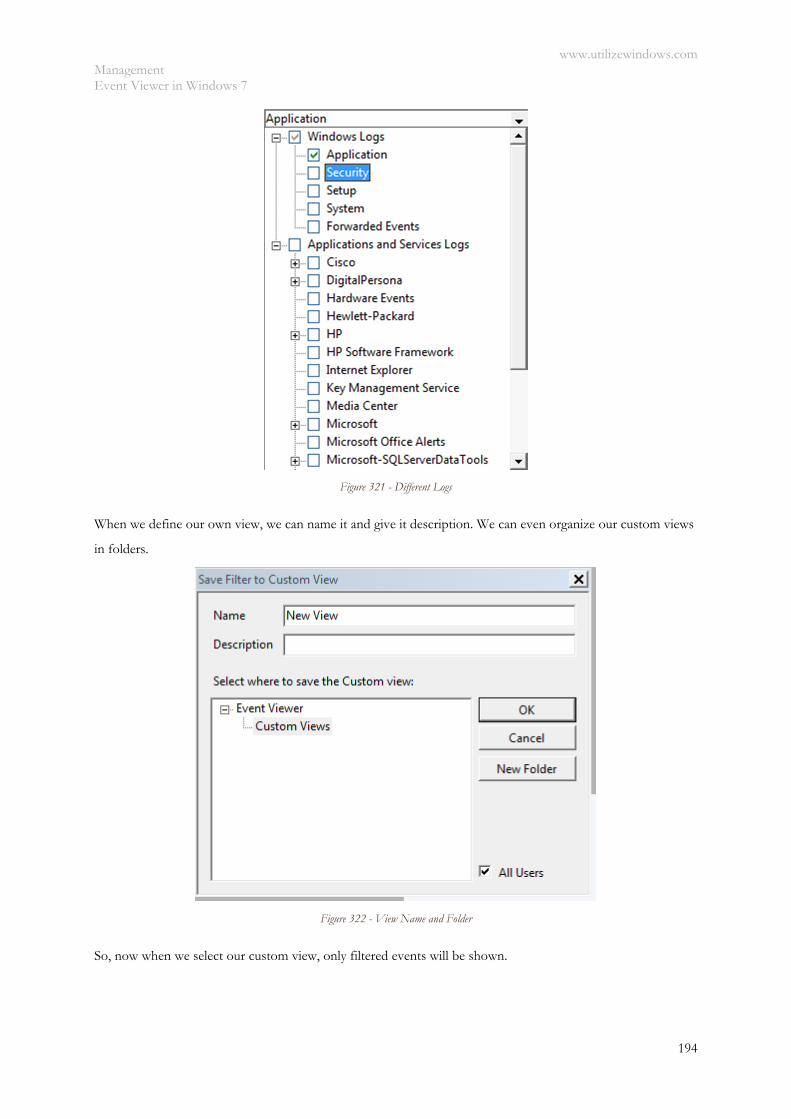
www.utilizewindows.com Management Event Viewer in Windows 7
194
Figure 321 - Different Logs
When we define our own view, we can name it and give it description. We can even organize our custom views
in folders.
Figure 322 - View Name and Folder
So, now when we select our custom view, only filtered events will be shown.
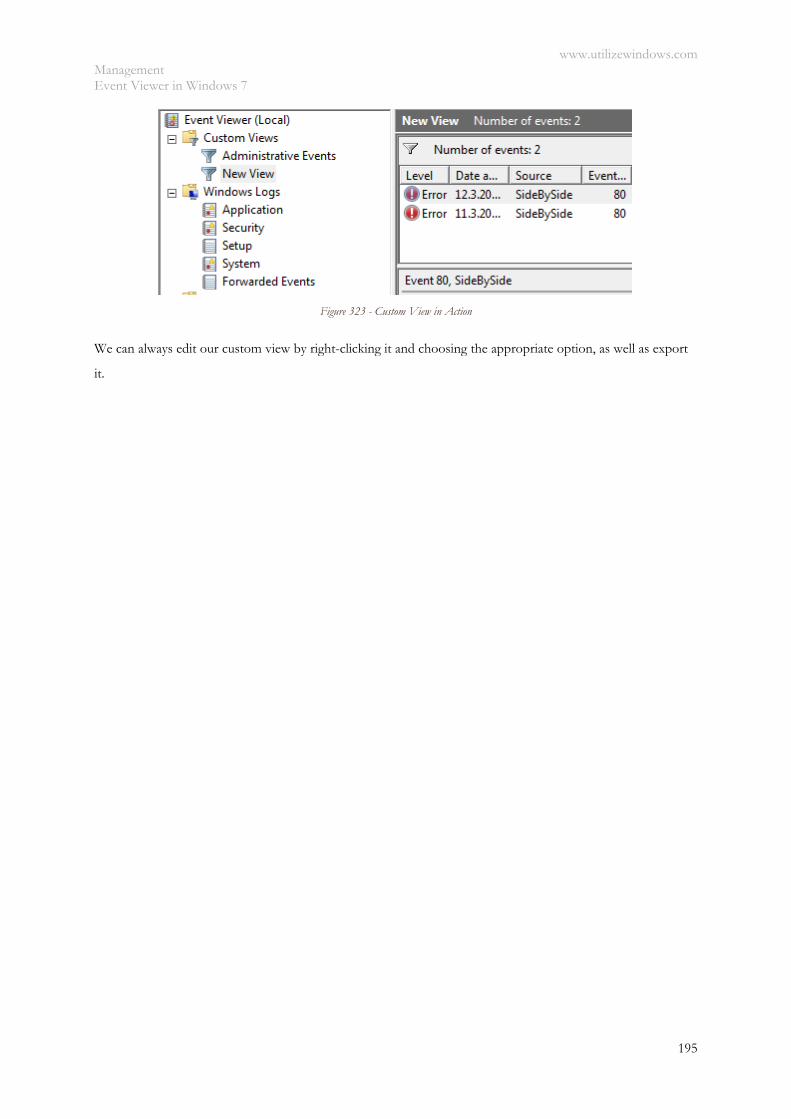
www.utilizewindows.com Management Event Viewer in Windows 7
195
Figure 323 - Custom View in Action
We can always edit our custom view by right-clicking it and choosing the appropriate option, as well as export
it.

www.utilizewindows.com Management Monitoring Performance in Windows 7
196
Monitoring Performance in Windows 7 Before you start
Objectives: Learn how to use Performance Monitor, Data Collector Sets, and Reports in Windows 7
Prerequisites: you have to know about Performance Management in Windows in general.
Key terms: performance, data collector set, report, Windows 7, demonstration.
Performance Monitor
In this demo we will take a look at how we can use the Performance Monitor to capture information about our
machine performance. We can access Performance Monitor by typing "perfmon" in the Start Menu search
box.
Figure 324 - Performance Monitor
If go to Monitoring Tools > Performance Monitor, we will see the performance of our machine in real time.
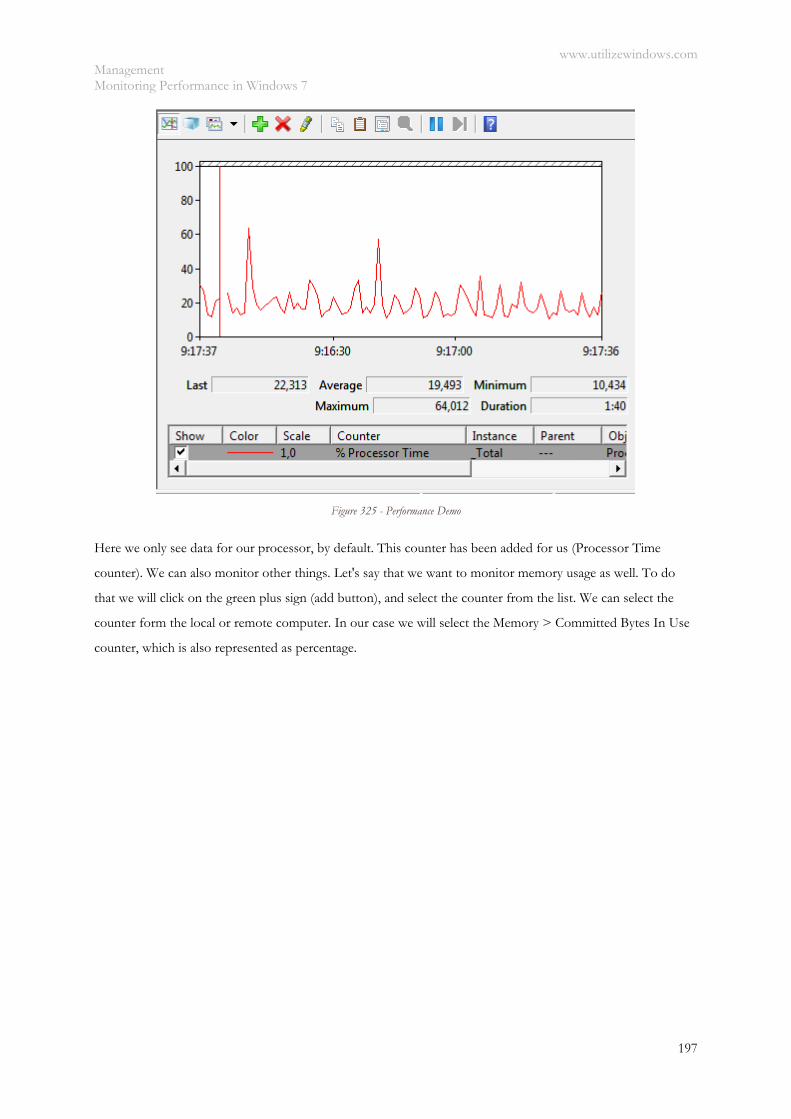
www.utilizewindows.com Management Monitoring Performance in Windows 7
197
Figure 325 - Performance Demo
Here we only see data for our processor, by default. This counter has been added for us (Processor Time
counter). We can also monitor other things. Let's say that we want to monitor memory usage as well. To do
that we will click on the green plus sign (add button), and select the counter from the list. We can select the
counter form the local or remote computer. In our case we will select the Memory > Committed Bytes In Use
counter, which is also represented as percentage.
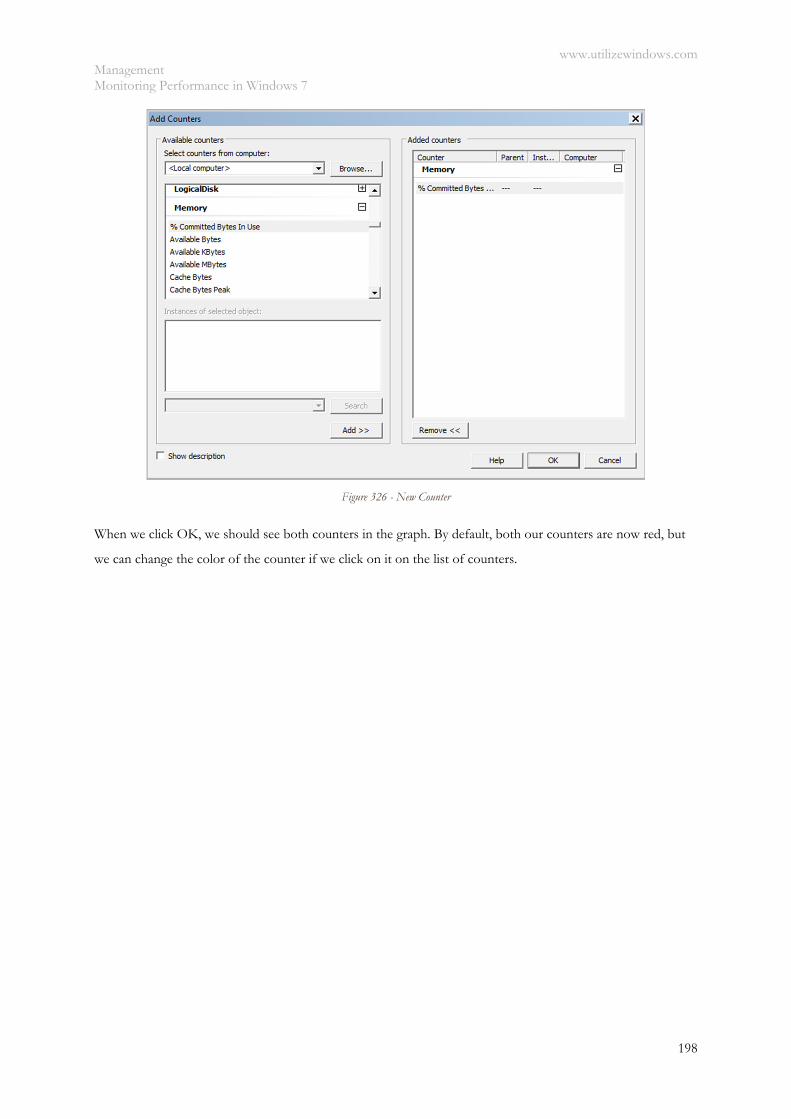
www.utilizewindows.com Management Monitoring Performance in Windows 7
198
Figure 326 - New Counter
When we click OK, we should see both counters in the graph. By default, both our counters are now red, but
we can change the color of the counter if we click on it on the list of counters.
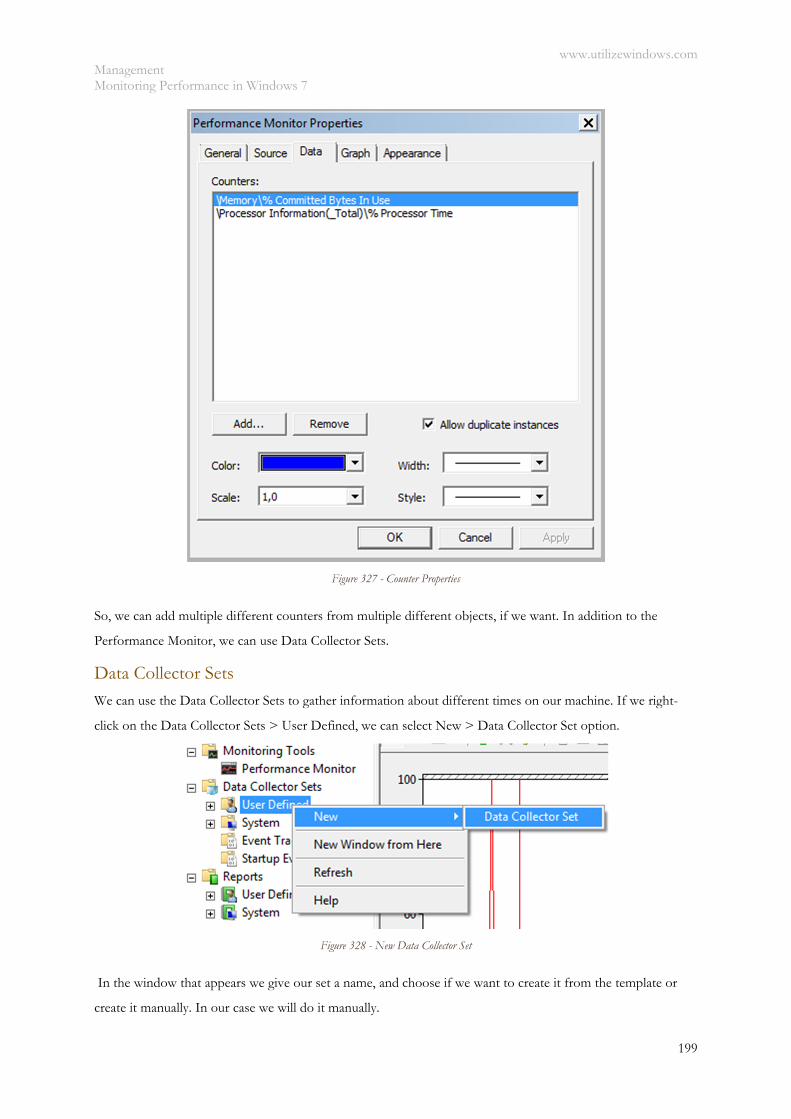
www.utilizewindows.com Management Monitoring Performance in Windows 7
199
Figure 327 - Counter Properties
So, we can add multiple different counters from multiple different objects, if we want. In addition to the
Performance Monitor, we can use Data Collector Sets.
Data Collector Sets We can use the Data Collector Sets to gather information about different times on our machine. If we right-
click on the Data Collector Sets > User Defined, we can select New > Data Collector Set option.
Figure 328 - New Data Collector Set
In the window that appears we give our set a name, and choose if we want to create it from the template or
create it manually. In our case we will do it manually.
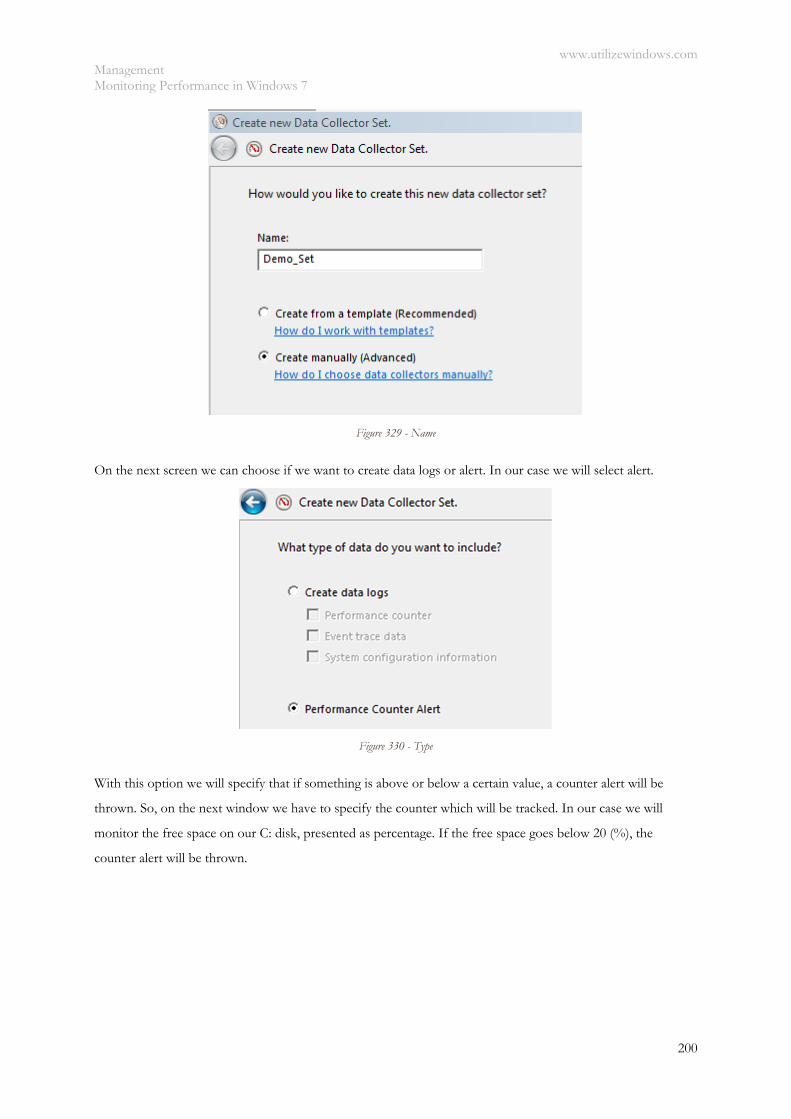
www.utilizewindows.com Management Monitoring Performance in Windows 7
200
Figure 329 - Name
On the next screen we can choose if we want to create data logs or alert. In our case we will select alert.
Figure 330 - Type
With this option we will specify that if something is above or below a certain value, a counter alert will be
thrown. So, on the next window we have to specify the counter which will be tracked. In our case we will
monitor the free space on our C: disk, presented as percentage. If the free space goes below 20 (%), the
counter alert will be thrown.
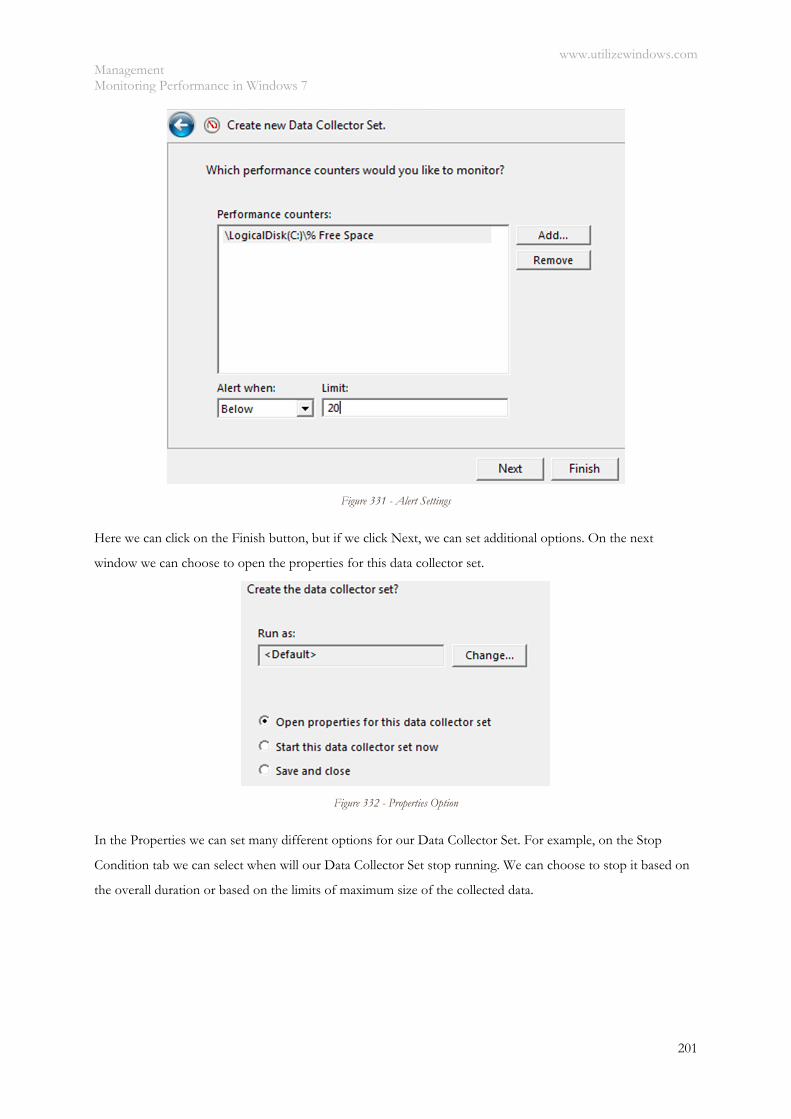
www.utilizewindows.com Management Monitoring Performance in Windows 7
201
Figure 331 - Alert Settings
Here we can click on the Finish button, but if we click Next, we can set additional options. On the next
window we can choose to open the properties for this data collector set.
Figure 332 - Properties Option
In the Properties we can set many different options for our Data Collector Set. For example, on the Stop
Condition tab we can select when will our Data Collector Set stop running. We can choose to stop it based on
the overall duration or based on the limits of maximum size of the collected data.
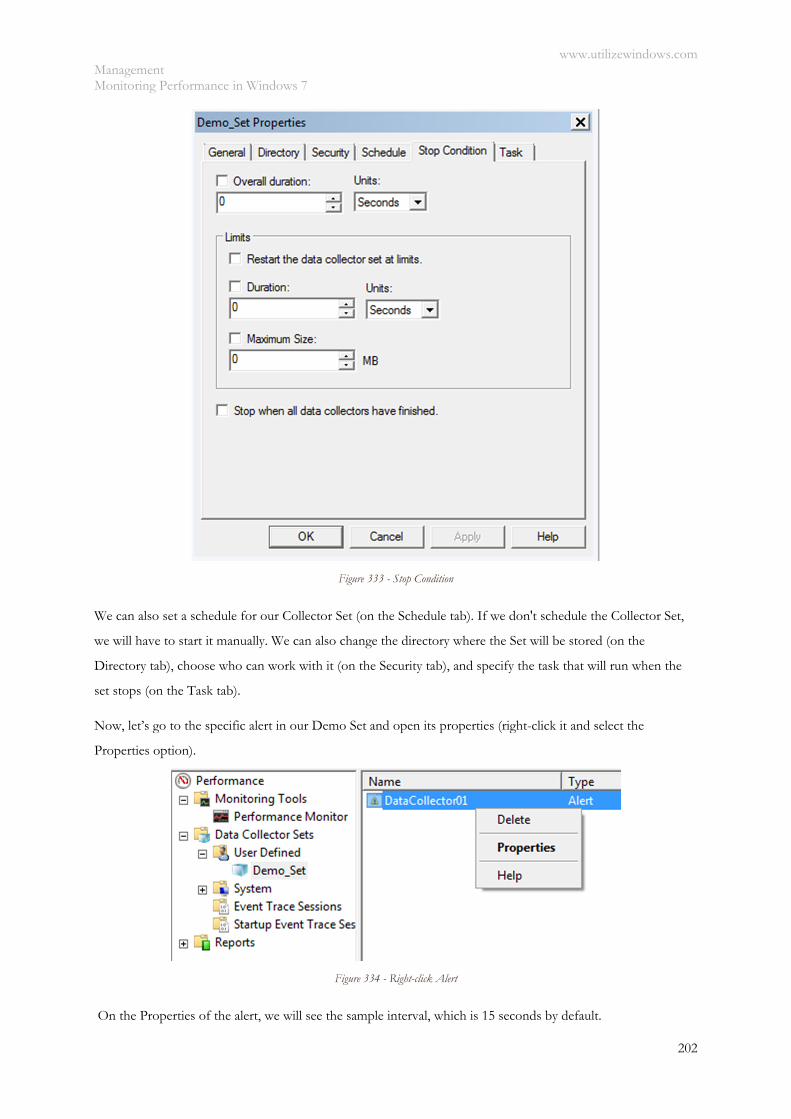
www.utilizewindows.com Management Monitoring Performance in Windows 7
202
Figure 333 - Stop Condition
We can also set a schedule for our Collector Set (on the Schedule tab). If we don't schedule the Collector Set,
we will have to start it manually. We can also change the directory where the Set will be stored (on the
Directory tab), choose who can work with it (on the Security tab), and specify the task that will run when the
set stops (on the Task tab).
Now, let’s go to the specific alert in our Demo Set and open its properties (right-click it and select the
Properties option).
Figure 334 - Right-click Alert
On the Properties of the alert, we will see the sample interval, which is 15 seconds by default.
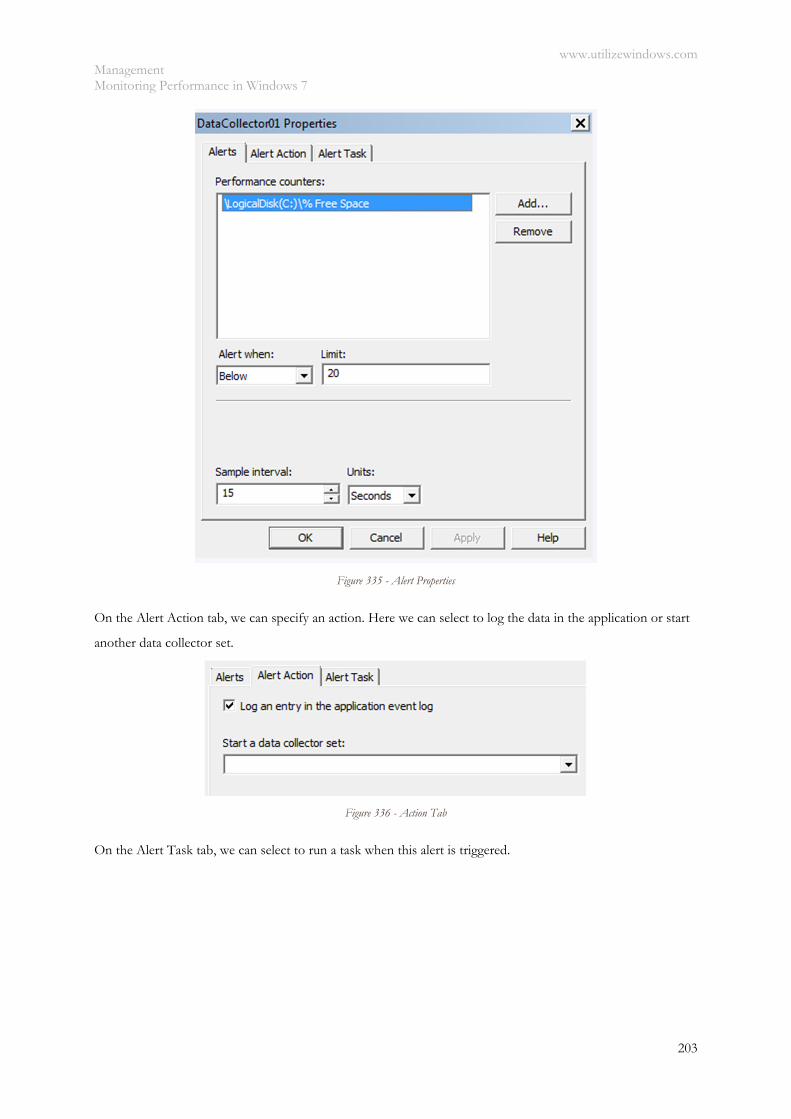
www.utilizewindows.com Management Monitoring Performance in Windows 7
203
Figure 335 - Alert Properties
On the Alert Action tab, we can specify an action. Here we can select to log the data in the application or start
another data collector set.
Figure 336 - Action Tab
On the Alert Task tab, we can select to run a task when this alert is triggered.

www.utilizewindows.com Management Monitoring Performance in Windows 7
204
Figure 337 - Task Tab
To start the Data Collector Set, we have to select it and select the Start option.
Figure 338 - Start Data Collector Set
So the previous example was the Performance Counter Alert. We can also use Data Collector Set to create data
logs.
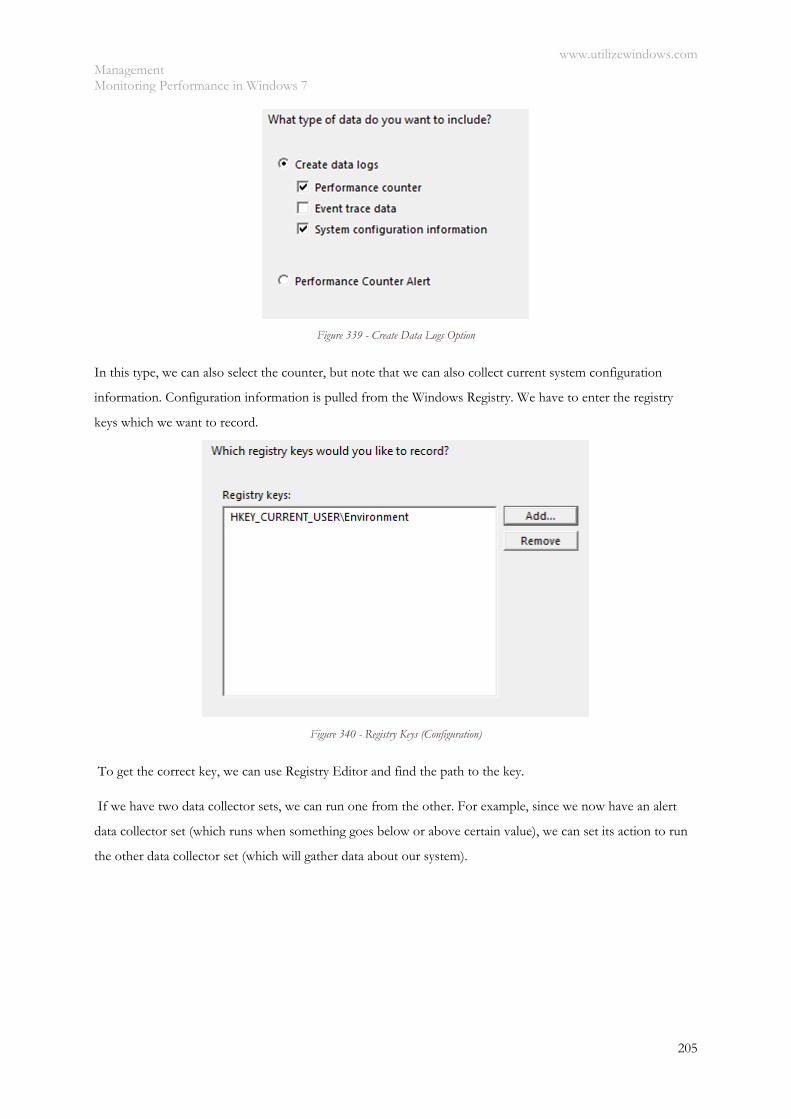
www.utilizewindows.com Management Monitoring Performance in Windows 7
205
Figure 339 - Create Data Logs Option
In this type, we can also select the counter, but note that we can also collect current system configuration
information. Configuration information is pulled from the Windows Registry. We have to enter the registry
keys which we want to record.
Figure 340 - Registry Keys (Configuration)
To get the correct key, we can use Registry Editor and find the path to the key.
If we have two data collector sets, we can run one from the other. For example, since we now have an alert
data collector set (which runs when something goes below or above certain value), we can set its action to run
the other data collector set (which will gather data about our system).
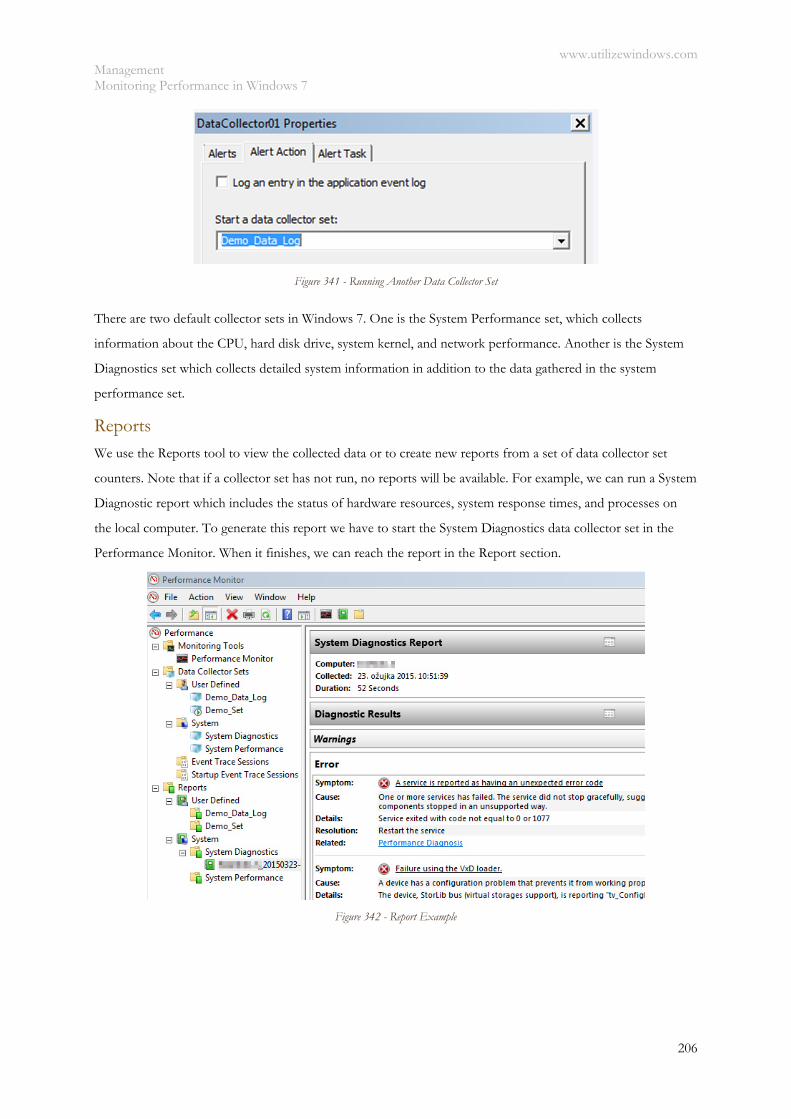
www.utilizewindows.com Management Monitoring Performance in Windows 7
206
Figure 341 - Running Another Data Collector Set
There are two default collector sets in Windows 7. One is the System Performance set, which collects
information about the CPU, hard disk drive, system kernel, and network performance. Another is the System
Diagnostics set which collects detailed system information in addition to the data gathered in the system
performance set.
Reports We use the Reports tool to view the collected data or to create new reports from a set of data collector set
counters. Note that if a collector set has not run, no reports will be available. For example, we can run a System
Diagnostic report which includes the status of hardware resources, system response times, and processes on
the local computer. To generate this report we have to start the System Diagnostics data collector set in the
Performance Monitor. When it finishes, we can reach the report in the Report section.
Figure 342 - Report Example
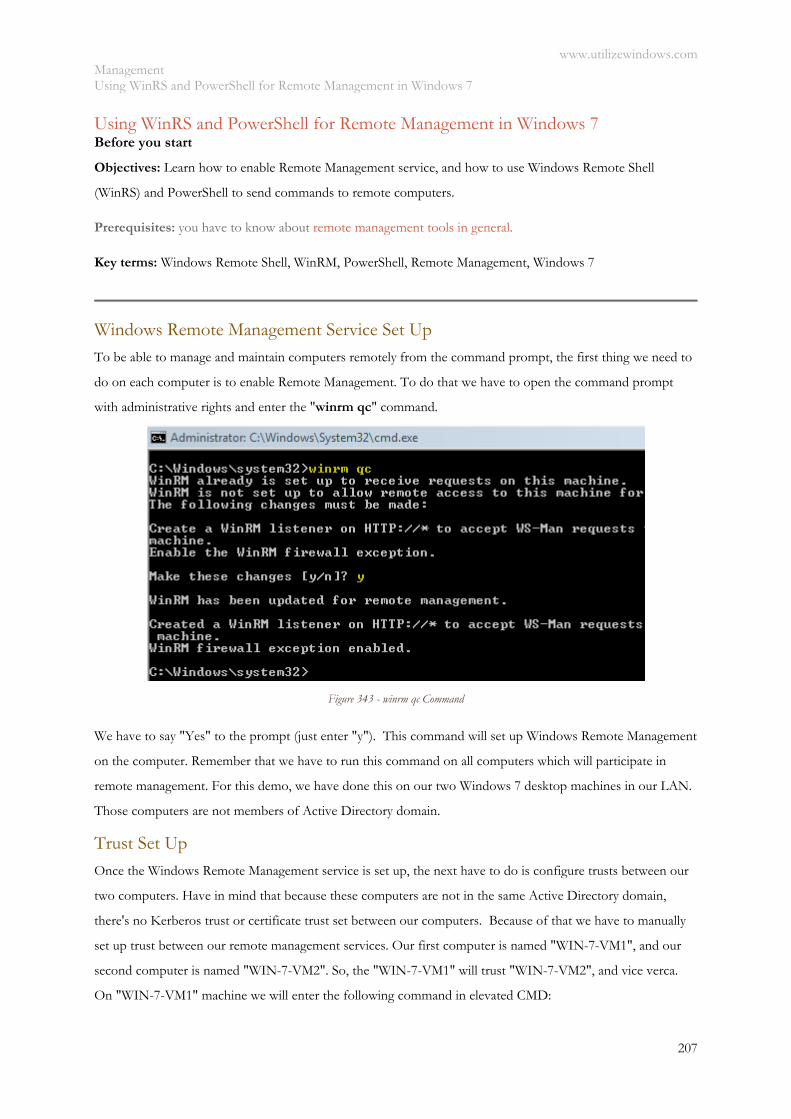
www.utilizewindows.com Management Using WinRS and PowerShell for Remote Management in Windows 7
207
Using WinRS and PowerShell for Remote Management in Windows 7 Before you start
Objectives: Learn how to enable Remote Management service, and how to use Windows Remote Shell
(WinRS) and PowerShell to send commands to remote computers.
Prerequisites: you have to know about remote management tools in general.
Key terms: Windows Remote Shell, WinRM, PowerShell, Remote Management, Windows 7
Windows Remote Management Service Set Up To be able to manage and maintain computers remotely from the command prompt, the first thing we need to
do on each computer is to enable Remote Management. To do that we have to open the command prompt
with administrative rights and enter the "winrm qc" command.
Figure 343 - winrm qc Command
We have to say "Yes" to the prompt (just enter "y"). This command will set up Windows Remote Management
on the computer. Remember that we have to run this command on all computers which will participate in
remote management. For this demo, we have done this on our two Windows 7 desktop machines in our LAN.
Those computers are not members of Active Directory domain.
Trust Set Up
Once the Windows Remote Management service is set up, the next have to do is configure trusts between our
two computers. Have in mind that because these computers are not in the same Active Directory domain,
there's no Kerberos trust or certificate trust set between our computers. Because of that we have to manually
set up trust between our remote management services. Our first computer is named "WIN-7-VM1", and our
second computer is named "WIN-7-VM2". So, the "WIN-7-VM1" will trust "WIN-7-VM2", and vice verca.
On "WIN-7-VM1" machine we will enter the following command in elevated CMD:
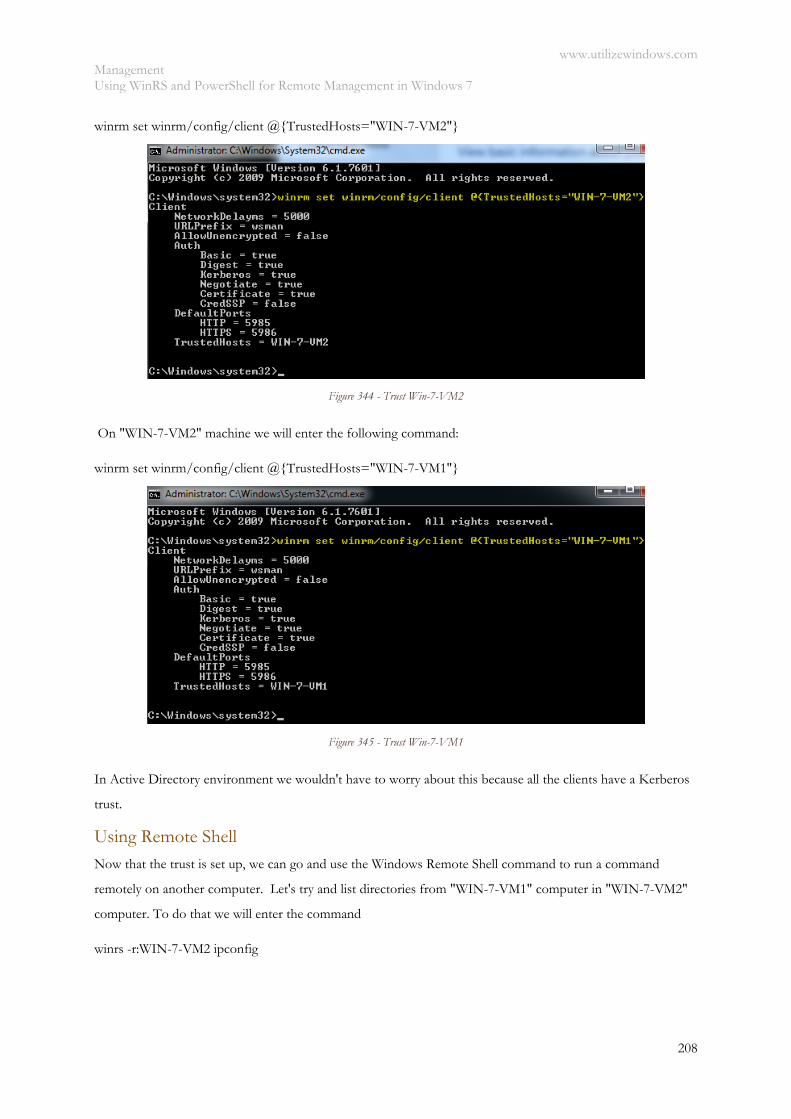
www.utilizewindows.com Management Using WinRS and PowerShell for Remote Management in Windows 7
208
winrm set winrm/config/client @{TrustedHosts="WIN-7-VM2"}
Figure 344 - Trust Win-7-VM2
On "WIN-7-VM2" machine we will enter the following command:
winrm set winrm/config/client @{TrustedHosts="WIN-7-VM1"}
Figure 345 - Trust Win-7-VM1
In Active Directory environment we wouldn't have to worry about this because all the clients have a Kerberos
trust.
Using Remote Shell Now that the trust is set up, we can go and use the Windows Remote Shell command to run a command
remotely on another computer. Let's try and list directories from "WIN-7-VM1" computer in "WIN-7-VM2"
computer. To do that we will enter the command
winrs -r:WIN-7-VM2 ipconfig
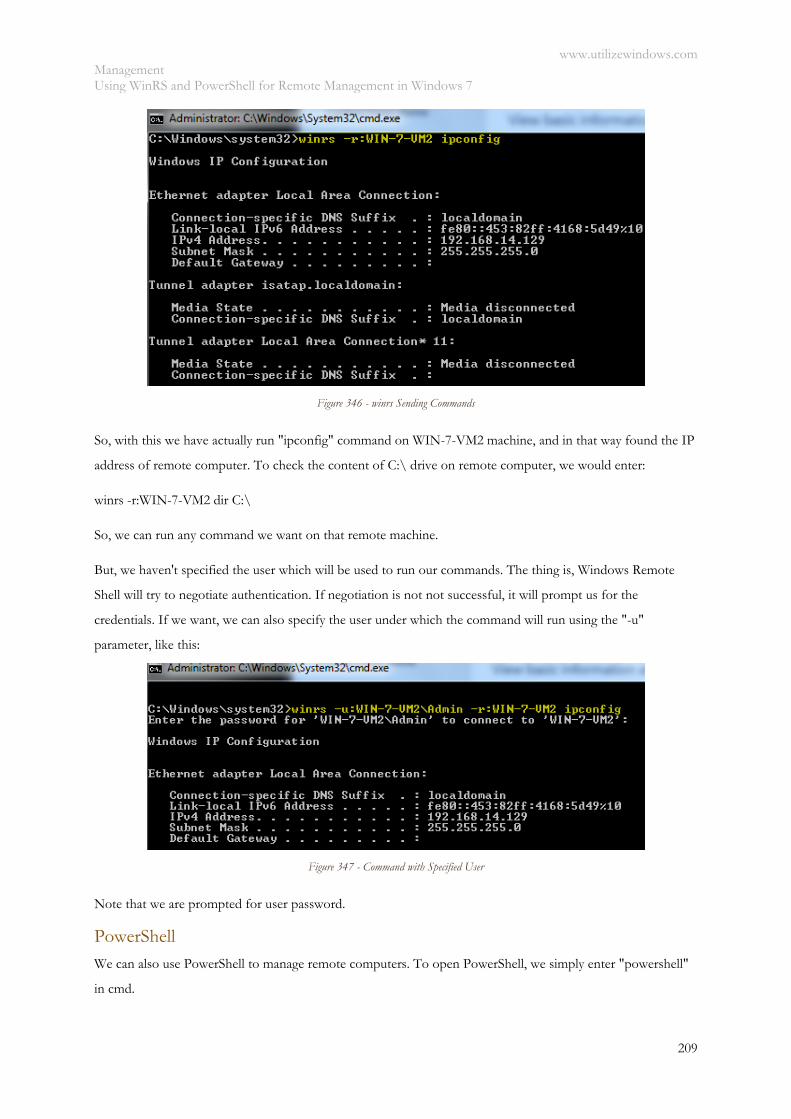
www.utilizewindows.com Management Using WinRS and PowerShell for Remote Management in Windows 7
209
Figure 346 - winrs Sending Commands
So, with this we have actually run "ipconfig" command on WIN-7-VM2 machine, and in that way found the IP
address of remote computer. To check the content of C:\ drive on remote computer, we would enter:
winrs -r:WIN-7-VM2 dir C:\
So, we can run any command we want on that remote machine.
But, we haven't specified the user which will be used to run our commands. The thing is, Windows Remote
Shell will try to negotiate authentication. If negotiation is not not successful, it will prompt us for the
credentials. If we want, we can also specify the user under which the command will run using the "-u"
parameter, like this:
Figure 347 - Command with Specified User
Note that we are prompted for user password.
PowerShell We can also use PowerShell to manage remote computers. To open PowerShell, we simply enter "powershell"
in cmd.

www.utilizewindows.com Management Using WinRS and PowerShell for Remote Management in Windows 7
210
Figure 348 - Enable PowerShell
In PowerShell we can also enter regular commands, but we can now also use advanced PowerShell features like
filtering or piping. Combining those features with remote management makes it even stronger. So, we can run
PowerShell commands on a remote machine using a "icm" command. We have to specify the name of the
computer, and then script or block of script. We can define a block of script by putting it in brackets. For
example, to get the ipconfig information from the "WIN-7-VM2", we would enter
icm WIN-7-VM2 {ipconfig}
Figure 349 - Remote Command Using PowerShell
Of course, we can use cmdlets:
Figure 350 - Sending cmdlets to Remote Computer

www.utilizewindows.com Management Using WinRS and PowerShell for Remote Management in Windows 7
211
To shutdown remote computer:
icm WIN-7-VM2 {stop-computer -force}
To restart remote computer:
icm WIN-7-VM2 {restart-computer -force}
So, as we have seen we can send commands to remote machines. Practically, any command we can run locally,
we can also send to remote machine.
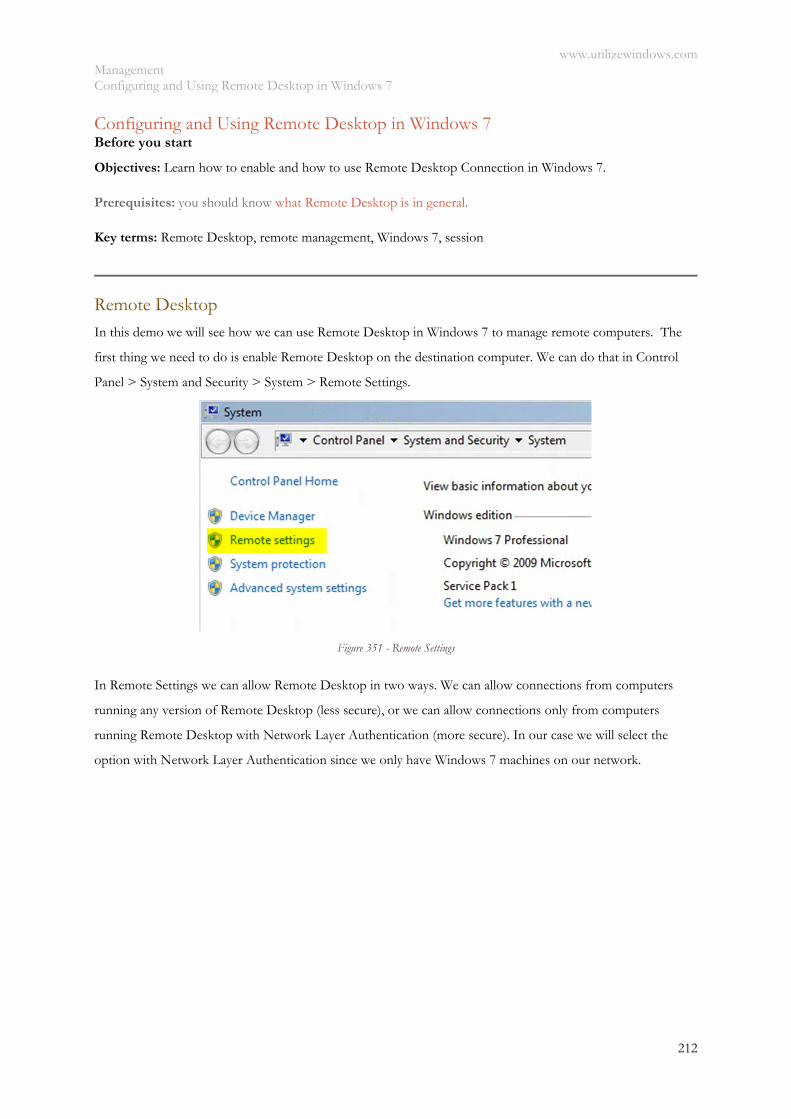
www.utilizewindows.com Management Configuring and Using Remote Desktop in Windows 7
212
Configuring and Using Remote Desktop in Windows 7 Before you start
Objectives: Learn how to enable and how to use Remote Desktop Connection in Windows 7.
Prerequisites: you should know what Remote Desktop is in general.
Key terms: Remote Desktop, remote management, Windows 7, session
Remote Desktop
In this demo we will see how we can use Remote Desktop in Windows 7 to manage remote computers. The
first thing we need to do is enable Remote Desktop on the destination computer. We can do that in Control
Panel > System and Security > System > Remote Settings.
Figure 351 - Remote Settings
In Remote Settings we can allow Remote Desktop in two ways. We can allow connections from computers
running any version of Remote Desktop (less secure), or we can allow connections only from computers
running Remote Desktop with Network Layer Authentication (more secure). In our case we will select the
option with Network Layer Authentication since we only have Windows 7 machines on our network.
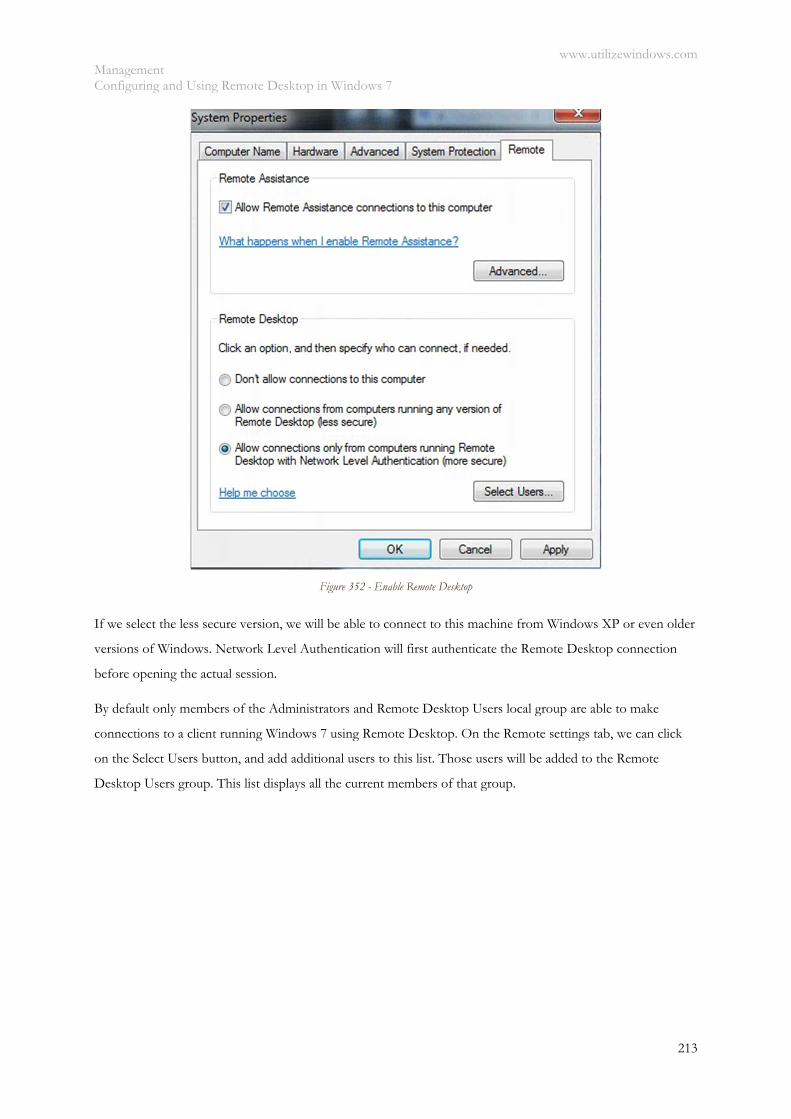
www.utilizewindows.com Management Configuring and Using Remote Desktop in Windows 7
213
Figure 352 - Enable Remote Desktop
If we select the less secure version, we will be able to connect to this machine from Windows XP or even older
versions of Windows. Network Level Authentication will first authenticate the Remote Desktop connection
before opening the actual session.
By default only members of the Administrators and Remote Desktop Users local group are able to make
connections to a client running Windows 7 using Remote Desktop. On the Remote settings tab, we can click
on the Select Users button, and add additional users to this list. Those users will be added to the Remote
Desktop Users group. This list displays all the current members of that group.
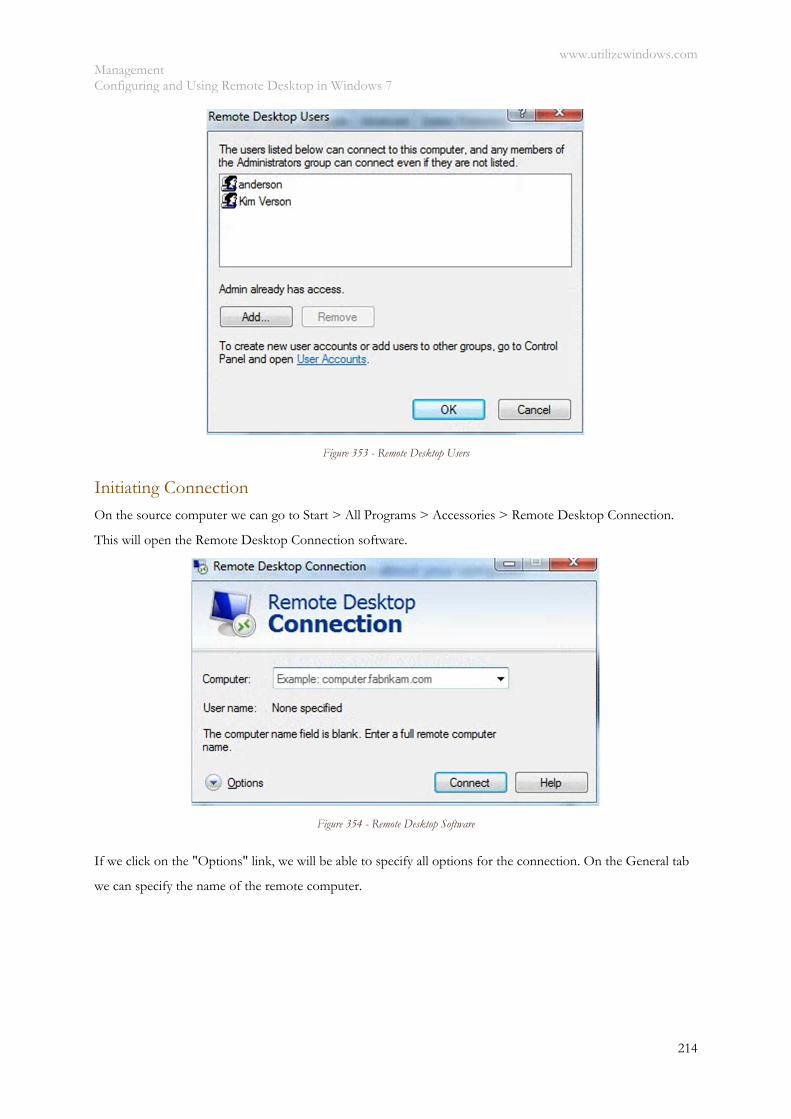
www.utilizewindows.com Management Configuring and Using Remote Desktop in Windows 7
214
Figure 353 - Remote Desktop Users
Initiating Connection On the source computer we can go to Start > All Programs > Accessories > Remote Desktop Connection.
This will open the Remote Desktop Connection software.
Figure 354 - Remote Desktop Software
If we click on the "Options" link, we will be able to specify all options for the connection. On the General tab
we can specify the name of the remote computer.
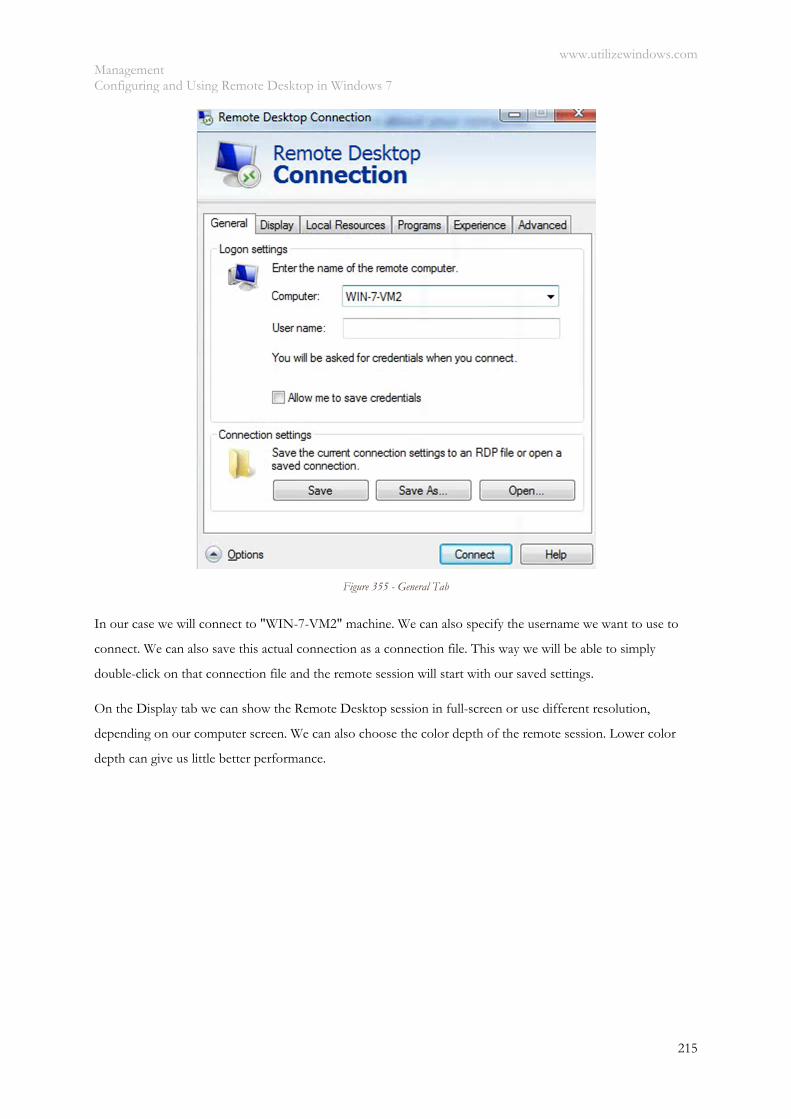
www.utilizewindows.com Management Configuring and Using Remote Desktop in Windows 7
215
Figure 355 - General Tab
In our case we will connect to "WIN-7-VM2" machine. We can also specify the username we want to use to
connect. We can also save this actual connection as a connection file. This way we will be able to simply
double-click on that connection file and the remote session will start with our saved settings.
On the Display tab we can show the Remote Desktop session in full-screen or use different resolution,
depending on our computer screen. We can also choose the color depth of the remote session. Lower color
depth can give us little better performance.
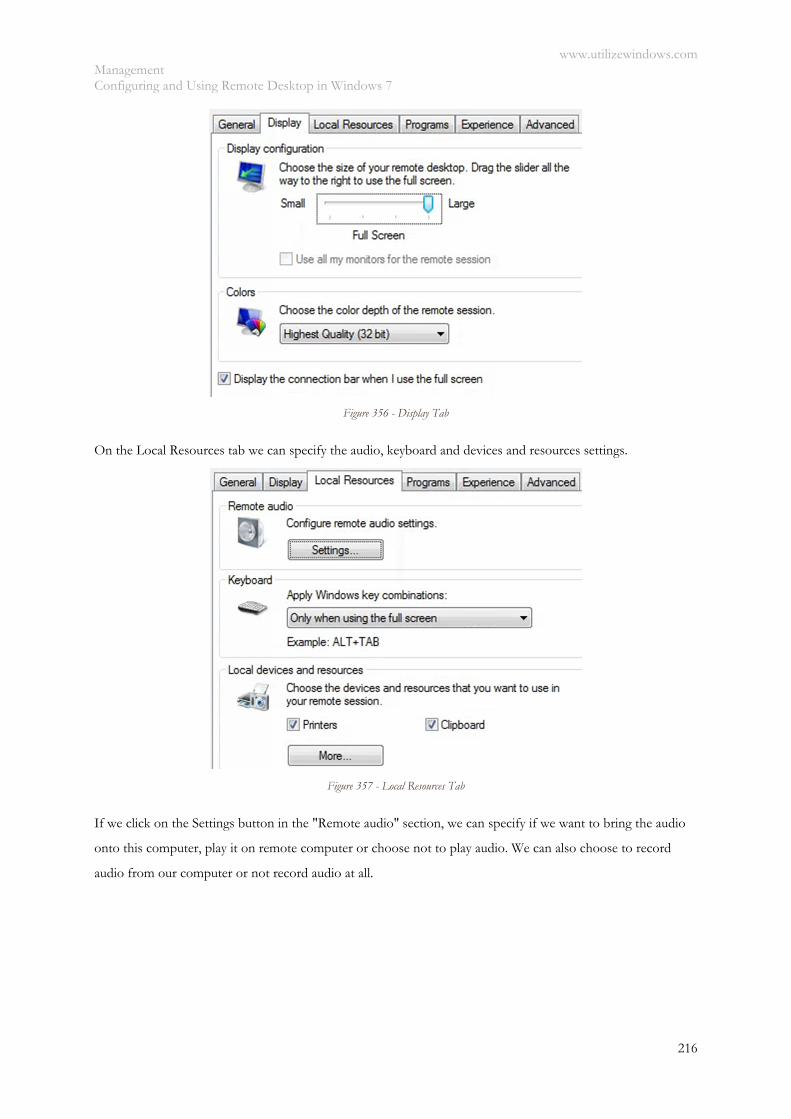
www.utilizewindows.com Management Configuring and Using Remote Desktop in Windows 7
216
Figure 356 - Display Tab
On the Local Resources tab we can specify the audio, keyboard and devices and resources settings.
Figure 357 - Local Resources Tab
If we click on the Settings button in the "Remote audio" section, we can specify if we want to bring the audio
onto this computer, play it on remote computer or choose not to play audio. We can also choose to record
audio from our computer or not record audio at all.
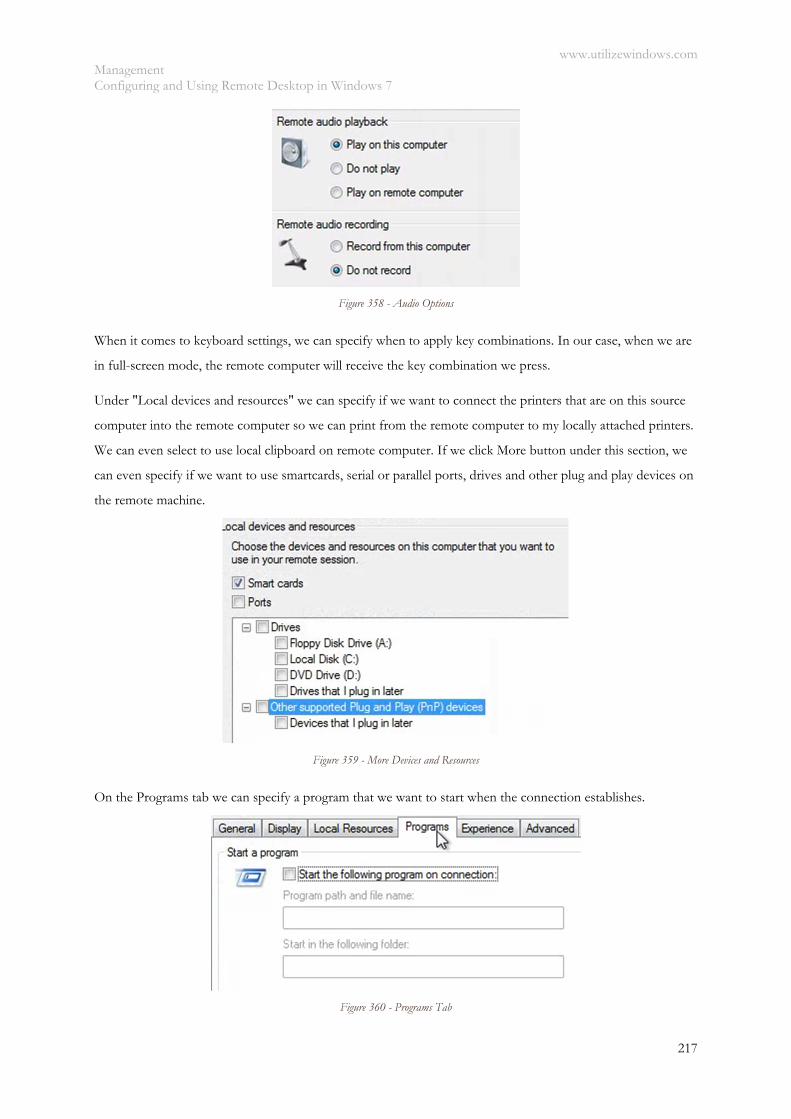
www.utilizewindows.com Management Configuring and Using Remote Desktop in Windows 7
217
Figure 358 - Audio Options
When it comes to keyboard settings, we can specify when to apply key combinations. In our case, when we are
in full-screen mode, the remote computer will receive the key combination we press.
Under "Local devices and resources" we can specify if we want to connect the printers that are on this source
computer into the remote computer so we can print from the remote computer to my locally attached printers.
We can even select to use local clipboard on remote computer. If we click More button under this section, we
can even specify if we want to use smartcards, serial or parallel ports, drives and other plug and play devices on
the remote machine.
Figure 359 - More Devices and Resources
On the Programs tab we can specify a program that we want to start when the connection establishes.
Figure 360 - Programs Tab
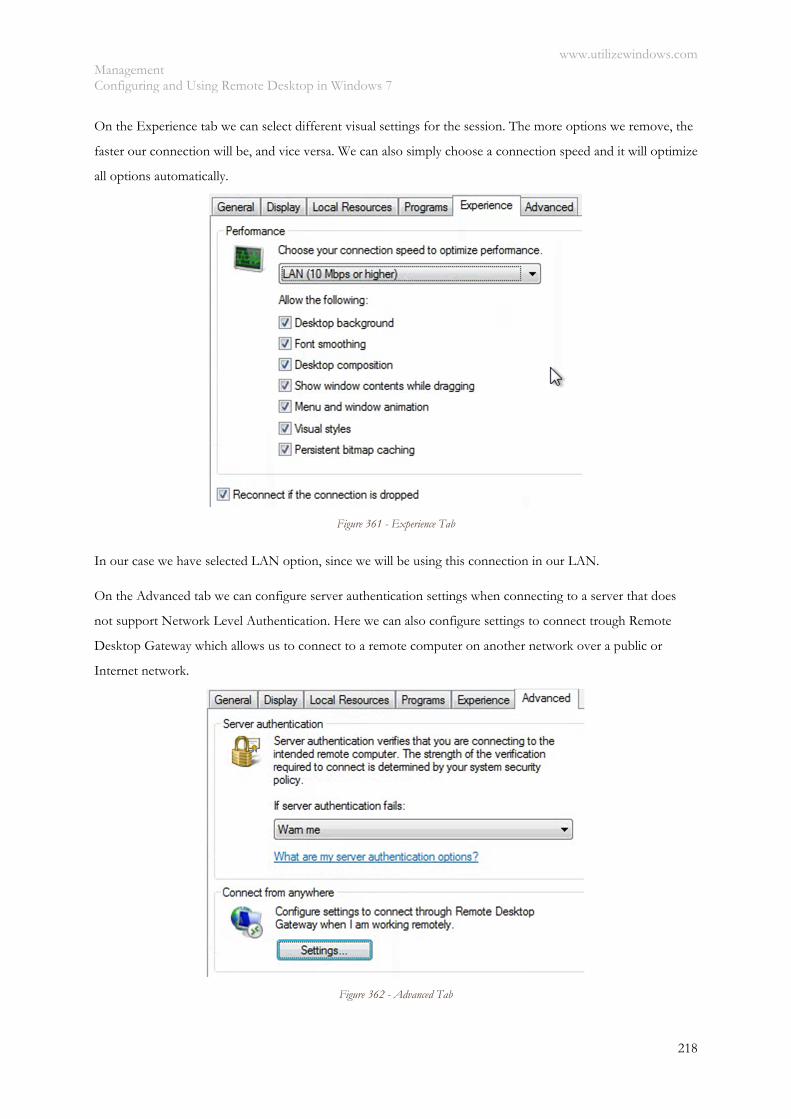
www.utilizewindows.com Management Configuring and Using Remote Desktop in Windows 7
218
On the Experience tab we can select different visual settings for the session. The more options we remove, the
faster our connection will be, and vice versa. We can also simply choose a connection speed and it will optimize
all options automatically.
Figure 361 - Experience Tab
In our case we have selected LAN option, since we will be using this connection in our LAN.
On the Advanced tab we can configure server authentication settings when connecting to a server that does
not support Network Level Authentication. Here we can also configure settings to connect trough Remote
Desktop Gateway which allows us to connect to a remote computer on another network over a public or
Internet network.
Figure 362 - Advanced Tab
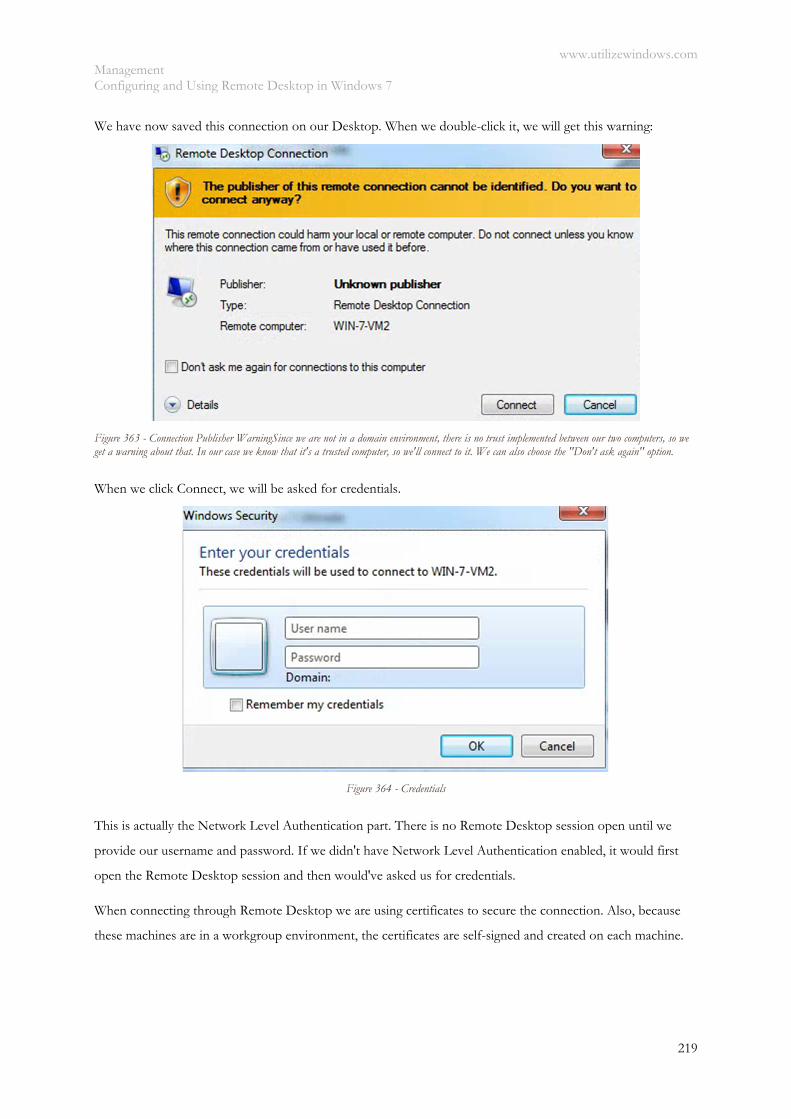
www.utilizewindows.com Management Configuring and Using Remote Desktop in Windows 7
219
We have now saved this connection on our Desktop. When we double-click it, we will get this warning:
Figure 363 - Connection Publisher WarningSince we are not in a domain environment, there is no trust implemented between our two computers, so we get a warning about that. In our case we know that it's a trusted computer, so we'll connect to it. We can also choose the "Don't ask again" option.
When we click Connect, we will be asked for credentials.
Figure 364 - Credentials
This is actually the Network Level Authentication part. There is no Remote Desktop session open until we
provide our username and password. If we didn't have Network Level Authentication enabled, it would first
open the Remote Desktop session and then would've asked us for credentials.
When connecting through Remote Desktop we are using certificates to secure the connection. Also, because
these machines are in a workgroup environment, the certificates are self-signed and created on each machine.
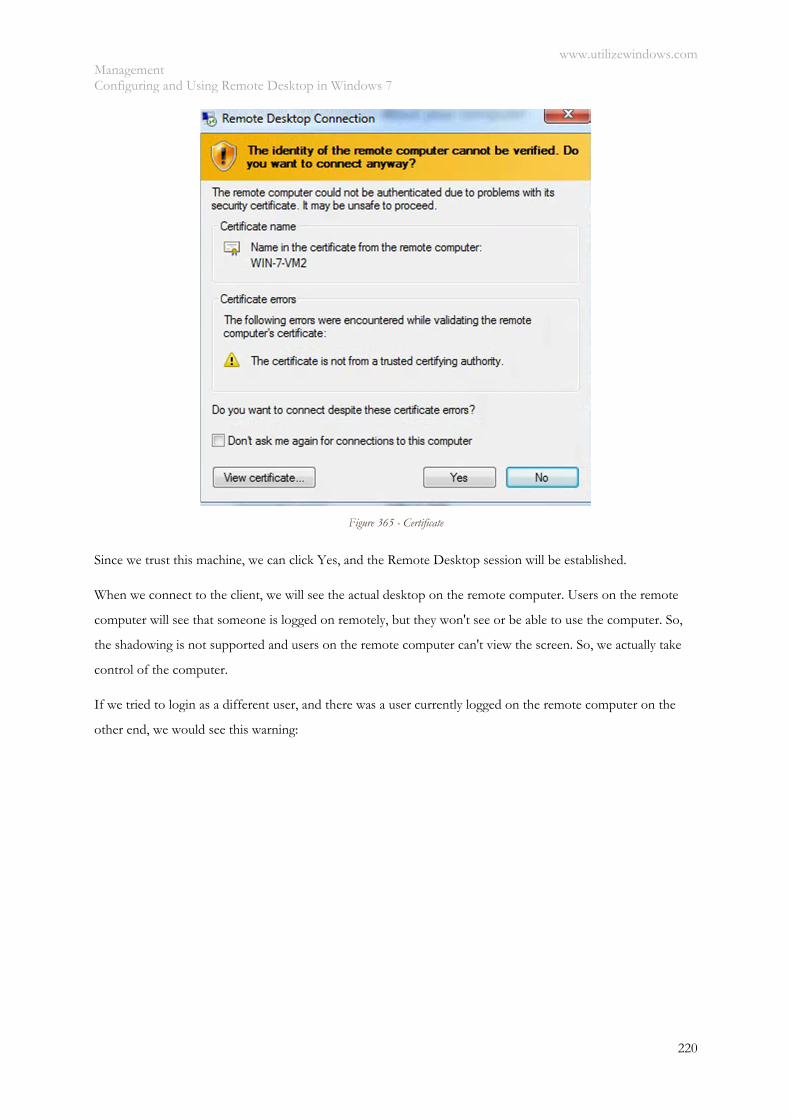
www.utilizewindows.com Management Configuring and Using Remote Desktop in Windows 7
220
Figure 365 - Certificate
Since we trust this machine, we can click Yes, and the Remote Desktop session will be established.
When we connect to the client, we will see the actual desktop on the remote computer. Users on the remote
computer will see that someone is logged on remotely, but they won't see or be able to use the computer. So,
the shadowing is not supported and users on the remote computer can't view the screen. So, we actually take
control of the computer.
If we tried to login as a different user, and there was a user currently logged on the remote computer on the
other end, we would see this warning:
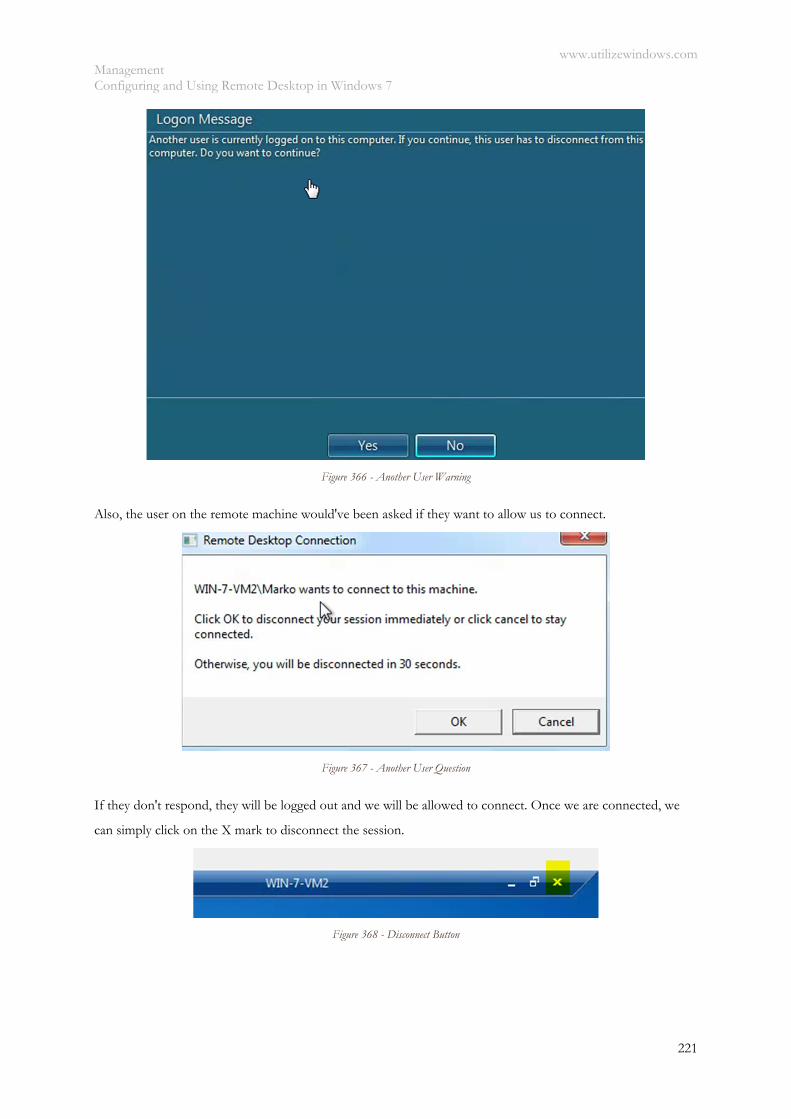
www.utilizewindows.com Management Configuring and Using Remote Desktop in Windows 7
221
Figure 366 - Another User Warning
Also, the user on the remote machine would've been asked if they want to allow us to connect.
Figure 367 - Another User Question
If they don't respond, they will be logged out and we will be allowed to connect. Once we are connected, we
can simply click on the X mark to disconnect the session.
Figure 368 - Disconnect Button

www.utilizewindows.com Management Configuring and Using Remote Desktop in Windows 7
222
We can also go to the Start menu and log off, and this will actually log us off from that remote machine. If we
disconnect, we actually stay logged on. So, this way we can connect to our remote machine again (or log on
locally with the same user account) and everything will be as we left it when we disconnected.
We can also run Remote Desktop from the command line. For example, to connect to the "WIN-7-VM2"
machine we would enter the following command:
mstsc /v:WIN-7-VM2
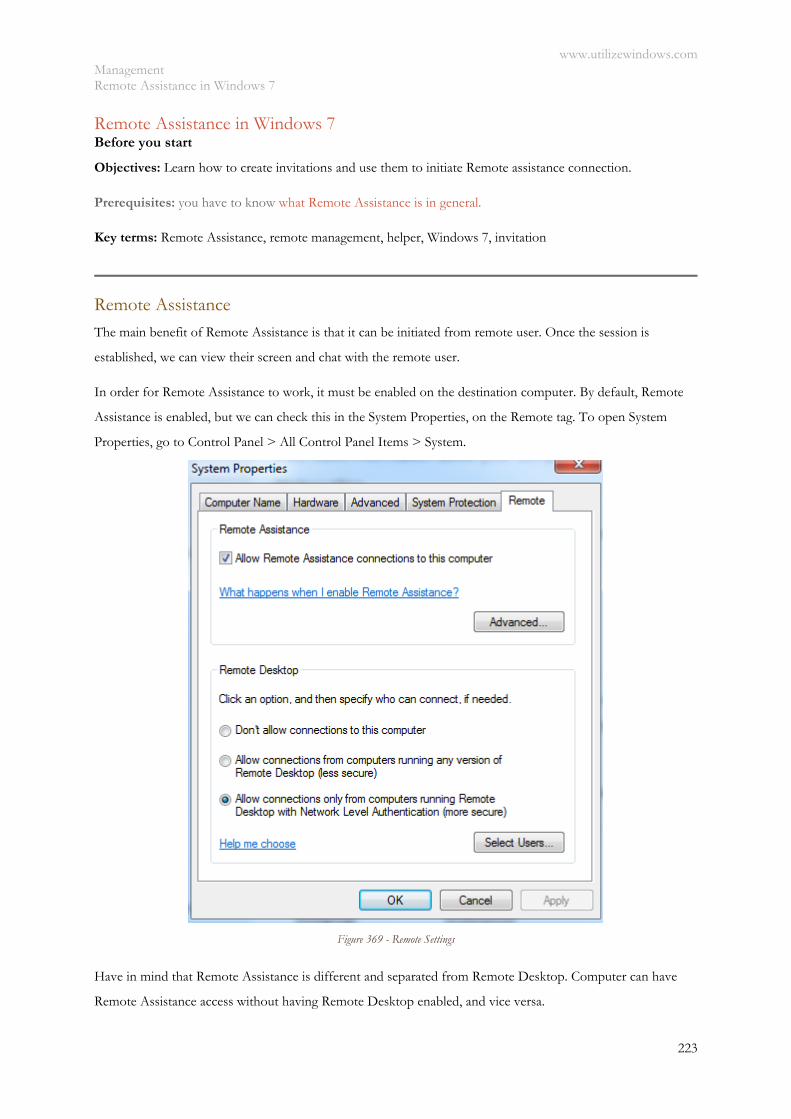
www.utilizewindows.com Management Remote Assistance in Windows 7
223
Remote Assistance in Windows 7 Before you start
Objectives: Learn how to create invitations and use them to initiate Remote assistance connection.
Prerequisites: you have to know what Remote Assistance is in general.
Key terms: Remote Assistance, remote management, helper, Windows 7, invitation
Remote Assistance
The main benefit of Remote Assistance is that it can be initiated from remote user. Once the session is
established, we can view their screen and chat with the remote user.
In order for Remote Assistance to work, it must be enabled on the destination computer. By default, Remote
Assistance is enabled, but we can check this in the System Properties, on the Remote tag. To open System
Properties, go to Control Panel > All Control Panel Items > System.
Figure 369 - Remote Settings
Have in mind that Remote Assistance is different and separated from Remote Desktop. Computer can have
Remote Assistance access without having Remote Desktop enabled, and vice versa.
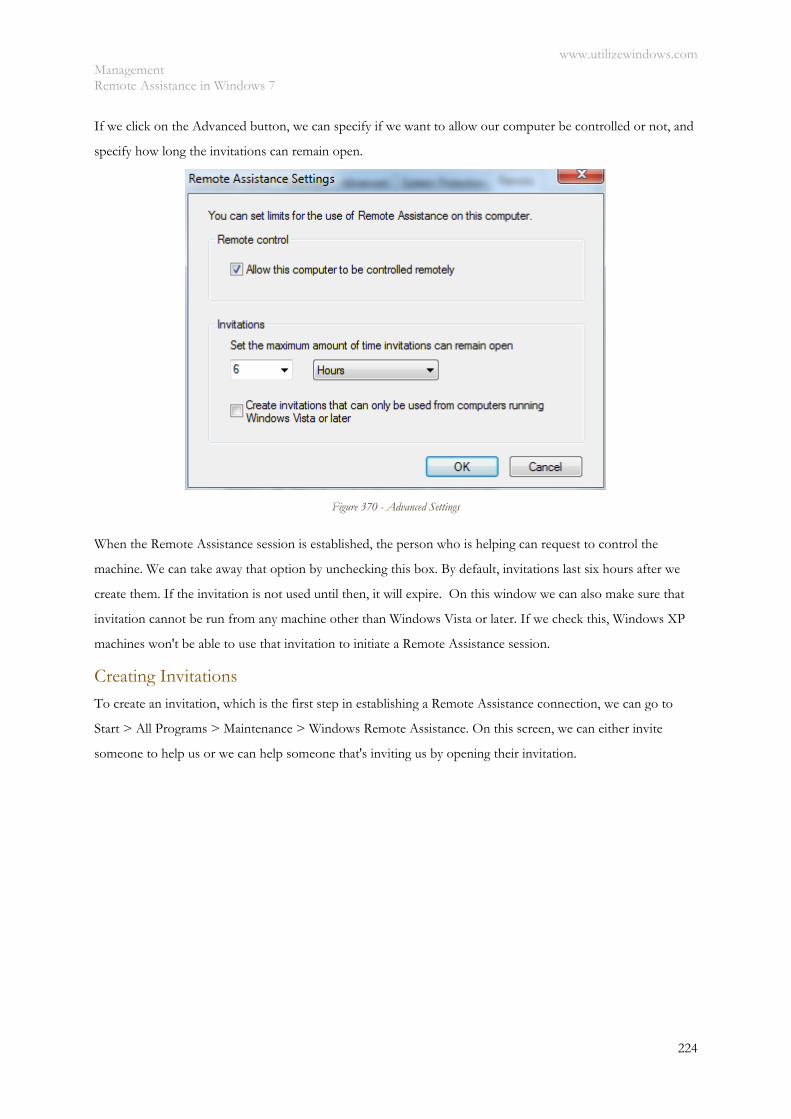
www.utilizewindows.com Management Remote Assistance in Windows 7
224
If we click on the Advanced button, we can specify if we want to allow our computer be controlled or not, and
specify how long the invitations can remain open.
Figure 370 - Advanced Settings
When the Remote Assistance session is established, the person who is helping can request to control the
machine. We can take away that option by unchecking this box. By default, invitations last six hours after we
create them. If the invitation is not used until then, it will expire. On this window we can also make sure that
invitation cannot be run from any machine other than Windows Vista or later. If we check this, Windows XP
machines won't be able to use that invitation to initiate a Remote Assistance session.
Creating Invitations
To create an invitation, which is the first step in establishing a Remote Assistance connection, we can go to
Start > All Programs > Maintenance > Windows Remote Assistance. On this screen, we can either invite
someone to help us or we can help someone that's inviting us by opening their invitation.
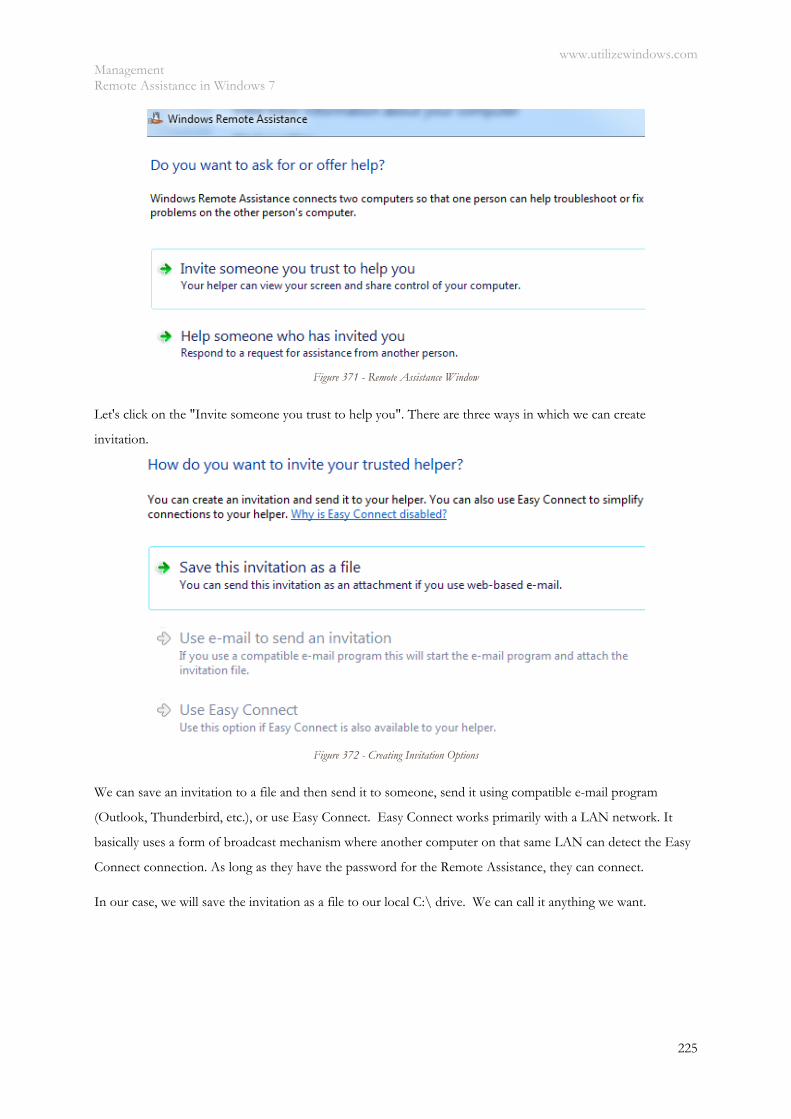
www.utilizewindows.com Management Remote Assistance in Windows 7
225
Figure 371 - Remote Assistance Window
Let's click on the "Invite someone you trust to help you". There are three ways in which we can create
invitation.
Figure 372 - Creating Invitation Options
We can save an invitation to a file and then send it to someone, send it using compatible e-mail program
(Outlook, Thunderbird, etc.), or use Easy Connect. Easy Connect works primarily with a LAN network. It
basically uses a form of broadcast mechanism where another computer on that same LAN can detect the Easy
Connect connection. As long as they have the password for the Remote Assistance, they can connect.
In our case, we will save the invitation as a file to our local C:\ drive. We can call it anything we want.
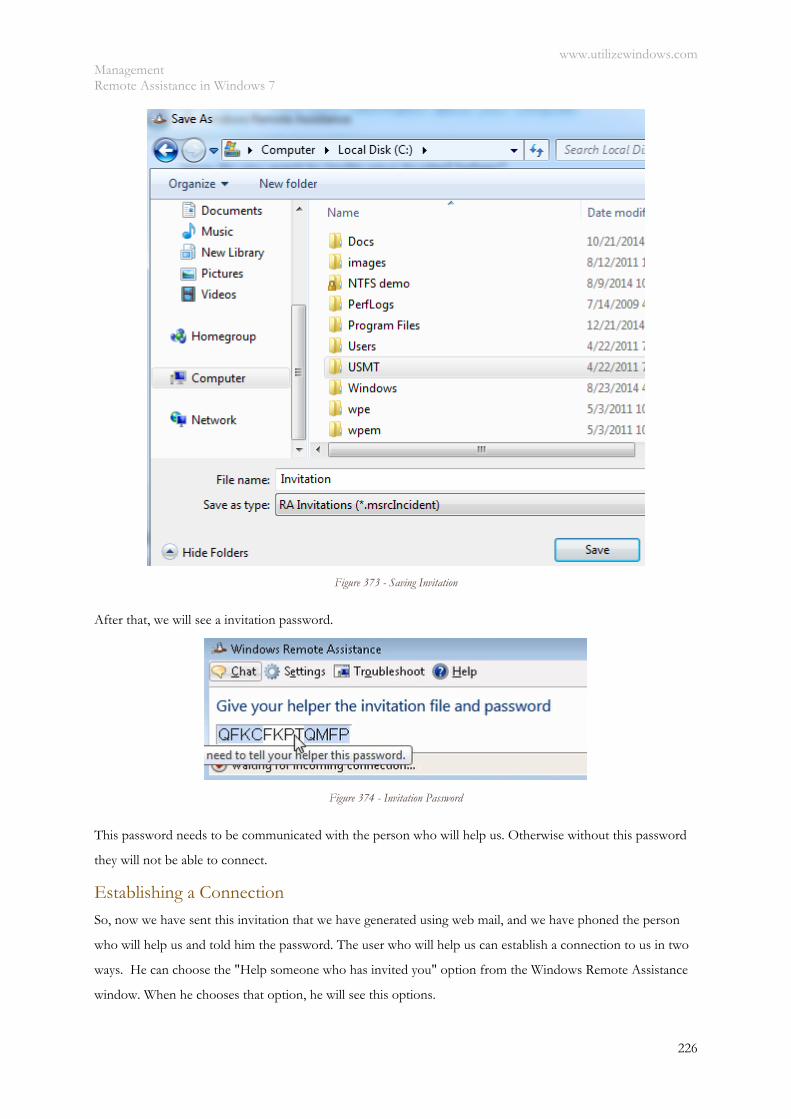
www.utilizewindows.com Management Remote Assistance in Windows 7
226
Figure 373 - Saving Invitation
After that, we will see a invitation password.
Figure 374 - Invitation Password
This password needs to be communicated with the person who will help us. Otherwise without this password
they will not be able to connect.
Establishing a Connection So, now we have sent this invitation that we have generated using web mail, and we have phoned the person
who will help us and told him the password. The user who will help us can establish a connection to us in two
ways. He can choose the "Help someone who has invited you" option from the Windows Remote Assistance
window. When he chooses that option, he will see this options.
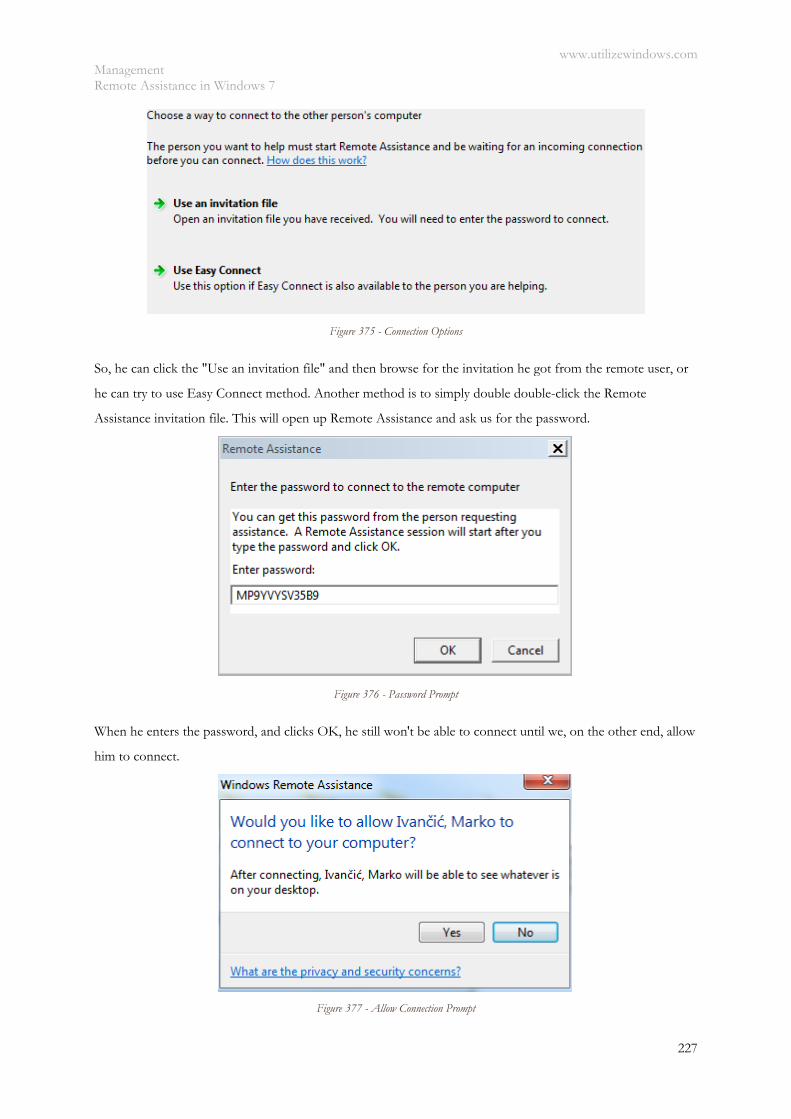
www.utilizewindows.com Management Remote Assistance in Windows 7
227
Figure 375 - Connection Options
So, he can click the "Use an invitation file" and then browse for the invitation he got from the remote user, or
he can try to use Easy Connect method. Another method is to simply double double-click the Remote
Assistance invitation file. This will open up Remote Assistance and ask us for the password.
Figure 376 - Password Prompt
When he enters the password, and clicks OK, he still won't be able to connect until we, on the other end, allow
him to connect.
Figure 377 - Allow Connection Prompt
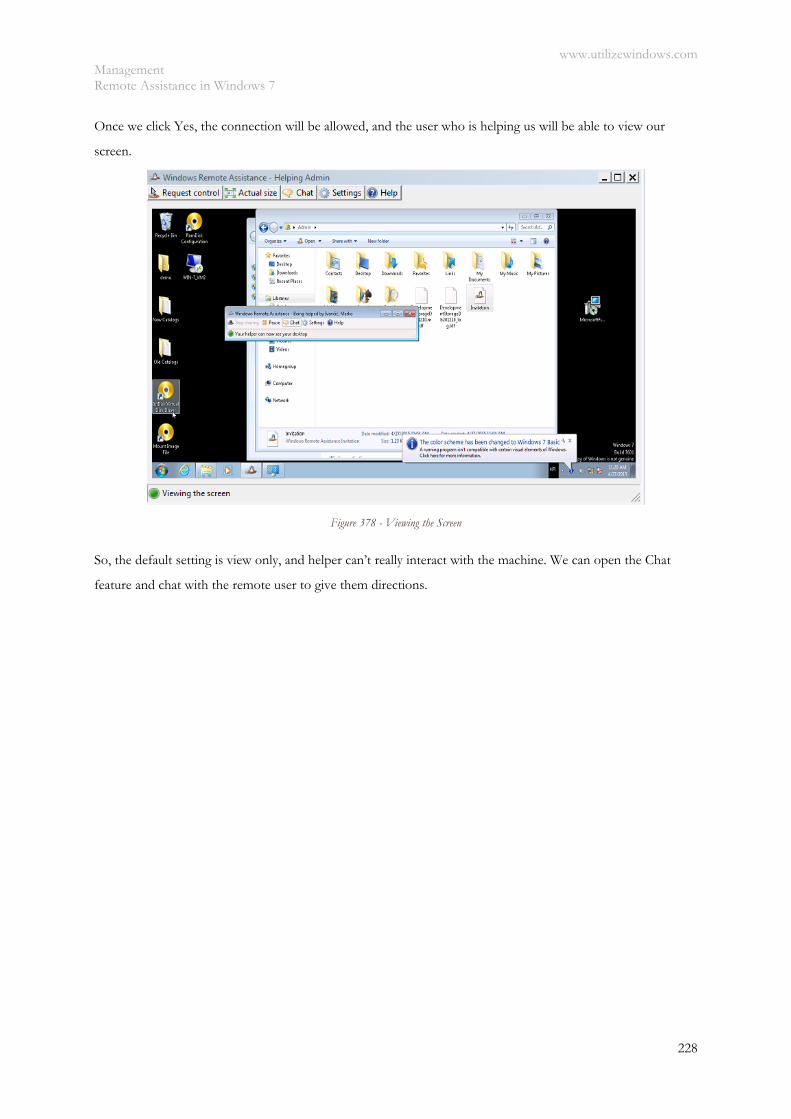
www.utilizewindows.com Management Remote Assistance in Windows 7
228
Once we click Yes, the connection will be allowed, and the user who is helping us will be able to view our
screen.
Figure 378 - Viewing the Screen
So, the default setting is view only, and helper can’t really interact with the machine. We can open the Chat
feature and chat with the remote user to give them directions.
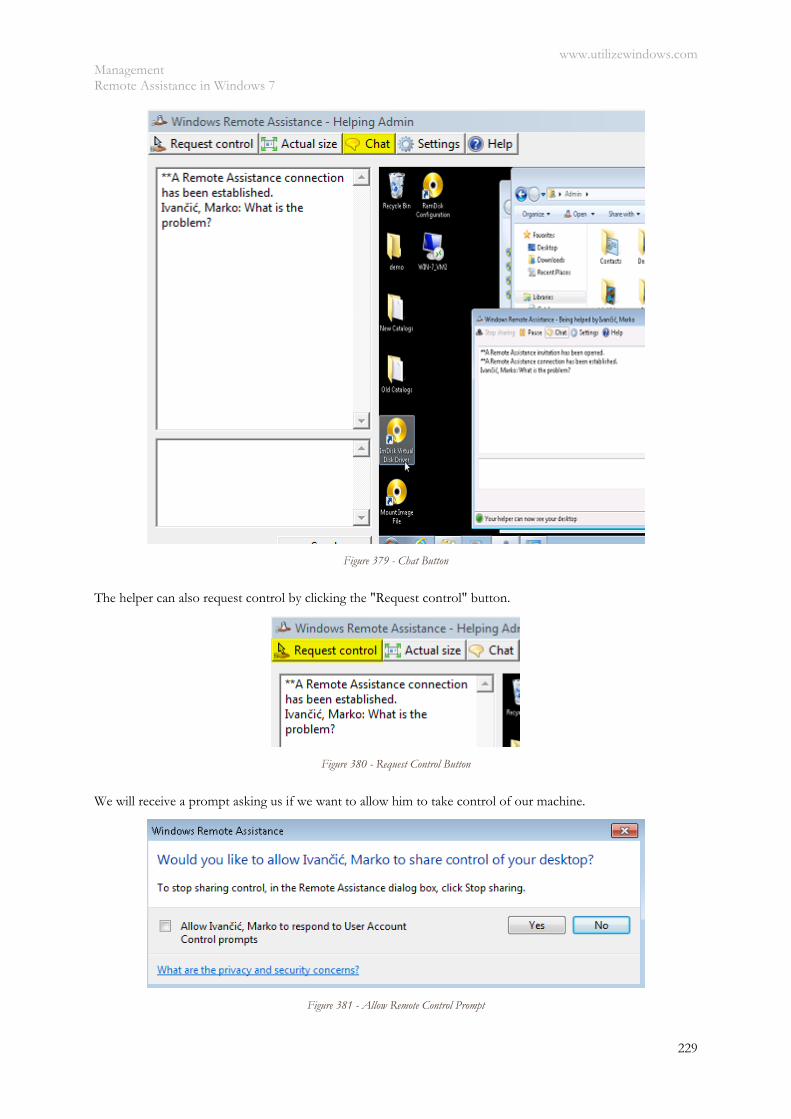
www.utilizewindows.com Management Remote Assistance in Windows 7
229
Figure 379 - Chat Button
The helper can also request control by clicking the "Request control" button.
Figure 380 - Request Control Button
We will receive a prompt asking us if we want to allow him to take control of our machine.
Figure 381 - Allow Remote Control Prompt
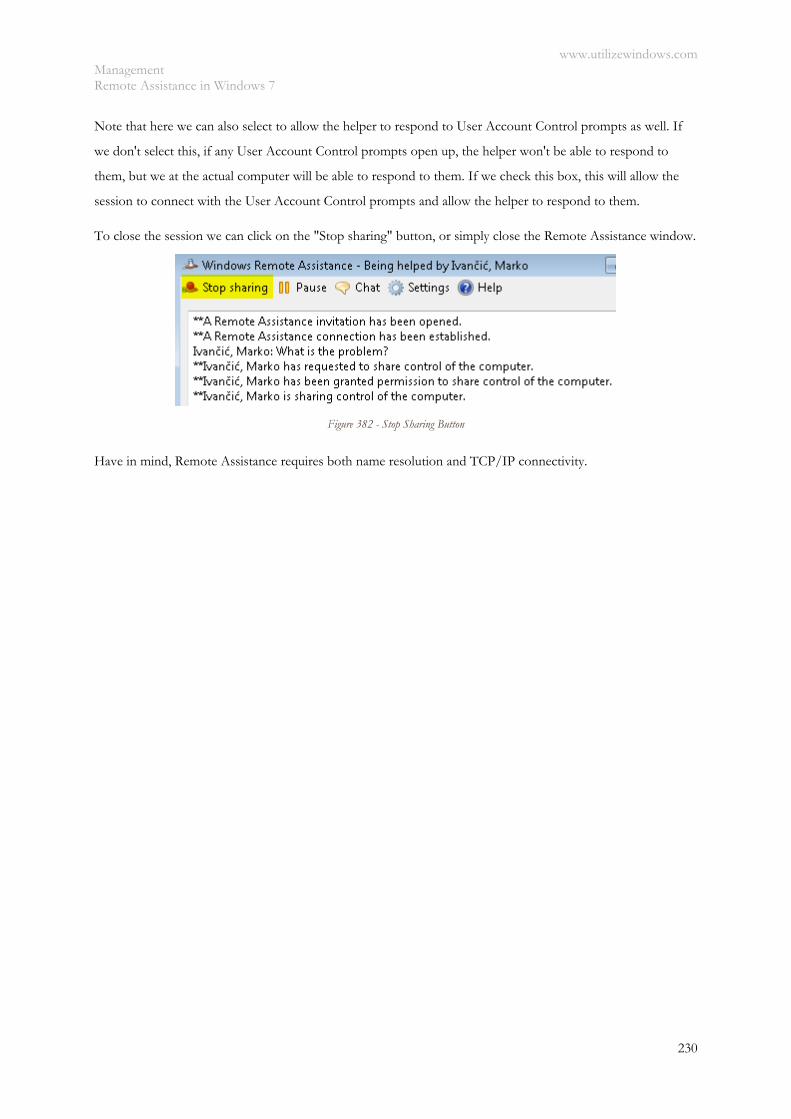
www.utilizewindows.com Management Remote Assistance in Windows 7
230
Note that here we can also select to allow the helper to respond to User Account Control prompts as well. If
we don't select this, if any User Account Control prompts open up, the helper won't be able to respond to
them, but we at the actual computer will be able to respond to them. If we check this box, this will allow the
session to connect with the User Account Control prompts and allow the helper to respond to them.
To close the session we can click on the "Stop sharing" button, or simply close the Remote Assistance window.
Figure 382 - Stop Sharing Button
Have in mind, Remote Assistance requires both name resolution and TCP/IP connectivity.
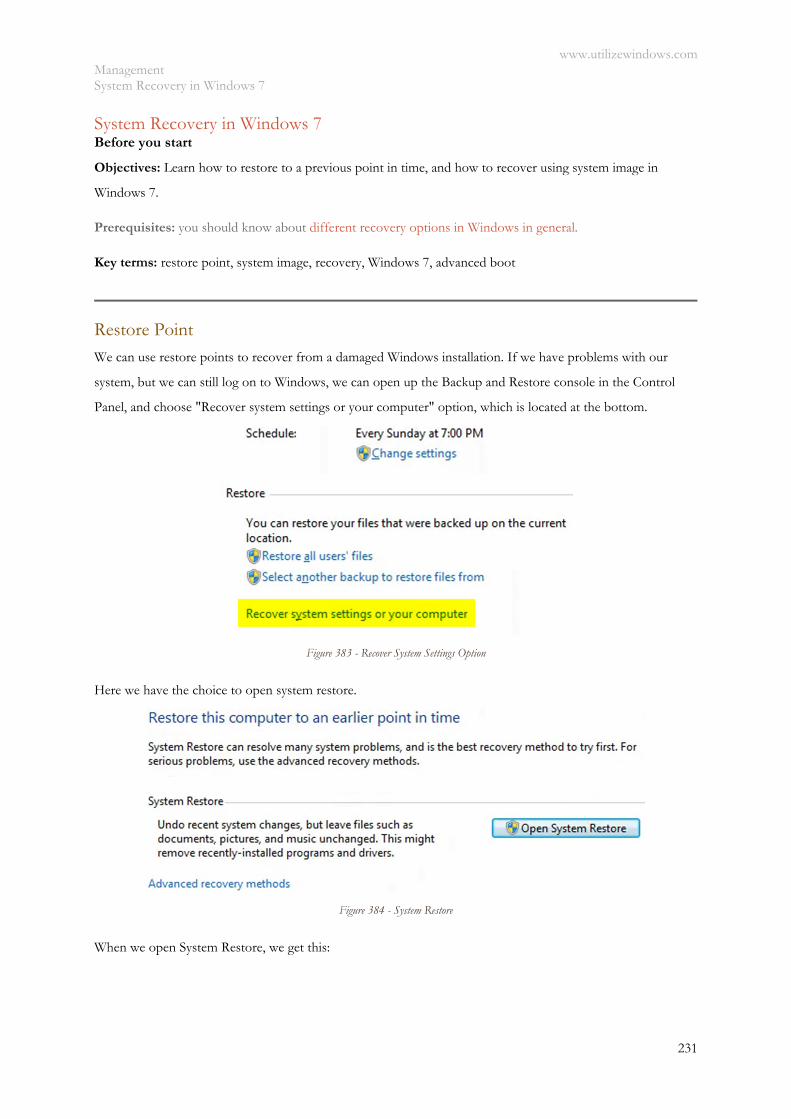
www.utilizewindows.com Management System Recovery in Windows 7
231
System Recovery in Windows 7 Before you start
Objectives: Learn how to restore to a previous point in time, and how to recover using system image in
Windows 7.
Prerequisites: you should know about different recovery options in Windows in general.
Key terms: restore point, system image, recovery, Windows 7, advanced boot
Restore Point We can use restore points to recover from a damaged Windows installation. If we have problems with our
system, but we can still log on to Windows, we can open up the Backup and Restore console in the Control
Panel, and choose "Recover system settings or your computer" option, which is located at the bottom.
Figure 383 - Recover System Settings Option
Here we have the choice to open system restore.
Figure 384 - System Restore
When we open System Restore, we get this:
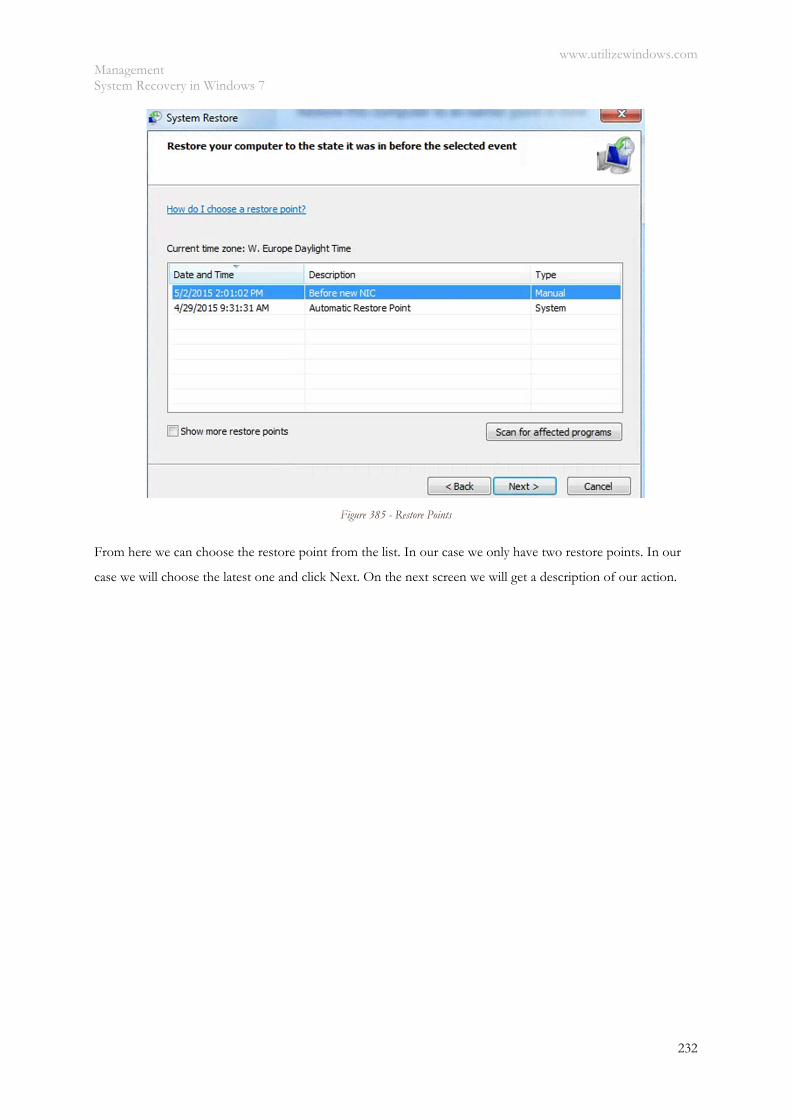
www.utilizewindows.com Management System Recovery in Windows 7
232
Figure 385 - Restore Points
From here we can choose the restore point from the list. In our case we only have two restore points. In our
case we will choose the latest one and click Next. On the next screen we will get a description of our action.
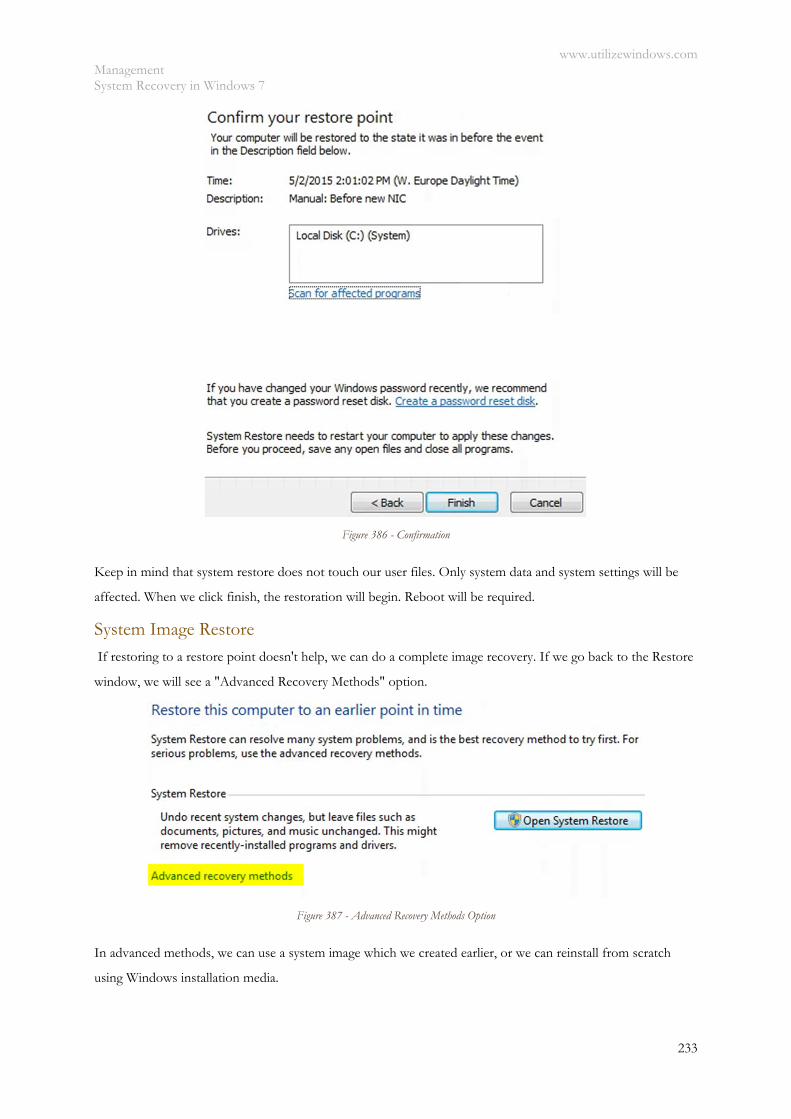
www.utilizewindows.com Management System Recovery in Windows 7
233
Figure 386 - Confirmation
Keep in mind that system restore does not touch our user files. Only system data and system settings will be
affected. When we click finish, the restoration will begin. Reboot will be required.
System Image Restore If restoring to a restore point doesn't help, we can do a complete image recovery. If we go back to the Restore
window, we will see a "Advanced Recovery Methods" option.
Figure 387 - Advanced Recovery Methods Option
In advanced methods, we can use a system image which we created earlier, or we can reinstall from scratch
using Windows installation media.
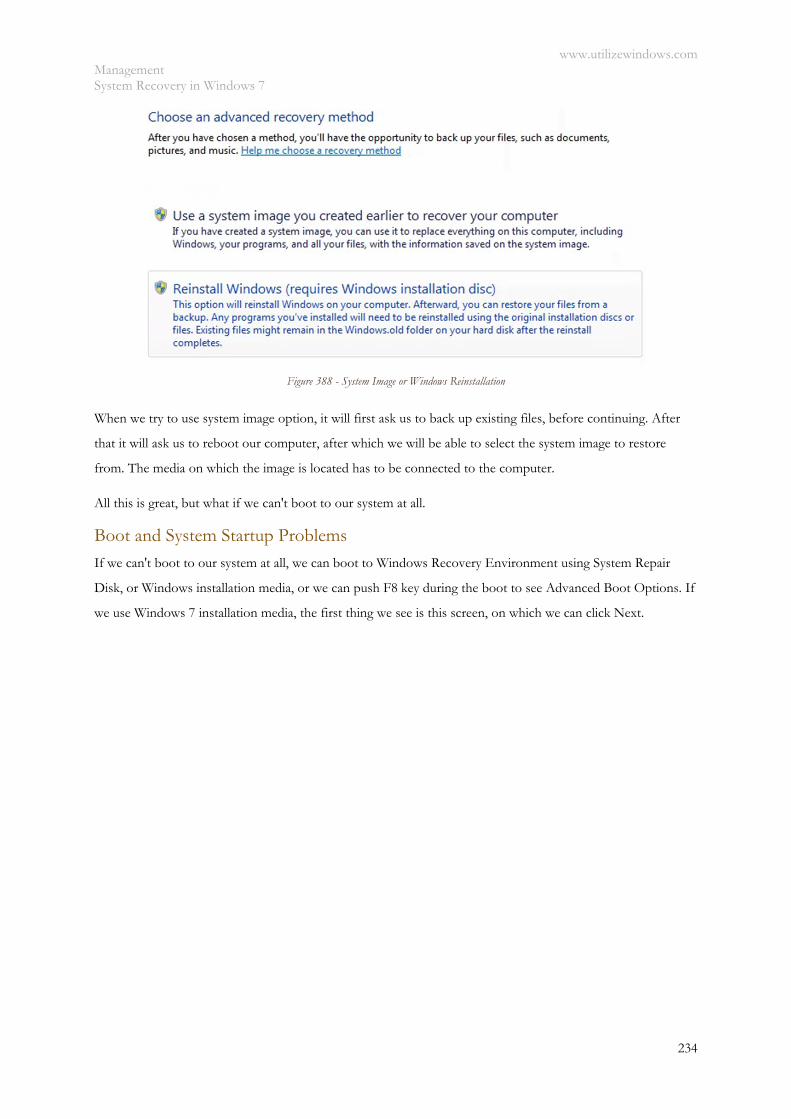
www.utilizewindows.com Management System Recovery in Windows 7
234
Figure 388 - System Image or Windows Reinstallation
When we try to use system image option, it will first ask us to back up existing files, before continuing. After
that it will ask us to reboot our computer, after which we will be able to select the system image to restore
from. The media on which the image is located has to be connected to the computer.
All this is great, but what if we can't boot to our system at all.
Boot and System Startup Problems If we can't boot to our system at all, we can boot to Windows Recovery Environment using System Repair
Disk, or Windows installation media, or we can push F8 key during the boot to see Advanced Boot Options. If
we use Windows 7 installation media, the first thing we see is this screen, on which we can click Next.
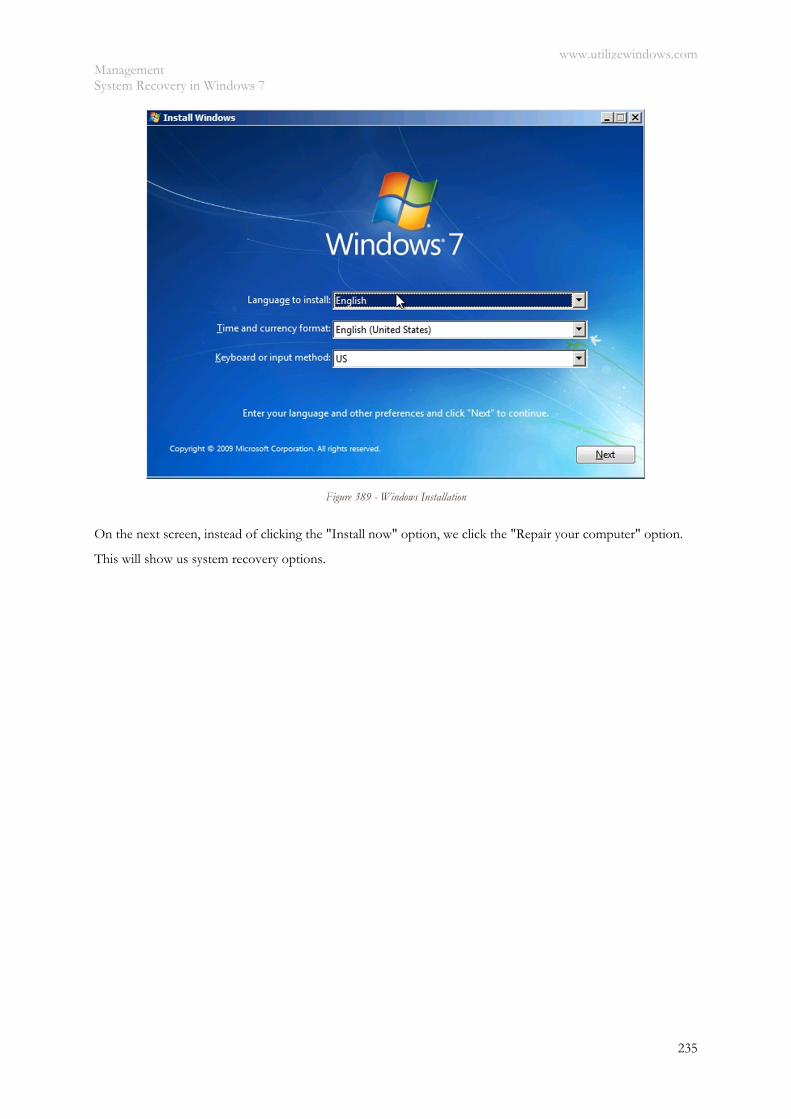
www.utilizewindows.com Management System Recovery in Windows 7
235
Figure 389 - Windows Installation
On the next screen, instead of clicking the "Install now" option, we click the "Repair your computer" option.
This will show us system recovery options.
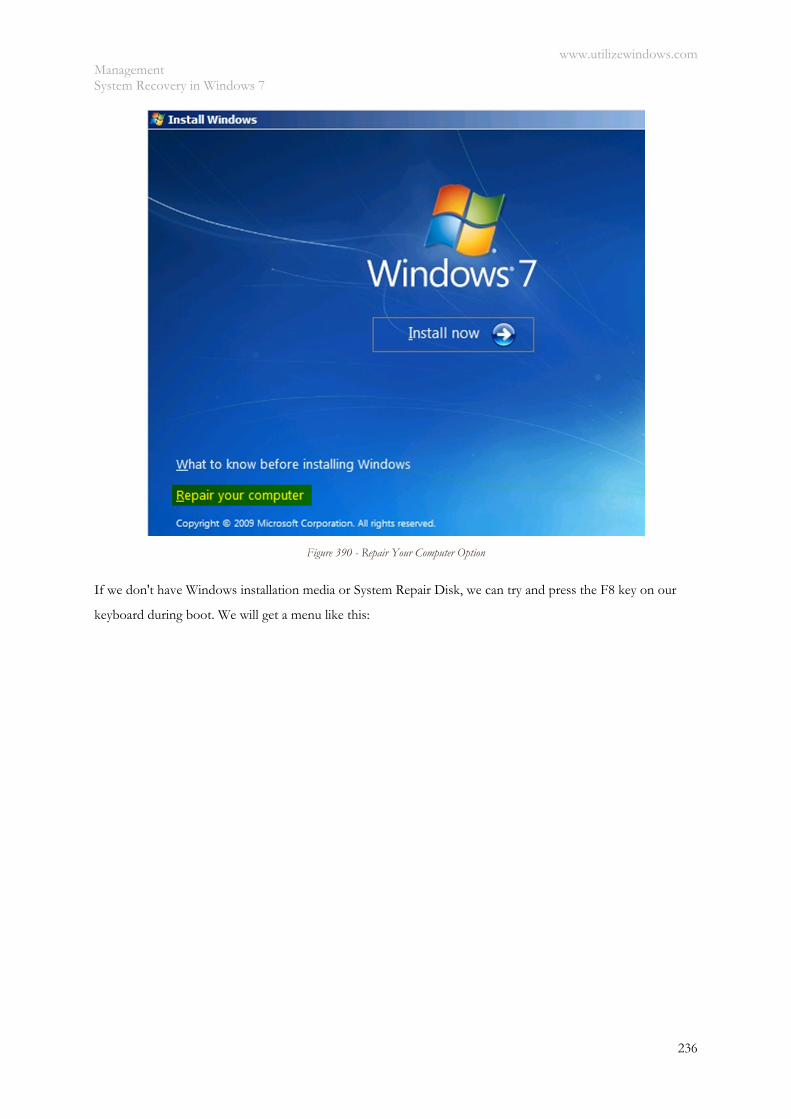
www.utilizewindows.com Management System Recovery in Windows 7
236
Figure 390 - Repair Your Computer Option
If we don't have Windows installation media or System Repair Disk, we can try and press the F8 key on our
keyboard during boot. We will get a menu like this:

www.utilizewindows.com Management System Recovery in Windows 7
237
Figure 391 - Advanced Boot Menu
On this menu we select the "Repair Your Computer" option which will show us a list of recovery tools.
Figure 392 - Recovery Options
On this screen we will select System Image Recovery Option and then select the system image we created
earlier. From this point on, we will be asked about how we want to partition our disks (do we want to keep

www.utilizewindows.com Management System Recovery in Windows 7
238
current partitions or use partitions from the image), and we will also be warned that we will lose all current data
on our disk (since the restore will use all data from the system image and overwrite all existing data).
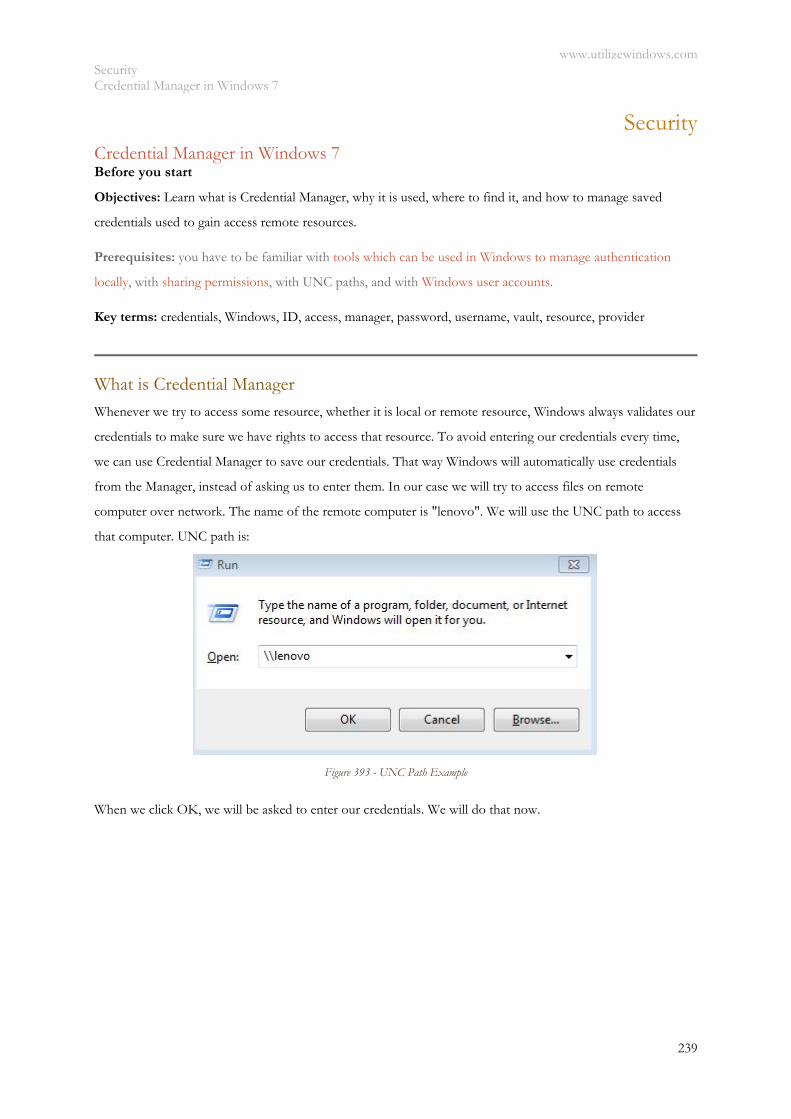
www.utilizewindows.com Security Credential Manager in Windows 7
239
Security Credential Manager in Windows 7 Before you start
Objectives: Learn what is Credential Manager, why it is used, where to find it, and how to manage saved
credentials used to gain access remote resources.
Prerequisites: you have to be familiar with tools which can be used in Windows to manage authentication
locally, with sharing permissions, with UNC paths, and with Windows user accounts.
Key terms: credentials, Windows, ID, access, manager, password, username, vault, resource, provider
What is Credential Manager
Whenever we try to access some resource, whether it is local or remote resource, Windows always validates our
credentials to make sure we have rights to access that resource. To avoid entering our credentials every time,
we can use Credential Manager to save our credentials. That way Windows will automatically use credentials
from the Manager, instead of asking us to enter them. In our case we will try to access files on remote
computer over network. The name of the remote computer is "lenovo". We will use the UNC path to access
that computer. UNC path is:
Figure 393 - UNC Path Example
When we click OK, we will be asked to enter our credentials. We will do that now.
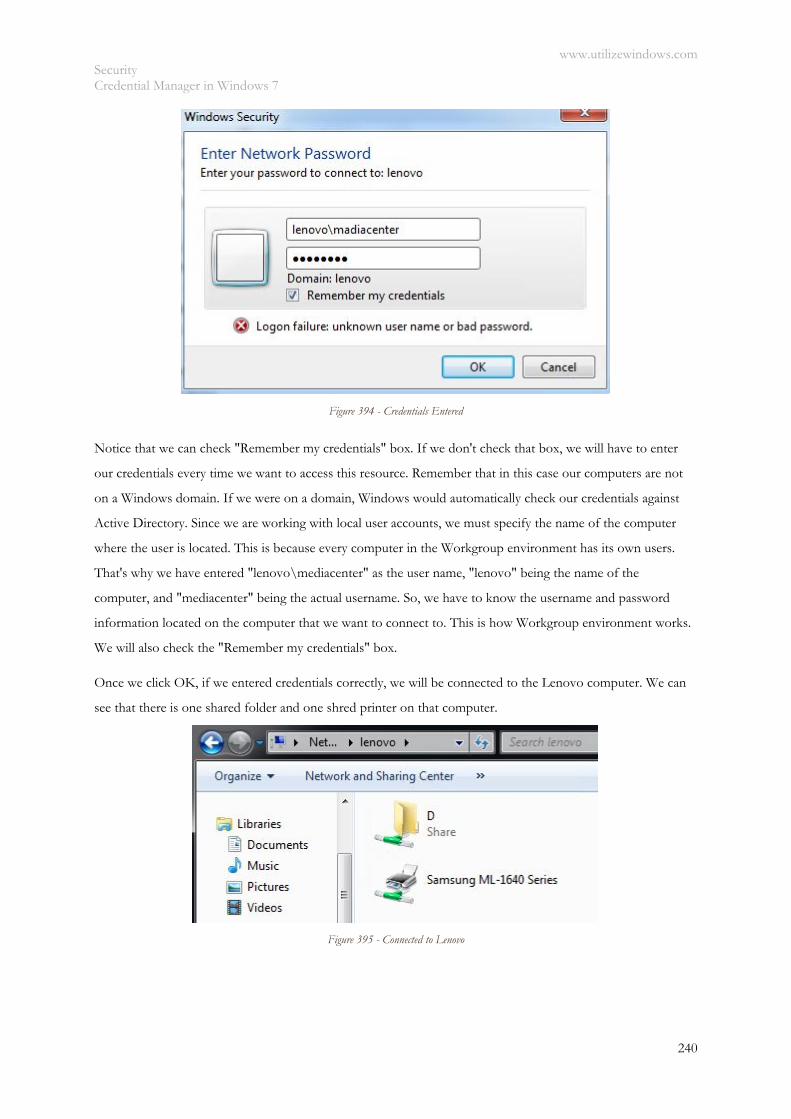
www.utilizewindows.com Security Credential Manager in Windows 7
240
Figure 394 - Credentials Entered
Notice that we can check "Remember my credentials" box. If we don't check that box, we will have to enter
our credentials every time we want to access this resource. Remember that in this case our computers are not
on a Windows domain. If we were on a domain, Windows would automatically check our credentials against
Active Directory. Since we are working with local user accounts, we must specify the name of the computer
where the user is located. This is because every computer in the Workgroup environment has its own users.
That's why we have entered "lenovo\mediacenter" as the user name, "lenovo" being the name of the
computer, and "mediacenter" being the actual username. So, we have to know the username and password
information located on the computer that we want to connect to. This is how Workgroup environment works.
We will also check the "Remember my credentials" box.
Once we click OK, if we entered credentials correctly, we will be connected to the Lenovo computer. We can
see that there is one shared folder and one shred printer on that computer.
Figure 395 - Connected to Lenovo
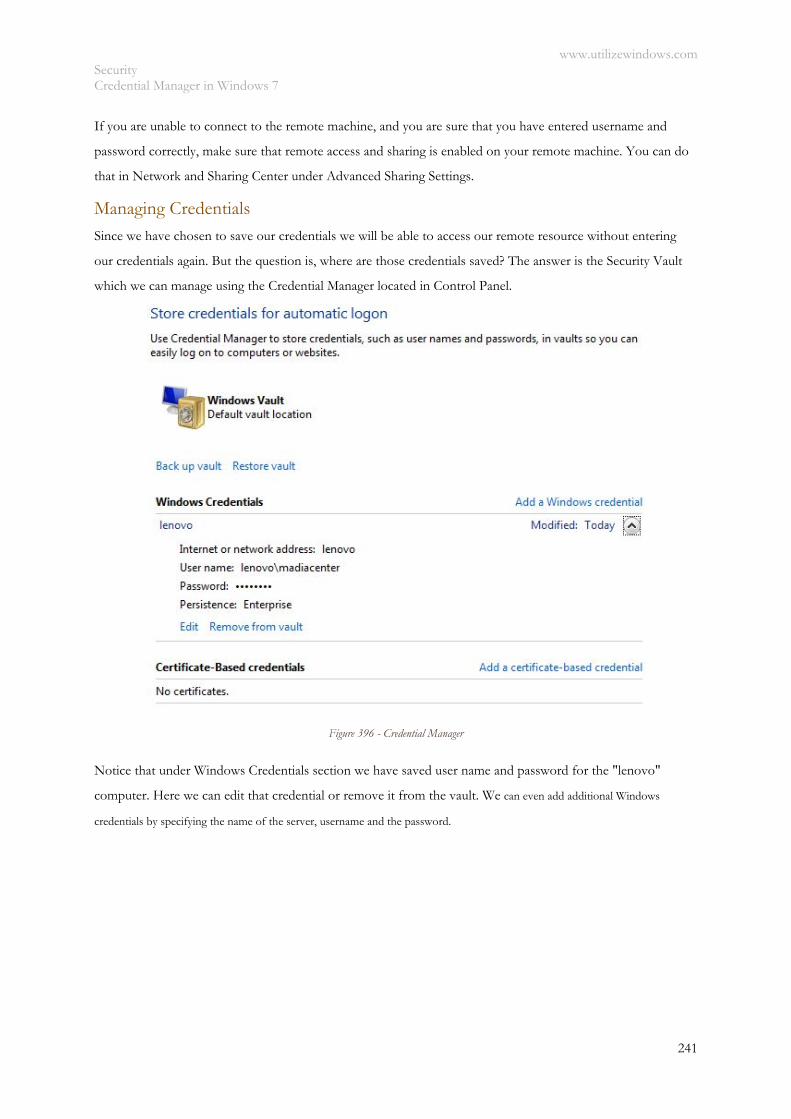
www.utilizewindows.com Security Credential Manager in Windows 7
241
If you are unable to connect to the remote machine, and you are sure that you have entered username and
password correctly, make sure that remote access and sharing is enabled on your remote machine. You can do
that in Network and Sharing Center under Advanced Sharing Settings.
Managing Credentials Since we have chosen to save our credentials we will be able to access our remote resource without entering
our credentials again. But the question is, where are those credentials saved? The answer is the Security Vault
which we can manage using the Credential Manager located in Control Panel.
Figure 396 - Credential Manager
Notice that under Windows Credentials section we have saved user name and password for the "lenovo"
computer. Here we can edit that credential or remove it from the vault. We can even add additional Windows
credentials by specifying the name of the server, username and the password.
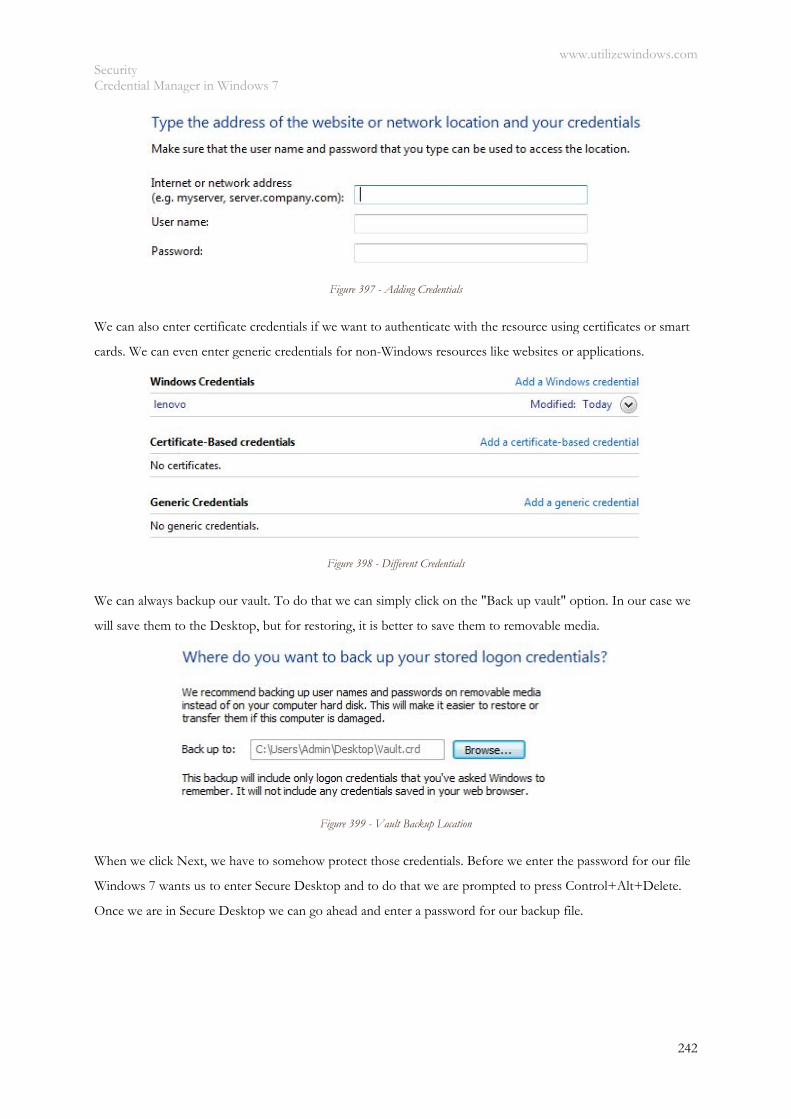
www.utilizewindows.com Security Credential Manager in Windows 7
242
Figure 397 - Adding Credentials
We can also enter certificate credentials if we want to authenticate with the resource using certificates or smart
cards. We can even enter generic credentials for non-Windows resources like websites or applications.
Figure 398 - Different Credentials
We can always backup our vault. To do that we can simply click on the "Back up vault" option. In our case we
will save them to the Desktop, but for restoring, it is better to save them to removable media.
Figure 399 - Vault Backup Location
When we click Next, we have to somehow protect those credentials. Before we enter the password for our file
Windows 7 wants us to enter Secure Desktop and to do that we are prompted to press Control+Alt+Delete.
Once we are in Secure Desktop we can go ahead and enter a password for our backup file.
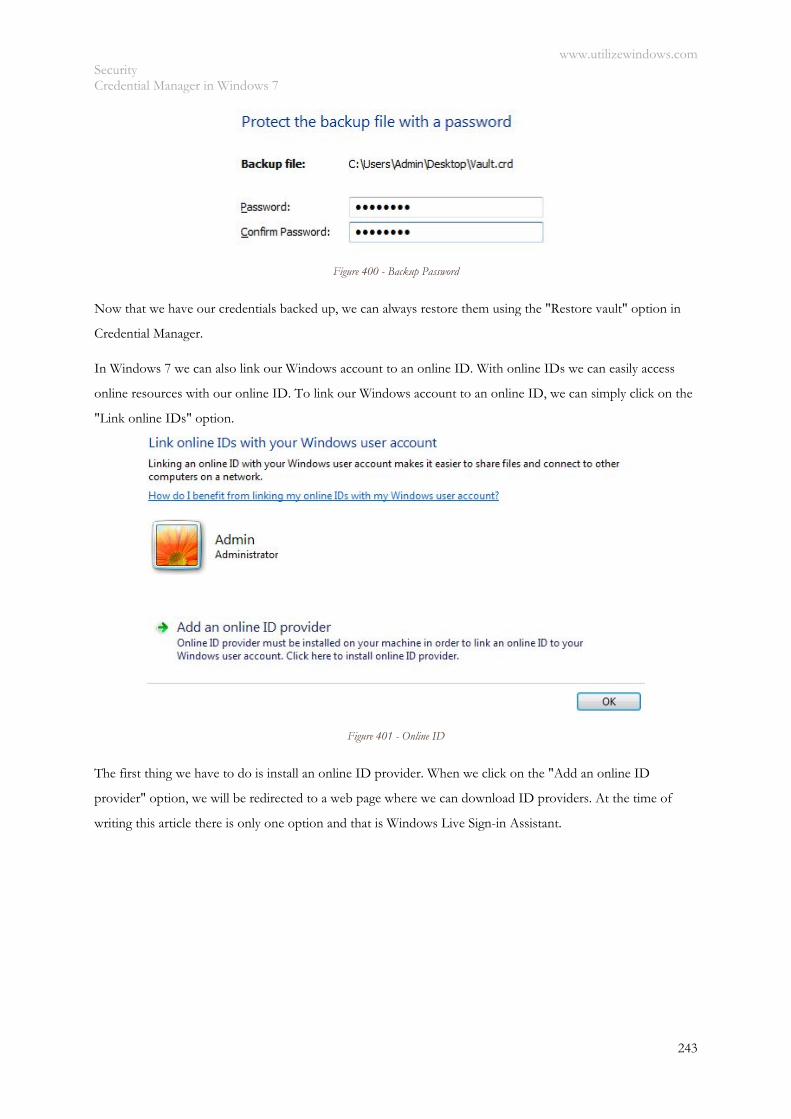
www.utilizewindows.com Security Credential Manager in Windows 7
243
Figure 400 - Backup Password
Now that we have our credentials backed up, we can always restore them using the "Restore vault" option in
Credential Manager.
In Windows 7 we can also link our Windows account to an online ID. With online IDs we can easily access
online resources with our online ID. To link our Windows account to an online ID, we can simply click on the
"Link online IDs" option.
Figure 401 - Online ID
The first thing we have to do is install an online ID provider. When we click on the "Add an online ID
provider" option, we will be redirected to a web page where we can download ID providers. At the time of
writing this article there is only one option and that is Windows Live Sign-in Assistant.
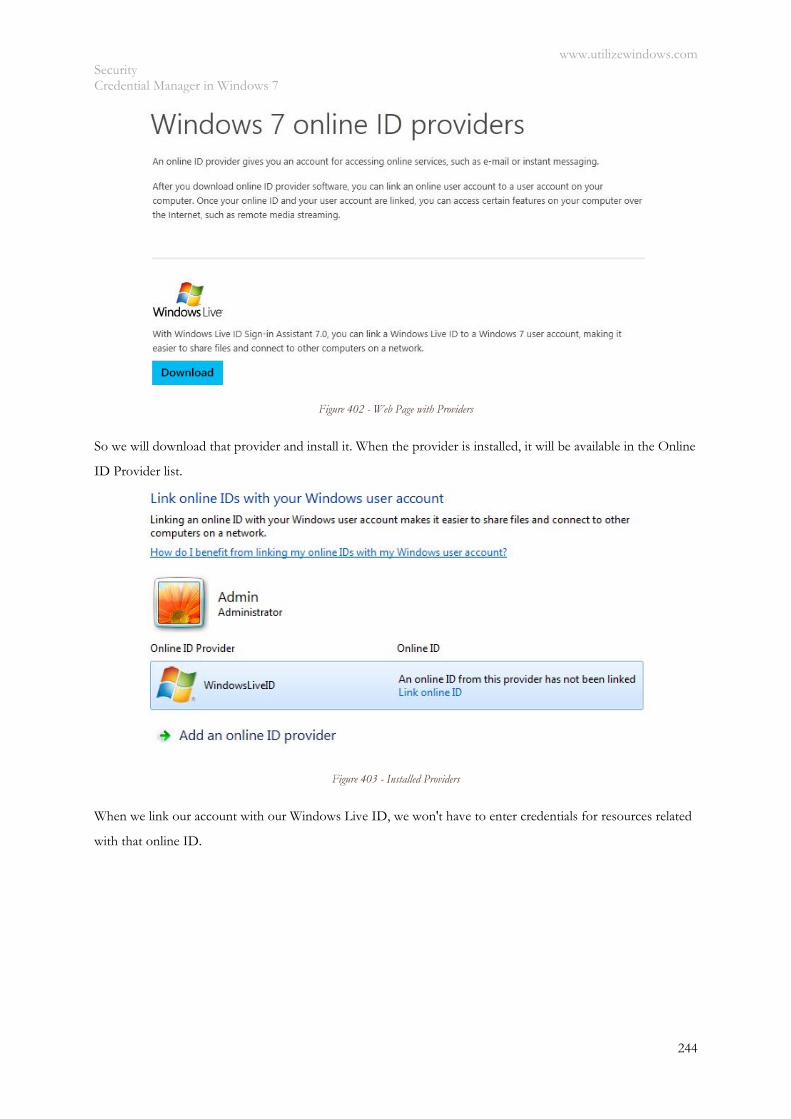
www.utilizewindows.com Security Credential Manager in Windows 7
244
Figure 402 - Web Page with Providers
So we will download that provider and install it. When the provider is installed, it will be available in the Online
ID Provider list.
Figure 403 - Installed Providers
When we link our account with our Windows Live ID, we won't have to enter credentials for resources related
with that online ID.
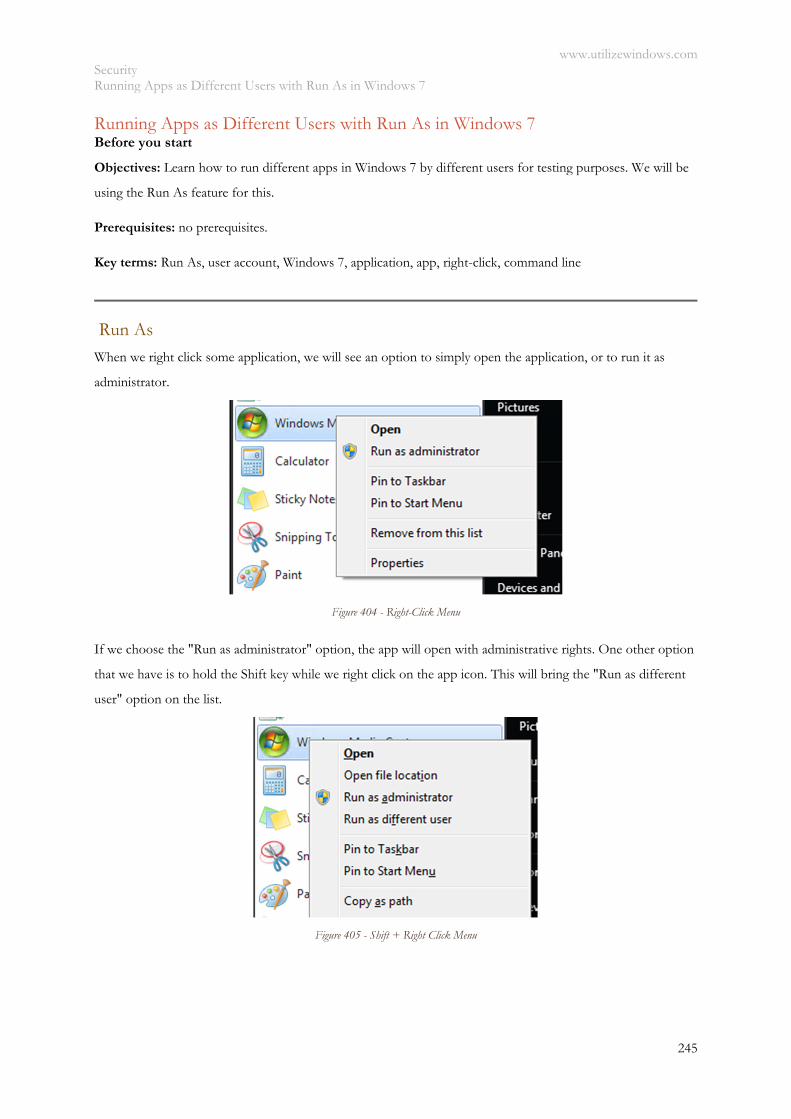
www.utilizewindows.com Security Running Apps as Different Users with Run As in Windows 7
245
Running Apps as Different Users with Run As in Windows 7 Before you start
Objectives: Learn how to run different apps in Windows 7 by different users for testing purposes. We will be
using the Run As feature for this.
Prerequisites: no prerequisites.
Key terms: Run As, user account, Windows 7, application, app, right-click, command line
Run As When we right click some application, we will see an option to simply open the application, or to run it as
administrator.
Figure 404 - Right-Click Menu
If we choose the "Run as administrator" option, the app will open with administrative rights. One other option
that we have is to hold the Shift key while we right click on the app icon. This will bring the "Run as different
user" option on the list.
Figure 405 - Shift + Right Click Menu
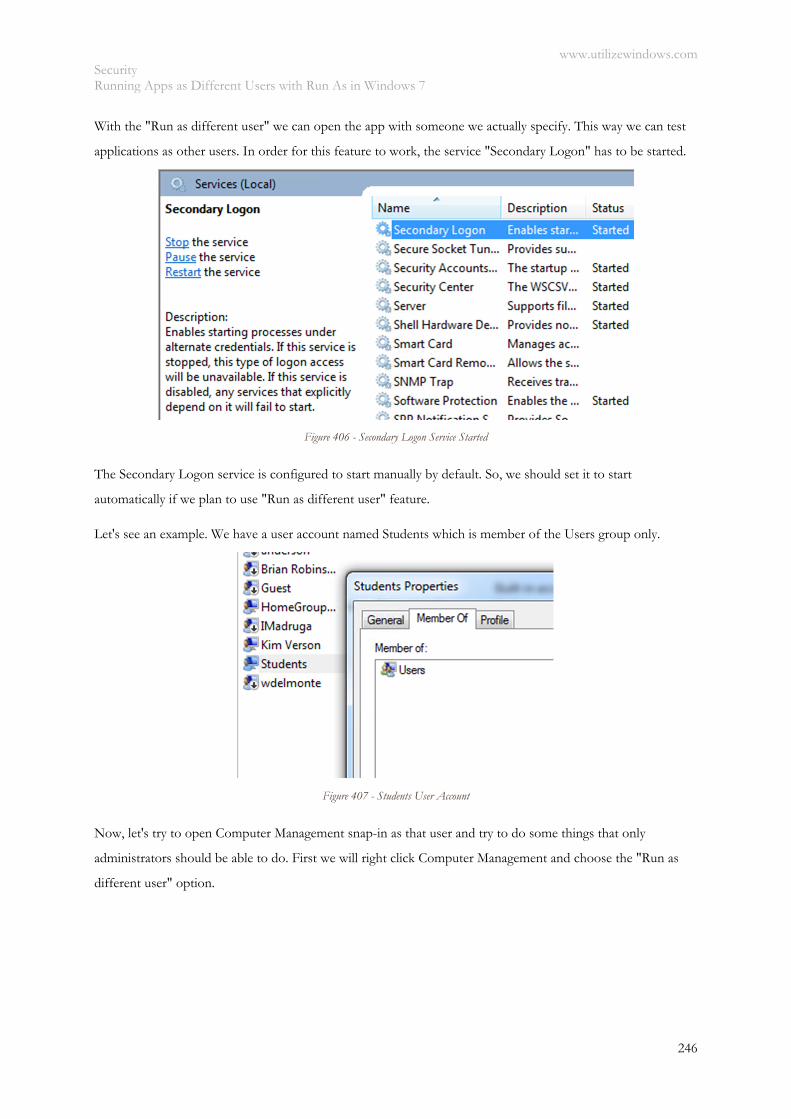
www.utilizewindows.com Security Running Apps as Different Users with Run As in Windows 7
246
With the "Run as different user" we can open the app with someone we actually specify. This way we can test
applications as other users. In order for this feature to work, the service "Secondary Logon" has to be started.
Figure 406 - Secondary Logon Service Started
The Secondary Logon service is configured to start manually by default. So, we should set it to start
automatically if we plan to use "Run as different user" feature.
Let's see an example. We have a user account named Students which is member of the Users group only.
Figure 407 - Students User Account
Now, let's try to open Computer Management snap-in as that user and try to do some things that only
administrators should be able to do. First we will right click Computer Management and choose the "Run as
different user" option.
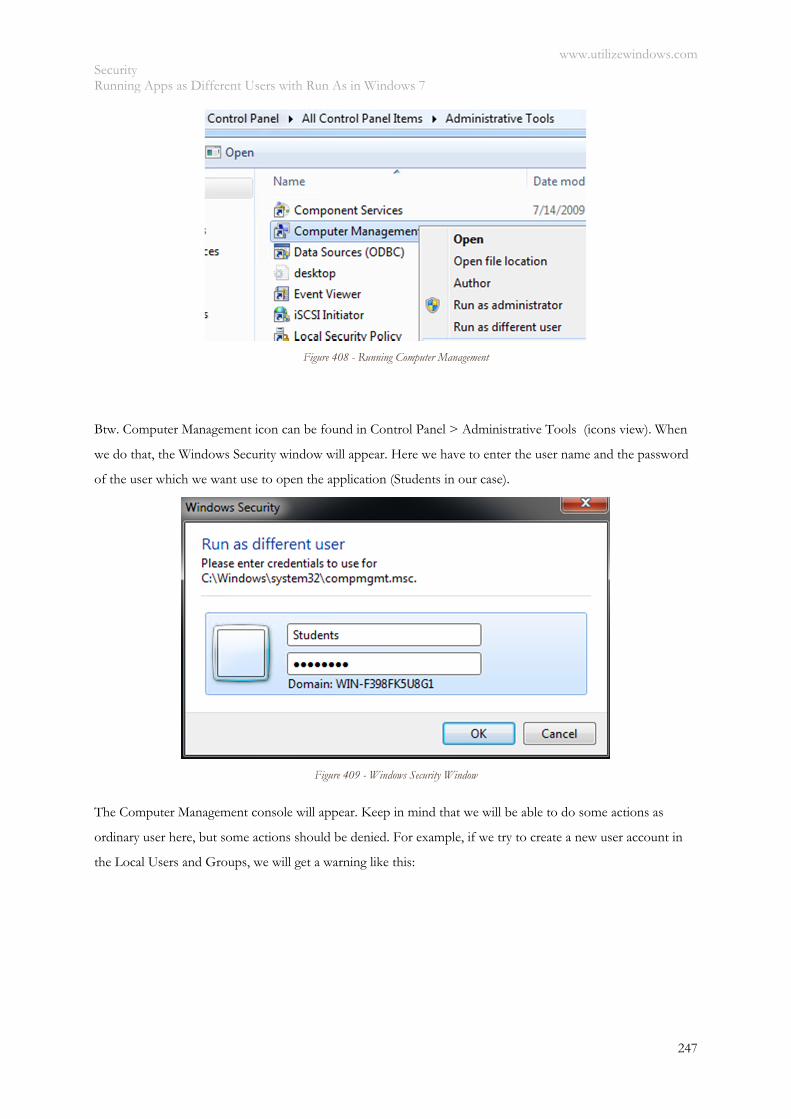
www.utilizewindows.com Security Running Apps as Different Users with Run As in Windows 7
247
Figure 408 - Running Computer Management
Btw. Computer Management icon can be found in Control Panel > Administrative Tools (icons view). When
we do that, the Windows Security window will appear. Here we have to enter the user name and the password
of the user which we want use to open the application (Students in our case).
Figure 409 - Windows Security Window
The Computer Management console will appear. Keep in mind that we will be able to do some actions as
ordinary user here, but some actions should be denied. For example, if we try to create a new user account in
the Local Users and Groups, we will get a warning like this:
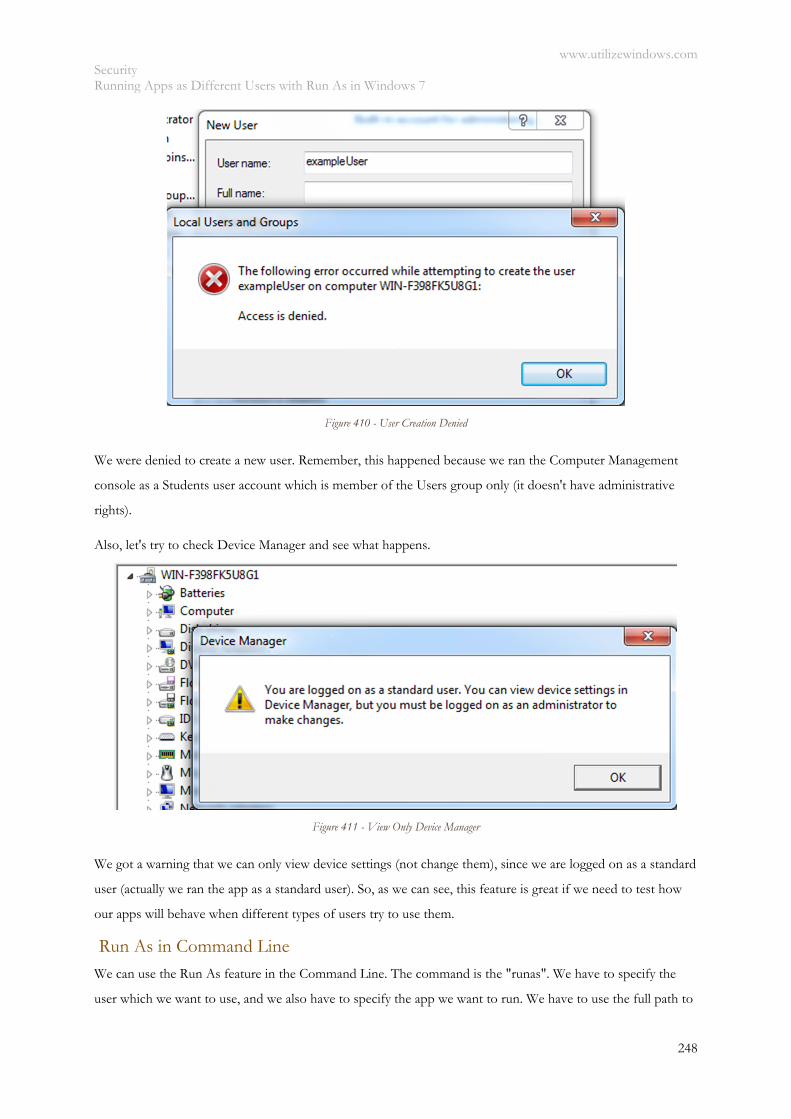
www.utilizewindows.com Security Running Apps as Different Users with Run As in Windows 7
248
Figure 410 - User Creation Denied
We were denied to create a new user. Remember, this happened because we ran the Computer Management
console as a Students user account which is member of the Users group only (it doesn't have administrative
rights).
Also, let's try to check Device Manager and see what happens.
Figure 411 - View Only Device Manager
We got a warning that we can only view device settings (not change them), since we are logged on as a standard
user (actually we ran the app as a standard user). So, as we can see, this feature is great if we need to test how
our apps will behave when different types of users try to use them.
Run As in Command Line We can use the Run As feature in the Command Line. The command is the "runas". We have to specify the
user which we want to use, and we also have to specify the app we want to run. We have to use the full path to
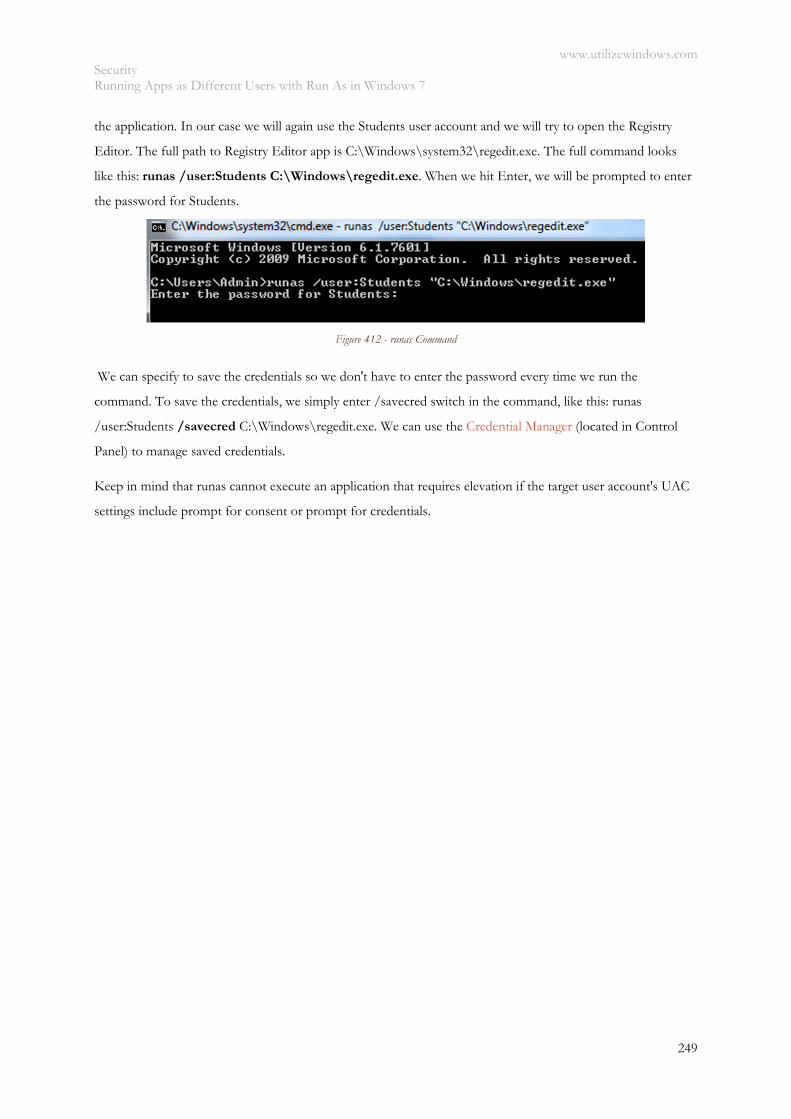
www.utilizewindows.com Security Running Apps as Different Users with Run As in Windows 7
249
the application. In our case we will again use the Students user account and we will try to open the Registry
Editor. The full path to Registry Editor app is C:\Windows\system32\regedit.exe. The full command looks
like this: runas /user:Students C:\Windows\regedit.exe. When we hit Enter, we will be prompted to enter
the password for Students.
Figure 412 - runas Command
We can specify to save the credentials so we don't have to enter the password every time we run the
command. To save the credentials, we simply enter /savecred switch in the command, like this: runas
/user:Students /savecred C:\Windows\regedit.exe. We can use the Credential Manager (located in Control
Panel) to manage saved credentials.
Keep in mind that runas cannot execute an application that requires elevation if the target user account's UAC
settings include prompt for consent or prompt for credentials.
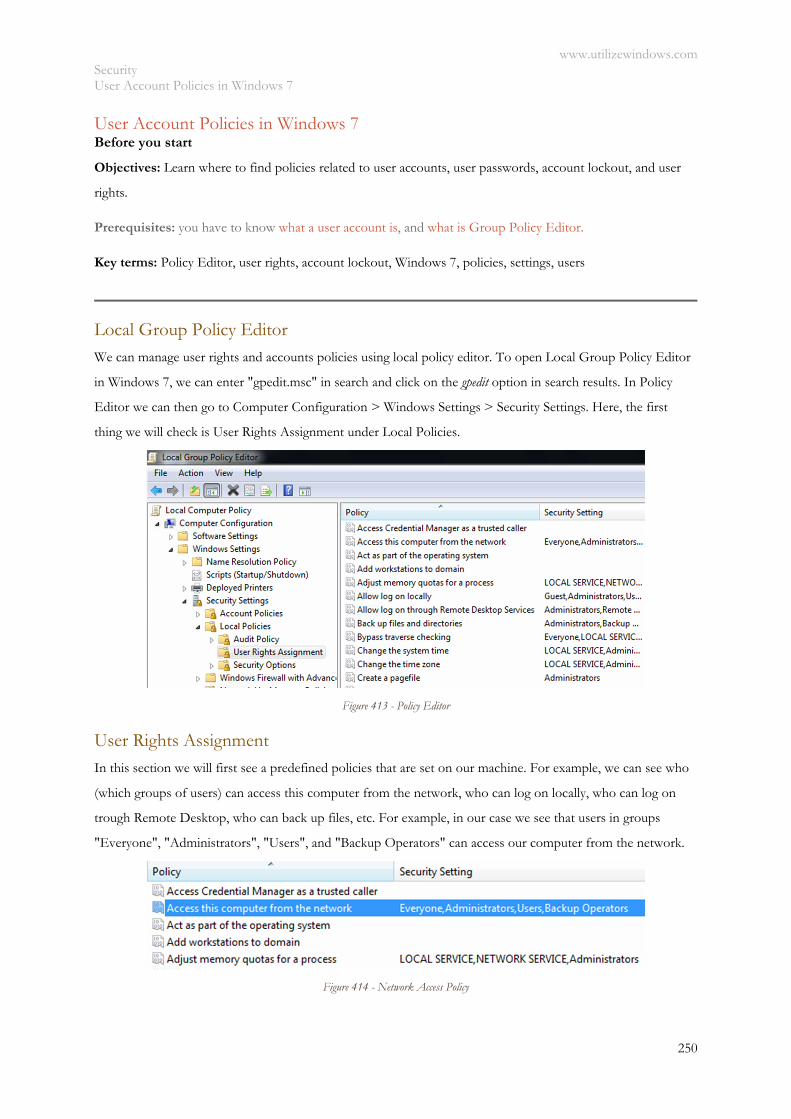
www.utilizewindows.com Security User Account Policies in Windows 7
250
User Account Policies in Windows 7 Before you start
Objectives: Learn where to find policies related to user accounts, user passwords, account lockout, and user
rights.
Prerequisites: you have to know what a user account is, and what is Group Policy Editor.
Key terms: Policy Editor, user rights, account lockout, Windows 7, policies, settings, users
Local Group Policy Editor We can manage user rights and accounts policies using local policy editor. To open Local Group Policy Editor
in Windows 7, we can enter "gpedit.msc" in search and click on the gpedit option in search results. In Policy
Editor we can then go to Computer Configuration > Windows Settings > Security Settings. Here, the first
thing we will check is User Rights Assignment under Local Policies.
Figure 413 - Policy Editor
User Rights Assignment In this section we will first see a predefined policies that are set on our machine. For example, we can see who
(which groups of users) can access this computer from the network, who can log on locally, who can log on
trough Remote Desktop, who can back up files, etc. For example, in our case we see that users in groups
"Everyone", "Administrators", "Users", and "Backup Operators" can access our computer from the network.
Figure 414 - Network Access Policy
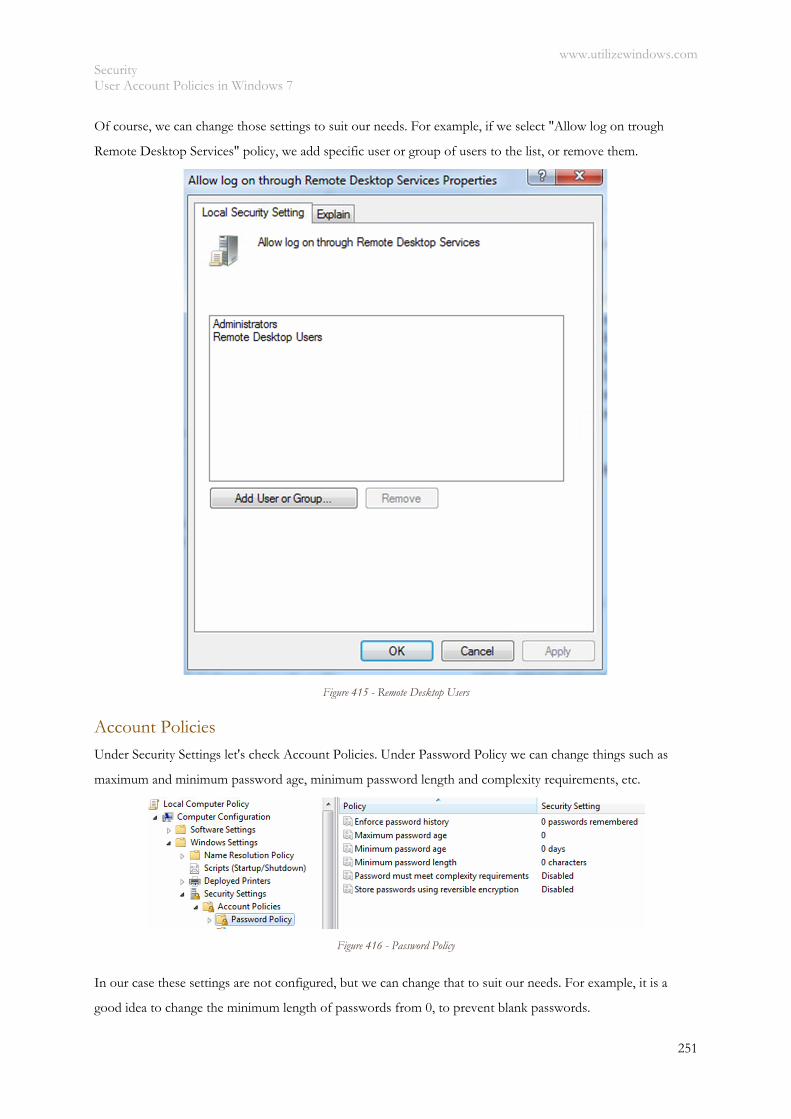
www.utilizewindows.com Security User Account Policies in Windows 7
251
Of course, we can change those settings to suit our needs. For example, if we select "Allow log on trough
Remote Desktop Services" policy, we add specific user or group of users to the list, or remove them.
Figure 415 - Remote Desktop Users
Account Policies Under Security Settings let's check Account Policies. Under Password Policy we can change things such as
maximum and minimum password age, minimum password length and complexity requirements, etc.
Figure 416 - Password Policy
In our case these settings are not configured, but we can change that to suit our needs. For example, it is a
good idea to change the minimum length of passwords from 0, to prevent blank passwords.
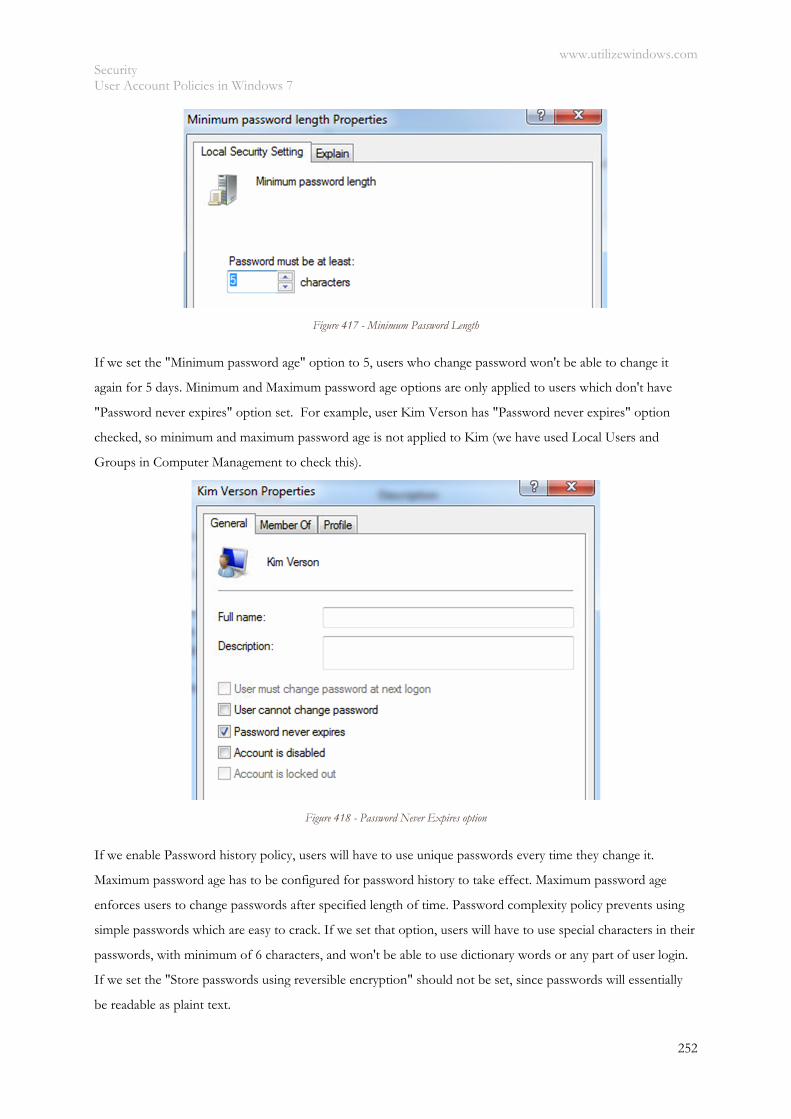
www.utilizewindows.com Security User Account Policies in Windows 7
252
Figure 417 - Minimum Password Length
If we set the "Minimum password age" option to 5, users who change password won't be able to change it
again for 5 days. Minimum and Maximum password age options are only applied to users which don't have
"Password never expires" option set. For example, user Kim Verson has "Password never expires" option
checked, so minimum and maximum password age is not applied to Kim (we have used Local Users and
Groups in Computer Management to check this).
Figure 418 - Password Never Expires option
If we enable Password history policy, users will have to use unique passwords every time they change it.
Maximum password age has to be configured for password history to take effect. Maximum password age
enforces users to change passwords after specified length of time. Password complexity policy prevents using
simple passwords which are easy to crack. If we set that option, users will have to use special characters in their
passwords, with minimum of 6 characters, and won't be able to use dictionary words or any part of user login.
If we set the "Store passwords using reversible encryption" should not be set, since passwords will essentially
be readable as plaint text.
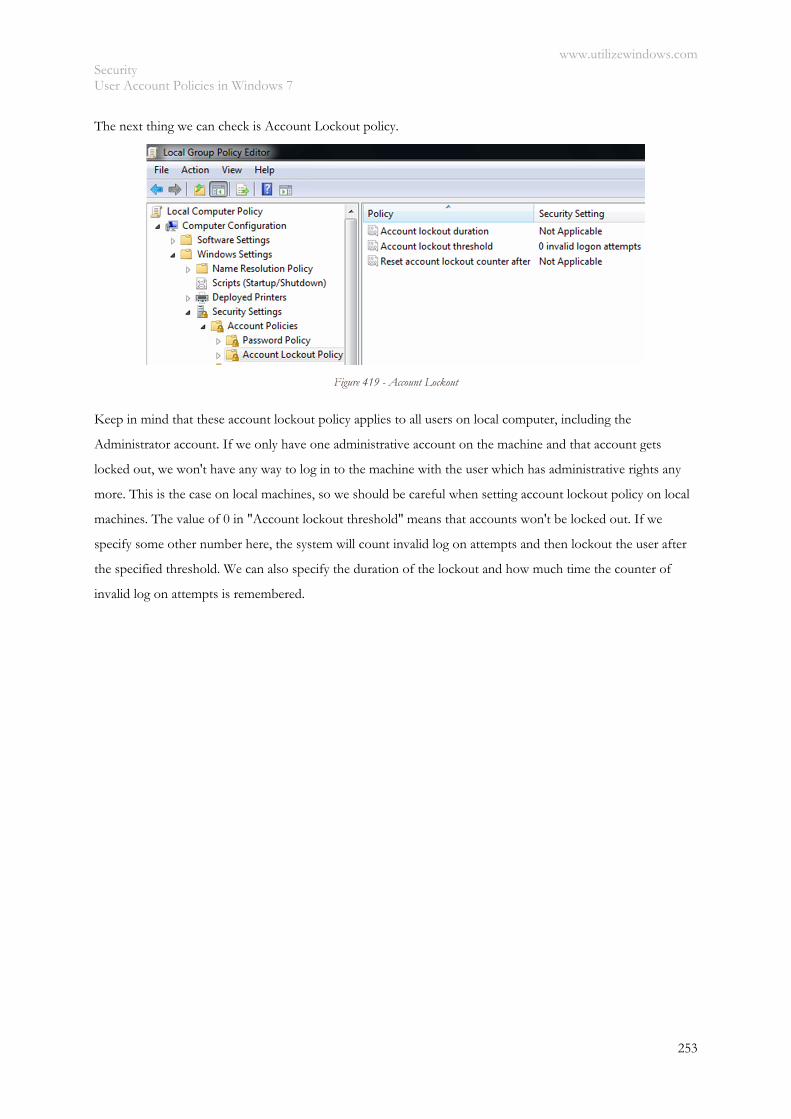
www.utilizewindows.com Security User Account Policies in Windows 7
253
The next thing we can check is Account Lockout policy.
Figure 419 - Account Lockout
Keep in mind that these account lockout policy applies to all users on local computer, including the
Administrator account. If we only have one administrative account on the machine and that account gets
locked out, we won't have any way to log in to the machine with the user which has administrative rights any
more. This is the case on local machines, so we should be careful when setting account lockout policy on local
machines. The value of 0 in "Account lockout threshold" means that accounts won't be locked out. If we
specify some other number here, the system will count invalid log on attempts and then lockout the user after
the specified threshold. We can also specify the duration of the lockout and how much time the counter of
invalid log on attempts is remembered.
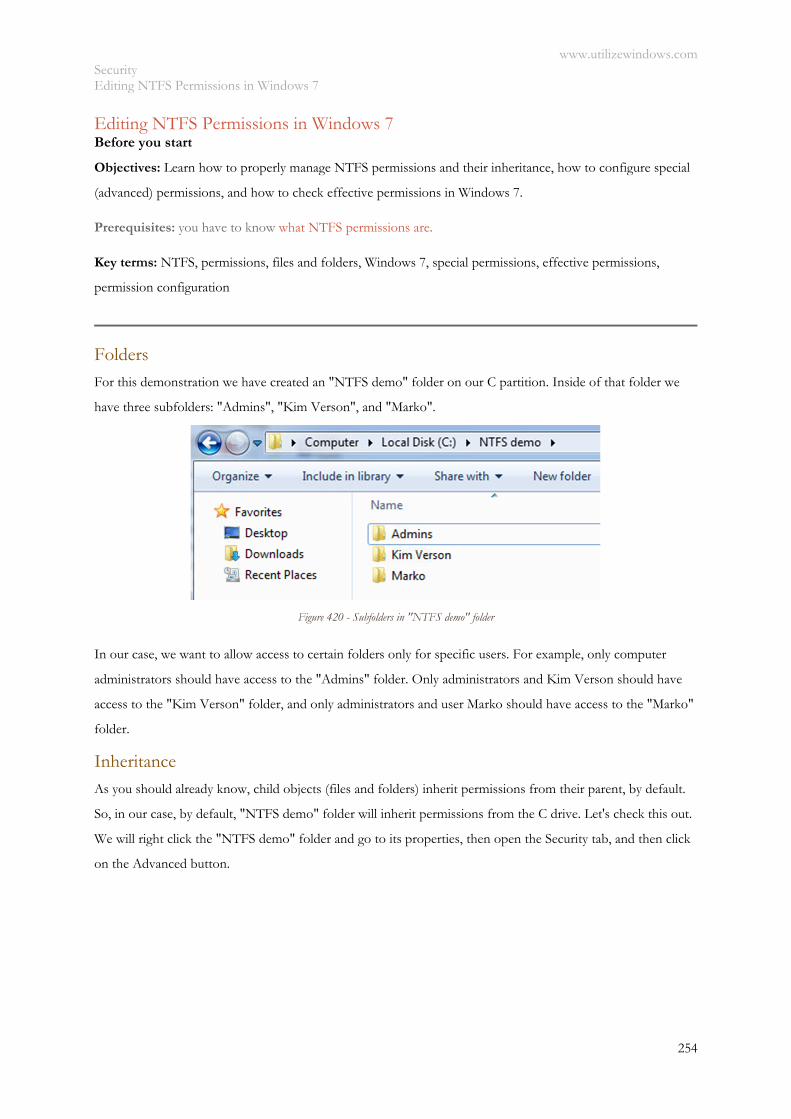
www.utilizewindows.com Security Editing NTFS Permissions in Windows 7
254
Editing NTFS Permissions in Windows 7 Before you start
Objectives: Learn how to properly manage NTFS permissions and their inheritance, how to configure special
(advanced) permissions, and how to check effective permissions in Windows 7.
Prerequisites: you have to know what NTFS permissions are.
Key terms: NTFS, permissions, files and folders, Windows 7, special permissions, effective permissions,
permission configuration
Folders
For this demonstration we have created an "NTFS demo" folder on our C partition. Inside of that folder we
have three subfolders: "Admins", "Kim Verson", and "Marko".
Figure 420 - Subfolders in "NTFS demo" folder
In our case, we want to allow access to certain folders only for specific users. For example, only computer
administrators should have access to the "Admins" folder. Only administrators and Kim Verson should have
access to the "Kim Verson" folder, and only administrators and user Marko should have access to the "Marko"
folder.
Inheritance
As you should already know, child objects (files and folders) inherit permissions from their parent, by default.
So, in our case, by default, "NTFS demo" folder will inherit permissions from the C drive. Let's check this out.
We will right click the "NTFS demo" folder and go to its properties, then open the Security tab, and then click
on the Advanced button.

www.utilizewindows.com Security Editing NTFS Permissions in Windows 7
255
Figure 421 - Inherited From Column
Notice that the option "Inherit inheritable permissions from this object's parent" is checked by default. Also,
notice that permissions are inherited from "C:\". The next thing we should do on the "NTFS demo" folder is
remove inheritance. This way, our new permissions won't be affected by the permissions set on the C drive. To
remove inheritance, we can click on the "Change Permissions..." button on the Advanced window, and then
uncheck the box for "Include inheritable permissions from this object's parent" option. When we do that, the
Windows Security window will appear.
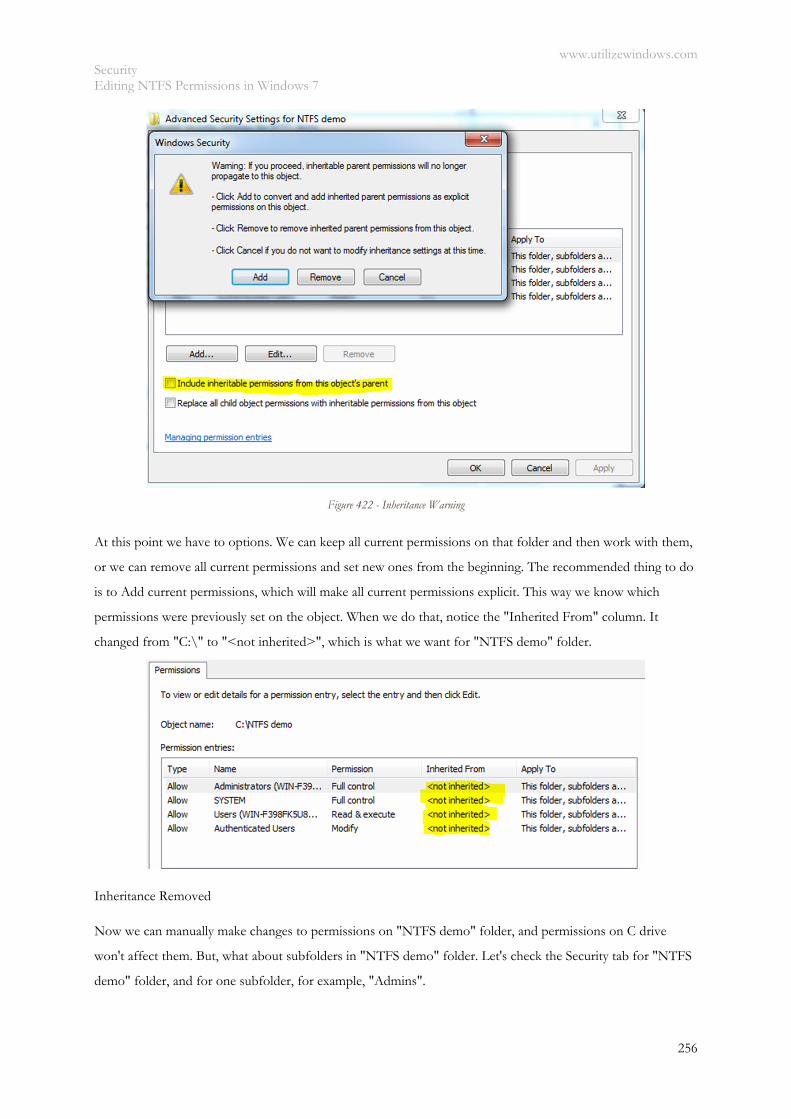
www.utilizewindows.com Security Editing NTFS Permissions in Windows 7
256
Figure 422 - Inheritance Warning
At this point we have to options. We can keep all current permissions on that folder and then work with them,
or we can remove all current permissions and set new ones from the beginning. The recommended thing to do
is to Add current permissions, which will make all current permissions explicit. This way we know which
permissions were previously set on the object. When we do that, notice the "Inherited From" column. It
changed from "C:\" to "<not inherited>", which is what we want for "NTFS demo" folder.
Inheritance Removed
Now we can manually make changes to permissions on "NTFS demo" folder, and permissions on C drive
won't affect them. But, what about subfolders in "NTFS demo" folder. Let's check the Security tab for "NTFS
demo" folder, and for one subfolder, for example, "Admins".
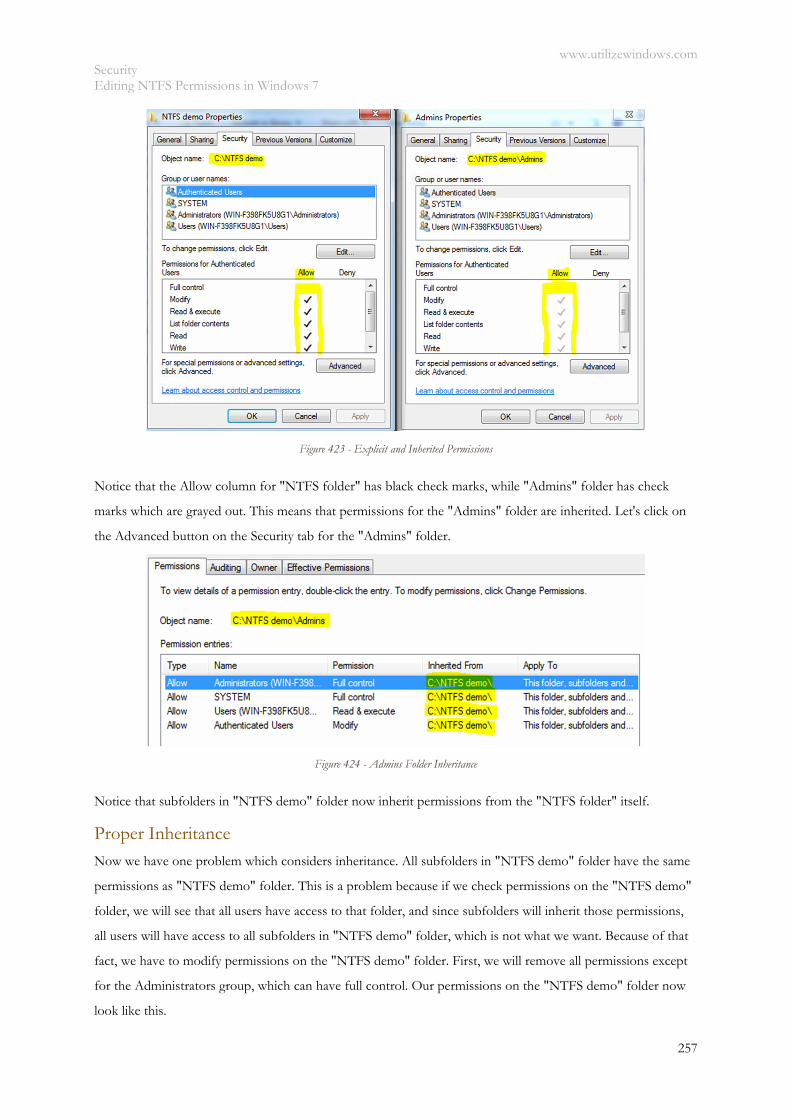
www.utilizewindows.com Security Editing NTFS Permissions in Windows 7
257
Figure 423 - Explicit and Inherited Permissions
Notice that the Allow column for "NTFS folder" has black check marks, while "Admins" folder has check
marks which are grayed out. This means that permissions for the "Admins" folder are inherited. Let's click on
the Advanced button on the Security tab for the "Admins" folder.
Figure 424 - Admins Folder Inheritance
Notice that subfolders in "NTFS demo" folder now inherit permissions from the "NTFS folder" itself.
Proper Inheritance
Now we have one problem which considers inheritance. All subfolders in "NTFS demo" folder have the same
permissions as "NTFS demo" folder. This is a problem because if we check permissions on the "NTFS demo"
folder, we will see that all users have access to that folder, and since subfolders will inherit those permissions,
all users will have access to all subfolders in "NTFS demo" folder, which is not what we want. Because of that
fact, we have to modify permissions on the "NTFS demo" folder. First, we will remove all permissions except
for the Administrators group, which can have full control. Our permissions on the "NTFS demo" folder now
look like this.
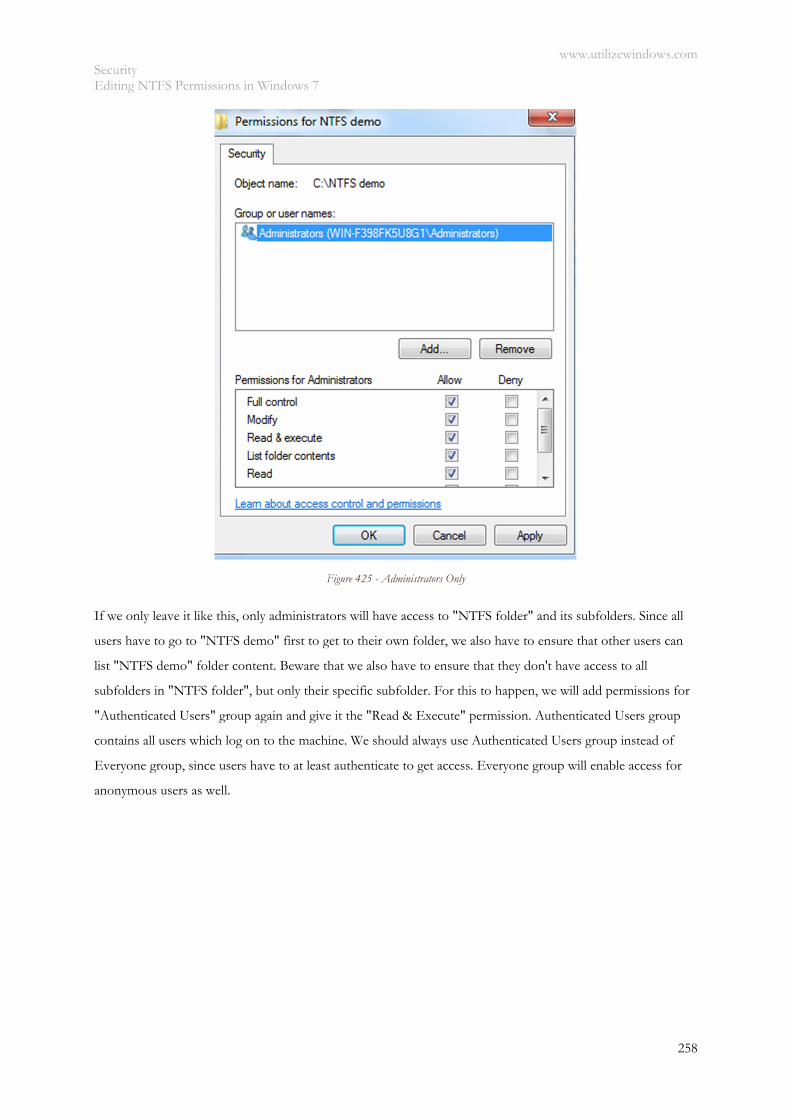
www.utilizewindows.com Security Editing NTFS Permissions in Windows 7
258
Figure 425 - Administrators Only
If we only leave it like this, only administrators will have access to "NTFS folder" and its subfolders. Since all
users have to go to "NTFS demo" first to get to their own folder, we also have to ensure that other users can
list "NTFS demo" folder content. Beware that we also have to ensure that they don't have access to all
subfolders in "NTFS folder", but only their specific subfolder. For this to happen, we will add permissions for
"Authenticated Users" group again and give it the "Read & Execute" permission. Authenticated Users group
contains all users which log on to the machine. We should always use Authenticated Users group instead of
Everyone group, since users have to at least authenticate to get access. Everyone group will enable access for
anonymous users as well.

www.utilizewindows.com Security Editing NTFS Permissions in Windows 7
259
Figure 426 - Authenticated Users Group Added Back
If we leave it like this, this permission will again be propagated to all child objects in "NTFS demo" folder. We
have to change that. We have to set this permission only for "NTFS demo" folder. For this we have to click on
the Advanced button on the Security tab, and check the Apply To column. Notice that now permissions will be
applied to this folder, subfolders and files.
Figure 427 - Apply To Column
To change this we will click on the "Change Permissions..." button, and double click on the permission for
"Authenticated User". On the "Permission Entry for NTFS demo", we will change the "Apply to" option to
"This folder only".

www.utilizewindows.com Security Editing NTFS Permissions in Windows 7
260
Figure 428 - Apply To Propagation Option
When we do that, permission for Authenticated Users group will only be applied for "NTFS demo" folder, and
not its subfolders. This way we ensure that all users can access "NTFS demo" folder, but don't have access to
specific subfolders.
So, the next thing to do is give explicit permissions to specific user for certain subfolder in "NTFS demo"
folder. For example, we will give the Modify permission to user Kim Verson for subfolder "Kim
Verson". Remember that maximum permission we should give to ordinary users is the Modify permission.
The difference between "Full control" and "Modify" permission is that users with "Modify" won't be able to
take ownership of the object or change its permissions.
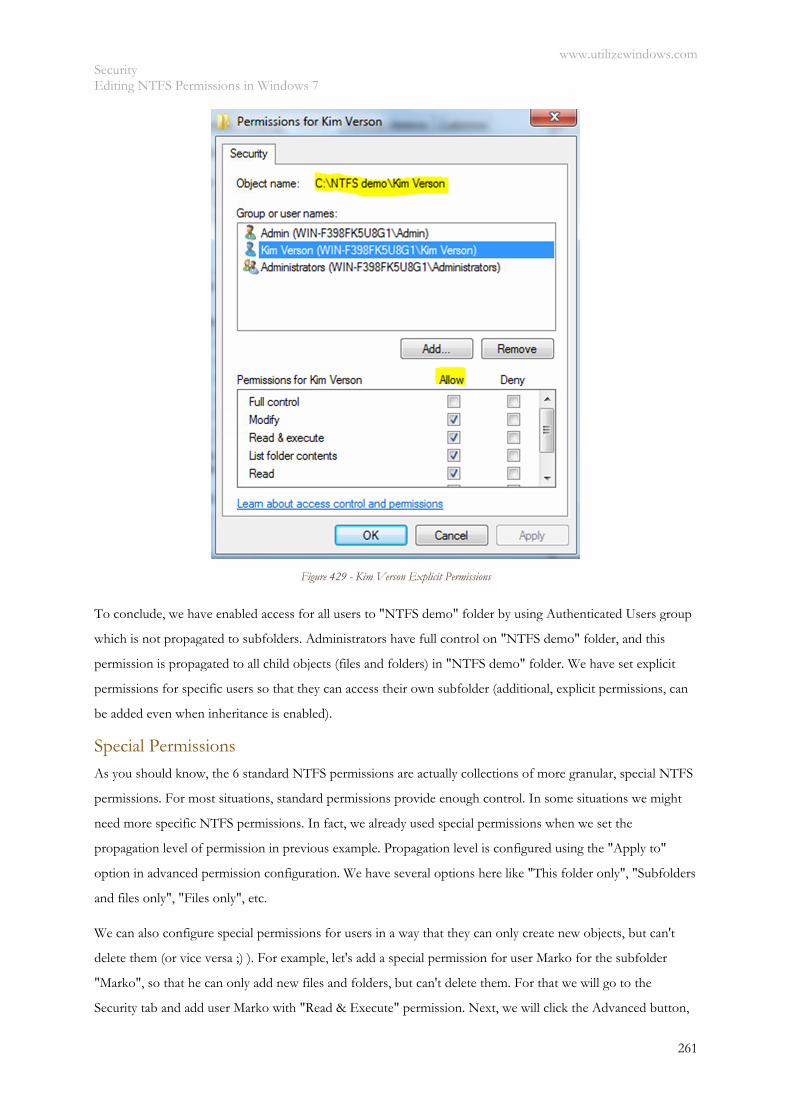
www.utilizewindows.com Security Editing NTFS Permissions in Windows 7
261
Figure 429 - Kim Verson Explicit Permissions
To conclude, we have enabled access for all users to "NTFS demo" folder by using Authenticated Users group
which is not propagated to subfolders. Administrators have full control on "NTFS demo" folder, and this
permission is propagated to all child objects (files and folders) in "NTFS demo" folder. We have set explicit
permissions for specific users so that they can access their own subfolder (additional, explicit permissions, can
be added even when inheritance is enabled).
Special Permissions
As you should know, the 6 standard NTFS permissions are actually collections of more granular, special NTFS
permissions. For most situations, standard permissions provide enough control. In some situations we might
need more specific NTFS permissions. In fact, we already used special permissions when we set the
propagation level of permission in previous example. Propagation level is configured using the "Apply to"
option in advanced permission configuration. We have several options here like "This folder only", "Subfolders
and files only", "Files only", etc.
We can also configure special permissions for users in a way that they can only create new objects, but can't
delete them (or vice versa ;) ). For example, let's add a special permission for user Marko for the subfolder
"Marko", so that he can only add new files and folders, but can't delete them. For that we will go to the
Security tab and add user Marko with "Read & Execute" permission. Next, we will click the Advanced button,
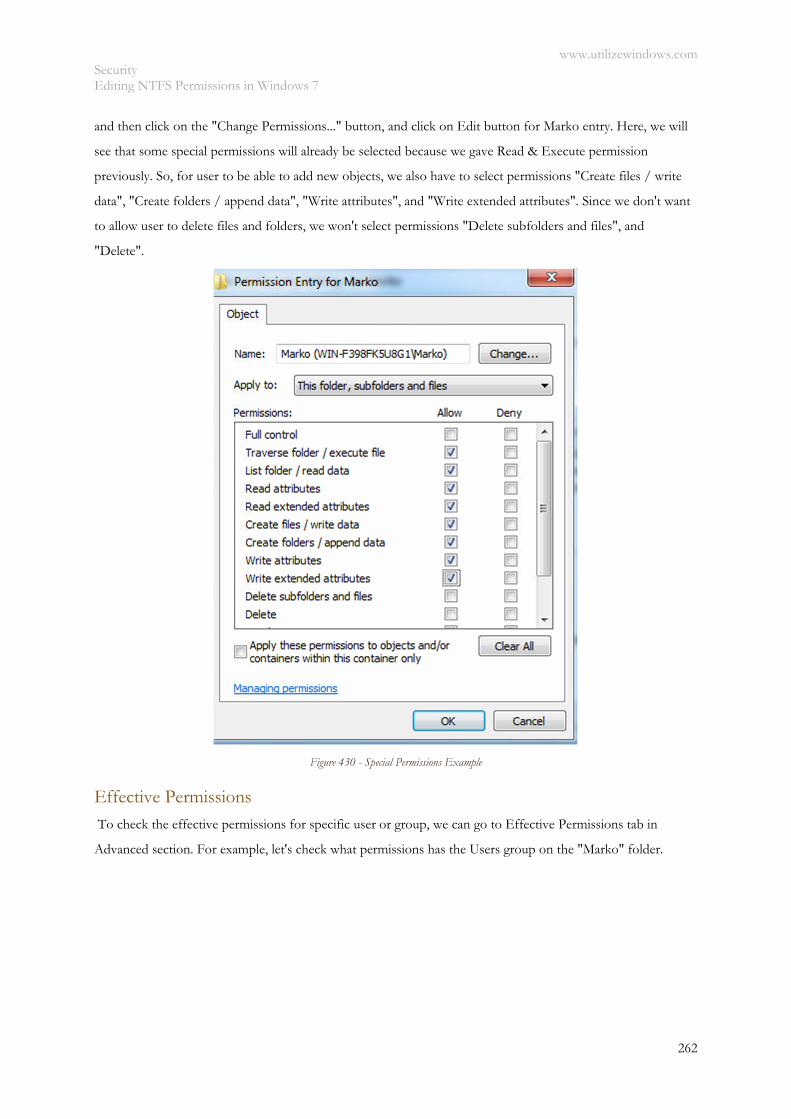
www.utilizewindows.com Security Editing NTFS Permissions in Windows 7
262
and then click on the "Change Permissions..." button, and click on Edit button for Marko entry. Here, we will
see that some special permissions will already be selected because we gave Read & Execute permission
previously. So, for user to be able to add new objects, we also have to select permissions "Create files / write
data", "Create folders / append data", "Write attributes", and "Write extended attributes". Since we don't want
to allow user to delete files and folders, we won't select permissions "Delete subfolders and files", and
"Delete".
Figure 430 - Special Permissions Example
Effective Permissions To check the effective permissions for specific user or group, we can go to Effective Permissions tab in
Advanced section. For example, let's check what permissions has the Users group on the "Marko" folder.
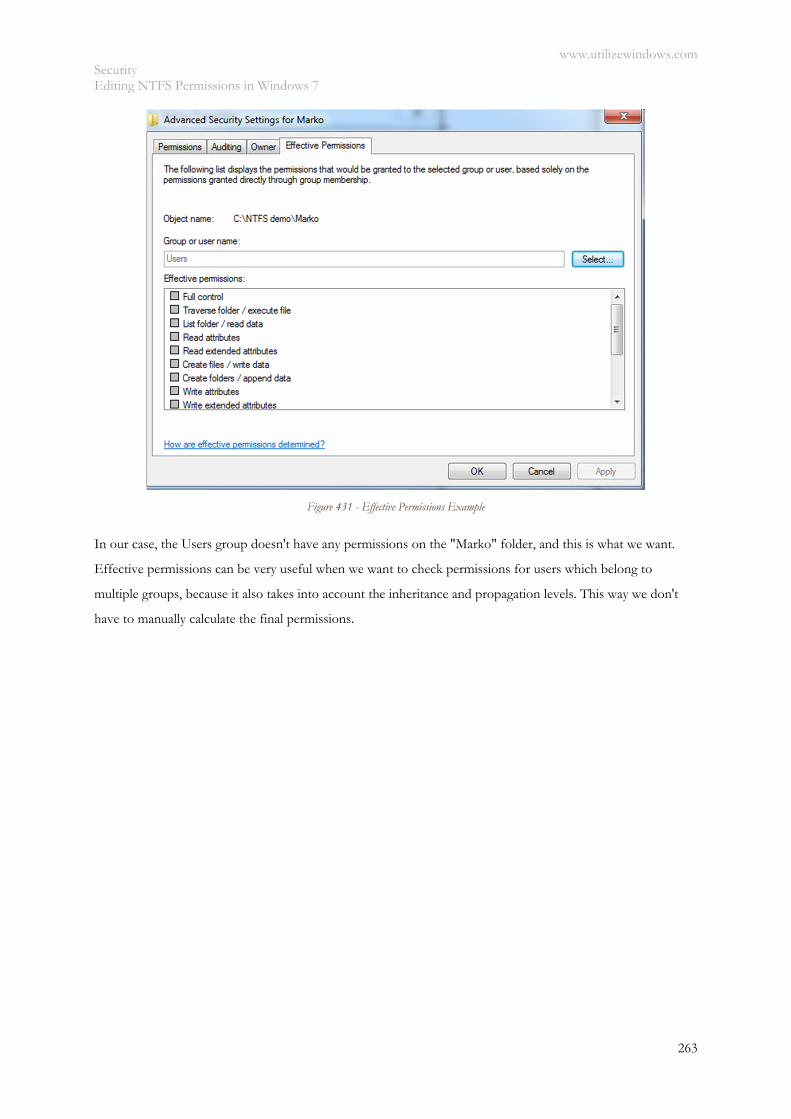
www.utilizewindows.com Security Editing NTFS Permissions in Windows 7
263
Figure 431 - Effective Permissions Example
In our case, the Users group doesn't have any permissions on the "Marko" folder, and this is what we want.
Effective permissions can be very useful when we want to check permissions for users which belong to
multiple groups, because it also takes into account the inheritance and propagation levels. This way we don't
have to manually calculate the final permissions.

www.utilizewindows.com Security Advanced Sharing Settings in Windows 7
264
Advanced Sharing Settings in Windows 7 Before you start
Objectives: Learn where to find and which options to configure when it comes to advanced sharing options in
Network and Sharing Center for Windows 7.
Prerequisites: no prerequisites.
Key terms: sharing options, network and sharing center, network discovery, public folders, file and printer
sharing, media streaming, password protected sharing
Network and Sharing Center
Window 7 has a special place where we can view our network information and set up connections. It's called
Network and Sharing Center and we can find it in Control Panel > Network and Internet > Network and
Sharing Center. This is a central location where we can perform all networking and sharing tasks.
The first thing we should be aware of is the location of our network connection. For each network connection
we choose a network location. The location identifies the type of network we are connecting to. This controls
firewall and security settings, and controls enabled services. The location types are:
Domain - in this case computers are connected to an Active Directory domain. This location type will
be selected automatically when we join our computer to the domain.
Public - this location means that we are on untrusted network.
Home - this location is a trusted (also called private) local area network
Work - this location is a trusted (private) local area network. This option is typically used when
domain is not implemented in work environment.
When we connect to a new network, we will get a prompt to choose the location for our network connection.
We can always change this later, if we need to.
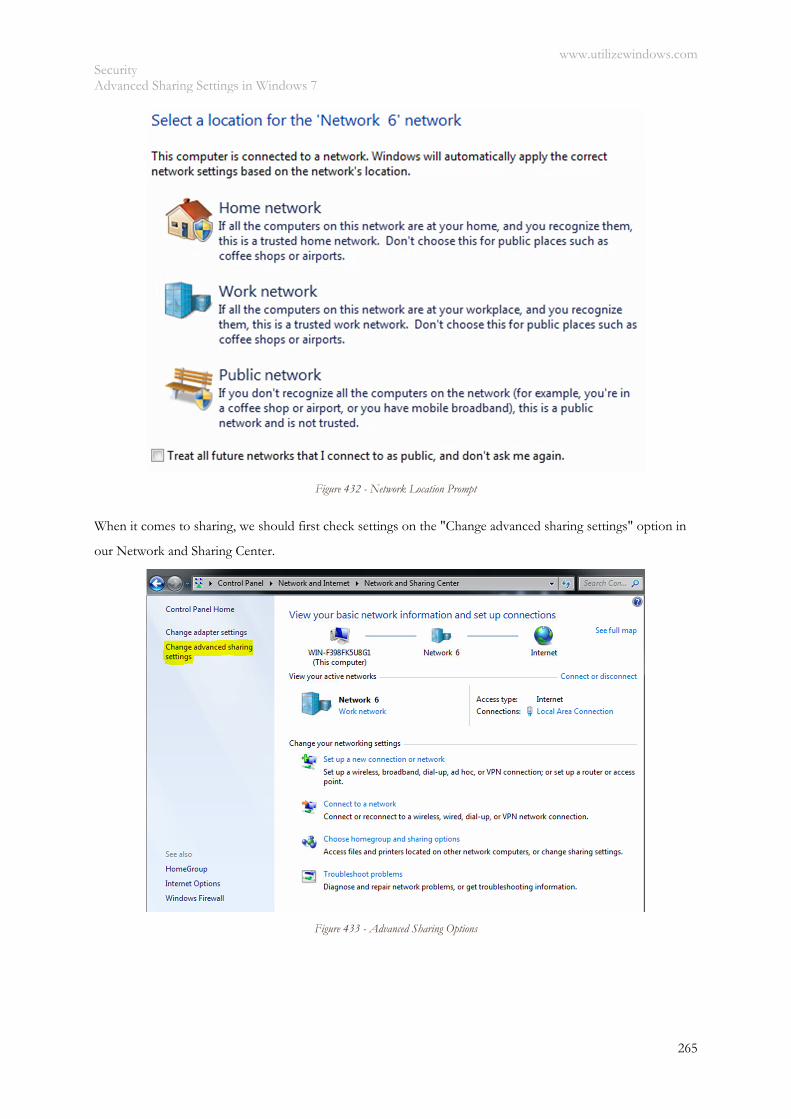
www.utilizewindows.com Security Advanced Sharing Settings in Windows 7
265
Figure 432 - Network Location Prompt
When it comes to sharing, we should first check settings on the "Change advanced sharing settings" option in
our Network and Sharing Center.
Figure 433 - Advanced Sharing Options
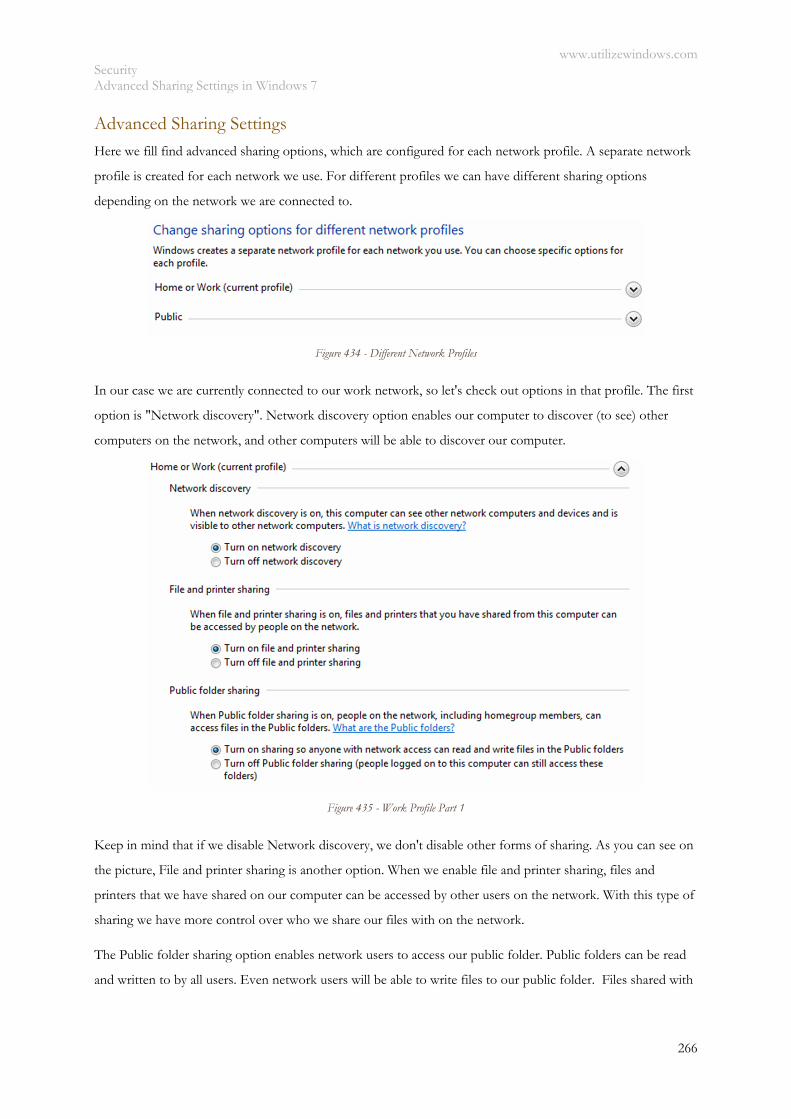
www.utilizewindows.com Security Advanced Sharing Settings in Windows 7
266
Advanced Sharing Settings
Here we fill find advanced sharing options, which are configured for each network profile. A separate network
profile is created for each network we use. For different profiles we can have different sharing options
depending on the network we are connected to.
Figure 434 - Different Network Profiles
In our case we are currently connected to our work network, so let's check out options in that profile. The first
option is "Network discovery". Network discovery option enables our computer to discover (to see) other
computers on the network, and other computers will be able to discover our computer.
Figure 435 - Work Profile Part 1
Keep in mind that if we disable Network discovery, we don't disable other forms of sharing. As you can see on
the picture, File and printer sharing is another option. When we enable file and printer sharing, files and
printers that we have shared on our computer can be accessed by other users on the network. With this type of
sharing we have more control over who we share our files with on the network.
The Public folder sharing option enables network users to access our public folder. Public folders can be read
and written to by all users. Even network users will be able to write files to our public folder. Files shared with
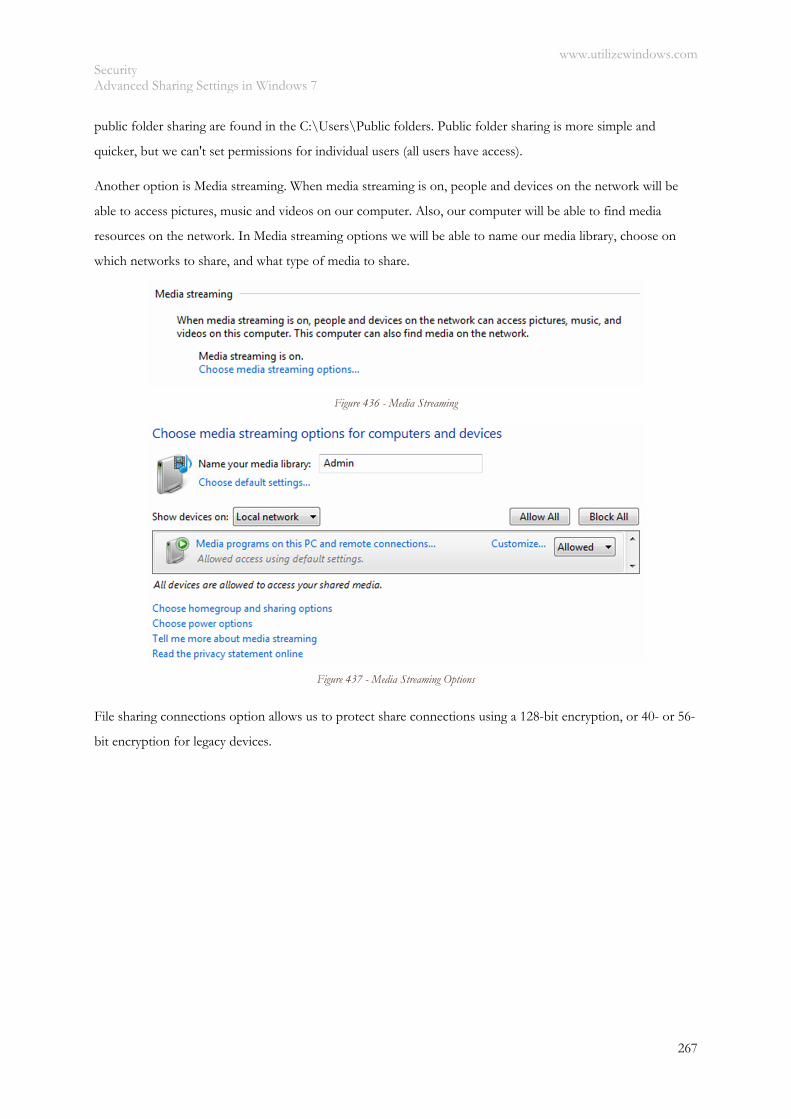
www.utilizewindows.com Security Advanced Sharing Settings in Windows 7
267
public folder sharing are found in the C:\Users\Public folders. Public folder sharing is more simple and
quicker, but we can't set permissions for individual users (all users have access).
Another option is Media streaming. When media streaming is on, people and devices on the network will be
able to access pictures, music and videos on our computer. Also, our computer will be able to find media
resources on the network. In Media streaming options we will be able to name our media library, choose on
which networks to share, and what type of media to share.
Figure 436 - Media Streaming
Figure 437 - Media Streaming Options
File sharing connections option allows us to protect share connections using a 128-bit encryption, or 40- or 56-
bit encryption for legacy devices.
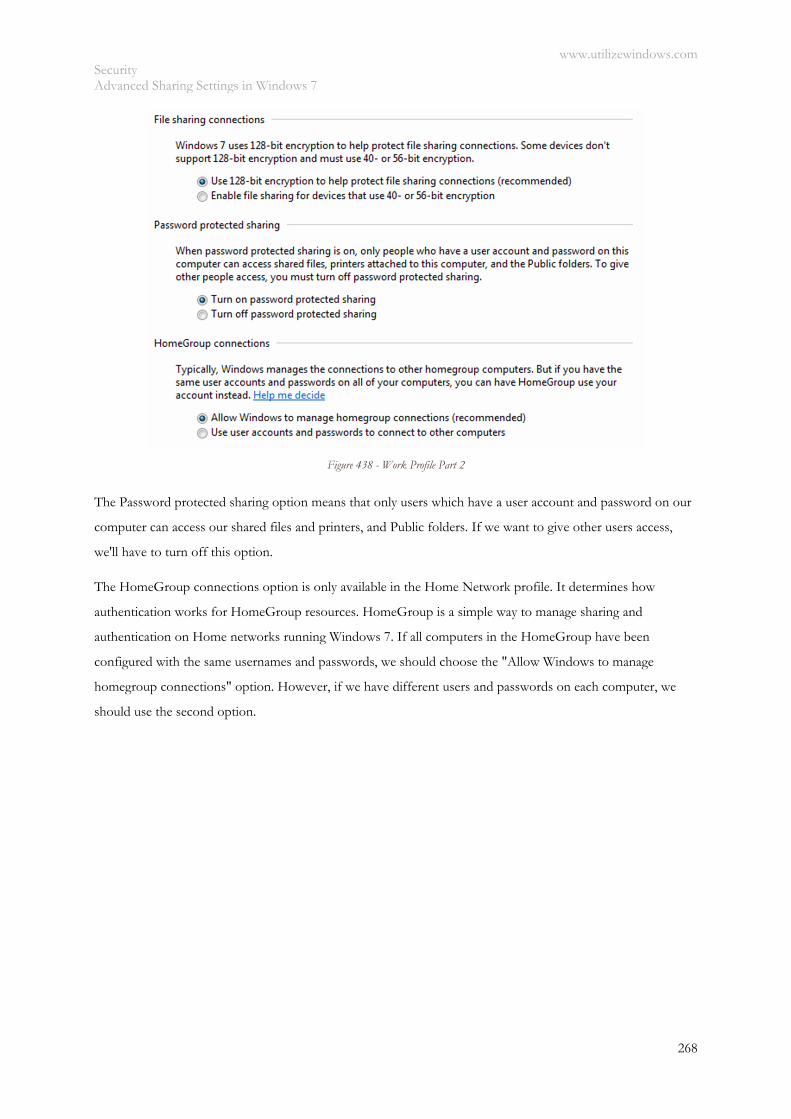
www.utilizewindows.com Security Advanced Sharing Settings in Windows 7
268
Figure 438 - Work Profile Part 2
The Password protected sharing option means that only users which have a user account and password on our
computer can access our shared files and printers, and Public folders. If we want to give other users access,
we'll have to turn off this option.
The HomeGroup connections option is only available in the Home Network profile. It determines how
authentication works for HomeGroup resources. HomeGroup is a simple way to manage sharing and
authentication on Home networks running Windows 7. If all computers in the HomeGroup have been
configured with the same usernames and passwords, we should choose the "Allow Windows to manage
homegroup connections" option. However, if we have different users and passwords on each computer, we
should use the second option.
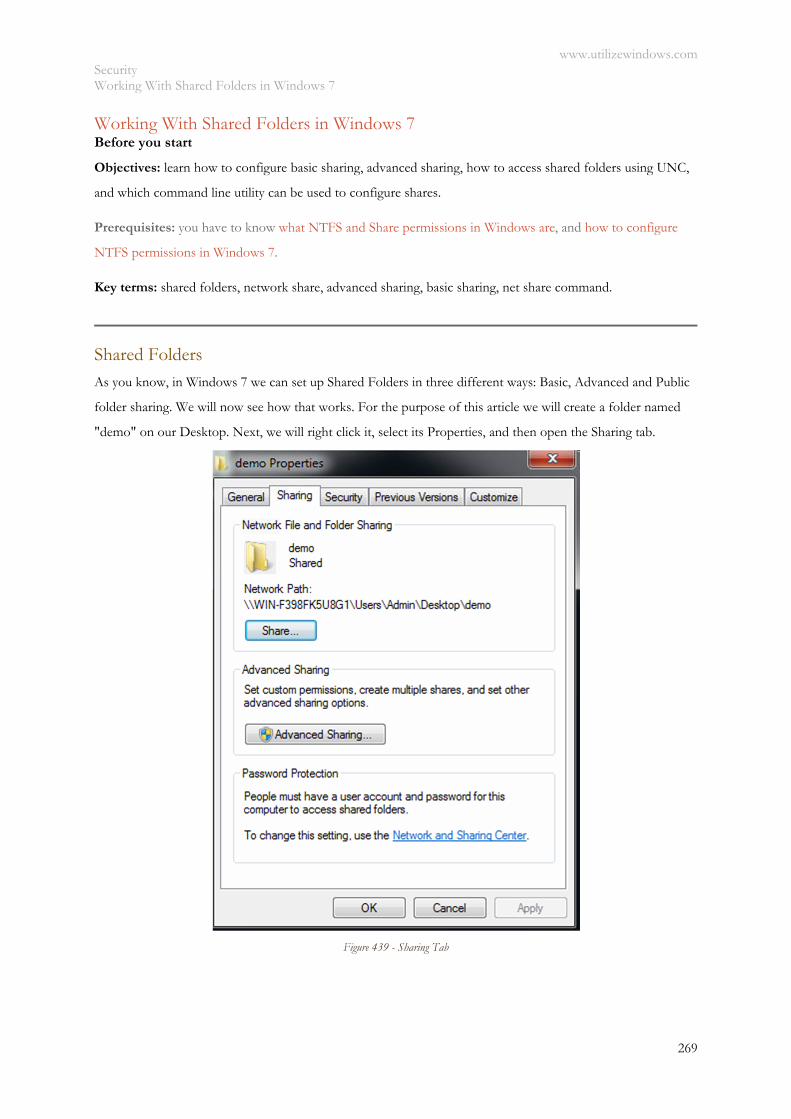
www.utilizewindows.com Security Working With Shared Folders in Windows 7
269
Working With Shared Folders in Windows 7 Before you start
Objectives: learn how to configure basic sharing, advanced sharing, how to access shared folders using UNC,
and which command line utility can be used to configure shares.
Prerequisites: you have to know what NTFS and Share permissions in Windows are, and how to configure
NTFS permissions in Windows 7.
Key terms: shared folders, network share, advanced sharing, basic sharing, net share command.
Shared Folders
As you know, in Windows 7 we can set up Shared Folders in three different ways: Basic, Advanced and Public
folder sharing. We will now see how that works. For the purpose of this article we will create a folder named
"demo" on our Desktop. Next, we will right click it, select its Properties, and then open the Sharing tab.
Figure 439 - Sharing Tab

www.utilizewindows.com Security Working With Shared Folders in Windows 7
270
Notice that we can see two Sharing sections on this tab. The first section is named Network File and Folder
sharing. Here we have a Share button which will take us to the Basic sharing options. On the Advanced Sharing
section we can click on the Advanced Sharing button which will take us to advanced options.
Basic Sharing To edit Basic sharing options we simply click on the Share button in the first section.
Figure 440 - Basic Sharing
Basic Sharing
This interface is a bit simpler than in Advanced Sharing. Here we can choose the users and groups and then
add them to the list. When we click Add, we can then change Permission Level by choosing appropriate
permission from the list.
Figure 441 - Basic Permissions
Notice that we can only give Read and Read/Write permissions. Owner permission is set for the user who
created the share.
When we click the Share button, we will get a UNC path to the shared folder which we can then copy and send
to other users. They will have to enter the whole path to access our shared folder.
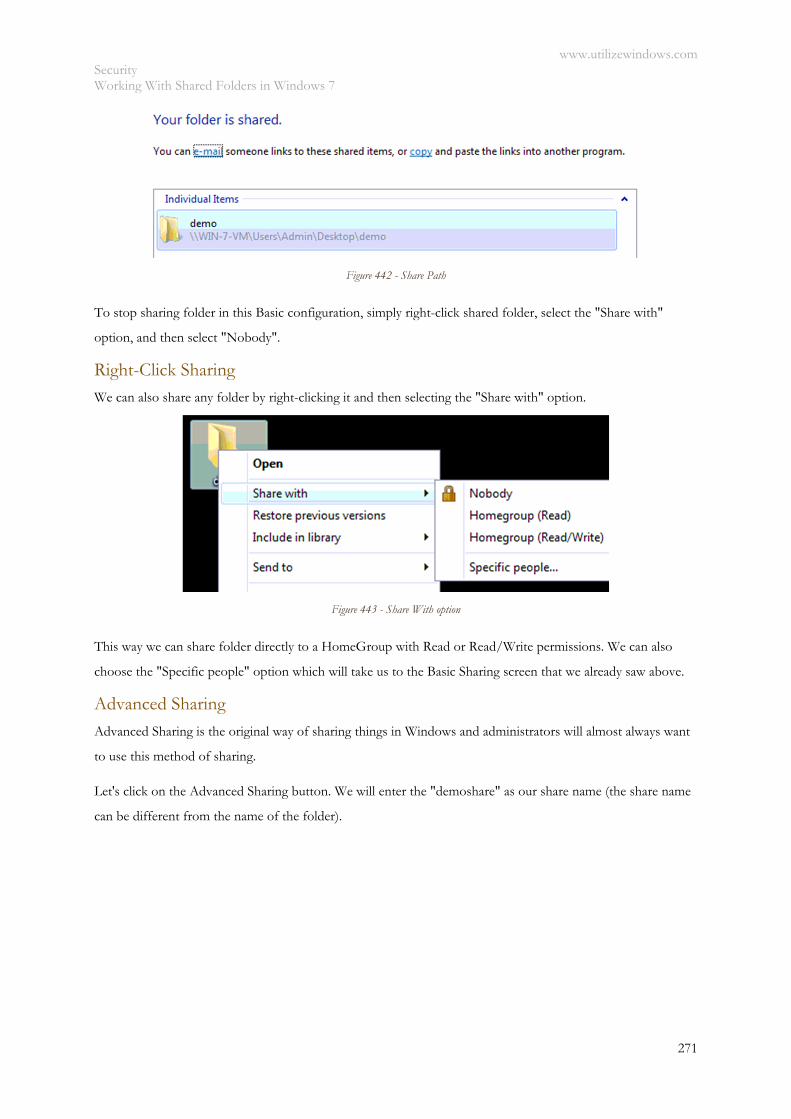
www.utilizewindows.com Security Working With Shared Folders in Windows 7
271
Figure 442 - Share Path
To stop sharing folder in this Basic configuration, simply right-click shared folder, select the "Share with"
option, and then select "Nobody".
Right-Click Sharing We can also share any folder by right-clicking it and then selecting the "Share with" option.
Figure 443 - Share With option
This way we can share folder directly to a HomeGroup with Read or Read/Write permissions. We can also
choose the "Specific people" option which will take us to the Basic Sharing screen that we already saw above.
Advanced Sharing
Advanced Sharing is the original way of sharing things in Windows and administrators will almost always want
to use this method of sharing.
Let's click on the Advanced Sharing button. We will enter the "demoshare" as our share name (the share name
can be different from the name of the folder).
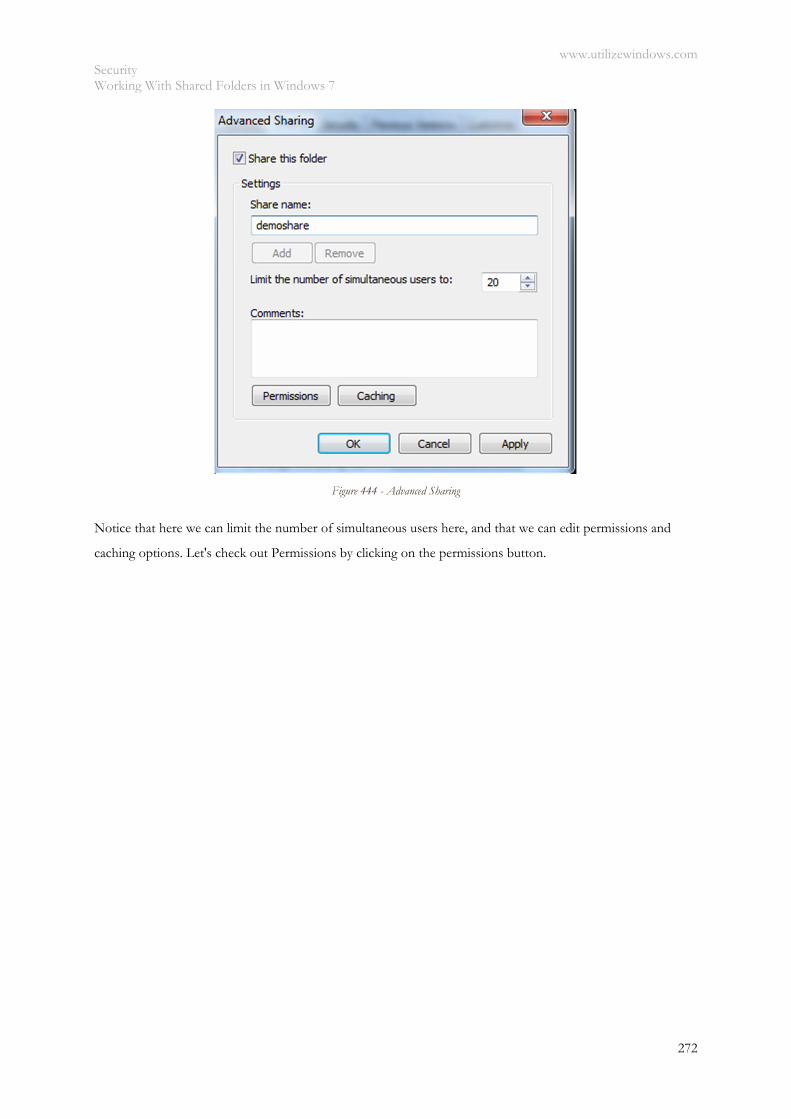
www.utilizewindows.com Security Working With Shared Folders in Windows 7
272
Figure 444 - Advanced Sharing
Notice that here we can limit the number of simultaneous users here, and that we can edit permissions and
caching options. Let's check out Permissions by clicking on the permissions button.

www.utilizewindows.com Security Working With Shared Folders in Windows 7
273
Figure 445 - Permissions
Notice that the Everyone group by default has Read permission on shared folders. Here we can now add other
users or groups and set their Share permissions.
Let's click on the OK buttons and check our shared folder in Windows Explorer. To do that we will enter the
UNC path to our share. Our computer name is WIN-7-VM and we know that the share name is "demoshare".
The UNC path syntax is \\computername\sharename. So, the UNC path to our share is \\WIN-7-
VM\demoshare. To check your computer name you can go to System properties (right-click your computer
icon and select Properties option). Let's enter the UNC path to our WIN-7-VM computer to see all shared
folders.
Figure 446 - Shares
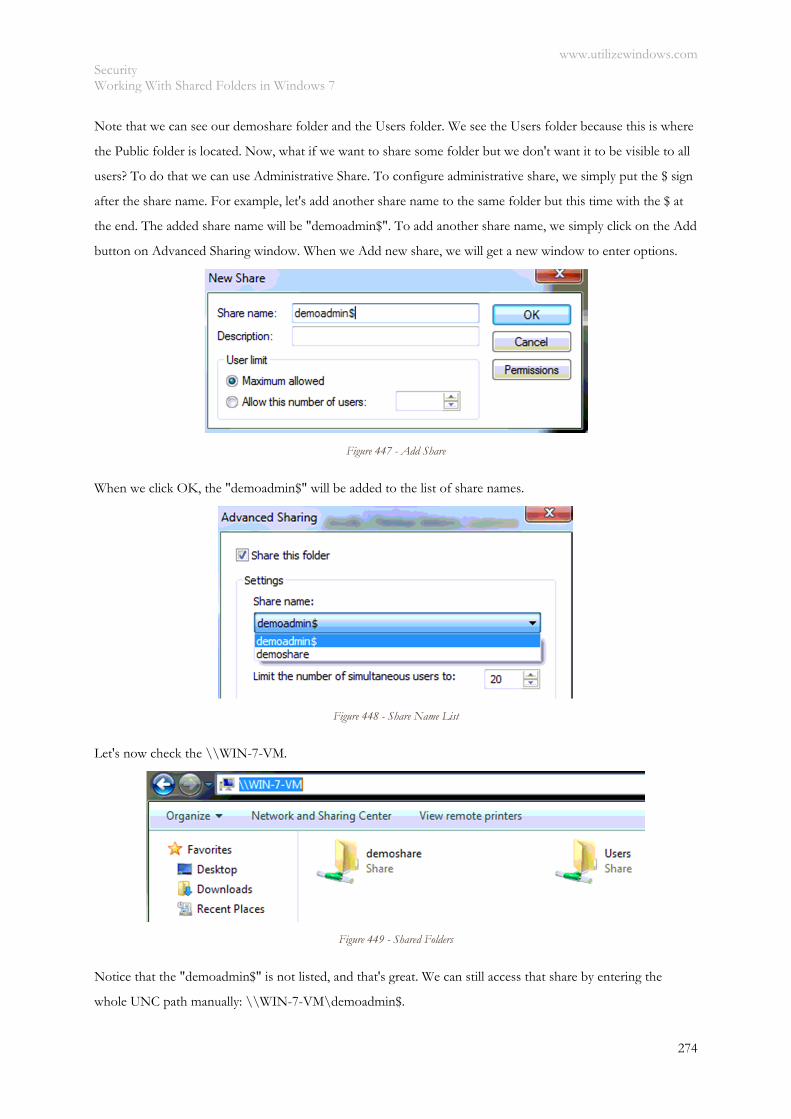
www.utilizewindows.com Security Working With Shared Folders in Windows 7
274
Note that we can see our demoshare folder and the Users folder. We see the Users folder because this is where
the Public folder is located. Now, what if we want to share some folder but we don't want it to be visible to all
users? To do that we can use Administrative Share. To configure administrative share, we simply put the $ sign
after the share name. For example, let's add another share name to the same folder but this time with the $ at
the end. The added share name will be "demoadmin$". To add another share name, we simply click on the Add
button on Advanced Sharing window. When we Add new share, we will get a new window to enter options.
Figure 447 - Add Share
When we click OK, the "demoadmin$" will be added to the list of share names.
Figure 448 - Share Name List
Let's now check the \\WIN-7-VM.
Figure 449 - Shared Folders
Notice that the "demoadmin$" is not listed, and that's great. We can still access that share by entering the
whole UNC path manually: \\WIN-7-VM\demoadmin$.
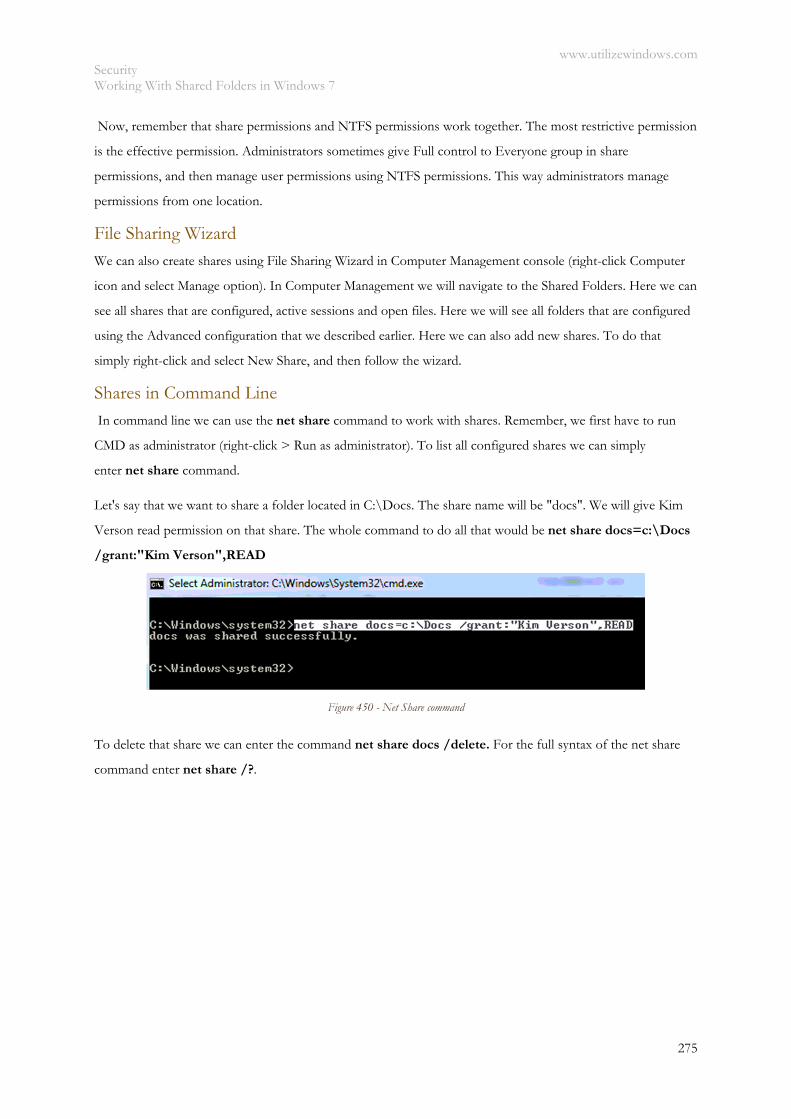
www.utilizewindows.com Security Working With Shared Folders in Windows 7
275
Now, remember that share permissions and NTFS permissions work together. The most restrictive permission
is the effective permission. Administrators sometimes give Full control to Everyone group in share
permissions, and then manage user permissions using NTFS permissions. This way administrators manage
permissions from one location.
File Sharing Wizard
We can also create shares using File Sharing Wizard in Computer Management console (right-click Computer
icon and select Manage option). In Computer Management we will navigate to the Shared Folders. Here we can
see all shares that are configured, active sessions and open files. Here we will see all folders that are configured
using the Advanced configuration that we described earlier. Here we can also add new shares. To do that
simply right-click and select New Share, and then follow the wizard.
Shares in Command Line
In command line we can use the net share command to work with shares. Remember, we first have to run
CMD as administrator (right-click > Run as administrator). To list all configured shares we can simply
enter net share command.
Let's say that we want to share a folder located in C:\Docs. The share name will be "docs". We will give Kim
Verson read permission on that share. The whole command to do all that would be net share docs=c:\Docs
/grant:"Kim Verson",READ
Figure 450 - Net Share command
To delete that share we can enter the command net share docs /delete. For the full syntax of the net share
command enter net share /?.
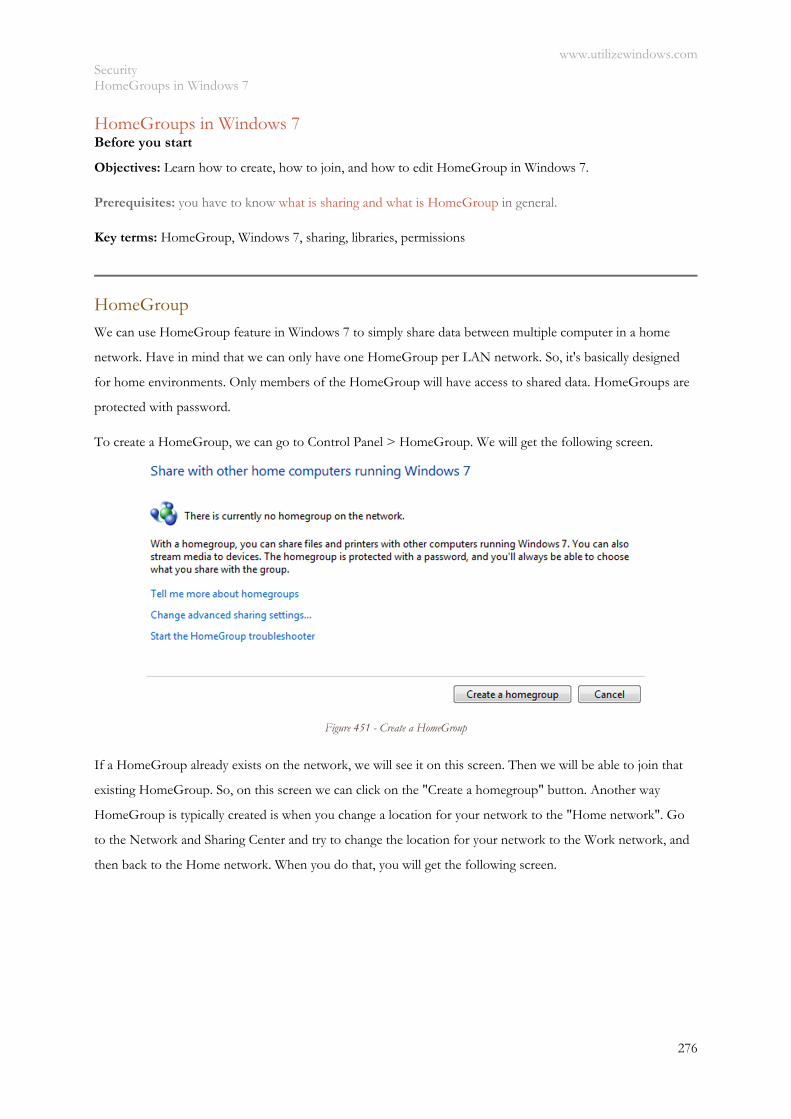
www.utilizewindows.com Security HomeGroups in Windows 7
276
HomeGroups in Windows 7 Before you start
Objectives: Learn how to create, how to join, and how to edit HomeGroup in Windows 7.
Prerequisites: you have to know what is sharing and what is HomeGroup in general.
Key terms: HomeGroup, Windows 7, sharing, libraries, permissions
HomeGroup
We can use HomeGroup feature in Windows 7 to simply share data between multiple computer in a home
network. Have in mind that we can only have one HomeGroup per LAN network. So, it's basically designed
for home environments. Only members of the HomeGroup will have access to shared data. HomeGroups are
protected with password.
To create a HomeGroup, we can go to Control Panel > HomeGroup. We will get the following screen.
Figure 451 - Create a HomeGroup
If a HomeGroup already exists on the network, we will see it on this screen. Then we will be able to join that
existing HomeGroup. So, on this screen we can click on the "Create a homegroup" button. Another way
HomeGroup is typically created is when you change a location for your network to the "Home network". Go
to the Network and Sharing Center and try to change the location for your network to the Work network, and
then back to the Home network. When you do that, you will get the following screen.
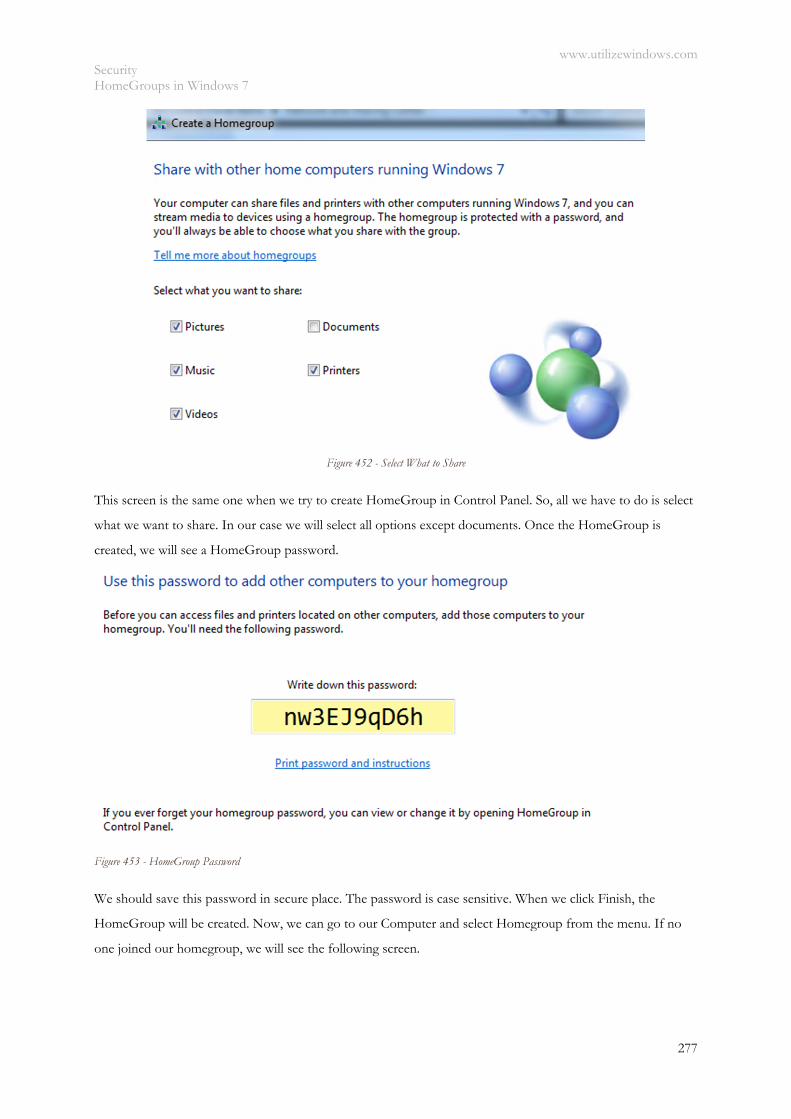
www.utilizewindows.com Security HomeGroups in Windows 7
277
Figure 452 - Select What to Share
This screen is the same one when we try to create HomeGroup in Control Panel. So, all we have to do is select
what we want to share. In our case we will select all options except documents. Once the HomeGroup is
created, we will see a HomeGroup password.
Figure 453 - HomeGroup Password
We should save this password in secure place. The password is case sensitive. When we click Finish, the
HomeGroup will be created. Now, we can go to our Computer and select Homegroup from the menu. If no
one joined our homegroup, we will see the following screen.
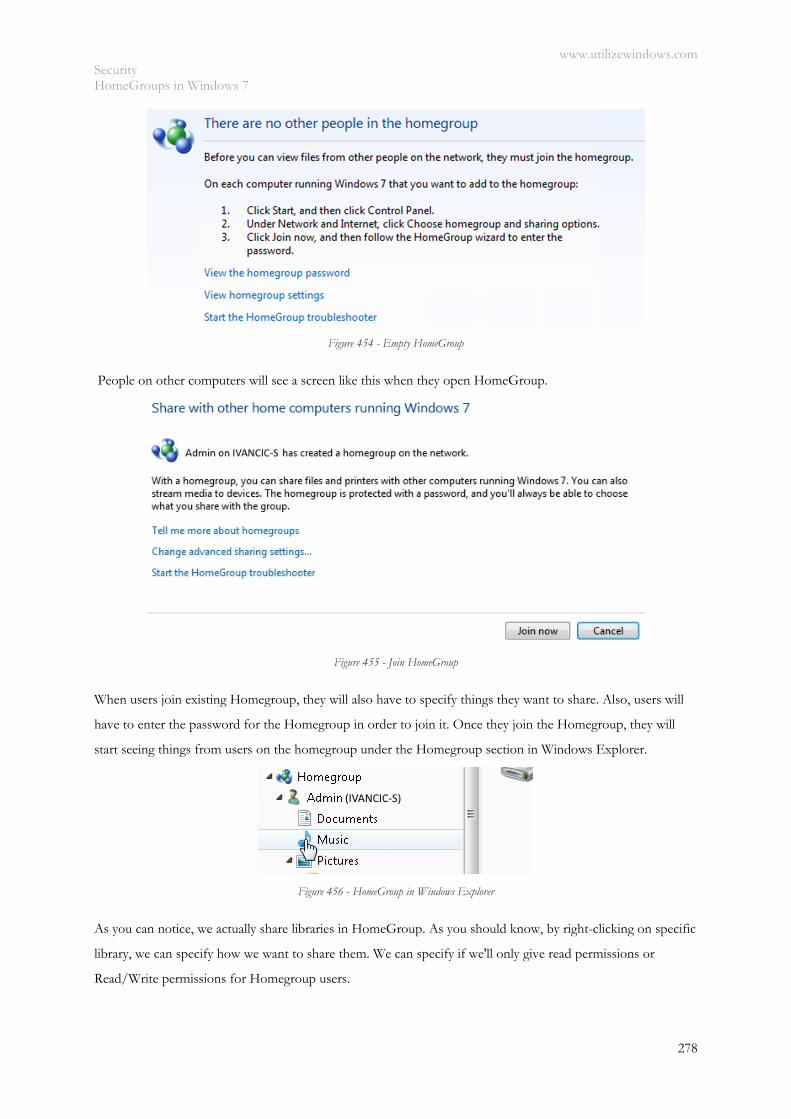
www.utilizewindows.com Security HomeGroups in Windows 7
278
Figure 454 - Empty HomeGroup
People on other computers will see a screen like this when they open HomeGroup.
Figure 455 - Join HomeGroup
When users join existing Homegroup, they will also have to specify things they want to share. Also, users will
have to enter the password for the Homegroup in order to join it. Once they join the Homegroup, they will
start seeing things from users on the homegroup under the Homegroup section in Windows Explorer.
Figure 456 - HomeGroup in Windows Explorer
As you can notice, we actually share libraries in HomeGroup. As you should know, by right-clicking on specific
library, we can specify how we want to share them. We can specify if we'll only give read permissions or
Read/Write permissions for Homegroup users.
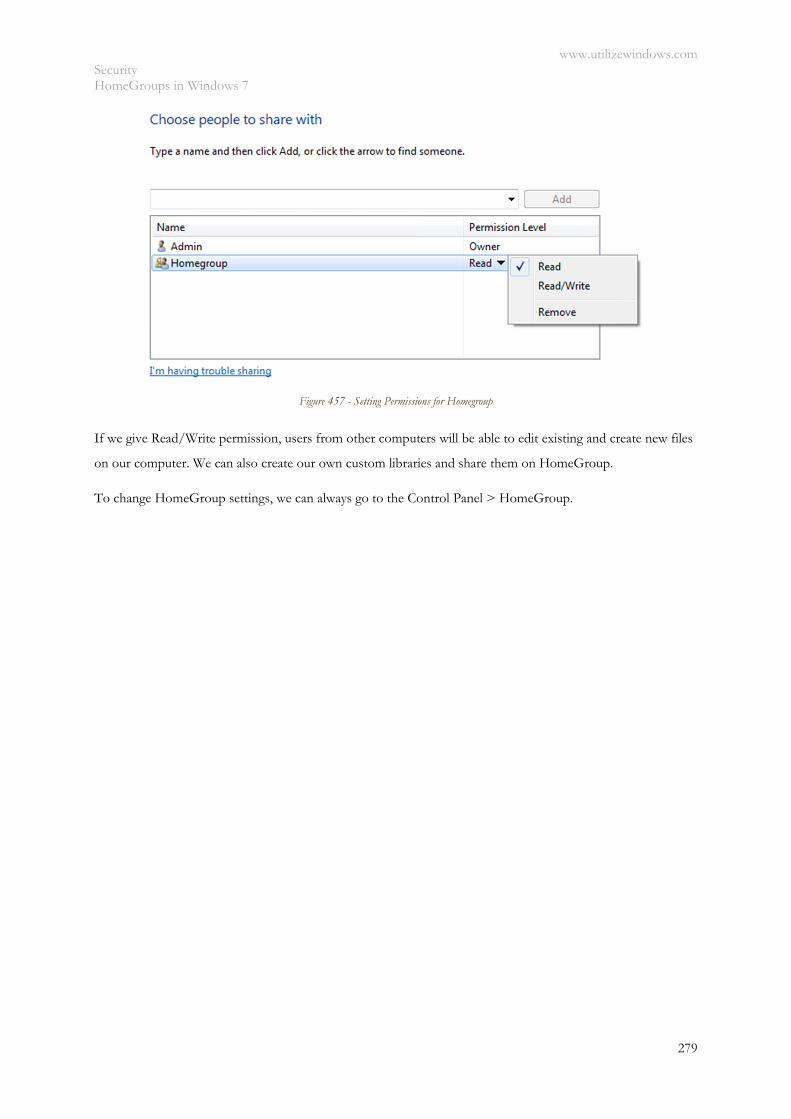
www.utilizewindows.com Security HomeGroups in Windows 7
279
Figure 457 - Setting Permissions for Homegroup
If we give Read/Write permission, users from other computers will be able to edit existing and create new files
on our computer. We can also create our own custom libraries and share them on HomeGroup.
To change HomeGroup settings, we can always go to the Control Panel > HomeGroup.
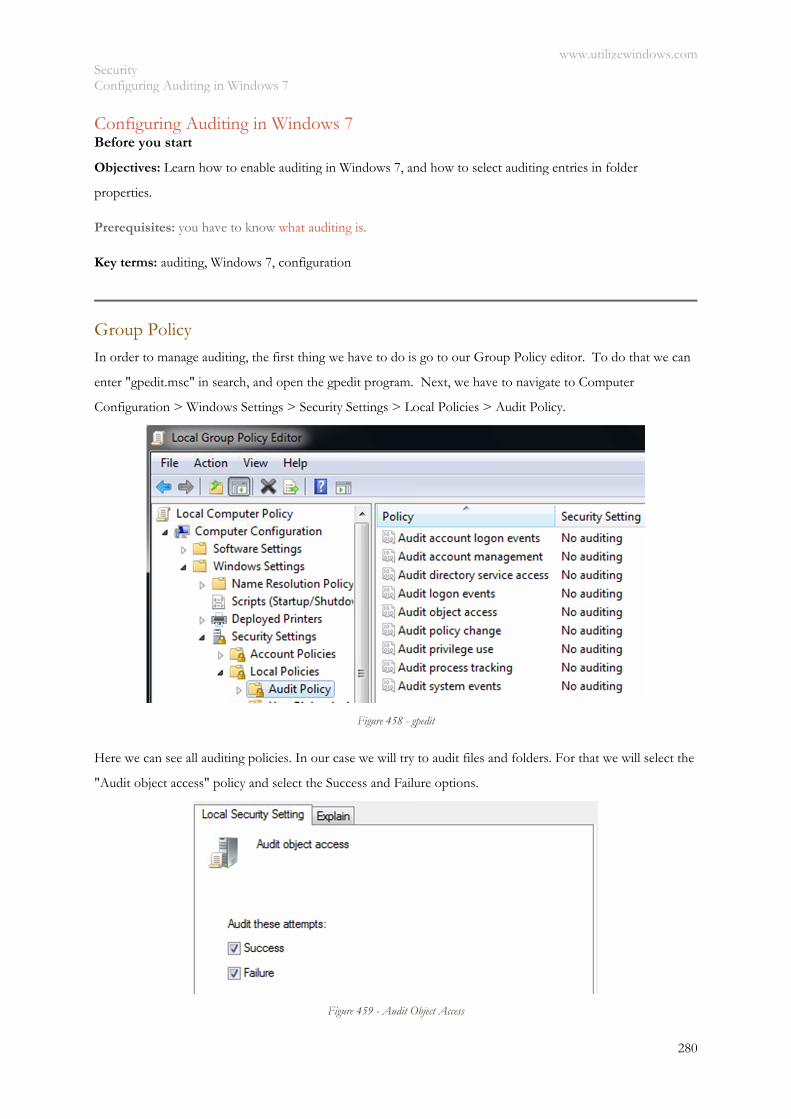
www.utilizewindows.com Security Configuring Auditing in Windows 7
280
Configuring Auditing in Windows 7 Before you start
Objectives: Learn how to enable auditing in Windows 7, and how to select auditing entries in folder
properties.
Prerequisites: you have to know what auditing is.
Key terms: auditing, Windows 7, configuration
Group Policy In order to manage auditing, the first thing we have to do is go to our Group Policy editor. To do that we can
enter "gpedit.msc" in search, and open the gpedit program. Next, we have to navigate to Computer
Configuration > Windows Settings > Security Settings > Local Policies > Audit Policy.
Figure 458 - gpedit
Here we can see all auditing policies. In our case we will try to audit files and folders. For that we will select the
"Audit object access" policy and select the Success and Failure options.
Figure 459 - Audit Object Access
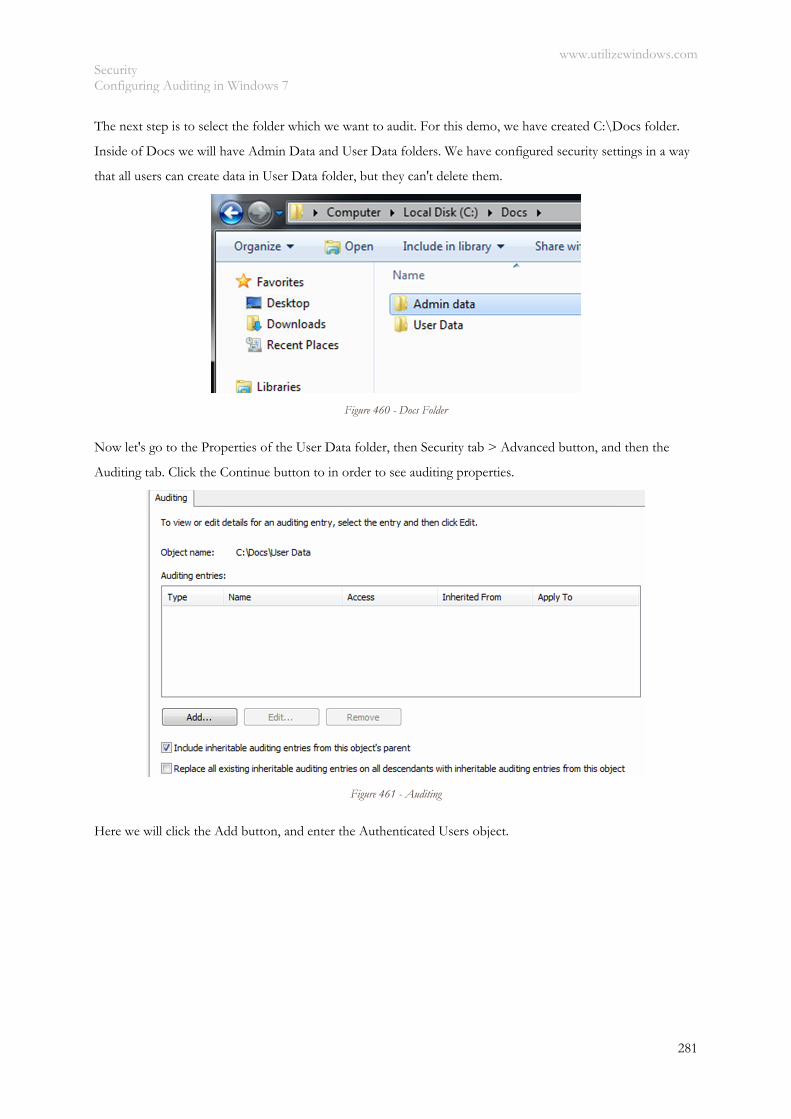
www.utilizewindows.com Security Configuring Auditing in Windows 7
281
The next step is to select the folder which we want to audit. For this demo, we have created C:\Docs folder.
Inside of Docs we will have Admin Data and User Data folders. We have configured security settings in a way
that all users can create data in User Data folder, but they can't delete them.
Figure 460 - Docs Folder
Now let's go to the Properties of the User Data folder, then Security tab > Advanced button, and then the
Auditing tab. Click the Continue button to in order to see auditing properties.
Figure 461 - Auditing
Here we will click the Add button, and enter the Authenticated Users object.
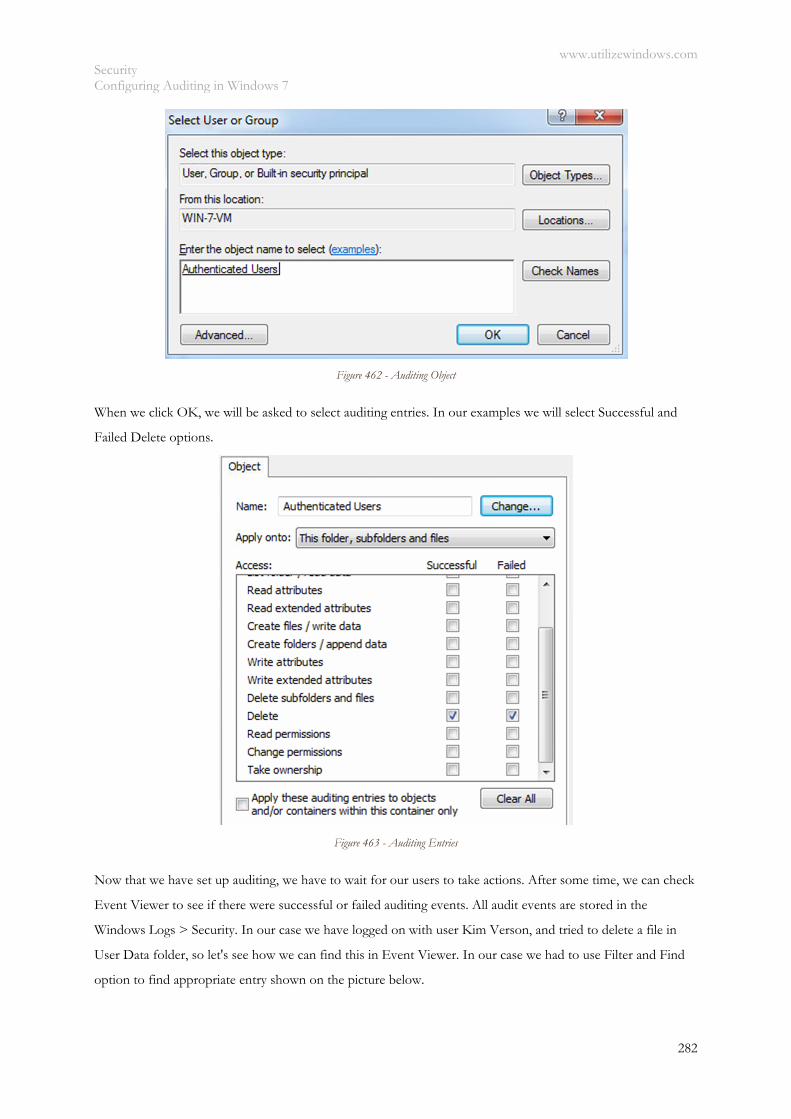
www.utilizewindows.com Security Configuring Auditing in Windows 7
282
Figure 462 - Auditing Object
When we click OK, we will be asked to select auditing entries. In our examples we will select Successful and
Failed Delete options.
Figure 463 - Auditing Entries
Now that we have set up auditing, we have to wait for our users to take actions. After some time, we can check
Event Viewer to see if there were successful or failed auditing events. All audit events are stored in the
Windows Logs > Security. In our case we have logged on with user Kim Verson, and tried to delete a file in
User Data folder, so let's see how we can find this in Event Viewer. In our case we had to use Filter and Find
option to find appropriate entry shown on the picture below.
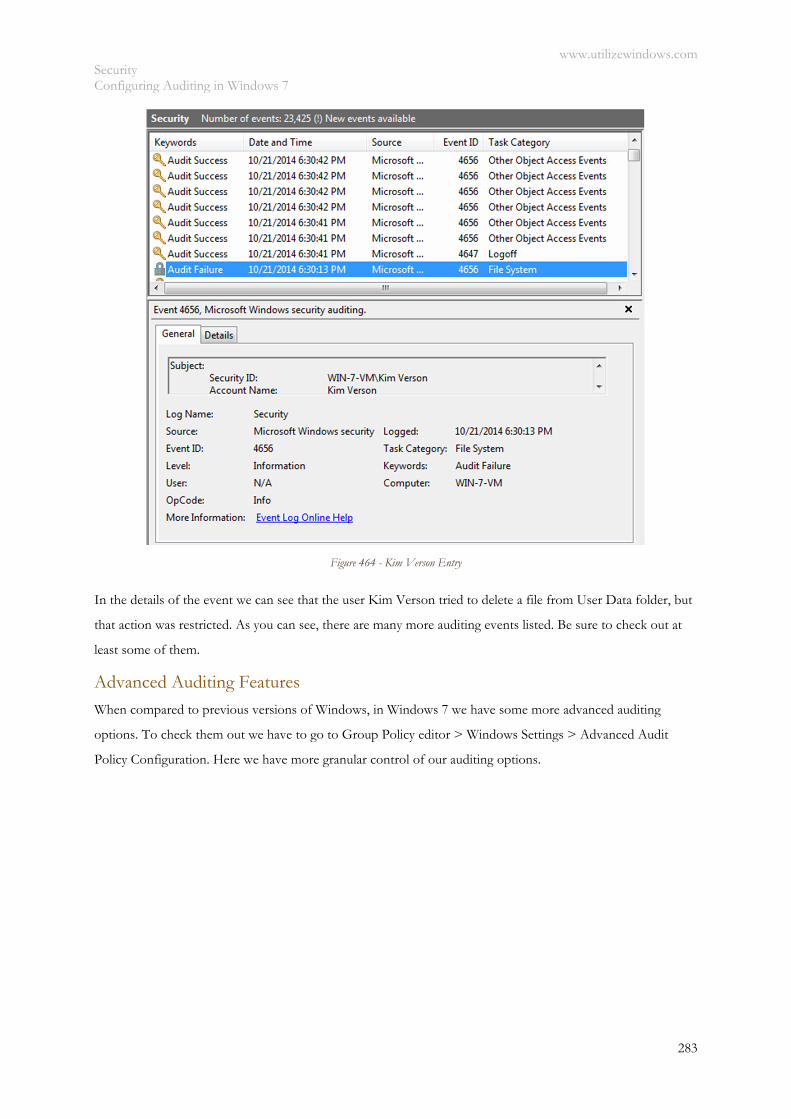
www.utilizewindows.com Security Configuring Auditing in Windows 7
283
Figure 464 - Kim Verson Entry
In the details of the event we can see that the user Kim Verson tried to delete a file from User Data folder, but
that action was restricted. As you can see, there are many more auditing events listed. Be sure to check out at
least some of them.
Advanced Auditing Features
When compared to previous versions of Windows, in Windows 7 we have some more advanced auditing
options. To check them out we have to go to Group Policy editor > Windows Settings > Advanced Audit
Policy Configuration. Here we have more granular control of our auditing options.
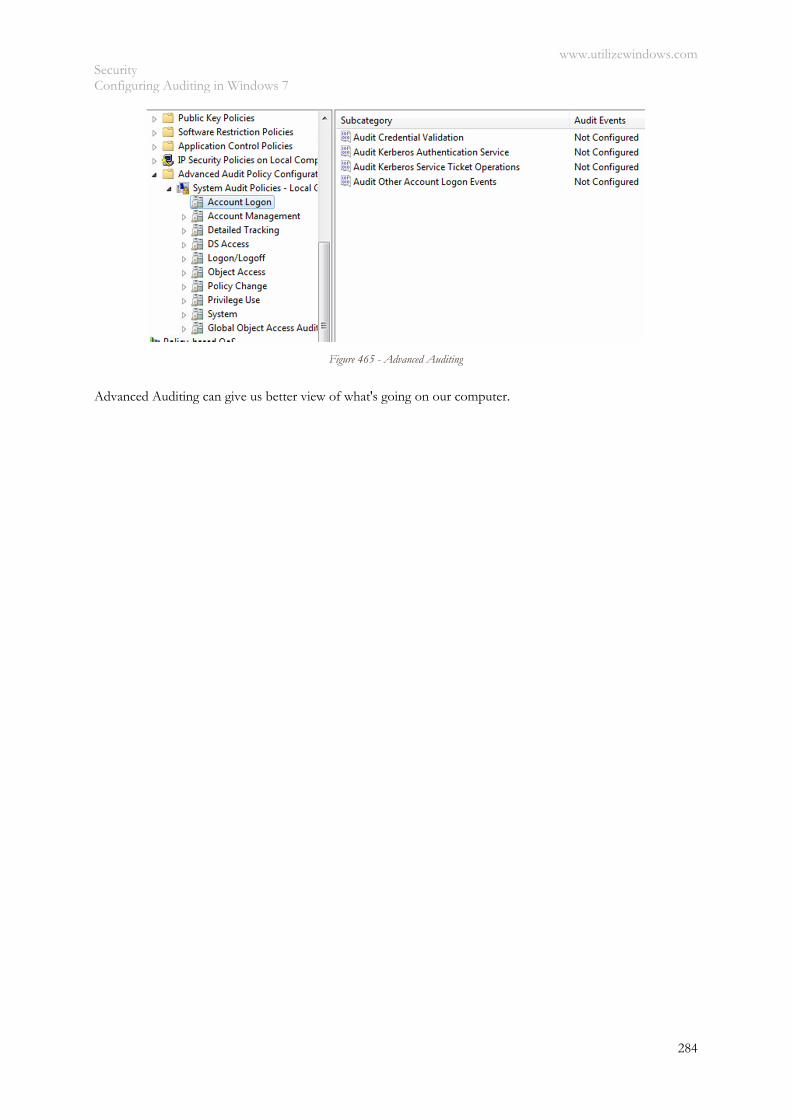
www.utilizewindows.com Security Configuring Auditing in Windows 7
284
Figure 465 - Advanced Auditing
Advanced Auditing can give us better view of what's going on our computer.
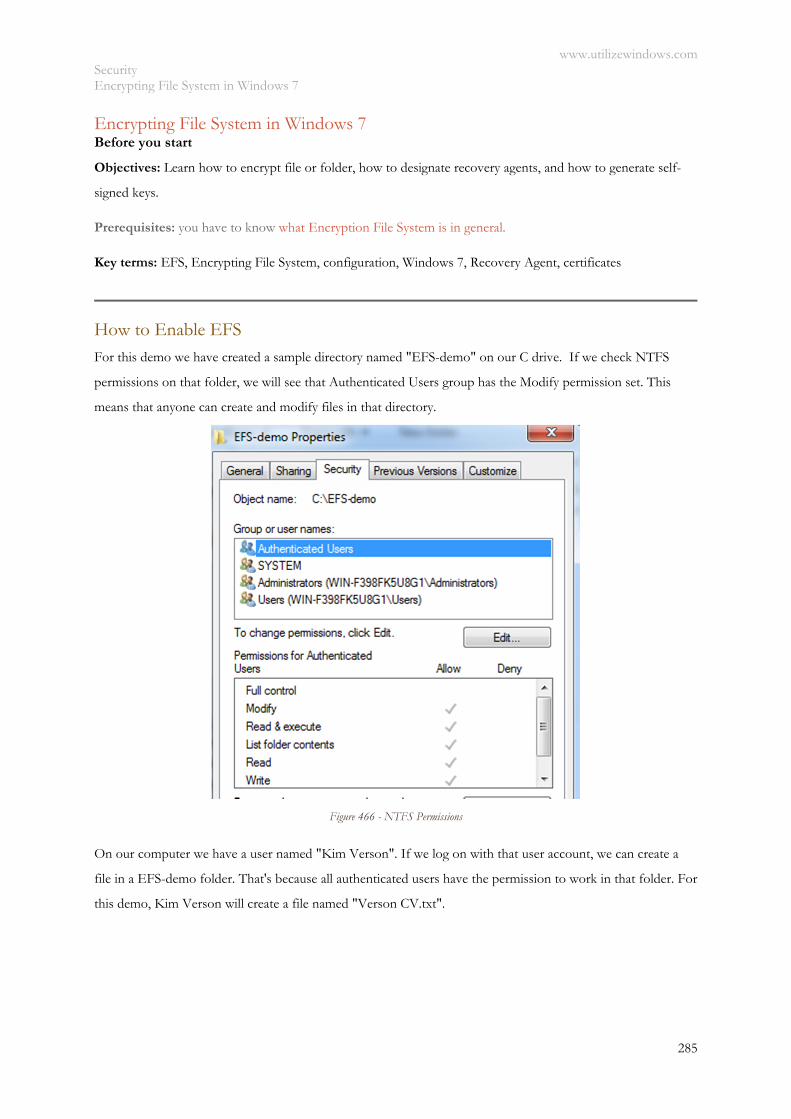
www.utilizewindows.com Security Encrypting File System in Windows 7
285
Encrypting File System in Windows 7 Before you start
Objectives: Learn how to encrypt file or folder, how to designate recovery agents, and how to generate self-
signed keys.
Prerequisites: you have to know what Encryption File System is in general.
Key terms: EFS, Encrypting File System, configuration, Windows 7, Recovery Agent, certificates
How to Enable EFS For this demo we have created a sample directory named "EFS-demo" on our C drive. If we check NTFS
permissions on that folder, we will see that Authenticated Users group has the Modify permission set. This
means that anyone can create and modify files in that directory.
Figure 466 - NTFS Permissions
On our computer we have a user named "Kim Verson". If we log on with that user account, we can create a
file in a EFS-demo folder. That's because all authenticated users have the permission to work in that folder. For
this demo, Kim Verson will create a file named "Verson CV.txt".
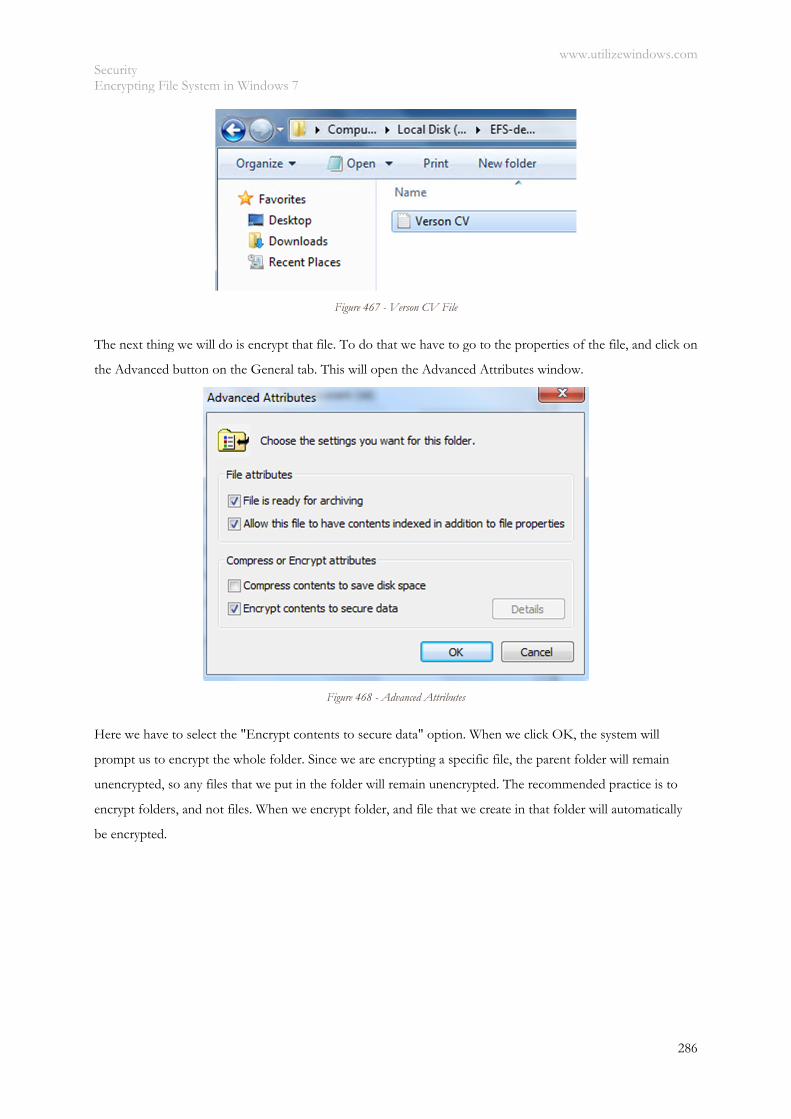
www.utilizewindows.com Security Encrypting File System in Windows 7
286
Figure 467 - Verson CV File
The next thing we will do is encrypt that file. To do that we have to go to the properties of the file, and click on
the Advanced button on the General tab. This will open the Advanced Attributes window.
Figure 468 - Advanced Attributes
Here we have to select the "Encrypt contents to secure data" option. When we click OK, the system will
prompt us to encrypt the whole folder. Since we are encrypting a specific file, the parent folder will remain
unencrypted, so any files that we put in the folder will remain unencrypted. The recommended practice is to
encrypt folders, and not files. When we encrypt folder, and file that we create in that folder will automatically
be encrypted.
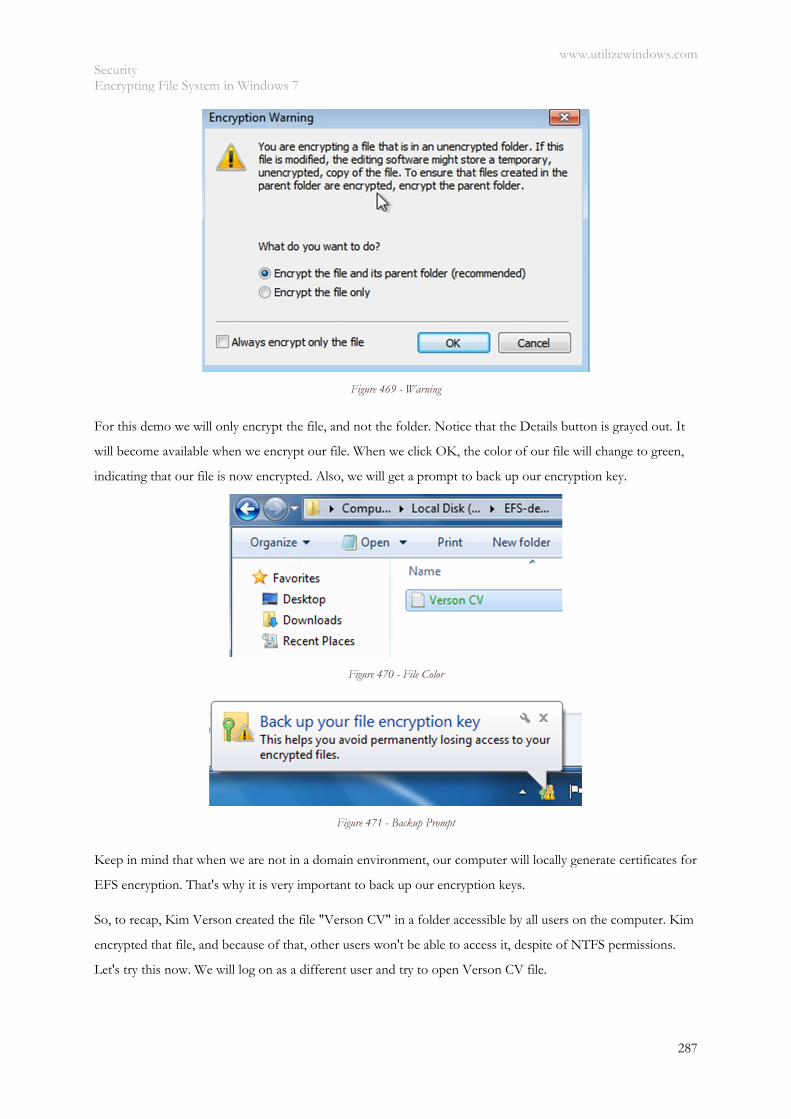
www.utilizewindows.com Security Encrypting File System in Windows 7
287
Figure 469 - Warning
For this demo we will only encrypt the file, and not the folder. Notice that the Details button is grayed out. It
will become available when we encrypt our file. When we click OK, the color of our file will change to green,
indicating that our file is now encrypted. Also, we will get a prompt to back up our encryption key.
Figure 470 - File Color
Figure 471 - Backup Prompt
Keep in mind that when we are not in a domain environment, our computer will locally generate certificates for
EFS encryption. That's why it is very important to back up our encryption keys.
So, to recap, Kim Verson created the file "Verson CV" in a folder accessible by all users on the computer. Kim
encrypted that file, and because of that, other users won't be able to access it, despite of NTFS permissions.
Let's try this now. We will log on as a different user and try to open Verson CV file.
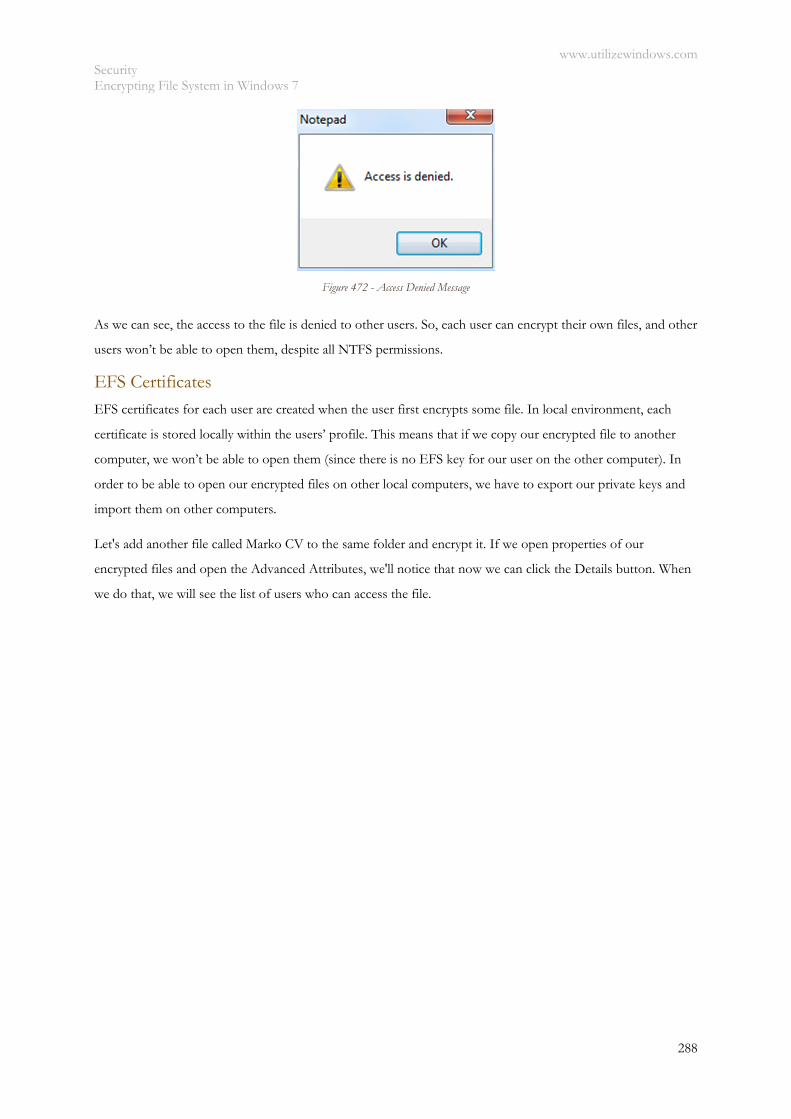
www.utilizewindows.com Security Encrypting File System in Windows 7
288
Figure 472 - Access Denied Message
As we can see, the access to the file is denied to other users. So, each user can encrypt their own files, and other
users won’t be able to open them, despite all NTFS permissions.
EFS Certificates EFS certificates for each user are created when the user first encrypts some file. In local environment, each
certificate is stored locally within the users’ profile. This means that if we copy our encrypted file to another
computer, we won’t be able to open them (since there is no EFS key for our user on the other computer). In
order to be able to open our encrypted files on other local computers, we have to export our private keys and
import them on other computers.
Let's add another file called Marko CV to the same folder and encrypt it. If we open properties of our
encrypted files and open the Advanced Attributes, we'll notice that now we can click the Details button. When
we do that, we will see the list of users who can access the file.
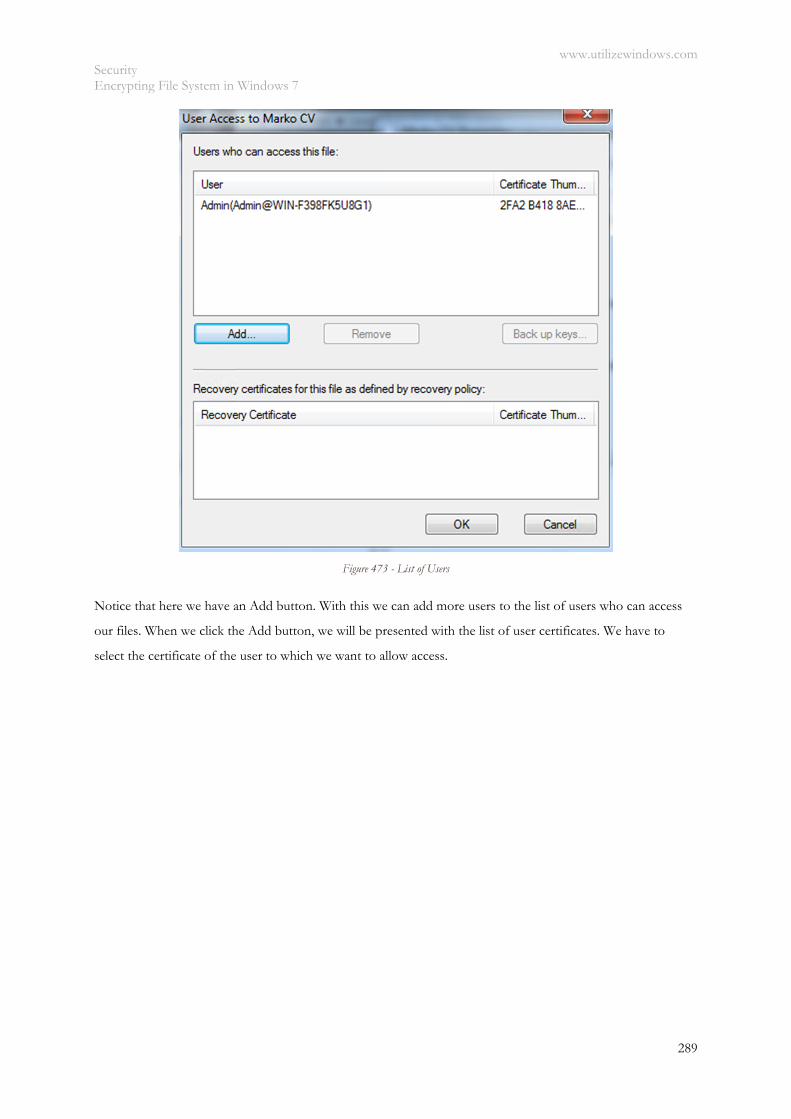
www.utilizewindows.com Security Encrypting File System in Windows 7
289
Figure 473 - List of Users
Notice that here we have an Add button. With this we can add more users to the list of users who can access
our files. When we click the Add button, we will be presented with the list of user certificates. We have to
select the certificate of the user to which we want to allow access.
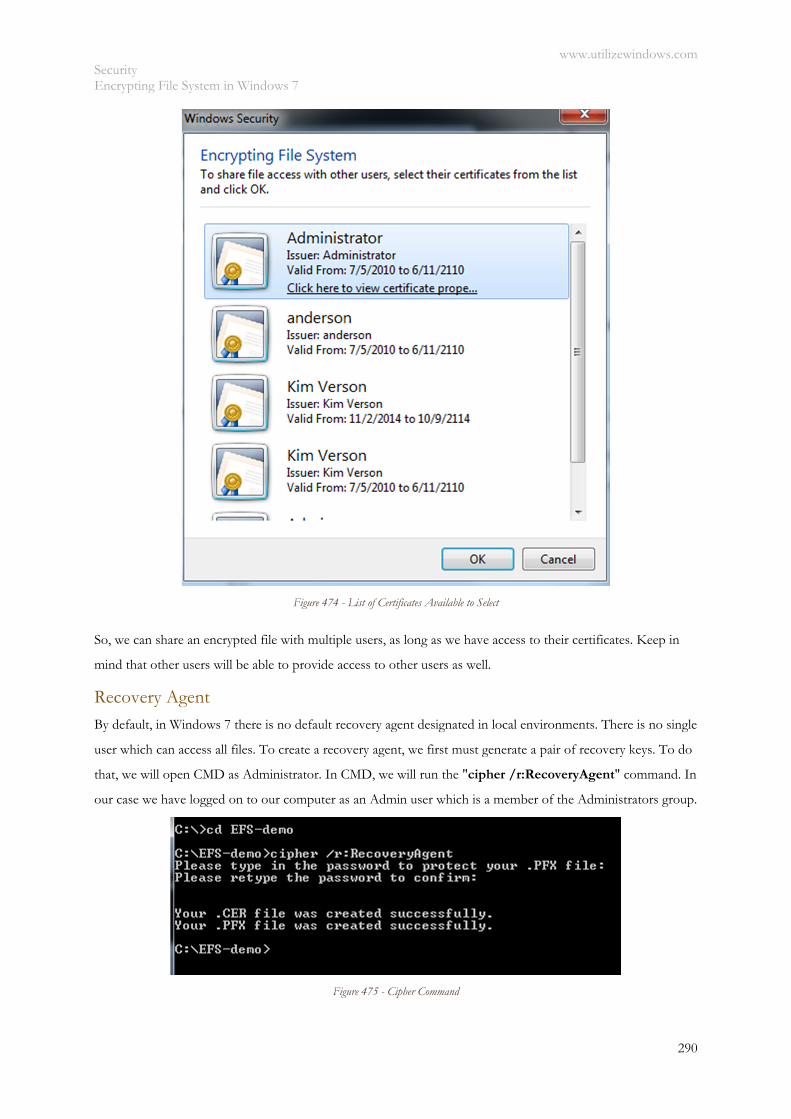
www.utilizewindows.com Security Encrypting File System in Windows 7
290
Figure 474 - List of Certificates Available to Select
So, we can share an encrypted file with multiple users, as long as we have access to their certificates. Keep in
mind that other users will be able to provide access to other users as well.
Recovery Agent By default, in Windows 7 there is no default recovery agent designated in local environments. There is no single
user which can access all files. To create a recovery agent, we first must generate a pair of recovery keys. To do
that, we will open CMD as Administrator. In CMD, we will run the "cipher /r:RecoveryAgent" command. In
our case we have logged on to our computer as an Admin user which is a member of the Administrators group.
Figure 475 - Cipher Command
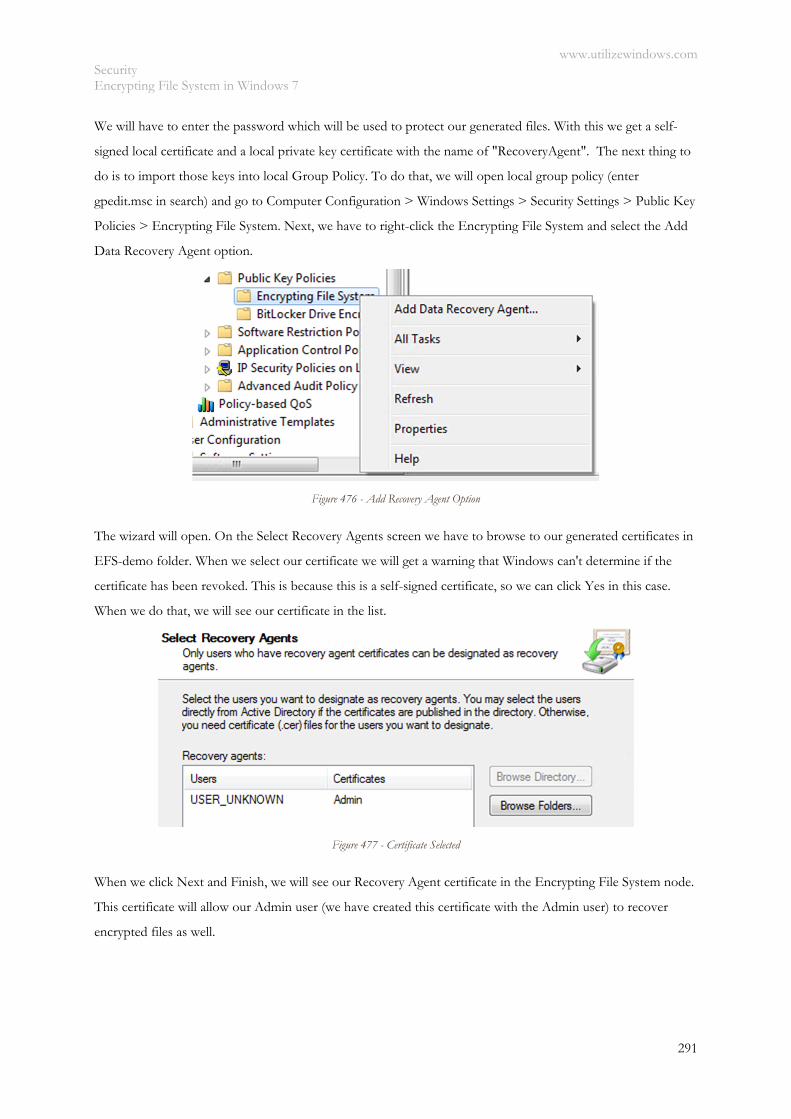
www.utilizewindows.com Security Encrypting File System in Windows 7
291
We will have to enter the password which will be used to protect our generated files. With this we get a self-
signed local certificate and a local private key certificate with the name of "RecoveryAgent". The next thing to
do is to import those keys into local Group Policy. To do that, we will open local group policy (enter
gpedit.msc in search) and go to Computer Configuration > Windows Settings > Security Settings > Public Key
Policies > Encrypting File System. Next, we have to right-click the Encrypting File System and select the Add
Data Recovery Agent option.
Figure 476 - Add Recovery Agent Option
The wizard will open. On the Select Recovery Agents screen we have to browse to our generated certificates in
EFS-demo folder. When we select our certificate we will get a warning that Windows can't determine if the
certificate has been revoked. This is because this is a self-signed certificate, so we can click Yes in this case.
When we do that, we will see our certificate in the list.
Figure 477 - Certificate Selected
When we click Next and Finish, we will see our Recovery Agent certificate in the Encrypting File System node.
This certificate will allow our Admin user (we have created this certificate with the Admin user) to recover
encrypted files as well.
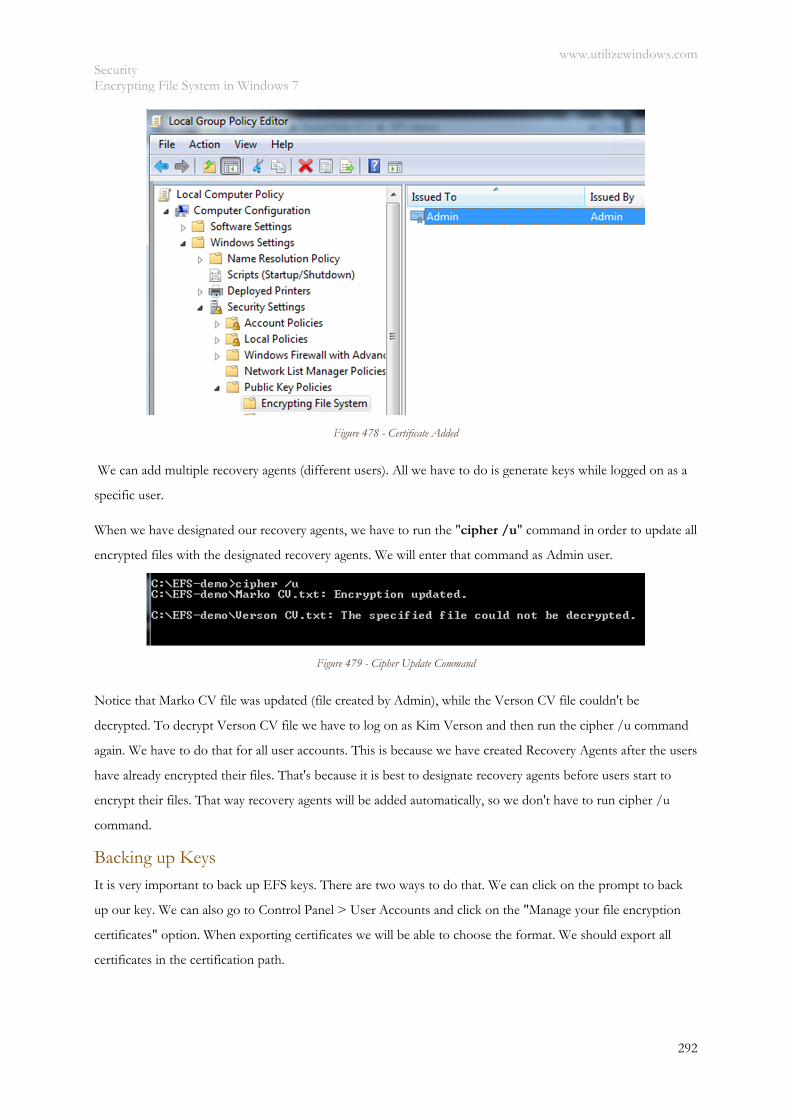
www.utilizewindows.com Security Encrypting File System in Windows 7
292
Figure 478 - Certificate Added
We can add multiple recovery agents (different users). All we have to do is generate keys while logged on as a
specific user.
When we have designated our recovery agents, we have to run the "cipher /u" command in order to update all
encrypted files with the designated recovery agents. We will enter that command as Admin user.
Figure 479 - Cipher Update Command
Notice that Marko CV file was updated (file created by Admin), while the Verson CV file couldn't be
decrypted. To decrypt Verson CV file we have to log on as Kim Verson and then run the cipher /u command
again. We have to do that for all user accounts. This is because we have created Recovery Agents after the users
have already encrypted their files. That's because it is best to designate recovery agents before users start to
encrypt their files. That way recovery agents will be added automatically, so we don't have to run cipher /u
command.
Backing up Keys
It is very important to back up EFS keys. There are two ways to do that. We can click on the prompt to back
up our key. We can also go to Control Panel > User Accounts and click on the "Manage your file encryption
certificates" option. When exporting certificates we will be able to choose the format. We should export all
certificates in the certification path.
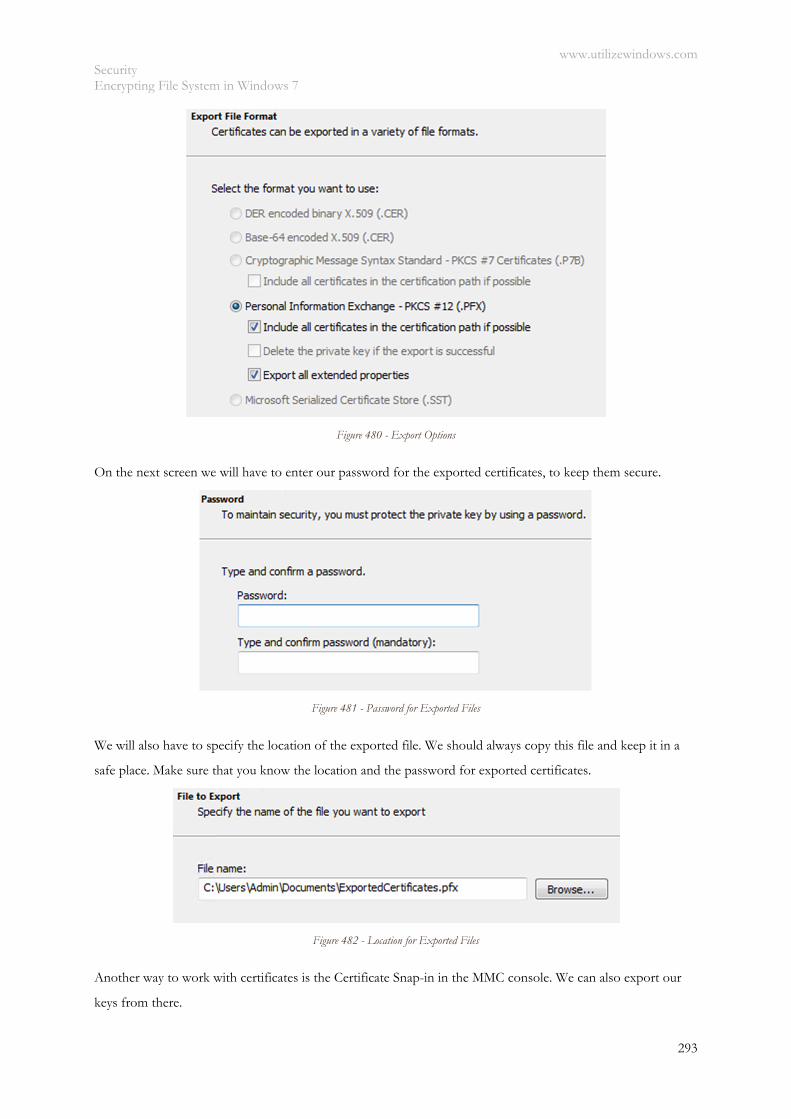
www.utilizewindows.com Security Encrypting File System in Windows 7
293
Figure 480 - Export Options
On the next screen we will have to enter our password for the exported certificates, to keep them secure.
Figure 481 - Password for Exported Files
We will also have to specify the location of the exported file. We should always copy this file and keep it in a
safe place. Make sure that you know the location and the password for exported certificates.
Figure 482 - Location for Exported Files
Another way to work with certificates is the Certificate Snap-in in the MMC console. We can also export our
keys from there.
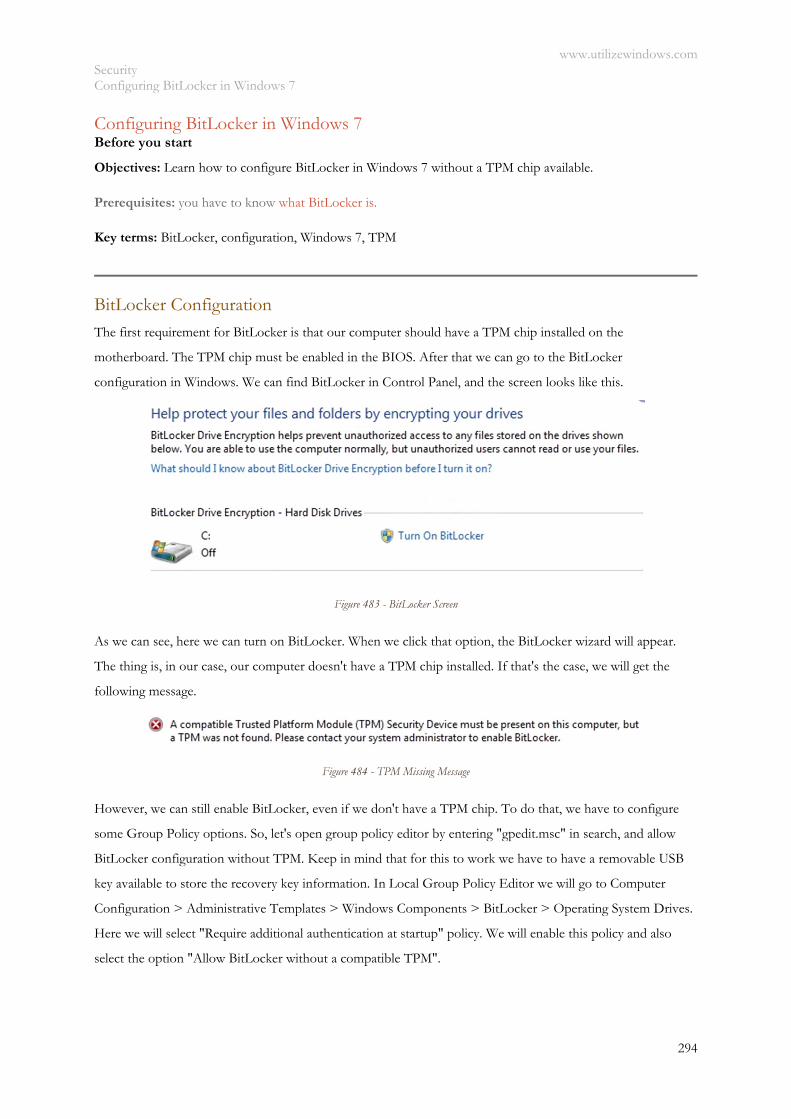
www.utilizewindows.com Security Configuring BitLocker in Windows 7
294
Configuring BitLocker in Windows 7 Before you start
Objectives: Learn how to configure BitLocker in Windows 7 without a TPM chip available.
Prerequisites: you have to know what BitLocker is.
Key terms: BitLocker, configuration, Windows 7, TPM
BitLocker Configuration
The first requirement for BitLocker is that our computer should have a TPM chip installed on the
motherboard. The TPM chip must be enabled in the BIOS. After that we can go to the BitLocker
configuration in Windows. We can find BitLocker in Control Panel, and the screen looks like this.
Figure 483 - BitLocker Screen
As we can see, here we can turn on BitLocker. When we click that option, the BitLocker wizard will appear.
The thing is, in our case, our computer doesn't have a TPM chip installed. If that's the case, we will get the
following message.
Figure 484 - TPM Missing Message
However, we can still enable BitLocker, even if we don't have a TPM chip. To do that, we have to configure
some Group Policy options. So, let's open group policy editor by entering "gpedit.msc" in search, and allow
BitLocker configuration without TPM. Keep in mind that for this to work we have to have a removable USB
key available to store the recovery key information. In Local Group Policy Editor we will go to Computer
Configuration > Administrative Templates > Windows Components > BitLocker > Operating System Drives.
Here we will select "Require additional authentication at startup" policy. We will enable this policy and also
select the option "Allow BitLocker without a compatible TPM".
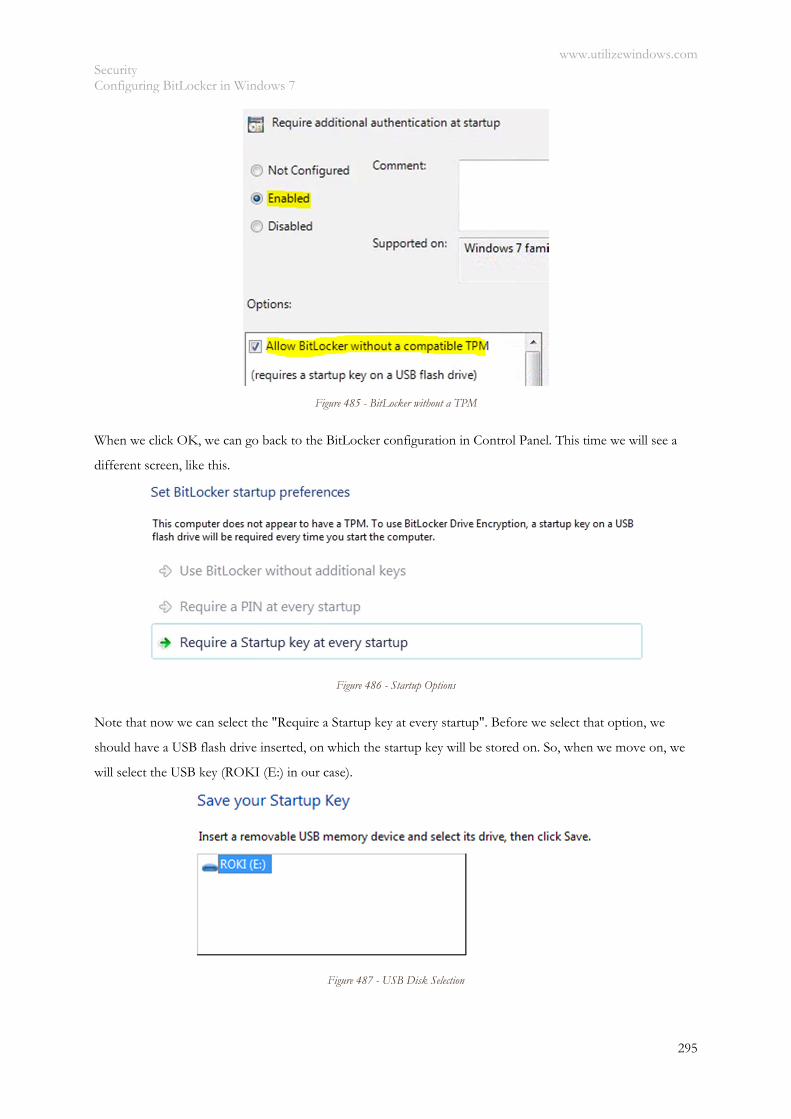
www.utilizewindows.com Security Configuring BitLocker in Windows 7
295
Figure 485 - BitLocker without a TPM
When we click OK, we can go back to the BitLocker configuration in Control Panel. This time we will see a
different screen, like this.
Figure 486 - Startup Options
Note that now we can select the "Require a Startup key at every startup". Before we select that option, we
should have a USB flash drive inserted, on which the startup key will be stored on. So, when we move on, we
will select the USB key (ROKI (E:) in our case).
Figure 487 - USB Disk Selection
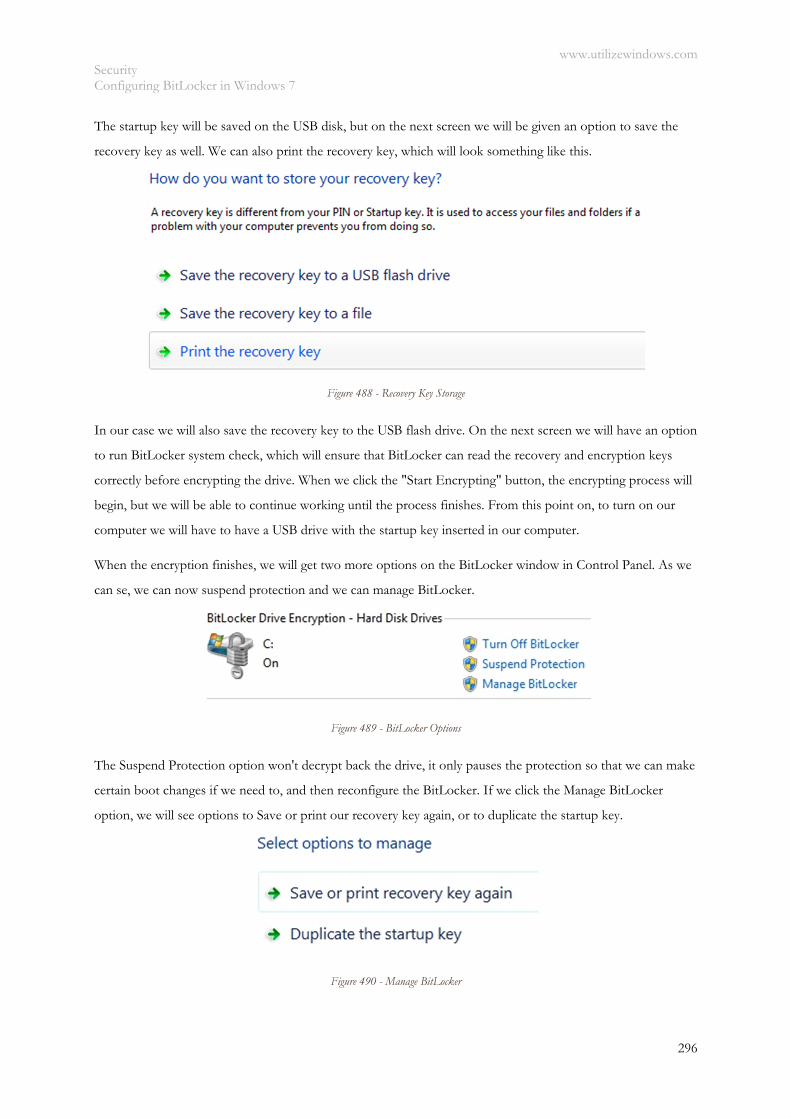
www.utilizewindows.com Security Configuring BitLocker in Windows 7
296
The startup key will be saved on the USB disk, but on the next screen we will be given an option to save the
recovery key as well. We can also print the recovery key, which will look something like this.
Figure 488 - Recovery Key Storage
In our case we will also save the recovery key to the USB flash drive. On the next screen we will have an option
to run BitLocker system check, which will ensure that BitLocker can read the recovery and encryption keys
correctly before encrypting the drive. When we click the "Start Encrypting" button, the encrypting process will
begin, but we will be able to continue working until the process finishes. From this point on, to turn on our
computer we will have to have a USB drive with the startup key inserted in our computer.
When the encryption finishes, we will get two more options on the BitLocker window in Control Panel. As we
can se, we can now suspend protection and we can manage BitLocker.
Figure 489 - BitLocker Options
The Suspend Protection option won't decrypt back the drive, it only pauses the protection so that we can make
certain boot changes if we need to, and then reconfigure the BitLocker. If we click the Manage BitLocker
option, we will see options to Save or print our recovery key again, or to duplicate the startup key.
Figure 490 - Manage BitLocker
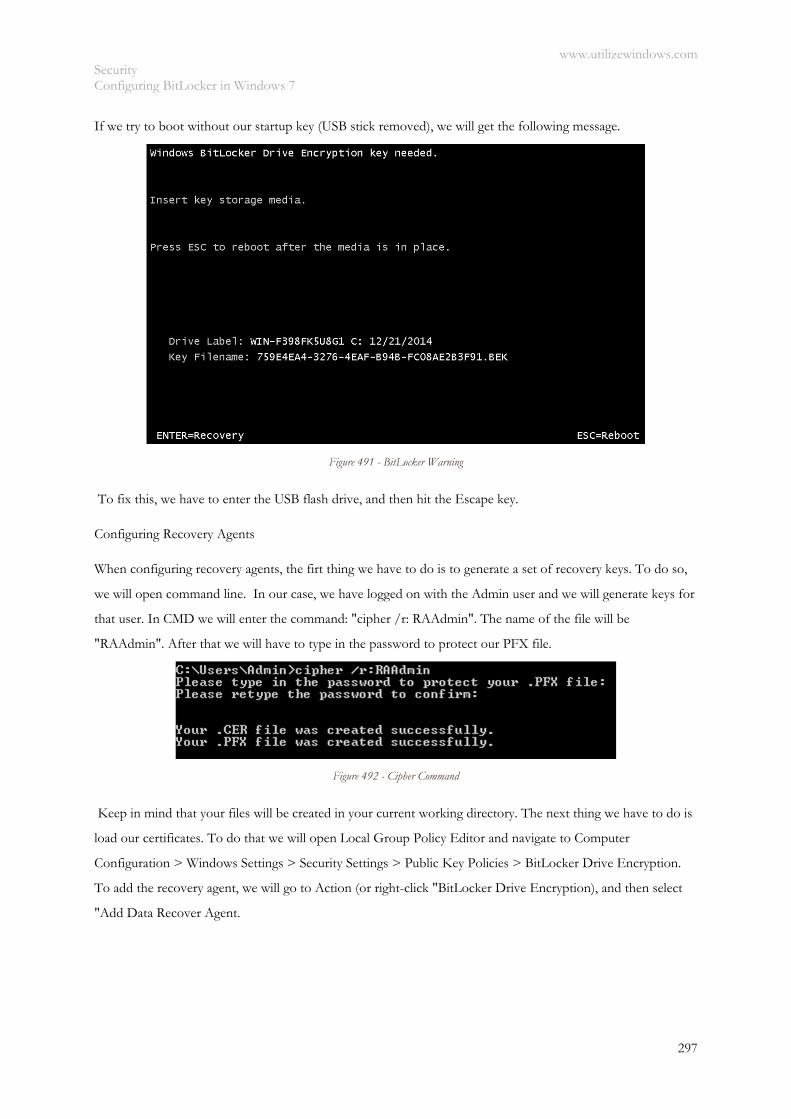
www.utilizewindows.com Security Configuring BitLocker in Windows 7
297
If we try to boot without our startup key (USB stick removed), we will get the following message.
Figure 491 - BitLocker Warning
To fix this, we have to enter the USB flash drive, and then hit the Escape key.
Configuring Recovery Agents
When configuring recovery agents, the firt thing we have to do is to generate a set of recovery keys. To do so,
we will open command line. In our case, we have logged on with the Admin user and we will generate keys for
that user. In CMD we will enter the command: "cipher /r: RAAdmin". The name of the file will be
"RAAdmin". After that we will have to type in the password to protect our PFX file.
Figure 492 - Cipher Command
Keep in mind that your files will be created in your current working directory. The next thing we have to do is
load our certificates. To do that we will open Local Group Policy Editor and navigate to Computer
Configuration > Windows Settings > Security Settings > Public Key Policies > BitLocker Drive Encryption.
To add the recovery agent, we will go to Action (or right-click "BitLocker Drive Encryption), and then select
"Add Data Recover Agent.
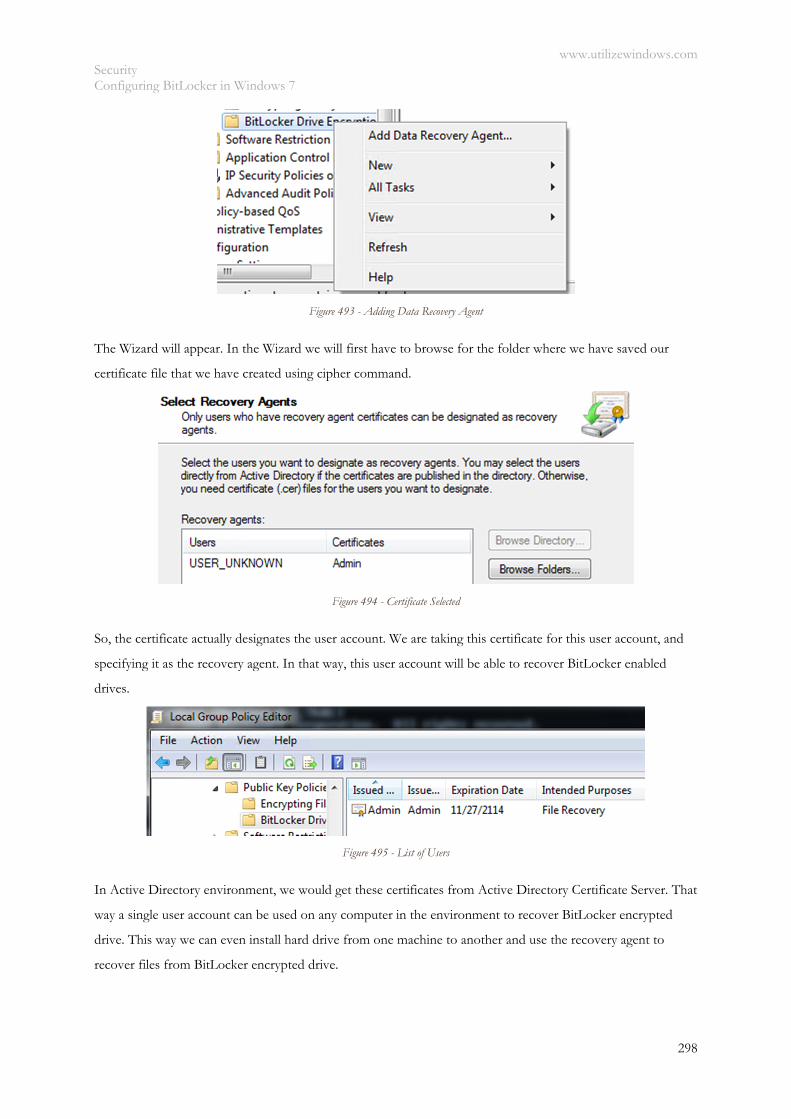
www.utilizewindows.com Security Configuring BitLocker in Windows 7
298
Figure 493 - Adding Data Recovery Agent
The Wizard will appear. In the Wizard we will first have to browse for the folder where we have saved our
certificate file that we have created using cipher command.
Figure 494 - Certificate Selected
So, the certificate actually designates the user account. We are taking this certificate for this user account, and
specifying it as the recovery agent. In that way, this user account will be able to recover BitLocker enabled
drives.
Figure 495 - List of Users
In Active Directory environment, we would get these certificates from Active Directory Certificate Server. That
way a single user account can be used on any computer in the environment to recover BitLocker encrypted
drive. This way we can even install hard drive from one machine to another and use the recovery agent to
recover files from BitLocker encrypted drive.
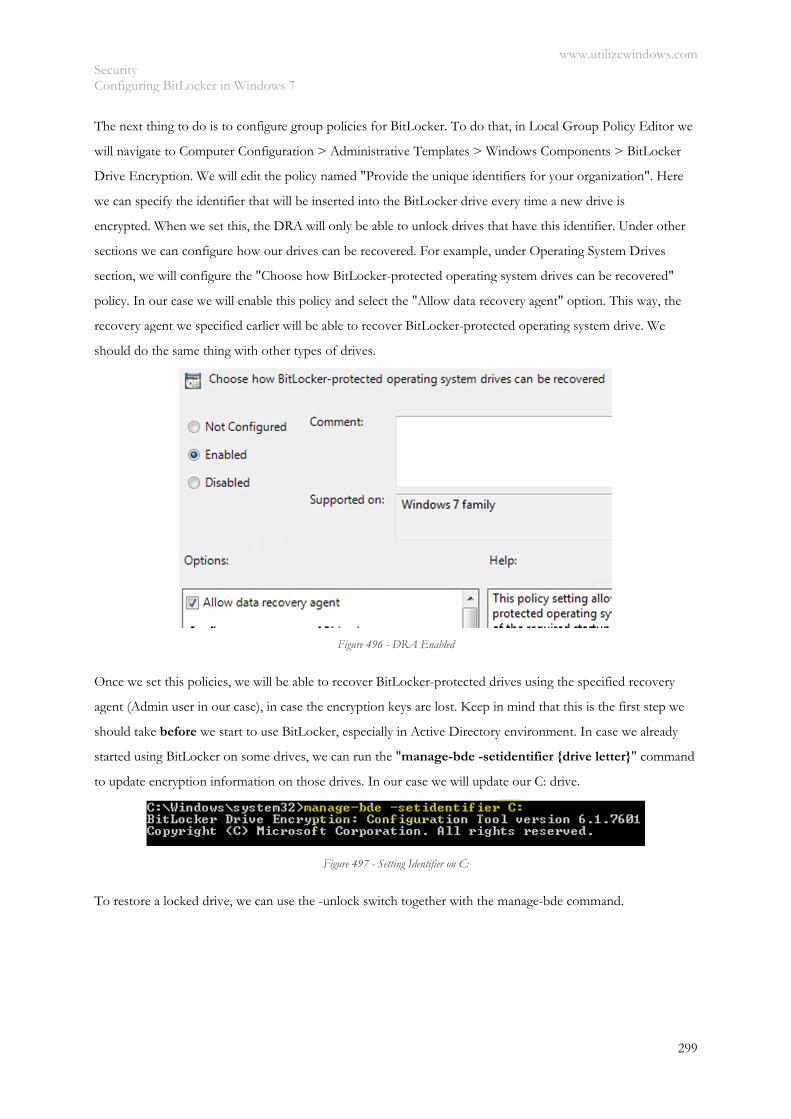
www.utilizewindows.com Security Configuring BitLocker in Windows 7
299
The next thing to do is to configure group policies for BitLocker. To do that, in Local Group Policy Editor we
will navigate to Computer Configuration > Administrative Templates > Windows Components > BitLocker
Drive Encryption. We will edit the policy named "Provide the unique identifiers for your organization". Here
we can specify the identifier that will be inserted into the BitLocker drive every time a new drive is
encrypted. When we set this, the DRA will only be able to unlock drives that have this identifier. Under other
sections we can configure how our drives can be recovered. For example, under Operating System Drives
section, we will configure the "Choose how BitLocker-protected operating system drives can be recovered"
policy. In our case we will enable this policy and select the "Allow data recovery agent" option. This way, the
recovery agent we specified earlier will be able to recover BitLocker-protected operating system drive. We
should do the same thing with other types of drives.
Figure 496 - DRA Enabled
Once we set this policies, we will be able to recover BitLocker-protected drives using the specified recovery
agent (Admin user in our case), in case the encryption keys are lost. Keep in mind that this is the first step we
should take before we start to use BitLocker, especially in Active Directory environment. In case we already
started using BitLocker on some drives, we can run the "manage-bde -setidentifier {drive letter}" command
to update encryption information on those drives. In our case we will update our C: drive.
Figure 497 - Setting Identifier on C:
To restore a locked drive, we can use the -unlock switch together with the manage-bde command.
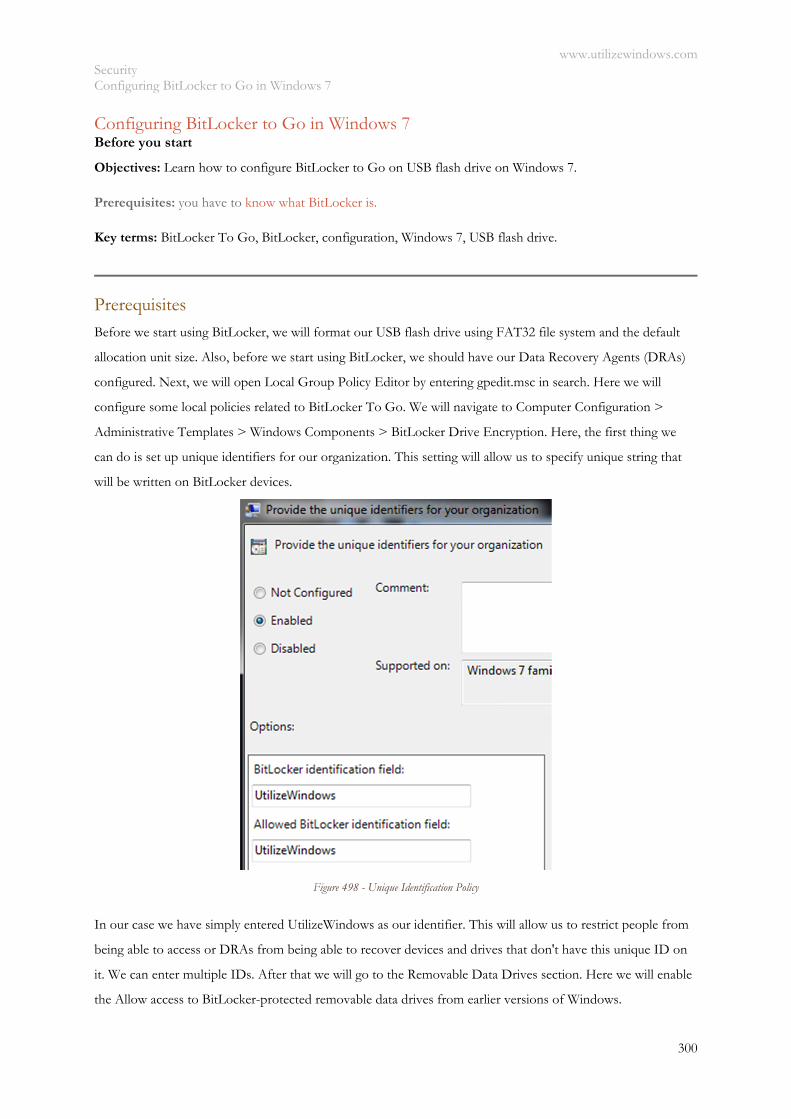
www.utilizewindows.com Security Configuring BitLocker to Go in Windows 7
300
Configuring BitLocker to Go in Windows 7 Before you start
Objectives: Learn how to configure BitLocker to Go on USB flash drive on Windows 7.
Prerequisites: you have to know what BitLocker is.
Key terms: BitLocker To Go, BitLocker, configuration, Windows 7, USB flash drive.
Prerequisites
Before we start using BitLocker, we will format our USB flash drive using FAT32 file system and the default
allocation unit size. Also, before we start using BitLocker, we should have our Data Recovery Agents (DRAs)
configured. Next, we will open Local Group Policy Editor by entering gpedit.msc in search. Here we will
configure some local policies related to BitLocker To Go. We will navigate to Computer Configuration >
Administrative Templates > Windows Components > BitLocker Drive Encryption. Here, the first thing we
can do is set up unique identifiers for our organization. This setting will allow us to specify unique string that
will be written on BitLocker devices.
Figure 498 - Unique Identification Policy
In our case we have simply entered UtilizeWindows as our identifier. This will allow us to restrict people from
being able to access or DRAs from being able to recover devices and drives that don't have this unique ID on
it. We can enter multiple IDs. After that we will go to the Removable Data Drives section. Here we will enable
the Allow access to BitLocker-protected removable data drives from earlier versions of Windows.
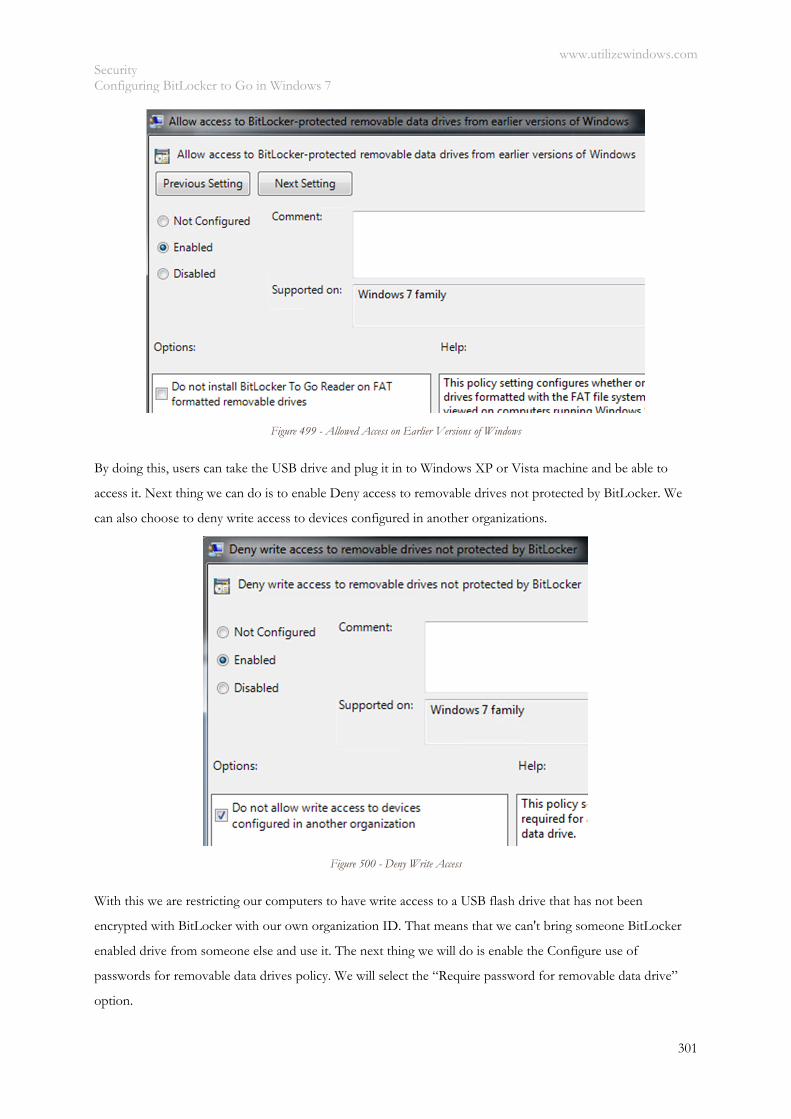
www.utilizewindows.com Security Configuring BitLocker to Go in Windows 7
301
Figure 499 - Allowed Access on Earlier Versions of Windows
By doing this, users can take the USB drive and plug it in to Windows XP or Vista machine and be able to
access it. Next thing we can do is to enable Deny access to removable drives not protected by BitLocker. We
can also choose to deny write access to devices configured in another organizations.
Figure 500 - Deny Write Access
With this we are restricting our computers to have write access to a USB flash drive that has not been
encrypted with BitLocker with our own organization ID. That means that we can't bring someone BitLocker
enabled drive from someone else and use it. The next thing we will do is enable the Configure use of
passwords for removable data drives policy. We will select the “Require password for removable data drive”
option.
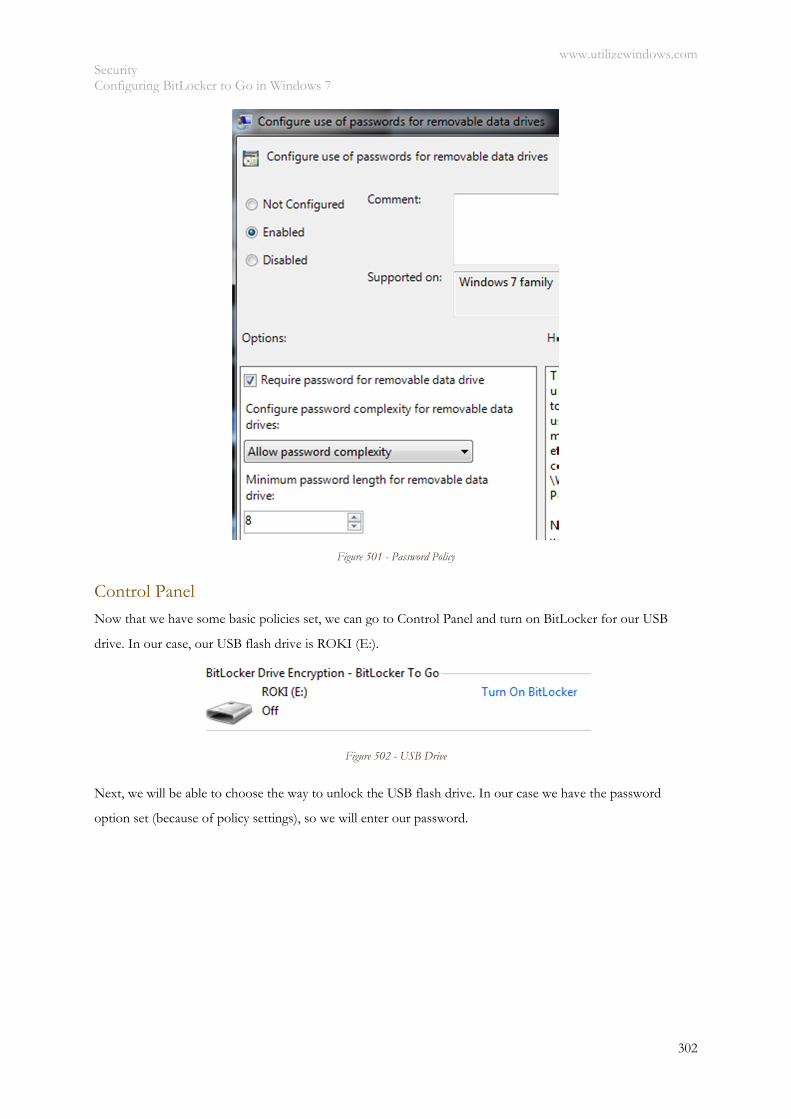
www.utilizewindows.com Security Configuring BitLocker to Go in Windows 7
302
Figure 501 - Password Policy
Control Panel Now that we have some basic policies set, we can go to Control Panel and turn on BitLocker for our USB
drive. In our case, our USB flash drive is ROKI (E:).
Figure 502 - USB Drive
Next, we will be able to choose the way to unlock the USB flash drive. In our case we have the password
option set (because of policy settings), so we will enter our password.
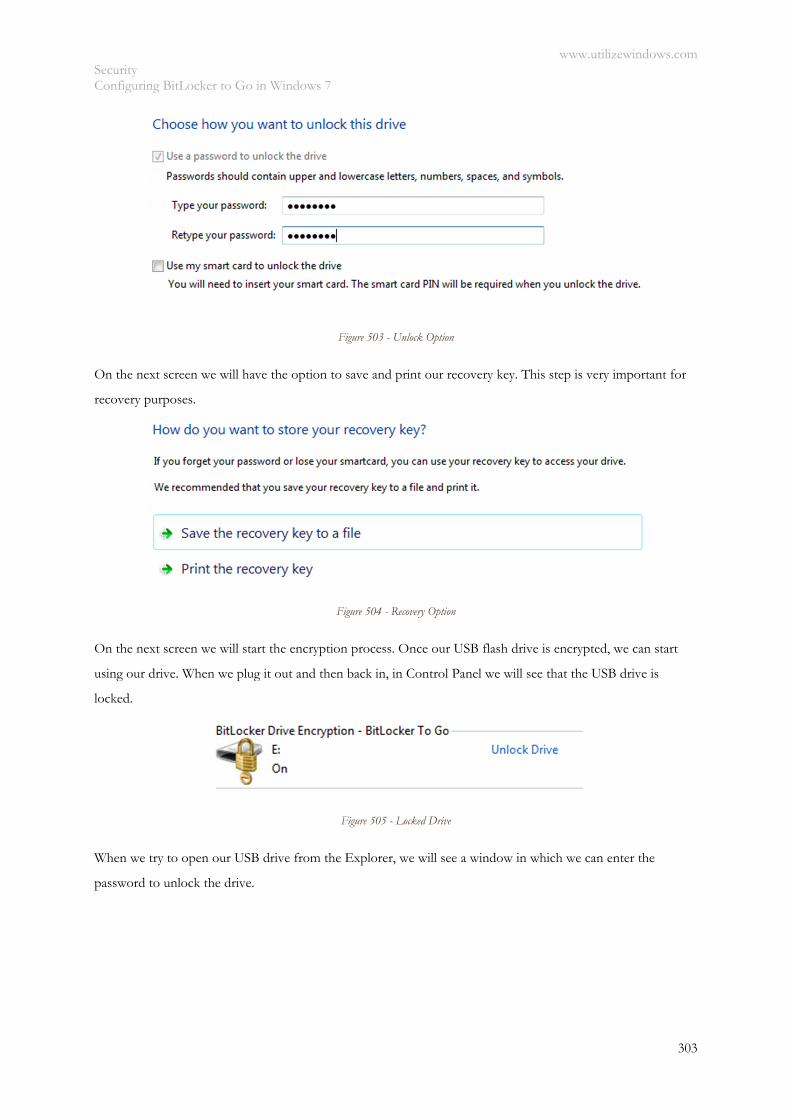
www.utilizewindows.com Security Configuring BitLocker to Go in Windows 7
303
Figure 503 - Unlock Option
On the next screen we will have the option to save and print our recovery key. This step is very important for
recovery purposes.
Figure 504 - Recovery Option
On the next screen we will start the encryption process. Once our USB flash drive is encrypted, we can start
using our drive. When we plug it out and then back in, in Control Panel we will see that the USB drive is
locked.
Figure 505 - Locked Drive
When we try to open our USB drive from the Explorer, we will see a window in which we can enter the
password to unlock the drive.

www.utilizewindows.com Security Configuring BitLocker to Go in Windows 7
304
Figure 506 - Unlocking Drive
Note that we can save our password so that our USB drive is automatically unlocked when we plug it in. Once
we click Unlock, we will have full access to our USB drive. We can manage BitLocker settings on our USB
drive now in Control Panel. We can change the password used to unlock the drive, save the recovery key again,
etc.
Figure 507 - Management Options

www.utilizewindows.com Security Windows Defender in Windows 7
305
Windows Defender in Windows 7 Before you start
Objectives: Learn where to find and how to configure Windows Defender in Windows 7.
Prerequisites: you should know what Windows Defender is in general.
Key terms: Windows Defender, Windows 7, configuration, options.
Windows Defender
In Windows 7, Windows Defender is integrated into Action Center, and this enables consistent alerts when
certain actions are required related to Windows Defender. We can find Windows Defender in Control Panel, or
we can simply search for it using Search in Start menu.
Figure 508 - Windows Defender
First thing we can do is to configure quick scan, full scan or custom scan.
Figure 509 - Scan Options
If we do a custom scan, we can choose the location we want to scan.
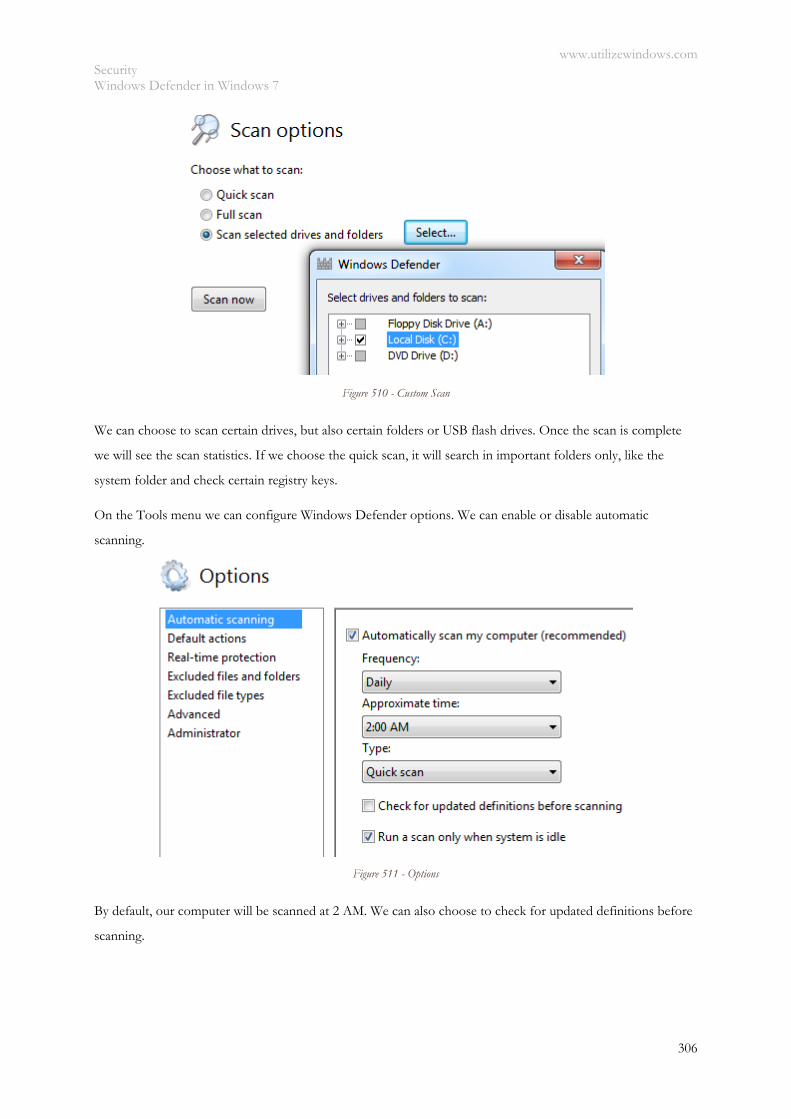
www.utilizewindows.com Security Windows Defender in Windows 7
306
Figure 510 - Custom Scan
We can choose to scan certain drives, but also certain folders or USB flash drives. Once the scan is complete
we will see the scan statistics. If we choose the quick scan, it will search in important folders only, like the
system folder and check certain registry keys.
On the Tools menu we can configure Windows Defender options. We can enable or disable automatic
scanning.
Figure 511 - Options
By default, our computer will be scanned at 2 AM. We can also choose to check for updated definitions before
scanning.
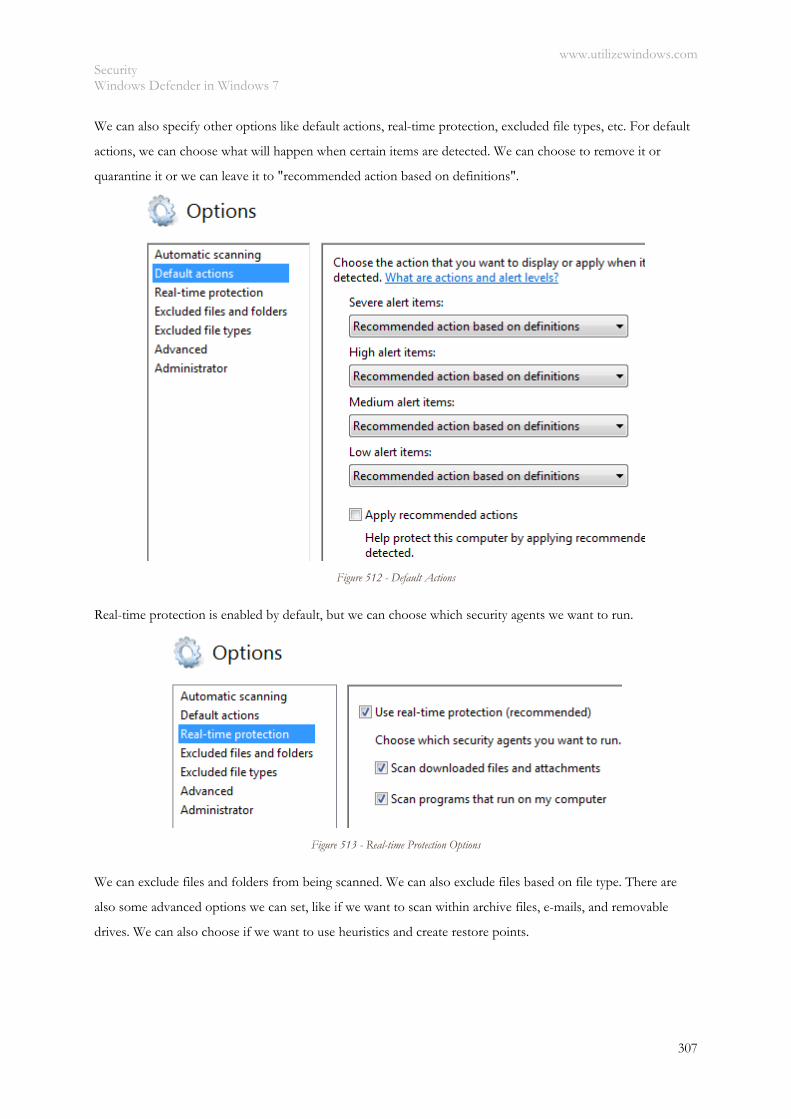
www.utilizewindows.com Security Windows Defender in Windows 7
307
We can also specify other options like default actions, real-time protection, excluded file types, etc. For default
actions, we can choose what will happen when certain items are detected. We can choose to remove it or
quarantine it or we can leave it to "recommended action based on definitions".
Figure 512 - Default Actions
Real-time protection is enabled by default, but we can choose which security agents we want to run.
Figure 513 - Real-time Protection Options
We can exclude files and folders from being scanned. We can also exclude files based on file type. There are
also some advanced options we can set, like if we want to scan within archive files, e-mails, and removable
drives. We can also choose if we want to use heuristics and create restore points.

www.utilizewindows.com Security Windows Defender in Windows 7
308
Figure 514 - Advanced Options
If we go back to the Tools menu, we can see that we can manage quarantined items, and view items that we
have allowed.
Figure 515 - Tools and Settings Menu
In the Quarantined items we will see items that have been recognized as malicious. In the Allowed items we
will have items that were recognized as malicious, but the user allowed them, so they are not monitored any

www.utilizewindows.com Security Windows Defender in Windows 7
309
more. Sometimes, apps that are legit may seem as malware to Windows Defender, and that's why we have an
option for allowed items.
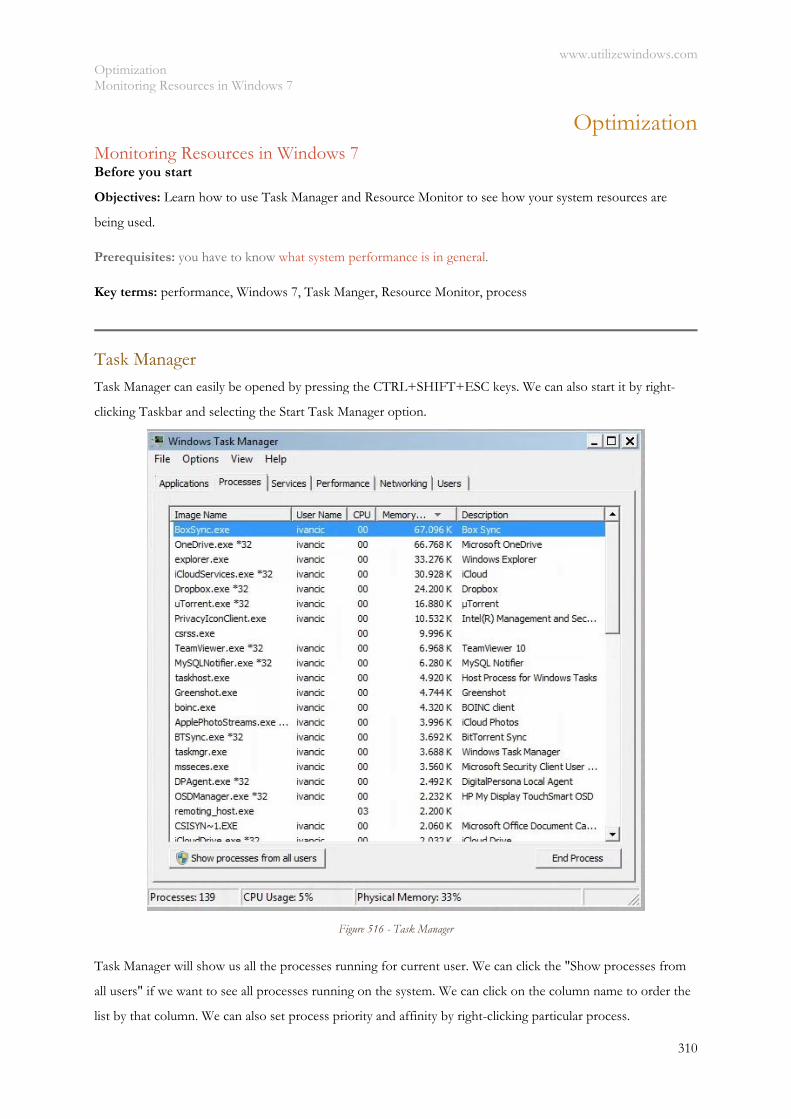
www.utilizewindows.com Optimization Monitoring Resources in Windows 7
310
Optimization Monitoring Resources in Windows 7 Before you start
Objectives: Learn how to use Task Manager and Resource Monitor to see how your system resources are
being used.
Prerequisites: you have to know what system performance is in general.
Key terms: performance, Windows 7, Task Manger, Resource Monitor, process
Task Manager Task Manager can easily be opened by pressing the CTRL+SHIFT+ESC keys. We can also start it by right-
clicking Taskbar and selecting the Start Task Manager option.
Figure 516 - Task Manager
Task Manager will show us all the processes running for current user. We can click the "Show processes from
all users" if we want to see all processes running on the system. We can click on the column name to order the
list by that column. We can also set process priority and affinity by right-clicking particular process.
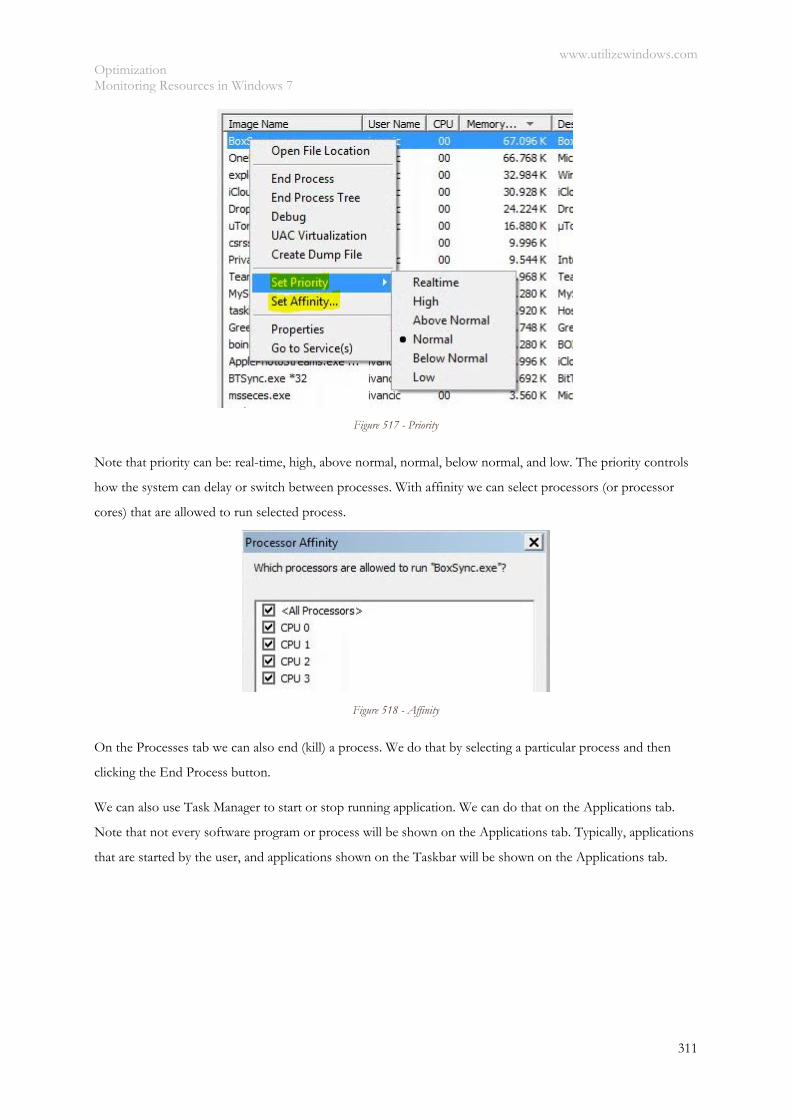
www.utilizewindows.com Optimization Monitoring Resources in Windows 7
311
Figure 517 - Priority
Note that priority can be: real-time, high, above normal, normal, below normal, and low. The priority controls
how the system can delay or switch between processes. With affinity we can select processors (or processor
cores) that are allowed to run selected process.
Figure 518 - Affinity
On the Processes tab we can also end (kill) a process. We do that by selecting a particular process and then
clicking the End Process button.
We can also use Task Manager to start or stop running application. We can do that on the Applications tab.
Note that not every software program or process will be shown on the Applications tab. Typically, applications
that are started by the user, and applications shown on the Taskbar will be shown on the Applications tab.
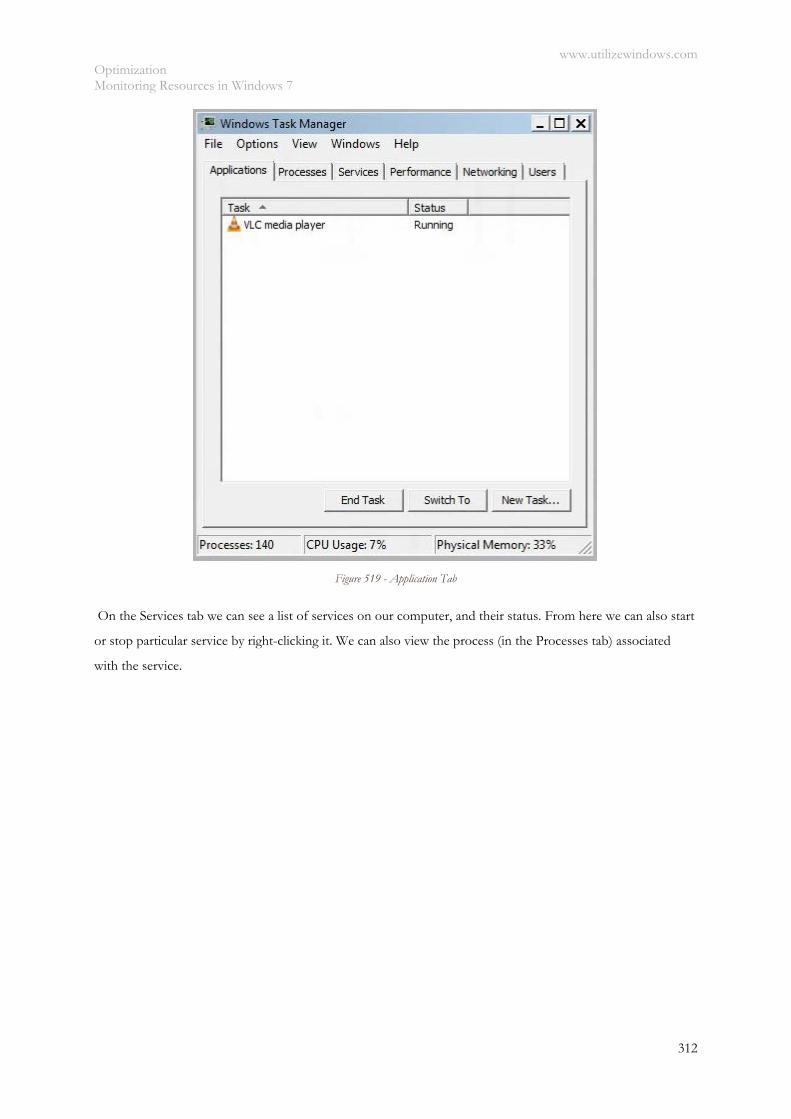
www.utilizewindows.com Optimization Monitoring Resources in Windows 7
312
Figure 519 - Application Tab
On the Services tab we can see a list of services on our computer, and their status. From here we can also start
or stop particular service by right-clicking it. We can also view the process (in the Processes tab) associated
with the service.
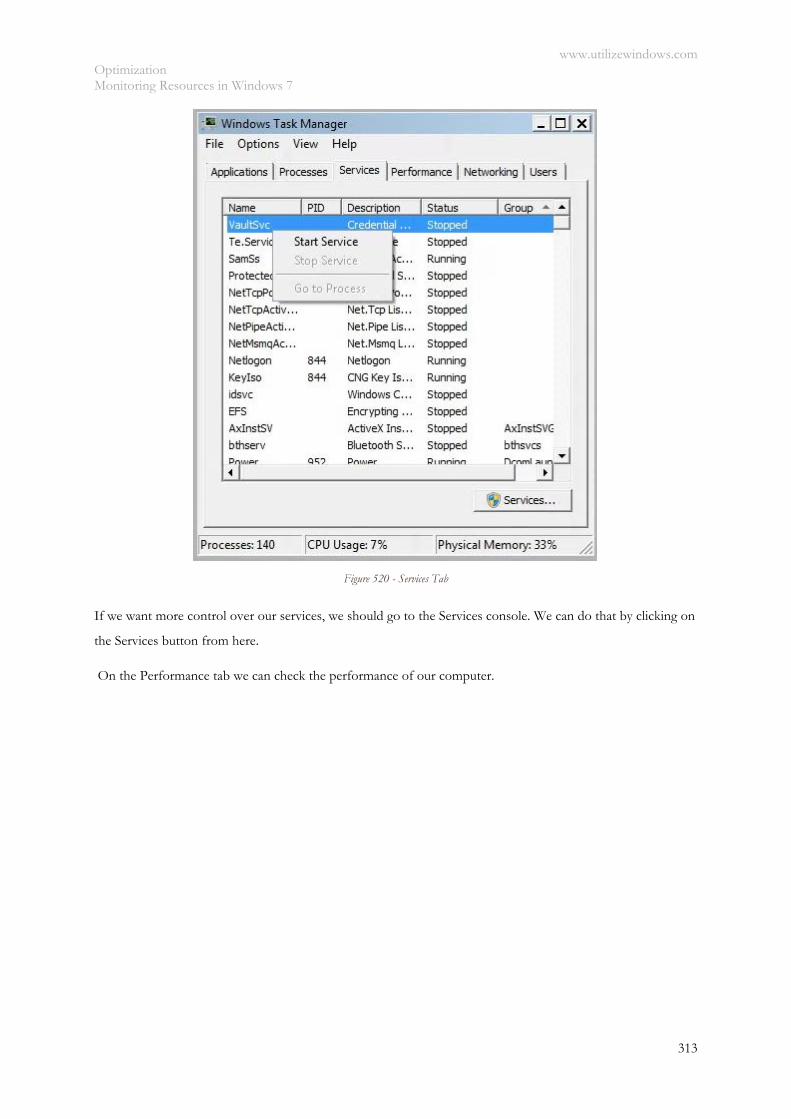
www.utilizewindows.com Optimization Monitoring Resources in Windows 7
313
Figure 520 - Services Tab
If we want more control over our services, we should go to the Services console. We can do that by clicking on
the Services button from here.
On the Performance tab we can check the performance of our computer.

www.utilizewindows.com Optimization Monitoring Resources in Windows 7
314
Figure 521 - Performance Tab
Here we can use the percentage of CPU usage at the moment and also usage history from past few minutes. In
our case we have multiple (four) cores, so we see four graphs, one for each core. On this tab we can also see
current memory usage and memory usage history for the last few minutes. If the CPU Usage History graph is
showing 100 percent, it can mean that some program might not be responding or is over using CPU
resources. If the Memory graph is consistently high, it can mean that we have too many applications opened at
the same time. As a temporary solution, we can quit some running programs to decrease the demand for RAM.
However, the only long-term solution is to add more physical RAM. Also, we could try implementing the
ReadyBoost feature.
Below CPU and memory graphs, we can see details about memory and resource usage. In the Physical Memory
section we can see the total amount of RAM installed, and also the amount of RAM recently used for system
resources (Cached). Here we also see amount of Available and Free memory. In the Kernel Memory section we
can see the total amount of memory being used by the core part of Windows called the Kernel. The used
virtual memory is shown on the Paged amount, while the Nonpaged amount shows the amount of RAM used
by the Kernel. In the System section we can see 5 values related to Handles, Threads, Processes, Up Time, and
Page File Handles (Commit). These are all pointers that refer to system elements such as files, directories,
registry keys, events, etc.
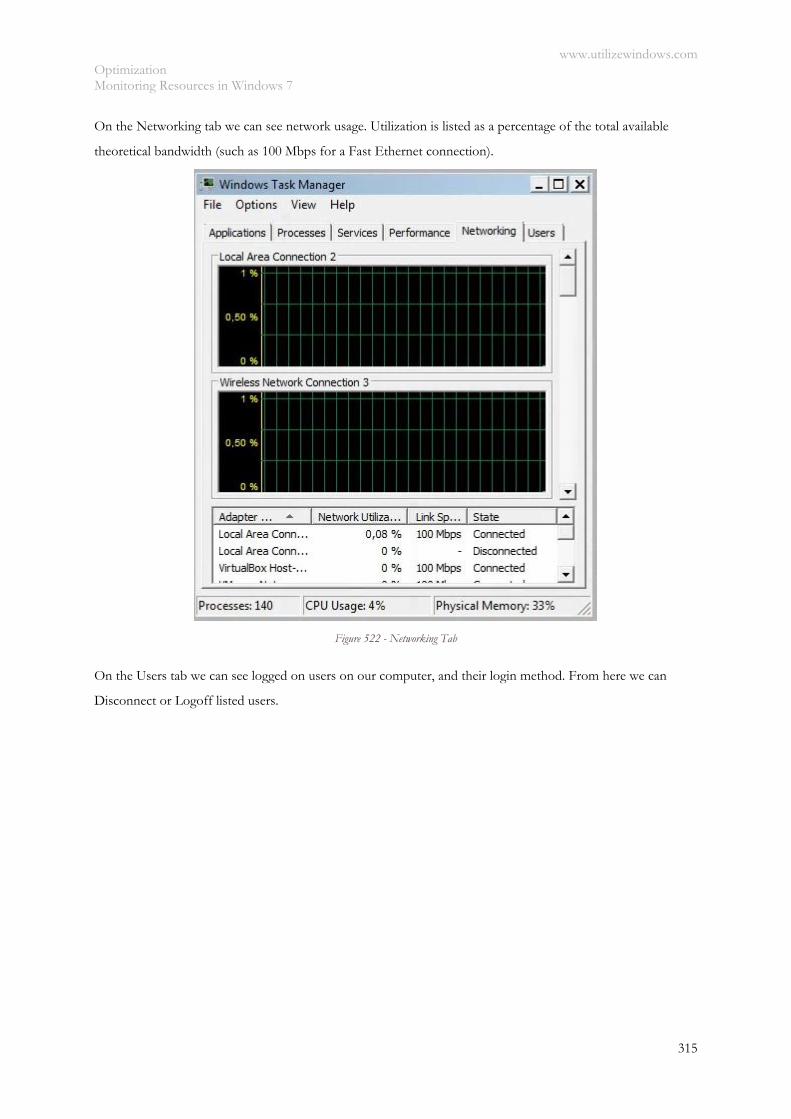
www.utilizewindows.com Optimization Monitoring Resources in Windows 7
315
On the Networking tab we can see network usage. Utilization is listed as a percentage of the total available
theoretical bandwidth (such as 100 Mbps for a Fast Ethernet connection).
Figure 522 - Networking Tab
On the Users tab we can see logged on users on our computer, and their login method. From here we can
Disconnect or Logoff listed users.
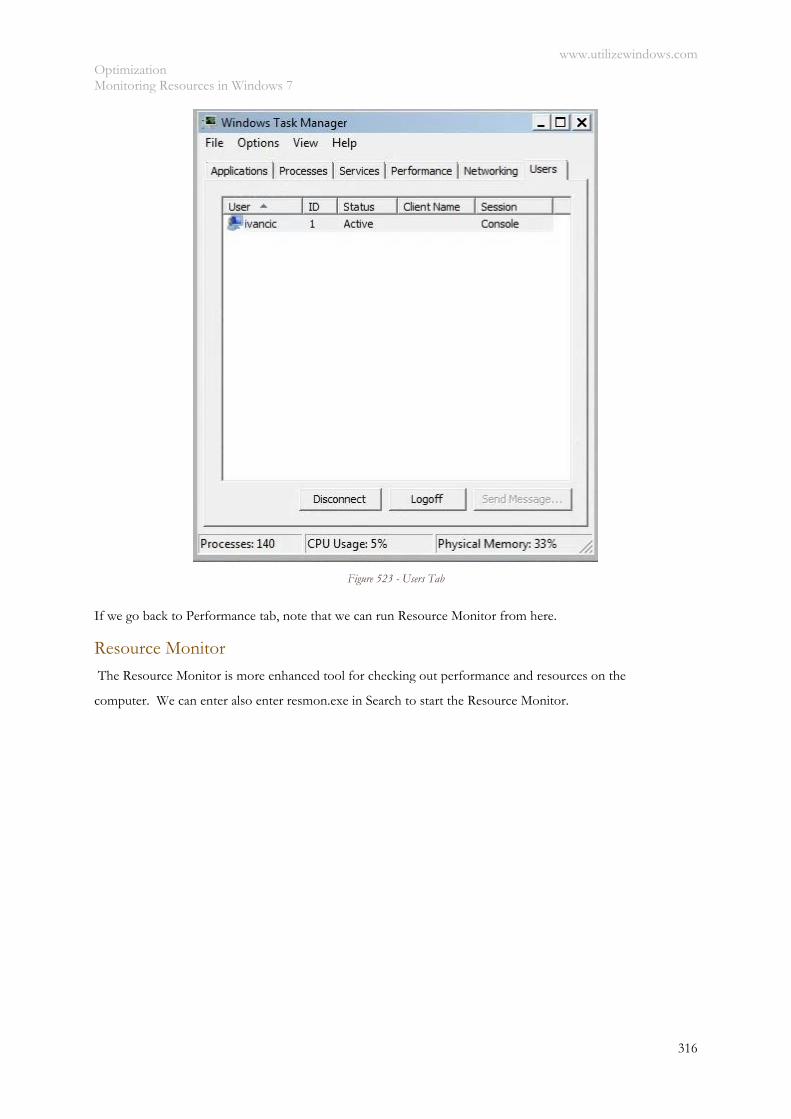
www.utilizewindows.com Optimization Monitoring Resources in Windows 7
316
Figure 523 - Users Tab
If we go back to Performance tab, note that we can run Resource Monitor from here.
Resource Monitor
The Resource Monitor is more enhanced tool for checking out performance and resources on the
computer. We can enter also enter resmon.exe in Search to start the Resource Monitor.
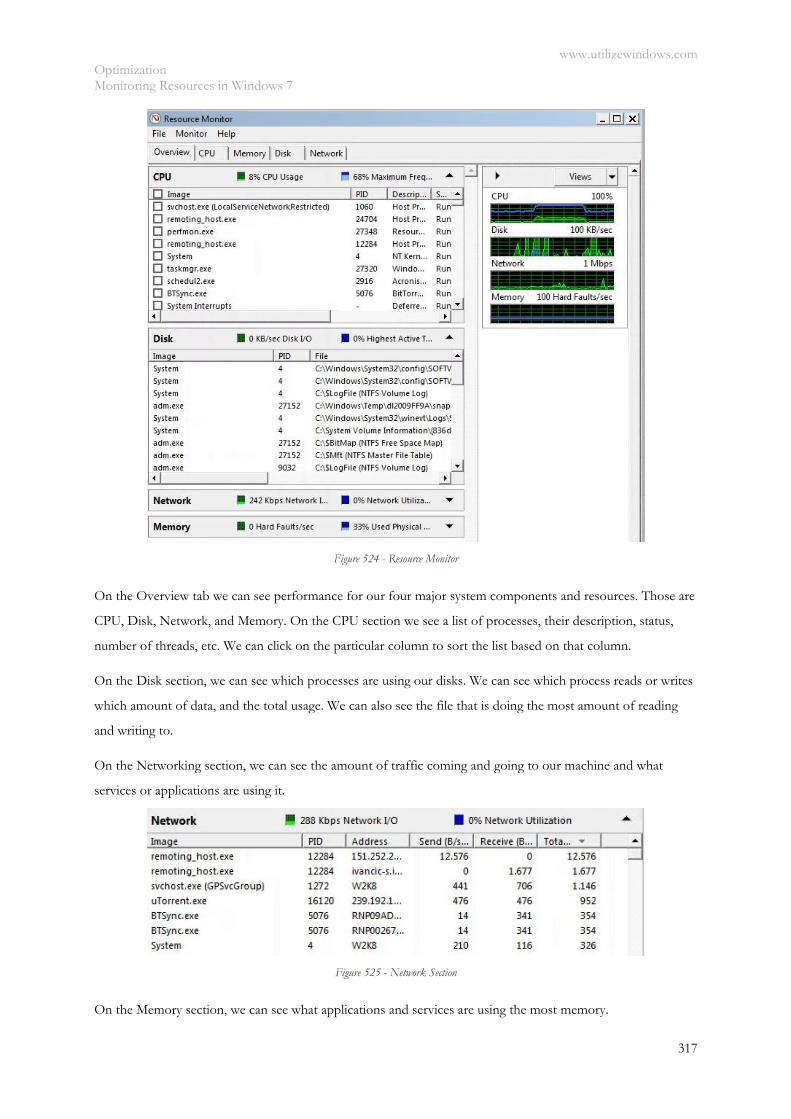
www.utilizewindows.com Optimization Monitoring Resources in Windows 7
317
Figure 524 - Resource Monitor
On the Overview tab we can see performance for our four major system components and resources. Those are
CPU, Disk, Network, and Memory. On the CPU section we see a list of processes, their description, status,
number of threads, etc. We can click on the particular column to sort the list based on that column.
On the Disk section, we can see which processes are using our disks. We can see which process reads or writes
which amount of data, and the total usage. We can also see the file that is doing the most amount of reading
and writing to.
On the Networking section, we can see the amount of traffic coming and going to our machine and what
services or applications are using it.
Figure 525 - Network Section
On the Memory section, we can see what applications and services are using the most memory.
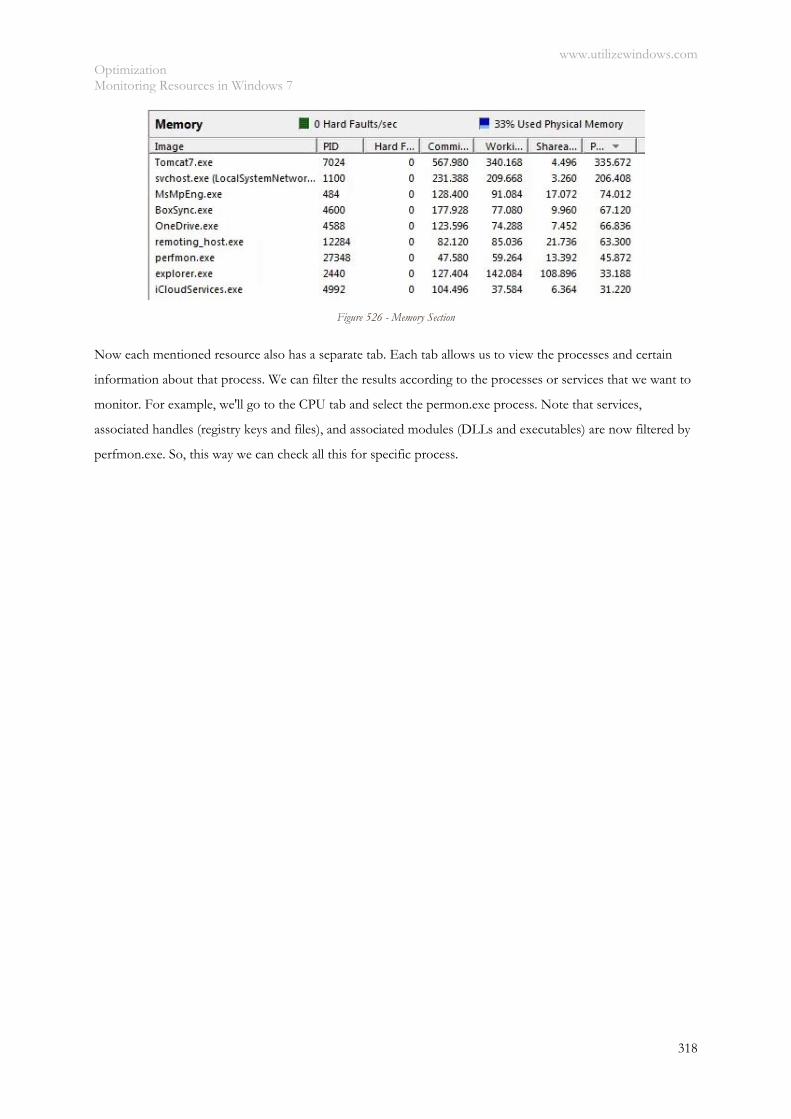
www.utilizewindows.com Optimization Monitoring Resources in Windows 7
318
Figure 526 - Memory Section
Now each mentioned resource also has a separate tab. Each tab allows us to view the processes and certain
information about that process. We can filter the results according to the processes or services that we want to
monitor. For example, we'll go to the CPU tab and select the permon.exe process. Note that services,
associated handles (registry keys and files), and associated modules (DLLs and executables) are now filtered by
perfmon.exe. So, this way we can check all this for specific process.
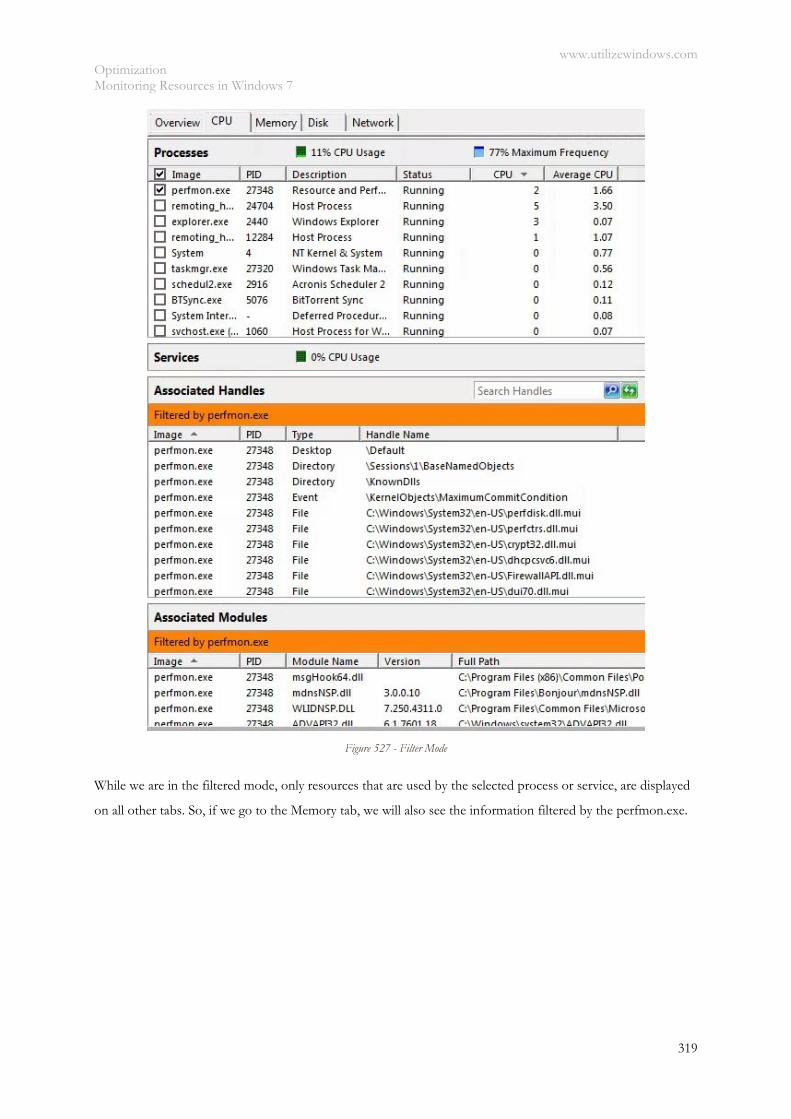
www.utilizewindows.com Optimization Monitoring Resources in Windows 7
319
Figure 527 - Filter Mode
While we are in the filtered mode, only resources that are used by the selected process or service, are displayed
on all other tabs. So, if we go to the Memory tab, we will also see the information filtered by the perfmon.exe.
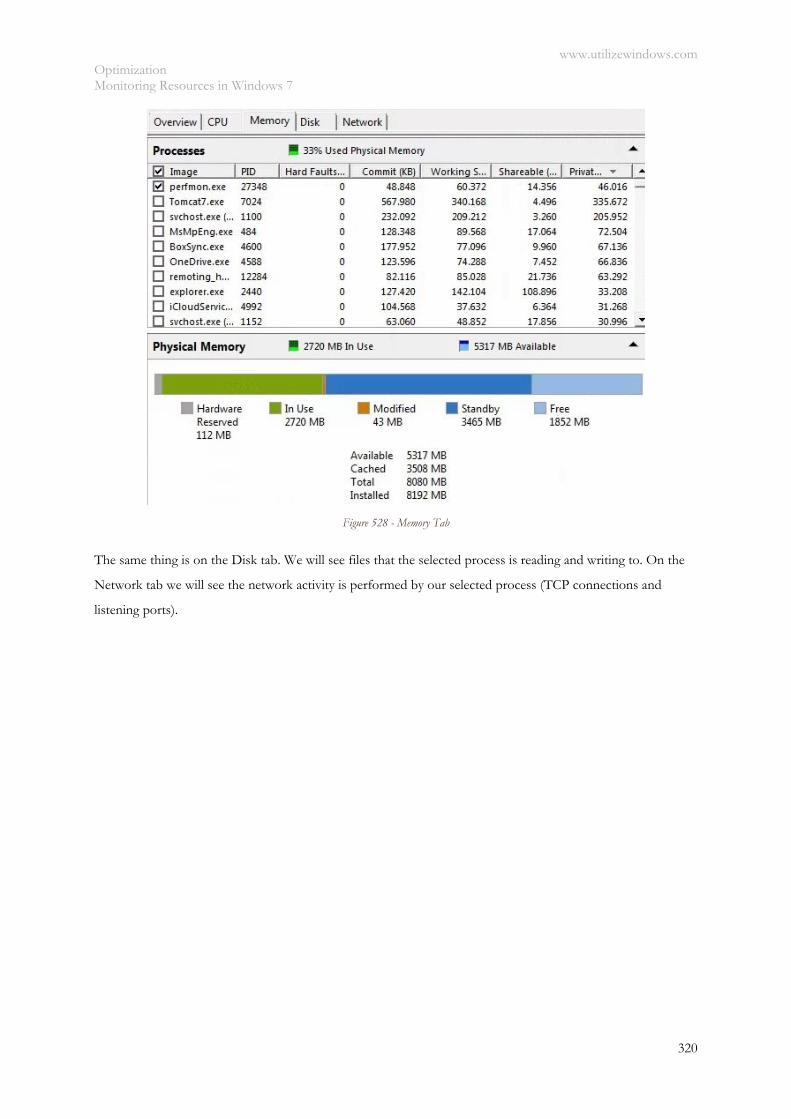
www.utilizewindows.com Optimization Monitoring Resources in Windows 7
320
Figure 528 - Memory Tab
The same thing is on the Disk tab. We will see files that the selected process is reading and writing to. On the
Network tab we will see the network activity is performed by our selected process (TCP connections and
listening ports).
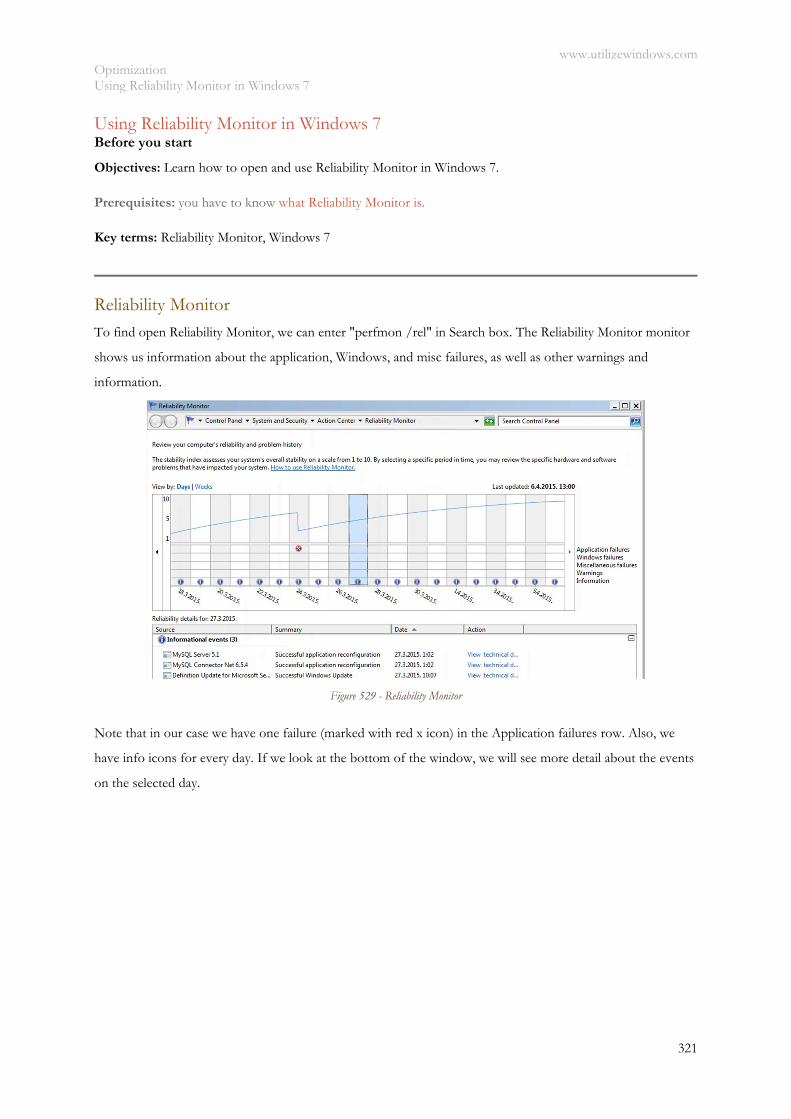
www.utilizewindows.com Optimization Using Reliability Monitor in Windows 7
321
Using Reliability Monitor in Windows 7 Before you start
Objectives: Learn how to open and use Reliability Monitor in Windows 7.
Prerequisites: you have to know what Reliability Monitor is.
Key terms: Reliability Monitor, Windows 7
Reliability Monitor
To find open Reliability Monitor, we can enter "perfmon /rel" in Search box. The Reliability Monitor monitor
shows us information about the application, Windows, and misc failures, as well as other warnings and
information.
Figure 529 - Reliability Monitor
Note that in our case we have one failure (marked with red x icon) in the Application failures row. Also, we
have info icons for every day. If we look at the bottom of the window, we will see more detail about the events
on the selected day.
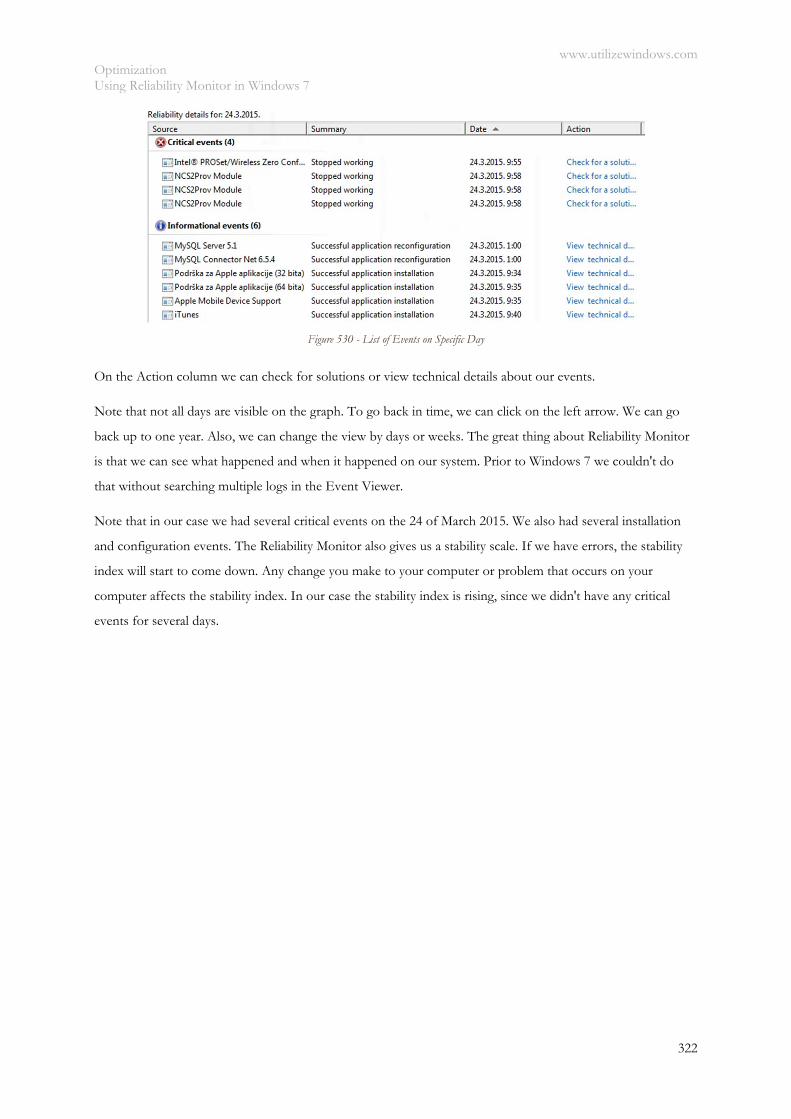
www.utilizewindows.com Optimization Using Reliability Monitor in Windows 7
322
Figure 530 - List of Events on Specific Day
On the Action column we can check for solutions or view technical details about our events.
Note that not all days are visible on the graph. To go back in time, we can click on the left arrow. We can go
back up to one year. Also, we can change the view by days or weeks. The great thing about Reliability Monitor
is that we can see what happened and when it happened on our system. Prior to Windows 7 we couldn't do
that without searching multiple logs in the Event Viewer.
Note that in our case we had several critical events on the 24 of March 2015. We also had several installation
and configuration events. The Reliability Monitor also gives us a stability scale. If we have errors, the stability
index will start to come down. Any change you make to your computer or problem that occurs on your
computer affects the stability index. In our case the stability index is rising, since we didn't have any critical
events for several days.
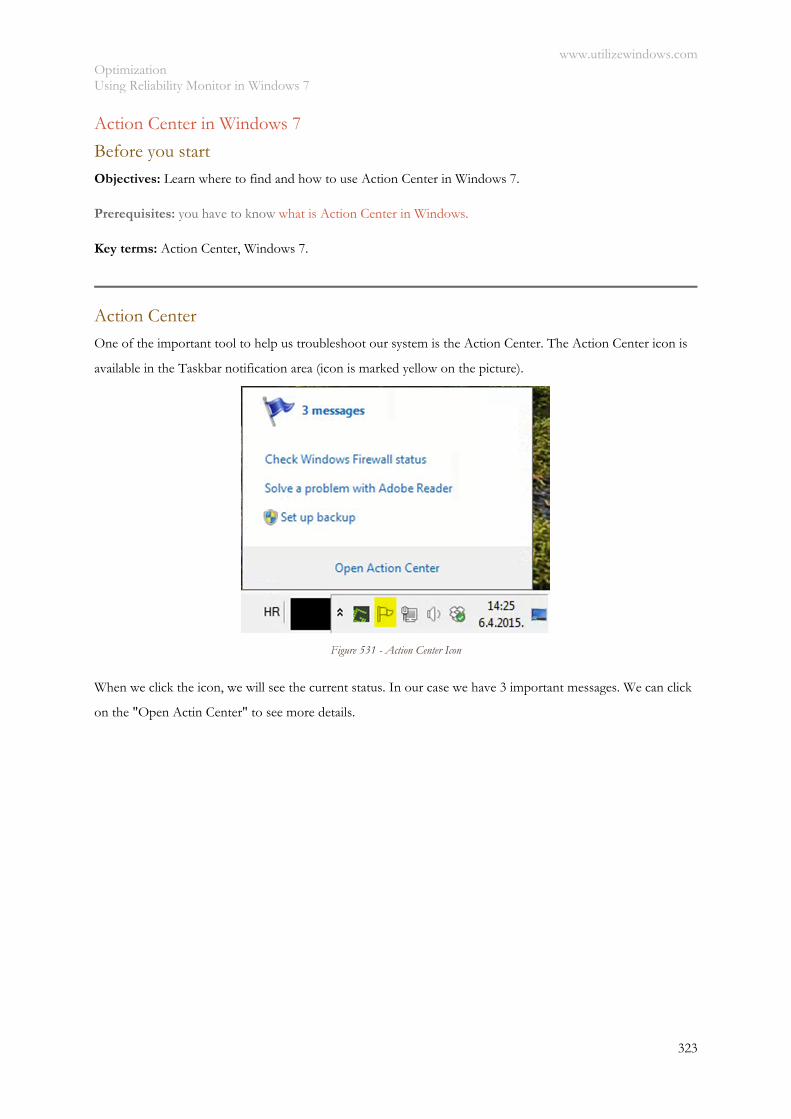
www.utilizewindows.com Optimization Using Reliability Monitor in Windows 7
323
Action Center in Windows 7
Before you start
Objectives: Learn where to find and how to use Action Center in Windows 7.
Prerequisites: you have to know what is Action Center in Windows.
Key terms: Action Center, Windows 7.
Action Center One of the important tool to help us troubleshoot our system is the Action Center. The Action Center icon is
available in the Taskbar notification area (icon is marked yellow on the picture).
Figure 531 - Action Center Icon
When we click the icon, we will see the current status. In our case we have 3 important messages. We can click
on the "Open Actin Center" to see more details.
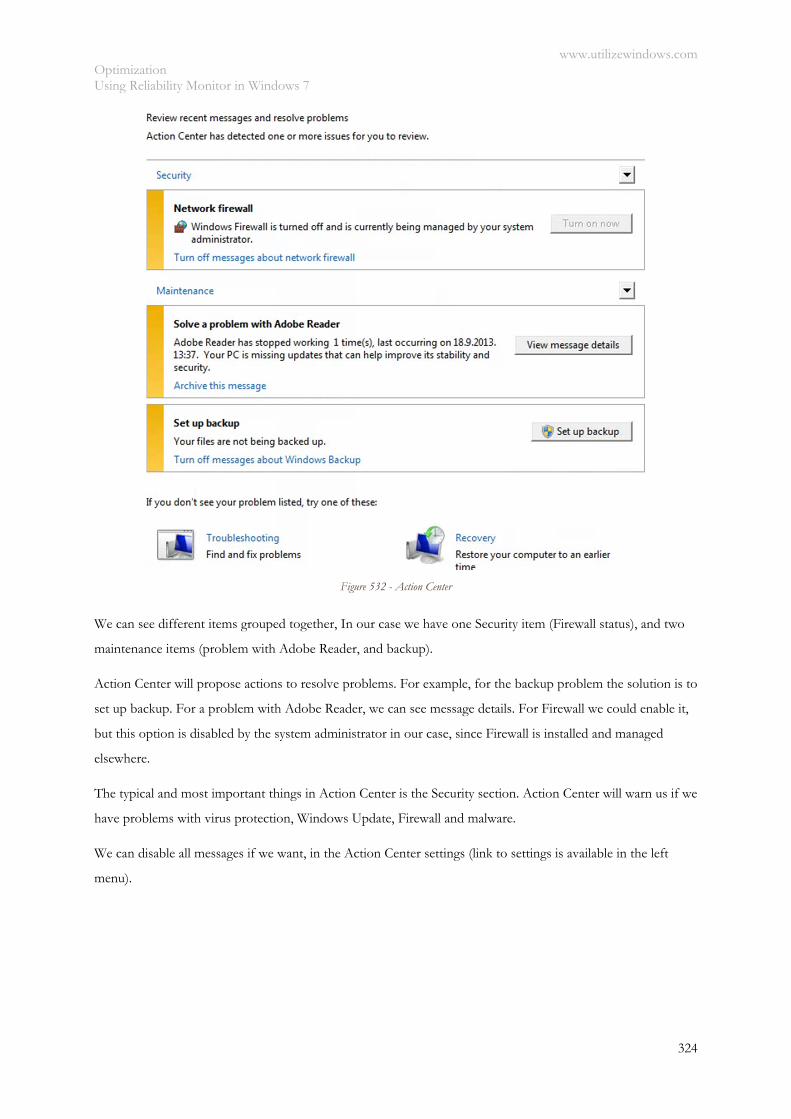
www.utilizewindows.com Optimization Using Reliability Monitor in Windows 7
324
Figure 532 - Action Center
We can see different items grouped together, In our case we have one Security item (Firewall status), and two
maintenance items (problem with Adobe Reader, and backup).
Action Center will propose actions to resolve problems. For example, for the backup problem the solution is to
set up backup. For a problem with Adobe Reader, we can see message details. For Firewall we could enable it,
but this option is disabled by the system administrator in our case, since Firewall is installed and managed
elsewhere.
The typical and most important things in Action Center is the Security section. Action Center will warn us if we
have problems with virus protection, Windows Update, Firewall and malware.
We can disable all messages if we want, in the Action Center settings (link to settings is available in the left
menu).
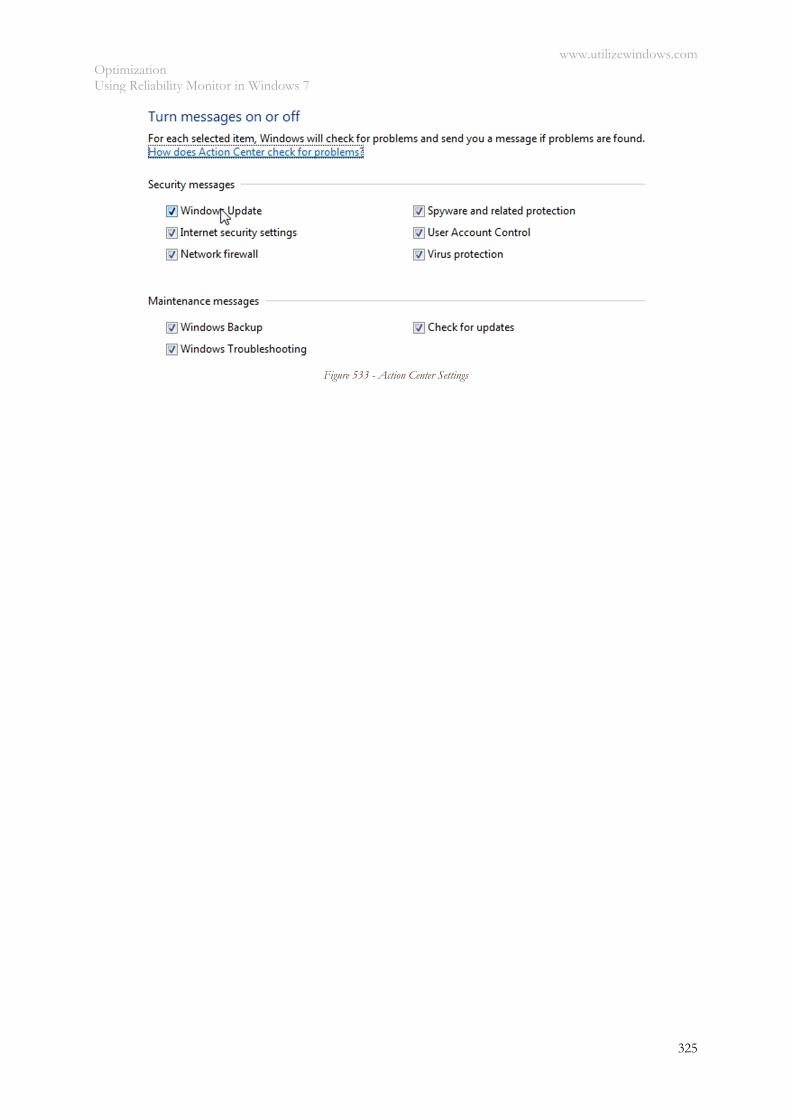
www.utilizewindows.com Optimization Using Reliability Monitor in Windows 7
325
Figure 533 - Action Center Settings
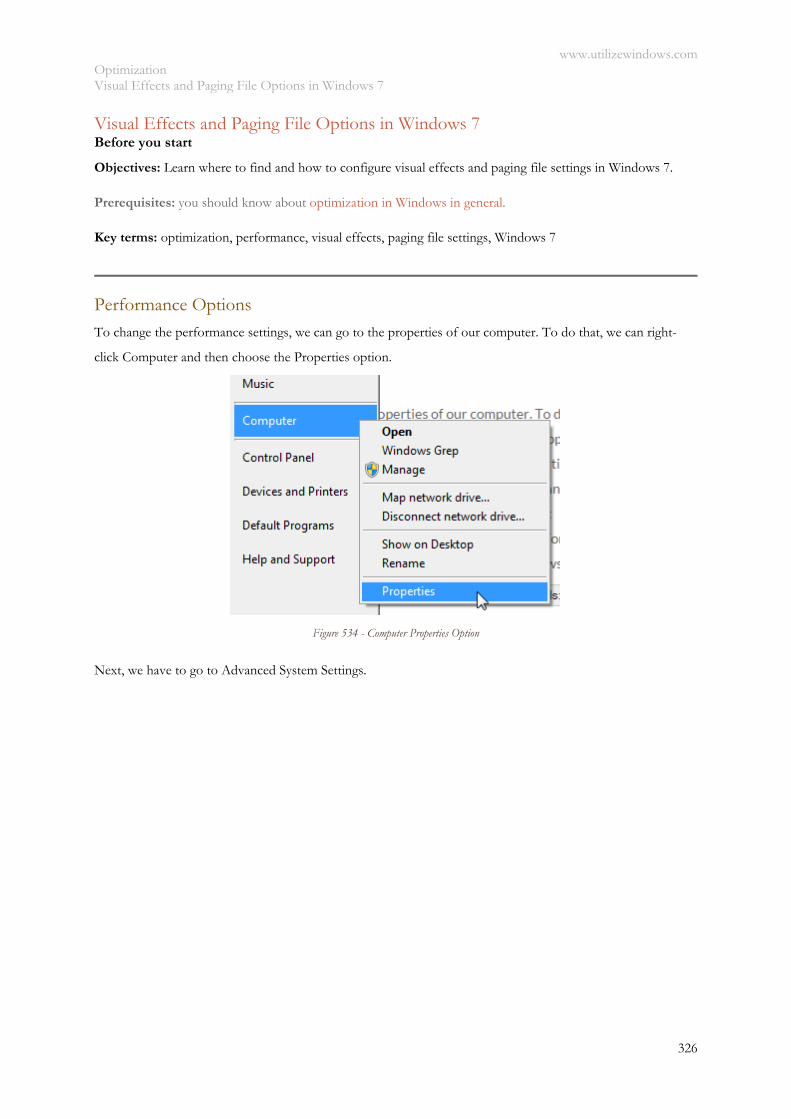
www.utilizewindows.com Optimization Visual Effects and Paging File Options in Windows 7
326
Visual Effects and Paging File Options in Windows 7 Before you start
Objectives: Learn where to find and how to configure visual effects and paging file settings in Windows 7.
Prerequisites: you should know about optimization in Windows in general.
Key terms: optimization, performance, visual effects, paging file settings, Windows 7
Performance Options
To change the performance settings, we can go to the properties of our computer. To do that, we can right-
click Computer and then choose the Properties option.
Figure 534 - Computer Properties Option
Next, we have to go to Advanced System Settings.
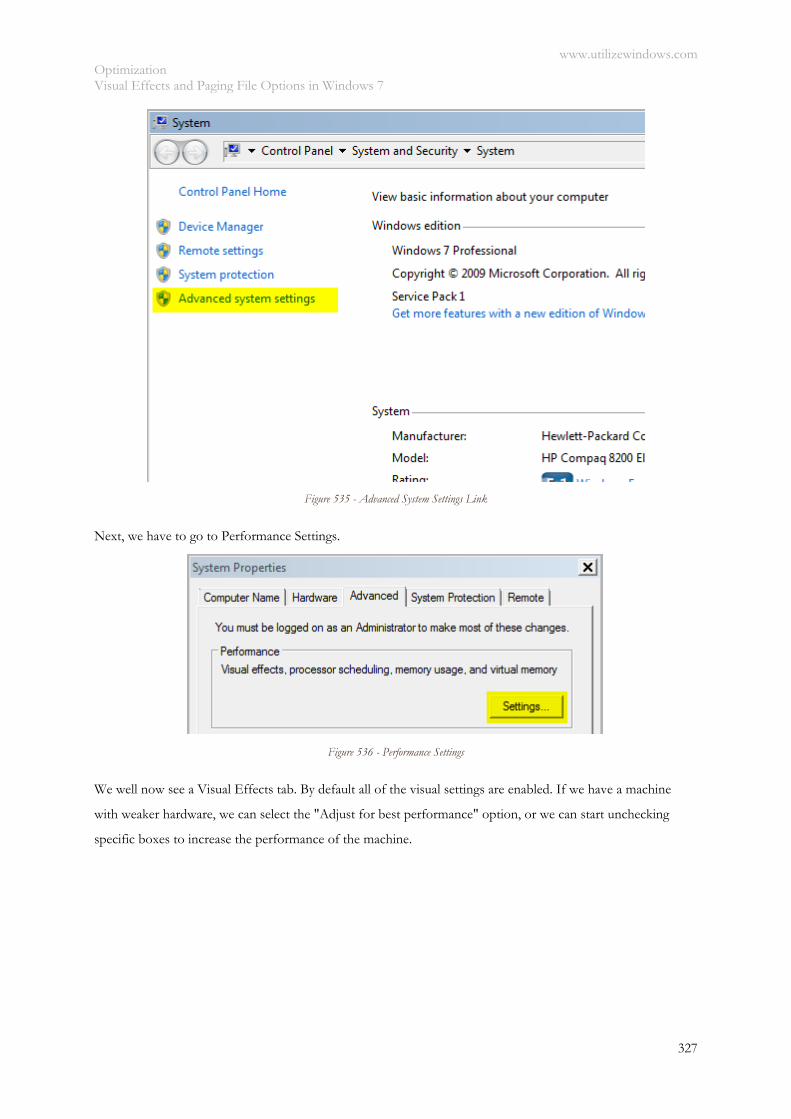
www.utilizewindows.com Optimization Visual Effects and Paging File Options in Windows 7
327
Figure 535 - Advanced System Settings Link
Next, we have to go to Performance Settings.
Figure 536 - Performance Settings
We well now see a Visual Effects tab. By default all of the visual settings are enabled. If we have a machine
with weaker hardware, we can select the "Adjust for best performance" option, or we can start unchecking
specific boxes to increase the performance of the machine.
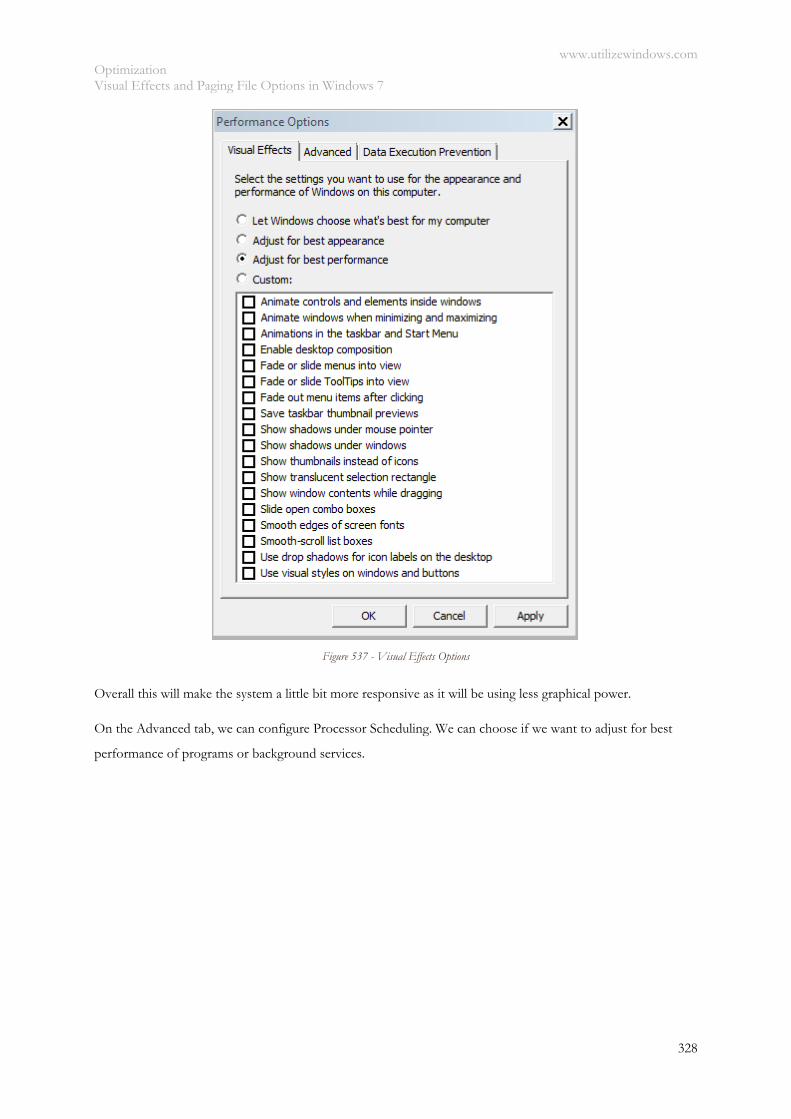
www.utilizewindows.com Optimization Visual Effects and Paging File Options in Windows 7
328
Figure 537 - Visual Effects Options
Overall this will make the system a little bit more responsive as it will be using less graphical power.
On the Advanced tab, we can configure Processor Scheduling. We can choose if we want to adjust for best
performance of programs or background services.

www.utilizewindows.com Optimization Visual Effects and Paging File Options in Windows 7
329
Figure 538 - Advanced Tab
Usually on desktops that are running programs we will choose the "Programs" option, but on servers or certain
desktops that are doing a lot of background applications like SQL databases, we would choose the
"Background services" option.
On this tab we can also configure the virtual memory of our computer. To do that we click on the Change
button on the Virtual Memory section.
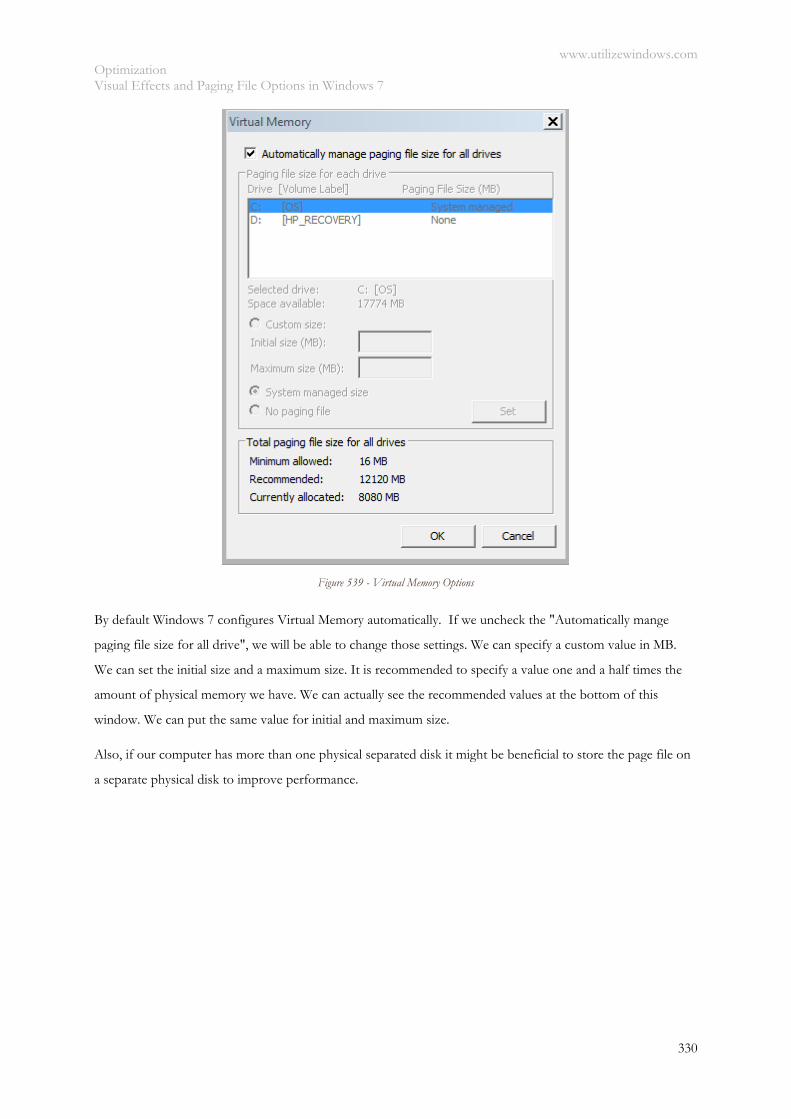
www.utilizewindows.com Optimization Visual Effects and Paging File Options in Windows 7
330
Figure 539 - Virtual Memory Options
By default Windows 7 configures Virtual Memory automatically. If we uncheck the "Automatically mange
paging file size for all drive", we will be able to change those settings. We can specify a custom value in MB.
We can set the initial size and a maximum size. It is recommended to specify a value one and a half times the
amount of physical memory we have. We can actually see the recommended values at the bottom of this
window. We can put the same value for initial and maximum size.
Also, if our computer has more than one physical separated disk it might be beneficial to store the page file on
a separate physical disk to improve performance.
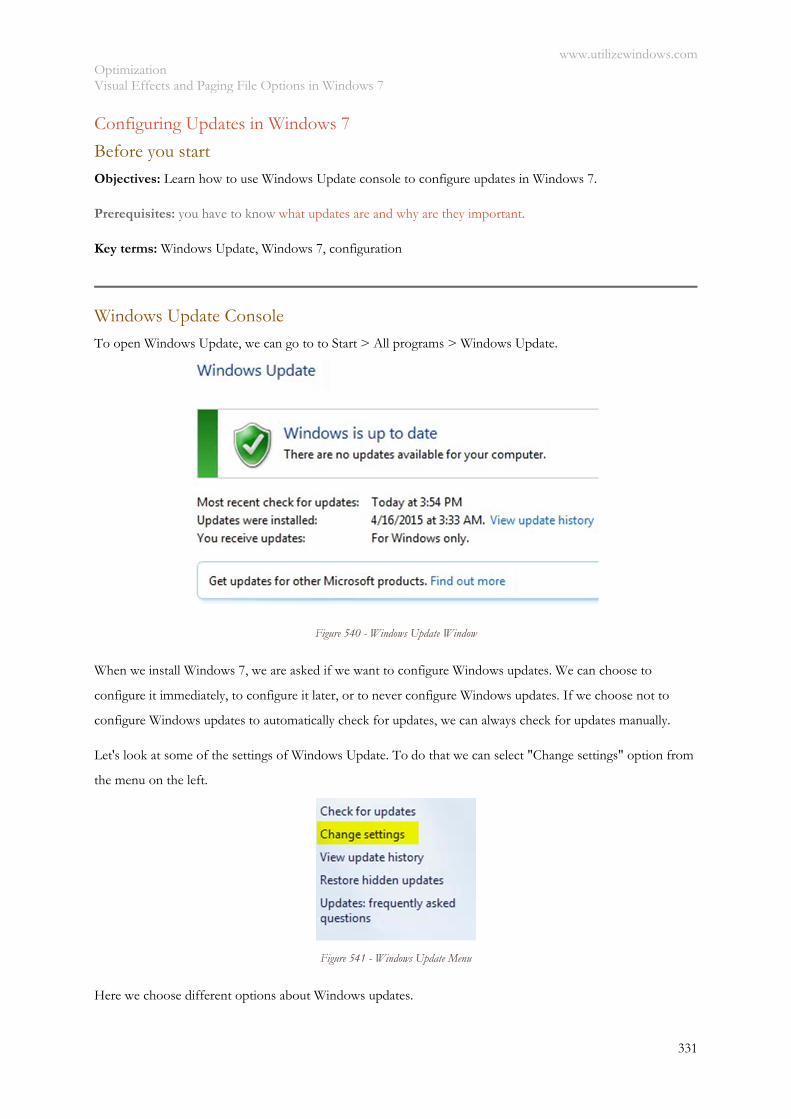
www.utilizewindows.com Optimization Visual Effects and Paging File Options in Windows 7
331
Configuring Updates in Windows 7
Before you start
Objectives: Learn how to use Windows Update console to configure updates in Windows 7.
Prerequisites: you have to know what updates are and why are they important.
Key terms: Windows Update, Windows 7, configuration
Windows Update Console To open Windows Update, we can go to to Start > All programs > Windows Update.
Figure 540 - Windows Update Window
When we install Windows 7, we are asked if we want to configure Windows updates. We can choose to
configure it immediately, to configure it later, or to never configure Windows updates. If we choose not to
configure Windows updates to automatically check for updates, we can always check for updates manually.
Let's look at some of the settings of Windows Update. To do that we can select "Change settings" option from
the menu on the left.
Figure 541 - Windows Update Menu
Here we choose different options about Windows updates.
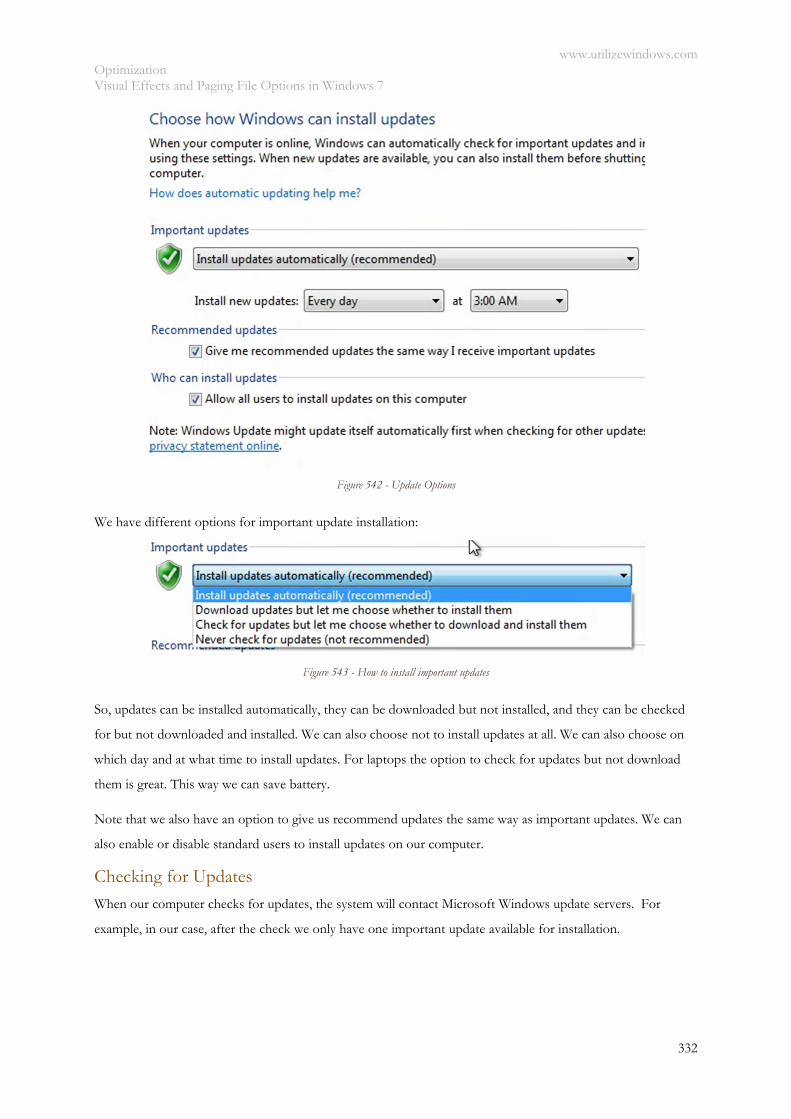
www.utilizewindows.com Optimization Visual Effects and Paging File Options in Windows 7
332
Figure 542 - Update Options
We have different options for important update installation:
Figure 543 - How to install important updates
So, updates can be installed automatically, they can be downloaded but not installed, and they can be checked
for but not downloaded and installed. We can also choose not to install updates at all. We can also choose on
which day and at what time to install updates. For laptops the option to check for updates but not download
them is great. This way we can save battery.
Note that we also have an option to give us recommend updates the same way as important updates. We can
also enable or disable standard users to install updates on our computer.
Checking for Updates When our computer checks for updates, the system will contact Microsoft Windows update servers. For
example, in our case, after the check we only have one important update available for installation.
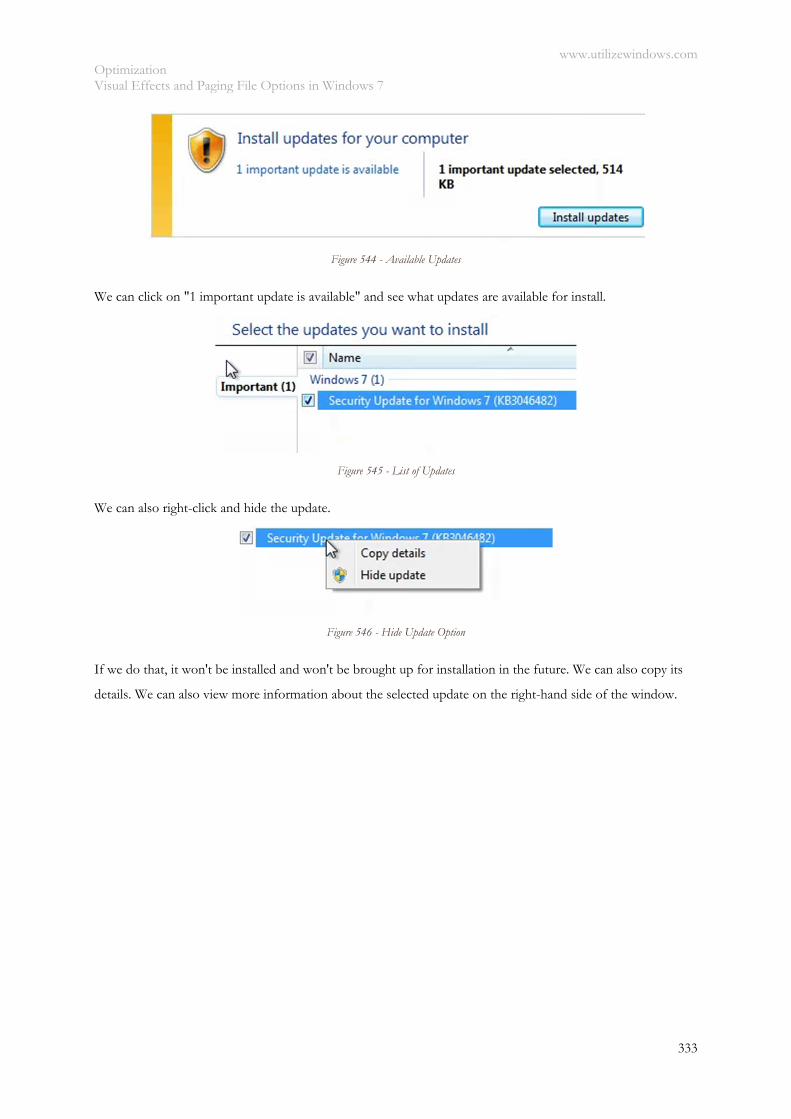
www.utilizewindows.com Optimization Visual Effects and Paging File Options in Windows 7
333
Figure 544 - Available Updates
We can click on "1 important update is available" and see what updates are available for install.
Figure 545 - List of Updates
We can also right-click and hide the update.
Figure 546 - Hide Update Option
If we do that, it won't be installed and won't be brought up for installation in the future. We can also copy its
details. We can also view more information about the selected update on the right-hand side of the window.
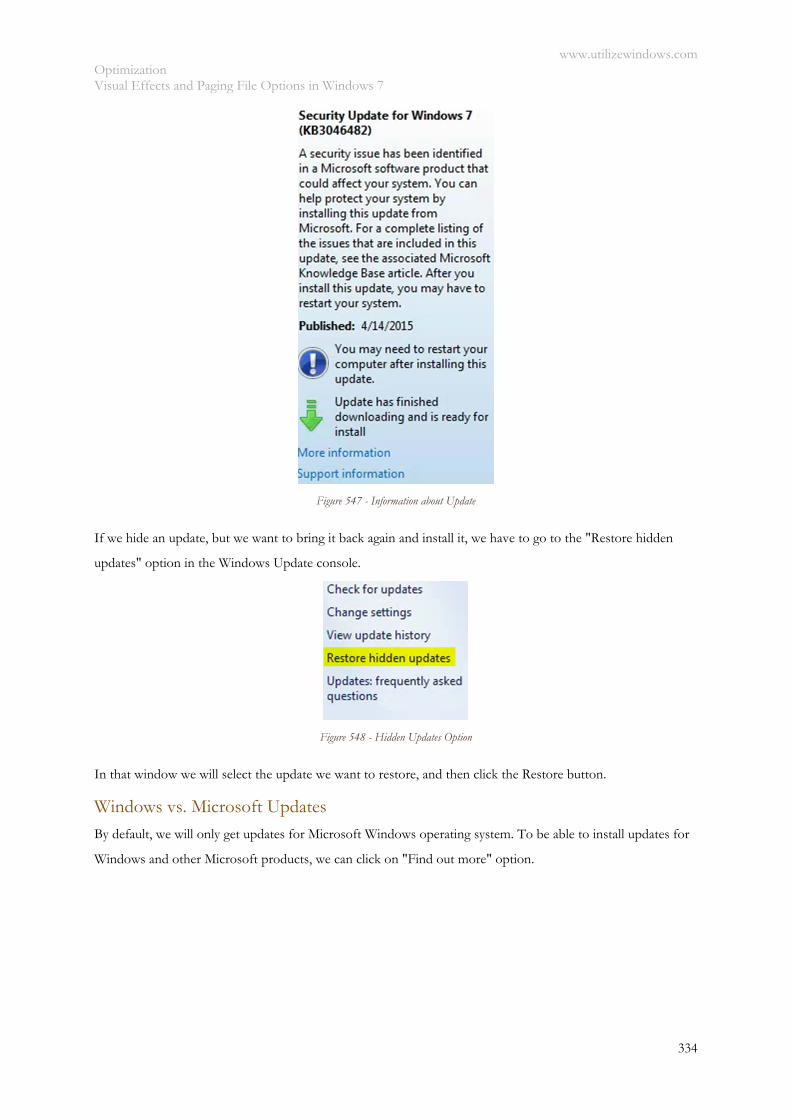
www.utilizewindows.com Optimization Visual Effects and Paging File Options in Windows 7
334
Figure 547 - Information about Update
If we hide an update, but we want to bring it back again and install it, we have to go to the "Restore hidden
updates" option in the Windows Update console.
Figure 548 - Hidden Updates Option
In that window we will select the update we want to restore, and then click the Restore button.
Windows vs. Microsoft Updates By default, we will only get updates for Microsoft Windows operating system. To be able to install updates for
Windows and other Microsoft products, we can click on "Find out more" option.
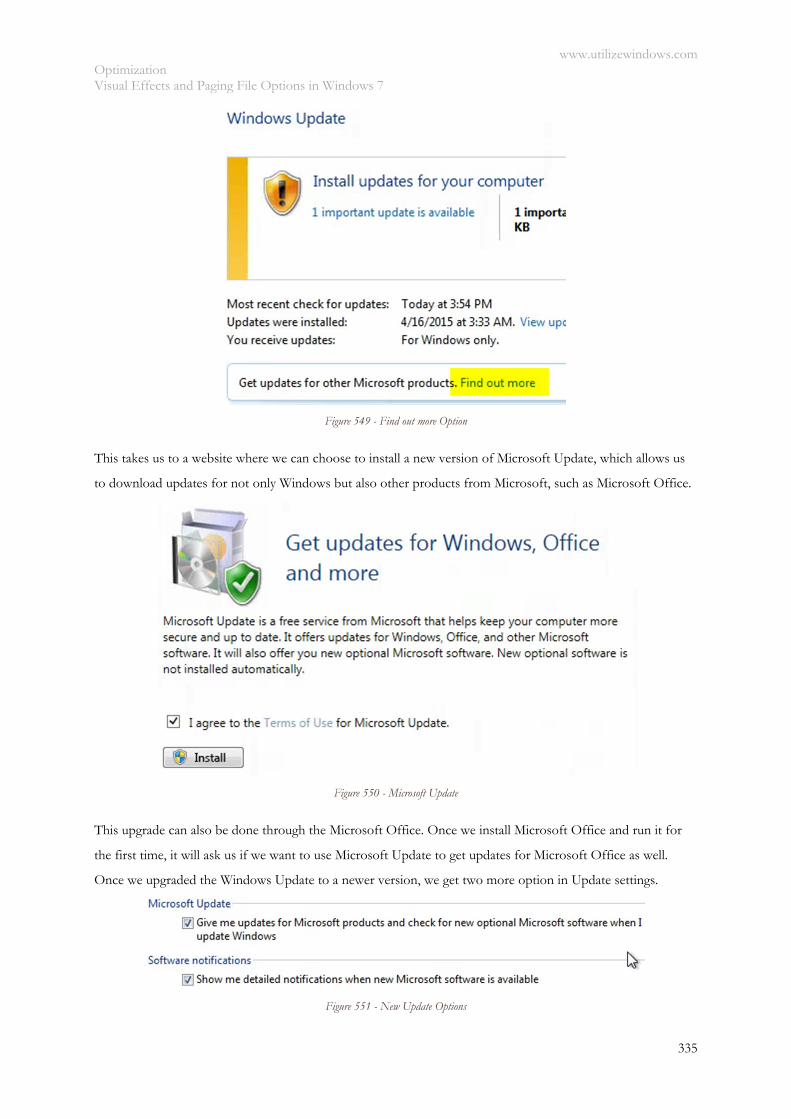
www.utilizewindows.com Optimization Visual Effects and Paging File Options in Windows 7
335
Figure 549 - Find out more Option
This takes us to a website where we can choose to install a new version of Microsoft Update, which allows us
to download updates for not only Windows but also other products from Microsoft, such as Microsoft Office.
Figure 550 - Microsoft Update
This upgrade can also be done through the Microsoft Office. Once we install Microsoft Office and run it for
the first time, it will ask us if we want to use Microsoft Update to get updates for Microsoft Office as well.
Once we upgraded the Windows Update to a newer version, we get two more option in Update settings.
Figure 551 - New Update Options
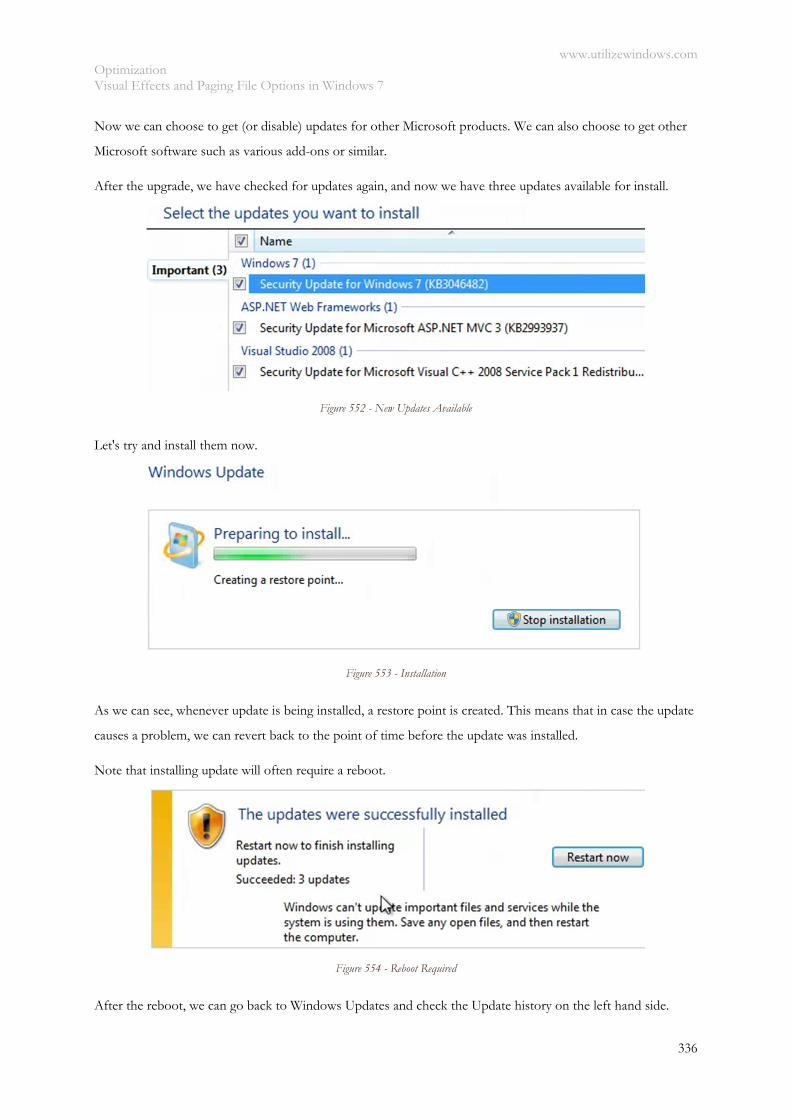
www.utilizewindows.com Optimization Visual Effects and Paging File Options in Windows 7
336
Now we can choose to get (or disable) updates for other Microsoft products. We can also choose to get other
Microsoft software such as various add-ons or similar.
After the upgrade, we have checked for updates again, and now we have three updates available for install.
Figure 552 - New Updates Available
Let's try and install them now.
Figure 553 - Installation
As we can see, whenever update is being installed, a restore point is created. This means that in case the update
causes a problem, we can revert back to the point of time before the update was installed.
Note that installing update will often require a reboot.
Figure 554 - Reboot Required
After the reboot, we can go back to Windows Updates and check the Update history on the left hand side.
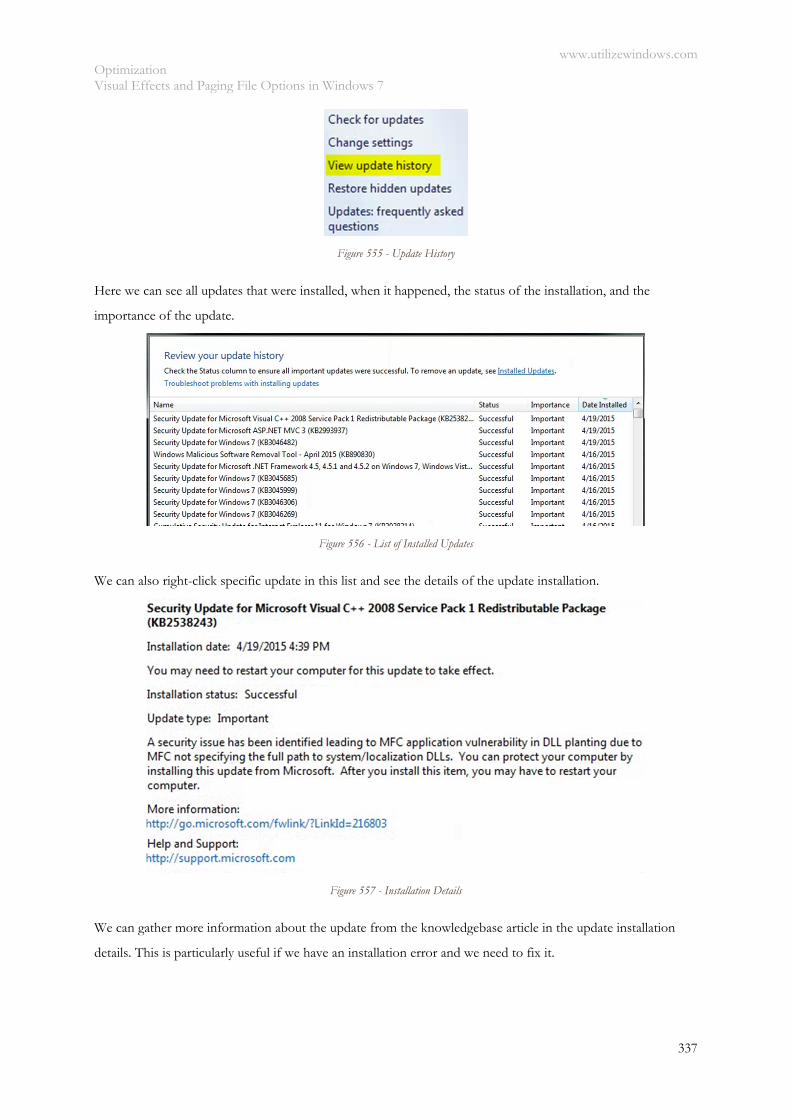
www.utilizewindows.com Optimization Visual Effects and Paging File Options in Windows 7
337
Figure 555 - Update History
Here we can see all updates that were installed, when it happened, the status of the installation, and the
importance of the update.
Figure 556 - List of Installed Updates
We can also right-click specific update in this list and see the details of the update installation.
Figure 557 - Installation Details
We can gather more information about the update from the knowledgebase article in the update installation
details. This is particularly useful if we have an installation error and we need to fix it.
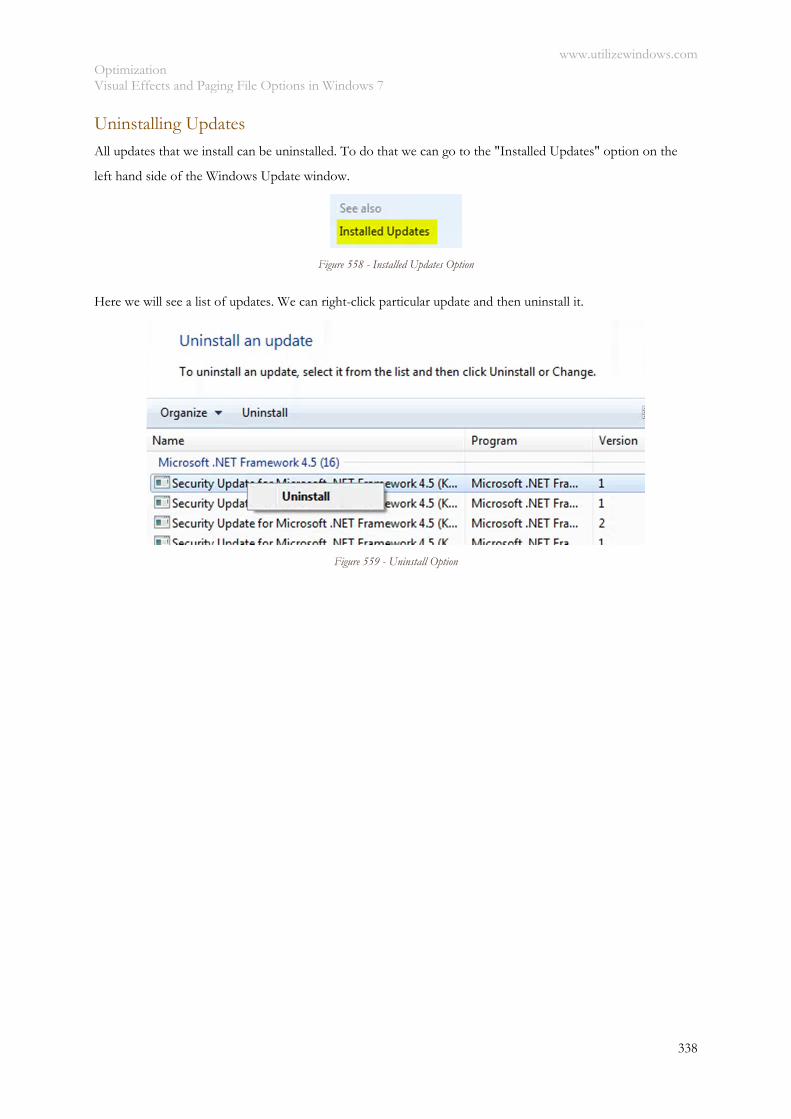
www.utilizewindows.com Optimization Visual Effects and Paging File Options in Windows 7
338
Uninstalling Updates
All updates that we install can be uninstalled. To do that we can go to the "Installed Updates" option on the
left hand side of the Windows Update window.
Figure 558 - Installed Updates Option
Here we will see a list of updates. We can right-click particular update and then uninstall it.
Figure 559 - Uninstall Option
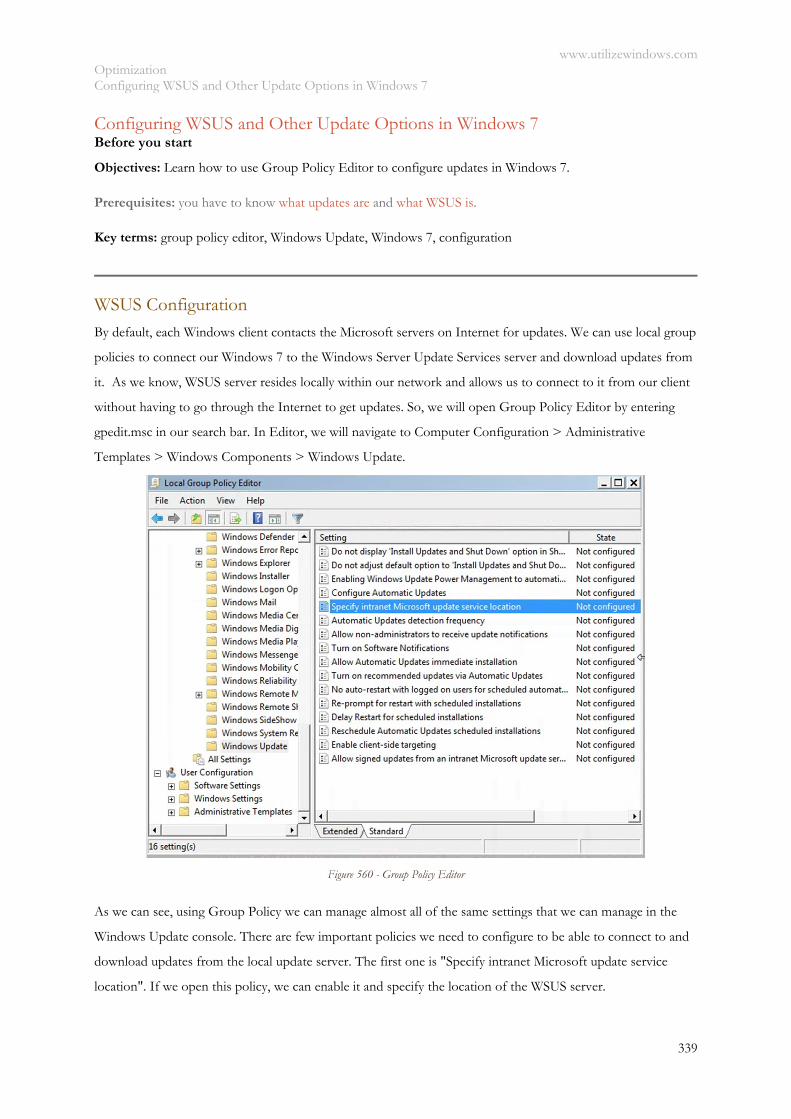
www.utilizewindows.com Optimization Configuring WSUS and Other Update Options in Windows 7
339
Configuring WSUS and Other Update Options in Windows 7 Before you start
Objectives: Learn how to use Group Policy Editor to configure updates in Windows 7.
Prerequisites: you have to know what updates are and what WSUS is.
Key terms: group policy editor, Windows Update, Windows 7, configuration
WSUS Configuration
By default, each Windows client contacts the Microsoft servers on Internet for updates. We can use local group
policies to connect our Windows 7 to the Windows Server Update Services server and download updates from
it. As we know, WSUS server resides locally within our network and allows us to connect to it from our client
without having to go through the Internet to get updates. So, we will open Group Policy Editor by entering
gpedit.msc in our search bar. In Editor, we will navigate to Computer Configuration > Administrative
Templates > Windows Components > Windows Update.
Figure 560 - Group Policy Editor
As we can see, using Group Policy we can manage almost all of the same settings that we can manage in the
Windows Update console. There are few important policies we need to configure to be able to connect to and
download updates from the local update server. The first one is "Specify intranet Microsoft update service
location". If we open this policy, we can enable it and specify the location of the WSUS server.
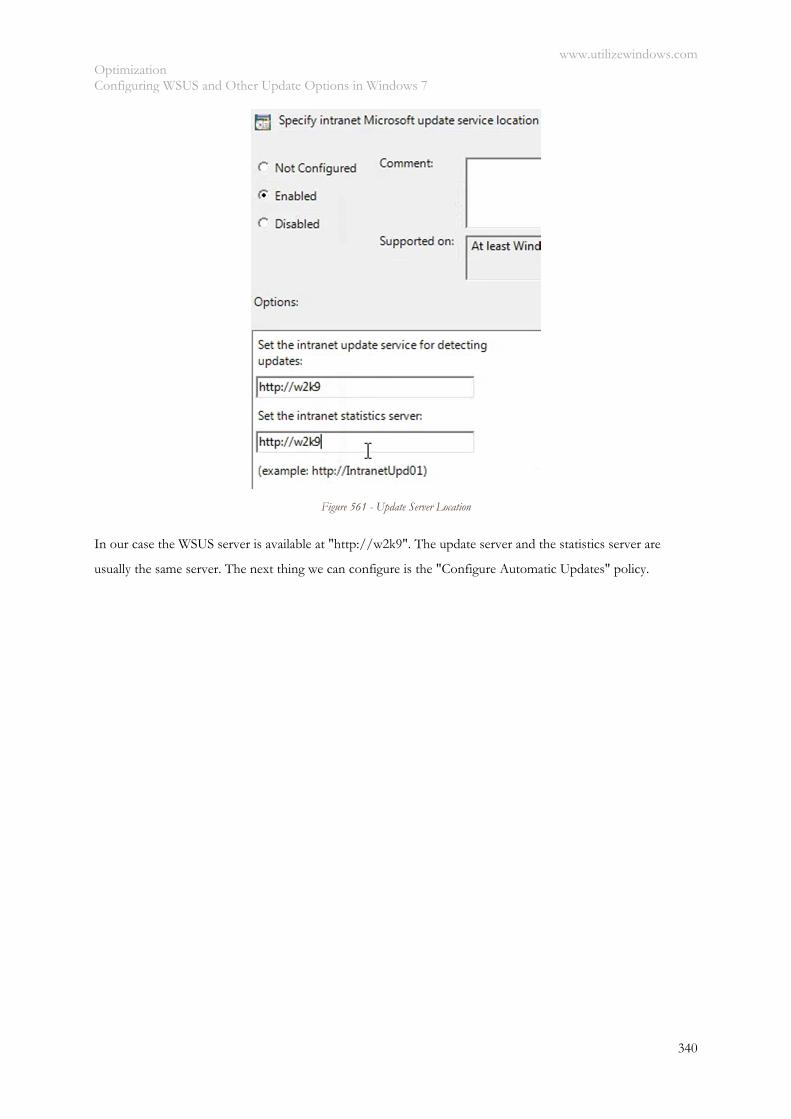
www.utilizewindows.com Optimization Configuring WSUS and Other Update Options in Windows 7
340
Figure 561 - Update Server Location
In our case the WSUS server is available at "http://w2k9". The update server and the statistics server are
usually the same server. The next thing we can configure is the "Configure Automatic Updates" policy.
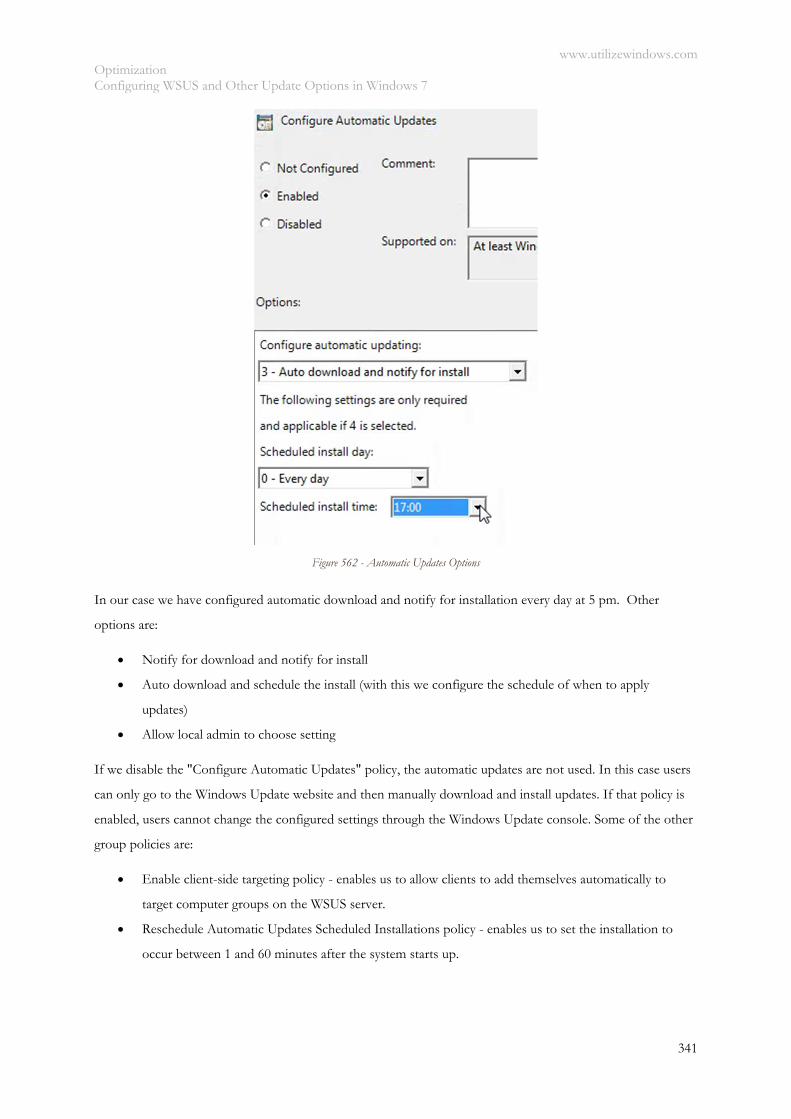
www.utilizewindows.com Optimization Configuring WSUS and Other Update Options in Windows 7
341
Figure 562 - Automatic Updates Options
In our case we have configured automatic download and notify for installation every day at 5 pm. Other
options are:
Notify for download and notify for install
Auto download and schedule the install (with this we configure the schedule of when to apply
updates)
Allow local admin to choose setting
If we disable the "Configure Automatic Updates" policy, the automatic updates are not used. In this case users
can only go to the Windows Update website and then manually download and install updates. If that policy is
enabled, users cannot change the configured settings through the Windows Update console. Some of the other
group policies are:
Enable client-side targeting policy - enables us to allow clients to add themselves automatically to
target computer groups on the WSUS server.
Reschedule Automatic Updates Scheduled Installations policy - enables us to set the installation to
occur between 1 and 60 minutes after the system starts up.
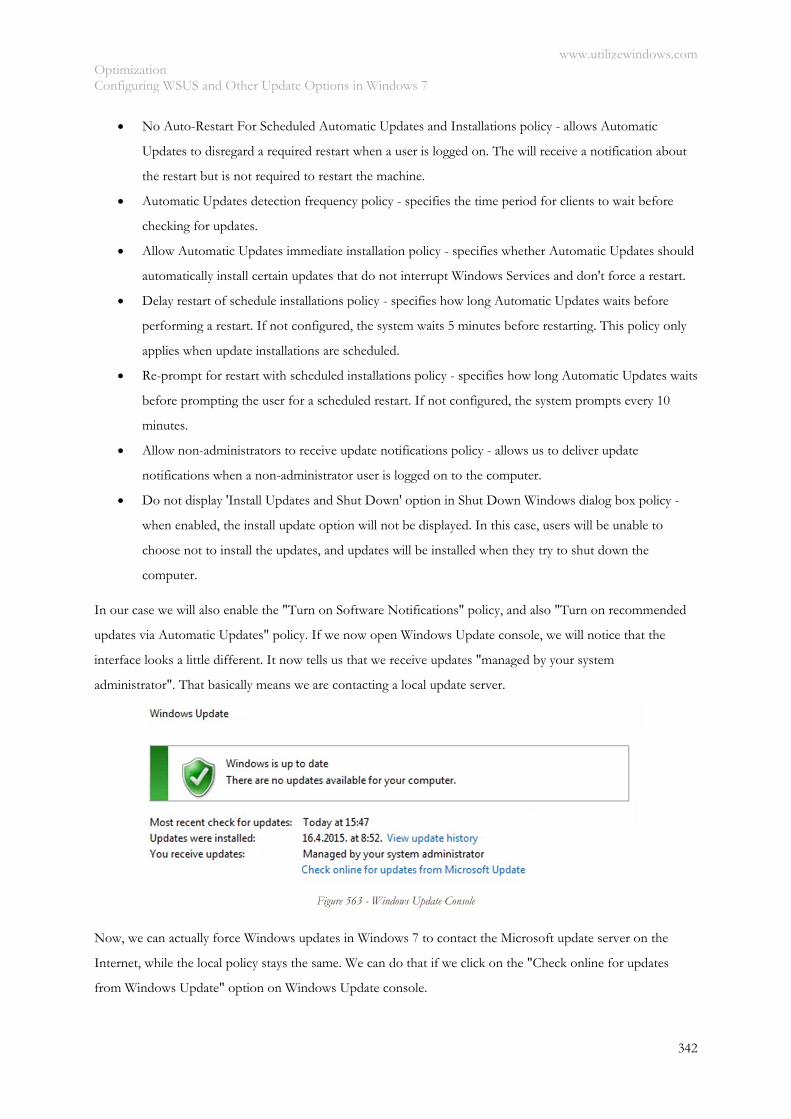
www.utilizewindows.com Optimization Configuring WSUS and Other Update Options in Windows 7
342
No Auto-Restart For Scheduled Automatic Updates and Installations policy - allows Automatic
Updates to disregard a required restart when a user is logged on. The will receive a notification about
the restart but is not required to restart the machine.
Automatic Updates detection frequency policy - specifies the time period for clients to wait before
checking for updates.
Allow Automatic Updates immediate installation policy - specifies whether Automatic Updates should
automatically install certain updates that do not interrupt Windows Services and don't force a restart.
Delay restart of schedule installations policy - specifies how long Automatic Updates waits before
performing a restart. If not configured, the system waits 5 minutes before restarting. This policy only
applies when update installations are scheduled.
Re-prompt for restart with scheduled installations policy - specifies how long Automatic Updates waits
before prompting the user for a scheduled restart. If not configured, the system prompts every 10
minutes.
Allow non-administrators to receive update notifications policy - allows us to deliver update
notifications when a non-administrator user is logged on to the computer.
Do not display 'Install Updates and Shut Down' option in Shut Down Windows dialog box policy -
when enabled, the install update option will not be displayed. In this case, users will be unable to
choose not to install the updates, and updates will be installed when they try to shut down the
computer.
In our case we will also enable the "Turn on Software Notifications" policy, and also "Turn on recommended
updates via Automatic Updates" policy. If we now open Windows Update console, we will notice that the
interface looks a little different. It now tells us that we receive updates "managed by your system
administrator". That basically means we are contacting a local update server.
Figure 563 - Windows Update Console
Now, we can actually force Windows updates in Windows 7 to contact the Microsoft update server on the
Internet, while the local policy stays the same. We can do that if we click on the "Check online for updates
from Windows Update" option on Windows Update console.
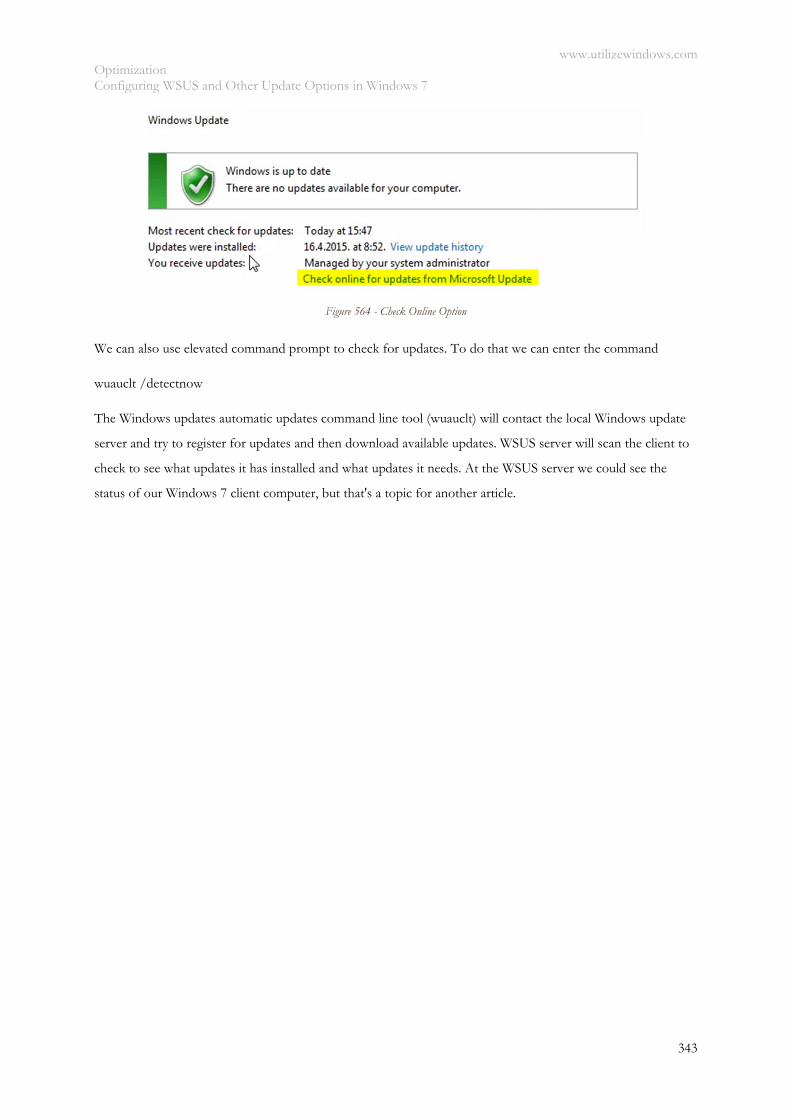
www.utilizewindows.com Optimization Configuring WSUS and Other Update Options in Windows 7
343
Figure 564 - Check Online Option
We can also use elevated command prompt to check for updates. To do that we can enter the command
wuauclt /detectnow
The Windows updates automatic updates command line tool (wuauclt) will contact the local Windows update
server and try to register for updates and then download available updates. WSUS server will scan the client to
check to see what updates it has installed and what updates it needs. At the WSUS server we could see the
status of our Windows 7 client computer, but that's a topic for another article.
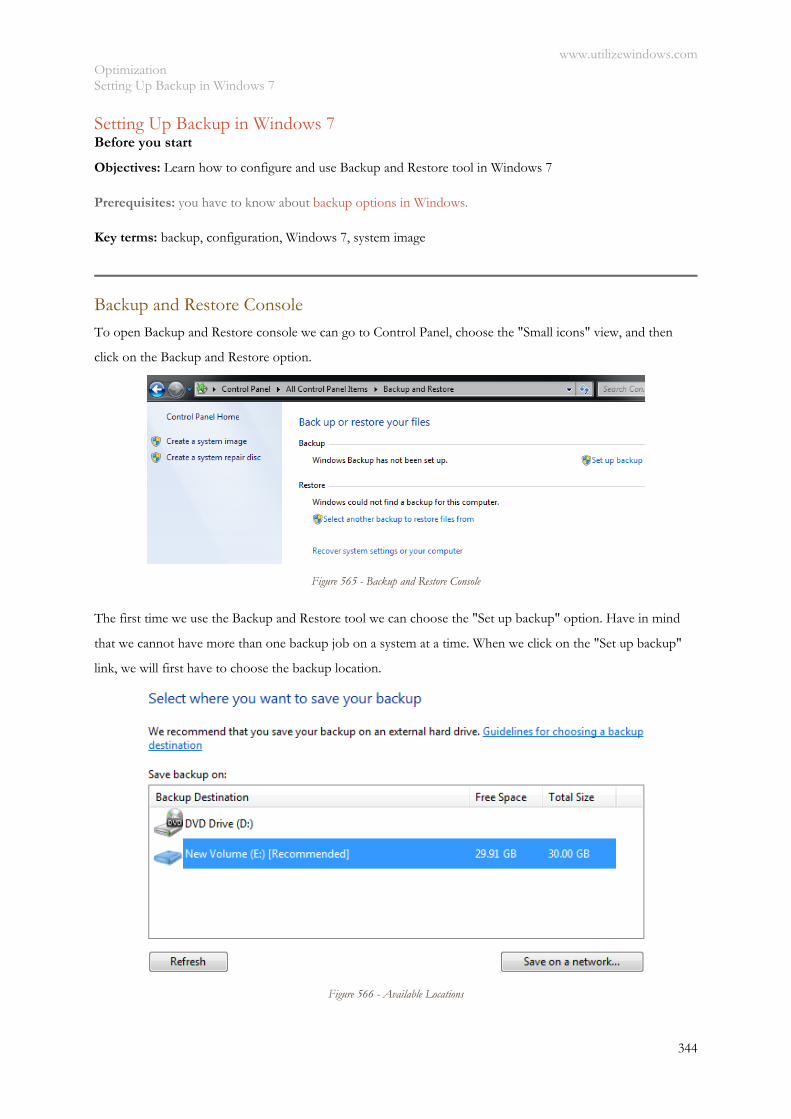
www.utilizewindows.com Optimization Setting Up Backup in Windows 7
344
Setting Up Backup in Windows 7 Before you start
Objectives: Learn how to configure and use Backup and Restore tool in Windows 7
Prerequisites: you have to know about backup options in Windows.
Key terms: backup, configuration, Windows 7, system image
Backup and Restore Console
To open Backup and Restore console we can go to Control Panel, choose the "Small icons" view, and then
click on the Backup and Restore option.
Figure 565 - Backup and Restore Console
The first time we use the Backup and Restore tool we can choose the "Set up backup" option. Have in mind
that we cannot have more than one backup job on a system at a time. When we click on the "Set up backup"
link, we will first have to choose the backup location.
Figure 566 - Available Locations
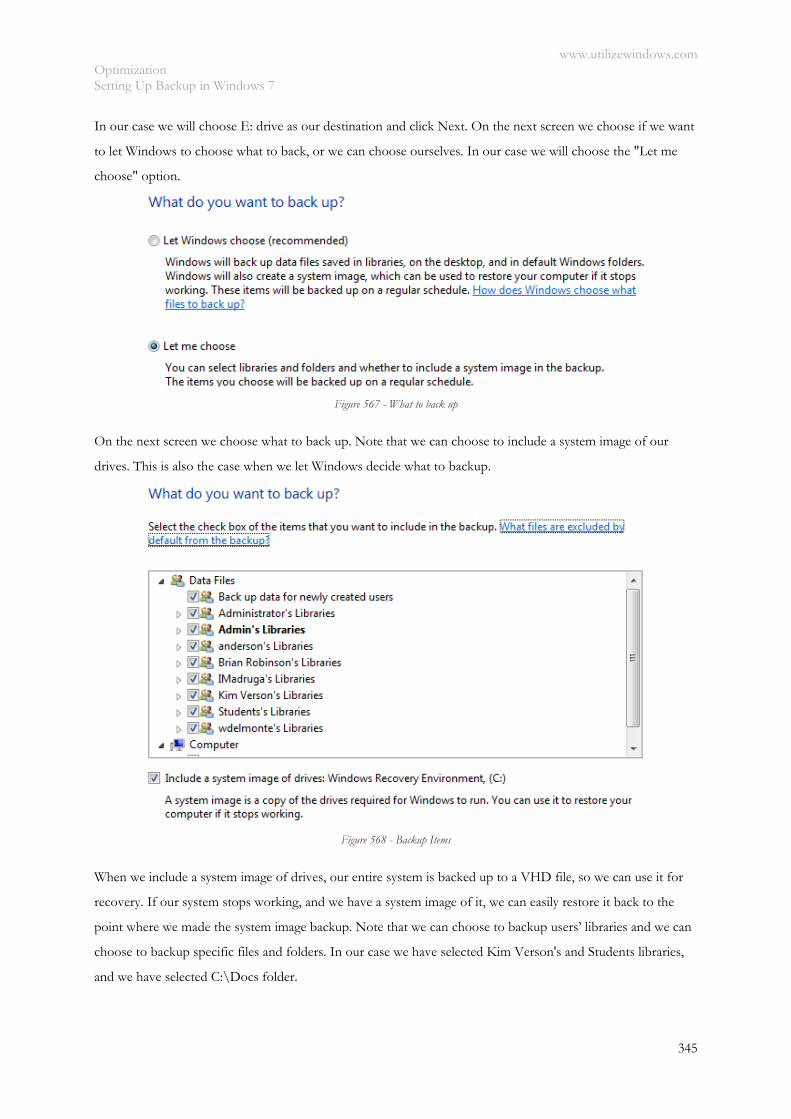
www.utilizewindows.com Optimization Setting Up Backup in Windows 7
345
In our case we will choose E: drive as our destination and click Next. On the next screen we choose if we want
to let Windows to choose what to back, or we can choose ourselves. In our case we will choose the "Let me
choose" option.
Figure 567 - What to back up
On the next screen we choose what to back up. Note that we can choose to include a system image of our
drives. This is also the case when we let Windows decide what to backup.
Figure 568 - Backup Items
When we include a system image of drives, our entire system is backed up to a VHD file, so we can use it for
recovery. If our system stops working, and we have a system image of it, we can easily restore it back to the
point where we made the system image backup. Note that we can choose to backup users’ libraries and we can
choose to backup specific files and folders. In our case we have selected Kim Verson's and Students libraries,
and we have selected C:\Docs folder.
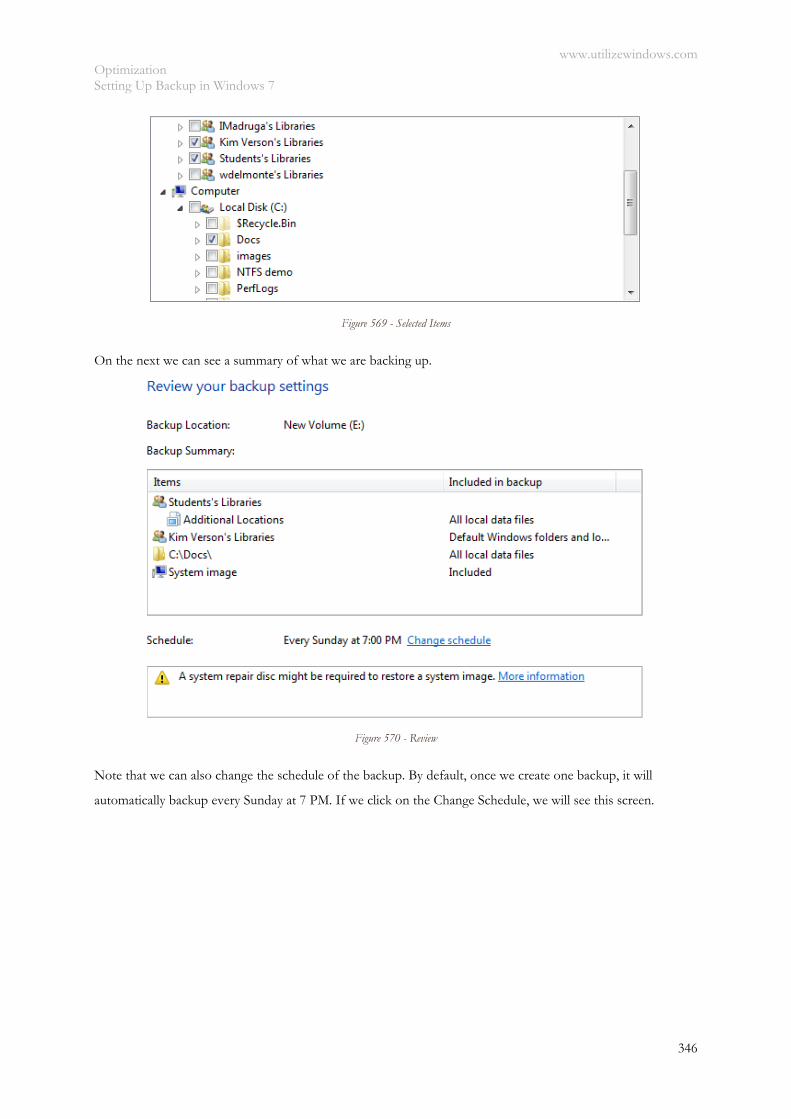
www.utilizewindows.com Optimization Setting Up Backup in Windows 7
346
Figure 569 - Selected Items
On the next we can see a summary of what we are backing up.
Figure 570 - Review
Note that we can also change the schedule of the backup. By default, once we create one backup, it will
automatically backup every Sunday at 7 PM. If we click on the Change Schedule, we will see this screen.
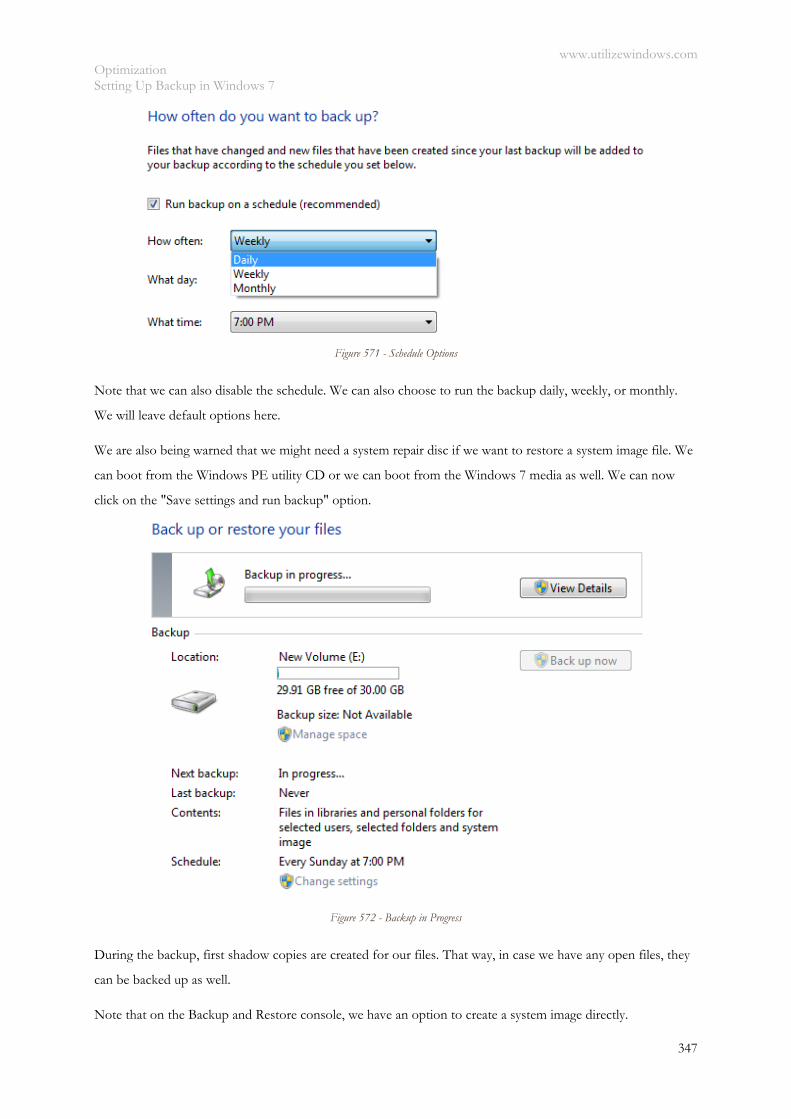
www.utilizewindows.com Optimization Setting Up Backup in Windows 7
347
Figure 571 - Schedule Options
Note that we can also disable the schedule. We can also choose to run the backup daily, weekly, or monthly.
We will leave default options here.
We are also being warned that we might need a system repair disc if we want to restore a system image file. We
can boot from the Windows PE utility CD or we can boot from the Windows 7 media as well. We can now
click on the "Save settings and run backup" option.
Figure 572 - Backup in Progress
During the backup, first shadow copies are created for our files. That way, in case we have any open files, they
can be backed up as well.
Note that on the Backup and Restore console, we have an option to create a system image directly.
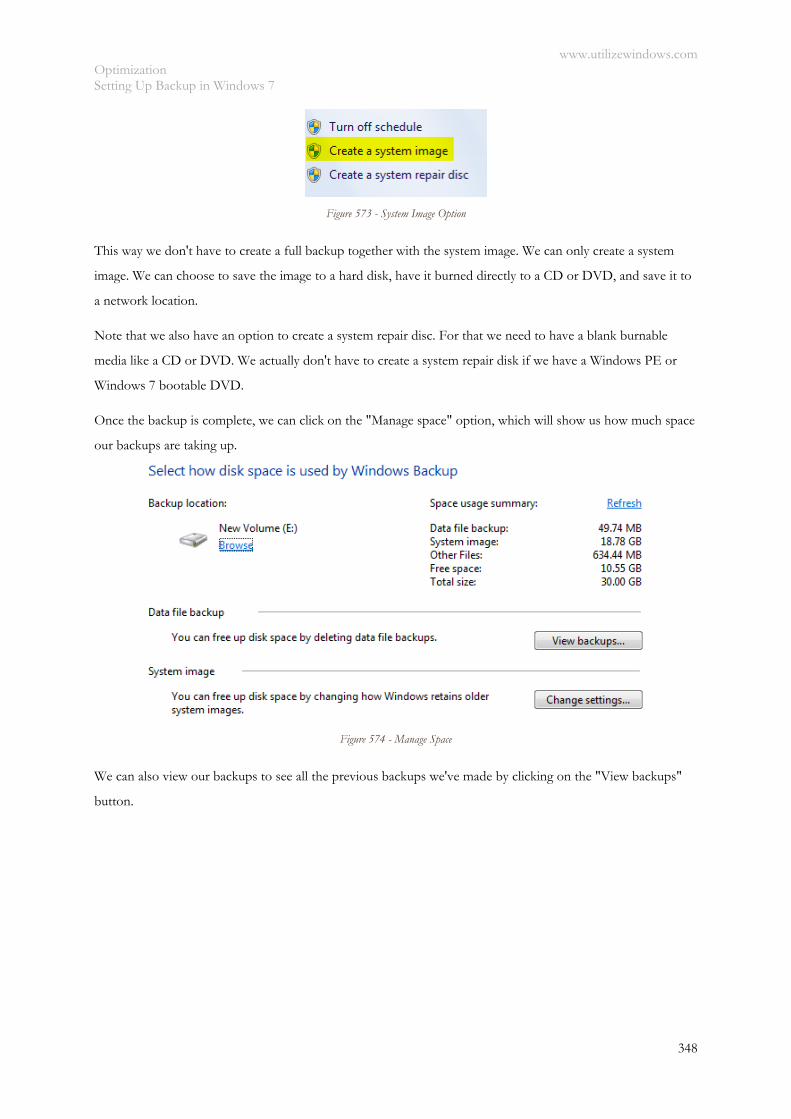
www.utilizewindows.com Optimization Setting Up Backup in Windows 7
348
Figure 573 - System Image Option
This way we don't have to create a full backup together with the system image. We can only create a system
image. We can choose to save the image to a hard disk, have it burned directly to a CD or DVD, and save it to
a network location.
Note that we also have an option to create a system repair disc. For that we need to have a blank burnable
media like a CD or DVD. We actually don't have to create a system repair disk if we have a Windows PE or
Windows 7 bootable DVD.
Once the backup is complete, we can click on the "Manage space" option, which will show us how much space
our backups are taking up.
Figure 574 - Manage Space
We can also view our backups to see all the previous backups we've made by clicking on the "View backups"
button.
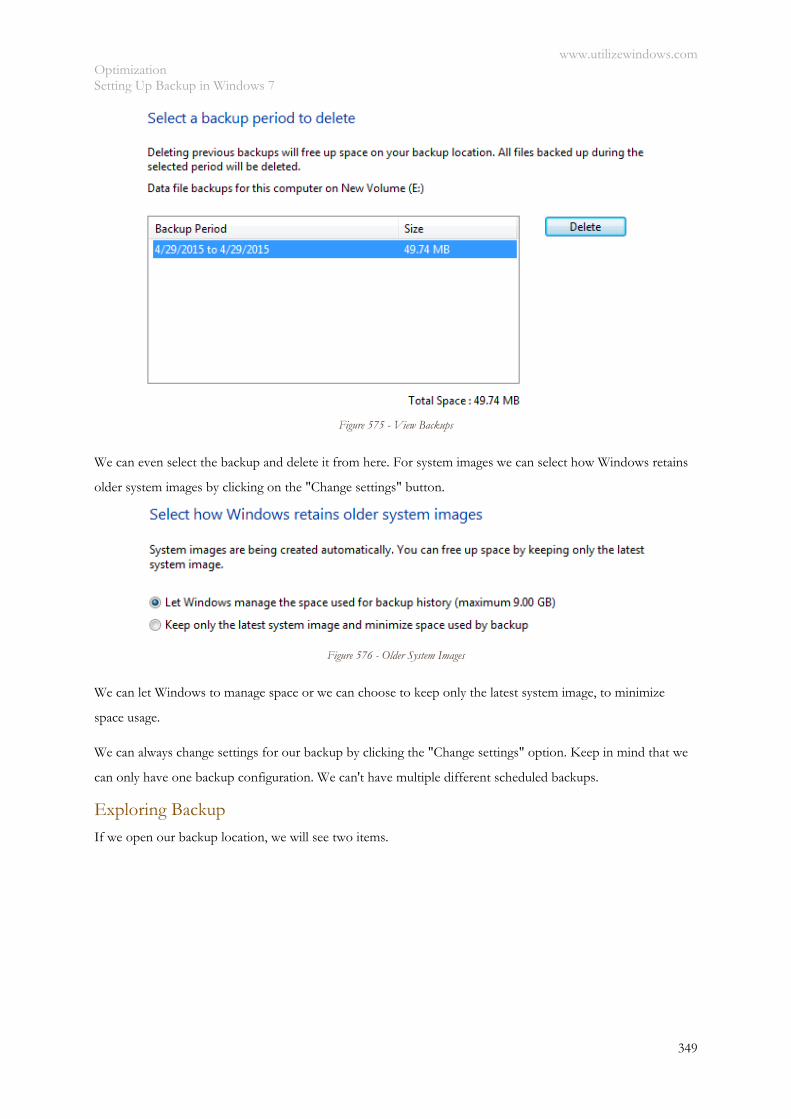
www.utilizewindows.com Optimization Setting Up Backup in Windows 7
349
Figure 575 - View Backups
We can even select the backup and delete it from here. For system images we can select how Windows retains
older system images by clicking on the "Change settings" button.
Figure 576 - Older System Images
We can let Windows to manage space or we can choose to keep only the latest system image, to minimize
space usage.
We can always change settings for our backup by clicking the "Change settings" option. Keep in mind that we
can only have one backup configuration. We can't have multiple different scheduled backups.
Exploring Backup
If we open our backup location, we will see two items.
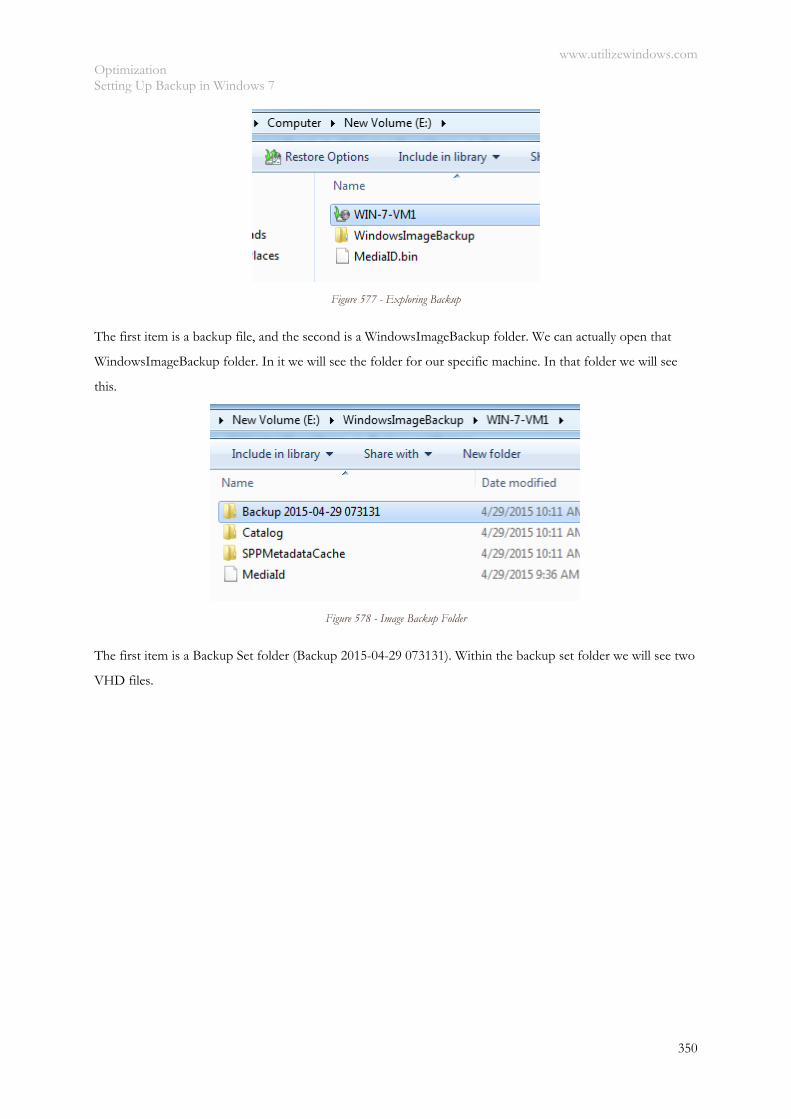
www.utilizewindows.com Optimization Setting Up Backup in Windows 7
350
Figure 577 - Exploring Backup
The first item is a backup file, and the second is a WindowsImageBackup folder. We can actually open that
WindowsImageBackup folder. In it we will see the folder for our specific machine. In that folder we will see
this.
Figure 578 - Image Backup Folder
The first item is a Backup Set folder (Backup 2015-04-29 073131). Within the backup set folder we will see two
VHD files.
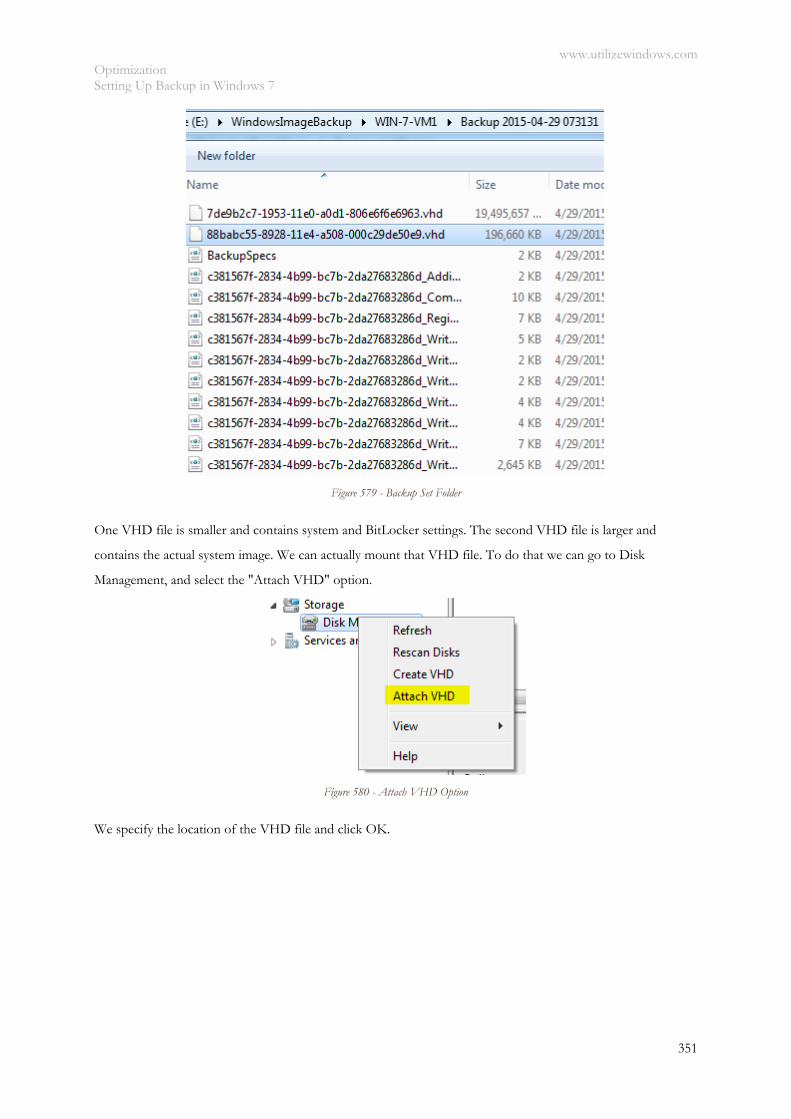
www.utilizewindows.com Optimization Setting Up Backup in Windows 7
351
Figure 579 - Backup Set Folder
One VHD file is smaller and contains system and BitLocker settings. The second VHD file is larger and
contains the actual system image. We can actually mount that VHD file. To do that we can go to Disk
Management, and select the "Attach VHD" option.
Figure 580 - Attach VHD Option
We specify the location of the VHD file and click OK.
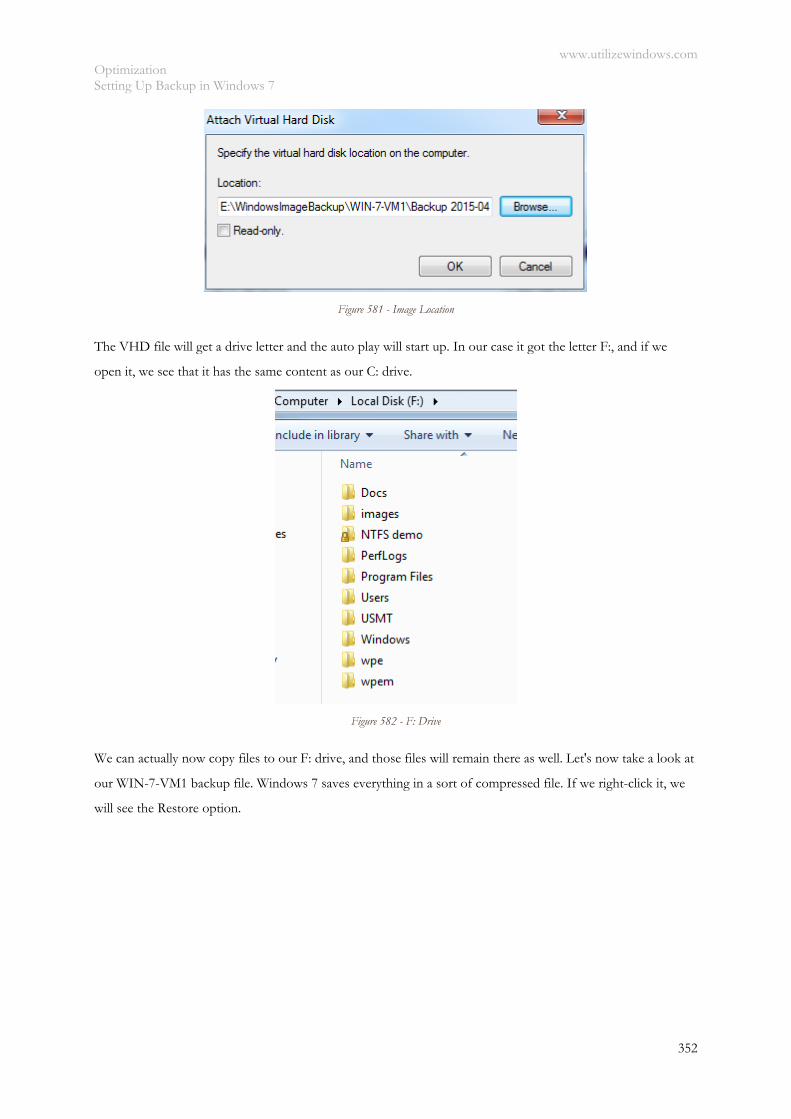
www.utilizewindows.com Optimization Setting Up Backup in Windows 7
352
Figure 581 - Image Location
The VHD file will get a drive letter and the auto play will start up. In our case it got the letter F:, and if we
open it, we see that it has the same content as our C: drive.
Figure 582 - F: Drive
We can actually now copy files to our F: drive, and those files will remain there as well. Let's now take a look at
our WIN-7-VM1 backup file. Windows 7 saves everything in a sort of compressed file. If we right-click it, we
will see the Restore option.
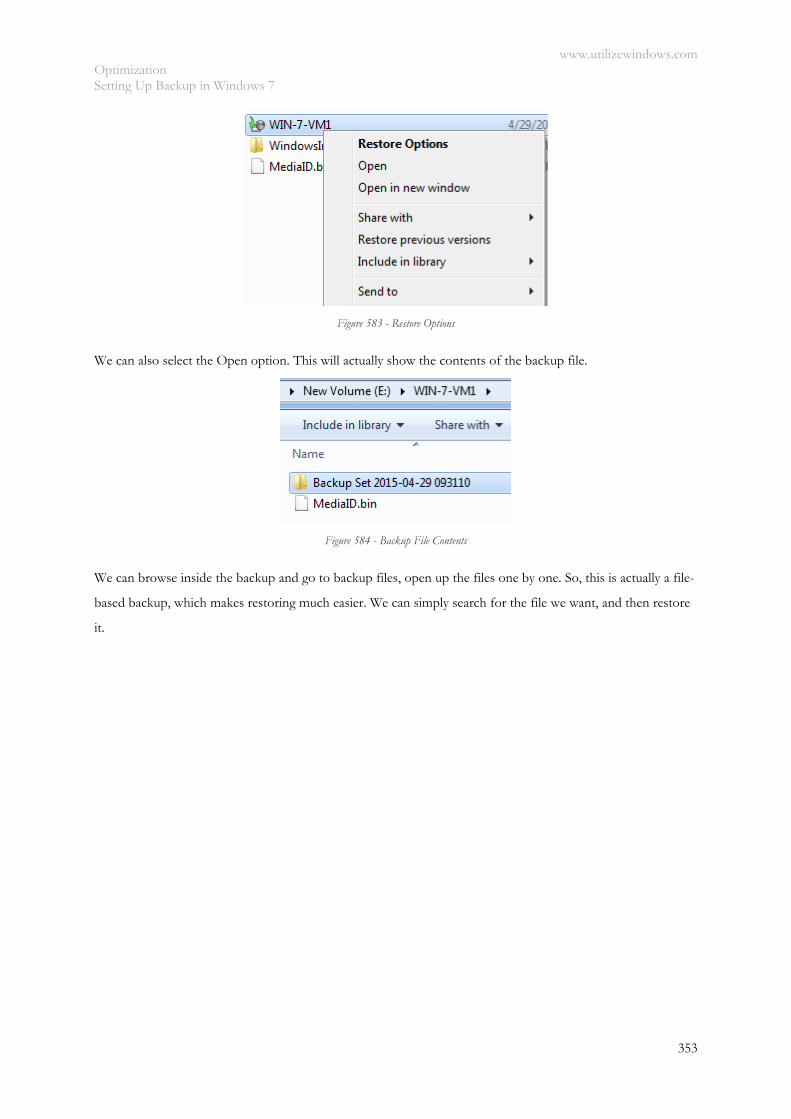
www.utilizewindows.com Optimization Setting Up Backup in Windows 7
353
Figure 583 - Restore Options
We can also select the Open option. This will actually show the contents of the backup file.
Figure 584 - Backup File Contents
We can browse inside the backup and go to backup files, open up the files one by one. So, this is actually a file-
based backup, which makes restoring much easier. We can simply search for the file we want, and then restore
it.
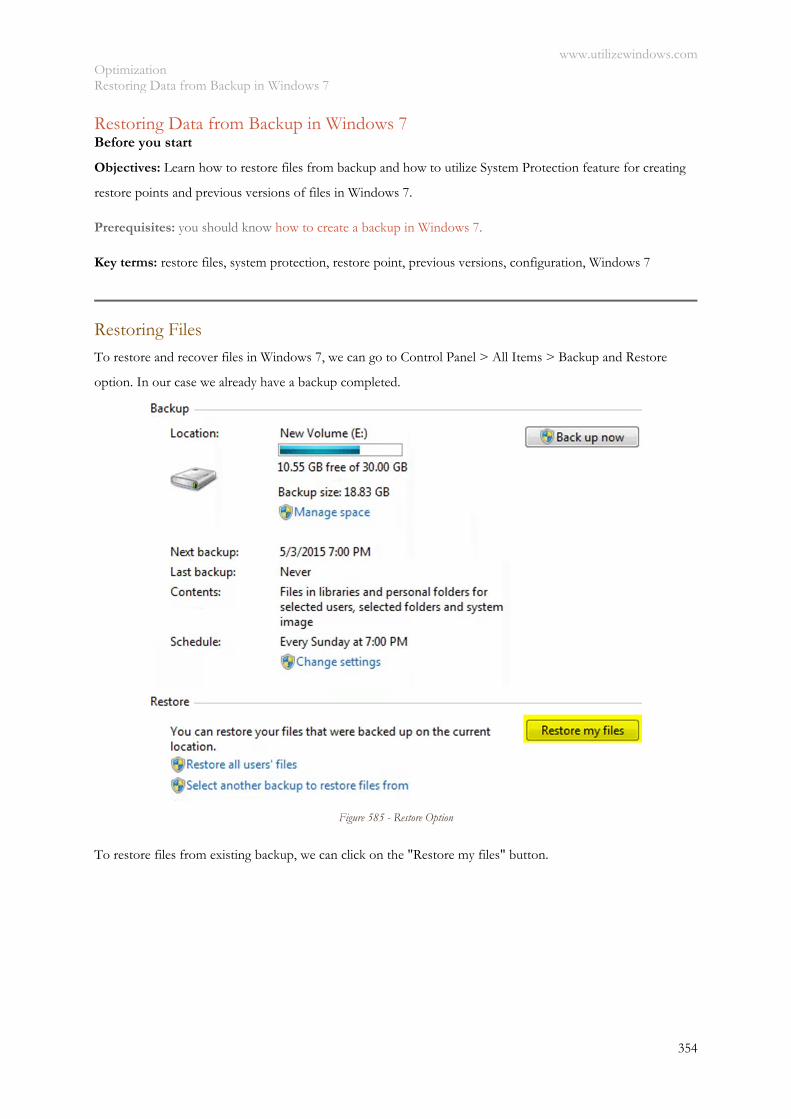
www.utilizewindows.com Optimization Restoring Data from Backup in Windows 7
354
Restoring Data from Backup in Windows 7 Before you start
Objectives: Learn how to restore files from backup and how to utilize System Protection feature for creating
restore points and previous versions of files in Windows 7.
Prerequisites: you should know how to create a backup in Windows 7.
Key terms: restore files, system protection, restore point, previous versions, configuration, Windows 7
Restoring Files To restore and recover files in Windows 7, we can go to Control Panel > All Items > Backup and Restore
option. In our case we already have a backup completed.
Figure 585 - Restore Option
To restore files from existing backup, we can click on the "Restore my files" button.
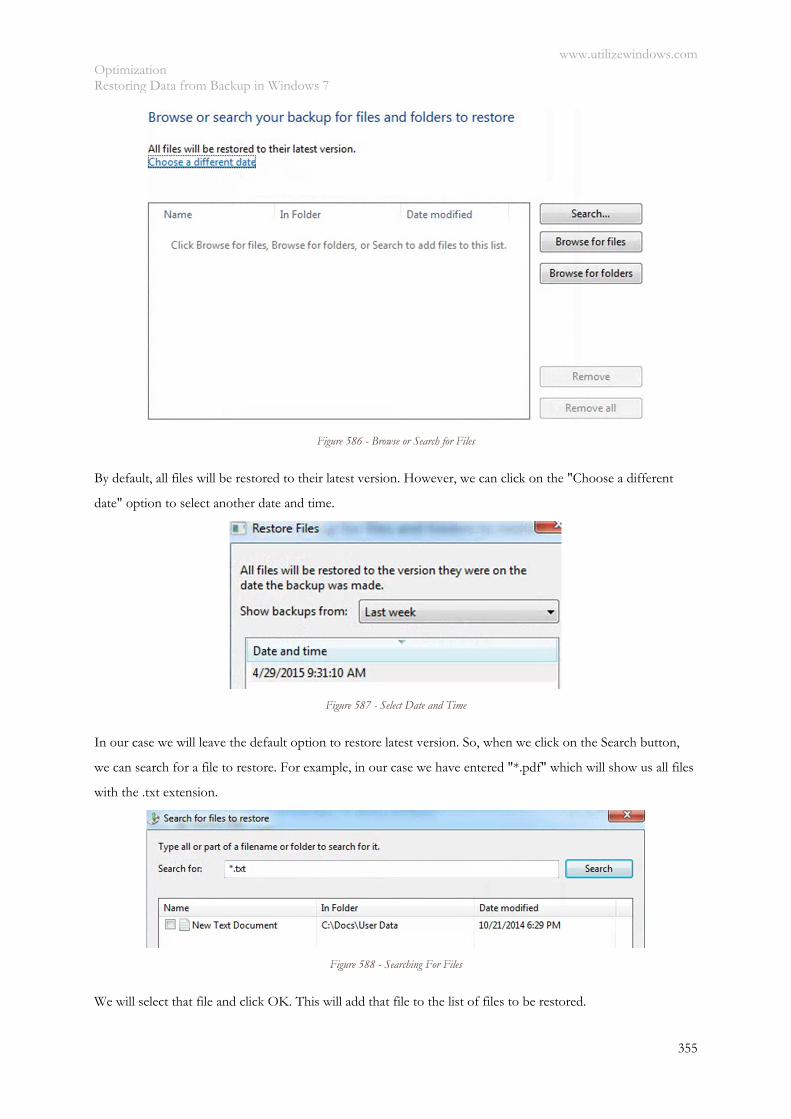
www.utilizewindows.com Optimization Restoring Data from Backup in Windows 7
355
Figure 586 - Browse or Search for Files
By default, all files will be restored to their latest version. However, we can click on the "Choose a different
date" option to select another date and time.
Figure 587 - Select Date and Time
In our case we will leave the default option to restore latest version. So, when we click on the Search button,
we can search for a file to restore. For example, in our case we have entered "*.pdf" which will show us all files
with the .txt extension.
Figure 588 - Searching For Files
We will select that file and click OK. This will add that file to the list of files to be restored.
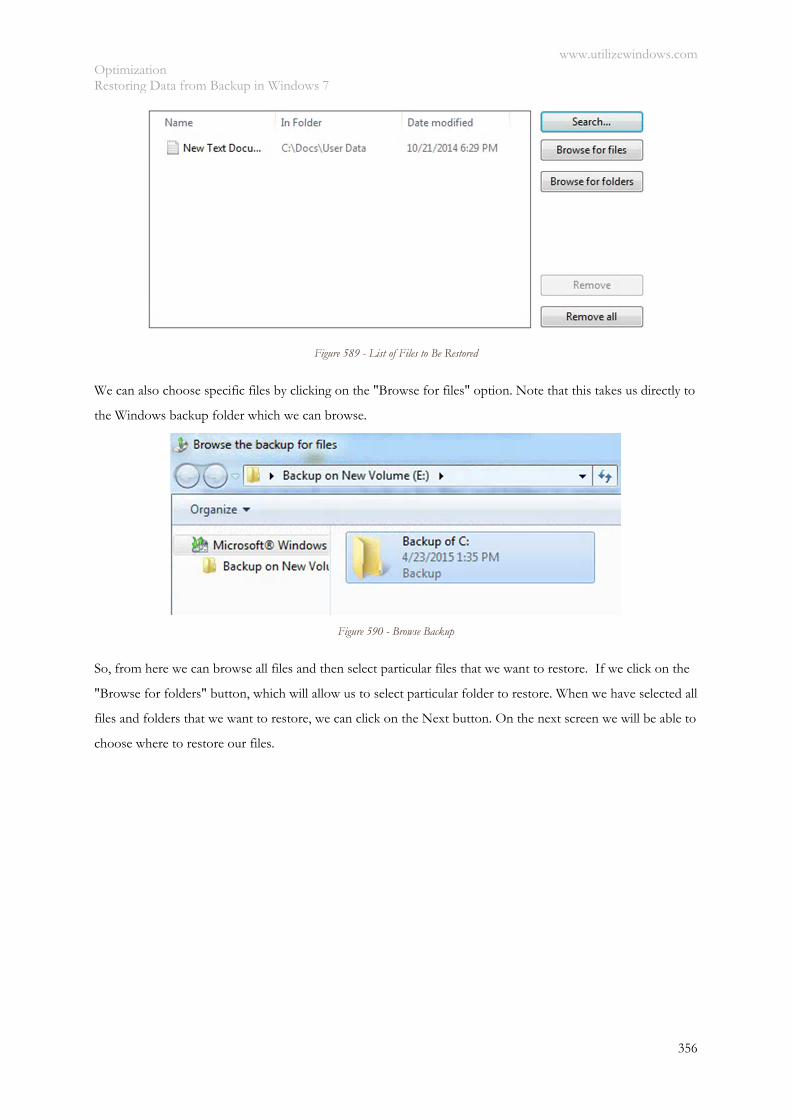
www.utilizewindows.com Optimization Restoring Data from Backup in Windows 7
356
Figure 589 - List of Files to Be Restored
We can also choose specific files by clicking on the "Browse for files" option. Note that this takes us directly to
the Windows backup folder which we can browse.
Figure 590 - Browse Backup
So, from here we can browse all files and then select particular files that we want to restore. If we click on the
"Browse for folders" button, which will allow us to select particular folder to restore. When we have selected all
files and folders that we want to restore, we can click on the Next button. On the next screen we will be able to
choose where to restore our files.
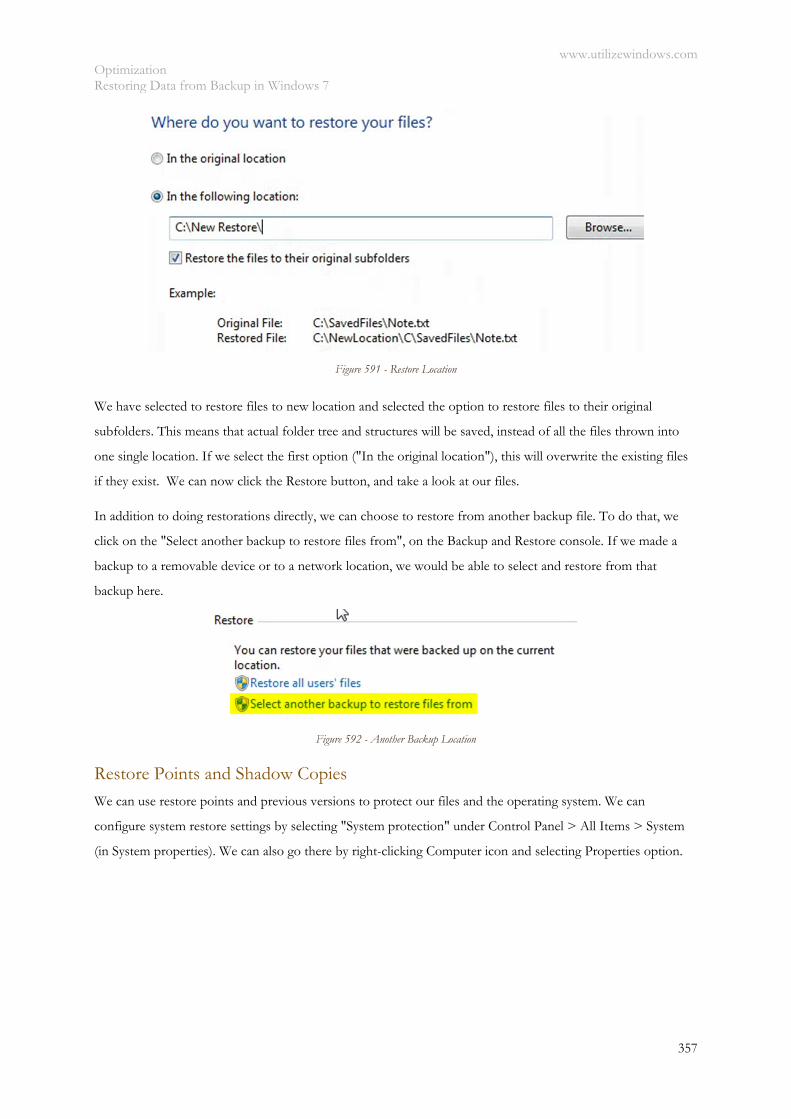
www.utilizewindows.com Optimization Restoring Data from Backup in Windows 7
357
Figure 591 - Restore Location
We have selected to restore files to new location and selected the option to restore files to their original
subfolders. This means that actual folder tree and structures will be saved, instead of all the files thrown into
one single location. If we select the first option ("In the original location"), this will overwrite the existing files
if they exist. We can now click the Restore button, and take a look at our files.
In addition to doing restorations directly, we can choose to restore from another backup file. To do that, we
click on the "Select another backup to restore files from", on the Backup and Restore console. If we made a
backup to a removable device or to a network location, we would be able to select and restore from that
backup here.
Figure 592 - Another Backup Location
Restore Points and Shadow Copies
We can use restore points and previous versions to protect our files and the operating system. We can
configure system restore settings by selecting "System protection" under Control Panel > All Items > System
(in System properties). We can also go there by right-clicking Computer icon and selecting Properties option.
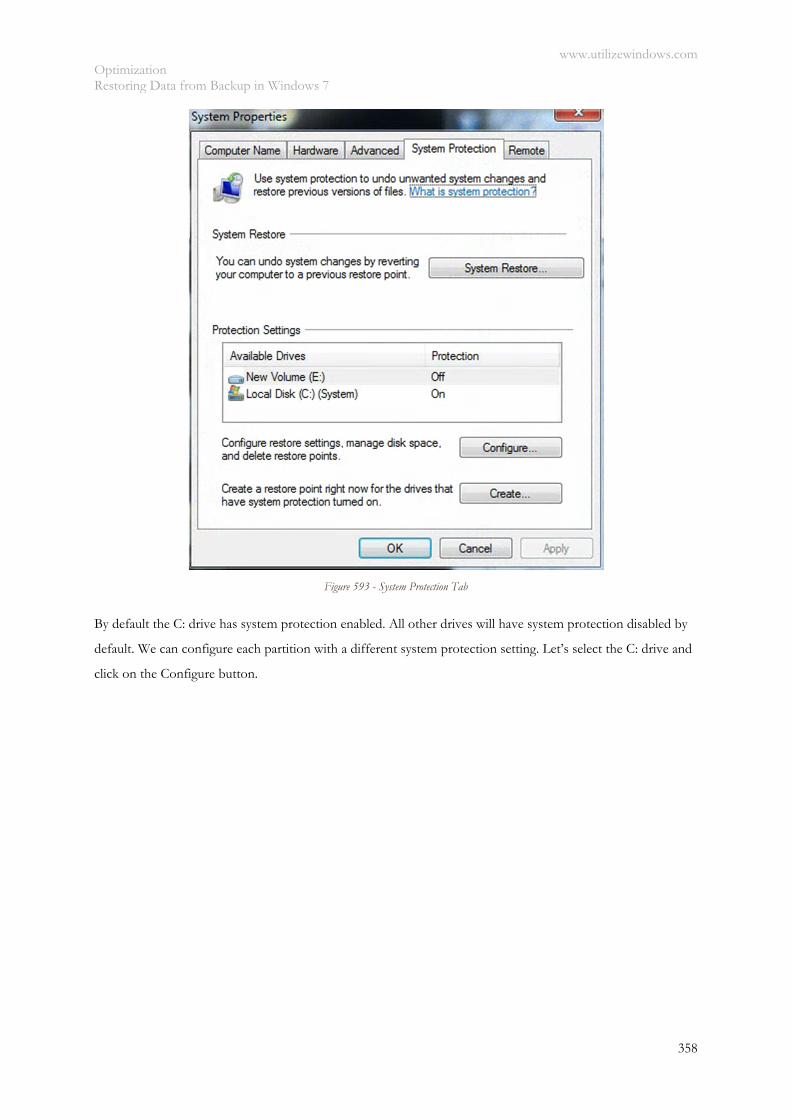
www.utilizewindows.com Optimization Restoring Data from Backup in Windows 7
358
Figure 593 - System Protection Tab
By default the C: drive has system protection enabled. All other drives will have system protection disabled by
default. We can configure each partition with a different system protection setting. Let’s select the C: drive and
click on the Configure button.
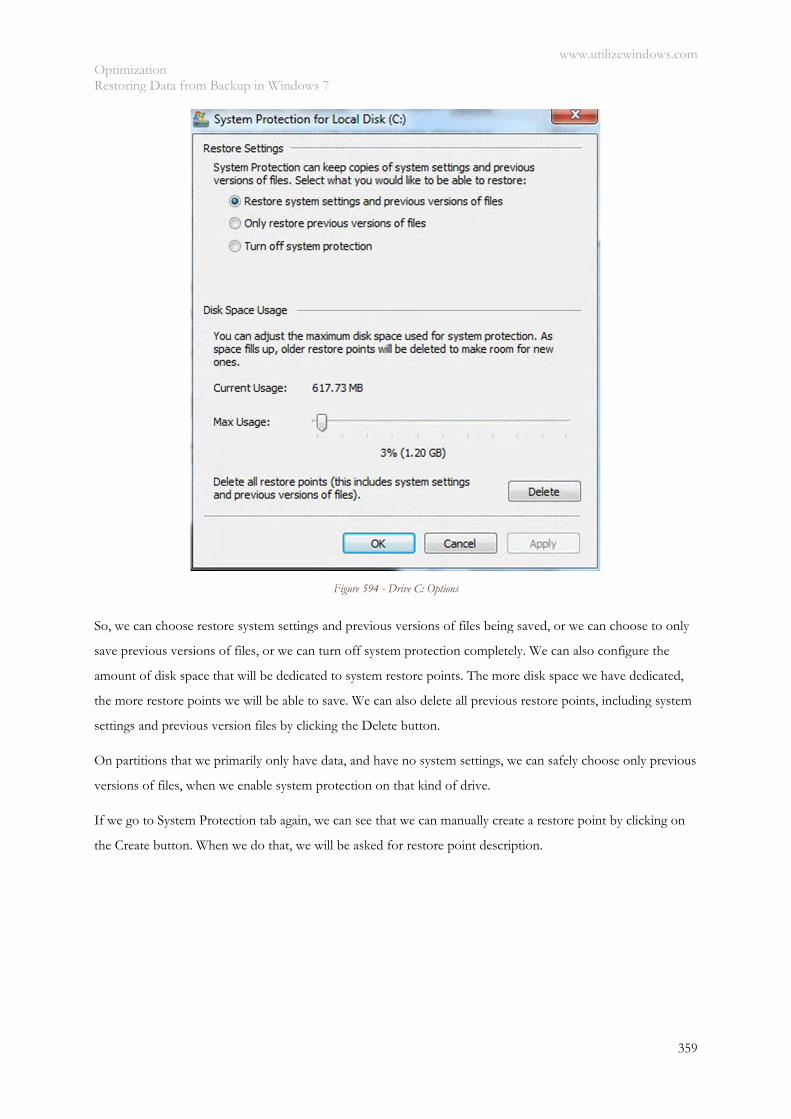
www.utilizewindows.com Optimization Restoring Data from Backup in Windows 7
359
Figure 594 - Drive C: Options
So, we can choose restore system settings and previous versions of files being saved, or we can choose to only
save previous versions of files, or we can turn off system protection completely. We can also configure the
amount of disk space that will be dedicated to system restore points. The more disk space we have dedicated,
the more restore points we will be able to save. We can also delete all previous restore points, including system
settings and previous version files by clicking the Delete button.
On partitions that we primarily only have data, and have no system settings, we can safely choose only previous
versions of files, when we enable system protection on that kind of drive.
If we go to System Protection tab again, we can see that we can manually create a restore point by clicking on
the Create button. When we do that, we will be asked for restore point description.
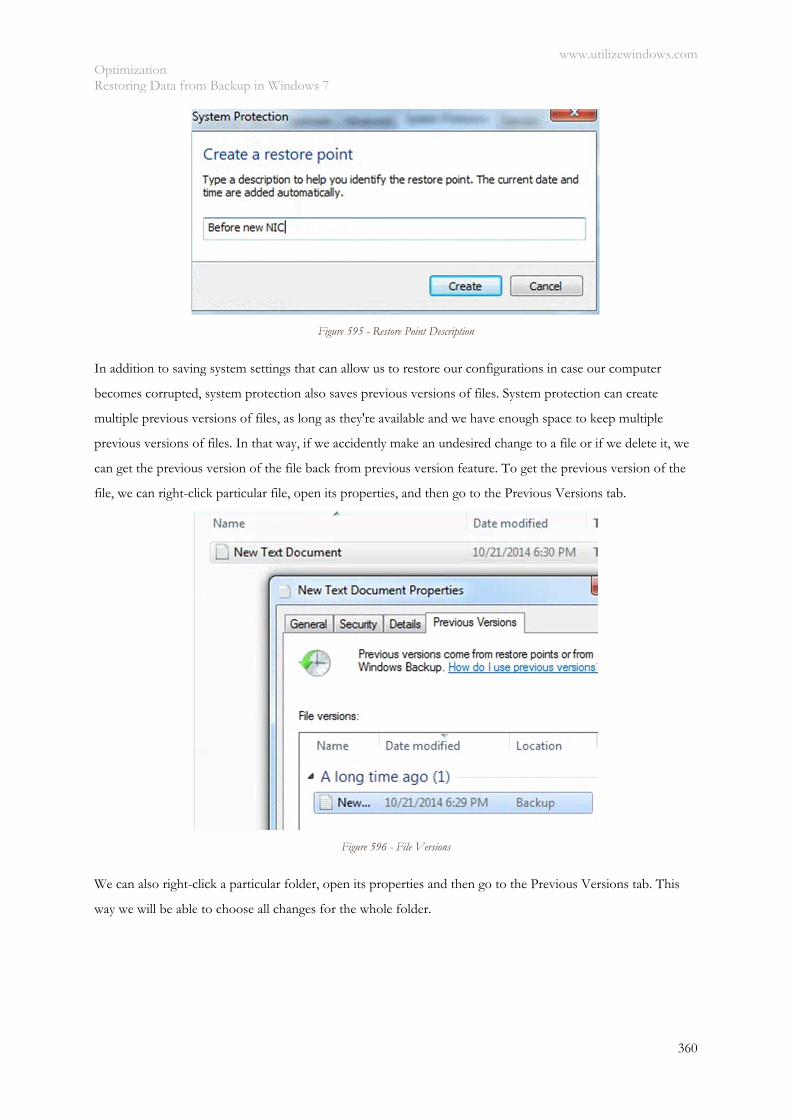
www.utilizewindows.com Optimization Restoring Data from Backup in Windows 7
360
Figure 595 - Restore Point Description
In addition to saving system settings that can allow us to restore our configurations in case our computer
becomes corrupted, system protection also saves previous versions of files. System protection can create
multiple previous versions of files, as long as they're available and we have enough space to keep multiple
previous versions of files. In that way, if we accidently make an undesired change to a file or if we delete it, we
can get the previous version of the file back from previous version feature. To get the previous version of the
file, we can right-click particular file, open its properties, and then go to the Previous Versions tab.
Figure 596 - File Versions
We can also right-click a particular folder, open its properties and then go to the Previous Versions tab. This
way we will be able to choose all changes for the whole folder.
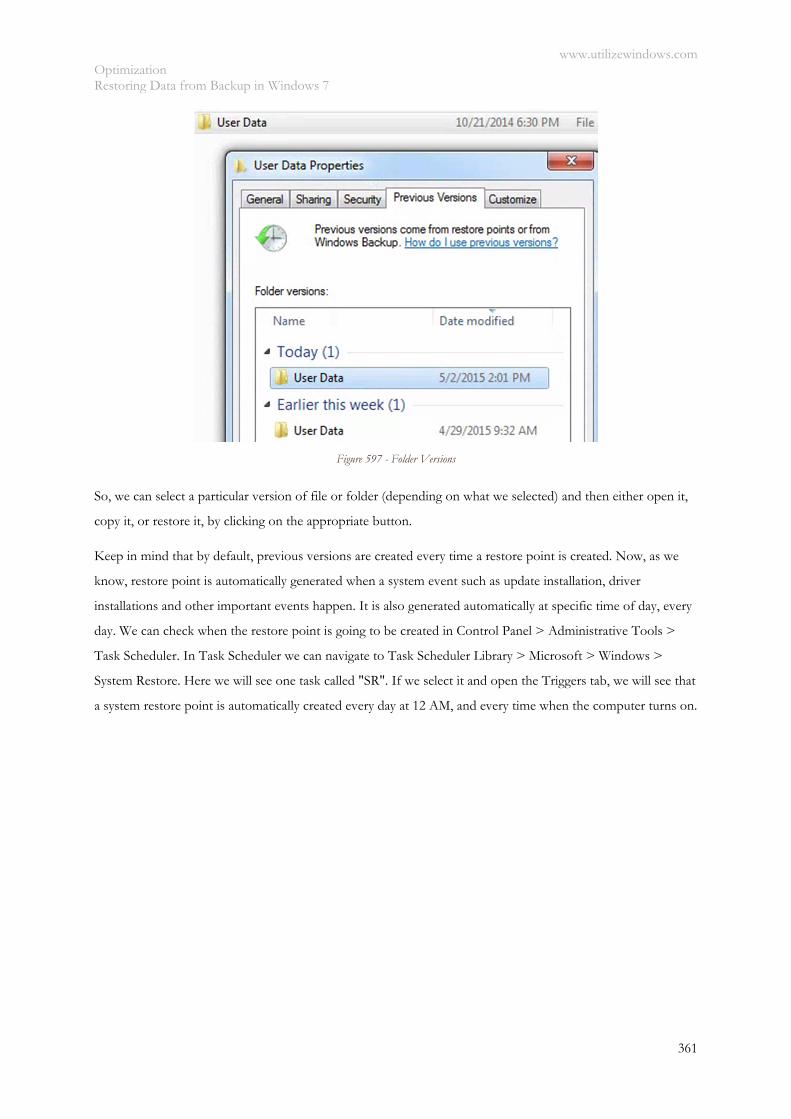
www.utilizewindows.com Optimization Restoring Data from Backup in Windows 7
361
Figure 597 - Folder Versions
So, we can select a particular version of file or folder (depending on what we selected) and then either open it,
copy it, or restore it, by clicking on the appropriate button.
Keep in mind that by default, previous versions are created every time a restore point is created. Now, as we
know, restore point is automatically generated when a system event such as update installation, driver
installations and other important events happen. It is also generated automatically at specific time of day, every
day. We can check when the restore point is going to be created in Control Panel > Administrative Tools >
Task Scheduler. In Task Scheduler we can navigate to Task Scheduler Library > Microsoft > Windows >
System Restore. Here we will see one task called "SR". If we select it and open the Triggers tab, we will see that
a system restore point is automatically created every day at 12 AM, and every time when the computer turns on.
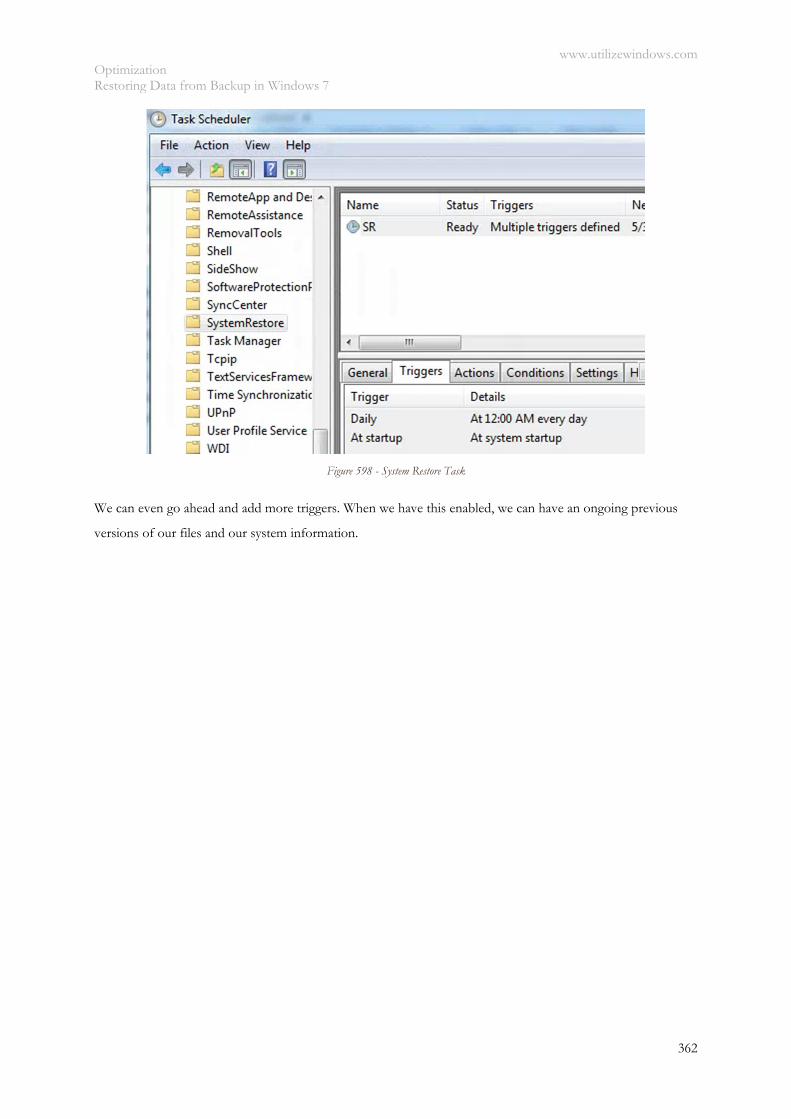
www.utilizewindows.com Optimization Restoring Data from Backup in Windows 7
362
Figure 598 - System Restore Task
We can even go ahead and add more triggers. When we have this enabled, we can have an ongoing previous
versions of our files and our system information.

http//www.utilizewindows.com
Utilize Windows 7