Embed Size (px)
Citation preview
Layaways
POS Module

Layaway Benefits
Layaways are a great customer service that
many retailers no longer offer

Transaction Menu
Press F2 to get to the transaction menu.
Then you will select L for Layaways
The screen should now show Layaway in the
top right corner of your POS screen

Customer Information
Once you go to the bottom Item (SKU) box,
it will automatically prompt the Customer
Information Screen
Input Customers name, phone #, and
address
Be sure to reference what kind of items are
included in the layaway

Post Items
Scan and post items just like a regular sale
Terms
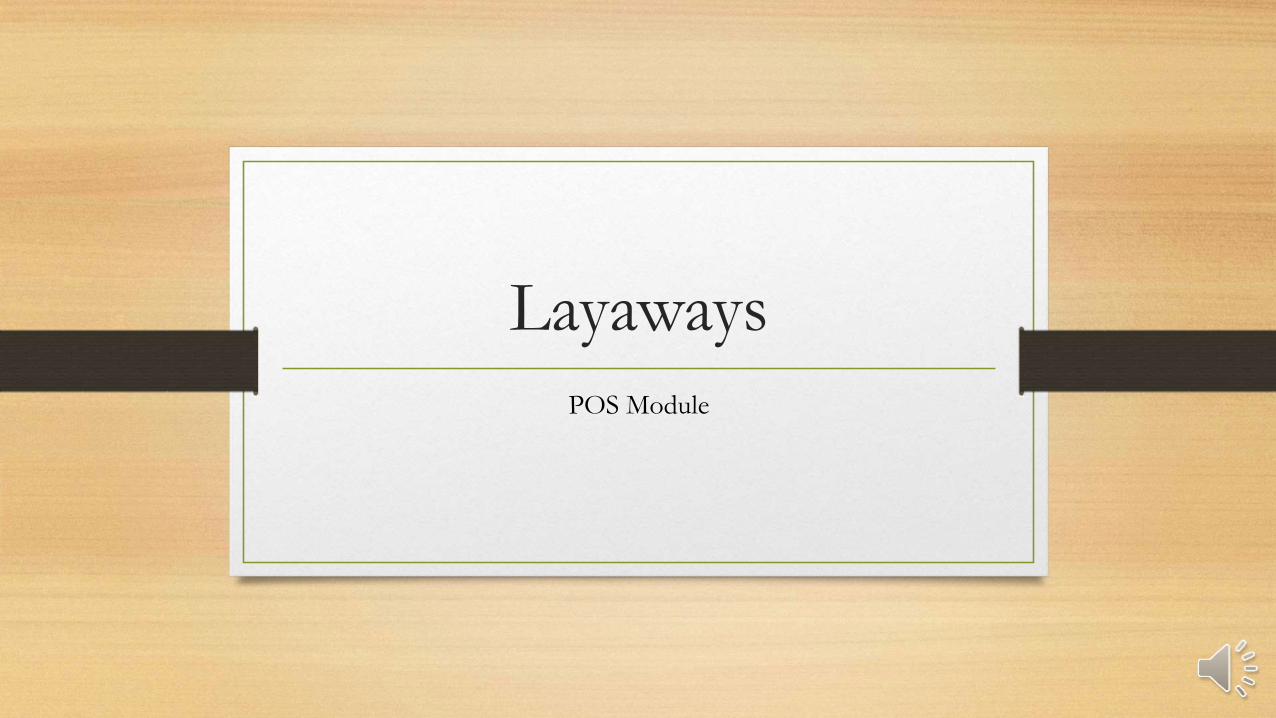
Once all items are scanned you must now
add the Layaway Terms
Input TERMS in the sku box and add qty 1
Once you post the sku you will see the
layaway terms posted to your layaway.
Once all items are scanned and terms are
applied press total

Finish Layaway
Once you total , you will choose Save and
Print to take the deposit.

Deposit Menu
POS will prompt a deposit box
It will auto fill with the ¼ down deposit that is required
You may change the amount to what the customer would like to put down unless it is
less than the required deposit
If less you will need a managers override
Input the amount the customer would like to put down and select OK

Total Menu
Now you will select the type of tender the
customer will be paying for their deposit.
Enter amount in appropriate cash, check or
charge field and press enter

Complete Transaction
Select Yes to print out a copy of the invoice
Secure the items in a Big R bag and attach
the invoice to it insuring the customer
information is visible.
Take the item to the designated layaway area

Taking Additional
Deposits

Pulling up the Layaway
If the customer has the receipt or knows the
layaway # you can easily find the layaway by
inputting the layaway # in the customer field
starting with a “.”
It will bring you live into the layaway
transaction

View Documents
If you do not have the layaway #, you must
go to View Documents to retrieve the
Layaway.
To do so you must go to the customer field
and select the “-” no sale key to bring you to
the header menu. Then select 5-view
documents

View Documents
Once you are in the viewer you will select
the store and the type of transaction. “L” for
Layaway and press Enter
View Documents
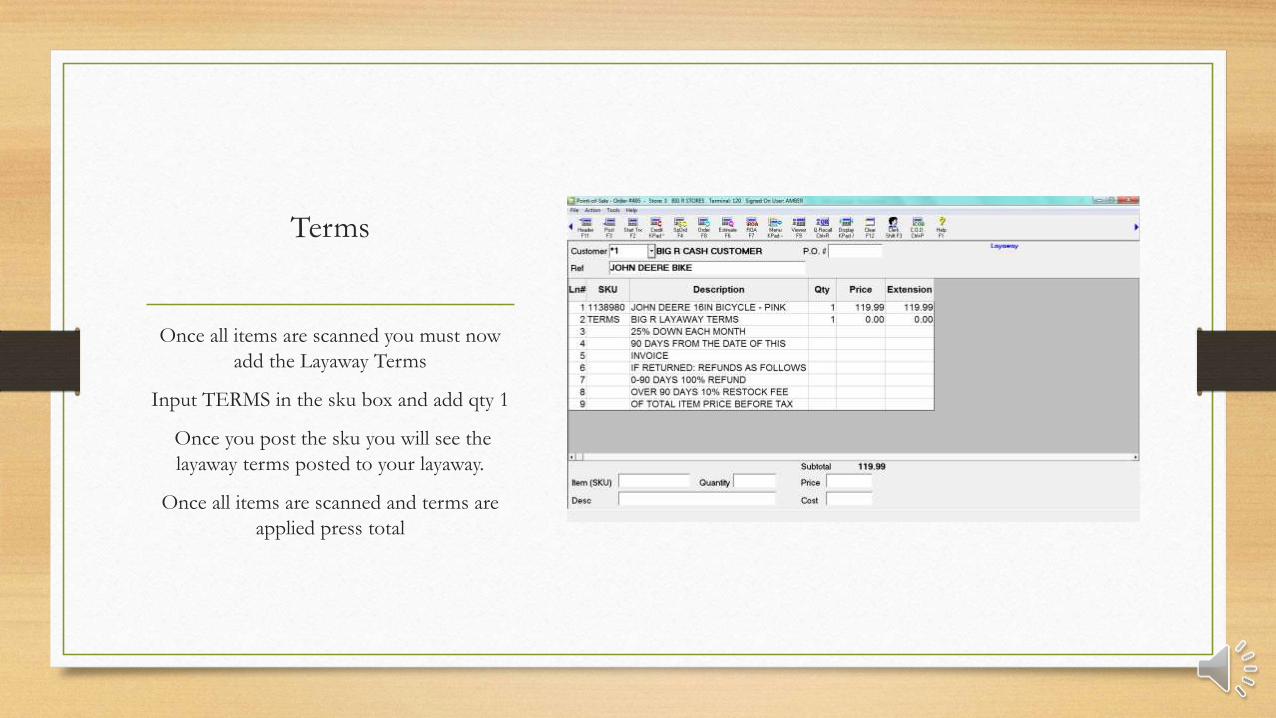
Now you will select your correct layaway
You can do so by looking for their name in
the customer name column
Highlight desired Layaway and press enter.
This will take you live back into that
transaction

Take Additional Payment
The Layaway Menu will pop up
To take an additional payment you will select
option 1-Apply a payment

Take Additional Payment
POS will prompt a deposit box
It will auto fill with an additional ¼ down deposit that is required
You may change the amount to what the customer would like to put down unless it is less than the
required deposit
If less you will need a managers override
Input the amount the customer would like to put down and select OK. Complete the transaction as
before.

Invoicing a Layaway

Invoice Layaway
When you get to the layaway menu you will
choose option 2- apply the final payment
It will give you the remaining balance in
parentheses.
Only invoice if the customer is picking up
the layaway.

Final Payment
Now you may proceed as a regular
transaction.
Make sure to call and have someone retrieve
the layaway from its designated area
REMINDER: To invoice means there is a
change in inventory/change of possession

COMPLETE
Layaways POS Module