Embed Size (px)
Citation preview
Learn How to Install the New Storefront WordPress Theme + Integrate with WooCommerce Storefront e-Commerce WordPress Manual 2015
Page:2
Copyright © 2015 by Ginzburg Press.
All rights reserved. No part of this publication may be reproduced, distributed or transmitted in any form or by any means, including photocopying, recording, or other electronic or mechanical methods, without the prior written permission of the publisher, except in the case of brief quotations embodied in critical reviews and certain other non-commercial uses permitted by copyright law.
Published by Ginzburg Press
www.ginzburgpress.com
Copyright ©2015 Ginzburg Press
Notice of Liability
The author and publisher have made every effort to ensure the accuracy of the information herein. However, the information contained in this book is sold without warranty, either express or implied. The author and publisher will not be held liable for any damages to be caused either directly or indirectly by the instructions contained in this book, or by the software or hardware products described herein.
Trademark Notice
Rather than indicating every occurrence of a trademarked name as such, this book uses the names only in an editorial fashion and to the benefit of the trademark owner, with no intention of infringement of the trademark.
WooThemesTM is the market leader in premium themes and plugins for WordPress. The publisher of this book has no affiliation with WooThemes. This book is training for WooThemes/WooCommerce new Storefront theme.
WordPress is a registered trademark of Automattic Inc.
This publisher is not affiliated with or sponsored by Automattic or the WordPress open source project.
Learn How to Install the New Storefront WordPress Theme + Integrate with WooCommerce/ Ginzburg Press.—1st ed.
Page:3
Contents
Section 1: Introduction ................................................................................................................. 5
Welcome to the Course! ........................................................................................................... 5
What are we Going to Cover in This Course? .......................................................................... 6
Why Should You Choose Storefront? ...................................................................................... 7
Meet Your Instructor! ................................................................................................................ 8
The 5 Factors You Should Consider Before You Setup Your Store ....................................... 10
The Creative Brief Worksheet ................................................................................................ 12
Conclusion to Section 1.......................................................................................................... 13
Section 2: Install WordPress and the Storefront Theme ............................................................ 14
cPanel WordPress Install ....................................................................................................... 14
WordPress Configuration ....................................................................................................... 16
Install Storefront ..................................................................................................................... 19
Install WooCommerce ............................................................................................................ 25
Conclusion to Section 2.......................................................................................................... 30
Section 3: The Storefront ........................................................................................................... 31
Configure the Menu Locations ............................................................................................... 38
Primary Menu ......................................................................................................................... 38
Secondary Menu .................................................................................................................... 41
Create the Homepage ............................................................................................................ 45
Homepage Control Plugin ...................................................................................................... 49
The Customizer ...................................................................................................................... 56
Page:4
Add a Logo ............................................................................................................................. 62
Import WooCommerce Dummy Data ..................................................................................... 72
Widgets .................................................................................................................................. 93
Products ............................................................................................................................... 107
Conclusion to Section 3........................................................................................................ 113
Section 4 - The Storefront Child Theme .................................................................................. 115
Create a Child Theme .......................................................................................................... 115
Conclusion to Section 4........................................................................................................ 128
Section 5: Page Builder ........................................................................................................... 129
Review the Page Builder Plugins ......................................................................................... 129
Install the Site Origin Page Builder Plugin ............................................................................ 131
Install a Responsive Slider ................................................................................................... 140
Change the Header Background Color ................................................................................ 153
Customize the Header ......................................................................................................... 157
Set up a Blog ........................................................................................................................ 166
Run the Updater ................................................................................................................... 176
Demo Site ............................................................................................................................ 177
Conclusion to Section 5 and the Course .............................................................................. 178
eCommerce Resources & Links .............................................................................................. 180
Page:5
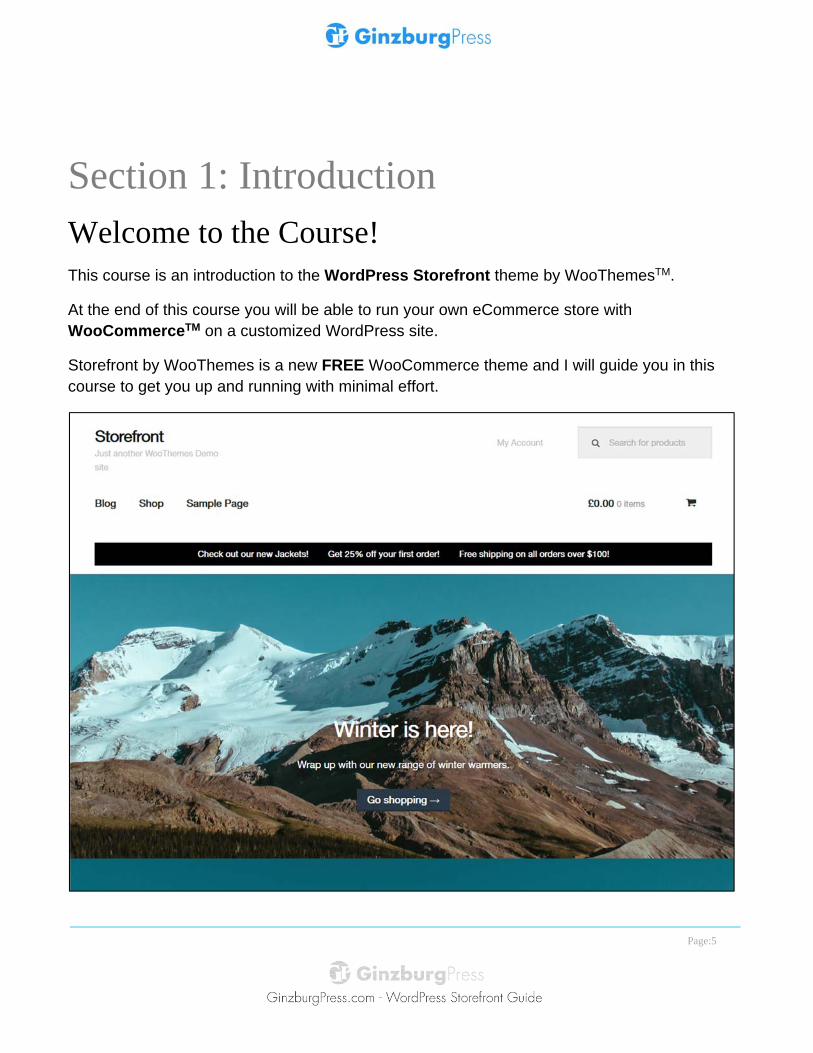
Section 1: Introduction Welcome to the Course! This course is an introduction to the WordPress Storefront theme by WooThemesTM.
At the end of this course you will be able to run your own eCommerce store with WooCommerceTM on a customized WordPress site.
Storefront by WooThemes is a new FREE WooCommerce theme and I will guide you in this course to get you up and running with minimal effort.
Page:6
What are we Going to Cover in This Course?
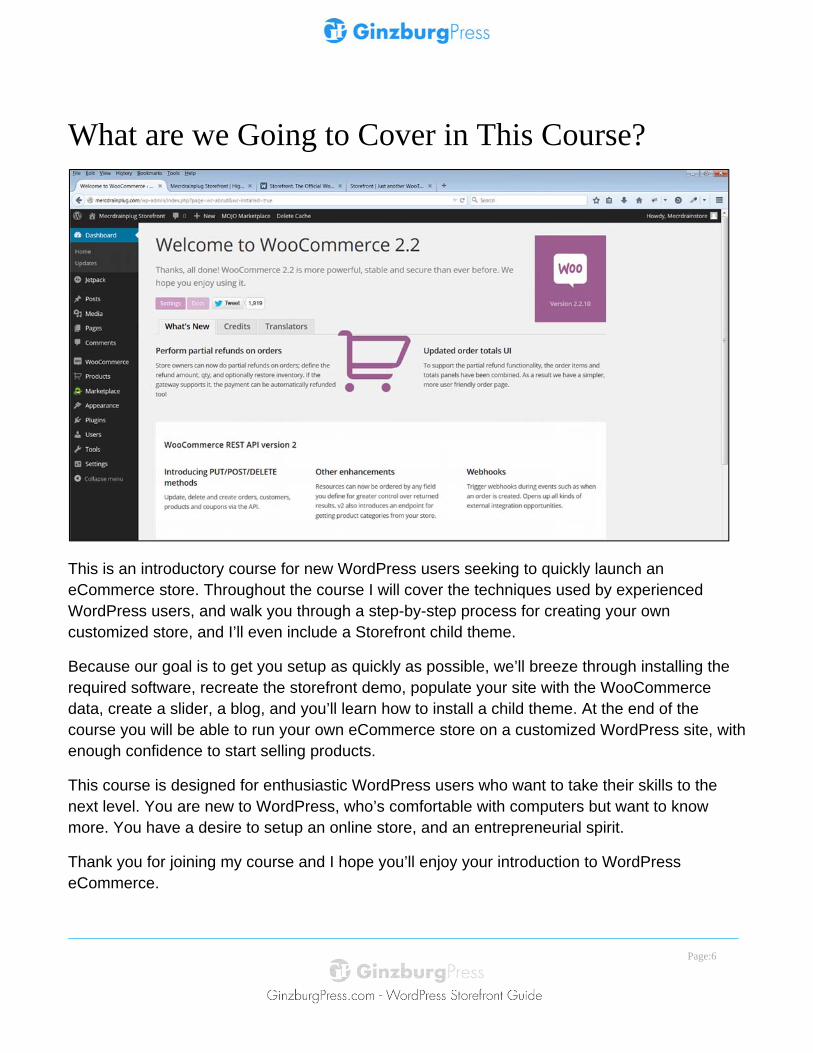
This is an introductory course for new WordPress users seeking to quickly launch an eCommerce store. Throughout the course I will cover the techniques used by experienced WordPress users, and walk you through a step-by-step process for creating your own customized store, and I’ll even include a Storefront child theme.
Because our goal is to get you setup as quickly as possible, we’ll breeze through installing the required software, recreate the storefront demo, populate your site with the WooCommerce data, create a slider, a blog, and you’ll learn how to install a child theme. At the end of the course you will be able to run your own eCommerce store on a customized WordPress site, with enough confidence to start selling products.
This course is designed for enthusiastic WordPress users who want to take their skills to the next level. You are new to WordPress, who’s comfortable with computers but want to know more. You have a desire to setup an online store, and an entrepreneurial spirit.
Thank you for joining my course and I hope you’ll enjoy your introduction to WordPress eCommerce.
Page:7
Why Should You Choose Storefront?
Storefront is a free WordPress theme integrated with WooCommerce. Storefront was developed by WooThemes the makers of WooCommerce.
Perhaps you have some items to sell and you would like to get your feet wet by setting up your own online store. The default Storefront design is clean and simple. It’s an excellent starting point from which to customize your store to match your brand, whether that's using the WordPress customizer or a custom plugin / child theme.
1. With Storefront you can quickly setup an online store. WooTheme’s Storefront
theme will be the perfect way to start your online eCommerce venture.
2. Storefront is a flexible and simple solution. Maybe you have a bricks and mortar store
and you haven’t found the right software. Storefront is a simple solution to help you get
started.
3. Storefront can be an excellent alternative. Perhaps you have an outdated or
antiquated online store and you would like to upgrade to something new and easy to use.
Storefront can be an excellent alternative to get you fitted with the latest WordPress
theme and functionality.
4. Perhaps you want to sell eCommerce WordPress solutions to your clients. Maybe
you are a graphics or web designer and you want to start selling eCommerce WordPress
solutions to your clients. With Storefront you can create a child theme as I show you in
this course and make your CSS customizations. Or you can utilize the built in WordPress
customizer to make your design change.

Page:8
Meet Your Instructor!
Welcome to my course. I would like to tell you a bit about my background in graphic design and website development.
I work as a freelance graphics, web and WordPress designer. Over the past 15 years I have developed and managed websites for small businesses to large corporations. I have designed and developed WordPress sites for clients for the past four years.
I received my Bachelor of Arts from York University in the mid-1980s. I ventured into graphic design, computer graphics and studied Pre-Press Computer Graphics for Macintosh at the Durham Business & Computer College in Toronto. I also took courses in basic computer programming at Centennial College.
During the 1990s I freelanced as a graphics designer for a print brokerage firm. I designed brochures, flyers, ad campaigns and advertising materials during this time. I enrolled in courses to improve my design skills at the International Academy of Design’s Advertising & Design Program. In 1998 I became a member of the accredited Association of Registered Graphic Designers of Ontario.
Page:9
When I first started designing with the computer, there was this little known company called Adobe - not so little any more - where my early technical skills included Photoshop, Illustrator, Fireworks, Contribute and Dreamweaver.
Back then, QuarkXpress was the dominant print and design layout program and now we have InDesign. In the late 1990s I migrated into web design because working with digital graphics was a natural progressive move into online work for me.
When Netscape and Yahoo seemed like the next best thing since sliced bread, I taught myself HTML and web design. During the 1990s, I had more clients interested in websites than brochures and much to my chagrin some requested flash intros. I created my very first website for a non-profit organization without the flash intro.
Before content managements systems proliferated the internet, I used PERL and CGI scripts to create online forms and databases. Before Facebook and YouTube, I collaborated with design agencies in corporate branding and designing client websites. The client would hand me a paper mockup of what the site should look like, literally on a restaurant napkin. Sometimes I recreated the design in Photoshop or I quickly mocked up the concept online.
During the late 1990s I diligently worked for small to large corporations maintaining their websites and for a few years I specialized in the call centre industry.
Eventually new computer languages and technologies appeared with a vengeance while eCommerce sites grew exponentially. Now everyone wanted a shopping cart and PayPal was a new type of payment application that enabled you to pay online. Then it just seemed like it happened overnight, blogs came on the scene.
In the past few years, I have created blogs, forums, Membership based sites, automotive inventory sites and eCommerce sites. My technical usage includes HTML, CSS, Perl, ASP, MySQL, and MSSQL and now PHP is quite popular thanks to WordPress and other content management systems.
Before the proliferation of WordPress, I attended software seminars to acquire licenses to market shopping carts to my clients. I worked with shopping carts that were based on CGI and ASP, such as the VPASP shopping cart and the Actinic eCommerce software.
Today I’m introducing you to WooCommerce and Storefront. I’ll demonstrate to you how to setup your own eCommerce website.
Thank you for joining my course and I hope you’ll enjoy your introduction to WordPress eCommerce.
Page:10
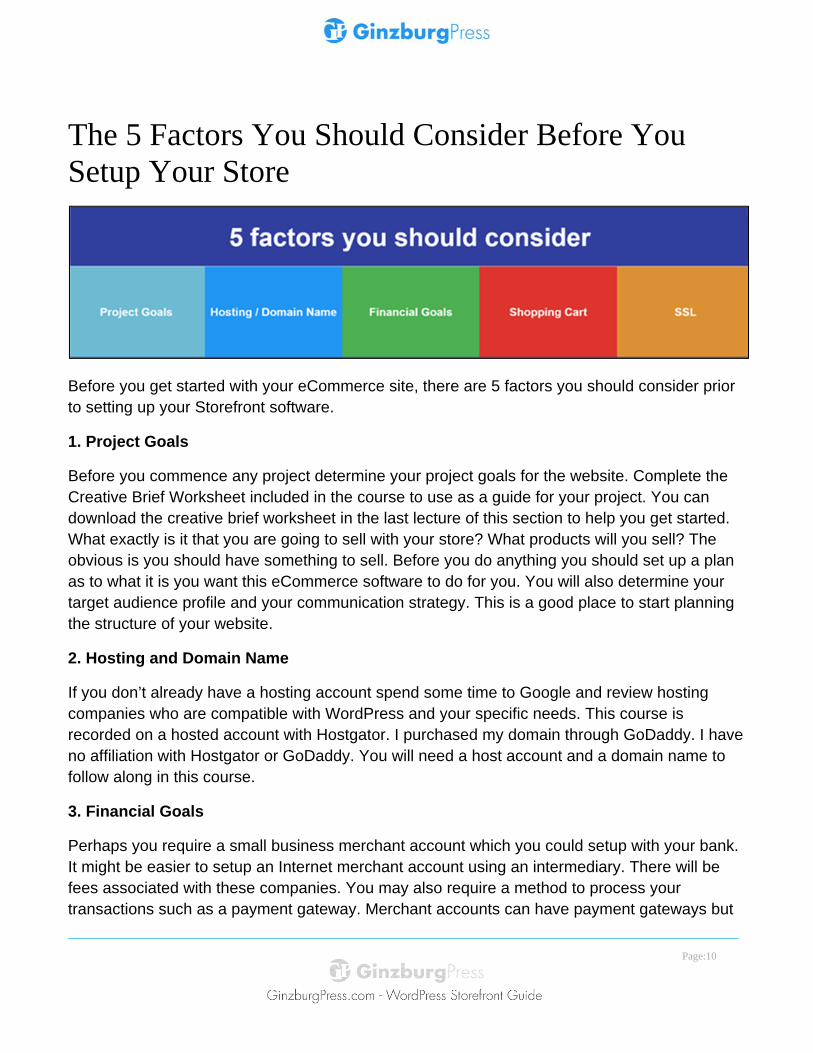
The 5 Factors You Should Consider Before You Setup Your Store
Before you get started with your eCommerce site, there are 5 factors you should consider prior to setting up your Storefront software.
1. Project Goals
Before you commence any project determine your project goals for the website. Complete the Creative Brief Worksheet included in the course to use as a guide for your project. You can download the creative brief worksheet in the last lecture of this section to help you get started. What exactly is it that you are going to sell with your store? What products will you sell? The obvious is you should have something to sell. Before you do anything you should set up a plan as to what it is you want this eCommerce software to do for you. You will also determine your target audience profile and your communication strategy. This is a good place to start planning the structure of your website.
2. Hosting and Domain Name
If you don’t already have a hosting account spend some time to Google and review hosting companies who are compatible with WordPress and your specific needs. This course is recorded on a hosted account with Hostgator. I purchased my domain through GoDaddy. I have no affiliation with Hostgator or GoDaddy. You will need a host account and a domain name to follow along in this course.
3. Financial Goals
Perhaps you require a small business merchant account which you could setup with your bank. It might be easier to setup an Internet merchant account using an intermediary. There will be fees associated with these companies. You may also require a method to process your transactions such as a payment gateway. Merchant accounts can have payment gateways but
Page:11
you may want to review other options such as PayPal, Google Checkout and Amazon Payments.
4. Shopping Cart
Since this course is based on WordPress you have chosen this option to setup your online store using WooThemes latest eCommerce theme: Storefront. The new Storefront theme is completely compatible with WooCommerce since they developed it. Storefront is a new theme that is free to download. WooCommerce is also free to download. They provide you with everything you require to get your products online.
5. SSL and Security
Depending upon what type of gateway you choose, you should consider purchasing a SSL or Secure Socket Layer certificate. You can most likely purchase your SSL through your hosting provider. In most cases, you will be processing payments off site if using PayPal, etc. Adding an SSL certificate is optional but it’s definitely an added plus to let your visitors be aware that you have an SSL protected site.
One of the most important factors to consider for your new website is security. I suggest you install a security plugin for your WordPress site before you commence selling products. I’m not affiliated with any of the iTheme plugins but if you’re uncertain which products to try, the iThemes security plugin has a free version you can install and try. I also use iThemes Backupbuddy plugin in conjunction with the security plugin to ensure the site is always backed up.
Page:12
The Creative Brief Worksheet
The Creative Brief Worksheet will help you define the purpose and goals of your project, who is the target audience and what content to include. It’s important that you have a clear plan for your website. Once you have determined your goals, content and strategy, you can refer to the brief as your guide from time to time to remind yourself to stay on track.
Download the creative brief worksheet from the last lecture of Section 1 to help you get started.
Page:13
Conclusion to Section 1 Congratulations! You’ve made it to the end of the first section of this course.
In this section I introduced you to the Storefront theme and WordPress. I reviewed the topics we’ll cover in the course, as well as the requirements. At the end of this course you will be able to run your own eCommerce store on a customized WordPress site. I also touched on why and who this course is for, and how Storefront is an excellent online store for you.
I introduced you to who I am: my credentials, my experience as a graphics, web and WordPress designer, my work with eCommerce applications, and my experience building WordPress sites.
I reviewed how you should assess your eCommerce needs and requirements. There are 5 factors you should consider before you start your eCommerce site.
1. Define your project goals
2. Choose a hosting and domain name
3. Determine your financial goals
4. Review your shopping cart
5. Consider your SSL and security
I also included a download for The Creative Brief Worksheet to help you define the purpose and goals of your project, who is the target audience and what content to include. It’s important that you have a clear plan for your website. Once you have determined your goals, content and strategy, you can refer to the brief as your guide from time to time to remind yourself to stay on track.
In the next section, we'll dive right in and install WordPress, the Storefront theme, and WooCommerce.
Page:14
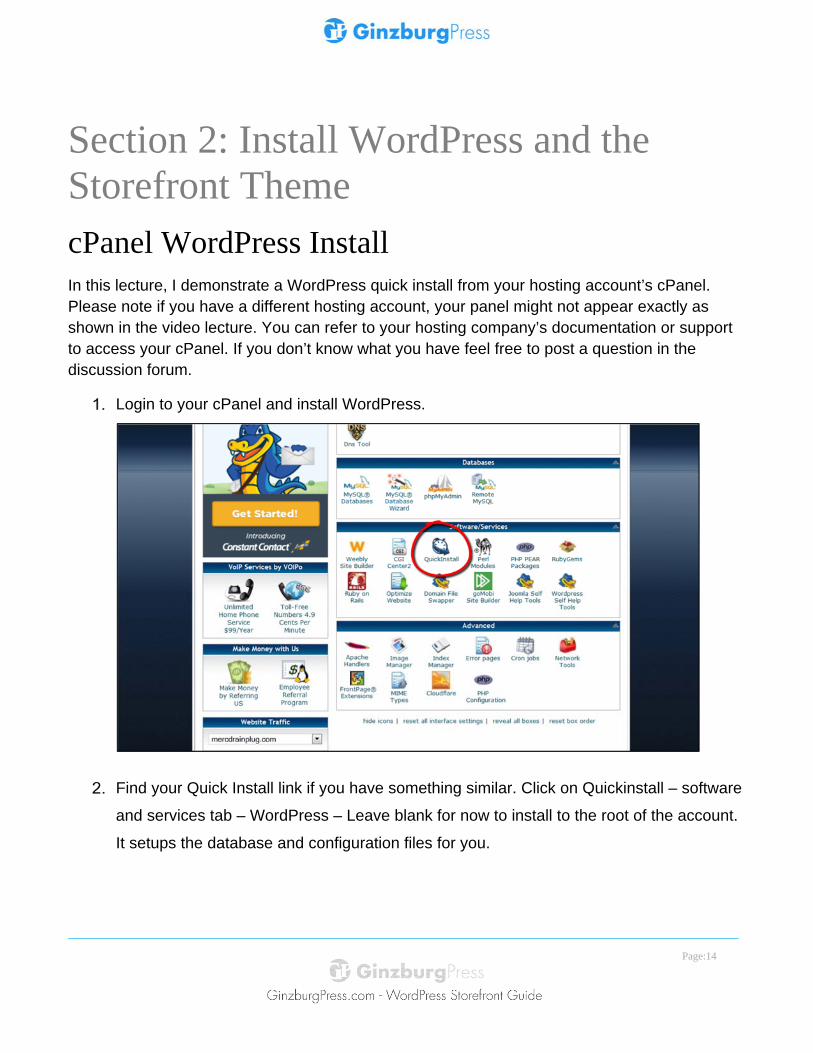
Section 2: Install WordPress and the Storefront Theme cPanel WordPress Install In this lecture, I demonstrate a WordPress quick install from your hosting account’s cPanel. Please note if you have a different hosting account, your panel might not appear exactly as shown in the video lecture. You can refer to your hosting company’s documentation or support to access your cPanel. If you don’t know what you have feel free to post a question in the discussion forum.
Login to your cPanel and install WordPress.
Find your Quick Install link if you have something similar. Click on Quickinstall – software
and services tab – WordPress – Leave blank for now to install to the root of the account.
It setups the database and configuration files for you.

Page:15
Page:16
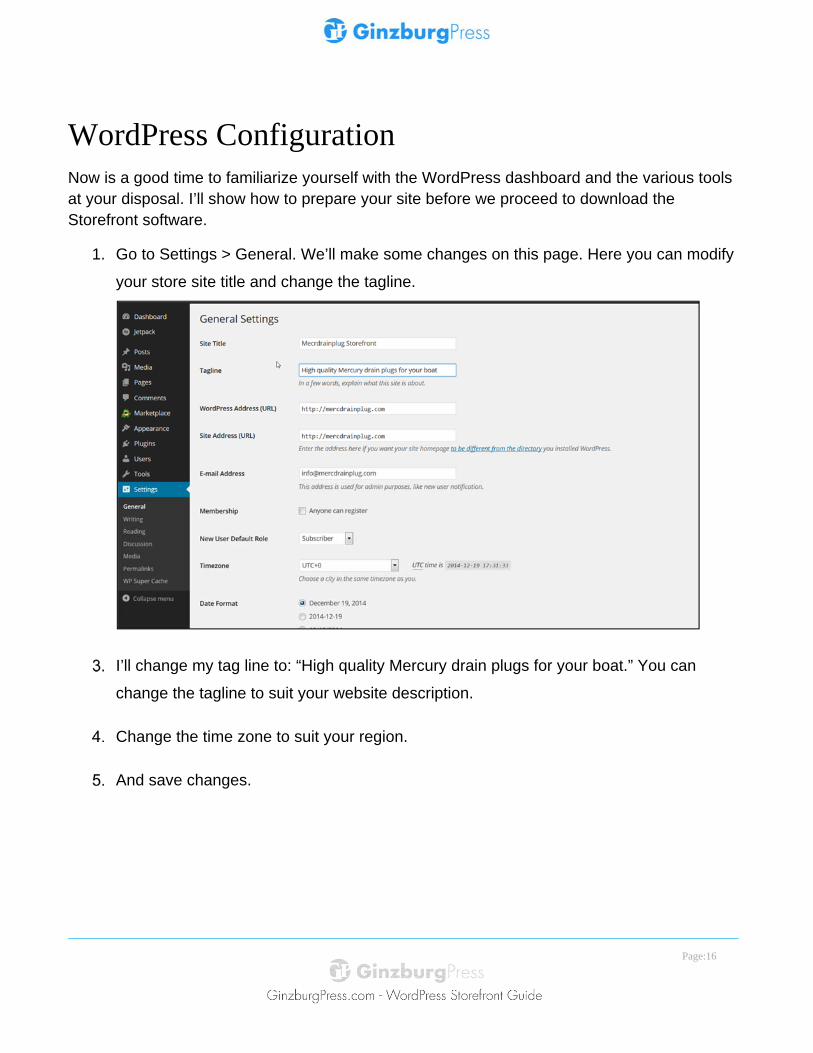
WordPress Configuration Now is a good time to familiarize yourself with the WordPress dashboard and the various tools at your disposal. I’ll show how to prepare your site before we proceed to download the Storefront software.
1. Go to Settings > General. We’ll make some changes on this page. Here you can modify
your store site title and change the tagline.
I’ll change my tag line to: “High quality Mercury drain plugs for your boat.” You can
change the tagline to suit your website description.
Change the time zone to suit your region.
And save changes.
Page:17
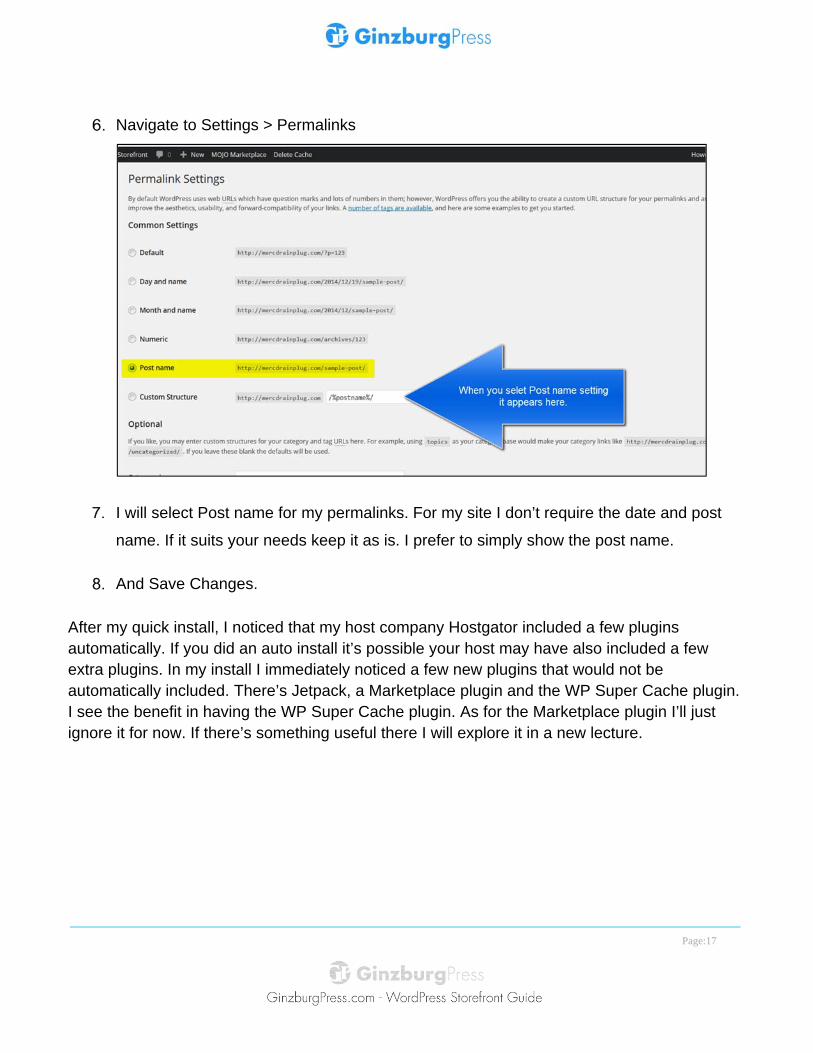
Navigate to Settings > Permalinks
I will select Post name for my permalinks. For my site I don’t require the date and post
name. If it suits your needs keep it as is. I prefer to simply show the post name.
And Save Changes.
After my quick install, I noticed that my host company Hostgator included a few plugins automatically. If you did an auto install it’s possible your host may have also included a few extra plugins. In my install I immediately noticed a few new plugins that would not be automatically included. There’s Jetpack, a Marketplace plugin and the WP Super Cache plugin. I see the benefit in having the WP Super Cache plugin. As for the Marketplace plugin I’ll just ignore it for now. If there’s something useful there I will explore it in a new lecture.
Page:18
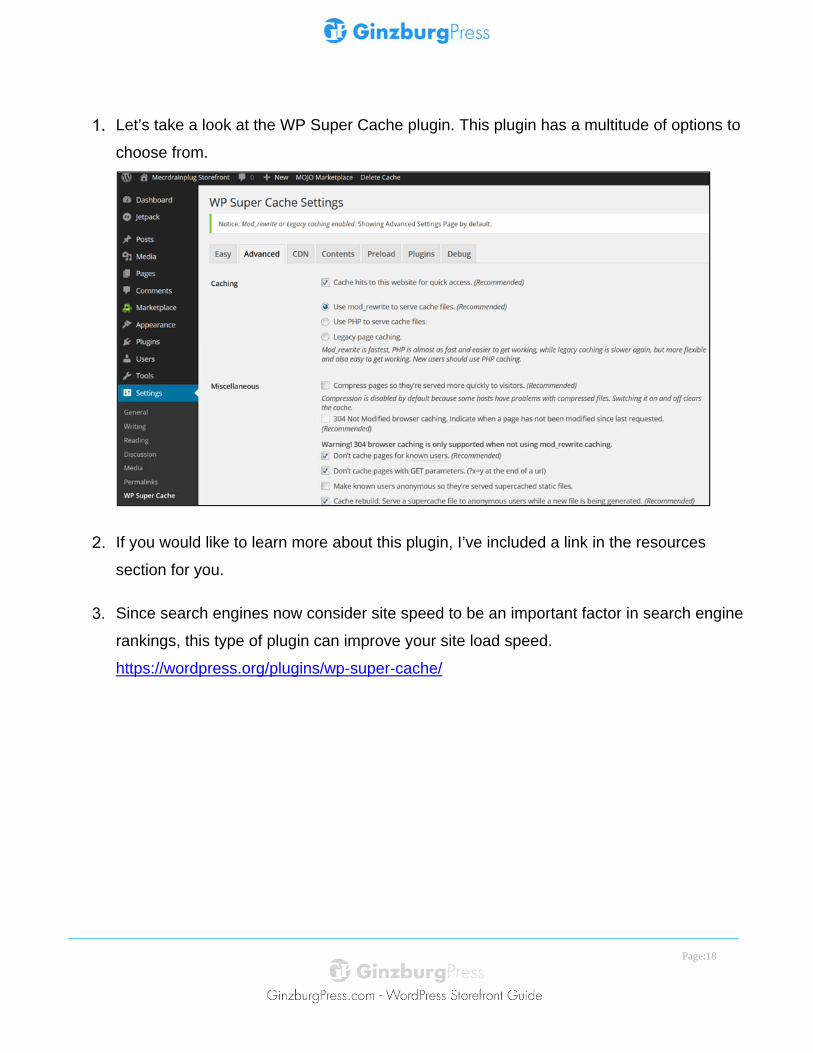
Let’s take a look at the WP Super Cache plugin. This plugin has a multitude of options to
choose from.
If you would like to learn more about this plugin, I’ve included a link in the resources
section for you.
Since search engines now consider site speed to be an important factor in search engine
rankings, this type of plugin can improve your site load speed.
https://wordpress.org/plugins/wp-super-cache/
Page:19
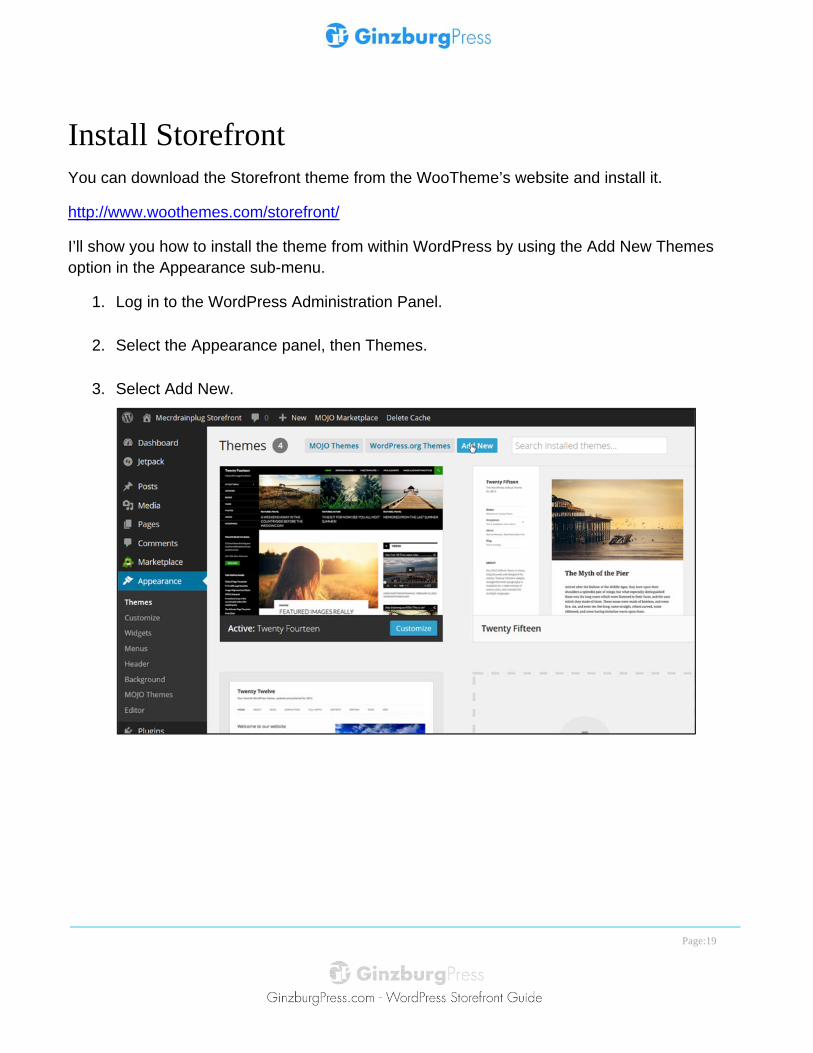
Install Storefront You can download the Storefront theme from the WooTheme’s website and install it.
http://www.woothemes.com/storefront/
I’ll show you how to install the theme from within WordPress by using the Add New Themes option in the Appearance sub-menu.
1. Log in to the WordPress Administration Panel.
2. Select the Appearance panel, then Themes.
3. Select Add New.
Page:20
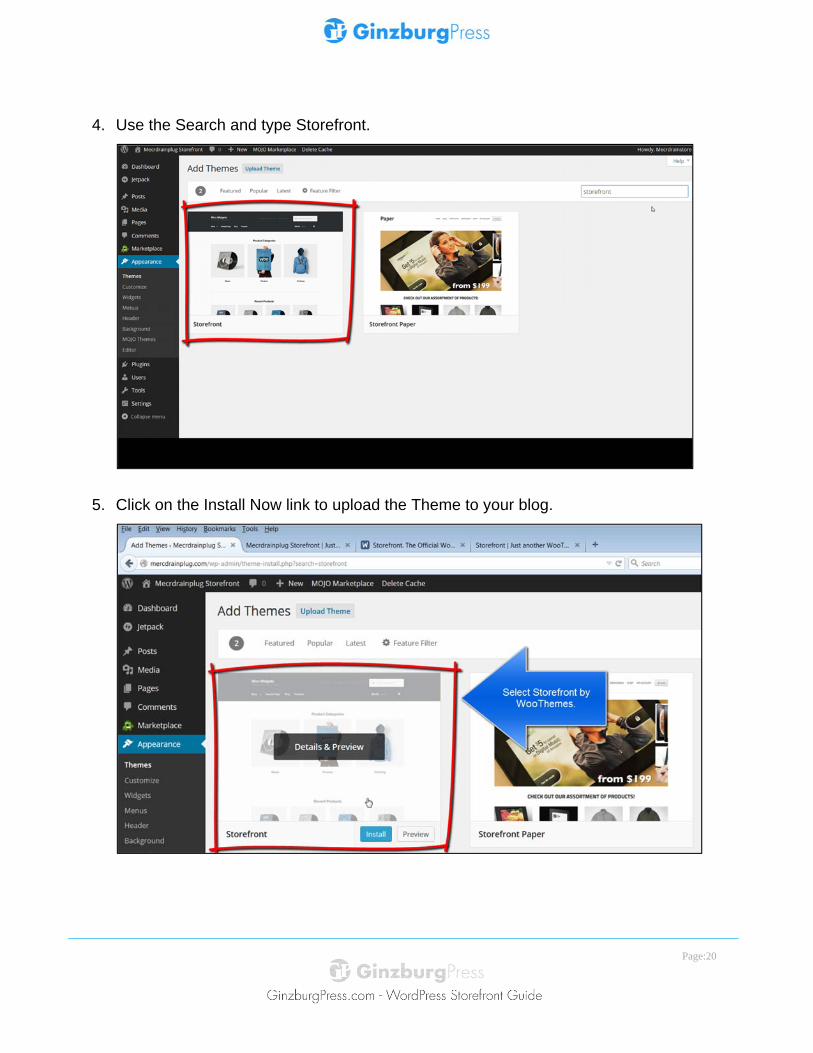
4. Use the Search and type Storefront.
5. Click on the Install Now link to upload the Theme to your blog.
Page:21
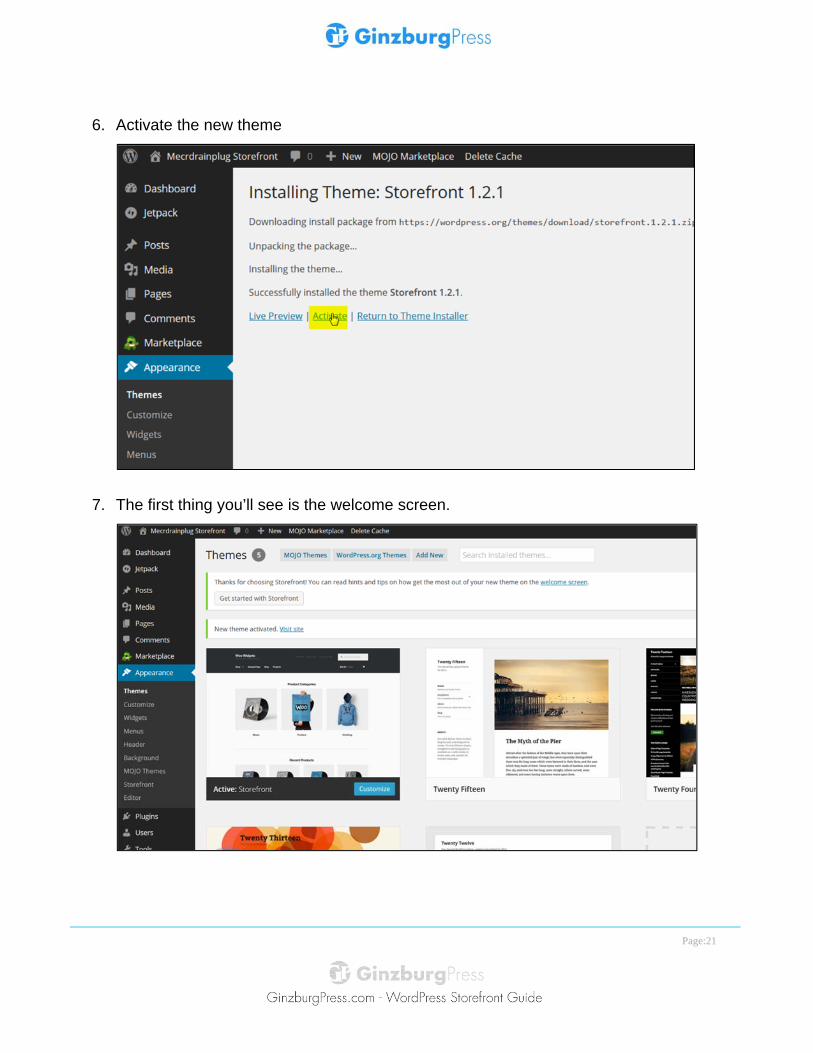
6. Activate the new theme
7. The first thing you’ll see is the welcome screen.
Page:22
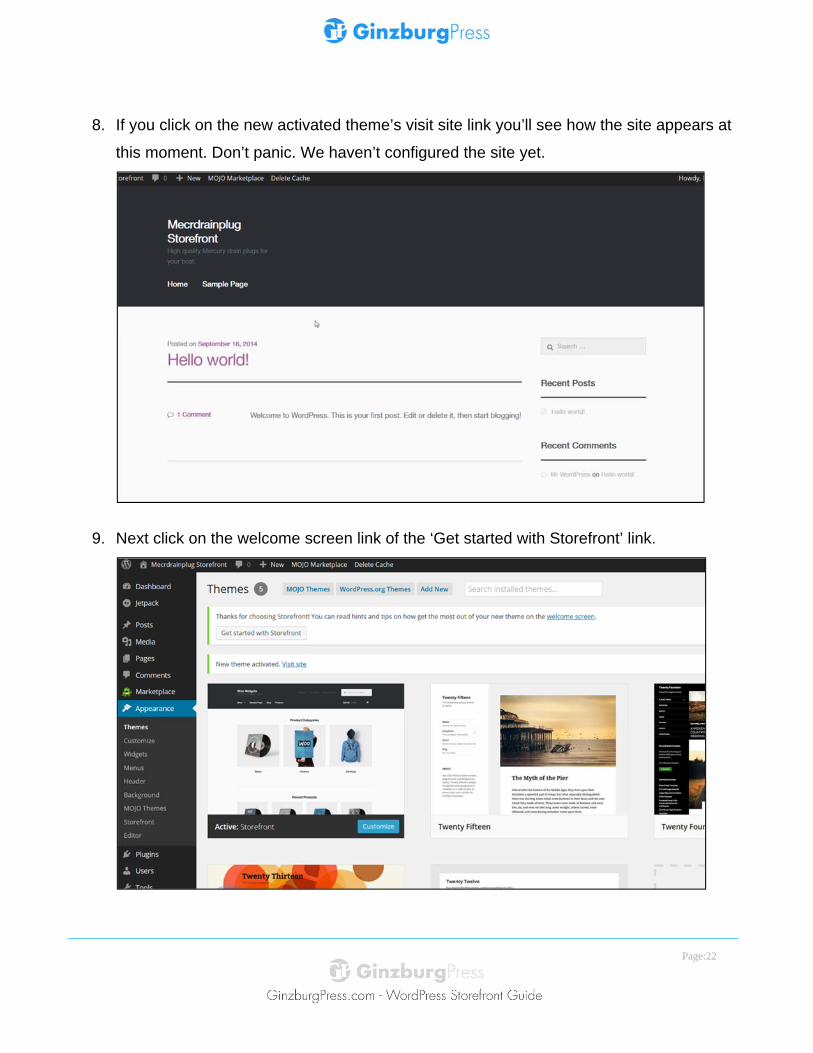
8. If you click on the new activated theme’s visit site link you’ll see how the site appears at
this moment. Don’t panic. We haven’t configured the site yet.
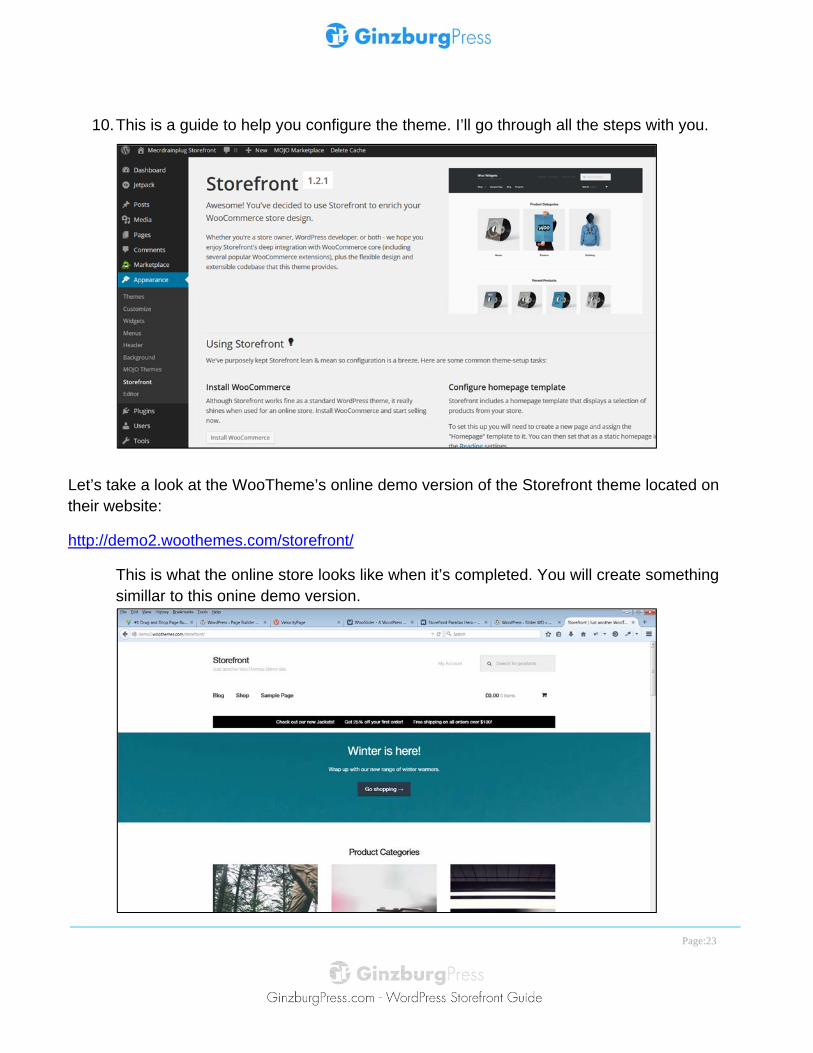
9. Next click on the welcome screen link of the ‘Get started with Storefront’ link.
Page:23
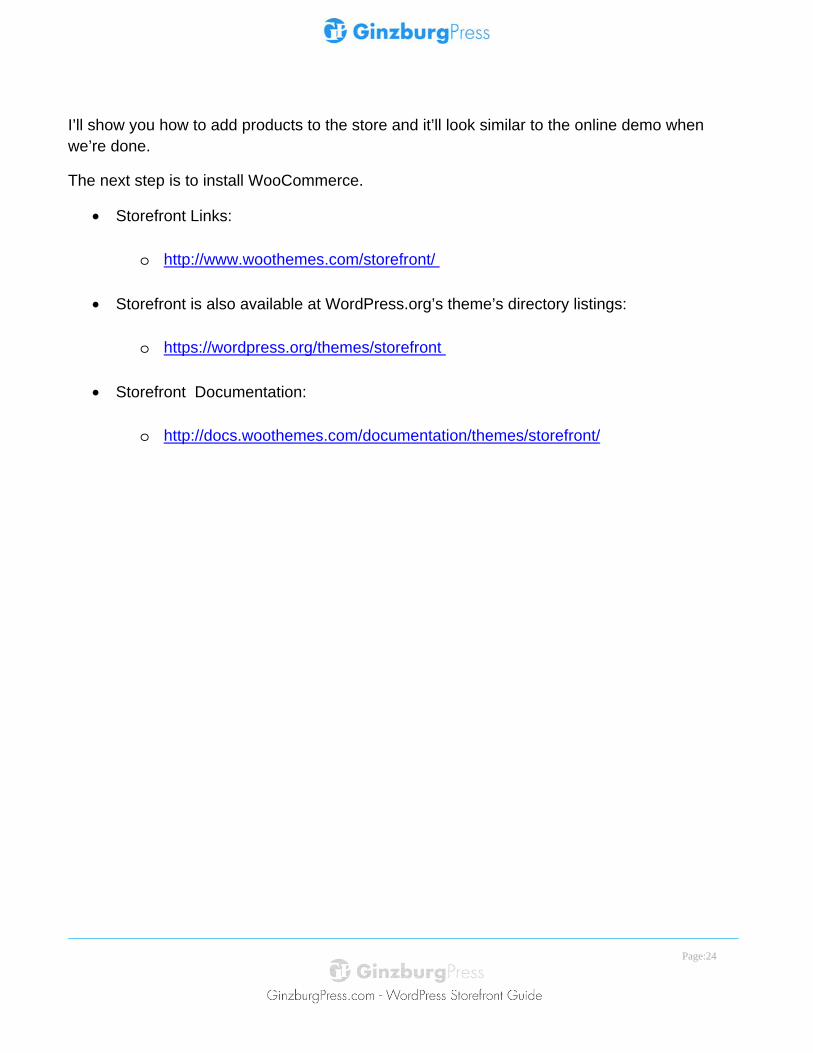
10. This is a guide to help you configure the theme. I’ll go through all the steps with you.
Let’s take a look at the WooTheme’s online demo version of the Storefront theme located on their website:
http://demo2.woothemes.com/storefront/
This is what the online store looks like when it’s completed. You will create something simillar to this onine demo version.
Page:24
I’ll show you how to add products to the store and it’ll look similar to the online demo when we’re done.
The next step is to install WooCommerce.
• Storefront Links:
o http://www.woothemes.com/storefront/
• Storefront is also available at WordPress.org’s theme’s directory listings:
o https://wordpress.org/themes/storefront
• Storefront Documentation:
o http://docs.woothemes.com/documentation/themes/storefront/
Page:25
Install WooCommerce We’ll Install the WooCommerce plugin and activate it.
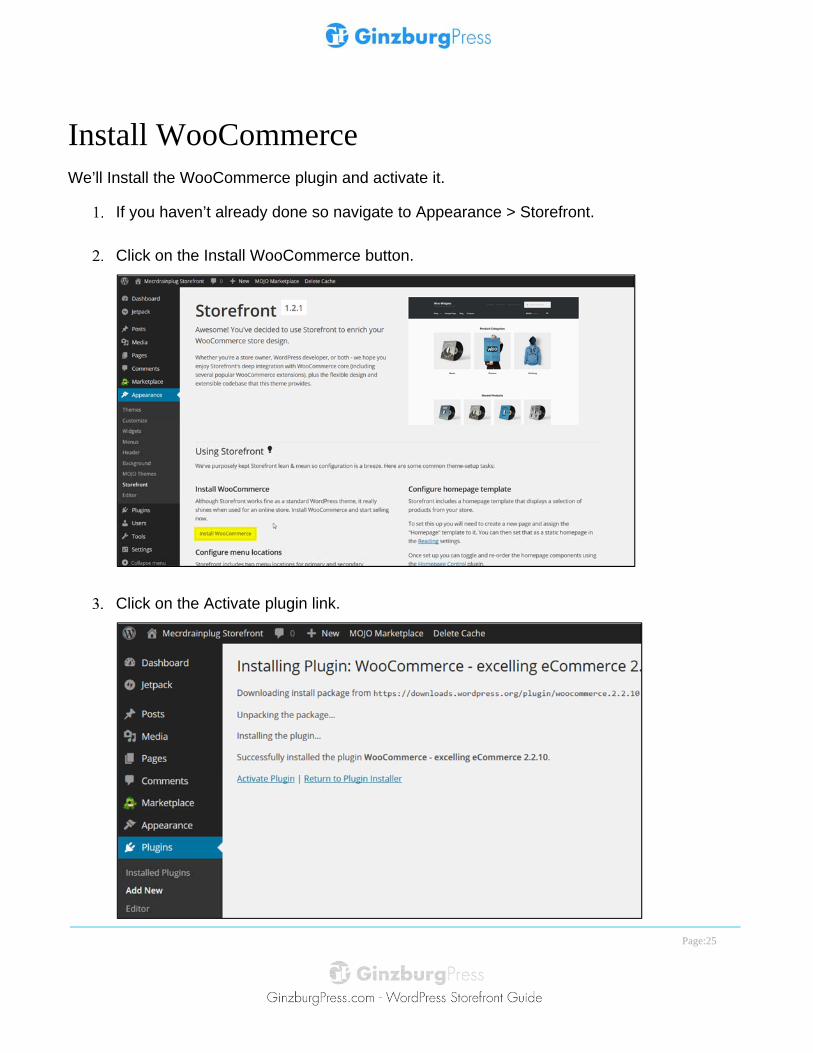
If you haven’t already done so navigate to Appearance > Storefront.
Click on the Install WooCommerce button.
Click on the Activate plugin link.
Page:26
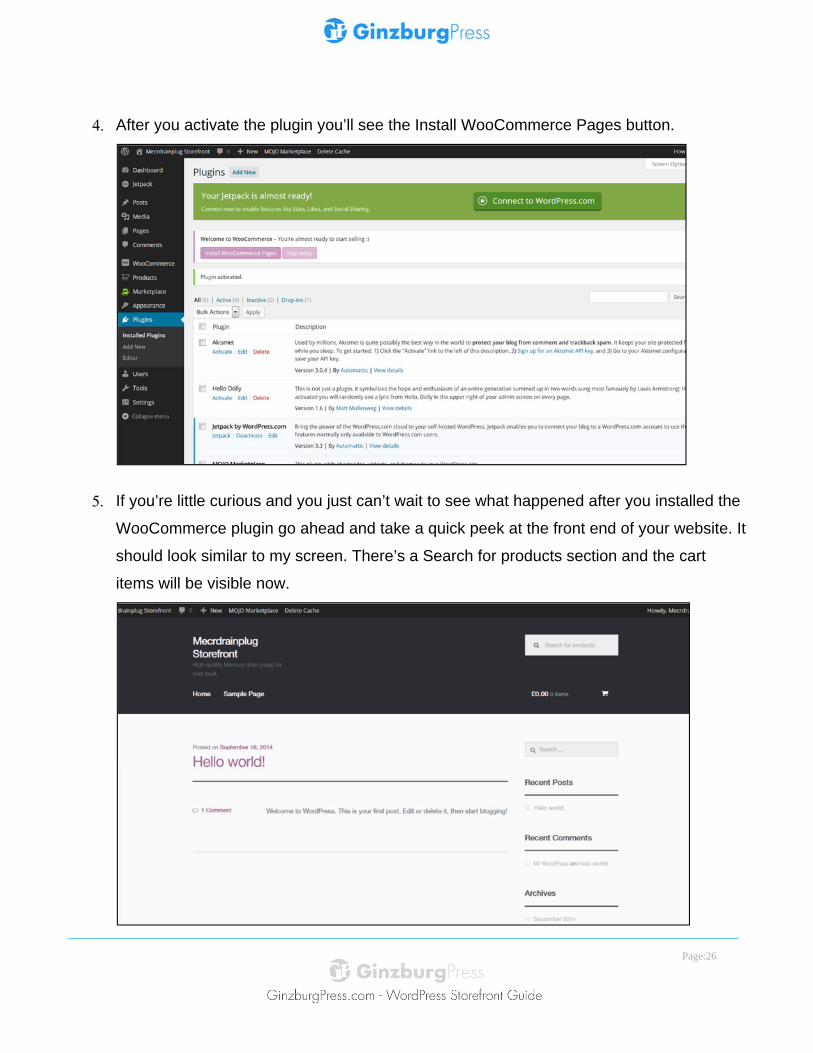
After you activate the plugin you’ll see the Install WooCommerce Pages button.
If you’re little curious and you just can’t wait to see what happened after you installed the
WooCommerce plugin go ahead and take a quick peek at the front end of your website. It
should look similar to my screen. There’s a Search for products section and the cart
items will be visible now.
Page:27
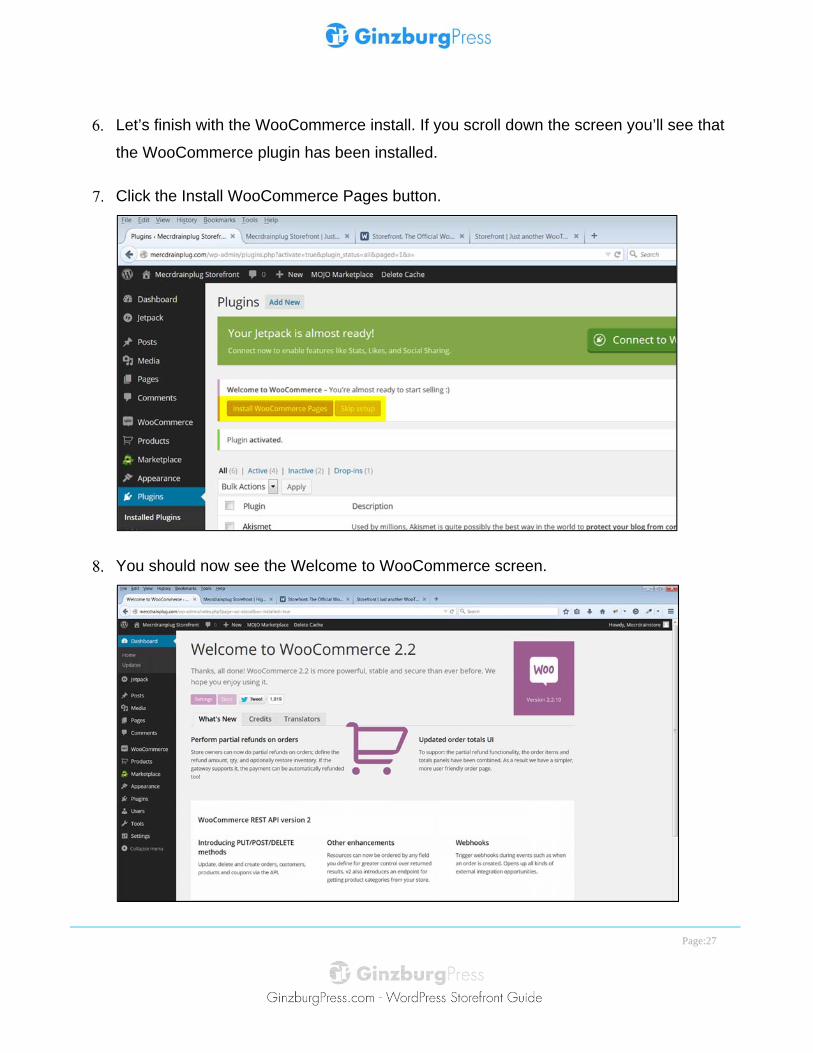
Let’s finish with the WooCommerce install. If you scroll down the screen you’ll see that
the WooCommerce plugin has been installed.
Click the Install WooCommerce Pages button.
You should now see the Welcome to WooCommerce screen.
Page:28
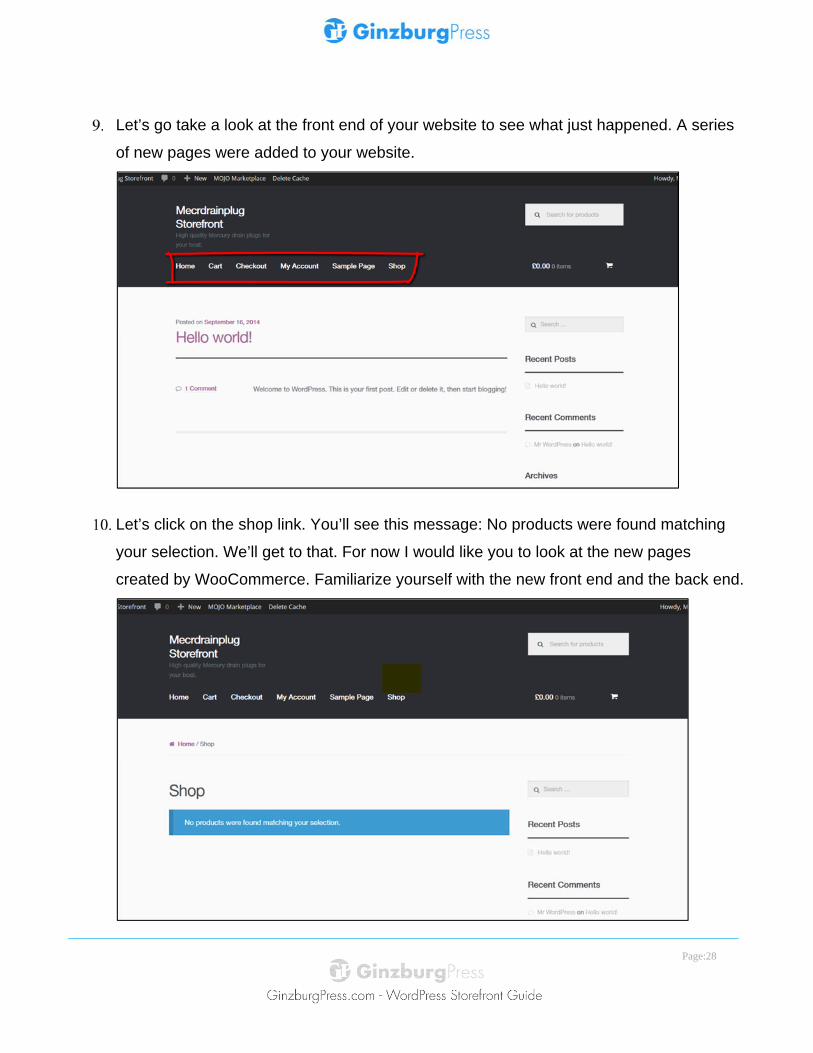
Let’s go take a look at the front end of your website to see what just happened. A series
of new pages were added to your website.
Let’s click on the shop link. You’ll see this message: No products were found matching
your selection. We’ll get to that. For now I would like you to look at the new pages
created by WooCommerce. Familiarize yourself with the new front end and the back end.
Page:29
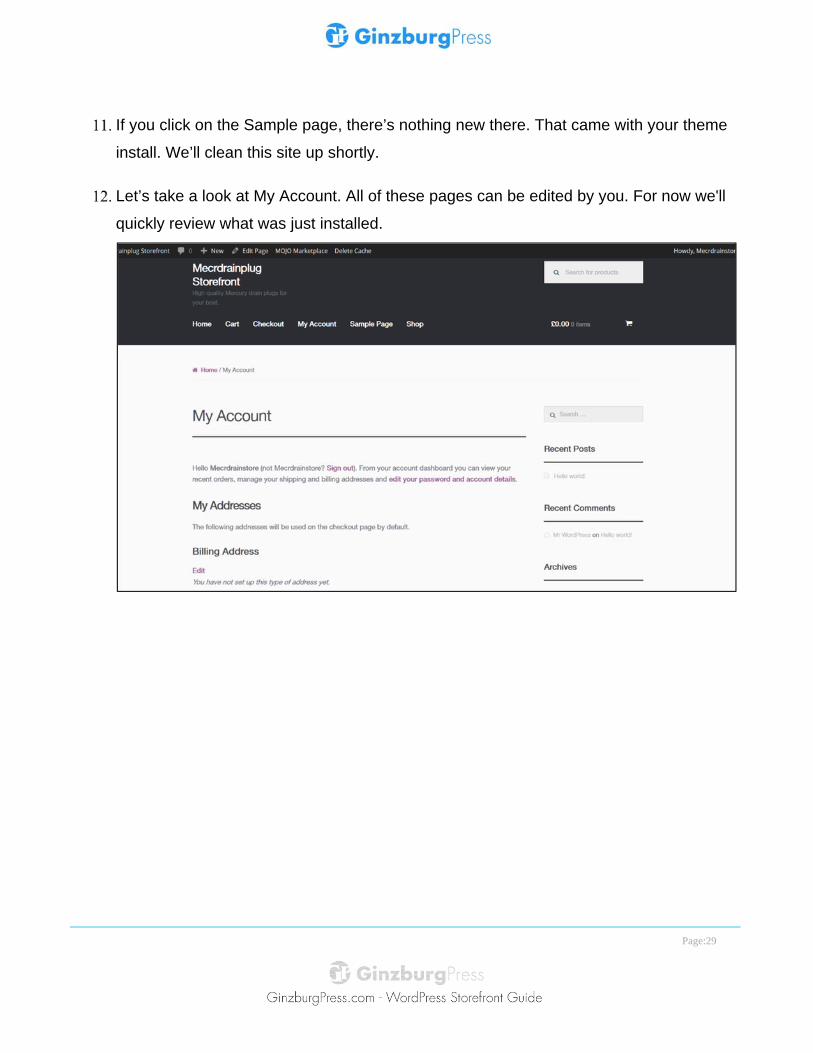
If you click on the Sample page, there’s nothing new there. That came with your theme
install. We’ll clean this site up shortly.
Let’s take a look at My Account. All of these pages can be edited by you. For now we'll
quickly review what was just installed.
Page:30
Conclusion to Section 2 Section 2 is done.
You’re moving along quite nicely.
Here’s what we covered in the WordPress and Storefront installation section.
• In this section you installed a WordPress theme on your hosting account's cPanel.
• Please note if you have a different hosting account, your panel might not appear exactly
as shown.
• I demonstrated how to perform a quick install on a hosted account.
• Now is a good time to familiarize yourself with the WordPress dashboard if you haven't
already done so.
• I showed you how to prepare your site before we proceeded to install the Storefront
theme.
• You also installed the new Storefront theme and the WooCommerce plugin.
• You activated the WooCommerce plugin.
That's it for Section 2! In the next section, we'll cover all the steps to setup your online store.
Page:31
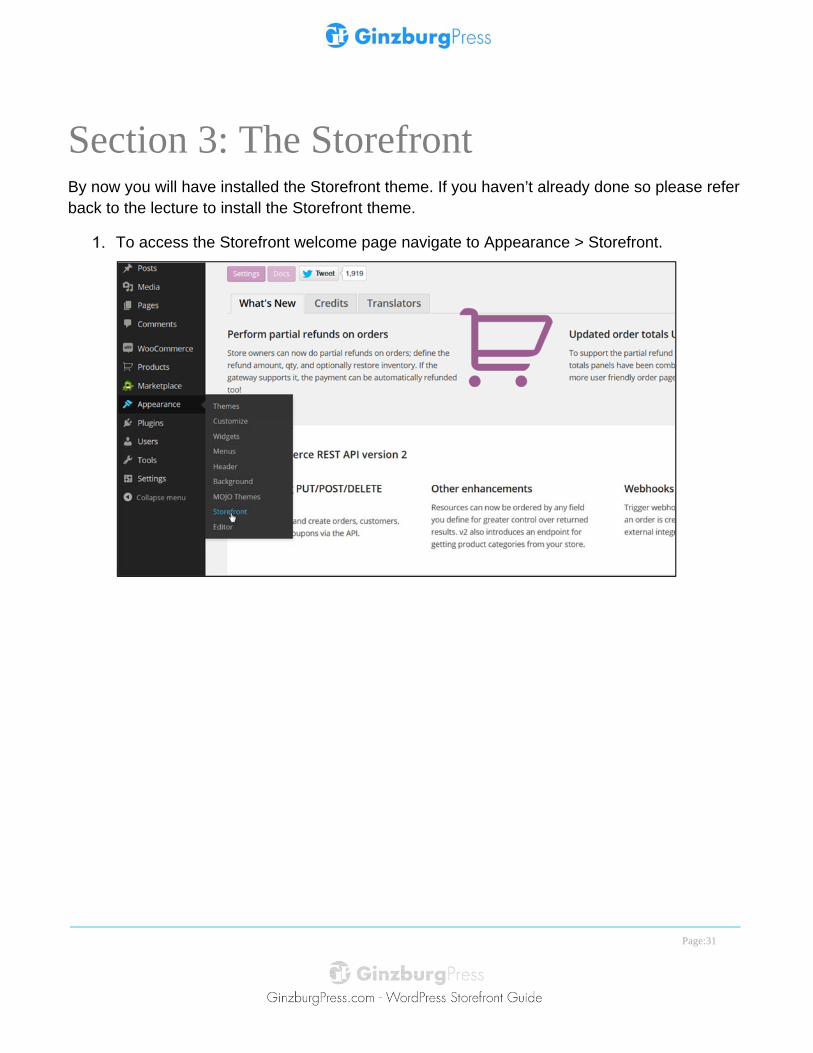
Section 3: The Storefront By now you will have installed the Storefront theme. If you haven’t already done so please refer back to the lecture to install the Storefront theme.
To access the Storefront welcome page navigate to Appearance > Storefront.
Page:32
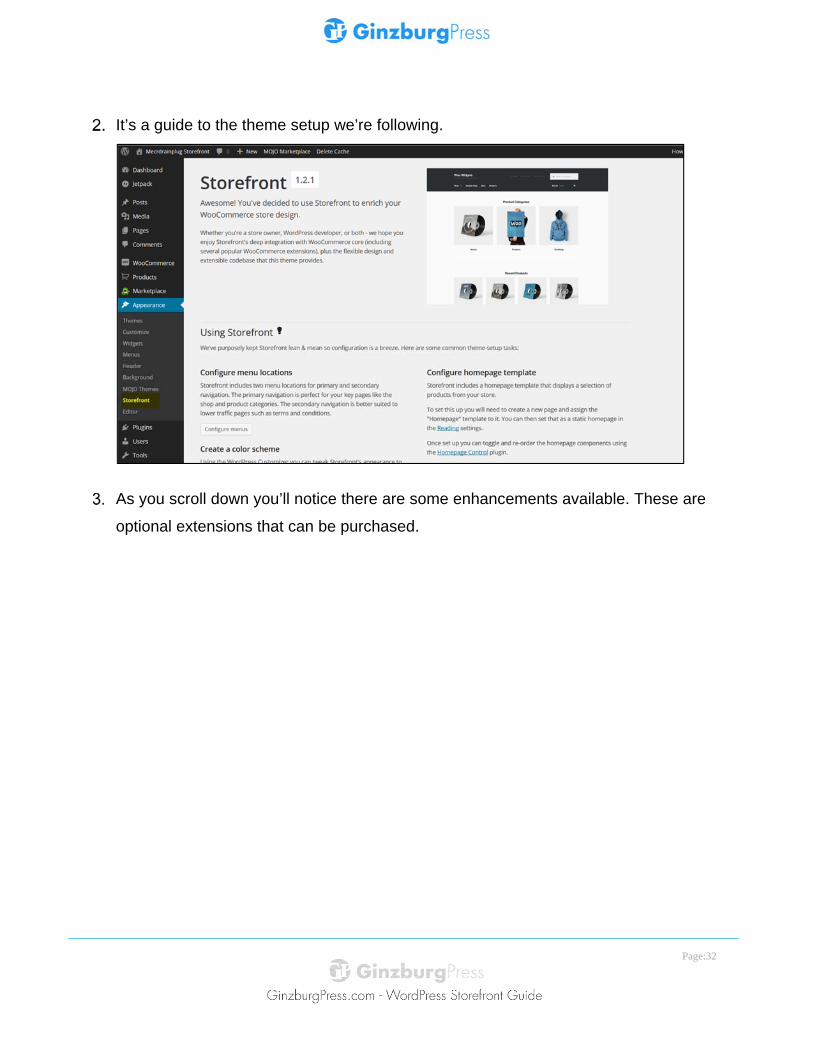
It’s a guide to the theme setup we’re following.
As you scroll down you’ll notice there are some enhancements available. These are
optional extensions that can be purchased.
Page:33
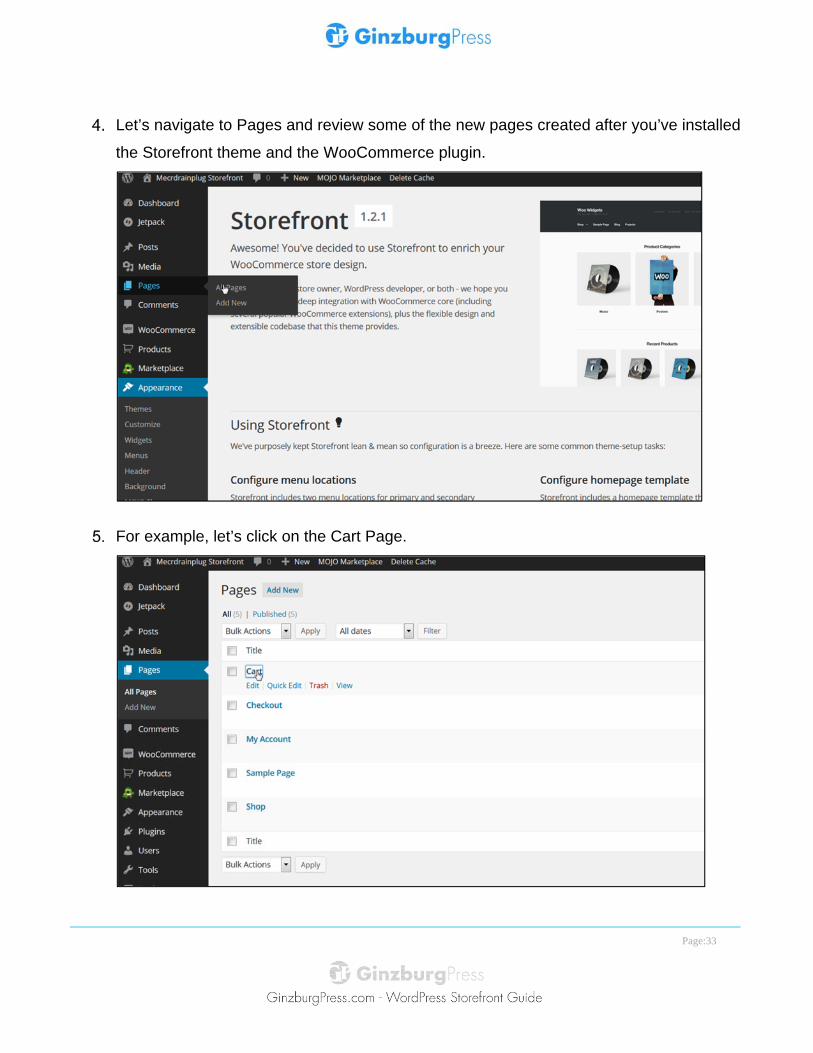
Let’s navigate to Pages and review some of the new pages created after you’ve installed
the Storefront theme and the WooCommerce plugin.
For example, let’s click on the Cart Page.
Page:34
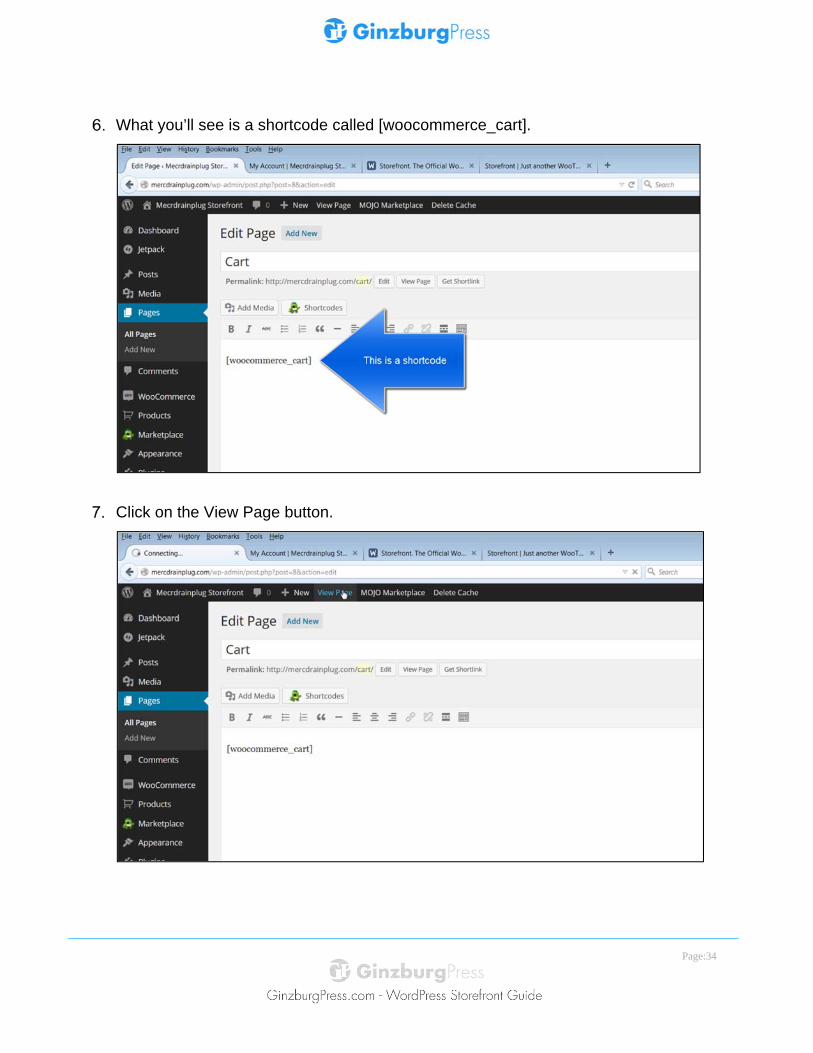
What you’ll see is a shortcode called [woocommerce_cart].
Click on the View Page button.
Page:35
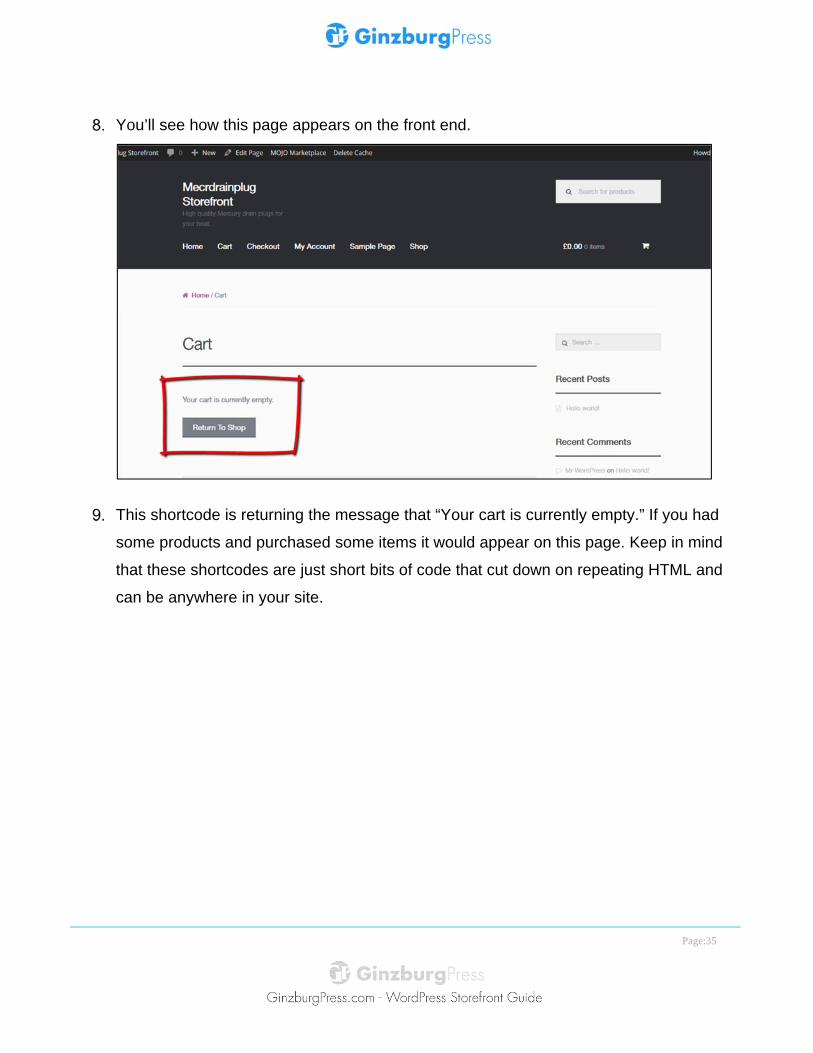
You’ll see how this page appears on the front end.
This shortcode is returning the message that “Your cart is currently empty.” If you had
some products and purchased some items it would appear on this page. Keep in mind
that these shortcodes are just short bits of code that cut down on repeating HTML and
can be anywhere in your site.
Page:36
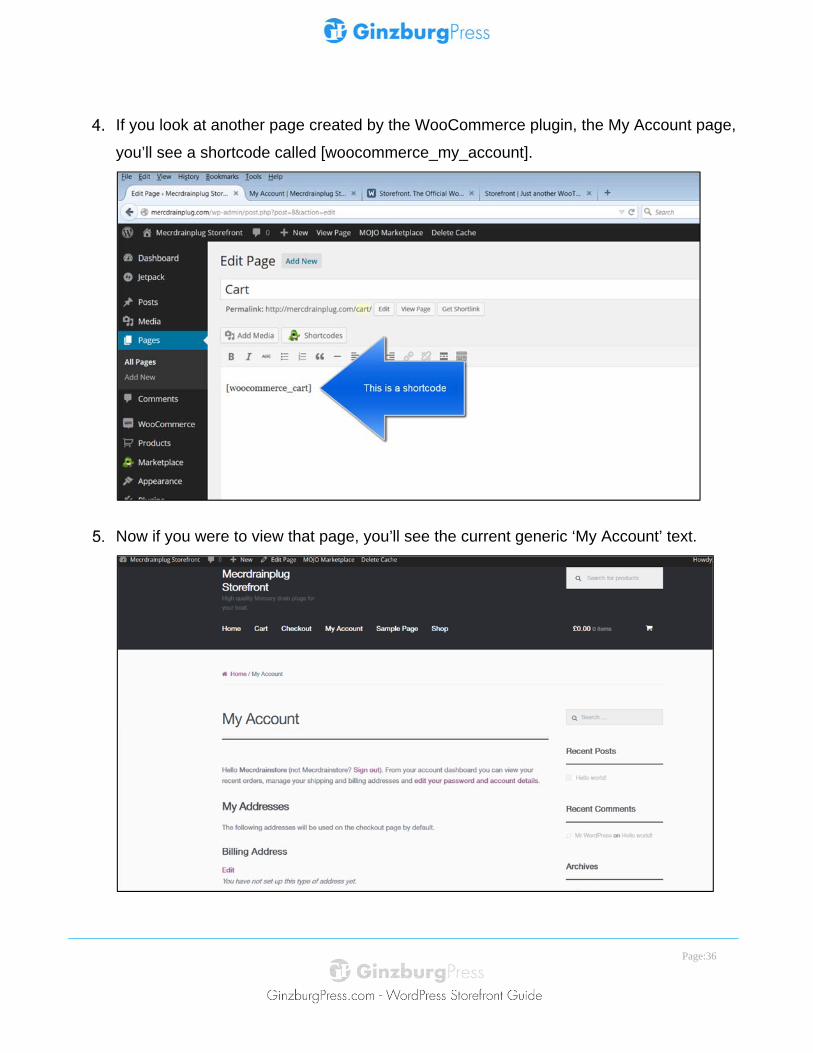
If you look at another page created by the WooCommerce plugin, the My Account page,
you’ll see a shortcode called [woocommerce_my_account].
Now if you were to view that page, you’ll see the current generic ‘My Account’ text.
Page:37
WooCommerce has some extensive documentation on Shortcodes:
http://docs.woothemes.com/document/woocommerce-shortcodes/
Installing storefront
Installation Configuration documents:
http://docs.woothemes.com/document/installation-configuration/
Page:38
Configure the Menu Locations Before we populate the store, let’s configure our store menu settings.
When activating Storefront for the first time, you won’t see anything in the secondary navigation when viewing the front end of your web site.
We’ll configure the menu locations to create a Primary, and a Secondary menu. I will show you how to add menu items.
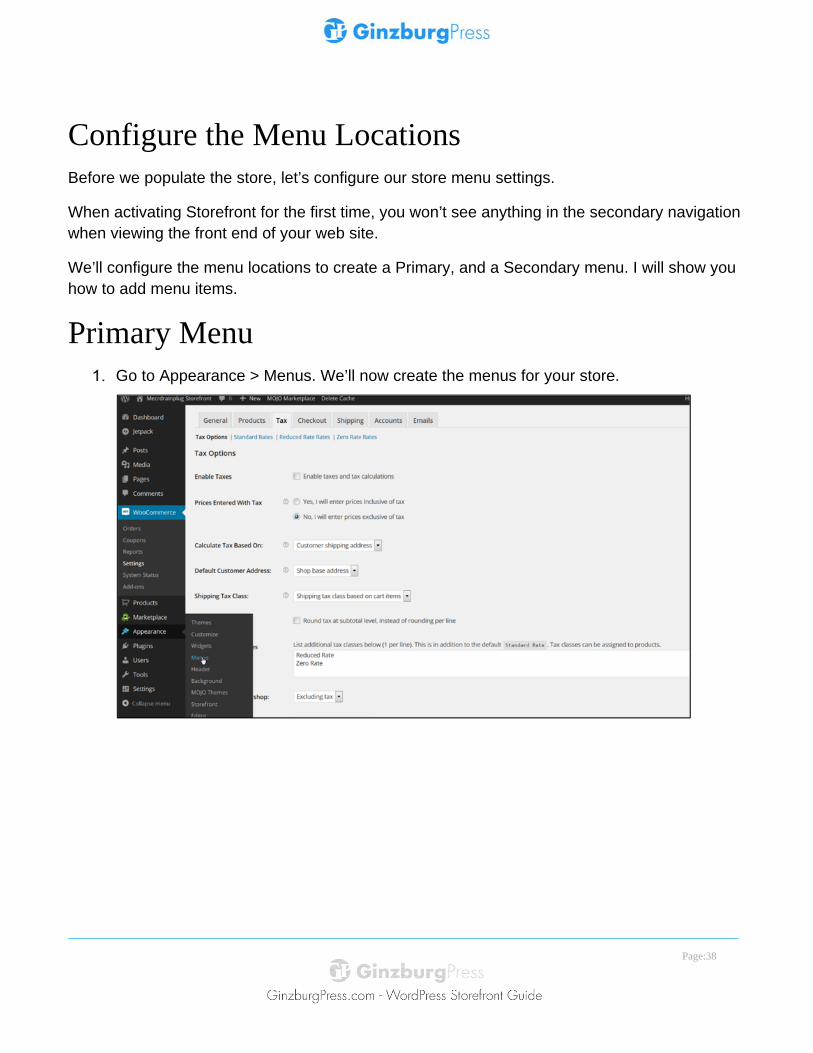
Primary Menu Go to Appearance > Menus. We’ll now create the menus for your store.
Page:39
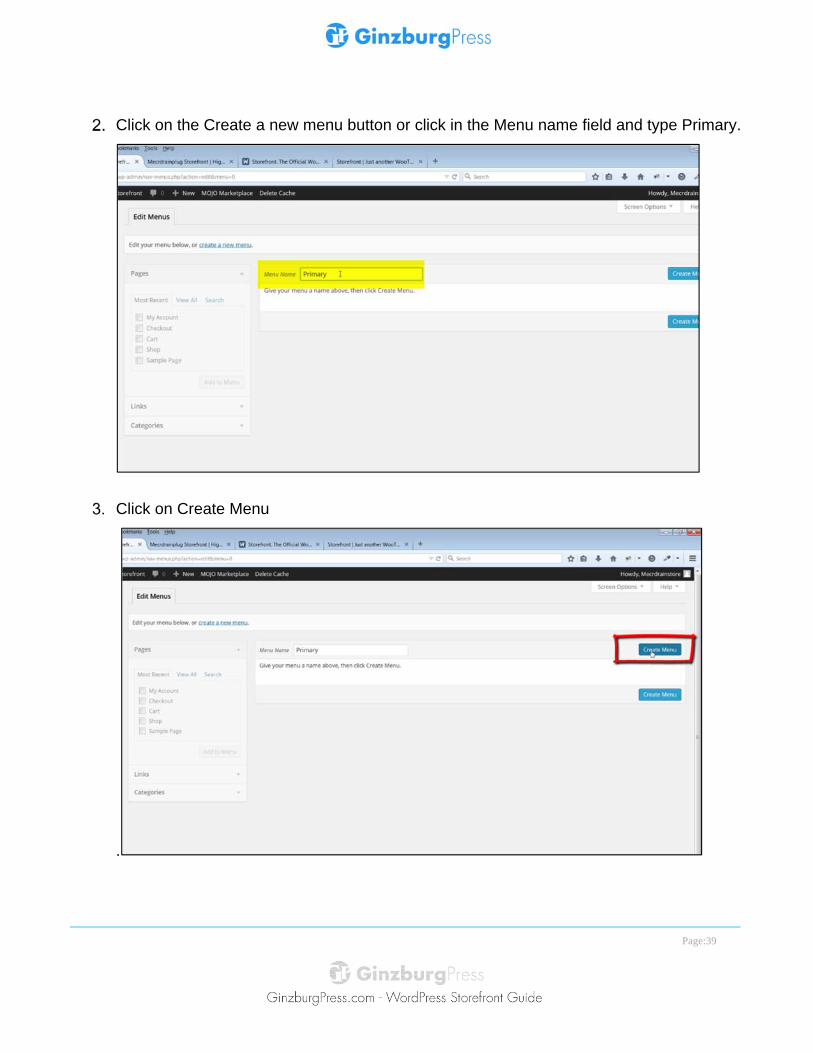
Click on the Create a new menu button or click in the Menu name field and type Primary.
Click on Create Menu
.
Page:40
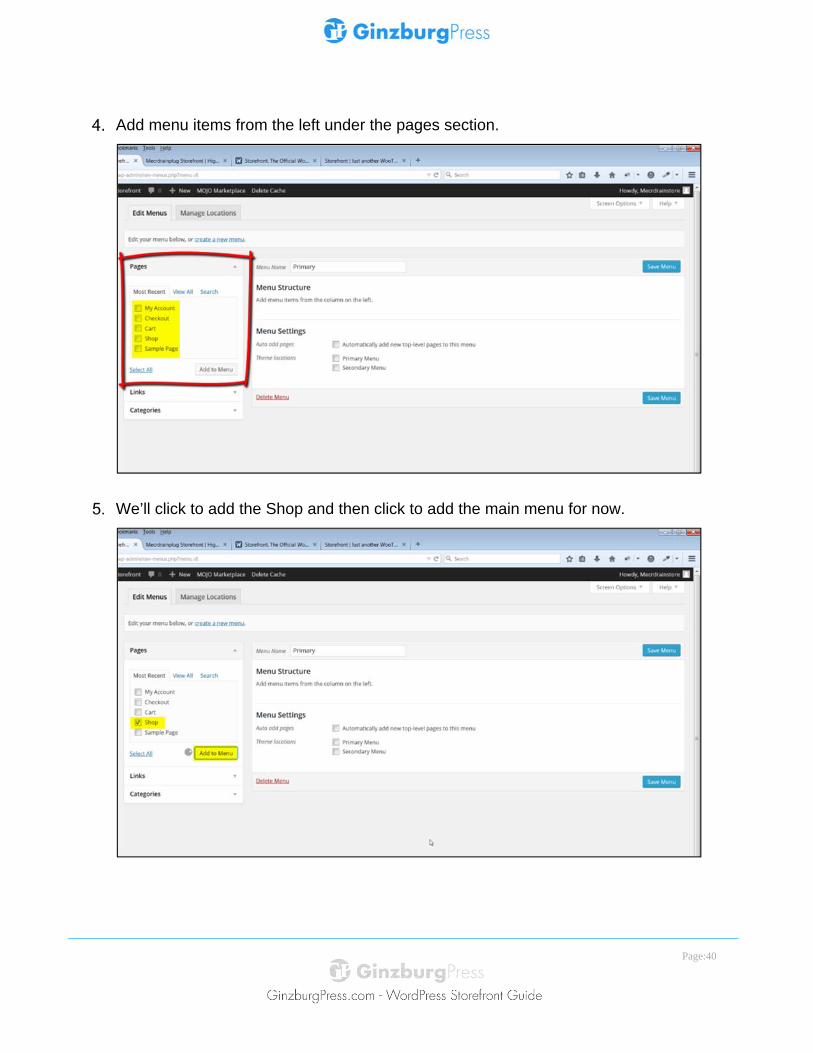
Add menu items from the left under the pages section.
We’ll click to add the Shop and then click to add the main menu for now.
Page:41
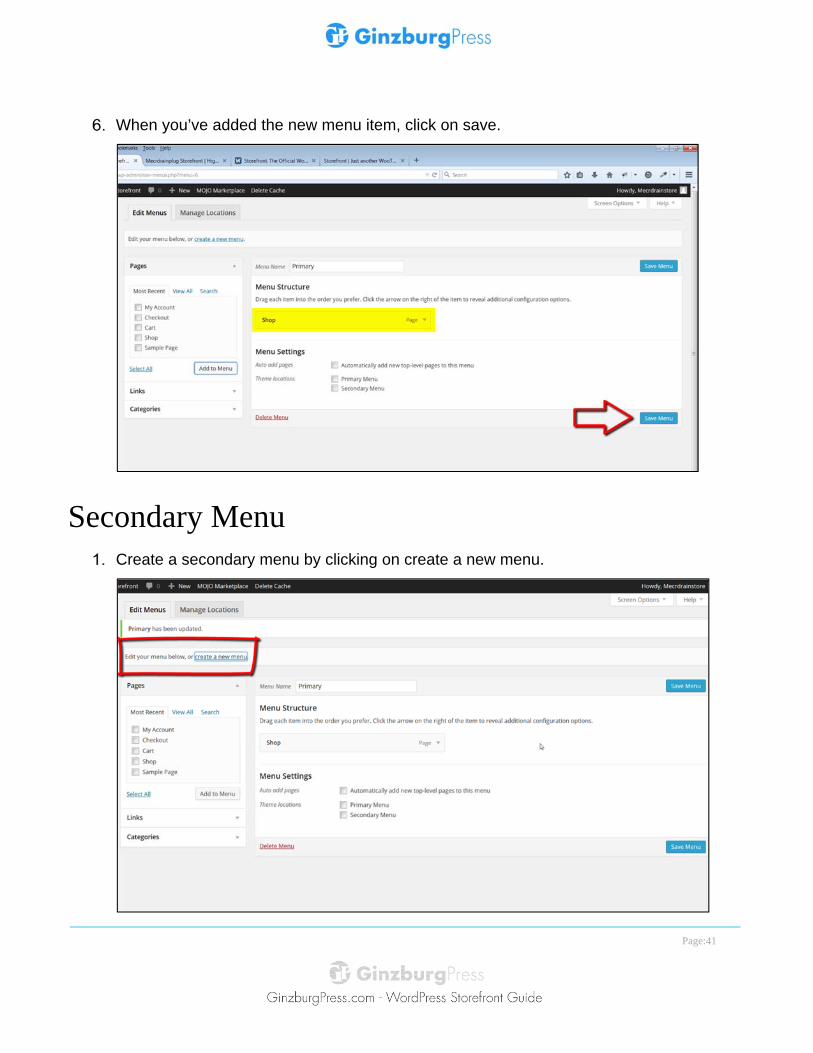
When you’ve added the new menu item, click on save.
Secondary Menu Create a secondary menu by clicking on create a new menu.
Page:42
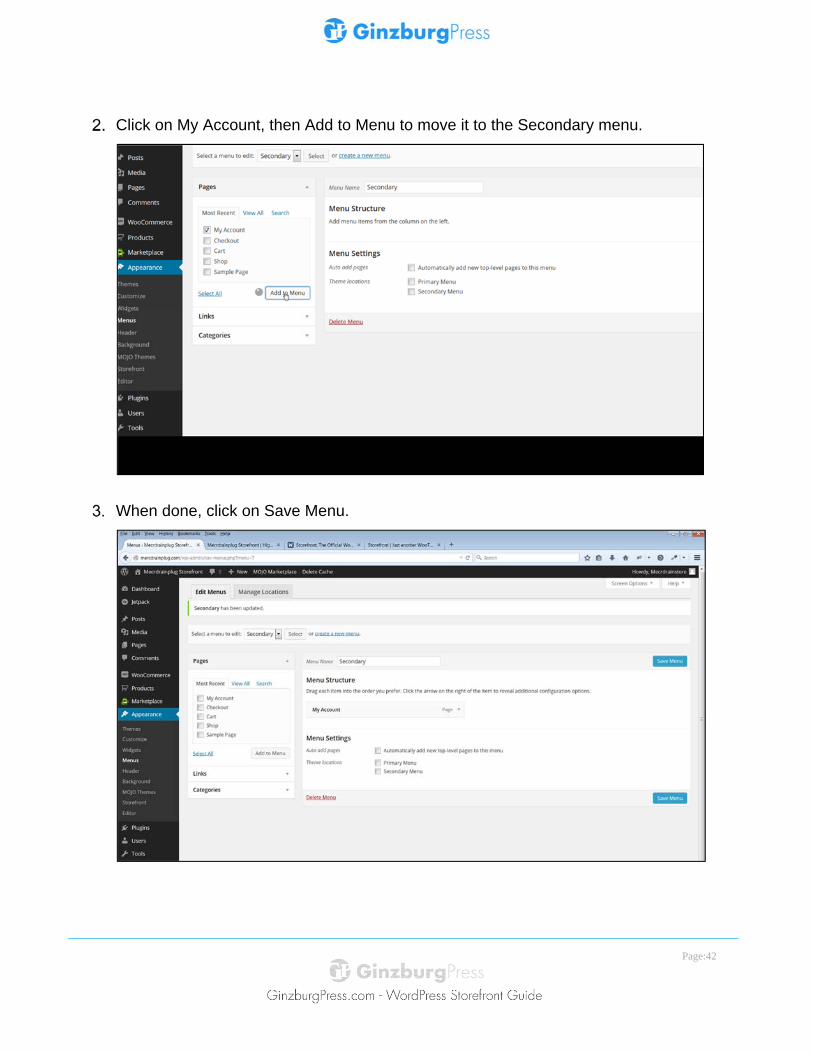
Click on My Account, then Add to Menu to move it to the Secondary menu.
When done, click on Save Menu.
Page:43
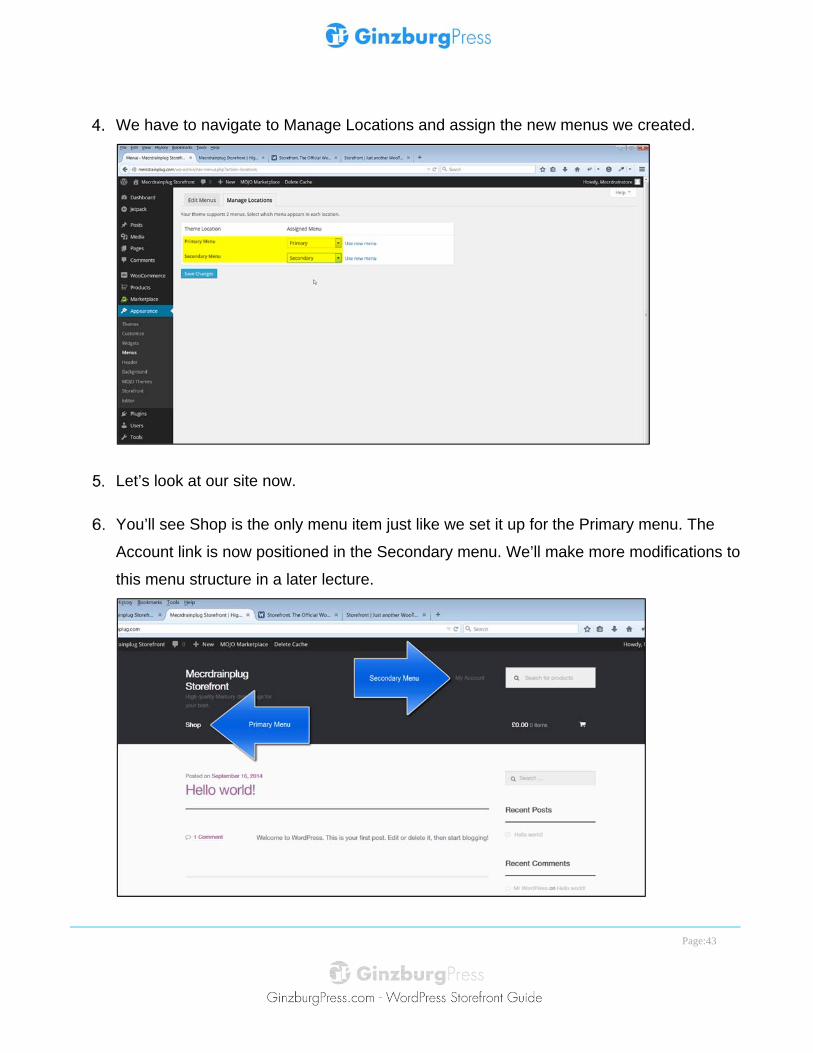
We have to navigate to Manage Locations and assign the new menus we created.
Let’s look at our site now.
You’ll see Shop is the only menu item just like we set it up for the Primary menu. The
Account link is now positioned in the Secondary menu. We’ll make more modifications to
this menu structure in a later lecture.

Page:44
If you’re interested you can read the WordPress codex to learn more about creating and assigning menus to theme locations.
http://codex.wordpress.org/WordPress_Menu_User_Guide
Page:45
Create the Homepage Storefront has two templated pages included, the Full Width template and the Homepage template.
We’ll setup the Storefront homepage template that will display a selection of products from your store.
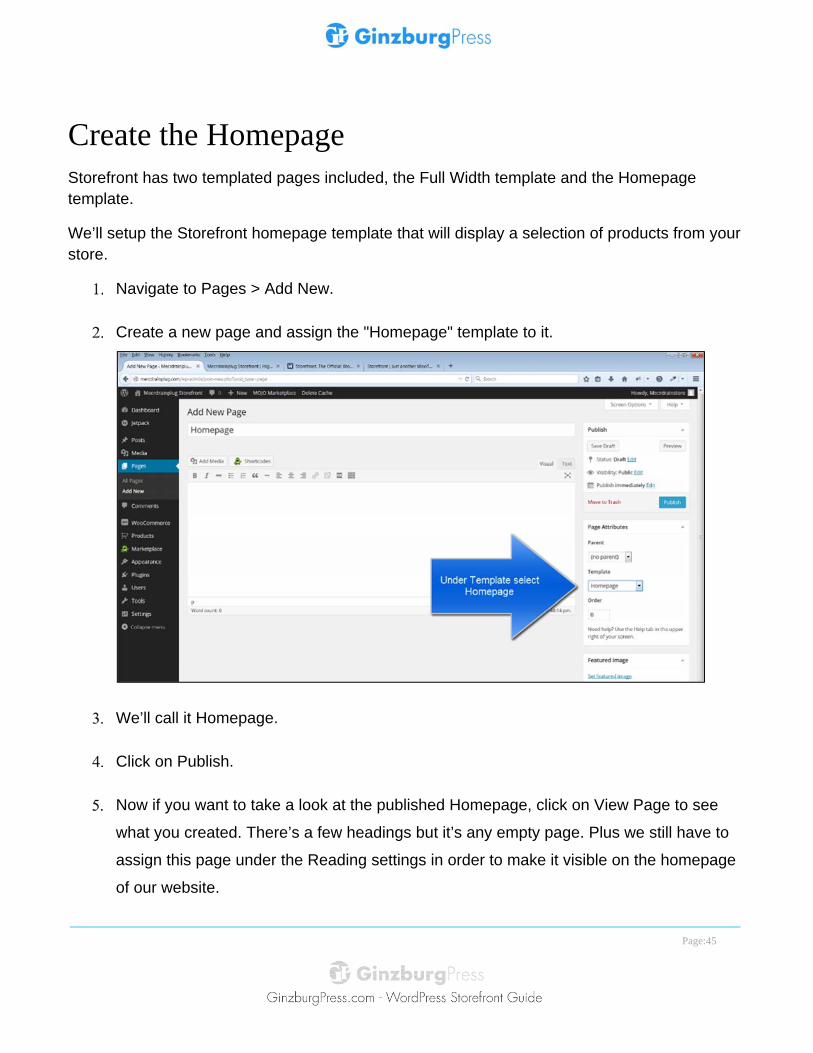
Navigate to Pages > Add New.
Create a new page and assign the "Homepage" template to it.
We’ll call it Homepage.
Click on Publish.
Now if you want to take a look at the published Homepage, click on View Page to see
what you created. There’s a few headings but it’s any empty page. Plus we still have to
assign this page under the Reading settings in order to make it visible on the homepage
of our website.
Page:46
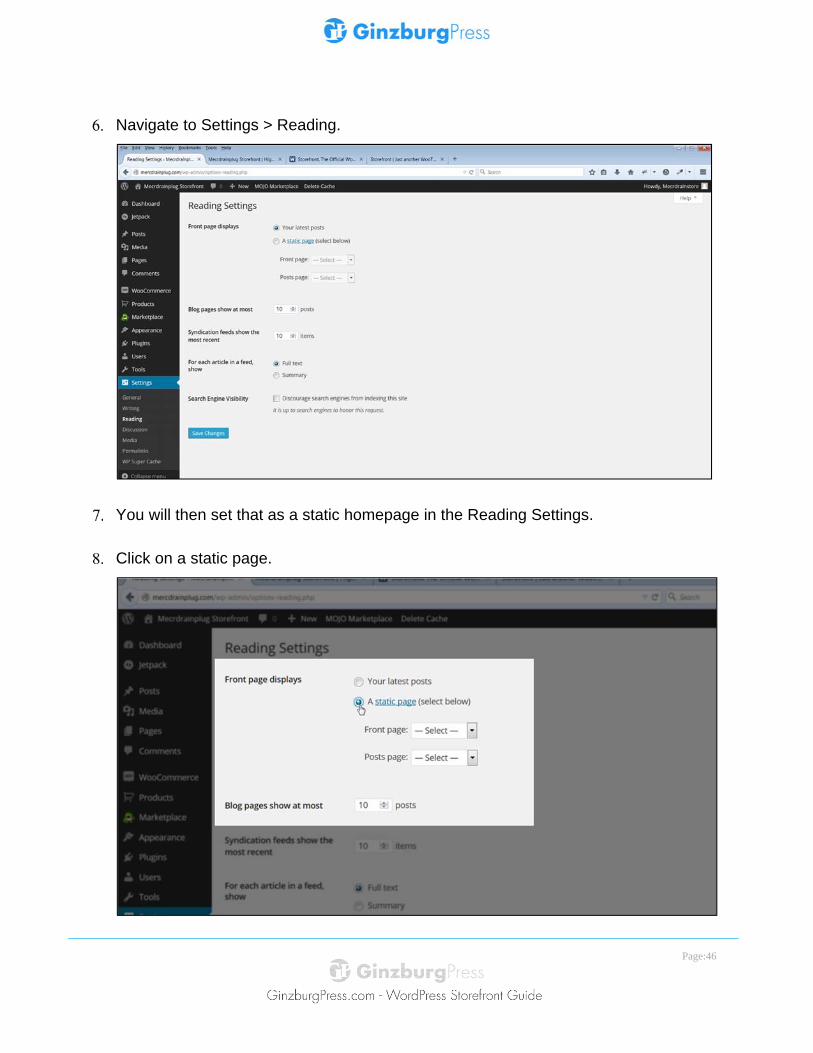
Navigate to Settings > Reading.
You will then set that as a static homepage in the Reading Settings.
Click on a static page.
Page:47
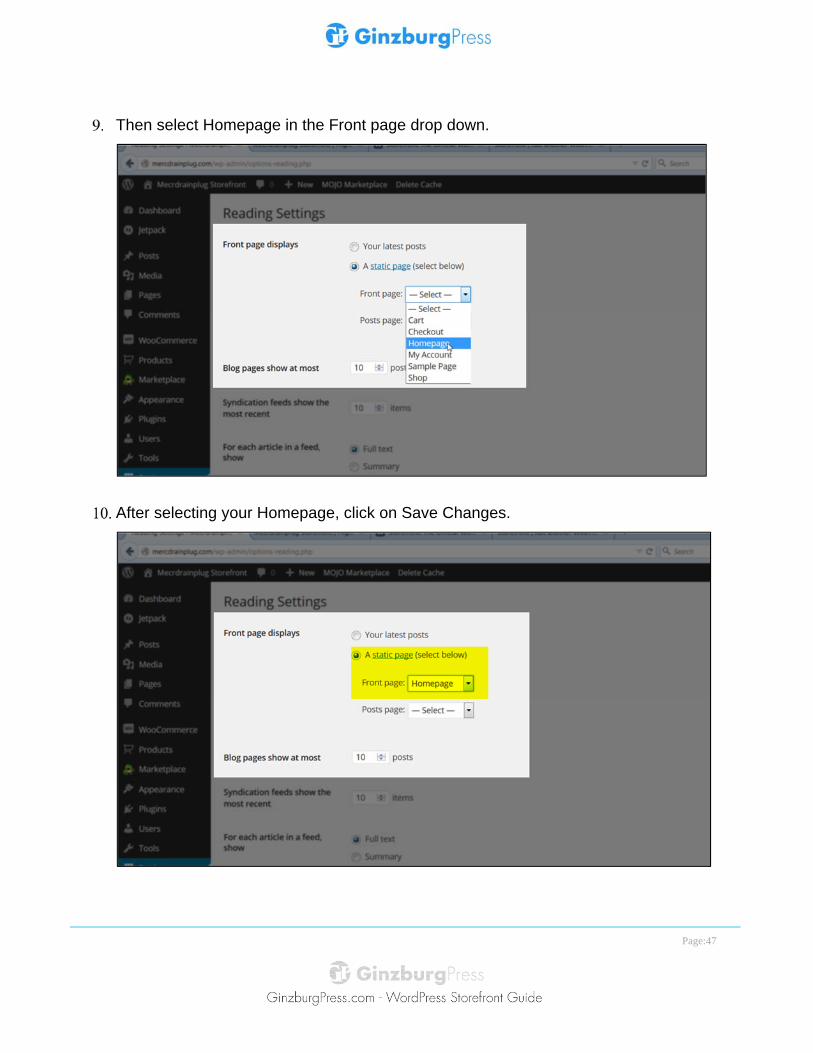
Then select Homepage in the Front page drop down.
After selecting your Homepage, click on Save Changes.
Page:48
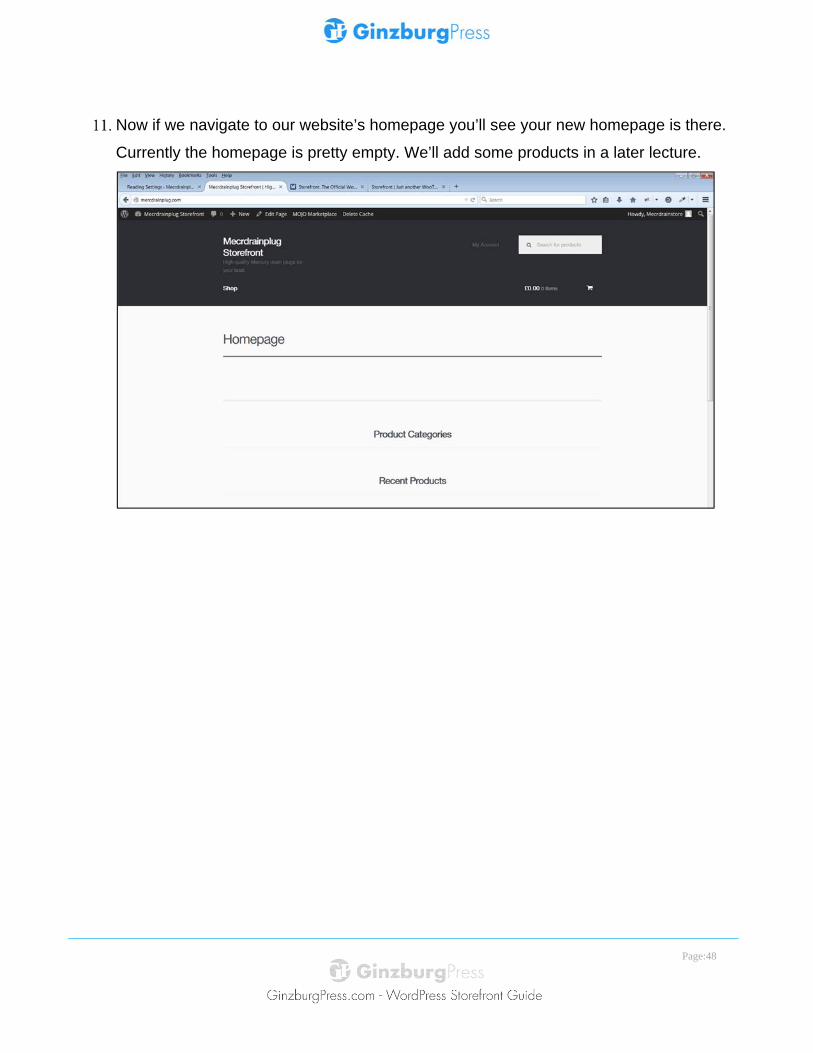
Now if we navigate to our website’s homepage you’ll see your new homepage is there.
Currently the homepage is pretty empty. We’ll add some products in a later lecture.
Page:49
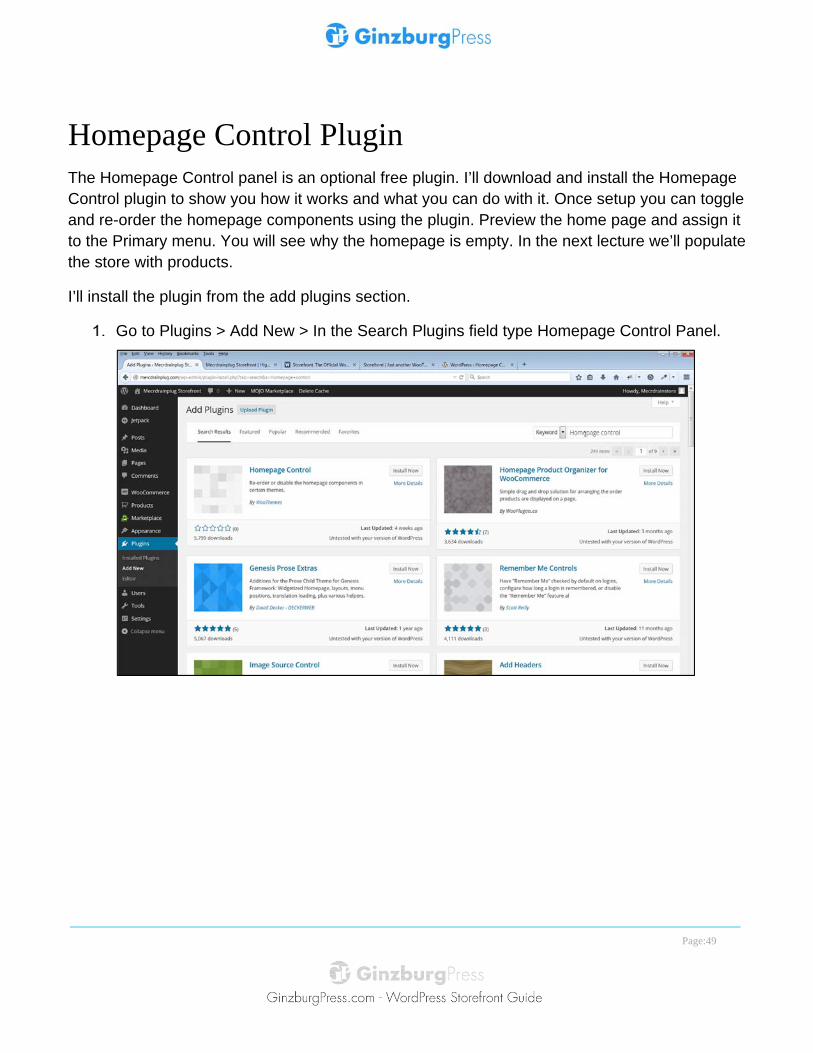
Homepage Control Plugin The Homepage Control panel is an optional free plugin. I’ll download and install the Homepage Control plugin to show you how it works and what you can do with it. Once setup you can toggle and re-order the homepage components using the plugin. Preview the home page and assign it to the Primary menu. You will see why the homepage is empty. In the next lecture we’ll populate the store with products.
I’ll install the plugin from the add plugins section.
Go to Plugins > Add New > In the Search Plugins field type Homepage Control Panel.
Page:50
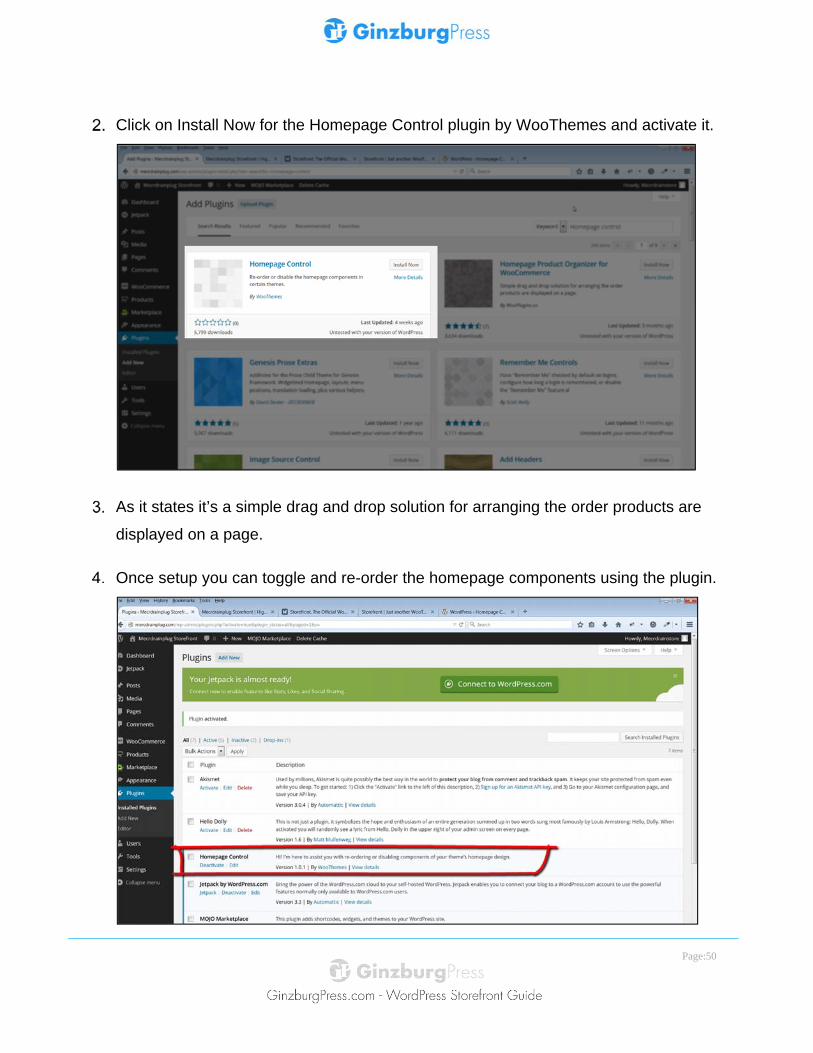
Click on Install Now for the Homepage Control plugin by WooThemes and activate it.
As it states it’s a simple drag and drop solution for arranging the order products are
displayed on a page.
Once setup you can toggle and re-order the homepage components using the plugin.
Page:51
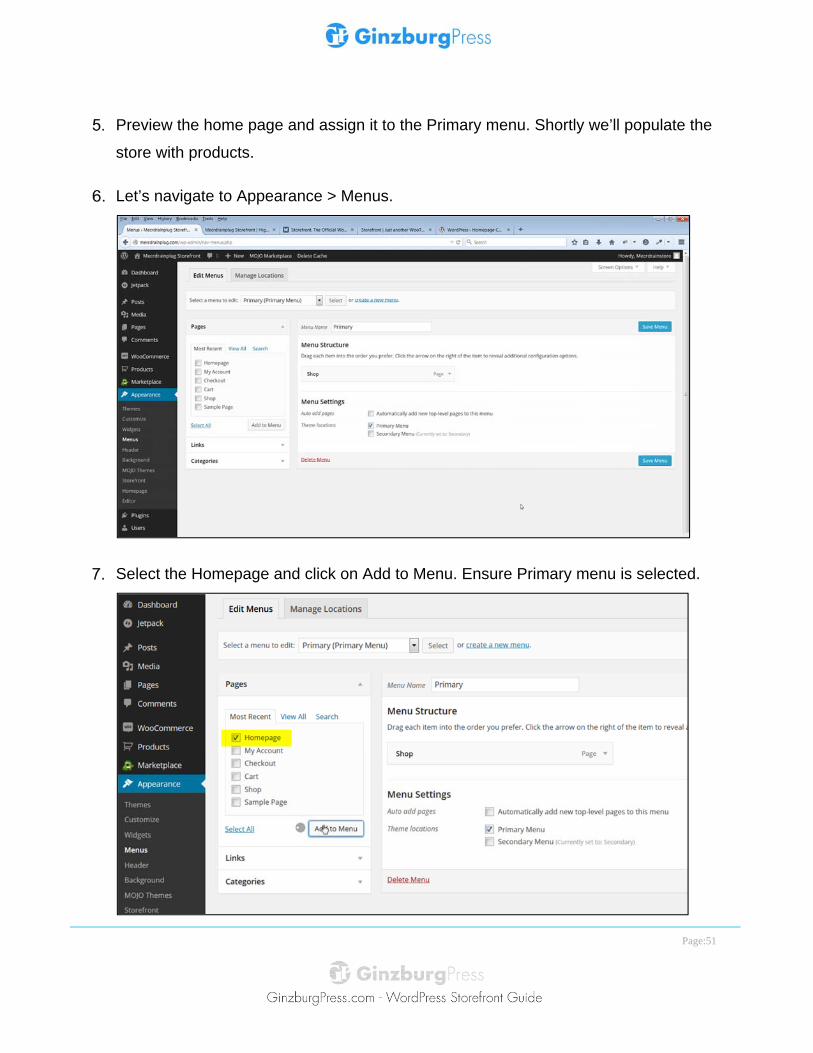
Preview the home page and assign it to the Primary menu. Shortly we’ll populate the
store with products.
Let’s navigate to Appearance > Menus.
Select the Homepage and click on Add to Menu. Ensure Primary menu is selected.
Page:52
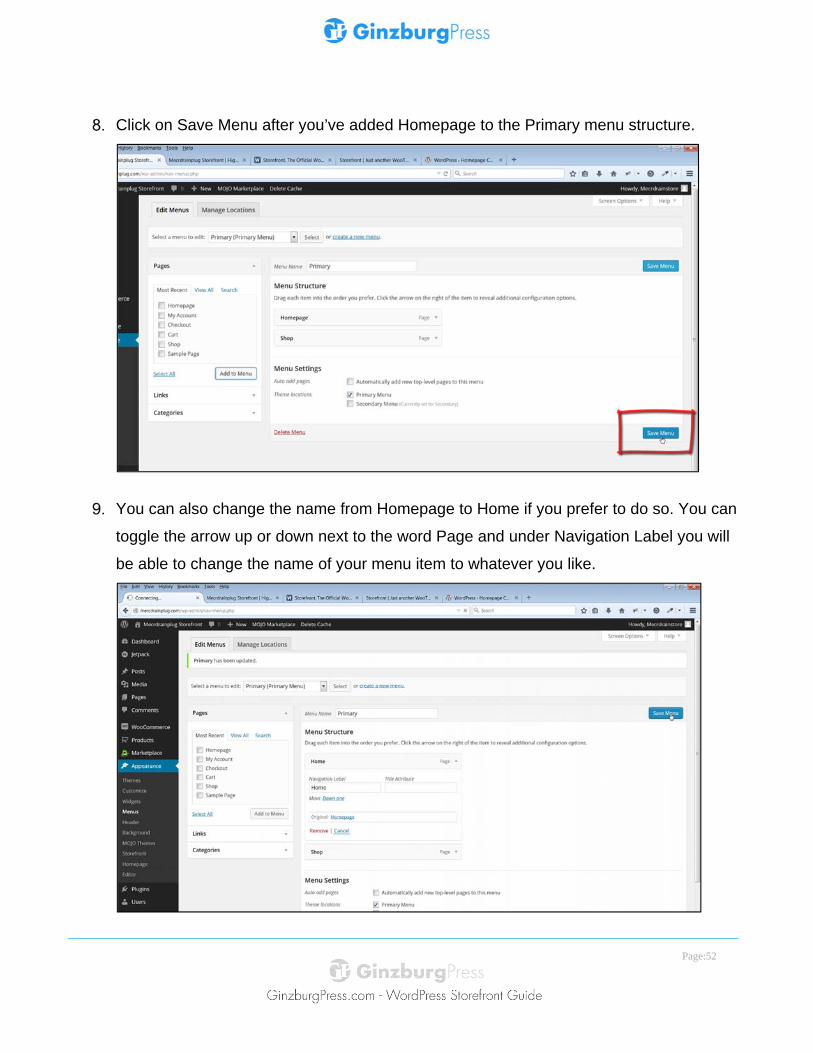
Click on Save Menu after you’ve added Homepage to the Primary menu structure.
You can also change the name from Homepage to Home if you prefer to do so. You can
toggle the arrow up or down next to the word Page and under Navigation Label you will
be able to change the name of your menu item to whatever you like.
Page:53
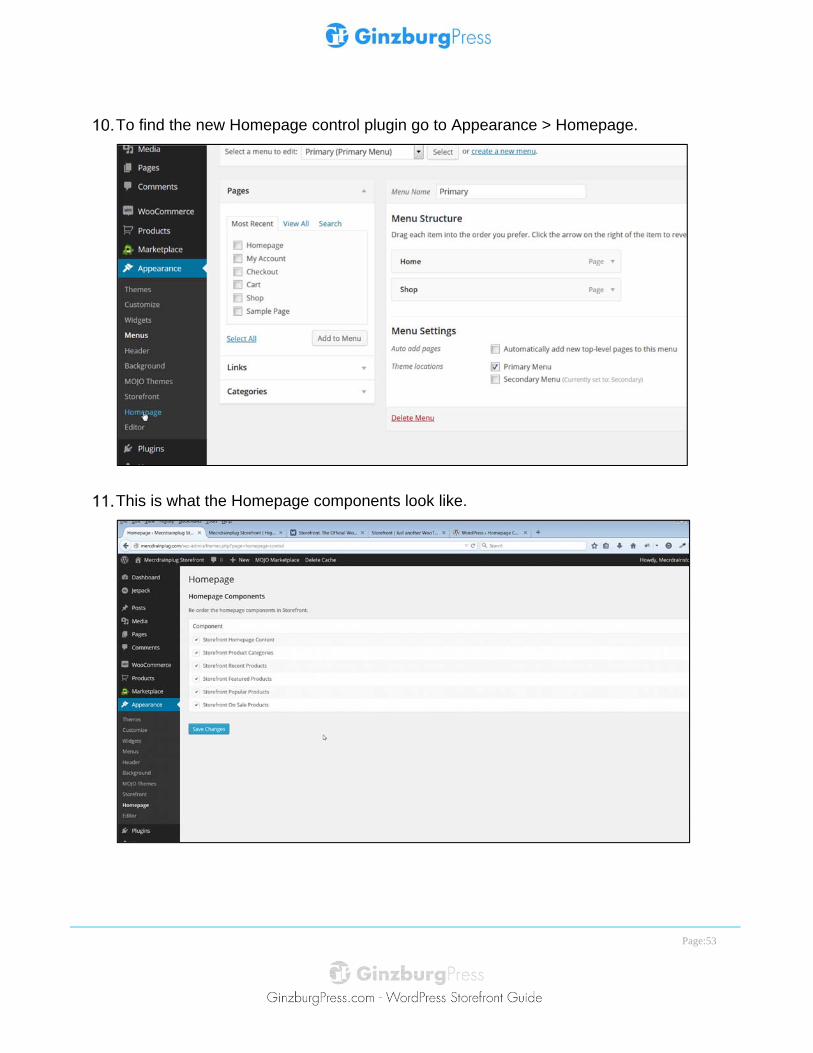
To find the new Homepage control plugin go to Appearance > Homepage.
This is what the Homepage components look like.
Page:54
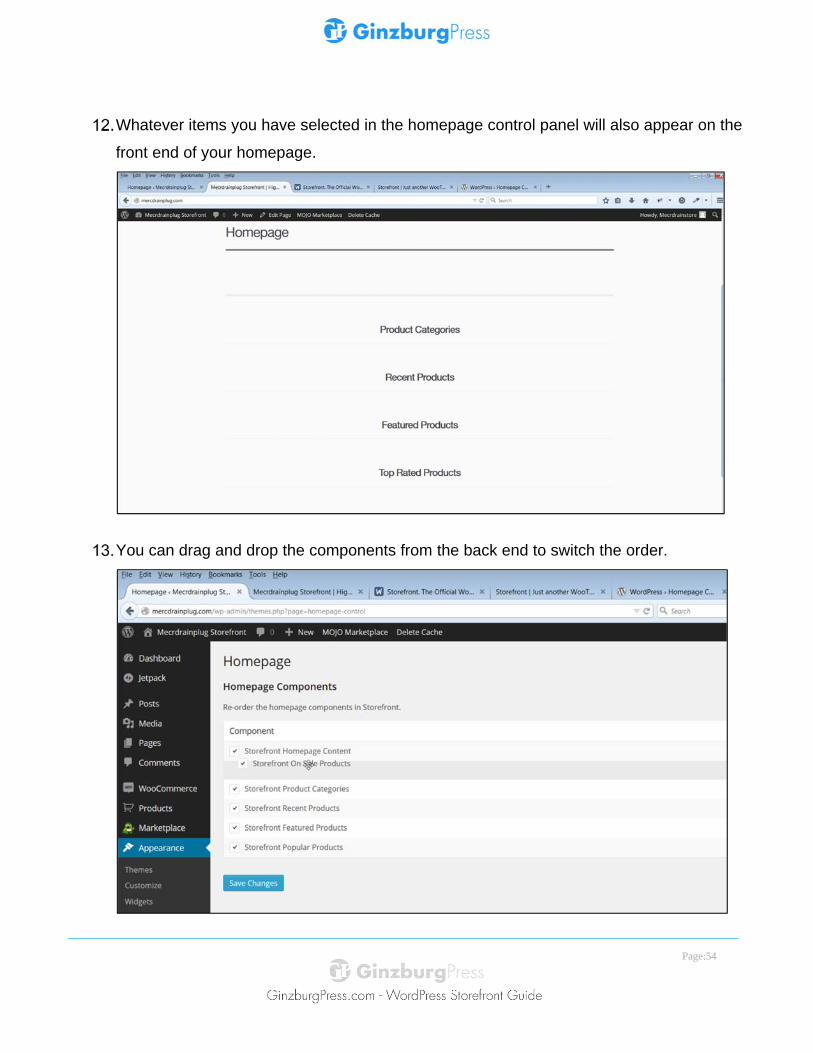
Whatever items you have selected in the homepage control panel will also appear on the
front end of your homepage.
You can drag and drop the components from the back end to switch the order.
Page:55
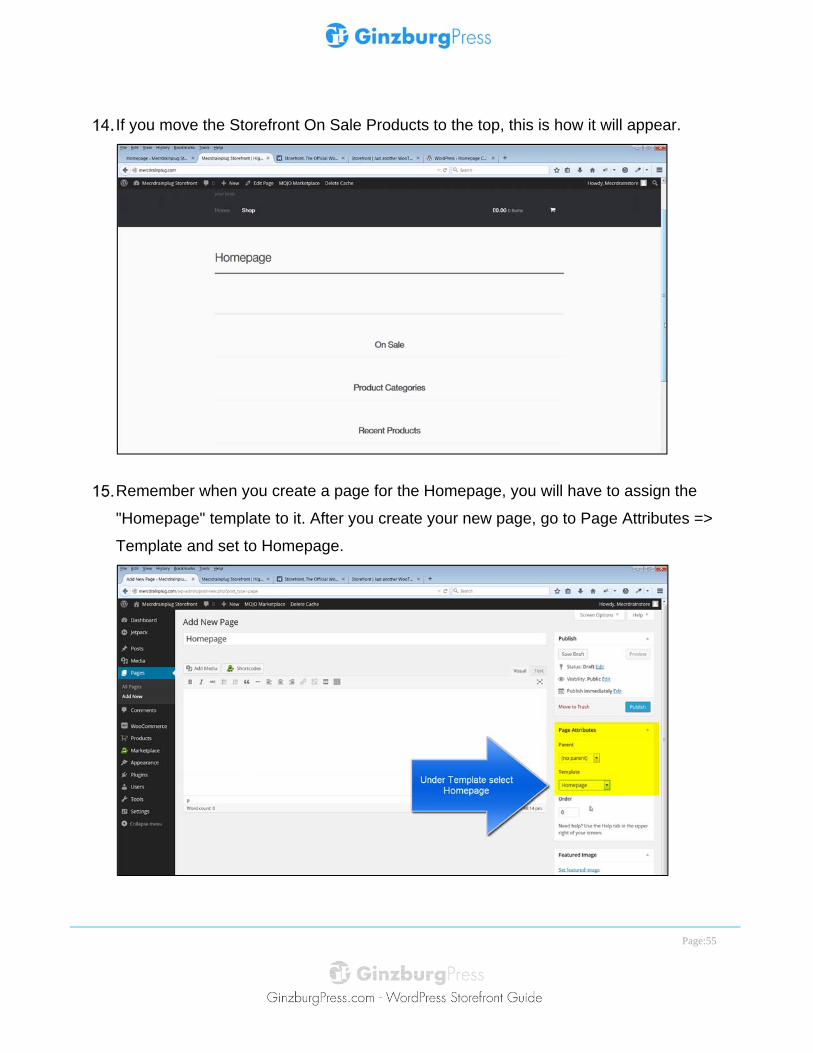
If you move the Storefront On Sale Products to the top, this is how it will appear.
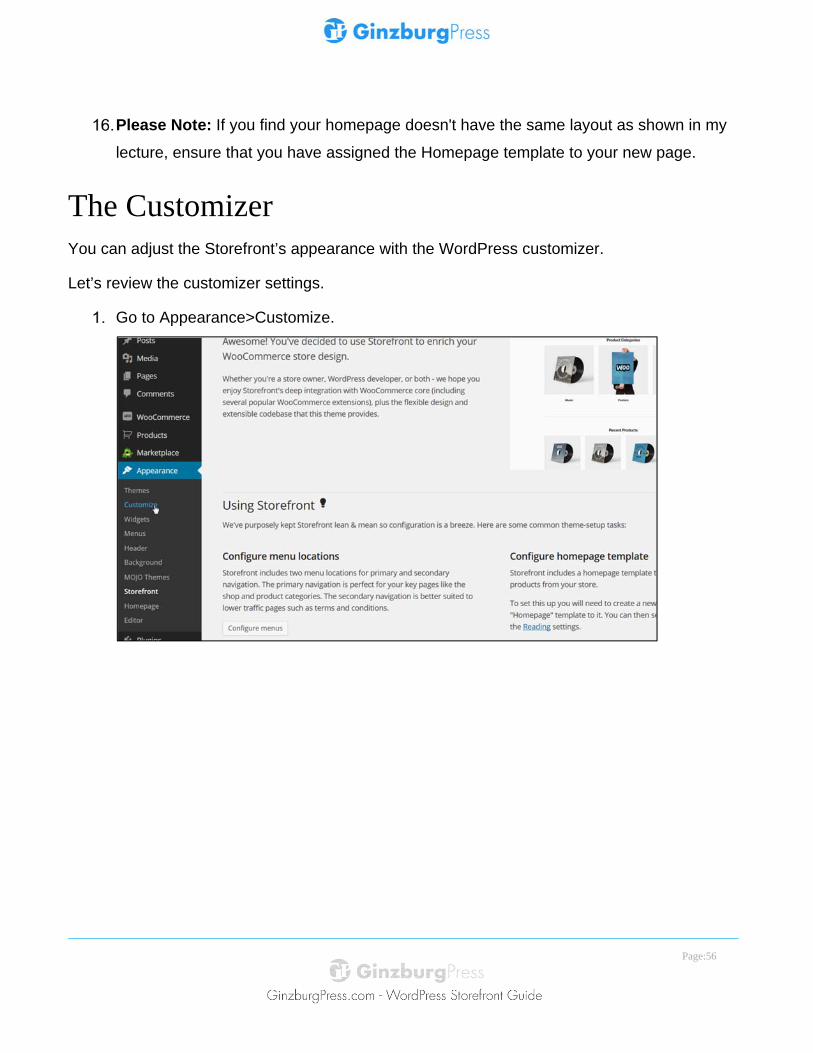
Remember when you create a page for the Homepage, you will have to assign the
"Homepage" template to it. After you create your new page, go to Page Attributes =>
Template and set to Homepage.
Page:56
Please Note: If you find your homepage doesn't have the same layout as shown in my
lecture, ensure that you have assigned the Homepage template to your new page.
The Customizer You can adjust the Storefront’s appearance with the WordPress customizer.
Let’s review the customizer settings.
Go to Appearance>Customize.
Page:57
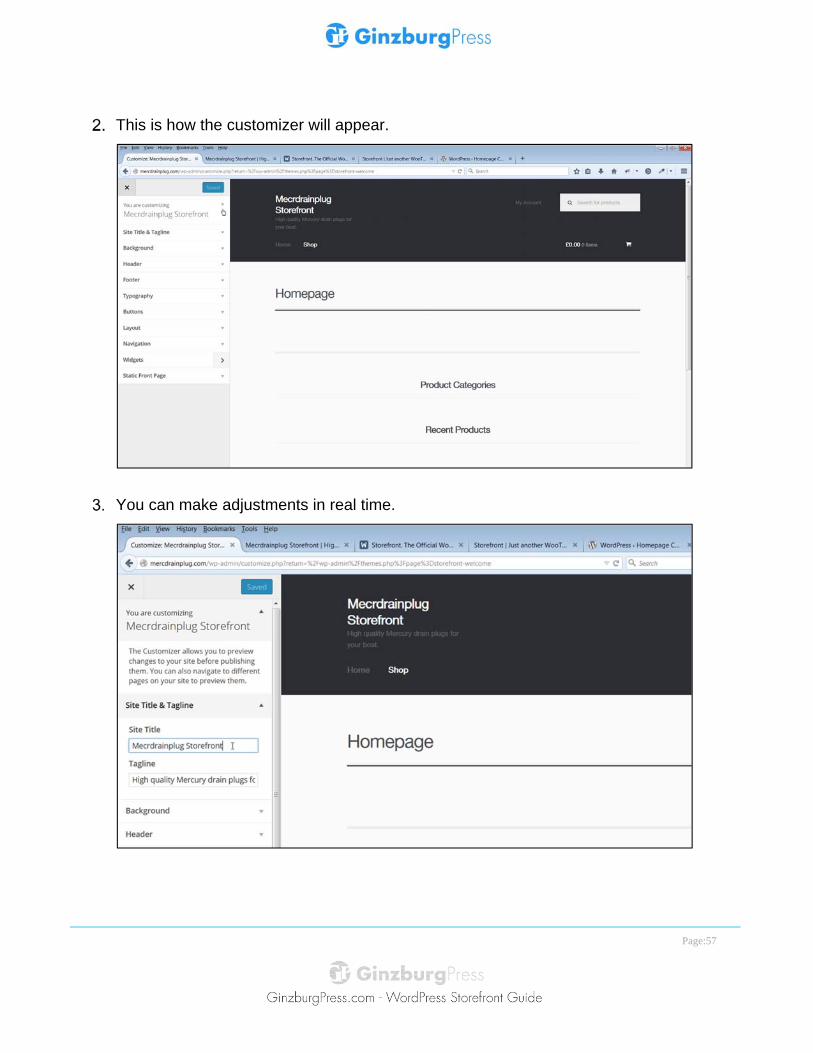
This is how the customizer will appear.
You can make adjustments in real time.
Page:58
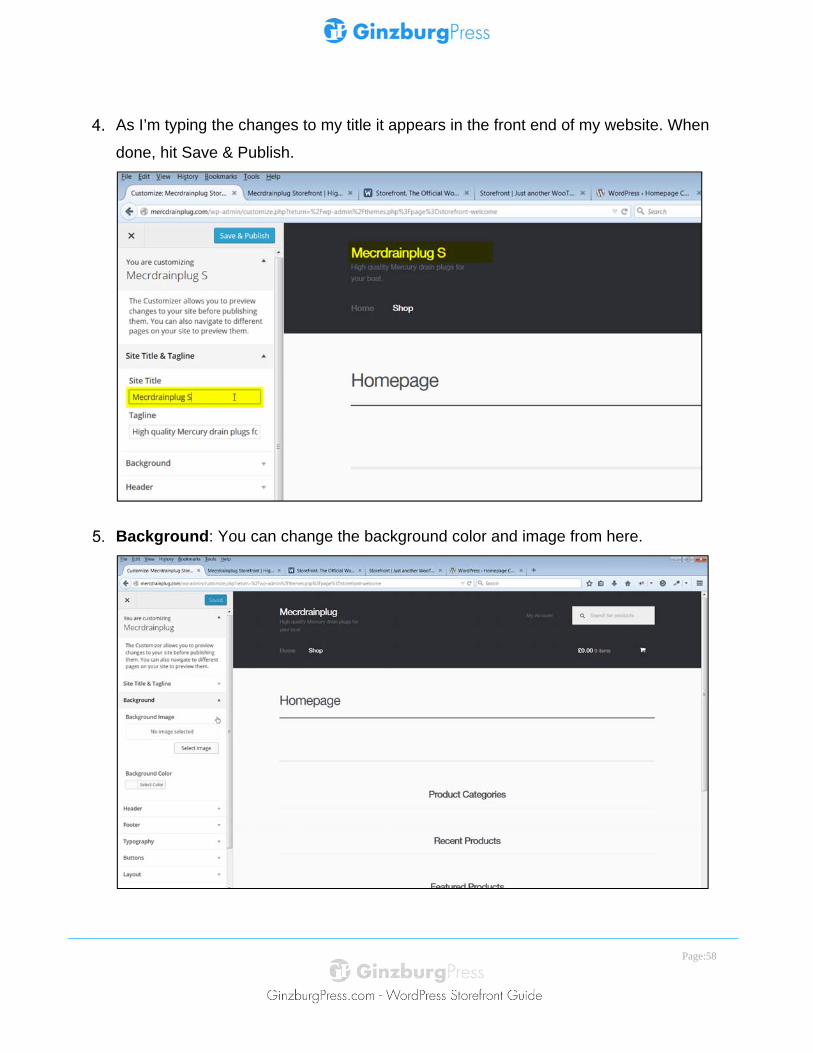
As I’m typing the changes to my title it appears in the front end of my website. When
done, hit Save & Publish.
Background: You can change the background color and image from here.
Page:59
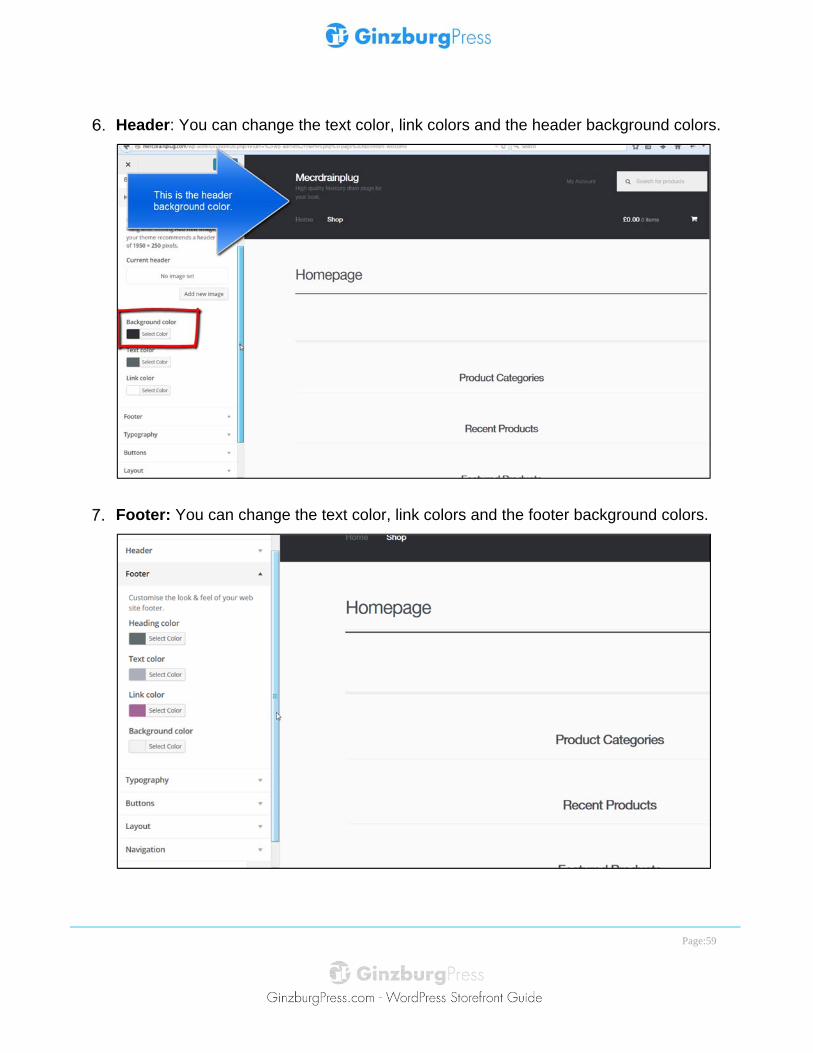
Header: You can change the text color, link colors and the header background colors.
Footer: You can change the text color, link colors and the footer background colors.
Page:60
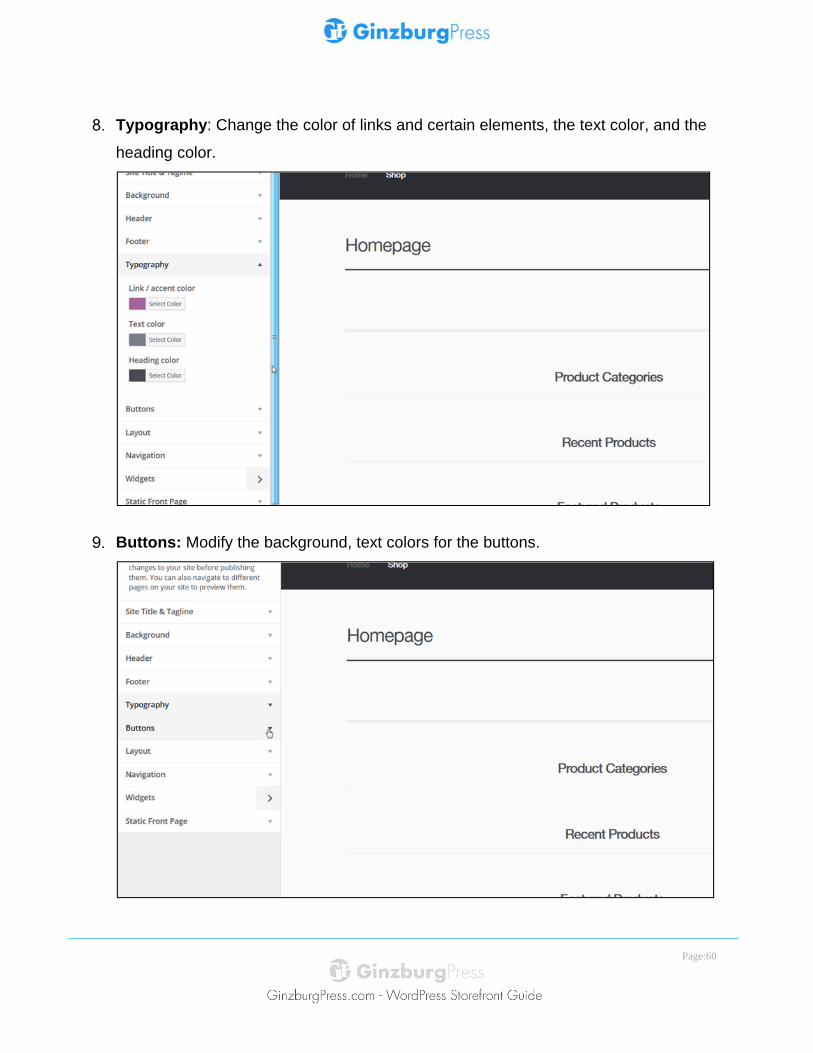
Typography: Change the color of links and certain elements, the text color, and the
heading color.
Buttons: Modify the background, text colors for the buttons.
Page:61
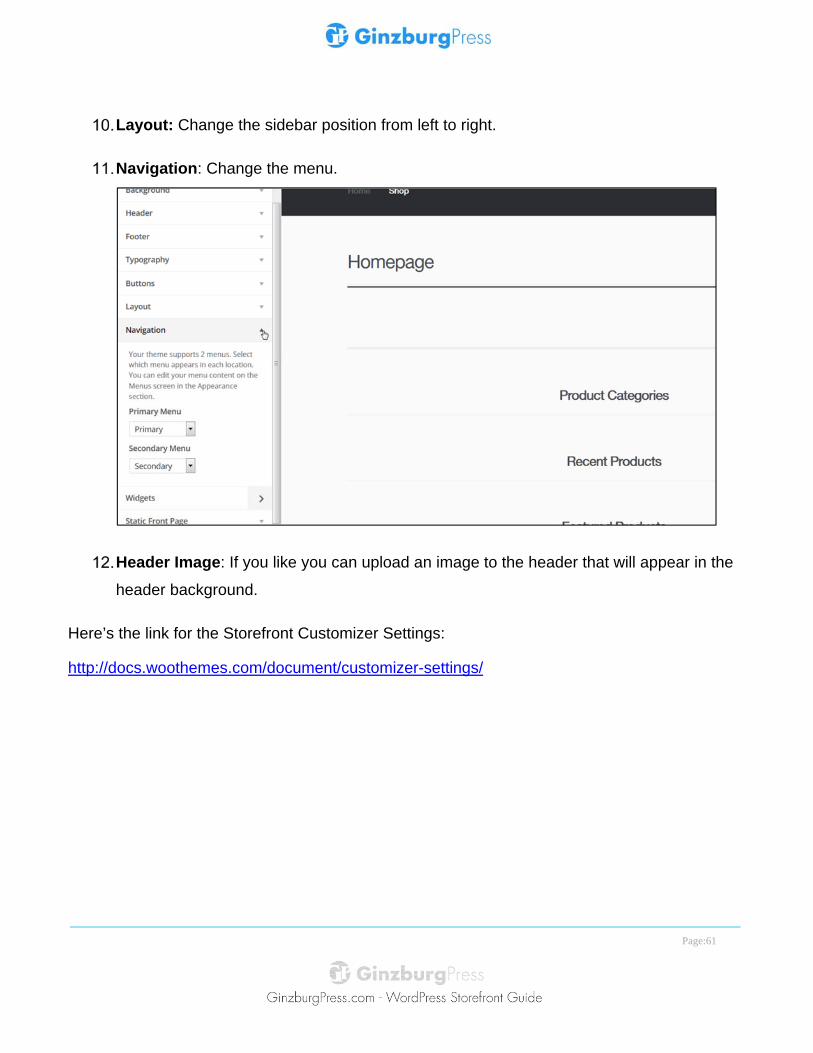
Layout: Change the sidebar position from left to right.
Navigation: Change the menu.
Header Image: If you like you can upload an image to the header that will appear in the
header background.
Here’s the link for the Storefront Customizer Settings:
http://docs.woothemes.com/document/customizer-settings/

Page:62
Add a Logo Let’s add a logo to the website.
There are two methods to add a logo to your site. The first method you can activate Jetpack. The second method which is a little more advanced requires you to add the logo to your child theme functions.php file. The simplest way to add a logo to the theme is to activate Jetpack to enable a custom logo option in the customizer. You’ll install jetpack. Activate Jetpack to enable a custom logo option in the customizer. If you would prefer not to activate Jetpack and you are a more advanced WordPress user, I have included a link on how to add a custom logo in the resources section for this lecture.
I will describe below how to activate Jetpack to add your own logo.
Activate Jetpack.
If you don’t have Jetpack installed navigate to Plugins > Add New. You’ll see Jetpack by
WordPress.com.
Page:63
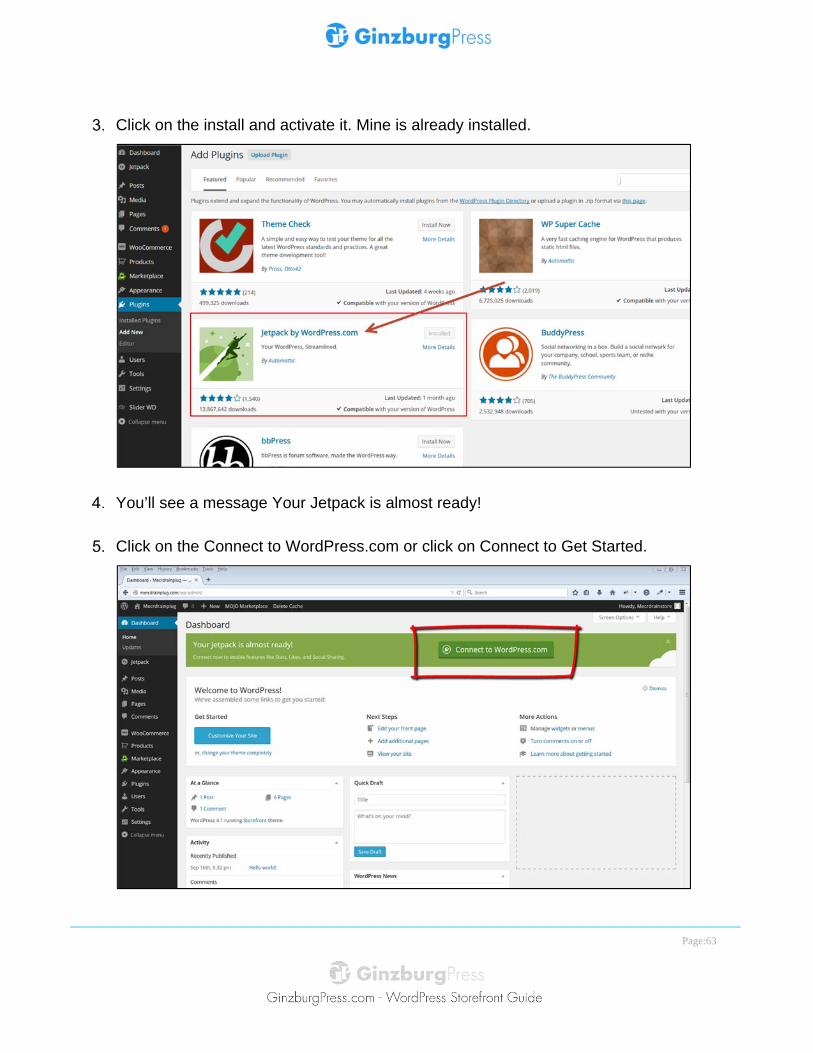
Click on the install and activate it. Mine is already installed.
You’ll see a message Your Jetpack is almost ready!
Click on the Connect to WordPress.com or click on Connect to Get Started.
Page:64
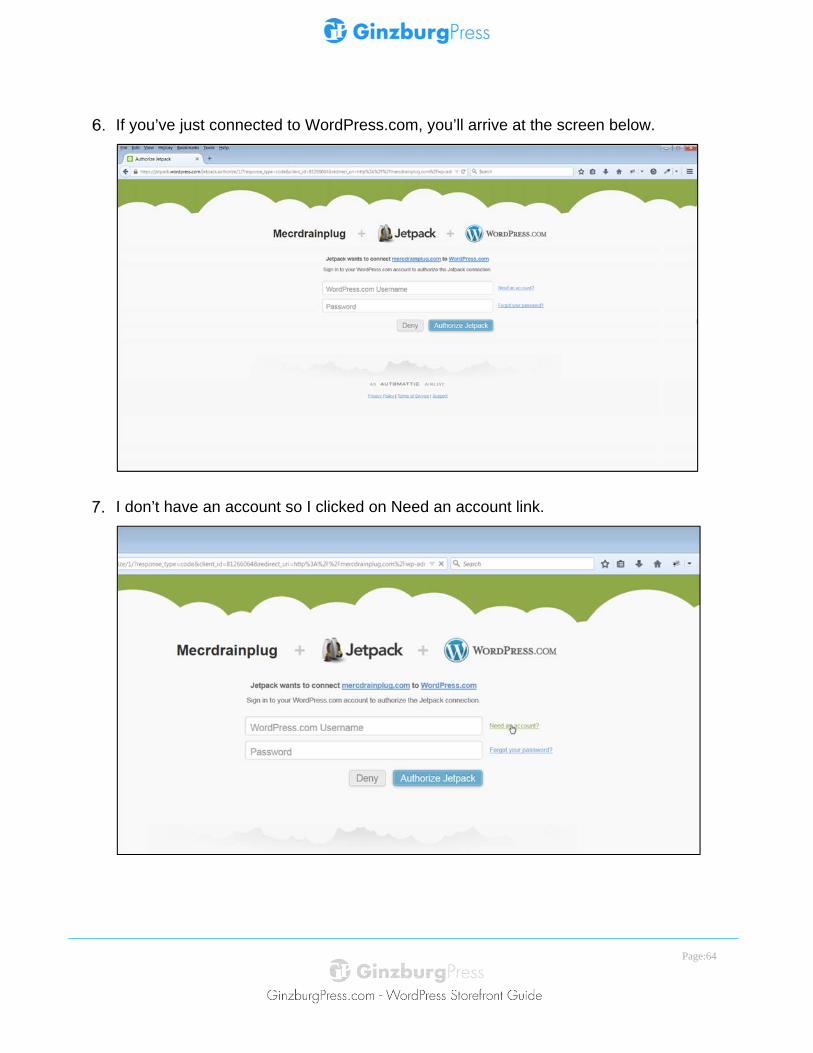
If you’ve just connected to WordPress.com, you’ll arrive at the screen below.
I don’t have an account so I clicked on Need an account link.
Page:65
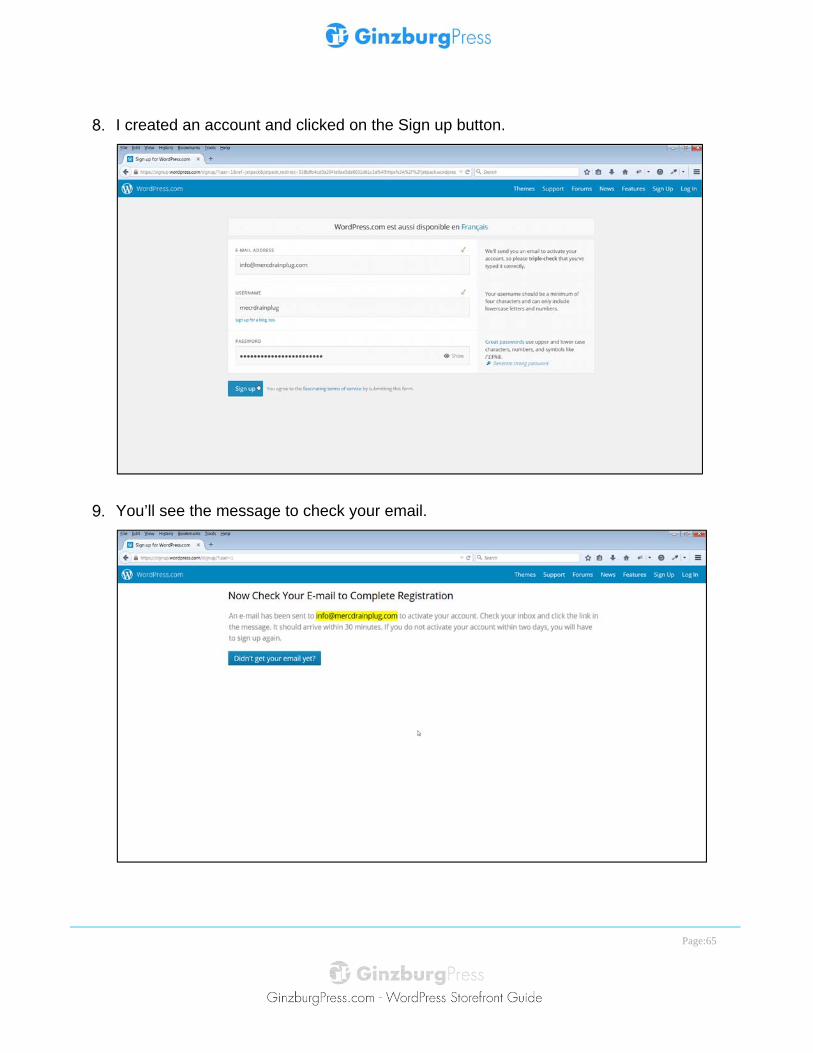
I created an account and clicked on the Sign up button.
You’ll see the message to check your email.
Page:66
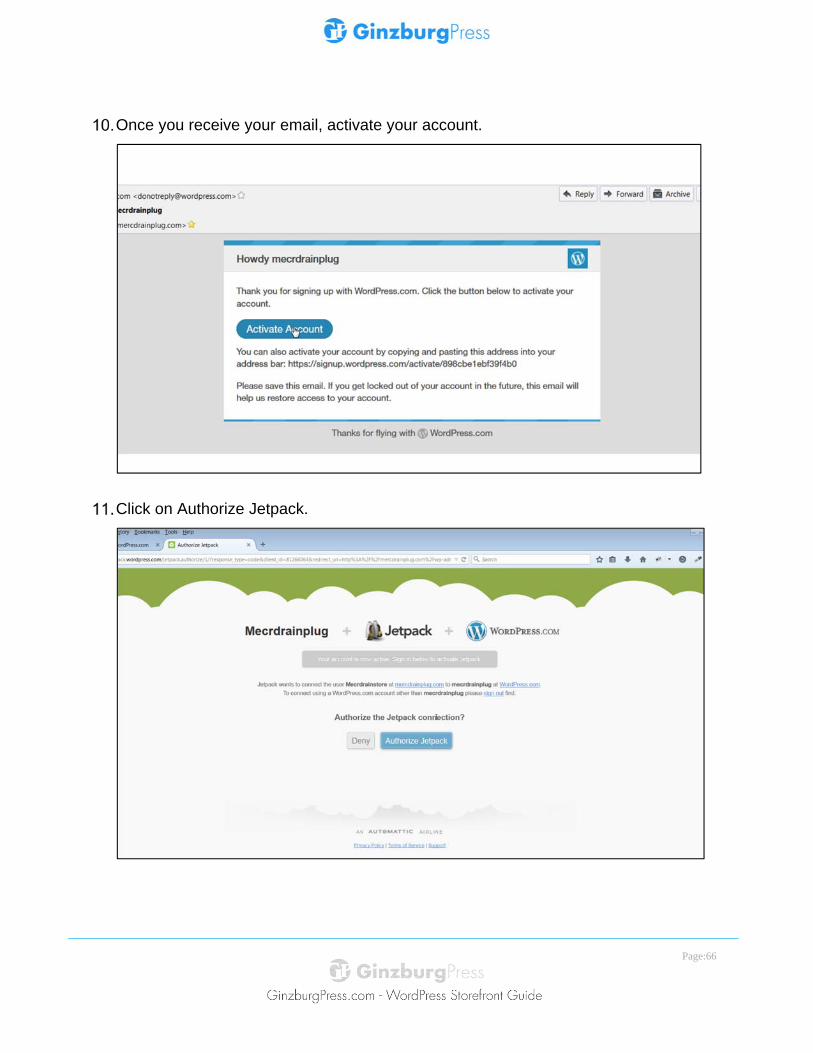
Once you receive your email, activate your account.
Click on Authorize Jetpack.
Page:67
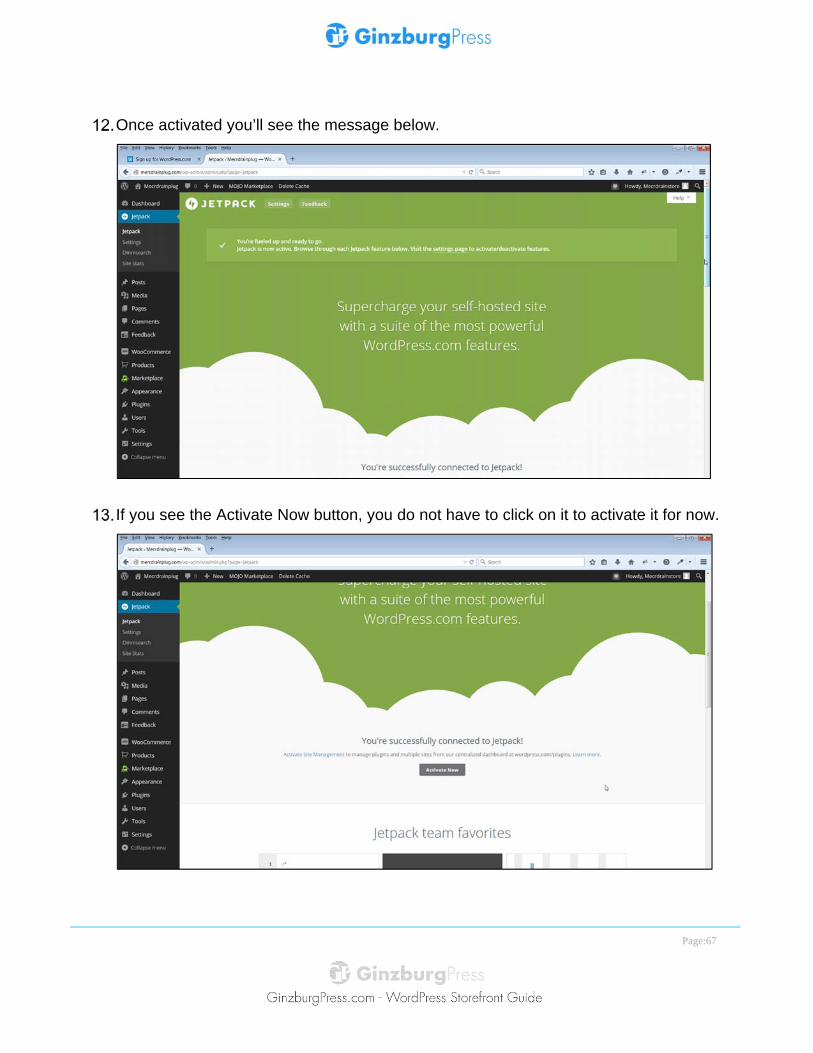
Once activated you’ll see the message below.
If you see the Activate Now button, you do not have to click on it to activate it for now.
Page:68
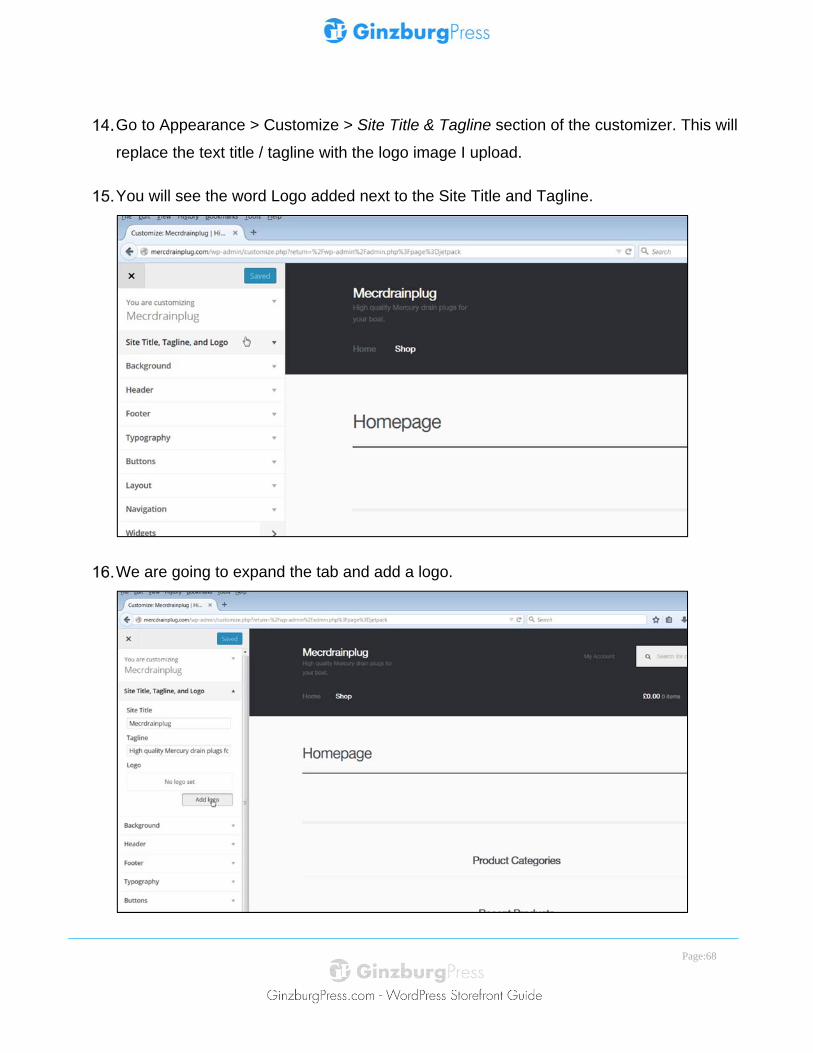
Go to Appearance > Customize > Site Title & Tagline section of the customizer. This will
replace the text title / tagline with the logo image I upload.
You will see the word Logo added next to the Site Title and Tagline.
We are going to expand the tab and add a logo.

Page:69
The Media uploader will appear. If you do have a logo, you can now upload it from your
machine.
Your logo will load and be available in your media library. Click on the Set as logo blue
button. My logo is 235 x 36 pixels.
Page:70
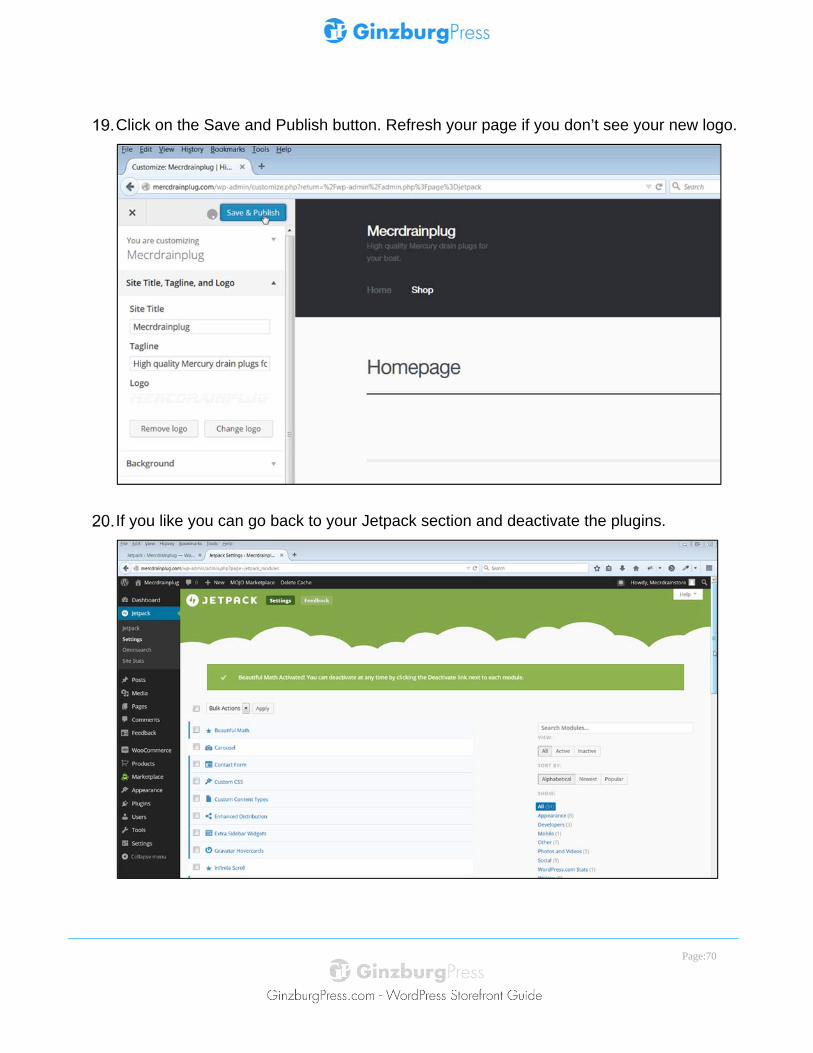
Click on the Save and Publish button. Refresh your page if you don’t see your new logo.
If you like you can go back to your Jetpack section and deactivate the plugins.

Page:71
You can bulk select everything and deactivate it.
It’s also possible to get an account without having to use their blog service. Just make sure that when you go to http://www.WordPress.com to get your account, you specify that you only want a user name and not a blog.
The link below also explains how to add a logo to Storefront.
http://docs.woothemes.com/document/storefront-faq/
If you’re an advanced user this link explains how to add a logo to your child theme without using Jetpack.
http://docs.woothemes.com/document/add-a-custom-logo/
Page:72
Import WooCommerce Dummy Data You will use the WordPress importer to locate and import data. I will demonstrate how to install the dummy data. The dummy data for WooCommerce is located in a file called dummy_data.xml which is located in the WooCommerce plugin directory.
I’ll show you how to change the product and catalog image sizes. I will show you why and how to regenerate your thumbnails.
The dummy data we’ll be importing into our site is included with WooCommerce. We will also be installing the WordPress importer.
Locating the WooCommerce Dummy Data
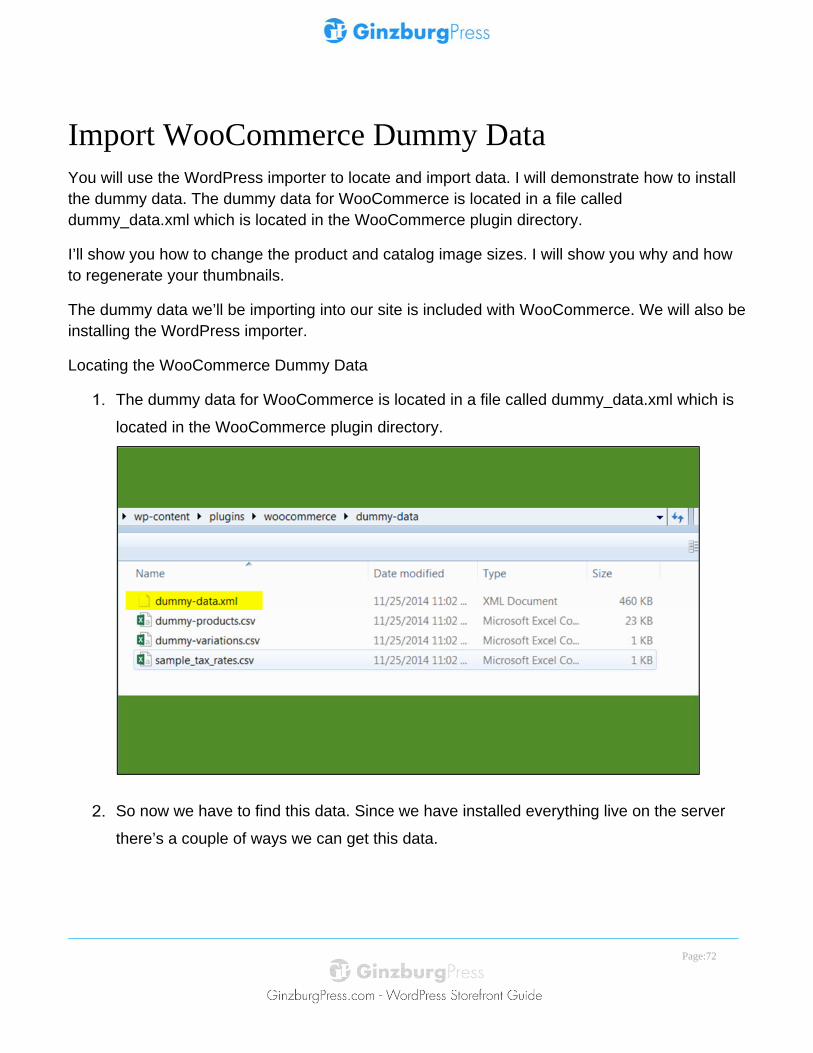
The dummy data for WooCommerce is located in a file called dummy_data.xml which is
located in the WooCommerce plugin directory.
So now we have to find this data. Since we have installed everything live on the server
there’s a couple of ways we can get this data.
Page:73
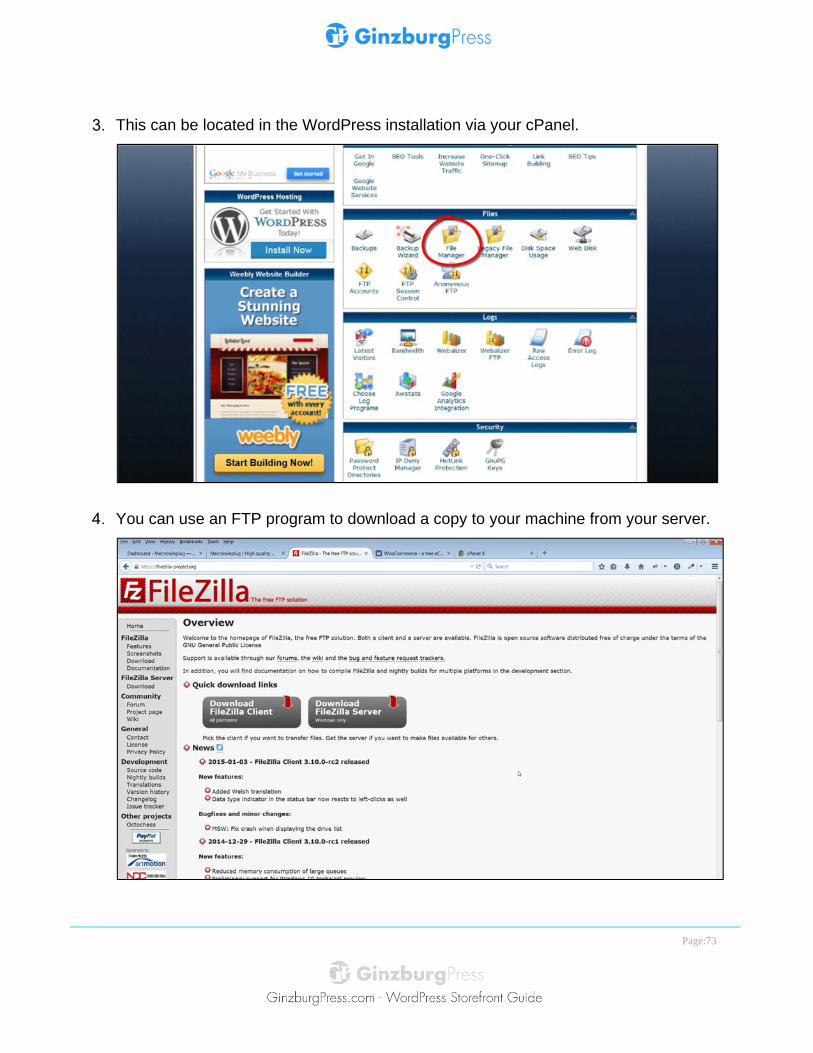
This can be located in the WordPress installation via your cPanel.
You can use an FTP program to download a copy to your machine from your server.
Page:74
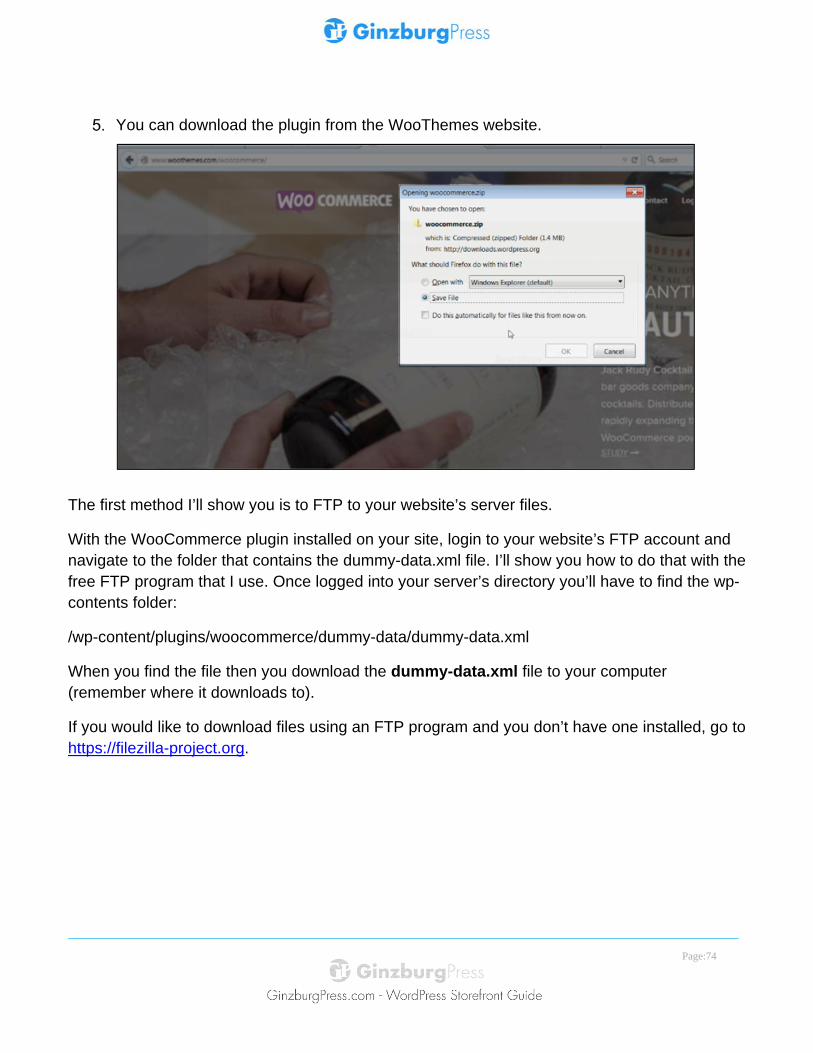
You can download the plugin from the WooThemes website.
The first method I’ll show you is to FTP to your website’s server files.
With the WooCommerce plugin installed on your site, login to your website’s FTP account and navigate to the folder that contains the dummy-data.xml file. I’ll show you how to do that with the free FTP program that I use. Once logged into your server’s directory you’ll have to find the wp-contents folder:
/wp-content/plugins/woocommerce/dummy-data/dummy-data.xml
When you find the file then you download the dummy-data.xml file to your computer (remember where it downloads to).
If you would like to download files using an FTP program and you don’t have one installed, go to https://filezilla-project.org.
Page:75
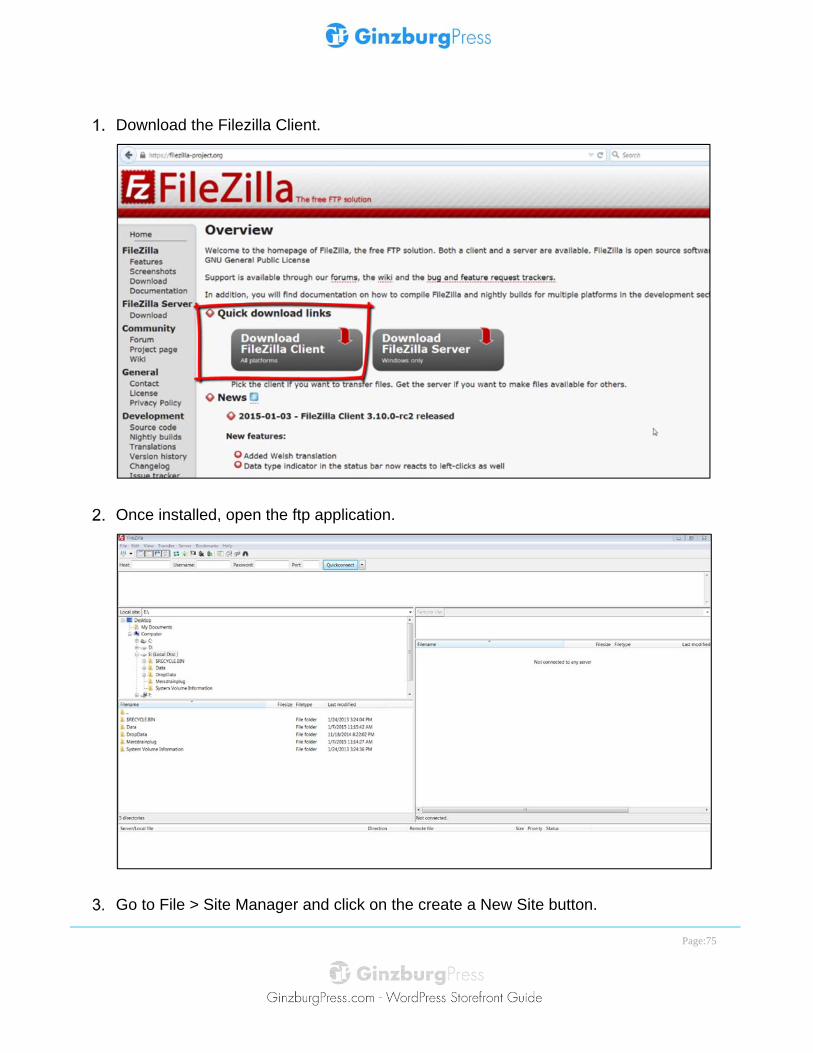
Download the Filezilla Client.
Once installed, open the ftp application.
Go to File > Site Manager and click on the create a New Site button.
Page:76
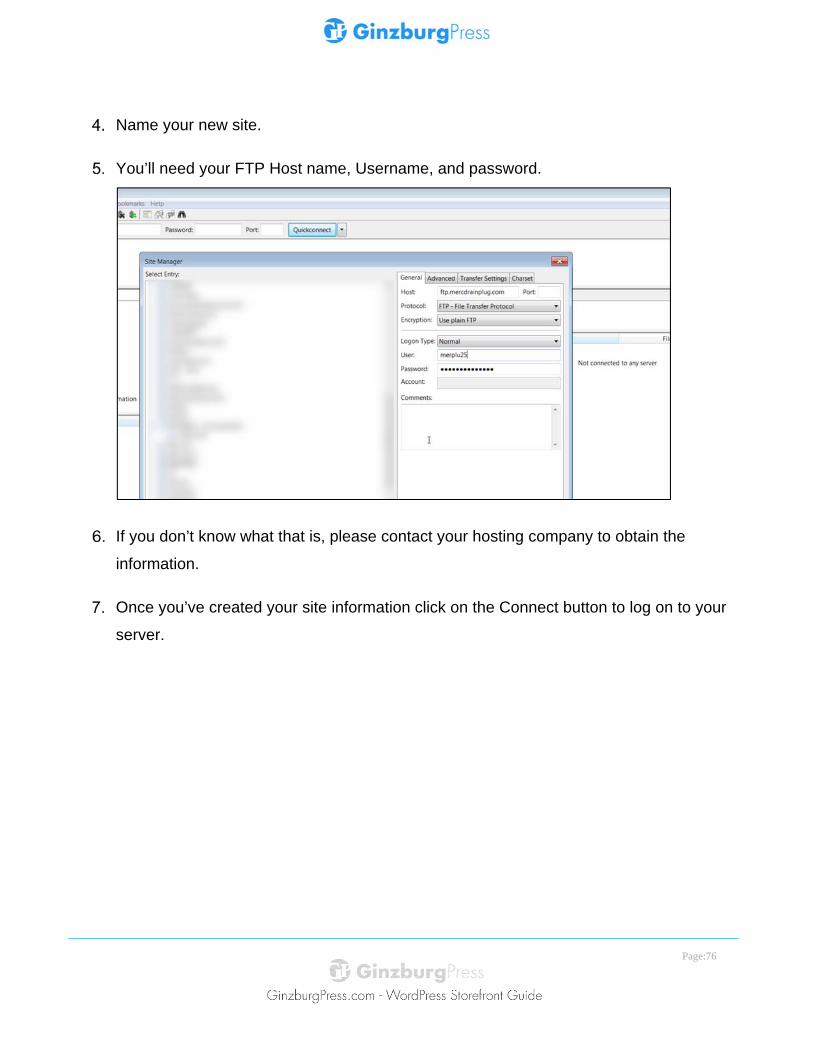
Name your new site.
You’ll need your FTP Host name, Username, and password.
If you don’t know what that is, please contact your hosting company to obtain the
information.
Once you’ve created your site information click on the Connect button to log on to your
server.
Page:77
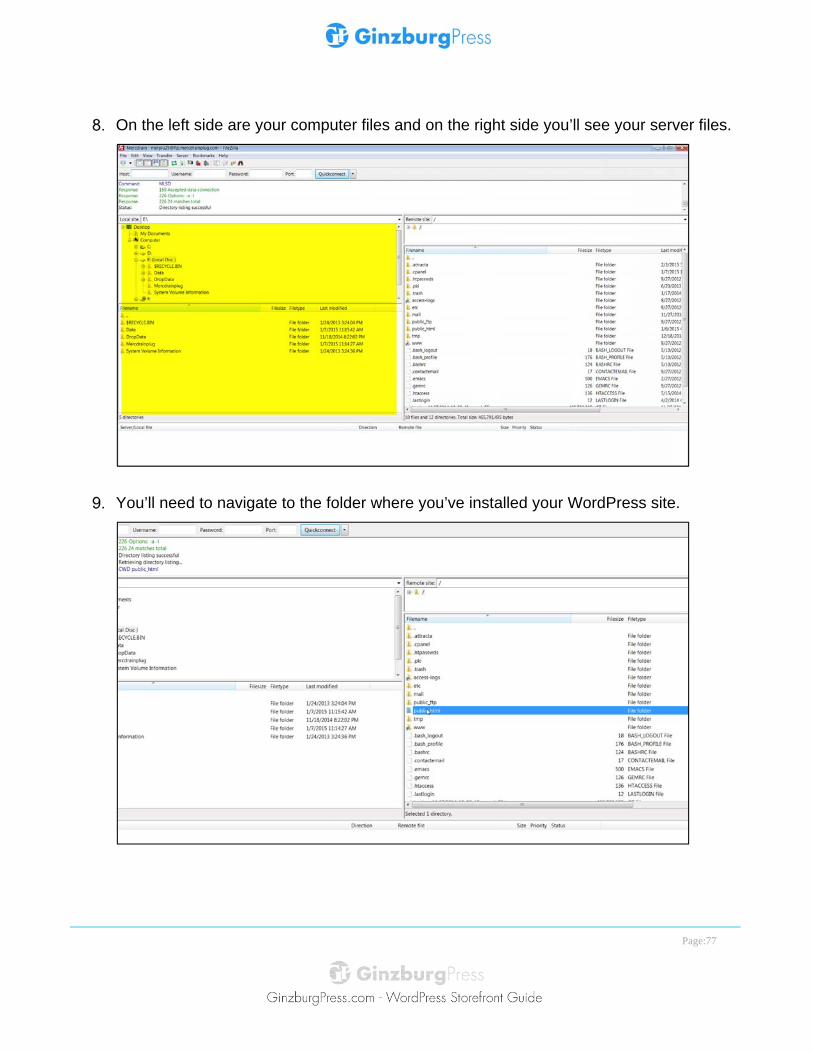
On the left side are your computer files and on the right side you’ll see your server files.
You’ll need to navigate to the folder where you’ve installed your WordPress site.
Page:78
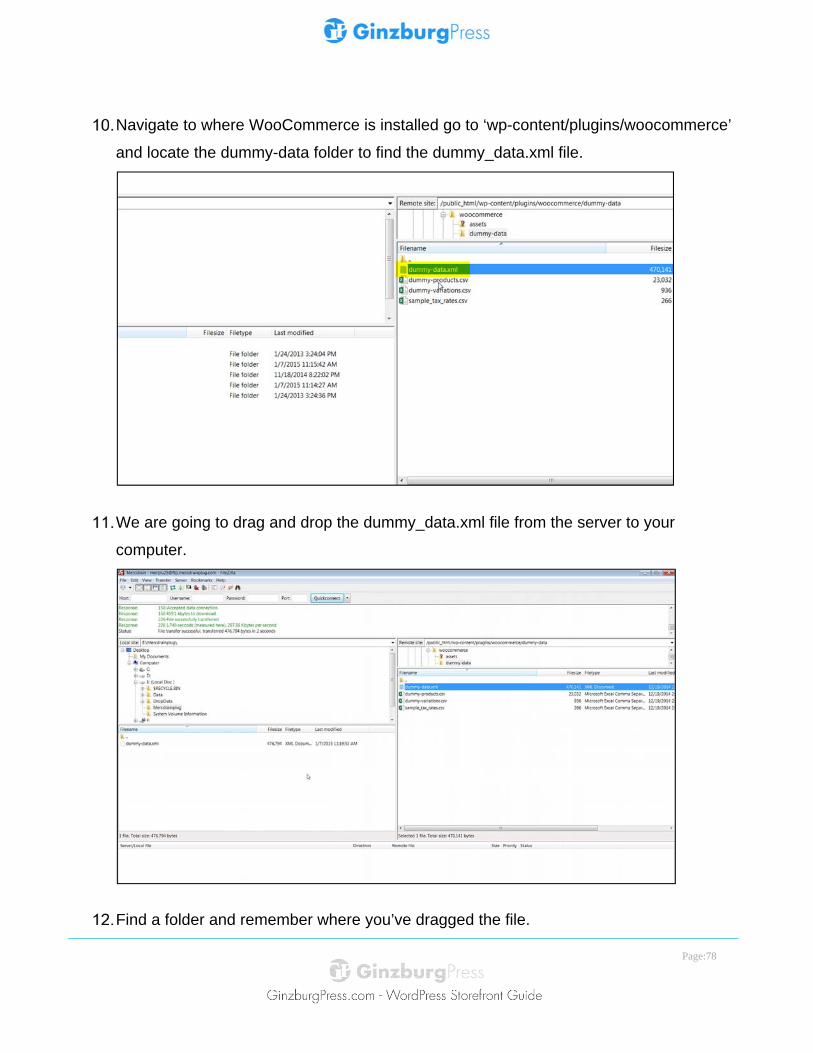
Navigate to where WooCommerce is installed go to ‘wp-content/plugins/woocommerce’
and locate the dummy-data folder to find the dummy_data.xml file.
We are going to drag and drop the dummy_data.xml file from the server to your
computer.
Find a folder and remember where you’ve dragged the file.
Page:79
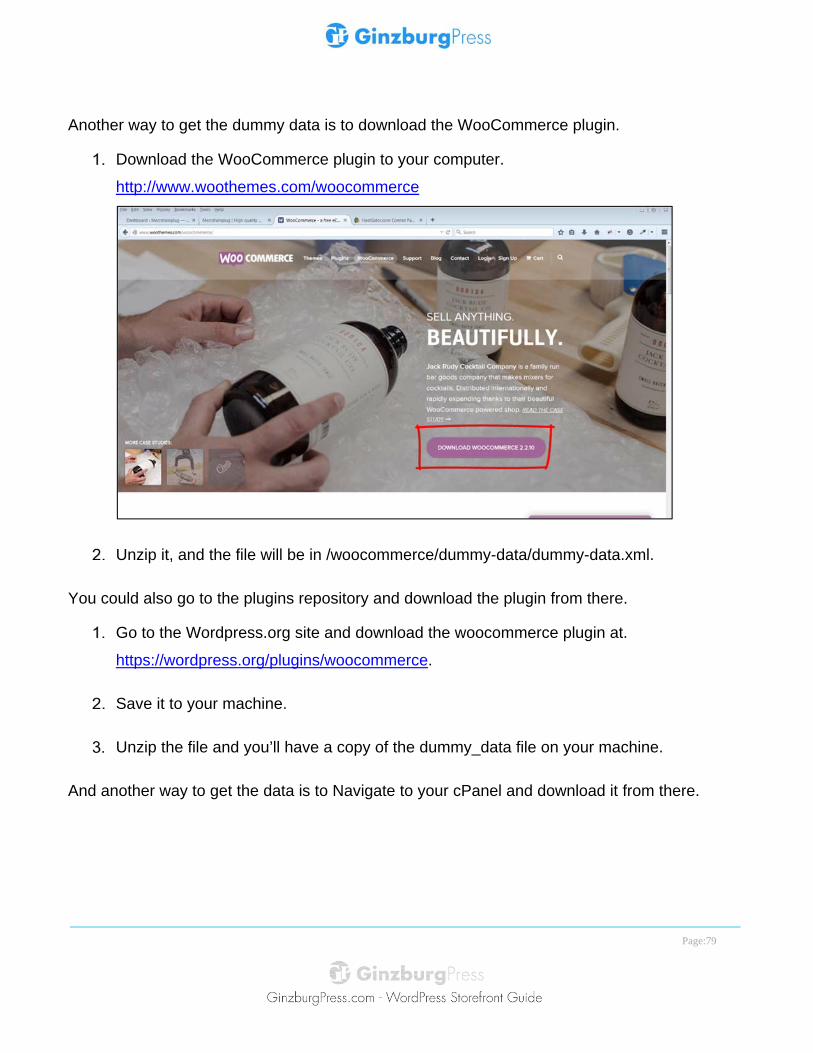
Another way to get the dummy data is to download the WooCommerce plugin.
Download the WooCommerce plugin to your computer.
http://www.woothemes.com/woocommerce
Unzip it, and the file will be in /woocommerce/dummy-data/dummy-data.xml.
You could also go to the plugins repository and download the plugin from there.
Go to the Wordpress.org site and download the woocommerce plugin at.
https://wordpress.org/plugins/woocommerce.
Save it to your machine.
Unzip the file and you’ll have a copy of the dummy_data file on your machine.
And another way to get the data is to Navigate to your cPanel and download it from there.
Page:80
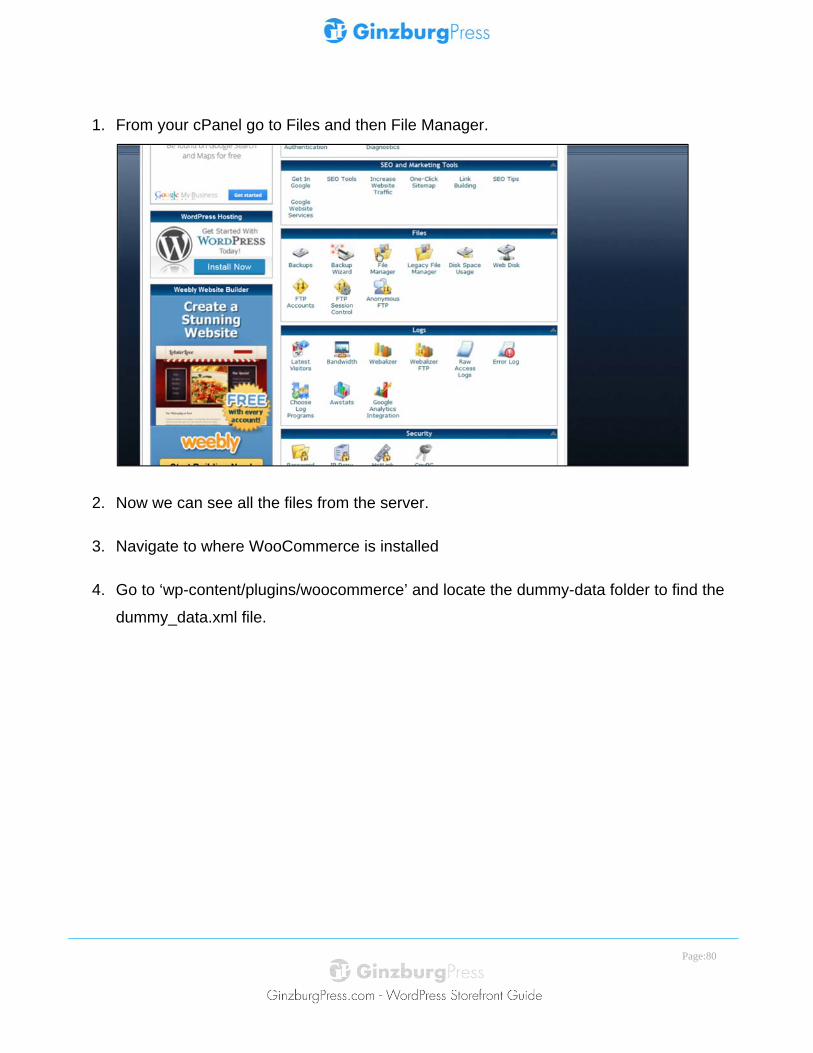
1. From your cPanel go to Files and then File Manager.
2. Now we can see all the files from the server.
3. Navigate to where WooCommerce is installed
4. Go to ‘wp-content/plugins/woocommerce’ and locate the dummy-data folder to find the
dummy_data.xml file.
Page:81
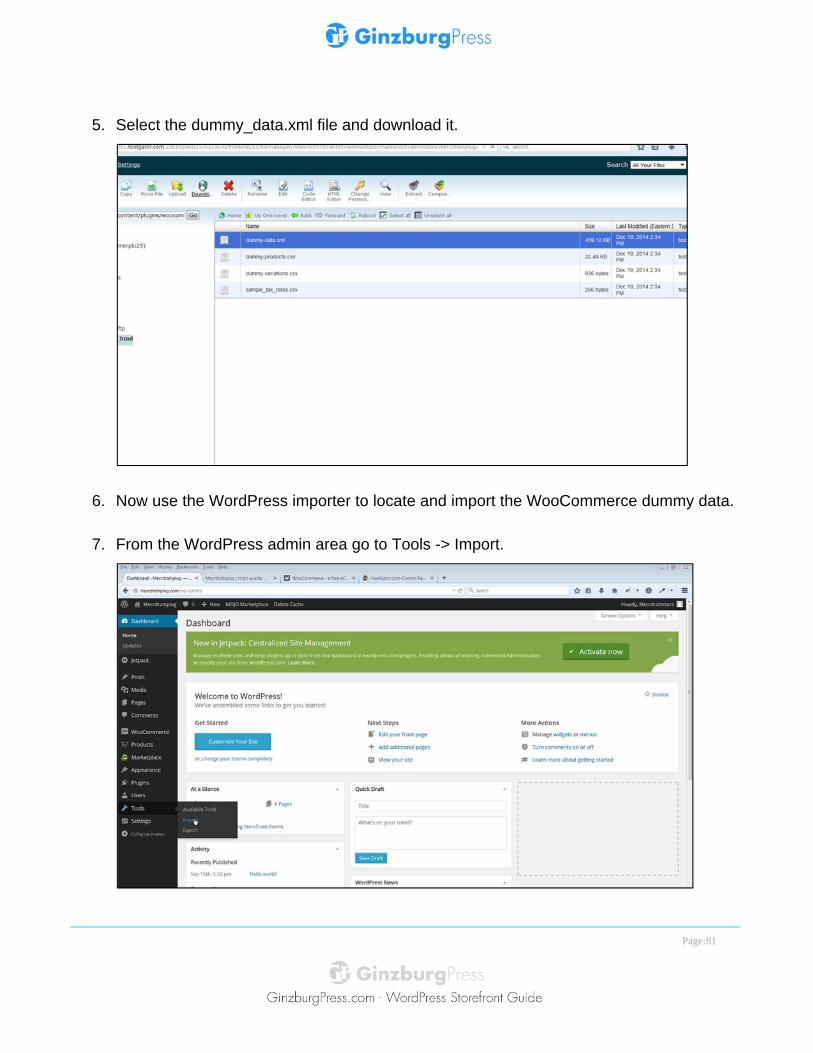
5. Select the dummy_data.xml file and download it.
6. Now use the WordPress importer to locate and import the WooCommerce dummy data.
7. From the WordPress admin area go to Tools -> Import.
Page:82
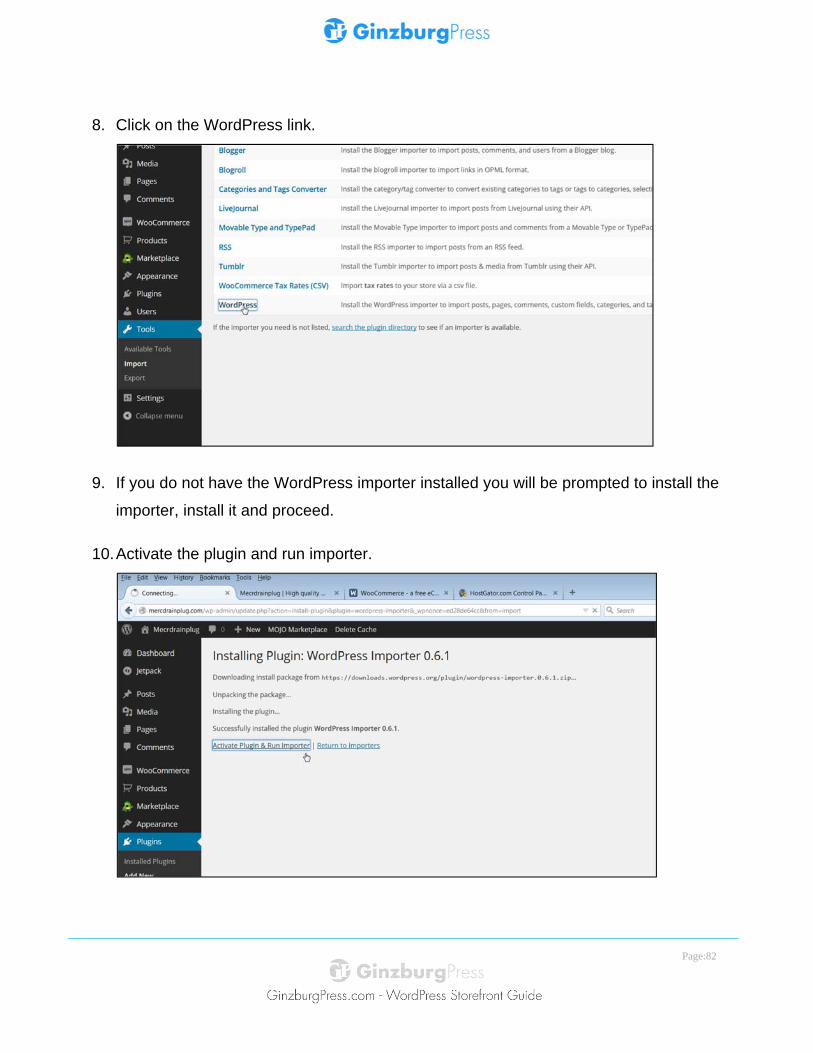
8. Click on the WordPress link.
9. If you do not have the WordPress importer installed you will be prompted to install the
importer, install it and proceed.
10. Activate the plugin and run importer.
Page:83
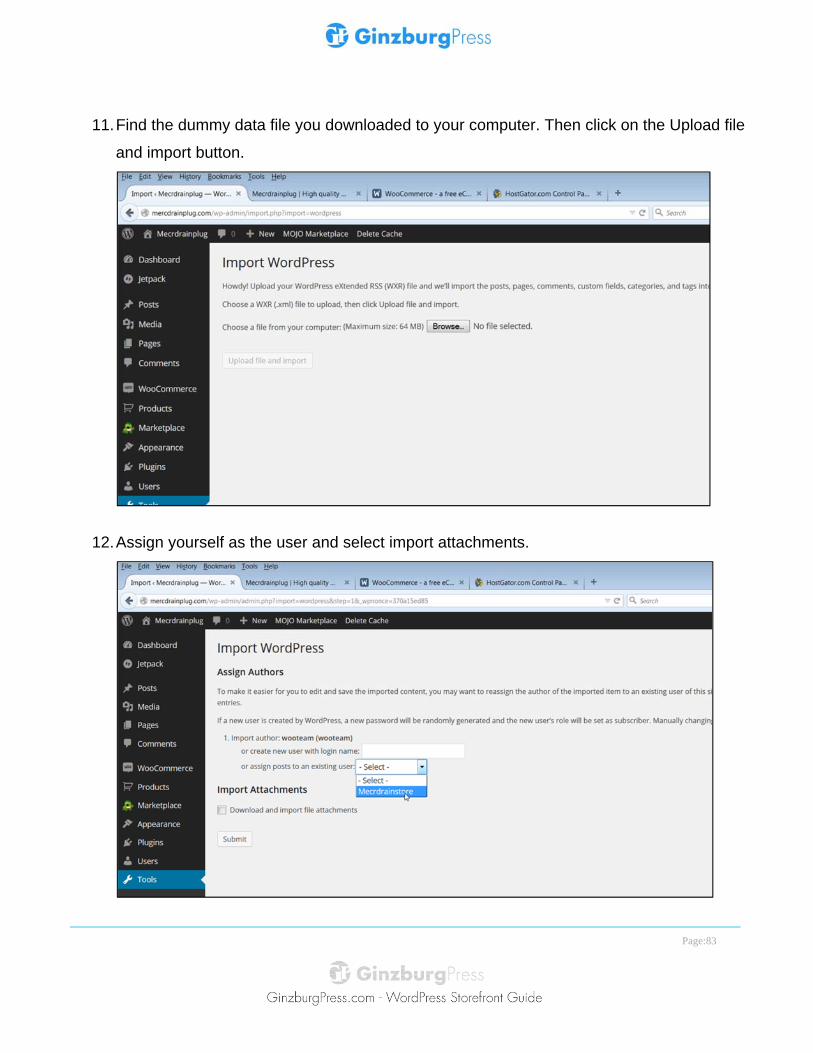
11. Find the dummy data file you downloaded to your computer. Then click on the Upload file
and import button.
12. Assign yourself as the user and select import attachments.

Page:84
13. Check the download and import file attachments checkbox. The latter will download all
the images to your local server for use on the products.
14. Click Submit, sometimes it takes a while to install, and your dummy data will now be
installed, and you now have a working copy of WooCommerce with data loaded.
When finished, a message will appear All done. Have fun!
Dummy data link:
http://docs.woothemes.com/document/importing-woocommerce-dummy-data/
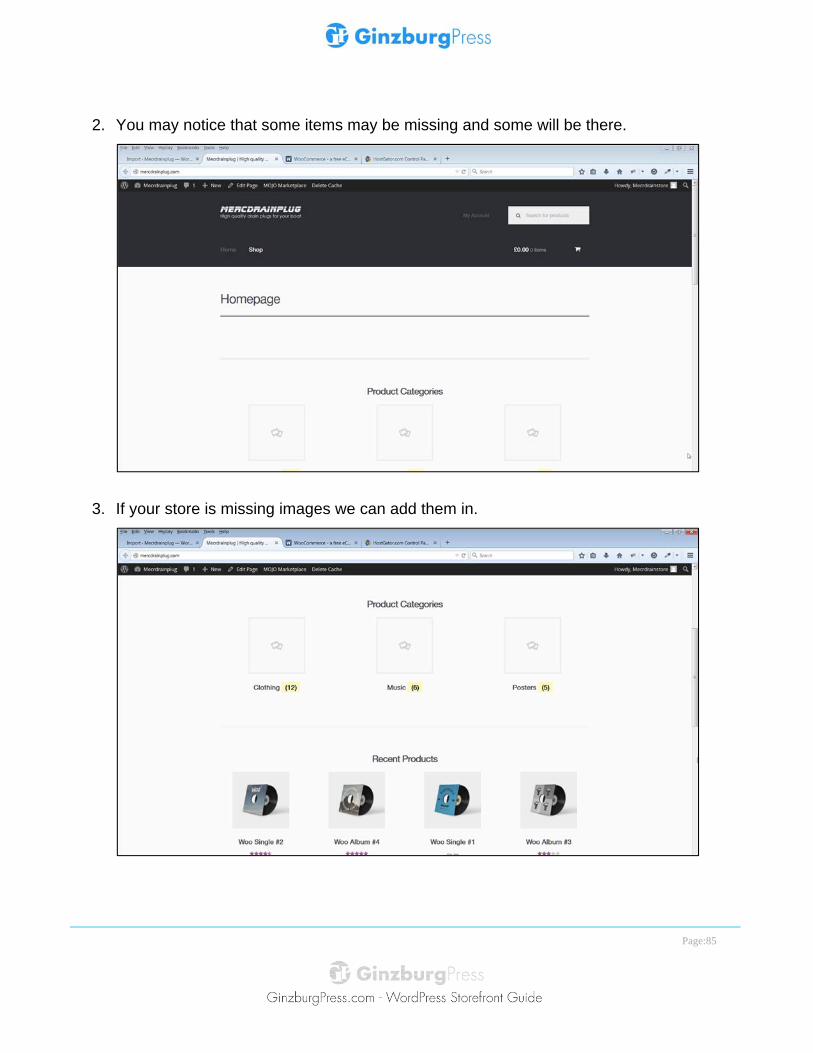
1. Go to the front end of your store to see how the installed dummy data appears.
Page:85
2. You may notice that some items may be missing and some will be there.
3. If your store is missing images we can add them in.
Page:86
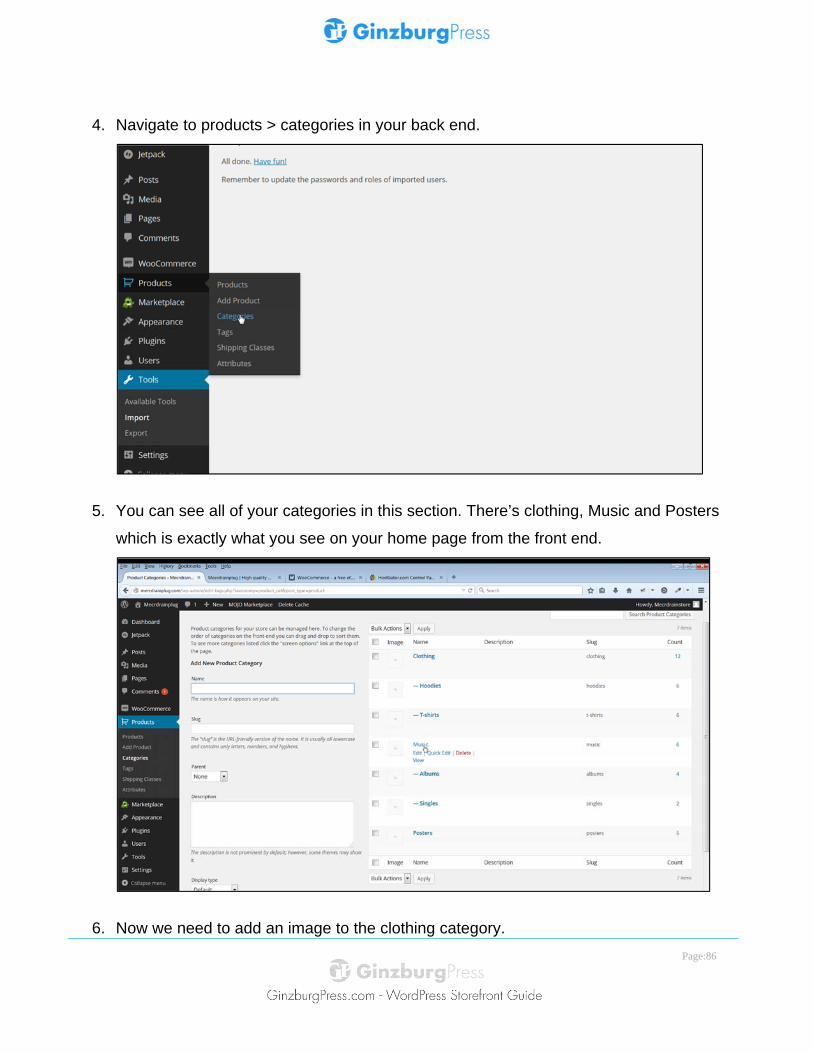
4. Navigate to products > categories in your back end.
5. You can see all of your categories in this section. There’s clothing, Music and Posters
which is exactly what you see on your home page from the front end.
6. Now we need to add an image to the clothing category.
Page:87
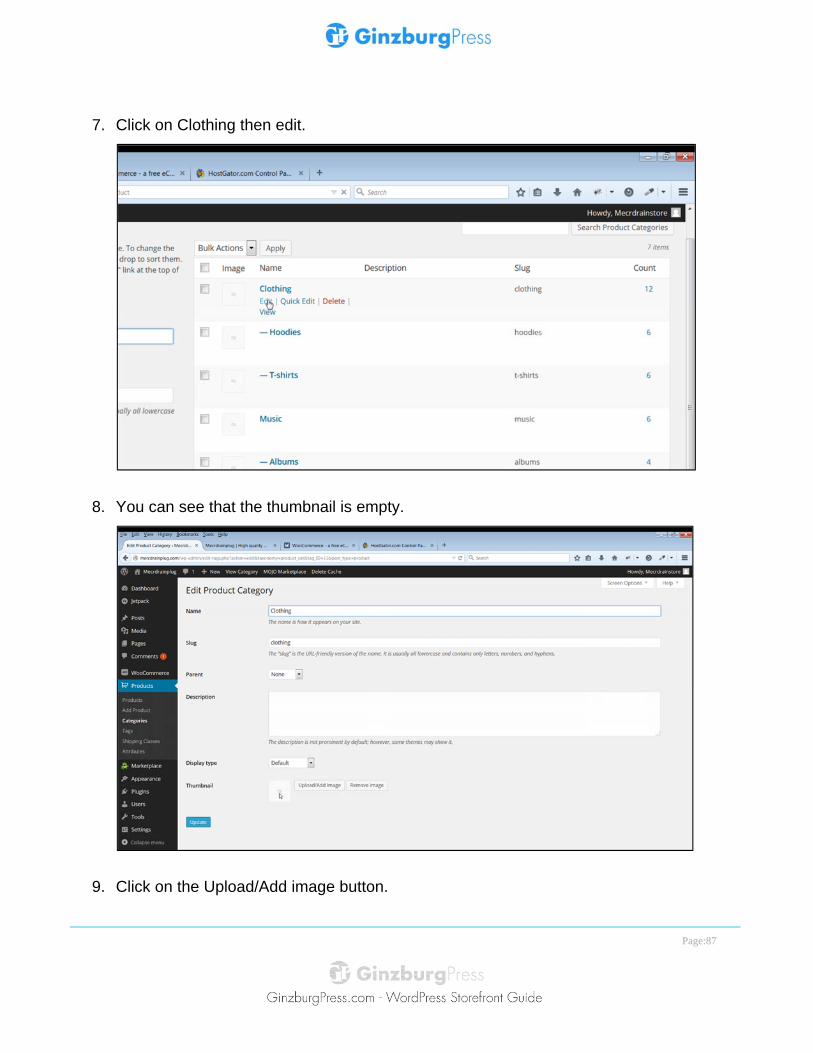
7. Click on Clothing then edit.
8. You can see that the thumbnail is empty.
9. Click on the Upload/Add image button.
Page:88
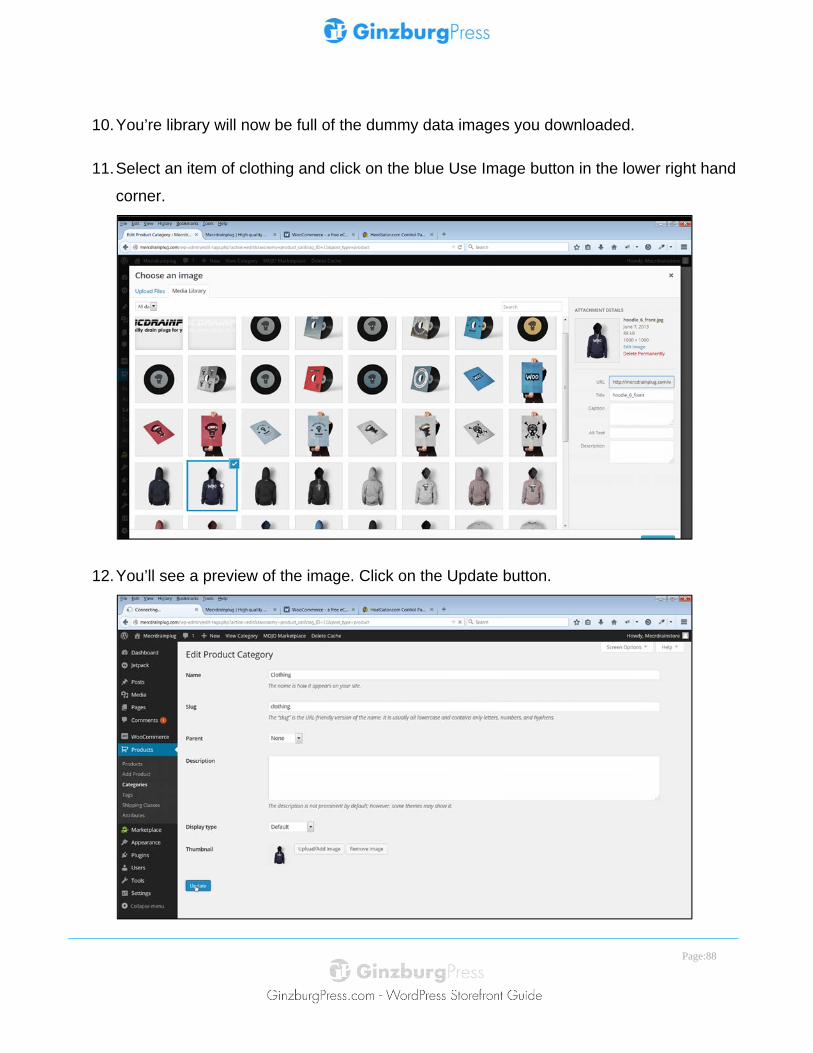
10. You’re library will now be full of the dummy data images you downloaded.
11. Select an item of clothing and click on the blue Use Image button in the lower right hand
corner.
12. You’ll see a preview of the image. Click on the Update button.
Page:89
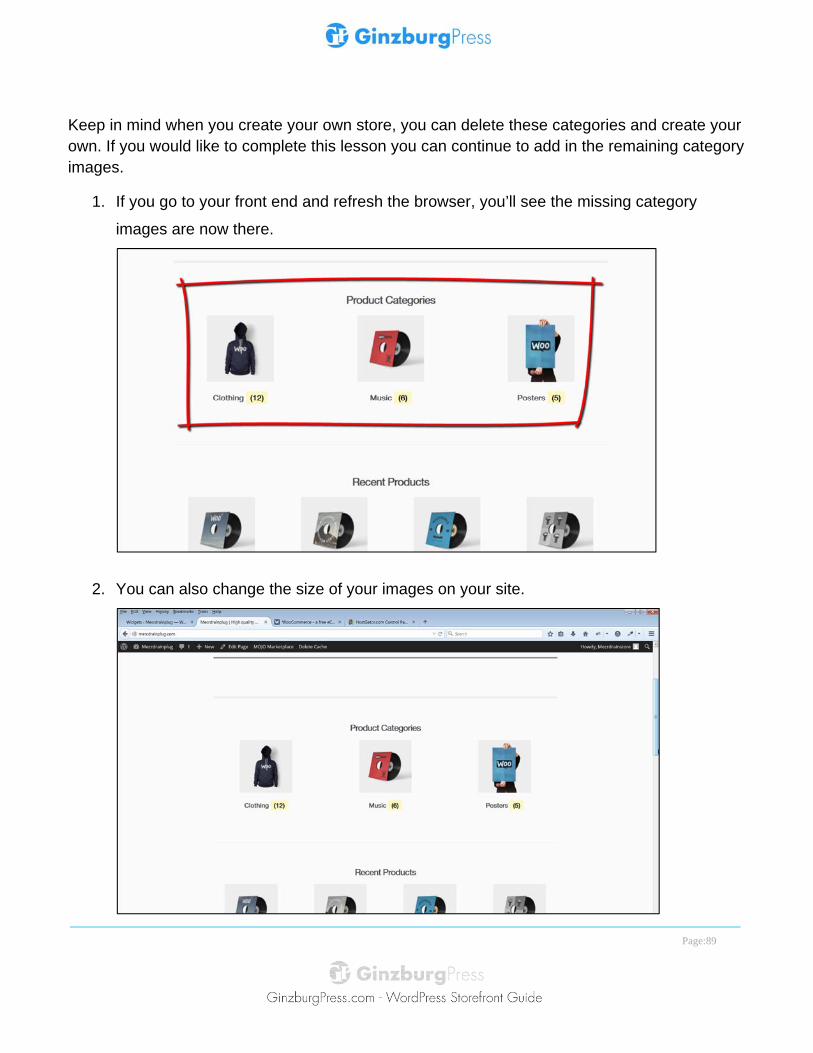
Keep in mind when you create your own store, you can delete these categories and create your own. If you would like to complete this lesson you can continue to add in the remaining category images.
1. If you go to your front end and refresh the browser, you’ll see the missing category
images are now there.
2. You can also change the size of your images on your site.
Page:90
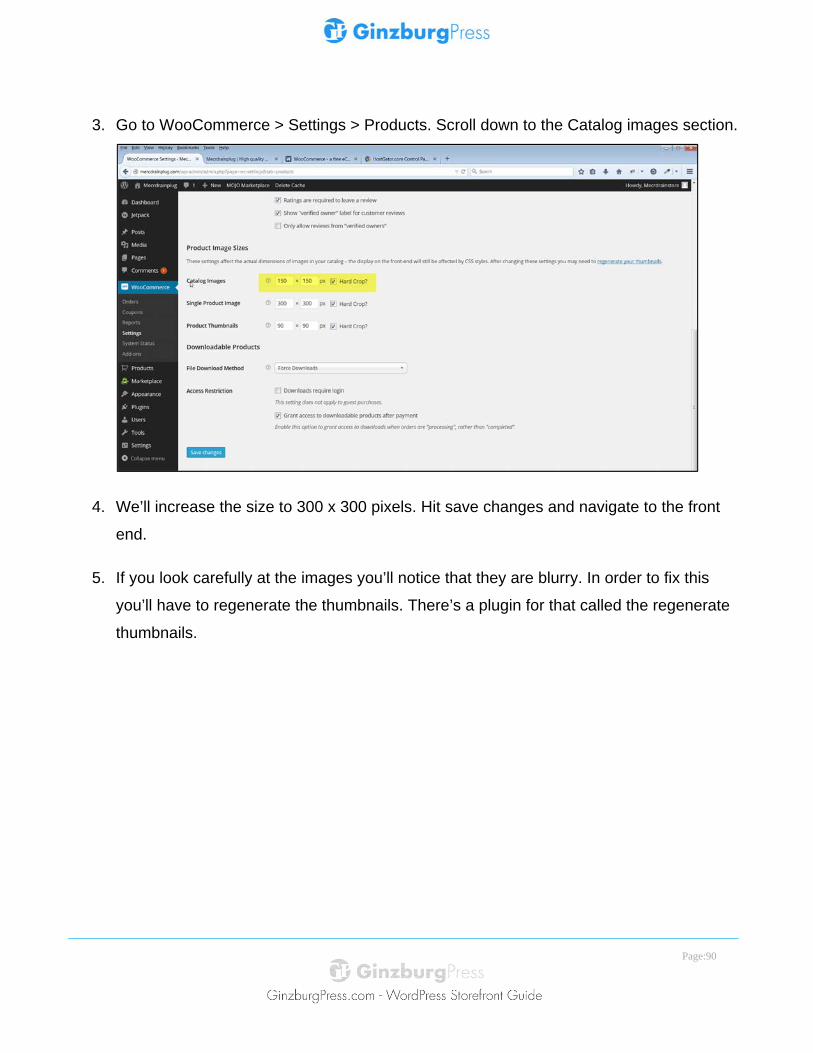
3. Go to WooCommerce > Settings > Products. Scroll down to the Catalog images section.
4. We’ll increase the size to 300 x 300 pixels. Hit save changes and navigate to the front
end.
5. If you look carefully at the images you’ll notice that they are blurry. In order to fix this
you’ll have to regenerate the thumbnails. There’s a plugin for that called the regenerate
thumbnails.
Page:91
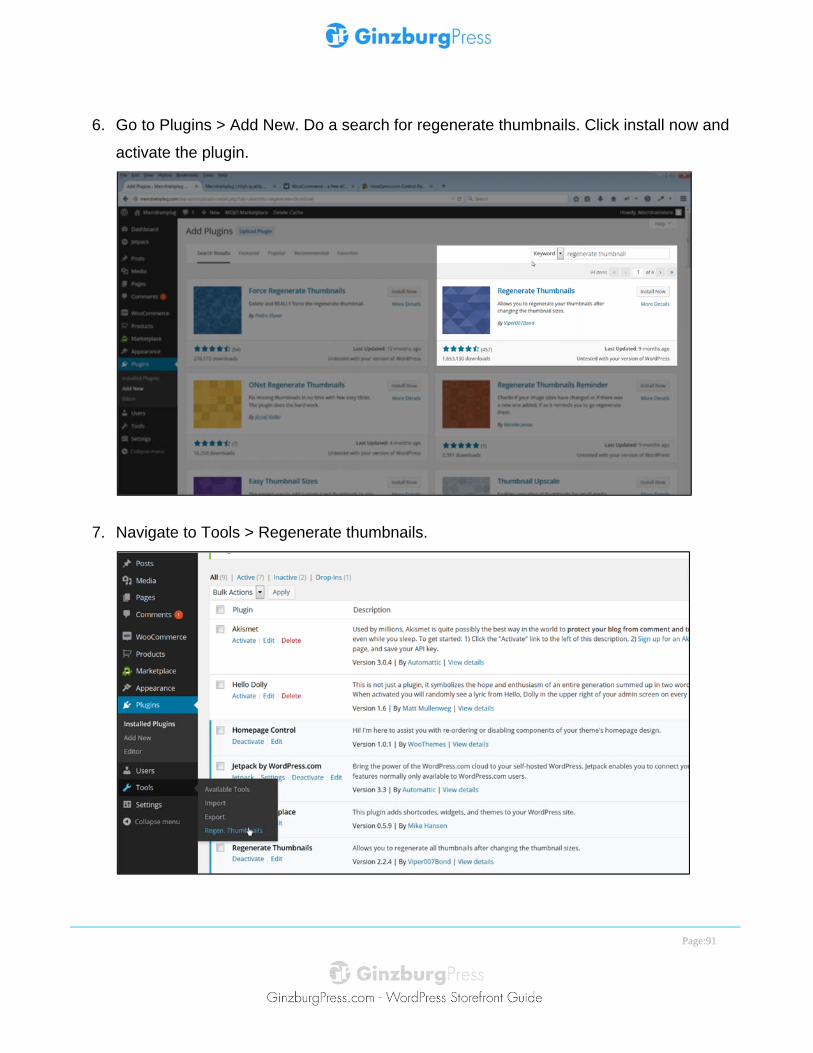
6. Go to Plugins > Add New. Do a search for regenerate thumbnails. Click install now and
activate the plugin.
7. Navigate to Tools > Regenerate thumbnails.
Page:92
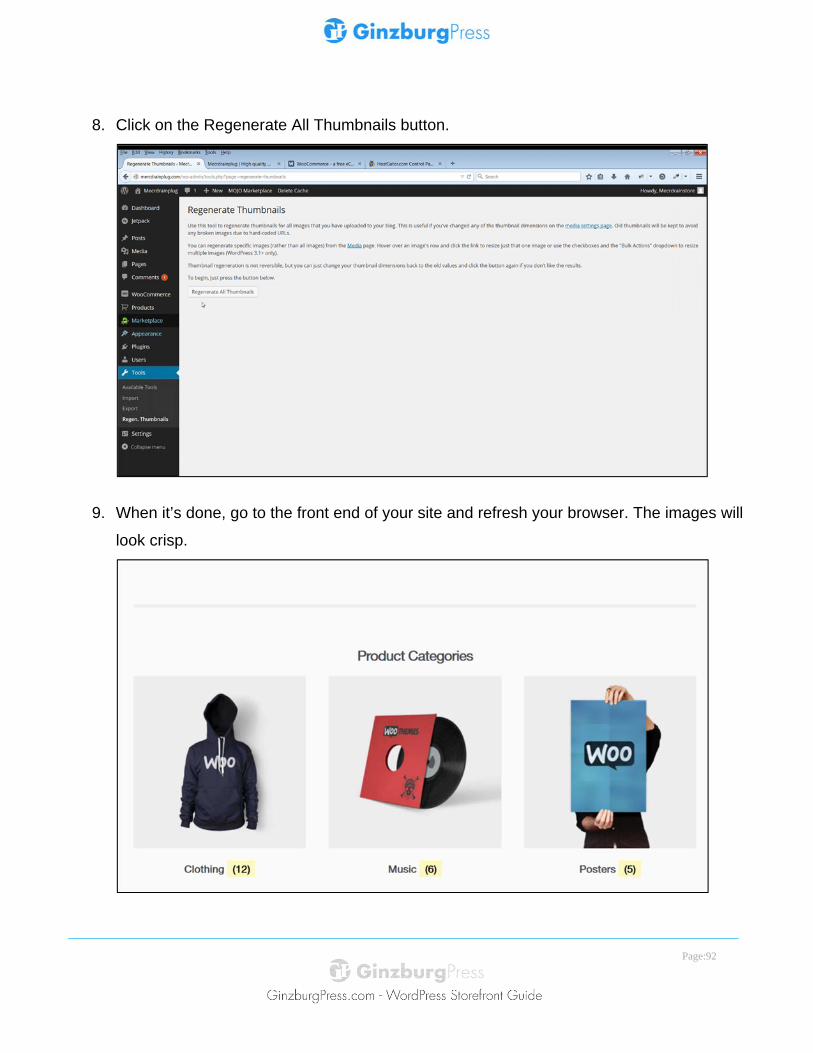
8. Click on the Regenerate All Thumbnails button.
9. When it’s done, go to the front end of your site and refresh your browser. The images will
look crisp.
Page:93
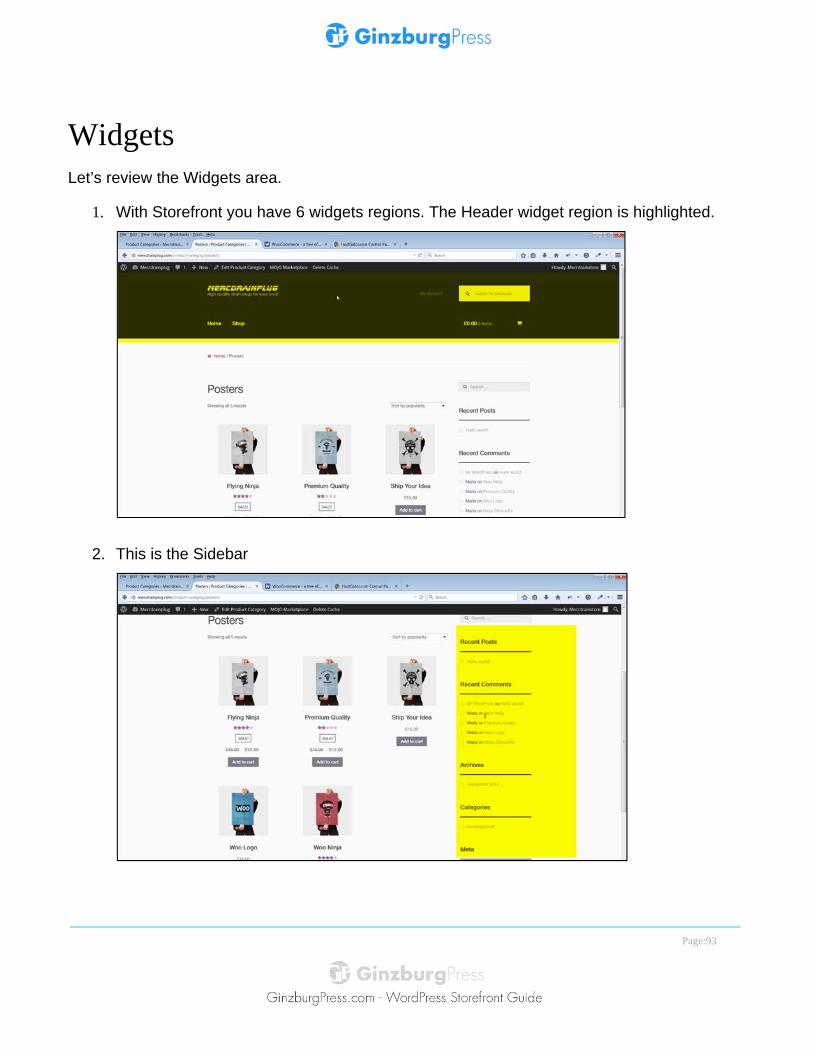
Widgets Let’s review the Widgets area.
1. With Storefront you have 6 widgets regions. The Header widget region is highlighted.
2. This is the Sidebar
Page:94
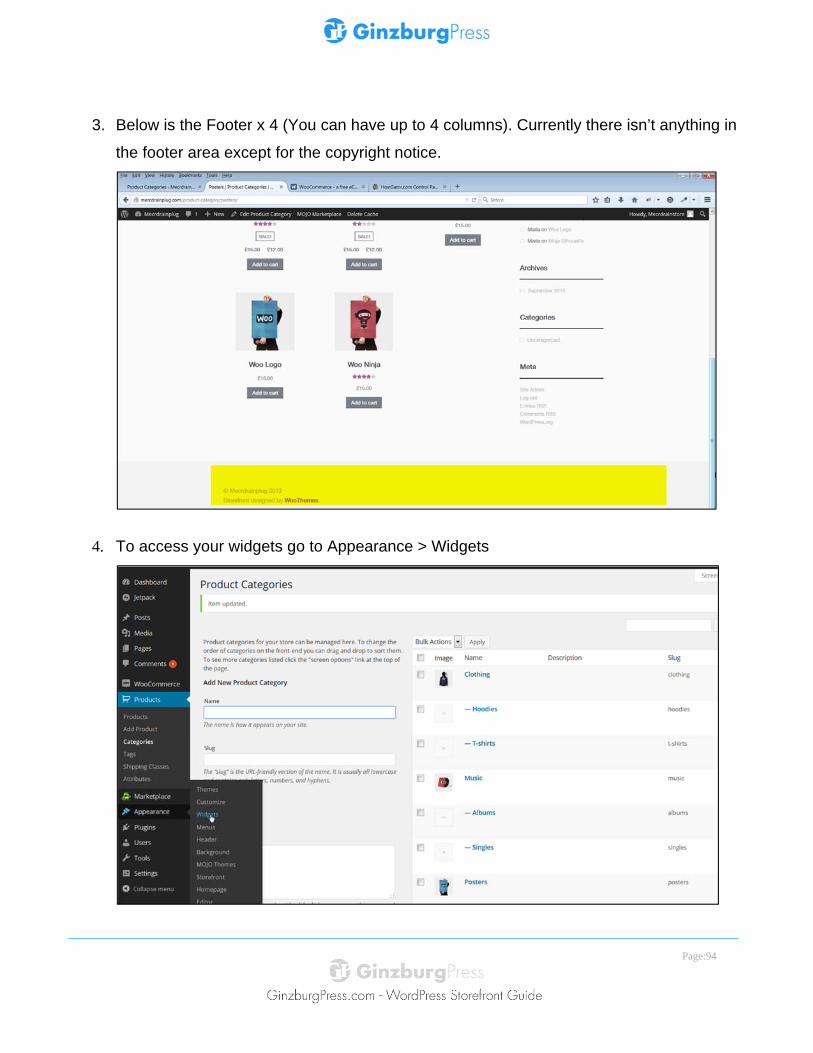
3. Below is the Footer x 4 (You can have up to 4 columns). Currently there isn’t anything in
the footer area except for the copyright notice.
4. To access your widgets go to Appearance > Widgets
Page:95
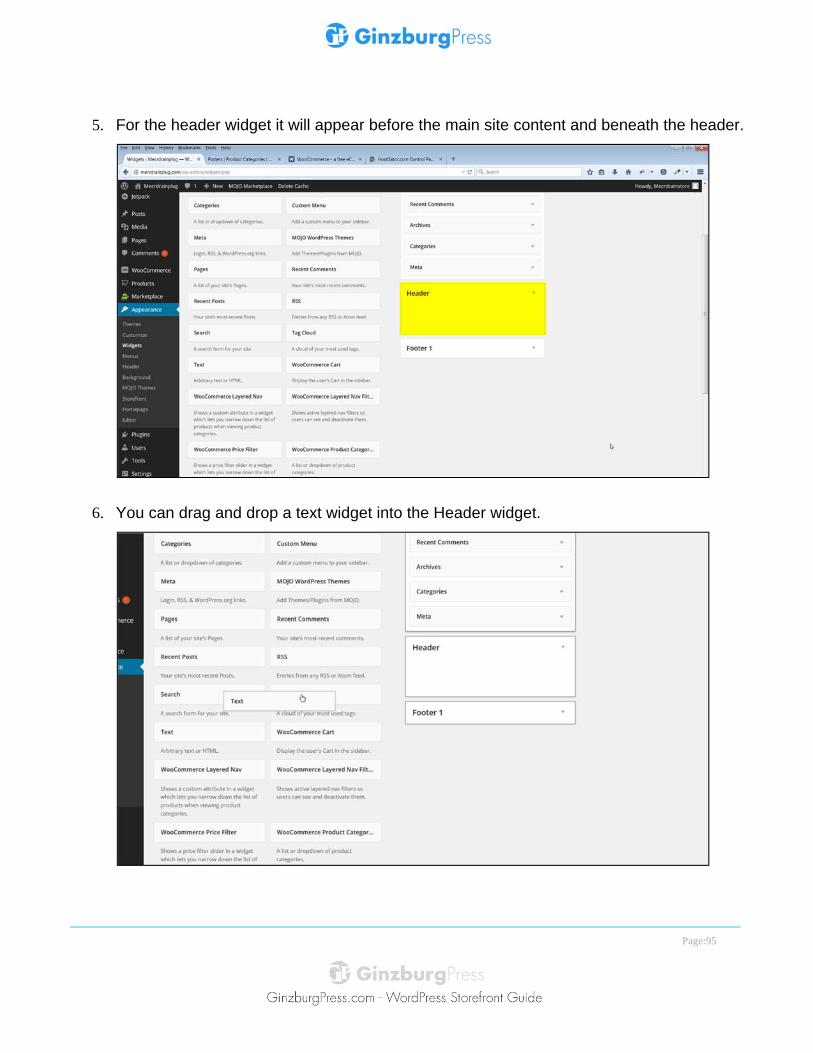
5. For the header widget it will appear before the main site content and beneath the header.
6. You can drag and drop a text widget into the Header widget.
Page:96
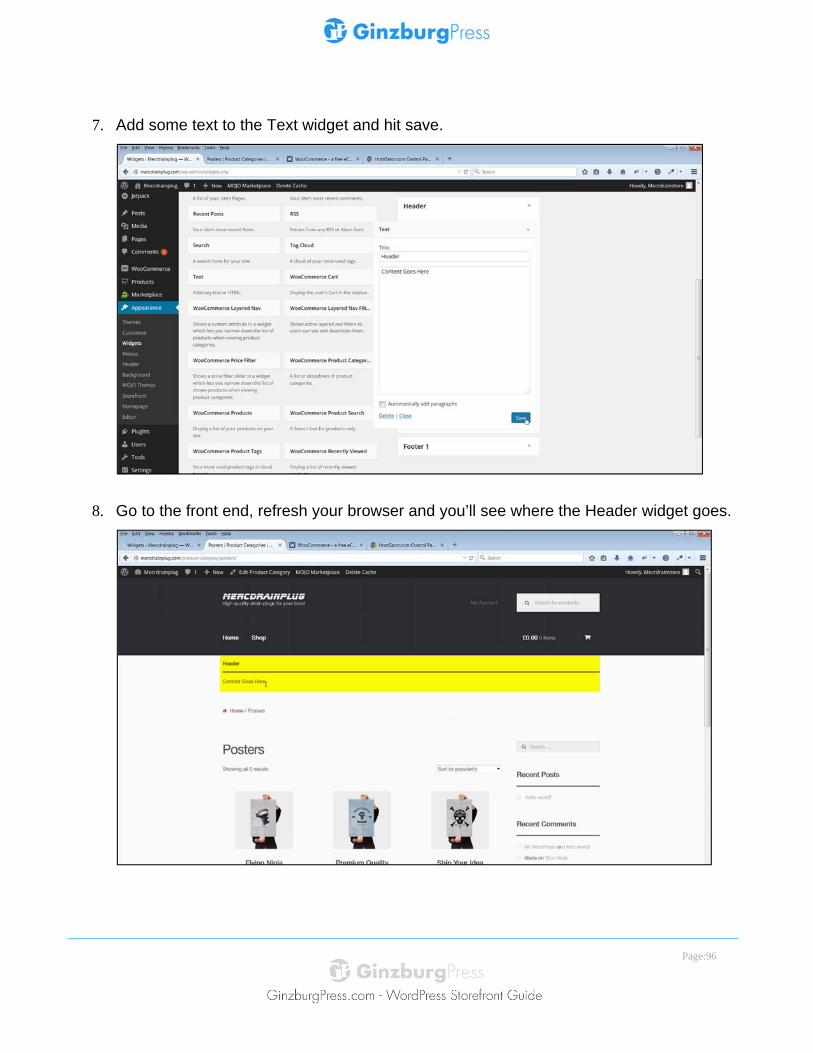
7. Add some text to the Text widget and hit save.
8. Go to the front end, refresh your browser and you’ll see where the Header widget goes.
Page:97
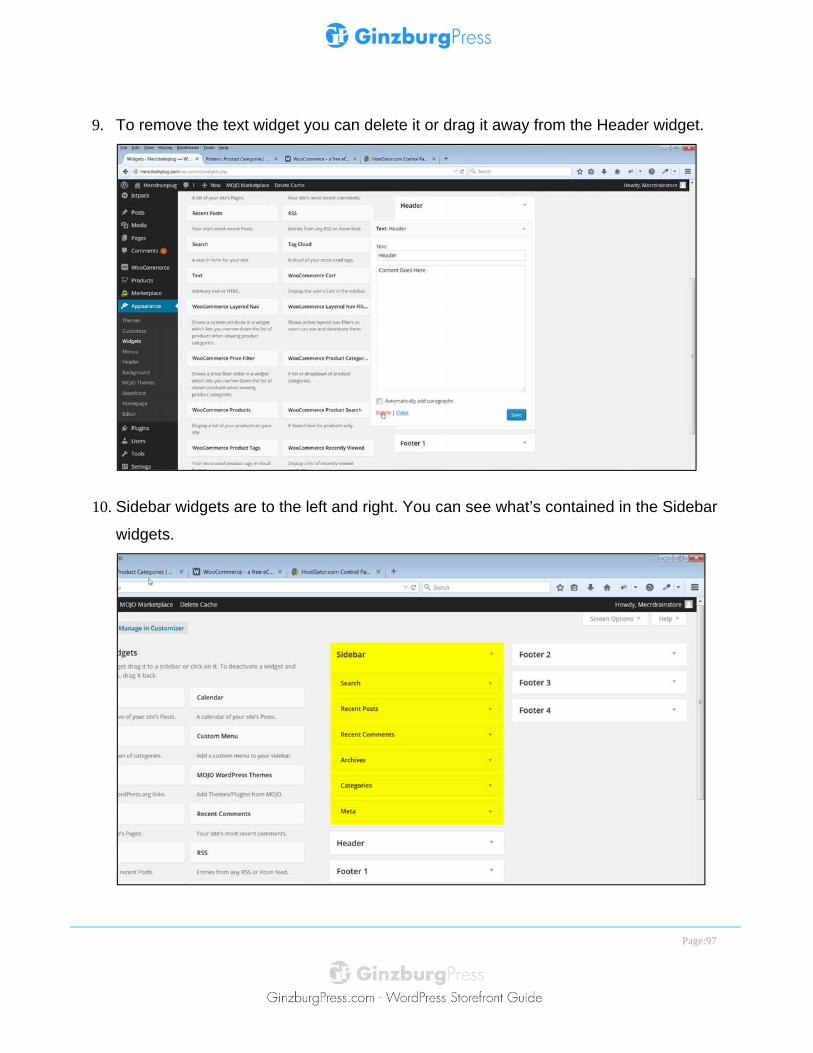
9. To remove the text widget you can delete it or drag it away from the Header widget.
10. Sidebar widgets are to the left and right. You can see what’s contained in the Sidebar
widgets.
Page:98
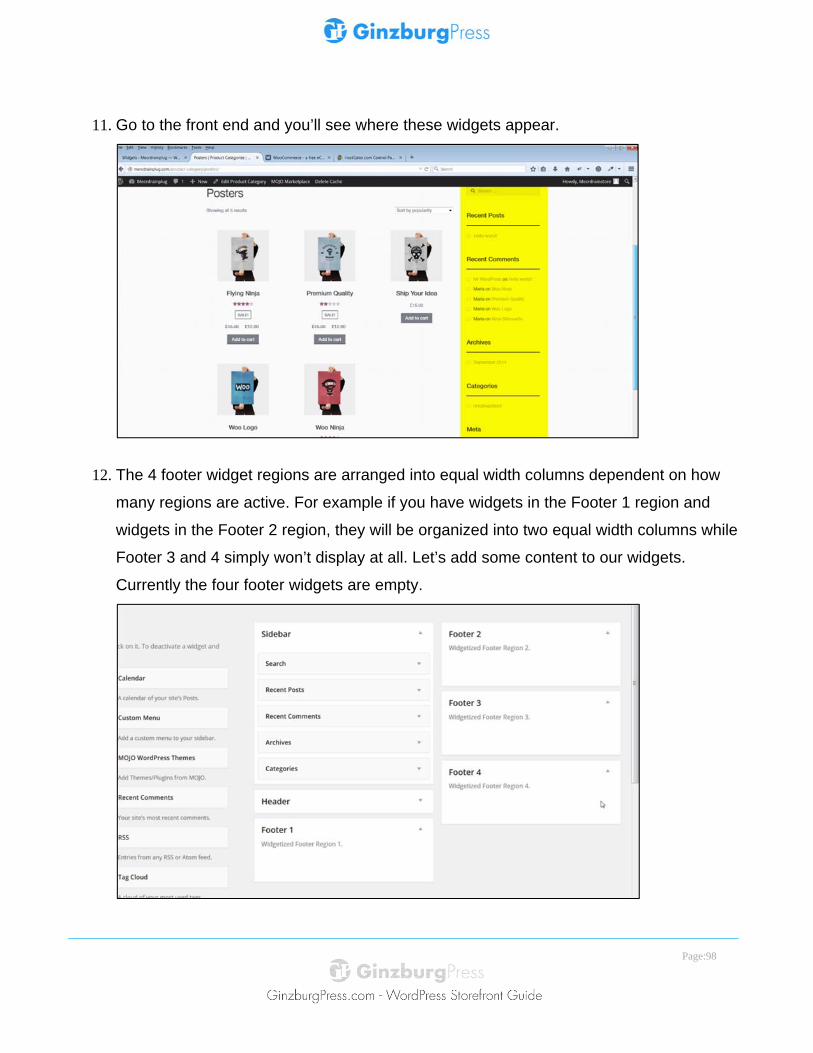
11. Go to the front end and you’ll see where these widgets appear.
12. The 4 footer widget regions are arranged into equal width columns dependent on how
many regions are active. For example if you have widgets in the Footer 1 region and
widgets in the Footer 2 region, they will be organized into two equal width columns while
Footer 3 and 4 simply won’t display at all. Let’s add some content to our widgets.
Currently the four footer widgets are empty.
Page:99
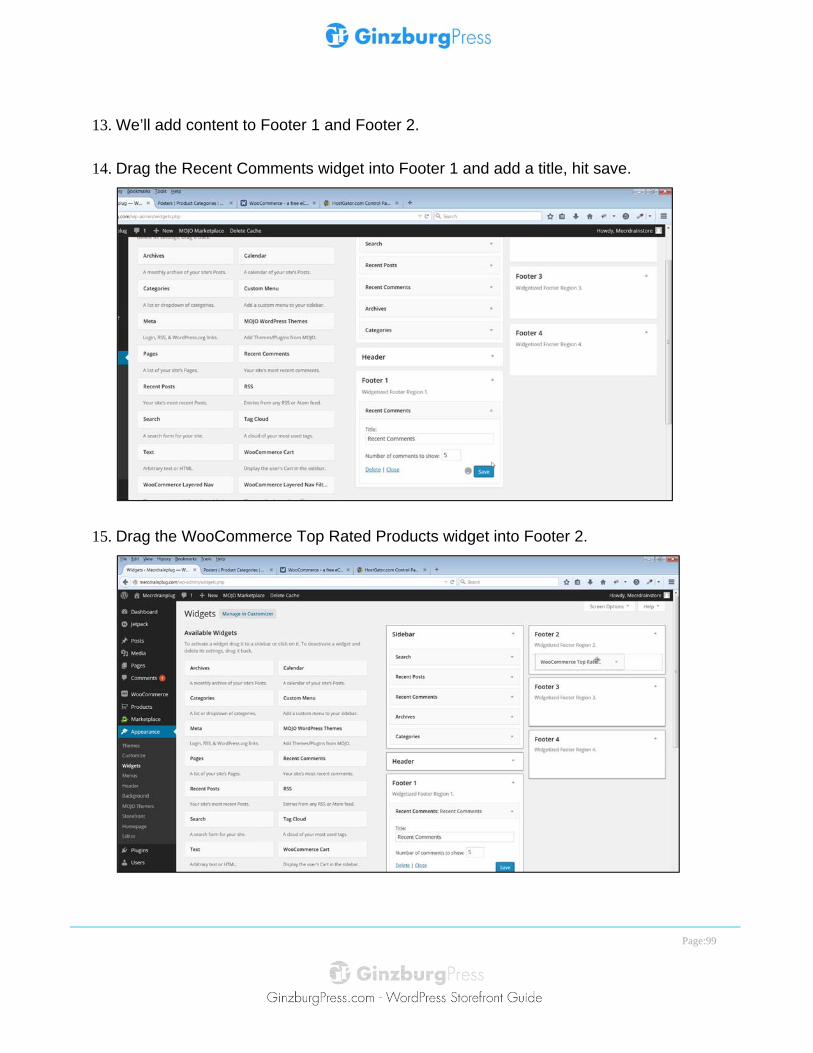
13. We’ll add content to Footer 1 and Footer 2.
14. Drag the Recent Comments widget into Footer 1 and add a title, hit save.
15. Drag the WooCommerce Top Rated Products widget into Footer 2.
Page:100
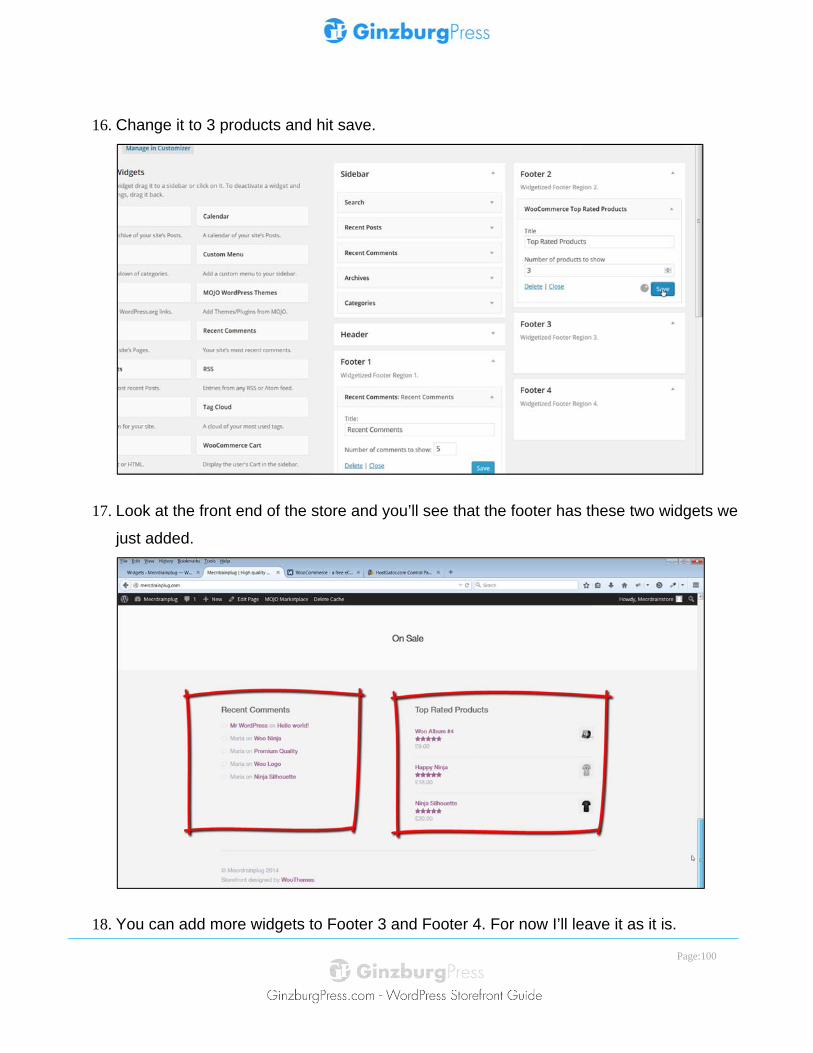
16. Change it to 3 products and hit save.
17. Look at the front end of the store and you’ll see that the footer has these two widgets we
just added.
18. You can add more widgets to Footer 3 and Footer 4. For now I’ll leave it as it is.
Page:101
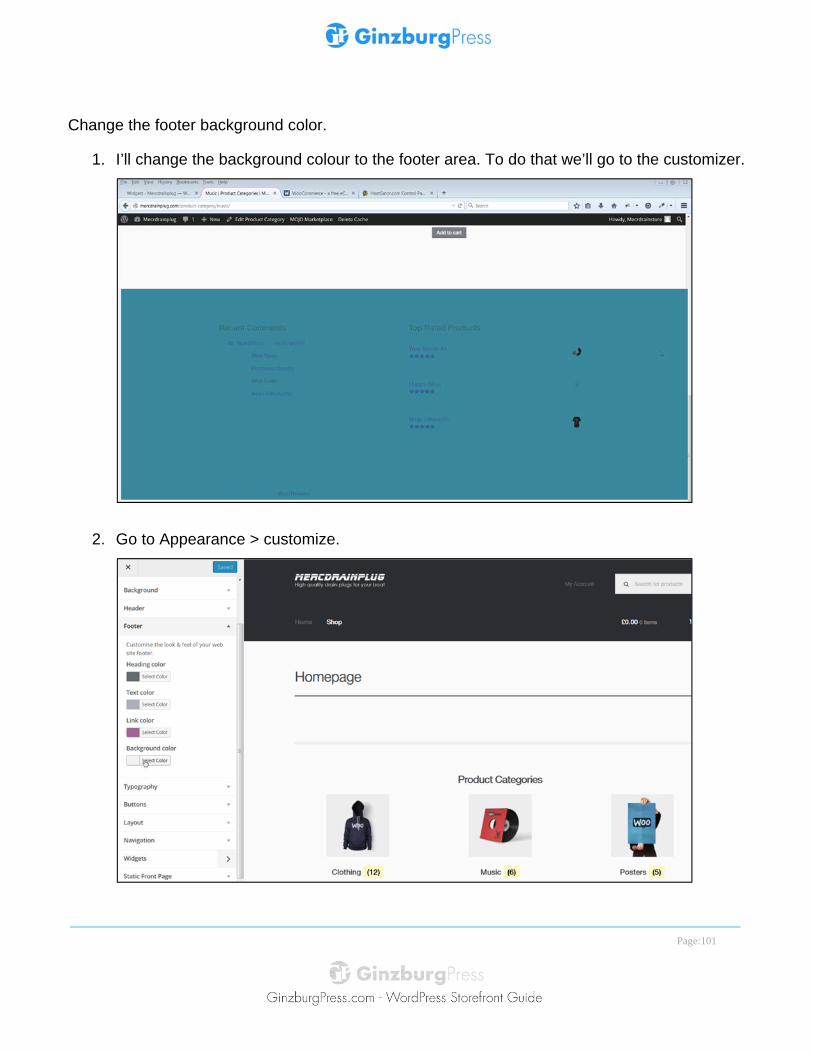
Change the footer background color.
1. I’ll change the background colour to the footer area. To do that we’ll go to the customizer.
2. Go to Appearance > customize.
Page:102
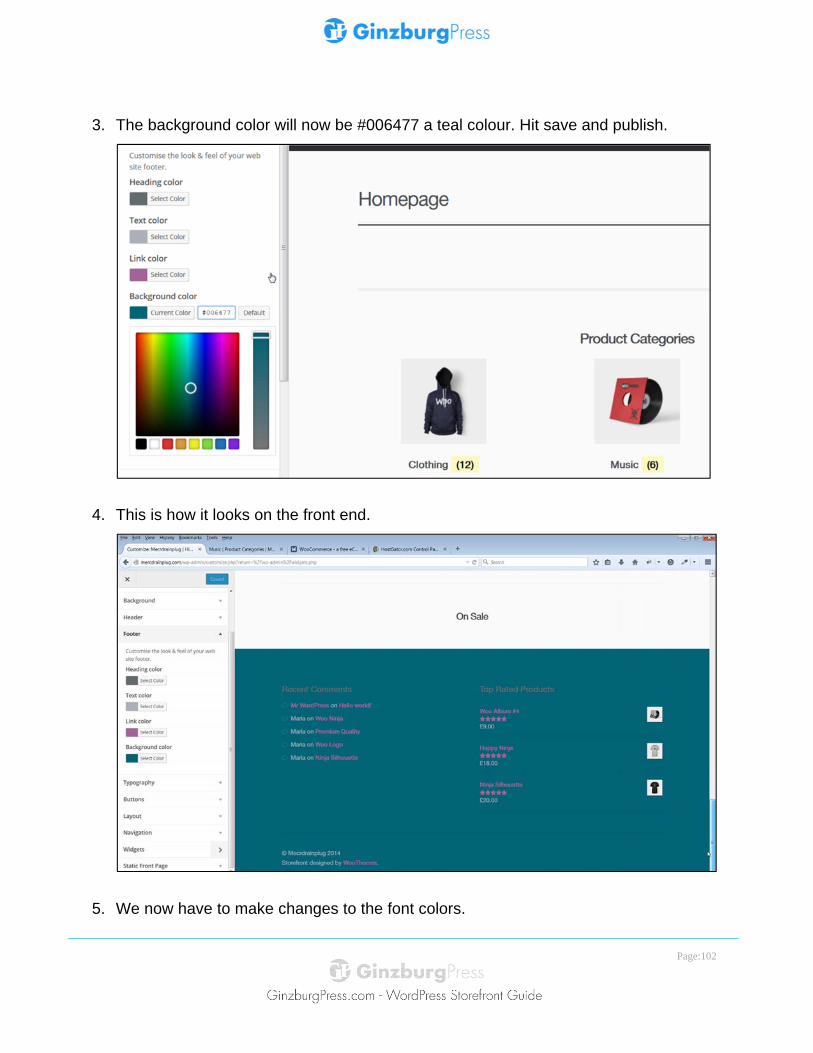
3. The background color will now be #006477 a teal colour. Hit save and publish.
4. This is how it looks on the front end.
5. We now have to make changes to the font colors.
Page:103
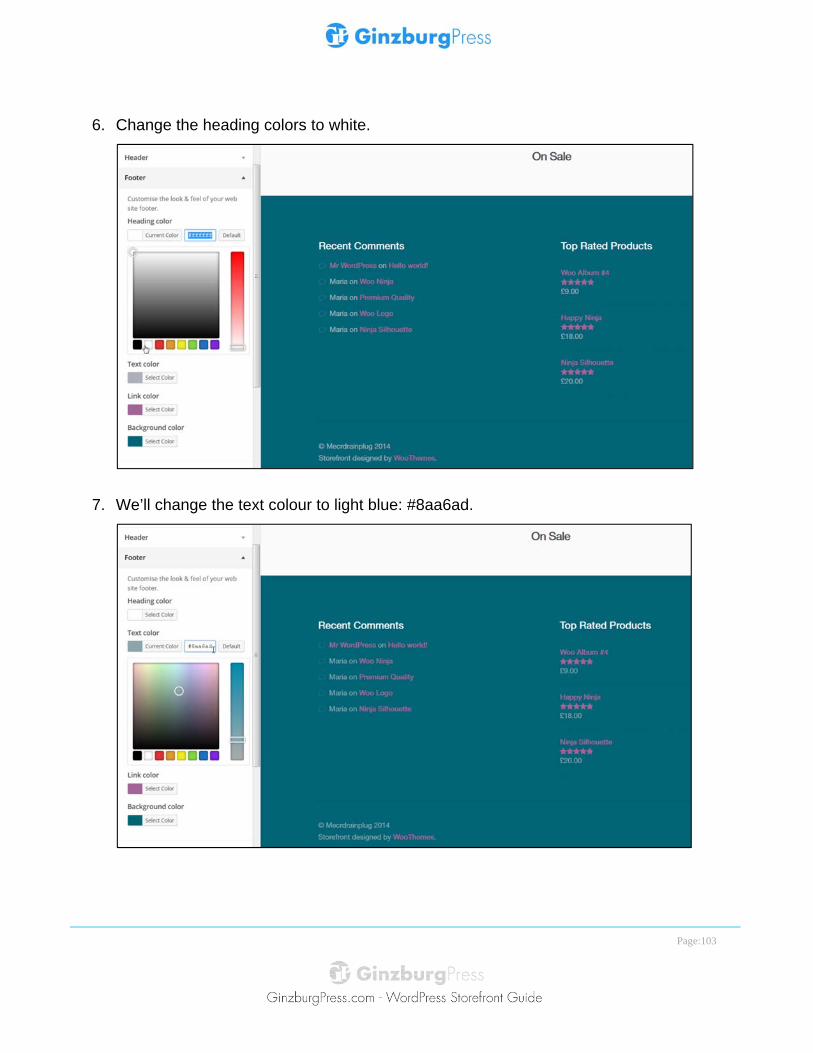
6. Change the heading colors to white.
7. We’ll change the text colour to light blue: #8aa6ad.
Page:104
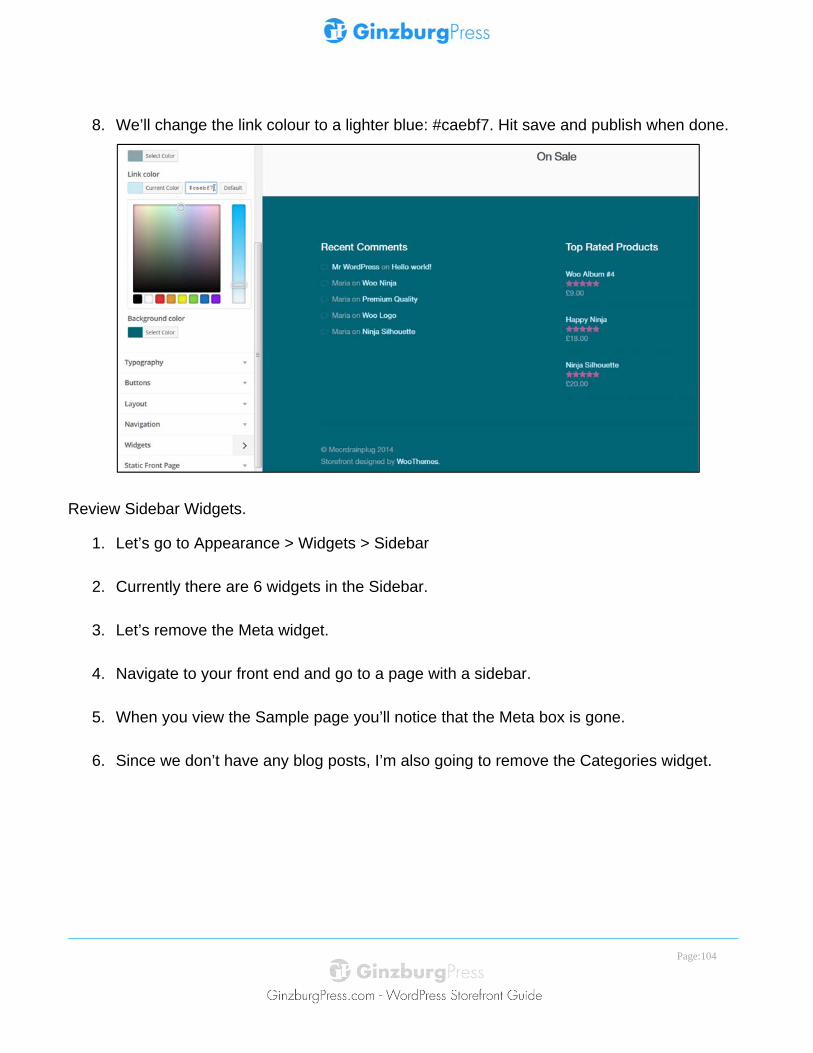
8. We’ll change the link colour to a lighter blue: #caebf7. Hit save and publish when done.
Review Sidebar Widgets.
1. Let’s go to Appearance > Widgets > Sidebar
2. Currently there are 6 widgets in the Sidebar.
3. Let’s remove the Meta widget.
4. Navigate to your front end and go to a page with a sidebar.
5. When you view the Sample page you’ll notice that the Meta box is gone.
6. Since we don’t have any blog posts, I’m also going to remove the Categories widget.
Page:105
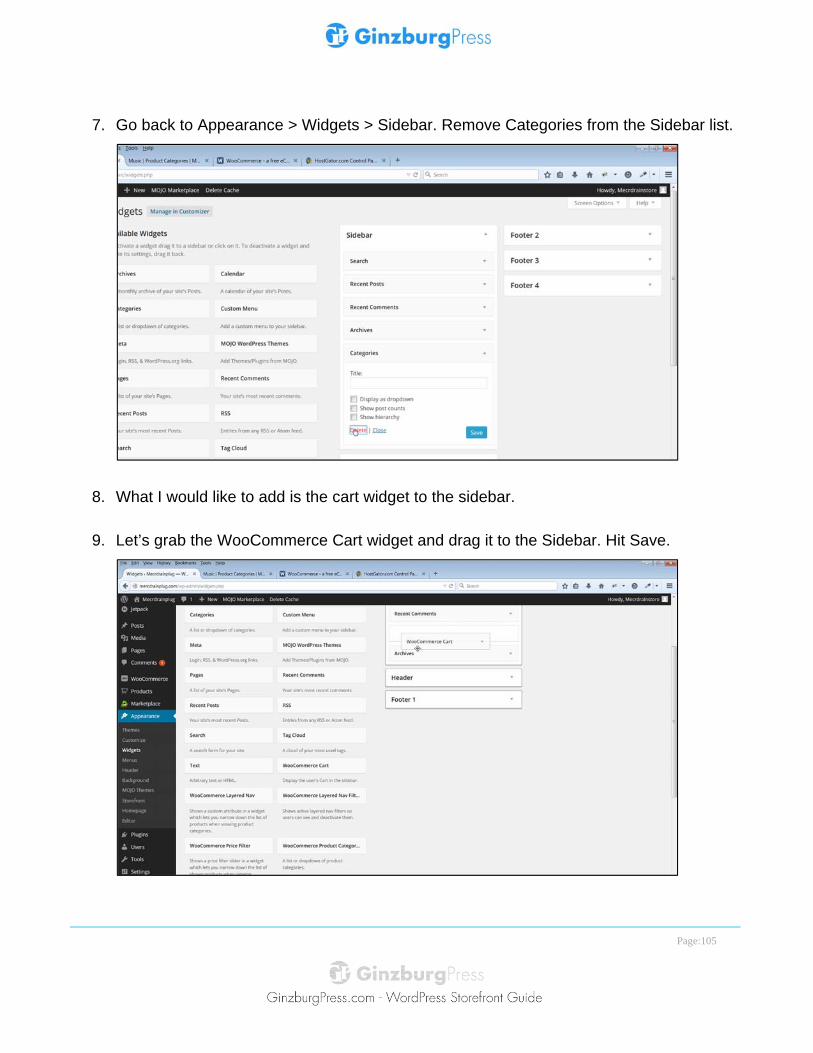
7. Go back to Appearance > Widgets > Sidebar. Remove Categories from the Sidebar list.
8. What I would like to add is the cart widget to the sidebar.
9. Let’s grab the WooCommerce Cart widget and drag it to the Sidebar. Hit Save.
Page:106
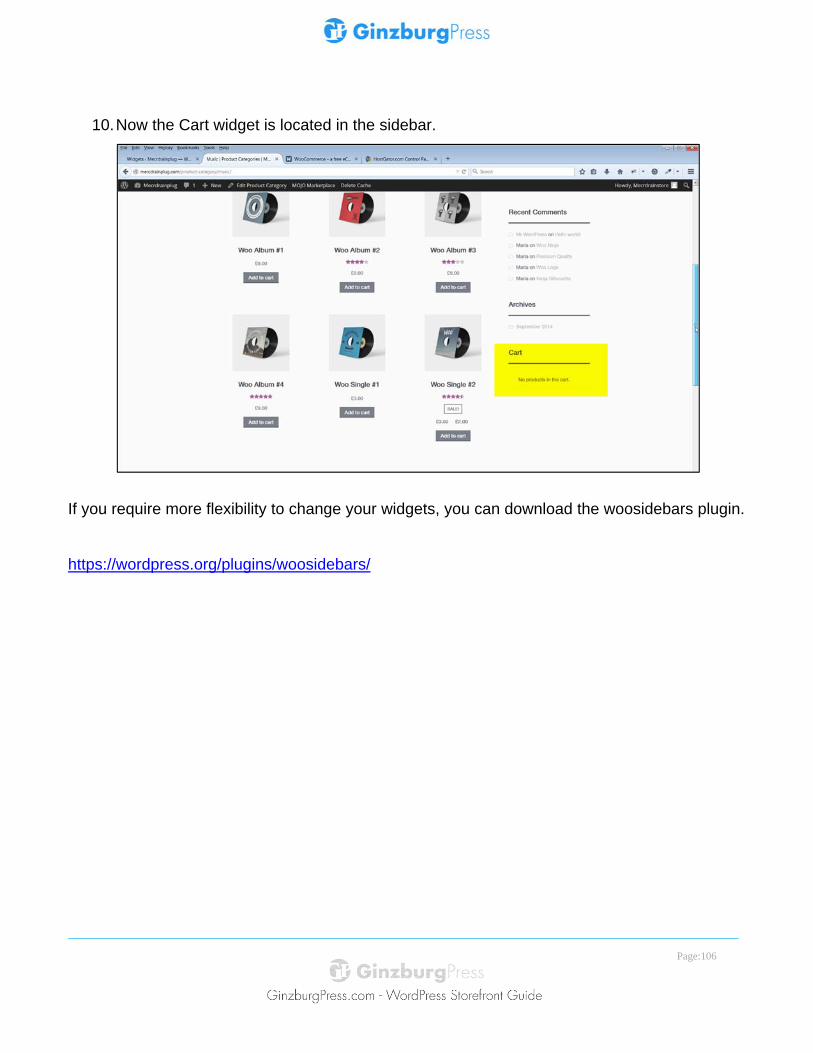
10. Now the Cart widget is located in the sidebar.
If you require more flexibility to change your widgets, you can download the woosidebars plugin.
https://wordpress.org/plugins/woosidebars/
Page:107
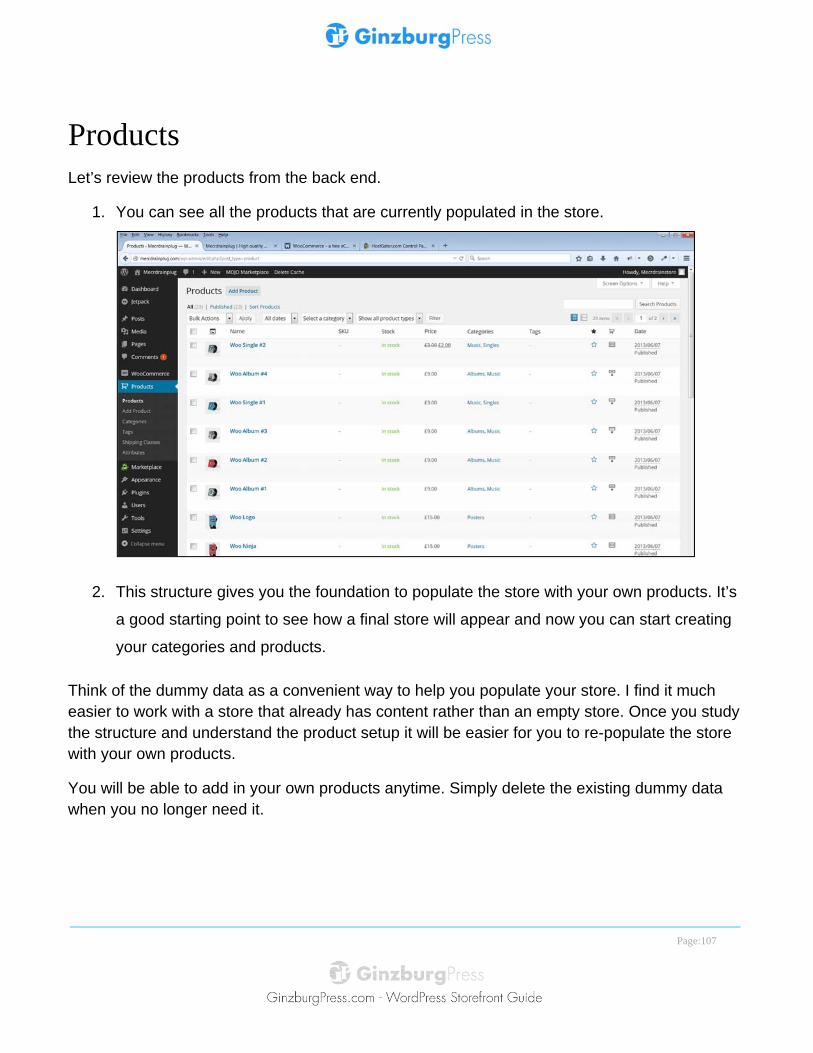
Products Let’s review the products from the back end.
1. You can see all the products that are currently populated in the store.
2. This structure gives you the foundation to populate the store with your own products. It’s
a good starting point to see how a final store will appear and now you can start creating
your categories and products.
Think of the dummy data as a convenient way to help you populate your store. I find it much easier to work with a store that already has content rather than an empty store. Once you study the structure and understand the product setup it will be easier for you to re-populate the store with your own products.
You will be able to add in your own products anytime. Simply delete the existing dummy data when you no longer need it.
Page:108
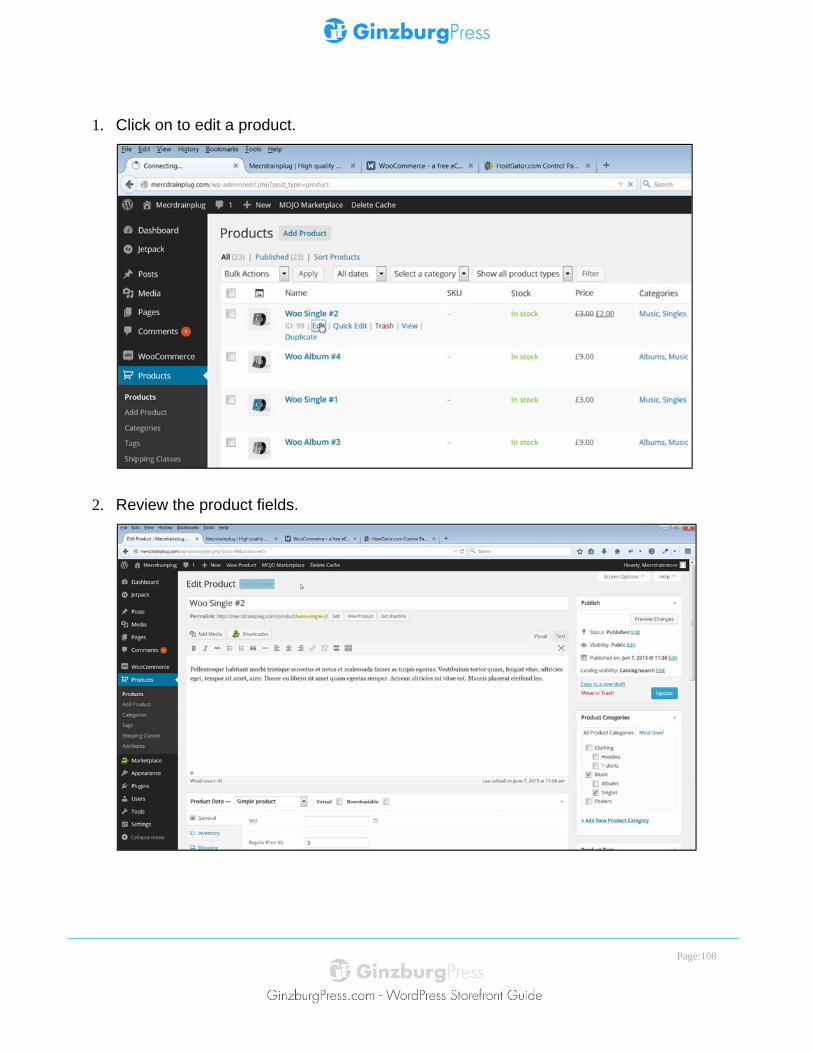
1. Click on to edit a product.
2. Review the product fields.
Page:109
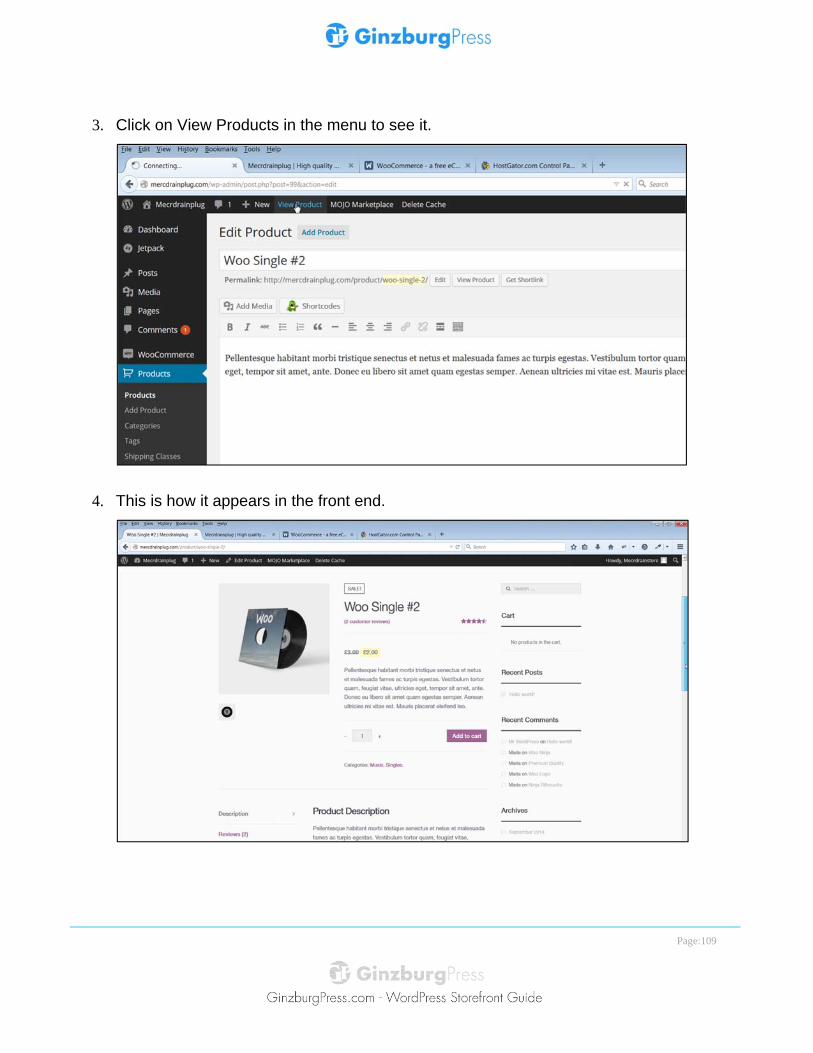
3. Click on View Products in the menu to see it.
4. This is how it appears in the front end.
Page:110
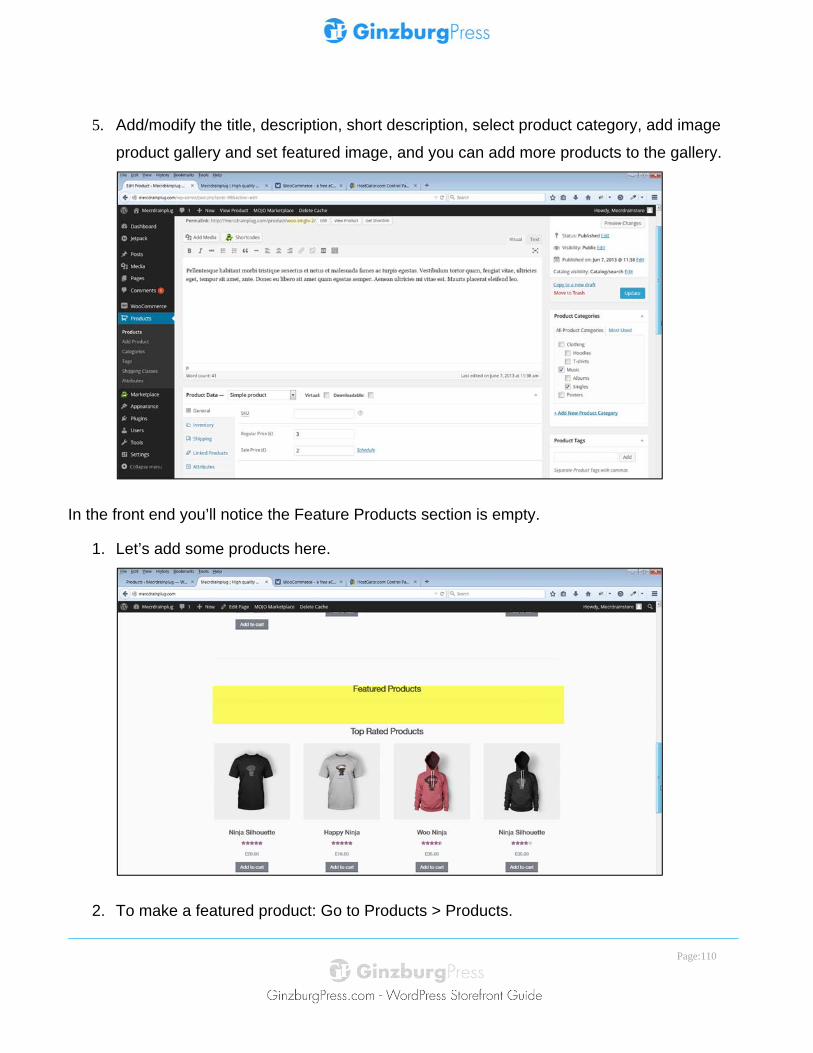
5. Add/modify the title, description, short description, select product category, add image
product gallery and set featured image, and you can add more products to the gallery.
In the front end you’ll notice the Feature Products section is empty.
1. Let’s add some products here.
2. To make a featured product: Go to Products > Products.
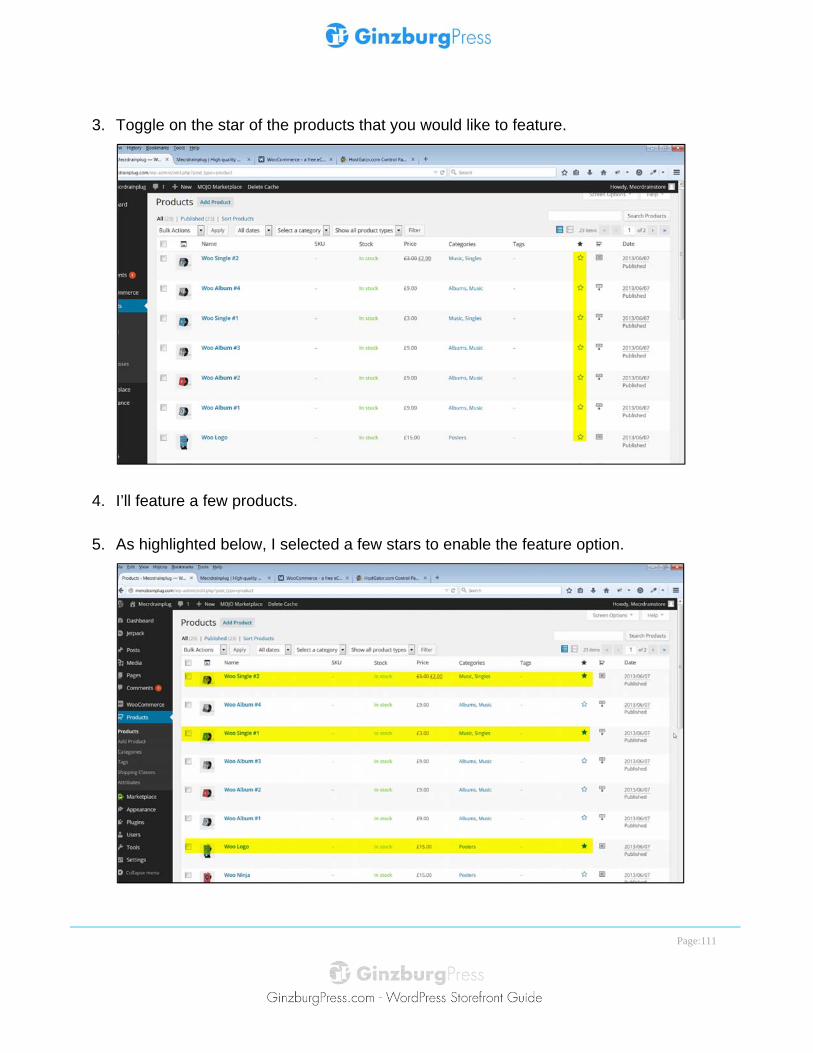
Page:111
3. Toggle on the star of the products that you would like to feature.
4. I’ll feature a few products.
5. As highlighted below, I selected a few stars to enable the feature option.
Page:112
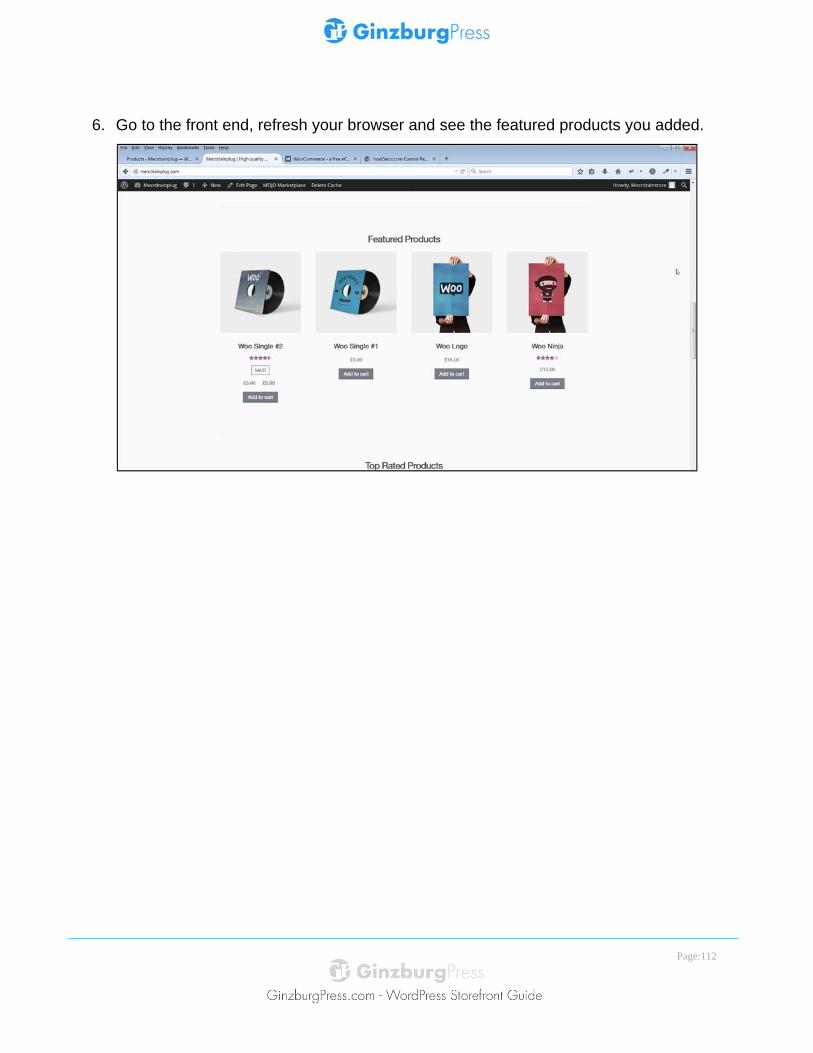
6. Go to the front end, refresh your browser and see the featured products you added.
Page:113
Conclusion to Section 3 Great! Section 3 is done. This section you just completed is the real heart of this course – setting up the Storefront.
Here’s what we covered in the Storefront section.
By now you will have installed the Storefront theme. If you haven’t already done so please refer back to the lecture to install the Storefront theme in the previous section.
• I showed you how to access the Storefront sections and the shopping cart.
• I reviewed the installed Storefront pages and the shortcodes.
• We also touched upon the WooCommerce options panel.
Configure the Menu Locations
Before we populated the store, we configured our store menu settings.
• You configured the menu locations to create a Primary, and a Secondary menu.
• I showed you how to add menu items.
The Homepage
• I showed you how to setup the Storefront homepage that displays a selection of products
from your store.
• You created a new page and assigned the "Homepage" template to it.
• You then set that as a static homepage in the Reading settings.
• Since the homepage was empty as we added some products.
The Homepage Control panel is an optional free plugin.
I downloaded and installed the Homepage Control plugin to show you how it works and what you could do with it. Once setup you can toggle and re-order the homepage components using
Page:114
the plugin. I previewed the home page and assigned it to the Primary menu. At this time the homepage was still empty as we prepared to populate the store with products.
The Customizer
Next you learned how to adjust the Storefront’s appearance with the WordPress customizer. I reviewed the customizer settings available for the Storefront.
Add a Logo
I showed you how to install Jetpack. You activated Jetpack to enable a custom logo option in the customizer. The simplest way to add a logo to the theme is to activate Jetpack. If for some reason you prefer not to activate Jetpack and you are a more advanced WordPress user, I included a link on how to add a custom logo in the resources section of the Add a Logo lecture.
Import Data
You then used the WordPress importer to locate and import data. I demonstrated how to install the dummy data. The dummy data for WooCommerce was located in a file called dummy_data.xml which was located in the WooCommerce plugin directory.
You could also go to the plugins repository and download the plugin to your machine. I showed you how to change the product and catalog image sizes. I also showed you why and how to regenerate your thumbnails.
Widgets
In this widgets lecture I reviewed the Storefront widgets area. You learned how you can add content to the header, sidebar and the footer. With Storefront you have 6 widget regions. Header, Sidebar, Footer x 4. I showed you how to change the background colour to the footer area.
Products
Finally I reviewed the Storefront products. You learned how this structure gives you the foundation to populate the store with your own products. It’s a good starting point to see how a final store will appear and now you can start creating your categories and products.
Think of the dummy data as a convenient way to help you populate your store. You will find it much easier to work with a store that already has content rather than an empty one. Once you study the structure and understand the product setup it will be easier for you to re-populate the store with your own products. You will be able to add in your own products anytime. Simply delete the existing dummy data when you no longer need it.
Page:115
Section 4 - The Storefront Child Theme Create a Child Theme You will learn how to create a child theme. (This is a bonus lecture. This section is optional. The child theme is available to download and install in the resources section). If you will be customizing your site with CSS then I suggest you use a child theme.
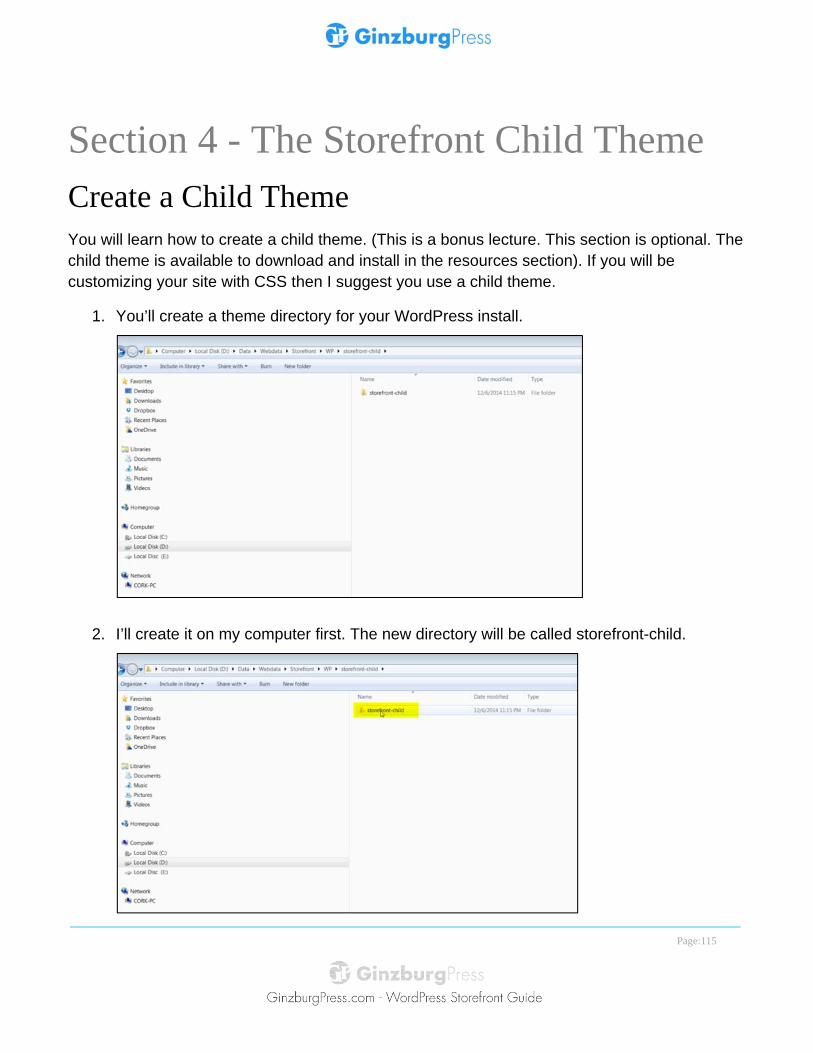
1. You’ll create a theme directory for your WordPress install.
2. I’ll create it on my computer first. The new directory will be called storefront-child.
Page:116
3. When done we’ll have to upload the child theme files to our server.
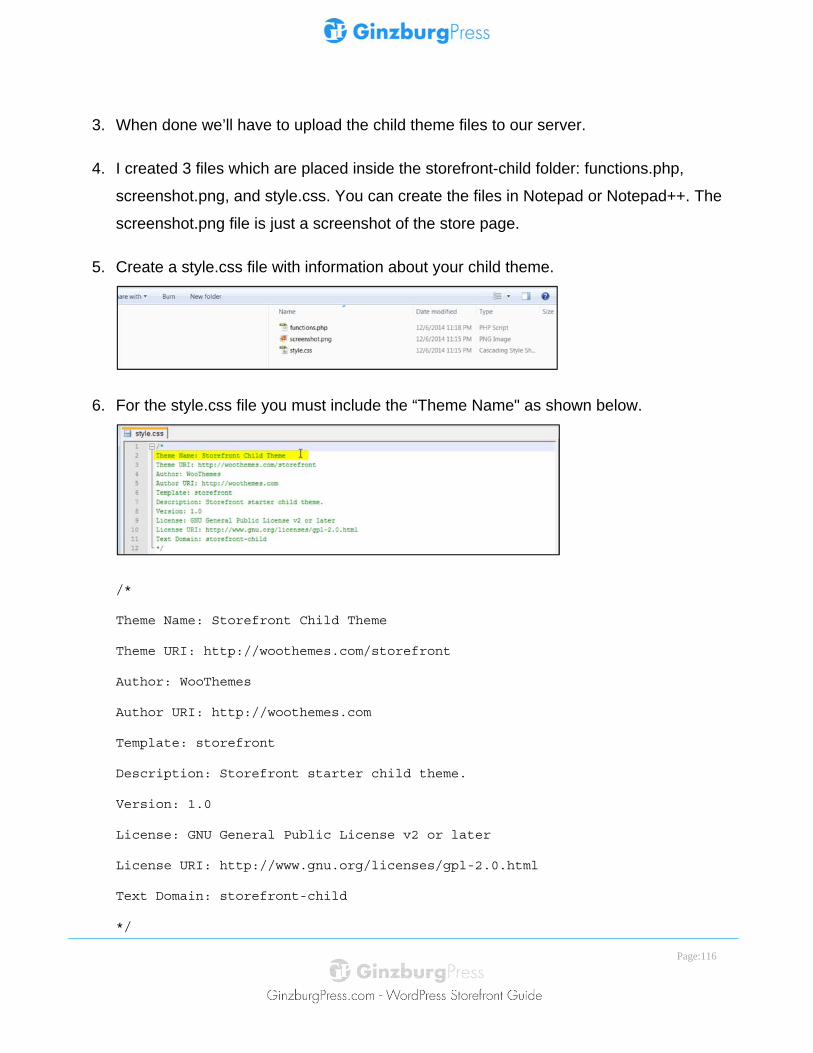
4. I created 3 files which are placed inside the storefront-child folder: functions.php,
screenshot.png, and style.css. You can create the files in Notepad or Notepad++. The
screenshot.png file is just a screenshot of the store page.
5. Create a style.css file with information about your child theme.
6. For the style.css file you must include the “Theme Name" as shown below.
/*
Theme Name: Storefront Child Theme
Theme URI: http://woothemes.com/storefront
Author: WooThemes
Author URI: http://woothemes.com
Template: storefront
Description: Storefront starter child theme.
Version: 1.0
License: GNU General Public License v2 or later
License URI: http://www.gnu.org/licenses/gpl-2.0.html
Text Domain: storefront-child
*/
Page:117
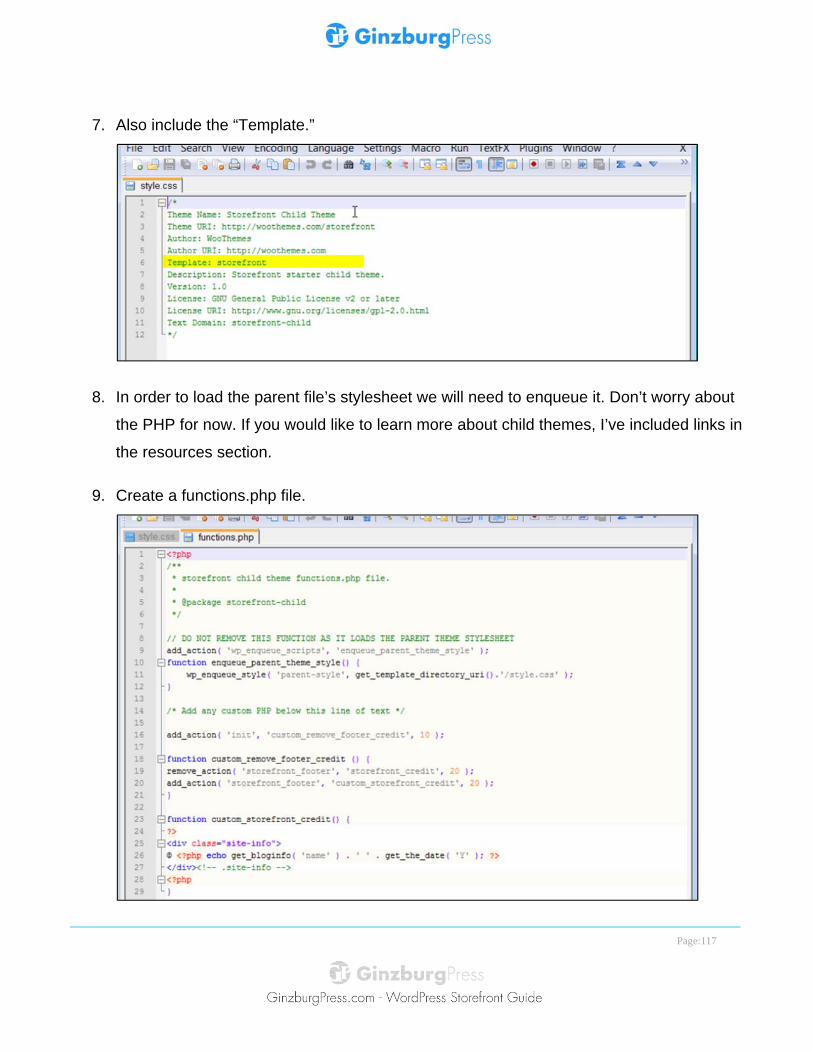
7. Also include the “Template.”
8. In order to load the parent file’s stylesheet we will need to enqueue it. Don’t worry about
the PHP for now. If you would like to learn more about child themes, I’ve included links in
the resources section.
9. Create a functions.php file.
Page:118
10. This is the code used in the functions.php file.
<?php
/**
* storefront child theme functions.php file.
*
* @package storefront-child
*/
// DO NOT REMOVE THIS FUNCTION AS IT LOADS THE PARENT THEME STYLESHEET
add_action( 'wp_enqueue_scripts', 'enqueue_parent_theme_style' );
function enqueue_parent_theme_style() {
wp_enqueue_style( 'parent-style', get_template_directory_uri().'/style.css' );
}
/* Add any custom PHP below this line of text */
add_action( 'init', 'custom_remove_footer_credit', 10 );
function custom_remove_footer_credit () {
remove_action( 'storefront_footer', 'storefront_credit', 20 );
add_action( 'storefront_footer', 'custom_storefront_credit', 20 );
}
function custom_storefront_credit() {
?>
<div class="site-info">
© <?php echo get_bloginfo( 'name' ) . ' ' . get_the_date( 'Y' ); ?>
</div><!-- .site-info -->
<?php
}

Page:119
11. Here’s the code in your functions file to remove the footer credit.
12. If you navigate to the front end and scroll down to the footer. This is what will be removed
from the code above.
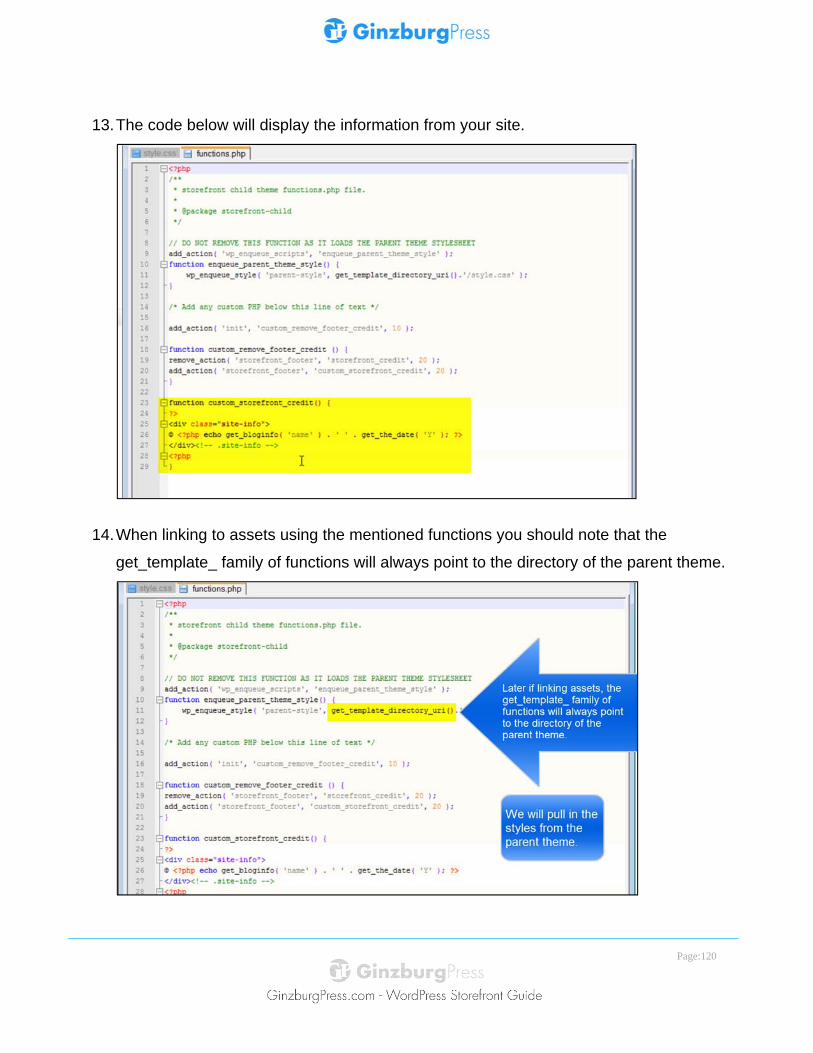
Page:120
13. The code below will display the information from your site.
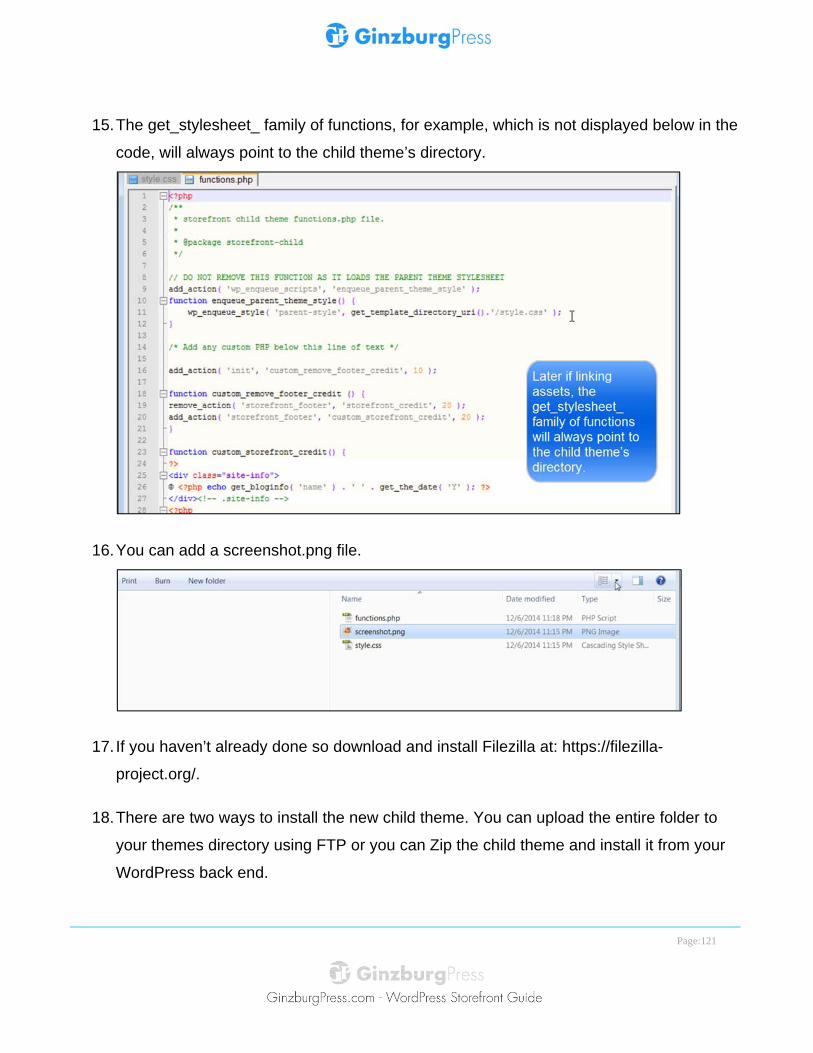
14. When linking to assets using the mentioned functions you should note that the
get_template_ family of functions will always point to the directory of the parent theme.
Page:121
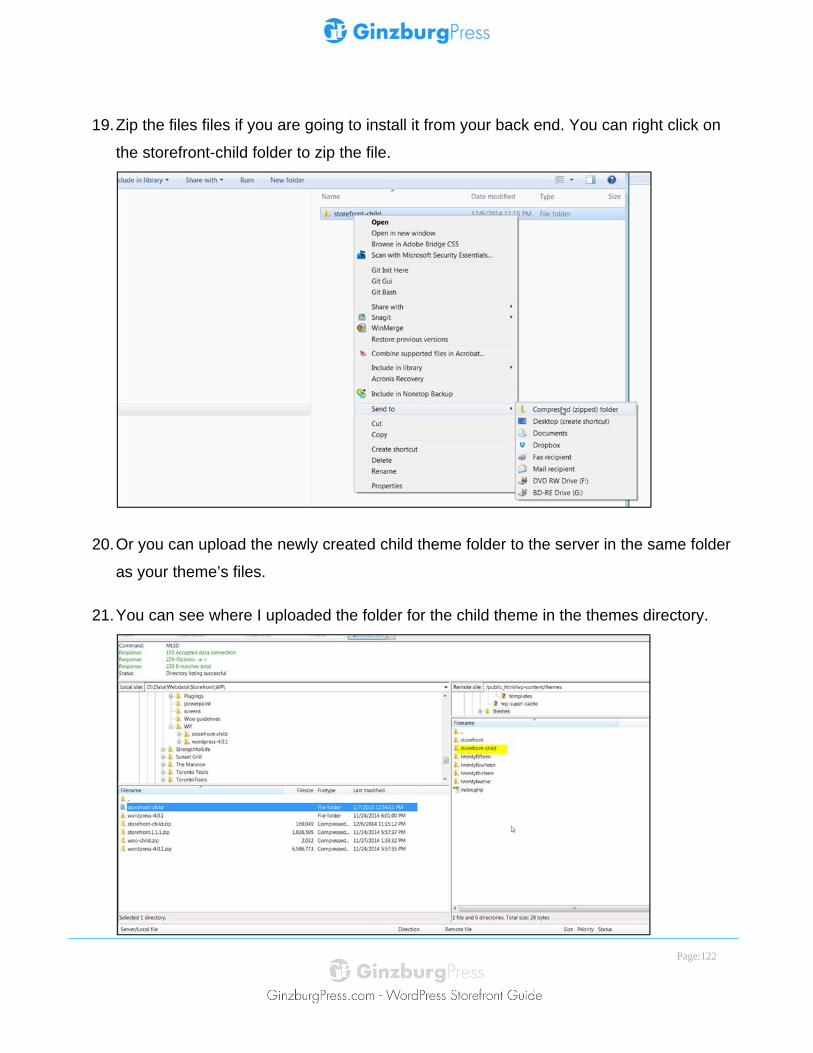
15. The get_stylesheet_ family of functions, for example, which is not displayed below in the
code, will always point to the child theme’s directory.
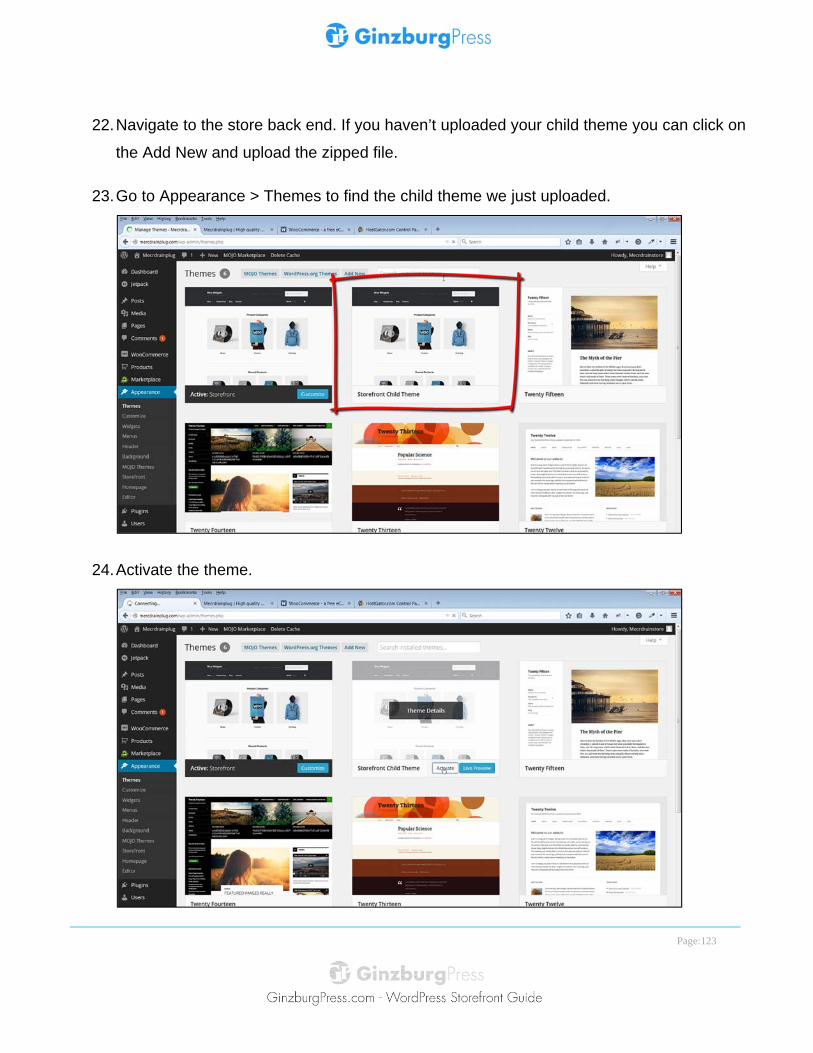
16. You can add a screenshot.png file.
17. If you haven’t already done so download and install Filezilla at: https://filezilla-
project.org/.
18. There are two ways to install the new child theme. You can upload the entire folder to
your themes directory using FTP or you can Zip the child theme and install it from your
WordPress back end.
Page:122
19. Zip the files files if you are going to install it from your back end. You can right click on
the storefront-child folder to zip the file.
20. Or you can upload the newly created child theme folder to the server in the same folder
as your theme’s files.
21. You can see where I uploaded the folder for the child theme in the themes directory.
Page:123
22. Navigate to the store back end. If you haven’t uploaded your child theme you can click on
the Add New and upload the zipped file.
23. Go to Appearance > Themes to find the child theme we just uploaded.
24. Activate the theme.
Page:124
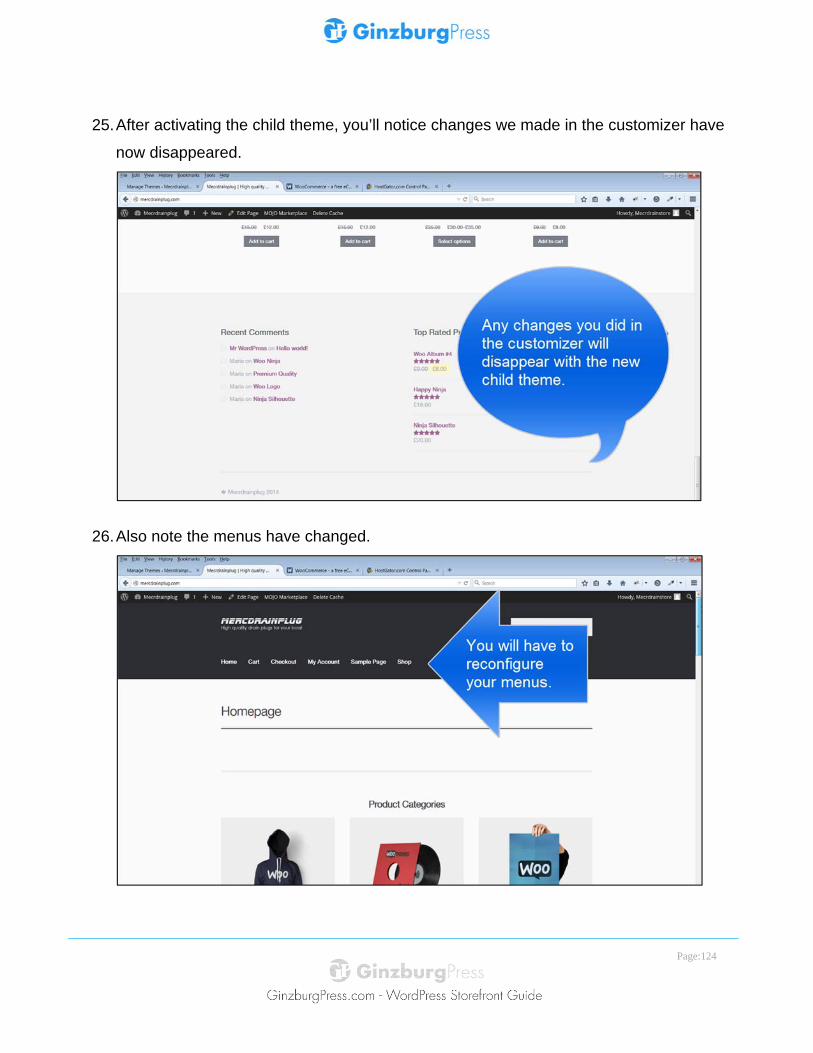
25. After activating the child theme, you’ll notice changes we made in the customizer have
now disappeared.
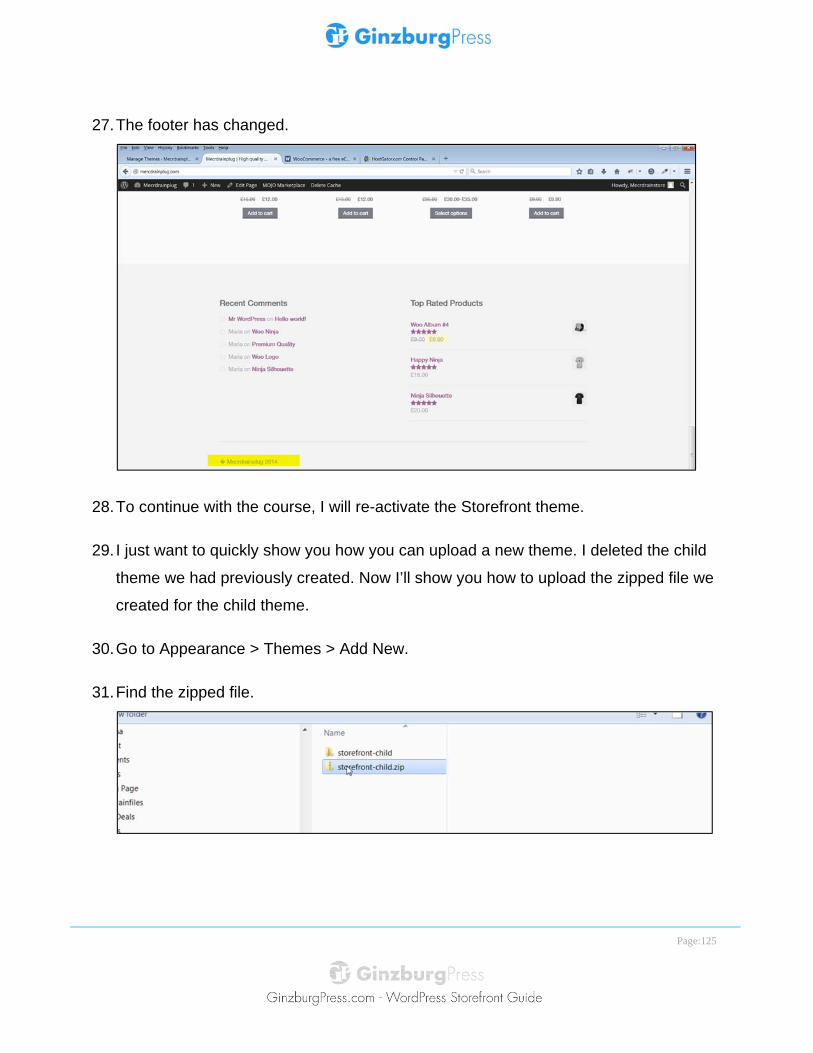
26. Also note the menus have changed.
Page:125
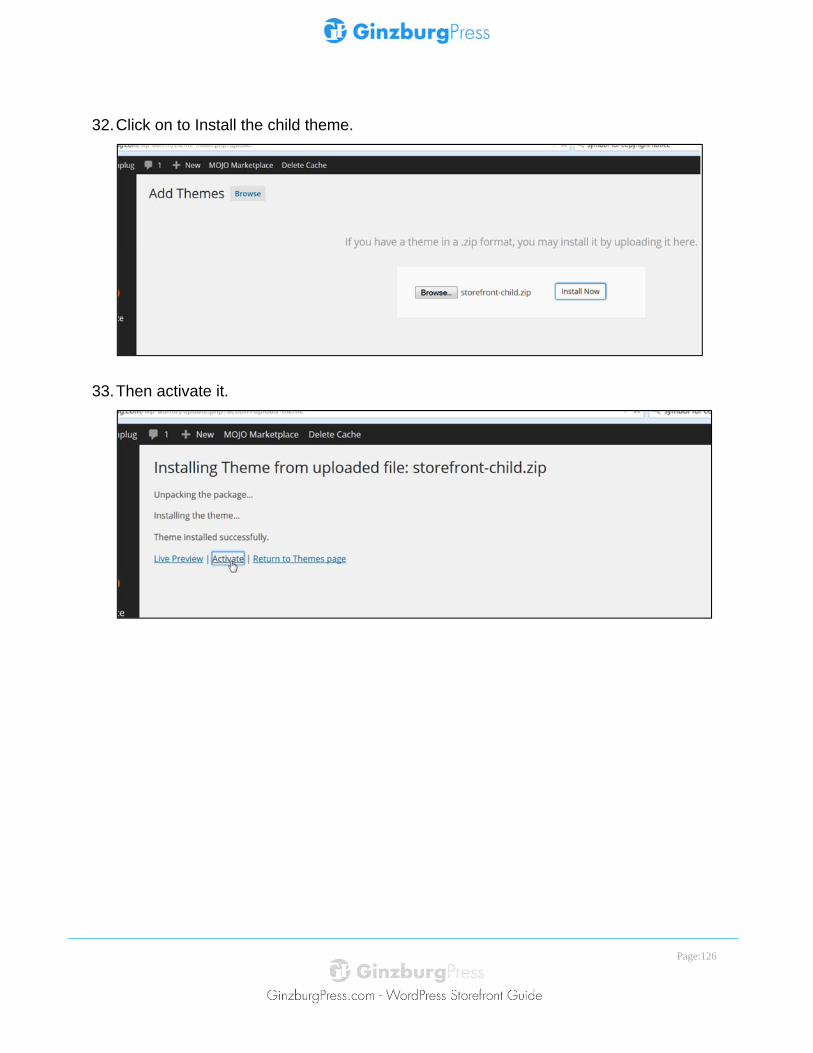
27. The footer has changed.
28. To continue with the course, I will re-activate the Storefront theme.
29. I just want to quickly show you how you can upload a new theme. I deleted the child
theme we had previously created. Now I’ll show you how to upload the zipped file we
created for the child theme.
30. Go to Appearance > Themes > Add New.
31. Find the zipped file.
Page:126
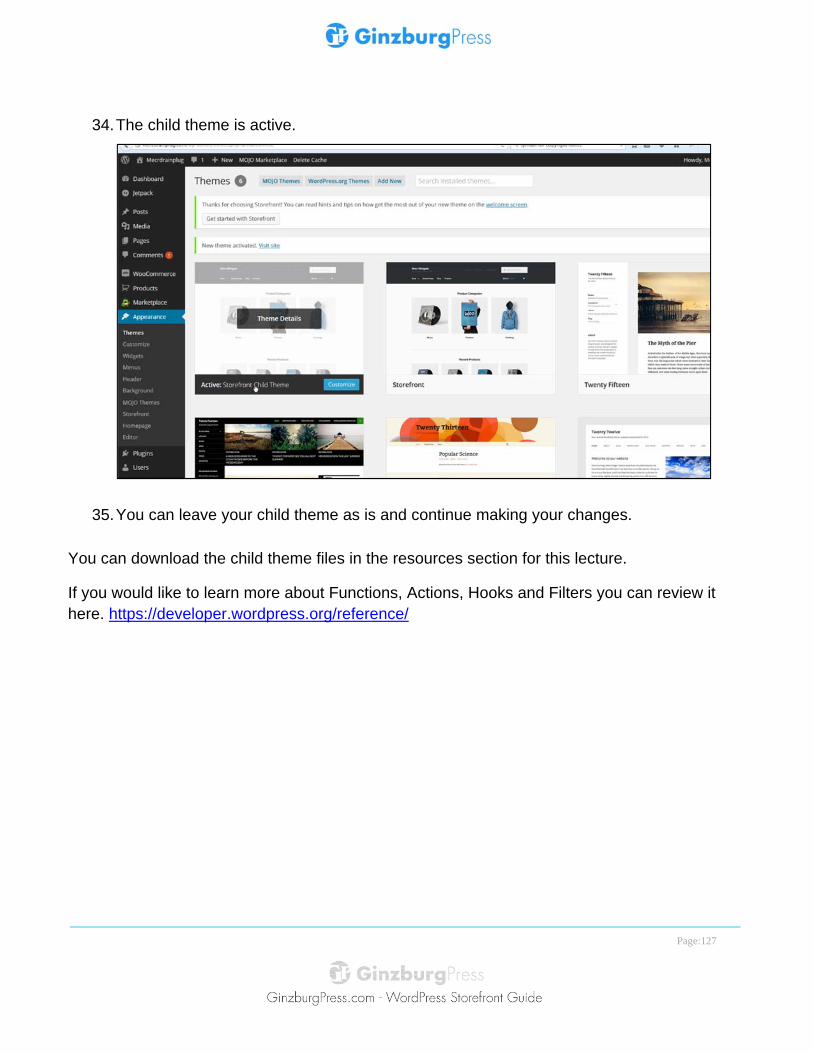
32. Click on to Install the child theme.
33. Then activate it.
Page:127
34. The child theme is active.
35. You can leave your child theme as is and continue making your changes.
You can download the child theme files in the resources section for this lecture.
If you would like to learn more about Functions, Actions, Hooks and Filters you can review it here. https://developer.wordpress.org/reference/
Page:128
Conclusion to Section 4 Wonderful! Section 4 is done. This section you just completed will set you on the path to customizing your theme – working with the Storefront child theme.
Here’s what we covered in the Storefront Child Theme.
This section is an optional bonus section for the advanced user. I demonstrated to you how to create your own child theme. You could also download the child theme files for Storefront created in this lecture. I also showed you how to download and install an FTP program.
1. In the theme directory I created a folder for the new child theme.
2. I called it storefront-child.
3. I created a stylesheet with information about the child theme.
4. You must include, “Theme Name" and “Template.
5. I pulled the styles from the parent theme.
Page:129
Section 5: Page Builder Review the Page Builder Plugins Page builders make it easy to make responsive layouts.
There are a few available page builder plugins compatible with the Storefront theme. You have a choice of Page Builder plugins such as Site Origin, Visual Composer and VelocityPage.
Let’s do a quick review of the Site Origin Page Builder Plugin which can be downloaded here:
https://wordpress.org/plugins/siteorigin-panels/.
Page Builder by Site Origin is one of the most popular page creation plugins for WordPress. According to the plugin author. It makes it easy to create responsive column based content, using the widgets you know with a simple drag and drop page builder.
I tested the Site Origin’s page builder with the Storefront theme and it appears to work without any issues. This plugin is free. This is the plugin that I will show you how to install.
This is optional. You do not have to install a page builder plugin if you don’t want to use one. I will briefly review the other page builder plugins available.
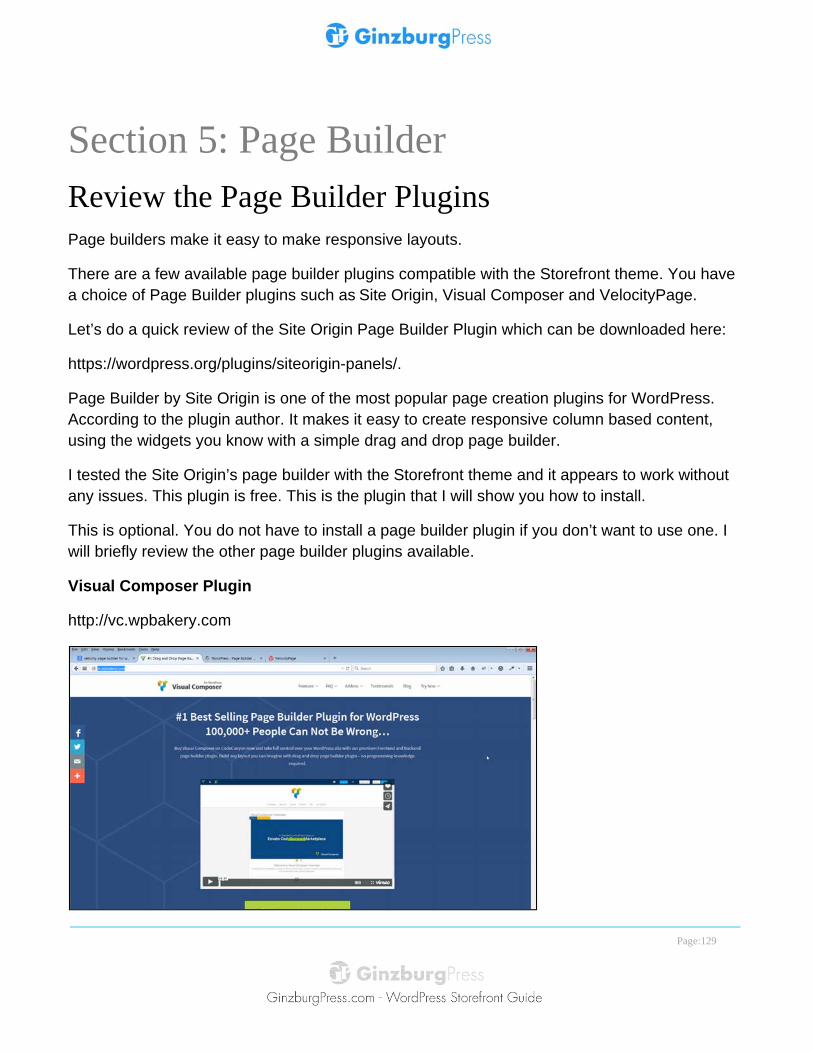
Visual Composer Plugin
http://vc.wpbakery.com
Page:130
The Visual Composer Plugin is not free.
I have used this plugin with other WordPress sites. However, for the purposes of this course I’ll use the Site Origin plugin. If you’re interested in the Visual Composer plugin take a look at their website. It includes many features to help you with Frontend editing, layout control and editing elements inline whereby you can see the changes instantly.
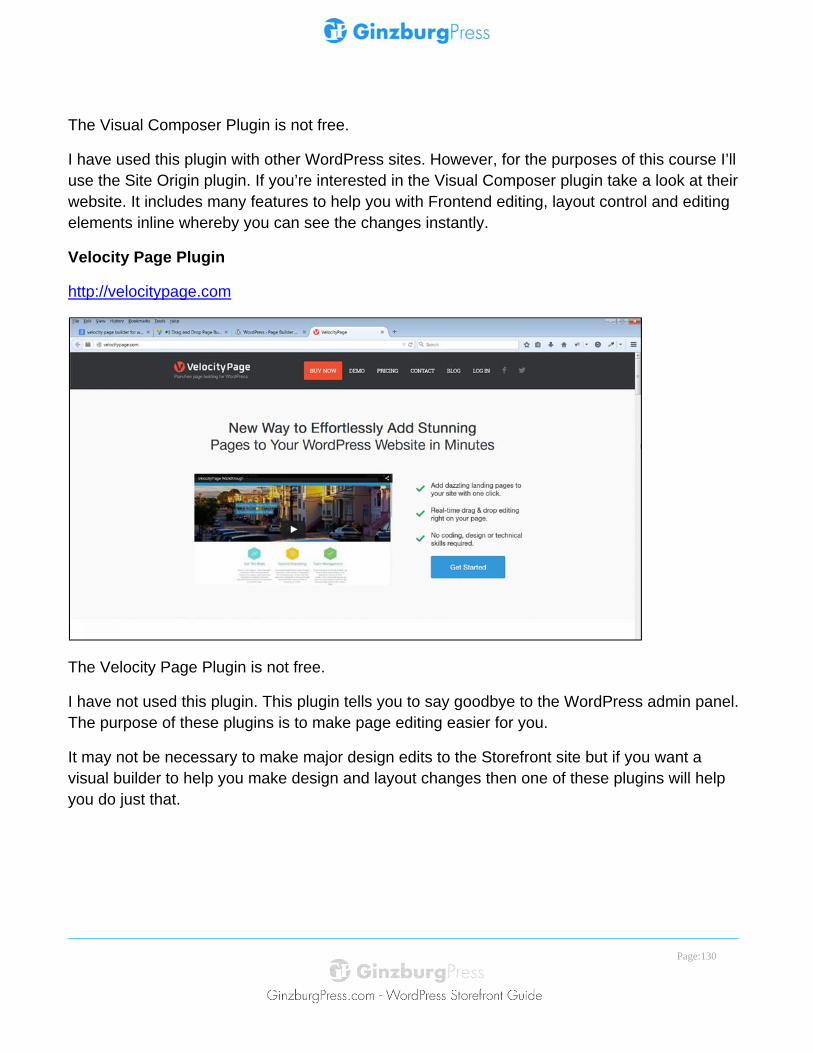
Velocity Page Plugin
http://velocitypage.com
The Velocity Page Plugin is not free.
I have not used this plugin. This plugin tells you to say goodbye to the WordPress admin panel. The purpose of these plugins is to make page editing easier for you.
It may not be necessary to make major design edits to the Storefront site but if you want a visual builder to help you make design and layout changes then one of these plugins will help you do just that.
Page:131
Install the Site Origin Page Builder Plugin Download and install a page builder plugin.
Let’s try the site origin page builder.
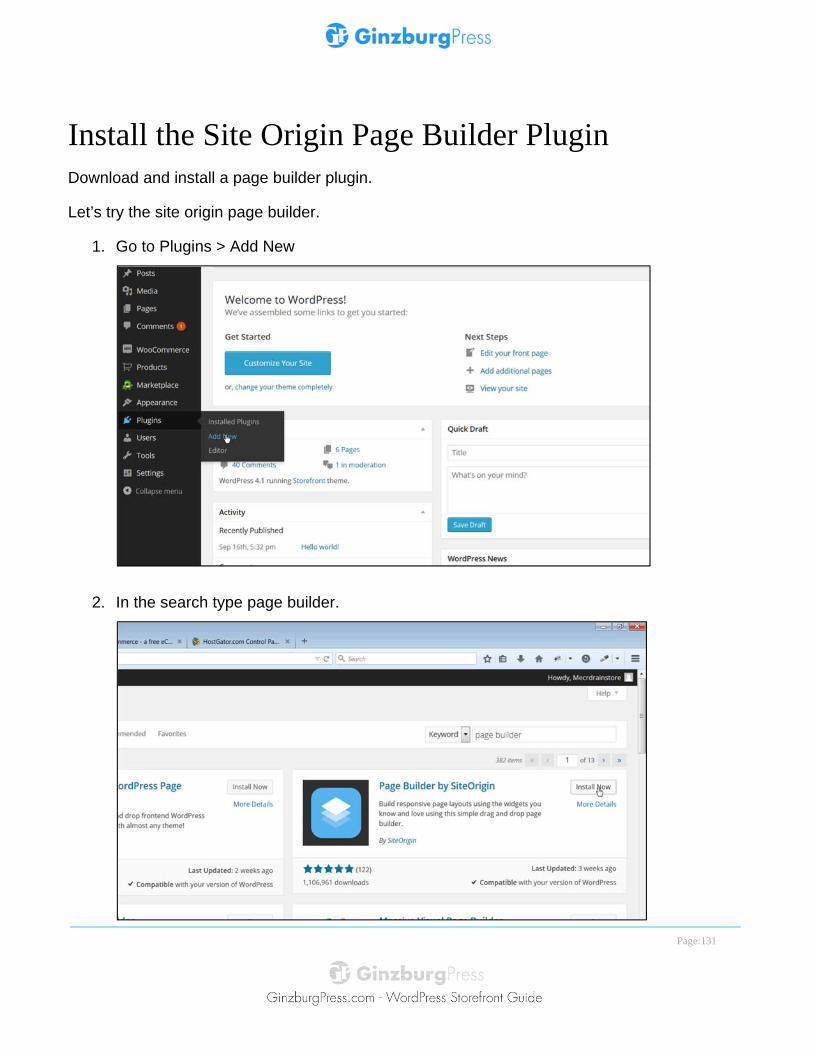
1. Go to Plugins > Add New
2. In the search type page builder.
Page:132
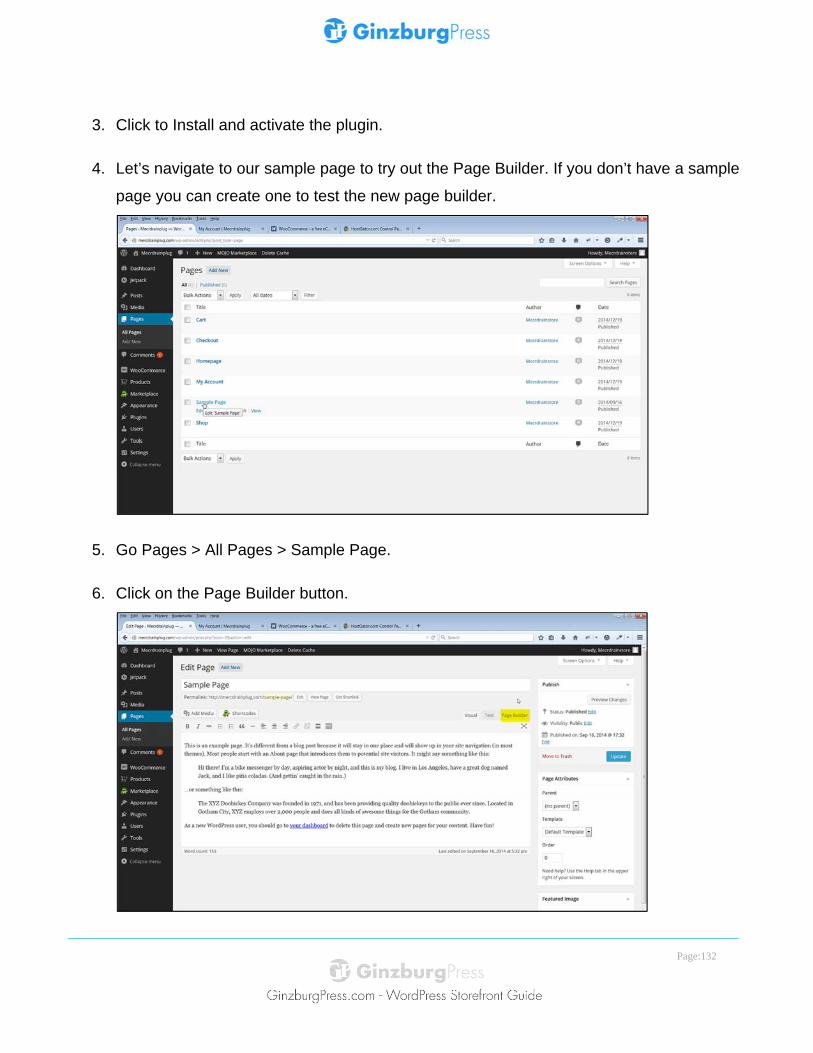
3. Click to Install and activate the plugin.
4. Let’s navigate to our sample page to try out the Page Builder. If you don’t have a sample
page you can create one to test the new page builder.
5. Go Pages > All Pages > Sample Page.
6. Click on the Page Builder button.
Page:133
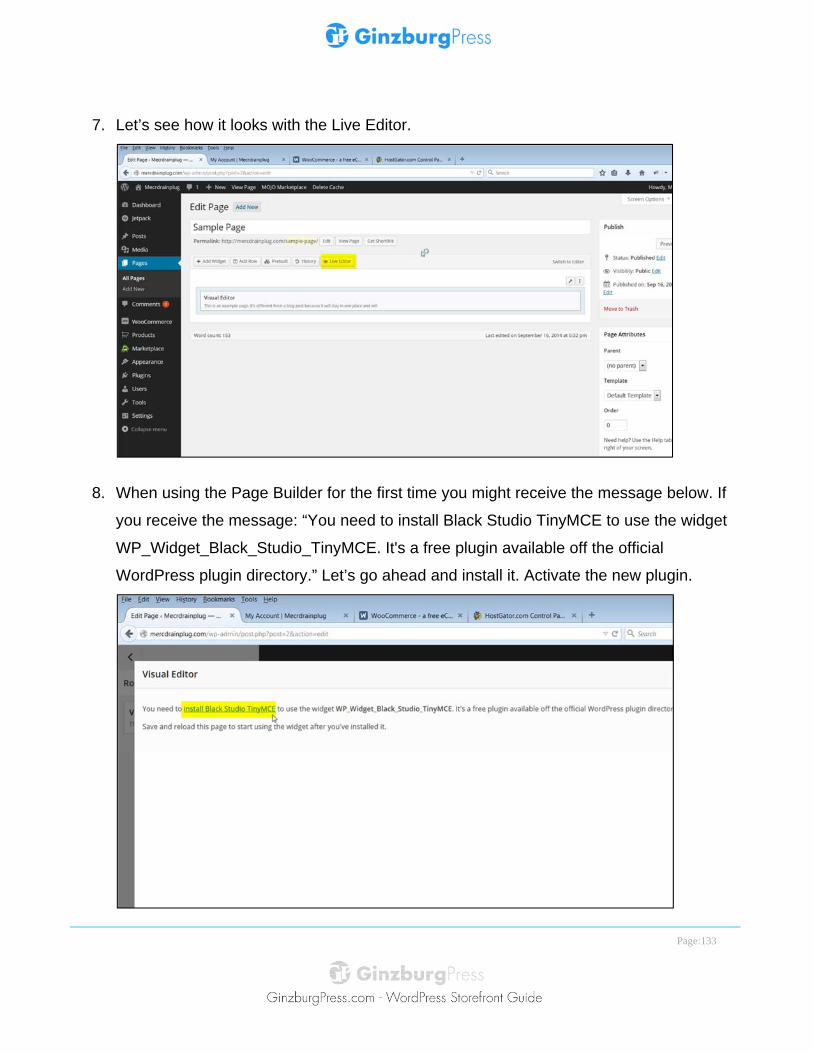
7. Let’s see how it looks with the Live Editor.
8. When using the Page Builder for the first time you might receive the message below. If
you receive the message: “You need to install Black Studio TinyMCE to use the widget
WP_Widget_Black_Studio_TinyMCE. It's a free plugin available off the official
WordPress plugin directory.” Let’s go ahead and install it. Activate the new plugin.

Page:134
9. Go to Live Editor in your sample page. Now we can edit the page. Make some edits and
click on update when you’re done editing.
10. Let’s add a row to the page. Click on the Add Row button.
Page:135
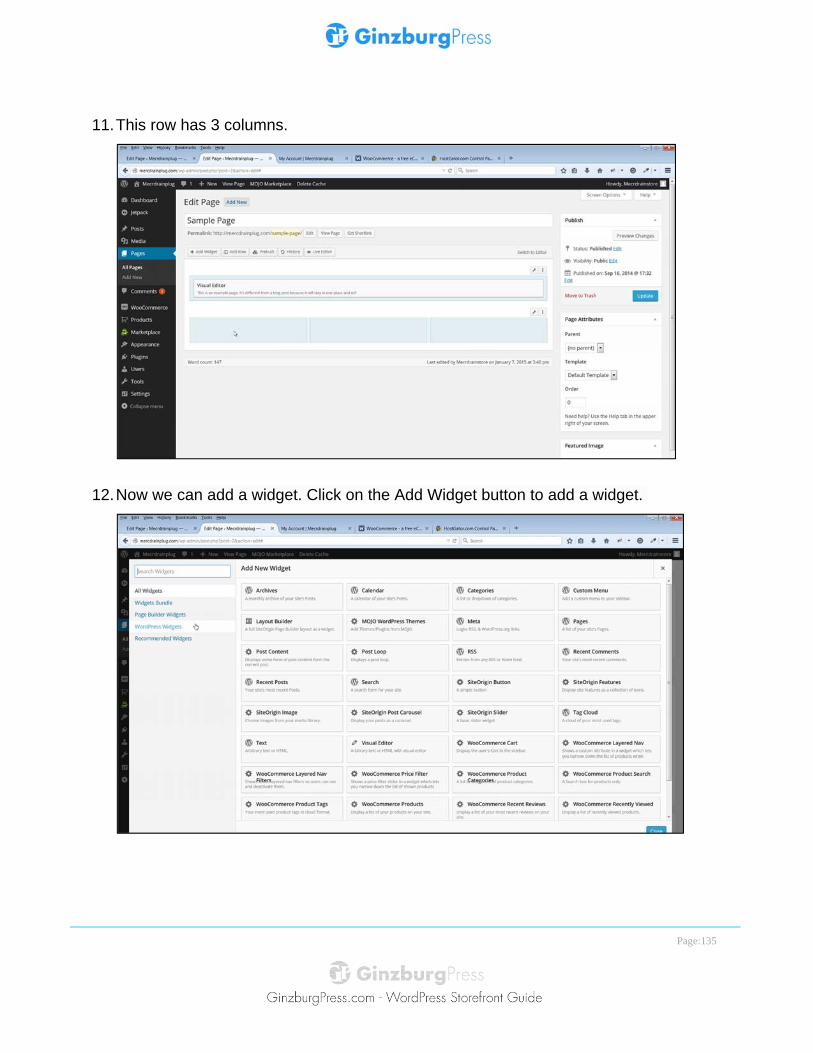
11. This row has 3 columns.
12. Now we can add a widget. Click on the Add Widget button to add a widget.
Page:136
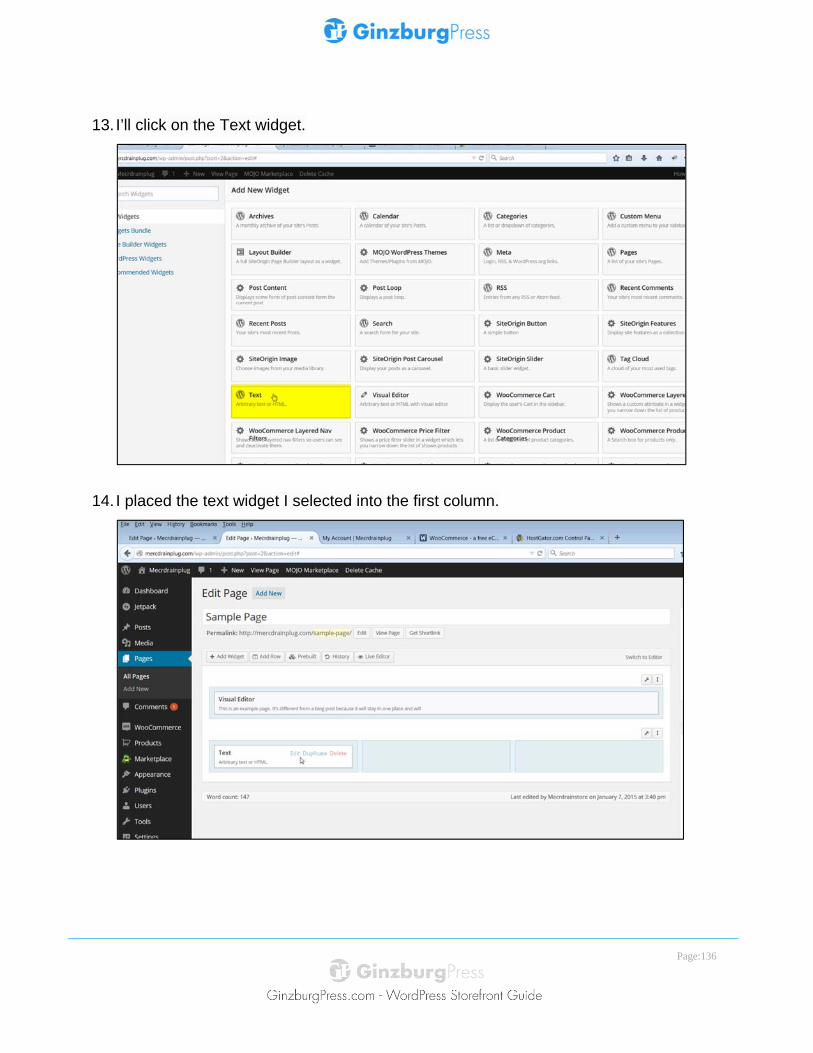
13. I’ll click on the Text widget.
14. I placed the text widget I selected into the first column.
Page:137
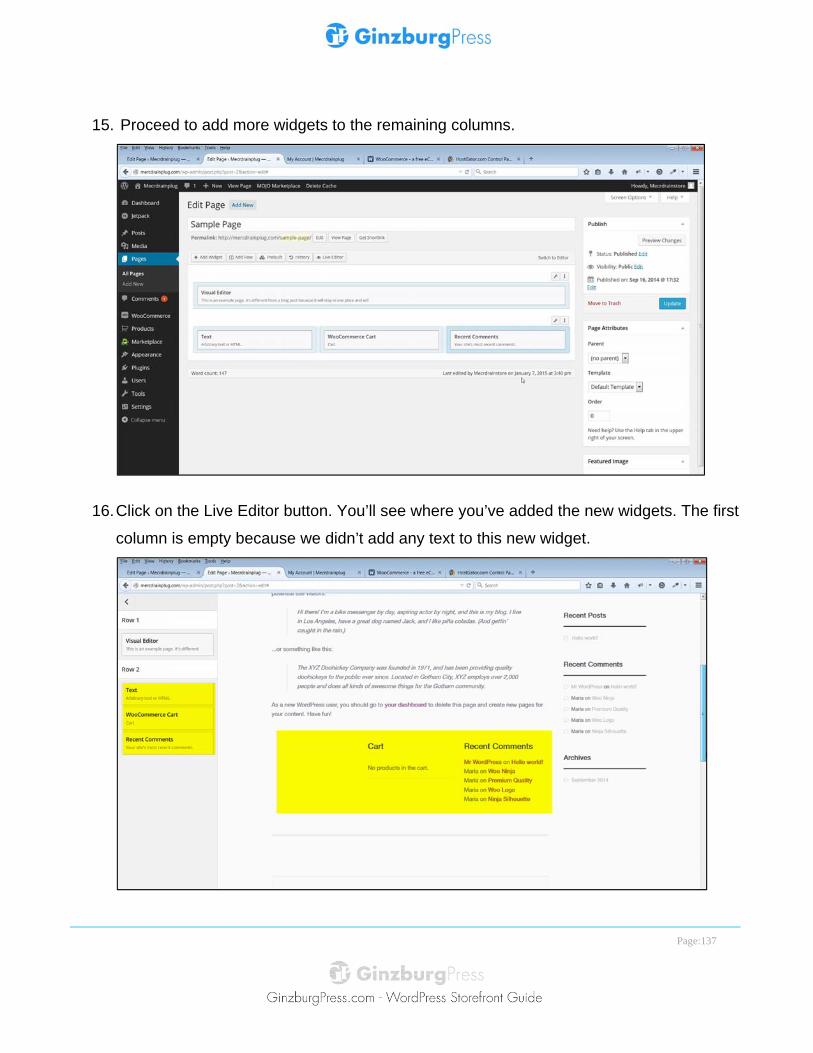
15. Proceed to add more widgets to the remaining columns.
16. Click on the Live Editor button. You’ll see where you’ve added the new widgets. The first
column is empty because we didn’t add any text to this new widget.
Page:138
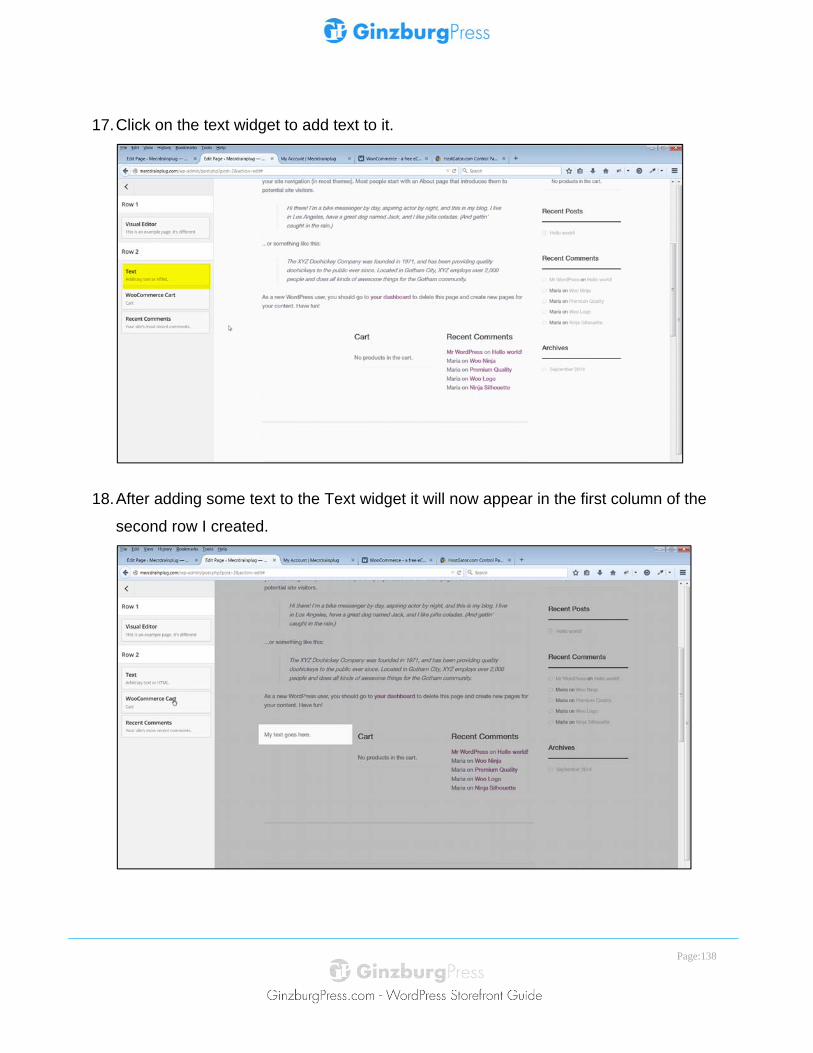
17. Click on the text widget to add text to it.
18. After adding some text to the Text widget it will now appear in the first column of the
second row I created.
Page:139
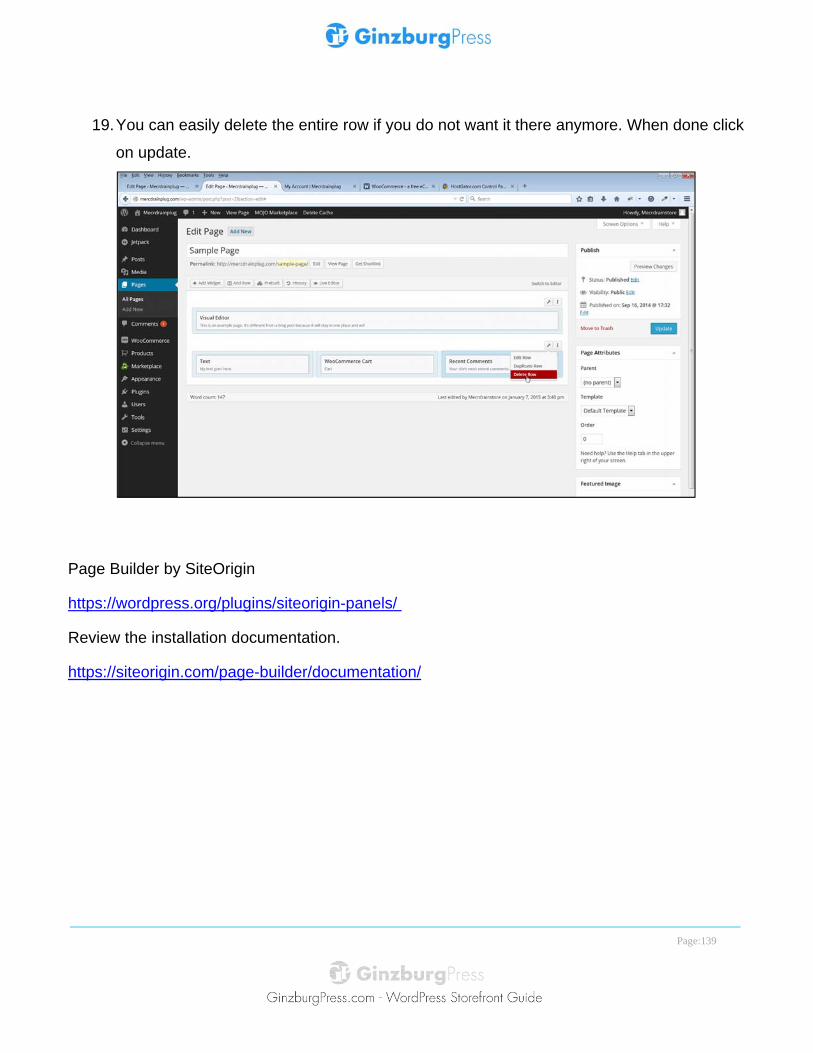
19. You can easily delete the entire row if you do not want it there anymore. When done click
on update.
Page Builder by SiteOrigin
https://wordpress.org/plugins/siteorigin-panels/
Review the installation documentation.
https://siteorigin.com/page-builder/documentation/
Page:140
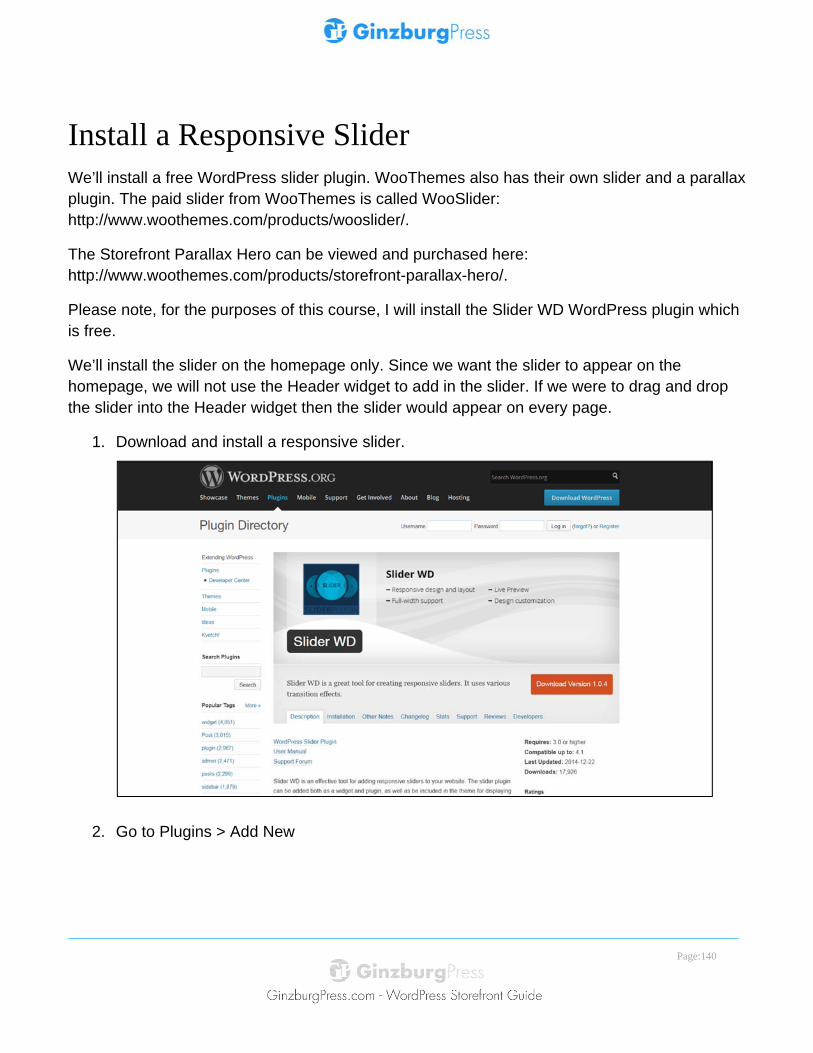
Install a Responsive Slider We’ll install a free WordPress slider plugin. WooThemes also has their own slider and a parallax plugin. The paid slider from WooThemes is called WooSlider: http://www.woothemes.com/products/wooslider/.
The Storefront Parallax Hero can be viewed and purchased here: http://www.woothemes.com/products/storefront-parallax-hero/.
Please note, for the purposes of this course, I will install the Slider WD WordPress plugin which is free.
We’ll install the slider on the homepage only. Since we want the slider to appear on the homepage, we will not use the Header widget to add in the slider. If we were to drag and drop the slider into the Header widget then the slider would appear on every page.
1. Download and install a responsive slider.
2. Go to Plugins > Add New
Page:141
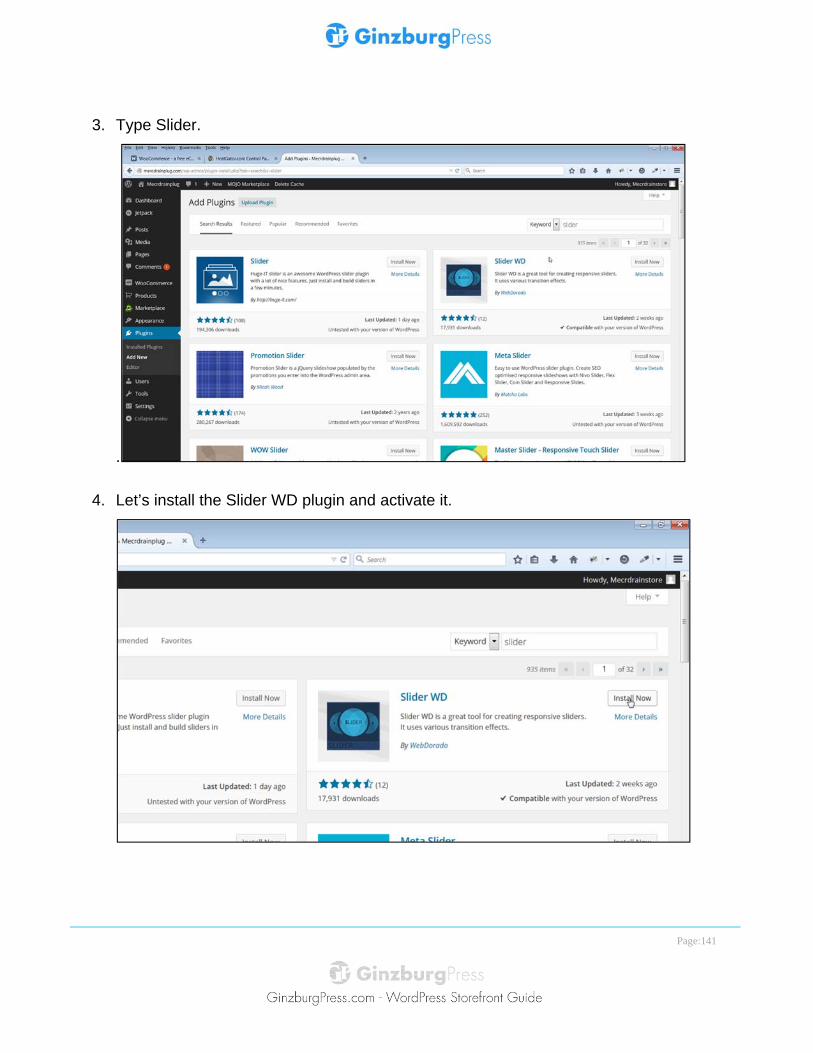
3. Type Slider.
.
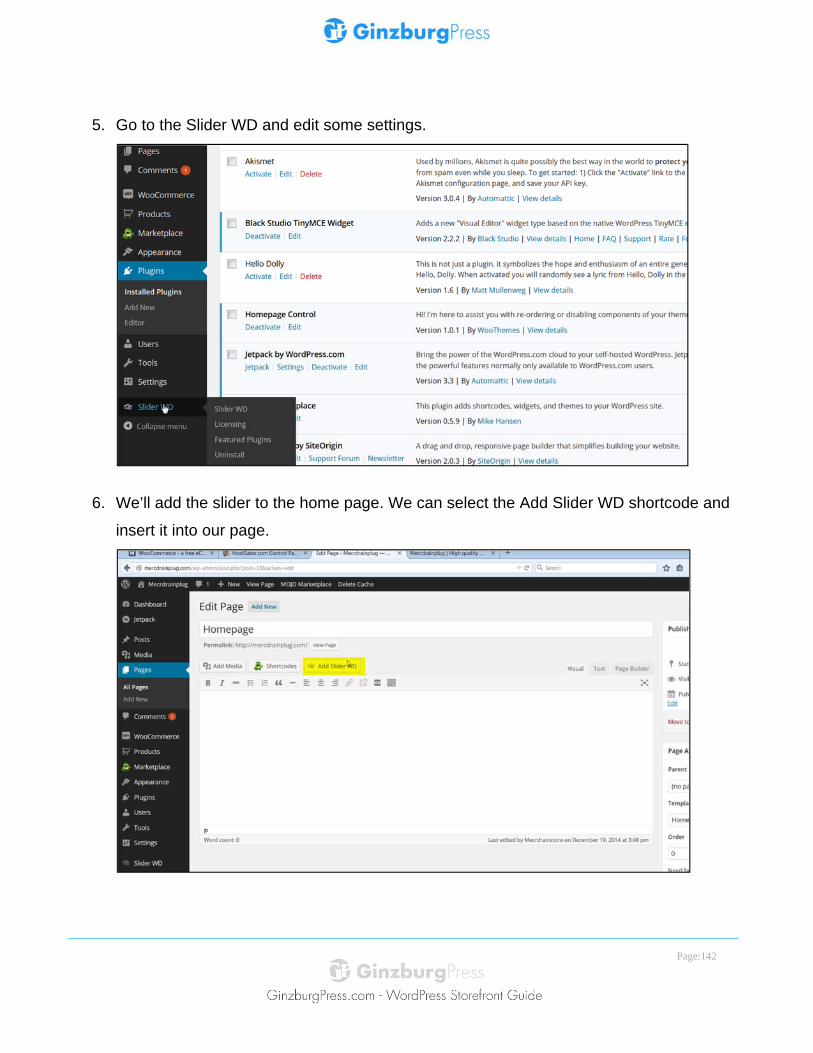
4. Let’s install the Slider WD plugin and activate it.
Page:142
5. Go to the Slider WD and edit some settings.
6. We’ll add the slider to the home page. We can select the Add Slider WD shortcode and
insert it into our page.
Page:143
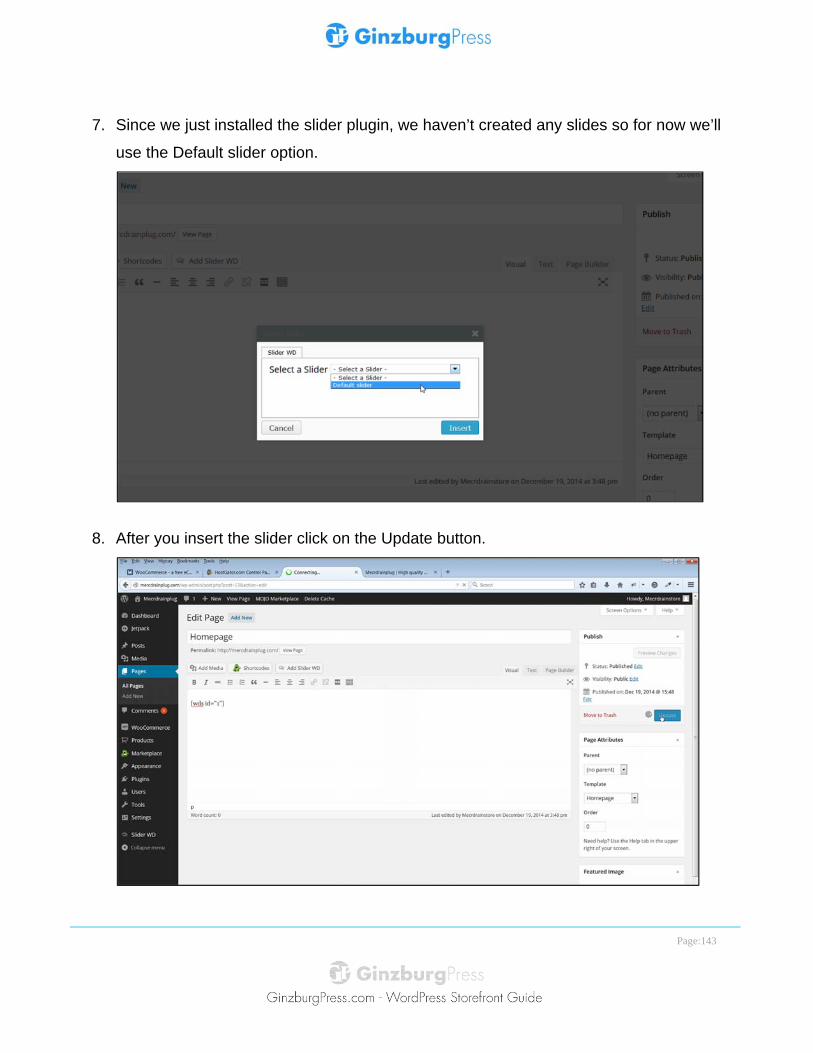
7. Since we just installed the slider plugin, we haven’t created any slides so for now we’ll
use the Default slider option.
8. After you insert the slider click on the Update button.
Page:144
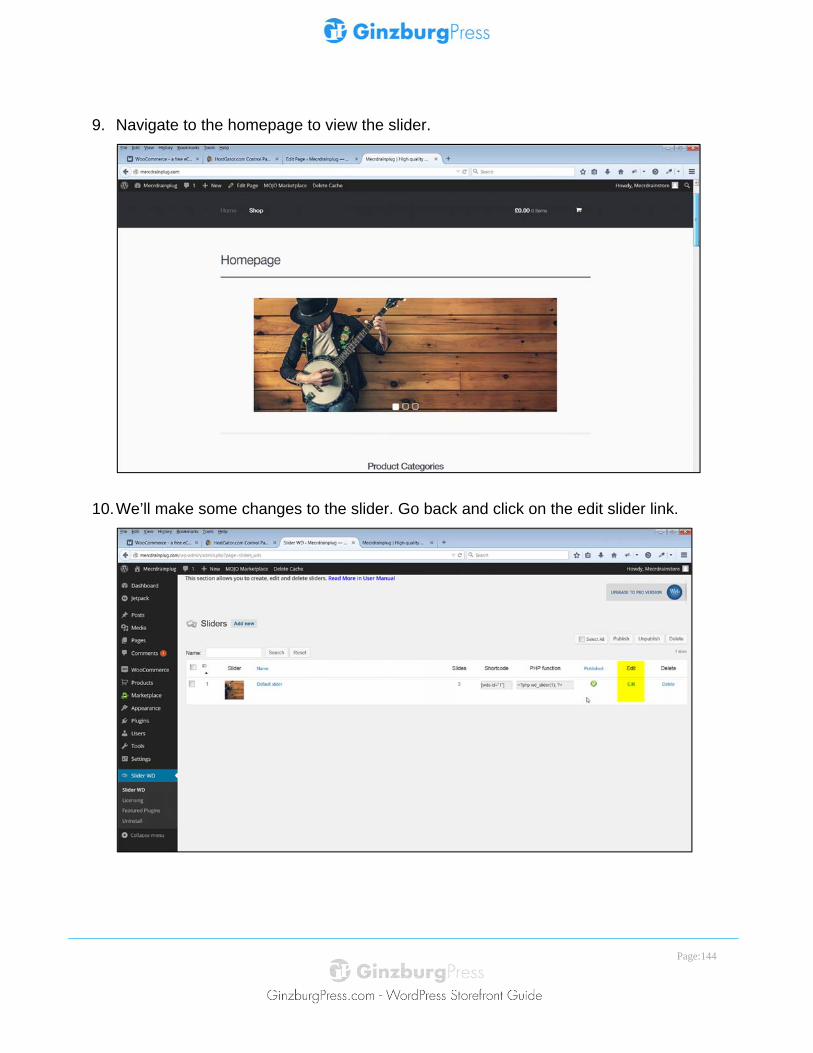
9. Navigate to the homepage to view the slider.
10. We’ll make some changes to the slider. Go back and click on the edit slider link.

Page:145
11. Click on Settings.
12. Select Yes for full width.
Page:146
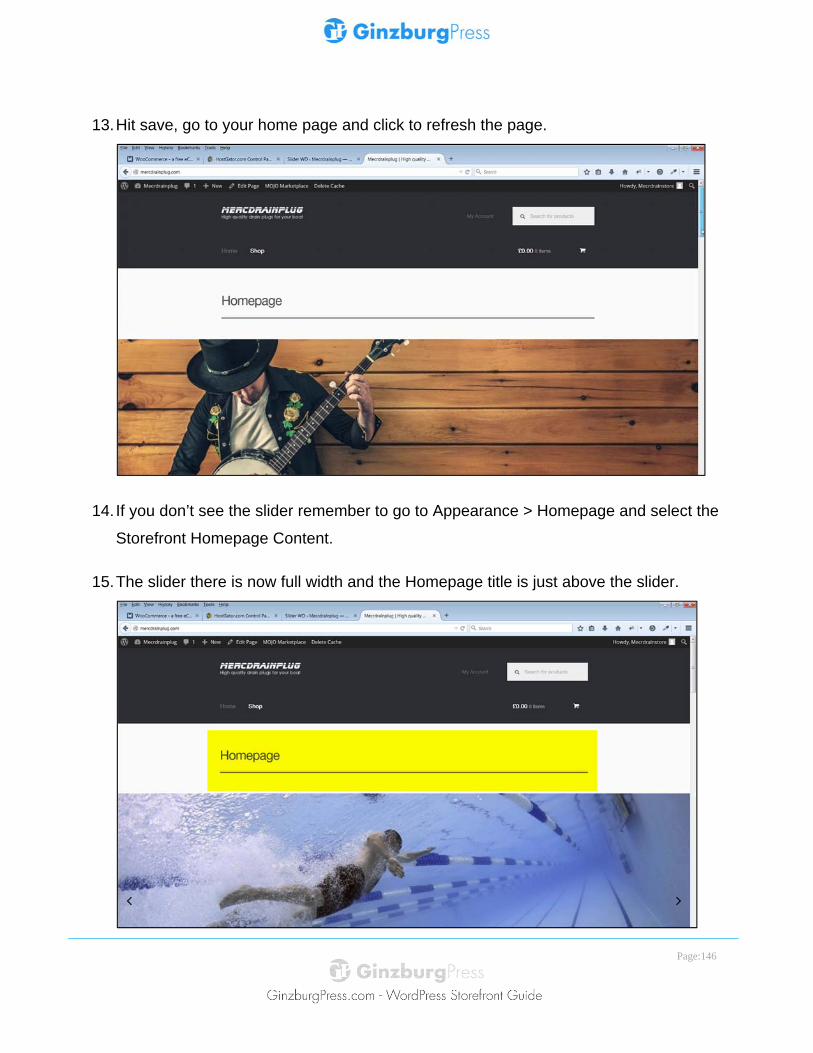
13. Hit save, go to your home page and click to refresh the page.
14. If you don’t see the slider remember to go to Appearance > Homepage and select the
Storefront Homepage Content.
15. The slider there is now full width and the Homepage title is just above the slider.
Page:147
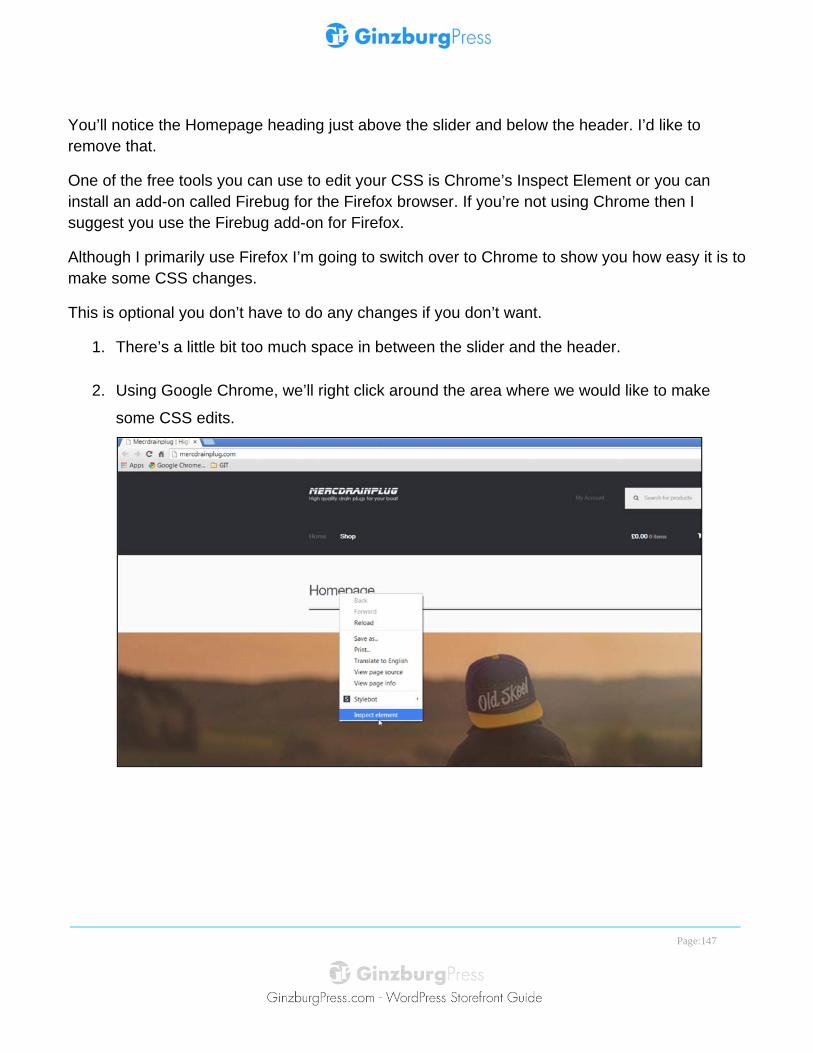
You’ll notice the Homepage heading just above the slider and below the header. I’d like to remove that.
One of the free tools you can use to edit your CSS is Chrome’s Inspect Element or you can install an add-on called Firebug for the Firefox browser. If you’re not using Chrome then I suggest you use the Firebug add-on for Firefox.
Although I primarily use Firefox I’m going to switch over to Chrome to show you how easy it is to make some CSS changes.
This is optional you don’t have to do any changes if you don’t want.
1. There’s a little bit too much space in between the slider and the header.
2. Using Google Chrome, we’ll right click around the area where we would like to make
some CSS edits.
Page:148
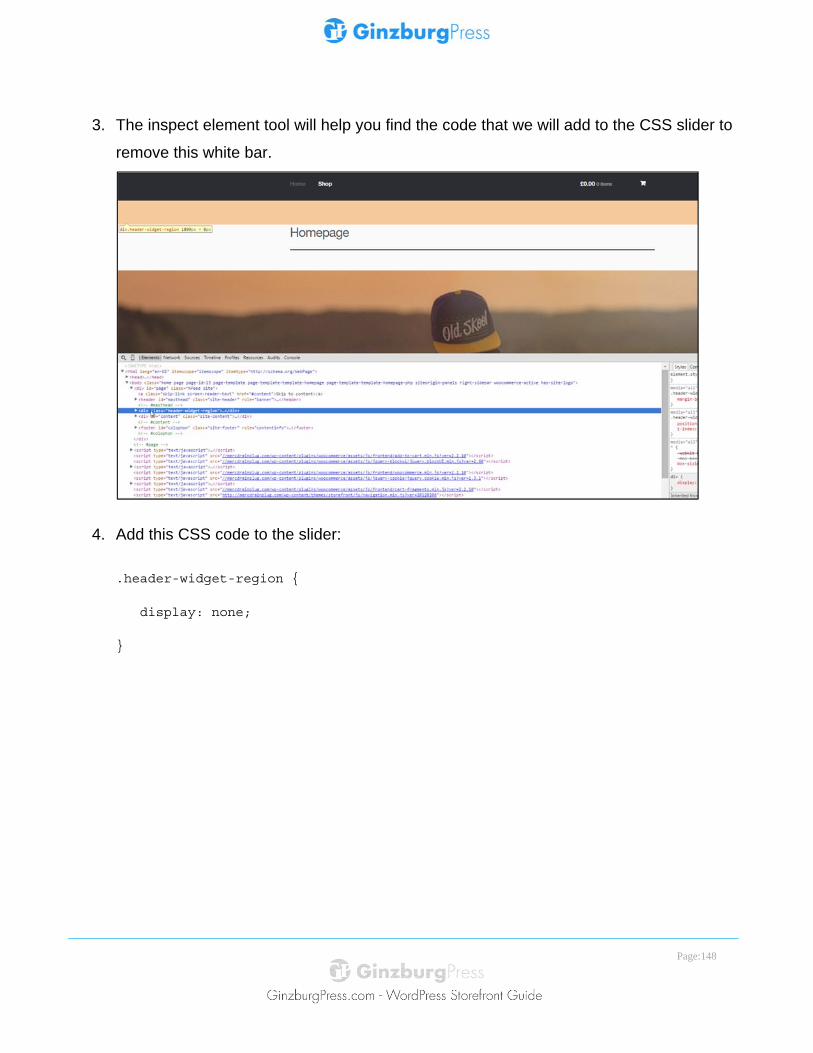
3. The inspect element tool will help you find the code that we will add to the CSS slider to
remove this white bar.
4. Add this CSS code to the slider:
.header-widget-region {
display: none;
}
Page:149
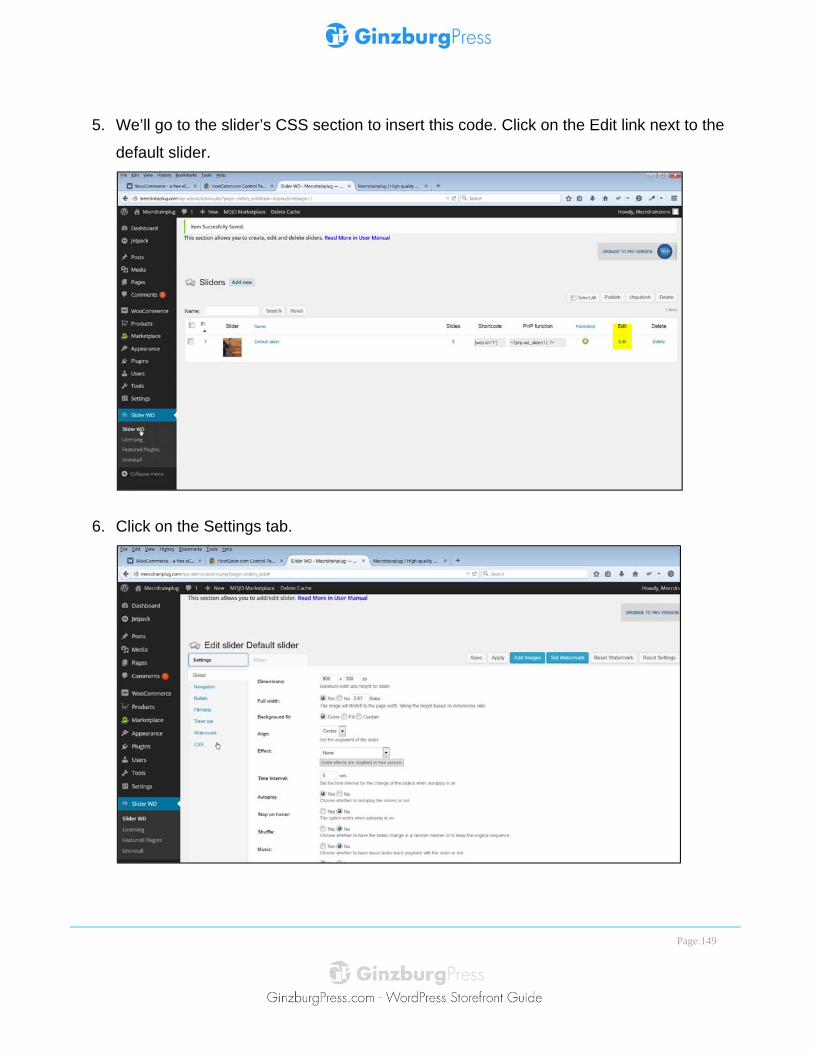
5. We’ll go to the slider’s CSS section to insert this code. Click on the Edit link next to the
default slider.
6. Click on the Settings tab.

Page:150
7. Then click on the CSS link.
8. If you are using a child theme you could place your CSS edits into the style.css file we
created in the Child Theme lecture.
9. This slider has a section to place your CSS edits.
10. We’ll place the CSS code in here if you don’t have a child theme setup. Hit save.
Page:151
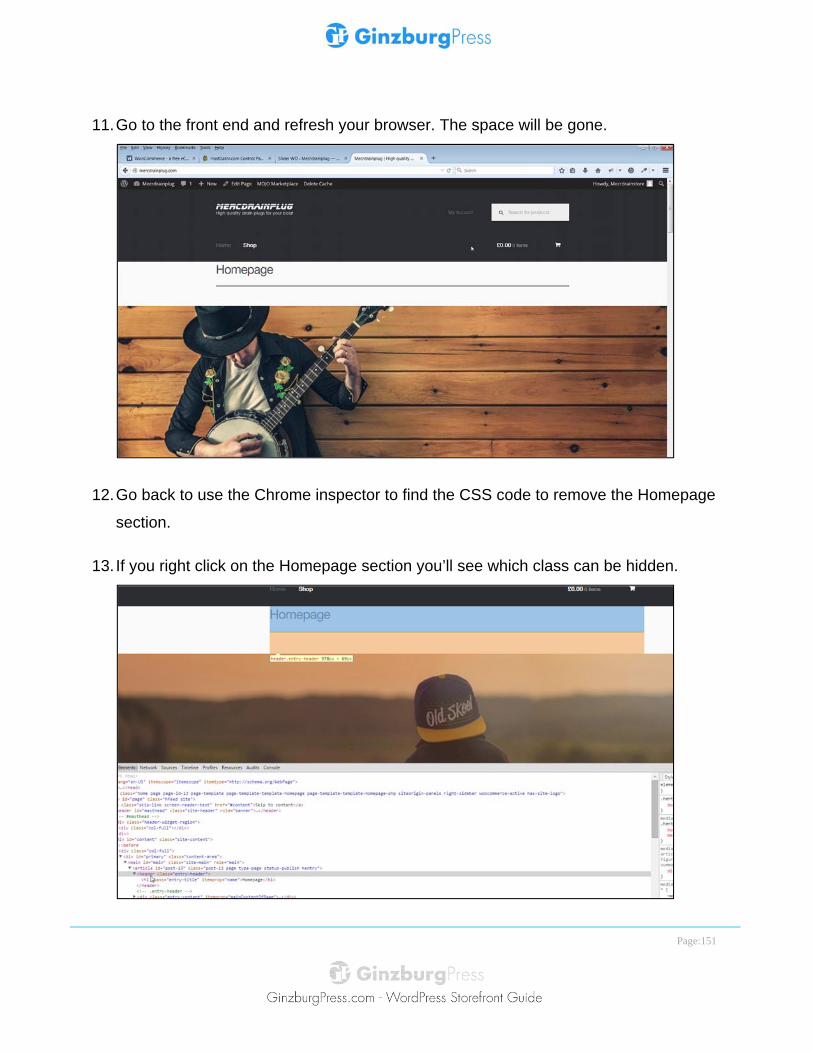
11. Go to the front end and refresh your browser. The space will be gone.
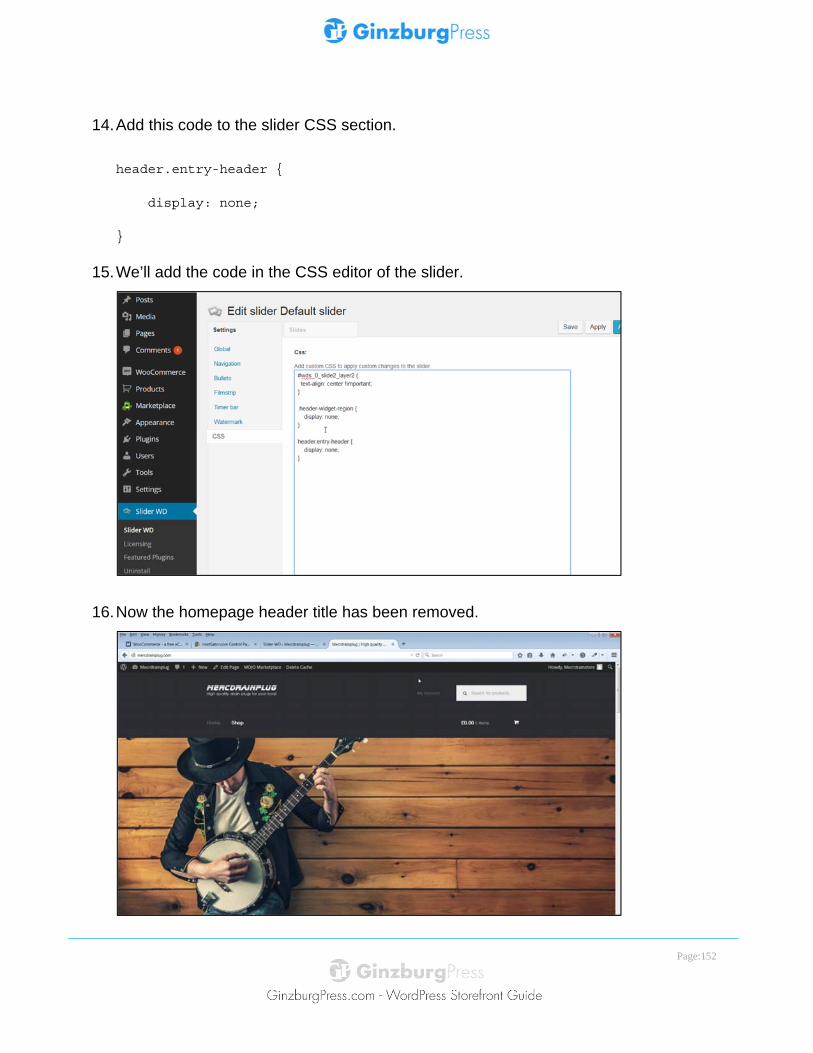
12. Go back to use the Chrome inspector to find the CSS code to remove the Homepage
section.
13. If you right click on the Homepage section you’ll see which class can be hidden.
Page:152
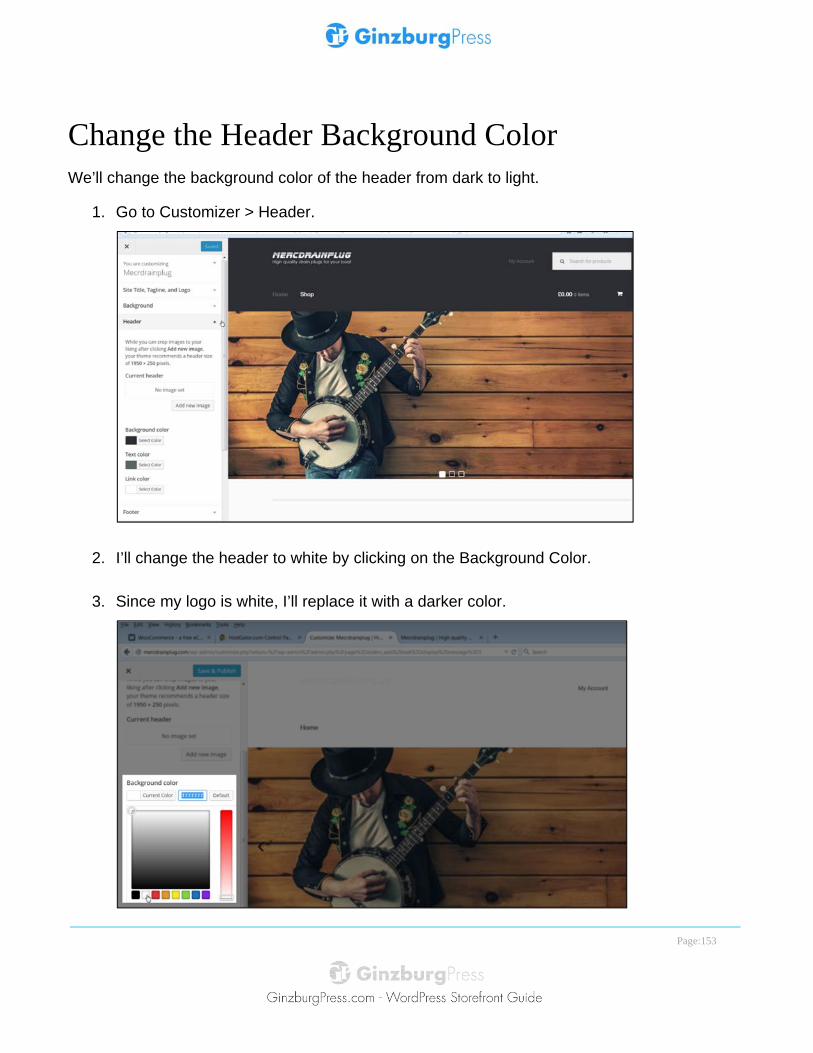
14. Add this code to the slider CSS section.
header.entry-header {
display: none;
}
15. We’ll add the code in the CSS editor of the slider.
16. Now the homepage header title has been removed.
Page:153
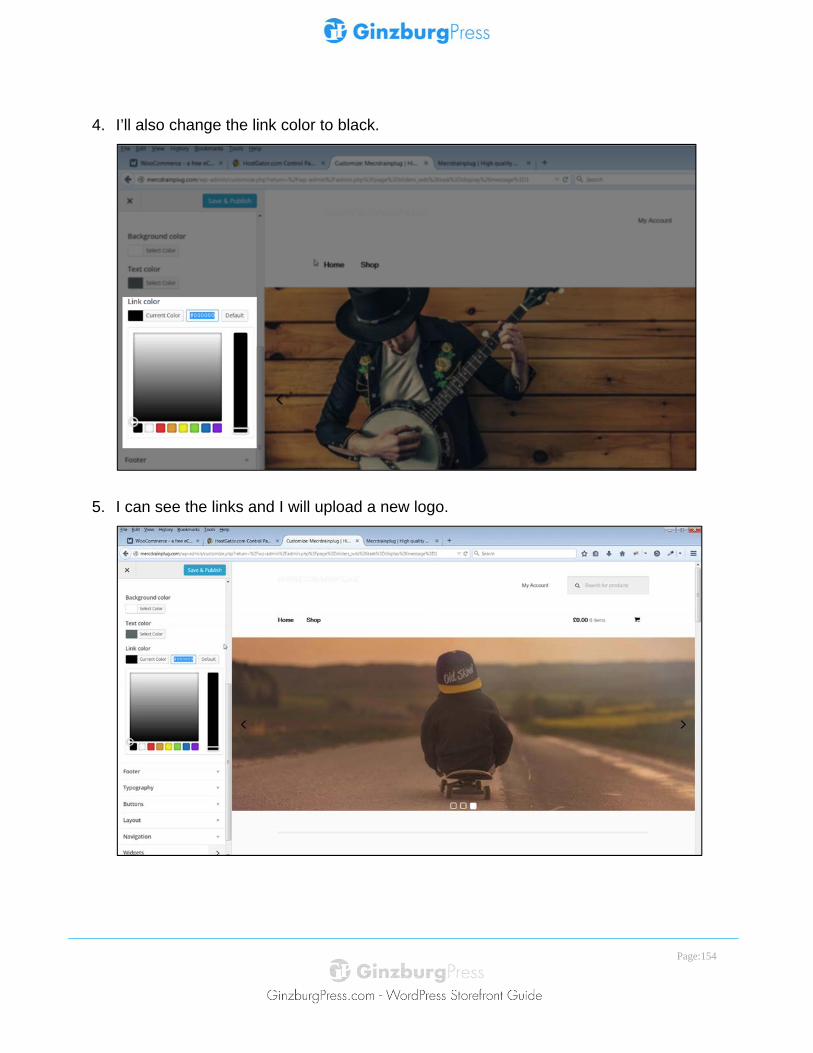
Change the Header Background Color We’ll change the background color of the header from dark to light.
1. Go to Customizer > Header.
2. I’ll change the header to white by clicking on the Background Color.
3. Since my logo is white, I’ll replace it with a darker color.
Page:154
4. I’ll also change the link color to black.
5. I can see the links and I will upload a new logo.

Page:155
6. I’ll change my logo from the customizer.
7. When I click on the Change logo button, it will take me to the Media Library.
Page:156
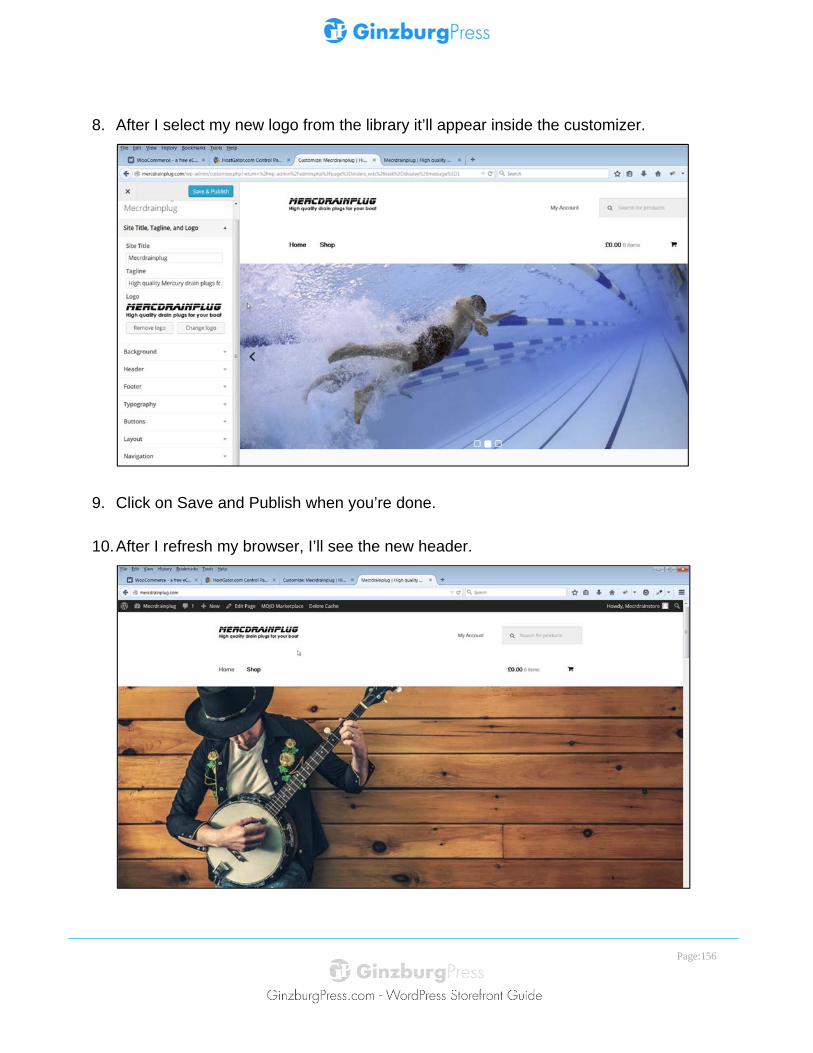
8. After I select my new logo from the library it’ll appear inside the customizer.
9. Click on Save and Publish when you’re done.
10. After I refresh my browser, I’ll see the new header.

Page:157
Customize the Header In this lecture we’ll customize the header with a call to action.
1. We will place a call to action just above the store products and below the navigation.
2. We can place a bar with text to break up the white space.
Page:158
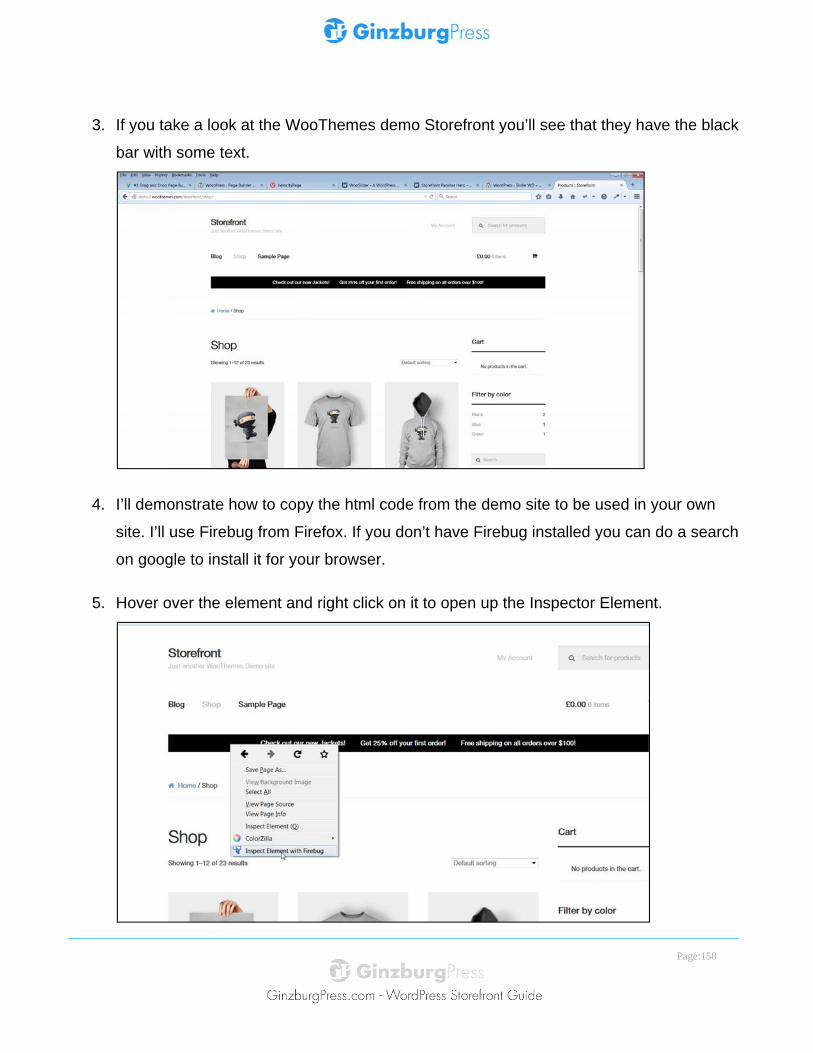
3. If you take a look at the WooThemes demo Storefront you’ll see that they have the black
bar with some text.
4. I’ll demonstrate how to copy the html code from the demo site to be used in your own
site. I’ll use Firebug from Firefox. If you don’t have Firebug installed you can do a search
on google to install it for your browser.
5. Hover over the element and right click on it to open up the Inspector Element.
Page:159
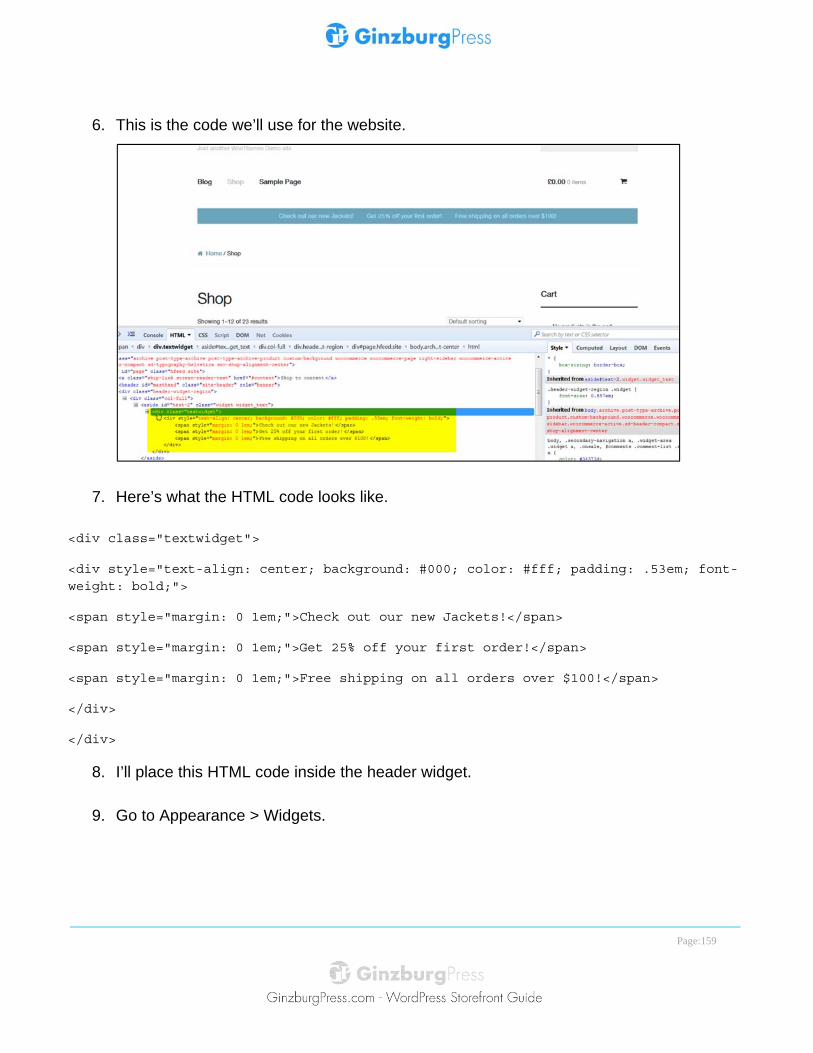
6. This is the code we’ll use for the website.
7. Here’s what the HTML code looks like.
<div class="textwidget">
<div style="text-align: center; background: #000; color: #fff; padding: .53em; font-weight: bold;">
<span style="margin: 0 1em;">Check out our new Jackets!</span>
<span style="margin: 0 1em;">Get 25% off your first order!</span>
<span style="margin: 0 1em;">Free shipping on all orders over $100!</span>
</div>
</div>
8. I’ll place this HTML code inside the header widget.
9. Go to Appearance > Widgets.
Page:160
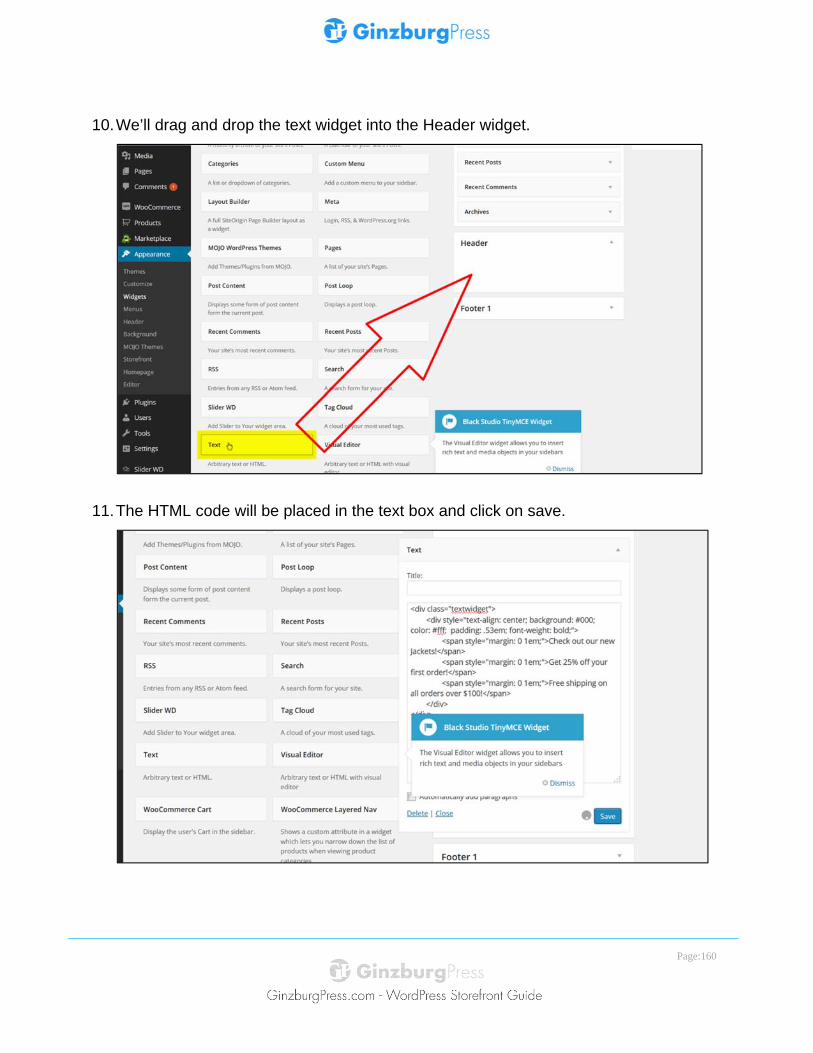
10. We’ll drag and drop the text widget into the Header widget.
11. The HTML code will be placed in the text box and click on save.
Page:161
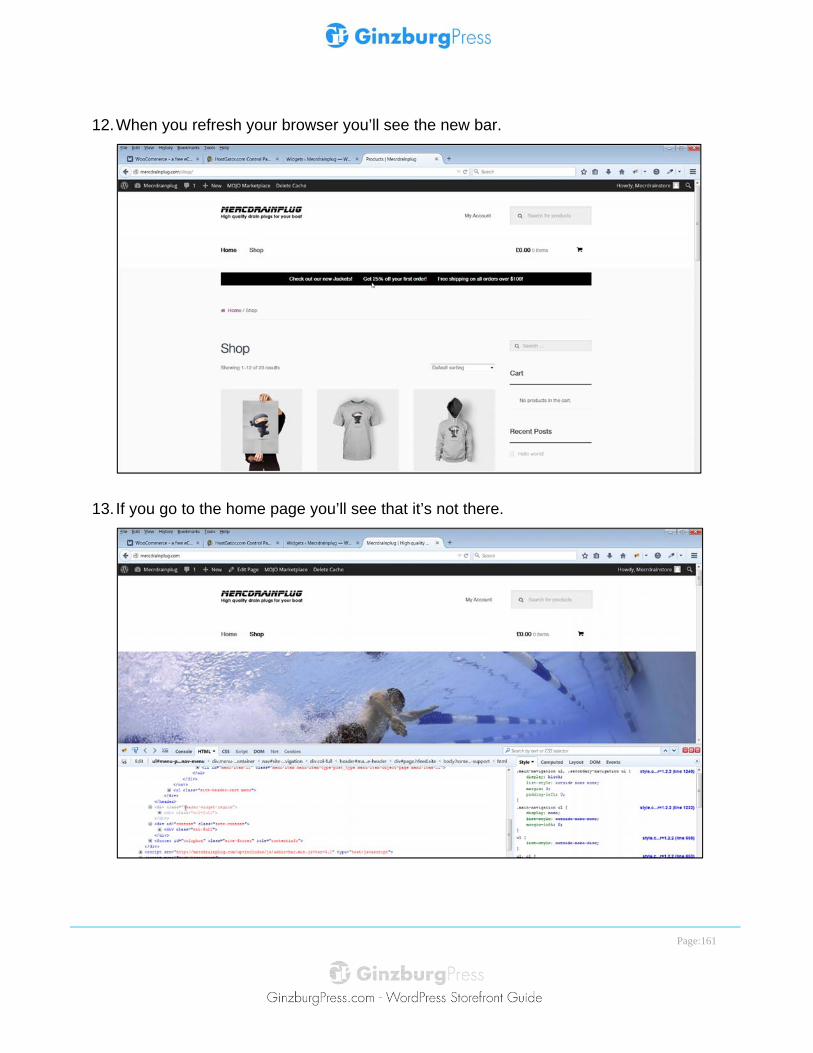
12. When you refresh your browser you’ll see the new bar.
13. If you go to the home page you’ll see that it’s not there.
Page:162
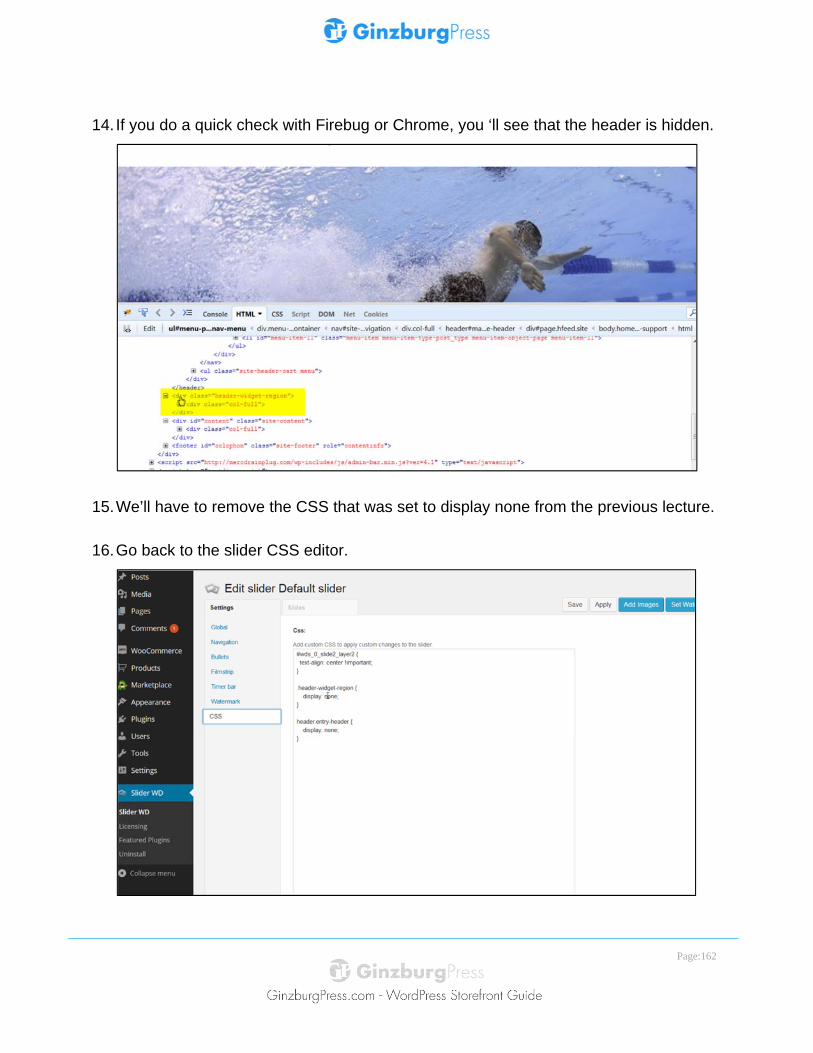
14. If you do a quick check with Firebug or Chrome, you ‘ll see that the header is hidden.
15. We’ll have to remove the CSS that was set to display none from the previous lecture.
16. Go back to the slider CSS editor.
Page:163
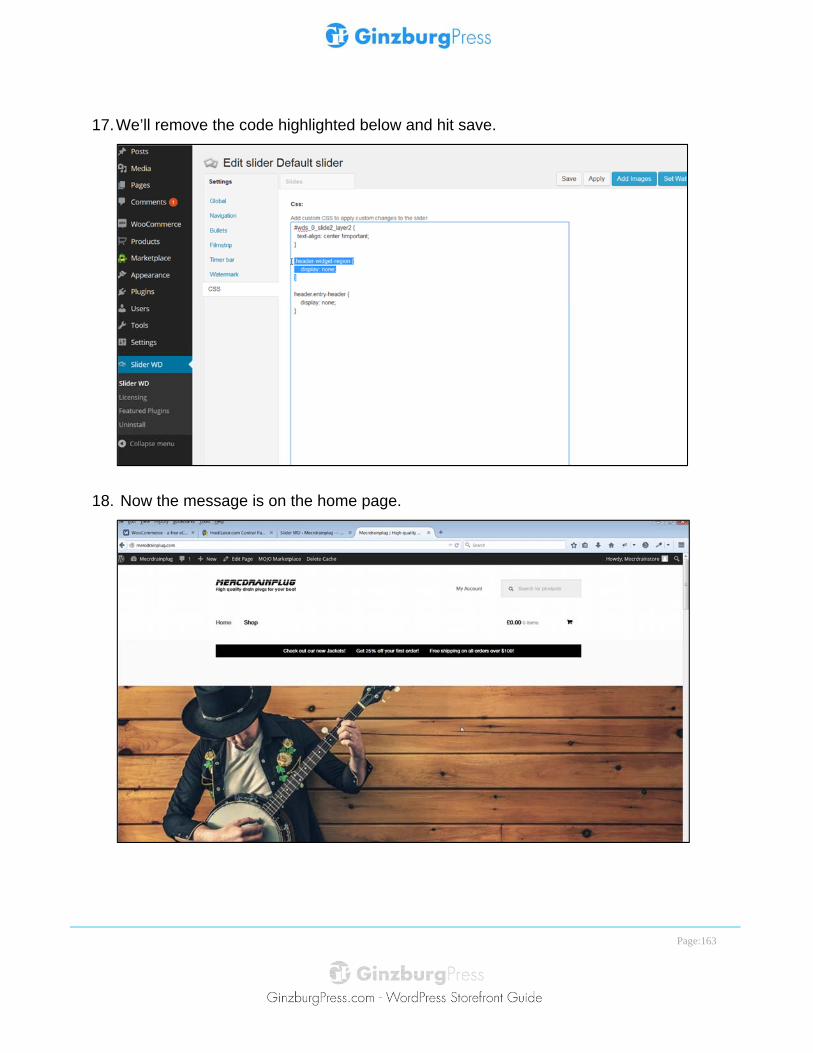
17. We’ll remove the code highlighted below and hit save.
18. Now the message is on the home page.
Page:164
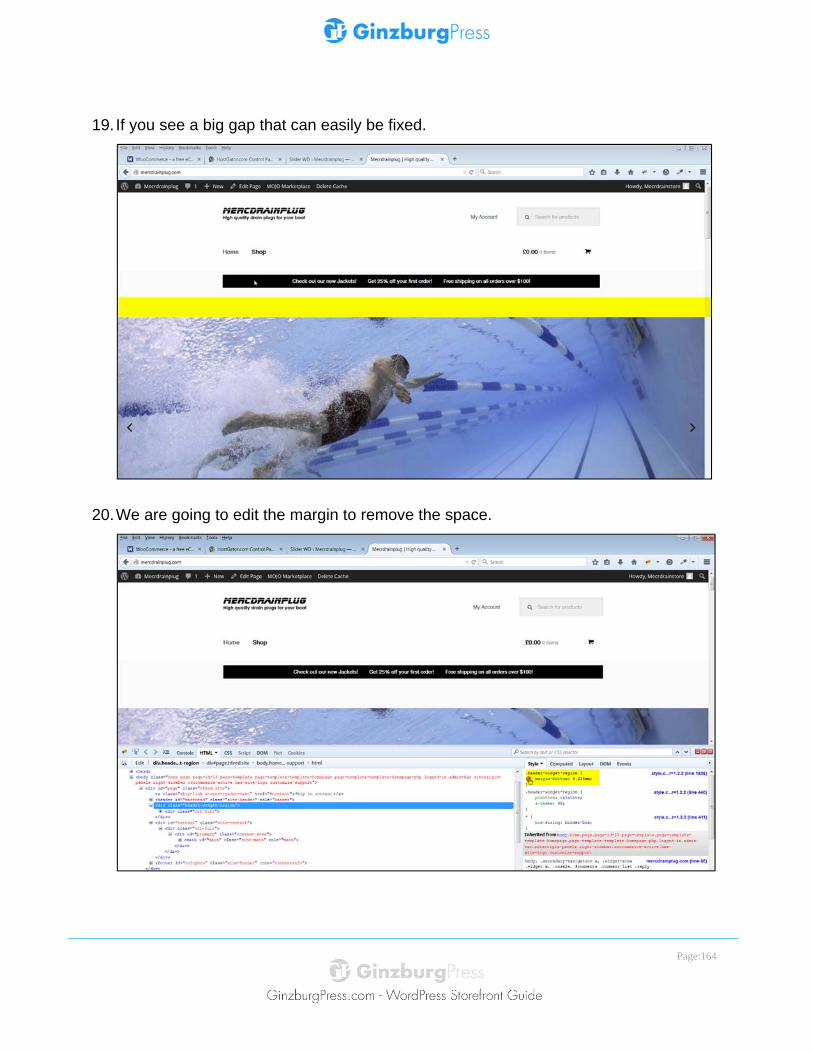
19. If you see a big gap that can easily be fixed.
20. We are going to edit the margin to remove the space.

Page:165
21. You’ll see the code that we’ll place in our CSS slider editor.
22. This is the revised code to remove the margin spacing.
Header-widget-region {
Margin-bottom: 0px;
}
23. Hit save and go to the front page.
24. Now you’ll see that the space has been reduced.
Page:166
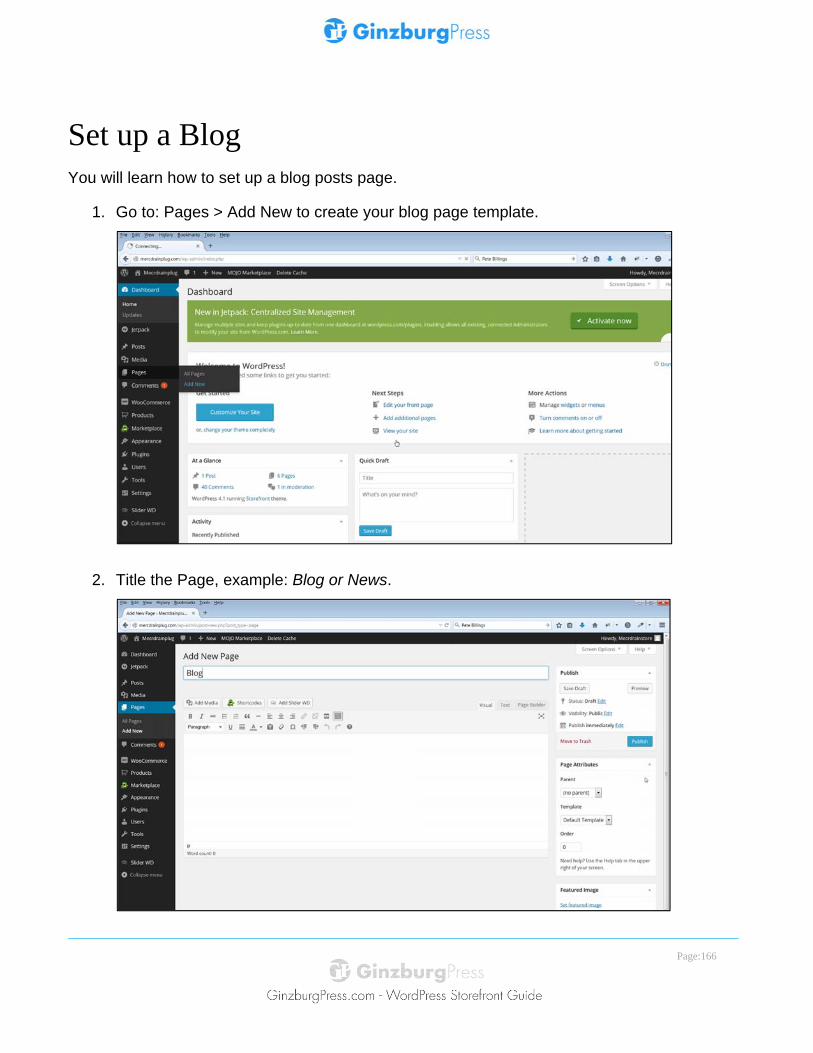
Set up a Blog You will learn how to set up a blog posts page.
1. Go to: Pages > Add New to create your blog page template.
2. Title the Page, example: Blog or News.
Page:167
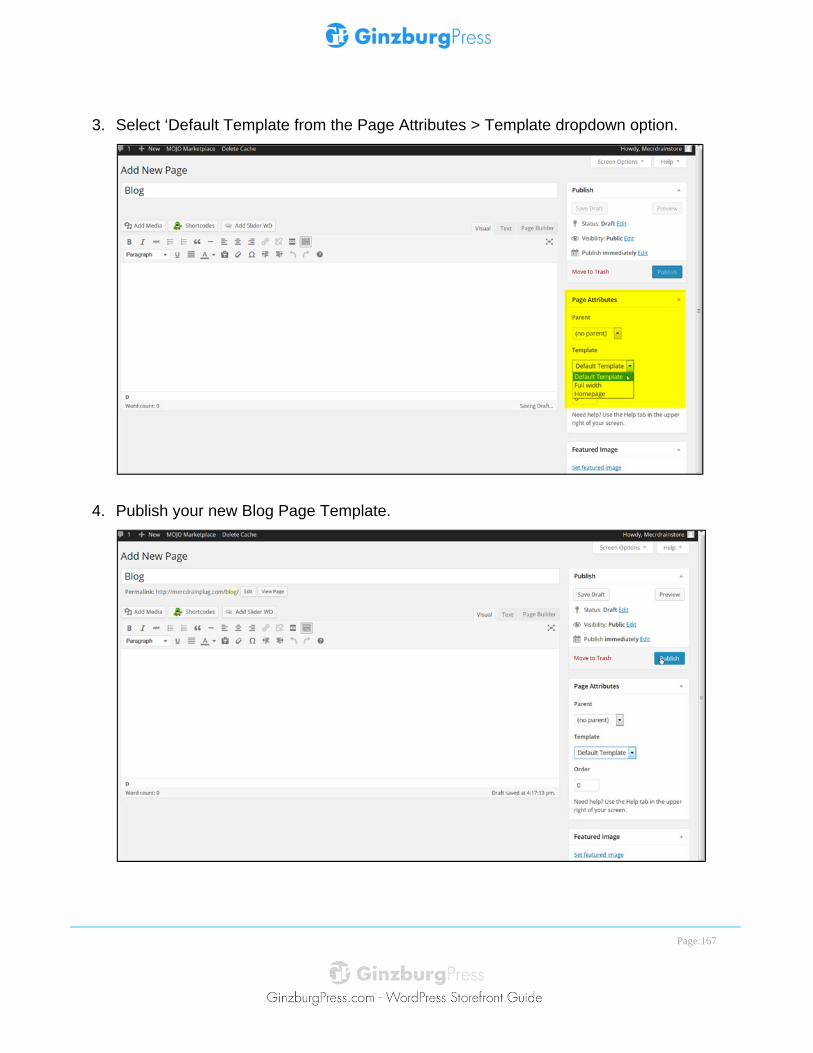
3. Select ‘Default Template from the Page Attributes > Template dropdown option.
4. Publish your new Blog Page Template.
Page:168
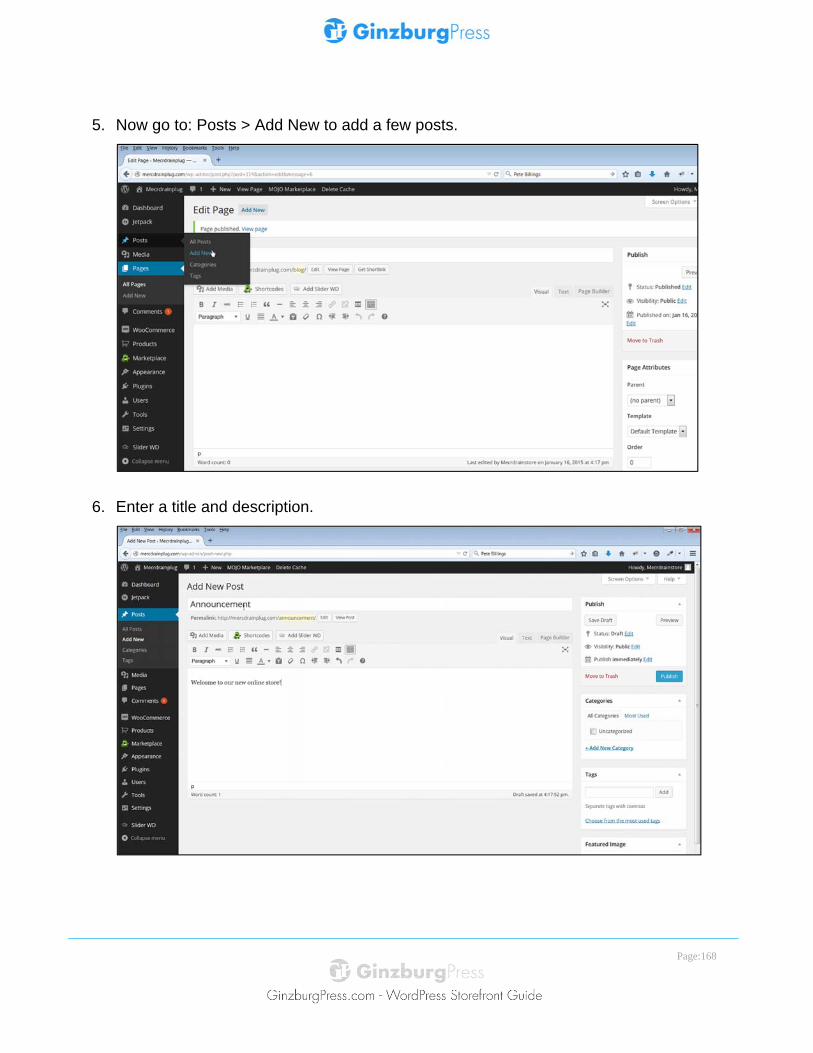
5. Now go to: Posts > Add New to add a few posts.
6. Enter a title and description.
Page:169
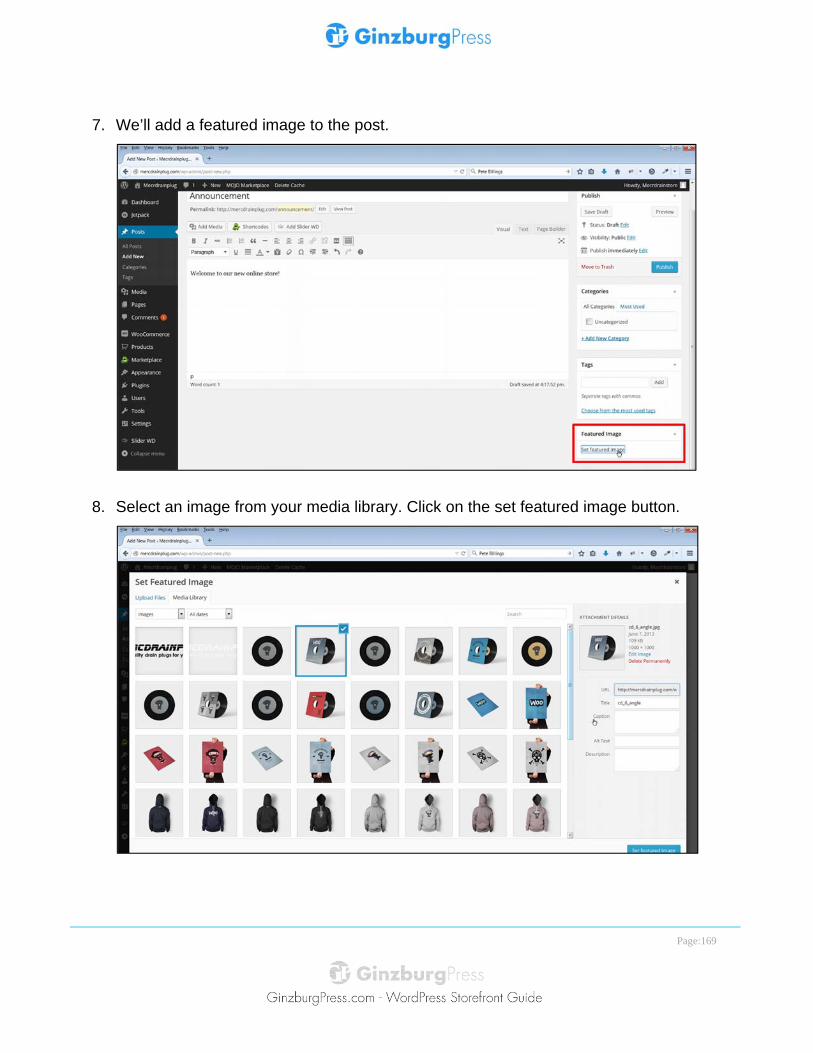
7. We’ll add a featured image to the post.
8. Select an image from your media library. Click on the set featured image button.
Page:170
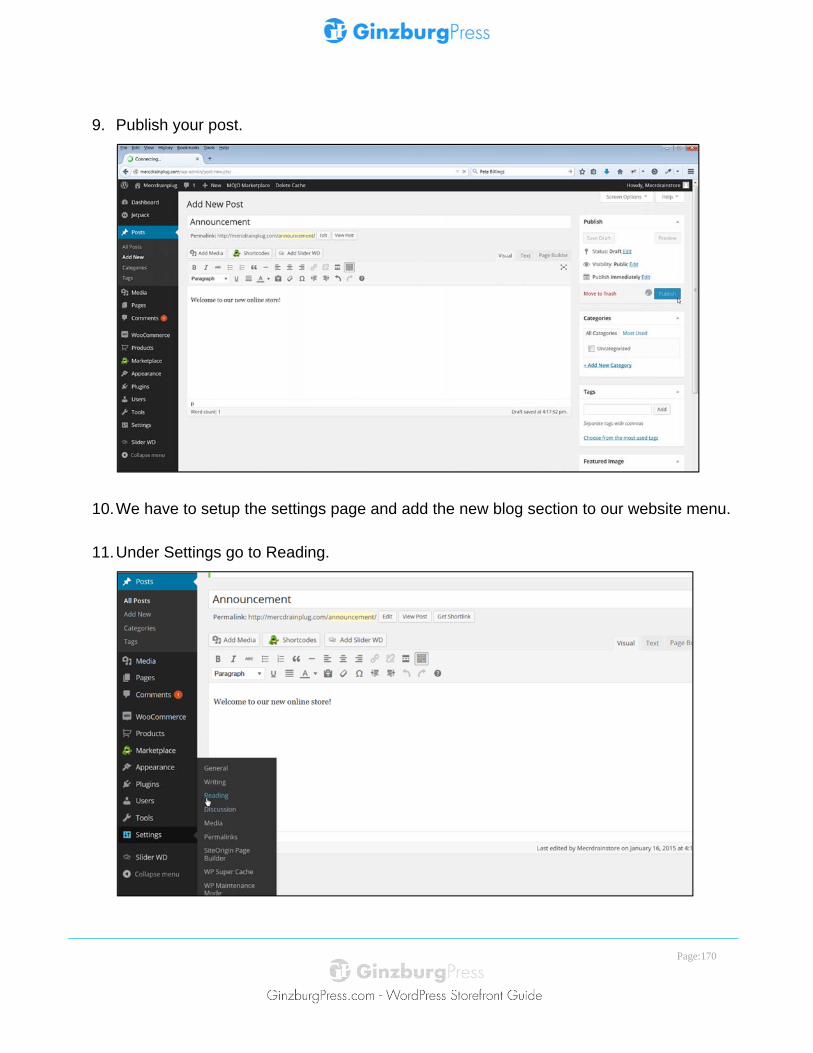
9. Publish your post.
10. We have to setup the settings page and add the new blog section to our website menu.
11. Under Settings go to Reading.
Page:171
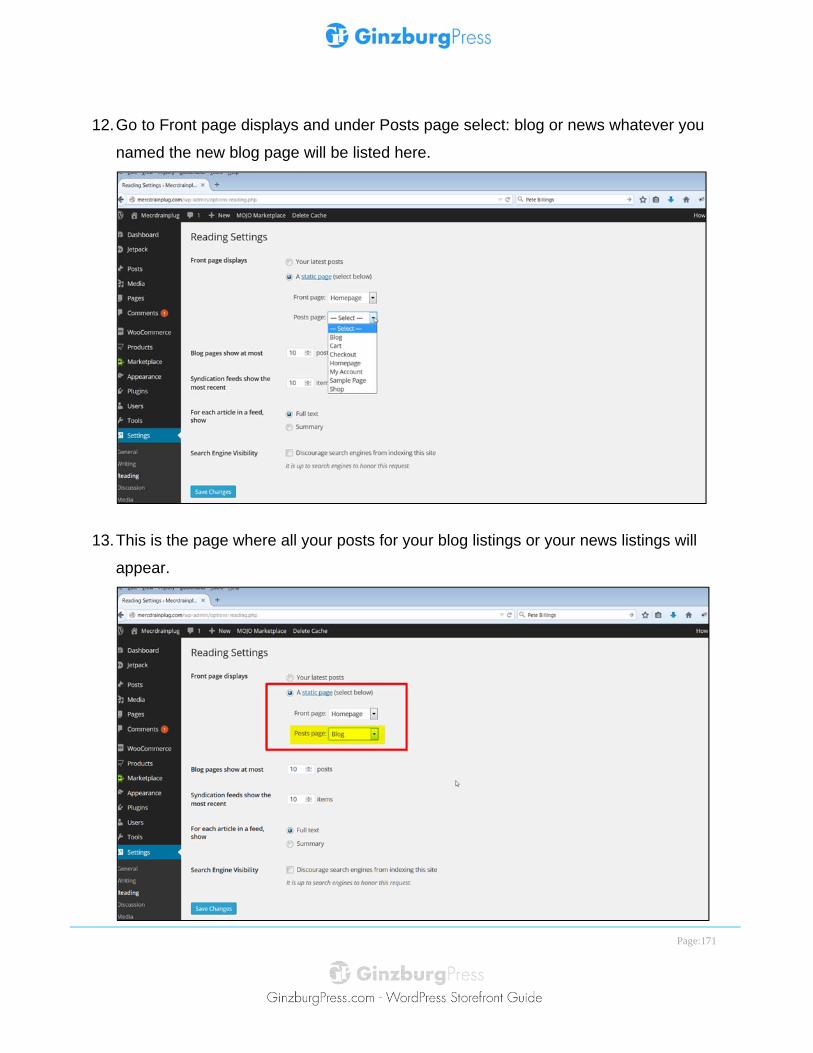
12. Go to Front page displays and under Posts page select: blog or news whatever you
named the new blog page will be listed here.
13. This is the page where all your posts for your blog listings or your news listings will
appear.
Page:172
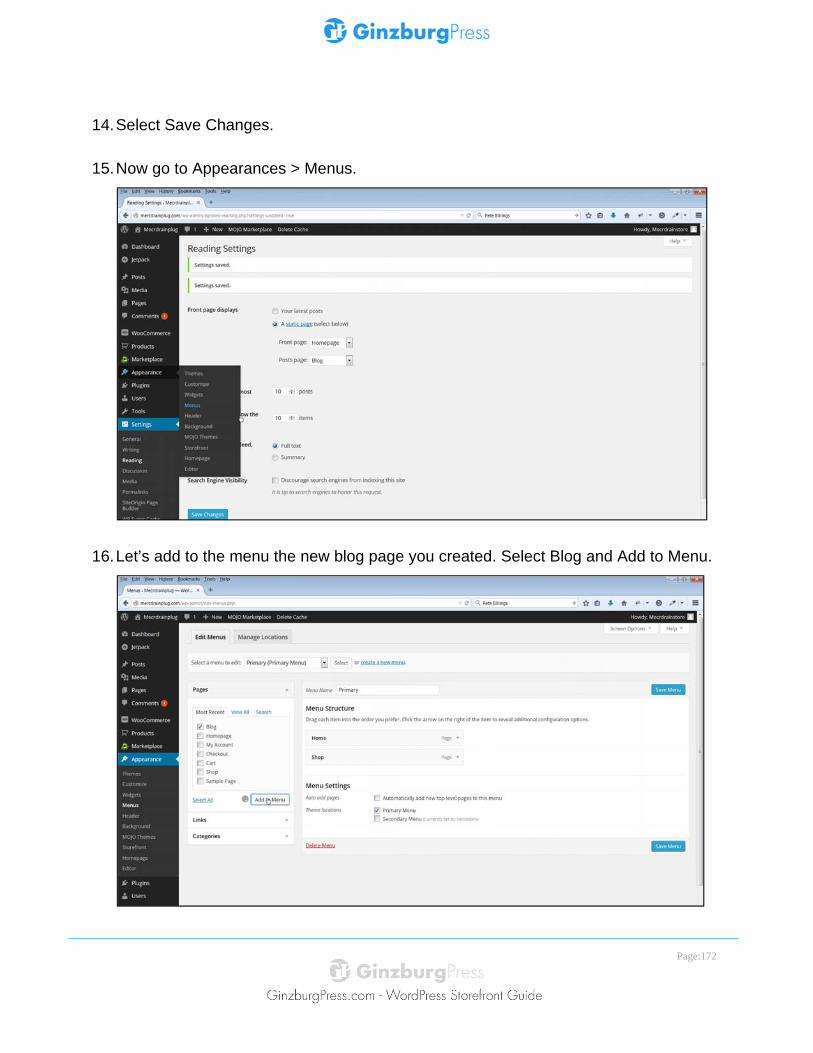
14. Select Save Changes.
15. Now go to Appearances > Menus.
16. Let’s add to the menu the new blog page you created. Select Blog and Add to Menu.

Page:173
17. You can rename the menu if you like.
18. Inside the navigation label, I’ll change mine to news and save it.
Page:174
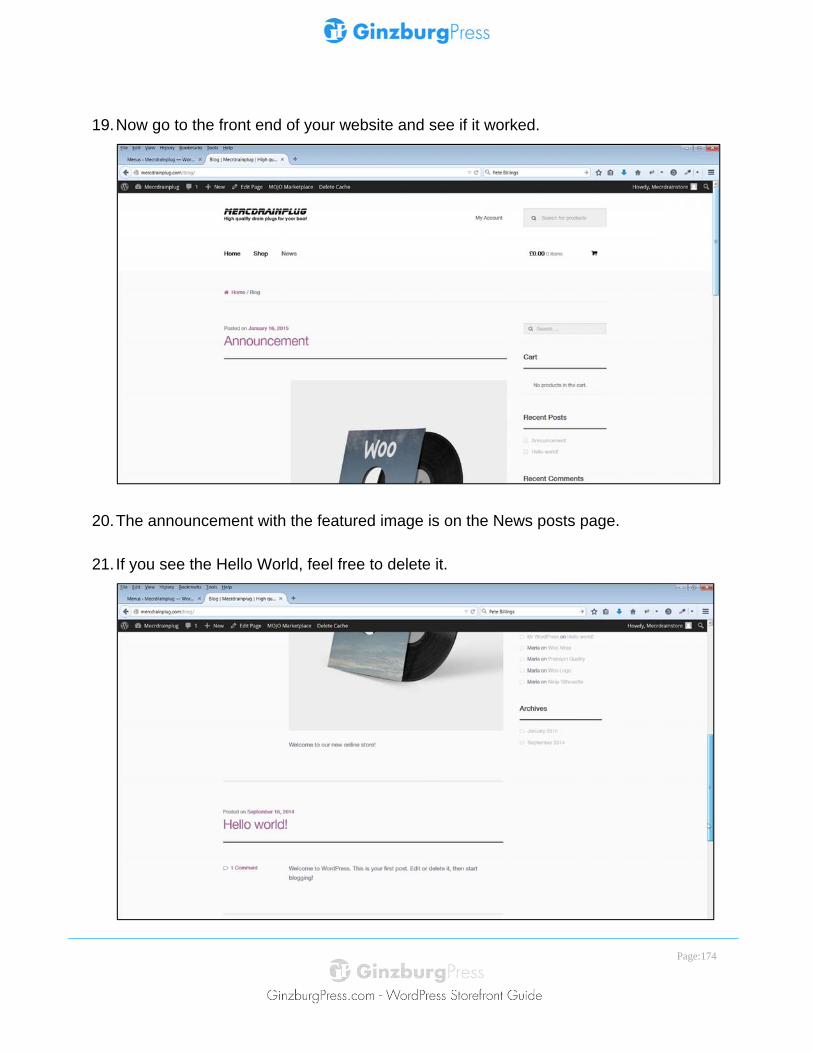
19. Now go to the front end of your website and see if it worked.
20. The announcement with the featured image is on the News posts page.
21. If you see the Hello World, feel free to delete it.
Page:175
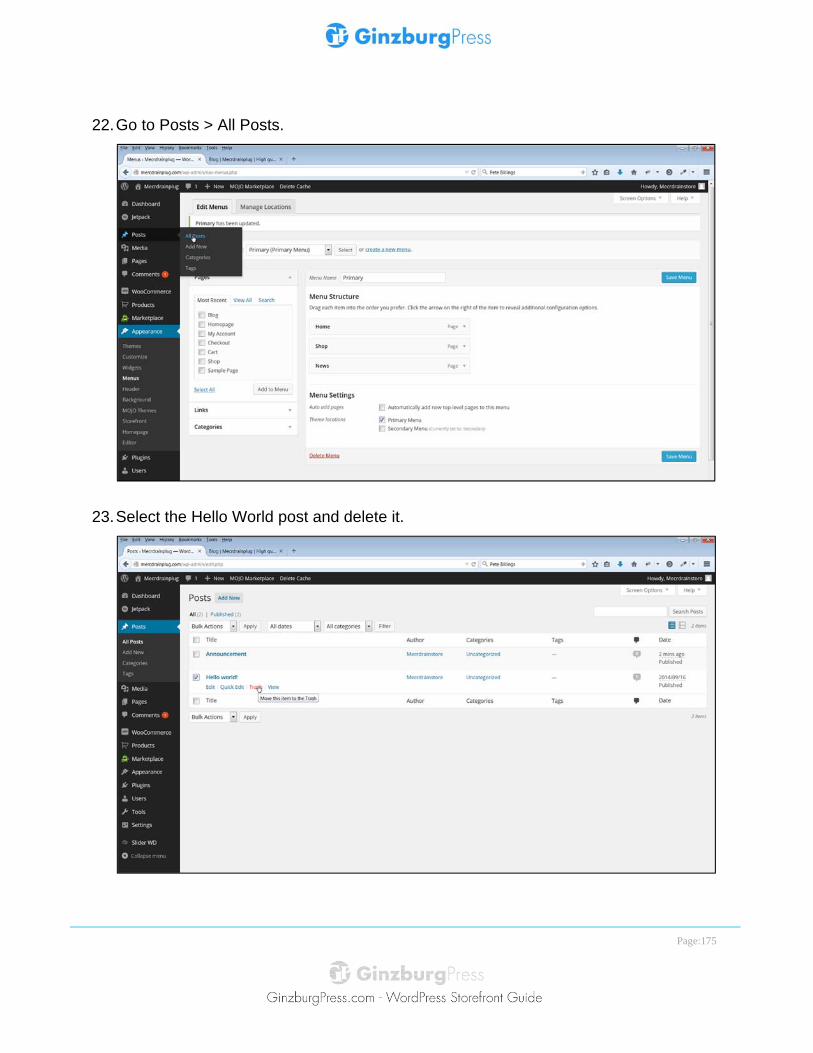
22. Go to Posts > All Posts.
23. Select the Hello World post and delete it.
Page:176
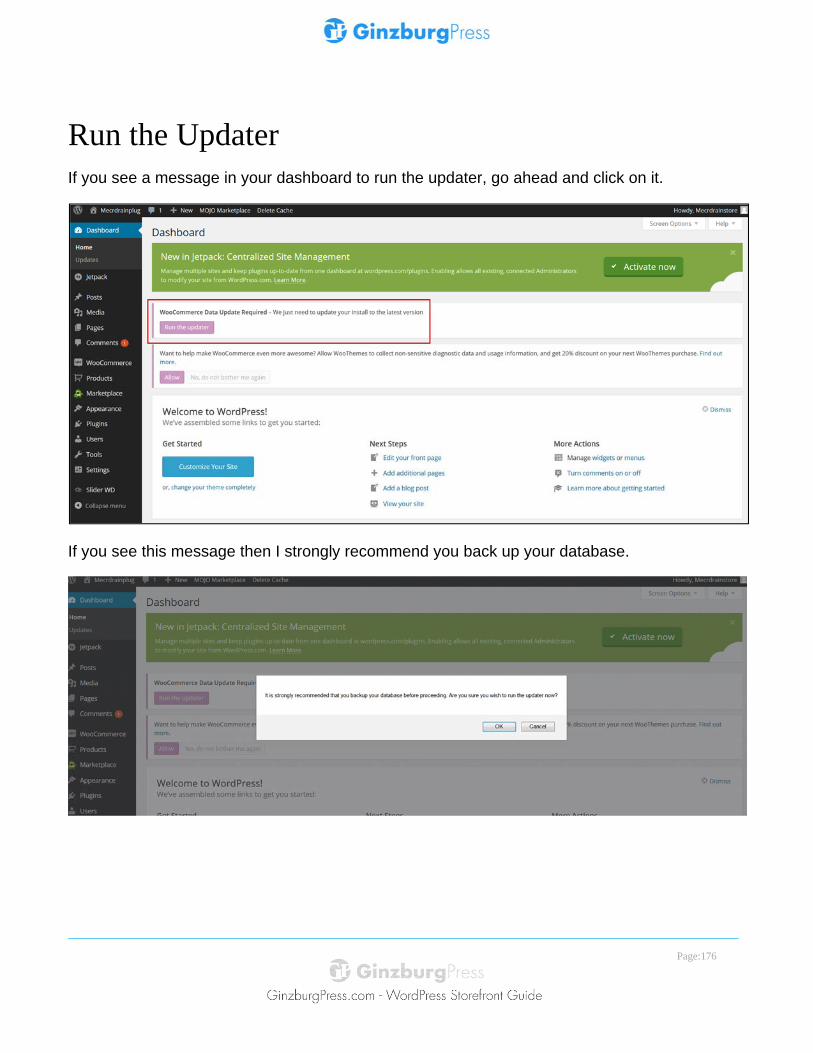
Run the Updater If you see a message in your dashboard to run the updater, go ahead and click on it.
If you see this message then I strongly recommend you back up your database.
Page:177
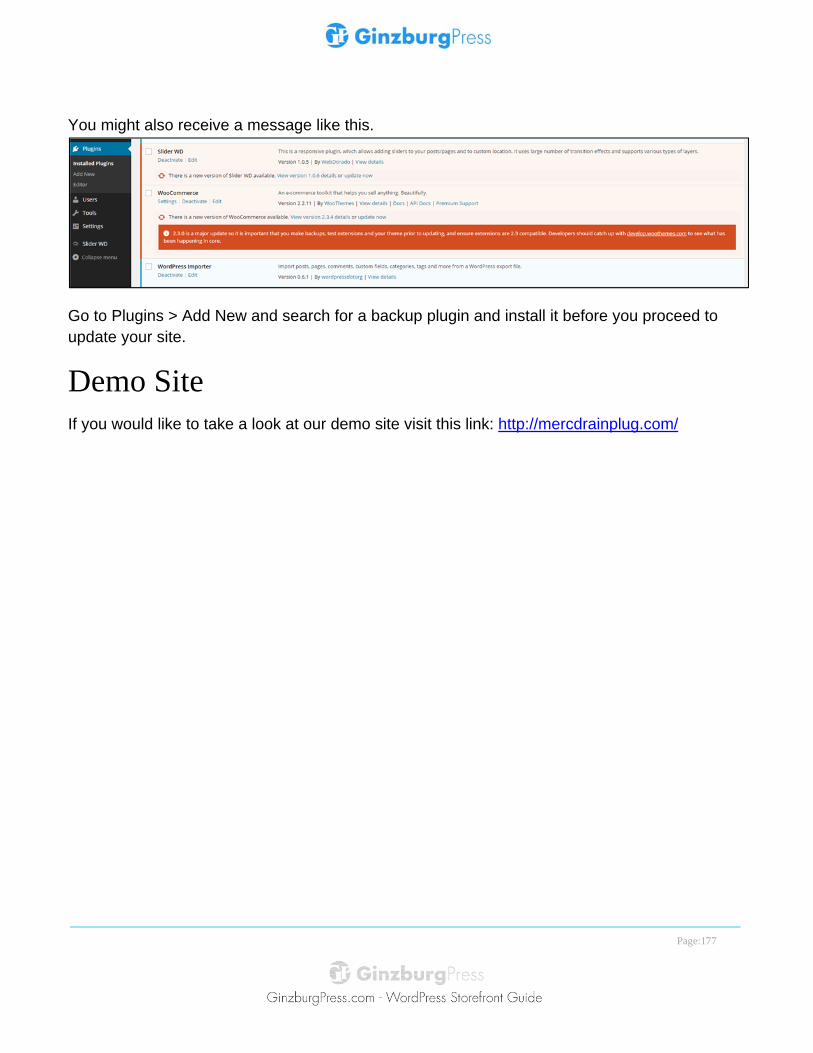
You might also receive a message like this.
Go to Plugins > Add New and search for a backup plugin and install it before you proceed to update your site.
Demo Site If you would like to take a look at our demo site visit this link: http://mercdrainplug.com/

Page:178
Conclusion to Section 5 and the Course Congratulations!
You did it!
You completed all the tasks to get your online store up and running.
Here’s what we covered in section 5.
You installed a page builder.
• You made layout changes to your pages with a page builder.
• You created a slider and a blog for your online store.
• Page builders make it easy to make responsive layouts.
There are a few available page builder plugins compatible with the Storefront theme.
I quickly reviewed the page builder plugin choices available such as:
• Site Origin,
• Visual Composer and,
• VelocityPage.
We did a quick review of the Site Origin Page Builder Plugin. Page Builder by Site Origin is one of the most popular page creation plugins for WordPress. According to the plugin author it makes it easy to create responsive column based content, using the widgets you know with a simple drag and drop page builder. This plugin is optional. You do not have to install a page builder plugin if you don’t want to use one.
It may not be necessary to make major design edits to the Storefront site but if you want a visual builder to help you make design and layout changes then one of these plugins will help you do just that.
I demonstrated how to install a responsive slider.
Page:179
• You learned how to make CSS edits with the aid of your browser using one of the free
tools such as Chrome’s Inspect Element.
• You can install an add-on called Firebug for the Firefox browser.
• I customized the header with a call to action bar.
I also demonstrated how to change the background color for the header.
I also set up a blog posts page. Remember, if you want to have a page to display your blog posts too, you will have to create another page (you can leave the content blank) and set that as the Posts Page in the same settings section.
Thank you for joining my course.
Any comments or feedback to my course is greatly appreciated.
Page:180
eCommerce Resources & Links • 10 Tips For Running a Successful WooCommerce Site:
o http://business.tutsplus.com/tutorials/10-tips-for-running-a-successful-
woocommerce-site--cms-21453
• An Introduction To WooCommerce:
o http://code.tutsplus.com/series/an-introduction-to-woocommerce--cms-755
• A Look at WooCommerce Products Settings:
o http://code.tutsplus.com/articles/a-look-at-woocommerce-products-settings--cms-
22038
• A Look at More WooCommerce Product Settings:
o http://code.tutsplus.com/articles/a-look-at-more-woocommerce-product-settings--
cms-22067
• The Beginners Guide to WooCommerce Taxes
o http://code.tutsplus.com/articles/the-beginners-guide-to-woocommerce-taxes--
cms-22060
• Getting Started with WooCommerce:
o http://code.tutsplus.com/series/getting-started-with-woocommerce--cms-685
• WooCommerce: General and Product Settings:
o http://code.tutsplus.com/tutorials/woocommerce-general-and-product-settings--
cms-21472
Page:181
• WooCommerce: Checkout, Shipping and Accounts Settings:
o http://code.tutsplus.com/tutorials/woocommerce-checkout-shipping-and-accounts-
settings--cms-21496
• WooCommerce: Adding Physical Products to Your Store:
o http://code.tutsplus.com/tutorials/woocommerce-adding-physical-products-to-your-
store--cms-21516
• Configuring Product Settings in WooCommerce:
o http://code.tutsplus.com/tutorials/configuring-product-settings-in-woocommerce--
cms-21529
• WooCommerce: Adding Virtual Products to Your Store
o http://code.tutsplus.com/tutorials/woocommerce-adding-virtual-products-to-your-
store--cms-21517
• Why you need to start using a staging environment:
o http://torquemag.io/need-start-using-staging-environment/
• The Ultimate, Epic Guide to Create a Successful Online Business in 2015
o http://ecommerce-platforms.com/ecommerce-selling-advice/ultimate-epic-guide-
successful-online-shop
• SEO for Ecommerce: A Comprehensive Guide
o http://www.slideshare.net/audette/seo-for-ecommerce-a-comprehensive-guide/
• How to update your theme
o http://docs.woothemes.com/document/how-to-update-your-theme/

Page:182
• Child Theme
o http://codex.wordpress.org/Child_Themes
• How to Create a WordPress Child Theme
o http://premium.wpmudev.org/blog/how-to-create-wordpress-child-theme/
• Infographic: The ultimate guide to creating a successful online business
o http://www.webdesignerdepot.com/2015/02/infographic-the-ultimate-guide-to-
creating-a-successful-online-business/
![StoreFront 3 - Citrix Docs · If the Citrix SCOM Management Pack Agent service is installed on the StoreFront server, StoreFront cannot upgrade. [#DNA-34792] On upgrade, StoreFront](https://img.pdfslide.us/doc/110x75/60ea15540160bf6e9274e47a/storefront-3-citrix-docs-if-the-citrix-scom-management-pack-agent-service-is-installed.jpg)