Embed Size (px)
Citation preview
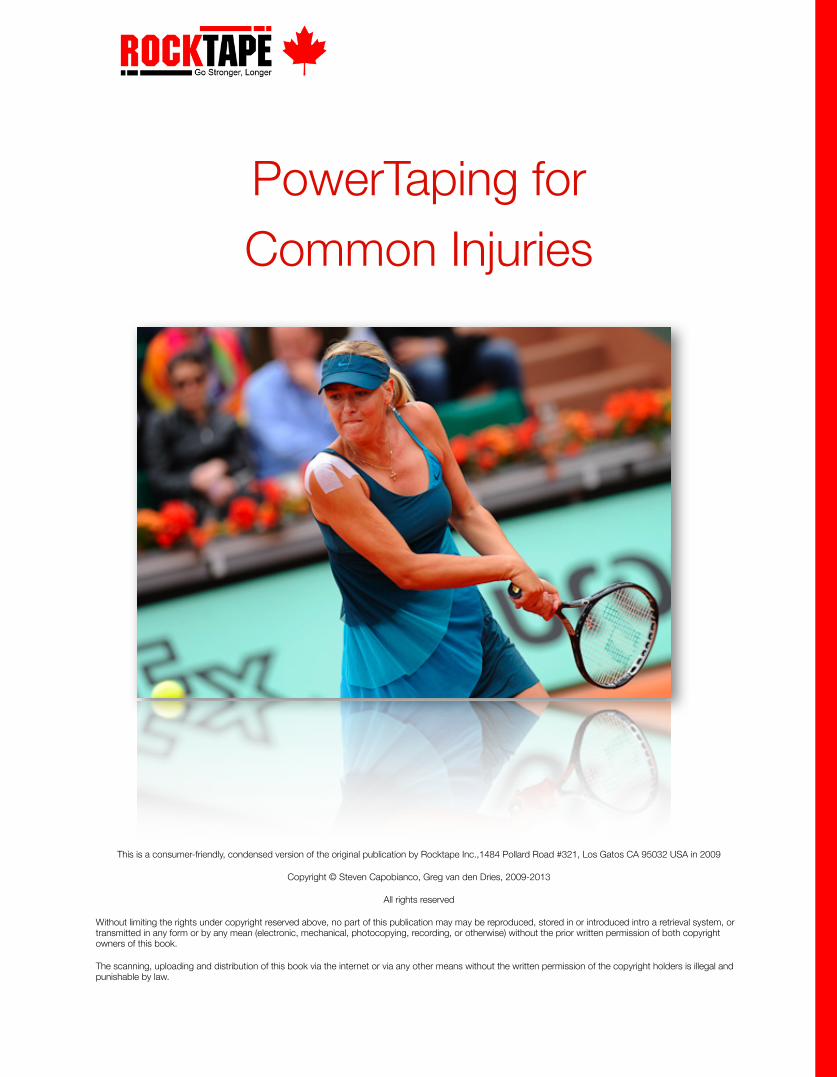
PowerTaping for Common Injuries
This is a consumer-friendly, condensed version of the original publication by Rocktape Inc.,1484 Pollard Road #321, Los Gatos CA 95032 USA in 2009
Copyright © Steven Capobianco, Greg van den Dries, 2009-2013
All rights reserved
Without limiting the rights under copyright reserved above, no part of this publication may may be reproduced, stored in or introduced intro a retrieval system, or transmitted in any form or by any mean (electronic, mechanical, photocopying, recording, or otherwise) without the prior written permission of both copyright owners of this book.
The scanning, uploading and distribution of this book via the internet or via any other means without the written permission of the copyright holders is illegal and punishable by law.
Table of Contents
Introduction 3Taping movements, not muscles 3
Taping methods: a quick comparison 4Rocktape 5Communicating about PowerTaping 7
PowerTaping Advantage Explained 8
Getting Started 11Basic Preparation 11Application of Tape 11Removal of Tape 12
Using RockTape 13When to use RockTape: 13When NOT to use RockTape: 13
PowerTaping for Rehabilitation 14Rehab Specific Taping - Introduction 15Decompression in Action 17
Plantar Fasciitis 18Ankle Sprain 19Achilles Tendon 20Shin Splints (Tibial Stress Syndrome) 21Knee Pain 22Thigh strain 23General Low Back Pain/Fatigue 24Specific Lower Back Pain 25Neck Pain 26Elbow Pain 27Shoulder Pain 28
PowerTaping for Athletic Performance 29
Introduction
Taping movements, not musclesWelcome to the revolution!
Strong words, we know, but the ideas in this ebook will certainly change the thinking of many. For over 500 years, anatomy has been classically taught on the “isolated muscle” theory, focusing on individual muscle structure and function. Therapists of all disciplines typically learn the action of muscles in a isolated environment, with very little regard for movement as a whole. As a result, many sports and rehabilitation taping protocols are based on outdated concepts.
PowerTaping is based on the obvious yet largely overlooked concept that muscles act in a chain.
Rocktape’s Open Source ConceptWhat is open source? Wikipedia defines the concept this way:
So what does this have to do with tape and movement? At Rocktape, we believe that knowledge and information are to be shared. We also believe that others have as much to share as we do. We believe, that together we can create something that is important, useful and most importantly, pragmatic. At Rocktape, we embrace this philosophy of doing well, by doing good.
In this ebook you will see an openness to share. We’ve invited friends and colleagues to contribute their experiences, ideas and concepts and they have obliged us with some great content. We applaud their willingness to share and be thought-leaders in their respective disciplines.
Our goal is to provide athletes, not just a new technique, but a new model, for the exploration and discussion of movement-based taping, and to create a community that can explore and contribute to this concept and advance the protocol with more knowledge and testing.
For a new methodology to grow and become mainstream, we need to collectively band together and formulate new, better, and more efficient means of taping that are clinically viable.
In short, viva la revolution!
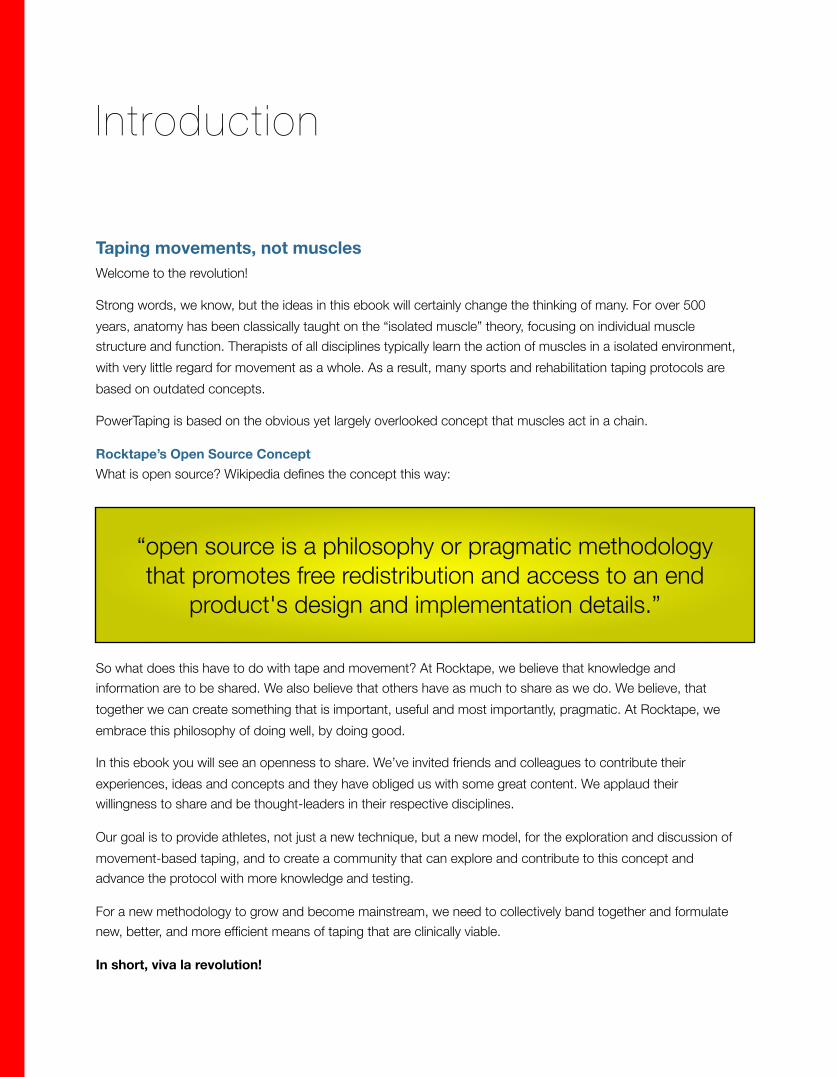
“open source is a philosophy or pragmatic methodology that promotes free redistribution and access to an end
product's design and implementation details.”
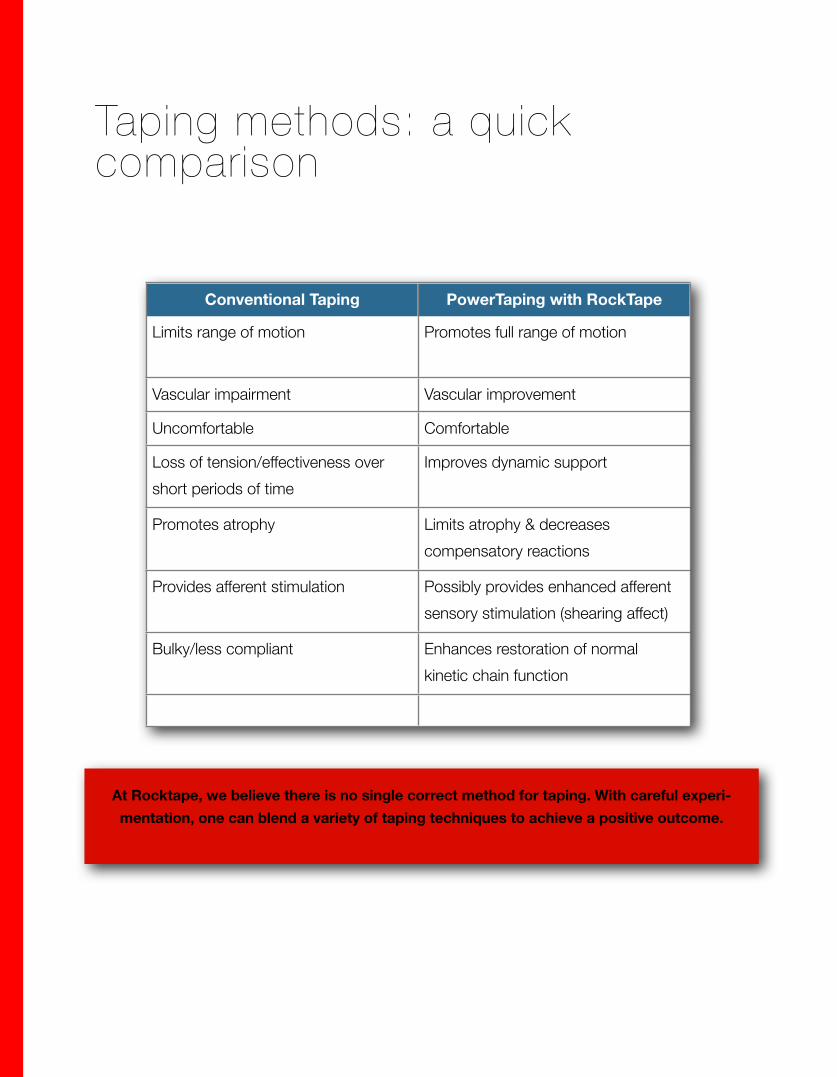
Taping methods: a quick comparison
Conventional Taping PowerTaping with RockTape
Limits range of motion Promotes full range of motion
Vascular impairment Vascular improvement
Uncomfortable Comfortable
Loss of tension/effectiveness over short periods of time
Improves dynamic support
Promotes atrophy Limits atrophy & decreases compensatory reactions
Provides afferent stimulation Possibly provides enhanced afferent sensory stimulation (shearing affect)
Bulky/less compliant Enhances restoration of normal kinetic chain function
At Rocktape, we believe there is no single correct method for taping. With careful experi-mentation, one can blend a variety of taping techniques to achieve a positive outcome.
Rocktape
Rocktape is an American-developed, Korean-made product consisting of flexible cotton and nylon fibers and acrylic adhesive that provides the support, stimulation, and resiliency necessary for rehabilitation, injury prevention, postural support and performance enhancement.
Rocktape features:
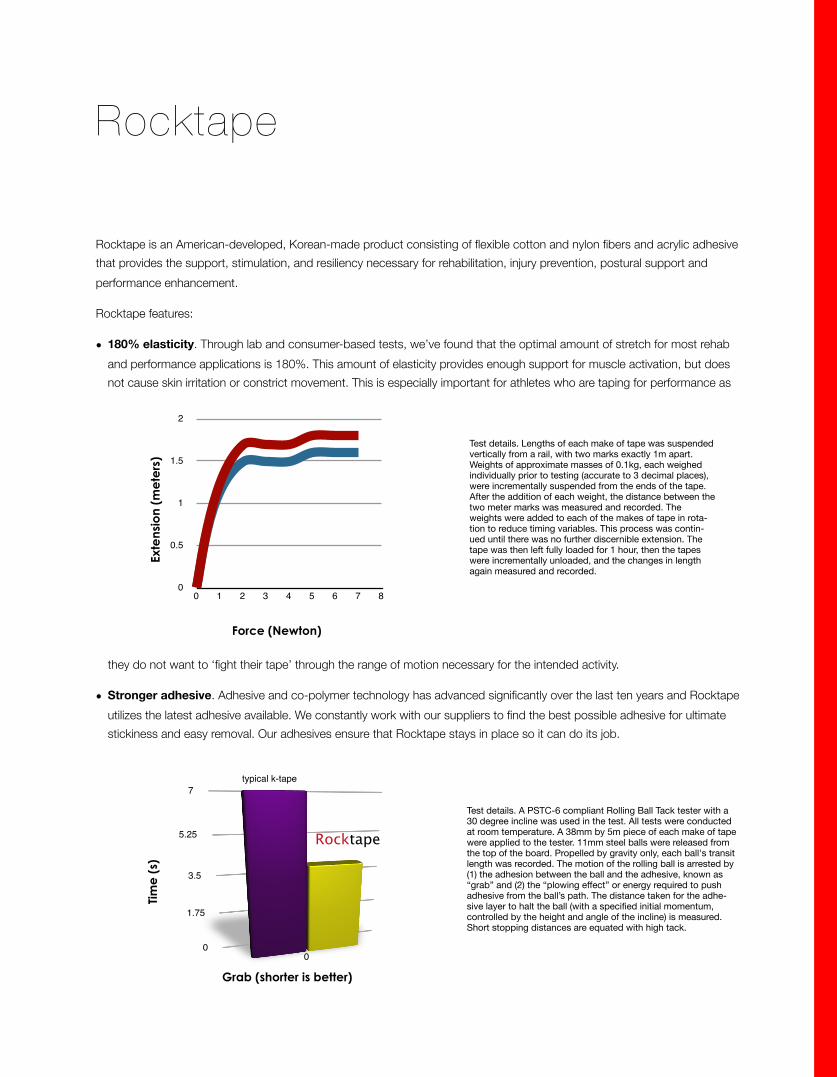
• 180% elasticity. Through lab and consumer-based tests, we’ve found that the optimal amount of stretch for most rehab and performance applications is 180%. This amount of elasticity provides enough support for muscle activation, but does not cause skin irritation or constrict movement. This is especially important for athletes who are taping for performance as
they do not want to ‘fight their tape’ through the range of motion necessary for the intended activity.
• Stronger adhesive. Adhesive and co-polymer technology has advanced significantly over the last ten years and Rocktape utilizes the latest adhesive available. We constantly work with our suppliers to find the best possible adhesive for ultimate stickiness and easy removal. Our adhesives ensure that Rocktape stays in place so it can do its job.
0
0.5
1
1.5
2
0 1 2 3 4 5 6 7 8
Force (Newton)
Exte
nsio
n (m
ete
rs)
Test details. Lengths of each make of tape was suspended vertically from a rail, with two marks exactly 1m apart. Weights of approximate masses of 0.1kg, each weighed individually prior to testing (accurate to 3 decimal places), were incrementally suspended from the ends of the tape. After the addition of each weight, the distance between the two meter marks was measured and recorded. The weights were added to each of the makes of tape in rota-tion to reduce timing variables. This process was contin-ued until there was no further discernible extension. The tape was then left fully loaded for 1 hour, then the tapes were incrementally unloaded, and the changes in length again measured and recorded.
Rocktape
typical k-tape
0
1.75
3.5
5.25
7
0
Grab (shorter is better)
Tim
e (
s)
Test details. A PSTC-6 compliant Rolling Ball Tack tester with a 30 degree incline was used in the test. All tests were conducted at room temperature. A 38mm by 5m piece of each make of tape were applied to the tester. 11mm steel balls were released from the top of the board. Propelled by gravity only, each ball's transit length was recorded. The motion of the rolling ball is arrested by (1) the adhesion between the ball and the adhesive, known as “grab” and (2) the “plowing effect” or energy required to push adhesive from the ball’s path. The distance taken for the adhe-sive layer to halt the ball (with a specified initial momentum, controlled by the height and angle of the incline) is measured. Short stopping distances are equated with high tack.
• Tighter weave which provides a higher tensile strength than other kinesiology tapes. Rocktape has what many consider the most comfortable feel. To create a comfortable, effective tape requires a careful balance of stretch, breathability, moisture management and adhesiveness. We also use a more expensive nylon which fatigues less. This allows us to create a superior tape that is more comfortable and will last for many days.
These characteristics have made Rocktape the product of choice for athletes who participate in endurance sports. Rocktape comes in a variety of colors and designs, widths and lengths, including:
• 2” wide Standard Rocktape - a flexible option for all taping methods
• 4” wide “Big Daddy” Rocktape - especially useful for lumbar support, groin, ribs, hamstring, thigh, shoulder edema and postural control. See the ends of both the Lower Extremities and Upper Extremities sections of this manual for specific taping methods that utilize 4” wide Rocktape.

Explaining PowerTaping
The key to communicating the PowerTaping Technique is a discussion about the relationship between movement and the resulting sports performance. It is also important to note that the PowerTaping Technique improves nerve-muscle efficiency via increased blood flow and skin stimulation, and maximizes mechanical advantage via the “snap back” phenomenon. These concepts resonate well with athletes looking for that extra edge over their opponents.
The classic question will arise: “How can a piece of tape on my skin affect my performance?”
To be honest, we have all asked the same question prior learning about functional taping protocols. The most important point is the effectiveness of the tape on the body’s largest sensing organ, the skin. It has a system of receptors that communicate with the brain about the body’s position. If we can tap into that system and heighten the awareness of our body in space, we can enhance performance. In addition, the fluid control dynamics of the tape allow for quicker recovery and limited muscle fatigue due to inflammation control.
The "Kinetic Chain" concept states that the body works by synergistically activating the muscles and joints as a unit via the nervous system. No joint or body part works in isolation. The Kinetic Chain is characterized by deceleration at one joint and acceleration at the next joint in the chain. The brain is organized in such a way as to optimize the selection of muscle synergies and not for the selection of a single muscle. Taping movements rather than individual muscles integrates and improves the function of the kinetic chain, and in doing so improves athletic performance.
- Greg van den Dries, Rocktape President and CEO
How can a piece of tape affect my performance?
PowerTaping Advantage Explained It is often said that a race is won or lost before the athlete gets to the starting line. If that is true, then training is the most critical component in the athlete’s preparation for competition.
With that said, there are no silver bullets or short cuts in life. No hologram, unicorn dust, or magic beans will ever replace the real work that needs to be done by the athlete to improve performance.
Our training methods have evolved significantly from the early days of sports science. Over the years, we’ve learned the importance of nutrition, periodization, form and technique. As our technological understanding expands, we’re continually adding to our knowledge of how the human body adapts itself to movement and competition. We now know more about the importance of movement, form and technique than we have ever known, primarily through the use of hi-speed and hi-resolution digital imaging.
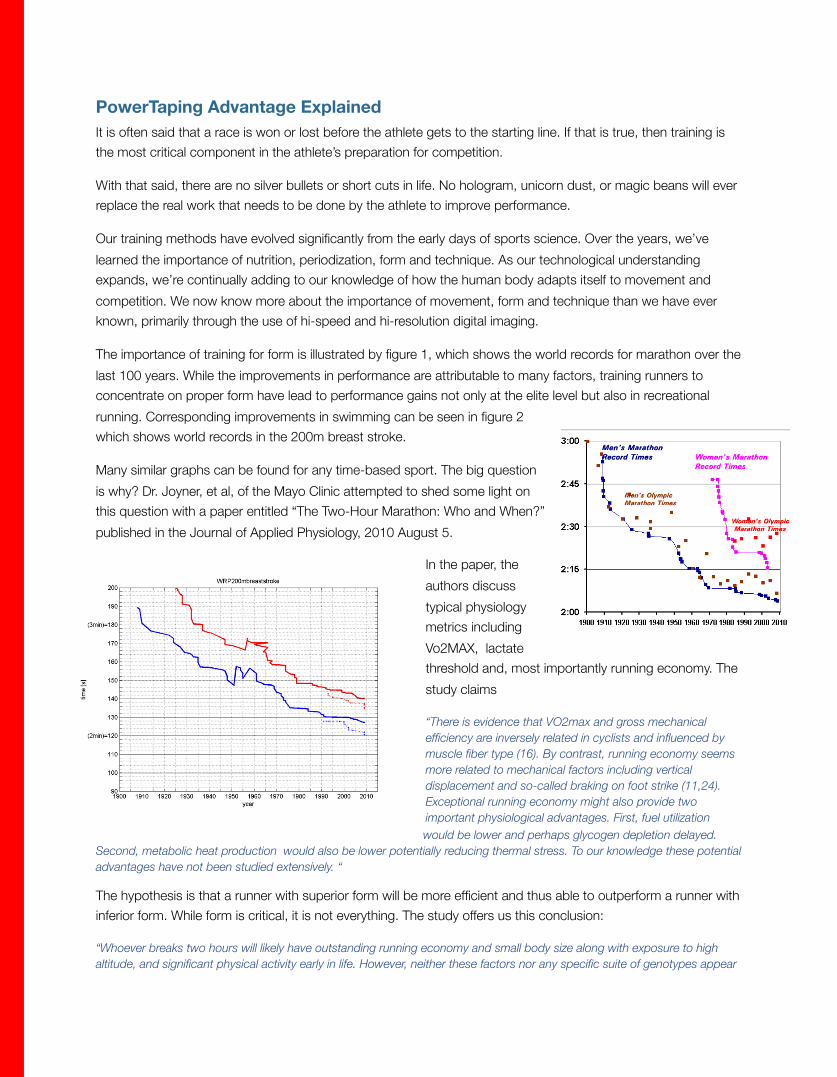
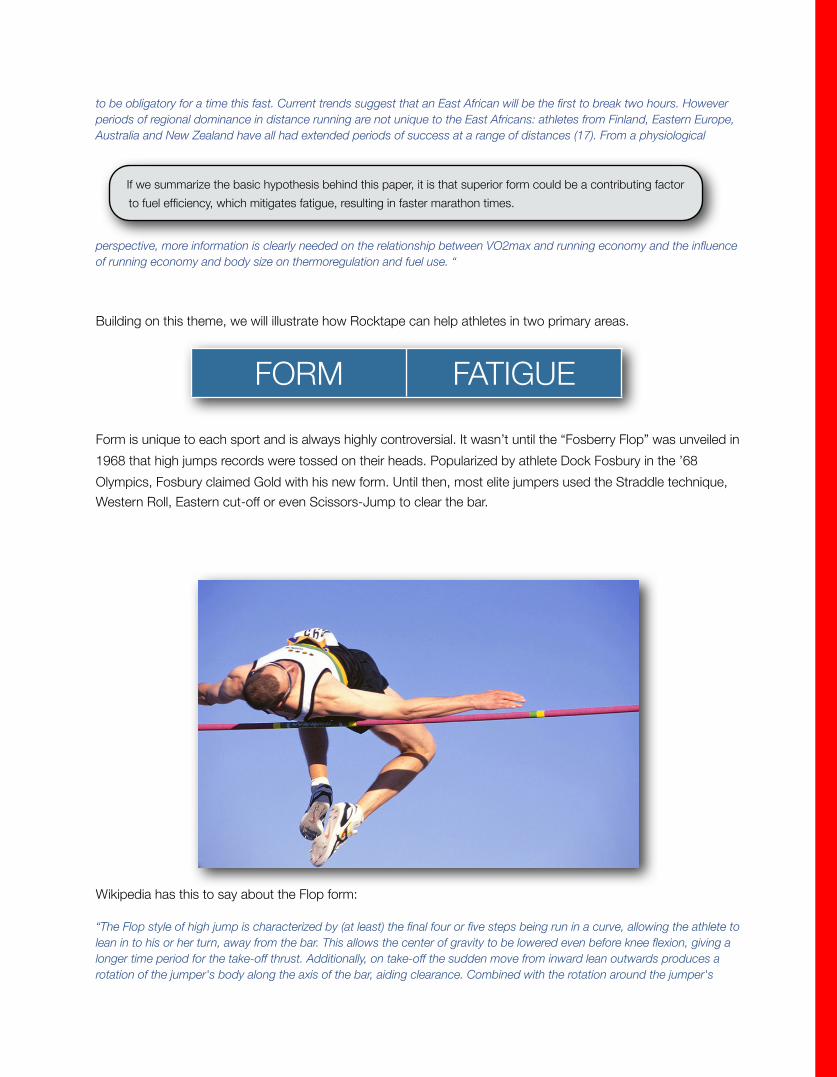
The importance of training for form is illustrated by figure 1, which shows the world records for marathon over the last 100 years. While the improvements in performance are attributable to many factors, training runners to concentrate on proper form have lead to performance gains not only at the elite level but also in recreational running. Corresponding improvements in swimming can be seen in figure 2 which shows world records in the 200m breast stroke.
Many similar graphs can be found for any time-based sport. The big question is why? Dr. Joyner, et al, of the Mayo Clinic attempted to shed some light on this question with a paper entitled “The Two-Hour Marathon: Who and When?” published in the Journal of Applied Physiology, 2010 August 5.
In the paper, the authors discuss typical physiology metrics including Vo2MAX, lactate threshold and, most importantly running economy. The study claims
“There is evidence that VO2max and gross mechanical efficiency are inversely related in cyclists and influenced by muscle fiber type (16). By contrast, running economy seems more related to mechanical factors including vertical displacement and so-called braking on foot strike (11,24). Exceptional running economy might also provide two important physiological advantages. First, fuel utilization would be lower and perhaps glycogen depletion delayed.
Second, metabolic heat production would also be lower potentially reducing thermal stress. To our knowledge these potential advantages have not been studied extensively. “
The hypothesis is that a runner with superior form will be more efficient and thus able to outperform a runner with inferior form. While form is critical, it is not everything. The study offers us this conclusion:
“Whoever breaks two hours will likely have outstanding running economy and small body size along with exposure to high altitude, and significant physical activity early in life. However, neither these factors nor any specific suite of genotypes appear
to be obligatory for a time this fast. Current trends suggest that an East African will be the first to break two hours. However periods of regional dominance in distance running are not unique to the East Africans: athletes from Finland, Eastern Europe, Australia and New Zealand have all had extended periods of success at a range of distances (17). From a physiological
perspective, more information is clearly needed on the relationship between VO2max and running economy and the influence of running economy and body size on thermoregulation and fuel use. “
Building on this theme, we will illustrate how Rocktape can help athletes in two primary areas.
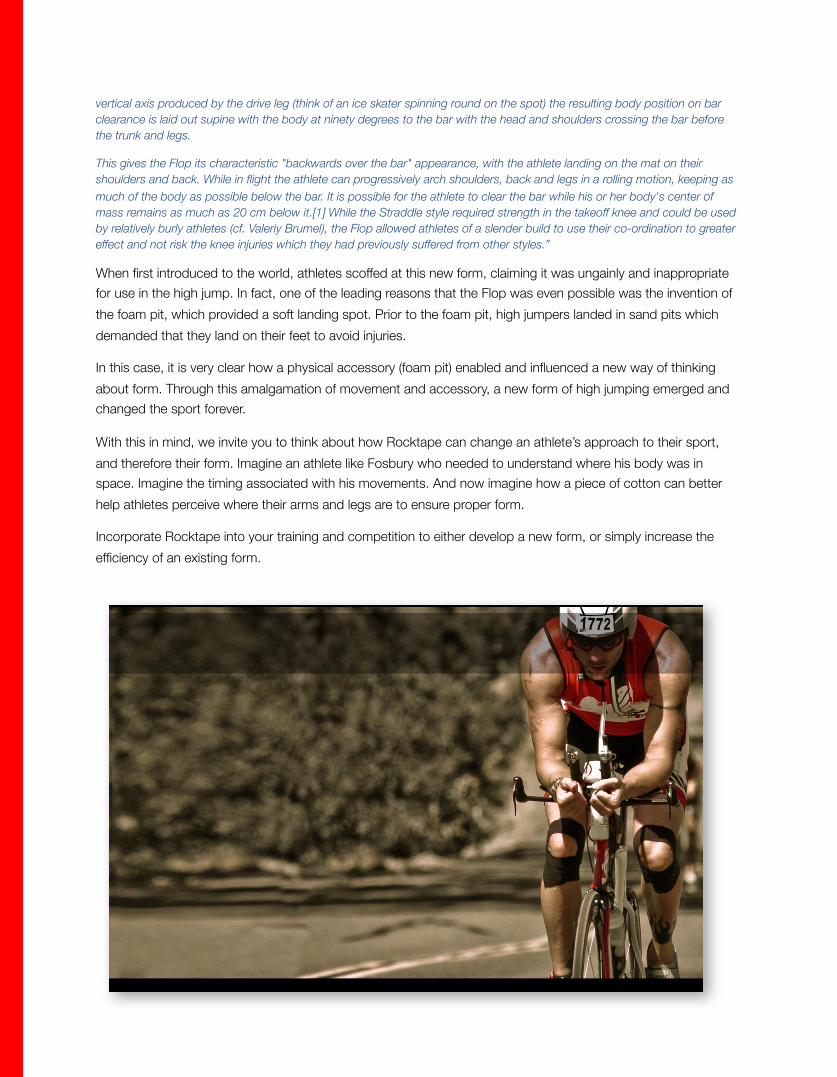
Form is unique to each sport and is always highly controversial. It wasn’t until the “Fosberry Flop” was unveiled in 1968 that high jumps records were tossed on their heads. Popularized by athlete Dock Fosbury in the ’68 Olympics, Fosbury claimed Gold with his new form. Until then, most elite jumpers used the Straddle technique, Western Roll, Eastern cut-off or even Scissors-Jump to clear the bar.
Wikipedia has this to say about the Flop form:
“The Flop style of high jump is characterized by (at least) the final four or five steps being run in a curve, allowing the athlete to lean in to his or her turn, away from the bar. This allows the center of gravity to be lowered even before knee flexion, giving a longer time period for the take-off thrust. Additionally, on take-off the sudden move from inward lean outwards produces a rotation of the jumper's body along the axis of the bar, aiding clearance. Combined with the rotation around the jumper's
If we summarize the basic hypothesis behind this paper, it is that superior form could be a contributing factor to fuel efficiency, which mitigates fatigue, resulting in faster marathon times.
FORM FATIGUE
vertical axis produced by the drive leg (think of an ice skater spinning round on the spot) the resulting body position on bar clearance is laid out supine with the body at ninety degrees to the bar with the head and shoulders crossing the bar before the trunk and legs.
This gives the Flop its characteristic "backwards over the bar" appearance, with the athlete landing on the mat on their shoulders and back. While in flight the athlete can progressively arch shoulders, back and legs in a rolling motion, keeping as much of the body as possible below the bar. It is possible for the athlete to clear the bar while his or her body's center of mass remains as much as 20 cm below it.[1] While the Straddle style required strength in the takeoff knee and could be used by relatively burly athletes (cf. Valeriy Brumel), the Flop allowed athletes of a slender build to use their co-ordination to greater effect and not risk the knee injuries which they had previously suffered from other styles.”
When first introduced to the world, athletes scoffed at this new form, claiming it was ungainly and inappropriate for use in the high jump. In fact, one of the leading reasons that the Flop was even possible was the invention of the foam pit, which provided a soft landing spot. Prior to the foam pit, high jumpers landed in sand pits which demanded that they land on their feet to avoid injuries.
In this case, it is very clear how a physical accessory (foam pit) enabled and influenced a new way of thinking about form. Through this amalgamation of movement and accessory, a new form of high jumping emerged and changed the sport forever.
With this in mind, we invite you to think about how Rocktape can change an athlete’s approach to their sport, and therefore their form. Imagine an athlete like Fosbury who needed to understand where his body was in space. Imagine the timing associated with his movements. And now imagine how a piece of cotton can better help athletes perceive where their arms and legs are to ensure proper form.
Incorporate Rocktape into your training and competition to either develop a new form, or simply increase the efficiency of an existing form.
Getting Started
Note that there are many instructional videos available at www.rocktape.com and www.rocktapecanada.com
Basic Preparation
Tissue Preparation• Skin must be clean and free from oils, lotions and moisture prior to application
• Shave or clip long hairs that might impede adherence of tape
• Patient/Athlete should be wearing clothing that allows unrestricted access to regions to be taped
Application of Tape• Measure tape for target tissue length
• Cut tape to appropriate length. Round edges to limit peeling.
• Tear off paper backing (1-2 inch) at one end of base
• Apply to skin of target tissue
• Place target tissue in a stretched position
Anchor end - rip tape backing 2-3” from end of tape and remove backing. Anchor end to skin and rub vigorously. Apply tape to area indicated.
u Start Here
Middle stretch - rip tape in middle, peel backing and pull evenly on each end of tape. When applying, never stretch ends of the tape, only stretch the mid-dle. Rub vigorously to set adhesive.
• Apply tape to the appropriate area with a “no stretch application” to “moderate tension (25% pull)”
• To avoid skin irritation, no tension should be applied on ends of tape
• Tape may be cut into sections to allow for proper contouring around joint lines/creases
• Rub tape vigorously, once applied to skin, to activate adhesive
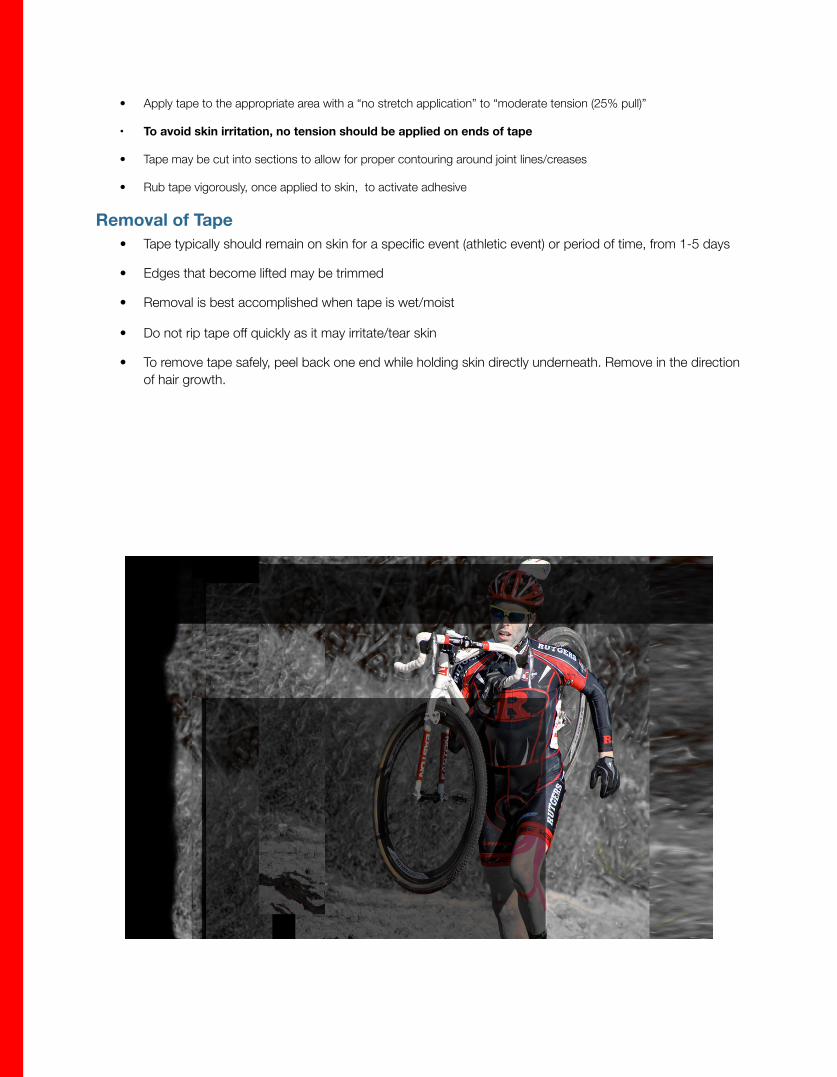
Removal of Tape• Tape typically should remain on skin for a specific event (athletic event) or period of time, from 1-5 days
• Edges that become lifted may be trimmed
• Removal is best accomplished when tape is wet/moist
• Do not rip tape off quickly as it may irritate/tear skin
• To remove tape safely, peel back one end while holding skin directly underneath. Remove in the direction of hair growth.
Using RockTape
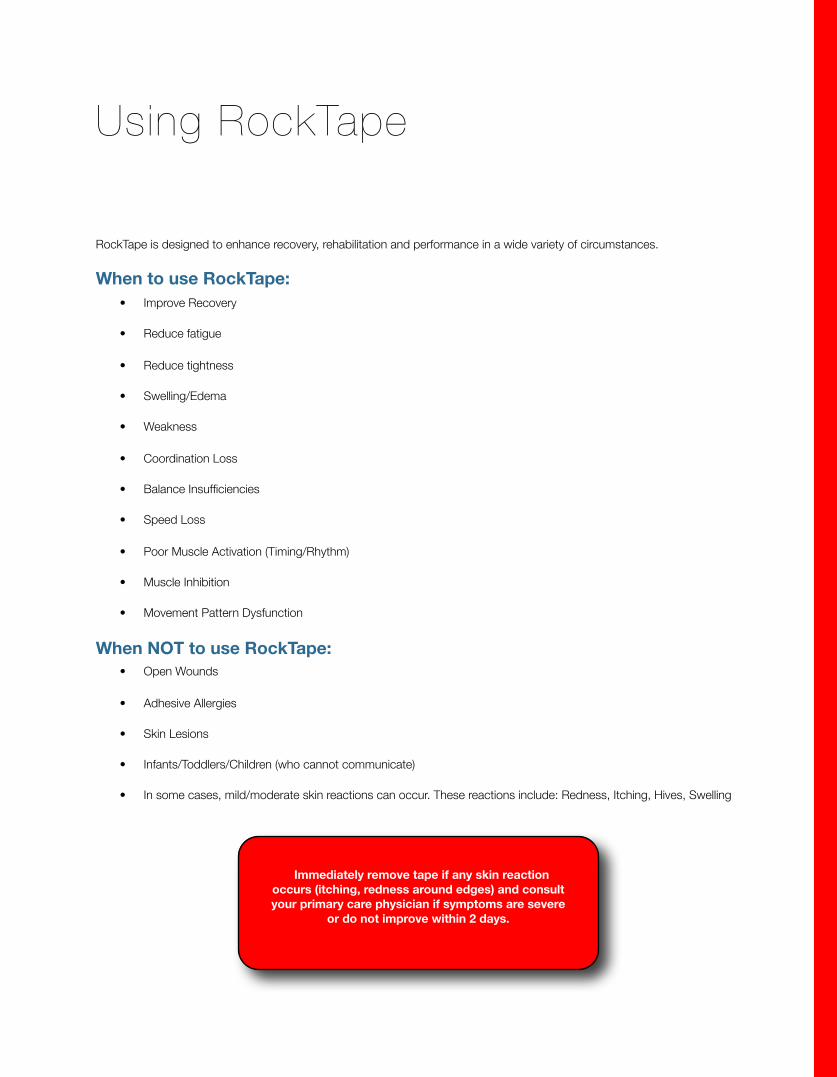
RockTape is designed to enhance recovery, rehabilitation and performance in a wide variety of circumstances.
When to use RockTape: • Improve Recovery
• Reduce fatigue
• Reduce tightness
• Swelling/Edema
• Weakness
• Coordination Loss
• Balance Insufficiencies
• Speed Loss
• Poor Muscle Activation (Timing/Rhythm)
• Muscle Inhibition
• Movement Pattern Dysfunction
When NOT to use RockTape:• Open Wounds
• Adhesive Allergies
• Skin Lesions
• Infants/Toddlers/Children (who cannot communicate)
• In some cases, mild/moderate skin reactions can occur. These reactions include: Redness, Itching, Hives, Swelling
Immediately remove tape if any skin reaction occurs (itching, redness around edges) and consult your primary care physician if symptoms are severe
or do not improve within 2 days.
PowerTaping for Rehabil itation
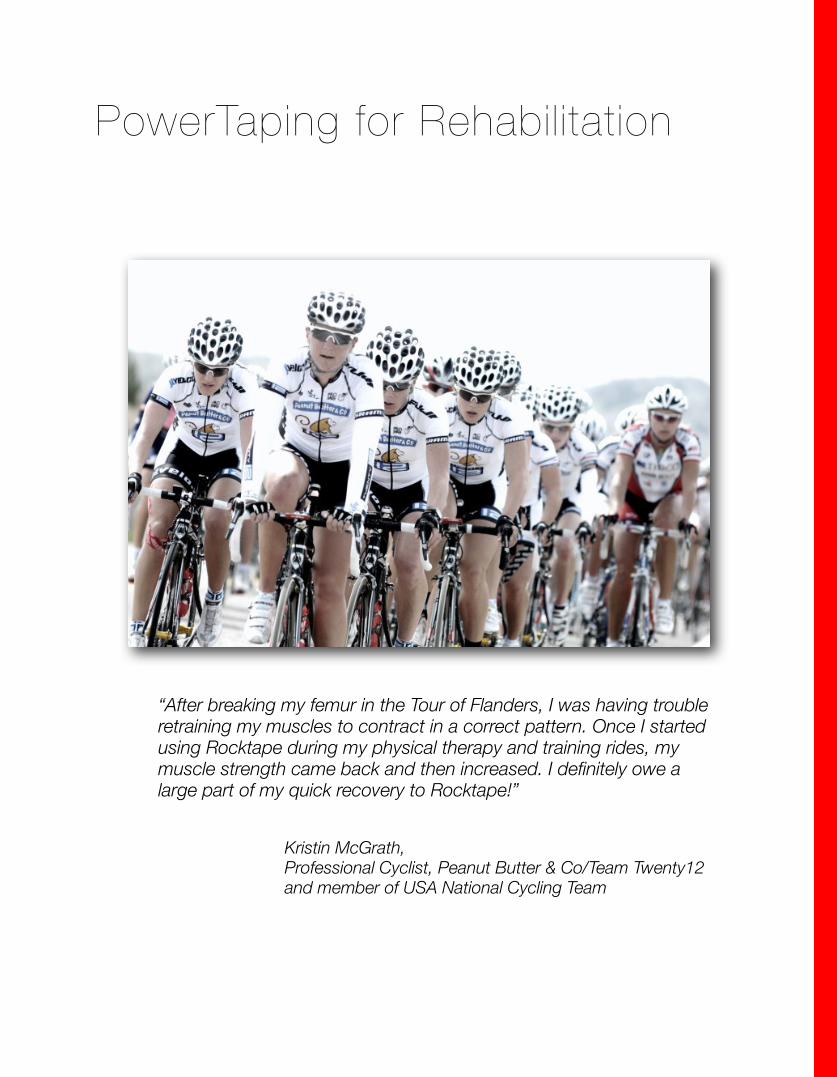
“After breaking my femur in the Tour of Flanders, I was having trouble retraining my muscles to contract in a correct pattern. Once I started using Rocktape during my physical therapy and training rides, my muscle strength came back and then increased. I definitely owe a large part of my quick recovery to Rocktape!”
Kristin McGrath, Professional Cyclist, Peanut Butter & Co/Team Twenty12 and member of USA National Cycling Team
Rehab Specific Taping - IntroductionFor years now, kinesiology taping has been used in conjunction with more traditional forms of rehabilitation. Through the use of kinesiology tape, many patients have reported significant improvements in their musculoskeletal symptoms, without sacrificing range of motion or comfort.
Always consult with a trained practitioner to determine if taping is appropriate for your injury/condition. After completing an appropriate history, examination and movement analysis, the practitioner can formulate a treatment plan including the use of kinesiology tape.
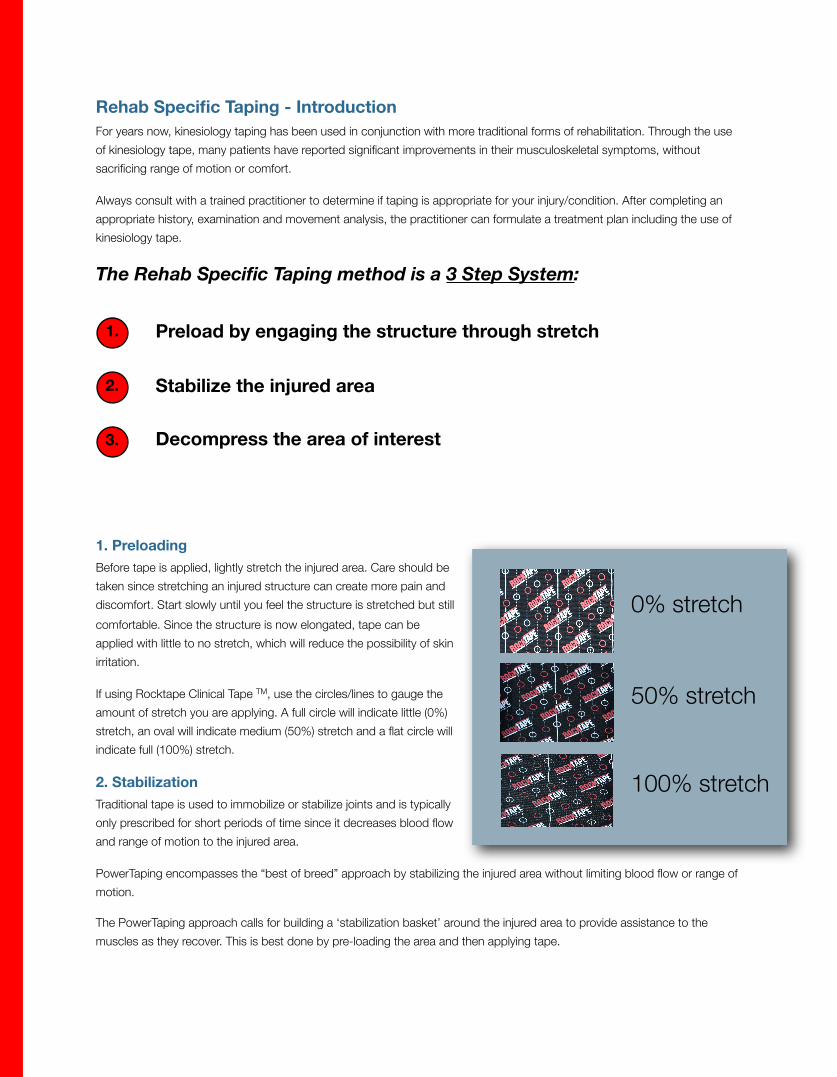
The Rehab Specific Taping method is a 3 Step System:
1. PreloadingBefore tape is applied, lightly stretch the injured area. Care should be taken since stretching an injured structure can create more pain and discomfort. Start slowly until you feel the structure is stretched but still comfortable. Since the structure is now elongated, tape can be applied with little to no stretch, which will reduce the possibility of skin irritation.
If using Rocktape Clinical Tape TM, use the circles/lines to gauge the amount of stretch you are applying. A full circle will indicate little (0%) stretch, an oval will indicate medium (50%) stretch and a flat circle will indicate full (100%) stretch.
2. StabilizationTraditional tape is used to immobilize or stabilize joints and is typically only prescribed for short periods of time since it decreases blood flow and range of motion to the injured area.
PowerTaping encompasses the “best of breed” approach by stabilizing the injured area without limiting blood flow or range of motion.
The PowerTaping approach calls for building a ‘stabilization basket’ around the injured area to provide assistance to the muscles as they recover. This is best done by pre-loading the area and then applying tape.
1.
2.
3.
Preload by engaging the structure through stretch
Stabilize the injured area
Decompress the area of interest
50% stretch
0% stretch
100% stretch
The PowerTaping method calls for tape to be applied in a way that will provide enough support to help mitigate pain but also increase blood flow while maintaining range of motion in order to decrease the risk of further atrophy of the area which causes more long-term symptoms.
In summary, applying stabilization is critical to the PowerTaping method because it:
• Stabilizes the injured tissue/joint
• Maintains range of motion
• Stimulates skin receptors
3. DecompressionTo help alleviate pain, a decompression strap may be applied to the injured area (X Marks the Spot Technique). The concept behind decompression is simple. If an area hurts, local pain fibers are irritated by inflammation. Applying decompression helps drain fluid from the area, thereby reducing pain.
To apply decompression, simply rip the tape in the middle and fold the ends of tape back to create a large bandage. If done properly, about 2-3 inches of tape will be exposed in the middle of the strip. Stretch the exposed tape slightly by gently pulling on the ends of the tape. Make sure you are applying even tension as you stretch the tape. Lay the exposed tape over the most painful area. Take your hands off the tape. Now slowly apply each end of the tape with no stretch. If the tape is stretched on the ends the tape will not stay in place.
This technique creates surface tension across which allows fluid to move more freely, thereby accelerating recovery and repair and also allows lymph fluid to more easily drain from the area, thus decreasing inflammation.

Decompression exampleAs illustrated, Rocktape lifts the skin away from the underlying fascia which houses the blood, lymph vessels and nerves. The concept revolves around developing partial pressure differentials with the lifting effect created by the elastic recoil of the tape. Pain is greatly reduced when inflammation/edema, which creates congestion, is controlled, not necessarily restricted, as in other styles of taping. The lifting effect allows the optimal amount of vascular supply to enhance injury recovery and sport performance..
Without Kinesiology tape With Kinesiology tape
Plantar Fasciitis
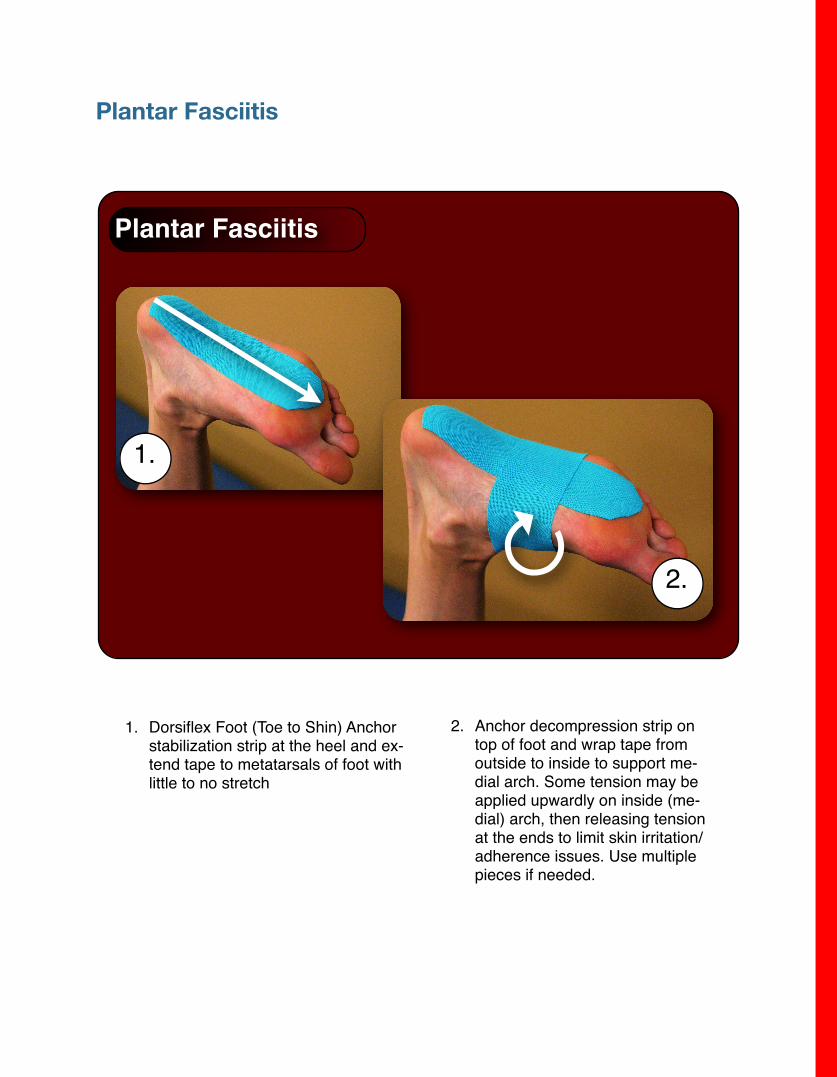
1. Dorsiflex Foot (Toe to Shin) Anchor stabilization strip at the heel and ex-tend tape to metatarsals of foot with little to no stretch
2. Anchor decompression strip on top of foot and wrap tape from outside to inside to support me-dial arch. Some tension may be applied upwardly on inside (me-dial) arch, then releasing tension at the ends to limit skin irritation/adherence issues. Use multiple pieces if needed.
Plantar Fasciitis
1.
2.P
Ankle Sprain
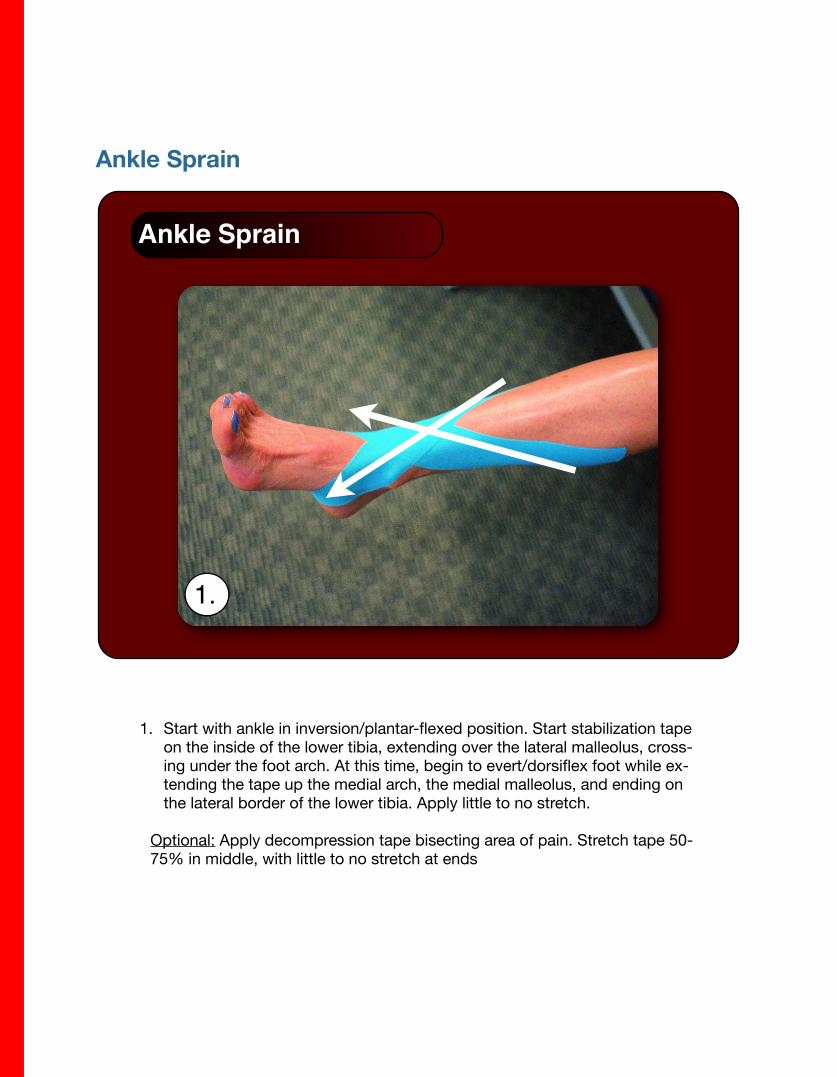
1. Start with ankle in inversion/plantar-flexed position. Start stabilization tape on the inside of the lower tibia, extending over the lateral malleolus, cross-ing under the foot arch. At this time, begin to evert/dorsiflex foot while ex-tending the tape up the medial arch, the medial malleolus, and ending on the lateral border of the lower tibia. Apply little to no stretch.
Optional: Apply decompression tape bisecting area of pain. Stretch tape 50-75% in middle, with little to no stretch at ends
Ankle Sprain
1.
Achilles Tendonitis
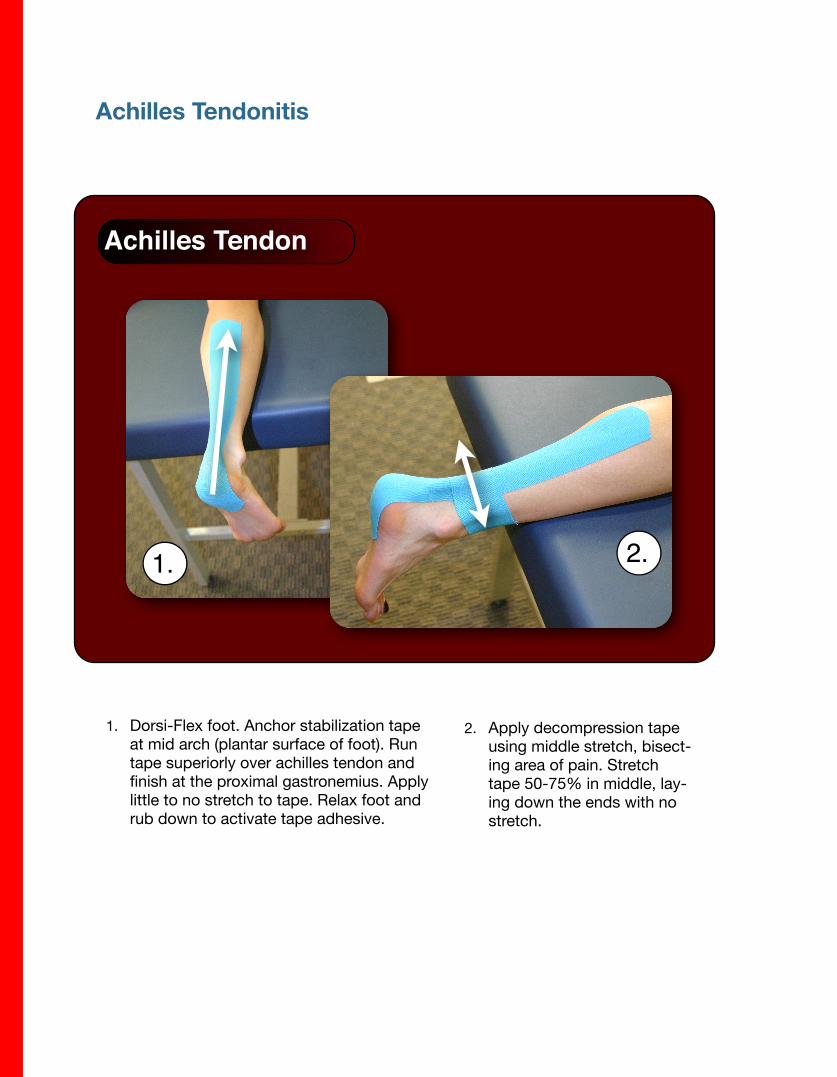
1. Dorsi-Flex foot. Anchor stabilization tape at mid arch (plantar surface of foot). Run tape superiorly over achilles tendon and finish at the proximal gastronemius. Apply little to no stretch to tape. Relax foot and rub down to activate tape adhesive.
2. Apply decompression tape using middle stretch, bisect-ing area of pain. Stretch tape 50-75% in middle, lay-ing down the ends with no stretch.
Achilles Tendon
1. 2.
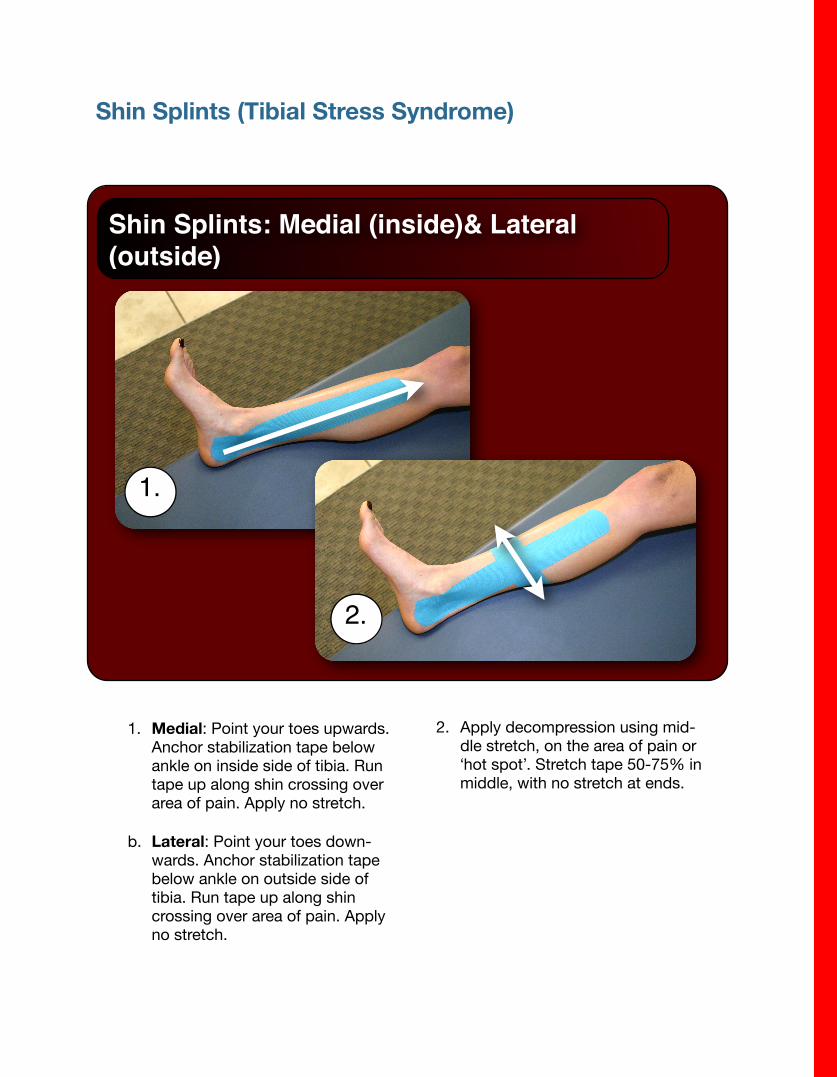
Shin Splints (Tibial Stress Syndrome)
1. Medial: Point your toes upwards. Anchor stabilization tape below ankle on inside side of tibia. Run tape up along shin crossing over area of pain. Apply no stretch.
b. Lateral: Point your toes down-wards. Anchor stabilization tape below ankle on outside side of tibia. Run tape up along shin crossing over area of pain. Apply no stretch.
2. Apply decompression using mid-dle stretch, on the area of pain or ʻhot spotʼ. Stretch tape 50-75% in middle, with no stretch at ends.
Shin Splints: Medial (inside)& Lateral (outside)
1.
2.
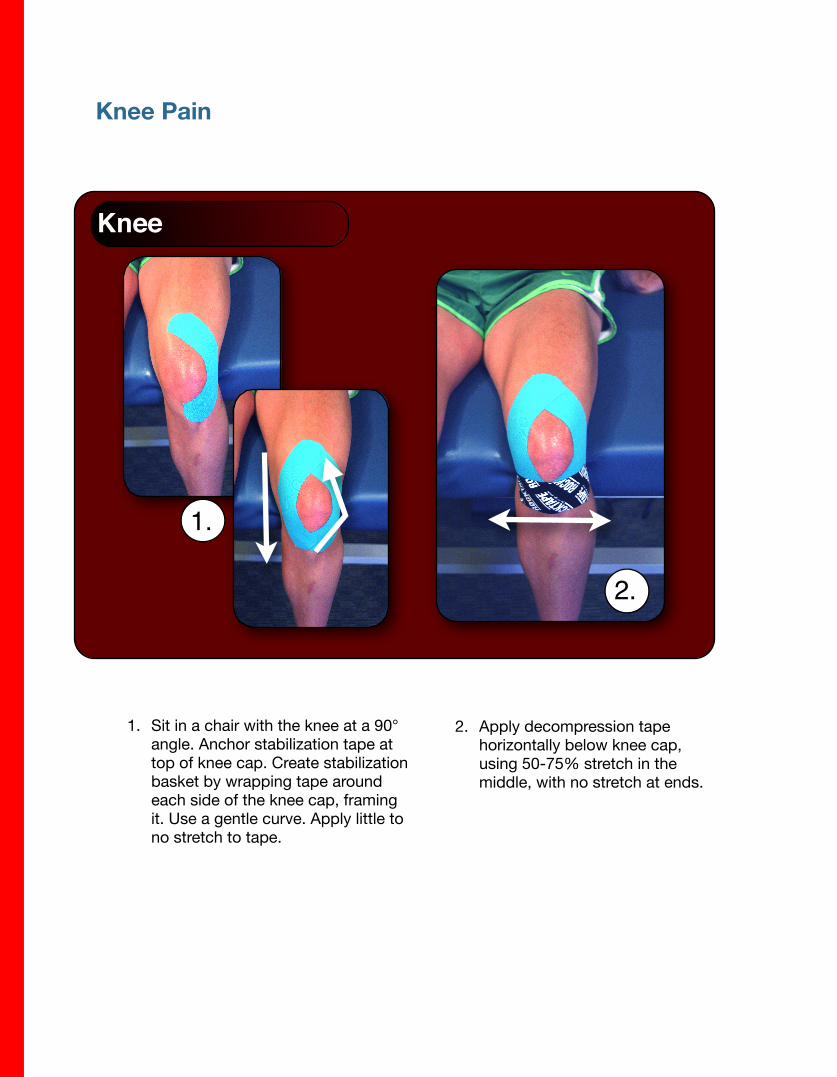
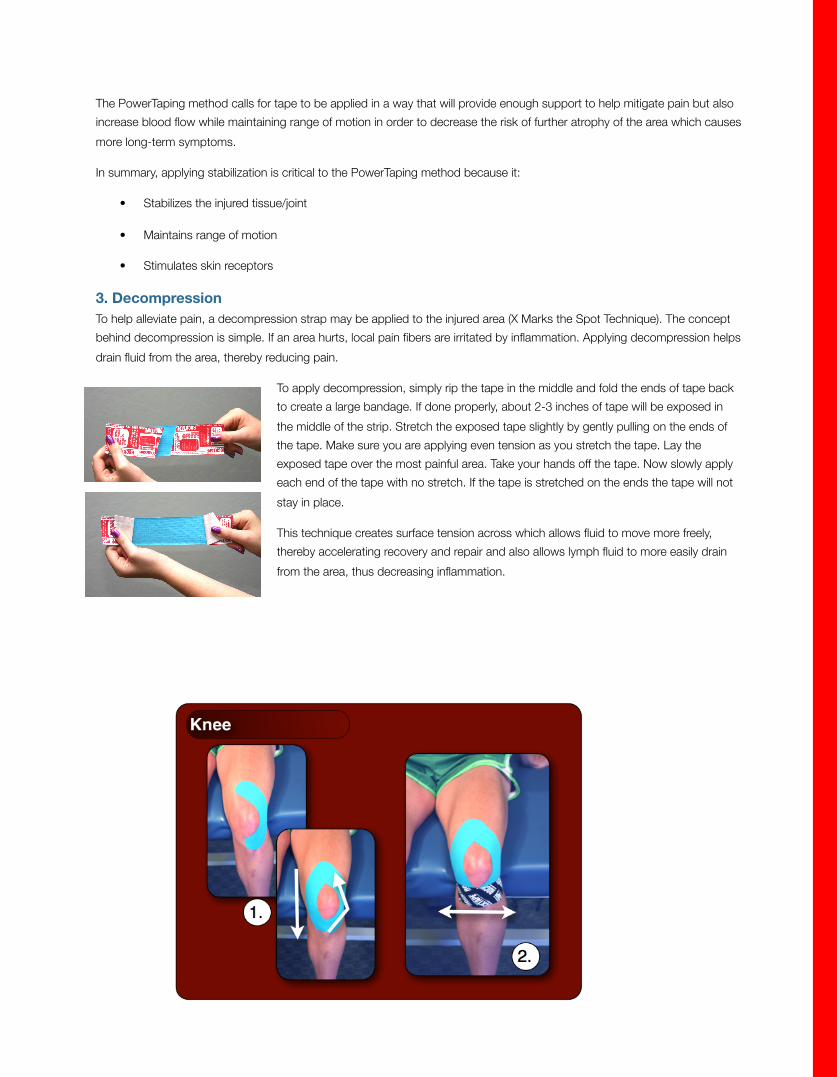
Knee Pain
1. Sit in a chair with the knee at a 90° angle. Anchor stabilization tape at top of knee cap. Create stabilization basket by wrapping tape around each side of the knee cap, framing it. Use a gentle curve. Apply little to no stretch to tape.
2. Apply decompression tape horizontally below knee cap, using 50-75% stretch in the middle, with no stretch at ends.
1.
Knee
2.
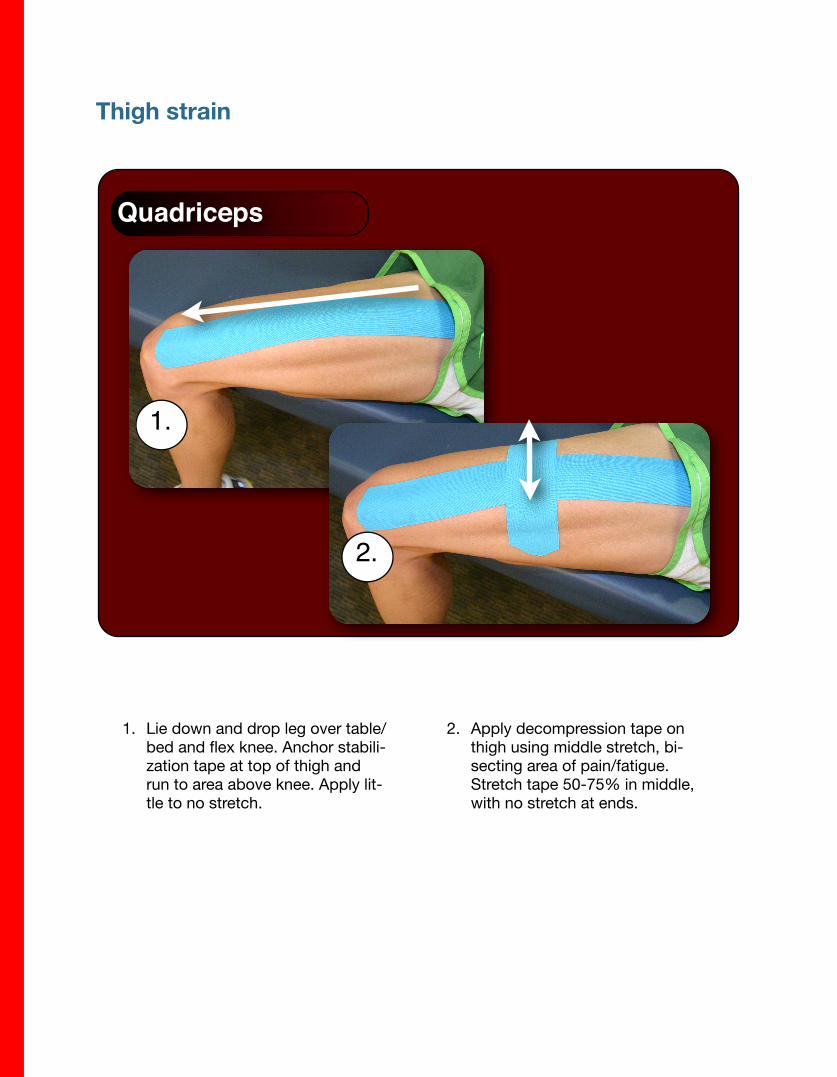
Thigh strain
1. Lie down and drop leg over table/bed and flex knee. Anchor stabili-zation tape at top of thigh and run to area above knee. Apply lit-tle to no stretch.
2. Apply decompression tape on thigh using middle stretch, bi-secting area of pain/fatigue. Stretch tape 50-75% in middle, with no stretch at ends.
Quadriceps
1.
2.
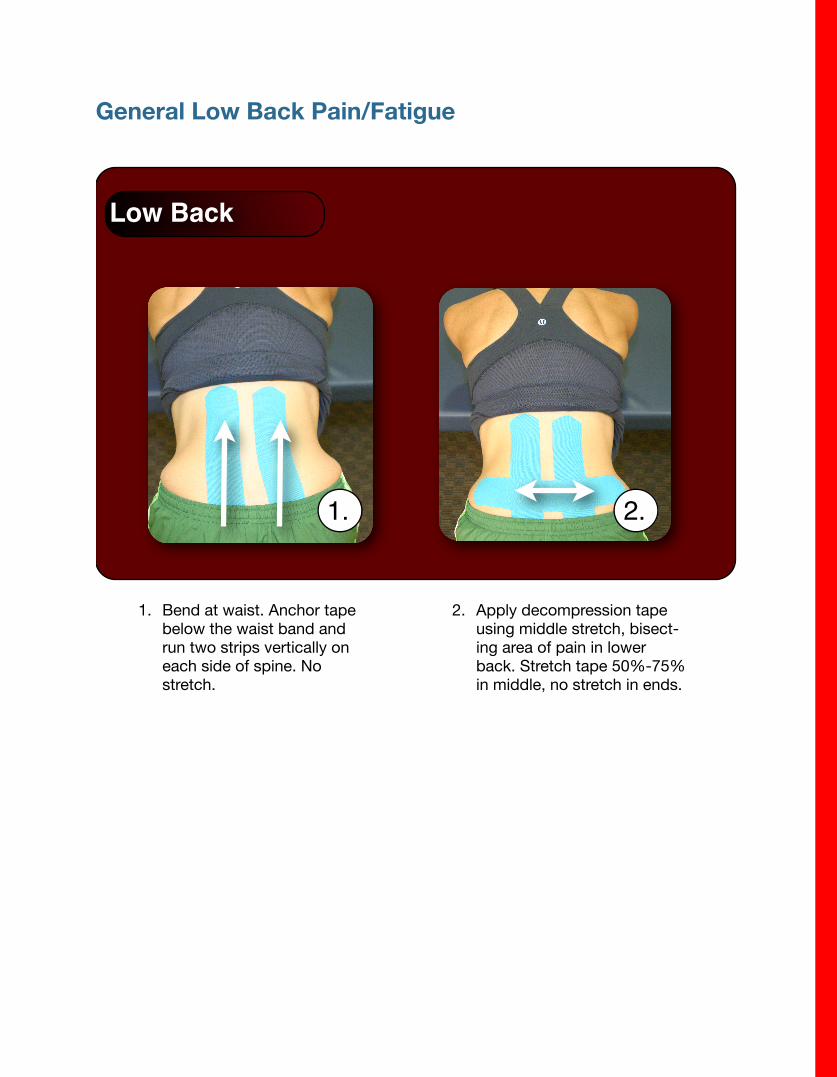
General Low Back Pain/Fatigue
Low Back
2. Apply decompression tape using middle stretch, bisect-ing area of pain in lower back. Stretch tape 50%-75% in middle, no stretch in ends.
1. Bend at waist. Anchor tape below the waist band and run two strips vertically on each side of spine. No stretch.
2.1.
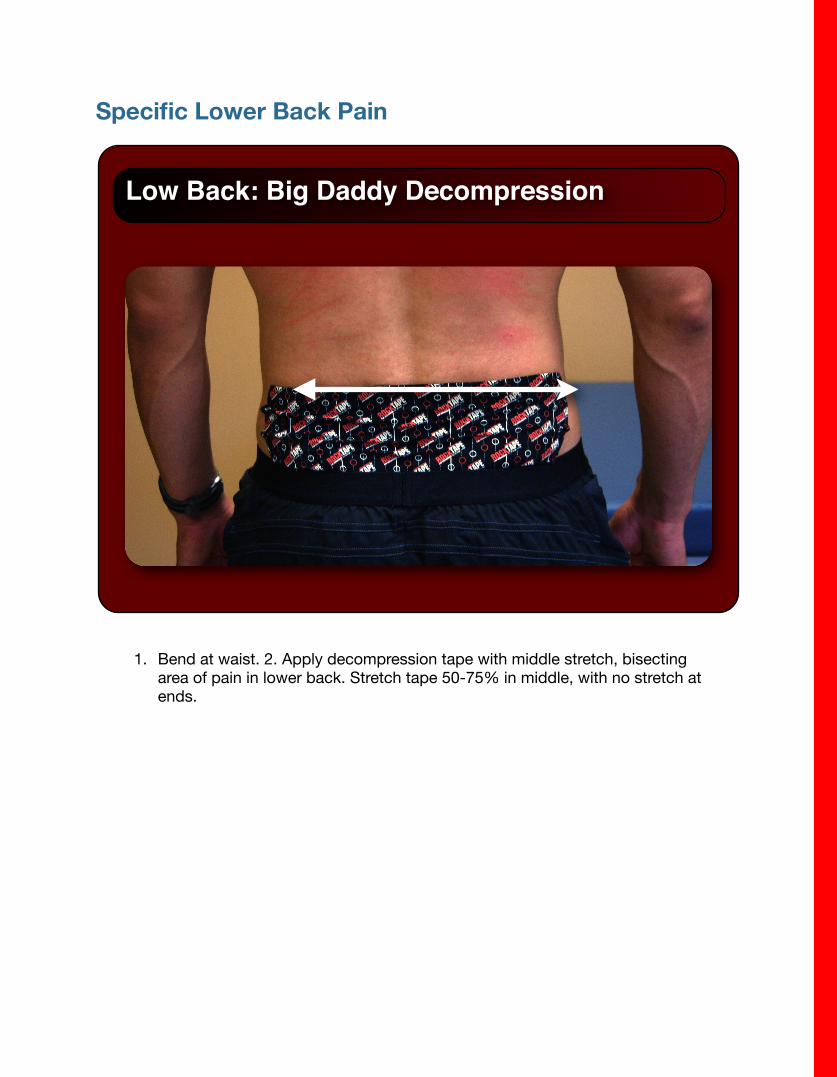
Specific Lower Back Pain
1. Bend at waist. 2. Apply decompression tape with middle stretch, bisecting area of pain in lower back. Stretch tape 50-75% in middle, with no stretch at ends.
Low Back: Big Daddy Decompression
Neck Pain
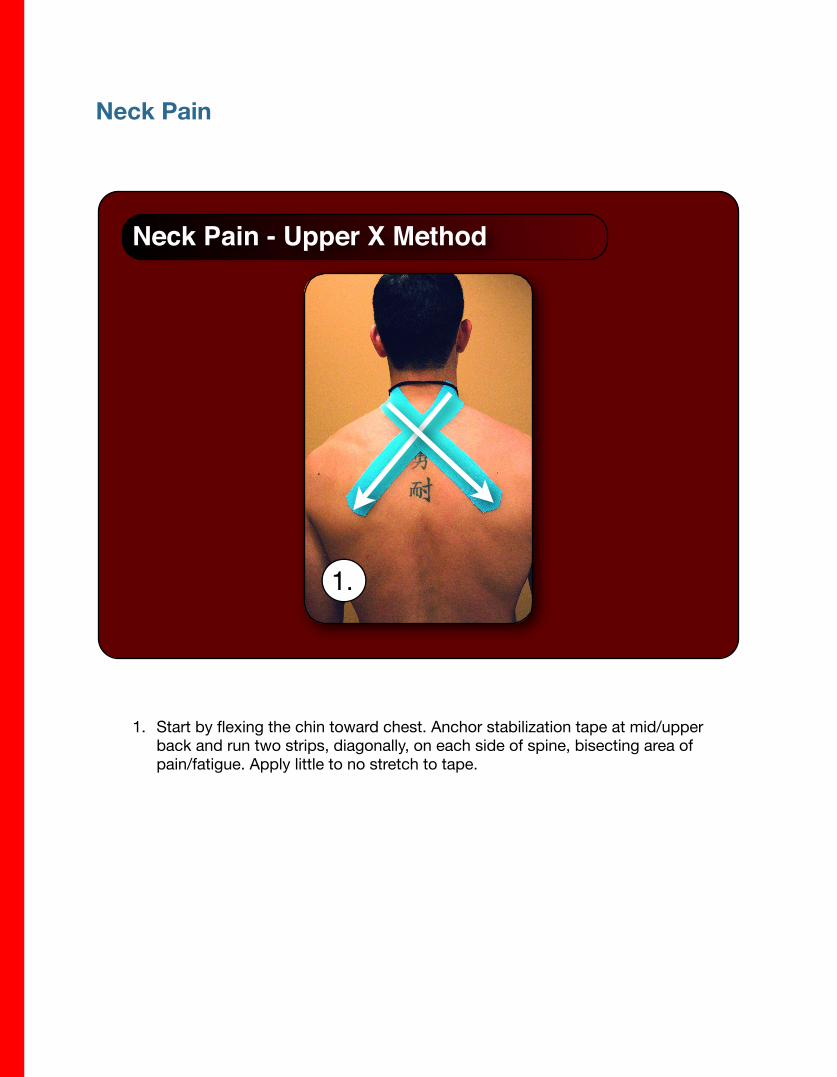
1. Start by flexing the chin toward chest. Anchor stabilization tape at mid/upper back and run two strips, diagonally, on each side of spine, bisecting area of pain/fatigue. Apply little to no stretch to tape.
1.
Neck Pain - Upper X Method
Elbow Pain
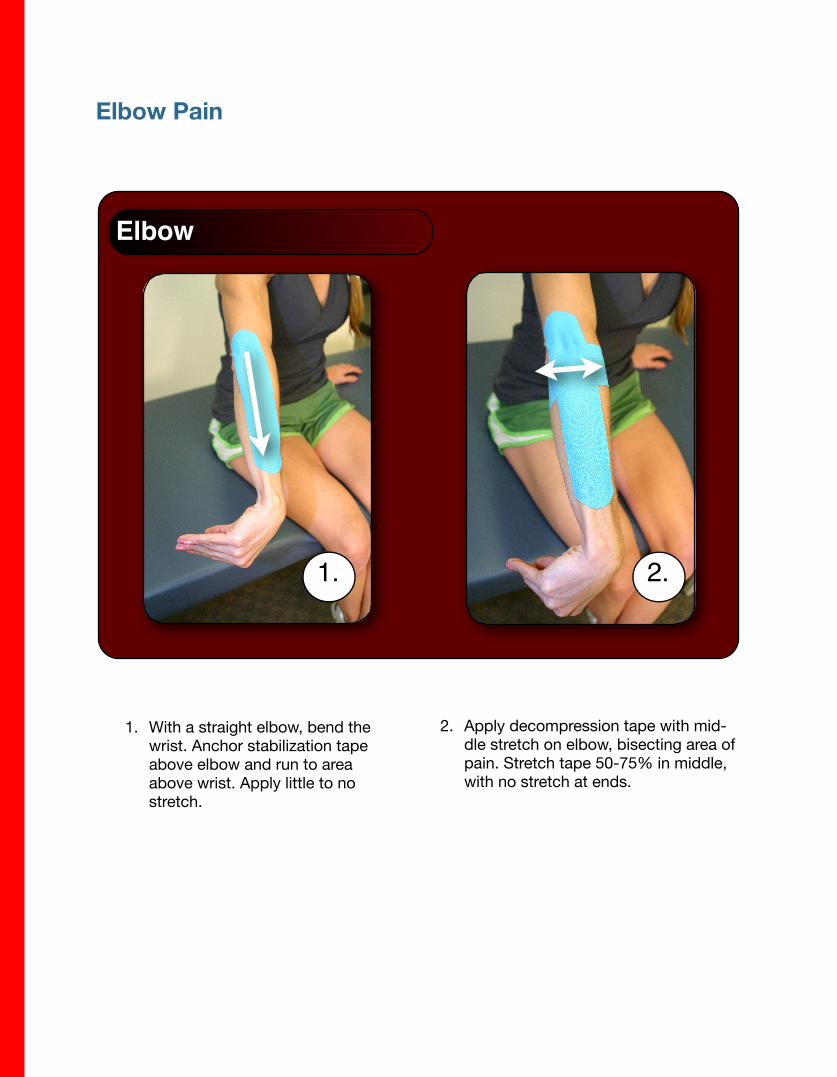
1. With a straight elbow, bend the wrist. Anchor stabilization tape above elbow and run to area above wrist. Apply little to no stretch.
2. Apply decompression tape with mid-dle stretch on elbow, bisecting area of pain. Stretch tape 50-75% in middle, with no stretch at ends.
2.1.
Elbow
Shoulder Pain
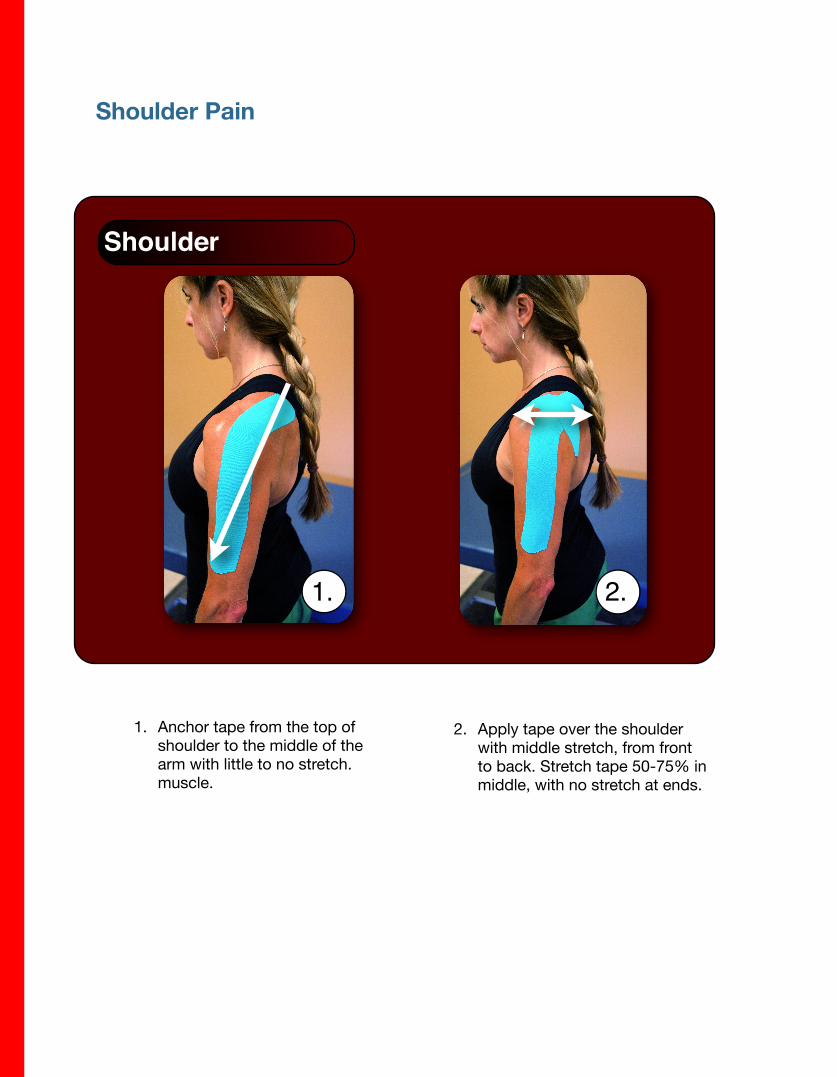
1. Anchor tape from the top of shoulder to the middle of the arm with little to no stretch. muscle.
2. Apply tape over the shoulder with middle stretch, from front to back. Stretch tape 50-75% in middle, with no stretch at ends.
Shoulder
1. 2.
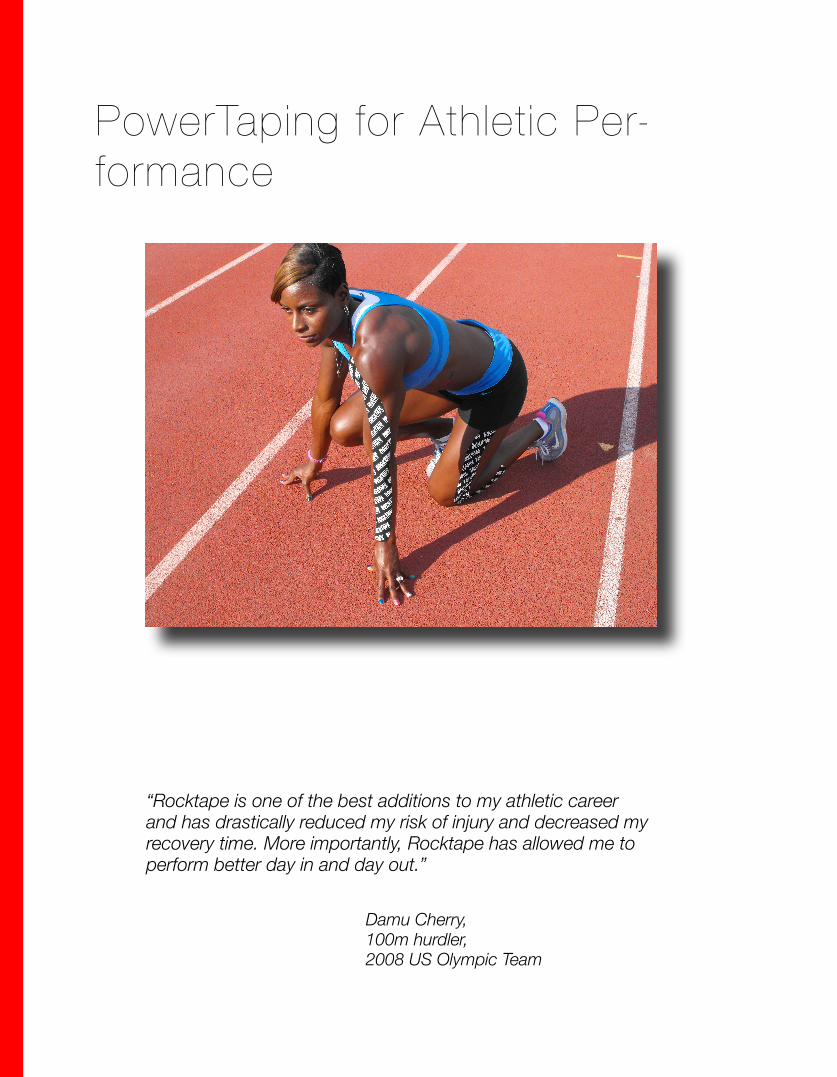
PowerTaping for Athletic Per-formance
“Rocktape is one of the best additions to my athletic career and has drastically reduced my risk of injury and decreased my recovery time. More importantly, Rocktape has allowed me to perform better day in and day out.”
Damu Cherry, 100m hurdler, 2008 US Olympic Team


![Feet injuries in rock climbers … · Rock climbing is a fast growing sport with followers around the globe[1]. While alpine climbing has its inher-ent dangers, sport, indoor and](https://img.pdfslide.us/doc/110x75/5fbecd47a44b1c3c2f635d9d/feet-injuries-in-rock-climbers-rock-climbing-is-a-fast-growing-sport-with-followers.jpg)