Embed Size (px)
Citation preview
BASIC SURGICAL SKILLS WITH ANASTOMOSIS
Dr Tridip Dutta BaruahAsst Prof, Deptt Of Surgery
MGMCRI
OBJECTIVES
To learn basic surgical techniques • –Surgical scrubbing • –Gowning and gloving for surgery • –Basic suturing techniques • –Treatment of various wounds • –Appropriate antibiotic use
HAND WASHING
Hand washing: the single most important measure for prevention of infection
• Plain soap and water is effective for removal of visible contaminants
• Wash with vigorous mechanical action on all hand surfaces for at least 40 seconds; washing above wrists, removing jewellery
• Nails are areas of greatest contamination • Rinse under poured or running water
HOW TO HAND WASH
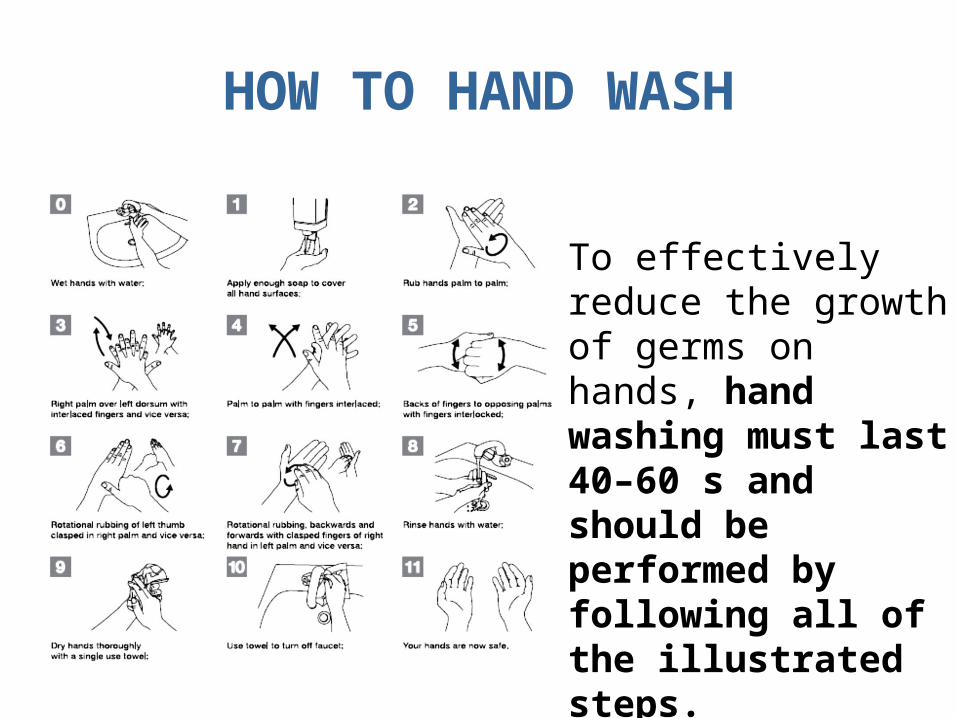
To effectively reduce the growth of germs on hands, hand washing must last 40–60 s and should be performed by following all of the illustrated steps.
HOW TO HAND RUB
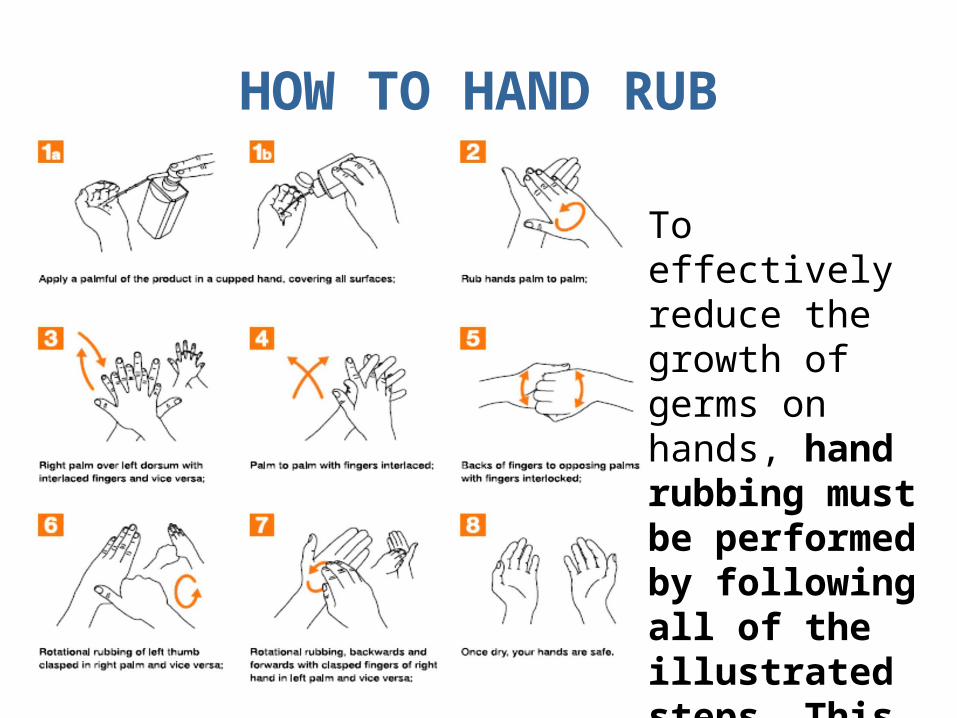
To effectively reduce the growth of germs on hands, hand rubbing must be performed by following all of the illustrated steps. This takes only 20–30 seconds
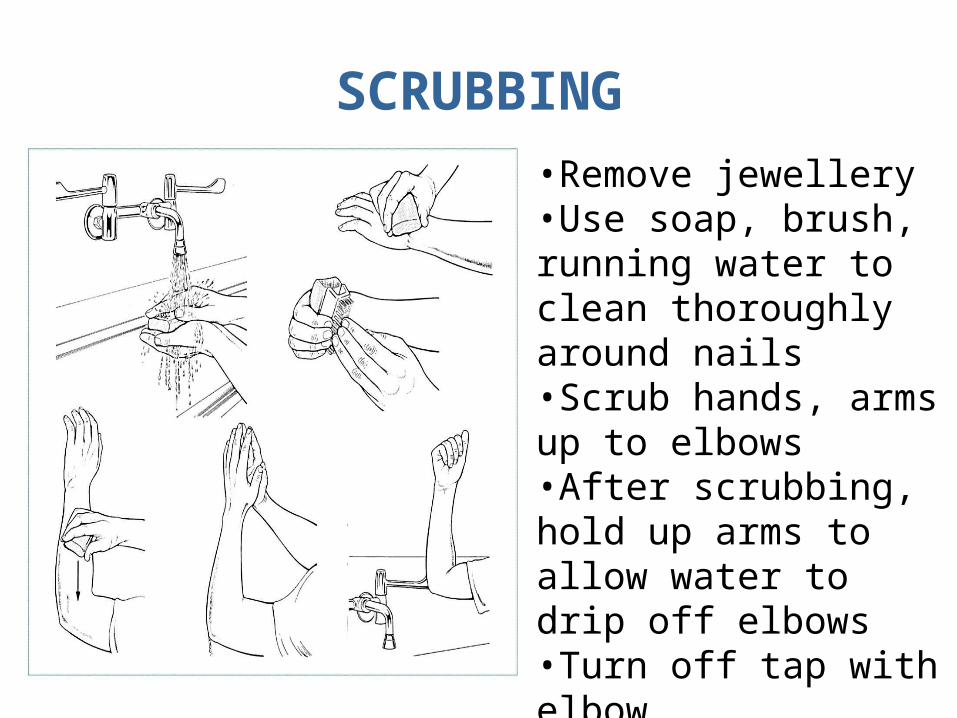
SCRUBBING•Remove jewellery •Use soap, brush, running water to clean thoroughly around nails •Scrub hands, arms up to elbows •After scrubbing, hold up arms to allow water to drip off elbows •Turn off tap with elbow
SCRUBBING
After scrubbing hands: •Dry with sterile towel, make sure towel does
not become contaminated •Hold hands, forearms away from body and
higher than elbows until putting on sterile gown and gloves
GOWNING
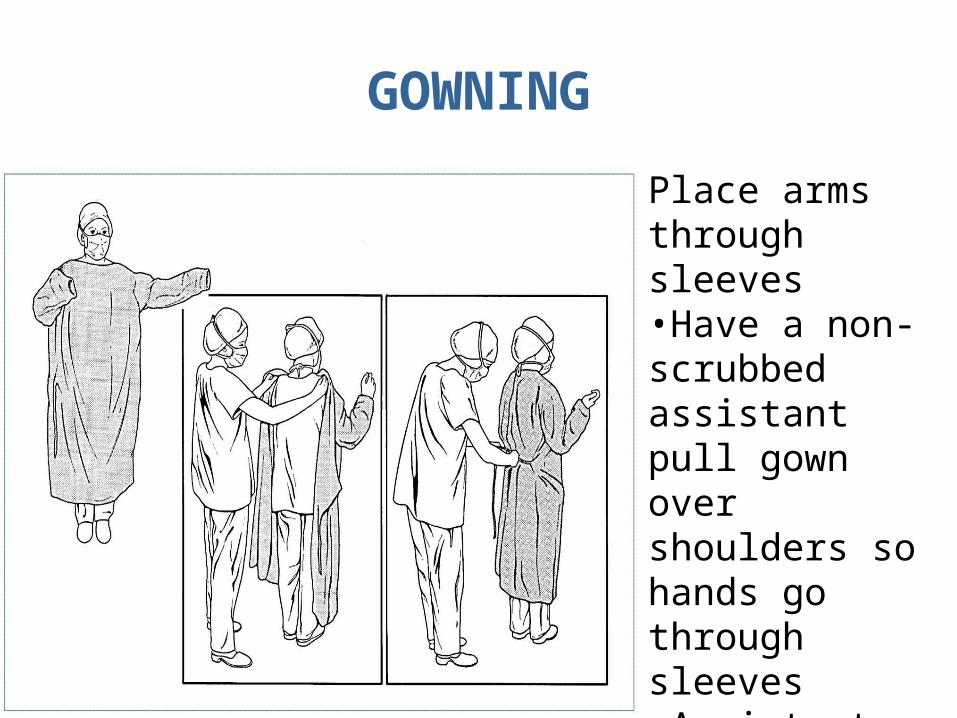
Place arms through sleeves •Have a non-scrubbed assistant pull gown over shoulders so hands go through sleeves •Assistant will tie back of gown
GLOVING
• Surgical gloves prevent transmission of HIV and other infections through contact with blood, other body fluids
• Easiest to have someone who is already gowned and gloved to assist
• Promptly change a glove punctured during surgery, rinse hand with antiseptic or rescrub
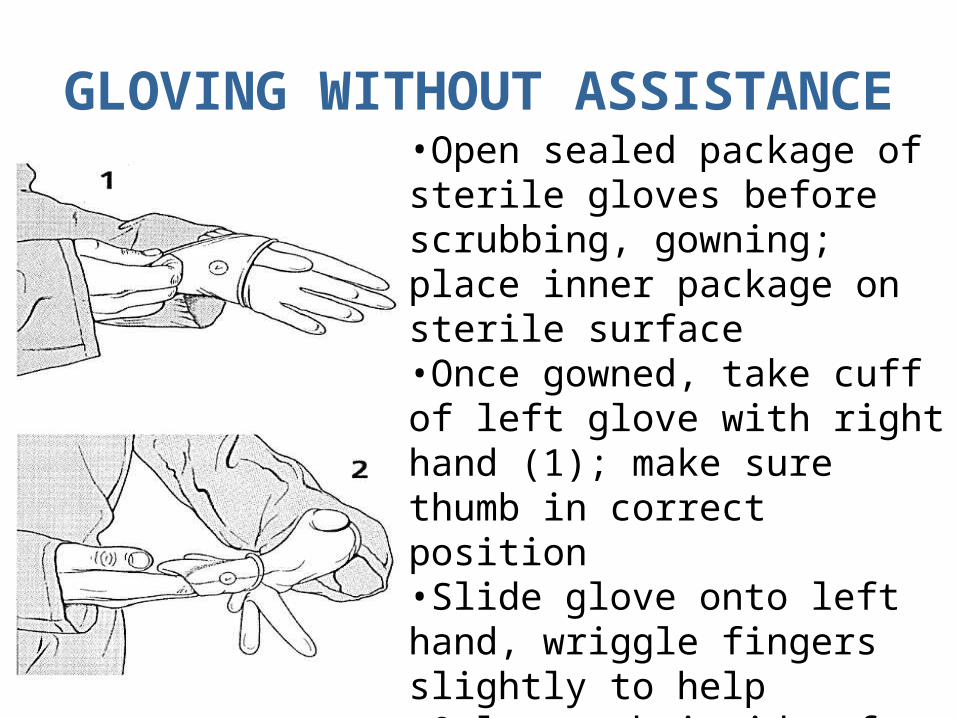
GLOVING WITHOUT ASSISTANCE•Open sealed package of sterile gloves before scrubbing, gowning; place inner package on sterile surface •Once gowned, take cuff of left glove with right hand (1); make sure thumb in correct position •Slide glove onto left hand, wriggle fingers slightly to help •Only touch inside of glove, cuff with bare hands •Slide fingers of gloved left hand into cuff of right glove (2)
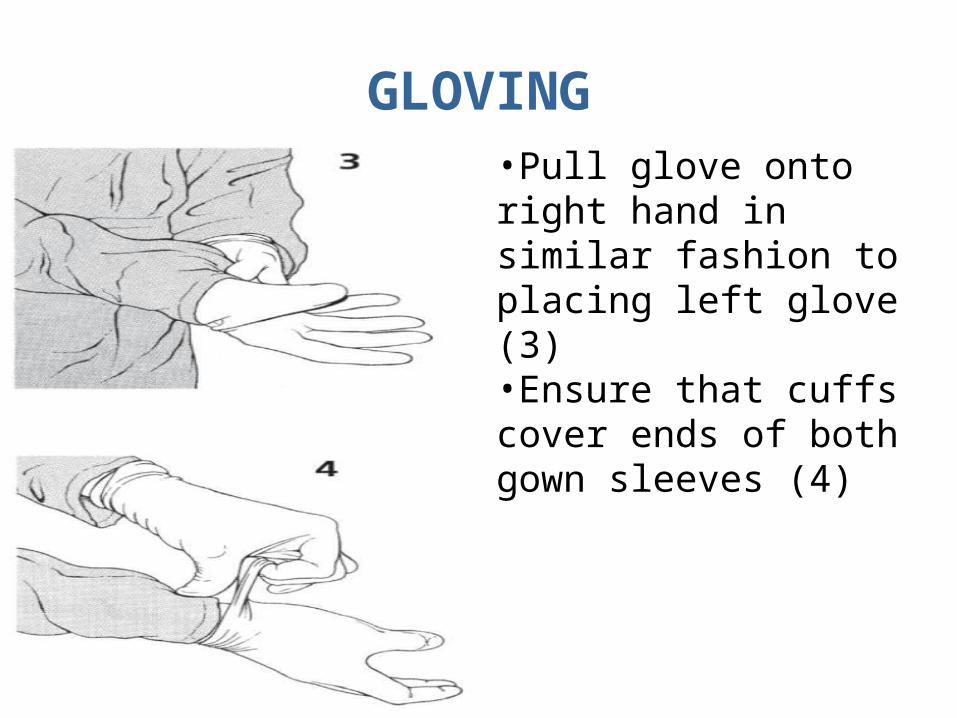
GLOVING•Pull glove onto right hand in similar fashion to placing left glove (3) •Ensure that cuffs cover ends of both gown sleeves (4)
INSTRUMENTS
Many types of instruments • Forceps, instruments for holding tissue • Needle holders • Scissors • Retractors Which instrument to use? • Choose shortest instrument that will comfortably reach
operative site • If cutting suture or non-tissue material, avoid using fine
scissors • If possible, choose instruments in good repair
INSTRUMENTS
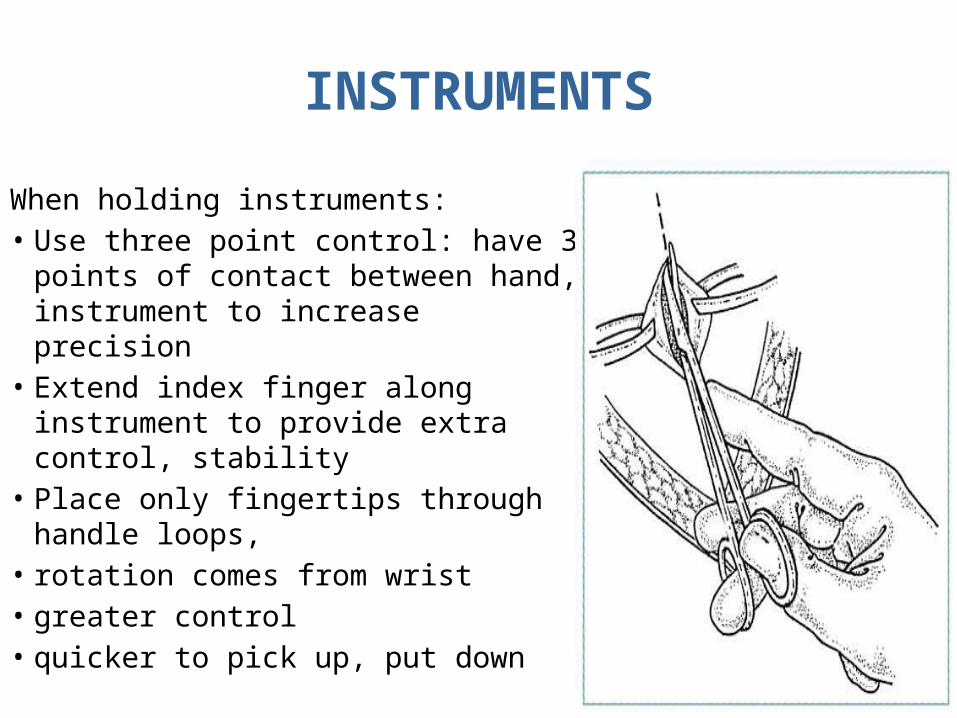
When holding instruments: • Use three point control: have 3 points
of contact between hand, instrument to increase precision
• Extend index finger along instrument to provide extra control, stability
• Place only fingertips through handle loops,
• rotation comes from wrist • greater control • quicker to pick up, put down
INSTRUMENTS
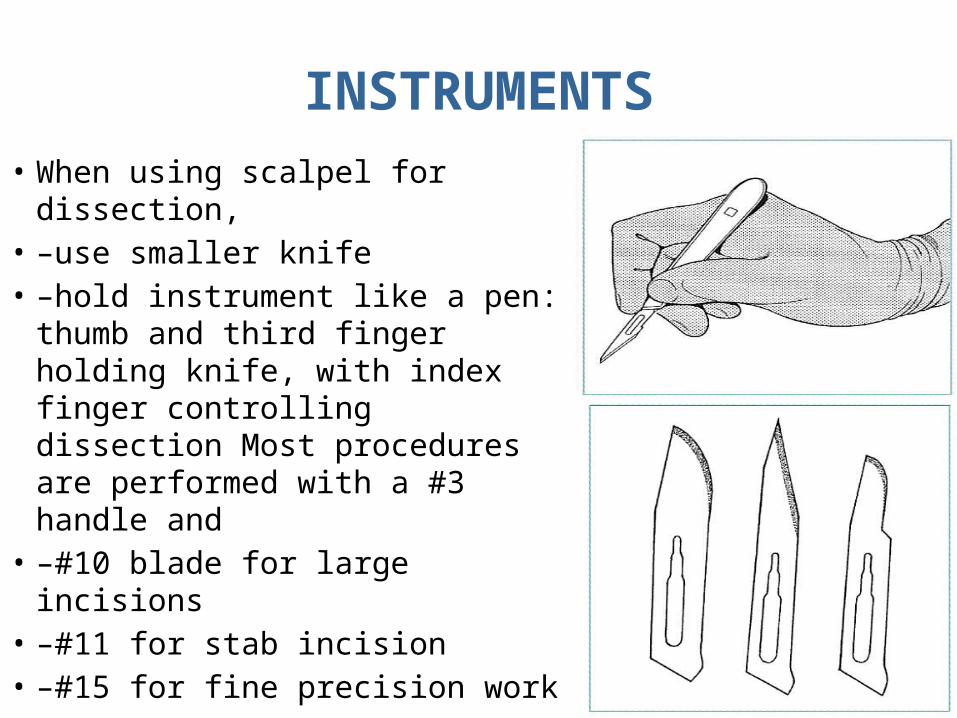
• When using scalpel for dissection, • –use smaller knife • –hold instrument like a pen:
thumb and third finger holding knife, with index finger controlling dissection Most procedures are performed with a #3 handle and
• –#10 blade for large incisions • –#11 for stab incision • –#15 for fine precision work

INSTRUMENT HANDLING
SKIN PREPARATION
• Before operation, wash surgical site, surrounding area with soap, water; particularly wash debris from injuries
• Prepare skin with antiseptic solution; start in centre, move to periphery
• Chlorhexidine gluconate and iodine preferable to alcohol as less irritating to skin
• Solution should remain wet on skin for at least two minutes
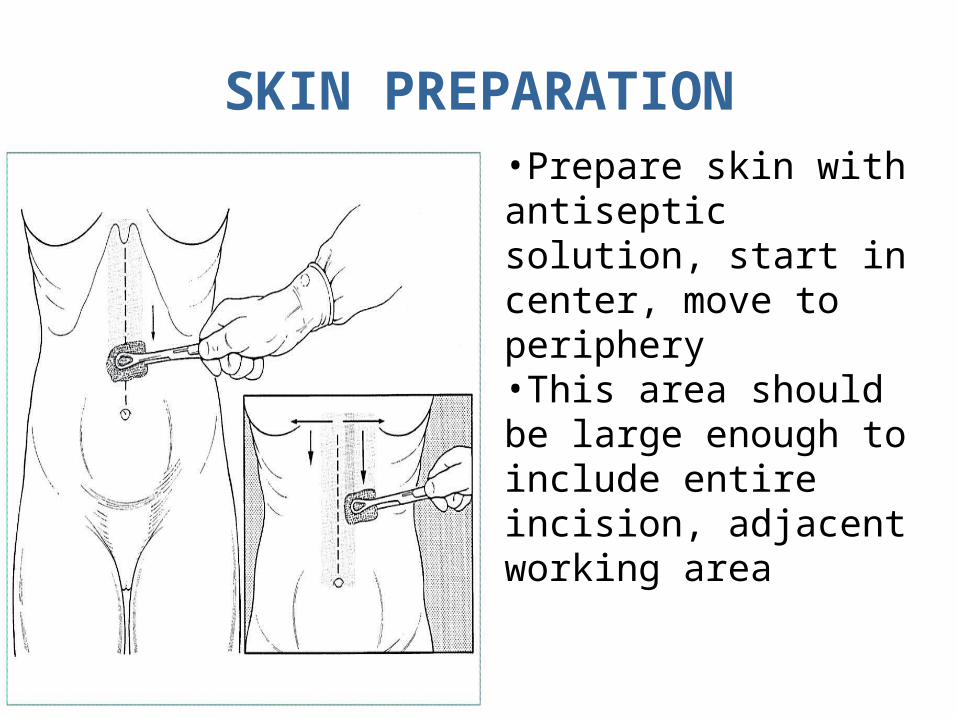
SKIN PREPARATION•Prepare skin with antiseptic solution, start in center, move to periphery •This area should be large enough to include entire incision, adjacent working area
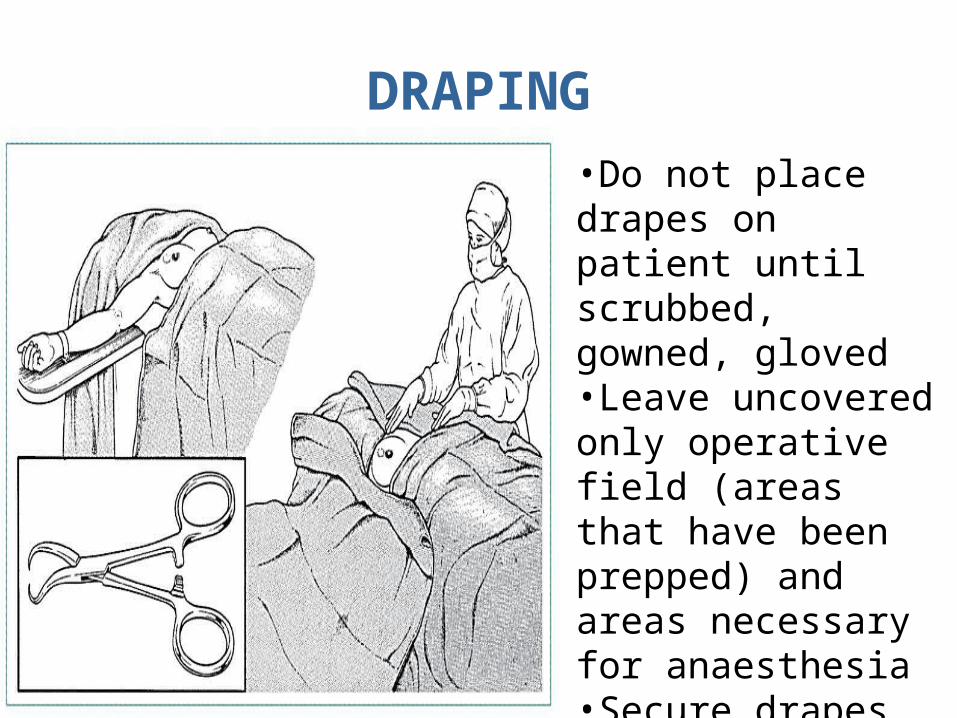
DRAPING•Do not place drapes on patient until scrubbed, gowned, gloved •Leave uncovered only operative field (areas that have been prepped) and areas necessary for anaesthesia •Secure drapes with towel clips at each corner
WOUND MANAGEMENT
Surgical wound classification: • Clean • Clean Contaminated: normal but colonized
tissue • Contaminated: contains foreign or infected
material • Infected: obvious pus present
WOUND MANAGEMENT
• Clean wounds: close immediately to allow healing by primary intention
• Contaminated or infected wounds: never close, leave open to heal by secondary intention
• Clean Contaminated: surgical toilet, leave open, then close 48 hours later - delayed primary closure
• Careless closure of a contaminated wound will promote infection and delay healing
WOUND MANAGEMENT
Primary repair: • Primary closure requires clean tissue to be
approximated without tension • Leave skin sutures in place for an average 7 days; longer
if healing expected to be slow due to blood supply of particular location (back or legs) or patient’s condition
• Close deep wounds in layers; absorbable sutures for deep layers
WOUND MANAGEMENT
Delayed Primary Closure: • Irrigate clean contaminated wounds, then pack open
with damp saline gauze • Close wounds with sutures at 2 days Secondary healing: • Perform wound toilet, surgical debridement without
closure; may need skin graft
WOUND TOILET AND DEBRIDEMENT
• Thoroughly clean the wound with normal saline or sterile water.
• It is important to use a large volume of fluid and pressure to remove all visible dirt and debris from a wound
• Use a large syringe for irrigation. Attach a 16 or 19 gauge needle or soft IV catheter to generate pressure
WOUND TOILET AND DEBRIDEMENT
• Gentle handling of tissues to minimize bleeding, additional trauma
• Control residual bleeding with compression, ligation, cautery • Dead or devitalized muscle is dark in color, soft, easily damaged;
does not contract when pinched • Dead tissue does not bleed when cut
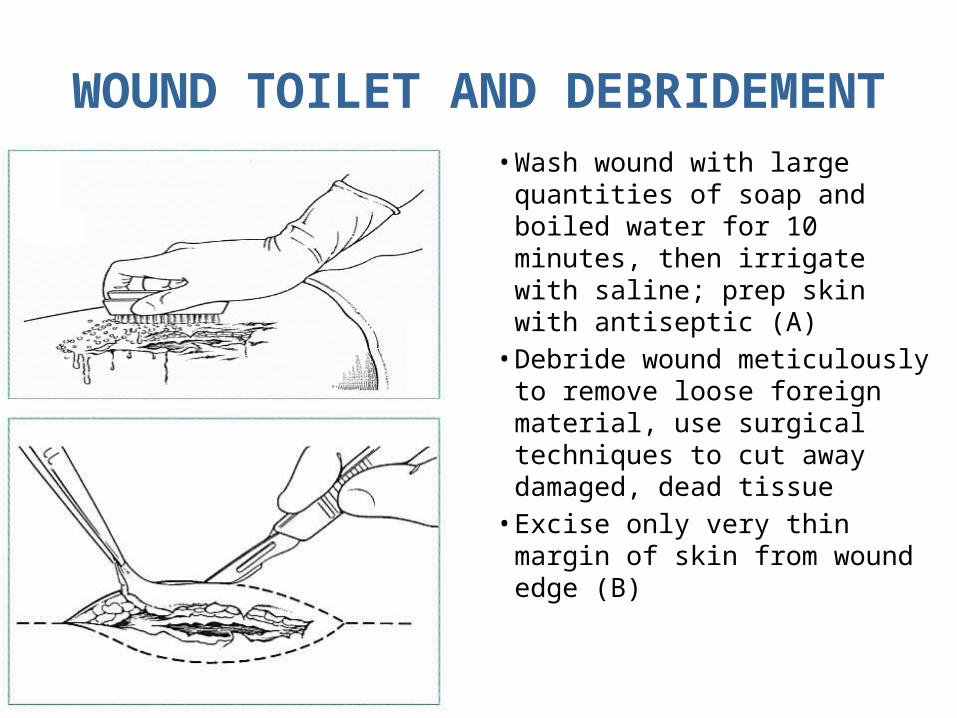
WOUND TOILET AND DEBRIDEMENT• Wash wound with large
quantities of soap and boiled water for 10 minutes, then irrigate with saline; prep skin with antiseptic (A)
• Debride wound meticulously to remove loose foreign material, use surgical techniques to cut away damaged, dead tissue
• Excise only very thin margin of skin from wound edge (B)
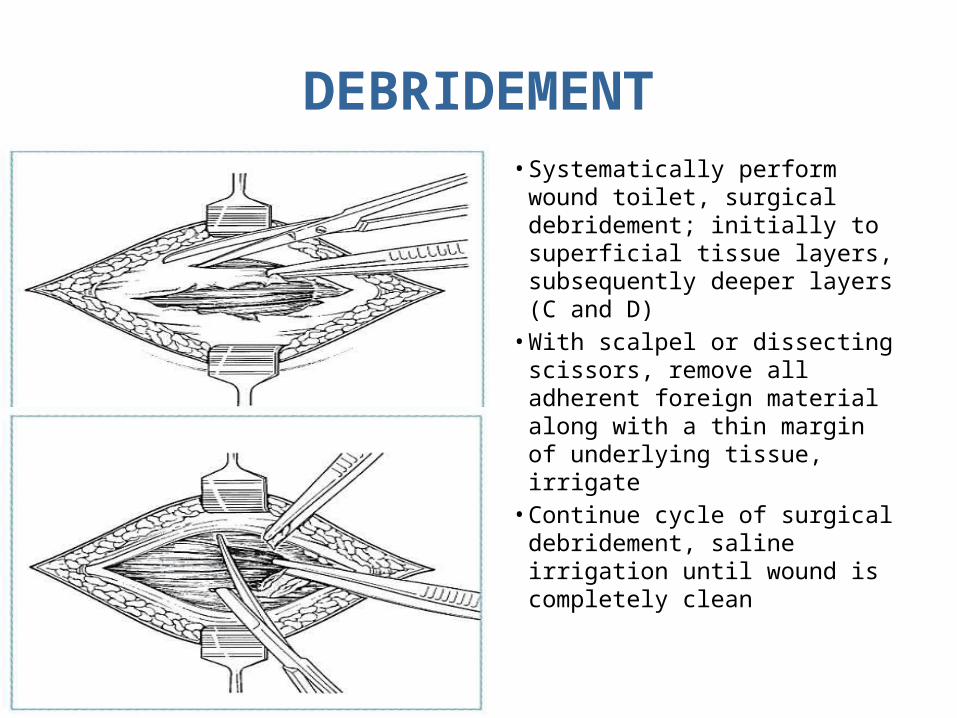
DEBRIDEMENT• Systematically perform wound
toilet, surgical debridement; initially to superficial tissue layers, subsequently deeper layers (C and D)
• With scalpel or dissecting scissors, remove all adherent foreign material along with a thin margin of underlying tissue, irrigate
• Continue cycle of surgical debridement, saline irrigation until wound is completely clean
WOUND TOILET AND DEBRIDEMENT
• Leave wound open after debridement to allow for healing by secondary intention
• Pack lightly with damp saline gauze, cover packed wound with dry dressing
• Change packing, dressing daily - more often if outer dressing becomes damp with blood, other body fluids
• Large defects will require closure with flaps or skin grafts but may be initially be managed with saline packing
PREVENTION OF INFECTIONS
• Restore breathing, blood circulation as soon as possible after injury
• Warm victim; at earliest opportunity provide high-energy nutrition, pain relief
• Perform wound toilet, debridement as soon as possible (within 8 hours if possible)
• Respect universal precautions • Antibiotic prophylaxis for deep or penetrating wounds
(dirty stick, knife) and wounds older than 12 hours
PREVENTION OF INFECTIONS• Cleaning wound: most important factor • Antibiotics usually not necessary unless: -Wound older than 12 hours -Deep penetrating wounds (dirty stick, knife)
• Wound closure -Less than 24 hours from injury, cleaned properly: primary closure -Greater than 24 hours, contaminated or animal bite: do not close -Wounds not closed primarily should be packed lightly with damp gauze -If clean after 48 hours, delayed primary closure -If wound infected, pack lightly, heal by secondary intention
PREVENTION OF INFECTIONS TETANUS VACCINATION
• Patient vaccinated: give booster if needed • Patient not vaccinated: give antitetanus serum and start dose of
tetanus toxoid vaccine (separate syringes, separate sites)
• Antitetanus serum for adults and children Tetanus immunoglobulin (human) 250 units IM, increased to 500 units if
any of the following conditions apply: -wound older than 12 hours -presence or risk of heavy contamination -patient weight more than 90 kg
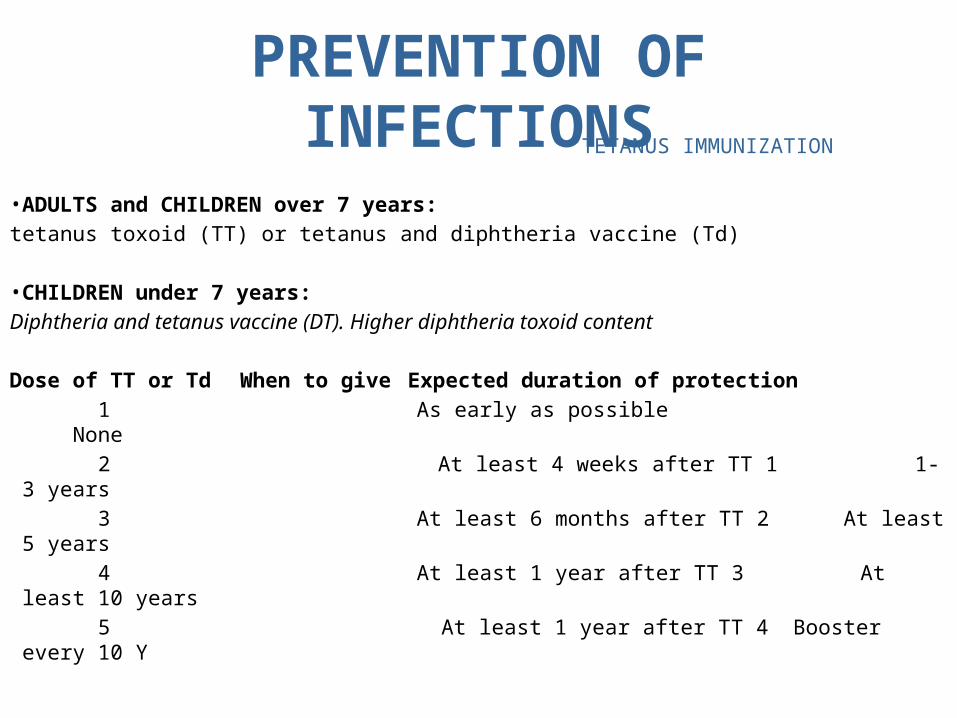
PREVENTION OF INFECTIONS TETANUS IMMUNIZATION
• ADULTS and CHILDREN over 7 years: tetanus toxoid (TT) or tetanus and diphtheria vaccine (Td)
• CHILDREN under 7 years: Diphtheria and tetanus vaccine (DT). Higher diphtheria toxoid content
Dose of TT or Td When to give Expected duration of protection 1 As early as possible None 2 At least 4 weeks after TT 1 1-3 years 3 At least 6 months after TT 2 At least 5 years 4 At least 1 year after TT 3 At least 10 years 5 At least 1 year after TT 4 Booster every 10 Y
PREVENTION OF INFECTIONS ANTIBIOTIC PROPHYLAXIS
Indicated for wounds at high risk for infection: • Contaminated wounds • Penetrating wounds • Abdominal trauma • Compound fractures • Lacerations greater than 5 cm • Wounds with devitalized tissue • High risk anatomical sites—hand, foot
SUTURE MATERIALS
Sutures are made of variety of materials with variety of properties
•Non-absorbable –Use when possible –Braided suture not ideal for contaminated wounds –May sterilize polyester thread or nylon line when commercial
suture unavailable •Absorbable –Degrades, loses tensile strength within 60 days –Option when not possible for patient to return or for children
for whom suture removal may be difficult
SKIN SUTURE PRINCIPLE
MUST
• NOT TENSION• NO EVERSI• NO INVERSI• NO DEAD SPACE
NO
• EPITEL TO EPITEL• ALL SURFACE• RIGHT MATERIAL
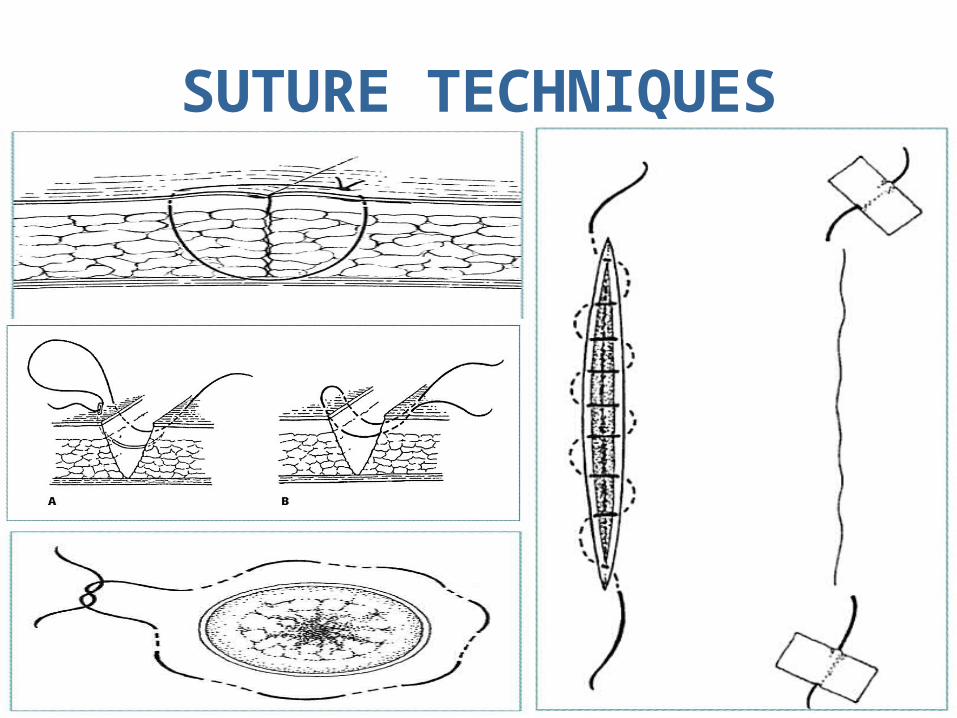
SUTURE TECHNIQUES
• Aim of all suturing techniques: approximate wound edges without gaps or tension
• Size of suture “bite” and interval between bites should be equal in length, proportional to thickness of tissue being approximated
• Suture is foreign body: use minimal size, amount of suture necessary to close wound

SUTURE TECHNIQUES• Use tip of needle driver to hold needle
between half - two thirds way along needle
• Hold needle driver so that fingers are just within rings so possible to rotate wrist
• Pass needle tip through skin at 90o • Use curve of needle by turning needle
through tissue • Close deep wounds in layers with either
absorbable or monofilament non-absorbable sutures
• Diag- ?
SUTURE TECHNIQUES
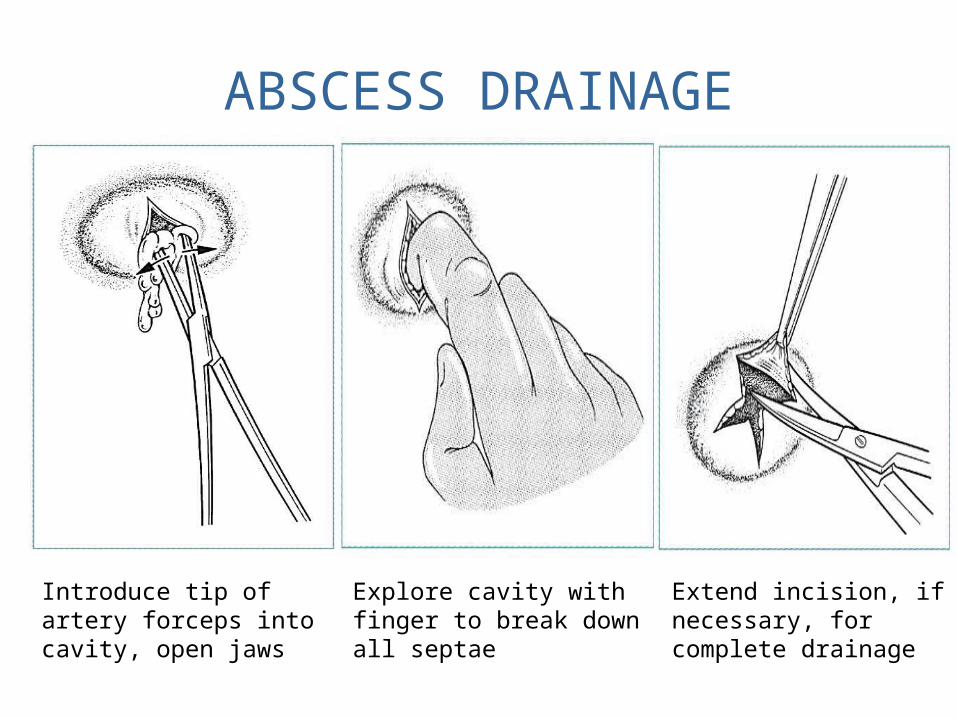
ABSCESS DRAINAGE
Introduce tip of artery forceps into cavity, open jaws
Explore cavity with finger to break down all septae
Extend incision, if necessary, for complete drainage

DRAINAGE OF BREAST ABSCESS
Incise
Spread
Break down loculations
Drain
ANASTOMOSIS
PRINCIPLES OF ANASTOMOSIS
A. Access and exposure : Intestinal anastomosis become difficult if access and exposure are
unsatisfactory as may result from :- Inadequate anaesthesia and muscle relaxation- Poor assistance- Inappropriate incision- Imperfect illumination- Inadequate mobilization of viscera especially fixed and deeply
placed viscera like oesophagus, colon and rectum.
PRINCIPLES OF ANASTOMOSISB. Blood supply :Poor blood supply is inimical to the healing of all anastomosis. Causes
of poor blood supply are:- Undue tension on suture line- From inadequate mobilization- Devascularization during mobilization of bowel- Strangulation of the tissues by tightly knotted sutures- Excessive use of diathermy- Tight clamp application to bowel mesentery. In oesophagus no
clamps are applied by some surgeons because blood supply is through intramural blood flow.
PRINCIPLES OF ANASTOMOSISC. Suture technique : Basic principles of intestinal sutures were established 100 years ago and have
undergone little modification. • Secure healing is dependent on accurate apposition of the serosal surface and
is achieved by the use of a inverting suture of cut edges.• Ravitch et al (1967) claimed that everting technique of suture gave better
results in animals study2 however clinical study of anastomosis have proved that everting technique results in higher incidence of anastomotic dehiscence.
• One aspect of the technique of intestinal suture which has remained the subject of some controversy is use of one or two layers of sutures in anastomosis.
• Two layers inverting suture technique devised by Czerny is the method used by surgeons. Halsted and Cushing recommended use of single layer of sutures in anastomosis.
PRINCIPLES OF ANASTOMOSISA. Single layer technique - • Less ischaemia and tissue necrosis.• Less narrowing of the intestinal lumen. Single layer technique is used in Colon and
Rectum.
B. Two layer technique - • Narrowing of lumen is hardly a problem• No evidence of single layer as better anastomosis over two layers. • Excellent results of single layer obtained by some surgeons are probably because of
expertise of surgeon rather than the technique3.Two layer technique is used in Oesophagus, Stomach, Duodenum and Small Intestine
• Studies have shown that single layer technique is better in extraperitoneal rectum so recommended for very low rectal anastomosis.
• It has been shown that single layer interrupted sutures are reliable for all gastrointestinal anastomoses.
PRINCIPLES OF ANASTOMOSISD. Suture material :• Two -layer anastomoses are made with an inner layer of absorbable suture and
outer layer of non-absorbable sutures. Single layer anastomoses are usually made with non-absorbable materials.
• Polyglycolic acid and Polyglactin most popular absorable suture material.• Non-absorbable sutures on the mucosal aspect of gut provoke a significant foreign
body reaction and granuloma formation. This is of little practical significance in small and large intestinal anastomoses but in gastric mucosa may result in ulceration and clinical symptoms. Theoretically monofilament sutures like nylon or polypropylene may cause less tissue reaction than braided sutures , but the difference in the intestine appears to be relatively minor 5 and the monofilament sutures have inferior handling qualities. Most surgeons prefer braided silk because of good handling.
• The size of the gauge used for anastomoses is not standard but mostly surgeons use 2-0/3-0 sutures in adult surgery as the finer sizes will have tendency to cut through.
PRINCIPLES OF ANASTOMOSISE. Factors affecting the healing of anastomoses
Dehiscence is chiefly a problem in anastomoses in oesophagus, colon and rectum. Local factors :i. Sepsis: Peritoneal sepsis has adverse effect on healing of anastomoses especially in large intestine7. Anastomotic
dehiscence is significant in carcinoma and traumatic injuries of the colon. Faecal soiling of peritoneum during surgery should be avoided.
ii. Mechanical state of the bowel: This is a factor which determines the failure or success of anastomoses in the left colon or rectum. This is major factor for dehiscence which follows primary anastosis of left colon in acute obstruction.Bowel preparation and prophylactic antimicrobial therapy especially systemic is more effective in prevention of postoperative sepsis in colonic surgery8
iii. Drains: Peritoneal drains are put for the purpose of removing any blood or serum after operations involving dissection or mobilization of viscera and in cases having faecal contamination. The drains are not deliberately placed in the vicinity of anastomoses and removed after 48 hrs. Protagonists of use of drain claim that they safeguard the patient by permitting enterocutaneous fistula when anastomotic dehiscence occurs rather than causing faecal peritonitis
iv. Faecal diversion:A proximal loop colostomy may be used for temporary protection of high risk anastomoses such as very low colorectal anastomoses or anastomoses in the presence of unfavourable local conditions. Septic complications will be less severe if diversion has been done in case of dehiscence rather than preventing the dehiscence10.
PRINCIPLES OF ANASTOMOSIS Systemic factors :
i. Advanced malignancyii Malnutrition- reduced collagen synthesis impaired
healingiii Extensive intraoperative blood loss-Hypovolaemia
and tissue hypoxia & Sepsisiv Old agev Preoperative irradiationvi Anaemia
THE ANASTOMOSIS Anastomoses may be made end to end,end to side,side to side, but the method used is fairly standard.
A. End To End Anastomosis1. Small bowel anastomoses : Insertion of posterior outer layer of suture- Non-absorbable silk interrupted submucosal sutures are placed. Inner
layer of sutures- (a) A continuous chromic catgut over –and- over suture technique starting from antimesenteric border through all the layers. (b) Mesenteric corner invagination by Connell suture technique (fig 2). (c) Anterior aspect of the inner layer by over-and-over suture technique but a continuous Connell suture technique is generally preferred. (d) Mucosa and edges of bowel on antimesenteric aspect are invaginated as last Connell suture is pulled tight and tied with starting suture. Insertion of anterior outer layer- Non-absorbable interrupted submucosal silk sutures. Alternatively, Anastomosis beginning with inner layer of sutures: Inner layer, Outer layer on anterior aspect and then outer layer on posterior aspect after rotating the anastomosis.
2. Ileocolic anastomoses : Correction for unequal ends of the bowel: This is required in cases of right hemicolectomy or small bowel
obstruction.(a). Widening the orifice of smaller lumen. Outer layer of submucosal sutures is inserted obliquely on the
antimesenteric border.(b). The open end of the bowel is widened by cutting along the antimesenteric border.Alternatively, end-to-side technique is preferred by some surgeons.
THE ANASTOMOSIS3. Gastroduodenal anastomosis: Billroth I gastroduodenal anastomosis- (a). Meticulous haemostasis to be achieved to prevent serious
postoperative bleeding from suture line because stomach has rich blood supply. (b). Connell suture technique is not haemostatic so ’Loop on the serosa’ technique to be used. This provides effective haemostasis and adequate inversion.
4.Colorectal anastomosis:
Two layer Method: Modified two layer technique is used in extraperitoneal rectal anastomosis. In low colorectal anastomosis where access is restricted, outer layer of submucosal horizontal mattress sutures is inserted. In extraperitoneal rectum these sutures are at right angle to the longitudinal muscle fibres and thus causing less cutting through. A similar technique is recommended for in two layer oesophageal anastomoses.
Single layer Method: This is simple and more satisfactory method for low rectal anastomoses. Mesenteric and antimesenteric silk sutures through all the layers of the bowel wall are inserted. The posterior layer of all the through-and-through sutures are passed and tied at the end. The interval between these sutures should be very small otherwise there is tendency for the eversion of mucosa. Anterior layer is again through all the layers , knotted on the mucosa. A small gap in the last is closed by horizontal submucosal suture. An alternative method of suturing anterior layer is submucosal horizontal mattress sutures.
THE ANASTOMOSIS B.End-to-side Anastomosis
This is mostly used in oesophagus and stomach surgery. Technique involves closure of end of bowel: This is required in cases of right hemicolectomy and subtotal hemicolectomy when end to side anastomosis is performed. Two layer inverting suture technique is used. First layer of continuous horizontal mattress suture. Then continuous over-and-over stitch incorporating all the layers. Finally interrupted submucosal sutures of silk invaginating the ends of bowel.
1. Ileocolic anastomosis: In right hemicolectomy, end of colon is closed and end of ileum is anastomosed to side of colon,
using standard two layer technique. Baker used similar technique in colorectal anastomoses. Side of colon is anastomosed to end of
rectal stump.2. Oesophagogastric and oesophago-jejunal anastomosis In operation for oesophagogastrectomy, the proximal end of the gastric remanant is closed and
end of oesophagus is sutured to front of stomach using two layer technique with outer layer of horizontal mattress. After total gastrectomy, the end of oesophagus is anastomosed to the side of jejunum using two layer technique. A defunctioned loop or Roux-en-y loop of jejunum is used.
THE ANASTOMOSIS
3. Gastrojejunal anastomosis: In partial gastrectomy, gastric remanant is anastomosed end-to-side to
jejunum using two layer technique. Double layer of catgut sutures are applied in view of rich blood supply. Loop on serosa sutures are applied for good haemostasis. Connell sutures can also be applied if haemostasis have been controlled by individually securing the vessels.
C. Side-to –Side Anastomosis: This method is used in gastric surgery to provide drainage of the stomach
after vagotomy or to relieve gastric outlet obstruction. Elsewhere as palliative measure in malignant disease. Gastro-jejunostomy in malignancy of distal stomach, Ileocolic in malignancy of right colon and cholecysto-jejunostomy in bile duct malignancy.

Thank you