Embed Size (px)
Citation preview

CAMANO ISLAND COFFEE BREW GUIDE11 WAYS TO BREW GREAT COFFEE AT HOME

JAMIE PARRISH WRITER
Brew Method: Chemex Favorite Roast: Peru Dark
BEN PICTON DESIGNER
Brew Method: Syphon Favorite Roast: Colombia Reserve
TJ FITTIS EDITOR
Brew Method: French Press Favorite Roast: Honduras Dark
ROBIN GUNDERSON PHOTOGRAPHER
Brew Method: Pour-Over Favorite Roast: Papua New Guinea Light
MEET THE TEAM
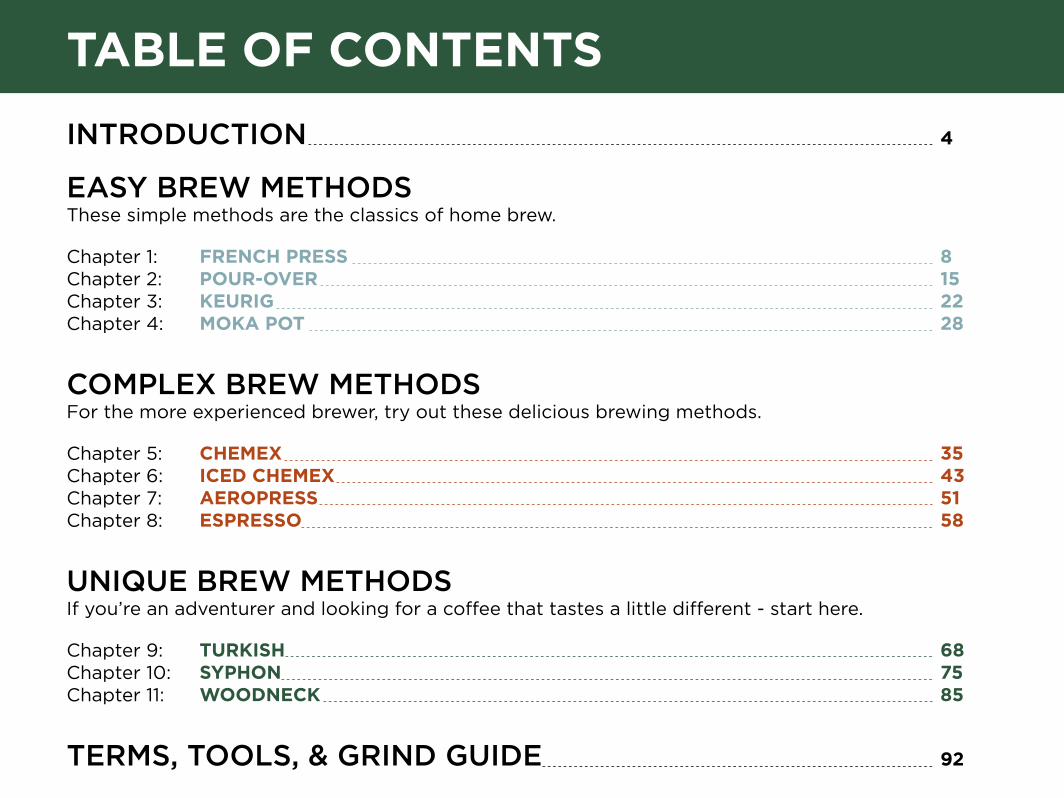
TABLE OF CONTENTS
INTRODUCTION
EASY BREW METHODS These simple methods are the classics of home brew.
COMPLEX BREW METHODS For the more experienced brewer, try out these delicious brewing methods.
UNIQUE BREW METHODSIf you’re an adventurer and looking for a coffee that tastes a little different - start here.
TERMS, TOOLS, & GRIND GUIDE
Chapter 1:Chapter 2:Chapter 3:Chapter 4:
FRENCH PRESSPOUR-OVERKEURIGMOKA POT
Chapter 5:Chapter 6:Chapter 7:Chapter 8:
CHEMEXICED CHEMEXAEROPRESSESPRESSO
Chapter 9:Chapter 10:Chapter 11:
TURKISH SYPHON WOODNECK
4
92
8152228
35435158
687585

4camanoislandcoffee.com (866) 387-5282
INTRODUCTION
Welcome to the Camano Island Coffee Brew Guide: 11 Ways to Make Great Coffee at Home. We’ve compiled many of our favorite homebrew methods to share with you. Whether you’re new to homebrew coffee, or searching for a new method, this is your one-stop shop for all your homebrewing needs.
HELPFUL TIPS BEFORE YOU GET STARTED
NEVER USE BOILING WATER Boiling water will scorch your grounds and cause a burnt flavor in your coffee. Always remove your kettle from the heat source at least 30 seconds before using.
PRE-RINSE YOUR FILTERIf your brewing method uses a paper filter, we recommend giving it a pre-rinse with hot water to remove any papery taste. If your brewing method uses a cloth filter, be sure to boil it the first time you use it and always store it in a dish or bag of water in the fridge. Give it a rinse with hot water before brewing as well.

5camanoislandcoffee.com (866) 387-5282
INTRODUCTION
HEAT YOUR MUGA hot mug keeps your coffee piping hot. The best way to do this is while pre-rinsing your filter. Simply place the filter over your mug as you rinse it so the hot water warms your mug too! Use this trick to ensure that your coffee stays warm and wonderful for as long as possible.
STORE YOUR COFFEE IN AN AIRTIGHT PLACEForget about putting it in the freezer - that doesn’t keep it fresh at all! Extreme temperatures change the coffee’s flavorful oils. This will give you a tainted flavor. Simply place your opened coffee bag in a zip-loc bag and keep it in the cupboard.
GRIND YOUR COFFEE JUST BEFORE YOU USE ITThe flavor of your coffee changes dramatically only minutes after you grind it. That’s why it’s best to grind your coffee right before you brew it. See our Grind Guide on page 98 to learn more.

6
WHY CAMANO ISLAND COFFEE
Whether you’re brewing Pour-Over, Turkish, or any other method, there is one key that can make or break your drink: the type of coffee you use.
4 REASONS YOU SHOULD DRINK CAMANO ISLAND COFFEE
ONLY ORGANIC All Camano Island Coffee is USDA Certified Organic. No pesticides, no herbicides, no harmful chemicals. Coffee is sprayed with more chemicals than any other crop outside of tobacco. That’s why we commit to only buying USDA Certified Organic coffee beans. These are the tastiest and healthiest beans on the market.
ONLY SHADE GROWNDirect sunlight is not good for coffee - it causes the beans to grow too quickly, and adds acidity and caffeine to the bean. Shade grown beans develop a smoother flavor, less acidity, and a lot less caffeine. This means no heartburn and no jitters - just a tasty cup of coffee.

7
WHY CAMANO ISLAND COFFEE
ONLY FRESHLY ROASTEDStraight from our roaster to your door. The best tasting coffee comes from freshly roasted beans. Even a few weeks on the shelf can be enough to diminish the flavor of your coffee. At Camano Island Coffee we are committed to shipping freshly roasted coffee beans straight to your door. Your beans will never sit around gathering dust. Just take a whiff of your next Coffee Lover’s Box shipment and you’ll know you’re getting the freshest beans possible.
ONLY FAIRLY TRADEDBy paying a fair wage for a beautiful product, we’re empowering coffee farmers around the world to support their families. This means the necessities of food, clothing, shelter, and an education for their children. This means ending generational poverty.
In addition, Camano Island Coffee partners with Agros International, a Seattle, WA based non-profit that assists responsible coffee farmers in purchasing their own land through low-interest or interest-free loans. When a farmer owns land, he owns his destiny and creates generational change for his family.

FRENCH PRESS
Skill Level
12 Minutes
The exact origin of the French Press has been subject to much debate. Folklore says it was an elderly Frenchman in the 1850s, while the Italians claim to have produced the most functional model in the early 1900s. Of course, the fight to take the credit is understandable, as French Press is one of the most-loved brew methods around the world. For this brew, we used a Bodum 32oz french press.
camanoislandcoffee.com
ShareThisEbook

9camanoislandcoffee.com (866) 387-5282
WHAT YOU NEED AMOUNTS
COFFEE
4 tbsp
32 g
8 tbsp
64 g
WATER
16 oz
473 g
32 oz
946 g
FRENCH PRESS
COFFEE
FILTERED WATER
WOOD STIRRER
GOOSENECK KETTLE
GRINDER
:
:
:
:
:
10
GROUNDSTo start, we suggest a ratio of 2
tablespoons of grounds for every
8oz of water. The coffee should be
ground on the coarsest setting - a
#9 on an industrial grinder. If your
grounds are too fine, you will get
“muddy” coffee in your press.
WATERHeat your water until it’s boiling,
and then remove from the heat
source for 30 seconds before
pouring (boiling water will burn
your grounds and ruin your drink!) -
The best temperature for brewing is
between 195°-205°.
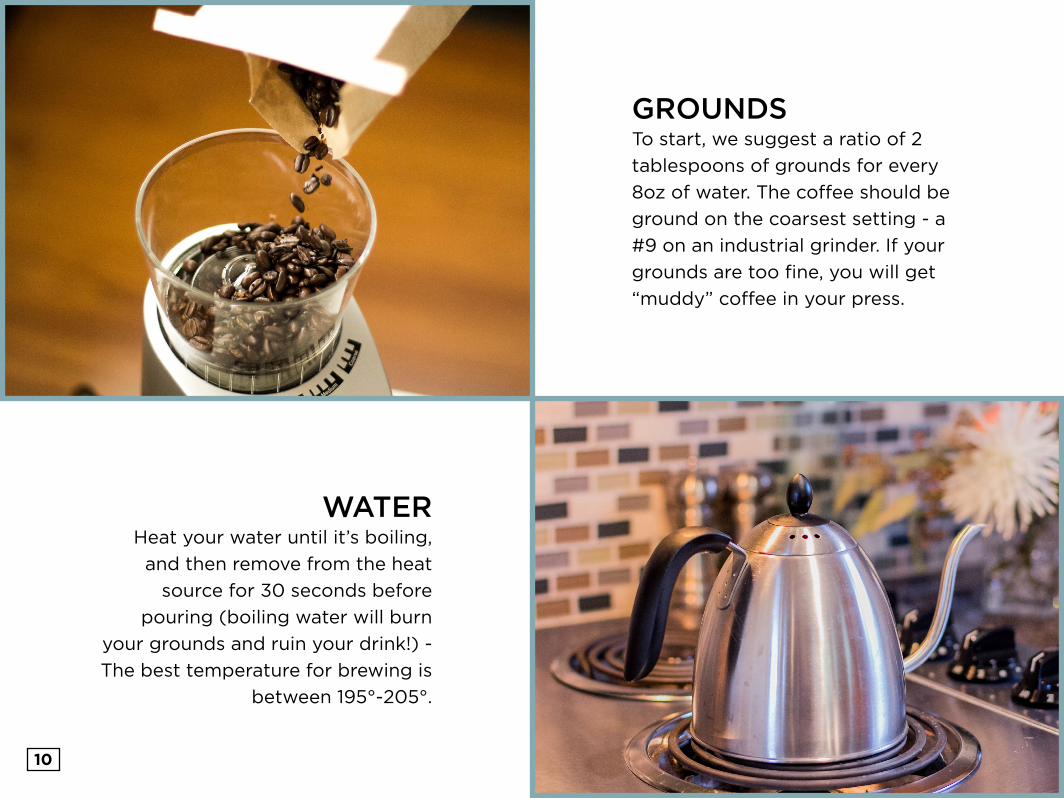
ADDING GROUNDSDrop the grounds into the french
press, and pour enough water over
them until they are fully covered.
BLOOMPause and let the coffee bloom for
45 seconds.

12
ADDING WATERContinue to pour the rest of your
water into the press. You can
now let it brew for 3-5 minutes
(personally, we think 4 minutes is
the perfect time, but it’s all about
your own taste preference).
BREAKING THE CRUSTOnce the time is up, use a small
bamboo paddle or chopstick (not
metal - you don’t want to crack the
glass) to break the crust and give the
grounds a quick stir.
13
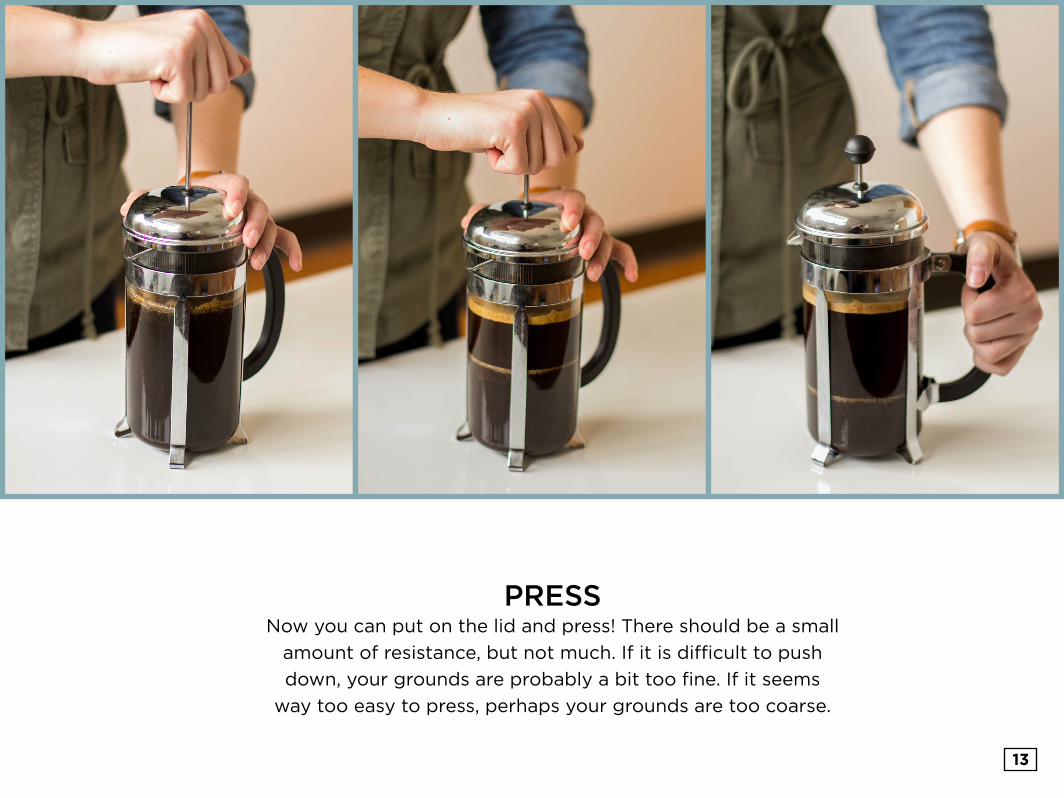
PRESSNow you can put on the lid and press! There should be a small
amount of resistance, but not much. If it is difficult to push
down, your grounds are probably a bit too fine. If it seems
way too easy to press, perhaps your grounds are too coarse.

ENJOYPour into your
favorite mug, and
enjoy your marvelous
cup of delicious
French Press.
POUR-OVER
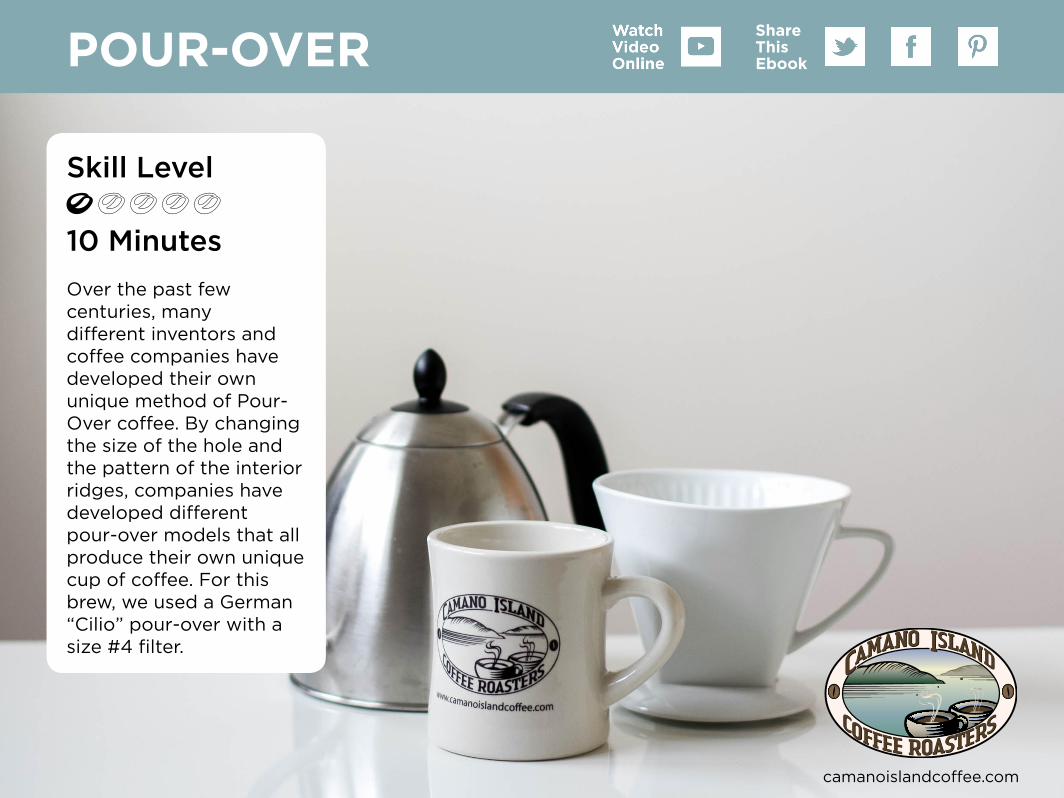
Skill Level
10 Minutes
Over the past few centuries, many different inventors and coffee companies have developed their own unique method of Pour-Over coffee. By changing the size of the hole and the pattern of the interior ridges, companies have developed different pour-over models that all produce their own unique cup of coffee. For this brew, we used a German “Cilio” pour-over with a size #4 filter.
camanoislandcoffee.com
ShareThisEbook
16camanoislandcoffee.com (866) 387-5282
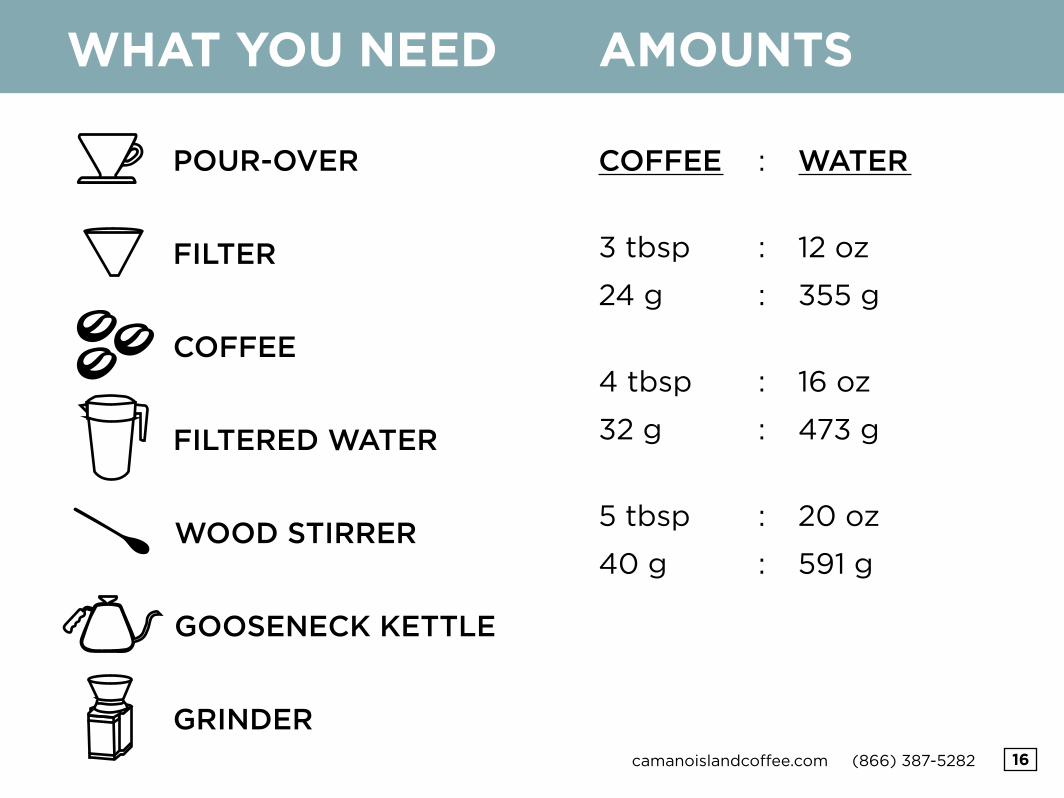
WHAT YOU NEED AMOUNTS
COFFEE
3 tbsp
24 g
4 tbsp
32 g
5 tbsp
40 g
WATER
12 oz
355 g
16 oz
473 g
20 oz
591 g
POUR-OVER
FILTER
:
:
:
:
:
:
:
COFFEE
FILTERED WATER
WOOD STIRRER
GOOSENECK KETTLE
GRINDER

17
GROUNDSTo start out, measure out your
Camano Island Coffee and set your
grinder to a medium-fine grind.
Also, that’s #5 or autodrip on an
industrial grinder.
WATERBring your water to a boil and then
remove from heat. Never pour
boiling water straight onto coffee
grounds - it will scorch them and
give your coffee a burnt flavor.
Allow the water to cool for 30
seconds (the temperature should
be between 195°-205°) before you
proceed to the next step.
18
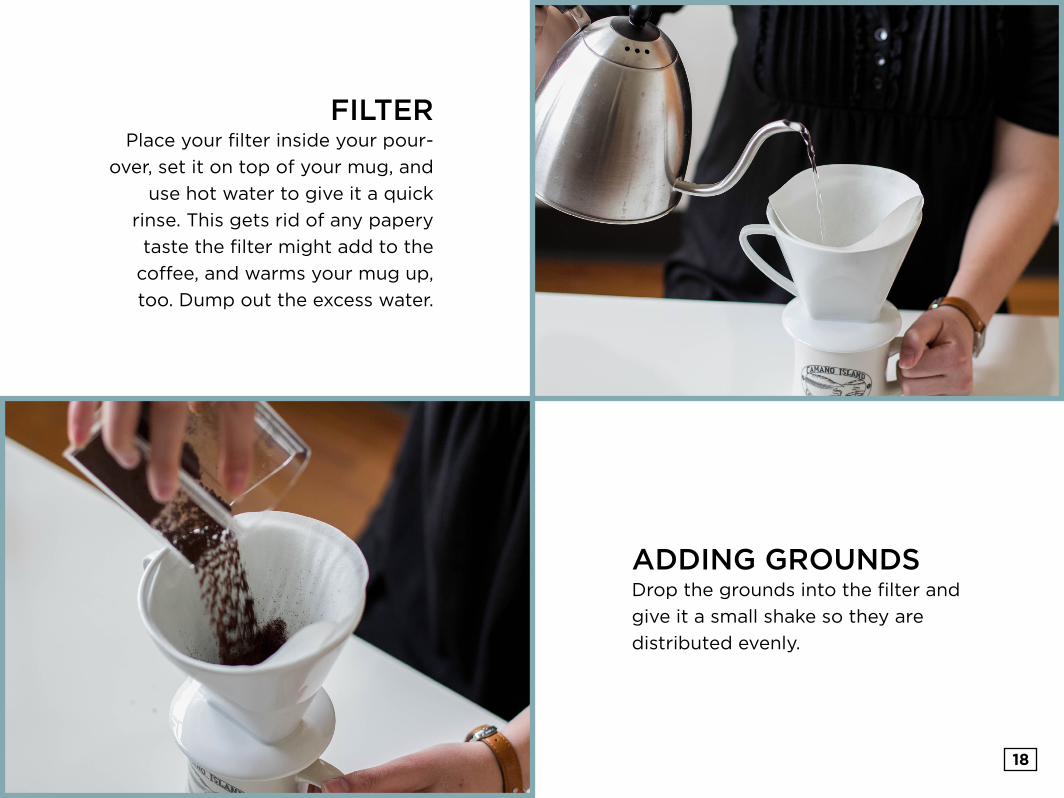
FILTERPlace your filter inside your pour-
over, set it on top of your mug, and
use hot water to give it a quick
rinse. This gets rid of any papery
taste the filter might add to the
coffee, and warms your mug up,
too. Dump out the excess water.
ADDING GROUNDSDrop the grounds into the filter and
give it a small shake so they are
distributed evenly.

19
POURINGGrab your kettle and begin pouring
the water in a slow, circular motion
outward from the center. Only
pour until the grounds are slightly
covered with water, then stop.
BLOOMLet the grounds bloom for 45
seconds, then use a small wooden
paddle or chopstick to give the
grounds a quick stir. By stirring the
grounds you are ensuring they are
evenly covered with water, which
helps create an even extraction.
20
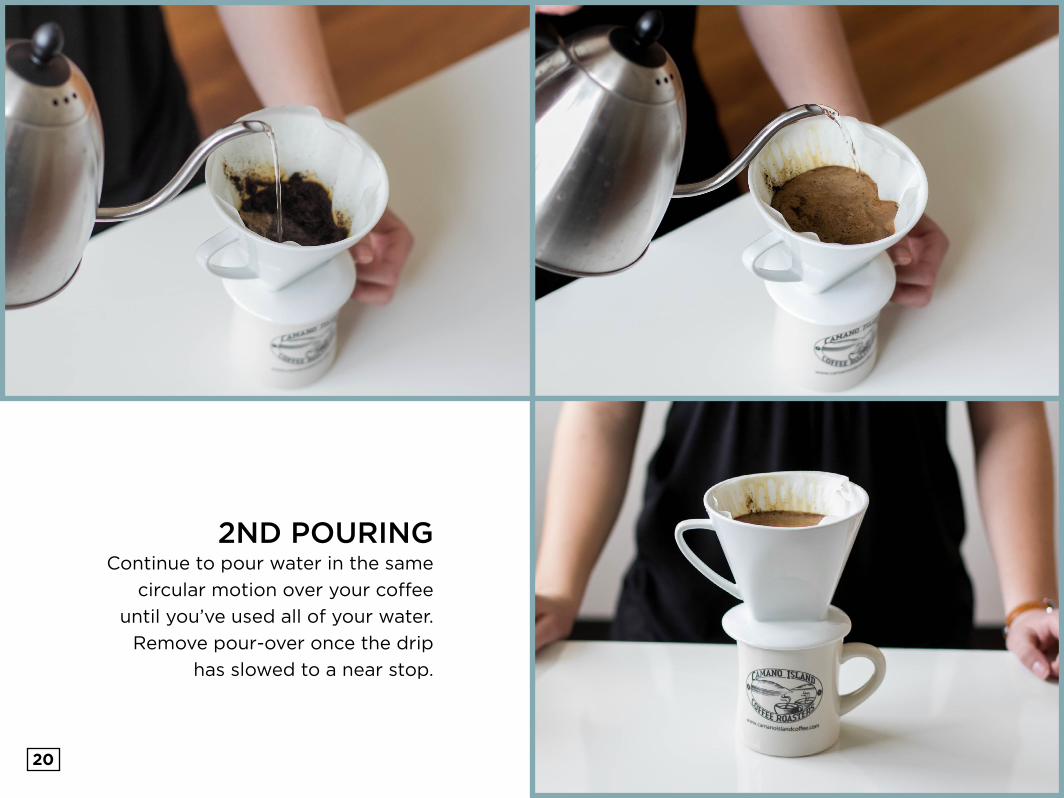
2ND POURINGContinue to pour water in the same
circular motion over your coffee
until you’ve used all of your water.
Remove pour-over once the drip
has slowed to a near stop.

ENJOYYou can now enjoy
your fresh cup of
Pour-Over coffee.

KEURIG SOLOFILL
Skill Level
5 Minutes
The Keurig is one of America’s new favorite ways to brew single-serve coffee. It’s fast and easy, but all those disposable K-cups can be harmful to the environment and your wallet. How can you avoid these problems? By using a refillable filter like the Solofill, you can save money and save the environment.
camanoislandcoffee.com
ShareThisEbook

23camanoislandcoffee.com (866) 387-5282
WHAT YOU NEED AMOUNTS
COFFEE
1 tbsp
8 g
1.5 tbsp
12 g
2 tbsp
16 g
WATER
6 oz
178 g
8 oz
207 g
10 oz
236 g
KEURIG
SOLOFILL
:
:
:
:
:
:
:
COFFEE
FILTERED WATER
GRINDER

24
GROUNDSFirst, you’ll want your coffee ground to a medium grind - a #6 on
an industrial grinder. This is important, because a coarse grind will
produce a weak coffee, but a fine grind will clog the machine.
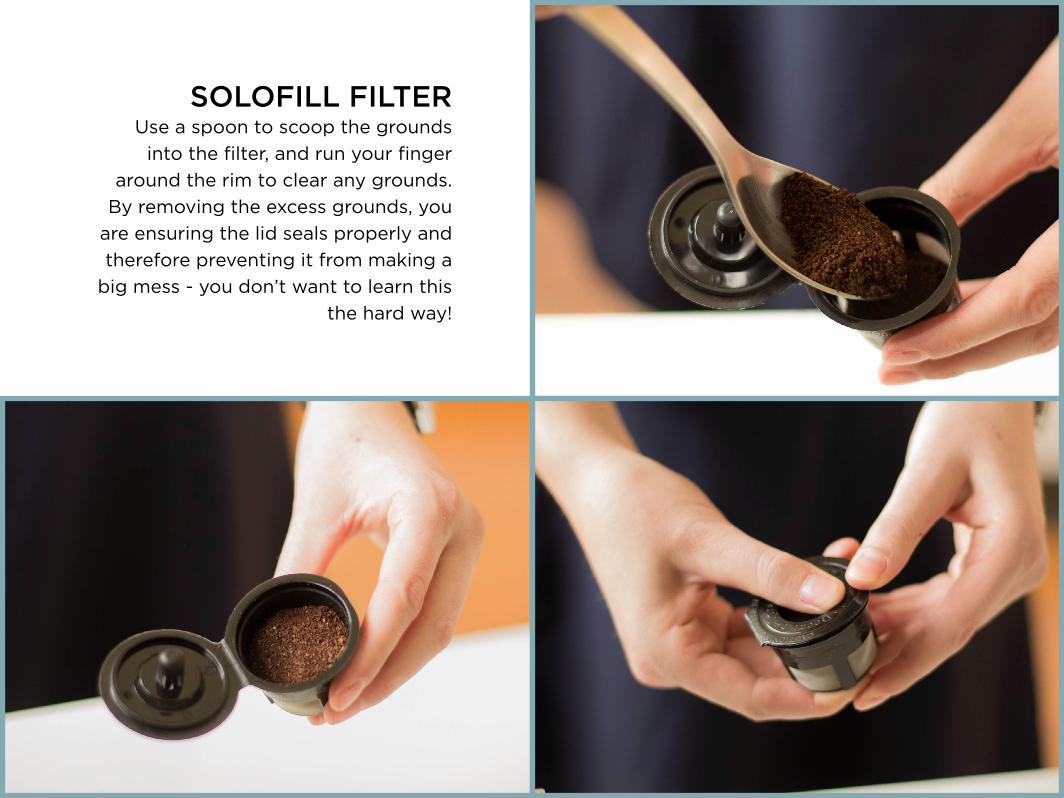
SOLOFILL FILTERUse a spoon to scoop the grounds
into the filter, and run your finger
around the rim to clear any grounds.
By removing the excess grounds, you
are ensuring the lid seals properly and
therefore preventing it from making a
big mess - you don’t want to learn this
the hard way!

26
BREWOnce you’re ready, close the top of the
lid and place your favorite coffee mug
underneath the spout. Press the “Brew”
button and in just a minute you can enjoy
your fresh Camano Island Coffee!

27
FINAL NOTEYou might be tempted to try to brew
twice using the same grounds, but don’t
do it! The second round will taste like
coffee-tinged water. Simply let the used
grounds cool a bit, dump them out, give
the filter a quick rinse, and you’re ready
to brew another cup.
ENJOYSit back, relax, and enjoy the simplicity
of the Keurig matched with the taste of
your favorite Camano Island Coffee.

MOKA POT
Skill Level
15 Minutes
Moka Pot was invented in 1933 when Italy’s economy wasn’t doing so swell. It was marketed as an affordable way to enjoy daily espresso at home, and thereby avoiding cafe prices. Today, many people still use the Moka Pot, and it’s known as one of the best ways to get “Stovetop Espresso.”
camanoislandcoffee.com
ShareThisEbook

29camanoislandcoffee.com (866) 387-5282
WHAT YOU NEED AMOUNTS
*NOTEThe amount of coffee you need depends on the size of your moka pot. You’ll want enough to fill the funnel filter of your pot without packing down the grounds. The same goes for water, so measure how much water fills the bottom half of your pot, up to the screw, before beginning.
MOKA POT
COFFEE
FILTERED WATER
GOOSENECK KETTLE
GRINDER
COFFEE*
4 tbsp
32 g
8 tbsp
64 g
WATER
16 oz
473 g
32 oz
946 g
:
:
:
:
:

30
GROUNDSGrind your beans on a medium
grind, which is a #6 or Drip Flat on
an industrial grinder.
WATERIt’s not recommended that you boil
your water directly in the moka pot,
because it might give it a metallic
taste, so heat it in a separate kettle
before beginning. Carefully pour
the boiling water right into the
bottom of the moka pot, filling it
until the water line is even with the
screw on the side.

ASSEMBLYPut the grounds in the funnel filter,
using your finger to even it out and
remove excess coffee. Place the
filter on the base, and screw the top
half on. Caution: the base will be
hot from the hot water, you might
want to use a towel or hot mitt
while you do this step.

32
BEGIN BREWOpen the lid and set the moka pot
onto your stovetop on a medium
setting. To avoid burning your pot,
don’t turn the burner any hotter than
medium. Also be careful not to have
the handle directly over the flame, as
it could melt if it gets too hot.
33
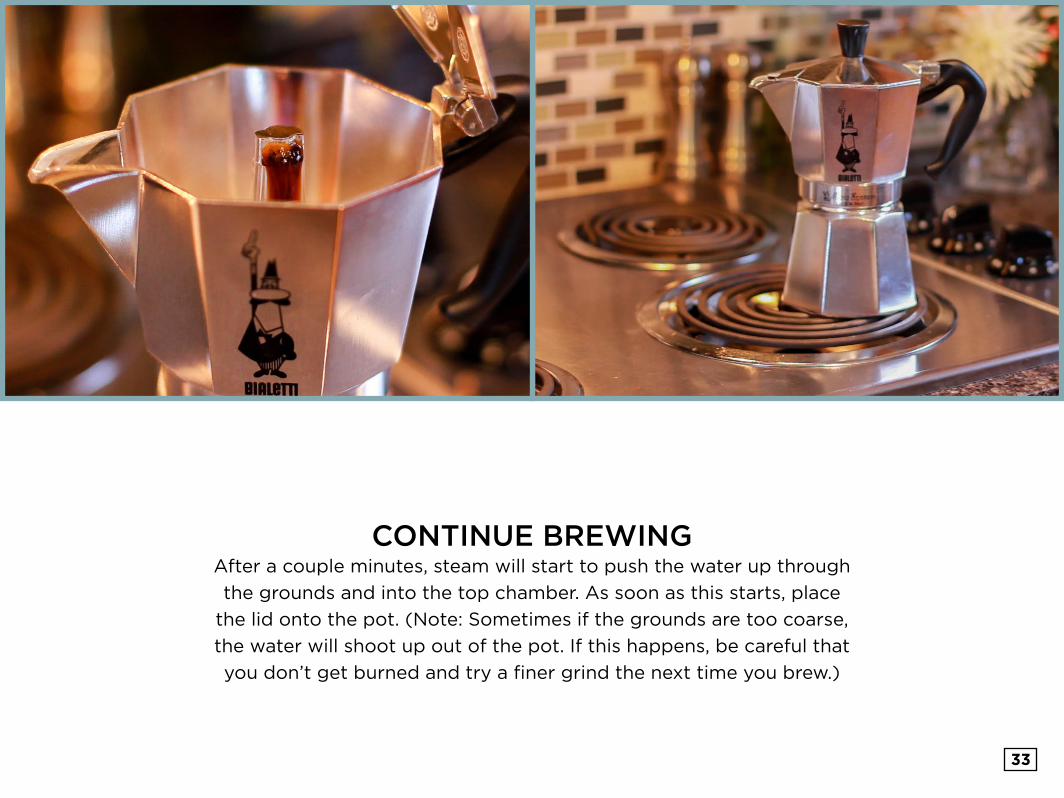
CONTINUE BREWINGAfter a couple minutes, steam will start to push the water up through
the grounds and into the top chamber. As soon as this starts, place
the lid onto the pot. (Note: Sometimes if the grounds are too coarse,
the water will shoot up out of the pot. If this happens, be careful that
you don’t get burned and try a finer grind the next time you brew.)
34
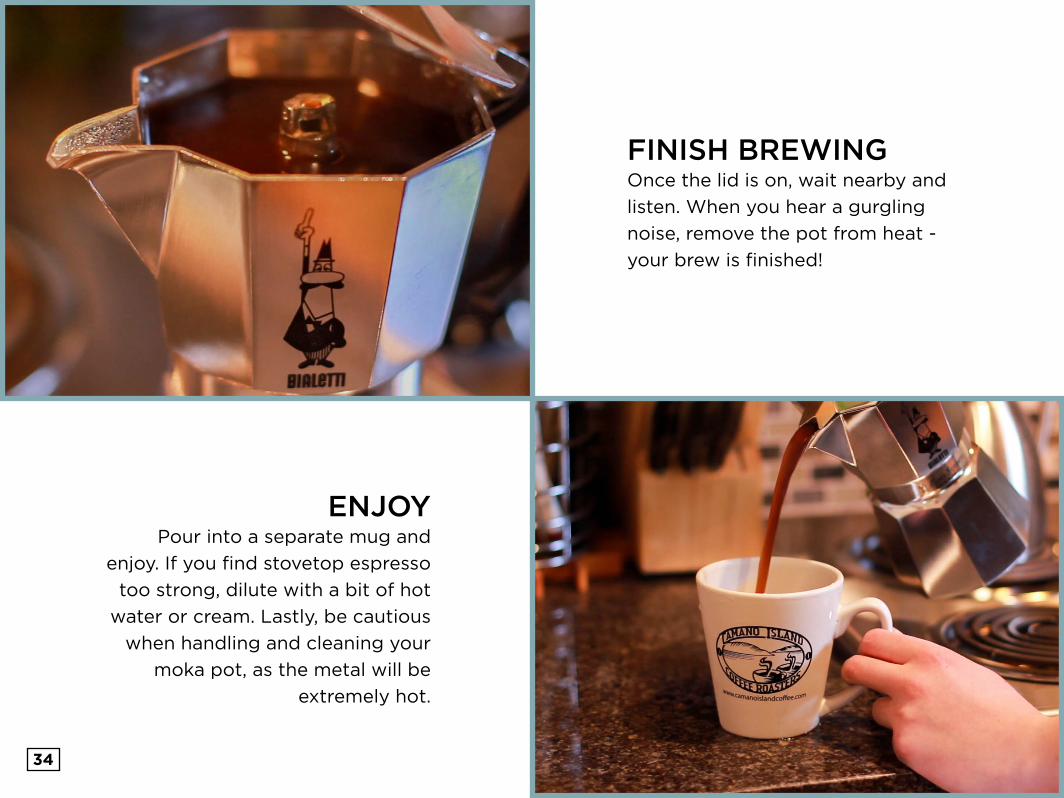
FINISH BREWINGOnce the lid is on, wait nearby and
listen. When you hear a gurgling
noise, remove the pot from heat -
your brew is finished!
ENJOYPour into a separate mug and
enjoy. If you find stovetop espresso
too strong, dilute with a bit of hot
water or cream. Lastly, be cautious
when handling and cleaning your
moka pot, as the metal will be
extremely hot.
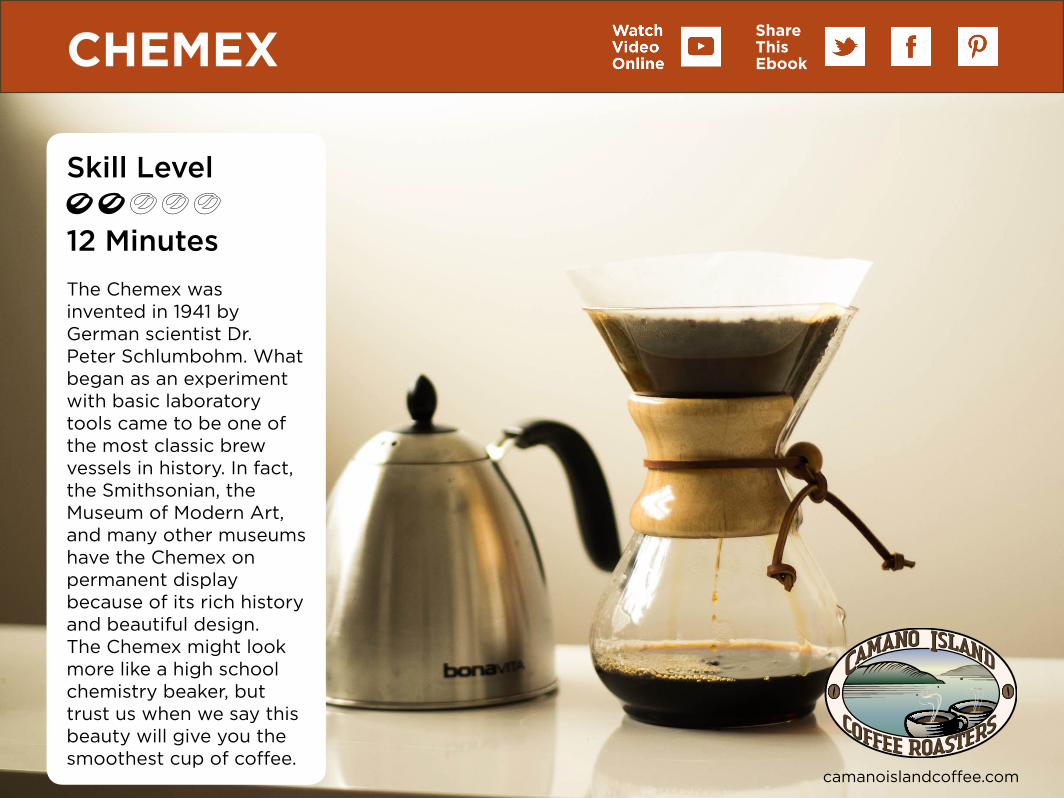
CHEMEX
Skill Level
12 Minutes
The Chemex was invented in 1941 by German scientist Dr. Peter Schlumbohm. What began as an experiment with basic laboratory tools came to be one of the most classic brew vessels in history. In fact, the Smithsonian, the Museum of Modern Art, and many other museums have the Chemex on permanent display because of its rich history and beautiful design. The Chemex might look more like a high school chemistry beaker, but trust us when we say this beauty will give you the smoothest cup of coffee.
camanoislandcoffee.com
ShareThisEbook

36camanoislandcoffee.com (866) 387-5282
AMOUNTSWHAT YOU NEED
COFFEE
FILTERED WATER
GOOSENECK KETTLE
GRINDER
CHEMEX
CHEMEX FILTER
COFFEE
4 tbsp
32 g
6 tbsp
48 g
8 tbsp
64 g
10 tbsp
80 g
WATER
16 oz
444 g
32 oz
880 g
40 oz
1182 g
50 oz
1478 g
:
:
:
:
:
:
:
:
:
CHEMEX
3 cup
6 cup
8 cup
10 cup
:
:
:
:
:

37
GROUNDSGrind your coffee on a coarse
grind - for industrial grinders, a
#9 setting - to get the best cup of
Chemex. If your grind is too fine,
it’ll back up the filter and cause
it to rip. We learned this the hard
and messy way!
WATERBring your water to a boil and then
remove from heat. Never pour
boiling water straight onto coffee
grounds - it will scorch them and
give your coffee a burnt flavor.
Allow the water to cool for 30
seconds (the temperature should
be between 195°-205°) before you
proceed to the next step.

FILTERChemex filters are a bit unusual. As much
as you’ll want to, don’t unfold it all the way.
Instead, pull just one edge away from the
three others. Now your filter will resemble
a normal Pour-Over filter. There will be one
edge on one side, and three on the other. Set
it into the Chemex with the crease sitting in
the pouring channel. Cone filters you use for
Pour-Over, like a #4 or #6, won’t fit properly
in a Chemex and are too thin to properly filter
for Chemex. Only use Chemex filters.

39
RINSE FILTERUse your hot water to give the filter
a quick rinse, which removes any
papery taste that the filter might add
to your coffee. This hot water will also
heat the carafe - keeping your coffee
hotter for longer. Dump out the excess
water before beginning your brew.
ADDING GROUNDSPlace your grounds into the
filter. Gently shake the Chemex
to level out your grounds.
You’re now ready to start the
brewing process.

40
BLOOMBegin pouring the water
over the grounds in a circular
pattern, until the water has
barely covered the grounds.
Let it bloom for 30 seconds.
41
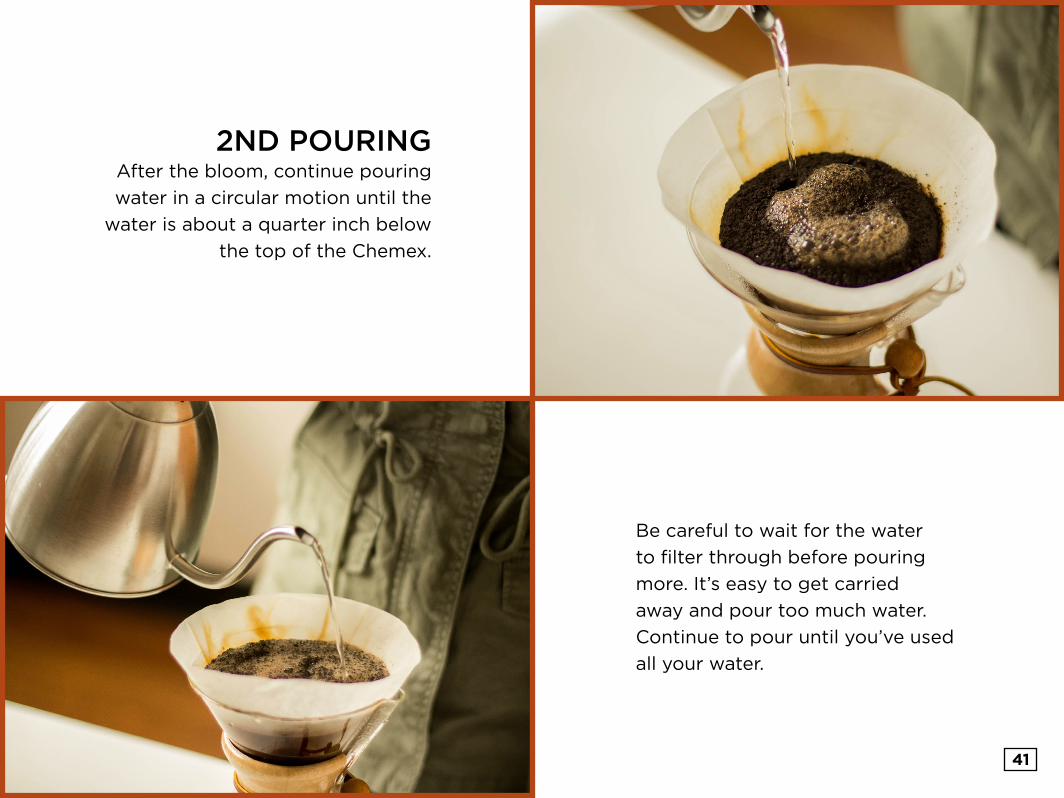
2ND POURINGAfter the bloom, continue pouring
water in a circular motion until the
water is about a quarter inch below
the top of the Chemex.
Be careful to wait for the water
to filter through before pouring
more. It’s easy to get carried
away and pour too much water.
Continue to pour until you’ve used
all your water.

ENJOYGrab your favorite mug and discover a new bold
take on your favorite Camano Island Coffee.
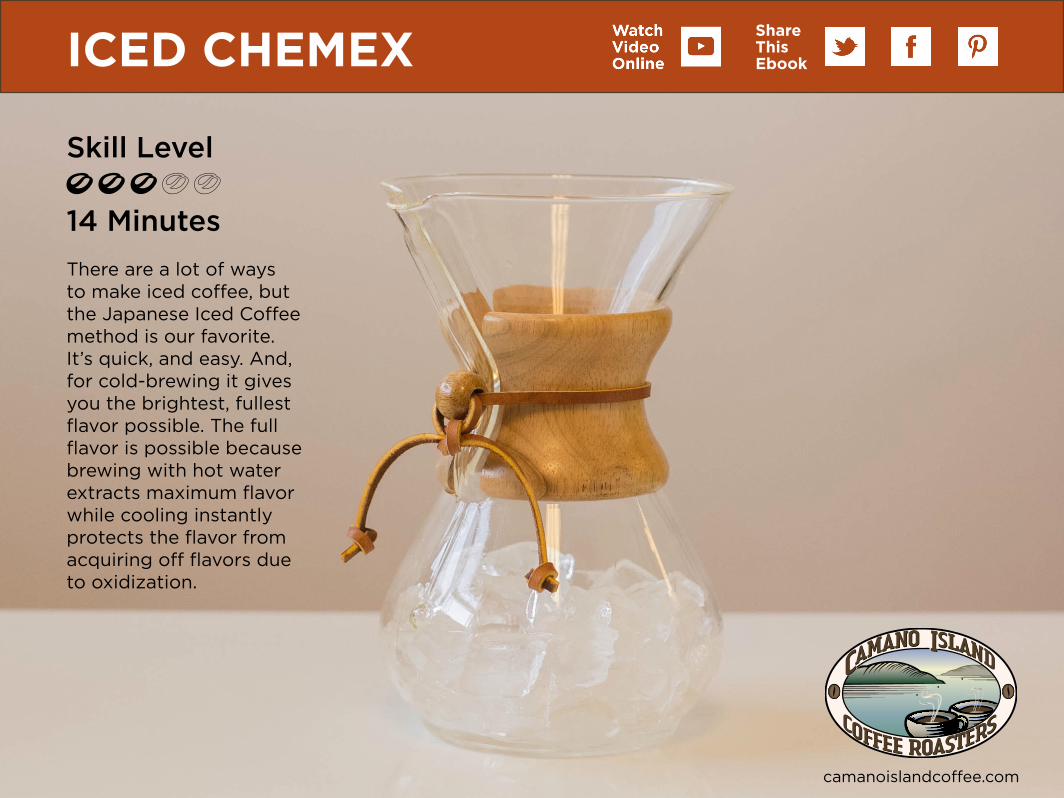
ICED CHEMEX
Skill Level
14 Minutes
There are a lot of ways to make iced coffee, but the Japanese Iced Coffee method is our favorite. It’s quick, and easy. And, for cold-brewing it gives you the brightest, fullest flavor possible. The full flavor is possible because brewing with hot water extracts maximum flavor while cooling instantly protects the flavor from acquiring off flavors due to oxidization.
camanoislandcoffee.com
ShareThisEbook
44camanoislandcoffee.com (866) 387-5282
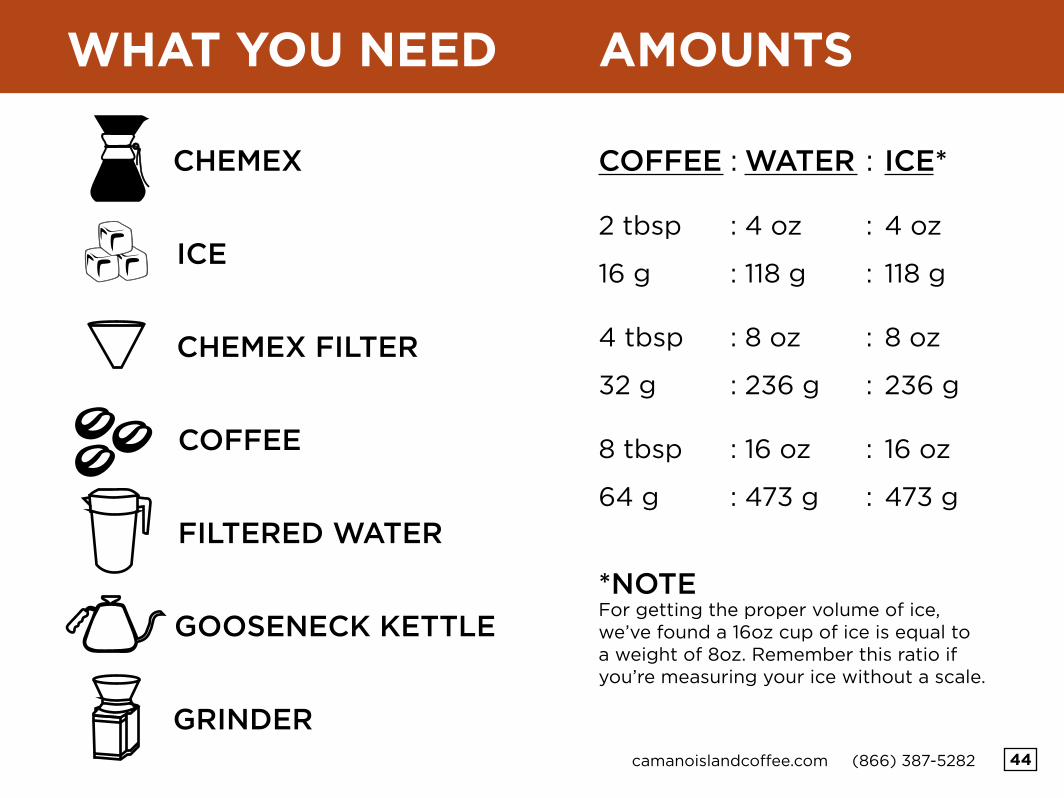
AMOUNTSWHAT YOU NEED
CHEMEX
COFFEE
FILTERED WATER
GOOSENECK KETTLE
GRINDER
CHEMEX FILTER
ICE
*NOTEFor getting the proper volume of ice, we’ve found a 16oz cup of ice is equal to a weight of 8oz. Remember this ratio if you’re measuring your ice without a scale.
COFFEE
2 tbsp
16 g
4 tbsp
32 g
8 tbsp
64 g
WATER
4 oz
118 g
8 oz
236 g
16 oz
473 g
:
:
:
:
:
:
:
ICE*
4 oz
118 g
8 oz
236 g
16 oz
473 g
:
:
:
:
:
:
:
45
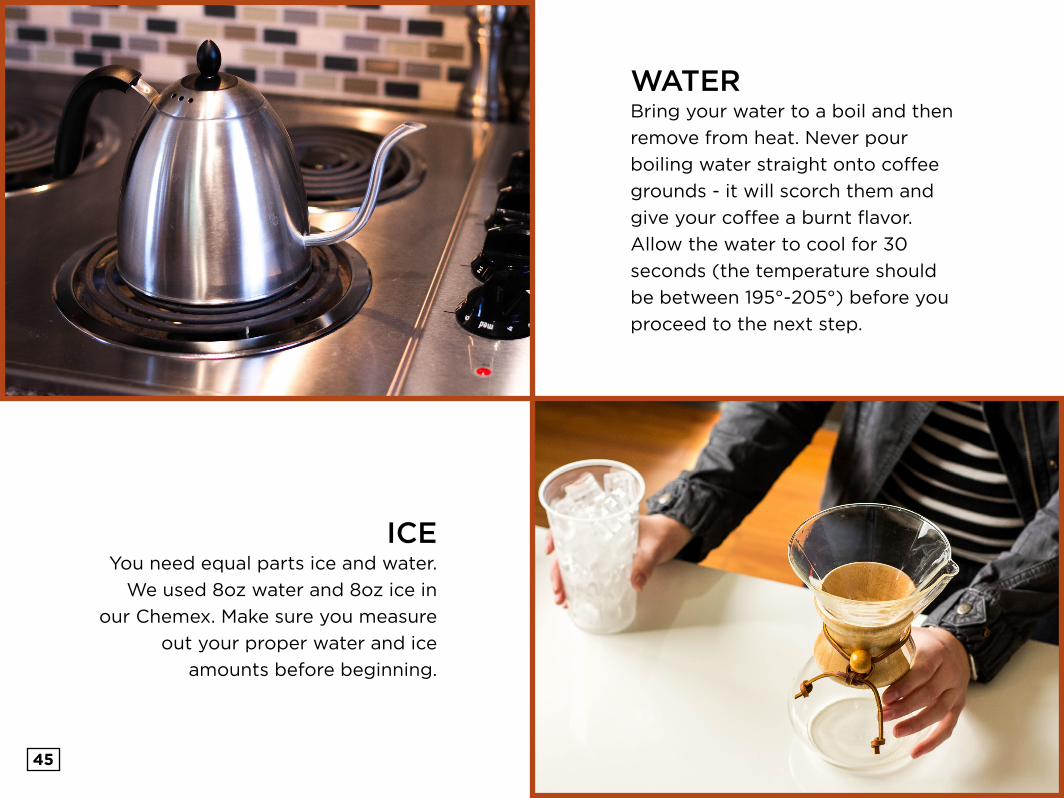
WATERBring your water to a boil and then
remove from heat. Never pour
boiling water straight onto coffee
grounds - it will scorch them and
give your coffee a burnt flavor.
Allow the water to cool for 30
seconds (the temperature should
be between 195°-205°) before you
proceed to the next step.
ICEYou need equal parts ice and water.
We used 8oz water and 8oz ice in
our Chemex. Make sure you measure
out your proper water and ice
amounts before beginning.

46
RINSE FILTERBefore unfolding your Chemex filter
place your Chemex filter over your
sink and pour hot water (not from
your pre-measured amount) over
the filter. This will remove the papery
taste from the filter.
GROUNDSAdditionally, you’ll want 4
tablespoons of coarsely ground
coffee. (Set an industrial grinder to a
#9, or “French Press” setting.)
47
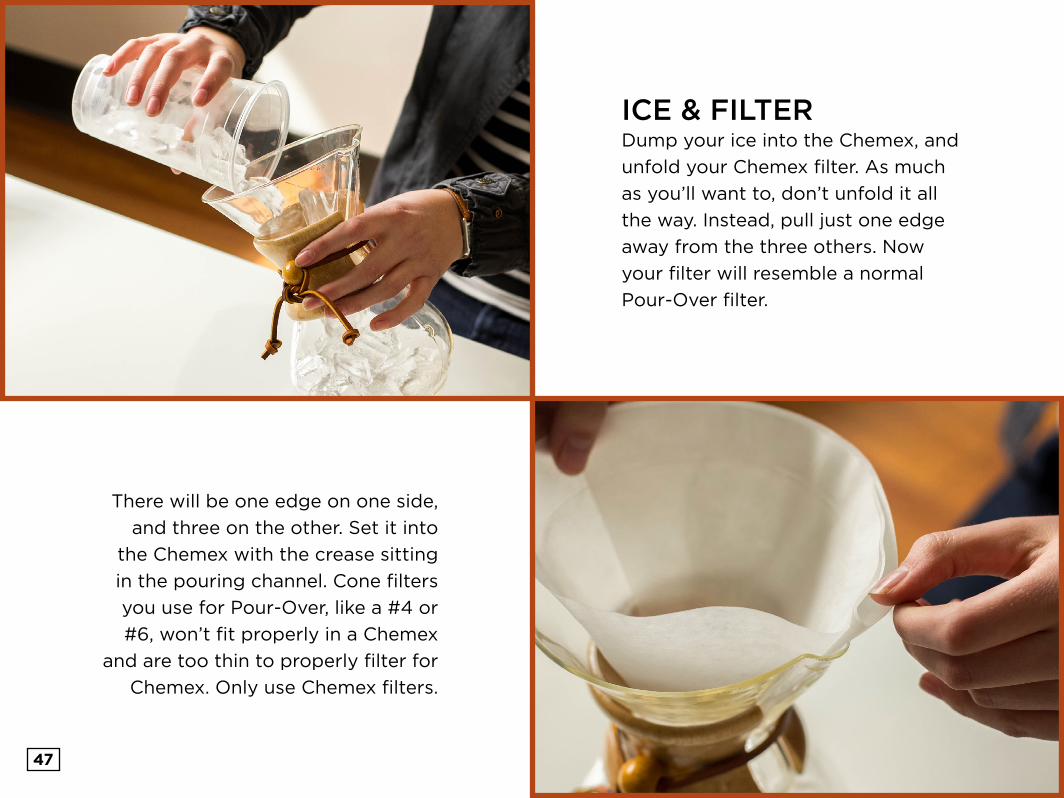
There will be one edge on one side,
and three on the other. Set it into
the Chemex with the crease sitting
in the pouring channel. Cone filters
you use for Pour-Over, like a #4 or
#6, won’t fit properly in a Chemex
and are too thin to properly filter for
Chemex. Only use Chemex filters.
ICE & FILTERDump your ice into the Chemex, and
unfold your Chemex filter. As much
as you’ll want to, don’t unfold it all
the way. Instead, pull just one edge
away from the three others. Now
your filter will resemble a normal
Pour-Over filter.

48
ADD GROUNDS & BLOOMAdd the grounds into the filter and begin
pouring your hot water over the grounds
until they are covered. Let the grounds
bloom for 30 seconds.

POURINGContinue to pour the rest of your 8oz
of water over the grounds in a slow,
circular motion. The ice will begin to
melt - that’s okay.
FINAL NOTESOnce the water has fully filtered
through, remove the filter. Take care
when pouring your iced coffee - the ice
tends to slide out quickly.
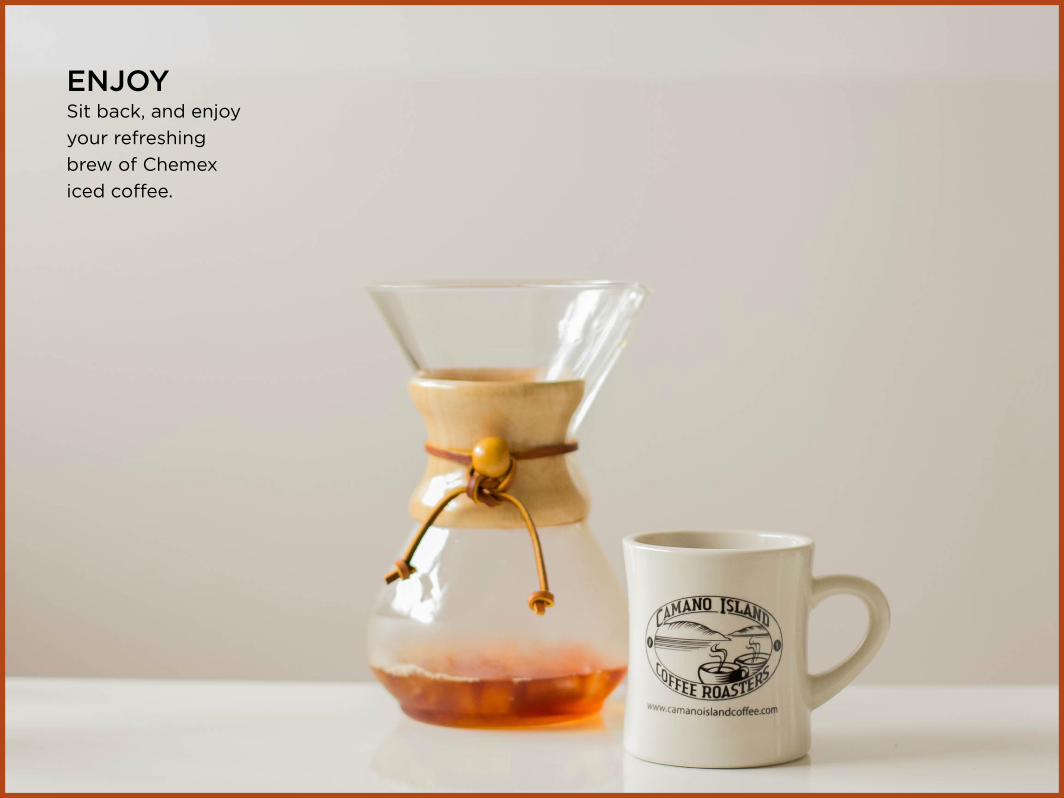
ENJOYSit back, and enjoy
your refreshing
brew of Chemex
iced coffee.

AEROPRESS
Skill Level
10 Minutes
Aerobie, the company that invented the Aeropress, is not a coffee company by origin. Their first product was actually the Aerobie Pro - a flying disk. Alan Adler, the founder of the company, had invented many disk-like toys before he invented the Aeropress. Today, Aeropress is Aerobie’s #1 product and an extremely popular method of one cup brewing. The Aeropress produces an espresso strength coffee and as a result, has become known as the “poor man’s espresso.”
camanoislandcoffee.com
ShareThisEbook

52camanoislandcoffee.com (866) 387-5282
AMOUNTSWHAT YOU NEED
COFFEE
FILTERED WATER
GOOSENECK KETTLE
GRINDER
AEROPRESS
CIRCULAR FILTER
TOOLS INCLUDED
COFFEE
1 scoop
16 g
WATER
12 oz
355 g
:
:
:

53
GROUNDSYou’ll want one heaping Aeropress
scoop of finely ground coffee to
start - a #4 grind on industrial
machines.
WATERBring your water to a boil and then
remove from heat. Never pour boiling
water straight onto coffee grounds - it
will scorch them and give your coffee a
burnt flavor. Allow the water to cool for
30 seconds (the temperature should be
between 195°-205°) before you proceed
to the next step.

54
FILTERPlace the paper filter into the plastic filter, screw it
onto the Aeropress and set it over your mug. From
here, you can wet the filter with your hot water, to
remove the papery taste and heat your press and
mug. Dump out the water before proceeding.

55
ADD GROUNDS & BLOOMDrop the grounds into the vessel, and add
just enough water to cover them. Let them
bloom for 30 seconds before continuing.
POURINGAfter the bloom, pour more hot water into
the Aeropress, until the water level is just
above the blue number 3.

STIRRING AND PRESSUse the paddle that comes with your
press to give the grounds a stir for about
5 seconds, then place the plunger into
the tube. From here, slowly press the
coffee through the filter until you hear a
hissing noise.

ENJOYAdd hot
water for an
americano,
steam milk
for a latte,
or drink it
straight.

ESPRESSO
Skill Level
8 Minutes
Espresso was invented as a way to make coffee “expressly,” as people were in a hurry and didn’t have time to wait 10 minutes to brew their morning pot of coffee. However, over the years, espresso has become more about the taste than the speed. The rich, strong flavor is something that coffee drinkers around the world look forward to every morning.
The art of steaming milk is tricky, but worth the dedication required to learn. Keep a close eye on all the small details, and with practice you can become a true pro.
camanoislandcoffee.com
ShareThisEbook
59camanoislandcoffee.com (866) 387-5282
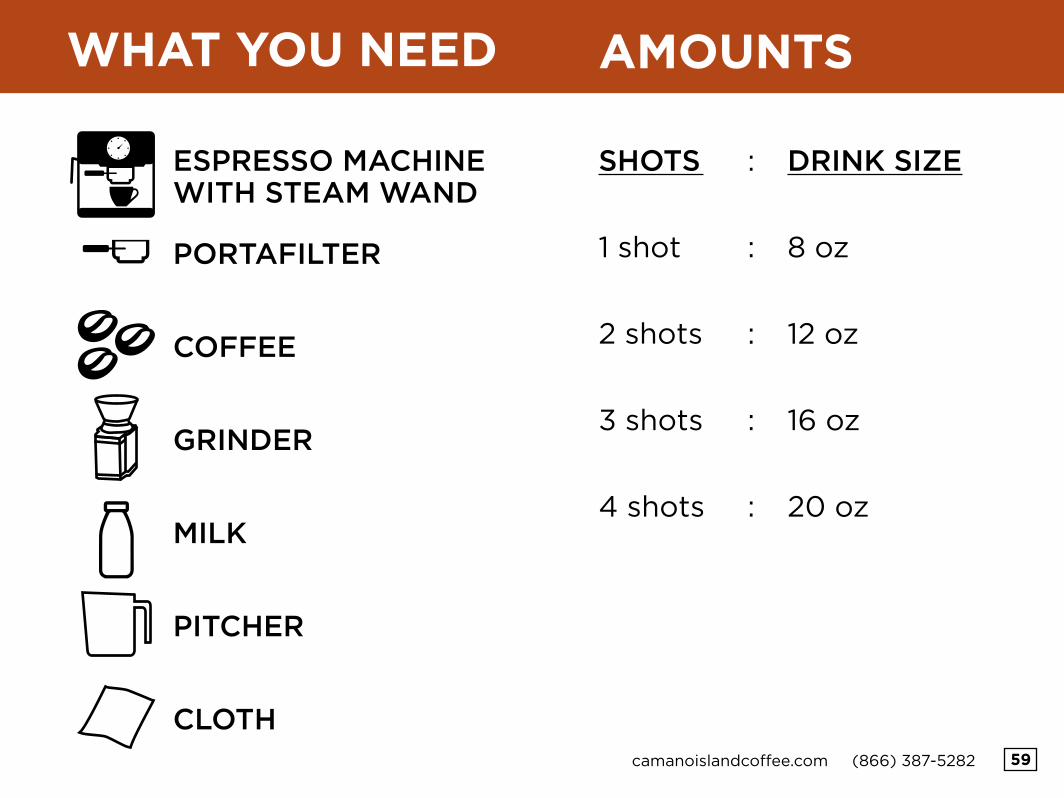
AMOUNTSWHAT YOU NEED
COFFEE
MILK
PITCHER
GRINDER
ESPRESSO MACHINE WITH STEAM WAND
CLOTH
PORTAFILTER
SHOTS
1 shot
2 shots
3 shots
4 shots
DRINK SIZE
8 oz
12 oz
16 oz
20 oz
:
:
:
:
:

60
ADDING GROUNDSPut the grounds into the
portafilter so it forms a little
mound on the top. Grab your
tamper and press down firmly.
Remove the tamper and use
the handle to give the side of
the filter a quick tap to remove
excess grounds, then press
again. Give it a quick twist
before you remove it so the top
is nice and smooth.
GRINDINGGrind your coffee on a fine grind - #1 on
an industrial grinder. For a double shot,
you’ll want 15 grams of coffee, which is
equal to a smidge less than 2 tablespoons.
61
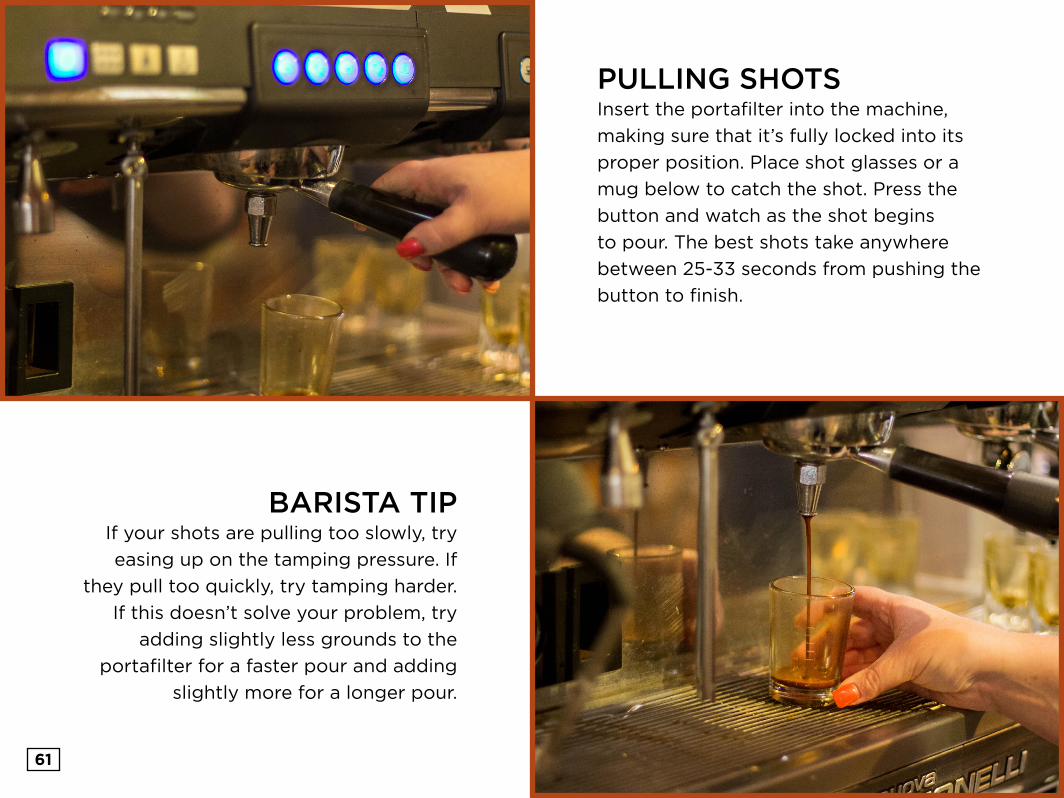
PULLING SHOTSInsert the portafilter into the machine,
making sure that it’s fully locked into its
proper position. Place shot glasses or a
mug below to catch the shot. Press the
button and watch as the shot begins
to pour. The best shots take anywhere
between 25-33 seconds from pushing the
button to finish.
BARISTA TIPIf your shots are pulling too slowly, try
easing up on the tamping pressure. If
they pull too quickly, try tamping harder.
If this doesn’t solve your problem, try
adding slightly less grounds to the
portafilter for a faster pour and adding
slightly more for a longer pour.
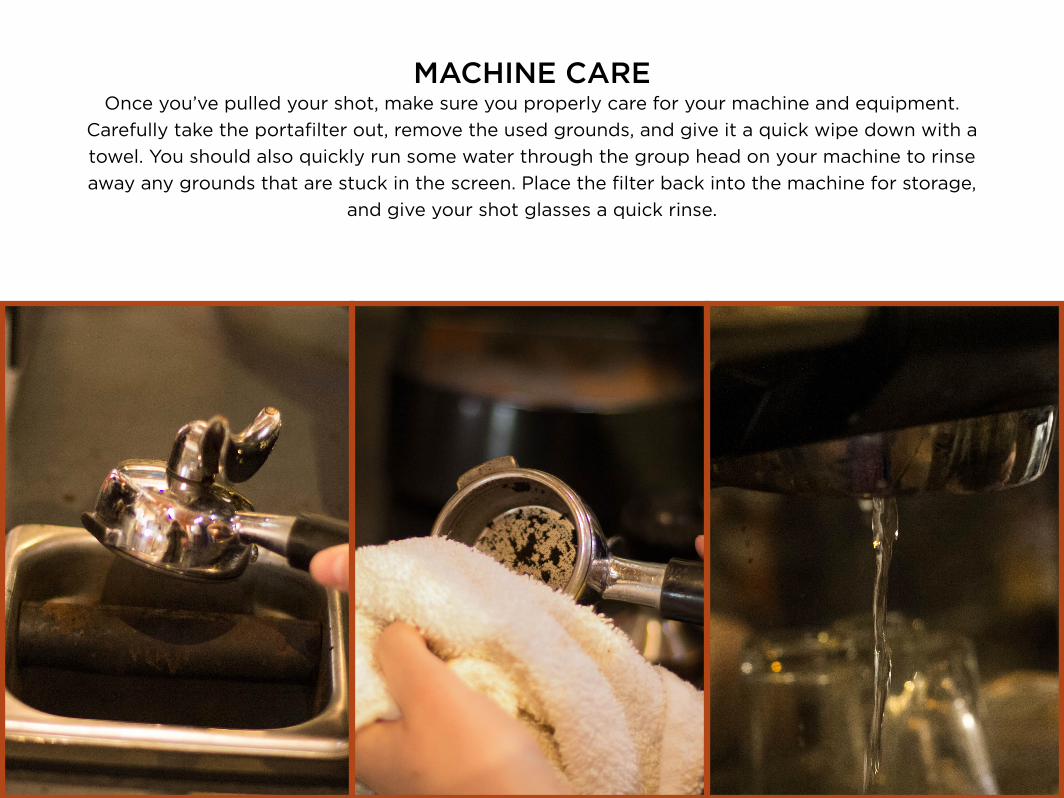
MACHINE CAREOnce you’ve pulled your shot, make sure you properly care for your machine and equipment.
Carefully take the portafilter out, remove the used grounds, and give it a quick wipe down with a
towel. You should also quickly run some water through the group head on your machine to rinse
away any grounds that are stuck in the screen. Place the filter back into the machine for storage,
and give your shot glasses a quick rinse.

63
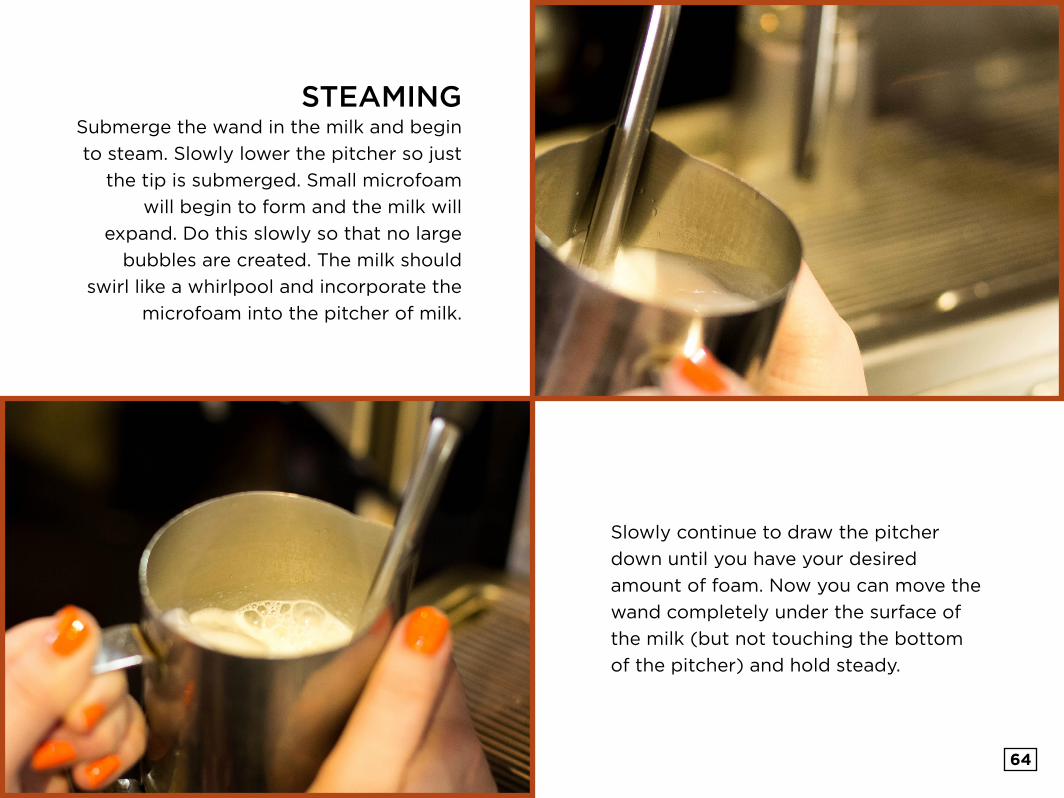
STEAMING PREPARATIONTo start, pour milk into your pitcher until
it’s about half full. You will need the extra
room to properly steam your milk and
achieve fantastic foam.
Before starting the steaming process, be
sure to give a quick pull on the handle to
bleed the steam wand. This removes any
water from the wand.
64
Slowly continue to draw the pitcher
down until you have your desired
amount of foam. Now you can move the
wand completely under the surface of
the milk (but not touching the bottom
of the pitcher) and hold steady.
STEAMINGSubmerge the wand in the milk and begin
to steam. Slowly lower the pitcher so just
the tip is submerged. Small microfoam
will begin to form and the milk will
expand. Do this slowly so that no large
bubbles are created. The milk should
swirl like a whirlpool and incorporate the
microfoam into the pitcher of milk.
65
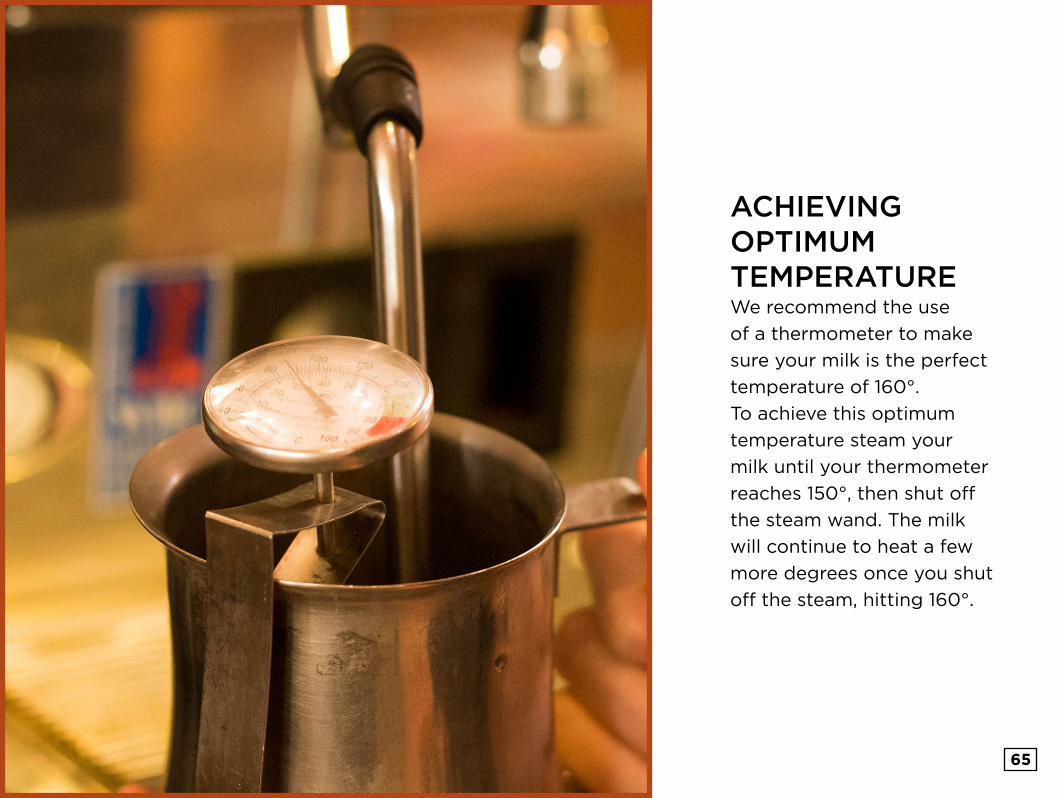
ACHIEVING OPTIMUM TEMPERATUREWe recommend the use
of a thermometer to make
sure your milk is the perfect
temperature of 160°.
To achieve this optimum
temperature steam your
milk until your thermometer
reaches 150°, then shut off
the steam wand. The milk
will continue to heat a few
more degrees once you shut
off the steam, hitting 160°.
66
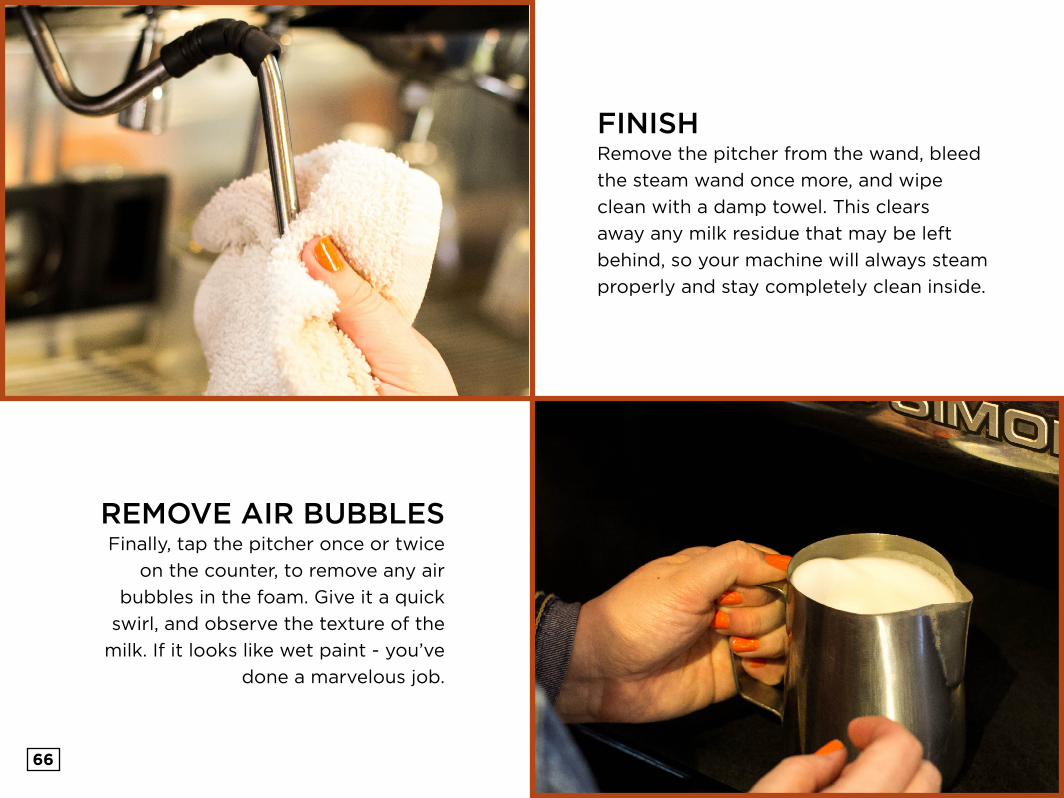
REMOVE AIR BUBBLESFinally, tap the pitcher once or twice
on the counter, to remove any air
bubbles in the foam. Give it a quick
swirl, and observe the texture of the
milk. If it looks like wet paint - you’ve
done a marvelous job.
FINISHRemove the pitcher from the wand, bleed
the steam wand once more, and wipe
clean with a damp towel. This clears
away any milk residue that may be left
behind, so your machine will always steam
properly and stay completely clean inside.

ENJOYWhether you made a
latte, americano, or some
other fabulous espresso
drink, enjoy sipping your
Camano Island Coffee -
you’ve earned it.

TURKISH
Skill Level
7 Minutes
Coffee is a huge part of Turkish culture. In fact, traditional houses include special “coffee rooms” specifically for brewing and drinking coffee. In the 17th century, the Turks were spending more time drinking coffee than going to the mosques to pray, so the government made coffee illegal. This, however, didn’t stop the Turks from drinking coffee, and to this day it remains a rich part of their culture today.
camanoislandcoffee.com
ShareThisEbook
69camanoislandcoffee.com (866) 387-5282
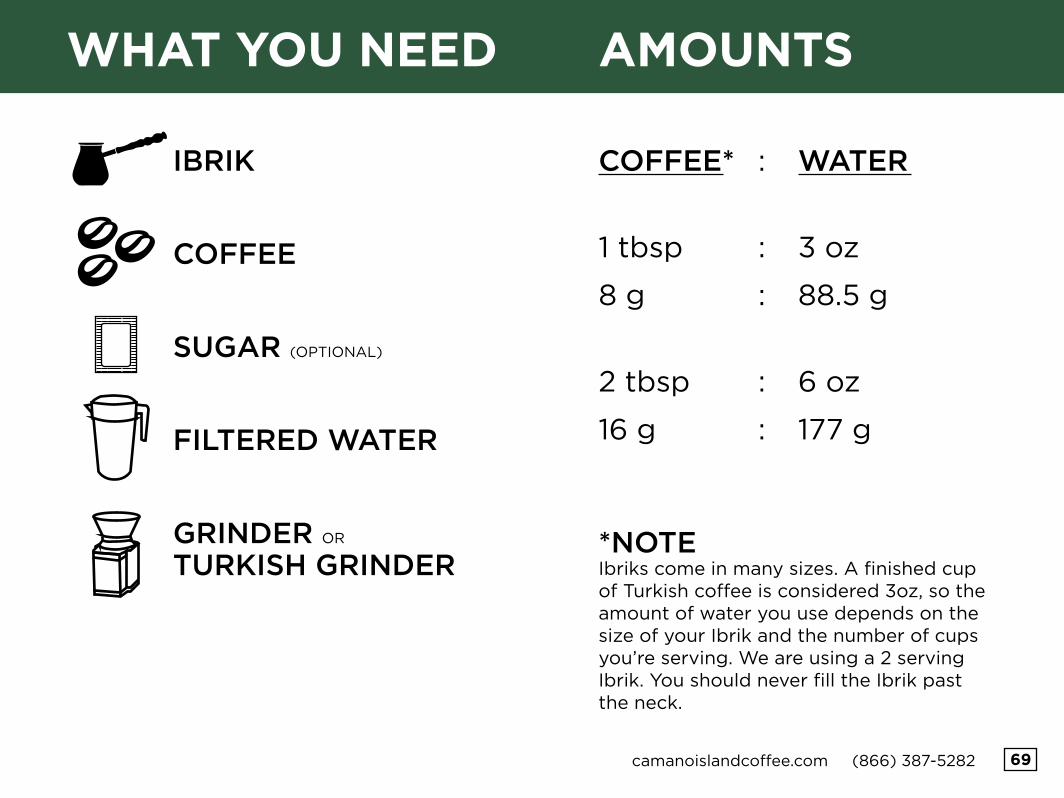
AMOUNTSWHAT YOU NEED
COFFEE
FILTERED WATER
GRINDER OR TURKISH GRINDER
IBRIK
*NOTEIbriks come in many sizes. A finished cup of Turkish coffee is considered 3oz, so the amount of water you use depends on the size of your Ibrik and the number of cups you’re serving. We are using a 2 serving Ibrik. You should never fill the Ibrik past the neck.
SUGAR (OPTIONAL)
COFFEE*
1 tbsp
8 g
2 tbsp
16 g
WATER
3 oz
88.5 g
6 oz
177 g
:
:
:
:
:
70
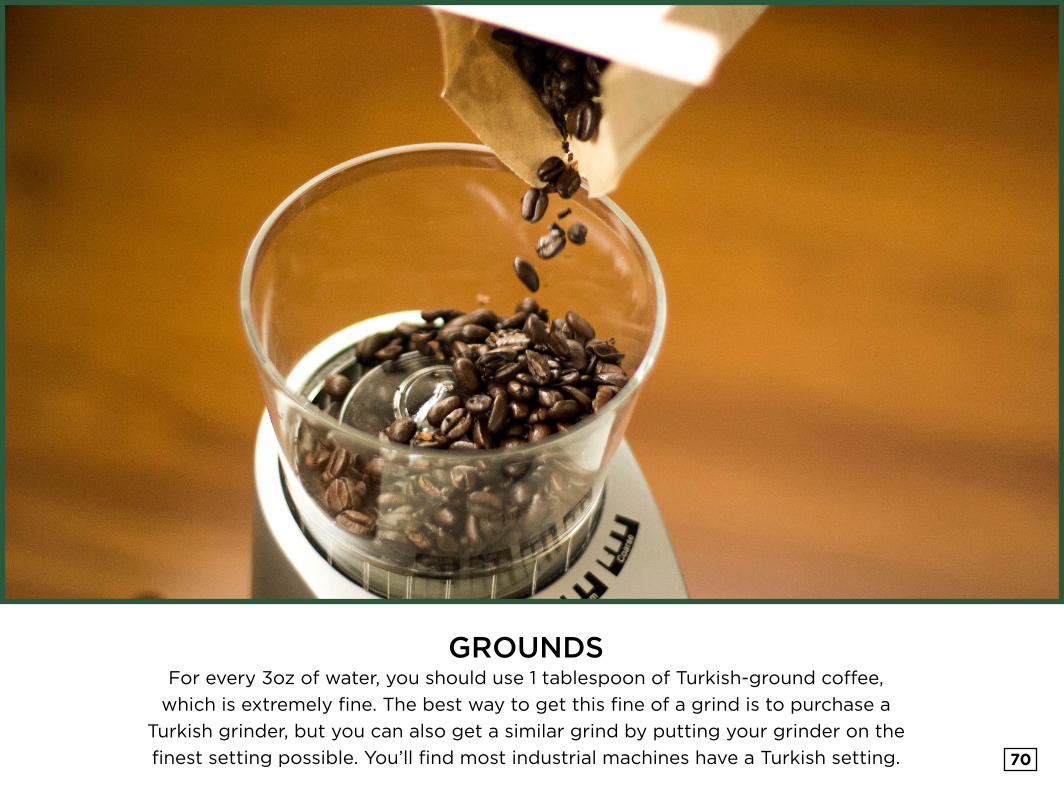
GROUNDSFor every 3oz of water, you should use 1 tablespoon of Turkish-ground coffee,
which is extremely fine. The best way to get this fine of a grind is to purchase a
Turkish grinder, but you can also get a similar grind by putting your grinder on the
finest setting possible. You’ll find most industrial machines have a Turkish setting.

WATER & ADDING GROUNDSPut the water into your ibrik and place it on
medium heat. Wait roughly 2 minutes, and then
add the grounds into the ibrik.
Do not stir the grounds.
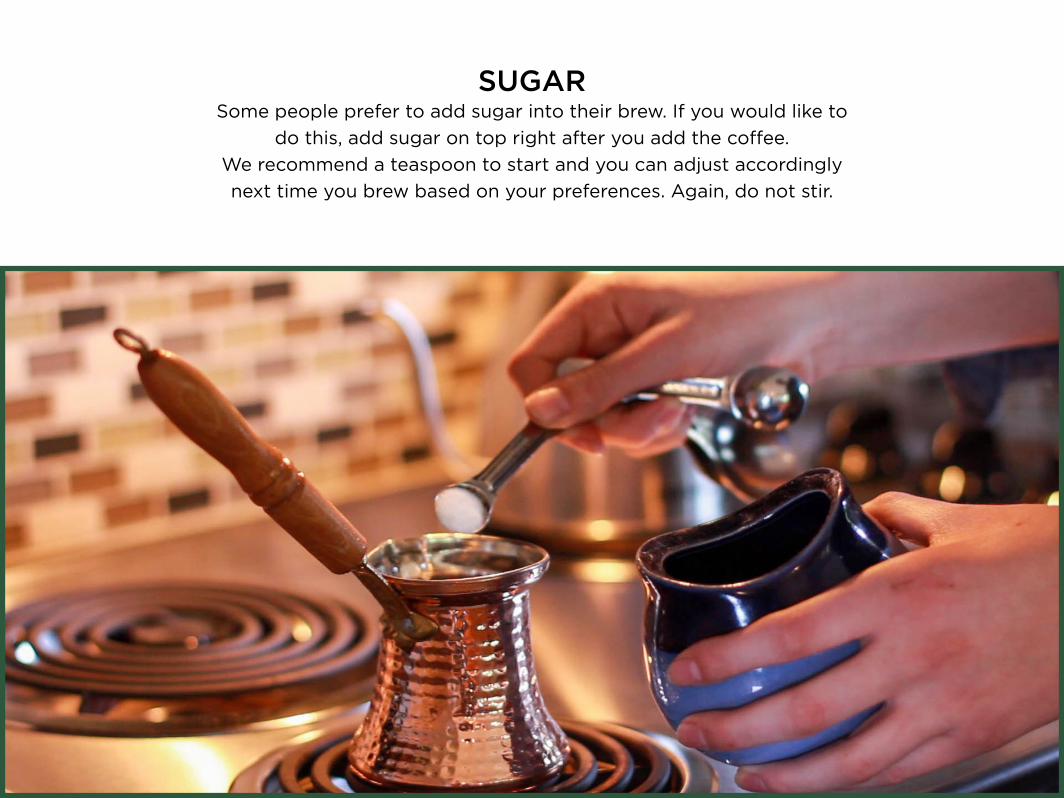
SUGARSome people prefer to add sugar into their brew. If you would like to
do this, add sugar on top right after you add the coffee.
We recommend a teaspoon to start and you can adjust accordingly
next time you brew based on your preferences. Again, do not stir.

73
BREWINGOnce the coffee starts sinking and the sugar begins to dissolve, you can give the coffee a few
quick stirs and turn down the heat just a bit. Your coffee will soon begin to bubble a bit on the
surface. When you see small bubbles, make sure you turn down the heat even lower. Keep a close
eye on your brew - don’t let it boil. A froth will start to rise to the surface. When it does this,
remove from heat and let it settle. Once the froth has gone down, put it back on the heat and let it
rise once more. Some prefer to let it rise and fall 3-4 times, but we recommend only twice.
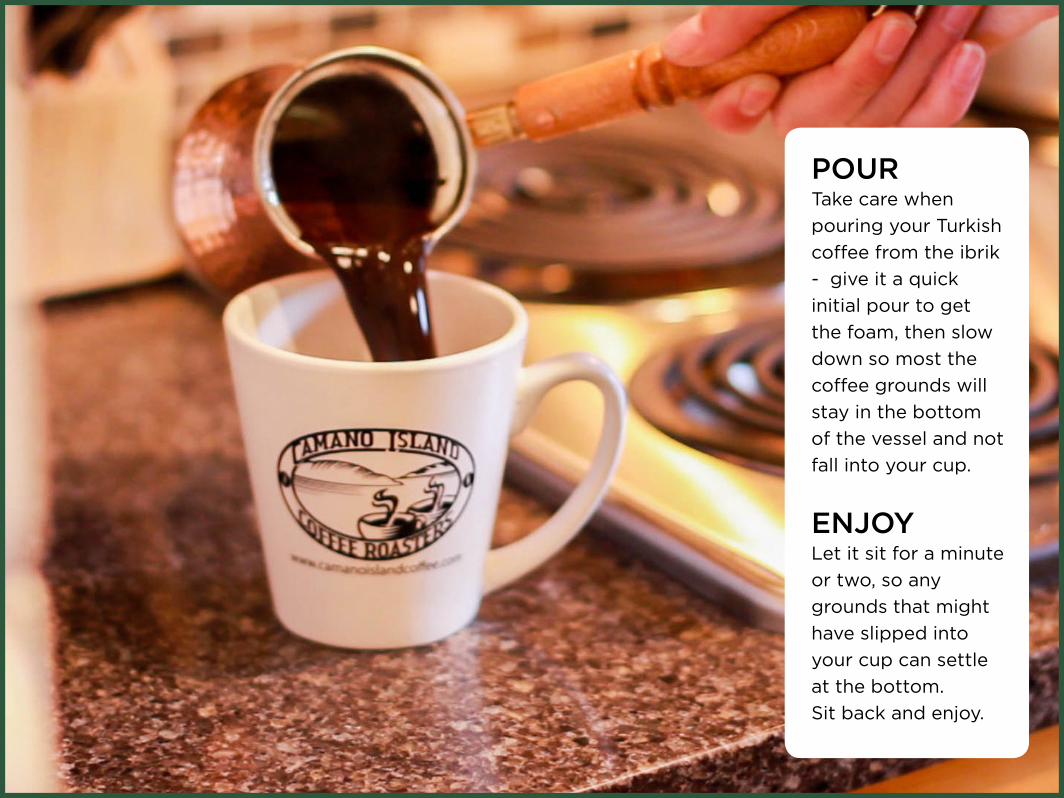
POURTake care when
pouring your Turkish
coffee from the ibrik
- give it a quick
initial pour to get
the foam, then slow
down so most the
coffee grounds will
stay in the bottom
of the vessel and not
fall into your cup.
ENJOYLet it sit for a minute
or two, so any
grounds that might
have slipped into
your cup can settle
at the bottom.
Sit back and enjoy.

SYPHON
Skill Level
12 Minutes
The history of Syphon began with a French woman in the mid 1800s, who designed a beautiful coffee brewer that was intended to be displayed at dinner parties during the brew.
Over the years, companies across the globe have designed and sold their own versions of the syphon. The stovetop and burner versions, both of which are manufactured in Japan, are the most popular versions available today. For this brew, we’ve used the Hario 5 cup Syphon.
camanoislandcoffee.com
ShareThisEbook
76camanoislandcoffee.com (866) 387-5282
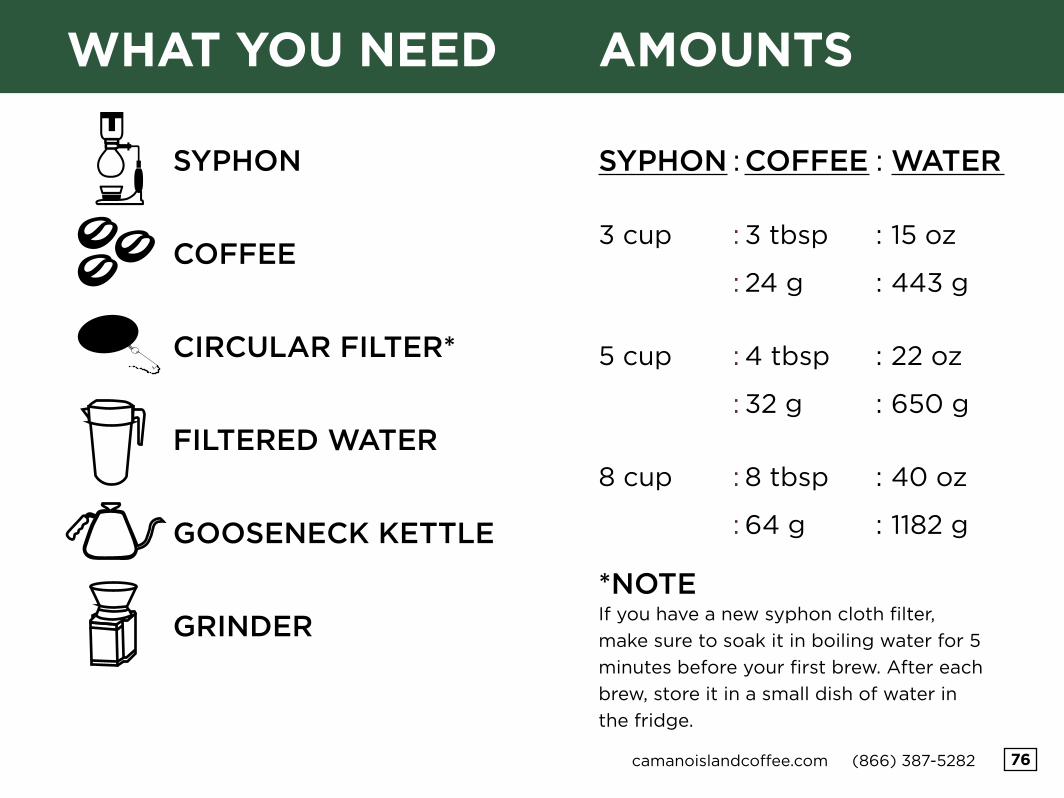
AMOUNTSWHAT YOU NEED
COFFEE
FILTERED WATER
GRINDER
SYPHON
CIRCULAR FILTER*
GOOSENECK KETTLE
COFFEE
3 tbsp
24 g
4 tbsp
32 g
8 tbsp
64 g
WATER
15 oz
443 g
22 oz
650 g
40 oz
1182 g
:
:
:
:
:
:
:
SYPHON
3 cup
5 cup
8 cup
:
:
:
:
:
:
:
*NOTEIf you have a new syphon cloth filter,
make sure to soak it in boiling water for 5
minutes before your first brew. After each
brew, store it in a small dish of water in
the fridge.
77
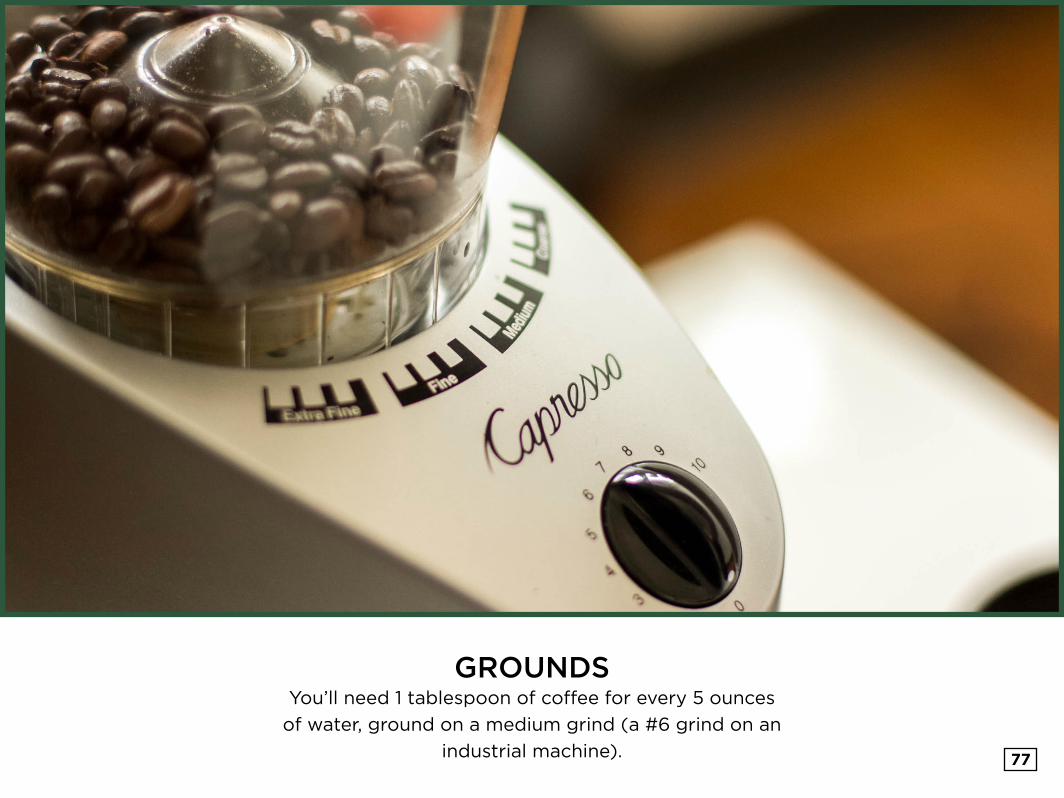
GROUNDSYou’ll need 1 tablespoon of coffee for every 5 ounces
of water, ground on a medium grind (a #6 grind on an
industrial machine).

78
FILTERTo start, you’ll want to assemble your filter.
We used a cloth filter on our syphon, but
other options are available as well - such
as glass, paper, or metal/mesh. If you are
using a cloth filter, make sure to soak it
in boiling water for a few minutes before
your first brew.
Drop the filter into the
top chamber and use the
chain to properly hook it
on at the bottom.

ASSEMBLYFill the “bulb” or lower chamber up with
water to the designated fill line and
assemble the syphon (don’t forget to
put the lid on the top chamber!)
80
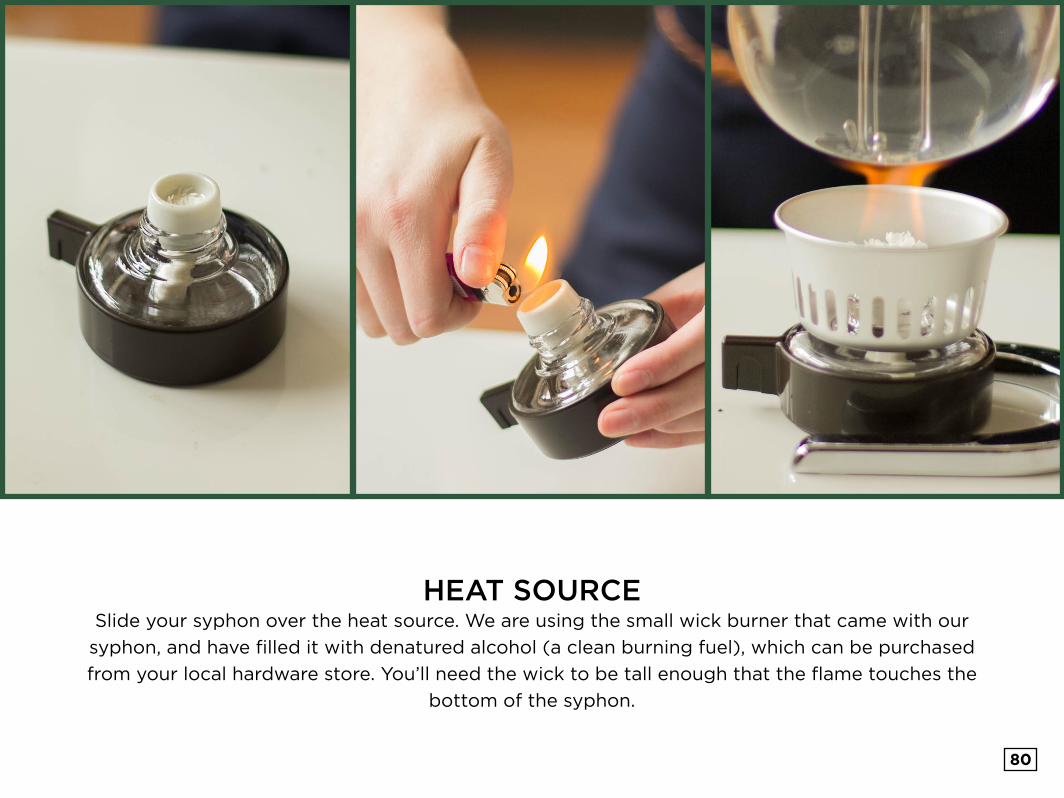
HEAT SOURCESlide your syphon over the heat source. We are using the small wick burner that came with our
syphon, and have filled it with denatured alcohol (a clean burning fuel), which can be purchased
from your local hardware store. You’ll need the wick to be tall enough that the flame touches the
bottom of the syphon.

81
BEGIN BREWAs it heats, the water will start to move up
the chain to the second chamber. When all
the water has reached the top, pop off the
lid and check the temperature. Adjust the
heat source accordingly, so your water is
approximately 190°.
82
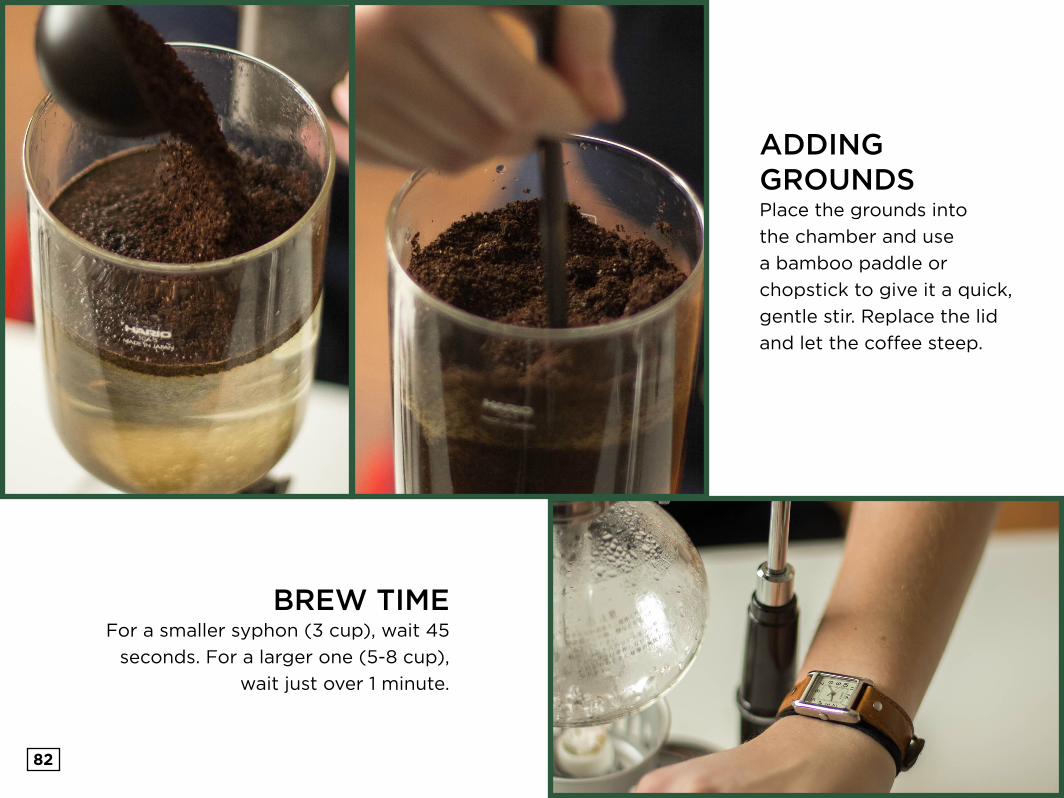
ADDING GROUNDSPlace the grounds into
the chamber and use
a bamboo paddle or
chopstick to give it a quick,
gentle stir. Replace the lid
and let the coffee steep.
BREW TIMEFor a smaller syphon (3 cup), wait 45
seconds. For a larger one (5-8 cup),
wait just over 1 minute.
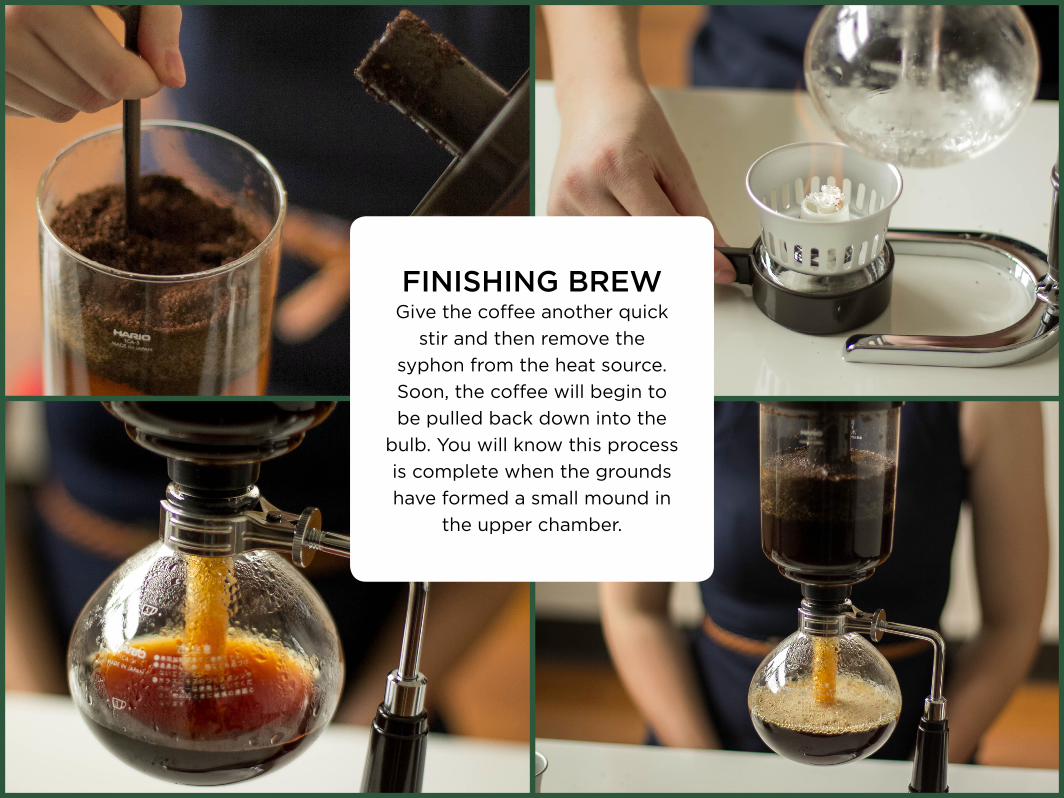
FINISHING BREWGive the coffee another quick
stir and then remove the
syphon from the heat source.
Soon, the coffee will begin to
be pulled back down into the
bulb. You will know this process
is complete when the grounds
have formed a small mound in
the upper chamber.

ENJOYYou can now remove the top components and use
the bottom carafe to serve your coffee.

WOODNECK
Skill Level
12 Minutes
Woodneck brewing originated in Japan in the early 1900s. Its unique flavor comes from the use of a cloth filter and the slow brewing process. We recommend the Woodneck to those who are truly dedicated to the craft of homebrew - it requires patience and precision to get the bold, sweet cup it’s known for.
camanoislandcoffee.com
ShareThisEbook

86camanoislandcoffee.com (866) 387-5282
WHAT YOU NEED AMOUNTS
COFFEE
3 tbsp
24 g
5 tbsp
40 g
WATER
8 oz
236 g
13 oz
385 g
WOODNECK
CLOTH FILTER*
:
:
:
:
:
COFFEE
FILTERED WATER
GOOSENECK KETTLE
GRINDER
*NOTEIf you have a new Woodneck cloth filter,
make sure you remove the cloth filter from
its frame and soak it in boiling water for 5
minutes before beginning to brew. After
each brew, store it in a small dish of water
in the fridge.
87
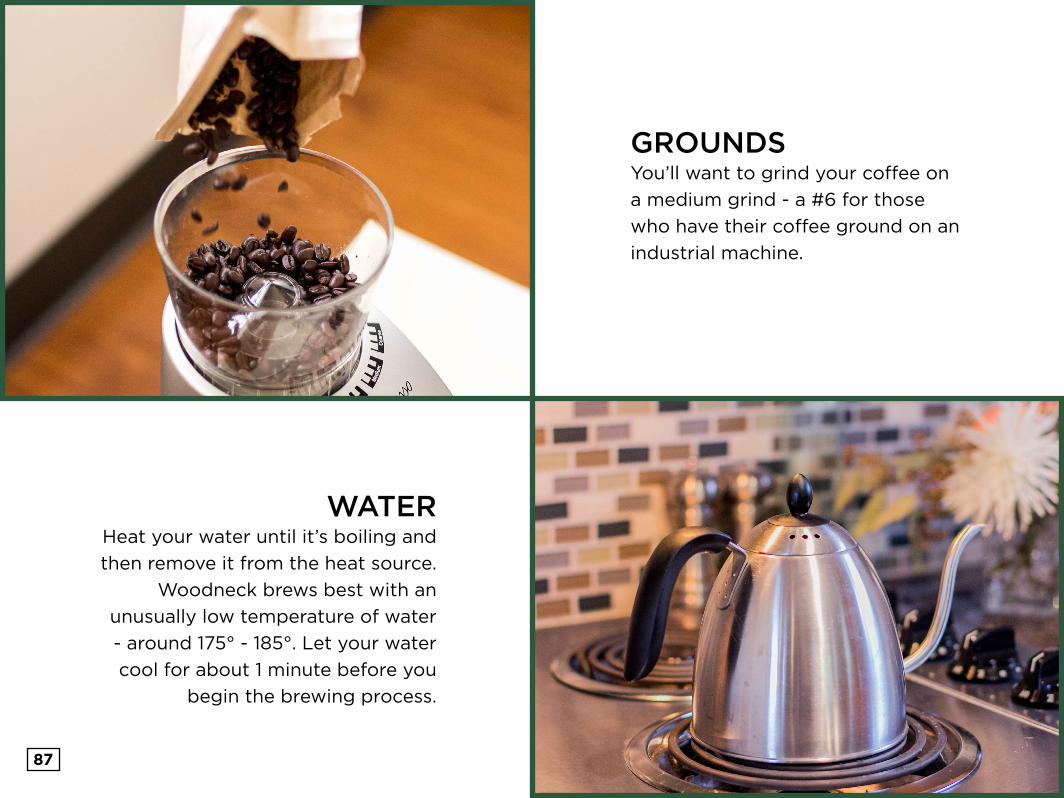
GROUNDSYou’ll want to grind your coffee on
a medium grind - a #6 for those
who have their coffee ground on an
industrial machine.
WATERHeat your water until it’s boiling and
then remove it from the heat source.
Woodneck brews best with an
unusually low temperature of water
- around 175° - 185°. Let your water
cool for about 1 minute before you
begin the brewing process.

88
ADDING GROUNDSOnce you’ve dumped the water
out of your Woodneck, place the
grounds into your filter. Give it
a gentle nudge, so the grounds
settle flat.
FILTERPlace the filter onto the wire frame,
set it over the carafe and pour boiling
water through the filter. The main
purpose of this step is to warm your
vessel prior to brewing to keep your
coffee hotter for longer.

89
BLOOMBegin pouring water in a very slow,
circular pattern, starting at the edges
and working your way towards the
middle. When the water has barely
covered the grounds, stop and let it
bloom for 45 seconds.
90
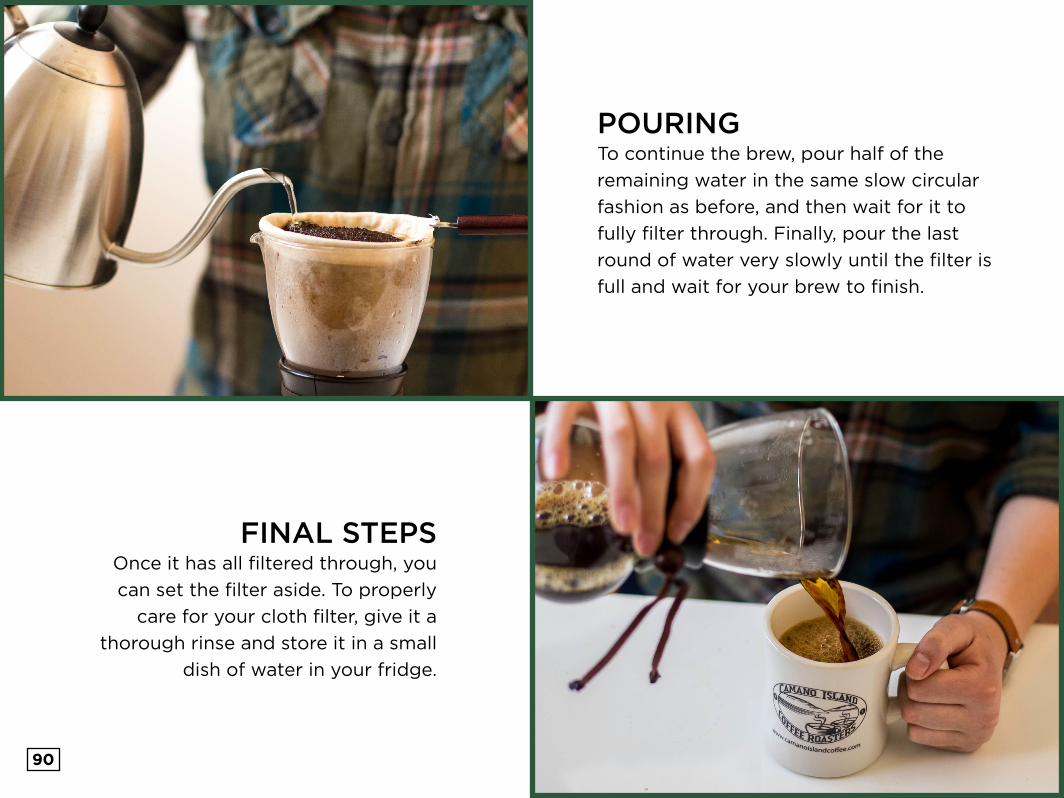
FINAL STEPSOnce it has all filtered through, you
can set the filter aside. To properly
care for your cloth filter, give it a
thorough rinse and store it in a small
dish of water in your fridge.
POURINGTo continue the brew, pour half of the
remaining water in the same slow circular
fashion as before, and then wait for it to
fully filter through. Finally, pour the last
round of water very slowly until the filter is
full and wait for your brew to finish.

ENJOYNow enjoy your
strong, bold cup
of Camano Island
Coffee.

92camanoislandcoffee.com (866) 387-5282
TERMS
BLOOMWhen you pour hot water over dry grounds, the grounds rise up and expand, creating a pretty sight that looks like the top of a chocolate muffin. This is called a “bloom” and it happens because CO
2 is
escaping from the grounds. Letting your coffee bloom is an important step to making the best cup of coffee.
ESPRESSOEspresso is made up of “shots,” which are brewed through a machine at high pressure and produce a final product of 1oz of highly concentrated coffee. There are “poor man methods” to brewing espresso, such as Aeropress or Moka Pot, but true espresso can only be made by a high quality espresso machine. Lattes, Americanos, and other specialty drinks are made with espresso shots.
GROUPHEADThe grouphead is the part of the espresso machine that you lock the portafilter into. Water is pushed through tiny holes in the grouphead and evenly distributed across all the coffee in the portafilter, ensuring an evenly extracted shot.
PORTAFILTERThe portafilter holds the coffee grounds when pulling shots of espresso. It is designed to lock into the espresso machine’s grouphead, so that the water can come through the grounds at the high pressure needed to pull the best shots.
ShareThisEbook

93camanoislandcoffee.com (866) 387-5282
TERMS
SINGLE-CUP BREWA Single-Cup Brew describes a coffee brewing method that brews one cup at a time. The Keurig and Pour-Over are examples of a single-cup brew.
TAMPERThe tamper is used to evenly pack the coffee grounds into the portafilter, which helps you get the best extraction possible.
#CICRBREWWant to share your favorite brewing method? Share it on Facebook, Twitter, Pinterest and Instagram. Use the hashtag #CICRBrew

94camanoislandcoffee.com (866) 387-5282
TOOLS OF THE TRADE
FRENCH PRESSThe French Press is a cylindrically shaped coffee brewer that has two main parts: the beaker (where the water and coffee grounds go), and the plunger. The plunger has a wire mesh filter on one end, designed to be pressed into the cylinder and separate the grounds from the liquid coffee at the end of the brew. Many french press filters can be taken apart to make cleaning easier. Recommended Brand: Bodum
POUR-OVERPour-Overs are made up of a single piece (most commonly ceramic - though they are also available in glass and plastic) with one or more holes in the bottom and various types of grooves on the inside walls. It’s a quick, clean and simple single-cup brewer. Recommended Brand: Hario
MOKA POTThe Moka Pot is made up of three main parts - the bottom chamber, the funnel filter, and the top chamber. It’s used on the stovetop to brew espresso at home without an expensive espresso machine. Recommended Brand: Bialetti
KEURIGThe Keurig is a countertop coffee machine that uses K-Cups to produce a single-cup brew. Recommended Brand: Keurig
ShareThisEbook
95camanoislandcoffee.com (866) 387-5282
SOLOFILLSolofill is a brand of reusable K-Cups. We recommend using a Solofill and your favorite Camano Island Coffee instead of expensive, non-recyclable K-Cups.
CHEMEXThe Chemex, brewed like the Pour-Over, is a vase-like vessel. The filter sits in the top, and the coffee brews through that into the bottom. It’s a simple brew and can be used as a classy serving tool when your coffee is finished. Recommended Brand: The one and only, Chemex
AEROPRESSThe Aeropress has a cylinder, a filter, and a plunger. The filter screws onto the cylinder, the coffee is added, and then pressed through the filter with the plunger. This method produces what is known as a “poor-man’s espresso” type drink, because it’s a cheap way to get a drink resembling espresso. Recommended Brand: Aerobie
ESPRESSO MACHINEEspresso Machines are complex machines that use high amounts of pressure to push water through coffee grounds to brew a highly concentrated coffee. There are many types of “drive mechanisms” in different espresso machines that make high pressure extraction possible, like steam-driven, pump-driven, and piston-driven. Steam-driven machines are lower in price and are typically used in home espresso setups, while pump-driven machines are much more expensive and are commonly found in cafes and coffee bars. Due to their complexity, espresso machines require regular maintenance to ensure they are producing the best cup of coffee every time.
TOOLS OF THE TRADE
96camanoislandcoffee.com (866) 387-5282
STEAM WANDSteam wands are found on most espresso machines. When dipped into a pitcher of milk, the steam is used to warm and froth the milk, so you can then mix it with shots of espresso to make a latte.
IBRIK (TURKISH)The Ibrik is the traditional brewing vessel for Turkish coffee. The long handle enables you to handle the Ibrik even when it has been on the stovetop. The peculiar shape is to aid in the brewing process, as well as pour the finished drink properly. Recommended Brand: Turkish Coffee World
SYPHONThe Syphon device creates a vacuum with heat and the unique shape of the vessel to brew coffee. The water starts in the lower bulb, then heat pushes the water into the upper chamber to mix with the grounds. Once it has steeped the heat source is removed and the vacuum pulls the coffee through a filter, giving you tasty coffee in the lower bulb and coffee grounds in the upper chamber. Recommended Brand: Hario
WOODNECKThe Woodneck, also known as Nel Drip, is a single-cup brewer that consists of a small carafe and a cloth filter on a wire frame. This cloth filter must be boiled before the first use. And you also must keep the cloth filter in a dish of water in your refrigerator after each use. Similar to Pour-Over, the grounds are placed in the filter which rests on top, and the coffee brews into the lower part of the carafe. Recommended Brand: Hario
TOOLS OF THE TRADE

97camanoislandcoffee.com (866) 387-5282
FILTERMany brew methods require some kind of filter. This keeps the grounds from being mixed with your final cup of coffee. Filters are typically made of either paper, cloth, or wire mesh. Paper filters require a pre-rinse with hot water to wash away a papery flavor, and cloth filters have to be boiled before first use so they are soft. Cloth filters also need to be stored in a small dish or bag of water in the fridge after their first use.
BURR GRINDERGrinders come in two main categories - Burr and Blade. We highly recommend that you invest in a Burr Grinder. Why? Because a burr grinder uses two burrs or gears to grind the beans producing a consistent grind each time. A blade grinder chops beans and as a result produces an inconsistent grind. A consistent grind is imperative for maximum flavor extraction and a perfect cup of coffee.
GOOSENECK KETTLEThe gooseneck kettle has a thin, curved spout which gives you better control of pouring. This helps you pour in the slow, circular motion needed for many homebrews such as Pour-Over and Chemex.
TOOLS OF THE TRADE
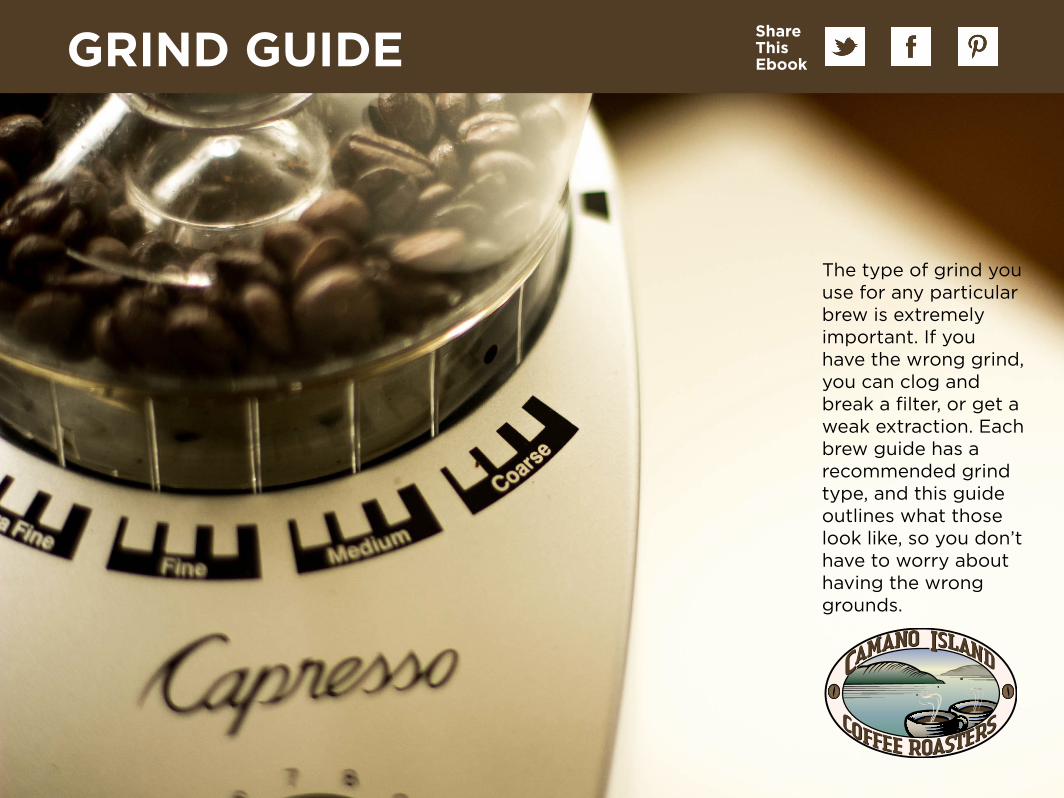
GRIND GUIDE
The type of grind you use for any particular brew is extremely important. If you have the wrong grind, you can clog and break a filter, or get a weak extraction. Each brew guide has a recommended grind type, and this guide outlines what those look like, so you don’t have to worry about having the wrong grounds.
ShareThisEbook
99
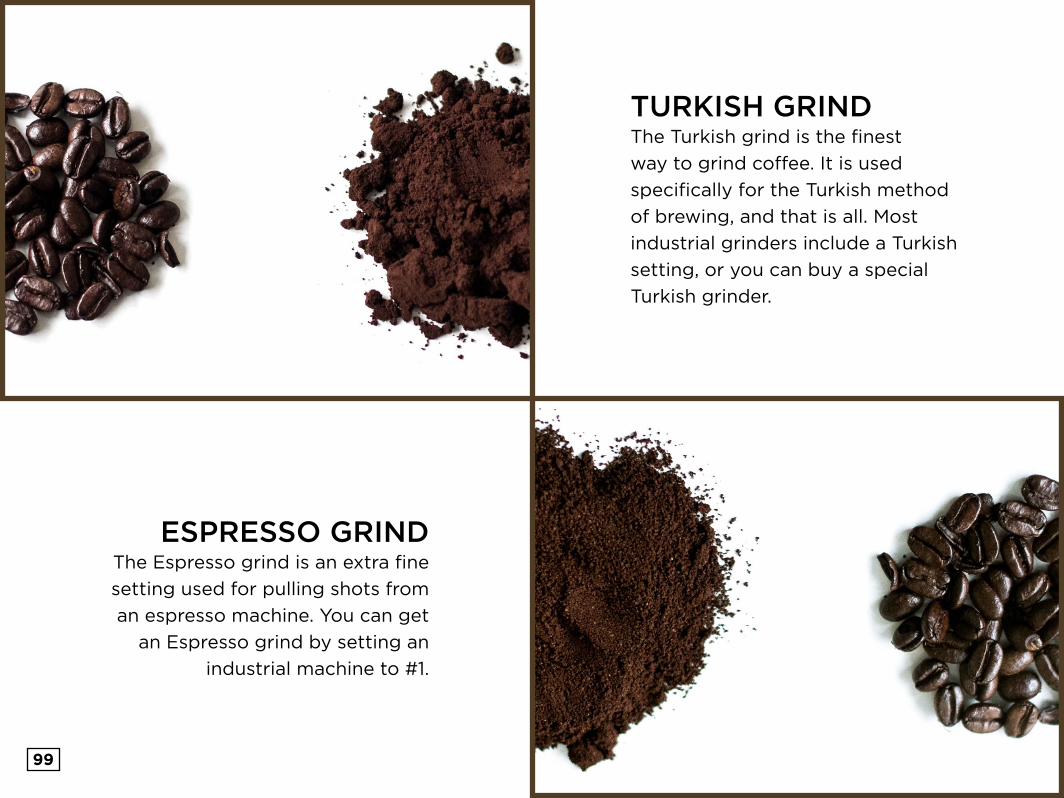
TURKISH GRINDThe Turkish grind is the finest
way to grind coffee. It is used
specifically for the Turkish method
of brewing, and that is all. Most
industrial grinders include a Turkish
setting, or you can buy a special
Turkish grinder.
ESPRESSO GRINDThe Espresso grind is an extra fine
setting used for pulling shots from
an espresso machine. You can get
an Espresso grind by setting an
industrial machine to #1.
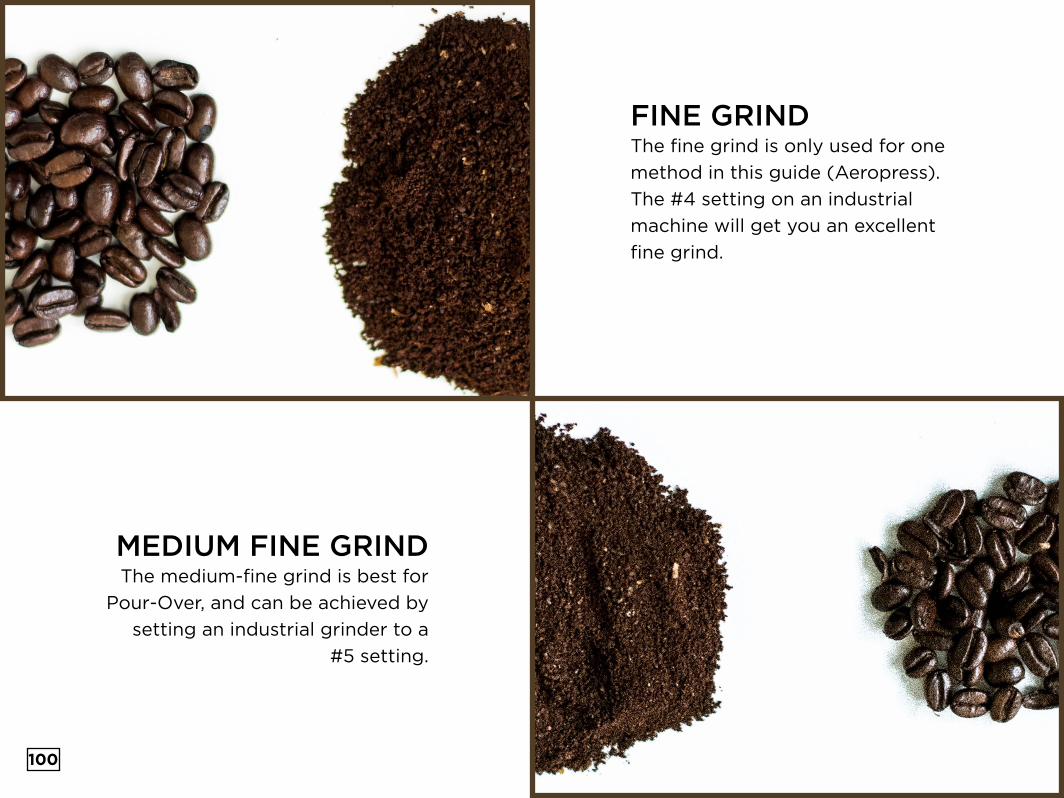
100
FINE GRINDThe fine grind is only used for one
method in this guide (Aeropress).
The #4 setting on an industrial
machine will get you an excellent
fine grind.
MEDIUM FINE GRINDThe medium-fine grind is best for
Pour-Over, and can be achieved by
setting an industrial grinder to a
#5 setting.

101
MEDIUM GRINDThe medium grind is used for Moka
Pot, Keurig, Syphon, and Woodneck
in this guide. Set an industrial
grinder to #6 for a medium grind.
COARSE GRINDThe coarse grind is used for a few
of our favorite brew methods:
French Press and Chemex (and
iced Chemex, too!) You can get a
coarse grind by selecting a #9 on an
industrial machine.

OH, AND ONE MORE THING

GET YOUR FREE POUND OF COFFEE
HOW IT WORKS
1. ORDER FREE COFFEE
For your first pound of Camano Island
Coffee you pay nothing but the flat-rate
$8.95 shipping and handling. We pay for
your coffee.
2. ALWAYS ENJOY COFFEE
Three weeks later we’ll send you your next
2lb shipment. You can adjust your shipment
to arrive as often as you need it, from every
2 weeks to every 10 weeks. You’re only
charged when each Coffee Lover’s Box
ships. There are no dues or cancellation fees.
3. CHANGE LIVES
With every shipment you receive, a
minimum of $1 per box will be donated to
our great cause.

LET’S BE FRIENDSConnect with us online and if you enjoyed our brew guide let us know with #CICRbrew
© 2014 Camano Island Coffee All Rights Reserved