Embed Size (px)
DESCRIPTION
Principles of gardening
Citation preview
http://breachrepairers.webs.com 1
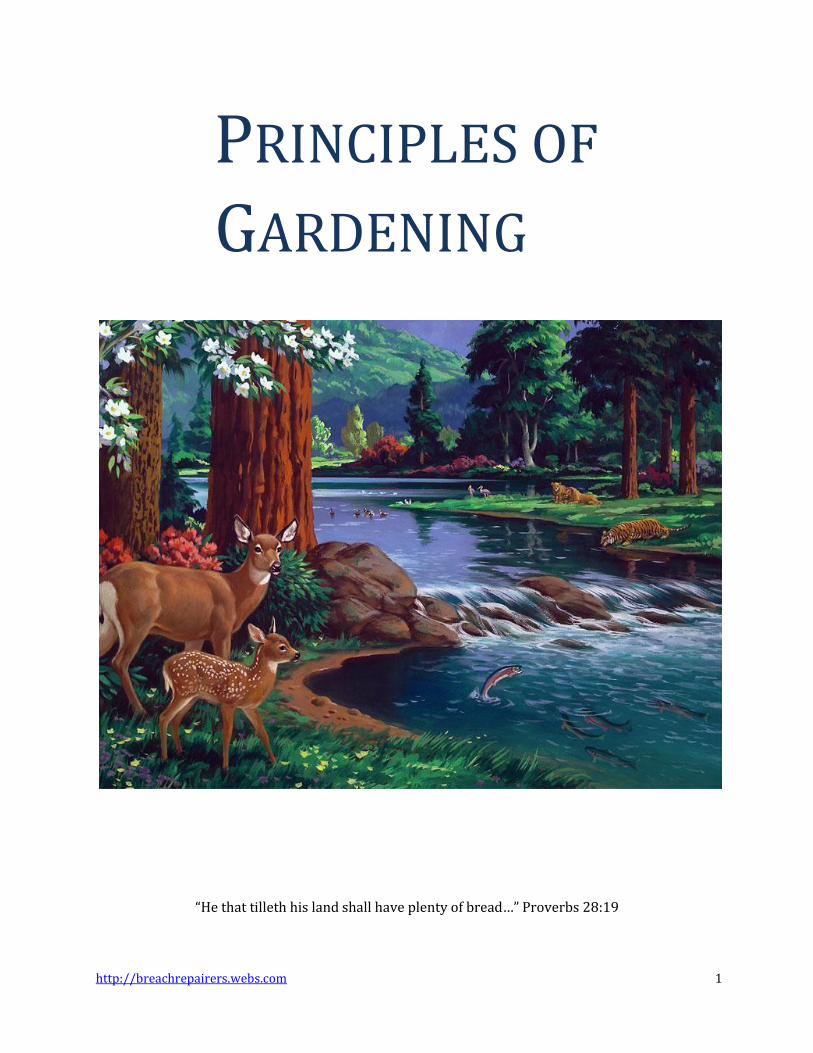
PRINCIPLES OF
GARDENING
“He that tilleth his land shall have plenty of bread…” Proverbs 28:19
http://breachrepairers.webs.com 2
Table of Contents Principles of Gardening ...................................................................................................................................................... 1
Table of Contents .............................................................................................................................................................. 2 Introduction ........................................................................................................................................................................ 4 In the near future .............................................................................................................................................................. 5 Grow All Your Own Food! ............................................................................................................................................. 7 An overwhelming surprise ........................................................................................................................................... 7 Ready for His Appearing ................................................................................................................................................ 8 Preparations We Must Make ..................................................................................................................................... 11 The Necessary Physical Preparation ..................................................................................................................... 12 Providing For Your Family’s Needs ....................................................................................................................... 13 A Balanced Diet .............................................................................................................................................................. 14 Protein foods ................................................................................................................................................................... 14 Anyone Can Grow a Garden ...................................................................................................................................... 18 Make a written plan for your garden .................................................................................................................... 18 Get out the seed catalogs ............................................................................................................................................ 19 Some seed suppliers ..................................................................................................................................................... 19 Fruit tree and small fruit sources ........................................................................................................................... 20 Organic grower & gardener’s supplies ................................................................................................................. 21 Tips on choosing your seed and plants ................................................................................................................ 21 A Sample Garden Plan ................................................................................................................................................. 22 Begin Where You Are ................................................................................................................................................... 24 Requirements for 1 Adult Per Year ........................................................................................................................ 26 Choosing & Preparing Your Garden Spot ............................................................................................................ 29 Getting your New Garden Site Ready .................................................................................................................... 32 Perfect soil---Perfect Plant Health .......................................................................................................................... 32 Cover Crops & Green Manures ................................................................................................................................. 44 Planting the green manure ........................................................................................................................................ 44 Growing Guide for Cover Crops & Green Manures .......................................................................................... 45 Growing Your Own Grain ........................................................................................................................................... 48 Soil Preparation for grain ........................................................................................................................................... 48 When to sow your Seeds ............................................................................................................................................ 48 Types of Grain You May Grow .................................................................................................................................. 49 Gardening All Year Long ............................................................................................................................................. 50 Organic Matter ................................................................................................................................................................ 50 How to Care for your Garden .................................................................................................................................... 50 Your Garden in the Springtime ................................................................................................................................ 51 Your Garden in the Summer ..................................................................................................................................... 51 Making your Garden Last a Longer Time ............................................................................................................ 52 Extending the Growing Season ................................................................................................................................ 52 Making a Greenhouse .................................................................................................................................................. 56 Water – The Crucial Element .................................................................................................................................... 58 The way water works in the soil ............................................................................................................................. 58 Watering—Irrigation Equipment ........................................................................................................................... 59 Crucial Water Times ..................................................................................................................................................... 60 Diseases, Insects, & Weeds ........................................................................................................................................ 61 Disease Control ............................................................................................................................................................... 61

http://breachrepairers.webs.com 3
Important Factors In Disease Control Are: ......................................................................................................... 61 Concerning the Use of Insect & Disease Control Agents ............................................................................... 64 Liqui-Cop ........................................................................................................................................................................... 66 Copper Dust ..................................................................................................................................................................... 67 Concern Copper Soap Fungicide ............................................................................................................................. 67 Green Cure ........................................................................................................................................................................ 67 About Surfactants Or Spreader-Stickers .............................................................................................................. 68
Vegetable Disease Control Recommendations ...................................................................................................... 69 Individual diseases and their control .................................................................................................................... 69 Other Insect Controls ................................................................................................................................................... 74 Control Of Specific Insect Pests ............................................................................................................................... 75
Harvesting & Storage of Vegetables ........................................................................................................................... 81 Suggestions for Storage .............................................................................................................................................. 81 Methods of Storage ....................................................................................................................................................... 81 Suggestions for Growing Vegetables ..................................................................................................................... 82
The Culture of Fruits, Nuts, Grains, and Vegetables ............................................................................................ 82 Fruits................................................................................................................................................................................... 82 Nuts & Seeds .................................................................................................................................................................... 84 Grains ................................................................................................................................................................................. 84 Vegetables ........................................................................................................................................................................ 88
Mulch Saves Work & Water ......................................................................................................................................... 110 Plastic Mulch.................................................................................................................................................................. 110 Organic Mulches ........................................................................................................................................................... 110 Using Mulch ................................................................................................................................................................... 111 Good Reasons for Mulching ..................................................................................................................................... 111 Here Are Some Mulching Materials ..................................................................................................................... 112
Composting ......................................................................................................................................................................... 112 To Make A Compost Pile ........................................................................................................................................... 113 Using Compost .............................................................................................................................................................. 113 Hints on Weed Control .............................................................................................................................................. 113
The Culture Of Fruit Trees ........................................................................................................................................... 115 Choosing the Site for Fruit Trees .......................................................................................................................... 115 Heaven's Method of Planting Fruit Trees .......................................................................................................... 115 Purchasing Trees ......................................................................................................................................................... 116
The Tools You Need For Gardening How To Use Them ................................................................................... 129 Tool Handles .................................................................................................................................................................. 130 Caring For Your Tools ................................................................................................................................................ 131

http://breachrepairers.webs.com 4
Introduction
Gen 1:1, 31 [1] In the beginning God created the heaven and the earth. [31] And God saw every thing that he had made, and, behold, it was very good. And the evening and the morning were the sixth day.
In the days of creation God made everything that was necessary to man, for him to have a healthful, joyful, useful existence. (See Gen. 1:1-19). The Lord God is a gardener. He loves beautiful things, can’t you just imagine in your mind how God felt, what He thought, when He was planning and making the garden. “Oh, I know they will love this.” “This is going to give them so much happiness.” “This will be good for them.” After all you know, that’s the way we think when we are preparing something or purchasing something to give to our loves ones; and we are made “in His image, after His likeness.” He made Adam and Eve with the same emotions, the same godly desires, the same intuition as He has.
Where did He place man? Gen 2:15. In the Garden that He had prepared. When He placed man in a rural setting, in a garden What was His plan for man? Why did He put man in the garden to work? God put man in the garden to enjoy the fruit of his labors. Of course, the work Adam did at first was not hard. It didn’t produce perspiration. He didn’t have to sweat. There were no weeds to pull, no briers to cut, no thistles to dig. There were no bugs to fight or varmints to eat His garden. There was no disease there either. Because Adam forgot God’s love for him, and chose to please himself, to put his own desires ahead of God’s will, ahead of God’s perfect plan for him. He chose to make self his god. His spiritual nature died that day, and all of his posterity, every child born into this world is born spiritually dead.
So God’s Plan B, which had already been written, was initiated. Because God had known beforehand that Adam would choose death over life, pleasure before self-denial, error before truth. Paradise was lost to man. However, though he was cast out of the garden, in plan B, God still intended that man’s life would be pastoral; that is, He was to live and work in the garden and field. This was to be his livelihood. Instead of being easy, gardening now would require sweat, because man’s nature now is carnal, whereas before it was spiritual. Now his desires tended toward pleasing self rather than God. His nature tended toward depending upon his own strength. If work was easy as before, man would have a greater tendency to become proud in his accomplishments, because he had yielded to the enemy and was more prone to listen to his suggestions, who originated pride in the courts of heaven.
Therefore man needed to realize that he would have to have power from outside himself to do the work. He needed something to help him realize his need of God. He was naked, poor, and blind, prone to make mistakes in judgment. He could now be easily misled by the enemy.

http://breachrepairers.webs.com 5
The Creator had a plan for Adam in the beginning. He just as surely has a plan for every individual that is ever born. The question today is: What is God’s plan for my family, for my children, for me? God’s desire for each one of us is that we should be happy.
John 15:11 These things have I spoken unto you, that my joy might remain in you, and that your joy might be full.
We know He wants us to prosper and He wants us to be healthy.
3 John 2 Beloved, I wish above all things that thou mayest prosper and be in health, even as thy soul prospereth.
God wants us all to spend eternity, in the earth made new.
1 Tim 2:4 Who will have all men to be saved, and to come unto the knowledge of the truth.
He wants all to have the rest that comes in knowing Him.
Matt 11:28 Come unto me, all ye that labour and are heavy laden, and I will give you rest.
He wants us all to seek first the kingdom of God.
Matt 6:33 But seek ye first the kingdom of God, and his righteousness; and all these things shall be added unto you.
If we seek first the kingdom of God, what will happen. All these things will be added unto us. What are all these things? Food, drink, clothing etc, this is God’s promise to us. He wants His people to separate from everything that would tend to lead them away from God. He wants us to do those things that will be the best for our physical and spiritual health.
One thing that will be the best help to both spiritual and physical well being is to spend a good amount of time in the country, learning from God’s “other’s” book.
The benefits of gardening and outdoor life for the children, the adults, the students, the missionaries in training are all wonderful reasons to live in the country and to work in the garden, but there are other very important reasons that knowing how to garden is an absolute necessity in our day. There are many of us who have good jobs, and are able to buy all the food we need at the time. Quite a few of us don’t have time to garden. However, the counsels remains.
In the near future CL 9 Again and again the Lord has instructed that our people are to take their families away from the cities, into the country, where they can raise their own provisions; for in the future the problem of buying and selling will be a very serious one. We should now begin to heed the instruction given us over and over again: Get out of the cities into rural districts, where the houses are not crowded closely together, and where you will be free from the interference of enemies.--Letter 5, 1904.

http://breachrepairers.webs.com 6
We don’t know how that might happen, whether it will be because of terrorism, economic collapse, inflation, or because of droughts, or trucker’s strikes. What we do know is that we are told it will be soon. People in many countries have already experienced severe famine or inability to purchase the food and things they need.
Prov 27:12 A prudent man foreseeth the evil, and hideth himself; but the simple pass on, and are punished.
The wise man hides himself from the trouble. He makes preparation, in other words, and the wise thing for us to do, for the sake of our families, for our loves ones, for the sake of those who do not see the trouble that’s coming, is to make preparation for that little time of trouble. Like Noah, who built an ark for the saving of his house.
Heb 11:7 By faith Noah, being warned of God of things not seen as yet, moved with fear, prepared an ark to the saving of his house; by the which he condemned the world, and became heir of the righteousness which is by faith.
It is very important that ever family should know how to work with the soil, to make it productive. They should know how to grow healthful food, and how to harvest and preserve it. They should have a place to preserve it. This is the preparation we need to make.

http://breachrepairers.webs.com 7
Grow All Your Own Food! How different have lifestyle’s changed over the last few years. In the early 1900s people mostly lived on farms. The routine was about the same every day. People would get up as the sun rose, go out in the barn, and milk the cows, and work in the farm. Food that was served was mostly from the labors of the family. Canned fruit, homemade bread, preservatives, this that could be produced from home were served. Families grew their own food. This can be done in this day also; however it’s been a long time since people in the U.S.A. have done it, many don’t believe it can be done any more. If you just stop to think about all the things you can grow and produce yourself, (if you have the time, of course). You might be surprised. Even though everything is moving at such a fast pace in our day, it’s still possible to have a garden. You may say, “I don’t have to garden. I work 60 or 70 hours a week, and when I come home I’m too tired.” I can tell you that there is a way to have a garden that is easier to care for than the average garden.
Do you suppose that there will be a time in the future that those who have some land where they grow their own food will be like kings and queens? Could it be that sometime in the future there will be a financial crisis, when many will not have the assets with which to buy sufficient food, or other things that are needed? Could it be that sometime in the future, food will be so expensive that knowing how to grow a garden will be an essential knowledge? If we have another major terrorist attack and the president declares martial law, if travel restrictions are imposed, will it be more difficult to go buy food? Could it be possible that sometime in the future, because of widespread calamities or other problems, much of the only food available will be what is locally grown, and if that were the case, do you suppose there won’t be enough to go around?
Might it be possible that sometime in the near future many people will want to leave the cities, but will have nowhere to go, but to your part of the country? Who will have the foresight to prepare for that crisis?
Who will have the generosity to be willing to help those who have no place to go? Will there be someone who has the capacity for receiving such ones? What if those who are without a home are your children, or brothers or sisters, or parents? Who will make a plan for them? There are some things we must do! There are some things that we must do soon.
An overwhelming surprise I was reading some tsunami stories recently. How very tragic were the results of the great tsunami in the area of the Far East. It was a beautiful day. Many people were enjoying their vacation on the beach. Most people in that area were going about their daily routine. Then, suddenly their lives were changed forever. Many lives were lost. It was a surprise for all of them, an overwhelming surprise.
8T 28 Transgression has almost reached its limit. Confusion fills the world, and a great terror is soon to come upon human beings. The end is very near. We who know the truth should be preparing for what is soon to break upon the world as an overwhelming surprise.
RH, April 23, 1889 par. 6 Coming events are casting their shadows upon our pathway. Fathers, mothers, I appeal to you to make most earnest efforts now for your children. Give them daily religious instruction. Teach them to love God, and to be true to the principles of right. With lofty, earnest faith, directed by the divine influence of the Holy Spirit, work, work now. Do not put it off one day, one hour.
http://breachrepairers.webs.com 8
A storm is coming, friends, a furious storm. A storm that is relentless in its fury. The crisis will break upon those who are not prepared for the overwhelming surprise. It won’t be just a physical surprise, it will affect every fiber of our being. It will affect us mentally. It will affect us spiritually. It will bring trouble to the families of the earth. In that day when fiery trials will assault every person that lives on earth, we won’t need the extra burden that will come if we have no way to get food, if we have not provided a way for our families.
The Lord has told us to get out into the country and purchase a little piece of ground where we can grow food for ourselves and our families. There is a preparation to make, but if we don’t prepare, we will be overwhelmed. Do you think things are going to go on forever just as they are? We in the United States of America have been blessed. We have had our troubles, yes, and we have had some almost desperate struggles, but we are still able to eat and work. Most of us, are able to keep our heads above water. Most of the time, we live in happiness and pleasure. However, the Bible speaks about a coming time of trouble. It will be a time of trial for every person on earth. Can you see any changed in the last few years that signal life is getting more difficult? Have you noticed that world is becoming more wicked.
When a nation violates the law of God at every corner, to where does that lead? Does it lead us closer to God? When the majority of our legislators follow after apostasy, to where does that lead our nation?
When the religious leaders and legislative leaders admire and seek erroneous counsel, how long will it be before the day of rest Sabbath, will publically cast aside to Sunday? When that happens, when the National Sunday Law is legislated, that is the last call to get out of the city. That will be the last chance before the great crisis comes, but let’s not wait that long, folks.
Ready for His Appearing Let us follow our Creator’s call to prepare for the little time of trouble by getting our families out in the country. Let’s make a way for ourselves and our loved ones to be ready for that time, both spiritually and physically.
Get ready spiritually by heeding the counsel of Revelation 18.
Rev 18:1-2, 4 [1] And after these things I saw another angel come down from heaven, having great power; and the earth was lightened with his glory. [2] And he cried mightily with a strong voice, saying, Babylon the great is fallen, is fallen, and is become the habitation of devils, and the hold of every foul spirit, and a cage of every unclean and hateful bird. [4] And I heard another voice from heaven, saying, Come out of her, my people, that ye be not partakers of her sins, and that ye receive not of her plagues.
Let us begin to get ready physically and spiritually by bringing ourselves and our families out of the strife and confusion of the cities. Christ desires to free us from sin, and it is through nature where we can behold the power of God to do this. Nature is indeed God’s one of the ways that God manifests Himself to His creatures, the Bible is another way. We need contact with the Bible every day, if we are going to be ready for the crisis. Christ wants to manifest Himself to us as we study His word. God wants to protect us from that overwhelming surprise that will soon take place. Nature also helps us to prepare for that overwhelming surprise.

http://breachrepairers.webs.com 9
10MR 263 By beholding the scenes of nature, the works of the Creator, by studying God's handiwork, imperceptibly you will be changed into the same image. LDE 97 We say again, "Out of the cities." Do not consider it a great deprivation that you must go into the hills and mountains, but seek for that retirement where you can be alone with God, to learn His will and way. . . . 10MR 263 In the movement of 1844, when we believed the coming of Christ was at hand, night after night, when bidding goodnight to those of like faith, we would grasp their hands, feeling that we might not clasp them again until we should meet in the kingdom of glory. Thus it will be again as we draw near to the close of time. I urge our people to make it their lifework to seek for spirituality. Christ is at the door. This is why I say to our people, Do not consider it a privation when you are called to leave the cities and move out into country places. Here there await rich blessings for those who will grasp them. By beholding the scenes of nature, the works of the Creator, by studying God's handiwork, imperceptibly you will be changed into the same image.
Isn’t that amazing? By being out in nature, in God’s second book, we will become like Him without even realizing it. That is of course, if you are seeking Him. You may say “well, Cain the first murderer wasn’t changed by that experience.” The reason for that, was because Cain didn’t want to be changed. God won’t empower us to change if we are not seeking for it.
Character Development is Easier in the Country 5T 232 Parents flock with their families to the cities because they fancy it easier to obtain a livelihood there than in the country. The children, having nothing to do when not in school, obtain a street education. From evil associates they acquire habits of vice and dissipation. The parents see all this; but it will require a sacrifice to correct their error, and they stay where they are until Satan gains full control of their children. Better sacrifice any and every worldly consideration than to imperil the precious souls committed to your care. They will be assailed by temptations, and should be taught to meet them; but it is your duty to cut off every influence, to break up every habit, to sunder every tie, that keeps you from the most free, open, and hearty committal of yourselves and your family to God. FE 326 Send the children to schools located in the city, where every phase of temptation is waiting to attract and demoralize them, and the work of character building is tenfold harder for both parents and children.
While preparing ourselves in the spiritual part of life, God has told us to make physical preparations also. Buy a home in the country; learn how to garden, teach your children how to love gardening.
The Parents Part
3MR 114 Let the mother take her children with her into the field or garden, and from the things of nature draw lessons that will point them to nature's God, and aid them in the struggle against evil. Let her point them to the lofty trees, the shrubs, and the carpet of green that covers the earth. Let her teach them how the lily, striking its roots down deep through the mire into the sand below, gains nourishment that enables it to send up a pure, beautiful blossom. Then let her show them how, by rejecting that which is impure, and choosing that which is pure, they may grow up into pure, noble men and women. . . . The children need to be given lessons that will nurture in them courage to resist evil. Point them from nature to nature's God, and they will thus become acquainted with the Creator. "How can I best
http://breachrepairers.webs.com 10
teach my children to serve and glorify God," should be the question occupying the minds of parents. If all heaven is interested in the welfare of the human race, should not we be diligent to do all in our power for the welfare of our children? 1NL 91 Teach your children that the garden in which they place the tiny seed represents the garden of the heart, and that God has enjoined upon you, their parents, to cultivate the soil of their hearts, as they cultivate the garden. RC 174 While we have dwelt upon the importance of the mother's work and mission, we would not lightly pass over the duty and responsibility of the husband and father in the training of his children. His efforts should be in harmony with those of the God-fearing mother. He should manifest his love and respect for her as the woman he has chosen and the mother of his children.... RC 174 Fathers should . . . mingle with the children, sympathizing with them in their little troubles, binding them to their hearts by the strong bonds of love, and establishing such an influence over their expanding minds that their counsel will be regarded as sacred. . . . HR, September 1, 1877 Upon returning home from his business he should find it a pleasant change to spend some time with his children. He may take them into the garden, and show them the opening buds, and the varied tints of the blooming flowers. Through such mediums he may give them the most important lessons concerning the Creator, by opening before them the great book of nature, where the love of God is expressed in every tree, and flower, and blade of grass. He may impress upon their minds the fact that if God cares so much for the trees and flowers, he will care much more for the creatures formed in his image. He may lead them early to understand that God wants children to be lovely, not with artificial adornment, but with beauty of character, the charms of kindness and affection, which will make their hearts bound with joy and happiness. ST, December 6, 1877 The average father wastes many golden opportunities to attract and bind his children to him. Upon returning home from his business he should find it a pleasant change to spend some time with his children. He may take them into the garden, and show them the opening buds, and the varied tints of the blooming flowers. Through such mediums he may give them the most important lessons concerning the Creator, by opening before them the great book of nature, where the love of God is expressed in every tree, and flower, and blade of grass. He may impress upon their minds the fact that if God cares so much for the trees and flowers, he will care much more for the creatures formed in his image. He may lead them early to understand that God wants children to be lovely, not with artificial adornment, but with beauty of character, the charms of kindness and affection, which will make their hearts bound with joy and happiness. Parents may do much to connect their children with God by encouraging them to love the things of nature which he has given them, and to recognize the hand of the Giver in all they receive. The soil of the heart may thus early be prepared for casting in the precious seeds of truth, which in due time will spring up and bear a rich harvest. Fathers, the golden hours which you might spend in getting a thorough knowledge of the temperament and character of your children, and the best method of dealing with their young minds, are too precious to be squandered in the pernicious habit of smoking, or in lounging about the dram-shop. ST, December 20, 1877 The father's duty to his children should be one of his first interests. It should not be, set aside for the sake of acquiring a fortune, or of gaining a high position in the world. In fact, those very conditions of affluence and honor frequently separate a man from his family, and cut off his influence from them more than anything else. If the father would have his children develop harmonious characters, and be an honor to him and a blessing to the world, he has a special work to do. God holds him responsible for that work. In the great day of reckoning it will be asked him: Where are the children that I intrusted to your care to educate for me, that their lips might speak my

http://breachrepairers.webs.com 11
praise, and their lives be as a diadem of beauty in the world, and they live to honor me through all eternity?
Preparations We Must Make Your children are going to need the knowledge of gardening, even if you don’t because they most likely will be going to go through the time of trouble, even if you don’t. The trouble is just over the hill.
Now is the time to learn how to grow your own food. Now is the time to learn how to live like royalty! Now is the time to get your family into activity for the glory of God. You may ask me, how is gardening going to help me or my family into activity for the glory of God? You may already live in the country, but God still desires for us advance in the truth. You realize of course, as we have already learned; if you and your children learn the necessity of gardening. If you learn to love it, what a great help it will be to them in their spiritual growth.
God desires to be in daily contact with us. He wants to reveal Himself to you through His word, and through nature. How much time do you spend with Him in nature? Perhaps you live in the country, but spend your days and evenings as most people do, in the city. Because of the technology we live with these days, we can live in the country, and go into our living room or bedroom push a button, and instantly we are in the city, beholding the city sights, listening to the city sounds.
Country living is a lifestyle. City living is a lifestyle. You can live in the country, but have a city mind, living the city life. However don’t dismay, you can begin to live the country life today! You can begin to develop a country mind today! But it is God who will do that work for you, if you are willing.
Oh friend, If you had lived in a prior age, maybe 70 years ago. How would you have spent your time? Most likely the normal person wouldn’t be watching television for 3 to 4 hours a day. They probably spend more time in meditation, more time reading, visiting your neighbors, teaching their children how to do a good job weeding the garden. In some ways life back then was much better, because were not drawn into the world the way we are now by the media, by the hurry and rush to go here and there and to do a dozen things more every day than we have time for. Of course, there is nothing wrong with technology, in itself; but I think we are allowing the enemy to use these things to draw us from the ways of God.
If we can get along without knowing all the news and the stores that we see on the media, I believe we will be much stronger spiritually. Our grandparents didn’t have it. They didn’t need it. There are many people who are not Seventh-day Adventist who have turned off the television. If you will try it, and seek God and work for Him, you will find yourselves much closer to God. The hour is late, my friends. The crisis is just before us. If we are ever going to be prepared for the time of trouble such as never was, we must start now. If we delay, we will be among those who are overwhelmed by the surprise that is coming to all the world.
We have an enemy, brothers and sisters, and he is working to destroy us. He makes it seems that the things of the world are so good for us, but as God’s word tells us,
Prov 14:12 There is a way which seemeth right unto a man, but the end thereof are the ways of death.
http://breachrepairers.webs.com 12
So how can we tell the difference? We must take time to think, to meditate, to pray. We need to be in constants contact with the God of heaven, the Master of the universe. We need wisdom from heaven, and God wants to give us this wisdom, we just have to ask. There is a preparation for each one of us to make so that when trouble comes to us, it will not be devastating. What is the most important thing in our lives? What is most important to you? Some say family, kids, a wife or husband, which is good. Our loved ones are the most important, and yet, the One who gives us every good thing, He who supplies our every need, who gives us every breath we take, is really the most important person in our lives. Without His sustaining power we would instantly cease to exist. And He is our Best and Truest friend. He will NEVER fail us. And if we seek Him for wisdom, He will give us wisdom for every situation. He will guide us every step of the way! So that being said, the most important preparation for the time of trouble is spiritual, that is, to know Jesus, and become like Him. However, for the next few moments, we want to discuss a certain aspect of the physical preparation.
The Necessary Physical Preparation As we allow God to teach us, we will learn how we can product enough food with adequate nutrition to sustain our families when the trouble comes. How can we place ourselves in a position in which we will not suffer unnecessarily before the time. It has been done in the past, and it can be done. The prophet has told us:
1MR 252 I am told that Dr. Kellogg advised the brethren to go ahead and build in the city of Los Angeles. But did he not know that the Lord has given instruction in regard to the need of getting out of the cities? As far as possible, our institutions should be located away from the cities. We must have workers for these institutions, and if they are located in the city, that means that families of our people must settle near them. But it is not God's will that His people shall settle in the cities, where there is constant turmoil and confusion. Their children should be spared this; for the whole system is demoralized by the hurry and rush and noise. The Lord desires His people to move into the country, where they can settle on the land, and raise their own fruit and vegetables, and where their children can be brought in direct contact with the works of God in nature. Take your families away from the cities, is my message.
2SM 141 Again and again the Lord has instructed that our people are to take their families away from the cities, into the country, where they can raise their own provisions, for in the future the problem of buying and selling will be a very serious one. We should now begin to heed the instruction given us over and over again: Get out of the cities into rural districts, where the houses are not crowded closely together, and where you will be free from the interference of enemies.
Hopefully you are beginning to see how the problem of buying and selling food will be a serious one. For example, if you own a bakery. If the price of gas and fuel goes up, the supplier says “we have to raise prices. The fuel for delivery is more expensive. The fuel needed to grow the ingredients costs more. We have to pay more for shipping to you.” So they may raise the price of ingredients by 10% or so in a matter of day. Then you hear from the UPS “we have to put a fuel surcharge on your shipping.” So this may end up being 15% higher, in the price that you now have to pay to send to customers. So let’s do the math, if the costs for running the shop increases, the shop would have to increase the price of its product (in this case bread), by at least 25% to just break even, just to keep up.

http://breachrepairers.webs.com 13
When will it stop? And it’s going to keep increasing, just look at the news. So, now it’s the time to learn how to garden. Now is the time to teach your children how to grow food, because, even if you don’t have to go through the time of trouble, they most likely will.
Providing For Your Family’s Needs We are going to begin by discussing how to provide for your family’s needs. If you have four in your family, ideally, you need 8 acres of land for your garden. Grain takes a bit of space to grow as does fruit, nut trees, vines, and bushes. For a well-rounded diet you really need all of these items. When fruit gets to $3 and $4 dollars a pound you will be glad you have your own trees and bushes. You can grow your own in a lot cheaper than you can buy them, if you know what you are doing.
Normally it takes an area of about 200 to 300 square feet (depending on the productivity of the soil) to produce food for one person, for one year, depending on their age and size. 200 to 300 square feet is about 1 to 2 acres. It can be done on a smaller plot if you know intensive gardening methods. Also, Ellen White says
5T 151 Could our brethren remember that God can bless twenty acres of land and make them as productive as one hundred, they would not continue to bury themselves in lands, but would let their means flow into God's treasury. "Take heed," said Christ, lest at any time your hearts be overcharged with surfeiting, and drunkenness, and cares of this life." Satan is pleased to have you increase your farms and invest your means in worldly enterprises, for by so doing you not only hinder the cause from advancing, but by anxiety and overwork lessen your prospect for eternal life.
God can make one acre as productive as five acres if we follow His plan.
http://breachrepairers.webs.com 14
A Balanced Diet For a balanced diet, you need a sufficient amount of protein, which is fairly easy to grow. You need carbohydrates, for energy, of course. You also need fats, a small amount of oils and fats are found in many things. And you can need plenty of fiber, which is very important. If you eat produce containing, these four things, the vitamins and minders will come with them. If your soil is correctly balanced, that is. Despite all this talk about protein, it’s really easy to find in your garden. Greens and beans complement each other in the area of proteins. If you eat grains with these, you will have all the other amino acids necessary. The following is a list of foods, that you need to eat to have a balanced diet.
Protein foods
Greens
Greens are not high in protein but the HIGH QUALITY protein they do have complements the protein in beans and grains. Protein is made up of essential amino acids. A complete protein has all the essential amino acids. To make the protein even better, you need to eat a variety of foods.
We really need to eat some greens every day for the best of health. In every area of the world, for the most part it is possible to grow edible greens within a few weeks. Even in cold climates, greens like turnips, kale, cabbage, broccoli will grow if protected from the harsh climates. In a cool greenhouse you can grow greens and salad all year. Many greens will grow only in cooler weather. Parsley is one green that every garden should have. It is very health giving and has been known to heal disease and save lives. When it gets hot the greens to grow are Swiss chard, New Zealand spinach, Malabar spinach, which isn’t really spinach, but if you can find the seed, it is a delicious green. Then there is the Sweet Potato, which is a very versatile plant, that likes hot weather. You can also eat the leaves or greens from the sweet potato, as well as the roots. Lambs quarter (some people call it pig weed), is a plant that grows wild (it’s a weed). It makes a delicious pot of greens.
Legumes
Peanuts, green beans, wax beans. Dry beans: lima beans, kidney beans, northern beans, pinto beans, soy beans, really beans of any kind. Some beans will grow well in one area, and poorly in another area. You need to know which is best for your area.
Grains
Corn is the easiest to harvest and preserve. However, if you have the right equipment, you can grow and prepare any grain that will grow in your area. Other grains such as wheat, barley, millet rye, spelt are easy enough to grow, but more difficult to harvest and process.
Nuts
Nuts are always a nutritious and satisfying food that will provide fats as well as protein. It is almost a must to have at least one kind of nut for a healthful diet, if you are living totally off the land. Filberts, or Hazel nuts are the quickest to produce, and the easiest tree nut to grow and harvest. In many areas of the country there are nut trees in the woods, such as black walnut, hickory nuts, etc. Many properties have nuts just waiting to be picked up.
http://breachrepairers.webs.com 15
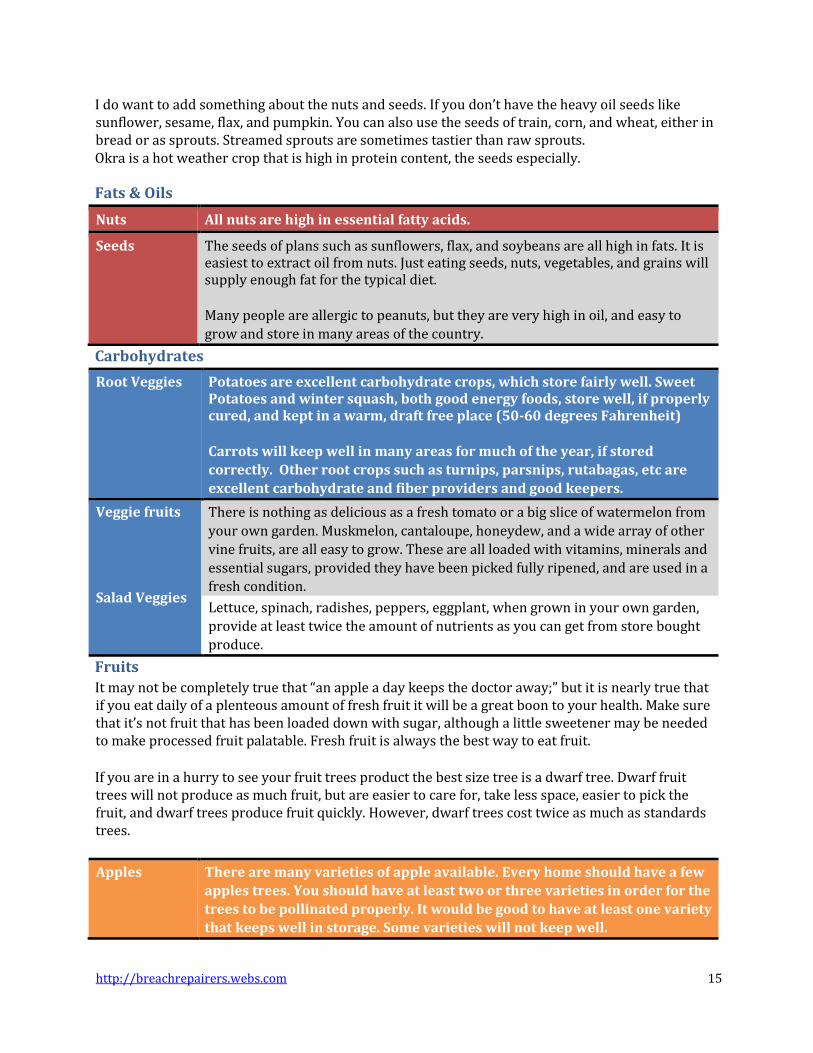
I do want to add something about the nuts and seeds. If you don’t have the heavy oil seeds like sunflower, sesame, flax, and pumpkin. You can also use the seeds of train, corn, and wheat, either in bread or as sprouts. Streamed sprouts are sometimes tastier than raw sprouts. Okra is a hot weather crop that is high in protein content, the seeds especially.
Fats & Oils
Nuts All nuts are high in essential fatty acids.
Seeds The seeds of plans such as sunflowers, flax, and soybeans are all high in fats. It is easiest to extract oil from nuts. Just eating seeds, nuts, vegetables, and grains will supply enough fat for the typical diet.
Many people are allergic to peanuts, but they are very high in oil, and easy to
grow and store in many areas of the country.
Carbohydrates
Root Veggies Potatoes are excellent carbohydrate crops, which store fairly well. Sweet Potatoes and winter squash, both good energy foods, store well, if properly cured, and kept in a warm, draft free place (50-60 degrees Fahrenheit)
Carrots will keep well in many areas for much of the year, if stored
correctly. Other root crops such as turnips, parsnips, rutabagas, etc are
excellent carbohydrate and fiber providers and good keepers.
Veggie fruits
Salad Veggies
There is nothing as delicious as a fresh tomato or a big slice of watermelon from
your own garden. Muskmelon, cantaloupe, honeydew, and a wide array of other
vine fruits, are all easy to grow. These are all loaded with vitamins, minerals and
essential sugars, provided they have been picked fully ripened, and are used in a
fresh condition.
Lettuce, spinach, radishes, peppers, eggplant, when grown in your own garden,
provide at least twice the amount of nutrients as you can get from store bought
produce.
Fruits
It may not be completely true that “an apple a day keeps the doctor away;” but it is nearly true that if you eat daily of a plenteous amount of fresh fruit it will be a great boon to your health. Make sure that it’s not fruit that has been loaded down with sugar, although a little sweetener may be needed to make processed fruit palatable. Fresh fruit is always the best way to eat fruit.
If you are in a hurry to see your fruit trees product the best size tree is a dwarf tree. Dwarf fruit trees will not produce as much fruit, but are easier to care for, take less space, easier to pick the fruit, and dwarf trees produce fruit quickly. However, dwarf trees cost twice as much as standards trees.
Apples There are many varieties of apple available. Every home should have a few
apples trees. You should have at least two or three varieties in order for the
trees to be pollinated properly. It would be good to have at least one variety
that keeps well in storage. Some varieties will not keep well.
http://breachrepairers.webs.com 16
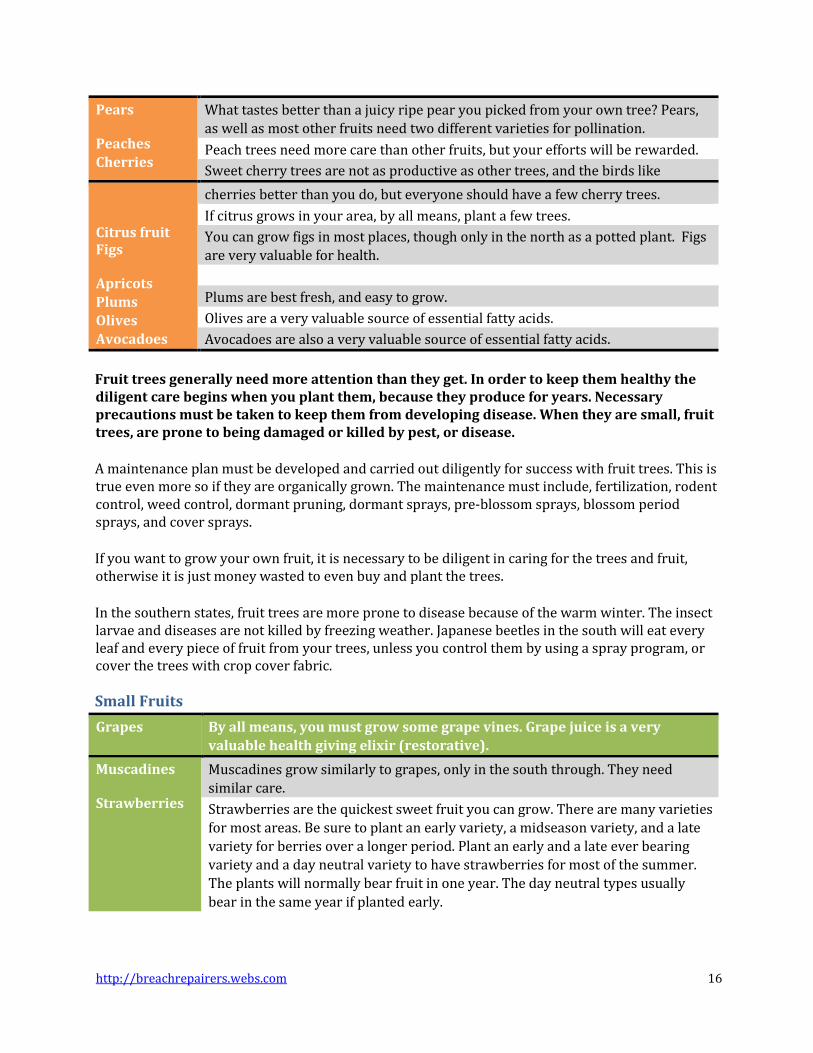
Pears
Peaches
Cherries
What tastes better than a juicy ripe pear you picked from your own tree? Pears,
as well as most other fruits need two different varieties for pollination.
Peach trees need more care than other fruits, but your efforts will be rewarded.
Sweet cherry trees are not as productive as other trees, and the birds like
Citrus fruit Figs
Apricots
Plums
Olives
Avocadoes
cherries better than you do, but everyone should have a few cherry trees.
If citrus grows in your area, by all means, plant a few trees.
You can grow figs in most places, though only in the north as a potted plant. Figs
are very valuable for health.
Plums are best fresh, and easy to grow.
Olives are a very valuable source of essential fatty acids.
Avocadoes are also a very valuable source of essential fatty acids.
Fruit trees generally need more attention than they get. In order to keep them healthy the diligent care begins when you plant them, because they produce for years. Necessary precautions must be taken to keep them from developing disease. When they are small, fruit trees, are prone to being damaged or killed by pest, or disease.
A maintenance plan must be developed and carried out diligently for success with fruit trees. This is true even more so if they are organically grown. The maintenance must include, fertilization, rodent control, weed control, dormant pruning, dormant sprays, pre-blossom sprays, blossom period sprays, and cover sprays.
If you want to grow your own fruit, it is necessary to be diligent in caring for the trees and fruit, otherwise it is just money wasted to even buy and plant the trees.
In the southern states, fruit trees are more prone to disease because of the warm winter. The insect larvae and diseases are not killed by freezing weather. Japanese beetles in the south will eat every leaf and every piece of fruit from your trees, unless you control them by using a spray program, or cover the trees with crop cover fabric.
Small Fruits
Grapes By all means, you must grow some grape vines. Grape juice is a very
valuable health giving elixir (restorative).
Muscadines
Strawberries
Muscadines grow similarly to grapes, only in the south through. They need
similar care.
Strawberries are the quickest sweet fruit you can grow. There are many varieties
for most areas. Be sure to plant an early variety, a midseason variety, and a late
variety for berries over a longer period. Plant an early and a late ever bearing
variety and a day neutral variety to have strawberries for most of the summer.
The plants will normally bear fruit in one year. The day neutral types usually
bear in the same year if planted early.

http://breachrepairers.webs.com 17
Raspberries
Blue berries
Black berries
Black raspberries and red raspberries bear one year after planting. Plant several
varieties for the longest season of fruit. You should have some ever bearing
varieties and some early and midseason varieties.
There are several rabbit eye varieties of blueberries that grow better in the
southern states. The northern varieties will grow in the north, and south, but not
as wells in the far south.
The thorn less variety of black berries is much easier to pick. The every bearing
types are more productive usually. Blackberries are tastier when fresh, if you
don’t want to use sweetener. When processing you will need to use sugar or
some sweetener.
Grapes, muscadines, and many types of raspberries, blackberries must be supported on a trellis. Fruits you can grow in just a few months include, of course all melons, squash, tomatoes, etc, that grow in the garden in about 90 days. Tomatoes and melons have just as much value as fruit as many of the other sweet fruits that take longer to produce.
In many areas of the country you can find wild fruits such as muscadines, persimmons, wild strawberries, elder berries, huckleberries, prickly pear, pawpaw, and wild plums, are yours for asking. You will need to compete with the animals to get them. Also, if they are growing along the road side, you must be sure that they have not been sprayed with chemicals.

http://breachrepairers.webs.com 18
Anyone Can Grow a Garden Besides the acreage 1 acre per year for food person, you should have another acre planted in a soil building cover crop. This crow will be plowed into the soil as green manure or soil building fertilizer. This will enable to build up the soil for one year’s plot. Plant the garden in one plot this year. The next year plant your garden in the one you have built up.
The method for building up your soil is very simple. Now, while you have mechanized equipment, plow under several cover crops each year, spring through fall on the plot you are not using for your garden. Then when gas is not available, or you have to do your work by hand tools, the soil will be built to such a fertile state that you will have a terrific garden.
Make a written plan for your garden It is possible, with the right equipment for one person to care for several acres of garden, if it is properly arranged. However, it is better for the family to work as a team. You need at least two acres of garden space of each member of the family to grow sufficient food for your family, if you want a good variety.
If you plan to grow all of your food, which you possibly can, you will need to plan wisely. The most important first step in any project, in anything we do, after asking for wisdom and direction, from the source of Wisdom and the Source of every good gift (James 1:15, 17), is to make a plan. Write it down on paper. Make sure to include in your plan:
1. What percent of my food do I need to grow? 2. The size of the garden you are able to care for? 3. Who will do the work? 4. What tools do I need? 5. How much water is available? 6. Will it be organic or with chemicals? 7. How and where will I preserve the harvest?
Always plan on sharing with neighbors. In the time of trouble you will reap the benefits of sharing.
Luke 6:38 Give, and it shall be given unto you; good measure, pressed down, and shaken together, and running over, shall men give into your bosom. For with the same measure that ye mete withal it shall be measured to you again.
A wealth of information is available, that will help in planning your garden as well as making it productive. Go to the ag extension office in your county seat. By all means you should visit there.
While you are waiting for the soil test results, there are several things you can do. The ground should be prepared to be used for a garden. The steps of preparation are:
1. Picking up rocks and debris. 2. Breaking up the ground by plowing, discing, or tilling. 3. Or the ground may be prepared, if not too large a space, by turning it with a shovel.

http://breachrepairers.webs.com 19
After the soil test is taken, and the ground is plowed, or spaded, the grass or weed growth should be allowed to decompose or compost (usually takes one or two months, depending on weather, etc.) After the soil test returned from the lab, the suggested minerals should be added, then worked into the soil. If possible these preparations should be made at least 2 or 3 months before gardening season, to allow time for the correct adjustments in the soil to be made. Then, when the ground has been worked again, it is ready for planting. Whatever you do, be sure to make proper preparation, for an efficient & productive garden experience. For instance, before the time comes to plant, get your tools together. Make sure you have what you need in the line of soil, fertilizer, pots for planting, water house, seed, etc.
For information on available soil test labs, you can look on the internet. Or write me for a list of labs in your area. James Taylor 3575 Lonesome Pine Rd, Savannah, TN 38372
Get out the seed catalogs Plan ahead, then follow your plan! This is good advice in every area of your life. While you are waiting for the cold, weather to pass, waiting for spring, a fun thing to do is get out the seed and plant catalogs and dream about those luscious, prizewinning vegetables you are going to grow in your garden this year.
Most seed catalogs have a guide to tell you how much seed you need for a 100 foot row, and how much that 100 feet or row will product under normal conditions. Use that guide to decide how much seed you must order. If you cannot use a whole package in one year go together with a friend and order together, so you can split the cost. If you prefer to get your seed locally, the garden store in your area will have seed for that locality but the variety may not be as large. In making your order, you must keep these things in mind.
Order varieties that will grow well in your area. Use your guide from the county extension office. It is fun to experiment with some new varieties though. I always like to try at least two or three new varieties each season. There are so many varieties of most vegetables from which to choose therefore you should pick only the best for your garden. Don’t order more seed than you can use. A packet of each thing is usually enough for a small garden. If you have rocky ground, don’t plant root vegetables like carrots or parsnips there. The roots will be damaged by the rocks. Instead, make a raised bed, using rock free soil.
Some plants need to be started in a greenhouse hotbed or sunny room. If you want to grow your own tomato, pepper or cabbage plants, you must get your seeds planted by six weeks before the frost free date in your area. Melons, cucumbers, okra, and warm weather vegetables may be planted two or three weeks early in the greenhouse or hotbed to get an earlier harvest. To know for sure you should see the vegetable planting guide in the seed catalog.
Some seed suppliers R. H. Shumway’s 334 W. Shroud St. Randolph, WI 53956 800-342-9461, http://www.rhsumway.com Some seeds are treated, ASK.
http://breachrepairers.webs.com 20
Vermont Bean Seed Co. 800-349-1071 http://www.VermontBean.com
Jordan Seeds 651-738-3422 or 6510739-9578 http://www.jordanseeds.com Wholesale for everyone but in larger quantities, some seeds are treated, ask.
Gurney’s seed and Nursery 513-354-1491 Some seeds are treated, ask.
Johnny’s http://www.johnnyseeds.com
877-564-697 Ask for treated seed, your choice. I use Johnny’s a lot.
Stokes seeds Buffalo, New York http://www.stokeseeds.com
Territorial seed co. Cottage Grove, Oregon 800-626-086 or 541-942-9547 Http://www.territorialseed.com
Fruit tree and small fruit sources If you want fruit trees or small fruit, these are some sources. I have dealt with all of them and found that they were at the time I purchased, good quality plants.
Vernon Barnes Nursery McMinnvile, TN 931-668-2166 Has fruit trees at a lower price, but order early.
Simmons Plant Farm 11542 N. Hwy 71 Mountainburg, AR 72946 501-369-2345 Berry plants, grapes, and asparagus
Vaughn Nursery 8678 Smithville Hwy Mc Minnvile, TN 931-934-2715 Lower prices
Boston Mountain 20289 Hwy 71
http://breachrepairers.webs.com 21
Mountainburg, AR 72946 Berry grape 479-369-2007 [email protected]
Degrandchamps Farm-Blueberry, cranberry South haven, MI 49090 888-483-7431
Finch Blueberry Nursery Bailey, NC 252-235-4664
Ison’s Nursery & Vineyards 6855 Newnan Road P.O. Box 190 Brooks, GA 30205 800-733-0324 *800 number only from September 15-May 1 Ison’s grapes, berries, muscadines, figs, persimmons, fruit trees, drip irrigational. These folks are helpful, and they give good advice.
IF YOU ARE ORDERING FRUIT TREES, IT IS BEST TO GET YOUR ORDER IN THE FALL, As they may run out by February.
Organic grower & gardener’s supplies Always remember that if you form a co-op or a buying network, and buy in bulk with other gardeners you can get better prices for both products and shipping.
Biocontrol Network Brentwood, TN 800-441-BUGS Fertilizer, pest-disease-control www.biocontrolnetwork.com
Extremely Green P.O. Box 2021 Abingdon, Maine 02351 781-878-5397 Fax: 781-878-5582 www.extremelygreen.com This place is an excellent source for everything organic. The only problem now is that shipping is probably $1 a pound by UPS. If you get together with other organic gardeners and buy in bill, it will be cheaper as you can ship by truck.
Tips on choosing your seed and plants 1. Don’t order more seeds than you need, although it may keep for a year or two. Fresh seeds
are better.

http://breachrepairers.webs.com 22
2. Usually, some varieties grow better than others in each area. Some are better for north, some for the south. Get a list, 100 feet of water house, 20 wooden or metal stakes for making rows, and 30 feet of string. Make sure to have all tools on hand. You will especially need the string and stakes. I normally have to spend at least one hour each day in the garden. I will can or freeze the produce for the family and some for the neighbors, and others who need it.
3. Golden Queen Sweet Corn-4 ft. of recommended varieties from the county agent. 4. In small gardens, save space by ordering compact varieties, such as bush cucumbers, rather
than vines. 5. In areas like the south that have high humidity, plants are more susceptible to disease, so
choose resistant varieties if they are available. 6. Consider growing your own bedding plants, rather than buying. If you are able and have the
know how, you will have a much larger range of varieties to choose from and you can save quite a bit of cash. Also, home grown plants are usually healthier and you can get them when you want.
7. Potatoes and tomatoes, and other transplants are usually cheaper if purchased locally 8. It is almost impossible to get a good stand of some vegetables (celery, for instance), in the
garden, and they must be started, in a protector environment. 9. Be sure to order your seed early. Many of the popular varieties are sold out before April.
To summarize, here is a list of things to do before planting a garden, in order of procedure. 1. Write a plan, detailing what you want to look for in a garden spot. 2. Locate a garden spot. Draw a plan of your garden, showing what you want to plant. 3. Take a soil test. 4. Prepare the garden by picking up debris, rocks, roots, etc. 5. Plow the weeds under with a tractor or hire it done, or turn the soil with a shovel. 6. If you want to make a hot bed, or greenhouse in which to start seedlings, the gall is the best
time to make it, before the cold winds of winter make it difficult. 7. Fall or early spring is the best time to go to the store and get your tools. Perhaps you already
have the tools you need. Bad weather days are a good time to get your tools together, clean and repair them to get them ready for use in the spring.
8. Order your seed.
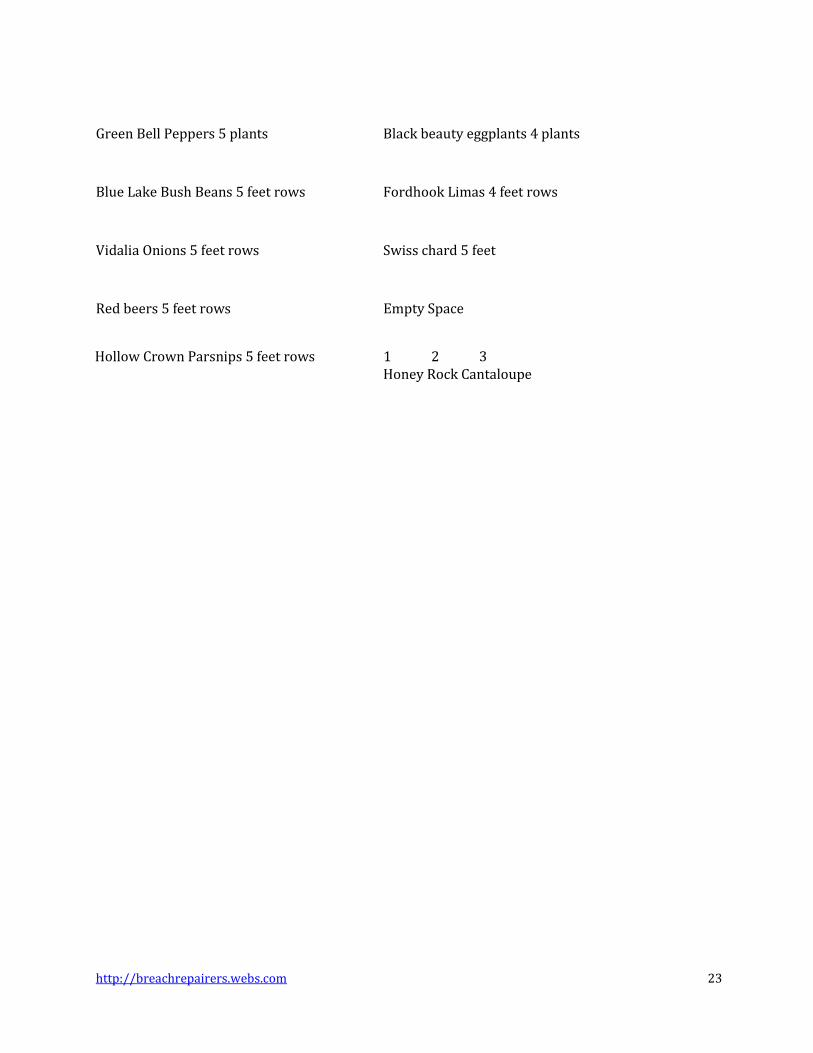
A Sample Garden Plan Garden size is 10 feet by 20 feet – 10 x 20, with the rows being two feet apart. Some of the tools needed are a shovel, hoe, garden rake Fortex Pole Green Beans-6 ft 42” between corn rows Golden Queen Sweet Corn 4 ft 6 ft row Marketmore cukes on a trellis
1 2 3 4 hills
Golden Queen Sweet Corn
Straightneck yellow squash
1 2 3 4
Roma tomato 3 plants Rutgers tomato 4 plants
http://breachrepairers.webs.com 23
Green Bell Peppers 5 plants Black beauty eggplants 4 plants
Blue Lake Bush Beans 5 feet rows Fordhook Limas 4 feet rows
Vidalia Onions 5 feet rows Swiss chard 5 feet
Red beers 5 feet rows Empty Space
Hollow Crown Parsnips 5 feet rows 1 2 3 Honey Rock Cantaloupe

http://breachrepairers.webs.com 24
Begin Where You Are The simple guide to the culture of fruits and vegetables may be helpful in your gardening endeavors. May God bless you as work and gain an experience in His second book.
You can begin gardening today, wherever you are, using the materials you have. Learn the art of improvising. It is best of course to have proper tools and a lot of space, but we all need to learn to make do with what we have. Someday that may seem to be important than it is now.
Even if you live in a high rise, you can eat fresh. You can begin to develop your “green thumb” by growing some sprouts in a jar or a colander. Even during the cold weather seasons, you can enjoy a garden fresh meal.
In the spring, if you live in the midst of the city, you can make a raised bed garden. You may be surprised at how much food you can product in a bed 4 ft wide by 8 ft long. If your lot is larger, you may even have room for a big garden with lots of fruit and vegetables, but whatever you do, begin today to make plans to grow your own food. Better yet, begin to plan for your move to the country, because there is where God wants you to live.
Wherever you live, begin to follow God’s plan and get your fingers in the soil. It will be a benefit to your health and to your family’s health. Read all you can about plants and how to grow them. Read a good gardening manual. Visit the government agricultural extension office for your county or area. Get some free literature from them.
Educate your children to love nature. Begin to instill in them a desire to spend time learning from God’s second book.
How to get your kids interested in Gardening
This seems to be the one of the most difficult things to do. I have worked with and taught lots of young people. Most of them don’t like to garden. Some, even refuse to get their hands “dirty.” However, there are a few tricks to the trade. These will work better for parents than for teachers.
1. Make the garden a family activity. Dad, mom, son and daughter, together, in the garden. Not just once in a while, but on a regular basis, weekly. It will work much better if the whole family is involved.
2. Better yet, make the garden a center of activities. Get a picnic table, and eat in or by the garden. Make it a fun place. Plan activities with the garden in mind.
3. Let the youngsters, from two and up, plan the garden, help prepare it, plant it, care for it, and harvest it. Reward them for their efforts. Be generous with commendation for good work accomplished.
4. Let the garden be a place of happiness. Let no crosswords, no hard correction occur in the garden.
How important is it to you to have a garden? How important is it that the children learn how to grow this?

http://breachrepairers.webs.com 25
5. Help them learn to love it. Let each child have his own little piece of the garden. Let them choose what to grow there.
6. The little ones need to plant things that sprout quickly or grow big, like radishes, lettuce, giant pumpkins, and tall sunflowers. They can make a sunflower house, with scarlet runner beans as wallpaper, or maybe a bean teepee, with flowering pole beans.
7. The older ones may want to grow flowers, or a bird and butterfly garden. Plant flowers that attract those things.
8. Let the kids plan and create a wildlife habitat. Make flowers a part of that. Let them do the research, with your encouragement.
9. Plant a pizza garden. Grow the things that go on pizza. Peppers, tomatoes, parsley, etc. 10. Get some books on bugs, birds, wild flowers, and other nature identification books ,
anything that will increase there interest in the great outdoors.
And remember, your Father, their Father in heaven, wants them to love nature and gardening.
Pray for the wisdom of heaven that you may know how to help your precious children love the handiwork of God; to love the God of nature. Bow with your Bible in hand before your Creator and claim His promise in James 1:5. Seek to “bring up your children in the way he should go.” Proverbs 22:6.

http://breachrepairers.webs.com 26
Requirements for 1 Adult Per Year
Per person per week and per person per year.
Item Servings (amount of ½ cup) Per
week
Per
year
Total
Bushels
Raw apples
Apple Sauce
Pears
Canned Berries or grapes
60-100 apples per bushel 4 200 3
3 156 3
3 156 3
4 208 3
*May substitute apricots, fig, cherries or other fruits
In May or June strawberries begin to bear. Late June brings early apples, early stone fruit, and cherries. In the fresh fruit season it is better to eat largely of fresh fruit, while it is available. In the south of course citrus and berries are available through the winter. In July of course melons and new tree fruits are coming in.
Crops
Nuts and seeds
Nuts are a concentrated food so you only need a 3 Tbsp serving or less depending on metabolism. Ideally a person needs some kind of raw seed or nut every day for the best health. Nuts will keep all year in the shell so you should always grow what you can. In most countries, the following nuts will grow; filberts, walnuts, and hickory nuts. Pecans and peanuts grow mostly in the south. Almonds and English walnuts grow well in warmer areas. Try them, but check temperature requirements.
Seven servings per person, per week is about 15 to 20 pounds in a year of nuts. Two or three tablespoons of raw seeds is a good amount for daily consumption for an adult. That is about ¾ cups a week. Some people have said that eating about 30 pounds a year per adult of either nuts or seeds is ideal.
Always remember that food of any kind is better fresh; and the more you can eat in its raw state, the better your health will be.
Legumes
If you grow a variety of 6 or 8 legumes that you can dry for winter use, you will have a much better choice of foods during the cold seasons. There are some varieties of green beans that do well in a greenhouse, especially fortex beans.
Most people enjoy sugar peas for instance. These are easy to grow and very delicious. Sweet green garden peas are another one that is easy to harvest and dry, or freeze. Legumes must be thoroughly cooked before consumption. If they are picked in an immature state, they will not keep very long, but at the same time they won’t need as much cooking. If you soak beans and put them through a sprouting process they will not require nearly as much cooking and will be more nutritious.

http://breachrepairers.webs.com 27
Soy beans and green lima beans, are both better picked green, and eaten fresh or frozen. Christmas lima beans add a nice pink color on the plate when served from dried or frozen beans. Field peas, black-eyed peas, and crowder peas, are all in the same family and all have similar taste, but are easy to grow and preserve green or dry. These grow mostly in Illinois and the south. Feva beans are beans that grow well in cooler weather. They are good early lima beans.
Of course, everyone likes green beans of some type. There are the long thin beans which are best picked when young. Then there are the flat Italian type beans; Kentucky wonder and romano which have a more mealy flavor. The stringless beans are the easiest to prepare. These include, blue lake, and many varieties. The most productive beans are the pole beans, both lima and green bean. The pole beans grow on a trellis or tepee, and produce twice as much as the bush beans. Someone once called the bush bean “backbreaker.” If you are in a hurry to pick green beans though, the contender, provider and a few other varieties will produce a nice bean in 50 days. The pole beans take about 70 days. The most tastiest green bean is a pole variety called fortex from Johnny’s seed, in my opinion. This bean was briefly mentioned earlier.
If you eat 3 and ½ cup servings of beans, a week, that equals 1 and ½ pounds so you will need to grow 70 pounds per person per year.
There are so many varieties to choose from and the protein is high quality if served with greens. Always remember that beans and peas is an important part of your diet. Beans and peas are nutritious, tasty, versatile, very easy to grow, easy to harvest, easy to preserve, good for the soil, and are from inexpensive seed. Make sure to use them a lot.
Peanuts
These are also a legume and a very nutritious nut, though some people are allergic. If you are not allergic you should grow some peanuts. They are very high in oil that separates easily from the nut. When you can’t buy oil, these will be a dependable source of your daily fat requirement, and the oil is fairly easy to extract.
Greens
As mentioned earlier, beans and greens eaten the same day, supply all the amino acids essential for that day’s nutritional requirements. If grains are eaten the same day, the protein from the grains, as well as the greens and beans supply a perfect amount of amino acids.
We really need a serving or two of greens every day, as the nutrients in greens are necessary for metabolism. Chlorophyll, for instance, is the closest thing in the planet kingdom to blood. It is the stuff of life. Chlorophyll is the element that is involved in turning sunlight into energy. Basically, it makes the food that we eat.
When I was younger I had a condition that would not allow me to keep food in my stomach. Over a period of years, I went from 160lbs to 95lbs, and would have died, but I discovered that a green food called parsley, would help me from the day me. Thus from that day I begin using parsley every day. In time, I gained a pound every day for 2 months and in a few years of that I was healed.
http://breachrepairers.webs.com 28
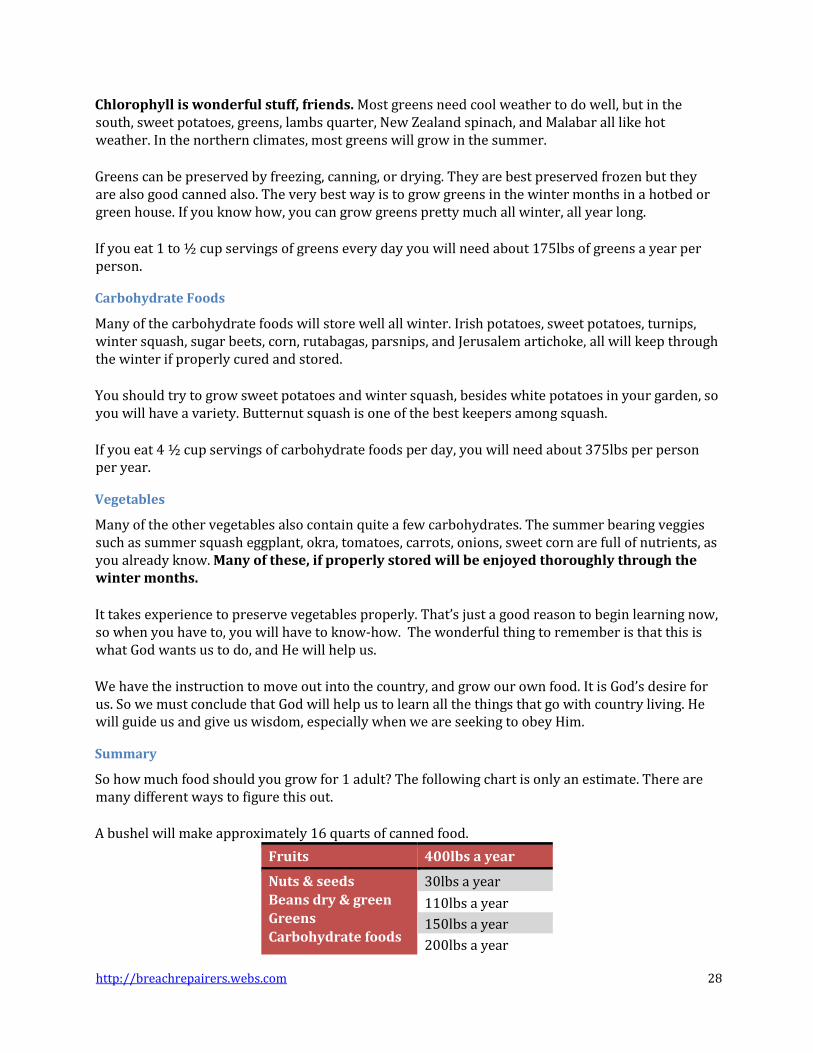
Chlorophyll is wonderful stuff, friends. Most greens need cool weather to do well, but in the south, sweet potatoes, greens, lambs quarter, New Zealand spinach, and Malabar all like hot weather. In the northern climates, most greens will grow in the summer.
Greens can be preserved by freezing, canning, or drying. They are best preserved frozen but they are also good canned also. The very best way is to grow greens in the winter months in a hotbed or green house. If you know how, you can grow greens pretty much all winter, all year long.
If you eat 1 to ½ cup servings of greens every day you will need about 175lbs of greens a year per person.
Carbohydrate Foods
Many of the carbohydrate foods will store well all winter. Irish potatoes, sweet potatoes, turnips, winter squash, sugar beets, corn, rutabagas, parsnips, and Jerusalem artichoke, all will keep through the winter if properly cured and stored.
You should try to grow sweet potatoes and winter squash, besides white potatoes in your garden, so you will have a variety. Butternut squash is one of the best keepers among squash.
If you eat 4 ½ cup servings of carbohydrate foods per day, you will need about 375lbs per person per year.
Vegetables
Many of the other vegetables also contain quite a few carbohydrates. The summer bearing veggies such as summer squash eggplant, okra, tomatoes, carrots, onions, sweet corn are full of nutrients, as you already know. Many of these, if properly stored will be enjoyed thoroughly through the winter months.
It takes experience to preserve vegetables properly. That’s just a good reason to begin learning now, so when you have to, you will have to know-how. The wonderful thing to remember is that this is what God wants us to do, and He will help us.
We have the instruction to move out into the country, and grow our own food. It is God’s desire for us. So we must conclude that God will help us to learn all the things that go with country living. He will guide us and give us wisdom, especially when we are seeking to obey Him.
Summary
So how much food should you grow for 1 adult? The following chart is only an estimate. There are many different ways to figure this out.
A bushel will make approximately 16 quarts of canned food.
Fruits 400lbs a year
Nuts & seeds
Beans dry & green
Greens
Carbohydrate foods
30lbs a year
110lbs a year
150lbs a year
200lbs a year
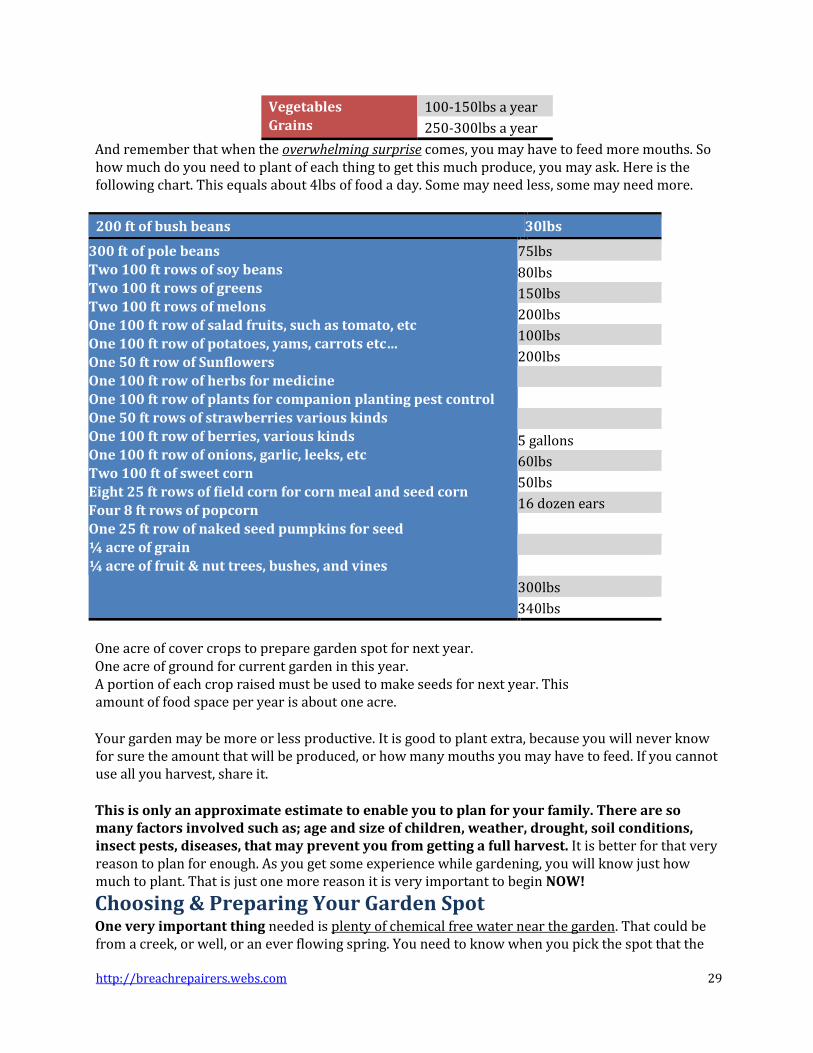
http://breachrepairers.webs.com 29
Vegetables
Grains 100-150lbs a year
250-300lbs a year
And remember that when the overwhelming surprise comes, you may have to feed more mouths. So how much do you need to plant of each thing to get this much produce, you may ask. Here is the following chart. This equals about 4lbs of food a day. Some may need less, some may need more.
200 ft of bush beans 30lbs
300 ft of pole beans
Two 100 ft rows of soy beans
Two 100 ft rows of greens
Two 100 ft rows of melons
One 100 ft row of salad fruits, such as tomato, etc
One 100 ft row of potatoes, yams, carrots etc…
One 50 ft row of Sunflowers
One 100 ft row of herbs for medicine
One 100 ft row of plants for companion planting pest control
One 50 ft rows of strawberries various kinds
One 100 ft row of berries, various kinds
One 100 ft row of onions, garlic, leeks, etc
Two 100 ft of sweet corn
Eight 25 ft rows of field corn for corn meal and seed corn
Four 8 ft rows of popcorn
One 25 ft row of naked seed pumpkins for seed
¼ acre of grain
¼ acre of fruit & nut trees, bushes, and vines
75lbs
80lbs
150lbs
200lbs
100lbs
200lbs
5 gallons
60lbs
50lbs
16 dozen ears
300lbs
340lbs
One acre of cover crops to prepare garden spot for next year. One acre of ground for current garden in this year. A portion of each crop raised must be used to make seeds for next year. This amount of food space per year is about one acre.
Your garden may be more or less productive. It is good to plant extra, because you will never know for sure the amount that will be produced, or how many mouths you may have to feed. If you cannot use all you harvest, share it.
This is only an approximate estimate to enable you to plan for your family. There are so many factors involved such as; age and size of children, weather, drought, soil conditions, insect pests, diseases, that may prevent you from getting a full harvest. It is better for that very reason to plan for enough. As you get some experience while gardening, you will know just how much to plant. That is just one more reason it is very important to begin NOW!
Choosing & Preparing Your Garden Spot One very important thing needed is plenty of chemical free water near the garden. That could be from a creek, or well, or an ever flowing spring. You need to know when you pick the spot that the

http://breachrepairers.webs.com 30
water will be available during a year or two of severe drought. Some wells and springs will flow plentifully in a wet year but will dry up during the driest weather. In those years, the demand for fresh produce will greatly increase the price of vegetables and reduce their availability.
The soil should not be rocky, but a few small rocks are permissible. Rocky soil is usually more fertile, BUT it dulls your tools, makes weed control difficult, and is not suitable for root crops. The soil should be at least 12 inches deep, better 16-24 inches or more, through most things will grow well in a shallow soil of 8” depth. A soil of 12 inch depth is satisfactory for most crops, however, the drainage is not as good as in deeper soils.
The best type of soil is a loam soil. Water should drain well from the soil. If water stands for more than an hour or two after the rain stops, the soil has poor drainage, and will not make the best garden. However, with the correct procedure, drainage can be improved.
The best garden space is on level ground, so water will not wash away the topsoil. A slight slope is usually satisfactory, but needs proper erosion control. An experienced gardener may be able to grow an excellent garden on hilly ground, but it requires a good knowledge of erosion prevention.
There should be no tall trees within 60 feet on the south or east side of the garden. Trees will shade the garden. Most vegetables require at least 5 hours and usually 8 hours of full sun. The amount of sunshine a garden receives throughout the day is a very important factor. Most garden plants will not grow well in a shady area. Any tree will draw water and nutrients from the soil, thus hindering plant growth. Some trees, such as black walnut, produce a chemical that growth of certain plants.
To discover how much sun a garden receives in a day, put a stake, or other markers at the edges of shadows once early in the morning on a clear day. Record the time. Then watch to see what time the shadows begin to cover your garden in the evening. Record the time. This will tell you how many hours of sun your garden receives.
Some soils are very poor in nutrients or minerals and will need to be built up. One way to tell if a certain spot is ready to produce a bountiful garden is to look at the weeds growing there. Do they have a dark green color? Are the weeds tall, or stunted? Are there many weeds, or just a few?
In checking the soil of your garden spot take a shovel and dig down 12 inches. Is it easy digging? Wet a little soil and squeeze it into a ball. Does it stick to your hand? If it is very sticky, it probably needs calcium, found in limestone. Soil with the correct balance of calcium and magnesium will be friable and easy to work with.
THESE ANSWERS SHOULD ALL BE YES FOR A GOOD GARDEN! Water available for watering ______________________ Five or more hours of sun daily ____________________ Topsoil is 8 inches deep or deeper ________________ Does water drain well after rain ___________________ Is the garden on level ground ______________________ free of ditches, gulleys and erosion ________________ Soil easy to dig with shovel or pick ________________ Soil crumbles when squeezed ______________________ Is your garden free of large rocks __________________ Is it free of small rocks ______________________________ Are many weeds growing ___________________________ Weeds have a good dark green color ______________ Does water stand after rain _________________________ THESE ANSWERS SHOULD ALL BE NO–but if yes these conditions can be corrected.

http://breachrepairers.webs.com 31
Is the soil sticky when wet _________________________ Is soil hard to dig with pick or shovel ______________ Water stands more than an hour after raining ______________
OTHER FACTORS Hours of sun daily ___________ Depth of topsoil ______________ Spot level _____________ Or sloping __________ Type of soil? Loam __________ Clay ____________ Sand ___________ Black ___________ Other _____________ Well placed drainage? ____________ Color of soil ______________ Ditches ________________
http://breachrepairers.webs.com 32
Getting your New Garden Site Ready Those who want to be able to grow their own food during a time of famine should establish their garden spot before the trouble comes, so the soil will already be built up by planting cover crops and adding nutrients, picking out the rocks, improving the drainage, planting fruit trees, and vines, etc.; getting the property ready to produce a bountiful harvest. That is one reason the prophet counsels us to get out of the city now, in order to prepare for the crisis.
The best time to prepare your garden spot is the year before you make a garden. Plow the spot where you want your garden. Then break it up, pulverize soil with a rotary disc. If you don't have farm equipment you may hire a local farmer to do it. Or you may turn the soil over with a shovel.
Using a roto tiller is not the best method to break uncultivated ground or sod, (as it affects the soil structure adversely), but if that is all you have or can manage now, go for it. Keep looking for a better way, however. Hiring someone to plowed and disced it is the best way if you don't have equipment. Then after the ground is broken, it will be easier to use a tiller. A tiller, though, will only work the soil 5 to 6 inches deep. You could always loosen the soil deeper with a shovel or spading fork and then till it. A good quality mini tiller is useful for weeding between rows, and for digging in loose soil, but you need a large rear tine tiller for breaking ground.
After you have worked the soil to the correct condition, add organic material and fertilizer as recommended. Then, work the plot until the coarse, lumpy texture is replaced with a fine, granular one suitable for a seedbed. Do not overwork the soil to a powdery fine condition as this will cause surface crusting.
If you are able, begin the spring of the year before you use your spot, prepare the soil by working it to the correct condition. Then plant a cover crop. In the spring, You may use a crop of legumes (cowpeas, field peas, soy beans, etc.), as these legumes pull nutrients out of the air and put them in the soil. In warm weather you can plant any kind of bean, or buckwheat. Plow them under before they go to seed. In the fall plant rye and clover or vetch, etc. to plow under in the spring before it goes to seed. These cover crops will add organic matter and nutrients to the soil.
Perfect soil---Perfect Plant Health The most important part of the garden is the soil. The soil provides the physical support for the plant. The soil is the medium through which mineral nutrients and moisture are provided to living plants. If the soil has the correct structure, and contains a perfect balance of minerals, it is possible for the plant to be free from insect attacks, free from disease, and to product perfect fruit.
The factors that enable a plant to produce the best produce are as follows. 1. The soil pH must be in the correct range. 2. The necessary major and minor minerals must be available. 3. A complete range of 70 trace elements must be available to the plant. 4. An adequate amount of moisture must be provided consistently 5. The soil must be friable so that the roots and moisture can move freely through it. 6. There must be enough organic matter (humus) to hold an adequate of moisture, to ensure
good soil tilth and to aerate the soil. 7. The soil/subsoil must be in such a condition to allow excess moisture to drain away. 8. The plant must be from stress, as much as possible.
http://breachrepairers.webs.com 33
9. Good environmental conditions must be present. 10. There must be adequate light for photosynthesis.
A Soil Test is a must!
After deciding on your garden site, take a soil sample and have it tested, preferably several months before you plant. Use the soil test as a guide as you try to establish a satisfactory fertility level. A regular test measures soil acidity (pH), available nitrogen, phosphorus, potassium, and if requested, calcium, magnesium and zinc. The test results will determine nutrient requirements.
To take a soil sample, make a drawing of your garden. On your paper, divide the garden in six equal sections. If there is a spot where the soil is different; for instance, more rocky, or a low spot draw that on your paper.
For your test, you will need; a garden spade, a pocket knife, a clean bucket, a new zip lock bag for each sample, pen and paper. Go to the garden in each section as marked on your paper, push a spade at least seven inches into the soil and lay the soil aside. Take another 1-inch slice of soil from the back of the hole the full depth of the hole. With your knife, cut a strip of soil from the center. Remove all the soil but the center 1 to 2 inch wide core. Place this core of soil in a clean bucket.
Repeat the procedure in each section, to get a representative sample of the whole garden and to get about one pint of soil. Mix the composite sample well and make sure it is dry. Put it in the zip lock bag.
Write on the bag#1 one a piece of paper write what you will grow in that spot, (what kind of nutrients have been added within the past year), and the location of the spot, so you will know where it is from. Then take the soil and paper to your to your county extension for analysis, or send it to private soil testing lab. The cost of the soil test, which varies with the number of elements tested, will be returned to you many times over in savings of fertilizer and in the production of high yields and quality produce.
Why is the Soil pH important?
pH is the term used for the relationship of hydrogen ions (H+) to hydroxyl ions (OH-). A soil pH reading indicates on a logarithmic scale the concentration of ions held to soil particles and organic matter. The range of the pH scale is from 0 to 14, with a pH of 7.0 being neutral. Reading below 7.0 show that a soil “acid,” and readings about 7.0 tell us the soil is in an “alkaline” condition. Most of the plants that grow in gardens require a slightly acid soil.
The soil’s pH affects the availability of nutrients. Plant roots can only absorb nutrients after they have been broken down into certain ion forms. Nutrients are available for the plants to use only at certain pH levels if the pH is within the correct range, a sufficient amount of these nutrients may be broken into these ion forms. When the soil’s pH is out of this range, the nutrients are “tied up” in the soil, and can’t be absorbed by the plant roots.” The pH must be adjusted to assure the plants can use the available nutrients in the soil to their fullest potential. Most vegetables in a garden prefer soil with a pH between 6.0 and 6.8. Potatoes develop better with a pH below 6.0.
“The sooner the better” is an excellent time to have your toil tested. In the spring, the labs are swamped, so the best time is in the autumn. After you receive the test results you can make
http://breachrepairers.webs.com 34
adjustments of pH needed. Also, if you test in the fall, it will help you plan which nutrients you need to add to the soil and how much for the garden in the year ahead. Adjusting pH
If a soil test indicates that your soil's pH is not in the range of 6.2 to 6.8, you need to adjust it. If the pH is too low, then your soil is too acidic and you should either add calcitic or dolomitic limestone (Dolomite limestone is high in magnesium, so apply it only if soil magnesium content is low).
The test results should tell you what and how much soil amendment to add. If the pH value is too high, your soil is too alkaline and you need to add sulfur. Applying lime or sulfur in the fall before planting is best because you have a longer soil reaction time. The more finely ground the liming material, the faster it dissolves.
Use of Wood Ashes
Wood ashes have some use as a liming material. They contain some calcium carbonate. The ash of hardwoods, such as maple, elm, oak and beech, contains about one-third more calcium. Wood ashes are high in potassium, which will build up easily to excess amounts, so be careful how much you use. Do not use coal ash on garden soils because it contains a high concentration of heavy metals and other toxic compounds which may be taken up by the plants.
Our Bodies Need Trace Minerals
Senate Document 264- from year 1936 “Our physical well-being is more directly dependent upon minerals we take into our systems than upon calories or vitamins, or upon precise proportions of starch, protein or carbohydrates we consume." Do you know that most of us today are suffering from certain dangerous diet deficiencies which cannot be remedied until depleted soils from which our food comes are brought into proper mineral balance?"
The alarming fact is that foods (fruits, vegetables and grains) now being raised on millions of acres of land that no longer contain enough of certain minerals are starving us - no matter how much of them we eat. No man of today can eat enough fruits and vegetables to supply his system with the minerals he requires for perfect health because his stomach isn't big enough to hold them." “The truth is that our foods vary enormously in value, and some of them aren't worth eating as food... Our physical well-being is more directly dependent upon the minerals we take into our systems than upon calories or vitamins or upon the precise proportions of starch, protein or carbohydrates we consume. This talk about minerals is novel and quite startling. In fact, a realization of the importance of minerals in food is so new that the text books on nutritional dietetics contain very little about it. Nevertheless, it is something that concerns all of us, and the further we delve into it the more startling it becomes."
"You'd think, wouldn't you, that a carrot is a carrot - that one is about as good as another as far as nourishment is concerned? But it isn't; one carrot may look and taste like another and yet be lacking in the particular mineral element which our system requires and which carrots are supposed to contain."
"Laboratory test prove that the fruits, the vegetables, the grains, the eggs, and even the milk and the meats of today are not what they were a few generations ago (which doubtless explains why our forefathers thrived on a selection of foods that would starve us!)"

http://breachrepairers.webs.com 35
"No man today can eat enough fruits and vegetables to supply his stomach with the mineral salts he requires for perfect longer does a balanced and fully nourishing diet consist merely of so many calories or certain vitamins or fixed proportion of starches, proteins and carbohydrates. We know that our diets must contain in addition something like a score of minerals salts."
"It is bad news to learn from our leading authorities that 99% of the American people are deficient in these minerals, and that a marked deficiency in any one of the more important minerals actually results in disease. Any upset of the balance, any considerable lack or one or another element, however microscopic the body requirement may be, and we sicken, suffer, shorten our lives."
"We know that vitamins are complex chemical substances which are indispensable to nutrition, and that each of them is of importance for normal function of some special structure in the body. Disorder and disease result from any vitamin deficiency. It is not commonly realized, however, that vitamins control the body's appropriation of minerals, and in the absence of minerals they have no function to perform. Lacking vitamins, the system can make some use of minerals, but lacking minerals, vitamins are useless." Certainly our physical well-being is more directly dependent upon the minerals we take into our systems than upon calories of vitamins or upon the precise proportions of starch, protein of carbohydrates we consume. This discovery is one of the latest and most important contributions of science to the problem of human health."
http://breachrepairers.webs.com 36
Soil Fertility
The following, besides other trace minerals, are nutrients known to be essential for plant growth.
Carbon is brought to the plant through photosynthesis from the carbon dioxide in the air and is stored as carbohydrates for energy.
Hydrogen also is necessary for making carbohydrate energy. It is obtained from air and liquid water.
Oxygen, taken from the air, aids in cellular respiration, which is the process of generating adenosine triphosphate (ATP) via the consumption of sugars. Oxygen gas is produced as a byproduct in this process.
Phosphorus is necessary for the conversion of light energy to chemical energy (ATP) during photosynthesis. It also aids in cell communication. Phosphorus is responsible for plant growth and flower/seed formation.
Potassium regulates the absorption of water by the plant. A correct balance of potassium is necessary for the plant to endure a period of dry weather.
Nitrogen is an essential component of all proteins. An imbalance of nitrogen results in stunted growth.
Sulphur is a necessary for the formation of amino acids and vitamins, and is an essential component in the manufacturing of chloroplasts. A chloroplast, which holds the chlorophyll, is the organelle in which photosynthesis occurs. Chlorophyll molecules are the small "sun-panels" which the plants use to gather energy from the sun's rays (and which give plants their green color). Photosynthesis is the process during which the actual sun rays are harvested.
Calcium regulates the transport of nutrients into the plant and the activation of enzymes.
Magnesium is an important part of chlorophyll, a without which photosynthesis cannot occur. It regulates the production of ATP or plant energy.
Iron is critical for chlorophyll formation and photosynthesis.. Iron is also used by enzymes to regulate transpiration in plants. Transpiration is the name we have given to the process during which plants pull water up from the ground and let it out it through small openings on the underside of the leaves. This transpiration process allows nutrients (dissolved in water) to reach all parts of the plants.
The following nutrients are essential in minute amounts. For example, Boron requirement in an acre of soil is just a few ounces. More than that can cause boron poisoning, which is the reason you need to test your soil, to discover deficiencies and surpluses.
Molybdenum a trace mineral is a cofactor to the enzymes which are necessary for building amino acids.
http://breachrepairers.webs.com 37
Boron, a trace mineral, is necessary for the movement of sugar through the plant, cell division, and making use of plant enzymes.
Copper, a trace mineral, is important for photosynthesis and regulates chemical reactions in the plants.
Manganese, a trace mineral, is necessary for building chloroplasts.
Zinc, a trace mineral, is essential in a large number of enzymes and plays an essential role in DNA transcription.
Nickel, a trace mineral, is essential for the plant to use nitrogen. It is necessary for the activation of plant enzymes.
Fertilizing Methods
The best way to increase the fertility of your soil is to use a combination of cover crops, compost, manure, and natural soil amendments. There are different methods for applying fertilizer nutrients to the soil.
You can broadcast fertilizer, such as you do seed over a large area like a lawn.
You can do banding (applying a circle of fertilizer around and deeper than the seed). Banding is done when transplanting and as the roots develop. The plant has instant access to the food.
Starter solutions are used when transplanting. Starter solutions (Such as fish emulsion or compost tea) are in liquid form.
Side dressing is done after the seeds have come up. Place some fertilizer along side the plants (about 4-6 inches away) and mix in with the soil.
Foliar feeding is a good way to get quick absorption of nutrients. When the soil is still too cold for the microorganisms to change the nutrients into useable plant food, use foliar feeding. It won't take the place of other fertilizers, but will give a boost to the plant. Foliar foods include fish emulsion, compost tea, poured over the plant, with a sprinkler can, applied through the watering system, or applied with a hand sprayer.
Fertilizers may be solids or liquids. A Solid fertilizer, which you apply dry, may be in a powder form or granular. A liquid fertilizer may come as a powder or liquid which you add to water before applying it.
Dry fertilizers do not work quite as fast but they will last longer. You can spread a dry fertilizer by broadcasting it before planting or you can sprinkle the dry fertilizer next to a plant, or beside a row of plants, which is called sidedressing. If you want to get the nutrients to the roots more quickly when sidedressing, it is best to cover the fertilizer or work it into the soil.

http://breachrepairers.webs.com 38
To apply a liquid fertilizer, first dissolve or dilute it according to label instructions. You can pour it into the soil at the base of the plant with a sprinkler can (this is called a soil drench). Or you can spray the fertilizer on the leaves (this is called foliar feeding). Because plants close down their leaf pores when it's sunny or hot, apply foliar fertilizers early or late in the day, or during a cloudy spell. Spray them on the tops and underside of the leaves until the liquid runs off.
If you want to use natural soil amendments (cottonseed, manure, seed meal, etc.) remember to cover them or place them in a shallow trench so they will not draw bugs when decomposing or wash away.
By Broadcasting
Fertilizing by broadcasting is scattering the nutrients over an area of your garden. You may spread nutrients with your hand, or a mechanized implement or a hand operated spreader. A hand pushed spreader is easy to use & available from most garden supply centers for anywhere from $30- $115 a spreader can be used for spreading nutrients or seed.
About Fertilizer
There are many brands and types of commercial fertilizer. Both chemical and organic. We prefer, of course the natural fertilizer, as it does not pollute the water underground, rivers, streams or oceans. Natural nutrients do not kill the soil bacteria, or earthworms.
If you want to use prepared organic fertilizer I usually recommend these easily available ONES FROM "Biocontrol Networking". These fertilizers usually cost around .50 cents a lb plus shipping.
PRO-BOOST 5-3-4 has 5 parts nitrogen 3parts phosphorus and 4 parts potassium
PRO-START 10-0-0 has 10 parts Nitrogen 0 parts Phosphorus 0 Parts Potassium This is a high nitrogen fertilizer
PRO-GROW 2-3-3 has 2 parts Nitrogen 3 parts Phosphorus 3 Parts Potassium This contains a more equal portion of three major nutrients.
By Side Dressing
Fertilizing by side dressing is the easiest fertilizer for side dressing plants is granular organic fertilizer, which you sometimes can purchase at Lowes at a higher price or from Biocontrol Network® in Brentwood, TN. www.biconet.com Their prices are as good as any and they are usually helpful, if you need advice.
Pro-Boost 10-0-0 as a nitrogen sidedress. 1 to 2 cups per 10 feet of row. For a heavy feeder.
For a NPK fertilizer you can use PRO-START 2-3-3 or PRO-GROW 5-3-4 on fruit bearing crops such as corn, tomatoes, melons etc.
PRO-GROW 5-3-4 has a higher nitrogen content - good for sidedressing green crops.
NOTE: I recommend the above granular organic fertilizers because they are easy to apply. If you cannot access these or prefer you may use a good quality compost or manure. Apply at a

http://breachrepairers.webs.com 39
rate of 1 cup or more per hill or per 18 inches of row. When applying manure mix it with the soil. Too much manure or seed meal will adversely affect the plant.
For vegetables to make abundant growth during the season, and produce a bountiful harvest, they need a uniform supply of nutrients. If you prefer to use seed meal material or manure as a fertilizer, it should be composted first. However you can use it raw, but be sure to cover it with soil. (however, do not use manure to fertilize root crops. Place the fertilizer in a band along the row about 3 inches from the row, then cover it with soil. You can dig a little trench to place the seed meal in then cover it. You may want to work it into the soil before planting. A gallon or 6 lbs to 100 square feet. Uncomposted, it will be slower in action.
An application of commercially prepared organic granular fertilizer (such as PRO- START) followed by a home mixed organic fertilizer is effective as a good side dressing. The prepared granular fertilizers give an immediate boost to the plants; and slower acting organic materials provide nutrients at a more uniform rate throughout the season;
NATURAL high nitrogen fertilizers include blood meal, fish meal, cottonseed meal, etc. fish & seed meals are best if composted before use. If you use them without composting, they may draw flies or smell unless covered. Natural fertilizers may wash away easily unless covered or in a trench.
Other Suggestions For Applying Fertilizers
When applying fertilizer, be sure to follow the directions on the label.
Organic fertilizers condition the soil and are relatively slow release fertilizers. You can buy manure that has been composted. Nutrients will vary depending on the type of manure you apply. Chicken manure is on the average of 3-5-2. Dairy manure is 2-1-3. So you can see that manures are relatively low in nutrients. Salt may be a problem with manures. Also weed seeds can be a problem. A good thing to do with manures is to compost them at a high heat and then use them. Do NOT buy sewer sludge. It is full of toxins and harmful substances.
If you use what you have available be sure you know if it is acid or alkaline. For instance, many people use wood ashes on their gardens. Wood ashes are very alkaline, so if you have alkaline soil already, you don't want to add wood ashes. If your soil is too acid then you can add a measured amount to neutralize your soil.
Bat guano 6-9-3 is from caves, and is already partially decomposed. It is rather expensive but nutrients are readily usable.
If you purchase bone meal (4-22-0) for phosphorus be sure the package states the phosphorus is accessible as some brands are not but most of the phosphorous is not soluble.
When the weather is hot and dry do not use high nitrogen fertilizers. After applying any fertilizer you should water. Otherwise they may have a tendency to burn. Salts will build up, especially in container plants, every 4 months or so. You can see salt buildup on the clay pots. Sometimes when you buy a plant from a nursery the salts are at a higher concentration. At home the plant will not be able to tolerate that much salt. Fertilizer is a salt. Greenhouses feed their plants daily with a diluted fertilizer. At home you won't be doing this. When you buy a plant from a greenhouse nursery, be

http://breachrepairers.webs.com 40
sure and leach (water it very thoroughly to wash out the salts) it out the first time you water it, And every 4 months thereafter.
What type of soil do you have? This is a very important factor in knowing when to fertilize and how often to fertilize. Also the types of plants being grown will be a factor. Root crops don't require as much nitrogen as leafy crops. Trees and shrubs feed light and corn is a heavy feeder of nitrogen. Turf grasses are like corn and require lots of nitrogen. Here is a good home made fertilizer recipe for broadcasting over your garden then working into soil. All measurements are in terms of volume, not weight.
4 parts seed meal 1 part dolomite lime (if required) 1/2 part bone meal -or- 1 part soft rock phosphate 1/2 part kelp meal Organic Amendments
Purpose of Soil Amendments
Keep in mind that the soil amendments main purpose is to improve the soil. Some amendments change the soil's pH, others add organic matter.
Seed Meal
Most seed meals provide nitrogen, with smaller amounts of phosphorus and potassium. In some areas, cottonseed meal, which is cheap, is easily available. Other options are alfalfa meal, Soy bean meal or rape/canola meal.
In spring you may substitute blood meal, more expensive, in place of some seed meal, since blood meal is somewhat faster acting. Try using three parts seed meal and one part blood meal.
Lime
Seed meals tend to be acidic, so lime is included to balance that out. Dolomite limestone is roughly half Magnesium Carbonate and half Calcium Carbonate. Calcitic limestone is pure Calcium Carbonate. Plants usually need more calcium than magnesium; so, if your soil needs magnesium, use 1/3 part dolomite lime and 2/3 part calcitic lime. If your soil is alkaline, you will want to reduce or eliminate the lime in this mix.
Bone Meal and Rock Phosphate
Use a mix, or all rock phosphate (cheaper) These ingredients make up the bulk of the phosphorus component. Less bone meal (NPK -0-10-0) is required as it releases its phosphorus more readily. The advantage of using rock phosphate (NPK - 0-3- 0) is that it continues to contribute phosphorus to your soil over many years.
Bonemeal is steamed animal bones, which supply 11% phosphorus, 1% nitrogen, and 24% calcium. It will usually last a year but because of the calcium content use it only on soils with a pH less than 6.0 Bone meal phosphorus is available more quickly than with rock phosphate. Broadcast bonemeal before planting 3 lbs. for 100 sq ft and Work it into the top 6 inches of soil. Bone meal is easier to find, get Rock phosphate from Biconet.com. 20 lb. of bone meal will run about $5 US.

http://breachrepairers.webs.com 41
Kelp Meal (NPK - 0-0=10)
Kelp/Seaweed is least expensive as a dry powder. If you purchase a large quantity it is less expensive. It is high in potassium and Trace minerals, work about 10 lbs. into 100 sq. ft. or 1 cup to 6 ft of row. Dry powdered Kelp is most likely the best & least expensive nutrient to use for adding trace minerals to your soil.
Bloodmeal is dried animal blood. It is rather expensive, but a little goes a long way. It is about 15% nitrogen, which is available for plants use right away. It will feed the plant for 3-4 months. Apply 13 lbs. for 100 ft. of row. Rake it into the surface of the soil; it washes into the root zone.
Cottonseed Meal
The nutrients in Cottonseed meal are released over an extended period of time. It has a high content of organic matter which loosens tight, heavy soils and helps light, sandy soils hold moisture and nutrients. As a slow-release, organic fertilizer, cottonseed meal is safe to use in liberal amounts without danger of burning plants. It should be composted before use, but you may use it raw. Work it into the soil before planting. A gallon or 6 lbs spread over 100 square feet is an appropriate amount. Uncomposted, it will be slower in action. The nutrient analysis is 6-1-1.
Fish meal
It is dried fish powder. It is high in nitrogen and other minerals. It is 6-3-3. 6 parts Nitrogen, 3 Parts phos. & 3 parts Potassium. It will last for a whole season if you apply it at planting. Spread 3 lbs. per 100 sq. ft. or 100 ft of row.
Greensand (Glauconite)
A fertilizer dried ocean deposits. It is slow-release source of potassium. One application will last for 10 years). It contains 5% potassium, and is a fairly good source of trace minerals. Will loosen clay soils. You may broadcast 10 lbs. per 100 sq. ft. on soils low in potassium, but none on soils with high potassium.
Sulfate of Potash
is a Quick-release potassium. It contains also magnesium and sulfur. Broadcast up to 1 lb. per 100 sq. ft. The potassium is easily dissolved & will burn plants if you apply too much. It is also called SulPo-Mag & K-Mag.
Cow Manure
Or sheep manure will Provides nutrients and humus. Nutrient content will vary with the type of animal. Fresh manure has a high nitrogen content that will burn plants, so apply the fresh several months before planting or let it compost for several months before applying to the soil around plants. You can apply 10-20 lbs. per 100 sq. ft. or 10 lbs to 100 ft of row. I would not recommend steer manure, as it is high in chemicals.
Chicken or turkey manure is very high in potassium, so be careful not to apply it too often. Horse Manure is very potent and contains tetanus germs, so I do not use it.
Rock Phosphate
is a rock powder. And is about 33% total phosphorus; But only about 3% of the phosphorus is available at any time. It is High in calcium, so use only on soils with a pH of less than 6. Work into
http://breachrepairers.webs.com 42
the top 6 inches of soil. You may also use it on the compost pile in autumn. Apply 6 lbs. per 100 sq. ft. for soils low in phosphorus or less on soils with more phosphorus
Wood Ashes
Wood Ashes are about 12% potassium. Ashes generally contain large amounts of calcium. So do not use ashes on soil with a pH above 6. Apply no more than 2 lbs. per 100 sq. ft. every 3-4 years, ashes placed without testing the soil may "lock UP" the nutrients in the soil. Compost
is simply decayed plant waste. Compost is usually loaded with essential nutrients and organic matter, and it stimulates the growth of soil bacteria.
Dead Leaves & Hay
etc may be placed on the garden as a mulch, but after being composted will add organic matter to the soil.
Grass clippings
mixed with the soil and allowed to decay for a few weeks, will add nitrogen to the soil and will increase soil organic matter and stimulate worms and other soil microorganisms. If you work fresh clippings into the soil before planting, you should use about 50 lbs.of material for 100 sq. ft. Or you may spread a 2-inches thick layer around the base of plants.
Gypsum
is an ingredient in plaster, as Calcium sulfate powder. It contains about 22% calcium and 17% sulfur. Gypsum loosens clay soils & neutralizes excessive salt content in soils. broadcast 4 lbs. 100 sq. ft.
Calcitic Limestone
Decreases the acidity of soils, and raises the pH. The Effect lasts about 4 years. broadcast 8 lbs. per 100 sq. ft. on clay soil, 6 lbs. on loams, and 2 lbs. on sands.; Dolomitic Limestone should be used only on soils low in magnesium.
Sulfur decreases the soil pH, making alkaline soils more acidic. The results last for 2 years or so.
Broadcast 1 lb. per 100 sq. ft. to lower the pH by one full point. You should mix the sulfur into the top 3 inches of soil. The recommendation is for more than a pound per 100 sq ft, It is best apply half in the late winter or early spring and half in the fall after harvest.
Worm castings
Worm manure. Is an excellent soil improver. It adds organic matter as well as plant nutrients. Spread 25 to 50 lbs. per 100 sq. ft. and work it in. You may also use it in the row or as a sidedressing material.
This chart shows the best time to apply fertilizer by side dresses
Table 6
Crop Time To Apply
Asparagus Before growth begins in spring. A shovel of composted manure over each plant.
http://breachrepairers.webs.com 43
Beans Use Pro-grow 5-3-4 or compost before planting. Side dress with pro-boost 10-0-0
bat guano or other high nitrogen agent after bloom and pods.
Beets Use Pro-start 2-3-3 or compost before planting, broadcast over area before
planting-NO Manure.
Cole crops Use Pro-start 2-3-3 or composted manure before planting, 3 weeks before
transplant-sidedress with high nitrogen Pro-Boost 10-0-0 or other high nitrogen
substance.
Carrots Use Prostart 2-3-3 or other low nitrogen source as additional nitrogen might
reduce yield or lower quality of root. –Broadcast before planting-NO MANURE.
Cucumbers, Melons Apply 5-3-43 or manure at planting. Sidedress with nitrogen 1 week after blossoms
begin & 3 weeks later.
Eggplant Apply manure or 2-3-4- when planting, Pro-Grow 5-3-4 at blossoming, and after
fruit begins to form
Greens Apply manure or Pro-Grow 5-3-4 at planting high nitrogen. When plants are about
5 weeks old
Lettuce Do not add additional nitrogen–Broadcast Pro-Grow 5-3-4 or composted manure
over area before planting.
Onions Pro-Grow 5-3-4 at & 1 or 2 after bulbs begin to enlarge—NO MANURE
Parsnips Do not add additional nitrogen. Broadcast Pro-start 2-3-3 or compost over area
before planting
Peas Manure or Pro-Grow 5-3-4 at planting, after peas begin to bloom and form fruit
Peppers Manure or Pro-Grow 5-3-4 at planting & again after fruit begins to form.
Potatoes Pro-Grow 5-3-4 and soft rock phosphate at planting. After potato formation starts
(bloom stage), Use Pro-boost 10-0-0 about 6 weeks after planting
Squash Use Pro-Grow-5-3-4 or manure and when blossoms form to keep quality.
Sweet Potatoes 2-3-3 at planting DO NOT SIDEDRESS unless you are growing plants for greens.
Tomatoes Pro-start Pro-Grow 5-3-4 at planting & 1 to 2 weeks AFTER fruits form and again 2
weeks after 1st ripe tomatoes
Turnip, Rutabaga Broadcast Pro-Start 2-3-3 over area before planting
http://breachrepairers.webs.com 44
Cover Crops & Green Manures A green manure cover crop is a crop you plant anywhere you want to add organic matter to the soil. When the cover crop is added to the soil, it improves soil drainage, soil tilth, soil fertility, and productivity, as well as preventing erosion. The cover crop also will keep the top soil from washing or blowing away (erosion) before you plant the main crop of vegetables, grass, etc.
Green manures add organic matter to the soil and choke out weeds. Green manure cover crops take up nutrients that might otherwise wash from bare soil, and return those nutrients to the soil as the green manure decays. The roots of the cover crop loosen the soil. After the crop reaches the height you want it to be, You work it into the soil, using a shovel, a tractor and plow, or a tiller or other heavy equipment. Turning a cover crop under is a time consuming job when using a hand method, but it can be done. The easiest way is to hire a farmer with a tractor and plow, or use your own tractor and equipment.
After you have worked the cover crop into the soil, it will take about 6 weeks for the roots, stems, and leaves to decay. During that time the soil should remain broken up.
You can plant a grass or legume as a green manure, or a mixture of both. Grasses are better at adding organic matter and stimulating earthworms, while legumes add more nitrogen. If you plant a legume, spread a commercially available inoculant on the seed before you plant the legume. The inoculant contains the nitrogen-fixing bacteria that live in legume roots.
When choosing a green manure, look for a plant that germinates easily in your soil and grows quickly, covering the ground. Some manures are planted in the fall and turned under in the spring, giving you organic matter quickly. Others grow from one spring to the next, giving erosion control, until you are ready to plant.
Green manures have drawbacks if you don't choose the crop wisely and manage it. If you let a grass green manure grow until it becomes tough, it can take a long time for soil organisms to break it down. You can get around that problem by growing the grass with a legume, or by adding another source of nitrogen, such as manure, bloodmeal, etc.,. If you plant seeds that can lie dormant in the soil for a few years before germinating, or let a green manure go to seed, you can create a weed problem.
Planting the green manure To plant a green manure, work the plot until the coarse, lumpy texture is replaced with a fine, granular one suitable for a seedbed. This is done by discing or tilling At the least you must break up the clumps, and smooth the seed bed. You can wait until you've harvested the existing crop, or sow it a few weeks before the season ends, to protect the soil after harvest. Scatter the seed as evenly as you can, then tamp the soil down. If you don't get rain while the seeds are germinating, water lightly daily. As the seedlings get bigger, water more deeply and less often.
If you plan to leave the manure crop on through the summer, mow or cut it each time it begins to flower, letting the clippings fall to the ground. That way, it can't go to seed and create a weed problem.
http://breachrepairers.webs.com 45
When you turn the manure under the soil, will depend on the results you want. Grasses and other non-legumes mostly add nutrients if you turn them under when they are young and tender. Turn them under when they are taller, they provide more organic matter. Mature legumes add more nitrogen than young ones, but will be harder turn under the soil.
A few weeks before you plan to plant your garden, use a scythe or other tool to chop the leaves and stems. If you plow under the cover crop with a tractor, you don't need to cut it first, but if you are turning it under by hand or with a tiller, you should cut it with a mulching mower and let the cuttings dry for a few days till brown. Green stuff that has been cut is hard to turn under with a shovel or plow.
If you covered only a small area with a green manure, you can turn it under with a spade. For a larger area, use a rototiller. Tough plants may require tilling a few times. The green manure you till under will take about 6 weeks to break down. If you want to speed up the breakdown of the green manure, you may broadcast a little (1 lb to 100 sq. ft) well-balanced organic fertilizer before turning it under.
Growing Guide for Cover Crops & Green Manures You can spread these seeds by hand, but the best method for even distribution is to use a drop seeder or broadcast seeder. To plant as living mulch between your vegetable rows, you must have a hand-operated drop seeder.
Ryegrass
Annual ryegrass dies out after one year of growth. Ryegrass loosens the soil to a greater depth because of its deep roots. It improves drainage. Annual ryegrass germinates well in cool soils, but prefers loose soils. Annual ryegrass releases substances that are toxic to other plants, so it helps with weed control, but you can't plant small-seeded crops such as lettuce and radishes until 6 or 8 weeks after turning annual ryegrass under. Large-seeded crops such as corn & beans, potatoes, peas, sweet potatoes, and transplants aren't affected.
Plant annual ryegrass in the fall. You can plant it along with a legume. Scatter 1.5-3 ounces of seed per 100 square feet, or 1-2 pounds per 1000 square feet. Cover with about half an inch of soil, then pack the soil.
Buckwheat
Use buckwheat, to quickly smother summer weeds. A buckwheat crop matures in two months; you can plant a second crop but don’t let it go to seed. Buckwheat is a good hot weather crop that builds organic matter and adds phosphorus and other nutrients to the soil. Buckwheat isn't particular about the soil.
Plant 5 ounces per 100 square feet or 3 pounds per 1000 square feet in the spring or summer.
Sudangrass
A tall grass that grows during hot weather to choke out weeds. It reduces the number of nematodes in the soil and adds lots of organic matter. Sudangrass has a dense root system that makes it well suited to erosion control and adds organic matter. Sudangrass survives drought well but performs

http://breachrepairers.webs.com 46
better with more water, especially in the Southwest. It adapts to poorly drained soils. When the soil is warm, plant 1.5-3 ounces per 100 square feet or 1-2 pounds per 1000 square feet.
Winter Rye
Winter Rye is ideal for smothering weeds because it produces toxins that kill seedlings, it is ideal for smothering weeds. Winter rye prefers a well drained soil. Plant in late summer or fall 4 ounces per 100 square feet or 2.5 pounds per 1000 square feet. Grow transplants or large-seeded plants after turning it under; small seeded plants don't tolerate the toxic substances.
Winter wheat
Sow winter wheat in the fall and turn under in the spring. Winter wheat prefers a loamy soil. In the late summer, plant 3-6 ounces per 100 square feet or 2-3 pounds per 1000 square feet.
The Following crops are legumes and must have an inoculant applied to the seed (ask dealer which inoculant to use)
Alfalfa
Alfalfa is one of the best legumes for fixing nitrogen in the soil, if the soil is deep and fertile. The roots of alfalfa go deep, and pulls up nutrients from the subsoil, which are returned to the topsoil when you turn the plants under. It's a perennial grown for one year. Alfalfa needs a deep, welldrained soil, a pH near neutral, and adequate amounts of phosphorus, potassium, calcium, and sulfur. Sow Alfalfa in the spring, planting 1.5 ounces per 100 square feet or 1 pound per 1000 square feet.
Crimson clover
Crimson clover is adapted to shady areas and grows well in cool temperatures. Crimson clover can grow in both sandy and clay soils but needs a pH of 5.8 or above Crimson clover won't do well in soil high in limestone.
Sow in October. Scatter 0.5 ounces per 100 square feet or 1 pound per 1000 square feet. Cover with a half inch of soil and tamp down. Keep the soil moist while the plants are young.
Ladino Clover
A tall variety of white clover, it dies during the winter, but produces more organic matter than white clover. Plant in the fall, 3/4 oz of seed per 100 square feet or 0.5 pound per 1000 square feet. Turn under in the spring.
Soybeans
Grow soybeans, in warm temps of summer to add nitrogen to poorly drained soils. Soybeans are often grown with a grass such as buckwheat. Soybeans do best on a well-drained soil, with a moderate amount of moisture, and will tolerate poor drainage.
Plant 3-5 ounces per 100 square feet or 2-3 pounds per 1000 square feet in the spring or early- to mid-summer. Cover with an inch of soil.
Sweet clover
Sweet clover is a good legume for improving soils with a pH of 6.5 or above. It adds phosphorus, nitrogen, and lots of organic matter to the soil. It has deep roots that loosen the soil and draw

http://breachrepairers.webs.com 47
nutrients from the subsoil, which return to the top soil when you plow it under. Sweet clover grows in a well-drained soil with a pH near 7.0. Sow in the spring or summer at 3/4 to 1.5 ounces per 100 square feet or 0.5-1 pound per 1000 square feet. There are several vetch species, including common vetch, hairy vetch, and purple vetch. All are vining annual legumes that are often planted with grasses. Use vetch as a winter annual to add nitrogen and organic matter. Hairy vetch grows in most soil types, while common vetch needs a fertile, loamy soil. All prefer well-drained soils and are drought tolerant. Vetch is difficult to get rid of once you plant it. Some people consider it a curse.
Plant it in late fall except for common or purple vetch in the North. You should plant those in the spring. Plant 3 ounces per 100 square feet or 2 pounds per acre. Cover with ½ inch of soil.
White Dutch Clover
White Dutch Clover is a low growing clover that grows well in cool, moist, and fertile locations. It has a shallow root system and spreads by runners across the top of the ground. It is best used as a living mulch between rows of veggies or as a soil builder for the lawn. It will provide natural nitrogen by taking nitrogen from the air and bringing it into the soil.
Drop or broadcast seed from March to October in most areas. Keep area moist until sprouting. Seeding Rate: ¼ Lb to 1,000 sq ft 4-6 lbs./acre
http://breachrepairers.webs.com 48
Growing Your Own Grain Tools you need for growing grain include
Garden rake for smoothing, leveling soil, covering the seed Seed spreader, drop seeder or broadcast seeder Scythe of some type for harvesting. A weed eater may work if you are careful. Twine
for tying grain in bundles For large areas, a roller, to pack the bed. A barrel, for packing the soil after sowing the grain.
Soil Preparation for grain Thorough soil preparation is very important for an abundant crop of grain. A good seed bed gives higher rates of germination, and benefits growing seedlings for weeks.
Soil condition to aim for Bread crumb sized soil particles at least 2 inches deep A firm seed bed in which your shoe leaves a visible but shallow impression not more than ¼
deep Sufficient moisture. Use a moisture meter
Wait until the soil conditions are right before tilling your soil. After a good rain or watering, the soil has a darker color. Wait until it lightens in color and looks dry on the surface, then till just 3 or 4 inches deep. The result should be a fine seed bed with no clumps.
You may need to begin preparing your soil the year before by growing cover crops and keeping weeds out of the area as mentioned before. If there are weed seeds in your grain field, they will come up and crowd out the grain. The area should be free of weeds. It should also be free of rocks.
When your field is free of weed seeds, and stones you may improve the soil by incorporating plenty of organic matter. Put down a thick layer 4-6" of leaves (may be impractical in large areas) in the late summer or fall. The earthworms usually convert this into granular particles and a friable soil. It makes a good start for working into a crumby seed bed.
Use a plow to turn the soil over in the late summer or fall and leave the soil untilled. The cold weather, freezing and thawing will condition the soil, breaking down clods. You may also use a flame thrower to heat the seed bed before planting and destroy any weed seeds near the soil surface. This is a simple way to kill weed seeds. Or you could let the weeks germinate and shallow till them out then pack and plant your grain.
When to sow your Seeds Go to the county extension office and ask for material on recommended varieties of the grain, and recommendations for the variety you want to plant. Check the details on what your seeds require: sowing depth, whether they should be covered, left loose or pressed down. To sow seeds in rows pull the teeth of the garden rake through the soil to make seed drills (depth depends on seed size) Try to sow seeds at the correct density. Use the back of the rake to draw the soil back over the drills. Then roll a barrel over the bed to pack the soil.

http://breachrepairers.webs.com 49
Types of Grain You May Grow
Corn
Corn is the easiest grain to grow, care for, harvest preserve and use, Corn, unlike other grains, is grown in rows and can easily be harvested, shelled.
Wheat, rye, barley, triticale and the like, of course, must be cut with a scythe, tied in bunches to cure, threshed either by a machine or by hand, then preserved easily.
Oats
Oats are very difficult to thresh and hull by hand. The best option for oats is to grow hulless oats, sometimes referred to as naked oats.
Naked Oats
Naked oats, so called because the kernels thresh free of the hulls, are a variety of oats that can be used without being milled or ground, as hulled oats must be. Naked oats will grow in any area where regular oats can be grown.
http://breachrepairers.webs.com 50
Gardening All Year Long As soon as the soil is workable in the spring, Plow the cover crop under. If you begin a new unworked garden site, in the spring, turn over the sod by plowing, rototilling or hand spading. Prepare the soil at least 8 inches deep. (A good seed bed for most vegetables is at least 8 inches. better 12 inches, especially for deep rooted crops.) Increase this depth each year until you reach 10 to 12 inches. Do not work the soil when it is very wet because you can damage its structure by compacting it. Pick up a handful of soil. If the soil crumbles readily, rather than sticking together, when you squeeze it in your hand you can proceed safely.
Organic Matter Add organic matter to the soil each spring and fall. You can also add it as mulch during the growing season and as a green manure or cover crop during or after the growing season. Adding organic matter is the most beneficial treatment for improving and maintaining your garden soil. Organic matter or humus loosens and improves the drainage and aeration of heavy clay soils while increasing the moisture-holding ability of: light, sandy soils.
Besides improving the soil structure, organic matter builds up the microscopic organisms, (biotics) the microscopic life in the soil help make available nutrients that have been held in the soil in an unusable form. The organic matter also provides nitrogen and other nutrients as it decays.
The type of organic matter you should add will depend on what materials are most available some sources are compost, manure, composted leaf mold, grass clippings and purchased humus. Do not apply fresh manure with a high nitrogen content in the spring. Uncomposted materials (when they are breaking down), will compete with the plants, for the same nutrients as the plants use. And plants will not do well in the soil until all raw organic materials that have been added are decomposed. That usually takes about 6 weeks, depending on soil temperatures & biotics.
Rabbit, chicken and sheep manure should be applied in the fall or composted before they are used on the garden. Fresh manure may also contain E Coli or other bacteria that are harmful to humans. It is better not to use horse manure (as it contains tetanus bacteria & is also very high in nitrogen which will burn the plants), on your garden, unless it is properly composted with an abundance of other materials.
How to Care for your Garden I cannot stress adequately the importance of the care given to your garden after planting. If you plant a large garden, spending many dollars and many hours preparing the soil, purchasing the seed, and planting the crop, there is a great investment made.
Then, if you let the weeds get ahead of you, or forget to water and care for your investment, the harvest will be poor, the quality of veggies low and you will not receive a satisfactory return for all the effort put forth in the beginning.
It is so-o important to plan and determine in the beginning to spend enough time in your garden all summer long to give adequate care. Just spending an hour or two a week, or 20 minutes every evening, can accomplish a great deal, depending on the size of the garden.
http://breachrepairers.webs.com 51
Your Garden in the Springtime Some crops you may plant in the fall and harvest them from late winter to late spring. These crops mature more slowly because of cold temperatures. The seed for some of these fall crops can be planted directly in the garden soil, but most of the crops for your spring garden seed must be planted, in pots or flats in a greenhouse, hotbed or a sunny window and then transplanted to the garden. If you don't have any of these, you may place the seeded flats under fluorescent lights 10 hours a day, or set outside every sunny warm day, when temperatures are 65° F or above. Most vegetable seeds germinate best at warmer temps.
The spring vegetables will grow and mature best with cooler air temperatures (50° to 65°F). Most early spring plants are raised either for their leaves, stems or flower buds. These crops produce leafy growth during short, cool days. If they are planted too late in the spring, summer heat will reduce the quality. As some will flower and form seeds (bolt), others to develop strong flavors, & bitterness. The warmer the temps, the more the bugs will eat.
A light frost will not usually injure cool weather crops, so you may plant spring vegetables as soon as the soil can be worked in the spring. Plant either seeds or transplants. The vegetables must reach an edible condition before hot summer days arrive. Some early vegies like winter lettuce, spinach, kale, broccoli, may be planted early and covered with crop cover fabric or in a crop tunnel to protect them from heavy frost damage.
Plant as soon as the soil is workable and dry enough to not form wet clods. Do not work the soil when it is wet. Doing so can affect soil texture for several years. Wait for the best soil conditions, no matter if you have spring fever.
Do not use organic mulch in early spring, as it keeps the soil too cool. At this time the soil needs as much sunlight as possible to warm it. After the average night temperature reaches 50° F, you can use organic mulches to conserve soil moisture and help prevent weeds.
If you have a small area available for gardening, plant spring garden crops together so that you can plant fall vegetables in the same area later. When you double crop, or use the same area twice in the same season, do not plant vegetables of a similar variety as your spring crops in the same area of the garden, because some diseases and insects will carryover from the spring crop.
Your Garden in the Summer If you planned correctly, as the harvest from your spring garden ends, the summer garden's crops should begin to produce. With careful planning you should have a continuous harvest of fresh garden vegetables. Your summer garden should have a variety of crops, some harvested during the summer months, and others continuing to bear into the fall. As a rule, summer crops may be planted in the late spring after the danger of frost is past, until the end of June, depending on fall frost date.
Warm-season crops require warm soil (65° degrees>F) and warm air temperatures for rapid vegetative growth and fruit production. Crop quality is enhanced by long, warm days and mild nights.
http://breachrepairers.webs.com 52
In the cool seasons, water demand is reduced by the cool temperatures and increasing rain fall. But when the weather is hot, the soil dries out quickly. Soil moisture must be maintained at a satisfactory level to prevent stress for the plants. This is very important for the most productive garden.
Making your Garden Last a Longer Time Many vegetables are suitable for planting in late summer. You should always follow your spring and summer gardens with a fall garden so that you can have fresh produce during the colder weather seasons. This is more important now as the price of fresh produce in the winter will continue to escalate.
To assure good germination when you are planting, always water well immediately after planting. If the weather is dry, it may be well to water your garden spot with sprinklers a day or two before planting. Then water it well again after covering your seed. The water helps to settle the soil around the seed (for seed-soil contact) Also, when setting plants, I usually put water with fish emulsion or other starter solution in the hole, making the soil muddy, before sticking the plant in.
Vegetables consist of two types: 1. The vegetables that grow well in warm/hot weather. 2. Cool-season crops which grow well during the cool fall days and withstand frost.
In spring and fall when nights are cool, growth is slower, so the crops take longer to mature than in the summer. Keep this in mind when you check seed catalogs for the average days to maturity. The warm days and cool nights of spring and fall, sometimes increase the quality of fruits and veggies. These periods of slower growth conditions increase natural sugar content of sweet corn and cole crops, and make root veggies more crisp and sweet.
The vegetables in Table 5 can be successfully grown for fall harvest. Ideally, you should plan several seeding dates to extend the harvest over a longer period. This table gives the latest dates for either seeding or transplanting as indicated.
Extending the Growing Season Floating row covers may help vegetables grow and ripen early in the spring. During the fall, row covers prove useful to gardeners who wish to extend the harvest of crops such as tomatoes, peppers, cucumbers, okra, etc. The purpose of a row cover is to trap heat and protect the crop from cooler night temperatures which might harm the fruit or kill the plant. Many times, at least in some areas, a period of mild weather follows the first killing frost. If you protect frost-sensitive vegetables at these times you may extend the harvest by several weeks.
There is a choice of self-ventilating or floating row covers available from garden centers. The perforated types are available in a plastic material (polyethelene) but must have wire hoops for support.
After planting, push hoops (made from no. 9 galvanized wire) into the ground, 3 to 5 feet apart. If frost is predicted, cover the hoops with clear polyethylene. Bury the edges of the plastic in the ground, but during hot days, you will need to assure good circulation under the polyethylene, and will need to water more, or pull the cover back.
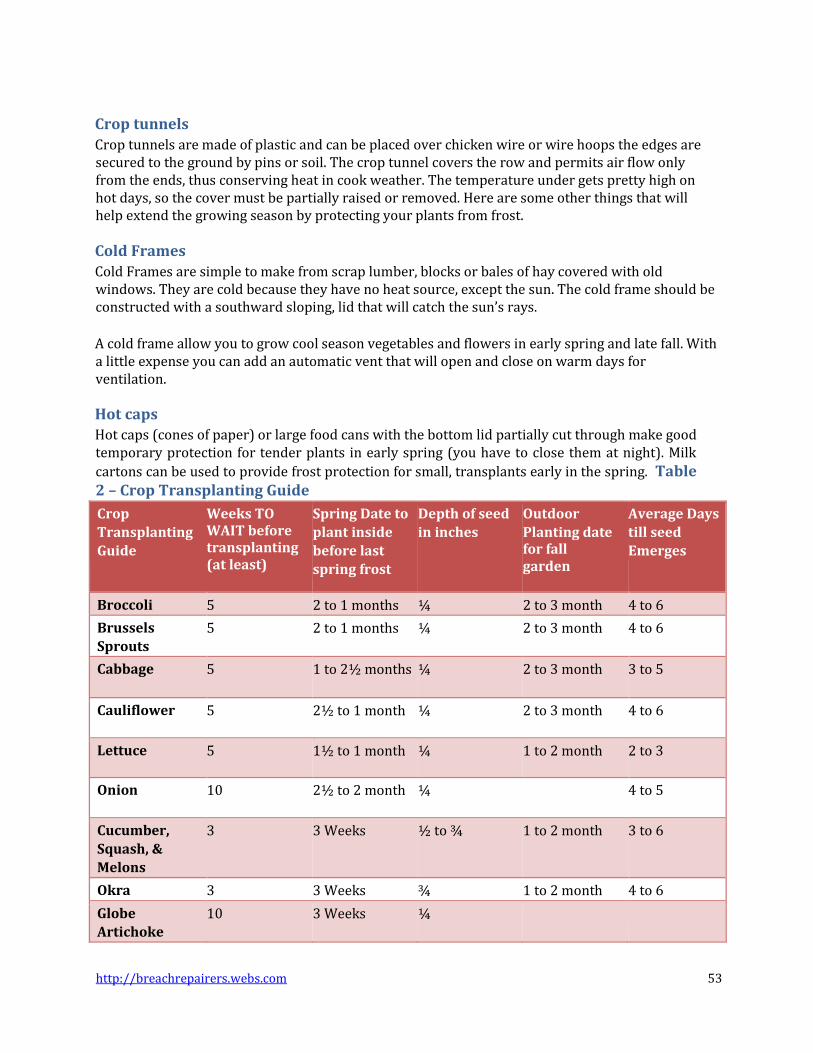
http://breachrepairers.webs.com 53
Crop tunnels
Crop tunnels are made of plastic and can be placed over chicken wire or wire hoops the edges are secured to the ground by pins or soil. The crop tunnel covers the row and permits air flow only from the ends, thus conserving heat in cook weather. The temperature under gets pretty high on hot days, so the cover must be partially raised or removed. Here are some other things that will help extend the growing season by protecting your plants from frost.
Cold Frames
Cold Frames are simple to make from scrap lumber, blocks or bales of hay covered with old windows. They are cold because they have no heat source, except the sun. The cold frame should be constructed with a southward sloping, lid that will catch the sun’s rays.
A cold frame allow you to grow cool season vegetables and flowers in early spring and late fall. With a little expense you can add an automatic vent that will open and close on warm days for ventilation.
Hot caps
Hot caps (cones of paper) or large food cans with the bottom lid partially cut through make good temporary protection for tender plants in early spring (you have to close them at night). Milk
cartons can be used to provide frost protection for small, transplants early in the spring. Table 2 – Crop Transplanting Guide
Crop
Transplanting
Guide
Weeks TO WAIT before transplanting (at least)
Spring Date to
plant inside
before last
spring frost
Depth of seed
in inches
Outdoor
Planting date for fall garden
Average Days
till seed
Emerges
Broccoli 5 2 to 1 months ¼ 2 to 3 month 4 to 6
Brussels
Sprouts
5 2 to 1 months ¼ 2 to 3 month 4 to 6
Cabbage 5 1 to 2½ months ¼
2 to 3 month 3 to 5
Cauliflower 5 2½ to 1 month ¼ 2 to 3 month 4 to 6
Lettuce 5 1½ to 1 month ¼ 1 to 2 month 2 to 3
Onion 10 2½ to 2 month ¼ 4 to 5
Cucumber,
Squash, &
Melons
3 3 Weeks ½ to ¾ 1 to 2 month 3 to 6
Okra 3 3 Weeks ¾ 1 to 2 month 4 to 6
Globe
Artichoke 10 3 Weeks ¼
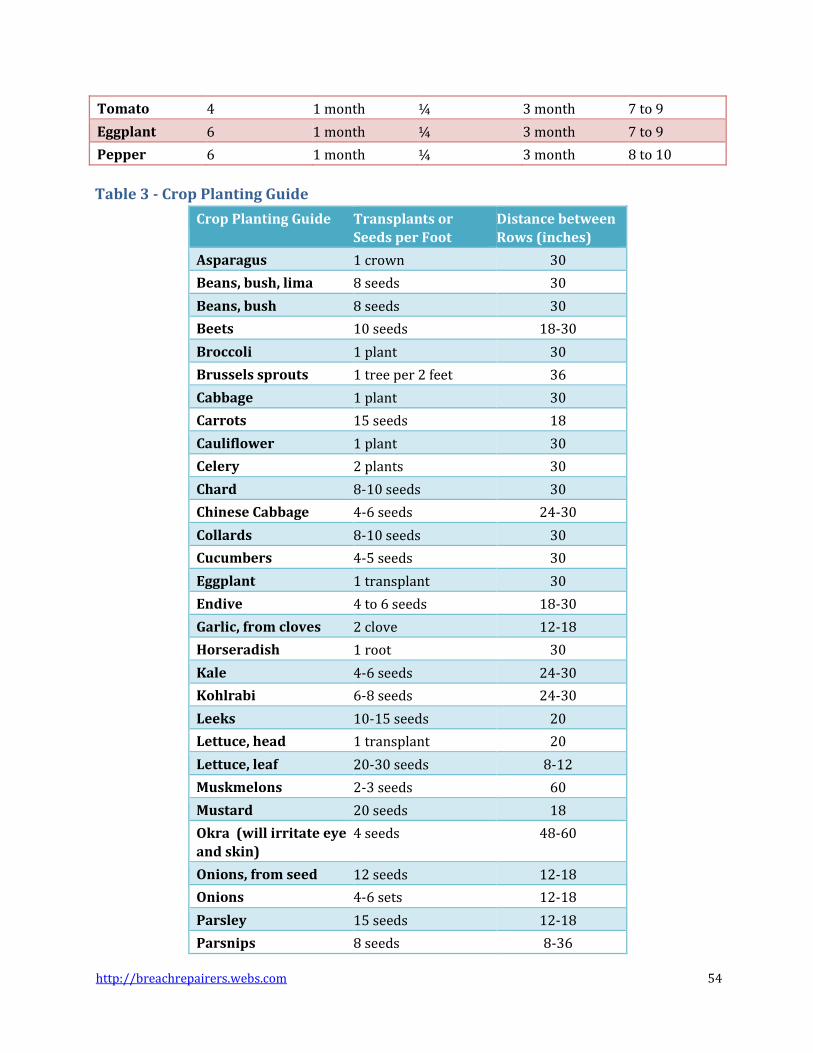
http://breachrepairers.webs.com 54
Tomato 4 1 month ¼ 3 month 7 to 9
Eggplant 6 1 month ¼ 3 month 7 to 9
Pepper 6 1 month ¼ 3 month 8 to 10
Table 3 - Crop Planting Guide
Crop Planting Guide Transplants or
Seeds per Foot
Distance between
Rows (inches)
Asparagus 1 crown 30
Beans, bush, lima 8 seeds 30
Beans, bush 8 seeds 30
Beets 10 seeds 18-30
Broccoli 1 plant 30
Brussels sprouts 1 tree per 2 feet 36
Cabbage 1 plant 30
Carrots 15 seeds 18
Cauliflower 1 plant 30
Celery 2 plants 30
Chard 8-10 seeds 30
Chinese Cabbage 4-6 seeds 24-30
Collards 8-10 seeds 30
Cucumbers 4-5 seeds 30
Eggplant 1 transplant 30
Endive 4 to 6 seeds 18-30
Garlic, from cloves 2 clove 12-18
Horseradish 1 root 30
Kale 4-6 seeds 24-30
Kohlrabi 6-8 seeds 24-30
Leeks 10-15 seeds 20
Lettuce, head 1 transplant 20
Lettuce, leaf 20-30 seeds 8-12
Muskmelons 2-3 seeds 60
Mustard 20 seeds 18
Okra (will irritate eye
and skin)
4 seeds 48-60
Onions, from seed 12 seeds 12-18
Onions 4-6 sets 12-18
Parsley 15 seeds 12-18
Parsnips 8 seeds 8-36
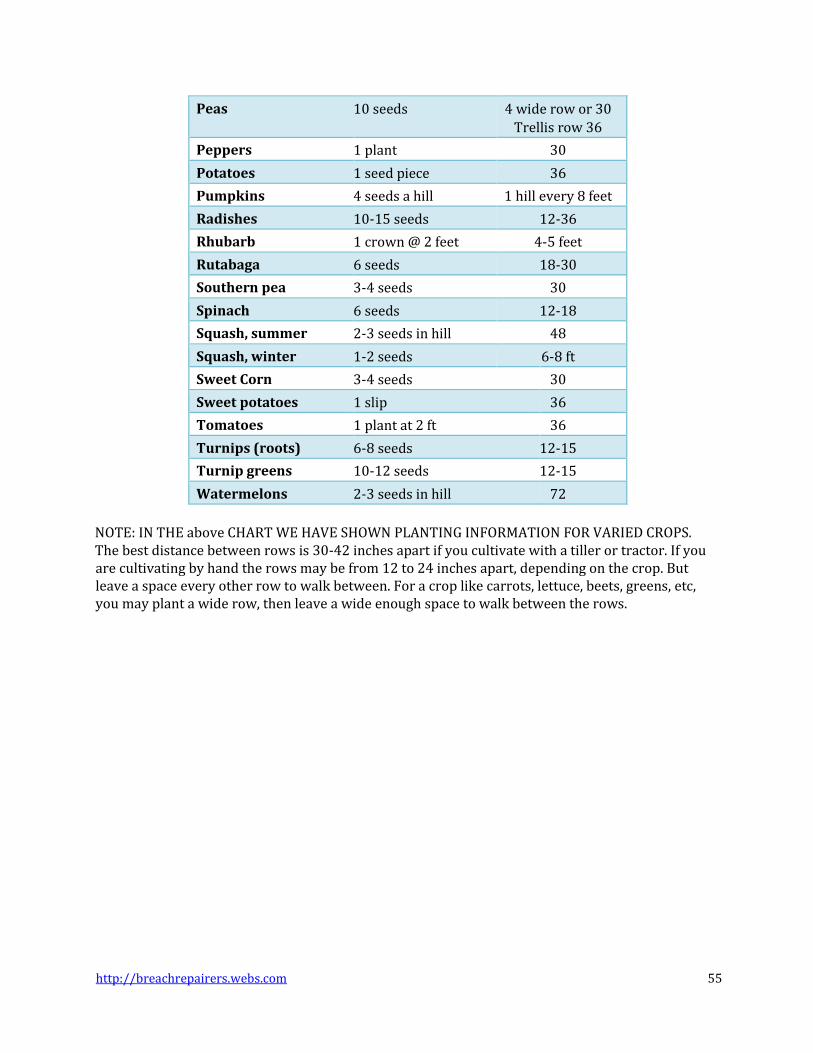
http://breachrepairers.webs.com 55
Peas 10 seeds 4 wide row or 30
Trellis row 36
Peppers 1 plant 30
Potatoes 1 seed piece 36
Pumpkins 4 seeds a hill 1 hill every 8 feet
Radishes 10-15 seeds 12-36
Rhubarb 1 crown @ 2 feet 4-5 feet
Rutabaga 6 seeds 18-30
Southern pea 3-4 seeds 30
Spinach 6 seeds 12-18
Squash, summer 2-3 seeds in hill 48
Squash, winter 1-2 seeds 6-8 ft
Sweet Corn 3-4 seeds 30
Sweet potatoes 1 slip 36
Tomatoes 1 plant at 2 ft 36
Turnips (roots) 6-8 seeds 12-15
Turnip greens 10-12 seeds 12-15
Watermelons 2-3 seeds in hill 72
NOTE: IN THE above CHART WE HAVE SHOWN PLANTING INFORMATION FOR VARIED CROPS. The best distance between rows is 30-42 inches apart if you cultivate with a tiller or tractor. If you are cultivating by hand the rows may be from 12 to 24 inches apart, depending on the crop. But leave a space every other row to walk between. For a crop like carrots, lettuce, beets, greens, etc, you may plant a wide row, then leave a wide enough space to walk between the rows.
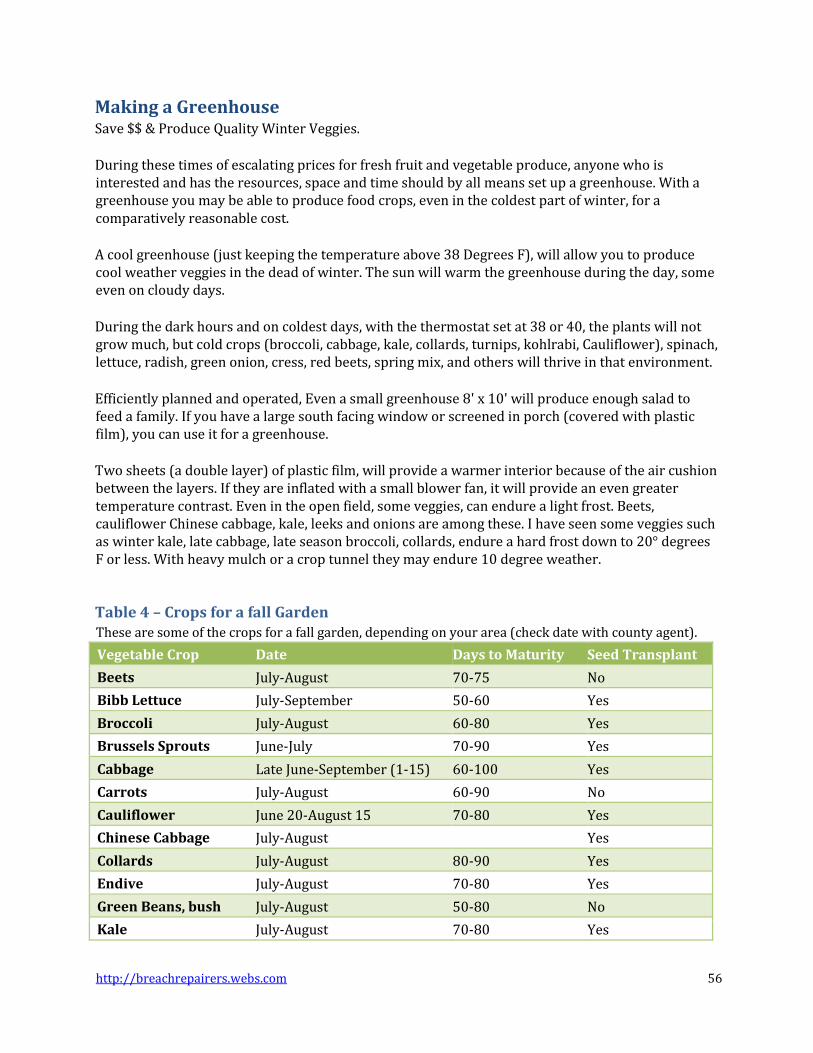
http://breachrepairers.webs.com 56
Making a Greenhouse Save $$ & Produce Quality Winter Veggies.
During these times of escalating prices for fresh fruit and vegetable produce, anyone who is interested and has the resources, space and time should by all means set up a greenhouse. With a greenhouse you may be able to produce food crops, even in the coldest part of winter, for a comparatively reasonable cost.
A cool greenhouse (just keeping the temperature above 38 Degrees F), will allow you to produce cool weather veggies in the dead of winter. The sun will warm the greenhouse during the day, some even on cloudy days.
During the dark hours and on coldest days, with the thermostat set at 38 or 40, the plants will not grow much, but cold crops (broccoli, cabbage, kale, collards, turnips, kohlrabi, Cauliflower), spinach, lettuce, radish, green onion, cress, red beets, spring mix, and others will thrive in that environment.
Efficiently planned and operated, Even a small greenhouse 8' x 10' will produce enough salad to feed a family. If you have a large south facing window or screened in porch (covered with plastic film), you can use it for a greenhouse.
Two sheets (a double layer) of plastic film, will provide a warmer interior because of the air cushion between the layers. If they are inflated with a small blower fan, it will provide an even greater temperature contrast. Even in the open field, some veggies, can endure a light frost. Beets, cauliflower Chinese cabbage, kale, leeks and onions are among these. I have seen some veggies such as winter kale, late cabbage, late season broccoli, collards, endure a hard frost down to 20° degrees F or less. With heavy mulch or a crop tunnel they may endure 10 degree weather.
Table 4 – Crops for a fall Garden These are some of the crops for a fall garden, depending on your area (check date with county agent).
Vegetable Crop Date Days to Maturity Seed Transplant
Beets July-August 70-75 No
Bibb Lettuce July-September 50-60 Yes
Broccoli July-August 60-80 Yes
Brussels Sprouts June-July 70-90 Yes
Cabbage Late June-September (1-15) 60-100 Yes
Carrots July-August 60-90 No
Cauliflower June 20-August 15 70-80 Yes
Chinese Cabbage July-August Yes
Collards July-August 80-90 Yes
Endive July-August 70-80 Yes
Green Beans, bush July-August 50-80 No
Kale July-August 70-80 Yes
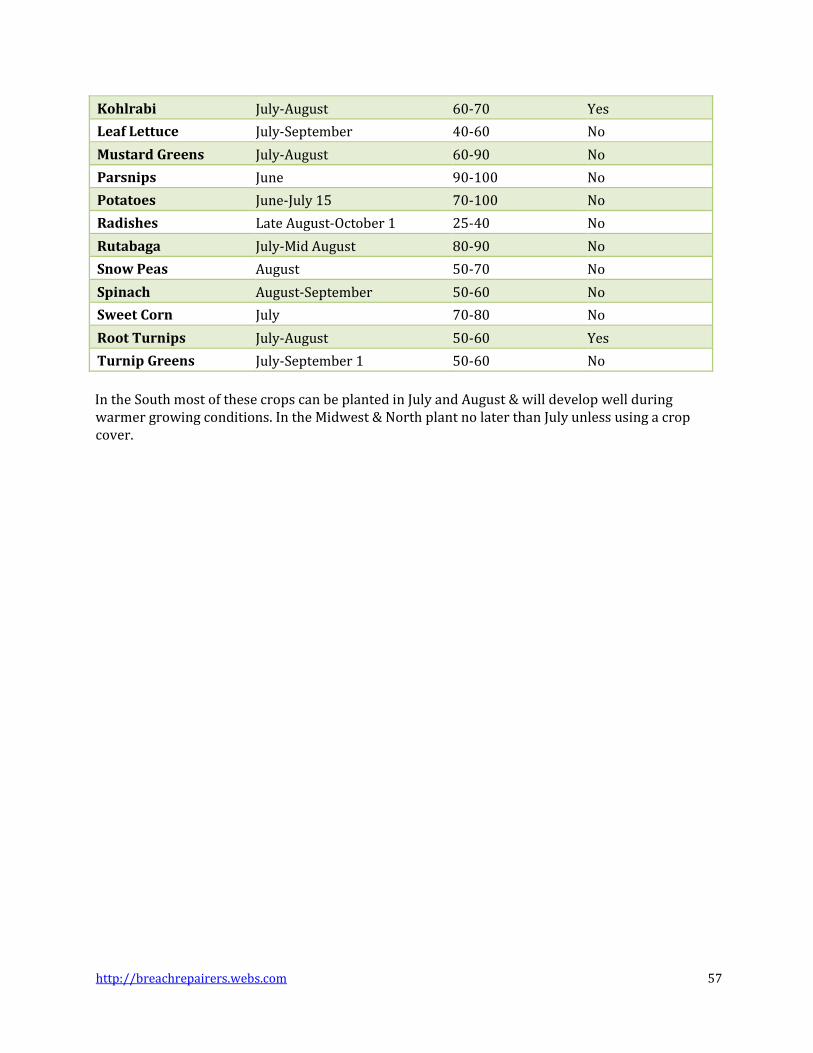
http://breachrepairers.webs.com 57
Kohlrabi July-August 60-70 Yes
Leaf Lettuce July-September 40-60 No
Mustard Greens July-August 60-90 No
Parsnips June 90-100 No
Potatoes June-July 15 70-100 No
Radishes Late August-October 1 25-40 No
Rutabaga July-Mid August 80-90 No
Snow Peas August 50-70 No
Spinach August-September 50-60 No
Sweet Corn July 70-80 No
Root Turnips July-August 50-60 Yes
Turnip Greens July-September 1 50-60 No
In the South most of these crops can be planted in July and August & will develop well during warmer growing conditions. In the Midwest & North plant no later than July unless using a crop cover.
http://breachrepairers.webs.com 58
Water – The Crucial Element Sunlight, carbon dioxide, minerals, soil biotics, water, are all essential elements for plant health. And having pure, abundant water available is a boon to the greatest production of fruits, veggies, grains and nuts. I have found that for most crops, drip or trickle irrigation is by far the best and most economical way to water. It aids in disease prevention, as well as weed control. Drip irrigation will save much water. You can water several acres from 1 water spigot in a 24 hour period, depending on your water flow and pressure.
Drip irrigation tubing is comparatively inexpensive. A flat, perforated tube, usually has holes about every 8 inches. The water, which is under low pressure, drips from the tiny holes, and in a few hours will thoroughly saturate the area around the row. Drip irrigation uses about 50% of the water required by overhead sprinklers. The plants leaves remain dry, thus preventing molds, mildews, and fungus diseases.
Drip irrigation is used for gardens, trees, orchards, and is an excellent way to conserve water or if you have low water pressure. With drip tubing I have watered several acres at a time from 1 water faucet.
It is easy to plan and construct a drip irrigation system. And the materials are usually available in most areas at a plumbers supply. If you need help in planning or setting up a system, call me.
Trickle irrigation equipment is usually available from local garden supply stores and is also listed in many seed and garden catalogs available to home gardeners. It is less expensive if you join 2 or 3 other gardeners and buy in quantity.
If you need or desire help in setting up a drip system, call me (615 944-5967) or email me at [email protected]
Vegetable crops need about 1 inch of water per week, as rain water, irrigation water or both, from April through September. You should have a rain gauge near your garden or check with the local weather bureau for rainfall amounts; then supplement rainfall with irrigation if needed. An average garden soil will store about 1.5 inches of water/foot of depth.
Irrigation will greatly aid in, increasing the amount of seeds that germinate and the stand of plants you will have as a result. It will keep plants growing uniformly and increase the amount of fruit produced. Soils often form a crust without adequate water, which will retard the germination and growth of crops. Irrigation will reduce the wilting of crops you have transplanted, such as tomato, pepper, lettuce, cabbage, etc. An adequate supply of soil moisture maintains the quality and yields of all crops, increases the size of tomatoes, cucumbers and melons, and will prevent the premature ripening of seed crops, such as beans and corn.
If overhead irrigation is used, it is a good idea to irrigate during the morning so that all the water is evaporated off the plant foliage before dark. This reduces disease problems.
The way water works in the soil When water is applied to the soil, it seeps down through the root zone slowly. Each layer of soil must be thoroughly wet before water will move down to the next layer. Wetting front is the usual
http://breachrepairers.webs.com 59
term used by agriculturists. If only one-half the necessary amount of water is applied at a given time, it will penetrate the top half of the root zone, but the area below the point where the wetting front stops will remain as dry as if it had received no moisture at all. This is the reason it is very important to water thoroughly when you water. Then don't water again until the soil has dried some (until it won't stick together in a mass when you squeeze it. It will rather crumble.).
Some plants require more water than others. Ie, corn requires a lot of water. Large plants require a lot of water. If you are not sure when to water, purchase a moisture meter. They are inexpensive and a handy tool. The total water a garden needs is basically, the same as the (1) amount of water lost from the plant plus (2) the amount evaporated from the soil. These two processes are called evapotranspiration. Evapotranspiration rates vary. These rates are influenced by the following factors: day length, temperature, cloud cover, wind, relative humidity, mulching, and type, size and number of plants growing in a given area.
If you water areas of the garden not occupied by vegetable roots. you are only encouraging growth of unwanted plants (weeds), although sometimes that can't be avoided.
Watering—Irrigation Equipment If you want to encourage deep root growth, you must water an area until the moisture reaches a depth of 8 inches or more. Shallow watering promotes shallow development of roots, and that will result in poor growth and a risk of injury to plants in the garden during extremes in weather.
There are several choices of watering equipment you can use, including just a garden hose with a spray or fan nozzle, drip irrigation systems and porous hose systems. A portable lawn sprinkler may be used. About ½ inch an hour is a good irrigation rate for overhead systems. A faster rate may cause runoff.
An Oscillating or rotating sprinkler must be placed on a higher point than the crop being irrigated to keep an even distribution. An oscillating sprinkler delivers a rectangular pattern, and makes it easy to water along edges of gardens; The Oscillating system, however, puts more water at the edges of the garden than in the center.
A rotating sprinkler delivers a circular water pattern with more water near the center than on the outer edge. Sprinklers should be moved often and overlap. Using this method will water some areas of the garden more thoroughly than other areas.
To discover how much water your sprinkler is producing per hour, set a few small, straight-sided cans on the ground at various distances from the sprinkler. If the sprinkler is set to apply 1 inch of water, leave it on until the can with the most water has about ½ inch in it. Check the time. Then, turn the sprinkler off or move it to another spot. Overlap the measured can and run the sprinkler again until the can has 1 inch of water in it. Then you can check the amounts in all the cans to see the difference in rates.
A better irrigation system for root crops such as carrots, or other root crops in a small garden is the soaker hose. This is good for solid rows of plants. The soaker hose will water within a short time an

http://breachrepairers.webs.com 60
area 6 inches wide. Put the hose, along one side of the crop row. Let the water soak or seep slowly into the soil. This method will require less water because the water goes right next to the plant, also, this way you can water in the evening without encouraging disease of foliage as no water is sprinkled on the plant leaves. But soaker hoses for large areas are expensive. Drip is the best method, for larger areas.
Crucial Water Times Most plants require water at all times, but water is crucial during periods from the time the fruits begin to develop until they are ready to pick.
Withholding water
With melons you should withhold water a week or 2 before picking. The fruit will be sweeter. Do not let the plant wilt though. A heavy rain or excess water may cause melons to split, as well as cabbage. Crucial watering times for cabbage, broccoli, cauliflower is when the head is developing. Be consistent. Water evenly the same amount every time to prevent too rapid growth.
http://breachrepairers.webs.com 61
Diseases, Insects, & Weeds
Disease Control Plants in the garden will be attacked and damaged by fungi, bacteria, nematodes and viruses if your soil is not perfectly balanced. There is a variety of ways to protect your garden from severe damage by the spread of disease. Organic disease control is more time consuming than chemical control and is more expensive, BUT it is safer for you and your family. There are so many organic disease controls now that it is wise, especially in an emergency, to save your crop by the use of a commercial organic control.
1. THE MOST EFFECTVE SINGLE CONTROL OF DISEASE AND PESTS IS TO PREVENT ALL STRESS TO PLANTS. ONE VERY IMPORTANT WAY WE DO THAT IS —Make sure your SOIL has CORRECT pH and correct mineral balance, including trace minerals.
2. The second best control is to plant for good air circulation. 3. The third best control is to keep the garden area clear of weeds as hosts of insects and
disease. 4. Start a new garden spot on another part of your property. Plant grass such as
Ryegrass, and a legume such as clover, etc on the old garden spot. Don't use it for 2 or 3 years. or use it to grow a grain crop, such as wheat, oats, millet, rye, but not corn.
5. Apply 3 lbs of kelp powder per 100 sq ft to your garden. Extensive tests have shown that when a sufficient amount of kelp a is used as a soil builder in balanced soil, the insect damage is not significant.
6. Keep close watch on the garden for the first sign of pests. Use an organic control immediately upon sighting egg, insects, or insect damage.
7. Apply a dose of beneficial nematodes to your garden.
Important Factors In Disease Control Are:
Before Planting
Choose a GARDEN SPACE that has at least 8 hours of sun daily Select a well-drained spot Remove or plow under old crop debris well before planting. Select disease-resistant varieties. Purchase disease-free transplants. Rotate the crops. It can be done in small gardens, but it requires that records be kept. Assure there is good air movement. Prevent stress to the young transplants.
At Planting Time
Don't plant warm weather crops in cold soil. Plant seed into warm soils. 65 degrees or more Space plants to assure adequate air movement between plants.
Keep the soil balanced with proper soil nutrition. If you have a drainage problem try Using raised beds to improve drainage. Do not plant late plantings of the same crop near the early planting to keep diseases from
moving from the old crop to the new one. Keep an eye open for diseased transplants
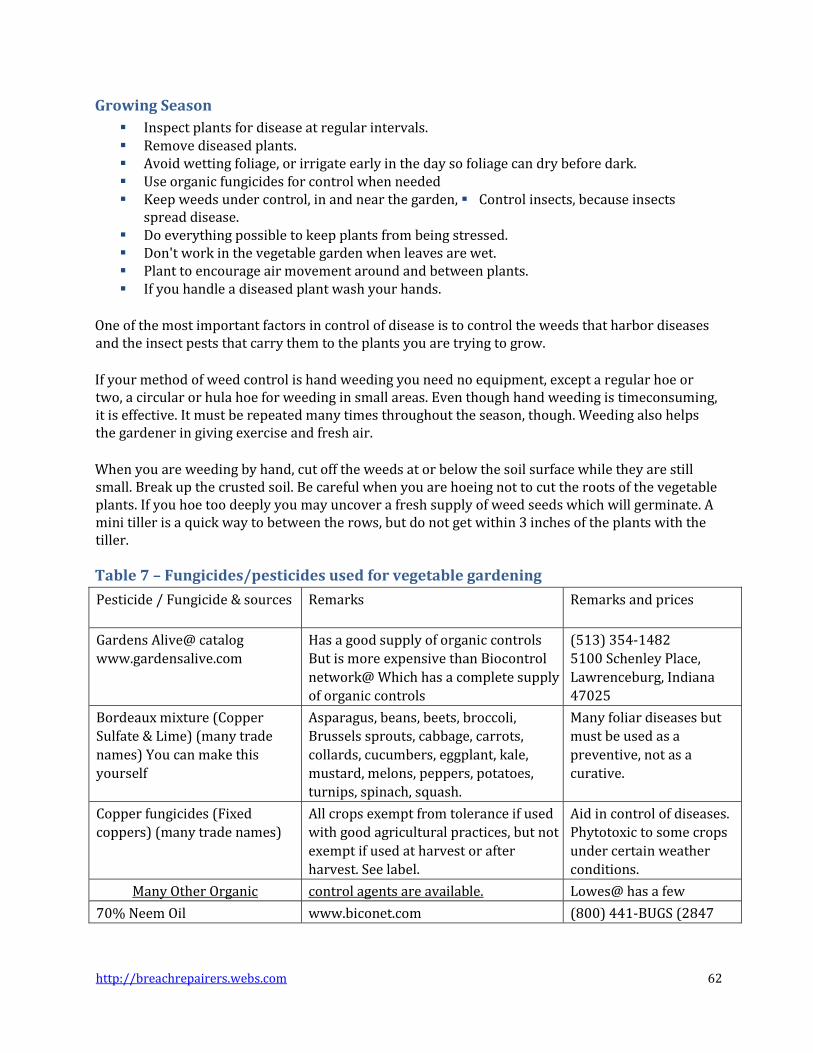
http://breachrepairers.webs.com 62
Growing Season
Inspect plants for disease at regular intervals. Remove diseased plants. Avoid wetting foliage, or irrigate early in the day so foliage can dry before dark. Use organic fungicides for control when needed Keep weeds under control, in and near the garden, Control insects, because insects
spread disease. Do everything possible to keep plants from being stressed. Don't work in the vegetable garden when leaves are wet. Plant to encourage air movement around and between plants. If you handle a diseased plant wash your hands.
One of the most important factors in control of disease is to control the weeds that harbor diseases and the insect pests that carry them to the plants you are trying to grow.
If your method of weed control is hand weeding you need no equipment, except a regular hoe or two, a circular or hula hoe for weeding in small areas. Even though hand weeding is timeconsuming, it is effective. It must be repeated many times throughout the season, though. Weeding also helps the gardener in giving exercise and fresh air.
When you are weeding by hand, cut off the weeds at or below the soil surface while they are still small. Break up the crusted soil. Be careful when you are hoeing not to cut the roots of the vegetable plants. If you hoe too deeply you may uncover a fresh supply of weed seeds which will germinate. A mini tiller is a quick way to between the rows, but do not get within 3 inches of the plants with the tiller.
Table 7 – Fungicides/pesticides used for vegetable gardening
Pesticide / Fungicide & sources Remarks
Remarks and prices
Gardens Alive@ catalog
www.gardensalive.com
Has a good supply of organic controls
But is more expensive than Biocontrol
network@ Which has a complete supply
of organic controls
(513) 354-1482
5100 Schenley Place,
Lawrenceburg, Indiana
47025
Bordeaux mixture (Copper
Sulfate & Lime) (many trade
names) You can make this
yourself
Asparagus, beans, beets, broccoli,
Brussels sprouts, cabbage, carrots,
collards, cucumbers, eggplant, kale,
mustard, melons, peppers, potatoes,
turnips, spinach, squash.
Many foliar diseases but
must be used as a
preventive, not as a
curative.
Copper fungicides (Fixed
coppers) (many trade names)
All crops exempt from tolerance if used
with good agricultural practices, but not
exempt if used at harvest or after
harvest. See label.
Aid in control of diseases.
Phytotoxic to some crops
under certain weather
conditions.
Many Other Organic control agents are available. Lowes@ has a few
70% Neem Oil www.biconet.com (800) 441-BUGS (2847
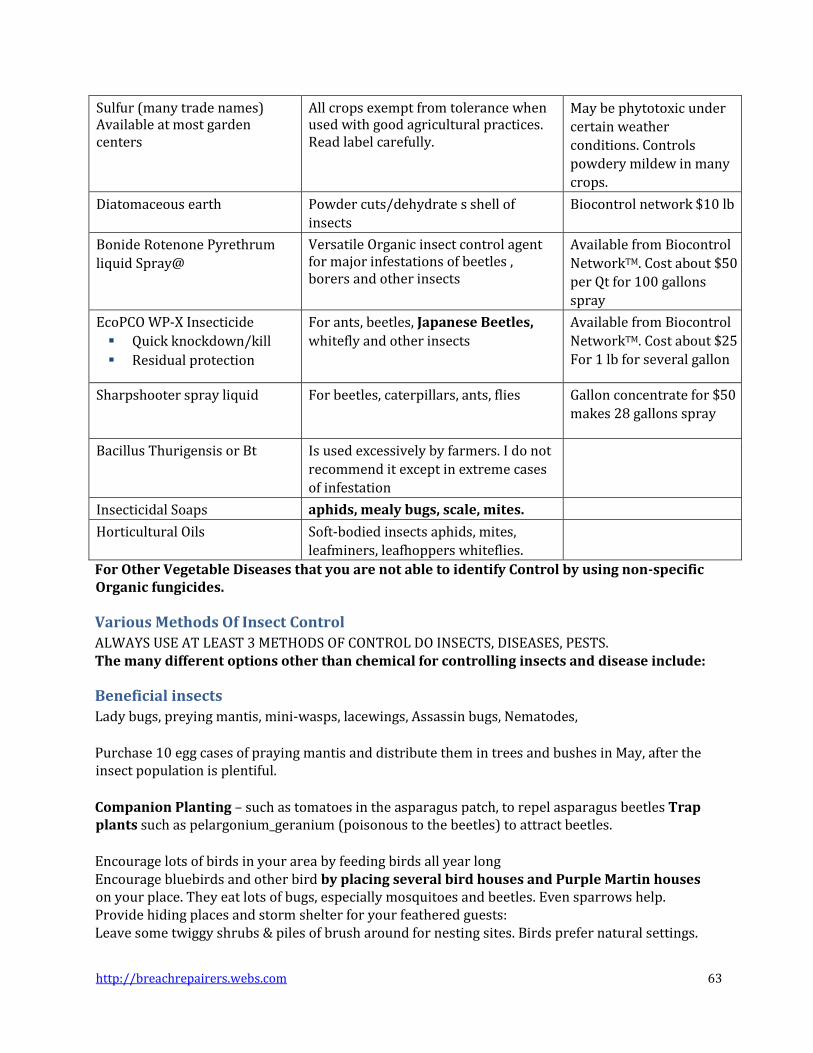
http://breachrepairers.webs.com 63
Sulfur (many trade names) Available at most garden centers
All crops exempt from tolerance when used with good agricultural practices. Read label carefully.
May be phytotoxic under
certain weather
conditions. Controls
powdery mildew in many
crops.
Diatomaceous earth Powder cuts/dehydrate s shell of
insects
Biocontrol network $10 lb
Bonide Rotenone Pyrethrum
liquid Spray@
Versatile Organic insect control agent for major infestations of beetles , borers and other insects
Available from Biocontrol
NetworkTM. Cost about $50
per Qt for 100 gallons
spray
EcoPCO WP-X Insecticide
Quick knockdown/kill
Residual protection
For ants, beetles, Japanese Beetles,
whitefly and other insects
Available from Biocontrol
NetworkTM. Cost about $25
For 1 lb for several gallon
Sharpshooter spray liquid For beetles, caterpillars, ants, flies Gallon concentrate for $50
makes 28 gallons spray
Bacillus Thurigensis or Bt Is used excessively by farmers. I do not
recommend it except in extreme cases
of infestation
Insecticidal Soaps aphids, mealy bugs, scale, mites.
Horticultural Oils Soft-bodied insects aphids, mites,
leafminers, leafhoppers whiteflies.
For Other Vegetable Diseases that you are not able to identify Control by using non-specific Organic fungicides.
Various Methods Of Insect Control
ALWAYS USE AT LEAST 3 METHODS OF CONTROL DO INSECTS, DISEASES, PESTS. The many different options other than chemical for controlling insects and disease include:
Beneficial insects
Lady bugs, preying mantis, mini-wasps, lacewings, Assassin bugs, Nematodes,
Purchase 10 egg cases of praying mantis and distribute them in trees and bushes in May, after the insect population is plentiful.
Companion Planting – such as tomatoes in the asparagus patch, to repel asparagus beetles Trap plants such as pelargonium_geranium (poisonous to the beetles) to attract beetles.
Encourage lots of birds in your area by feeding birds all year long Encourage bluebirds and other bird by placing several bird houses and Purple Martin houses on your place. They eat lots of bugs, especially mosquitoes and beetles. Even sparrows help. Provide hiding places and storm shelter for your feathered guests: Leave some twiggy shrubs & piles of brush around for nesting sites. Birds prefer natural settings.
http://breachrepairers.webs.com 64
Birds are attracted to moving water for drinking and bathing. If you have a birdbath, consider adding a bubbler to it. A simple outdoor fountain is not expensive. A small pond with a solarpowered fountain or re-circulating waterfall will draw birds from a long ways away.
Concerning the Use of Insect & Disease Control Agents A natural or organic control agent, is so called because it comes from a natural source, such as a plant, (pyrethrum, rotenone, ryania, etc) or mineral (boric acid, cryolite, diatomaceous earth, etc)
When you are using any concentrated fungicide or pesticide, organic or otherwise, there are certain precautions that you should take. Just because a product is "natural" does not mean that it i not toxic.
The relative toxicity to humans of any product is indicated on the label. The least toxic products carry the signal word (CAUTION) on the label. (WARNING) means medium toxicity. (DANGER) indicates a strong toxicity.
Some organic pesticides or fungicides may be nontoxic or are only slightly toxic to people, but they may be very toxic to animals. The organic pesticide ryania is very toxic to fish. Some organic pesticides may be toxic to beneficial insects, such as honeybees.
1. READ the label Carefully 2. FOLLOW THE DIRECTIONS on the label. 3. DO NOT use the product in any way the label does not recommend. 4. Pour carefully, Mix the spray materials carefully. 5. DO NOT breath the powder or mist from the spray. 6. When applying, stand upwind from the plants you are spraying. 7. Do not over apply the spray material. Spray only to the drip point. 8. Discard leftover spray materials according to directions. 9. KEEP ALL materials & ingredients in a safe place, not accessible to pets or children. 10. Do NOT reenter sprayed area while it is wet.
Pesticides, fungicides are usually more effective if a surfactant, adjuvant, or spreader sticker is mixed with the spray liquid.
Even if a product is considered to be organic, it is still a pesticide. It is important to be careful when using any pesticide, even organic or natural pesticides. Just because a product is thought to be organic, or natural, does not mean that it is not toxic. Some organic pesticides are as toxic, or even more toxic, than many synthetic chemical pesticides. Organic pesticides have specific modes of action, just as do synthetic pesticides.
Included among "Biopesticides" are: Pyrethrum daisy, Cluysanthemum cinerariifolium. A flower you can grow yourself. Pvrethrutm is non-toxic to mammals.
Rotenone, the root of a south American plant, sometimes combined with pyrethrum. is used primarily for control of various leaf-feeding caterpillars and beetles, such as cabbageworms and Colorado potato beetle. Some insects with sucking mouthparts, such as aphids and thrips, are also
http://breachrepairers.webs.com 65
susceptible to rotenone. It is a relatively slow-acting insecticide, often requiring several days to actually kill susceptible insects, although they stop feeding shortly after exposure. Rotenone is hi hl toxic to fish and trioderatel toxic to mammals.
Ryania, from roots and stems of a S American shrub Ryania speciosa. Kills codling moth, many caterpillars, leaf beetles, thrips, non-toxic to mammals
Sabadilla is dangerous. Do not use it.
Insecticidal soap products are useful against aphid, mealybug, whitefly, mite, and other softbodied species. Soaps can also be used as herbicides, killing weeds as well as moss and algae. Insecticidal soap products can suppress powdery mildew in some crops. Nontoxic to mammals
Spinosad is a microbial agent that is effective for control of fire ants and caterpillars
Diatomaceous earth is a product made from the fossilized remains of diatoms, a type of hardshelled algae. The particles are harmful to the exoskeleton of insects, snails and slugs.
Two common types of bio pesticides are biochemical and microbial. Biochemical pesticides function like naturally occurring chemicals, but are not toxic to humans
Insect pheromones, for example, are naturally-occurring chemicals that insects use to locate mates. Man-made pheromones are used to disrupt insect mating by creating confusion during the search for mates, or are used to attract male insects to traps. Pheromones are often used to detect or monitor insect populations, or to control them.
Microbial insecticides come from naturally-occurring or genetically altered bacteria, fungi, algae, or viruses. They suppress pests by producing a toxin specific to the pest, causing a disease or some other forms of action.
An example of a microbial pesticide is Bacillus thuringiensis, or "Bt." which is a naturally occurring soil bacteria that is toxic to the larvae of several species of insects but not toxic to other insects or mammals. Bacillus thuringiensis is be applied to plant foliage.
Bt, is toxic to the caterpillars (larvae) of moths and butterflies. Several strains of Bt have been developed to control pests of various plants. Some plants have been genetically modified with the genes of Bt. I would not use these genetically modified plants, or any GMO. I DO NOT RECOMMEND the use of it except in severe infestations.
Kaolin Clay in a product known as SurroundTM may also be used as a spray to keep insects from eating the leaves of plants. It is effective, with other agents, against leafhoppers, caterpillars.
Organic Fungicides-Disease Control Agents
Organic fungicides include sulfur, copper, Considered synthetic, allowed with restrictions. The following forms are permitted for use in plant disease control:
http://breachrepairers.webs.com 66
Coppers, fixed - copper hydroxide, copper oxide, copper oxy chloride, Copper sulfate--all used in a manner that minimizes accumulation in the soil. –
Bordeaux mixture is a mixture of copper sulfate and hydrated lime used as a fungicide in vineyards. It is used to control infestations of fungi, and downy mildew on tree, and vine fruits & nuts.
Small amounts can be made by mixing four ounces of hydrated lime in 2 gallons of water. Mix four ounces of copper sulfate in 1 gallon of water. Pour the copper sulfate mixture into the lime mixture. Strain through cheesecloth, add to 42 gallons of water, and then add the sulfate mixture. Use immediately. It leaves the plant looking ugly. Fruit mayneed be thorough washing before use. Bordeaux mixture can cause damage to plants if used improperly. Damage or injury results more in humid weather and when the mixture doesn't dry quickly.
Potassium bicarbonate - ArmicarbTM for black rot and powdery mildew on grapes
Lime sulfur is sold as a spray for deciduous trees to control fungi, bacteria and insects living or dormant on the surface of the bark. Lime sulfur burns leaves so it is not as useful for warm periods or evergreens. It is a corrosive material so should not come in contact with the eyes or skin.
Spray oils are used to control the egg stage of mites and insects by preventing the normal exchange of gases through the insect egg surface, so they cannot hatch. When used against other stages of insect. The oils block the respiratory system causing suffocation or break down the outside issued of the insect.
Oils may also provide some control of plant viruses, and suppress some fungal diseases, especially powdery mildew. Oils are often added to other pesticide products to improve their effectiveness.
An application of fish oil may be used in conjunction with lime sulfur, to thin the fruit on some trees. Evidently, it works partially by suppressing photosynthesis. Minerals and soybean oils have been shown to delay bloom and thin the crop in peaches.
Types of pest it controls
Oil products can control soft-bodied insects such as aphids, mites, thrips, whiteflies, mealybugs, and psyllids
The “Zea-later” is a new tool marketed for the application of a mix of plant oil and Bt directly into the skills of the corn ear to control the corn earworm. It is available from Johnny’s Seed Co.
Some suggestions of products to use as Fungicides follows:
Liqui-Cop Liquid copper Fungicide spray for disease prevention
Liquid copper fungicide spray for disease prevention on fruit trees, nut crops, citrus, vegetables and ornamentals. Use to control leaf curl (peaches for example), shothole, brown rot on almonds, apricots, peaches, nectarines, walnuts, citrus.

http://breachrepairers.webs.com 67
Copper Dust Very economical replacement for Bordeaux mixture with an expanded label. Liqui-Cop is extremely weatherproof and does not require oil or a sticker. A replacement for lime sulfur. Can be mixed with oils, for use as dormant spray on fruit trees. Seven percent (7%) copper sulfate for controlling early and late blight, lead spots, downy mildew, anthracnose, and certain other fungal diseased on various diseases on various vegetables, flowers, ornamentals and fruits, and it wont burn plants. 201601 Bonide Copper Dust 7%, 1 lb (Bordeaux) (1.4#) $7.80
Concern Copper Soap Fungicide Concern Copper Soap Fungicide for flowers, fruits & vegetables. A patented, fixed copper fungicide made by combining a soluble copper fertilizer with a naturallyoccurring fatty acid. The copper and the fatty acid combine to form a copper salt of a fatty acid, known technically as a true soap.
The copper soap fungicide controls many common diseases using low concentrations of copper, down as low as 90 ppm. Concern Copper Soap Fungicide for flowers, fruits, and vegetables is suited for use in domestic circumstances, both indoors and outdoors.
The National Organic Standards Board of the USA allows fixed copper to be used in organic crop production for controlling plant diseases.
No visible residue even after multiple applications. No solvents, odorless. Effective for treatment of downy mildews, leaf, and fruit spots, blights and rusts.
Green Cure Fungicude GreenCure is an environmentally friendly fungicide that has been proven to cure and prevent powdery mildew, black spot, downy mildew, blights, molds and other plant diseases. GreenCure fungicide is recommended for use on over 85 different flowers, trees, houseplants, fruits, vegetables, and turfs. Unlike many fungicides, GreenCure is not a toxic chemical. Its active ingredient, potassium bicarbonate.
Homemade Horticultural Oil spray recipe 1 tablespoon vegetable cooking oil and 1 teaspoon of NON-DEGREASING liquid dishwashing detergent per gallon of water. Mix thoroughly before using.
Potassium carbonate 3 teaspoons mixed with 1 teaspoon of sodium bicarbonate (baking soda) plus 1 tablespoon surfactant mixed with a gallon of water good control for fungus.
You can get potassium bicarbonate at www.garden-ville.com
The 70% Neem Oil controls numerous diseases as well as insects. Neem is the newest botanical insecticide, derived from seeds of the Neem tree, Azadirchta indica. Extracts from neem seeds and other parts of the tree have long been used for pharmaceutical proposes, as in toothpaste, particularly in India.
http://breachrepairers.webs.com 68
Neem is safe to humans but will control insects, such as leaf chewing beetles and caterpillars. Neem applied to leaves often deters feeding. Neem apparently affectes the hormones many insects need to develop, killing them as they attempt to molt or emerge from eggs. Aphids and most other sucking insects generally are less susceptible. Neem is claimed to be non-toxic to humans.
So these are some of the benefits of Neem Broad spectrum insecticide/fungicide/miticide Controls insects and mites including whitefly, aphid and scale Controls fungal diseases including black spot, rust, mildew and scab. For indoor/outdoor use on ornamental plants, flowers, vegetables, trees, shrubs and fruit &
nut crops. No surfactant is needed with Neem.
Application: 70% Neem Oil is an effective fungicide for the prevention and control of various fungal diseases including powdery mildew, black spot, downy mildew, anthracnose, rust, leaf spot, botrytis, needle rust, scab and flower, twig, tip blight, and alternaria. As a preventive, 70% Neem Oil should be applied on a 7 day schedule until the potential for disease development is no longer present. To control disease already present, continue spraying on a 14 day schedule to prevent the disease from reoccurring. To prevent rust leaf spot diseases, anthracnose and scab; begin applications at the first sign of spring budding. To prevent powdery mildew; apply in mid-summer or when disease is first detected. Applications should continue until disease pressure no longer exists.
NOTE: NEEM OIL IS GENERALLY A SAFE PRODUCT; HOWEVER, IT MAY HAVE A CONTRACEPTIVE EFFECT ON BOTH MEN AND WOMEN IF USED EXCESSIVELY. Mixing Instructions: Mix 70% Neem Oil at the rate of 2 tablespoons (1 ounce)
About Surfactants Or Spreader-Stickers Water, has a property called surface tension. Each H2O molecule is surrounded and attracted by other water molecules. However, at the surface, H2O molecules are surrounded by other water molecules. A tension is created as the water molecules at the surface are pulled into the body of water. This tension is created as the water to bead up on surfaces (glass, leaves, cloth), which slows wetting of the surface and inhibits contact with spray liquids. You can see surface tension at work by placing a drop of water onto a counter top. The drop will hold its shape and will not spread.
For the control agent to be most effective, surface tension must be reduced so the water which contains the fungicide can spread and wet the lead and stem surfaces. Substances that are able to break the surface tension of the water effectively are called surface active agents, or surfactants. They are said to make water “wetter.”
Some types of soap make effective surfactants. I think Octagon soap grated with a food grater is a good one. Some dishwashing liquids are effective also as surfactants. Horticultural spray oils work as surfactants also, though I think soap or a combination of oil and soap is better.
http://breachrepairers.webs.com 69
Vegetable Disease Control Recommendations Tip: It is very important to plant warm season vegetables in warm soil. Purchase a soil thermometer and always check soil temperature before you plant. It will save you a lot of trouble with disease and replanting.
Individual diseases and their control
Asparagus
Disease Symptom Suggestion
Crown Rots, wilt or fungus
Rust
Plants gradually decline and die Test your soil. Keep soil pH 6.0
or higher. Provide good
drainage. Maintain high
fertility. Harvest for shorter
period than usual.
Reddish-black pustules on
leaves & stems
Grow rust-resistant varieties.
Spray with sulfur fungicides.
Beans (Snap and Lima)
Disease Symptom Suggestion
Anthracnose
Bacterial Blights (bacteria)
Seed Decay (damping off) roots and stems rot
Rust or Fungus
Pod, leaves & stems have dark,
sunken, circular or oval areas
with brown borders and
salmon-colored discharge in
center.
Plant certified seed; rotate
crops; Gather and burn bean
residue. Sulfur spray or dust.
Don’t work in wet plants
Brown spots, dead areas on
leaves, yellow border; bean
pods have red – brown sunken
spots
Plant certified seed; rotate
crops; Gather and burn bean
residue. Sulfur spray or dust.
Don’t work in wet plants Do
not save seed from one
growing season to the next.
Apply fixed copper fungicides
every seven days when
disease first appears
Seeds fail to grow; young plants
die; stems shrivel in spots; poor
stand
Use organic seed fungicide.
Soak seed in chamomile tea
before planting; wait to plant
till soil is warm.
Leaves show small, brown spots;
mainly in fall garden
Plant resistant varieties; dust
with sulfur dust.
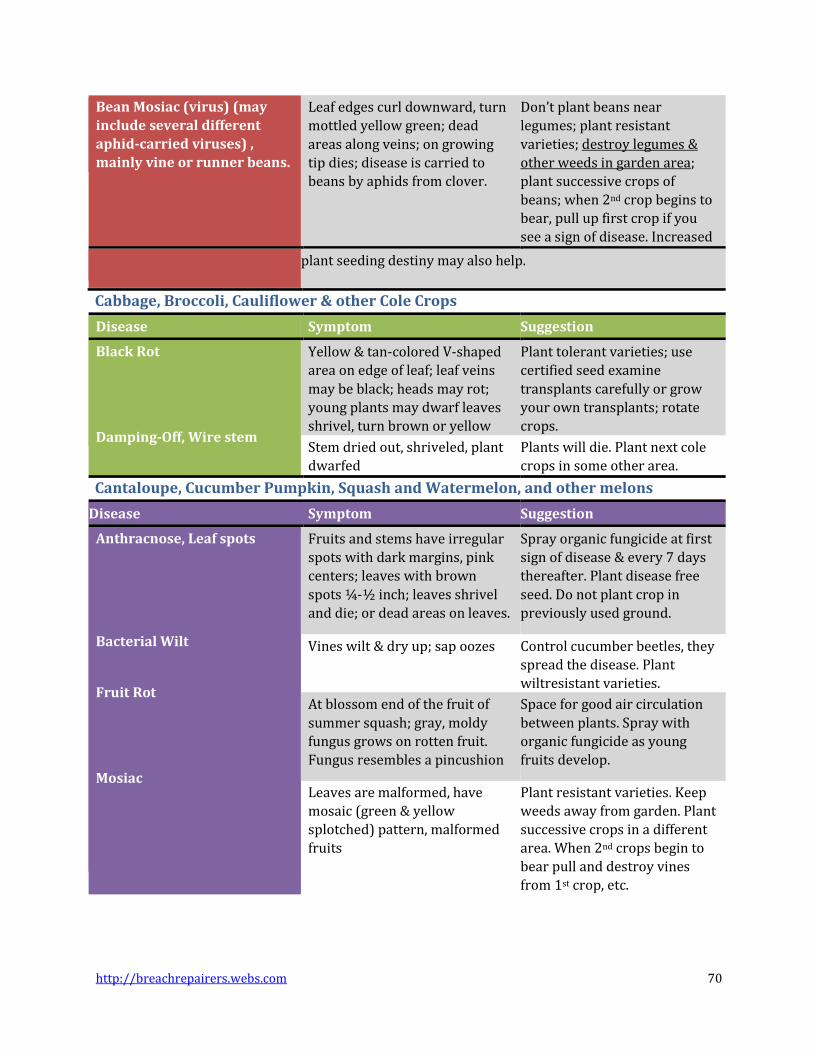
http://breachrepairers.webs.com 70
Bean Mosiac (virus) (may
include several different
aphid-carried viruses) ,
mainly vine or runner beans.
Leaf edges curl downward, turn
mottled yellow green; dead
areas along veins; on growing
tip dies; disease is carried to
beans by aphids from clover.
Don’t plant beans near
legumes; plant resistant
varieties; destroy legumes &
other weeds in garden area;
plant successive crops of
beans; when 2nd crop begins to
bear, pull up first crop if you
see a sign of disease. Increased
plant seeding destiny may also help.
Cabbage, Broccoli, Cauliflower & other Cole Crops
Disease Symptom Suggestion
Black Rot
Damping-Off, Wire stem
Yellow & tan-colored V-shaped
area on edge of leaf; leaf veins
may be black; heads may rot;
young plants may dwarf leaves
shrivel, turn brown or yellow
Plant tolerant varieties; use
certified seed examine
transplants carefully or grow
your own transplants; rotate
crops.
Stem dried out, shriveled, plant
dwarfed
Plants will die. Plant next cole
crops in some other area.
Cantaloupe, Cucumber Pumpkin, Squash and Watermelon, and other melons
Disease Symptom Suggestion
Anthracnose, Leaf spots
Bacterial Wilt
Fruit Rot
Mosiac
Fruits and stems have irregular
spots with dark margins, pink
centers; leaves with brown
spots ¼-½ inch; leaves shrivel
and die; or dead areas on leaves.
Spray organic fungicide at first
sign of disease & every 7 days
thereafter. Plant disease free
seed. Do not plant crop in
previously used ground.
Vines wilt & dry up; sap oozes Control cucumber beetles, they
spread the disease. Plant
wiltresistant varieties.
At blossom end of the fruit of
summer squash; gray, moldy
fungus grows on rotten fruit.
Fungus resembles a pincushion
Space for good air circulation
between plants. Spray with
organic fungicide as young
fruits develop.
Leaves are malformed, have
mosaic (green & yellow
splotched) pattern, malformed
fruits
Plant resistant varieties. Keep
weeds away from garden. Plant
successive crops in a different
area. When 2nd crops begin to
bear pull and destroy vines
from 1st crop, etc.
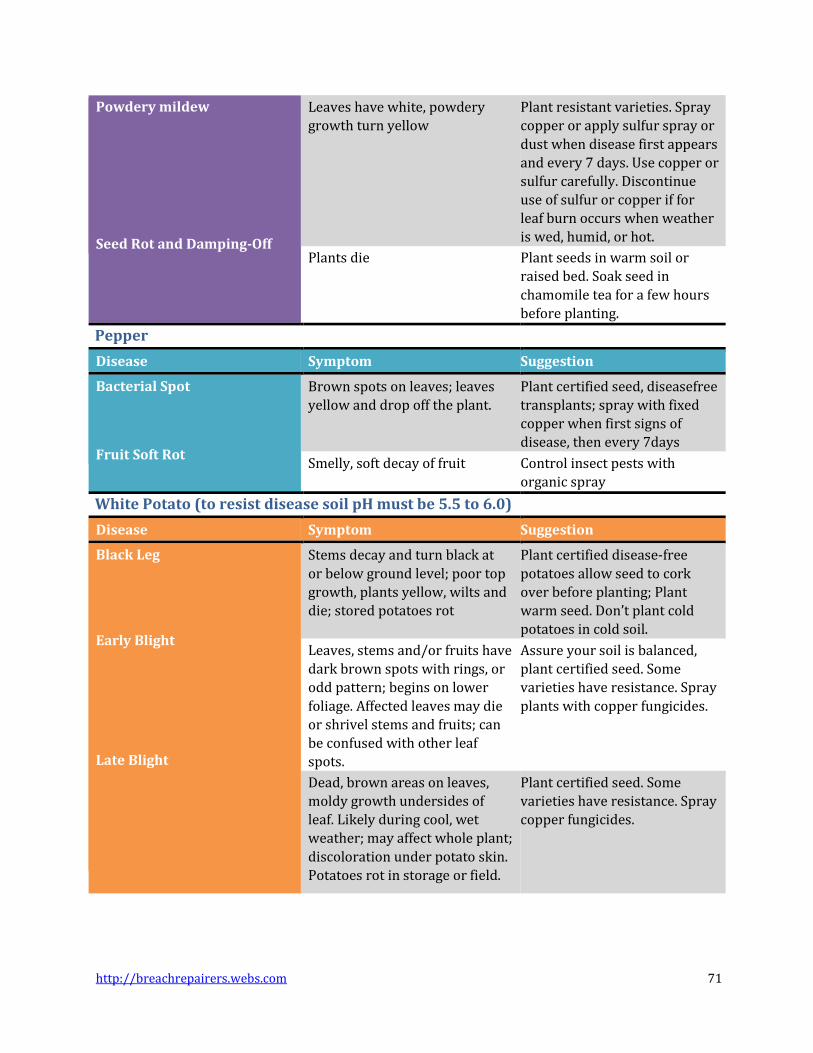
http://breachrepairers.webs.com 71
Powdery mildew
Seed Rot and Damping-Off
Leaves have white, powdery
growth turn yellow
Plant resistant varieties. Spray
copper or apply sulfur spray or
dust when disease first appears
and every 7 days. Use copper or
sulfur carefully. Discontinue
use of sulfur or copper if for
leaf burn occurs when weather
is wed, humid, or hot.
Plants die Plant seeds in warm soil or
raised bed. Soak seed in
chamomile tea for a few hours
before planting.
Pepper
Disease Symptom Suggestion
Bacterial Spot
Fruit Soft Rot
Brown spots on leaves; leaves
yellow and drop off the plant.
Plant certified seed, diseasefree
transplants; spray with fixed
copper when first signs of
disease, then every 7days
Smelly, soft decay of fruit Control insect pests with
organic spray
White Potato (to resist disease soil pH must be 5.5 to 6.0)
Disease Symptom Suggestion
Black Leg
Early Blight
Late Blight
Stems decay and turn black at
or below ground level; poor top
growth, plants yellow, wilts and
die; stored potatoes rot
Plant certified disease-free
potatoes allow seed to cork
over before planting; Plant
warm seed. Don’t plant cold
potatoes in cold soil.
Leaves, stems and/or fruits have
dark brown spots with rings, or
odd pattern; begins on lower
foliage. Affected leaves may die
or shrivel stems and fruits; can
be confused with other leaf
spots.
Assure your soil is balanced,
plant certified seed. Some
varieties have resistance. Spray
plants with copper fungicides.
Dead, brown areas on leaves,
moldy growth undersides of
leaf. Likely during cool, wet
weather; may affect whole plant;
discoloration under potato skin.
Potatoes rot in storage or field.
Plant certified seed. Some
varieties have resistance. Spray
copper fungicides.
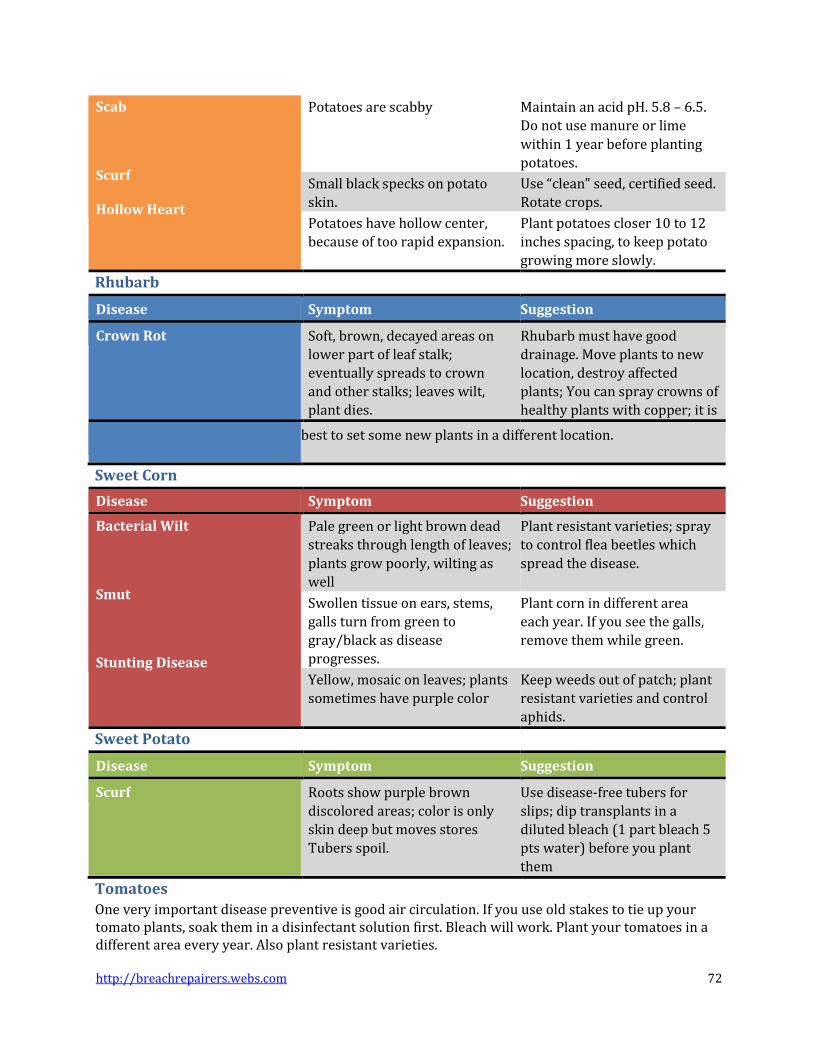
http://breachrepairers.webs.com 72
Scab
Scurf
Hollow Heart
Potatoes are scabby Maintain an acid pH. 5.8 – 6.5.
Do not use manure or lime
within 1 year before planting
potatoes.
Small black specks on potato
skin.
Use “clean” seed, certified seed.
Rotate crops.
Potatoes have hollow center,
because of too rapid expansion.
Plant potatoes closer 10 to 12
inches spacing, to keep potato
growing more slowly.
Rhubarb
Disease Symptom Suggestion
Crown Rot Soft, brown, decayed areas on
lower part of leaf stalk;
eventually spreads to crown
and other stalks; leaves wilt,
plant dies.
Rhubarb must have good
drainage. Move plants to new
location, destroy affected
plants; You can spray crowns of
healthy plants with copper; it is
best to set some new plants in a different location.
Sweet Corn
Disease Symptom Suggestion
Bacterial Wilt
Smut
Stunting Disease
Pale green or light brown dead
streaks through length of leaves;
plants grow poorly, wilting as
well
Plant resistant varieties; spray
to control flea beetles which
spread the disease.
Swollen tissue on ears, stems,
galls turn from green to
gray/black as disease
progresses.
Plant corn in different area
each year. If you see the galls,
remove them while green.
Yellow, mosaic on leaves; plants
sometimes have purple color
Keep weeds out of patch; plant
resistant varieties and control
aphids.
Sweet Potato
Disease Symptom Suggestion
Scurf Roots show purple brown
discolored areas; color is only
skin deep but moves stores
Tubers spoil.
Use disease-free tubers for
slips; dip transplants in a
diluted bleach (1 part bleach 5
pts water) before you plant
them
Tomatoes
One very important disease preventive is good air circulation. If you use old stakes to tie up your tomato plants, soak them in a disinfectant solution first. Bleach will work. Plant your tomatoes in a different area every year. Also plant resistant varieties.
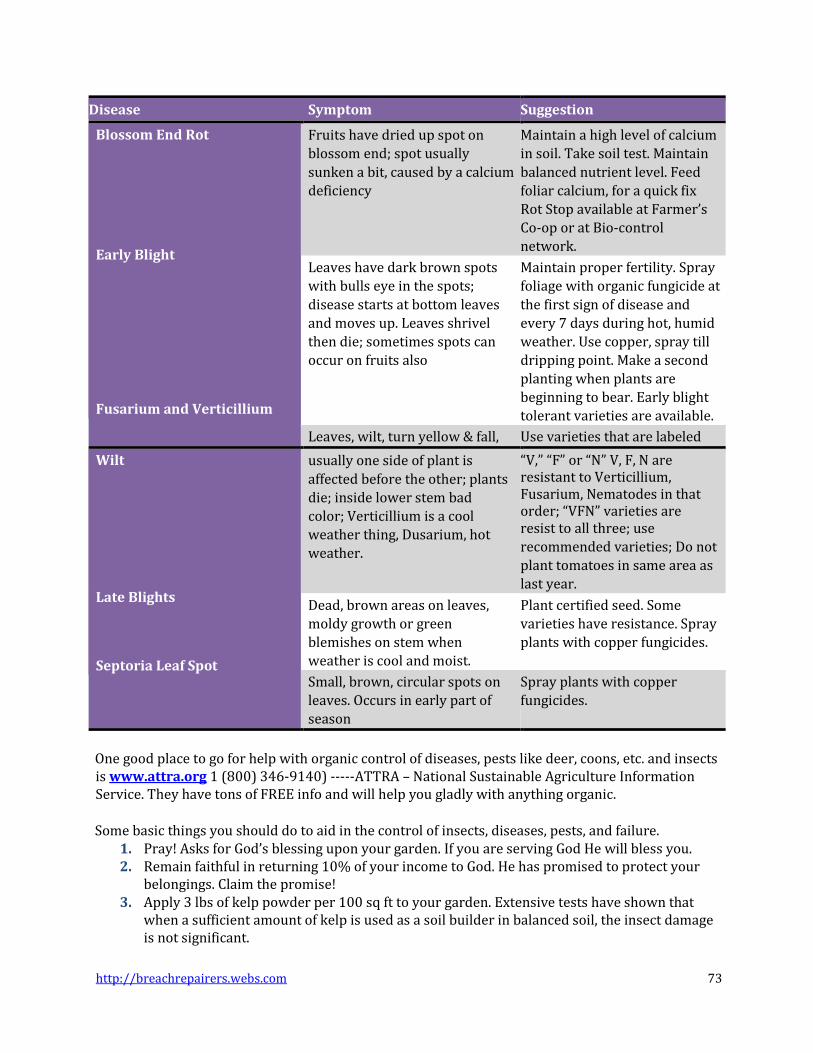
http://breachrepairers.webs.com 73
Disease Symptom Suggestion
Blossom End Rot
Early Blight
Fusarium and Verticillium
Fruits have dried up spot on
blossom end; spot usually
sunken a bit, caused by a calcium
deficiency
Maintain a high level of calcium
in soil. Take soil test. Maintain
balanced nutrient level. Feed
foliar calcium, for a quick fix
Rot Stop available at Farmer’s
Co-op or at Bio-control
network.
Leaves have dark brown spots
with bulls eye in the spots;
disease starts at bottom leaves
and moves up. Leaves shrivel
then die; sometimes spots can
occur on fruits also
Maintain proper fertility. Spray
foliage with organic fungicide at
the first sign of disease and
every 7 days during hot, humid
weather. Use copper, spray till
dripping point. Make a second
planting when plants are
beginning to bear. Early blight
tolerant varieties are available.
Leaves, wilt, turn yellow & fall, Use varieties that are labeled
Wilt
Late Blights
Septoria Leaf Spot
usually one side of plant is
affected before the other; plants
die; inside lower stem bad
color; Verticillium is a cool
weather thing, Dusarium, hot
weather.
“V,” “F” or “N” V, F, N are resistant to Verticillium, Fusarium, Nematodes in that order; “VFN” varieties are resist to all three; use
recommended varieties; Do not
plant tomatoes in same area as
last year.
Dead, brown areas on leaves,
moldy growth or green
blemishes on stem when
weather is cool and moist.
Plant certified seed. Some
varieties have resistance. Spray
plants with copper fungicides.
Small, brown, circular spots on
leaves. Occurs in early part of
season
Spray plants with copper
fungicides.
One good place to go for help with organic control of diseases, pests like deer, coons, etc. and insects is www.attra.org 1 (800) 346-9140) -----ATTRA – National Sustainable Agriculture Information Service. They have tons of FREE info and will help you gladly with anything organic.
Some basic things you should do to aid in the control of insects, diseases, pests, and failure. 1. Pray! Asks for God’s blessing upon your garden. If you are serving God He will bless you. 2. Remain faithful in returning 10% of your income to God. He has promised to protect your
belongings. Claim the promise! 3. Apply 3 lbs of kelp powder per 100 sq ft to your garden. Extensive tests have shown that
when a sufficient amount of kelp is used as a soil builder in balanced soil, the insect damage is not significant.

http://breachrepairers.webs.com 74
4. Control weeds in and around your garden. Weeds harbor many types of insect pests. 5. Keep close watch on the garden for the first sign of pests. Use an organic control
immediately upon sighting of egg, insects, or insect damage. 6. Prevent stress to plants. Insects prefer to chew on stressed plants. 7. Apply a dose of beneficial nematodes to your garden.
Other Insect Controls One effective way to control many insects is to apply beneficial nematodes, to your soil. It is a fairly simple process.
Beneficial Nematodes are tiny, unsegmented worms (seen only through microscopes) that dwell in the soil, all around the world. If you release these nematodes in your garden soil, they seek out certain insects as hosts. They enter their host through body openings, inject them with bacteria, then feed on the fluid that results. The nematodes reproduce. Their offspring feed on the cadaver of the host, then when developed, emerge to seek out new hosts. Hose insect usually dies within hours.
It is really easy to use nematodes. They are shipped in a powdery clay that is readily mixes with water. The mix may be applied to the soil, using a watering can, a sprayer or through an irrigation systems. It should be applied early in the morning or late in afternoon when temperatures are cooler and sunlight will not dry the soil so quickly. You should moisten the soil just a bit before applying the nematode solution, then water it in a little bit after application. The soil should not be saturated when you finish.
It takes 10 of nematodes to effectively treat 900 sq. ft. of garden row or 2200 sq ft if you cover the area broadcast.
From Biocontrol network the nematodes cost for 2200 sq ft is $25.90 plus shipping.
221321 Nematodes – Heterohabditus b., 10 mil. (2200 sq. ft.) (1.2#) $25.90
221331 Nematodes – Heterohabditus b., 50 mil. (1/4 acre (1.2#)
$56.00
221226 Nematodes – Steinernema carpocapsae b., 10 mil. (2200 sq. ft.) (2#) $25.90
221234 Nematodes – Steinernema carpocapsae b., 50 mil. (2200 sq. ft.) (.8#) $56.00
The nematode enters the host and kills it within 24 to 48 hours. It then reproduces within the hose and searches for new hosts. This hunt and seek cycle provides long-term control.
Steinernema feltia Steinernema carpocapsae Heterorhabditis
bacteriophora
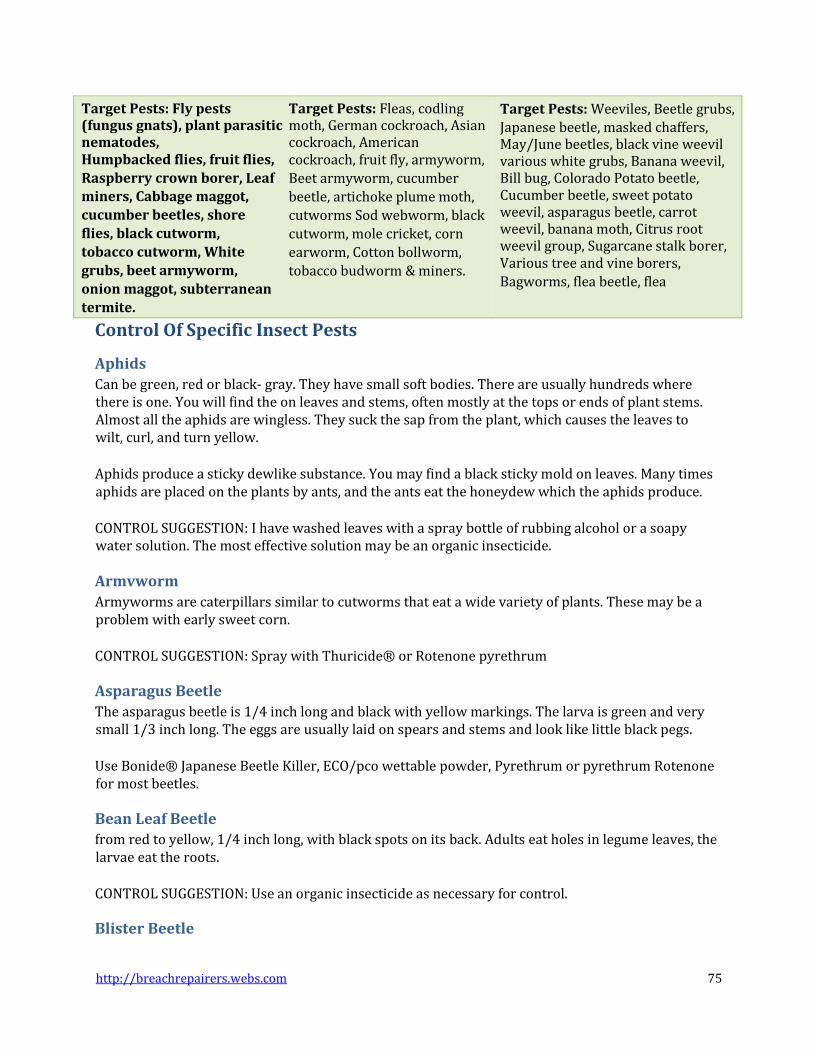
http://breachrepairers.webs.com 75
Target Pests: Fly pests (fungus gnats), plant parasitic nematodes, Humpbacked flies, fruit flies,
Raspberry crown borer, Leaf
miners, Cabbage maggot,
cucumber beetles, shore
flies, black cutworm,
tobacco cutworm, White
grubs, beet armyworm,
onion maggot, subterranean
termite.
Target Pests: Fleas, codling moth, German cockroach, Asian cockroach, American cockroach, fruit fly, armyworm,
Beet armyworm, cucumber
beetle, artichoke plume moth,
cutworms Sod webworm, black
cutworm, mole cricket, corn
earworm, Cotton bollworm,
tobacco budworm & miners.
Target Pests: Weeviles, Beetle grubs, Japanese beetle, masked chaffers, May/June beetles, black vine weevil various white grubs, Banana weevil, Bill bug, Colorado Potato beetle, Cucumber beetle, sweet potato weevil, asparagus beetle, carrot weevil, banana moth, Citrus root weevil group, Sugarcane stalk borer, Various tree and vine borers,
Bagworms, flea beetle, flea
Control Of Specific Insect Pests
Aphids
Can be green, red or black- gray. They have small soft bodies. There are usually hundreds where there is one. You will find the on leaves and stems, often mostly at the tops or ends of plant stems. Almost all the aphids are wingless. They suck the sap from the plant, which causes the leaves to wilt, curl, and turn yellow.
Aphids produce a sticky dewlike substance. You may find a black sticky mold on leaves. Many times aphids are placed on the plants by ants, and the ants eat the honeydew which the aphids produce.
CONTROL SUGGESTION: I have washed leaves with a spray bottle of rubbing alcohol or a soapy water solution. The most effective solution may be an organic insecticide.
Armvworm
Armyworms are caterpillars similar to cutworms that eat a wide variety of plants. These may be a problem with early sweet corn.
CONTROL SUGGESTION: Spray with Thuricide® or Rotenone pyrethrum
Asparagus Beetle
The asparagus beetle is 1/4 inch long and black with yellow markings. The larva is green and very small 1/3 inch long. The eggs are usually laid on spears and stems and look like little black pegs.
Use Bonide® Japanese Beetle Killer, ECO/pco wettable powder, Pyrethrum or pyrethrum Rotenone for most beetles.
Bean Leaf Beetle
from red to yellow, 1/4 inch long, with black spots on its back. Adults eat holes in legume leaves, the larvae eat the roots.
CONTROL SUGGESTION: Use an organic insecticide as necessary for control.
Blister Beetle
http://breachrepairers.webs.com 76
Blister beetles, are black or gray, many times they have stripes, soft-wings & are 1/4 to 1/2 inch long. They eat foliage of various vegetable crops, including potato, tomato and beets. CONTROL
SUGGESTION: same as above
Cabbage Looper
a green caterpillar with light stripes on its back. It can be 1 1/2 inch long and humps up or loops when it crawls. It is found on many kinds of plants, usually more on the cole crops. It drills holes in cabbage heads. Usually more common with fall plantings.
CONTROL SUGGESTION: Use Japanese Beetle killer or pyrethrum spray
Colorado Potato Beetle
a Black and orange striped beetle 1/2 inch long. Larvae are orange, You can usually find Orange eggs on affected plants. Adults and larvae eat leaves of eggplant, potato and tomato. There are two generations in spring and summer. You can hand-pick the adults in the first generation, or control the first generation with sprays helps to prevent a whole lot of beetles in the summer generation. See asparagus beetle controls
Pyrethrum rotenone, a heavy duty organic pesticide can be used for heavy infestations. But you will have to apply it 2 times weekly until the infestation is under control.
Corn Earworm
are the same as tomato fruit worms. They are green, brown or pink caterpillars. They have stripes along the sides. They are 1 to 1 1/4 inches long. They eat holes in okra pods, peppers, tomatoes. They also burrow through the shucks of corn to feed on the kernels. Sometimes early in the season they feed on the shoots of corn. To control them, Delay planting sweet corn until daytime temperature is 75 degrees F.
Cross-Striped Cabbageworm
is a bluish gray caterpillar up to 1/2 inch long with many fine, black, lines across the back. It has a yellow stripe on each side and a green, mottled underside. It is found more often on buds and heads of cabbage, but will attack all cole crops. Bacillus thuringiensis sprays are effective.
Imported Cabbageworm
is a small green caterpillar up to an inch long or longer. The adult is a white butterfly with black markings on the wings. The caterpillar eats holes in cabbage leaves and bores into the head. Often you will find larvae near the developing bud of the plant.
CONTROL SUGGESTION: Use an organic insecticide.
Cucumber Beetle
There are two species of cucumber beetles, one with black stripes and the other black spots. They are yellow-green, besides bothering cucumbers, they will eat the blossoms & leaves of other cucurbits. The larvae of the spotted cucumber beetle also eat the roots of corn and other plants. You must get control of these pests EARLY in the season to prevent disease.
Cutworms
http://breachrepairers.webs.com 77
have a dull color, smooth skin. They are caterpillars that cut plants off above, at or below ground level. Some eat plants and fruit.
SUGGESTION: Use a 6-inch diameter cardboard collar 3 inches high, pushed into the soil 1 inch after planting transplants. You can. Prepare beds and eliminate weeds at least two weeks before planting.
European corn borer
It bores holes in the stalks and ears of corn, and in fruits of peppers, usually in the top of the fruit. Water that gets into the fruit through the hole, makes the fruit rot. A good control may be Bacillus thuringiensis (Bt) Thuricide™ var. kustaki also known as Bt var. Berliner, Which is a biological pesticide capable of killing many larvae, Bt must be ingested by the larva in adequate amounts to be effective. However. Larvae that bore directly into the stalk may not eat enough of the material to be affected. The pest control agents should be applied so that they collect on the leaves and roll into the whorls. If you have persistent trouble with European corn borers vou can use both Heterohabditis and steinermena carpocapsae beneficial nematodes for more effective control.
Flea Beetles are tiny jumping beetles, black in color. They are about 1/10 inch long. There are many species of flea beetles. They eat holes in potato, tomato, eggplant, peppers and many other veggies.
Grasshoppers there are 2300 species of grasshoppers, Unless there are a lot they aren't a big problem. The best thing to do is to nip it in the bud, when you see few, begin your spray program. SUGGESTION: Keep
Lots of Praying Mantis, & Blue birds
Sink glass jars % way into the soil. Fill to the halfway point with a mixture of 10 parts water to 1 part of molasses. The hoppers are drawn to the sweet smell of the molasses, they dive in and drown. Clean traps as needed.
Brew coffee 5 to 10 times stronger. Cool and spray as is.
An effective control for grasshoppers may be to mix an two ounces of diatomaceous earth with a gallon of rotenone-pyrethin spray.
Greenhouse Whitefly is a very small, white insect, with a powdery look, that flies up from the foliage when it is moved. Immature white flies appear as tiny green scales on the underside of leaves. The plants lack vigor. The leaves will wilt, and turn yellow and are covered with a black, sticky substance. Tomato, eggplant, and some weeds are hosts to the whitefly.
The Whitefly overwinters in the greenhouse in the cold areas. Whiteflies are a serious problem in warm climates. Many times whiteflies and aphids are carried into the garden on purchased bedding plants. When you purchase flowers or veggies always look carefully for insects or the tell tale signs.
CONTROL SUGGESTION: Control Weeds in the area. Watch purchased plants closely. Spray with an organic insecticide if you see the signs of infestation. You may need to spray 2 or 3 times a week if
http://breachrepairers.webs.com 78
there are many insects. If there is a heavy infestation late in the season It will be difficult to control. There are several organic controls you can use if needed.
Japanese Beetle
Japanese beetle is a large beetle with shiny green with other colors. It is 1/2 inch long. The larvae are white grubs buried in the soil, usually just under the sod. The adults turn a leaf into a skeleton, they will eat the flesh of the fruits of peach and plum, just leaving the seed. They are very destructive to a corn as well as other crops.
These beetles are very difficult to control. Some gardeners use Japanese beetle traps. My experience is that if you use these traps you will catch all the neighbor's beetles, as well as some of your own. The best control is to use a variety of methods.
CONTROL SUGGESTION: Traps, Sprays, milky spore disease and insect predators are all helpful in controlling the beetle. You can use Bonide® Japanese beetle killer spray or pyrethrin -rotenone spray.
The Leafhopper
is a small, green insect that is shaped like a wedge. They are found mostly on beans, lettuce and tomatoes. A telltale sign is leaves that curl downward or upward.. Plants may be stunted or killed. On potatoes, the tips and sides of leaves curl upward, The leaves wilt & die. The leafhopper carries disease from weeds to garden. CONTROL SUGGESTION:. Eliminate weeds. Spray with insecticide the weeds that are present at the same time you spray the plants.
Mexican Bean Beetle
1/4 inch long, is a yellow color. It has black spots on its back, The larvae are yellow, with soft spines. The larvae are 1/3 inch long and are found on the underside of leaves. These bugs skeletonize bean foliage and feed on bean pods. They are similar to lady beetles in their appearance, Control with organic insecticide.
Mites
are tiny insects with 8 legs. They are so small, many times you may not notice them,. They usually live on the leaf undersides and give them a powdery look. You will find mites on Beans, cucumbers, melons and tomatoes, etc. usually in hot, dry weather.
CONTROL: Spray with organic insecticide like Sharpshooter® every 7 days You may be able to wash some off with a strong spray of water. Spraying or washing with a sudsy Octagon® soap solution sometimes helps temporarily. Even dish soap may help control mites
Onion Thrips
There are many different kinds of thrips, but most of them do little damage. However, the onion thrip sucks the sap from onion plants. Onion thrips are brown, yellow, or white, with no wings; very tiny. A few have wings.
CONTROL SUGGESTION: Control with. Organic insecticide rotenone pyrethrum
http://breachrepairers.webs.com 79
There are several kinds of root maggots, they may attack, cole crops, onions, & other crops They are white, no legs, and without a distinct head. They make a tunnel through the roots, stems, bulbs or seeds and cause the damaged parts to rot. The adult maggots are similar to house flies in their appearance. To control them, do not plant until soil is warm. If you are troubled by maggots, do not sow seed too deeply.
Sowbug
is a small gray brown insect that rolls into a ball when disturbed. It feeds on decaying organic matter, sometimes eats root hairs, or ripe fruit that is lying on the ground. Mulched areas usually have a lot of these. To control them, clean up the litter on the ground in the area. Keep compost pile away from the garden.
Squash bugs
are usually brown or gray. They attack mainly cucurbits like squash, pumpkins, gourds and melons. Use same control as Squash vine borers
Sguash Vine Borers
bore into the vines and fruit of squash and other cucurbits. The adult moth looks like a wasp.
Symptoms: Parts of vine wilt and die
CONTROL SUGGESTION: Spray with an organic insecticide every 7 days. To save the affected vine look for the hole & slit the vine trunk or stem that is affected, with a knife, and remove the borer by hand. Then tape the split stem together with duct tape and keep the plant watered. Be sure to remove all vines from garden when crop is finished. Do not plant squash in same area next time.
Stink bugs
are shaped similar to a shield. A harlequin bug is black and orange, and also shield shaped. Other stink bug pests are brown or green. The young stink bugs look different than the adult. Stink bugs usually spread bacteria, which will cause plants to wilt and die. Some stink bugs cause malformed fruit.
CONTROL SUGGESTION: Weeds are usually hosts from year to year of many pests. Eliminate all weeds from the garden area. If you have a lot of weeds in the garden area, spray an organic insecticide weekly for control.
Tomato Hornworm
are big green caterpillars up to 4 inches long with white lines on the sides and a horn on the rear end. They eat leaves off the stem of tomatoes and eggplant, sometimes potato, and some weeds. I usually pick them off, but they are hard to find. Keep looking. Another control Bt. is effective against hornworms, Or use an organic insecticide.
White Grubs
are larvae in the soil from May beetles or Japanese Beetles with hard, brown heads.
Wireworms
are small, light yellow, or brown, hard-bodied worms. They drill holes in roots of beans, beets, carrots, celery, lettuce, onions, potatoes, sweet potatoes and turnips. The adults are brown and are

http://breachrepairers.webs.com 80
called click beetles, because if you hold them they make a clicking sound. To control them, do not plant root crops in soil that has recently been in sod.
Other Bugs
There are many kinds of Bugs in different shapes, colors, and sizes, that are not covered in this manual. Basically, most small bugs can be controlled easily with a n organic insecticide. Some of the larger bugs, such as Japanese beetle can only be controlled by continually using various forms of control. If you see a new, safe control come on the market, try it.
http://www.pueblo.gsa.gov/cic_text/housing/japanese-beetle/jbeetle.html which is a New Mexico state government websight gives us the following information on milky spore And Bt. Milky Spore-Milky spore is the common name for spores of the bacterium Bacillus papillae. Upon ingestion, these spores germinate in the grub's gut, infect the gut cells, and enter the blood, where they multiply. The buildup of the spores in the blood causes the grub to take on a milky appearance.
Milky spore disease builds up in turf slowly (over 2-4 years) as grubs ingest the spores, become infected, and die, each releasing 1-2 billion spores back into the soil. Milky spore disease can suppress the development of large beetle populations. But it works best when applied in community-wide treatment programs. Bt. and Milky Spore controls are much more effective if the whole community is participating. Even though you kill the larvae in your yard, the neighbor will still have them.
http://breachrepairers.webs.com 81
Harvesting & Storage of Vegetables Suggestions for Harvesting vegetables and fruit To prevent spreading disease, Always wash your hands before working in the garden, or picking produce and after handling any diseased plants.
It is very important when harvesting and storing fruits and vegetables to handle them carefully, avoid bruising, cutting, or damaging the tender skin. Breaks in the skin of fruits Increase the loss of valuable moisture, and make it possible for decay organisms to enter the produce. Careless field treatment is the major cause of damage and decay of produce.
Another important factor in harvesting of soft fruit, such as tomatoes, is the use of shallow containers for picking, One very important rule to remember when harvesting things from your garden is: NEVER Harvest when plants are even the least bit wet! You will spread disease if you do and many veggies spoil more quickly when harvested or stored wet.
When harvesting vine crops, do not step on the vines.
Suggestions for Storage Most vegetables will not further ripen after harvest. The best procedure to follow to assure your vegetables will keep is, to select for preserving, products that are fully ripened, blemish free with no disease, not cuts or bruises.
Some vegetables, such as squash, pumpkins, eggplant, peppers, okra, should be harvested with stems left on. Other veggies, such as tomatoes, cantaloupe, green beans, etc. should have stems removed when harvesting.
While vegetables are in storage they should be examined periodically for decay and pest damage. The decayed items should be removed immediately to prevent decay from spreading.
As a rule, the longer produce is held in storage, the greater is the possibility of decay and pest damage. For that reason, the later maturing produce keeps better. Produce held in storage is still part of a living plant that is kept dormant by the environment. If subjected to adverse conditions like lack of oxygen, freezing, or excessive moisture, it will lose quality or decay. Produce can tolerate less than optimum storage conditions, but storage life is thus shortened.
Methods of Storage *Never store produce in an area where chemicals or fuels are stored as they may absorb the odor of the chemicals.
There are several ways to store veggies out of doors. Some kinds of produce may be preserved in the garden right where they grew. A few crops may be protected from freezing or by being left in the soil. And covered by such insulating materials as dry leaves, sawdust, straw. Root crops such as carrots, turnips and parsnips will store well this way. When the ground begins to freeze in the fall, cover these root crops with a heavy mulch of straw or dry leaves to make midwinter harvesting easier other root crops such as potatoes, onions, sweet potatoes will rot if left in the ground.
http://breachrepairers.webs.com 82
A clean large trash container can be buried in the ground for vegetable storage purposes in areas where night temps are colder than freezing for an extended period. A container with a lid is more easily opened and closed than a hole or trench under soil. Also a metal can is more or less rodent proof.
A plastic container is not as good for storage because rodents may chew their way in. Small holes may be drilled in the bottom of the can for drainage. Whatever container you use you should leave an inch of the can above the soil level. You may cover the lid with straw or leaves.. Use one container for fruits and one for vegetables. Use a thermometer to assure the temperature in the container is not too cold for storage.
A root cellar constructed below ground is another option for preserving veggies in colder areas of the country.
Some vegetables like lettuce will not wilt as quickly if they are sealed in plastic when placed in the fridge.
Most greens and stem vegetables will keep for a week in the fridge or a year in the freezer at zero degrees if blanched for a few minutes. Some people dry their greens, but it requires some expertise to get them dried correctly.
Most root vegetables will keep for a month in the fridge, a little longer if kept at 33° F. In the freezer, blanched or cooked root veggies will keep for a year. While potatoes, sweet potatoes, yams & winter squash should be kept out of the fridge. 50c F is a good storage temp for these.
Suggestions for Growing Vegetables Some of the methods of planting vegetables include:
1. Set out plants started in the greenhouse.
2. Plant roots from vegetables like rhubarb, asparagus, el -
3. Sow seed in a row directly in the ground.
4. Broadcast seed over a large area, such as with turnips, greens, etc
The Culture of Fruits, Nuts, Grains, and Vegetables
Fruits
Muskmelon
Growing Cantaloupe and other melons Plant seeds or transplants in rows 5 feet apart with hills spaced 2 to 3 feet apart in the rows.
Plant two or three seeds per hill. The seed should be placed 1/2 to 3/4 inch deep.
To start plants in greenhouse, plant seed in individual containers three to four weeks before the plants are to be transplanted out-of-doors. Cantaloupes grown from transplants can be harvested as much as two weeks earlier than those grown directly from seed.
http://breachrepairers.webs.com 83
Use caution when transplanting. If roots are damaged or disturbed during transplanting, the plants will not do well.
If you will make a raised bed as long as your garden and 18 inches wide then lay a 4 foot wide black plastic, before you plant your melons, it will conserve moisture in your bed and keep them weed free.
Buy melon plants from a supplier or nursery, or start seeds indoors one or two weeks before the last expected frost.
Move them to the garden three weeks after the last frost.
Cut a slit in the plastic sheet to accommodate each transplant, and set it into the soil at about an inch deeper than it was growing in its container. Check your seed packet or plant label for spacing. It will vary from 4 to 6 feet for most varieties, 2 feet for bush types. I have had good success at 18" in the row spacing intervals in rich soil, with rows 6 to 8 feet apart.
Lay a mulch of straw, or hay if you don't use black plastic. If you use plastic mulch, make sure you anchor the sheet securely at planting time. If it shifts it may smother the tiny plants.
You may cover the planting area with a floating row cover to protect plants from insects and cold temps, but remove the cover as soon as flowers appear. When plants begin to set fruit, spray them with fish emulsion solution.
If you have a disease problem you may place a board under each melon when it's about half-grown to prevent it from rotting.
Make sure plants get at least an inch of water a week but unless a weather is dry for a long period, stop watering when the fruits begin to ripen as they will develop a better flavor if they don't get too much moisture during the last week or two.
Cantaloupe
depending on the variety, should be picked when they have developed a yellow color but while they still have some green color. They should have a good ripe odor. Harvest at (full Slip) when the melon will pull away from the vine easily. The entire stem will disconnect from the melon with a slight tug if the melon is ready. They bruise easily, so should be carefully handled. Store them just above freezing for two weeks or less for best quality.
Be careful when walking through the garden. Do not step on the vines.
Cantaloupe is best preserved frozen in small bite size chunks. It will keep 6 months at zero0 F. Most sweet melons keep well if dried. The cantaloupe has a strong musky flavor. If you like the flavor of cantaloupe, try preserving some with a food dehydrator. Sealed in ajar or plastic, it will keep for a year or two.
Watermelons
http://breachrepairers.webs.com 84
Watermelons like warm weather and warm soil. They require a lot of space in the garden because of large vines. Types range from large, fruits to small, round, "icebox types" weighing between 5 and 10 pounds. Seedless watermelons are a little more difficult to grow. They require a seeded melon for pollination.
Plant seed for early melons in peat pots (2 seeds to a pot) or other containers in a greenhouse or hotbed 3 or 4 weeks before the last host Move them to the garden when soil temp is 65 to 70 F. Do not disturb the roots. Plant under black plastic mulch for a quicker crop. Planting seed directly in the garden is the easiest way to grow melons.. Plant 4 seeds per hill about 1 inch deep after danger of frost is past. Space hills 6 to 8 feet apart in the row with rows 6 feet apart.
Harvesting: Watermelons should be harvested when fully ripe. This stage is sometimes hard to determine. Immature fruits give a metallic ring when thumped and a more hollow, dead sound when mature. One more reliable method is to examine the ground side of the watermelon. A consistent yellowish cream color means that the melon is just right. If the patch is bright yellow, the melon may be overripe. I can better determine ripeness, by pushing down on the melon with the heel of the hand. If you hear a faint crackling sound, the melon is always ready to pick.
Nuts & Seeds
Grains
Beans
Most beans are sensitive to cold temperatures and should not be planted until after the danger of frost is past in the spring and the soil temperature is 65 degrees F. Fava beans will grow in cool spring weather and royal burgundy string beans will germinate in cooler soil.
Most people grow bush green beans because they mature in 50 to 80 days and require less space. Pole green beans and Pole limas need more space and take 65 to 90 days to mature.
Pole beans
require stakes, a trellis, a fence or some other type of support. They continue to bear over a longer period than bush bean varieties..
Snap beans reach their best stage for eating when the seed within the pod is about one-
third developed.
Varieties that are specified as shell beans are more suitable for shelling than for using in the pod. You may use the shell beans immature when the pods have filled out. If you want dry beans you should wait to harvest them when the pods are dry and brown. Make sure they are thoroughly dry or they will mold.
There are both pole and bush type lima beans, or butterbeans. There a quite a few varieties of lima beans. Lima beans will drop their blossoms during excessively hot or rainy weather.
http://breachrepairers.webs.com 85
Plant bush snap beans in rows 24 to 30 inches apart. Plant seeds 2 to 3 inches apart in the row and 1 to 1 1/2 inches deep in a well-prepared seedbed. It will usually take 1 pound of bush snap bean seed to plant 100 feet of row. Seed lima beans about 4 to 5 inches apart in the row. They do not produce well when they are crowded. Plant soybeans the same as bush snap beans. Plant pole beans 4 to 6 inches apart in rows 36 to 48 inches apart. You can have a continuous supply of beans by planting every two weeks until mid-August.
Green beans and wax beans
Always wash or sterilize your hands before working with the plants. Wait until the plants have dried in the morning before picking the green beans, as they will quickly mold if wet.
Always use two hands when picking bean pods. If you pull off the beans without holding the vines, you will break some of the vines.
If you see disease on the vines or pods, do not pick those beans, because you will spread the disease to the healthy vines.
If the bean pods are dirty, do not wash them until you are ready to cook them. Do not store them wet. If you are hungry for the first green beans, you may begin harvesting them when the pods are small, but to get the most bean for your effort, wait to harvest when the pods are firm, crisp and fully elongated, but before the seed within the pod has develop. The exact size of the pod depends on the variety.
Pick beans every other day to keep the plants producing more. The bean plant continues to form new flowers and produces more beans if pods are continually removed before the seeds mature.
Some varieties of green beans get stringy or tough if you wait until they reach full size to pick.
If you want to use them as shelled beans, wait to pick when the pods are well filled out. If you want to use them as dried beans, wait until the pods are brown and dry. Pick them when the weather is dry and sunny. If the pods are the least bit damp, the beans will mold after shelling them, unless you dry them with in a low moisture atmosphere or artificial heat.
When you are saving bean seed or other seed, it is best to dry them in a warm place or with artificial heat.
Fava Beans
require the same culture as English peas. They are frost-tolerant Lima bean, that should be planted in March or early April from Virginia northward, Fava beans thrive in cool rainy areas. Plants should flower when daytime temperatures average less than 70 F. From Virginia northward, favas are planted in the spring, but in the Gulf Coast states and warm coastal areas they may be planted from October to December for harvest in March. They are the size of a large lima.
For use as a snap bean, harvest the pods at 2 to 3". For use as a green shelled bean, harvest when pods are 4 to 7" long. To preserve them they should be frozen or dried.
http://breachrepairers.webs.com 86
Soy Beans
Edible soybeans are grown like bush snap beans. They need usually 80 to 100 days to mature to green ripe stage. Plant them about ½ inch deep 2 inches apart in the row.
Pick soy when the pods are nearly full-grown when you see just a tinge of yellow on the pods. Shelling soy beans is easier if you drop the pods in a pot of boiling water for a few minutes.
Fish them out of the water and squeeze the stem end. They should pop right out. If you want to grow them for seed or dry beans, let them stay on the vine till after a frost. I usually pull up all the vines at one time and carry them to the garage. Then sit and pull the beans off the plant. After picking beans off they should be shelled and processed ASAP.
Storing the fresh beans
If you cannot process soy beans right away, refrigerate them dry-unwashed and let some air get to them. Do not wrap them in plastic. They should keep for up to 5-7 days.
Sweet corn
varieties are numerous. There are dozens of varieties. Plant some varieties that are recommended for your area. I always like to experiment though, so I try to plant at least one different variety every year. Temperature is an important factor which determines the number of days required to reach maturity from seeding date. Ripening may be increased with high temperatures or delayed with cool temps.
If you plant 2 different varieties, make sure the dates of maturity are 2 weeks apart, or they may cross pollinate.
Preparation of corn ground Com is a heavy feeder.
It is best the year before planting corn on a particular area to grow a legume (clover, Beans, etc) as a cover crop then plow it under while still green. Then in the year you plant Prepare the soil before planting by plowing or tilling under 50 lbs of compost or composted manure per 1000 sq ft. I always like to. plow under manure, then place granular fertilizer in the row. Or you can fertilize the Corn at planting time by making your row 2 inches deep. Put composted manure in the row a cupful to 2 feet or granular 5-3-4 (package recommendations) or other high nitrogen plant food. Cover the fertilizer with an inch of soil. Drop the seed 1 kernel every 4 inches then cover with an inch of soil.
Planting corn An additional sidedressinq of 10-0-0 or other high nitrogen fertilizer when corn is knee-high, using about 1 pound per 20 feet of row.
The harvest period for sweet corn can be extended by planting early-, midseason- and latematuring varieties or by making successive plantings. Make successive plantings every two weeks throughout the season until July 15. Use only earliest maturing varieties for July plantings. The fallmaturing sweet corn will give high quality because of cool nights in September.
http://breachrepairers.webs.com 87
It is very important to plant at least four rows of the same variety in a block as good pollination is produced by the pollen falling from the tassel to the silk. The wind aids by blowing the pollen from one row to the next. Each silk on an ear of corn pollinates one kernel. Every kernel must be pollinated, or there will be a vacant spot on the ear.
Sometimes a strong wind storm or heavy rain will knock the plants over. They usually straighten up by themselves after a day or 2 Some people pull the dirt up around the plants with a hoe to prevent wind damage.
Harvest Normally, sweet corn is ready to pick about 20 days after the first silk appears on the ear. It requires a little experience to pick the ripe ears every time. The best way to tell if an ear is ready is to wrap your hand around the ear. It should feel fat. The silk should be dark brown. The juice of the kernel should still be milky.
Of course, you can always pull the shucks down to have a look. BUT, if the ear is not ready, the birds, the bugs, the ants, will all have a feast on the exposed kernels.
The harvest season for sweet corn is brief as the enzymatic conversion of starch to sugar occurs rather quickly. For the best flavor harvesting should be done in the morning while air temperature is still cool. When ears of corn are hot from the sun they lose their quality quickly. To maintain fresh-from- the-garden quality of corn. Cool it as fast as possible.
Sweet Potatoes need a long growing time They grow well in medium to light sandy soils which are well-drained and relatively low in nitrogen. Excess nitrogen and applications of animal manures cause low quality roots. Heavy, tight soils may cause misshaped roots. I have grown lots of perfect sweet potatoes in clay soils though.
There are various types of sweet potatoes — Yam type roots are most popular. Root skin color varies from yellow to red, pink and orange.
You can buy transplants or "slips" from a local plant grower, or produce your own starts. If you are producing transplants, the potatoes should be bedded in a greenhouse or hotbed (75° to 80°F preferred) about five or six weeks before the planting date. Use only disease-free potatoes to grow plants.
If starting your own plants, purchase the best sweet potatoes you can find. The best way is to make a sweet potato bed 20 sq ft to a bushel. Dig a trench 4 ft by 5 ft, 12 inches deep. In the trench place a 4 inch layer of sand. Then place a 2 inch layer of composted manure.
On top of that place a 3 inch layer of sand. Lay the sweet potatoes side by side on the sand, covering the sand. Place another 3 inch layer of sand on top of the potatoes. Water the bed well, then cover the bed completely with tar or roofing paper, fastened down. Make sure to keep the sand moist but not soggy. The seed potatoes should be bedded when the soil temperature reaches 60 °f. One bushel of seed potatoes will produce about 1,000 slips from one cutting or 2,000 from three cuttings. About 20 bushels of seed potatoes will be required to produce enough transplants for one acre.
Prepare soil for sweet potatoes by growing a legume cover crop the year before, then broadcast Pro-grow 5-3-4 over the area (Package recommendations). The Soil pH should be 5.5 to 6.7.
http://breachrepairers.webs.com 88
Vegetables
Artichokes
are usually harvested an inch below the bud with a sharp knife at a size of 3 % inch diameter or more.
Artichokes will keep for a week if you store them unwashed, in the refrigerator. Harvest with stems still attached, so you can stand the artichokes upright in a bowl of water or wrap ends in a moist paper towel, or store them in a plastic bag.
Globe artichoke hearts can be eaten raw or cooked. They are most often steamed. The heart, or center of the bud, is eaten along with small, tender outer leaves. The stem is also edible.
Globe Artichokes are very low maintenance. They will do well in rich or poor soil. The only pest is usually aphids in the spring, which are carried there by ants.
Most artichokes will take light frosts but a hard freeze will kill them, so they must be protected from temperatures below 32° F. They are somewhat drought-resistant and will do OK without irrigation.
Artichoke plants are perennials, they rarely produce flowers the first year. Sow 2 seeds one inch deep, spaced 2 ½ ft apart inches apart. Rows should be spaced 5-6 feet apart. Plants should be 2 ½ feet apart in the row. It takes an artichoke plant two years before it produces its first bulb.
Unharvested buds will produce big, beautiful flowers. So if you miss the harvest, enjoy the beauty.
Asparagus
is a hardy perennial vegetable. It usually is productive for 15 years or longer. Asparagus can be planted anywhere it won't be in the way. It needs fertile soil though, to produce a bountiful crop. There aren't many insects or diseases that bother it. It is one of the spring veggies that you will be always happy to see. That is, if you like it. It is very beneficial to the health.
Before you plant asparagus crowns, dig a trench 6-8 inches deep and a foot wide. The rows should be 4-5 feet apart. Mix liberal amount of organic matter or manure into the soil you removed. Put 3-4 inches of the soil back in the trench, then lay the crowns, spreading out the roots. The crown should be higher than the roots. Make a little mound for the crown. One root every 18 inches.
Cover with the remaining soil and pack down. If the soil is heavy, don't plant them quite so deep, but should have at least 3 inches of soil over the roots. Keep it well watered through the season. In June the plants should be fertilized after you finish cutting. Every fall place a shovel full of manure or compost over the plant. Keep it free of weeds. You can put a straw, leaf or other natural mulch on to keep the weeds down. You can also plant Asparagus seed, which will take 3 years to produce.
Asparagus should not be harvested until the second or third year after planting, depending on the health and growth of the plants. The first two years are important plants well established. Cut no shoots smaller than your little finger.
After the third year, you may harvest for 8 to 10 weeks. Harvest spears daily when they are 5 to 7 inches tall. To break them off at the soil level is better than cutting below the soil surface.
http://breachrepairers.webs.com 89
When the weather gets cold, remove the asparagus tops and burn them, to prevent disease.
Beets
are fairly easy to grow. The tops may be harvested as greens. Beets don't like acid soil, so make sure your soil is balanced with a pH at 6.0 or greater.
If you will plant some beet seed every three weeks from early spring to mid-August you will have continuous supply of young, tender beets.
Plant seeds 1/4 inch deep in rows 18 inches apart or wider. Beet seeds are actually fruits containing several seeds. You must thin the seedlings when plants get some size to stand 2 to 3 inches apart in the row. You can use the thinnings as greens. Close planting or failure to thin can cause undersized roots to form.
Harvest beets for greens when the tops are large enough for cooking. For best tasting roots, harvest when they are 1 ½ inches or less in diameter. Always loosen heavy soil before pulling beets, or the tops will break off.
Beets will keep for several months if packed in moist sand and placed in a basement or garage. Do not let them freeze. Before storing, trim off all but 1/4 inch of the tops.
The best short term storage for beet roots is at temperatures of 32 to 40°F and high humidity. Preservation methods include canning or freezing.
Broccoli
There are different types of broccoli —green, purple broccoli; romanesco, with a conical head; and broccoli raab.
All of the cole crops begin to get buggy and the flavor gets strong as the night temperatures rise to 60 F or higher. Plant so you can harvest before that time.
Plant: You may Purchase transplants locally in every area of the country, but for the best quality grow your own. Plant the seed 8 weeks before last frost in spring. Set them out after the roots begin to fill the pot, about 4 to 6 weeks after planting. Don't let the roots get crowded. In Tennessee set out April 1 to 15 or by August 1 for a fall crop. Broccoli does well as a fall crop.
For transplants set plants 14 to 18 inches apart in rows 30 inches apart. Use fish emulsion 1 cup to 5 gallon of water for a starter solution. Pour a cup or two of that solution the hole before you set the plants.
Broccoli is ready to cut when the head is well filled out and the buds are swelled but still tightly packed. And before the head cracks apart and the stems separate. The first crop will be the central flower head. Cut it off with a 4 inch long stem. Many varieties will then produce side shoots from a leaf axis (where the leaves join the plant), which you can cut later.
Try to cut the head off at an angle, to keep water from gathering on the newly cut stem which will cause the plant stem to rot.
http://breachrepairers.webs.com 90
Brussels Sprouts
Brussel Sprouts develops buds or small heads that grow in the axils of the leaves. The heads, about 1 inch in diameter, have a stronger flavor than cabbage. You either like them, or hate them.
Plant: Brussels sprouts can be grown as an early spring crop or as a fall crop in a cool, moist climate. For an early spring crop, start the seed about eight weeks before you set the plants in the garden. Plant by March 1 in the south so you may harvest by June 1-30.
For a fall crop, sow seeds in open plant beds or seed flats from June 15 to July 1. Transplants will usually be ready in four to six weeks. Space plants 24 inches apart in the row. Harvest will then occur the first part of October. Fall harvest is the most practical and rewarding.
Brussels Sprouts produce miniature heads all up and down the stem. The sprouts ripen first on the bottom of the stem. Pick them when they are well filled out, and firm to the touch, and when they are about 1 to 1 1/2 inch in diameter. They will keep for a week or two in the fridge. The best method of preservation is freezing. To pick them, twist them off. Each plant should yield about 1 quart of sprouts. Harvest continues well into the cold fall months. Snow and cold does not stop sprout development, and may even improve their flavor. You may harvest until plants freeze up or die.
Cabbage
Cabbage grows better in cool temperatures of spring, fall and early winter. It gets buggy in the summer. It will withstand temperatures down to 20°F or less if it is protected with crop cover fabric.
Heads differ in sizes, hardiness, shape, color and leaf type. There are some varieties that are better for spring and some that are better for fall planting.
Plant: Buy locally grown transplants or start your own four to six weeks prior to planting. You can set cabbage as early as Feb in the south, Sow late cabbage in pots or flats for fall crop from July 1 to Aug 1.
Plant cabbage seeds 14-deep 4 weeks before last frost in spring if you are planting in the row. Transplant or thin small cabbage plants to 15-18" apart in rows 30" apart or more. Cabbage can be planted in flats in Jan for Feb for Mar planting. Transplant after 4-6 weeks later.
Cabbage likes full sun, but will tolerate part shade. It is a heavy feeder. To help deter Cabbage worms, use row covers in the earlier part of the growing season - this will prevent moths from laying eggs on the plant.
Plant spacing affects head size; close spacing (9 to 12 inches apart in the row) produces small heads. Place heads no closer than 14 to 16 inches apart in the row.
Late Cabbage
The late CABBAGE will keep quite a while in the field in cold temperatures. Late cabbage will endure freezing weather down to 20°, or colder temps if it is mulched heavily. Early cabbage
http://breachrepairers.webs.com 91
however, should be cut and stored before a hard frost. You can harvest cabbage by cutting the stem below the head with a sharp knife.
Actually, Cabbage can be harvested any time after the heads form, if you are really hungry. But for highest yield, cut the cabbage heads when they are solid (firm to hand pressure) but before they crack or split. When heads are mature, a sudden heavy rain may cause the heads to crack or split open. If that happens, you should harvest within a few days, as they will deteriorate quickly. Do not store split heads. Use them as soon as possible after they are discovered. Store cabbage heads with the outer leaves left intact.
In addition to harvesting the mature heads of the cabbage, you can harvest a later crop of small heads). These sprouts develop on the stumps of the cut stems of certain varieties.
Discard the loose outer leaves and check for possible insect problems. Do not store it with other veggies. Cabbage has a strong odor which may contaminate other vegetables.
To make your cabbage keep longer in storage, pull the plant by the roots, knock off the soil, and hang them upside down in a root cellar. If they have dirt on the heads, you should wash it off and let the head dry before storage. Never store a head that has black spots as it will rot quickly.
If you have a cooler, store them at 40° or below. Cabbage can be made into sauerkraut to preserve it. The spring cabbages are not as hardy as fall types, and will not keep as well in storage.
Carrots
Carrots are easy to grow but you must have deep friable loam or sandy soil to grow full size carrots. They do not do well in clay or rocky soil.
Plant carrots from 6 weeks before last frost date until the first of 8 weeks before the last frost date. Sowing at three-week intervals will give you a continuing harvest.
Plant seed 1/4 inch deep in double rows if you don't have a weed problem or in single rows 18 inches or more apart. Since carrot seed is slow to germinate, radish seed is often mixed with it. The radishes will mark the row and break the crusty soil, making it easier for the carrots to come through. Thin carrots to 2 to 3 inches between plants after the seedlings are 1 to 2 inches tall.
Harvest carrots anytime but they are more productive if you wait till the roots are at least 3/4 inch in diameter. Carrot tops may not be strong enough to withstand being pulled from the ground, so you probably will need a shovel or spading fork. Finger carrots are usually ready to harvest within 50 to 60 days. Summer planted carrots may be left in the ground until a killing frost. Some gardeners place a heavy straw or dead leaves mulch over the row so that carrots can be harvested throughout the winter.
To store the carrots, Wash the roots, cut off the tops to 1 inch above the root and store at about 33 36°F with high humidity in perforated plastic bags in the refrigerator, or a cold, moist cellar or pit. Carrots will keep from two to four months. Do not store carrots in the same room as apples. Apples give off ethylene, which will make carrots become bitter.
http://breachrepairers.webs.com 92
Do not allow them to freeze. Carrots may be placed in a refrigerator, or stored in an underground container. We use to spread them out in a tub and layer them sand then carrots then more sand etc. and store in a cool root cellar. Under proper storage conditions, carrots keep 4 to 6 months. Beets, turnips, rutabagas also can be stored this way, each type of vegetable in its own container.
Cauliflower
Cauliflower plants need a cool, humid climate. You may plant cauliflower in early spring. Usually they are best grown in the fall. Plant the seed in flats 6 weeks before last spring frost to set after last frost or, plant seed 10 weeks before first fall frost,
Plant Set plants 16 inches apart in rows. Any interruption in growth (cold, heat, drought) can cause the plant to button. Blanch the head for the best flavor. Sunlight discolors the curd and produces a strong flavor in the head. So when the curd begins to form, gather the long leaves over the small, white curd and tie them together over the heads.
Start the blanching process when the flower head (also called a curd or button) is about the size of an egg. Make sure neither it nor the foliage is wet; otherwise the plant may rot. Loop heavy twine around the leaves, gently lift them up and tie them together. The aim is to keep light and moisture out, but to let air in and also leave room for the flower to grow.
Harvest cauliflower heads when they're full but before the sections begin to loosen. The timing depends on the variety, so start checking plants daily when the heads reach 3 to 4 inches across. Usually takes a week or two. Cauliflower is harvested by cutting the stem just below the head. Leave some of the leaves around the head to protect the curd. Never let the heads get dirty, as that will increase the likelihood of spoilage.
Once the leaves have been trimmed Cauliflower will deteriorate after a week and get black spots. You should use it or freeze it before the week is up. You may have a longer harvest by planting a few plants every 3 weeks from the middle of July, to the middle of August.
Celery
is a more difficult to grow than other vegetables. Celery requires a longer growing season, lots of water, and cooler temperatures. Without the proper care and conditions, Celery will be very dry and stringy.
Did you know that celery has negative calories? It is almost absent of calories, so when you chew it, you burn more calories than you get. Calories, netting you a negative calorie meal or snack!
Plant seedlings indoors. The seeds are very tiny, difficult to sow. Sow seeds in individual pots or containers. As the seed is very tiny, put 4 into each pot. After they have germinated and are large enough pull two plants. As they continue to grow, thin to one per pot.
Transplant outdoors after the last date for frost in your area. Space plants one foot apart, in rows 2 to 2 1/2 feet apart.
http://breachrepairers.webs.com 93
Celery requires at least an inch or more of water every week. Provide plenty of water during the entire growing season, especially during hot, dry weather. If celery does not get enough water, the stalks will be dry, and small. Celery plants must have full sun. and rich well balanced soil. Put compost and mulch around the plants to retain moisture. They will require about 100 to 120 days to reach maturity.
Blanch inner stalks by tying the stalks together with twine when the plant is 12 inches tall. Or by building up the soil around it.
Cover your crop in the early fall to protect them against frost just prior to the maturing of the plant. If frost does damage the plant, the inner stalks should still be good.
CELERY can be harvested after the stalks reach a foot tall or more. It will keep for a few weeks if cut where the roots join and placed unwashed in plastic in the fridge.
Celery should not be stored with onions, turnips or cabbage as the flavor of the celery will be tainted. The temperature of the storage area should be near 32° F and the humidity moderate. The roots should be in moist sand or soil. Keep the foliage dry
Chinese Cabbage
Chinese cabbage is the same as Chihili, Michili or Wong Bok. It is a tender green, but will withstand a light frost.
Plant Chinese cabbage seeds % inch deep 12 to 15 inches apart in the row.. Harvest: Harvest when heads are firm and full.
Store Chinese cabbage in perforated plastic bags in the refrigerator, cellar or outdoor pit for up to two months.
Collards
are in the same family as cabbage, kale, broccoli, etc.
Plant seed about 6 weeks before last frost in spring or 8 weeks before 1st fall frost. To get the most collards for the space you use, set plants 6 to 10 inches apart in the row. Then as they grow cut out every other plant and eat it. The plants you leave will get much larger.
Harvest when the leaves reach a desirable size. All parts of the collard plant are edible and may be harvested at any time in the season. Plants can be cut at ground level when they reach 6 to 10 inches in height. You may wait till the leaves are larger, 10 inches tall or more. Cut the outer leaves and leave the inner leaves for later use. Some collards will endure a 20 degree or colder freeze. Collards usually develop a better flavor after frost..
Collards may be kept in plastic bags in the refrigerator for up to 14 days.. They will keep better in the fridge if they are kept a bit moist.
Cucumbers
like warm weather. Varieties of cukes include, slicers, pickling cucumber, burpless, mediteranean, gherkins, Armenian, lemon types, etc. A plant will stay productive for about 4 to 8 weeks. Then they
http://breachrepairers.webs.com 94
begin to get bitter, misshapen, or buggy. To have a cointiuous supply, you should planrt a new crop every 4 weeks or so. 2 or 3 vines will provide enough cukes for 4 people, unless you really love them. Plant the last crop, preferably a short season one, about 60 days before the first fall frost.
Planting: Cucumber vines spread from row to row. If you train them on a trellis or fence, the fruits will grow straight & clean. If you trellis them, plant four to five seeds per foot of row. When planting cucumbers in a row plant 2 seed every 18 inches. The rows should be 4 or 5 feet apart.
For the flower to become fruit, bees must carry pollen from a male flower to a female flower. A female flower has a tiny fruit at the blossom.
Harvest cucumbers when they reach the size you desire, but don’t wait till they turn yellow. If you let the seed in the fruit develop, it will reduce fruit bearing. If fruits are picked early, plants can bear about 40 cucumbers, but if you wait till fruits get big large size, only a dozen or so cucumbers will form on each plant. Old cucumbers prevent plant food from going into the production of new fruit. It takes about 15 days for any one fruit to get over ripe, depending on conditions. It is very important to remove fruits before they get oversize, so the plants will continue to produce.
Eggplant
is very susceptible to cold soils and frost. It is best to plant seed 8 weeks before the last spring frost. Then set them out when the soil is 70° F
Set Plants 18 inches apart in rows 3 ft apart.
Harvest Eggplant when the fruit has a glossy skin and probably a uniform color. It should feel light, not heavy when you lift it. It should be at least 6 inches long. A Dull coating or seeds that have turned brown indicate overripe fruits. They have less flavor.
You may check for maturity by pushing on one side of the fruit (just a little) with the ball of the thumb. If the fruit does not spring back when released, it is mature. Eggplants should be picked as soon as they are ripe. Because the stem is woody and may have thorns, cut, do not pull, the fruit from the plant. Leave some stem on the fruit, so that the branches will not be broken, and handle the easily bruised fruits carefully.
Fruits are edible from the time they are one-third grown until they are ripe and remain edible after achieving full color. Remove mature fruits so new ones can develop.
A whole eggplant will last better and longer out of the refrigerator but in a cool place - about 50° F. If you are storing cut eggplant, wrap it in plastic and place in the warmest part of the fridge Eggplant is not suitable for drying or canning. Freezing is the best method for home preservation.
To freeze eggplant: Wash, peel if desired, and slice 1/3-inch thick. Prepare, enough eggplant for one blanching at a time.
Water blanch, covered for 4 minutes in one gallon boiling water containing 1/2 cup lemon juice (fresh or bottled). Cool, drain and package. Seal in zip lock freezer bags and freeze. . Store them in a refrigerator.
http://breachrepairers.webs.com 95
Garlic
There is only one species of true garlic, Allium sativum, an herbaceous biennial (blooms every other year or year after planting), a member of the lily family. The leaves grow 8 to 10 inches tall,
Plant garlic in the fall. Dig a 2 inch deep row. Place one clove every 6 inches, cover and pack soil. Some gardeners enjoy eating the green shoots and leaves of garlic plants. Do not cut leaves more than once or twice, however, if you want new cloves to form. Cutting leaves continuously inhibits bulb formation, flower stalks may appear in the spring, but they must be removed so the plant's energies can be directed toward root and bulb formation.
Harvest
As summer progresses, the leaves will gradually brown and die off. If you harvest too early, the garlic will not be ready. If you wait too late and too many leaves have died off then there will be insufficient protection left for your garlic and it will not keep well when you store it.
The easiest way to know when to harvest garlic is to look at the leaves. When the leaves are 1/3 brown, you will need to check the bulbs to see if they have a good size. Loosen the dirt above one or two garlic bulbs to check their size, still keeping them in the ground. If they look large enough, go ahead and dig a few. If you find they are too small, let the bulbs grow a bit more.
You don't want to wait too long though. When the leaves get to be 1/2 - 2/3 brown, you should harvest the garlic regardless of size. Putting off harvesting garlic until after the leaves are completely brown will only result in a poor quality bulb.
In the north garlic will probably be ready in July or August,. In warmer climates, it may be ready in the spring, though some varieties do better in the south than others..
Hints on harvesting garlic
Dig your garlic, don't pull it. Be careful. Fresh garlic bulbs bruise easily and you may slice a bulb open while digging if you are not careful. Lift each bulb individually from the ground. Place it in a container where it get bruised.
When your garlic has been dug, don't leave it laying on the ground. Too much sun will burn it and cause the flavor to deteriorate. Instead get it inside quickly, clean off the soil but do not wash it.
Stop watering 10 days to 2 weeks before harvest so outside of bulbs will harden off. Harvest by digging the bulbs up instead of pulling. Leave the stems attached for braiding or tying.
Curing and storage
After cleaning the bulbs, braid or tie the tops together, or lay them out individually and cure them thoroughly 2-3 weeks in a single layer in a cool, shady place. You could hang them up in an airy container in a well-ventilated area. After drying, you can remove the tops and roots. Store garlic in low humidity at room temperature or lower.
Greens
http://breachrepairers.webs.com 96
To prepare greens for freezing, pick blemish free, tender leaves; wash the leaves, if leaf ribs and stems are heavy or tough, pull off the tender part of leaves. - Water blanch collards 3 minutes and all other greens 2 minutes. Cool, drain and package, leaving 1/2-inch headspace. Seal and freeze.
Amaranth Or pigweed
is a wild green with black seeds that grows in many parts of the country. The small leaves and growing stems is what you pick. Steam them for a few minutes.
Lambsquarter
or pigweed is a weed that grows in cultivated ground. It gets several feet tall. If you pick the leaves and the growing tips of stems and stem them for a few minutes you will find they are delicious! Well, I think so anyway. I grew up on the stuff and it is my favorite green, and It's free for the taking.
Spinach
is a green that about everyone has tried. To harvest it you may cut the stem just below the bottom leaves, or pick the individual leaves if you want to get a greater harvest. It doesn't need to cook but a few minutes.
Sweet Potato
is one of the few tasty greens that will grow .in hot weather and is not bothered by bugs, but the deer love them. Pick the individual leaves and steam them like spinach.
Kale
is related to cabbage, collards, cauliflower, broccoli and Brussels sprouts. Varieties are widely diverse, being tall or short, erect or flattened.
Plant seeds in the spring or in late summer where the plants are to grow, or they may be sown in flats in the greenhouse or hotbed and transplanted to the garden. Plant a spring crop as early as the soil is ready. Plant seed for the fall crop in late July and August. Space plants 8 to 12 inches apart.
Kale is pretty if it is cut in a bunch, just below where the bottom leaves join the stem, but if you want the plant to produce more leaves, pick the outer leaves off individually as they get eating size. Kale will keep better in the fridge if it is kept a bit moist at cool temperatures.
Kohlrabi
Plant seeds outdoors about four weeks before the estimated last spring frost. Or a few weeks before the first fall frost. Kohlrabi likes cold frosty weather, and will take a hard frost. There's no reason to purchase plants because kohlrabi grows so rapidly. Seeds should be sown thinly and. Cover with 1/4 inch of soil. When seedlings get big enough, thin them to 6 inches apart in the row.
Bulbs will develop to edible size in about 6 weeks. They will be more tender and have better flavor if the soil is rich in nutrients. Spray with fish emulsion solution once a week for the best quality.
You may clip young leaves for eating as steamed greens throughout the season. Harvest the bulbs (swollen stems) when they reach about 1 1/2 inches in diameter. If they get biffer they will be tough and stringy, with a hot flavor.

http://breachrepairers.webs.com 97
Kohlrabi should be harvested after the bulb reaches 2 or 3 inches diameter. If left too long it will be fibrous. Cut it a little above ground level. The leaves as well as the bulb are edible. Tastes a bit like turnip.
Leeks
resemble the onion in its growth and use.. Instead of a bulb, leeks produce a thick, fleshy shaft like a large green onion. The flavor is milder than an onion's. Plant seeds indoors at least 10 weeks before the average last spring frost. When the young plants are about the thickness of a pencil, transplant them to the garden.
Set plants about 4-6 inches apart, depending on the variety. To encourage long, thin stems, leeks are planted closer together; for thicker stems, set them farther apart. Use the end of a rake handle to make a hole that's just deep enough to leave only the top inch of the transplant exposed.
Setting it deep will aid in blanching the stem. Set the transplant into the hole and fill it loosely with soil. Soil should be hilled around leeks as they grow to blanch them.
Make sure the plants get at least 1 ½ inches of water a week; otherwise the stems will be tough
When you harvest your leeks, don't use too much force. You can ease the plants out best with a twisting motion. Before you pull them you it helps to trim the underground roots to make it easier to pull them up.
Begin harvesting leeks just as soon as they're big enough to use. Under favorable conditions they grow to 1 1/2 inches or more in diameter, with white parts 6 to 8 inches long Young, tender ones are good raw; Leeks can be harvested and used at any size. Smaller thinnings make excellent additions to salads. Pencil-thin leeks can be steamed and served like asparagus. Leeks need to be washed thoroughly, since dirt gets inside them.
Seal your leeks in plastic to store them in the fridge for a week. In the cold areas where the ground freezes leeks may keep all winter in the ground covered with a hay mulch after the first frost.
Lettuce
is one of the easiest salad veggies to grow. It tolerates a light frost, but high summer temperatures cause it to bolt (go to seed) and develop a bitter flavor. Slow-bolting or heat-resistant varieties are available.
There are four types of lettuce: crisphead, butterhead or bibb, romaine or cos, and leaf lettuce.
Plant lettuce seed thinly in a shallow row, and cover with % inch of soil. For early and late planting, cos and head lettuce is best if started as transplants and spaced 12 to 18 inches apart in the row..
It is best to plant lettuce on the shady side of tall-growing crops such as sweet corn, staked tomatoes etc, or in other cool areas of the garden.
Plant some lettuce seed every 3 weeks until the daytime temperatures get above 70 degrees consistently. Plant slow bolting lettuce beginning in the early fall until 3 weeks before 1st frost.
http://breachrepairers.webs.com 98
Cover it with crop cover fabric before the first frost and you should have lettuce until a hard freeze or later.
Leaf and bibb lettuce will do well in a cool greenhouse or hotbed all winter. Just don't let it freeze.
"Tipburn" is a problem where the tips or edges of the lettuce leaves turn brown during a dry, hot period that has followed moist weather. Plants grown in shady areas are less affected than those grown in full sun and dry areas.
In a row of lettuce that is planted too thickly, the leaves will rot in the field, after excess rain or watering. If you use drip irrigation this is usually not a problem.
If leaf lettuce is planted where grass is a problem, the grass will grow up with the lettuce and make it difficult to harvest.
Harvest leaf lettuce as soon as the plants reach a suitable size. Thinning the rows prevents crowding, so you may wish to harvest every other plant or the very largest plants first. Bibb lettuce is mature when leaves form a loose head. Cos or romaine is ready to use when leaves have elongated and overlapped to form a fairly tight head about 4 inches wide at the base and 6 to 8 inches tall.
Crisphead lettuce
is mature when leaves overlap to form a head. Crisphead lettuce will keep about two weeks in the crisper drawer of the refrigerator. Leaf and bibb lettuce will store up to four weeks if the leaves are dry when bagged.
Always harvest lettuce when dry. Do not wash it; place in a plastic bag, and store in fridge.
Mustard Greens
Mustard greens are easy to grow, and they mature quickly but they tend to bolt or go to seed quickly in hot weather.
Plant seeds 1/4 inch deep in the row. Plant from 6 weeks before last frost until last spring frost, for the spring crop and from late July to early September as a fall crop. Planting every 3 weeks during these periods will assure a continuous supply. Seed may be broadcast or sown in rows and thinned to 3 inches apart.
Harvest mustard leaves as they become large enough to use. Greens mature quickly and do not store well, so several plantings may be desired. Mustard greens can be stored in plastic bags in the refrigerator for one to two weeks.
Okra
Okra likes warm weather. Varieties differ in plant size, pod type and color, and number of spines
Plant 2 Okra seeds 18 inches apart in rows 48 inches apart. Thin to one plant after the plants are 6 inches tall.
http://breachrepairers.webs.com 99
Harvest Break off Okra pods when they are about 2 to 4 inches long. Be faithful in picking fruit every two to three days until frost. Pods get long and tough very quickly. The longer you wait, the harder to pick. And be sure to wear long sleeves when you pick, or you will itch.
Store pods in the refrigerator for a week. Don't let them get wet. To preserve them, the stems must be removed without cutting into the pod, then they may be frozen raw.
Onions
Try to purchase onion sets that are small, if you are using them for bulb onions. There are many different kinds of onions: bulb onions, green onion, Egyptian onions, scallions, to name a few.
Actually, any onion type can be eaten as a green onion. Scallions or bunching onions do not form bulbs. They are only useful for green onions.
Here are some bulb onion varieties: these are daylight sensitive long day onions need more hours of daylight than short day onions. Short day onions do well in the south, long day do well in the north. Don't use long day onions in the south.
Southport Red Globe, harvest at 110 days, long-day, sweet, red flesh. Yellow Sweet Spanish, harvest at 110 days, long-day, white flesh. Bermuda, harvest at 185 days, short-day, is large, white, mild Yellow Granex, (Vidalia), harvest at 120 days, short-day, large, white. Walla Walla Sweet, harvest at 56 days, long day, cold hardy, sweet white. Redwing, harvest at 59 days, red.
For green or bunching onions, use sets, seeds or transplants for spring planting. For fall planting, use Egyptian or perennial tree and the yellow multiplier or potato onion sets.
Onions that keep well in storage are globe types. Globe varieties are yellow, red and white. They should be grown from seeds.
Plant onion sets 1 to 2 inches apart and 1 to 2 inches deep in the row 4 weeks before last frost. Sets more than 7/8 inch in diameter will most likely produce seed stalks. Divide the onion sets into two sizes before planting.
Large sets bigger than a dime are best used for green onions. The smaller sets produce the best bulbs for large, dry onions. Plant the larger sets on one end of the row and the smaller sets on the other end for larger onions.
When the bulbs gain some size, Thin them to 4-inches apart. Pull every other onion and use them as green onions. Exposure to very cold temperatures may cause seed stalks to develop. If you see a seed stalk, break it off immediately.
Egyptian tree or multiplier onions may be planted just about anytime & harvested after the leaves die down, sets should be spaced 4 inches apart.

http://breachrepairers.webs.com 100
Harvest green onions whenever the tops are 6 inches high. Bulb onions should be harvested when about two-thirds of the tops have fallen over. Handle the onions carefully. Don't let them get sunburned. Dry them in a warm dry shady place. If space is available, onions may be placed inside a building for curing. Tops may be left on or cut off. When curing inside, spread onions out on a table or hung up to dry in small bunches.
Before you store them, cut off all but 1 inch of tops. Curing usually takes three to four weeks. Soft and thick-necked bulbs should not be stored with other onions. Store them with good ventilation, temperatures of 35° to 40°F, dry. Don't let them freeze.
Parsnips
grow well in cool weather, but I have good success planting them in early July They usually take 90 to 120 days to mature. The quality, sweetness is greatly improved by storing at 33-40° F temperatures, which increases the sugar content. They keep well through the winter.
Plant Parsnip seed soon after you buy it, because it loses vitality quickly. Sow a few radish seed in the row with the parsnips,. They are slow to germinate.
Plant the seed 1/2 inch deep from June 15 to July with seeds 2 inches apart in the row.
Dig the parsnips after a hard freeze. Wash & Store in a root cellar or in an outdoor pit. Or leave them in the ground and mulch heavily after the soil temp is 40° F. Parsnips will be damaged if frozen after harvest. When you want to dig some, the mulch can be pulled aside.
Peas
come in several varieties. Snow or sugar peas and snap peas, unlike English peas, are usually eaten, pod and all. Seeds may be shelled and eaten like regular peas if pods develop too fast. English peas must be shelled before eating.
Peas are a cool-season crop and should be planted in early spring or late summer. Peas should be coated with the proper Rhizobium inoculant, which you can get from the seed company or Farmer's Co-op,
The inoculant is a nitrogen fixing bacteria which enables the plants to use nitrogen in the atmosphere.
Plant 1 seed every inch in the row. Cover with ¾ - 1 inch of soil, in the spring as soon as soil is workable. (February in Tennessee) Early. They will tolerate light freezes. A few successive plantings can be made at one- to two-week intervals. A single planting of early-, midseason- and late-maturing varieties will also extend the supply.
Plant a fall crop of snow or snap peas around the first week of August. Peas must have a consistent supply of water or they will not be productive.
Dwarf varieties of peas grow about 1 ft to 18 inches high. These will not need support, but can be planted in twin rows 6" apart. They will support each other. The tall varieties (over 2 ft) must be supported by a fence or trellis.
http://breachrepairers.webs.com 101
It will take about 2-3 weeks from the time they blossom till you can harvest the peas.
Harvest English peas when the pods are % full for tender peas or you can let them go a little longer. They will lose quality rather quickly if left too long. Do not shell English peas until ready to use them. They will stay fresh longer if left in the pods until they are to be cooked. They will keep up to a week in plastic bags in the refrigerator. Snow peas, sugar peas, snap peas must be picked just before the peas begin to develop in the pod.
Preserve peas ASAP after picking. Blanch them briefly and freeze. Some varieties are superior to others for freezing. At 0° F
Peppers
Pepper types include bell or green, banana, pimento, cherry, cayenne or red or green chili peppers, serrano, yellow wax, habanero, and other hot types. The culture of all peppers is the same.
Plant pepper seed indoors eight to ten weeks before the last spring frost.. Set plants after all danger of frost has past. Set plants 14 to 18 inches apart within the row.
Harvest peppers when they are firm. Most peppers take 70 to 90 days to become mature green. You may pick them a smaller size if you prefer, .If you desire peppers with color it will take a little longer. If red fruits are desired, allow the green fruit to remain on the plant until the red color develops. Cut peppers from the plant to prevent injuring the plant and remaining fruit. Pepper stems and branches are fragile. Leave a short piece of stem on the fruit to allow the pepper to store longer. Store peppers in the refrigerator in plastic bags for not more than 3 weeks. Pick all the before frost or cover the plants with crop cover fabric. When you pick hot peppers, keep hands away from your face. Ouch!
Peppers may be frozen raw. Remove the seeds, then Freeze them whole or cut up. They may also be dried. Peppers will continue to ripen after being picked. Store peppers at room temperature if you wish them to ripen.
Potatoes should be planted in a different spot every year. Do not use the same ground for potatoes until after 3 years at least.
Purchase seed from a seed supplier. Don't plant potatoes from the grocery store, mainly because, the potatoes may have some chemical retardant to prevent sprouting and the possibility they carry potato diseases that you don't want in your soil. You can save your own seed potatoes, if there is no disease in them. You must have a place to store them at 36-40°F.
Each seed piece must have at least two eyes.. The fewer cut surfaces the better, making more energy available for growth. Any jagged or torn surfaces will invite seed-piece rot. Seed can be freshly cut and planted into soil. If the seed is cut more than a day before planting, store it for a day or two at 50 to 55 degrees F and over 90 percent humidity. This will help the cut surfaces to heal. The healed seed pieces can then be held at low temperatures until planting.
http://breachrepairers.webs.com 102
Store seed at 38 degrees F, and keep cool up to two weeks before planting. Warm the seed pieces to room temperature the last two weeks before planting. This will start the potato sprouting. If seed pieces have sprouts over one inch long, keep them cool until planting time.
"Pipping" or "green sprouting" can be used to encourage early production. You may do that by spreading seed potatoes out in a single layer in an area exposed to light. This can be done on a floor indoors or out, as long as the temperature doesn't drop below freezing. The ideal condition to green sprout potatoes is 70 degrees F with high humidity. A barn or garage in early spring will work. Turn the potatoes over to encourage uniform sprouts. Green sprouting will produce short stubby (less than 1 inch) sprouts that emerge quickly and set tubers early.
Plant potatoes in the early spring as soon as the soil temperature reaches 40° F. Before planting them though, you must cut the potatoes into pieces, each piece having 2 or 3 eyes.
Dig a trench 4- 6 inches deep and drop the pieces in the trench 10 to 12 inches apart. Cover them and walk on the row to pack it down. You should see plants in about 2 weeks. To plant my potatoes I stick a shovel in the ground, push it forward, drop the potato behind the shovel, then pull out the shovel, holding my foot over the potato to be sure it is buried 4 inches deep.
The potato crop will form between the seed piece and the soil surface, so when the plant gets 8 inches tall pull 2 inches of soil up around the plant then again in a week. The developing potatoes will turn green if the sunlight hits them.
About 2 weeks after your potatoes emerge side dress them with a balanced fertilizer. See fertilizer chart on page.
It is good to plant 2 or 3 varieties of potatoes to assure getting a good crop. Plant an early maturing variety and a late maturing variety in Feb or March then a late potato again July 15. In the south you can plant a late maturing potato as late as August 1 for potatoes to store through the winter.
Fertilizing the soil for potatoes
For best results. Potatoes like a soil pH of 5.2 to 6.0, to discourage the growth of bacteria that cause scab diseases. Potatoes require a large amount of soil nutrients. The ground, ideally for potatoes should be fertilized by adding bean or seed meal and growing a cover crop a year before planting.
Add about 1 pound of a complete organic fertilizer with a high phosphate content (twice as much phosphorus as nitrogen) for each 15 feet of row when you plant. Work this into the bottom of the furrow and mix with soil before putting down the seed piece. If your fertilizer is say, 5-3-3, you will need to add extra phosphorus with it, such as soft rock phosphate. Or you can spread the granular fertilizer over the top after you finish planting. See Organic fertilizer guide on page
Harvest potatoes no earlier than 2 weeks after blossoms have fallen, or before maturity if you want small new potatoes. For mature potatoes, wait and harvest after vines have been dead for two weeks so potato skins will have time to toughen.
Remove the withered vines before digging. Tubers should be dug with garden fork, shovel or plow when the ground is thoroughly dry. Pack them unwashed in baskets, boxes or open mesh bags.

http://breachrepairers.webs.com 103
Sprouting of potatoes indicates they were stored in too warm a place. Sweet-tasting potatoes indicate that they were stored in too cool a place. Late maturing potatoes will store better than early ones
If tubers in the garden are set shallow and are turning green, they should be hilled (covered with soil) for two to three weeks. Most will be normal when dug. Dig carefully to avoid bruising and let tubers surface dry before storing. Potatoes need to be cured for ten to 14 days at 50° to 55°F in the dark with high relative humidity before storing. They will turn green and become bitter if exposed to light.
After digging potatoes leave them on the ground for not more than an hour or so to dry. Then move them to a shaded area to prevent sunburn. Be careful to avoid bruising the tuber. Dig late potato crop after a frost but before the ground freezes.
Storage potatoes can be stored for four to six months. The most important factor is storage is the temperature, 45° F being ideal. If you want to save them for seed lower the temperature to 35° F.
Sprouting in storage is a serious problem at higher temperatures. Other important factors include maintenance of humidity, proper ventilation, and having tubers which are free of disease when placed in storage. Clean your storage room thoroughly before storing potatoes. Potatoes should be stored off the floor at about 50% moisture in the dark.
Pumpkins should only be grown if a great deal of space is available. Many people plant pumpkins among corn. If you do that though, wait until the com gets 4 ft. tall Pumpkins are one of the few vegetables which thrive under partial shade, and sweet corn will be harvested before they require a great deal of room. For extra large pumpkins, remove all but one or two fruits from a vine.
Plant pumpkins when the average temperature is 70 or above. Dig a 10 inch diameter hole with your hoe or shovel. Place the dirt beside the hole. In the hole put a shovel full of composted manure or other composted high nitrogen soil amendment. Add a 2 or 3 hands full of pelletized limestone, a handful of kelp meal, and a handful of rock phosphate or bone meal. Pull the dirt pie over the hole to make 6 inch high mound of soil. Place 4-6 seeds in each hill of soil Space hills 8 to 12 feet apart in each direction.
Harvest your pumpkins whenever they are a deep, solid color, the stem has turned a brown color, and the pumpkin skin is too hard to poke your thumb nail through, but before they are injured by hard frost. When cutting pumpkins from the vine, leave a portion of the stem attached. Pumpkins keep best in a well-ventilated place where the temperature is 55° to 60° F.
There are a few pumpkin varieties that have hulless seeds. These are excellent for those who want the nutrition found in pumpkin seeds. Lady Godiva, Triple treat, streaker, eat all, Sweetnut and Hullless are all naked varieties. If you have room, you really should try some.
The best way to preserve pumpkin and squash seeds is to scrape the pulp out of the pumpkin, separate the seed from the pulp; rinse the seed, then place it on a screen to dry in a hot shady place, with low humidity, or dry them in the oven at 110 F.
http://breachrepairers.webs.com 104
Radishes are easy and quick to grow. Cool weather is essential for highest radish quality They will become "hot" and woody in hot weather. The small, round varieties are ready to eat more quickly than long radishes.
Plant radish seed 1/4 inch deep anytime after soil can be worked. Radishes should be thinned so there is a 1/2 inch space between plants. Make several small plantings at seven- to ten-day intervals since radishes are in prime condition for only a few days. Plant in early spring or as a fall crop around the first of August until a week before frost.
Harvest radishes when roots are 1/2 to 1 inch in diameter. Radishes remain in edible condition for only a short time before they become pithy and hot. Wash roots, trim both tap root and tops and store in plastic bags in refrigerator. They will keep up to a month.
Rhubarb is started by planting pieces the crown of a rhubarb root. You may purchase these crowns commercially or dig some from a neighbor's plants.. If you have an old plant, cut through the crown between the buds, leave a large a piece of root with each large bud. To PLANT Rhubarb Dig a 10 inch diameter hole 5 inches deep with your hoe or shovel. The holes should be 3 feet apart in the row. Place the dirt beside the hole.
In the hole put a shovel full of composted manure or other composted high nitrogen soil amendment. Add a 2 or 3 hands full of pelletized limestone, a handful of kelp meal, And a handful of Pro-grow 5-3-4.put some soil on the nutrients then place the crown. Cover with soil and firm soil down. Plant crown at least 3 inches deep in early spring. If you can't plant the crown for a week or longer, store it in a cool, dark place. You can divide the plants and make new plantings when plants are about four years old, or whenever the leaves and stems are getting smaller because of crowding.
Each fall, Mulch with a spade full of composted manure, then, soon after the ground is frozen, cover the rows with straw or other mulch material. Rake the mulch off in early spring.
Harvest Rhubarb for a short period the year after planting. You may harvest for 8 weeks in the 3rd season. Pull stalks from the base to harvest.. If seed stalks develop, cut them from the base of the plant as soon as they appear. Flowering will sap the strength of the plant. Do not allow it to flower.
Southern Peas Crowder peas, Blackeye peas, Purple hull peas, field peas, are all Southern peas. They are not peas, but beans. They like hot weather.
Plant Southern peas 2 to 3 inches apart in the row, when soil temperature is at least 65° F. Cover with 14 to 1 inch of soil. Harvest Southern peas taste best when they are just approaching maturity. When they are ready to pick, the pod will open easily. The pods will look dull and feel leathery. The peas will have a slight green color. The peas can be picked anytime after they reach this stage. Immature peas are darker green and have a bitter taste. They can be used fresh, canned, frozen or as dry shelled beans.
Both seeds and pods are eaten in the green, immature stage like snap beans, or they can be left to further mature the seed. Shell them before pods turn yellow for fresh beans. Use or freeze them soon after shelling. They will not keep long. For dry use, let pods dry & turn a brown and then shell.
http://breachrepairers.webs.com 105
Spinach is a quick-maturing, cool-season crop. It can be grown early in spring and from late fall into winter. Hot summer days cause it to bolt or go to seed. Some varieties will mature as early as 20 to 40 days after sowing under favorable weather conditions. Spinach is a good crop to grow in bedding flats in your sunny window, in the greenhouse or hotbed.
Plant spinach seeds 2 inches apart in the row 1/2 inch deep 2 or 3 weeks before the last spring frost. Plant again 2 weeks later. You can make successive plantings every 2 weeks till the night time temperature averages 65° F. For the fall crop plant 6 to 8 weeks before the first frost. Thin plants to stand 4 inches apart in the row. You may eat the thinnings.
Harvest the whole plant by cutting stem at soil surface. Or pick individual leaves if you want plant to get bigger. Making successive plantings may be better than removing only outer leaves, Spinach will keep in the fridge for 4 or 5 days. To Freeze it blanch it briefly.
Hot weather spinach includes New Zealand Spinach which is not really, but used as spinach. It will produce leaves all summer. Pick only the individual leaves.
MALABAR is not actually spinach, but a delicious substitute that grows well in hot weather. Thick, dark-green leaves provide greens throughout the summer: heat tolerant and vigorous. The attractive plants have a red stem and grow as a vine that will reach 6 feet, so it must be trellised.
Squash is divided into two types— summer and winter. Summer squash are usually bush-type plants, but you may use some summer squash as winter keepers and some winter squash as summer squash.. Summer squash are usually eaten in immature stages, when they are small, with a soft skin. Summer squash usually produce their first fruits in about 1 1/2 to 2 months after planting and will continue to bear until they get diseased or the bugs damage them usually about 6 weeks.
Winter squash varieties favorites include acorn & butternut, which are two of the best flavored in my opinion. Winter varieties require more room to grow than summer types. There are bush types available now though.
Plant summer squash after the danger of frost is past, in hills 3 feet apart with three seeds to a hill. Winter squash that make vines need more room so plant them 6 feet apart,
For early fruit, plant squash seeds in peat pots in the greenhouse or hotbed and move them to the garden when plants have 4 leaves, after soil has warmed to 60° F. Squashes are warm-season plants and do not do well until soil and air temperatures are above 60° F. Soil pH can be between 5.5 and 6.8. Black plastic can be put on soil, and seed or transplants can be planted through a slit in the plastic. Seed should be covered 1 inch deep with soil.
Storage: Summer squash will store up to a week if kept in a perforated plastic bag in the refrigerator. Take care in harvesting not to bruise or injure fruits.
Harvest winter squash for storage when the skin is hard and cannot be penetrated by the thumbnail and the stems have turned brown and dry. Do not let them be exposed to frost, which will make them spoil in storage. Bring them in when night temperatures are 50° F, but make sure
http://breachrepairers.webs.com 106
the stems are brown or they will spoil. Cut the stem with a pair of pruning shears. Leave a portion of stem and handle carefully to avoid bruising. Cure in a warm room 75° F to 85° with good air movement. Examine frequently for decay. The squash should be sound with no blemishes & should be stored single layer in a clean area with a temperature of around 55°F and with 60% relative humidity. Acorn squash will not keep more than 6 weeks.
Sunflower
may be sown outdoors in the garden.. Or, if you want to start them a little earlier, they can be planted in a 4 inch pot in the greenhouse 2 or 3 weeks before soil temp reaches 60 F. After you plant the seed you may want to cover them with a screen until they sprout, as the birds and animals love to dig the seeds out. If you plant sunflowers indoors, use individual peat pots.
The giant sunflowers should be planted 1 inch deep 1 or 2 seed every 18 inches in rows 3- 4 feet apart. Thin plants to 1 every 18" after they sprout. You may want to plant them by a fence, so you can tie them up if they lean or fall.
The miniature sunflower plants do not make suitable seed for eating, so always plant the large variety.
Miniature sunflowers make great borders or edging plants in gardens. Fertilize—Work some manure or Pro-grow 5-3-4 into the soil before you plant sunflower.
When the flower buds begin to form work into the soil around the plant a cup of compost or manure; or % cup of a complete balance fertilizer like Pro-Grow 5-3-4
When the petals fall from the blossom, wrap the head in nylon hose of other netting to keep birds from eating the seed.
Days to Maturity are usually 70 to 100 or so. Harvest heads after the petals have fallen and the seed heads start to turn brown. Cut the stem 6 or 8 inches below the head and hang heads in an airy place to dry. You can pull out a seed and open it to see if it is full before cutting the stem if you are not sure. Do not stack them in a box, as mold can develop during the drying process. As soon as the heads have thoroughly dried, extract the seeds by rubbing two flower heads together. They should come off of the flower head fairly easily.
Insects and Pests: The birds and squirrels are the primary invaders for your Sunflower crop. Fortunately, most insects are not a problem. Occasionally, ants enjoy the nectar from the flower. They are no real threat to the seeds.
Sweet potatoes
hate wet roots and must be planted on a ridge of soil at least 10 inches high. After making your ridge, punch a hole with a hoe handle every 10 inches in the center of the ridge. Pour 2 cups of water in each hole. Grab the slip by the root end and push it into the hole, drawing the soil around it and packing the soil around the Slip. A starter solution is recommended when plants are set. Add ½
http://breachrepairers.webs.com 107
cup of fish emulsion fertilizer to 5 gallons of water and use about 2 cup of this solution or 2 cups of compost tea per plant
When the soil temperature in the garden reaches 60 °F and the slips are at least 10 inches tall Place you hand on the sand between the slips to hold the potato down while pulling the slips out with roots connected. Set the slips in a bucket with roots in water. Every year use a different area to grow your slips and potatoes.
A starter solution is recommended when plants are set. Add 1 cup of fish emulsion fertilizer to 5 gallons of water and use about 1 cup of this solution or 2 cups of compost tea per plant.
Harvest Sweet potatoes any time they reach a usable size. Sweet potatoes continue to grow until vines are killed by frost. However, do not let the frost touch the plants, as the roots will be affected. Cut the vines before frost. You may harvest the crop when the greatest number of 6- to 8-ounce potatoes are found in the hill. Sample digging will provide this information.. Plow or spade one row at a time and pick up potatoes. Injured potatoes will not keep, so use them soon.
Curing Sweet potatoes: Stack crates a few inches off the floor and 12 inches from the walls to allow for adequate ventilation. To cure them Requires moist air at 90°F for about ten days. A space heater in a small closed room is sufficient. But you should place a metal bucket of water in front of the heater or on top of the stove. And maybe pour a little water on the potatoes once a day. Extend the curing period to two or three weeks if the temperature is under 75°F. When they are cured some sprouts may be seen on the potatoes. Then store the potatoes to a relatively warm place.
Keep potatoes in a place as near 55°F as possible and not too dry I've heard that the old timers stored them under the bed.
Swiss Chard
can be grown either for greens or its large, fleshy leaf stalks. A hardy plant, Swiss chard will withstand hot weather from spring to late fall better than most greens.
Plant in the garden after danger of frost is past, Sow seeds ½ inch deep 2 seeds every 10 inches in the row. They will have to be thinned as 1 seed will sprout several plants.
Harvest can be made from the same plants through the growing season. Outer leaves may be removed near ground level with a sharp knife, leaving smaller leaves near the center of the plant. It is important not to cut into the growing point or bud in the center of the plant so new leaves can continue to develop.
Tomatoes
grow under a wide range of conditions with minimum effort. They require relatively little space for large production. Each tomato plant, if properly cared for, can be expected to yield 10 to 15 pounds of fruit for determinate types to up to 60 Lb for indeterminate tomatoes.
The tomato is a warm-season plant and should not be set outside until danger of frost is past, unless it is protected by a cover.
http://breachrepairers.webs.com 108
Growth habits vary, Determinate plants will grow as a bush and will stop growing when they reach a certain point. They may grow with little support but indeterminate plants must have a trellis or other tall support as they will grow to 6 feet or more. These plants produce fruit over a long period of time. If the disease does not damage them.
Purchasing plants. Some precautions you need to be aware of if purchasing plants. Purchase early if possible. Examine the plants carefully. Select plants that are a healthy dark green. If possible, purchase smaller plants in appropriately sized pots. They will actually grow
more quickly and remain more healthy than large plants in.a small pot. Look at the leaves. Do they have spots? They may carry disease to your garden. Do they have dry spots on the stem?. It may be disease or just a soil deficiency that may be
corrected. Remember though, too much stress for the plant when young will reduce the harvest.
Ideally, Select stocky transplants about 6 to 10 inches tall.
Plant tomato transplants in the garden a little deeper than the pot in which they were grown. Pour fish emulsion Starter fertilizer in the hole before setting the plant. To ensure good air circulation, space plants at least 24 inches apart in rows 3 % feet apart.
Fertilize: Tomato plants will benefit from additional fertilizer after fruit has set. When first fruits reach golf ball size, scatter compost or granular plant food 5-3-4 in a 6- to 10-inch circle around each plant. Water thoroughly and repeat about every two weeks.
Stake or trellis: Trellising will make it easier to care for the plants and will prevent fruit rots. Drive stakes in soil about 4 to 6 inches from plant, 10 inches deep, soon after transplants are a foot tall. Use wooden stakes 5 feet long and 2 inches wide. Attach heavy twine at 10-inch intervals to stakes. As tomatoes grow, pull them up alongside stakes and tie loosely. The vines may be more productive If they are supported by a fence or trellis.
Pruning: If tomatoes are staked, they will be easier to manage if pruned to one or two main stems. At the junction of each leaf and first main stem, a new shoot will develop. If plants are trained to two stems, choose one of these shoots, for your second main stem. Once each week, remove all other shoots to hold the plant to these two stems. Remove shoots by pinching them off with your fingers.
You want to start pruning tomato plants a when they get to be about 1 - 2 feet tall. Any smaller than this, and the plant may not recover from the shock of being pruned.
The main advantages to pruning tomatoes is to promote better air circulation. However, there are also disadvantages. Prune off too much and the fruits may get sunburn. You may have less fruit. It is your choice.
If you use tomato cages, put them on before plants get over 1 ft tall. Otherwise, breakage often occurs when you try to train stems which have grown too long. One material suggested for cage use is concrete reinforcing wire which gives good support and allows you to reach through to pick tomatoes. This wire will rust, so paint them with rust-resistant paint.
http://breachrepairers.webs.com 109
Galvanized fence wire will last many seasons without painting. Be sure to get large enough mesh so your hand will fit through for harvesting. Galvanized wire comes either welded or woven. Since welded joints occasionally break, woven is the best type to use.
Turnips
are an easily grown cool-season crop which can be planted in early spring or late summer for winter harvest. Some varieties are grown only for their leaves, some for mois. If you have perfectly balanced soil, the greens are mouth watering, and the roots are sweet and delicious. Plant spring turnip seed about a month before the last spring frost, or as soon as ground can be worked in spring. For a late fall turnip crop, seed should be sown 2 months before the first freeze of fall.. Most people broadcast the see over a chosen area, however, scattering seed thinly Vi inch deep in rows makes a more manageable crop. When plants have become established, thin them to 3 to inches apart in the row. Harvest turnips when they reach 2 to 3 inches in diameter. The larger a turnip gets the more woody it is. If they are protected from freezing by a straw mulch, turnips can be left in the ground until the night temperature gets below 15 F. They may also be kept in the refrigerator for several months.
http://breachrepairers.webs.com 110
Mulch Saves Work & Water Mulching is an excellent way to conserve moisture, prevent weed growth, keep soil cool or warm the soil, depending on the type of mulch you use. It will also reduce plant diseases.
An organic mulch will increase soil biotic activity and increase soil fertility-provide nutrients Mulch will reduce erosion by breaking the impact of rain and wind.
Mulch placed over the soil after sidedressing makes it easier for the plants to use the available nutrients.
Vegetables remain cleaner in mulched gardens because they have less contact with the soil.
You may use an organic mulch—materials such as straw, hay, peat moss, leaves. Etc. Or you may use plastic/polyethylene mulch.
Plastic Mulch Plastic mulch materials are usually 3 or 4 feet wide and can be black, white, brown or clear polyethylene film. Darker plastics are recommended because they will not allow weed growth; Clear plastic materials act as a greenhouse, under which weeds flourish. White plastic is used for summer planting on some plants, because, reflecting the light, it has a cooling effect upon the soil.
Colored plastics mulches tend to warm the soil by about 1 to 5° F. This extra warmth will make plants such as tomatoes, grow faster, especially in the spring and will encourage vigorous growth of vine crops, such as melons, squash, etc. in the summer.
Plastic mulch will not allow water to pass through, so it is best to lay drip tape under the plastic, for consistent watering of plants.
You can use instead of plastic a weed barrier mulch. Water will freely pass through weed barrier, but it costs about 3 times as much as plastic. Weed barrier can be held down by wire staples
The only time to apply plastic mulch is on a calm day. This is how you do it. Slide a tool handle through the roll of polyethylene. Place the roll where the row starts. With a hoe make furrows about 4 inches deep on both sides of the row. Roll out the plastic, covering the edges with soil as you unroll. Cut plastic off at the end of the row & place the edge into a furrow across the row. Cutting holes in the plastic using a bulb planter or knife.
At season's end you will have to remove plastic and dispose of it.
Organic Mulches
Organic mulches are such materials as hay or straw. Black and white newspaper, cardboard, etc. Do not use any material that come from an area treated with herbicides. These mulches will deter weeds if spread over the garden at least 4 inches deep. You may first lay about six sheets of
http://breachrepairers.webs.com 111
newspaper on the soil, then cover the paper with organic matter. The newspaper is the mulch, and the hay or straw holds the paper in place and gives a better appearance.
Soils will be cool for a longer period longer in the spring if you use organic mulches, because the sun does not reach the soil. For the garden to grow quickly in the spring, wait to place the mu\ch after the soil warms to 70 °F). Use only as mulch material that is weed- and seed-free.
Most organic mulches will begin to break down by fall. Then they can be tilled in fairly easily, adding valuable organic matter to the soil.
Using Mulch Mulching is simply covering the soil surface with a material that smothers weeds and delays the evaporation of moisture from the soil. Mulches include dead plant material such as pine needles or bark chips, but also anything that keeps weeds down and moisture in can be considered a mulch (including old carpeting & Low-growing non-competitive plants, which are known as undersown crops or living mulch.).
Good Reasons for Mulching The right mulch can just about eliminate the need to pull weeds. Only the most tenacious perennials poke through, such as yellow nutsedge or johnsongrass. Mulches also prevent weeds seeds from reaching the soil. Usually, they fall on the mulch, where they sprout and weakly grow, or die. By covering the soil surface, mulches reduce the amount of sunlight and wind that reaches the soil, so water evaporates from the soil more slowly. And the soil stays cooler, so the roots stay cooler (a big help in the heat of the summer).
A mulch derived from plants (such as grass clippings, hay, straw, etc.) can also add organic matter to the soil, improving its structure and fertility and encouraging a healthy population of microorganisms. Mulches may make a garden more attractive, and when it rains, a mulch may keep soil from splashing onto the leaves and fruit.
A Few Cautions Mulches do have some drawbacks. For one thing, insects such as slugs and sowbugs love the conditions mulch provides. If the insects are abundant enough to cause serious damage, you may need to remove the mulch for a while.
Choosing and Using Mulches Whatever material you choose, you want it deep enough to control weeds. Start by putting a 3 inch mulch around flowers and vegetables and a 4-6 inch mulch around trees and shrubs. If weeds pop through, add another inch. As the mulch breaks down, you can add more.
One considerations is how easy the mulch is to find and how much it costs. Some mulches, such as newspaper and grass clippings, are easy to find and inexpensive. It is better if you can provide a mulch without spending any cash.
http://breachrepairers.webs.com 112
Here Are Some Mulching Materials Wood chips are small pieces of wood about an inch in diameter. They tie up soil nutrients as they work to digest the chips. Bags labeled "wood chips" may contain chemicals that harm plants. Freshly chipped wood needs to sit for a few months before you use it. Chips are not a good mulch for vegetables.
Shredded Bark is not practical for veggies.
Compost is a very fertile mulch. It will build the soil quickly, but will not kill weeds or prevent them from growing. If the compost is only partially decomposed it may be better for controlling weeds, but will mainly just hold in water and slow down the growth of your veggies. You can speed the growth by adding a little bloodmeal or other nitrogen source. Apply a 3 inch layer.
Hay and Straw are a good loose mulch, Hay may be high in nitrogen, It may not tie up soil nutrients. Hay many times contains weed seed. Straw is usually free of weed seed. When using straw add a little bloodmeal or other nitrogen source to make up for the microbial activity that slows down plant growth.. Some weeds may grow through it. Apply hay and straw in a 6 inch layer.
Shredded leaves make a lightweight, mulch. You may want to shred the leaves with your lawn mower, Rake the leaves into a long pile, not too high, and run the mower over it, Apply a 6 inch layer of leaves
Grass clippings add lots of organic matter to the soil, they have a good balance of carbon and nitrogen so they probably won't cause active soil bacteria tie up soil nitrogen. Green grass clippings get moldy though, and usually stink. Grass that's gone to seed or contains weed seeds will make a weed problem in the garden. If you're applying fresh clippings, place (3 inches). Use 4 inches of dried clippings.
Sawdust adds organic matter, helps lower the pH of alkaline soils, and repels some insects. But it will tie up soil nutrients for a while, so you must add extra nitrogen fertilizer or manure under it. Apply 3 inches of sawdust.
It ii is always best to compost sawdust before adding it as a mulch on veggies. Use a 3 inch layer of composted and turn it under at the end of the season.
Newspaper sheets make a good mulch that weeds can't get through very well, but water will go through it. Newspaper should be 10 sheets thick. Add nitrogen after you turn it under in the fall.
Composting One method of composting is vermiculture. That is using red worms in your compost pile. To do this you must get accurate directions from the worm suppliers. It is a fairly easy and profitable method of producing compost. Call me if you need help. ((731)925-2253
Compost is vegetable material, (grass clippings, leaves, peelings from the kitchen, sawdust, animal manure, shredded office paper, etc.), that has been allowed to decompose until it becomes humus, a crumbly black substance. You can use it as a fertilizer, mulch, or soil conditioner. The most
http://breachrepairers.webs.com 113
important purpose of compost is to add organic matter to the soil. This humus makes the soil easier to work and better able to hold the right amount of moisture and nutrients.
Composting requires layering materials, in a pile or bin. The easiest form of composting is to just heap materials into a pile and let the pile decompose at its own pace (this method is called cold composting and takes a year or two, depending on conditions. If you keep turning the compost pile with a pitchfork every week or so, and keep it moist, You may have finished compost in a few months.
Hot composting is done by layering in 6 inch layers (brown) dead plant materials and (green) live plant materials the moisture and oxygen make microorganisms so active that they produce heat. The temperatures in the pile should reach 160 °F, hot enough to kill weed seeds & most disease germs.
To Make A Compost Pile You spread a 6" layer of coarse dead plant materials which are high in carbon, (leaves, straw, sawdust, and shredded paper, etc.). Then you place a 6" layer of materials high in nitrogen, such as fresh grass clippings, alfalfa hay, and vegetable scraps.
You can sprinkle the pile with a cup of bloodmeal to each 2 ft length of pile, (which breaks down fairly quickly) or 3 cups of manure, which you can buy at a garden center. Then sprinkle Yz cup of agricultural lime over the pile, for each 2 feet a few hands full of kelp powder (for trace minerals) then repeat the process until the pile is at least 4 or 5 feet high. Set an oscillating sprinkler beside the pile for an hour or so.
Water it once a week at least. More if the weather is hot & dry. To see if your pile is hot enough you may place a soil thermometer in the pile to check. The center of the pile should be 160°F. After the temp goes down to normal, turn the pile, adding more a cup or 2 of bloodmeal or other high nitrogen to each layer. The pile should heat up again. When it cools down turn it again. Do not add more nitrogen.
Avoid adding grease, meat scraps, and bones as they will break down slowly and will attract animal pests. Large leaves, twigs, and branches break down very slowly unless they have been shredded. Don't add weed plants that have gone to seed or diseased plants, because the pile may not kill seed or disease germs. Don't add animal or human feces, which can spread disease.
Using Compost When the compost is ready, the organic matter will be broken until most of it is unrecognizable. You should spread a 3 inch layer over the area you want to improve, or use it as a sidedress or mulch, then use a spading fork or shovel to turn a 3 inch layer of compost into the top 6-8 inches of soil in the garden. To use compost as a mulch, use the compost earlier, while you can still see some chunks of decomposed matter.
Hints on Weed Control There are certain types of weeds that are very difficult to kill. You should not put your garden where there is a lot of Johnson grass, for example, or Bermuda grass. The growth of Zoysia grass,

http://breachrepairers.webs.com 114
and nut sedge is nearly impossible to stop. As well as being unattractive and an eyesore. Weeds use the nutrients as well as the water and sunlight needed by the vegetable plants.
Prevent garden weeds from going to seed. Use only well composted manure.. Keep weeds away from the garden area. Always clean equipment to prevent weed seeds plant parts from being carried into clean
areas. Turn compost frequently and assure temperature is high enough to kill the seeds and
diseases Do not use hay containing grass or weed seeds as mulch. The best time to kill the weeds is when they are babies. Don't wait.
http://breachrepairers.webs.com 115
The Culture Of Fruit Trees While we were in Australia, we adopted the ... plan . . .of digging deep trenches and filling them in with dressing that would create good soil. This we did in the cultivation of tomatoes, oranges, lemons, peaches, and grapes. {4BIO 223.2}
The man of whom we purchased our peach trees told me that he would be pleased to have me observe the way they were planted. I then asked him to let me show him how it had been represented in the night season that they should be planted. I ordered my hired man to dig a deep cavity in the ground, then put in rich dirt, then stones, then rich dirt. After this he put in layers of earth and dressing until the hole was filled. . . .He [the nurseryman] said to me, 'You need no lesson from me to teach you how to plant the trees."-Letter 350, 1907.
This is taken from the biography of Ellen White THE AUSTRALIAN YEARS p. 223
Choosing the Site for Fruit Trees The First considerations in planning your orchard are these: Choose an area that is in the sun most or all of the day. Early morning sun will be helpful in drying the dew from your trees. This will reduce the tendency to diseases and fungi. Always choose a place for garden and orchard where you will have an abundance of pure water all through the spring, summer and fall. In years of the driest weather, this is very important.
Good drainage is a more important consideration than soil fertility. Avoid soils and sites that are not well drained. You have poor drainage in any area where water stands for more than 24 hours after a rain. In areas of poor drainage, tree roots will be drowned as the oxygen cannot reach the roots.
Cold air always goes to the lowest place, so do not plant you fruit at the bottom of a hill. Frost usually kills blossoms in a low lying area. Try to set your trees on a slight eastern or southern slope. Or on top of a hill. Deer and other pests will eat the trees when they are young, if they are placed in an unprotected area.
Heaven's Method of Planting Fruit Trees THE MOST PRODUCTIVE and quickest production of fruit is attained if you plant your fruit trees in this method. Total cost of this method is from $30 to $50 depending on price of tree and Soil amendments.
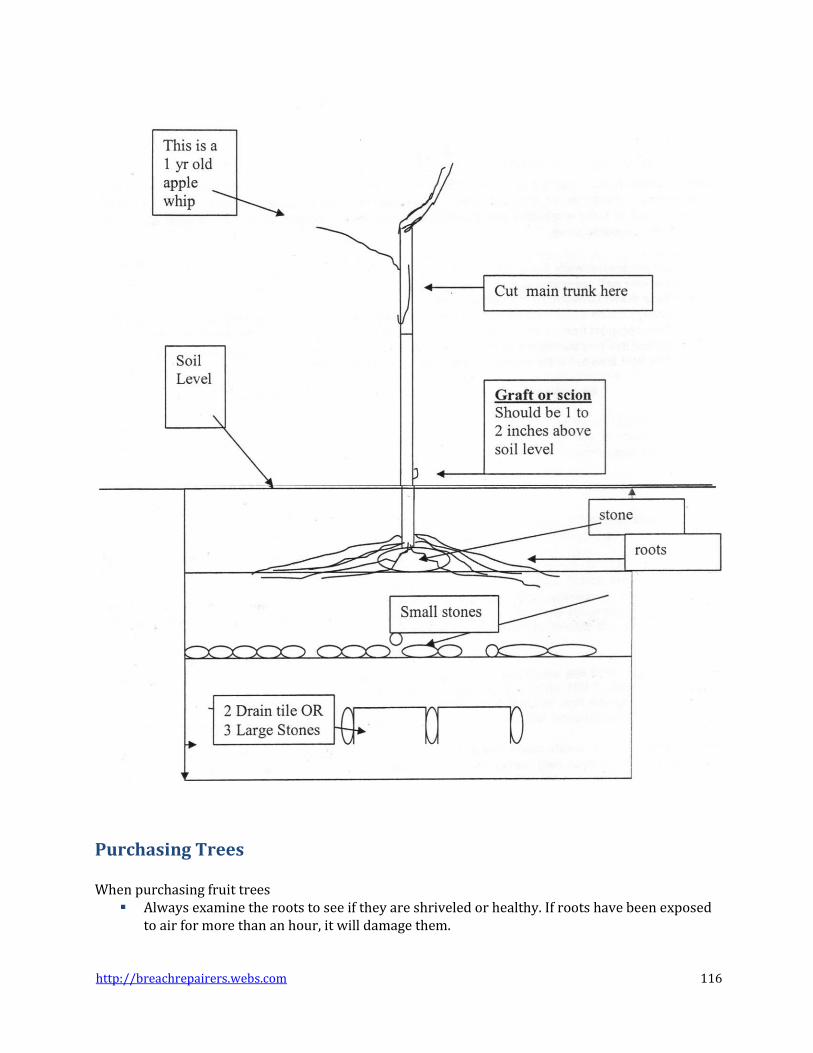
http://breachrepairers.webs.com 116
Purchasing Trees
When purchasing fruit trees Always examine the roots to see if they are shriveled or healthy. If roots have been exposed
to air for more than an hour, it will damage them.
http://breachrepairers.webs.com 117
A healthy 1-year-old whip, approximately 2 to 3 feet tall with a 1/2-inch diameter trunk and a good root system, is preferred.
A small tree with a good root system is much better than a large tree. Trees that are 2 years old or older are not as good a choice as 1 -year-old trees. Older trees
often do not have adequate buds on the lower trunk to develop a good framework. If older trees are purchased, cut them back to force buds lower on the main trunk. Do not purchase trees that appear stunted, or diseased or with few or broken roots. Make sure the selection is the desired variety and rootstock; it is critical that you get a
correct rootstock. Otherwise you may get a rootstock which is slow to bear. Do not purchase plants at discount prices. You get what you pay for!
There are three types of fruit trees to choose from: Dwarf trees produce the same sized fruit as other standard trees. Dwarf trees are usually
5-8 ft tall and yield about 2-4 bushel when fully grown.. The fruit is easy to pick and the trees are easier to care for. Dwarf trees work well in containers. They may bear the second year after planting.
Semi-dwarf trees grow to about 15' and easier to care for than full size trees. The fruit yield is a little less than a standard fruit tree and you may need a ladder to pick it.
Standard trees are full-sized trees and may produce 20 or more bushels of fruit. They do not bear as soon as the smaller size trees. There may be a small harvest in 3 years.
Personally I prefer the semi-dwarf Apple trees. I would not buy dwarf peach or cherry trees unless I wanted trees to grow in pots. Although more expensive to purchase, semi-dwarf apple trees are easier to prune, spray and harvest and they produce fruit at an earlier age than do full-sized trees. Dwarf trees will be about 20 to 30 percent as large as standard trees and may require some support by either a trellis or a post.
Standard Apple should be 20 feet apart, dwarf trees 10 ft so you may get 2 times as many dwarf trees in an area, trees must be the most common dwarf rootstock is M 9. Fully developed Dwarf trees will produce 2-4 bushel, semi dwarf 6-10 standard 10-20 or more
Pollination
Most Apple varieties are not self pollinating, so must have pollen from another variety to set fruit; Always plant two or more varieties with overlapping bloom periods to assure good fruit set.. Some varieties bear are not good pollinators.
Peach trees are usually self pollinating, so do not need another variety. However, it is always a good idea to plant 2 or 3 varieties of any plant, so that if one fails, you may have fruit from the others.
Some sweet cherries must have a sour cherry to pollinate them. Soil Preparation and Planting
The day your fruit trees arrive from the nursery, you should open the bundles and look to see if you have received what you ordered. Also look for damage and note the general condition of the trees.
If you are not going to plant the trees in their permanent location very soon, you should "heel them in" To do that you dig a trench a foot deep and 12 to 18 inches long, If you have 3 trees, your trench

http://breachrepairers.webs.com 118
should be 3 ft long. Soak the roots in water for Vi to 1 hour before planting. Plant the trees in their permanent spot while they are still dormant in the early spring. However, not while the soil is too wet.
Before you receive your trees, you should prepare the soil by growing cover crops there. Then cultivate the soil. Dig the holes and have all your amendments ready before it is time to plant them.
When you are ready to plant your fruit trees or bushes, soak bareroot plants in water for an hour or two. DO NOT let the roots dry out.
When you plant your trees, do not crowd the roots. Cut off all broken or mutilated parts of roots with pruning shears. Set the plants with the graft or bud union no more than 1 inch above the soil line Work soil in and around the roots. When the hole is half filled, firm the soil with your feet. Finish filling the hole and again pack the soil firmly. Do not leave a large depression around the tree. But you should make a rim of soil 2 foot diameter around the trunk to hold water.
Also, do not place fertilizer in the planting hole or fertilize immediately after planting. Fertilizer in the hole can kill a young tree.
1. Dig a large hole about 3 ft deep & 3 ft wide. 2. In the bottom of the hole place 2 pieces of 4 inch drain tile. Plug up the ends with stones.
Then put any sod from the diggings on the bottom of the hole. However, do not use a sod that will spread, such as zoysia, Bermuda, Johnson grass, sandburs etc.
3. Mix equal parts of topsoil, peat moss and finished compost with 3-5 lbs of colloidal phosphate or soft rock phosphate. With a cupful of kelp powder. And if you have acid soil add 2 or 3 cups of limestone.
4. Place a layer of 1 ½ large wheelbarrows of the mix (9 Cu Ft.) in the hole, for a 1 ft layer of soil.
5. On top of this place a layer of small rocks, small fist size or smaller size, (Broken Bricks or broken up concrete blocks will work)
6. On top of the rocks. Place a layer of pure topsoil (about 8-12 inches) 7. Fill the hole with water, let it soak in. 8. Cut off all broken or mutilated parts of roots with pruning shears.. 9. Place a large stone in the hole. Spread the roots of the tree over the stone. 10. Work soil in and around the roots. 11. Put a few shovels full of soil around the tree first to hold it in place. Make sure the tree is in
line with the other trees both directions, to make an even row. 12. Next place a layer of the topsoil mix in # 3 above. Bring soil up to ground level. 13. Pull the tree up so that the graft or bud union is 1 to 2 inches above the soil line.. 14. Do not leave a depression but level the soil around the tree and pack it down with your feet. 15. Then Make a 2 foot diameter ring of soil around the trunk, to hold water. 16. After planting, apply sufficient water to thoroughly soak the soil in the area of the tree roots.
This watering brings the soil into closer contact with all sides of the roots and eliminates air pockets around the roots
17. The tree may have to be staked with a metal fence pole to train it to grow straight. If you do stake it you should tie the tree to the stake in 1 or 2 places. Tie it with string, twine or other material that will not cut into the bark.

http://breachrepairers.webs.com 119
I know this is a rather complicated and fairly expensive procedure, BUT it will pay off abundantly with rapid results. Mrs. White, who used this method, said she had blossoms the first year after planting.
NOTE: Some growers recommend making the hole just deep enough to accommodate the roots.
Trees planted by that method will work fine. However, I believe that with Grandma White's method your trees will be healthier and produce fruit more quickly.
Prune and Train Your Young Trees
As I cannot do justice to the art of pruning in this book, I would encourage you to go to the county extension office and get the free information that tells how to prune, or purchase a book that explains pruning in detail. A tree can be ruined for good production by pruning the wrong way.
I will attempt here to give some brief tips that will aid you in the work of pruning
The day you plant your trees is the best day to begin training & pruning them to be productive.
When a tree is dug up and moved, a portion of the roots are always left in the ground where it grew. This loss of roots makes the tree unbalanced, having too much top for the amount of roots that remain. To correct this imbalance, when you plant a bare root tree, you should cut at least 1/3 off the top. If you purchase a container-grown tree, it will usually be two- to three-year-old trees old and will need light pruning, and maybe some correction in the formation of scaffold branches. Sometimes a tree does not grow as well as it should the first year. If this is what happens, prune the tree back to a whip and start over again. Fruiting will be delayed a year, but it will be a much more manageable tree. The highest or longest branch on the tree will have the most rapid growth. Always cut back any branch that is longer than the leader (the center trunk).
The reason for pruning a young tree is to control its shape by developing a strong, well-balanced framework of scaffold branches. Remove or cut back any unwanted branches while they are small to avoid large cuts in later years.
In order to train your tree correctly you should have an idea as to how you want the tree to develop. Ideally, the apple tree should have a scaffold branch on each side of the tree, (at least 8 or 10 inches apart) spiraling up the trunk. Then a space of 18 inches of trunk before another set of scaffold branches is started.
Although some summer pruning can be done, fruit trees should be pruned annually in early spring while the trees are is still dormant. Pruning before trees are fully dormant or before a long cold spell reduces the ability of the tree to endure freezing temperatures and will cause death to some of the wood.
After the tree has been in the ground one or two years, all lateral branches lower than 18 inches above the ground should be removed. Also limbs that have a narrow angle (less that 45 degrees) should be removed or the angle changed with a limb spreader (a 4 to 6" length of 1" x 2" wood with a headless nail in each end).

http://breachrepairers.webs.com 120
The spreader is placed between the narrow angled limb and the trunk to widen the angle. A narrow angled limb is more likely to break from the trunk under the weight of a large amount of fruit.
Apple trees may be trained to the central-leader system which will allow three to four groups of four branches to develop for a standard-sized tree. The central leader is cut back about 18 inches above the lower group of limbs to encourage the development of more limbs higher up. In the south or areas where humidity is high, fruit trees may better be pruned to the open center system, providing better air circulation, thus making the tree less prone to certain diseases.
Peach trees are usually pruned to have an open center, to admit light and permit better air circulation.
A peach tree is more productive when the fruiting wood is within 10 feet from the main trunk. 1/3 of the wood at the ends of the canopy branches of a healthy peach tree should be removed every year.
Pruning too early reduces cold tolerance
During winter, pruning may reduce the cold tolerance of the tree for about two weeks. Trees that are pruned just before severe cold weather may have poor flower bud survival, one-year-old shoots may die back.
Pruning just before bloom, will make the flower buds less tolerant of frost. Pruning peach trees during bloom or shortly after bloom is not the best way, but it is better to prune a little late than too early.
A fruit tree must be pruned: To develop a framework that can support a heavy crop. To keep a balance between the fruiting wood and the vegetative growth. To keep the height and spread of the tree within a healthy range. To keep the tree open to permit the entrance of sunlight and allow air circulation. To remove diseased and broken limbs. To maintain fruit producing wood throughout the tree.
You can usually prune o\d and Neglected fruit trees to bring them to full production. This will usually require the removal of many large limbs. Only remove two to three large limbs each year. In three years of work you could have a well formed tree. If you remove too much wood, the growth will be so excessive that it will more difficult to prune the next year.
When pruning any tree, these are the basic steps.
First, cut out all diseased parts of the tree.
Then cut out all broken or crossing branches,

http://breachrepairers.webs.com 121
Third, cut out all branches that grow straight up from a limb.
(Do not cut out more than 14 of the wood on an apple tree, Cut no more than 20 % of a pear tree. You can cut off 33% of a peach or nectarine tree.) Fourth, cut off stub branches and branches that are growing toward the center of the tree. These branches prevent sunlight from reaching the fruit
If 2 branches are crowding each other, cut out one, leave the best one. To determine which is best, study the branches. If one branch crosses several branches, cut out that.
Remember when pruning to cut above a bud that goes in the direction you want the branch to grow. A branch will grow in the direction of the last bud on the end of that branch.
Always make your cut 1/16 inch above the bud. Otherwise the bud may die. Never leave a stub on an apple tree, as it takes 7 years for an inch of stub to heal. Always cut a branch off even with the trunk. When cutting a larger branch off a tree, make a cut beneath the branch first. Otherwise, when you cut from above, the branch will peel off the bark beneath when it falls.
Tips on Fertilizing Fruit Trees
Fruit trees should be fertilized each year sometime in June. You should test the soil now and every two to three years to determine the nutritional needs of your soil.
Fertilize your trees with a balanced fertilizer each year. To do that get a sledge hammer and a 3 or 4 ft length of 1 -1 % inch galvanized pipe. In early June, under the drip line, (the place where the water drips off the tree at the end of the branches) drive the slanted pipe 12 inches deep into the ground on each side of a non-bearing tree, OR every 4 feet, around the tree on a bearing tree.
In the hole put 1/4 cup of kelp meal, ¼ cup of rock phosphate or bone meal, 1/2 cup of Progrow 5-3-4 or similar fertilizer or 2 cups of manure. If your soil has a low pH 6.0 or lower, Put also ½ cup of agricultural limestone in the hole. Fill the hole with water, then if pH is low, spread 2 or 3 cups of limestone on the soil under and around the tree.
It is not best to fertilize your fruit tree in the fall, because the new growth that springs from that increase in nutrients will be tender and will not be able to endure the hard freezes, but may die back. If you fertilize with a fertilizer that includes nitrogen before the tree blooms in the spring, the tree will concentrate on growing rather than fruit bearing. And the blossoms may drop.
It will be the same with small fruit like berries. In strawberries, the fruit will not have as good quality if they are fertilized with nitrogen before blossoms or fruit are developing.
However, you may fertilize anytime with non-nitrogen nutrients.
http://breachrepairers.webs.com 122
2 year or older Trees
Once the trees begin to bear fruit, You may use the length of shoot growth as an indication of whether you need to increase the amount of nitrogen next year. A growth of 12 to 18 inches per year is ideal for bearing trees. You should use one pound total for tree of Pro-grow 5-3-4 for each inch of trunk diameter. If the trunk diameter of the tree is 8 inches 3 feet off the ground, apply 4 lbs total of 5-3-4 in June.
WHEN THE TREE SETS FRUIT, Thinning is necessary to prevent breakage of limbs and to encourage quality fruit.
Healthy fruit trees will set more fruit than they are capable of carrying to maturity. Removing excess fruit from the tree will ensure that the shape and size of the fruit that remain on the tree are the best. Failure to remove excess fruit decreases the formation of flower buds for the following year and may cause the tree to produce a crop sporadically. Most of the flower buds for next year are set within 6 weeks after full bloom. You should finish thinning within that time.
Remove fruit by hand. Leave one fruit per cluster, and space the clusters about every 6 inches. Start at the end of a branch and systematically remove excess fruit. To remove the fruit without damaging the spur or other apples on the spur, hold the stem between the thumb and forefinger and push the fruit from the stem with the other fingers. This method removes the apple and leaves the stem attached to the spur. It is not necessary to thin cherries, plums, figs, and other small fruit.
Summertime Maintenance of your trees
Diseases & Insects
It is very difficult to grow-top quality fruit unless a diligent pest control program is kept up. A successful spray program begins with dormant sprays before the tree blossoms and every week thereafter until harvest. Brown rot is one of most prevalent diseases of stone fruits and must be prevented.. Many other diseases affect the stone fruits, including bacterial spot, leaf curl, nematodes, peach phony, Rhizopus rot and scab.
Insects cause damage to every part of the tree. Every stone fruit tree (peaches, nectarines, plums etc.) is susceptible to peach tree borers, & the fruits and leaves are affected by the plum curculio, scale, stink bugs, tarnished plant bugs, oriental fruit moths, Japanese beetles and the green June beetle. Pome fruit trees (apple, pears, etc) have as many or more pests and diseases that affect them. The cherries aren't bothered as much by bugs, but the birds love them more than you do, so you will need an owl or scarecrow in your trees.
Fig trees don't have many pests or diseases.
There is nothing better than going out in the back yard, and picking your own sweet, juicy Citrus. No grapefruit is as sweet as the one you grew. However. You will have to give diligent care to get the best.
Disease and Insect Control
You will not harvest a quality crop unless diseases and insects are controlled. Common apple diseases that should be controlled include bitter rot, cedar apple rust, fireblight, scab, sooty blotch.
http://breachrepairers.webs.com 123
Insect pests that do the greatest damage to the apple are spider mites, plum curculio, aphids and coddling moth. To control fruit tree pests, always use two or three types of organic controls, to assure better success. I like to place at least 2 sticky traps in the tree to monitor what Kind of pests are there.
There are a quite a few insects that damage peach flowers, fruit, and wood. Peach tree borers will kill a tree in a short time, plum curculio, scale, oriental fruit moths, catfacing insects such as stink bugs and tarnished plant bugs. Japanese beetles are a severe pest in the south. They will eat every peach on the tree. Green June beetle also must be controlled. Insects and diseases must be controlled by a diligent effort, organic sprays and controls, if you expect to have any fruit.
If you grow crops organically for a year or two, the population of beneficial insect predators, (preying mantis, lady bugs, assassin bugs, wasps, etc.) will increase rapidly and help control insect pests.
Keeping Pests Out Of the Trees & Garden
It is a good idea to use at least 2 or 3 methods to keep the pests away from your gardens-trees
A Rodent guard may be necessary in some areas to prevent rabbits, mice, etc. from nibbling. After the tree is planted, an 18-inch piece of hardware cloth should be placed around the trunk of the tree to prevent damage. It should be placed about four inches into the soil. As the tree grows older, remove the hardware cloth. Do not use paper wraps around the tree as they will provide a place for insect pests to hide.
A stake to support or straighten the tree may be needed. Drive the stake 2 feet into the soil. Secure the tree to the stake by number 9 wire wrapped in a section of garden hose to prevent digging in to the bark when the tree grows
In some areas of the south, prairie voles eat the roots of fruit trees. Ask ATTRA for organic controls of that animal.
ATTRA - National Sustainable Agriculture Information Service 800 346-9140 P.O. Box 3657 Fayetteville, AR 72702
Voles like areas with lots of soil cover, mulch, heavy grass, etc. To find out if you have voles, lay a piece, of carpet on the ground under your tree for a few weeks. They will make a home under it.
Deer and other pests will eat the trees when they are young, if they are placed in an unprotected area. So they must be protected. I have made a cage out of hogwire with 6 inch spacing to protect my trees. It works pretty well to keep deer and other varmints from on the tender branches of the tree. You can make about 6 or 7 cages out of a 50 ft roll.
One thing that works fairly well for about 3 weeks at a time is to hang tobacco bags or nylon stocking material filled with coyote urine, It is a bit costly.
http://breachrepairers.webs.com 124
I have tried other smelly repellents, rotten eggs, hot pepper spray, electric noisemakers, dirty clothes, human hair, firecrackers, and other things. The two best methods I believe to keep deer out are A border collie, or other cattle dog, correctly trained to chase animals, That only works if you just have one dog, or at least one that doesn't run with other dogs. When 2 dogs get together, usually, they roam the neighborhood together, forget the deer. Another thing that works well is to hang Aluminum pans or small flags painted white (on a wire 4 feet high) around your garden. The deer see the white and think it is the white tail of a deer, which signals danger. An electric wire 4 ft high around your garden will keep the deer out, but only if it is always hot.
Other Important Things
The Chilling Requirements of Stone fruit trees must be met if you expect to have fruit. The best place to get that info is from the nursery who sells you the trees. Thinning the Fruit
A heavy set of fruit should be thinned. If the fruit set is heavy, branches may break and the fruits will be small. To prevent limbs from breaking and to keep fruit quality, excess fruits must be removed.
Hand-thinning should be finished about four weeks after full bloom, spacing the peaches about 6 inches apart on the limb. Apples should have no more than 2 or 3 in a cluster When you are thinning by hand, Be careful not to pull off the spur on apple and pear trees. On a peach tree, grasp the stem or branch firmly between your thumb and finger and pull the fruit off with a quick motion.
Apple and peach trees usually will set more fruit than they are able to properly ripen. Excess fruit must be picked from the tree to ensure proper development of fruit color, shape and size. If excess fruit is not removed, fewer flower buds will be formed for the next year and there may not be any crop.
Hand thinning, to be effective, must be completed within a month after full bloom.
Remove the fruit by hand. Leave one apple per cluster, and space the clusters about every 6 inches. Start at one end of a branch and systematically remove fruit. To remove the fruit without damaging the spur, hold the stem between the thumb and forefinger and push the fruit from the stem with the other fingers. This method removes the apple and leaves the stem attached to the spur.
Harvesting Fruit - PEACHES and other stone fruit
Wait, Do not harvest your fruit until it is well filled out. As a peach ripens, the part facing the sun will get a reddish blush and the part not exposed to sun (ground color) turns from green to yellow. The best way to tell if a peach is ripe is by looking for a yellow ground color. Some varieties will have a slight green color to the background even when it is ready to pick. The peach will also have medium-soft flesh and will smell like a peach.
The point on the bottom will usually be sticking out when the fruit is unripe, but will be surrounded by flesh when ripe.
Lay then gently in the container. Peaches more than 14 inches deep will bruise the bottom layer.
http://breachrepairers.webs.com 125
All of the fruit on a tree does not ripen at the same time. Usually, fruits on the outside and top of a tree will ripen 5 to 10 days before the fruits in the middle and inside part of the tree.
Any fruit that is picked too soon will not store as well and will not taste as good as fully ripened fruit.
Apple
If an apple is ripe, the calyx on the end nay be beginning to open. Cup the fruit in your hand,lift and gently pull on the stem. If ripe, the apple will detach easily; should there be more than slight resistance, don't tug the fruit, but test again in a few days.
Harvest time varies with individual tastes. One person may consider a fruit ripe while another individual believes it is immature. However, fruit picked too soon does not store well and does not develop full flavor. When picking apples, it is important to avoid injury to the fruit. Remove the apple from the spur by pulling upward and outward while rotating the fruit slightly. On some of the thin, long-stemmed varieties such as Golden Delicious, it is sometimes necessary to firmly place the index finger at the point of attachment on the stem and spur to prevent the spur from breaking. Apples picked with the stem attached to the fruit keep longer.
Pears
do not ripen well on trees. The best way to tell if a pear is ripe is to gently press near the stem with your thumb. When it gives to gentle pressure it is ripe, juicy and ready to eat. If you wait until the pear is soft around the middle it will be overripe.
Other Suggestions On Growing Your Own Fruit
I suppose there is not a single person who does not enjoy some kind of fruit. But I think one of the most delicious and nutritious things you can eat is in the fruit category. Had you noticed though, that the price of fruit began escalating some time before vegetable prices rose so much. Fruit production is more difficult, more expensive, takes more land, more thorough care. Fruit trees, of course, take more time to develop.
The price of fruit, though, will probably continue to rise, and the time may come that those who raise their own fruit will eat like kings and queens! If you would like to produce your own fruit, you may find that it is not as difficult as it may appear.
Small fruit, such as berries, grapes, and figs are fairly easy to grow. The biggest concern with growing small fruit is to have perfect soil. If the soil is right the plants will grow quickly, can handle drought, stress, insects, disease better. Planted in the right place, with the correct soil, and proper care, will guarantee success. Fruit trees, need more care than small fruit, but will richly reward diligent effort.
Some basics for fruit production include: One of the main things to remember is that fruit trees must have diligent care. If you spend the money, plant the trees, then let the bugs eat them or the weeds take over, or let the deer eat them, what have you accomplished?
http://breachrepairers.webs.com 126
Fruit trees take several years (2 to 5 years) to produce, but small fruits, strawberries, raspberries, blackberries produce the year after planting. Everbearing and day neutral strawberries will produce the 1 st year if the soil is correct and proper care is given.
Blueberries and Grapes, Muscadines, produce in 2 years.
Weed control, Balanced soil, weekly feeding, with compost tea and fish fertilizer, etc, consistent and sufficient watering, are all necessary to aid Fruit plants and trees in developing quickly. I have seen trees produce fruit the 2nd or 3rd year with this program. If you want fruit quickly, you must prevent stress.
Trellising of fruit trees with the tree trunk on a slant will hasten Fruit bearing. Also, the closer to the ground the lower branches connect to the tree, the quicker the tree will bear. The higher the lowest branch, the longer it will take to produce fruit.
Keeping the deer and other varmints, as well as insect pests, away from the tree is important. Any stress the tree may have will retard fruit bearing.
A perfect balance of minerals , including a complete supply of all the 70+ trace minerals, is essential if you want to control insects and diseases. In our own lives, we all know that if we don't get all the necessary nutrients, we get sick. In the plant kingdom also , the health of the plants depends on adequate nutrition.
Deficiency brings Disease. AND the law of "the survival of the fittest" applies. If a plant does not have all the trace minerals and macro minerals, it will not be as productive as it would if it did have them. Furthermore, The insect pests will pick on those plants which are the weakest and have the poorest health. Proper nutrition is one of the methods that nature uses to assure the healthiest species will survive.
Sufficient Water Is Essential
I cannot exaggerate the importance of sufficient moisture for maximum health of your garden and orchard. All plants must have their required amount of water supplied at regular intervals. Yes you can overwater. Just know the plant's requirements and water accordingly.
If you go on a vacation for a few weeks and leave your trees without water, It will stress the health of the tree. It is very important to have source of pure water for the trees. The water must get to the roots on a regular basis.
Running a water line to each tree will help greatly. If you have a timer on your watering system, they will be watered without much effort.
Trees and plants must be fertilized regularly to give the best results. There are so many organic options available for feeding and controlling the pests of the plants we should have no problem keeping them healthy.
http://breachrepairers.webs.com 127
Growing Your Own Fruit
Last issue we talked about the blessing of fruit. Who is there that doesn't enjoy at least some of the varied kinds of fruit that is available to us. I remember when I was a pup, my dad didn't eat a lot of fruit. He did eat some though. When He was growing up in the sandhills of Nebraska, there wasn't much fruit available, but there were wild plums and wild choke cherries. The plums could be eaten fresh. But you had to process the choke cherries with lots of sugar. That was all the fruit they had besides tomatoes and other garden fruits. So Grandma made lots of jelly. Dad put jelly on everything. If you asked him to eat some fruit. He would say, "This jelly is my fruit." We would laugh at that.
You and I know that wasn't probably the best way to eat fruit, but that brings us to the point. We should educate ourselves and our children about what is the best thing to eat. Especially teenagers and young people now don't eat as well as they know they should. It is very important for us as parents to educate our kids and provide a healthful diet for them. What you do is what your kids will do! What you teach them by precept and example will have a tremendous effect on their health and the way they live, As it is written: "As is the mother, so is the daughter" Ezekiel 16:44
One of the best ways to teach your children to eat a variety of fruit, and other fresh produce, is to provide it for them now while they are young.
If you grow your own fruit, you will have a great advantage. When people ask me I advise everyone to plant fruit trees, although, because time is so short, you should probably plant as much small fruit as possible. Small fruit produces quickly, is easier to care for and takes less space than trees.
The price of fruit will probably continue to rise, and the time is now here that those who raise their own food will eat like kings and queens! If you would like to produce your own fruit, you may find that it is not as difficult as it may appear.
Small fruit, such as berries, grapes, and figs are fairly easy to grow. The biggest concern with growing small fruit is to have perfect soil. If the soil is right the plants will grow quickly, can handle drought, stress, insects, disease better. Fruit planted in the right place, with the correct soil, and proper care, will guarantee success. Fruit trees, need more care than small fruit, but will richly reward diligent effort.
I cannot stress it enough One of the main things to remember is that fruit trees must have diligent care. If you spend the money, plant the fruits, then let the bugs eat them or the weeds take over, or let the deer eat them, It is wasted time, money, effort & sweat.
The important things in growing fruits are balanced soil, soil fertility pure water, good air circulation, bug control, disease control, weed control, sunlight. Pruning correctly is VERY important. You can ruin a tree by not pruning a tree correctly. Know what you are doing; read a book; Ask for help!
. I have seen trees produce fruit the 2nd or 3nd year with the right program. If you want fruit quickly, you must prevent stress of all kinds, lack of fertility, shortage of water, bugs, diseases, animal pests> Any of these will cause stress and delay fruit bearing.
http://breachrepairers.webs.com 128
Trellising of fruit trees with the tree trunk on a slant will hasten Fruit bearing. Also, the closer to the ground the lower branches connect to the tree, the quicker the tree will bear. The higher the lowest branch, the longer it will take to produce fruit.
Deficiency brings Disease. AND the law of "the survival of the fittest" applies. If a plant has any type of stress it will not be as productive
If you go on a vacation for a few weeks and leave your trees under stress, It will effect health of the tree. Whatever you do, have a written plan for your garden, & food production. Follow your plan!
You can order fruit trees and small fruit this fall. I wouldn't wait. If you have the space, do it now. If you have to and have the resources, hire someone to plant them, but try to get fruit ordered. Right away. In some areas, you may not be able to plant till spring, but in order to get the best variety, order your plants in the fall. The Nurseries will be mostly sold out by December.
If you can, It is best to prepare the soil (add nutrients, adjust pH, till, dig, plow) a few months ahead of buying your plants. They will do better the first year if you do begin today to prepare. When planning what type of fruit to plant you must consider the planting zone you are in You can get that information and a lot of other by visiting your county extension agent in the county seat, or go online. Find out what kind of fruit will or will not do well in your area. Get information on how to prepare the soil, conditions favorable for fruitfulness, diseases and pests that may damage your crop, the proper way to plant your plants, etc.
Everyone should plant strawberries, if you like them. They produce the first year after planting. June bearers produce in the spring. Everbearing strawberries will produce 2 or 3 crops in spring, and fall.
Day neutral strawberries will produce off and on all summer.
When planting strawberries, plant an early variety, a mid season variety, a late variety. Depending on your latitude, the June bearers will bear all the way from april 15 to late June.
Strawberries, red raspberries, blackberries, boysenberries, dewberries, loganberries are all berries, of course, but if you plant some of each, they will give you a good variety of fruit flavors until your fruit trees begin to bear. Most berry plants, with fertile, balanced soil, plenty of pure water and no stress, will bear the year after you plant them.
Some nurseries sell 2 and 3 year old plants. They are expensive, but may bear a larger crop than a one year plant.
Blue berries begin full bearing the 3rd year. They must have acid soil- a pH of 4.0-5 to do well.
http://breachrepairers.webs.com 129
The Tools You Need For Gardening How To Use Them Just as you cannot pound a nail with your fist, there are tasks in the garden that are best completed with the appropriate tool.
One of the most essential tools for the garden is the round point shovel, often called a garden shovel. It is used for double digging beds, digging holes, moving soil, planting and harvesting crops. Round point - number one tool for digging, lifting and throwing. The round point cuts into the soil. The rim on the top of the shovel blade is there to allow added foot pressure for digging holes. Do your feet a favor and look for one with a wider rim if you are planning on doing a lot of digging.
Garden - similar to a square point shovel, great for cutting, digging, edging and lifting sod.
Another essential tool that is very useful in the garden is the spading fork, or garden fork, which is a four pronged fork with a four foot long handle and four heavy tines. It can be used for turning the soil, breaking new ground, cultivating the garden, harvesting crops, moving or transplanting plants. Every gardener should have a spading fork.
Spading - has flat tines that are great for turning soil, lifting plants or bulbs and separating perennials. A spading fork is less jarring to the user than a shovel when digging in rocky soil. You can also use this tool to aerate and relieve soil compaction.
If you do purchase one however, be sure the handle has a strong shank (where the handle joins the fork). The shank is the weakest point on this tool. If you get a weak shank, take it to a metal working shop or welder and ask them to strengthen that part.
There are many types of garden hoes. Every one should have a common garden hoe, and a stirrup hoe. It is also called scuffle hoe, hula hoe or action hoe. It has a circular blade that cuts either way you slide it back and forth on the soil to cut baby weeds before they get big. It is very useful in getting close to plants without cutting them.
Another hoe you can use for close weeding is a thin bladed hoe such as a swan necked hoe, a thin bladed onion hoe, or a half moon hoe The blades of these hoes are thin, useful for skimming just under the soil to slice weed roots with less effort.. With these hoes you don't have to bend or stoop as much as with a regular hoe. These hoes are best found on the internet or in large garden centers.
A METAL wheelbarrow is also a very necessary item. DO NOT purchase a plastic Wheelbarrow. They don't hold up and cannot be used for any heavy hauling (soil, etc.).
A Garden rake is also a must for moving small amounts of soil, smoothing,, leveling soil, covering rows, cleaning up trash, rocks, etc. The common garden rake is called a bowhead rake. Usually, the bows that connect to the blade are welded and will bend or break very easily. Do not purchase that type of rake. Rather purchase a rake with the blade connected to the handle by a shaft, sometimes called a flat rake or landscaping rake. Get one with steel teeth.
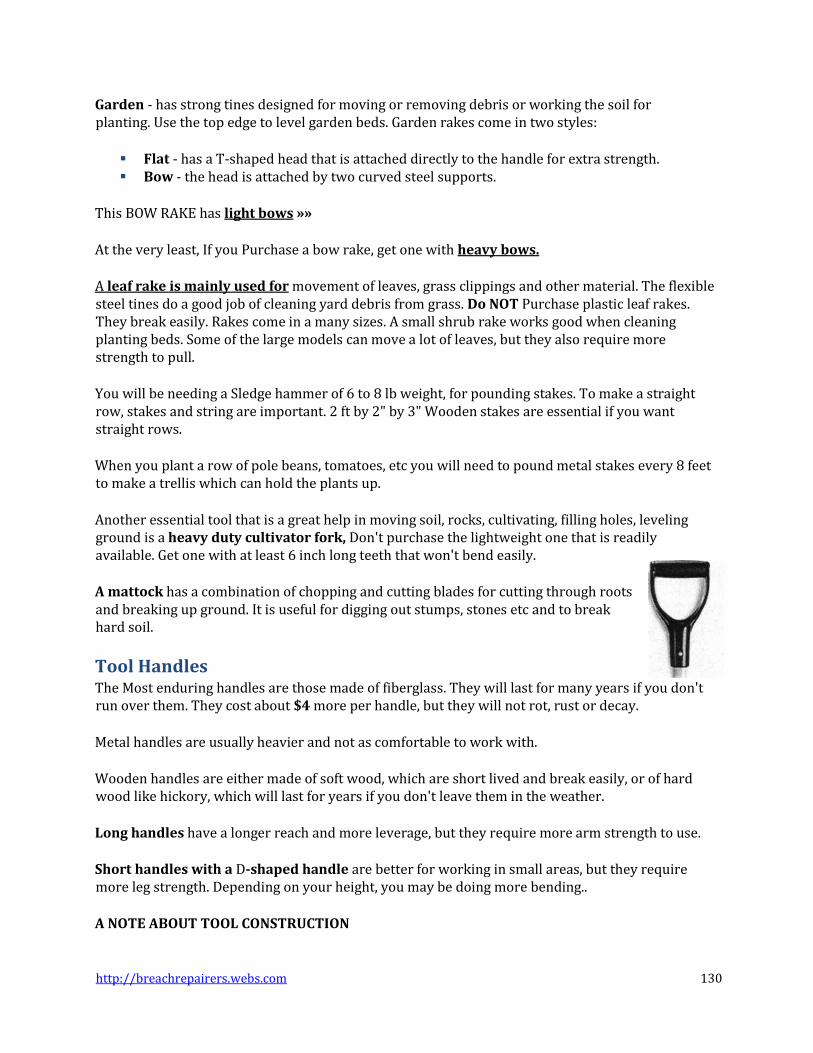
http://breachrepairers.webs.com 130
Garden - has strong tines designed for moving or removing debris or working the soil for planting. Use the top edge to level garden beds. Garden rakes come in two styles:
Flat - has a T-shaped head that is attached directly to the handle for extra strength. Bow - the head is attached by two curved steel supports.
This BOW RAKE has light bows »»
At the very least, If you Purchase a bow rake, get one with heavy bows.
A leaf rake is mainly used for movement of leaves, grass clippings and other material. The flexible steel tines do a good job of cleaning yard debris from grass. Do NOT Purchase plastic leaf rakes. They break easily. Rakes come in a many sizes. A small shrub rake works good when cleaning planting beds. Some of the large models can move a lot of leaves, but they also require more strength to pull.
You will be needing a Sledge hammer of 6 to 8 lb weight, for pounding stakes. To make a straight row, stakes and string are important. 2 ft by 2" by 3" Wooden stakes are essential if you want straight rows.
When you plant a row of pole beans, tomatoes, etc you will need to pound metal stakes every 8 feet to make a trellis which can hold the plants up.
Another essential tool that is a great help in moving soil, rocks, cultivating, filling holes, leveling ground is a heavy duty cultivator fork, Don't purchase the lightweight one that is readily available. Get one with at least 6 inch long teeth that won't bend easily.
A mattock has a combination of chopping and cutting blades for cutting through roots and breaking up ground. It is useful for digging out stumps, stones etc and to break hard soil.
Tool Handles The Most enduring handles are those made of fiberglass. They will last for many years if you don't run over them. They cost about $4 more per handle, but they will not rot, rust or decay.
Metal handles are usually heavier and not as comfortable to work with.
Wooden handles are either made of soft wood, which are short lived and break easily, or of hard wood like hickory, which will last for years if you don't leave them in the weather.
Long handles have a longer reach and more leverage, but they require more arm strength to use.
Short handles with a D-shaped handle are better for working in small areas, but they require more leg strength. Depending on your height, you may be doing more bending..
A NOTE ABOUT TOOL CONSTRUCTION
http://breachrepairers.webs.com 131
When you are purchasing tools keep in mind that the life and usefulness of a tool will depend on the quality. If a tool is constructed with separate pieces welded together, it will not be as strong as o tool that is forged in one piece.
Tools that are low priced generally have welded toolheads In the case of a bow-type garden rake, for instance, the finger portion of the toolhead will be stamped out and then steel rods will be welded to the head to make the bow that fastens to the handle. In the case of a hoe, the blade will be stamped out, and then a rod with a handle socket will be welded to the blade.
Forged Heads Higher-priced garden tools generally have forged toolheads. Forging is a manufacturing process in which the entire toolhead is formed from a single piece of steel. Forging increases the strength of the steel. You can recognize a forged tool by the lack of welds. A forged toolhead will be one continuous piece of steel formed into a rake head, shovel head, hoe or fork.
Don't Purchase Welded toolheads. The welding process weakens the tool. But the forging process actually strengthens the steel. Forged tools are more expensive, but forged tools are stronger and last longer. If a tool is cheap, that is usually what it is - CHEAP!
Caring For Your Tools When you purchase good tools, they usually require a substantial investment. If you leave them outside in the weather, the wood handles turn an ugly gray color, and begin to deteriorate. Even fiberglass handles turn an off color. If soil is left on them after use, They will soon begin to rust. If you lay them flat on the ground, when finished with them, be sure you don't run over them and break the handles.
So, here are a few guidelines for care of your tools. 1. Always clean your tools after use and store them inside the shed. 2. If Tools are out in the weather a lot, rub linseed oil or a wood protector solution on
wood handles. 3. When you are using a tool and lay it down, place it in an area where someone won't
trip over it. 4. Place tools where you can see them and they will not be hard to find. 5. Keep a file handy for sharpening the cutting edges of hoes, shovels, etc. A sharp tool is
much more effective than a dull one. 6. Do not use your good tools to mix concrete. It will ruin them, being very corrosive.
If you want to prune fruit trees, you must have the appropriate tools. There are two styles of hand held pruners:
Anvil Pruners have- a sharp edged blade that makes the cut against a flat-surfaced "anvil". These usually slide back when you are cutting, and are not the best choice.
Bypass Pruners have a scissors-style bite.. The curved blades make a much better cuts than the anvil type, & they can cut nearer to the trunk.
Loppers are also of 2 types, anvil and bypass, with long handles for extra leverage. The bypass are a much better choice. - The biggest ones can cut up to about 2" in diameter Pole pruners are

http://breachrepairers.webs.com 132
good for cutting tree limbs you can't reach. With loppers. Pole pruners allow upper tier pruning without climbing or the need for a ladder. A rope and pulley operates the cutter from ground level.
A cross-cut pruning saw is essential for pruning trees. I use a bow saw for cutting where there is ample room, but a saw with a small handle is essential for tight areas.
In closing this book, i would like to invite you to the precious blessing anyone can experience by getting out in the country and beginning to enjoy the lessons the creator has placed in his other book. God's first choice for man was and still remains country living! May his richest blessings be yours.

http://breachrepairers.webs.com

http://breachrepairers.webs.com
1
![nicenstripy Gardening Risk Assessment Gardening... · Index (Change date to suit) Page 0 of 2 [Company address] nicenstripy Gardening Risk Assessment](https://img.pdfslide.us/doc/110x75/5b0851b87f8b9a992a8c1994/nicenstripy-gardening-risk-gardeningindex-change-date-to-suit-page-0-of-2-company.jpg)