Embed Size (px)
Citation preview

WWW.THINKERERS.ORGPRESENTS
RASPBERRY PI

HI THEREI'm Adrian
Social entrepreneur and maker enthusiastBased in KL
Previously enterprise software specialist
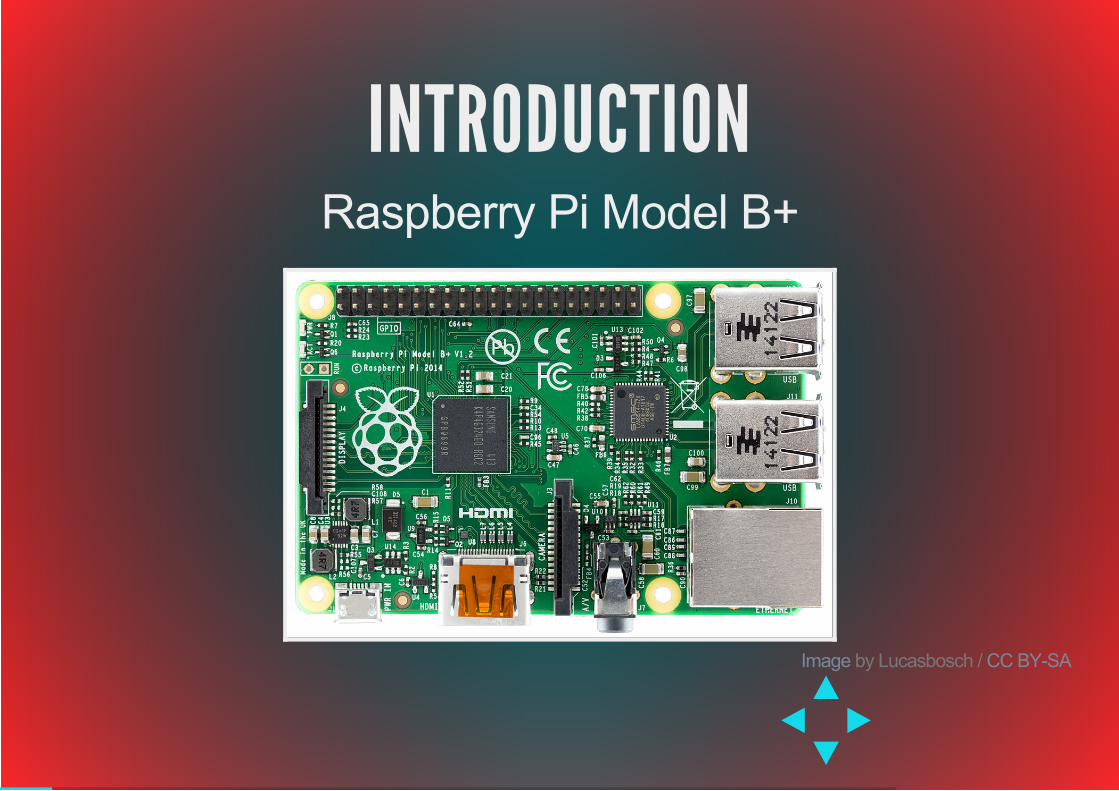
INTRODUCTIONRaspberry Pi Model B+
by Lucasbosch / Image CC BYSA

PI? RASPBERRY?lowcost singleboard computerdeveloped by the Raspberry Pi Foundation, UKmainly runs Linux operating systemsPi => Python

WHY RASPBERRY PI?originally for teaching computer science inschoolsfunctions just like a regular PC:browse internet, plays videos and games, wordprocessingallows easy and painless way to controlelectrical components/sensors using softwareaffordably priced at USD35 (≈ RM125)

WHAT'S IN THE B+?700MHz ARM11 processorVideoCore IV GPU512MB RAMHDMI output (up to 1920x1200)Builtin Ethernet port4 USB 2.0 ports

OTHER MODELSModel A (April 2012)Model B (Oct 2012)Compute Model (April 2014)Model B+ (July 2014)Model A+ (Nov 2014)Version 2 Model B (Feb 2015)

WHAT'S NOT IN THE BOX?Display monitor (duh!)Keyboard & mouse (obviously...)Power supply (via Micro USB port)Storage (microSD card)

CONNECTING TO THE PI

STANDALONERaspberry Pi + Monitor + Keyboard + Mouse

HEADLESSRaspberry Pi + Network + Your Laptop

NETWORKING WITH THE PIBuiltin Ethernet for wired connectionsWireless also supported when attached to acompatible WiFi dongleWe will connect to the Pi through a networkusing SSH

SSHalso called Secure Shellallows remote login to a networked computeruses encryption to secure data communicationsinvolves an SSH server (the Raspberry Pi)and an SSH client (your laptop)

SSH CLIENTSLinux and Mac OS X have a builtin command:sshWindows users can installPuTTY
tip: PuTTY GUI client is also available for Linux

CONNECTING VIA SSHEach Pi has been assigned a fixed IP addressFor Linux and Mac OS X, type:ssh [email protected] Windows, run PuTTYHostname = 10.1.1.10, Port = 22Click 'Open'

BASIC CLI & PYTHON
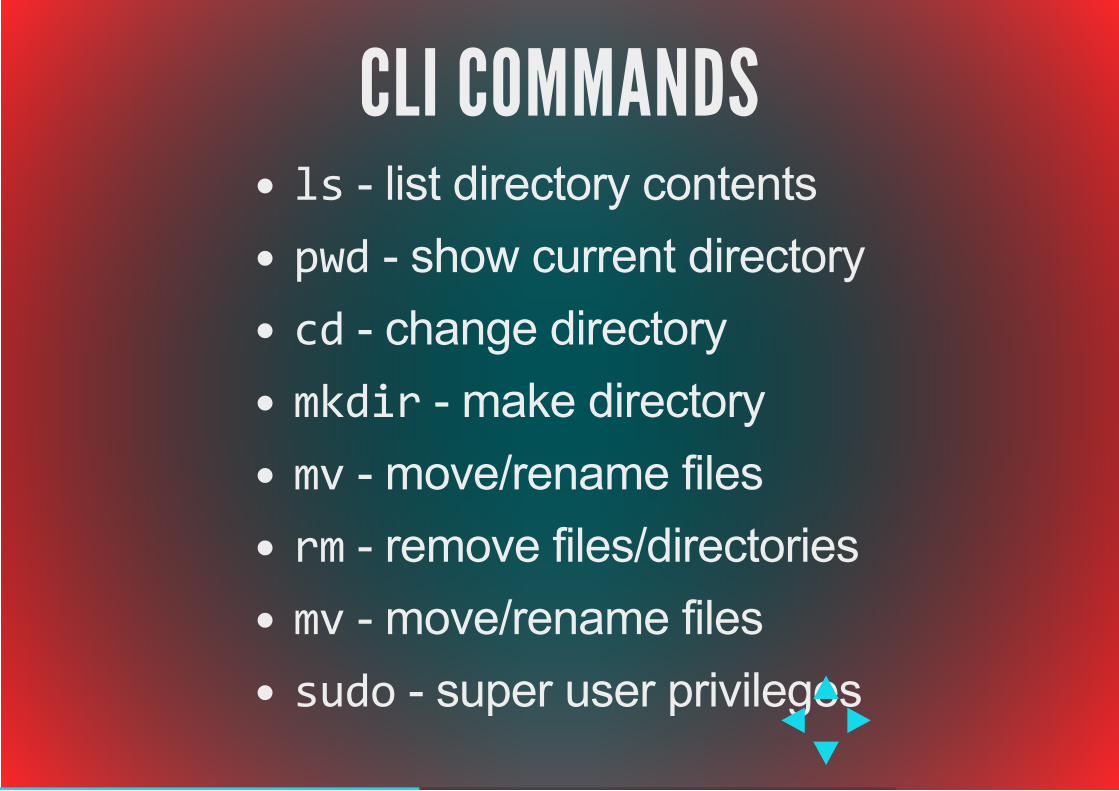
CLI COMMANDSls list directory contentspwd show current directorycd change directorymkdir make directorymv move/rename filesrm remove files/directoriesmv move/rename filessudo super user privileges

PYTHONis a programming languageyou create a file (called a Python script) thatcontains a set of instructionsthese instructions tell the computer what to do,like read input from the keyboard or print sometext to the screenyou then pass the script to the Pythoninterpreter which will execute those instructions

HELLO PYTHONLets write a simple Python script to read inputfrom the keyboard and then print it to the screen

HELLO PYTHON1. Create a new directory
2. Change to that new directory
3. Create a Python script
mkdir ~/python‐intro
cd ~/python‐intro
nano hello.py

SIMPLE PYTHON PROGRAM4. Type in the following
name = raw_input("Hi, what is your name? ")print("Hello %s, have fun hacking today!" % name)

SIMPLE PYTHON PROGRAM5. Save the file by pressing Ctrl+X6. When asked to confirm, press Y, then hitENTER7. Run the Python script by typing:
python hello.py

MODIFYING A PYTHON PROGRAMTo edit your Python script, run the following again
Try adding another question and responsenano hello.py

GPIO AND CIRCUITS

WHAT IS GPIOGeneralpurpose input/outputgeneric pins on an integrated circuiteach pin can be configured as input or outputinput/output values can be high (1) or low (0)exposed as a 20x2 row of pins on the Model B+

GPIO ON THE PIThe GPIO pins are exposed on the 20x2 pinheader of the Model B+
by Lucasbosch / / cropped from originalImage CC BYSA

GPIO PINOUTPinout on the Model B+Note how some of the pins have a specificfunction
by Image www.raspberrypispy.co.uk

VOLTAGE SUPPLY RAILSThe Pi supplies 2 voltage levels: 5V and 3.3VWhat voltage level to use depends on the
component

VOLTAGE SUPPLY RAILS2 x 5volt pins (red)2 x 3.3volt pins (orange)8 x ground pins (grey)
by Image www.raspberrypispy.co.uk

WARNINGThe GPIO pins on the Pi are NOT 5V tolerantNever connect a 5V pin directly to any other pin
as this can permanently damage the Pi

REMEMBERAlways ensure the Pi is turned off before making
any changes to your circuit

TURNING THE PI OFF1. Run this command
2. Wait for the lights to stop flashing3. Disconnect the USB power cable from the Pi
or switch off the power socket
sudo halt

GPIO PIN BREAKOUT
by Lucasbosch / / modified from originalImage CC BYSA

DOWNLOADall the code we will be using from
We will transfer the code to the Pi using anetwork share
http://bit.ly/1A3lWd4
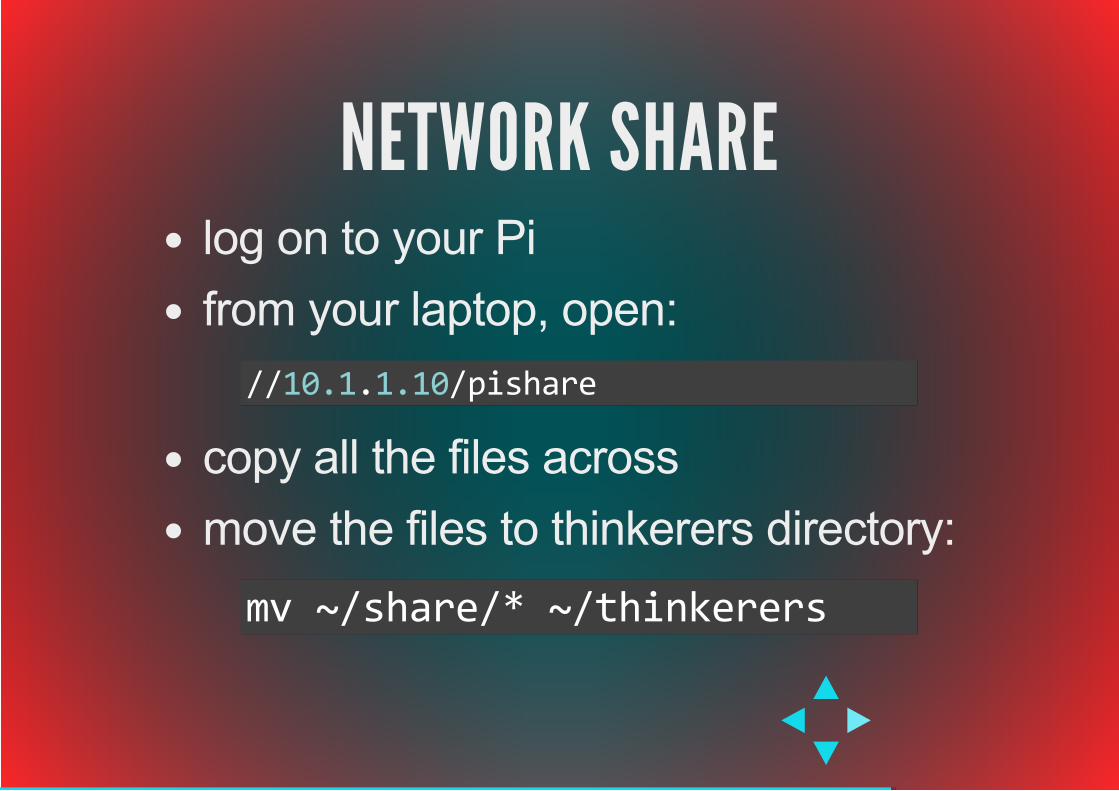
NETWORK SHARElog on to your Pifrom your laptop, open:
copy all the files acrossmove the files to thinkerers directory:
//10.1.1.10/pishare
mv ~/share/* ~/thinkerers

CONTROLLING AN LED WITH GPIO

CONTROLLING AN LED WITH GPIOGet the script
And run it
sudo is required when using GPIO
~/thinkerers/05‐led‐gpio.py
sudo python 05‐led‐gpio.py

LED PATTERNSGet the script
And run it~/thinkerers/05‐led‐patterns.py
sudo python 05‐led‐patterns.py

READING A SWITCHGet the script
And run it
Press the switch and watch the output on thescreenTo quit the program, press Ctrl+X
~/thinkerers/06‐switch‐input.py
sudo python 06‐switch‐input.py

READING A SWITCHTO CONTROL LED PATTERN
Get the script
And run it
Press the switch and watch the LED patternschange
~/thinkerers/06‐switch‐led.py
sudo python 06‐switch‐led.py
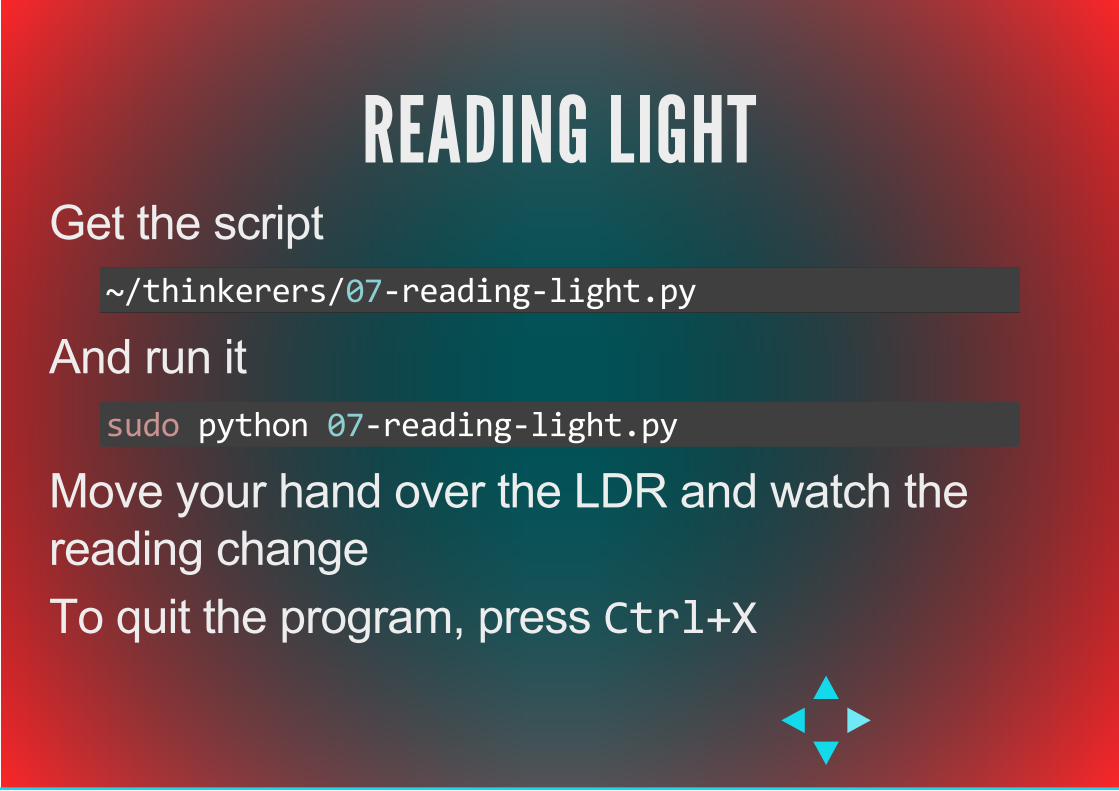
READING LIGHTGet the script
And run it
Move your hand over the LDR and watch thereading changeTo quit the program, press Ctrl+X
~/thinkerers/07‐reading‐light.py
sudo python 07‐reading‐light.py

SOME MODULES NEED TO BE ENABLEDRun this
Note: this isn't permanent
sudo modprobe w1‐gpiosudo modprobe w1‐therm
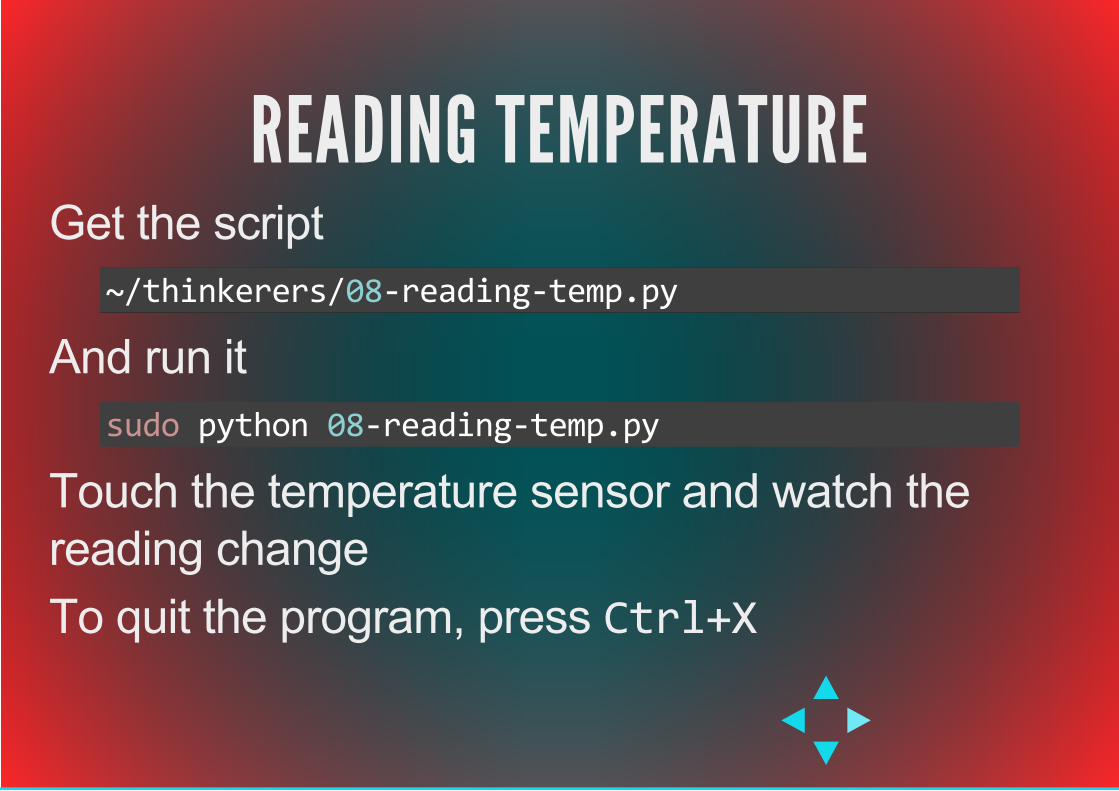
READING TEMPERATUREGet the script
And run it
Touch the temperature sensor and watch thereading changeTo quit the program, press Ctrl+X
~/thinkerers/08‐reading‐temp.py
sudo python 08‐reading‐temp.py

SONAR SENSORGet the script
Hold the sensor steady and point it at a nearbyflat surfaceThen execute the script
~/thinkerers/08‐sonar‐sensor.py
sudo python 08‐sonar‐sensor.py
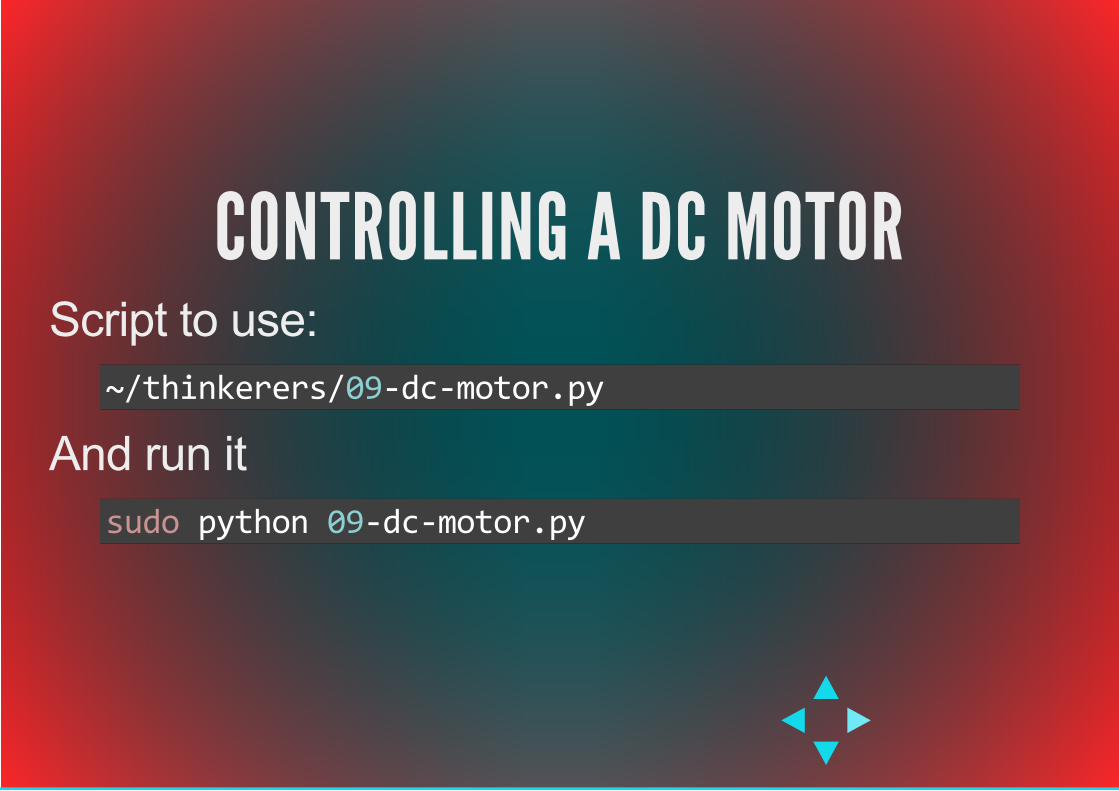
CONTROLLING A DC MOTORScript to use:
And run it~/thinkerers/09‐dc‐motor.py
sudo python 09‐dc‐motor.py

CAUTIONTake care removing the L293D
Slowly wedge it out by gripping the sidesTry not to bend the sharp pins

CONTROLLING A SERVO MOTORThe Pi isn't actually good for servo control
Only one PWM pin GPIO18Linux OS interrupts the pulse generated
Both software and hardware solutions available

CONTROLLING A SERVO MOTORScript to use:
Execute the script
Enter angle between 0 and 180 degrees
~/thinkerers/09‐servo‐motor.py
sudo python 09‐servo‐motor.py

Input + Output = AUTOMATIONTry to combine what you just learnt
Can you control the DC motor based on light?Example: bright = move forwards
dim = move backwards

CONTROLLING A MOTORBASED ON LIGHT
Get the script
And run it
Enter a light level around 7Slowly cover / uncover the LDR and watch themotor move
~/thinkerers/10‐light‐dc‐motor.py
sudo python 10‐light‐dc‐motor.py

REMOTE MONITORING AND CONTROL

RUN A SIMPLE FILE SERVERCreate a directory
Change to that directory
Create a test file, enter some text, and save it
Run this
mkdir ~/website
cd ~/website
nano test.txt
sudo python ‐m SimpleHTTPServer 80

RUN A SIMPLE FILE SERVEREnter your Pi's IP address into your browser'saddress bar:
Can you see the test file you created?http://10.1.1.XXX/

BASIC WEB SERVERGet the script
And run it
In your browser, go to
~/thinkerers/11‐basic‐server.py
sudo python 11‐basic‐server.py
http://10.1.1.XXX/any‐text‐you‐like

WEB SERVER + SENSORLoad temperature sensor modules
Check if module detected the sensor
A file with the name "28xxxxxxxx" should exist
sudo modprobe w1‐gpiosudo modprobe w1‐therm
cd /sys/bus/w1/devices

Get the script
And run it
Access your Pi's IP address in your browser
~/thinkerers/11‐sensor‐server.py
sudo python 11‐sensor‐server.py
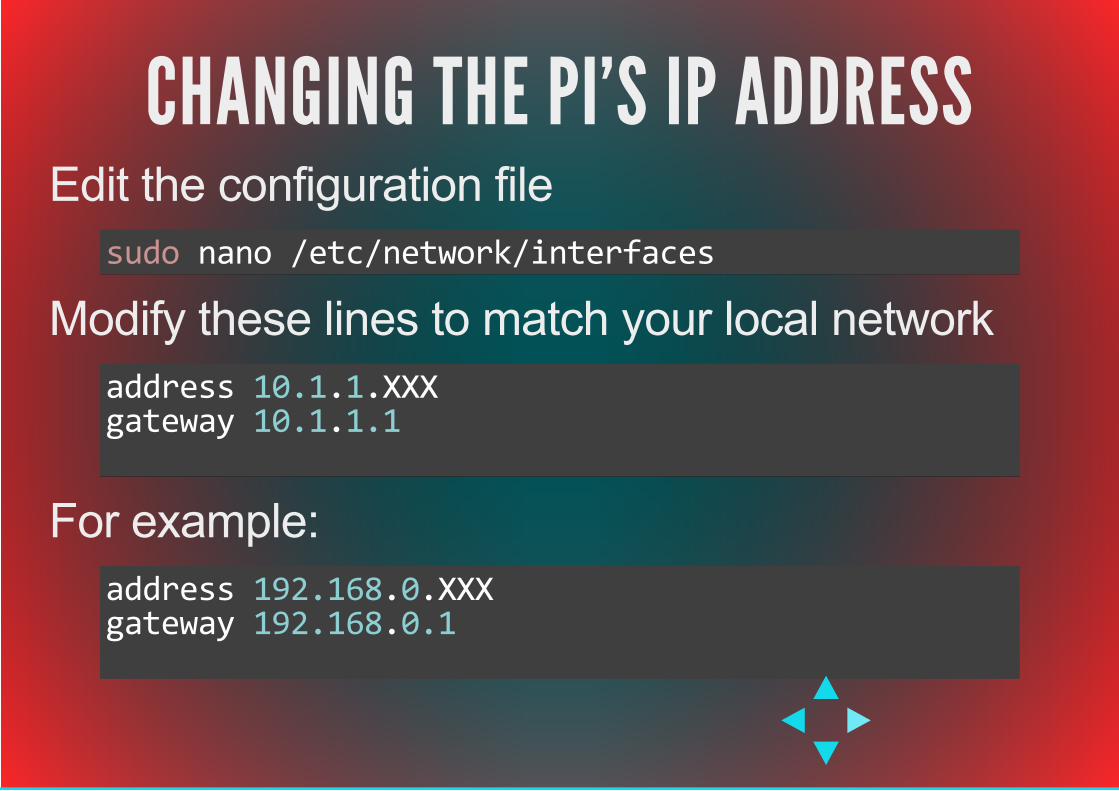
CHANGING THE PI'S IP ADDRESSEdit the configuration file
Modify these lines to match your local network
For example:
sudo nano /etc/network/interfaces
address 10.1.1.XXXgateway 10.1.1.1
address 192.168.0.XXXgateway 192.168.0.1
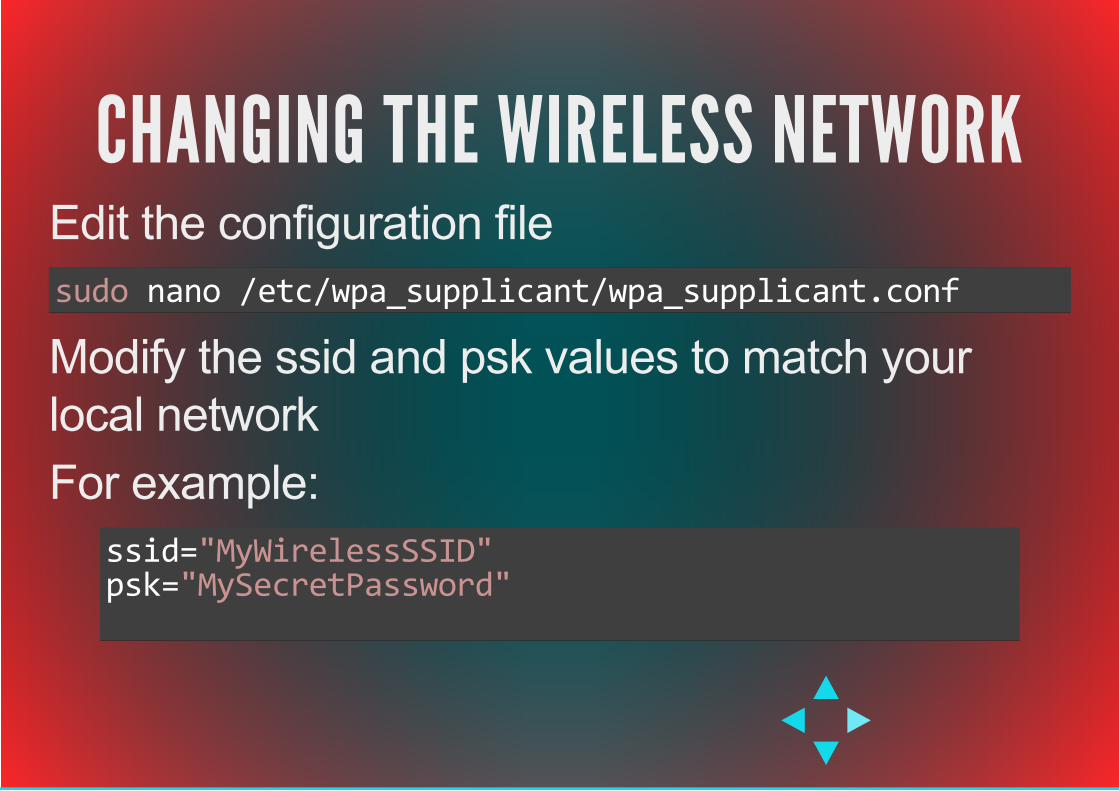
CHANGING THE WIRELESS NETWORKEdit the configuration file
Modify the ssid and psk values to match yourlocal networkFor example:
sudo nano /etc/wpa_supplicant/wpa_supplicant.conf
ssid="MyWirelessSSID"psk="MySecretPassword"

RECOMMENDED RESOURCESTOO MANY TO CHOOSE!

THE ENDTHANKS FOR COMING!
MIND DOING A SHORT SURVEY?

This work by Adrian Lai is licensed under a
Python code samples provided are free of known copyright restrictions
The Raspberry Pi and the Raspberry Pi Logoare trademarks of the Raspberry Pi Foundation
All other registered trademarks are property of their respective owners
Creative Commons AttributionShareAlike 4.0 International License