Embed Size (px)
Citation preview

Mr. Balvant TandelM.Com, MLISc, UGC-NET
Asst. ProfessorDept. of Library and Information Science
Anand Institute of P G Studies in Arts
What is Word Processing?

Features of word processor
Word Processing
Software that is designed for the entry, editing, and printing of documents.
Windows Version = Microsoft Word (MS Word)
Word processing documents include: Letters
Memorandums
Faxes
Mail Merges
Reports
One page flyers
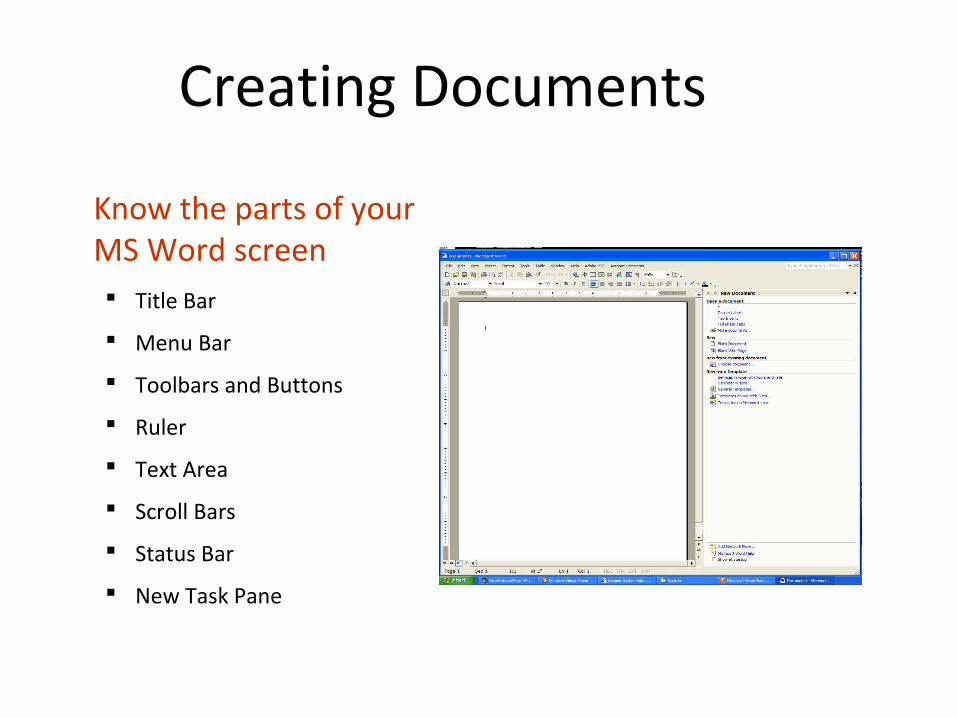
Creating Documents
Know the parts of your MS Word screen Title Bar
Menu Bar
Toolbars and Buttons
Ruler
Text Area
Scroll Bars
Status Bar
New Task Pane
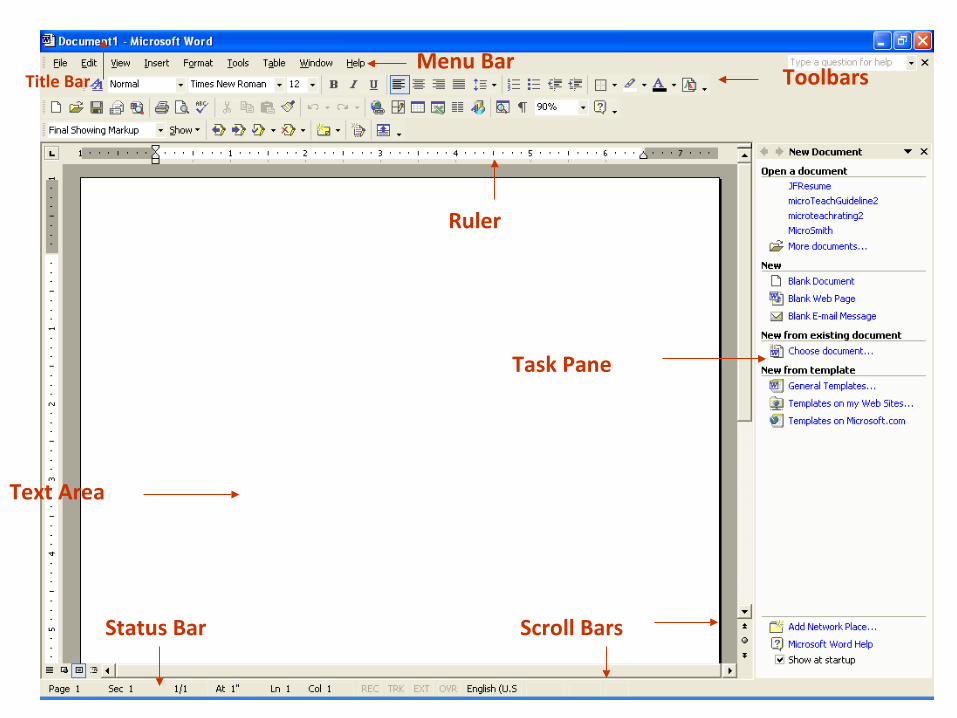
Ruler
Menu BarTitle Bar
Task Pane
Status Bar
Text Area
Scroll Bars
Toolbars
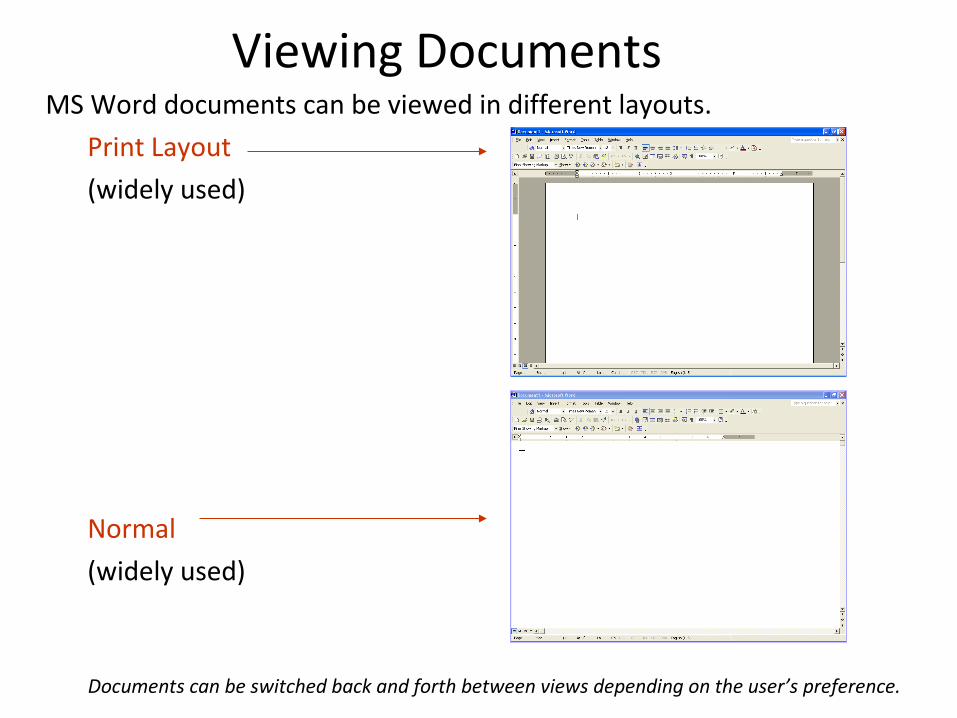
Viewing DocumentsMS Word documents can be viewed in different layouts.
Print Layout
(widely used)
Normal
(widely used)
Documents can be switched back and forth between views depending on the user’s preference.
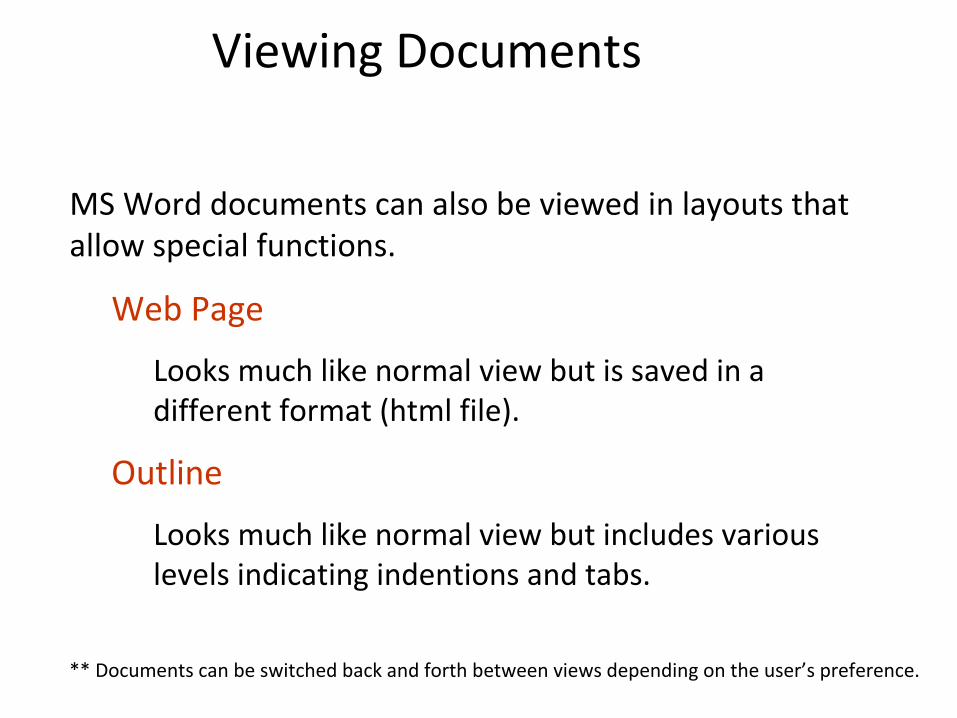
Viewing Documents
MS Word documents can also be viewed in layouts that allow special functions.
Web Page
Looks much like normal view but is saved in a different format (html file).
Outline
Looks much like normal view but includes various levels indicating indentions and tabs.
** Documents can be switched back and forth between views depending on the user’s preference.
Saving Documents Always save in a familiar location.
Create a folder for multiple documents.
Be sure to name your file appropriately.
MS Word will add a file extension to the name.
File names are followed by a period and a three letter extension. MS Word = .doc
Save As vs. Save Save a new document with Save As. To update an existing document use Save.
Always be sure to make a back up copy.
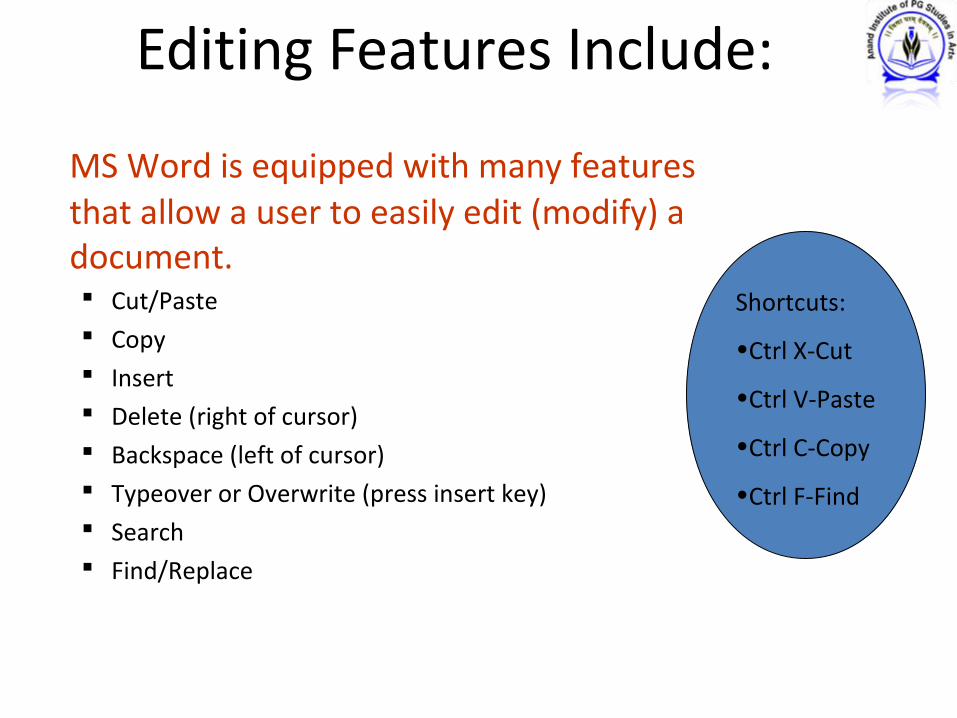
Editing Features Include:
MS Word is equipped with many features that allow a user to easily edit (modify) a document. Cut/Paste Copy Insert Delete (right of cursor) Backspace (left of cursor) Typeover or Overwrite (press insert key) Search Find/Replace
Shortcuts:
•Ctrl X-Cut
•Ctrl V-Paste
•Ctrl C-Copy
•Ctrl F-Find
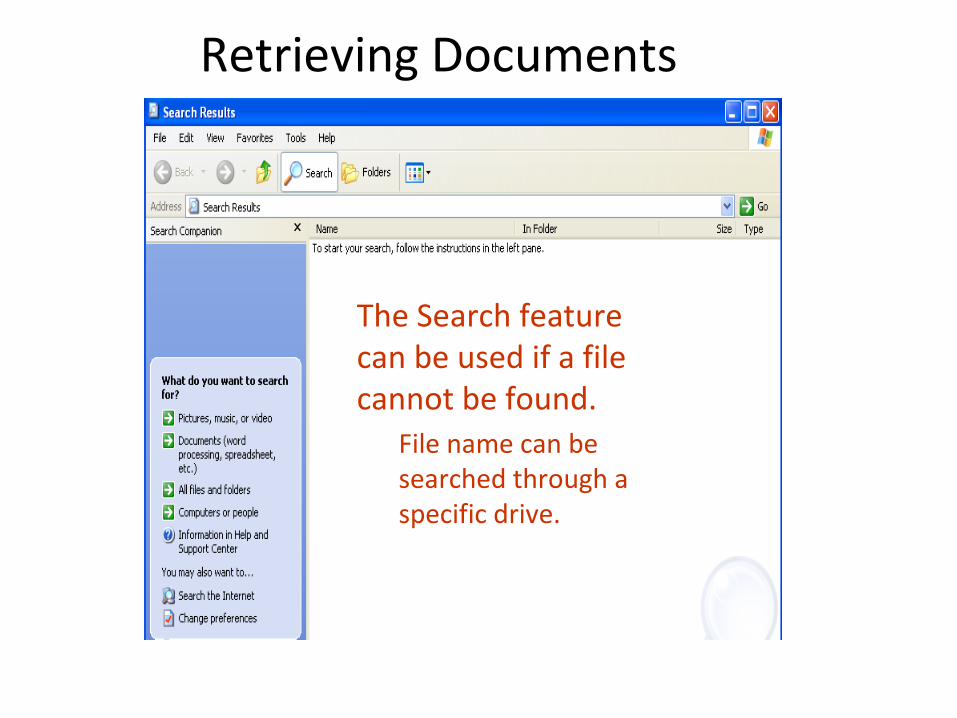
Retrieving Documents
The Search feature can be used if a file cannot be found.
File name can be searched through a specific drive.
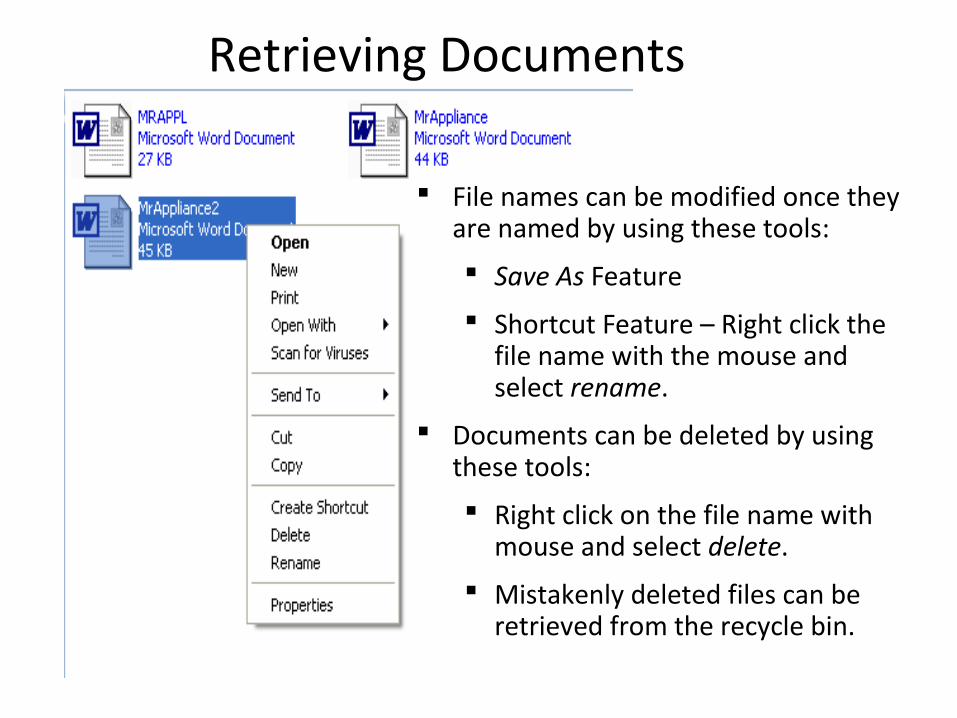
Retrieving Documents
File names can be modified once they are named by using these tools:
Save As Feature
Shortcut Feature – Right click the file name with the mouse and select rename.
Documents can be deleted by using these tools:
Right click on the file name with mouse and select delete.
Mistakenly deleted files can be retrieved from the recycle bin.
Printing Documents
Before printing a final draft be sure to proofread. Read over the document again. Ask a neighbor to proofread. Use the Spelling/Grammar Check.
After proofreading, resave and print.
Character Formatting
Font: A group of characters that have a similar appearance.
Font Attributes: Additions that enhance your font for emphasis.
Font Size: The size of characters.
Type Face: A set of characters with a common style and design.
Character Formatting
Bold/Boldface: A formatting option that makes selected words print darker than normal.
Italics: Characters are evenly slanted toward the right.
Subscript: Text that has been lowered vertically.
Superscript: Text that has been raised vertically.
Underline: A horizontal line that is placed beneath characters. (Do not underline for emphasis since you can do this with bold, italics, color, and font size. Reserve underlining for hot links as an underline in modern computer usage implies a link web link or other file link.)
Paragraph Formatting
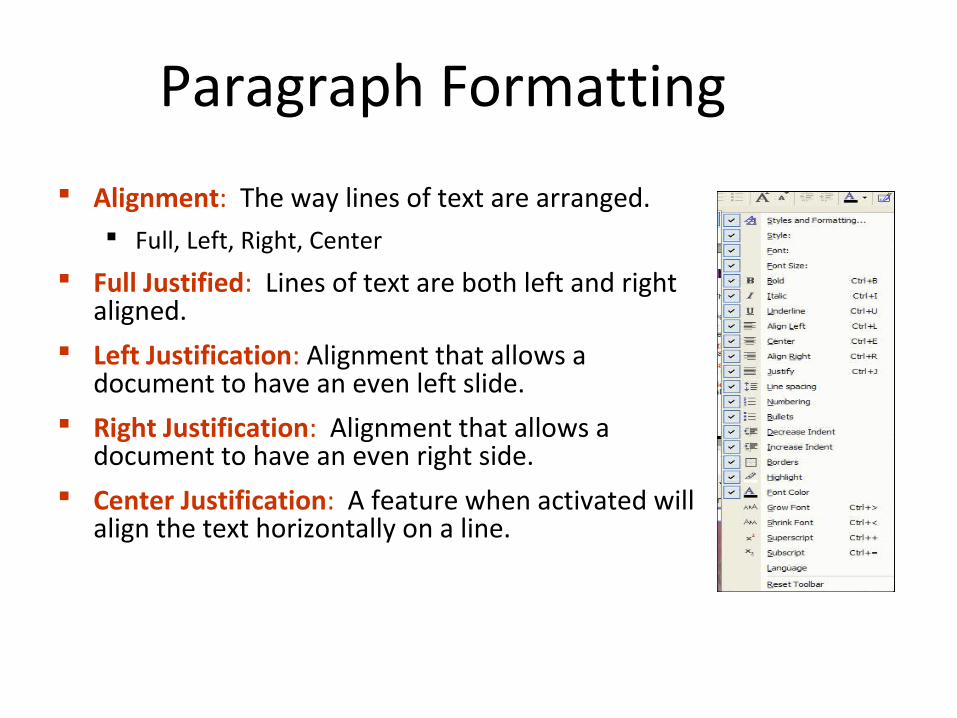
Alignment: The way lines of text are arranged. Full, Left, Right, Center
Full Justified: Lines of text are both left and right aligned.
Left Justification: Alignment that allows a document to have an even left slide.
Right Justification: Alignment that allows a document to have an even right side.
Center Justification: A feature when activated will align the text horizontally on a line.
Character Formatting
Border: A frame that surrounds pictures or text.
Bulleted List: A list of key points, each preceded by a symbol for emphasis.
Hanging Indent: All lines except the first line are indented. Used in citing references.
Indent: Insetting text from one of the margins.
Paragraph Formatting
Line Spacing: The amount of space between lines in a document. Single Space, Double Space, Triple Space, etc.
Page Break: Indicates that the maximum number of lines have been keyed on a page and a new page is beginning. Hard break - created by the user.
Soft break - created by the word processing program.
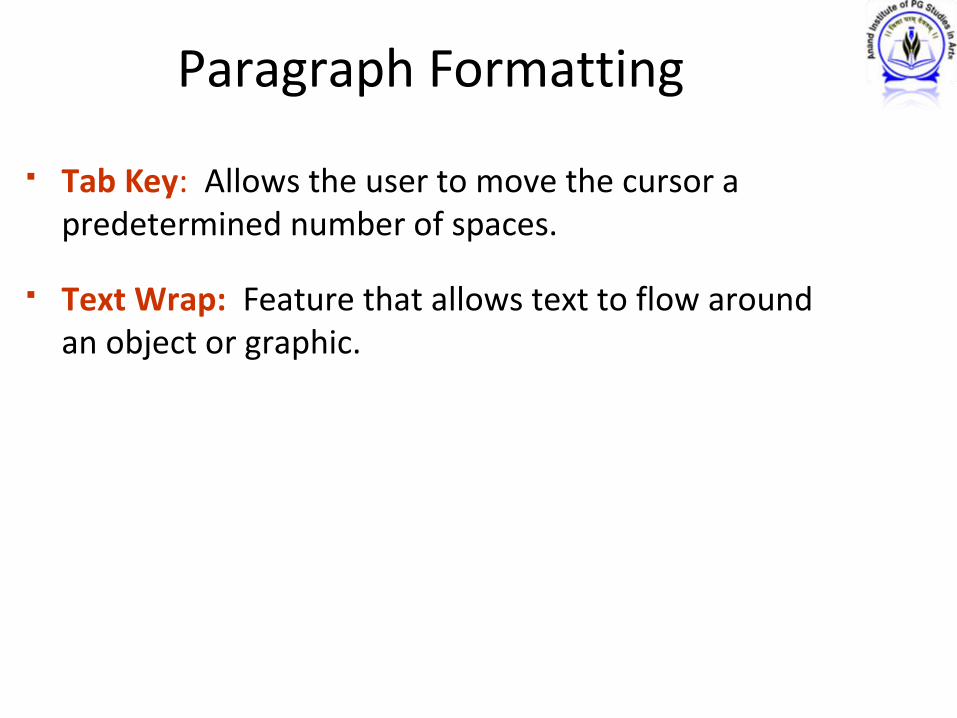
Paragraph Formatting
Tab Key: Allows the user to move the cursor a predetermined number of spaces.
Text Wrap: Feature that allows text to flow around an object or graphic.
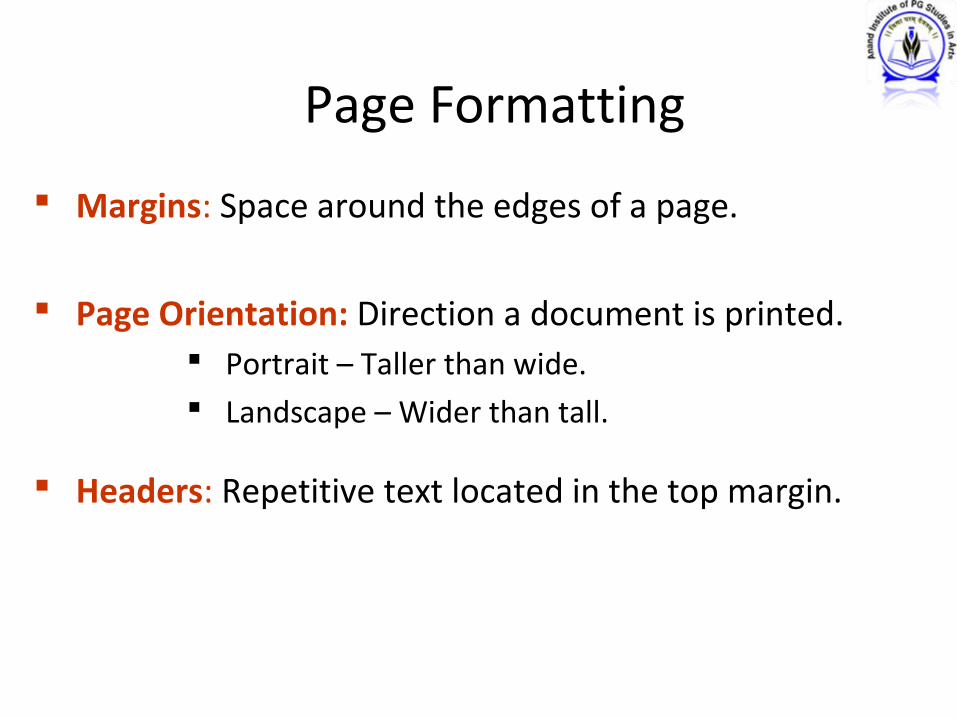
Page Formatting
Margins: Space around the edges of a page.
Page Orientation: Direction a document is printed. Portrait – Taller than wide. Landscape – Wider than tall.
Headers: Repetitive text located in the top margin.
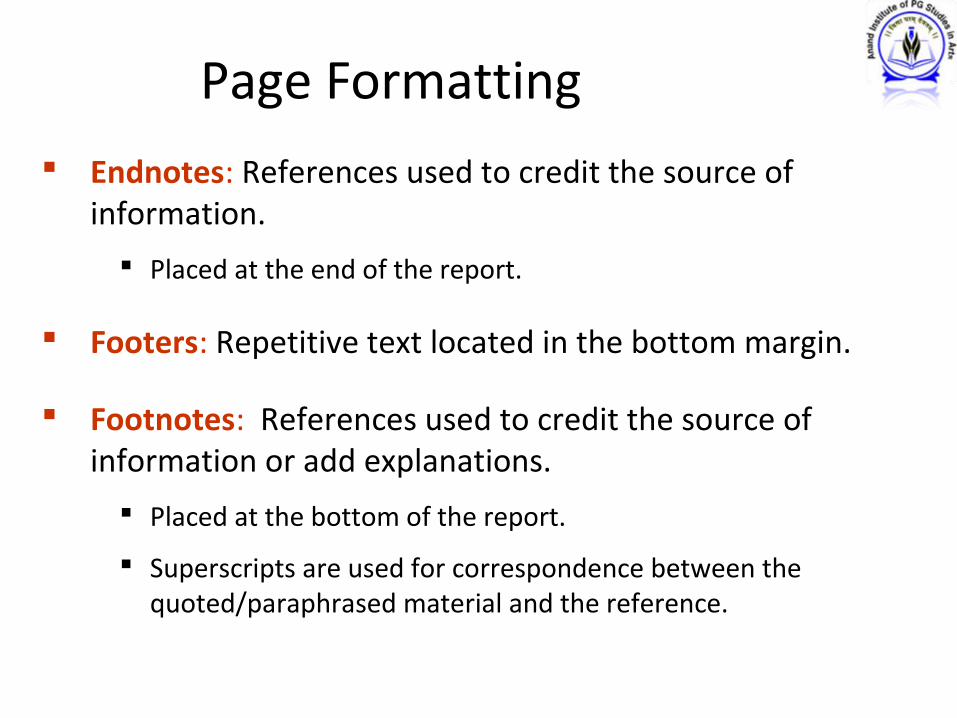
Page Formatting Endnotes: References used to credit the source of
information.
Placed at the end of the report.
Footers: Repetitive text located in the bottom margin.
Footnotes: References used to credit the source of information or add explanations.
Placed at the bottom of the report.
Superscripts are used for correspondence between the quoted/paraphrased material and the reference.
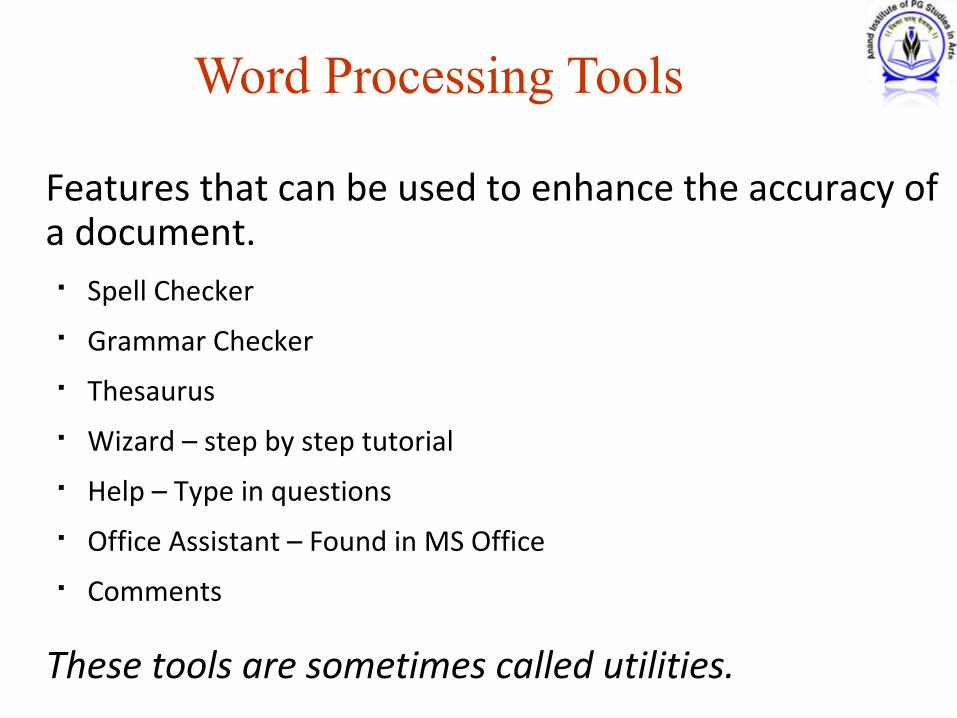
Features that can be used to enhance the accuracy of a document. Spell Checker Grammar Checker Thesaurus Wizard – step by step tutorial Help – Type in questions Office Assistant – Found in MS Office Comments
These tools are sometimes called utilities.
Word Processing Tools
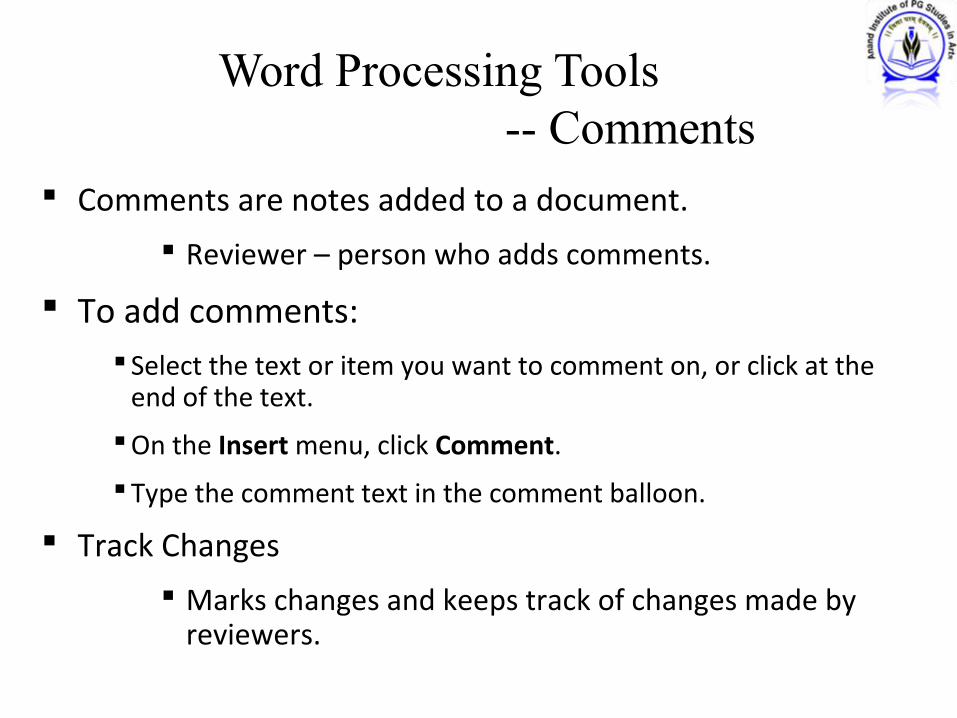
Word Processing Tools-- Comments
Comments are notes added to a document.
Reviewer – person who adds comments.
To add comments: Select the text or item you want to comment on, or click at the
end of the text.
On the Insert menu, click Comment.
Type the comment text in the comment balloon.
Track Changes
Marks changes and keeps track of changes made by reviewers.
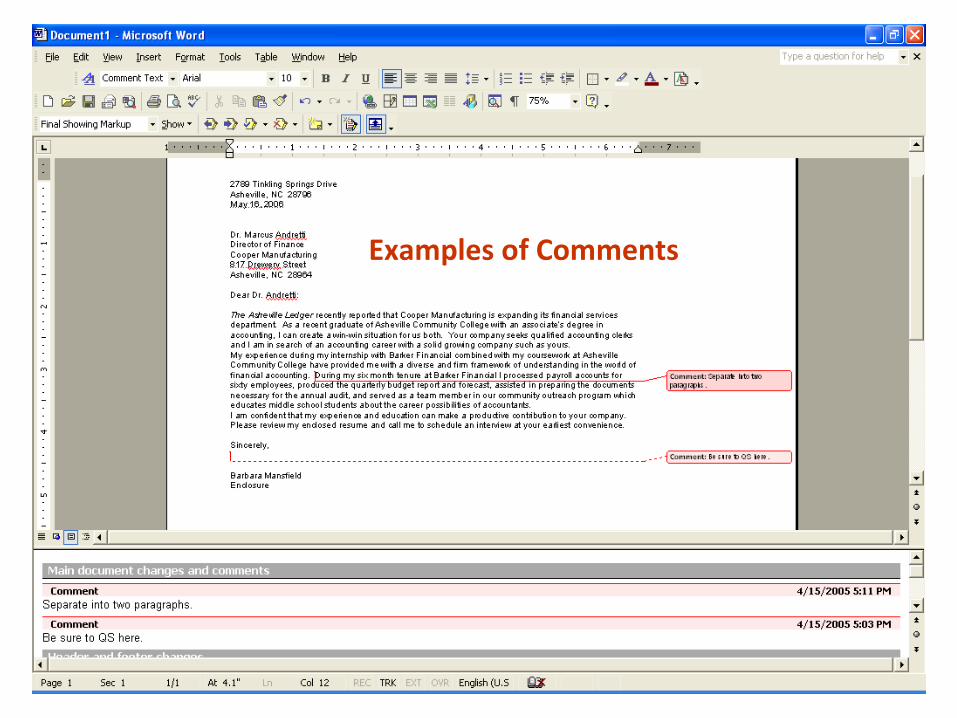
Examples of Comments
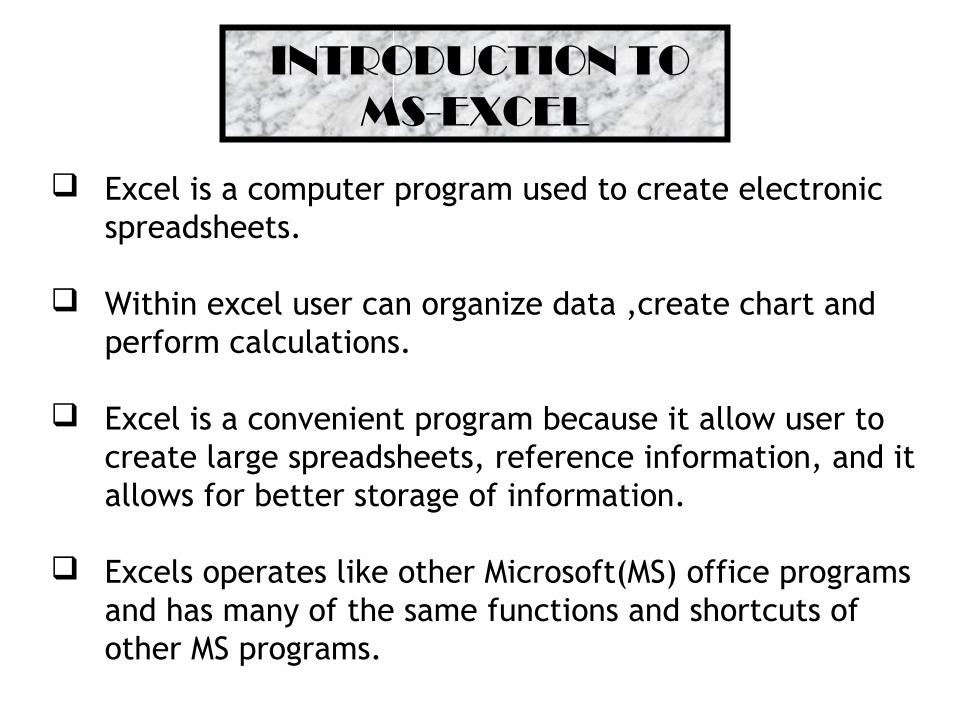
INTRODUCTION TO MS-EXCEL
Excel is a computer program used to create electronic spreadsheets.
Within excel user can organize data ,create chart and perform calculations.
Excel is a convenient program because it allow user to create large spreadsheets, reference information, and it allows for better storage of information.
Excels operates like other Microsoft(MS) office programs and has many of the same functions and shortcuts of other MS programs.
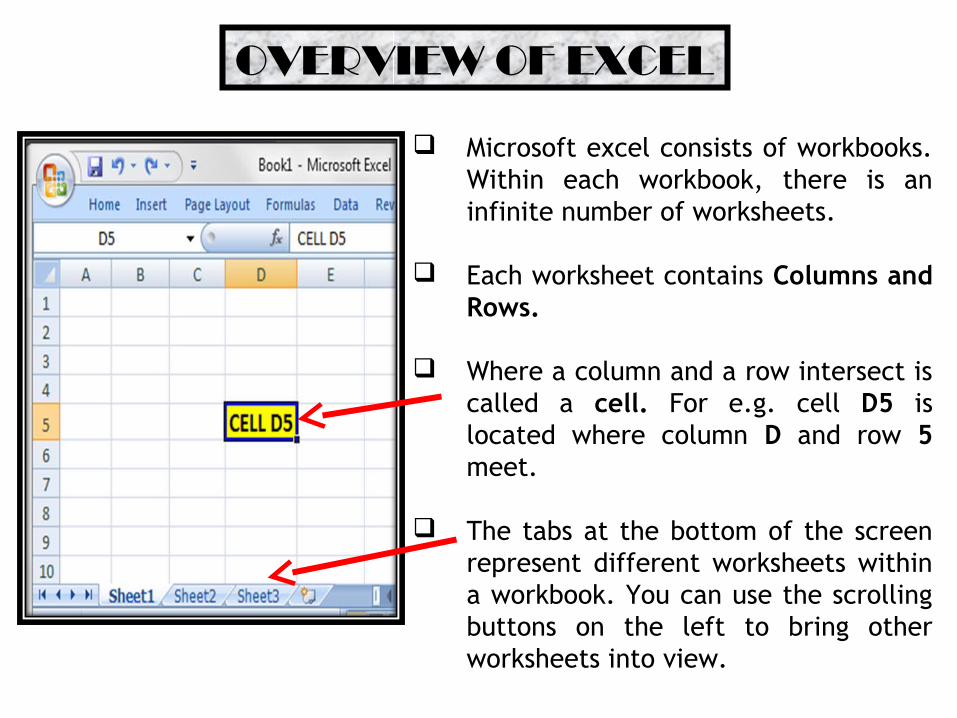
OVERVIEW OF EXCEL
Microsoft excel consists of workbooks. Within each workbook, there is an infinite number of worksheets.
Each worksheet contains Columns and Rows.
Where a column and a row intersect is called a cell. For e.g. cell D5 is located where column D and row 5 meet.
The tabs at the bottom of the screen represent different worksheets within a workbook. You can use the scrolling buttons on the left to bring other worksheets into view.
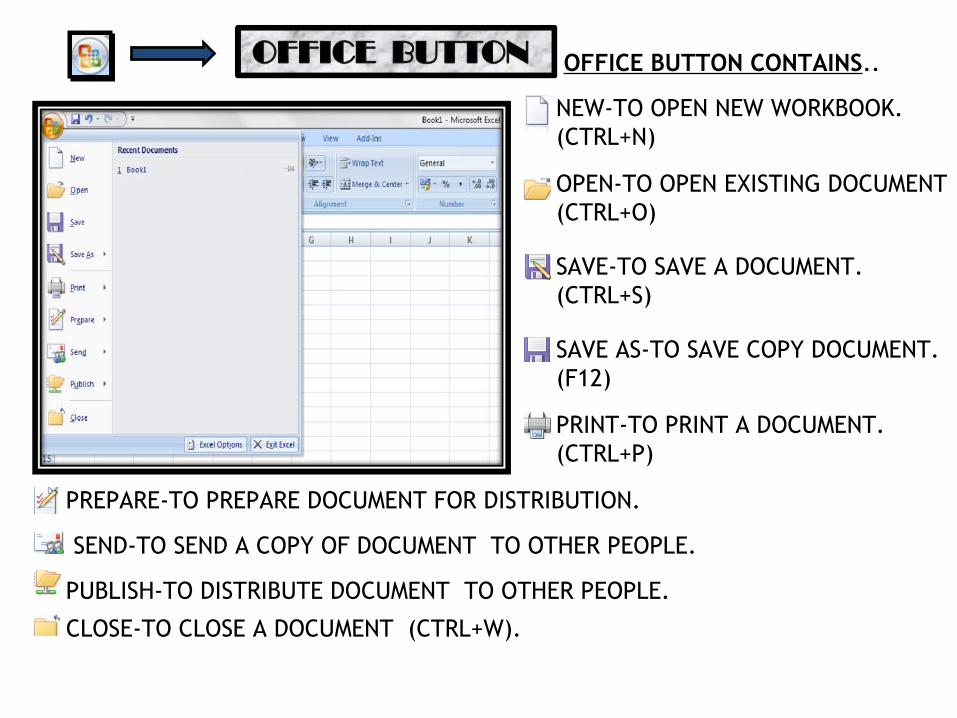
OFFICE BUTTON CONTAINS..
NEW-TO OPEN NEW WORKBOOK. (CTRL+N)
OPEN-TO OPEN EXISTING DOCUMENT (CTRL+O)
SAVE-TO SAVE A DOCUMENT. (CTRL+S)
SAVE AS-TO SAVE COPY DOCUMENT. (F12)
PRINT-TO PRINT A DOCUMENT. (CTRL+P)
PREPARE-TO PREPARE DOCUMENT FOR DISTRIBUTION.
SEND-TO SEND A COPY OF DOCUMENT TO OTHER PEOPLE.
PUBLISH-TO DISTRIBUTE DOCUMENT TO OTHER PEOPLE.
CLOSE-TO CLOSE A DOCUMENT (CTRL+W).
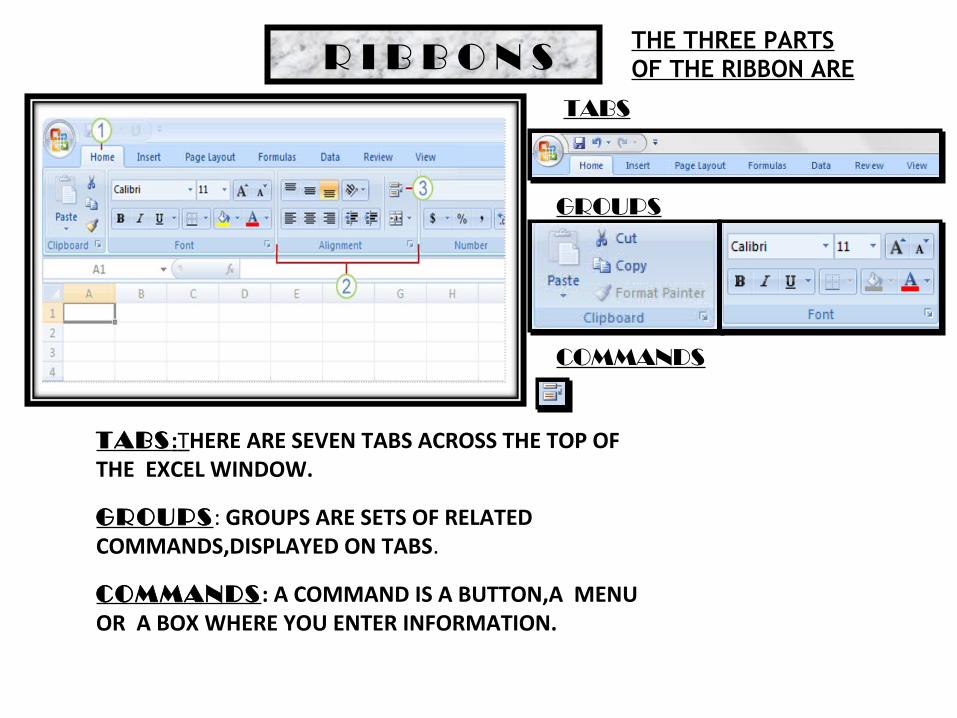
TABS :THERE ARE SEVEN TABS ACROSS THE TOP OF THE EXCEL WINDOW.
GROUPS : GROUPS ARE SETS OF RELATED COMMANDS,DISPLAYED ON TABS.
COMMANDS : A COMMAND IS A BUTTON,A MENU OR A BOX WHERE YOU ENTER INFORMATION.
THE THREE PARTS OF THE RIBBON ARE R I B B O N S
TABS
GROUPS
COMMANDS
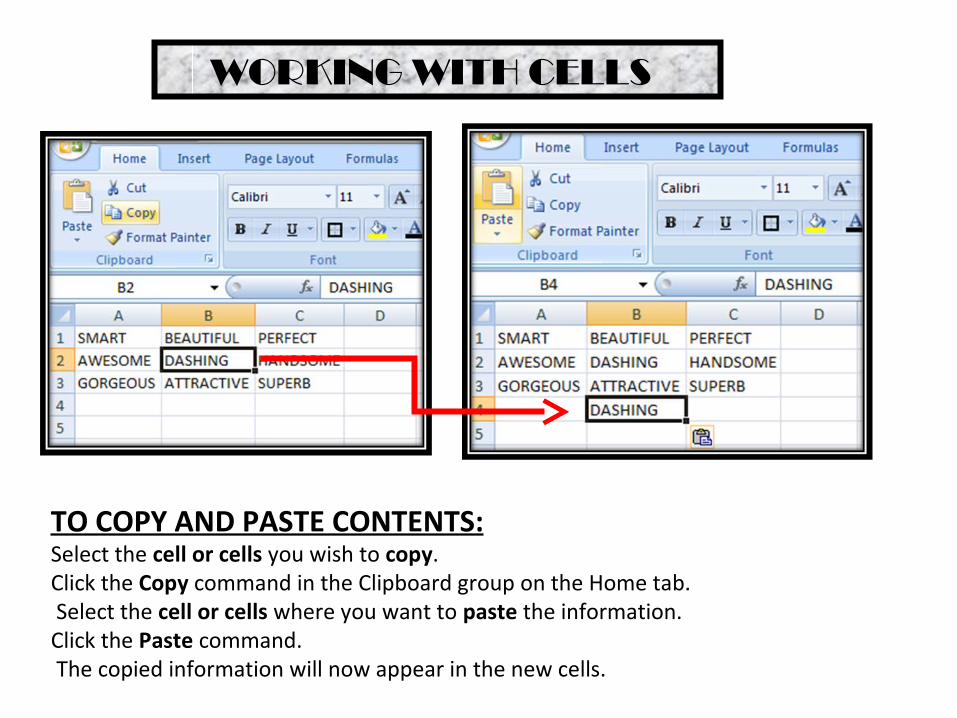
WORKING WITH CELLS
TO COPY AND PASTE CONTENTS:Select the cell or cells you wish to copy. Click the Copy command in the Clipboard group on the Home tab. Select the cell or cells where you want to paste the information.Click the Paste command. The copied information will now appear in the new cells.
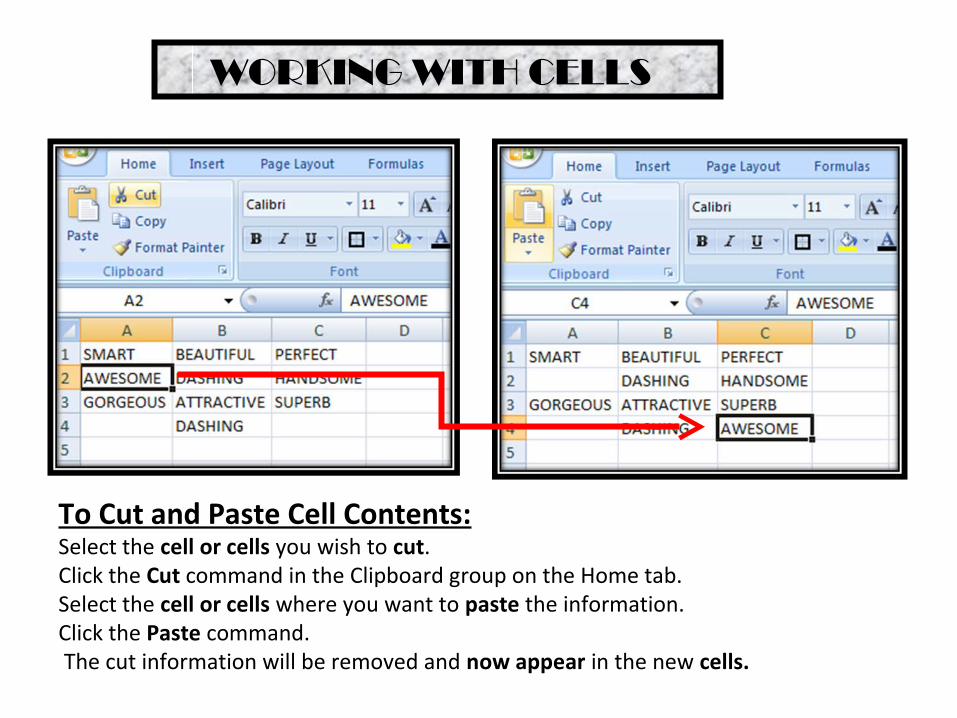
WORKING WITH CELLS
To Cut and Paste Cell Contents:Select the cell or cells you wish to cut. Click the Cut command in the Clipboard group on the Home tab.Select the cell or cells where you want to paste the information.Click the Paste command. The cut information will be removed and now appear in the new cells.
FORMATTING TEXT
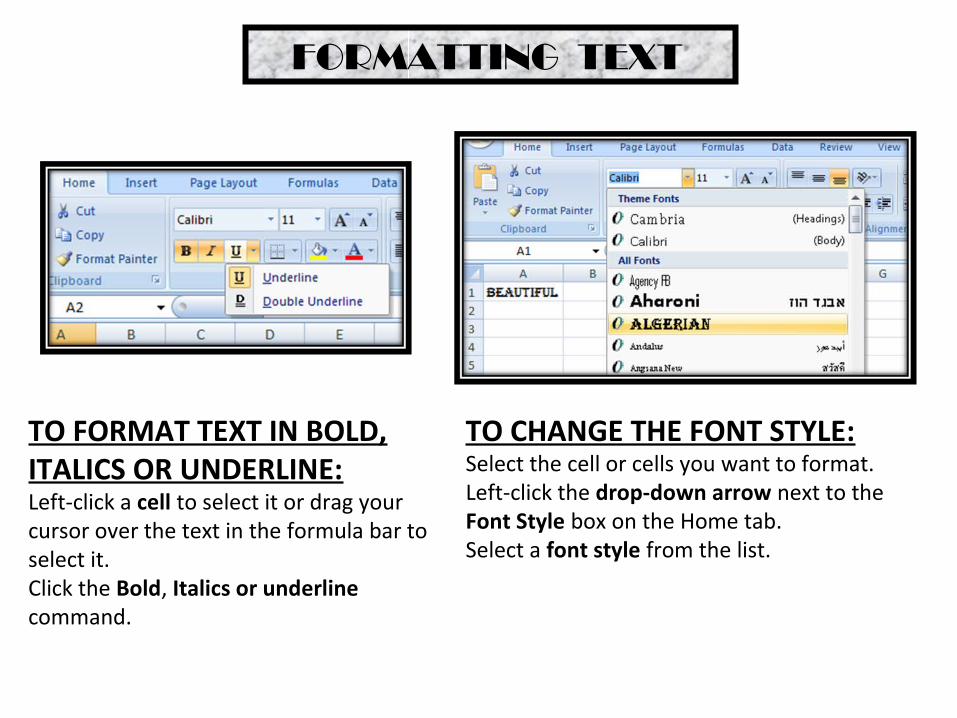
TO FORMAT TEXT IN BOLD, ITALICS OR UNDERLINE:Left-click a cell to select it or drag your cursor over the text in the formula bar to select it.Click the Bold, Italics or underline command.
TO CHANGE THE FONT STYLE:Select the cell or cells you want to format. Left-click the drop-down arrow next to the Font Style box on the Home tab.Select a font style from the list.
FORMATTING TEXT
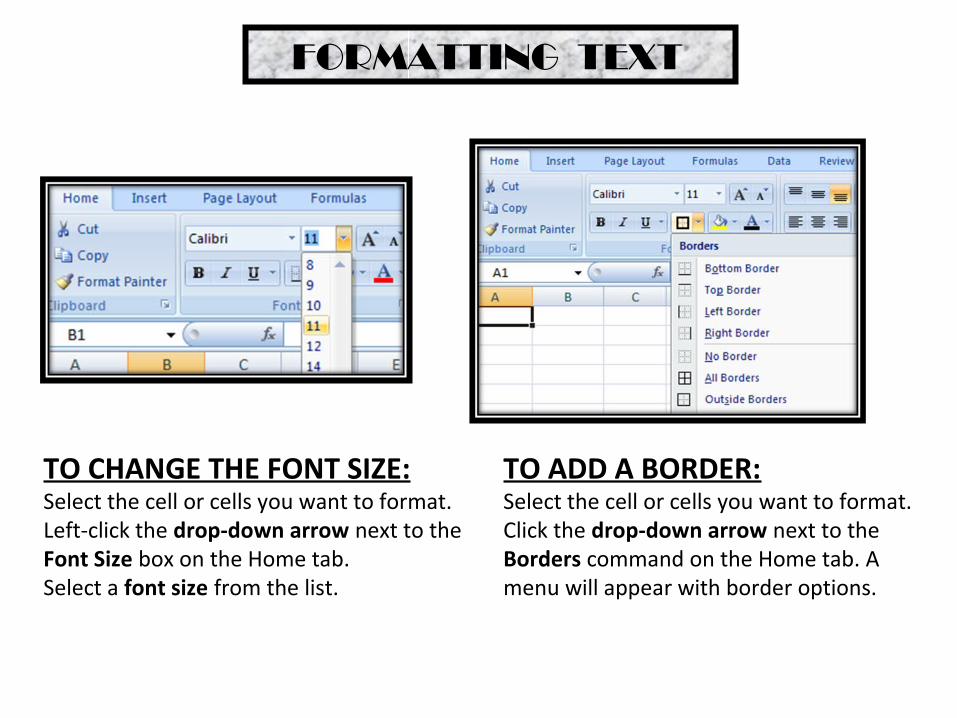
TO CHANGE THE FONT SIZE:Select the cell or cells you want to format.Left-click the drop-down arrow next to the Font Size box on the Home tab.Select a font size from the list.
TO ADD A BORDER:Select the cell or cells you want to format.Click the drop-down arrow next to the Borders command on the Home tab. A menu will appear with border options.
FORMATTING TEXT
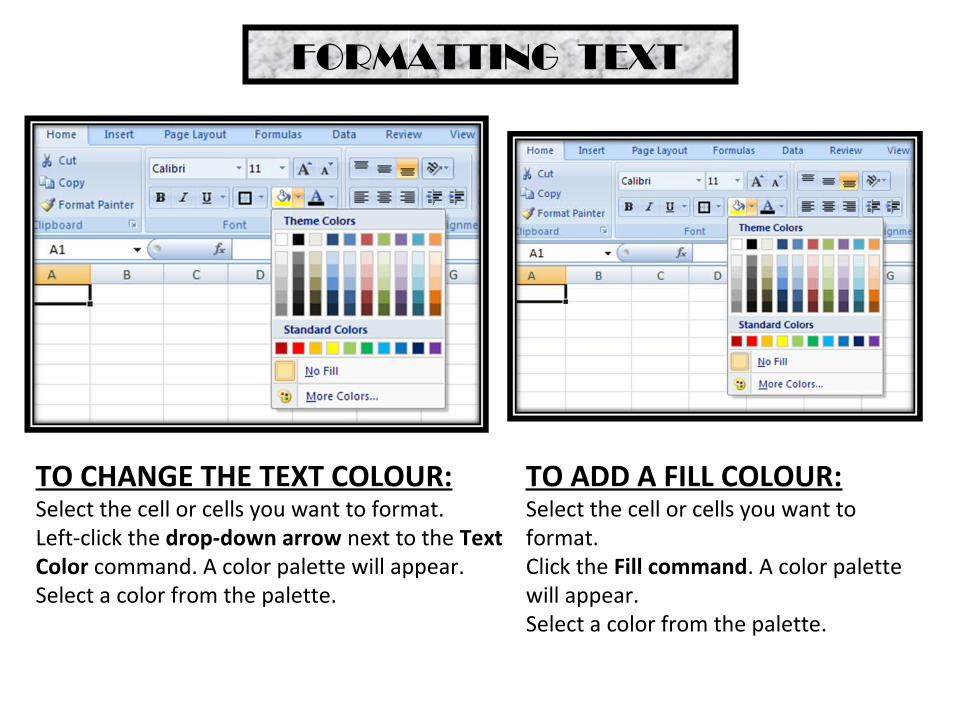
TO CHANGE THE TEXT COLOUR:Select the cell or cells you want to format.Left-click the drop-down arrow next to the Text Color command. A color palette will appear.Select a color from the palette.
TO ADD A FILL COLOUR:Select the cell or cells you want to format. Click the Fill command. A color palette will appear.Select a color from the palette.
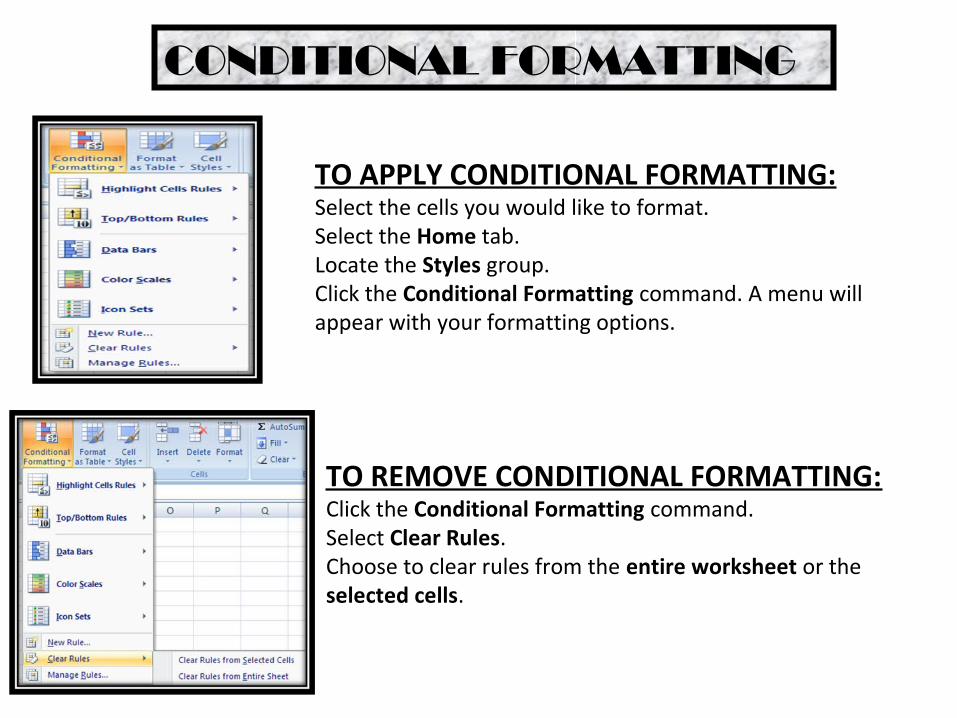
CONDITIONAL FORMATTING
TO APPLY CONDITIONAL FORMATTING:Select the cells you would like to format.Select the Home tab.Locate the Styles group.Click the Conditional Formatting command. A menu will appear with your formatting options.
TO REMOVE CONDITIONAL FORMATTING:Click the Conditional Formatting command.Select Clear Rules.Choose to clear rules from the entire worksheet or the selected cells.
CONDITIONAL FORMATTING
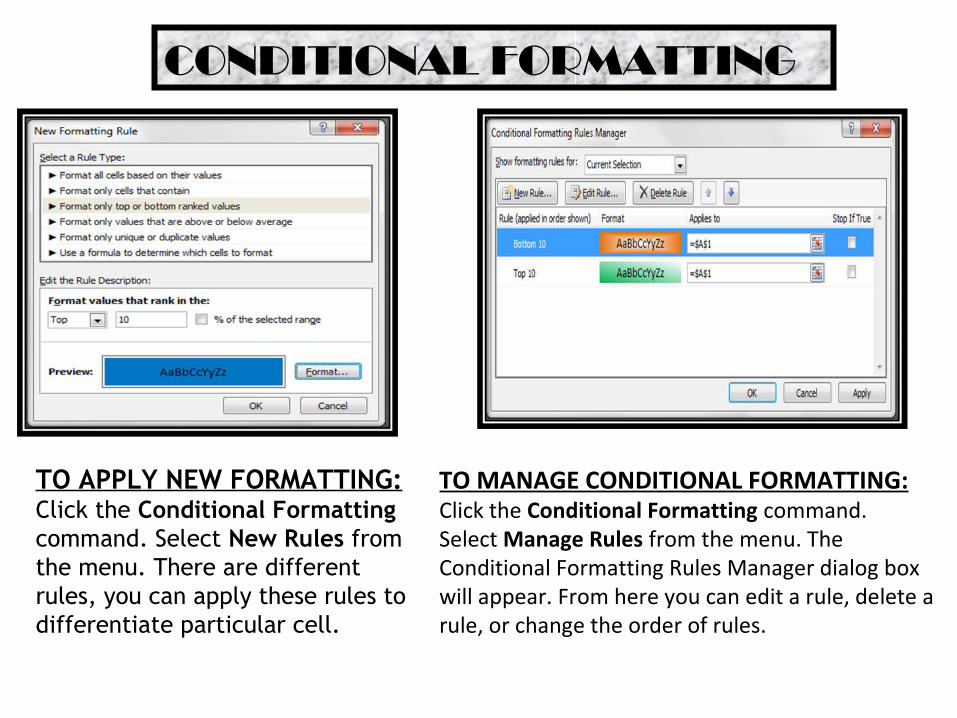
TO MANAGE CONDITIONAL FORMATTING:Click the Conditional Formatting command.Select Manage Rules from the menu. The Conditional Formatting Rules Manager dialog box will appear. From here you can edit a rule, delete a rule, or change the order of rules.
TO APPLY NEW FORMATTING:Click the Conditional Formatting command. Select New Rules from the menu. There are different rules, you can apply these rules to differentiate particular cell.
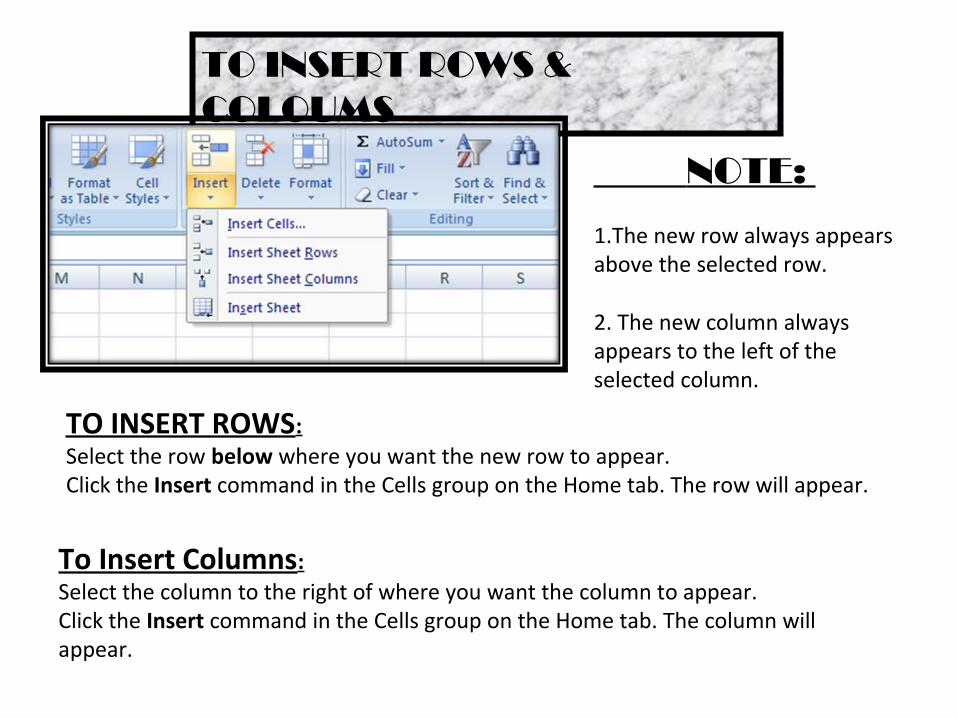
TO INSERT ROWS & COLOUMS
TO INSERT ROWS:Select the row below where you want the new row to appear.Click the Insert command in the Cells group on the Home tab. The row will appear.
To Insert Columns:Select the column to the right of where you want the column to appear.Click the Insert command in the Cells group on the Home tab. The column will appear.
NOTE:
1.The new row always appears above the selected row.
2. The new column always appears to the left of the selected column.
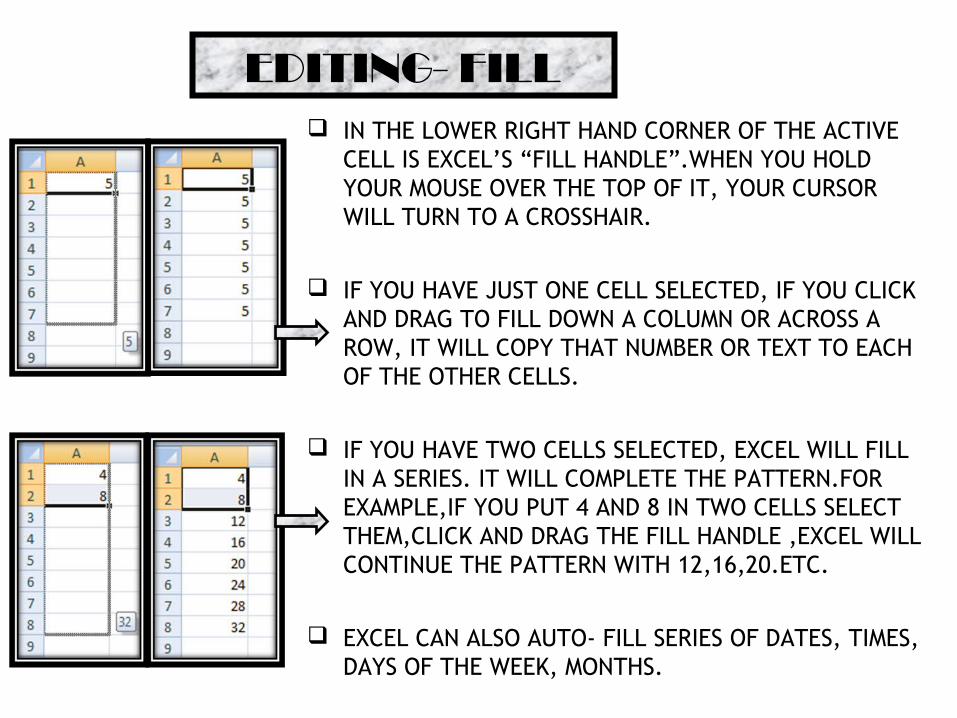
EDITING- FILL IN THE LOWER RIGHT HAND CORNER OF THE ACTIVE
CELL IS EXCEL’S “FILL HANDLE”.WHEN YOU HOLD YOUR MOUSE OVER THE TOP OF IT, YOUR CURSOR WILL TURN TO A CROSSHAIR.
IF YOU HAVE JUST ONE CELL SELECTED, IF YOU CLICK AND DRAG TO FILL DOWN A COLUMN OR ACROSS A ROW, IT WILL COPY THAT NUMBER OR TEXT TO EACH OF THE OTHER CELLS.
IF YOU HAVE TWO CELLS SELECTED, EXCEL WILL FILL IN A SERIES. IT WILL COMPLETE THE PATTERN.FOR EXAMPLE,IF YOU PUT 4 AND 8 IN TWO CELLS SELECT THEM,CLICK AND DRAG THE FILL HANDLE ,EXCEL WILL CONTINUE THE PATTERN WITH 12,16,20.ETC.
EXCEL CAN ALSO AUTO- FILL SERIES OF DATES, TIMES, DAYS OF THE WEEK, MONTHS.
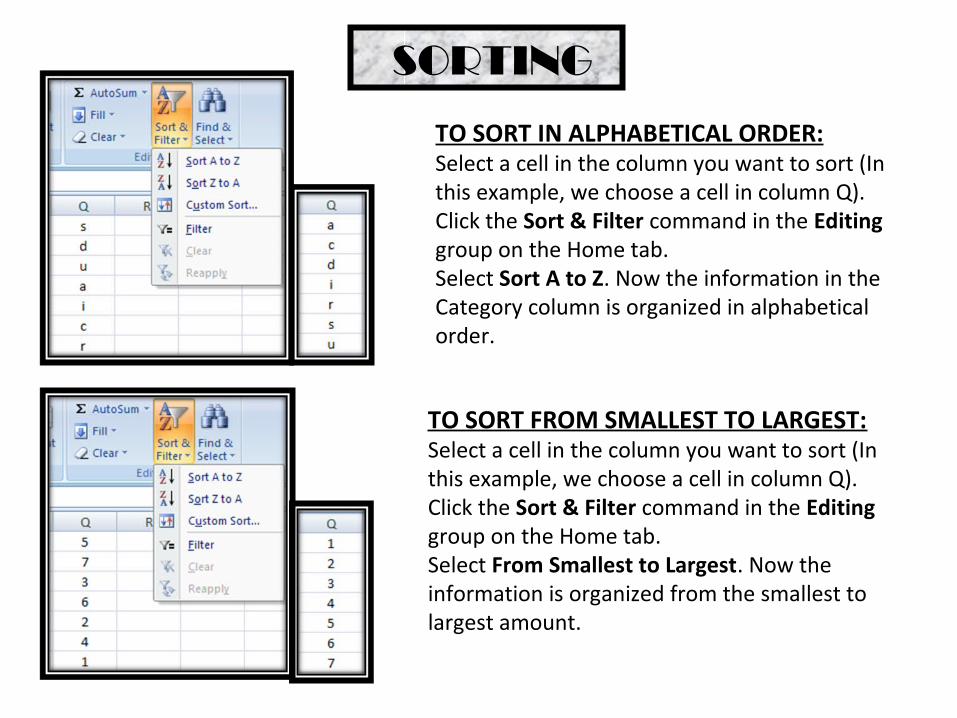
SORTING
TO SORT IN ALPHABETICAL ORDER:Select a cell in the column you want to sort (In this example, we choose a cell in column Q).Click the Sort & Filter command in the Editing group on the Home tab. Select Sort A to Z. Now the information in the Category column is organized in alphabetical order.
TO SORT FROM SMALLEST TO LARGEST:Select a cell in the column you want to sort (In this example, we choose a cell in column Q).Click the Sort & Filter command in the Editing group on the Home tab. Select From Smallest to Largest. Now the information is organized from the smallest to largest amount.

CELL REFERENCING
A RELATIVE CELL
REFERENCE AS (A1) IS BASED
ON THE RELATIVE
POSITION OF THE CELL. IF THE POSITION OF THE CELL
THAT CONTAINS THE
REFERENCE CHANGES, THE
REFERENCE ITSELF IS
CHANGED.
IN CELL (C1) SUM FUNCTION IS USED.THEN FUNCTION FROM CELL (C1) IS COPY TO CELL (D3).WHEN THE POSITION OF THE CELL IS CHANGED FROM (C1) TO (D3),THEN THE REFERENCE IS ALSO CHANGED FROM (A1,B1) TO (B3,C3).
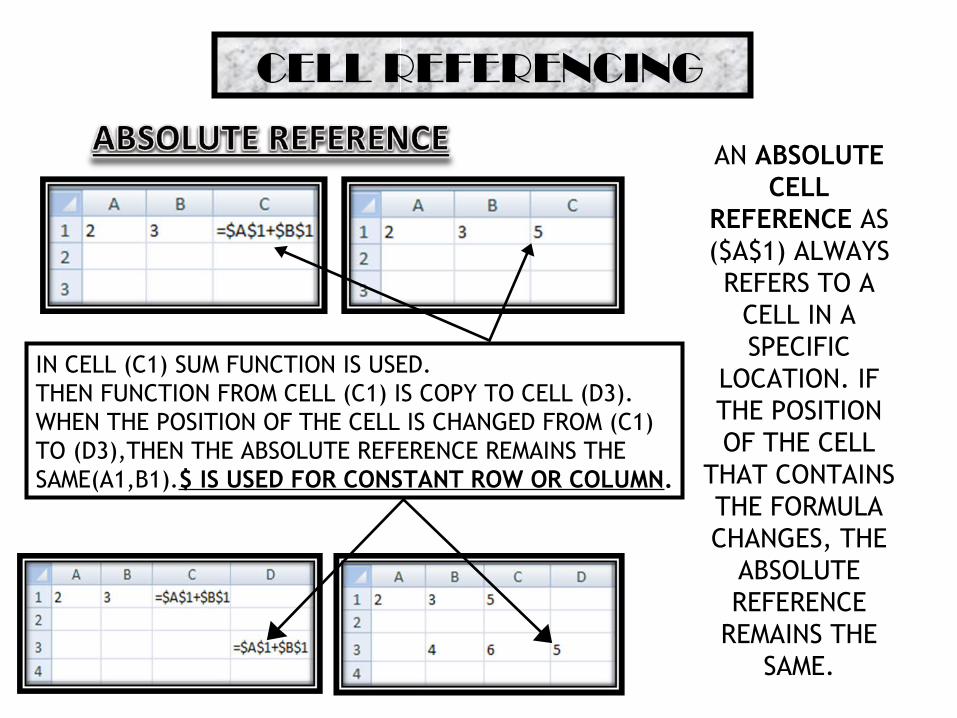
CELL REFERENCING
AN ABSOLUTE CELL
REFERENCE AS ($A$1) ALWAYS REFERS TO A
CELL IN A SPECIFIC
LOCATION. IF THE POSITION OF THE CELL
THAT CONTAINS THE FORMULA CHANGES, THE
ABSOLUTE REFERENCE
REMAINS THE SAME.
IN CELL (C1) SUM FUNCTION IS USED.THEN FUNCTION FROM CELL (C1) IS COPY TO CELL (D3).WHEN THE POSITION OF THE CELL IS CHANGED FROM (C1) TO (D3),THEN THE ABSOLUTE REFERENCE REMAINS THE SAME(A1,B1).$ IS USED FOR CONSTANT ROW OR COLUMN.
CELL REFERENCING
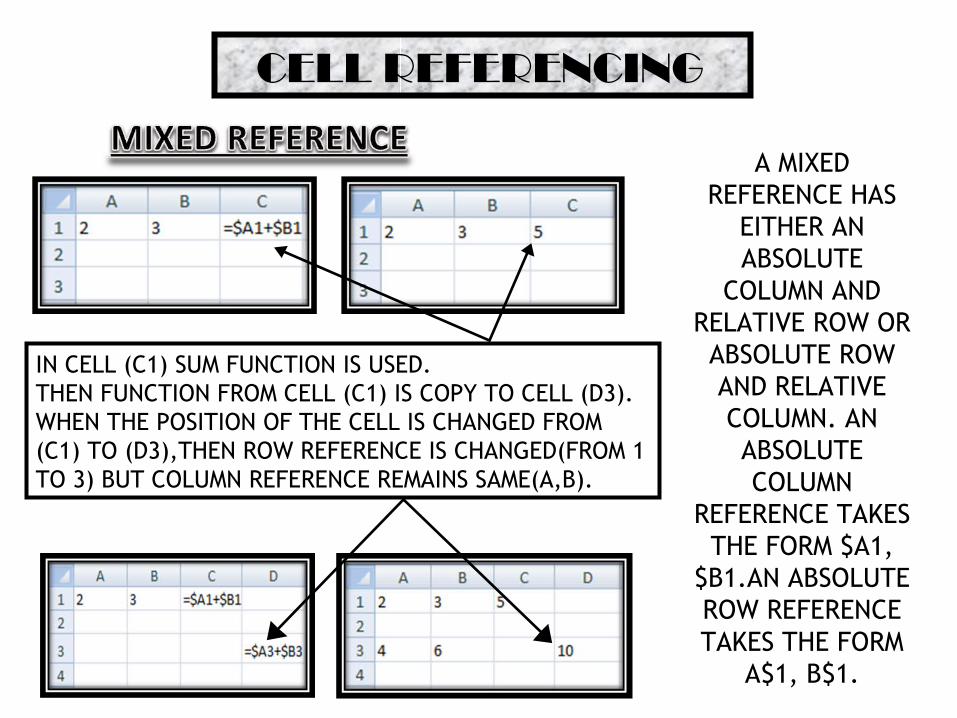
IN CELL (C1) SUM FUNCTION IS USED.THEN FUNCTION FROM CELL (C1) IS COPY TO CELL (D3).WHEN THE POSITION OF THE CELL IS CHANGED FROM (C1) TO (D3),THEN ROW REFERENCE IS CHANGED(FROM 1 TO 3) BUT COLUMN REFERENCE REMAINS SAME(A,B).
A MIXED REFERENCE HAS
EITHER AN ABSOLUTE
COLUMN AND RELATIVE ROW OR ABSOLUTE ROW AND RELATIVE COLUMN. AN ABSOLUTE COLUMN
REFERENCE TAKES THE FORM $A1,
$B1.AN ABSOLUTE ROW REFERENCE TAKES THE FORM
A$1, B$1.
===
===
FUNCTIONS
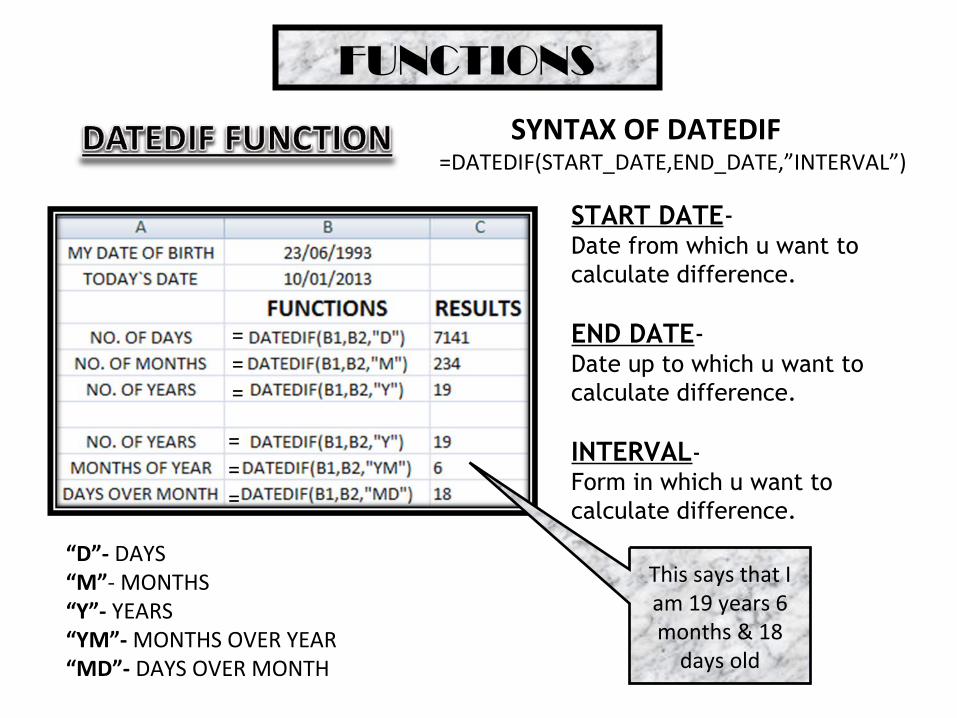
SYNTAX OF DATEDIF=DATEDIF(START_DATE,END_DATE,”INTERVAL”)
START DATE- Date from which u want to calculate difference.
END DATE- Date up to which u want to calculate difference.
INTERVAL- Form in which u want to calculate difference.
This says that I am 19 years 6 months & 18
days old
“D”- DAYS“M”- MONTHS“Y”- YEARS“YM”- MONTHS OVER YEAR“MD”- DAYS OVER MONTH
FUNCTIONS
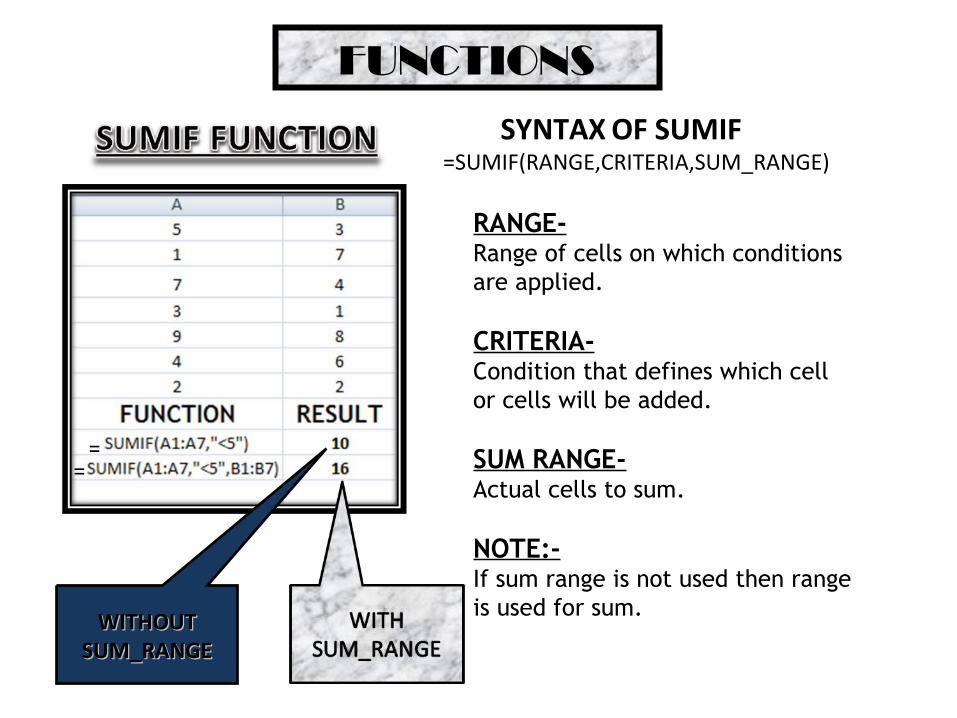
SYNTAX OF SUMIF=SUMIF(RANGE,CRITERIA,SUM_RANGE)
RANGE-Range of cells on which conditions are applied.
CRITERIA-Condition that defines which cell or cells will be added.
SUM RANGE-Actual cells to sum.
NOTE:-If sum range is not used then range is used for sum.
WITHOUT WITHOUT SUM_RANGESUM_RANGE
==
FUNCTIONS
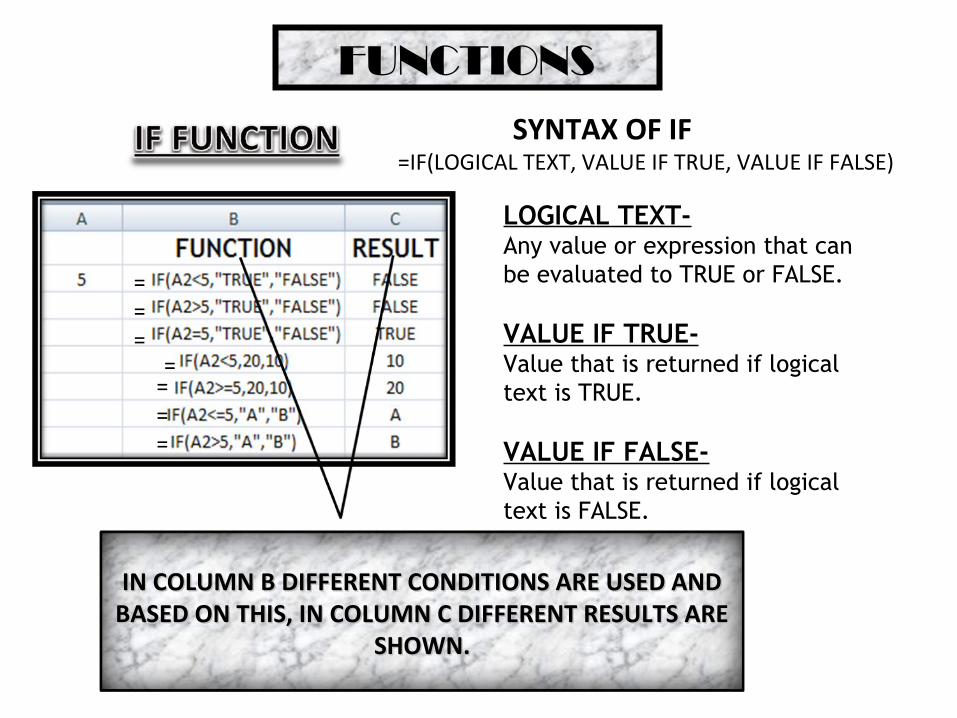
SYNTAX OF IF=IF(LOGICAL TEXT, VALUE IF TRUE, VALUE IF FALSE)
LOGICAL TEXT-Any value or expression that can be evaluated to TRUE or FALSE.
VALUE IF TRUE-Value that is returned if logical text is TRUE.
VALUE IF FALSE-Value that is returned if logical text is FALSE.
IN COLUMN B DIFFERENT CONDITIONS ARE USED AND IN COLUMN B DIFFERENT CONDITIONS ARE USED AND BASED ON THIS, IN COLUMN C DIFFERENT RESULTS ARE BASED ON THIS, IN COLUMN C DIFFERENT RESULTS ARE
SHOWN.SHOWN.
===
===
=
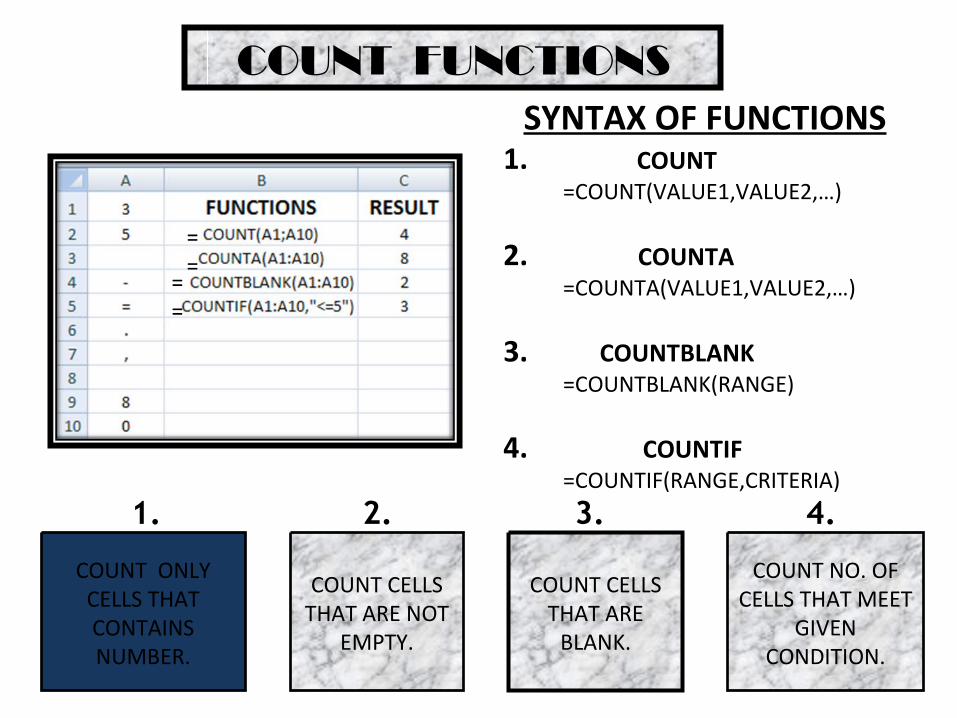
COUNT FUNCTIONSSYNTAX OF FUNCTIONS
1. COUNT =COUNT(VALUE1,VALUE2,…)
2. COUNTA =COUNTA(VALUE1,VALUE2,…)
3. COUNTBLANK =COUNTBLANK(RANGE)
4. COUNTIF =COUNTIF(RANGE,CRITERIA)
COUNT ONLY CELLS THAT CONTAINS NUMBER.
COUNT CELLS THAT ARE NOT
EMPTY.
COUNT CELLS THAT ARE
BLANK.
COUNT NO. OF CELLS THAT MEET
GIVEN CONDITION.
1. 2. 3. 4.
==
==
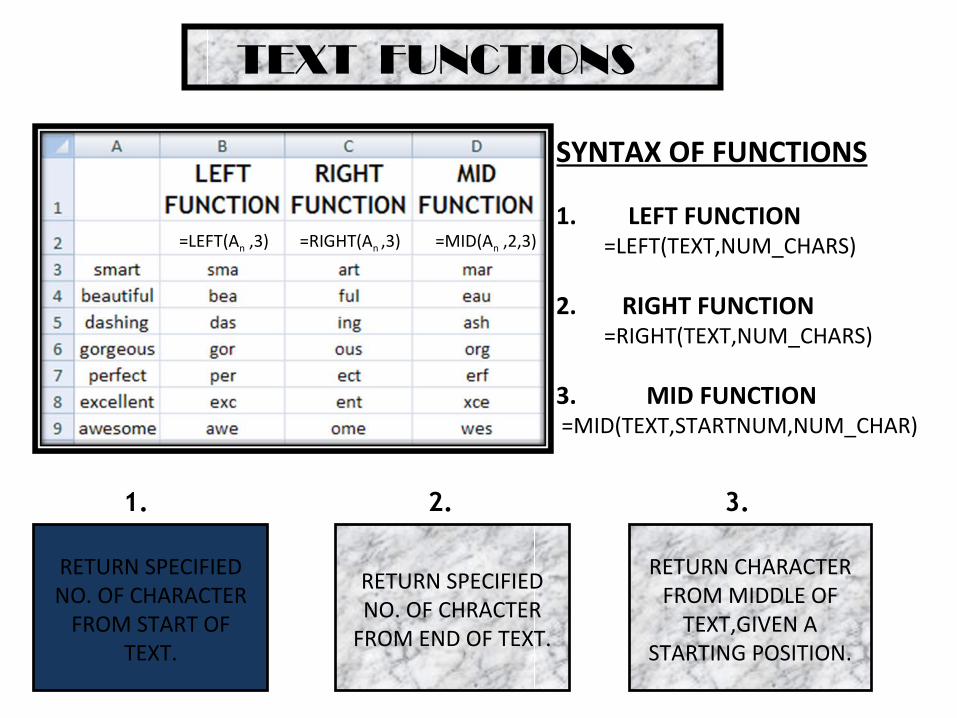
TEXT FUNCTIONS
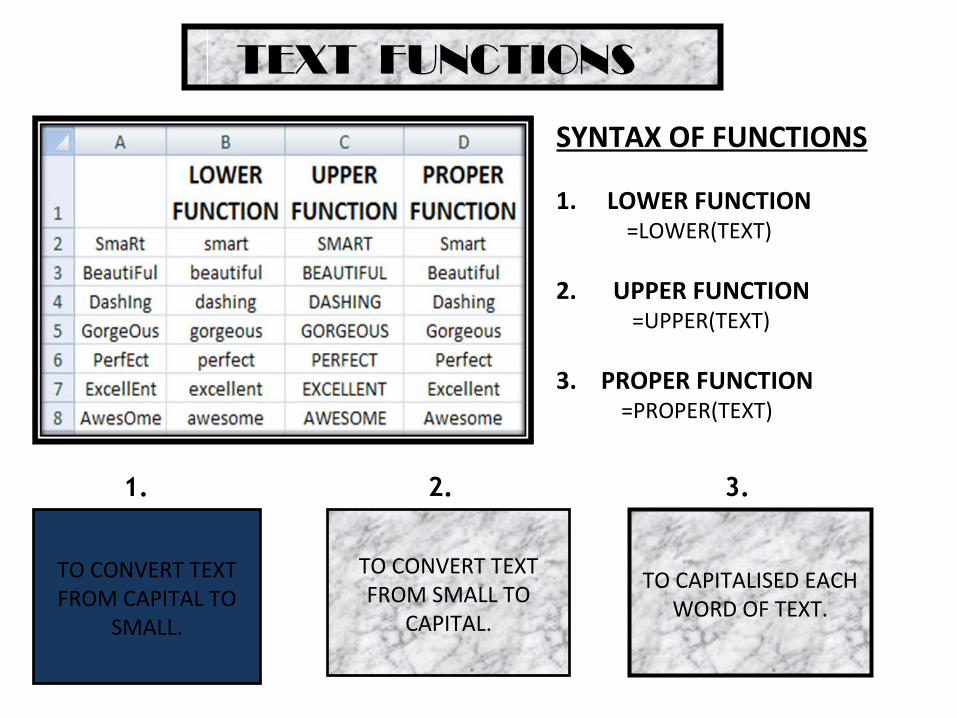
SYNTAX OF FUNCTIONS
1. LOWER FUNCTION =LOWER(TEXT)
2. UPPER FUNCTION =UPPER(TEXT)
3. PROPER FUNCTION =PROPER(TEXT)
TO CONVERT TEXT FROM CAPITAL TO
SMALL.
TO CAPITALISED EACH WORD OF TEXT.
TO CONVERT TEXT FROM SMALL TO
CAPITAL.
1. 2. 3.
TEXT FUNCTIONS
=LEFT(An ,3) =RIGHT(An ,3) =MID(An ,2,3)
SYNTAX OF FUNCTIONS
1. LEFT FUNCTION =LEFT(TEXT,NUM_CHARS)
2. RIGHT FUNCTION =RIGHT(TEXT,NUM_CHARS)
3. MID FUNCTION =MID(TEXT,STARTNUM,NUM_CHAR)
RETURN SPECIFIED NO. OF CHARACTER
FROM START OF TEXT.
RETURN SPECIFIED NO. OF CHRACTER
FROM END OF TEXT.
RETURN CHARACTER FROM MIDDLE OF
TEXT,GIVEN A STARTING POSITION.
1. 2. 3.
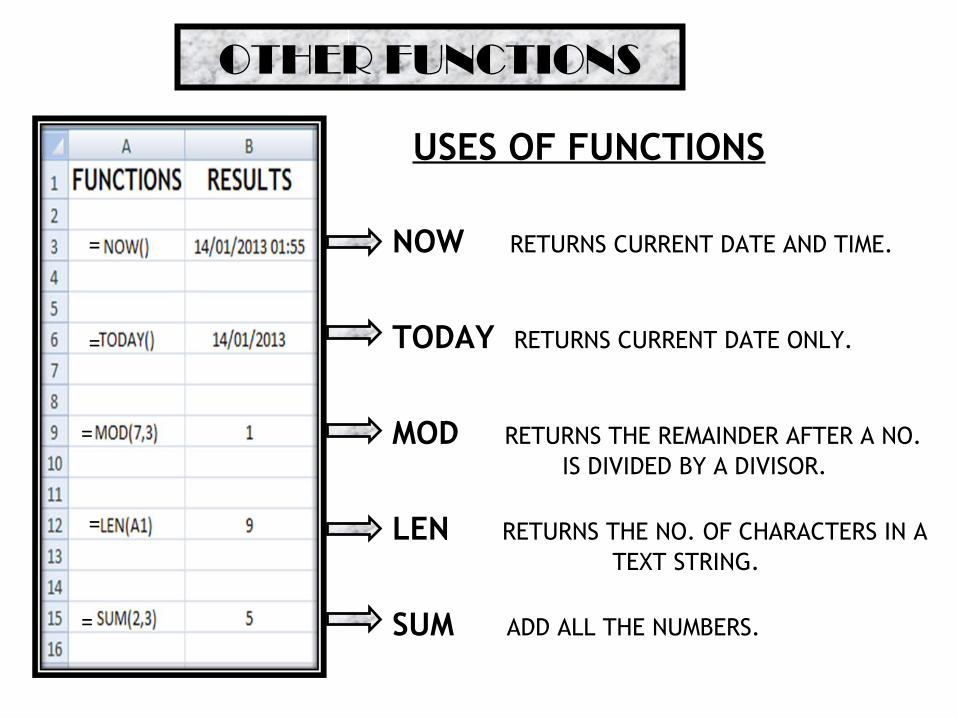
OTHER FUNCTIONS
=
=
NOW RETURNS CURRENT DATE AND TIME.
TODAY RETURNS CURRENT DATE ONLY.
MOD RETURNS THE REMAINDER AFTER A NO. IS DIVIDED BY A DIVISOR.
LEN RETURNS THE NO. OF CHARACTERS IN A TEXT STRING.
SUM ADD ALL THE NUMBERS.
USES OF FUNCTIONS
=
=
=
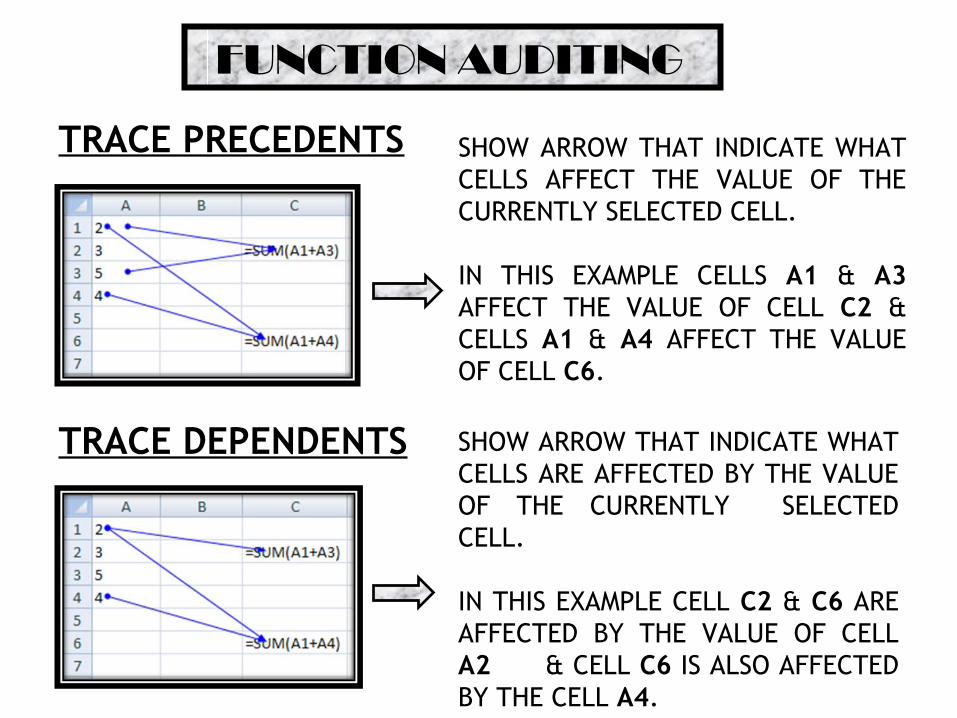
SHOW ARROW THAT INDICATE WHAT CELLS AFFECT THE VALUE OF THE CURRENTLY SELECTED CELL.
IN THIS EXAMPLE CELLS A1 & A3 AFFECT THE VALUE OF CELL C2 & CELLS A1 & A4 AFFECT THE VALUE OF CELL C6.
SHOW ARROW THAT INDICATE WHAT CELLS ARE AFFECTED BY THE VALUE OF THE CURRENTLY SELECTED CELL.
IN THIS EXAMPLE CELL C2 & C6 ARE AFFECTED BY THE VALUE OF CELL A2 & CELL C6 IS ALSO AFFECTED BY THE CELL A4.
TRACE PRECEDENTS
TRACE DEPENDENTS
FUNCTION AUDITING
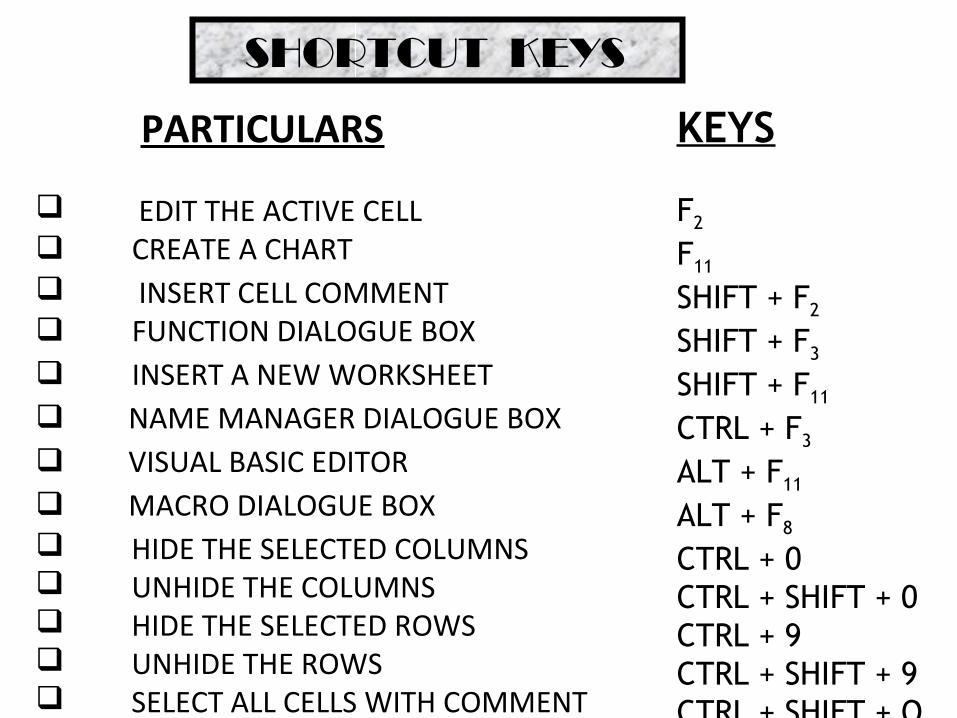
SHORTCUT KEYS
PARTICULARS
EDIT THE ACTIVE CELL CREATE A CHART INSERT CELL COMMENT FUNCTION DIALOGUE BOX INSERT A NEW WORKSHEET NAME MANAGER DIALOGUE BOX VISUAL BASIC EDITOR MACRO DIALOGUE BOX HIDE THE SELECTED COLUMNS UNHIDE THE COLUMNS HIDE THE SELECTED ROWS UNHIDE THE ROWS SELECT ALL CELLS WITH COMMENT
KEYS
F2 F11 SHIFT + F2 SHIFT + F3 SHIFT + F11 CTRL + F3 ALT + F11 ALT + F8 CTRL + 0CTRL + SHIFT + 0CTRL + 9CTRL + SHIFT + 9CTRL + SHIFT + O
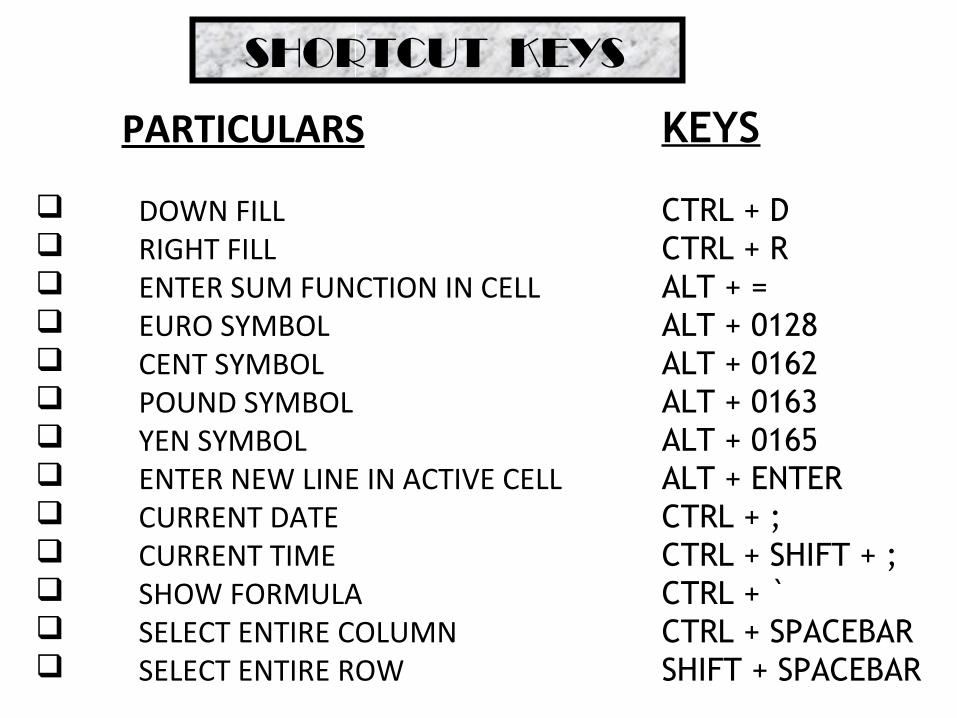
SHORTCUT KEYS
PARTICULARS
DOWN FILL RIGHT FILL ENTER SUM FUNCTION IN CELL EURO SYMBOL CENT SYMBOL POUND SYMBOL YEN SYMBOL ENTER NEW LINE IN ACTIVE CELL CURRENT DATE CURRENT TIME SHOW FORMULA SELECT ENTIRE COLUMN SELECT ENTIRE ROW
KEYS
CTRL + DCTRL + RALT + =ALT + 0128ALT + 0162ALT + 0163ALT + 0165ALT + ENTERCTRL + ;CTRL + SHIFT + ;CTRL + `CTRL + SPACEBARSHIFT + SPACEBAR
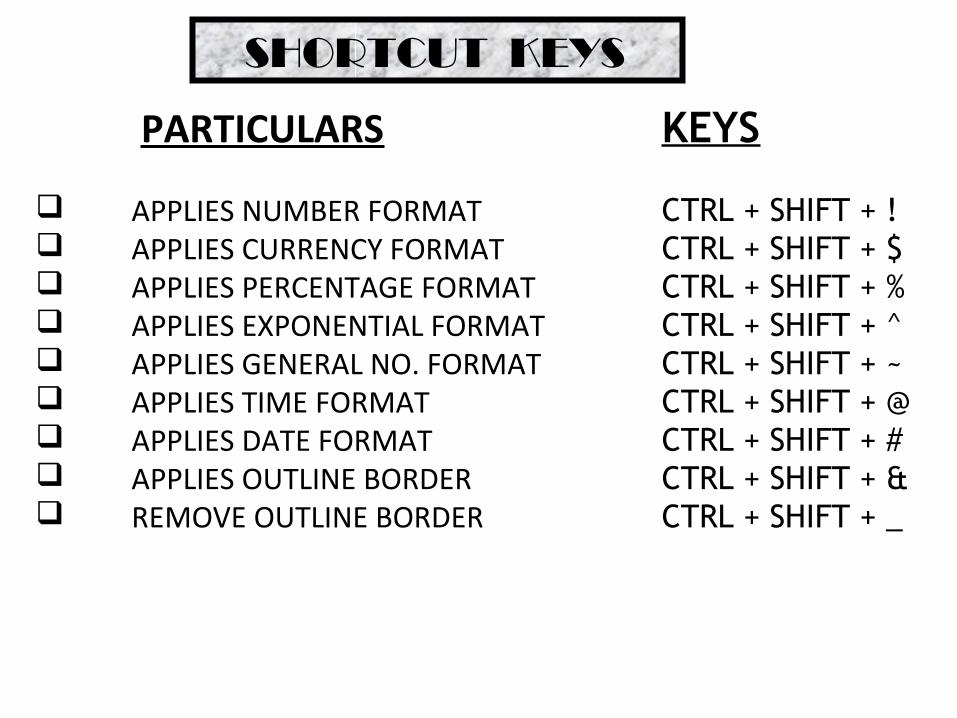
SHORTCUT KEYS
PARTICULARS
APPLIES NUMBER FORMAT APPLIES CURRENCY FORMAT APPLIES PERCENTAGE FORMAT APPLIES EXPONENTIAL FORMAT APPLIES GENERAL NO. FORMAT APPLIES TIME FORMAT APPLIES DATE FORMAT APPLIES OUTLINE BORDER REMOVE OUTLINE BORDER
KEYS
CTRL + SHIFT + !CTRL + SHIFT + $CTRL + SHIFT + %CTRL + SHIFT + ^CTRL + SHIFT + ~CTRL + SHIFT + @CTRL + SHIFT + #CTRL + SHIFT + &CTRL + SHIFT + _
Microsoft PowerPoint 2007
What is PowerPoint?
Presentation software that allows you to create slides, handouts, notes, and outlines. Slide shows can include text, graphics, video, animation, sound and much more.
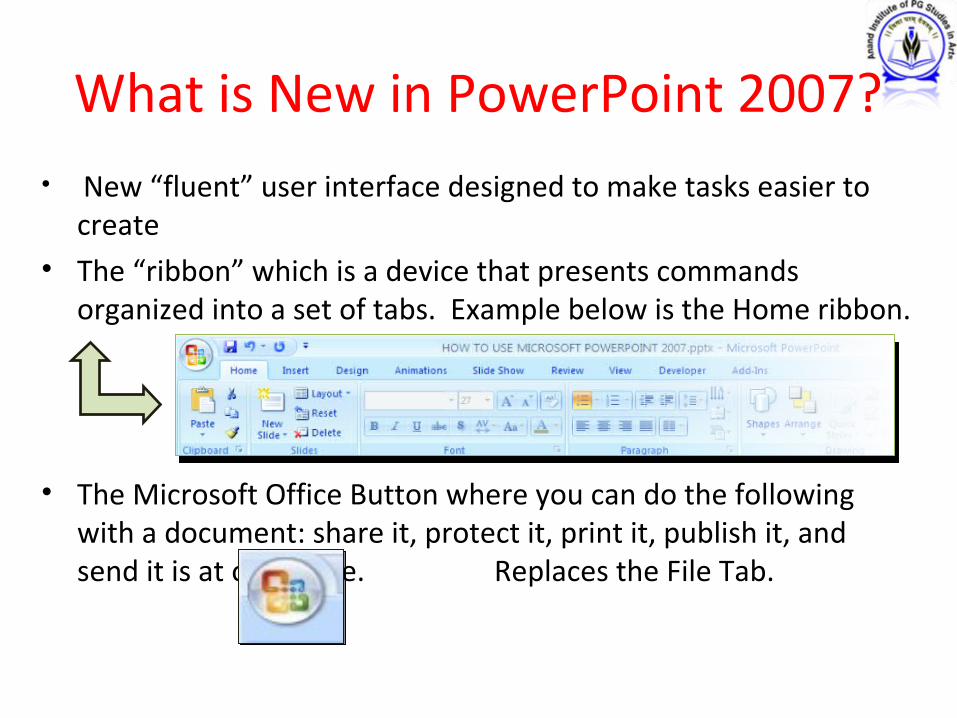
What is New in PowerPoint 2007?• New “fluent” user interface designed to make tasks easier to
create• The “ribbon” which is a device that presents commands
organized into a set of tabs. Example below is the Home ribbon.
• The Microsoft Office Button where you can do the following with a document: share it, protect it, print it, publish it, and send it is at one place. Replaces the File Tab.
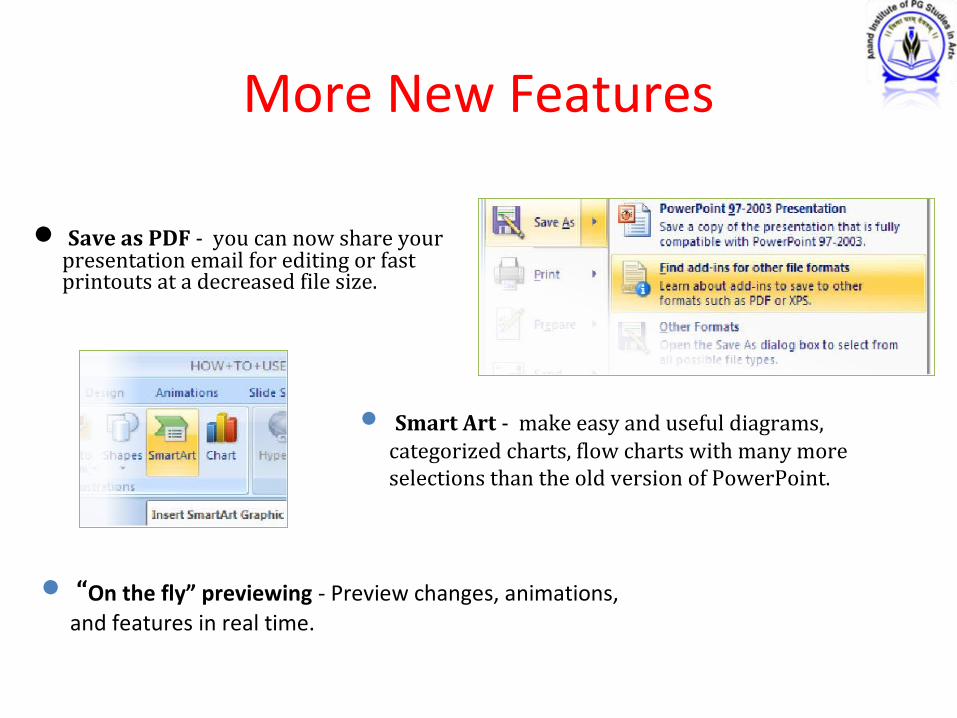
More New Features
Save as PDF - you can now share your presentation email for editing or fast printouts at a decreased file size.
Smart Art - make easy and useful diagrams, categorized charts, flow charts with many more selections than the old version of PowerPoint.
“On the fly” previewing - Preview changes, animations, and features in real time.
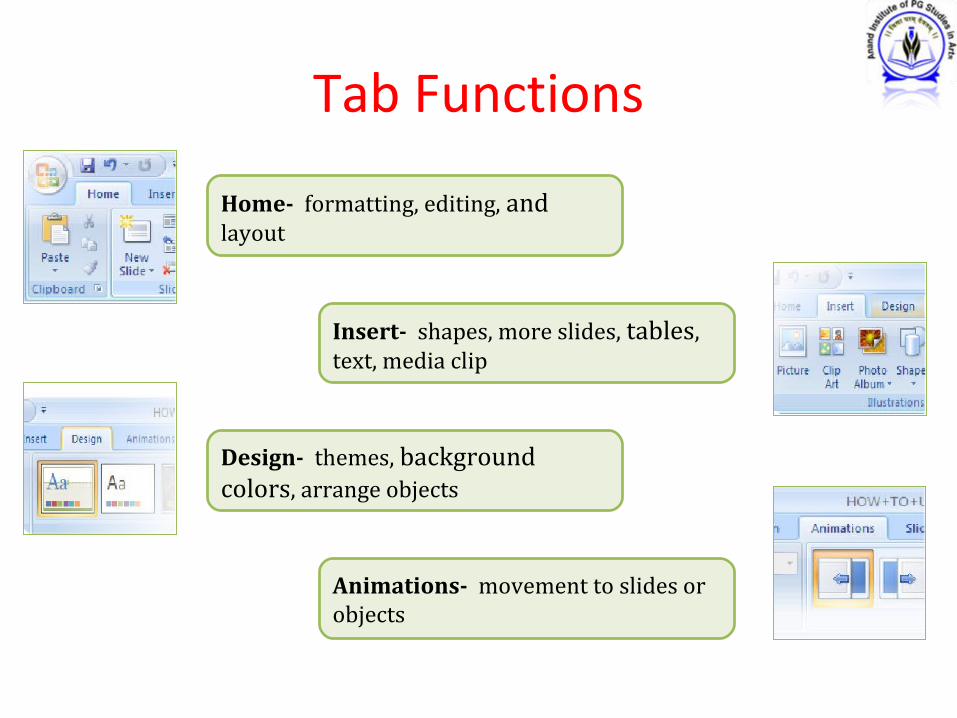
Tab Functions
Home- formatting, editing, and layout
Insert- shapes, more slides, tables, text, media clip
Design- themes, background colors, arrange objects
Animations- movement to slides or objects
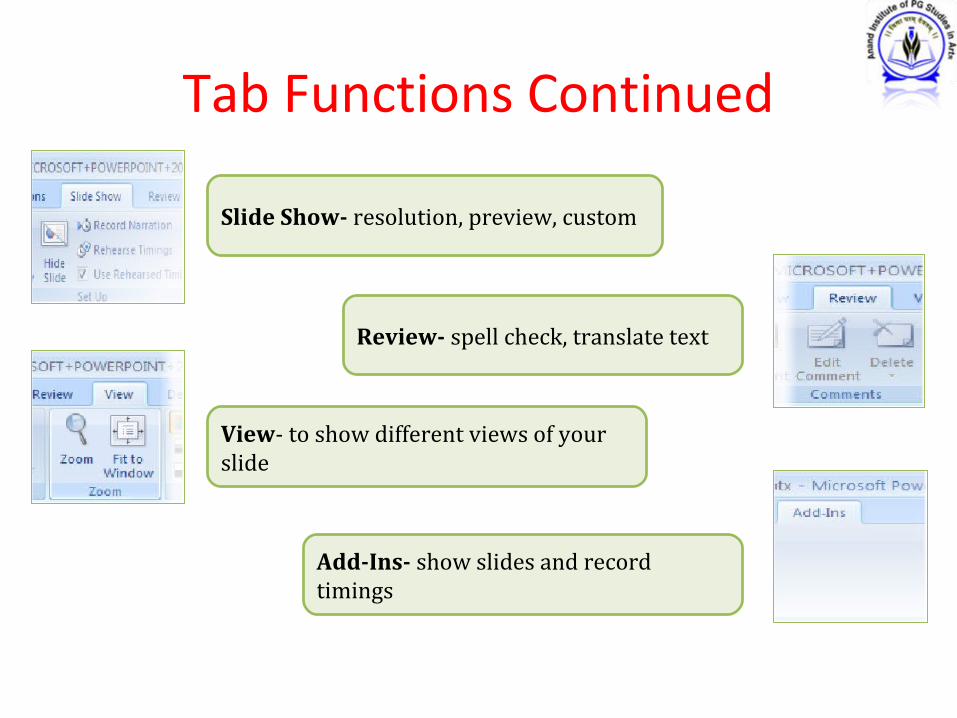
Tab Functions Continued
Slide Show- resolution, preview, custom
Review- spell check, translate text
View- to show different views of your slide
Add-Ins- show slides and record timings
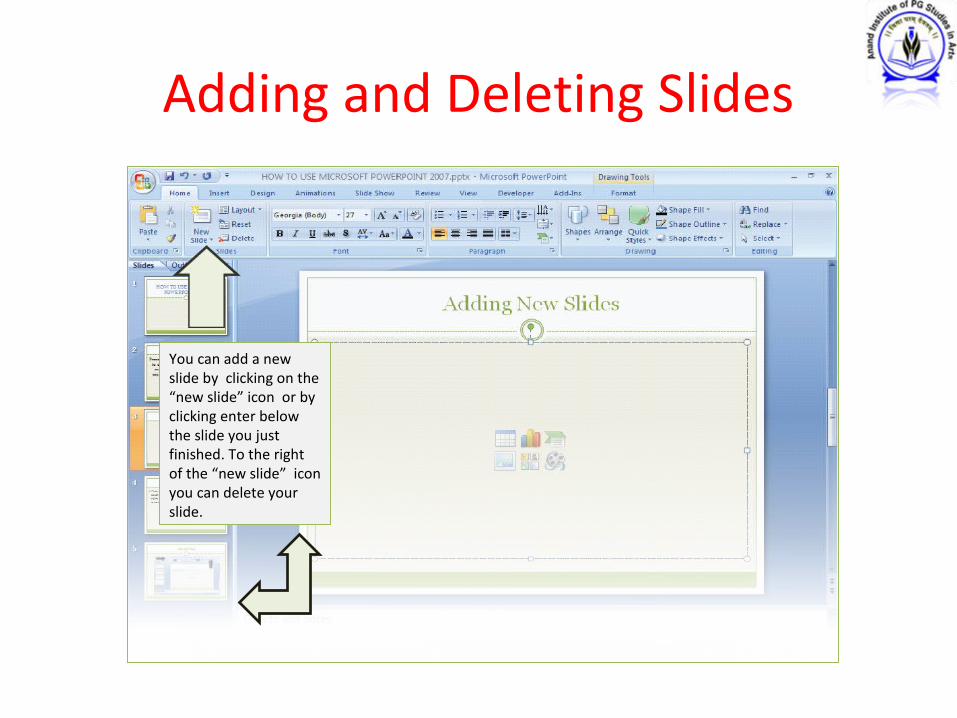
Adding and Deleting Slides
You can add a new slide by clicking on the “new slide” icon or by clicking enter below the slide you just finished. To the right of the “new slide” icon you can delete your slide.
You can add a new slide by clicking on the “new slide” icon or by clicking enter below the slide you just finished. To the right of the “new slide” icon you can delete your slide.
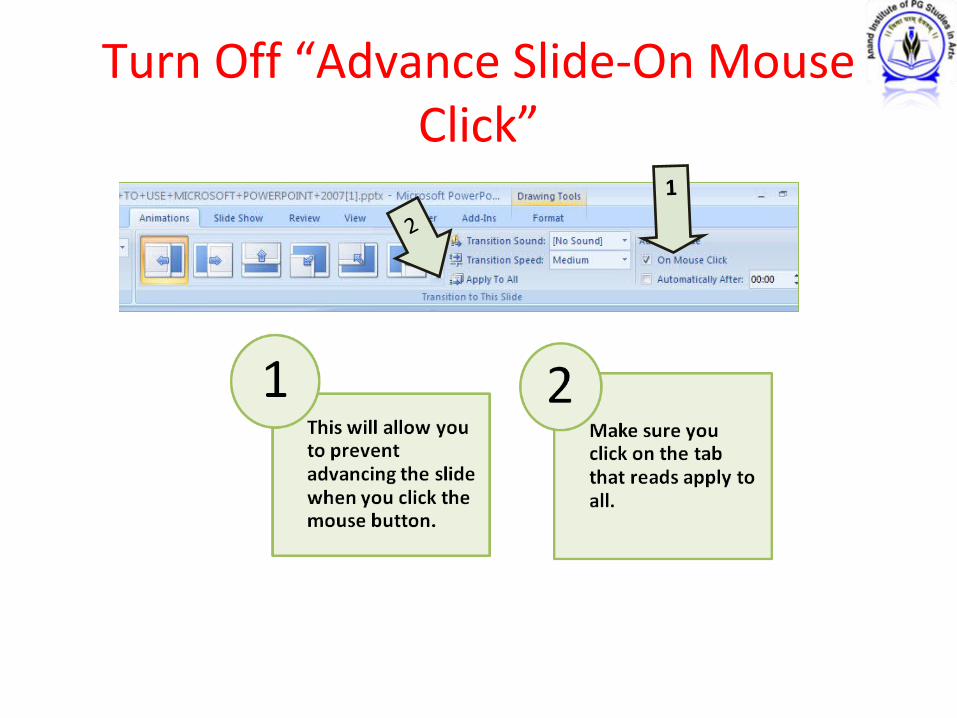
Turn Off “Advance Slide-On Mouse Click”
2
1
Different Ways to View PowerPoint
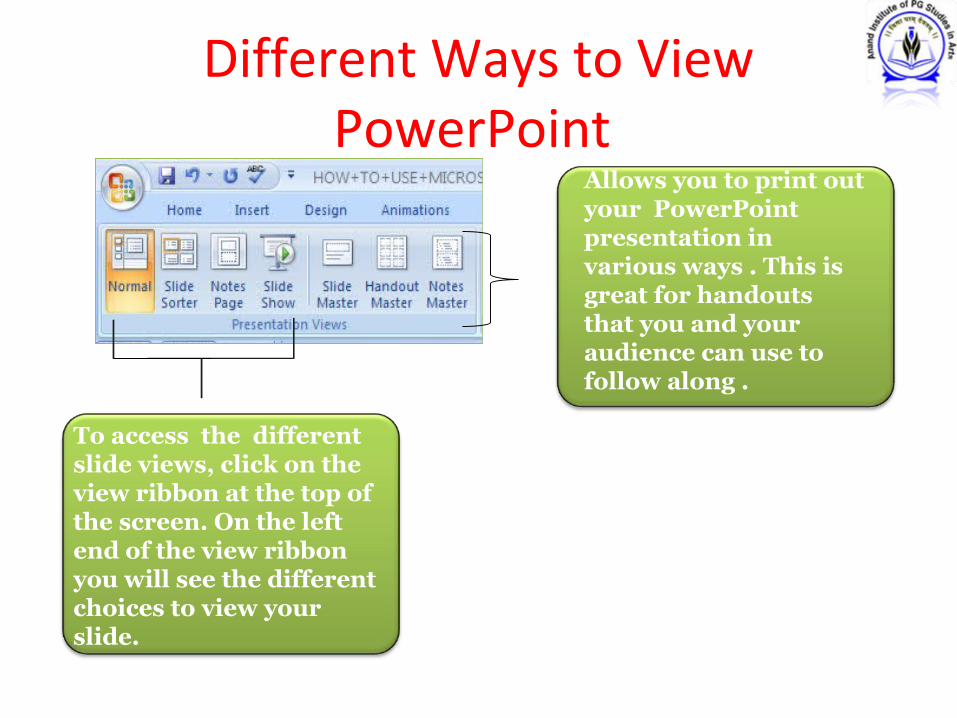
To access the different slide views, click on the view ribbon at the top of the screen. On the left end of the view ribbon you will see the different choices to view your slide.
Allows you to print out your PowerPoint presentation in various ways . This is great for handouts that you and your audience can use to follow along .
Backgrounds, Style, Fonts, Colors
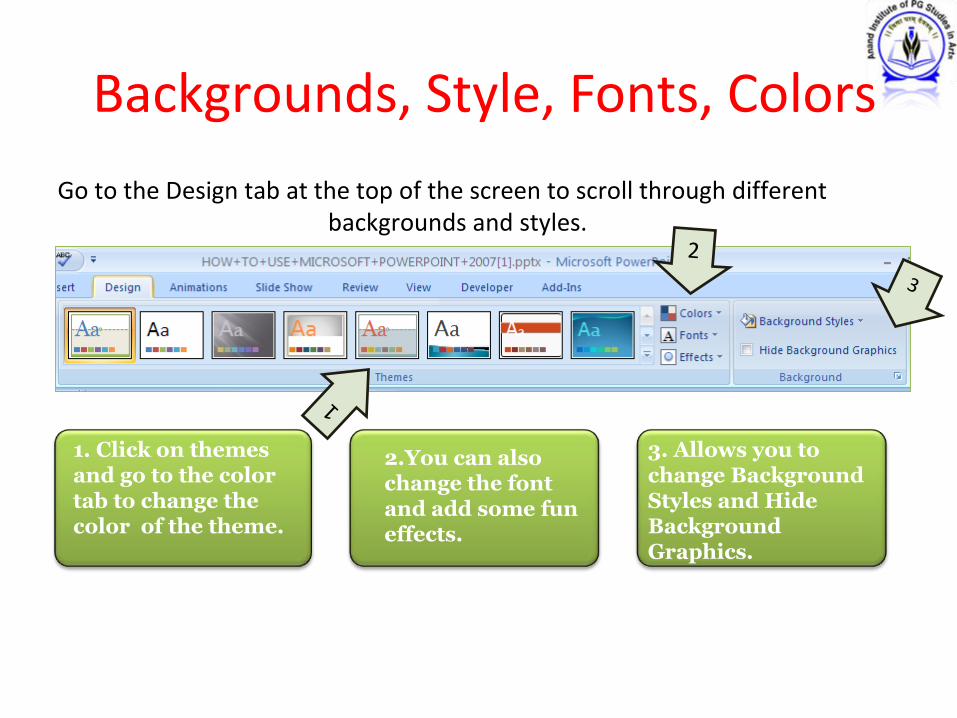
Go to the Design tab at the top of the screen to scroll through different backgrounds and styles.
1
1. Click on themes and go to the color tab to change the color of the theme.
2.You can also change the font and add some fun effects.
2 3
3. Allows you to change Background Styles and Hide Background Graphics.
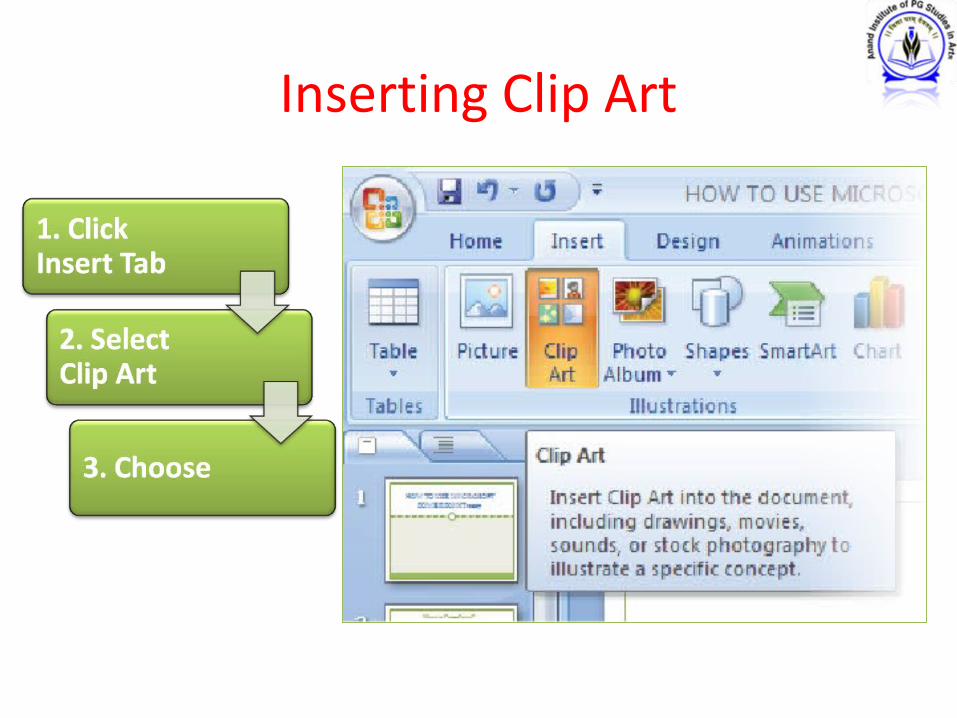
Inserting Clip Art
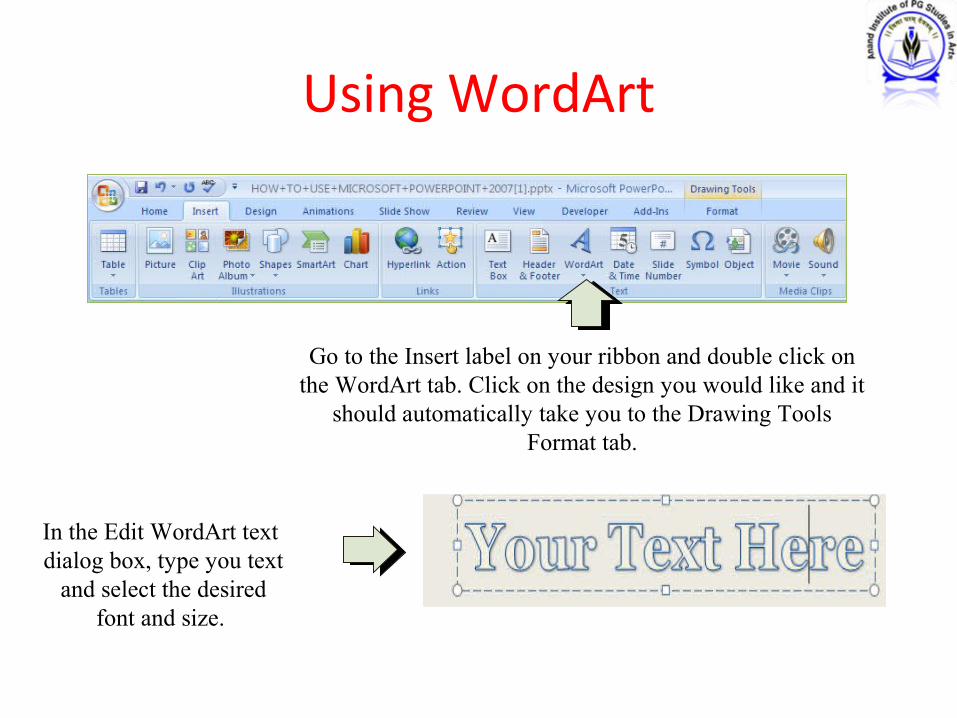
Using WordArt
Go to the Insert label on your ribbon and double click on the WordArt tab. Click on the design you would like and it
should automatically take you to the Drawing Tools Format tab.
In the Edit WordArt text dialog box, type you text
and select the desired font and size.
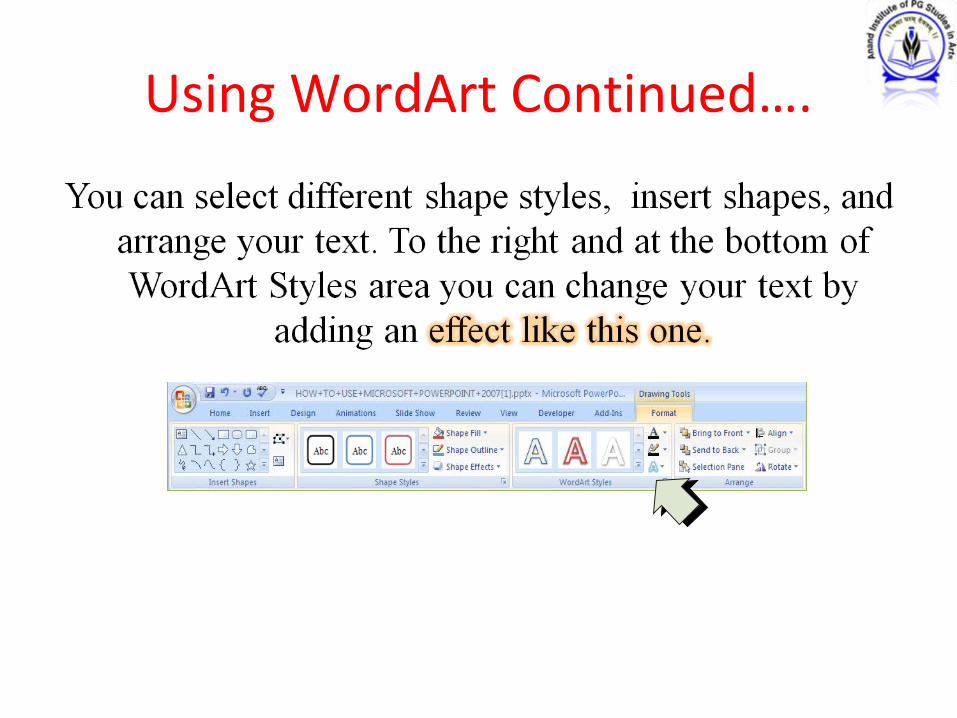
Using WordArt Continued….
Inserting Sound Files• Two Types: Embedded vs. Linked sound files– Embedded sound file is directly inserted into
PowerPoint– Linked sound file is when a connection is created
between the destination file and a source file. Destination being Word or PowerPoint document.
• When your presentation contains linked files, you must copy both the linked files and the presentation if you plan to give the presentation on another computer or send it to someone in an e-mail message.
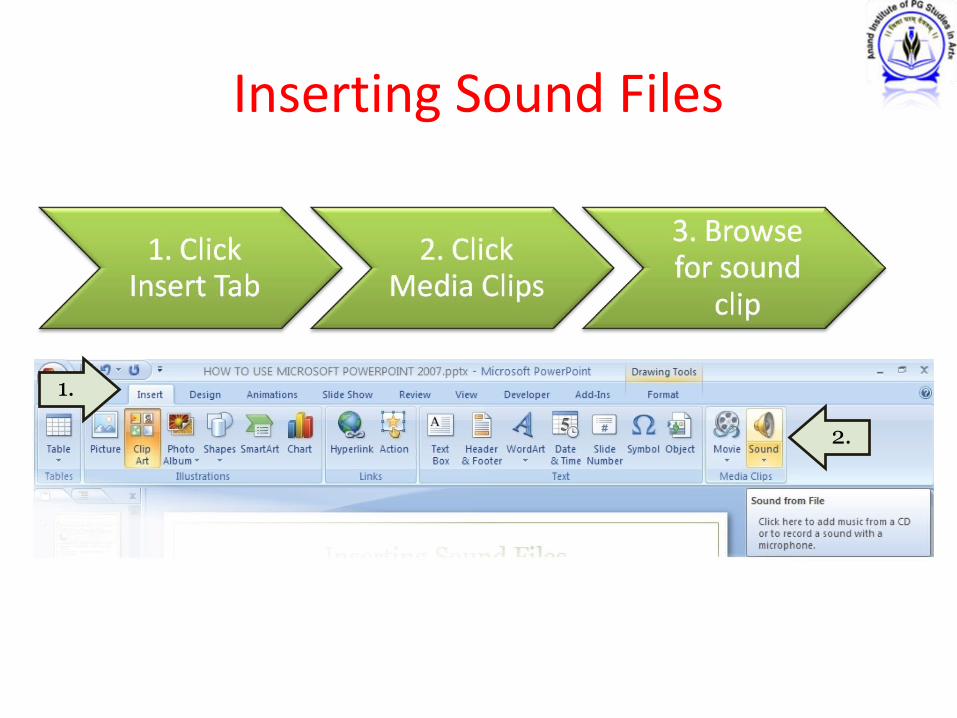
Inserting Sound Files
1.
2.
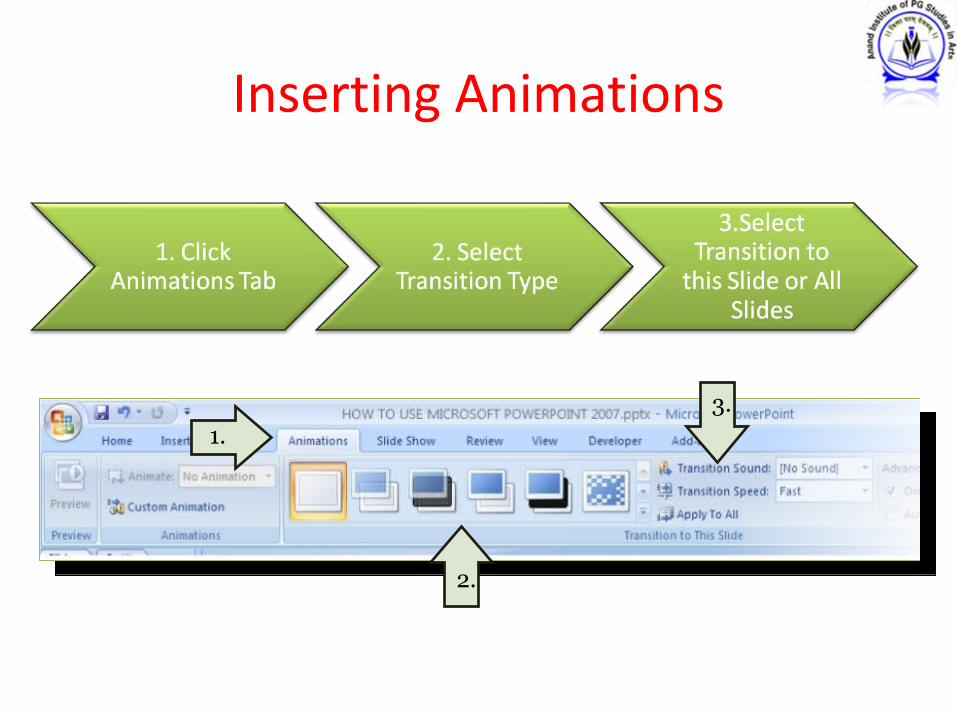
Inserting Animations
1.
2.
3.
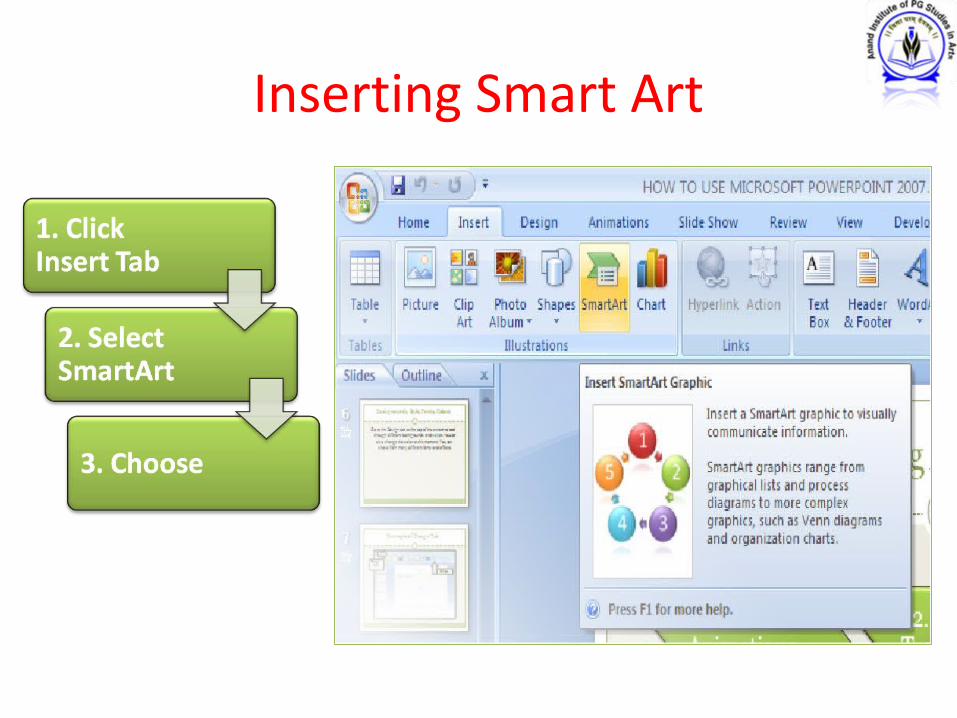
Inserting Smart Art
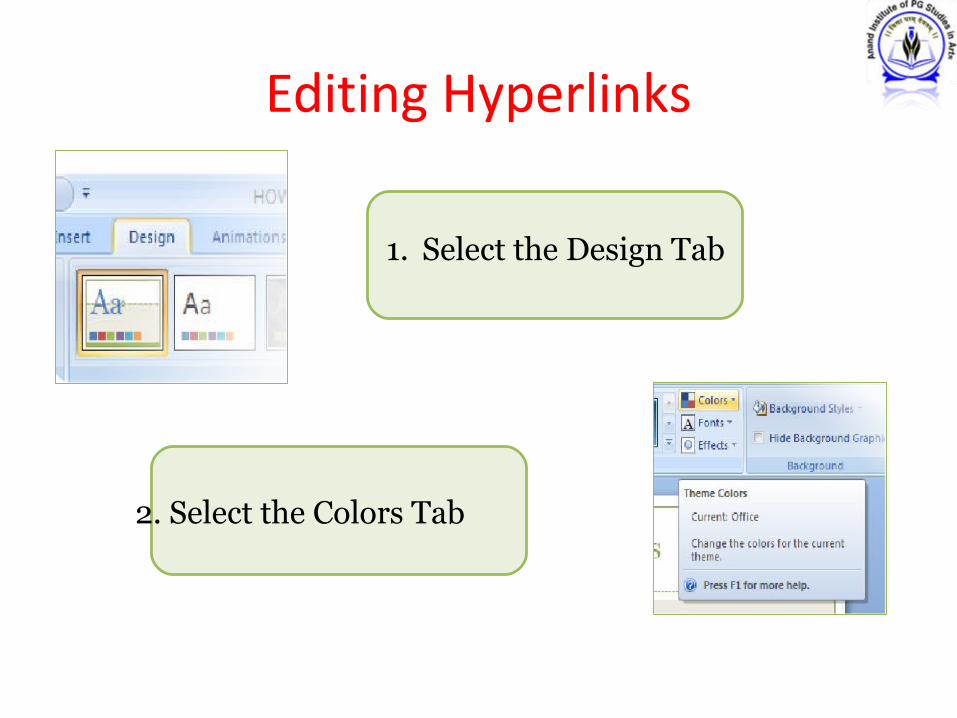
Editing Hyperlinks
1. Select the Design Tab
2. Select the Colors Tab
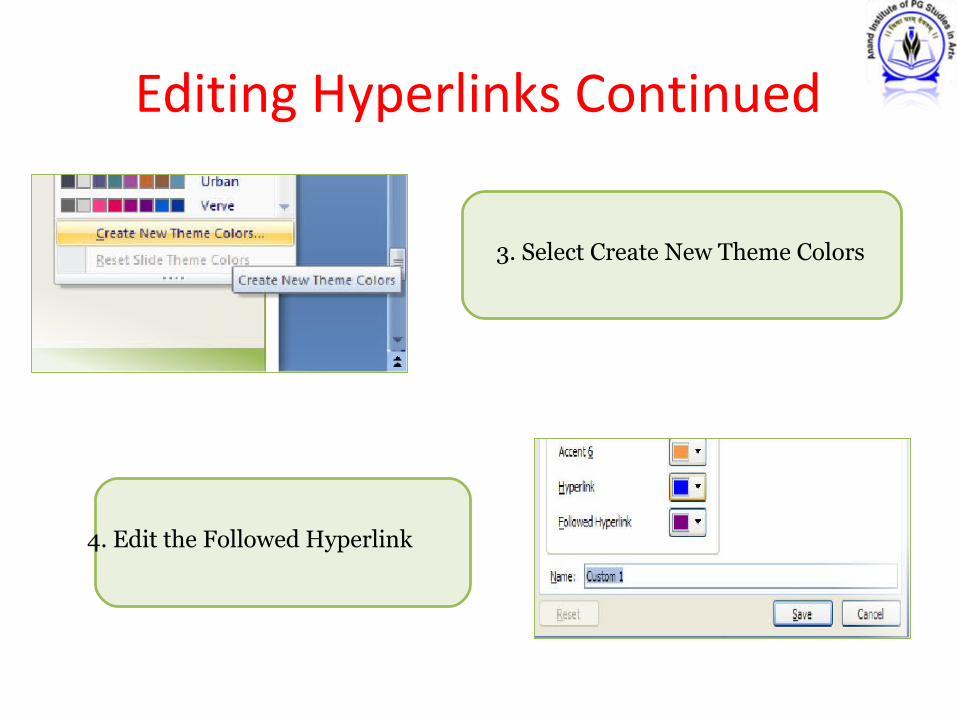
Editing Hyperlinks Continued
3. Select Create New Theme Colors
4. Edit the Followed Hyperlink

www.pustakaly.com

www.openlibrary.org
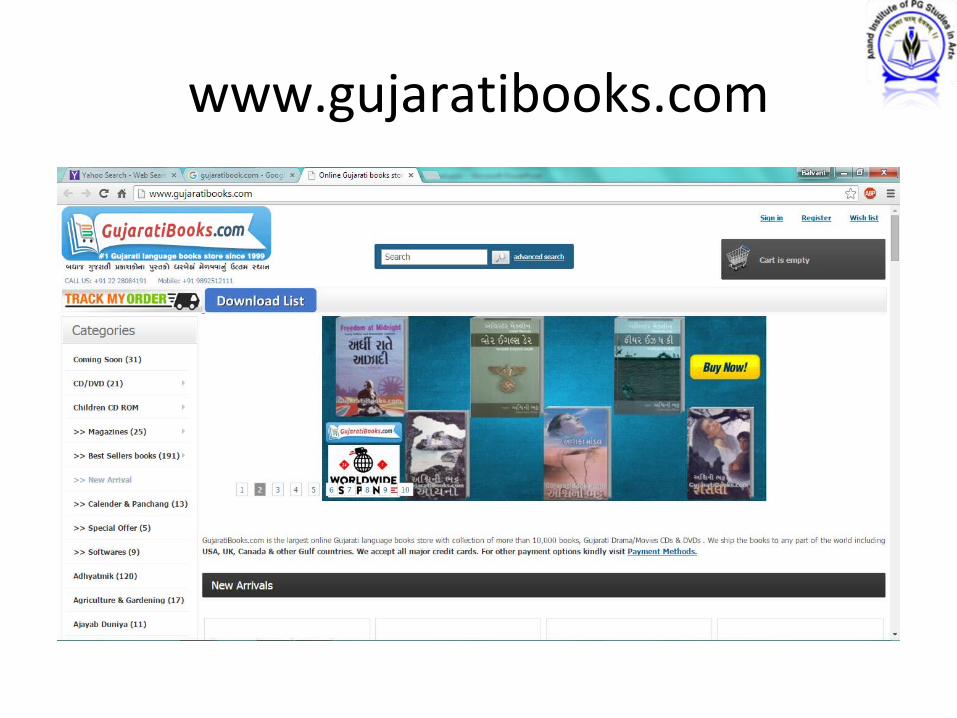
www.gujaratibooks.com
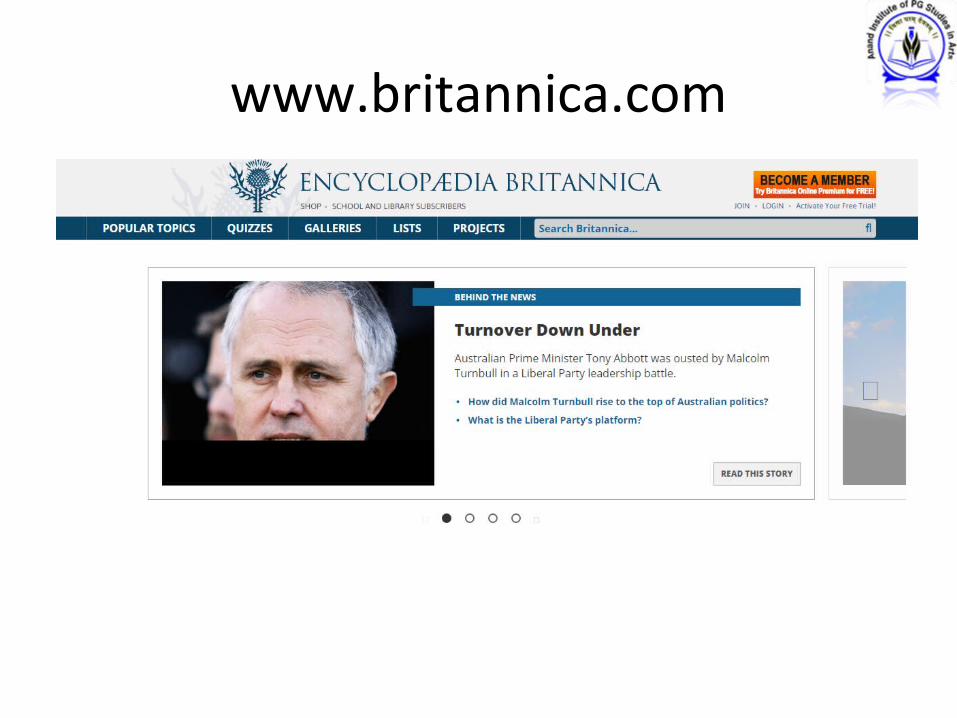
www.britannica.com