Embed Size (px)
Citation preview
1
MODULE
Learning Outcomes
Reports12
• Format two-page reports with cover pages.
• Insert page numbers in report with preliminary pages.
• Insert multilevel list.
• Create and modify table of contents.
• Create and modify table of figures.
• Use navigation tools.
• Build keyboarding skills.
© 2017 Cengage Learning. All Rights Reserved. May not be copied, scanned, or duplicated, in whole or in part, except for use as permitted in a license distributed with a certain product or service or otherwise on a password-protected website for classroom use.
2
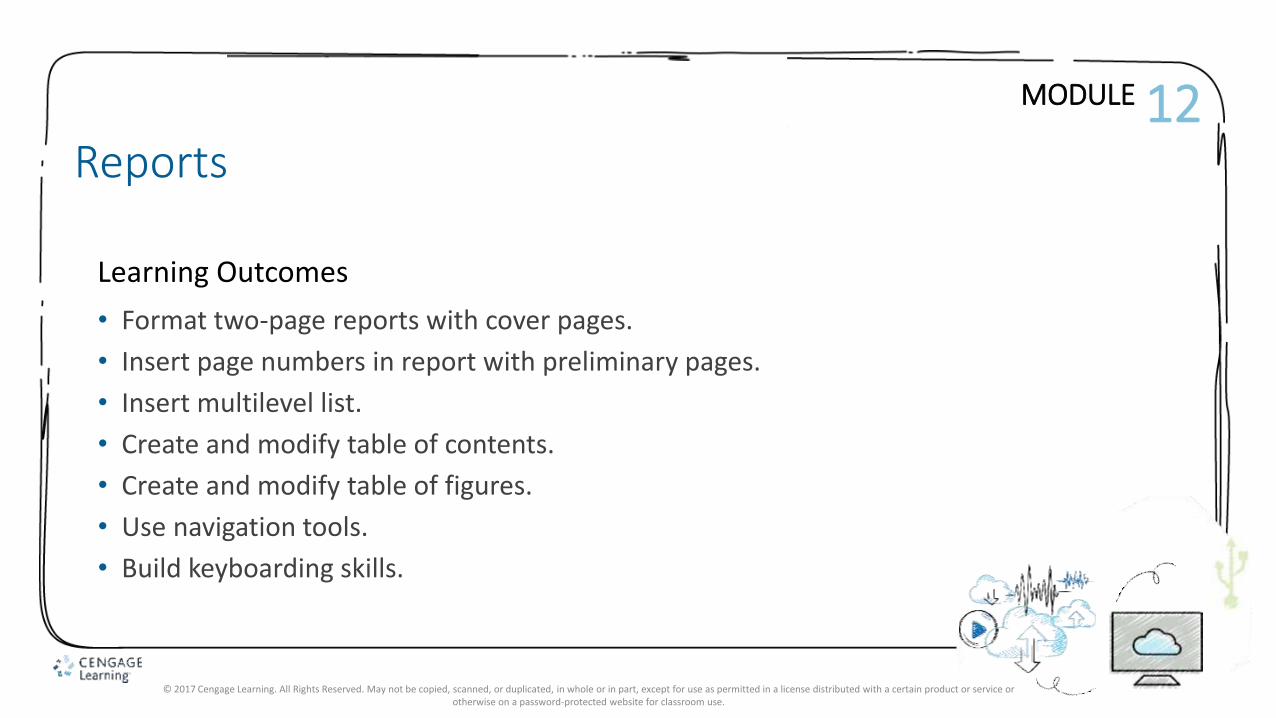
1. Select items to be formatted.
2. Click the Multilevel List button.
3. Select a style and then key the list.
4. Use the Increase or Decrease Indent button to promote or demote items in the list.
Home/Paragraph/Multilevel List
To format items in a multilevel list:
Multilevel List Lesson 70
© 2017 Cengage Learning. All Rights Reserved. May not be copied, scanned, or duplicated, in whole or in part, except for use as permitted in a license distributed with a certain product or service or otherwise on a password-protected website for classroom use.

3
1. Click Themes to display the gallery of Built-In themes.
2. Click the theme you wish to use.
Design/Themes/Themes
To apply a document theme:
Review Document Themes Lesson 70
Gallery of Built-In themes
© 2017 Cengage Learning. All Rights Reserved. May not be copied, scanned, or duplicated, in whole or in part, except for use as permitted in a license distributed with a certain product or service or otherwise on a password-protected website for classroom use.
4
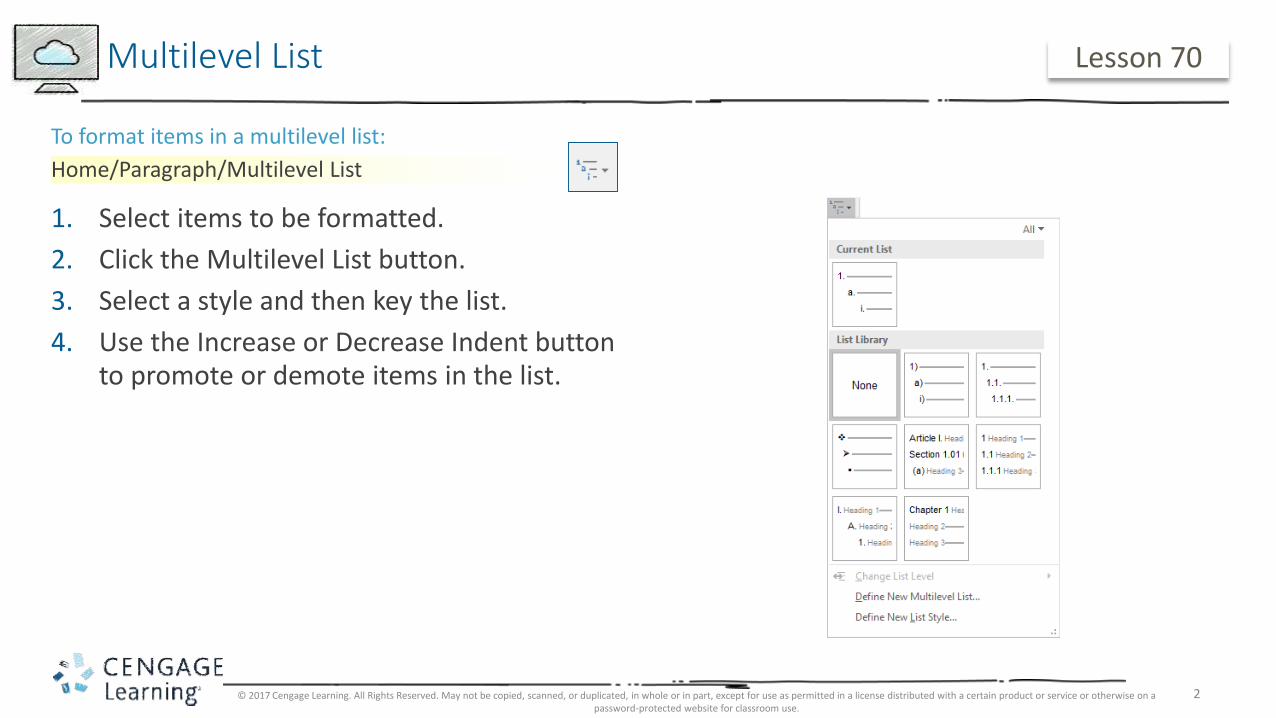
1. In Print Layout view, position the insertion point for the footnote reference.
2. Click Insert Footnote and key the footnote.
3. Tap ENTER once to add one blank line between footnotes.
4. Click above the footnote divider line to return to the document.
References/Footnotes/Insert Footnote
To insert footnotes:
Review Footnotes Lesson 70
Footnote divider line
Insert one blank line between footnotes
© 2017 Cengage Learning. All Rights Reserved. May not be copied, scanned, or duplicated, in whole or in part, except for use as permitted in a license distributed with a certain product or service or otherwise on a password-protected website for classroom use.
5
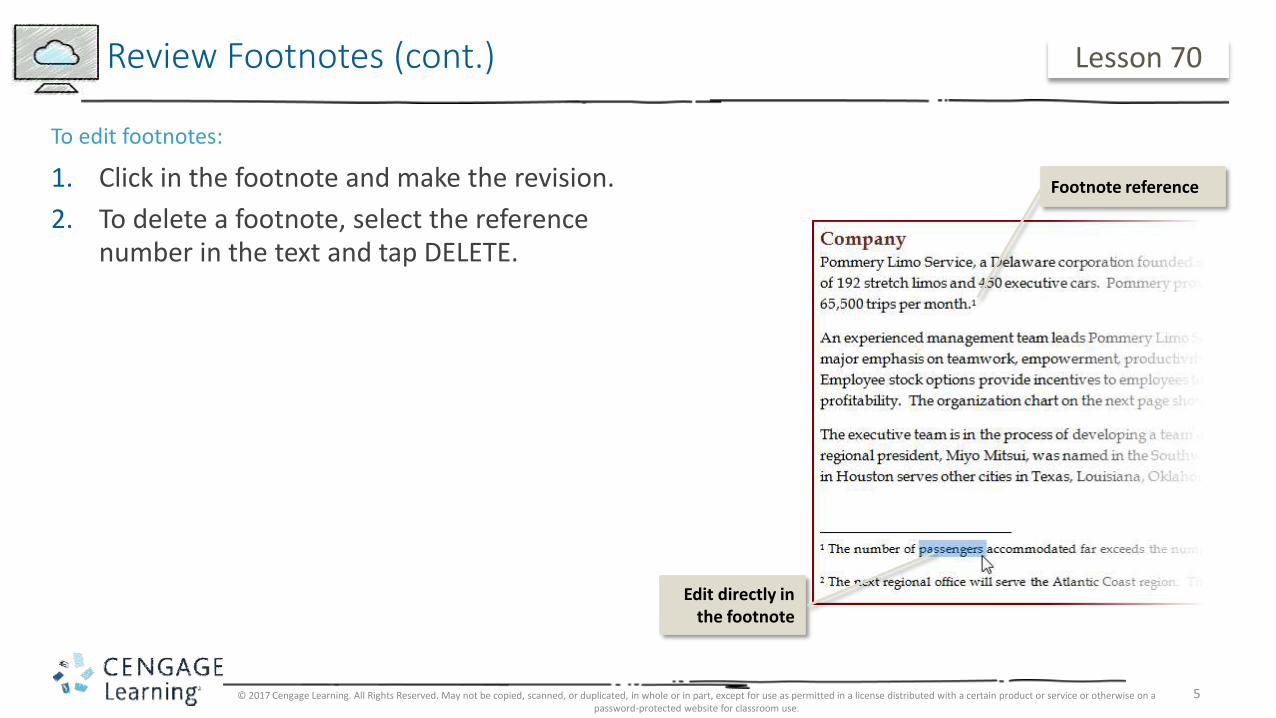
1. Click in the footnote and make the revision.
2. To delete a footnote, select the reference number in the text and tap DELETE.
Review Footnotes (cont.)
To edit footnotes:
Lesson 70
Footnote reference
Edit directly in the footnote
© 2017 Cengage Learning. All Rights Reserved. May not be copied, scanned, or duplicated, in whole or in part, except for use as permitted in a license distributed with a certain product or service or otherwise on a password-protected website for classroom use.
6
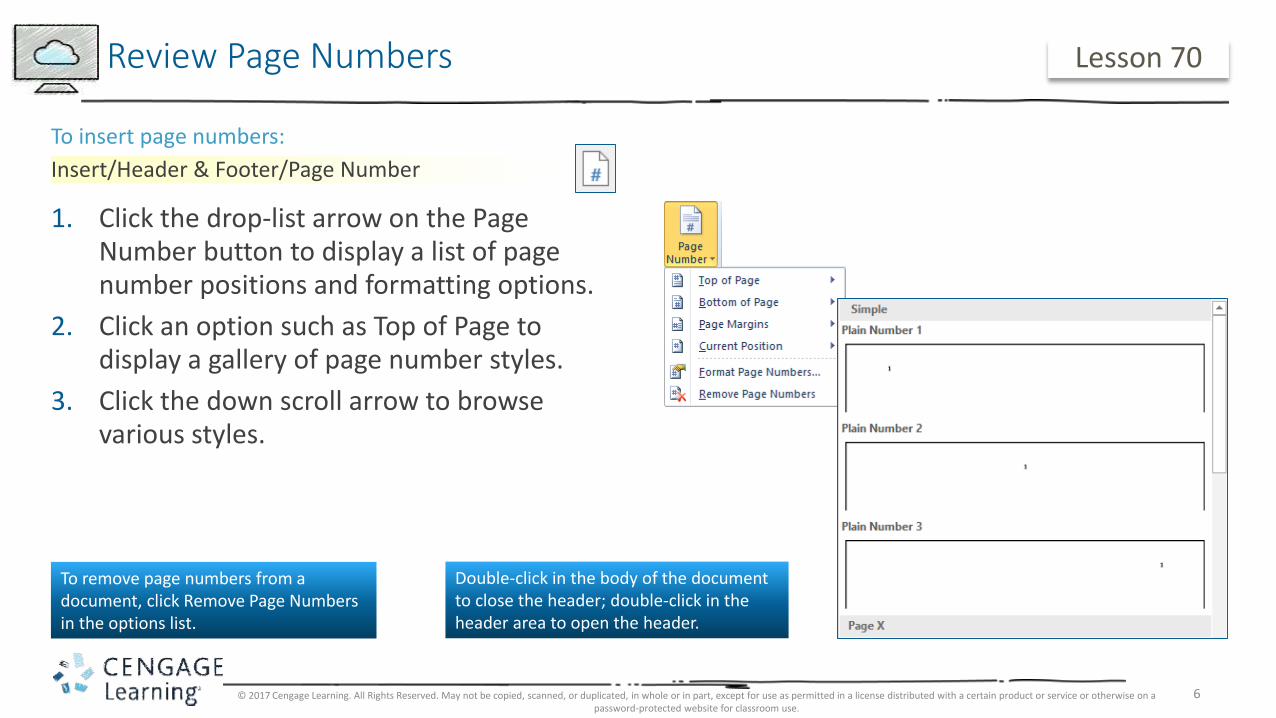
1. Click the drop-list arrow on the Page Number button to display a list of page number positions and formatting options.
2. Click an option such as Top of Page to display a gallery of page number styles.
3. Click the down scroll arrow to browse various styles.
Insert/Header & Footer/Page Number
To insert page numbers:
Review Page Numbers Lesson 70
To remove page numbers from a document, click Remove Page Numbers in the options list.
Double-click in the body of the document to close the header; double-click in the header area to open the header.
© 2017 Cengage Learning. All Rights Reserved. May not be copied, scanned, or duplicated, in whole or in part, except for use as permitted in a license distributed with a certain product or service or otherwise on a password-protected website for classroom use.

7
1. When the page number is inserted, the Header & Footer Tools Design conceptual tab displays.
2. Click Different First Page; the page number will not display on the first page.
Header & Footer Tools Design/Options
To remove page number from first page:
Review Page Numbers (cont.) Lesson 70
Different First Page
© 2017 Cengage Learning. All Rights Reserved. May not be copied, scanned, or duplicated, in whole or in part, except for use as permitted in a license distributed with a certain product or service or otherwise on a password-protected website for classroom use.

8
• Margins:
• Use the default top, side, and bottom margins for unbound reports.
• Set the left margin at 1.5" for a leftbound report.
• Font size:
• Use the 11-point default font size for all reports.
• Spacing:
• Use the default 1.08 line spacing for all reports.
• Page numbers:
• Insert page numbers at the top right.
• Suppress the page number on the first page.
Report Formats Lesson 70
© 2017 Cengage Learning. All Rights Reserved. May not be copied, scanned, or duplicated, in whole or in part, except for use as permitted in a license distributed with a certain product or service or otherwise on a password-protected website for classroom use.

9
• Enumerated or bulleted items:
• Use the default 0.25" indent for numbers and bullets.
• Tap ENTER once after each item.
• Explanatory footnote:
• Superscript appears in report text.
• Reference displays at the bottom of the page where the reference was cited.
Report Formats (cont.) Lesson 70
© 2017 Cengage Learning. All Rights Reserved. May not be copied, scanned, or duplicated, in whole or in part, except for use as permitted in a license distributed with a certain product or service or otherwise on a password-protected website for classroom use.
10
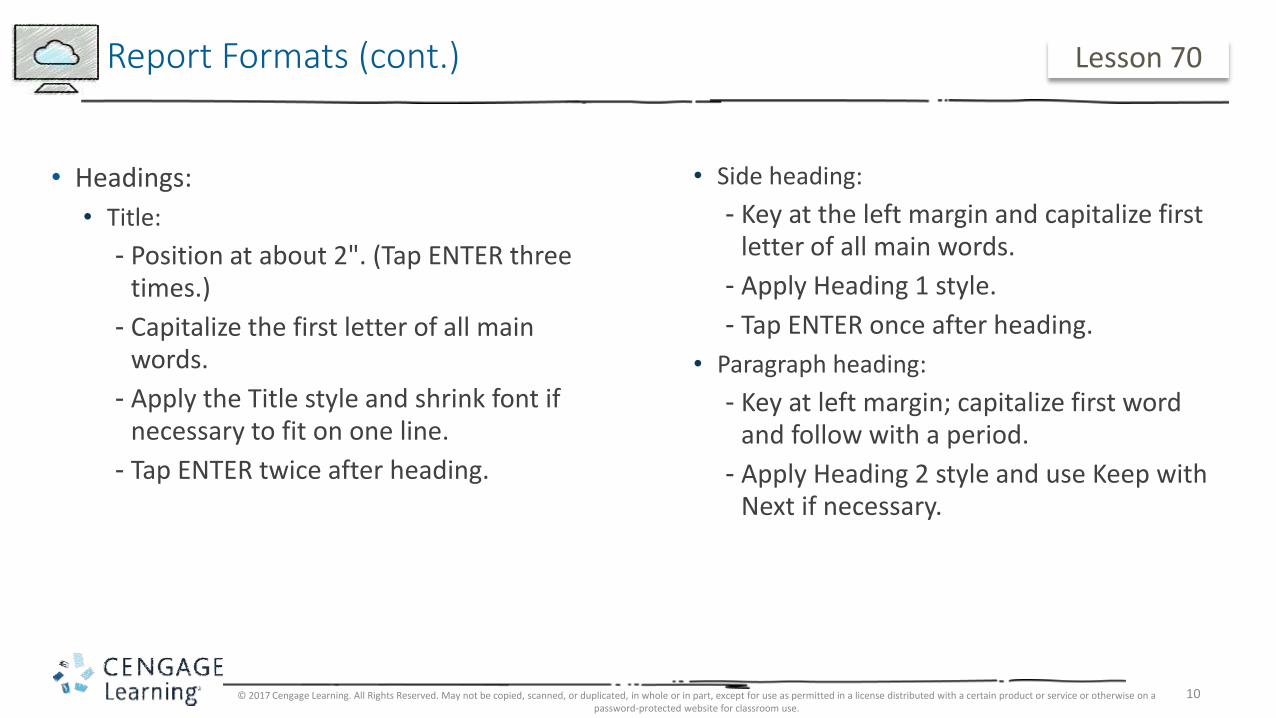
• Headings:
• Title:
- Position at about 2". (Tap ENTER three times.)
- Capitalize the first letter of all main words.
- Apply the Title style and shrink font if necessary to fit on one line.
- Tap ENTER twice after heading.
Report Formats (cont.)
• Side heading:
- Key at the left margin and capitalize first letter of all main words.
- Apply Heading 1 style.
- Tap ENTER once after heading.
• Paragraph heading:
- Key at left margin; capitalize first word and follow with a period.
- Apply Heading 2 style and use Keep with Next if necessary.
Lesson 70
© 2017 Cengage Learning. All Rights Reserved. May not be copied, scanned, or duplicated, in whole or in part, except for use as permitted in a license distributed with a certain product or service or otherwise on a password-protected website for classroom use.
11
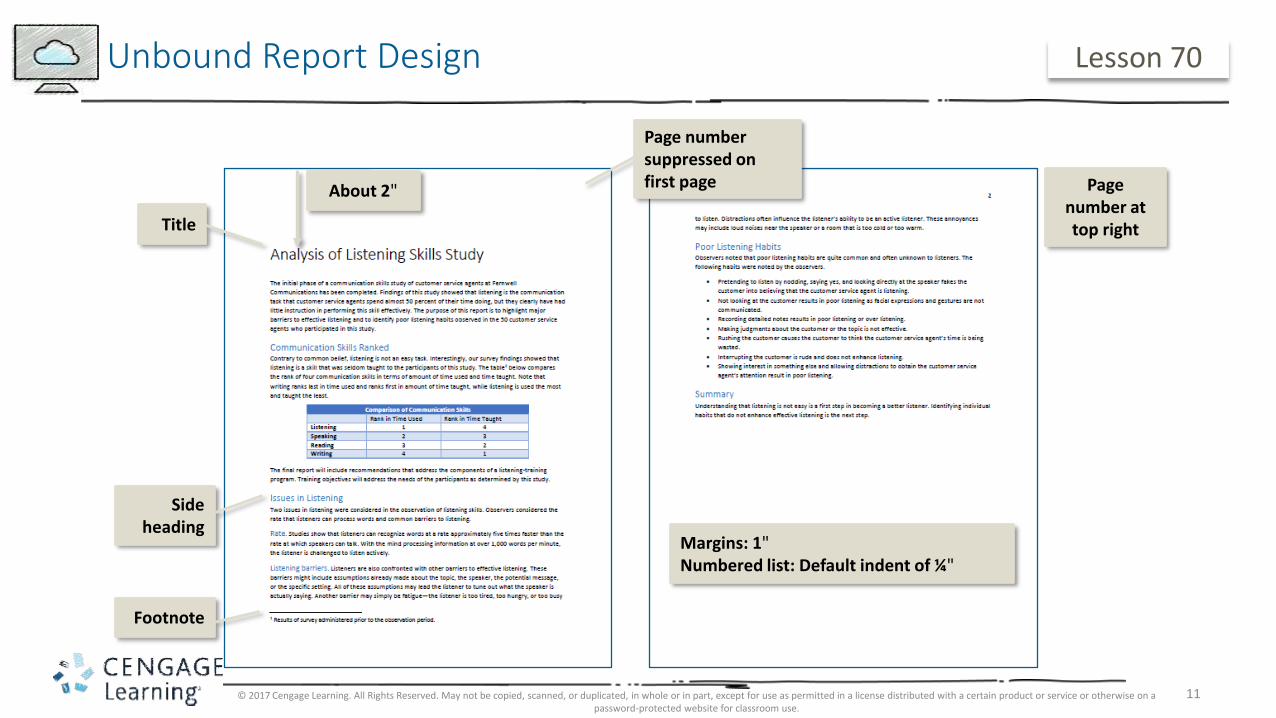
Unbound Report Design
About 2" Page number at top right
Margins: 1" Numbered list: Default indent of ¼"
Side heading
Title
Footnote
Page numbersuppressed on first page
Lesson 70
© 2017 Cengage Learning. All Rights Reserved. May not be copied, scanned, or duplicated, in whole or in part, except for use as permitted in a license distributed with a certain product or service or otherwise on a password-protected website for classroom use.

12
Leftbound Report Design
Use a 1.5" left margin for all
pages
Apply Add Space Before Paragraph to add space
below table
Page number is suppressed in header on first page
Lesson 70
© 2017 Cengage Learning. All Rights Reserved. May not be copied, scanned, or duplicated, in whole or in part, except for use as permitted in a license distributed with a certain product or service or otherwise on a password-protected website for classroom use.

13
1. Click Header or Footer to display the Built-In gallery of styles.
2. Click the desired header or footer style.
3. Click [Type the document title] and key the desired text for the header if used in that header/footer style.
4. From the Options group, click Different First Page, if desired.
Insert/Header & Footer/Header or Footer
To insert a header or footer:
Built-In Headers and Footers Lesson 71
© 2017 Cengage Learning. All Rights Reserved. May not be copied, scanned, or duplicated, in whole or in part, except for use as permitted in a license distributed with a certain product or service or otherwise on a password-protected website for classroom use.
14
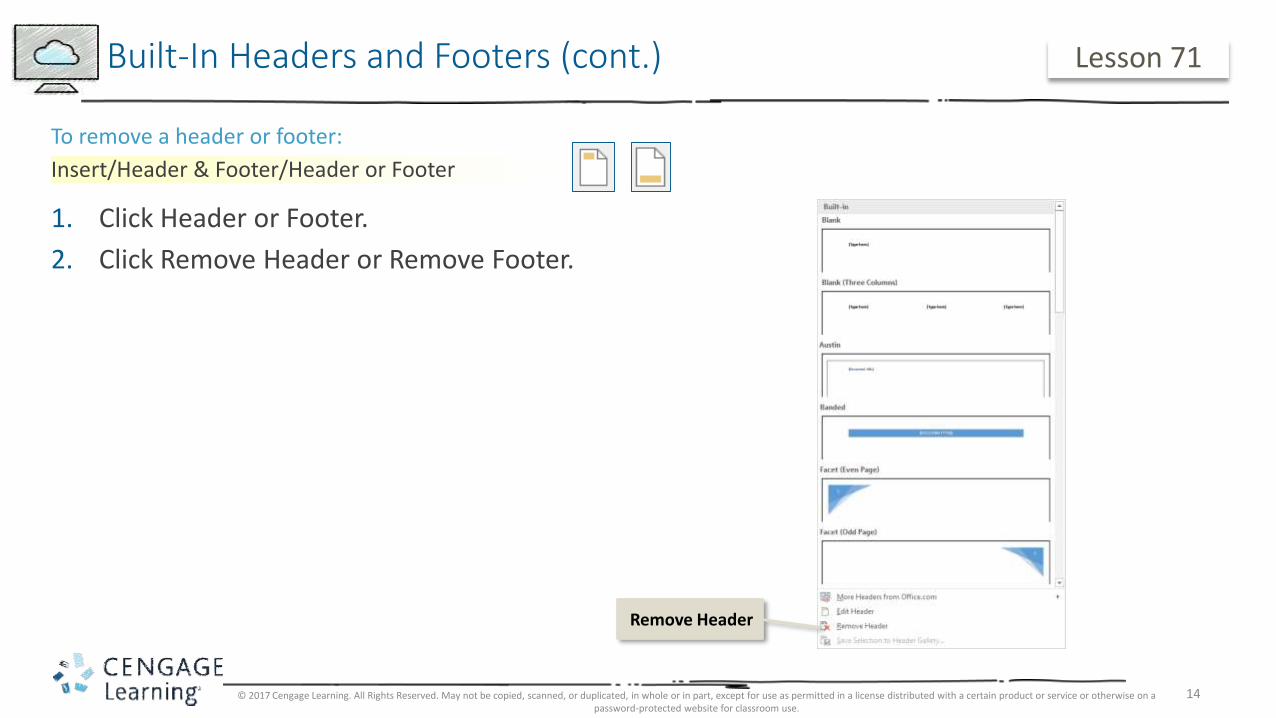
1. Click Header or Footer.
2. Click Remove Header or Remove Footer.
Insert/Header & Footer/Header or Footer
To remove a header or footer:
Built-In Headers and Footers (cont.) Lesson 71
Remove Header
© 2017 Cengage Learning. All Rights Reserved. May not be copied, scanned, or duplicated, in whole or in part, except for use as permitted in a license distributed with a certain product or service or otherwise on a password-protected website for classroom use.

15
1. Click the scroll arrows in the gallery to select the desired style.
2. Select [Document Title] and key the report title.
3. Repeat for all other items located in the template.
Insert/Pages/Cover Page
To create a cover page:
Cover Page Lesson 71
© 2017 Cengage Learning. All Rights Reserved. May not be copied, scanned, or duplicated, in whole or in part, except for use as permitted in a license distributed with a certain product or service or otherwise on a password-protected website for classroom use.
16
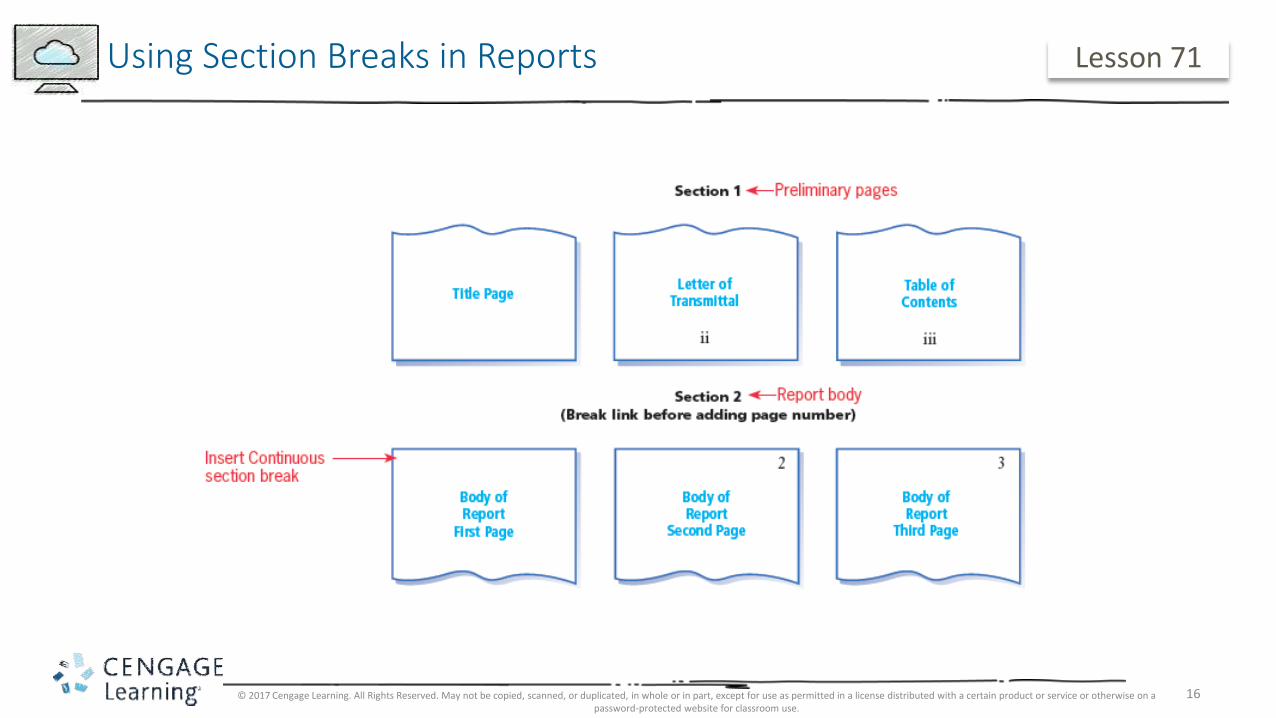
Using Section Breaks in Reports Lesson 71
© 2017 Cengage Learning. All Rights Reserved. May not be copied, scanned, or duplicated, in whole or in part, except for use as permitted in a license distributed with a certain product or service or otherwise on a password-protected website for classroom use.
17
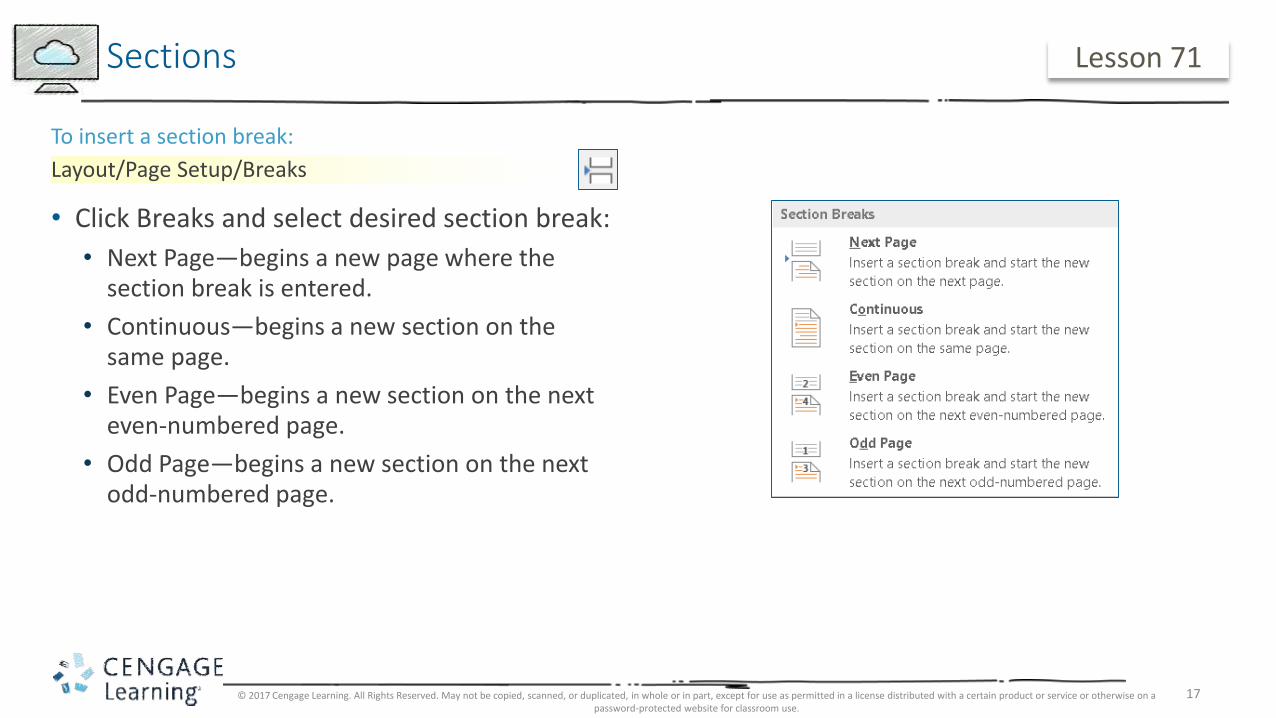
• Click Breaks and select desired section break:
• Next Page—begins a new page where the section break is entered.
• Continuous—begins a new section on the same page.
• Even Page—begins a new section on the next even-numbered page.
• Odd Page—begins a new section on the next odd-numbered page.
Layout/Page Setup/Breaks
To insert a section break:
Sections Lesson 71
© 2017 Cengage Learning. All Rights Reserved. May not be copied, scanned, or duplicated, in whole or in part, except for use as permitted in a license distributed with a certain product or service or otherwise on a password-protected website for classroom use.

18
1. Turn on Show/Hide to see a section break in Print Layout view.
2. Switch to Draft view to see section breaks running the full width of the window.
3. Use the status bar to determine in which section the insertion point is currently located.
Sections (cont.)
To view section breaks:
Lesson 71
© 2017 Cengage Learning. All Rights Reserved. May not be copied, scanned, or duplicated, in whole or in part, except for use as permitted in a license distributed with a certain product or service or otherwise on a password-protected website for classroom use.
19
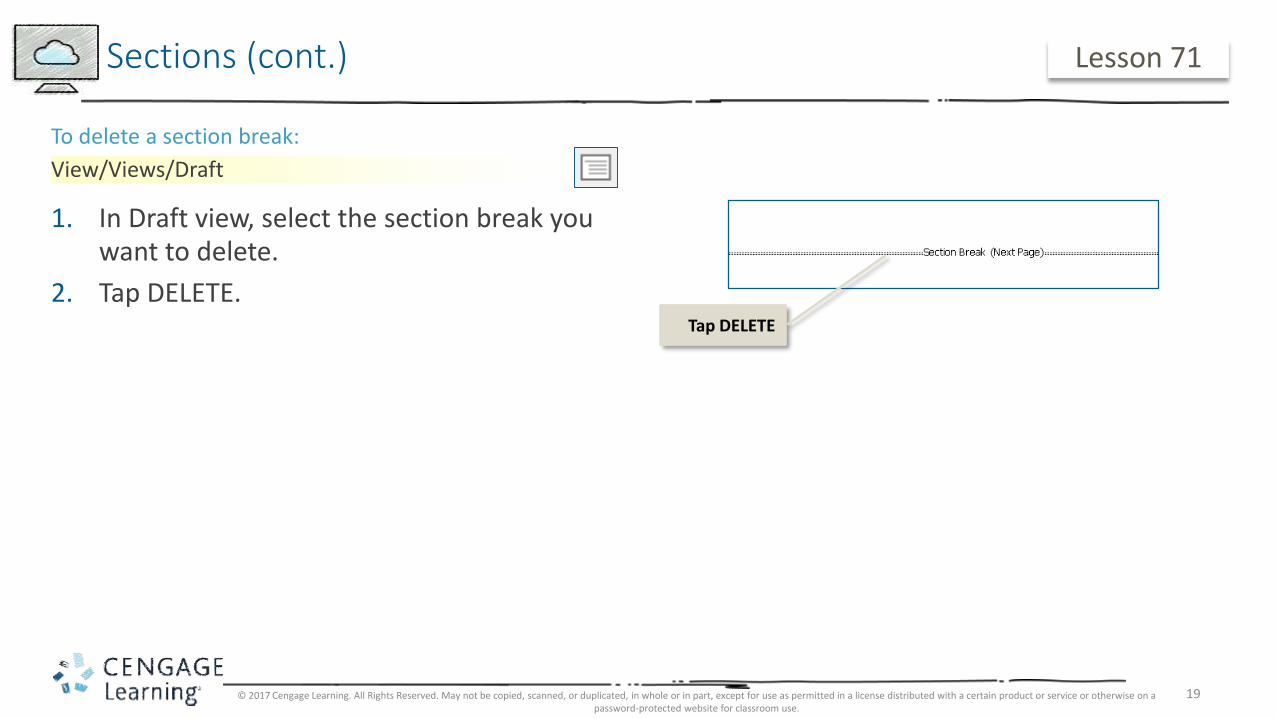
1. In Draft view, select the section break you want to delete.
2. Tap DELETE.
View/Views/Draft
To delete a section break:
Sections (cont.) Lesson 71
Tap DELETE
© 2017 Cengage Learning. All Rights Reserved. May not be copied, scanned, or duplicated, in whole or in part, except for use as permitted in a license distributed with a certain product or service or otherwise on a password-protected website for classroom use.

20
1. Position the insertion point in the header section.
2. Click Link to Previous to deselect and break the link.
3. Click Go to Footer and break the link.
Header & Footer Tools Design/Navigation
Step 1: To break the links in Section 2:
Break Links/Number Sections Lesson 71
Go to Footer button
Click to deselect and break link
Place insertion point in Section 2 header section
© 2017 Cengage Learning. All Rights Reserved. May not be copied, scanned, or duplicated, in whole or in part, except for use as permitted in a license distributed with a certain product or service or otherwise on a password-protected website for classroom use.
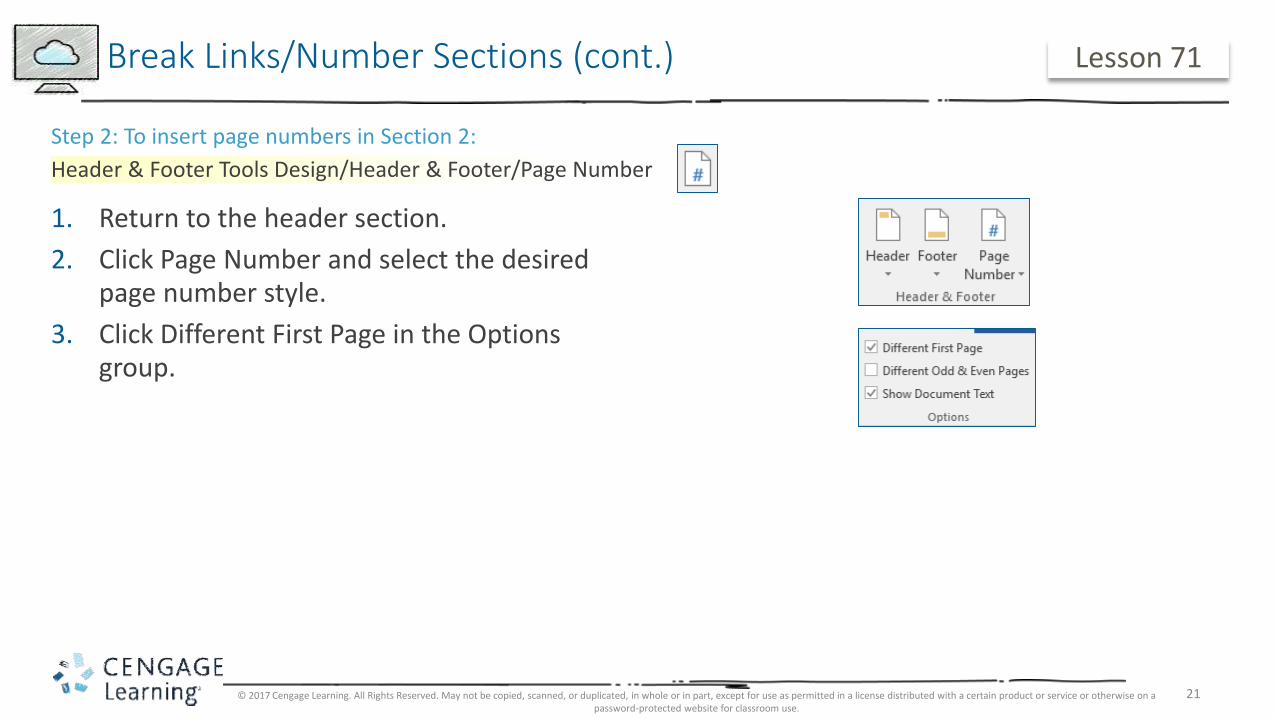
21
1. Return to the header section.
2. Click Page Number and select the desired page number style.
3. Click Different First Page in the Options group.
Header & Footer Tools Design/Header & Footer/Page Number
Step 2: To insert page numbers in Section 2:
Break Links/Number Sections (cont.) Lesson 71
© 2017 Cengage Learning. All Rights Reserved. May not be copied, scanned, or duplicated, in whole or in part, except for use as permitted in a license distributed with a certain product or service or otherwise on a password-protected website for classroom use.

22
1. Click Format Page Numbers to display Page Number Format dialog box.
2. Click the Start at up arrow until 1 displays.
Insert/Header & Footer/Page Number
Step 3: To start number at page 1:
Break Links/Number Sections (cont.) Lesson 71
© 2017 Cengage Learning. All Rights Reserved. May not be copied, scanned, or duplicated, in whole or in part, except for use as permitted in a license distributed with a certain product or service or otherwise on a password-protected website for classroom use.
23
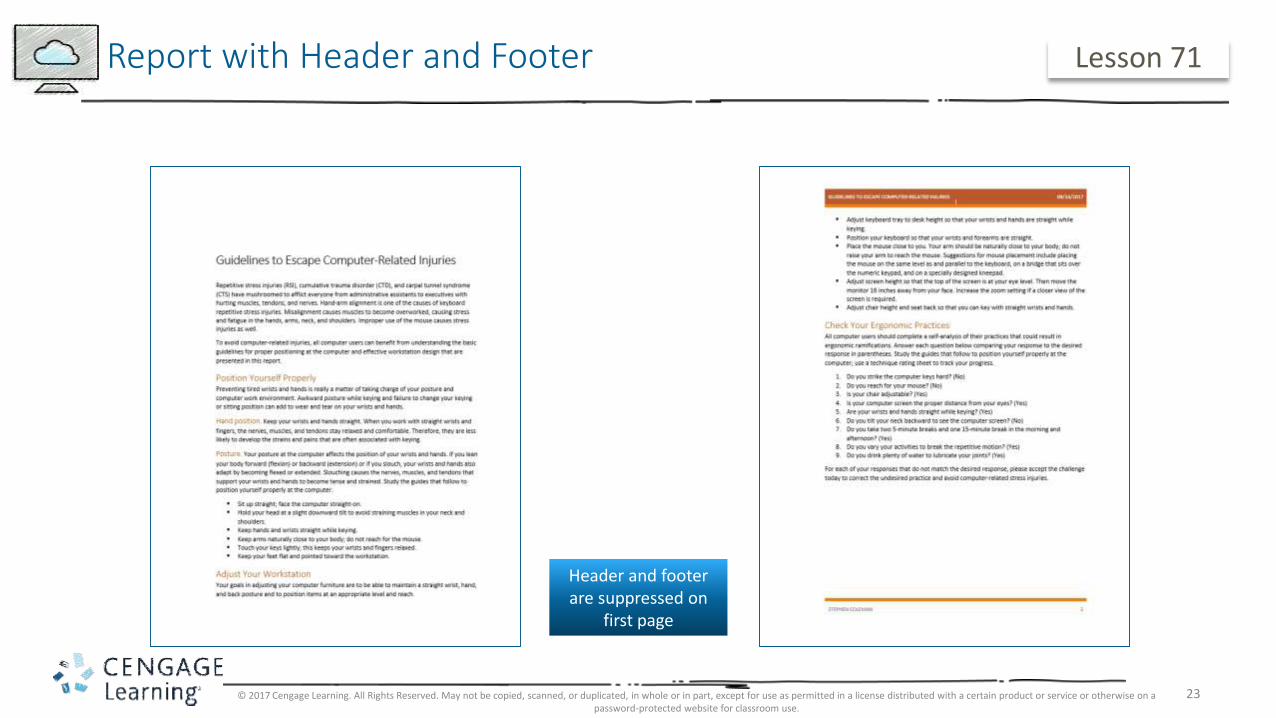
Report with Header and Footer Lesson 71
Header and footer are suppressed on
first page
© 2017 Cengage Learning. All Rights Reserved. May not be copied, scanned, or duplicated, in whole or in part, except for use as permitted in a license distributed with a certain product or service or otherwise on a password-protected website for classroom use.

24
Alternate Style: Display Footer First Page Lesson 71
© 2017 Cengage Learning. All Rights Reserved. May not be copied, scanned, or duplicated, in whole or in part, except for use as permitted in a license distributed with a certain product or service or otherwise on a password-protected website for classroom use.


![[braindump2go] latest 70 332 exam questions 71 80](https://img.pdfslide.us/doc/110x75/57906fe81a28ab68749b01d2/braindump2go-latest-70-332-exam-questions-71-80-579392952b8b7.jpg)

![[Braindump2go] Latest 70-332 Exam Questions 71-80](https://img.pdfslide.us/doc/110x75/563db884550346aa9a94692a/braindump2go-latest-70-332-exam-questions-71-80.jpg)

![NetBackup 70 71 Tuning Guide[1]](https://img.pdfslide.us/doc/110x75/553420184a795983608b4a60/netbackup-70-71-tuning-guide1.jpg)