Embed Size (px)
Citation preview

Beginning iPhone DevelopmentExploring the iPhone SDK
DAVE MARK JEFF LAMARCHE

Beginning iPhone Development: Exploring the iPhone SDK
Copyright © 2009 by Dave Mark, Jeff LaMarche
All rights reserved. No part of this work may be reproduced or transmitted in any form or by any means, electronic
or mechanical, including photocopying, recording, or by any information storage or retrieval system, without the
prior written permission of the copyright owner and the publisher.
ISBN-13 (pbk): 978-1-4302-1626-1
ISBN-10 (pbk): 1-4302-1626-3
Printed and bound in the United States of America 9 8 7 6 5 4 3 2 1
Trademarked names may appear in this book. Rather than use a trademark symbol with every occurrence of a
trademarked name, we use the names only in an editorial fashion and to the benefit of the trademark owner,
with no intention of infringement of the trademark.
Lead Editor: Clay Andres
Technical Reviewer: Mark Dalrymple
Editorial Board: Clay Andres, Steve Anglin, Mark Beckner, Ewan Buckingham, Tony Campbell, Gary Cornell,
Jonathan Gennick, Michelle Lowman, Matthew Moodie, Jeffrey Pepper, Frank Pohlmann, Ben Renow-Clarke,
Dominic Shakeshaft, Matt Wade, Tom Welsh
Project Manager: Laura Esterman
Copy Editor: Heather Lang
Assistant Production Director: Kari Brooks-Copony
Production Editor: Kelly Winquist
Compositor: Diana Van Winkle
Proofreader: Linda Seifert
Indexer: Broccoli Information Management
Artist: Diana Van Winkle
Cover Designer: Kurt Krames
Manufacturing Director: Tom Debolski
Distributed to the book trade worldwide by Springer-Verlag New York, Inc., 233 Spring Street, 6th Floor,
New York, NY 10013. Phone 1-800-SPRINGER, fax 201-348-4505, e-mail [email protected], or visit
http://www.springeronline.com.
For information on translations, please contact Apress directly at 2855 Telegraph Avenue, Suite 600, Berkeley, CA
94705. Phone 510-549-5930, fax 510-549-5939, e-mail [email protected], or visit http://www.apress.com.
Apress and friends of ED books may be purchased in bulk for academic, corporate, or promotional use.
eBook versions and licenses are also available for most titles. For more information, reference our Special Bulk
Sales–eBook Licensing web page at http://www.apress.com/info/bulksales.
The information in this book is distributed on an “as is” basis, without warranty. Although every precaution has
been taken in the preparation of this work, neither the author(s) nor Apress shall have any liability to any person or
entity with respect to any loss or damage caused or alleged to be caused directly or indirectly by the information
contained in this work.
The source code for this book is available to readers at http://www.apress.com.

To Deneen J. Melander, you are the light of my life. LFU4FREIH. . .
—Dave
To the most important people in my life, my wife and kids.
—Jeff
v
Contents at a Glance
About the Authors . . . . . . . . . . . . . . . . . . . . . . . . . . . . . . . . . . . . . . . . . . . . . . . . . . . . . . . . . . . .xvii
About the Technical Reviewer . . . . . . . . . . . . . . . . . . . . . . . . . . . . . . . . . . . . . . . . . . . . . . . . . xix
Acknowledgments . . . . . . . . . . . . . . . . . . . . . . . . . . . . . . . . . . . . . . . . . . . . . . . . . . . . . . . . . . . xxi
Preface . . . . . . . . . . . . . . . . . . . . . . . . . . . . . . . . . . . . . . . . . . . . . . . . . . . . . . . . . . . . . . . . . . . . . . xxiii
CHAPTER 1 Welcome to the Jungle . . . . . . . . . . . . . . . . . . . . . . . . . . . . . . . . . . . . . . . . . 1
CHAPTER 2 Appeasing the Tiki Gods . . . . . . . . . . . . . . . . . . . . . . . . . . . . . . . . . . . . . .11
CHAPTER 3 Handling Basic Interaction . . . . . . . . . . . . . . . . . . . . . . . . . . . . . . . . . . . .29
CHAPTER 4 More User Interface Fun . . . . . . . . . . . . . . . . . . . . . . . . . . . . . . . . . . . . . . .53
CHAPTER 5 Autorotation and Autosizing . . . . . . . . . . . . . . . . . . . . . . . . . . . . . . . . . .89
CHAPTER 6 Multiview Applications . . . . . . . . . . . . . . . . . . . . . . . . . . . . . . . . . . . . . . 113
CHAPTER 7 Tab Bars and Pickers . . . . . . . . . . . . . . . . . . . . . . . . . . . . . . . . . . . . . . . . 139
CHAPTER 8 Introduction to Table Views . . . . . . . . . . . . . . . . . . . . . . . . . . . . . . . . . 185
CHAPTER 9 Navigation Controllers and Table Views . . . . . . . . . . . . . . . . . . . . . . 231
CHAPTER 10 Application Settings and User Defaults . . . . . . . . . . . . . . . . . . . . . . 303
CHAPTER 11 Basic Data Persistence . . . . . . . . . . . . . . . . . . . . . . . . . . . . . . . . . . . . . . 329
CHAPTER 12 Drawing with Quartz and OpenGL . . . . . . . . . . . . . . . . . . . . . . . . . . . 361
CHAPTER 13 Taps, Touches, and Gestures . . . . . . . . . . . . . . . . . . . . . . . . . . . . . . . . . 401
CHAPTER 14 Where Am I? Finding Your Way with Core Location . . . . . . . . . . . 429
CHAPTER 15 Whee! . . . . . . . . . . . . . . . . . . . . . . . . . . . . . . . . . . . . . . . . . . . . . . . . . . . . . . 441
CHAPTER 16 iPhone Camera and Photo Library . . . . . . . . . . . . . . . . . . . . . . . . . . . 463
CHAPTER 17 Application Localization . . . . . . . . . . . . . . . . . . . . . . . . . . . . . . . . . . . . 473
CHAPTER 18 Where to Next? . . . . . . . . . . . . . . . . . . . . . . . . . . . . . . . . . . . . . . . . . . . . . 491
INDEX . . . . . . . . . . . . . . . . . . . . . . . . . . . . . . . . . . . . . . . . . . . . . . . . . . . . . . . . . . . . . . . . . . . . . . 495
vii
Contents
About the Authors . . . . . . . . . . . . . . . . . . . . . . . . . . . . . . . . . . . . . . . . . . . . . . . . . . . . . . . . . . . .xvii
About the Technical Reviewer . . . . . . . . . . . . . . . . . . . . . . . . . . . . . . . . . . . . . . . . . . . . . . . . . xix
Acknowledgments . . . . . . . . . . . . . . . . . . . . . . . . . . . . . . . . . . . . . . . . . . . . . . . . . . . . . . . . . . . xxi
Preface . . . . . . . . . . . . . . . . . . . . . . . . . . . . . . . . . . . . . . . . . . . . . . . . . . . . . . . . . . . . . . . . . . . . . . xxiii
CHAPTER 1 Welcome to the Jungle . . . . . . . . . . . . . . . . . . . . . . . . . . .1
What This Book Is . . . . . . . . . . . . . . . . . . . . . . . . . . . . . . . . . . . . . . . . . . . . . . 1
What You Need Before You Can Begin . . . . . . . . . . . . . . . . . . . . . . . . . . . 2
What You Need to Know Before You Begin . . . . . . . . . . . . . . . . . . . . . . 4
What’s Different About Coding for iPhone? . . . . . . . . . . . . . . . . . . . . . 5
Only One Running Application . . . . . . . . . . . . . . . . . . . . . . . . . . . . 5
Only One Window . . . . . . . . . . . . . . . . . . . . . . . . . . . . . . . . . . . . . . . . . 6
Limited Access . . . . . . . . . . . . . . . . . . . . . . . . . . . . . . . . . . . . . . . . . . . . 6
Limited Response Time . . . . . . . . . . . . . . . . . . . . . . . . . . . . . . . . . . . . 6
Limited Screen Size . . . . . . . . . . . . . . . . . . . . . . . . . . . . . . . . . . . . . . . 6
Limited System Resources . . . . . . . . . . . . . . . . . . . . . . . . . . . . . . . . . 7
Missing Cocoa Tools . . . . . . . . . . . . . . . . . . . . . . . . . . . . . . . . . . . . . . . 7
Some New Stuff . . . . . . . . . . . . . . . . . . . . . . . . . . . . . . . . . . . . . . . . . . . 7
A Different Approach . . . . . . . . . . . . . . . . . . . . . . . . . . . . . . . . . . . . . . 8
What’s in This Book . . . . . . . . . . . . . . . . . . . . . . . . . . . . . . . . . . . . . . . . . . . . 8
Are You Ready? . . . . . . . . . . . . . . . . . . . . . . . . . . . . . . . . . . . . . . . . . . . . . . .10
CHAPTER 2 Appeasing the Tiki Gods . . . . . . . . . . . . . . . . . . . . . . . 11
Setting Up Your Project in Xcode . . . . . . . . . . . . . . . . . . . . . . . . . . . . . .11
The Xcode Project Window . . . . . . . . . . . . . . . . . . . . . . . . . . . . . . .14
Introducing Interface Builder . . . . . . . . . . . . . . . . . . . . . . . . . . . . . . . . . .17
What’s in the Nib File? . . . . . . . . . . . . . . . . . . . . . . . . . . . . . . . . . . . .19
Adding a Label to the View . . . . . . . . . . . . . . . . . . . . . . . . . . . . . . .20
Some iPhone Polish—Finishing Touches . . . . . . . . . . . . . . . . . . . . . . .23
Ready to Compile and Run . . . . . . . . . . . . . . . . . . . . . . . . . . . . . . .26
Bring It on Home . . . . . . . . . . . . . . . . . . . . . . . . . . . . . . . . . . . . . . . . . . . . .27

CONTENTSviii
CHAPTER 3 Handling Basic Interaction . . . . . . . . . . . . . . . . . . . . . 29
The Model-View- Controller Paradigm . . . . . . . . . . . . . . . . . . . . . . . . . .30
Creating Our Project . . . . . . . . . . . . . . . . . . . . . . . . . . . . . . . . . . . . . . . . . .31
Creating the View Controller . . . . . . . . . . . . . . . . . . . . . . . . . . . . . . . . . .31
Outlets . . . . . . . . . . . . . . . . . . . . . . . . . . . . . . . . . . . . . . . . . . . . . . . . . .33
Actions . . . . . . . . . . . . . . . . . . . . . . . . . . . . . . . . . . . . . . . . . . . . . . . . . .33
Adding Actions and Outlets to the View Controller . . . . . . . .34
Adding Actions and Outlets to the Implementation File . . .37
Using the Application Delegate . . . . . . . . . . . . . . . . . . . . . . . . . . . . . . .41
Editing MainWindow.xib . . . . . . . . . . . . . . . . . . . . . . . . . . . . . . . . . . . . . .44
Editing Button_FunViewController.xib . . . . . . . . . . . . . . . . . . . . . . . . .45
Creating the View in Interface Builder . . . . . . . . . . . . . . . . . . . . .45
Connecting Everything . . . . . . . . . . . . . . . . . . . . . . . . . . . . . . . . . .48
Trying It Out . . . . . . . . . . . . . . . . . . . . . . . . . . . . . . . . . . . . . . . . . . . . .52
Bring It on Home . . . . . . . . . . . . . . . . . . . . . . . . . . . . . . . . . . . . . . . . . . . . .52
CHAPTER 4 More User Interface Fun . . . . . . . . . . . . . . . . . . . . . . . 53
A Screen Full of Controls . . . . . . . . . . . . . . . . . . . . . . . . . . . . . . . . . . . . . .54
Active, Static, and Passive Controls . . . . . . . . . . . . . . . . . . . . . . . . . . . .55
Creating the Application . . . . . . . . . . . . . . . . . . . . . . . . . . . . . . . . . . . . . .56
Importing the Image . . . . . . . . . . . . . . . . . . . . . . . . . . . . . . . . . . . . .56
Implementing the Image View and Text Fields. . . . . . . . . . . . .57
Adding the Image View . . . . . . . . . . . . . . . . . . . . . . . . . . . . . . . . . .59
Adding the Text Fields . . . . . . . . . . . . . . . . . . . . . . . . . . . . . . . . . . . .63
Set the Attributes for the Second Text Field . . . . . . . . . . . . . . .66
Connecting Outlets . . . . . . . . . . . . . . . . . . . . . . . . . . . . . . . . . . . . . .66
Build and Run . . . . . . . . . . . . . . . . . . . . . . . . . . . . . . . . . . . . . . . . . . . . . . . . .67
Making the Keyboard Go Away When Done Is Tapped . . . . .67
Touching the Background to Close the Keyboard . . . . . . . . .69
Implementing the Slider and Label . . . . . . . . . . . . . . . . . . . . . . . . . . . .70
Determining Outlets . . . . . . . . . . . . . . . . . . . . . . . . . . . . . . . . . . . . .70
Determining Actions . . . . . . . . . . . . . . . . . . . . . . . . . . . . . . . . . . . . .71
Adding Outlets and Actions . . . . . . . . . . . . . . . . . . . . . . . . . . . . . .71
Adding the Slider and Label . . . . . . . . . . . . . . . . . . . . . . . . . . . . . .72
Connecting the Actions and Outlets . . . . . . . . . . . . . . . . . . . . . .73
Implementing the Switches and Segmented Control . . . . . . . . . . .74
Determining Outlets . . . . . . . . . . . . . . . . . . . . . . . . . . . . . . . . . . . . .74
Determining Actions . . . . . . . . . . . . . . . . . . . . . . . . . . . . . . . . . . . . .74

CONTENTS ix
Adding the Switches and Segmented Control . . . . . . . . . . . . .76
Connecting the Outlets . . . . . . . . . . . . . . . . . . . . . . . . . . . . . . . . . .78
Implementing the Button, Action Sheet, and Alert . . . . . . . . . . . . .79
Adding the Outlet and Action to the
Controller Header File . . . . . . . . . . . . . . . . . . . . . . . . . . . . . . . . .79
Adding the Button in Interface Builder . . . . . . . . . . . . . . . . . . . .80
Implementing the Button’s Action Method . . . . . . . . . . . . . . . .80
Showing an Action Sheet . . . . . . . . . . . . . . . . . . . . . . . . . . . . . . . . . . . . .81
The Action Sheet Delegate and Creating an Alert . . . . . . . . . .83
Spiffing Up the Button . . . . . . . . . . . . . . . . . . . . . . . . . . . . . . . . . . . . . . . .84
The viewDidLoad Method . . . . . . . . . . . . . . . . . . . . . . . . . . . . . . . .85
Control States . . . . . . . . . . . . . . . . . . . . . . . . . . . . . . . . . . . . . . . . . . . .86
Stretchable Images . . . . . . . . . . . . . . . . . . . . . . . . . . . . . . . . . . . . . . .86
Crossing the Finish Line . . . . . . . . . . . . . . . . . . . . . . . . . . . . . . . . . . . . . . .87
CHAPTER 5 Autorotation and Autosizing . . . . . . . . . . . . . . . . . . . 89
Handling Rotation Using Autosize Attributes . . . . . . . . . . . . . . . . . .91
Specifying Rotation Support . . . . . . . . . . . . . . . . . . . . . . . . . . . . . .91
Designing an Interface with Autosize Attributes . . . . . . . . . . .93
Autosize Attributes . . . . . . . . . . . . . . . . . . . . . . . . . . . . . . . . . . . . . . .94
Setting the Buttons’ Autosize Attributes . . . . . . . . . . . . . . . . . . .96
Restructuring a View When Rotated . . . . . . . . . . . . . . . . . . . . . . . . . . .97
Declaring and Connecting Outlets . . . . . . . . . . . . . . . . . . . . . . . .98
Moving the Buttons on Rotation . . . . . . . . . . . . . . . . . . . . . . . . . .99
Swapping Views . . . . . . . . . . . . . . . . . . . . . . . . . . . . . . . . . . . . . . . . . . . . 102
Determining Outlets . . . . . . . . . . . . . . . . . . . . . . . . . . . . . . . . . . . 103
Determining Actions . . . . . . . . . . . . . . . . . . . . . . . . . . . . . . . . . . . 104
Declaring Actions and Outlets . . . . . . . . . . . . . . . . . . . . . . . . . . 104
Designing the Two Views . . . . . . . . . . . . . . . . . . . . . . . . . . . . . . . 105
Implementing the Swap and the Action . . . . . . . . . . . . . . . . 106
Linking in the Core Graphics Framework . . . . . . . . . . . . . . . . 109
Rotating Out of Here . . . . . . . . . . . . . . . . . . . . . . . . . . . . . . . . . . . . . . . . 111
CHAPTER 6 Multiview Applications . . . . . . . . . . . . . . . . . . . . . . . 113
The View Switcher Application . . . . . . . . . . . . . . . . . . . . . . . . . . . . . . 116
The Architecture of a Multiview Application . . . . . . . . . . . . . . . . . 117
Multiview Controllers Are View Controllers . . . . . . . . . . . . . . 117
Anatomy of a Content View . . . . . . . . . . . . . . . . . . . . . . . . . . . . . 117
CONTENTSx
Building View Switcher . . . . . . . . . . . . . . . . . . . . . . . . . . . . . . . . . . . . . . 118
Creating Our View Controller and Nib Files . . . . . . . . . . . . . . 119
Modifying the App Delegate . . . . . . . . . . . . . . . . . . . . . . . . . . . 121
SwitchViewController.h . . . . . . . . . . . . . . . . . . . . . . . . . . . . . . . . . 122
Modifying MainWindow.xib . . . . . . . . . . . . . . . . . . . . . . . . . . . . 123
Writing SwitchViewController.m . . . . . . . . . . . . . . . . . . . . . . . . 126
Implementing the Content Views . . . . . . . . . . . . . . . . . . . . . . . 130
Animating the Transition . . . . . . . . . . . . . . . . . . . . . . . . . . . . . . . . . . . . 132
Refactoring . . . . . . . . . . . . . . . . . . . . . . . . . . . . . . . . . . . . . . . . . . . . . . . . . 135
Switching Off . . . . . . . . . . . . . . . . . . . . . . . . . . . . . . . . . . . . . . . . . . . . . . . 137
CHAPTER 7 Tab Bars and Pickers . . . . . . . . . . . . . . . . . . . . . . . . . . 139
The Pickers Application . . . . . . . . . . . . . . . . . . . . . . . . . . . . . . . . . . . . . 140
Delegates and Datasources . . . . . . . . . . . . . . . . . . . . . . . . . . . . . . . . . 141
Setting Up the Tab Bar Framework . . . . . . . . . . . . . . . . . . . . . . . . . . . 142
Creating the Files . . . . . . . . . . . . . . . . . . . . . . . . . . . . . . . . . . . . . . 142
Setting Up the Content View Nibs . . . . . . . . . . . . . . . . . . . . . . 143
Adding the Root View Controller . . . . . . . . . . . . . . . . . . . . . . . . 144
Implementing the Date Picker . . . . . . . . . . . . . . . . . . . . . . . . . . . . . . . 148
Implementing the Single Component Picker . . . . . . . . . . . . . . . . . 151
Declaring Outlets and Actions . . . . . . . . . . . . . . . . . . . . . . . . . . 151
Building the View . . . . . . . . . . . . . . . . . . . . . . . . . . . . . . . . . . . . . . 152
Implementing the Controller As
Datasource and Delegate . . . . . . . . . . . . . . . . . . . . . . . . . . . . 153
Implementing a Multicomponent Picker . . . . . . . . . . . . . . . . . . . . . 158
Declaring Outlets and Actions . . . . . . . . . . . . . . . . . . . . . . . . . . 158
Building the View . . . . . . . . . . . . . . . . . . . . . . . . . . . . . . . . . . . . . . 159
Implementing the Controller . . . . . . . . . . . . . . . . . . . . . . . . . . . 159
Implementing Dependent Components . . . . . . . . . . . . . . . . . . . . . 163
Creating a Simple Game with a Custom Picker . . . . . . . . . . . . . . . 170
Writing the Controller Header File . . . . . . . . . . . . . . . . . . . . . . 170
Building the View . . . . . . . . . . . . . . . . . . . . . . . . . . . . . . . . . . . . . . 171
Adding Image Resources . . . . . . . . . . . . . . . . . . . . . . . . . . . . . . . 172
Implementing the Controller . . . . . . . . . . . . . . . . . . . . . . . . . . . 172
The spin Method . . . . . . . . . . . . . . . . . . . . . . . . . . . . . . . . . . . . . . . 175
The viewDidLoad Method . . . . . . . . . . . . . . . . . . . . . . . . . . . . . . 176
Final Details . . . . . . . . . . . . . . . . . . . . . . . . . . . . . . . . . . . . . . . . . . . . 178
Linking in the Audio Toolbox Framework . . . . . . . . . . . . . . . . 182
Final Spin . . . . . . . . . . . . . . . . . . . . . . . . . . . . . . . . . . . . . . . . . . . . . . . . . . . 183

CONTENTS xi
CHAPTER 8 Introduction to Table Views . . . . . . . . . . . . . . . . . . . 185
Table View Basics . . . . . . . . . . . . . . . . . . . . . . . . . . . . . . . . . . . . . . . . . . . 186
Grouped and Indexed Tables . . . . . . . . . . . . . . . . . . . . . . . . . . . 187
Implementing a Simple Table . . . . . . . . . . . . . . . . . . . . . . . . . . . . . . . 189
Designing the View . . . . . . . . . . . . . . . . . . . . . . . . . . . . . . . . . . . . 189
Writing the Controller . . . . . . . . . . . . . . . . . . . . . . . . . . . . . . . . . . 190
Adding an Image . . . . . . . . . . . . . . . . . . . . . . . . . . . . . . . . . . . . . . . . . . . 194
Additional Configurations . . . . . . . . . . . . . . . . . . . . . . . . . . . . . . . . . . . 195
Setting the Indent Level . . . . . . . . . . . . . . . . . . . . . . . . . . . . . . . . 195
Handling Row Selection . . . . . . . . . . . . . . . . . . . . . . . . . . . . . . . . 196
Changing Font Size and Row Height . . . . . . . . . . . . . . . . . . . . 198
What Else Can the Delegate Do? . . . . . . . . . . . . . . . . . . . . . . . 199
Customizing Table View Cells . . . . . . . . . . . . . . . . . . . . . . . . . . . . . . . . 199
The Cells Application . . . . . . . . . . . . . . . . . . . . . . . . . . . . . . . . . . . 200
Adding Subviews to the Table View Cell . . . . . . . . . . . . . . . . . 200
Using a Custom Subclass of UITableViewCell . . . . . . . . . . . . 204
Grouped and Indexed Sections . . . . . . . . . . . . . . . . . . . . . . . . . . . . . . 209
Building the View . . . . . . . . . . . . . . . . . . . . . . . . . . . . . . . . . . . . . . 209
Importing the Data. . . . . . . . . . . . . . . . . . . . . . . . . . . . . . . . . . . . . 209
Implementing the Controller . . . . . . . . . . . . . . . . . . . . . . . . . . . 210
Adding an Index . . . . . . . . . . . . . . . . . . . . . . . . . . . . . . . . . . . . . . . 214
Implementing a Search Bar . . . . . . . . . . . . . . . . . . . . . . . . . . . . . . . . . . 215
Rethinking the Design . . . . . . . . . . . . . . . . . . . . . . . . . . . . . . . . . 215
A Deep Mutable Copy . . . . . . . . . . . . . . . . . . . . . . . . . . . . . . . . . . 216
Updating the Controller Header File . . . . . . . . . . . . . . . . . . . . 218
Modifying the View . . . . . . . . . . . . . . . . . . . . . . . . . . . . . . . . . . . . 220
Modifying the Controller Implementation . . . . . . . . . . . . . . . 221
Putting It All on the Table . . . . . . . . . . . . . . . . . . . . . . . . . . . . . . . . . . . 230
CHAPTER 9 Navigation Controllers and Table Views . . . . . . . . 231
Navigation Controllers . . . . . . . . . . . . . . . . . . . . . . . . . . . . . . . . . . . . . . 232
Stacky Goodness . . . . . . . . . . . . . . . . . . . . . . . . . . . . . . . . . . . . . . . 232
A Stack of Controllers . . . . . . . . . . . . . . . . . . . . . . . . . . . . . . . . . . 232
Nav, a Hierarchical Application in Six Parts . . . . . . . . . . . . . . . . . . . 233
Constructing the Nav Application’s Skeleton . . . . . . . . . . . . . . . . . 236
Creating the Root View Controller . . . . . . . . . . . . . . . . . . . . . . 236
Setting Up the Navigation Controller . . . . . . . . . . . . . . . . . . . 236
Our First Subcontroller: The Disclosure Button View . . . . . . . . . . 244

CONTENTSxii
Our Second Subcontroller: The Checklist . . . . . . . . . . . . . . . . . . . . . 252
Our Third Subcontroller: Controls on Table Rows . . . . . . . . . . . . . 257
Our Fourth Subcontroller: Moveable Rows . . . . . . . . . . . . . . . . . . 263
Editing Mode . . . . . . . . . . . . . . . . . . . . . . . . . . . . . . . . . . . . . . . . . . 263
Creating a New Second- Level Controller . . . . . . . . . . . . . . . . 264
Our Fifth Subcontroller: Deletable Rows . . . . . . . . . . . . . . . . . . . . . 270
Our Sixth Subcontroller: An Editable Detail Pane . . . . . . . . . . . . 276
Creating the Data Model Object . . . . . . . . . . . . . . . . . . . . . . . . 276
Creating the Controllers . . . . . . . . . . . . . . . . . . . . . . . . . . . . . . . . 278
Creating the Detail View Controller . . . . . . . . . . . . . . . . . . . . . 282
But There’s One More Thing. . . . . . . . . . . . . . . . . . . . . . . . . . . . . . . . . 298
Breaking the Tape . . . . . . . . . . . . . . . . . . . . . . . . . . . . . . . . . . . . . . . . . . . 301
CHAPTER 10 Application Settings and User Defaults . . . . . . . . 303
Getting to Know Your Settings Bundle . . . . . . . . . . . . . . . . . . . . . . . 304
The AppSettings Application . . . . . . . . . . . . . . . . . . . . . . . . . . . . . . . . 305
Creating the Project . . . . . . . . . . . . . . . . . . . . . . . . . . . . . . . . . . . . . . . . . 306
Working with the Settings Bundle . . . . . . . . . . . . . . . . . . . . . . . . . . . 309
Adding a Settings Bundle to Our Project . . . . . . . . . . . . . . . . 309
Setting Up the Property List . . . . . . . . . . . . . . . . . . . . . . . . . . . . 310
Adding a Text Field Setting . . . . . . . . . . . . . . . . . . . . . . . . . . . . . 311
Adding a Secure Text Field Setting . . . . . . . . . . . . . . . . . . . . . . 314
Adding a Multivalue Field . . . . . . . . . . . . . . . . . . . . . . . . . . . . . . 314
Adding a Toggle Switch Setting . . . . . . . . . . . . . . . . . . . . . . . . . 315
Adding the Slider Setting . . . . . . . . . . . . . . . . . . . . . . . . . . . . . . . 316
Adding a Child Settings View . . . . . . . . . . . . . . . . . . . . . . . . . . . 317
Reading Settings in Our Application . . . . . . . . . . . . . . . . . . . . . . . . . 319
Changing Defaults from Our Application . . . . . . . . . . . . . . . . . . . . 323
Beam Me Up, Scotty . . . . . . . . . . . . . . . . . . . . . . . . . . . . . . . . . . . . . . . . 327
CHAPTER 11 Basic Data Persistence . . . . . . . . . . . . . . . . . . . . . . . . 329
Your Application’s Sandbox . . . . . . . . . . . . . . . . . . . . . . . . . . . . . . . . . 330
Getting the Documents Directory . . . . . . . . . . . . . . . . . . . . . . 331
Getting the tmp Directory . . . . . . . . . . . . . . . . . . . . . . . . . . . . . . 331
File Saving Strategies . . . . . . . . . . . . . . . . . . . . . . . . . . . . . . . . . . . . . . . 332
Single-File Persistence . . . . . . . . . . . . . . . . . . . . . . . . . . . . . . . . . . 332
Multiple-File Persistence . . . . . . . . . . . . . . . . . . . . . . . . . . . . . . . 332
Persisting Application Data . . . . . . . . . . . . . . . . . . . . . . . . . . . . . . . . . . 333
Property List Serialization . . . . . . . . . . . . . . . . . . . . . . . . . . . . . . 333

CONTENTS xiii
The Persistence Application . . . . . . . . . . . . . . . . . . . . . . . . . . . . . . . . . 335
Creating the Persistence Project . . . . . . . . . . . . . . . . . . . . . . . . 335
Designing the Persistence Application View . . . . . . . . . . . . . 336
Editing the Persistence Classes . . . . . . . . . . . . . . . . . . . . . . . . . 337
Archiving Model Objects . . . . . . . . . . . . . . . . . . . . . . . . . . . . . . . 341
Implementing NSCopying . . . . . . . . . . . . . . . . . . . . . . . . . . . . . . 343
The Archiving Application . . . . . . . . . . . . . . . . . . . . . . . . . . . . . . . . . . . 345
Implementing the FourLines Class . . . . . . . . . . . . . . . . . . . . . . 345
Implementing the PersistenceViewController Class . . . . . . 346
Using iPhone’s Embedded SQLite3 . . . . . . . . . . . . . . . . . . . . . . . . . . 350
Setting Up a Project to Use SQLite3 . . . . . . . . . . . . . . . . . . . . . 352
Persistence Rewarded . . . . . . . . . . . . . . . . . . . . . . . . . . . . . . . . . . . . . . . 359
CHAPTER 12 Drawing with Quartz and OpenGL . . . . . . . . . . . . . 361
Two Views of a Graphical World . . . . . . . . . . . . . . . . . . . . . . . . . . . . . . 362
This Chapter’s Drawing Application . . . . . . . . . . . . . . . . . . . . . . . . . . 363
The Quartz Approach to Drawing . . . . . . . . . . . . . . . . . . . . . . . . . . . . 363
Quartz 2D’s Graphics Contexts . . . . . . . . . . . . . . . . . . . . . . . . . . 363
The Coordinates System . . . . . . . . . . . . . . . . . . . . . . . . . . . . . . . . 364
Specifying Colors . . . . . . . . . . . . . . . . . . . . . . . . . . . . . . . . . . . . . . 365
Drawing Images in Context . . . . . . . . . . . . . . . . . . . . . . . . . . . . . 367
Drawing Shapes: Polygons, Lines, and Curves . . . . . . . . . . . 368
Quartz 2D Tool Sampler: Patterns, Gradients,
and Dash Patterns . . . . . . . . . . . . . . . . . . . . . . . . . . . . . . . . . . . 368
Building the QuartzFun Application . . . . . . . . . . . . . . . . . . . . . . . . . 368
Creating a Random Color . . . . . . . . . . . . . . . . . . . . . . . . . . . . . . . 370
Defining Application Constants . . . . . . . . . . . . . . . . . . . . . . . . . 371
Implementing the QuartzFunView Skeleton . . . . . . . . . . . . . 371
Adding Outlets and Actions to the View Controller . . . . . . 374
Updating QuartzFunViewController.xib . . . . . . . . . . . . . . . . . 376
Drawing the Line . . . . . . . . . . . . . . . . . . . . . . . . . . . . . . . . . . . . . . . 378
Drawing the Rectangle and Ellipse . . . . . . . . . . . . . . . . . . . . . . 380
Drawing the Image . . . . . . . . . . . . . . . . . . . . . . . . . . . . . . . . . . . . . 382
Some OpenGL ES Basics . . . . . . . . . . . . . . . . . . . . . . . . . . . . . . . . . . . . . 388
Building the GLFun Application . . . . . . . . . . . . . . . . . . . . . . . . . 388
Drawing a Blank . . . . . . . . . . . . . . . . . . . . . . . . . . . . . . . . . . . . . . . . . . . . 400

CONTENTSxiv
CHAPTER 13 Taps, Touches, and Gestures . . . . . . . . . . . . . . . . . . . 401
Multitouch Terminology. . . . . . . . . . . . . . . . . . . . . . . . . . . . . . . . . . . . . 402
The Responder Chain . . . . . . . . . . . . . . . . . . . . . . . . . . . . . . . . . . . . . . . 402
Forwarding an Event: Keeping the Responder Chain Alive . . 403
The Multitouch Architecture . . . . . . . . . . . . . . . . . . . . . . . . . . . . . . . . 404
The Four Gesture Notification Methods . . . . . . . . . . . . . . . . . 405
The Touch Explorer Application. . . . . . . . . . . . . . . . . . . . . . . . . . . . . . 406
The Swipes Application . . . . . . . . . . . . . . . . . . . . . . . . . . . . . . . . . . . . . 410
Implementing Multiple Swipes . . . . . . . . . . . . . . . . . . . . . . . . . . . . . . 413
Detecting Multiple Taps . . . . . . . . . . . . . . . . . . . . . . . . . . . . . . . . . . . . . 416
Detecting Pinches . . . . . . . . . . . . . . . . . . . . . . . . . . . . . . . . . . . . . . . . . . 420
Defining Custom Gestures . . . . . . . . . . . . . . . . . . . . . . . . . . . . . . . . . . 424
The CheckPlease Touch Methods . . . . . . . . . . . . . . . . . . . . . . . 427
Garçon? Check, Please! . . . . . . . . . . . . . . . . . . . . . . . . . . . . . . . . . . . . . . 428
CHAPTER 14 Where Am I? Finding Your Way with Core Location . . . . . . . . . . . . . . . . . . . . . . . . . . . 429
The Location Manager . . . . . . . . . . . . . . . . . . . . . . . . . . . . . . . . . . . . . . 430
Setting the Desired Accuracy . . . . . . . . . . . . . . . . . . . . . . . . . . . 430
Setting the Distance Filter . . . . . . . . . . . . . . . . . . . . . . . . . . . . . . 430
Starting the Location Manager . . . . . . . . . . . . . . . . . . . . . . . . . 431
Using the Location Manager Wisely . . . . . . . . . . . . . . . . . . . . . 431
The Location Manager Delegate . . . . . . . . . . . . . . . . . . . . . . . . . . . . . 431
Getting Location Updates . . . . . . . . . . . . . . . . . . . . . . . . . . . . . . 432
Getting Latitude and Longitude Using CLLocation . . . . . . 432
Error Notifications . . . . . . . . . . . . . . . . . . . . . . . . . . . . . . . . . . . . . . 433
Trying Out Core Location . . . . . . . . . . . . . . . . . . . . . . . . . . . . . . . . . . . . 434
Updating Location Manager . . . . . . . . . . . . . . . . . . . . . . . . . . . . 438
Determining Distance Traveled . . . . . . . . . . . . . . . . . . . . . . . . . 439
Wherever You Go, There You Are . . . . . . . . . . . . . . . . . . . . . . . . . . . . . 439
CHAPTER 15 Whee! . . . . . . . . . . . . . . . . . . . . . . . . . . . . . . . . . . . . . . . 441
Accelerometer Physics . . . . . . . . . . . . . . . . . . . . . . . . . . . . . . . . . . . . . . 441
Accessing the Accelerometer . . . . . . . . . . . . . . . . . . . . . . . . . . . . . . . . 442
UIAcceleration . . . . . . . . . . . . . . . . . . . . . . . . . . . . . . . . . . . . . . . . . 443
Implementing the accelerometer:didAccelerate: Method . . 444
Shake and Break . . . . . . . . . . . . . . . . . . . . . . . . . . . . . . . . . . . . . . . . . . . . 447
The Code That Breaks . . . . . . . . . . . . . . . . . . . . . . . . . . . . . . . . . . 448
Load the Simulation Files . . . . . . . . . . . . . . . . . . . . . . . . . . . . . . . 451
All Better—The Healing Touch . . . . . . . . . . . . . . . . . . . . . . . . . . 452

CONTENTS xv
The Rolling Marble Program . . . . . . . . . . . . . . . . . . . . . . . . . . . . . . . . . 452
Implementing the Ball View Controller . . . . . . . . . . . . . . . . . . 453
Writing the Ball View . . . . . . . . . . . . . . . . . . . . . . . . . . . . . . . . . . . 454
Calculating Ball Movement . . . . . . . . . . . . . . . . . . . . . . . . . . . . . 458
Rolling On . . . . . . . . . . . . . . . . . . . . . . . . . . . . . . . . . . . . . . . . . . . . . . . . . . 461
CHAPTER 16 iPhone Camera and Photo Library . . . . . . . . . . . . . 463
Using the Image Picker and UIImagePickerController . . . . . . . . . 464
Implementing the Image Picker Controller Delegate . . . . . . . . . 465
Road Testing the Camera and Library . . . . . . . . . . . . . . . . . . . . . . . . 467
Designing the Interface . . . . . . . . . . . . . . . . . . . . . . . . . . . . . . . . 468
Implementing the Camera View Controller . . . . . . . . . . . . . . 468
It’s a Snap! . . . . . . . . . . . . . . . . . . . . . . . . . . . . . . . . . . . . . . . . . . . . . . . . . . 472
CHAPTER 17 Application Localization . . . . . . . . . . . . . . . . . . . . . . 473
Localization Architecture . . . . . . . . . . . . . . . . . . . . . . . . . . . . . . . . . . . . 473
Using String Files . . . . . . . . . . . . . . . . . . . . . . . . . . . . . . . . . . . . . . . . . . . 475
Creating the Strings File . . . . . . . . . . . . . . . . . . . . . . . . . . . . . . . . 476
Real-World iPhone: Localizing Your Application . . . . . . . . . . . . . . 477
Looking at the Current Locale . . . . . . . . . . . . . . . . . . . . . . . . . . 480
Trying Out LocalizeMe. . . . . . . . . . . . . . . . . . . . . . . . . . . . . . . . . . 481
Localizing the Nib . . . . . . . . . . . . . . . . . . . . . . . . . . . . . . . . . . . . . . 482
Looking at the Localized Project Structure . . . . . . . . . . . . . . 483
Localizing an Image . . . . . . . . . . . . . . . . . . . . . . . . . . . . . . . . . . . . 485
Localizing the Application Icon . . . . . . . . . . . . . . . . . . . . . . . . . 486
Generating and Localizing a Strings File . . . . . . . . . . . . . . . . . 487
Auf Wiedersehen . . . . . . . . . . . . . . . . . . . . . . . . . . . . . . . . . . . . . . . . . . . 490
CHAPTER 18 Where to Next? . . . . . . . . . . . . . . . . . . . . . . . . . . . . . . . 491
Getting Unstuck . . . . . . . . . . . . . . . . . . . . . . . . . . . . . . . . . . . . . . . . . . . . 491
Apple’s Documentation . . . . . . . . . . . . . . . . . . . . . . . . . . . . . . . . 492
Mailing Lists . . . . . . . . . . . . . . . . . . . . . . . . . . . . . . . . . . . . . . . . . . . 492
Discussion Forums . . . . . . . . . . . . . . . . . . . . . . . . . . . . . . . . . . . . . 492
Web Sites . . . . . . . . . . . . . . . . . . . . . . . . . . . . . . . . . . . . . . . . . . . . . . 493
Blogs . . . . . . . . . . . . . . . . . . . . . . . . . . . . . . . . . . . . . . . . . . . . . . . . . . 493
And If All Else Fails. . . . . . . . . . . . . . . . . . . . . . . . . . . . . . . . . . . . . 494
Farewell . . . . . . . . . . . . . . . . . . . . . . . . . . . . . . . . . . . . . . . . . . . . . . . . . . . . 494
INDEX . . . . . . . . . . . . . . . . . . . . . . . . . . . . . . . . . . . . . . . . . . . . . . . . . . . . . 495

xvii
About the Authors
Dave Mark is a longtime Mac developer and author and has written a
number of books on Mac development, including Learn C on the Mac
(Apress 2009), The Macintosh Programming Primer series (Addison-Wesley
1992), and Ultimate Mac Programming (Wiley 1995). Dave loves the water
and spends as much time as possible on it, in it, or near it. He lives with
his wife and three children in Virginia.
Jeff LaMarche is a longtime Mac developer and certified Apple iPhone
Developer with more than 20 years of programming experience. He’s
written on Cocoa and Objective-C for MacTech Magazine, as well as arti-
cles for Apple’s Developer Technical Services web site. He has experience
working in enterprise software as both a developer for PeopleSoft, start-
ing in the late 1990s, and later as an independent consultant.

xix
About the Technical Reviewer
Mark Dalrymple is a longtime Mac and Unix programmer, working on
cross-platform toolkits, Internet publishing tools, high-performance
web servers, and end-user desktop applications. He’s also the principal
author of Advanced Mac OS X Programming (Big Nerd Ranch 2005) and
Learn Objective-C on the Mac (Apress 2009). In his spare time, he plays
trombone and bassoon and makes balloon animals.
xxi
Acknowledgments
This book could not have been written without our mighty, kind, and clever families, friends,
and cohorts. First and foremost, eternal thanks to Terry and Deneen for putting up with us
and for keeping the rest of the universe at bay while we toiled away on this book. This proj-
ect saw us tucked away in our writers’ cubby for many long hours, and somehow, you didn’t
complain once. We are lucky men.
This book could not have been written without the fine folks at Apress. More than just a
publisher, they became fast friends. Clay Andres brought us to Apress in the first place and
carried this book on his back. Dominic Shakeshaft was the gracious mastermind who dealt
with all of our complaints with a smile on his face and somehow found a solution that made
sense and made this book better. Laura Esterman, our wonderful and gracious project man-
ager, was the irresistible force to our slowly movable object. She kept the book on the right
track and always kept us pointed in the right direction. Heather Lang, copy editor extraordi-
naire, you were such a pleasure to work with; please, please, please copy edit our next book,
too! Grace Wong and the production team took all these pieces and somehow made them
whole, and Kari Brooks-Copony pulled together an incredibly yummy interior design. Kelly
Winquist somehow coaxed such beautiful printed pages out of our Word documents. Pete
Aylward assembled the marketing message and got it out to the world. To all the folks at
Apress, thank you, thank you, thank you!
A very special shout out to our incredibly talented technical reviewer, Mark Dalrymple—in
addition to providing insightful feedback, Mark tested all the code in this book and helped
keep us on the straight and narrow. Thanks Mark!
Finally, thanks to our children for their patience while their dads were working so hard. This
book is for you Maddie, Gwynnie, Ian, Kai, Daniel, Kelley, and Ryan.

xxiii
Preface
“I haven’t been this excited about a programming platform since I first set eyes on the Mac.”
We’ve been hearing this sentiment a lot lately, and frankly, we feel exactly the same way. The
iPhone is thrilling, a fantastic piece of technology, and a brilliant combination of function
and fun. And the things you can do as a programmer!
This world is just beginning to open up. Spend some time browsing through the App Store,
and you can’t help but be filled with inspiration. And, if designing your own iPhone applica-
tion just isn’t your thing, the opportunities for iPhone development consulting are limitless.
Everyone seems to want to port their product to the platform. Our phones have been ring-
ing off the hook.
If you get a few moments, swing by our web site, http://iphonedevbook.com, and say “hi.”
Tell us about your own projects. We’d love to hear from you.
Dave and Jeff

1
s
Chapter1Welcome to the Jungle
o, you want to write iPhone applications? Well, we can’t say that we blame
you. iPhone might just be the most interesting new platform to come around
in a long time; certainly, it is the most interesting mobile platform to date,
especially now that Apple has provided a set of elegant, well- documented
tools for developing iPhone applications.
What This Book IsThis book is a guide to help you get started down the path to creating your
own iPhone applications. Our goal is to get you past the initial learning curve
to help you to understand the way iPhone applications work and how they
are built. As you work your way through this book, you will create a number
of small applications, each designed to highlight specific iPhone features and
show you how to control or interact with those features. If you combine the
foundation you’ll gain by making your way through this book with your own
creativity and determination, then add in the extensive and well- written docu-
mentation provided by Apple, you’ll have everything you’ll need to build your
own professional iPhone applications.

CHAPTER 1: Welcome to the Jungle 2
What You Need Before You Can BeginBefore you can begin writing software for iPhone, you’ll need a few things. For starters, you’ll
need an Intel- based Macintosh running Leopard (OS X 10.5.3 or later). Any Macintosh com-
puter—laptop or desktop—released since 2006 should work just fine.
You do not need a top-of-the- line model to get started, so a MacBook or Mac Mini will serve
admirably. The older and slower the model, the more it will benefit from a RAM upgrade,
however.
You’ll also need to sign up to become a registered iPhone developer. Apple requires this step
before you’re allowed to download the iPhone software development kit (SDK).
To sign up, navigate to http://developer.apple.com/iphone/, which will bring you to
a page similar to the one shown in Figure 1-1. Somewhere on the page is a link to the latest
and greatest iPhone SDK. Click the link, and you’ll be brought to a sign- up page with three
options.
The simplest (and free) option is to click the button that reads, Download the Free SDK. You’ll
be prompted for your Apple ID. Use your Apple ID to log in. If you don’t have an Apple ID,
click the Create Apple ID button, create one, and then log in. Once you are logged in, you’ll be
taken to the main iPhone development page. Not only will you find a link to the SDK down-
load, but you’ll also find links to a wealth of documentation, videos, sample code and the
like, all dedicated to teaching you the finer points of iPhone application development.
One of the most important elements included with the iPhone SDK is Xcode, Apple’s inte-
grated development environment (IDE). Xcode includes tools for creating and debugging
source code, compiling applications, and performance tuning the applications you’ve writ-
ten. By the time you are finished with this book, you will become an Xcode aficionado!
The free SDK also includes a simulator that will allow you to run most iPhone programs on
your Mac. This is perfect for learning how to program your iPhone. The free option will not,
however, allow you to download your applications onto your actual iPhone (or iPod Touch).
It also does not give you the ability to distribute your applications on Apple’s iPhone App
Store. For that, you’ll need one of the other two options, which aren’t free.
NOTE
The simulator does not support hardware- dependent features, such as iPhone’s accelerometer or camera.
For those, you’ll need the alternate options as well. Just thought you’d like to know!
CHAPTER 1: Welcome to the Jungle 3
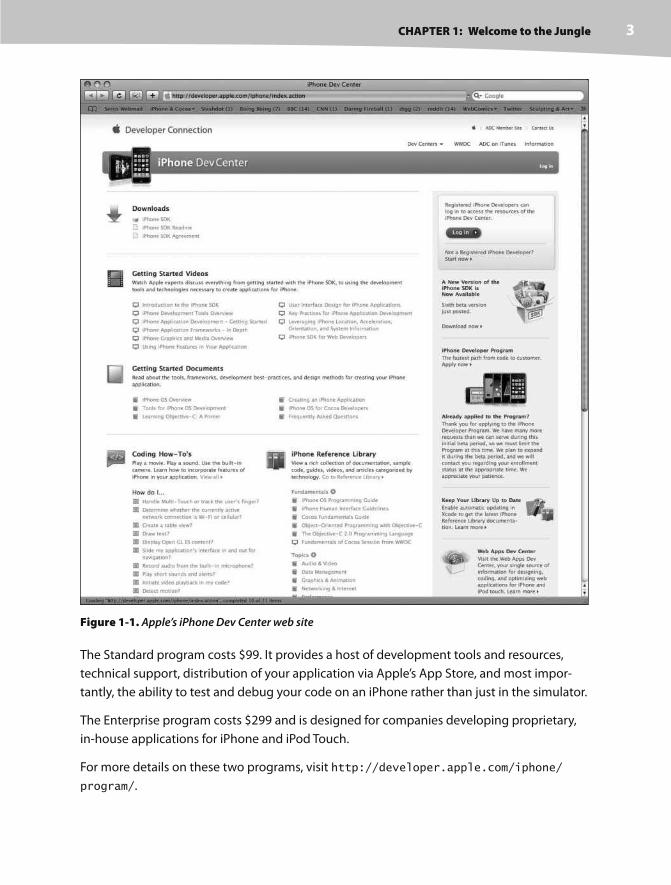
Figure 1-1. Apple’s iPhone Dev Center web site
The Standard program costs $99. It provides a host of development tools and resources,
technical support, distribution of your application via Apple’s App Store, and most impor-
tantly, the ability to test and debug your code on an iPhone rather than just in the simulator.
The Enterprise program costs $299 and is designed for companies developing proprietary,
in- house applications for iPhone and iPod Touch.
For more details on these two programs, visit http://developer.apple.com/iphone/
program/.

CHAPTER 1: Welcome to the Jungle 4
Because iPhone is an always- connected mobile device that uses another company’s wireless
infrastructure, Apple has had to place far more restrictions on iPhone developers than it ever
has on Mac developers, who are able to write and distribute programs with absolutely no
oversight or approval from Apple.
Apple has not added restrictions to be mean but rather is trying to minimize the chances
of malicious or poorly written programs being distributed that could degrade performance
on the shared network. Developing for the iPhone may seem like a lot of hoops to jump
through, but Apple has gone through quite an effort to make the process as painless as
possible. It should be noted too that $99 is still considerably less than buying, for example,
Visual Studio, Microsoft’s software development IDE.
This may seem obvious, but you’ll also need an iPhone. While much of your code can be
tested using the iPhone Simulator, not all programs can be, and even those that can really
need to be thoroughly tested on an actual iPhone before you ever consider releasing your
application to the public.
NOTE
If you are going to sign up for the Standard or Enterprise program, you should go do it right now. The
approval process can take a while, and you’ll need that approval to be able to run your applications on
your iPhone or iPod Touch. Don’t worry, though, all the projects in the first several chapters and the major-
ity of the applications in this book will run just fine on the iPhone Simulator.
What You Need to Know Before You BeginThis book assumes that you already have some programming knowledge. It assumes that
you understand the fundamentals of object- oriented programming: that you know what
objects, loops, and variables are, for example. It also assumes you are familiar with the
Objective- C programming language. Cocoa Touch, the part of the SDK that you will be using
through most of this book, uses Objective- C 2.0, but don’t worry if you’re not familiar with
the more recent additions to the Objective- C language. We’ll be sure to highlight any of the
2.0 language features we take advantage of and explain how they work and why we are
using them.
You should also be familiar with the iPhone itself. Just as you would with any platform for
which you wanted to write an application, get to know the iPhone’s nuances and quirks, and
get familiar with the iPhone interface and with the way Apple’s iPhone programs look and feel.

CHAPTER 1: Welcome to the Jungle 5
NEW TO OBJECTIVE- C?
If you have not programmed in Objective- C before, here are a few resources to help you get started.
First, check out Learn Objective- C on the Mac, an excellent and approachable introduction to Objective- C by
Mac programming experts Mark Dalrymple and Scott Knaster (Apress 2008).
http://www.apress.com/book/view/9781430218159
Next, navigate over to the Apple iPhone Dev Center, and download a copy of The Objective- C 2.0 Programming
Language, a very detailed and extensive description of the language and a great reference guide:
http://developer.apple.com/iphone/library/
documentation/Cocoa/Conceptual/ObjectiveC
Note that you’ll be asked to log in before you are taken to the start of this document.
What’s Different About Coding for iPhone?If you have never used Cocoa or its predecessor NextSTEP, you may find Cocoa Touch, the
application framework you’ll be using to write iPhone applications, a little alien; there are
some fundamental differences from other common application frameworks such as those
used when building .NET or Java applications. Don’t worry too much if you feel a little lost at
first. Just keep plugging away at the exercises, and it’ll all start to fall into place after a while.
If you have written programs using Cocoa or NextSTEP, you’re going to find a lot in the
iPhone SDK that is familiar to you. A great many classes are unchanged from the versions
that are used to develop for Mac OS X, and even those that are different tend to follow the
same basic principles and use design patterns similar to the ones you are already familiar
with. There are, however, several differences between Cocoa and Cocoa Touch.
Regardless of your background, you need to keep in mind some key differences between
iPhone development and desktop application development.
Only One Running Application
With the exception of the operating system itself, only one application can be running at any
given time on an iPhone. This may change in the future as iPhone gets more memory and
more powerful processors, but for the time being, your application will be the only one run-
ning while your code is executing. When your application isn’t the one the user is interacting
with, it won’t be able to do anything.

CHAPTER 1: Welcome to the Jungle 6
Only One Window
Unlike desktop and laptop operating systems, where many running programs coexist, each
with the ability to create and control multiple windows, iPhone gives your application just
one “window” to work with. All of your application’s interaction with the user takes place
inside this one window, and its size is fixed at the size of the iPhone screen.
Limited Access
Unlike programs on a computer that pretty much have access to everything the user who
launched them does, iPhone seriously restricts what your application can get to. You can
only read and write files from the part of iPhone’s file system that was created for your appli-
cation. This area is called your application’s sandbox, and it is where your application will
store documents, preferences, and every other kind of data it may need to store.
Your application is also constrained in some other ways; you will not be able to access
low- number network ports on iPhone, for example, or do anything else that would typically
require root or administrative access on a desktop computer.
Limited Response Time
Because of the way it is used, iPhone needs to be snappy and expects the same of your
application. When your program is launched, you have to get your application open, prefer-
ences and data loaded, and the main view shown on the screen as fast as possible—in not
more than a few seconds. At any time when your program is running, it may have the rug
pulled out from under it. If the user presses the home button, iPhone goes home, and you
have to quickly save everything and quit. If you take longer than five seconds to save and
give up control, your application process will be killed, regardless of whether you are fin-
ished saving.
As a result, you have to carefully craft your iPhone applications to make sure data is not lost
when the user quits.
Limited Screen Size
iPhone’s screen is really nice. When introduced, it was the highest resolution screen available
on a consumer device, by far. But the iPhone display just isn’t all that big, and as a result, you
have a lot less room to work with than on modern computers, just 480 320 pixels. To give
an interesting contrast, at the time of this writing, Apple’s least expensive iMac supports
1680 1050 pixels, and its least expensive notebook computer, the MacBook, supports
1280 800 pixels. On the other end of the spectrum, Apple’s largest monitor, the 30- inch
Cinema Display offers a whopping 2560 1600 pixels.

CHAPTER 1: Welcome to the Jungle 7
Limited System Resources
Any old- time programmers who are reading this are likely laughing at the idea of a machine
with at least 128MB of RAM and 4GB of storage being in any way resource constrained, but
it is true. Developing for the iPhone is not, perhaps, in exactly the same league as trying to
write a complex spreadsheet application on a machine with 48KB of memory, but given the
graphical nature of iPhone and all the things it is capable of doing, running out of memory
is very, very easy. The versions of iPhone available right now all have 128MB of physical RAM,
though that will likely increase over time. Some of that memory is used for the screen buffer
and by other system processes. Usually, about half of that memory is left for your application
to use.
Although 64MB probably sounds pretty decent for such a small computer, there is another
factor to consider when it comes to memory on iPhone: modern computer operating sys-
tems like Mac OS X will take chunks of memory that aren’t being used and write them out to
disk in something called a swap file, which allows applications to keep running even when
they have requested more memory than is actually available on the computer. The iPhone
OS, however, will not write volatile memory, such as application data, out to a swap file. As
a result, the amount of memory available to your application is constrained by the amount
of unused physical memory in the phone.
Cocoa Touch has built- in mechanisms for letting your application know that memory is get-
ting low. When that happens, your application must free up unneeded memory or risk being
forced to quit.
Missing Cocoa Tools
If you’re coming to iPhone with previous Cocoa experience, a few tools that you’re probably
accustomed to using aren’t available on iPhone. The iPhone SDK doesn’t support Core Data
or Cocoa Bindings. We mentioned earlier that Cocoa Touch uses Objective- C 2.0, but one of
the key new features of that language is not available on iPhone: Cocoa Touch does not sup-
port garbage collection.
Some New Stuff
Since we’ve mentioned that Cocoa Touch is missing some things that Cocoa has, it seems
only fair to mention that the iPhone SDK contains some new functionality that is not cur-
rently present in Cocoa or, at least, is not available on every Mac. The iPhone SDK provides
a way for your application to determine the phone’s current geographic coordinates using
Core Location. iPhone also has a built-in camera and photo library, and the SDK provides
mechanisms that allow your application to access both. iPhone also has a built- in accelerom-
eter that lets you detect how your iPhone is being held and moved.

CHAPTER 1: Welcome to the Jungle 8
A Different Approach
Two things iPhone doesn’t have are a physical keyboard and a mouse, which means that you
have a fundamentally different way of interacting with the user than you do when program-
ming for a general- purpose computer. Fortunately, most of that interaction is handled for
you. If you add a text field to your application, iPhone knows to bring up a keyboard when
the user clicks in that field, for example, without your having to write any extra code.
What’s in This BookHere is a very brief overview of the remaining chapters in this book.
Chapter 2
In this chapter, we’ll learn how to use Xcode’s partner in crime, Interface Builder, to create
a simple interface, placing some text on the iPhone screen.
Chapter 3
In Chapter 3, we’ll start interacting with the user, building a simple application that dynami-
cally updates displayed text at runtime based on buttons the user presses.
Chapter 4
Chapter 4 will build on Chapter 3 by introducing you to several more of iPhone’s standard
user interface controls. We’ll also look at how to use alerts and sheets to prompt users to
make a decision or to inform them that something out of the ordinary has occurred.
Chapter 5
In Chapter 5, we’ll look at handling autorotation, the mechanism that allows iPhone applica-
tions to be used in both portrait and landscape mode.
Chapter 6
We’ll move into more advanced user interfaces in Chapter 6 and look at creating multiview
interfaces. We’ll change which view is being shown to the user at runtime, allowing you to
create more complex user interfaces.
Chapter 7
Toolbar controllers are one of the standard iPhone user interfaces; in Chapter 7, we’ll look at
how to implement this kind of interface.

CHAPTER 1: Welcome to the Jungle 9
Chapter 8
In Chapter 8, we’ll look at table views, the primary way of providing lists of data to the user
and the foundation of hierarchical navigation- based applications.
Chapter 9
One of the most common iPhone application interfaces is the hierarchical list that lets you
drill down to see more data or more details. In Chapter 9, you’ll see what’s involved in imple-
menting this standard type of interface.
Chapter 10
In Chapter 10, we’ll look at implementing application settings, which is iPhone’s mechanism
for letting users set their application- level preferences.
Chapter 11
Chapter 11 looks at data management on iPhone. We’ll talk about creating objects to hold
application data and see how that data can be persisted to iPhone’s file system as well as to
the provided embedded database called SQLite.
Chapter 12
Everybody loves to draw, so we’ll look at doing some custom drawing in Chapter 12, using
basic drawing functions in Quartz and OpenGL ES.
Chapter 13
iPhone’s multitouch screen can accept a wide variety of gestural inputs from the user. In
Chapter 13, you’ll learn all about detecting basic gestures such as the pinch and swipe. We’ll
also look at the process of defining new gestures and talk about when new gestures are
appropriate.
Chapter 14
iPhone is capable of determining its latitude and longitude thanks to Core Location. We’ll
build some code that makes use of Core Location to figure out where in the world your
iPhone is and use that information in our quest for world dominance.
Chapter 15
In Chapter 15, we’ll look at interfacing with iPhone’s accelerometer, which is how your
iPhone knows which way it’s being held. We’ll look at some of the fun things your applica-
tion can do with that information.
CHAPTER 1: Welcome to the Jungle 10
Chapter 16
Each iPhone has a camera and a library of pictures, both of which are available to your appli-
cation, if you ask nicely! In Chapter 16, we’ll show you how to ask nicely.
Chapter 17
iPhone is currently available in 70 countries. In Chapter 17, we’ll show you how to write your
applications in such a way that all parts of your application can be easily translated into
other languages to expand the potential audience for your applications.
Chapter 18
At this point in the book, you’ll have mastered the fundamental building blocks for creating
iPhone applications. But where do you go from here? In Chapter 18, we’ll explore the logical
next steps for you to take on your journey to master the iPhone SDK.
Are You Ready?iPhone is an incredible new computing platform, an exciting new frontier for your develop-
ment pleasure. Programming your iPhone is going to be a new experience, different from
that of any platform you’ve worked with before. For everything that looks familiar, there will
be something alien, but as you work through the book’s code, the concepts should all come
together and start to make sense.
You should keep in mind that the exercises in this book are not simply a checklist that, when
completed, magically grants you iPhone developer guru status. Make sure you understand
what you did, and why, before moving on to the next project. Don’t be afraid to make
changes to the code; experimenting and observing the results is one of the best ways you
can wrap your head around the complexities of coding in an environment like Cocoa Touch.
That said, if you’ve got your iPhone SDK installed, turn the page. If not, get to it! Got it? Good.
Then let’s go!

11
a
Chapter 2Appeasing the Tiki Gods
s you’re probably well aware, it has become something of a tradition to call
the first project in any book on programming “Hello, World!” We considered
breaking this tradition but were scared that the Tiki gods would inflict some
painful retribution on us for such a gross breach of etiquette. So let’s do it by
the book, shall we?
In this chapter, we’re going use Xcode and Interface Builder to create a small
iPhone application to display the text “Hello, World!” on its screen. We’ll look
at what’s involved in creating an iPhone application project in Xcode, work
through the specifics of using Interface Builder to design our application’s user
interface, and then run our application on the iPhone simulator. After that,
we’ll give our application an icon and a unique identifier to make it feel more
like a real iPhone application.
We’ve got a lot to do here, so let’s get going.
Setting Up Your Project in XcodeBy now, you should have Xcode and the iPhone SDK installed on your machine.
You should also download the book projects archive from the Apress web site.
Here’s a link to the book page:
http://www.apress.com/book/view/9781430216261
Look for the Source Code link in the Book Extras section on the left side of the
page. Expand the archive, and place the project folder in a convenient location.

CHAPTER 2: Appeasing the Tiki Gods 12
Even though you have the complete set of project files at your disposal, we think you’ll get
more out of the book if you create each project by hand instead of simply running the ver-
sion you downloaded. The biggest reason for this is the familiarity and expertise you’ll gain
in working with the various tools we use throughout the book if you roll your own projects.
There’s just no substitute for actually clicking and dragging out buttons and sliders and
scrolling through source code to make changes as we move from one version of a program
to another.
That said, our first project is in the 02 Hello World folder. If you’ll be creating your own proj-
ects, create a new 02 Hello World folder and follow along.
Launch Xcode, which is located in /Developer/Applications. If this is your first time using
Xcode, don’t worry; we’ll walk you through the process of creating a new project. If you’re
already an old hand, just skim ahead.
When you first launch Xcode, you’ll be presented with a welcome screen like the one shown
in Figure 2-1. The welcome screen contains useful links to iPhone and Mac OS X technical
documentation, tutorial videos, news, sample code, and lots more. All of this information
is available on Apple’s developer web site and within Xcode’s documentation browser, so
if you’d rather not see this screen in the future, just uncheck the Show at Launch checkbox
before closing it. If you feel like poking through the information here for a few minutes, by
all means, go right ahead. When you’re done, close the window, and we’ll proceed.
Figure 2-1. The Xcode welcome screen

CHAPTER 2: Appeasing the Tiki Gods 13
NOTE
If you have an iPhone or iPod Touch connected to your machine when you first launch Xcode, you might
see a message asking if you want to use that device for development. For now, click the Ignore button. If
you choose to join the paid iPhone Developer Program, you will gain access to a program portal that will
tell you how to use your iPhone or iPod Touch for development and testing.
Create a new project by selecting New Project… from the File menu, or by pressing N,
which will bring up the New Project Assistant (see Figure 2-2).
Figure 2-2. The New Project assistant, which lets you select from various file
templates when creating a new file
As you’ll see in Figure 2-2, the pane on the left side of the window is divided into two main
sections: iPhone and Mac OS X. You’ll notice that there are a number of project template cat-
egories available for Mac OS X, but only one category (at least at the time of this writing) for
the iPhone: Application.
As we did in Figure 2-2, select Application from under the iPhone heading, and you’ll be
shown a number of icons in the upper right pane, each of which represents a separate project
template that can be used as a starting point for your iPhone applications. The icon labeled
View- Based Application is the simplest template and the one we’ll be using for the first several
chapters. The others provide you with additional code and/or resources needed to create

CHAPTER 2: Appeasing the Tiki Gods 14
common iPhone application interfaces and contain stuff we’re not ready to look at yet, but
don’t worry, we’ll get to them later.
For this first project, click the View- Based Application icon (that icon is selected in Figure 2-2)
and then click the button labeled Choose.
Once you’ve selected your project template, you’ll be asked to save your new project using
the standard save sheet (see Figure 2-3). Type Hello World for the project name, and save it
wherever you want it stored. The Document folder is not a bad place, but you might want to
create a dedicated folder for your Xcode projects.
Figure 2-3. Selecting the name and location for your project
The Xcode Project Window
After you dismiss the save panel, Xcode will create and then open your project and a new
project window will appear that looks like Figure 2-4. We find that the project window, when
first created, is a little small for our tastes, and we usually expand the window to take up
more of the screen. There’s a lot of information crammed into this window, and it’s where
you will be spending a lot of your iPhone development time.
Your project window features a toolbar across the top, which gives you ready access to a lot
of commonly used commands. Below the toolbar, the window is divided into three main
sections, or panes.

CHAPTER 2: Appeasing the Tiki Gods 15
Figure 2-4. The Hello World project in Xcode
The pane that runs down the left side of the window is called the Groups & Files pane. All of
the resources that make up your project are grouped here, as are a number of relevant proj-
ect settings. Just as in the Finder, clicking the little triangle to the left of an item expands that
item to show available subitems. Click the triangle again to hide the subitems.
The top right pane is called the Detail View and shows you detailed information about items
selected in the Groups & Files pane. The lower right pane is called the Editor pane. If you
select a single file in either the Groups & Files or Detail pane, and Xcode knows how to display
that kind of file, the contents of the file will be displayed here. Editable files, such as source
code, can also be edited here. In fact, this is where you will be writing and editing your appli-
cation’s source code.
Now that we have the terminology out of the way, take a look at the Groups & Files pane. The
first item in the list should bear the same name as your project, in this case, Hello World. This
item is the gathering point for the source code and the other resources specific to your proj-
ect. For the time being, don’t worry about the items in the Groups & Files pane except those
under Hello World.

CHAPTER 2: Appeasing the Tiki Gods 16
Take a look at Figure 2-4. Note that the disclosure triangle to the left of Hello World is open,
and there are five subfolders: Classes, Other Sources, Resources, Frameworks, and Products.
Let’s briefly talk about what each subfolder is used for.
Classes is where you will spend much of your time. This is where most of the code that
you write will go, since this is where all Objective- C classes rightfully belong. You are
free to create subfolders under the Classes folder to help organize your code. We’ll be
using this folder starting in the next chapter.
Other Sources contains source code files that aren’t Objective- C classes. Typically, you
won’t spend a lot of time in the Other Sources folder. When you create a new iPhone
application project, there are two files in this folder:
Hello World_Prefix.pch: The extension .pch stands for “precompiled header.” This is
a list of header files from external frameworks that are used by our project. Xcode
will precompile the headers contained in this file, which will reduce the amount of
time it takes to compile your project whenever you select Build or Build and Go.
It will be a while before you have to worry about this, as the most commonly used
header files are already included for you.
main.m: This is where your application’s main() method is. You normally won’t
need to edit or change this file.
Resources contains noncode files that will be included as part of your application. This
is where you will include things like your application’s icon image and other images,
sound files, movie files, text files, or property lists that your program may need while
it’s running. Remember, since your application runs in its own sandbox, you will have
to include any files you need here, because you won’t be able to access files located
elsewhere on the iPhone except through sanctioned APIs, such as the ones that pro-
vide access to the iPhone’s photo library and address book. There should be three
items in this folder:
Hello_WorldViewController.xib: This file contains information used by the program
Interface Builder, which we’ll take for a spin a bit later in this chapter.
Info.plist: This is a property list that contains information about our application.
We’ll look at this file a little bit later in the chapter too.
MainWindow.xib: This is your application’s main Interface Builder (or “nib”) file. In
a simple application like the one we’re building in this chapter, there’s often no
need to touch this file. In later chapters, when we design more complex interfaces,
we will work with this file and look at it in more depth.
CHAPTER 2: Appeasing the Tiki Gods 17
Frameworks are a special kind of library that can contain code as well as resources
such as image and sound files. Any framework or library that you add to this folder
will be linked in to your application, and your code will be able to use objects, func-
tions, and resources contained in that framework or library. The most commonly
needed frameworks and libraries are linked in to our project by default, so most of the
time, we will not need to do anything with this folder. Less commonly used libraries
and frameworks, however, are not included by default, and you will see how to link to
them into an application later in this book.
Products contains the application that this project produces when it is compiled. If
you expand Products, you’ll see an item called Hello World.app. This is the application
that this particular project creates. Hello World.app is this project’s only product. Right
now, Hello World.app is listed in red, which means that the file cannot be found, which
makes sense, since we haven’t compiled our project yet! Highlighting a file’s name in
red is Xcode’s way of telling us that it can’t find the underlying physical file.
NOTE
These “folders” under your project in the Groups & Files pane do not necessarily correspond to folders on
your Mac’s file system. These are logical groupings within Xcode to help you keep everything organized
and to make it faster and easier to find what you’re looking for while working on your application. If you
look into your project’s folder, you’ll notice that while there is a Classes folder, there is no folder called
Other Sources or Resources. Often, the items contained in those two project folders are stored right in the
project’s root directory, but you can store them anywhere, even outside of your project folder if you wish.
The hierarchy inside Xcode is completely independent of the file system hierarchy. Moving a file out of the
Classes folder in Xcode, for example, will not change the file’s location on your hard drive.
Introducing Interface BuilderNow that you’re familiar with the basics of Xcode, let’s take a look at the other half of the
dynamic duo used in iPhone software development: Interface Builder, commonly referred
to as IB.
In your project window’s Groups & Files list, expand the Resources group, and then
double- click the file Hello_WorldViewController.xib. This will open that file in Interface Builder.
If this is your first time using Interface Builder, a window grouping similar to that shown in
Figure 2-5 should appear. If you’ve used Interface Builder before, the windows will be where
you left them the last time you used it.

CHAPTER 2: Appeasing the Tiki Gods 18
Figure 2-5. Hello_WorldViewController.xib in Interface Builder
NOTE
Interface Builder has a long history; it has been around since 1988 and has been used to develop applica-
tions for NextSTEP, OpenSTEP, Mac OS X, and now iPhone. Interface Builder supports two file types: an
older format that uses the extension .nib and a newer format that utilizes the extension .xib. The iPhone
project templates all use .xib files by default, but until very recently, all Interface Builder files had the
extension .nib, and as a result, most developers took to calling Interface Builder files “nib files.” Interface
Builder files are commonly called nib files regardless of whether the extension actually used for the file is
.xib or .nib. In fact, Apple actually uses the terms “nib” and “nib file” throughout its documentation.
The window labeled Hello_WorldViewController.xib (the upper left window in Figure 2-5) is
the nib’s main window. It is your home base and starting point in this particular nib file. With
the exception of the first two icons (File’s Owner and First Responder), every icon in this win-
dow represents a single instance of an Objective- C class that will be created automatically
for you when this nib file is loaded.

CHAPTER 2: Appeasing the Tiki Gods 19
Want to create an instance of a button? You could, of course, create the button by writing
code. But more commonly, you will use Interface Builder to create the button and specify its
attributes (shape, size, label, etc.).
The Hello_WorldViewController.xib file we are looking at right now gets loaded automatically
when your application launches—for the moment, don’t worry about how—so it is an excel-
lent place to create the objects that make up your user interface.
For example, to add a button to your application, you’ll need to instantiate an object of type
UIButton. You can do this in code by typing a line like this:
UIButton *myButton = [[UIButton alloc] initWithFrame:aRect];
In Interface Builder, you can accomplish the same exact thing by dragging a button from
a palette of interface objects onto your application’s main window. Interface Builder makes
it easy to set the button’s attributes, and since the button will be saved in the nib file, the
button will be automatically instantiated when your application starts up. You’ll see how this
works in a minute.
What’s in the Nib File?
Take a look at Figure 2-5. As we mentioned earlier, the window labeled Hello_
WorldViewController.xib (the upper left window) is the nib file’s main window. Every nib file
starts off with the same two icons, File’s Owner and First Responder. They are created auto-
matically and cannot be deleted. From that, you can probably guess that they are important,
and they are.
File’s Owner will always be the first icon in any nib file and represents the object that loaded
the nib file from disk. In other words, File’s Owner is the object that “owns” this copy of the
nib file. If this is a bit confusing, don’t worry; it’s not important at the moment. When it does
become important later on, we’ll go over it again.
The second icon in this and any other nib file is called First Responder. We’ll talk more about
responders later in the book, but in very basic terms, the first responder is the object with
which the user is currently interacting. If, for example, the user is currently entering data
into a text field, that field is the current first responder. The first responder changes as the
user interacts with the interface, and the First Responder icon gives you a convenient way to
communicate with whatever control or view is the current first responder without having
to write code to determine which control or view that might be. Again, we’ll talk about this
much more later on, so don’t worry if this concept is a bit fuzzy right now.
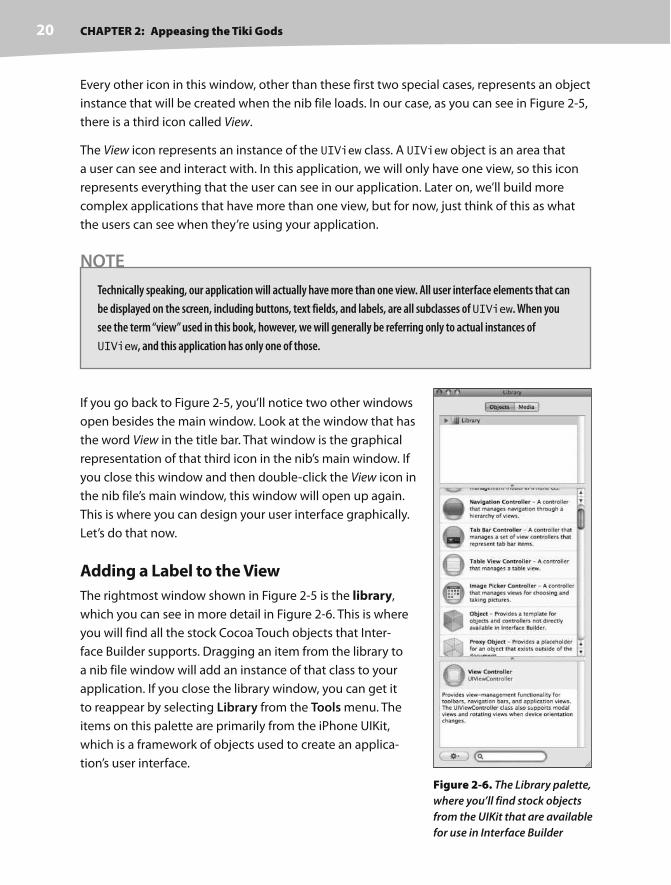
CHAPTER 2: Appeasing the Tiki Gods 20
Every other icon in this window, other than these first two special cases, represents an object
instance that will be created when the nib file loads. In our case, as you can see in Figure 2-5,
there is a third icon called View.
The View icon represents an instance of the UIView class. A UIView object is an area that
a user can see and interact with. In this application, we will only have one view, so this icon
represents everything that the user can see in our application. Later on, we’ll build more
complex applications that have more than one view, but for now, just think of this as what
the users can see when they’re using your application.
NOTE
Technically speaking, our application will actually have more than one view. All user interface elements that can
be displayed on the screen, including buttons, text fields, and labels, are all subclasses of UIView. When you
see the term “view” used in this book, however, we will generally be referring only to actual instances of
UIView, and this application has only one of those.
If you go back to Figure 2-5, you’ll notice two other windows
open besides the main window. Look at the window that has
the word View in the title bar. That window is the graphical
representation of that third icon in the nib’s main window. If
you close this window and then double- click the View icon in
the nib file’s main window, this window will open up again.
This is where you can design your user interface graphically.
Let’s do that now.
Adding a Label to the View
The rightmost window shown in Figure 2-5 is the library,
which you can see in more detail in Figure 2-6. This is where
you will find all the stock Cocoa Touch objects that Inter-
face Builder supports. Dragging an item from the library to
a nib file window will add an instance of that class to your
application. If you close the library window, you can get it
to reappear by selecting Library from the Tools menu. The
items on this palette are primarily from the iPhone UIKit,
which is a framework of objects used to create an applica-
tion’s user interface.
Figure 2-6. The Library palette,
where you’ll find stock objects
from the UIKit that are available
for use in Interface Builder
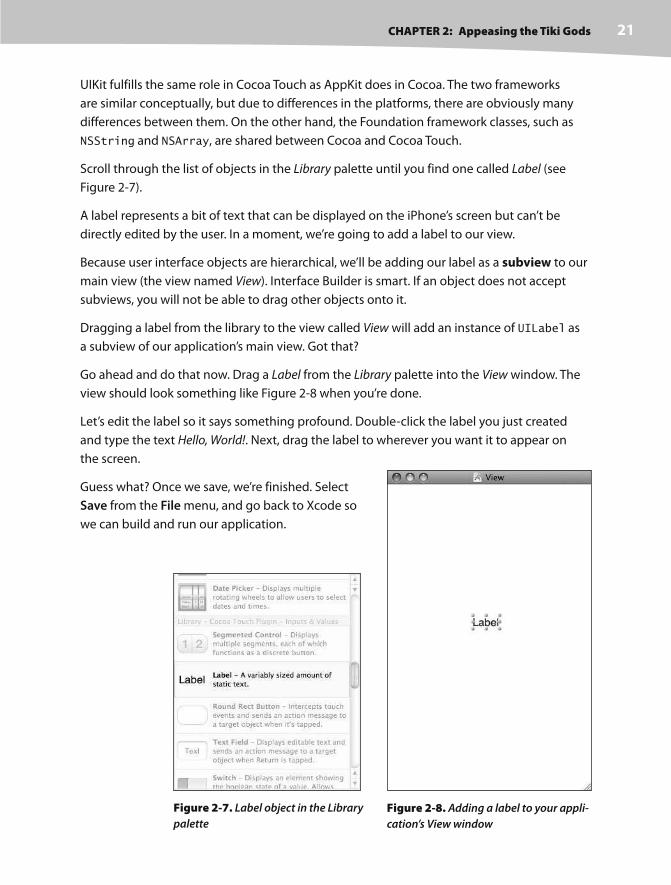
CHAPTER 2: Appeasing the Tiki Gods 21
UIKit fulfills the same role in Cocoa Touch as AppKit does in Cocoa. The two frameworks
are similar conceptually, but due to differences in the platforms, there are obviously many
differences between them. On the other hand, the Foundation framework classes, such as
NSString and NSArray, are shared between Cocoa and Cocoa Touch.
Scroll through the list of objects in the Library palette until you find one called Label (see
Figure 2-7).
A label represents a bit of text that can be displayed on the iPhone’s screen but can’t be
directly edited by the user. In a moment, we’re going to add a label to our view.
Because user interface objects are hierarchical, we’ll be adding our label as a subview to our
main view (the view named View). Interface Builder is smart. If an object does not accept
subviews, you will not be able to drag other objects onto it.
Dragging a label from the library to the view called View will add an instance of UILabel as
a subview of our application’s main view. Got that?
Go ahead and do that now. Drag a Label from the Library palette into the View window. The
view should look something like Figure 2-8 when you’re done.
Let’s edit the label so it says something profound. Double- click the label you just created
and type the text Hello, World!. Next, drag the label to wherever you want it to appear on
the screen.
Guess what? Once we save, we’re finished. Select
Save from the File menu, and go back to Xcode so
we can build and run our application.
Figure 2-7. Label object in the Library
palette
Figure 2-8. Adding a label to your appli-
cation’s View window
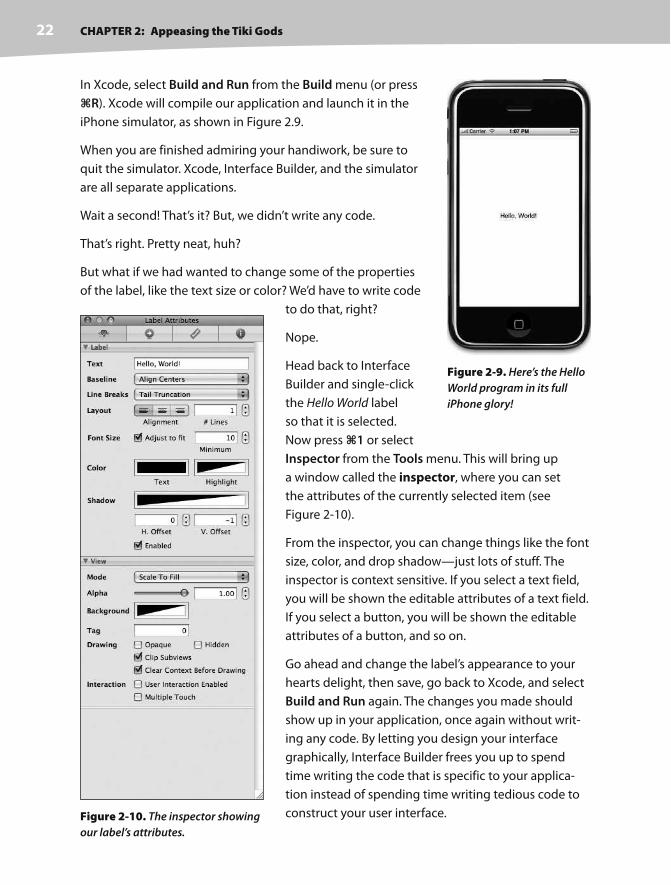
CHAPTER 2: Appeasing the Tiki Gods 22
In Xcode, select Build and Run from the Build menu (or press
R). Xcode will compile our application and launch it in the
iPhone simulator, as shown in Figure 2.9.
When you are finished admiring your handiwork, be sure to
quit the simulator. Xcode, Interface Builder, and the simulator
are all separate applications.
Wait a second! That’s it? But, we didn’t write any code.
That’s right. Pretty neat, huh?
But what if we had wanted to change some of the properties
of the label, like the text size or color? We’d have to write code
to do that, right?
Nope.
Head back to Interface
Builder and single- click
the Hello World label
so that it is selected.
Now press 1 or select
Inspector from the Tools menu. This will bring up
a window called the inspector, where you can set
the attributes of the currently selected item (see
Figure 2-10).
From the inspector, you can change things like the font
size, color, and drop shadow—just lots of stuff. The
inspector is context sensitive. If you select a text field,
you will be shown the editable attributes of a text field.
If you select a button, you will be shown the editable
attributes of a button, and so on.
Go ahead and change the label’s appearance to your
hearts delight, then save, go back to Xcode, and select
Build and Run again. The changes you made should
show up in your application, once again without writ-
ing any code. By letting you design your interface
graphically, Interface Builder frees you up to spend
time writing the code that is specific to your applica-
tion instead of spending time writing tedious code to
construct your user interface.
Figure 2-9. Here’s the Hello
World program in its full
iPhone glory!
Figure 2-10. The inspector showing
our label’s attributes.
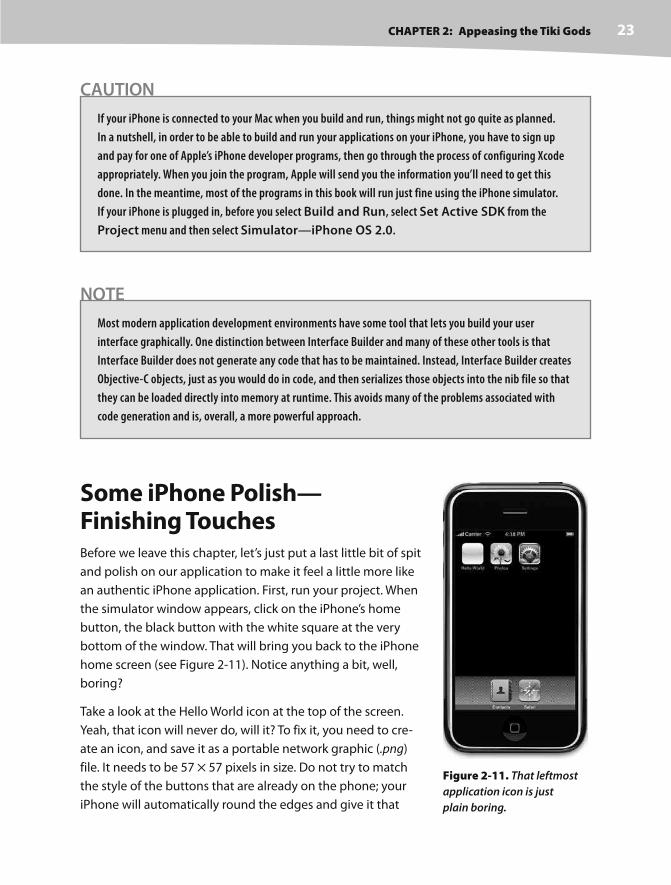
CHAPTER 2: Appeasing the Tiki Gods 23
CAUTION
If your iPhone is connected to your Mac when you build and run, things might not go quite as planned.
In a nutshell, in order to be able to build and run your applications on your iPhone, you have to sign up
and pay for one of Apple’s iPhone developer programs, then go through the process of configuring Xcode
appropriately. When you join the program, Apple will send you the information you’ll need to get this
done. In the meantime, most of the programs in this book will run just fine using the iPhone simulator.
If your iPhone is plugged in, before you select Build and Run, select Set Active SDK from the
Project menu and then select Simulator—iPhone OS 2.0.
NOTE
Most modern application development environments have some tool that lets you build your user
interface graphically. One distinction between Interface Builder and many of these other tools is that
Interface Builder does not generate any code that has to be maintained. Instead, Interface Builder creates
Objective- C objects, just as you would do in code, and then serializes those objects into the nib file so that
they can be loaded directly into memory at runtime. This avoids many of the problems associated with
code generation and is, overall, a more powerful approach.
Some iPhone Polish— Finishing TouchesBefore we leave this chapter, let’s just put a last little bit of spit
and polish on our application to make it feel a little more like
an authentic iPhone application. First, run your project. When
the simulator window appears, click on the iPhone’s home
button, the black button with the white square at the very
bottom of the window. That will bring you back to the iPhone
home screen (see Figure 2-11). Notice anything a bit, well,
boring?
Take a look at the Hello World icon at the top of the screen.
Yeah, that icon will never do, will it? To fix it, you need to cre-
ate an icon, and save it as a portable network graphic (.png)
file. It needs to be 57 57 pixels in size. Do not try to match
the style of the buttons that are already on the phone; your
iPhone will automatically round the edges and give it that
Figure 2-11. That leftmost
application icon is just
plain boring.

CHAPTER 2: Appeasing the Tiki Gods 24
nice glassy appearance. Just create a normal flat, square image. We have provided an icon
image in the projects archive (within the 02 Hello World folder) that you can use if you don’t
want to create your own.
NOTE
For your application’s icon, you have to use a .png image, but you should actually use this format for all
images you add to your iPhone projects. Even though most common image formats will display correctly,
you should use .png files unless you have a compelling reason to use another format. Xcode automatically
optimizes .png images at build time to make them the fastest and most efficient image type for use in
iPhone applications.
After you’ve designed your application icon, drag the .png file from the Finder to the
Resources folder in Xcode, as shown in Figure 2-12, or select the Resources folder in Xcode,
choose Add to Project… from the Project menu, and navigate to your icon image file.
Figure 2-12. Dragging an icon file into the Resources folder of your Xcode project
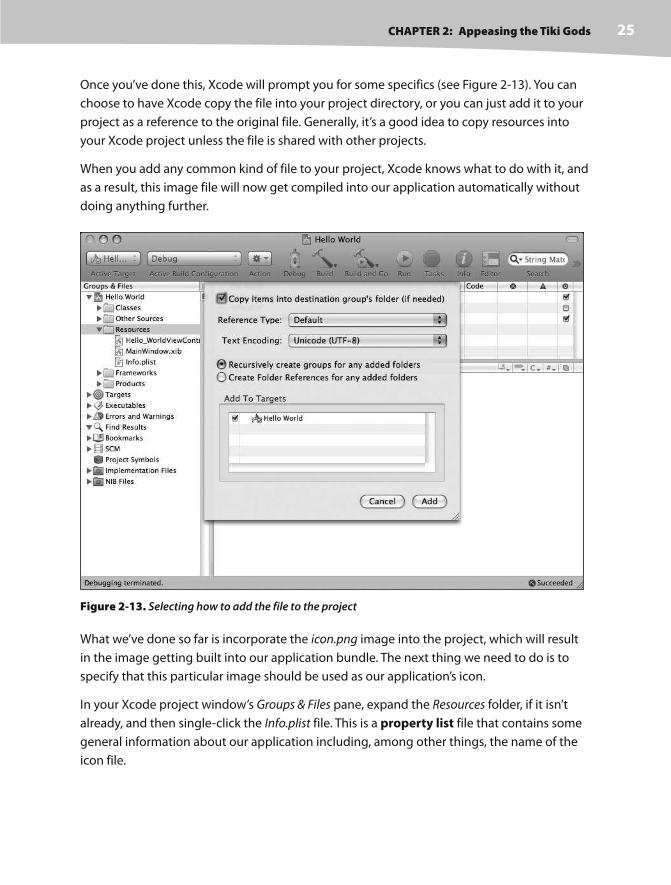
CHAPTER 2: Appeasing the Tiki Gods 25
Once you’ve done this, Xcode will prompt you for some specifics (see Figure 2-13). You can
choose to have Xcode copy the file into your project directory, or you can just add it to your
project as a reference to the original file. Generally, it’s a good idea to copy resources into
your Xcode project unless the file is shared with other projects.
When you add any common kind of file to your project, Xcode knows what to do with it, and
as a result, this image file will now get compiled into our application automatically without
doing anything further.
Figure 2-13. Selecting how to add the file to the project
What we’ve done so far is incorporate the icon.png image into the project, which will result
in the image getting built into our application bundle. The next thing we need to do is to
specify that this particular image should be used as our application’s icon.
In your Xcode project window’s Groups & Files pane, expand the Resources folder, if it isn’t
already, and then single- click the Info.plist file. This is a property list file that contains some
general information about our application including, among other things, the name of the
icon file.

CHAPTER 2: Appeasing the Tiki Gods 26
When you select Info.plist, the property list will appear in the editing pane (see Figure 2-14).
Within the property list, find a row with the label Icon file in the left column. The correspond-
ing right column in that same row should be empty. Double- click the empty cell, and type in
the name of the .png file you just added to your project.
Figure 2-14. Specifying the icon file
Ready to Compile and Run
Before we compile and run, take a look at the other rows in
Info.plist. While most of these settings are fine as they are, one
in particular requires our attention, the setting named Bundle
identifier. This is a unique identifier for your application and
should always be set. If you’re just going to run your applica-
tion on the iPhone simulator, the standard naming convention
for bundle identifiers is to use one of the top- level Internet
domains such as com or org followed by a period, then the
name of your company or organization followed by another
period and the name of your application. If you want to run
your application on an actual iPhone, creating your applica-
tion’s bundle identifier is a little more involved process that
we’ll cover in a later chapter. Since we’re here, why don’t we
change our bundle identifier to com.apress.HelloWorld.
Once that change is made, compile and run. When the simula-
tor has finished launching, press the button with the white
square to go home, and check out your snazzy new icon. Ours
is shown in Figure 2-15.
Figure 2-15. Your applica-
tion now has a snazzy icon!

CHAPTER 2: Appeasing the Tiki Gods 27
NOTE
If you want to clear out old applications from the iPhone simulator’s home screen, you can simply delete
the folder called iPhone Simulator from the Application Support folder contained in your home directory’s
Library folder.
Bring It on HomePat yourself on the back. Although it may not seem like you accomplished all that much in
this chapter, we actually covered a lot of ground. You learned about the iPhone project tem-
plates, created an application, saw how to use Interface Builder, and learned how to set your
application icon and bundle identifier.
Hello World, however, is a strictly one- way application: we show some information to the
user, but we never get any input from them. When you’re ready to see how we go about get-
ting input from the user of an iPhone and taking actions based on that input, take a deep
breath and turn the page.
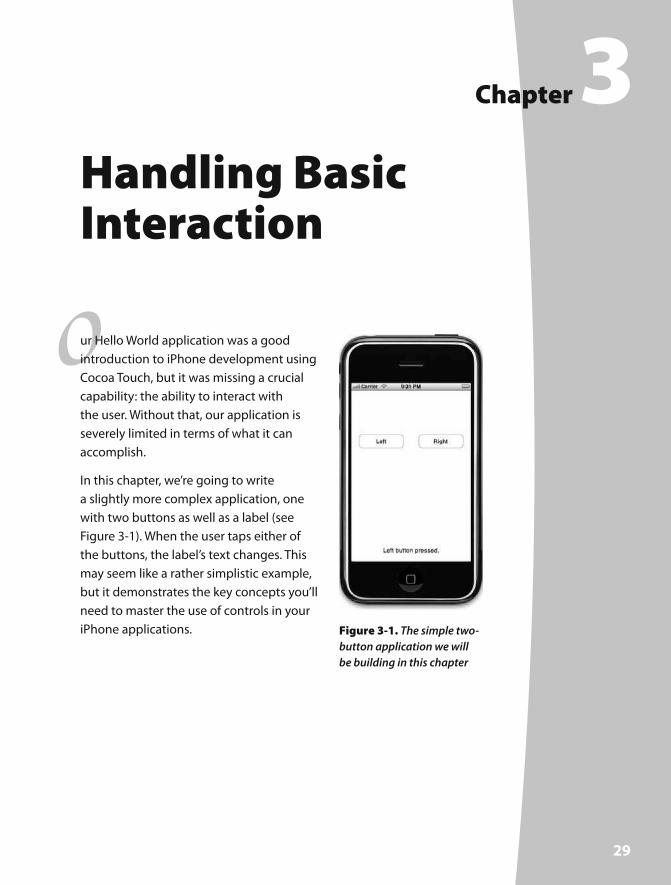
29
o
Chapter 3Handling Basic Interaction
ur Hello World application was a good
introduction to iPhone development using
Cocoa Touch, but it was missing a crucial
capability: the ability to interact with
the user. Without that, our application is
severely limited in terms of what it can
accomplish.
In this chapter, we’re going to write
a slightly more complex application, one
with two buttons as well as a label (see
Figure 3-1). When the user taps either of
the buttons, the label’s text changes. This
may seem like a rather simplistic example,
but it demonstrates the key concepts you’ll
need to master the use of controls in your
iPhone applications. Figure 3-1. The simple two-
button application we will
be building in this chapter

CHAPTER 3: Handling Basic Interaction30
The Model-View- Controller ParadigmBefore diving in, a tiny bit of theory is in order. The designers of Cocoa Touch were guided
by a concept called Model-View- Controller (or MVC), which is a very logical way of dividing
up the code that makes up a GUI- based application. These days, almost all object- oriented
frameworks pay a certain amount of homage to MVC, but few are as true to the MVC model
as Cocoa Touch.
The MVC model divides up all functionality into three distinct categories:
Model: The classes that hold your application’s data
View: Made up of the windows, controls, and other elements that the user can see
and interact with
Controller: Binds the model and view together and is the application logic that
decides how to handle the user’s inputs
The goal in MVC is to make the objects that implement these three types of code as dis-
tinct from one another as possible. Any object you write should be readily identifiable as
belonging in one of the three categories, with little or no functionality within it that could be
classified within either of the other two. An object that implements a button, for example,
shouldn’t contain code to process data when that button is tapped, and code that imple-
ments a bank account shouldn’t contain code to draw a table to display its transactions.
MVC helps ensure maximum reusability. A class that implements a generic button can be
used in any application. A class that implements a button that does some particular calcula-
tion when it is clicked can only be used in the application for which it was originally written.
When you write Cocoa Touch applications, you will primarily create your view components
using Interface Builder, although you will sometimes also modify your interface from code,
or you might subclass existing views and controls.
Your model will be created by crafting Objective- C classes designed to hold your applica-
tion’s data. We won’t be creating any model objects in this chapter’s application, because we
have no need to store or preserve data, but we will introduce model objects as our applica-
tions get more complex in future chapters.
Your controller component will typically be comprised of classes that you create and that are
specific to your application. Controllers can be completely custom classes (NSObject sub-
classes), but more often, they will be subclasses of one of several existing generic controller
classes from the UIKit framework such as UIViewController, which you’ll see in a moment.
By subclassing one of these existing classes, you will get a lot of functionality for free and
won’t have to spend time recoding the wheel, so to speak.
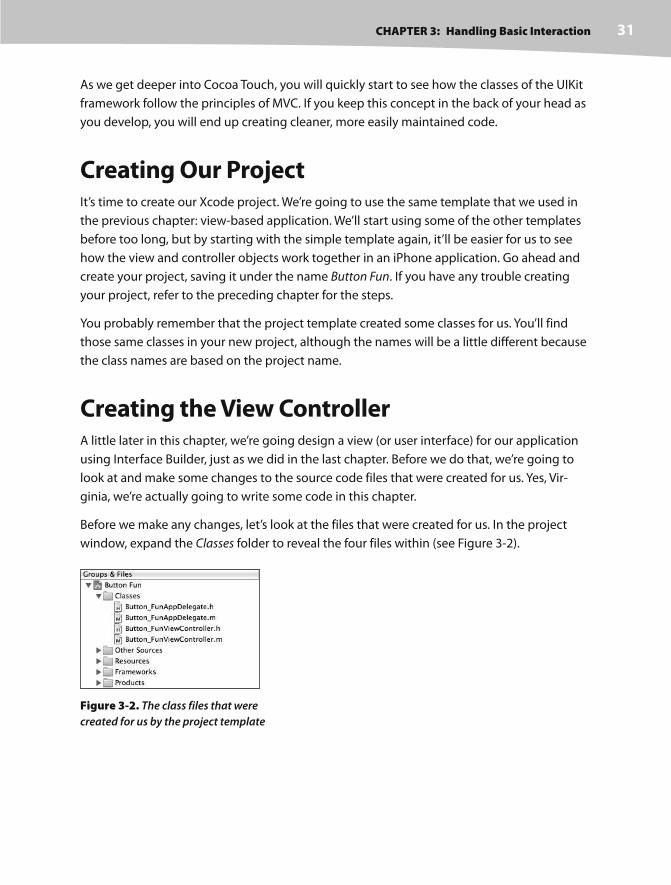
CHAPTER 3: Handling Basic Interaction 31
As we get deeper into Cocoa Touch, you will quickly start to see how the classes of the UIKit
framework follow the principles of MVC. If you keep this concept in the back of your head as
you develop, you will end up creating cleaner, more easily maintained code.
Creating Our ProjectIt’s time to create our Xcode project. We’re going to use the same template that we used in
the previous chapter: view- based application. We’ll start using some of the other templates
before too long, but by starting with the simple template again, it’ll be easier for us to see
how the view and controller objects work together in an iPhone application. Go ahead and
create your project, saving it under the name Button Fun. If you have any trouble creating
your project, refer to the preceding chapter for the steps.
You probably remember that the project template created some classes for us. You’ll find
those same classes in your new project, although the names will be a little different because
the class names are based on the project name.
Creating the View Controller A little later in this chapter, we’re going design a view (or user interface) for our application
using Interface Builder, just as we did in the last chapter. Before we do that, we’re going to
look at and make some changes to the source code files that were created for us. Yes, Vir-
ginia, we’re actually going to write some code in this chapter.
Before we make any changes, let’s look at the files that were created for us. In the project
window, expand the Classes folder to reveal the four files within (see Figure 3-2).
Figure 3-2. The class files that were
created for us by the project template

CHAPTER 3: Handling Basic Interaction32
These four files implement two classes, each of which contains a .m and .h file. The appli-
cation we are creating in this chapter has only one view, and the controller class that is
responsible for managing that one view is called Button_FunViewController. Click Button_
FunViewController.h in the Groups & Files pane, and take a look at the contents of the file:
#import <UIKit/UIKit.h>
@interface Button_FunViewController : UIViewController {
}
@end
Not much to it, is there? This is a subclass of UIViewController, which is one of those
generic controller classes we mentioned earlier. It is part of the UIKit and gives us a bunch
of functionality for free. Xcode doesn’t know what our application- specific functionality is
going to be, but it does know we’re going to have some, so it has created this class to hold
that functionality.
Take a look back at Figure 3-1. Our program consists of two buttons and a text label that
reflects which button was tapped. We’ll create all three of these elements in Interface
Builder. Since we’re also going to be writing code, there must be some way for our code
to interact with the elements we create in Interface Builder, right?
Absolutely right. Our controller class can refer to objects in the nib by using a special kind
of instance variable called an outlet. Think of an outlet as a pointer that points to an object
within the nib. For example, suppose you created a text label in Interface Builder and
wanted to change the label’s text from within your code. By declaring an outlet and pointing
that outlet to the label object, you could use the outlet from within your code to change the
label. You’ll see how to do just that in a bit.
Going in the opposite direction, interface objects in our nib file can be set up to trigger spe-
cial methods in our controller class. These special methods are known as action methods.
For example, you can tell Interface Builder that when the user touches up (pulls a finger off
the screen) within a button, a specific action method within your code should be called.
Our next program will feature two buttons and a label.
In our code, we’ll create an outlet that points to the label, and this outlet will allow us to
change the text of that label. We’ll also create a method named buttonPressed: that will
fire whenever one of the two buttons is tapped. buttonPressed: will set the label’s text to
let the user know which button was tapped.

CHAPTER 3: Handling Basic Interaction 33
We’ll use Interface Builder to create the buttons and label, and then we’ll do some clicking
and dragging to connect the label to our label outlet and our buttons to our buttonPressed:
action.
But before we get to our code, here’s a bit more detail on outlets and actions.
Outlets
Outlets are instance variables that are declared using the keyword IBOutlet. A declaration
of an outlet in your controller’s header file might look like this:
IBOutlet UIButton *myButton;
The IBOutlet keyword is defined like this:
#ifndef IBOutlet
#define IBOutlet
#endif
Confused? IBOutlet does absolutely nothing as far as the compiler is concerned. Its sole
purpose is to act as a hint to tell Interface Builder that this is an instance variable that we’re
going to connect to an object in a nib. Any instance variable that you create and want to
connect to an object in a nib file must be preceded by the IBOutlet keyword. When you
open Interface Builder, it will scan your project header files for occurrences of this keyword
and will allow you to make connections from your code to the nib based on these (and only
these) variables. In a few minutes, you’ll see how to actually make the connection between
an outlet and a user interface object in Interface Builder.
Actions
Actions are methods that are part of your controller class. They are also declared with a spe-
cial keyword, IBAction, which tells Interface Builder that this method is an action and can
be triggered by a control. Typically, the declaration for an action method will look like this:
- (IBAction)doSomething:(id)sender;
The actual name of the method can be anything you want, but it must have a return type of
IBAction, which is the same as declaring a return type of void. This is another way of saying
that action methods do not return a value. Usually, the action method will take one argu-
ment, and it’s typically defined as id and given a name of sender. The control that triggers
your action will use the sender argument to pass a reference to itself. So, for example, if your
action method was called as the result of a button tap, the argument sender would contain
a reference to the specific button that was tapped.

CHAPTER 3: Handling Basic Interaction34
As you’ll see in a bit, our program will use that sender argument to set the label to the text
“left” or “right”, depending on which button was tapped. If you don’t need to know which
control called your method, you can also define action methods without a sender param-
eter. This would look like so:
- (IBAction)doSomething;
It won’t hurt anything if you declare an action method with a sender argument and then
ignore sender. You will likely see a lot of sample code that does just that, because histori-
cally, action methods in Cocoa had to accept sender whether they used it or not.
Adding Actions and Outlets to the View Controller
Now that you know what outlets and actions are, let’s go ahead and add one of each to
our controller class. We need an outlet so we can change the label’s text. Since we won’t be
changing the buttons, we don’t need an outlet for them.
We’ll also declare a single action method that will be called by both buttons. While many
action methods are specific to a single control, it’s possible to use a single action to handle
input from multiple controls, which is what we’re going to do here. Our action will grab the
button’s name from its sender argument and use the label outlet to embed that button
name in the label’s text. You’ll see how this is done in a moment.
NOTE
Because Xcode creates files for us to use that already contain some of the code we need, we will often be
inserting code into an existing file. When you see code listings like the one for Button_FunViewController.h,
any code that is in a normal typeface is existing code that should already be in the file. Code that is
listed in bold is new code that you need to type.
Go ahead and add the following code to Button_FunViewController.h:
#import <UIKit/UIKit.h>
@interface Button_FunViewController : UIViewController {
IBOutlet UILabel *statusText;}
@property (retain, nonatomic) UILabel *statusText;
- (IBAction)buttonPressed:(id)sender;@end
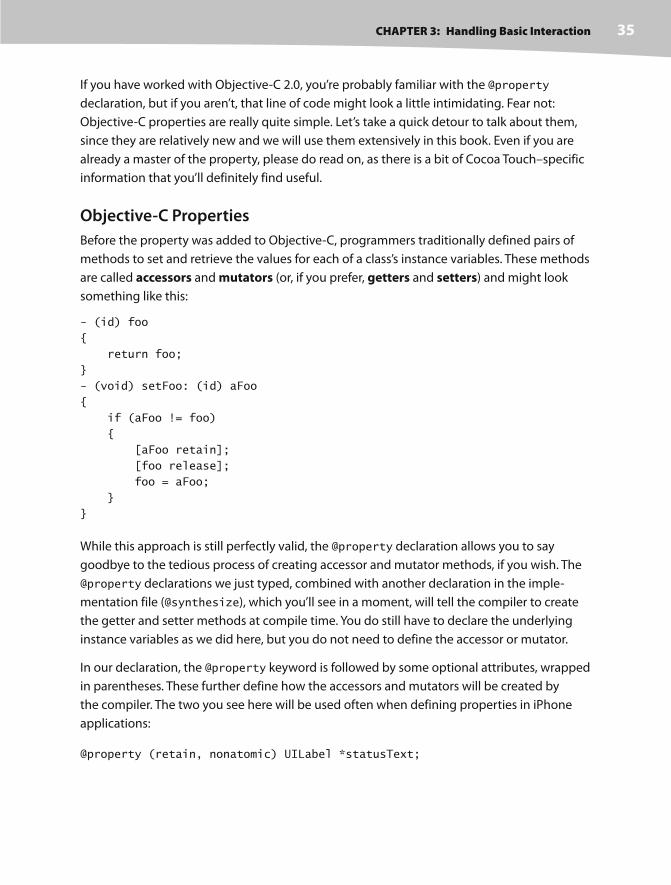
CHAPTER 3: Handling Basic Interaction 35
If you have worked with Objective- C 2.0, you’re probably familiar with the @property
declaration, but if you aren’t, that line of code might look a little intimidating. Fear not:
Objective- C properties are really quite simple. Let’s take a quick detour to talk about them,
since they are relatively new and we will use them extensively in this book. Even if you are
already a master of the property, please do read on, as there is a bit of Cocoa Touch–specific
information that you’ll definitely find useful.
Objective-C Properties
Before the property was added to Objective- C, programmers traditionally defined pairs of
methods to set and retrieve the values for each of a class’s instance variables. These methods
are called accessors and mutators (or, if you prefer, getters and setters) and might look
something like this:
- (id) foo
{
return foo;
}
- (void) setFoo: (id) aFoo
{
if (aFoo != foo)
{
[aFoo retain];
[foo release];
foo = aFoo;
}
}
While this approach is still perfectly valid, the @property declaration allows you to say
goodbye to the tedious process of creating accessor and mutator methods, if you wish. The
@property declarations we just typed, combined with another declaration in the imple-
mentation file (@synthesize), which you’ll see in a moment, will tell the compiler to create
the getter and setter methods at compile time. You do still have to declare the underlying
instance variables as we did here, but you do not need to define the accessor or mutator.
In our declaration, the @property keyword is followed by some optional attributes, wrapped
in parentheses. These further define how the accessors and mutators will be created by
the compiler. The two you see here will be used often when defining properties in iPhone
applications:
@property (retain, nonatomic) UILabel *statusText;
CHAPTER 3: Handling Basic Interaction36
The first of these attributes, retain, tells the compiler to send a retain message to any object
that we assign to this property. This will keep the instance variable underlying our property
from being flushed from memory while we’re still using it. This is necessary because the default
behavior (assign) is intended for use with garbage collection, a feature of Objective- C 2.0
that isn’t currently available on iPhone. As a result, if you define a property that is an object
(as opposed to a raw datatype like int), you should generally specify retain in the optional
attributes. When declaring a property for an int, float, or other raw datatype, you do not
need to specify any optional attributes.
The second of our optional attributes, nonatomic, changes the way that the accessor and
mutator methods are generated. Without getting too technical, let’s just say that, by default,
these methods are created with some additional code that is helpful when writing multi-
threaded programs. That additional overhead, though small, is unnecessary when declaring
a pointer to a user interface object, so we declare nonatomic to save a bit of overhead. There
will be times (as you’ll see later in the book) where you don’t want to specify nonatomic
for a property. As a general rule, most of the time we will specify nonatomic when writing
iPhone applications.
Objective-C properties have another nice feature. They introduce the use of dot notation
to the language. Traditionally, to use an accessor method, you would send a message to the
object, like this:
myVar = [someObject foo];
This approach still works just fine. But when you’ve defined a property, you also have the
option of using dot notation, similar to that used in Java, C++, and C#, like so:
myVar = someObject.foo;
Those two statements are identical as far as the compiler is concerned; use whichever one
makes you happy. Dot notation also works with mutators. This statement
someObject.foo = myVar;
is functionally identical to
[someObject setFoo:myVar];
You can read more about the new Objective- C properties in the second edition of Learn
Objective- C on the Mac, by Mark Dalrymple and Scott Knaster (Apress 2008), and in The
Objective- C 2.0 Programming Language available from Apple’s developer web site: http://
developer.apple.com/documentation/Cocoa/Conceptual/ObjectiveC/ObjC.pdf.

CHAPTER 3: Handling Basic Interaction 37
Adding Actions and Outlets to the Implementation File
We are done with our controller class header file for the time being, so save it and single- click
the class’s implementation file, Button_FunViewController.m. The file should look like this:
#import "Button_FunViewController.h"
@implementation Button_FunViewController
/*
Implement loadView if you want to create a view hierarchy programmatically
- (void)loadView {
}
*/
/*
Implement viewDidLoad if you need to do additional setup after loading the
view.
- (void)viewDidLoad {
[super viewDidLoad];
}
*/
- (BOOL)shouldAutorotateToInterfaceOrientation:(UIInterfaceOrientation)
interfaceOrientation {
// Return YES for supported orientations
return (interfaceOrientation == UIInterfaceOrientationPortrait);
}
- (void)didReceiveMemoryWarning {
[super didReceiveMemoryWarning]; // Releases the view if it doesn't
have a superview
// Release anything that's not essential, such as cached data
}
- (void)dealloc {
[super dealloc];
}
@end

CHAPTER 3: Handling Basic Interaction38
Apple has anticipated some of the methods that we are likely to override and has included
method stubs in the implementation file. Some of them are commented out and can be
either uncommented or deleted as appropriate. The ones that aren’t commented out are
either used by the template or so commonly used that they were included to save us time.
We won’t need any of the commented- out methods for this application, so go ahead and
delete them, which will shorten up the code and make it easier to follow as we insert new
code into this file.
Once you’ve deleted the commented- out methods, add the following code. When you’re
done, meet us back here, and we’ll talk about what we did:
#import "Button_FunViewController.h"
@implementation Button_FunViewController
@synthesize statusText;
- (IBAction)buttonPressed:(id)sender
{
NSString *title = [sender titleForState:UIControlStateNormal];
NSString *newText = [[NSString alloc] initWithFormat:
@"%@ button pressed.", title];
statusText.text = newText;
[newText release];
}- (BOOL)shouldAutorotateToInterfaceOrientation:(UIInterfaceOrientation)
interfaceOrientation {
// Return YES for supported orientations
return (interfaceOrientation == UIInterfaceOrientationPortrait);
}
- (void)didReceiveMemoryWarning {
[super didReceiveMemoryWarning]; // Releases the view if it doesn't
have a superview
// Release anything that's not essential, such as cached data
}
- (void)dealloc {
[statusText release]; [super dealloc];
}
@end

CHAPTER 3: Handling Basic Interaction 39
OK, let’s look at the newly added code. First, we added this:
@synthesize statusText;
This is how we tell the compiler to automatically create the accessor and mutator meth-
ods for us. By virtue of this line of code, there are now two “invisible” methods in our class:
statusText and setStatusText:. We didn’t write them, but they are there nonetheless,
waiting for us to use them.
The next bit of newly added code is the implementation of our action method that will get
called when either button is tapped:
-(IBAction)buttonPressed: (id)sender
{
NSString *title = [sender titleForState:UIControlStateNormal];
NSString *newText = [[NSString alloc] initWithFormat:
@"%@ button pressed.", title];
statusText.text = newText;
[newText release];
}
Remember that the parameter passed into an action method is the control or object that
invoked it. So, in our application, sender will always point to the button that was tapped.
This is a very handy mechanism, as it allows us to have one action method handle the
input from multiple controls, which is exactly what we’re doing here: both buttons call this
method, and we tell them apart by looking at sender. The first line of code in this method
grabs the tapped button’s title from sender.
NSString *title = [sender titleForState:UIControlStateNormal];
NOTE
We had to provide a control state when we requested the button’s title. The four possible states are
normal, which represents the control when it’s active but not currently being used; highlighted, which
represents the control when it is in the process of being tapped or otherwise used; disabled, which is the
state of a button that is not enabled and can’t be used; and selected, which is a state that only certain
controls have and which indicates that the control is currently selected. UIControlStateNormal
represents a control’s normal state and is the one you will use the vast majority of the time. If values for
the other states are not specified, those states will have the same value as the normal state.
The next thing we do is create a new string based on that title:
NSString *newText = [[NSString alloc] initWithFormat:@"%@ button pressed.",
title];

CHAPTER 3: Handling Basic Interaction40
This new string will append the text “button pressed.” to the name of the button. So if we
tapped a button with a title of “Left”, this new string would equal “Left button pressed.”
Finally, we set the text of our label to this new string:
statusText.text = newText;
We’re using dot notation here to set the label’s text, but we could have also used
[statusText setText:newText]; instead. Finally, we release the string:
[newText release];
The importance of releasing objects when you’re done with them cannot be overstated.
iPhone is a very resource- constrained device, and even a small number of memory leaks can
cause your program to crash. It’s also worth pointing out that we didn’t do this:
NSString *newText = [NSString stringWithFormat:@"%@ button pressed.",
title];
This code would work exactly the same as the code we used. Class methods like this one are
called convenience or factory methods, and they return an autoreleased object. Follow-
ing the general memory rule that “if you didn’t allocate it or retain it, don’t release it,” these
autoreleased objects don’t have to be released unless you specifically retain them, and using
them often results in code that’s a little shorter and more readable.
But, there is a cost associated with these convenience methods because they use the autore-
lease pool. The memory allocated for an autoreleased object will stay allocated for some
period of time after we’re done with it. On Mac OS X, with swap files and relatively large
amounts of physical memory, the cost of using autoreleased objects is nominal, but on
iPhone, these objects can have a detrimental effect on your application’s memory footprint.
It is OK to use autorelease, but try to use it only when you really need to, not just to save
typing a line or two of code.
TIP
If you’re a bit fuzzy on objective- C memory management, you really should review the memory
management “contract” at http://developer.apple.com/documentation/Cocoa/
Conceptual/MemoryMgmt/Tasks/MemoryManagementRules.html. Even a small number
of memory leaks can wreak havoc in an iPhone application.
The last thing we did was to release the outlet in our dealloc method:
[statusText release];
CHAPTER 3: Handling Basic Interaction 41
Releasing this item might seem strange. You might be thinking, since we didn’t instantiate
it, we shouldn’t be responsible for releasing it. If you have worked with older versions of
Cocoa and Objective- C, you’re probably thinking this is just plain wrong. However, because
we implemented properties for each of these outlets and specified retain in that property’s
attributes, releasing it is correct and necessary. Interface Builder will use our generated
mutator method when assigning the outlets, and that mutator will retain the object that is
assigned to it, so it’s important to release the outlet here to avoid leaking memory.
Before moving on, make sure you’ve saved this file, and then go ahead and compile the
project by pressing B to make sure you didn’t make any mistakes while typing. If it doesn’t
compile, go back and compare your code to the code in this book.
MESSAGE NESTING
Objective-C messages are often nested by some developers. You may come across code like this in your travels:
statusText.text = [NSString stringWithFormat:@"%@ button pressed.",
[sender titleForState:UIControlStateNormal]];
This one line of code will function exactly the same as the four lines of code that make up our
buttonPressed: method. For sake of clarity, we won’t generally nest Objective- C messages in the code
examples in this book, with the exception of calls to alloc and init, which, by longstanding convention,
are almost always nested.
Using the Application DelegateThe other two files under the Classes folder implement our application delegate. Cocoa
Touch makes extensive use of delegates, which are classes that take responsibility for doing
certain things on behalf of another object. The application delegate lets us do things at cer-
tain predefined times on behalf of the UIApplication class. Every iPhone application has
one and only one instance of UIApplication, which is responsible for the application’s run
loop and handles application- level functionality such as routing input to the appropriate
controller class.
UIApplication is a standard part of the UIKit, and it does its job mostly behind the scenes, so
you don’t have to worry about it for the most part. At certain well- defined times during an applica-
tion’s execution, however, UIApplication will call specific delegate methods, if there is a delegate
and if it implements that method. For example, if you have code that needs to fire just before your
program quits, you would implement the method applicationWillTerminate: in your applica-
tion delegate and put your termination code there. This type of delegation allows our application
to implement common applicationwide behavior without having to subclass UIApplication or,
indeed, to even know anything about its inner workings.

CHAPTER 3: Handling Basic Interaction42
Click Button_FunAppDelegate.h in the Groups & Files pane, and look at the application
delegate’s header file. It should look like this:
#import <UIKit/UIKit.h>
@class Button_FunViewController;
@interface Button_FunAppDelegate : NSObject <UIApplicationDelegate> {
IBOutlet UIWindow *window;
IBOutlet Button_FunViewController *viewController;
}
@property (nonatomic, retain) UIWindow *window;
@property (nonatomic, retain) Button_FunViewController *viewController;
@end
We don’t need to make any changes to this file, and after implementing our controller class,
most everything here should look familiar to you. One thing worth pointing out is this line of
code:
@interface Button_FunAppDelegate : NSObject <UIApplicationDelegate> {
Do you see that value between the angle brackets? This indicates that this class conforms
to a protocol called UIApplicationDelegate. Hold down the option key and move your
cursor so that it is over the word UIApplicationDelegate. Your cursor should turn into
crosshairs; when it does, double- click the mouse button. This will open the documenta-
tion browser and show you the documentation for the UIApplicationDelegate protocol
(see Figure 3-3). This same trick works with class, protocol, and category names, as well as
method names displayed in the editor pane. Just option–double- click a word, and it will
search for that word in the documentation browser.
Knowing how to quickly look up things in the documentation is definitely worthwhile, but
looking at the definition of this protocol is perhaps more important. Here’s where you’ll find
what methods the application delegate can implement and when those methods will get
called. It’s probably worth your time to read over the descriptions of these methods.
NOTE
If you’ve worked with Objective- C before but not with Objective- C 2.0, you should be aware that protocols
can now specify optional methods. UIApplicationDelegate contains many optional methods, and
you do not need to implement any of the optional methods in your application delegate unless you have
a reason.

CHAPTER 3: Handling Basic Interaction 43
Figure 3-3. Looking at the UIApplicationDelegate documentation using the documentation browser
Click Button_FunAppDelegate.m, and look at the implementation of the application delegate.
It should look like this:
#import "Button_FunAppDelegate.h"
#import "Button_FunViewController.h"
@implementation Button_FunAppDelegate
@synthesize window;
@synthesize viewController;
- (void)applicationDidFinishLaunching:(UIApplication *)application {
// Override point for customization after app launch
[window addSubview:viewController.view];
[window makeKeyAndVisible];
}

CHAPTER 3: Handling Basic Interaction44
- (void)dealloc {
[viewController release];
[window release];
[super dealloc];
}
@end
Right in the middle of the file, you can see that our application delegate has implemented
one of the protocol’s methods: applicationDidFinishLaunching:, which, as you can
probably guess, fires as soon as the application has finished all the setup work and is ready
to start interacting with the user.
Our delegate version of applicationDidFinishLaunching: adds our view controller’s view
as a subview to the application’s main window and makes the window visible, which is how the
view we are going to design get shown to the user. You don’t need to do anything to make this
happen; it’s all part of the code generated as part of the template we used to build this project.
We just wanted to give you a bit of background on application delegates and see how this
all ties together.
Editing MainWindow.xibSo far, we’ve looked at the four files in our project’s Classes tab (two .m files, two .h files).
We’ve also explored one of the three files in the Resources tab. We looked at Info.plist in
Chapter 2 when we added our icon to the project. In a moment, we’ll be editing our view
controller nib in Interface Builder, just as we did in the last chapter.
There’s one other file in the Resources tab that we
want to talk about. The file MainWindow.xib is what
causes your application’s delegate, main window,
and view controller instances to get create at run-
time. Remember, this file is provided as part of the
project template. You don’t need to change or do
anything here. This is just a chance to see what’s
going on behind the scenes, to get a glimpse of the
big picture.
Expand the Resources folder in Xcode’s Groups &
Files pane, and double- click MainWindow.xib. Once
Interface Builder opens, take a look at the nib’s main
window: the one labeled MainWindow.xib, which
should look like Figure 3-4.
Figure 3-4. Our application’s
MainWindow.xib as it appears in
Interface Builder

CHAPTER 3: Handling Basic Interaction 45
You should recognize the first two icons in this window from Chapter 2. As a reminder, every
other icon in a nib window after the first two represents an object that will get instantiated
when the nib file loads. Let’s take a look at the third, fourth, and fifth icons.
NOTE
Long names get truncated in the nib file’s main window in the default view, as you can see in Figure 3-4.
If you hold your cursor over one of these icons for a few seconds, a tooltip will pop up to show you the full
name of the item. Note also that the names shown in the main window do not necessarily indicate the
underlying class of the object. The default name for a new instance usually will clue you in to the underly-
ing class, but these names can be, and often are, changed.
The third icon is an instance of Button_FunAppDelegate. The fourth icon is our application’s
one and only window (an instance of UIWindow). And, finally, the fifth icon is an instance of
Button_FunViewController. These three icons indicate that once the nib file is loaded, our
application will have one instance of the application delegate, Button_FunAppDelegate;
one instance of UIWindow (the class that represents the application’s one and only window);
and one instance of our view controller, Button_FunViewController. As you can see, Inter-
face Builder can do much more than just create interface elements. It allows you to create
instances of any other class. This is an incredibly powerful feature. Every line of code that you
don’t write is a line of code you don’t have to debug or maintain. Right here, we’re creating
three object instances at launch time without having to write a single line of code.
OK, that’s all there is to see here, folks; move along. Be sure to close this nib file on the way out.
And if you are prompted to save, just say “no,” because you shouldn’t have changed anything.
Editing Button_FunViewController.xibNow that you’ve got a handle on the files that make up our project and the concepts that
bring them all together, let’s turn our attention to Interface Builder and the process of con-
structing our interface.
Creating the View in Interface Builder
In Xcode, double- click Button_FunViewController.xib in the Groups & Files pane. The nib file
should open in Interface Builder. Make sure the library is visible. If it’s not, you can show it
by selecting Library from the Tools menu. You also need to make sure that the nib’s View
window is open. If it’s not, double- click the icon called View in the nib’s main window (see
Figure 3-5).
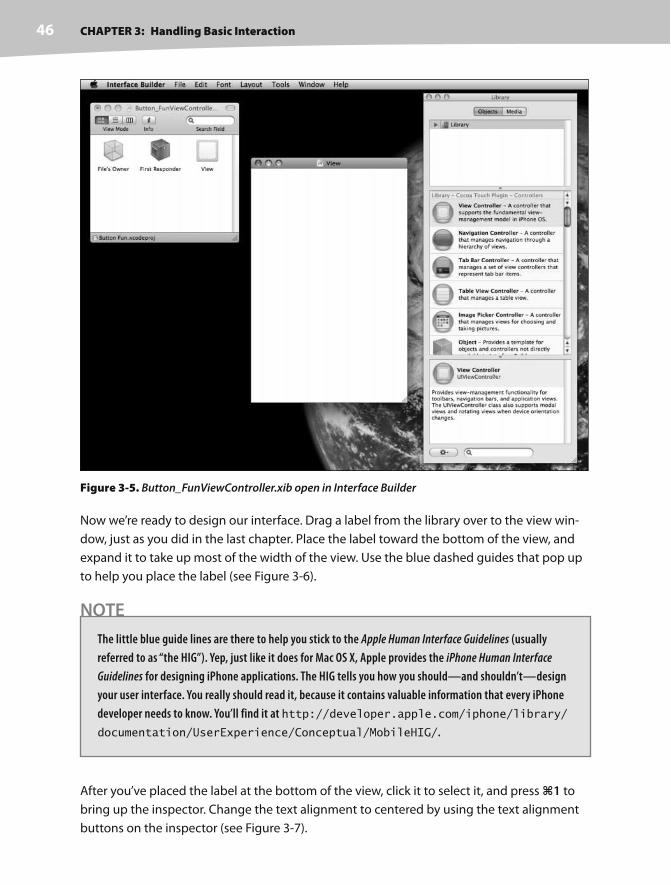
CHAPTER 3: Handling Basic Interaction46
Figure 3-5. Button_FunViewController.xib open in Interface Builder
Now we’re ready to design our interface. Drag a label from the library over to the view win-
dow, just as you did in the last chapter. Place the label toward the bottom of the view, and
expand it to take up most of the width of the view. Use the blue dashed guides that pop up
to help you place the label (see Figure 3-6).
NOTE
The little blue guide lines are there to help you stick to the Apple Human Interface Guidelines (usually
referred to as “the HIG”). Yep, just like it does for Mac OS X, Apple provides the iPhone Human Interface
Guidelines for designing iPhone applications. The HIG tells you how you should—and shouldn’t—design
your user interface. You really should read it, because it contains valuable information that every iPhone
developer needs to know. You’ll find it at http://developer.apple.com/iphone/library/
documentation/UserExperience/Conceptual/MobileHIG/.
After you’ve placed the label at the bottom of the view, click it to select it, and press 1 to
bring up the inspector. Change the text alignment to centered by using the text alignment
buttons on the inspector (see Figure 3-7).

CHAPTER 3: Handling Basic Interaction 47
Figure 3-6. Using the blue guide lines to place objects
Once you have the label placed where you want it,
double- click the label and delete the existing text.
We don’t want any text to display until a button has
been tapped.
Next, we’re going to drag two Round Rect Buttons
from the library (see Figure 3-8) to our view.
Figure 3-8. The Round Rect Button
as it appears in the library
Figure 3-7. The inspector’s text
alignment buttons

CHAPTER 3: Handling Basic Interaction48
Place the two buttons next to each other, roughly in the middle of the view. The exact
placement doesn’t matter. Double- click the button that you placed on the left. Doing this
will allow the button’s title to be edited, so go ahead and change its text to read “Left”. Next,
double- click the button on the right, and change its text to read “Right”. When you’re done,
your view should look something like the one shown in Figure 3-9.
Figure 3-9. The finished view
Connecting Everything
We now have all the pieces of our interface. All that’s left is to make the various connections
that will allow these pieces to work together.
The first step is to make a connection from File’s Owner to the label in the View window. Why
File’s Owner?
When an instance of UIViewController or one of its subclasses is instantiated, it looks for
its corresponding nib file. In the template we've used, the MyViewController class would
attempt to load a nib called MyViewController.xib, which was created for us by the project tem-
plate we chose. If it finds such a nib, it loads it into memory and becomes that nib file’s owner.
Since the MainWindow.xib file contains an icon that represents Button_FunViewController, an
instance of Button_FunViewController will get created automagically when our application
launches. When that happens, that instance will automatically load Button_FunViewController.
xib into memory and become its file’s owner.

CHAPTER 3: Handling Basic Interaction 49
Earlier in the chapter, we added an outlet to Button_FunViewController, which is this nib’s
owner. We can now make a connection between that outlet and the label using the File’s
Owner icon. Let’s look at how we do that.
NOTE
It’s OK if you don’t fully understand the nib loading process yet. It’s complicated, and we’ll be talking
about it and seeing it in action in several of the later chapters. For now, just remember that your control-
ler class is the file’s owner for the nib file of the same name.
Connecting Outlets
Hold down the control key; click the File’s Owner icon in the main nib window; and keep the
mouse button down. Drag away from the File’s Owner icon toward the View window. A blue
guide line should appear. Keep dragging until your cursor is over the label in the View win-
dow. Even though you won’t be able to see the label, it will magically appear once you are
over it (see Figure 3-10).
Figure 3-10. Control- dragging to connect outlets

CHAPTER 3: Handling Basic Interaction50
With the cursor still over the label, let go of the mouse button, and a small grey menu like
the one shown in Figure 3-11 should pop up.
Figure 3-11. Outlet selection menu
Select statusText from the grey menu.
By control- dragging from File’s Owner to an interface object, you are telling Interface Builder
that you want to connect one of the File’s Owner’s outlets to this object when the nib file is
loaded. In this case, the file’s owner is the class Button_FunViewController, and the Button_
FunViewController outlet we are interested in is statusText. When we control- dragged
from File’s Owner to the label object and selected statusText from the pop- up menu that
appeared, we told Interface Builder to have Button_FunViewController’s statusText outlet
point to the label, so any time we refer to statusText in our code, we will be dealing with this
label. Cool, eh?
Specifying Actions
The only thing left to do is to identify which actions these buttons trigger and under what
circumstances they trigger them. If you’re familiar with Cocoa programming for Mac OS X,
you’re probably getting ready to control- drag from the buttons over to the File’s Owner icon.
And, to be honest, that will probably work, but it’s not the best way to do it for iPhone.
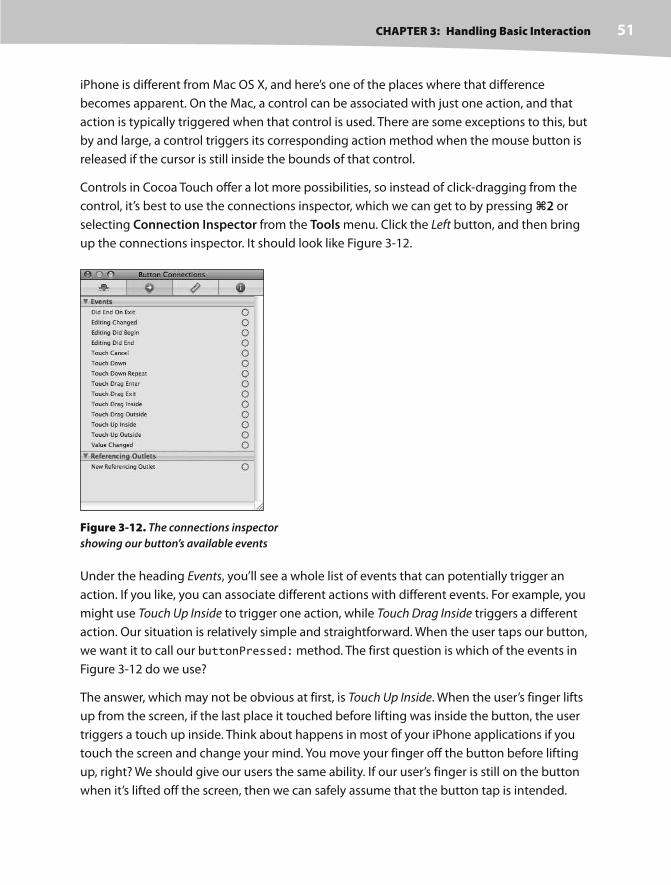
CHAPTER 3: Handling Basic Interaction 51
iPhone is different from Mac OS X, and here’s one of the places where that difference
becomes apparent. On the Mac, a control can be associated with just one action, and that
action is typically triggered when that control is used. There are some exceptions to this, but
by and large, a control triggers its corresponding action method when the mouse button is
released if the cursor is still inside the bounds of that control.
Controls in Cocoa Touch offer a lot more possibilities, so instead of click- dragging from the
control, it’s best to use the connections inspector, which we can get to by pressing 2 or
selecting Connection Inspector from the Tools menu. Click the Left button, and then bring
up the connections inspector. It should look like Figure 3-12.
Figure 3-12. The connections inspector
showing our button’s available events
Under the heading Events, you’ll see a whole list of events that can potentially trigger an
action. If you like, you can associate different actions with different events. For example, you
might use Touch Up Inside to trigger one action, while Touch Drag Inside triggers a different
action. Our situation is relatively simple and straightforward. When the user taps our button,
we want it to call our buttonPressed: method. The first question is which of the events in
Figure 3-12 do we use?
The answer, which may not be obvious at first, is Touch Up Inside. When the user’s finger lifts
up from the screen, if the last place it touched before lifting was inside the button, the user
triggers a touch up inside. Think about happens in most of your iPhone applications if you
touch the screen and change your mind. You move your finger off the button before lifting
up, right? We should give our users the same ability. If our user’s finger is still on the button
when it’s lifted off the screen, then we can safely assume that the button tap is intended.

CHAPTER 3: Handling Basic Interaction52
Now that we know the event we want to trigger our action, how do we associate the event
with a specific action method?
See that little circle in the inspector to the right of Touch Up Inside? Click in that circle and drag
away with the mouse button still pressed; there’s no need to hold down the control key this
time. You should get a blue guide line, just as you did when we were connecting outlets ear-
lier. Drag this guide line over to the File’s Owner icon, and when the little grey menu pops up,
select buttonPressed:. Remember, the File’s Owner icon represents the class whose nib we are
editing. In this case, File’s Owner represents the Button_FunViewController class. When we
dragged from the button’s event to the File’s Owner icon, we are telling Interface Builder to call
the selected method when the specified event occurs. So when the user touches up inside the
button, the Button_FunViewController class’s buttonPressed: method will be called.
Do this same sequence with the other button and then save. Now, anytime the user taps one
of these buttons, our buttonPressed: method will get called.
Trying It Out
Once you’ve saved the nib file, head back to Xcode and take your application for a spin.
Select Build and Run from the Build menu. Your code should compile, and your applica-
tion should come up in the iPhone Simulator. When you tap the left button, the text “Left
button pressed.” should appear, as it does in Figure 3-1. If you then tap the right button, the
label will change to say “Right button pressed.”
Bring It on HomeThis chapter’s simple application introduced you to MVC, creating and connecting outlets
and actions, implementing view controllers, and using application delegates. You learned
how to trigger action methods when a button is tapped and saw how to change the text of
a label at runtime. Although a simple application, the basic concepts we used to build it are
the same concepts that underlie the use of all controls on the iPhone, not just buttons. In
fact, the way we used buttons and labels in this chapter is pretty much the way that we will
implement and interact with most of the standard controls on the iPhone.
It’s very important that you understand everything we did in this chapter and why we did
it. If you don’t, go back and redo the parts that you don’t fully understand. This is important
stuff! If you don’t make sure you understand everything now, you will only get more con-
fused as we get into creating more complex interfaces later on in this book.
In the next chapter, we’ll take a look at some of the other standard iPhone controls. You’ll also
learn how to use alerts to notify the user of important happenings and how to indicate that
the user needs to make a choice before proceeding by using action sheets. When you feel
you’re ready to proceed, give yourself a pat on the back for being such an awesome
student, and head on over to the next chapter.

53
i
Chapter 4More User Interface Fun
n Chapter 3, we discussed the Model-View- Controller concept and built an
application that brought that idea to life. You learned about outlets and
actions and used them to tie a button control to a text label. In this chapter,
we’re going to build an application that will take your knowledge of controls
to a whole new level.
We’ll implement an image view, a slider, two different text fields, a segmented
control, a couple of switches, and an iPhone button that looks more like, well,
an iPhone button. You’ll learn how to use the view hierarchy to group multiple
items under a common parent view and make manipulating the interface at
runtime easier. You’ll see how to set and retrieve the values of various con-
trols, both by using outlets and by using the sender argument of our action
methods. After that, we’ll look at using action sheets to force the user to make
a choice and alerts to give the user important feedback. We’ll also learn about
control states and the use of stretchable images to make buttons look the way
they should.
Because this chapter’s application uses so many different user interface items,
we’re going to work a little differently than we did in the previous two chap-
ters. We’re going to break our application into pieces, implementing one piece
at a time, bouncing back and forth between Xcode, Interface Builder, and
the iPhone simulator and testing each piece before we move on to the next.
Breaking the process of building a complex interface into smaller chunks will
make it much less intimidating and will make it more closely resemble the
actual process you’ll go through when building your own applications. This
code-compile- debug cycle makes up a large part of a software developer’s
typical day.

CHAPTER 4: More User Interface Fun 54
A Screen Full of ControlsAs we mentioned, the application we’re going to build in this
chapter is a bit more complex than was the case in Chapter 3.
We’re still only going to use a single view and controller, but
as you can see in Figure 4-1, there’s quite a bit more going on
in this one view.
The logo at the top of the iPhone screen is an image view,
and in this application, it does nothing more than display
a static image. Below the logo, there are two text fields, one
that allows the entry of alphanumeric text and one that
allows only numbers. Below the text fields is a slider. As the
user changes the slider, the value of the label next to it will
change so that it always reflects the slider’s value.
Below the slider is a segmented control and two switches. The
segmented control will hide and show the pair of switches
based on whether the Show or the Hide segment is selected.
Figure 4-2 shows what happens when the user taps the Hide
segment. Changing the value of either switch will cause the
other one to change its value to match. Now, this isn’t some-
thing you would likely do in a real application, but it will let
us show you how to change the value of a control programmatically and how Cocoa Touch
animates certain actions for you without you having to do any work.
Below the switches is a Do Something button, which will cause an action sheet to pop up
and ask the users if they really meant to tap the button (see Figure 4-3). This is the standard
way of responding to input that is potentially dangerous or that could have significant reper-
cussions and gives the user a chance to stop potential badness from happening.
If Yes, I’m Sure! is selected, the application will put up an alert, letting the user know if every-
thing is OK (see Figure 4-4).
Figure 4-1. The Control Fun
application, featuring text
fields, labels, a slider, and
several other stock iPhone
controls

CHAPTER 4: More User Interface Fun 55
Figure 4-2. When the seg-
mented controller is used, the
switches are hidden if they are
currently being shown and
shown if they are currently
being hidden.
Figure 4-3. Our application
uses an action sheet to solicit
a response from the user.
Figure 4-4. Alerts are
used to notify the user when
important things happen.
We use one here to confirm
that everything went OK.
Active, Static, and Passive ControlsUser interface controls come in three basic forms: active, static (or inactive), and passive.
The buttons that we used in the last chapter are classic examples of active controls. You
push them, and something happens—usually, a piece of code fires. Although many of the
controls that you will use will directly trigger action methods, not all controls will.
The label that you used in the last chapter is a good example of a static control. You added it
to your interface and even changed it programmatically, but the user could not do anything
with it. Labels and images are both controls that are often used in this manner, though both
are subclasses of UIControl and can be made to fire code if you need them to.
Some controls can work in a passive manner, simply holding on to a value that the user has
entered until you’re ready for it. These controls don’t trigger action methods, but the user
can interact with them and change their values.
A classic example of a passive control is a text field on a web page. Although there can be
validation code that fires when you tab out of a field, the vast majority of web page text
fields are simply containers for data that gets submitted to the server when you click the

CHAPTER 4: More User Interface Fun 56
submit button. The text fields themselves don’t actually trigger any code to fire, but when
the submit button is clicked, the text fields’ data goes along for the ride.
On an iPhone, many of the available controls can be used in all three ways, and most can
function in more than one, depending on your needs. All iPhone controls are subclasses of
UIControl and, because of that, are capable of triggering action methods. Most controls can
also be used passively, and all of them can be made inactive when they are created or changed
from active to inactive, and vice versa, at runtime. For example, using one control could trig-
ger another inactive control to become active. However, some controls, such as buttons, really
don’t serve much purpose unless they are used in an active manner to trigger code.
As you might expect, there are some behavioral differences between controls on the iPhone
and those on your Mac. Here are a few examples. Because of the multitouch interface, all
iPhone controls can trigger multiple actions depending on how they are touched: your user
might trigger a different action with a finger swipe across the control than with just a touch.
You could also have one action fire when the user presses down on a button and a separate
action fire when the finger is lifted off the button. Conversely, you could also have a single
control call multiple action methods on a single event. You could have two different action
methods fire on the touch up inside event, meaning that both methods would get called
when the user’s finger is lifted after touching that button.
Another major difference between the iPhone and the Mac stems from the fact that the
iPhone has no physical keyboard. The iPhone keyboard is actually just a view filled with
a series of button controls. Your code will likely never directly interact with the iPhone key-
board, but as you’ll see later in the chapter, sometimes you have to write code to make the
keyboard behave in exactly the manner you want.
Creating the ApplicationFire up Xcode if it’s not already open, and create a new project called Control Fun. We’re
going to use the View- Based Application template option again, so create your project just as
you did in the last two chapters.
Importing the Image
Now that you’ve created your project, let’s go get the image we’ll use in our image view.
The image has to be imported into Xcode before it will be available for use inside Interface
Builder, so let’s import it now. You can find a suitable .png image in the project archives in
the 04 Control Fun directory, or you can use an image of your own choosing—make sure that
the image you select is a .png image sized correctly for the space available. It should be less
than 100 pixels tall and not more than 300 pixels wide so that it can comfortably fit at the
top of the view without being resized.

CHAPTER 4: More User Interface Fun 57
Add the image to the Resources folder of your project, just as we did in Chapter 2, by either
dragging the image from the Finder to the Resources folder or by selecting Add to Project
from the Project menu.
Implementing the Image View and Text Fields
With the image added to your project, your next
step is to implement the five interface elements at
the top of the application’s screen, with the image
view, the two text fields, and the two labels (see
Figure 4-5).
Determining Outlets
Before we hop over to Interface Builder, we need to
figure out which of these objects requires an outlet.
Remember, outlets have to be defined in your con-
troller class’s header file before you can connect them to anything in Interface Builder.
The image view is just a static image. We’re going to designate the image to be displayed
right in Interface Builder, and that image won’t change while our application is running. As
a result, it does not require an outlet. If we did want to change the image or change any of its
characteristics at runtime, we would need an outlet. That is not the case here.
The same is true for the two labels. They are there to display text but won’t be changed at
runtime, and the user won’t interact with them, so we don’t need outlets for them either.
On the other hand, the two text fields aren’t really much use if we can’t get to the data they
contain. The way to access the data held by a passive control is to use an outlet, so we need
to define an outlet for each of these text fields. This is old hat for you by now, so why don’t
you add two outlets and their corresponding properties to your Control_FunViewController.h
class file using the names nameField and numberField? When you’re done, it should look
something like this:
#import <UIKit/UIKit.h>
@interface Control_FunViewController : UIViewController {
IBOutlet UITextField *nameField;
IBOutlet UITextField *numberField;
}
@property (nonatomic, retain) UITextField *nameField;
@property (nonatomic, retain) UITextField *numberField;
@end
Figure 4-5. The image view, labels, and
text fields we will implement first
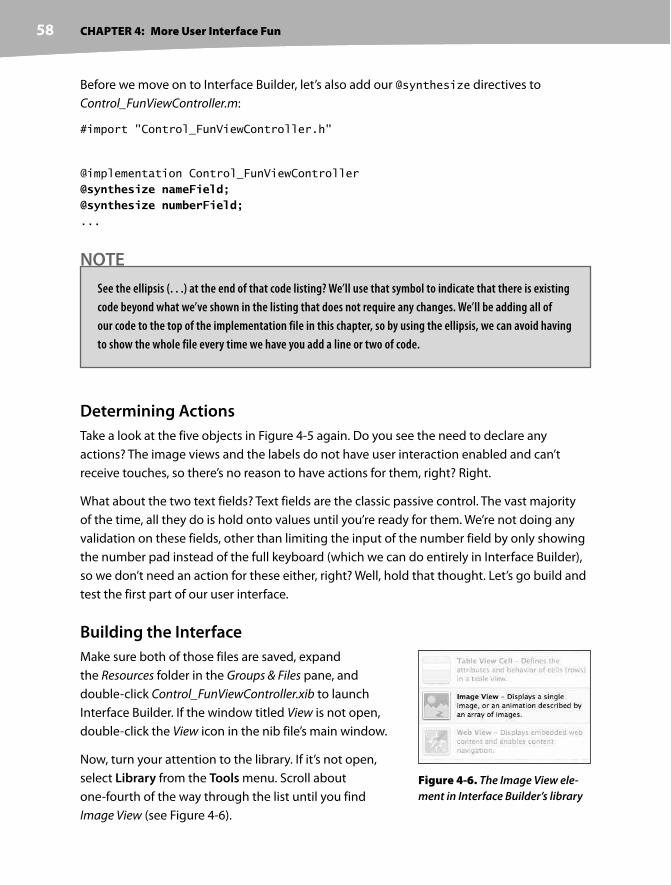
CHAPTER 4: More User Interface Fun 58
Before we move on to Interface Builder, let’s also add our @synthesize directives to
Control_FunViewController.m:
#import "Control_FunViewController.h"
@implementation Control_FunViewController
@synthesize nameField;@synthesize numberField;...
NOTE
See the ellipsis (. . .) at the end of that code listing? We’ll use that symbol to indicate that there is existing
code beyond what we’ve shown in the listing that does not require any changes. We’ll be adding all of
our code to the top of the implementation file in this chapter, so by using the ellipsis, we can avoid having
to show the whole file every time we have you add a line or two of code.
Determining Actions
Take a look at the five objects in Figure 4-5 again. Do you see the need to declare any
actions? The image views and the labels do not have user interaction enabled and can’t
receive touches, so there’s no reason to have actions for them, right? Right.
What about the two text fields? Text fields are the classic passive control. The vast majority
of the time, all they do is hold onto values until you’re ready for them. We’re not doing any
validation on these fields, other than limiting the input of the number field by only showing
the number pad instead of the full keyboard (which we can do entirely in Interface Builder),
so we don’t need an action for these either, right? Well, hold that thought. Let’s go build and
test the first part of our user interface.
Building the Interface
Make sure both of those files are saved, expand
the Resources folder in the Groups & Files pane, and
double- click Control_FunViewController.xib to launch
Interface Builder. If the window titled View is not open,
double- click the View icon in the nib file’s main window.
Now, turn your attention to the library. If it’s not open,
select Library from the Tools menu. Scroll about
one- fourth of the way through the list until you find
Image View (see Figure 4-6).
Figure 4-6. The Image View ele-
ment in Interface Builder’s library

CHAPTER 4: More User Interface Fun 59
Adding the Image View
Drag an image view onto the window called View. Because this is the first item you’re put-
ting on your view, Interface Builder is going to automatically resize the image view so that
it’s the same size as the view. Since we don’t want our image view to take the entire space,
use the drag handles to resize the image view to the approximate size of the image you
imported into Xcode. Don’t worry about getting it exactly right yet. It’ll be easier to do that
in a moment.
By the way, sometimes an object will get
deselected and can be very hard to select
again because it is behind another object,
takes up the entire view, or has no drawn
border. In those cases, don’t despair! There
is a way to select the object again. In the
nib’s main window, you’ll see three but-
tons labeled View Mode. Click the middle
one, and you’ll get a hierarchical view
of the nib, which will let you drill down
into subviews, as shown in Figure 4-7.
Double- clicking any item in this view
will also cause the same item to become
selected in the View window.
With the image view selected, bring up the inspec-
tor by pressing 1, and you should see the editable
options of the UIImageView class, as shown in
Figure 4-8.
The most important setting for our image view is the
topmost item in the inspector, labeled Image. If you
click the little arrow to the right of the field, a menu
will pop up with the available images, which should
include any images that you added to your Xcode
project. Select the image you added a minute ago.
Your image should now appear in your image view.
Figure 4-7. Putting the nib’s main window in hierar-
chical view and drilling down to subviews
Figure 4-8. The image view inspector

CHAPTER 4: More User Interface Fun 60
Resize the Image View
Now, resize your image view so that it is exactly the same size as your image. We’ll talk about
why in a moment. An easy way to resize the view so that it’s the same size as the selected
image is to press = or to select Size to Fit from the Layout menu, which will automatically
resize any view to the exact size needed to contain its contents. You’ll also want to move the
resized image so that it’s centered and the top is aligned with the blue guide lines. You can
easily center an item in the view by choosing Align Horizontal Center in Container from the
Layout menu’s Alignment submenu.
TIP
Dragging and resizing views in Interface Builder can be tricky. Don’t forget about the hierarchical View
Mode button in the main nib window. It will help you find and select (double- click) the image view. When
it comes to resizing, hold down the option key. Interface Builder will draw some helpful red lines on the
screen that make it much easier to get a sense of the image view’s size. This trick won’t work for dragging.
In that case, the option key tells Interface Builder you are trying to make a copy of the dragged object.
The Mode Attribute
The next option down in the image view inspector is a drop- down menu labeled Mode. The
Mode menu defines how the image will be aligned inside the view and whether it will be
scaled to fit. You can feel free to play with the various options, but the default value of Center
is probably best for our needs. Keep in mind that choosing any option that causes the image
to scale will potentially add processing overhead, so it’s best to avoid those and size your
images correctly before you import them. If you want to display the same image at multiple
sizes, generally it’s better to have multiple copies of the image at different sizes in your proj-
ect rather than force the iPhone to do scaling at runtime.
The Alpha Slider
The next item in the inspector is Alpha, and this is one you need to be very careful with.
Alpha defines how transparent your image is: how much of what’s beneath it shows
through. If you have any value less than 1.0, your iPhone will draw this view as transparent
so that any objects underneath it show through. With a value less than 1.0, even if there’s
nothing actually underneath your image, you will cause your application to spend processor
cycles calculating transparency, so don’t set this to anything other than 1.0 unless you have
a very good reason for doing so.
CHAPTER 4: More User Interface Fun 61
Ignore the Background
You can ignore the next item down, called Background. This is a property inherited from
UIView, but it doesn’t impact the appearance of an image view.
The Tag Attribute
The next item down—Tag—is worth mentioning, though we won’t be using it in this chapter.
All subclasses of UIView, including all views and controls, have a tag property, which is just
a numeric value that you can set that will tag along with your image view. The tag is designed
for your use; the system will never set or change its value. If you assign a tag value to a control
or view, you can be sure that the tag will always have that value unless you change it.
Tags provide an easy, language- independent way of identifying objects on your interface.
Let’s say you had five different buttons, each with a different label, and you wanted to use
a single action method to handle all five buttons. In that case, you would probably need
some way to differentiate among the buttons when your action method was called. Sure,
you could look at the button’s title, but code that does that probably won’t work when your
application is translated into Swahili or Sanskrit. Unlike labels, tags will never change, so if
you set a tag value here in Interface Builder, you can then use that as a fast and reliable way
to check which control was passed into an action method in the sender argument.
The Drawing Checkboxes
Below Tag are a series of Drawing checkboxes. The first one is labeled Opaque. Select it.
This tells the iPhone OS that nothing below your view should be drawn and allows iPhone’s
drawing methods to do some optimizations that speed up drawing.
You might be wondering why we need to select the Opaque checkbox, when we’ve already
set the value of Alpha to 1.0 to indicate no transparency. The reason is that the alpha value
applies to the parts of the image to be drawn, but if an image doesn’t completely fill the
image view, or there are holes in the image thanks to an alpha channel or clipping path,
the objects below will still show through regardless of the value set in Alpha. By checking
Opaque, we are telling iPhone that nothing below this view ever needs to be drawn no mat-
ter what. We can safely check the Opaque checkbox, because we earlier selected Size to Fit,
which caused the image view to match the size of the image it contains.
The Hidden checkbox does exactly what you think it does. If it’s checked, the user can’t see
this control. Hiding the control can be useful at times, including later in this chapter when
we hide the switches, but the vast majority of the time you want this to remain unchecked.
We can leave this at the default value.
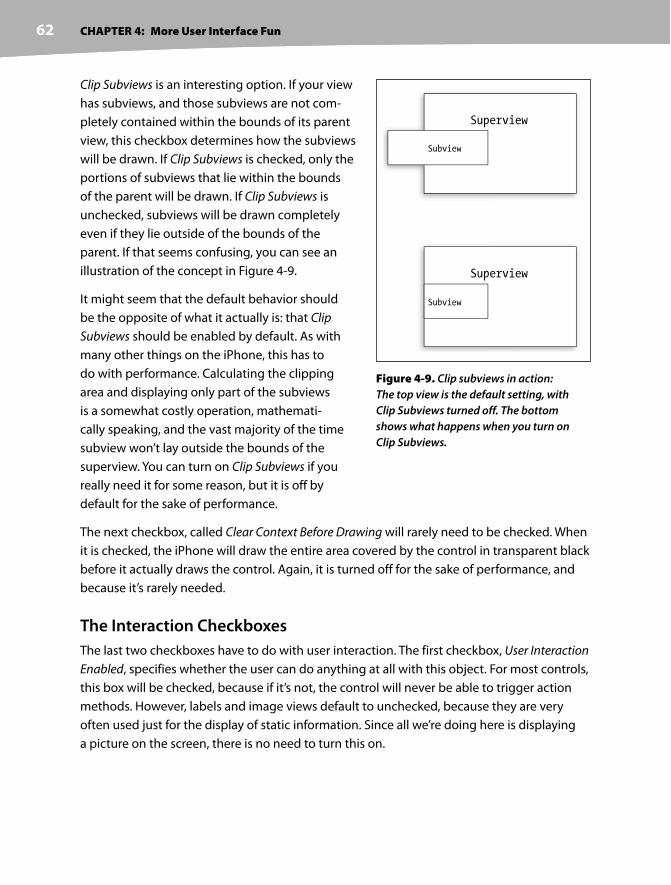
CHAPTER 4: More User Interface Fun 62
Clip Subviews is an interesting option. If your view
has subviews, and those subviews are not com-
pletely contained within the bounds of its parent
view, this checkbox determines how the subviews
will be drawn. If Clip Subviews is checked, only the
portions of subviews that lie within the bounds
of the parent will be drawn. If Clip Subviews is
unchecked, subviews will be drawn completely
even if they lie outside of the bounds of the
parent. If that seems confusing, you can see an
illustration of the concept in Figure 4-9.
It might seem that the default behavior should
be the opposite of what it actually is: that Clip
Subviews should be enabled by default. As with
many other things on the iPhone, this has to
do with performance. Calculating the clipping
area and displaying only part of the subviews
is a somewhat costly operation, mathemati-
cally speaking, and the vast majority of the time
subview won’t lay outside the bounds of the
superview. You can turn on Clip Subviews if you
really need it for some reason, but it is off by
default for the sake of performance.
The next checkbox, called Clear Context Before Drawing will rarely need to be checked. When
it is checked, the iPhone will draw the entire area covered by the control in transparent black
before it actually draws the control. Again, it is turned off for the sake of performance, and
because it’s rarely needed.
The Interaction Checkboxes
The last two checkboxes have to do with user interaction. The first checkbox, User Interaction
Enabled, specifies whether the user can do anything at all with this object. For most controls,
this box will be checked, because if it’s not, the control will never be able to trigger action
methods. However, labels and image views default to unchecked, because they are very
often used just for the display of static information. Since all we’re doing here is displaying
a picture on the screen, there is no need to turn this on.
Superview
Subview
Superview
Subview
Figure 4-9. Clip subviews in action:
The top view is the default setting, with
Clip Subviews turned off. The bottom
shows what happens when you turn on
Clip Subviews.

CHAPTER 4: More User Interface Fun 63
The last checkbox is Multiple Touch, and it determines whether this control is capable of
receiving multitouch events. Multitouch events allows complex gestures like the pinch
gesture used to zoom in many iPhone applications. We’ll talk more about gestures and mul-
titouch events in Chapter 13. Since this image view doesn’t accept user interaction at all,
there’s no reason to turn on multitouch events, so leave it at the default value.
Adding the Text Fields
Once you’ve got your image view all finished, grab a text field
from the library and drag it over to the View window. Place it
underneath the image view, using the blue guides to align it
with the right margin (see Figure 4-10). The horizontal blue
guide that appears to show you how close to the image view
to place it should be considered the minimum distance away
from the image view that the text field should be placed. You
can put it there for now, but to give it a balanced appearance,
we found it looked better a little further below. Remember,
you can always come back to Interface Builder and change
the position and size of interface elements without having to
change code or reestablish connections.
After you drop the text field, grab a label from the library, and
drag that over so it is aligned with the left margin of the view
and aligned vertically with the text field you placed earlier. Note
that multiple blue guides will pop up as you move the label
around, so that you could align the text field and label using the
top, bottom, middle, or the text baseline guide. We’re going to
align the label and the text field using the text baseline guide,
which will draw a line from the bottom of the label’s text going
through the text field, as shown in Figure 4-11. If the blue guide
line is being drawn through the middle of the label’s text, you’re
on the center guideline, not the text baseline guide. Using the
text baseline guide will cause the text of the label and the text
that the user will type into the text field to be at the same verti-
cal position on the screen.
Figure 4-11. Aligning the
label and text field using
the baseline guide
Figure 4-10. Placing the
text field
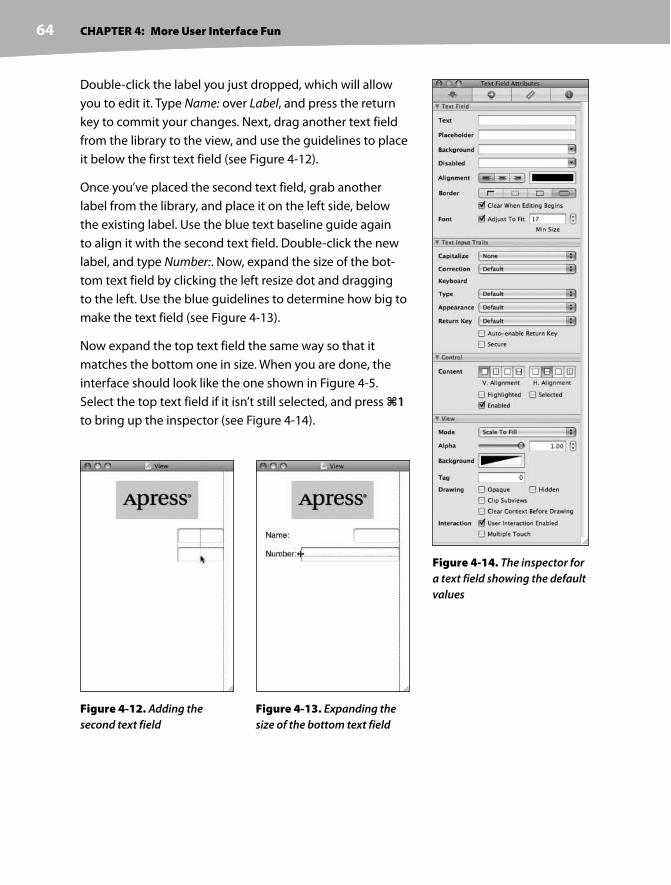
CHAPTER 4: More User Interface Fun 64
Double-click the label you just dropped, which will allow
you to edit it. Type Name: over Label, and press the return
key to commit your changes. Next, drag another text field
from the library to the view, and use the guidelines to place
it below the first text field (see Figure 4-12).
Once you’ve placed the second text field, grab another
label from the library, and place it on the left side, below
the existing label. Use the blue text baseline guide again
to align it with the second text field. Double- click the new
label, and type Number:. Now, expand the size of the bot-
tom text field by clicking the left resize dot and dragging
to the left. Use the blue guidelines to determine how big to
make the text field (see Figure 4-13).
Now expand the top text field the same way so that it
matches the bottom one in size. When you are done, the
interface should look like the one shown in Figure 4-5.
Select the top text field if it isn’t still selected, and press 1
to bring up the inspector (see Figure 4-14).
Figure 4-14. The inspector for
a text field showing the default
values
Figure 4-13. Expanding the
size of the bottom text field
Figure 4-12. Adding the
second text field

CHAPTER 4: More User Interface Fun 65
The Text Field Settings
Text fields are one of the most complex controls on the iPhone as well as being one of the
most commonly used. Let’s look at the topmost section of the inspector first. In the first field,
Text, you can set a default value for this field. Whatever you type in this field will show up in
the text field when your application launches.
The second field is Placeholder, and it allows you to specify a bit of text that will be displayed
in grey inside the text field, but only when the field has no value. You can use a placeholder
instead of a label if space is tight, or you can use it to clarify what the user should type into
this field. You can go ahead and type Type in a name as the placeholder for this text field.
The next two fields are only used if you need to customize the appearance of your text field,
which is completely unnecessary and actually ill advised the vast majority of the time. Users
expect text fields to look a certain way. As a result, we’re going to skip right over the Back-
ground and Disabled fields and leave them blank.
Below these fields are three buttons for controlling the alignment of the text displayed in
the field. We’ll leave this field at the default value of left- aligned (the leftmost button). Next
to that is a field that lets us specify the color of the text field’s text. Again, we’ll leave it at the
default value of black.
Next are four buttons labeled Border. These allow you to change the way the text field’s edge
will be drawn. You can feel free to try out all four different styles, but the default value is the
rightmost button, and it creates the text field style that users are most accustomed to seeing
for normal text fields in an iPhone application, so when you’re done playing, set it back to
that one.
The Clear When Editing Begins checkbox specifies what happens when the user touches
this field to use it. If this box is checked, any value that was previously in this field will get
deleted, and the user will be starting fresh. If this box is unchecked, the previous value will
stay in the field, and the user will be able to edit it. Uncheck this if it’s checked, or just leave it
as is if it’s checked.
The Adjust to Fit checkbox specifies whether the size of the text should shrink if the text field
is reduced in size. Adjusting to fit will keep the entire text visible in the view even if the text
would normally be too big to fit in the allotted space. To the right of the checkbox is a text field
that allows you to specify a minimum text size. No matter the size of the field, the text will not
be resized below that minimum size. Specifying a minimum size will allow you to make sure
that the text doesn’t get too small to be readable.

CHAPTER 4: More User Interface Fun 66
Text Input Traits
The next section defines how the keyboard will look and behave when this text field is being
used. Since we’re expecting a name, let’s change the Capitalize drop- down to Words, which
will cause every word to be automatically capitalized, which is what you typically want with
names. Let’s also change the value of the Return Key pop- up to Done and leave all the other
text input traits at their default values. The Return Key is the key on the lower right of the key-
board, and its label changes based on what you’re doing. If you are entering text into Safari’s
search field, for example, then it says Google. Typically, for general application text fields,
Done is the right choice.
And the Rest . . .
The next section allows you to set general control attributes inherited from UIControl, but
these generally don’t apply to text fields and, with the exception of the Enabled checkbox,
won’t affect the field’s appearance. We want to leave these text fields enabled so that the
user can interact with them, so just leave everything here as is.
The last section on the inspector should look familiar to you. It’s identical to the section of
the same name on the image view inspector we looked at a few minutes ago. These are
attributes inherited from the UIView class, and since all controls are subclasses of UIView,
they all share this section of attributes. Note that for a text field, you do not want to check
Opaque, because doing so will make the entered text unreadable. In fact, you can leave all
the values in this section exactly as they are.
Set the Attributes for the Second Text Field
Next, single- click the second text field in the View window and return to the inspector. In
the Placeholder field, type Type in a number, and uncheck Clear When Editing Begins. In the
section called Text Input Traits, click the Keyboard Type pop- up menu. Since we only want the
user to enter numbers, not letters, go ahead and select Number Pad. By doing this, the users
will be presented with a keyboard containing only numbers, meaning they won’t be able to
enter alphabetical characters, symbols, or anything besides numbers. We don’t have to set
the Return Key value for the numeric keypad, because that style of keyboard doesn’t have
a return key, so everything else on the inspector can stay at the default values.
Connecting Outlets
OK, for this first part of the interface, all that’s left is hooking up our outlets. Control- drag
from File’s Owner to each of the text fields, and connect them to their corresponding outlets.
Save the nib file once you’ve connected both text fields to their corresponding outlets, and
then go back to Xcode.

CHAPTER 4: More User Interface Fun 67
Build and RunLet’s see how it works, shall we? Select Build and Run from
Xcode’s Build menu. Your application should come up in the
iPhone simulator. Click the Name text field. The keyboard
should appear (see Figure 4-15). Now click the Number field,
and the keyboard should change to the number pad. Cocoa
Touch gives us all this functionality for free just by adding text
fields to our interface.
Woo-hoo! But, there’s a little problem. How do you get the
keyboard to go away? Go ahead and try, we’ll wait right here
while you do.
Making the Keyboard Go Away When Done Is Tapped
Because the keyboard is software based, rather than being
a physical keyboard, we need to take a few extra steps to
make sure the keyboard goes away when the user is done
with it. When the user taps the Done button, a “did end on
exit” event will be generated, and at that time, we need to tell the text field to give up con-
trol so that the keyboard will go away. In order to do that, we need to add an action method
to our controller class, so add the following line of code to Control_FunViewController.h:
#import <UIKit/UIKit.h>
@interface Control_FunViewController : UIViewController {
IBOutlet UITextField *nameField;
IBOutlet UITextField *numberField;
}
@property (nonatomic, retain) UITextField *nameField;
@property (nonatomic, retain) UITextField *numberField;
- (IBAction)textFieldDoneEditing:(id)sender;@end
Now switch over to Control_FunViewController.m, and we’ll implement this method. Only one
line of code is needed in this new action method to make it work. Add the following method
to Control_FunViewController.m:
- (IBAction)textFieldDoneEditing:(id)sender{ [sender resignFirstResponder];}
Figure 4-15. The keyboard
comes up automatically when
you touch the text field.

CHAPTER 4: More User Interface Fun 68
We mentioned the concept of a first responder earlier and said that it’s the control that the
user is currently interacting with. Here, we tell any control that triggers this action to give up
first responder status. When a text field yields first responder status, the keyboard associated
with it goes away.
Save both of the files you just edited. Let’s just hop back over to Interface Builder and trigger
this action from both of our text fields.
Once you’re back in Interface Builder, single- click the Name text field, and press 2 to bring
up the connections inspector. This time, we don’t want the touch up inside event that we
used in the last chapter. Instead, we want Did End on Exit since that is the event that will fire
when the user taps the Done button on iPhone’s keyboard. Drag from the circle next to Did
End on Exit to the File’s Owner icon and connect it to the textFieldDoneEditing: action.
Repeat with the other text field, and save. Let’s go back to Xcode to build and run again.
When the simulator appears, click the name field, type in something, and then tap the Done
button. Sure enough, the keyboard drops away, just as you expect it to. Alright! What about
the number field, though? Um, where’s the Done button on that one (see Figure 4-16)?
Well, crud! Not all keyboard layouts feature a done button. We
could force the user to tap the name field and then tap Done,
but that’s not very user friendly, is it? And we most definitely
want our application to be user friendly.
Can you recall what Apple’s iPhone applications do in this
situation? Well, in most places where there are text fields, tap-
ping anywhere in the view where there’s no active control will
cause the keyboard to go away. How do we do that?
The answer is probably going to surprise you because of
its simplicity. We need to create an invisible button that sits
behind everything else and does nothing except tell our text
fields to yield first responder status when it detects a touch.
Figure 4-16. The numeric
keypad doesn’t have a
Done button

CHAPTER 4: More User Interface Fun 69
Touching the Background to Close the Keyboard
Let’s go back to Xcode. We need to add one more action to our controller class. Add the
following line to your Control_FunViewController.h file:
#import <UIKit/UIKit.h>
@interface Control_FunViewController : UIViewController {
IBOutlet UITextField *nameField;
IBOutlet UITextField *numberField;
}
@property (nonatomic, retain) UITextField *nameField;
@property (nonatomic, retain) UITextField *numberField;
- (IBAction)textFieldDoneEditing:(id)sender;
- (IBAction)backgroundClick:(id)sender;@end
Save the header file; switch over to the implementation file; and add this code, which sim-
ply tells all text fields to yield first responder status if they have it. It is perfectly safe to call
resignFirstResponder on a control that is not the first responder, so we can safely call it
on both text fields without having to check which one is the first responder, if any.
- (IBAction)backgroundClick:(id)sender{ [nameField resignFirstResponder]; [numberField resignFirstResponder];}
TIP
You’ll be switching between header and implementation files a lot as you code. Fortunately, Xcode
has a key combination that will switch you between these files quickly. The default key combination is
(option-command- up arrow), although you can change it to anything you want using Xcode’s
preferences.
Save this file, and go back to Interface Builder. We now need to create that supersecret invisi-
ble button that will call the backgroundClick: action. Make sure your View window and the
library are both open. Drag a Round Rect Button from the library over to your view’s window.
Use the resize dots around the edges of the button to make it fill the entire screen. Do not
stop at the blue margin lines this time: keep going right to the edges, and don’t worry about
the fact that it’s covering the other items in your view. To put this button behind everything
else, select Send to Back from the Layout menu.

CHAPTER 4: More User Interface Fun 70
Now, with the new button still selected, press 1
to bring up the inspector and change the button’s
type from Rounded Rect to Custom, as we’re doing in
Figure 4-17.
Our button should have basically disappeared except
for the resize dots around the edges. The Custom
option is generally used when you want to override the
default appearance of a button. However, it can also
be used when you simply want a button to have no
appearance, as we’re doing here.
Now, just switch to the connections inspector by pressing 2 and then drag from the Touch Up
Inside event of this button to the File’s Owner icon, and choose the backgroundClick: action.
Now, touches anywhere in the view without an active control will trigger our new action
method, which will cause the keyboard to retract.
Save the nib, and let’s go back and try it out. Compile and run your application again. This
time, the keyboard should disappear not only when the Done button is tapped but also
when you click anywhere that’s not an active control, which is the behavior that your user
will expect.
Excellent! Now that we’ve got this section all squared away, are you ready to move onto the
next group of controls?
Implementing the Slider and LabelNow that we’ve got the text fields done, let’s implement the slider. Remember, as the user
moves the slider, the label will change to reflect the slider’s value.
Determining Outlets
We’re going to add two more items to the interface. Want to take a stab at figuring out how
many outlets we’ll need? Well, the label will need to be changed programmatically when the
slider changes, so we’re going to need an outlet for it. What about the slider?
The slider will trigger an action, and when it does, that action method will receive a pointer
to the slider in the sender argument. We’ll be able to retrieve the slider’s value from sender,
so we won’t need an outlet to get the slider’s value. So do we need an outlet for the slider at
all? In other words, do we need access to the slider’s value outside of the action method it
will call?
In a real application, you very often would. Here, since we have another control that will
have the same value as the slider and already has an outlet, there’s really no reason to have
Figure 4-17. Changing the button
type from Rounded Rect to Custom
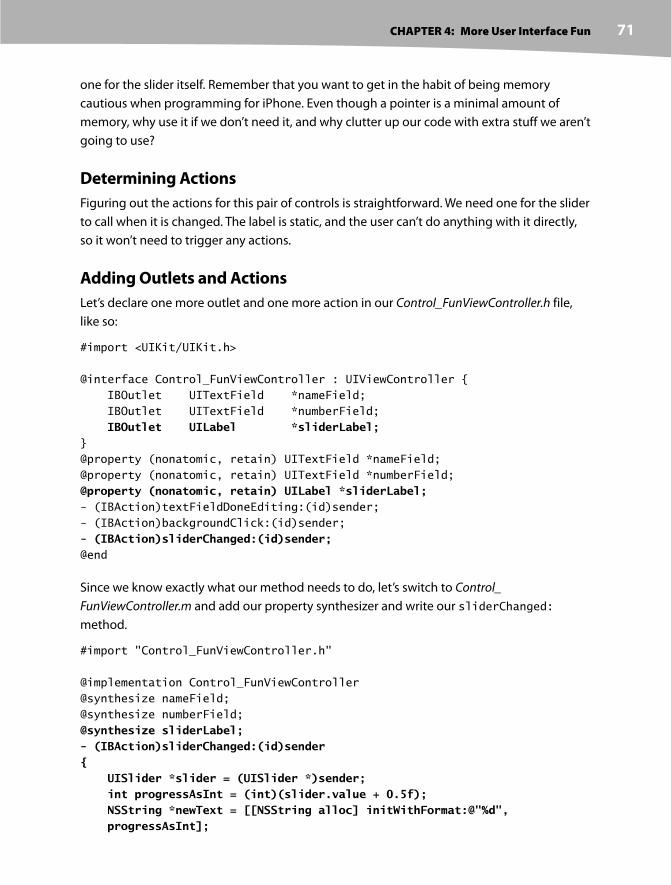
CHAPTER 4: More User Interface Fun 71
one for the slider itself. Remember that you want to get in the habit of being memory
cautious when programming for iPhone. Even though a pointer is a minimal amount of
memory, why use it if we don’t need it, and why clutter up our code with extra stuff we aren’t
going to use?
Determining Actions
Figuring out the actions for this pair of controls is straightforward. We need one for the slider
to call when it is changed. The label is static, and the user can’t do anything with it directly,
so it won’t need to trigger any actions.
Adding Outlets and Actions
Let’s declare one more outlet and one more action in our Control_FunViewController.h file,
like so:
#import <UIKit/UIKit.h>
@interface Control_FunViewController : UIViewController {
IBOutlet UITextField *nameField;
IBOutlet UITextField *numberField;
IBOutlet UILabel *sliderLabel;}
@property (nonatomic, retain) UITextField *nameField;
@property (nonatomic, retain) UITextField *numberField;
@property (nonatomic, retain) UILabel *sliderLabel;- (IBAction)textFieldDoneEditing:(id)sender;
- (IBAction)backgroundClick:(id)sender;
- (IBAction)sliderChanged:(id)sender;@end
Since we know exactly what our method needs to do, let’s switch to Control_
FunViewController.m and add our property synthesizer and write our sliderChanged:
method.
#import "Control_FunViewController.h"
@implementation Control_FunViewController
@synthesize nameField;
@synthesize numberField;
@synthesize sliderLabel;- (IBAction)sliderChanged:(id)sender{ UISlider *slider = (UISlider *)sender; int progressAsInt = (int)(slider.value + 0.5f); NSString *newText = [[NSString alloc] initWithFormat:@"%d", progressAsInt];
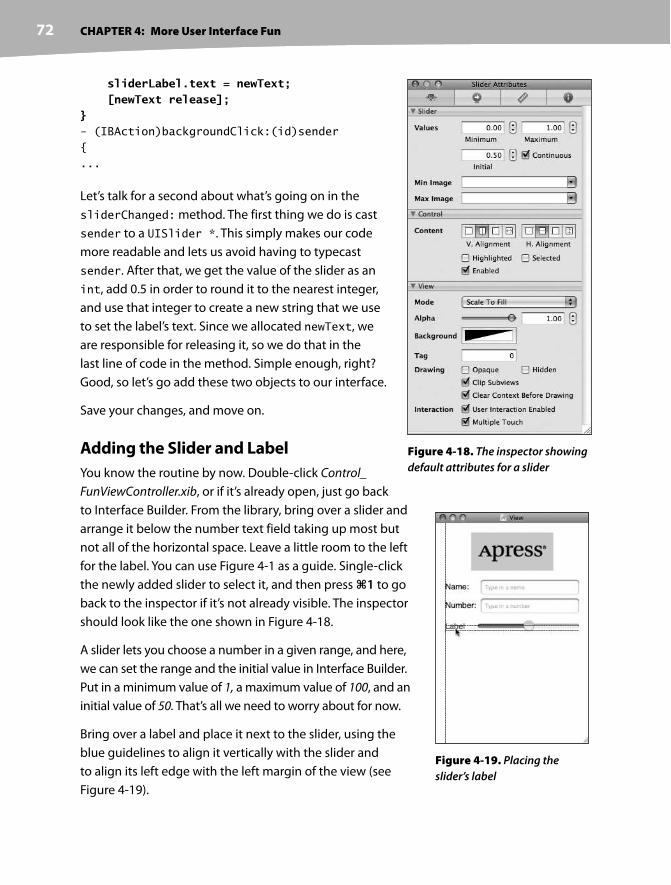
CHAPTER 4: More User Interface Fun 72
sliderLabel.text = newText; [newText release];}- (IBAction)backgroundClick:(id)sender
{
...
Let’s talk for a second about what’s going on in the
sliderChanged: method. The first thing we do is cast
sender to a UISlider *. This simply makes our code
more readable and lets us avoid having to typecast
sender. After that, we get the value of the slider as an
int, add 0.5 in order to round it to the nearest integer,
and use that integer to create a new string that we use
to set the label’s text. Since we allocated newText, we
are responsible for releasing it, so we do that in the
last line of code in the method. Simple enough, right?
Good, so let’s go add these two objects to our interface.
Save your changes, and move on.
Adding the Slider and Label
You know the routine by now. Double- click Control_
FunViewController.xib, or if it’s already open, just go back
to Interface Builder. From the library, bring over a slider and
arrange it below the number text field taking up most but
not all of the horizontal space. Leave a little room to the left
for the label. You can use Figure 4-1 as a guide. Single- click
the newly added slider to select it, and then press 1 to go
back to the inspector if it’s not already visible. The inspector
should look like the one shown in Figure 4-18.
A slider lets you choose a number in a given range, and here,
we can set the range and the initial value in Interface Builder.
Put in a minimum value of 1, a maximum value of 100, and an
initial value of 50. That’s all we need to worry about for now.
Bring over a label and place it next to the slider, using the
blue guidelines to align it vertically with the slider and
to align its left edge with the left margin of the view (see
Figure 4-19).
Figure 4-18. The inspector showing
default attributes for a slider
Figure 4-19. Placing the
slider’s label
CHAPTER 4: More User Interface Fun 73
Double-click the newly placed label, and change its text from Label to 100. This is the larg-
est value that the slider can hold, and we can use that to determine the correct width of
the slider. Since “100” is shorter than “Label,” you should resize the label by grabbing the
right- middle resize dot and dragging to the left. Make sure you stop resizing before the
text starts to get smaller. If it does start to get smaller, bring the resize dot back to the right
until it returns to its original size. You can also use the size-to- fit option we discussed ear-
lier by pressing = or selecting Size to Fit from the Layout Menu. Next, resize the slider by
single- clicking the slider to select it and dragging the left resize dot to the left until the blue
guides indicate that you should stop.
Now double- click the label again, and change its value to 50. That is the starting value of the
slider, and we need to change it back to make sure that the interface looks correct at launch
time; once the slider is used, the code we just wrote will make sure the label continues to
show the correct value.
Connecting the Actions and Outlets
All that’s left to do with these two controls is to connect the outlet and action. Well, what are
you waiting for? You know how to do that. Well, in case you’ve forgotten, control- drag from
the File’s Owner icon to the label you just added, and select sliderLabel. Next, single- click
the slider, press 2 to bring up the connections inspector, and drag from—hmm, we don’t
want Touch Up Inside, this time, do we? How about Value Changed? That sounds like a good
one, huh? Yep, go ahead and drag from that one to File’s Owner, and select sliderChanged.
CAUTION
In some versions of Interface Builder, when you attempt to control- drag from File’s Owner to items
on the interface, it will only let you select the large background button and not the other items like
sliderLabel. If you experience this, you can work around it by pressing 2 to bring up the
connections inspector and dragging from the little circle next to the outlet you’re trying to connect
to the object you wish to connect to.
Save the nib; go back to Xcode; and try out the slider. As you move it, you should see the
label’s text change in real time. Another piece falls into place. Now, let’s look at implement-
ing the switches.
CHAPTER 4: More User Interface Fun 74
Implementing the Switches and Segmented ControlBack to Xcode we go once again. Getting dizzy yet? This back and forth may seem a bit
strange, but it’s fairly common to bounce around among Interface Builder, Xcode, and the
iPhone simulator while you’re developing.
Our application is going to have two switches, which are small controls that can only have
two states: on and off. We’ll also add a segmented control to hide and show the switches.
Let’s implement those next.
Determining Outlets
We won’t need an outlet for the segmented control, since we won’t be changing its attributes
or doing anything with it outside of the action method it calls. We will need some outlets for
the switches, however. Since changing the value of either switch will trigger a change in the
value of the other switch, we’ll need to change the value of the switch that didn’t trigger the
action method, so we won’t be able to rely on using sender. We also need another outlet. We
need one for another view that we’re going to add. Remember that we’re going to hide and
show these switches and their labels whenever the segmented control is touched.
We could hide each of the items individually, but the easiest way to group multiple controls
to hide and unhide them together is to use a UIView as a common parent for the items
that need to be hidden or shown together. You’ll see how that works in Interface Builder in
a moment, but first, we need to create the outlet for the parent view in addition to the out-
lets for the two switches.
Determining Actions
The segmented control is going to need to trigger an action method that will hide or show
the view containing the switches and their labels. We’re also going to need an action that
will fire when either switch is tapped. We’ll have both switches call the same action method,
just as we did with the two buttons in Chapter 3. In Control_FunViewController.h, go ahead
and add three outlets and two actions, like so:
#import <UIKit/UIKit.h>
#define kShowSegmentIndex 0@interface Control_FunViewController : UIViewController {
IBOutlet UITextField *nameField;
IBOutlet UITextField *numberField;
IBOutlet UILabel *sliderLabel;
IBOutlet UISwitch *leftSwitch; IBOutlet UISwitch *rightSwitch; IBOutlet UIView *switchView;

CHAPTER 4: More User Interface Fun 75
}
@property (nonatomic, retain) UITextField *nameField;
@property (nonatomic, retain) UITextField *numberField;
@property (nonatomic, retain) UILabel *sliderLabel;
@property (nonatomic, retain) UISwitch *leftSwitch;@property (nonatomic, retain) UISwitch *rightSwitch;@property (nonatomic, retain) UIView *switchView;- (IBAction)textFieldDoneEditing:(id)sender;
- (IBAction)backgroundClick:(id)sender;
- (IBAction)sliderChanged:(id)sender;
- (IBAction)switchChanged:(id)sender;- (IBAction)toggleShowHide:(id)sender;@end
CAUTION
When you are typing, Xcode will often try to guess what your intentions are and complete your words
for you. This feature is called Code Sense, and it can be a tremendous timesaver. It will, at times, be
completely off base. When you start typing switchView, it may try to suggest a switch statement.
Just keep typing and ignore the suggestion, and it will go away.
In the code we’ll be writing in a minute, we’re going to refer to a UISegmentedControl prop-
erty named selectedSegmentIndex, which tells us which segment is currently selected.
That property is an integer number. The Show segment will have an index of 0. Rather than
stick that 0 in our code, we define the constant kShowSegmentIndex so that the code we
write will be more readable.
Switch over to Control_FunViewController.m and add the following code:
#import "Control_FunViewController.h"
@implementation Control_FunViewController
@synthesize nameField;
@synthesize numberField;
@synthesize sliderLabel;
@synthesize leftSwitch;@synthesize rightSwitch;@synthesize switchView;- (IBAction)switchChanged:(id)sender{ UISwitch *whichSwitch = (UISwitch *)sender; BOOL setting = whichSwitch.isOn; [leftSwitch setOn:setting animated:YES]; [rightSwitch setOn:setting animated:YES];}

CHAPTER 4: More User Interface Fun 76
- (IBAction)toggleShowHide:(id)sender{ UISegmentedControl *segmentedControl = (UISegmentedControl *)sender; NSInteger segment = segmentedControl.selectedSegmentIndex; if (segment == kShowSegmentIndex) [switchView setHidden:NO]; else [switchView setHidden:YES];}- (IBAction)sliderChanged:(id)sender
{
...
The first method we added was pretty straightforward. We simply grab the value of
sender and use that value to set both switches. Now, sender is always going to be either
leftSwitch or rightSwitch, so you might be wondering why we’re setting them both. It’s
less work to just set the value of both switches every time than to determine which switch
called us and only set the other one. Whichever switch called this method will already be set
to the correct value, and setting it again to that same value won’t have any affect.
Notice that when we change the value of the switch, there is a parameter called animated.
This lets us specify whether the button should slide over slowly, just as if somebody had
pressed it, or if it should just be moved instantly to the new position. We specified YES
because having the switches slide over looks cool, and iPhone users have come to expect
that kind of visual feedback. You can try specifying NO if you want to see the difference, but
unless you have good reason, it’s generally a good idea to animate changes so the user is
well aware of them.
In the second method, toggleShowHide:, we look at which segment is currently selected
and show or hide the UIView we created an outlet for, which will be the parent view of all
the objects that need to get hidden. Certain properties get inherited from the superview,
so if a view is hidden or disabled, for example, all of that view’s subviews will be hidden or
disabled also.
Save both files, and move over to Interface Builder so we can edit Control_FunViewController.
xib and create our switches.
Adding the Switches and Segmented Control
Drag a segmented control from the library (see Figure 4-20) and place it on the View window,
a little below the slider.
Expand the width of the segmented control so that it stretches from the view’s left margin to its
right margin, as it does in Figure 4-21. Place your cursor over the word First on the segmented

CHAPTER 4: More User Interface Fun 77
control and double- click. This should cause the segment’s
title to become editable, so change it from First to Show, as
shown in Figure 4-21. After doing that, repeat the process
with the Second segment; rename it Hide.
Dragging Out Another View
Drag another View from the library onto our View
window, right below the segmented control. By default,
a UIView element is not drawn and has no impact on the
way things look; it is just a container that can hold other
views. We can, however, change the background color of the view so that it is visible and
easier to work with. You can change the new view’s background color in the inspector; we
chose a nice, conservative light grey (as shown in Figure 4-22), but feel free select a more
zany color if you want. We won’t tell anyone.
If your view gets deselected before you have a chance to set a new background color, here’s
a little trick that can help you find it and will also help you when designing your views. Hold
down the option key, and move your cursor over the View window. As you move over an
object, it will become highlighted in red, and you will also see how many pixels there are
between the edges of the item and its superview, as shown in Figure 4-23.
Figure 4-20. The Segmented
Control option in the library
Figure 4-21. Renaming the
segments
Figure 4-22. Placing the view
object
Figure 4-23. Holding down
the option key gives you more
information about the items
on your interface as you mouse
over them.

CHAPTER 4: More User Interface Fun 78
Adding Two Labeled Switches
Grab a switch from the library, and place it on the view that
you just added to your window. Remember, you need to make
sure that switches get added as subviews of the new view,
so make sure you see the word View in a grey box as well as
a green plus icon, just like in Figure 4-24, before you release
the mouse button. Repeat the process with a second switch,
making sure it also is added as a subview. Now drag over two
labels, making sure to also add them as subviews. Place one
label above each switch, and change the text to read Left for
the one on the left and Right for the one on the right.
TIP
Holding down the option key and dragging an object in Interface
Builder will create a copy of that item. When you have many
instances of the same object to create, it can be faster to drag only
one object from the library and then option- drag as many copies as
you need.
Connecting the Outlets
Control-drag from File’s Owner to each of the switches, and connect them to the appropriate
leftSwitch or rightSwitch outlet. After doing that, control- drag from the File’s Owner icon
to the switch’s parent view, and connect it to the switchView outlet.
Now select the left switch again by single- clicking it, and press 2 to bring up the connec-
tions inspector. Drag from the Value Changed event to the File’s Owner icon, and select the
switchChanged: action. Repeat with the other switch.
Single-click the segmented control, and look for the Value Changed event on the con-
nections inspector. Drag from the circle next to it to the File’s Owner icon, and select the
toggleShowHide: action method.
Save your work.
Go back to Xcode, and take the application for a test drive. Click a switch, and watch how the
other switch takes the value from the one you changed. Click the segmented control, and
watch the switch and labels disappear and reappear.
Once you’re done playing with it, let’s move on to the final section.
Figure 4-24. Adding the
switches as subviews of
the existing view
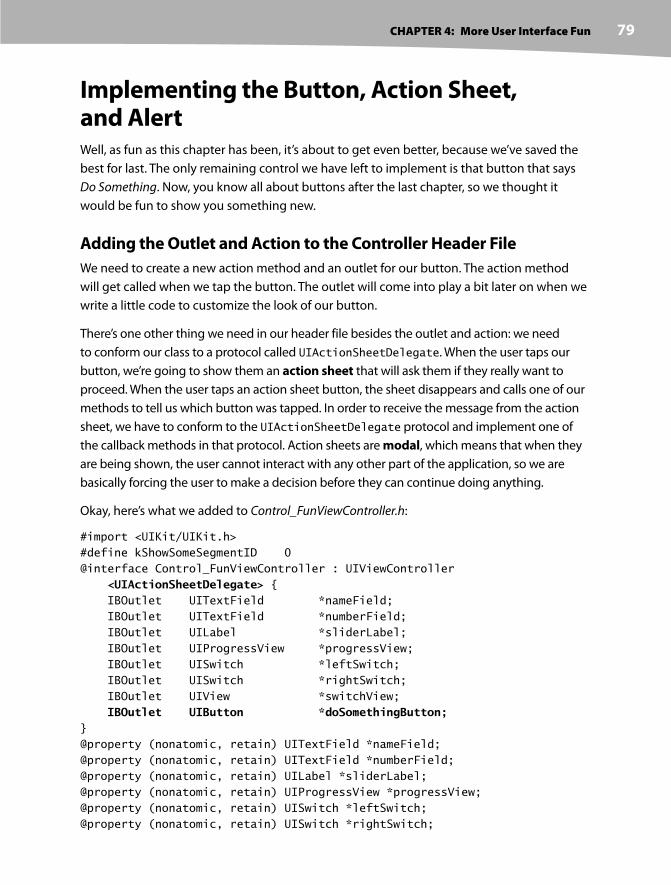
CHAPTER 4: More User Interface Fun 79
Implementing the Button, Action Sheet, and AlertWell, as fun as this chapter has been, it’s about to get even better, because we’ve saved the
best for last. The only remaining control we have left to implement is that button that says
Do Something. Now, you know all about buttons after the last chapter, so we thought it
would be fun to show you something new.
Adding the Outlet and Action to the Controller Header File
We need to create a new action method and an outlet for our button. The action method
will get called when we tap the button. The outlet will come into play a bit later on when we
write a little code to customize the look of our button.
There’s one other thing we need in our header file besides the outlet and action: we need
to conform our class to a protocol called UIActionSheetDelegate. When the user taps our
button, we’re going to show them an action sheet that will ask them if they really want to
proceed. When the user taps an action sheet button, the sheet disappears and calls one of our
methods to tell us which button was tapped. In order to receive the message from the action
sheet, we have to conform to the UIActionSheetDelegate protocol and implement one of
the callback methods in that protocol. Action sheets are modal, which means that when they
are being shown, the user cannot interact with any other part of the application, so we are
basically forcing the user to make a decision before they can continue doing anything.
Okay, here’s what we added to Control_FunViewController.h:
#import <UIKit/UIKit.h>
#define kShowSomeSegmentID 0
@interface Control_FunViewController : UIViewController <UIActionSheetDelegate> { IBOutlet UITextField *nameField;
IBOutlet UITextField *numberField;
IBOutlet UILabel *sliderLabel;
IBOutlet UIProgressView *progressView;
IBOutlet UISwitch *leftSwitch;
IBOutlet UISwitch *rightSwitch;
IBOutlet UIView *switchView;
IBOutlet UIButton *doSomethingButton;}
@property (nonatomic, retain) UITextField *nameField;
@property (nonatomic, retain) UITextField *numberField;
@property (nonatomic, retain) UILabel *sliderLabel;
@property (nonatomic, retain) UIProgressView *progressView;
@property (nonatomic, retain) UISwitch *leftSwitch;
@property (nonatomic, retain) UISwitch *rightSwitch;
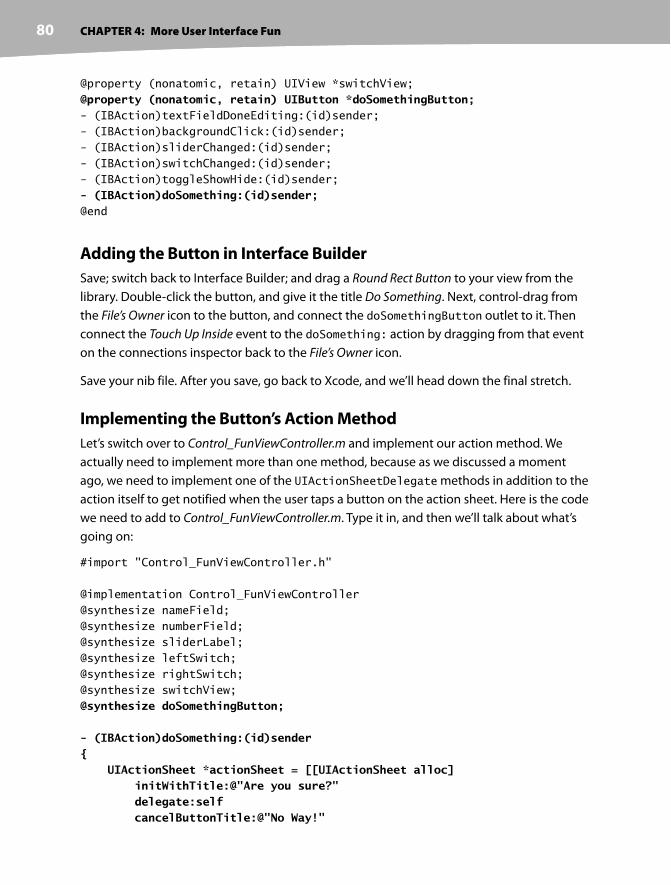
CHAPTER 4: More User Interface Fun 80
@property (nonatomic, retain) UIView *switchView;
@property (nonatomic, retain) UIButton *doSomethingButton;- (IBAction)textFieldDoneEditing:(id)sender;
- (IBAction)backgroundClick:(id)sender;
- (IBAction)sliderChanged:(id)sender;
- (IBAction)switchChanged:(id)sender;
- (IBAction)toggleShowHide:(id)sender;
- (IBAction)doSomething:(id)sender;@end
Adding the Button in Interface Builder
Save; switch back to Interface Builder; and drag a Round Rect Button to your view from the
library. Double- click the button, and give it the title Do Something. Next, control- drag from
the File’s Owner icon to the button, and connect the doSomethingButton outlet to it. Then
connect the Touch Up Inside event to the doSomething: action by dragging from that event
on the connections inspector back to the File’s Owner icon.
Save your nib file. After you save, go back to Xcode, and we’ll head down the final stretch.
Implementing the Button’s Action Method
Let’s switch over to Control_FunViewController.m and implement our action method. We
actually need to implement more than one method, because as we discussed a moment
ago, we need to implement one of the UIActionSheetDelegate methods in addition to the
action itself to get notified when the user taps a button on the action sheet. Here is the code
we need to add to Control_FunViewController.m. Type it in, and then we’ll talk about what’s
going on:
#import "Control_FunViewController.h"
@implementation Control_FunViewController
@synthesize nameField;
@synthesize numberField;
@synthesize sliderLabel;
@synthesize leftSwitch;
@synthesize rightSwitch;
@synthesize switchView;
@synthesize doSomethingButton;
- (IBAction)doSomething:(id)sender{ UIActionSheet *actionSheet = [[UIActionSheet alloc] initWithTitle:@"Are you sure?" delegate:self cancelButtonTitle:@"No Way!"
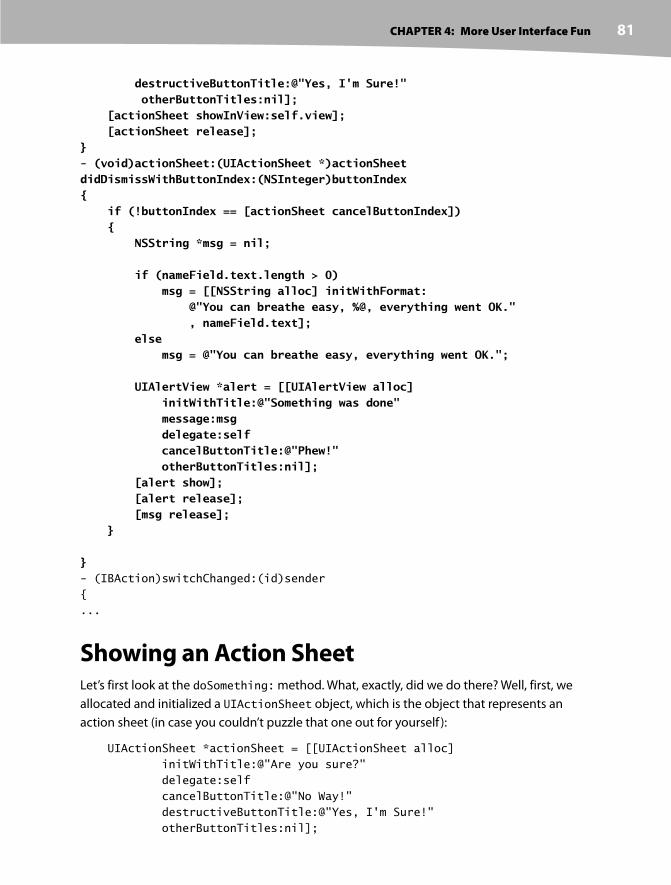
CHAPTER 4: More User Interface Fun 81
destructiveButtonTitle:@"Yes, I'm Sure!" otherButtonTitles:nil]; [actionSheet showInView:self.view]; [actionSheet release];}- (void)actionSheet:(UIActionSheet *)actionSheetdidDismissWithButtonIndex:(NSInteger)buttonIndex{ if (!buttonIndex == [actionSheet cancelButtonIndex]) { NSString *msg = nil; if (nameField.text.length > 0) msg = [[NSString alloc] initWithFormat: @"You can breathe easy, %@, everything went OK." , nameField.text]; else msg = @"You can breathe easy, everything went OK."; UIAlertView *alert = [[UIAlertView alloc] initWithTitle:@"Something was done" message:msg delegate:self cancelButtonTitle:@"Phew!" otherButtonTitles:nil]; [alert show]; [alert release]; [msg release]; } }- (IBAction)switchChanged:(id)sender
{
...
Showing an Action SheetLet’s first look at the doSomething: method. What, exactly, did we do there? Well, first, we
allocated and initialized a UIActionSheet object, which is the object that represents an
action sheet (in case you couldn’t puzzle that one out for yourself ):
UIActionSheet *actionSheet = [[UIActionSheet alloc]
initWithTitle:@"Are you sure?"
delegate:self
cancelButtonTitle:@"No Way!"
destructiveButtonTitle:@"Yes, I'm Sure!"
otherButtonTitles:nil];

CHAPTER 4: More User Interface Fun 82
The initializer method took a number of parameters. Let’s look at each of them in turn. The
first parameter is the title to be displayed. If you look at Figure 4-3, you can see how the title
we’re supplying will be displayed at the top of the action sheet.
The next argument is the delegate for the action sheet. The action sheet’s delegate will be
notified when a button on that sheet has been tapped. More specifically, the delegate’s
actionSheet:didDismissWithButtonIndex:actionSheet:didDismissWithButtonIndex:
method will be called. By passing self as the delegate parameter, we ensure that our
version of actionSheet:didDismissWithButtonIndex: will be called.
Next, we pass in the title for the button that users will tap to indicate they do not wish to
proceed. All action sheets should have a cancel button, though you can give it any title that
is appropriate to your situation. You do not want to use an action sheet if there is no choice
to be made. In situations where you want to notify the user without giving a choice of
options, an alert sheet is more appropriate. We’ll see how to use alert sheets in a bit.
The next parameter is the destructive button, and you can think of this as the “yes, please go
ahead” button, though once again, you can assign any title to it that is appropriate to your
situation.
The last parameter allows us to specify any number of other buttons that we may want
shown on the sheet. This final argument can take a variable number of values, which is one
of the nice features of the Objective- C language. If we had wanted two more buttons on our
action sheet, we could have done it like this:
UIActionSheet *actionSheet = [[UIActionSheet alloc]
initWithTitle:@"Are you sure?"
delegate:self
cancelButtonTitle:@"No Way!"
destructiveButtonTitle:@"Yes, I'm Sure!"
otherButtonTitles:@"Foo", @"Bar", nil];
This would have resulted in an action sheet with four buttons that the user could choose
from. You can pass as many arguments as you want in the otherButtonTitles parameter,
as long as you pass nil as the last one, but there is, of course, a practical limitation on how
many buttons you can have based on the amount of screen space available.
After we create the action sheet, we tell it to show itself. On an iPhone, action sheets always
have a parent, which must be a view that is currently visible to the user. In our case, we want
the view that we designed in Interface Builder to be the parent, so we use self.view. View
is a property of our classes’ parent class, UIViewController, and it points to the view that
this class is the controller for.
Finally, when we’re all done, we release the action sheet. Don’t worry; it will stick around
until the user has tapped a button.

CHAPTER 4: More User Interface Fun 83
The Action Sheet Delegate and Creating an Alert
Well, that wasn’t so hard, was it? In just a few lines of code, we showed an action sheet and
required the user to make a decision. iPhone will even animate the sheet for us without requir-
ing us to do any additional work. Now, we just need to find out which button the user tapped.
The other method that we just implemented, actionSheet:didDismissWithButtonIndex,
is one of the UIActionSheetDelegate methods, and since we specified self as our action
sheet’s delegate, this method will automatically get called by the alert sheet when a button
is tapped.
The argument buttonIndex will tell us which button was actually tapped. But, how do we
know which button index refers to the cancel button and which one refers to the other but-
ton? Well, fortunately, the delegate method receives a pointer to the UIActionSheet object
that represents the sheet, and that action sheet object knows which button is the cancel
button. We just need look at one of its properties, cancelButtonIndex:
if (!buttonIndex == [actionSheet cancelButtonIndex])
This line of code makes sure the user didn’t tap the cancel button. Since we only gave the
user two options, we know that if they didn’t tap the cancel button, they must have tapped
the other button, so it’s OK to proceed. Once we know the user didn’t cancel, the first thing
we do is create a new string that will be displayed to the user. In a real application, here you
would do whatever processing the user requested. We’re just going to pretend we did some-
thing, and notify the user using an alert.
If the user has entered a name in the top text field, we’ll grab that, and we’ll use it in the message
that we’re going to display in the alert. Otherwise, we’ll just craft a generic message to show:
NSString *msg = nil;
if (nameField.text.length > 0)
msg = [[NSString alloc] initWithFormat:
@"You can breathe easy, %@, everything went OK.",
nameField.text];
else
msg = @"You can breathe easy, everything went OK.";
The next lines of code are going to look kind of familiar. Alerts and actions sheets are created
and used in a very similar manner:
UIAlertView *alert = [[UIAlertView alloc]
initWithTitle:@"Something was done"
message:msg
delegate:nil
cancelButtonTitle:@"Phew!"
otherButtonTitles:nil];

CHAPTER 4: More User Interface Fun 84
Again, we pass a title to be displayed, this time along with a more detailed message, which
is that string we just created. Alerts have delegates too, and if we needed to know when the
user had dismissed the alert or which button was tapped, we could specify self as the dele-
gate here just as we did with the action sheet. If we had done that, we would now have to go
conform our class to the UIAlertViewDelegate protocol also and implement one or more
of the methods from that protocol. In this case, we’re just informing the user of something
and only giving the user one button. We don’t really care when the button is tapped, and we
already know which button will be tapped, so we just specify nil here to indicate that we
don’t need to be pinged when the user is done with the alert.
Alerts, unlike action sheets, are not tied to a particular view, so we just tell the alert to show itself
without specifying a parent view. After that, it’s just a matter of some memory cleanup and we’re
done. Go ahead and save, and then build, run, and try out the completed application.
Spiffing Up the ButtonIf you compare your running application to Figure 4-1, you might notice an interesting dif-
ference. Your Do Something button doesn’t look like ours, and it doesn’t look like the button
on the action sheet or those in other iPhone applications, does it? That default Round Rect
Button doesn’t really look right, so let’s take care of that before we finish up the chapter.
Most of the buttons you see on your iPhone are drawn using images. Don’t worry; you don’t
have to create images in an image editor for every button. All you have to do is specify
a kind of template image that the iPhone will use when drawing your buttons.
It’s important to keep in mind that your application is sandboxed. You can’t get to the tem-
plate images that are used in other applications on your iPhone or the ones used by the
iPhone OS, so you have to make sure that any images you need are in your application’s
bundle. So, where can we get these image templates?
Fortunately, Apple has provided a bunch for you. You can get them from the iPhone sam-
ple application called UICatalog, available at http://developer.apple.com/iphone/
library/samplecode/UICatalog/index.html, or you can simply copy them out of the
04 Control Fun folder from this book’s project archive. Yes, it is OK to use these images in
your own applications; Apple’s sample code license specifically allows you to use and
distribute them.
So, from either the 04 Control Fun folder or the Images subfolder of the UICatalog project’s
folder, add the two images named blueButton.png and whiteButton.png to your Xcode project.
If you open one of these two images in Preview.app or in an image editing program, you’ll
see that there’s not very much to them, and there’s a trick to using them for your buttons.

CHAPTER 4: More User Interface Fun 85
Go back to Interface Builder, single- click the Do Something button, and change its type from
Round Rect to Custom, just as you did with the invisible background button earlier in the
chapter. You’ll see in the inspector that you can specify an image for your button, but we’re
not going to do that, because these image templates need to be handled a little differently.
Save the nib, and go back to Xcode.
The viewDidLoad Method
UIViewController, our controller’s superclass, has a method called viewDidLoad that we
can override if we need to modify any of the objects that were created from our nib. Because
we can’t do what we want completely in Interface Builder, we’re going to take advantage of
viewDidLoad. Go ahead and add the following code to your Control_FunViewController.m
file. When you’re done, we’ll talk about what the method does.
#import "Control_FunViewController.h"
@implementation Control_FunViewController
@synthesize nameField;
@synthesize numberField;
@synthesize switchView;
@synthesize leftSwitch;
@synthesize rightSwitch;
@synthesize sliderLabel;
@synthesize doSomethingButton;
- (void)viewDidLoad{ jmUIImage *buttonImageNormal = [UIImage imageNamed:@"whiteButton.png"]; UIImage *stretchableButtonImageNormal = [buttonImageNormal stretchableImageWithLeftCapWidth:12 topCapHeight:0]; [doSomethingButton setBackgroundImage:stretchableButtonImageNormal forState:UIControlStateNormal];
UIImage *buttonImagePressed = [UIImage imageNamed:@"blueButton.png"]; UIImage *stretchableButtonImagePressed = [buttonImagePressed stretchableImageWithLeftCapWidth:12 topCapHeight:0]; [doSomethingButton setBackgroundImage:stretchableButtonImagePressed forState:UIControlStateHighlighted]; }- (IBAction)sliderChanged:(id)sender
{
...

CHAPTER 4: More User Interface Fun 86
This code sets the background image for the button based on those template images we
added to our project. It specifies that, while being touched, the button should change from
using the white image to the blue image. This short method introduces two new concepts:
control states, and stretchable images. Let’s look at each of them in turn.
Control States
Every iPhone control has four possible control states and is always in one and only one of
those states at any given moment. The most common state is the normal control state,
which is the default state. It’s the state that controls are in when not in any of the other
states. The highlighted state is the state a control is in when it’s currently being used. For
a button, this would be while the user has a finger on the button. The disabled state is what
controls are in when they’ve been turned off, which can be done by unchecking the Enabled
checkbox in Interface Builder or setting the control’s enabled property to NO. The final state
is selected, which only some controls support, and it is usually used to indicate that this
control is turned on or selected. Selected is similar to highlighted, but controls can continue
to be selected when the user is no longer directly using that control.
Certain iPhone controls have attributes that can take on different values depending on their
state. For example, by specifying one image for UIControlStateNormal and a different
image for UIControlStateHighlighted, we are telling the iPhone to use one image when
the user has a finger on the button and a different image the rest of the time.
Stretchable Images
Stretchable images are an interesting concept. A stretchable image is a resizable image that
knows how to resize itself intelligently so that it maintains the correct appearance. For these
button templates, we don’t want the edges to stretch evenly with the rest of the image. End
caps are the parts of an image, measured in pixels, that should not be resized. We want the
bevel around the edges to stay the same no matter what size we make the button, so we
specify a left end cap size of 12.
Because we pass in the new stretchable image into our button rather than the image tem-
plate, the iPhone knows how to draw the button properly at any size. We could now go in
and change the size of the button in Interface Builder, and it would still be drawn correctly. If
we had specified the button image right in Interface Builder, it would resize the entire image
evenly, and our button would look weird at most sizes.
TIP
How did we know what value to use for the end caps? It’s simple really: we copied them from Apple’s
sample code.
CHAPTER 4: More User Interface Fun 87
Why don’t you save and go try it out? Everything should work exactly as it did earlier, but
that button should look a lot more iPhone- like.
Crossing the Finish LineThis was a big chapter. Conceptually, we didn’t hit you with too much new stuff, but we took
you through the use of an awful lot of controls and showed you a lot of different implemen-
tation details. You got a lot more practice with outlets and actions and saw how to use the
hierarchical nature of views to your advantage. You learned about control states and stretch-
able images, and you also learned to use both action sheets and alerts.
There’s a lot going on in this little application, so feel free to go back and play with it, change
values, experiment by adding and changing code, and see what different settings in Inter-
face Builder do. There’s no way we could take you through every permutation of every
control available on an iPhone, but the application you just put together is a good starting
point and covers a lot of the basics.
In the next chapter, we’re going to look at what happens when the user rotates the iPhone
from portrait to landscape or vice versa. You’re probably well aware that many iPhone appli-
cations change their displays based on the way the user is holding the iPhone, and we’re
going to show you how to do that in your own applications.

89
Chapter 5
tAutorotation and Autosizing
he iPhone is an amazing piece of engineering. Apple engineers found all
kinds of ways to squeeze maximum functionality into a pocket- sized package.
One example is the mechanism that allows applications to be used in either
portrait (tall and skinny) or landscape (short and wide) mode and to change
that orientation at runtime if the phone is rotated. A prime example of this
behavior, which is called autorotation, can be seen in iPhone’s web browser,
Mobile Safari (see Figure 5-1).
Figure 5-1. Like many iPhone applications, Mobile Safari changes its display based
on how it is held, making the most of the available screen space.

CHAPTER 5: Autorotation and Autosizing 90
Autorotation might not be right for every application. Several of Apple’s iPhone applications
support only a single orientation. Movies can only be watched in landscape mode, for exam-
ple, and contacts can only be edited in portrait mode. Bottom line, if autorotation enhances
the user experience, add it to your application.
Fortunately, Apple did a great job of hiding the complexities of autorotation in the iPhone
OS and in the UIKit, so implementing this behavior in your own iPhone applications is actu-
ally quite easy.
Autorotation is specified in the view controller, so if the user rotates the phone, the view
controller will be asked if it’s OK to rotate to the new orientation (something you’ll see how
to do in this chapter). If the view controller responds in the affirmative, the application’s
window and views will be rotated, and the window and view will get resized to fit the new
orientation.
A view that starts in portrait mode will be 320 pixels wide and 460 pixels tall or 480 pixels
tall if there’s no status bar. The status bar is the 20- pixel strip at the top of the screen (see
Figure 5-1) that shows things like signal strength, time, and battery charge. When the phone
is switched to landscape mode, the view rotates, along with the application’s window,
and gets resized to fit the new orientation, so that it is 480 pixels wide by 300 pixels tall
(320 pixels if there’s no status bar).
Most of the work in actually moving the pixels around the screen is managed by the iPhone
OS. Your application’s main job in all this is making sure everything fits nicely and looks
proper in the resized window.
Your application can take three general approaches when managing rotation. Which one
you use depends on the complexity of your interface, and we’ll look at all three approaches
in this chapter. With simpler interfaces, you can simply specify the correct autosize attri-
butes for all of the objects that make up your interface. Autosize attributes tell the iPhone
how your controls should behave when their enclosing view gets resized. If you’ve worked
with Cocoa on Mac OS X, you’re already familiar with the basic process, because it is the
same one used to specify how Cocoa controls behave when the user resizes the window in
which they are contained. You’ll see this concept in action in just a bit.
Autosize is quick and easy but not appropriate for all applications. More complex interfaces
have to handle autorotation in a different manner. For more complex views, you have two
basic approaches. One approach is to manually reposition the objects in your view when
notified that your view is rotating. The second approach is to actually design two different
versions of your view in Interface Builder, one for portrait mode and a separate one for land-
scape mode. In both cases, you will need to override methods from UIViewController in
your view’s controller class.

CHAPTER 5: Autorotation and Autosizing 91
Let’s get started, shall we? We’ll look at autosizing first.
Handling Rotation Using Autosize AttributesStart a new project in Xcode, and call it Autosize. We’re going to stick with the same
view- based application template for this application. Before we design our view in Interface
Builder, we need to tell the iPhone that our view supports autorotation. We do that by modify-
ing the view controller class.
Specifying Rotation Support
Once your project is open in Xcode, expand the Classes folder, and single- click
AutoSizeViewController.m. If you look at the code that’s already there, you’ll see that
a method called shouldAutorotateToInterfaceOrientation: is already provided for
you courtesy of the template. The method should look like this right now:
- (BOOL)shouldAutorotateToInterfaceOrientation:
(UIInterfaceOrientation)interfaceOrientation {
// Return YES for supported orientations
return (interfaceOrientation == UIInterfaceOrientationPortrait);
}
This method is the system’s way of asking your view controller if it’s OK to rotate to a specific
orientation. There are four defined orientations that correspond to the four general ways
that the iPhone can be held:
UIInterfaceOrientationPortrait
UIInterfaceOrientationPortraitUpsideDown
UIInterfaceOrientationLandscapeLeft
UIInterfaceOrientationLandscapeRight
When the phone is changed to a new orientation, this method is called on the active view
controller. The parameter interfaceOrientation will contain one of the four values in
the preceding list, and this method needs to return either YES or NO to signify whether the
application’s window should be rotated to match the new orientation. Because every view
controller subclass can implement this differently, it is possible for one application to sup-
port autorotation with some of its views but not with others.
CHAPTER 5: Autorotation and Autosizing 92
TIP
Have you noticed that the defined system constants on iPhone are always designed so that values that
work together start with the same letters? One reason why UIInterfaceOrientationPortrait,
UIInterfaceOrientationPortraitUpsideDown, UIInterfaceOrientationLandscapeLeft
and UIInterfaceOrientationLandscapeRight all begin with UIInterfaceOrientation
is to let you take advantage of Xcode’s Code Sense feature. You’ve probably noticed that when you type in
Xcode, it often attempts to complete words that you type. That’s Code Sense in action. Developers cannot
possibly remember all the various defined constants in the system, but you can remember the common
beginning for the groups you use frequently. When you need to specify an orientation, simply type
UIInterfaceOrientation (or even UIInterf) and then press the escape key to bring up a list of all matches (in
Xcode’s preferences, you can change the key that’s used). All of the valid constants, variables, methods, and
functions that match what you’ve typed so far will pop up so you can select them by pressing the tab or
return key. This is much faster than having to go look the values up in the documentation or header files.
The default implementation of this method looks at interfaceOrientation and only
returns YES if it is equal to UIInterfaceOrientationPortrait, which basically limits this
application to one orientation, effectively disabling autorotation.
If we wanted to enable rotation to any orientation, we’d simply change the method to return
YES for any value passed in, like so:
- (BOOL)shouldAutorotateToInterfaceOrientation:
(UIInterfaceOrientation)interfaceOrientation {
return YES;
}
In order to support some but not all orientations, we have to look at the value of
interfaceOrientation and return YES for those that we wish to support and NO for those
we don’t. For example, to support portrait mode and landscape mode in both directions but
not rotation to the upside down portrait mode, we could do this:
- (BOOL)shouldAutorotateToInterfaceOrientation:
(UIInterfaceOrientation)interfaceOrientation {
return (interfaceOrientation == UIInterfaceOrientationPortrait ||
interfaceOrientation == UIInterfaceOrientationLandscapeLeft ||
interfaceOrientation == UIInterfaceOrientationLandscapeRight);
}
Go ahead and change the shouldAutorotateToInterfaceOrientation: method to match
the preceding version. As a general rule, UIInterfaceOrientationPortraitUpsideDown
is discouraged by Apple, because if the phone rings while it is being held upside down, the
phone is likely to remain upside down when it’s answered.
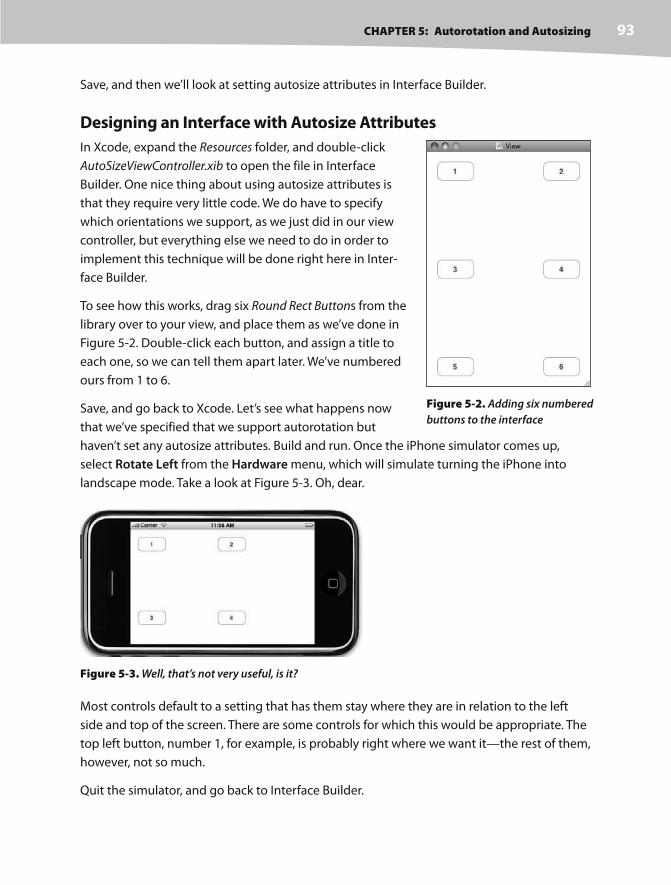
CHAPTER 5: Autorotation and Autosizing 93
Save, and then we’ll look at setting autosize attributes in Interface Builder.
Designing an Interface with Autosize Attributes
In Xcode, expand the Resources folder, and double- click
AutoSizeViewController.xib to open the file in Interface
Builder. One nice thing about using autosize attributes is
that they require very little code. We do have to specify
which orientations we support, as we just did in our view
controller, but everything else we need to do in order to
implement this technique will be done right here in Inter-
face Builder.
To see how this works, drag six Round Rect Buttons from the
library over to your view, and place them as we’ve done in
Figure 5-2. Double- click each button, and assign a title to
each one, so we can tell them apart later. We’ve numbered
ours from 1 to 6.
Save, and go back to Xcode. Let’s see what happens now
that we’ve specified that we support autorotation but
haven’t set any autosize attributes. Build and run. Once the iPhone simulator comes up,
select Rotate Left from the Hardware menu, which will simulate turning the iPhone into
landscape mode. Take a look at Figure 5-3. Oh, dear.
Figure 5-3. Well, that’s not very useful, is it?
Most controls default to a setting that has them stay where they are in relation to the left
side and top of the screen. There are some controls for which this would be appropriate. The
top left button, number 1, for example, is probably right where we want it—the rest of them,
however, not so much.
Quit the simulator, and go back to Interface Builder.
Figure 5-2. Adding six numbered
buttons to the interface

CHAPTER 5: Autorotation and Autosizing 94
Autosize Attributes
Single-click the top- left button on your view, and then press 3 to bring up the size inspec-
tor, which should look like Figure 5-4.
Figure 5-4. The size inspector allows
you to set an object’s autosize attributes.
The size inspector allows you to set an object’s autosize attributes. Figure 5-5 shows the
part of the size inspector that controls an object’s autosize attributes.
The box on the left in Figure 5-5 is where we actually set the attributes; the box on the right
is a little animation that will show us how the object will behave during a resize. In the box
on the left, the inner square represents the current object. If a button is selected, the inner
square represents that button.
The red arrows inside the inner square represent the horizontal and vertical space inside the
selected object. Clicking either arrow will change it from solid to dashed or from dashed back
to solid. If the horizontal arrow is solid, the width of the object is free to change as the window
resizes; if the horizontal arrow is dashed, the iPhone will try to keep the width of the object at
its original value if possible. The same is true for the height of the object and the vertical arrow.

CHAPTER 5: Autorotation and Autosizing 95
The four red “I” shapes outside the inner box represent the distance between the edge of the
selected object and the same edge of the view that contains it. If the “I” is dashed, the space
is flexible, and if it’s solid red, the amount of space should be kept constant if possible.
Huh?
Perhaps this will make a little more sense if you actually
see it in action. Take a look back at Figure 5-5, which repre-
sents the default autosize settings. These default settings
specify that the object’s size will remain constant as its
superview is resized and that the distance from the left
and top edges should also stay constant. If you look at the
animation next to the autosize control, you can see how it
will behave during a resize. Notice that the inner box stays
in the same place relative to the left and top edges of the
parent view as the parent view changes in size.
Try this experiment. Click both of the solid red “I” shapes
(to the top and left of the inner box) so they become
dashed and look like the ones shown in Figure 5-6.
With all the lines set to dashed, the size of the object will
be kept the same, and it will float in the middle of the
superview as the superview is resized.
Now, click the vertical arrow inside the box and the “I”
shape both above and below the box so that your auto-
size attributes look like the ones shown in Figure 5-7.
With this configuration, we are indicating that the verti-
cal size of our object can change and that the distance
from the top of our object to the top of the window and
the distance from the bottom of our object to the bottom of the window should stay con-
stant. With this configuration, the width of the object wouldn’t change, but its height would.
Change the autosize attributes a few more times and watch the animation until you grok
how different settings will impact the behavior when the view is rotated and resized.
Figure 5-5. The Autosizing section
of the size inspector
Figure 5-6. With all dashed lines,
your control floats in the parent
and keeps its size.
Figure 5-7. This configuration
allows the vertical size of our
object to change.

CHAPTER 5: Autorotation and Autosizing 96
Setting the Buttons’ Autosize Attributes
Now, let’s set the autosize attributes for our six buttons. Go ahead and see if you can figure
them out. If you get stumped, take a look at Figure 5-8, which shows you the autosize attri-
butes needed for each button in order to keep them on the screen when the phone is rotated.
Figure 5-8. Autosize attributes for all six buttons
Once you have the attributes set the same as Figure 5-8, save the nib, go back to Xcode, and
build and run. This time, when the iPhone simulator comes up, you should be able to select
Rotate Left or Rotate Right from the Hardware menu and have all the buttons stay on the
screen (see Figure 5-9). If you rotate back, they should return to their original position. This
technique will work for a great many applications.
In this example, we kept our buttons the same size, so now all of our buttons are visible and
usable, but there is an awful lot of unused white space on the screen. Perhaps it would be
better if we allowed the width or height of our buttons to change so that there will be less
empty space on the interface? Feel free to experiment with the autosize attributes of these
six buttons, and add some other buttons if you want. Play around until you feel comfortable
with the way autosize works.
In the course of your experimentation, you’re bound to notice that, sometimes, no combina-
tion of autosize attributes will give you exactly what you want. Sometimes, you are going to
need to rearrange your interface more drastically than can be handled with this technique.
For those situations, a little more code is in order. Let’s take a look at that, shall we?
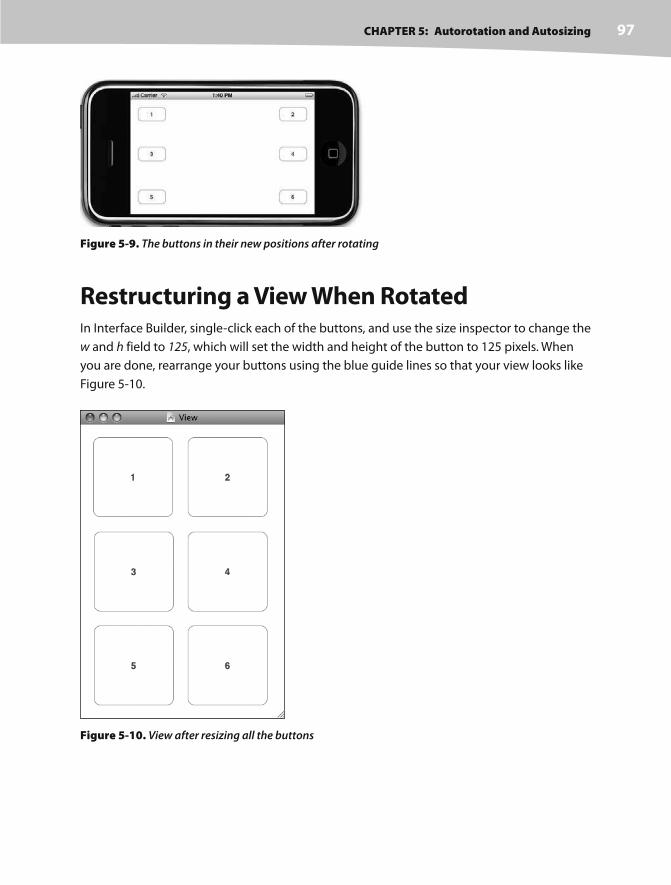
CHAPTER 5: Autorotation and Autosizing 97
Figure 5-9. The buttons in their new positions after rotating
Restructuring a View When Rotated In Interface Builder, single- click each of the buttons, and use the size inspector to change the
w and h field to 125, which will set the width and height of the button to 125 pixels. When
you are done, rearrange your buttons using the blue guide lines so that your view looks like
Figure 5-10.
Figure 5-10. View after resizing all the buttons
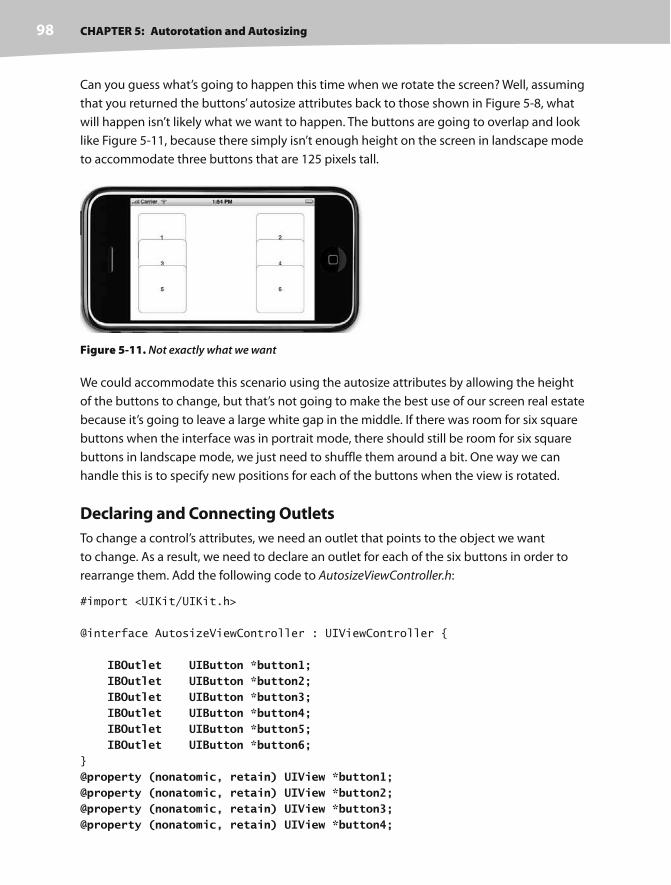
CHAPTER 5: Autorotation and Autosizing 98
Can you guess what’s going to happen this time when we rotate the screen? Well, assuming
that you returned the buttons’ autosize attributes back to those shown in Figure 5-8, what
will happen isn’t likely what we want to happen. The buttons are going to overlap and look
like Figure 5-11, because there simply isn’t enough height on the screen in landscape mode
to accommodate three buttons that are 125 pixels tall.
Figure 5-11. Not exactly what we want
We could accommodate this scenario using the autosize attributes by allowing the height
of the buttons to change, but that’s not going to make the best use of our screen real estate
because it’s going to leave a large white gap in the middle. If there was room for six square
buttons when the interface was in portrait mode, there should still be room for six square
buttons in landscape mode, we just need to shuffle them around a bit. One way we can
handle this is to specify new positions for each of the buttons when the view is rotated.
Declaring and Connecting Outlets
To change a control’s attributes, we need an outlet that points to the object we want
to change. As a result, we need to declare an outlet for each of the six buttons in order to
rearrange them. Add the following code to AutosizeViewController.h:
#import <UIKit/UIKit.h>
@interface AutosizeViewController : UIViewController {
IBOutlet UIButton *button1; IBOutlet UIButton *button2; IBOutlet UIButton *button3; IBOutlet UIButton *button4; IBOutlet UIButton *button5; IBOutlet UIButton *button6;}
@property (nonatomic, retain) UIView *button1;@property (nonatomic, retain) UIView *button2;@property (nonatomic, retain) UIView *button3;@property (nonatomic, retain) UIView *button4;
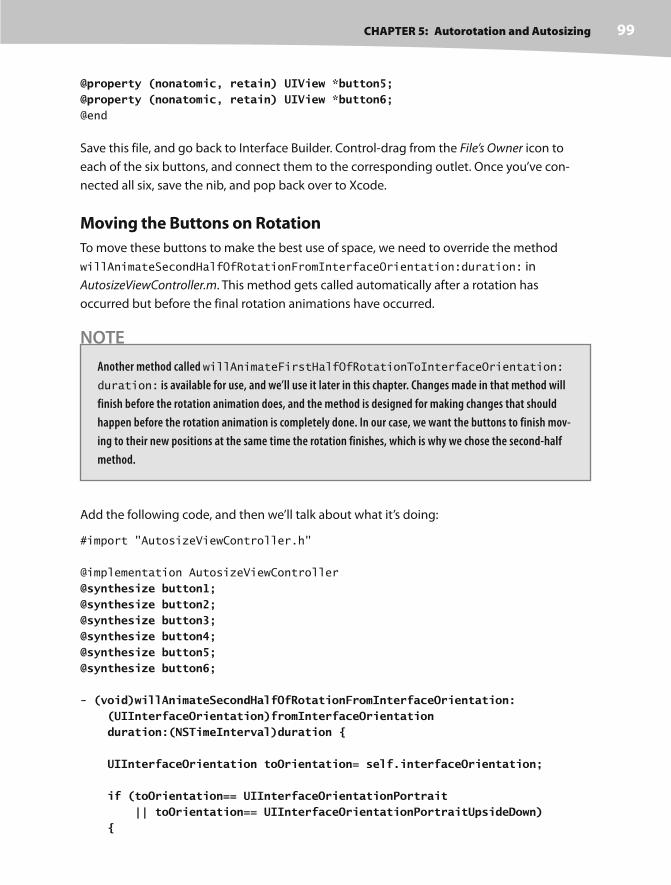
CHAPTER 5: Autorotation and Autosizing 99
@property (nonatomic, retain) UIView *button5;@property (nonatomic, retain) UIView *button6;@end
Save this file, and go back to Interface Builder. Control- drag from the File’s Owner icon to
each of the six buttons, and connect them to the corresponding outlet. Once you’ve con-
nected all six, save the nib, and pop back over to Xcode.
Moving the Buttons on Rotation
To move these buttons to make the best use of space, we need to override the method
willAnimateSecondHalfOfRotationFromInterfaceOrientation:duration: in
AutosizeViewController.m. This method gets called automatically after a rotation has
occurred but before the final rotation animations have occurred.
NOTE
Another method called willAnimateFirstHalfOfRotationToInterfaceOrientation:
duration: is available for use, and we’ll use it later in this chapter. Changes made in that method will
finish before the rotation animation does, and the method is designed for making changes that should
happen before the rotation animation is completely done. In our case, we want the buttons to finish mov-
ing to their new positions at the same time the rotation finishes, which is why we chose the second- half
method.
Add the following code, and then we’ll talk about what it’s doing:
#import "AutosizeViewController.h"
@implementation AutosizeViewController
@synthesize button1;@synthesize button2;@synthesize button3;@synthesize button4;@synthesize button5;@synthesize button6;
- (void)willAnimateSecondHalfOfRotationFromInterfaceOrientation: (UIInterfaceOrientation)fromInterfaceOrientation duration:(NSTimeInterval)duration {
UIInterfaceOrientation toOrientation= self.interfaceOrientation;
if (toOrientation== UIInterfaceOrientationPortrait || toOrientation== UIInterfaceOrientationPortraitUpsideDown) {

CHAPTER 5: Autorotation and Autosizing 100
button1.frame = CGRectMake(20, 20, 125, 125); button2.frame = CGRectMake(175, 20, 125, 125); button3.frame = CGRectMake(20, 168, 125, 125); button4.frame = CGRectMake(175, 168, 125, 125); button5.frame = CGRectMake(20, 315, 125, 125); button6.frame = CGRectMake(175, 315, 125, 125); } else { button1.frame = CGRectMake(20, 20, 125, 125); button2.frame = CGRectMake(20, 155, 125, 125); button3.frame = CGRectMake(177, 20, 125, 125); button4.frame = CGRectMake(177, 155, 125, 125); button5.frame = CGRectMake(328, 20, 125, 125); button6.frame = CGRectMake(328, 155, 125, 125); }}- (BOOL)shouldAutorotateToInterfaceOrientation:
(UIInterfaceOrientation)interfaceOrientation {
return (interfaceOrientation == UIInterfaceOrientationPortrait ||
interfaceOrientation == UIInterfaceOrientationLandscapeLeft ||
interfaceOrientation == UIInterfaceOrientationLandscapeRight);
}
- (void)didReceiveMemoryWarning {
[super didReceiveMemoryWarning];
// Releases the view if it doesn't have a superview
// Release anything that's not essential, such as cached data
}
- (void)dealloc {
[button1 release]; [button2 release]; [button3 release]; [button4 release]; [button5 release]; [button6 release]; [super dealloc];
}
The size and position of all views, including controls like buttons, are specified in a property
called frame, which is a struct of type CGRect. CGRectMake is a function provided by Apple
that lets you easily create a CGRect by specifying the x and y positions along with the width
and height. The only potentially confusing thing in this code is the fact that we are notified
not of the orientation that we rotated to but the orientation that we rotated from. Because
we need to know the new orientation, we ignore that parameter and use the
interfaceOrientation property inherited from UIViewController.

CHAPTER 5: Autorotation and Autosizing 101
Save this code. Now build and run to see it in action. Try rotating, and watch how the buttons
end up in their new positions. That’s pretty cool, but there’s one minor and subtle oddity here.
If you watch very carefully, you’ll see that the buttons sort of jump to their new positions. If
only there were a way that we could easily animate that movement so it didn’t look so out of
place, but animating the movement would be hard, right?
Figure 5-12. Making better use of the landscape screen
Historically speaking, handling animation in a user interface is hard. But many types of ani-
mation you are likely to want to do are actually very easy on iPhone thanks to a technology
called Core Animation. We won’t be working directly with Core Animation in this book,
but Cocoa Touch makes tremendous use of it under the hood. In the last chapter, when the
switches slid to their new setting, that was Core Animation in action. And in this chapter, we
can animate the movement of these buttons to their new locations easily. All we have to do
is indicate that the changes we are making are to be animated, and we do that by placing all
of the changes we want animated together inside of an animation block. To do that, we add
two lines of code to our method to signal the beginning and end of the animation block:
...
- (void)willAnimateSecondHalfOfRotationFromInterfaceOrientation:
(UIInterfaceOrientation)fromInterfaceOrientation
duration:(NSTimeInterval)duration {
UIInterfaceOrientation toOrientation= self.interfaceOrientation;
[UIView beginAnimations:@"move buttons" context:nil];
if (toOrientation== UIInterfaceOrientationPortrait
|| toOrientation== UIInterfaceOrientationPortraitUpsideDown)
{
button1.frame = CGRectMake(20, 20, 125, 125);
button2.frame = CGRectMake(175, 20, 125, 125);
button3.frame = CGRectMake(20, 168, 125, 125);
button4.frame = CGRectMake(175, 168, 125, 125);
button5.frame = CGRectMake(20, 315, 125, 125);
button6.frame = CGRectMake(175, 315, 125, 125);
}

CHAPTER 5: Autorotation and Autosizing 102
else
{
button1.frame = CGRectMake(20, 20, 125, 125);
button2.frame = CGRectMake(20, 155, 125, 125);
button3.frame = CGRectMake(177, 20, 125, 125);
button4.frame = CGRectMake(177, 155, 125, 125);
button5.frame = CGRectMake(328, 20, 125, 125);
button6.frame = CGRectMake(328, 155, 125, 125);
}
[UIView commitAnimations];}
...
The first new line of code is a call to a class method that tells iPhone that we are starting an
animation block. The first parameter is the name we’re assigning to that block. The second
parameter is used by a variety of Core Animation’s delegate methods. Since we won’t be
using any of those methods, we just pass nil. After our code repositions our buttons, we
then call another class method, commitAnimations, to indicate that our animation block is
finished. And that’s it. Now, when you run this new version and select Rotate Left from the
Hardware menu, you’ll get to see the buttons zoom to their new positions at the end of
the autorotate.
Swapping ViewsThere is one other way of handling autorotation, and it’s an option you’ll likely only use in
the case of very complex interfaces. Moving controls to different locations, as we did in the
last section, can be a very tedious process, especially with a complex interface. Wouldn’t it
be nice if we could just design the landscape and portrait views separately and then swap
them out when the phone is rotated?
Well, we can. But it’s a moderately complex option. While controls on both views can trigger
the same actions, we will have to have two completely distinct sets of outlets, one for each
of the views, and that will add a certain complexity to our code. It is, by no means, an insur-
mountable amount of complexity, and there are times when this option is the best one. Let’s
try it out.
Create a new project in Xcode using the view- based application template again; we’ll start
working with other templates next chapter. Call this project Swap. The interface we’ll be
building in this application won’t actually be complex enough to really justify the technique
we’re using. However, we want to make sure the process is clear, so we’re going to use a fairly
simple interface. When this application we’re writing starts up, it will be in portrait mode.
There will be two buttons, one on top of the other (see Figure 5-13).

CHAPTER 5: Autorotation and Autosizing 103
When you rotate the phone, we’ll swap in a completely dif-
ferent view to be shown for the landscape orientation. It
will also feature two buttons with the exact same labels (see
Figure 5-14), so the user won’t know they’re looking at two
different views.
When the buttons are tapped, they will become hidden. This
gives us a chance to show you some of the nuances of deal-
ing with two sets of outlets. In a real application, there may
be times when you want to hide or disable a button like this.
As an example, you might create a button that kicked off
a lengthy process and you didn’t want the user tapping the
same button again until that process had finished.
Figure 5-14. Similar but not the same
Determining Outlets
Because there are two buttons on each view that we’re going to build, and because an outlet
can’t point to more than one object, we need to declare four outlets, two for the landscape
view buttons and two for the portrait view buttons. When using this technique, it becomes
very important to put some thought into your outlet names to keep your code from becom-
ing confusing to read.
But, oho! Is that somebody in the back saying, “Do we really need outlets for all these
buttons? Since we’re deactivating the button that was tapped, can’t we just use sender
instead?” And in a single- view scenario, that would be exactly the right way to go about it.
Think about this. What if the user taps the Foo button and then rotates the phone? The Foo
button on the other view is a completely different button, and it will still be active, which
isn’t the behavior we want. We don’t really want to advertise to the users that the object
they’re dealing with now isn’t the same one they were dealing with a moment ago.
In addition to the outlets for the buttons, we need two more outlets to point to the two dif-
ferent versions of our view. When only working with a single view, our parent class’s view
Figure 5-13. The Swap
application at launch

CHAPTER 5: Autorotation and Autosizing 104
property was all we needed. But, since we’re going to be changing the value of view at
runtime, we need to make sure we have a way to get to both views, hence the need for
two UIView outlets.
Determining Actions
Our buttons need to trigger an action, so we’re definitely going to need at least one action
method. We’re going to design a single action method to handle the pressing of any of the
buttons, so we’ll just declare a single buttonPressed: action in our view controller class.
Declaring Actions and Outlets
Add the following code to SwapViewController.h to create the outlets we’ll need when we go
to Interface Builder.
#import <UIKit/UIKit.h>
#define degreesToRadian(x) (M_PI * (x) / 180.0)
@interface SwapViewController : UIViewController {
IBOutlet UIView *landscape; IBOutlet UIView *portrait;
// Foo IBOutlet UIButton *landscapeFooButton; IBOutlet UIButton *portraitFooButton;
// Bar IBOutlet UIButton *landscapeBarButton; IBOutlet UIButton *portraitBarButton;}
@property (nonatomic, retain) UIView *landscape;@property (nonatomic, retain) UIView *portrait;@property (nonatomic, retain) UIButton *landscapeFooButton;@property (nonatomic, retain) UIButton *portraitFooButton;@property (nonatomic, retain) UIButton *landscapeBarButton;@property (nonatomic, retain) UIButton *portraitBarButton;
-(IBAction)buttonPressed:(id)sender;@end
This line of code:
#define degreesToRadian(x) (M_PI * x / 180.0)
is simply a macro to convert between degrees and radians. We’ll use that in a few minutes
when calling a function that requires radians as an input. Most people, including us, don’t
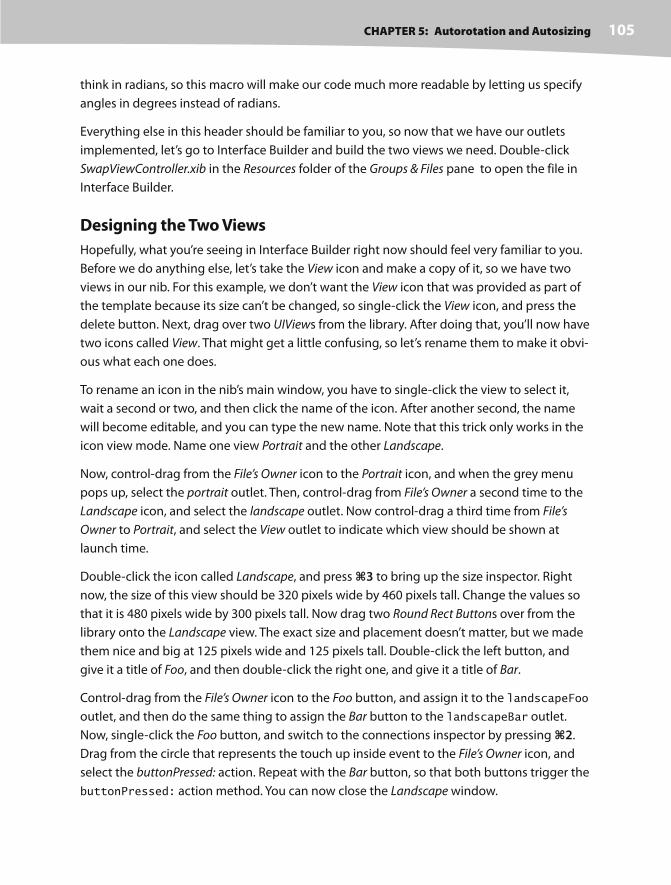
CHAPTER 5: Autorotation and Autosizing 105
think in radians, so this macro will make our code much more readable by letting us specify
angles in degrees instead of radians.
Everything else in this header should be familiar to you, so now that we have our outlets
implemented, let’s go to Interface Builder and build the two views we need. Double- click
SwapViewController.xib in the Resources folder of the Groups & Files pane to open the file in
Interface Builder.
Designing the Two Views
Hopefully, what you’re seeing in Interface Builder right now should feel very familiar to you.
Before we do anything else, let’s take the View icon and make a copy of it, so we have two
views in our nib. For this example, we don’t want the View icon that was provided as part of
the template because its size can’t be changed, so single- click the View icon, and press the
delete button. Next, drag over two UIViews from the library. After doing that, you’ll now have
two icons called View. That might get a little confusing, so let’s rename them to make it obvi-
ous what each one does.
To rename an icon in the nib’s main window, you have to single- click the view to select it,
wait a second or two, and then click the name of the icon. After another second, the name
will become editable, and you can type the new name. Note that this trick only works in the
icon view mode. Name one view Portrait and the other Landscape.
Now, control- drag from the File’s Owner icon to the Portrait icon, and when the grey menu
pops up, select the portrait outlet. Then, control- drag from File’s Owner a second time to the
Landscape icon, and select the landscape outlet. Now control- drag a third time from File’s
Owner to Portrait, and select the View outlet to indicate which view should be shown at
launch time.
Double-click the icon called Landscape, and press 3 to bring up the size inspector. Right
now, the size of this view should be 320 pixels wide by 460 pixels tall. Change the values so
that it is 480 pixels wide by 300 pixels tall. Now drag two Round Rect Buttons over from the
library onto the Landscape view. The exact size and placement doesn’t matter, but we made
them nice and big at 125 pixels wide and 125 pixels tall. Double- click the left button, and
give it a title of Foo, and then double- click the right one, and give it a title of Bar.
Control-drag from the File’s Owner icon to the Foo button, and assign it to the landscapeFoo
outlet, and then do the same thing to assign the Bar button to the landscapeBar outlet.
Now, single- click the Foo button, and switch to the connections inspector by pressing 2.
Drag from the circle that represents the touch up inside event to the File’s Owner icon, and
select the buttonPressed: action. Repeat with the Bar button, so that both buttons trigger the
buttonPressed: action method. You can now close the Landscape window.
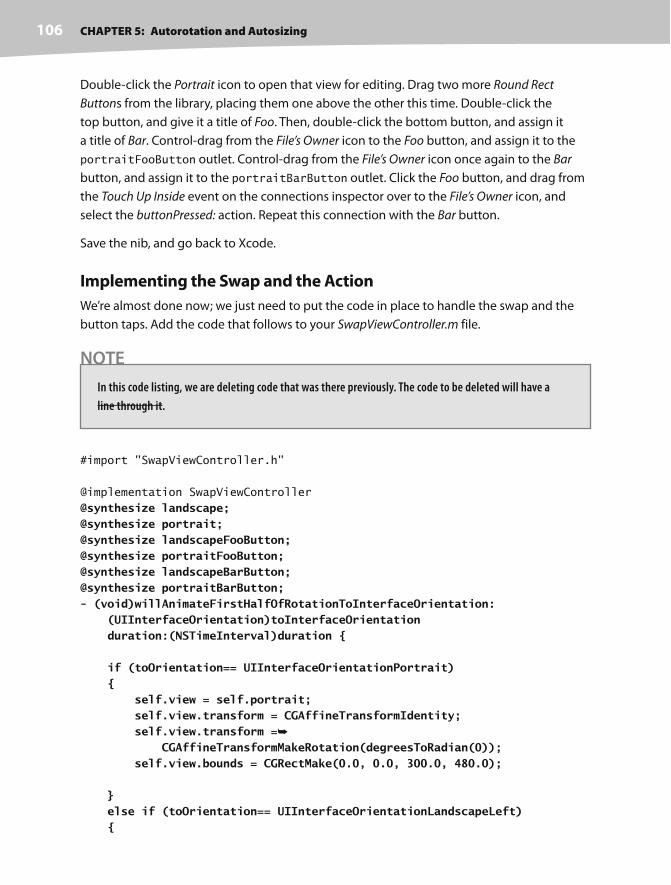
CHAPTER 5: Autorotation and Autosizing 106
Double-click the Portrait icon to open that view for editing. Drag two more Round Rect
Buttons from the library, placing them one above the other this time. Double- click the
top button, and give it a title of Foo. Then, double- click the bottom button, and assign it
a title of Bar. Control- drag from the File’s Owner icon to the Foo button, and assign it to the
portraitFooButton outlet. Control- drag from the File’s Owner icon once again to the Bar
button, and assign it to the portraitBarButton outlet. Click the Foo button, and drag from
the Touch Up Inside event on the connections inspector over to the File’s Owner icon, and
select the buttonPressed: action. Repeat this connection with the Bar button.
Save the nib, and go back to Xcode.
Implementing the Swap and the Action
We’re almost done now; we just need to put the code in place to handle the swap and the
button taps. Add the code that follows to your SwapViewController.m file.
NOTE
In this code listing, we are deleting code that was there previously. The code to be deleted will have a
line through it.
#import "SwapViewController.h"
@implementation SwapViewController
@synthesize landscape;@synthesize portrait;@synthesize landscapeFooButton;@synthesize portraitFooButton;@synthesize landscapeBarButton;@synthesize portraitBarButton;- (void)willAnimateFirstHalfOfRotationToInterfaceOrientation: (UIInterfaceOrientation)toInterfaceOrientation duration:(NSTimeInterval)duration {
if (toOrientation== UIInterfaceOrientationPortrait) { self.view = self.portrait; self.view.transform = CGAffineTransformIdentity; self.view.transform = CGAffineTransformMakeRotation(degreesToRadian(0)); self.view.bounds = CGRectMake(0.0, 0.0, 300.0, 480.0);
} else if (toOrientation== UIInterfaceOrientationLandscapeLeft) {

CHAPTER 5: Autorotation and Autosizing 107
self.view = self.landscape; self.view.transform = CGAffineTransformIdentity; self.view.transform = CGAffineTransformMakeRotation(degreesToRadian(- 90)); self.view.bounds = CGRectMake(0.0, 0.0, 460.0, 320.0); } else if (toOrientation== UIInterfaceOrientationPortraitUpsideDown) { self.view = self.portrait; self.view.transform = CGAffineTransformIdentity; self.view.transform = CGAffineTransformMakeRotation(degreesToRadian(180)); self.view.bounds = CGRectMake(0.0, 0.0, 300.0, 480.0); } else if (toOrientation== UIInterfaceOrientationLandscapeRight) { self.view = self.landscape; self.view.transform = CGAffineTransformIdentity; self.view.transform = CGAffineTransformMakeRotation(degreesToRadian(90)); self.view.bounds = CGRectMake(0.0, 0.0, 460.0, 320.0); }}-(IBAction)buttonPressed:(id)sender {
if (sender == portraitFooButton || sender == landscapeFooButton) { portraitFooButton.hidden = YES; landscapeFooButton.hidden = YES; } else { portraitBarButton.hidden = YES; landscapeBarButton.hidden = YES; }
}- (BOOL)shouldAutorotateToInterfaceOrientation: (UIInterfaceOrientation)interfaceOrientation { // Return YES for supported orientations return (interfaceOrientation == UIInterfaceOrientationPortrait); return YES;}- (void)didReceiveMemoryWarning {
[super didReceiveMemoryWarning];

CHAPTER 5: Autorotation and Autosizing 108
// Releases the view if it doesn't have a superview
// Release anything that's not essential, such as cached data
}
- (void)dealloc {
[landscape release];
[portrait release]; [landscapeFooButton release]; [portraitFooButton release]; [landscapeBarButton release]; [portraitBarButton release];
[super dealloc];
}
@end
The first method in our new code is called willAnimateFirstHalfOfRotationToInterface
Orientation:duration:. This is a method from our superclass that we’ve overridden that
gets called as the rotation begins but before the rotation actually happens. Actions that we
take in this method will be animated as part of the first half of the rotation animation.
In this method, we look at the orientation that we’re rotating to and set the view property
to either landscape or portrait, as appropriate for the new orientation. We then call
CGAffineTransformMakeRotation, part of the Core Graphics framework, to create a
rotation transformation. Transformations are mathematical descriptions of changes to
an object’s size, position, or angle. Ordinarily, iPhone takes care of setting the transform
value automatically when the phone is rotated. However, when we swap in our new view
here, we have to make sure that we give it the correct value so as not to confuse the iPhone.
That’s what willAnimateFirstHalfOfRotationToInterfaceOrientation:duration:
is doing each time it sets the view’s transform property. Once the view has been rotated,
we adjust its frame so that it fits snugly into the window at the current orientation.
Next up is our buttonPressed: method, and there shouldn’t be anything too surprising
there. We look at the button that was tapped, hide it, and then hide the corresponding
button on the other view.
You should be comfortable with everything else we wrote in this class. The new
shouldAutorotateToInterfaceOrientation: method simply returns YES to tell the
iPhone that we support rotation to any orientation, and the code added to the dealloc
method is simple memory cleanup.
So, we should be ready to compile it and try it out, right? Not quite yet. We have one more
thing to do before this will compile. Make sure you save your code before we move on, though.

CHAPTER 5: Autorotation and Autosizing 109
Linking in the Core Graphics Framework
A few moments ago, we told you that the CGAffineTransformMakeRotation function was
part of the Core Graphics framework. But, by default, the Core Graphics framework is not
included in our Xcode project. We have to manually link that framework into our project.
You do that using the Frameworks folder in your project window’s Groups & Files pane.
Now, how did we know that we needed to link to the Core Graphics framework?
Select Build from the Build menu in Xcode, and you’ll see that we get a linking error on
_CGAffineTransformMakeRotation. We know that “CG” stands for “Core Graphics,” but
you won’t always know which framework contains the method reported in a link error.
Here’s a neat trick for finding the offending function’s framework.
First, find the call of CGAffineTransformMakeRotation in your source code. In our case,
we find it in SwapViewController.m. Double- click the function name, and leave your cursor
over the selected function. After a brief pause, a drop- down menu arrow will appear to the
right of the function name. Carefully slide your cursor to the right, and click the arrow. Select
Jump to Definition from the contextual menu that appears.
This selection will bring you to the header file where the function or method is defined. As
a rule, the top of the header file will indicate the framework to which it belongs. Here’s the
top of the header file where CGAffineTransformMakeRotation is defined:
/* CoreGraphics - CGAffineTransform.h
* Copyright (c) 1998- 2008 Apple Inc.
* All rights reserved. */
#ifndef CGAFFINETRANSFORM_H_
#define CGAFFINETRANSFORM_H_
typedef struct CGAffineTransform CGAffineTransform;
#include <CoreGraphics/CGBase.h>
#include <CoreGraphics/CGGeometry.h>
struct CGAffineTransform {
...
The first comment block in these header files will always include both the filename and the
framework to which the file belongs. As you can see here, CGAffineTransform.h is part of Core
Graphics, so we know that’s the framework we have to add. Once we know the library or
framework that we need to link in, our next step is to find it so we can add it to the project
window’s Frameworks folder.

CHAPTER 5: Autorotation and Autosizing 110
Single-click the Frameworks folder in the Groups & Files pane, and select Add to Project from
the Project menu. This will bring up the standard Open File sheet. We now have to navigate
to the correct version of the Core Graphics framework: the one for the iPhone simulator.
To find the one we need, we need to look in the /Developer folder on our Mac’s hard drive.
Inside of that folder, is a folder called Platforms, and inside that is the iPhoneSimulator.
platform. But we can’t stop there.
Inside that is a folder called Developer, and inside that, one called SDKs. Under the SDKs
folder is the iPhoneSimulator2.1.sdk folder, which has a System folder inside of it. Inside of the
System folder is a folder called Library, and inside that is one called Frameworks. Phew, we’re
here. Inside the Frameworks folder is a framework called CoreGraphics.framework.
If you are following along on your own machine, you’ll notice that CoreGraphics.framework
is not just a file. There are items you could select below this framework. Don’t go any lower!
Just select CoreGraphics.framework, and click the Add button.
We will be adding frameworks to a number of projects throughout this book. You might
want to stick a bookmark right here so you can refer to this section later on for the file path
to add frameworks. Or be like us and dog- ear the darn page.
Once you do that, you’re going to be presented with the same dialog that you get when you
add an image to your project (see Figure 5-15). It’s very important to select the right options
here, much more so than when adding a picture. We do not want to add the framework
to our project because we’re just linking, so make sure that the Copy items into destination
group’s folder (if needed) checkbox is unchecked. More importantly, we need to make sure we
select the correct Reference Type, which is Relative to Current SDK. This option will allow the
selected framework to change when we
change the SDK we’re using. The iPhone
and iPhone simulator each have their
own SDK, and we’ll change SDKs when
we build applications for the iPhone
itself, instead of for the simulator. With
this option, changing SDKs automatically
changes which version of the framework
we’re linking to.
Figure 5-15. The add resource sheet

CHAPTER 5: Autorotation and Autosizing 111
NOTE
Coolness alert! If you apply to and get accepted in Apple’s iPhone Developer Program, the first thing you’ll
want to do is build your applications and run them on your iPhone or iPod. The coolness here is that you
don’t have to change the Framework when you change platforms. Xcode will automatically do the right
thing. Just be sure you choose Relative to Current SDK when you add a framework to your project.
Once your sheet looks like Figure 5-15, select the Add button to link your project to the Core
Graphics framework. Now, you can go ahead and compile and then run the project.
TIP
A safer way of adding frameworks is to right- click the Resources folder in the Groups & Files pane. When
you do that, a contextual menu will pop up, and Existing Frameworks. . . is one of the options
in the Add submenu. Selecting this option is exactly the same as selecting Add to Project from the
Project menu, except that it knows you won’t be copying the framework into your project.
When your project runs, the simulator window should appear in portrait mode with our two
big buttons. Click the top button. It should disappear. Now change the phone to landscape
orientation, and it will swap the views. The button you clicked on the portrait view should
also be hidden in the landscape view, even though it’s not the same button.
Coolness.
Note that if you accidentally clicked both buttons, the only way to bring them back is to quit
the simulator and rerun the project. Don’t use this approach in your own applications.
Rotating Out of HereIn this chapter, you got to try out three completely different approaches to supporting autorota-
tion in your applications. You learned about autosizing attributes and how to restructure your
views, in code, when the phone rotates. You saw how to swap between two completely different
views when the phone rotates, and you learned how to link new frameworks into your project.
In this chapter, you also got your first taste of using multiple views in an application by swap-
ping between two views from the same nib. In the next chapter, we’re going to start looking at
true multiview applications. Every application we’ve written so far has used a single view con-
troller and all except the last used a single content view. A lot of complex iPhone applications
like Mail and Contacts, however, are only made possible by the use of multiple views and view
controllers, and we’re going to look at exactly how that works in Chapter 6.

113
u
Chapter 6Multiview Applications
p until this point, we’ve written applications with a single view controller.
While there certainly is a lot you can do with a single view, the real power of
the iPhone platform emerges when you can switch out views based on user
input. Multiview applications come in several different flavors, but the under-
lying mechanism is the same, regardless of how it may appear on the screen.
Strictly speaking, we have worked with multiple views in our previous appli-
cations, since buttons, labels, and other controls are all subclasses of UIView
and can all go into the view hierarchy. But when Apple uses the term “view” in
documentation, it is generally referring to a subclass of UIView that has a cor-
responding view controller. These types of views are also sometimes referred
to as content views, because they are the primary container for the content of
our application.
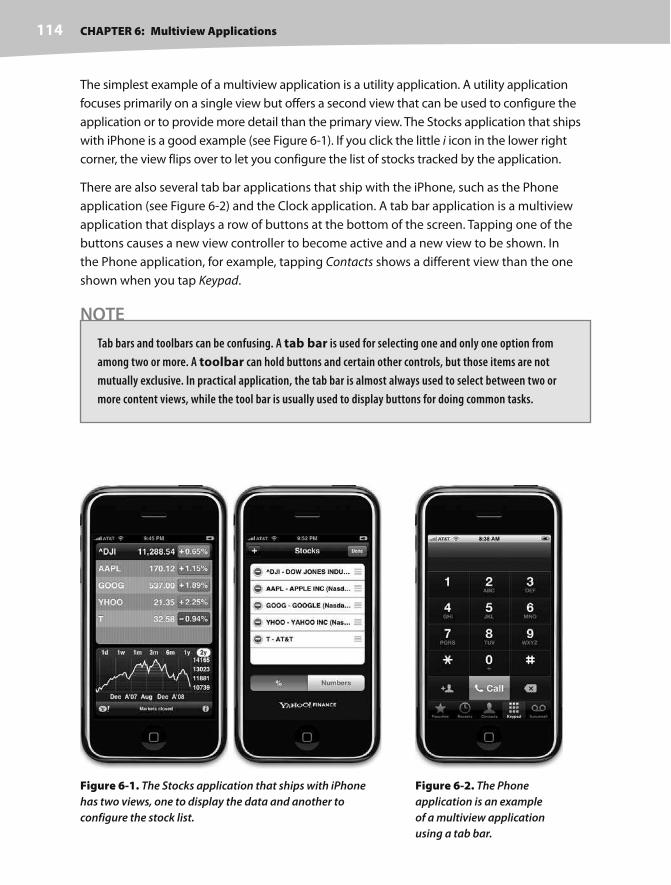
CHAPTER 6: Multiview Applications114
The simplest example of a multiview application is a utility application. A utility application
focuses primarily on a single view but offers a second view that can be used to configure the
application or to provide more detail than the primary view. The Stocks application that ships
with iPhone is a good example (see Figure 6-1). If you click the little i icon in the lower right
corner, the view flips over to let you configure the list of stocks tracked by the application.
There are also several tab bar applications that ship with the iPhone, such as the Phone
application (see Figure 6-2) and the Clock application. A tab bar application is a multiview
application that displays a row of buttons at the bottom of the screen. Tapping one of the
buttons causes a new view controller to become active and a new view to be shown. In
the Phone application, for example, tapping Contacts shows a different view than the one
shown when you tap Keypad.
NOTE
Tab bars and toolbars can be confusing. A tab bar is used for selecting one and only one option from
among two or more. A toolbar can hold buttons and certain other controls, but those items are not
mutually exclusive. In practical application, the tab bar is almost always used to select between two or
more content views, while the tool bar is usually used to display buttons for doing common tasks.
Figure 6-1. The Stocks application that ships with iPhone
has two views, one to display the data and another to
configure the stock list.
Figure 6-2. The Phone
application is an example
of a multiview application
using a tab bar.
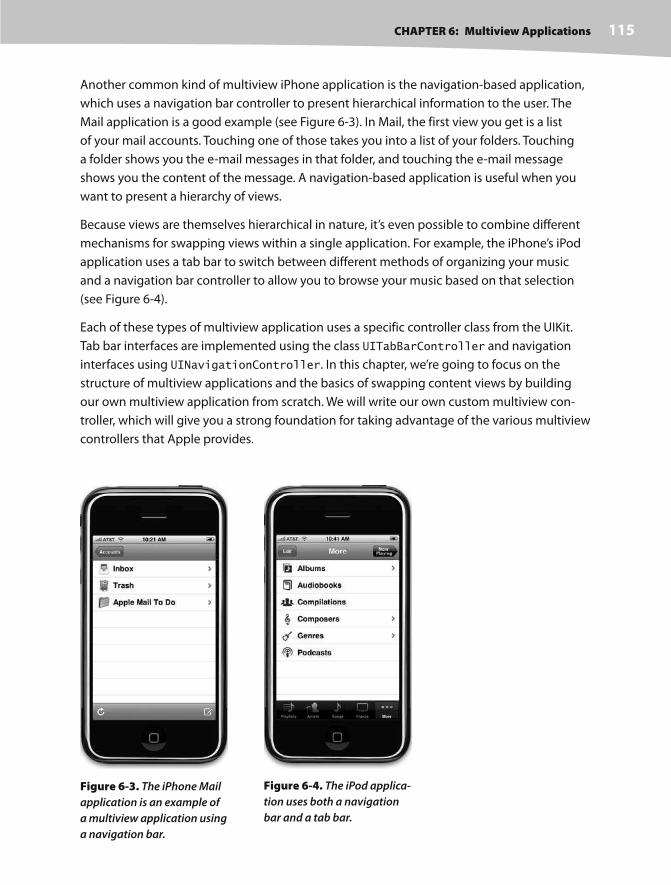
CHAPTER 6: Multiview Applications 115
Another common kind of multiview iPhone application is the navigation- based application,
which uses a navigation bar controller to present hierarchical information to the user. The
Mail application is a good example (see Figure 6-3). In Mail, the first view you get is a list
of your mail accounts. Touching one of those takes you into a list of your folders. Touching
a folder shows you the e-mail messages in that folder, and touching the e-mail message
shows you the content of the message. A navigation- based application is useful when you
want to present a hierarchy of views.
Because views are themselves hierarchical in nature, it’s even possible to combine different
mechanisms for swapping views within a single application. For example, the iPhone’s iPod
application uses a tab bar to switch between different methods of organizing your music
and a navigation bar controller to allow you to browse your music based on that selection
(see Figure 6-4).
Each of these types of multiview application uses a specific controller class from the UIKit.
Tab bar interfaces are implemented using the class UITabBarController and navigation
interfaces using UINavigationController. In this chapter, we’re going to focus on the
structure of multiview applications and the basics of swapping content views by building
our own multiview application from scratch. We will write our own custom multiview con-
troller, which will give you a strong foundation for taking advantage of the various multiview
controllers that Apple provides.
Figure 6-3. The iPhone Mail
application is an example of
a multiview application using
a navigation bar.
Figure 6-4. The iPod applica-
tion uses both a navigation
bar and a tab bar.

CHAPTER 6: Multiview Applications116
The View Switcher ApplicationThe application we’re going to build in this chapter, View Switcher, is fairly simple in appear-
ance, but in terms of the code we’re going to write, it’s by far the most complex application
we’ve tackled. View Switcher will consist of three different controllers, three nibs, and an
application delegate.
When first launched, View Switcher will look like Figure 6-5, with a toolbar at the bottom
containing a single button. The rest of the view will contain a blue background and a button
yearning to be pressed.
When the Switch Views button is pressed, the background will turn yellow, and the button’s
title will change (see Figure 6-6).
If either the Press Me or the Press Me, Too button is pressed, an alert will pop up indicating
which view’s button was pressed (see Figure 6-7).
Although we could achieve this same functionality by writing a single- view application,
we’re taking this more complex approach to demonstrate the mechanics of a multiview
application. There are actually three view controllers interacting in this simple application,
one that controls the blue view, one that controls the yellow view, and a third special con-
troller that swaps the other two in and out when the Switch Views button is pressed.
Figure 6-6. After pressing
the Switch Views button
Figure 6-7. Pressing the
center button shows an alert
Figure 6-5. View Switcher
at launch

CHAPTER 6: Multiview Applications 117
The Architecture of a Multiview ApplicationBefore we start building our application, let’s talk a little bit about the way iPhone multiview
applications are put together. Nearly all multiview applications use the same basic pattern.
The nib file is a key player here. Once you create your project, you’ll find MainWindow.xib in
your project window’s Resources folder. Inside the file, along with the application delegate
and the application’s main window, there will be an instance of a controller class that is
responsible for managing which other view is currently being shown to the user. This root
controller is often an instance of UINavigationController or UITabBarController,
though it can also be a custom subclass of UIViewController. The job of the root control-
ler is to take two or more other views and present them to the user as appropriate, based
on the user’s input. A tab bar controller, for example, will swap in different views and view
controllers based on which tab bar item was last tapped. A navigation controller will do the
same thing as the user drills down and back up through hierarchical data.
Multiview Controllers Are View Controllers
It’s important to understand that each of these multiview controllers is a view controller.
Even the provided multiview classes UITabBarController and UINavigationController
are subclasses of UIViewController and can do anything other view controllers can do. The
root controller is the primary view controller for the application and, as such, is the view that
specifies whether it is OK to automatically rotate to a new orientation.
In multiview applications, most of the screen will be taken up by a content view, and each
content view will have its own controller with its own outlets and actions. In a tab bar appli-
cation, for example, the events generated by touching the tab bar will go to the tab bar
controller, but events anywhere else on the screen will go to the controller that corresponds
to the content view currently being displayed.
Anatomy of a Content View
Each view controller, besides the multiview controller, controls a content view, and these
content views are where the bulk of your application’s user interface gets built. Each content
view is generally made up of two or three pieces: the view controller, the nib and, option-
ally, a subclass of UIView. When you create a new Xcode project using a multiview template,
you will always be provided with files for all three of these components. The controller and
nib are generally required. Although you can create your interface in code rather than using
a nib file, few people choose that route because it is more time consuming and more diffi-
cult to maintain.

CHAPTER 6: Multiview Applications118
You also will get a UIView subclass for each content view, but you won’t always need it.
In fact, you usually won’t need the UIView subclass, but it’s provided in case you need to
change the appearance or behavior of your content view beyond what’s possible using
the attributes inspector in Interface Builder. In this chapter, we’ll only be creating a nib and
a controller class for each content view.
A content view is created indirectly by instantiating its controller class and specifying a nib
name. Nibs are typically named using the same name as the controller class. So the class
called MyController would typically load a nib file called MyController.xib.
The root controller gets created when the application loads MainWindow.xib.
Building View SwitcherWe know you’ve been patiently waiting for us to use an Xcode template other than a
view- based application. Well, your patience is about to be rewarded! Select New Project…
from the File menu or press N. When the assistant opens up, select Window- Based
Application (see Figure 6-8), and type in a project name of View Switcher.
Figure 6-8. Selecting a new project template
The template we just selected is actually even simpler than the one we’ve been using up to
now. This template will give us a window, an application delegate, and nothing else—no
views, no controllers, no nothing. You won’t use this template very often when you’re

CHAPTER 6: Multiview Applications 119
creating applications, but by starting from nothing, you’ll really get a feel for the way
multiview applications are architected.
Take a second to expand the Resources and Classes folders in the Groups & Files pane and
look at what’s there. You’ll find a single nib file, MainWindow.xib, the Info.plist file, and the
two files in the class folder that implement the application delegate. Everything else we
need for our application, we will have to have to create.
Creating Our View Controller and Nib Files
One of the more daunting aspects of creating a multiview application from scratch is that
we have to create several interconnected objects. We’re going to create all the files that will
make up our application before we do anything in Interface Builder and before we write any
code. By creating all the files first, we’ll be able to use Xcode’s Code Sense to write our code
faster. If a class hasn’t been declared, Code Sense has no way to know about it, so we would
have to type it in full every time, which takes longer and is more error prone.
Fortunately, in addition to project templates, Xcode also provides file templates for many
standard file types, which makes creating the basic skeleton of our application fairly easy.
Single- click the Classes folder in the Groups & Files pane, and then type N or select New
File… from the File menu. Take a look at the window that opens up (see Figure 6-9).
Figure 6-9. Creating a new view controller class

CHAPTER 6: Multiview Applications120
If you select Cocoa Touch Classes from the left- hand pane, you will be given templates for a num-
ber of common Cocoa Touch classes. Select UIViewController subclass, and click Next. Type in the
name SwitchViewController.m, and make sure that Also create “SwitchViewController.h” is checked
before clicking the Finish button. Xcode should add two files to your Classes folder; the
SwitchViewController class will be your root controller. Repeat the same steps two more
times to create BlueViewController.m and YellowViewController.m, making sure to also create the
corresponding header files for both. These are the two content views that will get swapped in
and out by SwitchViewController.
We also need two more nib files, one for each of the two content views we just created. To
create these, single- click the Resources folder in the Groups & Files pane so that we create
them in the correct place, and then press N or select New File… from the File menu again.
This time, when the assistant window comes up, select User Interfaces under the iPhone OS
heading in the left pane (see Figure 6-10).
Figure 6-10. Creating nib files for the content views
Select the icon for the View XIB template, which will create a nib with a content view, and
then click the Next button. When prompted for a filename, type BlueView.xib. Repeat the
steps to create a second nib file called YellowView.xib. Once you’ve done that, you have all
the files you need. It’s time to start hooking everything together.

CHAPTER 6: Multiview Applications 121
Modifying the App Delegate
Our first stop on the multiview express is the application delegate. Single- click the file View_
SwitcherAppDelegate.h in the Groups & Files pane, and make the following changes
to that file:
#import <UIKit/UIKit.h>
@class View_SwitcherViewController;
@class SwitchViewController;
@interface View_SwitcherAppDelegate : NSObject <UIApplicationDelegate> {
IBOutlet UIWindow *window;
IBOutlet SwitchViewController *switchViewController;}
@property (nonatomic, retain) UIWindow *window;
@property (nonatomic, retain) SwitchViewController *switchViewController;
@end
The IBOutlet declaration you just typed is an outlet that will point to our application’s root
controller. We need this outlet because we are about to write code that will add the root con-
troller’s view to our application’s main window. By doing that, when we go to Interface Builder
and add an instance of the SwitchViewController class to MainWindow.xib, we’ll already
have an outlet to connect it to.
Now, we need to add the root controller’s view to our application’s main window. Click View_
SwitcherAppDelegate.m, and add the following code:
#import "View_SwitcherAppDelegate.h"
#import "SwitchViewController.h"
@implementation View_SwitcherAppDelegate
@synthesize window;
@synthesize switchViewController;
- (void)applicationDidFinishLaunching:(UIApplication *)application {
// Override point for customization after app launch
[window addSubview:switchViewController.view]; [window makeKeyAndVisible];
}

CHAPTER 6: Multiview Applications122
- (void)dealloc {
[window release];
[switchViewController release]; [super dealloc];
}
@end
Besides implementing the switchViewController outlet, we are adding the root con-
troller’s view to the window. Remember, the window is the only gateway to the user, so
anything that needs to be displayed to the user has to get added as a window subview.
SwitchViewController.h
Because we’re going to be adding an instance of SwitchViewController to MainWindow.
xib, now’s the time to add any needed outlets or actions to the SwitchViewController.h
header file.
We’ll need one action method to toggle between the two views. We won’t need any outlets,
but we will need two other pointers, one to each of the view controllers that we’re going to
be swapping in and out. These don’t need to be outlets, because we’re going to create them
in code rather than in a nib. Add the following code to SwitchViewController.h:
#import <UIKit/UIKit.h>
@class BlueViewController;@class YellowViewController;
@interface SwitchViewController : UIViewController {
YellowViewController *yellowViewController; BlueViewController *blueViewController;}
@property (retain, nonatomic) YellowViewController *yellowViewController;@property (retain, nonatomic) BlueViewController *blueViewController;
-(IBAction)switchViews:(id)sender;@end
Now that we’ve declared the action we need, we can add an instance of this class to
MainWindow.xib.

CHAPTER 6: Multiview Applications 123
Modifying MainWindow.xib
Save your source code, and double- click MainWindow.xib to open it in Interface Builder.
Four icons should appear in the nib’s main window: File’s Owner, First Responder, View_
SwitcherAppDelegate, and Window (see Figure 6-11). We need to add one more icon that
will represent an instance of our root controller. Since Interface Builder’s library doesn’t
have a SwitchViewController, we’ll have to add a view controller and change its class to
SwitchViewController.
Figure 6-11. MainMenu.xib
Since the class we need to add is a subclass of UIViewController, look in the library for
View Controller (see Figure 6-12), and drag one to the nib’s main window.
Figure 6-12. View Controller in the library

CHAPTER 6: Multiview Applications124
Once you do this, your nib’s main window will now have five icons, and a new window con-
taining a dashed, grey, rounded rectangle labeled View should appear (see Figure 6-13).
We just added an instance of UIViewController, but we actually need an
instance of SwitchViewController, so let’s change our view controller’s class to
SwitchViewController. Single- click the View Controller icon in the nib’s main window,
and press 4 to open the identity inspector (see Figure 6-14).
The identity inspector allows you to specify the class of the currently selected object. Our
view controller is currently specified as a UIViewController, and it has no actions defined.
Click inside the combo box labeled Class, the one at the top of the inspector that currently
reads UIViewController. Change the Class to SwitchViewController. Once you make that
change, the switchViews: action method should appear in the section labeled Class Actions
(see Figure 6-15). You should also notice that in the nib’s main window, the name of that new
icon has switched from View Controller to Switch View Controller.
We now need to build our root controller’s view. Remember that new window that appeared
when we dragged the generic view controller onto the main nib window (see Figure 6-13)?
We’ll build the view for SwitchViewController in that window.
Figure 6-13. The window representing
your view controller in Interface Builder
Figure 6-14. The Identity Inspector
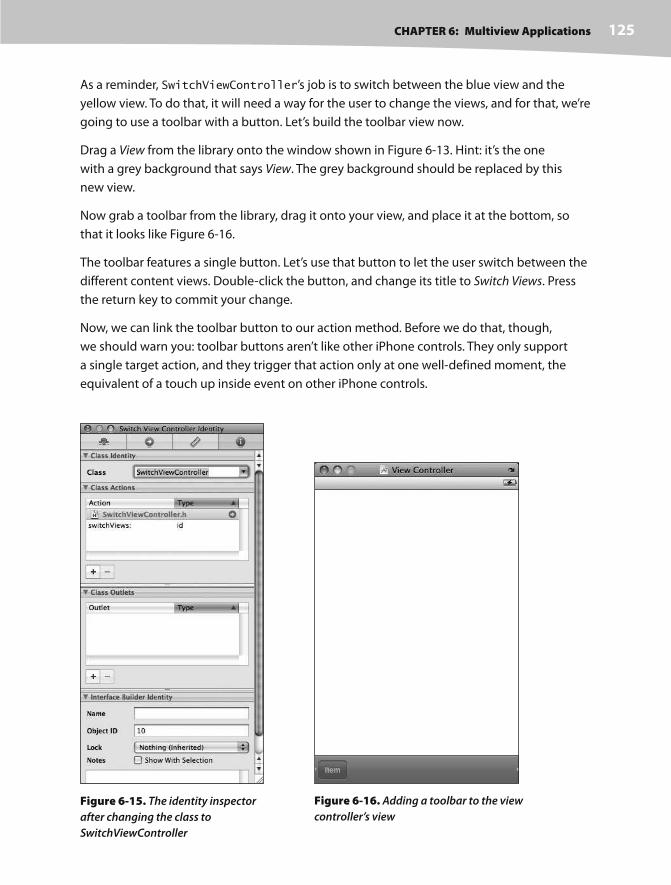
CHAPTER 6: Multiview Applications 125
As a reminder, SwitchViewController’s job is to switch between the blue view and the
yellow view. To do that, it will need a way for the user to change the views, and for that, we’re
going to use a toolbar with a button. Let’s build the toolbar view now.
Drag a View from the library onto the window shown in Figure 6-13. Hint: it’s the one
with a grey background that says View. The grey background should be replaced by this
new view.
Now grab a toolbar from the library, drag it onto your view, and place it at the bottom, so
that it looks like Figure 6-16.
The toolbar features a single button. Let’s use that button to let the user switch between the
different content views. Double- click the button, and change its title to Switch Views. Press
the return key to commit your change.
Now, we can link the toolbar button to our action method. Before we do that, though,
we should warn you: toolbar buttons aren’t like other iPhone controls. They only support
a single target action, and they trigger that action only at one well- defined moment, the
equivalent of a touch up inside event on other iPhone controls.
Figure 6-15. The identity inspector
after changing the class to
SwitchViewController
Figure 6-16. Adding a toolbar to the view
controller’s view
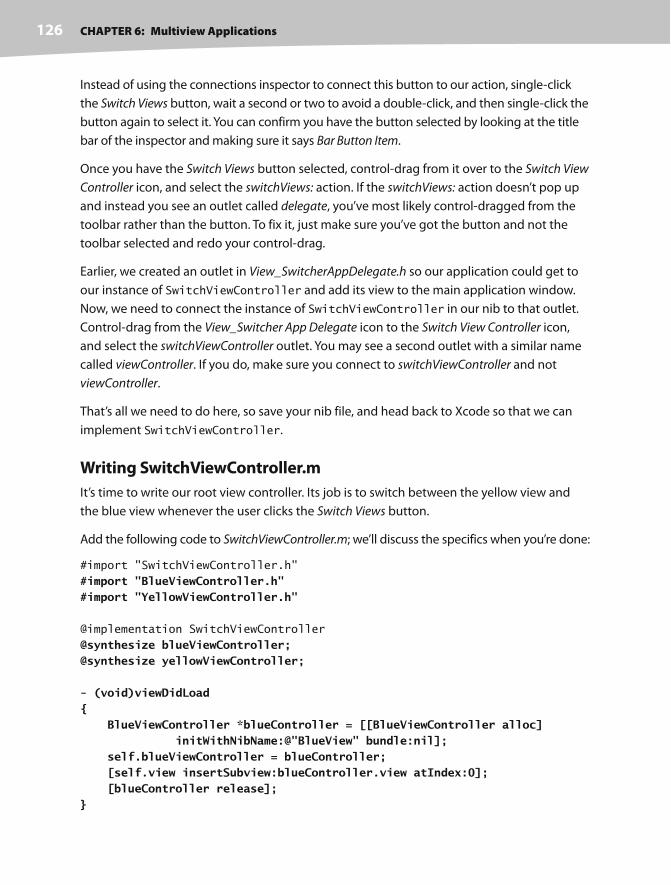
CHAPTER 6: Multiview Applications126
Instead of using the connections inspector to connect this button to our action, single- click
the Switch Views button, wait a second or two to avoid a double- click, and then single- click the
button again to select it. You can confirm you have the button selected by looking at the title
bar of the inspector and making sure it says Bar Button Item.
Once you have the Switch Views button selected, control- drag from it over to the Switch View
Controller icon, and select the switchViews: action. If the switchViews: action doesn’t pop up
and instead you see an outlet called delegate, you’ve most likely control- dragged from the
toolbar rather than the button. To fix it, just make sure you’ve got the button and not the
toolbar selected and redo your control- drag.
Earlier, we created an outlet in View_SwitcherAppDelegate.h so our application could get to
our instance of SwitchViewController and add its view to the main application window.
Now, we need to connect the instance of SwitchViewController in our nib to that outlet.
Control- drag from the View_Switcher App Delegate icon to the Switch View Controller icon,
and select the switchViewController outlet. You may see a second outlet with a similar name
called viewController. If you do, make sure you connect to switchViewController and not
viewController.
That’s all we need to do here, so save your nib file, and head back to Xcode so that we can
implement SwitchViewController.
Writing SwitchViewController.m
It’s time to write our root view controller. Its job is to switch between the yellow view and
the blue view whenever the user clicks the Switch Views button.
Add the following code to SwitchViewController.m; we’ll discuss the specifics when you’re done:
#import "SwitchViewController.h"
#import "BlueViewController.h"#import "YellowViewController.h"
@implementation SwitchViewController
@synthesize blueViewController;@synthesize yellowViewController;
- (void)viewDidLoad{ BlueViewController *blueController = [[BlueViewController alloc] initWithNibName:@"BlueView" bundle:nil]; self.blueViewController = blueController; [self.view insertSubview:blueController.view atIndex:0]; [blueController release];}

CHAPTER 6: Multiview Applications 127
- (IBAction)switchViews:(id)sender{
// Lazy load - we load the Yellow nib the first // time the button is pressed if (self.yellowViewController == nil) { YellowViewController *yellowController = [[YellowViewController alloc] initWithNibName:@"YellowView" bundle:nil]; self.yellowViewController = yellowController; [yellowController release]; }
if (self.blueViewController.view.superview == nil) { [yellowViewController.view removeFromSuperview]; [self.view insertSubview:blueViewController.view atIndex:0];\ } else { [blueViewController.view removeFromSuperview]; [self.view insertSubview:yellowViewController.view atIndex:0];
}} - (id)initWithNibName:(NSString *)nibNameOrNil
bundle:(NSBundle *)nibBundleOrNil {
if (self = [super initWithNibName:nibNameOrNil
bundle:nibBundleOrNil]) {
// Initialization code
}
return self;
}
- (BOOL)shouldAutorotateToInterfaceOrientation:
(UIInterfaceOrientation)interfaceOrientation {
// Return YES for supported orientations
return (interfaceOrientation == UIInterfaceOrientationPortrait);
}
- (void)didReceiveMemoryWarning {
[super didReceiveMemoryWarning];
// Releases the view if it doesn’t have a superview
// Release anything that’s not essential, such as cached data
}

CHAPTER 6: Multiview Applications128
- (void)dealloc {
[yellowViewController release]; [blueViewController release]; [super dealloc];
}
@end
The first method we added, viewDidLoad, is a UIViewController method that gets called
when the nib is loaded. How could we tell? Option–double- click the method name, and
take a look at the document that appears. The method is defined in our superclass and is
intended to be overridden by classes that need to get notified when the view has finished
loading.
We override viewDidLoad to create an instance of BlueViewController. We use the
initWithNibName method to load the BlueViewController instance from the nib file
BlueView.xib. Note that the filename provided to initWithNibName does not include the
.xib extension. Once the BlueViewController is created, we assign this new instance to
our blueViewController property.
BlueViewController *blueController = [[BlueViewController alloc]
initWithNibName:@"BlueView" bundle:nil];
self.blueViewController = blueController;
Next, we insert the blue view as a subview of the root view. We insert it at index zero, which
tells iPhone to put this view behind everything else. Sending the view to the back ensures
that the toolbar we created in Interface Builder a moment ago will always be visible on the
screen, since we’re inserting the content views behind it.
[self.view insertSubview:blueController.view atIndex:0];
Now, why didn’t we load the yellow view here also? We’re going to need to load it at some
point, so why not do it now? Good question. The answer is that the user may never tap the
Switch Views button. The user might come in, use the view that’s visible when the applica-
tion launches, and then quit. In that case, why use resources to load the yellow view and its
controller?
Instead, we’ll load the yellow view the first time we actually need it. This is called lazy loading,
and it’s a standard way of keeping memory overhead down. The actual loading of the yellow
view happens in the switchViews: method, so let’s take a look at that.
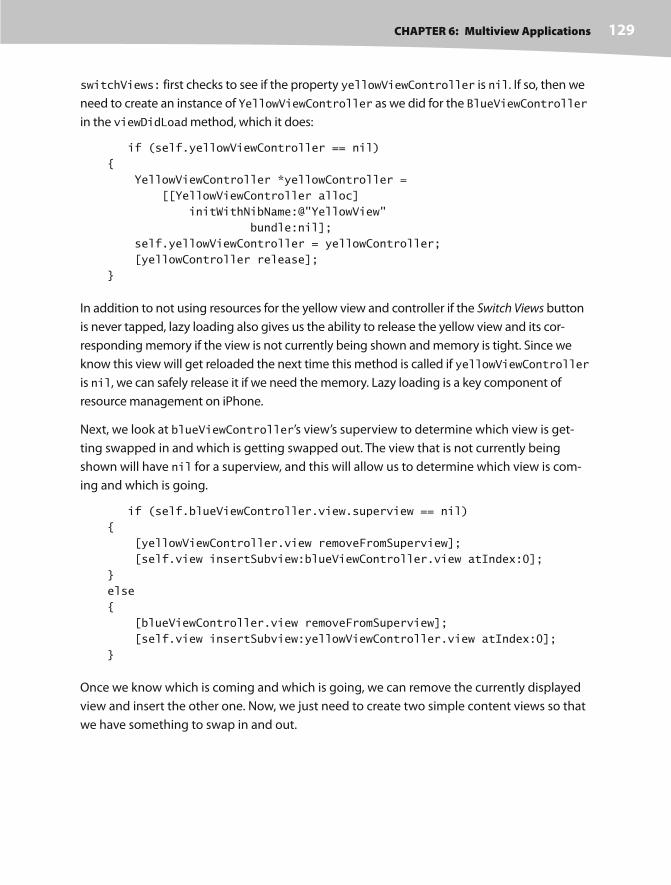
CHAPTER 6: Multiview Applications 129
switchViews: first checks to see if the property yellowViewController is nil. If so, then we
need to create an instance of YellowViewController as we did for the BlueViewController
in the viewDidLoad method, which it does:
if (self.yellowViewController == nil)
{
YellowViewController *yellowController =
[[YellowViewController alloc]
initWithNibName:@"YellowView"
bundle:nil];
self.yellowViewController = yellowController;
[yellowController release];
}
In addition to not using resources for the yellow view and controller if the Switch Views button
is never tapped, lazy loading also gives us the ability to release the yellow view and its cor-
responding memory if the view is not currently being shown and memory is tight. Since we
know this view will get reloaded the next time this method is called if yellowViewController
is nil, we can safely release it if we need the memory. Lazy loading is a key component of
resource management on iPhone.
Next, we look at blueViewController’s view’s superview to determine which view is get-
ting swapped in and which is getting swapped out. The view that is not currently being
shown will have nil for a superview, and this will allow us to determine which view is com-
ing and which is going.
if (self.blueViewController.view.superview == nil)
{
[yellowViewController.view removeFromSuperview];
[self.view insertSubview:blueViewController.view atIndex:0];
}
else
{
[blueViewController.view removeFromSuperview];
[self.view insertSubview:yellowViewController.view atIndex:0];
}
Once we know which is coming and which is going, we can remove the currently displayed
view and insert the other one. Now, we just need to create two simple content views so that
we have something to swap in and out.

CHAPTER 6: Multiview Applications130
Implementing the Content Views
The two content views that we are creating in this application are extremely simple. They
each have one action method that is triggered by a button, and neither one needs any out-
lets. The two views are also nearly identical. In fact, they are so similar that they could have
been represented by the same class. We chose to make them two separate classes, because
that’s how most multiview applications are constructed. Let’s declare an action method in
each of the header files. First, in BlueViewController.h, add the following declaration:
#import <UIKit/UIKit.h>
@interface BlueViewController : UIViewController {
}
-(IBAction)blueButtonPressed:(id)sender;@end
Save it, and then add the following line to YellowViewController.h:
#import <UIKit/UIKit.h>
@interface YellowViewController : UIViewController {
}
- (IBAction)yellowButtonPressed:(id)sender;@end
Save this one as well, and then double- click BlueView.xib to open it in Interface Builder so we
can make a few changes. First, we have to tell it that the class that will load this nib from disk
is BlueViewController, so single- click the File’s Owner icon and press 4 to bring up the
identity inspector. File’s Owner defaults to NSObject; change it to BlueViewController.
Next, we’ll change the size of the view in the nib. Double- click the View icon to open the
window, and press 3 to bring up the size inspector. Change the height of this view from
480 to 416. Why 416 pixels? Because 480 pixels minus 20 pixels for the status bar, minus
another 44 pixels for the toolbar equals 416, which is the space remaining for the content view.
Press 1 to bring up the attributes inspector. Click the color well that’s labeled Background,
and change the background color of this view to a nice shade of blue. Next, drag a Round Rect
Button from the library over to the window. Double- click the button and change its title to
Press Me. You can place the button anywhere that looks good to you. Next, switch to the con-
nections inspector (by pressing 2), drag from the Touch Up Inside event to the File’s Owner
icon, and connect to the blueButtonPressed: action method.
We have one more thing to do in this nib, which is to connect the BlueViewController’s
view outlet to the view in the nib. The view outlet is inherited from the parent class,
UIViewController and gives the controller access to the view it controls. When we

CHAPTER 6: Multiview Applications 131
changed the underlying class of the file’s owner, the existing outlet connections were broken.
As a result, we need to reestablish the connection from the controller to its view. Control- drag
from the File’s Owner icon to the View icon, and select the view outlet to do that.
Save the nib, go back to Xcode, and double- click YellowView.xib. We’re going to make almost
the same exact changes to this nib file. We need to change the file’s owner from NSObject to
YellowViewController using the identity inspector, change the view’s height to 416 pixels using
the size inspector, and change the view’s background to a nice yellow color using the attri-
butes inspector. You’ll also need to add a round rectangular button to this view, give it a label
of Press Me, Too, and connect that button’s Touch Up Inside event to the yellowButtonPressed:
action method in File’s Owner. Finally, control- drag from the File’s Owner icon to the View icon,
and connect to the view outlet.
Once all that is done, save the nib, and go back to Xcode.
The two action methods we’re going to implement do nothing more than show an alert,
something you already know how to do, so go ahead and add the following code to
BlueViewController.m:
#import "BlueViewController.h"
@implementation BlueViewController
- (IBAction)blueButtonPressed:(id)sender{ UIAlertView *alert = [[UIAlertView alloc] initWithTitle:@"Blue View Button Pressed" message:@"You pressed the button on the blue view" delegate:nil cancelButtonTitle:@"Yep, I did." otherButtonTitles:nil]; [alert show]; [alert release];}- (id)initWithNibName:(NSString *)nibNameOrNil
bundle:(NSBundle *)nibBundleOrNil {
...
Save, switch over to YellowViewController.m, and add this very similar code to that file:
#import "YellowViewController.h"
@implementation YellowViewController
-(IBAction)yellowButtonPressed:(id)sender{ UIAlertView *alert = [[UIAlertView alloc] initWithTitle:@"Yellow View Button Pressed"

CHAPTER 6: Multiview Applications132
message:@"You pressed the button on the yellow view" delegate:nil cancelButtonTitle:@"Yep, I did." otherButtonTitles:nil]; [alert show]; [alert release];}
- (id)initWithNibName:(NSString *)nibNameOrNil
bundle:(NSBundle *)nibBundleOrNil {
...
Save it, and we’re ready to try it out. When our application launches, it’ll show the view we
built in BlueView.xib, and when you tap the Switch Views button, it will change to show us
the view that we built in YellowView.xib. Tap it again, and it goes back to the view we built in
BlueView.xib. Whether you tap the button on the blue or yellow view, you’ll get an alert view
with a message indicating which button was pressed. This alert shows us that the correct
controller class is getting called for the view that is being shown.
The transition between the two views is kind of abrupt, though. Gosh, if only there were
some way to make the transition look nicer.
Animating the TransitionOf course, there is a way to make the transition look nicer, and you’ve already used it. We can
animate the transition in order to give the user visual feedback of the change. UIView has sev-
eral class methods we can call to indicate that the transition should be animated, to indicate
the type of transition that should be used, and to specify how long the transition should take.
Go back to SwitchViewController.m, and replace your switchViews: method with this new
version:
- (IBAction)switchViews:(id)sender{ if (self.yellowViewController == nil) { YellowViewController *yellowController = [[YellowViewController alloc] initWithNibName:@"YellowView" bundle:nil]; self.yellowViewController = yellowController; [yellowController release]; }
[UIView beginAnimations:@"View Flip" context:nil];

CHAPTER 6: Multiview Applications 133
[UIView setAnimationDuration:1.25]; [UIView setAnimationCurve:UIViewAnimationCurveEaseInOut]; if (blueViewController.view.superview == nil) { [UIView setAnimationTransition: UIViewAnimationTransitionFlipFromRight forView:self.view cache:YES]; [blueViewController viewWillAppear:YES]; [yellowViewController viewWillDisappear:YES]; [yellowViewController.view removeFromSuperview]; [self.view insertSubview: self.blueViewController.view atIndex:0]; [yellowViewController viewDidDisappear:YES]; [blueViewController viewDidAppear:YES]; } else { [UIView setAnimationTransition: UIViewAnimationTransitionFlipFromLeft forView:self.view cache:YES]; [yellowViewController viewWillAppear:YES]; [blueViewController viewWillDisappear:YES]; [blueViewController.view removeFromSuperview]; [self.view insertSubview:self.yellowViewController.view atIndex:0]; [blueViewController viewDidDisappear:YES]; [yellowViewController viewDidAppear:YES]; } [UIView commitAnimations];}
Compile this new version, and run your application. When
you tap the Switch Views button, instead of the new view just
appearing, the view will flip over as shown in Figure 6-17.
Figure 6-17. The view
transition animated using
the flip style

CHAPTER 6: Multiview Applications134
In the previous chapter, to animate the button movement, we begin an animation block,
made the changes to be animated, and then committed those changes. We use the same
approach here. We start by declaring an animation block and specifying how long the ani-
mation should take:
[UIView beginAnimations:@"View Flip" context:nil];
[UIView setAnimationDuration:1.25];
After that, we set the animation curve, which determines the timing of the animation. The
default, which is a linear curve, causes the animation to happen at a constant speed. The
option we set here indicates that it should change the speed so that it is slow at the begin-
ning and end of the transition but faster in the middle. This gives the animation a more
natural, less mechanical appearance.
[UIView setAnimationCurve:UIViewAnimationCurveEaseInOut];
Next, we have to specify the transition to use. At the time of this writing, four view transi-
tions are available on the iPhone:
UIViewAnimationTransitionFlipFromLeft
UIViewAnimationTransitionFlipFromRight
UIViewAnimationTransitionCurlUp
UIViewAnimationTransitionCurlDown
We chose to use two different effects, depending on which view was being swapped in.
Using a left flip for one transition and a right flip for the other will make the view seem to flip
back and forth. The cache option speeds up drawing by taking a snapshot of the view when
the animation begins and using that image rather than redrawing the view at each step of
the animation. You should always have it cache the animation unless the appearance of the
view may need to change during the animation.
[UIView setAnimationTransition:UIViewAnimationTransitionFlipFromRight
forView:self.view cache:YES];
After we set the transition, we make two calls, one on each of the views being used in the
transition:
[self.blueViewController viewWillAppear:YES];
[self.yellowViewController viewWillDisappear:YES];
When we’re all done swapping the views, we make two more calls on those views:
[self.yellowViewController viewDidDisappear:YES];
[self.blueViewController viewDidAppear:YES];

CHAPTER 6: Multiview Applications 135
The default implementations of these methods in UIView do nothing, so our calls to
viewDidDisappear: and viewDidAppear: don’t do anything, since our views are instances
of UIView.
Why is it important to make these calls even though they do nothing? Even though we are
using UIView now, we could very well decide to create a subclass of UIView at some point
in development, and that subclass might need to do something before and/or after a transi-
tion. Views that have running animations on them, for example, will often choose to turn
those animations off when their view is swapped out and turn them back on when they are
swapped back in. The performance hit for making these four calls is meaningless, since they
trigger no code, and by putting them in, we can be sure that our application will continue to
work even if we switch the class of our view.
Of course, when we’re all done specifying the changes to be animated, we call
commitAnimations on UIView:
[UIView commitAnimations];
Thanks to Cocoa Touch’s use of Core Animation under the hood, we’re able to do fairly
sophisticated animation with only a handful of code.
RefactoringSo, we’re done, right? Our application does exactly what it’s supposed to and works well.
Time to move on to the next chapter? Well, not quite yet.
Take a look at the new version of switchViews: that we just wrote. Specifically, at this part:
if (self.blueViewController.view.superview == nil)
{
[UIView setAnimationTransition:
UIViewAnimationTransitionFlipFromRight
forView:self.view cache:YES];
[self.blueViewController viewWillAppear:YES];
[self.yellowViewController viewWillDisappear:YES];
[self.yellowViewController.view removeFromSuperview];
[self.view insertSubview: self.blueViewController.view atIndex:0];
[self.yellowViewController viewDidDisappear:YES];
[self.blueViewController viewDidAppear:YES];
}
else
{
[UIView setAnimationTransition:
UIViewAnimationTransitionFlipFromLeft
forView:self.view cache:YES];

CHAPTER 6: Multiview Applications136
[self.yellowViewController viewWillAppear:YES];
[self.blueViewController viewWillDisappear:YES];
[self.blueViewController.view removeFromSuperview];
[self.view insertSubview:self.yellowViewController.view atIndex:0];
[self.blueViewController viewDidDisappear:YES];
[self.yellowViewController viewDidAppear:YES];
}
Anytime you see two or more chunks of code that look this similar, you should take a second
look at the code to see if it can be generalized out into a single block of code. Why? Well, if
we realize there’s a bug in one of these blocks, we’ll have to chase down and fix that bug in
two separate places, since the code is identical except for which view is being used in each
of the calls. The process of changing code to improve it or make it more maintainable with-
out changing what it actually does is called refactoring. Let’s refactor this part of the code.
In most languages, the way to refactor a situation like this would be to create a new method
or function that would get called twice. There’s another way to handle it right in this one
method, though. Take a look at this new version of switchViews:.
- (IBAction)switchViews:(id)sender
{
if (self.yellowViewController == nil) {
YellowViewController *yellowController =
[[YellowViewController alloc]
initWithNibName:@"YellowView"
bundle:nil];
self.yellowViewController = yellowController;
[yellowController release];
}
[UIView beginAnimations:@"View Flip" context:nil];
[UIView setAnimationDuration:1.25];
[UIView setAnimationCurve:UIViewAnimationCurveEaseInOut];
UIViewController *coming = nil;
UIViewController *going = nil;
UIViewAnimationTransition transition;
if (self.blueViewController.view.superview == nil) {
coming = blueViewController;
going = yellowViewController;
transition = UIViewAnimationTransitionFlipFromLeft;
}
else{
coming = yellowViewController;
going = blueViewController;
CHAPTER 6: Multiview Applications 137
transition = UIViewAnimationTransitionFlipFromRight;
}
[UIView setAnimationTransition: transition forView:self.view
cache:YES];
[coming viewWillAppear:YES];
[going viewWillDisappear:YES];
[going.view removeFromSuperview];
[self.view insertSubview: coming.view atIndex:0];
[going viewDidDisappear:YES];
[coming viewDidAppear:YES];
[UIView commitAnimations];
}
Basically, we just declared two new pointers called coming and going and assigned
blueViewController or yellowBlueController to the appropriate pointer based on
which view is currently being shown. Now, we have a single code block that works on those
two pointers, and the logic isn’t repeated in two places, which makes our code easier to
maintain.
If you find yourself typing very similar code more than once, or worse, copying and pasting large
chunks of code, you might want to take a step back and ask yourself if there’s a better way.
Switching OffWhoo-boy! Creating our own multiview controller was a lot of work, wasn’t it? You should
have a very good grasp on how multiview applications are put together now that you’ve built
one from scratch. Although Xcode contains project templates for the three most common
types of multiview applications, you need to understand the overall structure of these types of
applications so you can build them yourself from the ground up. The delivered templates are
incredible timesavers, but at times, they simply won’t meet your needs.
In the next two chapters, we’re going to continue building multiview applications to reinforce
the concepts from this chapter and to give you a feel for how more complex applications are
put together. In the next chapter, we’ll construct a tab bar application, and in the chapter after
that, we’ll construct a navigation- based application.

139
Chapter 7
iTab Bars and Pickers
n the last chapter, you built your first multiview application. In this chapter,
you’re going to build a full tab bar application with five different tabs and five
different content views. Building this application is going to reinforce a lot of
what you learned in the last chapter, but you’re too smart to spend a whole
chapter doing stuff you already sorta know how to do, so we’re going to use
those five content views to show you how to use a type of iPhone control that
we have not covered yet. The control is called the picker view, although it’s
usually just called the picker.
You may not be familiar with the name, but
you’ve almost certainly used a picker if you’ve
owned an iPhone for more than, say, 10 min-
utes. Pickers are the controls with dials that
spin. You use them to input dates in the Cal-
endar application or to set a timer in the Clock
application (see Figure 7-1).
Pickers are rather more complex than the
iPhone controls you’ve seen so far, and as such,
they deserve a little more attention. Pickers can
be configured to display one dial or many. By
default, pickers display lists of text, but they can
also be made to display images.
Figure 7-1. A picker in the
Clock application

CHAPTER 7: Tab Bars and Pickers 140
The Pickers ApplicationThis chapter’s application, Pickers, will feature a tab bar. As you build Pickers, you’ll change
the default tab bar so it has five tabs, add an icon to each of the tab bar items, and then cre-
ate a series of content views and connect each to a tab.
The first content view we’ll build will have a date picker, which is the easiest type of picker
to implement (see Figure 7-2). The view will also have a button that, when tapped, will dis-
play an alert that displays the date that was picked.
The second tab will feature a picker with a single list of values (see Figure 7-3). This picker is
a little bit more work to implement than a date picker. You’ll learn how to specify the values
to be displayed in the picker by using a delegate and a datasource.
In the third tab, we’re going to create a picker with two separate wheels. The technical term
for each of these wheels is a picker component, so here, we are creating a picker with two
components. We’ll see how to use the datasource and delegate to provide two independent
lists of data to the picker (see Figure 7-4). Each of this picker’s components can be changed
without impacting the other one.
In the fourth content view, we’re going to build another picker with two components. But this
time, the values displayed in the component on the right are going to change based on the value
selected in the component on the left. In our example, we’re going to display a list of states in the
left component and a list of that state’s ZIP codes in the right component (see Figure 7-5).
Figure 7-2. The first tab will
show a date picker.
Figure 7-3. A picker display-
ing a single list of values
Figure 7-4. A two-
component picker

CHAPTER 7: Tab Bars and Pickers 141
And last, but most certainly not least, we’re going to have
a little fun with the fifth content view. We’re going to see how
to add image data to a picker, and we’re going to do it by writ-
ing a little game that uses a picker with five components. In
several places in Apple’s documentation, the picker’s appear-
ance is described as looking a bit like a slot machine. Well, then,
what could be more fitting than writing a little slot machine
game (see Figure 7-6)? For this picker, the user won’t be able
to manually change the values of the components but will be
able to select the Spin button to make the five wheels will spin
to a new, randomly selected value. If three copies of the same
image appear in a row, the user wins.
Figure 7-5. In this picker,
one component is dependent
on the other. As we select
a state in the left compo-
nent, the right component
changes to a list of ZIP codes
in that state.
Figure 7-6. Our five com-
ponent picker. Note that we
do not condone using your
iPhone as a tiny casino.
Delegates and DatasourcesBefore we dive in and start building our application, let’s look
at why pickers are so much more complex than the other
controls you’ve used so far. It’s not just a matter of there being
more configurable attributes to set in Interface Builder. In
fact, the picker actually has very few attributes that are con-
figurable in Interface Builder. With the exception of the date
picker, you can’t use a picker by just grabbing one in Interface
Builder, dropping it on your content view, and configuring it.
You have to also provide it with both a picker delegate and
a picker datasource.
By this point, you should be comfortable using delegates. We’ve already used application
delegates and action sheet delegates, and the basic idea is the same here. The picker defers
several jobs to its delegate. The most important of these is the task of determining what to
actually draw for each of the rows in each of its components. The picker asks the delegate for
either a string or a view that will be drawn at a given spot on a given component.

CHAPTER 7: Tab Bars and Pickers 142
In addition to the delegate, pickers have to have a datasource. The datasource works similarly
to the delegate, in that its methods are called at certain, prespecified times. Picker datasource
methods are used by the picker to get the number of components and the number of rows in
each component. Without a datasource and a delegate specified, pickers cannot do their job
and, in fact, won’t even be drawn.
It’s very common for the datasource and the delegate to be the same object, and just as
common for that object to be the view controller for the picker’s enclosing view, which is the
approach we’ll be using in this application. The view controllers for each content pane will
be the datasource and the delegate for their picker.
NOTE
Here’s a pop quiz: Is the picker datasource part of the model, view, or controller portion of the application?
It’s a trick question. A datasource sounds like it must be part of the model, but in fact, it’s actually part
of the controller. The datasource isn’t usually an object designed to hold data; it’s an object that supplies
data to the picker.
Let’s fire up Xcode and get to it.
Setting Up the Tab Bar FrameworkAlthough Xcode does provide a template for tab bar applications, we’re going to build ours
from scratch. It’s not much extra work, and it’s good practice. So, create a new project, select-
ing the Window- Based Application template again. When prompted for a name, type Pickers.
We’re going to walk you through the building of the whole application, but if, at any step of
the way, you feel like challenging yourself by moving ahead of us, by all means, go ahead. If
you get stumped, you can always come back. If you don’t feel like skipping ahead, that’s just
fine. We’d love the company.
Creating the Files
In the last chapter, we created a root view controller. We’ll be doing that again this time, but
we won’t need to create a class for it, because Apple provides a very good one for managing
tab bar views, so we’re just going to use an instance of UITabBarController for our root
controller. We will create that instance in Interface Builder in a few minutes.

CHAPTER 7: Tab Bars and Pickers 143
We need to create five new classes in Xcode: the five view controllers that the root controller
will swap in and out.
Expand the Classes and Resources folders in the Groups & Files pane. Next, single- click the
Classes folder, and press N or select New File. . . from the File menu.
Select Cocoa Touch Classes in the left pane of the new file assistant, and then select the icon
for UIViewController subclass, and click Next. Name the first one DatePickerViewController.m,
making sure to check Also create “DatePickerViewController.h”.
Repeat four more times, using the names SingleComponentPickerViewController.m,
DoubleComponentPickerViewController.m, DependentComponentPickerViewController.m,
and CustomPickerViewController.m.
Next, single- click the Resources folder, and press N or select New File. . . from the
File menu again. This time, you want to select User Interfaces in the left pane of the new
file assistant, and then click the View XIB icon. We need five nibs, one for each content view.
Call the first one you create DatePickerView.xib. Then create four more: SingleComponent-
PickerView.xib, DoubleComponentPickerView.xib, DependentComponentPickerView.xib, and
CustomPickerView.xib.
Setting Up the Content View Nibs
Double-click DatePickerView.xib to open the file in Interface Builder. We’re not actually
going to build our content views yet. We’re just going to wire up the skeleton of our tab
view application now so that the basic application works. We have to make sure that each
of the nib files is pointing to the right File’s Owner icon, which needs to be the correspond-
ing UIViewController subclass. For DatePickerView.xib, the controller class needs to be
DatePickerViewController. Single- click File’s Owner, and then press 4 to bring up the
identity inspector. Change the class to DatePickerViewController.
Now, control- drag from the File’s Owner icon to the View icon, and select the view outlet.
Finally, single- click the View icon, and press 3 to bring up the size inspector. Change the
height of the view to 411 pixels, which is the amount of space remaining after you take out
the status bar and the tab bar. Save this nib, and close it.
Repeat all those same steps with each of the four remaining nib files, making File’s Owner
point to the corresponding view controller. Make sure you save each nib file as you finish up,
and when you’re done with all five, go back to Xcode.

CHAPTER 7: Tab Bars and Pickers 144
Adding the Root View Controller
We’re going to create our root view controller, which will be an instance of
UITabBarController, in Interface Builder. Before we can do that, however, we should
declare an outlet for it. Single- click the PickersAppDelegate.h class, and add the following
code to it:
#import <UIKit/UIKit.h>
@class PickersViewController;
@interface PickersAppDelegate : NSObject <UIApplicationDelegate> {
IBOutlet UIWindow *window;
IBOutlet UITabBarController *rootController;}
@property (nonatomic, retain) UIWindow *window;
@property (nonatomic, retain) UITabBarController *rootController;@end
Before we move to Interface Builder to create our root view controller, let’s add the following
code to PickersAppDelegate.m:
#import "PickersAppDelegate.h"
@implementation PickersAppDelegate
@synthesize window;
@synthesize rootController;
- (void)applicationDidFinishLaunching:(UIApplication *)application {
// Override point for customization after app launch
[window addSubview:rootController.view]; [window makeKeyAndVisible];
}
- (void)dealloc {
[rootController release]; [window release];
[super dealloc];
}
@end

CHAPTER 7: Tab Bars and Pickers 145
There shouldn’t be anything there that’s a surprise
to you. It’s pretty much the same thing we did in the
last chapter, except that we’re not using a controller
class provided by Apple; instead, we’re using one
we wrote ourselves. Make sure you save both files.
Tab bars use icons to represent each of the tabs,
so we should also add the icons we’re going to use
before heading over to Interface Builder. You can
find some suitable icons in the project archive that
accompanies this book in the 07 Pickers/Tab Bar
Icons/ folder. The icons should be 24 by 24 pixels
and saved in .png format. The icon file should have
a transparent background. Generally, medium grey
icons look the best on a tab bar. Don’t worry about
trying to match the appearance of the tab bar. Just
as it does with the application icon, the iPhone is
going to take your image and make it look just right.
You should be comfortable adding resources to your
project by this point, so go ahead and add the five
icons we’ve provided by dragging them from the
finder to the Resources folder of your Xcode proj-
ect or selecing Add to Project. . . from the Project
menu.
Once you’ve added the icons, double- click
MainWindow.xib to open the file in Interface Builder.
Drag a Tab Bar Controller from the library (see
Figure 7-7) over to the nib’s main window. Be sure
you drag to the window labeled MainWindow.xib
and not to the window labeled Window, which will
not accept the drag, so you’ll know when you get
it right.
Once you drop the tab bar controller onto your nib’s
main window, a new window will appear that looks
like Figure 7-8. This tab bar controller will be our
root view controller. As a reminder, the root view
controller controls the very first view that the user
will see when your program runs.
Figure 7-7. Tab Bar Controller in the
library
Figure 7-8. The tab bar controller’s
window
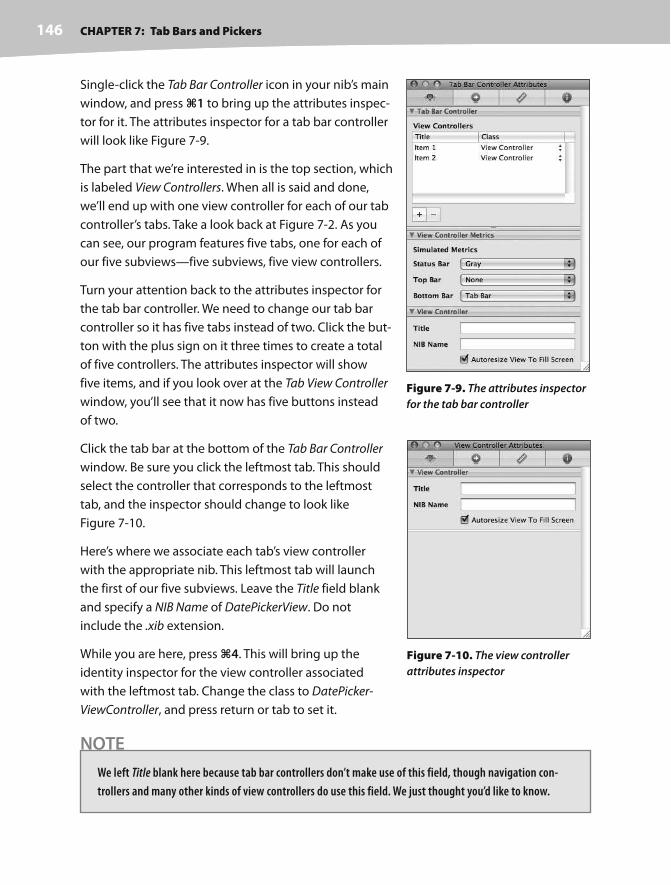
CHAPTER 7: Tab Bars and Pickers 146
Single-click the Tab Bar Controller icon in your nib’s main
window, and press 1 to bring up the attributes inspec-
tor for it. The attributes inspector for a tab bar controller
will look like Figure 7-9.
The part that we’re interested in is the top section, which
is labeled View Controllers. When all is said and done,
we’ll end up with one view controller for each of our tab
controller’s tabs. Take a look back at Figure 7-2. As you
can see, our program features five tabs, one for each of
our five subviews—five subviews, five view controllers.
Turn your attention back to the attributes inspector for
the tab bar controller. We need to change our tab bar
controller so it has five tabs instead of two. Click the but-
ton with the plus sign on it three times to create a total
of five controllers. The attributes inspector will show
five items, and if you look over at the Tab View Controller
window, you’ll see that it now has five buttons instead
of two.
Click the tab bar at the bottom of the Tab Bar Controller
window. Be sure you click the leftmost tab. This should
select the controller that corresponds to the leftmost
tab, and the inspector should change to look like
Figure 7-10.
Here’s where we associate each tab’s view controller
with the appropriate nib. This leftmost tab will launch
the first of our five subviews. Leave the Title field blank
and specify a NIB Name of DatePickerView. Do not
include the .xib extension.
While you are here, press 4. This will bring up the
identity inspector for the view controller associated
with the leftmost tab. Change the class to DatePicker-
ViewController, and press return or tab to set it.
NOTE
We left Title blank here because tab bar controllers don’t make use of this field, though navigation con-
trollers and many other kinds of view controllers do use this field. We just thought you’d like to know.
Figure 7-9. The attributes inspector
for the tab bar controller
Figure 7-10. The view controller
attributes inspector

CHAPTER 7: Tab Bars and Pickers 147
Type 1 to return to the attributes inspector. Click the
first tab in the tab bar, and click it again in the same
spot. This should cause the inspector to change again,
so it looks like Figure 7-11.
By clicking the tab bar again in the same spot, we’ve
changed the selection from the view controller associ-
ated with the tab bar item to the tab bar item itself. In
other words, the first click selected the first of the five
subview’s view controllers. The second click selects the
tab bar item itself so that we can set its title and icon.
This is where we can specify the tab bar item’s icon
and title. Change the Title from Item 1 to Date; click the
Image combo box; and select the clockicon.png image.
If you are using your own set of icons, select one of the
.png files you provided instead. For the rest of this chapter, we’ll discuss the resources we
provided. Make adjustments for your own media, as necessary.
If you look over at the Tab Bar Controller window, you’ll see that the leftmost tab bar item
now reads Date and has a picture of a clock on it. We now need to repeat this process for the
other four tab bar items.
The second view controller should be given a title of Single and a nib name of
SingleComponentPickerView. In the identity inspector, its class should be changed
to SingleComponentPickerViewController. The second tab bar item should be given a title of
Single, and it should use the icon called singleicon.png.
The third view controller should be given a title of Double and a nib name of
DoubleComponentPickerView. Its class should be changed to DoubleComponentPickerView-
Controller. The third tab bar item should be assigned a title of Double, and it should be
assigned the image called doubleicon.png.
The fourth view controller should be assigned a title of Dependent and a nib name of
DependentComponentPickerView. Its class should be changed to DependentComponentPicker-
ViewController. The fourth tab bar item gets a title of Dependent and should be assigned the
icon image dependenticon.png.
The fifth and last view controller should be assigned a title of Custom, a nib name of Custom-
PickerView. Its class should be changed to CustomPickerViewController. The last tab bar item
also gets a title of Custom and the toolicon.png icon.
Figure 7-11. The tab bar item
attributes inspector
CHAPTER 7: Tab Bars and Pickers 148
All that we have left to do in this nib file is to control- drag from the Pickers App Delegate icon
to the Tab Bar Controller icon, selecting the rootController outlet. Save your nib, and go back
to Xcode.
At this point, the tab bar and the content views should all be hooked up and working. Com-
pile and run, and your application should launch with a toolbar that functions; clicking a tab
should select it. There’s nothing in the content views now, so the changes won’t be very
dramatic. But if everything went okay, the basic framework for your multiview application is
now set up and working, and we can start designing the individual content views.
TIP
If your simulator bursts into flames when you click one of the tabs, don’t panic! Most likely, you’ve either
missed a step or made a typo. Go back and check all the nib file names; make sure the connections are
right; and make sure the class names are all set correctly.
If you want to make double sure everything is working, you can add a different label or some
other object to each of the content views and then relaunch the application. If everything is
working, you’ll see the content of the different views change as you select different tabs.
Implementing the Date PickerTo implement the date picker, we’ll need a single outlet and a single action. The outlet
will be used to grab the value from the date picker. The action will be triggered by a but-
ton and will throw up an alert to show the date value pulled from the picker. Single- click
DatePickerViewController.h, and add the following code:
#import <UIKit/UIKit.h>
@interface DatePickerViewController : UIViewController {
IBOutlet UIDatePicker *datePicker;}
@property (nonatomic, retain) UIDatePicker *datePicker;-(IBAction)buttonPressed;@end
Save this file, and double- click DatePickerView.xib to open the content view for this first tab
in Interface Builder. The first thing we need is a date picker, so look for Date Picker in the
library (see Figure 7-12), and drag one over to the View window. If the View window is not
open, open it by double- clicking the View icon in the nib’s main window.

CHAPTER 7: Tab Bars and Pickers 149
Place the date picker right at the top of the view.
It should take up the entire width of your content
view and a good portion of the height. Don’t use
the blue guidelines for the picker; it’s designed
to fit snugly against the edges of the view (see
Figure 7-13).
Single-click the date picker if it’s not already selected,
and press 1 to bring up the attributes inspector. As
you can see (in Figure 7-14), a number of attributes can
be configured for a date picker. You won’t get off this
easy with the rest of the pickers, so enjoy it while you
can. We’re going to leave most of the values at their
defaults, though you should feel free to play with the
options when we’re done to see what they do. The one
thing we are going to do is limit the range of the picker
to reasonable dates. Change the Minimum date value to
1/1/1900, and change the Maximum to 12/31/2200.
Next, grab a Round Rect Button from the library, and
place it below the date picker. Double- click it, and give
it a title of Select, and press 2 to switch to the con-
nections inspector. Drag from the circle next to the
Touch Up Inside event over to the File’s Owner icon, and
connect to the buttonPressed action. Then control- drag
from the File’s Owner icon back to the date picker, and
select the datePicker outlet. Save, close the nib, and go
back to Xcode.
Figure 7-12. The Date Picker in the
library
Figure 7-13. Place all pickers right up
against the edges of the view.
Figure 7-14. The attributes inspec-
tor for a Date Picker

CHAPTER 7: Tab Bars and Pickers 150
Now we just need to implement DatePickerViewController, so click
DatePickerViewController.m, and add the following code:
#import "DatePickerViewController.h"
@implementation DatePickerViewController
@synthesize datePicker;
- (id)initWithNibName:(NSString *)nibNameOrNil
bundle:(NSBundle *)nibBundleOrNil {
if (self = [super initWithNibName:nibNameOrNil bundle:nibBundleOrNil])
{
// Initialization code
}
return self;
}
-(IBAction)buttonPressed { NSDate *selected = [datePicker date]; NSString *message = [[NSString alloc] initWithFormat: @"The date and time you selected is: %@", selected]; UIAlertView *alert = [[UIAlertView alloc] initWithTitle:@"Date and Time Selected" message:message delegate:nil cancelButtonTitle:@"Yes, I did." otherButtonTitles:nil]; [alert show]; [alert release]; [message release];}- (void)viewDidLoad { NSDate *now = [[NSDate alloc] init]; [datePicker setDate:now animated:YES]; [now release];}
- (BOOL)shouldAutorotateToInterfaceOrientation:
(UIInterfaceOrientation)interfaceOrientation {
// Return YES for supported orientations
return (interfaceOrientation == UIInterfaceOrientationPortrait);
}
- (void)didReceiveMemoryWarning {
[super didReceiveMemoryWarning];
// Releases the view if it doesn't have a superview
// Release anything that's not essential, such as cached data
}

CHAPTER 7: Tab Bars and Pickers 151
- (void)dealloc {
[datePicker release]; [super dealloc];
}
We added the implementation of buttonPressed, and we overrode viewDidLoad. In
buttonPressed, we use our datePicker outlet to get the current date value from the date
picker, and then we construct a string based on that date and use it to show an alert sheet.
In viewDidLoad, we created a new NSDate object. An NSDate object created this way will
hold the current date and time. We then set datePicker to that date, which ensures that
every time this view loads, the picker will reset to the current date and time.
Go ahead and build and run, make sure your date picker checks out. If everything went OK,
your application should look like Figure 7-2 when it runs. If you click the Select button, an
alert sheet will pop up telling you the date and time currently selected in the date picker.
Though the date picker does not allow you to specify seconds or a time zone, the alert that
displays the selected date and time displays both seconds and a time zone offset. We could
have added a formatter to simplify the string displayed in the alert, but isn’t this chapter
long enough already?
Implementing the Single Component PickerWell, date pickers are easy enough, but let’s look at using pickers that let the user select from
a list of values. In this example, we’re going to create an NSArray to hold the values we want
to display in the picker. Pickers don’t hold any data themselves. Instead, they call methods
on their datasource and delegate to get the data they need to display. The picker doesn’t
really care where the underlying data is. It asks for the data when it needs it, and the data-
source and delegate work together to supply that data. As a result, the data could be coming
from a static list, as we’ll do in this section, or could be loaded from a file or a URL, or even
made up or calculated on the fly.
Declaring Outlets and Actions
As always, we need to make sure our outlets and actions are in place in our controller’s
header file before we start working in Interface Builder. In Xcode, single- click
SingleComponentPickerViewController.h. This controller class will act as both the datasource and
the delegate for its picker, so we need to make sure it conforms to the protocols for those two
roles. In addition, we’ll need to declare an outlet and an action. Add the following code:
#import <UIKit/UIKit.h>
@interface SingleComponentPickerViewController : UIViewController
<UIPickerViewDelegate, UIPickerViewDataSource> {

CHAPTER 7: Tab Bars and Pickers 152
IBOutlet UIPickerView *singlePicker; NSArray *pickerData;}
@property (nonatomic, retain) UIPickerView *singlePicker;@property (nonatomic, retain) NSArray *pickerData;- (IBAction)buttonPressed;@end
We start by conforming our controller class to two protocols, UIPickerViewDelegate and
UIPickerViewDataSource. After that, we declare an outlet for the picker and a pointer to
an NSArray, which will be used to hold the list of items that will be displayed in the picker.
Finally, we declare the action method for the button, just as we did for the date picker.
Building the View
Double-click SingleComponentPickerView.xib to
open the content view for the second tab in our tab
bar. Bring over a Picker View from the library (see
Figure 7-15), and add it to your nib’s View window,
placing it snugly into the top of the view as you did
with the date picker view.
After placing the picker, control- drag from File’s
Owner to the picker view, and select the singlePicker
outlet. Next, single- click the picker if it’s not already
selected, and press 2 to bring up the connections
inspector. If you look at the connections available for
the picker view, you’ll see that the first two items are
DataSource and Delegate. Drag from the circle next to DataSource to the File’s Owner icon.
Then drag again from the circle next to Delegate to the File’s Owner icon. Now this picker
knows that the instance of the SingleComponentPickerViewController class
is its datasource and delegate and will ask it to supply the data to be displayed. In other
words, when the picker needs information about the data it is going to display, it asks
the SingleComponentPickerViewController instance that controls this view for that
information.
Drag a Round Rect Button to the view, double- click it, and give it a title of Select. Press return
to commit the change. In the connections inspector, drag from the circle next to Touch Up
Inside to the File’s Owner icon, selecting the buttonPressed action. Save the nib file, close it,
and go back to Xcode.
Figure 7-15. The Picker View in the
library

CHAPTER 7: Tab Bars and Pickers 153
Implementing the Controller As Datasource and Delegate
To make our controller work properly as the picker’s datasource and delegate, we are
going to have to implement a few methods that you’ve never seen before. Single- click
SingleComponentPickerViewController.m, and add the following code:
#import "SingleComponentPickerViewController.h"
@implementation SingleComponentPickerViewController
@synthesize singlePicker;@synthesize pickerData;
- (id)initWithNibName:(NSString *)nibNameOrNil
bundle:(NSBundle *)nibBundleOrNil {
if (self = [super initWithNibName:nibNameOrNil
bundle:nibBundleOrNil]) {
// Initialization code
}
return self;
}
- (IBAction)buttonPressed{ NSInteger row = [singlePicker selectedRowInComponent:0]; NSString *selected = [pickerData objectAtIndex:row]; NSString *title = [[NSString alloc] initWithFormat: @"You selected %@!", selected]; UIAlertView *alert = [[UIAlertView alloc] initWithTitle:title message:@"Thank you for choosing." delegate:nil cancelButtonTitle:@"You're Welcome" otherButtonTitles:nil]; [alert show]; [alert release]; [title release];}- (void)viewDidLoad { NSArray *array = [[NSArray alloc] initWithObjects:@"Luke", @"Leia", @"Han", @"Chewbacca", @"Artoo", @"Threepio", @"Lando", nil]; self.pickerData = array; [array release];}
- (BOOL)shouldAutorotateToInterfaceOrientation:
(UIInterfaceOrientation)interfaceOrientation {
// Return YES for supported orientations
return (interfaceOrientation == UIInterfaceOrientationPortrait);
}

CHAPTER 7: Tab Bars and Pickers 154
- (void)didReceiveMemoryWarning {
[super didReceiveMemoryWarning];
// Releases the view if it doesn't have a superview
// Release anything that's not essential, such as cached data
}
- (void)dealloc {
[singlePicker release]; [pickerData release]; [super dealloc];
}
#pragma mark -#pragma mark Picker Data Source Methods- (NSInteger)numberOfComponentsInPickerView:(UIPickerView *)pickerView{ return 1;}- (NSInteger)pickerView:(UIPickerView *)pickerView numberOfRowsInComponent:(NSInteger)component{ return [pickerData count];}#pragma mark Picker Delegate Methods- (NSString *)pickerView:(UIPickerView *)pickerView titleForRow:(NSInteger)row forComponent:(NSInteger)component{ return [pickerData objectAtIndex:row];}@end
The first two methods should be familiar to you by now. The buttonPressed method is
nearly identical to the one we used with the date picker. Unlike the date picker, a regular
picker can’t tell us what data it holds, because it doesn’t maintain the data. It hands that job
off to the delegate and datasource. Instead, we have to ask the picker which row is selected
and then grab the corresponding data from our pickerData array.
Here is how we ask it for the selected row:
NSInteger row = [singlePicker selectedRowInComponent:0];
CHAPTER 7: Tab Bars and Pickers 155
Notice that we had to specify which component we want to know about. We only have one
component in this picker, so we simply pass in 0, which is the index of the first component.
CAUTION
Did you notice that there is no asterisk between NSInteger and row. Although, on the iPhone, the
prefix “NS” usually indicates an Objective- C class from the Foundation framework, this is one of the
exceptions to that general rule. NSInteger is always defined as an integer datatype, either an int
or a long. We use NSInteger rather than int or long, because when we use NSInteger, the
compiler automatically chooses whichever size is best for the platform for which we are compiling. It will
create a 32- bit int when compiling for a 32- bit processor and a longer 64- bit long when compiling for
a 64- bit architecture. At present, there is no 64- bit iPhone, but who knows? Someday in the future, there
may be. You might also write classes for your iPhone applications that you’ll later want to recycle and use
in Cocoa applications for Mac OS X, which already does run on both 32- and 64- bit machines.
In viewDidLoad, we create an array with several objects so that we have data to feed the
picker. Usually, your data will come from other sources, like a property list in your project’s
Resources folder. By embedding a list of items in our code the way we’ve done here, we are
making it much harder on ourselves if we need to update this list or if we want to have our
application translated into other languages. But this approach is the quickest and easiest
way to get data into an array for demonstration purposes. Even though you won’t usually
create your arrays like this, you will almost always cache the data you are using into an array
here in the viewDidLoad method so that you’re not constantly going to disk or to the net-
work every time the picker asks you for data.
TIP
If you’re not supposed to create arrays from lists of objects in your code as we just did in viewDidLoad,
how should you do it? Embed the lists in property list files, and add those files to the Resources folder of
your project. Property list files can be changed without recompiling your source code, which means no
risk of introducing new bugs when you do so. You can also provide different versions of the list for differ-
ent languages, as you’ll see in the chapter on localizing your application, Chapter 17. Property lists can
be created using the Property List Editor application located at /Developer/Applications/Utilities/Property
List Editor.app, or right in Xcode, which supports the editing of property lists in the editor pane. Both
NSArray and NSDictionary offer a method called initWithContentsOfFile: to allow you
to initialize instances from a property file, something we’ll do in this chapter when implementing the
Dependent tab.

CHAPTER 7: Tab Bars and Pickers 156
At the bottom of the file, we get into the new methods required to implement the picker.
The first two methods after dealloc are from the UIPickerViewDataSource protocol, and
they are both required for all pickers (except date pickers). Here’s the first one:
- (NSInteger)numberOfComponentsInPickerView:(UIPickerView *)pickerView
{
return 1;
}
Pickers can have more than one spinning wheel, or component, and this is how the picker
asks how many components it should display. We only want to display one list this time, so
we simply return a value of 1. Notice that a UIPickerView is passed in as a parameter. This
parameter points to the picker view that is asking us the question, which makes it possible
to have multiple pickers being controlled by the same datasource. In our case, we know that
we have only one picker, so we can safely ignore this argument because we already know
which picker is calling us.
The second datasource method is used by the picker to ask how many rows of data there are
for a given component:
- (NSInteger)pickerView:(UIPickerView *)pickerView
numberOfRowsInComponent:(NSInteger)component
{
return [pickerData count];
}
Once again, we are told which picker view is asking, and which component that picker is
asking about. Since we know that we have only one picker and one component, we don’t
bother with either of the arguments and simply return the count of objects from our data
array.
After the two datasource methods, we implement one delegate method. Unlike the data-
source methods, all of the delegate methods are optional. The term “optional” is a bit deceiving
because you do have to implement at least one delegate method. You will usually implement
the method that we are implementing here. As you’ll see when we get to the custom picker, if
you want to display something other than text in the picker, you have to implement a different
method instead.
- (NSString *)pickerView:(UIPickerView *)pickerView
titleForRow:(NSInteger)row
forComponent:(NSInteger)component
{
return [pickerData objectAtIndex:row];
}

CHAPTER 7: Tab Bars and Pickers 157
#PRAGMA WHAT?
Did you notice these lines of code from SingleComponentPickerViewController.m?
#pragma mark -
#pragma mark Picker Data Source Methods
Any line of code that begins with #pragma is technically a compiler directive, specifically, a pragmatic, or
compiler- specific, directive that won’t necessarily work with other compilers or in other environments. If
the compiler doesn’t recognize the directive, it ignores it, though it may generate a warning. In this case, the
#pragma directives are actually directives to the IDE, not the compiler, and they tell Xcode’s editor to put
a break in the pop- up menu of methods and functions at the top of the editor pane as shown in the follow-
ing screen shot. The first one puts a divider line in the menu. The second creates a bold entry.
Some of your classes, especially some of your controller classes, are likely to get rather long, and the methods
and functions pop- up menu makes navigating around your code much easier. Putting in #pragma
directives and logically organizing your code will make that pop- up more efficient to use.
In this method, the picker is asking us to provide the data for a specific row in a specific
component. We are provided with a pointer to the picker that is asking, along with the com-
ponent and row that it is asking about. Since our view has one picker with one component,
we simply ignore everything except the row argument and use that to return the appropri-
ate item from our data array.

CHAPTER 7: Tab Bars and Pickers 158
Go ahead and compile and run again. When the simulator comes up, switch to the second
tab—the one labeled Single—and check out your new custom picker, which should look like
Figure 7-3.
When you’re done reliving all those Star Wars memories, come on back to Xcode and we’ll
see how to implement a picker with two components. If you feel up to a challenge, this next
content view is actually a good one for you to attempt on your own. You’ve already seen all
the methods you’ll need for this picker, so go ahead, take a crack at it. We’ll wait here. You
might want to start off with a good look at Figure 7-4, just to refresh your memory. When
you’re done, read on, and you’ll see how we tackled this problem.
Implementing a Multicomponent PickerThe next content pane will have a picker with two components or wheels, and each wheel
will be independent of the other wheel. The left wheel will have a list of sandwich fillings,
and the right wheel will have a selection of bread types. As we mentioned a moment ago,
we’ll write the same datasource and delegate methods that we did for the single component
picker, we’ll just have to write a little additional code in some of those methods to make sure
we’re returning the right value and row count for each component.
Declaring Outlets and Actions
Single-click DoubleComponentPickerViewController.h, and add the following code:
#import <UIKit/UIKit.h>
#define kFillingComponent 0#define kBreadComponent 1
@interface DoubleComponentPickerViewController : UIViewController
<UIPickerViewDelegate, UIPickerViewDataSource> {
IBOutlet UIPickerView *doublePicker; NSArray *fillingTypes; NSArray *breadTypes;
}
@property(nonatomic, retain) UIPickerView *doublePicker;@property(nonatomic, retain) NSArray *fillingTypes;@property(nonatomic, retain) NSArray *breadTypes;-(IBAction)buttonPressed;@end

CHAPTER 7: Tab Bars and Pickers 159
As you can see, we start out by defining two constants that will represent the two compo-
nents, which will make our code easier to read. Components are assigned numbers, with the
leftmost component being assigned zero, and increasing by one each move to the right.
Next, we conform our controller class to both the delegate and datasource protocols, and
we declare an outlet for the picker, as well as for two arrays to hold the data for our two
picker components. After declaring properties for each of our instance variables, we declare
a single action method for the button, just as we did in the last two context panes. Save this,
and double- click DoubleComponentPickerView.xib to open the nib file in Interface Builder.
Building the View
Add a picker and a button to the View, and then make the necessary connections. We’re not
going to walk you through it this time, but you can refer to the previous section if you need
a step-by- step guide, since the two applications are identical in terms of the nib file. Here’s
a summary of what you need to do:
Connect the doublePicker outlet on File’s Owner to the picker.
Connect the DataSource and Delegate connections on the picker view to File’s Owner
(use the connections inspector).
Connect the Touch Up Inside event of the button to the buttonPressed action on File’s
Owner (use the connections inspector).
Make sure you save your nib and close it before you head back to Xcode. Oh, and dog- ear
this page (or use a bookmark, if you prefer). You’ll be referring to it in a bit.
Implementing the Controller
Single-click DoubleComponentPickerViewController.m, and add the following code:
#import "DoubleComponentPickerViewController.h"
@implementation DoubleComponentPickerViewController
@synthesize doublePicker;@synthesize fillingTypes;@synthesize breadTypes;- (id)initWithNibName:(NSString *)nibNameOrNil
bundle:(NSBundle *)nibBundleOrNil {
if (self = [super initWithNibName:nibNameOrNil
bundle:nibBundleOrNil]) {
// Initialization code
}
return self;
}
-(IBAction)buttonPressed

CHAPTER 7: Tab Bars and Pickers 160
{ NSInteger breadRow = [doublePicker selectedRowInComponent: kBreadComponent]; NSInteger fillingRow = [doublePicker selectedRowInComponent: kFillingComponent]; NSString *bread = [breadTypes objectAtIndex:breadRow]; NSString *filling = [fillingTypes objectAtIndex:fillingRow];
NSString *message = [[NSString alloc] initWithFormat: @"Your %@ on %@ bread will be right up.", filling, bread];
UIAlertView *alert = [[UIAlertView alloc] initWithTitle: @"Thank you for your order" message:message delegate:nil cancelButtonTitle:@"Great!" otherButtonTitles:nil]; [alert show]; [alert release]; [message release];
}- (void)viewDidLoad { NSArray *breadArray = [[NSArray alloc] initWithObjects:@"White", @"Whole Wheat", @"Rye", @"Sourdough", @"Seven Grain", nil]; self.breadTypes = breadArray; [breadArray release];
NSArray *fillingArray = [[NSArray alloc] initWithObjects:@"Ham", @"Turkey", @"Peanut Butter", @"Tuna Salad", @"Chicken Salad", @"Roast Beef", @"Vegemite", nil]; self.fillingTypes = fillingArray; [fillingArray release];}
- (BOOL)shouldAutorotateToInterfaceOrientation:
(UIInterfaceOrientation)interfaceOrientation {
// Return YES for supported orientations
return (interfaceOrientation == UIInterfaceOrientationPortrait);
}
- (void)didReceiveMemoryWarning {
[super didReceiveMemoryWarning];
// Releases the view if it doesn't have a superview
// Release anything that's not essential, such as cached data

CHAPTER 7: Tab Bars and Pickers 161
}
- (void)dealloc {
[doublePicker release]; [breadTypes release]; [fillingTypes release]; [super dealloc];
}
#pragma mark -#pragma mark Picker Data Source Methods- (NSInteger)numberOfComponentsInPickerView:(UIPickerView *)pickerView{ return 2;}- (NSInteger)pickerView:(UIPickerView *)pickerView numberOfRowsInComponent:(NSInteger)component{ if (component == kBreadComponent) return [self.breadTypes count];
return [self.fillingTypes count];}#pragma mark Picker Delegate Methods- (NSString *)pickerView:(UIPickerView *)pickerView titleForRow:(NSInteger)row forComponent:(NSInteger)component{ if (component == kBreadComponent) return [self.breadTypes objectAtIndex:row];
return [self.fillingTypes objectAtIndex:row];}@end
The buttonPressed method is a little more involved this time, but there’s very little there
that’s new to you; we just have to specify which component we are talking about when we
request the selected row using those constants we defined earlier, kBreadComponent and
kFillingComponent.
NSInteger breadRow = [doublePicker selectedRowInComponent:
kBreadComponent];
NSInteger fillingRow = [doublePicker selectedRowInComponent:
kFillingComponent];
You can see here that using the two constants instead of 0 and 1 makes our code consider-
ably more readable. From this point on, the buttonPressed method is fundamentally the
same as the last one we wrote.

CHAPTER 7: Tab Bars and Pickers 162
viewDidLoad: is also very similar to the one we wrote for the previous section. The only
difference is that we are loading two arrays with data rather than just one. Again, we’re just
creating arrays from a hard- coded list of strings, something you generally shouldn’t do in
your own applications.
When we get down to the datasource methods, that’s where things start to change a bit. In the
first method, we specify that our picker should have two components rather than just one:
- (NSInteger)numberOfComponentsInPickerView:(UIPickerView *)pickerView
{
return 2;
}
Easy enough. This time, when we are asked for the number of rows, we have to check which
component the picker is asking about and return the correct row count for the correspond-
ing array:
- (NSInteger)pickerView:(UIPickerView *)pickerView
numberOfRowsInComponent:(NSInteger)component
{
if (component == kBreadComponent)
return [self.breadTypes count];
return [self.fillingTypes count];
}
Then, in our delegate method, we do the same thing. We check the component and use the
correct array for the requested component to fetch and return the right value.
- (NSString *)pickerView:(UIPickerView *)pickerView
titleForRow:(NSInteger)row
forComponent:(NSInteger)component
{
if (component == kBreadComponent)
return [self.breadTypes objectAtIndex:row];
return [self.fillingTypes objectAtIndex:row];
}
That wasn’t so hard, was it? Compile and run your application, and make sure the Double content
pane looks like Figure 7-4. Notice that each wheel is completely independent of the other one. Turn-
ing one has no affect on the other. That’s appropriate in this case. But there are going to be times
when one component is dependent on another. A good example of this is in the date picker. When
you change the month, the dial that shows the number of days in the month may have to change
because not all months have the same number of days. Implementing this isn’t really hard once you
know how, but it’s not the easiest thing to figure out on your own, so let’s do that next.

CHAPTER 7: Tab Bars and Pickers 163
Implementing Dependent ComponentsWe’re picking up steam now. For this next section, we’re not going to hold your hand quite
as much when it comes to material we’ve already covered. Instead, we’ll focus on the new
stuff. Our new picker will display a list of US states in the left component and a list of ZIP
codes in the right component that correspond to the state currently selected in the left.
We’ll need a separate list of ZIP code values for each item in the left- hand component.
We’ll declare two arrays, one for each component, as we did last time. We’ll also need
an NSDictionary. In the dictionary, we’re going to have an NSArray for each state (see
Figure 7-16). Later on, we’ll implement a delegate method that will notify us when the
picker’s selection changes. If the value on the left changes, we will grab the correct array out
of the dictionary and assign it to the array being used for the right- hand component. Don’t
worry if you didn’t catch all that, we’ll talk about it more as we get into the code.
NSDictionary
Alabama
Alaska
Arizona
Arkansas
NSArray
NSArray
NSArray
NSArray
onary
NSArray
onar
NSArray
NSArray12345123461234712348...
NSArrayyNSArray12354123561235712358
NSArray12345123461234712348
NSArrayy
ray
ArrayArrayNS
ray
NS
NSArrayy
NS
NSArrayy
NS
rayy
...
...
Figure 7-16. Our application’s data: For each state there will be one
entry in a dictionary with the name of the state as the key. Stored under
that key will be an NSArray instance containing all the ZIP codes from
that state.
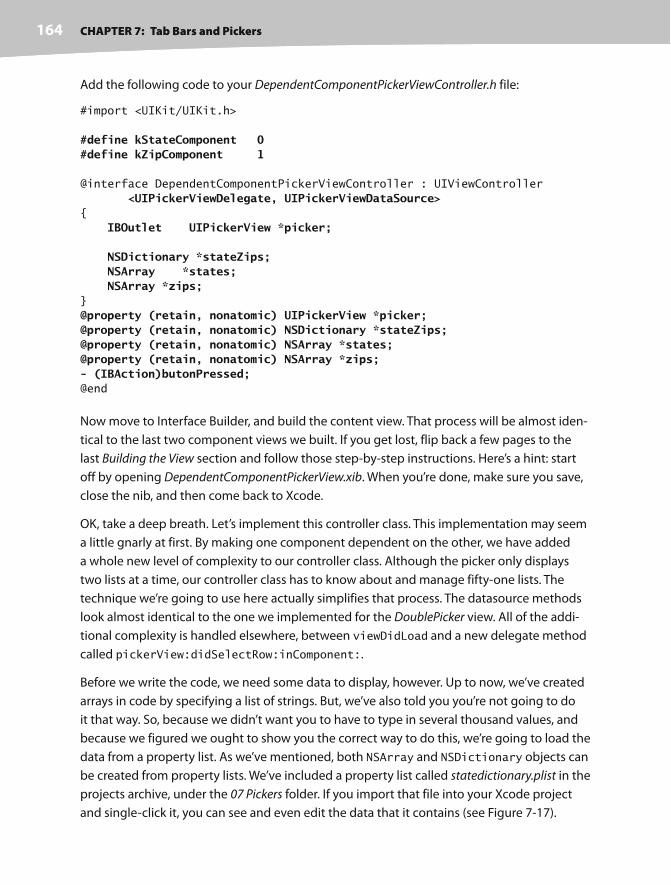
CHAPTER 7: Tab Bars and Pickers 164
Add the following code to your DependentComponentPickerViewController.h file:
#import <UIKit/UIKit.h>
#define kStateComponent 0#define kZipComponent 1
@interface DependentComponentPickerViewController : UIViewController
<UIPickerViewDelegate, UIPickerViewDataSource>{
IBOutlet UIPickerView *picker;
NSDictionary *stateZips; NSArray *states; NSArray *zips;}
@property (retain, nonatomic) UIPickerView *picker;@property (retain, nonatomic) NSDictionary *stateZips;@property (retain, nonatomic) NSArray *states;@property (retain, nonatomic) NSArray *zips;- (IBAction)butonPressed;@end
Now move to Interface Builder, and build the content view. That process will be almost iden-
tical to the last two component views we built. If you get lost, flip back a few pages to the
last Building the View section and follow those step-by- step instructions. Here’s a hint: start
off by opening DependentComponentPickerView.xib. When you’re done, make sure you save,
close the nib, and then come back to Xcode.
OK, take a deep breath. Let’s implement this controller class. This implementation may seem
a little gnarly at first. By making one component dependent on the other, we have added
a whole new level of complexity to our controller class. Although the picker only displays
two lists at a time, our controller class has to know about and manage fifty- one lists. The
technique we’re going to use here actually simplifies that process. The datasource methods
look almost identical to the one we implemented for the DoublePicker view. All of the addi-
tional complexity is handled elsewhere, between viewDidLoad and a new delegate method
called pickerView:didSelectRow:inComponent:.
Before we write the code, we need some data to display, however. Up to now, we’ve created
arrays in code by specifying a list of strings. But, we’ve also told you you’re not going to do
it that way. So, because we didn’t want you to have to type in several thousand values, and
because we figured we ought to show you the correct way to do this, we’re going to load the
data from a property list. As we’ve mentioned, both NSArray and NSDictionary objects can
be created from property lists. We’ve included a property list called statedictionary.plist in the
projects archive, under the 07 Pickers folder. If you import that file into your Xcode project
and single- click it, you can see and even edit the data that it contains (see Figure 7-17).
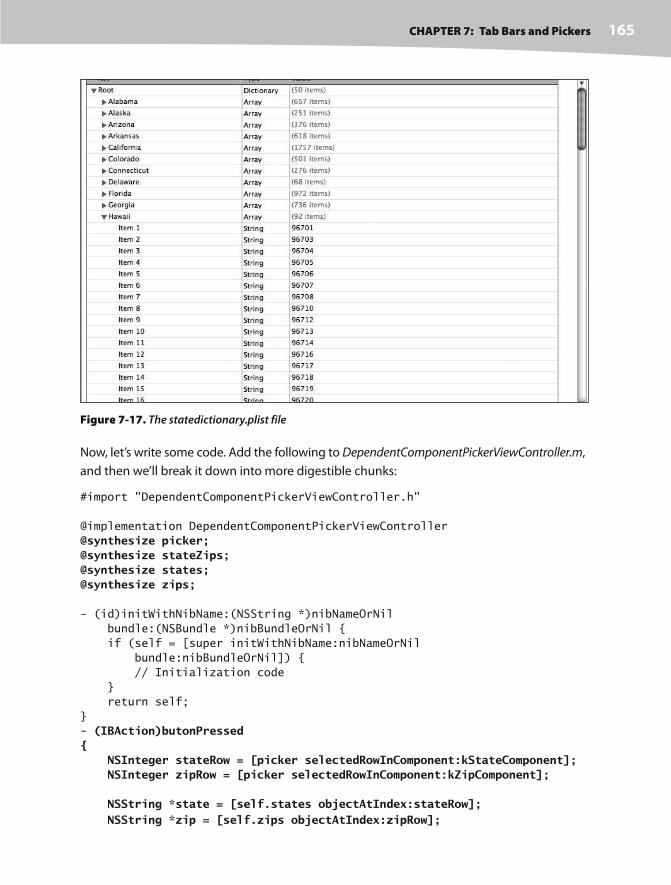
CHAPTER 7: Tab Bars and Pickers 165
Figure 7-17. The statedictionary.plist file
Now, let’s write some code. Add the following to DependentComponentPickerViewController.m,
and then we’ll break it down into more digestible chunks:
#import "DependentComponentPickerViewController.h"
@implementation DependentComponentPickerViewController
@synthesize picker;@synthesize stateZips;@synthesize states;@synthesize zips;
- (id)initWithNibName:(NSString *)nibNameOrNil
bundle:(NSBundle *)nibBundleOrNil {
if (self = [super initWithNibName:nibNameOrNil
bundle:nibBundleOrNil]) {
// Initialization code
}
return self;
}
- (IBAction)butonPressed{ NSInteger stateRow = [picker selectedRowInComponent:kStateComponent]; NSInteger zipRow = [picker selectedRowInComponent:kZipComponent];
NSString *state = [self.states objectAtIndex:stateRow]; NSString *zip = [self.zips objectAtIndex:zipRow];

CHAPTER 7: Tab Bars and Pickers 166
NSString *title = [[NSString alloc] initWithFormat: @"You selected zip code %@.", zip]; NSString *message = [[NSString alloc] initWithFormat: @"%@ is in %@", zip, state];
UIAlertView *alert = [[UIAlertView alloc] initWithTitle:title message:message delegate:nil cancelButtonTitle:@"OK" otherButtonTitles:nil]; [alert show]; [alert release]; [title release]; [message release];}
- (void)viewDidLoad {
NSBundle *bundle = [NSBundle mainBundle]; NSString *plistPath = [bundle pathForResource: @"statedictionary" ofType:@"plist"];
NSDictionary *dictionary = [[NSDictionary alloc] initWithContentsOfFile:plistPath]; self.stateZips = dictionary; [dictionary release];
NSArray *components = [self.stateZips allKeys]; NSArray *sorted = [components sortedArrayUsingSelector: @selector(compare:)]; self.states = sorted;
NSString *selectedState = [self.states objectAtIndex:0]; NSArray *array = [stateZips objectForKey:selectedState]; self.zips = array;}
- (BOOL)shouldAutorotateToInterfaceOrientation:
(UIInterfaceOrientation)interfaceOrientation {
// Return YES for supported orientations
return (interfaceOrientation == UIInterfaceOrientationPortrait);
}
- (void)didReceiveMemoryWarning {
[super didReceiveMemoryWarning];
// Releases the view if it doesn't have a superview
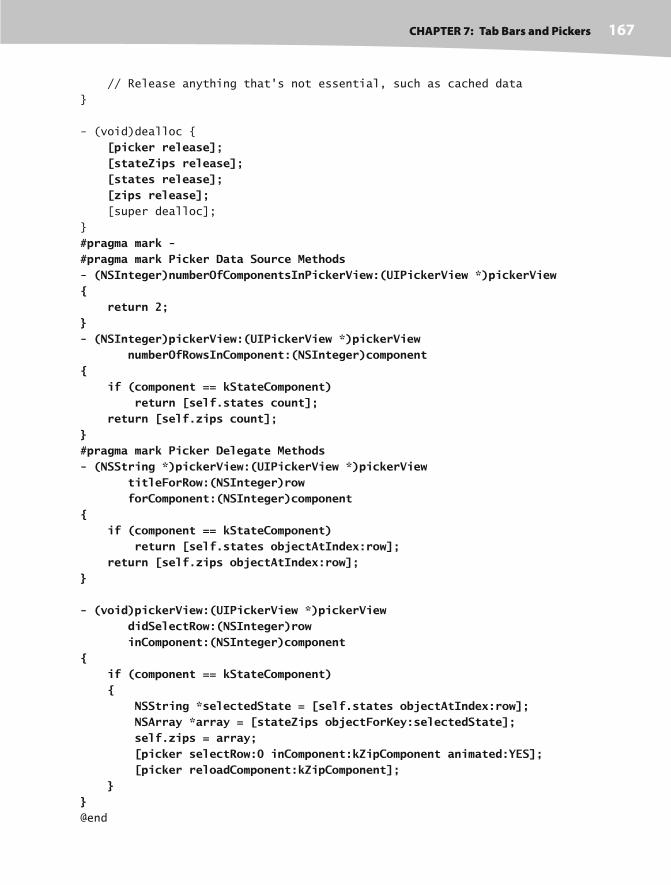
CHAPTER 7: Tab Bars and Pickers 167
// Release anything that's not essential, such as cached data
}
- (void)dealloc {
[picker release]; [stateZips release]; [states release]; [zips release]; [super dealloc];
}
#pragma mark -#pragma mark Picker Data Source Methods- (NSInteger)numberOfComponentsInPickerView:(UIPickerView *)pickerView{ return 2;}- (NSInteger)pickerView:(UIPickerView *)pickerView numberOfRowsInComponent:(NSInteger)component{ if (component == kStateComponent) return [self.states count]; return [self.zips count];}#pragma mark Picker Delegate Methods- (NSString *)pickerView:(UIPickerView *)pickerView titleForRow:(NSInteger)row forComponent:(NSInteger)component{ if (component == kStateComponent) return [self.states objectAtIndex:row]; return [self.zips objectAtIndex:row];}
- (void)pickerView:(UIPickerView *)pickerView didSelectRow:(NSInteger)row inComponent:(NSInteger)component{ if (component == kStateComponent) { NSString *selectedState = [self.states objectAtIndex:row]; NSArray *array = [stateZips objectForKey:selectedState]; self.zips = array; [picker selectRow:0 inComponent:kZipComponent animated:YES]; [picker reloadComponent:kZipComponent]; }}@end

CHAPTER 7: Tab Bars and Pickers 168
There’s no need to talk about the buttonPressed method; it’s fundamentally the same as
the last one. We should talk about the viewDidLoad method, though. There’s some stuff
going on there that you need to understand, so pull up a chair, and let’s chat.
The first thing we do in this new viewDidLoad method is grab a reference to our applica-
tion’s main bundle.
NSBundle *bundle = [NSBundle mainBundle];
What is a bundle, you ask? Well, a bundle is just a special type of folder whose contents fol-
low a specific structure. Applications and frameworks are both bundles, and this call returns
a bundle object that represents our application. One of the primary uses of NSBundle is
to get to resources that you added to the Resources folder of your project. Those files will
get copied into your application’s bundle when you build your application. We’ve added
resources like images to our projects, but up to now, we’ve only used those in Interface
Builder. If we want to get to those resources in our code, we have to use NSBundle. We use
the main bundle to retrieve the path of the resource in which we’re interested:
NSString *plistPath = [bundle pathForResource:@"statedictionary"
ofType:@"plist"];
This will return a string containing the location of the statedictionary.plist file. We can then
use that path to create an NSDictionary object. Once we do that, the entire contents of
that property list will be loaded into the newly created NSDictionary object, which we then
assign to stateZips.
NSDictionary *dictionary = [[NSDictionary alloc]
initWithContentsOfFile:plistPath];
self.stateZips = dictionary;
[dictionary release];
The dictionary we just loaded uses the names of the states as the keys and contains an
NSArray with all the ZIP codes for that state as the values. To populate the array for the
left- hand component, we get the list of all keys from our dictionary and assign those to the
states array. Before we assign it, though, we sort it alphabetically.
NSArray *components = [self.stateZips allKeys];
NSArray *sorted = [components sortedArrayUsingSelector:
@selector(compare:)];
self.states = sorted;
Unless we specifically set the selection to another value, pickers start with the first row (row
0) selected. In order to get the zips array that corresponds to the first row in the states
array, we grab the object from the states array that’s at index 0. That will return the name of
the state that will be selected at launch time. We then use that state name to grab the array

CHAPTER 7: Tab Bars and Pickers 169
of ZIP codes for that state, which we assign to the zips array that will be used to feed data to
the right- hand component.
NSString *selectedState = [self.states objectAtIndex:0];
NSArray *array = [stateZips objectForKey:selectedState];
self.zips = array;
The two datasource methods are practically identical to the last version; we return the number
of rows in the appropriate array. The same is true for the first delegate method we implemented.
The second delegate method is the new one, and it’s where the magic happens:
- (void)pickerView:(UIPickerView *)pickerView
didSelectRow:(NSInteger)row
inComponent:(NSInteger)component
{
if (component == kStateComponent)
{
NSString *selectedState = [self.states objectAtIndex:row];
NSArray *array = [stateZips objectForKey:selectedState];
self.zips = array;
[picker selectRow:0 inComponent:kZipComponent animated:YES];
[picker reloadComponent:kZipComponent];
}
}
In this method, which is called any time the picker’s
selection changes, we look at the component and see if
the left- hand component changed. If it did, we grab the
array that corresponds to the new selection and assign
it to the zips array. Then we set the right- hand compo-
nent back to the first row and tell it to reload itself. By
swapping the zips array whenever the state changes,
the rest of the code remains pretty much the same as it
was in the DoublePicker example.
We’re not quite done yet. Compile and run your applica-
tion, and check out the Dependent tab, as illustrated in
Figure 7-18. Do you see anything there you don’t like?
The two components are equal in size. Even though the
ZIP code will never be more than five characters long,
it’s been given equal billing with the state. Since states
like Mississippi and Massachusetts won’t fit in half of the
picker, this seems less than ideal. Fortunately, there’s
another delegate method we can implement to indicate Figure 7-18. Do we really want the
two components to be equal size?

CHAPTER 7: Tab Bars and Pickers 170
how wide each component should be. We have about 295 pixels available to the picker com-
ponents in portrait orientation, but for every additional component we add, we lose a little
bit of space to drawing the edges of the new component. You might need to experiment a
little with values to get it to look right. Add the following method to the delegate section of
DependentComponentPickerViewController.m:
- (CGFloat)pickerView:(UIPickerView *)pickerView widthForComponent:(NSInteger)component{ if (component == kZipComponent) return 90; return 200;}
In this method, we return a number that represents how many pixels wide each component
should be, and the picker will do its best to accommodate this. Save, compile, and run, and
the picker on the Dependent tab will look more like the one shown in Figure 7-5.
Well, by this point, you should be pretty darn comfortable with both pickers and tab bar
applications. We have one more thing to show you about pickers, but let’s have a little fun
while doing it. Let’s create a simple slot machine game.
Creating a Simple Game with a Custom PickerNext up, we’re going to create an actual working slot machine. Well, OK, it won’t dispense sil-
ver dollars, but it does look pretty cool. Take a look back at Figure 7-6 before proceeding, so
you know what the view we’re building is going to look like.
Writing the Controller Header File
Add the following code to CustomPickerViewController.h for starters:
#import <UIKit/UIKit.h>
@interface CustomPickerViewController : UIViewController
<UIPickerViewDataSource, UIPickerViewDelegate> {
IBOutlet UIPickerView *picker; IBOutlet UILabel *winLabel;
NSArray *column1; NSArray *column2; NSArray *column3; NSArray *column4; NSArray *column5;

CHAPTER 7: Tab Bars and Pickers 171
}
@property(nonatomic, retain) UIPickerView *picker;@property(nonatomic, retain) UILabel *winLabel;@property(nonatomic, retain) NSArray *column1;@property(nonatomic, retain) NSArray *column2;@property(nonatomic, retain) NSArray *column3;@property(nonatomic, retain) NSArray *column4;@property(nonatomic, retain) NSArray *column5;-(IBAction)spin;@end
We’re declaring two outlets, one for a picker view and one for a label. The label will be used
to tell users when they’ve won, which happens when they get three of the same symbol in
a row.
We also create five pointers to NSArray objects. We’ll use these to hold the image views con-
taining the images we want the picker to draw. Even though we’re using the same images
in all five columns, we need separate arrays for each one with its own set of image views,
because each view can only be drawn in one place in the picker. We also declare an action
method, this time called spin.
Building the View
Even though the picker in Figure 7-6 looks quite a bit fancier than the other ones we’ve built,
there’s actually very little difference in the way we’ll design our nib. All the extra work is done
in the delegate methods of our controller.
Make sure you’ve saved your new source code, and then double- click CustomPickerView.xib
to open the file in Interface Builder. Add a label, a picker, and a button. Give the button a title
of Spin. Next, select the label, and use the Fonts palette (press T) to make the label’s text
nice and big. You may need to make the label itself bigger to accommodate your new super-
sized text. You can also assign your label a nice festive color using the attributes inspector.
While you’re there, be sure to set the text alignment to centered. After getting the text the
way you want it, delete the word Label from it, since we don’t want any text displayed until
the first time the user wins.
After that, make all the connections to outlets and actions. You need to connect the file’s
owner’s picker outlet to the picker view, the file’s owner’s winLabel outlet to the label, and
the button’s touch up inside event to the spin action. After that, just make sure to specify the
Delegate and the DataSource for the picker.
Oh, and there’s one additional thing that you need to do. Select the picker, and bring up the
attributes inspector. You need to uncheck the checkbox labeled User Interaction Enabled so
that the user can’t manually change the dial and cheat. Once you’ve done all that, save and
return to Xcode.

CHAPTER 7: Tab Bars and Pickers 172
CAUTION
Be careful when using the Fonts palette in Interface Builder for designing iPhone interfaces. Interface
Builder will let you assign any font that’s on your Mac to the label, but the iPhone has a very limited
selection of fonts. You should limit your font selections to one of the following font families: American
Typewriter, AppleGothic, Arial, Arial Rounded MT Bold, Arial Unicode MS, Courier, Courier New, DB LCD
Temp, Georgia, Helvetica, Helvetica Neue, Hiragino Kaku Gothic ProN W3, Hiragino Kaku Gothic ProN W6,
Marker Felt, STHeiti J, STHeiti K, STHeiti SC, STHeiti TC, Times New Roman, Trebuchet MS, Verdana, or
Zapfino.
Adding Image Resources
Once you’re back in Xcode, we need to add the images that we’ll be using in our game.
We’ve included a set of six image files (seven.png, bar.png, crown.png, cherry.png, lemon.png,
and apple.png) for you in the project archive under the 07 Pickers/Custom Picker Images
folder. Add all of those files to the Resources folder of your project. It’s probably a good idea
to copy them into the project folder when prompted to do so.
Implementing the Controller
We’ve got a bunch of new stuff to cover in the implementation of this controller. Add the fol-
lowing code to your CustomPickerViewController.m file, and then we’ll look at each new thing
in turn:
#import "CustomPickerViewController.h"
@implementation CustomPickerViewController
@synthesize picker;@synthesize winLabel;@synthesize column1;@synthesize column2;@synthesize column3;@synthesize column4;@synthesize column5;- (id)initWithNibName:(NSString *)nibNameOrNil
bundle:(NSBundle *)nibBundleOrNil {
if (self = [super initWithNibName:nibNameOrNil
bundle:nibBundleOrNil]) {
// Initialization code
}
return self;
}
-(IBAction)spin{

CHAPTER 7: Tab Bars and Pickers 173
BOOL win = NO; int numInRow = 1; int lastVal = -1; for (int i = 0; i < 5; i++) { int newValue = random() % [self.column1 count];
if (newValue == lastVal) numInRow++; else numInRow = 1;
lastVal = newValue; [picker selectRow:newValue inComponent:i animated:YES]; [picker reloadComponent:i]; if (numInRow >= 3) win = YES; }
if (win) winLabel.text = @"WIN!"; else winLabel.text = @"";}
- (void)viewDidLoad {
UIImage *seven = [UIImage imageNamed:@"seven.png"]; UIImage *bar = [UIImage imageNamed:@"bar.png"]; UIImage *crown = [UIImage imageNamed:@"crown.png"]; UIImage *cherry = [UIImage imageNamed:@"cherry.png"]; UIImage *lemon = [UIImage imageNamed:@"lemon.png"]; UIImage *apple = [UIImage imageNamed:@"apple.png"];
for (int i = 1; i <= 5; i++) { UIImageView *sevenView = [[UIImageView alloc] initWithImage:seven]; UIImageView *barView = [[UIImageView alloc] initWithImage:bar]; UIImageView *crownView = [[UIImageView alloc] initWithImage:crown]; UIImageView *cherryView = [[UIImageView alloc] initWithImage:cherry]; UIImageView *lemonView = [[UIImageView alloc] initWithImage:lemon]; UIImageView *appleView = [[UIImageView alloc] initWithImage:apple];
NSArray *imageViewArray = [[NSArray alloc] initWithObjects: sevenView, barView, crownView, cherryView, lemonView, appleView, nil];
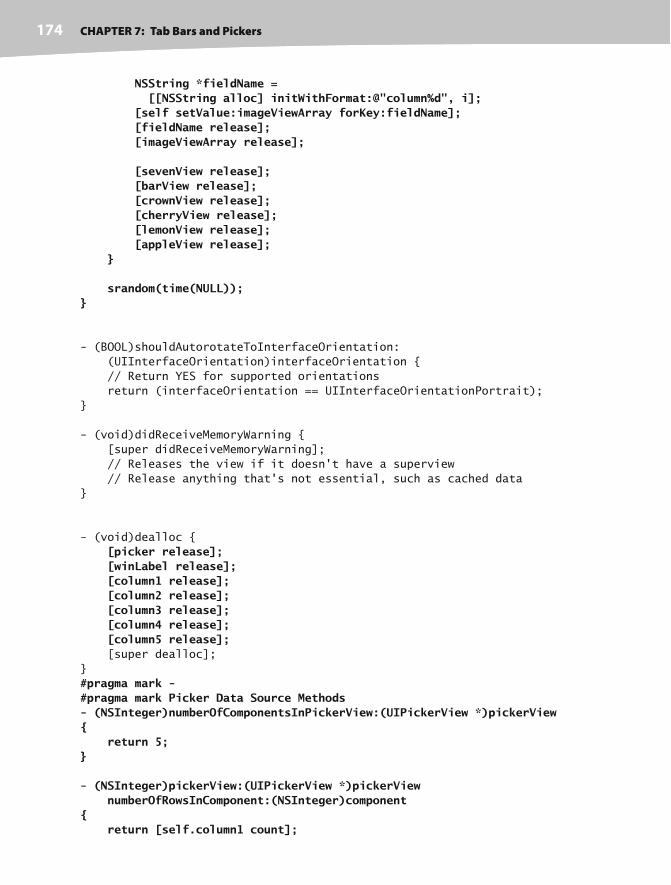
CHAPTER 7: Tab Bars and Pickers 174
NSString *fieldName = [[NSString alloc] initWithFormat:@"column%d", i]; [self setValue:imageViewArray forKey:fieldName]; [fieldName release]; [imageViewArray release];
[sevenView release]; [barView release]; [crownView release]; [cherryView release]; [lemonView release]; [appleView release]; }
srandom(time(NULL));}
- (BOOL)shouldAutorotateToInterfaceOrientation:
(UIInterfaceOrientation)interfaceOrientation {
// Return YES for supported orientations
return (interfaceOrientation == UIInterfaceOrientationPortrait);
}
- (void)didReceiveMemoryWarning {
[super didReceiveMemoryWarning];
// Releases the view if it doesn't have a superview
// Release anything that's not essential, such as cached data
}
- (void)dealloc {
[picker release]; [winLabel release]; [column1 release]; [column2 release]; [column3 release]; [column4 release]; [column5 release]; [super dealloc];
}
#pragma mark -#pragma mark Picker Data Source Methods- (NSInteger)numberOfComponentsInPickerView:(UIPickerView *)pickerView{ return 5;}
- (NSInteger)pickerView:(UIPickerView *)pickerView numberOfRowsInComponent:(NSInteger)component{ return [self.column1 count];

CHAPTER 7: Tab Bars and Pickers 175
}#pragma mark Picker Delegate Methods
- (UIView *)pickerView:(UIPickerView *)pickerView viewForRow:(NSInteger)row forComponent:(NSInteger)component reusingView:(UIView *)view{ NSString *arrayName = [[NSString alloc] initWithFormat:@"column%d", component+1]; NSArray *array = [self valueForKey:arrayName]; return [array objectAtIndex:row];}@end
There’s a lot going on there, huh? Let’s take the new stuff method by method.
The spin Method
The spin method method fires when the user touches the Spin button. In it, we first declare
a few variables that will help us keep track of whether the user has won. We’ll use win to
keep track of whether we’ve found three in a row by setting it to YES if we have. We’ll use
numInRow to keep track of how many of the same value we’ve gotten in a row so far, and we
will keep track of the previous component’s value in lastVal so that we have a way to com-
pare the current value to the previous. We initialize lastVal to –1 because we know that
value won’t match any of the real values:
BOOL win = NO;
int numInRow = 1;
int lastVal = -1;
Next, we loop through all five components and set each one to a new, randomly generated
row selection. We get the count from the column1 array to do that, which is a shortcut we
can use because we know that all five columns have the same number of values:
for (int i = 0; i < 5; i++)
{
int newValue = random() % [self.column1 count];
We compare the new value to the last value and increment numInRow if it matches. If the
value didn’t match, we reset numInRow back to 1. We then assign the new value to lastVal
so we’ll have it to compare the next time through the loop:
if (newValue == lastVal)
numInRow++;
else
numInRow = 1;
lastVal = newValue;
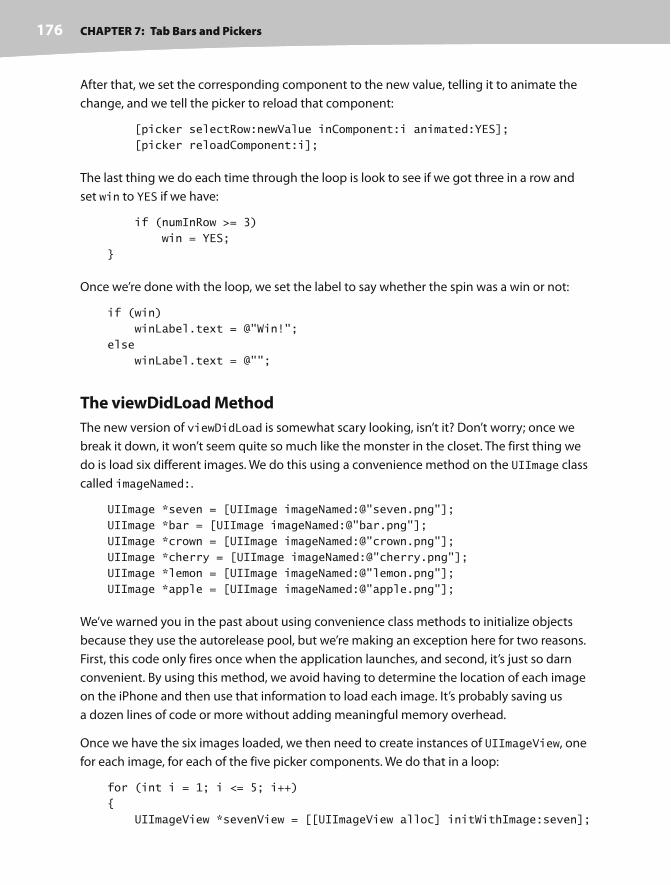
CHAPTER 7: Tab Bars and Pickers 176
After that, we set the corresponding component to the new value, telling it to animate the
change, and we tell the picker to reload that component:
[picker selectRow:newValue inComponent:i animated:YES];
[picker reloadComponent:i];
The last thing we do each time through the loop is look to see if we got three in a row and
set win to YES if we have:
if (numInRow >= 3)
win = YES;
}
Once we’re done with the loop, we set the label to say whether the spin was a win or not:
if (win)
winLabel.text = @"Win!";
else
winLabel.text = @"";
The viewDidLoad Method
The new version of viewDidLoad is somewhat scary looking, isn’t it? Don’t worry; once we
break it down, it won’t seem quite so much like the monster in the closet. The first thing we
do is load six different images. We do this using a convenience method on the UIImage class
called imageNamed:.
UIImage *seven = [UIImage imageNamed:@"seven.png"];
UIImage *bar = [UIImage imageNamed:@"bar.png"];
UIImage *crown = [UIImage imageNamed:@"crown.png"];
UIImage *cherry = [UIImage imageNamed:@"cherry.png"];
UIImage *lemon = [UIImage imageNamed:@"lemon.png"];
UIImage *apple = [UIImage imageNamed:@"apple.png"];
We’ve warned you in the past about using convenience class methods to initialize objects
because they use the autorelease pool, but we’re making an exception here for two reasons.
First, this code only fires once when the application launches, and second, it’s just so darn
convenient. By using this method, we avoid having to determine the location of each image
on the iPhone and then use that information to load each image. It’s probably saving us
a dozen lines of code or more without adding meaningful memory overhead.
Once we have the six images loaded, we then need to create instances of UIImageView, one
for each image, for each of the five picker components. We do that in a loop:
for (int i = 1; i <= 5; i++)
{
UIImageView *sevenView = [[UIImageView alloc] initWithImage:seven];

CHAPTER 7: Tab Bars and Pickers 177
UIImageView *barView = [[UIImageView alloc] initWithImage:bar];
UIImageView *crownView = [[UIImageView alloc] initWithImage:crown];
UIImageView *cherryView = [[UIImageView alloc]
initWithImage:cherry];
UIImageView *lemonView = [[UIImageView alloc] initWithImage:lemon];
UIImageView *appleView = [[UIImageView alloc] initWithImage:apple];
Once we have the image views, we put them into an array. This array is the one that will be
used to provide data to the picker for one of its five components.
NSArray *imageViewArray = [[NSArray alloc] initWithObjects:
sevenView, barView, crownView, cherryView, lemonView,
appleView, nil];
Now, we just need to assign this array to one of our five arrays. To do that, we’re going to cre-
ate a string that matches the name of one of the arrays. The first time through the loop, this
string will be column1, which is the name of the array we’ll use to feed the first component
in the picker. The second time through, it will equal column2, and so on:
NSString *fieldName = [[NSString alloc]
initWithFormat:@"column%d", i];
Once we have the name of one of the five arrays, we can assign this array to that property
using a very handy method called setValue:forKey:. This method lets you set a property
based on its name. So, if we call this with a value of “column1”, it is exactly the same as calling
the mutator method setColumn1:.
[self setValue:imageViewArray forKey:fieldName];
After that, we just do a little memory cleanup:
[fieldName release];
[imageViewArray release];
[sevenView release];
[barView release];
[crownView release];
[cherryView release];
[lemonView release];
[appleView release];
}
The last thing we do in this method is to seed the random number generator. If we don’t do
that, the game will play the same every time you play it, which gets kind of boring.
srandom(time(NULL));
}
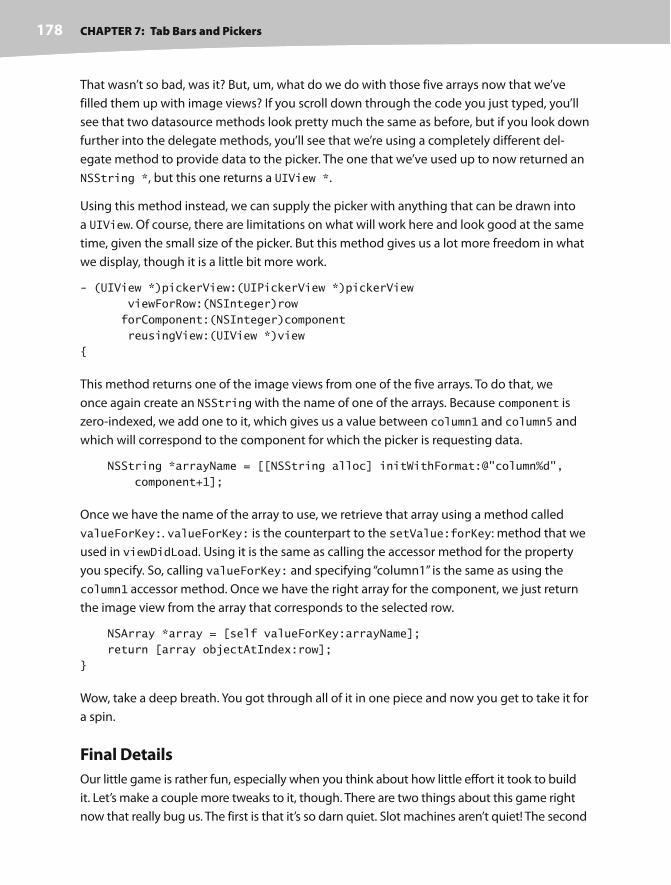
CHAPTER 7: Tab Bars and Pickers 178
That wasn’t so bad, was it? But, um, what do we do with those five arrays now that we’ve
filled them up with image views? If you scroll down through the code you just typed, you’ll
see that two datasource methods look pretty much the same as before, but if you look down
further into the delegate methods, you’ll see that we’re using a completely different del-
egate method to provide data to the picker. The one that we’ve used up to now returned an
NSString *, but this one returns a UIView *.
Using this method instead, we can supply the picker with anything that can be drawn into
a UIView. Of course, there are limitations on what will work here and look good at the same
time, given the small size of the picker. But this method gives us a lot more freedom in what
we display, though it is a little bit more work.
- (UIView *)pickerView:(UIPickerView *)pickerView
viewForRow:(NSInteger)row
forComponent:(NSInteger)component
reusingView:(UIView *)view
{
This method returns one of the image views from one of the five arrays. To do that, we
once again create an NSString with the name of one of the arrays. Because component is
zero- indexed, we add one to it, which gives us a value between column1 and column5 and
which will correspond to the component for which the picker is requesting data.
NSString *arrayName = [[NSString alloc] initWithFormat:@"column%d",
component+1];
Once we have the name of the array to use, we retrieve that array using a method called
valueForKey:. valueForKey: is the counterpart to the setValue:forKey: method that we
used in viewDidLoad. Using it is the same as calling the accessor method for the property
you specify. So, calling valueForKey: and specifying “column1” is the same as using the
column1 accessor method. Once we have the right array for the component, we just return
the image view from the array that corresponds to the selected row.
NSArray *array = [self valueForKey:arrayName];
return [array objectAtIndex:row];
}
Wow, take a deep breath. You got through all of it in one piece and now you get to take it for
a spin.
Final Details
Our little game is rather fun, especially when you think about how little effort it took to build
it. Let’s make a couple more tweaks to it, though. There are two things about this game right
now that really bug us. The first is that it’s so darn quiet. Slot machines aren’t quiet! The second
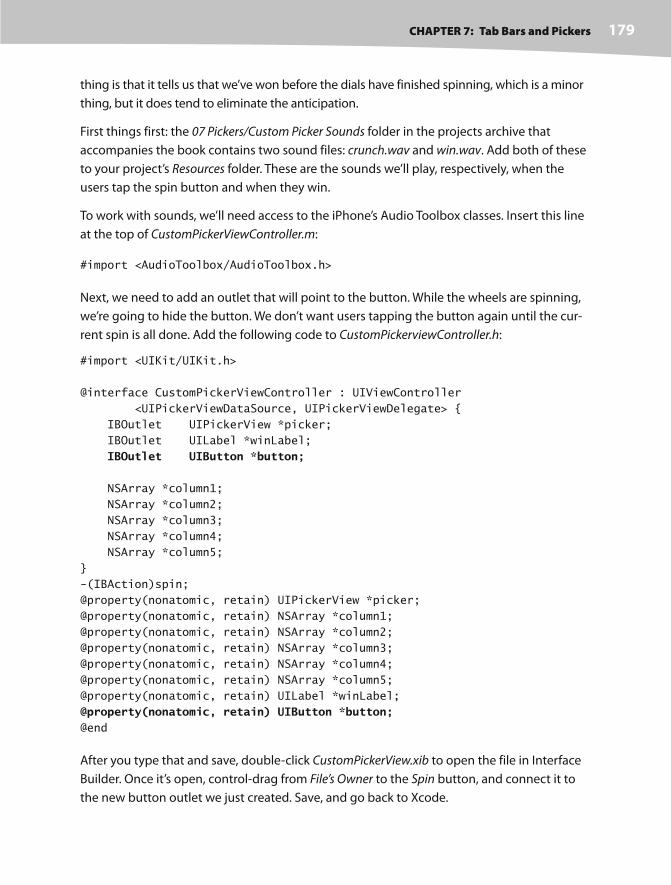
CHAPTER 7: Tab Bars and Pickers 179
thing is that it tells us that we’ve won before the dials have finished spinning, which is a minor
thing, but it does tend to eliminate the anticipation.
First things first: the 07 Pickers/Custom Picker Sounds folder in the projects archive that
accompanies the book contains two sound files: crunch.wav and win.wav. Add both of these
to your project’s Resources folder. These are the sounds we’ll play, respectively, when the
users tap the spin button and when they win.
To work with sounds, we’ll need access to the iPhone’s Audio Toolbox classes. Insert this line
at the top of CustomPickerViewController.m:
#import <AudioToolbox/AudioToolbox.h>
Next, we need to add an outlet that will point to the button. While the wheels are spinning,
we’re going to hide the button. We don’t want users tapping the button again until the cur-
rent spin is all done. Add the following code to CustomPickerviewController.h:
#import <UIKit/UIKit.h>
@interface CustomPickerViewController : UIViewController
<UIPickerViewDataSource, UIPickerViewDelegate> {
IBOutlet UIPickerView *picker;
IBOutlet UILabel *winLabel;
IBOutlet UIButton *button;
NSArray *column1;
NSArray *column2;
NSArray *column3;
NSArray *column4;
NSArray *column5;
}
-(IBAction)spin;
@property(nonatomic, retain) UIPickerView *picker;
@property(nonatomic, retain) NSArray *column1;
@property(nonatomic, retain) NSArray *column2;
@property(nonatomic, retain) NSArray *column3;
@property(nonatomic, retain) NSArray *column4;
@property(nonatomic, retain) NSArray *column5;
@property(nonatomic, retain) UILabel *winLabel;
@property(nonatomic, retain) UIButton *button;@end
After you type that and save, double- click CustomPickerView.xib to open the file in Interface
Builder. Once it’s open, control- drag from File’s Owner to the Spin button, and connect it to
the new button outlet we just created. Save, and go back to Xcode.
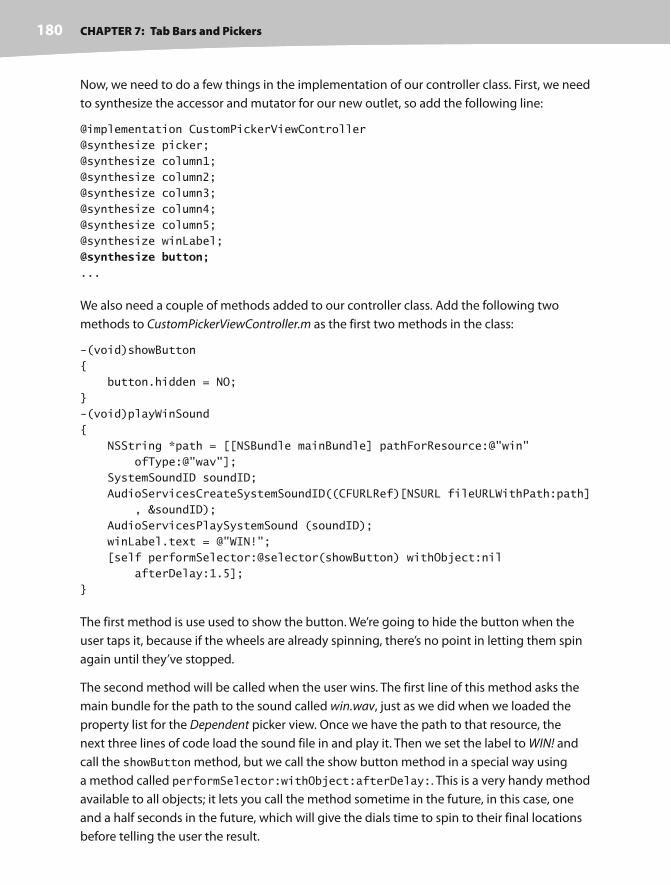
CHAPTER 7: Tab Bars and Pickers 180
Now, we need to do a few things in the implementation of our controller class. First, we need
to synthesize the accessor and mutator for our new outlet, so add the following line:
@implementation CustomPickerViewController
@synthesize picker;
@synthesize column1;
@synthesize column2;
@synthesize column3;
@synthesize column4;
@synthesize column5;
@synthesize winLabel;
@synthesize button;...
We also need a couple of methods added to our controller class. Add the following two
methods to CustomPickerViewController.m as the first two methods in the class:
-(void)showButton
{
button.hidden = NO;
}
-(void)playWinSound
{
NSString *path = [[NSBundle mainBundle] pathForResource:@"win"
ofType:@"wav"];
SystemSoundID soundID;
AudioServicesCreateSystemSoundID((CFURLRef)[NSURL fileURLWithPath:path]
, &soundID);
AudioServicesPlaySystemSound (soundID);
winLabel.text = @"WIN!";
[self performSelector:@selector(showButton) withObject:nil
afterDelay:1.5];
}
The first method is use used to show the button. We’re going to hide the button when the
user taps it, because if the wheels are already spinning, there’s no point in letting them spin
again until they’ve stopped.
The second method will be called when the user wins. The first line of this method asks the
main bundle for the path to the sound called win.wav, just as we did when we loaded the
property list for the Dependent picker view. Once we have the path to that resource, the
next three lines of code load the sound file in and play it. Then we set the label to WIN! and
call the showButton method, but we call the show button method in a special way using
a method called performSelector:withObject:afterDelay:. This is a very handy method
available to all objects; it lets you call the method sometime in the future, in this case, one
and a half seconds in the future, which will give the dials time to spin to their final locations
before telling the user the result.

CHAPTER 7: Tab Bars and Pickers 181
We also have to make some changes to the spin: method. We have to write code to play
a sound and to call the playerWon method if the player, in fact, won. Make the following
changes to it now:
-(IBAction)spin
{
BOOL win = NO;
int numInRow = 1;
int lastVal = -1;
for (int i = 0; i < 5; i++)
{
int newValue = random() % [self.column1 count];
if (newValue == lastVal)
numInRow++;
else
numInRow = 1;
lastVal = newValue;
[picker selectRow:newValue inComponent:i animated:YES];
[picker reloadComponent:i];
if (numInRow >= 3)
win = YES;
}
button.hidden = YES; NSString *path = [[NSBundle mainBundle] pathForResource:@"crunch" ofType:@"wav"]; SystemSoundID soundID; AudioServicesCreateSystemSoundID((CFURLRef)[NSURL fileURLWithPath:path] , &soundID); AudioServicesPlaySystemSound (soundID);
if (win) [self performSelector:@selector(playWinSound) withObject:nil afterDelay:.5]; else [self performSelector:@selector(showButton) withObject:nil afterDelay:.5];
winLabel.text = @"";
}
CHAPTER 7: Tab Bars and Pickers 182
The first line of code we added hides the Spin! button. The next four lines play a sound to let
the player know they’ve spun the wheels. Then, instead of setting the label to WIN! as soon
as we know the user has won, we do something tricky. We call one of the two methods we
just created, but we do it after a delay using performSelector:afterDelay:. If the user
won, we call our playerWon method half a second into the future, which will give time for
the dials to spin into place; otherwise, we just wait a half a second and reenable the Spin!
button.
The only thing left is to make sure we release our button outlet, so make the following
change to your dealloc method:
- (void)dealloc {
[picker release];
[winLabel release];
[column1 release];
[column2 release];
[column3 release];
[column4 release];
[column5 release];
[button release]; [super dealloc];
}
Linking in the Audio Toolbox Framework
If you try to compile now, you’ll get another linking error. Turns out, it’s those functions we
called to load and play sounds. Yeah, they’re not in any of the frameworks that are linked in
by default. A quick command–double- click on the AudioServicesCreateSystemSoundID
function takes us to the header file where it’s declared, and from there, we can see that this
function is part of the Audio Toolbox framework.
Select Add to Project. . . from the Project menu, and navigate to the frameworks folder for
the iPhone simulator at /Developer/Platforms/iPhoneSimulator.platform/Developer/SDKs/
iPhoneSimulator2.1.sdk/System/Library/Frameworks/ and add AudioToolbox.framework to your
project, making sure not to copy the framework into your project and selecting Relative to
Current SDK. Once you do that, your application should compile just fine, and you can play
the game with sound and all.
CHAPTER 7: Tab Bars and Pickers 183
Final SpinBy now, you certainly should be comfortable with tab bar applications and pickers. In this
chapter, you got to build a full- fledged tab bar application from scratch containing five dif-
ferent content views. You learned how to use pickers in a number of different configurations.
You learned how to create pickers with multiple components and even how to make the
values in one component dependent on the value selected in another component. You also
learned how to make the picker display images rather than just text.
Along the way, you also learned about picker delegates and datasources and saw how to
load images, play sounds, and create dictionaries from property lists. It was long chapter,
so congratulations on making it through! When you’re ready to tackle table views, turn the
page, and we’ll keep going.

185
i
Chapter 8Introduction to Table Views
n our next chapter, we’re going to build a hierarchical navigation- based appli-
cation similar to the Mail application that ships on the iPhone. Our application
will allow the user to drill down into nested lists of data and edit that data. But,
before we can do that, you need to master the concept of table views. And
that’s the goal of this chapter.
Table views are the most common mechanism used to display lists of data
to the user. They are highly configurable objects that can be made to look
practically any way you want them to. Mail uses table views to show lists of
accounts, folders, and messages, but table views are not just limited to the
display of textual data. Table views are also used in the YouTube, Settings,
and iPod applications, even though these applications all have very different
appearances (see Figure 8-1).
Figure 8-1. Though they all look different, the Settings, iPod, and YouTube
applications all use table views to display their data.

CHAPTER 8: Introduction to Table Views186
Table View BasicsTables display lists of data. Each item in a table’s list is a row. iPhone tables can have an
unlimited number of rows, constrained only by the amount of available memory. iPhone
tables can be only one column wide.
A table view is the view object that displays a table’s data and is an instance of the class
UITableView. Each visible row of the table is implemented by the class UITableViewCell.
So a table view is the object that displays the visible part of a table, and a table view cell is
responsible for displaying a single row of the table (see Figure 8-2).
Figure 8-2. Each table view is an instance of UITableView, and each visible row is an instance of
UITableViewCell.
Table views are not responsible for storing your table’s data. They only store enough data to
draw the rows that are currently visible. Table views get their configuration data from an object
that conforms to the UITableViewDelegate protocol and their row data from an object that
conforms to the UITableViewDataSource protocol. You’ll see how all this works when we get
into our sample programs later in the chapter.
As mentioned, all tables are implemented as a single column. But the YouTube application,
shown on the right side of Figure 8-1, does have the appearance of having at least two col-
umns, perhaps even three if you count the icons. But no, each row in the table is represented
by a single UITableViewCell. Each UITableViewCell object can be configured with an
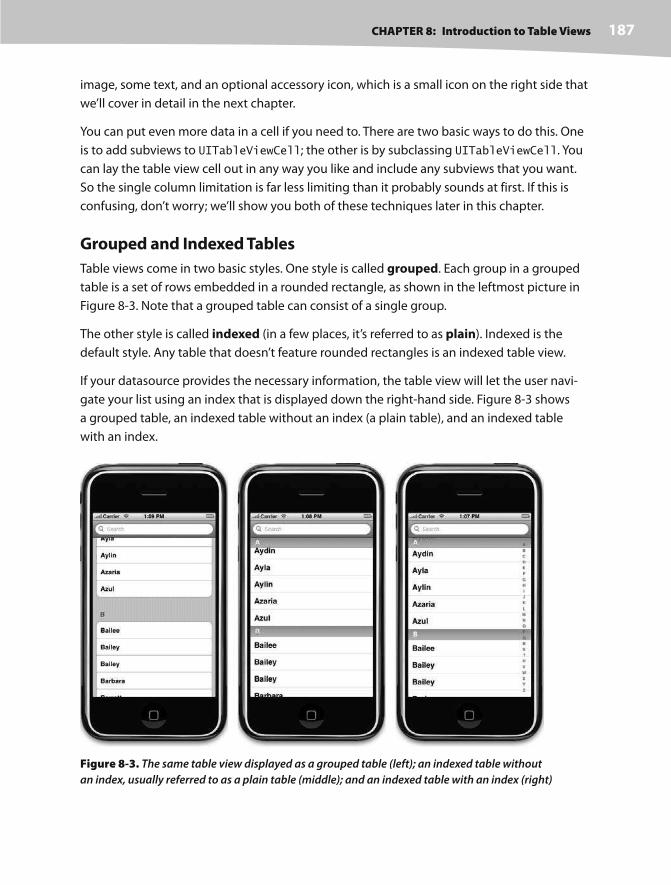
CHAPTER 8: Introduction to Table Views 187
image, some text, and an optional accessory icon, which is a small icon on the right side that
we’ll cover in detail in the next chapter.
You can put even more data in a cell if you need to. There are two basic ways to do this. One
is to add subviews to UITableViewCell; the other is by subclassing UITableViewCell. You
can lay the table view cell out in any way you like and include any subviews that you want.
So the single column limitation is far less limiting than it probably sounds at first. If this is
confusing, don’t worry; we’ll show you both of these techniques later in this chapter.
Grouped and Indexed Tables
Table views come in two basic styles. One style is called grouped. Each group in a grouped
table is a set of rows embedded in a rounded rectangle, as shown in the leftmost picture in
Figure 8-3. Note that a grouped table can consist of a single group.
The other style is called indexed (in a few places, it’s referred to as plain). Indexed is the
default style. Any table that doesn’t feature rounded rectangles is an indexed table view.
If your datasource provides the necessary information, the table view will let the user navi-
gate your list using an index that is displayed down the right- hand side. Figure 8-3 shows
a grouped table, an indexed table without an index (a plain table), and an indexed table
with an index.
Figure 8-3. The same table view displayed as a grouped table (left); an indexed table without
an index, usually referred to as a plain table (middle); and an indexed table with an index (right)

CHAPTER 8: Introduction to Table Views188
Each division of your table is known to your datasource as a section. In a grouped table,
each group is a section (see Figure 8-4). In an indexed table, each indexed grouping of data
is a section. For example, in the indexed tables shown in Figure 8-3, all the names beginning
with “A” would be one section, those beginning with “B” another, and so on.
Figure 8-4. Sections and rows in a grouped table are obvious, but all tables
support them.
Sections have two primary purposes. In a grouped table, each section represents one group.
In an indexed table, each section corresponds to one index entry. So, if you wanted to dis-
play a list indexed alphabetically with an index entry for every letter, for example, you would
have 26 sections, each containing all the values that begin with a particular letter.
CAUTION
It is technically possible to create a grouped table with an index. Even though it’s possible, you should not
provide an index for a grouped table view. The iPhone Human Interface Guidelines specifically state that
grouped tables should not provide indexes.
We’ll create both types of tables in this chapter.
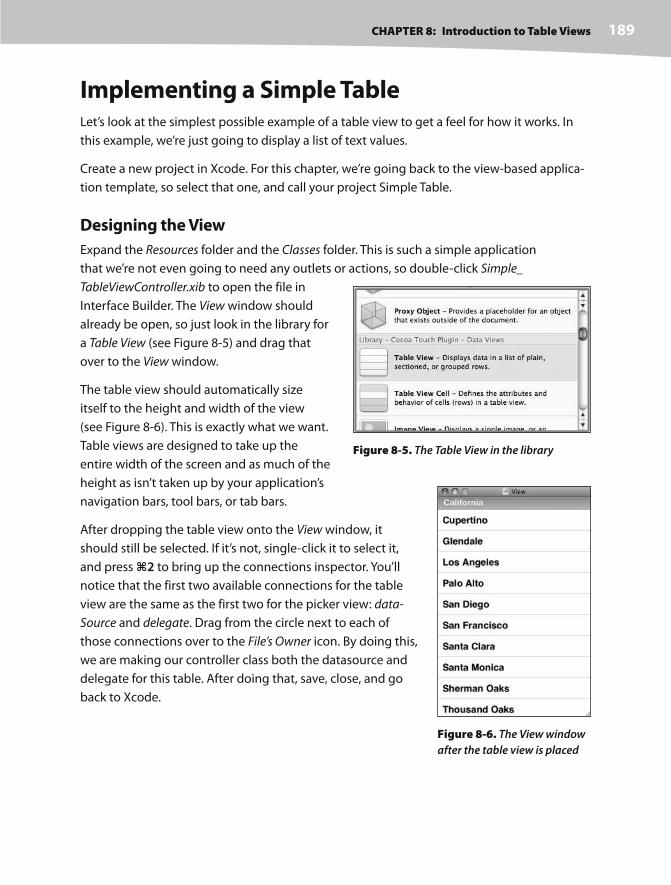
CHAPTER 8: Introduction to Table Views 189
Implementing a Simple TableLet’s look at the simplest possible example of a table view to get a feel for how it works. In
this example, we’re just going to display a list of text values.
Create a new project in Xcode. For this chapter, we’re going back to the view- based applica-
tion template, so select that one, and call your project Simple Table.
Designing the View
Expand the Resources folder and the Classes folder. This is such a simple application
that we’re not even going to need any outlets or actions, so double- click Simple_
TableViewController.xib to open the file in
Interface Builder. The View window should
already be open, so just look in the library for
a Table View (see Figure 8-5) and drag that
over to the View window.
The table view should automatically size
itself to the height and width of the view
(see Figure 8-6). This is exactly what we want.
Table views are designed to take up the
entire width of the screen and as much of the
height as isn’t taken up by your application’s
navigation bars, tool bars, or tab bars.
After dropping the table view onto the View window, it
should still be selected. If it’s not, single- click it to select it,
and press 2 to bring up the connections inspector. You’ll
notice that the first two available connections for the table
view are the same as the first two for the picker view: data-
Source and delegate. Drag from the circle next to each of
those connections over to the File’s Owner icon. By doing this,
we are making our controller class both the datasource and
delegate for this table. After doing that, save, close, and go
back to Xcode.
Figure 8-5. The Table View in the library
Figure 8-6. The View window
after the table view is placed

CHAPTER 8: Introduction to Table Views190
Writing the Controller
Next stop is our controller class’s header file. Single- click Simple_TableViewController.h, and
add the following code:
#import <UIKit/UIKit.h>
@interface Simple_TableViewController : UIViewController
<UITableViewDelegate, UITableViewDataSource> { NSArray *listData;}
@property (nonatomic, retain) NSArray *listData;@end
All we’re doing here is conforming our class to the two protocols that are needed for it to act
as the delegate and datasource for the table view and then declaring an array that will hold
the data to be displayed.
Switch over to Simple_TableViewController.m, and we’ll add some more code:
#import "Simple_TableViewController.h"
@implementation Simple_TableViewController
@synthesize listData;#pragma mark Table View Controller Methods- (void)viewDidLoad { NSArray *array = [[NSArray alloc] initWithObjects:@"Sleepy", @"Sneezy", @"Bashful", @"Happy", @"Doc", @"Grumpy", @"Dopey", @"Thorin", @"Dorin", @"Nori", @"Ori", @"Balin", @"Dwalin", @"Fili", @"Kili", @"Oin", @"Gloin", @"Bifur", @"Bofur", @"Bombur", nil]; self.listData = array; [array release]; [super viewDidLoad];}- (BOOL)shouldAutorotateToInterfaceOrientation:
(UIInterfaceOrientation)interfaceOrientation {
// Return YES for supported orientations
return (interfaceOrientation == UIInterfaceOrientationPortrait);
}
- (void)didReceiveMemoryWarning {
[super didReceiveMemoryWarning];
// Releases the view if it doesn't have a superview
// Release anything that's not essential, such as cached data
}
CHAPTER 8: Introduction to Table Views 191
- (void)dealloc {
[listData release];
[super dealloc];
}
#pragma mark -#pragma mark Table View Data Source Methods- (NSInteger)tableView:(UITableView *)tableView numberOfRowsInSection:(NSInteger)section{ return [self.listData count];}- (UITableViewCell *)tableView:(UITableView *)tableView cellForRowAtIndexPath:(NSIndexPath *)indexPath {
static NSString *SimpleTableIdentifier = @"SimpleTableIdentifier";
UITableViewCell *cell = [tableView dequeueReusableCellWithIdentifier: SimpleTableIdentifier]; if (cell == nil) { cell = [[[UITableViewCell alloc] initWithFrame:CGRectZero reuseIdentifier: SimpleTableIdentifier] autorelease]; }
NSUInteger row = [indexPath row]; cell.text = [listData objectAtIndex:row]; return cell;}@end
We added three methods to the controller. You should be very comfortable with the first
one, viewDidLoad, since we’ve done similar things in the past. We’re simply creating an array
of data to pass to the table. In a real application, this array would likely come from another
source, such as a text file, property list, or URL.
If you scroll down to the end, you can see we added two datasource methods. The first one,
tableView:numberOfRowsInSection:, is used by the table to ask how many rows are in
a particular section. As you might expect, the default number of sections is one, and this
method will be called to get the number of rows in the one section that makes up the list.
We just return the number of items in our array.
The next method probably requires a little explanation, so let’s look at it more closely:
- (UITableViewCell *)tableView:(UITableView *)tableView
cellForRowAtIndexPath:(NSIndexPath *)indexPath
{

CHAPTER 8: Introduction to Table Views192
This method is called by the table view when it needs to draw one of its rows. You’ll notice
that the second argument to this method is an NSIndexPath instance. This is the mechanism
that table views use to wrap the section and row into a single object. To get the row or the
section out of an NSIndexPath, you just call either its row method or its section method,
both of which return an int.
The first parameter, tableView, is a reference to the table doing the asking. This allows us to
create classes that act as a datasource for multiple tables.
Next, we declare a static string instance.
static NSString *SimpleTableIdentifier = @"SimpleTableIdentifier";
This string will be used as a key to represent a single kind of table cell. We’ll only be using
one kind of cell in this table, so we define a single identifier. A table view can only display
a few rows at a time on iPhone’s small screen, but the table itself can conceivably hold
considerably more. Remember that each row in the table is represented by an instance of
UITableViewCell, which is a subclass of UIView, which means each row can hold subviews.
With a large table, this could represent a huge amount of overhead if the table were to try
and keep one table view cell instance for every row in the table regardless of whether that
row was currently being displayed. Fortunately, tables don’t work that way.
Instead, as table view cells scroll off the screen, they are placed into a queue of cells available
to be reused. If the system runs low on memory, the table view will get rid of the cells in the
queue, but as long as it’s got some available memory for them, it will hold on to them in case
you want to use them again.
Every time a table view cell rolls off the screen, there’s a pretty good chance that another
one just rolled onto the screen on the other side. If that new row can just reuse one of the
cells that already rolled off the screen, the system can avoid the overhead associated with
constantly creating and releasing those views. To take advantage of this mechanism, we’ll
ask the table view to give us one of its dequeued cells of the type we want. Note that we’re
making use of the NSString identifier we declared earlier. In effect, we’re asking for a reus-
able cell of type SimpleTableIdentifier:
UITableViewCell *cell = [tableView dequeueReusableCellWithIdentifier:
SimpleTableIdentifier];
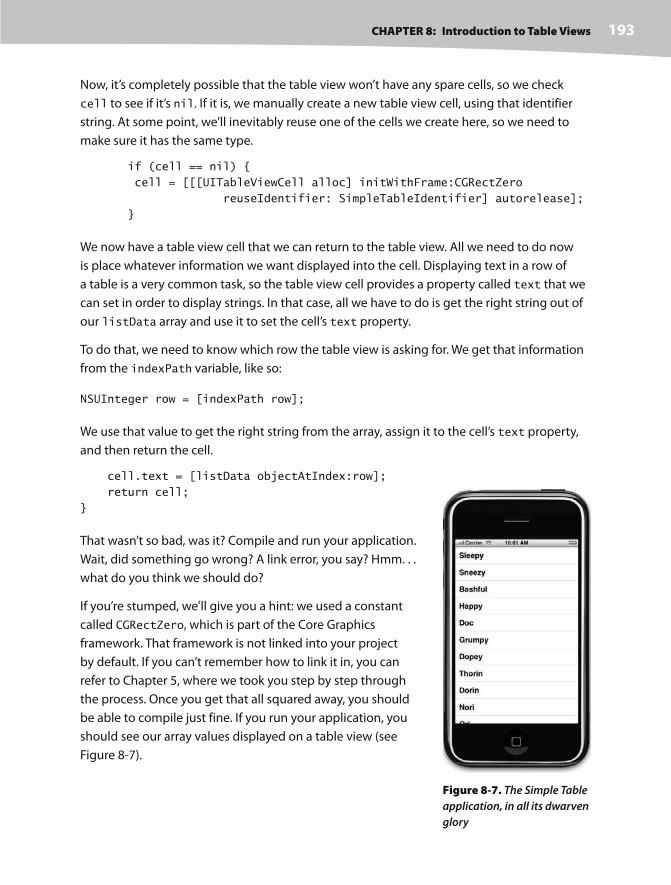
CHAPTER 8: Introduction to Table Views 193
Now, it’s completely possible that the table view won’t have any spare cells, so we check
cell to see if it’s nil. If it is, we manually create a new table view cell, using that identifier
string. At some point, we’ll inevitably reuse one of the cells we create here, so we need to
make sure it has the same type.
if (cell == nil) {
cell = [[[UITableViewCell alloc] initWithFrame:CGRectZero
reuseIdentifier: SimpleTableIdentifier] autorelease];
}
We now have a table view cell that we can return to the table view. All we need to do now
is place whatever information we want displayed into the cell. Displaying text in a row of
a table is a very common task, so the table view cell provides a property called text that we
can set in order to display strings. In that case, all we have to do is get the right string out of
our listData array and use it to set the cell’s text property.
To do that, we need to know which row the table view is asking for. We get that information
from the indexPath variable, like so:
NSUInteger row = [indexPath row];
We use that value to get the right string from the array, assign it to the cell’s text property,
and then return the cell.
cell.text = [listData objectAtIndex:row];
return cell;
}
That wasn’t so bad, was it? Compile and run your application.
Wait, did something go wrong? A link error, you say? Hmm. . .
what do you think we should do?
If you’re stumped, we’ll give you a hint: we used a constant
called CGRectZero, which is part of the Core Graphics
framework. That framework is not linked into your project
by default. If you can’t remember how to link it in, you can
refer to Chapter 5, where we took you step by step through
the process. Once you get that all squared away, you should
be able to compile just fine. If you run your application, you
should see our array values displayed on a table view (see
Figure 8-7).
Figure 8-7. The Simple Table
application, in all its dwarven
glory
CHAPTER 8: Introduction to Table Views194
Adding an ImageIt’d be nice if we could add an image to each row. Guess we’d have to create a subclass of
UITableViewCell to do that, huh? Actually, no, not if you can live with the image being on
the left- hand side of each row. The default table view cell can handle that situation just fine.
Let’s check it out.
In the 08 Simple Table folder, in the project archive, grab the file called star.png, and add it to
your project’s Resources folder. star.png is a small icon we prepared just for this project.
Next, let’s get to the code. In the file Simple_TableViewController.m, add the following code to
the tableView:cellForRowAtIndexPath: method:
- (UITableViewCell *)tableView:(UITableView *)tableView
cellForRowAtIndexPath:(NSIndexPath *)indexPath
{
static NSString *SimpleTableIdentifier = @" SimpleTableIdentifier ";
UITableViewCell *cell = [tableView dequeueReusableCellWithIdentifier:
SimpleTableIdentifier];
if (cell == nil) {
cell = [[[UITableViewCell alloc] initWithFrame:CGRectZero
reuseIdentifier: SimpleTableIdentifier] autorelease];
}
NSUInteger row = [indexPath row];
cell.text = [listData objectAtIndex:row];
UIImage *image = [UIImage imageNamed:@"star.png"]; cell.image = image; return cell;
}
@end
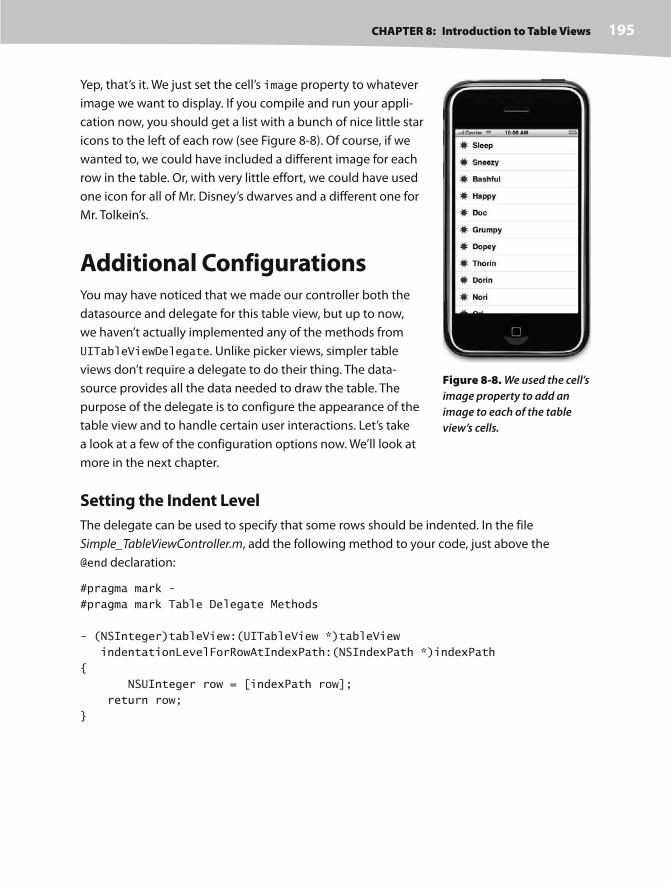
CHAPTER 8: Introduction to Table Views 195
Yep, that’s it. We just set the cell’s image property to whatever
image we want to display. If you compile and run your appli-
cation now, you should get a list with a bunch of nice little star
icons to the left of each row (see Figure 8-8). Of course, if we
wanted to, we could have included a different image for each
row in the table. Or, with very little effort, we could have used
one icon for all of Mr. Disney’s dwarves and a different one for
Mr. Tolkein’s.
Additional ConfigurationsYou may have noticed that we made our controller both the
datasource and delegate for this table view, but up to now,
we haven’t actually implemented any of the methods from
UITableViewDelegate. Unlike picker views, simpler table
views don’t require a delegate to do their thing. The data-
source provides all the data needed to draw the table. The
purpose of the delegate is to configure the appearance of the
table view and to handle certain user interactions. Let’s take
a look at a few of the configuration options now. We’ll look at
more in the next chapter.
Setting the Indent Level
The delegate can be used to specify that some rows should be indented. In the file
Simple_TableViewController.m, add the following method to your code, just above the
@end declaration:
#pragma mark -
#pragma mark Table Delegate Methods
- (NSInteger)tableView:(UITableView *)tableView
indentationLevelForRowAtIndexPath:(NSIndexPath *)indexPath
{
NSUInteger row = [indexPath row];
return row;
}
Figure 8-8. We used the cell’s
image property to add an
image to each of the table
view’s cells.

CHAPTER 8: Introduction to Table Views196
This method sets the indent level for each row to its row
number, so row 0 will have an indent level of 0, row 1 will have
an indent level of 1, and so on. An indent level is simply an
integer that tells the table view to move that row a little to the
right. The higher the number, the further to the right the row
will be indented. You might use this technique, for example, to
indicate that one row is somehow subordinate to another row,
as Mail does when representing subfolders.
When we run the application again, you can see that each row
is now drawn a little further to the right than the last one (see
Figure 8-9).
Handling Row Selection
The table’s delegate can use two methods to determine if the
user has selected a particular row. One method gets called
before the row gets highlighted and can be used to prevent
the row from being selected or can even change which row
gets selected. Let’s implement that method and specify that
the first row is not selectable. Add the following method to
the end of Simple_TableViewController.m, just before the @end
declaration:
-(NSIndexPath *)tableView:(UITableView *)tableView
willSelectRowAtIndexPath:(NSIndexPath *)indexPath
{
NSUInteger row = [indexPath row];
if (row == 0)
return nil;
return indexPath;
}
This method gets passed indexPath, which represents the item that’s about to get selected.
Our code looks at which row is about to be selected. If the row is the first row, which is always
index zero, then it returns nil, which indicates that no row should actually be selected. Other-
wise, it returns indexPath, which is how we indicate that it’s OK for the selection to proceed.
Figure 8-9. Each row of the
table is drawn with an indent
level higher than the row
before it.
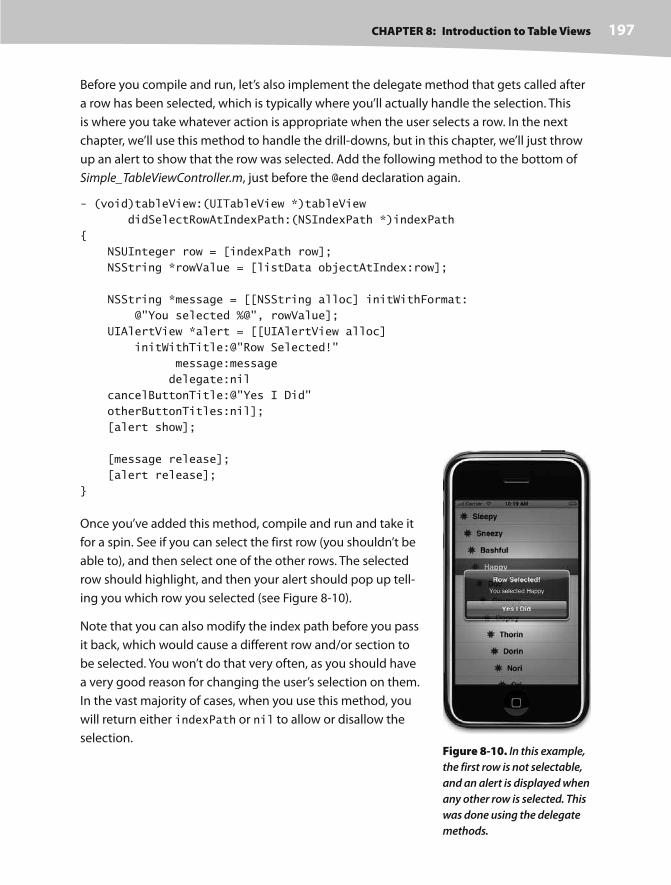
CHAPTER 8: Introduction to Table Views 197
Before you compile and run, let’s also implement the delegate method that gets called after
a row has been selected, which is typically where you’ll actually handle the selection. This
is where you take whatever action is appropriate when the user selects a row. In the next
chapter, we’ll use this method to handle the drill- downs, but in this chapter, we’ll just throw
up an alert to show that the row was selected. Add the following method to the bottom of
Simple_TableViewController.m, just before the @end declaration again.
- (void)tableView:(UITableView *)tableView
didSelectRowAtIndexPath:(NSIndexPath *)indexPath
{
NSUInteger row = [indexPath row];
NSString *rowValue = [listData objectAtIndex:row];
NSString *message = [[NSString alloc] initWithFormat:
@"You selected %@", rowValue];
UIAlertView *alert = [[UIAlertView alloc]
initWithTitle:@"Row Selected!"
message:message
delegate:nil
cancelButtonTitle:@"Yes I Did"
otherButtonTitles:nil];
[alert show];
[message release];
[alert release];
}
Once you’ve added this method, compile and run and take it
for a spin. See if you can select the first row (you shouldn’t be
able to), and then select one of the other rows. The selected
row should highlight, and then your alert should pop up tell-
ing you which row you selected (see Figure 8-10).
Note that you can also modify the index path before you pass
it back, which would cause a different row and/or section to
be selected. You won’t do that very often, as you should have
a very good reason for changing the user’s selection on them.
In the vast majority of cases, when you use this method, you
will return either indexPath or nil to allow or disallow the
selection. Figure 8-10. In this example,
the first row is not selectable,
and an alert is displayed when
any other row is selected. This
was done using the delegate
methods.
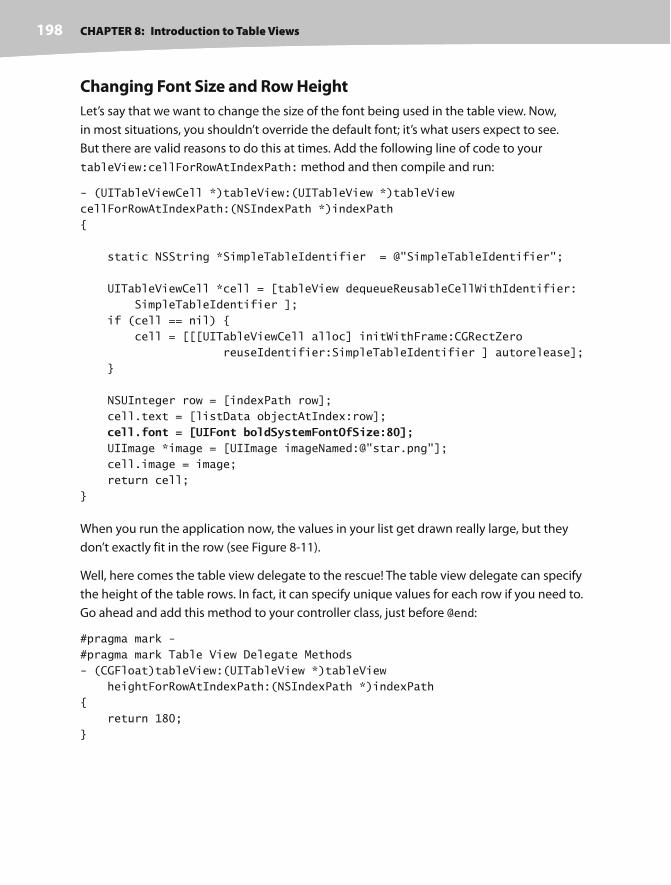
CHAPTER 8: Introduction to Table Views198
Changing Font Size and Row Height
Let’s say that we want to change the size of the font being used in the table view. Now,
in most situations, you shouldn’t override the default font; it’s what users expect to see.
But there are valid reasons to do this at times. Add the following line of code to your
tableView:cellForRowAtIndexPath: method and then compile and run:
- (UITableViewCell *)tableView:(UITableView *)tableView
cellForRowAtIndexPath:(NSIndexPath *)indexPath
{
static NSString *SimpleTableIdentifier = @"SimpleTableIdentifier";
UITableViewCell *cell = [tableView dequeueReusableCellWithIdentifier:
SimpleTableIdentifier ];
if (cell == nil) {
cell = [[[UITableViewCell alloc] initWithFrame:CGRectZero
reuseIdentifier:SimpleTableIdentifier ] autorelease];
}
NSUInteger row = [indexPath row];
cell.text = [listData objectAtIndex:row];
cell.font = [UIFont boldSystemFontOfSize:80]; UIImage *image = [UIImage imageNamed:@"star.png"];
cell.image = image;
return cell;
}
When you run the application now, the values in your list get drawn really large, but they
don’t exactly fit in the row (see Figure 8-11).
Well, here comes the table view delegate to the rescue! The table view delegate can specify
the height of the table rows. In fact, it can specify unique values for each row if you need to.
Go ahead and add this method to your controller class, just before @end:
#pragma mark -
#pragma mark Table View Delegate Methods
- (CGFloat)tableView:(UITableView *)tableView
heightForRowAtIndexPath:(NSIndexPath *)indexPath
{
return 180;
}
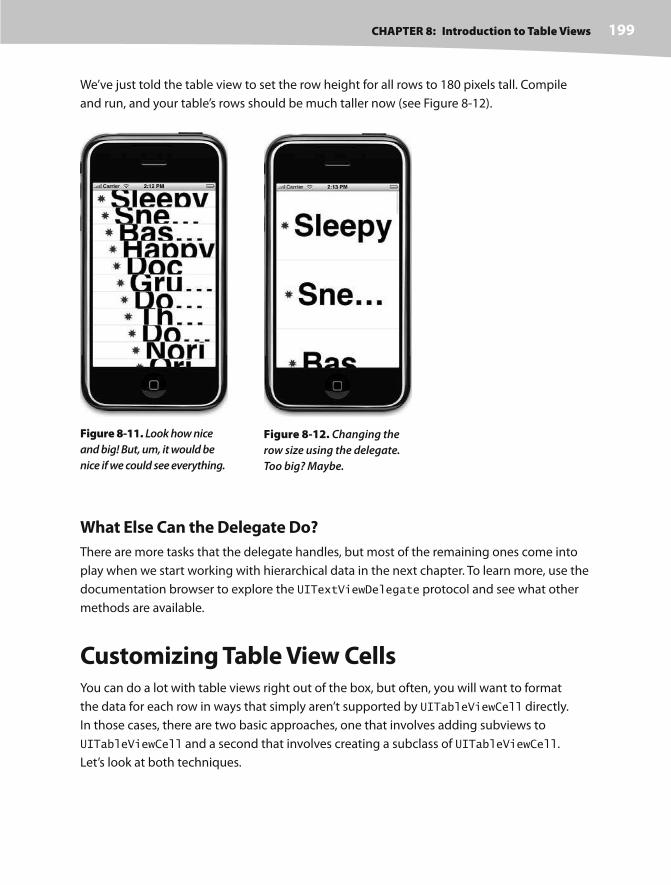
CHAPTER 8: Introduction to Table Views 199
What Else Can the Delegate Do?
There are more tasks that the delegate handles, but most of the remaining ones come into
play when we start working with hierarchical data in the next chapter. To learn more, use the
documentation browser to explore the UITextViewDelegate protocol and see what other
methods are available.
Customizing Table View CellsYou can do a lot with table views right out of the box, but often, you will want to format
the data for each row in ways that simply aren’t supported by UITableViewCell directly.
In those cases, there are two basic approaches, one that involves adding subviews to
UITableViewCell and a second that involves creating a subclass of UITableViewCell.
Let’s look at both techniques.
Figure 8-11. Look how nice
and big! But, um, it would be
nice if we could see everything.
Figure 8-12. Changing the
row size using the delegate.
Too big? Maybe.
We’ve just told the table view to set the row height for all rows to 180 pixels tall. Compile
and run, and your table’s rows should be much taller now (see Figure 8-12).

CHAPTER 8: Introduction to Table Views200
The Cells Application
To show how to use custom cells, we’re going to create a new
application with another table view, and we’re going to dis-
play two lines of information to the user (see Figure 8-13).
Our application will display the name and color of a series of
potentially familiar computer models, and we’ll display both
of those pieces of information in the same table cell by add-
ing subviews to the table view cell.
Adding Subviews to the Table View Cell
The default table view cell only displays a single line of text.
Even if you try to force it to use multiple lines by specifying
a string containing carriage returns, it will remove the carriage
returns and display the data on a single line. We’re going to cre-
ate a project that adds subviews to its cells to work around that
limitation, enabling us to display two lines of data in each cell.
Create a new Xcode project using the view- based
application template. Name the project Cells. Double- click
CellsViewController.xib, and add a Table View, and set its delegate and datasource to File’s
Owner as we did in the previous section. Save the nib, and come back to Xcode. You can refer
to the “Building the View” section earlier in the chapter for the exact steps if you need to.
Modifying the Controller Header File
Single-click CellsViewController.h, and add the following code:
#import <UIKit/UIKit.h>
#define kNameValueTag 1#define kColorValueTag 2
@interface CellsViewController : UIViewController
<UITableViewDataSource, UITableViewDelegate>{
NSArray *computers;}
@property (nonatomic, retain) NSArray *computers;@end
The first thing that you’ll notice here is that we have defined two constants. We’re going to use
these in a few moments to assign tags to some of the subviews that we’ll be adding to the table
view cell. We’re going to add four subviews to the cell, and two of those need to be changed for
every row. In order to do that, we need some mechanism that will allow us to retrieve the two
Figure 8-13. Adding sub-
views to the table view cell
can give you multiline rows.

CHAPTER 8: Introduction to Table Views 201
fields from the cell when going to update the cell with a particular row’s data. If we set unique
tag values for each label that we’ll need to use again, we’ll be able to retrieve them from the table
view cell and set their value.
Implementing the Controller’s Code
In our controller, we need to set up some data to use, and then implement the table data-
source methods to feed that data to the table. Single- click CellsViewController.m, and add the
following code:
#import "CellsViewController.h"
@implementation CellsViewController
@synthesize computers;- (void)viewDidLoad {
NSDictionary *row1 = [[NSDictionary alloc] initWithObjectsAndKeys: @"MacBook", @"Name", @"White", @"Color", nil]; NSDictionary *row2 = [[NSDictionary alloc] initWithObjectsAndKeys: @"MacBook Pro", @"Name", @"Silver", @"Color", nil]; NSDictionary *row3 = [[NSDictionary alloc] initWithObjectsAndKeys: @"iMac", @"Name", @"White", @"Color", nil];
NSArray *array = [[NSArray alloc] initWithObjects:row1, row2, row3, nil]; self.computers = array;
[row1 release]; [row2 release]; [row3 release]; [array release];
}- (BOOL)shouldAutorotateToInterfaceOrientation:
(UIInterfaceOrientation)interfaceOrientation {
// Return YES for supported orientations
return (interfaceOrientation == UIInterfaceOrientationPortrait);
}
- (void)didReceiveMemoryWarning {
[super didReceiveMemoryWarning];
// Releases the view if it doesn't have a superview
// Release anything that's not essential, such as cached data
}
- (void)dealloc {

CHAPTER 8: Introduction to Table Views202
[computers release];
[super dealloc];
}
#pragma mark -#pragma mark Table Data Source Methods- (NSInteger)tableView:(UITableView *)tableView numberOfRowsInSection:(NSInteger)section{ return [self.computers count];}-(UITableViewCell *)tableView:(UITableView *)tableView cellForRowAtIndexPath:(NSIndexPath *)indexPath { static NSString *CellTableIdentifier = @"CellTableIdentifier ";
UITableViewCell *cell = [tableView dequeueReusableCellWithIdentifier: CellTableIdentifier]; if (cell == nil) { CGRect cellFrame = CGRectMake(0, 0, 300, 65); cell = [[[UITableViewCell alloc] initWithFrame: cellFrame reuseIdentifier: CellTableIdentifier] autorelease];
CGRect nameLabelRect = CGRectMake(0, 5, 70, 15); UILabel *nameLabel = [[UILabel alloc] initWithFrame:nameLabelRect]; nameLabel.textAlignment = UITextAlignmentRight; nameLabel.text = @"Name:"; nameLabel.font = [UIFont boldSystemFontOfSize:12]; [cell.contentView addSubview: nameLabel]; [nameLabel release];
CGRect colorLabelRect = CGRectMake(0,26, 70, 15); UILabel *colorLabel = [[UILabel alloc] initWithFrame: colorLabelRect]; colorLabel.textAlignment = UITextAlignmentRight; colorLabel.text = @"Color:"; colorLabel.font = [UIFont boldSystemFontOfSize:12]; [cell.contentView addSubview: colorLabel]; [colorLabel release];
CGRect nameValueRect = CGRectMake(80, 5, 200, 15); UILabel *nameValue = [[UILabel alloc] initWithFrame: nameValueRect]; nameValue.tag = kNameValueTag; [cell.contentView addSubview:nameValue]; [nameValue release];
CGRect colorValueRect = CGRectMake(80, 25, 200, 15); UILabel *colorValue = [[UILabel alloc] initWithFrame:

CHAPTER 8: Introduction to Table Views 203
colorValueRect]; colorValue.tag = kColorValueTag; [cell.contentView addSubview:colorValue]; [colorValue release];
}
NSUInteger row = [indexPath row]; NSDictionary *rowData = [self.computers objectAtIndex:row]; UILabel *name = (UILabel *)[cell.contentView viewWithTag: kNameValueTag]; name.text = [rowData objectForKey:@"Name"];
UILabel *color = (UILabel *)[cell.contentView viewWithTag: kColorValueTag]; color.text = [rowData objectForKey:@"Color"]; return cell;}@end
The viewDidLoad method this time creates a bunch of dictionaries. Each dictionary contains
the name and color information for one row in the table. The name for that row is held in the
dictionary under the key Name, and the color is held under the key Color. We stick all the dic-
tionaries into a single array, which is our data for this table.
Let’s focus on tableView:cellForRowWithIndexPath:, since that’s where we’re really
getting into some new stuff. The first two lines of code are just like our earlier versions. We
create an identifier and ask the table to dequeue a table view cell if it has one.
If the table doesn’t have any cells available for reuse, we have to create a new cell. When we
do this, we also need to create and add the subviews that we’ll be using to implement our
two-line-per- row table. Let’s look at that code a little more closely. First, we create a cell. This
is, essentially, the same technique as before, except that we manually specify the size of the
cell instead of letting the table view calculate it.
CGRect cellFrame = CGRectMake(0, 0, 300, 65);
cell = [[[UITableViewCell alloc] initWithFrame: cellFrame
reuseIdentifier: CellTableIdentifier] autorelease];
After that, we create four UILabels and add them to the table view cell. The table view cell
already has a UIView subview called contentView, which it uses to group all of its subviews,
much the way we grouped those two switches inside of a UIView back in Chapter 4. As
a result, we don’t add the labels as subviews directly to the table view cell, but rather to its
contentView.
[cell.contentView addSubview:colorValue];

CHAPTER 8: Introduction to Table Views204
Two of these labels contain static text. The label nameLabel contains the text Name: and the
label colorLabel contains the text Color:. Those are just static labels that we won’t change.
The other two labels, however, will be used to display our row- specific data. Remember, we
need some way of retrieving these fields later on, so we assign values to both of them. For
example, we assign the constant kNameValueTag into nameValue’s tag field:
nameValue.tag = kNameValueTag;
In a moment, we’ll use that tag to retrieve the correct label from the cell.
Once we’re done creating our new cell, we use the indexPath argument that was passed in
to determine which row the table is requesting a cell for and then use that row value to grab
the correct dictionary for the requested row. Remember that that dictionary has two key/
value pairs, one with name and another with color.
NSUInteger row = [indexPath row];
NSDictionary *rowData = [self.computers objectAtIndex:row];
Remember those tags we set before? Well, here, we use them to retrieve the label whose
value we need to set.
UILabel *name = (UILabel *)[cell.contentView viewWithTag:kNameValueTag];
Once we have that label, we just set its text to one of the values we pull from the dictionary
that represents this row.
name.text = [rowData objectForKey:@"Name"];
Compile and run your application, and you should get rows with two lines of data in it, just
as in Figure 8-13. Being able to add views to the table view provides a lot more flexibility
than using the standard table view cell alone, but it can get a little tedious creating, position-
ing, and adding all the subviews programmatically. Gosh, it sure would be nice if we could
design the table view cell in Interface Builder, wouldn’t it?
Using a Custom Subclass of UITableViewCell
Well, we’re in luck. It just so happens that you can use Interface Builder to design your table
cell views. We’re going to re- create that same two- line interface we just built in code using
Interface Builder. To do this, we’ll create a subclass of UITableViewCell and a new nib file
that will contain the table view cell. Then, when we need a table view cell to represent a row,
instead of adding subviews to a standard table view cell, we’ll just load in our subclass from
the nib file and use two outlets we’ll add to set the name and color. Make sense? Let’s do it.
Right-click (or control- click) on the Classes folder in Xcode and select New File. . . from the
Add submenu that comes up, or just press N. When the new file assistant comes up, select
CHAPTER 8: Introduction to Table Views 205
Cocoa Touch Classes from the left pane, and then select UITableViewCell subclass from the
upper right pane. Click the Next button; give the new file a name of CustomCell.m; and make
sure that Also create “CustomCell.h” is checked.
Once that file is created, right- click the Resources folder in Xcode, and select Add New File. . .
again. This time, in the left pane of the new file assistant, click User Interfaces, and from the
upper right pane, select Empty XIB. When prompted for a name, type CustomCell.xib.
Creating the UITableViewCell Subclass
Now that we have all the new files we need, let’s go ahead and create our new subclass of
UITableViewCell.
We’re going to use outlets in our subclass to make it easier to set the value that needs to
change for each row. We could use tags again and avoid creating a subclass altogether, but
by doing it this way, our code will be much more concise and easy to read, because we’ll be
able to set the labels on each row’s cell just by setting properties, like so:
cell.nameLabel = @"Foo";
Single-click CustomCell.h, and add the following code:
#import <UIKit/UIKit.h>
@interface CustomCell : UITableViewCell {
IBOutlet UILabel *nameLabel; IBOutlet UILabel *colorLabel;}
@property (nonatomic, retain) UILabel *nameLabel;@property (nonatomic, retain) UILabel *colorLabel;@end
That’s all we need to do here, so let’s switch over to CustomCell.m and add two more lines:
#import "CustomCell.h"
@implementation CustomCell
@synthesize nameLabel;@synthesize colorLabel;- (id)initWithFrame:(CGRect)frame
reuseIdentifier:(NSString *)reuseIdentifier {
if (self = [super initWithFrame:frame
reuseIdentifier:reuseIdentifier]) {
// Initialization code
}
return self;
}

CHAPTER 8: Introduction to Table Views206
- (void)setSelected:(BOOL)selected animated:(BOOL)animated {
[super setSelected:selected animated:animated];
// Configure the view for the selected state
}
- (void)dealloc {
[super dealloc];
}
@end
Make sure you save both of those, and we’re done with our custom subclass.
Designing the Table View Cell in Interface Builder
Next, double- click CustomCell.xib to open the
file in Interface Builder. There are only two
icons in this nib’s main window: File’s Owner
and First Responder. Look in the library for
a Table View Cell (see Figure 8-14), and drag
one of those over to your nib’s main window.
Make sure the table view cell is selected, and
press 4 to bring up the identity inspector.
Change the class from UITableViewCell to
CustomCell.
After that, press 3 to bring up the size inspector, and change the table view cell’s height
from 44 to 65. That will give us a little bit more room to play with.
Finally, press 1 to go to the attributes inspector. The first field you’ll see there is Identifier,
and that’s the reuse identifier that we’ve been using in our code. If this does not ring a bell,
scan back through the chapter and look for SimpleTableIdentifier. Set the Identifier to
CustomCellIdentifier. Next, look for the pop- up button called Accessory, and change it from
Detail Disclosure to None (see Figure 8-15). Accessory icons take up space in our cell, and we
want the entire cell for our own selfish needs. We’ll talk about accessory icons in the next
chapter.
Remember, even though UITableViewCell is a subclass of UIView, it uses a content view to
hold and group its subviews. Double- click the Custom Cell icon, which will open a new win-
dow. You’ll notice a grey dashed rounded rectangle labeled Content View (see Figure 8-16).
Figure 8-14. Table View Cell in the library
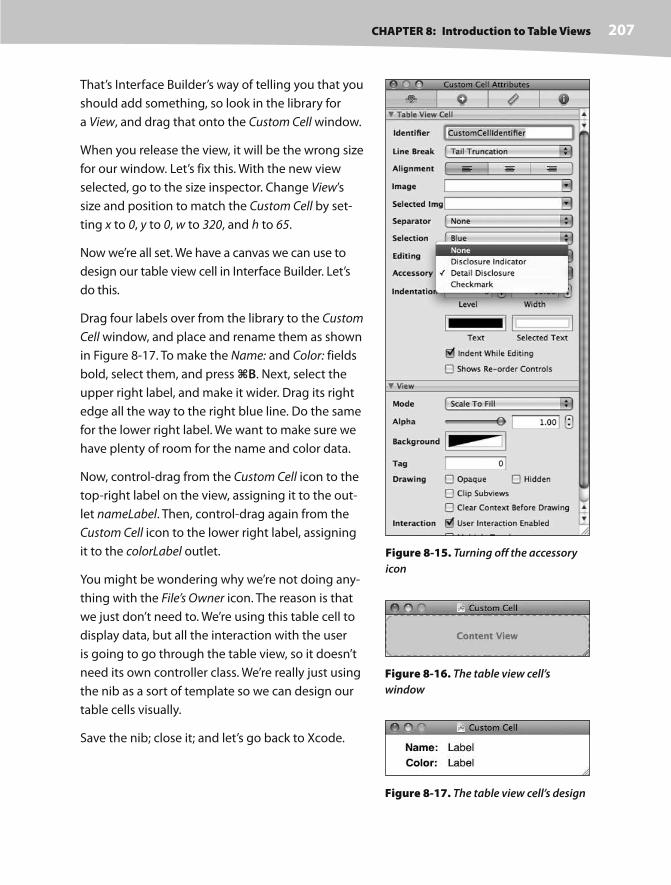
CHAPTER 8: Introduction to Table Views 207
That’s Interface Builder’s way of telling you that you
should add something, so look in the library for
a View, and drag that onto the Custom Cell window.
When you release the view, it will be the wrong size
for our window. Let’s fix this. With the new view
selected, go to the size inspector. Change View’s
size and position to match the Custom Cell by set-
ting x to 0, y to 0, w to 320, and h to 65.
Now we’re all set. We have a canvas we can use to
design our table view cell in Interface Builder. Let’s
do this.
Drag four labels over from the library to the Custom
Cell window, and place and rename them as shown
in Figure 8-17. To make the Name: and Color: fields
bold, select them, and press B. Next, select the
upper right label, and make it wider. Drag its right
edge all the way to the right blue line. Do the same
for the lower right label. We want to make sure we
have plenty of room for the name and color data.
Now, control- drag from the Custom Cell icon to the
top- right label on the view, assigning it to the out-
let nameLabel. Then, control- drag again from the
Custom Cell icon to the lower right label, assigning
it to the colorLabel outlet.
You might be wondering why we’re not doing any-
thing with the File’s Owner icon. The reason is that
we just don’t need to. We’re using this table cell to
display data, but all the interaction with the user
is going to go through the table view, so it doesn’t
need its own controller class. We’re really just using
the nib as a sort of template so we can design our
table cells visually.
Save the nib; close it; and let’s go back to Xcode.
Figure 8-15. Turning off the accessory
icon
Figure 8-16. The table view cell’s
window
Figure 8-17. The table view cell’s design
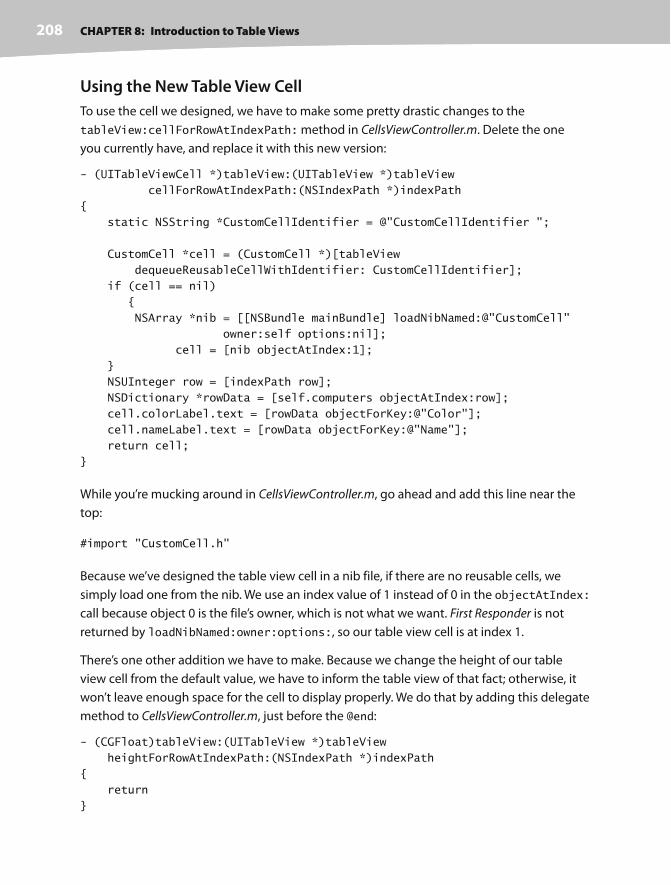
CHAPTER 8: Introduction to Table Views208
Using the New Table View Cell
To use the cell we designed, we have to make some pretty drastic changes to the
tableView:cellForRowAtIndexPath: method in CellsViewController.m. Delete the one
you currently have, and replace it with this new version:
- (UITableViewCell *)tableView:(UITableView *)tableView
cellForRowAtIndexPath:(NSIndexPath *)indexPath
{
static NSString *CustomCellIdentifier = @"CustomCellIdentifier ";
CustomCell *cell = (CustomCell *)[tableView
dequeueReusableCellWithIdentifier: CustomCellIdentifier];
if (cell == nil)
{
NSArray *nib = [[NSBundle mainBundle] loadNibNamed:@"CustomCell"
owner:self options:nil];
cell = [nib objectAtIndex:1];
}
NSUInteger row = [indexPath row];
NSDictionary *rowData = [self.computers objectAtIndex:row];
cell.colorLabel.text = [rowData objectForKey:@"Color"];
cell.nameLabel.text = [rowData objectForKey:@"Name"];
return cell;
}
While you’re mucking around in CellsViewController.m, go ahead and add this line near the
top:
#import "CustomCell.h"
Because we’ve designed the table view cell in a nib file, if there are no reusable cells, we
simply load one from the nib. We use an index value of 1 instead of 0 in the objectAtIndex:
call because object 0 is the file’s owner, which is not what we want. First Responder is not
returned by loadNibNamed:owner:options:, so our table view cell is at index 1.
There’s one other addition we have to make. Because we change the height of our table
view cell from the default value, we have to inform the table view of that fact; otherwise, it
won’t leave enough space for the cell to display properly. We do that by adding this delegate
method to CellsViewController.m, just before the @end:
- (CGFloat)tableView:(UITableView *)tableView
heightForRowAtIndexPath:(NSIndexPath *)indexPath
{
return
}
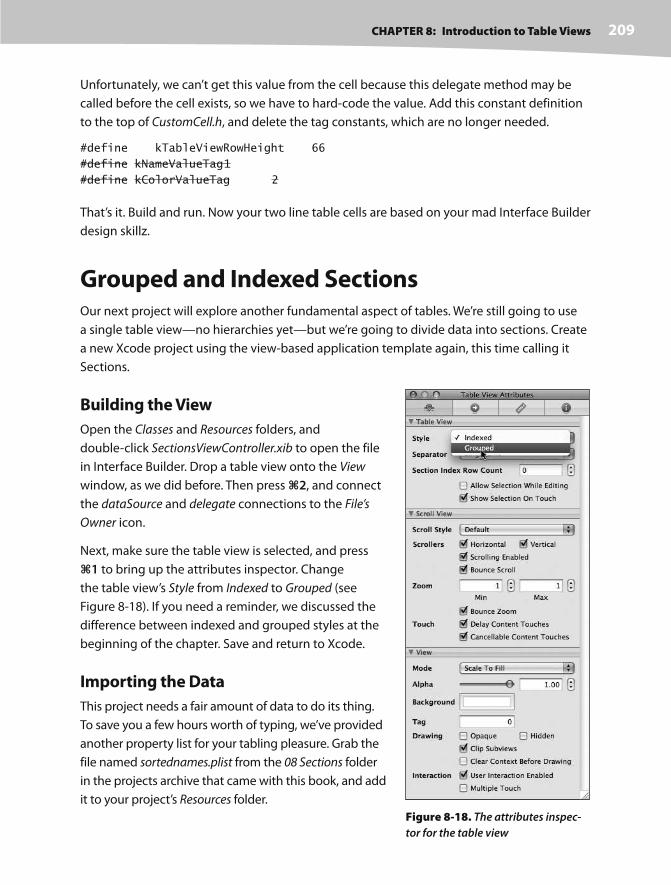
CHAPTER 8: Introduction to Table Views 209
Unfortunately, we can’t get this value from the cell because this delegate method may be
called before the cell exists, so we have to hard- code the value. Add this constant definition
to the top of CustomCell.h, and delete the tag constants, which are no longer needed.
#define kTableViewRowHeight 66
#define kNameValueTag 1
#define kColorValueTag 2
That’s it. Build and run. Now your two line table cells are based on your mad Interface Builder
design skillz.
Grouped and Indexed SectionsOur next project will explore another fundamental aspect of tables. We’re still going to use
a single table view—no hierarchies yet—but we’re going to divide data into sections. Create
a new Xcode project using the view- based application template again, this time calling it
Sections.
Building the View
Open the Classes and Resources folders, and
double- click SectionsViewController.xib to open the file
in Interface Builder. Drop a table view onto the View
window, as we did before. Then press 2, and connect
the dataSource and delegate connections to the File’s
Owner icon.
Next, make sure the table view is selected, and press
1 to bring up the attributes inspector. Change
the table view’s Style from Indexed to Grouped (see
Figure 8-18). If you need a reminder, we discussed the
difference between indexed and grouped styles at the
beginning of the chapter. Save and return to Xcode.
Importing the Data
This project needs a fair amount of data to do its thing.
To save you a few hours worth of typing, we’ve provided
another property list for your tabling pleasure. Grab the
file named sortednames.plist from the 08 Sections folder
in the projects archive that came with this book, and add
it to your project’s Resources folder.
Figure 8-18. The attributes inspec-
tor for the table view
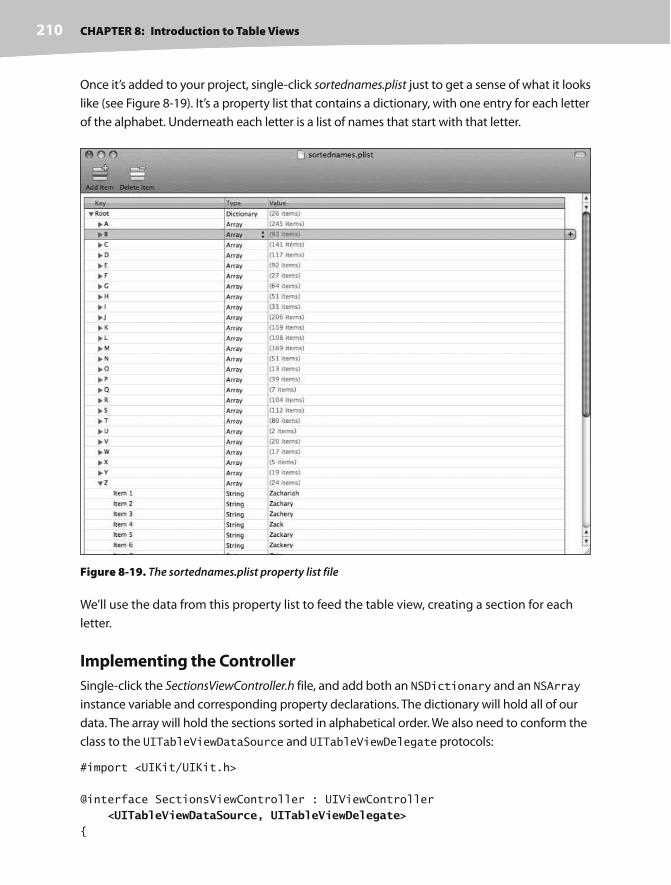
CHAPTER 8: Introduction to Table Views210
Once it’s added to your project, single- click sortednames.plist just to get a sense of what it looks
like (see Figure 8-19). It’s a property list that contains a dictionary, with one entry for each letter
of the alphabet. Underneath each letter is a list of names that start with that letter.
Figure 8-19. The sortednames.plist property list file
We’ll use the data from this property list to feed the table view, creating a section for each
letter.
Implementing the Controller
Single-click the SectionsViewController.h file, and add both an NSDictionary and an NSArray
instance variable and corresponding property declarations. The dictionary will hold all of our
data. The array will hold the sections sorted in alphabetical order. We also need to conform the
class to the UITableViewDataSource and UITableViewDelegate protocols:
#import <UIKit/UIKit.h>
@interface SectionsViewController : UIViewController
<UITableViewDataSource, UITableViewDelegate>{
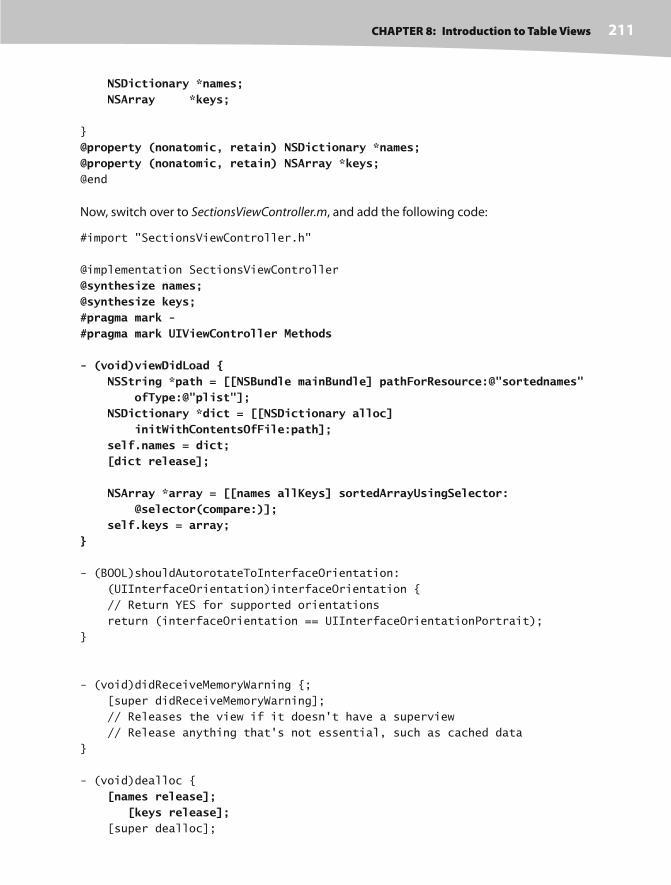
CHAPTER 8: Introduction to Table Views 211
NSDictionary *names; NSArray *keys;
}
@property (nonatomic, retain) NSDictionary *names;@property (nonatomic, retain) NSArray *keys;@end
Now, switch over to SectionsViewController.m, and add the following code:
#import "SectionsViewController.h"
@implementation SectionsViewController
@synthesize names;@synthesize keys;#pragma mark -#pragma mark UIViewController Methods
- (void)viewDidLoad { NSString *path = [[NSBundle mainBundle] pathForResource:@"sortednames" ofType:@"plist"]; NSDictionary *dict = [[NSDictionary alloc] initWithContentsOfFile:path]; self.names = dict; [dict release];
NSArray *array = [[names allKeys] sortedArrayUsingSelector: @selector(compare:)]; self.keys = array;}
- (BOOL)shouldAutorotateToInterfaceOrientation:
(UIInterfaceOrientation)interfaceOrientation {
// Return YES for supported orientations
return (interfaceOrientation == UIInterfaceOrientationPortrait);
}
- (void)didReceiveMemoryWarning {;
[super didReceiveMemoryWarning];
// Releases the view if it doesn't have a superview
// Release anything that's not essential, such as cached data
}
- (void)dealloc {
[names release]; [keys release]; [super dealloc];

CHAPTER 8: Introduction to Table Views212
}
#pragma mark -#pragma mark Table View Data Source Methods- (NSInteger)numberOfSectionsInTableView:(UITableView *)tableView{ return [keys count];}- (NSInteger)tableView:(UITableView *)tableView numberOfRowsInSection:(NSInteger)section{ NSString *key = [keys objectAtIndex:section]; NSArray *nameSection = [names objectForKey:key]; return [nameSection count];}- (UITableViewCell *)tableView:(UITableView *)tableView cellForRowAtIndexPath:(NSIndexPath *)indexPath{ NSUInteger section = [indexPath section]; NSUInteger row = [indexPath row];
NSString *key = [keys objectAtIndex:section]; NSArray *nameSection = [names objectForKey:key];
static NSString *SectionsTableIdentifier = @"SectionsTableIdentifier";
UITableViewCell *cell = [tableView dequeueReusableCellWithIdentifier: SectionsTableIdentifier ]; if (cell == nil) { cell = [[[UITableViewCell alloc] initWithFrame:CGRectZero reuseIdentifier: SectionsTableIdentifier ] autorelease]; }
cell.text = [nameSection objectAtIndex:row]; return cell;
}- (NSString *)tableView:(UITableView *)tableView titleForHeaderInSection:(NSInteger)section{ NSString *key = [keys objectAtIndex:section]; return key;}@end
Most of this isn’t too different from what you’ve seen before. In the viewDidLoad method,
we created an NSDictionary instance from the property list we added to our project and
assigned it to names. After that, we grabbed all the keys from that dictionary and sorted

CHAPTER 8: Introduction to Table Views 213
them to give us an ordered NSArray with all the key values in the dictionary in alphabetical
order. Remember, the NSDictionary uses the letters of the alphabet as its keys, so this array
will have 26 letters, in order from “A” to “Z,” and we’ll use that array to help us keep track of
the sections.
Scroll down to the datasource methods. The first one we added to our class specifies the
number of sections. We didn’t implement this method last time because we were happy
with the default setting of 1. This time, we’re telling the table view that we have one section
for each key in our dictionary.
- (NSInteger)numberOfSectionsInTableView:(UITableView *)tableView
{
return [keys count];
}
The next method calculates the number of rows in a specific section. Last time, we had only
one section, so we just returned the number of rows we had in our array. This time, we have
to break it down per section. We can do that by retrieving the array that corresponds to the
section in question and returning the count from that array.
- (NSInteger)tableView:(UITableView *)tableView
numberOfRowsInSection:(NSInteger)section
{
NSString *key = [keys objectAtIndex:section];
NSArray *nameSection = [names objectForKey:key];
return [nameSection count];
}
In our tableView:cellForRowAtIndexPath: method, we have to extract both the section
and row from the index path and use that to determine which value to use. The section will
tell us which array to pull out of the names dictionary, and then we can use the row to figure
out which value from that array to use. Everything else in that method is basically the same
as the version in the Simple Table application.
The method tableView:titleForHeaderInSection allows you to specify an optional
header value for each section, and we simply return the letter for this group.
- (NSString *)tableView:(UITableView *)tableView
titleForHeaderInSection:(NSInteger)section
{
NSString *key = [keys objectAtIndex:section];
return key;
}

CHAPTER 8: Introduction to Table Views214
Finally, since we reference CGRectZero in SectionViewController.m, we’ll need to link in the
Core Graphics Framework. Single- click the Frameworks folder in the Groups & Files pane, and
select Add to Project from the Project menu. If you can’t remember how to navigate to the
framework, check back to the end of Chapter 5, where we lay it out in detail.
Why don’t you compile and run the project and revel in its grooviness? Remember that we
changed the table’s Style to Grouped, so we ended up with a grouped table with 26 sections,
which should look like Figure 8-20.
As a contrast, let’s change our table view back to the indexed style and see what an indexed
table view with multiple sections looks like. Double- click SectionViewController.xib to open
the file in Interface Builder. Select the table view, and use the attributes inspector to change
the view back to Indexed. Save, and go back to Xcode to build and run it—same data, differ-
ent grooviness (see Figure 8-21).
Adding an Index
One problem with our current table is the sheer number of rows. There are two thousand
names in this list. Your finger will get awfully tired looking for Zachariah or Zebediah, not to
mention Zojirishu.
One solution to this problem is to add an index down the right side of the table view. Now
that we’ve set our table view style back to indexed, that’s actually relatively easy to do. Add
the following method to the bottom of SectionsViewController.m, just above the @end:
- (NSArray *)sectionIndexTitlesForTableView:(UITableView *)tableView
{
return keys;
}
Yep, that’s it. In this method, the delegate is asking for an array of the values to display in
the index. You must have more than one section in your table view to use the index, and the
entries in this array must correspond to those sections. The returned array must have the
same number of entries as you have sections, and the values must correspond to the appro-
priate section. In other words, the first item in this array will take the user to the first section,
which is section 0.
Compile and run again, and you’ll have yourself a nice index (see Figure 8-22).

CHAPTER 8: Introduction to Table Views 215
Implementing a Search BarThe index is helpful, but even so, we still have an awful lot of
names here. If we want to see if the name Arabella is in the list,
for example, we’re still going to have to scroll for a while even
after using the index. It’d be nice if we could let the user pare
down the list by specifying a search term, wouldn’t it? That’d
be darn user friendly. Well, it’s a little bit of extra work, but
it’s not too bad. We’re going to implement a standard iPhone
search bar, like the one shown in Figure 8-23.
Rethinking the Design
Before we set about doing this, we need to put some thought
into how it’s going to work. Currently, we have a dictionary
that holds a bunch of arrays, one for each letter of the alpha-
bet. The dictionary is immutable, which means we can’t add
or delete values from it, and so are the arrays that it holds. We
also have to retain the ability to get back to the original data-
set when the user hits cancel or erases their search term.
Figure 8-20. A grouped table
with multiple sections
Figure 8-21. An indexed
table view with sections
Figure 8-22. The indexed
table view with an index
Figure 8-23. The application
with a search bar added to it
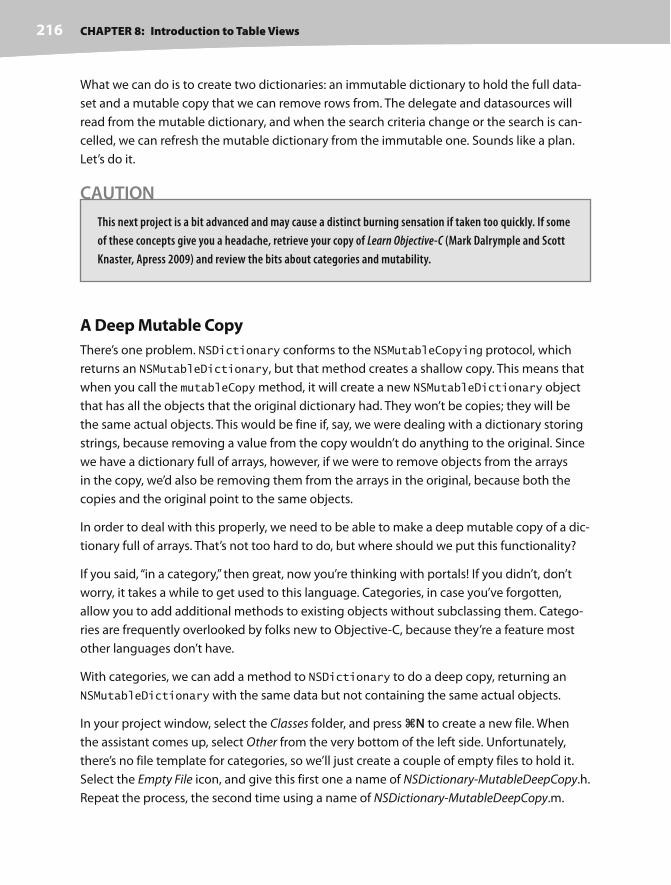
CHAPTER 8: Introduction to Table Views216
What we can do is to create two dictionaries: an immutable dictionary to hold the full data-
set and a mutable copy that we can remove rows from. The delegate and datasources will
read from the mutable dictionary, and when the search criteria change or the search is can-
celled, we can refresh the mutable dictionary from the immutable one. Sounds like a plan.
Let’s do it.
CAUTION
This next project is a bit advanced and may cause a distinct burning sensation if taken too quickly. If some
of these concepts give you a headache, retrieve your copy of Learn Objective- C (Mark Dalrymple and Scott
Knaster, Apress 2009) and review the bits about categories and mutability.
A Deep Mutable Copy
There’s one problem. NSDictionary conforms to the NSMutableCopying protocol, which
returns an NSMutableDictionary, but that method creates a shallow copy. This means that
when you call the mutableCopy method, it will create a new NSMutableDictionary object
that has all the objects that the original dictionary had. They won’t be copies; they will be
the same actual objects. This would be fine if, say, we were dealing with a dictionary storing
strings, because removing a value from the copy wouldn’t do anything to the original. Since
we have a dictionary full of arrays, however, if we were to remove objects from the arrays
in the copy, we’d also be removing them from the arrays in the original, because both the
copies and the original point to the same objects.
In order to deal with this properly, we need to be able to make a deep mutable copy of a dic-
tionary full of arrays. That’s not too hard to do, but where should we put this functionality?
If you said, “in a category,” then great, now you’re thinking with portals! If you didn’t, don’t
worry, it takes a while to get used to this language. Categories, in case you’ve forgotten,
allow you to add additional methods to existing objects without subclassing them. Catego-
ries are frequently overlooked by folks new to Objective- C, because they’re a feature most
other languages don’t have.
With categories, we can add a method to NSDictionary to do a deep copy, returning an
NSMutableDictionary with the same data but not containing the same actual objects.
In your project window, select the Classes folder, and press N to create a new file. When
the assistant comes up, select Other from the very bottom of the left side. Unfortunately,
there’s no file template for categories, so we’ll just create a couple of empty files to hold it.
Select the Empty File icon, and give this first one a name of NSDictionary- MutableDeepCopy.h.
Repeat the process, the second time using a name of NSDictionary- MutableDeepCopy.m.

CHAPTER 8: Introduction to Table Views 217
TIP
A faster way to create the two files needed for the category is to select the NSObject subclass tem-
plate and then delete the file contents. This option will give you both the header and implementation file,
saving you one step.
Put the following code in NSDictionary- MutableDeepCopy.h:
#import <Foundation/Foundation.h>
@interface NSDictionary(MutableDeepCopy)
- (NSMutableDictionary *)mutableDeepCopy;
@end
Flip over to NSDictionary- MutableDeepCopy.m, and add the implementation:
#import "NSDictionary- MutableDeepCopy.h"
@implementation NSDictionary (MutableDeepCopy)
- (NSMutableDictionary *) mutableDeepCopy
{
NSMutableDictionary *ret = [NSMutableDictionary dictionaryWithCapacity:
[self count]];
NSArray *keys = [self allKeys];
for (id key in keys)
{
id oneValue = [self valueForKey:key];
id oneCopy = nil;
if ([oneValue respondsToSelector:@selector(mutableDeepCopy)])
oneCopy = [oneValue mutableDeepCopy];
else if ([oneValue respondsToSelector:@selector(mutableCopy)])
oneCopy = [oneValue mutableCopy];
if (oneCopy == nil)
oneCopy = [oneValue copy];
[ret setValue:oneCopy forKey:key];
}
return ret;
}
@end
This method creates a new mutable dictionary and then loops through all the keys of the
original dictionary, making mutable copies of each array it encounters. Since this method
will behave just as if it were part of NSDictionary, any reference to self is a reference to
the dictionary that this method is being called on. The method first attempts to make a deep

CHAPTER 8: Introduction to Table Views218
mutable copy, and if the object doesn’t respond to the mutableDeepCopy message, it tries
to make a mutable copy. If the object doesn’t respond to the mutableCopy message, it falls
back on making a regular copy to ensure that all the objects contained in the dictionary do
get copied. By doing it this way, if we were to have a dictionary containing dictionaries (or
other objects that supported deep mutable copies), the contained ones would also get deep
copied.
For a few of you, this might be the first time you’ve seen this syntax in Objective- C:
for (id key in keys)
There’s a new feature of Objective- C 2.0, called fast enumeration. Fast enumeration is a
language- level replacement for NSEnumerator, which you’ll find covered in Learn Objective C.
It allows you to quickly iterate through a collection, such as an NSArray, without the hassle of
creating additional objects.
All of the delivered Cocoa collection classes, including NSDictionary, NSArray, and NSSet
support fast enumeration, and you should use this syntax any time you need to iterate over
a collection. It will ensure you get the most efficient loop possible.
You may have noticed that we’re using a convenience class method to create the dictionary
ret even though we’ve previously warned against using convenience methods unneces-
sarily. The problem with using a convenience method is that the object returned by the
convenience method is put into the autorelease pool and will stick around at least until the
end of the current event loop, even if its retain count drops to zero. Obviously, the concern
here is inefficient use of memory.
In this case, when we return the value at the end of the method, we have to call autorelease
on it to make sure that it’s still around for the code that called this method. Since it’s going into
the autorelease pool anyway, we might as well take advantage of the convenience method
and save ourselves typing a line or two of code.
If we include the NSDictionary- MutableDeepCopy.h header file in one of our other classes,
we’ll be able to call mutableDeepCopy on any NSDictionary object we like. Let’s take advan-
tage of that now.
Updating the Controller Header File
Next, we need to add some outlets to our controller class header file. We’ll need an outlet for
the table view. Up until now, we haven’t needed a pointer to the table view outside of the
datasource methods, but we’re going to need one now, since we’ll need to tell the table to
reload itself based on the result of the search.

CHAPTER 8: Introduction to Table Views 219
We’re also going to need an outlet to a search bar, which is a control used for, well, searching.
In addition to those two outlets, we’re also going to need an additional dictionary. The exist-
ing dictionary and array are both immutable objects, and we need to change both of them
to the corresponding mutable version, so the NSArray becomes an NSMutableArray and
the NSDictionary becomes an NSMutableDictionary.
We won’t need any new action methods in our controller, but we will need a couple of new
methods. For now, just declare them, and we’ll talk about them in detail once we enter the
code.
We’ll also need to conform our class to the UISearchBarDelegate protocol. We’ll need to
become the search bar’s delegate in addition to being the table view’s delegate.
Make the following changes to SectionsViewController.h:
#import <UIKit/UIKit.h>
@interface SectionsViewController : UIViewController
<UITableViewDataSource, UITableViewDelegate, UISearchBarDelegate>{
IBOutlet UITableView *table; IBOutlet UISearchBar *search; NSDictionary *allNames; NSMutableDictionary *names; NSMutableArray *keys; NSDictionary *names;
NSArray *keys;
}
@property (nonatomic, retain) NSDictionary *names;
@property (nonatomic, retain) NSArray *keys;
@property (nonatomic, retain) UITableView *table;@property (nonatomic, retain) UISearchBar *search;@property (nonatomic, retain) NSDictionary *allNames;@property (nonatomic, retain) NSMutableDictionary *names;@property (nonatomic, retain) NSMutableArray *keys;- (void)resetSearch;- (void)handleSearchForTerm:(NSString *)searchTerm;@end
Here’s what we just did. The outlet table will point to our table view; the outlet search will
point to the search bar; the dictionary allNames will hold the full data set; the dictionary
names will hold the data set that matches the current search criteria; and keys will hold the
index values and section names. If you’re clear on everything, let’s now modify our view in
Interface Builder.

CHAPTER 8: Introduction to Table Views220
Modifying the View
Double-click SectionsViewController.xib to
open the file in Interface Builder. Once you’re
there, select the table view and, using the top
resize handle, shorten it a little so that there’s
some room at the top to add a search bar.
Don’t worry about being precise; you’ll adjust
to perfection in just a second. As a reminder,
if you have trouble getting the resize handles
to appear, change the main nib window to list
mode, and double- click the Table View. That’ll
select the Table View, and the resize handles
will appear.
Next, grab a Search Bar from the library (see Figure 8-24), and add it to the top of your view.
Play around with the search bar and table view so that
they look nice. The table view should go right up to the
bottom of the search bar, and the two controls together
should take up the entire space of the view, as shown in
Figure 8-25.
Now control- drag from the File’s Owner icon to the table
view, and select the table outlet. Repeat with the search
bar, and select the search outlet. Single- click the search
bar, and go to the attributes inspector by pressing 1.
It should look like
Figure 8-26.
Check the box that
says Shows Cancel
Button. Type search in
the Placeholder field.
A Cancel button will
appear to the right
of the search field.
The user can tap this
button to cancel the
search. The place-
holder text search will
appear in the search
field, in grey letters.
Figure 8-25. The new version
of our view with both a table
view and a search bar
Figure 8-26. The attributes inspec-
tor for the search bar
Figure 8-24. The Search Bar in the library
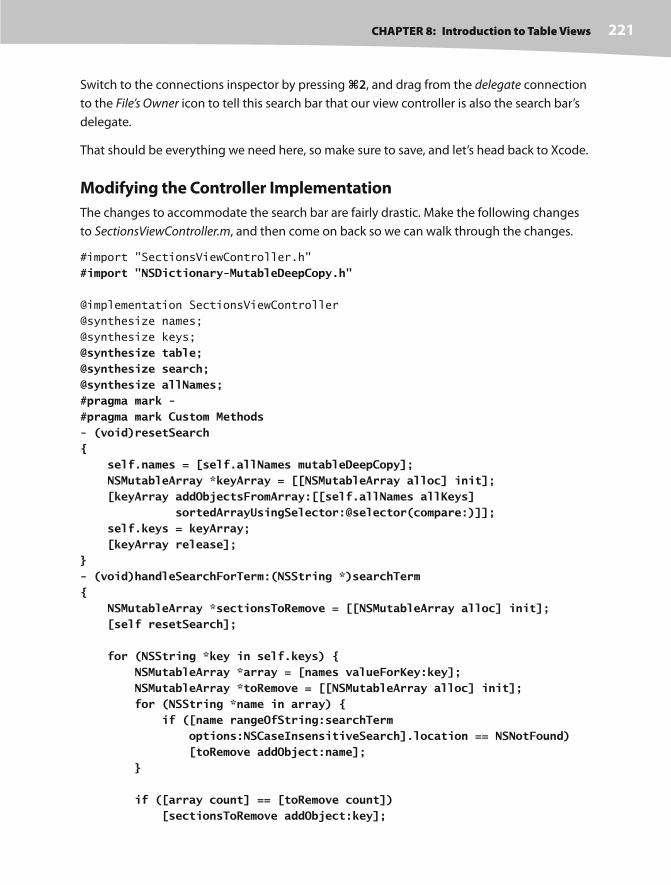
CHAPTER 8: Introduction to Table Views 221
Switch to the connections inspector by pressing 2, and drag from the delegate connection
to the File’s Owner icon to tell this search bar that our view controller is also the search bar’s
delegate.
That should be everything we need here, so make sure to save, and let’s head back to Xcode.
Modifying the Controller Implementation
The changes to accommodate the search bar are fairly drastic. Make the following changes
to SectionsViewController.m, and then come on back so we can walk through the changes.
#import "SectionsViewController.h"
#import "NSDictionary- MutableDeepCopy.h"
@implementation SectionsViewController
@synthesize names;
@synthesize keys;
@synthesize table;@synthesize search;@synthesize allNames;#pragma mark -#pragma mark Custom Methods- (void)resetSearch{ self.names = [self.allNames mutableDeepCopy]; NSMutableArray *keyArray = [[NSMutableArray alloc] init]; [keyArray addObjectsFromArray:[[self.allNames allKeys] sortedArrayUsingSelector:@selector(compare:)]]; self.keys = keyArray; [keyArray release];}- (void)handleSearchForTerm:(NSString *)searchTerm{ NSMutableArray *sectionsToRemove = [[NSMutableArray alloc] init]; [self resetSearch];
for (NSString *key in self.keys) { NSMutableArray *array = [names valueForKey:key]; NSMutableArray *toRemove = [[NSMutableArray alloc] init]; for (NSString *name in array) { if ([name rangeOfString:searchTerm options:NSCaseInsensitiveSearch].location == NSNotFound) [toRemove addObject:name]; }
if ([array count] == [toRemove count]) [sectionsToRemove addObject:key];

CHAPTER 8: Introduction to Table Views222
[array removeObjectsInArray:toRemove]; [toRemove release]; } [self.keys removeObjectsInArray:sectionsToRemove]; [sectionsToRemove release]; [table reloadData];}#pragma mark -
#pragma mark UIViewController Methods
- (void)viewDidLoad {
NSString *path = [[NSBundle mainBundle] pathForResource:@"sortednames"
ofType:@"plist"];
NSDictionary *dict = [[NSDictionary alloc]
initWithContentsOfFile:path];
self.names = dict;
self.allNames = dict;
[dict release];
NSArray *array = [[names allKeys] sortedArrayUsingSelector:
@selector(compare:)];
self.keys = array;
[self resetSearch]; search.autocapitalizationType = UITextAutocapitalizationTypeNone; search.autocorrectionType = UITextAutocorrectionTypeNo;}
- (BOOL)shouldAutorotateToInterfaceOrientation:
(UIInterfaceOrientation)interfaceOrientation {
// Return YES for supported orientations
return (interfaceOrientation == UIInterfaceOrientationPortrait);
}
- (void)didReceiveMemoryWarning {;
[super didReceiveMemoryWarning];
// Releases the view if it doesn't have a superview
// Release anything that's not essential, such as cached data
}
- (void)dealloc {
[table release]; [search release];

CHAPTER 8: Introduction to Table Views 223
[allNames release]; [keys release];
[names release];
[super dealloc];
}
#pragma mark -
#pragma mark Table View Data Source Methods
- (NSInteger)numberOfSectionsInTableView:(UITableView *)tableView
{
return [keys count];
return ([keys count] > 0) ? [keys count] : 1;}
- (NSInteger)tableView:(UITableView *)aTableView
numberOfRowsInSection:(NSInteger)section
{
if ([keys count] == 0) return 0; NSString *key = [keys objectAtIndex:section];
NSArray *nameSection = [names objectForKey:key];
return [nameSection count];
}
- (UITableViewCell *)tableView:(UITableView *)aTableView
cellForRowAtIndexPath:(NSIndexPath *)indexPath
{
NSUInteger section = [indexPath section];
NSUInteger row = [indexPath row];
NSString *key = [keys objectAtIndex:section];
NSArray *nameSection = [names objectForKey:key];
static NSString *sectionsTableIdentifier = @"sectionsTableIdentifier";
UITableViewCell *cell = [aTableView dequeueReusableCellWithIdentifier:
sectionsTableIdentifier];
if (cell == nil) {
cell = [[[UITableViewCell alloc] initWithFrame:CGRectZero
reuseIdentifier: sectionsTableIdentifier] autorelease];
}
cell.text = [nameSection objectAtIndex:row];
return cell;
}
- (NSString *)tableView:(UITableView *)tableView
titleForHeaderInSection:(NSInteger)section
{
if ([keys count] == 0)

CHAPTER 8: Introduction to Table Views224
return @"";
NSString *key = [keys objectAtIndex:section];
return key;
}
- (NSArray *)sectionIndexTitlesForTableView:(UITableView *)tableView
{
return keys;
}
#pragma mark -#pragma mark Table View Delegate Methods- (NSIndexPath *)tableView:(UITableView *)tableView willSelectRowAtIndexPath:(NSIndexPath *)indexPath{ [search resignFirstResponder]; return indexPath;}#pragma mark -#pragma mark Search Bar Delegate Methods- (void)searchBarSearchButtonClicked:(UISearchBar *)searchBar{ NSString *searchTerm = [searchBar text]; [self handleSearchForTerm:searchTerm];}
- (void)searchBar:(UISearchBar *)searchBar textDidChange:(NSString *)searchTerm{ if ([searchTerm length] == 0) { [self resetSearch]; [table reloadData]; return; } [self handleSearchForTerm:searchTerm];
}- (void)searchBarCancelButtonClicked:(UISearchBar *)searchBar{ search.text = @""; [self resetSearch]; [table reloadData]; [searchBar resignFirstResponder];}@end

CHAPTER 8: Introduction to Table Views 225
Copying Data from allNames
Wow, are you still with us after all that typing? Let’s break it down and see what we just did.
We’ll start with the two new methods we added. Here’s the first one:
- (void)resetSearch
{
self.names = [self.allNames mutableDeepCopy];
NSMutableArray *keyArray = [[NSMutableArray alloc] init];
[keyArray addObjectsFromArray:[[self.allNames allKeys]
sortedArrayUsingSelector:@selector(compare:)]];
self.keys = keyArray;
[keyArray release];
}
This method will get called any time the search is cancelled or the search term changes. All
it does is create a mutable copy of allNames, assign it to names, and then refresh the keys
array so it includes all the letters of the alphabet. We have to refresh the keys array because,
if a search eliminates all values from a section, we need to get rid of that section too. Other-
wise, the screen gets filled up with headers and empty sections, and it doesn’t look good. We
also don’t want to provide an index to something that doesn’t exist, so as we cull the names
based on the search terms, we also cull the empty sections.
Implementing the Search
The other new method is the actual search:
- (void)handleSearchForTerm:(NSString *)searchTerm
{
NSMutableArray *sectionsToRemove = [[NSMutableArray alloc] init];
[self resetSearch];
for (NSString *key in self.keys)
{
NSMutableArray *array = [names valueForKey:key];
NSMutableArray *toRemove = [[NSMutableArray alloc] init];
for (NSString *name in array) {
if ([name rangeOfString:searchTerm
options:NSCaseInsensitiveSearch].location == NSNotFound)
[toRemove addObject:name];
}
if ([array count] == [toRemove count])
[sectionsToRemove addObject:key];
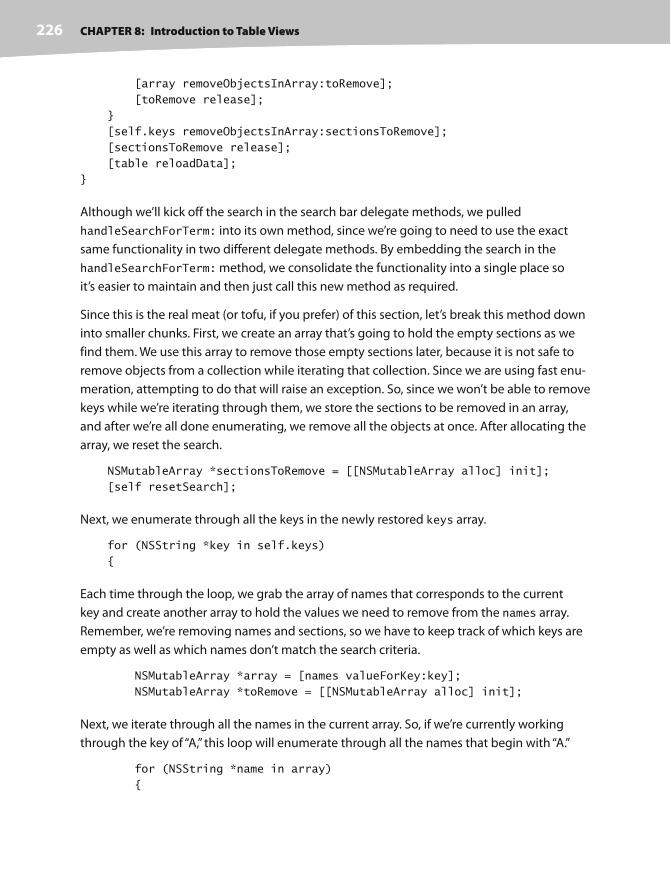
CHAPTER 8: Introduction to Table Views226
[array removeObjectsInArray:toRemove];
[toRemove release];
}
[self.keys removeObjectsInArray:sectionsToRemove];
[sectionsToRemove release];
[table reloadData];
}
Although we’ll kick off the search in the search bar delegate methods, we pulled
handleSearchForTerm: into its own method, since we’re going to need to use the exact
same functionality in two different delegate methods. By embedding the search in the
handleSearchForTerm: method, we consolidate the functionality into a single place so
it’s easier to maintain and then just call this new method as required.
Since this is the real meat (or tofu, if you prefer) of this section, let’s break this method down
into smaller chunks. First, we create an array that’s going to hold the empty sections as we
find them. We use this array to remove those empty sections later, because it is not safe to
remove objects from a collection while iterating that collection. Since we are using fast enu-
meration, attempting to do that will raise an exception. So, since we won’t be able to remove
keys while we’re iterating through them, we store the sections to be removed in an array,
and after we’re all done enumerating, we remove all the objects at once. After allocating the
array, we reset the search.
NSMutableArray *sectionsToRemove = [[NSMutableArray alloc] init];
[self resetSearch];
Next, we enumerate through all the keys in the newly restored keys array.
for (NSString *key in self.keys)
{
Each time through the loop, we grab the array of names that corresponds to the current
key and create another array to hold the values we need to remove from the names array.
Remember, we’re removing names and sections, so we have to keep track of which keys are
empty as well as which names don’t match the search criteria.
NSMutableArray *array = [names valueForKey:key];
NSMutableArray *toRemove = [[NSMutableArray alloc] init];
Next, we iterate through all the names in the current array. So, if we’re currently working
through the key of “A,” this loop will enumerate through all the names that begin with “A.”
for (NSString *name in array)
{

CHAPTER 8: Introduction to Table Views 227
Inside this loop, we use one of NSString’s methods that returns the location of a substring
within a string. We specify an option of NSCaseInsensitiveSearch to tell it we don’t care
about the search term’s case. In other words, “A” is the same as “a.” The value returned by
this method is an NSRange struct with two members, location and length. If the search
term was not found, the location will be set to NSNotFound, so we just check for that. If the
NSRange that is returned contains NSNotFound, we add the name to the array of objects to
be removed later.
if ([name rangeOfString:searchTerm
options:NSCaseInsensitiveSearch].location == NSNotFound)
[toRemove addObject:name];
}
After we’ve looped through all the names for a given letter, we check to see if the array of
names to be removed is the same length as the array of names. If it is, we know this section
is now empty, and we add it to the array of keys to be removed later.
if ([array count] == [toRemove count])
[sectionsToRemove addObject:key];
Next, we actually remove the nonmatching names from this section’s arrays and then release
the array we used to keep track of the names. It’s very important to avoid using convenience
methods inside of loops like this as much as possible, because they will put something into
the autorelease pool every time through the loop. However, the autorelease pool can’t get
flushed until we’re all done with our loop.
[array removeObjectsInArray:toRemove];
[toRemove release];
}
Finally, we remove the empty sections, release the array used to keep track of the empty sec-
tions, and tell the table to reload its data.
[self.keys removeObjectsInArray:sectionsToRemove];
[sectionsToRemove release];
[table reloadData];
}
Changes to viewDidLoad
Down in viewDidLoad, we made a few changes. First of all, we now load the property list
into the allNames dictionary instead of the names dictionary and delete the code that load
the keys array because that is now done in the resetSearch method. We then call the
resetSearch method, which populates the names mutable dictionary and the keys array for
us. Next, we make two calls on our search bar to do some configuration that we weren’t able

CHAPTER 8: Introduction to Table Views228
to do in Interface Builder because the affected settings weren’t available on the attributes
inspector:
search.autocapitalizationType = UITextAutocapitalizationTypeNone;
search.autocorrectionType = UITextAutocorrectionTypeNo;
Since our search is not case sensitive, there’s no point in capitalizing what the user types into
the search bar. We also don’t want to use autocorrection, because many search terms will be
partial names, and we don’t want our search trying to autocorrect those.
Changes to Datasource Methods
If you skip down to the datasource methods, you’ll see we made a few minor changes there.
Because the names dictionary and keys array are still being used to feed the datasource,
these methods are basically the same as they were before. We did have to account for the
facts that table views always have a minimum of one section and yet the search could
potentially exclude all names from all sections. So, we added a little code to check for the
situation where all sections were removed, and in those cases, we feed the table view a sin-
gle section with no rows and a blank name. This avoids any problems and doesn’t give any
incorrect feedback to the user.
Adding a Table View Delegate Method
Below the datasource methods, we’ve added a single delegate method. If the user clicks
a row while using the search bar, we want the keyboard to go away. We accomplish this
by implementing tableView:willSelectRowAtIndexPath: and telling the search bar
to resign first responder status, which will cause the keyboard to retract. Next, we return
indexPath unchanged. We could also have done this in tableView:didSelectRowAtIndex
Path:, but because we’re doing it here, the keyboard retracts a tiny bit sooner.
- (NSIndexPath *)tableView:(UITableView *)tableView
willSelectRowAtIndexPath:(NSIndexPath *)indexPath
{
[search resignFirstResponder];
return indexPath;
}
Adding Search Bar Delegate Methods
The search bar has a number of methods that it calls on its delegate. When the user taps
return or the search key on the keyboard, searchBarSearchButtonClicked: will be called.
Our version of this method grabs the search term from the search bar and calls our search
method, which will remove the non- matching names from names and the empty sections
from keys.
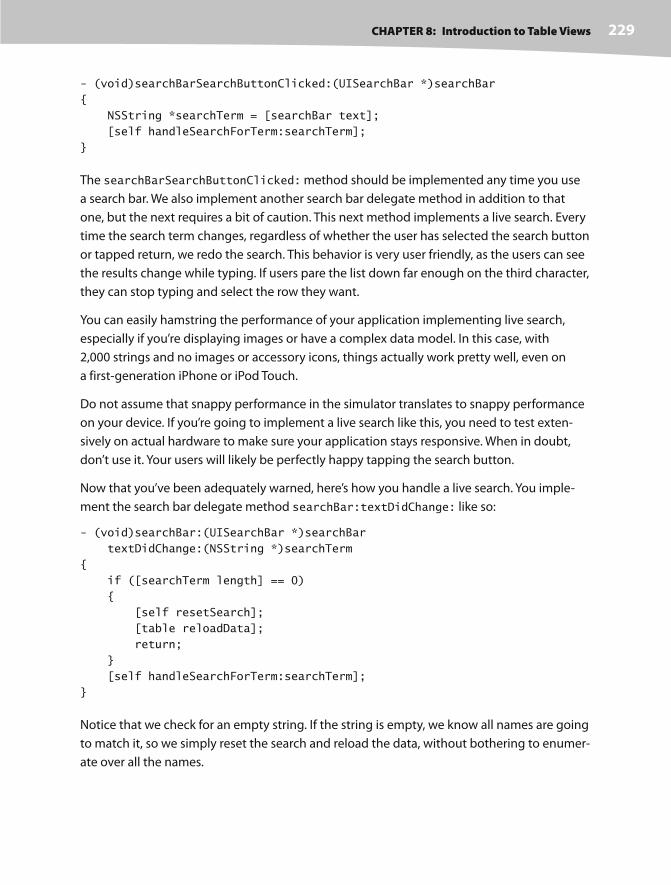
CHAPTER 8: Introduction to Table Views 229
- (void)searchBarSearchButtonClicked:(UISearchBar *)searchBar
{
NSString *searchTerm = [searchBar text];
[self handleSearchForTerm:searchTerm];
}
The searchBarSearchButtonClicked: method should be implemented any time you use
a search bar. We also implement another search bar delegate method in addition to that
one, but the next requires a bit of caution. This next method implements a live search. Every
time the search term changes, regardless of whether the user has selected the search button
or tapped return, we redo the search. This behavior is very user friendly, as the users can see
the results change while typing. If users pare the list down far enough on the third character,
they can stop typing and select the row they want.
You can easily hamstring the performance of your application implementing live search,
especially if you’re displaying images or have a complex data model. In this case, with
2,000 strings and no images or accessory icons, things actually work pretty well, even on
a first- generation iPhone or iPod Touch.
Do not assume that snappy performance in the simulator translates to snappy performance
on your device. If you’re going to implement a live search like this, you need to test exten-
sively on actual hardware to make sure your application stays responsive. When in doubt,
don’t use it. Your users will likely be perfectly happy tapping the search button.
Now that you’ve been adequately warned, here’s how you handle a live search. You imple-
ment the search bar delegate method searchBar:textDidChange: like so:
- (void)searchBar:(UISearchBar *)searchBar
textDidChange:(NSString *)searchTerm
{
if ([searchTerm length] == 0)
{
[self resetSearch];
[table reloadData];
return;
}
[self handleSearchForTerm:searchTerm];
}
Notice that we check for an empty string. If the string is empty, we know all names are going
to match it, so we simply reset the search and reload the data, without bothering to enumer-
ate over all the names.

CHAPTER 8: Introduction to Table Views230
Last, we implement a method that allows us to get notified when the user clicks the Cancel
button on the search bar:
- (void)searchBarCancelButtonClicked:(UISearchBar *)searchBar
{
search.text = @"";
[self resetSearch];
[table reloadData];
[searchBar resignFirstResponder];
}
When the user clicks Cancel, we set the search term to an empty string, reset the search,
and reload the data so that all names are showing. We also tell the search bar to yield first
responder status so that the keyboard drops away and the user can resume working with
the table view.
Putting It All on the TableWell, how are you doing? This was a pretty hefty chapter, and you’ve learned a ton! You
should have a very solid understanding of the way flat tables work and understand how to
customize tables and table view cells as well as how to configure table views. You also know
how to implement a search bar, which is a vital tool in any iPhone application that presents
large volumes of data. Make sure you understand everything we did in this chapter, because
we’re going to build on it.
We’re going to continue working with table views in the next chapter, and you’re going to
learn how to use them to present hierarchical data. You’ll see how to create content views
that allow the user to edit data selected in a table view, as well as how to present checklists
in tables, embed controls in table rows, and delete rows.

231
i
Chapter 9Navigation Controllers and Table Views
n the previous chapter, you mastered the basics of working with table views.
In this chapter, you’re going to get a whole lot more practice, because we’re
going to explore navigation controllers. Table views and navigation control-
lers work hand in hand. Strictly speaking, a navigation controller doesn’t need
a table view in order to do its thing. As a practical matter, however, when you
implement a navigation controller, you almost always implement at least one
table, and usually several, because the strength of the navigation controller is in
the ease with which it handles complex hierarchical data. On the iPhone’s small
screen, hierarchical data is best presented using a succession of table views.
In this chapter, we’re going to build an application progressively, just as we
did with the tab view application back in Chapter 7. We’re going to get the
navigation controller and the first view controller working, and then we’ll start
adding more controllers and more layers to the hierarchy. Each view control-
ler we create will reinforce some aspect of table use or configuration. You’re
going to see how to drill down from table views into child tables and also from
table views down into content views where detailed data can be viewed and
even edited. You’re also going to see how to use a table list to allow the user to
select from multiple values and learn how to use edit mode to allow rows to
be deleted from a table view.
That is a lot, isn’t it? Well, nothing for it but to get started. Let’s go!

CHAPTER 9: Navigation Controllers and Table Views 232
Navigation ControllersThe main tool you’ll use to build hierarchical applications is UINavigationController.
UINavigationController is similar to UITabBarController in that it manages, and
swaps in and out, multiple content views. The main difference between the two is that
UINavigationController is implemented as a stack, which makes it well suited to
working with hierarchies.
Already know everything there is to know about stacks? Scan through this section and we’ll
meet you at the beginning of the next section, “A Stack of Controllers.” New to stacks? Fortu-
nately, it’s a pretty easy concept.
Stacky Goodness
A stack is a commonly used data structure that works on the principle of last in, first out.
Believe it or not, a Pez dispenser is a great example of a stack. Ever try to load one? Accord-
ing to the little instruction sheet that comes with each and every Pez dispenser, there are
a few easy steps. First, unwrap the pack of Pez candy. Second, open the dispenser by tipping
its head straight back. Third, grab the stack (notice the clever way we inserted the word
“stack” in there!) of candy, holding it firmly between your pointer finger and thumb, and
insert the column into the open dispenser. Fourth, pick up the little pieces of candy that
flew all over the place because these instructions just never work.
OK, that example was not particularly useful. But what happens next is: as you pick up the
pieces and jam them, one at a time, into the dispenser, you are working with a stack. Remem-
ber, we said a stack was last in, first out. That also means first in, last out. The first piece of Pez
you push into the dispenser will be the last piece that pops out. The last piece of Pez you push
in there will be the first piece you pop out.
A computer stack follows the same rules. When you add an object to a stack, it’s called a push:
you push an object onto the stack. When you remove an object from the stack, it’s called a pop.
When you pop an object off the stack, it’s always the last one you pushed onto the stack. The first
object you push onto the stack will always be the last one you pop off the stack.
A Stack of Controllers
A navigation controller maintains a stack of view controllers. Any kind of view controller is fair
game for the stack. When you design your navigation controller, you’ll need to specify the very
first view the user sees. That view is the bottommost view in the view hierarchy and its control-
ler is called the root view controller. The root view controller is the very first view controller the
navigation controller pushes onto its stack. As the user selects the next view to look at, a new
view controller is pushed onto the stack, and the view it controls is shown to the user. We refer
to these new view controllers as subcontrollers. As you’ll see, this chapter’s application, Nav, is
made up of a navigation controller and six subcontrollers.
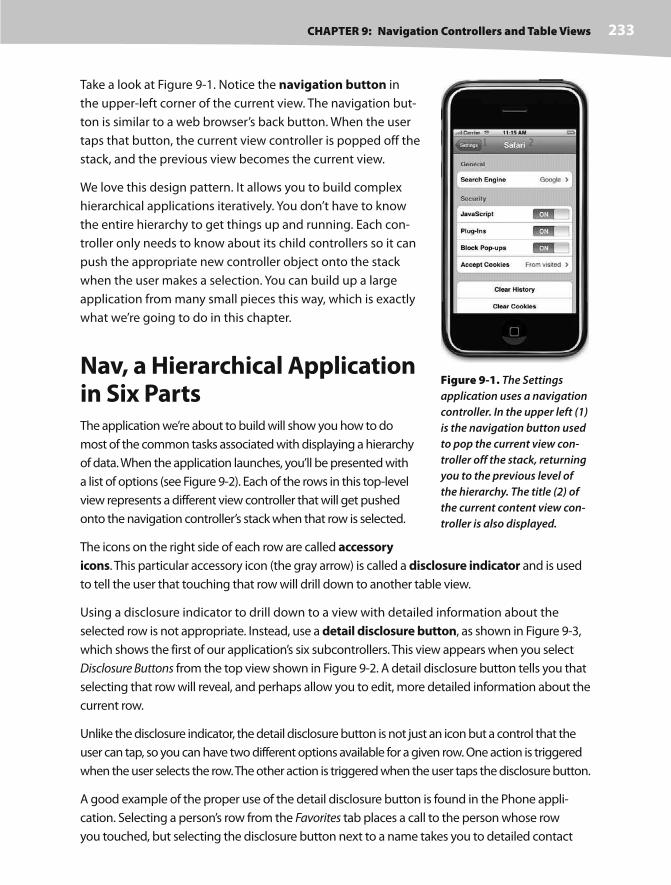
CHAPTER 9: Navigation Controllers and Table Views 233
Take a look at Figure 9-1. Notice the navigation button in
the upper- left corner of the current view. The navigation but-
ton is similar to a web browser’s back button. When the user
taps that button, the current view controller is popped off the
stack, and the previous view becomes the current view.
We love this design pattern. It allows you to build complex
hierarchical applications iteratively. You don’t have to know
the entire hierarchy to get things up and running. Each con-
troller only needs to know about its child controllers so it can
push the appropriate new controller object onto the stack
when the user makes a selection. You can build up a large
application from many small pieces this way, which is exactly
what we’re going to do in this chapter.
Nav, a Hierarchical Application in Six PartsThe application we’re about to build will show you how to do
most of the common tasks associated with displaying a hierarchy
of data. When the application launches, you’ll be presented with
a list of options (see Figure 9-2). Each of the rows in this top- level
view represents a different view controller that will get pushed
onto the navigation controller’s stack when that row is selected.
The icons on the right side of each row are called accessory
icons. This particular accessory icon (the gray arrow) is called a disclosure indicator and is used
to tell the user that touching that row will drill down to another table view.
Using a disclosure indicator to drill down to a view with detailed information about the
selected row is not appropriate. Instead, use a detail disclosure button, as shown in Figure 9-3,
which shows the first of our application’s six subcontrollers. This view appears when you select
Disclosure Buttons from the top view shown in Figure 9-2. A detail disclosure button tells you that
selecting that row will reveal, and perhaps allow you to edit, more detailed information about the
current row.
Unlike the disclosure indicator, the detail disclosure button is not just an icon but a control that the
user can tap, so you can have two different options available for a given row. One action is triggered
when the user selects the row. The other action is triggered when the user taps the disclosure button.
A good example of the proper use of the detail disclosure button is found in the Phone appli-
cation. Selecting a person’s row from the Favorites tab places a call to the person whose row
you touched, but selecting the disclosure button next to a name takes you to detailed contact
Figure 9-1. The Settings
application uses a navigation
controller. In the upper left (1)
is the navigation button used
to pop the current view con-
troller off the stack, returning
you to the previous level of
the hierarchy. The title (2) of
the current content view con-
troller is also displayed.

CHAPTER 9: Navigation Controllers and Table Views 234
information. The YouTube application is another great example.
Selecting a row plays a video, but tapping the detail disclosure
button takes you to more detailed information about the video.
In the Contacts application, the list of contacts does not feature
detail disclosure buttons even though selecting a row does take
you to a detail view. Since there is only one option available for
each row in the Contacts application, no accessory icon is dis-
played.
To restate, if tapping a row takes you to a more detailed view of
that row, you’ll either use no accessory icon or use a detail disclo-
sure button, if you want to support two different options for the
row. If tapping a row takes you to another view entirely, one that
is not a more detailed view of that row, use a disclosure indicator
(gray arrow) to mark the row.
The second of our application’s six subcontrollers is shown in
Figure 9-4. This is the view that appears when you select Check
One in Figure 9-2.
This view comes in handy when you want to present a list from
which only one item can be selected. This approach is to iPhone
as radio buttons are to Mac OS X. These lists use a checkmark to
mark the currently selected row.
The third of our application’s six subcontrollers is shown in
Figure 9-5. This view features a switch control in each row’s
accessory view. The accessory view is the far right part of the table view cell that usually holds
the accessory icon but can be used for more. When we get to this part of our application, you’ll
see how to create and retrieve values from controls placed in the accessory view.
The fourth of our application’s six subcontrollers is shown in Figure 9-6. In this view, we’ll let the
user rearrange the order of the rows in a list by having the table enter edit mode (more on this
when we get to it in code later in this chapter).
The fifth of our application’s six subcontrollers is shown in Figure 9-7. In this view, we’re going to
show another use of edit mode by allowing the user to delete rows from our table.
The sixth and last of our application’s six subcontrollers is shown in Figure 9-8, and it shows an
editable detail view using a grouped table. This technique for detail view is used widely by the
applications that ship on the iPhone.
So very much to do. Let’s get started!
Figure 9-2. This chapter’s
application’s top- level view.
Note the accessory icons on
the right side of the view. This
particular type of accessory
icon is called a disclosure indi-
cator and tells the user that
touching that row will drill
down to another table view.
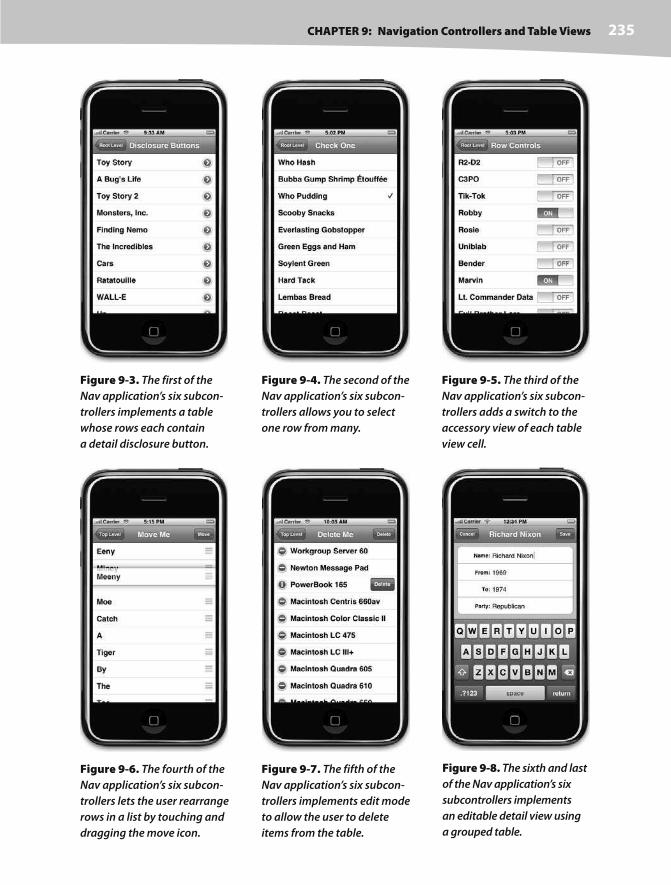
CHAPTER 9: Navigation Controllers and Table Views 235
Figure 9-3. The first of the
Nav application’s six subcon-
trollers implements a table
whose rows each contain
a detail disclosure button.
Figure 9-4. The second of the
Nav application’s six subcon-
trollers allows you to select
one row from many.
Figure 9-5. The third of the
Nav application’s six subcon-
trollers adds a switch to the
accessory view of each table
view cell.
Figure 9-6. The fourth of the
Nav application’s six subcon-
trollers lets the user rearrange
rows in a list by touching and
dragging the move icon.
Figure 9-7. The fifth of the
Nav application’s six subcon-
trollers implements edit mode
to allow the user to delete
items from the table.
Figure 9-8. The sixth and last
of the Nav application’s six
subcontrollers implements
an editable detail view using
a grouped table.

CHAPTER 9: Navigation Controllers and Table Views 236
Constructing the Nav Application’s SkeletonXcode offers a perfectly good template for creating navigation- based applications, and you
will likely use it much of the time when you need to create hierarchical applications. However,
we’re not going to use that one today. Nope. We’re going to construct our navigation- based
application from the ground up so you get a feel for how everything fits together. It’s not really
very different from the way we built the tab bar controller in Chapter 7, so you shouldn’t have
any problems keeping up.
In Xcode, press N to create a new project, and select Window- Based Application from the
iPhone template list. Give your new project a name of Nav. As you’ll see, if you click the Classes
and Resources folders, this template gives you an application delegate, a MainWindow.xib, and
not much else. We need to add a navigation controller to MainWindow.xib, which will be our
application’s root controller. And, since all navigation controllers have to have their own root
view controller, we’ll need to create that as well. Since we’re already in Xcode, let’s create the
files needed to implement the root view controller.
Creating the Root View Controller
In your project window, select the Classes folder in the Groups & Files pane, and then press
N or select New File. . . from the File menu. When the new file assistant comes up, select
Cocoa Touch Classes and UIViewController subclass, and then click Next. Give this file a name
of RootViewController.m, and make sure that you check Also create “RootViewController.h”.
Those files you just created will contain the controller class for our navigation control-
ler’s root view controller, which is the one that will be displayed when the application is
launched. And now we need to go create a nib file, right?
Nope. In this chapter, we’re going to subclass UITableViewController instead of
UIViewController. If we subclass UITableViewController, it will create a table view for
us with no need for a nib file. This approach obviously doesn’t work if you need more than
a table, such as when we added the search bar in the last chapter. But, when all you need is a
table, this is the way to go.
Setting Up the Navigation Controller
Before we get into our code, let’s talk about the names we use to refer to the various control-
lers that make up our application. At the root of our application is the controller whose view
gets added to the window, known as the root controller. In our case, the root controller is the
navigation controller that will swap in and out all the other views that make up our hierarchy
of views.
Here’s where things get a bit confusing. As it turns out, a navigation controller has a property
called rootViewController, which is the controller for the bottommost view controller in

CHAPTER 9: Navigation Controllers and Table Views 237
the stack. In our case, this is the six- row view shown in Figure 9-2. The point of confusion is
that the root view controller has a rootViewController property. In order to avoid confu-
sion, instead of referring to the root controller as rootController, as we have in previous
chapters, we’ll refer to it as the navController.
Take a moment to make sense of all this and file it away in permanent storage. And now,
back to our show.
Add the following code to NavAppDelegate.h:
#import <UIKit/UIKit.h>
@class NavViewController;
@interface NavAppDelegate : NSObject <UIApplicationDelegate> {
IBOutlet UIWindow *window;
IBOutlet UINavigationController *navController;}
@property (nonatomic, retain) UIWindow *window;
@property (nonatomic, retain) UINavigationController *navController;@end
Next, we need to hop over to the implementation file and add the @synthesize statement
for navController. We’ll also add navController’s view as a subview of our application’s
window so that it gets shown to the user. Single- click NavAppDelegate.m, and make the fol-
lowing changes:
#import "NavAppDelegate.h"
@implementation NavAppDelegate
@synthesize window;
@synthesize navController; - (void)applicationDidFinishLaunching:(UIApplication *)application {
[window addSubview: navController.view]; [window makeKeyAndVisible];
}
- (void)dealloc {
[navController release]; [window release];
[super dealloc];
}
@end

CHAPTER 9: Navigation Controllers and Table Views 238
Save both of these files. Next, we have to create a navigation controller, connect it to the
navController outlet we just declared, and then tell the navigation controller what to use
as its root view controller.
Double-click MainWindow.xib to open the file in Interface Builder. Look in the library for a
Navigation Controller (see Figure 9-9), and drag one over to the nib’s main window, which is
the window labeled MainWindow.xib, not the one labeled Window.
Figure 9-9. The Navigation Controller in the library
Control-drag from the Nav App Delegate icon to the new Navigation Controller icon, and
select the navController outlet. Be careful not to select the viewController outlet if there is
one: that’s not the one you want, and connecting your navigation controller to it will cause
an exception at runtime.
We’re almost done, but the next task is a little tricky. We need to tell the navigation controller
where to find its root view controller. The easiest way to do that is to change the nib’s main
window into list mode using the middle View Mode button in the toolbar of that window
(see Figure 9-10).
Figure 9-10. Switching MainWindow.xib’s main window
into list mode

CHAPTER 9: Navigation Controllers and Table Views 239
Click the little disclosure triangle to the left of Navigation Controller to expand it. Underneath
it, you’ll find two items, Navigation Bar and View Controller (Navigation Item).
Single-click the View Controller (Navigation Item) icon, and press 4 to bring up the identity
inspector. Change the underlying class to RootViewController, and press return to commit
the change. Switch to the attributes inspector using 1. Here, if we wanted to, we could also
specify a nib file from which it should load the root- level view. Instead, we’re going to leave
the NIB Name field blank, which is how we indicate that the table view controller should
create a table view instance for us. That’s all the changes we need here, so save, close the
window, and go back to Xcode.
Now, of course, we need a list for our root view to display. In the last chapter, we used simple
arrays of strings. In this application, the root view controller is going to manage a list of its sub-
controllers, which we will be building. Tapping any row will cause an instance of the selected
view controller to get pushed onto the navigation controller’s stack. We also want to be able
to display an icon next to each row, so instead of adding a UIImage property to every sub-
controller that we create, we’re going to create a subclass of UITableViewController that
has a UIImage property to hold the row icon. We will then subclass this new class instead of
subclassing UITableViewController directly, and as a result, all of our subclasses will get that
UIImage property for free, which will make our code much cleaner.
We will never actually create an instance of this new class. It exists solely to let us add a com-
mon item to the rest of the controllers we’re going to write. In many languages, we would
declare this as an abstract class, but Objective- C doesn’t support abstract classes. We can
make classes that aren’t intended to be instantiated, but the compiler won’t prevent us from
actually creating them the way it does in many other languages. Objective- C is a much more
permissive language than most other popular languages, and this can be a little hard to get
used to.
Single-click the Classes folder in Xcode, and press N to bring up the new file assistant.
Select Cocoa Touch Classes from the left pane, and then select NSObject subclass. Give
the new file the name SecondLevelViewController. Once the new files are created, select
SecondLevelViewController.h, and make the following changes:
#import <UIKit/UIKit.h>
@interface SecondLevelViewController : NSObject {
@interface SecondLevelViewController : UITableViewController {
UIImage *rowImage;}
@property (nonatomic, retain) UIImage *rowImage;@end
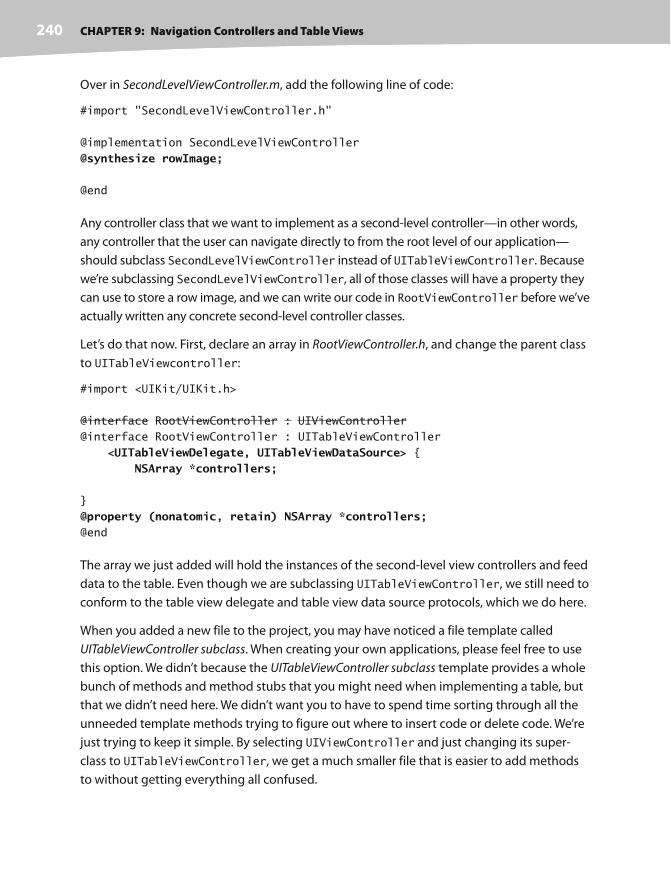
CHAPTER 9: Navigation Controllers and Table Views 240
Over in SecondLevelViewController.m, add the following line of code:
#import "SecondLevelViewController.h"
@implementation SecondLevelViewController
@synthesize rowImage;
@end
Any controller class that we want to implement as a second- level controller—in other words,
any controller that the user can navigate directly to from the root level of our application—
should subclass SecondLevelViewController instead of UITableViewController. Because
we’re subclassing SecondLevelViewController, all of those classes will have a property they
can use to store a row image, and we can write our code in RootViewController before we’ve
actually written any concrete second- level controller classes.
Let’s do that now. First, declare an array in RootViewController.h, and change the parent class
to UITableViewcontroller:
#import <UIKit/UIKit.h>
@interface RootViewController : UIViewController
@interface RootViewController : UITableViewController
<UITableViewDelegate, UITableViewDataSource> { NSArray *controllers;
}
@property (nonatomic, retain) NSArray *controllers;@end
The array we just added will hold the instances of the second- level view controllers and feed
data to the table. Even though we are subclassing UITableViewController, we still need to
conform to the table view delegate and table view data source protocols, which we do here.
When you added a new file to the project, you may have noticed a file template called
UITableViewController subclass. When creating your own applications, please feel free to use
this option. We didn’t because the UITableViewController subclass template provides a whole
bunch of methods and method stubs that you might need when implementing a table, but
that we didn’t need here. We didn’t want you to have to spend time sorting through all the
unneeded template methods trying to figure out where to insert code or delete code. We’re
just trying to keep it simple. By selecting UIViewController and just changing its super-
class to UITableViewController, we get a much smaller file that is easier to add methods
to without getting everything all confused.

CHAPTER 9: Navigation Controllers and Table Views 241
Add the following code to RootViewController.m, and then come on back and gossip with us, ’K?
#import "RootViewController.h"
#import "SecondLevelViewController.h"#import "NavAppDelegate.h"
@implementation RootViewController
@synthesize controllers;
- (id)initWithStyle:(UITableViewStyle)style {
if (self = [super initWithStyle:style]) {
}
return self;
}
- (void)viewDidLoad { self.title = @"Root Level"; NSMutableArray *array = [[NSMutableArray alloc] init]; self.controllers = array; [array release]; [super viewDidLoad];}
- (void)dealloc {
[controllers release]; [super dealloc];
}
#pragma mark -#pragma mark Table Data Source Methods- (NSInteger)tableView:(UITableView *)tableView numberOfRowsInSection:(NSInteger)section { return [self.controllers count];}- (UITableViewCell *)tableView:(UITableView *)tableView cellForRowAtIndexPath:(NSIndexPath *)indexPath {
static NSString *RootViewControllerCell= @"RootViewControllerCell";
UITableViewCell *cell = [tableView dequeueReusableCellWithIdentifier: RootViewControllerCell]; if (cell == nil) { cell = [[[UITableViewCell alloc] initWithFrame:CGRectZero reuseIdentifier: RootViewControllerCell] autorelease]; } // Configure the cell NSUInteger row = [indexPath row]; SecondLevelViewController *controller =

CHAPTER 9: Navigation Controllers and Table Views 242
[controllers objectAtIndex:row]; cell.text = controller.title; cell.image = controller.rowImage; return cell;}
#pragma mark -#pragma mark Table View Delegate Methods- (UITableViewCellAccessoryType)tableView:(UITableView *)tableView accessoryTypeForRowWithIndexPath:(NSIndexPath *)indexPath{ return UITableViewCellAccessoryDisclosureIndicator;}
- (void)tableView:(UITableView *)tableView didSelectRowAtIndexPath:(NSIndexPath *)indexPath { NSUInteger row = [indexPath row]; SecondLevelViewController *nextController = [self.controllers objectAtIndex:row];
NavAppDelegate *delegate = [[UIApplication sharedApplication] delegate]; [delegate.navController pushViewController:nextController animated:YES];}
@end
The first thing we want you to notice is that we’ve imported that new SecondLevelViewController.h
header file. Doing that lets us use the SecondLevelViewController class in our code so that the
compiler will know about the rowImage property. We’ve also imported our application delegate
class’s header, because we will also need access to the application delegate. The application del-
egate has an outlet to our application’s navigation controller, so anytime we need access to the
navigation controller, we’ll do it through our application delegate.
Next comes the viewDidLoad method. The first thing we do is set self.title. A navigation
controller knows what to display in the title of its navigation bar by asking the currently active
controller for its title. Therefore, it’s important to set the title for all controller instances in
a navigation- based application, so the users know where they are at all times.
We then create a mutable array and assign it to the controllers property we declared
earlier. Later, when we’re ready to add rows to our table, we will add view controllers to this
array, and they will show up automatically. Selecting one of those rows will automatically
cause the corresponding view to get presented to the user.
CHAPTER 9: Navigation Controllers and Table Views 243
The final piece of the viewDidLoad method is the call to [super viewDidLoad]. We do this
because we are subclassing UITableViewController this time, instead of UIViewController.
UIViewController’s viewDidLoad method is empty, but UITableViewController’s
might not be. It’s not a bad idea to always call [super viewDidLoad] when you override
the viewDidLoad method, since calling UIViewController’s empty version won’t hurt
anything. When you subclass any view controller class other than UIViewController, mak-
ing sure that call your superclass’s version if you override viewDidLoad is very important,
because your superclass may need to do something when the view loads.
The tableView:numberOfRowsInSection: method is identical to ones you’ve seen in the
past; it simply returns the count from our array. The tableView:cellForRowAtIndexPath:
method is also very similar to ones we’ve written in the past. It gets a reusable cell, or
creates a new one if there aren’t any, and then grabs the controller object from the array
corresponding to the row being asked about. It then sets the cell’s text to the controller’s
title and returns the cell.
Notice that we are assuming the object retrieved from the array is an instance of
SecondLevelViewController and are assigning the controller’s rowImage property to
a UIImage. This step will make more sense when we declare and add the first concrete
second- level controller to the array in a few minutes.
The last method we added is the most important one here, and it’s the only functionality
that’s truly new. You’ve seen the tableView:didSelectRowAtIndexPath: method before,
of course. It’s the one that gets called after a user taps a row. If tapping a row needs to trig-
ger a drill down, this is how we do it. First, we get the row from indexPath:
NSUInteger row = [indexPath row];
Next, we grab the correct controller from our array that corresponds to that row:
SecondLevelViewController *nextController =
[self.controllers objectAtIndex:row];
Since the navigation controller is maintained by the application delegate, we use the shared
UIApplication instance to grab a reference to that delegate.
NavAppDelegate *delegate = [[UIApplication sharedApplication] delegate];
Next, we use the delegate’s navController outlet, which points to our application’s navi-
gation controller, to push the next controller, the one we pulled from our array, onto the
navigation controller’s stack:
[delegate.navController pushViewController:nextController animated:YES];

CHAPTER 9: Navigation Controllers and Table Views 244
That’s really all there is to it. Each controller in the hierarchy
needs to know about only its children. When a row is selected,
the active controller is responsible for getting or creating
a new subcontroller, setting its properties if necessary (it’s not
necessary here), and then pushing that new subcontroller
onto the navigation controller’s stack. Once you’ve done that,
everything else is handled automatically by the navigation
controller.
At this point, the application skeleton is done. You’ll need to
link the Core Graphics framework into your project. If you
don’t remember how to do that, refer to Chapter 5 where we
gave you step-by- step instructions for adding that framework
to a project.
Save all your files, and build and run to make sure all your typ-
ing took hold. If all is well, the application should launch, and
a navigation bar with the title Root Level should appear. Since
our array is currently empty, no rows will display at this point
(see Figure 9-11).
Now, we’re ready to start developing the second- level views. Before we do that, go grab the
image icons from the 09 Nav directory. A subdirectory called Images should have six .png
images that we will use as row images. Add all six of them to the Resources folder of your
Xcode project before proceeding.
Our First Subcontroller: The Disclosure Button ViewLet’s implement the first of our second- level view controllers. To do that, we’ll first need to
create a subclass of SecondLevelViewController.
Select the Classes folder in Xcode, and press N to bring up the new file assistant again.
This time, select Cocoa Touch Classes in the left pane and UIViewController subclass from the
upper- right pane. Name the file DisclosureButtonController.m, and make sure the checkbox for
creating the header file is checked. This class will manage the table of movies that will be dis-
played when the user clicks the Disclosure Buttons item from the top- level view (see Figure 9-3).
When the user clicks any movie title, the application will drill down into another view that will
report which row was selected. As a result, we’re also going to need a detail view for the user to
drill down into, so repeat the steps to create another file, and call it DisclosureDetailController.m.
Be sure to check the checkbox so the header file is created as well.
Figure 9-11. The application
skeleton in action
CHAPTER 9: Navigation Controllers and Table Views 245
The detail view will be a very simple view with just a single label that we can set. It won’t be
editable, and we’ll just use this to show how to pass values into a child controller. Because
this controller will not be responsible for a table view, we also need a nib to go along with
the controller class. Before we create the nib, let’s quickly add the outlet for the label. Add
the following code to DisclosureDetailController.h:
#import <UIKit/UIKit.h>
@interface DisclosureDetailController : UIViewController {
IBOutlet UILabel *label; NSString *message;}
@property (nonatomic, retain) UILabel *label;@property (nonatomic, retain) NSString *message;@end
Why, pray tell, are we adding both a label and a string? Remember the concept of lazy load-
ing? Well, view controllers do lazy loading. When we create our controller, it won’t load its
nib file until it actually gets displayed. When the controller is pushed onto the navigation
controller’s stack, we can’t count on there being a label to set. If the nib file has not been
loaded, label will just be a pointer set to nil. Yeesh. But it’s OK. Instead, we’ll set message
to the value we want, and in the viewWillAppear: method, we’ll set the label based on the
value in message.
Why are we using viewWillAppear: to do our updating instead of using viewDidLoad, as
we’ve done in the past? The problem is that viewDidLoad only gets called the first time its view
is loaded. But in our case, we are reusing the DisclosureDetailController’s view. No matter
what fine Pixar flick you pick, when you click the disclosure button, the detail message appears in
the same DisclosureDetailController view. If we used viewDidLoad to manage our updates,
that view would only get updated the very first time the DisclosureDetailController view
appeared. When we picked our second fine Pixar flick, we’d still see the detail message from the
first fine Pixar flick (try saying that ten times fast). Not good. Since viewWillAppear: gets called
every time a view is about to be drawn, we’ll be fine using it for our updating.
Add the following code to DisclosureDetailController.m:
#import "DisclosureDetailController.h"
@implementation DisclosureDetailController
@synthesize label;@synthesize message;- (id)initWithNibName:(NSString *)nibNameOrNil
bundle:(NSBundle *)nibBundleOrNil {
if (self = [super initWithNibName:nibNameOrNil
bundle:nibBundleOrNil]) {
// Initialization code
CHAPTER 9: Navigation Controllers and Table Views 246
}
return self;
}
- (void)viewWillAppear:(BOOL)animated { label.text = message; [super viewWillAppear:animated];}
- (BOOL)shouldAutorotateToInterfaceOrientation:
(UIInterfaceOrientation)interfaceOrientation {
// Return YES for supported orientations
return (interfaceOrientation == UIInterfaceOrientationPortrait);
}
- (void)didReceiveMemoryWarning {
[super didReceiveMemoryWarning];
// Releases the view if it doesn't have a superview
// Release anything that's not essential, such as cached data
}
- (void)dealloc {
[label release]; [message release]; [super dealloc];
}
@end
That’s all pretty straightforward, right? OK, let’s go create the nib to go along with this file. Be
sure you’ve saved your source changes.
Select the Resources folder in Xcode, and press N to create another new file. This time,
select User Interfaces on the left pane and View XIB from the upper- right. Give this nib file the
name DisclosureDetail.xib.
Let’s set up the nib first. Double- click DisclosureDetail.xib in Xcode to open the file in Inter-
face Builder. Once it’s open, single- click File’s Owner, and press 4 to bring up the identity
inspector. Change the underlying class to DisclosureDetailController. Now control- drag from
the File’s Owner icon to the View icon, and select the view outlet to reestablish the link from
the controller to its view that was broken when we changed its class.
Drag a Label from the library, and place it on the View window. Resize it so that it takes up
most of the width of the view, using the blue guide lines to place it correctly, and then use
the attributes inspector to change the text alignment to centered. Control- drag from File’s
Owner to the label, and select the label outlet. Save, close the nib, and head back to Xcode.
CHAPTER 9: Navigation Controllers and Table Views 247
For this example, our list is just going to show a number of rows from an array, so we will declare
an NSArray named list. We also need to declare an instance variable to hold one instance of
our child controller, which will point to an instance of the DisclosureDetailController class
we just built. We could allocate a new instance of that controller class every time the user taps
a detail disclosure button, but it’s more efficient to create one and then keep reusing it. Make the
following changes to DisclosureButtonController.h:
#import <UIKit/UIKit.h>
#import "SecondLevelViewController.h"@class DisclosureDetailController;
@interface DisclosureButtonController : UIViewController {
@interface DisclosureButtonController : SecondLevelViewController <UITableViewDelegate, UITableViewDataSource> { NSArray *list; DisclosureDetailController *childController;}
@property (nonatomic, retain) NSArray *list;@end
Notice that we didn’t declare a property for the childController. We are using this
instance variable internally in our class and don’t want to expose it to others, so we don’t
advertise its existence by declaring a property.
Now, we get to the juicy part. Type the following changes into DisclosureButtonController.m.
We’ll talk about what’s going on afterward.
#import "DisclosureButtonController.h"
#import "NavAppDelegate.h"#import "DisclosureDetailController.h"
@implementation DisclosureButtonController
@synthesize list;- (id)initWithStyle:(UITableViewStyle)style {
if (self = [super initWithStyle:style]) {
}
return self;
}
- (void)dealloc {
[list release]; [childController release]; [super dealloc];
}
- (void)viewDidLoad { NSArray *array = [[NSArray alloc] initWithObjects:@"Toy Story", @"A Bug's Life", @"Toy Story 2", @"Monsters, Inc.",
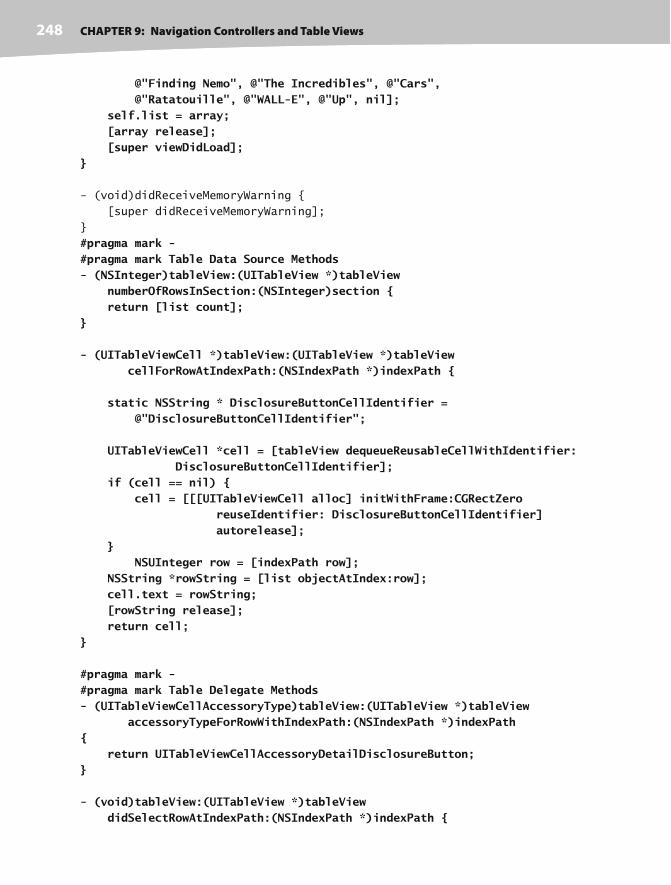
CHAPTER 9: Navigation Controllers and Table Views 248
@"Finding Nemo", @"The Incredibles", @"Cars", @"Ratatouille", @"WALL- E", @"Up", nil]; self.list = array; [array release]; [super viewDidLoad];}
- (void)didReceiveMemoryWarning {
[super didReceiveMemoryWarning];
}
#pragma mark -#pragma mark Table Data Source Methods- (NSInteger)tableView:(UITableView *)tableView numberOfRowsInSection:(NSInteger)section { return [list count];}
- (UITableViewCell *)tableView:(UITableView *)tableView cellForRowAtIndexPath:(NSIndexPath *)indexPath {
static NSString * DisclosureButtonCellIdentifier = @"DisclosureButtonCellIdentifier";
UITableViewCell *cell = [tableView dequeueReusableCellWithIdentifier: DisclosureButtonCellIdentifier]; if (cell == nil) { cell = [[[UITableViewCell alloc] initWithFrame:CGRectZero reuseIdentifier: DisclosureButtonCellIdentifier] autorelease]; } NSUInteger row = [indexPath row]; NSString *rowString = [list objectAtIndex:row]; cell.text = rowString; [rowString release]; return cell;}
#pragma mark -#pragma mark Table Delegate Methods- (UITableViewCellAccessoryType)tableView:(UITableView *)tableView accessoryTypeForRowWithIndexPath:(NSIndexPath *)indexPath{ return UITableViewCellAccessoryDetailDisclosureButton;}
- (void)tableView:(UITableView *)tableView didSelectRowAtIndexPath:(NSIndexPath *)indexPath {

CHAPTER 9: Navigation Controllers and Table Views 249
UIAlertView *alert = [[UIAlertView alloc] initWithTitle: @"Hey, do you see the disclosure button?" message:@"If you're trying to drill down, touch that instead" delegate:nil cancelButtonTitle:@"Won't happen again" otherButtonTitles:nil]; [alert show]; [alert release];
}- (void)tableView:(UITableView *)tableView accessoryButtonTappedForRowWithIndexPath:(NSIndexPath *)indexPath{ if (childController == nil) childController = [[DisclosureDetailController alloc] initWithNibName:@"DisclosureDetail" bundle:nil];
childController.title = @"Disclosure Button Pressed"; NSUInteger row = [indexPath row];
NSString *selectedMovie = [list objectAtIndex:row]; NSString *detailMessage = [[NSString alloc] initWithFormat:@"You pressed the disclosure button for %@.", selectedMovie]; childController.message = detailMessage; childController.title = selectedMovie; [detailMessage release]; NavAppDelegate *delegate = [[UIApplication sharedApplication] delegate]; [delegate.navController pushViewController:childController animated:YES];}@end
By now, you should be fairly comfortable with everything up to and including the three
datasource methods we just added. Let’s look at our three new delegate methods.
The first one is tableView:accessoryTypeForRowWithIndexPath:. Since we want every
row to show a disclosure button, this method returns UITableViewCellAccessoryDetail
DisclosureButton, ignoring the passed- in parameters. We could also have used indexPath
to look at the data for this row and had our code return UITableViewCellAccessoryDetail
DisclosureButton only for rows that actually had something to drill down into. For rows
that didn’t, we could have returned UITableViewCellAccessoryNone instead, which would
have resulted in a row without the disclosure button. Since we know that all of our rows can
be drilled into, we’re able to just return the same value for every row.

CHAPTER 9: Navigation Controllers and Table Views 250
The second method, tableView:didSelectRowAtIndexPath:, which gets called when
the row is selected, puts up a polite little alert telling the user to tap the disclosure button
instead of selecting the row. If the user actually taps the detail disclosure button, the last of
our new delegate methods, tableView:accessoryButtonTappedForRowWithIndexPath:,
is called. Let’s look at this one a little more closely.
The first thing we do is check the childController instance variable to see if it’s nil. If it is,
we have not yet allocated and initialized a new instance of DetailDisclosureController,
so we do that next. This gives us a new controller that we can push onto the navigation
stack, just as we did earlier in RootViewController. Before we push it onto the stack,
though, we need to give it some text to display. In this case, we’ll set message to reflect the
row whose disclosure button was tapped. We also set the new view’s title based on the
selected row.
Now our second level controller is done, as is our detail controller. The only remaining tasks
are to create an instance of our second level controller and add it to RootViewController’s
controllers. Single- click RootViewController.m, and insert the following code into the
viewDidLoad method:
- (void)viewDidLoad {
self.title = @"Root Level";
NSMutableArray *array = [[NSMutableArray alloc] init];
// Disclosure Button DisclosureButtonController *disclosureButtonController = [[DisclosureButtonController alloc] initWithStyle:UITableViewStylePlain]; disclosureButtonController.title = @"Disclosure Buttons"; disclosureButtonController.rowImage = [UIImage imageNamed:@"disclosureButtonControllerIcon.png"]; [array addObject:disclosureButtonController]; [disclosureButtonController release];
self.controllers = array;
[array release];
[super viewDidLoad];
}
All that we’re doing is creating a new instance of DisclosureButtonController. We specify
UITableViewStylePlain to indicate that we want an indexed table, not a grouped table.
Next, we set the title and the image to one of the .png files we had you add to your project,
add the controller to the array, and release the controller. Up at the top of the file, you’ll need
to add one line of code to import the header class for our new file. Insert this line right above
the @implementation declaration:
#import "DisclosureButtonController.h"

CHAPTER 9: Navigation Controllers and Table Views 251
Save everything, and try building. If everything went as
planned, your project should compile and then launch in the
simulator. When it comes up, there should be just a single row
(see Figure 9-12).
If you touch the one row, it will take you down to the table
view we just implemented (see Figure 9-13).
Notice that the title that we set for our controller is now
displayed in the navigation bar, and the title of the view
controller we were previously at (Root Level) is contained in
a navigation button. Tapping that button will take the user
back up to the first level. Select any row in this table, and you
will get a gentle reminder that the detail disclosure button is
there for drilling down (see Figure 9-14).
If you touch the detail disclosure button itself, you drill down
into another view. The new view (see Figure 9-15) shows infor-
mation that we passed into it. Even though this is a simple
example, the same basic technique is used anytime you show
a detail view.
Figure 9-12. Our application
after adding the first of six
second- level controllers
Figure 9-13. The Disclosure
Buttons view
Figure 9-14. Selecting the
row does not drill down when
there is a detail disclosure
button visible.
Figure 9-15. The detail view
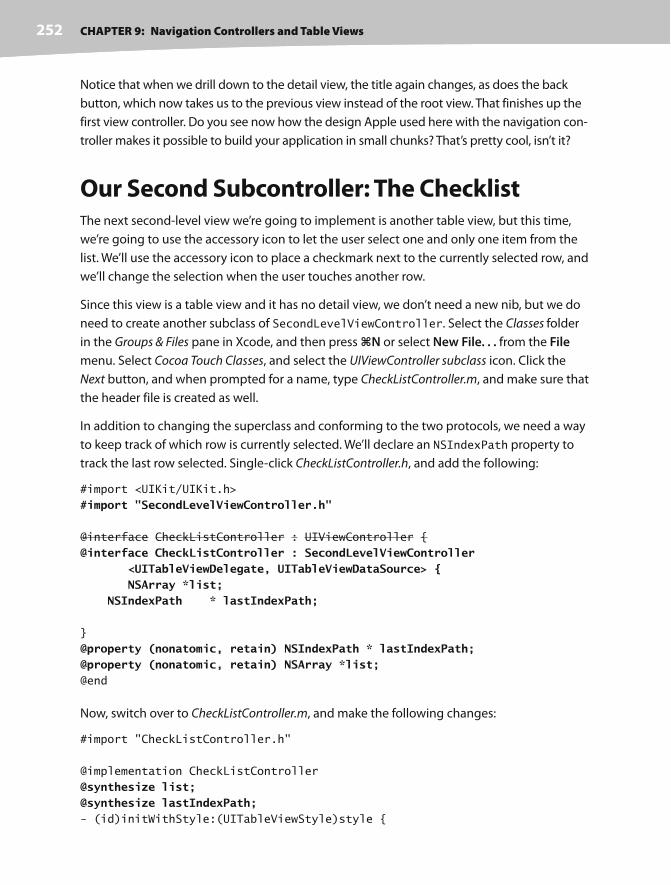
CHAPTER 9: Navigation Controllers and Table Views 252
Notice that when we drill down to the detail view, the title again changes, as does the back
button, which now takes us to the previous view instead of the root view. That finishes up the
first view controller. Do you see now how the design Apple used here with the navigation con-
troller makes it possible to build your application in small chunks? That’s pretty cool, isn’t it?
Our Second Subcontroller: The ChecklistThe next second- level view we’re going to implement is another table view, but this time,
we’re going to use the accessory icon to let the user select one and only one item from the
list. We’ll use the accessory icon to place a checkmark next to the currently selected row, and
we’ll change the selection when the user touches another row.
Since this view is a table view and it has no detail view, we don’t need a new nib, but we do
need to create another subclass of SecondLevelViewController. Select the Classes folder
in the Groups & Files pane in Xcode, and then press N or select New File. . . from the File
menu. Select Cocoa Touch Classes, and select the UIViewController subclass icon. Click the
Next button, and when prompted for a name, type CheckListController.m, and make sure that
the header file is created as well.
In addition to changing the superclass and conforming to the two protocols, we need a way
to keep track of which row is currently selected. We’ll declare an NSIndexPath property to
track the last row selected. Single- click CheckListController.h, and add the following:
#import <UIKit/UIKit.h>
#import "SecondLevelViewController.h"
@interface CheckListController : UIViewController {
@interface CheckListController : SecondLevelViewController <UITableViewDelegate, UITableViewDataSource> { NSArray *list; NSIndexPath * lastIndexPath;
}
@property (nonatomic, retain) NSIndexPath * lastIndexPath;@property (nonatomic, retain) NSArray *list;@end
Now, switch over to CheckListController.m, and make the following changes:
#import "CheckListController.h"
@implementation CheckListController
@synthesize list;@synthesize lastIndexPath;- (id)initWithStyle:(UITableViewStyle)style {

CHAPTER 9: Navigation Controllers and Table Views 253
if (self = [super initWithStyle:style]) {
}
return self;
}
- (void)dealloc {
[list release]; [lastIndexPath release]; [super dealloc];
}
- (void)viewDidLoad {
NSArray *array = [[NSArray alloc] initWithObjects:@"Who Hash", @"Bubba Gump Shrimp Étouffée", @"Who Pudding", @"Scooby Snacks", @"Everlasting Gobstopper", @"Green Eggs and Ham", @"Soylent Green", @"Hard Tack", @"Lembas Bread", @"Roast Beast", @"Blancmange", nil]; self.list = array; [array release];
[super viewDidLoad];}
- (void)didReceiveMemoryWarning {
[super didReceiveMemoryWarning];
}
#pragma mark -#pragma mark Table Data Source Methods- (NSInteger)tableView:(UITableView *)tableView numberOfRowsInSection:(NSInteger)section { return [list count];}- (UITableViewCell *)tableView:(UITableView *)tableView cellForRowAtIndexPath:(NSIndexPath *)indexPath {
static NSString *CheckMarkCellIdentifier = @"CheckMarkCellIdentifier";
UITableViewCell *cell = [tableView dequeueReusableCellWithIdentifier: CheckMarkCellIdentifier]; if (cell == nil) { cell = [[[UITableViewCell alloc] initWithFrame:CGRectZero reuseIdentifier:CheckMarkCellIdentifier] autorelease]; } NSUInteger row = [indexPath row]; NSUInteger oldRow = [lastIndexPath row];
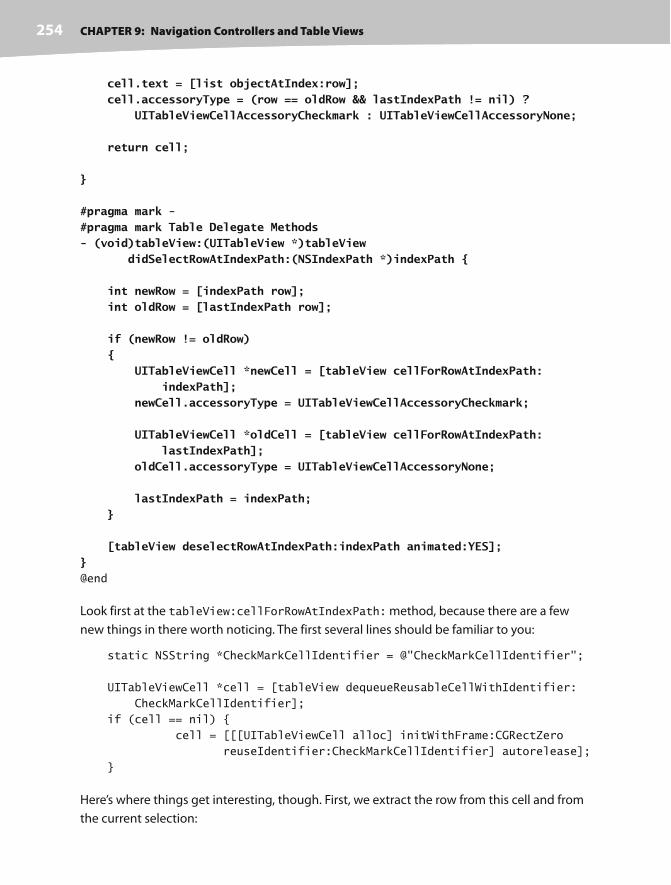
CHAPTER 9: Navigation Controllers and Table Views 254
cell.text = [list objectAtIndex:row]; cell.accessoryType = (row == oldRow && lastIndexPath != nil) ? UITableViewCellAccessoryCheckmark : UITableViewCellAccessoryNone;
return cell;
}
#pragma mark -#pragma mark Table Delegate Methods- (void)tableView:(UITableView *)tableView didSelectRowAtIndexPath:(NSIndexPath *)indexPath {
int newRow = [indexPath row]; int oldRow = [lastIndexPath row];
if (newRow != oldRow) { UITableViewCell *newCell = [tableView cellForRowAtIndexPath: indexPath]; newCell.accessoryType = UITableViewCellAccessoryCheckmark;
UITableViewCell *oldCell = [tableView cellForRowAtIndexPath: lastIndexPath]; oldCell.accessoryType = UITableViewCellAccessoryNone;
lastIndexPath = indexPath; }
[tableView deselectRowAtIndexPath:indexPath animated:YES];}@end
Look first at the tableView:cellForRowAtIndexPath: method, because there are a few
new things in there worth noticing. The first several lines should be familiar to you:
static NSString *CheckMarkCellIdentifier = @"CheckMarkCellIdentifier";
UITableViewCell *cell = [tableView dequeueReusableCellWithIdentifier:
CheckMarkCellIdentifier];
if (cell == nil) {
cell = [[[UITableViewCell alloc] initWithFrame:CGRectZero
reuseIdentifier:CheckMarkCellIdentifier] autorelease];
}
Here’s where things get interesting, though. First, we extract the row from this cell and from
the current selection:

CHAPTER 9: Navigation Controllers and Table Views 255
NSUInteger row = [indexPath row];
NSUInteger oldRow = [lastIndexPath row];
We grab the value for this row from our array and assign it to the cell’s title:
cell.text = [list objectAtIndex:row];
cell.text = rowTitle;
Then, we set the accessory to show either a checkmark or nothing, depending on whether
the two rows are the same. In other words, if the row the table is requesting a cell for is the
currently selected row, we set the accessory icon to be a checkmark; otherwise, we set it to
be nothing. Notice that we also check lastIndexPath to make sure it’s not nil. We do this
because a nil lastIndexPath indicates no selection. However, calling the row method on
a nil object will return a 0, which is a valid row, but we don’t want to put a checkmark on
row 0 when, in reality, there is no selection.
cell.accessoryType = (row == oldRow && lastIndexPath != nil) ?
UITableViewCellAccessoryCheckmark :
UITableViewCellAccessoryNone;
After that, we just release the string we declared and return the cell.
[rowTitle release];
return cell;
Now skip down to the last method. You’ve seen the tableView:didSelectRowAtIndexPath:
method before, but we’re doing something new here. We grab not only the row that was just
selected but also the row that was previously selected.
int newRow = [indexPath row];
int oldRow = [lastIndexPath row];
We do this so if the new row and the old row are the same, we don’t bother making any changes:
if (newRow != oldRow)
{
Next, we grab the cell that was just selected and assign a check mark as its accessory icon:
UITableViewCell *newCell = [tableView
cellForRowAtIndexPath:indexPath];
newCell.accessoryType = UITableViewCellAccessoryCheckmark;
We then grab the previously selected cell, and we set its accessory icon to none:
UITableViewCell *oldCell = [tableView cellForRowAtIndexPath:
lastIndexPath];
oldCell.accessoryType = UITableViewCellAccessoryNone;

CHAPTER 9: Navigation Controllers and Table Views 256
After that, we store the index path that was just selected in lastIndexPath, so we’ll have it
next time a row is selected:
lastIndexPath = indexPath;
}
When we’re all done, we tell the table view to deselect the row that was just selected,
because we don’t want the row to stay highlighted. We’ve already marked the row with
a check mark; leaving it blue would just be a distraction.
[tableView deselectRowAtIndexPath:indexPath animated:YES];
}
Next, we just need to add an instance of this controller to RootViewController’s controllers
array. We do that by adding the following code to the viewDidLoad method in
RootViewController.m:
- (void)viewDidLoad {
self.title = @"Root Level";
NSMutableArray *array = [[NSMutableArray alloc] init];
// Disclosure Button
DisclosureButtonController *disclosureButtonController =
[[DisclosureButtonController alloc]
initWithStyle:UITableViewStylePlain];
disclosureButtonController.title = @"Disclosure Buttons";
disclosureButtonController.rowImage = [UIImage imageNamed:
@"disclosureButtonControllerIcon.png"];
[array addObject:disclosureButtonController];
[disclosureButtonController release];
// Check List CheckListController *checkListController = [[CheckListController alloc] initWithStyle:UITableViewStylePlain]; checkListController.title = @"Check One"; checkListController.rowImage = [UIImage imageNamed: @"checkmarkControllerIcon.png"]; [array addObject:checkListController]; [checkListController release];
self.controllers = array;
[array release];
[super viewDidLoad];
}
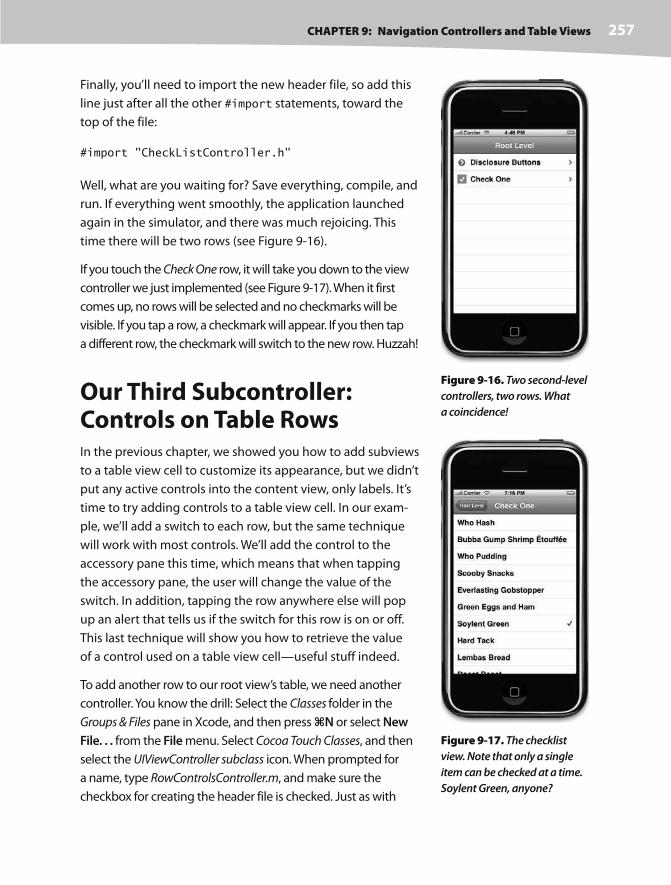
CHAPTER 9: Navigation Controllers and Table Views 257
Finally, you’ll need to import the new header file, so add this
line just after all the other #import statements, toward the
top of the file:
#import "CheckListController.h"
Well, what are you waiting for? Save everything, compile, and
run. If everything went smoothly, the application launched
again in the simulator, and there was much rejoicing. This
time there will be two rows (see Figure 9-16).
If you touch the Check One row, it will take you down to the view
controller we just implemented (see Figure 9-17). When it first
comes up, no rows will be selected and no checkmarks will be
visible. If you tap a row, a checkmark will appear. If you then tap
a different row, the checkmark will switch to the new row. Huzzah!
Our Third Subcontroller: Controls on Table Rows In the previous chapter, we showed you how to add subviews
to a table view cell to customize its appearance, but we didn’t
put any active controls into the content view, only labels. It’s
time to try adding controls to a table view cell. In our exam-
ple, we’ll add a switch to each row, but the same technique
will work with most controls. We’ll add the control to the
accessory pane this time, which means that when tapping
the accessory pane, the user will change the value of the
switch. In addition, tapping the row anywhere else will pop
up an alert that tells us if the switch for this row is on or off.
This last technique will show you how to retrieve the value
of a control used on a table view cell—useful stuff indeed.
To add another row to our root view’s table, we need another
controller. You know the drill: Select the Classes folder in the
Groups & Files pane in Xcode, and then press N or select New
File. . . from the File menu. Select Cocoa Touch Classes, and then
select the UIViewController subclass icon. When prompted for
a name, type RowControlsController.m, and make sure the
checkbox for creating the header file is checked. Just as with
Figure 9-16. Two second- level
controllers, two rows. What
a coincidence!
Figure 9-17. The checklist
view. Note that only a single
item can be checked at a time.
Soylent Green, anyone?

CHAPTER 9: Navigation Controllers and Table Views 258
the last section, this controller can be completely implemented with a single table view; no nib
file is necessary.
Single-click RowControlsController.h, and add the following code:
#import <UIKit/UIKit.h>
#import "SecondLevelViewController.h"
#define kSwitchTag 100
@interface RowControlsController : UIViewController {
@interface RowControlsController : SecondLevelViewController <UITableViewDelegate, UITableViewDataSource> { NSArray *list;}
@property (nonatomic, retain) NSArray *list;@end
Not much there, huh? We’re defining a constant to use when setting the tag of the switch
that we will be adding to the table cell views. We’ll then be able to use that tag to retrieve
the switch in other parts of our code. We change the parent class, make our class conform
our to the table datasource and table delegate methods, and create an array to hold our
table data.
Switch over to RowControlsController.m, and make the following changes:
#import "RowControlsController.h"
@implementation RowControlsController
@synthesize list;- (id)initWithStyle:(UITableViewStyle)style {
if (self = [super initWithStyle:style]) {
}
return self;
}
- (void)dealloc {
[list release]; [super dealloc];
}
- (void)didReceiveMemoryWarning {
[super didReceiveMemoryWarning];
}
- (void)viewDidLoad { NSArray *array = [[NSArray alloc] initWithObjects:@"R2- D2", @"C3PO", @"Tik- Tok", @"Robby", @"Rosie", @"Uniblab", @"Bender", @"Marvin", @"Lt. Commander Data",

CHAPTER 9: Navigation Controllers and Table Views 259
@"Evil Brother Lore", @"Optimus Prime", @"Tobor", @"HAL", @"Orgasmatron", nil]; self.list = array; [array release]; [super viewDidLoad];} #pragma mark -#pragma mark Table Data Source Methods- (NSInteger)tableView:(UITableView *)tableView numberOfRowsInSection:(NSInteger)section { return [list count];}- (UITableViewCell *)tableView:(UITableView *)tableView cellForRowAtIndexPath:(NSIndexPath *)indexPath {
static NSString *ControlRowIdentifier = @"ControlRowIdentifier";
UITableViewCell *cell = [tableView dequeueReusableCellWithIdentifier:ControlRowIdentifier]; if (cell == nil) { cell = [[[UITableViewCell alloc] initWithFrame:CGRectZero reuseIdentifier:ControlRowIdentifier] autorelease]; UISwitch *switchView = [[UISwitch alloc] init]; switchView.tag = kSwitchTag; cell.accessoryView = switchView; [switchView release]; } NSUInteger row = [indexPath row]; NSString *rowTitle = [list objectAtIndex:row]; cell.text = rowTitle;
return cell;} #pragma mark -#pragma mark Table Delegate Methods- (void)tableView:(UITableView *)tableView didSelectRowAtIndexPath:(NSIndexPath *)indexPath{ NSUInteger row = [indexPath row]; UITableViewCell *cell = [tableView cellForRowAtIndexPath:indexPath]; UISwitch *switchView = (UISwitch *)[cell viewWithTag:kSwitchTag];
NSString *baseString = @"%@ %@."; NSString *onString = (switchView.on) ? @"IS on" : @"IS NOT on"; NSString *robot = [list objectAtIndex:row]; NSString *messageString = [[NSString alloc] initWithFormat:baseString, robot, onString];
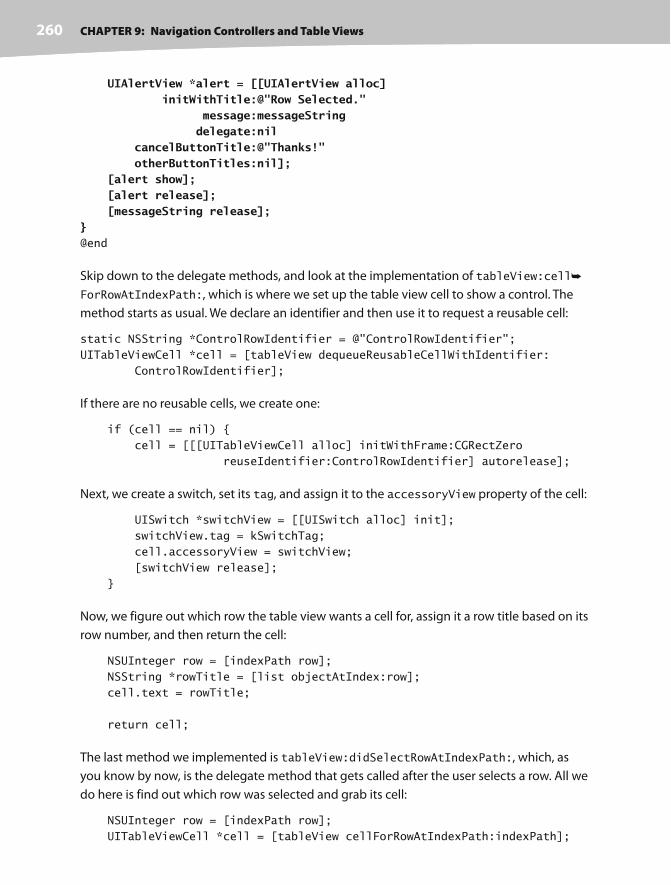
CHAPTER 9: Navigation Controllers and Table Views 260
UIAlertView *alert = [[UIAlertView alloc] initWithTitle:@"Row Selected." message:messageString delegate:nil cancelButtonTitle:@"Thanks!" otherButtonTitles:nil]; [alert show]; [alert release]; [messageString release];} @end
Skip down to the delegate methods, and look at the implementation of tableView:cell
ForRowAtIndexPath:, which is where we set up the table view cell to show a control. The
method starts as usual. We declare an identifier and then use it to request a reusable cell:
static NSString *ControlRowIdentifier = @"ControlRowIdentifier";
UITableViewCell *cell = [tableView dequeueReusableCellWithIdentifier:
ControlRowIdentifier];
If there are no reusable cells, we create one:
if (cell == nil) {
cell = [[[UITableViewCell alloc] initWithFrame:CGRectZero
reuseIdentifier:ControlRowIdentifier] autorelease];
Next, we create a switch, set its tag, and assign it to the accessoryView property of the cell:
UISwitch *switchView = [[UISwitch alloc] init];
switchView.tag = kSwitchTag;
cell.accessoryView = switchView;
[switchView release];
}
Now, we figure out which row the table view wants a cell for, assign it a row title based on its
row number, and then return the cell:
NSUInteger row = [indexPath row];
NSString *rowTitle = [list objectAtIndex:row];
cell.text = rowTitle;
return cell;
The last method we implemented is tableView:didSelectRowAtIndexPath:, which, as
you know by now, is the delegate method that gets called after the user selects a row. All we
do here is find out which row was selected and grab its cell:
NSUInteger row = [indexPath row];
UITableViewCell *cell = [tableView cellForRowAtIndexPath:indexPath];
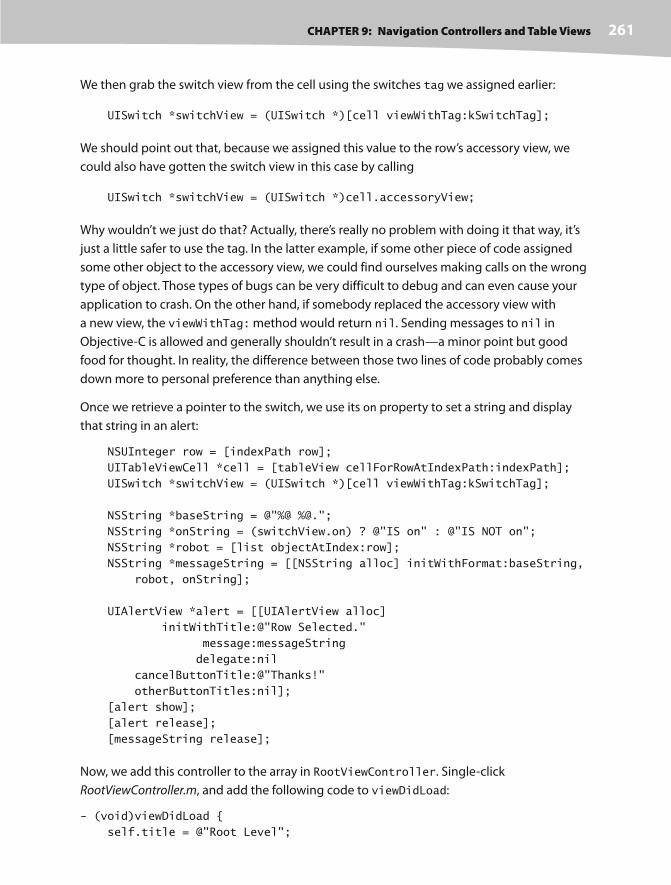
CHAPTER 9: Navigation Controllers and Table Views 261
We then grab the switch view from the cell using the switches tag we assigned earlier:
UISwitch *switchView = (UISwitch *)[cell viewWithTag:kSwitchTag];
We should point out that, because we assigned this value to the row’s accessory view, we
could also have gotten the switch view in this case by calling
UISwitch *switchView = (UISwitch *)cell.accessoryView;
Why wouldn’t we just do that? Actually, there’s really no problem with doing it that way, it’s
just a little safer to use the tag. In the latter example, if some other piece of code assigned
some other object to the accessory view, we could find ourselves making calls on the wrong
type of object. Those types of bugs can be very difficult to debug and can even cause your
application to crash. On the other hand, if somebody replaced the accessory view with
a new view, the viewWithTag: method would return nil. Sending messages to nil in
Objective- C is allowed and generally shouldn’t result in a crash—a minor point but good
food for thought. In reality, the difference between those two lines of code probably comes
down more to personal preference than anything else.
Once we retrieve a pointer to the switch, we use its on property to set a string and display
that string in an alert:
NSUInteger row = [indexPath row];
UITableViewCell *cell = [tableView cellForRowAtIndexPath:indexPath];
UISwitch *switchView = (UISwitch *)[cell viewWithTag:kSwitchTag];
NSString *baseString = @"%@ %@.";
NSString *onString = (switchView.on) ? @"IS on" : @"IS NOT on";
NSString *robot = [list objectAtIndex:row];
NSString *messageString = [[NSString alloc] initWithFormat:baseString,
robot, onString];
UIAlertView *alert = [[UIAlertView alloc]
initWithTitle:@"Row Selected."
message:messageString
delegate:nil
cancelButtonTitle:@"Thanks!"
otherButtonTitles:nil];
[alert show];
[alert release];
[messageString release];
Now, we add this controller to the array in RootViewController. Single- click
RootViewController.m, and add the following code to viewDidLoad:
- (void)viewDidLoad {
self.title = @"Root Level";

CHAPTER 9: Navigation Controllers and Table Views 262
NSMutableArray *array = [[NSMutableArray alloc] init];
// Disclosure Button
DisclosureButtonController *disclosureButtonController =
[[DisclosureButtonController alloc]
initWithStyle:UITableViewStylePlain];
disclosureButtonController.title = @"Disclosure Buttons";
disclosureButtonController.rowImage = [UIImage
imageNamed:@"disclosureButtonControllerIcon.png"];
[array addObject:disclosureButtonController];
[disclosureButtonController release];
// Check List
CheckListController *checkListController = [[CheckListController alloc]
initWithStyle:UITableViewStylePlain];
checkListController.title = @"Check One";
checkListController.rowImage = [UIImage
imageNamed:@"checkmarkControllerIcon.png"];
[array addObject:checkListController];
[checkListController release];
// Table Row Controls RowControlsController *rowControlsController = [[RowControlsController alloc] initWithStyle:UITableViewStylePlain]; rowControlsController.title = @"Row Controls"; rowControlsController.rowImage = [UIImage imageNamed: @"rowControlsIcon.png"]; [array addObject:rowControlsController]; [rowControlsController release];
self.controllers = array;
[array release];
[super viewDidLoad];
}
In order for this code to compile, we have to also import the header file for the
RowControlsController class, so add the following line of code just before
the @implementation line in the same file:
#import "RowControlsController.h"
Save everything, and compile it. This time, assuming everything went OK, you’ll get yet
another row when your application launches (see Figure 9-18).
If you tap this new row, it will take you down to a new list where every row has a switch con-
trol on the right side of the row. Tapping any switch toggles its value (see Figure 9-19).

CHAPTER 9: Navigation Controllers and Table Views 263
Tapping a row anywhere but on its switch will display an alert
telling you whether the switch for that row is turned on or off.
At this point, you should be getting pretty comfortable with
how this all works, so let’s try a slightly more difficult case,
shall we? Let’s look at how to allow the user to reorder the
rows in a table.
Our Fourth Subcontroller: Moveable Rows How you doing? Hanging in there? This chapter is very long,
and you’ve already accomplished a lot. Why not take a break,
and grab a Fresca and some Amazin’ Raisins? We’ll do the
same. When you’re refreshed and ready to move on, we’ll
build another second- level view controller and add it to our
application.
Editing Mode
Moving and deleting rows, as well as inserting rows at a specific
spot in the table are all tasks that can be implemented fairly
easily. All three are done by turning on something called edit-
ing mode, which is done using the setEditing:animated:
method on the table view. This method takes two Booleans.
The first indicates whether you are turning on or off editing
mode, and the second indicates whether the table should ani-
mate the transition. If you set editing to the mode it’s already in
(in other words, turning it on when it’s already on or off when
it’s already off ), the transition will not be animated regardless of
what you specify in the second parameter.
In the follow- on controller, we’ll again use editing mode, this
time to allow the user to delete rows from the table. Allowing
row reordering is the easiest of the editing mode tasks, so we’ll
tackle it first.
Once editing mode is turned on, a number of new delegate
methods come into play. The table view uses them to ask if
a certain row can be moved or edited and again to notify you
if the user actually does move or edit a specific row. It sounds
more complex than it is. Let’s see it in action.
Figure 9-18. The row controls
controller added to the root
level controller
Figure 9-19. The table with
switch controls in the acces-
sory view. Tap a switch;
change a robot’s life!

CHAPTER 9: Navigation Controllers and Table Views 264
Creating a New Second- Level Controller
Because we don’t have to display a detail view, the Move Me view controller can be imple-
mented without a nib and with just a single controller class. So, select the Classes folder
in the Groups & Files pane in Xcode, and then press N or select New File. . . from the File
menu. Select Cocoa Touch Classes, and then select the UIViewController subclass icon. When
prompted for a name, type MoveMeController.m this time.
In our header file, we need two things. First, we need a mutable array to hold our data and
keep track of the order of the rows. It has to be mutable because we need to be able to
move items around as we get notified of moves. We also need an action method to toggle
edit mode on and off. The action method will be called by a navigation bar button that we
will create. Single- click MoveMeController.h, and make the following changes:
#import <UIKit/UIKit.h>
#import "SecondLevelViewController.h"
@interface MoveMeController : UIViewController {
@interface MoveMeController : SecondLevelViewController <UITableViewDelegate, UITableViewDataSource> { NSMutableArray *list;}
@property (nonatomic, retain) NSMutableArray *list;-(IBAction)toggleMove;@end
Switch over to MoveMeController.m, and add the following code:
#import "MoveMeController.h"
@implementation MoveMeController
@synthesize list;-(IBAction)toggleMove{ [self.tableView setEditing:!self.tableView.editing animated:YES];}- (id)initWithStyle:(UITableViewStyle)style {
if (self = [super initWithStyle:style]) {
}
return self;
}
- (void)dealloc {
[list release]; [super dealloc];
}

CHAPTER 9: Navigation Controllers and Table Views 265
- (void)viewDidLoad { NSMutableArray *array = [[NSMutableArray alloc] initWithObjects: @"Eeny", @"Meeny", @"Miney", @"Moe", @"Catch", @"A", @"Tiger", @"By", @"The", @"Toe", nil]; self.list = array; [array release];
UIBarButtonItem *moveButton = [[UIBarButtonItem alloc] initWithTitle:@"Move" style:UIBarButtonItemStyleBordered target:self action:@selector(toggleMove)]; self.navigationItem.rightBarButtonItem = moveButton; [moveButton release]; [super viewDidLoad];}- (void)didReceiveMemoryWarning {
[super didReceiveMemoryWarning];
}
#pragma mark -#pragma mark Table Data Source Methods- (NSInteger)tableView:(UITableView *)tableView numberOfRowsInSection:(NSInteger)section { return [list count];}- (UITableViewCell *)tableView:(UITableView *)tableView cellForRowAtIndexPath:(NSIndexPath *)indexPath {
static NSString *MoveMeCellIdentifier = @"MoveMeCellIdentifier";
UITableViewCell *cell = [tableView dequeueReusableCellWithIdentifier:MoveMeCellIdentifier]; if (cell == nil) { cell = [[[UITableViewCell alloc] initWithFrame:CGRectZero reuseIdentifier:MoveMeCellIdentifier] autorelease]; cell.showsReorderControl = YES;
} NSUInteger row = [indexPath row]; cell.text = [list objectAtIndex:row];
return cell;}- (UITableViewCellEditingStyle)tableView:(UITableView *)tableView editingStyleForRowAtIndexPath:(NSIndexPath *)indexPath { return UITableViewCellEditingStyleNone;}
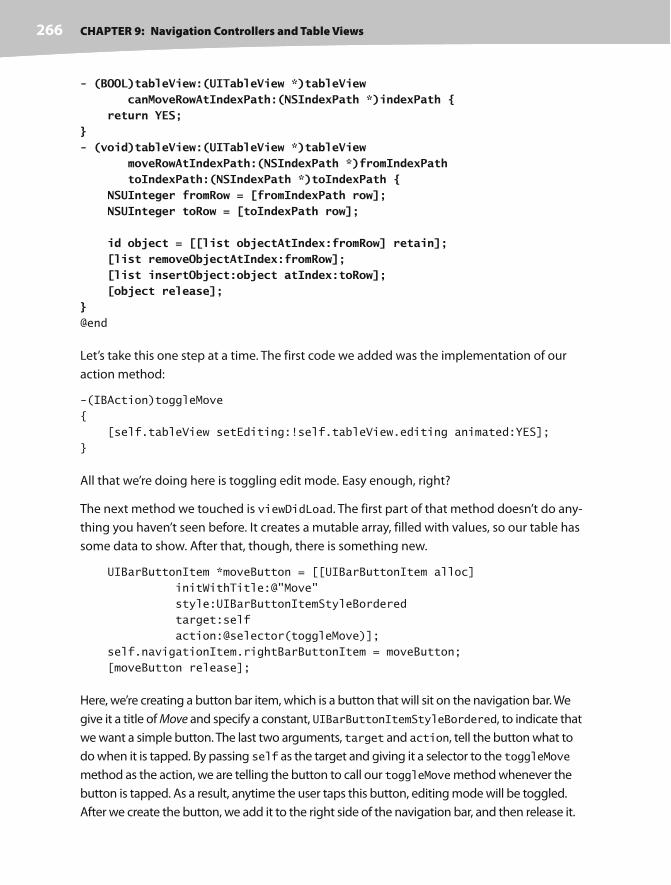
CHAPTER 9: Navigation Controllers and Table Views 266
- (BOOL)tableView:(UITableView *)tableView canMoveRowAtIndexPath:(NSIndexPath *)indexPath { return YES;}- (void)tableView:(UITableView *)tableView moveRowAtIndexPath:(NSIndexPath *)fromIndexPath toIndexPath:(NSIndexPath *)toIndexPath { NSUInteger fromRow = [fromIndexPath row]; NSUInteger toRow = [toIndexPath row];
id object = [[list objectAtIndex:fromRow] retain]; [list removeObjectAtIndex:fromRow]; [list insertObject:object atIndex:toRow]; [object release];}@end
Let’s take this one step at a time. The first code we added was the implementation of our
action method:
-(IBAction)toggleMove
{
[self.tableView setEditing:!self.tableView.editing animated:YES];
}
All that we’re doing here is toggling edit mode. Easy enough, right?
The next method we touched is viewDidLoad. The first part of that method doesn’t do any-
thing you haven’t seen before. It creates a mutable array, filled with values, so our table has
some data to show. After that, though, there is something new.
UIBarButtonItem *moveButton = [[UIBarButtonItem alloc]
initWithTitle:@"Move"
style:UIBarButtonItemStyleBordered
target:self
action:@selector(toggleMove)];
self.navigationItem.rightBarButtonItem = moveButton;
[moveButton release];
Here, we’re creating a button bar item, which is a button that will sit on the navigation bar. We
give it a title of Move and specify a constant, UIBarButtonItemStyleBordered, to indicate that
we want a simple button. The last two arguments, target and action, tell the button what to
do when it is tapped. By passing self as the target and giving it a selector to the toggleMove
method as the action, we are telling the button to call our toggleMove method whenever the
button is tapped. As a result, anytime the user taps this button, editing mode will be toggled.
After we create the button, we add it to the right side of the navigation bar, and then release it.

CHAPTER 9: Navigation Controllers and Table Views 267
Now, skip down to the tableView:cellForRowAtIndexPath: method we just added. Did
you notice this new line of code?
cell.showsReorderControl = YES;
Standard accessory icons can be specified by implementing the tableView:accessory
TypeForRowWithIndexPath: method. But, the reorder control is not a standard accessory
icon: it’s a special case that’s only shown when the table is in edit mode. To enable the
reorder control, we have to set a property on the cell itself. Note, though, that setting this
property to YES doesn’t actually display the reorder control until the table gets put into
edit mode. Everything else in this method is stuff we’ve done before.
The next new method is short but important. In our table view, we want to be able to reor-
der the rows, but we don’t want the user to be able to delete or insert rows. As a result, we
implement the method tableView:editingStyleForRowAtIndexPath:. This method
allows the table view to ask if a specific row can be deleted or if a new row can be inserted at
a specific spot. By returning UITableViewCellEditingStyleNone for each row, we are indi-
cating that we don’t support inserts or deletes for any row.
Next comes the method tableView:canMoveRowAtIndexPath:. This method gets called
for each row, and it gives you the chance to disallow the movement of specific rows. If you
return NO from this method for any row, the reorder control will not be shown for that row,
and the user will be unable to move it from its current position. We want to allow full reor-
dering, so we just return YES for each row.
The last method, tableView:moveRowAtIndexPath:fromIndexPath:, is the method that will
actually get called when the user moves a row. The two parameters besides tableView are both
NSIndexPath instances that identify the row that was moved and the row’s new position. The
table view has already moved the rows in the table so the user is seeing the right thing, but we
need to update our data model to keep the two in sync and avoid causing display problems.
First, we retrieve the row that needs to be moved. Then, we retrieve the row’s new position.
NSUInteger fromRow = [fromIndexPath row];
NSUInteger toRow = [toIndexPath row];
We now need to remove the specified object from the array and reinsert it at its new loca-
tion. But before we do that, we retrieve a pointer to the about-to-be- moved object and
retain it so that the object doesn’t get released when we remove it from the array. If the array
is the only object that has retained the object we’re removing (and in our case, it is), remov-
ing the selected object from the array will cause its retain count to drop to 0, meaning it will
probably disappear on us. By retaining it first, we prevent that from happening.
id object = [[list objectAtIndex:fromRow] retain];
[list removeObjectAtIndex:fromRow];

CHAPTER 9: Navigation Controllers and Table Views 268
After we’ve removed it, we need to reinsert it into the specified new location:
[list insertObject:object atIndex:toRow];
And, finally, because we’ve retained it, we need to release it to avoid leaking memory:
[object release];
Well, there you have it. We’ve implemented a table that allows reordering of rows. Now, we
just need to add an instance of this new class to RootViewController’s array of controllers.
You’re probably comfortable doing this by now, but we’ll walk you through it just to keep
you company.
In RootViewController.m, import the new view’s header file by adding the following line of
code just before the @implementation declaration:
#import "MoveMeController.h"
Now, add the following code to the viewDidLoad method in the same file:
- (void)viewDidLoad {
self.title = @"Root Level";
NSMutableArray *array = [[NSMutableArray alloc] init];
// Disclosure Button
DisclosureButtonController *disclosureButtonController =
[[DisclosureButtonController alloc]
initWithStyle:UITableViewStylePlain];
disclosureButtonController.title = @"Disclosure Buttons";
disclosureButtonController.rowImage = [UIImage
imageNamed:@"disclosureButtonControllerIcon.png"];
[array addObject:disclosureButtonController];
[disclosureButtonController release];
// Check List
CheckListController *checkListController = [[CheckListController alloc]
initWithStyle:UITableViewStylePlain];
checkListController.title = @"Check One";
checkListController.rowImage = [UIImage
imageNamed:@"checkmarkControllerIcon.png"];
[array addObject:checkListController];
[checkListController release];
// Table Row Controls
RowControlsController *rowControlsController =
[[RowControlsController alloc]
initWithStyle:UITableViewStylePlain];

CHAPTER 9: Navigation Controllers and Table Views 269
rowControlsController.title = @"Row Controls";
rowControlsController.rowImage = [UIImage imageNamed:
@"rowControlsIcon.png"];
[array addObject:rowControlsController];
[rowControlsController release];
// Move Me MoveMeController *moveMeController = [[MoveMeController alloc] initWithStyle:UITableViewStylePlain]; moveMeController.title = @"Move Me"; moveMeController.rowImage = [UIImage imageNamed:@"moveMeIcon.png"]; [array addObject:moveMeController]; [moveMeController release];
self.controllers = array;
[array release];
[super viewDidLoad];
}
OK, let’s go ahead and compile this bad boy and see what
shakes out. If everything went smoothly, our application
will launch in the simulator with (count ’em) four rows in the
root- level table. If you click the new one, called Move Me, it’ll
take you down to a list of rows. If you want to try moving the
rows, click the Move button, and the reorder controls should
appear (see Figure 9-20).
If you tap in the reorder control and then drag, the row
should move as you drag, as in Figure 9-6. Move the row as
you like. The row should settle into its new position nicely.
You can even navigate back up to the top level and come
back down, and your rows will be right where you left them.
If you quit and come back in, they will get restored, but don’t
worry; in a few chapters, we’ll teach you how to save and
restore data.
NOTE
If you find you have a bit of trouble making contact with the move control, don’t panic. If you are very
careful to actually click the pixels of the move control, you should be able to experience moving goodness.
The difficulty here is that you are interfacing with the simulator using a single- pixel hot- spot cursor. If you
downloaded the application onto your iPhone or iPod Touch, you’d be using your big, fat fingers, which,
presumably, are several pixels wide and will have no trouble making contact with the move control.
Figure 9-20. The Move Me
view controller when you first
drill down

CHAPTER 9: Navigation Controllers and Table Views 270
In case you hadn’t noticed, this chapter is a bit of a marathon. If you’re feeling a little over-
whelmed, this is probably a good time to take a break. There’s a lot of stuff in this chapter
to absorb, but it’s important. The vast majority of iPhone applications will use table views
in some respect. When you’re ready to move on, we’ll look at another use of edit mode. This
time, we’ll let the user delete our precious rows. Gasp!
Our Fifth Subcontroller: Deletable RowsLetting users delete rows isn’t really any harder than letting them move rows. Let’s take
a look at that process. Instead of creating an array from a hard- coded list of objects, we’re
going to load a property list file this time, just to save some typing. You can grab the file
called computers.plist out of the 09 Nav folder in the projects archive that accompanies this
book and add it to the Resources folder of your Xcode project.
Select the Classes folder in the Groups & Files pane in Xcode, and then press N or select New
File. . . from the File menu. Select Cocoa Touch Classes, and then select the UIViewController
subclass icon. When prompted for a name, this time type DeleteMeController.m.
Once you’ve got your new files, let’s start by editing DeleteMeController.h. The changes we’re
going to make there should look familiar, as they’re nearly identical to the ones we made in
the last view controller we built. Go ahead and make these changes now:
#import <UIKit/UIKit.h>
#import "SecondLevelViewController.h"
@interface DeleteMeController : UIViewController {
@interface DeleteMeController : SecondLevelViewController <UITableViewDelegate, UITableViewDataSource> { NSMutableArray *list;}
@property (nonatomic, retain) NSMutableArray *list;-(IBAction)toggleEdit:(id)sender;@end
No surprises here, right? We’re changing the superclass from UIViewController to
SecondLevelViewController and conforming the class to the two protocols we need to
act as the datasource and delegate for our table. After that, we declare a mutable array to
hold our data and an action method to toggle edit mode. In the last revision of our applica-
tion, we used edit mode to let the users reorder rows. In this version, edit mode will be used
to let them delete rows. You can actually combine both in the same table if you like. We
separated them so the concepts would be a bit easier to follow, but the delete and reorder
operations do play nicely together. A row that can be reordered will display the reorder icon
anytime that the table is in edit mode. When you tap the red circular icon on the left side of

CHAPTER 9: Navigation Controllers and Table Views 271
the row (see Figure 9-7), the Delete button will pop up, obscuring the reorder icon but only
temporarily.
Switch over to DeleteMeController.m, and add the following code:
#import "DeleteMeController.h"
@implementation DeleteMeController
@synthesize list;-(IBAction)toggleEdit:(id)sender { [self.tableView setEditing:!self.tableView.editing animated:YES];}#pragma mark -- (id)initWithNibName:(NSString *)nibNameOrNil
bundle:(NSBundle *)nibBundleOrNil {
if (self = [super initWithNibName:nibNameOrNil
bundle:nibBundleOrNil]) {
// Initialization code
}
return self;
}
- (void)viewDidLoad { NSString *path = [[NSBundle mainBundle] pathForResource:@"computers" ofType:@"plist"]; NSMutableArray *array = [[NSMutableArray alloc] initWithContentsOfFile:path]; self.list = array; [array release];
UIBarButtonItem *editButton = [[UIBarButtonItem alloc] initWithTitle:@"Delete" style:UIBarButtonItemStyleBordered target:self action:@selector(toggleEdit:)]; self.navigationItem.rightBarButtonItem = editButton; [editButton release];
[super viewDidLoad];}- (BOOL)shouldAutorotateToInterfaceOrientation:
(UIInterfaceOrientation)interfaceOrientation {
// Return YES for supported orientations
return (interfaceOrientation == UIInterfaceOrientationPortrait);
}
- (void)didReceiveMemoryWarning {
[super didReceiveMemoryWarning];
// Releases the view if it doesn't have a superview

CHAPTER 9: Navigation Controllers and Table Views 272
// Release anything that's not essential, such as cached data
}
- (void)dealloc {
[list release]; [super dealloc];
}
#pragma mark -#pragma mark Table Data Source Methods- (NSInteger)tableView:(UITableView *)tableView numberOfRowsInSection:(NSInteger)section { return [list count];}- (UITableViewCell *)tableView:(UITableView *)tableView cellForRowAtIndexPath:(NSIndexPath *)indexPath {
static NSString *DeleteMeCellIdentifier = @"DeleteMeCellIdentifier";
UITableViewCell *cell = [tableView dequeueReusableCellWithIdentifier: DeleteMeCellIdentifier]; if (cell == nil) { cell = [[[UITableViewCell alloc] initWithFrame:CGRectZero reuseIdentifier:DeleteMeCellIdentifier] autorelease]; } NSInteger row = [indexPath row]; cell.text = [self.list objectAtIndex:row]; return cell;}
#pragma mark -#pragma mark Table Delegate Methods- (void)tableView:(UITableView *)tableView commitEditingStyle:(UITableViewCellEditingStyle)editingStyle forRowAtIndexPath:(NSIndexPath *)indexPath {
NSUInteger row = [indexPath row]; [self.list removeObjectAtIndex:row]; [tableView deleteRowsAtIndexPaths:[NSArray arrayWithObject:indexPath] withRowAnimation:UITableViewRowAnimationFade];}@end
Let’s look at what we did. The new action method, toggleEdit:, is exactly the same as
our last version. It sets edit mode to on if it’s currently off and vice versa. The viewDidLoad
method is also similar to the one from the previous view controller. The only difference is
that we’re loading our array from a property list rather than feeding it a hard- coded list of
strings. The property list we’re using contains a flat array of strings containing a variety of
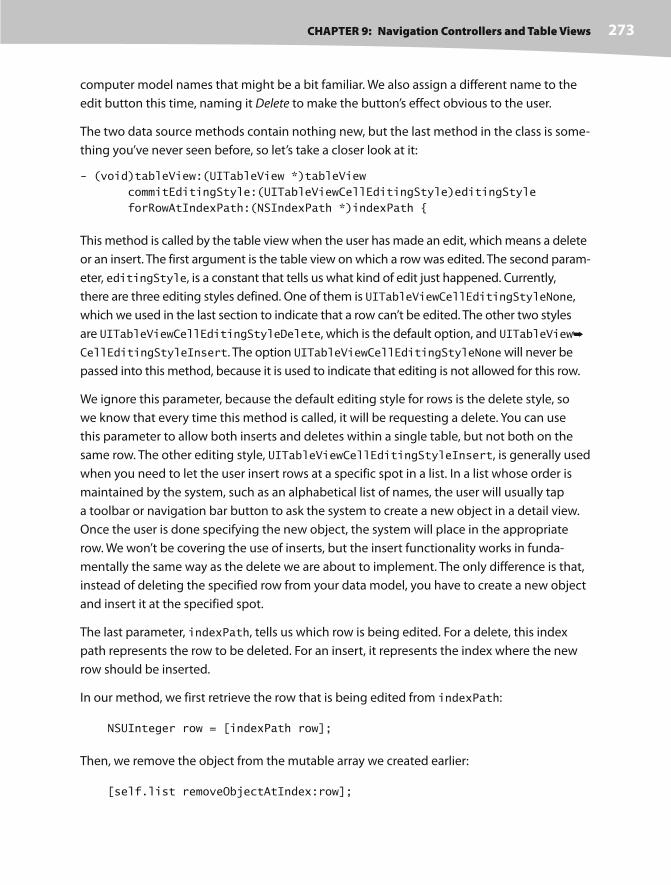
CHAPTER 9: Navigation Controllers and Table Views 273
computer model names that might be a bit familiar. We also assign a different name to the
edit button this time, naming it Delete to make the button’s effect obvious to the user.
The two data source methods contain nothing new, but the last method in the class is some-
thing you’ve never seen before, so let’s take a closer look at it:
- (void)tableView:(UITableView *)tableView
commitEditingStyle:(UITableViewCellEditingStyle)editingStyle
forRowAtIndexPath:(NSIndexPath *)indexPath {
This method is called by the table view when the user has made an edit, which means a delete
or an insert. The first argument is the table view on which a row was edited. The second param-
eter, editingStyle, is a constant that tells us what kind of edit just happened. Currently,
there are three editing styles defined. One of them is UITableViewCellEditingStyleNone,
which we used in the last section to indicate that a row can’t be edited. The other two styles
are UITableViewCellEditingStyleDelete, which is the default option, and UITableView
CellEditingStyleInsert. The option UITableViewCellEditingStyleNone will never be
passed into this method, because it is used to indicate that editing is not allowed for this row.
We ignore this parameter, because the default editing style for rows is the delete style, so
we know that every time this method is called, it will be requesting a delete. You can use
this parameter to allow both inserts and deletes within a single table, but not both on the
same row. The other editing style, UITableViewCellEditingStyleInsert, is generally used
when you need to let the user insert rows at a specific spot in a list. In a list whose order is
maintained by the system, such as an alphabetical list of names, the user will usually tap
a toolbar or navigation bar button to ask the system to create a new object in a detail view.
Once the user is done specifying the new object, the system will place in the appropriate
row. We won’t be covering the use of inserts, but the insert functionality works in funda-
mentally the same way as the delete we are about to implement. The only difference is that,
instead of deleting the specified row from your data model, you have to create a new object
and insert it at the specified spot.
The last parameter, indexPath, tells us which row is being edited. For a delete, this index
path represents the row to be deleted. For an insert, it represents the index where the new
row should be inserted.
In our method, we first retrieve the row that is being edited from indexPath:
NSUInteger row = [indexPath row];
Then, we remove the object from the mutable array we created earlier:
[self.list removeObjectAtIndex:row];

CHAPTER 9: Navigation Controllers and Table Views 274
Finally, we tell the table to delete the row, specifying the constant UITableViewRowAnimation
Fade, which represents one type of animation the iPhone will use when removing rows. There
are several other options in addition to this one, which causes the row to fade away. You can look
up the UITableViewRowAnimation in Xcode’s document browser to see what other animations
are available.
[tableView deleteRowsAtIndexPaths:[NSArray arrayWithObject:indexPath]
withRowAnimation:UITableViewRowAnimationFade];
}
And that’s all she wrote, folks. That’s the whole enchilada for this class, so let’s add an
instance of it to our root view controller and try it out. In RootViewController.m, we first need
to import our new controller class’s header file, so add the following line of code right before
the @implementation declaration:
#import "DeleteMeController.h"
Now, add the following code to the viewDidLoad method:
- (void)viewDidLoad {
self.title = @"Root Level";
NSMutableArray *array = [[NSMutableArray alloc] init];
// Disclosure Button
DisclosureButtonController *disclosureButtonController =
[[DisclosureButtonController alloc]
initWithStyle:UITableViewStylePlain];
disclosureButtonController.title = @"Disclosure Buttons";
disclosureButtonController.rowImage = [UIImage imageNamed:
@"disclosureButtonControllerIcon.png"];
[array addObject:disclosureButtonController];
[disclosureButtonController release];
// Check List
CheckListController *checkListController = [[CheckListController alloc]
initWithStyle:UITableViewStylePlain];
checkListController.title = @"Check One";
checkListController.rowImage = [UIImage imageNamed:
@"checkmarkControllerIcon.png"];
[array addObject:checkListController];
[checkListController release];
// Table Row Controls
RowControlsController *rowControlsController =
[[RowControlsController alloc]
initWithStyle:UITableViewStylePlain];
rowControlsController.title = @"Row Controls";
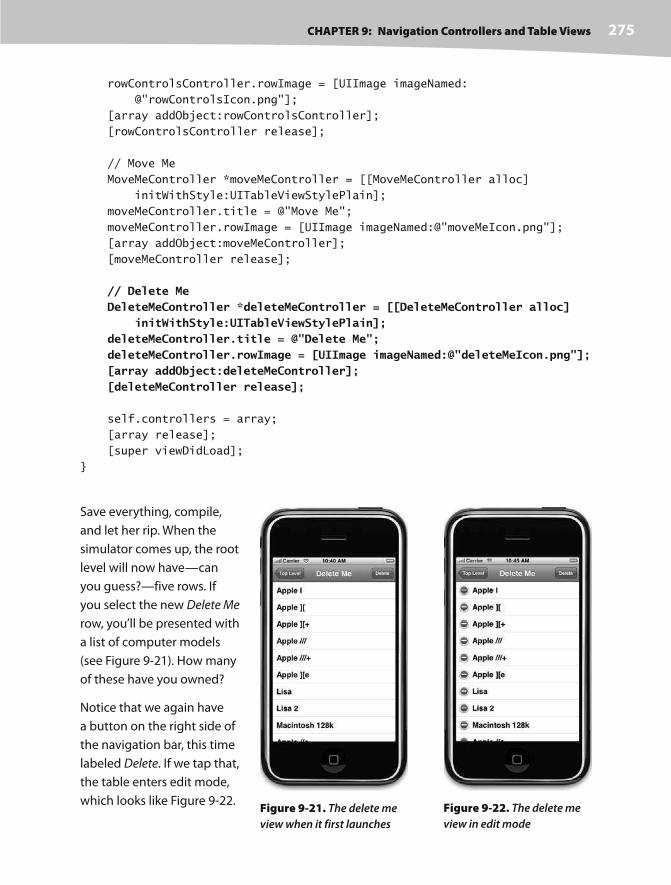
CHAPTER 9: Navigation Controllers and Table Views 275
rowControlsController.rowImage = [UIImage imageNamed:
@"rowControlsIcon.png"];
[array addObject:rowControlsController];
[rowControlsController release];
// Move Me
MoveMeController *moveMeController = [[MoveMeController alloc]
initWithStyle:UITableViewStylePlain];
moveMeController.title = @"Move Me";
moveMeController.rowImage = [UIImage imageNamed:@"moveMeIcon.png"];
[array addObject:moveMeController];
[moveMeController release];
// Delete Me DeleteMeController *deleteMeController = [[DeleteMeController alloc] initWithStyle:UITableViewStylePlain]; deleteMeController.title = @"Delete Me"; deleteMeController.rowImage = [UIImage imageNamed:@"deleteMeIcon.png"]; [array addObject:deleteMeController]; [deleteMeController release];
self.controllers = array;
[array release];
[super viewDidLoad];
}
Figure 9-21. The delete me
view when it first launches
Figure 9-22. The delete me
view in edit mode
Save everything, compile,
and let her rip. When the
simulator comes up, the root
level will now have—can
you guess?—five rows. If
you select the new Delete Me
row, you’ll be presented with
a list of computer models
(see Figure 9-21). How many
of these have you owned?
Notice that we again have
a button on the right side of
the navigation bar, this time
labeled Delete. If we tap that,
the table enters edit mode,
which looks like Figure 9-22.
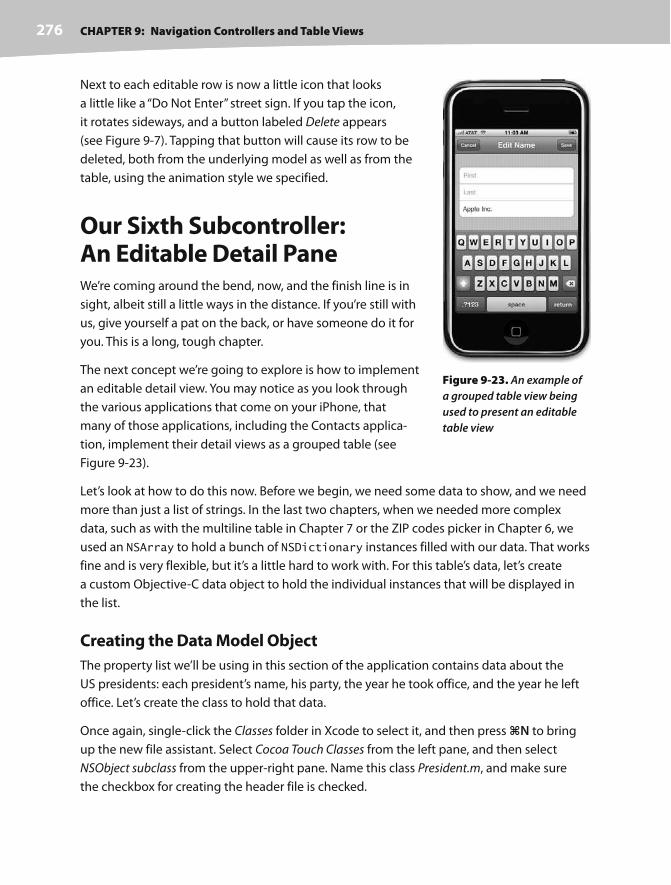
CHAPTER 9: Navigation Controllers and Table Views 276
Next to each editable row is now a little icon that looks
a little like a “Do Not Enter” street sign. If you tap the icon,
it rotates sideways, and a button labeled Delete appears
(see Figure 9-7). Tapping that button will cause its row to be
deleted, both from the underlying model as well as from the
table, using the animation style we specified.
Our Sixth Subcontroller: An Editable Detail Pane We’re coming around the bend, now, and the finish line is in
sight, albeit still a little ways in the distance. If you’re still with
us, give yourself a pat on the back, or have someone do it for
you. This is a long, tough chapter.
The next concept we’re going to explore is how to implement
an editable detail view. You may notice as you look through
the various applications that come on your iPhone, that
many of those applications, including the Contacts applica-
tion, implement their detail views as a grouped table (see
Figure 9-23).
Let’s look at how to do this now. Before we begin, we need some data to show, and we need
more than just a list of strings. In the last two chapters, when we needed more complex
data, such as with the multiline table in Chapter 7 or the ZIP codes picker in Chapter 6, we
used an NSArray to hold a bunch of NSDictionary instances filled with our data. That works
fine and is very flexible, but it’s a little hard to work with. For this table’s data, let’s create
a custom Objective- C data object to hold the individual instances that will be displayed in
the list.
Creating the Data Model Object
The property list we’ll be using in this section of the application contains data about the
US presidents: each president’s name, his party, the year he took office, and the year he left
office. Let’s create the class to hold that data.
Once again, single- click the Classes folder in Xcode to select it, and then press N to bring
up the new file assistant. Select Cocoa Touch Classes from the left pane, and then select
NSObject subclass from the upper- right pane. Name this class President.m, and make sure
the checkbox for creating the header file is checked.
Figure 9-23. An example of
a grouped table view being
used to present an editable
table view
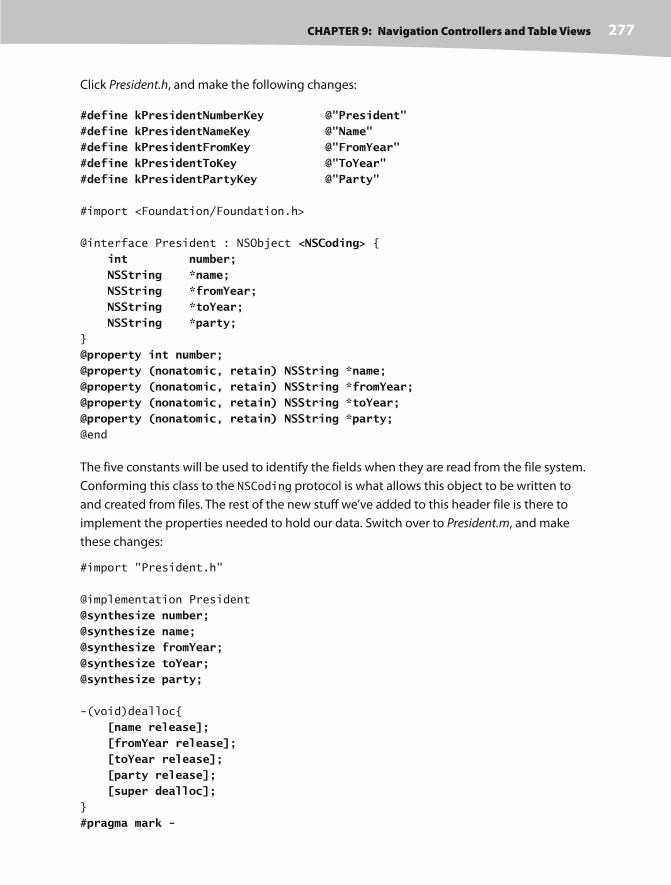
CHAPTER 9: Navigation Controllers and Table Views 277
Click President.h, and make the following changes:
#define kPresidentNumberKey @"President"#define kPresidentNameKey @"Name"#define kPresidentFromKey @"FromYear"#define kPresidentToKey @"ToYear"#define kPresidentPartyKey @"Party"
#import <Foundation/Foundation.h>
@interface President : NSObject <NSCoding> { int number; NSString *name; NSString *fromYear; NSString *toYear; NSString *party;}
@property int number;@property (nonatomic, retain) NSString *name;@property (nonatomic, retain) NSString *fromYear;@property (nonatomic, retain) NSString *toYear;@property (nonatomic, retain) NSString *party;@end
The five constants will be used to identify the fields when they are read from the file system.
Conforming this class to the NSCoding protocol is what allows this object to be written to
and created from files. The rest of the new stuff we’ve added to this header file is there to
implement the properties needed to hold our data. Switch over to President.m, and make
these changes:
#import "President.h"
@implementation President
@synthesize number;@synthesize name;@synthesize fromYear;@synthesize toYear;@synthesize party;
-(void)dealloc{
[name release]; [fromYear release]; [toYear release]; [party release]; [super dealloc];}
#pragma mark -
CHAPTER 9: Navigation Controllers and Table Views 278
#pragma mark NSCoding- (void)encodeWithCoder:(NSCoder *)coder{ [coder encodeInt:self.number forKey:kPresidentNumberKey]; [coder encodeObject:self.name forKey:kPresidentNameKey]; [coder encodeObject:self.fromYear forKey:kPresidentFromKey]; [coder encodeObject:self.toYear forKey:kPresidentToKey]; [coder encodeObject:self.party forKey:kPresidentPartyKey];
}- (id)initWithCoder:(NSCoder *)coder{ if (self = [super init]) { self.number = [coder decodeIntForKey:kPresidentNumberKey]; self.name = [coder decodeObjectForKey:kPresidentNameKey]; self.fromYear = [coder decodeObjectForKey:kPresidentFromKey]; self.toYear = [coder decodeObjectForKey:kPresidentToKey]; self.party = [coder decodeObjectForKey:kPresidentPartyKey]; } return self;}@end
Don’t worry too much about the encodeWithCoder: and initWithCoder: methods.
We’ll be covering those in more detail later. All you need to know is that these two methods
are part of the NSCoding protocol. encodeWithCoder: encodes our object to be archived;
initWithCoder: is used to create new objects from archives. These methods will allow us to
create President objects from a property list archive file. Everything else in this class should
be fairly self- explanatory.
We’ve provided you with a property list file that contains data for all the US presidents and
can be used to create new instances of the President object we just wrote. We will be
using this in the next section, so you won’t have to type in a whole bunch of data. Grab the
Presidents.plist file from the 09 Nav folder in the projects archive, and add it to the Resources
folder of your project.
Now, we’re ready to write our two controller classes.
Creating the Controllers
For this part of the application, we’re going to need two new controllers, one that will show
the list to be edited and another one to view and edit the details of the item selected in that
list. Since both of these view controllers will be based on tables, we won’t need to create
any nib files, but we will need two separate controller classes. Let’s create the files for both
classes now and then implement them.

CHAPTER 9: Navigation Controllers and Table Views 279
Select the Classes folder in the Groups & Files pane in Xcode, and then press N or
select New File. . . from the File menu. Select Cocoa Touch Classes, and then select the
UIViewController subclass icon. For a name, type PresidentsViewController.m, and make sure
to have it create the header file also. Repeat the same process a second time using the name
PresidentDetailController.m.
NOTE
In case you were wondering, PresidentDetailController is singular (as opposed to
PresidentsDetailController) because it deals with detail on a single president. Yes, we actu-
ally had a fistfight about that little detail, but one intense paintball session later, we are friends again.
Let’s create the view controller that shows the list of presidents first. Single- click
PresidentsViewController.h, and make the following changes:
#import <UIKit/UIKit.h>
#import "SecondLevelViewController.h"@class PresidentDetailController;
@interface PresidentsViewController : UIViewController {
@interface PresidentsViewController : SecondLevelViewController <UITableViewDelegate, UITableViewDataSource> { NSMutableArray *list;}
@property (nonatomic, retain) NSMutableArray *list;@end
There’s nothing new here for an old hand like you.
Switch over to PresidentsViewController.m, and make the following changes, which we’ll talk
about when you’re done:
#import "PresidentsViewController.h"
#import "PresidentDetailController.h"#import "President.h"#import "NavAppDelegate.h"
@implementation PresidentsViewController
@synthesize list;
- (id)initWithStyle:(UITableViewStyle)style {
if (self = [super initWithStyle:style]) {
}
return self;
}
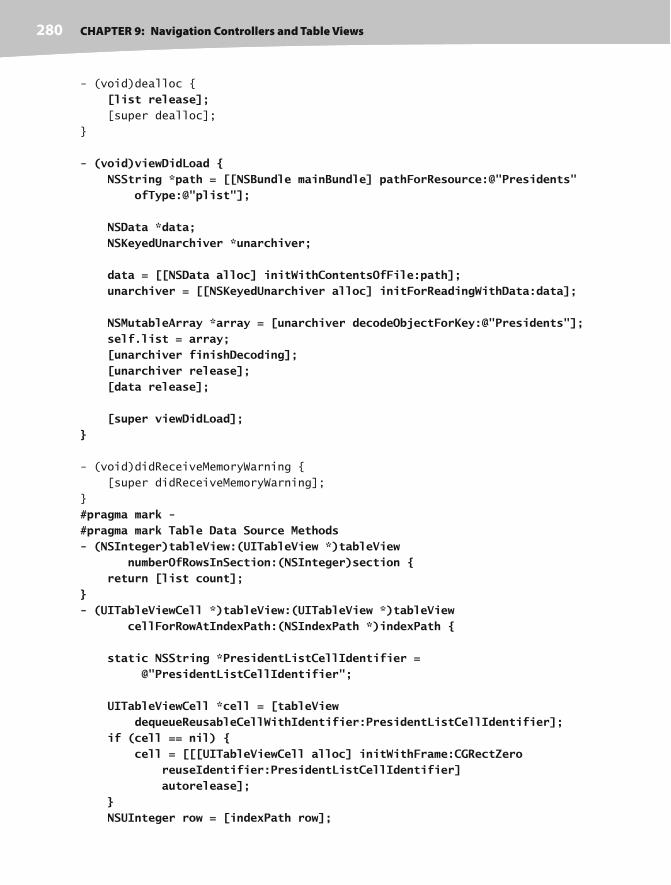
CHAPTER 9: Navigation Controllers and Table Views 280
- (void)dealloc {
[list release]; [super dealloc];
}
- (void)viewDidLoad { NSString *path = [[NSBundle mainBundle] pathForResource:@"Presidents" ofType:@"plist"];
NSData *data; NSKeyedUnarchiver *unarchiver;
data = [[NSData alloc] initWithContentsOfFile:path]; unarchiver = [[NSKeyedUnarchiver alloc] initForReadingWithData:data];
NSMutableArray *array = [unarchiver decodeObjectForKey:@"Presidents"]; self.list = array; [unarchiver finishDecoding]; [unarchiver release]; [data release];
[super viewDidLoad];}
- (void)didReceiveMemoryWarning {
[super didReceiveMemoryWarning];
}
#pragma mark -#pragma mark Table Data Source Methods- (NSInteger)tableView:(UITableView *)tableView numberOfRowsInSection:(NSInteger)section { return [list count];}- (UITableViewCell *)tableView:(UITableView *)tableView cellForRowAtIndexPath:(NSIndexPath *)indexPath {
static NSString *PresidentListCellIdentifier = @"PresidentListCellIdentifier";
UITableViewCell *cell = [tableView dequeueReusableCellWithIdentifier:PresidentListCellIdentifier]; if (cell == nil) { cell = [[[UITableViewCell alloc] initWithFrame:CGRectZero reuseIdentifier:PresidentListCellIdentifier] autorelease]; } NSUInteger row = [indexPath row];
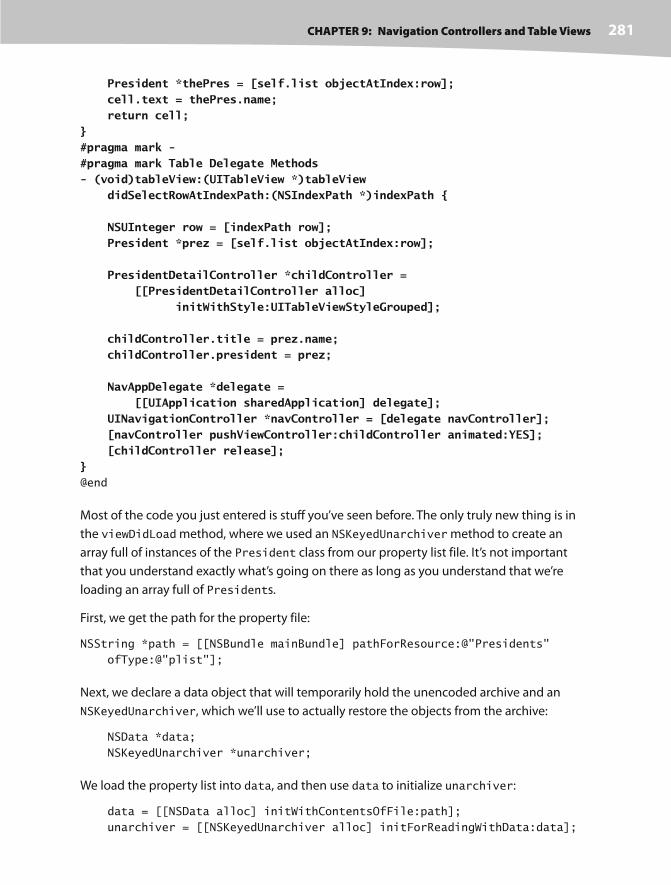
CHAPTER 9: Navigation Controllers and Table Views 281
President *thePres = [self.list objectAtIndex:row]; cell.text = thePres.name; return cell;}#pragma mark -#pragma mark Table Delegate Methods- (void)tableView:(UITableView *)tableView didSelectRowAtIndexPath:(NSIndexPath *)indexPath {
NSUInteger row = [indexPath row]; President *prez = [self.list objectAtIndex:row];
PresidentDetailController *childController = [[PresidentDetailController alloc] initWithStyle:UITableViewStyleGrouped];
childController.title = prez.name; childController.president = prez;
NavAppDelegate *delegate = [[UIApplication sharedApplication] delegate]; UINavigationController *navController = [delegate navController]; [navController pushViewController:childController animated:YES]; [childController release];}@end
Most of the code you just entered is stuff you’ve seen before. The only truly new thing is in
the viewDidLoad method, where we used an NSKeyedUnarchiver method to create an
array full of instances of the President class from our property list file. It’s not important
that you understand exactly what’s going on there as long as you understand that we’re
loading an array full of Presidents.
First, we get the path for the property file:
NSString *path = [[NSBundle mainBundle] pathForResource:@"Presidents"
ofType:@"plist"];
Next, we declare a data object that will temporarily hold the unencoded archive and an
NSKeyedUnarchiver, which we’ll use to actually restore the objects from the archive:
NSData *data;
NSKeyedUnarchiver *unarchiver;
We load the property list into data, and then use data to initialize unarchiver:
data = [[NSData alloc] initWithContentsOfFile:path];
unarchiver = [[NSKeyedUnarchiver alloc] initForReadingWithData:data];

CHAPTER 9: Navigation Controllers and Table Views 282
Now, we decode an array from the archive. The key @"Presidents" is the same value that
was used to create this archive:
NSMutableArray *array = [unarchiver decodeObjectForKey:@"Presidents"];
We then assign this decoded array to our list property, finalize the decoding process, clean
up our memory, and make our call to super:
self.list = array;
[unarchiver finishDecoding];
[unarchiver release];
[data release];
[super viewDidLoad];
There’s one other change from the last time we created a detail view. It’s in the last method,
tableView:didSelectRowAtIndexPath:. When we created the Disclosure Button view, we
reused the same child controller every time and just changed its values. That’s relatively easy to
do when you’ve got a nib with outlets. When you’re using a table view to implement your detail
view, the methods that fire the first time and the ones that fire subsequent times are different.
Also, the table cells that are used to display and change the data get reused. The combination of
these two details means your code can get very, very complex if you’re trying to make it behave
exactly the same way every time and to make sure that you are able to keep track of all the
changes. As a result, it’s well worth the little bit of additional overhead from allocating and releas-
ing new controller objects to keep down the complexity of our controller class.
Let’s look at the detail controller, because that’s where the bulk of the new stuff is this time.
This new controller gets pushed onto the navigation stack when the user taps one of the
rows in the PresidentsViewController table to allow data entry for that president. Let’s
implement the detail view now.
Creating the Detail View Controller
Please fasten your seatbelts, ladies and gentlemen; we’re expecting a little turbulence ahead.
Air sickness bags are located in the seat pocket in front of you.
This next controller is just a little on the gnarly side, but we’ll get through it safely. Please
remain seated. Single- click PresidentDetailController.h, and make the following changes:
#define kNumberOfEditableRows 4#define kNameRowIndex 0#define kFromYearRowIndex 1#define kToYearRowIndex 2#define kPartyIndex 3
#define kLabelTag 4096
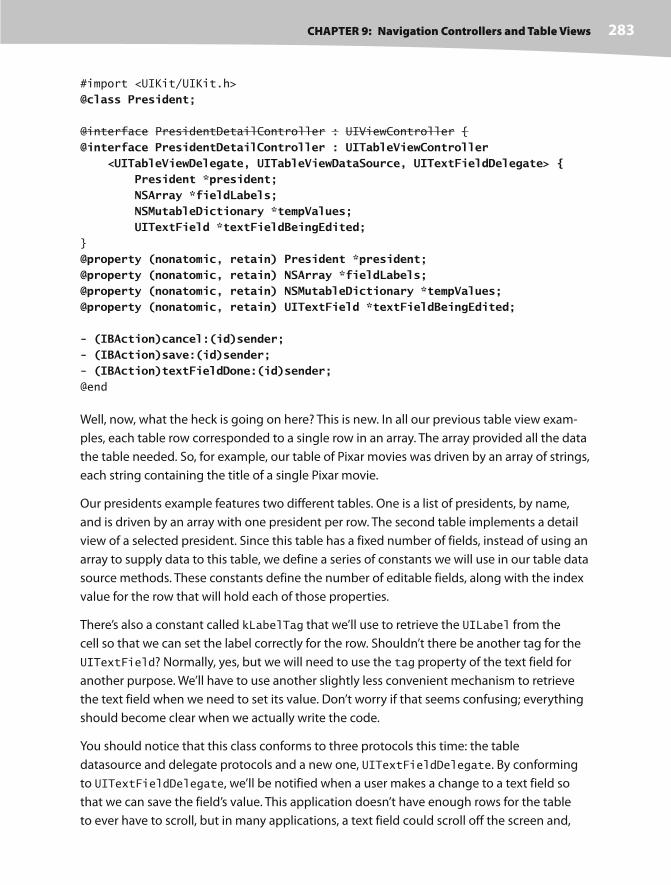
CHAPTER 9: Navigation Controllers and Table Views 283
#import <UIKit/UIKit.h>
@class President;
@interface PresidentDetailController : UIViewController {
@interface PresidentDetailController : UITableViewController <UITableViewDelegate, UITableViewDataSource, UITextFieldDelegate> { President *president; NSArray *fieldLabels; NSMutableDictionary *tempValues; UITextField *textFieldBeingEdited;}
@property (nonatomic, retain) President *president;@property (nonatomic, retain) NSArray *fieldLabels;@property (nonatomic, retain) NSMutableDictionary *tempValues;@property (nonatomic, retain) UITextField *textFieldBeingEdited;
- (IBAction)cancel:(id)sender;- (IBAction)save:(id)sender;- (IBAction)textFieldDone:(id)sender;@end
Well, now, what the heck is going on here? This is new. In all our previous table view exam-
ples, each table row corresponded to a single row in an array. The array provided all the data
the table needed. So, for example, our table of Pixar movies was driven by an array of strings,
each string containing the title of a single Pixar movie.
Our presidents example features two different tables. One is a list of presidents, by name,
and is driven by an array with one president per row. The second table implements a detail
view of a selected president. Since this table has a fixed number of fields, instead of using an
array to supply data to this table, we define a series of constants we will use in our table data
source methods. These constants define the number of editable fields, along with the index
value for the row that will hold each of those properties.
There’s also a constant called kLabelTag that we’ll use to retrieve the UILabel from the
cell so that we can set the label correctly for the row. Shouldn’t there be another tag for the
UITextField? Normally, yes, but we will need to use the tag property of the text field for
another purpose. We’ll have to use another slightly less convenient mechanism to retrieve
the text field when we need to set its value. Don’t worry if that seems confusing; everything
should become clear when we actually write the code.
You should notice that this class conforms to three protocols this time: the table
datasource and delegate protocols and a new one, UITextFieldDelegate. By conforming
to UITextFieldDelegate, we’ll be notified when a user makes a change to a text field so
that we can save the field’s value. This application doesn’t have enough rows for the table
to ever have to scroll, but in many applications, a text field could scroll off the screen and,
CHAPTER 9: Navigation Controllers and Table Views 284
perhaps, be deallocated or reused. If the text field is lost, the value stored in it is lost, so sav-
ing the value when the user makes a change is the way to go.
Down a little further, we declare a pointer to a President object. This is the object that we will
actually be editing using this view, and it’s set in the tableView:didSelectRowAtIndexPath:
of our parent controller based on the row selected there. When the user taps the row for Thomas
Jefferson, the PresidentsViewController will create an instance of the PresidentDetail
Controller. The PresidentsViewController will then set the president property of that
instance to the object that represents Thomas Jefferson, and push the newly created instance of
PresidentDetailController onto the navigation stack.
The second instance variable, fieldLabels, is an array that holds a list of labels that cor-
respond to the constants kNameRowIndex, kFromYearRowIndex, kToYearRowIndex, and
kPartyIndex. For example, kNameRowIndex is defined as 0. So, the label for the row that
shows the president’s name is stored at index 0 in the fieldLabels array. You’ll see this in
action when we get to it in code in a minute.
Next, we define a mutable dictionary, tempValues, that will hold values from fields the user
changes. We don’t want to make the changes directly to the president object because
if the user selects the Cancel button, we need the original data so we can go back to it.
Instead, what we will do is store any value that gets changed in our new mutable dictionary,
tempValues. So if, for example, the user edited the Name: field and then tapped the Party:
field to start editing that one, the PresidentDetailController would get notified at that
time that the Name: field had been edited, because it is the text field’s delegate.
When the PresidentDetailController gets notified of the change, it stores the new value
in the dictionary using the name of the property it represents as the key. In our example,
we’d store a change to the Name: field using the key @"name". That way, regardless of
whether users save or cancel, we have the data we need to handle it. If the users cancel, we
just discard this dictionary, and if they save, we copy the changed values over to president.
Next up is a pointer to a UITextField, named textFieldBeingEdited. The moment the
users click in one of the PresidentDetailController text fields, textFieldBeingEdited
is set to point to that text field. Why do we need this text field pointer? We have an interest-
ing timing problem, and textFieldBeingEdited is the solution.
Users can take one of two basic paths to finish editing a text field. First, they can touch another
control or text field that becomes first responder. In this case, the text field that was being
edited loses first responder status, and the delegate method textFieldDidEndEditing:
is called. You’ll see textFieldDidEndEditing: in a few pages when we enter the code for
PresidentDetailController.m. In this case, textFieldDidEndEditing: takes the new value of
the text field and stores it in tempValues.

CHAPTER 9: Navigation Controllers and Table Views 285
The second way the users can finish editing a text field is by tapping the Save or Cancel but-
ton. When they do this, the save: or cancel: action method gets called. In both methods, the
PresidentDetailController view must be popped off the stack, since both the save and
cancel actions end the editing session. This presents a problem. The save: and cancel: action
methods do not have a simple way of finding the just- edited text field to save the data.
textFieldDidEndEditing:, the delegate method we discussed in the previous paragraph,
does have access to the text field, since the text field is passed in as a parameter. That’s where
textFieldBeingEdited comes in. The cancel: action method ignores textFieldBeing
Edited, since the user did not want to save changes, so the changes can be lost with no prob-
lem. But the save: method does care about those changes and needs a way to save them.
Since textFieldBeingEdited is maintained as a pointer to the current text field being edited,
save: uses that pointer to copy the value in the text field to tempValues. Now, save: can do
its job and pop the PresidentDetailController view off the stack, which will bring our list
of presidents back to the top of the stack. When the view is popped off the stack, the text field
and its value are lost. That’s OK; we’ve saved that sucker already, so all is cool.
Single-click PresidentDetailController.m, and make the following changes:
#import "PresidentDetailController.h"
#import "President.h"#import "NavAppDelegate.h"
@implementation PresidentDetailController
@synthesize president;@synthesize fieldLabels;@synthesize tempValues;@synthesize textFieldBeingEdited;#pragma mark --(IBAction)cancel:(id)sender{
NavAppDelegate *delegate = [[UIApplication sharedApplication] delegate]; [delegate.navController popViewControllerAnimated:YES];
}- (IBAction)save:(id)sender{
if (textFieldBeingEdited != nil) { NSNumber *tagAsNum= [[NSNumber alloc] initWithInt:textFieldBeingEdited.tag]; [tempValues setObject:textFieldBeingEdited.text forKey: tagAsNum]; [tagAsNum release];
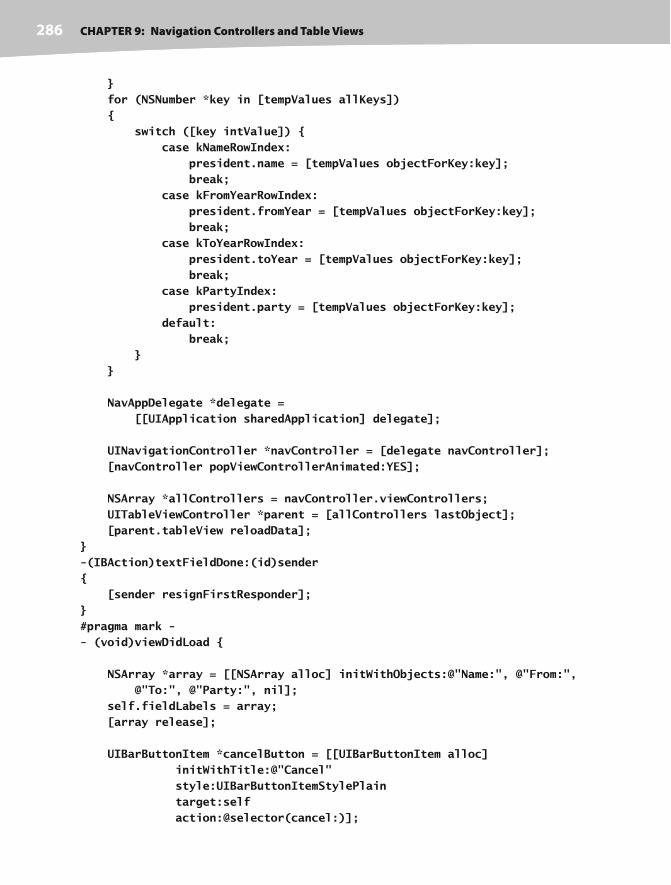
CHAPTER 9: Navigation Controllers and Table Views 286
} for (NSNumber *key in [tempValues allKeys]) { switch ([key intValue]) { case kNameRowIndex: president.name = [tempValues objectForKey:key]; break; case kFromYearRowIndex: president.fromYear = [tempValues objectForKey:key]; break; case kToYearRowIndex: president.toYear = [tempValues objectForKey:key]; break; case kPartyIndex: president.party = [tempValues objectForKey:key]; default: break; } }
NavAppDelegate *delegate = [[UIApplication sharedApplication] delegate];
UINavigationController *navController = [delegate navController]; [navController popViewControllerAnimated:YES];
NSArray *allControllers = navController.viewControllers; UITableViewController *parent = [allControllers lastObject]; [parent.tableView reloadData];}-(IBAction)textFieldDone:(id)sender{ [sender resignFirstResponder];}#pragma mark -- (void)viewDidLoad {
NSArray *array = [[NSArray alloc] initWithObjects:@"Name:", @"From:", @"To:", @"Party:", nil]; self.fieldLabels = array; [array release];
UIBarButtonItem *cancelButton = [[UIBarButtonItem alloc] initWithTitle:@"Cancel" style:UIBarButtonItemStylePlain target:self action:@selector(cancel:)];

CHAPTER 9: Navigation Controllers and Table Views 287
self.navigationItem.leftBarButtonItem = cancelButton; [cancelButton release];
UIBarButtonItem *saveButton = [[UIBarButtonItem alloc] initWithTitle:@"Save" style:UIBarButtonItemStyleDone target:self action:@selector(save:)]; self.navigationItem.rightBarButtonItem = saveButton; [saveButton release];
NSMutableDictionary *dict = [[NSMutableDictionary alloc] init]; self.tempValues = dict; [dict release]; [super viewDidLoad];}- (void)didReceiveMemoryWarning {
[super didReceiveMemoryWarning];
// Releases the view if it doesn't have a superview
// Release anything that's not essential, such as cached data
}
- (void)dealloc {
[textFieldBeingEdited release]; [tempValues release]; [president release]; [fieldLabels release];
[super dealloc];
}
#pragma mark -#pragma mark Table Data Source Methods- (NSInteger)tableView:(UITableView *)tableView numberOfRowsInSection:(NSInteger)section { return kNumberOfEditableRows;}
- (UITableViewCell *)tableView:(UITableView *)tableView cellForRowAtIndexPath:(NSIndexPath *)indexPath{ static NSString *PresidentCellIdentifier = @"PresidentCellIdentifier";
UITableViewCell *cell = [tableView dequeueReusableCellWithIdentifier: PresidentCellIdentifier]; if (cell == nil) {

CHAPTER 9: Navigation Controllers and Table Views 288
cell = [[[UITableViewCell alloc] initWithFrame:CGRectZero reuseIdentifier:PresidentCellIdentifier] autorelease]; UILabel *label = [[UILabel alloc] initWithFrame: CGRectMake(10, 10, 75, 25)]; label.textAlignment = UITextAlignmentRight; label.tag = kLabelTag; label.font = [UIFont boldSystemFontOfSize:14]; [cell.contentView addSubview:label]; [label release];
UITextField *textField = [[UITextField alloc] initWithFrame: CGRectMake(90, 12, 200, 25)]; textField.clearsOnBeginEditing = NO; [textField setDelegate:self]; textField.returnKeyType = UIReturnKeyDone; [textField addTarget:self action:@selector(textFieldDone:) forControlEvents:UIControlEventEditingDidEndOnExit]; [cell.contentView addSubview:textField]; } NSUInteger row = [indexPath row];
UILabel *label = (UILabel *)[cell viewWithTag:kLabelTag]; UITextField *textField = nil; for (UIView *oneView in cell.contentView.subviews) { if ([oneView isMemberOfClass:[UITextField class]]) textField = (UITextField *)oneView; } label.text = [fieldLabels objectAtIndex:row]; NSNumber *rowAsNum = [[NSNumber alloc] initWithInt:row]; switch (row) { case kNameRowIndex: if ([[tempValues allKeys] containsObject:rowAsNum]) textField.text = [tempValues objectForKey:rowAsNum]; else textField.text = president.name; break; case kFromYearRowIndex: if ([[tempValues allKeys] containsObject:rowAsNum]) textField.text = [tempValues objectForKey:rowAsNum]; else textField.text = president.fromYear; break; case kToYearRowIndex: if ([[tempValues allKeys] containsObject:rowAsNum]) textField.text = [tempValues objectForKey:rowAsNum];
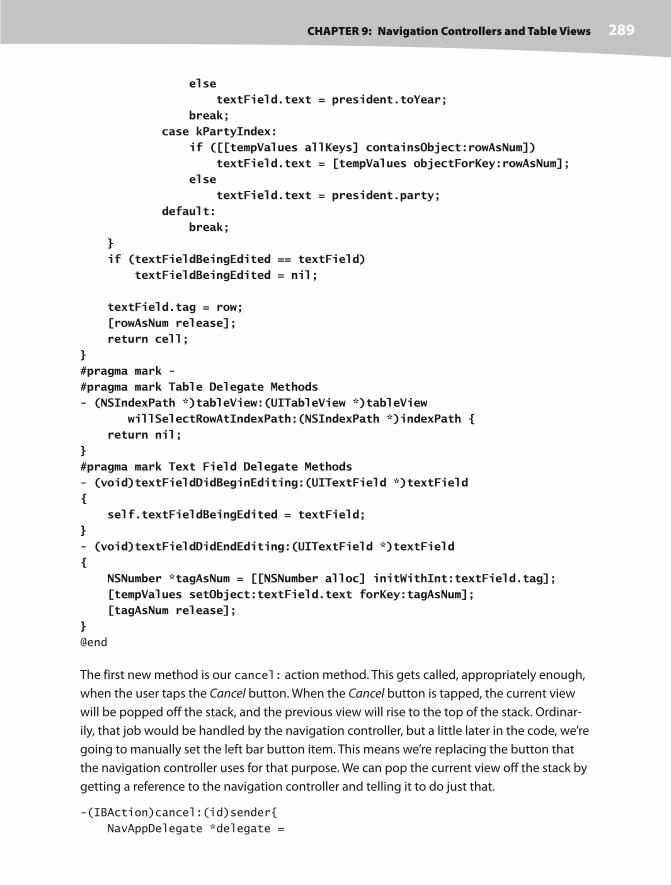
CHAPTER 9: Navigation Controllers and Table Views 289
else textField.text = president.toYear; break; case kPartyIndex: if ([[tempValues allKeys] containsObject:rowAsNum]) textField.text = [tempValues objectForKey:rowAsNum]; else textField.text = president.party; default: break; } if (textFieldBeingEdited == textField) textFieldBeingEdited = nil;
textField.tag = row; [rowAsNum release]; return cell;}#pragma mark -#pragma mark Table Delegate Methods- (NSIndexPath *)tableView:(UITableView *)tableView willSelectRowAtIndexPath:(NSIndexPath *)indexPath { return nil;}#pragma mark Text Field Delegate Methods- (void)textFieldDidBeginEditing:(UITextField *)textField{ self.textFieldBeingEdited = textField;}- (void)textFieldDidEndEditing:(UITextField *)textField{ NSNumber *tagAsNum = [[NSNumber alloc] initWithInt:textField.tag]; [tempValues setObject:textField.text forKey:tagAsNum]; [tagAsNum release];}@end
The first new method is our cancel: action method. This gets called, appropriately enough,
when the user taps the Cancel button. When the Cancel button is tapped, the current view
will be popped off the stack, and the previous view will rise to the top of the stack. Ordinar-
ily, that job would be handled by the navigation controller, but a little later in the code, we’re
going to manually set the left bar button item. This means we’re replacing the button that
the navigation controller uses for that purpose. We can pop the current view off the stack by
getting a reference to the navigation controller and telling it to do just that.
-(IBAction)cancel:(id)sender{
NavAppDelegate *delegate =
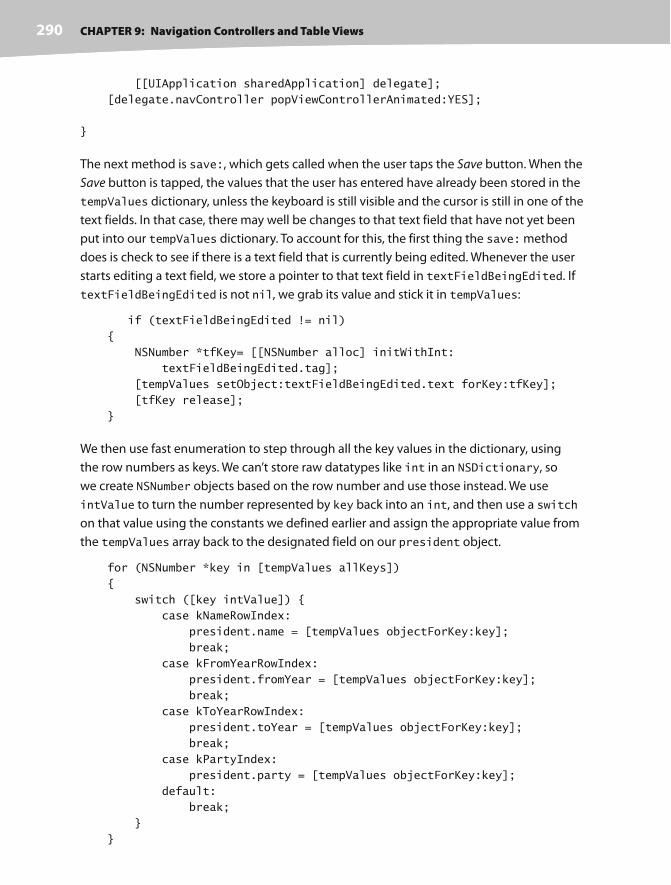
CHAPTER 9: Navigation Controllers and Table Views 290
[[UIApplication sharedApplication] delegate];
[delegate.navController popViewControllerAnimated:YES];
}
The next method is save:, which gets called when the user taps the Save button. When the
Save button is tapped, the values that the user has entered have already been stored in the
tempValues dictionary, unless the keyboard is still visible and the cursor is still in one of the
text fields. In that case, there may well be changes to that text field that have not yet been
put into our tempValues dictionary. To account for this, the first thing the save: method
does is check to see if there is a text field that is currently being edited. Whenever the user
starts editing a text field, we store a pointer to that text field in textFieldBeingEdited. If
textFieldBeingEdited is not nil, we grab its value and stick it in tempValues:
if (textFieldBeingEdited != nil)
{
NSNumber *tfKey= [[NSNumber alloc] initWithInt:
textFieldBeingEdited.tag];
[tempValues setObject:textFieldBeingEdited.text forKey:tfKey];
[tfKey release];
}
We then use fast enumeration to step through all the key values in the dictionary, using
the row numbers as keys. We can’t store raw datatypes like int in an NSDictionary, so
we create NSNumber objects based on the row number and use those instead. We use
intValue to turn the number represented by key back into an int, and then use a switch
on that value using the constants we defined earlier and assign the appropriate value from
the tempValues array back to the designated field on our president object.
for (NSNumber *key in [tempValues allKeys])
{
switch ([key intValue]) {
case kNameRowIndex:
president.name = [tempValues objectForKey:key];
break;
case kFromYearRowIndex:
president.fromYear = [tempValues objectForKey:key];
break;
case kToYearRowIndex:
president.toYear = [tempValues objectForKey:key];
break;
case kPartyIndex:
president.party = [tempValues objectForKey:key];
default:
break;
}
}

CHAPTER 9: Navigation Controllers and Table Views 291
Now, our president object has been updated, and we need to move up a level in the view hier-
archy. Tapping a Save or Done button on a detail view should generally bring the user back up
to the previous level, so we grab our application delegate and use its rootController outlet to
pop ourselves off of the navigation stack, sending the user back up to the list of presidents:
NavAppDelegate *delegate =
[[UIApplication sharedApplication] delegate];
[delegate.navController popViewControllerAnimated:YES];
There’s one other thing we have to do here, which is to tell our parent view’s table to reload
its data. Because one of the fields that the user can edit is the name field, which is displayed
in the PresidentsViewController table, if we don’t have that table reload its data, it will
continue to show the old value.
UINavigationController *navController = [delegate navController];
NSArray *allControllers = navController.viewControllers;
UITableViewController *parent = [allControllers lastObject];
[parent.tableView reloadData];
The third action method will be called when the user taps the Done button on the keyboard.
Without this method, the keyboard won’t retract when the user taps Done. This approach
isn’t strictly necessary in our application, since the four rows that can be edited here fit in the
area above the keyboard. That said, you’ll need this method if you add a row or in a future
application that requires more screen real estate. It’s a good idea to keep the behavior con-
sistent from application to application even if doing so is not critical to your application’s
functionality.
-(IBAction)textFieldDone:(id)sender
{
[sender resignFirstResponder];
}
The viewDidLoad method doesn’t contain anything too surprising. We create the array of
field names and assign it the fieldLabels property.
NSArray *array = [[NSArray alloc] initWithObjects:@"Name:",
@"From:", @"To:", @"Party:", nil];
self.fieldLabels = array;
[array release];
Next, we create two buttons and add them to the navigation bar. We put the Cancel
button in the left bar button item spot, which supplants the navigation button put
there automatically. We put the Save button in the right spot and assign it the style
UIBarButtonItemStyleDone. This style was specifically designed for this occasion, for a
button users tap when they are happy with their changes and ready to leave the view. A but-
ton with this style will be blue instead of grey and usually will carry a label of Save or Done.
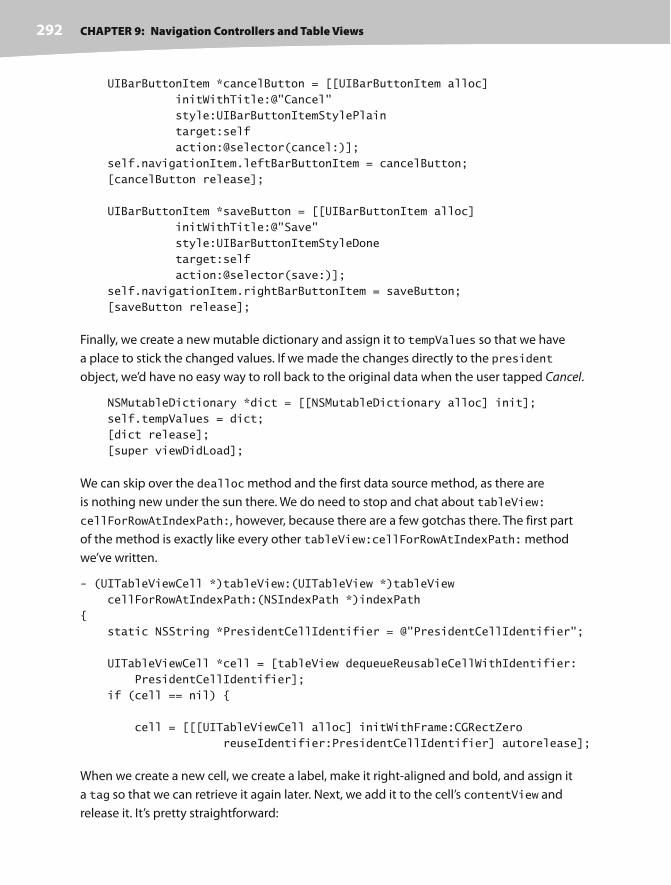
CHAPTER 9: Navigation Controllers and Table Views 292
UIBarButtonItem *cancelButton = [[UIBarButtonItem alloc]
initWithTitle:@"Cancel"
style:UIBarButtonItemStylePlain
target:self
action:@selector(cancel:)];
self.navigationItem.leftBarButtonItem = cancelButton;
[cancelButton release];
UIBarButtonItem *saveButton = [[UIBarButtonItem alloc]
initWithTitle:@"Save"
style:UIBarButtonItemStyleDone
target:self
action:@selector(save:)];
self.navigationItem.rightBarButtonItem = saveButton;
[saveButton release];
Finally, we create a new mutable dictionary and assign it to tempValues so that we have
a place to stick the changed values. If we made the changes directly to the president
object, we’d have no easy way to roll back to the original data when the user tapped Cancel.
NSMutableDictionary *dict = [[NSMutableDictionary alloc] init];
self.tempValues = dict;
[dict release];
[super viewDidLoad];
We can skip over the dealloc method and the first data source method, as there are
is nothing new under the sun there. We do need to stop and chat about tableView:
cellForRowAtIndexPath:, however, because there are a few gotchas there. The first part
of the method is exactly like every other tableView:cellForRowAtIndexPath: method
we’ve written.
- (UITableViewCell *)tableView:(UITableView *)tableView
cellForRowAtIndexPath:(NSIndexPath *)indexPath
{
static NSString *PresidentCellIdentifier = @"PresidentCellIdentifier";
UITableViewCell *cell = [tableView dequeueReusableCellWithIdentifier:
PresidentCellIdentifier];
if (cell == nil) {
cell = [[[UITableViewCell alloc] initWithFrame:CGRectZero
reuseIdentifier:PresidentCellIdentifier] autorelease];
When we create a new cell, we create a label, make it right- aligned and bold, and assign it
a tag so that we can retrieve it again later. Next, we add it to the cell’s contentView and
release it. It’s pretty straightforward:

CHAPTER 9: Navigation Controllers and Table Views 293
UILabel *label = [[UILabel alloc] initWithFrame:
CGRectMake(10, 10, 75, 25)];
label.textAlignment = UITextAlignmentRight;
label.tag = kLabelTag;
label.font = [UIFont boldSystemFontOfSize:14];
[cell.contentView addSubview:label];
[label release];
After that, we create a new text field. The user actually types in this field. We set it so it does
not clear the current value when editing so we don’t lose the existing data, and we set self
as the text field’s delegate. By setting the text field’s delegate to self, we can get notified
by the text field when certain events occur by implementing appropriate methods from
the UITextFieldDelegate protocol. As you’ll see in a moment, we’ve implemented two
text field delegate methods in this class. Those methods will get called by the text fields on
all rows when the user begins and ends editing the text they contain. We also set the key-
board’s return key type, which is how we specify the text for the key in the bottom- right of
the keyboard. The default value is Return, but since we have only single- line fields, we want
the key to say Done instead, so we pass UIReturnKeyDone.
UITextField *textField = [[UITextField alloc] initWithFrame:
CGRectMake(90, 12, 200, 25)];
textField.clearsOnBeginEditing = NO;
[textField setDelegate:self];
textField.returnKeyType = UIReturnKeyDone;
After that, we tell the text field to call our textFieldDone: method on the Did End on Exit
event. This is exactly the same thing as dragging from the Did End on Exit event in the con-
nections inspector in Interface Builder to File’s Owner and selecting an action method. Since
we don’t have a nib file, we have to do it programmatically, but the result is the same.
When we’re all done configuring the text field, we add it to the cell’s content view. Notice,
however, that we did not set a tag before we added it to that view.
[textField addTarget:self
action:@selector(textFieldDone:)
forControlEvents:UIControlEventEditingDidEndOnExit];
[cell.contentView addSubview:textField];
}
At this point, we know that we’ve either got a brand new cell or a reused cell, but we don’t
know which. The first thing we do is figure out which row this darn cell is going to represent:
NSUInteger row = [indexPath row];
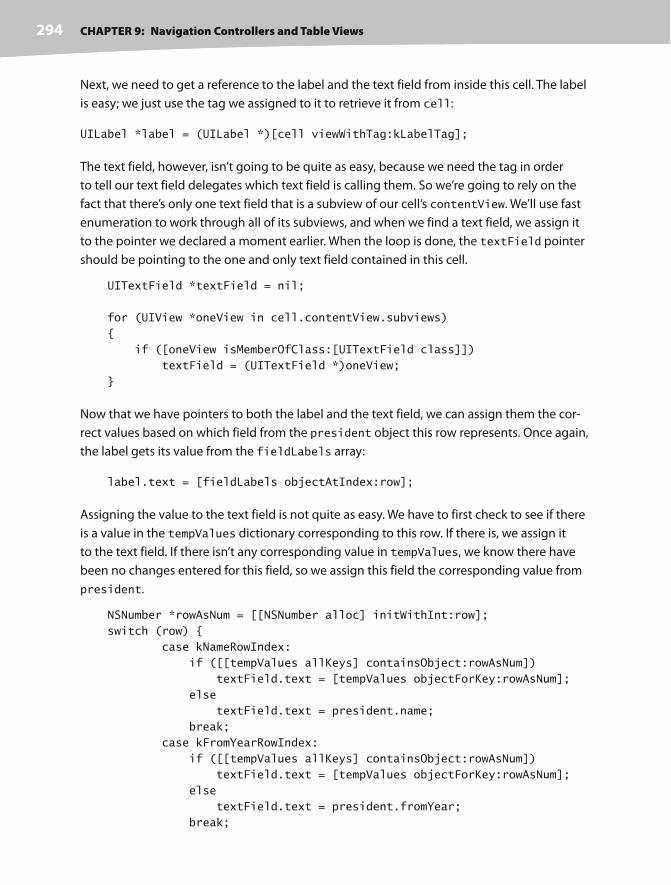
CHAPTER 9: Navigation Controllers and Table Views 294
Next, we need to get a reference to the label and the text field from inside this cell. The label
is easy; we just use the tag we assigned to it to retrieve it from cell:
UILabel *label = (UILabel *)[cell viewWithTag:kLabelTag];
The text field, however, isn’t going to be quite as easy, because we need the tag in order
to tell our text field delegates which text field is calling them. So we’re going to rely on the
fact that there’s only one text field that is a subview of our cell’s contentView. We’ll use fast
enumeration to work through all of its subviews, and when we find a text field, we assign it
to the pointer we declared a moment earlier. When the loop is done, the textField pointer
should be pointing to the one and only text field contained in this cell.
UITextField *textField = nil;
for (UIView *oneView in cell.contentView.subviews)
{
if ([oneView isMemberOfClass:[UITextField class]])
textField = (UITextField *)oneView;
}
Now that we have pointers to both the label and the text field, we can assign them the cor-
rect values based on which field from the president object this row represents. Once again,
the label gets its value from the fieldLabels array:
label.text = [fieldLabels objectAtIndex:row];
Assigning the value to the text field is not quite as easy. We have to first check to see if there
is a value in the tempValues dictionary corresponding to this row. If there is, we assign it
to the text field. If there isn’t any corresponding value in tempValues, we know there have
been no changes entered for this field, so we assign this field the corresponding value from
president.
NSNumber *rowAsNum = [[NSNumber alloc] initWithInt:row];
switch (row) {
case kNameRowIndex:
if ([[tempValues allKeys] containsObject:rowAsNum])
textField.text = [tempValues objectForKey:rowAsNum];
else
textField.text = president.name;
break;
case kFromYearRowIndex:
if ([[tempValues allKeys] containsObject:rowAsNum])
textField.text = [tempValues objectForKey:rowAsNum];
else
textField.text = president.fromYear;
break;
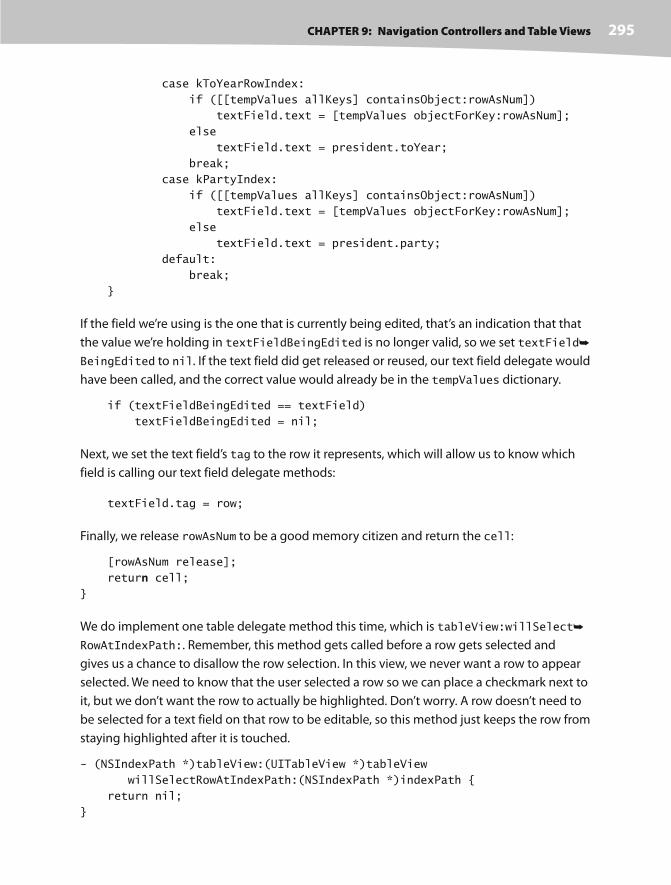
CHAPTER 9: Navigation Controllers and Table Views 295
case kToYearRowIndex:
if ([[tempValues allKeys] containsObject:rowAsNum])
textField.text = [tempValues objectForKey:rowAsNum];
else
textField.text = president.toYear;
break;
case kPartyIndex:
if ([[tempValues allKeys] containsObject:rowAsNum])
textField.text = [tempValues objectForKey:rowAsNum];
else
textField.text = president.party;
default:
break;
}
If the field we’re using is the one that is currently being edited, that’s an indication that that
the value we’re holding in textFieldBeingEdited is no longer valid, so we set textField
BeingEdited to nil. If the text field did get released or reused, our text field delegate would
have been called, and the correct value would already be in the tempValues dictionary.
if (textFieldBeingEdited == textField)
textFieldBeingEdited = nil;
Next, we set the text field’s tag to the row it represents, which will allow us to know which
field is calling our text field delegate methods:
textField.tag = row;
Finally, we release rowAsNum to be a good memory citizen and return the cell:
[rowAsNum release];
return cell;}
We do implement one table delegate method this time, which is tableView:willSelect
RowAtIndexPath:. Remember, this method gets called before a row gets selected and
gives us a chance to disallow the row selection. In this view, we never want a row to appear
selected. We need to know that the user selected a row so we can place a checkmark next to
it, but we don’t want the row to actually be highlighted. Don’t worry. A row doesn’t need to
be selected for a text field on that row to be editable, so this method just keeps the row from
staying highlighted after it is touched.
- (NSIndexPath *)tableView:(UITableView *)tableView
willSelectRowAtIndexPath:(NSIndexPath *)indexPath {
return nil;
}
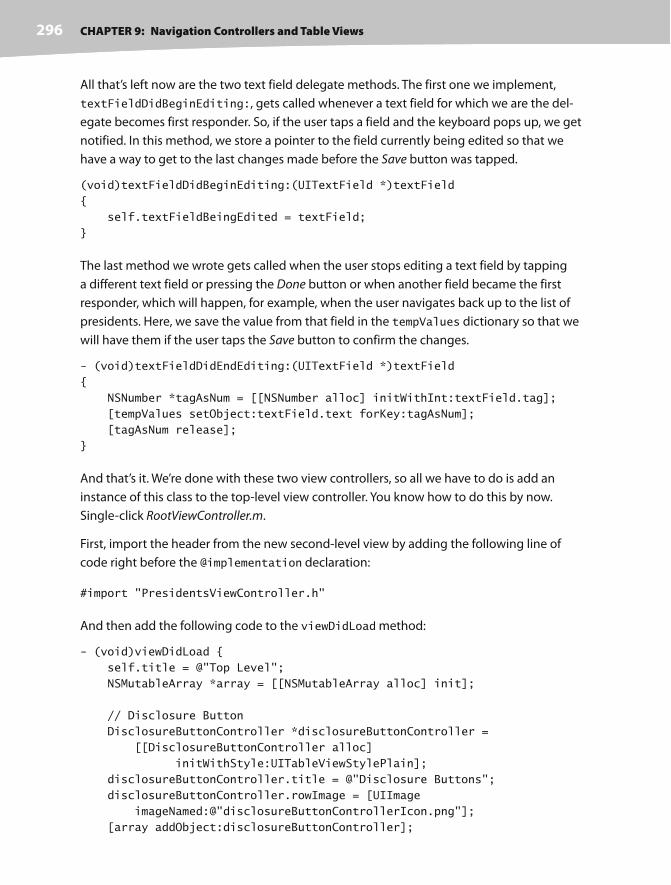
CHAPTER 9: Navigation Controllers and Table Views 296
All that’s left now are the two text field delegate methods. The first one we implement,
textFieldDidBeginEditing:, gets called whenever a text field for which we are the del-
egate becomes first responder. So, if the user taps a field and the keyboard pops up, we get
notified. In this method, we store a pointer to the field currently being edited so that we
have a way to get to the last changes made before the Save button was tapped.
(void)textFieldDidBeginEditing:(UITextField *)textField
{
self.textFieldBeingEdited = textField;
}
The last method we wrote gets called when the user stops editing a text field by tapping
a different text field or pressing the Done button or when another field became the first
responder, which will happen, for example, when the user navigates back up to the list of
presidents. Here, we save the value from that field in the tempValues dictionary so that we
will have them if the user taps the Save button to confirm the changes.
- (void)textFieldDidEndEditing:(UITextField *)textField
{
NSNumber *tagAsNum = [[NSNumber alloc] initWithInt:textField.tag];
[tempValues setObject:textField.text forKey:tagAsNum];
[tagAsNum release];
}
And that’s it. We’re done with these two view controllers, so all we have to do is add an
instance of this class to the top- level view controller. You know how to do this by now.
Single- click RootViewController.m.
First, import the header from the new second- level view by adding the following line of
code right before the @implementation declaration:
#import "PresidentsViewController.h"
And then add the following code to the viewDidLoad method:
- (void)viewDidLoad {
self.title = @"Top Level";
NSMutableArray *array = [[NSMutableArray alloc] init];
// Disclosure Button
DisclosureButtonController *disclosureButtonController =
[[DisclosureButtonController alloc]
initWithStyle:UITableViewStylePlain];
disclosureButtonController.title = @"Disclosure Buttons";
disclosureButtonController.rowImage = [UIImage
imageNamed:@"disclosureButtonControllerIcon.png"];
[array addObject:disclosureButtonController];
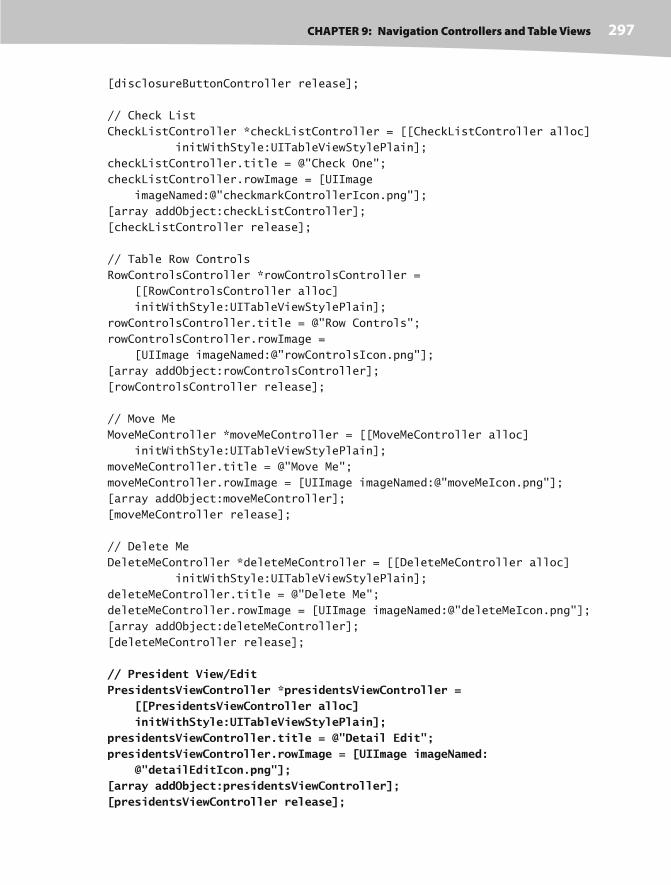
CHAPTER 9: Navigation Controllers and Table Views 297
[disclosureButtonController release];
// Check List
CheckListController *checkListController = [[CheckListController alloc]
initWithStyle:UITableViewStylePlain];
checkListController.title = @"Check One";
checkListController.rowImage = [UIImage
imageNamed:@"checkmarkControllerIcon.png"];
[array addObject:checkListController];
[checkListController release];
// Table Row Controls
RowControlsController *rowControlsController =
[[RowControlsController alloc]
initWithStyle:UITableViewStylePlain];
rowControlsController.title = @"Row Controls";
rowControlsController.rowImage =
[UIImage imageNamed:@"rowControlsIcon.png"];
[array addObject:rowControlsController];
[rowControlsController release];
// Move Me
MoveMeController *moveMeController = [[MoveMeController alloc]
initWithStyle:UITableViewStylePlain];
moveMeController.title = @"Move Me";
moveMeController.rowImage = [UIImage imageNamed:@"moveMeIcon.png"];
[array addObject:moveMeController];
[moveMeController release];
// Delete Me
DeleteMeController *deleteMeController = [[DeleteMeController alloc]
initWithStyle:UITableViewStylePlain];
deleteMeController.title = @"Delete Me";
deleteMeController.rowImage = [UIImage imageNamed:@"deleteMeIcon.png"];
[array addObject:deleteMeController];
[deleteMeController release];
// President View/Edit PresidentsViewController *presidentsViewController = [[PresidentsViewController alloc] initWithStyle:UITableViewStylePlain]; presidentsViewController.title = @"Detail Edit"; presidentsViewController.rowImage = [UIImage imageNamed: @"detailEditIcon.png"]; [array addObject:presidentsViewController]; [presidentsViewController release];

CHAPTER 9: Navigation Controllers and Table Views 298
self.controllers = array;
[array release];
[super viewDidLoad];
}
Save everything, sigh deeply, hold your breath, and then
build that sucker. If everything is in order, the simulator will
launch, and a sixth and final row will appear, just like the one
in Figure 9-2. If you click the new row, you’ll be taken to a list
of US presidents (see Figure 9-24).
Tapping any of the rows will take you down to the detail
view that we just built (see Figure 9-8), and you’ll be able
to edit the values. If you select the Done button in the key-
board, the keyboard should retract. Tap one of the editable
values, and the keyboard will reappear. Make some changes,
and tap Cancel, and the application will pop back to the list
of presidents. If you revisit the president you just cancelled
out of, your changes will be gone. On the other hand, if you
make some changes and tap Save, your changes will be
reflected in the parent table, and when you come back into
the detail view, the new values will still be there.
But There’s One More Thing. . .There’s one more little bit of polish we need to add to make our application behave the way
it should. In the version we just built, the keyboard incorporates a Done button that, when
tapped, makes the keyboard retract. That behavior is proper if there are other controls on
the view that the user might need to get to. Since every row on this table view is a text field,
however, we need a slightly different solution. The keyboard should feature a Return button
instead of a Done button. When tapped, that button should take the user to the next row’s
text field.
In order to accomplish this, the first thing we need to do is replace the Done button
with a Return button. We can accomplish this by deleting a single line of code from
PresidentDetailController.m. In the tableView:cellForRowAtIndexPath: method, delete
the following line of code:
- (UITableViewCell *)tableView:(UITableView *)tableView
cellForRowAtIndexPath:(NSIndexPath *)indexPath
{
static NSString *PresidentCellIdentifier = @"PresidentCellIdentifier";
Figure 9-24. Our sixth and
final subcontroller presents
a list of US presidents. Tap one
of the presidents, and you’ll
be taken to a detail view (or
a secret service agent will wres-
tle you to the ground).
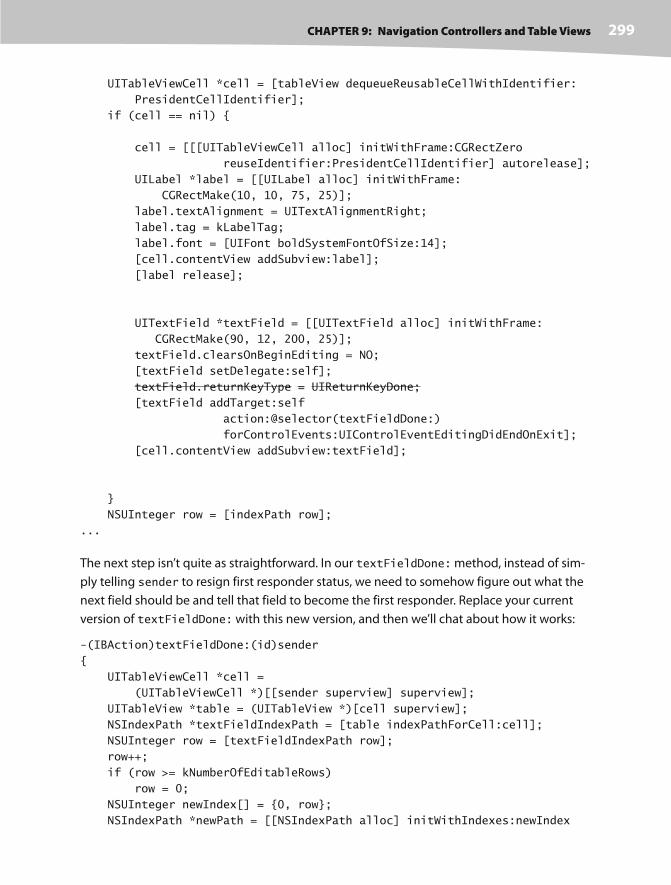
CHAPTER 9: Navigation Controllers and Table Views 299
UITableViewCell *cell = [tableView dequeueReusableCellWithIdentifier:
PresidentCellIdentifier];
if (cell == nil) {
cell = [[[UITableViewCell alloc] initWithFrame:CGRectZero
reuseIdentifier:PresidentCellIdentifier] autorelease];
UILabel *label = [[UILabel alloc] initWithFrame:
CGRectMake(10, 10, 75, 25)];
label.textAlignment = UITextAlignmentRight;
label.tag = kLabelTag;
label.font = [UIFont boldSystemFontOfSize:14];
[cell.contentView addSubview:label];
[label release];
UITextField *textField = [[UITextField alloc] initWithFrame:
CGRectMake(90, 12, 200, 25)];
textField.clearsOnBeginEditing = NO;
[textField setDelegate:self];
textField.returnKeyType = UIReturnKeyDone;
[textField addTarget:self
action:@selector(textFieldDone:)
forControlEvents:UIControlEventEditingDidEndOnExit];
[cell.contentView addSubview:textField];
}
NSUInteger row = [indexPath row];
...
The next step isn’t quite as straightforward. In our textFieldDone: method, instead of sim-
ply telling sender to resign first responder status, we need to somehow figure out what the
next field should be and tell that field to become the first responder. Replace your current
version of textFieldDone: with this new version, and then we’ll chat about how it works:
-(IBAction)textFieldDone:(id)sender
{
UITableViewCell *cell =
(UITableViewCell *)[[sender superview] superview];
UITableView *table = (UITableView *)[cell superview];
NSIndexPath *textFieldIndexPath = [table indexPathForCell:cell];
NSUInteger row = [textFieldIndexPath row];
row++;
if (row >= kNumberOfEditableRows)
row = 0;
NSUInteger newIndex[] = {0, row};
NSIndexPath *newPath = [[NSIndexPath alloc] initWithIndexes:newIndex
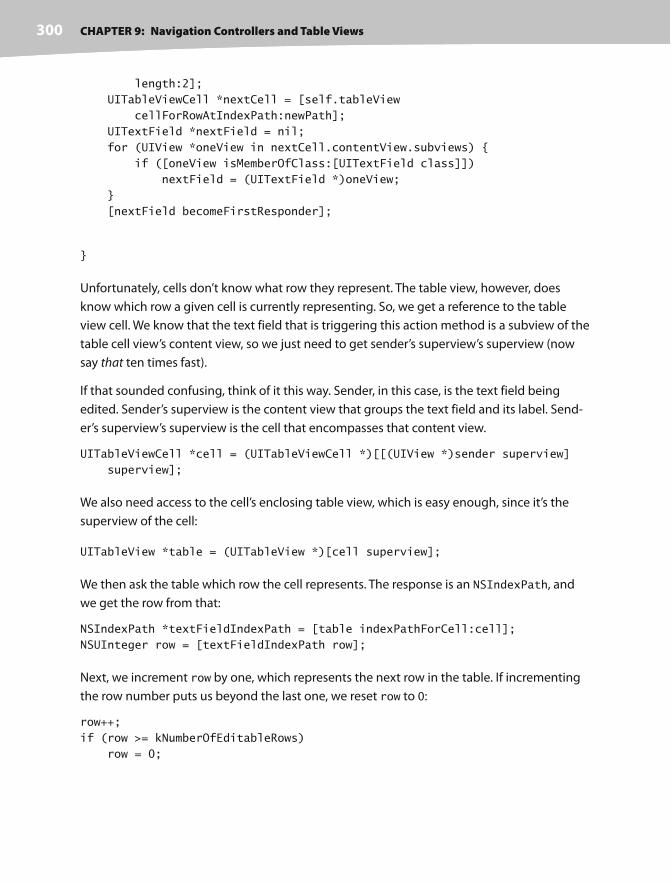
CHAPTER 9: Navigation Controllers and Table Views 300
length:2];
UITableViewCell *nextCell = [self.tableView
cellForRowAtIndexPath:newPath];
UITextField *nextField = nil;
for (UIView *oneView in nextCell.contentView.subviews) {
if ([oneView isMemberOfClass:[UITextField class]])
nextField = (UITextField *)oneView;
}
[nextField becomeFirstResponder];
}
Unfortunately, cells don’t know what row they represent. The table view, however, does
know which row a given cell is currently representing. So, we get a reference to the table
view cell. We know that the text field that is triggering this action method is a subview of the
table cell view’s content view, so we just need to get sender’s superview’s superview (now
say that ten times fast).
If that sounded confusing, think of it this way. Sender, in this case, is the text field being
edited. Sender’s superview is the content view that groups the text field and its label. Send-
er’s superview’s superview is the cell that encompasses that content view.
UITableViewCell *cell = (UITableViewCell *)[[(UIView *)sender superview]
superview];
We also need access to the cell’s enclosing table view, which is easy enough, since it’s the
superview of the cell:
UITableView *table = (UITableView *)[cell superview];
We then ask the table which row the cell represents. The response is an NSIndexPath, and
we get the row from that:
NSIndexPath *textFieldIndexPath = [table indexPathForCell:cell];
NSUInteger row = [textFieldIndexPath row];
Next, we increment row by one, which represents the next row in the table. If incrementing
the row number puts us beyond the last one, we reset row to 0:
row++;
if (row >= kNumberOfEditableRows)
row = 0;

CHAPTER 9: Navigation Controllers and Table Views 301
Then we build a new NSIndexPath to represent the next row, and use that index path to get
a reference to the cell currently representing the next row:
NSUInteger newIndex[] = {0, row};
NSIndexPath *newPath = [[NSIndexPath alloc] initWithIndexes:newIndex
length:2];
UITableViewCell *nextCell = [self.tableView cellForRowAtIndexPath:newPath];
For the text field, we’re already using tag for another purpose, so we have to loop through
the subviews of the cell’s content view to find the text field rather than using tag to retrieve
it:
UITextField *nextField = nil;
for (UIView *oneView in nextCell.contentView.subviews) {
if ([oneView isMemberOfClass:[UITextField class]])
nextField = (UITextField *)oneView;
}
And finally, we can tell that new text field to become the first responder:
[nextField becomeFirstResponder];
Now, compile and run, and when you drill down to the detail view, tapping the Return but-
ton will take you to the next field in the table, which will make entering data much easier for
your users.
Breaking the TapeThis chapter was a marathon, and if you’re still standing, you should feel pretty darn good
about yourself. Dwelling on these mystical table view and navigation controller objects is
important, because they are the backbone of a great many iPhone applications, and their
complexity can definitely get you into trouble if you don’t truly understand them.
As you start building your own tables, check back to this chapter and the previous one, and
don’t be afraid of Apple’s documentation, either. Table views are extraordinarily complex,
and we could never cover every conceivable permutation, but you should now have a very
good set of table view building blocks you can use as you design and build your own appli-
cations. As always, please do feel free to reuse this code in your own applications. It’s a gift
from us to you. Enjoy!
In the next chapter, we’re going to look at application settings, the mechanism the iPhone
uses to gather and store user preferences. Once you’ve completed your cooldown, drink
plenty of fluids, and proceed to the next chapter. Oh, and don’t forget to stretch.

303
a
Chapter 10Application Settings and User Defaults
ll but the simplest computer programs today have a preferences window where
the user can set application- specific options. On Mac OS X, the Preferences. . .
menu item is usually found in the application menu. Selecting it brings up
a window where the user can enter and change various options. The iPhone has
a dedicated application called Settings, which you no doubt have played with
any number of times. In this chapter, we’ll show you how to add settings for
your application to the Settings application, and we’ll show you how to access
those settings from within your application.
NOTE
Apple’s term for Settings and its underlying mechanism is Application Preferences.

CHAPTER 10: Application Settings and User Defaults 304
Getting to Know Your Settings BundleThe Settings application (see Figure 10-1) lets the user enter
and change preferences for any application that has a settings
bundle. A settings bundle is a group of files built into an appli-
cation that tells the Settings application what preferences the
application wishes to collect from the user.
Pick up your iPhone or iPod Touch, and locate your Settings
icon. You’ll find it on the home screen. When you touch the
icon, the Settings application will launch. Ours is shown in
Figure 10-2.
The Settings application acts as a common user interface
for the iPhone’s User Defaults mechanism. User Defaults
is the part of Application Preferences that stores and
retrieves preferences. User Defaults is implemented by
the NSUserDefaults class. If you’ve done Cocoa program-
ming on the Mac, you’re probably already familiar with
NSUserDefaults, because it is the same class that is used
to store and read preferences on the Mac. Your applications
will use NSUserDefaults to read and store preference data
using a key value, just as you would access keyed data from
an NSDictionary. The difference is that NSUserDefaults
data is persisted to the file system rather than stored in an
object instance in memory.
In this chapter, we’re going to create an application, add and
configure a settings bundle, and then access and edit those
preferences from within our application.
One nice thing about the Settings application is that you don’t
have to design a user interface for your preferences. You create
a property list defining your application’s available settings, and
the Settings application creates the interface for you. There are
limits to what you can do with the Settings application, how-
ever. Any preference that the user might need to change while
your application is running should not be limited to the Settings
application because your user would be forced to quit your
application to change those values.
Figure 10-1. The Settings
application icon is the third
one down in the last column.
It may be in a different spot
on your iPhone or iPod Touch,
but it’s always available.
Figure 10-2. Our Settings
application

CHAPTER 10: Application Settings and User Defaults 305
Immersive applications, such as games, generally should provide their own preferences view
so that the user doesn’t have to quit in order to make a change. Even utility and productivity
applications might, at times, have preferences that a user should be able to change without
leaving the application. We’ll also show you to how to collect preferences from the user right
in your application and store those in iPhone’s User Defaults.
The AppSettings ApplicationWe’re going to build a simple application in this chapter. First, we’ll implement a settings
bundle so that when the user launches the Settings application, there will be an entry for
our application (see Figure 10-3).
If the user selects our application, it will drill down into a view that shows the preferences
relevant to our application. As you can see from Figure 10-4, the Settings application is using
text fields, secure text fields, switches, and sliders to coax values out of our intrepid user.
You should also notice that there are two items on the view that have disclosure indicators. The
first one, Protocol, takes the user to another table view that displays the available options for
that item. From that table view, the user can select a single value (see Figure 10-5).
Figure 10-3. The settings
application showing an entry
for our application
Figure 10-4. Our applica-
tion’s primary settings view
Figure 10-5. Selecting a
single preference item from
a list

CHAPTER 10: Application Settings and User Defaults 306
The other disclosure indicator on our application’s main view in the Settings application
allows the user to drill down to another set of preferences (see Figure 10-6). This child view
can have the same kinds of controls as the main settings view and can even have its own
child views. You may have noticed that the Settings application uses a navigation controller,
which it needs because it supports the building of hierarchical preference views.
When users actually launch your application, they will be presented with a list of the prefer-
ences gathered in the Settings application (see Figure 10-7).
In order to show how to update preferences from within our application, we also provide
a little information button in the lower- right corner that will take the user to another view to
set two of the preference values right in our application (see Figure 10-8).
Let’s get started, shall we?
Creating the ProjectIn Xcode, press N or select New Project. . . from the File menu. When the new project
assistant comes up, select Application from under the iPhone heading in the left pane, and
then click the Utility Application icon before clicking the Choose. . . button. Name your new
project AppSettings.
Figure 10-6. A child settings
view in our application
Figure 10-7. Our applica-
tion’s main view
Figure 10-8. Setting some
preferences right in our
application

CHAPTER 10: Application Settings and User Defaults 307
This is a new project template that we haven’t used before, so let’s take a second to look at
the project before we proceed. This template creates an application very similar to the one
we built in Chapter 6. The application has a main view and a secondary view called the flip-
side view. Tapping the information button on the main view takes you to the flipside view,
and tapping the Done button on the flipside view takes you back to the main view.
You’ll notice that, for the first time, there is no Classes folder in our Xcode project (see
Figure 10-9). Because it takes several files to implement this type of application, the tem-
plate very kindly organizes the files in groups for us to make our lives easier. Expand
the folders Main View, Flipside View, and Application Controllers. Heck, while you’re in the
folder- expanding groove, flip open Resources too.
All the classes that make up the main view, including the view controller and a subclass of
UIView, are included in the folder called Main View. Likewise, all source code files needed to
implement the flipside view are contained in the folder called Flipside View. Finally, the appli-
cation delegate and the root controller class are contained in the folder called Application
Controllers.
Figure 10-9. Our project created from the Utility Application template
This template has provided us with a custom subclass of UIView for both the main and flip-
side views. We won’t actually need to subclass UIView in this application for either of our

CHAPTER 10: Application Settings and User Defaults 308
views, but we’ll leave both FlipsideView and MainView in our project. It won’t hurt any-
thing to leave them as is, but if we remove them, we will have to go rewire the nibs to point
to UIView.
Let’s make a quick change to MainWindow.xib. Double- click MainWindow.xib to open the
file in Interface Builder. Put the main window (the one titled MainWindow.xib) in list mode
(the center View Mode button). Next, click the disclosure triangle to the left of the Root View
Controller icon. This reveals a View icon. Now click the disclosure triangle to the left of the
View icon. This reveals an icon called Light Info Button (see Figure 10-10).
TIP
Instead of expanding each of the items individually, you can expand the entire hierarchy in Interface
Builder by holding down the option key and clicking the disclosure triangle next to the Root View
Controller icon.
We’re going to change this icon so it will look good on a white background. Single- click the
Light Info Button icon to select it, and then press 1 to bring up the attributes inspector.
Change the button’s Type from Info Light to Info Dark. Once you’ve done that, you can save,
close MainWindow.xib, and go back to Xcode.
Figure 10-10. Using the list view mode
We’ve included a few icons with this chapter’s code to make sure your program looks like
ours. First, open the 10 AppSettings folder in the project archive, grab the file called icon.png,
and add it to the Resources folder of your project.
Next, single- click info.plist in the Resources folder, and set the value of the Icon file row to
icon.png.

CHAPTER 10: Application Settings and User Defaults 309
Working with the Settings BundleThe Settings application bases the display of preferences for a given application on the
contents of the settings bundle inside that application. Each settings bundle must have
a property list, called Root.plist, which defines the root level preferences view. This property
list must follow a very precise format, which we’ll talk about in a few minutes. If it finds a set-
tings bundle with an appropriate Root.plist file, the Settings application will build a settings
view for our application based on the contents of the property list. If we want our prefer-
ences to include any subviews, we have to add additional property lists to the bundle and
add an entry to Root.plist for each child view. You’ll see exactly how to do that in this chapter.
One small wrinkle with this process is that you can’t add or delete items from a settings
bundle from within Xcode. You can change the contents of files that are already in the set-
tings bundle from Xcode, but if you need to actually add or remove items, you’ll have to do it
in the Finder. No worries, we’ll show you how to do this a bit further down.
Adding a Settings Bundle to Our Project
In the Groups & Files pane, click the root object (the one called AppSettings, which should be
at the very top of the list) and then select New File. . . from the File menu or press N. In the
left pane, select Settings under the iPhone OS heading, and then select the Settings Bundle
icon (see Figure 10-11). Click the Next button, and choose the default name of Settings.
bundle by pressing return.
Figure 10-11. Creating a settings bundle

CHAPTER 10: Application Settings and User Defaults 310
You should now see a new item in Xcode’s Groups & File pane called Settings.bundle. Expand
Settings.bundle, and you should see two items, an icon named Root.plist and a folder named
en.lproj. We’ll discuss en.lproj in Chapter 17 when we talk about localizing your application
into other languages. For the moment, let’s just concentrate on Root.plist.
Setting Up the Property List
Single-click Root.plist, and take a look at the editor pane. You’re looking at Xcode’s property
list editor. This editor functions in the same way as the Property List Editor application in
/Developer/Applications/Utilities.
Property lists all have a root node, which has a node type of Dictionary, which means it stores
items using a key value, just as an NSDictionary does. All of the children of a Dictionary node
need to have both a key and a value. There can only be one root node in any given property
list, and all nodes must come under it.
There are several different types of nodes that can be put into a property list. In addition
to Dictionary nodes, which allow you to store other nodes under a key, there are also Array
nodes, which store an ordered list of other nodes similar to an NSArray. The Dictionary and
Array types are the only property list node types that can contain other nodes. There are also
a number of other node types designed to hold data. The data node types are Boolean, Data,
Date, Number, and String.
TIP
Although you can use any kind of object as a key in an NSDictionary, keys in property list dictionary
nodes have to be strings, though you are free to use any node type for the values.
When creating a settings property list, you have to follow a defined format. Fortunately,
when you added the settings bundle to your project, a properly formatted property list,
called Root.plist, was created for you. This is the Root.plist that you just clicked in the settings
bundle.
In the Root.plist editor pane, expand the node named PreferenceSpecifiers (see Figure 10-12).
Figure 10-12. Root.plist in the editor pane

CHAPTER 10: Application Settings and User Defaults 311
Before we add our preference specifiers, let’s look at the property list so you can see the
required format. The first item under the Root node is a key named Title. This name will
appear in our application’s portion of the Settings application. Double- click the current
value next to Title, and change it from YOUR_PROJECT_NAME to AppSettings.
We’ll talk about the second entry, StringsTable, in Chapter 17 as well; a strings table is also
used in translating your application into another language. Since it is optional, you can
delete that entry now by clicking it and pressing the delete key. You can leave it there if you
like, since it won’t do any harm, but if you delete it, your table will be one item.
The next item under the root node is PreferenceSpecifiers, and it’s an array. Click its disclosure
triangle to reveal its subitems. This array node is designed to hold a set of dictionary nodes,
each of which represents a single preference that the user can enter or a single child view
that the user can drill down into. You’ll notice that Xcode’s template kindly gave us four
nodes. Those nodes aren’t likely to reflect our actual preferences, so delete Item 2, Item 3,
and Item 4 by single- clicking each of those rows and pressing the delete key.
Single-click Item 1 but don’t expand it. Look at the right edge of the row, and notice the
button with the plus icon. That button is used to add a sibling node after this row. In other
words, it will add another node at the same level as this one. If we click that icon now, we
will get a new row called Item 2 right after Item 1.
Now expand Item 1, and notice that the button changes to a different icon, one with three
horizontal lines. That new icon indicates that clicking that button now will add a child node,
so if we click it now, we will get a new row underneath Item 1.
Expand Item 2. The first row under it has a key of Type, and every property list node in the
PreferenceSpecifiers array must have an entry with this key. It’s typically the first one,
but order doesn’t matter in a dictionary, so the Type key doesn’t have to be first. The value in
the current Item 1, PSGroupSpecifier, is used to indicate that a new group should be started.
If you look back at Figure 10-4, you’ll see that the Settings application presents the settings
in a grouped table. Item 1 in the PreferenceSpecifiers array in a settings bundle property list
should always have this type, because you need at least one group in every table.
The only other entry in Item 1 has a key of Title, and this is used to set an optional header just
above the group that’s being started. If you look again back at Figure 10-4, you’ll see that
our first group is called General Info. Double- click the value next to Title, and change it from
Group to General Info.
Adding a Text Field Setting
We now need to add a second item in this array, which will represent the first actual prefer-
ence field. We’re going to start with a simple text field. If we single- click the PreferenceSpecifiers
row in the editor pane, and click the button to add a child, the new row will be inserted at the
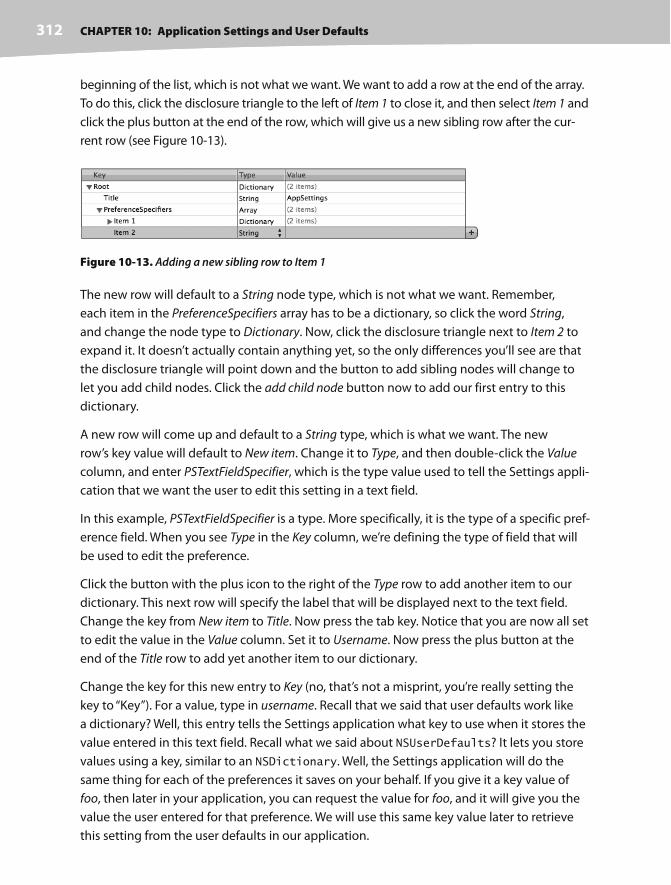
CHAPTER 10: Application Settings and User Defaults 312
beginning of the list, which is not what we want. We want to add a row at the end of the array.
To do this, click the disclosure triangle to the left of Item 1 to close it, and then select Item 1 and
click the plus button at the end of the row, which will give us a new sibling row after the cur-
rent row (see Figure 10-13).
Figure 10-13. Adding a new sibling row to Item 1
The new row will default to a String node type, which is not what we want. Remember,
each item in the PreferenceSpecifiers array has to be a dictionary, so click the word String,
and change the node type to Dictionary. Now, click the disclosure triangle next to Item 2 to
expand it. It doesn’t actually contain anything yet, so the only differences you’ll see are that
the disclosure triangle will point down and the button to add sibling nodes will change to
let you add child nodes. Click the add child node button now to add our first entry to this
dictionary.
A new row will come up and default to a String type, which is what we want. The new
row’s key value will default to New item. Change it to Type, and then double- click the Value
column, and enter PSTextFieldSpecifier, which is the type value used to tell the Settings appli-
cation that we want the user to edit this setting in a text field.
In this example, PSTextFieldSpecifier is a type. More specifically, it is the type of a specific pref-
erence field. When you see Type in the Key column, we’re defining the type of field that will
be used to edit the preference.
Click the button with the plus icon to the right of the Type row to add another item to our
dictionary. This next row will specify the label that will be displayed next to the text field.
Change the key from New item to Title. Now press the tab key. Notice that you are now all set
to edit the value in the Value column. Set it to Username. Now press the plus button at the
end of the Title row to add yet another item to our dictionary.
Change the key for this new entry to Key (no, that’s not a misprint, you’re really setting the
key to “Key”). For a value, type in username. Recall that we said that user defaults work like
a dictionary? Well, this entry tells the Settings application what key to use when it stores the
value entered in this text field. Recall what we said about NSUserDefaults? It lets you store
values using a key, similar to an NSDictionary. Well, the Settings application will do the
same thing for each of the preferences it saves on your behalf. If you give it a key value of
foo, then later in your application, you can request the value for foo, and it will give you the
value the user entered for that preference. We will use this same key value later to retrieve
this setting from the user defaults in our application.
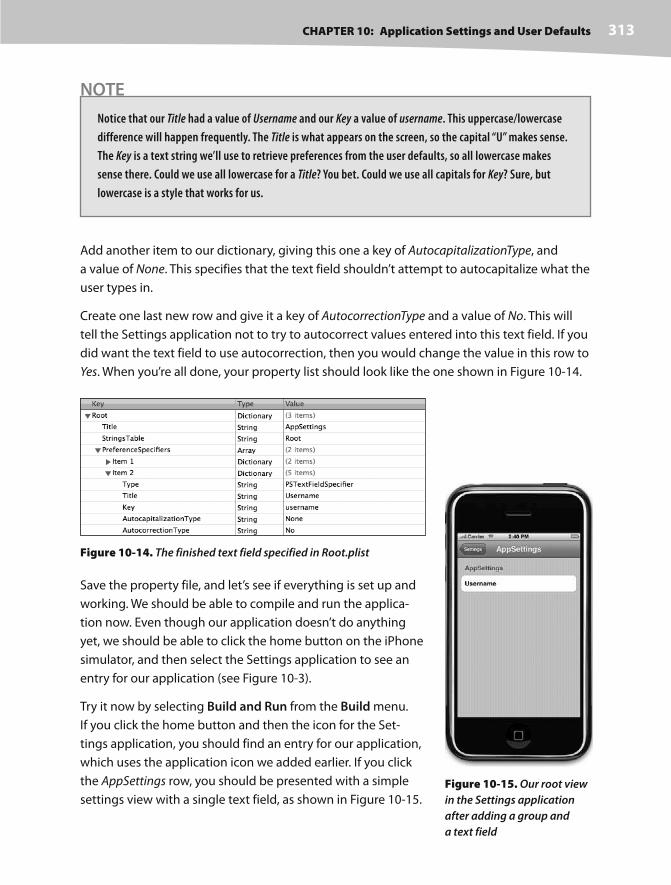
CHAPTER 10: Application Settings and User Defaults 313
NOTE
Notice that our Title had a value of Username and our Key a value of username. This uppercase/lowercase
difference will happen frequently. The Title is what appears on the screen, so the capital “U” makes sense.
The Key is a text string we’ll use to retrieve preferences from the user defaults, so all lowercase makes
sense there. Could we use all lowercase for a Title? You bet. Could we use all capitals for Key? Sure, but
lowercase is a style that works for us.
Add another item to our dictionary, giving this one a key of AutocapitalizationType, and
a value of None. This specifies that the text field shouldn’t attempt to autocapitalize what the
user types in.
Create one last new row and give it a key of AutocorrectionType and a value of No. This will
tell the Settings application not to try to autocorrect values entered into this text field. If you
did want the text field to use autocorrection, then you would change the value in this row to
Yes. When you’re all done, your property list should look like the one shown in Figure 10-14.
Figure 10-14. The finished text field specified in Root.plist
Save the property file, and let’s see if everything is set up and
working. We should be able to compile and run the applica-
tion now. Even though our application doesn’t do anything
yet, we should be able to click the home button on the iPhone
simulator, and then select the Settings application to see an
entry for our application (see Figure 10-3).
Try it now by selecting Build and Run from the Build menu.
If you click the home button and then the icon for the Set-
tings application, you should find an entry for our application,
which uses the application icon we added earlier. If you click
the AppSettings row, you should be presented with a simple
settings view with a single text field, as shown in Figure 10-15.
Figure 10-15. Our root view
in the Settings application
after adding a group and
a text field

CHAPTER 10: Application Settings and User Defaults 314
Adding a Secure Text Field Setting
Quit the simulator, and go back to Xcode. We’re not done yet, but you should now have
a sense of how easy adding preferences to your application is. Let’s add the rest of the fields
for our root settings view. The first one we’ll add is a secure text field for the user’s password.
Here’s an easy way to add another node. Collapse Item 2 in the PreferenceSpecifiers array.
Now select Item 2. Press C to copy it to the clipboard, and then press V to paste it back.
This will create a new Item 3 that is identical to Item 2. Expand the new item, and change the
Title to Password and the Key to password.
Next, add one more child to the new item. Remember, the order of items does not matter, so
feel free to place it right below the Key item. Give the new item a Key of IsSecure, and change
the Type to Boolean. Once you do that, the space where you normally type in a value will
change to a checkbox. Click it to check the box, which tells the Settings application that this
field needs to be a password field rather than just an ordinary text field.
Adding a Multivalue Field
The next item we’re going to add is a multivalue field. This type of field will automatically
generate a row with a disclosure indicator, and clicking it will take you down to another
table where you can select one of several rows. Collapse Item 3; select the row; and click the
plus icon at the end of the row to add Item 4. Change Item 4’s Type to Dictionary, and expand
Item 4 by clicking the disclosure triangle.
Give it a child row with a key of Type and a value of PSMultiValueSpecifier. Add a second row
with a key of Title and value of Protocol. Now create a third row with a key of Key and a value
of protocol. The next part is a little tricky, so let’s talk about it before we do it.
We’re going to add two more children to Item 4, but they are going to be Array type nodes,
not String type nodes. One, called Titles, is going to hold a list of the values that the user
can select from. The other, called Values, is going to hold a list of the values that actually get
stored in the User Defaults. So, if the user selects the first item in the list, which corresponds
to the first item in the Titles array, the Settings application will actually store the first value
from the Values array. This pairing of Titles and Values lets you present user- friendly text to
the user but actually store something else, like a number, a date, or a different string. Both
of these arrays are required. If you want them both to be the same, you can create one array,
copy it, paste it back in, and change the key so that you have two arrays with the same con-
tent but stored under different keys. We’ll actually do just that.
Add a new child to Item 4. Change its key to Values and set its type to Array. Expand the array,
and add five child nodes. All five nodes should be String type nodes and should contain the
following values: HTTP, SMTP, NNTP, IMAP, and POP3.
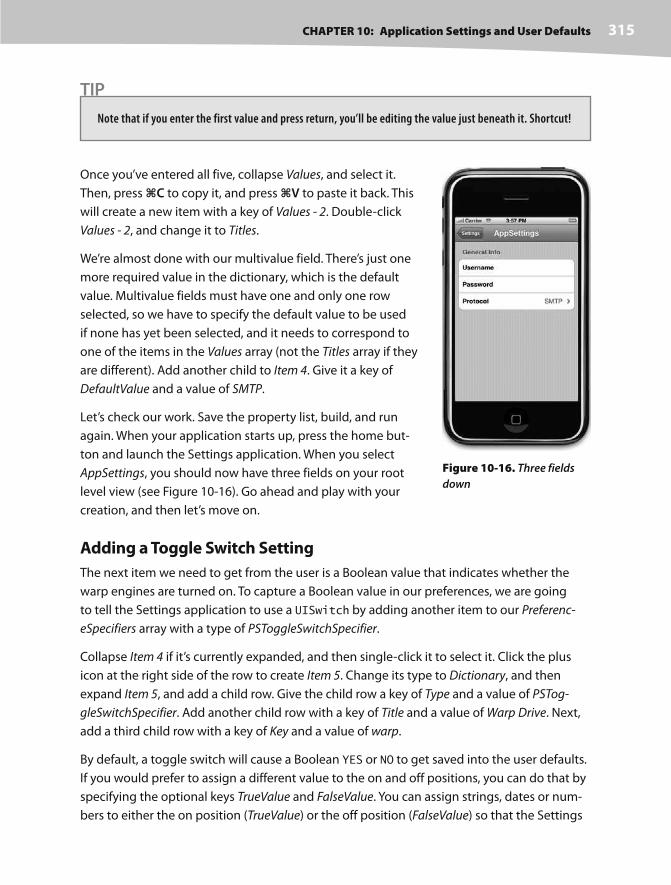
CHAPTER 10: Application Settings and User Defaults 315
TIP
Note that if you enter the first value and press return, you’ll be editing the value just beneath it. Shortcut!
Once you’ve entered all five, collapse Values, and select it.
Then, press C to copy it, and press V to paste it back. This
will create a new item with a key of Values - 2. Double- click
Values - 2, and change it to Titles.
We’re almost done with our multivalue field. There’s just one
more required value in the dictionary, which is the default
value. Multivalue fields must have one and only one row
selected, so we have to specify the default value to be used
if none has yet been selected, and it needs to correspond to
one of the items in the Values array (not the Titles array if they
are different). Add another child to Item 4. Give it a key of
DefaultValue and a value of SMTP.
Let’s check our work. Save the property list, build, and run
again. When your application starts up, press the home but-
ton and launch the Settings application. When you select
AppSettings, you should now have three fields on your root
level view (see Figure 10-16). Go ahead and play with your
creation, and then let’s move on.
Adding a Toggle Switch Setting
The next item we need to get from the user is a Boolean value that indicates whether the
warp engines are turned on. To capture a Boolean value in our preferences, we are going
to tell the Settings application to use a UISwitch by adding another item to our Preferenc-
eSpecifiers array with a type of PSToggleSwitchSpecifier.
Collapse Item 4 if it’s currently expanded, and then single- click it to select it. Click the plus
icon at the right side of the row to create Item 5. Change its type to Dictionary, and then
expand Item 5, and add a child row. Give the child row a key of Type and a value of PSTog-
gleSwitchSpecifier. Add another child row with a key of Title and a value of Warp Drive. Next,
add a third child row with a key of Key and a value of warp.
By default, a toggle switch will cause a Boolean YES or NO to get saved into the user defaults.
If you would prefer to assign a different value to the on and off positions, you can do that by
specifying the optional keys TrueValue and FalseValue. You can assign strings, dates or num-
bers to either the on position (TrueValue) or the off position (FalseValue) so that the Settings
Figure 10-16. Three fields
down

CHAPTER 10: Application Settings and User Defaults 316
application will store the string you specify instead of just storing YES or NO. Let’s set the on
position to save the string Engaged and the off position to store Disabled.
Do this by adding two more children to Item 5, one with a key of TrueValue and a value of
Engaged, and a second one with a key of FalseValue and a value of Disabled.
We have one more required item in this dictionary, which is the default value. If we had not
supplied the option FalseValue and TrueValue items, we would create a new row with a key
of DefaultValue and change the type from String to Boolean. However, because we did add
those two items, the value we put in DefaultValue has to match either the value passed in
TrueValue or the one passed in FalseValue.
Let’s make our warp engines on by default, so create one last child to Item 5, give it a key of
DefaultValue and a value of Engaged. Note that the string “Engaged” is what will be stored in
the user defaults, not what will appear on the screen. We just wanted to be clear on that.
Adding the Slider Setting
The next item we need to implement is a slider. In the Settings application, a slider can have
a small image at each end, but it can’t have a label. Let’s put the slider in its own group with
a header so that the user will know what the slider does.
Single-click Item 1 under PreferenceSpecifiers, and press C to copy it to the clipboard.
Now, select Item 5, making sure it’s collapsed, and then press V to paste. Since Item 1 was
a group specifier, the item we just pasted in as the new Item 6 is also a group specifier and
will tell the Settings application to start a new group at this location.
Expand Item 6, double- click the value in the row labeled Title and change the value to Warp
Factor.
Collapse Item 6 and select it. Then, click the button at the end of its row to add a new sibling
row. Change the Type of the new row, Item 7, from String to Dictionary and then expand the
new row. Add a child row, and give it a key of Type and a value of PSSliderSpecifier, which
indicates to the Settings application that it should use a UISlider to get this information
from the user. Add another child with a key of Key and a value of warpfactor so that the Set-
tings application knows what key to use when storing this value.
We’re going to allow the user to enter a value from one to ten, and we’ll set the default to
warp 5. Sliders need to have a minimum value, a maximum value, and a starting (or default)
value, and all of these need to be stored as numbers, not strings, in your property list. To
do this, add three more child rows to Item 7, setting the Type of all three rows from String to
Number. Give the first one a key of DefaultValue and a value of 5. Give the second one a key
of MinimumValue and a value of 1, and give the final one a key of MaximumValue and a value
of 10.

CHAPTER 10: Application Settings and User Defaults 317
If you want to test the slider, go ahead, but hurry back. We’re going to do just a bit more cus-
tomization. Sliders allow placement of a small 21- pixel 21- pixel image at each end of the
slider. Let’s provide little icons to indicate that moving the slider to the left slows us down,
and moving it to the right speeds us up.
In the 10 AppSettings folder in the project archive that accompanies this book, you’ll find two
icons called rabbit.png and turtle.png. We need to add both of these to our settings bundle.
Because these images need to be used by the Settings application, we can’t just put them in
our Resources folder, we need to put them in the settings bundle so the Settings application
can get them. To do that, go to the Finder and navigate to wherever you saved your Xcode
project. In that same folder, you’ll find an icon named Settings.bundle.
Remember, bundles look like files in the Finder, but they are really folders, and you can get
to their contents by control- clicking (or right- clicking) the bundle’s icon and selecting Show
Package Contents. This will open a new window, and you should see the same two items
that you see in Settings.bundle in Xcode. Copy the two icon files, rabbit.png and turtle.png,
from the 10 AppSettings folder to this folder.
Also add the two files you just copied into your settings bundle to the Resources folder of
your Xcode project. You do not need to copy them into your project, just create references.
This will allow us to use the same two images from within our application. Even though the
pictures in the settings bundle will get compiled into our application, unless we do this step,
they won’t be accessible to our application, only to the Settings application.
You can leave this window open in the Finder, as we’ll need to
copy another file here in a few minutes. For now, go back to
Xcode, and let’s tell the slider to use these two images.
Go back to Root.plist and add two more child rows under Item
7. Give one a key of MinimumValueImage and a value of turtle.
png. Give the other a key of MaximumValueImage and a value
of rabbit.png. Save your property list, and let’s build and run to
make sure everything is still hunky- dory. If everything is, you
should be able to navigate to the Settings application and
find the slider waiting for you with the sleepy turtle and the
happy rabbit at each end of the slider (see Figure 10-17).
Adding a Child Settings View
We’re going to add another preference specifier to tell the
Settings application that we want it to display a child settings
view. This specifier will present a row with a disclosure indica-
tor that, when tapped, will take the user down to a whole new
view full of preferences. Before we add that node, however,
Figure 10-17. We have text
fields, multivalue fields, tog-
gle switch, and a slider. We’re
almost done.

CHAPTER 10: Application Settings and User Defaults 318
since we don’t want this new preference to be grouped with the slider, we’re going to copy
the group specifier in Item 1 and paste it at the end of the PreferenceSpecifiers array to cre-
ate a new group for our child settings view. In Root.plist, collapse Item 1 if it’s expanded, and
then single- click it to select it and press C to copy it to the clipboard. Next, collapse Item 7
if it’s expanded; single- click it to select it, and then press V to paste in a new Item 8. Expand
Item 8, and double- click the value column next to the key Title, changing it from General Info
to Additional Info.
Now, collapse Item 8 again. Select it, and press the add sibling button at the right end of the
row to add Item 9, which will be our actual child view. Change the new row’s type from String
to Dictionary and expand it by clicking the disclosure triangle. Add a child row, and give it
a key of Type and a value of PSChildPaneSpecifier. Add another child row with a key of Title
and a value of More Settings.
We need to add one final row, which will tell the Settings application which property list to
load for the More Settings view.
Add another child row and give it a key of File and a value of More. The file extension .plist is
assumed and must not be included, or the Settings application won’t find the property list file.
Now, we have to add another property list to our settings bundle to describe the prefer-
ence values that should be captured on this child view. Each view in the Settings application
is based on a property list file, so we need to add another property list file to our settings
bundle to define this child view. We can’t add new files to the bundle in Xcode, and the Prop-
erty List Editor’s Save dialog will not let us save into a bundle. So, we have to create a new
property list, save it somewhere else, and then drag it into the Settings.bundle window using
the Finder.
You’ve now seen all the different types of preference fields that you can use in a settings
bundle property list file, so to save yourself some typing, why don’t you grab More.plist out
of the 10 AppSettings folder in the projects archive that accompanies this book, and drag it
into that Settings.bundle window we left open earlier. Once you do that, go back to Xcode so
that we can add this new property list as a child of our Root.plist file.
TIP
When you create your own child settings views, the easiest way to do it is to make a copy of Root.plist
and give it a new name. Then delete all of the existing preference specifiers except the first one, and add
whatever preference specifiers you need to that new file.
Save, and we’re done with our settings bundle. Feel free to compile, run, and test out the Set-
tings application. You should be able to reach the child view and set values for all the other
fields. Go ahead and play with it, and make changes to the property list if you want. We’ve

CHAPTER 10: Application Settings and User Defaults 319
covered almost every configuration option available (at least at the time of this writing), but
you can find the full documentation of the settings property list format in the document called
Settings Application Schema Reference in the iPhone Dev Center. You’ll find it on this page, along
with a ton of other useful reference documents:
http://developer.apple.com/iphone/library/navigation/Reference.html
Reading Settings in Our ApplicationWe’ve now solved half of our problem. The user can get to our preferences, but how do we
get to them? As it turns out, that’s the easy part.
We’ll take advantage of a class called NSUserDefaults to read in the user’s settings.
NSUserDefaults is implemented as a singleton, which means there is only one instance of
NSUserDefaults running in your application. To get access to that one instance, we call the
class method standardUserDefaults, like so:
NSUserDefaults *defaults = [NSUserDefaults standardUserDefaults];
Once we have a pointer to the standard user defaults, we use it just like an NSDictionary.
To get a value out of it, we can call objectForKey: which will return an Objective- C object
like an NSString, NSDate, or NSNumber. If we want to retrieve the value as a scalar like an
int, float, or BOOL, we can use other methods, such as intForKey:, floatForKey:, or
boolForKey:.
When you were creating the property list for this application, you created an array of
PreferenceSpecifiers. Some of those specifiers were used to create groups. Others created
interface objects that the user used to set their settings. Those are the specifiers we are really
interested in, because that’s where the real data is. Every specifier that was tied to a user set-
ting had a Key named Key. Take a minute to go back and check. For example, the Key for our
slider had a value of warpfactor. The Key for our Password field was password. We’ll use those
keys to retrieve the user settings.
So that we have a place to display the settings, let’s quickly set up our main view with
a bunch of labels. Before going over to Interface Builder, let’s create outlets for all the labels
we’ll need. Single- click MainViewController.h, and make the following changes:
#define kUsernameKey @"username"#define kPasswordKey @"password"#define kProtocolKey @"protocol"#define kWarpDriveKey @"warp"#define kWarpFactorKey @"warpfactor"#define kFavoriteTeaKey @"favoriteTea"#define kFavoriteCandyKey @"favoriteCandy"

CHAPTER 10: Application Settings and User Defaults 320
#define kFavoriteGameKey @"favoriteGame"#define kFavoriteExcuseKey @"favoriteExcuse"#define kFavoriteSinKey @"favoriteSin"
#import <UIKit/UIKit.h>
@interface MainViewController : UIViewController {
IBOutlet UILabel *usernameLabel; IBOutlet UILabel *passwordLabel; IBOutlet UILabel *protocolLabel; IBOutlet UILabel *warpDriveLabel; IBOutlet UILabel *warpFactorLabel;
IBOutlet UILabel *favoriteTeaLabel; IBOutlet UILabel *favoriteCandyLabel; IBOutlet UILabel *favoriteGameLabel; IBOutlet UILabel *favoriteExcuseLabel; IBOutlet UILabel *favoriteSinLabel;}
@property (nonatomic, retain) UILabel *usernameLabel;@property (nonatomic, retain) UILabel *passwordLabel;@property (nonatomic, retain) UILabel *protocolLabel;@property (nonatomic, retain) UILabel *warpDriveLabel;@property (nonatomic, retain) UILabel *warpFactorLabel;
@property (nonatomic, retain) UILabel *favoriteTeaLabel;@property (nonatomic, retain) UILabel *favoriteCandyLabel;@property (nonatomic, retain) UILabel *favoriteGameLabel;@property (nonatomic, retain) UILabel *favoriteExcuseLabel;@property (nonatomic, retain) UILabel *favoriteSinLabel;
-(void)refreshFields;@end
There’s nothing new here. We declare a bunch of constants. These are the key values that we
used in our property list file for the different preference fields. Then we declare ten outlets,
all of them labels, and create properties for each of them. Last, we declare a method that will
read settings out of the user defaults and push those values into the various labels. We put
this functionality in its own method, because we have to do this same task in more than one
place. Now that we’ve got our outlets declared, let’s head over to Interface Builder.
Double-click MainView.xib to open it in Interface Builder. When it comes up, you’ll notice
that the background of the view is dark gray. Let’s change it to white. Single- click the Main
View icon in the nib’s main window, and press 1 to bring up the attributes inspector. Use
the color well labeled Background to change the background to white. Now double- click the
Main View icon if the window labeled Main View is not already open.

CHAPTER 10: Application Settings and User Defaults 321
Look in the library for a Label. We need to bring
over a grand total of twenty labels. Half of them
will be static labels that are right- aligned and bold;
the other half will be used to display the actual val-
ues retrieved from the user defaults and will have
outlets pointing to them. Use Figure 10-18 as your
guide to build this view. You don’t have to match
the appearance exactly, but you do need to have
one label on the view for each of the outlets we
declared. Go ahead and design the view. You don’t
need our help for this. When you’re done and have
it looking the way you like, come back, and we’ll
continue on.
The next thing we need to do is control- drag from
File’s Owner to each of the labels intended to display
a settings value. You will control- drag a total of ten
times, setting each label to a different outlet. Once
you have all ten outlets connected to labels, save,
close the MainView.xib window, and go back to
Xcode.
Single-click MainViewController.m, and add the following code. Once you’re done, we’ll look
at what you did.
#import "MainViewController.h"
#import "MainView.h"
@implementation MainViewController
@synthesize usernameLabel;@synthesize passwordLabel;@synthesize protocolLabel;@synthesize warpDriveLabel;@synthesize warpFactorLabel;@synthesize favoriteTeaLabel;@synthesize favoriteCandyLabel;@synthesize favoriteGameLabel;@synthesize favoriteExcuseLabel;@synthesize favoriteSinLabel;
-(void)refreshFields{ NSUserDefaults *defaults = [NSUserDefaults standardUserDefaults]; usernameLabel.text = [defaults objectForKey:kUsernameKey]; passwordLabel.text = [defaults objectForKey:kPasswordKey];
Figure 10-18. The Main View window in
Interface Builder

CHAPTER 10: Application Settings and User Defaults 322
protocolLabel.text = [defaults objectForKey:kProtocolKey]; warpDriveLabel.text = [defaults objectForKey:kWarpDriveKey]; warpFactorLabel.text = [[defaults objectForKey:kWarpFactorKey] stringValue]; favoriteTeaLabel.text = [defaults objectForKey:kFavoriteTeaKey]; favoriteCandyLabel.text = [defaults objectForKey:kFavoriteCandyKey]; favoriteGameLabel.text = [defaults objectForKey:kFavoriteGameKey]; favoriteExcuseLabel.text = [defaults objectForKey:kFavoriteExcuseKey]; favoriteSinLabel.text = [defaults objectForKey:kFavoriteSinKey];}
- (id)initWithNibName:(NSString *)nibNameOrNil
bundle:(NSBundle *)nibBundleOrNil {
if (self = [super initWithNibName:nibNameOrNil
bundle:nibBundleOrNil]) {
// Custom initialization
}
return self;
}
- (void)viewDidAppear:(BOOL)animated { [self refreshFields]; [super viewDidAppear:animated];} - (void)viewDidLoad { [self refreshFields]; }
- (BOOL)shouldAutorotateToInterfaceOrientation:(UIInterfaceOrientation)
interfaceOrientation {
// Return YES for supported orientations
return (interfaceOrientation == UIInterfaceOrientationPortrait);
}
- (void)didReceiveMemoryWarning {
[super didReceiveMemoryWarning];
// Releases the view if it doesn't have a superview
// Release anything that's not essential, such as cached data
}
- (void)dealloc {
[usernameLabel release]; [passwordLabel release]; [protocolLabel release]; [warpDriveLabel release]; [warpFactorLabel release]; [favoriteTeaLabel release]; [favoriteCandyLabel release];

CHAPTER 10: Application Settings and User Defaults 323
[favoriteGameLabel release]; [favoriteExcuseLabel release]; [favoriteSinLabel release]; [super dealloc];
}
@end
There’s not really much here that should throw you. The new method, refreshFields,
does nothing more than grab the standard user defaults, and set the text property of all the
labels to the appropriate object from the user defaults, using the key values that we put in
our properties file. Notice that for warpFactorLabel, we’re calling stringValue on the object
returned. All of our other preferences are strings, which come back from the user defaults as
NSString objects. The preference stored by the slider, however, comes back as an NSNumber,
so we call stringValue on it to get a string representation of the value it holds.
After that, we added a viewDidLoad method, where we call our refreshFields method,
as well as a viewDidAppear: method where we also call our refreshFields method. This
will cause our displayed fields to get set to the appropriate preference values when the view
loads, and then to get refreshed when the view gets swapped back in. We do this because,
in a few minutes, we will be implementing the flipside view, where the user will be allowed
to change some of the settings. If we didn’t refresh the fields in viewDidAppear:, any time
values were changed on the flipside view, the changes wouldn’t show in the front.
You might be wondering why we chose viewDidAppear: instead of viewWillAppear:,
since we want the change to happen before the view is presented to the user. The
answer is one of timing. We will be pushing the changes back into the user defaults in
the viewWillDisappear: method of FlipsideViewController. The viewWillAppear:
method of that controller will actually get called before the viewWillDisappear: of this
controller, so updating our fields there wouldn’t work. Don’t worry, though, because the flip
animation takes a second to happen, by the time the main side view is being shown again,
our update has happened, and the user won’t see the change.
This class is done. You should be able to compile and run your application and have it look
something like Figure 10-7, except yours will be showing whatever values you entered in
your Settings application, of course. Couldn’t be much easier, could it?
Changing Defaults from Our ApplicationNow that we’ve got the main view up and running, let’s build the flipside view. As you
can see in Figure 10-19, the flipside view features our warp drive switch, as well as the
warp factor slider. We’ll use the same controls that the Settings application uses for these

CHAPTER 10: Application Settings and User Defaults 324
two items: a switch and a slider. First, we need to declare our outlets, so single- click
FlipsideViewController.h, and make the following changes:
#import <UIKit/UIKit.h>
@interface FlipsideViewController : UIViewController {
IBOutlet UISwitch *engineSwitch; IBOutlet UISlider *warpFactorSlider;
}
@property (nonatomic, retain) UISwitch *engineSwitch;@property (nonatomic, retain) UISlider *warpFactorSlider;@end
Now, double- click FlipsideView.xib to open it in Interface Builder. If the Flipside View window
is not open, double- click the Flipside View icon in the nib’s main window to open it. Drag two
Labels from the library and place them on Flipside View window. Double- click one of them
and change it to read Warp Engines:. Double- click the other, and call it Warp Factor:. You can
use Figure 10-19 as a placement guide.
Next, drag over a Switch from the library, and place it against the right side of the view across
from the label that reads Warp Engines. Control- drag from the File’s Owner icon to the new
switch, and connect it to the engineSwitch outlet.
Now drag over a Slider from the library, and place it below the label that reads Warp Factor.
Resize the slider so that it stretches from the blue guide line on the left margin to the one on
the right, and then control- drag from the File’s Owner icon to the slider, and connect it to the
warpFactorSlider outlet.
Single-click the slider if it’s not still selected, and press 1 to bring up the attributes inspec-
tor. Set Minimum to 1.00, Maximum to 10.00, and Initial to 5.00. Next, select turtle.png for
Min Image and rabbit.png for Max Image. Once you’re done, the inspector should look like
Figure 10-20.
Save and close the nib, and head back to Xcode so we can finish the flipside view controller.
Single- click FlipsideViewController.m, and make the following changes:
#import "FlipsideViewController.h"
#import "MainViewController.h"
@implementation FlipsideViewController
@synthesize engineSwitch;@synthesize warpFactorSlider;

CHAPTER 10: Application Settings and User Defaults 325
- (void)viewDidLoad {
self.view.backgroundColor = [UIColor viewFlipsideBackgroundColor];
NSUserDefaults *defaults = [NSUserDefaults standardUserDefaults]; engineSwitch.on = ([[defaults objectForKey:kWarpDriveKey] isEqualToString:@"Engaged"]) ? YES : NO; warpFactorSlider.value = [defaults floatForKey:kWarpFactorKey];}
- (void)viewWillDisappear:(BOOL)animated{ NSUserDefaults *defaults = [NSUserDefaults standardUserDefaults]; NSString *prefValue = (engineSwitch.on) ? @"Engaged" : @"Disabled"; [defaults setObject:prefValue forKey:kWarpDriveKey]; [defaults setFloat:warpFactorSlider.value forKey:kWarpFactorKey]; [super viewWillDisappear:animated];}
Figure 10-19. Desiging the flipside view
in Interface Builder
Figure 10-20. The attributes inspec-
tor for our Warp Factor slider

CHAPTER 10: Application Settings and User Defaults 326
- (BOOL)shouldAutorotateToInterfaceOrientation:(UIInterfaceOrientation)
interfaceOrientation {
// Return YES for supported orientations
return (interfaceOrientation == UIInterfaceOrientationPortrait);
}
- (void)didReceiveMemoryWarning {
[super didReceiveMemoryWarning];
// Releases the view if it doesn't have a superview
// Release anything that's not essential, such as cached data
}
- (void)dealloc {
[engineSwitch release]; [warpFactorSlider release]; [super dealloc];
}
@end
In the viewDidLoad method, we deleted one line of code and added three (well, four,
because one line was too long to fit the page width of this book). The one line of code we
deleted wasn’t really important. Code in the template set the background color of the view
using a class method, and that line of code caused the flipside view to have a textured, dark
gray appearance rather than using the background that was set in Interface Builder. The
textured background made it difficult to read the text and to see the slider pictures that we
used; we deleted it to let the background color from Interface Builder shine through so our
text and icons could be seen more easily.
The four lines of code we added get a reference to the standard user defaults and use the
outlets for the switch and slider to set them to the values stored in the user defaults. Because
we opted to store strings rather than Booleans for the warp drive setting, we have to handle
the conversion in our code because a UISwitch instance is set using a BOOL property.
NSUserDefaults *defaults = [NSUserDefaults standardUserDefaults];
engineSwitch.on = ([[defaults objectForKey:kWarpDriveKey]
isEqualToString:@"Engaged"]) ? YES : NO;
warpFactorSlider.value = [defaults floatForKey:kWarpFactorKey];
We also overrode our parent’s viewWillDisappear: method so that we could stuff the
values from our controls back into the user defaults before the main view is shown again.
Because our controller’s viewWillDisappear: method will fire before the main view’s
viewWillAppear: method, the changed values will already be stored in the user defaults
for the view to retrieve, so the main view will get updated with the correct new values.
CHAPTER 10: Application Settings and User Defaults 327
Beam Me Up, ScottyAt this point, you should have a very solid grasp on both the Settings application and user
defaults. You know how to add a settings bundle to your application and how to build
a hierarchy of views for your application’s preferences. You also saw how to read and write
preferences using NSUserDefaults and how to let the user change preferences from within
your application, and you even got a chance to use a new project template in Xcode. There
really shouldn’t be much in the way of application preferences that you aren’t equipped to
handle now.
In the next chapter, we’re going to tackle the different approaches to file management on
the iPhone. We’ll cover different techniques for persisting your objects to the file system and
also take a look at using your iPhone’s embedded database, SQLite. Ready? Let’s go!

329
s
Chapter 11Basic Data Persistence
o far, we’ve focused on the controller and view aspects of the Model-View-
Controller paradigm. Although several of our applications have read data
out of the application bundle, none of our applications have saved their data
to any form of persistent storage, persistent storage being any form of non-
volatile storage that survives a restart of the computer or device. So far, every
sample application either did not store data or used volatile or nonpersistent
storage. Every time one of our sample applications launched, it appeared with
exactly the same data it had the first time you launched it.
This approach has worked for us up to this point. But in the real world, your
application needs to persist data so that when users make changes, those
changes are stored and are there when they launch the program again.
A number of different mechanisms are available for persisting data on the
iPhone. If you’ve programmed in Cocoa for Mac OS X, you’ve likely used some
or all of these techniques.
In this chapter, we’re going to look at three different mechanisms for persist-
ing data to the iPhone’s file system. We’re going to look at using property lists,
object archives (or archiving), and the iPhone’s embedded relational database,
called SQLite3. We will write example applications that use all three.
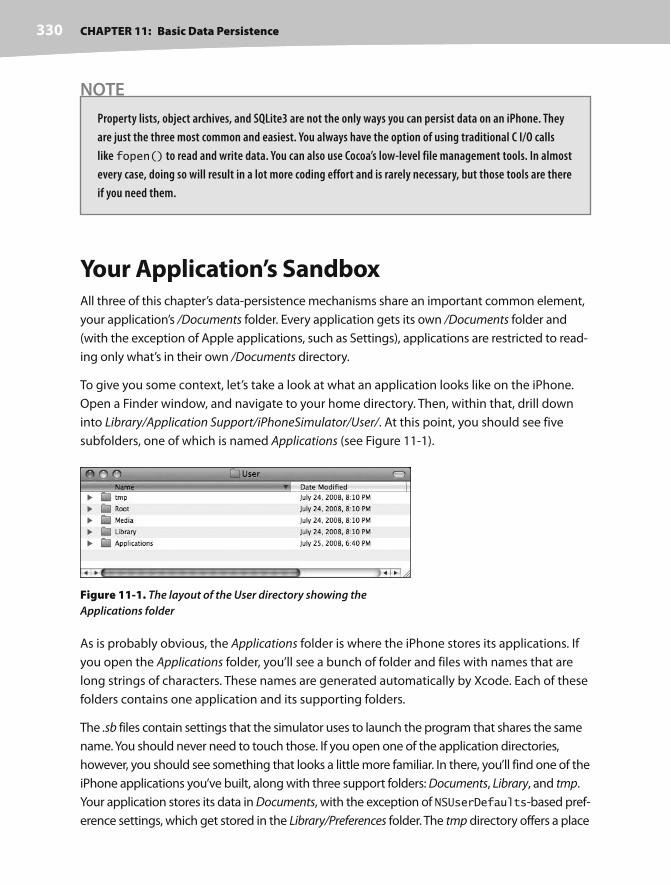
CHAPTER 11: Basic Data Persistence330
NOTE
Property lists, object archives, and SQLite3 are not the only ways you can persist data on an iPhone. They
are just the three most common and easiest. You always have the option of using traditional C I/O calls
like fopen() to read and write data. You can also use Cocoa’s low- level file management tools. In almost
every case, doing so will result in a lot more coding effort and is rarely necessary, but those tools are there
if you need them.
Your Application’s SandboxAll three of this chapter’s data- persistence mechanisms share an important common element,
your application’s /Documents folder. Every application gets its own /Documents folder and
(with the exception of Apple applications, such as Settings), applications are restricted to read-
ing only what’s in their own /Documents directory.
To give you some context, let’s take a look at what an application looks like on the iPhone.
Open a Finder window, and navigate to your home directory. Then, within that, drill down
into Library/Application Support/iPhoneSimulator/User/. At this point, you should see five
subfolders, one of which is named Applications (see Figure 11-1).
Figure 11-1. The layout of the User directory showing the
Applications folder
As is probably obvious, the Applications folder is where the iPhone stores its applications. If
you open the Applications folder, you’ll see a bunch of folder and files with names that are
long strings of characters. These names are generated automatically by Xcode. Each of these
folders contains one application and its supporting folders.
The .sb files contain settings that the simulator uses to launch the program that shares the same
name. You should never need to touch those. If you open one of the application directories,
however, you should see something that looks a little more familiar. In there, you’ll find one of the
iPhone applications you’ve built, along with three support folders: Documents, Library, and tmp.
Your application stores its data in Documents, with the exception of NSUserDefaults- based pref-
erence settings, which get stored in the Library/Preferences folder. The tmp directory offers a place
CHAPTER 11: Basic Data Persistence 331
where your application can store temporary files. Files written into /tmp will not be backed up by
iTunes when your iPhone syncs, but your application does need to take responsibility for deleting
the files in /tmp once they are no longer needed, to avoid filling up the file system.
Getting the Documents Directory
Since our application is in a folder with a seemingly random name, how do we retrieve the
full path to the Documents directory so that we can read and write our files? It’s actually
quite easy. There is a C function called NSSearchPathForDirectoriesInDomain that will
find various directories for you. This is a Foundation function, so it is shared with Cocoa for
Mac OS X. Many of its available options are designed for OS X and won’t return any values
on the iPhone, because those locations don’t exist on the iPhone (the Downloads folder) or
your application doesn’t have rights to access the location due to the iPhone’s sandboxing
mechanism.
Here’s some code to retrieve the path to the documents directory:
NSArray *paths = NSSearchPathForDirectoriesInDomains(NSDocumentDirectory,
NSUserDomainMask, YES);
NSString *documentsDirectory = [paths objectAtIndex:0];
The constant NSDocumentDirectory says we are looking for the path to the Documents
directory. The second constant, NSUserDomainMask, indicates that we want to restrict our
search to our application’s sandbox. In Mac OS X, this same constant is used to indicate that
we want the function to look in the user’s home directory, which explains its somewhat odd
name.
Though an array of matching paths is returned, we can count on our Documents directory
residing at index 0 in the array. Why? We know that only one directory meets the criteria
we’ve specified since each application has only one Documents directory. We can create
a filename, for reading or writing purposes, by appending another string onto the end of the
path we just retrieved. We’ll use an NSString method designed for just that purpose called
stringByAppendingPathComponent:, like so:
NSString *filename = [documentsDirectory
stringByAppendingPathComponent:@"theFile.txt"];
After this call, filename would contain the full path to a file called theFile.txt in our applica-
tion’s Documents directory, and we can use filename to create, read, and write from that file.
Getting the tmp Directory
Getting a reference to your application’s temporary directory is even easier than getting a ref-
erence to the Documents directory. The Foundation function called NSTemporaryDirectory()
will return a string containing the full path to your application’s temporary directory. To create
CHAPTER 11: Basic Data Persistence332
a filename for a file that will get stored in the temporary directory, we first find the temporary
directory:
NSString *tempPath = NSTemporaryDirectory();
Then, we create a path to a file in that directory by appending a filename to that path, like
this:
NSString *tempFile = [tempPath
stringByAppendingPathComponent:@"tempFile.txt"];
File Saving StrategiesAs a reminder, in this chapter, we’re going to look at three different approaches to data per-
sistence. All three approaches make use of your iPhone’s file system.
In the case of SQLite3, you’ll create a single SQLite3 database file and let SQLite3 worry
about storing and retrieving your data. With the other two persistence mechanisms, prop-
erty lists and archiving, you need to put some thought into whether you are going to store
your data in a single file or in multiple files.
Single-File Persistence
Using a single file is the easiest approach, and with many applications, it is a perfectly
acceptable one. You start off by creating a root object, usually an NSArray or NSDictionary,
though your root object can also be based on a custom class. Next, you populate your root
object with your program data. Whenever you need to save, your code rewrites the entire
contents of that root object to a single file. When your application launches, it reads the
entire contents of that file into memory, and when it quits, it writes out the entire contents.
This is the approach we’ll use in this chapter.
The downside of using a single file is that you have to load all of your application’s data into
memory, and you have to write all of it to the file system for even the smallest changes. If
your application isn’t likely to manage more than a few megabytes of data, this approach is
probably fine, and its simplicity will certainly make your life easier.
Multiple-File Persistence
The multiple file approach is definitely more complicated. As an example, you might write
an e-mail application that stored each e-mail message in its own file. There are obvious
advantages to this method. It allows the application to load only data that the user has
requested (another form of lazy loading), and when the user makes a change, only the files
that changed have to be saved. This method also gives you the opportunity to free up mem-
ory when you receive a low- memory notification, since any memory that is being used to

CHAPTER 11: Basic Data Persistence 333
store data that the user is not currently looking at can be flushed and simply reloaded from
the file system the next time it’s needed. The downside of multiple- file persistence is that
it adds a fair amount of complexity to your application. For now, we’ll stick with single- file
persistence.
Persisting Application DataLet’s get into the specifics of each of our three persistence methods: property lists, object
archives, and SQLite3. We’ll explore each of these in turn, and build an application that uses
each mechanism to save some data to the iPhone’s file system. We’ll start with property lists.
Property List Serialization
Several of our applications have made use of property lists, most recently when we used
a property list to specify our application preferences. Property lists are convenient, because
they can be edited manually using Xcode or the Property List Editor application, and both
NSDictionary and NSArray instances can be written to and created from property lists as
long as the dictionary or array contains only specific serializable objects. A serialized object
has been converted into a stream of bytes so it can be stored in a file or transferred over a net-
work. Although any object can be made serializable, only certain objects can be placed into
a collection class, such as an NSDictionary or NSArray, and then stored to a property list
using the collection classes’ writeToFile:atomically: method. The Objective- C classes that
can be serialized this way follow:
NSArray
NSMutableArray
NSDictionary
NSMutableDictionary
NSData
NSMutableData
NSString
NSMutableString
NSNumber
NSDate

CHAPTER 11: Basic Data Persistence334
If you can build your data model from just these objects, you can use property lists to easily
save and load your data. In fact, we’ve used this mechanism in many of the sample applica-
tions to provide you with sample data.
If you’re going to use property lists to persist your application data, you’ll use either an NSArray
or an NSDictionary to hold the data that needs to be persisted. Assuming that all of the objects
that you put into the NSArray or NSDictionary are serializable objects, you can write a property
list by calling the writeToFile:atomically: method on the dictionary or array instance, like so:
[myArray writeToFile:@"/some/file/location/output.plist" atomically:YES];
NOTE
In case you were wondering, the atomically parameter tells the method to write the data to an
auxiliary file, not to the specified location. Once it has successfully written the file, it will then copy that
auxiliary file to the location specified by the first parameter. This is a safer way to write a file, because if
the application crashes during the save, the existing file, if there was one, will not be corrupted. It adds
a tiny bit of overhead, but in most situations, it’s worth the cost.
One problem with the property list approach is that custom objects cannot be serialized into
property lists. You also can’t use other delivered classes from Cocoa Touch that aren’t speci-
fied in the previous list of serializable objects, which means that classes like NSURL, UIImage
and UIColor cannot be used directly.
Not being able to serialize these objects also means that you can’t easily create derived or
calculated properties (for example, a property that is the sum of two other properties), and
some of your code that really should be contained in model classes has to be moved to your
controller classes. Again, these restrictions are OK for simple data models and simple appli-
cations. Most of the time, however, your application will be much easier to maintain if you
create dedicated model classes.
However, simple property lists can still be useful in complex applications. They are a great
way to include data in your application. For example, when your application includes a picker,
often the best way to include the list of items to go in your picker is to create a property list file
and include it in your project’s Resources folder, which will cause it to get compiled into your
application.
Let’s a build a simple application that uses property lists to store its data.

CHAPTER 11: Basic Data Persistence 335
The Persistence ApplicationWe’re going to build a program that lets you enter data into four text fields, saves those
fields to a property list file when the application quits, and then reloads the data back from
that property list file the next time the application launches (see Figure 11-2).
NOTE
In this chapter’s applications, we won’t be taking the time to set up all the user interface niceties that we
have in the past. Tapping the return key, for example, will neither dismiss the keyboard nor take you to
the next field. If you want to add that polish to the application, doing so would be good practice, but it’s
not really material to this chapter’s topic, so we won’t be walking you through it.
Creating the Persistence Project
In Xcode, create a new project using the view- based application template, and save the proj-
ect with the name Persistence. This project contains all the files that we’ll need to build our
application, so we can dive right into things. In a minute, we’re going to build a view with
four text fields. Let’s create the outlets we need before we go to Interface Builder. Expand
the Classes folder. Then, single- click the PersistenceViewController.h file, and make the follow-
ing changes:
#import <UIKit/UIKit.h>
#define kFilename @"data.plist"
@interface PersistenceViewController : UIViewController {
IBOutlet UITextField *field1; IBOutlet UITextField *field2; IBOutlet UITextField *field3; IBOutlet UITextField *field4;}
@property (nonatomic, retain) UITextField *field1;@property (nonatomic, retain) UITextField *field2;@property (nonatomic, retain) UITextField *field3;@property (nonatomic, retain) UITextField *field4;- (NSString *)dataFilePath;- (void)applicationWillTerminate:(NSNotification *)notification;@end

CHAPTER 11: Basic Data Persistence336
In addition to defining four text field outlets, we’ve also
defined a constant for the filename we’re going to use, as
well as two additional methods. One method, dataFilePath,
will create and return the full pathname to our data file by
concatenating kFilename onto the path for the Documents
directory. The other method, applicationWillTerminate:,
which we’ll discuss in a minute, will get called when our appli-
cation quits and will save data to the property list file.
Next, expand the Resources folder, and double- click
PersistenceViewController.xib to open the file in Interface
Builder.
Designing the Persistence Application View
Once Interface Builder comes up, the window called View
should open as well. If it doesn’t, double- click the View icon to
open it. Drag a Text Field from the library, and place it against
the top- right blue guide line. Expand it to the left so that it
reaches about two- thirds of the way across the window, and
then press 1 to bring up the attributes inspector. Uncheck the box labeled Clear When Edit-
ing Begins.
Next, hold down the option key and drag the
text box downward, which will create a copy of
it. Repeat this step two more times so that you
have four text fields. Now, drag four labels to the
window, and use Figure 11-3 as a placement and
design guide. Notice that we’ve placed the text
fields at the top of our view so that there is room
for the keyboard.
Once you have all four text fields and labels placed,
control- drag from the File’s Owner icon to each of
the four text fields. Connect the topmost text field
to the outlet called field1, the next one to field2, the
third to field3, and the bottom one to field4. When
you have all four text fields connected to outlets,
save, close PersistenceViewController.xib, and go
back to Xcode.
Figure 11-2. The property
list application
Figure 11-3. Designing the Persistence
application’s view

CHAPTER 11: Basic Data Persistence 337
Editing the Persistence Classes
Single-click PersistenceViewController.m, and make the following changes, which we’ll dis-
cuss when you finish typing:
#import "PersistenceViewController.h"
@implementation PersistenceViewController
@synthesize field1;@synthesize field2;@synthesize field3;@synthesize field4;
- (NSString *)dataFilePath{ NSArray *paths = NSSearchPathForDirectoriesInDomains( NSDocumentDirectory, NSUserDomainMask, YES); NSString *documentsDirectory = [paths objectAtIndex:0]; return [documentsDirectory stringByAppendingPathComponent:kFilename];}- (void)applicationWillTerminate:(NSNotification *)notification{ NSMutableArray *array = [[NSMutableArray alloc] init]; [array addObject:field1.text]; [array addObject:field2.text]; [array addObject:field3.text]; [array addObject:field4.text]; [array writeToFile:[self dataFilePath] atomically:YES]; [array release];}#pragma mark -- (void)viewDidLoad {
NSString *filePath = [self dataFilePath]; if ([[NSFileManager defaultManager] fileExistsAtPath:filePath]) { NSArray *array = [[NSArray alloc] initWithContentsOfFile:filePath]; field1.text = [array objectAtIndex:0]; field2.text = [array objectAtIndex:1]; field3.text = [array objectAtIndex:2]; field4.text = [array objectAtIndex:3]; [array release]; }
UIApplication *app = [UIApplication sharedApplication]; [[NSNotificationCenter defaultCenter] addObserver:self selector:@selector(applicationWillTerminate:)

CHAPTER 11: Basic Data Persistence338
name:UIApplicationWillTerminateNotification object:app]; [super viewDidLoad];}
- (BOOL)shouldAutorotateToInterfaceOrientation:
(UIInterfaceOrientation)interfaceOrientation {
// Return YES for supported orientations
return (interfaceOrientation == UIInterfaceOrientationPortrait);
}
- (void)didReceiveMemoryWarning {
[super didReceiveMemoryWarning];
// Releases the view if it doesn't have a superview
// Release anything that's not essential, such as cached data
}
- (void)dealloc {
[field1 release]; [field2 release]; [field3 release]; [field4 release]; [super dealloc];
}
@end
The first method we added, dataFilePath, returns the full pathname of our data file. It does
that by finding the documents directory and appending kFilename to it. This method will
be called from any code that needs to load or save data.
- (NSString *)dataFilePath
{
NSArray *paths = NSSearchPathForDirectoriesInDomains(
NSDocumentDirectory, NSUserDomainMask, YES);
NSString *documentsDirectory = [paths objectAtIndex:0];
return [documentsDirectory stringByAppendingPathComponent:kFilename];
}
The second new method is called applicationWillTerminate:. Notice that it takes
a pointer to an NSNotification as an argument. applicationWillTerminate: is a noti-
fication method, and all notifications take a single NSNotification instance as their
argument.
Notifications are a lightweight mechanism that objects can use to communicate with each
other. Any object can define one or more notifications that it will publish to the application’s
notification center, which is a singleton object that exists only to pass these notifications
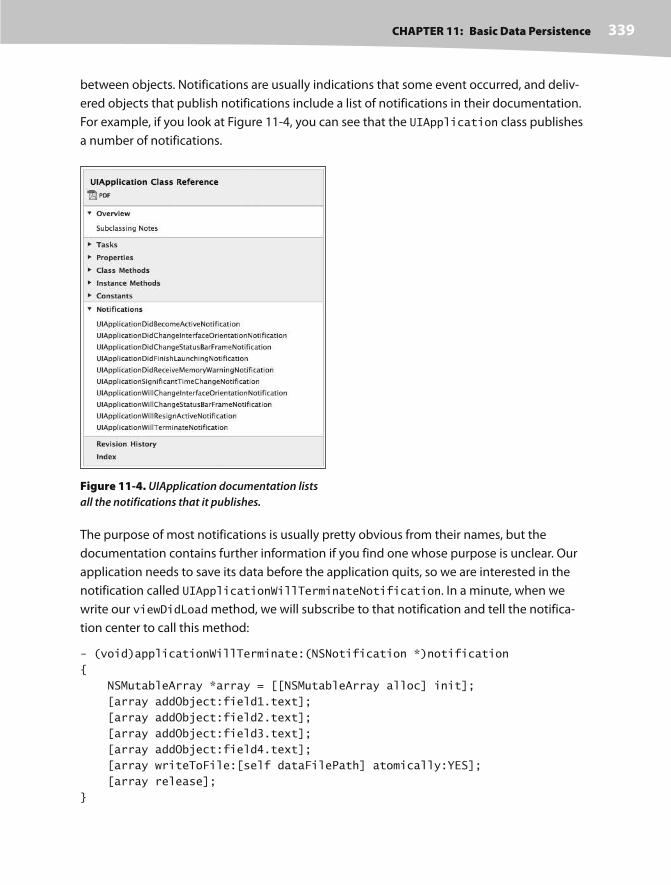
CHAPTER 11: Basic Data Persistence 339
between objects. Notifications are usually indications that some event occurred, and deliv-
ered objects that publish notifications include a list of notifications in their documentation.
For example, if you look at Figure 11-4, you can see that the UIApplication class publishes
a number of notifications.
Figure 11-4. UIApplication documentation lists
all the notifications that it publishes.
The purpose of most notifications is usually pretty obvious from their names, but the
documentation contains further information if you find one whose purpose is unclear. Our
application needs to save its data before the application quits, so we are interested in the
notification called UIApplicationWillTerminateNotification. In a minute, when we
write our viewDidLoad method, we will subscribe to that notification and tell the notifica-
tion center to call this method:
- (void)applicationWillTerminate:(NSNotification *)notification
{
NSMutableArray *array = [[NSMutableArray alloc] init];
[array addObject:field1.text];
[array addObject:field2.text];
[array addObject:field3.text];
[array addObject:field4.text];
[array writeToFile:[self dataFilePath] atomically:YES];
[array release];
}

CHAPTER 11: Basic Data Persistence340
The method itself is fairly simple. We create a mutable array, add the text from each of the
four fields to the array, and then write the contents of that array out to a property list file.
That’s all there is to saving our data using property lists.
In the viewDidLoad method, we do a few more things. The first thing we do is check to see if
a data file already exists. If there isn’t one, we don’t want to bother trying to load it. If the file
does exist, we instantiate an array with the contents of that file and then copy the objects from
that array to our four text fields. Because arrays are ordered lists, by copying them in the same
order as we saved them, we are always sure to get the right values in the right fields.
- (void)viewDidLoad {
NSString *filePath = [self dataFilePath];
if ([[NSFileManager defaultManager] fileExistsAtPath:filePath])
{
NSArray *array = [[NSArray alloc] initWithContentsOfFile:filePath];
field1.text = [array objectAtIndex:0];
field2.text = [array objectAtIndex:1];
field3.text = [array objectAtIndex:2];
field4.text = [array objectAtIndex:3];
[array release];
}
After we load the data from the property list, we get a reference to our application instance and
use that to subscribe to the UIApplicationWillTerminateNotification, using the default
NSNotificationCenter instance and a method called addObserver:selector:name:object:.
We pass an observer of self, which means that our PersistenceViewController is the object
that needs to get notified. For selector, we pass a selector to the applicationWillTerminate:
method we wrote a minute ago, telling the notification center to call that method when the
notification is published. The third parameter, name:, is the name of the notification that we’re
interested in receiving, and the final parameter, object:, is the object we’re interested in getting
the notification from. If we pass nil for the final parameter, we would then get notified any time
any method posted the UIApplicationWillTerminateNotification.
UIApplication *app = [UIApplication sharedApplication];
[[NSNotificationCenter defaultCenter] addObserver:self
selector:@selector(applicationWillTerminate:)
name:UIApplicationWillTerminateNotification
object:app];
After subscribing to the notification, we just give our superclass a chance to respond to
viewDidLoad, and we’re done.
[super viewDidLoad];
}

CHAPTER 11: Basic Data Persistence 341
That wasn’t too bad, was it? When our main view is finished loading, we look for a property
list file. If it exists, we copy data from it into our text fields. Next, we register to be notified
when the application terminates. When the application does terminate, we gather up the
values from our four text fields, stick them in a mutable array, and write that mutable array
out to a property list.
Why don’t you compile and run the application? It should build and then launch in the
simulator. Once it comes up, you should be able to type into any of the four text fields.
When you’ve typed something in them, press the home button (the circular button with the
rounded square in it at the bottom of the simulator window). It’s very important that you
press the home button. If you just quit the simulator, that’s the equivalent of force quitting
your application, and you will never receive the notification that the application is terminat-
ing, and your data will never get saved.
Property list serialization is pretty cool and very easy to use, but it’s a little limiting, since only
a small selection of objects can be stored in property lists. Let’s look at a little more robust
approach.
Archiving Model Objects
In the last part of Chapter 9, when we built the Presidents data model object, you saw an
example of the process of loading archived data using NSCoder. In the Cocoa world, the
term “archiving” refers to another form of serialization, but it’s a more generic type that any
object can implement. Any object specifically written to hold data (model objects) should
support archiving. The technique of archiving model objects lets you easily write complex
objects to a file and then read them back in. As long as every property you implement in
your class is either a scalar like int or float or else is an instance of a class that conforms to
the NSCoding protocol, you can archive your objects completely. Since most Foundation and
Cocoa Touch classes capable of storing data do conform to NSCoding, archiving is actually
relatively easy to implement for most classes.
Although not strictly required to make archiving work, another protocol should be imple-
mented along with NSCoding—the NSCopying protocol, which is a protocol that allows your
object to be copied. Being able to copy an object gives you a lot more flexibility when using
data model objects. For example, in the Presidents application in Chapter 9, instead of that
complex code we had to write to store changes the user made so we could handle both the
Cancel and Save buttons, we could have made a copy of the president object and stored
the changes in that copy. If the user tapped Save, we’d just copy the changed version over to
replace the original version.

CHAPTER 11: Basic Data Persistence342
Conforming to NSCoding
The NSCoding protocol declares two methods, both required. One encodes your object into an
archive; the other one creates a new object by decoding an archive. Both methods are passed
an instance of NSCoder, which you work with very much like NSUserDefaults from the previ-
ous chapter. You can encode and decode both objects and scalars using key- value coding.
A method to encode an object might look like this:
- (void)encodeWithCoder:(NSCoder *)encoder
{
[encoder encodeObject:foo forKey:kFooKey];
[encoder encodeObject:bar forKey:kBarKey];
[encoder encodeInt:someInt forKey:kSomeIntKey];
[encoder encodeFloat:someFloat forKey:kSomeFloatKey]
}
To support archiving in our object, we have to encode each of our instance variables into
encoder using the appropriate encoding method, so we need to implement a method that
initializes an object from an NSCoder, allowing us to restore an object that was previously
archived. Implementing the initWithCoder: method is slightly more complex than
encodeWithEncoder:. If you are subclassing NSObject directly, or subclassing some other
class that doesn’t conform to NSCoding, your method would look something like the following:
- (id)initWithCoder:(NSCoder *)decoder
{
if (self = [super init])
{
self.foo = [decoder decodeObjectForKey:kFooKey];
self.bar = [decoder decodeObjectForKey:kBarKey];
self.someInt = [decoder decodeIntForKey:kSomeIntKey];
self.someFloat = [decoder decodeFloatForKey:kAgeKey];
}
return self;
}
The method initializes an object instance using [super init], and if that’s successful,
it sets its properties by decoding values from the passed- in instance of NSCoder. When
implementing NSCoding for a class with a superclass that also conforms to NSCoding, the
initWithCoder: method needs to look slightly different. Instead of calling init on super,
it has to call initWithCoder:, like so:
- (id)initWithCoder:(NSCoder *)encoder
{
if (self = [super initWithCoder:decoder])
{
self.foo = [decoder decodeObjectForKey:kFooKey];
CHAPTER 11: Basic Data Persistence 343
self.bar = [decoder decodeObjectForKey:kBarKey];
self.someInt = [decoder decodeIntForKey:kSomeIntKey];
self.someFloat = [decoder decodeFloatForKey:kAgeKey];
}
return self;
}
And that’s basically it. As long as you implement these two methods to encode and decode
all of your object’s properties, then your object is archivable and can be written to and read
from archives.
Implementing NSCopying
As we mentioned a few minutes ago, conforming to NSCopying is a very good idea for
any data model objects as well. NSCopying has one method, called copyWithZone:, and
it allows objects to be copied. Implementing NSCopying is very similar to implementing
initWithCoder:. You just need to create a new instance of the same class and then set all
of that new instance’s properties to the same values as this objects properties. Here’s what
a copyWithZone: method might look like:
- (id)copyWithZone:(NSZone *)zone
{
MyClass *copy = [[[self class] allocWithZone: zone] init];
copy.foo = [self.foo copy];
copy.bar = [self.bar copy];
copy.someInt = self.someInt;
copy.someFloat = self.someFloat;
return copy;
}
Notice that we do not release or autorelease the new object we created. Copied objects are
implicitly retained and should be released or autoreleased in the code that called copy.
Archiving a Data Object
Creating an archive from an object or objects that conforms to NSCoding is relatively easy.
First, we create an instance of NSMutableData to hold the encoded data and then create an
NSKeyedArchiver instance to archive objects into that NSMutableData instance:
NSMutableData *data = [[NSMutableData alloc] init];
NSKeyedArchiver *archiver = [[NSKeyedArchiver alloc]
initForWritingWithMutableData:data];
After creating both of those, we then use key- value coding to archive any objects we wish to
include in the archive, like this:
[archiver encodeObject:myObject forKey:@"keyValueString"];

CHAPTER 11: Basic Data Persistence344
Once we’ve encoded all the objects we want to include, we just tell the archiver we’re done,
write the NSMutableData instance to the file system, and do memory cleanup on our objects.
[archiver finishEncoding];
BOOL success = [data writeToFile:@"/path/to/archive" atomically:YES];
[archiver release];
[data release];
If anything went wrong while writing the file, success will be set to NO. If success is YES, the
data was successfully written to the specified file. Any objects created from this archive will
be exact copies of the objects that were last written into the file.
Unarchiving a Data Object
To reconstitute objects from the archive, we go through a similar process. We create an
NSData instance from the archive file and create an NSKeyedUnarchiver to decode the data:
NSData *data = [[NSData alloc] initWithContentsOfFile:path];
NSKeyedUnarchiver *unarchiver = [[NSKeyedUnarchiver alloc]
initForReadingWithData:data];
After that, we read our objects from the unarchiver using the same key that we used to
archive the object:
self.object = [unarchiver decodeObjectForKey:@"keyValueString"];
NOTE
The object returned by decodeObjectForKey: is autoreleased, so if we need to keep it around, we
need to retain it. Assigning it to a property declared with the retain keyword usually handles this for
us, but if you’re not assigning it to a property and need the object to stick around past the end of the cur-
rent event loop, then you need to retain it.
Finally, we tell the archiver we are done and do our memory cleanup:
[unarchiver finishDecoding];
[unarchiver release];
[data release];
If you’re feeling a little overwhelmed by archiving, don’t worry; it’s actually fairly straight-
forward. We’re going to retrofit our Persistence application to use archiving, so you’ll get to
see it in action. Once you’ve done it a few times, archiving will become second nature, as all
you’re really doing is storing and retrieving your object’s properties using key- value coding.
CHAPTER 11: Basic Data Persistence 345
The Archiving ApplicationLet’s retrofit the Persistence application so it uses archiving instead of property lists. We’re
going to be making some fairly significant changes to the Persistence source code, so you
might want to make a copy of your project before continuing.
Implementing the FourLines Class
Once you’re ready to proceed and have the Persistence project open in Xcode, single- click
the Classes folder and press N or select New File. . . from the File menu. When the new file
assistant comes up, select NSObject subclass, and name the file FourLines.m, making sure the
box to create the header file is checked. This file is going to be our data model, and it’s going
to hold the data that we’re currently storing in a dictionary in the property list application.
Single- click FourLines.h, and make the following changes:
#define kField1Key @"Field1"#define kField2Key @"Field2"#define kField3Key @"Field3"#define kField4Key @"Field4"
#import <UIKit/UIKit.h>
@interface FourLines : NSObject <NSCoding, NSCopying> { NSString *field1; NSString *field2; NSString *field3; NSString *field4;}
@property (nonatomic, retain) NSString *field1;@property (nonatomic, retain) NSString *field2;@property (nonatomic, retain) NSString *field3;@property (nonatomic, retain) NSString *field4;@end
This is a very straightforward data model class with four string properties. Notice that
we’ve conformed the class to the NSCoding and NSCopying protocols. Now switch over to
FourLines.m, and add the following code.
#import "FourLines.h"
@implementation FourLines
@synthesize field1;@synthesize field2;@synthesize field3;@synthesize field4;
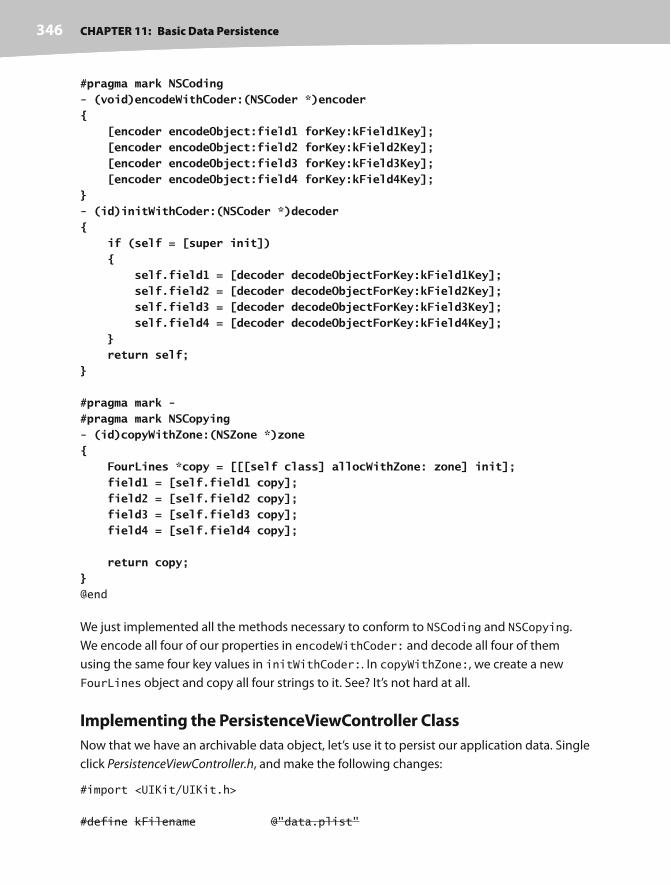
CHAPTER 11: Basic Data Persistence346
#pragma mark NSCoding- (void)encodeWithCoder:(NSCoder *)encoder{ [encoder encodeObject:field1 forKey:kField1Key]; [encoder encodeObject:field2 forKey:kField2Key]; [encoder encodeObject:field3 forKey:kField3Key]; [encoder encodeObject:field4 forKey:kField4Key];}- (id)initWithCoder:(NSCoder *)decoder{ if (self = [super init]) { self.field1 = [decoder decodeObjectForKey:kField1Key]; self.field2 = [decoder decodeObjectForKey:kField2Key]; self.field3 = [decoder decodeObjectForKey:kField3Key]; self.field4 = [decoder decodeObjectForKey:kField4Key]; } return self;}
#pragma mark -#pragma mark NSCopying- (id)copyWithZone:(NSZone *)zone{ FourLines *copy = [[[self class] allocWithZone: zone] init]; field1 = [self.field1 copy]; field2 = [self.field2 copy]; field3 = [self.field3 copy]; field4 = [self.field4 copy];
return copy;}@end
We just implemented all the methods necessary to conform to NSCoding and NSCopying.
We encode all four of our properties in encodeWithCoder: and decode all four of them
using the same four key values in initWithCoder:. In copyWithZone:, we create a new
FourLines object and copy all four strings to it. See? It’s not hard at all.
Implementing the PersistenceViewController Class
Now that we have an archivable data object, let’s use it to persist our application data. Single
click PersistenceViewController.h, and make the following changes:
#import <UIKit/UIKit.h>
#define kFilename @"data.plist"
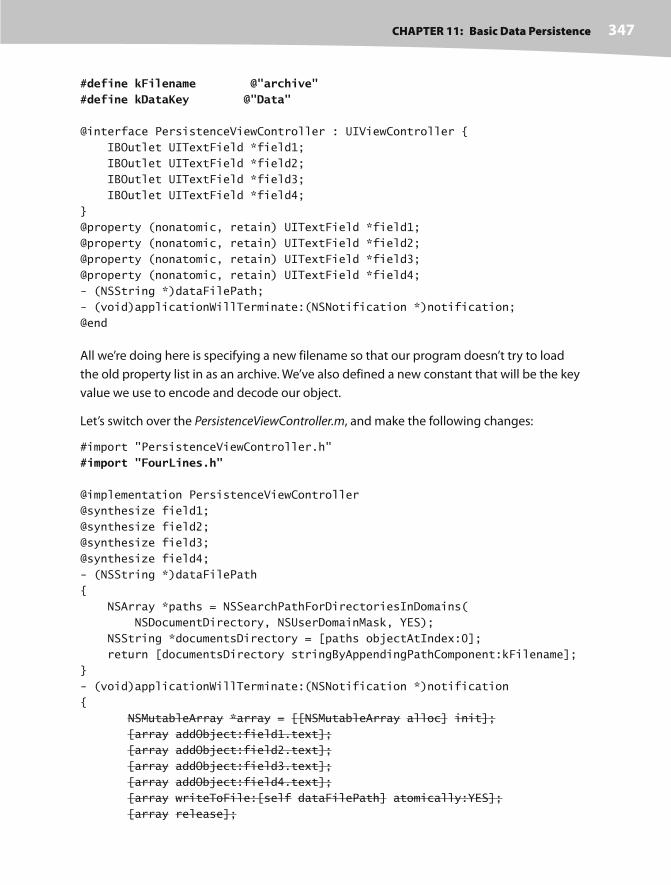
CHAPTER 11: Basic Data Persistence 347
#define kFilename @"archive"#define kDataKey @"Data"
@interface PersistenceViewController : UIViewController {
IBOutlet UITextField *field1;
IBOutlet UITextField *field2;
IBOutlet UITextField *field3;
IBOutlet UITextField *field4;
}
@property (nonatomic, retain) UITextField *field1;
@property (nonatomic, retain) UITextField *field2;
@property (nonatomic, retain) UITextField *field3;
@property (nonatomic, retain) UITextField *field4;
- (NSString *)dataFilePath;
- (void)applicationWillTerminate:(NSNotification *)notification;
@end
All we’re doing here is specifying a new filename so that our program doesn’t try to load
the old property list in as an archive. We’ve also defined a new constant that will be the key
value we use to encode and decode our object.
Let’s switch over the PersistenceViewController.m, and make the following changes:
#import "PersistenceViewController.h"
#import "FourLines.h"
@implementation PersistenceViewController
@synthesize field1;
@synthesize field2;
@synthesize field3;
@synthesize field4;
- (NSString *)dataFilePath
{
NSArray *paths = NSSearchPathForDirectoriesInDomains(
NSDocumentDirectory, NSUserDomainMask, YES);
NSString *documentsDirectory = [paths objectAtIndex:0];
return [documentsDirectory stringByAppendingPathComponent:kFilename];
}
- (void)applicationWillTerminate:(NSNotification *)notification
{
NSMutableArray *array = [[NSMutableArray alloc] init];
[array addObject:field1.text];
[array addObject:field2.text];
[array addObject:field3.text];
[array addObject:field4.text];
[array writeToFile:[self dataFilePath] atomically:YES];
[array release];

CHAPTER 11: Basic Data Persistence348
FourLines *fourLines = [[FourLines alloc] init]; fourLines.field1 = field1.text; fourLines.field2 = field2.text; fourLines.field3 = field3.text; fourLines.field4 = field4.text;
NSMutableData *data = [[NSMutableData alloc] init]; NSKeyedArchiver *archiver = [[NSKeyedArchiver alloc] initForWritingWithMutableData:data]; [archiver encodeObject:fourLines forKey:kDataKey]; [archiver finishEncoding]; [data writeToFile:[self dataFilePath] atomically:YES]; [fourLines release]; [archiver release]; [data release];
}
#pragma mark -
- (void)viewDidLoad {
NSString *filePath = [self dataFilePath];
if ([[NSFileManager defaultManager] fileExistsAtPath:filePath])
{
NSMutableArray *array =[[NSMutableArray alloc]
initWithContentsOfFile:filePath];
field1.text = [array objectAtIndex:0];
field2.text = [array objectAtIndex:1];
field3.text = [array objectAtIndex:2];
field4.text = [array objectAtIndex:3];
[array release];
NSData *data = [[NSMutableData alloc] initWithContentsOfFile:[self dataFilePath]]; NSKeyedUnarchiver *unarchiver = [[NSKeyedUnarchiver alloc] initForReadingWithData:data]; FourLines *fourLines = [unarchiver decodeObjectForKey:kDataKey]; [unarchiver finishDecoding];
field1.text = fourLines.field1; field2.text = fourLines.field2; field3.text = fourLines.field3; field4.text = fourLines.field4;
[unarchiver release]; [data release]; }
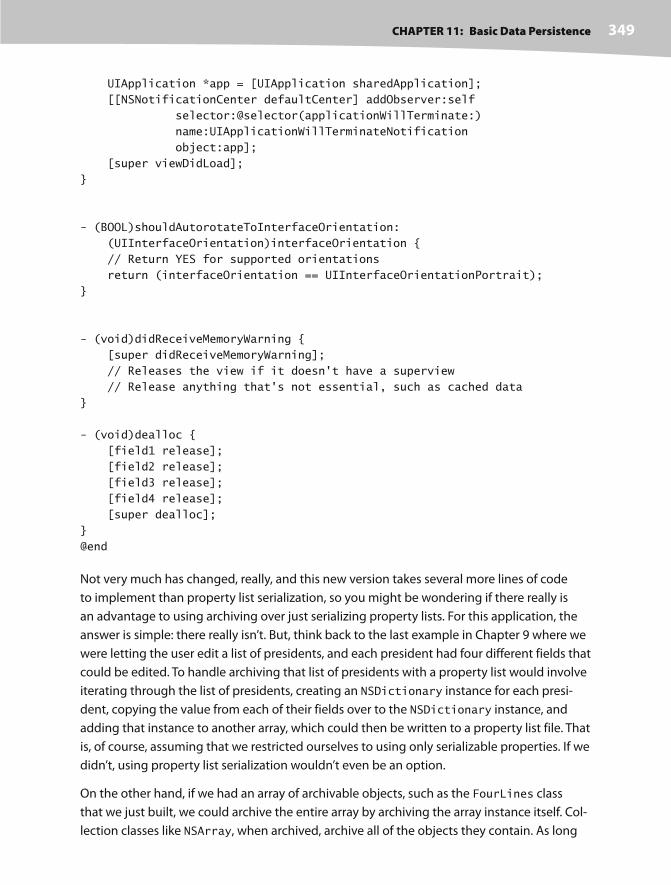
CHAPTER 11: Basic Data Persistence 349
UIApplication *app = [UIApplication sharedApplication];
[[NSNotificationCenter defaultCenter] addObserver:self
selector:@selector(applicationWillTerminate:)
name:UIApplicationWillTerminateNotification
object:app];
[super viewDidLoad];
}
- (BOOL)shouldAutorotateToInterfaceOrientation:
(UIInterfaceOrientation)interfaceOrientation {
// Return YES for supported orientations
return (interfaceOrientation == UIInterfaceOrientationPortrait);
}
- (void)didReceiveMemoryWarning {
[super didReceiveMemoryWarning];
// Releases the view if it doesn't have a superview
// Release anything that's not essential, such as cached data
}
- (void)dealloc {
[field1 release];
[field2 release];
[field3 release];
[field4 release];
[super dealloc];
}
@end
Not very much has changed, really, and this new version takes several more lines of code
to implement than property list serialization, so you might be wondering if there really is
an advantage to using archiving over just serializing property lists. For this application, the
answer is simple: there really isn’t. But, think back to the last example in Chapter 9 where we
were letting the user edit a list of presidents, and each president had four different fields that
could be edited. To handle archiving that list of presidents with a property list would involve
iterating through the list of presidents, creating an NSDictionary instance for each presi-
dent, copying the value from each of their fields over to the NSDictionary instance, and
adding that instance to another array, which could then be written to a property list file. That
is, of course, assuming that we restricted ourselves to using only serializable properties. If we
didn’t, using property list serialization wouldn’t even be an option.
On the other hand, if we had an array of archivable objects, such as the FourLines class
that we just built, we could archive the entire array by archiving the array instance itself. Col-
lection classes like NSArray, when archived, archive all of the objects they contain. As long
CHAPTER 11: Basic Data Persistence350
as every object you put into an array or dictionary conforms to NSCoding, you can archive
the array or dictionary and restore it, and all the objects that were in it when you archived
it will be in the restored array or dictionary. In other words, this approach scales beauti-
fully, because no matter how many objects you add, the work to write those objects to disk
(assuming you’re using single- file persistence) is exactly the same. With property lists, the
amount of work increases with every object you add.
Using iPhone’s Embedded SQLite3The third persistence option we’re going to discuss is the iPhone’s embedded SQL database
called SQLite3. SQLite3 is very efficient at storing and retrieving large amounts of data. It’s
also capable of doing complex aggregations on your data, with much faster results than
you’d get doing the same thing using objects. For example, if your application needed to cal-
culate the sum of a particular field across all the objects in your application, or if you needed
the sum from just the objects that meet certain criteria, SQLite3 would allow you to do that
without loading every object into memory. Getting aggregations from SQLite3 is several
orders of magnitude faster than loading all the objects into memory and summing up their
values. Being a full- fledged embedded database, SQLite3 contains tools to make it even
faster by, for example, creating table indexes that can speed up your queries.
SQLite3 uses the Structured Query Language (SQL). SQL is the standard language used
to interact with relational databases, and it is a language with its own syntax and a lot of
subtleties that are way beyond the scope of this book. Whole books have been written on
the syntax of SQL (dozens of them, in fact), as well as on SQLite itself. So, if you don’t already
know SQL and you want to use SQLite3 in your application, you’re going to have a little work
ahead of you. We’ll show you how to set up and interact with the SQLite database from your
iPhone applications, and you’ll see some of the basics of the syntax in this chapter. But to
really make the most of SQLite3, you’re going to need to do some additional research and
exploration.
TIP
There are two schools of thought about the pronunciation of “SQL” and “SQLite.” Most official documen-
tation says to pronounce “SQL” as “Ess-Queue- Ell” and “SQLite” as “Ess-Queue-Ell- Light.” Many people
pronounce them, respectively, as “Sequel” and “Sequel Light.”
Relational databases, including SQLite3, and object- oriented programming languages
use fundamentally different approaches to storing and organizing data. The approaches
are different enough that numerous techniques and many libraries and tools for con-
verting between the two have arisen. These different techniques are collectively called

CHAPTER 11: Basic Data Persistence 351
object- relational mapping (ORM). Core Data provides a Cocoa- based ORM solution for Mac
OS X. However, no ORM libraries or tools ship with the iPhone. As a result, it is incumbent
on us, the programmers, to devise our own approach to mapping information from the
database to our objects and back again. In this chapter, we’re going to focus on the basics,
including setting up SQLite3, creating a table to hold your data, and saving data to and
retrieving values from the database. Obviously, in the real world, such a simple application
wouldn’t warrant the investment in SQLite3. But its simplicity is exactly what makes it a good
learning example.
If you’re completely new to SQL, you might want to find out more about SQLite3 and the
SQL language before continuing on with this chapter. A couple of good starting points are
the Introduction to the SQLite3 C API at http://www.sqlite.org/cintro.html and the
SQLite SQL Language Guide at http://www.sqlite.org/lang.html.
Creating or Opening the Database
Before you can use SQLite3, you have to open the database. The command that’s used to do
that, sqlite3_open(), will open an existing database, or if none exists at the specified loca-
tion, it will create a new one. Here’s what the code to open a new database might look like:
sqlite3 *database;
int result = sqlite3_open("/path/to/database/file", &database);
If result is equal to the constant SQLITE_OK, then the database was successfully opened.
One thing you should note here is that the path to the database file has to be passed in as
a C string, not as an NSString. SQLite3 was written in portable C, not Objective- C, and it
has no idea what an NSString is. Fortunately, there is an NSString method that generates
a C- string from an NSString instance:
char * cStringPath = [pathString UTF8String];
When you’re all done with an SQLite3 database, you close the database by calling:
sqlite3_close(database);
Databases store all their data in tables. You can create a new table by crafting an SQL CREATE
statement and passing it in to an open database using the function sqlite3_exec, like so:
char * errorMsg;
const char *createSQL = "CREATE TABLE IF NOT EXISTS PEOPLE
(ID INTEGER PRIMARY KEY AUTOINCREMENT, FIELD_DATA TEXT)";
int result = sqlite3_exec (database, createSQL, NULL, NULL, &errorMsg;);
As you did before, you need to check result for SQLITE_OK to make sure your command
ran successfully. If it didn’t, errorMsg will contain a description of the problem that occurred.
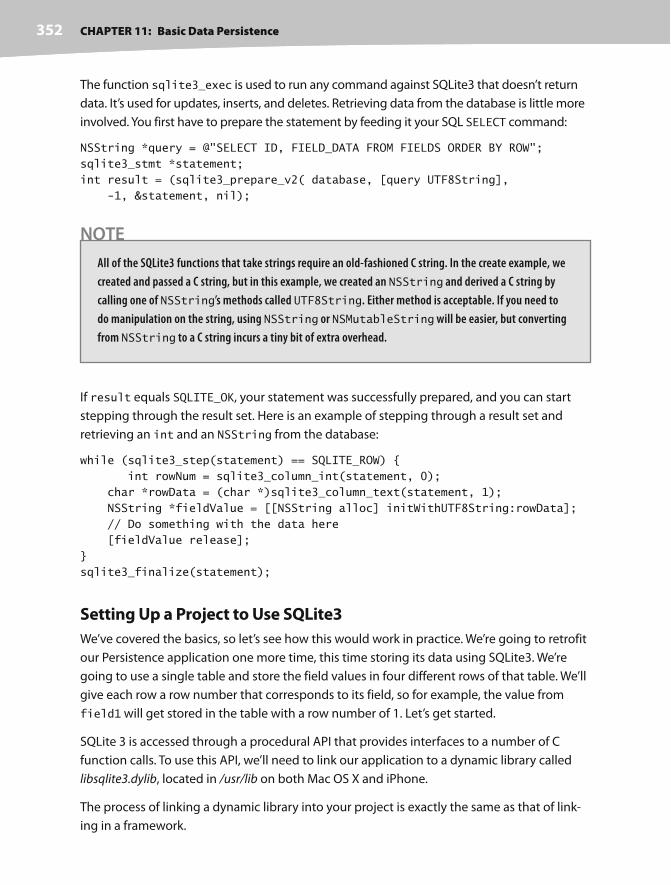
CHAPTER 11: Basic Data Persistence352
The function sqlite3_exec is used to run any command against SQLite3 that doesn’t return
data. It’s used for updates, inserts, and deletes. Retrieving data from the database is little more
involved. You first have to prepare the statement by feeding it your SQL SELECT command:
NSString *query = @"SELECT ID, FIELD_DATA FROM FIELDS ORDER BY ROW";
sqlite3_stmt *statement;
int result = (sqlite3_prepare_v2( database, [query UTF8String],
-1, &statement, nil);
NOTE
All of the SQLite3 functions that take strings require an old- fashioned C string. In the create example, we
created and passed a C string, but in this example, we created an NSString and derived a C string by
calling one of NSString’s methods called UTF8String. Either method is acceptable. If you need to
do manipulation on the string, using NSString or NSMutableString will be easier, but converting
from NSString to a C string incurs a tiny bit of extra overhead.
If result equals SQLITE_OK, your statement was successfully prepared, and you can start
stepping through the result set. Here is an example of stepping through a result set and
retrieving an int and an NSString from the database:
while (sqlite3_step(statement) == SQLITE_ROW) {
int rowNum = sqlite3_column_int(statement, 0);
char *rowData = (char *)sqlite3_column_text(statement, 1);
NSString *fieldValue = [[NSString alloc] initWithUTF8String:rowData];
// Do something with the data here
[fieldValue release];
}
sqlite3_finalize(statement);
Setting Up a Project to Use SQLite3
We’ve covered the basics, so let’s see how this would work in practice. We’re going to retrofit
our Persistence application one more time, this time storing its data using SQLite3. We’re
going to use a single table and store the field values in four different rows of that table. We’ll
give each row a row number that corresponds to its field, so for example, the value from
field1 will get stored in the table with a row number of 1. Let’s get started.
SQLite 3 is accessed through a procedural API that provides interfaces to a number of C
function calls. To use this API, we’ll need to link our application to a dynamic library called
libsqlite3.dylib, located in /usr/lib on both Mac OS X and iPhone.
The process of linking a dynamic library into your project is exactly the same as that of link-
ing in a framework.
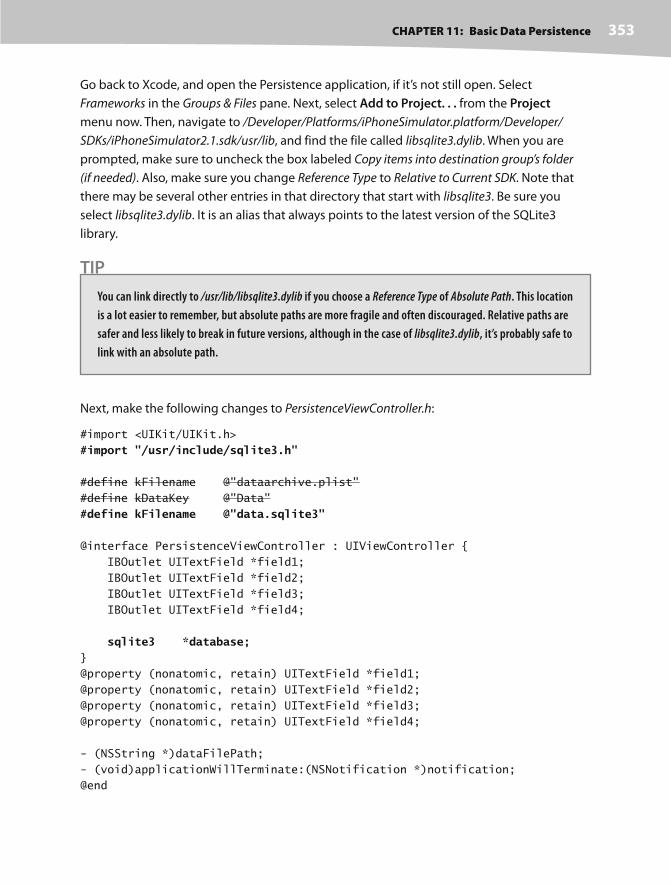
CHAPTER 11: Basic Data Persistence 353
Go back to Xcode, and open the Persistence application, if it’s not still open. Select
Frameworks in the Groups & Files pane. Next, select Add to Project. . . from the Project
menu now. Then, navigate to /Developer/Platforms/iPhoneSimulator.platform/Developer/
SDKs/iPhoneSimulator2.1.sdk/usr/lib, and find the file called libsqlite3.dylib. When you are
prompted, make sure to uncheck the box labeled Copy items into destination group’s folder
(if needed). Also, make sure you change Reference Type to Relative to Current SDK. Note that
there may be several other entries in that directory that start with libsqlite3. Be sure you
select libsqlite3.dylib. It is an alias that always points to the latest version of the SQLite3
library.
TIP
You can link directly to /usr/lib/libsqlite3.dylib if you choose a Reference Type of Absolute Path. This location
is a lot easier to remember, but absolute paths are more fragile and often discouraged. Relative paths are
safer and less likely to break in future versions, although in the case of libsqlite3.dylib, it’s probably safe to
link with an absolute path.
Next, make the following changes to PersistenceViewController.h:
#import <UIKit/UIKit.h>
#import "/usr/include/sqlite3.h"
#define kFilename @"dataarchive.plist"
#define kDataKey @"Data"
#define kFilename @"data.sqlite3"
@interface PersistenceViewController : UIViewController {
IBOutlet UITextField *field1;
IBOutlet UITextField *field2;
IBOutlet UITextField *field3;
IBOutlet UITextField *field4;
sqlite3 *database;}
@property (nonatomic, retain) UITextField *field1;
@property (nonatomic, retain) UITextField *field2;
@property (nonatomic, retain) UITextField *field3;
@property (nonatomic, retain) UITextField *field4;
- (NSString *)dataFilePath;
- (void)applicationWillTerminate:(NSNotification *)notification;
@end
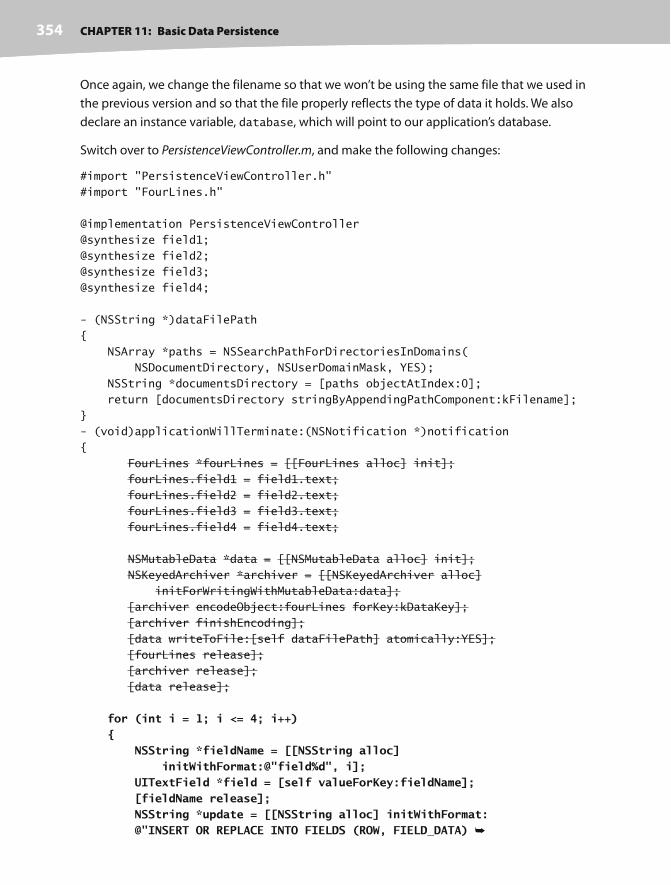
CHAPTER 11: Basic Data Persistence354
Once again, we change the filename so that we won’t be using the same file that we used in
the previous version and so that the file properly reflects the type of data it holds. We also
declare an instance variable, database, which will point to our application’s database.
Switch over to PersistenceViewController.m, and make the following changes:
#import "PersistenceViewController.h"
#import "FourLines.h"
@implementation PersistenceViewController
@synthesize field1;
@synthesize field2;
@synthesize field3;
@synthesize field4;
- (NSString *)dataFilePath
{
NSArray *paths = NSSearchPathForDirectoriesInDomains(
NSDocumentDirectory, NSUserDomainMask, YES);
NSString *documentsDirectory = [paths objectAtIndex:0];
return [documentsDirectory stringByAppendingPathComponent:kFilename];
}
- (void)applicationWillTerminate:(NSNotification *)notification
{
FourLines *fourLines = [[FourLines alloc] init];
fourLines.field1 = field1.text;
fourLines.field2 = field2.text;
fourLines.field3 = field3.text;
fourLines.field4 = field4.text;
NSMutableData *data = [[NSMutableData alloc] init];
NSKeyedArchiver *archiver = [[NSKeyedArchiver alloc]
initForWritingWithMutableData:data];
[archiver encodeObject:fourLines forKey:kDataKey];
[archiver finishEncoding];
[data writeToFile:[self dataFilePath] atomically:YES];
[fourLines release];
[archiver release];
[data release];
for (int i = 1; i <= 4; i++) { NSString *fieldName = [[NSString alloc] initWithFormat:@"field%d", i]; UITextField *field = [self valueForKey:fieldName]; [fieldName release]; NSString *update = [[NSString alloc] initWithFormat: @"INSERT OR REPLACE INTO FIELDS (ROW, FIELD_DATA)

CHAPTER 11: Basic Data Persistence 355
VALUES (%d, '%@');", i, field.text]; char * errorMsg;
if (sqlite3_exec (database, [update UTF8String], NULL, NULL, &errorMsg) != SQLITE_OK) { NSAssert1(0, @"Error updating tables: %s", errorMsg); sqlite3_free(errorMsg); } } sqlite3_close(database);
}
#pragma mark -
- (void)viewDidLoad {
NSString *filePath = [self dataFilePath];
if ([[NSFileManager defaultManager] fileExistsAtPath:filePath])
{
NSData *data = [[NSMutableData alloc]
initWithContentsOfFile:[self dataFilePath]];
NSKeyedUnarchiver *unarchiver =
[[NSKeyedUnarchiver alloc] initForReadingWithData:data];
FourLines *fourLines = [unarchiver decodeObjectForKey:kDataKey];
[unarchiver finishDecoding];
field1.text = fourLines.field1;
field2.text = fourLines.field2;
field3.text = fourLines.field3;
field4.text = fourLines.field4;
[unarchiver release];
[data release];
}
if (sqlite3_open([[self dataFilePath] UTF8String], &database) != SQLITE_OK) { sqlite3_close(database); NSAssert(0, @"Failed to open database"); }
char *errorMsg; NSString *createSQL = @"CREATE TABLE IF NOT EXISTS FIELDS (ROW INTEGER PRIMARY KEY, FIELD_DATA TEXT);"; if (sqlite3_exec (database, [createSQL UTF8String], NULL, NULL, &errorMsg) != SQLITE_OK) { sqlite3_close(database); NSAssert1(0, @"Error creating table: %s", errorMsg); }

CHAPTER 11: Basic Data Persistence356
NSString *query = @"SELECT ROW, FIELD_DATA FROM FIELDS ORDER BY ROW"; sqlite3_stmt *statement; if (sqlite3_prepare_v2( database, [query UTF8String], -1, &statement, nil) == SQLITE_OK) { while (sqlite3_step(statement) == SQLITE_ROW) { int row = sqlite3_column_int(statement, 0); char *rowData = (char *)sqlite3_column_text(statement, 1);
NSString *fieldName = [[NSString alloc] initWithFormat:@"field%d", row]; NSString *fieldValue = [[NSString alloc] initWithUTF8String:rowData]; UITextField *field = [self valueForKey:fieldName]; field.text = fieldValue; [fieldName release]; [fieldValue release]; } sqlite3_finalize(statement); }
UIApplication *app = [UIApplication sharedApplication];
[[NSNotificationCenter defaultCenter] addObserver:self
selector:@selector(applicationWillTerminate:)
name:UIApplicationWillTerminateNotification
object:app];
[super viewDidLoad];
}
- (BOOL)shouldAutorotateToInterfaceOrientation:
(UIInterfaceOrientation)interfaceOrientation {
// Return YES for supported orientations
return (interfaceOrientation == UIInterfaceOrientationPortrait);
}
- (void)didReceiveMemoryWarning {
[super didReceiveMemoryWarning];
// Releases the view if it doesn't have a superview
// Release anything that's not essential, such as cached data
}
- (void)dealloc {
[field1 release];
[field2 release];
[field3 release];
[field4 release];
[super dealloc];

CHAPTER 11: Basic Data Persistence 357
}
@end
Let’s take a look at these changes. Hmm?
The first changes we made are in the applicationWillTerminate: method, where we
need to save our application data. Because the data in the database is stored in a table, our
application’s data will look something like Table 11-1 when stored.
Table 11-1. Data Stored in the FIELDS Table of the Database
ROW FIELD_DATA
1 Four score and seven years ago
2 Our fathers brought forth on this
3 Continent, a new nation, conceived
4 In Liberty, and dedicated to the
To save the data, we loop through all four fields and issue a separate command to update
each row of the database. Here’s our loop, and the first thing we do in the loop is craft a field
name so we can retrieve the correct text field outlet. Remember, valueForKey: allows you
to retrieve a property based on its name.
for (int i = 1; i <= 4; i++)
{
NSString *fieldName = [[NSString alloc]
initWithFormat:@"field%d", i];
UITextField *field = [self valueForKey:fieldName];
We then use the value from the text field to craft an INSERT OR REPLACE SQL statement.
This statement will insert our data into the database if it’s not already there, or it will update
the existing row whose row number matches if there already is one:
NSString *update = [[NSString alloc] initWithFormat:
@"INSERT OR REPLACE INTO FIELDS (ROW, FIELD_DATA)
VALUES (%d, '%@');", i, field.text];
Next, we execute the SQL INSERT OR REPLACE against our database:
char * errorMsg;
if (sqlite3_exec (database, [update UTF8String], NULL, NULL,
&errorMsg) != SQLITE_OK) {
NSAssert1(0, @"Error updating tables: %s", errorMsg);
}
}

CHAPTER 11: Basic Data Persistence358
Notice that we’ve used an assertion here if we encountered an error. We use assertions rather
than exceptions or manual error checking, because this condition should only happen if we,
the developers, make a mistake. Using this assertion macro will help us debug our code, and
it can be stripped out of our final application. If an error condition is one that a user might
reasonably experience, you should probably use some other form of error checking.
Once we’re done with the loop, we close the database, and we’re finished with this method’s
changes:
sqlite3_close(database);
The only other new code is in the viewDidLoad method. The first thing we do is open the
database. If we hit a problem opening the database, we close it and raise an assertion:
if (sqlite3_open([[self dataFilePath] UTF8String], &database)
!= SQLITE_OK) {
sqlite3_close(database);
NSAssert(0, @"Failed to open database");
}
Next, we have to make sure that we have a table to hold our data. We can use SQL CREATE
TABLE to do that. By specifying IF NOT EXISTS, we prevent the database from overwrit-
ing existing data. If there is already a table with the same name, this command quietly exits
without doing anything, so it’s safe to call every time our application launches without
explicitly checking to see if a table exists.
char *errorMsg;
NSString *createSQL = @"CREATE TABLE IF NOT EXISTS FIELDS
(ROW INTEGER PRIMARY KEY, FIELD_DATA TEXT);";
if (sqlite3_exec (database, [createSQL UTF8String], NULL, NULL,
&errorMsg) != SQLITE_OK) {
sqlite3_close(database);
NSAssert1(0, @"Error creating table: %s", errorMsg);
}
Finally, we need to load our data. We do this using a SQL SELECT statement. In this simple
example, we create a SQL SELECT that requests all the rows from the database and ask
SQLite3 to prepare our SELECT. We also tell SQLite to order the rows by the row number so
that we always get them back in the same order. Absent this, SQLite will return the rows in
the order in which they are stored internally.
NSString *query = @"SELECT ROW, FIELD_DATA FROM FIELDS ORDER BY ROW";
sqlite3_stmt *statement;
if (sqlite3_prepare_v2( database, [query UTF8String],
-1, &statement, nil) == SQLITE_OK) {

CHAPTER 11: Basic Data Persistence 359
Then, we step through each of the returned rows:
while (sqlite3_step(statement) == SQLITE_ROW) {
We grab the row number and store it in an int, and then we grab the field data as a C string:
int row = sqlite3_column_int(statement, 0);
char *rowData = (char *)sqlite3_column_text(statement, 1);
Next, we create a field name based on the row number (e.g., field1 for row 1), convert the
C string to an NSString, and use that to set the appropriate field with the value retrieved
from the database:
NSString *fieldName = [[NSString alloc]
initWithFormat:@"field%d", row];
NSString *fieldValue = [[NSString alloc]
initWithUTF8String:rowData];
UITextField *field = [self valueForKey:fieldName];
field.text = fieldValue;
Finally, we do some memory cleanup, and we’re all done:
[fieldName release];
[fieldValue release];
}
}
Why don’t you compile and run and try it out? Enter some data, and press the iPhone simu-
lator’s home button. Then, relaunch the Persistence application, and on launch, that data
should be right where you left it. As far as the user is concerned, there’s absolutely no differ-
ence between the three different versions of this application, but each version used a very
different persistence mechanism.
Persistence RewardedYou should now have a solid handle on three different ways of preserving your application
data between sessions—four ways if you include the user defaults that you learned how
to use in the last chapter. We built an application that persisted data using property lists
and modified the application to save its data using object archives. We then made one final
change and used the iPhone’s built- in SQLite3 mechanism to save the application data.
These mechanisms are the basic building blocks for saving and loading data in almost all
iPhone applications.
Ready for more? Time to drag out your crayons, because in the next chapter, you’re going to
learn how to draw. Cool!

361
e
Chapter 12Drawing with Quartz and OpenGL
very application we’ve built so far has been constructed from views and controls
provided to us as part of the UIKit framework. You can do an awful lot with these
stock components, and a great many application interfaces can be constructed
using only these stock objects. Some applications, however, can’t be fully real-
ized without looking further. For instance, at times, an application needs to be
able to do custom drawing. Fortunately for us, we have not one but two sepa-
rate libraries we can call on for our drawing needs: Quartz 2D, which is part of
the Core Graphics framework, and OpenGL ES, which is a cross- platform graph-
ics library. OpenGL ES is a slimmed down version of another cross- platform
graphic library called OpenGL. OpenGL ES is a subset of OpenGL designed spe-
cifically for embedded systems such as the iPhone (hence the letters “ES”). In this
chapter, we’ll explore both of these powerful graphics environments. We’ll build
sample applications in both and try to get a sense of which environment to
use when.

CHAPTER 12: Drawing with Quartz and OpenGL362
Two Views of a Graphical WorldAlthough Quartz and OpenGL overlap a lot, there are distinct differences between them.
Quartz is a set of functions, datatypes, and objects designed to let you draw directly into
a view or to an image in memory.
Quartz treats the view or image that is being drawn into as a virtual canvas and follows
what’s called a painter’s model, which is just a fancy way to say that that drawing com-
mands are applied in much the same way as paint is applied to a canvas. If a painter paints
an entire canvas red, and then paints the bottom half of the canvas blue, the canvas will be
half red and half either blue or purple. Blue if the paint is opaque; purple if the paint is semi-
transparent.
Quartz’s virtual canvas works the same way. If you paint the whole view red, and then paint
the bottom half of the view blue, you’ll have a view that’s half red and half either blue or
purple, depending on whether the second drawing action was fully opaque or partially
transparent. Each drawing action is applied to the canvas on top of any previous drawing
actions.
On the other hand, OpenGL ES, is implemented as a state machine. This concept is some-
what more difficult concept to grasp, because it doesn’t resolve to a simple metaphor like
painting on a virtual canvas. Instead of letting you take actions that directly impact a view,
window, or image, OpenGL ES maintains a virtual three- dimensional world. As you add
objects to that world, OpenGL keeps track of the state of all objects. Instead of a virtual can-
vas, OpenGL ES gives you a virtual window into its world. You add objects to the world and
define the location of your virtual window with respect to the world. OpenGL then draws
what you can see through that window based on the way its configured and where the vari-
ous objects are in relation to each other. This concept is a bit abstract, so if you’re confused,
don’t worry; it’ll make more sense as we make our way through this chapter’s code.
Quartz is relatively easy to use. It provides a variety of line, shape, and image drawing func-
tions. Though easy to use, Quartz 2D is limited to two- dimensional drawing. Although many
Quartz functions do result in drawing that takes advantage of hardware acceleration, there is
no guarantee that any particular action you take in Quartz will be accelerated.
OpenGL, though considerably more complex and conceptually more difficult, offers a lot
more power. It has tools for both two- dimensional and three- dimensional drawing and is
specifically designed to take full advantage of hardware acceleration. Because it can keep
track of the state of a virtual world, it’s also extremely well suited to writing games and other
complex, graphics- intensive programs.
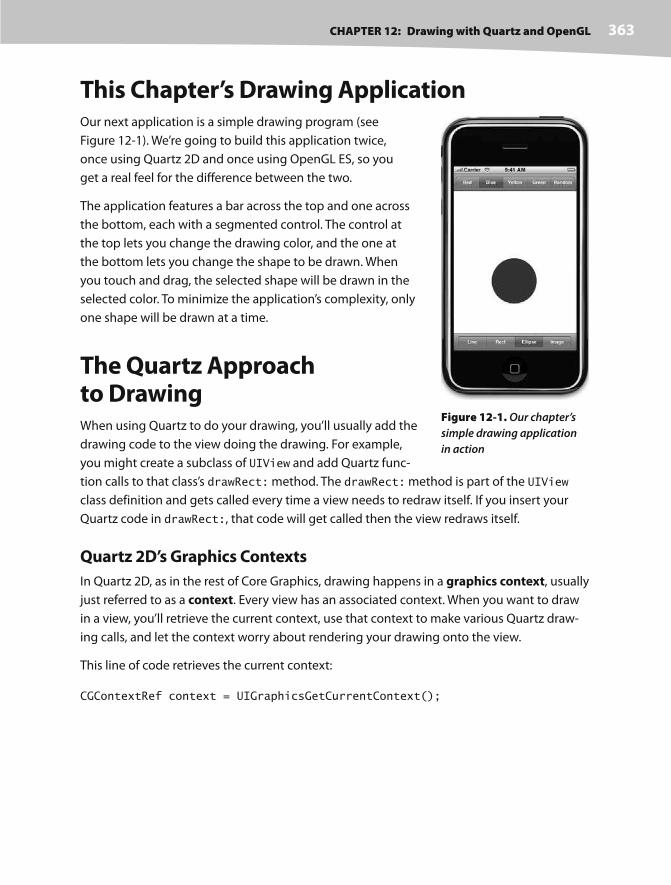
CHAPTER 12: Drawing with Quartz and OpenGL 363
This Chapter’s Drawing ApplicationOur next application is a simple drawing program (see
Figure 12-1). We’re going to build this application twice,
once using Quartz 2D and once using OpenGL ES, so you
get a real feel for the difference between the two.
The application features a bar across the top and one across
the bottom, each with a segmented control. The control at
the top lets you change the drawing color, and the one at
the bottom lets you change the shape to be drawn. When
you touch and drag, the selected shape will be drawn in the
selected color. To minimize the application’s complexity, only
one shape will be drawn at a time.
The Quartz Approach to DrawingWhen using Quartz to do your drawing, you’ll usually add the
drawing code to the view doing the drawing. For example,
you might create a subclass of UIView and add Quartz func-
tion calls to that class’s drawRect: method. The drawRect: method is part of the UIView
class definition and gets called every time a view needs to redraw itself. If you insert your
Quartz code in drawRect:, that code will get called then the view redraws itself.
Quartz 2D’s Graphics Contexts
In Quartz 2D, as in the rest of Core Graphics, drawing happens in a graphics context, usually
just referred to as a context. Every view has an associated context. When you want to draw
in a view, you’ll retrieve the current context, use that context to make various Quartz draw-
ing calls, and let the context worry about rendering your drawing onto the view.
This line of code retrieves the current context:
CGContextRef context = UIGraphicsGetCurrentContext();
Figure 12-1. Our chapter’s
simple drawing application
in action
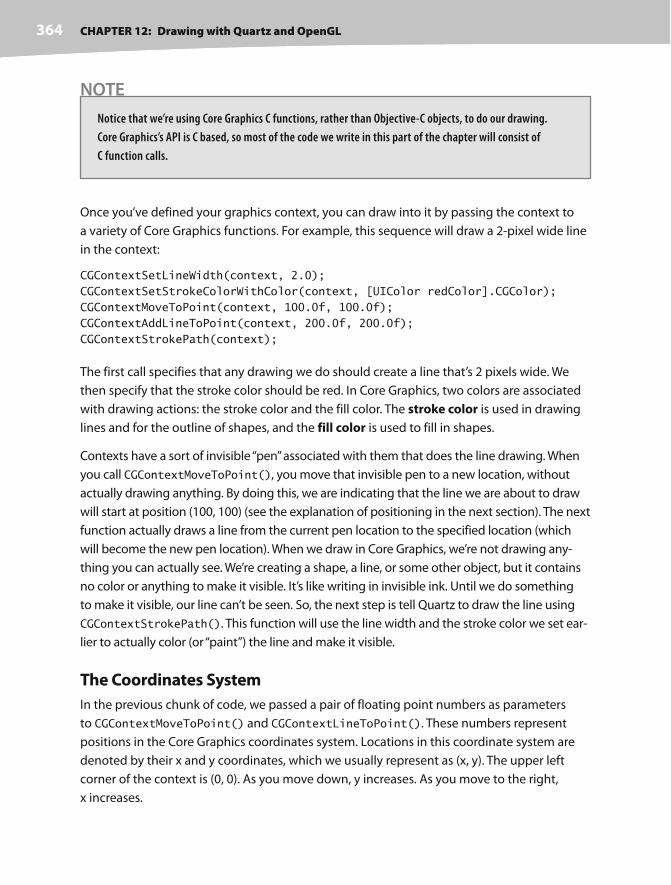
CHAPTER 12: Drawing with Quartz and OpenGL364
NOTE
Notice that we’re using Core Graphics C functions, rather than Objective- C objects, to do our drawing.
Core Graphics’s API is C based, so most of the code we write in this part of the chapter will consist of
C function calls.
Once you’ve defined your graphics context, you can draw into it by passing the context to
a variety of Core Graphics functions. For example, this sequence will draw a 2- pixel wide line
in the context:
CGContextSetLineWidth(context, 2.0);
CGContextSetStrokeColorWithColor(context, [UIColor redColor].CGColor);
CGContextMoveToPoint(context, 100.0f, 100.0f);
CGContextAddLineToPoint(context, 200.0f, 200.0f);
CGContextStrokePath(context);
The first call specifies that any drawing we do should create a line that’s 2 pixels wide. We
then specify that the stroke color should be red. In Core Graphics, two colors are associated
with drawing actions: the stroke color and the fill color. The stroke color is used in drawing
lines and for the outline of shapes, and the fill color is used to fill in shapes.
Contexts have a sort of invisible “pen” associated with them that does the line drawing. When
you call CGContextMoveToPoint(), you move that invisible pen to a new location, without
actually drawing anything. By doing this, we are indicating that the line we are about to draw
will start at position (100, 100) (see the explanation of positioning in the next section). The next
function actually draws a line from the current pen location to the specified location (which
will become the new pen location). When we draw in Core Graphics, we’re not drawing any-
thing you can actually see. We’re creating a shape, a line, or some other object, but it contains
no color or anything to make it visible. It’s like writing in invisible ink. Until we do something
to make it visible, our line can’t be seen. So, the next step is tell Quartz to draw the line using
CGContextStrokePath(). This function will use the line width and the stroke color we set ear-
lier to actually color (or “paint”) the line and make it visible.
The Coordinates System
In the previous chunk of code, we passed a pair of floating point numbers as parameters
to CGContextMoveToPoint() and CGContextLineToPoint(). These numbers represent
positions in the Core Graphics coordinates system. Locations in this coordinate system are
denoted by their x and y coordinates, which we usually represent as (x, y). The upper left
corner of the context is (0, 0). As you move down, y increases. As you move to the right,
x increases.
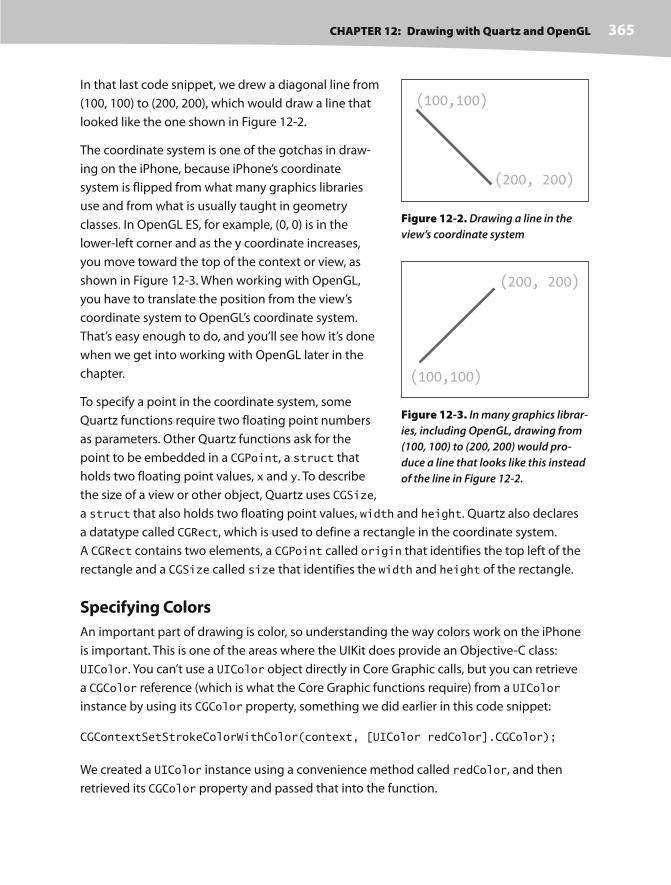
CHAPTER 12: Drawing with Quartz and OpenGL 365
In that last code snippet, we drew a diagonal line from
(100, 100) to (200, 200), which would draw a line that
looked like the one shown in Figure 12-2.
The coordinate system is one of the gotchas in draw-
ing on the iPhone, because iPhone’s coordinate
system is flipped from what many graphics libraries
use and from what is usually taught in geometry
classes. In OpenGL ES, for example, (0, 0) is in the
lower- left corner and as the y coordinate increases,
you move toward the top of the context or view, as
shown in Figure 12-3. When working with OpenGL,
you have to translate the position from the view’s
coordinate system to OpenGL’s coordinate system.
That’s easy enough to do, and you’ll see how it’s done
when we get into working with OpenGL later in the
chapter.
To specify a point in the coordinate system, some
Quartz functions require two floating point numbers
as parameters. Other Quartz functions ask for the
point to be embedded in a CGPoint, a struct that
holds two floating point values, x and y. To describe
the size of a view or other object, Quartz uses CGSize,
a struct that also holds two floating point values, width and height. Quartz also declares
a datatype called CGRect, which is used to define a rectangle in the coordinate system.
A CGRect contains two elements, a CGPoint called origin that identifies the top left of the
rectangle and a CGSize called size that identifies the width and height of the rectangle.
Specifying Colors
An important part of drawing is color, so understanding the way colors work on the iPhone
is important. This is one of the areas where the UIKit does provide an Objective- C class:
UIColor. You can’t use a UIColor object directly in Core Graphic calls, but you can retrieve
a CGColor reference (which is what the Core Graphic functions require) from a UIColor
instance by using its CGColor property, something we did earlier in this code snippet:
CGContextSetStrokeColorWithColor(context, [UIColor redColor].CGColor);
We created a UIColor instance using a convenience method called redColor, and then
retrieved its CGColor property and passed that into the function.
(100,100)
(200, 200)
Figure 12-2. Drawing a line in the
view’s coordinate system
(100,100)
(200, 200)
Figure 12-3. In many graphics librar-
ies, including OpenGL, drawing from
(100, 100) to (200, 200) would pro-
duce a line that looks like this instead
of the line in Figure 12-2.

CHAPTER 12: Drawing with Quartz and OpenGL366
A Bit of Color Theory for Your iPhone’s Display
In modern computer graphics, a very common way to represent colors is to use four com-
ponents: red, green, blue, and alpha. In Quartz 2D, these values are of type CGFloat (which,
on the iPhone, is the same as a float) and hold a value between 0 and 1. The first three are
fairly easy to understand, as they represent the additive primary colors or the RGB color
model (see Figure 12-4). Combining these three colors in different proportions results in
different colors. If you add together light of these three shades in equal proportions, the
result will appear to the eye as either white or a shade of grey depending on the intensity of
the light mixed. Combining the three additive primaries in different proportions, gives you
range of different colors, referred to as a gamut.
Figure 12-4. A simple representation of the additive primary colors
that make up the RGB color model
In grade school, you probably learned that the primary colors are red, yellow, and blue. These
primaries, which are known as the historical subtractive primaries or the RYB color model,
have little application in modern color theory and are almost never used in computer graphics.
The color gamut of the RYB color model is extremely limited, and this model doesn’t lend itself
easily to mathematical definition. As much as we hate to tell you that your wonderful third
grade art teacher, Mrs. Smedlee, was wrong about anything, well, in the context of computer
graphics, she was. Repeat after us, “The primary colors are red, green, and blue.”

CHAPTER 12: Drawing with Quartz and OpenGL 367
More Than Color Meets the Eye
In addition to red, green, and blue, Quartz 2D (and OpenGL ES) have another component,
called alpha, which represents how transparent a color is. Alpha is used, when drawing one
color on top of another color, to determine the final color that gets drawn. With an alpha
of 1.0, the drawn color is 100 percent opaque and obscures any colors beneath it. With any
value less than 1.0, the colors below will show through and mix. When an alpha compo-
nent is used, the color model is sometimes referred to as the RGBA color model, although
technically speaking, the alpha isn’t really part of the color; it just defines how the color will
interact with other colors when it is drawn.
Although the RGB model is the most commonly used in computer graphics, it is not the only
color model. Several others are in use, including hue, saturation, value (HSV); hue, saturation,
lightness (HSL); cyan, magenta, yellow, key (CMYK), which is used in four- color printing; and
grayscale. To make matters even more confusing, there are different versions of the RGB color
space. Fortunately, for most operations, we don’t have to worry about the color model that
is being used. We can just pass the CGColor from our UIColor object and Core Graphics will
handle any necessary conversions. When working with OpenGL ES, it’s important to keep in
mind that Quartz supports other color models, because OpenGL ES requires colors to be
specified in RGBA.
UIColor has a large number of convenience methods that return UIColor objects initialized
to a specific color. In our previous code sample, we used the redColor method to get a color
initialized to red. Fortunately for us, the UIColor instances created by these convenience
methods all use the RGBA color model.
If you need more control over color, instead of using a convenience method, you can create
a color by specifying all four of the components. Here’s an example:
return [UIColor colorWithRed:1.0f green:0.0f blue:0.0f alpha:1.0f];
Drawing Images in Context
Quartz 2D allows you to draw images directly into a context. This is another example of an
Objective- C class (UIImage) that you can use as an alternative to working with a Core Graph-
ics data structure (CGImage). The UIImage class contains methods to draw its image into the
current context. You’ll need to identify where the image should appear in the context by
specifying either a CGPoint to identify the image’s upper- left corner or a CGRect to frame
the image—resized, if necessary, to fit the frame. You can draw a UIImage into the current
context like so:
CGPoint drawPoint = CGPointMake(100.0f, 100.0f);
[image drawAtPoint:drawPoint];

CHAPTER 12: Drawing with Quartz and OpenGL368
Drawing Shapes: Polygons, Lines, and Curves
Quartz 2D provides a number of functions to make it easier to create complex shapes. To
draw a rectangle or a polygon, you don’t have to calculate angles, draw lines, or do any math
at all, really. You can just call a Quartz function to do the work for you. For example, to draw
an ellipse, you define the rectangle into which the ellipse needs to fit and let Core Graphics
do the work:
CGRect theRect = CGMakeRect(0,0,100,100);
CGContextAddEllipseInRect(context, theRect);
CGContextDrawPath(context, kCGPathFillStroke);
There are similar methods for rectangles. There are also methods that let you create more com-
plex shapes, such as arcs and Bezier paths. To learn more about arcs and Bezier paths in Quartz,
check out the Quartz 2D Programming Guide in the iPhone Dev Center at http://developer.
apple.com/documentation/GraphicsImaging/Conceptual/drawingwithquartz2d/dq_
intro/chapter_1_section_1.html or in Xcode’s online documentation.
Quartz 2D Tool Sampler: Patterns, Gradients, and Dash Patterns
Although not as expansive as OpenGL, Quartz 2D does offer quite an impressive array of
tools, and many of these other tools are also beyond the scope of this book, but you should
know they exist. For example, Quart 2D supports filling polygons with gradients, not just
solid colors, and supports not only solid lines but an assortment of dash patterns. Take a look
at the screen shots in Figure 12-5, which are taken from Apple’s QuartzDemo sample code,
to see a sampling of what Quartz 2D can do for you.
Now that you have a basic understanding of how Quartz 2D works and what it is capable of,
let’s try it out.
Building the QuartzFun ApplicationIn Xcode, create a new project using the view- based application template, and call it Quartz-
Fun. Once it’s created, expand the Classes and Resources folders, and single- click the Classes
folder so we can add our classes. The template already provided us with an application dele-
gate and a view controller. We’re going to be executing our custom drawing in a view, so we
need to create a subclass of UIView where we’ll do the drawing by overriding the drawRect:
method. Create a new Cocoa Touch Classes file, and select the UIView subclass template. Call
the file QuartzFunView.m, and be sure to create the header as well.
We’re going to define some constants, as we’ve done several times, but this time, our con-
stants are going to be needed by more than one class and don’t relate to one specific class.
We’re going to create a header file just for the constants, so create a new file, selecting the
Empty File template from the Other heading and calling it Constants.h.
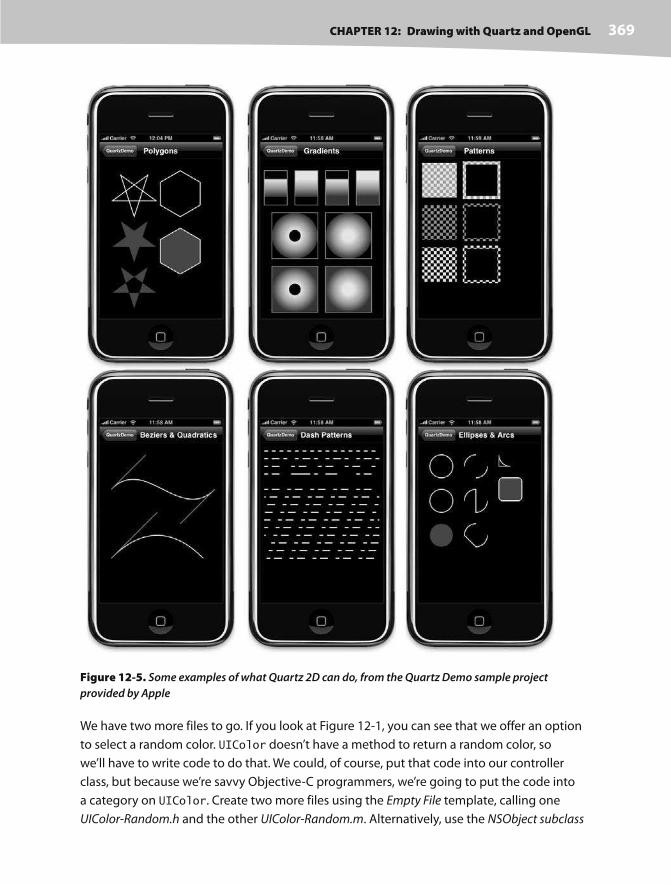
CHAPTER 12: Drawing with Quartz and OpenGL 369
Figure 12-5. Some examples of what Quartz 2D can do, from the Quartz Demo sample project
provided by Apple
We have two more files to go. If you look at Figure 12-1, you can see that we offer an option
to select a random color. UIColor doesn’t have a method to return a random color, so
we’ll have to write code to do that. We could, of course, put that code into our controller
class, but because we’re savvy Objective- C programmers, we’re going to put the code into
a category on UIColor. Create two more files using the Empty File template, calling one
UIColor- Random.h and the other UIColor- Random.m. Alternatively, use the NSObject subclass
CHAPTER 12: Drawing with Quartz and OpenGL370
template to create UIColor- Random.m, and let the template create UIColor- Random.h for you
automatically; then, delete the contents of the two files.
Creating a Random Color
Let’s tackle the category first. In UIColor- Random.h, place the following code:
#import <UIKit/UIKit.h>
@interface UIColor(Random)
+(UIColor *)randomColor;
@end
Now, switch over to UIColor- Random.m, and add this:
#import "UIColor- Random.h"
@implementation UIColor(Random)
+(UIColor *)randomColor
{
static BOOL seeded = NO;
if (!seeded) {
seeded = YES;
srandom(time(NULL));
}
CGFloat red = (CGFloat)random()/(CGFloat)RAND_MAX;
CGFloat blue = (CGFloat)random()/(CGFloat)RAND_MAX;
CGFloat green = (CGFloat)random()/(CGFloat)RAND_MAX;
return [UIColor colorWithRed:red green:green blue:blue alpha:1.0f];
}
@end
This is fairly straightforward. We declare a static variable that tells us if this is the first time
through the method. The first time this method is called during an application’s run, we will
seed the random number generator. Doing this here means we don’t have to rely on the
application doing it somewhere else, and as a result, we can reuse this category in other
iPhone projects.
Once we’ve made sure the random number generator is seeded, we generate three random
CGFloats with a value between 0.0 and 1.0, and use those three values to create a new color.
We set alpha to 1.0 so that all generated colors will be opaque.
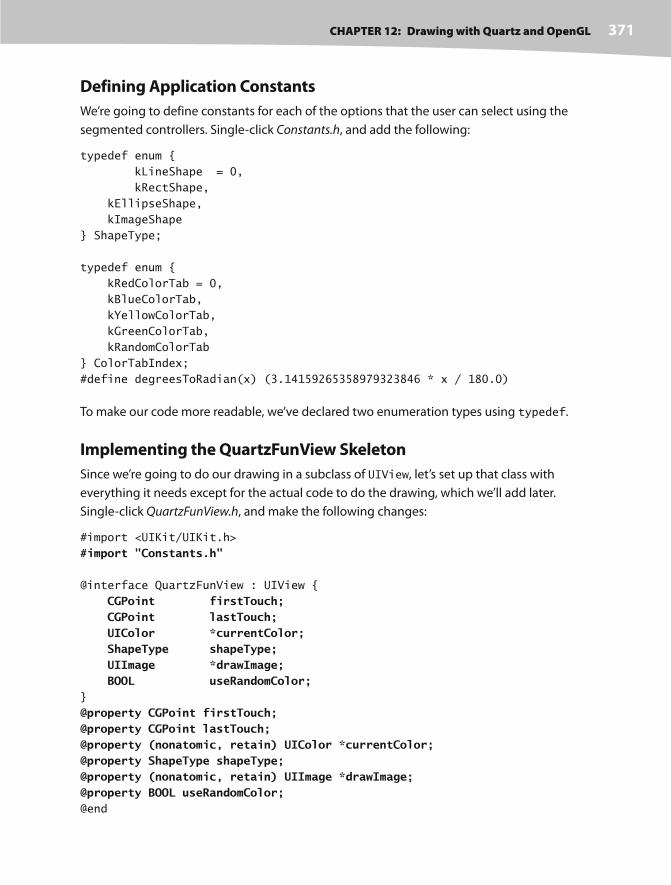
CHAPTER 12: Drawing with Quartz and OpenGL 371
Defining Application Constants
We’re going to define constants for each of the options that the user can select using the
segmented controllers. Single- click Constants.h, and add the following:
typedef enum {
kLineShape = 0,
kRectShape,
kEllipseShape,
kImageShape
} ShapeType;
typedef enum {
kRedColorTab = 0,
kBlueColorTab,
kYellowColorTab,
kGreenColorTab,
kRandomColorTab
} ColorTabIndex;
#define degreesToRadian(x) (3.14159265358979323846 * x / 180.0)
To make our code more readable, we’ve declared two enumeration types using typedef.
Implementing the QuartzFunView Skeleton
Since we’re going to do our drawing in a subclass of UIView, let’s set up that class with
everything it needs except for the actual code to do the drawing, which we’ll add later.
Single- click QuartzFunView.h, and make the following changes:
#import <UIKit/UIKit.h>
#import "Constants.h"
@interface QuartzFunView : UIView {
CGPoint firstTouch; CGPoint lastTouch; UIColor *currentColor; ShapeType shapeType; UIImage *drawImage; BOOL useRandomColor;}
@property CGPoint firstTouch;@property CGPoint lastTouch;@property (nonatomic, retain) UIColor *currentColor;@property ShapeType shapeType;@property (nonatomic, retain) UIImage *drawImage;@property BOOL useRandomColor;@end

CHAPTER 12: Drawing with Quartz and OpenGL372
The first thing we do is import the Constants.h header we just
created so we can make use of our enumerations. We then
declare our instance variables. The first two will track the
user’s finger as it drags across the screen. We’ll store the loca-
tion where the user first touches the screen in firstTouch.
We’ll store the location of the user’s finger while dragging
and when the drag ends in lastTouch. Our drawing code
will use these two variables to determine where to draw the
requested shape.
Next, we define a color to hold the user’s color selection and
a ShapeType to keep track of the shape the user wants drawn.
After that is a UIImage property that will hold the image to
be drawn on the screen when the user selects the rightmost
toolbar item on the bottom toolbar (see Figure 12-6). The
last property is a Boolean that will be used to keep track of
whether the user is requesting a random color.
Switch to QuartzFunView.m, and make the following changes:
#import "QuartzFunView.h"
#import "UIColor- Random.h"@implementation QuartzFunView
@synthesize firstTouch;@synthesize lastTouch;@synthesize currentColor;@synthesize shapeType;@synthesize drawImage;@synthesize useRandomColor;
- (id)initWithCoder:(NSCoder*)coder{ if ( ( self = [super initWithCoder:coder] ) ) { self.currentColor = [UIColor redColor]; self.useRandomColor = NO; if (drawImage == nil) self.drawImage = [UIImage imageNamed:@"iphone.png"]; } return self;}- (void)drawRect:(CGRect)rect {
// Drawing code
}
- (void)touchesBegan:(NSSet *)touches withEvent:(UIEvent *)event {
Figure 12-6. When draw-
ing a UIImage to the screen,
notice that the color control
disappears.
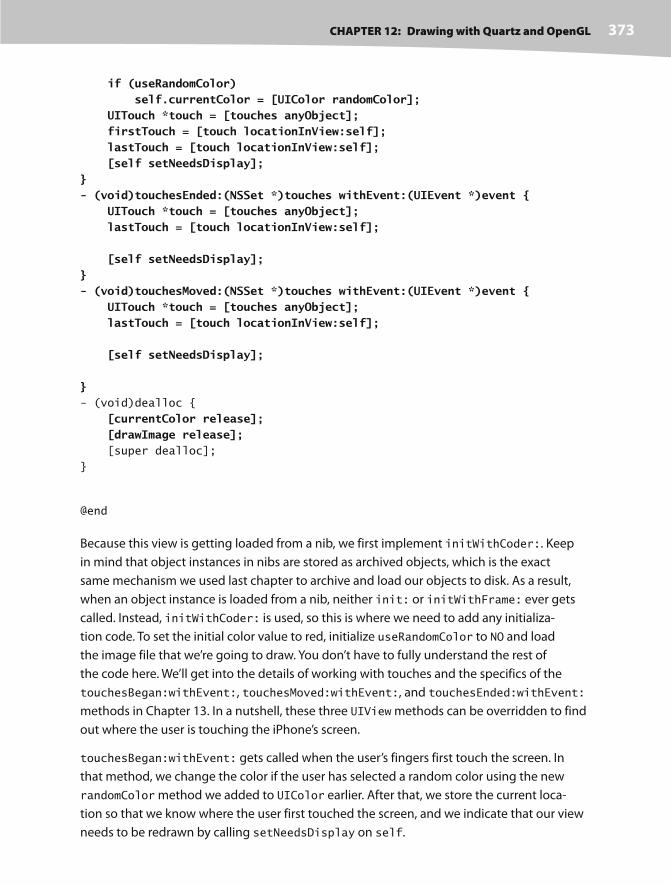
CHAPTER 12: Drawing with Quartz and OpenGL 373
if (useRandomColor) self.currentColor = [UIColor randomColor]; UITouch *touch = [touches anyObject]; firstTouch = [touch locationInView:self]; lastTouch = [touch locationInView:self]; [self setNeedsDisplay];}- (void)touchesEnded:(NSSet *)touches withEvent:(UIEvent *)event { UITouch *touch = [touches anyObject]; lastTouch = [touch locationInView:self];
[self setNeedsDisplay];}- (void)touchesMoved:(NSSet *)touches withEvent:(UIEvent *)event { UITouch *touch = [touches anyObject]; lastTouch = [touch locationInView:self];
[self setNeedsDisplay];
}- (void)dealloc {
[currentColor release]; [drawImage release]; [super dealloc];
}
@end
Because this view is getting loaded from a nib, we first implement initWithCoder:. Keep
in mind that object instances in nibs are stored as archived objects, which is the exact
same mechanism we used last chapter to archive and load our objects to disk. As a result,
when an object instance is loaded from a nib, neither init: or initWithFrame: ever gets
called. Instead, initWithCoder: is used, so this is where we need to add any initializa-
tion code. To set the initial color value to red, initialize useRandomColor to NO and load
the image file that we’re going to draw. You don’t have to fully understand the rest of
the code here. We’ll get into the details of working with touches and the specifics of the
touchesBegan:withEvent:, touchesMoved:withEvent:, and touchesEnded:withEvent:
methods in Chapter 13. In a nutshell, these three UIView methods can be overridden to find
out where the user is touching the iPhone’s screen.
touchesBegan:withEvent: gets called when the user’s fingers first touch the screen. In
that method, we change the color if the user has selected a random color using the new
randomColor method we added to UIColor earlier. After that, we store the current loca-
tion so that we know where the user first touched the screen, and we indicate that our view
needs to be redrawn by calling setNeedsDisplay on self.

CHAPTER 12: Drawing with Quartz and OpenGL374
The next method, touchesMoved:withEvent:, gets continuously called while the user is
dragging a finger on the screen. All we do here is store off the new location in lastTouch
and indicate that the screen needs to be redrawn.
The last one, touchesEnded:withEvent:, gets called when the user lifts that finger off of
the screen. Just like in the touchesMoved:withEvent: method, all we do is store off the final
location in the lastTouch variable and indicate that the view needs to be redrawn.
Don’t worry if you don’t fully grok what the three methods that start with touches are doing;
we’ll be working on these in much greater detail in the next few chapters.
We’ll come back to this class once we have our application skeleton up and running. That
drawRect: method, which is currently empty except for a comment, is where we will do this
application’s real work, and we haven’t written that yet. Let’s finish setting up the application
before we add our drawing code.
Adding Outlets and Actions to the View Controller
If you refer to Figure 12-1, you’ll see that our interface includes two segmented controllers,
one at the top and one at the bottom of the screen. The one on top, which lets the user
select color, is only applicable to three of the four options on the bottom, so we’re going
to need an outlet to that top segmented controller, so we can hide it when it doesn’t serve
a purpose. We also need two methods, one that will be called when a new color is selected
and another that will be called when a new shape is selected.
Single-click QuartzFunViewController.h, and make the following changes:
#import <UIKit/UIKit.h>
@interface QuartzFunViewController : UIViewController {
IBOutlet UISegmentedControl *colorControl;
}
@property (nonatomic, retain) UISegmentedControl *colorControl;- (IBAction)changeColor:(id)sender;- (IBAction)changeShape:(id)sender;@end
Nothing there should need explanation at this point, so switch over to
QuartzFunViewController.m, and make these changes:
#import "QuartzFunViewController.h"
#import "QuartzFunView.h"#import "UIColor- Random.h"#import "Constants.h"
@implementation QuartzFunViewController

CHAPTER 12: Drawing with Quartz and OpenGL 375
@synthesize colorControl;
- (IBAction)changeColor:(id)sender { UISegmentedControl *control = sender; NSInteger index = [control selectedSegmentIndex];
QuartzFunView *quartzView = (QuartzFunView *)self.view;
switch (index) { case kRedColorTab: quartzView.currentColor = [UIColor redColor]; quartzView.useRandomColor = NO; break; case kBlueColorTab: quartzView.currentColor = [UIColor blueColor]; quartzView.useRandomColor = NO; break; case kYellowColorTab: quartzView.currentColor = [UIColor yellowColor]; quartzView.useRandomColor = NO; break; case kGreenColorTab: quartzView.currentColor = [UIColor greenColor]; quartzView.useRandomColor = NO; break; case kRandomColorTab: quartzView.useRandomColor = YES; break; default: break; }}- (IBAction)changeShape:(id)sender { UISegmentedControl *control = sender; [(QuartzFunView *)self.view setShapeType:[control selectedSegmentIndex]];
if ([control selectedSegmentIndex] == kImageShape) colorControl.hidden = YES; else colorControl.hidden = NO;}
- (void)viewDidLoad {
[super viewDidLoad];
}

CHAPTER 12: Drawing with Quartz and OpenGL376
- (BOOL)shouldAutorotateToInterfaceOrientation:
(UIInterfaceOrientation)interfaceOrientation {
// Return YES for supported orientations
return (interfaceOrientation == UIInterfaceOrientationPortrait);
}
- (void)didReceiveMemoryWarning {
[super didReceiveMemoryWarning];
// Releases the view if it doesn't have a superview
// Release anything that's not essential, such as cached data
}
- (void)dealloc {
[colorControl release]; [super dealloc];
}
@end
Again, this code is pretty straightforward. In the changeColor: method, we look at which
segment was selected and create a new color based on that selection. We cast view to
QuartzFunView. Next, we set its currentColor property so that it knows what color to use
when drawing, except when a random color is selected, in which case, we just set the view’s
useRandomColor property to YES. Since all the drawing code will be in the view itself, we
don’t have to do anything else method.
In the changeShape: method, we do something similar. However, since we don’t need to
create an object, we can just set the view’s shapeType property to the segment index from
sender. Recall the ShapeType enum? The four elements of the enum correspond to the four
toolbar segments at the bottom of the application view. We set the shape to be the same
as the currently selected segment, and we hide and unhide the colorControl based on
whether the Image segment was selected.
Updating QuartzFunViewController.xib
Before we can start drawing, we need to add the segmented controls to our nib and then
hook up the actions and outlets. Double- click QuartzFunViewController.xib to open the file in
Interface Builder. The first order of business is to change the class of the view, so single- click
the View icon in the window labeled QuartzFunViewController.xib, and press 4 to open the
identity inspector. Change the class from UIView to QuartzFunView.
Next, look for a Navigation Bar in the library. Make sure you are grabbing a Navigation Bar—
not a Navigation Controller. We just want the bar that goes at the top of the view. Place the
Navigation Bar snugly against the top of the view window.

CHAPTER 12: Drawing with Quartz and OpenGL 377
Next, look for a Segmented Control in the library,
and drag that right on top of the Navigation Bar.
Once you drop it, it should stay selected, so grab
one of the resize dots on either side of the seg-
mented control and resize it so that it takes up the
entire width of the navigation bar. You won’t get
any blue guide lines, but Interface Builder won’t
let you make the bar any bigger than you want it
in this case, so just drag until it won’t expand any
further.
Press 1 to bring up the attributes inspector,
and change the number of segments from 2 to 5.
Double- click each segment in turn, changing its
label to (from left to right) Red, Blue, Yellow, Green,
and Random in that order. At this point, your View
window should look like Figure 12-7.
Control-drag from the File’s Owner icon to the seg-
mented control, and select the colorControl outlet.
Next, make sure the segmented control is selected,
and press 2 to bring up the connections inspec-
tor. Drag from the Value Changed event to File’s
Owner, and select the changeColor: action.
Now look for a Toolbar in the library, and drag one of those over to the bottom of the win-
dow. The Toolbar from the library has a button on it that we don’t need, so select it and press
the delete button on your keyboard. Once it’s placed and the button is deleted, grab another
Segmented Control, and drop it onto the toolbar.
As it turns out, segmented controls are a bit harder to center in a toolbar, so we’ll bring in
a little help. Drag a Flexible Space Bar Button Item from the library onto the toolbar, to the
left of our segmented control. Next, drag a second Flexible Space Bar Button Item onto the
toolbar, to the right of our segmented control. These items will keep the segmented control
centered in the toolbar as we resize it. Click the segmented control to select it, and resize it
so it fills the toolbar with a bit of space to the left and right.
Next, press 1 to bring up the attributes inspector, and change the number of segments
from 2 to 4. Change the titles of the four segments to be Line, Rect, Ellipse, and Image, in that
order. Switch to the connections inspector, and connect Value Changed event to File’s Owner’s
changeShape: action method. Save and close the nib, and go back to Xcode.
Figure 12-7. The completed navigation
bar
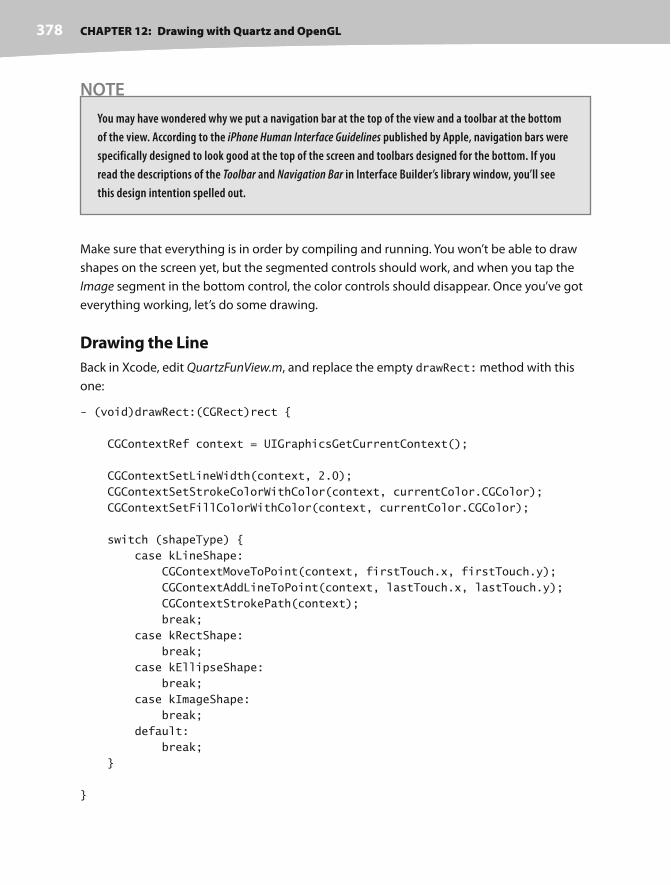
CHAPTER 12: Drawing with Quartz and OpenGL378
NOTE
You may have wondered why we put a navigation bar at the top of the view and a toolbar at the bottom
of the view. According to the iPhone Human Interface Guidelines published by Apple, navigation bars were
specifically designed to look good at the top of the screen and toolbars designed for the bottom. If you
read the descriptions of the Toolbar and Navigation Bar in Interface Builder’s library window, you’ll see
this design intention spelled out.
Make sure that everything is in order by compiling and running. You won’t be able to draw
shapes on the screen yet, but the segmented controls should work, and when you tap the
Image segment in the bottom control, the color controls should disappear. Once you’ve got
everything working, let’s do some drawing.
Drawing the Line
Back in Xcode, edit QuartzFunView.m, and replace the empty drawRect: method with this
one:
- (void)drawRect:(CGRect)rect {
CGContextRef context = UIGraphicsGetCurrentContext();
CGContextSetLineWidth(context, 2.0);
CGContextSetStrokeColorWithColor(context, currentColor.CGColor);
CGContextSetFillColorWithColor(context, currentColor.CGColor);
switch (shapeType) {
case kLineShape:
CGContextMoveToPoint(context, firstTouch.x, firstTouch.y);
CGContextAddLineToPoint(context, lastTouch.x, lastTouch.y);
CGContextStrokePath(context);
break;
case kRectShape:
break;
case kEllipseShape:
break;
case kImageShape:
break;
default:
break;
}
}
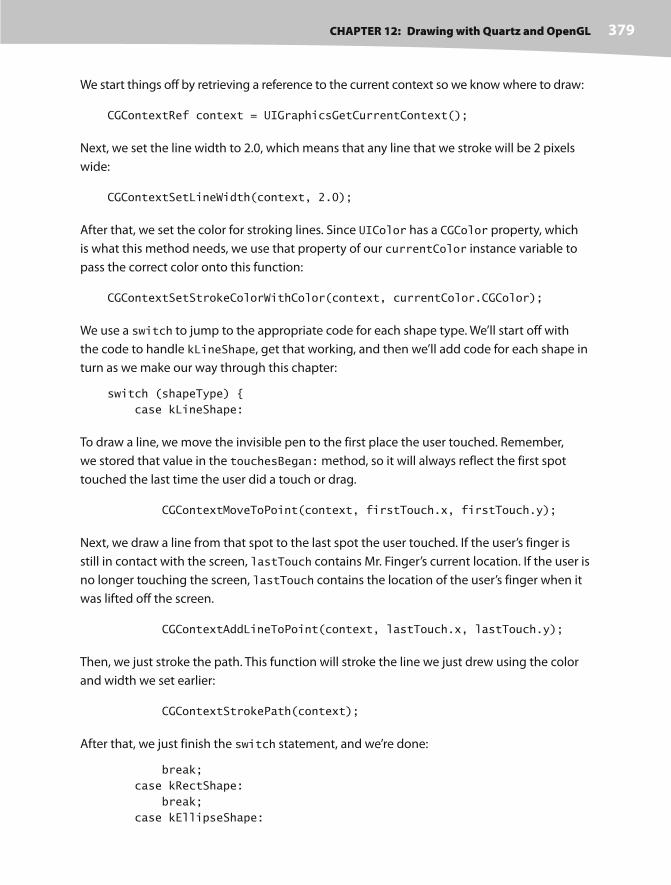
CHAPTER 12: Drawing with Quartz and OpenGL 379
We start things off by retrieving a reference to the current context so we know where to draw:
CGContextRef context = UIGraphicsGetCurrentContext();
Next, we set the line width to 2.0, which means that any line that we stroke will be 2 pixels
wide:
CGContextSetLineWidth(context, 2.0);
After that, we set the color for stroking lines. Since UIColor has a CGColor property, which
is what this method needs, we use that property of our currentColor instance variable to
pass the correct color onto this function:
CGContextSetStrokeColorWithColor(context, currentColor.CGColor);
We use a switch to jump to the appropriate code for each shape type. We’ll start off with
the code to handle kLineShape, get that working, and then we’ll add code for each shape in
turn as we make our way through this chapter:
switch (shapeType) {
case kLineShape:
To draw a line, we move the invisible pen to the first place the user touched. Remember,
we stored that value in the touchesBegan: method, so it will always reflect the first spot
touched the last time the user did a touch or drag.
CGContextMoveToPoint(context, firstTouch.x, firstTouch.y);
Next, we draw a line from that spot to the last spot the user touched. If the user’s finger is
still in contact with the screen, lastTouch contains Mr. Finger’s current location. If the user is
no longer touching the screen, lastTouch contains the location of the user’s finger when it
was lifted off the screen.
CGContextAddLineToPoint(context, lastTouch.x, lastTouch.y);
Then, we just stroke the path. This function will stroke the line we just drew using the color
and width we set earlier:
CGContextStrokePath(context);
After that, we just finish the switch statement, and we’re done:
break;
case kRectShape:
break;
case kEllipseShape:
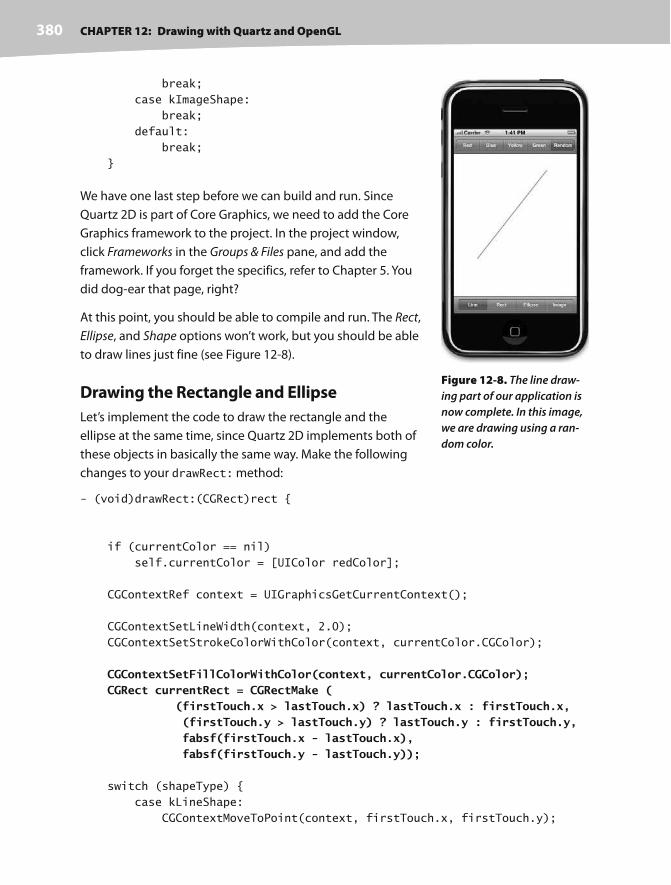
CHAPTER 12: Drawing with Quartz and OpenGL380
break;
case kImageShape:
break;
default:
break;
}
We have one last step before we can build and run. Since
Quartz 2D is part of Core Graphics, we need to add the Core
Graphics framework to the project. In the project window,
click Frameworks in the Groups & Files pane, and add the
framework. If you forget the specifics, refer to Chapter 5. You
did dog- ear that page, right?
At this point, you should be able to compile and run. The Rect,
Ellipse, and Shape options won’t work, but you should be able
to draw lines just fine (see Figure 12-8).
Drawing the Rectangle and Ellipse
Let’s implement the code to draw the rectangle and the
ellipse at the same time, since Quartz 2D implements both of
these objects in basically the same way. Make the following
changes to your drawRect: method:
- (void)drawRect:(CGRect)rect {
if (currentColor == nil)
self.currentColor = [UIColor redColor];
CGContextRef context = UIGraphicsGetCurrentContext();
CGContextSetLineWidth(context, 2.0);
CGContextSetStrokeColorWithColor(context, currentColor.CGColor);
CGContextSetFillColorWithColor(context, currentColor.CGColor); CGRect currentRect = CGRectMake ( (firstTouch.x > lastTouch.x) ? lastTouch.x : firstTouch.x, (firstTouch.y > lastTouch.y) ? lastTouch.y : firstTouch.y, fabsf(firstTouch.x - lastTouch.x), fabsf(firstTouch.y - lastTouch.y));
switch (shapeType) {
case kLineShape:
CGContextMoveToPoint(context, firstTouch.x, firstTouch.y);
Figure 12-8. The line draw-
ing part of our application is
now complete. In this image,
we are drawing using a ran-
dom color.

CHAPTER 12: Drawing with Quartz and OpenGL 381
CGContextAddLineToPoint(context, lastTouch.x, lastTouch.y);
CGContextStrokePath(context);
break;
case kRectShape:
CGContextAddRect(context, currentRect); CGContextDrawPath(context, kCGPathFillStroke); break;
case kEllipseShape:
CGContextAddEllipseInRect(context, currentRect); CGContextDrawPath(context, kCGPathFillStroke); break;
case kImageShape:
break;
default:
break;
}
}
Because we want to paint both the ellipse and the rectangle in a solid color, we add a call to
set the fill color using currentColor:
CGContextSetFillColorWithColor(context, currentColor.CGColor);
Next, we declare a CGRect variable. We’ll use currentRect to hold the rectangle described
by the user’s drag. Remember, a CGRect has two members: size, and origin. A function
called CGRectMake() lets us create a CGRect by specifying the x, y, width, and height val-
ues, so we use that to make our rectangle. The code to make the rectangle may look a little
intimidating at first glance, but it’s not that complicated. The user could have dragged in any
direction, so the origin will vary depending on the drag direction. We use the lower x value
from the two points and the lower y value from the two points to create the origin. Then we
figure out the size by getting the absolute value of the difference between the two x values
and the two y values.
CGRect currentRect = CGRectMake (
(firstTouch.x > lastTouch.x) ? lastTouch.x : firstTouch.x,
(firstTouch.y > lastTouch.y) ? lastTouch.y : firstTouch.y,
fabsf(firstTouch.x - lastTouch.x),
fabsf(firstTouch.y - lastTouch.y));
Once we have this rectangle defined, drawing either a rectangle or an ellipse is as easy as
calling two functions, one to draw the rectangle or ellipse in the CGRect we defined and the
other to stroke and fill it.
case kRectShape:
CGContextAddRect(context, currentRect);
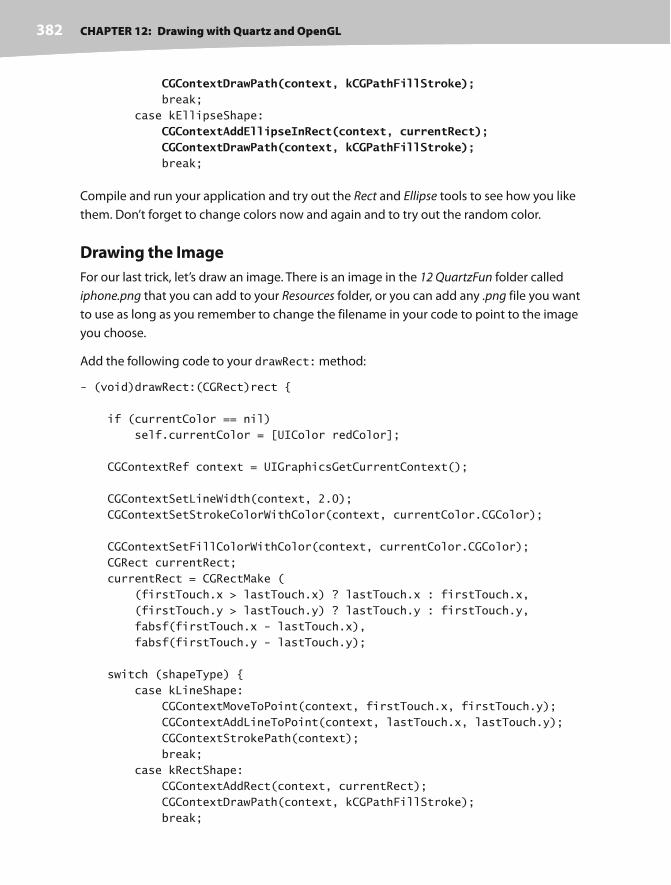
CHAPTER 12: Drawing with Quartz and OpenGL382
CGContextDrawPath(context, kCGPathFillStroke); break;
case kEllipseShape:
CGContextAddEllipseInRect(context, currentRect); CGContextDrawPath(context, kCGPathFillStroke); break;
Compile and run your application and try out the Rect and Ellipse tools to see how you like
them. Don’t forget to change colors now and again and to try out the random color.
Drawing the Image
For our last trick, let’s draw an image. There is an image in the 12 QuartzFun folder called
iphone.png that you can add to your Resources folder, or you can add any .png file you want
to use as long as you remember to change the filename in your code to point to the image
you choose.
Add the following code to your drawRect: method:
- (void)drawRect:(CGRect)rect {
if (currentColor == nil)
self.currentColor = [UIColor redColor];
CGContextRef context = UIGraphicsGetCurrentContext();
CGContextSetLineWidth(context, 2.0);
CGContextSetStrokeColorWithColor(context, currentColor.CGColor);
CGContextSetFillColorWithColor(context, currentColor.CGColor);
CGRect currentRect;
currentRect = CGRectMake (
(firstTouch.x > lastTouch.x) ? lastTouch.x : firstTouch.x,
(firstTouch.y > lastTouch.y) ? lastTouch.y : firstTouch.y,
fabsf(firstTouch.x - lastTouch.x),
fabsf(firstTouch.y - lastTouch.y);
switch (shapeType) {
case kLineShape:
CGContextMoveToPoint(context, firstTouch.x, firstTouch.y);
CGContextAddLineToPoint(context, lastTouch.x, lastTouch.y);
CGContextStrokePath(context);
break;
case kRectShape:
CGContextAddRect(context, currentRect);
CGContextDrawPath(context, kCGPathFillStroke);
break;

CHAPTER 12: Drawing with Quartz and OpenGL 383
case kEllipseShape:
CGContextAddEllipseInRect(context, currentRect);
CGContextDrawPath(context, kCGPathFillStroke);
break;
case kImageShape: {
CGFloat horizontalOffset = drawImage.size.width / 2; CGFloat verticalOffset = drawImage.size.height / 2; CGPoint drawPoint = CGPointMake(lastTouch.x - horizontalOffset, lastTouch.y - verticalOffset); [drawImage drawAtPoint:drawPoint]; break;
}
default:
break;
}
}
TIP
Notice that, in the switch statement, we added curly braces around the code under
case kImageShape:. GCC has a problem with variables declared in the first line after a case
statement. These curly braces are our way of telling GCC to stop complaining. We could also have
declared horizontalOffset before the switch statement, but this approach keeps the related
code together.
First, we calculate the center of the image, since we want the image drawn centered on the
point where the user last touched. Without this adjustment, the image would get drawn
with the upper- left corner at the user’s finger, also a valid option. We then make a new
CGpoint by subtracting these offsets from the x and y values in lastTouch.
CGFloat horizontalOffset = drawImage.size.width / 2;
CGFloat verticalOffset = drawImage.size.height / 2;
CGPoint drawPoint = CGPointMake(lastTouch.x - horizontalOffset,
lastTouch.y - verticalOffset);
Now, we tell the image to draw itself. This line of code will do the trick:
[drawImage drawAtPoint:drawPoint];

CHAPTER 12: Drawing with Quartz and OpenGL384
Our application does what we want, but we should consider a bit of optimization. In our
application, you won’t notice a slowdown, but in a more complex application, running on
a slower processor, you might see some lag. The problem occurs in QuartzFunView.m, in the
methods touchesMoved: and touchesEnded:. Both methods include this line of code:
[self setNeedsDisplay];
Obviously, this is how we tell our view to redraw itself. This code works, but it causes the
entire view to get erased and redrawn, even if only a tiny little bit changed. We do want to
erase the screen when we get ready to drag out a new shape, but we don’t want to clear the
screen several times a second as we drag out our shape.
Rather than forcing the entire view to be redrawn many times during our drag, we can use
setNeedsDisplayInRect: instead. setNeedsDisplayInRect: is an NSView method that
marks a rectangular portion of a view’s region as needing redisplay. We need to redraw not
just the rectangle between firstTouch and lastTouch but any part of the screen encom-
passed by the current drag. If the user touches the screen and then scribbles all over and we
redrew the only section between firstTouch and lastTouch, we’d leave a lot of stuff drawn
on the screen that we don’t want.
The answer is to keep track of the entire area that’s been affected by a particular drag in
a CGRect instance variable. In touchesBegan:, we reset that instance variable to just the
point where the user touched. Then in touchesMoved: and touchesEnded:, we use a Core
Graphics function to get the union of the current rectangle and the stored rectangle, and
we store the resulting rectangle. We also use it to specify what part of the view needs to be
redrawn. This approach gives us a running total of the area impacted by the current drag.
Right now, we calculate the current rectangle in the drawRect: method for use in drawing
the ellipse and rectangle shapes. We’ll move that calculation into a new method so that it
can be used in all three places without repeating code. Ready? Let’s do it. Make the following
changes to QuartzFunView.h:
#import <UIKit/UIKit.h>
#import "Constants.h"
@interface QuartzFunView : UIView {
CGPoint firstTouch;
CGPoint lastTouch;
UIColor *currentColor;
ShapeType shapeType;
UIImage *drawImage;
CGRect redrawRect;}
@property CGPoint firstTouch;
@property CGPoint lastTouch;

CHAPTER 12: Drawing with Quartz and OpenGL 385
@property (nonatomic, retain) UIColor *currentColor;
@property ShapeType shapeType;
@property (nonatomic, retain) UIImage *drawImage;
@property (readonly) CGRect currentRect;@property CGRect redrawRect;@end
We declare a CGRect called redrawRect that we will use to keep track of the area that needs
to be redrawn. We also declare a read only property called currentRect, which will return
that rectangle that we were previously calculating in drawRect:. Notice that it is a property
with no underlying instance variable.
Switch over to QuartzFunView.m, and make the following changes:
#import "QuartzFunView.h"
@implementation QuartzFunView
@synthesize firstTouch;
@synthesize lastTouch;
@synthesize currentColor;
@synthesize shapeType;
@synthesize drawImage;
@synthesize redrawRect;@dynamic currentRect;- (id)initWithFrame:(CGRect)frame {
if (self = [super initWithFrame:frame]) {
}
return self;
}
- (CGRect)currentRect { return CGRectMake ( (firstTouch.x > lastTouch.x) ? lastTouch.x : firstTouch.x, (firstTouch.y > lastTouch.y) ? lastTouch.y : firstTouch.y, fabsf(firstTouch.x - lastTouch.x), fabsf(firstTouch.y - lastTouch.y));}- (void)drawRect:(CGRect)rect {
if (currentColor == nil)
self.currentColor = [UIColor redColor];
CGContextRef context = UIGraphicsGetCurrentContext();
CGContextSetLineWidth(context, 2.0);
CGContextSetStrokeColorWithColor(context, currentColor.CGColor);
CGContextSetFillColorWithColor(context, currentColor.CGColor);

CHAPTER 12: Drawing with Quartz and OpenGL386
CGRect currentRect = CGRectMake (
(firstTouch.x > lastTouch.x) ? lastTouch.x : firstTouch.x,
(firstTouch.y > lastTouch.y) ? lastTouch.y : firstTouch.y,
fabsf(firstTouch.x - lastTouch.x),
fabsf(firstTouch.y - lastTouch.y));
switch (shapeType) {
case kLineShape:
CGContextMoveToPoint(context, firstTouch.x, firstTouch.y);
CGContextAddLineToPoint(context, lastTouch.x, lastTouch.y);
CGContextStrokePath(context);
break;
case kRectShape:
CGContextAddRect(context, self.currentRect); CGContextDrawPath(context, kCGPathFillStroke);
break;
case kEllipseShape:
CGContextAddEllipseInRect(context, self.currentRect); CGContextDrawPath(context, kCGPathFillStroke);
break;
case kImageShape:
if (drawImage == nil)
self.drawImage = [UIImage imageNamed:@"iphone.png"];
CGFloat horizontalOffset = drawImage.size.width / 2;
CGFloat verticalOffset = drawImage.size.height / 2;
CGPoint drawPoint = CGPointMake(lastTouch.x - horizontalOffset,
lastTouch.y - verticalOffset);
[drawImage drawAtPoint:drawPoint];
break;
default:
break;
}
}
- (void)touchesBegan:(NSSet *)touches withEvent:(UIEvent *)event
{
UITouch *touch = [touches anyObject];
firstTouch = [touch locationInView:self];
lastTouch = [touch locationInView:self];
if (shapeType == kImageShape) { CGFloat horizontalOffset = drawImage.size.width / 2; CGFloat verticalOffset = drawImage.size.height / 2; redrawRect = CGRectMake(firstTouch.x - horizontalOffset, firstTouch.y - verticalOffset, drawImage.size.width, drawImage.size.height);

CHAPTER 12: Drawing with Quartz and OpenGL 387
} else redrawRect = CGRectMake(firstTouch.x, firstTouch.y, 0, 0); [self setNeedsDisplay];
}
- (void)touchesEnded:(NSSet *)touches withEvent:(UIEvent *)event
{
UITouch *touch = [touches anyObject];
lastTouch = [touch locationInView:self];
[self setNeedsDisplay];
if (shapeType == kImageShape) { CGFloat horizontalOffset = drawImage.size.width / 2; CGFloat verticalOffset = drawImage.size.height / 2; redrawRect = CGRectUnion(redrawRect, CGRectMake(lastTouch.x – horizontalOffset, lastTouch.y – verticalOffset, drawImage.size.width, drawImage.size.height)); } else redrawRect = CGRectUnion(redrawRect, self.currentRect); redrawRect = CGRectInset(redrawRect, -2.0, -2.0); [self setNeedsDisplayInRect:redrawRect];}
- (void)touchesMoved:(NSSet *)touches withEvent:(UIEvent *)event
{
UITouch *touch = [touches anyObject];
lastTouch = [touch locationInView:self];
[self setNeedsDisplay];
if (shapeType == kImageShape) { CGFloat horizontalOffset = drawImage.size.width / 2; CGFloat verticalOffset = drawImage.size.height / 2; redrawRect = CGRectUnion(redrawRect, CGRectMake(lastTouch.x - horizontalOffset, lastTouch.y - verticalOffset, drawImage.size.width, drawImage.size.height)); } redrawRect = CGRectUnion(redrawRect, self.currentRect); [self setNeedsDisplayInRect:redrawRect];}
- (void)dealloc {
[currentColor release];
[drawImage release];
[super dealloc];
}
@end

CHAPTER 12: Drawing with Quartz and OpenGL388
With only a few additional lines of code, we reduced the amount of work necessary to
redraw our view by getting rid of the need to erase and redraw the portion of the view that
wasn’t been impacted by the current drag. Being kind to the iPhone’s precious processor
cycles like this can make a big difference in the performance of your applications, especially
as they get more complex.
Some OpenGL ES BasicsAs we mentioned earlier in the chapter, OpenGL ES and Quartz 2D take fundamentally dif-
ferent approaches to drawing. A detailed introduction to OpenGL ES would be a book in and
of itself, so we’re not going to attempt that here. Instead, we’re going to re- create our Quartz
2D application using OpenGL ES, just to give you a sense of the basics and some sample
code you can use to kick start your own OpenGL applications.
NOTE
When you are ready to add OpenGL to your own applications, take a side trip to http://www.khronos.
org/opengles/, which is the home base of the OpenGL ES standards group. Even better, visit this page,
and search for the word “tutorial”: http://www.khronos.org/developers/resources/
opengles/
Let’s get started with our application.
Building the GLFun Application
Create a new view- based application in Xcode, and call it GLFun. To save time, copy the
files Constants.h, UIColor- Random.h, UIColor- Random.m, and iphone.png from the Quartz-
Fun project into this new project. Open GLFunViewController.h, and make the following
changes. You should recognize them, as they’re identical to the changes we made to
QuartzFunViewController.h earlier:
#import <UIKit/UIKit.h>
#import "Constants.h"@interface GLFunViewController : UIViewController {
IBOutlet UISegmentedControl *colorControl;}
@property (nonatomic, retain) UISegmentedControl *colorControl;- (IBAction)changeColor:(id)sender;- (IBAction)changeShape:(id)sender;@end

CHAPTER 12: Drawing with Quartz and OpenGL 389
Switch over to QuartzFunViewController.m, and make the following changes. Again, they
should look very familiar to you:
#import "GLFunViewController.h"
#import "GLFunView.h"#import "UIColor- Random.h"
@implementation GLFunViewController
@synthesize colorControl;- (IBAction)changeColor:(id)sender { UISegmentedControl *control = sender; NSInteger index = [control selectedSegmentIndex];
GLFunView *glView = (GLFunView *)self.view;
switch (index) { case kRedColorTab: glView.currentColor = [UIColor redColor]; glView.useRandomColor = NO; break; case kBlueColorTab: glView.currentColor = [UIColor blueColor]; glView.useRandomColor = NO; break; case kYellowColorTab: glView.currentColor = [UIColor yellowColor]; glView.useRandomColor = NO; break; case kGreenColorTab: glView.currentColor = [UIColor greenColor]; glView.useRandomColor = NO; break; case kRandomColorTab: glView.useRandomColor = YES; break; default: break; }}- (IBAction)changeShape:(id)sender { UISegmentedControl *control = sender; [(GLFunView *)self.view setShapeType:[control selectedSegmentIndex]]; if ([control selectedSegmentIndex] == kImageShape) [colorControl setHidden:YES]; else [colorControl setHidden:NO];}

CHAPTER 12: Drawing with Quartz and OpenGL390
- (BOOL)shouldAutorotateToInterfaceOrientation:
(UIInterfaceOrientation)interfaceOrientation {
// Return YES for supported orientations
return (interfaceOrientation == UIInterfaceOrientationPortrait);
}
- (void)didReceiveMemoryWarning {
[super didReceiveMemoryWarning];
// Releases the view if it doesn't have a superview
// Release anything that's not essential, such as cached data
}
- (void)dealloc {
[colorControl release]; [super dealloc];
}
@end
The only difference between this and QuartzFunController.m is that we’re referencing a view
called GLFunView instead of one called QuartzFunView. The code that does our drawing is
contained in a subclass of UIView. Since we’re doing the drawing in a completely different
way this time, it makes sense to use a new class to contain that drawing code.
Before we proceed, you’ll need to add a few more files to your project. In the 12 GLFun
folder, you’ll find four files named Texture2D.h, Texture2D.m, OpenGLES2DView.h, and
OpenGLES2DView.m. The code in these files was written by Apple and makes drawing images
in OpenGL ES much easier than it otherwise would be. You can feel free to use these files in
your own programs if you wish.
OpenGL ES doesn’t have sprites or images, per se; it has textures, and textures have to
be drawn onto an object. The way you draw an image in OpenGL ES is to draw a polygon,
and then map a texture onto that polygon so that it exactly matches the polygon’s size.
Texture2D encapsulates that relatively complex process into a single, easy-to- use class.
OpenGLES2DView is a subclass of UIView that uses OpenGL to do its drawing. We set up this
view so that the coordinate systems of OpenGL ES and the coordinate system of the view are
mapped on a one-to- one basis. OpenGL ES is a three- dimensional system. OpenGLES2DView
maps the OpenGL 3- D world to the pixels of a 2- D view. Note that, despite the one-to- one
relationship between the view and the OpenGL context, the y coordinates are still flipped, so
we have to translate the y coordinate from the view coordinate system, where increases in y
represent moving down, to the OpenGL coordinate system, where increases in y represent
moving up.

CHAPTER 12: Drawing with Quartz and OpenGL 391
To use the OpenGLES2DView class, first subclass it, and then implement the draw method to
do your actual drawing. You can also implement any other methods you need in your view,
such as the touch- related methods.
Create a new file using the UIView subclass template and call it GLFunView.m, making sure
to have it create the header file. Now, you can double- click GLFunViewController.xib, and
design the interface. We’re not going to walk you through it this time, but if you get stuck,
you can refer to the earlier section called “Updating QuartzFunViewController.xib” for the
specific steps.
Once you’re done, save and go back to Xcode. Single- click GLFunView.h, and make the fol-
lowing changes:
#import <UIKit/UIKit.h>
#import "Constants.h"#import "Texture2D.h"#import "OpenGLES2DView.h"
@interface GLFunView : UIView {
@interface GLFunView : OpenGLES2DView { CGPoint firstTouch; CGPoint lastTouch; UIColor *currentColor; BOOL useRandomColor;
ShapeType shapeType;
Texture2D *sprite;}
@property CGPoint firstTouch;@property CGPoint lastTouch;@property (nonatomic, retain) UIColor *currentColor;@property BOOL useRandomColor;@property ShapeType shapeType;@property (nonatomic, retain) Texture2D *sprite;@end
This class is similar to QuartzFunView.h, but instead of using UIImage to hold our image, we
use a Texture2D to simplify the process of drawing images into an OpenGL ES context. We
also change the superclass from UIView to OpenGLES2DView so that our view becomes an
OpenGL ES–backed view set up for doing two- dimensional drawing.
Switch over to GLFunView.m, and make the following changes.
#import "GLFunView.h"
@implementation GLFunView

CHAPTER 12: Drawing with Quartz and OpenGL392
@synthesize firstTouch;@synthesize lastTouch;@synthesize currentColor;@synthesize useRandomColor;@synthesize shapeType;@synthesize sprite;- (id)initWithCoder:(NSCoder*)coder{ if (self = [super initWithCoder:coder]) { self.currentColor = [UIColor redColor]; self.useRandomColor = NO; } return self;}
- (void)draw { glLoadIdentity();
glClearColor(1.0f, 1.0f, 1.0f, 1.0f); glClear(GL_COLOR_BUFFER_BIT);
CGColorRef color = currentColor.CGColor; const CGFloat *components = CGColorGetComponents(color); CGFloat red = components[0]; CGFloat green = components[1]; CGFloat blue = components[2];
glColor4f(red,green, blue, 1.0);
switch (shapeType) { case kLineShape: { if (sprite){ [sprite release]; self.sprite = nil; }
GLfloat vertices[4];
// Convert coordinates vertices[0] = firstTouch.x; vertices[1] = self.frame.size.height - firstTouch.y; vertices[2] = lastTouch.x; vertices[3] = self.frame.size.height - lastTouch.y; glLineWidth(2.0); glVertexPointer (2, GL_FLOAT , 0, vertices); glDrawArrays (GL_LINES, 0, 2);

CHAPTER 12: Drawing with Quartz and OpenGL 393
break; } case kRectShape:{ if (sprite){ [sprite release]; self.sprite = nil; } // Calculate bounding rect and store in vertices GLfloat vertices[8]; GLfloat minX = (firstTouch.x > lastTouch.x) ? lastTouch.x : firstTouch.x; GLfloat minY = (self.frame.size.height - firstTouch.y > self.frame.size.height - lastTouch.y) ? self.frame.size.height - lastTouch.y : self.frame.size.height - firstTouch.y; GLfloat maxX = (firstTouch.x > lastTouch.x) ? firstTouch.x : lastTouch.x; GLfloat maxY = (self.frame.size.height - firstTouch.y > self.frame.size.height - lastTouch.y) ? self.frame.size.height - firstTouch.y : self.frame.size.height - lastTouch.y;
vertices[0] = maxX; vertices[1] = maxY; vertices[2] = minX; vertices[3] = maxY; vertices[4] = minX; vertices[5] = minY; vertices[6] = maxX; vertices[7] = minY;
glVertexPointer (2, GL_FLOAT , 0, vertices); glDrawArrays (GL_TRIANGLE_FAN, 0, 4); break; } case kEllipseShape: { if (sprite){ [sprite release]; self.sprite = nil; } GLfloat vertices[720]; GLfloat xradius = (firstTouch.x > lastTouch.x) ? (firstTouch.x - lastTouch.x)/2 : (lastTouch.x - firstTouch.x)/2; GLfloat yradius = (self.frame.size.height - firstTouch.y > self.frame.size.height - lastTouch.y) ? ((self.frame.size.height - firstTouch.y) -
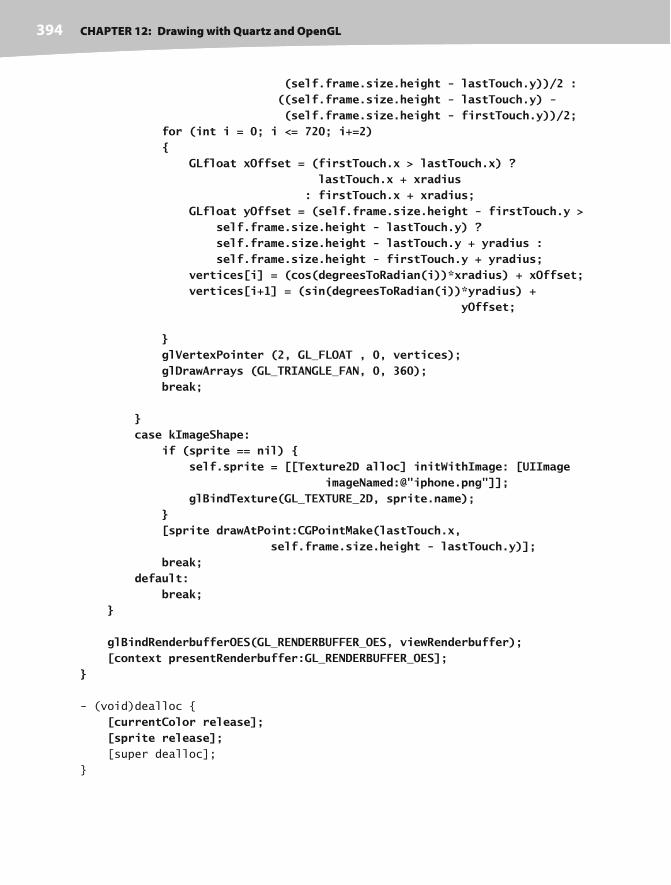
CHAPTER 12: Drawing with Quartz and OpenGL394
(self.frame.size.height - lastTouch.y))/2 : ((self.frame.size.height - lastTouch.y) - (self.frame.size.height - firstTouch.y))/2; for (int i = 0; i <= 720; i+=2) { GLfloat xOffset = (firstTouch.x > lastTouch.x) ? lastTouch.x + xradius : firstTouch.x + xradius; GLfloat yOffset = (self.frame.size.height - firstTouch.y > self.frame.size.height - lastTouch.y) ? self.frame.size.height - lastTouch.y + yradius : self.frame.size.height - firstTouch.y + yradius; vertices[i] = (cos(degreesToRadian(i))*xradius) + xOffset; vertices[i+1] = (sin(degreesToRadian(i))*yradius) + yOffset;
} glVertexPointer (2, GL_FLOAT , 0, vertices); glDrawArrays (GL_TRIANGLE_FAN, 0, 360); break;
} case kImageShape: if (sprite == nil) { self.sprite = [[Texture2D alloc] initWithImage: [UIImage imageNamed:@"iphone.png"]]; glBindTexture(GL_TEXTURE_2D, sprite.name); } [sprite drawAtPoint:CGPointMake(lastTouch.x, self.frame.size.height - lastTouch.y)]; break; default: break; }
glBindRenderbufferOES(GL_RENDERBUFFER_OES, viewRenderbuffer); [context presentRenderbuffer:GL_RENDERBUFFER_OES];}
- (void)dealloc {
[currentColor release]; [sprite release]; [super dealloc];
}

CHAPTER 12: Drawing with Quartz and OpenGL 395
- (void)touchesBegan:(NSSet *)touches withEvent:(UIEvent *)event{ if (useRandomColor) self.currentColor = [UIColor randomColor];
UITouch* touch = [[event touchesForView:self] anyObject]; firstTouch = [touch locationInView:self]; lastTouch = [touch locationInView:self]; [self draw];
}
- (void)touchesMoved:(NSSet *)touches withEvent:(UIEvent *)event{
UITouch *touch = [touches anyObject]; lastTouch = [touch locationInView:self];
[self draw];
}
- (void)touchesEnded:(NSSet *)touches withEvent:(UIEvent *)event{ UITouch *touch = [touches anyObject]; lastTouch = [touch locationInView:self];
[self draw];}@end
You can see that using OpenGL isn’t, by any means, easier or more concise than using Quartz
2D. Although it’s more powerful than Quartz, you’re also closer to the metal, so to speak.
OpenGL can be daunting at times.
Because this view is being loaded from a nib, we added an initWithCoder: method, and in
it, we create and assign a UIColor to currentColor. We also defaulted useRandomColor to
NO. Notice that we don’t create our Texture2D object yet, though. Since three of our shapes
are being drawn without textures, we don’t want a texture loaded. If a texture is loaded,
OpenGL ES will attempt to use textures when drawing polygons. So, we need to take steps
to make sure no texture is loaded when we draw out other shapes. The primary way of han-
dling this is to lazily load the texture.

CHAPTER 12: Drawing with Quartz and OpenGL396
After the initWithCoder: method, we have our draw method, which is where you can really
see the difference in the approaches between the two libraries. Let’s take a look at process of
drawing a line. Here’s how we drew the line in the Quartz version (we’ve removed the code
that’s not directly relevant to drawing):
CGContextRef context = UIGraphicsGetCurrentContext();
CGContextSetLineWidth(context, 2.0);
CGContextSetStrokeColorWithColor(context, currentColor.CGColor);
CGContextMoveToPoint(context, firstTouch.x, firstTouch.y);
CGContextAddLineToPoint(context, lastTouch.x, lastTouch.y);
CGContextStrokePath(context);
Here are the steps we had to take in OpenGL to draw that same line. First, we reset the
virtual world so that any rotations, translations, or other transforms that might have been
applied to it are gone:
glLoadIdentity();
Next, we clear the background to white:
glClearColor(1.0f, 1.0f, 1.0f, 1.0f);
glClear(GL_COLOR_BUFFER_BIT);
After that, we have to set the OpenGL drawing color by dissecting a UIColor and pulling the
individual RGB components out of it. Fortunately, because we used the convenience class
methods, we don’t have to worry about which color model the UIColor uses. We can safely
assume it will use the RGBA color space:
CGColorRef color = currentColor.CGColor;
const CGFloat *components = CGColorGetComponents(color);
CGFloat red = components[0];
CGFloat green = components[1];
CGFloat blue = components[2];
glColor4f(red,green, blue, 1.0);
To draw a line, we need two vertices, which means we need an array with four elements. As
we’ve discussed, a point in two- dimensional space is represented by two values, x and y. In
Quartz, we used a CGPoint struct to hold these. In OpenGL, points are not embedded in
structs. Instead, we pack an array with all the points that make up the shape we need to
draw. So, to draw a line from point (100, 150) to point (200, 250) in OpenGL ES, we would
create a vertex array that looked like this:
vertex[0] = 100;
vertex[1] = 150;
vertex[2] = 200;
vertex[3] = 250;

CHAPTER 12: Drawing with Quartz and OpenGL 397
Our array has the format {x1, y1, x2, y2, x3, y3}. The next code in this method converts two
CGPoint structs into a vertex array:
GLfloat vertices[4];
vertices[0] = firstTouch.x;
vertices[1] = self.frame.size.height - firstTouch.y;
vertices[2] = lastTouch.x;
vertices[3] = self.frame.size.height - lastTouch.y;
Once we’ve defined the vertex array that describes what we want to draw (in this
example, a line), we specify the line width, pass the array into OpenGL ES using the
method glVertexPointer(), and tell OpenGL ES to draw the arrays:
glLineWidth(2.0);
glVertexPointer (2, GL_FLOAT , 0, vertices);
glDrawArrays (GL_LINES, 0, 2);
Whenever we finish drawing in OpenGL ES, we have to tell it to render its buffer, and tell our
view’s context to show the newly rendered buffer:
glBindRenderbufferOES(GL_RENDERBUFFER_OES, viewRenderbuffer);
[context presentRenderbuffer:GL_RENDERBUFFER_OES];
To clarify, the process of drawing in OpenGL is made up of three steps. First, you draw in the
context. Second, once all your drawing is done, you render the context into the buffer. And
third, you present your render buffer, which is when the pixels actually get drawn onto the
screen.
As you can see, the OpenGL example is considerably longer. The difference between Quartz
2D and OpenGL ES becomes even more dramatic when we look at the process of drawing
an ellipse. OpenGL ES doesn’t know how to draw an ellipse. OpenGL, the big brother and
predecessor to OpenGL ES, has a number of convenience functions for generating common
two- and three- dimensional shapes, but those convenience functions are some of the func-
tionality that was stripped out of OpenGL ES to make it more streamlined and suitable for
use in embedded devices like the iPhone. As a result, a lot more responsibility falls into the
developer’s lap.
As a reminder, here is how we drew the ellipse using Quartz 2D:
CGContextRef context = UIGraphicsGetCurrentContext();
CGContextSetLineWidth(context, 2.0);
CGContextSetStrokeColorWithColor(context, currentColor.CGColor);
CGContextSetFillColorWithColor(context, currentColor.CGColor);
CGRect currentRect;
CGContextAddEllipseInRect(context, self.currentRect);
CGContextDrawPath(context, kCGPathFillStroke);

CHAPTER 12: Drawing with Quartz and OpenGL398
For the OpenGL ES version, we start off with the same steps as before, resetting any move-
ment or rotations, clearing the background to white, and setting the draw color based on
currentColor:
glLoadIdentity();
glClearColor(1.0f, 1.0f, 1.0f, 1.0f);
glClear(GL_COLOR_BUFFER_BIT);
CGColorRef color = currentColor.CGColor;
const CGFloat *components = CGColorGetComponents(color);
CGFloat red = components[0];
CGFloat green = components[1];
CGFloat blue = components[2];
glColor4f(red,green, blue, 1.0);
Since OpenGL ES doesn’t know how to draw an ellipse, we have to roll our own, which
means dredging up painful memories of Ms. Picklebaum’s geometry class. We’ll define
a vertex array that holds 720 GLfloats, which will hold an x and a y position for 360 points,
one for each degree around the circle. We could change the number of points to increase or
decrease the smoothness of the circle. This approach looks good on any view that’ll fit on
the iPhone screen but probably does require more processing than strictly necessary if all
you are drawing is smaller circles.
GLfloat vertices[720];
Next, we’ll figure out the horizontal and vertical radii of the ellipse based on the two points
stored in firstTouch and lastTouch:
GLfloat xradius = (firstTouch.x > lastTouch.x) ?
(firstTouch.x - lastTouch.x)/2 :
(lastTouch.x - firstTouch.x)/2;
GLfloat yradius = (self.frame.size.height - firstTouch.y >
self.frame.size.height - lastTouch.y) ?
((self.frame.size.height - firstTouch.y) –
(self.frame.size.height - lastTouch.y))/2 :
((self.frame.size.height - lastTouch.y) –
(self.frame.size.height - firstTouch.y))/2;
Next, we’ll loop around the circle, calculating the correct points around the circle:
for (int i = 0; i <= 720; i+=2) {
GLfloat xOffset = (firstTouch.x > lastTouch.x) ?
lastTouch.x + xradius : firstTouch.x + xradius;
GLfloat yOffset = (self.frame.size.height - firstTouch.y >
self.frame.size.height - lastTouch.y) ?
self.frame.size.height - lastTouch.y + yradius :
self.frame.size.height - firstTouch.y + yradius;
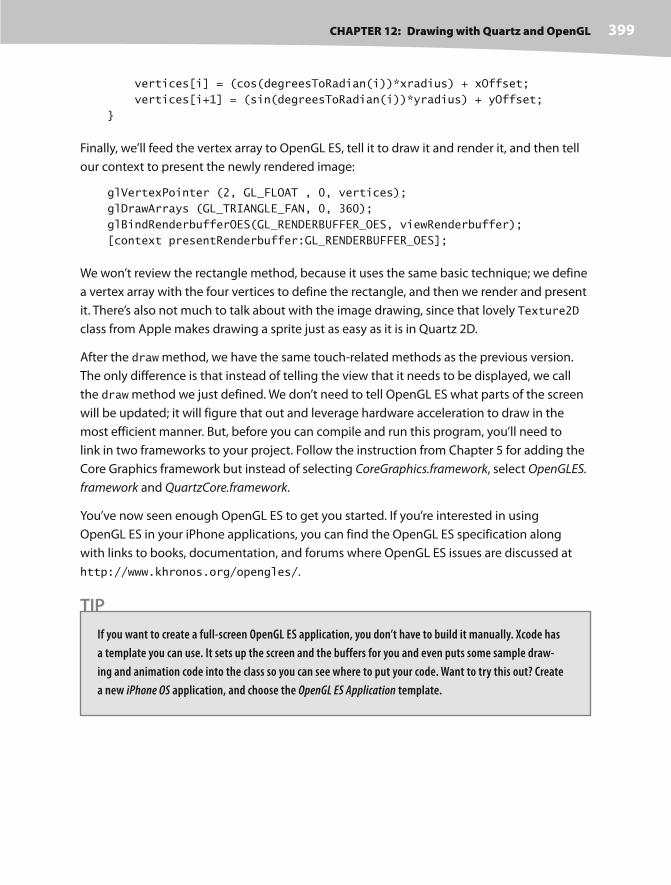
CHAPTER 12: Drawing with Quartz and OpenGL 399
vertices[i] = (cos(degreesToRadian(i))*xradius) + xOffset;
vertices[i+1] = (sin(degreesToRadian(i))*yradius) + yOffset;
}
Finally, we’ll feed the vertex array to OpenGL ES, tell it to draw it and render it, and then tell
our context to present the newly rendered image:
glVertexPointer (2, GL_FLOAT , 0, vertices);
glDrawArrays (GL_TRIANGLE_FAN, 0, 360);
glBindRenderbufferOES(GL_RENDERBUFFER_OES, viewRenderbuffer);
[context presentRenderbuffer:GL_RENDERBUFFER_OES];
We won’t review the rectangle method, because it uses the same basic technique; we define
a vertex array with the four vertices to define the rectangle, and then we render and present
it. There’s also not much to talk about with the image drawing, since that lovely Texture2D
class from Apple makes drawing a sprite just as easy as it is in Quartz 2D.
After the draw method, we have the same touch- related methods as the previous version.
The only difference is that instead of telling the view that it needs to be displayed, we call
the draw method we just defined. We don’t need to tell OpenGL ES what parts of the screen
will be updated; it will figure that out and leverage hardware acceleration to draw in the
most efficient manner. But, before you can compile and run this program, you’ll need to
link in two frameworks to your project. Follow the instruction from Chapter 5 for adding the
Core Graphics framework but instead of selecting CoreGraphics.framework, select OpenGLES.
framework and QuartzCore.framework.
You’ve now seen enough OpenGL ES to get you started. If you’re interested in using
OpenGL ES in your iPhone applications, you can find the OpenGL ES specification along
with links to books, documentation, and forums where OpenGL ES issues are discussed at
http://www.khronos.org/opengles/.
TIP
If you want to create a full- screen OpenGL ES application, you don’t have to build it manually. Xcode has
a template you can use. It sets up the screen and the buffers for you and even puts some sample draw-
ing and animation code into the class so you can see where to put your code. Want to try this out? Create
a new iPhone OS application, and choose the OpenGL ES Application template.
CHAPTER 12: Drawing with Quartz and OpenGL400
Drawing a BlankIn this chapter, we’ve really just scratched the surface of the iPhone’s drawing ability. You
should feel pretty comfortable with Quartz 2D now, and with some occasional references to
Apple’s documentation, you can probably handle most any drawing requirement that comes
your way. You should also have a basic understanding of what OpenGL ES is and how it inte-
grates with iPhone’s view system.
Next up? You’re going to learn how to add gestural support to your applications.

401
t
Chapter 13Taps, Touches, and Gestures
he iPhone screen, with its crisp, bright, 160 pixels per inch, touch- sensitive dis-
play, is truly a thing of beauty and a masterpiece of engineering. The iPhone’s
multitouch screen is one of the key factors in iPhone’s tremendous usability.
Because the screen can detect multiple touches at the same time and track
them independently, applications are able to detect a wide range of gestures,
giving the user power that goes beyond the interface.
Suppose you are in the Mail application exploring your inbox, and you decide
to delete an e-mail. You could tap the Edit button, select the row, and then tap
the Delete button: that’s three steps. Or you could just swipe your finger across
the row you want to delete and then tap the Delete button that pops up—two
steps.
This example is just one of the countless gestures that are made possible by
iPhone’s multitouch screen. You can pinch your fingers together to zoom into
a picture or reverse pinch to zoom out. You can double- tap a frame in Mobile
Safari to zoom so that the frame takes up your entire screen. You can swipe
two fingers across a scrollable view, such as a long web page or e-mail mes-
sage, and the view will scroll, up and down, along with your fingers.
In this chapter, we’re going to look at the underlying architecture that lets you
detect gestures. You’ll learn how to detect the most common ones and learn
how to create and detect a completely new gesture.
CHAPTER 13: Taps, Touches, and Gestures 402
Multitouch TerminologyBefore we dive into the architecture, let’s go over some basic vocabulary. First, a gesture is
any sequence of events that happens from the time you touch the screen with one or more
fingers until you lift your fingers off the screen. No matter how long it takes, as long as one
or more fingers are still against the screen, you are still inside a gesture (unless a system
event, such as an incoming phone call, interrupts it). A gesture is passed through the sys-
tem inside an event. Events are generated when you interact with the iPhone’s multitouch
screen and contain information about the touch or touches that occurred.
The term touch, obviously, refers to a finger being placed on the iPhone’s screen. The num-
ber of touches involved in a gesture is equal to the number of fingers on the screen at the
same time. You can actually put all five fingers on the screen, and as long as they aren’t too
close to each other, the iPhone can recognize and track them all. Now, there aren’t many
useful five- finger gestures, but it’s nice to know the iPhone can handle one if it needs to.
A tap happens when you touch the screen with a single finger and then immediately lift
your finger off the screen without moving it around. The iPhone keeps track of the number
of taps and can tell you if the user double- tapped or triple- tapped or even twenty- tapped.
It handles all the timing and other work necessary to differentiate between two single- taps
and a double- tap, for example. It’s important to note that the iPhone only keeps track of taps
when one finger is used. If it detects multiple touches, it resets the tap count to one.
The Responder ChainSince gestures get passed through the system inside of events, and events get passed
through the responder chain, you need to have an understanding of how the responder
chain works in order to handle gestures properly. If you’ve worked with Cocoa for Mac OS
X, you’re probably familiar with the concept of a responder chain, as the same basic mecha-
nism is used in both Cocoa and Cocoa Touch. If this is new material, don’t worry; we’ll explain
how it works.
Several times in this book, we’ve mentioned the first responder, which is usually the object
with which the user is currently interacting. The first responder is the start of the responder
chain. There are other responders as well. Any class that has UIResponder as one of its
superclasses is a responder. UIView is a subclass of UIResponder and UIControl is a sub-
class of UIView, so all views and all controls are responders. UIViewController is also
a subclass of UIResponder, meaning that it is a responder, as are all of its subclasses like
UINavigationController and UITabBarController. Responders, then, are so named
because they respond to system- generated events, such as screen touches.
CHAPTER 13: Taps, Touches, and Gestures 403
If the first responder doesn’t handle a particular event, such as a gesture, it passes that event
up the responder chain. If the next object in the chain responds to that particular event, it
will usually consume the event, which stops the event’s progression through the responder
chain. In some cases, if a responder only partially handles an event, that responder will take
an action and forward the event to the next responder in the chain. That’s not usually what
happens, though. Normally, when an object responds to an event, that’s the end of the line
for the event. If the event goes through the entire responder chain and no object handles
the event, the event is then discarded.
Here’s another, more specific look at the responder chain. The first responder is almost always
a view or control and gets the first shot at responding to an event. If the first responder doesn’t
handle the event, it passes the event to its view controller. If the view controller doesn’t con-
sume the event, the event is then passed to the first responder’s parent view. If the parent view
doesn’t respond, the event will go to the parent view’s controller, if it has one. The event will
proceed up the view hierarchy, with each view and then that view’s controller getting a chance
to handle the event. If the event makes it all the way up through the view hierarchy, the event
is passed to the application’s window. If the window doesn’t handle the event, then it passes
that event to our application’s UIApplication object instance. If UIApplication doesn’t
respond to it, the event goes gently into that good night.
This process is important for a number of reasons. First, it controls the way gestures can be
handled. Let’s say a user is looking at a table and swipes a finger across a row of that table.
What object handles that gesture?
If the swipe is within a view or control that’s a subview of the table view cell, then that view
or control will get a chance to respond. If it doesn’t, the table view cell gets a chance. In an
application like Mail, where a swipe can be used to delete a message, the table view cell
probably needs to look at that event to see if it contains a swipe gesture. Most table view
cells don’t respond to gestures, however, and if they don’t, the event proceeds up to the
table view, then up the rest of the responder chain until something responds to that event
or it reaches the end of the line.
Forwarding an Event: Keeping the Responder Chain Alive
Let’s take a step back to that table view cell in the Mail application. We don’t know the inter-
nal details of Apple’s Mail application, but let’s assume, for the nonce, that the table view cell
handles the delete swipe and only the delete swipe. That table view cell has to implement
the methods related to receiving touch events (which you’ll see in a few minutes) so that it
can check to see if that event contained a swipe gesture. If the event contains a swipe, then
the table view cell takes an action, and that’s that; the event goes no further.
If the event doesn’t contain a swipe gesture, the table view cell is responsible for forwarding that
event manually to the next object in the responder chain. If it doesn’t do its forwarding job, the

CHAPTER 13: Taps, Touches, and Gestures 404
table and other objects up the chain will never get a chance to respond, and the application may
not function as the user expects. That table view cell could prevent other views from recognizing
a gesture.
Whenever you respond to a touch event, you have to keep in mind that your code doesn’t work
in a vacuum. If an object intercepts an event that it doesn’t handle, it needs to pass it along man-
ually, by calling the same method on the next responder. Here’s a bit of fictional code:
-(void)respondToFictionalEvent:(UIEvent *)event {
if (someCondition)
[self handleEvent:event];
else
[self.nextResponder respondToFictionalEvent:event];
}
Notice how we call the same method on the next responder. That’s how to be a good
responder chain citizen. Fortunately, most of the time, methods that respond to an event
also consume the event, but it’s important to know that if that’s not the case, you have to
make sure the event gets pushed back into the responder chain.
The Multitouch ArchitectureNow that you know a little about the responder chain, let’s look at the process of handling
gestures. As we’ve indicated, gestures get passed along the responder chain, embedded
in events. That means that the code to handle any kind of interaction with the multitouch
screen needs to be contained in an object in the responder chain. Generally, that means
we can either choose to embed that code in a subclass of UIView or embed the code in
a UIViewController.
So does this code belong in the view or in the view controller?
If the view needs to do something to itself based on the user’s touches, the code prob-
ably belongs in the class that defines that view. For example, many control classes, such
as UISwitch and UISlider, respond to touch- related events. A UISwitch might want to
turn itself on or off based on a touch. The folks who created the UISwitch class embedded
gesture- handling code in the class so the UISwitch can respond to a gesture.
Often, however, when the gesture being processed affects more than the object being touched,
the gesture code really belongs in the view’s controller class. For example, if the user makes
a gesture touching one row that indicates that all rows should be deleted, the gesture should be
handled by code in the view controller. The way you respond to touches and gestures in both
situations is exactly the same, regardless of the class to which the code belongs.
CHAPTER 13: Taps, Touches, and Gestures 405
The Four Gesture Notification Methods
There are four methods used to notify a responder about touches and gestures. When the
user first touches the screen, the iPhone looks for a responder that has a method called
touchesBegan:withEvent:. To find out when the user first begins a gesture or taps the
screen, implement this method in your view or your view controller. Here’s an example of
what that method might look like:
- (void)touchesBegan:(NSSet *)touches withEvent:(UIEvent *)event {
NSUInteger numTaps = [[touches anyObject] tapCount];
NSUInteger numTouches = [touches count];
// Do something here.
}
This method, and all of the touch- related methods, gets passed an NSSet instance called
touches and an instance of UIEvent. You can determine the number of fingers currently pressed
against the screen by getting a count of the objects in touches. Every object in touches is
a UITouch event that represents one finger touching the screen. If this touch is part of a series
of taps, you can find out the tap count by asking any of the UITouch objects. Of course, if there’s
more than one object in touches, you know the tap count has to be one, because the system
keeps tap counts only as long as just one finger is being used to tap the screen. In the preceding
example, if numTouches is 2, you know the user just double- tapped the screen.
All of the objects in touches may not be relevant to the view or view controller where you’ve
implemented this method. A table view cell, for example, probably doesn’t care about touches
that are in other rows or that are in the navigation bar. You can get a subset of touches that
has only those touches that fall within a particular view from the event, like so:
NSSet *myTouches = [event touchesForView:self.view];
Every UITouch represents a different finger, and each finger is located at a different position
on the screen. You can find out the position of a specific finger using the UITouch object. It
will even translate the point into the view’s local coordinate system if you ask it to, like this:
CGPoint point = [touch locationInView:self];
You can get notified while the user is moving fingers across the screen by implementing
touchesMoved:withEvent:. This method gets called multiple times during a long drag, and
each time it gets called, you will get another set of touches and another event. In addition to
being able to find out each finger’s current position from the UITouch objects, you can also
find out the previous location of that touch, which is the finger’s position the last time either
touchesMoved:withEvent: or touchesBegan:withEvent: was called.

CHAPTER 13: Taps, Touches, and Gestures 406
When the user’s fingers are removed from the screen, another event, touchesEnded:withEvent:,
is invoked. When this method gets called, you know that the user is done with a gesture.
There’s one final touch- related method that responders might implement. It’s called
touchesCancelled:withEvent:, and it gets called if the user is in the middle of a gesture
when something happens to interrupt it, like the phone ringing. This is where you can do
any cleanup you might need so you can start fresh with a new gesture. When this method is
called, touchesEnded:withEvent: will not get called for the current gesture.
OK, enough theory—let’s see some of this in action.
The Touch Explorer ApplicationWe’re going to build a little application that will give you
a better feel for when the four touch- related responder
methods get called. In Xcode, create a new project using
the view- based application template, and call the new proj-
ect TouchExplorer. TouchExplorer will print messages to
the screen, containing the touch and tap count, every time
a touch- related method gets called (see Figure 13-1).
We need three labels for this application: one to indicate
which method was last called, another to report the cur-
rent tap count, and a third to report the number of touches.
Single- click TouchExplorerViewController.h, and add three
outlets and a method declaration. The method will be used to
update the labels from multiple places.
#import <UIKit/UIKit.h>
@interface TouchExplorerViewController : UIViewController {
IBOutlet UILabel *messageLabel; IBOutlet UILabel *tapsLabel; IBOutlet UILabel *touchesLabel;}
@property (nonatomic, retain) UILabel *messageLabel;@property (nonatomic, retain) UILabel *tapsLabel;@property (nonatomic, retain) UILabel *touchesLabel;- (void)updateLabelsFromTouches:(NSSet *)touches;@end
Figure 13-1. The Touch
Explorer application

CHAPTER 13: Taps, Touches, and Gestures 407
NOTE
Although the applications in this chapter will run on the simulator, you won’t be able to see all of the
available multitouch functionality unless you run them on an iPhone or iPod Touch. If you’ve been
accepted into the iPhone Developer Program, you have the ability to run the programs you write on your
device of choice. The Apple web site does a great job of walking you through the process of getting every-
thing you need to prepare to connect Xcode to your device. If you need a bit of help getting started, we’ve
put together a little jump- start write- up in Appendix A.
Now, double- click TouchExplorerViewController.xib to
open the file in Interface Builder. If the window titled
View is not open, double- click the View icon to open it.
Drag three Labels from the library to the View window.
You should resize the labels so that they take up the
full width of the view and center the text, but the exact
placement of the labels doesn’t matter. You can also play
with the fonts and colors if you’re feeling a bit Picasso.
When you’re done placing them, double- click each label,
and press the delete key to get rid of the text that’s in
them.
Control-drag from the File’s Owner icon to each of the
three labels, connecting one to the messageLabel out-
let, another to the tapsLabel outlet, and the last one to
the touchesLabel outlet. Finally, single- click the View
icon, and press 1 to bring up the attributes inspector
(see Figure 13-2). On the inspector, make sure that both
User Interacting Enabled and Multiple Touch are checked.
If Multiple Touch is not checked, your controller class’s touch methods will always receive one
and only one touch no matter how many fingers are actually touching the phone’s screen.
When you’re done, save and close the nib, and head back to Xcode.
Single-click TouchExplorerViewController.m, and add the following code:
#import "TouchExplorerViewController.h"
@implementation TouchExplorerViewController
@synthesize messageLabel;@synthesize tapsLabel;@synthesize touchesLabel;
Figure 13-2. Making sure that the
view is set to receive multitouch
events

CHAPTER 13: Taps, Touches, and Gestures 408
- (void)updateLabelsFromTouches:(NSSet *)touches { NSUInteger numTaps = [[touches anyObject] tapCount]; NSString *tapsMessage = [[NSString alloc] initWithFormat:@"%d taps detected", numTaps]; tapsLabel.text = tapsMessage; [tapsMessage release];
NSUInteger numTouches = [touches count]; NSString *touchMsg = [[NSString alloc] initWithFormat: @"%d touches detected", numTouches]; touchesLabel.text = touchMsg; [touchMsg release];}- (BOOL)shouldAutorotateToInterfaceOrientation:
(UIInterfaceOrientation)interfaceOrientation {
// Return YES for supported orientations
return (interfaceOrientation == UIInterfaceOrientationPortrait);
}
- (void)didReceiveMemoryWarning {
[super didReceiveMemoryWarning];
// Releases the view if it doesn't have a superview
// Release anything that's not essential, such as cached data
}
- (void)dealloc {
[messageLabel release]; [tapsLabel release]; [touchesLabel release]; [super dealloc];
}
#pragma mark -- (void)touchesBegan:(NSSet *)touches withEvent:(UIEvent *)event {
messageLabel.text = @"Touches Began"; [self updateLabelsFromTouches:touches];
}- (void)touchesCancelled:(NSSet *)touches withEvent:(UIEvent *)event{
messageLabel.text = @"Touches Cancelled"; [self updateLabelsFromTouches:touches];}
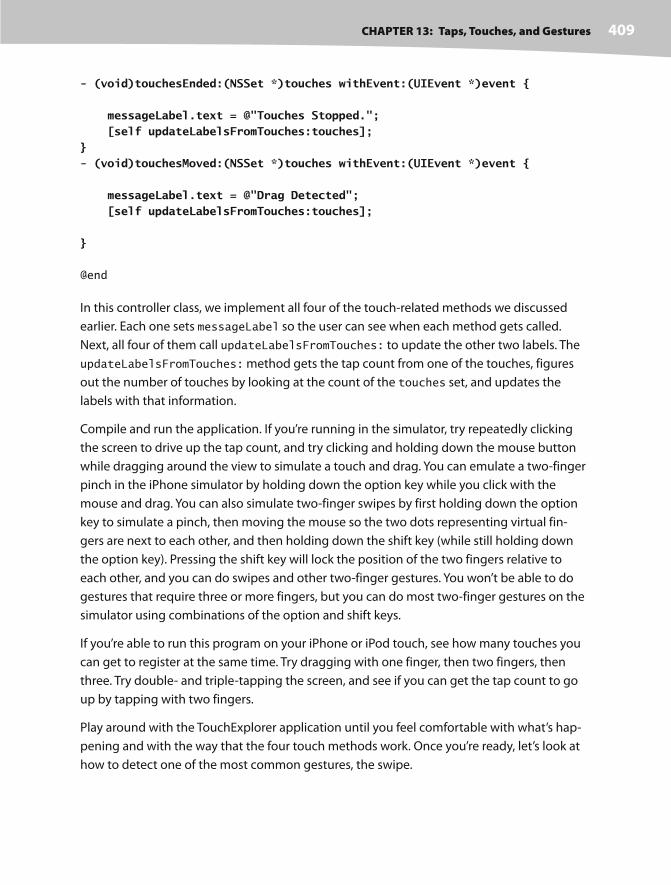
CHAPTER 13: Taps, Touches, and Gestures 409
- (void)touchesEnded:(NSSet *)touches withEvent:(UIEvent *)event {
messageLabel.text = @"Touches Stopped."; [self updateLabelsFromTouches:touches];}- (void)touchesMoved:(NSSet *)touches withEvent:(UIEvent *)event {
messageLabel.text = @"Drag Detected"; [self updateLabelsFromTouches:touches];
}
@end
In this controller class, we implement all four of the touch- related methods we discussed
earlier. Each one sets messageLabel so the user can see when each method gets called.
Next, all four of them call updateLabelsFromTouches: to update the other two labels. The
updateLabelsFromTouches: method gets the tap count from one of the touches, figures
out the number of touches by looking at the count of the touches set, and updates the
labels with that information.
Compile and run the application. If you’re running in the simulator, try repeatedly clicking
the screen to drive up the tap count, and try clicking and holding down the mouse button
while dragging around the view to simulate a touch and drag. You can emulate a two- finger
pinch in the iPhone simulator by holding down the option key while you click with the
mouse and drag. You can also simulate two- finger swipes by first holding down the option
key to simulate a pinch, then moving the mouse so the two dots representing virtual fin-
gers are next to each other, and then holding down the shift key (while still holding down
the option key). Pressing the shift key will lock the position of the two fingers relative to
each other, and you can do swipes and other two- finger gestures. You won’t be able to do
gestures that require three or more fingers, but you can do most two- finger gestures on the
simulator using combinations of the option and shift keys.
If you’re able to run this program on your iPhone or iPod touch, see how many touches you
can get to register at the same time. Try dragging with one finger, then two fingers, then
three. Try double- and triple- tapping the screen, and see if you can get the tap count to go
up by tapping with two fingers.
Play around with the TouchExplorer application until you feel comfortable with what’s hap-
pening and with the way that the four touch methods work. Once you’re ready, let’s look at
how to detect one of the most common gestures, the swipe.

CHAPTER 13: Taps, Touches, and Gestures 410
The Swipes ApplicationCreate a new project in Xcode using the view- based applica-
tion template again, this time naming the project Swipes.
The application we’re about to build does nothing more than
detect swipes, both horizontal and vertical (see Figure 13-3).
If you swipe your finger across the screen from left to right,
right to left, top to bottom, or bottom to top, Swipes will dis-
play a message across the top of the screen for a few seconds
informing you that a swipe was detected.
Detecting swipes is relatively easy. We’re going to define
a minimum gesture length in pixels, which is how far the user
has to swipe before the gesture counts as a swipe. We’ll also
define a variance, which is how far from a straight line our
user can veer and still have the gesture count as a horizontal
or vertical swipe. A diagonal line generally won’t count as
a swipe, but one that’s just a little off from horizontal or verti-
cal will.
When the user touches the screen, we’ll save the location of the first touch in a variable.
Then, we’ll check as the user’s finger moves across the screen to see if it reaches a point
where it has gone far enough and straight enough to count as a swipe. Let’s build it.
Click SwipesViewController.h, and add the following code:
#define kMinimumGestureLength 25#define kMaximumVariance 5
#import <UIKit/UIKit.h>
@interface SwipesViewController : UIViewController {
IBOutlet UILabel *label;
CGPoint gestureStartPoint;}
@property (nonatomic, retain) UILabel *label;@property CGPoint gestureStartPoint;- (void)eraseText;@end
We start by defining a minimum gesture length of 25 pixels and a variance of 5. If the user
was doing a horizontal swipe, the gesture could end up 5 pixels above or below the starting
vertical position and still count as a swipe as long as the user moved 25 pixels horizontally.
Figure 13-3. The Swipes
application

CHAPTER 13: Taps, Touches, and Gestures 411
In a real application, you would probably have to play with these numbers a bit to find what
worked in your application’s interface.
We also declare an outlet for our one label and a variable to hold the first spot the user
touches. The last thing we do is declare a method that will be used to erase the text after
a few seconds.
Double-click SwipesViewController.xib to open it in Interface Builder. Make sure that the view
is set to receive multiple touches using the attributes inspector, and drag a Label from the
library and drop it on the View window. Set up the label so it takes the entire width of the
view from blue line to blue line, and feel free to play with the text attributes to make the
label easier to read. Next, double- click the label and delete its text. Control- drag from the
File’s Owner icon to the label, and connect it to the label outlet. Save your nib, close, and go
back to Xcode.
Single-click SwipesViewController.m, and add the following code. We’ll discuss what it’s doing
when you’re done:
#import "SwipesViewController.h"
@implementation SwipesViewController
@synthesize label;@synthesize gestureStartPoint;- (void)eraseText{ label.text = @"";}- (BOOL)shouldAutorotateToInterfaceOrientation:
(UIInterfaceOrientation)interfaceOrientation {
// Return YES for supported orientations
return (interfaceOrientation == UIInterfaceOrientationPortrait);
}
- (void)didReceiveMemoryWarning {
[super didReceiveMemoryWarning];
// Releases the view if it doesn't have a superview
// Release anything that's not essential, such as cached data
}
- (void)dealloc {
[label release]; [super dealloc];
}
#pragma mark -- (void)touchesBegan:(NSSet *)touches withEvent:(UIEvent *)event {

CHAPTER 13: Taps, Touches, and Gestures 412
UITouch *touch = [touches anyObject]; gestureStartPoint = [touch locationInView:self.view];
}- (void)touchesMoved:(NSSet *)touches withEvent:(UIEvent *)event {
UITouch *touch = [touches anyObject]; CGPoint currentPosition = [touch locationInView:self.view];
CGFloat deltaX = fabsf(gestureStartPoint.x - currentPosition.x); CGFloat deltaY = fabsf(gestureStartPoint.y - currentPosition.y);
if (deltaX >= kMinimumGestureLength && deltaY <= kMaximumVariance) { label.text = @"Horizontal swipe detected"; [self performSelector:@selector(eraseText) withObject:nil afterDelay:2]; } else if (deltaY >= kMinimumGestureLength && deltaX <= kMaximumVariance){ label.text = @"Vertical swipe detected"; [self performSelector:@selector(eraseText) withObject:nil afterDelay:2]; }
}@end
Let’s start with the touchesBegan:withEvent: method. All we do there is grab any touch
from the touches set and store its point. We’re primarily interested in single- finger swipes
right now, so we don’t worry about how many touches there are; we just grab one of them.
UITouch *touch = [touches anyObject];
gestureStartPoint = [touch locationInView:self.view];
In the next method, touchesMoved:withEvent:, we do the real work. First, we get the cur-
rent position of the user’s finger:
UITouch *touch = [touches anyObject];
CGPoint currentPosition = [touch locationInView:self.view];
After that, we calculate how far the user’s finger has moved both horizontally and vertically
from its starting position. The function fabsf() is from the standard C math library that
returns the absolute value of a float. This allows us to subtract one from the other without
having to worry about which is the higher value:
CGFloat deltaX = fabsf(gestureStartPoint.x - currentPosition.x);
CGFloat deltaY = fabsf(gestureStartPoint.y - currentPosition.y);

CHAPTER 13: Taps, Touches, and Gestures 413
Once we have the two deltas, we check to see if the user has moved far enough in one
direction without having moved too far in the other to constitute a swipe. If they have, we
set the label’s text to indicate whether a horizontal or vertical swipe was detected. We also
use performSelector:withObject:afterDelay:to erase the text after it’s been on the
screen for 2 seconds. That way, the user can practice multiple swipes without having to
worry if the label is referring to an earlier attempt or the most recent one:
if (deltaX >= kMinimumGestureLength && deltaY <= kMaximumVariance) {
label.text = @"Horizontal swipe detected";
[self performSelector:@selector(eraseText)
withObject:nil afterDelay:2];
}
else if (deltaY >= kMinimumGestureLength &&
deltaX <= kMaximumVariance){
label.text = @"Vertical swipe detected";
[self performSelector:@selector(eraseText)
withObject:nil afterDelay:2];
}
Go ahead and compile and run. If you find yourself clicking and dragging with no visible
results, be patient. Click and drag straight down or straight across until you get the hang of
swiping.
Implementing Multiple SwipesIn the Swipes application, we only worried about single- finger swipes, so we just grabbed
any object out of the touches set to figure out where the user’s finger was during the swipe.
This approach is fine if you’re only interested in single- finger swipes, which is the most com-
mon type of swipe used.
We have a bit of a problem, however, if we want to implement two- or three- finger swipes.
That problem is that we are provided the touches as an NSSet, not as an NSArray. Sets are
unordered collections, which means that we have no easy way to figure out which finger is
which when we do comparison. We can’t assume that the first touch in the set, for example, is
referring to the same finger that was the first touch in the set back when the gesture started.
To make matters worse, it’s completely possible that, when the user does a two- or three-
finger gesture, one finger will touch the screen before another, meaning that in the
touchesBegan:withEvent: method, we might only get told about one touch.
We need to find a way to detect a multiple- finger swipe without falsely identifying
other gestures, such as pinches, as swipes. The solution is fairly straightforward. When
touchesBegan:withEvent: gets notified that a gesture has begun, we save one finger’s posi-
tion just as we did before. No need to save all the finger positions. Any one of them will do.

CHAPTER 13: Taps, Touches, and Gestures 414
When we check for swipes, we loop through all the touches provided to the
touchesMoved:withEvent: method, comparing each one to the saved point. If the user
did a multiple- finger swipe, when comparing to the saved point, at least one of the touches
we get in that method will indicate a swipe. If we find either a horizontal or vertical swipe,
we loop through the touches again and make sure that every finger is at least the mini-
mum distance away from the first finger’s horizontal or vertical position, depending on the
type of swipe. Let’s retrofit the Swipes application to detect multiple- finger swipes now. In
order to implement this, we need to make a minor change to the header file, so single click
SwipesViewController.h, and add the following code:
#define kMinimumGestureLength 25
#define kMaximumVariance 5
typedef enum { kNoSwipe = 0 ,kHorizontalSwipe ,kVerticalSwipe} SwipeType;
#import <UIKit/UIKit.h>
...
This enumeration will give us an easy way to indicate whether a gesture is a horizontal or
vertical swipe or if no swipe was detected at all. Now, switch back to SwipesViewController.m,
and completely replace the touchesMoved:withEvent: method with this new version:
- (void)touchesMoved:(NSSet *)touches withEvent:(UIEvent *)event {
SwipeType swipeType = kNoSwipe;
for (UITouch *touch in touches) {
CGPoint currentPosition = [touch locationInView:self.view];
CGFloat deltaX = fabsf(currentPosition.x- gestureStartPoint.x);
CGFloat deltaY = fabsf(currentPosition.y- gestureStartPoint.y);
if (deltaX >= kMinimumGestureLength &&
deltaY <= kMaximumVariance)
swipeType = kHorizontalSwipe;
else if (deltaY >= kMinimumGestureLength &&
deltaX <= kMaximumVariance)
swipeType = kVerticalSwipe;
}
BOOL allFingersFarEnoughAway = YES;
if (swipeType != kNoSwipe) {

CHAPTER 13: Taps, Touches, and Gestures 415
for (UITouch *touch in touches) {
CGPoint currentPosition = [touch locationInView:self.view];
CGFloat distance;
if (swipeType == kHorizontalSwipe)
distance = fabsf(currentPosition.x - gestureStartPoint.x);
else
distance = fabsf(currentPosition.y - gestureStartPoint.y);
if (distance < kMinimumGestureLength)
allFingersFarEnoughAway = NO;
}
}
if (allFingersFarEnoughAway && swipeType != kNoSwipe)
{
NSString *swipeCountString= nil;
if ([touches count] == 2)
swipeCountString = @"Double ";
else if ([touches count] == 3)
swipeCountString = @"Triple ";
else if ([touches count] == 4)
swipeCountString = @"Quadruple ";
else
swipeCountString = @"";
NSString *swipeTypeString = (swipeType == kHorizontalSwipe) ?
@"Horizontal" : @"Vertical";
NSString *message = [[NSString alloc] initWithFormat:
@"%@%@ Swipe Detected.", swipeCountString, swipeTypeString];
label.text = message;
[message release];
[self performSelector:@selector(eraseText)
withObject:nil afterDelay:2];
}
}
Compile and run. You should be able to trigger double and triple swipes in both directions
and should still be able to trigger single swipes. If you have small fingers, you might even be
able to trigger a quadruple swipe.
With a multiple- finger swipe, one thing to be careful of is that your fingers aren’t too close
to each other. If two fingers are very close to each other, they may register as only a single
touch. Because of this, you shouldn’t rely on quadruple swipes for any important gestures,
because many people will have fingers that are too big to do a quadruple swipe effectively.

CHAPTER 13: Taps, Touches, and Gestures 416
Detecting Multiple TapsIn the TouchExplorer application, we printed the tap count
to the screen, so you’ve already seen how easy it is to detect
multiple taps. It’s not quite as straightforward as it seems,
however, because often you will want to take different
actions based on the number of taps. If the user triple- taps,
you get notified three separate times. You get a single- tap,
a double- tap, and finally a triple- tap. If you want to do some-
thing on a double- tap but something completely different on
a triple- tap, having three separate notifications could cause
a problem. Let’s create another application to illustrate and
then solve that problem.
In Xcode, create a new project with the view- based applica-
tion template. Call this new project TapTaps. This application
is going to have four labels, one each that informs us when
it has detected a single- tap, double- tap, triple- tap, and qua-
druple tap. In the first version of the application, all four fields
will work independently, so if you tap four times, you’ll get
notified of all four tap types (see Figure 13-4).
Once we get that first version working, we’ll see how to change its behavior so only one
label appears when the user stops tapping, showing the total number or user taps.
We need outlets for the four labels, and we also need separate methods for each tap scenario
to simulate what you’d have in a real application. We’ll also include a method for erasing the
text fields. Expand the Classes folder, single- click TapTapsViewController.h, and make the follow-
ing changes:
#import <UIKit/UIKit.h>
@interface TapTapsViewController : UIViewController {
IBOutlet UILabel *singleLabel; IBOutlet UILabel *doubleLabel; IBOutlet UILabel *tripleLabel; IBOutlet UILabel *quadrupleLabel;}
@property (nonatomic, retain) UILabel *singleLabel;@property (nonatomic, retain) UILabel *doubleLabel;@property (nonatomic, retain) UILabel *tripleLabel;@property (nonatomic, retain) UILabel *quadrupleLabel;- (void)singleTap;- (void)doubleTap;- (void)tripleTap;
Figure 13-4. The TapTaps
application detecting all tap
types simultaneously

CHAPTER 13: Taps, Touches, and Gestures 417
- (void)quadrupleTap;- (void)eraseMe:(UITextField *)textField ;@end
Save it, and then expand the Resources folder. Double- click TapTapsViewController.xib to
open the file in Interface Builder. Once you’re there, make sure you set the view to accept
multiple touches, and then add four Labels to the view from the library. Make all four labels
stretch from blue guide line to blue guide line, then format them however you see fit. We
chose to make each label a different color but that is, by no means, necessary. When you’re
done, make sure you double- click each label and press the delete key to get rid of any text.
Now, control- drag from the File’s Owner icon to each label, and connect each one to single-
Label, doubleLabel, tripleLabel, and quadrupleLabel, respectively. Once you’ve done that, you
can save and go back to Xcode.
In TapTapsViewController.m, make the following changes:
#import "TapTapsViewController.h"
@implementation TapTapsViewController
@synthesize singleLabel;@synthesize doubleLabel;@synthesize tripleLabel;@synthesize quadrupleLabel;- (void)singleTap { singleLabel.text = @"Single Tap Detected"; [self performSelector:@selector(eraseMe:) withObject:singleLabel afterDelay:1.6f];}- (void)doubleTap { doubleLabel.text = @"Double Tap Detected"; [self performSelector:@selector(eraseMe:) withObject:doubleLabel afterDelay:1.6f];}- (void)tripleTap { tripleLabel.text = @"Triple Tap Detected"; [self performSelector:@selector(eraseMe:) withObject:tripleLabel afterDelay:1.6f];}- (void)quadrupleTap { quadrupleLabel.text = @"Quadruple Tap Detected"; [self performSelector:@selector(eraseMe:) withObject:quadrupleLabel afterDelay:1.6f];}- (void)eraseMe:(UITextField *)textField { textField.text = @"";}- (BOOL)shouldAutorotateToInterfaceOrientation:
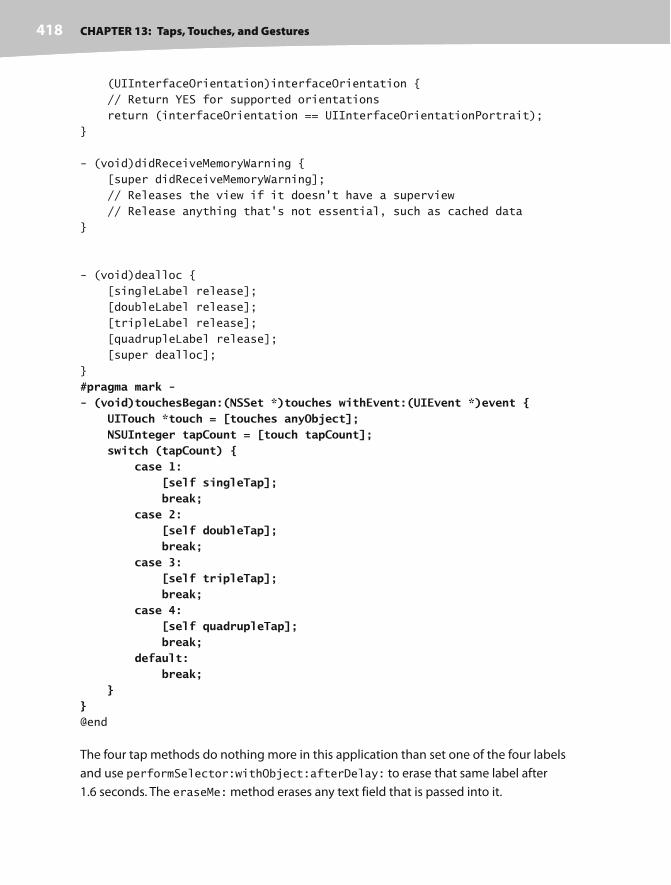
CHAPTER 13: Taps, Touches, and Gestures 418
(UIInterfaceOrientation)interfaceOrientation {
// Return YES for supported orientations
return (interfaceOrientation == UIInterfaceOrientationPortrait);
}
- (void)didReceiveMemoryWarning {
[super didReceiveMemoryWarning];
// Releases the view if it doesn't have a superview
// Release anything that's not essential, such as cached data
}
- (void)dealloc {
[singleLabel release];
[doubleLabel release];
[tripleLabel release];
[quadrupleLabel release];
[super dealloc];
}
#pragma mark -- (void)touchesBegan:(NSSet *)touches withEvent:(UIEvent *)event { UITouch *touch = [touches anyObject]; NSUInteger tapCount = [touch tapCount]; switch (tapCount) { case 1: [self singleTap]; break; case 2: [self doubleTap]; break; case 3: [self tripleTap]; break; case 4: [self quadrupleTap]; break; default: break; }}@end
The four tap methods do nothing more in this application than set one of the four labels
and use performSelector:withObject:afterDelay: to erase that same label after
1.6 seconds. The eraseMe: method erases any text field that is passed into it.
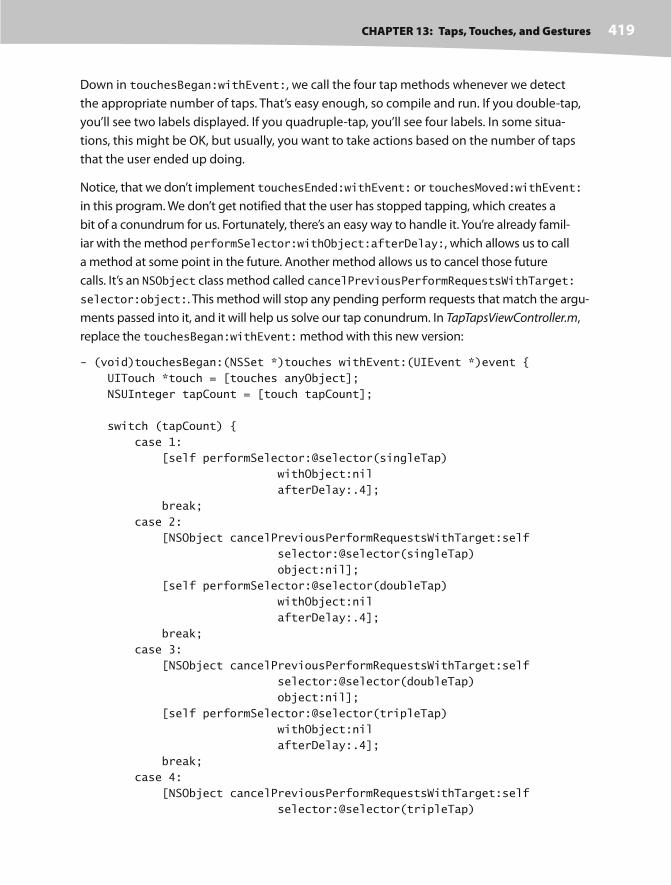
CHAPTER 13: Taps, Touches, and Gestures 419
Down in touchesBegan:withEvent:, we call the four tap methods whenever we detect
the appropriate number of taps. That’s easy enough, so compile and run. If you double- tap,
you’ll see two labels displayed. If you quadruple- tap, you’ll see four labels. In some situa-
tions, this might be OK, but usually, you want to take actions based on the number of taps
that the user ended up doing.
Notice, that we don’t implement touchesEnded:withEvent: or touchesMoved:withEvent:
in this program. We don’t get notified that the user has stopped tapping, which creates a
bit of a conundrum for us. Fortunately, there’s an easy way to handle it. You’re already famil-
iar with the method performSelector:withObject:afterDelay:, which allows us to call
a method at some point in the future. Another method allows us to cancel those future
calls. It’s an NSObject class method called cancelPreviousPerformRequestsWithTarget:
selector:object:. This method will stop any pending perform requests that match the argu-
ments passed into it, and it will help us solve our tap conundrum. In TapTapsViewController.m,
replace the touchesBegan:withEvent: method with this new version:
- (void)touchesBegan:(NSSet *)touches withEvent:(UIEvent *)event {
UITouch *touch = [touches anyObject];
NSUInteger tapCount = [touch tapCount];
switch (tapCount) {
case 1:
[self performSelector:@selector(singleTap)
withObject:nil
afterDelay:.4];
break;
case 2:
[NSObject cancelPreviousPerformRequestsWithTarget:self
selector:@selector(singleTap)
object:nil];
[self performSelector:@selector(doubleTap)
withObject:nil
afterDelay:.4];
break;
case 3:
[NSObject cancelPreviousPerformRequestsWithTarget:self
selector:@selector(doubleTap)
object:nil];
[self performSelector:@selector(tripleTap)
withObject:nil
afterDelay:.4];
break;
case 4:
[NSObject cancelPreviousPerformRequestsWithTarget:self
selector:@selector(tripleTap)

CHAPTER 13: Taps, Touches, and Gestures 420
object:nil];
[self quadrupleTap];
break;
default:
break;
}
}
In this version, every time we detect a number of taps, instead of calling the correspond-
ing method immediately, we use performSelector:withObject:afterDelay: to call
it four- tenths of a second in the future, and we cancel the perform request done by our
method when the previous tap count was received. So, when we receive one tap, we call the
singleTap method four- tenths of a second in the future. When we receive notification of
a double- tap, we cancel the call to singleTap and call doubleTap four- tenths of a second in
the future. We do the same thing with triple- taps and quadruple- taps so that only one of the
four methods gets called for any particular tap sequence.
Compile and run this version, and when you double- , triple- , or quadruple- tap, you should
only see one label displayed.
Detecting PinchesAnother common gesture is the two- finger pinch. It’s used in a number of applications,
including Mobile Safari, Mail, and Photos to let you zoom in (if you pinch together) or zoom
out (if you pinch apart).
Detecting pinches is pretty easy. First, when the gesture begins, we check to make sure
there are two touches, because pinches are two- finger gestures. If there are two, we store
the distance between them. Then, as the gesture progresses, we keep checking the distance
between the user’s fingers, and if the distance increases or decreases more than a certain
amount, we know there’s been a pinch.
Create a new project in Xcode, again using the view- based application template, and call
this one PinchMe. In this project and the next one, we’re going to need to do some fairly
standard analytic geometry to calculate such things as the distance between two points (in
this project) and later the angle between two lines. Don’t worry if you don’t remember much
geometry, we’ve provided you with functions that will do the calculations for you. Look in
the 13 PinchMe folder for two files, named CGPointUtils.h and CGPointUtils.c. Drag both of
these to the Classes folder of your project. Feel free to use these utility functions in your own
applications.
The PinchMe application is only going to need a single outlet for a label, but it also needs an
instance variable to hold the starting distance between the fingers and, as with the previous
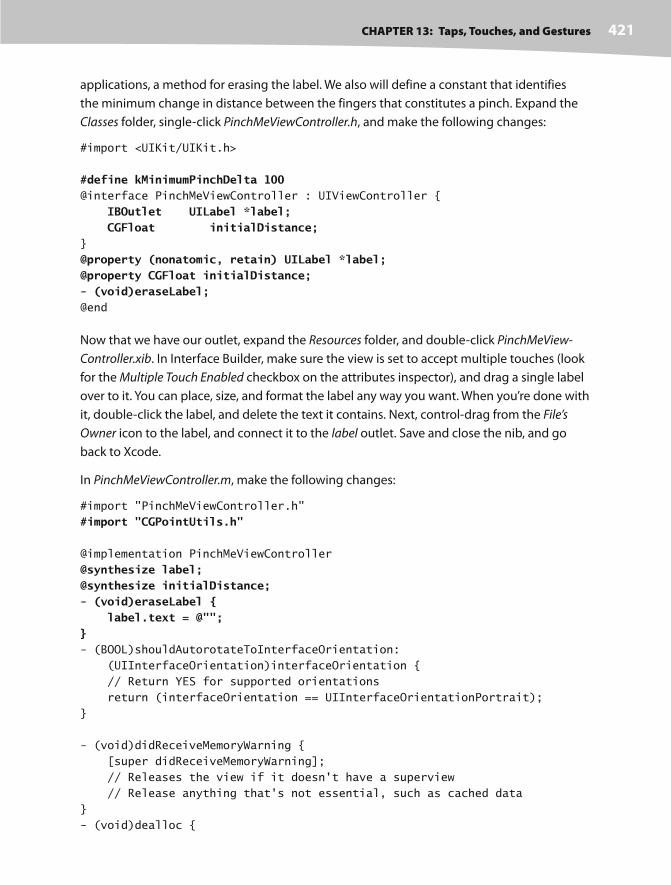
CHAPTER 13: Taps, Touches, and Gestures 421
applications, a method for erasing the label. We also will define a constant that identifies
the minimum change in distance between the fingers that constitutes a pinch. Expand the
Classes folder, single- click PinchMeViewController.h, and make the following changes:
#import <UIKit/UIKit.h>
#define kMinimumPinchDelta 100@interface PinchMeViewController : UIViewController {
IBOutlet UILabel *label; CGFloat initialDistance;}
@property (nonatomic, retain) UILabel *label;@property CGFloat initialDistance;- (void)eraseLabel;@end
Now that we have our outlet, expand the Resources folder, and double- click PinchMeView-
Controller.xib. In Interface Builder, make sure the view is set to accept multiple touches (look
for the Multiple Touch Enabled checkbox on the attributes inspector), and drag a single label
over to it. You can place, size, and format the label any way you want. When you’re done with
it, double- click the label, and delete the text it contains. Next, control- drag from the File’s
Owner icon to the label, and connect it to the label outlet. Save and close the nib, and go
back to Xcode.
In PinchMeViewController.m, make the following changes:
#import "PinchMeViewController.h"
#import "CGPointUtils.h"
@implementation PinchMeViewController
@synthesize label;@synthesize initialDistance;- (void)eraseLabel { label.text = @"";}- (BOOL)shouldAutorotateToInterfaceOrientation:
(UIInterfaceOrientation)interfaceOrientation {
// Return YES for supported orientations
return (interfaceOrientation == UIInterfaceOrientationPortrait);
}
- (void)didReceiveMemoryWarning {
[super didReceiveMemoryWarning];
// Releases the view if it doesn't have a superview
// Release anything that's not essential, such as cached data
}
- (void)dealloc {

CHAPTER 13: Taps, Touches, and Gestures 422
[label release]; [super dealloc];
}
#pragma mark -- (void)touchesBegan:(NSSet *)touches withEvent:(UIEvent *)event { if ([touches count] == 2) { NSArray *twoTouches = [touches allObjects]; UITouch *first = [twoTouches objectAtIndex:0]; UITouch *second = [twoTouches objectAtIndex:1]; initialDistance = distanceBetweenPoints( [first locationInView:self.view], [second locationInView:self.view]); }}- (void)touchesMoved:(NSSet *)touches withEvent:(UIEvent *)event {
if ([touches count] == 2) { NSArray *twoTouches = [touches allObjects]; UITouch *first = [twoTouches objectAtIndex:0]; UITouch *second = [twoTouches objectAtIndex:1]; CGFloat currentDistance = distanceBetweenPoints( [first locationInView:self.view], [second locationInView:self.view]);
if (initialDistance == 0) initialDistance = currentDistance; else if (currentDistance - initialDistance > kMinimumPinchDelta) { label.text = @"Outward Pinch"; [self performSelector:@selector(eraseLabel) withObject:nil afterDelay:1.6f]; } else if (initialDistance - currentDistance > kMinimumPinchDelta) { label.text = @"Inward Pinch"; [self performSelector:@selector(eraseLabel) withObject:nil afterDelay:1.6f]; } }}- (void)touchesEnded:(NSSet *)touches withEvent:(UIEvent *)event { initialDistance = 0;}@end

CHAPTER 13: Taps, Touches, and Gestures 423
In the touchesBegan:withEvent: method, we check to see if this touch involves two fin-
gers. If there are, we figure out the distance between the two points using a method from
CGPointUtils.c and store the result in the instance variable initialDistance.
In touchesMoved:withEvent:, we again check to see if we have two touches, and if we do,
we calculate the distance between the two touches:
if ([touches count] == 2) {
NSArray *twoTouches = [touches allObjects];
UITouch *first = [twoTouches objectAtIndex:0];
UITouch *second = [twoTouches objectAtIndex:1];
CGFloat currentDistance = distanceBetweenPoints(
[first locationInView:self.view],
[second locationInView:self.view]);
The next thing we do is check to see if initialDistance is 0. We do this because it is
possible for the user’s fingers to hit the screen at different times, so it’s possible that
touchesBegan:withEvent: didn’t get called with two fingers. If initialDistance is 0,
this is the first point where both fingers are against the screen, and we store the current
distance between the points as the initial distance:
if (initialDistance == 0)
initialDistance = currentDistance;
Otherwise, we check to see if the initial distance subtracted from the current distance is
more than the amount we’ve defined as the minimum change needed to count as a pinch. If
so, we have an outward pinch, because the distance now is greater than the initial distance:
else if (currentDistance - initialDistance > kMinimumPinchDelta) {
label.text = @"Outward Pinch";
[self performSelector:@selector(eraseLabel)
withObject:nil
afterDelay:1.6f];
}
If not, we do another check for an inward pinch by looking to see if initial distance minus the
current distance is enough to qualify as a pinch:
else if (initialDistance - currentDistance > kMinimumPinchDelta) {
label.text = @"Inward Pinch";
[self performSelector:@selector(eraseLabel)
withObject:nil
afterDelay:1.6f];
}

CHAPTER 13: Taps, Touches, and Gestures 424
And that’s all there is to pinch detection. Compile and run to give it a try. If you’re on the
simulator, remember that you can simulate a pinch by holding down the option key and
clicking and dragging in the simulator window using your mouse.
Defining Custom GesturesYou’ve now seen how to detect the most commonly used
iPhone gestures. The real fun begins when you start defining
your own, custom gestures!
Defining a custom gesture is tricky. You’ve already mastered
the basic mechanism, and that wasn’t too difficult. The tricky
part is being flexible when defining what constitutes a ges-
ture. Most people are not precise when they use gestures.
Remember the variance we used when we implemented the
swipe so that even a swipe that wasn’t perfectly horizontal or
vertical still counted? That’s a perfect example of the subtlety
you need to add to your own gesture definitions. If you define
your gesture too strictly, it will be useless. If you define it to
generically, you’ll get too many false positives, which will
frustrate the user. In a sense, defining a custom gesture can
be hard because you have to be precise about a gesture’s
imprecision. If you try to capture a complex gesture like, say,
a figure eight, the math behind detecting the gesture is also
going to get quite complex.
In our sample, we’re going to define a gesture shaped like a check mark (see Figure 13-5).
What are the defining properties of this checkmark gesture? Well, the principle one is that
sharp change in angle between the two lines. We also want to make sure that the user’s
finger has traveled a little distance in a straight line before it makes that sharp angle. In
Figure 13-5, the legs of the checkmark meet at an acute angle, just under ninety degrees.
A gesture that required exactly an eighty- five degree angle would be awfully hard to get
right, so we’ll define a range of acceptable angles.
Create a new project in Xcode using the view- based application template, and call the proj-
ect CheckPlease. We’re going to need a function from CGPointUtils, so add CGPointUtils.h
and CGPointUtils.c to this project’s Classes folder.
Figure 13-5. An illustration
of our checkmark gesture
CHAPTER 13: Taps, Touches, and Gestures 425
Expand the Classes folder, single- click CheckPleaseViewController.h, and make the following
changes:
#define kMinimumCheckMarkAngle 50#define kMaximumCheckMarkAngle 135#define kMinimumCheckMarkLength 10#import <UIKit/UIKit.h>
@interface CheckPleaseViewController : UIViewController {
IBOutlet UILabel *label; CGPoint lastPreviousPoint; CGPoint lastCurrentPoint; CGFloat lineLengthSoFar;}
@property (nonatomic, retain) UILabel *label;- (void)eraseLabel;@end
You can see that we’ve defined a minimum angle of 50 degrees and a maximum angle of
135 degrees. This is a pretty broad range, and depending on your needs, you might decide
to restrict the angle. We experimented a bit with this and found that our practice checkmark
gestures fell into a fairly broad range, which is why we chose a relatively large tolerance here.
We were somewhat sloppy with our checkmark gestures, and so we expect that at least
some of our users will be as well.
Next, we define an outlet to a label that we’ll use to inform the user when we’ve detected
a checkmark gesture. We also declare three variables, lastPreviousPoint, lastCurrentPoint,
and lineLengthSoFar. Each time we’re notified of a touch, we’re given the previous touch
point and the current touch point. Those two points define a line segment. The next touch
adds another segment. We store the previous touch’s previous and current points in
lastPreviousPoint and lastCurrentPoint, which gives us the previous line segment. We
can then compare that line segment to the current touch’s line segment. Comparing these two
line segments can tell us if we’re still drawing a single line or if there’s a sharp enough angle
between the two segments that we’re actually drawing a checkmark.
Remember, every UITouch object knows its current position in the view, as well as its previ-
ous position in the view. In order to compare angles, however, we need to know the line that
the previous two points made, so we need to store the current and previous points from the
last time the user touched the screen. We’ll use these two variables to store those two values
each time this method gets called, so that we have the ability to compare the current line to
the previous line and check the angle.

CHAPTER 13: Taps, Touches, and Gestures 426
We also declare a variable to keep a running count of how far the user has dragged the fin-
ger. If the finger hasn’t traveled at least 10 pixels (the value in kMinimumCheckMarkLength),
whether the angle falls in the correct range doesn’t matter. If we didn’t require this distance,
we would receive a lot of false positives.
Expand the Resources folder, and double- click CheckPleaseViewController.xib to open Inter-
face Builder. Since this is a single- finger gesture, you don’t need to turn on multitouch
support for the view, just add a Label from the library and set it up the way you want it
to look. Double- click the label to delete its text, and control- drag from the File’s Owner
icon to that label to connect it to the label outlet. Save the nib file. Now go back to Xcode,
single- click CheckPleaseViewController.m, and make the following changes:
#import "CheckPleaseViewController.h"
#import "CGPointUtils.h"
@implementation CheckPleaseViewController
@synthesize label;- (void)eraseLabel { label.text = @"";}- (BOOL)shouldAutorotateToInterfaceOrientation:
(UIInterfaceOrientation)interfaceOrientation {
// Return YES for supported orientations
return (interfaceOrientation == UIInterfaceOrientationPortrait);
}
- (void)didReceiveMemoryWarning {
[super didReceiveMemoryWarning];
// Releases the view if it doesn't have a superview
// Release anything that's not essential, such as cached data
}
- (void)dealloc {
[label release]; [super dealloc];
}
#pragma mark -- (void)touchesBegan:(NSSet *)touches withEvent:(UIEvent *)event { UITouch *touch = [touches anyObject]; CGPoint point = [touch locationInView:self.view]; lastPreviousPoint = point; lastCurrentPoint = point; lineLengthSoFar = 0.0f;}- (void)touchesMoved:(NSSet *)touches withEvent:(UIEvent *)event {
UITouch *touch = [touches anyObject];

CHAPTER 13: Taps, Touches, and Gestures 427
CGPoint previousPoint = [touch previousLocationInView:self.view]; CGPoint currentPoint = [touch locationInView:self.view]; CGFloat angle = angleBetweenLines(lastPreviousPoint, lastCurrentPoint, previousPoint, currentPoint);
if (angle >= kMinimumCheckMarkAngle&& angle <= kMaximumCheckMarkAngle && lineLengthSoFar > kMinimumCheckMarkLength) { label.text = @"Checkmark"; [self performSelector:@selector(eraseLabel) withObject:nil afterDelay:1.6]; }
lineLengthSoFar += distanceBetweenPoints(previousPoint, currentPoint); lastPreviousPoint = previousPoint; lastCurrentPoint = currentPoint;}@end
The CheckPlease Touch Methods
Let’s take a look at the touch methods. First, in touchesBegan:withEvent:, we determine
the point that the user is currently touching and store that value in lastPreviousPoint and
lastCurrentPoint. Since this method is called when a gesture begins, we know there is no
previous point to worry about, so we store the current point in both. We also reset the run-
ning line length count to 0.
Then, in touchesMoved:withEvent:, we calculate the angle between the line from the current
touch’s previous position to its current position, and the line between the two points stored in
the lastPreviousPoint and lastCurrentPoint instance variables. Once we have that angle,
we check to see if it falls within our range of acceptable angles and check to make sure that the
user’s finger has traveled far enough before making that sharp turn. If both of those are true,
we set the label to show that we’ve identified a checkmark gesture. Next, we calculate the dis-
tance between the touch’s position and its previous position, add that to lineLengthSoFar,
and replace the values in lastPreviousPoint and lastCurrentPoint with the two points
from the current touch so we’ll have them next time through this method.
Compile and run, and try out the gesture.
When defining new gestures for your own applications, make sure you test them thoroughly,
and if you can, have other people test them for you as well. You want to make sure that your
gesture is easy for the user to do, but not so easy that it gets triggered unintentionally. You
also need to make sure that you don’t conflict with other gestures used in your application.
A single gesture should not count, for example, as both a custom gesture and a pinch.

CHAPTER 13: Taps, Touches, and Gestures 428
Garçon? Check, Please!Well, you should now understand the mechanism the iPhone uses to tell your application
about touches, taps, and gestures. You also know how to detect the most commonly used
iPhone gestures and even got a taste of how you might go about defining your own custom
gestures. The iPhone’s interface relies on gestures for much of its ease of use, so you’ll want
to have these techniques at the ready for most of your iPhone development.
When you’re ready to move on, turn the page, and we’ll tell you how to figure out where in
the world you are using Core Location.

429
y
Chapter 14Where Am I? Finding Your Way with Core Location
our iPhone has the ability to determine where in the world it is using a frame-
work called Core Location. There are actually three technologies that Core
Location can leverage to do this: GPS, cell tower triangulation, and Wi- Fi
Positioning Service (WPS). GPS is the most accurate of the three but is not
available on first- generation iPhones. GPS reads microwave signals from
multiple satellites to determine the current location. Cell tower triangulation
determines the current location by doing a calculation based on the locations
of the cell towers in the phone’s range. Cell tower triangulation can be fairly
accurate in cities and other areas with a high cell tower density but becomes
less accurate in areas where there is a greater distance between towers. The
last option, WPS, uses the IP address from iPhone’s Wi- Fi connection to make
a guess at your location by referencing a large database of known service
providers and the areas they service. WPS is imprecise and can be off by
many miles.
All three methods put a noticeable drain on iPhone’s battery, so keep that in
mind when using Core Location. Your application shouldn’t poll for location
any more often than is absolutely necessary. When using Core Location, you
have the option of specifying a desired accuracy. By carefully specifying the
absolute minimum accuracy level you need, you can prevent unnecessary
battery drain.
The technologies that Core Location depends on are hidden from your appli-
cation. We don’t tell Core Location whether to use GPS, triangulation, or WPS.
CHAPTER 14: Where Am I? Finding Your Way with Core Location430
We just tell it how accurate we would like it to be, and it will decide which technologies give
it the best chance to fulfill your request.
The Location ManagerThe Core Location API is actually fairly easy to work with. The main class we’ll work with is
CLLocationManager, usually referred to as the Location Manager. In order to interact with
Core Location, we need to create an instance of the Location Manager, like this:
CLLocationManager *locationManager = [[CLLocationManager alloc] init];
This creates an instance of the Location Manager for us, but it doesn’t actually start polling for our
location. We create a delegate and assign it to the Location Manager. The Location Manager calls
our delegate method when the location information is available. This may take some time, even
a few seconds. Our delegate must conform to the CLLocationManagerDelegate protocol.
Setting the Desired Accuracy
After you set the delegate, you also want to set the requested accuracy. As we said before,
don’t specify a degree of accuracy any greater than you absolutely need. If you’re writing
an application that just needs to know which state or country the phone is in, don’t specify
a high level of precision. Remember, the more accuracy you demand of Core Location, the
more juice you’re likely to use. Also, keep in mind that there is no guarantee that you will get
the level of accuracy that you have requested.
Here’s an example of setting the delegate and requesting a specific level of accuracy:
locationManager.delegate = self;
locationManager.desiredAccuracy = kCLLocationAccuracyBest;
The accuracy is set using a CLLocationAccuracy value, a type that’s defined as a double. The
value is in meters, so if you specify a desiredAccuracy of 10, you’re telling Core Location that
you want it to try to determine the current location within 10 meters, if possible. Specifying
kCLLocationAccuracyBest, as we did previously, tells Core Location to use the most accurate
method that’s currently available. In addition to kCLLocationAccuracyBest, you can also
use kCLLocationAccuracyNearestTenMeters, kCLLocationAccuracyHundredMeters,
kCLLocationAccuracyKilometer, and kCLLocationAccuracyThreeKilometers.
Setting the Distance Filter
By default, the Location Manager will notify the delegate of any detected change in location. By
specifying a distance filter, you are telling Location Manager not to notify you for every change

CHAPTER 14: Where Am I? Finding Your Way with Core Location 431
and to only notify you when the location changes more than a certain amount. Setting up a dis-
tance filter can reduce the amount of polling that your application does. Distance filters are also
set in meters. Specifying a distance filter of 1000 tells the Location Manager not to notify the
delegate until the iPhone has moved at least 1,000 meters from its previously reported position.
Here’s an example:
locationManager.distanceFilter = 1000.0f;
If you ever want to return the Location Manager to the default setting of no filter, you can
use the constant kCLDistanceFilterNone, like this:
locationManager.distanceFilter = kCLDistanceFilterNone;
Starting the Location Manager
When you’re ready to start polling for location, you tell the Location Manager to start, and
it will then go off and do its thing and then call a delegate method when it has determined
the current location. Until you tell it to stop, it will continue to call your delegate method
whenever it senses a change that exceeds the current distance filter. Here’s how you start
the location manager:
[locationManager startUpdatingLocation];
Using the Location Manager Wisely
If you only need to determine the current location and have no need to continuously poll
for location, you should have your location delegate stop the location manager as soon as
it gets the information your application needs. If you need to continuously poll, make sure
you stop polling as soon as you possibly can. Remember, as long as you are getting updates
from the Location Manager, you are putting a strain on the user’s battery. To tell the Location
Manager to stop sending updates to its delegate, call stopUpdatingLocation, like this:
[locationManager stopUpdatingLocation];
The Location Manager DelegateThe location manager delegate must conform to the CLLocationManagerDelegate protocol,
which defines two methods, both of which are optional. One of these methods is called by the
Location Manager when it has determined the current location or when it detects a change in
location. The other method is called when the Location Manager encounters an error.
CHAPTER 14: Where Am I? Finding Your Way with Core Location432
Getting Location Updates
When the Location Manager wants to inform its delegate of the current location, it calls
the locationManager:didUpdateToLocation:fromLocation: method. This method has
three parameters. The first parameter is the Location Manager that called the method. The
second is a CLLocation object that defines the current location of the iPhone, and the third
is a CLLocation object that defines the previous location from the last update. The first time
this method is called, the previous location object will be nil.
Getting Latitude and Longitude Using CLLocation
Location information is passed from the Location Manager using instances of the CLLocation
class. This class has five properties that might be of interest to your application. The latitude
and longitude are stored in a property called coordinate. To get the latitude and longitude in
degrees, do this:
CLLocationDegrees latitude = theLocation.coordinate.latitude;
CLLocationDegrees longitude = theLocation.coordinate.longitude;
The CLLocation object can also tell you how confident the Location Manager is in its lati-
tude and longitude calculations. The horizontalAccuracy property describes the radius of
a circle with the coordinate as its center. The larger the value in horizontalAccuracy, the
less certain Core Location is of the location. A very small radius indicates a high level of con-
fidence in the determined location.
You can see a graphic representation of horizontalAccuracy in the Maps application (see
Figure 14-1). The blue circle shown in Maps uses horizontalAccuracy for its radius when
it detects your location. The Location Manager thinks you are at the center of that circle.
If you’re not, you’re almost certainly somewhere inside the blue circle. A negative value in
horizontalAccuracy is an indication that you cannot rely on the values in coordinate for
some reason.
The CLLocation object also has a property called altitude that can tell you how many
meters above or below sea level you are:
CLLocationDistance altitude = theLocation.altitude.
Each CLLocation object maintains a property called verticalAccuracy that is an indication
of how confident Core Location is in its determination of altitude. The value in altitude could
be off by as many meters as the value in verticalAccuracy, and if the verticalAccuracy
value is negative, Core Location is telling you it could not determine a valid altitude.
CLLocation objects also have a timestamp that tells when the Location Manager made the
location determination.
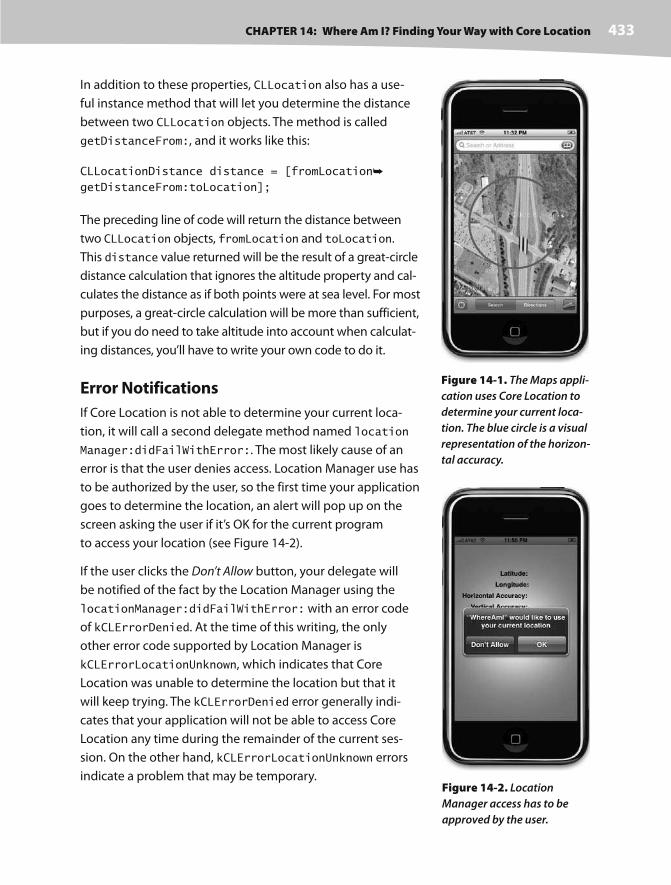
CHAPTER 14: Where Am I? Finding Your Way with Core Location 433
In addition to these properties, CLLocation also has a use-
ful instance method that will let you determine the distance
between two CLLocation objects. The method is called
getDistanceFrom:, and it works like this:
CLLocationDistance distance = [fromLocation
getDistanceFrom:toLocation];
The preceding line of code will return the distance between
two CLLocation objects, fromLocation and toLocation.
This distance value returned will be the result of a great- circle
distance calculation that ignores the altitude property and cal-
culates the distance as if both points were at sea level. For most
purposes, a great- circle calculation will be more than sufficient,
but if you do need to take altitude into account when calculat-
ing distances, you’ll have to write your own code to do it.
Error Notifications
If Core Location is not able to determine your current loca-
tion, it will call a second delegate method named location
Manager:didFailWithError:. The most likely cause of an
error is that the user denies access. Location Manager use has
to be authorized by the user, so the first time your application
goes to determine the location, an alert will pop up on the
screen asking the user if it’s OK for the current program
to access your location (see Figure 14-2).
If the user clicks the Don’t Allow button, your delegate will
be notified of the fact by the Location Manager using the
locationManager:didFailWithError: with an error code
of kCLErrorDenied. At the time of this writing, the only
other error code supported by Location Manager is
kCLErrorLocationUnknown, which indicates that Core
Location was unable to determine the location but that it
will keep trying. The kCLErrorDenied error generally indi-
cates that your application will not be able to access Core
Location any time during the remainder of the current ses-
sion. On the other hand, kCLErrorLocationUnknown errors
indicate a problem that may be temporary.
Figure 14-1. The Maps appli-
cation uses Core Location to
determine your current loca-
tion. The blue circle is a visual
representation of the horizon-
tal accuracy.
Figure 14-2. Location
Manager access has to be
approved by the user.

CHAPTER 14: Where Am I? Finding Your Way with Core Location434
NOTE
When working in the simulator, you will not be prompted for access to Core Location, and location will be
determined using a super secret algorithm kept in a locked vault buried deep beneath Apple headquarters
in Cupertino.
Trying Out Core LocationLet’s build a small application to detect the iPhone’s current
location and the total distance traveled while the program
has been running. You can see what our final application will
look like in Figure 14-3.
In Xcode, create a new project using the view- based
application template, and call the project WhereAmI.
Expand the Classes and Resources folders, and single- click
WhereAmIViewController.h. Make the following changes,
which we’ll discuss in a moment:
#import <UIKit/UIKit.h>
#import <CoreLocation/CoreLocation.h>
@interface WhereAmIViewController :
UIViewController <CLLocationManagerDelegate> { CLLocationManager *locationManager;
CLLocation *startingPoint; IBOutlet UILabel *latitudeLabel; IBOutlet UILabel *longitudeLabel; IBOutlet UILabel *horizontalAccuracyLabel; IBOutlet UILabel *altitudeLabel; IBOutlet UILabel *verticalAccuracyLabel; IBOutlet UILabel *distanceTraveledLabel;}
@property (retain, nonatomic) CLLocationManager *locationManager;@property (retain, nonatomic) CLLocation *startingPoint;@property (retain, nonatomic) UILabel *latitudeLabel;@property (retain, nonatomic) UILabel *longitudeLabel;@property (retain, nonatomic) UILabel *horizontalAccuracyLabel;@property (retain, nonatomic) UILabel *altitudeLabel;@property (retain, nonatomic) UILabel *verticalAccuracyLabel;@property (retain, nonatomic) UILabel *distanceTraveled;@end
Figure 14-3. The WhereAmI
application in action. This
screenshot was taken in
the simulator. Notice that the
vertical accuracy is a negative
number, which tells us it
couldn’t determine the
altitude.

CHAPTER 14: Where Am I? Finding Your Way with Core Location 435
The first thing to notice is that we’ve included the Core Location header files. Core Location
is not part of the UIKit, so we need to include the header files manually. Next, we conform
this class to the CLLocationManagerDelegate method so that we can receive location infor-
mation from the Location Manager.
After that, we declare a CLLocationManager pointer, which will be used to hold the instance
of the Core Location we create. We also declare a pointer to a CLLocation, which we will set
to the location we receive in the first update from the location manager. This way, if the user
has our program running and moves far enough to trigger an update, we’ll be able to calcu-
late how far our user moved.
The remaining instance variables are all outlets that will be used to update labels on the user
interface.
Double-click WhereAmIViewController.xib to open Interface Builder. Using Figure 14-3 as
your guide, drag twelve Labels over from the library to the View window. Six of them should
be placed on the left side of the screen, right justified, and made bold. The six bold labels
should be given the values Latitude:, Longitude:, Horizontal Accuracy:, Altitude:, Vertical Accu-
racy:, and Distance Traveled:, The other six should be left- justified and placed next to each
of the bold labels. Each of the labels on the right side should be connected to the appropri-
ate outlet we defined in the header file earlier. Once you have all six attached to outlets,
double- click each one in turn, and delete the text it holds. Save and go back to Xcode.
Single-click WhereAmIViewController.m, and make the following changes:
#import "WhereAmIViewController.h"
@implementation WhereAmIViewController
@synthesize locationManager;@synthesize startingPoint;@synthesize latitudeLabel;@synthesize longitudeLabel;@synthesize horizontalAccuracyLabel;@synthesize altitudeLabel;@synthesize verticalAccuracyLabel;@synthesize distanceTraveled;
#pragma mark -- (void)viewDidLoad { self.locationManager = [[CLLocationManager alloc] init]; locationManager.delegate = self; locationManager.desiredAccuracy = kCLLocationAccuracyBest; [locationManager startUpdatingLocation];}- (BOOL)shouldAutorotateToInterfaceOrientation:
(UIInterfaceOrientation)interfaceOrientation {
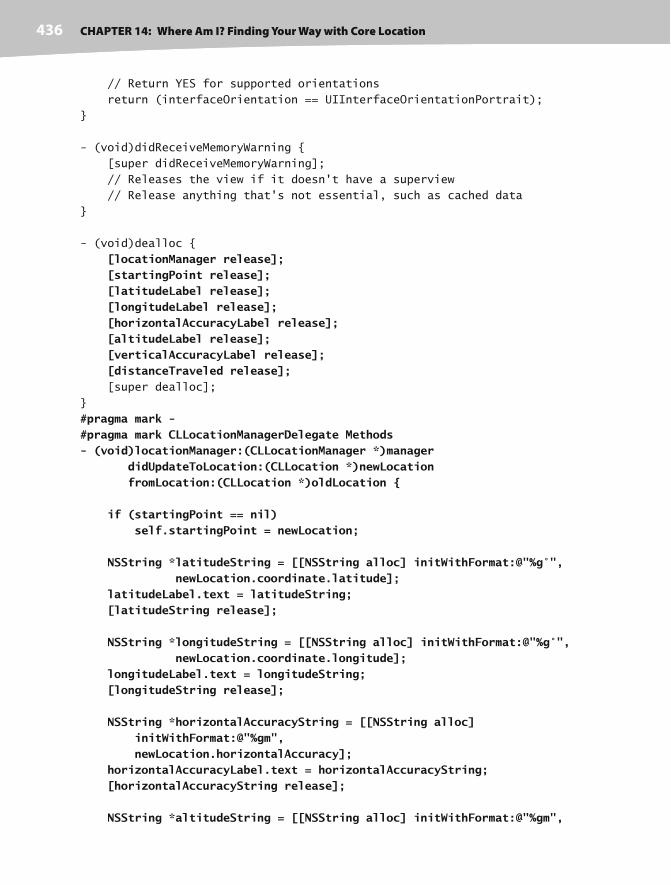
CHAPTER 14: Where Am I? Finding Your Way with Core Location436
// Return YES for supported orientations
return (interfaceOrientation == UIInterfaceOrientationPortrait);
}
- (void)didReceiveMemoryWarning {
[super didReceiveMemoryWarning];
// Releases the view if it doesn't have a superview
// Release anything that's not essential, such as cached data
}
- (void)dealloc {
[locationManager release]; [startingPoint release]; [latitudeLabel release]; [longitudeLabel release]; [horizontalAccuracyLabel release]; [altitudeLabel release]; [verticalAccuracyLabel release]; [distanceTraveled release]; [super dealloc];
}
#pragma mark -#pragma mark CLLocationManagerDelegate Methods- (void)locationManager:(CLLocationManager *)manager didUpdateToLocation:(CLLocation *)newLocation fromLocation:(CLLocation *)oldLocation { if (startingPoint == nil) self.startingPoint = newLocation; NSString *latitudeString = [[NSString alloc] initWithFormat:@"%g°", newLocation.coordinate.latitude]; latitudeLabel.text = latitudeString; [latitudeString release]; NSString *longitudeString = [[NSString alloc] initWithFormat:@"%g°", newLocation.coordinate.longitude]; longitudeLabel.text = longitudeString; [longitudeString release]; NSString *horizontalAccuracyString = [[NSString alloc] initWithFormat:@"%gm", newLocation.horizontalAccuracy]; horizontalAccuracyLabel.text = horizontalAccuracyString; [horizontalAccuracyString release]; NSString *altitudeString = [[NSString alloc] initWithFormat:@"%gm",

CHAPTER 14: Where Am I? Finding Your Way with Core Location 437
newLocation.altitude]; altitudeLabel.text = altitudeString; [altitudeString release]; NSString *verticalAccuracyString = [[NSString alloc] initWithFormat:@"%gm", newLocation.verticalAccuracy]; verticalAccuracyLabel.text = verticalAccuracyString; [verticalAccuracyString release]; CLLocationDistance distance = [newLocation getDistanceFrom:startingPoint]; NSString *distanceString = [[NSString alloc] initWithFormat:@"%gm", distance]; distanceTraveledLabel.text = distanceString; [distanceString release];}
- (void)locationManager:(CLLocationManager *)manager didFailWithError:(NSError *)error {
NSString *errorType = (error.code == kCLErrorDenied) ? @"Access Denied" : @"Unknown Error"; UIAlertView *alert = [[UIAlertView alloc] initWithTitle:@"Error getting Location" message:errorType delegate:nil cancelButtonTitle:@"Okay" otherButtonTitles:nil]; [alert show]; [alert release];
}
@end
In the viewDidLoad method, we allocate and initialize a CLLocationManager instance,
assign our controller class as the delegate, set the desired accuracy to the best available,
and then tell our Location Manager instance to start giving us location updates:
- (void)viewDidLoad {
self.locationManager = [[CLLocationManager alloc] init];
locationManager.delegate = self;
locationManager.desiredAccuracy = kCLLocationAccuracyBest;
[locationManager startUpdatingLocation];
}
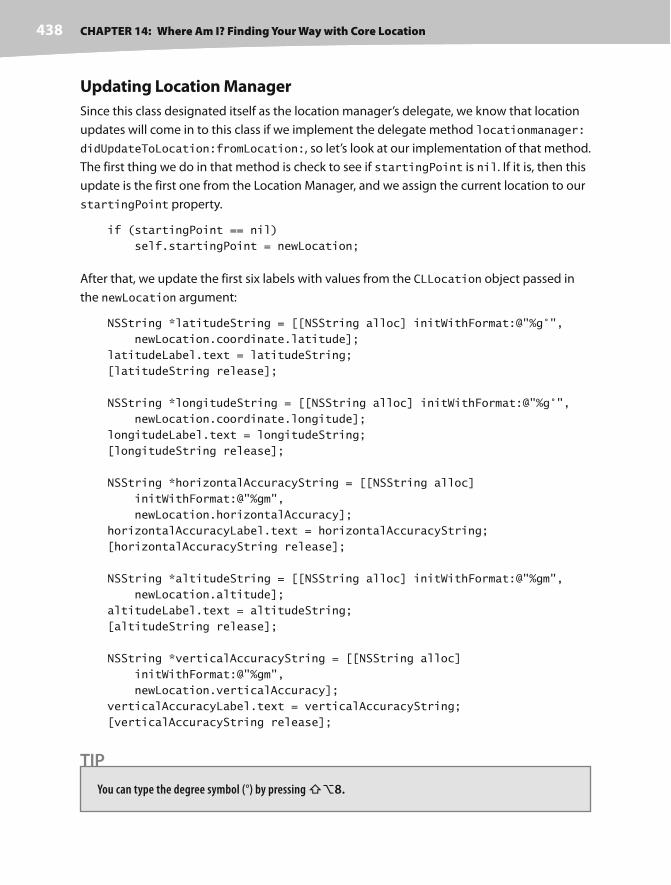
CHAPTER 14: Where Am I? Finding Your Way with Core Location438
Updating Location Manager
Since this class designated itself as the location manager’s delegate, we know that location
updates will come in to this class if we implement the delegate method locationmanager:
didUpdateToLocation:fromLocation:, so let’s look at our implementation of that method.
The first thing we do in that method is check to see if startingPoint is nil. If it is, then this
update is the first one from the Location Manager, and we assign the current location to our
startingPoint property.
if (startingPoint == nil)
self.startingPoint = newLocation;
After that, we update the first six labels with values from the CLLocation object passed in
the newLocation argument:
NSString *latitudeString = [[NSString alloc] initWithFormat:@"%g°",
newLocation.coordinate.latitude];
latitudeLabel.text = latitudeString;
[latitudeString release];
NSString *longitudeString = [[NSString alloc] initWithFormat:@"%g°",
newLocation.coordinate.longitude];
longitudeLabel.text = longitudeString;
[longitudeString release];
NSString *horizontalAccuracyString = [[NSString alloc]
initWithFormat:@"%gm",
newLocation.horizontalAccuracy];
horizontalAccuracyLabel.text = horizontalAccuracyString;
[horizontalAccuracyString release];
NSString *altitudeString = [[NSString alloc] initWithFormat:@"%gm",
newLocation.altitude];
altitudeLabel.text = altitudeString;
[altitudeString release];
NSString *verticalAccuracyString = [[NSString alloc]
initWithFormat:@"%gm",
newLocation.verticalAccuracy];
verticalAccuracyLabel.text = verticalAccuracyString;
[verticalAccuracyString release];
TIP
You can type the degree symbol (°) by pressing 8.

CHAPTER 14: Where Am I? Finding Your Way with Core Location 439
Determining Distance Traveled
Finally, we determine the distance between the current location and the location stored in
startingPoint and display the distance. While this application runs, if the user moves far
enough for the Location Manager to detect the change, the Distance Traveled: field will get
continually updated with the distance away from where the user’s were when the applica-
tion was started.
CLLocationDistance distance = [newLocation
getDistanceFrom:startingPoint];
NSString *distanceString = [[NSString alloc]
initWithFormat:@"%gm", distance];
distanceTraveledLabel.text = distanceString;
[distanceString release];
And there you have it. Core Location is fairly straightforward and easy to use. Before you can
compile this program, you have to add CoreLocation.framework to your project. You do this
exactly the same as you did back in Chapter 5 when you added the CoreGraphics.framework,
except you choose CoreLocation.framework instead of CoreGraphics.framework after navigat-
ing to the appropriate Frameworks folder. Compile and run the application, and try it out.
If you have the ability to run the application on your iPhone, try going for a drive with the
application running and watch the values change as you drive. Um, actually, better have
someone else do the driving!
Wherever You Go, There You AreYou’ve now seen pretty much all there is to Core Location. Although the underlying technol-
ogy is quite complex, Apple has provided a simple interface that hides most of the complexity,
making it quite easy to add location- related features to your applications, so you can tell where
the users are and identify when they move.
And speaking of moving, when you’re ready, proceed directly to the next chapter so we can
play with iPhone’s built- in accelerometer.

441
o
Chapter 15Whee!
ne of the coolest features of the iPhone and iPod Touch is the built- in acceler-
ometer, the tiny device that lets the iPhone know how it’s being held and if it’s
being moved. The iPhone OS uses the accelerometer to handle autorotation,
and many games use it as a control mechanism. It can also be used to detect
shakes and other sudden movement.
Accelerometer PhysicsAn accelerometer measures both acceleration and gravity by sensing the
amount of inertial force in a given direction. The accelerometer inside iPhone
is a three- axis accelerometer, meaning that it is capable of detecting either
movement or the pull of gravity in three- dimensional space. As a result, you
can use the accelerometer to tell not only how the phone is currently being
held (as autorotation does) but also if it’s laying on a table and even whether
it’s face down or face up.
Accelerometers give measurements in g- forces (“g” for gravity), so a value of
1.0 returned by the accelerometer means that 1 g is sensed in a particular
direction. If the iPhone is being held still with no movement, there will be
approximately 1 g of force exerted on it by the pull of the earth. If the iPhone
is being held upright, in portrait orientation, the iPhone will detect and report
about 1 g of force exerted on its y axis. If the iPhone is being held at an angle,
that 1 g of force will be distributed along different axes depending on how the
iPhone is being held. When held at a 45- degree angle, that 1 g of force will be
split roughly equally between two of the axes.
Sudden movement can be detected by looking for accelerometer values con-
siderably larger than 1 g. In normal usage, the accelerometer does not detect
significantly more than 1 g on any axis. If you shake, drop, or throw your

CHAPTER 15: Whee!442
iPhone, the accelerometer will detect a greater amount of force on one or more axes. Please
do not drop or throw your own iPhone just to test this theory.
You can see a graphic representation of the three axes used by iPhone’s accelerometer in
Figure 15-1. One thing to notice is that the accelerometer uses the more standard conven-
tion for the y coordinate, with increases in y indicating upward force, which is the opposite
of Quartz 2D’s coordinate system. When you are using the accelerometer as a control mecha-
nism with Quartz 2D, you have to translate the y coordinate. When working with OpenGL ES,
which you are more likely to be using if you are using the accelerometer to control anima-
tion, no translation is required.
Figure 15-1. The iPhone accelerometer’s axes in three dimensions
Accessing the AccelerometerThe UIAccelerometer class exists as a singleton. To retrieve a reference to the class, call the
method sharedAccelerometer, like so:
UIAccelerometer *accelerometer = [UIAccelerometer sharedAccelerometer];

CHAPTER 15: Whee! 443
Getting information from the accelerometer is similar to getting information from Core
Location. You create a class that conforms to the UIAccelerometerDelegate protocol,
implement a method to which the accelerometer will provide information, and specify an
instance of that class to be the accelerometer’s delegate.
When you assign a delegate, you need to specify an update interval in seconds. iPhone’s
accelerometer supports polling at a rate of up to 100 times per second, although there is
no guarantee that it will actually update you that many times or that those updates will be
exactly evenly spaced. To assign a delegate and specify a polling interval of 60 times per
second, you would do this:
accelerometer.delegate = self;
accelerometer.updateInterval = 1.0f/60.0f;
Once you’ve done that, all that’s left is to implement the method that the accelerometer uses
to update its delegate, accelerometer:didAccelerate:. This method takes two arguments.
The first is a reference to the shared UIAccelerometer instance. The second contains the
actual data from the accelerometer, embedded in an object of the class UIAcceleration.
Before we look at the delegate method, let’s talk about the UIAcceleration object that’s
used to pass the information to the delegate.
UIAcceleration
We mentioned earlier that the iPhone’s accelerometer detects acceleration along three axes,
and it provides this information to the delegate using instances of the UIAcceleration class.
Each UIAcceleration instance has an x, y, and z property, each of which holds a signed float-
ing point value. A value of 0 means that the accelerometer detects no movement on that
particular axis. A positive or negative value indicates force in one direction. For example, a neg-
ative value for y indicates that downward pull is sensed, which is probably an indication that
the phone is being held upright in portrait orientation. A positive value for y indicates some
force is being exerted in the opposite direction, which could mean the phone is being held
upside down or that the phone is being moved in a downward direction.
Keeping the diagram in Figure 15-1 in mind, let’s look at some accelerometer results. Note
that, in real life, you will almost never get values this precise, as the accelerometer is sensi-
tive enough to pick up even tiny amounts of movement, and you will usually pick up at least
some tiny amount of force on all three axes. This is real- world physics and not high school
physics lab.

CHAPTER 15: Whee!444
Figure 15-2. Idealized acceleration values for different device orientations
Implementing the accelerometer:didAccelerate: Method
In order to receive accelerometer information, the class you specify as the accelerometer’s
delegate needs to implement the accelerometer:didAccelerate: method. If you wanted
to display the acceleration values in a UILabel, you would implement that method like this:
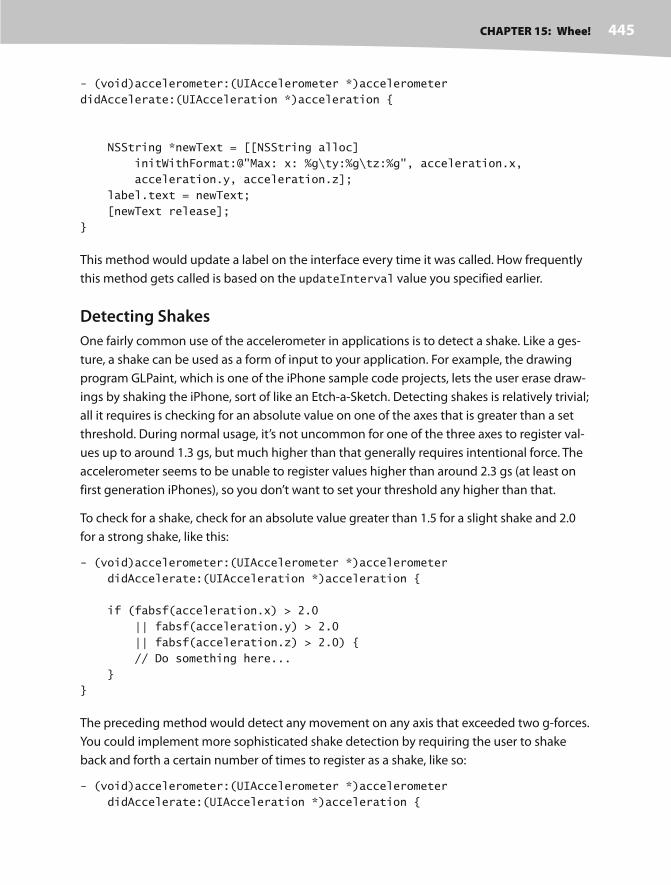
CHAPTER 15: Whee! 445
- (void)accelerometer:(UIAccelerometer *)accelerometer
didAccelerate:(UIAcceleration *)acceleration {
NSString *newText = [[NSString alloc]
initWithFormat:@"Max: x: %g\ty:%g\tz:%g", acceleration.x,
acceleration.y, acceleration.z];
label.text = newText;
[newText release];
}
This method would update a label on the interface every time it was called. How frequently
this method gets called is based on the updateInterval value you specified earlier.
Detecting Shakes
One fairly common use of the accelerometer in applications is to detect a shake. Like a ges-
ture, a shake can be used as a form of input to your application. For example, the drawing
program GLPaint, which is one of the iPhone sample code projects, lets the user erase draw-
ings by shaking the iPhone, sort of like an Etch-a- Sketch. Detecting shakes is relatively trivial;
all it requires is checking for an absolute value on one of the axes that is greater than a set
threshold. During normal usage, it’s not uncommon for one of the three axes to register val-
ues up to around 1.3 gs, but much higher than that generally requires intentional force. The
accelerometer seems to be unable to register values higher than around 2.3 gs (at least on
first generation iPhones), so you don’t want to set your threshold any higher than that.
To check for a shake, check for an absolute value greater than 1.5 for a slight shake and 2.0
for a strong shake, like this:
- (void)accelerometer:(UIAccelerometer *)accelerometer
didAccelerate:(UIAcceleration *)acceleration {
if (fabsf(acceleration.x) > 2.0
|| fabsf(acceleration.y) > 2.0
|| fabsf(acceleration.z) > 2.0) {
// Do something here...
}
}
The preceding method would detect any movement on any axis that exceeded two g- forces.
You could implement more sophisticated shake detection by requiring the user to shake
back and forth a certain number of times to register as a shake, like so:
- (void)accelerometer:(UIAccelerometer *)accelerometer
didAccelerate:(UIAcceleration *)acceleration {

CHAPTER 15: Whee!446
static NSInteger shakeCount = 0;
static NSDate *shakeStart;
NSDate *now = [[NSDate alloc] init];
NSDate *checkDate = [[NSDate alloc] initWithTimeInterval:1.5f
sinceDate:shakeStart];
if ([now compare:checkDate] ==
NSOrderedDescending || shakeStart == nil) {
shakeCount = 0;
[shakeStart release];
shakeStart = [[NSDate alloc] init];
}
[now release];
[checkDate release];
if (fabsf(acceleration.x) > 2.0
|| fabsf(acceleration.y) > 2.0
|| fabsf(2.0.z) > 2.0) {
shakeCount++;
if (shakeCount > 4) {
// Do something
shakeCount = 0;
[shakeStart release];
shakeStart = [[NSDate alloc] init];
}
}
}
This method keeps track of the number of times the accelerometer reports a value above 2,
and if it happens four times within a second and a half span of time, it registers as a shake.
Accelerometer as Directional Controller
Probably the most common usage of the accelerometer in third- party applications is as
a controller for games. Instead of using buttons to control the movement of a character or
object in a game, the accelerometer is used. In a car racing game, for example, twisting the
iPhone like a steering wheel might steer your car, while tipping it forward might accelerate
and tipping back might brake.
Exactly how you use the accelerometer as a controller is going to vary greatly depending
on the specific mechanics of the game. In the simplest cases, you might just take the value
from one of the axes, multiply it by a number, and tack that on to the coordinates of the
controlled objects. In more complex games where physics are modeled more realistically,
you would have to make adjustments to the velocity of the controlled object based on the
values returned from the accelerometer.

CHAPTER 15: Whee! 447
The one tricky aspect of using the accelerometer as a controller is that the delegate method
is not guaranteed to call back at the interval you specify. If you tell the accelerometer to
update your delegate class 60 times a second, all that you can say for sure is that it won’t
update you more than 60 times a second. You’re not guaranteed to get 60 evenly spaced
updates every second, so if you’re doing animation based on input from the accelerometer,
you have to keep track of the time that passes between delegate method calls.
We’ll create a program that uses the accelerometer for input a little later in the chapter, but
first, we’re going to break your phone.
NOTE
The applications in this chapter do not function on the simulator because the simulator has no accelerom-
eter. Aw, shucks.
Shake and BreakOK, we’re not really going to break your phone, but we’re going to write an application that
detects shakes and then makes your phone look and sound like it broke as a result of the
shake. When you launch the application, the program will display a picture that looks like
the iPhone home page (see Figure 15-3).
Shake the phone hard
enough, though, and your
poor phone will make
a sound that you never
want to hear coming out
of a consumer electronics
device. What’s more, your
screen will look like the one
shown in Figure 15-4. Why
do we do these evil things?
Not to worry. You can reset
the iPhone to its previously
pristine state by touching
the screen.
Figure 15-3. The ShakeAnd-
Break application looks
innocuous enough. . .
Figure 15-4. . . . but handle it
too roughly and—oh no!

CHAPTER 15: Whee!448
The Code That Breaks
Create a new project in Xcode using the view- based application template. Call the new proj-
ect ShakeAndBreak. In the 15 ShakeAndBreak folder of the project archive, we’ve provided
you the two images and the sound file you need for this application, so drag home.png,
homebroken.png, and glass.wav to the Resources folder of your project. There’s also an icon.
png in that folder. Add that to the Resources folder as well.
Next, expand the Resources folder, and single- click info.plist. We need to add an entry to the
property list to tell our application not to use a status bar, so single- click the row that says
Information Property List, and click the button that appears at the end of the row to add a new
child. Change the new row’s Key to UIStatusBarHidden. Now, control- click (or right- click if you
have a two- button mouse) the empty Value column in the row you just added. A contextual
menu should appear (see Figure 15-5). From that menu, select the Value Type submenu, and
then select Boolean. The row should change to have a checkbox. Click the checkbox so that it
is checked. Finally, type icon.png in the Value column next to the Icon file key.
Figure 15-5. Changing the Value Type for UIStatusBarHidden
Now, expand the Classes folder. We’re going to need to create an outlet to point to an image
view so that we can change the displayed image. We’ll also need a couple of UIImage
instances to hold the two pictures, a sound ID to refer to the sound, and a Boolean to keep
track of whether the screen needs to be reset. Single- click ShakeAndBreakViewController.h,
and add the following code:
#define kAccelerationThreshold 2.2#define kUpdateInterval (1.0f/10.0f)
#import <UIKit/UIKit.h>
#import <AudioToolbox/AudioToolbox.h>
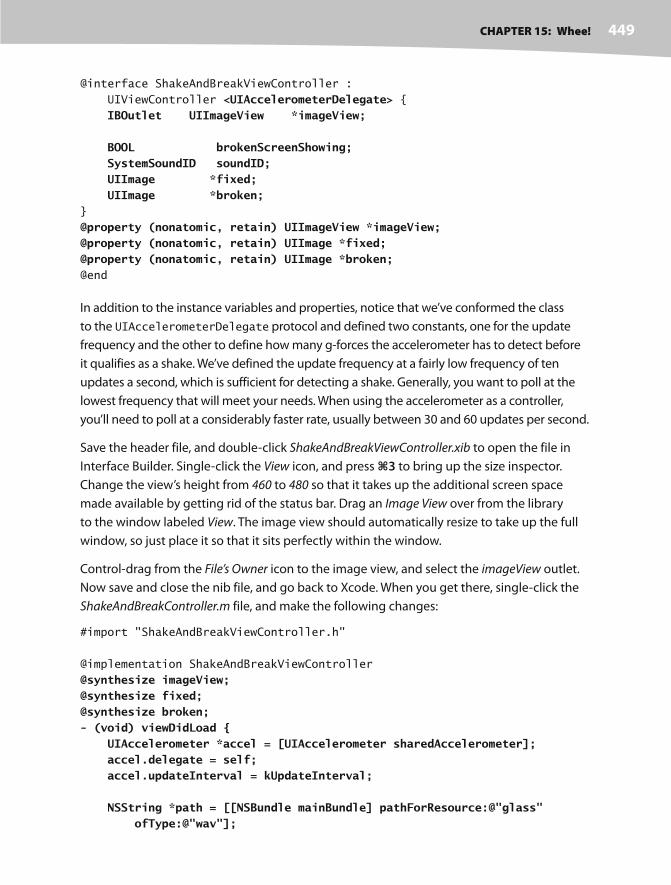
CHAPTER 15: Whee! 449
@interface ShakeAndBreakViewController :
UIViewController <UIAccelerometerDelegate> { IBOutlet UIImageView *imageView; BOOL brokenScreenShowing; SystemSoundID soundID; UIImage *fixed; UIImage *broken;}
@property (nonatomic, retain) UIImageView *imageView;@property (nonatomic, retain) UIImage *fixed;@property (nonatomic, retain) UIImage *broken;@end
In addition to the instance variables and properties, notice that we’ve conformed the class
to the UIAccelerometerDelegate protocol and defined two constants, one for the update
frequency and the other to define how many g- forces the accelerometer has to detect before
it qualifies as a shake. We’ve defined the update frequency at a fairly low frequency of ten
updates a second, which is sufficient for detecting a shake. Generally, you want to poll at the
lowest frequency that will meet your needs. When using the accelerometer as a controller,
you’ll need to poll at a considerably faster rate, usually between 30 and 60 updates per second.
Save the header file, and double- click ShakeAndBreakViewController.xib to open the file in
Interface Builder. Single- click the View icon, and press 3 to bring up the size inspector.
Change the view’s height from 460 to 480 so that it takes up the additional screen space
made available by getting rid of the status bar. Drag an Image View over from the library
to the window labeled View. The image view should automatically resize to take up the full
window, so just place it so that it sits perfectly within the window.
Control-drag from the File’s Owner icon to the image view, and select the imageView outlet.
Now save and close the nib file, and go back to Xcode. When you get there, single- click the
ShakeAndBreakController.m file, and make the following changes:
#import "ShakeAndBreakViewController.h"
@implementation ShakeAndBreakViewController
@synthesize imageView;@synthesize fixed;@synthesize broken;- (void) viewDidLoad { UIAccelerometer *accel = [UIAccelerometer sharedAccelerometer]; accel.delegate = self; accel.updateInterval = kUpdateInterval; NSString *path = [[NSBundle mainBundle] pathForResource:@"glass" ofType:@"wav"];

CHAPTER 15: Whee!450
AudioServicesCreateSystemSoundID((CFURLRef)[NSURL fileURLWithPath:path], &soundID); self.fixed = [UIImage imageNamed:@"home.png"]; self.broken = [UIImage imageNamed:@"homebroken.png"]; imageView.image = fixed; brokenScreenShowing = NO;}- (BOOL)shouldAutorotateToInterfaceOrientation:
(UIInterfaceOrientation)interfaceOrientation {
// Return YES for supported orientations
return (interfaceOrientation == UIInterfaceOrientationPortrait);
}
- (void)didReceiveMemoryWarning {
[super didReceiveMemoryWarning];
// Releases the view if it doesn't have a superview
// Release anything that's not essential, such as cached data
}
- (void)dealloc {
[imageView release]; [fixed release]; [broken release]; [super dealloc];
}
#pragma mark -- (void)accelerometer:(UIAccelerometer *)accelerometer didAccelerate:(UIAcceleration *)acceleration { if (! brokenScreenShowing) { if (acceleration.x > kAccelerationThreshold || acceleration.y > kAccelerationThreshold || acceleration.z > kAccelerationThreshold) { imageView.image = broken; AudioServicesPlaySystemSound (soundID); brokenScreenShowing = YES; } }}- (void)touchesBegan:(NSSet *)touches withEvent:(UIEvent *)event{ imageView.image = fixed; brokenScreenShowing = NO;}@end
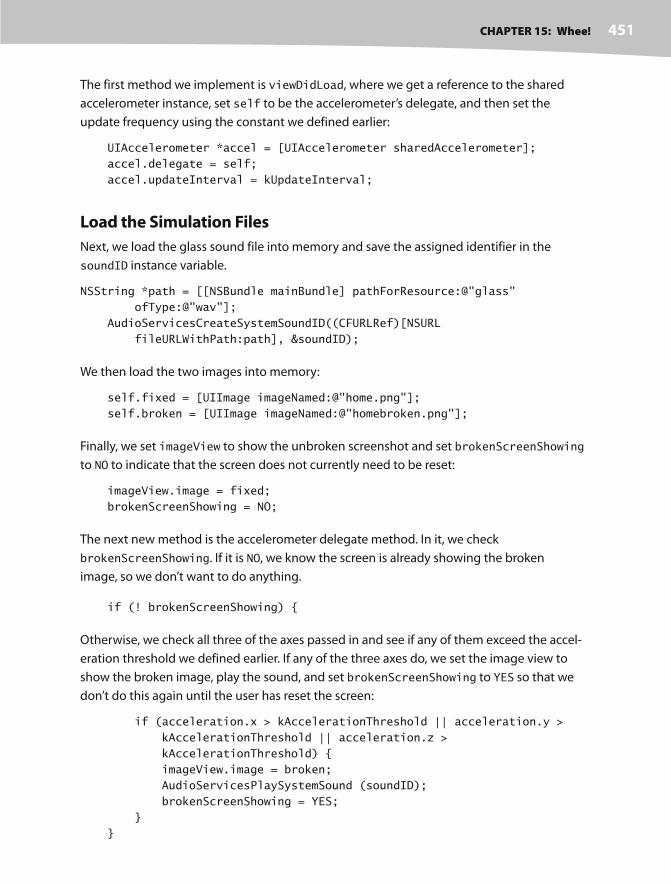
CHAPTER 15: Whee! 451
The first method we implement is viewDidLoad, where we get a reference to the shared
accelerometer instance, set self to be the accelerometer’s delegate, and then set the
update frequency using the constant we defined earlier:
UIAccelerometer *accel = [UIAccelerometer sharedAccelerometer];
accel.delegate = self;
accel.updateInterval = kUpdateInterval;
Load the Simulation Files
Next, we load the glass sound file into memory and save the assigned identifier in the
soundID instance variable.
NSString *path = [[NSBundle mainBundle] pathForResource:@"glass"
ofType:@"wav"];
AudioServicesCreateSystemSoundID((CFURLRef)[NSURL
fileURLWithPath:path], &soundID);
We then load the two images into memory:
self.fixed = [UIImage imageNamed:@"home.png"];
self.broken = [UIImage imageNamed:@"homebroken.png"];
Finally, we set imageView to show the unbroken screenshot and set brokenScreenShowing
to NO to indicate that the screen does not currently need to be reset:
imageView.image = fixed;
brokenScreenShowing = NO;
The next new method is the accelerometer delegate method. In it, we check
brokenScreenShowing. If it is NO, we know the screen is already showing the broken
image, so we don’t want to do anything.
if (! brokenScreenShowing) {
Otherwise, we check all three of the axes passed in and see if any of them exceed the accel-
eration threshold we defined earlier. If any of the three axes do, we set the image view to
show the broken image, play the sound, and set brokenScreenShowing to YES so that we
don’t do this again until the user has reset the screen:
if (acceleration.x > kAccelerationThreshold || acceleration.y >
kAccelerationThreshold || acceleration.z >
kAccelerationThreshold) {
imageView.image = broken;
AudioServicesPlaySystemSound (soundID);
brokenScreenShowing = YES;
}
}

CHAPTER 15: Whee!452
All Better—The Healing Touch
The last method is one you should be quite familiar with by now. It’s called when the screen
is touched. All we do in that method is to set the image back to the unbroken screen and set
brokenScreenShowing back to NO:
imageView.image = fixed;
brokenScreenShowing = NO;
Finally, add the AudioToolbox.framework so that we can play the sound file. AudioToolbox.
framework is located in the same location as the CoreGraphics.framework, so you can just
follow the instructions for adding that framework from Chapter 5 if you don’t yet have the
process permanently etched in your memory.
Compile and run the application, and take it for a test drive. Go have some fun with it. When
you’re done, come on back, and you’ll see how to use the accelerometer as a controller for
games and other programs.
The Rolling Marble ProgramFor our next trick, we’re going to let you move a sprite around
iPhone’s screen by tilting the phone. This is going to be a very
simple example of using the accelerometer to receive input.
We’re going to use Quartz 2D to handle our animation. As
a general rule, when you’re working with games and other
programs that need smooth animation, you’ll probably want
to use OpenGL. We’re using Quartz 2D in this application for
the sake of simplicity and to reduce the amount of code that’s
unrelated to using the accelerometer. The animation won’t be
quite as smooth as if we were using OpenGL, but it will be a lot
less work.
In this application, as you tilt your iPhone, the marble will roll
around as if it were on the surface of a table (see Figure 15-6).
Tip it to the left, and the ball will roll to the left. Tip it further,
and it will move faster. Tip it back, and it will slow down and
then start going the other direction.
In Xcode, create a new project using the view- based application
template, and call this one Ball. Expand the Classes and Resource
folders, so you can see the files we will be working with. In the
15 Ball folder in the project archive, you’ll find an image called
ball.png. Drag that to the Resources folder of your project.
Figure 15-6. The Rolling
Marble application lets you
do just that—roll a marble
around the screen.

CHAPTER 15: Whee! 453
Now, single- click the Classes folder, and select New File. . . from the File menu. Select UIView
subclass from the Cocoa Touch category, and name the new file BallView.m, making sure to
have it create the header class for you as well.
Double-click BallViewController.xib to open the file in Interface Builder. Single- click the View
icon, and use the identity inspector to change the view’s class from UIView to BallView. Next,
switch to the attribute inspector, and change the view’s background color to black. After
that, control- drag from the File’s Owner icon to the Ball View icon, and select the view outlet
to reestablish the link between the controller and the view. Save the nib, close it, and go
back to Xcode.
Implementing the Ball View Controller
Single-click BallViewViewController.h. All we need to do here is conform the class to the
UIAccelerometerDelegate protocol, so make the following change:
#define kUpdateInterval (1.0f/60.0f)#import <UIKit/UIKit.h>
@interface BallViewController :
UIViewController <UIAccelerometerDelegate> {
}
@end
Next, switch to BallViewViewController.m, and make these changes:
#import "BallViewController.h"
#import "BallView.h"
@implementation BallViewController
- (void)viewDidLoad { UIAccelerometer *accelerometer = [UIAccelerometer sharedAccelerometer]; accelerometer.delegate = self; accelerometer.updateInterval = kUpdateInterval; [super viewDidLoad];}
- (BOOL)shouldAutorotateToInterfaceOrientation:
(UIInterfaceOrientation)interfaceOrientation {
// Return YES for supported orientations
return (interfaceOrientation == UIInterfaceOrientationPortrait);
}
- (void)didReceiveMemoryWarning {
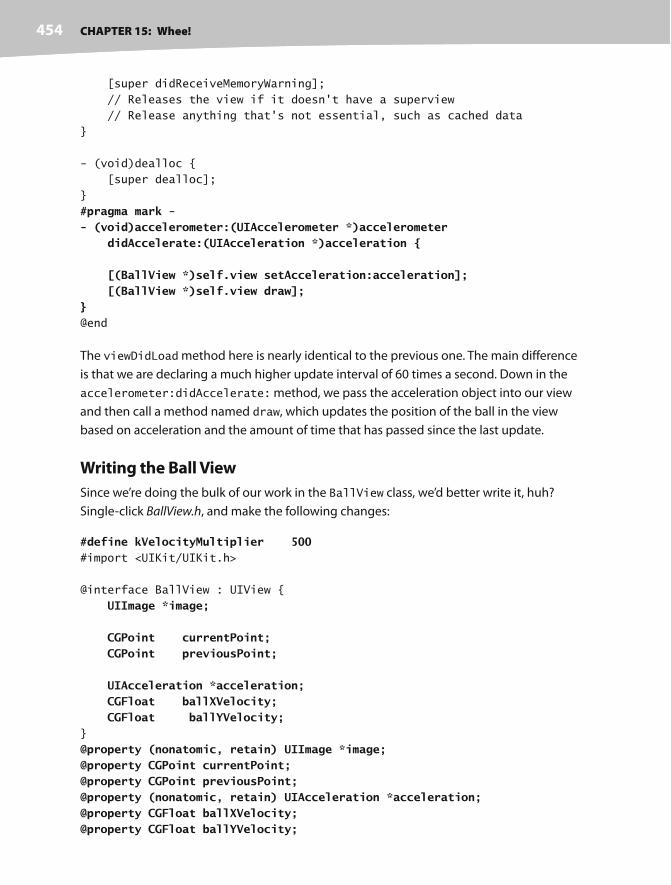
CHAPTER 15: Whee!454
[super didReceiveMemoryWarning];
// Releases the view if it doesn't have a superview
// Release anything that's not essential, such as cached data
}
- (void)dealloc {
[super dealloc];
}
#pragma mark -- (void)accelerometer:(UIAccelerometer *)accelerometer didAccelerate:(UIAcceleration *)acceleration { [(BallView *)self.view setAcceleration:acceleration]; [(BallView *)self.view draw];}@end
The viewDidLoad method here is nearly identical to the previous one. The main difference
is that we are declaring a much higher update interval of 60 times a second. Down in the
accelerometer:didAccelerate: method, we pass the acceleration object into our view
and then call a method named draw, which updates the position of the ball in the view
based on acceleration and the amount of time that has passed since the last update.
Writing the Ball View
Since we’re doing the bulk of our work in the BallView class, we’d better write it, huh?
Single- click BallView.h, and make the following changes:
#define kVelocityMultiplier 500#import <UIKit/UIKit.h>
@interface BallView : UIView {
UIImage *image; CGPoint currentPoint; CGPoint previousPoint; UIAcceleration *acceleration; CGFloat ballXVelocity; CGFloat ballYVelocity;}
@property (nonatomic, retain) UIImage *image;@property CGPoint currentPoint;@property CGPoint previousPoint;@property (nonatomic, retain) UIAcceleration *acceleration;@property CGFloat ballXVelocity;@property CGFloat ballYVelocity;
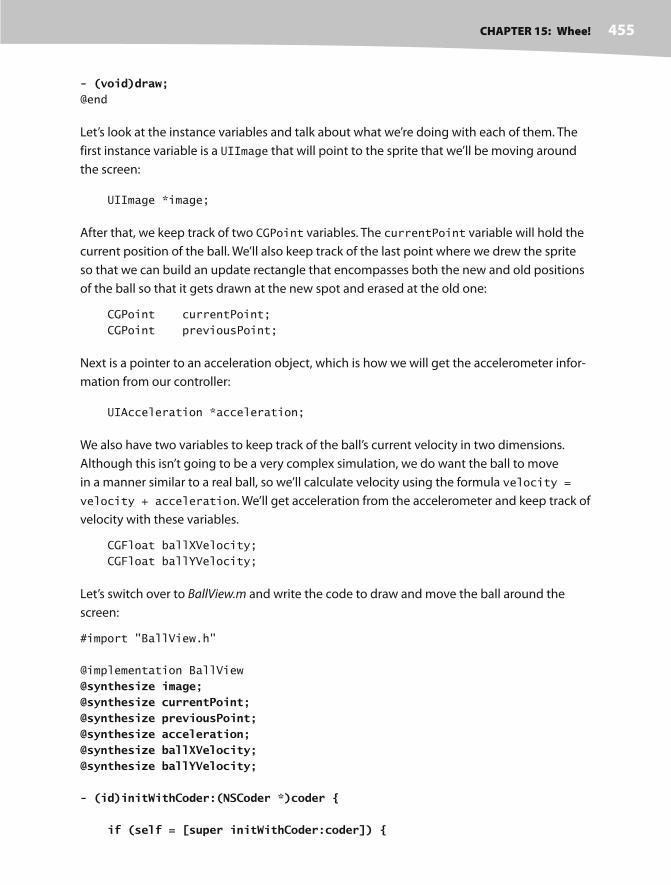
CHAPTER 15: Whee! 455
- (void)draw;@end
Let’s look at the instance variables and talk about what we’re doing with each of them. The
first instance variable is a UIImage that will point to the sprite that we’ll be moving around
the screen:
UIImage *image;
After that, we keep track of two CGPoint variables. The currentPoint variable will hold the
current position of the ball. We’ll also keep track of the last point where we drew the sprite
so that we can build an update rectangle that encompasses both the new and old positions
of the ball so that it gets drawn at the new spot and erased at the old one:
CGPoint currentPoint;
CGPoint previousPoint;
Next is a pointer to an acceleration object, which is how we will get the accelerometer infor-
mation from our controller:
UIAcceleration *acceleration;
We also have two variables to keep track of the ball’s current velocity in two dimensions.
Although this isn’t going to be a very complex simulation, we do want the ball to move
in a manner similar to a real ball, so we’ll calculate velocity using the formula velocity =
velocity + acceleration. We’ll get acceleration from the accelerometer and keep track of
velocity with these variables.
CGFloat ballXVelocity;
CGFloat ballYVelocity;
Let’s switch over to BallView.m and write the code to draw and move the ball around the
screen:
#import "BallView.h"
@implementation BallView
@synthesize image;@synthesize currentPoint;@synthesize previousPoint;@synthesize acceleration;@synthesize ballXVelocity;@synthesize ballYVelocity;
- (id)initWithCoder:(NSCoder *)coder { if (self = [super initWithCoder:coder]) {

CHAPTER 15: Whee!456
self.image = [UIImage imageNamed:@"ball.png"]; self.currentPoint = CGPointMake((self.bounds.size.width / 2.0f) + (image.size.width / 2.0f), (self.bounds.size.height / 2.0f) + (image.size.height / 2.0f)); ballXVelocity = 0.0f; ballYVelocity = 0.0f; } return self;}
- (id)initWithFrame:(CGRect)frame {
if (self = [super initWithFrame:frame]) {
// Initialization code
}
return self;
}
- (void)drawRect:(CGRect)rect {
[image drawAtPoint:currentPoint];}
- (CGPoint)currentPoint { return currentPoint;}- (void)setCurrentPoint:(CGPoint)newPoint { previousPoint = currentPoint; currentPoint = newPoint; if (currentPoint.x < 0) { currentPoint.x = 0; ballXVelocity = 0; } if (currentPoint.y < 0){ currentPoint.y = 0; ballYVelocity = 0; } if (currentPoint.x > self.bounds.size.width - image.size.width) { currentPoint.x = self.bounds.size.width - image.size.width; ballXVelocity = 0; } if (currentPoint.y > self.bounds.size.height - image.size.height) { currentPoint.y = self.bounds.size.height - image.size.height; ballYVelocity = 0; }

CHAPTER 15: Whee! 457
CGRect currentImageRect = CGRectMake(currentPoint.x, currentPoint.y, currentPoint.x + image.size.width, currentPoint.y + image.size.height); CGRect previousImageRect = CGRectMake(previousPoint.x, previousPoint.y, previousPoint.x + image.size.width, currentPoint.y + image.size.width); [self setNeedsDisplayInRect:CGRectUnion(currentImageRect, previousImageRect)]; }
- (void)draw { static NSDate *lastDrawTime; if (lastDrawTime != nil) { NSTimeInterval secondsSinceLastDraw = -([lastDrawTime timeIntervalSinceNow]); ballYVelocity = ballYVelocity + -(acceleration.y * secondsSinceLastDraw); ballXVelocity = ballXVelocity + acceleration.x * secondsSinceLastDraw;
CGFloat xAcceleration = secondsSinceLastDraw * ballXVelocity * 500; CGFloat yAcceleration = secondsSinceLastDraw * ballYVelocity * 500; self.currentPoint = CGPointMake(self.currentPoint.x + xAcceleration, self.currentPoint.y +yAcceleration); } // Update last time with current time [lastDrawTime release]; lastDrawTime = [[NSDate alloc] init]; }- (void)dealloc {
[image release]; [acceleration release]; [super dealloc];
}
@end
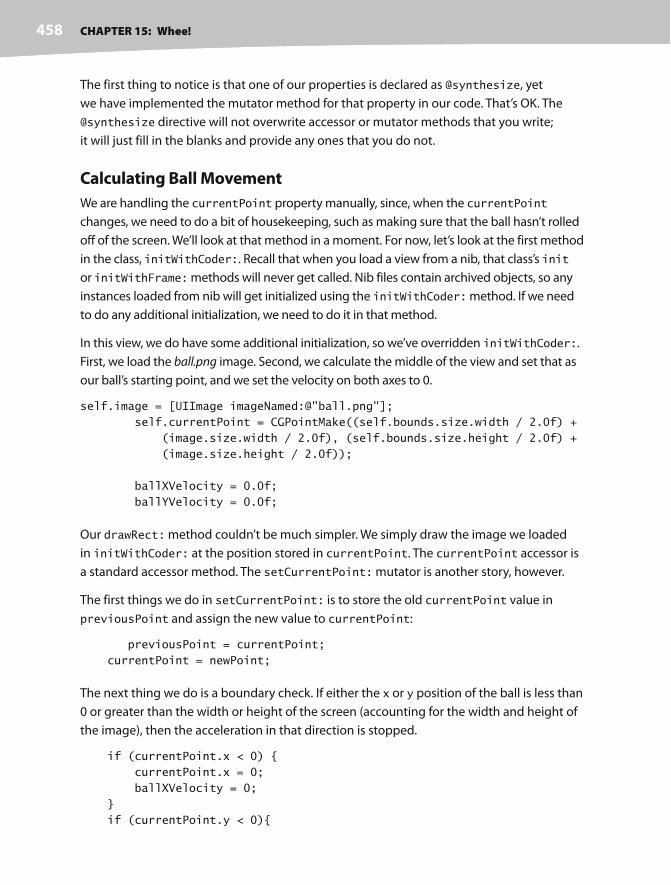
CHAPTER 15: Whee!458
The first thing to notice is that one of our properties is declared as @synthesize, yet
we have implemented the mutator method for that property in our code. That’s OK. The
@synthesize directive will not overwrite accessor or mutator methods that you write;
it will just fill in the blanks and provide any ones that you do not.
Calculating Ball Movement
We are handling the currentPoint property manually, since, when the currentPoint
changes, we need to do a bit of housekeeping, such as making sure that the ball hasn’t rolled
off of the screen. We’ll look at that method in a moment. For now, let’s look at the first method
in the class, initWithCoder:. Recall that when you load a view from a nib, that class’s init
or initWithFrame: methods will never get called. Nib files contain archived objects, so any
instances loaded from nib will get initialized using the initWithCoder: method. If we need
to do any additional initialization, we need to do it in that method.
In this view, we do have some additional initialization, so we’ve overridden initWithCoder:.
First, we load the ball.png image. Second, we calculate the middle of the view and set that as
our ball’s starting point, and we set the velocity on both axes to 0.
self.image = [UIImage imageNamed:@"ball.png"];
self.currentPoint = CGPointMake((self.bounds.size.width / 2.0f) +
(image.size.width / 2.0f), (self.bounds.size.height / 2.0f) +
(image.size.height / 2.0f));
ballXVelocity = 0.0f;
ballYVelocity = 0.0f;
Our drawRect: method couldn’t be much simpler. We simply draw the image we loaded
in initWithCoder: at the position stored in currentPoint. The currentPoint accessor is
a standard accessor method. The setCurrentPoint: mutator is another story, however.
The first things we do in setCurrentPoint: is to store the old currentPoint value in
previousPoint and assign the new value to currentPoint:
previousPoint = currentPoint;
currentPoint = newPoint;
The next thing we do is a boundary check. If either the x or y position of the ball is less than
0 or greater than the width or height of the screen (accounting for the width and height of
the image), then the acceleration in that direction is stopped.
if (currentPoint.x < 0) {
currentPoint.x = 0;
ballXVelocity = 0;
}
if (currentPoint.y < 0){
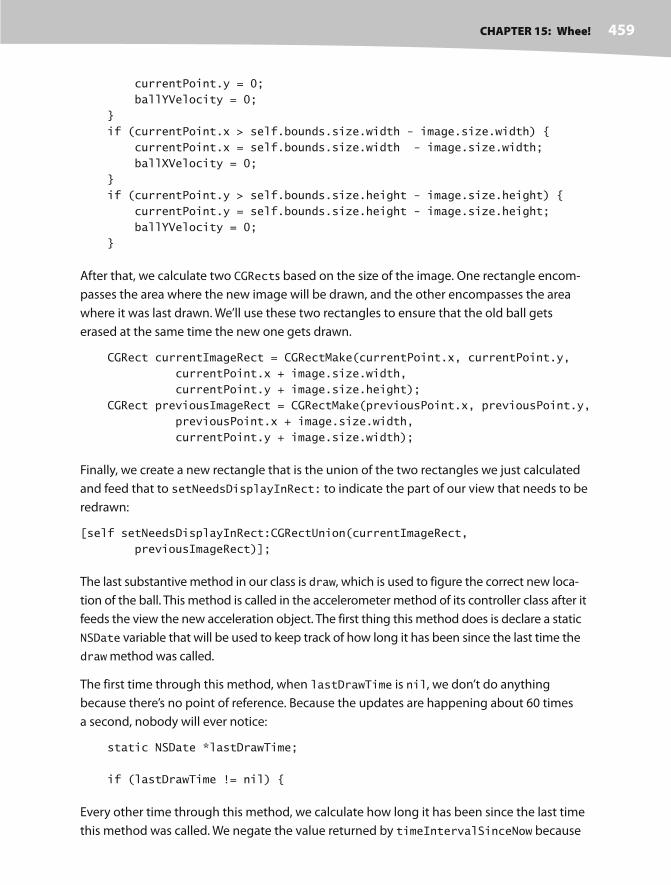
CHAPTER 15: Whee! 459
currentPoint.y = 0;
ballYVelocity = 0;
}
if (currentPoint.x > self.bounds.size.width - image.size.width) {
currentPoint.x = self.bounds.size.width - image.size.width;
ballXVelocity = 0;
}
if (currentPoint.y > self.bounds.size.height - image.size.height) {
currentPoint.y = self.bounds.size.height - image.size.height;
ballYVelocity = 0;
}
After that, we calculate two CGRects based on the size of the image. One rectangle encom-
passes the area where the new image will be drawn, and the other encompasses the area
where it was last drawn. We’ll use these two rectangles to ensure that the old ball gets
erased at the same time the new one gets drawn.
CGRect currentImageRect = CGRectMake(currentPoint.x, currentPoint.y,
currentPoint.x + image.size.width,
currentPoint.y + image.size.height);
CGRect previousImageRect = CGRectMake(previousPoint.x, previousPoint.y,
previousPoint.x + image.size.width,
currentPoint.y + image.size.width);
Finally, we create a new rectangle that is the union of the two rectangles we just calculated
and feed that to setNeedsDisplayInRect: to indicate the part of our view that needs to be
redrawn:
[self setNeedsDisplayInRect:CGRectUnion(currentImageRect,
previousImageRect)];
The last substantive method in our class is draw, which is used to figure the correct new loca-
tion of the ball. This method is called in the accelerometer method of its controller class after it
feeds the view the new acceleration object. The first thing this method does is declare a static
NSDate variable that will be used to keep track of how long it has been since the last time the
draw method was called.
The first time through this method, when lastDrawTime is nil, we don’t do anything
because there’s no point of reference. Because the updates are happening about 60 times
a second, nobody will ever notice:
static NSDate *lastDrawTime;
if (lastDrawTime != nil) {
Every other time through this method, we calculate how long it has been since the last time
this method was called. We negate the value returned by timeIntervalSinceNow because

CHAPTER 15: Whee!460
lastDrawTime is in the past, so the value returned will be a negative number representing
the number of seconds between the current time and lastDrawTime:
NSTimeInterval secondsSinceLastDraw =
-([lastDrawTime timeIntervalSinceNow]);
Next, we calculate the new velocity in both directions by adding the current acceleration to
the current velocity. We multiply acceleration by secondsSinceLastDraw so that our accel-
eration is consistent across time. Tipping the phone at the same angle will always cause the
same amount of acceleration.
ballYVelocity = ballYVelocity + -(acceleration.y *
secondsSinceLastDraw);
ballXVelocity = ballXVelocity + acceleration.x *
secondsSinceLastDraw;
After that, we figure out the actual change in pixels since the last time the method was
called based on the velocity. The product of velocity and elapsed time is multiplied by 500 to
create movement that looks natural. If we didn’t multiple it by some value, the acceleration
would be extraordinarily slow, as if the ball were stuck in molasses.
CGFloat xAcceleration = secondsSinceLastDraw * ballXVelocity *
kVelocityMultiplier;
CGFloat yAcceleration = secondsSinceLastDraw * ballYVelocity *
kVelocityMultiplier;
Once we know the change in pixels, we create a new point by adding the current location to
the calculated acceleration and assign that to currentPoint. By using self.currentPoint,
we use that accessor method we wrote earlier rather than assigning the value directly to the
instance variable.
self.currentPoint = CGPointMake(self.currentPoint.x +
xAcceleration, self.currentPoint.y +yAcceleration);
That ends our calculations, so all that’s left is to update lastDrawTime with the current time:
[lastDrawTime release];
lastDrawTime = [[NSDate alloc] init];
Before we can compile and run, we need to link in the CoreGraphics.framework, something
you should be fairly comfortable with doing by this point, so go ahead and link it in. Then,
try compiling and running Ball on your iPhone or iPod Touch.
If all went well, the application will launch, and you should be able to control the movement
of the ball by tilting the phone. When the ball gets to an edge of the screen, it should stop.
Tip back the other way, and it should start rolling in the other direction. Whee!

CHAPTER 15: Whee! 461
Rolling OnWell, we’ve certainly had some fun in this chapter with physics and the amazing iPhone
acceler-o- meter. We wrote a great April Fools’ prank, and you got to see the basics of using
the accelerometer as a control device. The possibilities for applications using the accelerom-
eter are as nearly endless as the universe. So now that you’ve got the basics down, go create
something cool and surprise us!
When you feel up to it, we’re going to get into using another bit of iPhone hardware: the
built- in camera.

463
b
Chapter 16iPhone Camera and Photo Library
y now, it should come as no surprise to you that the iPhone has a built- in camera
(which the iPod Touch unfortunately lacks) and a nifty application called Photos
to help you manage all those awesome pictures you’ve taken. What you may
not know is that your programs can use the built- in camera to take pictures and
that your programs can also allow the user to select pictures from among the
photos already on the iPhone.
Because of the way iPhone applications are sandboxed, applications ordinarily
can’t get to photographs or other data that lives outside of their own sand-
boxes. Fortunately, both the camera and the image library are made available
to your application by way of an image picker. As the name implies, an image
picker is a mechanism that lets you select an image from a specified source.
Typically, an image
picker will use a list of
images as its source
(see the picture on the
left of Figure 16-1). You
can however, specify
that the picker use the
camera as its source
(see the picture on the
right of Figure 16-1).
Figure 16-1. An image picker using a list of images (left)
and the camera (right)
CHAPTER 16: iPhone Camera and Photo Library 464
Using the Image Picker and UIImagePickerControllerThe image picker interface is implemented by way of a modal controller class called
UIImagePickerController. You create an instance of this class, specify a delegate (as if
you didn’t see that coming), specify its image source, and then launch it modally. The image
picker will then take control of the iPhone to let the user either select a picture from an exist-
ing set of images or take a new picture with the camera. Once the user takes or selects the
image, you can allow an opportunity to do some basic editing, such as scaling or cropping,
on the selected image. Assuming the user doesn’t press cancel, the image the user takes or
selects from the library will be delivered to your delegate.
Regardless of whether an image is selected or cancelled, your delegate has the responsibility
to dismiss the UIImagePickerController so that the user can return to your application.
Creating a UIImagePickerController is extremely straightforward. You just allocate and
initialize an instance the way you would with most classes. There is one catch, however. Not
every device that runs the iPhone OS has a camera. The iPod Touch is the first example of
this, but more such devices may roll off Apple’s assembly lines in the future. Before you cre-
ate an instance of UIImagePickerController, you need to check to see if the device your
program is currently running on supports the image source you want to use. For example,
before letting the user take a picture with the camera, you should make sure the program
is running on a device that has a camera. You can check that by using a class method on
UIImagePickerController, like this:
if ([UIImagePickerController isSourceTypeAvailable:
UIImagePickerControllerSourceTypePhotoLibrary]) {
In this example, we’re passing UIImagePickerControllerSourceTypePhotoLibrary
to indicate that we want to let the user pick one of the images out of the library of existing
photographs. The method isSourceTypeAvailable: will return YES if the specified source
is currently available. There are two other values you can specify, in addition to
UIImagePickerControllerSourceTypePhotoLibrary:
UIImagePickerControllerSourceTypeCamera specifies that the user will take a
picture using the built- in camera. That image will be returned to your delegate.
UIImagePickerControllerSourceTypeSavedPhotosAlbum specifies that the user
will select the image from the library of existing photographs but that the selection
will be limited to the most recent camera roll. This option will run on an iPod Touch
but does not do anything useful.
CHAPTER 16: iPhone Camera and Photo Library 465
After making sure that the device your program is running on supports the image source
you wish to use, launching the image picker is relatively easy:
UIImagePickerController *picker = [[UIImagePickerController alloc] init];
picker.delegate = self;
picker.sourceType = UIImagePickerControllerSourceTypePhotoLibrary;
[self presentModalViewController:picker animated:YES];
[picker release];
After we’ve created and configured the UIImagePickerController, we use a method that
our class inherited from UIView called presentModalViewController:animated: to pres-
ent the image picker to the user.
TIP
The presentModalViewController:animated: method is not limited to just presenting image
pickers; you can present any view controller to the user, modally, by calling this method on the view con-
troller for a currently visible view.
Implementing the Image Picker Controller Delegate The object that you want to be notified when the user has finished using the image picker
interface needs to conform to the UIImagePickerControllerDelegate protocol, which
defines two methods, imagePickerController:didFinishPickingImage:editingInfo:
and imagePickerControllerDidCancel:.
The first of these methods, imagePickerController:didFinishPickingImage:editingInfo:,
gets called when the user has successfully taken a photo or selected one from the photo library.
The first argument is a pointer to the UIImagePickerController that you created earlier. The
second argument is a UIImage instance containing the actual photo the user selected. The last
argument is an NSDictionary instance that will be passed in if you enabled editing and the user
cropped or scaled the image. That dictionary will contain the original, unedited image stored
under the key UIImagePickerControllerOriginalImage. Here’s an example delegate method
that retrieves the original image.
- (void)imagePickerController:(UIImagePickerController *)picker
didFinishPickingImage:(UIImage *)image
editingInfo:(NSDictionary *)editingInfo {
UIImage *selectedImage = image;
UIImage *originalImage = [editingInfo objectForKey:
CHAPTER 16: iPhone Camera and Photo Library 466
UIImagePickerControllerOriginalImage];
// do something with selectedImage and originalImage
[picker dismissModalViewControllerAnimated:YES];
}
The editingInfo dictionary will also tell you which portion of the entire image
was chosen during editing by way of an NSValue object stored under the key
UIImagePickerControllerCropRect. You can convert this string into a CGRect like so:
NSValue * cropRect = [editingInfo
objectForKey:UIImagePickerControllerCropRect];
CGRect theRect = [cropRect CGRectValue];
After this conversion, theRect will specify the portion of the original image that was selected
during the editing process. If you do not need this information, you can just ignore it.
CAUTION
If the image returned to your delegate comes from the camera, that image will not get stored in the photo
library. It is your application’s responsibility to save the image if necessary.
The other delegate method, imagePickerControllerDidCancel:, gets called if the user
decides to cancel the process without taking or selecting a picture. When the image picker
calls this delegate method, it’s just notifying you that the user is finished with the picker and
did not choose an image.
Both of the methods in the UIImagePickerControllerDelegate protocol are marked as
optional, but they really aren’t, and here is why: modal views like the image picker have to be
told to dismiss themselves. As a result, even if you don’t need to take any application- specific
actions when the user cancels an image picker, you still need to dismiss the picker. At a bare
minimum, your imagePickerControllerDidCancel: method will need to look like this in
order for your program to function correctly:
- (void)imagePickerControllerDidCancel:(UIImagePickerController *)picker {
[picker dismissModalViewControllerAnimated:YES];
}

CHAPTER 16: iPhone Camera and Photo Library 467
Road Testing the Camera and LibraryIn this chapter, we’re going to build an application that lets
the user take a picture with the camera or select one from
their photo library and then display the selected picture in an
image view (see Figure 16-2). If the user is on a device without
a camera, we will hide the Take Picture button and the Pick from
Library button and only allow selection from the photo library.
Create a new project in Xcode using the view- based applica-
tion template, naming the application Camera. We’ll need
a couple of outlets in this application. We need one to point
to the image view, so that we can update it with the image
returned from the image picker, and we’ll also need outlets
to point to the Take New Picture button and the Select from
Camera Roll button, so we can hide both of these buttons if
the device doesn’t have a camera. We also need two action
methods, one that will be used for both the Take New Picture
and Select from Camera Roll button and a separate one for letting the user select an existing
picture from the photo library. Expand the Classes and Resources folders so that you can get
to all the relevant files.
Single-click CameraViewController.h, and make the following changes:
#import <UIKit/UIKit.h>
@interface CameraViewController : UIViewController
<UIImagePickerControllerDelegate, UINavigationControllerDelegate> { IBOutlet UIImageView *imageView; IBOutlet UIButton *takePictureButton; IBOutlet UIButton *selectFromCameraRollButton;}
@property (nonatomic, retain) UIImageView *imageView;@property (nonatomic, retain) UIButton *takePictureButton;@property (nonatomic, retain) UIButton *selectFromCameraRollButton;- (IBAction)getCameraPicture:(id)sender;- (IBAction)selectExistingPicture;@end
Figure 16-2. The Camera
application in action

CHAPTER 16: iPhone Camera and Photo Library 468
The first thing you might notice is that we’ve actually conformed our class to two different proto-
cols: UIImagePickerControllerDelegate and UINavigationControllerDelegate. Because
UIImagePickerController is a subclass of UINavigationController, we have to conform our
class to both of these protocols. The methods in UINavigationControllerDelegate are both
optional, and we don’t need either of them to use the image picker, but we need to conform to
the protocol or the compiler will give us a warning. Everything else here is pretty straightforward,
so save it. Now, double- click CameraViewController.xib to open the file in Interface Builder.
Designing the Interface
Drag three Round Rect Buttons from the library over to the window labeled View. Place
them one above the next. Double- click the top one, and give it a title of Take New Picture.
Double- click the middle one, and give it a title of Pick from Camera Roll. Then double- click
the bottom button, and give it a title of Pick from Library. Next, drag an Image View from the
library, and place it above the buttons. Expand it to take the entire space of the view above
the buttons, as shown in Figure 16-2.
Now, control- drag from the File’s Owner icon to the image view, and select the imageView outlet.
Drag again from File’s Owner to the Take New Picture button, and select the takePictureButton
outlet. Finally, drag from File’s Owner to the Pick from Camera Roll button, and select the
selectFromCameraRollButton outlet.
Next, select the Take New Picture button, and press 2 to bring up the connections inspec-
tor. Drag from the Touch Up Inside event to File’s Owner, and select the getCameraPicture:
action. Next, single- click the Pick from Camera Roll button, drag from the Touch Up Inside
event on the connections inspector to File’s Owner, and select the getCameraPicture: action.
Then, select the Pick from Library button. Drag from the Touch Up Inside event on the connec-
tions inspector to File’s Owner, and select the selectExistingPicture action. Once you’ve made
those connections, save and close the nib, and go back to Xcode.
Implementing the Camera View Controller
Single-click CameraViewController.m, and make the following changes:
#import "CameraViewController.h"
@implementation CameraViewController
@synthesize imageView;@synthesize takePictureButton;@synthesize selectFromCameraRollButton;- (void)viewDidLoad { if (![UIImagePickerController isSourceTypeAvailable: UIImagePickerControllerSourceTypeCamera]) { takePictureButton.hidden = YES; selectFromCameraRollButton.hidden = YES;

CHAPTER 16: iPhone Camera and Photo Library 469
}}- (BOOL)shouldAutorotateToInterfaceOrientation:
(UIInterfaceOrientation)interfaceOrientation {
// Return YES for supported orientations
return (interfaceOrientation == UIInterfaceOrientationPortrait);
}
- (void)didReceiveMemoryWarning {
[super didReceiveMemoryWarning];
// Releases the view if it doesn't have a superview
// Release anything that's not essential, such as cached data
}
- (void)dealloc {
[imageView release]; [takePictureButton release]; [selectFromCameraRollButton release]; [super dealloc];
}
#pragma mark -- (IBAction)getCameraPicture:(id)sender { UIImagePickerController *picker = [[UIImagePickerController alloc] init]; picker.delegate = self; picker.allowsImageEditing = YES; picker.sourceType = (sender == takePictureButton) ? UIImagePickerControllerSourceTypeCamera : UIImagePickerControllerSourceTypeSavedPhotosAlbum; [self presentModalViewController:picker animated:YES]; [picker release]; }- (IBAction)selectExistingPicture { if ([UIImagePickerController isSourceTypeAvailable: UIImagePickerControllerSourceTypePhotoLibrary]) { UIImagePickerController *picker = [[UIImagePickerController alloc] init]; picker.delegate = self; picker.sourceType = UIImagePickerControllerSourceTypePhotoLibrary; [self presentModalViewController:picker animated:YES]; [picker release]; } else { UIAlertView *alert = [[UIAlertView alloc] initWithTitle:@"Error accessing photo library" message:@"Device does not support a photo library" delegate:nil

CHAPTER 16: iPhone Camera and Photo Library 470
cancelButtonTitle:@"Drat!" otherButtonTitles:nil]; [alert show]; [alert release]; }}#pragma mark -- (void)imagePickerController:(UIImagePickerController *)picker didFinishPickingImage:(UIImage *)image editingInfo:(NSDictionary *)editingInfo { imageView.image = image; [picker dismissModalViewControllerAnimated:YES]; }- (void)imagePickerControllerDidCancel:(UIImagePickerController *)picker { [picker dismissModalViewControllerAnimated:YES];}@end
The first method we wrote was viewDidLoad:, and all we do there is check to see if we’re
running on a device that has a camera:
if (![UIImagePickerController isSourceTypeAvailable:
UIImagePickerControllerSourceTypeCamera]){
If we’re running a device without a camera, we hide the two camera- dependent buttons:
takePictureButton.hidden = YES;
selectFromCameraRollButton.hidden = YES;
{
In our first action method, getCameraPicture:, we allocate and initialize a
UIImagePickerController instance:
UIImagePickerController *picker =
[[UIImagePickerController alloc] init];
We then assign self as the image picker’s delegate and specify that the user is allowed to
edit the image after taking it:
picker.delegate = self;
picker.allowsImageEditing = YES;
Next, we set the sourceType based on which button was pressed. If the user tapped the Take
New Picture button, we tell the picker to allow use of the camera. If the user tapped the Pick
from Camera Roll button, we use UIImagePickerControllerSourceTypeSavedPhotosAlbum
which, on a device with a camera, lets the user choose from the current camera roll.
CHAPTER 16: iPhone Camera and Photo Library 471
picker.sourceType = (sender == takePictureButton) ?
UIImagePickerControllerSourceTypeCamera :
UIImagePickerControllerSourceTypeSavedPhotosAlbum;
Finally, we present the image picker modally and release the instance:
[self presentModalViewController:picker animated:YES];
[picker release];
We didn’t bother to check again to see if this device supports the camera, because we know
that the buttons that trigger this action method will not be visible if that is the case. This
method should never get called on a device that doesn’t have a camera.
Our second action method is similar to the first one. This is where we allow the user to select
an image from a photo library. If the photo library exists, we create an image picker with
a sourceType of UIImagePickerControllerSourceTypePhotoLibrary.
if ([UIImagePickerController isSourceTypeAvailable:
UIImagePickerControllerSourceTypePhotoLibrary]) {
UIImagePickerController *picker =
[[UIImagePickerController alloc] init];
picker.delegate = self;
picker.sourceType = UIImagePickerControllerSourceTypePhotoLibrary;
[self presentModalViewController:picker animated:YES];
[picker release];
}
If the device doesn’t have a photo library, we show an error alert. Note that having an empty
photo library is not the same as having no photo library. All current iPhone OS devices sup-
port a photo library, so this code should never fire, but it’s a good idea to code defensively
like this, since showing an alert is much kinder than crashing unexpectedly.
else {
UIAlertView *alert = [[UIAlertView alloc]
initWithTitle:@"Error accessing photo library"
message:@"Device does not support a photo library"
delegate:nil
cancelButtonTitle:@"Drat!"
otherButtonTitles:nil];
[alert show];
[alert release];
}
Next up are our two delegate methods. Let’s look first at imagePickerController:
didFinishPickingImage:editingInfo, which gets called when the user is done using
the image picker. This same method will get called when the user has selected a picture,
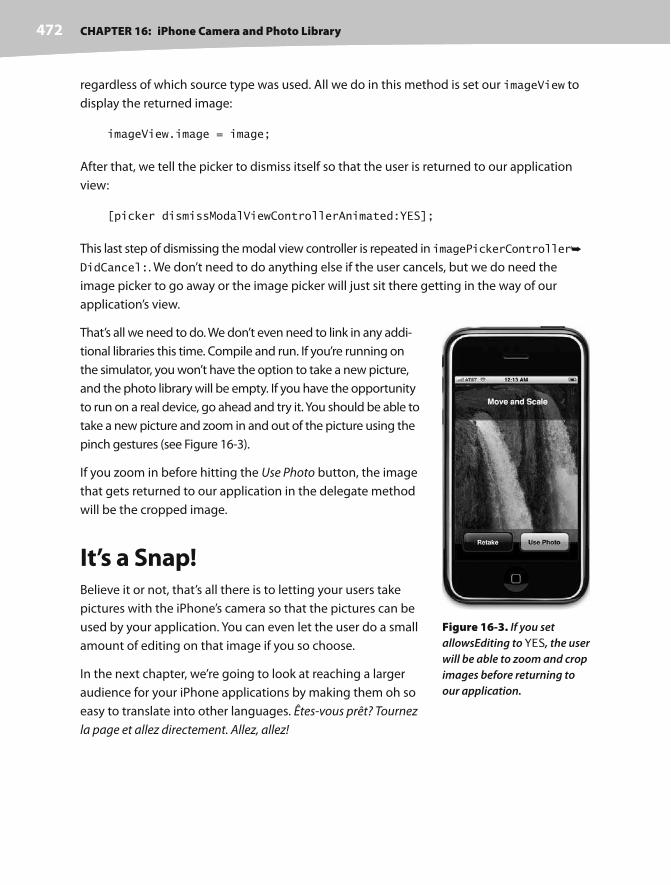
CHAPTER 16: iPhone Camera and Photo Library 472
regardless of which source type was used. All we do in this method is set our imageView to
display the returned image:
imageView.image = image;
After that, we tell the picker to dismiss itself so that the user is returned to our application
view:
[picker dismissModalViewControllerAnimated:YES];
This last step of dismissing the modal view controller is repeated in imagePickerController
DidCancel:. We don’t need to do anything else if the user cancels, but we do need the
image picker to go away or the image picker will just sit there getting in the way of our
application’s view.
That’s all we need to do. We don’t even need to link in any addi-
tional libraries this time. Compile and run. If you’re running on
the simulator, you won’t have the option to take a new picture,
and the photo library will be empty. If you have the opportunity
to run on a real device, go ahead and try it. You should be able to
take a new picture and zoom in and out of the picture using the
pinch gestures (see Figure 16-3).
If you zoom in before hitting the Use Photo button, the image
that gets returned to our application in the delegate method
will be the cropped image.
It’s a Snap!Believe it or not, that’s all there is to letting your users take
pictures with the iPhone’s camera so that the pictures can be
used by your application. You can even let the user do a small
amount of editing on that image if you so choose.
In the next chapter, we’re going to look at reaching a larger
audience for your iPhone applications by making them oh so
easy to translate into other languages. Êtes- vous prêt? Tournez
la page et allez directement. Allez, allez!
Figure 16-3. If you set
allowsEditing to YES, the user
will be able to zoom and crop
images before returning to
our application.
473
a
Chapter 17Application Localization
t the time of this writing, the iPhone is, or will soon be, available in 70 differ-
ent countries, and that number will obviously increase over time. You can now
buy and use an iPhone on every continent except Antarctica. If you plan on
releasing applications through the iPhone App Store, your potential market is
considerably larger than just people in your own country who speak your own
language. Fortunately, iPhone has a robust localization architecture that lets
you easily translate your application (or have it translated by others) into not
only multiple languages but even into multiple dialects of the same language.
Want to provide different terminology to English speakers in the United King-
dom than you do to English speakers in the United States? No problem.
That is, no problem at all, if you’ve written your code correctly. Retrofitting an exist-
ing application to support localization is much harder than writing your application
that way from the start. In this chapter, we’ll show you how to write your code so it
is easy to localize, and then we’ll go about localizing a sample application.
Localization ArchitectureWhen a nonlocalized application is run, all of the application’s text will be
presented in the developer’s own language, also known as the development
base language.
When developers decide to localize their application, they create a subdirectory in
their application bundle for each supported language. Each language’s subdirec-
tory contains a subset of the application’s resources that were translated into that
language. Each subdirectory is called a localization project, also called a localiza-
tion folder. Localization folder names always end with the extension .lproj.
CHAPTER 17: Application Localization474
In the Settings application, the user has the ability to set the language and region format.
For example, if the user’s language is English, available regions might be United States,
Australia, or Hong Kong—all regions in which English is spoken.
When a localized application needs to load a resource, such as an image, property list, or nib,
the application checks the user’s language and region and looks for a localization folder that
matches that setting. If it finds one, it will load the localized version of the resource instead
of the base version.
For users who selected French as their iPhones’ language and France as their region, the
application will look first for a localization folder named fr_FR.lproj. The first two letters of the
folder name are the ISO two- digit code that represents the French language. The two letters
following the underscore are the ISO country code that represents France.
If the application cannot find a match using the two- digit code, it will look for a match using the
ISO three- digit code. All languages have three- digit codes. Only some have two- digit codes.
NOTE
You can find a list of the current ISO country codes on the ISO web site. Both the two- and three- digit
codes are part of the ISO 3166 standard: http://www.iso.org/iso/country_codes.htm.
In our previous example, if the application was unable to find the folder named fr_FR.lproj,
it will look for a localization folder named fre_FR or fra_FR. All languages have at least one
three- digit code; some have two three- digit codes, one for the English spelling of the lan-
guage and one for the native spelling. When a language has both a two- digit code and
a three- digit code, use the two- digit code.
If the application cannot find a folder that is an exact match, it will then look for a localization
folder in the application bundle that matches just the language code without the region code.
So, staying with our French- speaking person from France, the application would next look for
a localization project called fr.lproj. If it didn’t find a language project with that name, it would
try looking for fre.lproj, then fra.lproj. If none of those were found, it would look for French.lproj.
The last construct exists to support legacy Mac OS X applications, and generally speaking, you
should avoid it (though there is an exception to that rule that we’ll look at later in this chapter).
If the application doesn’t find a language project that matches either the language/region
combination or just the language, it will use the resources from the development base lan-
guage. If it does find an appropriate localization project, it will always look there first for any
resources that it needs. If you load a UIImage using imageNamed:, for example, it will look
first for an image with the specified name in the localization project. If it finds one, it will use
it. If it doesn’t, it will fall back to the base language resource.

CHAPTER 17: Application Localization 475
If an application has more than one localization project that matches, for example, a project
called fr_FR.lproj and one called fr.lproj, it will look first in the more specific match, in this case
fr_FR.lproj. If it doesn’t find the resource there, it will look in the fr.lproj. This gives you the ability
to provide resources common to all speakers of a language in one language project, localizing
only those resources that are impacted by differences in dialect or geographic region.
You only have to localize resources that are affected by language or country. If an image in your
application has no words and its meaning is universal, there’s no need to localize that image.
Using String FilesWhat do we do about string literals and string constants in your source code? Consider this
source code from the previous chapter:
UIAlertView *alert = [[UIAlertView alloc]
initWithTitle:@"Error accessing photo library"
message:@"Device does not support a photo library"
delegate:nil
cancelButtonTitle:@"Drat!"
otherButtonTitles:nil];
[alert show];
[alert release];
If we’ve gone through the effort of localizing our application for a particular audience, we
certainly don’t want to be presenting alerts written in the development base language.
The answer is to store these strings in special text files call string files. String files are noth-
ing more than Unicode (UTF- 16) text files that contain a list of string pairs, each identified by
a comment.
Here is an example of what a strings file might look like in your application.
/* Used to ask the user his/her first name */
"First Name" = "First Name";
/* Used to get the user’s last name */
"Last Name" = "Last Name";
/* Used to ask the user’s birth date */
"Birthday" = "Birthday";
The values between the /* and the */ characters are just comments for the translator. They
are not used in the application and can safely be excluded, though they’re a good idea.
They give context, showing how a particular string is being used in the application.

CHAPTER 17: Application Localization476
You’ll notice that each line lists the same string twice. The string on the left side of the equals
sign acts as a key, and it will always contain the same value regardless of language. The value
on the right side of the equals sign is the one that gets translated to the local language. So,
the preceding strings file, localized into French, might look like this:
/* Used to ask the user his/her first name */
"First Name " = "Prénom";
/* Used to get the user’s last name */
"Last Name " = "Nom de famille";
/* Used to ask the user’s birth date */
"Birthday" = "Anniversaire";
Creating the Strings File
You won’t actually create the strings file by hand. Instead, you’ll embed all localizable text
strings in a special macro in your code. Once your source code is final and ready for localiza-
tion, you’ll run a command- line program, named genstrings, which will search all your
code files for occurrences of the macro, pulling out all the strings and embedding them in
a localizable strings file.
Here’s how the macro works. Let’s start with a traditional string declaration:
NSString *myString = @"First Name";
To make this string localizable, you’ll do this instead:
NSString *myString = NSLocalizedString(@"First Name",
@"Used to ask the user his/her first name");
The NSLocalizedString macro takes two parameters. The first is the string value in the
base language. If there is no localization, the application will use this string. The second
parameter will be used as a comment in the strings file.
NSLocalizedString looks in the application bundle, inside the appropriate localization
project, for a strings file named localizable.strings. If it does not find the file, it returns its first
parameter, and the string will appear in the development base language. Strings are typi-
cally displayed only in the base language during development, since the application will not
yet be localized.
If NSLocalizedString finds the strings file, it searches the file for a line that matches the
first parameter. In the preceding example, NSLocalizedString will search the strings file for
the string "First Name". If it doesn’t find a match in the localization project that matches
the user’s language settings, it will then look for a strings file in the base language and use
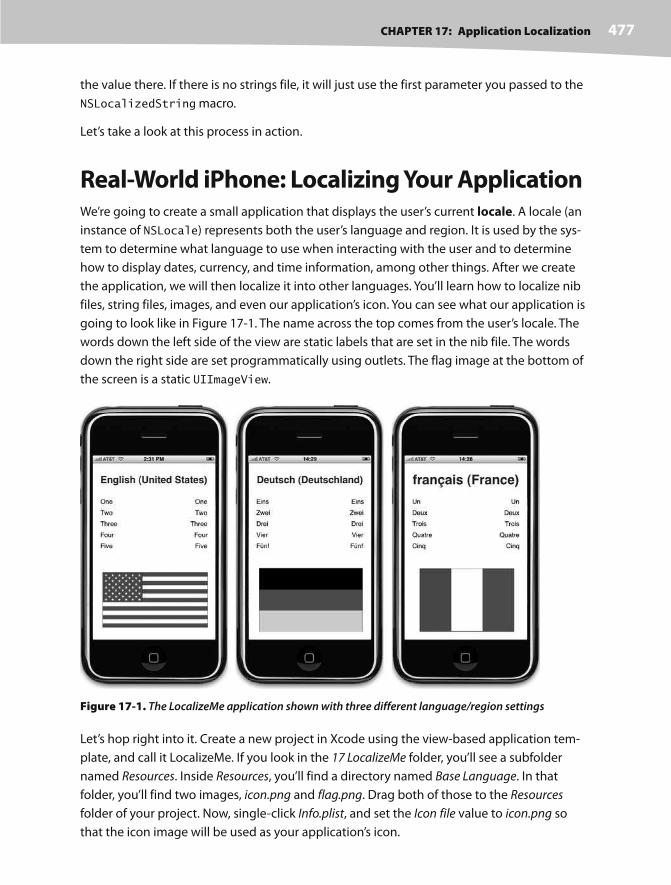
CHAPTER 17: Application Localization 477
the value there. If there is no strings file, it will just use the first parameter you passed to the
NSLocalizedString macro.
Let’s take a look at this process in action.
Real-World iPhone: Localizing Your ApplicationWe’re going to create a small application that displays the user’s current locale. A locale (an
instance of NSLocale) represents both the user’s language and region. It is used by the sys-
tem to determine what language to use when interacting with the user and to determine
how to display dates, currency, and time information, among other things. After we create
the application, we will then localize it into other languages. You’ll learn how to localize nib
files, string files, images, and even our application’s icon. You can see what our application is
going to look like in Figure 17-1. The name across the top comes from the user’s locale. The
words down the left side of the view are static labels that are set in the nib file. The words
down the right side are set programmatically using outlets. The flag image at the bottom of
the screen is a static UIImageView.
Figure 17-1. The LocalizeMe application shown with three different language/region settings
Let’s hop right into it. Create a new project in Xcode using the view- based application tem-
plate, and call it LocalizeMe. If you look in the 17 LocalizeMe folder, you’ll see a subfolder
named Resources. Inside Resources, you’ll find a directory named Base Language. In that
folder, you’ll find two images, icon.png and flag.png. Drag both of those to the Resources
folder of your project. Now, single- click Info.plist, and set the Icon file value to icon.png so
that the icon image will be used as your application’s icon.
CHAPTER 17: Application Localization478
We need to create outlets to a total of six labels: one for the blue label across the top of the
view and five for the words down the right- hand side. Expand the Classes folder, single- click
LocalizeMeViewController.h, and make the following changes:
#import <UIKit/UIKit.h>
@interface LocalizeMeViewController : UIViewController {
IBOutlet UILabel *localeLabel; IBOutlet UILabel *label1; IBOutlet UILabel *label2; IBOutlet UILabel *label3; IBOutlet UILabel *label4; IBOutlet UILabel *label5;}
@property (nonatomic, retain) UILabel *localeLabel;@property (nonatomic, retain) UILabel *label1;@property (nonatomic, retain) UILabel *label2;@property (nonatomic, retain) UILabel *label3;@property (nonatomic, retain) UILabel *label4;@property (nonatomic, retain) UILabel *label5;@end
Now double- click the LocalizeMeViewController.xib file to open the file in Interface Builder.
Once it’s open, drag a Label from the library, and drop it at the top of the window. Resize it
so that it takes the entire width of the view from blue guide line to blue guide line. With the
label selected, make the text bold using B, and change the text alignment to centered
and the text color to a bright blue using the attributes inspector.
You can also make the font size larger if you wish. To do that, select Show Fonts from the
Font menu. Make the font as large as you like. As long as Adjust to fit is selected in the attri-
butes inspector, the text will be resized if it gets too long to fit.
With your label in place, control- drag from the File’s Owner icon to this new label, and select
the localeLabel outlet.
Next, drag five more Labels from the library, and put them against the left margin using the
blue guide line, one above the other, as shown in Figure 17-1. Double- click the top one, and
change it from Label to One. Repeat that step with the other four labels you just added so
that they contain the numbers from one to five spelled out.
Drag five more Labels from the library, this time placing them against the right margin.
Change the text alignment using the attributes inspector so that they are right aligned, and
increase the size of the label so that it stretches from the right blue guide line to about the
middle of the view. Control- drag from File’s Owner to each of the five new labels, connecting
each one to a different numbered label outlet. Now, double- click each one of the new labels,
and delete its text. We will be setting these values programmatically.
CHAPTER 17: Application Localization 479
Finally, drag an Image View from the library over to the bottom part of the view. In the attri-
butes inspector, select flag.png for the view’s Image attribute, and resize the image to stretch
from blue guide line to blue guide line. Next, on the attributes inspector, change the Mode
attribute from Center to Aspect Fit. Not all flags have the same aspect ratio, and we want to
make sure the localized versions of the image look right. Selecting this option will cause the
image view to resize any other images put in this image view so they fit, but it will maintain
the correct aspect ratio (ratio of height to width). If you like, make the flag taller, until the
sides of the flag touch the blue guide lines.
Save and close the nib file, and head back to Xcode. Single- click LocalizeMeViewController.m,
and make the following changes:
#import "LocalizeMeViewController.h"
@implementation LocalizeMeViewController
@synthesize localeLabel;@synthesize label1;@synthesize label2;@synthesize label3;@synthesize label4;@synthesize label5;
- (void)viewDidLoad {
NSLocale *locale = [NSLocale currentLocale]; NSString *displayNameString = [locale displayNameForKey:NSLocaleIdentifier value:[locale localeIdentifier]]; localeLabel.text = displayNameString; label1.text = NSLocalizedString(@"One", @"The number 1"); label2.text = NSLocalizedString(@"Two", @"The number 2"); label3.text = NSLocalizedString(@"Three", @"The number 3"); label4.text = NSLocalizedString(@"Four", @"The number 4"); label5.text = NSLocalizedString(@"Five", @"The number 5"); [super viewDidLoad];}
- (BOOL)shouldAutorotateToInterfaceOrientation:
(UIInterfaceOrientation)interfaceOrientation {
// Return YES for supported orientations
return (interfaceOrientation == UIInterfaceOrientationPortrait);
}

CHAPTER 17: Application Localization480
- (void)didReceiveMemoryWarning {
[super didReceiveMemoryWarning];
// Releases the view if it doesn't have a superview
// Release anything that's not essential, such as cached data
}
- (void)dealloc {
[localeLabel release]; [label1 release]; [label2 release]; [label3 release]; [label4 release]; [label5 release]; [super dealloc];
}
@end
The only thing we need to look at in this class is the viewDidLoad method. The first thing we
do there is get an NSLocale instance that represents the users’ current locale, which can tell us
both their language and their region preferences, as set in their iPhone’s Settings application.
NSLocale *locale = [NSLocale currentLocale];
Looking at the Current Locale
The next line of code might need a little bit of explanation. NSLocale works somewhat like
a dictionary. There is a whole bunch of information that it can give us about the current user’s
preferences, including the name of the currency they use and the date format they expect. You
can find a complete list of the values that you can retrieve in the NSLocale API reference.
In this next line of code, we’re retrieving the locale identifier, which is the name of
the language and/or region that this locale represents. We’re using a function called
displayNameForKey:value:. The purpose of this method is to return the value of the item
we’ve requested in a specific language.
The display name for the French language, for example, would be Français in French, but
French in English. This method gives us the ability to retrieve data about any locale so that it
can be displayed appropriately to any users. In this case, we’re getting the display name for the
locale in the language of that locale, which is why we pass in [locale localeIdentifier]
in the second argument. The localeIdentifier is a string in the format we used earlier to
create our language projects. For an American English speaker, it would be en_US and for
a French speaker from France, it would be fr_FR.
NSString *displayNameString = [locale
displayNameForKey:NSLocaleIdentifier
value:[locale localeIdentifier]];
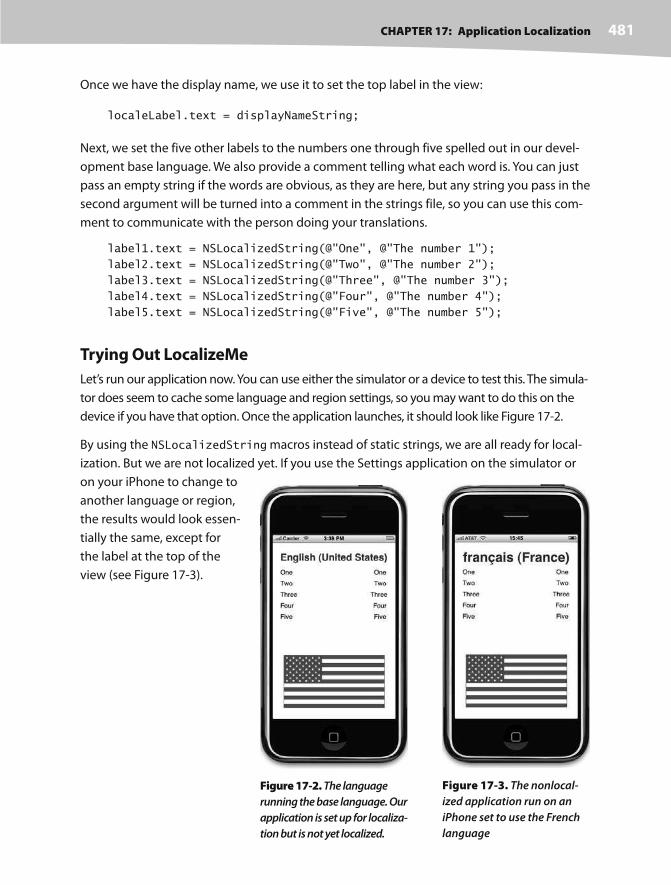
CHAPTER 17: Application Localization 481
Once we have the display name, we use it to set the top label in the view:
localeLabel.text = displayNameString;
Next, we set the five other labels to the numbers one through five spelled out in our devel-
opment base language. We also provide a comment telling what each word is. You can just
pass an empty string if the words are obvious, as they are here, but any string you pass in the
second argument will be turned into a comment in the strings file, so you can use this com-
ment to communicate with the person doing your translations.
label1.text = NSLocalizedString(@"One", @"The number 1");
label2.text = NSLocalizedString(@"Two", @"The number 2");
label3.text = NSLocalizedString(@"Three", @"The number 3");
label4.text = NSLocalizedString(@"Four", @"The number 4");
label5.text = NSLocalizedString(@"Five", @"The number 5");
Trying Out LocalizeMe
Let’s run our application now. You can use either the simulator or a device to test this. The simula-
tor does seem to cache some language and region settings, so you may want to do this on the
device if you have that option. Once the application launches, it should look like Figure 17-2.
By using the NSLocalizedString macros instead of static strings, we are all ready for local-
ization. But we are not localized yet. If you use the Settings application on the simulator or
on your iPhone to change to
another language or region,
the results would look essen-
tially the same, except for
the label at the top of the
view (see Figure 17-3).
Figure 17-2. The language
running the base language. Our
application is set up for localiza-
tion but is not yet localized.
Figure 17-3. The nonlocal-
ized application run on an
iPhone set to use the French
language

CHAPTER 17: Application Localization482
NOTE
If you run into any problems getting this application to launch, try following the localization steps through
the rest of the chapter. If that doesn’t help, check our web site at http://www.iphonedevbook.com
for more suggestions.
Localizing the Nib
Now, let’s localize the nib file. The basic process for localizing any file is the same. In Xcode,
single- click LocalizeMeViewController.xib, and then press I to open the Info window for that
file. If the window is not currently showing the General tab, select the General tab. Click the
button that says Make File Localizable in the lower- left part of the window (see Figure 17-4).
Figure 17-4. The LocalizeMeViewController.xib Info window
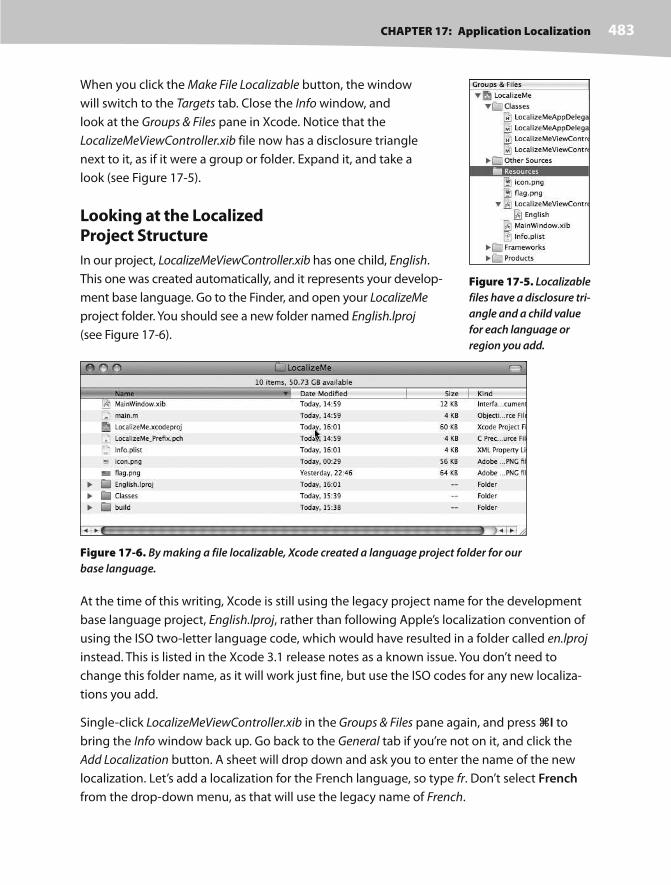
CHAPTER 17: Application Localization 483
When you click the Make File Localizable button, the window
will switch to the Targets tab. Close the Info window, and
look at the Groups & Files pane in Xcode. Notice that the
LocalizeMeViewController.xib file now has a disclosure triangle
next to it, as if it were a group or folder. Expand it, and take a
look (see Figure 17-5).
Looking at the Localized Project Structure
In our project, LocalizeMeViewController.xib has one child, English.
This one was created automatically, and it represents your develop-
ment base language. Go to the Finder, and open your LocalizeMe
project folder. You should see a new folder named English.lproj
(see Figure 17-6).
Figure 17-6. By making a file localizable, Xcode created a language project folder for our
base language.
At the time of this writing, Xcode is still using the legacy project name for the development
base language project, English.lproj, rather than following Apple’s localization convention of
using the ISO two- letter language code, which would have resulted in a folder called en.lproj
instead. This is listed in the Xcode 3.1 release notes as a known issue. You don’t need to
change this folder name, as it will work just fine, but use the ISO codes for any new localiza-
tions you add.
Single-click LocalizeMeViewController.xib in the Groups & Files pane again, and press I to
bring the Info window back up. Go back to the General tab if you’re not on it, and click the
Add Localization button. A sheet will drop down and ask you to enter the name of the new
localization. Let’s add a localization for the French language, so type fr. Don’t select French
from the drop- down menu, as that will use the legacy name of French.
Figure 17-5. Localizable
files have a disclosure tri-
angle and a child value
for each language or
region you add.
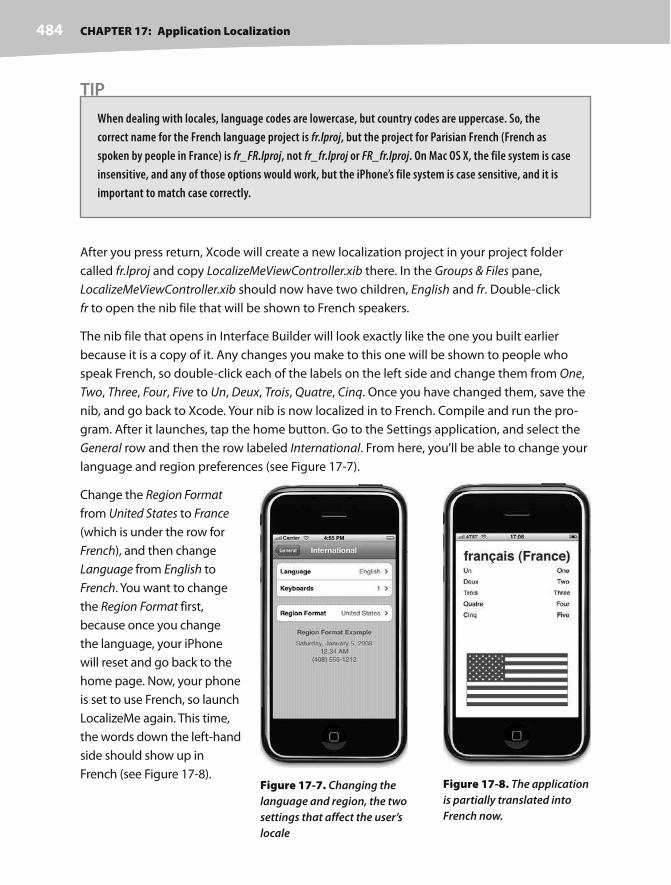
CHAPTER 17: Application Localization484
TIP
When dealing with locales, language codes are lowercase, but country codes are uppercase. So, the
correct name for the French language project is fr.lproj, but the project for Parisian French (French as
spoken by people in France) is fr_FR.lproj, not fr_fr.lproj or FR_fr.lproj. On Mac OS X, the file system is case
insensitive, and any of those options would work, but the iPhone’s file system is case sensitive, and it is
important to match case correctly.
After you press return, Xcode will create a new localization project in your project folder
called fr.lproj and copy LocalizeMeViewController.xib there. In the Groups & Files pane,
LocalizeMeViewController.xib should now have two children, English and fr. Double- click
fr to open the nib file that will be shown to French speakers.
The nib file that opens in Interface Builder will look exactly like the one you built earlier
because it is a copy of it. Any changes you make to this one will be shown to people who
speak French, so double- click each of the labels on the left side and change them from One,
Two, Three, Four, Five to Un, Deux, Trois, Quatre, Cinq. Once you have changed them, save the
nib, and go back to Xcode. Your nib is now localized in to French. Compile and run the pro-
gram. After it launches, tap the home button. Go to the Settings application, and select the
General row and then the row labeled International. From here, you’ll be able to change your
language and region preferences (see Figure 17-7).
Change the Region Format
from United States to France
(which is under the row for
French), and then change
Language from English to
French. You want to change
the Region Format first,
because once you change
the language, your iPhone
will reset and go back to the
home page. Now, your phone
is set to use French, so launch
LocalizeMe again. This time,
the words down the left- hand
side should show up in
French (see Figure 17-8). Figure 17-7. Changing the
language and region, the two
settings that affect the user’s
locale
Figure 17-8. The application
is partially translated into
French now.

CHAPTER 17: Application Localization 485
CAUTION
Both the iPhone and the iPhone simulator cache resources to improve performance. Because of this, you
will sometimes need to manually remove the old version of an application and do a clean build in order for
localization changes to show up. On the simulator, here’s a neat trick: Quit the simulator. Then, in Xcode,
select Clean from the Build menu. Next, go into the Finder, and delete the folder ~/Library/Application
Support/iPhone Simulator (where ~ is your home directory). Now, open an old project from this book, and
run it on the simulator. When it launches, tap the home button, launch Settings, and change your region
to France and your language to French. Once you get that change to take, quit the simulator. Finally, go
back to your LocalizeMe project and run it on the simulator. Voilà!
The problem is that the flag is wrong. We could have changed the flag image right in the nib
by just selecting a different image in the French localized nib file. Instead of doing that, we’ll
actually localize the flag image itself. When an image or other resource used by a nib is local-
ized, the nib will automatically show the correct version for the language, though not for the
dialect, as of when this book was written. If we localize the flag.png file itself with a French
version, the nib will automatically show the correct flag when appropriate.
Localizing an Image
Let’s localize the flag image now. Single- click flag.png in Xcode’s Groups & Files pane. Next, press
I to bring up the Info window for that file, and click the Make File Localizable button. Once you
do that, Xcode is going to copy flag.png into the English.lproj folder (or from your base language
folder, if it’s different). Switch back to the General tab, and click the Add Localization button. When
prompted for a language, enter fr. There should now be another file in your fr.lproj folder inside
of your LocalizeMe project folder, called flag.png; it is a copy of the flag.png file from the base lan-
guage. Obviously, that’s not the correct image. Since Xcode doesn’t let you edit image files, the
easiest way get the right image into the localization project is to just copy the correct image into
the project using the Finder. In the Resources folder of the 17 LocalizeMe folder, you’ll find a folder
called fr. In that subfolder, you’ll find a flag.png file that contains the French flag rather than the
American one. Copy the flag.png file from there to your project’s fr.lproj subfolder, overwriting the
file that’s there.
That’s it. You’re done. Because the iPhone probably cached the American flag when you last
ran the application, let’s remove the old application from your iPhone using the Organizer
window in Xcode. If you are running in the simulator, you don’t need to do this; skip ahead
to the clean build step.

CHAPTER 17: Application Localization486
Select Organizer from the Window menu, or press ^ O to bring it up (see Figure 17-9).
Figure 17-9. The Xcode Organizer window lets you manually remove applications.
On the Summary tab, you’ll see three sections. The bottommost section is labeled Applications.
In the list of applications, look for LocalizeMe; select it, and click the minus button to remove
the old version of that application and the caches associated with it.
Now, select Clean from the Build menu, and build and run the application again. Once the
application launches, the French flag should now come up in addition to the French words
down the left- hand side, assuming your phone or simulator is still set up as if you were
French (see Figure 17-10).
Localizing the Application Icon
You can localize the application’s icon image in exactly the same way that you localized
flag.png. Single- click icon.png in the Groups & Files pane. Bring up the Info window, and
switch to the General tab if you’re not already there. Click the Make Localizable button,
and switch back to the General tab. Click the Add Localization button, and when prompted
for the language, type fr.

CHAPTER 17: Application Localization 487
In the fr folder in the Resources folder of 17 LocalizeMe, where
you just copied the flag.png file, you’ll also find a localized ver-
sion of icon.png. Copy that into your fr.lproj folder using the
Finder, overwriting the version that’s there. Now, the iPhone
will automatically detect and show this icon to users who
speak French.
Generating and Localizing a Strings File
If you look at Figure 17-10, you’ll see that the words on the
right- hand side of the view are still in English. In order to
translate those, we need to generate our base language
strings file and then localize it. In order to accomplish this,
we’ll need to leave the comfy confines of Xcode for a few
minutes.
Launch Terminal.app, which is in /Applications/Utilities/. When
the terminal window opens, type cd followed by a space.
Don’t press return.
Now, go to the Finder, and drag your LocalizeMe project
folder to the terminal window. As soon as you drop the folder
onto the terminal window, the path to the project folder
should appear on the command line. Now, press return.
The cd command is Unix- speak for “change directory,” so what
you’ve just done is steer your terminal session from its default
directory over to your project directory.
Our next step is to run the program genstrings and tell it to
find all the occurrences of NSLocalizedString in our .m files
in the Classes folder. To do this, type the following command,
and then press return:
genstrings ./Classes/*.m
When the command is done executing (it just takes a second)
you’ll be returned to the command line. In the Finder, look in
the project folder for a new file called Localizable.strings. Drag
that to the Resources folder in Xcode, but when it prompts
you, don’t click the Add button just yet.
Figure 17-10. The image and
nib are both localized now.
Figure 17-11. We localized
our application icon!

CHAPTER 17: Application Localization488
TIP
You can safely rerun genstrings at any time to re- create your base language file. Generally speaking,
you should not edit the base language file. If you need to make a change to any of the strings used, find it
in your code and change it there; then, regenerate the Localizable.strings file using genstrings.
Localizable.strings files are encoded in UTF- 16, which is a two- byte version of Unicode. Most
of us are probably using UTF- 8 or a language- local encoding scheme as our default encod-
ing in Xcode. When we import the Localizable.strings file into our project, we need to take
that into account. First, uncheck the box that says Copy items into destination group’s folder (if
needed), because the file is already in our project folder. More importantly, change the text
encoding to Unicode (UTF- 16) (see Figure 17-12). If you don’t do that, the file will look like
gibberish when you try to edit it in Xcode.
Figure 17-12. Importing the Localizable.strings file
Now, go ahead and click the Add button. Once the file is imported, single- click Localizable.
strings in Resources, and take a look at it. It should contain five entries, because we use
NSLocalizableString five times with five distinct values. The values that we passed in
as the second argument have become the comments for each of the strings.

CHAPTER 17: Application Localization 489
The strings were generated in alphabetical order, which is a nice feature. In this case, since
we’re dealing with numbers, alphabetical order is not the most intuitive way to present
them, but in most cases, having them in alphabetical order will be helpful.
/* The number 5 */
"Five" = "Five";
/* The number 4 */
"Four" = "Four";
/* The number 1 */
"One" = "One";
/* The number 3 */
"Three" = "Three";
/* The number 2 */
"Two" = "Two";
Let’s localize this sucker.
Single-click Localizable.strings, and press I to bring up the Info window. If you switch to
the General tab, you’ll find that same Make File Localizable button that we used to make the
images and the nib file localizable. Click it now.
Switch back to the General tab, and click Add Localization. When prompted for a language,
type fr to indicate that we are localizing for all dialects of the French language. Back in
the Groups & Files pane of Xcode, click the disclosure triangle next to Localizable.strings.
Single- click fr, and in the editor pane of Xcode, make the following changes:
/* The number 5 */
"Five" = "Cinq";
/* The number 4 */
"Four" = "Quatre";
/* The number 1 */
"One" = "Un";
/* The number 3 */
"Three" = "Trois";
/* The number 2 */
"Two" = "Deux";

CHAPTER 17: Application Localization490
In real life, you would ordinarily send this file out to a translation service to translate the
value to the right of the equals signs. In this simple example, armed with knowledge that
came from years watching Sesame Street, we can do the translation ourselves.
Now save, compile, and run—our application is now fully localized for France. We’ve
provided you with the information in the Resources subfolder of 17 LocalizeMe to do the
German localization if you want some more practice. You’ll find another icon.png, flag.png,
and Localizable.strings file if you want to try adding support for that language.
Auf Wiedersehen
If you want to maximize sales of your iPhone application, localize it as much as possible.
Fortunately, iPhone’s localization architecture makes easy work of supporting multiple lan-
guages, and even multiple dialects of the same language, within your application. As you
saw in this chapter, nearly any type of file that you add to your application can be localized,
as needed.
Even if you don’t plan on localizing your application, get in the habit of using
NSLocalizedString instead of just using static strings in your code. With Xcode’s Code
Sense feature, the difference in typing time is negligible, and should you ever want to
translate your application, your life will be much, much easier.
At this point, our journey is nearly done. We’re almost to the end of our travels together.
After the next chapter, we’ll be saying sayonara, au revoir, auf wiedersehen, aντίο, arrivederci,
and adiós. You now have a solid foundation you can use to build your own cool iPhone appli-
cations. Stick around for the going- away party though, as we’ve still got a few helpful bits of
information for you.

491
w
Chapter 18Where to Next?
ell, wow! You’re still with us, huh? Great! It sure has been a long journey since
that very first iPhone application we built together. You’ve certainly come
a long way. We’d love to tell you that you now know it all, but when it comes
to technology, and especially when it comes to programming, you never
know it all. The programming language and frameworks we’ve been working
with for the last 17 chapters are the end result of over 20 years of evolution.
And Apple engineers are feverishly working round the clock, thinking of that
next cool new thing. The iPhone platform has just begun to blossom. There is
so much more to come.
By making it through this book, you’ve built yourself a sturdy foundation.
You’ve got a solid knowledge of Objective- C, Cocoa Touch, and the tools that
bring these technologies together to create incredible new iPhone applica-
tions. You understand the iPhone software architecture, the design patterns
that make Cocoa Touch sing. In short, you are ready to chart your own course.
We are so proud! So where to next?
Getting UnstuckAt its core, programming is about problem solving, about figuring things out.
It’s fun, and it’s rewarding like few things are. But, at times, you will run up
against a puzzle that just seems insurmountable, a problem that just does not
seem to have a solution.
Sometimes, the answer just appears if you take a bit of time away from the
problem. A good night’s sleep or a few hours of doing something different can
often be all that is needed to get you through it. Believe us; you can stare at
the same problem for hours, overanalyzing and getting yourself so worked up
that you miss an obvious solution.
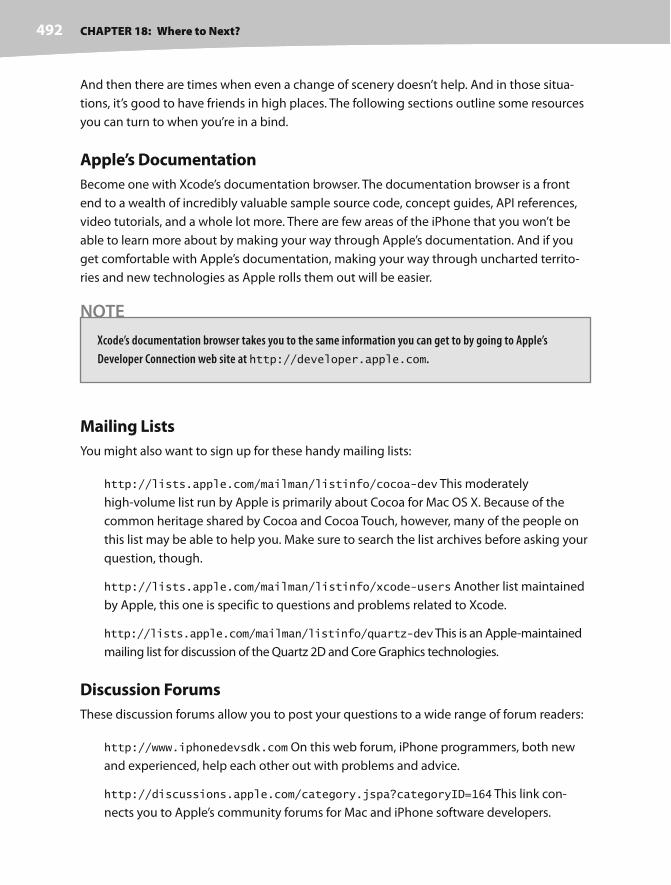
CHAPTER 18: Where to Next?492
And then there are times when even a change of scenery doesn’t help. And in those situa-
tions, it’s good to have friends in high places. The following sections outline some resources
you can turn to when you’re in a bind.
Apple’s Documentation
Become one with Xcode’s documentation browser. The documentation browser is a front
end to a wealth of incredibly valuable sample source code, concept guides, API references,
video tutorials, and a whole lot more. There are few areas of the iPhone that you won’t be
able to learn more about by making your way through Apple’s documentation. And if you
get comfortable with Apple’s documentation, making your way through uncharted territo-
ries and new technologies as Apple rolls them out will be easier.
NOTE
Xcode’s documentation browser takes you to the same information you can get to by going to Apple’s
Developer Connection web site at http://developer.apple.com.
Mailing Lists
You might also want to sign up for these handy mailing lists:
http://lists.apple.com/mailman/listinfo/cocoa-dev This moderately
high- volume list run by Apple is primarily about Cocoa for Mac OS X. Because of the
common heritage shared by Cocoa and Cocoa Touch, however, many of the people on
this list may be able to help you. Make sure to search the list archives before asking your
question, though.
http://lists.apple.com/mailman/listinfo/xcode-users Another list maintained
by Apple, this one is specific to questions and problems related to Xcode.
http://lists.apple.com/mailman/listinfo/quartz-dev This is an Apple- maintained
mailing list for discussion of the Quartz 2D and Core Graphics technologies.
Discussion Forums
These discussion forums allow you to post your questions to a wide range of forum readers:
http://www.iphonedevsdk.com On this web forum, iPhone programmers, both new
and experienced, help each other out with problems and advice.
http://discussions.apple.com/category.jspa?categoryID=164 This link con-
nects you to Apple’s community forums for Mac and iPhone software developers.
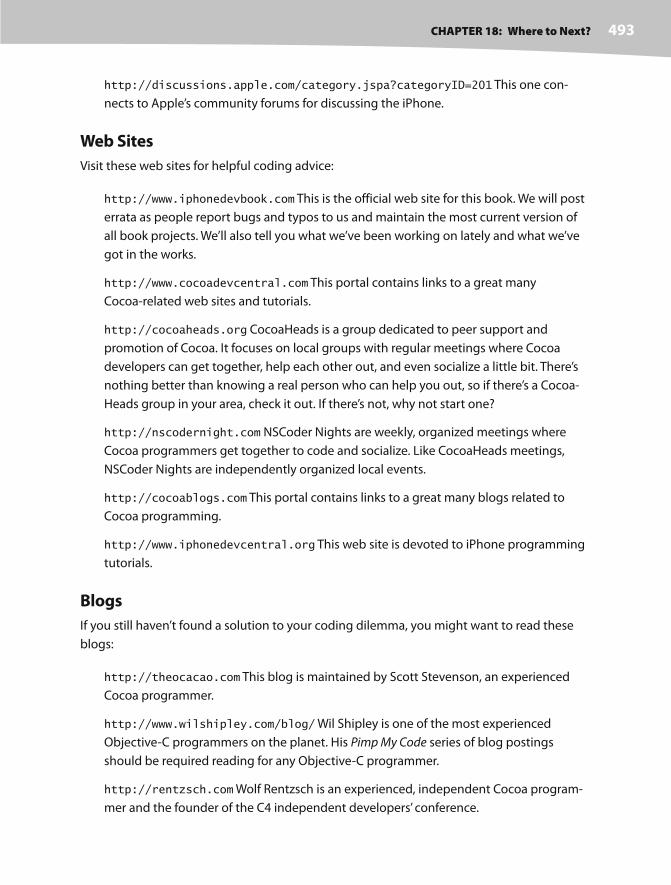
CHAPTER 18: Where to Next? 493
http://discussions.apple.com/category.jspa?categoryID=201 This one con-
nects to Apple’s community forums for discussing the iPhone.
Web Sites
Visit these web sites for helpful coding advice:
http://www.iphonedevbook.com This is the official web site for this book. We will post
errata as people report bugs and typos to us and maintain the most current version of
all book projects. We’ll also tell you what we’ve been working on lately and what we’ve
got in the works.
http://www.cocoadevcentral.com This portal contains links to a great many
Cocoa- related web sites and tutorials.
http://cocoaheads.org CocoaHeads is a group dedicated to peer support and
promotion of Cocoa. It focuses on local groups with regular meetings where Cocoa
developers can get together, help each other out, and even socialize a little bit. There’s
nothing better than knowing a real person who can help you out, so if there’s a Cocoa-
Heads group in your area, check it out. If there’s not, why not start one?
http://nscodernight.com NSCoder Nights are weekly, organized meetings where
Cocoa programmers get together to code and socialize. Like CocoaHeads meetings,
NSCoder Nights are independently organized local events.
http://cocoablogs.com This portal contains links to a great many blogs related to
Cocoa programming.
http://www.iphonedevcentral.org This web site is devoted to iPhone programming
tutorials.
Blogs
If you still haven’t found a solution to your coding dilemma, you might want to read these
blogs:
http://theocacao.com This blog is maintained by Scott Stevenson, an experienced
Cocoa programmer.
http://www.wilshipley.com/blog/ Wil Shipley is one of the most experienced
Objective- C programmers on the planet. His Pimp My Code series of blog postings
should be required reading for any Objective- C programmer.
http://rentzsch.com Wolf Rentzsch is an experienced, independent Cocoa program-
mer and the founder of the C4 independent developers’ conference.

CHAPTER 18: Where to Next?494
http://chanson.livejournal.com Chris Hanson works at Apple on the Xcode team,
and his blog is filled with great insight and information about Xcode and related topics.
And If All Else Fails. . .
Drop Dave and Jeff an e-mail at [email protected]. This is the perfect place
to send e-mails about typos in the book or bugs in our code. We can’t promise to respond to
every e-mail, but we will read all of them. Be sure to read the errata before clicking send. And
please do write and tell us about the cool applications you develop.
FarewellWe sure are glad you came along on this journey with us. We wish you the best of luck and
hope that you enjoy programming the iPhone as much as we do.

495
Special Characters#import statements, 257#pragma directives, 157, 483–485/* character, 475*\ character, 475... (ellipsis), 58
Aabstract class, 239accelerometer
accessing, 442–447overview, 441physics of, 441–442Rolling Marble program, 452–460ShakeAndBreak project, 447–452
accelerometer:didAccelerate: method, 443–447, 454
accessors, 35accessory icons, 233accessory view, 234accessoryView property, 260action argument, 266action method, 39action sheet, 81–84actions
adding to view controllers, 34–41, 71–72, 106–108, 374–376
connecting, 73declaring, 104–105, 151–152, 158–159determining, 58, 71–76, 104overview, 33–34specifying, 50–52
actionSheet:didDismissWithButtonIndex: method, 82–83
active controls, 55–56Add Localization button, 485–486Add submenu, 111Add to Project setting, 24additive primary colors, 366addObserver:selector:name:object: method, 340Adjust to Fit checkbox, 65alerts, 79–84Align Horizontal Center in Container option, 60Alignment submenu, 60
allNames method, 219, 221–223, 225, 227Alpha checkbox, 61alpha component, 60, 367altitude property, 432animated parameter, 75–76animation block, 101AppKit framework, 21Apple Human Interface Guidelines, 46application constants, 371, 480–481application localization, 473, 480–481, 490application settings
AppSettings application, 305–308overview, 305reading, 319–323settings bundles
adding to project, 309–310child settings view, 317–319multivalue field, 314–315overview, 309property list, setting up, 310–311secure text field setting, 314slider setting, 316–317text field setting, 311–313toggle switch setting, 315–316
user defaults, changing, 323–326Application Support folder, 27applicationDidFinishLaunching method, 44applicationWillTerminate: method, 41, 336, 338,
340, 357AppSettings application, 305–308archiving
data objects, 343–344model objects, 341–343
Archiving application, 345–350atomically parameter, 334Audio Toolbox framework, 182, 452AudioServicesCreateSystemSoundID function,
182AutocorrectionType key, 313autorelease method, 191, 193–194, 198, 202–203,
212, 218, 223autorotation
autosize attributes, 90–96overview, 89–91restructuring view when rotated, 97–102
Index

INDEX496
autorotation (continued)swapping views
declaring actions, 104–105declaring outlets, 104–105designing two views, 105–106determining actions, 104determining outlets, 103–104implementing swap and action, 106–108linking in Core Graphics framework,
109–111overview, 102–103
autosize attributes, 90–96AutosizeViewController.h file, 98AutoSizeViewController.m file, 91, 99AutoSizeViewController.xib file, 93
BBackground field, 65Background property, 61backgroundClick: action, 69–70BallView class, 454–458BallViewController.xib file, 453BallViewViewController.h file, 453–454blogs, 493–494blueButton.png file, 84BlueViewController class, 120, 122, 126, 128–131blueViewController method, 137blueViewController property, 128BlueView.xib file, 120Book Extras section, 11BOOL property, 326boolForKey: method, 319Border button, 65brokenScreenShowing method, 451Build and Run option, 22, 67–70Build menu, 22Bundle identifier, 26bundles, defined, 168. See also settings bundlesbutton action method, 80–81Button Fun project. See interactionButton_FunAppDelegate view, 42–43, 45Button_FunViewController view, 32, 34, 37–38,
42–43, 45, 48–50, 52Button_FunViewController.m file, 37Button_FunViewController.xib file, 45–52buttonIndex argument, 83buttonPressed: method, 32–34, 38–39, 41, 51–52,
104–106, 108, 148–154, 158–159, 161, 168buttons
action method, implementing, 80–81adding in Interface Builder, 80adding outlets and actions to controller
header file, 79control states, 86
moving on rotation, 99–102overview, 79–85stretchable images, 86–87viewDidLoad method, 85–86
Ccamera and photo library
designing interface, 468image picker controller delegate, 465–466implementing Camera View Controller,
468–472overview, 463UIImagePickerController class, 464–465
CameraViewController.h file, 467CameraViewController.m file, 468–472CameraViewController.xib file, 468cancel: action method, 285, 289cancelButtonIndex property, 83cancelPreviousPerformRequestsWithTarget:
selector:object: method, 419Capitalize drop-down, 66case kImageShape: method, 383cells
Cells application, 200overview, 199subviews, adding, 200–204UITableViewCell subclass, 204–209
CGAffineTransform.h file, 109CGAffineTransformMakeRotation class, 108–109CGColor class, 364–365, 367, 378–382, 385, 392,
396–398CGContextLineToPoint( ) method, 364CGContextMoveToPoint( ) method, 364CGContextStrokePath( ) method, 364CGFloat class, 366, 370, 383, 386–387, 392, 396,
398CGPoint class, 365, 367, 371, 383–384, 386, 391,
397CGPointUtils.c file, 420, 423–424CGPointUtils.h file, 420–421, 424, 426CGRect class, 100, 365, 367–368, 372, 378,
380–382, 384–386, 397, 459CGRectMake( ) function, 100, 381CGRectZero constant, 191, 193–194, 198, 212,
214, 223CGSize class, 365changeColor: method, 376changeShape: action method, 376–377CheckListController.m file, 252checklists, 252–257CheckPlease touch methods, 427CheckPleaseViewController.h file, 425–426CheckPleaseViewController.m file, 426child settings view, 317–319
INDEX 497
childController property, 247, 249–250, 281Cinema Display monitor, 6Class methods, 40Classes folder, 17, 31, 41, 91, 119, 143, 189, 416,
420–421, 424–425Classes subfolder, 16Classes tab, 44classic passive control, 58Clear Context Before Drawing checkbox, 62Clear When Editing Begins checkbox, 65Clip Subviews checkbox, 62CLLocation class, 432–433CLLocationAccuracy class, 430CLLocationManager class, 430, 437CLLocationManager method, 435CLLocationManagerDelegate method, 430–431,
435clockicon.png image, 147CMYK (cyan, magenta, yellow key), 367Cocoa Bindings tool, 7Cocoa Touch
versus Cocoa, 5–8requirements for, 2–5
Cocoa Touch Classes file, 368Cocoa Touch Classes option, 120, 143Cocoa Touch Classes subclass, 236, 239, 244, 252,
257, 264, 270, 276, 279CocoaHeads group, 493colors, 365–367, 370column1 string, 170–175, 177–182commitAnimations method, 102connections inspector, 126Constants.h header, 372Contacts application, 234content view nibs, 143content views
anatomy of, 117–118defined, 113implementing, 130–132
contentView method, 203, 288, 292–294, 299–301
context, defined, 363Control Fun application
connecting outlets, 66image view, 57–63importing images, 56overview, 56text fields, 57–58, 63–66
control states, 39, 53, 86Control_FunViewController.h file, 57, 67, 69, 71, 74Control_FunViewController.m file, 58, 67, 71, 75,
80, 85Control_FunViewController.xib file, 58, 72, 76controller class, 30, 32, 69
controller header file, 79, 170–171, 200–201, 218–219
controllerscustom picker, 172–175multicomponent picker, 159–162single component picker, 153–158writing for tables, 190–193
controllers array, 256controllers property, 242controls, 54–56convenience method, 40coordinate property, 432coordinates system, 364–365Copy items into destination group’s folder
(if needed) checkbox, 110copyWithZone: method, 343, 346Core Animation technology, 101Core Data tool, 7Core Graphics C functions, 364Core Graphics framework
linking in, 109–111mailing list, 492
Core Location frameworkLocation Manager, 430–431, 438location manager delegate, 431overview, 430using, 434–437
CoreGraphics.framework file, 110, 452, 460Create Apple ID button, 2CREATE TABLE command, 351, 355, 358currentColor instance variable, 379currentColor property, 371–373, 375–376,
378–382, 384–385, 387, 389, 391–392, 394–398
currentPoint property, 455, 458currentRect property, 380–383, 385–387, 397curves, drawing, 368custom gestures, 424–427Custom option, 70CustomPickerViewController.m file, 143, 172,
179–180CustomPickerView.xib file, 143, 171, 179cyan, magenta, yellow key (CMYK), 367
Ddash patterns, 368data model object, 276–278data objects, 343–344data persistence
Archiving application, 345–350/Documents folder, 330–332file saving, 332–333overview, 329

INDEX498
data persistence (continued)Persistence application
archiving model objects, 341–343creating project, 336designing view, 336editing classes, 337–341NSCopying, 343–344overview, 335
persisting application data, 333–334SQLite3
database, creating or opening, 351–352overview, 350–351setting up project to use, 352–359
data property, 231–233, 240, 246, 249, 258, 264–273, 276–278, 280–287
dataFilePath method, 335–340, 347–348, 353–355, 358
datasource methods, 228datasources, picker, 141–142date pickers, 140datePicker method, 148–151DatePickerViewController class, 143, 146, 148, 150DatePickerViewController.m file, 143DatePickerView.xib file, 148dealloc method, 108, 292deep mutable copies, 216–218default autosize settings, 95delegates, defined, 41Delete button, 401DeleteMeController.h file, 270–271, 274dependent component pickers, 163–170Dependent tab, 169DependentComponentPickerViewController
class, 147DependentComponentPickerView
Controller.m file, 143, 165, 170DependentComponentPickerView.xib file, 164detail disclosure button, 233Detail View pane, 15DetailDisclosureController class, 250/Developer folder, 110development base language, 473Did End on Exit event, 293directional controller, 446–447Disabled fields, 65disabled state, 39disclosure button view, 244–252disclosure indicator, 233DisclosureButtonController class, 244, 247, 250,
256, 262, 268, 274, 296DisclosureButtonController.m file, 244, 247DisclosureDetailController class, 247DisclosureDetailController view, 245
DisclosureDetailController.h file, 245, 247DisclosureDetailController.m file, 244–245DisclosureDetail.xib file, 246discussion forums, 492–493displayNameForKey:value: function, 480distance filters, 430–431Do Something button, 54, 84–85documentation browser, 492Documents directory, 331/Documents folder, 330–332Done button, 67–68doSomething: method, 80–81doSomethingButton outlet, 80dot notation, 36Double content pane, 162DoubleComponentPickerView class, 147DoubleComponentPickerViewController.m file,
143, 159DoubleComponentPickerView.xib file, 143, 159doubleLabel label, 416–418DoublePicker view, 164doubleTap method, 416–420Download the Free SDK button, 2draw method, 391, 396, 399drawing
drawing application, 363OpenGL ES, 361–362, 388–399Quartz, 363–368
Drawing checkboxes, 61–62drawRect: method, 363, 368, 374, 378, 380, 384,
458
EEdit button, 401editable detail panes
controllers, creating, 278–282data model object, creating, 276–278detail view controller, creating, 282–298
editing mode, 234, 263editingInfo dictionary, 466editingStyle parameter, 272–273Editor pane, 15ellipses, drawing, 380–382ellipsis (...), 58Enabled checkbox, 86enabled property, 86encodeWithCoder: method, 278, 346encodeWithEncoder: method, 342End caps, 86eraseMe: method, 418error notifications, 433errorMsg command, 351, 355, 357–358Events heading, 51

INDEX 499
Ffabsf( ) function, 412factory method, 40Favorites tab, 233fieldLabels variable, 283–288, 291, 294filename method, 331–332, 347, 354File’s Owner icon, 50, 99, 105–106, 407, 411, 417,
421, 426fill color, 364first responder, 402First Responder icon, 19firstTouch method, 371–373, 378–382, 384–387,
391–398flag.png file, 485Flexible Space Bar Button item, 377flipside view, 307FlipsideView class, 308FlipsideViewController class, 323–324FlipsideViewController.h file, 324floatForKey: method, 319font size, 198–199Foo button, 103fopen( ) function, 330forums, 492–493forwarding events, 403–404Foundation framework classes, 21FourLines class, 345–346, 349, 487–490frame property, 100–102, 108Frameworks folder, 109–110Frameworks subfolder, 16–17fromLocation property, 433
Ggamuts, 366genstrings program, 476, 488gestures
custom, 424–427defined, 402notification methods, 405–406
getCameraPicture: method, 470getDistanceFrom: method, 433getters, defined, 35GLfloats class, 398GLFun application, 399GLFunView class, 389–391GLFunViewController.h file, 388GLFunViewController.xib file, 391GLFunView.h file, 391gradients, 368graphics contexts, 363–364, 367grouped sections, 209–214grouped tables, 187Groups & Files pane, 15, 17
HhandleSearchForTerm: method, 226Hardware menu, 93"Hello, World!" project
finishing touches, 23–27Interface Builder
adding labels to views, 20–22nib file, 20overview, 17–19
overview, 11setting up in Xcode, 11–17
Hello World folder, 15Hello World icon, 23Hello World label, 22Hello World_Prefix.pch extension, 16Hello World.app file, 17Hello_WorldViewController.xib file, 16–17, 19Hidden checkbox, 61Hide segment, 54highlighted state, 39, 86historical subtractive primaries, 366horizontalAccuracy property, 432hue, saturation, lightness (HSL), 367hue, saturation, value (HSV), 367
IIBAction keyword, 33–34, 38–39IBOutlet keyword, 33, 121Icon file, 26Icon file key, 448icon.png image, 25IDE (integrated development environment), 2Ignore button, 13iMac display, 6Image combo box, 147image picker, 463–465image picker controller delegate, 465–466image property, 195image resources, 172image view, 54, 57–63imageNamed: method, 173, 176, 474imagePickerControllerDidCancel: method,
465–466, 472imagePickerController:didFinishPickingImage:
editingInfo: method, 465, 471images, adding to tables, 194–195Images subfolder, 84imageView method, 451indent level, 195–196indexed sections
controllers, implementing, 210–214importing data, 209indexes, adding, 214

INDEX500
indexed sections (continued)overview, 209views, building, 209
indexed tables, 187Info.plist file, 16, 25, 119Information Property List row, 448initialDistance variable, 421–423initWithCoder: method, 278, 342–343, 346, 373,
395–396, 458initWithContentsOfFile method, 155, 166, 168initWithFrame: method, 373, 458initWithNibName method, 128INSERT OR REPLACE SQL statement, 357inspector window, 22instance variables, 33integrated development environment (IDE), 2interaction
application delegate, 41–44Button Fun project, 31Button_FunViewController.xib, editing, 45–52MainWindow.xib, editing, 44–45MVC paradigm, 30–31overview, 29View Controller
actions, 33–41outlets, 33–41overview, 31–33
Interaction checkboxes, 62–63Interface Builder
buttons, adding in, 80"Hello, World!" project, 17–23table view cells, designing in, 206–207views, creating in, 45–48
interfaceOrientation parameter, 91–92, 99–101, 107
intForKey: method, 319iPhone Developer Program, 13, 407iPhone Human Interface Guidelines, 46, 378iPhone Simulator folder, 27iphone.png image, 372, 382, 386, 388, 394iPhoneSimulator2.0.sdk folder, 110isSourceTypeAvailable: method, 464
KkBreadComponent constant, 158, 160–162kCLDistanceFilterNone method, 431kCLErrorDenied method, 433kCLErrorLocationUnknown method, 433kCLLocationAccuracyBest method, 430kCLLocationAccuracyHundredMeters method,
430kCLLocationAccuracyKilometer method, 430kCLLocationAccuracyNearestTenMeters method,
430
kCLLocationAccuracyThreeKilometers method, 430
keyboard, closing, 67–70Keyboard Type pop-up menu, 66keys array, 225–228kFilename method, 335–338, 346–347, 353–354kFillingComponent constant, 158, 160–161kFromYearRowIndex constant, 282, 284, 286, 288,
290, 294kLabelTag constant, 282–283, 288, 293–294, 299kLineShape method, 371, 378–380, 382, 386, 392kNameRowIndex constant, 284, 286, 288, 290,
294kNameValueTag constant, 200, 202–204, 209kPartyIndex constant, 282, 284, 286, 289–290,
295kShowSegmentIndex property, 74–76kToYearRowIndex constant, 282, 284, 286, 288,
290, 295
Llabel outlet, 421labels, 20–22, 70–73Landscape icon, 105landscape mode, 90landscape property, 89–90, 92–93, 98, 101, 104,
106–108Landscape window, 105landscapeBar outlet, 105landscapeFoo outlet, 105lastCurrentPoint variable, 425–427lastDrawTime method, 459–460lastIndexPath method, 252–256lastPreviousPoint variable, 425–427lastTouch method, 371–374, 378–387, 391–398lastVal method, 173, 175, 181Layout menu, 60lazy loading, 128leftSwitch argument, 74–76, 78–80, 85Leopard operating system, 2library, overview, 20Library folder, 110Library menu, 58Library palette, 21lineLengthSoFar variable, 425–427lines, drawing, 368, 378–380list property, 282listData array, 193loadNibNamed:owner:options: method, 208locale localeIdentifier string, 480localizable.strings, 476localization folder, 473LocalizeMeViewController.h file, 478LocalizeMeViewController.m file, 479

INDEX 501
LocalizeMeViewController.xib file, 478, 482–484Location Manager, 430–431, 438location manager delegate, 431–433locationManager:didFailWithError: method, 433locationManager:didUpdateToLocation:
fromLocation: method, 432, 438
MMac OS X, 2mailing lists, 492main( ) method, 16main bundle, 168main.m extension, 16MainView class, 308, 321MainViewController.m file, 321MainView.xib window, 321MainWindow.xib file, 16, 44, 48, 117, 119,
123–126, 145, 236, 238Make File Localizable button, 489Make Localizable button, 486MaximumValueImage key, 317messageLabel method, 406–409MinimumValueImage key, 317modal, defined, 79Mode attribute, 60Mode menu, 60model objects, archiving, 341–343Model-View-Controller (MVC) paradigm, 30–31MoveMeController.m file, 264multicomponent pickers, 158–162Multiple Touch checkbox, 63multitouch technology
architecture of, 404–406custom gestures, 424–427overview, 56, 401pinches, detecting, 420–424responder chain, 402–404swipes, implementing multiple, 413–415Swipes application, 413taps, detecting multiple, 416–420terminology, 402Touch Explorer application, 406–409
multivalue field, 314–315multiview applications
animating transitions, 132–135architecture of, 117–118overview, 113–115refactoring, 135–137View Switcher application
App Delegate, 121content views, implementing, 130–132MainWindow.xib file, 123–126nib files, 119–120overview, 116–119
SwitchViewController.h header file, 122SwitchViewController.m file, 126–129view controller, 119–120
multiview controllers, 117mutableCopy method, 216, 218mutableDeepCopy method, 217–218, 221, 225mutators, 35MVC (Model-View-Controller) paradigm, 30–31MyController class, 118
NName text field, 67–68nameField file, 57–58, 67, 69, 71, 74–75, 79–81,
83, 85Nav App Delegate icon, 238NavAppDelegate.m file, 237navController property, 237–238, 242–243, 249,
281, 285–286, 290–291Navigation Bars, 376navigation button, 233navigation controllers
checklists, 252–257disclosure button view, 244–252editable detail panes
controllers, creating, 278–282data model object, creating, 276–278detail view controller, creating, 282–298overview, 276
Nav application, 236–244overview, 231–232Return button, 298–301rows
controls on, 257–263deletable, 270–276moveable, 263–270
stacks, 232view controllers, 232–233
New Project Assistant, 13newText argument, 72NextSTEP, 5, 18nib files, 20, 119–120nil object, 255nonatomic attribute, 36normal control state, 86normal state, 39NSArray class, 21NSBundle class, 150, 153, 159, 165–166, 168, 172,
180–181NSCaseInsensitiveSearch option, 227NSCoder class, 341–342, 346NSCoder Nights meetings, 493NSCoding class, 277–278, 341–343, 345–346, 350NSCopying class, 341, 343–346NSDate object, 151, 319

INDEX502
NSDictionary class, 155, 163NSDocumentDirectory constant, 331, 337–338,
347, 354NSEnumerator class, 218NSInteger class, 153–156, 160–162, 165, 167,
169–170, 174–175, 178NSKeyedArchiver class, 343, 348, 354NSKeyedUnarchiver class, 280–281, 344, 348, 355NSLocale class, 480NSLocalizableString class, 488NSLocalizedString class, 476, 481, 487NSMutableCopying protocol, 216NSMutableData class, 333, 343–344, 348,
354–355NSMutableDictionary class, 216–217, 219NSNotFound class, 221, 225, 227NSNotification class, 335, 337–339, 347, 353–354NSNotificationCenter object, 337, 340, 349, 356NSNumber class, 285–286, 288–290, 294, 296,
319, 323NSObject class, 419NSRange class, 227NSSearchPathForDirectoriesInDomain function,
331NSSet class, 218, 405–406, 408–409, 411–414,
418–419, 422, 426NSString class, 21NSTemporaryDirectory( ) function, 332NSURL class, 334NSUserDefaults class, 304, 312, 319, 321,
325–327, 342NSUserDomainMask constant, 331, 337–338, 347,
354NSValue class, 466NSView class, 384numberField file, 57–58, 67, 69, 71, 74–75, 79–80,
85numInRow method, 173, 175–176, 181
OobjectAtIndex: method, 208Objective-C 2.0, 4–5, 493Objective-C classes, 18, 30object-relational mapping (ORM), 351Opaque checkbox, 61Opaque tag, 66OpenGL ES, 361–362, 388–399OpenGLES2DView subclass, 390–391origin element, 365, 381ORM (object-relational mapping), 351Other Sources subfolder, 16otherButtonTitles parameter, 82
outletsadding to view controllers, 34–41, 71–72,
374–376connecting, 49–50, 66–73, 98–99declaring, 98–99, 104–105, 151–152, 158–159defined, 32determining, 57–58, 70–74, 103–104overview, 33, 473–476
Owner icon, 19
Ppainter’s model, 362passive controls, 55–56patterns, 368performSelector:afterDelay: method, 182performSelector:withObject:afterDelay: method,
180, 413, 418–419Persistence application
archiving model objects, 341–343creating project, 336designing view, 336editing classes, 337–341NSCopying class, 343–344overview, 335
persistence classes, 337–341PersistenceViewController class, 335–337, 340,
346–350, 353–354Pick from Camera Roll button, 468Pick from Library button, 467–468picker component, 140picker datasource, 141picker delegate, 141picker outlet, 171picker view, 139pickerData array, 154pickers
customAudio Toolbox framework, 182controller header file, 170–171controllers, implementing, 172–175image resources, adding, 172overview, 170spin method, 175–176viewDidLoad method, 176–178views, building, 171–172
datasources, 141–142date, 148–151delegates, 141–142dependent component, 163–170multicomponent, 158–162overview, 139Pickers application, 140–141single component, 151–158
INDEX 503
PickersAppDelegate.h class, 144pickerView:didSelectRow:inComponent method,
164pinches, detecting, 420–424PinchMeViewController.h file, 421PinchMeViewController.m file, 421Placeholder field, 65–66Platforms folder, 110playerWon method, 181–182polygons, drawing, 368pops, 232portable network graphic (.png) files, 23–24, 56,
145, 250portrait mode, 90portrait property, 89–90, 92, 104, 106–108portraitBarButton outlet, 106portraitFooButton outlet, 106pragmatic directives, 157PreferenceSpecifiers array, 310–312, 315presentModalViewController:animated: method,
465President class, 281, 284, 290–292, 294PresidentDetailController class, 279, 281, 283–285PresidentDetailController.h file, 282PresidentDetailController.m file, 279, 284–285, 298Presidents data model object, 341PresidentsViewController class, 279, 282, 284,
291, 296–297Preview.app file, 84previousPoint value, 458Products subfolder, 16–17Project menu, 57project template, 13property lists, 25, 310–311PSMultiValueSpecifier, 314pushes, 232
QQuartz 2D, 363–368, 492QuartzFun application
adding outlets and actions to view controller, 374–376
application constants, defining, 371color, creating random, 370images, drawing, 382–383lines, drawing, 378–380optimizing, 384–388overview, 368–370QuartzFunView skeleton, 371–374QuartzFunViewController.xib, updating,
376–378rectangles and ellipses, drawing, 380–382
QuartzFun folder, 382
QuartzFunController.m file, 390QuartzFunView property, 368, 371–372, 374–376,
384–385, 390QuartzFunViewController.h file, 374, 388QuartzFunViewController.m file, 374, 389QuartzFunViewController.xib file, 376–378QuartzFunView.h file, 371–372, 374, 384–385, 391QuartzFunView.m file, 378, 384
Rrectangles, drawing, 380–382redColor method, 364–365, 367, 372, 375, 380,
382, 385, 389, 392redrawRect method, 384–387redrawRect property, 385refactoring, defined, 136refreshFields method, 320–323resetSearch method, 227resignFirstResponder method, 69resizing image view, 60Resources subfolder, 16–17, 24–25Resources tab, 44responder chain, 402–404response time, 6retain attribute, 36, 41Return button, 298–301Return Key pop-up, 66return key type, 293Return Key value, 66RGB color model, 366RGBA color model, 367rightSwitch argument, 74–76, 78–80, 85Rolling Marble program, 452–460root directory, 17root view controllers, 144–148, 232rootController property, 148, 237, 291RootViewController control, 236, 239–241, 250,
256, 261, 268rootViewController property, 236–237RootViewController.m file, 236, 241, 250, 256, 261,
268, 274, 296rotation transformation, 108Round Rect Button option, 47, 69, 84, 149Rounded Rect to Custom option, 70row method, 192, 255rowAsNum method, 288–289, 294–295RowControlsController class, 262RowControlsController.h file, 258, 262RowControlsController.m file, 257–258rowImage property, 242–243rows
controls on, 257–263deletable, 270–276height, 198–199

INDEX504
rows (continued)moveable, 263–270selection, 196–197
RYB color model, 366
Ssandboxes, defined, 6save: action method, 285screen size, 6SDK (software development kit), 2search bar
controller header file, updating, 218–219controller implementation, modifying,
221–230deep mutable copies, 216–218overview, 215preparation for implementing, 215–216views, modifying, 220–221
search bar delegate methods, 228–230searchBarSearchButtonClicked: method, 228–229searchBar:textDidChange: method, 229second-level controllers
checklists, 252–257disclosure button view, 244–252editable detail panes
controllers, creating, 278–282data model object, creating, 276–278detail view controller, creating, 282–298overview, 276
rowscontrols on, 257–263deletable, 270–276moveable, 263–270
SecondLevelViewController subclass, 239–244, 247, 252, 258, 264, 270, 279
SecondLevelViewController.h file, 239–242, 247, 252, 258, 264, 270, 279
secondsSinceLastDraw method, 460section method, 192sections, defined, 188SectionsViewController.h file, 210SectionsViewController.xib file, 209SectionViewController.xib file, 214secure text field setting, 314segmented control, 54, 74–76, 377SELECT command, 352, 358Select from Camera Roll button, 467selected state, 39selectedSegmentIndex property, 75–76selectExistingPicture action, 468selectFromCameraRollButton outlet, 468self.currentPoint method, 460self.view. View property, 82sender argument, 33, 53, 61, 70
sender attribute, 39setColumn1 method, 177setCurrentPoint: method, 458setEditing:animated: method, 263setNeedsDisplay method, 373, 384, 387setNeedsDisplayInRect: method, 384, 459setStatusText method, 39setters, defined, 35Settings application, 304Settings Application Schema Reference, 319settings bundles
adding to project, 309–310child settings view, 317–319multivalue field, 314–315overview, 309property list, setting up, 310–311secure text field setting, 314slider setting, 316–317text field setting, 311–313toggle switch setting, 315–316
setValue:forKey: method, 177–178shake detection, 445–452ShakeAndBreak project, 447–452ShakeAndBreakViewController.h file, 448ShakeAndBreakViewController.xib file, 449shapes, drawing, 368ShapeType property, 371–372, 384–385, 391sharedAccelerometer method, 442shouldAutorotateToInterfaceOrientation:
method, 91–92, 108Show at Launch check box, 12Show segment, 54showButton method, 180Simple_TableViewController.h file, 190Simple_TableViewController.xib file, 189SimpleTableIdentifier class, 191–194, 198, 206single component pickers, 151–158SingleComponentPickerView controller, 147SingleComponentPickerViewController class, 152SingleComponentPickerViewController.h file, 151SingleComponentPickerViewController.m file,
143, 153, 157SingleComponentPickerView.xib file, 152singleLabel label, 416–418singleTap method, 416–420size element, 365, 381, 383, 386–387, 392–394,
397–398size inspector, 94Size to Fit option, 60sliderChanged: method, 71–72sliderLabel method, 73sliders, 54, 70–73, 316–317software development kit (SDK), 2Source Code link, 11
INDEX 505
sourceType method, 470Spin button, 141spin method, 139, 141, 171–172, 175–176,
179–182SQL (Structured Query Language), 350SQLITE_OK command, 351–352, 355–358SQLite3, 350–359sqlite3_exec function, 351–352, 355, 357–358sqlite3_open command, 351, 355, 358stacks, defined, 232standardUserDefaults method, 319, 321, 325–326startingPoint property, 438–439state machine concept, 362statedictionary.plist property, 164–165, 168states array, 168stateZips method, 164–169static controls, 55–56status bar, 90statusText method, 39, 50stopUpdatingLocation, 431stretchable images, 86–87, 475–477string files, 475–477stringByAppendingPathComponent: method,
331stringValue property, 322–323stroke color, 364struct method, 365Structured Query Language (SQL), 350subclasses, 30subcontrollers, 232subviews, 21, 200–204Summary tab, 486swap files, 7SwapViewController.h file, 104SwapViewController.m file, 106, 109SwapViewController.xib file, 105swipes, 413–415Swipes application, 413SwipesViewController.h file, 410–411, 414SwipesViewController.m file, 411, 414SwipesViewController.xib file, 411switch statement, 75, 379, 383Switch View Controller icon, 126Switch Views button, 116, 126switchChanged: action, 78switches, 74–79switchView method, 75, 78SwitchViewController class, 121–122, 126SwitchViewController.h header file, 122SwitchViewController.m file, 126–129switchViews method, 122, 124, 126–129, 132,
135–136System folder, 110system resources, 7
Ttab bar, 114Tab Bar Controllers, 145–147tab bars, 139, 142–148Tab View Controller window, 146table view delegate method, 228table views
cellsCells application, 200overview, 199subviews, adding, 200–204UITableViewCell subclass, 204–209
configurations, 195–199grouped and indexed sections, 209–214grouped tables, 187images, adding, 194–195implementing, 189–193indexed tables, 187overview, 185–187search bar
controller header file, updating, 218–219controller implementation, modifying,
221–230deep mutable copies, 216–218overview, 215preparation for implementing, 215–216views, modifying, 220–221
tableView:accessoryButtonTappedForRowWithIndexPath: method, 250
tableView:accessoryTypeForRowWithIndexPath: method, 249, 267
tableView:canMoveRowAtIndexPath: method, 267
tableView:cellForRowAtIndexPath: method, 194, 198, 208, 213, 254, 260, 267, 292, 298
tableView:cellForRowWithIndexPath: method, 203
tableView:didSelectRowAtIndexPath: method, 228, 243, 250, 255, 260, 282, 284
tableView:editingStyleForRowAtIndexPath: method, 267
tableView:moveRowAtIndexPath:fromIndexPath: method, 267
tableView:numberOfRowsInSection: method, 191, 243
tableView:titleForHeaderInSection method, 213tableView:willSelectRowAtIndexPath: method,
228, 295Tag attribute, 61tag property, 61Take New Picture button, 467–468taps, 402, 416–420tapsLabel outlet, 407TapTaps application, 416

INDEX506
TapTapsViewController.h file, 416–417TapTapsViewController.m file, 417, 419TapTapsViewController.xib file, 417target argument, 266tempValues variable, 283–290, 292, 294–296text fields
actions, determining, 58interface, building, 58outlets, determining, 57–58overview, 57–64settings, 65, 311–313text input traits, 66
Text Input Traits section, 66text property, 193textField pointer, 294textFieldBeingEdited method, 283–285, 287,
289–290, 295–296textFieldDidBeginEditing: method, 296textFieldDidEndEditing: method, 284–285textFieldDone: method, 293, 299textFieldDoneEditing: action, 68Texture2D class, 399timeIntervalSinceNow method, 459tmp directory, 331–332toggle switch setting, 315–316toggleEdit: method, 272toggleMove: method, 266toggleShowHide: action method, 75–76, 78, 80toLocation property, 433toolicon.png icon, 147Tools menu, 58Touch Explorer application, 406–409Touch Up Inside event, 51, 70, 106, 149, 468touches, defined, 402touches method, 401–402, 404–406, 408–415,
417–419, 421–423, 426touchesBegan: method, 384touchesBegan:withEvent: method, 373, 405,
412–413, 419, 423, 427touchesCancelled:withEvent: method, 406touchesEnded: method, 384touchesEnded:withEvent: method, 373, 406touchesLabel outlet, 407touchesMoved: method, 384touchesMoved:withEvent:, 373touchesMoved:withEvent: method, 405, 412, 414,
423TouchExplorer application, 409, 416TouchExplorerViewController.h file, 406TouchExplorerViewController.xib file, 407transform property, 108transformations, defined, 108tripleLabel label, 416–418
UUIAcceleration class, 443UIAccelerometer class, 442–443UIAccelerometerDelegate protocol, 443, 449, 453UIActionSheet object, 81, 83UIActionSheetDelegate class, 79–80, 83UIAlertViewDelegate protocol, 84UIApplication class, 41, 339, 403UIApplicationDelegate class, 42UIApplicationWillTerminateNotification
notification, 338–340, 349, 356UIBarButtonItemStyleBordered class, 265–266,
271UIBarButtonItemStyleDone class, 287, 291–292UIColor class, 334, 364–367, 369–373, 375,
379–380, 382–385, 389–392, 395–396UIColor-Random.h file, 369UIControl class, 55–56, 66UIControlStateHighlighted class, 85–86UIControlStateNormal class, 39, 85–86UIImage class, 176, 239UIImagePickerController class, 468, 470UIImagePickerControllerCropRect class, 466UIImagePickerControllerDelegate class, 468UIImagePickerControllerOriginalImage class, 465UIImagePickerControllerSourceTypeCamera class,
464UIImagePickerControllerSourceTypePhotoLibrary
class, 464, 471UIImagePickerControllerSourceTypeSaved
PhotosAlbum class, 464, 470UIImageView class, 59, 173, 176–177, 477UIInterfaceOrientationLandscapeLeft function,
92UIInterfaceOrientationLandscapeRight function,
92UIInterfaceOrientationPortrait class, 91–92,
99–101, 106–107UIInterfaceOrientationPortraitUpsideDown class,
91–92, 99, 101, 107UIKit framework, 20, 30UILabel class, 203, 444UINavigationController class, 115, 117, 232, 237,
281, 286, 291, 402, 468UINavigationControllerDelegate class, 468UIPickerView class, 152–158, 161–164, 167,
169–171, 174–175, 178–179UIPickerViewDataSource class, 151–152, 156, 158,
164, 170, 179UIPickerViewDelegate class, 151–152, 158, 164,
170, 179UIResponder class, 402
INDEX 507
UIReturnKeyDone class, 288, 293, 299UISearchBarDelegate protocol, 219UISegmentedControl class, 75UISegmentedControl property, 76UISlider class, 72, 316, 324, 404UIStatusBarHidden row, 448UISwitch class, 315, 324, 326, 404UITabBarController class, 115, 117, 142, 144, 232,
402UITableView class, 186, 191, 194–198, 202, 208,
212–214, 219, 223–224, 228UITableViewCell class, 186–187, 191–194,
198–199, 202–209, 212, 223UITableViewCellAccessoryDetailDisclosureButton
class, 248–249UITableViewCellAccessoryNone class, 249,
254–255UITableViewCellEditingStyleDelete class, 273UITableViewCellEditingStyleInsert class, 273UITableViewCellEditingStyleNone class, 265, 267,
273UITableViewController class, 236, 239–240, 243,
283, 286, 291UITableViewDataSource class, 186, 190, 200, 210,
219UITableViewDelegate class, 186, 190, 195, 200,
210, 219UITableViewRowAnimation class, 274UITableViewRowAnimationFade class, 272, 274UITableViewStylePlain class, 250, 256, 262,
268–269, 274–275, 296–297UITextField class, 283–284, 288–289, 293–294,
296, 299–301UITextFieldDelegate class, 199, 283, 293UITouch class, 405, 412, 414–415, 418–419,
422–423, 425–426UIView class, 20UIViewController class, 30–34UIWindow class, 45unarchiver property, 280–282unarchiving data objects, 344updateInterval value, 445updateLabelsFromTouches: method, 409updating
Location Manager, 438QuartzFunViewController.xib, 376–378
User Defaults, 304User Interaction Enabled checkbox, 62user interfaces
action sheet, 81–84alerts, 79–81Build and Run option, 67–70buttons, 84–87Control Fun application, 56–66
controlsactive, static, and passive, 55–56overview, 54
labels, 70–73overview, 53segmented control, 74–78sliders, 70–73switches, 74–78
useRandomColor method, 371–373, 375–376, 389, 391–392, 395
VvalueForKey: method, 357valueForKey:. valueForKey method, 178velocity = velocity + acceleration formula, 455verticalAccuracy property, 432view controllers
actionsadding, 34–41, 374–376overview, 33–34
creating, 119–120detail, 282–298multiview controllers, 117outlets
adding, 34–41, 374–376overview, 33
overview, 31–33root, 236rotation, 90–91
View icon, 20, 58, 105View Mode button, 59–60, 238view outlet, 130view property, 104, 108View Switcher application
application delegate, 121content views, implementing, 130–132MainWindow.xib file, 123–126nib files, 119–120overview, 116–119SwitchViewController.h header file, 122SwitchViewController.m file, 126–129view controller, 119–120
View window, 21, 49, 59, 77View XIB icon, 143View_Switcher App Delegate icon, 126View_SwitcherAppDelegate.h file, 121View-Based Application icon, 13view-based application template, 56, 102viewController outlet, 238viewDidAppear: method, 133–137, 323viewDidDisappear method, 133–137viewDidLoad: method, 85–86, 176–178, 227–228
INDEX508
viewscreating in Interface Builder, 45–48custom pickers, 171–172designing, 336labels, adding to, 20–22multicomponent picker, 159restructuring when rotated, 97–102single component picker, 152swapping
actions, 104–108designing two views, 105–106linking in Core Graphics framework,
109–111outlets, 103–105overview, 102–103
viewWillAppear: method, 245, 323, 326viewWillDisappear: method, 323, 326viewWithTag: method, 261
WwarpFactorLabel property, 320–323web sites, coding advice, 493WhereAmIViewController.h file, 434whiteButton.png file, 84
Wi-Fi Positioning Service (WPS), 429willAnimateFirstHalfOfRotationToInterface
Orientation:duration method, 99, 108willAnimateSecondHalfOfRotationFromInterface
Orientation:duration method, 99Window-Based Application template, 142, 236winLabel outlet, 171Words drop-down, 66WPS (Wi-Fi Positioning Service), 429writeToFile atomically: method, 333–334
XXcode, 2, 11–17, 22, 31, 34, 59, 91.xib files, 18, 146
YyellowBlueController method, 137YellowViewController class, 120, 122, 126–127,
129–132, 136YellowView.xib file, 120
Zzips array, 168–169