Embed Size (px)
DESCRIPTION
Citation preview
User’s Guide

Contents
2 Welcome
3 Activation Steps
4 Introduction
4 Purpose
5 Key Features
6 Activation
8 Using the System
8 Login
9 Credit Sale 10 For Swipe Capable Devices
10 For Manual Entry
12 Cash Sale
13 Reverse Phone Lookup
13 Void Transaction
14 Refund 14 For Swipe Credit Returns
14 For Manual Entry Credit Returns
14 For Cash Refund
15 Offline 16 Offline Credit Sale
17 For Swipe Capable Devices
17 For Manual Entry
18 Offline Cash Sale
18 Upload Offline Trxs
19 History 19 Last 30 Days
19 Current Batch
19 Transaction Errors
19 Email Transactions
20 Settings 20 Enable Sales Tax
20 Enter Sales Tax %
20 Enable Tipping
20 Enable Signature Capture
20 Offline Mode – Change Password
21 Sage Mobile Payment Portal
21 Home
21 My Account 22 Sage Mobile Payments – Web Edition
22 Update Account Info
22 Change Billing Information
22 Edit Secret Question
23 My Apps 23 Recent Activity
23 New Customers
23 Transactions
23 Training 23 Getting Started
24 Video Tutorials
24 Helpful Documents
24 FAQs
24 Support 24 Terms of Use
24 Repair/Warranty Info
24 FAQs
24 Contact Us
24 Shop
25 Contact Us
1

If you have any questions about your mobile phone compatibility or how to find a phone model please visit devices.roamdata.com or call 1-888-477-8570.
Welcome to Sage Mobile Payments! As a merchant, using our app and swiper device, you can now benefit from fast and easy payment processing via your mobile phone, anytime, anywhere. In addition, the Sage Mobile Payments Portal, gives you the ability to conveniently manage and oversee your account just as easily.
3
To activate full service, please follow the steps below:
Upon signup, you’ll receive an activation email containing a username and temporary password. Follow the instructions in the email to activate your Sage Mobile Payments Portal (www.mysagemobile.com) account.
To use your Sage Mobile Payments app, you must first log into your Sage Mobile Payments Portal account, and:
• Accept Sage’s Terms and Conditions
• Change your password
• Accept the recurring payment method provided
Download the Sage Mobile Payments application from your phone’s Market/App Store.
N O T E : Until these steps are completed, you cannot use Sage Mobile Payments on your mobile device or PC/Mac Virtual Terminal.
If you experience any issues with the download or login, please contact your reseller.
Activating Sage Mobile Payments
2
3
1
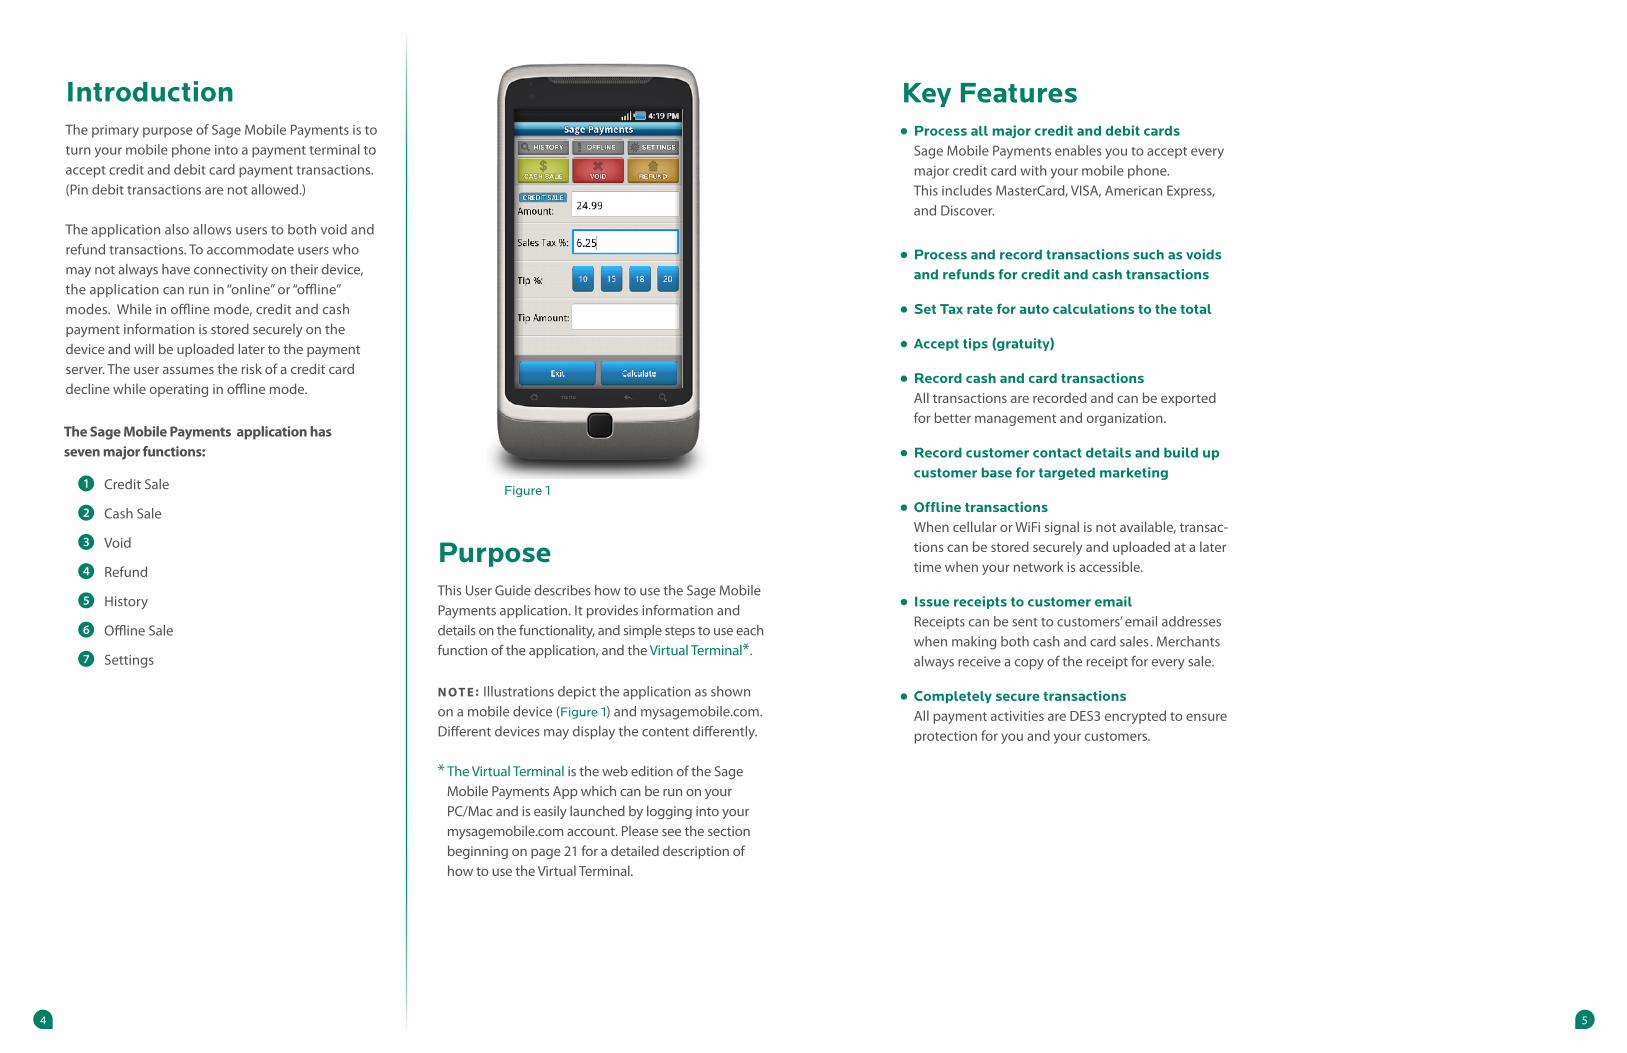
Key Features•Process all major credit and debit cards Sage Mobile Payments enables you to accept every major credit card with your mobile phone. This includes MasterCard, VISA, American Express, and Discover.
•Process and record transactions such as voids and refunds for credit and cash transactions
•Set Tax rate for auto calculations to the total
•Accept tips (gratuity)
•Record cash and card transactions All transactions are recorded and can be exported for better management and organization.
•Record customer contact details and build up customer base for targeted marketing
•Offline transactions When cellular or WiFi signal is not available, transac- tions can be stored securely and uploaded at a later time when your network is accessible.
•Issue receipts to customer email Receipts can be sent to customers’ email addresses when making both cash and card sales. Merchants always receive a copy of the receipt for every sale.
•Completely secure transactions All payment activities are DES3 encrypted to ensure protection for you and your customers.
Introduction The primary purpose of Sage Mobile Payments is to turn your mobile phone into a payment terminal to accept credit and debit card payment transactions. (Pin debit transactions are not allowed.)
The application also allows users to both void and refund transactions. To accommodate users who may not always have connectivity on their device, the application can run in “online” or “offline” modes. While in offline mode, credit and cash payment information is stored securely on the device and will be uploaded later to the payment server. The user assumes the risk of a credit card decline while operating in offline mode.
PurposeThis User Guide describes how to use the Sage MobilePayments application. It provides information and details on the functionality, and simple steps to use each function of the application, and the Virtual Terminal*.
N O T E : Illustrations depict the application as shown on a mobile device (Figure 1) and mysagemobile.com. Different devices may display the content differently.
* The Virtual Terminal is the web edition of the Sage Mobile Payments App which can be run on your PC/Mac and is easily launched by logging into your mysagemobile.com account. Please see the section beginning on page 21 for a detailed description of how to use the Virtual Terminal.
The Sage Mobile Payments application has seven major functions:
1
2
3
4
5
6
7
Credit Sale
Cash Sale
Void
Refund
History
Offline Sale
Settings
Figure 1
54
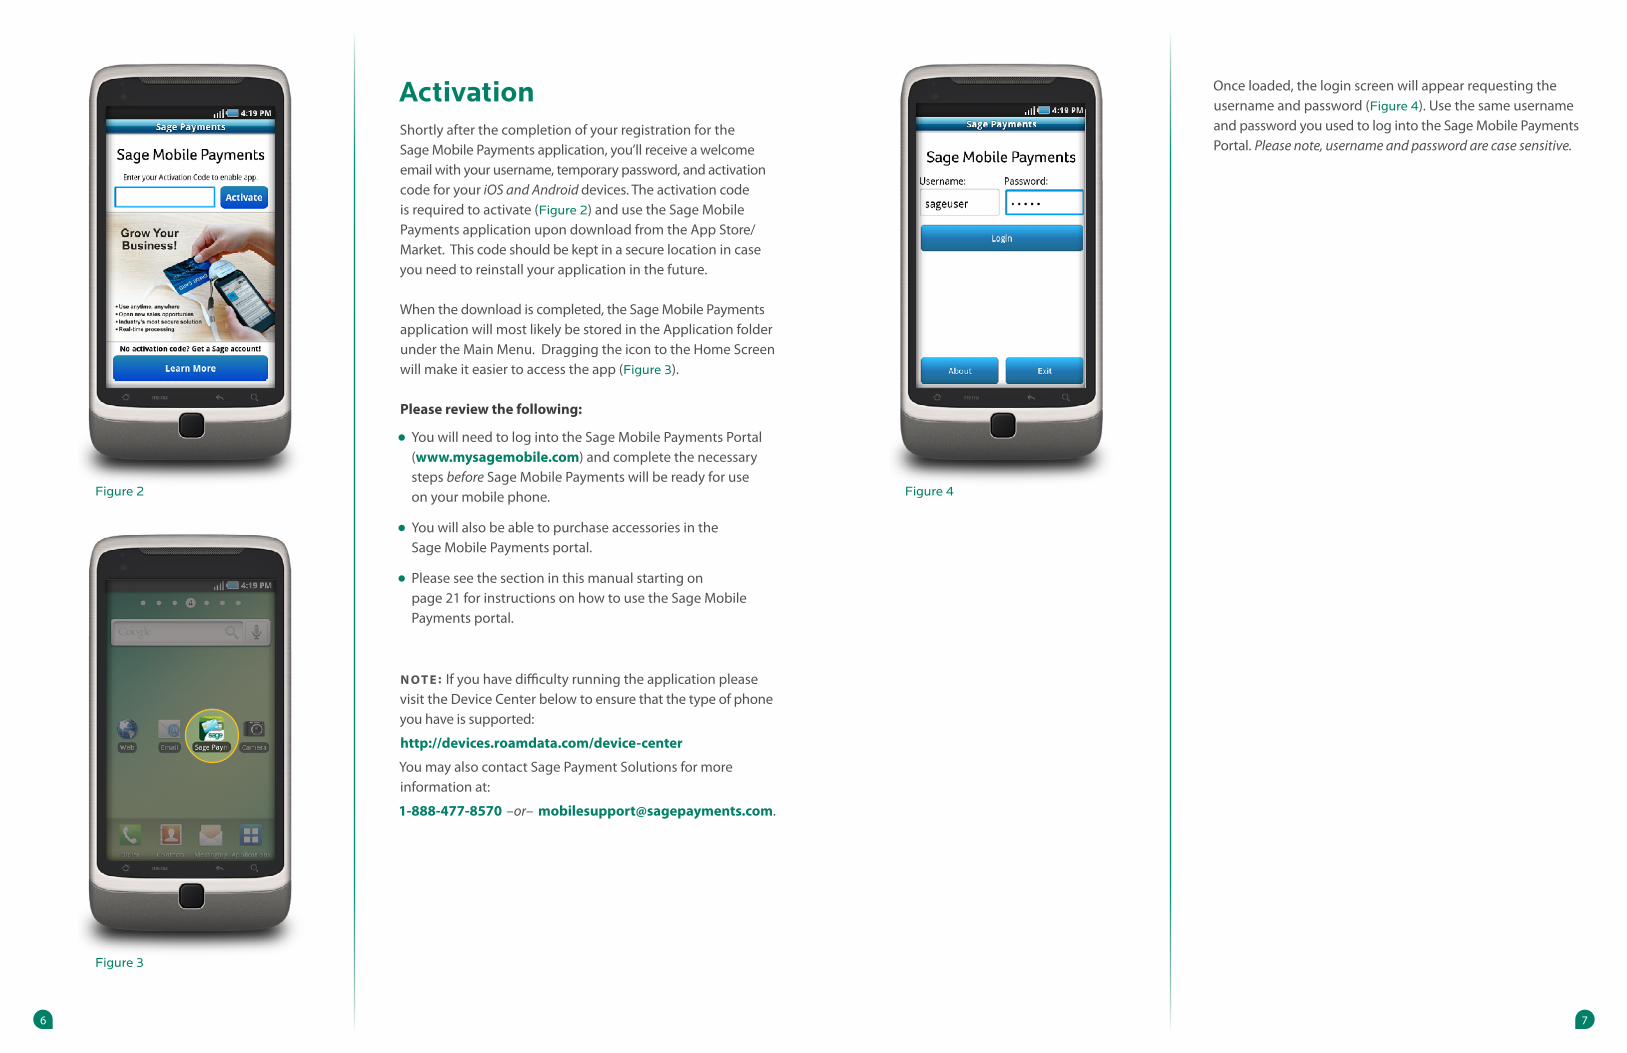
Once loaded, the login screen will appear requesting the username and password (Figure 4). Use the same username and password you used to log into the Sage Mobile Payments Portal. Please note, username and password are case sensitive.
Figure 4
ActivationShortly after the completion of your registration for the Sage Mobile Payments application, you’ll receive a welcome email with your username, temporary password, and activation code for your iOS and Android devices. The activation code is required to activate (Figure 2) and use the Sage Mobile Payments application upon download from the App Store/Market. This code should be kept in a secure location in case you need to reinstall your application in the future.
When the download is completed, the Sage Mobile Payments application will most likely be stored in the Application folder under the Main Menu. Dragging the icon to the Home Screen will make it easier to access the app (Figure 3).
Please review the following:
•You will need to log into the Sage Mobile Payments Portal (www.mysagemobile.com) and complete the necessary steps before Sage Mobile Payments will be ready for use on your mobile phone.
•You will also be able to purchase accessories in the Sage Mobile Payments portal.
•Please see the section in this manual starting on page 21 for instructions on how to use the Sage Mobile Payments portal.
N O T E : If you have difficulty running the application please visit the Device Center below to ensure that the type of phone you have is supported:
http://devices.roamdata.com/device-center
You may also contact Sage Payment Solutions for more information at:
1-888-477-8570 –or– [email protected].
Figure 2
Figure 3
76
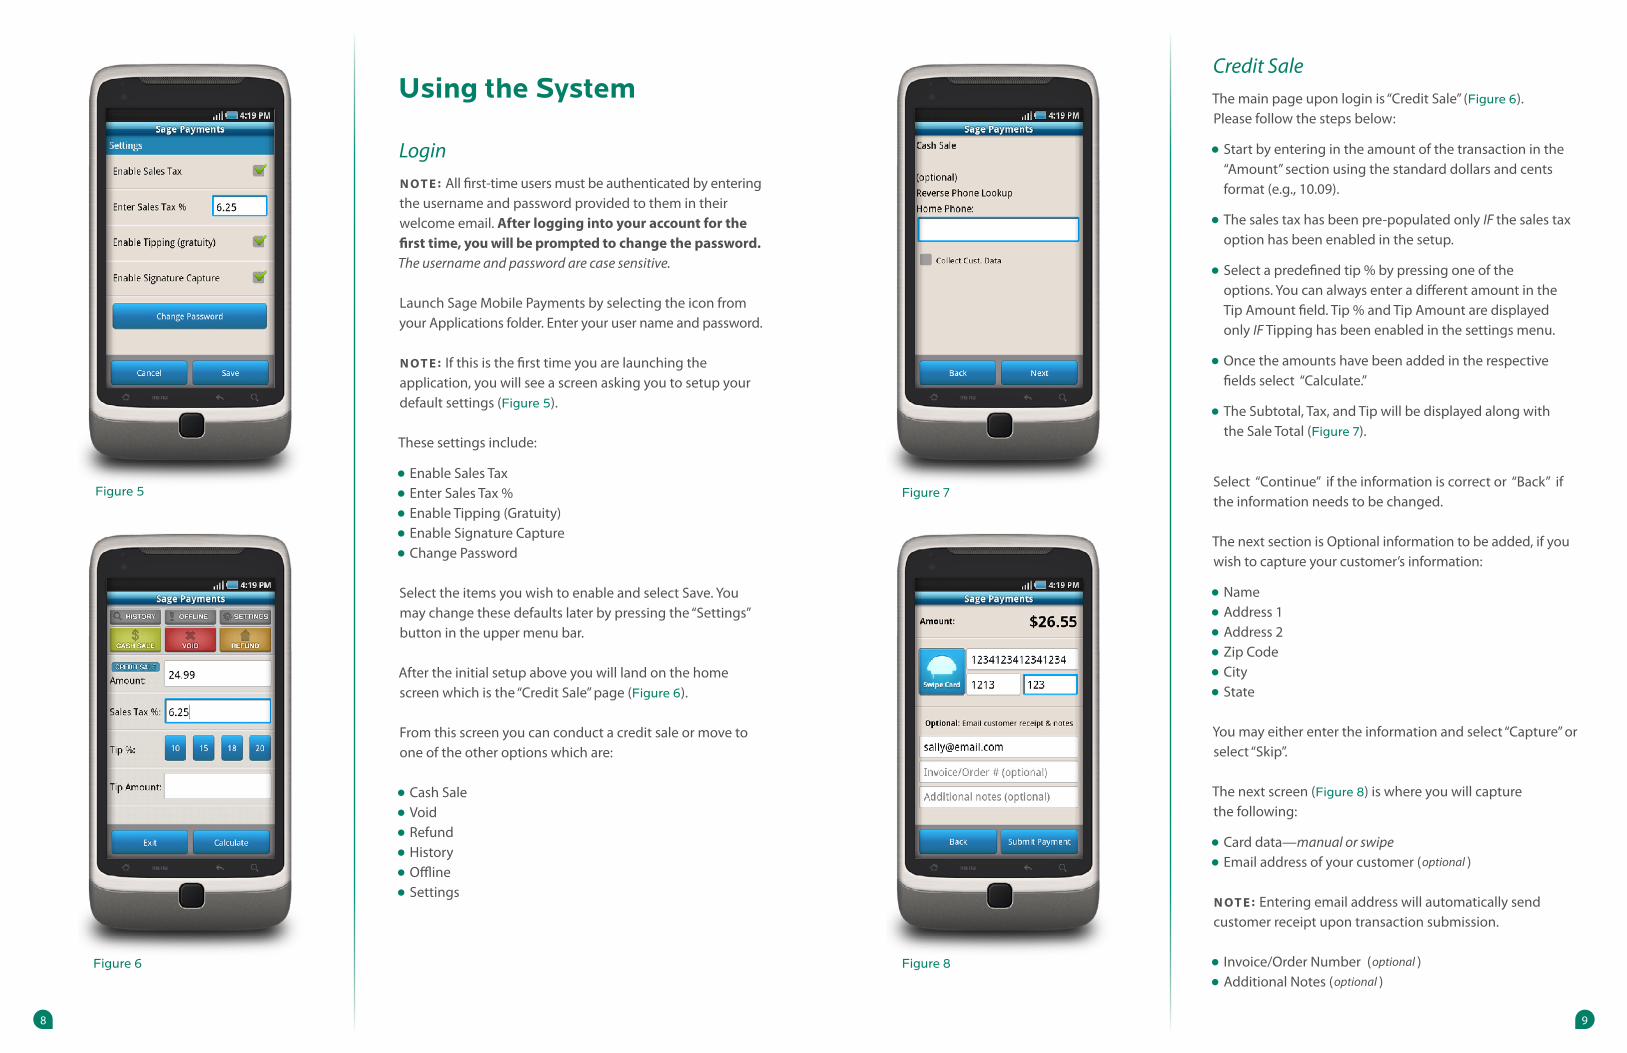
Credit Sale
The main page upon login is “Credit Sale” (Figure 6). Please follow the steps below:
•Start by entering in the amount of the transaction in the “Amount” section using the standard dollars and cents format (e.g., 10.09).
•The sales tax has been pre-populated only IF the sales tax option has been enabled in the setup.
•Select a predefined tip % by pressing one of the options. You can always enter a different amount in the Tip Amount field. Tip % and Tip Amount are displayed only IF Tipping has been enabled in the settings menu.
•Once the amounts have been added in the respective fields select “Calculate.”
•The Subtotal, Tax, and Tip will be displayed along with the Sale Total (Figure 7).
Select “Continue” if the information is correct or “Back” if the information needs to be changed.
The next section is Optional information to be added, if you wish to capture your customer’s information:
•Name
•Address 1
•Address 2
•Zip Code
•City
•State
You may either enter the information and select “Capture” or select “Skip”.
The next screen (Figure 8) is where you will capture the following:
•Card data—manual or swipe
•Email address of your customer (optional )
N O T E : Entering email address will automatically send customer receipt upon transaction submission.
•Invoice/Order Number (optional )
•Additional Notes (optional )Figure 8
Figure 7
Using the System
Login
N O T E : All first-time users must be authenticated by entering the username and password provided to them in their welcome email. After logging into your account for the first time, you will be prompted to change the password. The username and password are case sensitive.
Launch Sage Mobile Payments by selecting the icon from your Applications folder. Enter your user name and password. N O T E : If this is the first time you are launching the application, you will see a screen asking you to setup your default settings (Figure 5).
These settings include:
•Enable Sales Tax
•Enter Sales Tax %
•Enable Tipping (Gratuity)
•Enable Signature Capture
•Change Password
Select the items you wish to enable and select Save. You may change these defaults later by pressing the “Settings” button in the upper menu bar.
After the initial setup above you will land on the home screen which is the “Credit Sale” page (Figure 6).
From this screen you can conduct a credit sale or move to one of the other options which are:
•Cash Sale
•Void
•Refund
•History
•Offline
•Settings
Figure 6
Figure 5
98
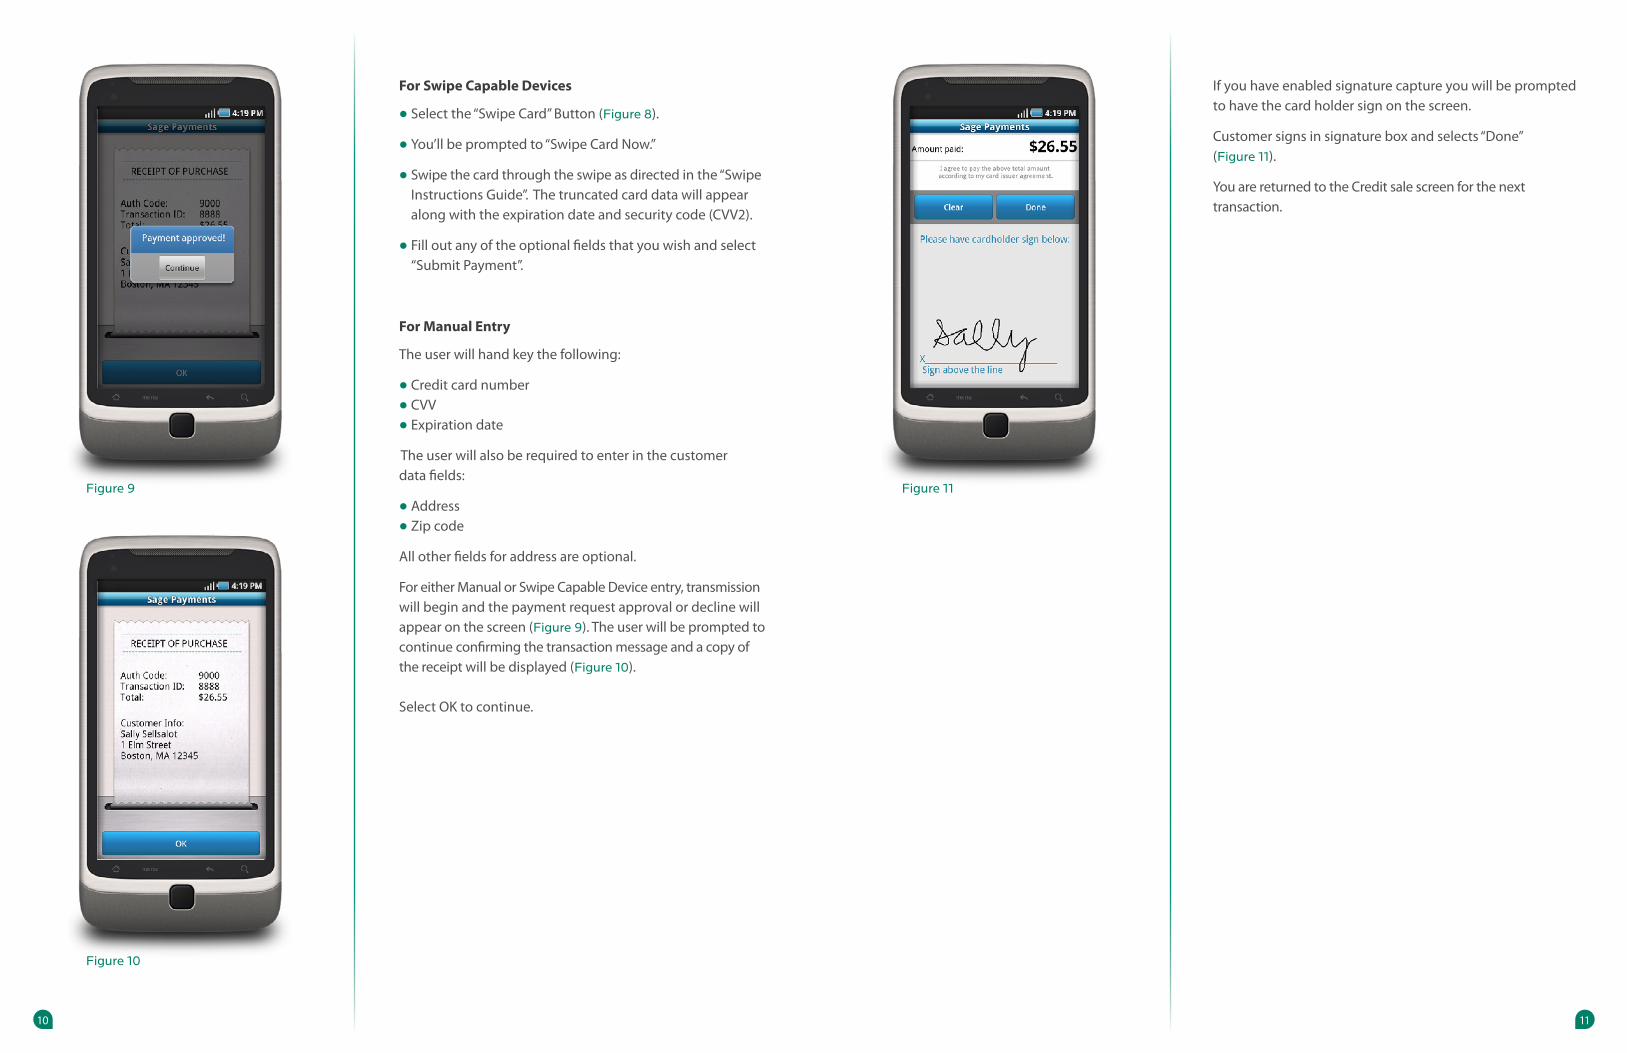
If you have enabled signature capture you will be prompted to have the card holder sign on the screen.
Customer signs in signature box and selects “Done” (Figure 11).
You are returned to the Credit sale screen for the next transaction.
Figure 11
For Swipe Capable Devices
•Select the “Swipe Card” Button (Figure 8).
•You’ll be prompted to “Swipe Card Now.”
•Swipe the card through the swipe as directed in the “Swipe Instructions Guide”. The truncated card data will appear along with the expiration date and security code (CVV2).
•Fill out any of the optional fields that you wish and select “Submit Payment”.
For Manual Entry
The user will hand key the following:
•Credit card number
•CVV
•Expiration date
The user will also be required to enter in the customer data fields:
•Address
•Zip code
All other fields for address are optional.
For either Manual or Swipe Capable Device entry, transmission will begin and the payment request approval or decline will appear on the screen (Figure 9). The user will be prompted to continue confirming the transaction message and a copy of the receipt will be displayed (Figure 10).
Select OK to continue.
Figure 10
Figure 9
1110
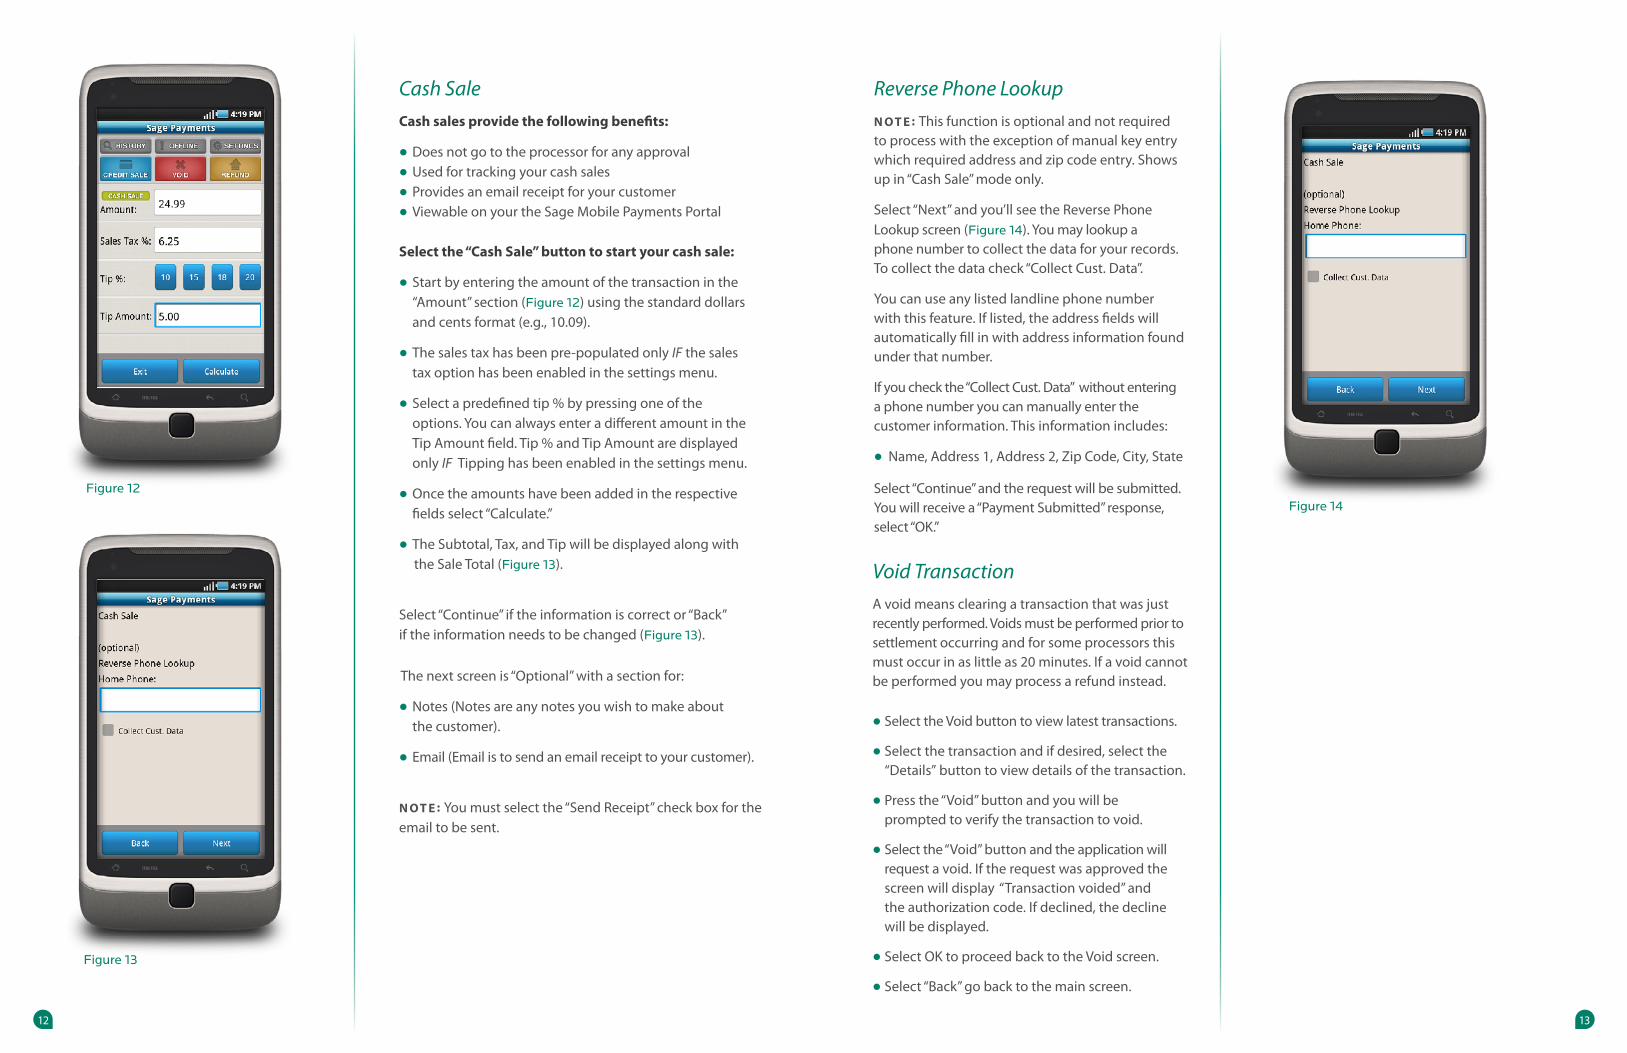
Reverse Phone Lookup
N O T E : This function is optional and not required to process with the exception of manual key entry which required address and zip code entry. Shows up in “Cash Sale” mode only.
Select “Next” and you’ll see the Reverse Phone Lookup screen (Figure 14). You may lookup a phone number to collect the data for your records. To collect the data check “Collect Cust. Data”.
You can use any listed landline phone number with this feature. If listed, the address fields will automatically fill in with address information found under that number.
If you check the “Collect Cust. Data” without entering a phone number you can manually enter the customer information. This information includes:
•Name, Address 1, Address 2, Zip Code, City, State
Select “Continue” and the request will be submitted. You will receive a “Payment Submitted” response, select “OK.”
Void Transaction
A void means clearing a transaction that was just recently performed. Voids must be performed prior to settlement occurring and for some processors this must occur in as little as 20 minutes. If a void cannot be performed you may process a refund instead.
•Select the Void button to view latest transactions.
•Select the transaction and if desired, select the “Details” button to view details of the transaction.
•Press the “Void” button and you will be prompted to verify the transaction to void.
•Select the “Void” button and the application will request a void. If the request was approved the screen will display “Transaction voided” and the authorization code. If declined, the decline will be displayed.
•Select OK to proceed back to the Void screen.
•Select “Back” go back to the main screen.
Cash Sale
Cash sales provide the following benefits:
•Does not go to the processor for any approval
•Used for tracking your cash sales
•Provides an email receipt for your customer
•Viewable on your the Sage Mobile Payments Portal
Select the “Cash Sale” button to start your cash sale:
•Start by entering the amount of the transaction in the “Amount” section (Figure 12) using the standard dollars and cents format (e.g., 10.09).
•The sales tax has been pre-populated only IF the sales tax option has been enabled in the settings menu.
•Select a predefined tip % by pressing one of the options. You can always enter a different amount in the Tip Amount field. Tip % and Tip Amount are displayed only IF Tipping has been enabled in the settings menu.
•Once the amounts have been added in the respective fields select “Calculate.”
•The Subtotal, Tax, and Tip will be displayed along with the Sale Total (Figure 13).
Select “Continue” if the information is correct or “Back” if the information needs to be changed (Figure 13).
The next screen is “Optional” with a section for:
•Notes (Notes are any notes you wish to make about the customer).
•Email (Email is to send an email receipt to your customer).
N O T E : You must select the “Send Receipt” check box for the email to be sent.
Figure 13
Figure 14Figure 12
1312
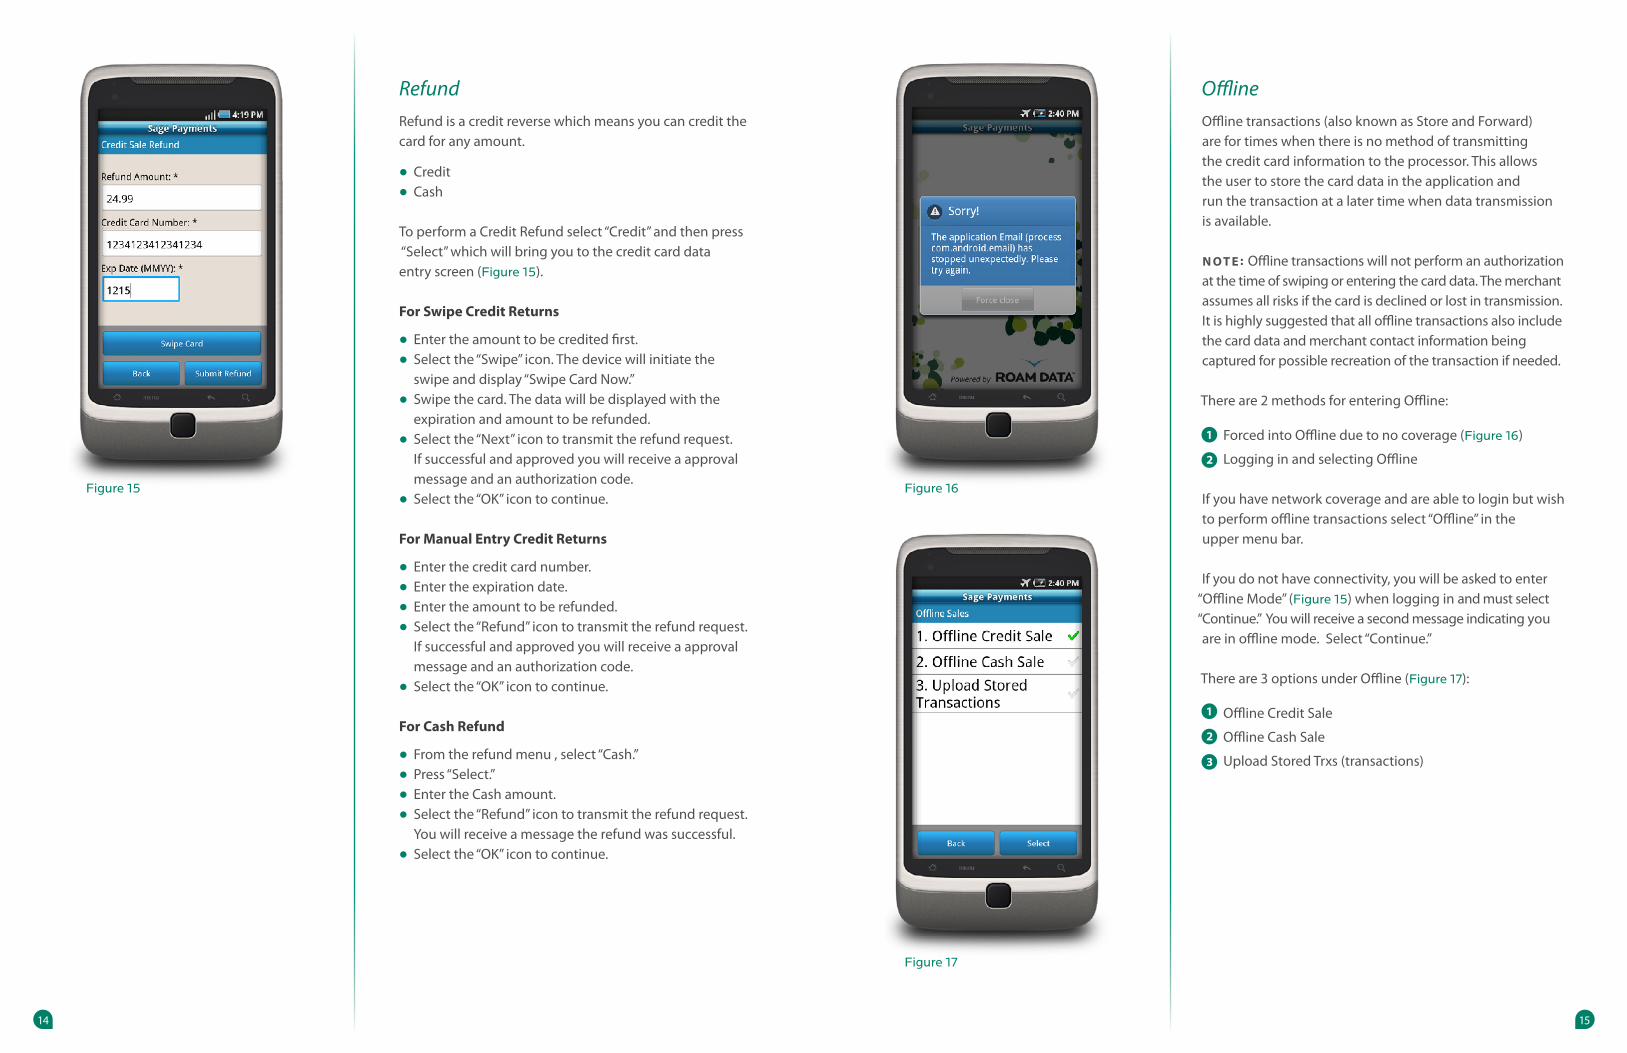
Offline
Offline transactions (also known as Store and Forward) are for times when there is no method of transmitting the credit card information to the processor. This allows the user to store the card data in the application and run the transaction at a later time when data transmission is available.
N O T E : Offline transactions will not perform an authorization at the time of swiping or entering the card data. The merchant assumes all risks if the card is declined or lost in transmission. It is highly suggested that all offline transactions also include the card data and merchant contact information being captured for possible recreation of the transaction if needed.
There are 2 methods for entering Offline:
Forced into Offline due to no coverage (Figure 16)
Logging in and selecting Offline
If you have network coverage and are able to login but wish to perform offline transactions select “Offline” in the upper menu bar.
If you do not have connectivity, you will be asked to enter “Offline Mode” (Figure 15) when logging in and must select “Continue.” You will receive a second message indicating you are in offline mode. Select “Continue.”
There are 3 options under Offline (Figure 17):
Offline Credit Sale
Offline Cash Sale
Upload Stored Trxs (transactions)
1
2
1
2
3
Figure 17
Figure 16
Refund
Refund is a credit reverse which means you can credit the card for any amount.
•Credit
•Cash To perform a Credit Refund select “Credit” and then press “Select” which will bring you to the credit card data entry screen (Figure 15).
For Swipe Credit Returns
•Enter the amount to be credited first.
•Select the “Swipe” icon. The device will initiate the swipe and display “Swipe Card Now.”
•Swipe the card. The data will be displayed with the expiration and amount to be refunded.
•Select the “Next” icon to transmit the refund request. If successful and approved you will receive a approval message and an authorization code.
•Select the “OK” icon to continue.
For Manual Entry Credit Returns
•Enter the credit card number.
•Enter the expiration date.
•Enter the amount to be refunded.
•Select the “Refund” icon to transmit the refund request. If successful and approved you will receive a approval message and an authorization code.
•Select the “OK” icon to continue.
For Cash Refund
•From the refund menu , select “Cash.”
•Press “Select.”
•Enter the Cash amount.
•Select the “Refund” icon to transmit the refund request. You will receive a message the refund was successful.
•Select the “OK” icon to continue.
Figure 15
1514
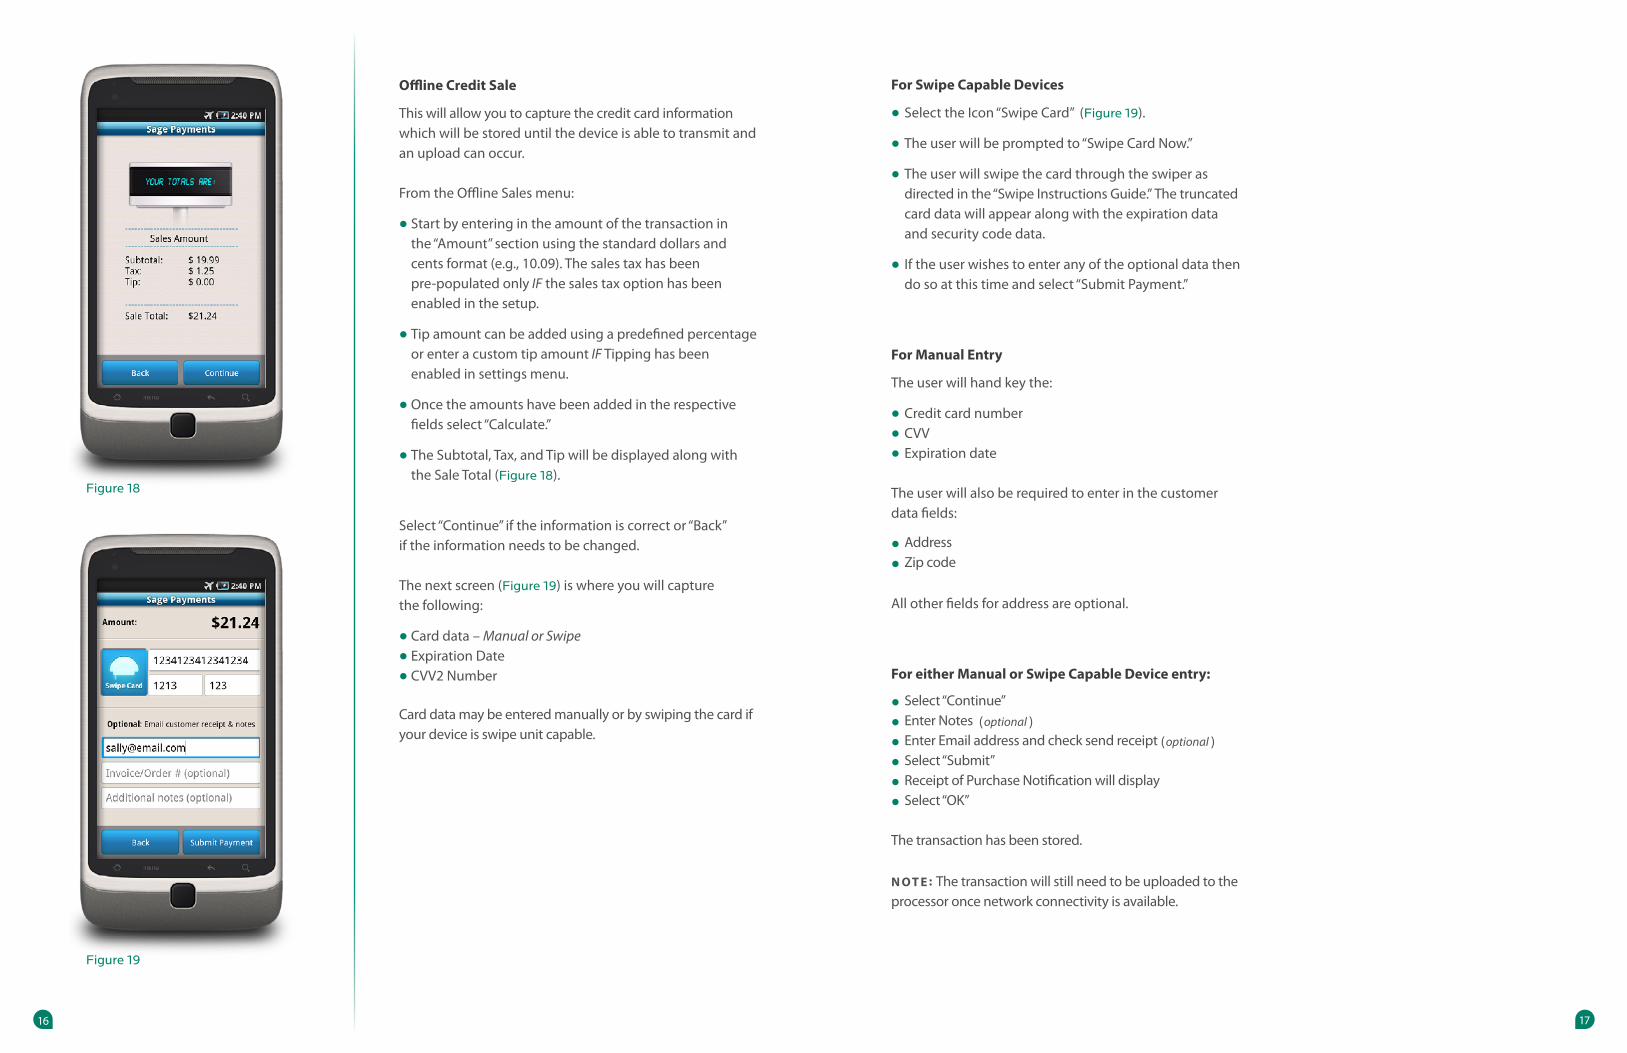
For Swipe Capable Devices
•Select the Icon “Swipe Card” (Figure 19).
•The user will be prompted to “Swipe Card Now.”
•The user will swipe the card through the swiper as directed in the “Swipe Instructions Guide.” The truncated card data will appear along with the expiration data and security code data.
•If the user wishes to enter any of the optional data then do so at this time and select “Submit Payment.”
For Manual Entry
The user will hand key the:
•Credit card number
•CVV
•Expiration date
The user will also be required to enter in the customer data fields:
•Address
•Zip code
All other fields for address are optional.
For either Manual or Swipe Capable Device entry:
•Select “Continue”
•Enter Notes (optional )
•Enter Email address and check send receipt (optional )
•Select “Submit”
•Receipt of Purchase Notification will display
•Select “OK”
The transaction has been stored.
N O T E : The transaction will still need to be uploaded to the processor once network connectivity is available.
Offline Credit Sale
This will allow you to capture the credit card information which will be stored until the device is able to transmit and an upload can occur.
From the Offline Sales menu:
•Start by entering in the amount of the transaction in the “Amount” section using the standard dollars and cents format (e.g., 10.09). The sales tax has been pre-populated only IF the sales tax option has been enabled in the setup.
•Tip amount can be added using a predefined percentage or enter a custom tip amount IF Tipping has been enabled in settings menu.
•Once the amounts have been added in the respective fields select “Calculate.”
•The Subtotal, Tax, and Tip will be displayed along with the Sale Total (Figure 18).
Select “Continue” if the information is correct or “Back” if the information needs to be changed.
The next screen (Figure 19) is where you will capture the following:
•Card data – Manual or Swipe
•Expiration Date
•CVV2 Number
Card data may be entered manually or by swiping the card if your device is swipe unit capable.
Figure 19
Figure 18
1716
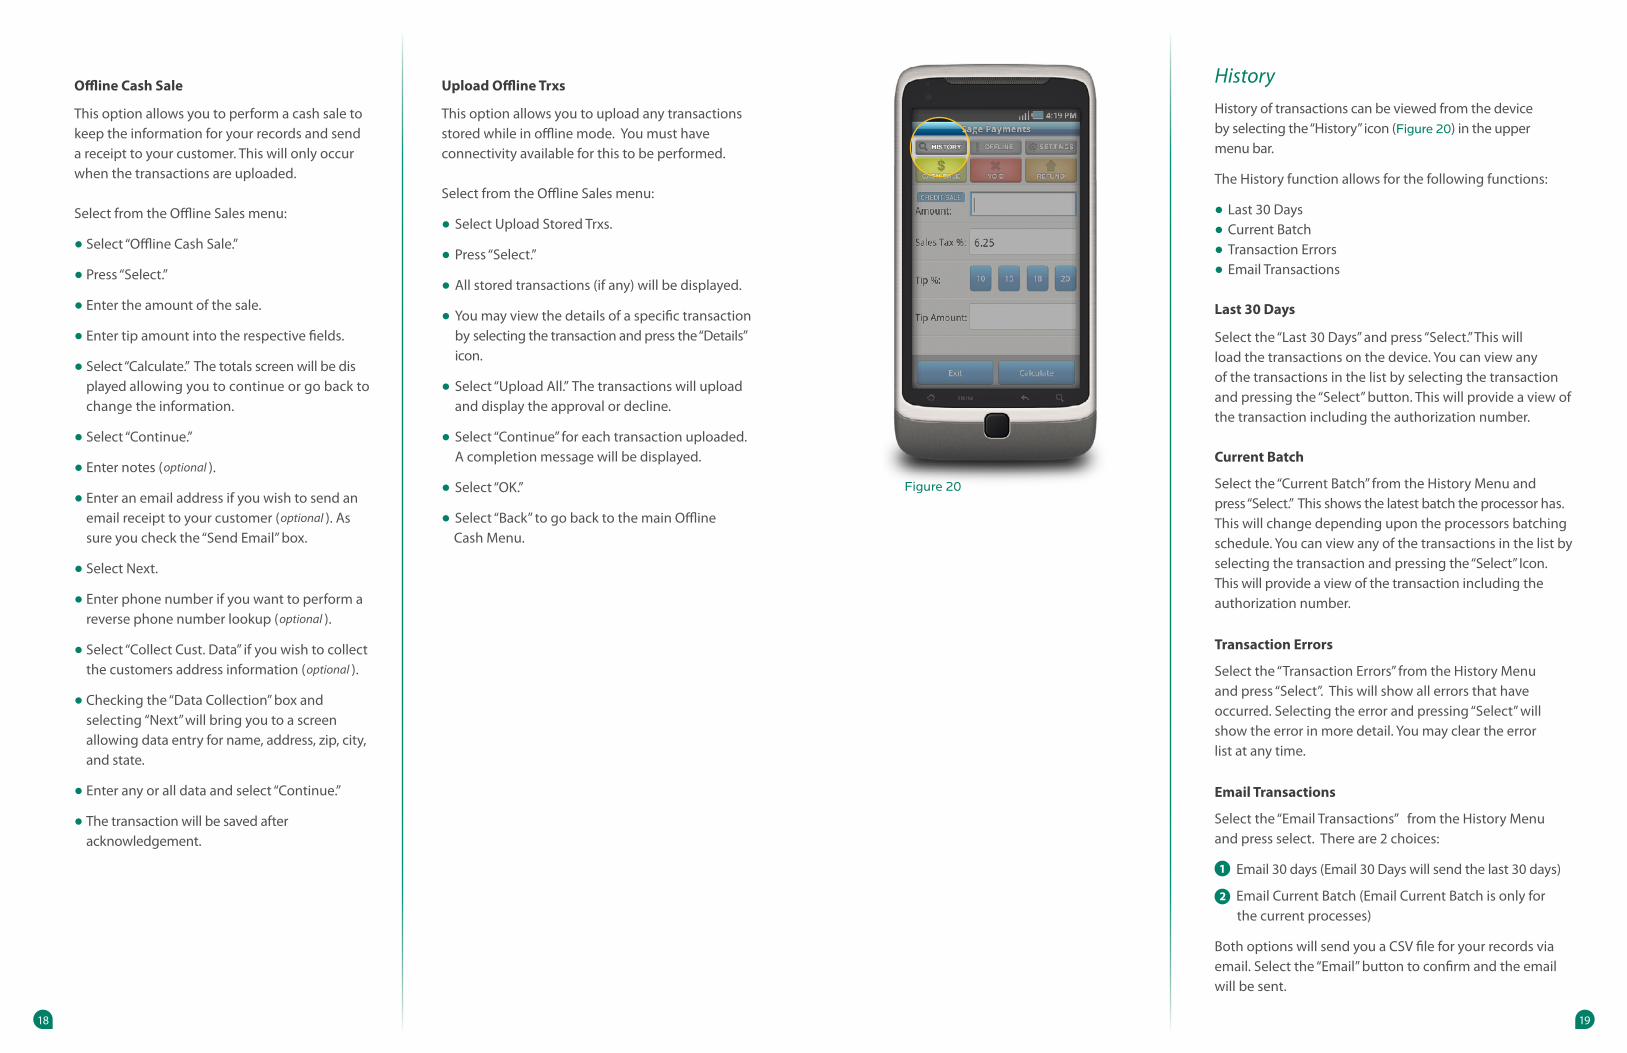
History
History of transactions can be viewed from the device by selecting the “History” icon (Figure 20) in the upper menu bar.
The History function allows for the following functions:
•Last 30 Days
•Current Batch
•Transaction Errors
•Email Transactions
Last 30 Days
Select the “Last 30 Days” and press “Select.” This will load the transactions on the device. You can view any of the transactions in the list by selecting the transaction and pressing the “Select” button. This will provide a view of the transaction including the authorization number.
Current Batch
Select the “Current Batch” from the History Menu and press “Select.” This shows the latest batch the processor has. This will change depending upon the processors batching schedule. You can view any of the transactions in the list by selecting the transaction and pressing the “Select” Icon. This will provide a view of the transaction including the authorization number.
Transaction Errors
Select the “Transaction Errors” from the History Menu and press “Select”. This will show all errors that have occurred. Selecting the error and pressing “Select” will show the error in more detail. You may clear the error list at any time.
Email Transactions
Select the “Email Transactions” from the History Menu and press select. There are 2 choices:
Email 30 days (Email 30 Days will send the last 30 days)
Email Current Batch (Email Current Batch is only for the current processes) Both options will send you a CSV file for your records via email. Select the “Email” button to confirm and the email will be sent.
1
2
Figure 20
Offline Cash Sale
This option allows you to perform a cash sale to keep the information for your records and send a receipt to your customer. This will only occur when the transactions are uploaded.
Select from the Offline Sales menu:
•Select “Offline Cash Sale.”
•Press “Select.”
•Enter the amount of the sale.
•Enter tip amount into the respective fields.
•Select “Calculate.” The totals screen will be dis played allowing you to continue or go back to change the information.
•Select “Continue.”
•Enter notes (optional ).
•Enter an email address if you wish to send an email receipt to your customer (optional ). As sure you check the “Send Email” box.
•Select Next.
•Enter phone number if you want to perform a reverse phone number lookup (optional ).
•Select “Collect Cust. Data” if you wish to collect the customers address information (optional ).
•Checking the “Data Collection” box and select ing “Next” will bring you to a screen allowing data entry for name, address, zip, city, and state.
•Enter any or all data and select “Continue.”
•The transaction will be saved after acknowledgement.
Upload Offline Trxs
This option allows you to upload any transactions stored while in offline mode. You must have connectivity available for this to be performed.
Select from the Offline Sales menu:
•Select Upload Stored Trxs.
•Press “Select.”
•All stored transactions (if any) will be displayed.
•You may view the details of a specific transaction by selecting the transaction and press the “Details” icon.
•Select “Upload All.” The transactions will upload and display the approval or decline.
•Select “Continue” for each transaction uploaded. A completion message will be displayed.
•Select “OK.”
•Select “Back” to go back to the main Offline Cash Menu.
1918
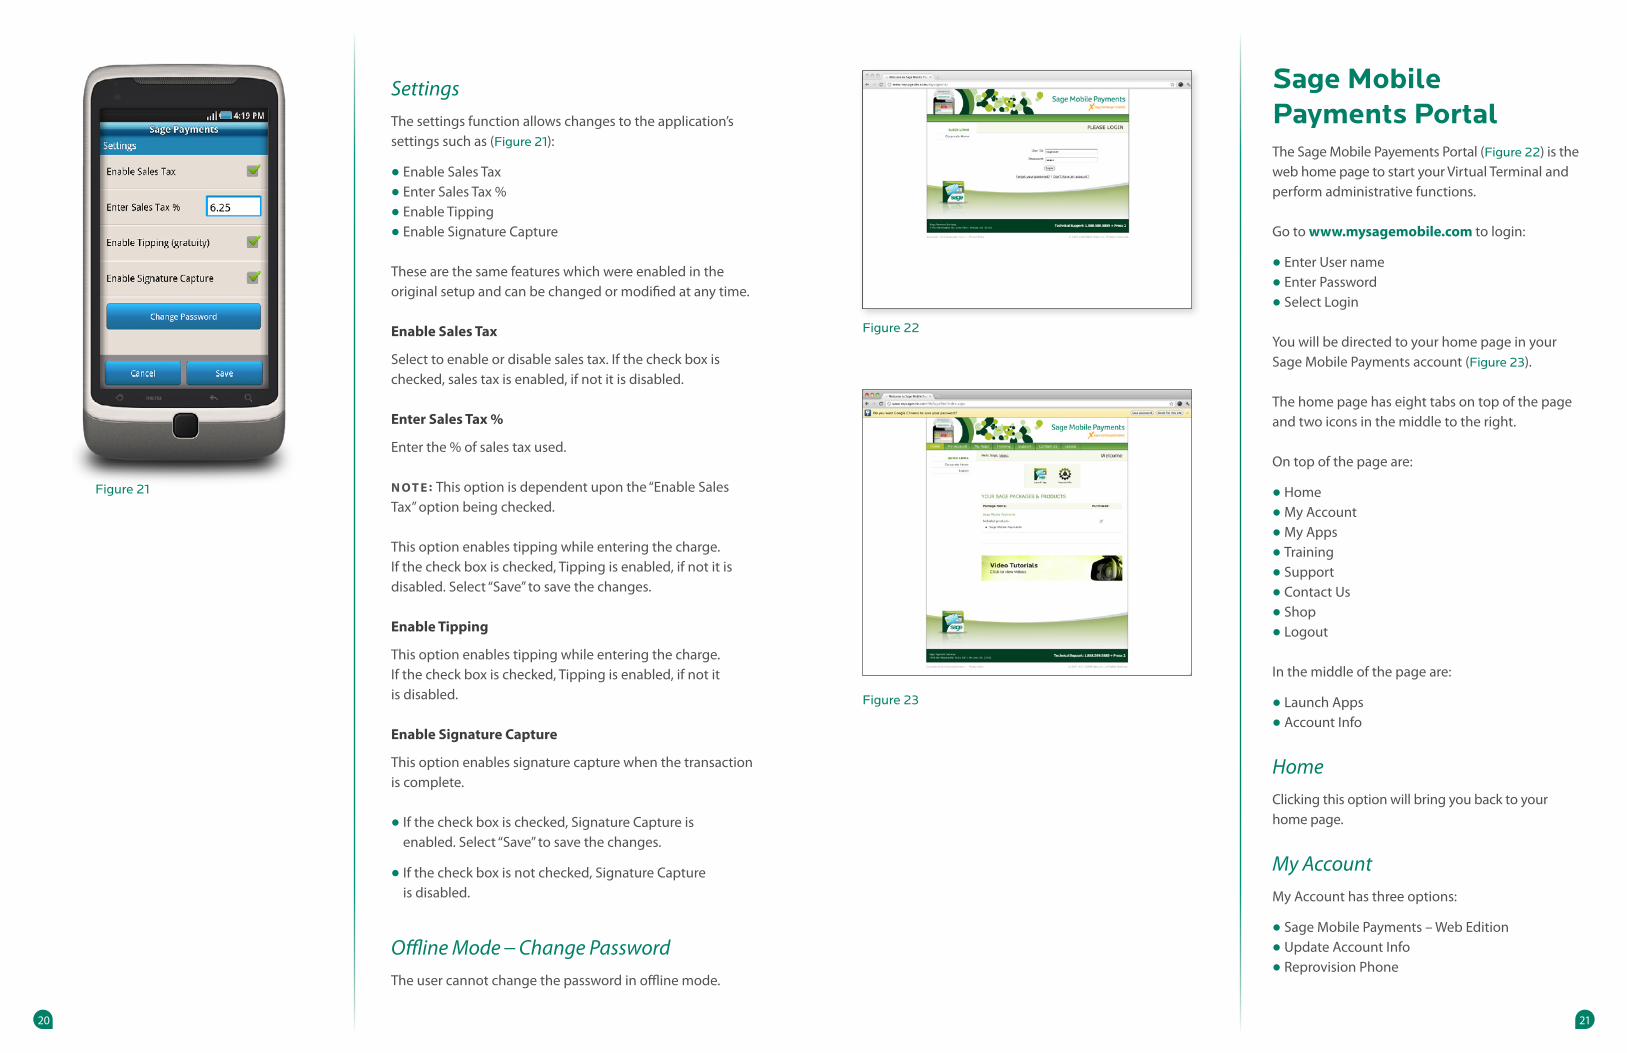
Sage Mobile Payments PortalThe Sage Mobile Payements Portal (Figure 22) is the web home page to start your Virtual Terminal and perform administrative functions.
Go to www.mysagemobile.com to login:
•Enter User name
•Enter Password
•Select Login You will be directed to your home page in your Sage Mobile Payments account (Figure 23).
The home page has eight tabs on top of the page and two icons in the middle to the right.
On top of the page are:
•Home
•My Account
•My Apps
•Training
•Support
•Contact Us
•Shop
•Logout
In the middle of the page are:
•Launch Apps
•Account Info
Home
Clicking this option will bring you back to your home page.
My Account
My Account has three options:
•Sage Mobile Payments – Web Edition
•Update Account Info
•Reprovision Phone
Figure 22
Figure 23
Settings
The settings function allows changes to the application’s settings such as (Figure 21):
•Enable Sales Tax
•Enter Sales Tax %
•Enable Tipping
•Enable Signature Capture
These are the same features which were enabled in the original setup and can be changed or modified at any time.
Enable Sales Tax
Select to enable or disable sales tax. If the check box is checked, sales tax is enabled, if not it is disabled.
Enter Sales Tax %
Enter the % of sales tax used.
N O T E : This option is dependent upon the “Enable Sales Tax” option being checked.
This option enables tipping while entering the charge. If the check box is checked, Tipping is enabled, if not it is disabled. Select “Save” to save the changes.
Enable Tipping
This option enables tipping while entering the charge. If the check box is checked, Tipping is enabled, if not it is disabled.
Enable Signature Capture
This option enables signature capture when the transaction is complete.
•If the check box is checked, Signature Capture is enabled. Select “Save” to save the changes.
•If the check box is not checked, Signature Capture is disabled.
Offline Mode – Change Password
The user cannot change the password in offline mode.
Figure 21
2120

My Apps
“My Apps” provides options for you to review transactions. Entering the application you will see three options (Figure 27):
•Recent Activity
•New Customers
•Transactions
Recent Activity
Once you have selected the application you will see the recent activities on the screen as the default. This lists your most recent processed transactions with date, time and type of sale.
New Customers
This will show you a list of customers, who’s informationyou have “Captured” during a transaction. This may also be downloaded as a CSV file if you wish. There is a drop down list for the last 30, 60, 90 days or all.
Transactions
This option allows you to see transactions which occurred in the last 90 days. There is a drop down which allows for the last 3 days, 3 weeks, or 3 months. You may also export the last 30, 60, 90 days or all using the drop down.
Training
The training tab has several options in it pertaining to training on the application. The options include (Figure 28):
•Getting Started
•Video Tutorials
•Helpful Documents
•FAQs
Getting Started
The main page under “Getting Started” has links and helpful advice on how to process via the web or device.
Figure 27
Figure 28
Hovering the mouse over the over the “My Account” tab will show the three options listed on the previous page.
The Virtual Terminal (Sage Mobile Payments – Web Edition)
•Select this option which will bring you to the Virtual Terminal launch page
•Select the “Launch” icon (Figure 24)
•A new window will open, select “Open”
•Java will launch
•New Window will appear
•Select the application
•Click “Run”
•Input User Name
•Input Password
•Select Login (Figure 25)
The Sage Mobile Payments app on the web will operate and look the same as the device application (Figure 26). See the application operations for more detail.
Update Account Info
Under this option there are 3 options:
•Change Billing Information
•Change Password
•Edit Secret Question
Change Billing Information
Select “Change Billing” Information to change the way your Sage Payment Solutions fees are deducted. This may be ACH (Checking Account) or Credit Card.
N O T E : If this information is not correct and the account becomes delinquent, your account can be deactivated). This does not affect how your funds are deposited as Sage Payment Solutions does not handle funding.
Edit Secret Question
This simply allows you to change your secret question if our support team requests this information for verification.
Figure 24
Figure 25
Figure 26
2322
Video Tutorials
Video tutorials are where videos of the installation and use of the application are kept. These are useful and for Desktop viewing, not for mobile.
Helpful Documents
There are several helpful documents under this section including swipe unit user manuals.
FAQs
The Frequently Asked Questions section provides answers to general questions. More FAQs can be found at www.roamdata.com/roampay/us/faqs.
Support
The support tab has 3 categories:
•Terms of Use
•Repair/Warranty Info
•FAQs
Terms of Use
The terms and conditions is the same set of Terms and Conditions accepted when signing up for the Sage Mobile Payments Application. This is for general review.
Repair/Warranty Info
This section provides Sage Payment Solutions repair and warranty policy.
NOTE: Your reseller may have provided hardware which is not covered by Sage Payment Solutions. Contact your reseller for information regarding repair or warranty. FAQs
The Frequently Asked Questions section provides answers to general questions. More FAQs can be found at www.roamdata.com/roampay/us/faqs.
Contact Us
If you feel you need to contact us please use this tab to find contact information.
NOTE: Most issues can be resolved by contacting your reseller. Your first point of contact should be your reseller for all questions including training, funding, and fee questions.
Shop
The “Shop“ tab is where you may purchase a swipe unit for your mobile device. This follows the standard shopping cart format. To assure your device is swipe supported please visit devices.roamdata.com.
Contact us via phone or email:
For a list of supported devices visit:devices.roamdata.com
Got a question?
24

1-800-261-0240www.sagepayments.com
1750 Old Meadow Rd, Suite 300McLean, VA 22102


![12 Sage Tips To Optimize Mobile Surveys [Infographic]](https://img.pdfslide.us/doc/110x75/58eeeb041a28ab30088b459f/12-sage-tips-to-optimize-mobile-surveys-infographic.jpg)