File No:JT190100002. Version No:A 1 / 15
Note:Subsequent updated versions of this manual will not be noticed, thank you.
Content
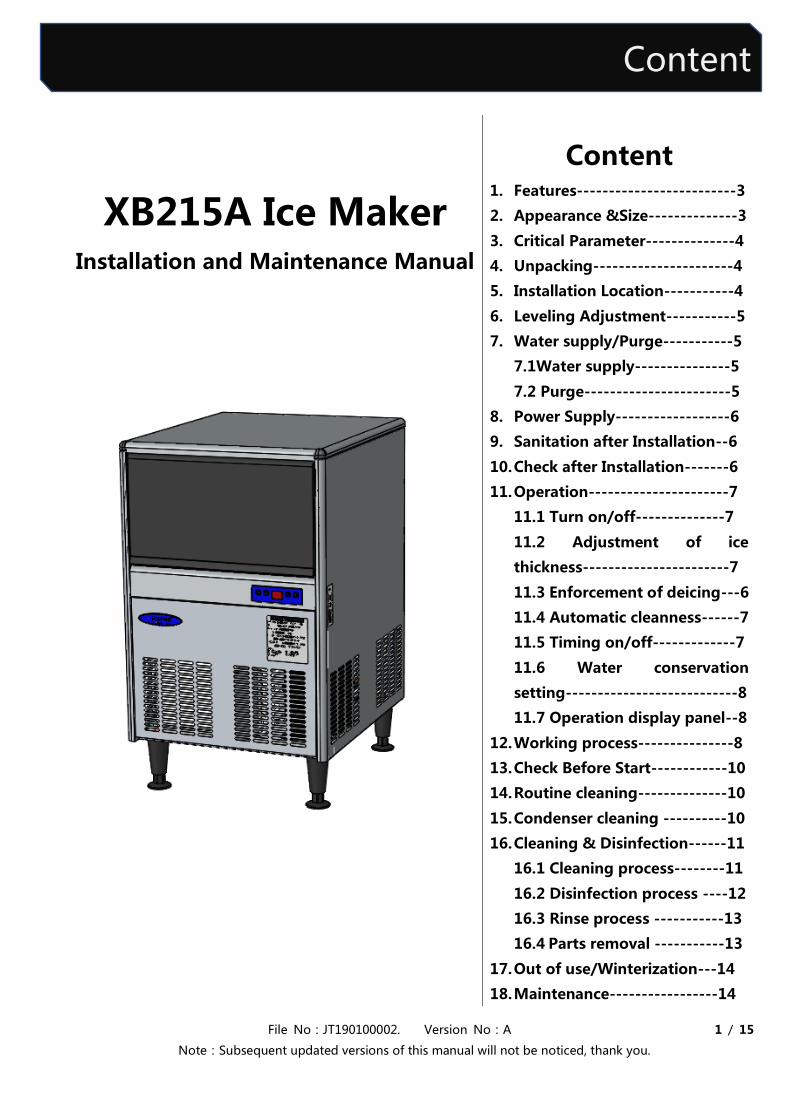
XB215A Ice Maker Installation and Maintenance Manual
Content 1. Features-------------------------3
2. Appearance &Size--------------3
3. Critical Parameter--------------4
4. Unpacking----------------------4
5. Installation Location-----------4
6. Leveling Adjustment-----------5
7. Water supply/Purge-----------5
7.1Water supply---------------5
7.2 Purge-----------------------5
8. Power Supply------------------6
9. Sanitation after Installation--6
10. Check after Installation-------6
11. Operation----------------------7
11.1 Turn on/off--------------7
11.2 Adjustment of ice
thickness-----------------------7
11.3 Enforcement of deicing---6
11.4 Automatic cleanness------7
11.5 Timing on/off-------------7
11.6 Water conservation
setting---------------------------8
11.7 Operation display panel--8
12. Working process---------------8
13. Check Before Start------------10
14. Routine cleaning--------------10
15. Condenser cleaning ----------10
16. Cleaning & Disinfection------11
16.1 Cleaning process--------11
16.2 Disinfection process ----12
16.3 Rinse process -----------13
16.4 Parts removal -----------13
17. Out of use/Winterization---14
18. Maintenance-----------------14
2 / 15 File No:JT190100002. Version No:A
Note:Subsequent updated versions of this manual will not be noticed, thank you.
Safety Tips
When operates and maintains an ice maker ,be sure to pay attention to the safety tips in
the manual. Ignoring these tips may result in personal injury and ice maker damage.
In this manual, you will see the following forms of security tips:
Please preserve this manual well
The manual is an integral part of the product, please keep it properly. Be sure to read
carefully the warnings, notices and important matters described in this manual, because
these warnings, notices and important matters provide the installer/user with important
information needed for proper installation, continuous and safe use and maintenance of the
product. Please keep this manual for reference when necessary.
Note
The correct installation, usage and maintenance of the ice maker is very important to
the output of the ice maker and reduce the failure rate. Please read and understand this
manual. which contains valuable information on installation. usage and maintenance. If
you encounter problems not covered in this manual, you may contact our company or
our service provider at any time.
Warning Possible personal injury would be happened when not following up regulations of
installation, operation or using altered equipment.
Important The mentioned information about adjustment、maintenance and sanitation is not
subject of the range of warranty clause.
File No:JT190100002. Version No:A 3 / 15
Note:Subsequent updated versions of this manual will not be noticed, thank you.
Features
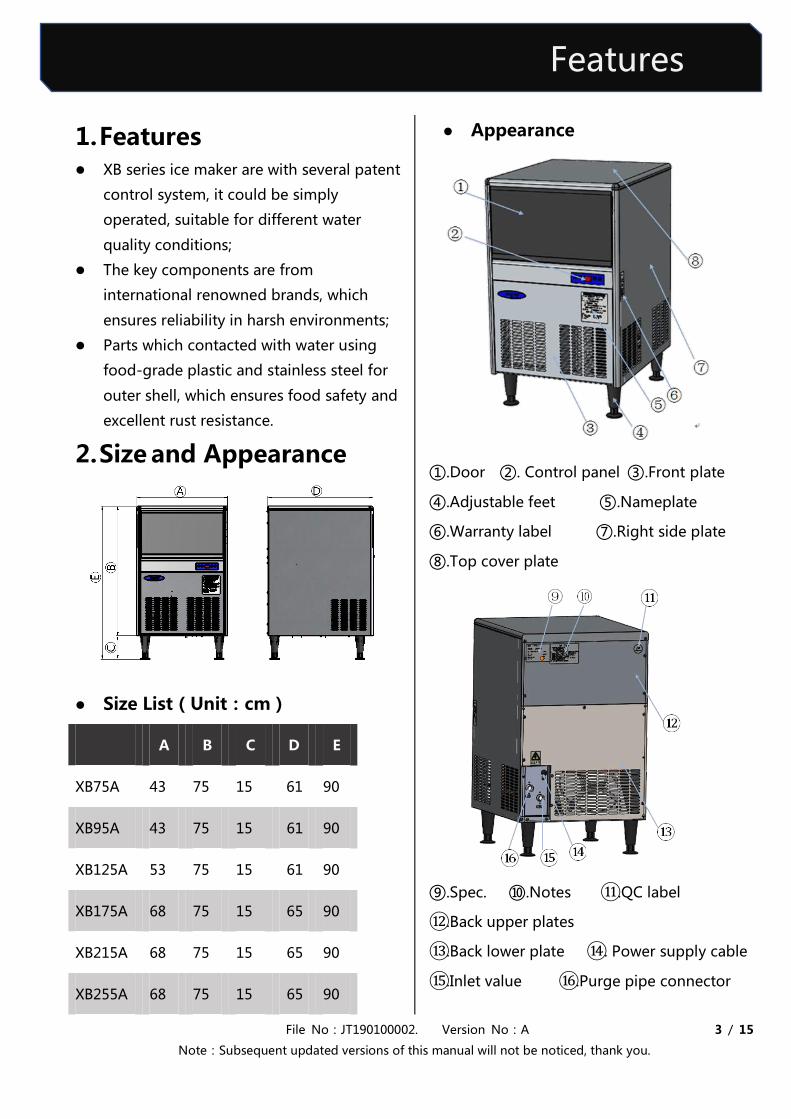
1. Features XB series ice maker are with several patent
control system, it could be simply
operated, suitable for different water
quality conditions;
The key components are from
international renowned brands, which
ensures reliability in harsh environments;
Parts which contacted with water using
food-grade plastic and stainless steel for
outer shell, which ensures food safety and
excellent rust resistance.
2. Size and Appearance
Size List(Unit:cm)
A B C D E
XB75A 43 75 15 61 90
XB95A 43 75 15 61 90
XB125A 53 75 15 61 90
XB175A 68 75 15 65 90
XB215A 68 75 15 65 90
XB255A 68 75 15 65 90
Appearance
①.Door ②. Control panel ③.Front plate
④.Adjustable feet ⑤.Nameplate
⑥.Warranty label ⑦.Right side plate
⑧.Top cover plate
⑨.Spec. ⑩.Notes ⑪.QC label
⑫.Back upper plates
⑬.Back lower plate ⑭. Power supply cable
⑮.Inlet value ⑯.Purge pipe connector
4 / 15 File No:JT190100002. Version No:A
Note:Subsequent updated versions of this manual will not be noticed, thank you.
Critical Parameter
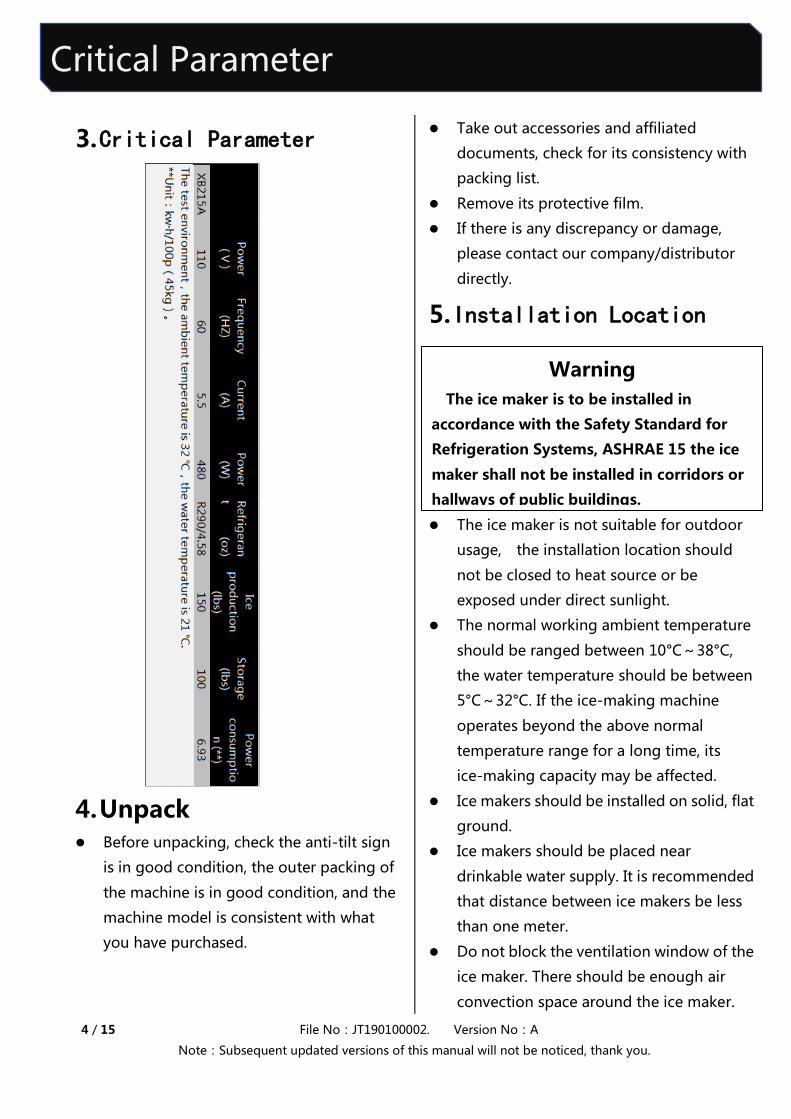
3. Critical Parameter
4. Unpack Before unpacking, check the anti-tilt sign
is in good condition, the outer packing of
the machine is in good condition, and the
machine model is consistent with what
you have purchased.
Take out accessories and affiliated
documents, check for its consistency with
packing list.
Remove its protective film.
If there is any discrepancy or damage,
please contact our company/distributor
directly.
5. Installation Location
The ice maker is not suitable for outdoor
usage, the installation location should
not be closed to heat source or be
exposed under direct sunlight.
The normal working ambient temperature
should be ranged between 10°C~38°C,
the water temperature should be between
5°C~32°C. If the ice-making machine
operates beyond the above normal
temperature range for a long time, its
ice-making capacity may be affected.
Ice makers should be installed on solid, flat
ground.
Ice makers should be placed near
drinkable water supply. It is recommended
that distance between ice makers be less
than one meter.
Do not block the ventilation window of the
ice maker. There should be enough air
convection space around the ice maker.
Warning
The ice maker is to be installed in
accordance with the Safety Standard for
Refrigeration Systems, ASHRAE 15 the ice
maker shall not be installed in corridors or
hallways of public buildings.
File No:JT190100002. Version No:A 5 / 15
Note:Subsequent updated versions of this manual will not be noticed, thank you.
Water supply/Purge
The ice maker can not work at sub-zero
temperatures, to prevent supply line
failures, empty the ice maker when the
temperature is below zero(see
“preparation for long-term storage of ice
maker”)
6. Leveling Adjustment
Screwing home four adjustable parts of
the legs first, and then screwing the legs
into ice maker bottom plate;
Moving ice maker to installation place.
Adjusting legs to ensure the ice maker is
leveling.
7. Water supply/Purge
7.1 Water supply
With local potable water quality,
determining if a water treatment system is
needed to prevent sediment formation,
filtering out impurities and removing
bleach smell .
Please install water supply pipe according
to below instruction :
Don't connect ice maker to hot water
pipe;
Water supply pressure range is 1bar~
5bar. Using water pressure regulator
for water supply pressure over rang.
Individual water faucet must be
installed for ice maker.
7.2 Purge
When installing drain hose, follow these
guidelines to be sure all purged water
flowing into gully drain:
The main gully drain capacity shall be
enough for all drain water:
Drain hose should be wrapped with
insulation material to prevent
condensation.
The drain hose of the water-cool
condenser and the drain hose of ice
bin should be placed separately
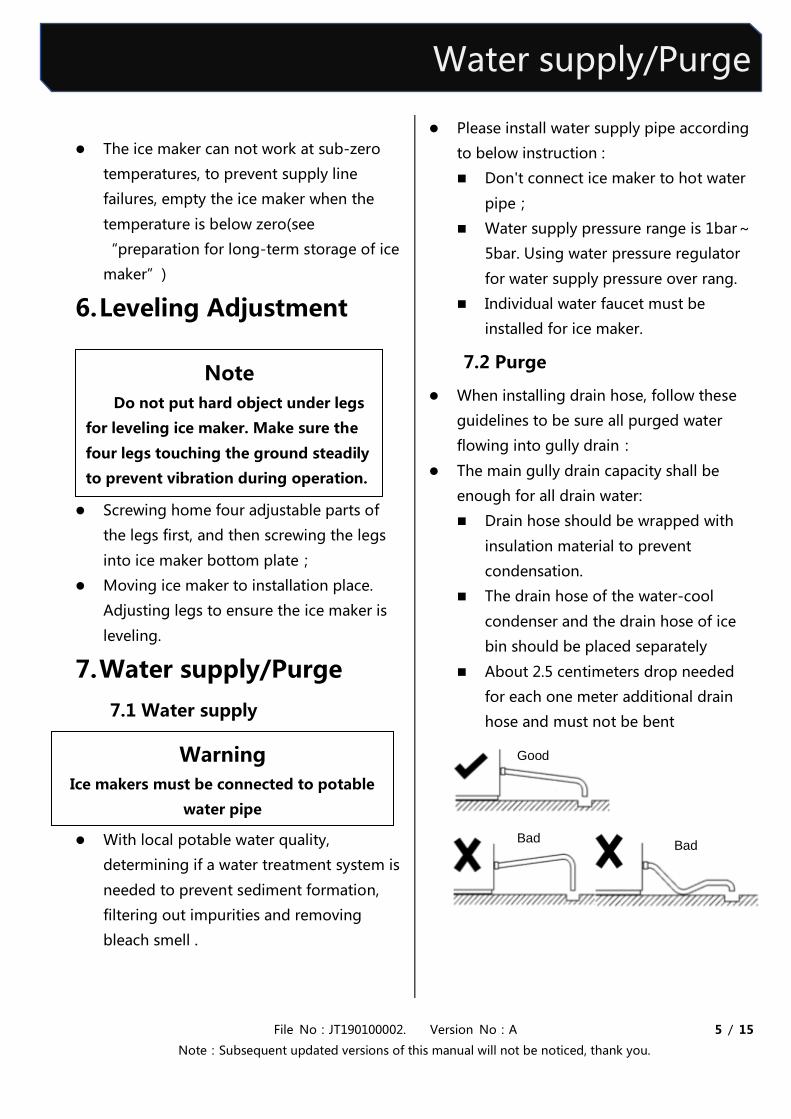
About 2.5 centimeters drop needed
for each one meter additional drain
hose and must not be bent
Good
BadBad
Good
BadBad
Warning
Ice makers must be connected to potable
water pipe
Note
Do not put hard object under legs
for leveling ice maker. Make sure the
four legs touching the ground steadily
to prevent vibration during operation.
6 / 15 File No:JT190100002. Version No:A
Note:Subsequent updated versions of this manual will not be noticed, thank you.
Power supply
Warning
The power supply must be reliably
grounded and the wiring used must
comply with the laws and regulations of
the country and region where the ice
maker is used.
Warning
Corrosive detergents such as banana
oil, oxalic acid or hydrochloric acid are
strictly prohibited.
8. Power supply
The voltage, frequency and capacity of the
power supply shall be consistent with the
nameplate of the machine.
±10% fluctuation of rated power voltage is
allowed.
Separate circuit breakers must be installed
for the ice maker.
9. Clean after Installation
After the ice maker is installed, clean
the shell, liner and ice scoop with a
clean wet cloth or sponge;
10. Check after installation
After the ice maker is installed, check
against the following information before
operation.
Is ice maker placed levelly?
Have you removed all the
transportation seals?
Are all the water and electricity
connected well?
Is the supply voltage consistent with
the rated voltage on the nameplate?
Is the ice maker properly grounded?
Are there adequate air Spaces around
the ice maker?
Is the ambient temperature of the ice
maker between 10°C and 38°C?
Does the water inlet temperature
remain between 5°C and 32°C?
Are the ice maker and refrigerator
cleaned?
File No:JT190100002. Version No:A 7 / 15
Note:Subsequent updated versions of this manual will not be noticed, thank you.
Ice Maker Operation
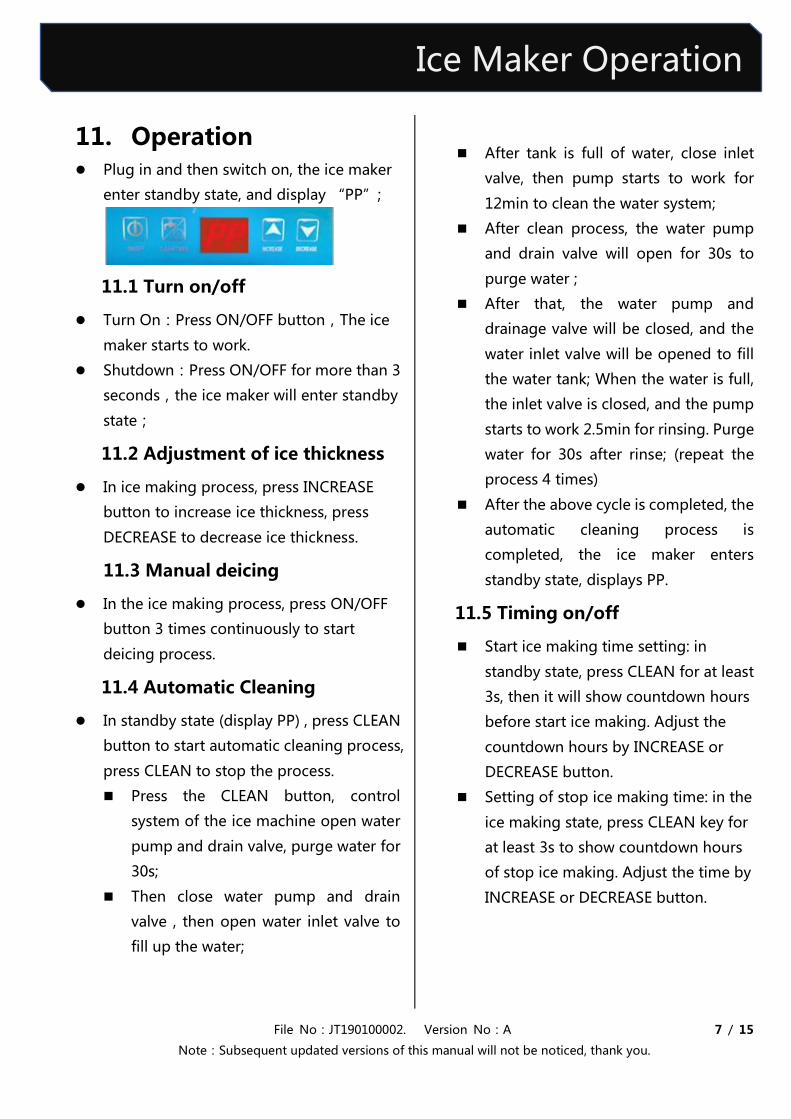
11. Operation Plug in and then switch on, the ice maker
enter standby state, and display “PP”;
11.1 Turn on/off
Turn On:Press ON/OFF button,The ice
maker starts to work.
Shutdown:Press ON/OFF for more than 3
seconds,the ice maker will enter standby
state;
11.2 Adjustment of ice thickness
In ice making process, press INCREASE
button to increase ice thickness, press
DECREASE to decrease ice thickness.
11.3 Manual deicing
In the ice making process, press ON/OFF
button 3 times continuously to start
deicing process.
11.4 Automatic Cleaning
In standby state (display PP) , press CLEAN
button to start automatic cleaning process,
press CLEAN to stop the process.
Press the CLEAN button, control
system of the ice machine open water
pump and drain valve, purge water for
30s;
Then close water pump and drain
valve , then open water inlet valve to
fill up the water;
After tank is full of water, close inlet
valve, then pump starts to work for
12min to clean the water system;
After clean process, the water pump
and drain valve will open for 30s to
purge water ;
After that, the water pump and
drainage valve will be closed, and the
water inlet valve will be opened to fill
the water tank; When the water is full,
the inlet valve is closed, and the pump
starts to work 2.5min for rinsing. Purge
water for 30s after rinse; (repeat the
process 4 times)
After the above cycle is completed, the
automatic cleaning process is
completed, the ice maker enters
standby state, displays PP.
11.5 Timing on/off
Start ice making time setting: in
standby state, press CLEAN for at least
3s, then it will show countdown hours
before start ice making. Adjust the
countdown hours by INCREASE or
DECREASE button.
Setting of stop ice making time: in the
ice making state, press CLEAN key for
at least 3s to show countdown hours
of stop ice making. Adjust the time by
INCREASE or DECREASE button.
8 / 15 File No:JT190100002. Version No:A
Note:Subsequent updated versions of this manual will not be noticed, thank you.
Ice Maker Operation
11.6 Water conservation setting
Under the condition of good water quality,
the function can be achieved by reducing
the number of times of purge water).
In standby state, press DECREASE
button for more than 3s, the display
flickers to show current purge times,
then press INCREASE or DECREASE
button to adjust purge times
0: no purge;
1:purge water once per ice-making
cycle;
2:purge water once every two
ice-making cycles;
3:purge water once every three
ice-making cycles;
.
.
.
10:drain water once every ten
ice-making cycles;
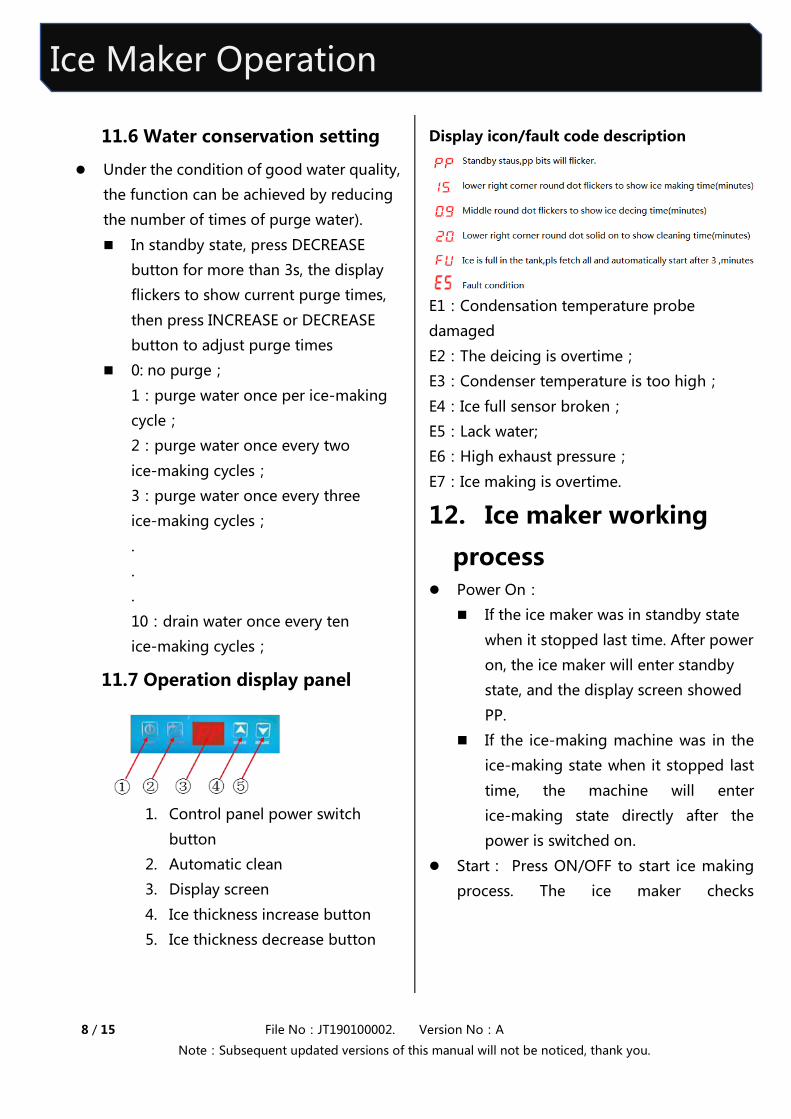
11.7 Operation display panel
1. Control panel power switch
button
2. Automatic clean
3. Display screen
4. Ice thickness increase button
5. Ice thickness decrease button
Display icon/fault code description
E1:Condensation temperature probe
damaged
E2:The deicing is overtime;
E3:Condenser temperature is too high;
E4:Ice full sensor broken;
E5:Lack water;
E6:High exhaust pressure;
E7:Ice making is overtime.
12. Ice maker working
process Power On:
If the ice maker was in standby state
when it stopped last time. After power
on, the ice maker will enter standby
state, and the display screen showed
PP.
If the ice-making machine was in the
ice-making state when it stopped last
time, the machine will enter
ice-making state directly after the
power is switched on.
Start: Press ON/OFF to start ice making
process. The ice maker checks
File No:JT190100002. Version No:A 9 / 15
Note:Subsequent updated versions of this manual will not be noticed, thank you.
Working Process
whether the high voltage protection
switch and the ice full switch are closed. If
the switch is not closed, the ice maker
keeps in stop state and displays failure
codes E6 or E4.
Ice melting process: Open hot gas valve
for ice defrosting, start compressor after
10s, and open the water inlet valve at the
same time; Water inlet valve is closed after
30s or water full of tank; Then pump starts ;
Open the purge valve after 10s; The hot
gas valve, water pump and drainage valve
closed after 20s.
Pre-cooling process: the condensing fan
start, the water inlet valve open till water
level to water level probe.
Ice making process: after pre-cooling
(40s), the pump works, and the machine
starts ice making cycle; In the cycle, the
water inlet valve is opened after 90s when
the water level falls below water level
probe, close water inlet valve after the
water level touches water level probe
again. If the water inlet valve opens for 5
minutes and still fails to reach the set
water level, it will enter the shutdown
protection state and the failure code E5
will be displayed. Enters energy
accumulation process when the water
level continues drop below the deicing
probe.
Energy accumulation process: Fan stops
working according to previous
condensation temperature. The process
can accelerate the speed of deicing.
Deicing process: after the energy
accumulation process, the hot gas valve
opens, starts the deicing process. The ice
tray begins to heat up, melting the bottom
of the ice cube and falling off into ice bin
rely on it is gravity. 10s after deicing, water
inlet valve opens until water level get to
water level probe, then close the water
inlet valve; After water baffle opened by
ice cube and then come back within 30s,
the deicing process will end; lf the baffle is
not closed within 30s, the ice maker will
enter ice-full state.
After deicing, enter the next ice-making
cycle: repeat "pre-cooling process" to
"deicing process".
Stop with full ice: if the baffle cannot be
reset within 30 seconds, the machine will
stop automatically, the display screen
shows "FU". When the ice is taken away,
the baffle will be reset and ice maker will
start to make ice after 3 minutes.
10 / 15 File No:JT190100002. Version No:A
Note:Subsequent updated versions of this manual will not be noticed, thank you.
Check before operation
13. Operation Inspection
Make sure the water faucet is open.
Power supply is ready.
Check all water pipes and joints to
ensure no leakage.
Ice bridge thickness check. The
thickness of the ice bridge should be
set at 3mm.If you need to adjust it,
press INCREASE button to increase the
ice thickness or press DECREASE
button to decrease the ice thickness.
14. Regular cleaning
Clean environment: clean the area around
the ice maker regularly to keep the
environment clean to support ice maker
running efficiently
Shell cleaning: Use sponge or soft cloth
with neutral cleaning agent to clean, and
wipe it up with a clean soft cloth. Stainless
steel cleaner can be used when necessary.
Air filter clean: filter can arrest dirt or dust
in the air enter condenser. It can postpone
condenser from blocking. If the filter is
blocked, the ice production will decrease.
We recommended to clean the air filter
once or twice a month.
Remove the air filter;
Please clean the air filter with a
vacuum cleaner or a soft brush. If the
air filter is severely clogged, clean it
with warm water and a neutral cleaner;
Put it back after the filter is completely
dry.
15. Condenser cleaning
Note
The ice-making machine has been tested in
factory before shipment. Generally, new
machines do not require any commissioning. To
ensure that the ice maker can work properly, an
operational check is required in the following
cases
Initial start-up
Restart after a long shutdown
After cleaning and sanitizing
Note
Do not flush this ice maker with water
sprayer. Do not use any alcohol
containing liquid to clean or disinfect
the ice maker, or it may cause cracks in
the plastic parts;
Do not remove the top plate and back
plate, and demolition should be provide
with the corresponding knowledge of
the maintenance personnel;
Do not put the plastic parts into the
water with the temperature exceeding
40°C or the dishwashing machine to
clean, so as to avoid damaging the
parts。
Warning
To clean the condenser, disconnect
the ice maker power supply, The edge
of the condenser is sharp.
File No:JT190100002. Version No:A 11 / 15
Note:Subsequent updated versions of this manual will not be noticed, thank you.
Cleaning and Disinfection
Note
Do not mix disinfectant with cleaning
agent.
Do not clean evaporator surfaces with
sharp objects.
It is recommended to implement this
process at least once in 3 months. It is recommended to clean the
condenser every six months by following
steps
Use a soft brush or vacuum cleaner to
clean the outside of the condenser,
the act direction should be from top to
bottom ( it will break condenser fins
act from one side to another)
Use commercial coil (air conditioning)
cleaner. Follow the instructions and
precautions for coil cleaning agent
when using. The damaged fins should
be straightened with a fin comb.
16. Cleaning & disinfection
To be sure the ice maker can run stably
and efficiently, the user is responsible for the
operation according to the requirements of
cleaning and disinfection (cleaning and
disinfection operation is not covered by the
warranty).If the ice maker needs clean and
disinfect in short of period, please check if the
water supply is appropriate, if the environment
is clean, or if an inappropriate water filter is
used.
16.1 Cleaning process
1. Open door and check if any ice formed
on evaporator.
If ice formed on evaporator (in ice
making process), please press
ON/OFF button 3 times continuously
to start deicing process.
Waiting till ice melt or fall off from
evaporator.
Press ON/OFF button for more than 3s
to stop ice make working.
2. Use ice scoop to take all ice cube from
ice bin.
3. Press the CLEAN button, the ice maker
will first drain 30s, then open the water
inlet valve and fill it with water. After
Important
Condenser dirty will block the
flow of air, cause the ice maker
operating temperature too high,
reduce ice production, shorten the
service life of parts.
Warning
Wearing protection appliances such
as rubber gloves, masks and
protective glasses before cleaning
and sanitizing’
The removal and installation of the
cleaned parts must be done without
power supply connection.
Ice that produced during cleaning
and disinfection must be discarded.
12 / 15 File No:JT190100002. Version No:A
Note:Subsequent updated versions of this manual will not be noticed, thank you.
Cleaning and Disinfection
60s, add 2 packs of cleaning agent
(KAY DELIMER, 56.7g/ pack) to the ice
maker sink, wait for the end of the
cleaning program (refer to 11.3 for
automatic
cleaning), Turn off power switch of the
ice maker unplug the from outlet.
4. Remove water tank, water pipe and
water baffle, and take out ice scoop
(refer to parts removal/installation
process 16.4 ).
5. Put 4 packages of cleaning agent (KAY
DELIMER, 56.7g/ package) into 8 liter
warm water (45 ~ 50°C)
6. Soak the parts in the mixed solution for
more than 5 minutes (it is
recommended to soak for more than
10 minutes in case of heavy scale).
After soaking, wear rubber gloves and
carefully clean all parts with a soft
nylon brush, sponge or soft cloth.
7. At the same time, dipping soft nylon
brush or soft cloth into mixed solution ,
cleaning other parts where will contact
water or ice like ice bin, door,
evaporator, (to the position where not
easy to touch, small plastic or wooden
rod wrapped with wet soft cloth is
helpful).
8. Take out the soaked parts and rinse
with clean water.
16.2 Disinfection process
9. Put 2 packets of disinfectant (KAY5,
28.4g/packet) into 8 liter warm water
(45 ~ 50°C).
10. Soak the cleaned parts in the prepared
disinfectant solution.
11. Concurrently, put the solution into
watering can, and spray the solution
evenly and completely on the surfaces
of the parts where contact with water
or ice cubes, such as the inside surface
of ice bin, door and evaporator.
12. After 20 minutes, take out the soaked
parts and rinse them with water.
13. Install the removed parts back to the
original place (refer to parts
removal/installation process 16.4 ).
14. Mix 1 liter water and 1/2 package of
disinfectant (KAY5, 28.4/ packet) as
disinfectant solution.
15. Plug in ice maker, close the door of ice
maker, turn on the switch and then
press the CLEAN button, ice maker will
drain for 30s in advance then water
inlet valve opens to let water into
water tank. After 60s, add the
prepared disinfectant solution into
water tank of ice maker, wait for the
end of the cleaning process (see 11.3
for automatic cleaning), then turn off
power switch, and then unplug the ice
maker.
File No:JT190100002. Version No:A 13 / 15
Note:Subsequent updated versions of this manual will not be noticed, thank you.
Cleaning and Disinfection
16.3 Rinsing process
9. Wipe the inside and outside surfaces of
ice maker with a clean wet cloth/sponge
to clean residue of disinfectant.
10. Rinse the ice bin surface, evaporator
and water tank with clean water
11. Drain all the water after washing.
12. Press ON/OFF more than 3s to start
the ice maker.
13. Discard the first three plates of ice to
ensure that the disinfectant is
completely discharged from the
system.
14. Turn off the power and put the ice
maker back in place to complete the
cleaning and disinfection process
16.4 Parts removal/installation
process
Remove and install the sink
Screw off the left and right hand screw.(as
shown). Pull the tank forward about 20mm.
Move the tank downward about 100mm. Take
out the tank.
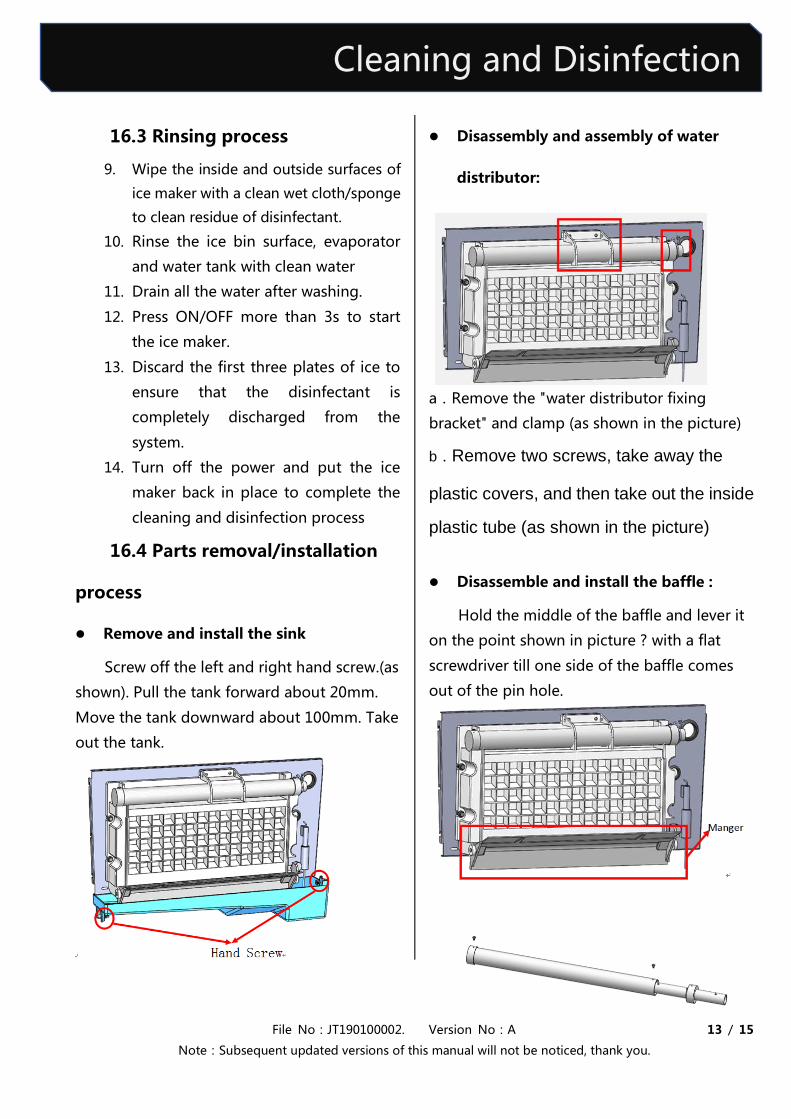
Disassembly and assembly of water
distributor:
a.Remove the "water distributor fixing
bracket" and clamp (as shown in the picture)
b.Remove two screws, take away the
plastic covers, and then take out the inside
plastic tube (as shown in the picture)
Disassemble and install the baffle :
Hold the middle of the baffle and lever it
on the point shown in picture ? with a flat
screwdriver till one side of the baffle comes
out of the pin hole.
14 / 15 File No:JT190100002. Version No:A
Note:Subsequent updated versions of this manual will not be noticed, thank you.
Maintenance
17. Removal from service / Winterization
Special protection measures are required if the ice maker is out of service for a long
period of time or exposed to an environment of 0°C or less. Follow these steps below:
Disconnect the power to the ice maker.
Disconnect the water supply to the ice maker.
Empty the sink.
Remove water inlet hose and drain it from the water inlet.
Ensure that there is no water residue in the inlet, drain and distribution pipes.
18. Maintenance
Note
If water is left in the machine in an environment below 0°C, it may cause
serious damage to the machine parts. This fault is not covered by warranty.
Warning
DANGER – RISK OF FIRE OR EXPLOSION. FLAMMABLE REFRIGERANT USED.
DO NOT USE MECHANICAL DEVICES TO DEFROST REFRIGERATOR. DO NOT
PUNCTURE REFRIGERANT TUBING.
Warning
DANGER – RISK OF FIRE OR EXPLOSION. FLAMMABLE REFRIGERANT USED.
TO BE REPAIRED ONLY BY TRAINED SERVICE PERSONNEL. DO NOT PUNCTURE
REFRIGERANT TUBING.
Warning
CAUTION – RISK OF FIRE OR EXPLOSION. FLAMMABLE REFRIGERANT USED.
CONSULT REPAIR MANUAL/OWNER'S GUIDE BEFORE ATTEMPTING TO SERVICE
THIS PRODUCT. ALL SAFETY PRECAUTIONS MUST BE FOLLOWED.
15 / 15 File No:JT190100002. Version No:A
Note:Subsequent updated versions of this manual will not be noticed, thank you.
Maintenance
Before applying for repair, please consider the following aspects in order to quickly identify
and improve the efficiency of machine recovery.
a). Whether the water supply is normally, including faucets open, inlet valve not blocked, and
water pressure is in 1bar~5bar.
b). Whether the power supply is normal, including voltage is in ±10% of rated voltage, power
switch is connected, the fuse is not burnt out and whether the plug is fixed well.
c). Whether the ambient temperature is too high or too low (the operating temperature
range of the ice maker is 10°C~38°C), whether the water temperature is too high or too low (the
water temperature range is 5°C~32°C).
d). Whether the ice bin is full of ice and can work after ice take away.
Write down the number of the machine and call the toll-free phone number
labeled with the service label or your service provider.
Warning
CAUTION – RISK OF FIRE OR EXPLOSION. DISPOSE OF PROPERLY IN
ACCORDANCE WITH FEDERAL OR LOCAL REGULATIONS. FLAMMABLE
REFRIGERANT USED.
Warning
CAUTION – RISK OF FIRE OR EXPLOSION DUE TO PUNCTURE OF
REFRIGERANT TUBING; FOLLOWHANDLING INSTRUCTIONS CAREFULLY.
FLAMMABLE REFRIGERANT USED.
Warning
Component parts shall be replaced with like components and that servicing
shall be done by factory authorized service personnel, so as to minimize the risk of
possible ignition due to incorrect parts or improper service.
Recommended