Wireless Alarm SystemUser Manual
1
1. Configuration List
2. System Components And Usage
Wireless Alarm Receiver
Indicator Light: Will be red if power on;Will flash if on setting mode
Speaker: Will alarm for several seconds if the sensor be triggered
Indicator Light
Speaker
Backup Battery Compartment
Backup Battery Compartment:4 pieces AA 1.5V batteries(can keep the wireless alarm receiver
working continuously for 100 hours if AC power off)
1 piece (includes 1 power adapter)
1 piece
Wireless Alarm Receiver
English Manual
Wireless Radar Sensor 1 piece (includes 1 set installation accessories)
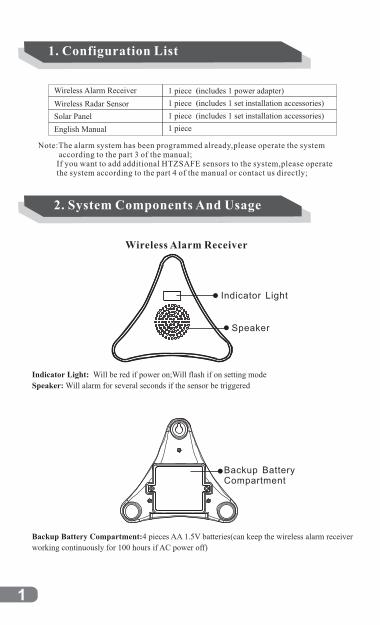
Solar Panel 1 piece (includes 1 set installation accessories)
Note:The alarm system has been programmed already,please operate the system according to the part 3 of the manual; If you want to add additional HTZSAFE sensors to the system,please operate the system according to the part 4 of the manual or contact us directly;

2
Power : power jack(DC5V)
ON/OFF: power switch(turn on/off the wireless alarm receiver)
set button(add/delete the sensors of the wireless alarm receiver)
Tone: Choose the ring tones(total 35 ring tones optional)
Power
ON/OFF
Tone
Wireless Radar Sensor
Sensor Eye: detect the objects
ON/OFF: turn on/off the radar sensor
Charge Jack:used to connect the solar panel or DC5V power adapter
Sensor Eye
ON/OFF Charge Jack
Solar Panel
Solar Panel
Solar Panel: charge the battery of the radar sensor(face to the sunlight as possible as you can)

3
3. Operation Instructions
Joint : used to fix the solar panel to the installation accessories and the direction is adjustable
Connection Cable: the length is 3 meters,used to connect to the charge jack of the radar sensor
Joint
Connection Cable
Step 1Power on the wireless alarm receiver by the power adapter.
(Indicator light up means the wireless alarm receiver works normally)
light up
Power

4
2nd method: stay still for 10 seconds,and then wave your hands in front of the sensor to activate
(the light of the ON/OFF button will flash once means the radar sensor was triggered and sent the alarm signal;
and then the radar sensor will back to work mode automatically after about 10 seconds if not detecting any movements)
1 foot waya
Step 2Turn on the Wireless Radar Sensor:Press the ON/OFF button 3 times
(bleep prompt means work normally)
ON/OFF( )press 3 times
Step 3Trigger The Wireless Radar Sensor
1st method:press the ON/OFF button twice
(the light of the ON/OFF button will flash once means
the radar sensor was triggered and sent the alarm signal)
ON/OFF( )press twice
Note: within 30 minutes after turning on the sensor, the sensor has bleep prompt to let you know whether it is ready to be triggered:if the sensor is not ready to be triggered,there is a bleep prompt every 2 seconds;if the sensor is ready to be triggered,there is no bleep prompt;

Tone
Step 4Press“Tone” to choose the ring tone for this sensor, there are 35 tones to choose from;
button
Step 5Connect the solar panel to the radar sensor
Charge Jack●
Note: if connection is properly,the ON/OFF button has a weak green light prompt,Please try your best to make the solar panel face to the sunlight when you install it
ON/OFF(weak green light)
5

6
Step 6
Installation
Wireless Radar Sensor
Solar Panel

7
4. Other Settings
(1)How to add sensors to the wireless alarm receiver
ADDStep 1Power on the wireless alarm receiver by the power adapter
(up to 32 sensors can be added to the receiver)
Installation Notes:
1. Please try your best to make the solar panel face to the sunlight2. the working principle of the radar sensor is detecting all the movements around it (not only in front of it), so please do not install the radar sensor closed to/around/under the plants which will be shaked easily by the wind. it will cause some false alarms.3.The radar sensor can detect the big size movements by passing through the walls. so please do not install the sensor at unsuitable environment.4.please install the radar sensor 4-5 feet off the ground,and adjust the sensor
eye a little upward or just point straight(not down). please install the radar sensor pointing up the driveway towards your house.

8
Step 2Press and hold the “ON/OFF” button for 5 seconds and release the button when the indicator light flashing;
ON/OFFON/OFF
light up
press and hold the ON/OFF button for 5 seconds
flashing
release the button
Step 3Trigger the sensor(for example,trigger the wireless radar sensor)Note:please make the radar sensor close to the Alarm receiver
(a ring tone prompt and the indicator light stops flashing means the sensor has been added to
the wireless alarm receiver successfully)
Step 4Trigger the sensor again to confirm the sensor has been added to the wireless alarmreceiver already.
Step 5Press“Tone ”Button to choose the ring tone for this sensor,there are 35 tones to choose from
stop flashing
ON/OFF
(the light of the ON/OFF button will flash once means the radar sensor
was triggered and sent the alarm signal)
(press 2 times)
Tone

9
(2)How to delete the sensors of the wireless alarm receiver
Step 1
Power on the wireless alarm receiver by the power adapter
Step 2Press and hold both the “ON/OFF” button and “Tone for 10 seconds and release the buttons when you heard a long bleep; Note: all the sensors will be deleted by this operation;
” button
ON/OFF
Tone
(3)How to adjust the alarm volume
ON/OFF
Tone
Step 1
Step 2
Power on the wireless alarm receiver by the power adapter
Press and hold the“ON/OFF”button first,and then press the“Tone”button to adjust the alarm volume,total 4 volume levels
(4)How to change the ring tone for the sensors
Step 1Power on the wireless alarm receiver by the power adapter
Step 2Trigger the sensor first,and then press the "Tone" button to choose the ring tone for this sensor;
Same steps for other sensors which have been added tothe wireless alarm receiver already.

Technical parameters
Static Current 20mA; Alarming Current 300mAWorking Current
DC5V
433MHz FSK+FHSS
Technical Parameters
4 pieces AA 1.5V batteries(package is not included)
Working Voltage
Wireless Frequency
Backup Battery
Item
5. Technical Parameters
162mm
52mm
Wireless Alarm Receiver
90mm
130mm
Wireless Radar Sensor
50mm
10

11
Radar Detection Range
Item
Wireless Transmission Range
Wireless Frequency
Working Voltage
Battery Type
Battery Capacity
433MHz FSK+FHSS
Chargeable LiFePO4 Battery
3.3V
It depends on the size of the movementsIf cars:up to 50 feet(15m)If a person weighting 50kg:up to 25 feet(7.5m)
Technical Parameters
500mAh
Technical parameters
Working Current Static: 5mA; Alarming:30mA
≥200mA in Sunny daysSolar Panel Output Current
Working Temperature Range
Solar Panel
157mm
187mm
1/4 Mile(400m)
-30℃ to 70℃
10-HB201804-4040S(1.2)T707(1.1)-02

Recommended