Web Interface – VLC Streaming.
Before you start: You will need to install VLC on the Web Interface PC and on the PCs you want to stream to.
See www.videolan.org for the latest version. I am currently using 0.9.4 for Windows.
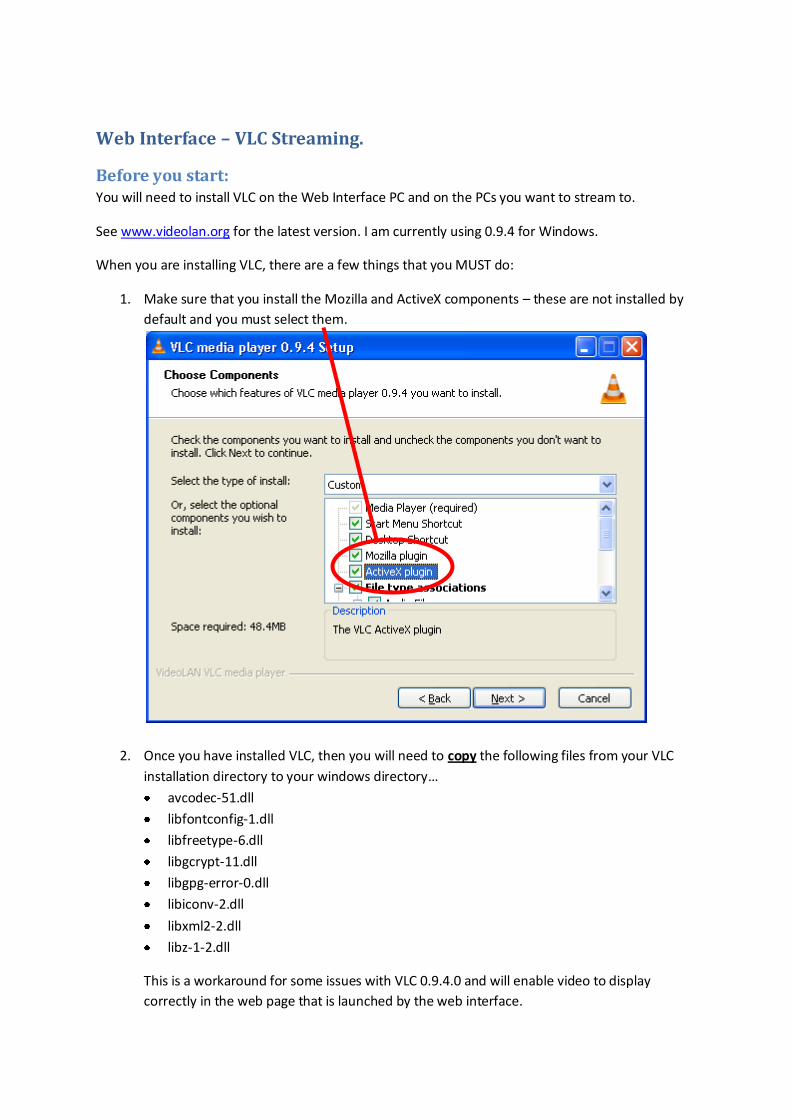
When you are installing VLC, there are a few things that you MUST do:
1. Make sure that you install the Mozilla and ActiveX components – these are not installed by
default and you must select them.
2. Once you have installed VLC, then you will need to copy the following files from your VLC
installation directory to your windows directory…
avcodec-51.dll
libfontconfig-1.dll
libfreetype-6.dll
libgcrypt-11.dll
libgpg-error-0.dll
libiconv-2.dll
libxml2-2.dll
libz-1-2.dll
This is a workaround for some issues with VLC 0.9.4.0 and will enable video to display
correctly in the web page that is launched by the web interface.

Configuring Streaming Information: Go to the “VLC Streaming” page of the Web Interface Manager.
Find the directory where VLC is installed.
The port number for VLC Remote Control can be left as 8070 if it does not conflict with any other
server you have running on the same PC. This is used locally by the web interface to send commands
to the instance of VLC used for streaming.
Enter the IP address or network name of the TV Server PC (if you want to stream files, I think it will
only work from the Web Interface PC).
You will see a list of your TV cards, as well as an entry for file streaming.
Edit the entries for each of the cards you want to stream…
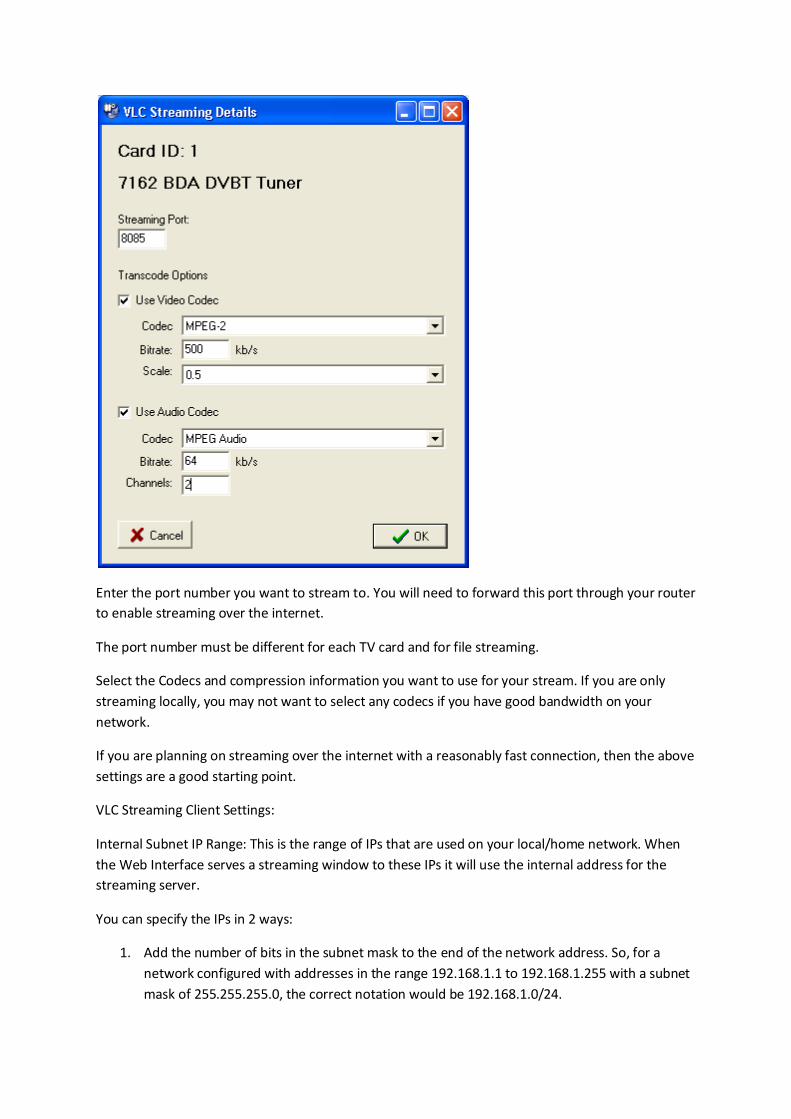
Enter the port number you want to stream to. You will need to forward this port through your router
to enable streaming over the internet.
The port number must be different for each TV card and for file streaming.
Select the Codecs and compression information you want to use for your stream. If you are only
streaming locally, you may not want to select any codecs if you have good bandwidth on your
network.
If you are planning on streaming over the internet with a reasonably fast connection, then the above
settings are a good starting point.
VLC Streaming Client Settings:
Internal Subnet IP Range: This is the range of IPs that are used on your local/home network. When
the Web Interface serves a streaming window to these IPs it will use the internal address for the
streaming server.
You can specify the IPs in 2 ways:
1. Add the number of bits in the subnet mask to the end of the network address. So, for a
network configured with addresses in the range 192.168.1.1 to 192.168.1.255 with a subnet
mask of 255.255.255.0, the correct notation would be 192.168.1.0/24.
2. Just enter the network portion of the address… For the above example, you would enter
192.168.1
The external IP / Domain name is used for clients connecting from outside your network.
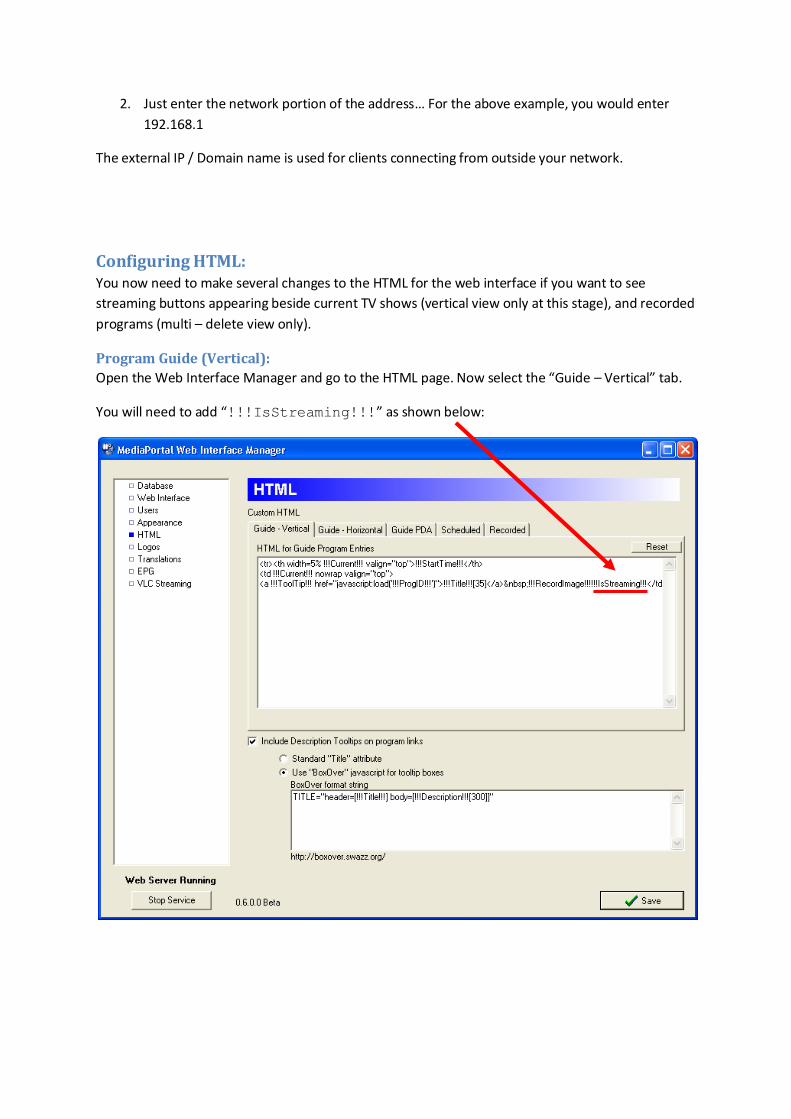
Configuring HTML: You now need to make several changes to the HTML for the web interface if you want to see
streaming buttons appearing beside current TV shows (vertical view only at this stage), and recorded
programs (multi – delete view only).
Program Guide (Vertical):
Open the Web Interface Manager and go to the HTML page. Now select the “Guide – Vertical” tab.
You will need to add “!!!IsStreaming!!!” as shown below:
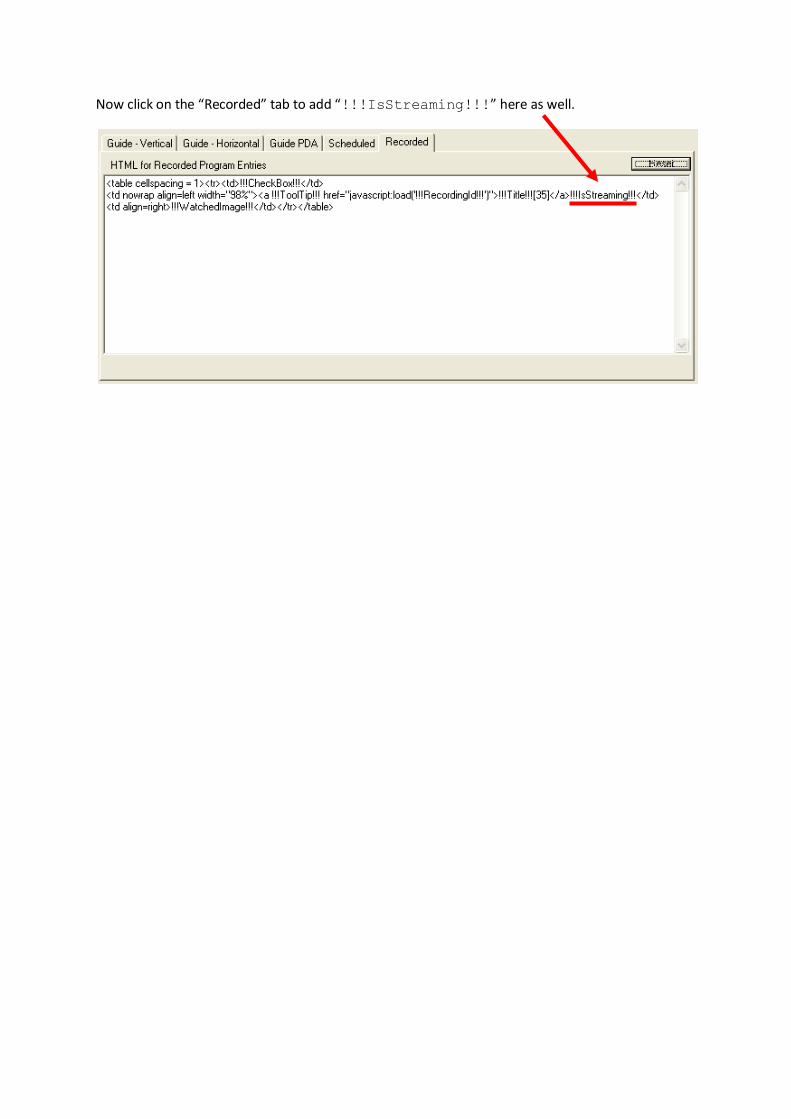
Now click on the “Recorded” tab to add “!!!IsStreaming!!!” here as well.
Steaming Clients
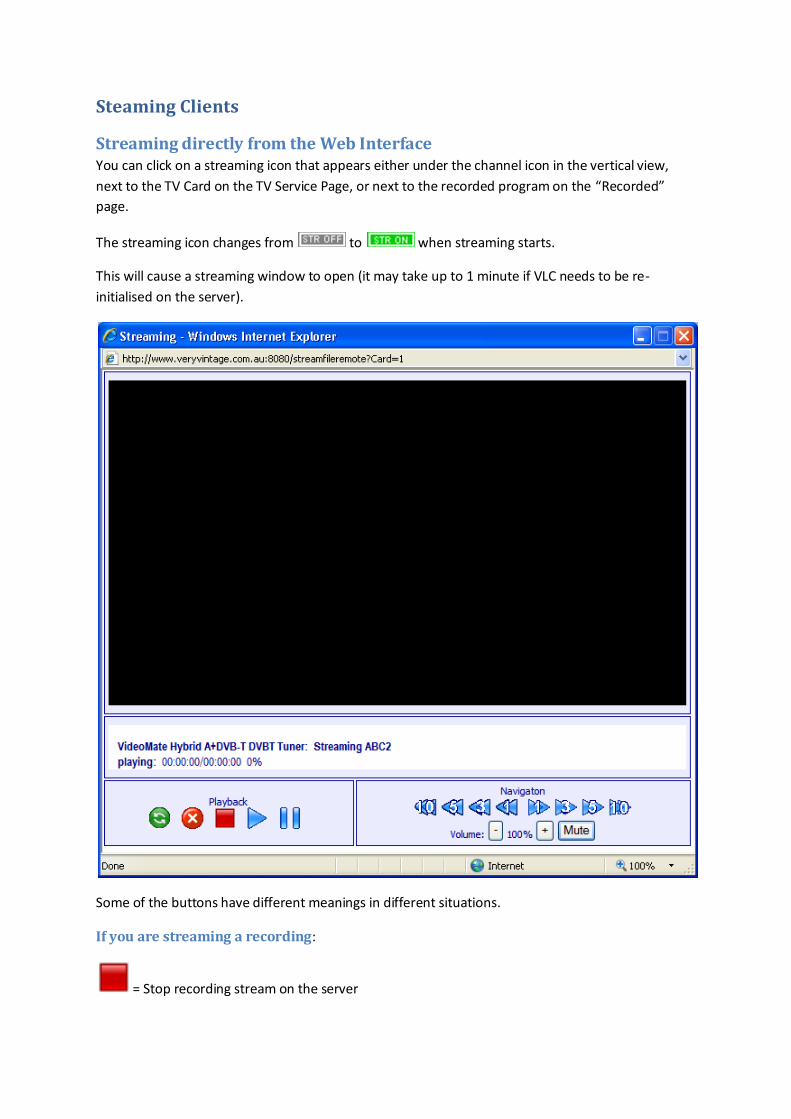
Streaming directly from the Web Interface You can click on a streaming icon that appears either under the channel icon in the vertical view,
next to the TV Card on the TV Service Page, or next to the recorded program on the “Recorded”
page.
The streaming icon changes from to when streaming starts.
This will cause a streaming window to open (it may take up to 1 minute if VLC needs to be re-
initialised on the server).
Some of the buttons have different meanings in different situations.
If you are streaming a recording:
= Stop recording stream on the server
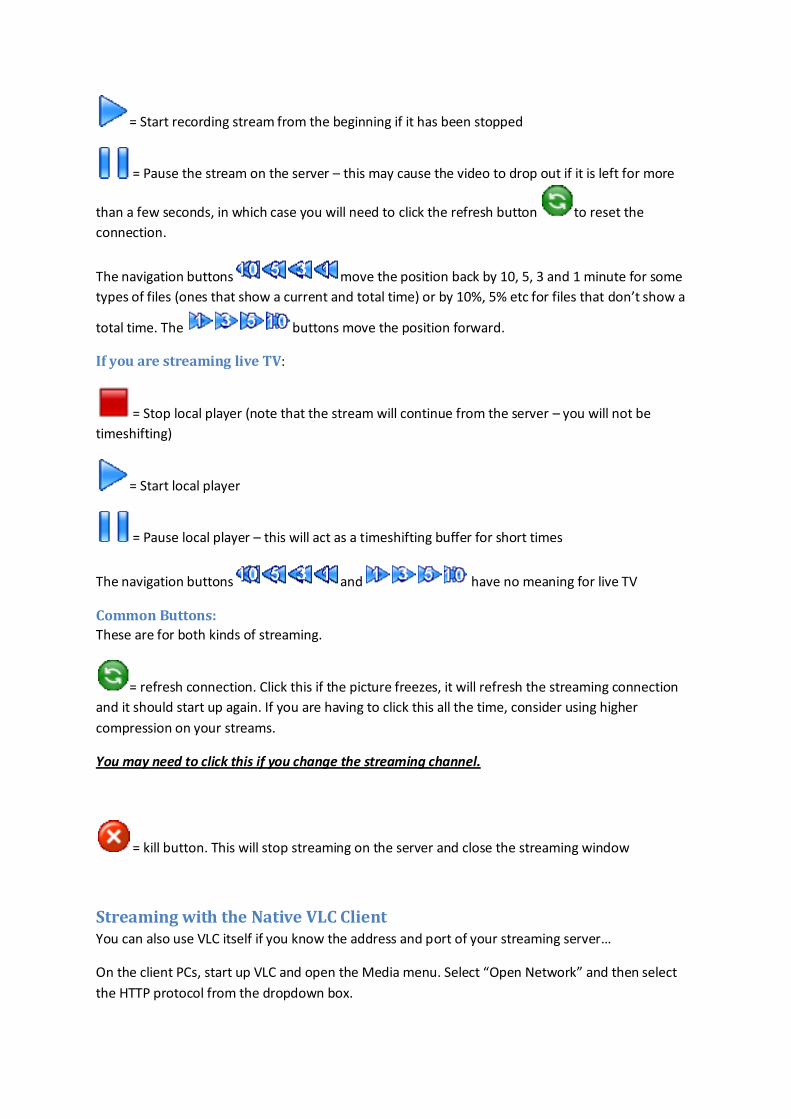
= Start recording stream from the beginning if it has been stopped
= Pause the stream on the server – this may cause the video to drop out if it is left for more
than a few seconds, in which case you will need to click the refresh button to reset the
connection.
The navigation buttons move the position back by 10, 5, 3 and 1 minute for some
types of files (ones that show a current and total time) or by 10%, 5% etc for files that don’t show a
total time. The buttons move the position forward.
If you are streaming live TV:
= Stop local player (note that the stream will continue from the server – you will not be
timeshifting)
= Start local player
= Pause local player – this will act as a timeshifting buffer for short times
The navigation buttons and have no meaning for live TV
Common Buttons:
These are for both kinds of streaming.
= refresh connection. Click this if the picture freezes, it will refresh the streaming connection
and it should start up again. If you are having to click this all the time, consider using higher
compression on your streams.
You may need to click this if you change the streaming channel.
= kill button. This will stop streaming on the server and close the streaming window
Streaming with the Native VLC Client You can also use VLC itself if you know the address and port of your streaming server…
On the client PCs, start up VLC and open the Media menu. Select “Open Network” and then select
the HTTP protocol from the dropdown box.
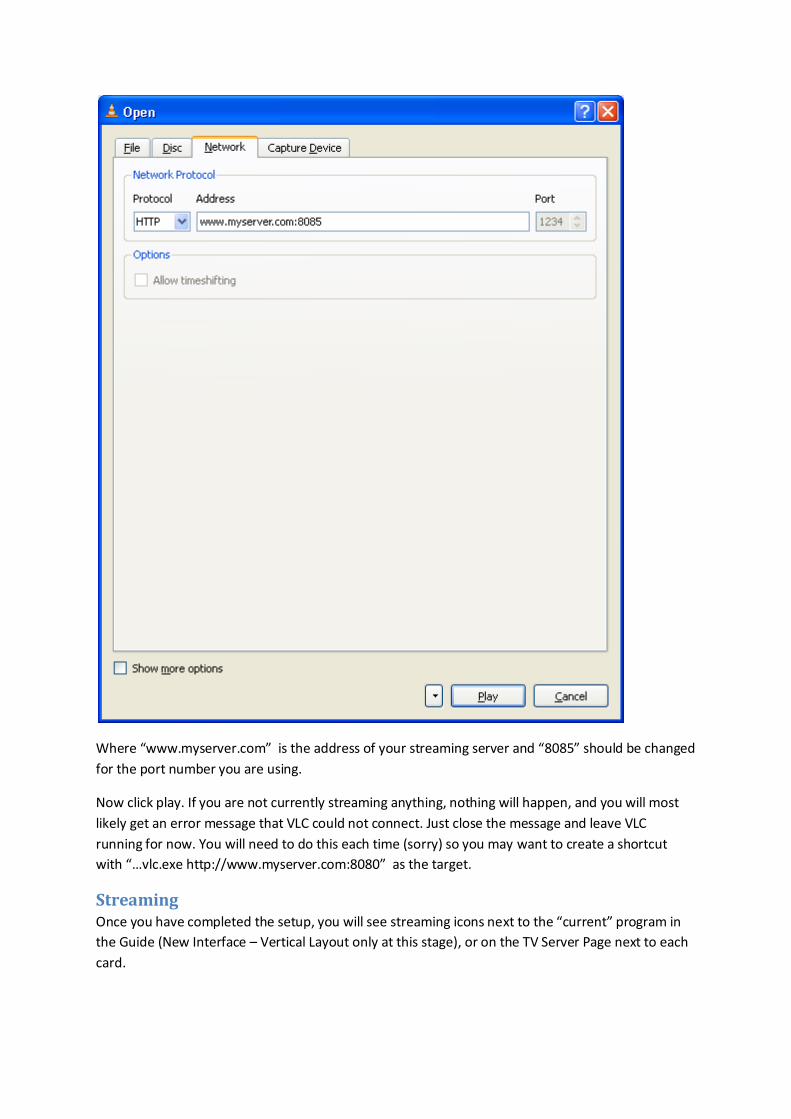
Where “www.myserver.com” is the address of your streaming server and “8085” should be changed
for the port number you are using.
Now click play. If you are not currently streaming anything, nothing will happen, and you will most
likely get an error message that VLC could not connect. Just close the message and leave VLC
running for now. You will need to do this each time (sorry) so you may want to create a shortcut
with “…vlc.exe http://www.myserver.com:8080” as the target.
Streaming Once you have completed the setup, you will see streaming icons next to the “current” program in
the Guide (New Interface – Vertical Layout only at this stage), or on the TV Server Page next to each
card.
If the icon is green, then VLC streaming is already running for this card/channel – click on it to Stop /
Start streaming.
If you are using the TV Server page, select a channel from the dropdown first, then click on
streaming.
On the client machine, with VLC running as described in the previous section, click on play. If your
firewall settings and router settings are correct, then you should see your stream.
Recorded programs can also be steamed from the recorded page BUT ONLY IN MULTI-DELETE VIEW.
Just click the stream button.
Unfortunately, at this stage, there is no way to fastforward or rewind streams from files, and no way
to pause TV streams – but I am working on it (and waiting for VLC to fix their telnet interface!).
Changing streams When you change channel, the stream is stopped and restarted – this stops the stream from
continually going back to the beginning of the timeshift file.
If you are using the Web Interface streaming window, you may need to click the refresh connection
button.
If you are using the native VLC client..
You will need to click on the stop button on the VLC client and then click play to start streaming the
new channel. You should not have to close VLC. Give it about 20 seconds to start streaming again. If
you get a connection error and you are sure it is streaming, just press play again – you may have
been too quick.
If you stop TV and restart it you will have to “Stop/Play” on the client. If the client stops mid stream
(as can happen if the bandwidth drops momentarily) just click pause and then play. It will sometimes
stop when minimised, just click pause/play.
When you change streaming files, you will need to “Stop/Play”.
Recommended