Tutorial para Phred/Phrap/Consed Tutorial Preparando a estrutura de diretórios O pacote vem com um script phredPhrap que permite rodar automaticamente todos os programas necessários. O script pode ser alterado, mas originalmente ele assume uma estrutura padrão de diretórios como segue: /meudiretório/chromat_dir /phd_dir /edit_dir
• Os arquivos dos cromatogramas devem ser copiados para o subdiretório chromat_dir.
• O pipeline deve ser executado com o comando phredPhrap necessariamente a partir do diretório edit_dir.
• Durante a execução, os arquivos PHD serão automaticamente criados e armazenados no subdiretório phd_dir.
Rodando o script phredPhrap
Inicialmente será feita uma montagem utilizando-se um conjunto-exemplo de
cromatogramas fornecido no pacote.
1. Vá ao diretório /montagem/standard. 2. Utilize o comando ls e veja conteúdo de cada um dos subdiretórios. 3. Vá ao subdiretório edit_dir. 4. Execute o pipeline com o comando phredPhrap. Atenção: o script não
rodará a partir de nenhum outro diretório. 5. Acompanhe a evolução do processamento na tela. 6. Inspecione os arquivos criados com os comandos ls e more (ou less).
*.fasta – contém as sequências derivadas dos cromatogramas em formato FASTA. *.fasta.screen – as mesmas sequências após o mascaramento com cross_match. *.fasta.screen.qual – arquivo em formato FASTA contendo os valores de qualidade das sequências. *.ace.n – arquivo da montagem. O número indica a versão. Diferentes montagens podem ser feitas e cada uma delas gerará um *.ace com numeração diferente (ex. *.ace.1, *.ace.2, etc.). *.fasta.screen.contigs – arquivo em formato FASTA contendo as sequências nucleotídicas de todos os contigs. *.fasta.screen.contigs.qual – arquivo em formato FASTA contendo os valores de qualidade das sequências de todos os contigs. *.fasta.screen.singlets – arquivo em formato FASTA contendo as sequências nucleotídicas de todos os singlets.
Phred/Phrap/Consed Tutorial By Arthur Gruber, DVM, PhD Tour for Consed
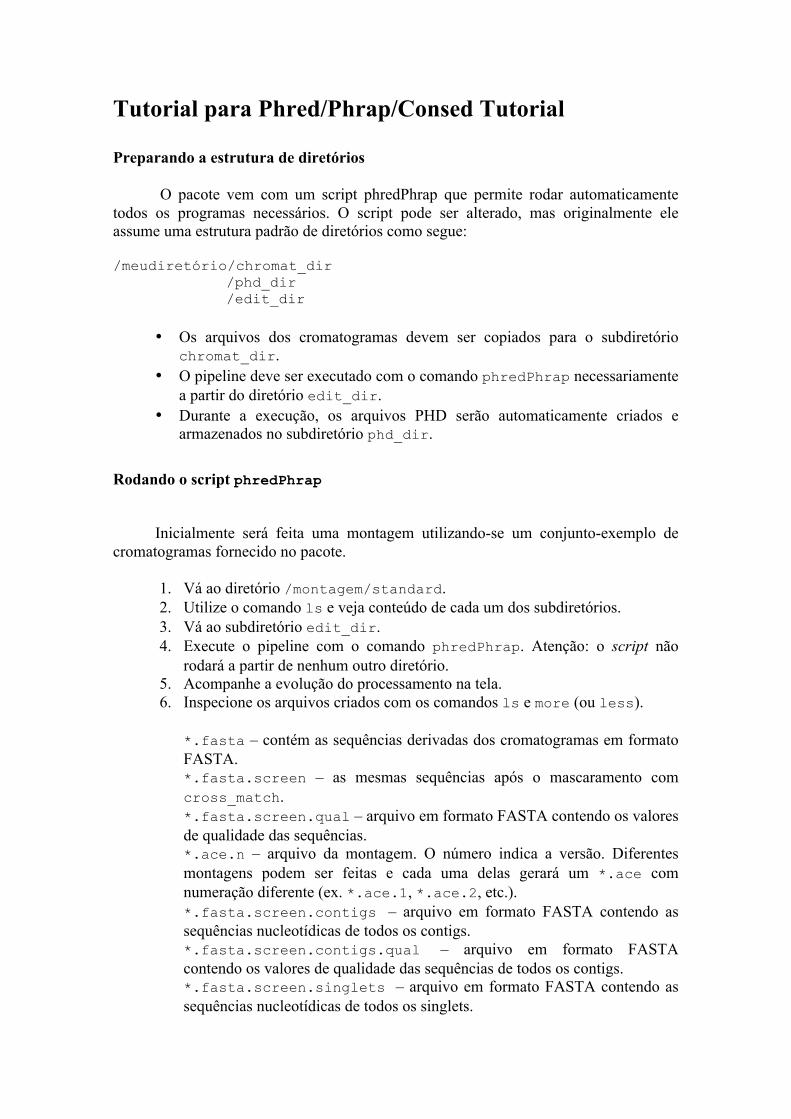
1. The first screen you will see will allow you to choose which assembly file (*.ace) to load.
2. Load the assembly file *.ace.1. At the Consed Main Window you will be able to observe how many contigs were obtained (in this example only one).
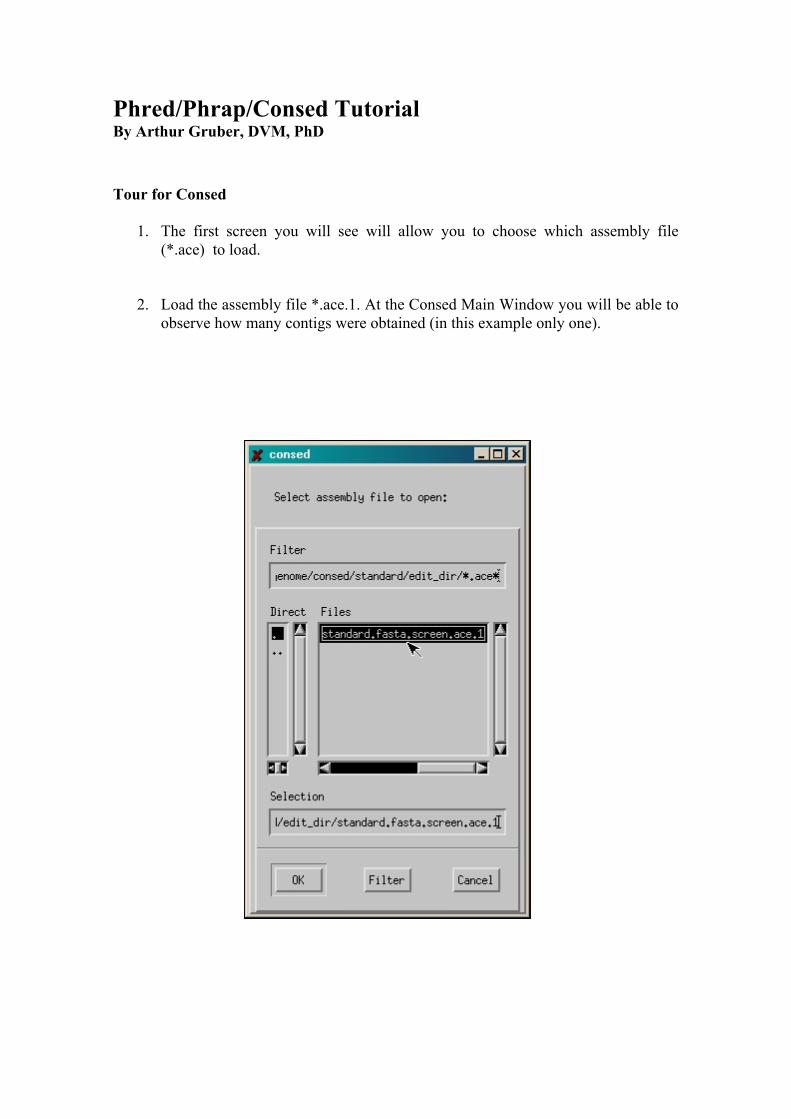
3. Click on the contig (What is the contig size?) and press enter. The Aligned Reads Windows will appear.
4. Go to the ends of the consensus sequence clicking on the <<< and >>> buttons
at the bottom bar (see arrows 1 and 2). What are the Xs in the sequence reads?
1 2
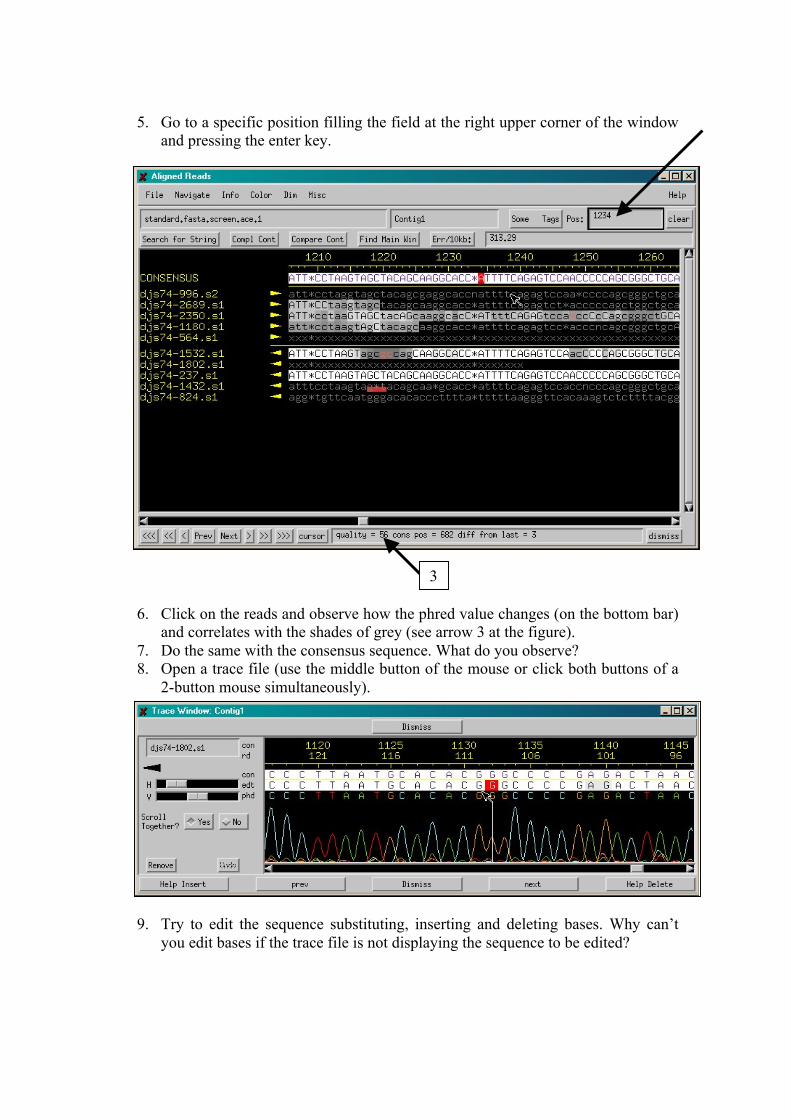
5. Go to a specific position filling the field at the right upper corner of the window
and pressing the enter key.
6. Click on the reads and observe how the phred value changes (on the bottom bar) and correlates with the shades of grey (see arrow 3 at the figure).
7. Do the same with the consensus sequence. What do you observe? 8. Open a trace file (use the middle button of the mouse or click both buttons of a
2-button mouse simultaneously).
9. Try to edit the sequence substituting, inserting and deleting bases. Why can’t
you edit bases if the trace file is not displaying the sequence to be edited?
3
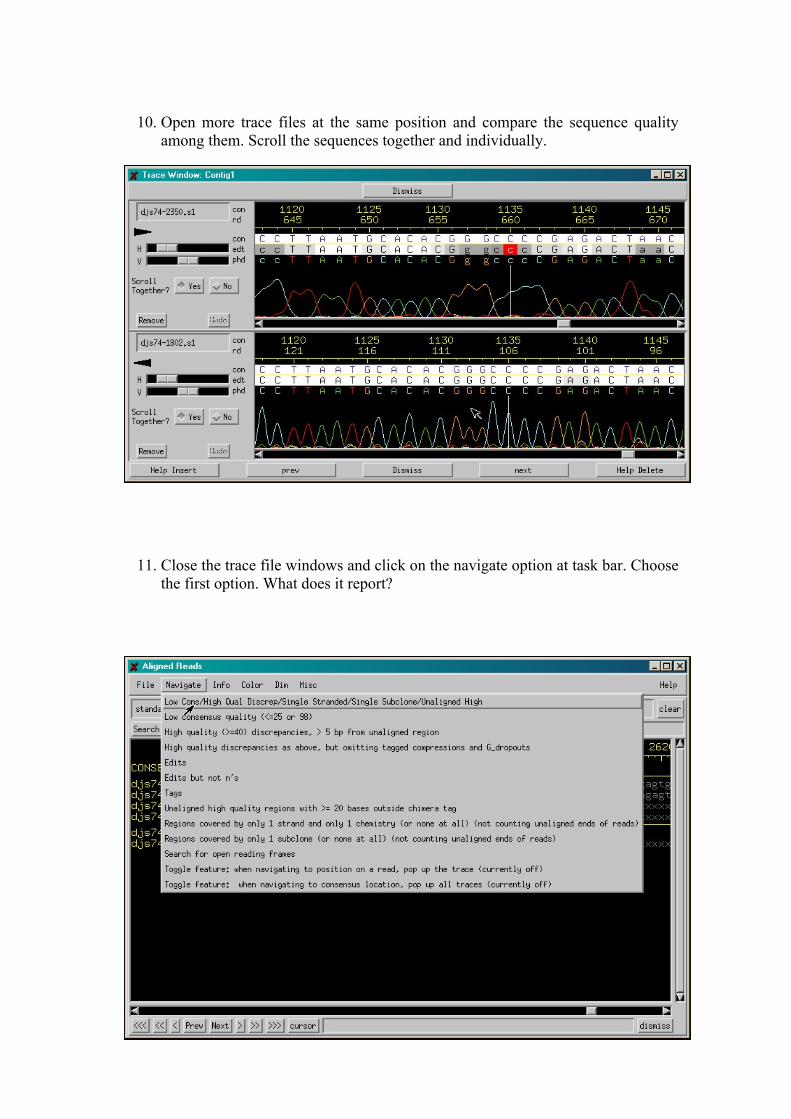
10. Open more trace files at the same position and compare the sequence quality
among them. Scroll the sequences together and individually.
11. Close the trace file windows and click on the navigate option at task bar. Choose the first option. What does it report?
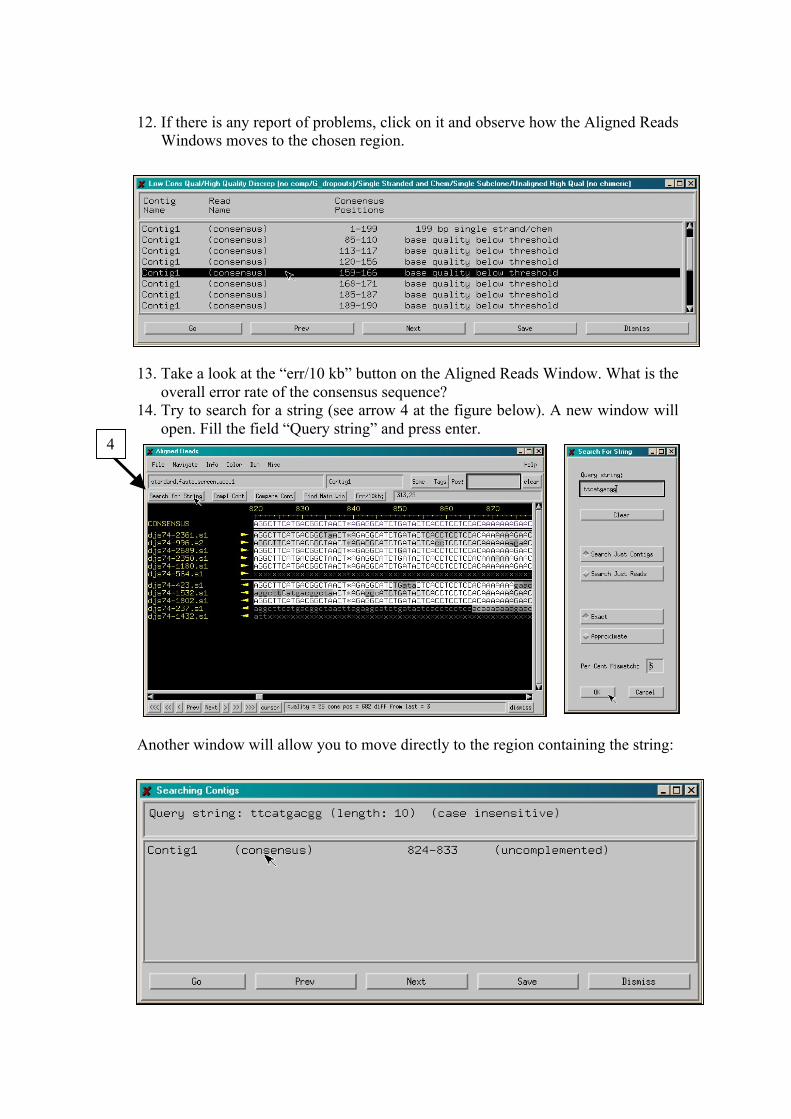
12. If there is any report of problems, click on it and observe how the Aligned Reads
Windows moves to the chosen region.
13. Take a look at the “err/10 kb” button on the Aligned Reads Window. What is the
overall error rate of the consensus sequence? 14. Try to search for a string (see arrow 4 at the figure below). A new window will
open. Fill the field “Query string” and press enter.
Another window will allow you to move directly to the region containing the string:
4
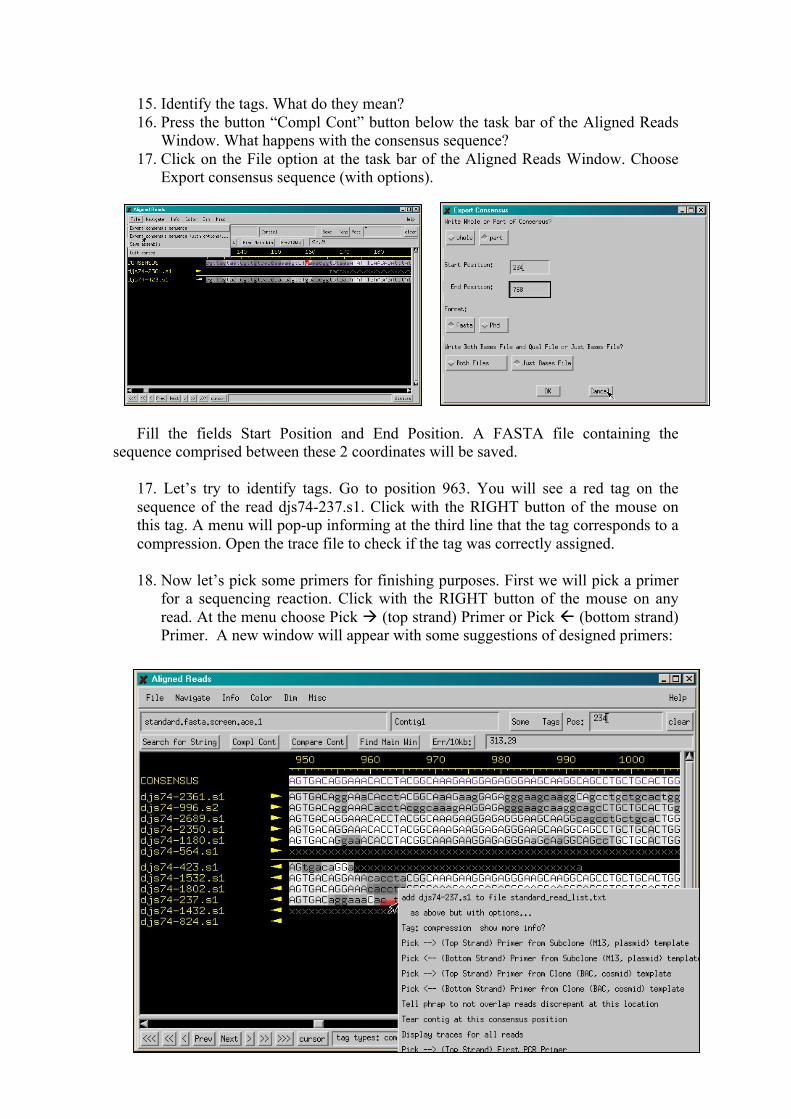
15. Identify the tags. What do they mean? 16. Press the button “Compl Cont” button below the task bar of the Aligned Reads
Window. What happens with the consensus sequence? 17. Click on the File option at the task bar of the Aligned Reads Window. Choose
Export consensus sequence (with options).
Fill the fields Start Position and End Position. A FASTA file containing the
sequence comprised between these 2 coordinates will be saved. 17. Let’s try to identify tags. Go to position 963. You will see a red tag on the sequence of the read djs74-237.s1. Click with the RIGHT button of the mouse on this tag. A menu will pop-up informing at the third line that the tag corresponds to a compression. Open the trace file to check if the tag was correctly assigned. 18. Now let’s pick some primers for finishing purposes. First we will pick a primer
for a sequencing reaction. Click with the RIGHT button of the mouse on any read. At the menu choose Pick (top strand) Primer or Pick (bottom strand) Primer. A new window will appear with some suggestions of designed primers:
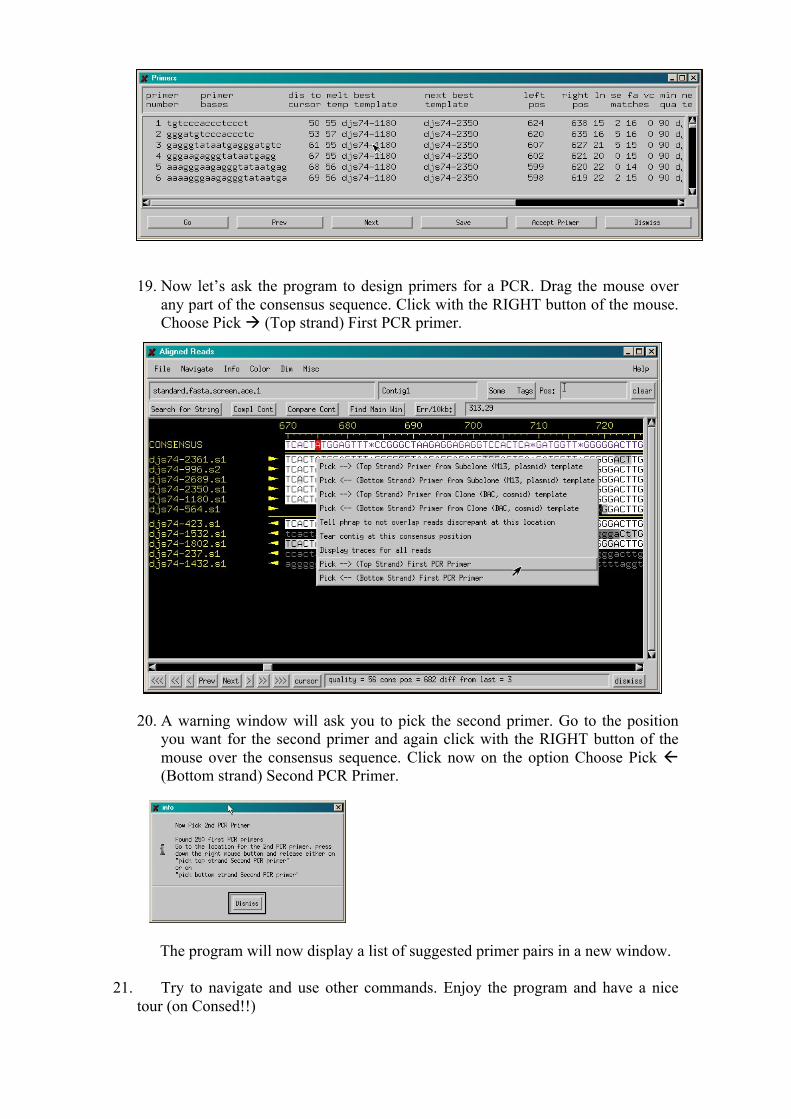
19. Now let’s ask the program to design primers for a PCR. Drag the mouse over
any part of the consensus sequence. Click with the RIGHT button of the mouse. Choose Pick (Top strand) First PCR primer.
20. A warning window will ask you to pick the second primer. Go to the position
you want for the second primer and again click with the RIGHT button of the mouse over the consensus sequence. Click now on the option Choose Pick (Bottom strand) Second PCR Primer.
The program will now display a list of suggested primer pairs in a new window.
21. Try to navigate and use other commands. Enjoy the program and have a nice
tour (on Consed!!)
Recommended