Test method T273 Investigation of seal behaviour OCTOBER 2012

Test method T273 - (i) Investigation of seal behaviour
Revision Summary
Ed/Rev Number
Clause Number
Description of Revision Authorisation Date
Reformatted and Revision Summary Added
D.Dash May 1999
Date on Test Method Revised to Agree with Date on Revision Summary
D.Dash Feb 2001
Ed 2/ Rev 0 All Reformatted RMS template J Friedrich October 2012
Note that Roads and Maritime Services is hereafter referred to as ‘RMS’.
The most recent revision to Test method T273 (other than minor editorial changes) are indicated by a vertical line in the margin as shown here.

October 2012
Test method T273
Investigation of seal behaviour
1. Scope This method sets out the procedure for the determination of layer depth, binder application rate, aggregate spread rate, and void content of a sprayed seal.
2. Definition
Term Definition
Layer depth The measured total depth of a sprayed seal
Binder application rate
The volume per square meter of bitumen in a sprayed seal.
Aggregate spread rate
The mass and volume per square meter of aggregate in a sprayed seal.
Voids Content The space within the bulk of the material not occupied by solid matter.
Void Ratio The ratio of the volume of voids to the total volume of the material, expressed as a percentage.
3. Format The test method consists of four parts: Part 1 - Obtaining a field sample. Part 2 - Preparing a sample for testing. Part 3 - Testing of seal sample. Part 4 - Calculating and reporting results.
Part 1 - Obtaining a Field Sample
Scope This part sets out the procedure for cutting a sample from a sprayed seal pavement surface.
Apparatus
(a) A portable saw suitable for cutting aggregate (e.g. a Stihl TS350)
(b) A ruler 400 mm long and a supply of marking chalk
(c) A supply of "quick-set" plaster, water and mixing utensils
(d) Work tools; chisel, hammer, shovel, crowbar
(e) Four wooden moulds (screw release) 300 mm x 300 mm x 50 mm (optional)
(f) A supply of mould release grease
(g) Suitable safety equipment - breathing mask, eye protection glasses, ear muffs and gloves
Test method T273 - Investigation of seal behaviour 1 of 27

October 2012
Procedure
(a) Mark out two concentric squares one approximately 400 mm x 400 mm and one approximately 290 mm x 290 mm. The area outside the 290 mm square is waste [see technique (a)].
(b) Cut along the marked lines, using the portable saw to a depth of about 50 mm.
SAFETY PRECAUTION: Always use a suitable breathing mask, eye protection glasses, ear muffs and gloves when operating saw.
(c) Chip off and discard the area around the 290 mm square.
(d) Carefully remove the 290 mm square sample using the hammer and chisel, and if required, the crowbar and shovel [see technique (b)].
(e) Set the sample in plaster before transporting [see Technique (c)].
(f) Refill damaged pavement with suitable material, e.g. coldmix
Techniques
(a) On hot days, or when the bitumen is soft, freeze the surface with dry ice. If dry ice is not available ordinary ice may be used but the freezing time of the pavement is longer
(b) To remove the cut sample from the road work steadily around each edge taking care not to crack or bend the specimen
(c) Stabilise the sample by one of the following methods:
(i) Grease wooden mould, mix plaster and pour into mould to a depth of about 30mm. Take cut sample and push into plaster with the seal surface upwards. Tap sides of mould to remove air voids
(ii) Place inverted sample (i.e. sealed surface downwards) on a sheet of cardboard (or similar material) and pour mixed plaster over road base material to a depth of about 20mm
Part 2 - Preparing a Seal Sample for Testing
Scope This part sets out the procedure for preparing a sample of sprayed seal for testing in a laboratory.
Apparatus
(a) A diamond saw (or equivalent) suitable for cutting aggregate and able to cut accurately to 1.0 mm
(b) An adjustable rectangular mould for testing sample [see fig. 1]
(c) A supply of dry ice or a freezer unit (only necessary for method B below
(d) `A transparent plastic ruler, 300 mm long and a marking pen
(e) A closed recirculating sand blaster suitable for class 1 sanding in accordance with AS 1627.4 (only necessary for method B below)
(f) A sharp pointed instrument to pick around aggregate.
(g) A supply of "quick-set" plaster
(h) Suitable equipment for mixing plaster
(i) Suitable safety equipment - breathing mask, eye protection glasses, ear muffs and gloves
(j) Two battens of length about 240 mm and width 10 mm x10 mm
Test method T273 - Investigation of seal behaviour 2 of 27

October 2012
Method A
This method provides for samples to be tested from the top of the seal only.
Procedure
(a) Obtain a seal sample by the method described in Part 1
(b) Visually inspect that the base of the sprayed seal is heavily bound by plaster
(c) Cut the sample to a size of approximately 250 mm x 180 mm. Keep all the off cut pieces to assist in seal depth measurements
SAFETY PRECAUTION: Always use breathing mask, eye protection glasses, ear muffs and gloves when operating a saw or sand blaster.
(d) If a pictorial record of the sample is required, take photographs of the seal surface and the seal cross-section
(e) Measure the length and width of the sample to the nearest 1.0 mm
(f) Measure and average the depth of the top layer in the seal [see Technique (a)]
(g) Measure and average the depth of each subsequent layer in the seal [see Techniques (b)]. Where it is difficult to distinguish between layers measure and average the total depth of the seal
(h) Clamp the sample into the test mould [see Techniques (c)]
(i) Invert mould (so that base is upwards) and pour a thin mixture of plaster into any joint cracks. Tap sides of mould to assist plaster flow. Having sealed cracks continue pouring plaster to a depth of about 10 mm
Method B
This method provides for samples to be tested starting from the base of the sample.
Procedure
(a) Obtain a seal sample by the method described in Part 1
(b) Cut the sample to approximately 250 mm x 180 mm. Keep all the off-cut pieces to assist with the seal depth measurements
SAFETY PRECAUTION: Always use breathing mask, eye protection glasses, ear muffs and gloves when operating a saw or sand blaster.
(c) Pack the sample in dry ice, or place in a freezer until the sample is rigid
(d) Carefully remove plaster from base material
(e) Remove all of the base material by sand blasting (including base material penetrated by bitumen). Take care not to remove any of the seal
(f) If a pictorial record of the sample is required, take photographs of the seal surface, underside and cross-section
(g) Measure the seal depths [see Method A (d)]
(h) Clamp the sample into the test mould [see Techniques (c)]
(i) Invert mould (so that base is upwards) and fill any joint cracks in the mould with a thin mixture of plaster. Tap sides of mould to assist plaster flow. If plaster gets onto test surface remove before it sets
CAUTION: The sample must be kept frozen through all operations. If the sample at any time shows signs of flexibility or bitumen mobility return
the sample to the freezing method.
Test method T273 - Investigation of seal behaviour 3 of 27
October 2012
Record
(a) The length and width of the sample to the nearest 1.0 mm
(b) The average depth of each layer in the seal to the nearest 0.5 mm
(c) The average total depth of the seal to the nearest 0.5 mm
Techniques
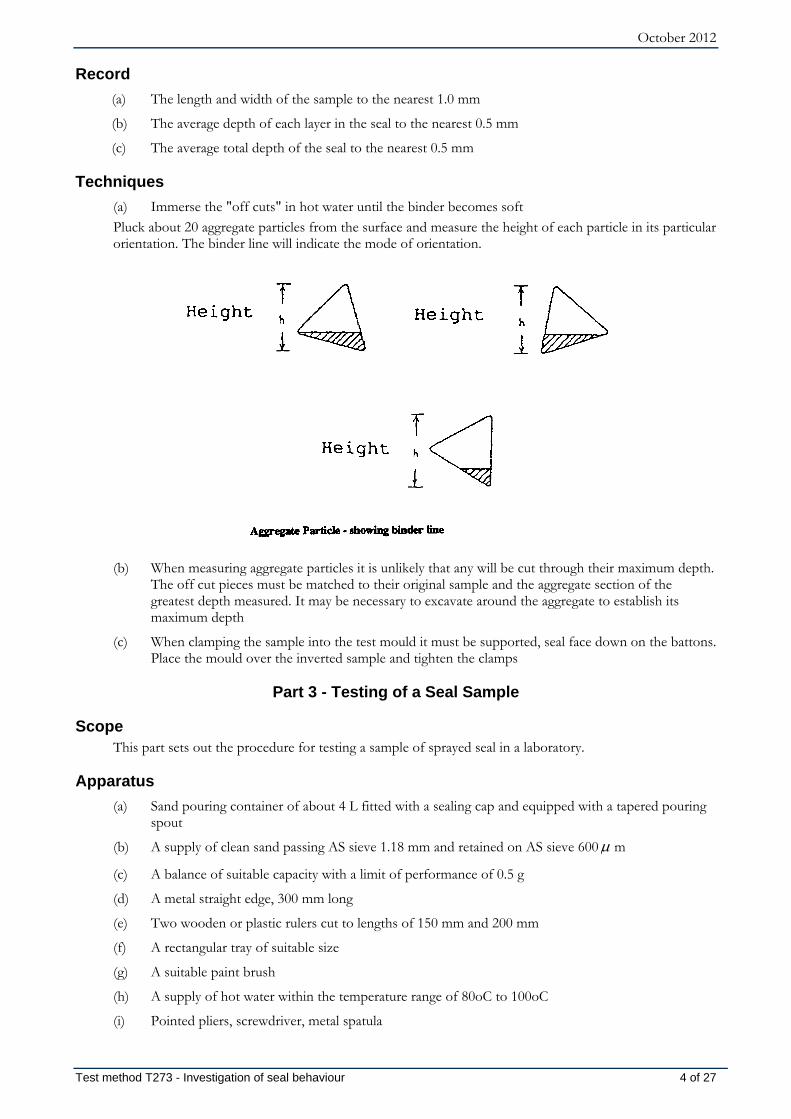
(a) Immerse the "off cuts" in hot water until the binder becomes soft Pluck about 20 aggregate particles from the surface and measure the height of each particle in its particular orientation. The binder line will indicate the mode of orientation.
(b) When measuring aggregate particles it is unlikely that any will be cut through their maximum depth. The off cut pieces must be matched to their original sample and the aggregate section of the greatest depth measured. It may be necessary to excavate around the aggregate to establish its maximum depth
(c) When clamping the sample into the test mould it must be supported, seal face down on the battons. Place the mould over the inverted sample and tighten the clamps
Part 3 - Testing of a Seal Sample
Scope This part sets out the procedure for testing a sample of sprayed seal in a laboratory.
Apparatus
(a) Sand pouring container of about 4 L fitted with a sealing cap and equipped with a tapered pouring spout
(b) A supply of clean sand passing AS sieve 1.18 mm and retained on AS sieve 600 m
(c) A balance of suitable capacity with a limit of performance of 0.5 g
(d) A metal straight edge, 300 mm long
(e) Two wooden or plastic rulers cut to lengths of 150 mm and 200 mm
(f) A rectangular tray of suitable size
(g) A suitable paint brush
(h) A supply of hot water within the temperature range of 80oC to 100oC
(i) Pointed pliers, screwdriver, metal spatula
Test method T273 - Investigation of seal behaviour 4 of 27

October 2012
(j) Metal dishes, approximately 225 mm diameter
(k) Solvent for washing bitumen from aggregate (e.g. Toluene)
Determination of The Bulk Density Of The Sand The bulk density (Ds) of the sand shall be the average of at least 3 individual density determinations,
recorded to the nearest 0.01 t/m . 3
The bulk density of the sand shall be determined using the MALD tray from Test Method T272 (without the membrane and ring). The bulk density of the sand shall be determined before each series of tests and with each batch of sand.
Procedure
Base Voids in Bottom Layer - Testing from base (Optional) Suitable for Initial seals and seals laid on a primer seal. (a) Prepare the seal sample by the method described in Part 2 - Method B.
(b) Fill the sand pouring container with sand
(c) Place mould containing sample in the rectangular tray
(d) Sprinkle sand from container into edge gaps left unfilled by plaster and any cracks in the seal. Sand should not appear above the top of the bitumen
(e) Weigh sand container and record mass (m7) to the nearest 1.0 g
(f) Using a smooth pouring motion fill all aggregate embedment voids so that the top of the aggregate is just visible [see Techniques (a) & (b)]
(g) Gently scrape a 150 mm and/or 200 mm ruler across the top of the sample to remove any high spots of sand
(h) Strike off any excess sand and return to container [see technique (c)]
(i) Reweigh sand container and record mass (m8) to the nearest 1.0 g
(j) Remove all sand from mould and brush from sample surface where necessary
(k) Repeat (b) to (j) to check initial measurements
(l) Check that the exposed base of the sample is facing upwards and pour plaster into the mould to a depth of about 10 mm
(m) Now test according to Procedure 2
Air Voids in Aggregate Layer - Testing from top
(a) Prepare the seal sample by the method described in Preparing a Seal Sample for Testing - Method A.
(b) Fill the sand pouring container with sand
(c) Place mould containing sample in the rectangular tray
(d) Sprinkle sand from container into edge gaps left unfilled by plaster and any cracks in the seal. Sand should not appear above the top of the bitumen
(e) Weigh sand container and record mass (mi) to the nearest 1.0 g
(f) Fill any void left by aggregate that may have been dislodged during preparation of the seal sample [see Techniques (d)]
(g) Reweigh sand container and record mass (m1) to the nearest 1.0 g
(h) Using a smooth pouring motion fill all aggregate voids with sand so that the top of the aggregate is just visible [see Technique (a) & (b)]
(i) Gently draw a 150 mm and/or 200 mm ruler across the top of the sample to remove any high spots of sand
Test method T273 - Investigation of seal behaviour 5 of 27

October 2012
(j) Remove any excess sand and return to container
(k) Reweigh sand container and record mass (m2) to the nearest 1.0 g
(l) Continue to fill mould with sand using a smooth pouring motion until mould is slightly over full
(m) Strike off excess sand with metal straight edge [see technique (c)]
(n) Return excess sand to container reweigh and record mass (m3) to the nearest 1.0 g
(o) Remove all sand from mould and brush from sample surface where necessary
(p) Repeat (b) to (o) to check initial measurements
Removal of One Layer of Aggregate (a) Measure surface voids as described in Clause 4.2.
(b) Fill the mould with hot water so that the bitumen becomes soft and the individual aggregate particles are easy to pluck.
(c) Pluck aggregate particles from the layer using pointed pliers taking care not to remove any aggregate from the lower layer.
NOTES
(i) If the water cools and causes the bitumen to become tacky, add hot water to resoften the bitumen
(ii) If the seal layers are difficult to distinguish between and/or when embedment has prevented the aggregate layers from being separated. The removal of more than one layer at a time may be inevitable
(d) Place the removed aggregate in a dish and wash with solvent
SAFETY PRECAUTION: Always use a breathing mask, eye protection goggles and plastic gloves when handling solvent.
(e) Dry the aggregate in oven
(f) Pick or sieve out any small amount of aggregate that may have been removed from lower layer
NOTE: Foreign aggregate is sometimes obvious by colour, shape and size. Shape and size should not be confused with broken aggregate of the seal.
(g) Weigh aggregate portions separately and record aggregate mass (M1ag) of current layer and aggregate mass (M1) of lower layer to the nearest 1.0 g.
(h) Determine Loose Unit Mass (LUM) of aggregate (Test Method T211) and record to the nearest 1.0 g.
(i) Determine Dry Bulk Density (DBD) of aggregate (Test Method T209) and record to the nearest 0.01 t/m3.
(j) Determine Average Least Dimension (ALD) of aggregate. (Using Test Method T235 or T275 as applicapable) and record to the nearest 0.1mm
(k) Determine Modified Average Least Dimension (MALD) (Test Method T272) and record to the nearest 0.1mm.
(l) Wash surface of the underlying layer with solvent until the aggregate surface resembles its original texture.
SAFETY PRECAUTION: Always use a breathing mask, eye protection goggles and plastic gloves when handling solvent.
Air voids in Subsequent Aggregate Layers (a) At least one layer of aggregate must have been removed using method 4.3 above
(b) Fill the sand pouring container with sand, weigh and record mass (m4) to the nearest 1.0 g
(c) Place mould containing sample into rectangular tray
Test method T273 - Investigation of seal behaviour 6 of 27

October 2012
(d) (d)Using a smooth pouring motion fill all aggregate voids with sand so that the top of the aggregate is just visible
(e) Gently scrape the modified rulers (150 mm and/or 200 mm) across the top of the sample to remove any high spots of sand
(f) Remove any excess sand and return to container
(g) Reweigh sand container and record mass (m5) to the nearest 1.0 g
(h) Continue to fill mould with sand using a smooth pouring motion until mould is slightly over full
(i) Strike off excess sand with metal straight edge [see Technique (c)]
(j) Return excess sand to container, reweigh and record mass (m6) to the nearest 1.0 g
(k) (k)Remove all sand from mould and brush from sample surface where necessary
(l) Repeat (b) to (k) to check initial measurements
(m) Repeat Procedure 3 (b) to (l) [removal of aggregate] and Procedure 4 (a) to (l) [air voids in aggregate layer], if further layers are present
Record The bulk density (Ds) of the sand to the nearest 0.01t/m3
Initial mass of sand and container (mi)
Mass of sand and container after correcting for aggregate loss (m1)
Mass of sand and container after filling aggregate voids (m2)
Mass of sand and container after filling to the top of the mould (m3)
Aggregate mass of current layer (M1ag)
Aggregate mass of lower layer (M1)
Aggregate Loose Unit Mass (LUM)
Aggregate Dry Bulk Density (DBD)
Aggregate Average Least Dimension (ALD)
Mass sand and container before testing lower layer (m4)
Aggregate voids of lower layer (m5)
Mass of sand and container after filling to the top of the mould from the lower layer (m6)
Mass of sand and container (m7) if applicable
Mass of sand and container (m8) if applicable
Aggregate
Techniques (a) The end of the pouring spout should be kept within 20 mm to 30 mm above the surface of the
sand in the mould (fig 2)
(b) When the surface texture is shallow, reduce the flow of the sand by partly covering the pouring spout with a finger. This eliminates the chance of excess sand pouring onto the surface.
Test method T273 - Investigation of seal behaviour 7 of 27

October 2012
(c) Strike off excess sand by drawing the straight edge across the mould towards the body. It is preferable to tilt back the straight edge to avoid compacting the sand (see fig. 3)
(d) (d)Where aggregate has been dislodged during sample preparation, fill with sand to a depth of approximately the volume of the missing aggregate
NOTE: Each operator should maintain a constant pouring height and motion. Sand compaction is subject to the falling height and rate of circular pouring motion of the sand
Test method T273 - Investigation of seal behaviour 8 of 27

October 2012
Test method T273 - Investigation of seal behaviour 9 of 27

October 2012
Test method T273 - Investigation of seal behaviour 10 of 27

October 2012
Test method T273 - Investigation of seal behaviour 11 of 27

October 2012
Test method T273 - Investigation of seal behaviour 12 of 27

October 2012
Test method T273 - Investigation of seal behaviour 13 of 27

October 2012
Test method T273 - Investigation of seal behaviour 14 of 27

October 2012
Test method T273 - Investigation of seal behaviour 15 of 27

October 2012
Test method T273 - Investigation of seal behaviour 16 of 27

October 2012
Test method T273 - Investigation of seal behaviour 17 of 27

October 2012
Test method T273 - Investigation of seal behaviour 18 of 27

October 2012
Test method T273 - Investigation of seal behaviour 19 of 27

October 2012
Test method T273 - Investigation of seal behaviour 20 of 27

October 2012
Test method T273 - Investigation of seal behaviour 21 of 27

October 2012
Test method T273 - Investigation of seal behaviour 22 of 27
October 2012
Test method T273 - Investigation of seal behaviour 23 of 27
October 2012
Test method T273 - Investigation of seal behaviour 24 of 27

October 2012
Test method T273 - Investigation of seal behaviour 25 of 27

October 2012
Test method T273 - Investigation of seal behaviour 26 of 27

October 2012
RMS 12.525
Test method T273 - Investigation of seal behaviour 27 of 27
Recommended