19
ASSEMBLY INSTRUCTIONS CONTINUED
Stand unit upright Slide bed above holes and hold in place Secure pins underneath bed, one at a time
1 2
6WARNING Pins must be COMPLETELY through BOTH SIDES of frame.
7
Let bed rest on inserted pins Place 3rd and 4th pin on each side Secure pins completely through bed and frame.
3 4
WARNING ALL FOUR (4) pins must be COMPLETELY through BOTH SIDES of frame in order to operate press.
Cross-section of press
Front view
Use bolts, washers and nuts to attach Z Bar to both sides of the press.
Note: Check all bolts for tightness. If press rocks, or is not level, loosen pressfeet slightly to compensate and retighten.
WARNINGBed must be at the BOTTOM of the frame before proceeding to the next step.
ASSEMBLY INSTRUCTIONS CONTINUED
4
5
Front view
Slide bed down to bottom of frame
Note: When sliding bed to frame bottom, DO NOT use bed handles.
PUMP INSTRUCTIONS
10
WARNINGDO NOT attempt to operate pump unless the BREATHER VALVE IS OPEN.Valve is closed prior to shipping to prevent the loss of hydraulic fluid.
CAUTIONHAND TIGHTEN VALVE ONLY.Excess pressure could damage the valve assembly.
CAUTIONDO NOT TURN RELEASE VALVE MORE THAN ONE FULL TURN or equipment may be disabled.
WARNING This symbol alerts you to the possibility of serious injury or death if instructions are not followed.
Failure to heed these warnings may result in loss of load, damage to the press and/or failure resulting in property damage, personal or fatal injury.This operating manual contains important details concerning the safe operation of this tool.The user must read and understand these details before any use of the tool.
This manual must be retained for future reference.
2. CLOSE the valve located on the FRONT of the pump assembly by turning CLOCKWISE. Connect using a 3/8" line. Do not exceed air pressure of 90-120 psig.
3. Squeeze air hose trigger until ram comes into contact with item to be pressed.
4. Once ram is in contact with the item to be pressed,insert pump handle into high pressure cradle. Using the high pressure pump moves the ram less with each stroke and requires less effort to apply pressure.
5. To relieve pressure and retract ram, turn valve located on FRONT of pump assembly ONE FULL TURN COUNTERCLOCKWISE.
Air Hose Trigger High Pressure Cradle
PUMP AND RAM ASSEMBLY INSTRUCTIONS
8
A
B
Note: There are two sets of holes for bolts. Use centermost holes on the side.
Note: Hose from pump’s outer side must run BEHIND the frame. Hose with nozzle will be used later.
This end up
Top of press frame, looking down
This end up
Note: Allow ram to rest on press bed while installing pump.
Note: Handle ram carefully to avoid damage to gauge or gauge face. Do not disconnect hoses prior to assembly.
Note: Position press feet on each side of the press.Attach one bolt, washer and nut on each side. Bolts should be attached OFFSET from one another.
Front view
Stand frame upside down Slide bed onto frame Slide bed down to bottom of frame
ASSEMBLY INSTRUCTIONS
1
3
2
Inside of frame
WARNINGBe aware of jagged edges on frame. Not all welds are smooth.Press bed can pinch or crush fingers.Wear safety gloves.
Note: In the upright position,inner bracing should form an inverted "v" with the narrower space facing the top of the press.
Note: Air motor must be operating at the same time.
PROCEDURE FOR BLEEDING AIR
9 1. Turn valve handle on FRONT of pump CLOCKWISE until closed. DO NOT OVERTIGHTEN.
3. Move press bed into highest position and lock bed into place with all four pins.
Air Hose Trigger
WARNING
Do not allow the ram to extend more than 5.5".
4. Place press plates DIRECTLY under ram, on press bed.
7. Squeeze trigger on air hose. Air will enter motor and extend the ram. Pump ram against press plates until gauge reads "5 Tons".
8. Insert pump handle into HIGH PRESSURE CRADLE for more precise control. Pump ram against press plates until gauge reads "10 Tons".
High Pressure Cradle
US TONSUS TONS
WARNINGDO NOT attempt to operate pump unless the BREATHER VALVE IS OPEN.Valve is closed prior to shipping to prevent the loss of hydraulic fluid.
CAUTION Bed must be in UP position, or you will over extend ram.
PARTS LIST
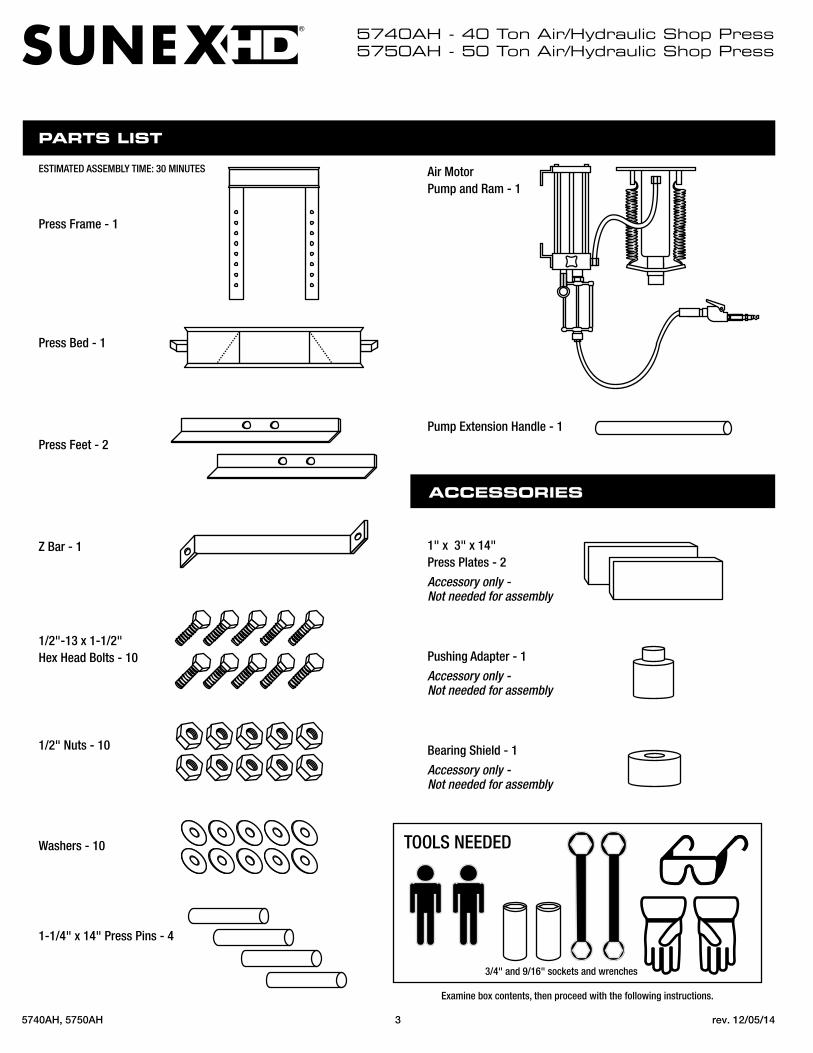
Press Frame - 1
Press Bed - 1
Press Feet - 2
Z Bar - 1
1/2"-13 x 1-1/2" Hex Head Bolts - 10
1/2" Nuts - 10
Washers - 10
1-1/4" x 14" Press Pins - 4
Air MotorPump and Ram - 1
Pump Extension Handle - 1
1" x 3" x 14"Press Plates - 2
Accessory only - Not needed for assembly
Pushing Adapter - 1
Accessory only - Not needed for assembly
Bearing Shield - 1
Accessory only - Not needed for assembly
ESTIMATED ASSEMBLY TIME: 30 MINUTES
Examine box contents, then proceed with the following instructions.
TOOLS NEEDED
3/4" and 9/16" sockets and wrenches
ACCESSORIES
WARNINGLeg ends and press feet are sharp and potentially dangerous. Wear safety gloves and safety goggles.
Top view of pump
REPLACEMENT PARTS LIST
Air/Hydraulic Shop Press
12
15
8
2
1
14
13
3
4
55
18
11
10
55
Only items identified by part number are available separately.
10
9
17
8
6
7
1. BEFORE OPERATING PUMP, open petcock valve (breather) located on TOP of pump assembly by turning COUNTERCLOCKWISE.
5. Put cradle in the DOWN position. Use an adapter on your air hose and allow air to flow through the opening in the petcock valve into the pump.
6. Air that has flowed into the pump causes the cradle to move up and the ram to move down. If this happens,proceed to step 7. If not, check all hoses and connections and repeat the procedure.
9. Turn valve handle on pump COUNTERCLOCKWISE
a maximum of one (1) turn to open valve. Ram will retract as pressure is released.
2. Turn petcock valve (breather) on TOP of pump COUNTERCLOCKWISE to open.
SAFETY INFORMATION
This symbol alerts you to the possibility of serious injury or death if instructions are not followed.
This symbol alerts you to the possibility of damage to or destruction of equipment if instructions are not followed.
Failure to heed these warnings may result in loss of load, damage to the press and/or failure resulting in property damage, personal or fatal injury. This operating manual contains important details concern-
ing the safe operation of this tool. The user must read and understand these details before any use of the tool. This manual must be retained for future reference.
• Read, study, understand and follow all instructions before operating this press.• Always wear safety goggles, (users and bystanders).• Parts being pressed may splinter, shatter, or be ejected from the press at a dangerous
rate of speed. Because there are a variety of press applications, it is the responsibility of the press owner to provide adequate guards, eye protection and protective clothing to the press operator.
• Visual inspection of the press should be made before use, checking for signs of cracked welds, bent bed pins, loose or missing bolts, leaks, or any other structural damage. Corrections must be made before using the press.
• Do not go near leaks. High pressure hydraulic fluid can puncture skin and cause serious injury, gangrene, or death. If injured, seek emergency medical help as immediate surgery is required to remove the fluid.
• Prior to use make sure the press is securely anchored to a concrete floor.• Keep hands, arms, feet, and legs out of work area. Accidental slippage can result in
personal injury.• Always use an accurate force gauge to measure pressing force.• Do not exceed the rated capacity or tamper with the pressure/force settings. When
attachments and adapters are used the rated capacity of the system shall be no greater than the rated capacity of the lowest rated component or combination of components that make up the system.
• Avoid off-center loads. Offset loads can damage ram and may cause load to eject at a dangerous rate of speed. Do not use any spacer or extender between the press ram plunger and the item being pressed. If there is not enough ram stroke, adjust the height of the movable bolster.
• Remove all loads from movable bolster before attempting to adjust bolster height. Beware of possible falling bolster.
• Press only on loads supported by movable bolster and press plates included. Do not support loads on floor or press frame legs.
• When using any accessories such as press plates or arbor plates, be certain they are centered on the movable bolster and in full contact with both sides of the bolster.
• Before applying load, be certain all movable bolster supporting pins are fully engaged. Verify lift cables (if equipped) are slack before pressing on the bolster.
• Always use a bearing shield when pressing bearings.• Use caution when positioning work to be pressed to ensure the item to be pressed
cannot be ejected at a dangerous rate of speed.• Release hydraulic pressure before loosening any fittings.• Maintain proper hydraulic fluid levels.• Do not make any alterations or modifications to the press.• This product may contain one or more chemicals known to the State of California to
cause cancer and birth defects or other reproductive harm. Wash hands thoroughly after handling.
• Failure to heed and understand these markings may result in serious or fatal personal injury and/or property damage.
OWNER/USER RESPONSIBILITYThe owner and/or user must have an understanding of the manufacturer's operating instructions and warnings before using this press. Personnel involved in the use and operation of equipment shall be careful, competent, trained, and qualified in the safe operation of the equipment and its proper use when servicing motor vehicles and their components. Warning information should be emphasized and understood. If the operator is not fluent in English, the manufacturer's instructions and warnings shall be read to and discussed with the operator in the operator's native language by the purchaser/owner, making sure that the operator comprehends its contents.
Owner and/or user must study and maintain for future reference the manufacturer’s instructions. Owner and/or user is responsible for keeping all warning labels and instruction manuals legible and intact. Replacement labels and literature are available from the manufacturers.INSPECTIONVisual inspection of the shop press should be made before each use of the press, checking for damaged, loose or missing parts. Each press must be inspected by a manufacturer’s repair facility immediately, if subjected to an abnormal load or shock. Any press which appears to be damaged in any way, is found to be badly worn, or operates abnormally must be removed from service until necessary repairs are made by a manufacturers's authorized repair facility. It is recommended that an annual inspection of the press be made by a manufacturer’s authorized repair facility and that any defective parts, decals or warning labels be replaced with manufacturer’s specified parts. A list of authorized repair facilities is available from the manufacturer.
SAFETY INSTRUCTIONS• CHECK YOUR LOCAL, STATE AND FEDERAL REGULATIONS
REGARDING THE SAFE USE OF THIS EQUIPMENT. • Your safety is top priority. Please handle equipment with care.• Fully retract unit and remove all items from the press bed frame. • Support the press bed, and remove the pins. • Raise or lower bed to desired height and reinstall press pins. Be certain
pins are fully engaged in the parallel flanges of the upright columns.• Position press on a flat, level, hard surface, preferably concrete.
Make sure all nuts and bolts are tight.• Clear the area of bystanders, especially small children, before using.• Set the press bed to the required height. The press is most effective
when the work piece is located 1 inch below the ram’s retracted position. The compression stroke can include the entire 5 inch working range.
• The press is designed to exert a force on anything which is positioned beneath its ram. The work piece can pop out from under the ram at a high rate of speed and injure someone.
• Pressing Bearings: It is essential that you use the bearing shield when pressing bearings on or off.
LIMITED WARRANTY:SUNEX INTERNATIONAL, INC. WARRANTS TO ITS CUSTOMERS THAT THE COMPANY’S SUNEX TOOLS® BRANDED PRODUCTS ARE FREE FROM DEFECTS IN WORKMANSHIP AND MATERIALS.Sunex International, Inc. will repair or replace its Sunex Tools® branded products which fail to give satisfactory service due to defective workmanship or materials, based upon the terms and conditions of the following described warranty plans attributed to that specific product. This product carries a ONE-YEAR warranty. During this warranty period, Sunex Tools® will repair or replace at our option any part or unit which proves to be defective in material or workmanship. Other important warranty information....This warranty does not cover damage to equipment or tools arising from alteration, abuse, misuse, damage and does not cover any repairs or replace-ment made by anyone other than Sunex Tools® or its authorized warranty service centers. The foregoing obligation is Sunex Tools®’ sole liability under this or any implied warranty and under no circumstances shall we be liable for any incidental or consequential damages. Note: Some states do not allow the exclusion or limitation of incidental or consequential damages, so the above limitation or exclusion may not apply to you.Return equipment or parts to Sunex Tools®, transportation prepaid. Be certain to include your name and address, evidence of the purchase date, and description of the suspected defect.If you have any questions about warranty service, please write to Sunex Tools®. This warranty gives you specific legal rights and you may also have other rights which vary from state to state. Repair kits and replacement parts are available for many of Sunex Tools® products regardless of whether or not the product isstill covered by a warranty plan.SHIPPING ADDRESS: MAILING ADDRESS:Sunex Tools Sunex Tools315 Hawkins Rd. P.O. Box 4215Travelers Rest, South Carolina 29690 Greenville, South Carolina 29608
WARNING
WARNING
CAUTION
THIS OPERATING MANUAL CONTAINS IMPORTANT SAFETY INFORMATION. READ CAREFULLY AND UNDERSTAND ALL INFORMATION BEFORE OPERATING THIS TOOL. SAVE THIS MANUAL FOR FUTURE USE.
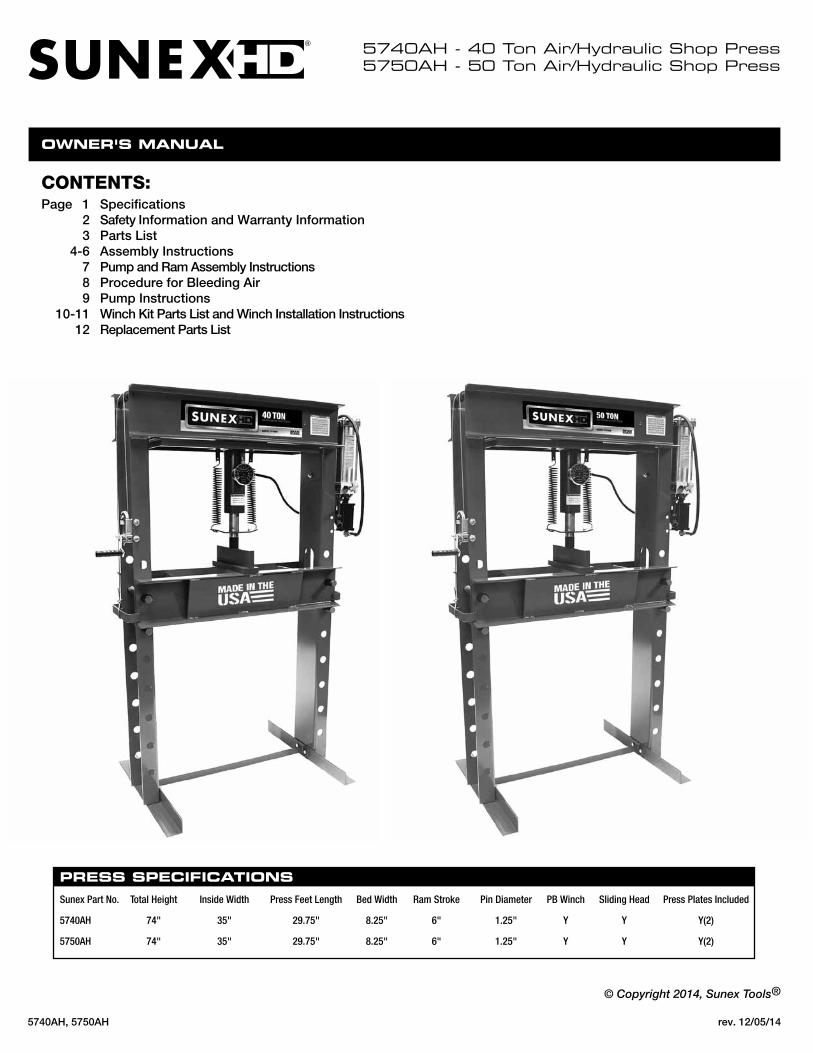
5740AH - 40 Ton Air/Hydraulic Shop Press5750AH - 50 Ton Air/Hydraulic Shop Press
Sunex Part No. Total Height Inside Width Press Feet Length Bed Width Ram Stroke Pin Diameter PB Winch Sliding Head Press Plates Included
5740AH 74" 35" 29.75" 8.25" 6" 1.25" Y Y Y(2)
5750AH 74" 35" 29.75" 8.25" 6" 1.25" Y Y Y(2)
PRESS SPECIFICATIONS
OWNER'S MANUAL
CONTENTS:Page 1 Specifications
2 Safety Information and Warranty Information3 Parts List
4-6 Assembly Instructions 789
Pump and Ram Assembly InstructionsProcedure for Bleeding AirPump Instructions
10-11 Winch Kit Parts List and Winch Installation Instructions12 Replacement Parts List
© Copyright 2014, Sunex Tools®
5740AH, 5750AH rev. 12/05/14
5740AH - 40 Ton Air/Hydraulic Shop Press5750AH - 50 Ton Air/Hydraulic Shop Press
5740AH - 40 Ton Air/Hydraulic Shop Press5750AH - 50 Ton Air/Hydraulic Shop Press
5740AH - 40 Ton Air/Hydraulic Shop Press5750AH - 50 Ton Air/Hydraulic Shop Press
5740AH - 40 Ton Air/Hydraulic Shop Press5750AH - 50 Ton Air/Hydraulic Shop Press
5740AH - 40 Ton Air/Hydraulic Shop Press5750AH - 50 Ton Air/Hydraulic Shop Press
5740AH - 40 Ton Air/Hydraulic Shop Press5750AH - 50 Ton Air/Hydraulic Shop Press
5740AH - 40 Ton Air/Hydraulic Shop Press5750AH - 50 Ton Air/Hydraulic Shop Press
5740AH - 40 Ton Air/Hydraulic Shop Press5750AH - 50 Ton Air/Hydraulic Shop Press
5740AH - 40 Ton Air/Hydraulic Shop Press5750AH - 50 Ton Air/Hydraulic Shop Press
5740AH - 40 Ton Air/Hydraulic Shop Press5750AH - 50 Ton Air/Hydraulic Shop Press
5740AH - 40 Ton Air/Hydraulic Shop Press5750AH - 50 Ton Air/Hydraulic Shop Press
5740AH, 5750AH 2 rev. 12/05/14 5740AH, 5750AH 3 rev. 12/05/14
5740AH, 5750AH 4 rev. 12/05/14 5740AH, 5750AH 5 rev. 12/05/14
5740AH, 5750AH 6 rev. 12/05/14 5740AH, 5750AH 7 rev. 12/05/14
5740AH, 5750AH 8 rev. 12/05/14 5740AH, 5750AH 9 rev. 12/05/14
5740AH, 5750AH 10 rev. 12/05/14 5740AH, 5750AH 11 rev. 12/05/14
5740AH, 5750AH 12 rev. 12/05/14
PUMP AND RAM EXPLODED PARTS DIAGRAM
8.886"
9.113"
ITEM NO. DESCRIPTION QTY.
1 Base Weldment 12 Plug 13 * Polypak Seal (Parker) 24 1/2-13 x 2 Hex HD C-S GR 2 Zinc 15 Piston 16 * O-Ring (Parker) 17 Rod 18 Retaining Ring Int. 3.5 NOM 19 Piston Guide 110 Retractor Plate 111 Spring 212 Fitting Gauge 1.75 113 Gauge 114 90˚ Elbow 1/4 NPTF to -6 JIC 115 Hose Hydraulic 41 1/2 LG 7/16-20 JICF 1
RAM
PUMPITEM NO. DESCRIPTION QTY.
1 Tank 12 Tie Rod 43 1" Piston Body 14 1/2" Piston Body 15 1" Piston 16 1/2" Piston 17 1/4" MNPT Pressure Plug 18 Pump Body 19 Pump Lid 110 Pump Bracket 211 Valve Assembly 112 Pivot Pin 213 * 5/16" Steel Ball 514 Brass Drain Cock 115 Cradle Assembly 216 Hydraulic Hose 41-1/2" L 7/16-20 JICF 117 7/16-14 Fin Hex Nut Zinc 419 * O-Ring 120 * O-Ring 121 * 3-1/2" Seal 222 * 3-5/16" Seal 123 * 3-3/16" Seal 124 SHCS 7/16 14 x 1/2" 425 SHCS 7/16 14 x 3/4" 426 * Light Spring 227 * Heavy Spring 228 7/16" Split Lock Washer 629 Pump Filter 130 Pump Fitting 1/4" MNPT 7/16" JICF 131 7/8" Grip 132 Handle for Pump 133 * O-Ring 1
# 23 (Pump)QTY: 1
# 21 (Pump)QTY: 2
# 19 (Pump)QTY: 1
# 22 (Pump)QTY: 1
See Replacement Parts List for parts available separately.Parts with (*) are only available in Seal Kit, part number RSCBP1217.
10
9
15
1
7
6
4
8
5
3
1111
1
14
13
12
3
2
7
21
17
30
16
9
# 3 (Ram)(Poly Pak - Note: Only the upper seal normally needs replacement)QTY: 1
# 33 (Pump)(O-Ring for # 11 Valve Assembly on Pump)QTY: 1
# 6 (Ram)QTY: 1
# 20 (Pump)QTY: 1
# 13 (Pump)QTY: 5
2
28
14
1
25
2411
1327
10
31
32
15
20
6
4
23
28
25
241028
13
29
21
8
26 24
12
22
3
19
5
15
# 26 (Pump)QTY: 2
# 27 (Pump)QTY: 2
Individual parts pictured are components of the Seal Kit, RSCBP1217.
Air Motor not shown
5740AH - 40 Ton Air/Hydraulic Shop Press5750AH - 50 Ton Air/Hydraulic Shop Press
5740AH, 5750AH 13 rev. 12/05/14
ITEM NO. SUNEX PART NO. DESCRIPTION QTY.
1 RS345009 2" Pushing Adaptor (Spring) 22 Press Bed 13 Press Frame 14 Ram Frame 15 RSCBP1225 Press Pin 46 RS310012 Pushing Adapter 17 RSBS1 Bearing Shield 18 RSCBP1205 Press Plate 29 RSCBP1211 Press Feet 210 RSCBP1212 Z Bar 111 RSCBP1209 Pump Handle 112 RS40AOPAM Pump (with air motor) 113 RSCBP1202 Ram (includes gauge) (5740AH) 1
RSCBP1202GG Ram (includes gauge) (5750AH) 114 RSCBP1206 Gauge (5740AH) 1
RSCBP1206G Liquid Filled Gauge (5750AH) 1
ITEM NO. SUNEX PART NO. DESCRIPTION QTY.
15 RSCBP1204 Hose & Fitting 116 RSCBP1217 Seal Kit for Pump and Ram (not shown) 117 RS40MPPHK Press Hardware Kit 1 set
1/2"-13 x 1-1/2" Hex Head Bolt 10 1/2" Nut 10
Washer 1018 RSAAMO2 Air Motor (shown with pump) 119 RS4050WCH Winch 1not shown RSWHK Winch Hardware Kit 1 set
Cable Clamp 1 1/2"-13 x 1-1/2" Hex Head Bolt 2 1/2" Nut 2
Washer 2Winch 1
Short Cable (includes eye bolt) 1 Long Cable 1
not shown RS5740AHLK Product Label Kit 1 not shown RS5750AHLK Product Label Kit 1
12 Dark Gray- Long Cable
Light Gray- Short Cable
1. Move press bed into LOWEST position so it is resting on top of pins 1 and 2.
Right side of press
3. Thread the BARE end of the LONGER of the two steel cables up and through the pump bracket.
Right side of press,under pump assembly
2. Install pre-attached eye bolt on LONGER cable to press bed handle located under pump assembly. DO NOT FULLY TIGHTEN. Center with side of press bed and make sure there is enough room to lower or raise both nuts on eye bolt for precise alignment.
WARNINGDO NOT FULLY TIGHTEN.
WINCH KIT PARTS LIST
Winch - 1
Long Cable - 1
Short Cable- 1
Cable Clamp - 1
1/2"-13 x 1-1/2" Hex Head Bolts - 2
1/2" Nuts - 2
Washers - 2
WINCH INSTALLATION INSTRUCTIONS
4. Run the long cable up and OVER BOTH ROLLER BRACKETS and feed into winch. Be sure to thread 12 inches (1 foot) of extra cable through winch.
5. Once winch cable has been threaded, pull excess cable back through winch as shown in diagramabove. The cable should be locked tightly around itself with no excess cable left hanging. Operate winch enough to remove slack from longer cable.
WARNINGMount winch to frame AFTER threading cable.
6. Mount winch to frame using the provided washers, 1/2" nuts and 1/2"-13 x 1-1/2" bolts.
Left side of press, under winch
8. Install pre-attached eye bolt on SHORTER cable to press bed handle located under winch after feeding it around in step 7.
7. Feed the short cable by running it up and OVER first roller, then UNDER second roller. Loop the short cable back toward the winch and securely attach to the longer cable using the cable clamp. Remove slack from short cable before securing to long cable. Clamp should be NO LESS THAN ONE INCH (1") from roller.
9. Turn eye hooks to adjust and level press bed. Once bed is level,firmly tighten eye hook mounting hardware. The steel cable will stretch with use. It may be necessary to repeat this leveling procedure in the future.
10. Test the winch kit by raising and lowering the press bed from its lowest to highest position. Repeat and adjust until bed is level and moves freely throughout its entire range of motion.Cut excess cable when all adjustments are complete.
LONG CABLE top view of press
Top view of press with bed in lowest position
This end feeds into winch.
SHIPPING ADDRESS:Sunex Tools315 Hawkins Rd.Travelers Rest, South Carolina 29690
MAILING ADDRESS:Sunex ToolsP.O. Box 4215Greenville, South Carolina 29608
Note: Refer to manual from winch manufacturer for detailed instructions on winch assembly and cable threading procedure.
WINCH INSTALLATION INSTRUCTIONS CONTINUED

19
ASSEMBLY INSTRUCTIONS CONTINUED
Stand unit upright Slide bed above holes and hold in place Secure pins underneath bed, one at a time
1 2
6WARNING Pins must be COMPLETELY through BOTH SIDES of frame.
7
Let bed rest on inserted pins Place 3rd and 4th pin on each side Secure pins completely through bed and frame.
3 4
WARNING ALL FOUR (4) pins must be COMPLETELY through BOTH SIDES of frame in order to operate press.
Cross-section of press
Front view
Use bolts, washers and nuts to attach Z Bar to both sides of the press.
Note: Check all bolts for tightness. If press rocks, or is not level, loosen pressfeet slightly to compensate and retighten.
WARNINGBed must be at the BOTTOM of the frame before proceeding to the next step.
ASSEMBLY INSTRUCTIONS CONTINUED
4
5
Front view
Slide bed down to bottom of frame
Note: When sliding bed to frame bottom, DO NOT use bed handles.
PUMP INSTRUCTIONS
10
WARNINGDO NOT attempt to operate pump unless the BREATHER VALVE IS OPEN.Valve is closed prior to shipping to prevent the loss of hydraulic fluid.
CAUTIONHAND TIGHTEN VALVE ONLY.Excess pressure could damage the valve assembly.
CAUTIONDO NOT TURN RELEASE VALVE MORE THAN ONE FULL TURN or equipment may be disabled.
WARNING This symbol alerts you to the possibility of serious injury or death if instructions are not followed.
Failure to heed these warnings may result in loss of load, damage to the press and/or failure resulting in property damage, personal or fatal injury.This operating manual contains important details concerning the safe operation of this tool.The user must read and understand these details before any use of the tool.
This manual must be retained for future reference.
2. CLOSE the valve located on the FRONT of the pump assembly by turning CLOCKWISE. Connect using a 3/8" line. Do not exceed air pressure of 90-120 psig.
3. Squeeze air hose trigger until ram comes into contact with item to be pressed.
4. Once ram is in contact with the item to be pressed,insert pump handle into high pressure cradle. Using the high pressure pump moves the ram less with each stroke and requires less effort to apply pressure.
5. To relieve pressure and retract ram, turn valve located on FRONT of pump assembly ONE FULL TURN COUNTERCLOCKWISE.
Air Hose Trigger High Pressure Cradle
PUMP AND RAM ASSEMBLY INSTRUCTIONS
8
A
B
Note: There are two sets of holes for bolts. Use centermost holes on the side.
Note: Hose from pump’s outer side must run BEHIND the frame. Hose with nozzle will be used later.
This end up
Top of press frame, looking down
This end up
Note: Allow ram to rest on press bed while installing pump.
Note: Handle ram carefully to avoid damage to gauge or gauge face. Do not disconnect hoses prior to assembly.
Note: Position press feet on each side of the press.Attach one bolt, washer and nut on each side. Bolts should be attached OFFSET from one another.
Front view
Stand frame upside down Slide bed onto frame Slide bed down to bottom of frame
ASSEMBLY INSTRUCTIONS
1
3
2
Inside of frame
WARNINGBe aware of jagged edges on frame. Not all welds are smooth.Press bed can pinch or crush fingers.Wear safety gloves.
Note: In the upright position,inner bracing should form an inverted "v" with the narrower space facing the top of the press.
Note: Air motor must be operating at the same time.
PROCEDURE FOR BLEEDING AIR
9 1. Turn valve handle on FRONT of pump CLOCKWISE until closed. DO NOT OVERTIGHTEN.
3. Move press bed into highest position and lock bed into place with all four pins.
Air Hose Trigger
WARNING
Do not allow the ram to extend more than 5.5".
4. Place press plates DIRECTLY under ram, on press bed.
7. Squeeze trigger on air hose. Air will enter motor and extend the ram. Pump ram against press plates until gauge reads "5 Tons".
8. Insert pump handle into HIGH PRESSURE CRADLE for more precise control. Pump ram against press plates until gauge reads "10 Tons".
High Pressure Cradle
US TONSUS TONS
WARNINGDO NOT attempt to operate pump unless the BREATHER VALVE IS OPEN.Valve is closed prior to shipping to prevent the loss of hydraulic fluid.
CAUTION Bed must be in UP position, or you will over extend ram.
PARTS LIST
Press Frame - 1
Press Bed - 1
Press Feet - 2
Z Bar - 1
1/2"-13 x 1-1/2" Hex Head Bolts - 10
1/2" Nuts - 10
Washers - 10
1-1/4" x 14" Press Pins - 4
Air MotorPump and Ram - 1
Pump Extension Handle - 1
1" x 3" x 14"Press Plates - 2
Accessory only - Not needed for assembly
Pushing Adapter - 1
Accessory only - Not needed for assembly
Bearing Shield - 1
Accessory only - Not needed for assembly
ESTIMATED ASSEMBLY TIME: 30 MINUTES
Examine box contents, then proceed with the following instructions.
TOOLS NEEDED
3/4" and 9/16" sockets and wrenches
ACCESSORIES
WARNINGLeg ends and press feet are sharp and potentially dangerous. Wear safety gloves and safety goggles.
Top view of pump
REPLACEMENT PARTS LIST
Air/Hydraulic Shop Press
12
15
8
2
1
14
13
3
4
55
18
11
10
55
Only items identified by part number are available separately.
10
9
17
8
6
7
1. BEFORE OPERATING PUMP, open petcock valve (breather) located on TOP of pump assembly by turning COUNTERCLOCKWISE.
5. Put cradle in the DOWN position. Use an adapter on your air hose and allow air to flow through the opening in the petcock valve into the pump.
6. Air that has flowed into the pump causes the cradle to move up and the ram to move down. If this happens,proceed to step 7. If not, check all hoses and connections and repeat the procedure.
9. Turn valve handle on pump COUNTERCLOCKWISE
a maximum of one (1) turn to open valve. Ram will retract as pressure is released.
2. Turn petcock valve (breather) on TOP of pump COUNTERCLOCKWISE to open.
SAFETY INFORMATION
This symbol alerts you to the possibility of serious injury or death if instructions are not followed.
This symbol alerts you to the possibility of damage to or destruction of equipment if instructions are not followed.
Failure to heed these warnings may result in loss of load, damage to the press and/or failure resulting in property damage, personal or fatal injury. This operating manual contains important details concern-
ing the safe operation of this tool. The user must read and understand these details before any use of the tool. This manual must be retained for future reference.
• Read, study, understand and follow all instructions before operating this press.• Always wear safety goggles, (users and bystanders).• Parts being pressed may splinter, shatter, or be ejected from the press at a dangerous
rate of speed. Because there are a variety of press applications, it is the responsibilityof the press owner to provide adequate guards, eye protection and protective clothingto the press operator.
• Visual inspection of the press should be made before use, checking for signs of cracked welds, bent bed pins, loose or missing bolts, leaks, or any other structural damage. Corrections must be made before using the press.
• Do not go near leaks. High pressure hydraulic fluid can puncture skin and cause serious injury, gangrene, or death. If injured, seek emergency medical help as immediate surgery is required to remove the fluid.
• Prior to use make sure the press is securely anchored to a concrete floor.• Keep hands, arms, feet, and legs out of work area. Accidental slippage can result in
personal injury.• Always use an accurate force gauge to measure pressing force.• Do not exceed the rated capacity or tamper with the pressure/force settings. When
attachments and adapters are used the rated capacity of the system shall be no greater than the rated capacity of the lowest rated component or combination of componentsthat make up the system.
• Avoid off-center loads. Offset loads can damage ram and may cause load to eject at a dangerous rate of speed. Do not use any spacer or extender between the press ram plunger and the item being pressed. If there is not enough ram stroke, adjust the height of the movable bolster.
• Remove all loads from movable bolster before attempting to adjust bolster height. Beware of possible falling bolster.
• Press only on loads supported by movable bolster and press plates included. Do not support loads on floor or press frame legs.
• When using any accessories such as press plates or arbor plates, be certain they are centered on the movable bolster and in full contact with both sides of the bolster.
• Before applying load, be certain all movable bolster supporting pins are fully engaged. Verify lift cables (if equipped) are slack before pressing on the bolster.
• Always use a bearing shield when pressing bearings.• Use caution when positioning work to be pressed to ensure the item to be pressed
cannot be ejected at a dangerous rate of speed.• Release hydraulic pressure before loosening any fittings.• Maintain proper hydraulic fluid levels.• Do not make any alterations or modifications to the press.• This product may contain one or more chemicals known to the State of California to
cause cancer and birth defects or other reproductive harm. Wash hands thoroughlyafter handling.
• Failure to heed and understand these markings may result in serious or fatal personal injury and/or property damage.
OWNER/USER RESPONSIBILITYThe owner and/or user must have an understanding of the manufacturer's operating instructions and warnings before using this press. Personnel involved in the use and operation of equipment shall be careful, competent, trained, and qualified in the safe operation of the equipment and its proper use when servicing motor vehicles and their components. Warning information should be emphasized and understood. If the operator is not fluent in English, the manufacturer's instructions and warnings shall be read to and discussed with the operator in the operator's native language by the purchaser/owner, making sure that the operator comprehends its contents.
Owner and/or user must study and maintain for future reference the manufacturer’s instructions. Owner and/or user is responsible for keeping all warning labels and instruction manuals legible and intact. Replacement labels and literature are available from the manufacturers.INSPECTIONVisual inspection of the shop press should be made before each use of the press, checking for damaged, loose or missing parts. Each press must be inspected by a manufacturer’s repair facility immediately, if subjected to an abnormal load or shock. Any press which appears to be damaged in any way, is found to be badly worn, or operates abnormally must be removed from service until necessary repairs are made by a manufacturers's authorized repair facility. It is recommended that an annual inspection of the press be made by a manufacturer’s authorized repair facility and that any defective parts, decals or warning labels be replaced with manufacturer’s specified parts. A list of authorized repair facilities is available from the manufacturer.
SAFETY INSTRUCTIONS• CHECK YOUR LOCAL, STATE AND FEDERAL REGULATIONS
REGARDING THE SAFE USE OF THIS EQUIPMENT.• Your safety is top priority. Please handle equipment with care.• Fully retract unit and remove all items from the press bed frame.• Support the press bed, and remove the pins.• Raise or lower bed to desired height and reinstall press pins. Be certain
pins are fully engaged in the parallel flanges of the upright columns.• Position press on a flat, level, hard surface, preferably concrete.
Make sure all nuts and bolts are tight.• Clear the area of bystanders, especially small children, before using.• Set the press bed to the required height. The press is most effective
when the work piece is located 1 inch below the ram’s retracted position.The compression stroke can include the entire 5 inch working range.
• The press is designed to exert a force on anything which is positionedbeneath its ram. The work piece can pop out from under the ram at ahigh rate of speed and injure someone.
• Pressing Bearings: It is essential that you use the bearing shield whenpressing bearings on or off.
WARNING
WARNING
CAUTION
THIS OPERATING MANUAL CONTAINS IMPORTANT SAFETY INFORMATION. READ CAREFULLY AND UNDERSTAND ALL INFORMATION BEFORE OPERATING THIS TOOL. SAVE THIS MANUAL FOR FUTURE USE.
5740AH - 40 Ton Air/Hydraulic Shop Press5750AH - 50 Ton Air/Hydraulic Shop Press
Sunex Part No. Total Height Inside Width Press Feet Length Bed Width Ram Stroke Pin Diameter PB Winch Sliding Head Press Plates Included
5740AH 74" 35" 29.75" 8.25" 6" 1.25" Y Y Y(2)
5750AH 74" 35" 29.75" 8.25" 6" 1.25" Y Y Y(2)
PRESS SPECIFICATIONS
OWNER'S MANUAL
CONTENTS:Page 1 Specifications
2 Safety Information and Warranty Information3 Parts List
4-6 Assembly Instructions 789
Pump and Ram Assembly InstructionsProcedure for Bleeding AirPump Instructions
10-11 Winch Kit Parts List and Winch Installation Instructions12 Replacement Parts List
© Copyright 2014, Sunex Tools®
5740AH, 5750AH rev. 12/05/14
5740AH - 40 Ton Air/Hydraulic Shop Press5750AH - 50 Ton Air/Hydraulic Shop Press
5740AH - 40 Ton Air/Hydraulic Shop Press5750AH - 50 Ton Air/Hydraulic Shop Press
5740AH - 40 Ton Air/Hydraulic Shop Press5750AH - 50 Ton Air/Hydraulic Shop Press
5740AH - 40 Ton Air/Hydraulic Shop Press5750AH - 50 Ton Air/Hydraulic Shop Press
5740AH - 40 Ton Air/Hydraulic Shop Press5750AH - 50 Ton Air/Hydraulic Shop Press
5740AH - 40 Ton Air/Hydraulic Shop Press5750AH - 50 Ton Air/Hydraulic Shop Press
5740AH - 40 Ton Air/Hydraulic Shop Press5750AH - 50 Ton Air/Hydraulic Shop Press
5740AH - 40 Ton Air/Hydraulic Shop Press5750AH - 50 Ton Air/Hydraulic Shop Press
5740AH - 40 Ton Air/Hydraulic Shop Press5750AH - 50 Ton Air/Hydraulic Shop Press
5740AH - 40 Ton Air/Hydraulic Shop Press5750AH - 50 Ton Air/Hydraulic Shop Press
5740AH - 40 Ton Air/Hydraulic Shop Press5750AH - 50 Ton Air/Hydraulic Shop Press
5740AH, 5750AH 2 rev. 12/05/14 5740AH, 5750AH 3 rev. 12/05/14
5740AH, 5750AH 4 rev. 12/05/14 5740AH, 5750AH 5 rev. 12/05/14
5740AH, 5750AH 6 rev. 12/05/14 5740AH, 5750AH 7 rev. 12/05/14
5740AH, 5750AH 8 rev. 12/05/14 5740AH, 5750AH 9 rev. 12/05/14
5740AH, 5750AH 10 rev. 12/05/14 5740AH, 5750AH 11 rev. 12/05/14
5740AH, 5750AH 12 rev. 12/05/14
PUMP AND RAM EXPLODED PARTS DIAGRAM
8.886"
9.113"
ITEM NO. DESCRIPTION QTY.
1 Base Weldment 12 Plug 13 * Polypak Seal (Parker) 24 1/2-13 x 2 Hex HD C-S GR 2 Zinc 15 Piston 16 * O-Ring (Parker) 17 Rod 18 Retaining Ring Int. 3.5 NOM 19 Piston Guide 110 Retractor Plate 111 Spring 212 Fitting Gauge 1.75 113 Gauge 114 90˚ Elbow 1/4 NPTF to -6 JIC 115 Hose Hydraulic 41 1/2 LG 7/16-20 JICF 1
RAM
PUMPITEM NO. DESCRIPTION QTY.
1 Tank 12 Tie Rod 43 1" Piston Body 14 1/2" Piston Body 15 1" Piston 16 1/2" Piston 17 1/4" MNPT Pressure Plug 18 Pump Body 19 Pump Lid 110 Pump Bracket 211 Valve Assembly 112 Pivot Pin 213 * 5/16" Steel Ball 514 Brass Drain Cock 115 Cradle Assembly 216 Hydraulic Hose 41-1/2" L 7/16-20 JICF 117 7/16-14 Fin Hex Nut Zinc 419 * O-Ring 120 * O-Ring 121 * 3-1/2" Seal 222 * 3-5/16" Seal 123 * 3-3/16" Seal 124 SHCS 7/16 14 x 1/2" 425 SHCS 7/16 14 x 3/4" 426 * Light Spring 227 * Heavy Spring 228 7/16" Split Lock Washer 629 Pump Filter 130 Pump Fitting 1/4" MNPT 7/16" JICF 131 7/8" Grip 132 Handle for Pump 133 * O-Ring 1
# 23 (Pump)QTY: 1
# 21 (Pump)QTY: 2
# 19 (Pump)QTY: 1
# 22 (Pump)QTY: 1
See Replacement Parts List for parts available separately.Parts with (*) are only available in Seal Kit, part number RSCBP1217.
10
9
15
1
7
6
4
8
5
3
1111
1
14
13
12
3
2
7
21
17
30
16
9
# 3 (Ram)(Poly Pak - Note: Only the upper seal normally needs replacement)QTY: 1
# 33 (Pump)(O-Ring for # 11 Valve Assembly on Pump)QTY: 1
# 6 (Ram)QTY: 1
# 20 (Pump)QTY: 1
# 13 (Pump)QTY: 5
2
28
14
1
25
2411
1327
10
31
32
15
20
6
4
23
28
25
241028
13
29
21
8
26 24
12
22
3
19
5
15
# 26 (Pump)QTY: 2
# 27 (Pump)QTY: 2
Individual parts pictured are components of the Seal Kit, RSCBP1217.
Air Motor not shown
5740AH - 40 Ton Air/Hydraulic Shop Press5750AH - 50 Ton Air/Hydraulic Shop Press
5740AH, 5750AH 13 rev. 12/05/14
ITEM NO. SUNEX PART NO. DESCRIPTION QTY.
1 RS345009 2" Pushing Adaptor (Spring) 22 Press Bed 13 Press Frame 14 Ram Frame 15 RSCBP1225 Press Pin 46 RS310012 Pushing Adapter 17 RSBS1 Bearing Shield 18 RSCBP1205 Press Plate 29 RSCBP1211 Press Feet 210 RSCBP1212 Z Bar 111 RSCBP1209 Pump Handle 112 RS40AOPAM Pump (with air motor) 113 RSCBP1202 Ram (includes gauge) (5740AH) 1
RSCBP1202GG Ram (includes gauge) (5750AH) 114 RSCBP1206 Gauge (5740AH) 1
RSCBP1206G Liquid Filled Gauge (5750AH) 1
ITEM NO. SUNEX PART NO. DESCRIPTION QTY.
15 RSCBP1204 Hose & Fitting 116 RSCBP1217 Seal Kit for Pump and Ram (not shown) 117 RS40MPPHK Press Hardware Kit 1 set
1/2"-13 x 1-1/2" Hex Head Bolt 10 1/2" Nut 10
Washer 1018 RSAAMO2 Air Motor (shown with pump) 119 RS4050WCH Winch 1not shown RSWHK Winch Hardware Kit 1 set
Cable Clamp 1 1/2"-13 x 1-1/2" Hex Head Bolt 2 1/2" Nut 2
Washer 2Winch 1
Short Cable (includes eye bolt) 1 Long Cable 1
not shown RS5740AHLK Product Label Kit 1 not shown RS5750AHLK Product Label Kit 1
12 Dark Gray- Long Cable
Light Gray- Short Cable
1. Move press bed into LOWEST position so it is resting on top of pins 1 and 2.
Right side of press
3. Thread the BARE end of the LONGER of the two steel cables up and through the pump bracket.
Right side of press,under pump assembly
2. Install pre-attached eye bolt on LONGER cable to press bed handle located under pump assembly. DO NOT FULLY TIGHTEN. Center with side of press bed and make sure there is enough room to lower or raise both nuts on eye bolt for precise alignment.
WARNINGDO NOT FULLY TIGHTEN.
WINCH KIT PARTS LIST
Winch - 1
Long Cable - 1
Short Cable- 1
Cable Clamp - 1
1/2"-13 x 1-1/2" Hex Head Bolts - 2
1/2" Nuts - 2
Washers - 2
WINCH INSTALLATION INSTRUCTIONS
4. Run the long cable up and OVER BOTH ROLLER BRACKETS and feed into winch. Be sure to thread 12 inches (1 foot) of extra cable through winch.
5. Once winch cable has been threaded, pull excess cable back through winch as shown in diagramabove. The cable should be locked tightly around itself with no excess cable left hanging. Operate winch enough to remove slack from longer cable.
WARNINGMount winch to frame AFTER threading cable.
6. Mount winch to frame using the provided washers, 1/2" nuts and 1/2"-13 x 1-1/2" bolts.
Left side of press, under winch
8. Install pre-attached eye bolt on SHORTER cable to press bed handle located under winch after feeding it around in step 7.
7. Feed the short cable by running it up and OVER first roller, then UNDER second roller. Loop the short cable back toward the winch and securely attach to the longer cable using the cable clamp. Remove slack from short cable before securing to long cable. Clamp should be NO LESS THAN ONE INCH (1") from roller.
9. Turn eye hooks to adjust and level press bed. Once bed is level,firmly tighten eye hook mounting hardware. The steel cable will stretch with use. It may be necessary to repeat this leveling procedure in the future.
10. Test the winch kit by raising and lowering the press bed from its lowest to highest position. Repeat and adjust until bed is level and moves freely throughout its entire range of motion.Cut excess cable when all adjustments are complete.
LONG CABLE top view of press
Top view of press with bed in lowest position
This end feeds into winch.
SHIPPING ADDRESS:Sunex Tools315 Hawkins Rd.Travelers Rest, South Carolina 29690
MAILING ADDRESS:Sunex ToolsP.O. Box 4215Greenville, South Carolina 29608
Note: Refer to manual from winch manufacturer for detailed instructions on winch assembly and cable threading procedure.
WINCH INSTALLATION INSTRUCTIONS CONTINUED
19
ASSEMBLY INSTRUCTIONS CONTINUED
Stand unit upright Slide bed above holes and hold in place Secure pins underneath bed, one at a time
1 2
6WARNING Pins must be COMPLETELY through BOTH SIDES of frame.
7
Let bed rest on inserted pins Place 3rd and 4th pin on each side Secure pins completely through bed and frame.
3 4
WARNING ALL FOUR (4) pins must be COMPLETELY through BOTH SIDES of frame in order to operate press.
Cross-section of press
Front view
Use bolts, washers and nuts to attach Z Bar to both sides of the press.
Note: Check all bolts for tightness. If press rocks, or is not level, loosen pressfeet slightly to compensate and retighten.
WARNINGBed must be at the BOTTOM of the frame before proceeding to the next step.
ASSEMBLY INSTRUCTIONS CONTINUED
4
5
Front view
Slide bed down to bottom of frame
Note: When sliding bed to frame bottom, DO NOT use bed handles.
PUMP INSTRUCTIONS
10
WARNINGDO NOT attempt to operate pump unless the BREATHER VALVE IS OPEN.Valve is closed prior to shipping to prevent the loss of hydraulic fluid.
CAUTIONHAND TIGHTEN VALVE ONLY.Excess pressure could damage the valve assembly.
CAUTIONDO NOT TURN RELEASE VALVE MORE THAN ONE FULL TURN or equipment may be disabled.
WARNING This symbol alerts you to the possibility of serious injury or death if instructions are not followed.
Failure to heed these warnings may result in loss of load, damage to the press and/or failure resulting in property damage, personal or fatal injury.This operating manual contains important details concerning the safe operation of this tool.The user must read and understand these details before any use of the tool.
This manual must be retained for future reference.
2. CLOSE the valve located on the FRONT of the pump assembly by turning CLOCKWISE. Connect using a 3/8" line. Do not exceed air pressure of 90-120 psig.
3. Squeeze air hose trigger until ram comes into contact with item to be pressed.
4. Once ram is in contact with the item to be pressed,insert pump handle into high pressure cradle. Using the high pressure pump moves the ram less with each stroke and requires less effort to apply pressure.
5. To relieve pressure and retract ram, turn valve located on FRONT of pump assembly ONE FULL TURN COUNTERCLOCKWISE.
Air Hose Trigger High Pressure Cradle
PUMP AND RAM ASSEMBLY INSTRUCTIONS
8
A
B
Note: There are two sets of holes for bolts. Use centermost holes on the side.
Note: Hose from pump’s outer side must run BEHIND the frame. Hose with nozzle will be used later.
This end up
Top of press frame, looking down
This end up
Note: Allow ram to rest on press bed while installing pump.
Note: Handle ram carefully to avoid damage to gauge or gauge face. Do not disconnect hoses prior to assembly.
Note: Position press feet on each side of the press.Attach one bolt, washer and nut on each side. Bolts should be attached OFFSET from one another.
Front view
Stand frame upside down Slide bed onto frame Slide bed down to bottom of frame
ASSEMBLY INSTRUCTIONS
1
3
2
Inside of frame
WARNINGBe aware of jagged edges on frame. Not all welds are smooth.Press bed can pinch or crush fingers.Wear safety gloves.
Note: In the upright position,inner bracing should form an inverted "v" with the narrower space facing the top of the press.
Note: Air motor must be operating at the same time.
PROCEDURE FOR BLEEDING AIR
9 1. Turn valve handle on FRONT of pump CLOCKWISE until closed. DO NOT OVERTIGHTEN.
3. Move press bed into highest position and lock bed into place with all four pins.
Air Hose Trigger
WARNING
Do not allow the ram to extend more than 5.5".
4. Place press plates DIRECTLY under ram, on press bed.
7. Squeeze trigger on air hose. Air will enter motor and extend the ram. Pump ram against press plates until gauge reads "5 Tons".
8. Insert pump handle into HIGH PRESSURE CRADLE for more precise control. Pump ram against press plates until gauge reads "10 Tons".
High Pressure Cradle
US TONSUS TONS
WARNINGDO NOT attempt to operate pump unless the BREATHER VALVE IS OPEN.Valve is closed prior to shipping to prevent the loss of hydraulic fluid.
CAUTION Bed must be in UP position, or you will over extend ram.
PARTS LIST
Press Frame - 1
Press Bed - 1
Press Feet - 2
Z Bar - 1
1/2"-13 x 1-1/2" Hex Head Bolts - 10
1/2" Nuts - 10
Washers - 10
1-1/4" x 14" Press Pins - 4
Air MotorPump and Ram - 1
Pump Extension Handle - 1
1" x 3" x 14"Press Plates - 2
Accessory only - Not needed for assembly
Pushing Adapter - 1
Accessory only - Not needed for assembly
Bearing Shield - 1
Accessory only - Not needed for assembly
ESTIMATED ASSEMBLY TIME: 30 MINUTES
Examine box contents, then proceed with the following instructions.
TOOLS NEEDED
3/4" and 9/16" sockets and wrenches
ACCESSORIES
WARNINGLeg ends and press feet are sharp and potentially dangerous. Wear safety gloves and safety goggles.
Top view of pump
REPLACEMENT PARTS LIST
Air/Hydraulic Shop Press
12
15
8
2
1
14
13
3
4
55
18
11
10
55
Only items identified by part number are available separately.
10
9
17
8
6
7
1. BEFORE OPERATING PUMP, open petcock valve (breather) located on TOP of pump assembly by turning COUNTERCLOCKWISE.
5. Put cradle in the DOWN position. Use an adapter on your air hose and allow air to flow through the opening in the petcock valve into the pump.
6. Air that has flowed into the pump causes the cradle to move up and the ram to move down. If this happens,proceed to step 7. If not, check all hoses and connections and repeat the procedure.
9. Turn valve handle on pump COUNTERCLOCKWISE
a maximum of one (1) turn to open valve. Ram will retract as pressure is released.
2. Turn petcock valve (breather) on TOP of pump COUNTERCLOCKWISE to open.
SAFETY INFORMATION
This symbol alerts you to the possibility of serious injury or death if instructions are not followed.
This symbol alerts you to the possibility of damage to or destruction of equipment if instructions are not followed.
Failure to heed these warnings may result in loss of load, damage to the press and/or failure resulting in property damage, personal or fatal injury. This operating manual contains important details concern-
ing the safe operation of this tool. The user must read and understand these details before any use of the tool. This manual must be retained for future reference.
• Read, study, understand and follow all instructions before operating this press.• Always wear safety goggles, (users and bystanders).• Parts being pressed may splinter, shatter, or be ejected from the press at a dangerous
rate of speed. Because there are a variety of press applications, it is the responsibility of the press owner to provide adequate guards, eye protection and protective clothing to the press operator.
• Visual inspection of the press should be made before use, checking for signs of cracked welds, bent bed pins, loose or missing bolts, leaks, or any other structural damage. Corrections must be made before using the press.
• Do not go near leaks. High pressure hydraulic fluid can puncture skin and cause serious injury, gangrene, or death. If injured, seek emergency medical help as immediate surgery is required to remove the fluid.
• Prior to use make sure the press is securely anchored to a concrete floor.• Keep hands, arms, feet, and legs out of work area. Accidental slippage can result in
personal injury.• Always use an accurate force gauge to measure pressing force.• Do not exceed the rated capacity or tamper with the pressure/force settings. When
attachments and adapters are used the rated capacity of the system shall be no greater than the rated capacity of the lowest rated component or combination of components that make up the system.
• Avoid off-center loads. Offset loads can damage ram and may cause load to eject at a dangerous rate of speed. Do not use any spacer or extender between the press ram plunger and the item being pressed. If there is not enough ram stroke, adjust the height of the movable bolster.
• Remove all loads from movable bolster before attempting to adjust bolster height. Beware of possible falling bolster.
• Press only on loads supported by movable bolster and press plates included. Do not support loads on floor or press frame legs.
• When using any accessories such as press plates or arbor plates, be certain they are centered on the movable bolster and in full contact with both sides of the bolster.
• Before applying load, be certain all movable bolster supporting pins are fully engaged. Verify lift cables (if equipped) are slack before pressing on the bolster.
• Always use a bearing shield when pressing bearings.• Use caution when positioning work to be pressed to ensure the item to be pressed
cannot be ejected at a dangerous rate of speed.• Release hydraulic pressure before loosening any fittings.• Maintain proper hydraulic fluid levels.• Do not make any alterations or modifications to the press.• This product may contain one or more chemicals known to the State of California to
cause cancer and birth defects or other reproductive harm. Wash hands thoroughly after handling.
• Failure to heed and understand these markings may result in serious or fatal personal injury and/or property damage.
OWNER/USER RESPONSIBILITYThe owner and/or user must have an understanding of the manufacturer's operating instructions and warnings before using this press. Personnel involved in the use and operation of equipment shall be careful, competent, trained, and qualified in the safe operation of the equipment and its proper use when servicing motor vehicles and their components. Warning information should be emphasized and understood. If the operator is not fluent in English, the manufacturer's instructions and warnings shall be read to and discussed with the operator in the operator's native language by the purchaser/owner, making sure that the operator comprehends its contents.
Owner and/or user must study and maintain for future reference the manufacturer’s instructions. Owner and/or user is responsible for keeping all warning labels and instruction manuals legible and intact. Replacement labels and literature are available from the manufacturers.INSPECTIONVisual inspection of the shop press should be made before each use of the press, checking for damaged, loose or missing parts. Each press must be inspected by a manufacturer’s repair facility immediately, if subjected to an abnormal load or shock. Any press which appears to be damaged in any way, is found to be badly worn, or operates abnormally must be removed from service until necessary repairs are made by a manufacturers's authorized repair facility. It is recommended that an annual inspection of the press be made by a manufacturer’s authorized repair facility and that any defective parts, decals or warning labels be replaced with manufacturer’s specified parts. A list of authorized repair facilities is available from the manufacturer.
SAFETY INSTRUCTIONS• CHECK YOUR LOCAL, STATE AND FEDERAL REGULATIONS
REGARDING THE SAFE USE OF THIS EQUIPMENT. • Your safety is top priority. Please handle equipment with care.• Fully retract unit and remove all items from the press bed frame. • Support the press bed, and remove the pins. • Raise or lower bed to desired height and reinstall press pins. Be certain
pins are fully engaged in the parallel flanges of the upright columns.• Position press on a flat, level, hard surface, preferably concrete.
Make sure all nuts and bolts are tight.• Clear the area of bystanders, especially small children, before using.• Set the press bed to the required height. The press is most effective
when the work piece is located 1 inch below the ram’s retracted position. The compression stroke can include the entire 5 inch working range.
• The press is designed to exert a force on anything which is positioned beneath its ram. The work piece can pop out from under the ram at a high rate of speed and injure someone.
• Pressing Bearings: It is essential that you use the bearing shield when pressing bearings on or off.
LIMITED WARRANTY:SUNEX INTERNATIONAL, INC. WARRANTS TO ITS CUSTOMERS THAT THE COMPANY’S SUNEX TOOLS® BRANDED PRODUCTS ARE FREE FROM DEFECTS IN WORKMANSHIP AND MATERIALS.Sunex International, Inc. will repair or replace its Sunex Tools® branded products which fail to give satisfactory service due to defective workmanship or materials, based upon the terms and conditions of the following described warranty plans attributed to that specific product. This product carries a ONE-YEAR warranty. During this warranty period, Sunex Tools® will repair or replace at our option any part or unit which proves to be defective in material or workmanship. Other important warranty information....This warranty does not cover damage to equipment or tools arising from alteration, abuse, misuse, damage and does not cover any repairs or replace-ment made by anyone other than Sunex Tools® or its authorized warranty service centers. The foregoing obligation is Sunex Tools®’ sole liability under this or any implied warranty and under no circumstances shall we be liable for any incidental or consequential damages. Note: Some states do not allow the exclusion or limitation of incidental or consequential damages, so the above limitation or exclusion may not apply to you.Return equipment or parts to Sunex Tools®, transportation prepaid. Be certain to include your name and address, evidence of the purchase date, and description of the suspected defect.If you have any questions about warranty service, please write to Sunex Tools®. This warranty gives you specific legal rights and you may also have other rights which vary from state to state. Repair kits and replacement parts are available for many of Sunex Tools® products regardless of whether or not the product isstill covered by a warranty plan.SHIPPING ADDRESS: MAILING ADDRESS:Sunex Tools Sunex Tools315 Hawkins Rd. P.O. Box 4215Travelers Rest, South Carolina 29690 Greenville, South Carolina 29608
WARNING
WARNING
CAUTION
THIS OPERATING MANUAL CONTAINS IMPORTANT SAFETY INFORMATION. READ CAREFULLY AND UNDERSTAND ALL INFORMATION BEFORE OPERATING THIS TOOL. SAVE THIS MANUAL FOR FUTURE USE.
5740AH - 40 Ton Air/Hydraulic Shop Press5750AH - 50 Ton Air/Hydraulic Shop Press
Sunex Part No. Total Height Inside Width Press Feet Length Bed Width Ram Stroke Pin Diameter PB Winch Sliding Head Press Plates Included
5740AH 74" 35" 29.75" 8.25" 6" 1.25" Y Y Y(2)
5750AH 74" 35" 29.75" 8.25" 6" 1.25" Y Y Y(2)
PRESS SPECIFICATIONS
OWNER'S MANUAL
CONTENTS:Page 1 Specifications
2 Safety Information and Warranty Information3 Parts List
4-6 Assembly Instructions 789
Pump and Ram Assembly InstructionsProcedure for Bleeding AirPump Instructions
10-11 Winch Kit Parts List and Winch Installation Instructions12 Replacement Parts List
© Copyright 2014, Sunex Tools®
5740AH, 5750AH rev. 12/05/14
5740AH - 40 Ton Air/Hydraulic Shop Press5750AH - 50 Ton Air/Hydraulic Shop Press
5740AH - 40 Ton Air/Hydraulic Shop Press5750AH - 50 Ton Air/Hydraulic Shop Press
5740AH - 40 Ton Air/Hydraulic Shop Press5750AH - 50 Ton Air/Hydraulic Shop Press
5740AH - 40 Ton Air/Hydraulic Shop Press5750AH - 50 Ton Air/Hydraulic Shop Press
5740AH - 40 Ton Air/Hydraulic Shop Press5750AH - 50 Ton Air/Hydraulic Shop Press
5740AH - 40 Ton Air/Hydraulic Shop Press5750AH - 50 Ton Air/Hydraulic Shop Press
5740AH - 40 Ton Air/Hydraulic Shop Press5750AH - 50 Ton Air/Hydraulic Shop Press
5740AH - 40 Ton Air/Hydraulic Shop Press5750AH - 50 Ton Air/Hydraulic Shop Press
5740AH - 40 Ton Air/Hydraulic Shop Press5750AH - 50 Ton Air/Hydraulic Shop Press
5740AH - 40 Ton Air/Hydraulic Shop Press5750AH - 50 Ton Air/Hydraulic Shop Press
5740AH - 40 Ton Air/Hydraulic Shop Press5750AH - 50 Ton Air/Hydraulic Shop Press
5740AH, 5750AH 2 rev. 12/05/14 5740AH, 5750AH 3 rev. 12/05/14
5740AH, 5750AH 4 rev. 12/05/14 5740AH, 5750AH 5 rev. 12/05/14
5740AH, 5750AH 6 rev. 12/05/14 5740AH, 5750AH 7 rev. 12/05/14
5740AH, 5750AH 8 rev. 12/05/14 5740AH, 5750AH 9 rev. 12/05/14
5740AH, 5750AH 10 rev. 12/05/14 5740AH, 5750AH 11 rev. 12/05/14
5740AH, 5750AH 12 rev. 12/05/14
PUMP AND RAM EXPLODED PARTS DIAGRAM
8.886"
9.113"
ITEM NO. DESCRIPTION QTY.
1 Base Weldment 12 Plug 13 * Polypak Seal (Parker) 24 1/2-13 x 2 Hex HD C-S GR 2 Zinc 15 Piston 16 * O-Ring (Parker) 17 Rod 18 Retaining Ring Int. 3.5 NOM 19 Piston Guide 110 Retractor Plate 111 Spring 212 Fitting Gauge 1.75 113 Gauge 114 90˚ Elbow 1/4 NPTF to -6 JIC 115 Hose Hydraulic 41 1/2 LG 7/16-20 JICF 1
RAM
PUMPITEM NO. DESCRIPTION QTY.
1 Tank 12 Tie Rod 43 1" Piston Body 14 1/2" Piston Body 15 1" Piston 16 1/2" Piston 17 1/4" MNPT Pressure Plug 18 Pump Body 19 Pump Lid 110 Pump Bracket 211 Valve Assembly 112 Pivot Pin 213 * 5/16" Steel Ball 514 Brass Drain Cock 115 Cradle Assembly 216 Hydraulic Hose 41-1/2" L 7/16-20 JICF 117 7/16-14 Fin Hex Nut Zinc 419 * O-Ring 120 * O-Ring 121 * 3-1/2" Seal 222 * 3-5/16" Seal 123 * 3-3/16" Seal 124 SHCS 7/16 14 x 1/2" 425 SHCS 7/16 14 x 3/4" 426 * Light Spring 227 * Heavy Spring 228 7/16" Split Lock Washer 629 Pump Filter 130 Pump Fitting 1/4" MNPT 7/16" JICF 131 7/8" Grip 132 Handle for Pump 133 * O-Ring 1
# 23 (Pump)QTY: 1
# 21 (Pump)QTY: 2
# 19 (Pump)QTY: 1
# 22 (Pump)QTY: 1
See Replacement Parts List for parts available separately.Parts with (*) are only available in Seal Kit, part number RSCBP1217.
10
9
15
1
7
6
4
8
5
3
1111
1
14
13
12
3
2
7
21
17
30
16
9
# 3 (Ram)(Poly Pak - Note: Only the upper seal normally needs replacement)QTY: 1
# 33 (Pump)(O-Ring for # 11 Valve Assembly on Pump)QTY: 1
# 6 (Ram)QTY: 1
# 20 (Pump)QTY: 1
# 13 (Pump)QTY: 5
2
28
14
1
25
2411
1327
10
31
32
15
20
6
4
23
28
25
241028
13
29
21
8
26 24
12
22
3
19
5
15
# 26 (Pump)QTY: 2
# 27 (Pump)QTY: 2
Individual parts pictured are components of the Seal Kit, RSCBP1217.
Air Motor not shown
5740AH - 40 Ton Air/Hydraulic Shop Press5750AH - 50 Ton Air/Hydraulic Shop Press
5740AH, 5750AH 13 rev. 12/05/14
ITEM NO. SUNEX PART NO. DESCRIPTION QTY.
1 RS345009 2" Pushing Adaptor (Spring) 22 Press Bed 13 Press Frame 14 Ram Frame 15 RSCBP1225 Press Pin 46 RS310012 Pushing Adapter 17 RSBS1 Bearing Shield 18 RSCBP1205 Press Plate 29 RSCBP1211 Press Feet 210 RSCBP1212 Z Bar 111 RSCBP1209 Pump Handle 112 RS40AOPAM Pump (with air motor) 113 RSCBP1202 Ram (includes gauge) (5740AH) 1
RSCBP1202GG Ram (includes gauge) (5750AH) 114 RSCBP1206 Gauge (5740AH) 1
RSCBP1206G Liquid Filled Gauge (5750AH) 1
ITEM NO. SUNEX PART NO. DESCRIPTION QTY.
15 RSCBP1204 Hose & Fitting 116 RSCBP1217 Seal Kit for Pump and Ram (not shown) 117 RS40MPPHK Press Hardware Kit 1 set
1/2"-13 x 1-1/2" Hex Head Bolt 10 1/2" Nut 10
Washer 1018 RSAAMO2 Air Motor (shown with pump) 119 RS4050WCH Winch 1not shown RSWHK Winch Hardware Kit 1 set
Cable Clamp 1 1/2"-13 x 1-1/2" Hex Head Bolt 2 1/2" Nut 2
Washer 2Winch 1
Short Cable (includes eye bolt) 1 Long Cable 1
not shown RS5740AHLK Product Label Kit 1 not shown RS5750AHLK Product Label Kit 1
12 Dark Gray- Long Cable
Light Gray- Short Cable
1. Move press bed into LOWEST position so it is resting on top of pins 1 and 2.
Right side of press
3. Thread the BARE end of the LONGER of the two steel cables up and through the pump bracket.
Right side of press,under pump assembly
2. Install pre-attached eye bolt on LONGER cable to press bed handle located under pump assembly. DO NOT FULLY TIGHTEN. Center with side of press bed and make sure there is enough room to lower or raise both nuts on eye bolt for precise alignment.
WARNINGDO NOT FULLY TIGHTEN.
WINCH KIT PARTS LIST
Winch - 1
Long Cable - 1
Short Cable- 1
Cable Clamp - 1
1/2"-13 x 1-1/2" Hex Head Bolts - 2
1/2" Nuts - 2
Washers - 2
WINCH INSTALLATION INSTRUCTIONS
4. Run the long cable up and OVER BOTH ROLLER BRACKETS and feed into winch. Be sure to thread 12 inches (1 foot) of extra cable through winch.
5. Once winch cable has been threaded, pull excess cable back through winch as shown in diagramabove. The cable should be locked tightly around itself with no excess cable left hanging. Operate winch enough to remove slack from longer cable.
WARNINGMount winch to frame AFTER threading cable.
6. Mount winch to frame using the provided washers, 1/2" nuts and 1/2"-13 x 1-1/2" bolts.
Left side of press, under winch
8. Install pre-attached eye bolt on SHORTER cable to press bed handle located under winch after feeding it around in step 7.
7. Feed the short cable by running it up and OVER first roller, then UNDER second roller. Loop the short cable back toward the winch and securely attach to the longer cable using the cable clamp. Remove slack from short cable before securing to long cable. Clamp should be NO LESS THAN ONE INCH (1") from roller.
9. Turn eye hooks to adjust and level press bed. Once bed is level,firmly tighten eye hook mounting hardware. The steel cable will stretch with use. It may be necessary to repeat this leveling procedure in the future.
10. Test the winch kit by raising and lowering the press bed from its lowest to highest position. Repeat and adjust until bed is level and moves freely throughout its entire range of motion.Cut excess cable when all adjustments are complete.
LONG CABLE top view of press
Top view of press with bed in lowest position
This end feeds into winch.
SHIPPING ADDRESS:Sunex Tools315 Hawkins Rd.Travelers Rest, South Carolina 29690
MAILING ADDRESS:Sunex ToolsP.O. Box 4215Greenville, South Carolina 29608
Note: Refer to manual from winch manufacturer for detailed instructions on winch assembly and cable threading procedure.
WINCH INSTALLATION INSTRUCTIONS CONTINUED

19
ASSEMBLY INSTRUCTIONS CONTINUED
Stand unit upright Slide bed above holes and hold in place Secure pins underneath bed, one at a time
1 2
6WARNING Pins must be COMPLETELY through BOTH SIDES of frame.
7
Let bed rest on inserted pins Place 3rd and 4th pin on each side Secure pins completely through bed and frame.
3 4
WARNING ALL FOUR (4) pins must be COMPLETELY through BOTH SIDES of frame in order to operate press.
Cross-section of press
Front view
Use bolts, washers and nuts to attach Z Bar to both sides of the press.
Note: Check all bolts for tightness. If press rocks, or is not level, loosen pressfeet slightly to compensate and retighten.
WARNINGBed must be at the BOTTOM of the frame before proceeding to the next step.
ASSEMBLY INSTRUCTIONS CONTINUED
4
5
Front view
Slide bed down to bottom of frame
Note: When sliding bed to frame bottom, DO NOT use bed handles.
PUMP INSTRUCTIONS
10
WARNINGDO NOT attempt to operate pump unless the BREATHER VALVE IS OPEN.Valve is closed prior to shipping to prevent the loss of hydraulic fluid.
CAUTIONHAND TIGHTEN VALVE ONLY.Excess pressure could damage the valve assembly.
CAUTIONDO NOT TURN RELEASE VALVE MORE THAN ONE FULL TURN or equipment may be disabled.
WARNING This symbol alerts you to the possibility of serious injury or death if instructions are not followed.
Failure to heed these warnings may result in loss of load, damage to the press and/or failure resulting in property damage, personal or fatal injury.This operating manual contains important details concerning the safe operation of this tool.The user must read and understand these details before any use of the tool.
This manual must be retained for future reference.
2. CLOSE the valve located on the FRONT of the pump assembly by turning CLOCKWISE. Connect using a 3/8" line. Do not exceed air pressure of 90-120 psig.
3. Squeeze air hose trigger until ram comes into contact with item to be pressed.
4. Once ram is in contact with the item to be pressed,insert pump handle into high pressure cradle. Using the high pressure pump moves the ram less with each stroke and requires less effort to apply pressure.
5. To relieve pressure and retract ram, turn valve located on FRONT of pump assembly ONE FULL TURN COUNTERCLOCKWISE.
Air Hose Trigger High Pressure Cradle
PUMP AND RAM ASSEMBLY INSTRUCTIONS
8
A
B
Note: There are two sets of holes for bolts. Use centermost holes on the side.
Note: Hose from pump’s outer side must run BEHIND the frame. Hose with nozzle will be used later.
This end up
Top of press frame, looking down
This end up
Note: Allow ram to rest on press bed while installing pump.
Note: Handle ram carefully to avoid damage to gauge or gauge face. Do not disconnect hoses prior to assembly.
Note: Position press feet on each side of the press.Attach one bolt, washer and nut on each side. Bolts should be attached OFFSET from one another.
Front view
Stand frame upside down Slide bed onto frame Slide bed down to bottom of frame
ASSEMBLY INSTRUCTIONS
1
3
2
Inside of frame
WARNINGBe aware of jagged edges on frame. Not all welds are smooth. Press bed can pinch or crush fingers. Wear safety gloves.
Note: In the upright position, inner bracing should form an inverted "v" with the narrower space facing the top of the press.
Note: Air motor must be operating at the same time.
PROCEDURE FOR BLEEDING AIR
9 1. Turn valve handle on FRONT of pump CLOCKWISE until closed. DO NOT OVERTIGHTEN.
3. Move press bed into highest position and lock bed into place with all four pins.
Air Hose Trigger
WARNING
Do not allow the ram to extend more than 5.5".
4. Place press plates DIRECTLY under ram, on press bed.
7. Squeeze trigger on air hose. Air will enter motor and extend the ram. Pump ram against press plates until gauge reads "5 Tons".
8. Insert pump handle into HIGH PRESSURE CRADLE for more precise control. Pump ram against press plates until gauge reads "10 Tons".
High Pressure Cradle
US TONSUS TONS
WARNINGDO NOT attempt to operate pump unless the BREATHER VALVE IS OPEN.Valve is closed prior to shipping to prevent the loss of hydraulic fluid.
CAUTION Bed must be in UP position, or you will over extend ram.
PARTS LIST
Press Frame - 1
Press Bed - 1
Press Feet - 2
Z Bar - 1
1/2"-13 x 1-1/2" Hex Head Bolts - 10
1/2" Nuts - 10
Washers - 10
1-1/4" x 14" Press Pins - 4
Air MotorPump and Ram - 1
Pump Extension Handle - 1
1" x 3" x 14"Press Plates - 2
Accessory only - Not needed for assembly
Pushing Adapter - 1
Accessory only - Not needed for assembly
Bearing Shield - 1
Accessory only - Not needed for assembly
ESTIMATED ASSEMBLY TIME: 30 MINUTES
Examine box contents, then proceed with the following instructions.
TOOLS NEEDED
3/4" and 9/16" sockets and wrenches
ACCESSORIES
WARNINGLeg ends and press feet are sharp and potentially dangerous. Wear safety gloves and safety goggles.
Top view of pump
REPLACEMENT PARTS LIST
Air/Hydraulic Shop Press
12
15
8
2
1
14
13
3
4
55
18
11
10
55
Only items identified by part number are available separately.
10
9
17
8
6
7
1. BEFORE OPERATING PUMP, open petcock valve (breather) located on TOP of pump assembly by turning COUNTERCLOCKWISE.
5. Put cradle in the DOWN position. Use an adapter on your air hose and allow air to flow through the opening in the petcock valve into the pump.
6. Air that has flowed into the pump causes the cradle to move up and the ram to move down. If this happens,proceed to step 7. If not, check all hoses and connections and repeat the procedure.
9. Turn valve handle on pump COUNTERCLOCKWISE
a maximum of one (1) turn to open valve. Ram will retract as pressure is released.
2. Turn petcock valve (breather) on TOP of pump COUNTERCLOCKWISE to open.
SAFETY INFORMATION
This symbol alerts you to the possibility of serious injury or death if instructions are not followed.
This symbol alerts you to the possibility of damage to or destruction of equipment if instructions are not followed.
Failure to heed these warnings may result in loss of load, damage to the press and/or failure resulting in property damage, personal or fatal injury. This operating manual contains important details concern-
ing the safe operation of this tool. The user must read and understand these details before any use of the tool. This manual must be retained for future reference.
• Read, study, understand and follow all instructions before operating this press.• Always wear safety goggles, (users and bystanders).• Parts being pressed may splinter, shatter, or be ejected from the press at a dangerous
rate of speed. Because there are a variety of press applications, it is the responsibility of the press owner to provide adequate guards, eye protection and protective clothing to the press operator.
• Visual inspection of the press should be made before use, checking for signs of cracked welds, bent bed pins, loose or missing bolts, leaks, or any other structural damage. Corrections must be made before using the press.
• Do not go near leaks. High pressure hydraulic fluid can puncture skin and cause serious injury, gangrene, or death. If injured, seek emergency medical help as immediate surgery is required to remove the fluid.
• Prior to use make sure the press is securely anchored to a concrete floor.• Keep hands, arms, feet, and legs out of work area. Accidental slippage can result in
personal injury.• Always use an accurate force gauge to measure pressing force.• Do not exceed the rated capacity or tamper with the pressure/force settings. When
attachments and adapters are used the rated capacity of the system shall be no greater than the rated capacity of the lowest rated component or combination of components that make up the system.
• Avoid off-center loads. Offset loads can damage ram and may cause load to eject at a dangerous rate of speed. Do not use any spacer or extender between the press ram plunger and the item being pressed. If there is not enough ram stroke, adjust the height of the movable bolster.
• Remove all loads from movable bolster before attempting to adjust bolster height. Beware of possible falling bolster.
• Press only on loads supported by movable bolster and press plates included. Do not support loads on floor or press frame legs.
• When using any accessories such as press plates or arbor plates, be certain they are centered on the movable bolster and in full contact with both sides of the bolster.
• Before applying load, be certain all movable bolster supporting pins are fully engaged. Verify lift cables (if equipped) are slack before pressing on the bolster.
• Always use a bearing shield when pressing bearings.• Use caution when positioning work to be pressed to ensure the item to be pressed
cannot be ejected at a dangerous rate of speed.• Release hydraulic pressure before loosening any fittings.• Maintain proper hydraulic fluid levels.• Do not make any alterations or modifications to the press.• This product may contain one or more chemicals known to the State of California to
cause cancer and birth defects or other reproductive harm. Wash hands thoroughly after handling.
• Failure to heed and understand these markings may result in serious or fatal personal injury and/or property damage.
OWNER/USER RESPONSIBILITYThe owner and/or user must have an understanding of the manufacturer's operating instructions and warnings before using this press. Personnel involved in the use and operation of equipment shall be careful, competent, trained, and qualified in the safe operation of the equipment and its proper use when servicing motor vehicles and their components. Warning information should be emphasized and understood. If the operator is not fluent in English, the manufacturer's instructions and warnings shall be read to and discussed with the operator in the operator's native language by the purchaser/owner, making sure that the operator comprehends its contents.
Owner and/or user must study and maintain for future reference the manufacturer’s instructions. Owner and/or user is responsible for keeping all warning labels and instruction manuals legible and intact. Replacement labels and literature are available from the manufacturers.INSPECTIONVisual inspection of the shop press should be made before each use of the press, checking for damaged, loose or missing parts. Each press must be inspected by a manufacturer’s repair facility immediately, if subjected to an abnormal load or shock. Any press which appears to be damaged in any way, is found to be badly worn, or operates abnormally must be removed from service until necessary repairs are made by a manufacturers's authorized repair facility. It is recommended that an annual inspection of the press be made by a manufacturer’s authorized repair facility and that any defective parts, decals or warning labels be replaced with manufacturer’s specified parts. A list of authorized repair facilities is available from the manufacturer.
SAFETY INSTRUCTIONS• CHECK YOUR LOCAL, STATE AND FEDERAL REGULATIONS
REGARDING THE SAFE USE OF THIS EQUIPMENT. • Your safety is top priority. Please handle equipment with care.• Fully retract unit and remove all items from the press bed frame. • Support the press bed, and remove the pins. • Raise or lower bed to desired height and reinstall press pins. Be certain
pins are fully engaged in the parallel flanges of the upright columns.• Position press on a flat, level, hard surface, preferably concrete.
Make sure all nuts and bolts are tight.• Clear the area of bystanders, especially small children, before using.• Set the press bed to the required height. The press is most effective
when the work piece is located 1 inch below the ram’s retracted position. The compression stroke can include the entire 5 inch working range.
• The press is designed to exert a force on anything which is positioned beneath its ram. The work piece can pop out from under the ram at a high rate of speed and injure someone.
• Pressing Bearings: It is essential that you use the bearing shield when pressing bearings on or off.
LIMITED WARRANTY:SUNEX INTERNATIONAL, INC. WARRANTS TO ITS CUSTOMERS THAT THE COMPANY’S SUNEX TOOLS® BRANDED PRODUCTS ARE FREE FROM DEFECTS IN WORKMANSHIP AND MATERIALS.Sunex International, Inc. will repair or replace its Sunex Tools® branded products which fail to give satisfactory service due to defective workmanship or materials, based upon the terms and conditions of the following described warranty plans attributed to that specific product. This product carries a ONE-YEAR warranty. During this warranty period, Sunex Tools® will repair or replace at our option any part or unit which proves to be defective in material or workmanship. Other important warranty information....This warranty does not cover damage to equipment or tools arising from alteration, abuse, misuse, damage and does not cover any repairs or replace-ment made by anyone other than Sunex Tools® or its authorized warranty service centers. The foregoing obligation is Sunex Tools®’ sole liability under this or any implied warranty and under no circumstances shall we be liable for any incidental or consequential damages. Note: Some states do not allow the exclusion or limitation of incidental or consequential damages, so the above limitation or exclusion may not apply to you.Return equipment or parts to Sunex Tools®, transportation prepaid. Be certain to include your name and address, evidence of the purchase date, and description of the suspected defect.If you have any questions about warranty service, please write to Sunex Tools®. This warranty gives you specific legal rights and you may also have other rights which vary from state to state. Repair kits and replacement parts are available for many of Sunex Tools® products regardless of whether or not the product isstill covered by a warranty plan.SHIPPING ADDRESS: MAILING ADDRESS:Sunex Tools Sunex Tools315 Hawkins Rd. P.O. Box 4215Travelers Rest, South Carolina 29690 Greenville, South Carolina 29608
WARNING
WARNING
CAUTION
THIS OPERATING MANUAL CONTAINS IMPORTANT SAFETY INFORMATION. READ CAREFULLY AND UNDERSTAND ALL INFORMATION BEFORE OPERATING THIS TOOL. SAVE THIS MANUAL FOR FUTURE USE.
5740AH - 40 Ton Air/Hydraulic Shop Press5750AH - 50 Ton Air/Hydraulic Shop Press
Sunex Part No. Total Height Inside Width Press Feet Length Bed Width Ram Stroke Pin Diameter PB Winch Sliding Head Press Plates Included
5740AH 74" 35" 29.75" 8.25" 6" 1.25" Y Y Y(2)
5750AH 74" 35" 29.75" 8.25" 6" 1.25" Y Y Y(2)
PRESS SPECIFICATIONS
OWNER'S MANUAL
CONTENTS:Page 1 Specifications
2 Safety Information and Warranty Information3 Parts List
4-6 Assembly Instructions 789
Pump and Ram Assembly InstructionsProcedure for Bleeding AirPump Instructions
10-11 Winch Kit Parts List and Winch Installation Instructions12 Replacement Parts List
© Copyright 2014, Sunex Tools®
5740AH, 5750AH rev. 12/05/14
5740AH - 40 Ton Air/Hydraulic Shop Press5750AH - 50 Ton Air/Hydraulic Shop Press
5740AH - 40 Ton Air/Hydraulic Shop Press5750AH - 50 Ton Air/Hydraulic Shop Press
5740AH - 40 Ton Air/Hydraulic Shop Press5750AH - 50 Ton Air/Hydraulic Shop Press
5740AH - 40 Ton Air/Hydraulic Shop Press5750AH - 50 Ton Air/Hydraulic Shop Press
5740AH - 40 Ton Air/Hydraulic Shop Press5750AH - 50 Ton Air/Hydraulic Shop Press
5740AH - 40 Ton Air/Hydraulic Shop Press5750AH - 50 Ton Air/Hydraulic Shop Press
5740AH - 40 Ton Air/Hydraulic Shop Press5750AH - 50 Ton Air/Hydraulic Shop Press
5740AH - 40 Ton Air/Hydraulic Shop Press5750AH - 50 Ton Air/Hydraulic Shop Press
5740AH - 40 Ton Air/Hydraulic Shop Press5750AH - 50 Ton Air/Hydraulic Shop Press
5740AH - 40 Ton Air/Hydraulic Shop Press5750AH - 50 Ton Air/Hydraulic Shop Press
5740AH - 40 Ton Air/Hydraulic Shop Press5750AH - 50 Ton Air/Hydraulic Shop Press
5740AH, 5750AH 2 rev. 12/05/14 5740AH, 5750AH 3 rev. 12/05/14
5740AH, 5750AH 4 rev. 12/05/14 5740AH, 5750AH 5 rev. 12/05/14
5740AH, 5750AH 6 rev. 12/05/14 5740AH, 5750AH 7 rev. 12/05/14
5740AH, 5750AH 8 rev. 12/05/14 5740AH, 5750AH 9 rev. 12/05/14
5740AH, 5750AH 10 rev. 12/05/14 5740AH, 5750AH 11 rev. 12/05/14
5740AH, 5750AH 12 rev. 12/05/14
PUMP AND RAM EXPLODED PARTS DIAGRAM
8.886"
9.113"
ITEM NO. DESCRIPTION QTY.
1 Base Weldment 12 Plug 13 * Polypak Seal (Parker) 24 1/2-13 x 2 Hex HD C-S GR 2 Zinc 15 Piston 16 * O-Ring (Parker) 17 Rod 18 Retaining Ring Int. 3.5 NOM 19 Piston Guide 110 Retractor Plate 111 Spring 212 Fitting Gauge 1.75 113 Gauge 114 90˚ Elbow 1/4 NPTF to -6 JIC 115 Hose Hydraulic 41 1/2 LG 7/16-20 JICF 1
RAM
PUMPITEM NO. DESCRIPTION QTY.
1 Tank 12 Tie Rod 43 1" Piston Body 14 1/2" Piston Body 15 1" Piston 16 1/2" Piston 17 1/4" MNPT Pressure Plug 18 Pump Body 19 Pump Lid 110 Pump Bracket 211 Valve Assembly 112 Pivot Pin 213 * 5/16" Steel Ball 514 Brass Drain Cock 115 Cradle Assembly 216 Hydraulic Hose 41-1/2" L 7/16-20 JICF 117 7/16-14 Fin Hex Nut Zinc 419 * O-Ring 120 * O-Ring 121 * 3-1/2" Seal 222 * 3-5/16" Seal 123 * 3-3/16" Seal 124 SHCS 7/16 14 x 1/2" 425 SHCS 7/16 14 x 3/4" 426 * Light Spring 227 * Heavy Spring 228 7/16" Split Lock Washer 629 Pump Filter 130 Pump Fitting 1/4" MNPT 7/16" JICF 131 7/8" Grip 132 Handle for Pump 133 * O-Ring 1
# 23 (Pump)QTY: 1
# 21 (Pump)QTY: 2
# 19 (Pump)QTY: 1
# 22 (Pump)QTY: 1
See Replacement Parts List for parts available separately.Parts with (*) are only available in Seal Kit, part number RSCBP1217.
10
9
15
1
7
6
4
8
5
3
1111
1
14
13
12
3
2
7
21
17
30
16
9
# 3 (Ram)(Poly Pak - Note: Only the upper seal normally needs replacement)QTY: 1
# 33 (Pump)(O-Ring for # 11 Valve Assembly on Pump)QTY: 1
# 6 (Ram)QTY: 1
# 20 (Pump)QTY: 1
# 13 (Pump)QTY: 5
2
28
14
1
25
2411
1327
10
31
32
15
20
6
4
23
28
25
241028
13
29
21
8
26 24
12
22
3
19
5
15
# 26 (Pump)QTY: 2
# 27 (Pump)QTY: 2
Individual parts pictured are components of the Seal Kit, RSCBP1217.
Air Motor not shown
5740AH - 40 Ton Air/Hydraulic Shop Press5750AH - 50 Ton Air/Hydraulic Shop Press
5740AH, 5750AH 13 rev. 12/05/14
ITEM NO. SUNEX PART NO. DESCRIPTION QTY.
1 RS345009 2" Pushing Adaptor (Spring) 22 Press Bed 13 Press Frame 14 Ram Frame 15 RSCBP1225 Press Pin 46 RS310012 Pushing Adapter 17 RSBS1 Bearing Shield 18 RSCBP1205 Press Plate 29 RSCBP1211 Press Feet 210 RSCBP1212 Z Bar 111 RSCBP1209 Pump Handle 112 RS40AOPAM Pump (with air motor) 113 RSCBP1202 Ram (includes gauge) (5740AH) 1
RSCBP1202GG Ram (includes gauge) (5750AH) 114 RSCBP1206 Gauge (5740AH) 1
RSCBP1206G Liquid Filled Gauge (5750AH) 1
ITEM NO. SUNEX PART NO. DESCRIPTION QTY.
15 RSCBP1204 Hose & Fitting 116 RSCBP1217 Seal Kit for Pump and Ram (not shown) 117 RS40MPPHK Press Hardware Kit 1 set
1/2"-13 x 1-1/2" Hex Head Bolt 10 1/2" Nut 10
Washer 1018 RSAAMO2 Air Motor (shown with pump) 119 RS4050WCH Winch 1not shown RSWHK Winch Hardware Kit 1 set
Cable Clamp 1 1/2"-13 x 1-1/2" Hex Head Bolt 2 1/2" Nut 2
Washer 2Winch 1
Short Cable (includes eye bolt) 1 Long Cable 1
not shown RS5740AHLK Product Label Kit 1 not shown RS5750AHLK Product Label Kit 1
12 Dark Gray- Long Cable
Light Gray- Short Cable
1. Move press bed into LOWEST position so it is resting on top of pins 1 and 2.
Right side of press
3. Thread the BARE end of the LONGER of the two steel cables up and through the pump bracket.
Right side of press,under pump assembly
2. Install pre-attached eye bolt on LONGER cable to press bed handle located under pump assembly. DO NOT FULLY TIGHTEN. Center with side of press bed and make sure there is enough room to lower or raise both nuts on eye bolt for precise alignment.
WARNINGDO NOT FULLY TIGHTEN.
WINCH KIT PARTS LIST
Winch - 1
Long Cable - 1
Short Cable- 1
Cable Clamp - 1
1/2"-13 x 1-1/2" Hex Head Bolts - 2
1/2" Nuts - 2
Washers - 2
WINCH INSTALLATION INSTRUCTIONS
4. Run the long cable up and OVER BOTH ROLLER BRACKETS and feed into winch. Be sure to thread 12 inches (1 foot) of extra cable through winch.
5. Once winch cable has been threaded, pull excess cable back through winch as shown in diagramabove. The cable should be locked tightly around itself with no excess cable left hanging. Operate winch enough to remove slack from longer cable.
WARNINGMount winch to frame AFTER threading cable.
6. Mount winch to frame using the provided washers, 1/2" nuts and 1/2"-13 x 1-1/2" bolts.
Left side of press, under winch
8. Install pre-attached eye bolt on SHORTER cable to press bed handle located under winch after feeding it around in step 7.
7. Feed the short cable by running it up and OVER first roller, then UNDER second roller. Loop the short cable back toward the winch and securely attach to the longer cable using the cable clamp. Remove slack from short cable before securing to long cable. Clamp should be NO LESS THAN ONE INCH (1") from roller.
9. Turn eye hooks to adjust and level press bed. Once bed is level,firmly tighten eye hook mounting hardware. The steel cable will stretch with use. It may be necessary to repeat this leveling procedure in the future.
10. Test the winch kit by raising and lowering the press bed from its lowest to highest position. Repeat and adjust until bed is level and moves freely throughout its entire range of motion.Cut excess cable when all adjustments are complete.
LONG CABLE top view of press
Top view of press with bed in lowest position
This end feeds into winch.
SHIPPING ADDRESS:Sunex Tools315 Hawkins Rd.Travelers Rest, South Carolina 29690
MAILING ADDRESS:Sunex ToolsP.O. Box 4215Greenville, South Carolina 29608
Note: Refer to manual from winch manufacturer for detailed instructions on winch assembly and cable threading procedure.
WINCH INSTALLATION INSTRUCTIONS CONTINUED

19
ASSEMBLY INSTRUCTIONS CONTINUED
Stand unit upright Slide bed above holes and hold in place Secure pins underneath bed, one at a time
1 2
6WARNING Pins must be COMPLETELY through BOTH SIDES of frame.
7
Let bed rest on inserted pins Place 3rd and 4th pin on each side Secure pins completely through bed and frame.
3 4
WARNING ALL FOUR (4) pins must be COMPLETELY through BOTH SIDES of frame in order to operate press.
Cross-section of press
Front view
Use bolts, washers and nuts to attach Z Bar to both sides of the press.
Note: Check all bolts for tightness. If press rocks, or is not level, loosen pressfeet slightly to compensate and retighten.
WARNINGBed must be at the BOTTOM of the frame before proceeding to the next step.
ASSEMBLY INSTRUCTIONS CONTINUED
4
5
Front view
Slide bed down to bottom of frame
Note: When sliding bed to frame bottom, DO NOT use bed handles.
PUMP INSTRUCTIONS
10
WARNINGDO NOT attempt to operate pump unless the BREATHER VALVE IS OPEN.Valve is closed prior to shipping to prevent the loss of hydraulic fluid.
CAUTIONHAND TIGHTEN VALVE ONLY.Excess pressure could damage the valve assembly.
CAUTIONDO NOT TURN RELEASE VALVE MORE THAN ONE FULL TURN or equipment may be disabled.
WARNING This symbol alerts you to the possibility of serious injury or death if instructions are not followed.
Failure to heed these warnings may result in loss of load, damage to the press and/or failure resulting in property damage, personal or fatal injury.This operating manual contains important details concerning the safe operation of this tool.The user must read and understand these details before any use of the tool.
This manual must be retained for future reference.
2. CLOSE the valve located on the FRONT of the pump assembly by turning CLOCKWISE. Connect using a 3/8" line. Do not exceed air pressure of 90-120 psig.
3. Squeeze air hose trigger until ram comes into contact with item to be pressed.
4. Once ram is in contact with the item to be pressed,insert pump handle into high pressure cradle. Using the high pressure pump moves the ram less with each stroke and requires less effort to apply pressure.
5. To relieve pressure and retract ram, turn valve located on FRONT of pump assembly ONE FULL TURN COUNTERCLOCKWISE.
Air Hose Trigger High Pressure Cradle
PUMP AND RAM ASSEMBLY INSTRUCTIONS
8
A
B
Note: There are two sets of holes for bolts. Use centermost holes on the side.
Note: Hose from pump’s outer side must run BEHIND the frame. Hose with nozzle will be used later.
This end up
Top of press frame, looking down
This end up
Note: Allow ram to rest on press bed while installing pump.
Note: Handle ram carefully to avoid damage to gauge or gauge face. Do not disconnect hoses prior to assembly.
Note: Position press feet on each side of the press.Attach one bolt, washer and nut on each side. Bolts should be attached OFFSET from one another.
Front view
Stand frame upside down Slide bed onto frame Slide bed down to bottom of frame
ASSEMBLY INSTRUCTIONS
1
3
2
Inside of frame
WARNINGBe aware of jagged edges on frame. Not all welds are smooth.Press bed can pinch or crush fingers.Wear safety gloves.
Note: In the upright position,inner bracing should form an inverted "v" with the narrower space facing the top of the press.
Note: Air motor must be operating at the same time.
PROCEDURE FOR BLEEDING AIR
9 1. Turn valve handle on FRONT of pump CLOCKWISE until closed. DO NOT OVERTIGHTEN.
3. Move press bed into highest position and lock bed into place with all four pins.
Air Hose Trigger
WARNING
Do not allow the ram to extend more than 5.5".
4. Place press plates DIRECTLY under ram, on press bed.
7. Squeeze trigger on air hose. Air will enter motor and extend the ram. Pump ram against press plates until gauge reads "5 Tons".
8. Insert pump handle into HIGH PRESSURE CRADLE for more precise control. Pump ram against press plates until gauge reads "10 Tons".
High Pressure Cradle
US TONSUS TONS
WARNINGDO NOT attempt to operate pump unless the BREATHER VALVE IS OPEN.Valve is closed prior to shipping to prevent the loss of hydraulic fluid.
CAUTION Bed must be in UP position, or you will over extend ram.
PARTS LIST
Press Frame - 1
Press Bed - 1
Press Feet - 2
Z Bar - 1
1/2"-13 x 1-1/2" Hex Head Bolts - 10
1/2" Nuts - 10
Washers - 10
1-1/4" x 14" Press Pins - 4
Air MotorPump and Ram - 1
Pump Extension Handle - 1
1" x 3" x 14"Press Plates - 2
Accessory only - Not needed for assembly
Pushing Adapter - 1
Accessory only - Not needed for assembly
Bearing Shield - 1
Accessory only - Not needed for assembly
ESTIMATED ASSEMBLY TIME: 30 MINUTES
Examine box contents, then proceed with the following instructions.
TOOLS NEEDED
3/4" and 9/16" sockets and wrenches
ACCESSORIES
WARNINGLeg ends and press feet are sharp and potentially dangerous. Wear safety gloves and safety goggles.
Top view of pump
REPLACEMENT PARTS LIST
Air/Hydraulic Shop Press
12
15
8
2
1
14
13
3
4
55
18
11
10
55
Only items identified by part number are available separately.
10
9
17
8
6
7
1. BEFORE OPERATING PUMP, open petcock valve (breather) located on TOP of pump assembly by turning COUNTERCLOCKWISE.
5. Put cradle in the DOWN position. Use an adapter on your air hose and allow air to flow through the opening in the petcock valve into the pump.
6. Air that has flowed into the pump causes the cradle to move up and the ram to move down. If this happens,proceed to step 7. If not, check all hoses and connections and repeat the procedure.
9. Turn valve handle on pump COUNTERCLOCKWISE
a maximum of one (1) turn to open valve. Ram will retract as pressure is released.
2. Turn petcock valve (breather) on TOP of pump COUNTERCLOCKWISE to open.
SAFETY INFORMATION
This symbol alerts you to the possibility of serious injury or death if instructions are not followed.
This symbol alerts you to the possibility of damage to or destruction of equipment if instructions are not followed.
Failure to heed these warnings may result in loss of load, damage to the press and/or failure resulting in property damage, personal or fatal injury. This operating manual contains important details concern-
ing the safe operation of this tool. The user must read and understand these details before any use of the tool. This manual must be retained for future reference.
• Read, study, understand and follow all instructions before operating this press.• Always wear safety goggles, (users and bystanders).• Parts being pressed may splinter, shatter, or be ejected from the press at a dangerous
rate of speed. Because there are a variety of press applications, it is the responsibility of the press owner to provide adequate guards, eye protection and protective clothing to the press operator.
• Visual inspection of the press should be made before use, checking for signs of cracked welds, bent bed pins, loose or missing bolts, leaks, or any other structural damage. Corrections must be made before using the press.
• Do not go near leaks. High pressure hydraulic fluid can puncture skin and cause serious injury, gangrene, or death. If injured, seek emergency medical help as immediate surgery is required to remove the fluid.
• Prior to use make sure the press is securely anchored to a concrete floor.• Keep hands, arms, feet, and legs out of work area. Accidental slippage can result in
personal injury.• Always use an accurate force gauge to measure pressing force.• Do not exceed the rated capacity or tamper with the pressure/force settings. When
attachments and adapters are used the rated capacity of the system shall be no greater than the rated capacity of the lowest rated component or combination of components that make up the system.
• Avoid off-center loads. Offset loads can damage ram and may cause load to eject at a dangerous rate of speed. Do not use any spacer or extender between the press ram plunger and the item being pressed. If there is not enough ram stroke, adjust the height of the movable bolster.
• Remove all loads from movable bolster before attempting to adjust bolster height. Beware of possible falling bolster.
• Press only on loads supported by movable bolster and press plates included. Do not support loads on floor or press frame legs.
• When using any accessories such as press plates or arbor plates, be certain they are centered on the movable bolster and in full contact with both sides of the bolster.
• Before applying load, be certain all movable bolster supporting pins are fully engaged. Verify lift cables (if equipped) are slack before pressing on the bolster.
• Always use a bearing shield when pressing bearings.• Use caution when positioning work to be pressed to ensure the item to be pressed
cannot be ejected at a dangerous rate of speed.• Release hydraulic pressure before loosening any fittings.• Maintain proper hydraulic fluid levels.• Do not make any alterations or modifications to the press.• This product may contain one or more chemicals known to the State of California to
cause cancer and birth defects or other reproductive harm. Wash hands thoroughly after handling.
• Failure to heed and understand these markings may result in serious or fatal personal injury and/or property damage.
OWNER/USER RESPONSIBILITYThe owner and/or user must have an understanding of the manufacturer's operating instructions and warnings before using this press. Personnel involved in the use and operation of equipment shall be careful, competent, trained, and qualified in the safe operation of the equipment and its proper use when servicing motor vehicles and their components. Warning information should be emphasized and understood. If the operator is not fluent in English, the manufacturer's instructions and warnings shall be read to and discussed with the operator in the operator's native language by the purchaser/owner, making sure that the operator comprehends its contents.
Owner and/or user must study and maintain for future reference the manufacturer’s instructions. Owner and/or user is responsible for keeping all warning labels and instruction manuals legible and intact. Replacement labels and literature are available from the manufacturers.INSPECTIONVisual inspection of the shop press should be made before each use of the press, checking for damaged, loose or missing parts. Each press must be inspected by a manufacturer’s repair facility immediately, if subjected to an abnormal load or shock. Any press which appears to be damaged in any way, is found to be badly worn, or operates abnormally must be removed from service until necessary repairs are made by a manufacturers's authorized repair facility. It is recommended that an annual inspection of the press be made by a manufacturer’s authorized repair facility and that any defective parts, decals or warning labels be replaced with manufacturer’s specified parts. A list of authorized repair facilities is available from the manufacturer.
SAFETY INSTRUCTIONS• CHECK YOUR LOCAL, STATE AND FEDERAL REGULATIONS
REGARDING THE SAFE USE OF THIS EQUIPMENT. • Your safety is top priority. Please handle equipment with care.• Fully retract unit and remove all items from the press bed frame. • Support the press bed, and remove the pins. • Raise or lower bed to desired height and reinstall press pins. Be certain
pins are fully engaged in the parallel flanges of the upright columns.• Position press on a flat, level, hard surface, preferably concrete.
Make sure all nuts and bolts are tight.• Clear the area of bystanders, especially small children, before using.• Set the press bed to the required height. The press is most effective
when the work piece is located 1 inch below the ram’s retracted position. The compression stroke can include the entire 5 inch working range.
• The press is designed to exert a force on anything which is positioned beneath its ram. The work piece can pop out from under the ram at a high rate of speed and injure someone.
• Pressing Bearings: It is essential that you use the bearing shield when pressing bearings on or off.
LIMITED WARRANTY:SUNEX INTERNATIONAL, INC. WARRANTS TO ITS CUSTOMERS THAT THE COMPANY’S SUNEX TOOLS® BRANDED PRODUCTS ARE FREE FROM DEFECTS IN WORKMANSHIP AND MATERIALS.Sunex International, Inc. will repair or replace its Sunex Tools® branded products which fail to give satisfactory service due to defective workmanship or materials, based upon the terms and conditions of the following described warranty plans attributed to that specific product. This product carries a ONE-YEAR warranty. During this warranty period, Sunex Tools® will repair or replace at our option any part or unit which proves to be defective in material or workmanship. Other important warranty information....This warranty does not cover damage to equipment or tools arising from alteration, abuse, misuse, damage and does not cover any repairs or replace-ment made by anyone other than Sunex Tools® or its authorized warranty service centers. The foregoing obligation is Sunex Tools®’ sole liability under this or any implied warranty and under no circumstances shall we be liable for any incidental or consequential damages. Note: Some states do not allow the exclusion or limitation of incidental or consequential damages, so the above limitation or exclusion may not apply to you.Return equipment or parts to Sunex Tools®, transportation prepaid. Be certain to include your name and address, evidence of the purchase date, and description of the suspected defect.If you have any questions about warranty service, please write to Sunex Tools®. This warranty gives you specific legal rights and you may also have other rights which vary from state to state. Repair kits and replacement parts are available for many of Sunex Tools® products regardless of whether or not the product isstill covered by a warranty plan.SHIPPING ADDRESS: MAILING ADDRESS:Sunex Tools Sunex Tools315 Hawkins Rd. P.O. Box 4215Travelers Rest, South Carolina 29690 Greenville, South Carolina 29608
WARNING
WARNING
CAUTION
THIS OPERATING MANUAL CONTAINS IMPORTANT SAFETY INFORMATION. READ CAREFULLY AND UNDERSTAND ALL INFORMATION BEFORE OPERATING THIS TOOL. SAVE THIS MANUAL FOR FUTURE USE.
5740AH - 40 Ton Air/Hydraulic Shop Press5750AH - 50 Ton Air/Hydraulic Shop Press
Sunex Part No. Total Height Inside Width Press Feet Length Bed Width Ram Stroke Pin Diameter PB Winch Sliding Head Press Plates Included
5740AH 74" 35" 29.75" 8.25" 6" 1.25" Y Y Y(2)
5750AH 74" 35" 29.75" 8.25" 6" 1.25" Y Y Y(2)
PRESS SPECIFICATIONS
OWNER'S MANUAL
CONTENTS:Page 1 Specifications
2 Safety Information and Warranty Information3 Parts List
4-6 Assembly Instructions 789
Pump and Ram Assembly InstructionsProcedure for Bleeding AirPump Instructions
10-11 Winch Kit Parts List and Winch Installation Instructions12 Replacement Parts List
© Copyright 2014, Sunex Tools®
5740AH, 5750AH rev. 12/05/14
5740AH - 40 Ton Air/Hydraulic Shop Press5750AH - 50 Ton Air/Hydraulic Shop Press
5740AH - 40 Ton Air/Hydraulic Shop Press5750AH - 50 Ton Air/Hydraulic Shop Press
5740AH - 40 Ton Air/Hydraulic Shop Press5750AH - 50 Ton Air/Hydraulic Shop Press
5740AH - 40 Ton Air/Hydraulic Shop Press5750AH - 50 Ton Air/Hydraulic Shop Press
5740AH - 40 Ton Air/Hydraulic Shop Press5750AH - 50 Ton Air/Hydraulic Shop Press
5740AH - 40 Ton Air/Hydraulic Shop Press5750AH - 50 Ton Air/Hydraulic Shop Press
5740AH - 40 Ton Air/Hydraulic Shop Press5750AH - 50 Ton Air/Hydraulic Shop Press
5740AH - 40 Ton Air/Hydraulic Shop Press5750AH - 50 Ton Air/Hydraulic Shop Press
5740AH - 40 Ton Air/Hydraulic Shop Press5750AH - 50 Ton Air/Hydraulic Shop Press
5740AH - 40 Ton Air/Hydraulic Shop Press5750AH - 50 Ton Air/Hydraulic Shop Press
5740AH - 40 Ton Air/Hydraulic Shop Press5750AH - 50 Ton Air/Hydraulic Shop Press
5740AH, 5750AH 2 rev. 12/05/14 5740AH, 5750AH 3 rev. 12/05/14
5740AH, 5750AH 4 rev. 12/05/14 5740AH, 5750AH 5 rev. 12/05/14
5740AH, 5750AH 6 rev. 12/05/14 5740AH, 5750AH 7 rev. 12/05/14
5740AH, 5750AH 8 rev. 12/05/14 5740AH, 5750AH 9 rev. 12/05/14
5740AH, 5750AH 10 rev. 12/05/14 5740AH, 5750AH 11 rev. 12/05/14
5740AH, 5750AH 12 rev. 12/05/14
PUMP AND RAM EXPLODED PARTS DIAGRAM
8.886"
9.113"
ITEM NO. DESCRIPTION QTY.
1 Base Weldment 12 Plug 13 * Polypak Seal (Parker) 24 1/2-13 x 2 Hex HD C-S GR 2 Zinc 15 Piston 16 * O-Ring (Parker) 17 Rod 18 Retaining Ring Int. 3.5 NOM 19 Piston Guide 110 Retractor Plate 111 Spring 212 Fitting Gauge 1.75 113 Gauge 114 90˚ Elbow 1/4 NPTF to -6 JIC 115 Hose Hydraulic 41 1/2 LG 7/16-20 JICF 1
RAM
PUMPITEM NO. DESCRIPTION QTY.
1 Tank 12 Tie Rod 43 1" Piston Body 14 1/2" Piston Body 15 1" Piston 16 1/2" Piston 17 1/4" MNPT Pressure Plug 18 Pump Body 19 Pump Lid 110 Pump Bracket 211 Valve Assembly 112 Pivot Pin 213 * 5/16" Steel Ball 514 Brass Drain Cock 115 Cradle Assembly 216 Hydraulic Hose 41-1/2" L 7/16-20 JICF 117 7/16-14 Fin Hex Nut Zinc 419 * O-Ring 120 * O-Ring 121 * 3-1/2" Seal 222 * 3-5/16" Seal 123 * 3-3/16" Seal 124 SHCS 7/16 14 x 1/2" 425 SHCS 7/16 14 x 3/4" 426 * Light Spring 227 * Heavy Spring 228 7/16" Split Lock Washer 629 Pump Filter 130 Pump Fitting 1/4" MNPT 7/16" JICF 131 7/8" Grip 132 Handle for Pump 133 * O-Ring 1
# 23 (Pump)QTY: 1
# 21 (Pump)QTY: 2
# 19 (Pump)QTY: 1
# 22 (Pump)QTY: 1
See Replacement Parts List for parts available separately.Parts with (*) are only available in Seal Kit, part number RSCBP1217.
10
9
15
1
7
6
4
8
5
3
1111
1
14
13
12
3
2
7
21
17
30
16
9
# 3 (Ram)(Poly Pak - Note: Only the upper seal normally needs replacement)QTY: 1
# 33 (Pump)(O-Ring for # 11 Valve Assembly on Pump)QTY: 1
# 6 (Ram)QTY: 1
# 20 (Pump)QTY: 1
# 13 (Pump)QTY: 5
2
28
14
1
25
2411
1327
10
31
32
15
20
6
4
23
28
25
241028
13
29
21
8
26 24
12
22
3
19
5
15
# 26 (Pump)QTY: 2
# 27 (Pump)QTY: 2
Individual parts pictured are components of the Seal Kit, RSCBP1217.
Air Motor not shown
5740AH - 40 Ton Air/Hydraulic Shop Press5750AH - 50 Ton Air/Hydraulic Shop Press
5740AH, 5750AH 13 rev. 12/05/14
ITEM NO. SUNEX PART NO. DESCRIPTION QTY.
1 RS345009 2" Pushing Adaptor (Spring) 22 Press Bed 13 Press Frame 14 Ram Frame 15 RSCBP1225 Press Pin 46 RS310012 Pushing Adapter 17 RSBS1 Bearing Shield 18 RSCBP1205 Press Plate 29 RSCBP1211 Press Feet 210 RSCBP1212 Z Bar 111 RSCBP1209 Pump Handle 112 RS40AOPAM Pump (with air motor) 113 RSCBP1202 Ram (includes gauge) (5740AH) 1
RSCBP1202GG Ram (includes gauge) (5750AH) 114 RSCBP1206 Gauge (5740AH) 1
RSCBP1206G Liquid Filled Gauge (5750AH) 1
ITEM NO. SUNEX PART NO. DESCRIPTION QTY.
15 RSCBP1204 Hose & Fitting 116 RSCBP1217 Seal Kit for Pump and Ram (not shown) 117 RS40MPPHK Press Hardware Kit 1 set
1/2"-13 x 1-1/2" Hex Head Bolt 10 1/2" Nut 10
Washer 1018 RSAAMO2 Air Motor (shown with pump) 119 RS4050WCH Winch 1not shown RSWHK Winch Hardware Kit 1 set
Cable Clamp 1 1/2"-13 x 1-1/2" Hex Head Bolt 2 1/2" Nut 2
Washer 2Winch 1
Short Cable (includes eye bolt) 1 Long Cable 1
not shown RS5740AHLK Product Label Kit 1 not shown RS5750AHLK Product Label Kit 1
12 Dark Gray- Long Cable
Light Gray- Short Cable
1. Move press bed into LOWEST position so it is resting on top of pins 1 and 2.
Right side of press
3. Thread the BARE end of the LONGER of the two steel cables up and through the pump bracket.
Right side of press,under pump assembly
2. Install pre-attached eye bolt on LONGER cable to press bed handle located under pump assembly. DO NOT FULLY TIGHTEN. Center with side of press bed and make sure there is enough room to lower or raise both nuts on eye bolt for precise alignment.
WARNINGDO NOT FULLY TIGHTEN.
WINCH KIT PARTS LIST
Winch - 1
Long Cable - 1
Short Cable- 1
Cable Clamp - 1
1/2"-13 x 1-1/2" Hex Head Bolts - 2
1/2" Nuts - 2
Washers - 2
WINCH INSTALLATION INSTRUCTIONS
4. Run the long cable up and OVER BOTH ROLLER BRACKETS and feed into winch. Be sure to thread 12 inches (1 foot) of extra cable through winch.
5. Once winch cable has been threaded, pull excess cable back through winch as shown in diagramabove. The cable should be locked tightly around itself with no excess cable left hanging. Operate winch enough to remove slack from longer cable.
WARNINGMount winch to frame AFTER threading cable.
6. Mount winch to frame using the provided washers, 1/2" nuts and 1/2"-13 x 1-1/2" bolts.
Left side of press, under winch
8. Install pre-attached eye bolt on SHORTER cable to press bed handle located under winch after feeding it around in step 7.
7. Feed the short cable by running it up and OVER first roller, then UNDER second roller. Loop the short cable back toward the winch and securely attach to the longer cable using the cable clamp. Remove slack from short cable before securing to long cable. Clamp should be NO LESS THAN ONE INCH (1") from roller.
9. Turn eye hooks to adjust and level press bed. Once bed is level,firmly tighten eye hook mounting hardware. The steel cable will stretch with use. It may be necessary to repeat this leveling procedure in the future.
10. Test the winch kit by raising and lowering the press bed from its lowest to highest position. Repeat and adjust until bed is level and moves freely throughout its entire range of motion.Cut excess cable when all adjustments are complete.
LONG CABLE top view of press
Top view of press with bed in lowest position
This end feeds into winch.
SHIPPING ADDRESS:Sunex Tools315 Hawkins Rd.Travelers Rest, South Carolina 29690
MAILING ADDRESS:Sunex ToolsP.O. Box 4215Greenville, South Carolina 29608
Note: Refer to manual from winch manufacturer for detailed instructions on winch assembly and cable threading procedure.
WINCH INSTALLATION INSTRUCTIONS CONTINUED

19
ASSEMBLY INSTRUCTIONS CONTINUED
Stand unit upright Slide bed above holes and hold in place Secure pins underneath bed, one at a time
1 2
6WARNING Pins must be COMPLETELY through BOTH SIDES of frame.
7
Let bed rest on inserted pins Place 3rd and 4th pin on each side Secure pins completely through bed and frame.
3 4
WARNING ALL FOUR (4) pins must be COMPLETELY through BOTH SIDES of frame in order to operate press.
Cross-section of press
Front view
Use bolts, washers and nuts to attach Z Bar to both sides of the press.
Note: Check all bolts for tightness. If press rocks, or is not level, loosen pressfeet slightly to compensate and retighten.
WARNINGBed must be at the BOTTOM of the frame before proceeding to the next step.
ASSEMBLY INSTRUCTIONS CONTINUED
4
5
Front view
Slide bed down to bottom of frame
Note: When sliding bed to frame bottom, DO NOT use bed handles.
PUMP INSTRUCTIONS
10
WARNINGDO NOT attempt to operate pump unless the BREATHER VALVE IS OPEN.Valve is closed prior to shipping to prevent the loss of hydraulic fluid.
CAUTIONHAND TIGHTEN VALVE ONLY.Excess pressure could damage the valve assembly.
CAUTIONDO NOT TURN RELEASE VALVE MORE THAN ONE FULL TURN or equipment may be disabled.
WARNING This symbol alerts you to the possibility of serious injury or death if instructions are not followed.
Failure to heed these warnings may result in loss of load, damage to the press and/or failure resulting in property damage, personal or fatal injury.This operating manual contains important details concerning the safe operation of this tool.The user must read and understand these details before any use of the tool.
This manual must be retained for future reference.
2. CLOSE the valve located on the FRONT of the pump assembly by turning CLOCKWISE. Connect using a 3/8" line. Do not exceed air pressure of 90-120 psig.
3. Squeeze air hose trigger until ram comes into contact with item to be pressed.
4. Once ram is in contact with the item to be pressed,insert pump handle into high pressure cradle. Using the high pressure pump moves the ram less with each stroke and requires less effort to apply pressure.
5. To relieve pressure and retract ram, turn valve located on FRONT of pump assembly ONE FULL TURN COUNTERCLOCKWISE.
Air Hose Trigger High Pressure Cradle
PUMP AND RAM ASSEMBLY INSTRUCTIONS
8
A
B
Note: There are two sets of holes for bolts. Use centermost holes on the side.
Note: Hose from pump’s outer side must run BEHIND the frame. Hose with nozzle will be used later.
This end up
Top of press frame, looking down
This end up
Note: Allow ram to rest on press bed while installing pump.
Note: Handle ram carefully to avoid damage to gauge or gauge face. Do not disconnect hoses prior to assembly.
Note: Position press feet on each side of the press.Attach one bolt, washer and nut on each side. Bolts should be attached OFFSET from one another.
Front view
Stand frame upside down Slide bed onto frame Slide bed down to bottom of frame
ASSEMBLY INSTRUCTIONS
1
3
2
Inside of frame
WARNINGBe aware of jagged edges on frame. Not all welds are smooth.Press bed can pinch or crush fingers.Wear safety gloves.
Note: In the upright position,inner bracing should form an inverted "v" with the narrower space facing the top of the press.
Note: Air motor must be operating at the same time.
PROCEDURE FOR BLEEDING AIR
9 1. Turn valve handle on FRONT of pump CLOCKWISE until closed.DO NOT OVERTIGHTEN.
3. Move press bed into highest positionand lock bed into place with all four pins.
Air Hose Trigger
WARNING
Do not allow the ram to extend more than 5.5".
4. Place press plates DIRECTLYunder ram, on press bed.
7. Squeeze trigger on air hose. Air will enter motor and extend the ram. Pump ram against press plates until gauge reads "5 Tons".
8. Insert pump handle into HIGH PRESSURE CRADLE for more precisecontrol. Pump ram against press plates until gauge reads "10 Tons".
High Pressure Cradle
US TONSUS TONS
WARNINGDO NOT attempt to operate pump unless the BREATHER VALVE IS OPEN. Valve is closed prior to shipping to prevent the loss of hydraulic fluid.
CAUTION Bed must be in UP position, or you will over extend ram.
PARTS LIST
Press Frame - 1
Press Bed - 1
Press Feet - 2
Z Bar - 1
1/2"-13 x 1-1/2" Hex Head Bolts - 10
1/2" Nuts - 10
Washers - 10
1-1/4" x 14" Press Pins - 4
Air MotorPump and Ram - 1
Pump Extension Handle - 1
1" x 3" x 14"Press Plates - 2
Accessory only - Not needed for assembly
Pushing Adapter - 1
Accessory only - Not needed for assembly
Bearing Shield - 1
Accessory only - Not needed for assembly
ESTIMATED ASSEMBLY TIME: 30 MINUTES
Examine box contents, then proceed with the following instructions.
TOOLS NEEDED
3/4" and 9/16" sockets and wrenches
ACCESSORIES
WARNINGLeg ends and press feet are sharp and potentially dangerous. Wear safety gloves and safety goggles.
Top view of pump
REPLACEMENT PARTS LIST
Air/Hydraulic Shop Press
12
15
8
2
1
14
13
3
4
55
18
11
10
55
Only items identified by part number are available separately.
10
9
17
8
6
7
1. BEFORE OPERATING PUMP, open petcock valve (breather) located on TOP of pump assembly by turning COUNTERCLOCKWISE.
5. Put cradle in theDOWN position. Use an adapter on your air hose and allow air to flow through the opening in the petcock valve into the pump.
6. Air that has flowed into the pump causes the cradle to move up and the ram to move down. If this happens, proceed to step 7. If not, check all hoses and connections and repeat the procedure.
9. Turn valve handle on pumpCOUNTERCLOCKWISEa maximum of one (1) turn to open valve. Ram will retract as pressure is released.
2. Turn petcock valve (breather) on TOP of pumpCOUNTERCLOCKWISE to open.
SAFETY INFORMATION
This symbol alerts you to the possibility of serious injury or death if instructions are not followed.
This symbol alerts you to the possibility of damage to or destruction of equipment if instructions are not followed.
Failure to heed these warnings may result in loss of load, damage to the press and/or failure resulting in property damage, personal or fatal injury. This operating manual contains important details concern-
ing the safe operation of this tool. The user must read and understand these details before any use of the tool. This manual must be retained for future reference.
• Read, study, understand and follow all instructions before operating this press.• Always wear safety goggles, (users and bystanders).• Parts being pressed may splinter, shatter, or be ejected from the press at a dangerous
rate of speed. Because there are a variety of press applications, it is the responsibility of the press owner to provide adequate guards, eye protection and protective clothing to the press operator.
• Visual inspection of the press should be made before use, checking for signs of cracked welds, bent bed pins, loose or missing bolts, leaks, or any other structural damage. Corrections must be made before using the press.
• Do not go near leaks. High pressure hydraulic fluid can puncture skin and cause serious injury, gangrene, or death. If injured, seek emergency medical help as immediate surgery is required to remove the fluid.
• Prior to use make sure the press is securely anchored to a concrete floor.• Keep hands, arms, feet, and legs out of work area. Accidental slippage can result in
personal injury.• Always use an accurate force gauge to measure pressing force.• Do not exceed the rated capacity or tamper with the pressure/force settings. When
attachments and adapters are used the rated capacity of the system shall be no greater than the rated capacity of the lowest rated component or combination of components that make up the system.
• Avoid off-center loads. Offset loads can damage ram and may cause load to eject at a dangerous rate of speed. Do not use any spacer or extender between the press ram plunger and the item being pressed. If there is not enough ram stroke, adjust the height of the movable bolster.
• Remove all loads from movable bolster before attempting to adjust bolster height. Beware of possible falling bolster.
• Press only on loads supported by movable bolster and press plates included. Do not support loads on floor or press frame legs.
• When using any accessories such as press plates or arbor plates, be certain they are centered on the movable bolster and in full contact with both sides of the bolster.
• Before applying load, be certain all movable bolster supporting pins are fully engaged. Verify lift cables (if equipped) are slack before pressing on the bolster.
• Always use a bearing shield when pressing bearings.• Use caution when positioning work to be pressed to ensure the item to be pressed
cannot be ejected at a dangerous rate of speed.• Release hydraulic pressure before loosening any fittings.• Maintain proper hydraulic fluid levels.• Do not make any alterations or modifications to the press.• This product may contain one or more chemicals known to the State of California to
cause cancer and birth defects or other reproductive harm. Wash hands thoroughly after handling.
• Failure to heed and understand these markings may result in serious or fatal personal injury and/or property damage.
OWNER/USER RESPONSIBILITYThe owner and/or user must have an understanding of the manufacturer's operating instructions and warnings before using this press. Personnel involved in the use and operation of equipment shall be careful, competent, trained, and qualified in the safe operation of the equipment and its proper use when servicing motor vehicles and their components. Warning information should be emphasized and understood. If the operator is not fluent in English, the manufacturer's instructions and warnings shall be read to and discussed with the operator in the operator's native language by the purchaser/owner, making sure that the operator comprehends its contents.
Owner and/or user must study and maintain for future reference the manufacturer’s instructions. Owner and/or user is responsible for keeping all warning labels and instruction manuals legible and intact. Replacement labels and literature are available from the manufacturers.INSPECTIONVisual inspection of the shop press should be made before each use of the press, checking for damaged, loose or missing parts. Each press must be inspected by a manufacturer’s repair facility immediately, if subjected to an abnormal load or shock. Any press which appears to be damaged in any way, is found to be badly worn, or operates abnormally must be removed from service until necessary repairs are made by a manufacturers's authorized repair facility. It is recommended that an annual inspection of the press be made by a manufacturer’s authorized repair facility and that any defective parts, decals or warning labels be replaced with manufacturer’s specified parts. A list of authorized repair facilities is available from the manufacturer.
SAFETY INSTRUCTIONS• CHECK YOUR LOCAL, STATE AND FEDERAL REGULATIONS
REGARDING THE SAFE USE OF THIS EQUIPMENT. • Your safety is top priority. Please handle equipment with care.• Fully retract unit and remove all items from the press bed frame. • Support the press bed, and remove the pins. • Raise or lower bed to desired height and reinstall press pins. Be certain
pins are fully engaged in the parallel flanges of the upright columns.• Position press on a flat, level, hard surface, preferably concrete.
Make sure all nuts and bolts are tight.• Clear the area of bystanders, especially small children, before using.• Set the press bed to the required height. The press is most effective
when the work piece is located 1 inch below the ram’s retracted position. The compression stroke can include the entire 5 inch working range.
• The press is designed to exert a force on anything which is positioned beneath its ram. The work piece can pop out from under the ram at a high rate of speed and injure someone.
• Pressing Bearings: It is essential that you use the bearing shield when pressing bearings on or off.
LIMITED WARRANTY:SUNEX INTERNATIONAL, INC. WARRANTS TO ITS CUSTOMERS THAT THE COMPANY’S SUNEX TOOLS® BRANDED PRODUCTS ARE FREE FROM DEFECTS IN WORKMANSHIP AND MATERIALS.Sunex International, Inc. will repair or replace its Sunex Tools® branded products which fail to give satisfactory service due to defective workmanship or materials, based upon the terms and conditions of the following described warranty plans attributed to that specific product. This product carries a ONE-YEAR warranty. During this warranty period, Sunex Tools® will repair or replace at our option any part or unit which proves to be defective in material or workmanship. Other important warranty information....This warranty does not cover damage to equipment or tools arising from alteration, abuse, misuse, damage and does not cover any repairs or replace-ment made by anyone other than Sunex Tools® or its authorized warranty service centers. The foregoing obligation is Sunex Tools®’ sole liability under this or any implied warranty and under no circumstances shall we be liable for any incidental or consequential damages. Note: Some states do not allow the exclusion or limitation of incidental or consequential damages, so the above limitation or exclusion may not apply to you.Return equipment or parts to Sunex Tools®, transportation prepaid. Be certain to include your name and address, evidence of the purchase date, and description of the suspected defect.If you have any questions about warranty service, please write to Sunex Tools®. This warranty gives you specific legal rights and you may also have other rights which vary from state to state. Repair kits and replacement parts are available for many of Sunex Tools® products regardless of whether or not the product isstill covered by a warranty plan.SHIPPING ADDRESS: MAILING ADDRESS:Sunex Tools Sunex Tools315 Hawkins Rd. P.O. Box 4215Travelers Rest, South Carolina 29690 Greenville, South Carolina 29608
WARNING
WARNING
CAUTION
THIS OPERATING MANUAL CONTAINS IMPORTANT SAFETY INFORMATION. READ CAREFULLY AND UNDERSTAND ALL INFORMATION BEFORE OPERATING THIS TOOL. SAVE THIS MANUAL FOR FUTURE USE.
5740AH - 40 Ton Air/Hydraulic Shop Press5750AH - 50 Ton Air/Hydraulic Shop Press
Sunex Part No. Total Height Inside Width Press Feet Length Bed Width Ram Stroke Pin Diameter PB Winch Sliding Head Press Plates Included
5740AH 74" 35" 29.75" 8.25" 6" 1.25" Y Y Y(2)
5750AH 74" 35" 29.75" 8.25" 6" 1.25" Y Y Y(2)
PRESS SPECIFICATIONS
OWNER'S MANUAL
CONTENTS:Page 1 Specifications
2 Safety Information and Warranty Information3 Parts List
4-6 Assembly Instructions 789
Pump and Ram Assembly InstructionsProcedure for Bleeding AirPump Instructions
10-11 Winch Kit Parts List and Winch Installation Instructions12 Replacement Parts List
© Copyright 2014, Sunex Tools®
5740AH, 5750AH rev. 12/05/14
5740AH - 40 Ton Air/Hydraulic Shop Press5750AH - 50 Ton Air/Hydraulic Shop Press
5740AH - 40 Ton Air/Hydraulic Shop Press5750AH - 50 Ton Air/Hydraulic Shop Press
5740AH - 40 Ton Air/Hydraulic Shop Press5750AH - 50 Ton Air/Hydraulic Shop Press
5740AH - 40 Ton Air/Hydraulic Shop Press5750AH - 50 Ton Air/Hydraulic Shop Press
5740AH - 40 Ton Air/Hydraulic Shop Press5750AH - 50 Ton Air/Hydraulic Shop Press
5740AH - 40 Ton Air/Hydraulic Shop Press5750AH - 50 Ton Air/Hydraulic Shop Press
5740AH - 40 Ton Air/Hydraulic Shop Press5750AH - 50 Ton Air/Hydraulic Shop Press
5740AH - 40 Ton Air/Hydraulic Shop Press5750AH - 50 Ton Air/Hydraulic Shop Press
5740AH - 40 Ton Air/Hydraulic Shop Press5750AH - 50 Ton Air/Hydraulic Shop Press
5740AH - 40 Ton Air/Hydraulic Shop Press5750AH - 50 Ton Air/Hydraulic Shop Press
5740AH - 40 Ton Air/Hydraulic Shop Press5750AH - 50 Ton Air/Hydraulic Shop Press
5740AH, 5750AH 2 rev. 12/05/14 5740AH, 5750AH 3 rev. 12/05/14
5740AH, 5750AH 4 rev. 12/05/14 5740AH, 5750AH 5 rev. 12/05/14
5740AH, 5750AH 6 rev. 12/05/14 5740AH, 5750AH 7 rev. 12/05/14
5740AH, 5750AH 8 rev. 12/05/14 5740AH, 5750AH 9 rev. 12/05/14
5740AH, 5750AH 10 rev. 12/05/14 5740AH, 5750AH 11 rev. 12/05/14
5740AH, 5750AH 12 rev. 12/05/14
PUMP AND RAM EXPLODED PARTS DIAGRAM
8.886"
9.113"
ITEM NO. DESCRIPTION QTY.
1 Base Weldment 12 Plug 13 * Polypak Seal (Parker) 24 1/2-13 x 2 Hex HD C-S GR 2 Zinc 15 Piston 16 * O-Ring (Parker) 17 Rod 18 Retaining Ring Int. 3.5 NOM 19 Piston Guide 110 Retractor Plate 111 Spring 212 Fitting Gauge 1.75 113 Gauge 114 90˚ Elbow 1/4 NPTF to -6 JIC 115 Hose Hydraulic 41 1/2 LG 7/16-20 JICF 1
RAM
PUMPITEM NO. DESCRIPTION QTY.
1 Tank 12 Tie Rod 43 1" Piston Body 14 1/2" Piston Body 15 1" Piston 16 1/2" Piston 17 1/4" MNPT Pressure Plug 18 Pump Body 19 Pump Lid 110 Pump Bracket 211 Valve Assembly 112 Pivot Pin 213 * 5/16" Steel Ball 514 Brass Drain Cock 115 Cradle Assembly 216 Hydraulic Hose 41-1/2" L 7/16-20 JICF 117 7/16-14 Fin Hex Nut Zinc 419 * O-Ring 120 * O-Ring 121 * 3-1/2" Seal 222 * 3-5/16" Seal 123 * 3-3/16" Seal 124 SHCS 7/16 14 x 1/2" 425 SHCS 7/16 14 x 3/4" 426 * Light Spring 227 * Heavy Spring 228 7/16" Split Lock Washer 629 Pump Filter 130 Pump Fitting 1/4" MNPT 7/16" JICF 131 7/8" Grip 132 Handle for Pump 133 * O-Ring 1
# 23 (Pump)QTY: 1
# 21 (Pump)QTY: 2
# 19 (Pump)QTY: 1
# 22 (Pump)QTY: 1
See Replacement Parts List for parts available separately.Parts with (*) are only available in Seal Kit, part number RSCBP1217.
10
9
15
1
7
6
4
8
5
3
1111
1
14
13
12
3
2
7
21
17
30
16
9
# 3 (Ram)(Poly Pak - Note: Only the upper seal normally needs replacement)QTY: 1
# 33 (Pump)(O-Ring for # 11 Valve Assembly on Pump)QTY: 1
# 6 (Ram)QTY: 1
# 20 (Pump)QTY: 1
# 13 (Pump)QTY: 5
2
28
14
1
25
2411
1327
10
31
32
15
20
6
4
23
28
25
241028
13
29
21
8
26 24
12
22
3
19
5
15
# 26 (Pump)QTY: 2
# 27 (Pump)QTY: 2
Individual parts pictured are components of the Seal Kit, RSCBP1217.
Air Motor not shown
5740AH - 40 Ton Air/Hydraulic Shop Press5750AH - 50 Ton Air/Hydraulic Shop Press
5740AH, 5750AH 13 rev. 12/05/14
ITEM NO. SUNEX PART NO. DESCRIPTION QTY.
1 RS345009 2" Pushing Adaptor (Spring) 22 Press Bed 13 Press Frame 14 Ram Frame 15 RSCBP1225 Press Pin 46 RS310012 Pushing Adapter 17 RSBS1 Bearing Shield 18 RSCBP1205 Press Plate 29 RSCBP1211 Press Feet 210 RSCBP1212 Z Bar 111 RSCBP1209 Pump Handle 112 RS40AOPAM Pump (with air motor) 113 RSCBP1202 Ram (includes gauge) (5740AH) 1
RSCBP1202GG Ram (includes gauge) (5750AH) 114 RSCBP1206 Gauge (5740AH) 1
RSCBP1206G Liquid Filled Gauge (5750AH) 1
ITEM NO. SUNEX PART NO. DESCRIPTION QTY.
15 RSCBP1204 Hose & Fitting 116 RSCBP1217 Seal Kit for Pump and Ram (not shown) 117 RS40MPPHK Press Hardware Kit 1 set
1/2"-13 x 1-1/2" Hex Head Bolt 10 1/2" Nut 10
Washer 1018 RSAAMO2 Air Motor (shown with pump) 119 RS4050WCH Winch 1not shown RSWHK Winch Hardware Kit 1 set
Cable Clamp 1 1/2"-13 x 1-1/2" Hex Head Bolt 2 1/2" Nut 2
Washer 2Winch 1
Short Cable (includes eye bolt) 1 Long Cable 1
not shown RS5740AHLK Product Label Kit 1 not shown RS5750AHLK Product Label Kit 1
12 Dark Gray- Long Cable
Light Gray- Short Cable
1. Move press bed into LOWEST position so it is resting on top of pins 1 and 2.
Right side of press
3. Thread the BARE end of the LONGER of the two steel cables up and through the pump bracket.
Right side of press,under pump assembly
2. Install pre-attached eye bolt on LONGER cable to press bed handle located under pump assembly. DO NOT FULLY TIGHTEN. Center with side of press bed and make sure there is enough room to lower or raise both nuts on eye bolt for precise alignment.
WARNINGDO NOT FULLY TIGHTEN.
WINCH KIT PARTS LIST
Winch - 1
Long Cable - 1
Short Cable- 1
Cable Clamp - 1
1/2"-13 x 1-1/2" Hex Head Bolts - 2
1/2" Nuts - 2
Washers - 2
WINCH INSTALLATION INSTRUCTIONS
4. Run the long cable up and OVER BOTH ROLLER BRACKETS and feed into winch. Be sure to thread 12 inches (1 foot) of extra cable through winch.
5. Once winch cable has been threaded, pull excess cable back through winch as shown in diagramabove. The cable should be locked tightly around itself with no excess cable left hanging. Operate winch enough to remove slack from longer cable.
WARNINGMount winch to frame AFTER threading cable.
6. Mount winch to frame using the provided washers, 1/2" nuts and 1/2"-13 x 1-1/2" bolts.
Left side of press, under winch
8. Install pre-attached eye bolt on SHORTER cable to press bed handle located under winch after feeding it around in step 7.
7. Feed the short cable by running it up and OVER first roller, then UNDER second roller. Loop the short cable back toward the winch and securely attach to the longer cable using the cable clamp. Remove slack from short cable before securing to long cable. Clamp should be NO LESS THAN ONE INCH (1") from roller.
9. Turn eye hooks to adjust and level press bed. Once bed is level,firmly tighten eye hook mounting hardware. The steel cable will stretch with use. It may be necessary to repeat this leveling procedure in the future.
10. Test the winch kit by raising and lowering the press bed from its lowest to highest position. Repeat and adjust until bed is level and moves freely throughout its entire range of motion.Cut excess cable when all adjustments are complete.
LONG CABLE top view of press
Top view of press with bed in lowest position
This end feeds into winch.
SHIPPING ADDRESS:Sunex Tools315 Hawkins Rd.Travelers Rest, South Carolina 29690
MAILING ADDRESS:Sunex ToolsP.O. Box 4215Greenville, South Carolina 29608
Note: Refer to manual from winch manufacturer for detailed instructions on winch assembly and cable threading procedure.
WINCH INSTALLATION INSTRUCTIONS CONTINUED

19
ASSEMBLY INSTRUCTIONS CONTINUED
Stand unit upright Slide bed above holes and hold in place Secure pins underneath bed, one at a time
1 2
6WARNING Pins must be COMPLETELY through BOTH SIDES of frame.
7
Let bed rest on inserted pins Place 3rd and 4th pin on each side Secure pins completely through bed and frame.
3 4
WARNING ALL FOUR (4) pins must be COMPLETELY through BOTH SIDES of frame in order to operate press.
Cross-section of press
Front view
Use bolts, washers and nuts to attach Z Bar to both sides of the press.
Note: Check all bolts for tightness. If press rocks, or is not level, loosen pressfeet slightly to compensate and retighten.
WARNINGBed must be at the BOTTOM of the frame before proceeding to the next step.
ASSEMBLY INSTRUCTIONS CONTINUED
4
5
Front view
Slide bed down to bottom of frame
Note: When sliding bed to frame bottom, DO NOT use bed handles.
PUMP INSTRUCTIONS
10
WARNINGDO NOT attempt to operate pump unless the BREATHER VALVE IS OPEN. Valve is closed prior to shipping to prevent the loss of hydraulic fluid.
CAUTIONHAND TIGHTEN VALVE ONLY. Excess pressure could damage the valve assembly.
CAUTIONDO NOT TURN RELEASE VALVE MORE THAN ONE FULL TURN or equipment may be disabled.
WARNING This symbol alerts you to the possibility of serious injury or death if instructions are not followed.
Failure to heed these warnings may result in loss of load, damage to the press and/or failure resulting in property damage, personal or fatal injury. This operating manual contains important details concerning the safe operation of this tool. The user must read and understand these details before any use of the tool.
This manual must be retained for future reference.
2. CLOSE the valve located on theFRONT of the pump assembly byturning CLOCKWISE. Connectusing a 3/8" line. Do not exceedair pressure of 90-120 psig.
3. Squeeze air hose trigger until ramcomes into contact with item to be pressed.
4. Once ram is in contact with the item to be pressed,insert pump handle into high pressure cradle. Usingthe high pressure pump moves the ram less witheach stroke and requires less effort to apply pressure.
5. To relieve pressure and retract ram, turn valve located on FRONT of pump assembly ONE FULLTURN COUNTERCLOCKWISE.
Air Hose Trigger High Pressure Cradle
PUMP AND RAM ASSEMBLY INSTRUCTIONS
8
A
B
Note: There are two sets of holes for bolts. Use centermost holes on the side.
Note: Hose from pump’s outer side must run BEHIND the frame. Hose with nozzle will be used later.
This end up
Top of press frame, looking down
This end up
Note: Allow ram to rest on press bed while installing pump.
Note: Handle ram carefully to avoid damage to gauge or gauge face. Do not disconnect hoses prior to assembly.
Note: Position press feet on each side of the press.Attach one bolt, washer and nut on each side. Bolts should be attached OFFSET from one another.
Front view
Stand frame upside down Slide bed onto frame Slide bed down to bottom of frame
ASSEMBLY INSTRUCTIONS
1
3
2
Inside of frame
WARNINGBe aware of jagged edges on frame. Not all welds are smooth.Press bed can pinch or crush fingers.Wear safety gloves.
Note: In the upright position,inner bracing should form an inverted "v" with the narrower space facing the top of the press.
Note: Air motor must be operating at the same time.
PROCEDURE FOR BLEEDING AIR
9 1. Turn valve handle on FRONT of pump CLOCKWISE until closed. DO NOT OVERTIGHTEN.
3. Move press bed into highest position and lock bed into place with all four pins.
Air Hose Trigger
WARNING
Do not allow the ram to extend more than 5.5".
4. Place press plates DIRECTLY under ram, on press bed.
7. Squeeze trigger on air hose. Air will enter motor and extend the ram. Pump ram against press plates until gauge reads "5 Tons".
8. Insert pump handle into HIGH PRESSURE CRADLE for more precise control. Pump ram against press plates until gauge reads "10 Tons".
High Pressure Cradle
US TONSUS TONS
WARNINGDO NOT attempt to operate pump unless the BREATHER VALVE IS OPEN.Valve is closed prior to shipping to prevent the loss of hydraulic fluid.
CAUTION Bed must be in UP position, or you will over extend ram.
PARTS LIST
Press Frame - 1
Press Bed - 1
Press Feet - 2
Z Bar - 1
1/2"-13 x 1-1/2" Hex Head Bolts - 10
1/2" Nuts - 10
Washers - 10
1-1/4" x 14" Press Pins - 4
Air MotorPump and Ram - 1
Pump Extension Handle - 1
1" x 3" x 14"Press Plates - 2
Accessory only - Not needed for assembly
Pushing Adapter - 1
Accessory only - Not needed for assembly
Bearing Shield - 1
Accessory only - Not needed for assembly
ESTIMATED ASSEMBLY TIME: 30 MINUTES
Examine box contents, then proceed with the following instructions.
TOOLS NEEDED
3/4" and 9/16" sockets and wrenches
ACCESSORIES
WARNINGLeg ends and press feet are sharp and potentially dangerous. Wear safety gloves and safety goggles.
Top view of pump
REPLACEMENT PARTS LIST
Air/Hydraulic Shop Press
12
15
8
2
1
14
13
3
4
55
18
11
10
55
Only items identified by part number are available separately.
10
9
17
8
6
7
1. BEFORE OPERATING PUMP, open petcock valve (breather) located on TOP of pump assembly by turning COUNTERCLOCKWISE.
5. Put cradle in the DOWN position. Use an adapter on your air hose and allow air to flow through the opening in the petcock valve into the pump.
6. Air that has flowed into the pump causes the cradle to move up and the ram to move down. If this happens,proceed to step 7. If not, check all hoses and connections and repeat the procedure.
9. Turn valve handle on pump COUNTERCLOCKWISE
a maximum of one (1) turn to open valve. Ram will retract as pressure is released.
2. Turn petcock valve (breather) on TOP of pump COUNTERCLOCKWISE to open.
SAFETY INFORMATION
This symbol alerts you to the possibility of serious injury or death if instructions are not followed.
This symbol alerts you to the possibility of damage to or destruction of equipment if instructions are not followed.
Failure to heed these warnings may result in loss of load, damage to the press and/or failure resulting in property damage, personal or fatal injury. This operating manual contains important details concern-
ing the safe operation of this tool. The user must read and understand these details before any use of the tool. This manual must be retained for future reference.
• Read, study, understand and follow all instructions before operating this press.• Always wear safety goggles, (users and bystanders).• Parts being pressed may splinter, shatter, or be ejected from the press at a dangerous
rate of speed. Because there are a variety of press applications, it is the responsibility of the press owner to provide adequate guards, eye protection and protective clothing to the press operator.
• Visual inspection of the press should be made before use, checking for signs of cracked welds, bent bed pins, loose or missing bolts, leaks, or any other structural damage. Corrections must be made before using the press.
• Do not go near leaks. High pressure hydraulic fluid can puncture skin and cause serious injury, gangrene, or death. If injured, seek emergency medical help as immediate surgery is required to remove the fluid.
• Prior to use make sure the press is securely anchored to a concrete floor.• Keep hands, arms, feet, and legs out of work area. Accidental slippage can result in
personal injury.• Always use an accurate force gauge to measure pressing force.• Do not exceed the rated capacity or tamper with the pressure/force settings. When
attachments and adapters are used the rated capacity of the system shall be no greater than the rated capacity of the lowest rated component or combination of components that make up the system.
• Avoid off-center loads. Offset loads can damage ram and may cause load to eject at a dangerous rate of speed. Do not use any spacer or extender between the press ram plunger and the item being pressed. If there is not enough ram stroke, adjust the height of the movable bolster.
• Remove all loads from movable bolster before attempting to adjust bolster height. Beware of possible falling bolster.
• Press only on loads supported by movable bolster and press plates included. Do not support loads on floor or press frame legs.
• When using any accessories such as press plates or arbor plates, be certain they are centered on the movable bolster and in full contact with both sides of the bolster.
• Before applying load, be certain all movable bolster supporting pins are fully engaged. Verify lift cables (if equipped) are slack before pressing on the bolster.
• Always use a bearing shield when pressing bearings.• Use caution when positioning work to be pressed to ensure the item to be pressed
cannot be ejected at a dangerous rate of speed.• Release hydraulic pressure before loosening any fittings.• Maintain proper hydraulic fluid levels.• Do not make any alterations or modifications to the press.• This product may contain one or more chemicals known to the State of California to
cause cancer and birth defects or other reproductive harm. Wash hands thoroughly after handling.
• Failure to heed and understand these markings may result in serious or fatal personal injury and/or property damage.
OWNER/USER RESPONSIBILITYThe owner and/or user must have an understanding of the manufacturer's operating instructions and warnings before using this press. Personnel involved in the use and operation of equipment shall be careful, competent, trained, and qualified in the safe operation of the equipment and its proper use when servicing motor vehicles and their components. Warning information should be emphasized and understood. If the operator is not fluent in English, the manufacturer's instructions and warnings shall be read to and discussed with the operator in the operator's native language by the purchaser/owner, making sure that the operator comprehends its contents.
Owner and/or user must study and maintain for future reference the manufacturer’s instructions. Owner and/or user is responsible for keeping all warning labels and instruction manuals legible and intact. Replacement labels and literature are available from the manufacturers.INSPECTIONVisual inspection of the shop press should be made before each use of the press, checking for damaged, loose or missing parts. Each press must be inspected by a manufacturer’s repair facility immediately, if subjected to an abnormal load or shock. Any press which appears to be damaged in any way, is found to be badly worn, or operates abnormally must be removed from service until necessary repairs are made by a manufacturers's authorized repair facility. It is recommended that an annual inspection of the press be made by a manufacturer’s authorized repair facility and that any defective parts, decals or warning labels be replaced with manufacturer’s specified parts. A list of authorized repair facilities is available from the manufacturer.
SAFETY INSTRUCTIONS• CHECK YOUR LOCAL, STATE AND FEDERAL REGULATIONS
REGARDING THE SAFE USE OF THIS EQUIPMENT. • Your safety is top priority. Please handle equipment with care.• Fully retract unit and remove all items from the press bed frame. • Support the press bed, and remove the pins. • Raise or lower bed to desired height and reinstall press pins. Be certain
pins are fully engaged in the parallel flanges of the upright columns.• Position press on a flat, level, hard surface, preferably concrete.
Make sure all nuts and bolts are tight.• Clear the area of bystanders, especially small children, before using.• Set the press bed to the required height. The press is most effective
when the work piece is located 1 inch below the ram’s retracted position. The compression stroke can include the entire 5 inch working range.
• The press is designed to exert a force on anything which is positioned beneath its ram. The work piece can pop out from under the ram at a high rate of speed and injure someone.
• Pressing Bearings: It is essential that you use the bearing shield when pressing bearings on or off.
LIMITED WARRANTY:SUNEX INTERNATIONAL, INC. WARRANTS TO ITS CUSTOMERS THAT THE COMPANY’S SUNEX TOOLS® BRANDED PRODUCTS ARE FREE FROM DEFECTS IN WORKMANSHIP AND MATERIALS.Sunex International, Inc. will repair or replace its Sunex Tools® branded products which fail to give satisfactory service due to defective workmanship or materials, based upon the terms and conditions of the following described warranty plans attributed to that specific product. This product carries a ONE-YEAR warranty. During this warranty period, Sunex Tools® will repair or replace at our option any part or unit which proves to be defective in material or workmanship. Other important warranty information....This warranty does not cover damage to equipment or tools arising from alteration, abuse, misuse, damage and does not cover any repairs or replace-ment made by anyone other than Sunex Tools® or its authorized warranty service centers. The foregoing obligation is Sunex Tools®’ sole liability under this or any implied warranty and under no circumstances shall we be liable for any incidental or consequential damages. Note: Some states do not allow the exclusion or limitation of incidental or consequential damages, so the above limitation or exclusion may not apply to you.Return equipment or parts to Sunex Tools®, transportation prepaid. Be certain to include your name and address, evidence of the purchase date, and description of the suspected defect.If you have any questions about warranty service, please write to Sunex Tools®. This warranty gives you specific legal rights and you may also have other rights which vary from state to state. Repair kits and replacement parts are available for many of Sunex Tools® products regardless of whether or not the product isstill covered by a warranty plan.SHIPPING ADDRESS: MAILING ADDRESS:Sunex Tools Sunex Tools315 Hawkins Rd. P.O. Box 4215Travelers Rest, South Carolina 29690 Greenville, South Carolina 29608
WARNING
WARNING
CAUTION
THIS OPERATING MANUAL CONTAINS IMPORTANT SAFETY INFORMATION. READ CAREFULLY AND UNDERSTAND ALL INFORMATION BEFORE OPERATING THIS TOOL. SAVE THIS MANUAL FOR FUTURE USE.
5740AH - 40 Ton Air/Hydraulic Shop Press5750AH - 50 Ton Air/Hydraulic Shop Press
Sunex Part No. Total Height Inside Width Press Feet Length Bed Width Ram Stroke Pin Diameter PB Winch Sliding Head Press Plates Included
5740AH 74" 35" 29.75" 8.25" 6" 1.25" Y Y Y(2)
5750AH 74" 35" 29.75" 8.25" 6" 1.25" Y Y Y(2)
PRESS SPECIFICATIONS
OWNER'S MANUAL
CONTENTS:Page 1 Specifications
2 Safety Information and Warranty Information3 Parts List
4-6 Assembly Instructions 789
Pump and Ram Assembly InstructionsProcedure for Bleeding AirPump Instructions
10-11 Winch Kit Parts List and Winch Installation Instructions12 Replacement Parts List
© Copyright 2014, Sunex Tools®
5740AH, 5750AH rev. 12/05/14
5740AH - 40 Ton Air/Hydraulic Shop Press5750AH - 50 Ton Air/Hydraulic Shop Press
5740AH - 40 Ton Air/Hydraulic Shop Press5750AH - 50 Ton Air/Hydraulic Shop Press
5740AH - 40 Ton Air/Hydraulic Shop Press5750AH - 50 Ton Air/Hydraulic Shop Press
5740AH - 40 Ton Air/Hydraulic Shop Press5750AH - 50 Ton Air/Hydraulic Shop Press
5740AH - 40 Ton Air/Hydraulic Shop Press5750AH - 50 Ton Air/Hydraulic Shop Press
5740AH - 40 Ton Air/Hydraulic Shop Press5750AH - 50 Ton Air/Hydraulic Shop Press
5740AH - 40 Ton Air/Hydraulic Shop Press5750AH - 50 Ton Air/Hydraulic Shop Press
5740AH - 40 Ton Air/Hydraulic Shop Press5750AH - 50 Ton Air/Hydraulic Shop Press
5740AH - 40 Ton Air/Hydraulic Shop Press5750AH - 50 Ton Air/Hydraulic Shop Press
5740AH - 40 Ton Air/Hydraulic Shop Press5750AH - 50 Ton Air/Hydraulic Shop Press
5740AH - 40 Ton Air/Hydraulic Shop Press5750AH - 50 Ton Air/Hydraulic Shop Press
5740AH, 5750AH 2 rev. 12/05/14 5740AH, 5750AH 3 rev. 12/05/14
5740AH, 5750AH 4 rev. 12/05/14 5740AH, 5750AH 5 rev. 12/05/14
5740AH, 5750AH 6 rev. 12/05/14 5740AH, 5750AH 7 rev. 12/05/14
5740AH, 5750AH 8 rev. 12/05/14 5740AH, 5750AH 9 rev. 12/05/14
5740AH, 5750AH 10 rev. 12/05/14 5740AH, 5750AH 11 rev. 12/05/14
5740AH, 5750AH 12 rev. 12/05/14
PUMP AND RAM EXPLODED PARTS DIAGRAM
8.886"
9.113"
ITEM NO. DESCRIPTION QTY.
1 Base Weldment 12 Plug 13 * Polypak Seal (Parker) 24 1/2-13 x 2 Hex HD C-S GR 2 Zinc 15 Piston 16 * O-Ring (Parker) 17 Rod 18 Retaining Ring Int. 3.5 NOM 19 Piston Guide 110 Retractor Plate 111 Spring 212 Fitting Gauge 1.75 113 Gauge 114 90˚ Elbow 1/4 NPTF to -6 JIC 115 Hose Hydraulic 41 1/2 LG 7/16-20 JICF 1
RAM
PUMPITEM NO. DESCRIPTION QTY.
1 Tank 12 Tie Rod 43 1" Piston Body 14 1/2" Piston Body 15 1" Piston 16 1/2" Piston 17 1/4" MNPT Pressure Plug 18 Pump Body 19 Pump Lid 110 Pump Bracket 211 Valve Assembly 112 Pivot Pin 213 * 5/16" Steel Ball 514 Brass Drain Cock 115 Cradle Assembly 216 Hydraulic Hose 41-1/2" L 7/16-20 JICF 117 7/16-14 Fin Hex Nut Zinc 419 * O-Ring 120 * O-Ring 121 * 3-1/2" Seal 222 * 3-5/16" Seal 123 * 3-3/16" Seal 124 SHCS 7/16 14 x 1/2" 425 SHCS 7/16 14 x 3/4" 426 * Light Spring 227 * Heavy Spring 228 7/16" Split Lock Washer 629 Pump Filter 130 Pump Fitting 1/4" MNPT 7/16" JICF 131 7/8" Grip 132 Handle for Pump 133 * O-Ring 1
# 23 (Pump)QTY: 1
# 21 (Pump)QTY: 2
# 19 (Pump)QTY: 1
# 22 (Pump)QTY: 1
See Replacement Parts List for parts available separately.Parts with (*) are only available in Seal Kit, part number RSCBP1217.
10
9
15
1
7
6
4
8
5
3
1111
1
14
13
12
3
2
7
21
17
30
16
9
# 3 (Ram)(Poly Pak - Note: Only the upper seal normally needs replacement)QTY: 1
# 33 (Pump)(O-Ring for # 11 Valve Assembly on Pump)QTY: 1
# 6 (Ram)QTY: 1
# 20 (Pump)QTY: 1
# 13 (Pump)QTY: 5
2
28
14
1
25
2411
1327
10
31
32
15
20
6
4
23
28
25
241028
13
29
21
8
26 24
12
22
3
19
5
15
# 26 (Pump)QTY: 2
# 27 (Pump)QTY: 2
Individual parts pictured are components of the Seal Kit, RSCBP1217.
Air Motor not shown
5740AH - 40 Ton Air/Hydraulic Shop Press5750AH - 50 Ton Air/Hydraulic Shop Press
5740AH, 5750AH 13 rev. 12/05/14
ITEM NO. SUNEX PART NO. DESCRIPTION QTY.
1 RS345009 2" Pushing Adaptor (Spring) 22 Press Bed 13 Press Frame 14 Ram Frame 15 RSCBP1225 Press Pin 46 RS310012 Pushing Adapter 17 RSBS1 Bearing Shield 18 RSCBP1205 Press Plate 29 RSCBP1211 Press Feet 210 RSCBP1212 Z Bar 111 RSCBP1209 Pump Handle 112 RS40AOPAM Pump (with air motor) 113 RSCBP1202 Ram (includes gauge) (5740AH) 1
RSCBP1202GG Ram (includes gauge) (5750AH) 114 RSCBP1206 Gauge (5740AH) 1
RSCBP1206G Liquid Filled Gauge (5750AH) 1
ITEM NO. SUNEX PART NO. DESCRIPTION QTY.
15 RSCBP1204 Hose & Fitting 116 RSCBP1217 Seal Kit for Pump and Ram (not shown) 117 RS40MPPHK Press Hardware Kit 1 set
1/2"-13 x 1-1/2" Hex Head Bolt 10 1/2" Nut 10
Washer 1018 RSAAMO2 Air Motor (shown with pump) 119 RS4050WCH Winch 1not shown RSWHK Winch Hardware Kit 1 set
Cable Clamp 1 1/2"-13 x 1-1/2" Hex Head Bolt 2 1/2" Nut 2
Washer 2Winch 1
Short Cable (includes eye bolt) 1 Long Cable 1
not shown RS5740AHLK Product Label Kit 1 not shown RS5750AHLK Product Label Kit 1
12 Dark Gray- Long Cable
Light Gray- Short Cable
1. Move press bed into LOWEST position so it is resting on top of pins 1 and 2.
Right side of press
3. Thread the BARE end of the LONGER of the two steel cables up and through the pump bracket.
Right side of press,under pump assembly
2. Install pre-attached eye bolt on LONGER cable to press bed handle located under pump assembly. DO NOT FULLY TIGHTEN. Center with side of press bed and make sure there is enough room to lower or raise both nuts on eye bolt for precise alignment.
WARNINGDO NOT FULLY TIGHTEN.
WINCH KIT PARTS LIST
Winch - 1
Long Cable - 1
Short Cable- 1
Cable Clamp - 1
1/2"-13 x 1-1/2" Hex Head Bolts - 2
1/2" Nuts - 2
Washers - 2
WINCH INSTALLATION INSTRUCTIONS
4. Run the long cable up and OVER BOTH ROLLER BRACKETS and feed into winch. Be sure to thread 12 inches (1 foot) of extra cable through winch.
5. Once winch cable has been threaded, pull excess cable back through winch as shown in diagramabove. The cable should be locked tightly around itself with no excess cable left hanging. Operate winch enough to remove slack from longer cable.
WARNINGMount winch to frame AFTER threading cable.
6. Mount winch to frame using the provided washers, 1/2" nuts and 1/2"-13 x 1-1/2" bolts.
Left side of press, under winch
8. Install pre-attached eye bolt on SHORTER cable to press bed handle located under winch after feeding it around in step 7.
7. Feed the short cable by running it up and OVER first roller, then UNDER second roller. Loop the short cable back toward the winch and securely attach to the longer cable using the cable clamp. Remove slack from short cable before securing to long cable. Clamp should be NO LESS THAN ONE INCH (1") from roller.
9. Turn eye hooks to adjust and level press bed. Once bed is level,firmly tighten eye hook mounting hardware. The steel cable will stretch with use. It may be necessary to repeat this leveling procedure in the future.
10. Test the winch kit by raising and lowering the press bed from its lowest to highest position. Repeat and adjust until bed is level and moves freely throughout its entire range of motion.Cut excess cable when all adjustments are complete.
LONG CABLE top view of press
Top view of press with bed in lowest position
This end feeds into winch.
SHIPPING ADDRESS:Sunex Tools315 Hawkins Rd.Travelers Rest, South Carolina 29690
MAILING ADDRESS:Sunex ToolsP.O. Box 4215Greenville, South Carolina 29608
Note: Refer to manual from winch manufacturer for detailed instructions on winch assembly and cable threading procedure.
WINCH INSTALLATION INSTRUCTIONS CONTINUED

19
ASSEMBLY INSTRUCTIONS CONTINUED
Stand unit upright Slide bed above holes and hold in place Secure pins underneath bed, one at a time
1 2
6WARNING Pins must be COMPLETELY through BOTH SIDES of frame.
7
Let bed rest on inserted pins Place 3rd and 4th pin on each side Secure pins completely through bed and frame.
3 4
WARNING ALL FOUR (4) pins must be COMPLETELY through BOTH SIDES of frame in order to operate press.
Cross-section of press
Front view
Use bolts, washers and nuts to attach Z Bar to both sides of the press.
Note: Check all bolts for tightness. If press rocks, or is not level, loosen pressfeet slightly to compensate and retighten.
WARNINGBed must be at the BOTTOM of the frame before proceeding to the next step.
ASSEMBLY INSTRUCTIONS CONTINUED
4
5
Front view
Slide bed down to bottom of frame
Note: When sliding bed to frame bottom, DO NOT use bed handles.
PUMP INSTRUCTIONS
10
WARNINGDO NOT attempt to operate pump unless the BREATHER VALVE IS OPEN.Valve is closed prior to shipping to prevent the loss of hydraulic fluid.
CAUTIONHAND TIGHTEN VALVE ONLY.Excess pressure could damage the valve assembly.
CAUTIONDO NOT TURN RELEASE VALVE MORE THAN ONE FULL TURN or equipment may be disabled.
WARNING This symbol alerts you to the possibility of serious injury or death if instructions are not followed.
Failure to heed these warnings may result in loss of load, damage to the press and/or failure resulting in property damage, personal or fatal injury.This operating manual contains important details concerning the safe operation of this tool.The user must read and understand these details before any use of the tool.
This manual must be retained for future reference.
2. CLOSE the valve located on the FRONT of the pump assembly by turning CLOCKWISE. Connect using a 3/8" line. Do not exceed air pressure of 90-120 psig.
3. Squeeze air hose trigger until ram comes into contact with item to be pressed.
4. Once ram is in contact with the item to be pressed,insert pump handle into high pressure cradle. Using the high pressure pump moves the ram less with each stroke and requires less effort to apply pressure.
5. To relieve pressure and retract ram, turn valve located on FRONT of pump assembly ONE FULL TURN COUNTERCLOCKWISE.
Air Hose Trigger High Pressure Cradle
PUMP AND RAM ASSEMBLY INSTRUCTIONS
8
A
B
Note: There are two sets of holes for bolts. Use centermost holes on the side.
Note: Hose from pump’s outer side must run BEHIND the frame. Hose with nozzle will be used later.
This end up
Top of press frame, looking down
This end up
Note: Allow ram to rest on press bed while installing pump.
Note: Handle ram carefully to avoid damage to gauge or gauge face. Do not disconnect hoses prior to assembly.
Note: Position press feet on each side of the press.Attach one bolt, washer and nut on each side. Bolts should be attached OFFSET from one another.
Front view
Stand frame upside down Slide bed onto frame Slide bed down to bottom of frame
ASSEMBLY INSTRUCTIONS
1
3
2
Inside of frame
WARNINGBe aware of jagged edges on frame. Not all welds are smooth.Press bed can pinch or crush fingers.Wear safety gloves.
Note: In the upright position,inner bracing should form an inverted "v" with the narrower space facing the top of the press.
Note: Air motor must be operating at the same time.
PROCEDURE FOR BLEEDING AIR
9 1. Turn valve handle on FRONT of pump CLOCKWISE until closed. DO NOT OVERTIGHTEN.
3. Move press bed into highest position and lock bed into place with all four pins.
Air Hose Trigger
WARNING
Do not allow the ram to extend more than 5.5".
4. Place press plates DIRECTLY under ram, on press bed.
7. Squeeze trigger on air hose. Air will enter motor and extend the ram. Pump ram against press plates until gauge reads "5 Tons".
8. Insert pump handle into HIGH PRESSURE CRADLE for more precise control. Pump ram against press plates until gauge reads "10 Tons".
High Pressure Cradle
US TONSUS TONS
WARNINGDO NOT attempt to operate pump unless the BREATHER VALVE IS OPEN.Valve is closed prior to shipping to prevent the loss of hydraulic fluid.
CAUTION Bed must be in UP position, or you will over extend ram.
PARTS LIST
Press Frame - 1
Press Bed - 1
Press Feet - 2
Z Bar - 1
1/2"-13 x 1-1/2" Hex Head Bolts - 10
1/2" Nuts - 10
Washers - 10
1-1/4" x 14" Press Pins - 4
Air MotorPump and Ram - 1
Pump Extension Handle - 1
1" x 3" x 14"Press Plates - 2
Accessory only - Not needed for assembly
Pushing Adapter - 1
Accessory only - Not needed for assembly
Bearing Shield - 1
Accessory only - Not needed for assembly
ESTIMATED ASSEMBLY TIME: 30 MINUTES
Examine box contents, then proceed with the following instructions.
TOOLS NEEDED
3/4" and 9/16" sockets and wrenches
ACCESSORIES
WARNINGLeg ends and press feet are sharp and potentially dangerous. Wear safety gloves and safety goggles.
Top view of pump
REPLACEMENT PARTS LIST
Air/Hydraulic Shop Press
12
15
8
2
1
14
13
3
4
55
18
11
10
55
Only items identified by part number are available separately.
10
9
17
8
6
7
1. BEFORE OPERATING PUMP, open petcock valve (breather) located on TOP of pump assembly by turning COUNTERCLOCKWISE.
5. Put cradle in the DOWN position. Use an adapter on your air hose and allow air to flow through the opening in the petcock valve into the pump.
6. Air that has flowed into the pump causes the cradle to move up and the ram to move down. If this happens,proceed to step 7. If not, check all hoses and connections and repeat the procedure.
9. Turn valve handle on pump COUNTERCLOCKWISE
a maximum of one (1) turn to open valve. Ram will retract as pressure is released.
2. Turn petcock valve (breather) on TOP of pump COUNTERCLOCKWISE to open.
SAFETY INFORMATION
This symbol alerts you to the possibility of serious injury or death if instructions are not followed.
This symbol alerts you to the possibility of damage to or destruction of equipment if instructions are not followed.
Failure to heed these warnings may result in loss of load, damage to the press and/or failure resulting in property damage, personal or fatal injury. This operating manual contains important details concern-
ing the safe operation of this tool. The user must read and understand these details before any use of the tool. This manual must be retained for future reference.
• Read, study, understand and follow all instructions before operating this press.• Always wear safety goggles, (users and bystanders).• Parts being pressed may splinter, shatter, or be ejected from the press at a dangerous
rate of speed. Because there are a variety of press applications, it is the responsibility of the press owner to provide adequate guards, eye protection and protective clothing to the press operator.
• Visual inspection of the press should be made before use, checking for signs of cracked welds, bent bed pins, loose or missing bolts, leaks, or any other structural damage. Corrections must be made before using the press.
• Do not go near leaks. High pressure hydraulic fluid can puncture skin and cause serious injury, gangrene, or death. If injured, seek emergency medical help as immediate surgery is required to remove the fluid.
• Prior to use make sure the press is securely anchored to a concrete floor.• Keep hands, arms, feet, and legs out of work area. Accidental slippage can result in
personal injury.• Always use an accurate force gauge to measure pressing force.• Do not exceed the rated capacity or tamper with the pressure/force settings. When
attachments and adapters are used the rated capacity of the system shall be no greater than the rated capacity of the lowest rated component or combination of components that make up the system.
• Avoid off-center loads. Offset loads can damage ram and may cause load to eject at a dangerous rate of speed. Do not use any spacer or extender between the press ram plunger and the item being pressed. If there is not enough ram stroke, adjust the height of the movable bolster.
• Remove all loads from movable bolster before attempting to adjust bolster height. Beware of possible falling bolster.
• Press only on loads supported by movable bolster and press plates included. Do not support loads on floor or press frame legs.
• When using any accessories such as press plates or arbor plates, be certain they are centered on the movable bolster and in full contact with both sides of the bolster.
• Before applying load, be certain all movable bolster supporting pins are fully engaged. Verify lift cables (if equipped) are slack before pressing on the bolster.
• Always use a bearing shield when pressing bearings.• Use caution when positioning work to be pressed to ensure the item to be pressed
cannot be ejected at a dangerous rate of speed.• Release hydraulic pressure before loosening any fittings.• Maintain proper hydraulic fluid levels.• Do not make any alterations or modifications to the press.• This product may contain one or more chemicals known to the State of California to
cause cancer and birth defects or other reproductive harm. Wash hands thoroughly after handling.
• Failure to heed and understand these markings may result in serious or fatal personal injury and/or property damage.
OWNER/USER RESPONSIBILITYThe owner and/or user must have an understanding of the manufacturer's operating instructions and warnings before using this press. Personnel involved in the use and operation of equipment shall be careful, competent, trained, and qualified in the safe operation of the equipment and its proper use when servicing motor vehicles and their components. Warning information should be emphasized and understood. If the operator is not fluent in English, the manufacturer's instructions and warnings shall be read to and discussed with the operator in the operator's native language by the purchaser/owner, making sure that the operator comprehends its contents.
Owner and/or user must study and maintain for future reference the manufacturer’s instructions. Owner and/or user is responsible for keeping all warning labels and instruction manuals legible and intact. Replacement labels and literature are available from the manufacturers.INSPECTIONVisual inspection of the shop press should be made before each use of the press, checking for damaged, loose or missing parts. Each press must be inspected by a manufacturer’s repair facility immediately, if subjected to an abnormal load or shock. Any press which appears to be damaged in any way, is found to be badly worn, or operates abnormally must be removed from service until necessary repairs are made by a manufacturers's authorized repair facility. It is recommended that an annual inspection of the press be made by a manufacturer’s authorized repair facility and that any defective parts, decals or warning labels be replaced with manufacturer’s specified parts. A list of authorized repair facilities is available from the manufacturer.
SAFETY INSTRUCTIONS• CHECK YOUR LOCAL, STATE AND FEDERAL REGULATIONS
REGARDING THE SAFE USE OF THIS EQUIPMENT. • Your safety is top priority. Please handle equipment with care.• Fully retract unit and remove all items from the press bed frame. • Support the press bed, and remove the pins. • Raise or lower bed to desired height and reinstall press pins. Be certain
pins are fully engaged in the parallel flanges of the upright columns.• Position press on a flat, level, hard surface, preferably concrete.
Make sure all nuts and bolts are tight.• Clear the area of bystanders, especially small children, before using.• Set the press bed to the required height. The press is most effective
when the work piece is located 1 inch below the ram’s retracted position. The compression stroke can include the entire 5 inch working range.
• The press is designed to exert a force on anything which is positioned beneath its ram. The work piece can pop out from under the ram at a high rate of speed and injure someone.
• Pressing Bearings: It is essential that you use the bearing shield when pressing bearings on or off.
LIMITED WARRANTY:SUNEX INTERNATIONAL, INC. WARRANTS TO ITS CUSTOMERS THAT THE COMPANY’S SUNEX TOOLS® BRANDED PRODUCTS ARE FREE FROM DEFECTS IN WORKMANSHIP AND MATERIALS.Sunex International, Inc. will repair or replace its Sunex Tools® branded products which fail to give satisfactory service due to defective workmanship or materials, based upon the terms and conditions of the following described warranty plans attributed to that specific product. This product carries a ONE-YEAR warranty. During this warranty period, Sunex Tools® will repair or replace at our option any part or unit which proves to be defective in material or workmanship. Other important warranty information....This warranty does not cover damage to equipment or tools arising from alteration, abuse, misuse, damage and does not cover any repairs or replace-ment made by anyone other than Sunex Tools® or its authorized warranty service centers. The foregoing obligation is Sunex Tools®’ sole liability under this or any implied warranty and under no circumstances shall we be liable for any incidental or consequential damages. Note: Some states do not allow the exclusion or limitation of incidental or consequential damages, so the above limitation or exclusion may not apply to you.Return equipment or parts to Sunex Tools®, transportation prepaid. Be certain to include your name and address, evidence of the purchase date, and description of the suspected defect.If you have any questions about warranty service, please write to Sunex Tools®. This warranty gives you specific legal rights and you may also have other rights which vary from state to state. Repair kits and replacement parts are available for many of Sunex Tools® products regardless of whether or not the product isstill covered by a warranty plan.SHIPPING ADDRESS: MAILING ADDRESS:Sunex Tools Sunex Tools315 Hawkins Rd. P.O. Box 4215Travelers Rest, South Carolina 29690 Greenville, South Carolina 29608
WARNING
WARNING
CAUTION
THIS OPERATING MANUAL CONTAINS IMPORTANT SAFETY INFORMATION. READ CAREFULLY AND UNDERSTAND ALL INFORMATION BEFORE OPERATING THIS TOOL. SAVE THIS MANUAL FOR FUTURE USE.
5740AH - 40 Ton Air/Hydraulic Shop Press5750AH - 50 Ton Air/Hydraulic Shop Press
Sunex Part No. Total Height Inside Width Press Feet Length Bed Width Ram Stroke Pin Diameter PB Winch Sliding Head Press Plates Included
5740AH 74" 35" 29.75" 8.25" 6" 1.25" Y Y Y(2)
5750AH 74" 35" 29.75" 8.25" 6" 1.25" Y Y Y(2)
PRESS SPECIFICATIONS
OWNER'S MANUAL
CONTENTS:Page 1 Specifications
2 Safety Information and Warranty Information3 Parts List
4-6 Assembly Instructions 789
Pump and Ram Assembly InstructionsProcedure for Bleeding AirPump Instructions
10-11 Winch Kit Parts List and Winch Installation Instructions12 Replacement Parts List
© Copyright 2014, Sunex Tools®
5740AH, 5750AH rev. 12/05/14
5740AH - 40 Ton Air/Hydraulic Shop Press5750AH - 50 Ton Air/Hydraulic Shop Press
5740AH - 40 Ton Air/Hydraulic Shop Press5750AH - 50 Ton Air/Hydraulic Shop Press
5740AH - 40 Ton Air/Hydraulic Shop Press5750AH - 50 Ton Air/Hydraulic Shop Press
5740AH - 40 Ton Air/Hydraulic Shop Press5750AH - 50 Ton Air/Hydraulic Shop Press
5740AH - 40 Ton Air/Hydraulic Shop Press5750AH - 50 Ton Air/Hydraulic Shop Press
5740AH - 40 Ton Air/Hydraulic Shop Press5750AH - 50 Ton Air/Hydraulic Shop Press
5740AH - 40 Ton Air/Hydraulic Shop Press5750AH - 50 Ton Air/Hydraulic Shop Press
5740AH - 40 Ton Air/Hydraulic Shop Press5750AH - 50 Ton Air/Hydraulic Shop Press
5740AH - 40 Ton Air/Hydraulic Shop Press5750AH - 50 Ton Air/Hydraulic Shop Press
5740AH - 40 Ton Air/Hydraulic Shop Press5750AH - 50 Ton Air/Hydraulic Shop Press
5740AH - 40 Ton Air/Hydraulic Shop Press5750AH - 50 Ton Air/Hydraulic Shop Press
5740AH, 5750AH 2 rev. 12/05/14 5740AH, 5750AH 3 rev. 12/05/14
5740AH, 5750AH 4 rev. 12/05/14 5740AH, 5750AH 5 rev. 12/05/14
5740AH, 5750AH 6 rev. 12/05/14 5740AH, 5750AH 7 rev. 12/05/14
5740AH, 5750AH 8 rev. 12/05/14 5740AH, 5750AH 9 rev. 12/05/14
5740AH, 5750AH 10 rev. 12/05/14 5740AH, 5750AH 11 rev. 12/05/14
5740AH, 5750AH 12 rev. 12/05/14
PUMP AND RAM EXPLODED PARTS DIAGRAM
8.886"
9.113"
ITEM NO. DESCRIPTION QTY.
1 Base Weldment 12 Plug 13 * Polypak Seal (Parker) 24 1/2-13 x 2 Hex HD C-S GR 2 Zinc 15 Piston 16 * O-Ring (Parker) 17 Rod 18 Retaining Ring Int. 3.5 NOM 19 Piston Guide 110 Retractor Plate 111 Spring 212 Fitting Gauge 1.75 113 Gauge 114 90˚ Elbow 1/4 NPTF to -6 JIC 115 Hose Hydraulic 41 1/2 LG 7/16-20 JICF 1
RAM
PUMPITEM NO. DESCRIPTION QTY.
1 Tank 12 Tie Rod 43 1" Piston Body 14 1/2" Piston Body 15 1" Piston 16 1/2" Piston 17 1/4" MNPT Pressure Plug 18 Pump Body 19 Pump Lid 110 Pump Bracket 211 Valve Assembly 112 Pivot Pin 213 * 5/16" Steel Ball 514 Brass Drain Cock 115 Cradle Assembly 216 Hydraulic Hose 41-1/2" L 7/16-20 JICF 117 7/16-14 Fin Hex Nut Zinc 419 * O-Ring 120 * O-Ring 121 * 3-1/2" Seal 222 * 3-5/16" Seal 123 * 3-3/16" Seal 124 SHCS 7/16 14 x 1/2" 425 SHCS 7/16 14 x 3/4" 426 * Light Spring 227 * Heavy Spring 228 7/16" Split Lock Washer 629 Pump Filter 130 Pump Fitting 1/4" MNPT 7/16" JICF 131 7/8" Grip 132 Handle for Pump 133 * O-Ring 1
# 23 (Pump)QTY: 1
# 21 (Pump)QTY: 2
# 19 (Pump)QTY: 1
# 22 (Pump)QTY: 1
See Replacement Parts List for parts available separately.Parts with (*) are only available in Seal Kit, part number RSCBP1217.
10
9
15
1
7
6
4
8
5
3
1111
1
14
13
12
3
2
7
21
17
30
16
9
# 3 (Ram)(Poly Pak - Note: Only the upper seal normally needs replacement)QTY: 1
# 33 (Pump)(O-Ring for # 11 Valve Assembly on Pump)QTY: 1
# 6 (Ram)QTY: 1
# 20 (Pump)QTY: 1
# 13 (Pump)QTY: 5
2
28
14
1
25
2411
1327
10
31
32
15
20
6
4
23
28
25
241028
13
29
21
8
26 24
12
22
3
19
5
15
# 26 (Pump)QTY: 2
# 27 (Pump)QTY: 2
Individual parts pictured are components of the Seal Kit, RSCBP1217.
Air Motor not shown
5740AH - 40 Ton Air/Hydraulic Shop Press5750AH - 50 Ton Air/Hydraulic Shop Press
5740AH, 5750AH 13 rev. 12/05/14
ITEM NO. SUNEX PART NO. DESCRIPTION QTY.
1 RS345009 2" Pushing Adaptor (Spring) 22 Press Bed 13 Press Frame 14 Ram Frame 15 RSCBP1225 Press Pin 46 RS310012 Pushing Adapter 17 RSBS1 Bearing Shield 18 RSCBP1205 Press Plate 29 RSCBP1211 Press Feet 210 RSCBP1212 Z Bar 111 RSCBP1209 Pump Handle 112 RS40AOPAM Pump (with air motor) 113 RSCBP1202 Ram (includes gauge) (5740AH) 1
RSCBP1202GG Ram (includes gauge) (5750AH) 114 RSCBP1206 Gauge (5740AH) 1
RSCBP1206G Liquid Filled Gauge (5750AH) 1
ITEM NO. SUNEX PART NO. DESCRIPTION QTY.
15 RSCBP1204 Hose & Fitting 116 RSCBP1217 Seal Kit for Pump and Ram (not shown) 117 RS40MPPHK Press Hardware Kit 1 set
1/2"-13 x 1-1/2" Hex Head Bolt 10 1/2" Nut 10
Washer 1018 RSAAMO2 Air Motor (shown with pump) 119 RS4050WCH Winch 1not shown RSWHK Winch Hardware Kit 1 set
Cable Clamp 1 1/2"-13 x 1-1/2" Hex Head Bolt 2 1/2" Nut 2
Washer 2Winch 1
Short Cable (includes eye bolt) 1 Long Cable 1
not shown RS5740AHLK Product Label Kit 1 not shown RS5750AHLK Product Label Kit 1
12 Dark Gray- Long Cable
Light Gray- Short Cable
1. Move press bed into LOWEST positionso it is resting on top of pins 1 and 2.
Right side of press
3. Thread the BARE end of the LONGERof the two steel cables up and through the pump bracket.
Right side of press, under pump assembly
2. Install pre-attached eye bolt on LONGERcable to press bed handle located underpump assembly. DO NOT FULLY TIGHTEN. Center with side of press bed and make sure there is enough room to lower or raiseboth nuts on eye bolt for precise alignment.
WARNINGDO NOT FULLY TIGHTEN.
WINCH KIT PARTS LIST
Winch - 1
Long Cable - 1
Short Cable- 1
Cable Clamp - 1
1/2"-13 x 1-1/2" Hex Head Bolts - 2
1/2" Nuts - 2
Washers - 2
WINCH INSTALLATION INSTRUCTIONS
4. Run the long cable up and OVER BOTH ROLLER BRACKETS and feed into winch. Be sure to thread 12 inches (1 foot) of extra cable through winch.
5. Once winch cable has been threaded, pull excess cable back through winch as shown in diagramabove. The cable should be locked tightly around itself with no excess cable left hanging. Operate winch enough to remove slack from longer cable.
WARNINGMount winch to frame AFTER threading cable.
6. Mount winch to frame using the provided washers, 1/2" nuts and 1/2"-13 x 1-1/2" bolts.
Left side of press, under winch
8. Install pre-attached eye bolt on SHORTER cable to press bed handle located under winch after feeding it around in step 7.
7. Feed the short cable by running it up and OVER first roller, then UNDER second roller. Loop the short cable back toward the winch and securely attach to the longer cable using the cable clamp. Remove slack from short cable before securing to long cable. Clamp should be NO LESS THAN ONE INCH (1") from roller.
9. Turn eye hooks to adjust and level press bed. Once bed is level,firmly tighten eye hook mounting hardware. The steel cable will stretch with use. It may be necessary to repeat this leveling procedure in the future.
10. Test the winch kit by raising and lowering the press bed from its lowest to highest position. Repeat and adjust until bed is level and moves freely throughout its entire range of motion.Cut excess cable when all adjustments are complete.
LONG CABLE top view of press
Top view of press with bed in lowest position
This end feeds into winch.
SHIPPING ADDRESS:Sunex Tools315 Hawkins Rd.Travelers Rest, South Carolina 29690
MAILING ADDRESS:Sunex ToolsP.O. Box 4215Greenville, South Carolina 29608
Note: Refer to manual from winch manufacturer for detailed instructions on winch assembly and cable threading procedure.
WINCH INSTALLATION INSTRUCTIONS CONTINUED
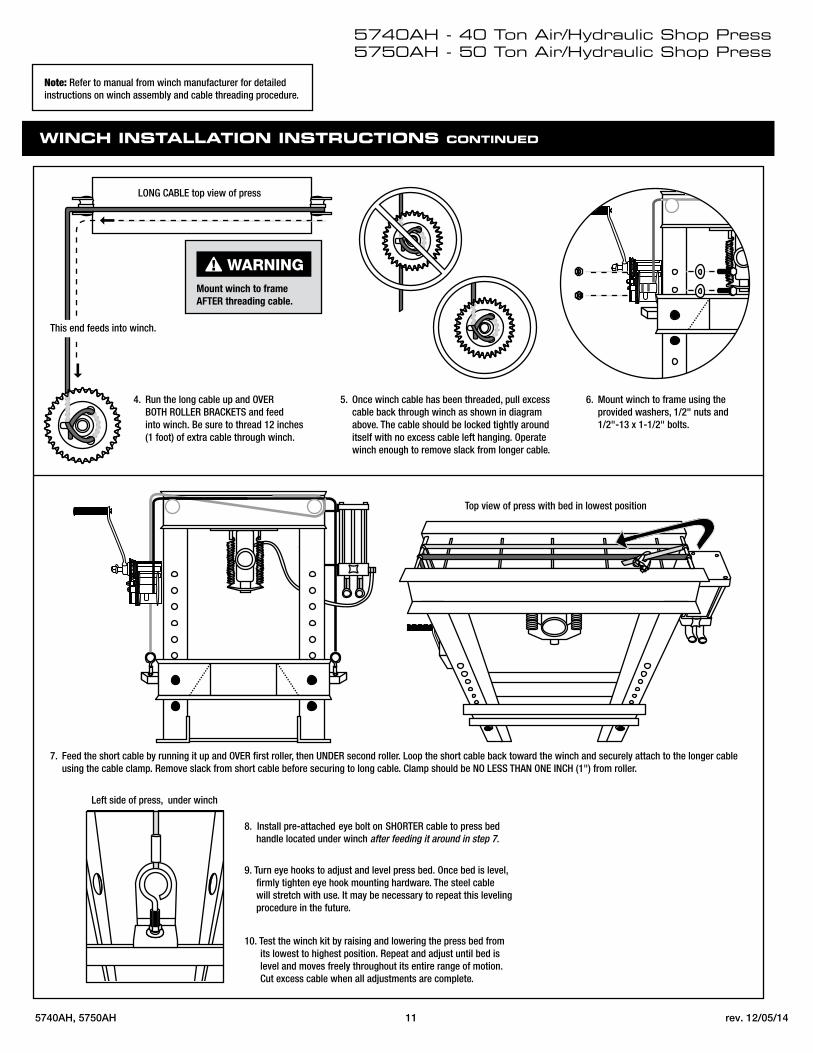
19
ASSEMBLY INSTRUCTIONS CONTINUED
Stand unit upright Slide bed above holes and hold in place Secure pins underneath bed, one at a time
1 2
6WARNING Pins must be COMPLETELY through BOTH SIDES of frame.
7
Let bed rest on inserted pins Place 3rd and 4th pin on each side Secure pins completely through bed and frame.
3 4
WARNING ALL FOUR (4) pins must be COMPLETELY through BOTH SIDES of frame in order to operate press.
Cross-section of press
Front view
Use bolts, washers and nuts to attach Z Bar to both sides of the press.
Note: Check all bolts for tightness. If press rocks, or is not level, loosen pressfeet slightly to compensate and retighten.
WARNINGBed must be at the BOTTOM of the frame before proceeding to the next step.
ASSEMBLY INSTRUCTIONS CONTINUED
4
5
Front view
Slide bed down to bottom of frame
Note: When sliding bed to frame bottom, DO NOT use bed handles.
PUMP INSTRUCTIONS
10
WARNINGDO NOT attempt to operate pump unless the BREATHER VALVE IS OPEN.Valve is closed prior to shipping to prevent the loss of hydraulic fluid.
CAUTIONHAND TIGHTEN VALVE ONLY.Excess pressure could damage the valve assembly.
CAUTIONDO NOT TURN RELEASE VALVE MORE THAN ONE FULL TURN or equipment may be disabled.
WARNING This symbol alerts you to the possibility of serious injury or death if instructions are not followed.
Failure to heed these warnings may result in loss of load, damage to the press and/or failure resulting in property damage, personal or fatal injury.This operating manual contains important details concerning the safe operation of this tool.The user must read and understand these details before any use of the tool.
This manual must be retained for future reference.
2. CLOSE the valve located on the FRONT of the pump assembly by turning CLOCKWISE. Connect using a 3/8" line. Do not exceed air pressure of 90-120 psig.
3. Squeeze air hose trigger until ram comes into contact with item to be pressed.
4. Once ram is in contact with the item to be pressed,insert pump handle into high pressure cradle. Using the high pressure pump moves the ram less with each stroke and requires less effort to apply pressure.
5. To relieve pressure and retract ram, turn valve located on FRONT of pump assembly ONE FULL TURN COUNTERCLOCKWISE.
Air Hose Trigger High Pressure Cradle
PUMP AND RAM ASSEMBLY INSTRUCTIONS
8
A
B
Note: There are two sets of holes for bolts. Use centermost holes on the side.
Note: Hose from pump’s outer side must run BEHIND the frame. Hose with nozzle will be used later.
This end up
Top of press frame, looking down
This end up
Note: Allow ram to rest on press bed while installing pump.
Note: Handle ram carefully to avoid damage to gauge or gauge face. Do not disconnect hoses prior to assembly.
Note: Position press feet on each side of the press.Attach one bolt, washer and nut on each side. Bolts should be attached OFFSET from one another.
Front view
Stand frame upside down Slide bed onto frame Slide bed down to bottom of frame
ASSEMBLY INSTRUCTIONS
1
3
2
Inside of frame
WARNINGBe aware of jagged edges on frame. Not all welds are smooth.Press bed can pinch or crush fingers.Wear safety gloves.
Note: In the upright position,inner bracing should form an inverted "v" with the narrower space facing the top of the press.
Note: Air motor must be operating at the same time.
PROCEDURE FOR BLEEDING AIR
9 1. Turn valve handle on FRONT of pump CLOCKWISE until closed. DO NOT OVERTIGHTEN.
3. Move press bed into highest position and lock bed into place with all four pins.
Air Hose Trigger
WARNING
Do not allow the ram to extend more than 5.5".
4. Place press plates DIRECTLY under ram, on press bed.
7. Squeeze trigger on air hose. Air will enter motor and extend the ram. Pump ram against press plates until gauge reads "5 Tons".
8. Insert pump handle into HIGH PRESSURE CRADLE for more precise control. Pump ram against press plates until gauge reads "10 Tons".
High Pressure Cradle
US TONSUS TONS
WARNINGDO NOT attempt to operate pump unless the BREATHER VALVE IS OPEN.Valve is closed prior to shipping to prevent the loss of hydraulic fluid.
CAUTION Bed must be in UP position, or you will over extend ram.
PARTS LIST
Press Frame - 1
Press Bed - 1
Press Feet - 2
Z Bar - 1
1/2"-13 x 1-1/2" Hex Head Bolts - 10
1/2" Nuts - 10
Washers - 10
1-1/4" x 14" Press Pins - 4
Air MotorPump and Ram - 1
Pump Extension Handle - 1
1" x 3" x 14"Press Plates - 2
Accessory only - Not needed for assembly
Pushing Adapter - 1
Accessory only - Not needed for assembly
Bearing Shield - 1
Accessory only - Not needed for assembly
ESTIMATED ASSEMBLY TIME: 30 MINUTES
Examine box contents, then proceed with the following instructions.
TOOLS NEEDED
3/4" and 9/16" sockets and wrenches
ACCESSORIES
WARNINGLeg ends and press feet are sharp and potentially dangerous. Wear safety gloves and safety goggles.
Top view of pump
REPLACEMENT PARTS LIST
Air/Hydraulic Shop Press
12
15
8
2
1
14
13
3
4
55
18
11
10
55
Only items identified by part number are available separately.
10
9
17
8
6
7
1. BEFORE OPERATING PUMP, open petcock valve (breather) located on TOP of pump assembly by turning COUNTERCLOCKWISE.
5. Put cradle in the DOWN position. Use an adapter on your air hose and allow air to flow through the opening in the petcock valve into the pump.
6. Air that has flowed into the pump causes the cradle to move up and the ram to move down. If this happens,proceed to step 7. If not, check all hoses and connections and repeat the procedure.
9. Turn valve handle on pump COUNTERCLOCKWISE
a maximum of one (1) turn to open valve. Ram will retract as pressure is released.
2. Turn petcock valve (breather) on TOP of pump COUNTERCLOCKWISE to open.
SAFETY INFORMATION
This symbol alerts you to the possibility of serious injury or death if instructions are not followed.
This symbol alerts you to the possibility of damage to or destruction of equipment if instructions are not followed.
Failure to heed these warnings may result in loss of load, damage to the press and/or failure resulting in property damage, personal or fatal injury. This operating manual contains important details concern-
ing the safe operation of this tool. The user must read and understand these details before any use of the tool. This manual must be retained for future reference.
• Read, study, understand and follow all instructions before operating this press.• Always wear safety goggles, (users and bystanders).• Parts being pressed may splinter, shatter, or be ejected from the press at a dangerous
rate of speed. Because there are a variety of press applications, it is the responsibility of the press owner to provide adequate guards, eye protection and protective clothing to the press operator.
• Visual inspection of the press should be made before use, checking for signs of cracked welds, bent bed pins, loose or missing bolts, leaks, or any other structural damage. Corrections must be made before using the press.
• Do not go near leaks. High pressure hydraulic fluid can puncture skin and cause serious injury, gangrene, or death. If injured, seek emergency medical help as immediate surgery is required to remove the fluid.
• Prior to use make sure the press is securely anchored to a concrete floor.• Keep hands, arms, feet, and legs out of work area. Accidental slippage can result in
personal injury.• Always use an accurate force gauge to measure pressing force.• Do not exceed the rated capacity or tamper with the pressure/force settings. When
attachments and adapters are used the rated capacity of the system shall be no greater than the rated capacity of the lowest rated component or combination of components that make up the system.
• Avoid off-center loads. Offset loads can damage ram and may cause load to eject at a dangerous rate of speed. Do not use any spacer or extender between the press ram plunger and the item being pressed. If there is not enough ram stroke, adjust the height of the movable bolster.
• Remove all loads from movable bolster before attempting to adjust bolster height. Beware of possible falling bolster.
• Press only on loads supported by movable bolster and press plates included. Do not support loads on floor or press frame legs.
• When using any accessories such as press plates or arbor plates, be certain they are centered on the movable bolster and in full contact with both sides of the bolster.
• Before applying load, be certain all movable bolster supporting pins are fully engaged. Verify lift cables (if equipped) are slack before pressing on the bolster.
• Always use a bearing shield when pressing bearings.• Use caution when positioning work to be pressed to ensure the item to be pressed
cannot be ejected at a dangerous rate of speed.• Release hydraulic pressure before loosening any fittings.• Maintain proper hydraulic fluid levels.• Do not make any alterations or modifications to the press.• This product may contain one or more chemicals known to the State of California to
cause cancer and birth defects or other reproductive harm. Wash hands thoroughly after handling.
• Failure to heed and understand these markings may result in serious or fatal personal injury and/or property damage.
OWNER/USER RESPONSIBILITYThe owner and/or user must have an understanding of the manufacturer's operating instructions and warnings before using this press. Personnel involved in the use and operation of equipment shall be careful, competent, trained, and qualified in the safe operation of the equipment and its proper use when servicing motor vehicles and their components. Warning information should be emphasized and understood. If the operator is not fluent in English, the manufacturer's instructions and warnings shall be read to and discussed with the operator in the operator's native language by the purchaser/owner, making sure that the operator comprehends its contents.
Owner and/or user must study and maintain for future reference the manufacturer’s instructions. Owner and/or user is responsible for keeping all warning labels and instruction manuals legible and intact. Replacement labels and literature are available from the manufacturers.INSPECTIONVisual inspection of the shop press should be made before each use of the press, checking for damaged, loose or missing parts. Each press must be inspected by a manufacturer’s repair facility immediately, if subjected to an abnormal load or shock. Any press which appears to be damaged in any way, is found to be badly worn, or operates abnormally must be removed from service until necessary repairs are made by a manufacturers's authorized repair facility. It is recommended that an annual inspection of the press be made by a manufacturer’s authorized repair facility and that any defective parts, decals or warning labels be replaced with manufacturer’s specified parts. A list of authorized repair facilities is available from the manufacturer.
SAFETY INSTRUCTIONS• CHECK YOUR LOCAL, STATE AND FEDERAL REGULATIONS
REGARDING THE SAFE USE OF THIS EQUIPMENT. • Your safety is top priority. Please handle equipment with care.• Fully retract unit and remove all items from the press bed frame. • Support the press bed, and remove the pins. • Raise or lower bed to desired height and reinstall press pins. Be certain
pins are fully engaged in the parallel flanges of the upright columns.• Position press on a flat, level, hard surface, preferably concrete.
Make sure all nuts and bolts are tight.• Clear the area of bystanders, especially small children, before using.• Set the press bed to the required height. The press is most effective
when the work piece is located 1 inch below the ram’s retracted position. The compression stroke can include the entire 5 inch working range.
• The press is designed to exert a force on anything which is positioned beneath its ram. The work piece can pop out from under the ram at a high rate of speed and injure someone.
• Pressing Bearings: It is essential that you use the bearing shield when pressing bearings on or off.
LIMITED WARRANTY:SUNEX INTERNATIONAL, INC. WARRANTS TO ITS CUSTOMERS THAT THE COMPANY’S SUNEX TOOLS® BRANDED PRODUCTS ARE FREE FROM DEFECTS IN WORKMANSHIP AND MATERIALS.Sunex International, Inc. will repair or replace its Sunex Tools® branded products which fail to give satisfactory service due to defective workmanship or materials, based upon the terms and conditions of the following described warranty plans attributed to that specific product. This product carries a ONE-YEAR warranty. During this warranty period, Sunex Tools® will repair or replace at our option any part or unit which proves to be defective in material or workmanship. Other important warranty information....This warranty does not cover damage to equipment or tools arising from alteration, abuse, misuse, damage and does not cover any repairs or replace-ment made by anyone other than Sunex Tools® or its authorized warranty service centers. The foregoing obligation is Sunex Tools®’ sole liability under this or any implied warranty and under no circumstances shall we be liable for any incidental or consequential damages. Note: Some states do not allow the exclusion or limitation of incidental or consequential damages, so the above limitation or exclusion may not apply to you.Return equipment or parts to Sunex Tools®, transportation prepaid. Be certain to include your name and address, evidence of the purchase date, and description of the suspected defect.If you have any questions about warranty service, please write to Sunex Tools®. This warranty gives you specific legal rights and you may also have other rights which vary from state to state. Repair kits and replacement parts are available for many of Sunex Tools® products regardless of whether or not the product isstill covered by a warranty plan.SHIPPING ADDRESS: MAILING ADDRESS:Sunex Tools Sunex Tools315 Hawkins Rd. P.O. Box 4215Travelers Rest, South Carolina 29690 Greenville, South Carolina 29608
WARNING
WARNING
CAUTION
THIS OPERATING MANUAL CONTAINS IMPORTANT SAFETY INFORMATION. READ CAREFULLY AND UNDERSTAND ALL INFORMATION BEFORE OPERATING THIS TOOL. SAVE THIS MANUAL FOR FUTURE USE.
5740AH - 40 Ton Air/Hydraulic Shop Press5750AH - 50 Ton Air/Hydraulic Shop Press
Sunex Part No. Total Height Inside Width Press Feet Length Bed Width Ram Stroke Pin Diameter PB Winch Sliding Head Press Plates Included
5740AH 74" 35" 29.75" 8.25" 6" 1.25" Y Y Y(2)
5750AH 74" 35" 29.75" 8.25" 6" 1.25" Y Y Y(2)
PRESS SPECIFICATIONS
OWNER'S MANUAL
CONTENTS:Page 1 Specifications
2 Safety Information and Warranty Information3 Parts List
4-6 Assembly Instructions 789
Pump and Ram Assembly InstructionsProcedure for Bleeding AirPump Instructions
10-11 Winch Kit Parts List and Winch Installation Instructions12 Replacement Parts List
© Copyright 2014, Sunex Tools®
5740AH, 5750AH rev. 12/05/14
5740AH - 40 Ton Air/Hydraulic Shop Press5750AH - 50 Ton Air/Hydraulic Shop Press
5740AH - 40 Ton Air/Hydraulic Shop Press5750AH - 50 Ton Air/Hydraulic Shop Press
5740AH - 40 Ton Air/Hydraulic Shop Press5750AH - 50 Ton Air/Hydraulic Shop Press
5740AH - 40 Ton Air/Hydraulic Shop Press5750AH - 50 Ton Air/Hydraulic Shop Press
5740AH - 40 Ton Air/Hydraulic Shop Press5750AH - 50 Ton Air/Hydraulic Shop Press
5740AH - 40 Ton Air/Hydraulic Shop Press5750AH - 50 Ton Air/Hydraulic Shop Press
5740AH - 40 Ton Air/Hydraulic Shop Press5750AH - 50 Ton Air/Hydraulic Shop Press
5740AH - 40 Ton Air/Hydraulic Shop Press5750AH - 50 Ton Air/Hydraulic Shop Press
5740AH - 40 Ton Air/Hydraulic Shop Press5750AH - 50 Ton Air/Hydraulic Shop Press
5740AH - 40 Ton Air/Hydraulic Shop Press5750AH - 50 Ton Air/Hydraulic Shop Press
5740AH - 40 Ton Air/Hydraulic Shop Press5750AH - 50 Ton Air/Hydraulic Shop Press
5740AH, 5750AH 2 rev. 12/05/14 5740AH, 5750AH 3 rev. 12/05/14
5740AH, 5750AH 4 rev. 12/05/14 5740AH, 5750AH 5 rev. 12/05/14
5740AH, 5750AH 6 rev. 12/05/14 5740AH, 5750AH 7 rev. 12/05/14
5740AH, 5750AH 8 rev. 12/05/14 5740AH, 5750AH 9 rev. 12/05/14
5740AH, 5750AH 10 rev. 12/05/14 5740AH, 5750AH 11 rev. 12/05/14
5740AH, 5750AH 12 rev. 12/05/14
PUMP AND RAM EXPLODED PARTS DIAGRAM
8.886"
9.113"
ITEM NO. DESCRIPTION QTY.
1 Base Weldment 12 Plug 13 * Polypak Seal (Parker) 24 1/2-13 x 2 Hex HD C-S GR 2 Zinc 15 Piston 16 * O-Ring (Parker) 17 Rod 18 Retaining Ring Int. 3.5 NOM 19 Piston Guide 110 Retractor Plate 111 Spring 212 Fitting Gauge 1.75 113 Gauge 114 90˚ Elbow 1/4 NPTF to -6 JIC 115 Hose Hydraulic 41 1/2 LG 7/16-20 JICF 1
RAM
PUMPITEM NO. DESCRIPTION QTY.
1 Tank 12 Tie Rod 43 1" Piston Body 14 1/2" Piston Body 15 1" Piston 16 1/2" Piston 17 1/4" MNPT Pressure Plug 18 Pump Body 19 Pump Lid 110 Pump Bracket 211 Valve Assembly 112 Pivot Pin 213 * 5/16" Steel Ball 514 Brass Drain Cock 115 Cradle Assembly 216 Hydraulic Hose 41-1/2" L 7/16-20 JICF 117 7/16-14 Fin Hex Nut Zinc 419 * O-Ring 120 * O-Ring 121 * 3-1/2" Seal 222 * 3-5/16" Seal 123 * 3-3/16" Seal 124 SHCS 7/16 14 x 1/2" 425 SHCS 7/16 14 x 3/4" 426 * Light Spring 227 * Heavy Spring 228 7/16" Split Lock Washer 629 Pump Filter 130 Pump Fitting 1/4" MNPT 7/16" JICF 131 7/8" Grip 132 Handle for Pump 133 * O-Ring 1
# 23 (Pump)QTY: 1
# 21 (Pump)QTY: 2
# 19 (Pump)QTY: 1
# 22 (Pump)QTY: 1
See Replacement Parts List for parts available separately.Parts with (*) are only available in Seal Kit, part number RSCBP1217.
10
9
15
1
7
6
4
8
5
3
1111
1
14
13
12
3
2
7
21
17
30
16
9
# 3 (Ram)(Poly Pak - Note: Only the upper seal normally needs replacement)QTY: 1
# 33 (Pump)(O-Ring for # 11 Valve Assembly on Pump)QTY: 1
# 6 (Ram)QTY: 1
# 20 (Pump)QTY: 1
# 13 (Pump)QTY: 5
2
28
14
1
25
2411
1327
10
31
32
15
20
6
4
23
28
25
241028
13
29
21
8
26 24
12
22
3
19
5
15
# 26 (Pump)QTY: 2
# 27 (Pump)QTY: 2
Individual parts pictured are components of the Seal Kit, RSCBP1217.
Air Motor not shown
5740AH - 40 Ton Air/Hydraulic Shop Press5750AH - 50 Ton Air/Hydraulic Shop Press
5740AH, 5750AH 13 rev. 12/05/14
ITEM NO. SUNEX PART NO. DESCRIPTION QTY.
1 RS345009 2" Pushing Adaptor (Spring) 22 Press Bed 13 Press Frame 14 Ram Frame 15 RSCBP1225 Press Pin 46 RS310012 Pushing Adapter 17 RSBS1 Bearing Shield 18 RSCBP1205 Press Plate 29 RSCBP1211 Press Feet 210 RSCBP1212 Z Bar 111 RSCBP1209 Pump Handle 112 RS40AOPAM Pump (with air motor) 113 RSCBP1202 Ram (includes gauge) (5740AH) 1
RSCBP1202GG Ram (includes gauge) (5750AH) 114 RSCBP1206 Gauge (5740AH) 1
RSCBP1206G Liquid Filled Gauge (5750AH) 1
ITEM NO. SUNEX PART NO. DESCRIPTION QTY.
15 RSCBP1204 Hose & Fitting 116 RSCBP1217 Seal Kit for Pump and Ram (not shown) 117 RS40MPPHK Press Hardware Kit 1 set
1/2"-13 x 1-1/2" Hex Head Bolt 10 1/2" Nut 10
Washer 1018 RSAAMO2 Air Motor (shown with pump) 119 RS4050WCH Winch 1not shown RSWHK Winch Hardware Kit 1 set
Cable Clamp 1 1/2"-13 x 1-1/2" Hex Head Bolt 2 1/2" Nut 2
Washer 2Winch 1
Short Cable (includes eye bolt) 1 Long Cable 1
not shown RS5740AHLK Product Label Kit 1 not shown RS5750AHLK Product Label Kit 1
12 Dark Gray- Long Cable
Light Gray- Short Cable
1. Move press bed into LOWEST position so it is resting on top of pins 1 and 2.
Right side of press
3. Thread the BARE end of the LONGER of the two steel cables up and through the pump bracket.
Right side of press,under pump assembly
2. Install pre-attached eye bolt on LONGER cable to press bed handle located under pump assembly. DO NOT FULLY TIGHTEN. Center with side of press bed and make sure there is enough room to lower or raise both nuts on eye bolt for precise alignment.
WARNINGDO NOT FULLY TIGHTEN.
WINCH KIT PARTS LIST
Winch - 1
Long Cable - 1
Short Cable- 1
Cable Clamp - 1
1/2"-13 x 1-1/2" Hex Head Bolts - 2
1/2" Nuts - 2
Washers - 2
WINCH INSTALLATION INSTRUCTIONS
4. Run the long cable up and OVER BOTH ROLLER BRACKETS and feed into winch. Be sure to thread 12 inches (1 foot) of extra cable through winch.
5. Once winch cable has been threaded, pull excess cable back through winch as shown in diagramabove. The cable should be locked tightly around itself with no excess cable left hanging. Operate winch enough to remove slack from longer cable.
WARNINGMount winch to frame AFTER threading cable.
6. Mount winch to frame using the provided washers, 1/2" nuts and 1/2"-13 x 1-1/2" bolts.
Left side of press, under winch
8. Install pre-attached eye bolt on SHORTER cable to press bedhandle located under winch after feeding it around in step 7.
7. Feed the short cable by running it up and OVER first roller, then UNDER second roller. Loop the short cable back toward the winch and securely attach to the longer cableusing the cable clamp. Remove slack from short cable before securing to long cable. Clamp should be NO LESS THAN ONE INCH (1") from roller.
9. Turn eye hooks to adjust and level press bed. Once bed is level, firmly tighten eye hook mounting hardware. The steel cable will stretch with use. It may be necessary to repeat this leveling procedure in the future.
10. Test the winch kit by raising and lowering the press bed from its lowest to highest position. Repeat and adjust until bed is level and moves freely throughout its entire range of motion.Cut excess cable when all adjustments are complete.
LONG CABLE top view of press
Top view of press with bed in lowest position
This end feeds into winch.
Note: Refer to manual from winch manufacturer for detailed instructions on winch assembly and cable threading procedure.
WINCH INSTALLATION INSTRUCTIONS CONTINUED

19
ASSEMBLY INSTRUCTIONS CONTINUED
Stand unit upright Slide bed above holes and hold in place Secure pins underneath bed, one at a time
1 2
6WARNING Pins must be COMPLETELY through BOTH SIDES of frame.
7
Let bed rest on inserted pins Place 3rd and 4th pin on each side Secure pins completely through bed and frame.
3 4
WARNING ALL FOUR (4) pins must be COMPLETELY through BOTH SIDES of frame in order to operate press.
Cross-section of press
Front view
Use bolts, washers and nuts to attach Z Bar to both sides of the press.
Note: Check all bolts for tightness. If press rocks, or is not level, loosen pressfeet slightly to compensate and retighten.
WARNINGBed must be at the BOTTOM of the frame before proceeding to the next step.
ASSEMBLY INSTRUCTIONS CONTINUED
4
5
Front view
Slide bed down to bottom of frame
Note: When sliding bed to frame bottom, DO NOT use bed handles.
PUMP INSTRUCTIONS
10
WARNINGDO NOT attempt to operate pump unless the BREATHER VALVE IS OPEN.Valve is closed prior to shipping to prevent the loss of hydraulic fluid.
CAUTIONHAND TIGHTEN VALVE ONLY.Excess pressure could damage the valve assembly.
CAUTIONDO NOT TURN RELEASE VALVE MORE THAN ONE FULL TURN or equipment may be disabled.
WARNING This symbol alerts you to the possibility of serious injury or death if instructions are not followed.
Failure to heed these warnings may result in loss of load, damage to the press and/or failure resulting in property damage, personal or fatal injury.This operating manual contains important details concerning the safe operation of this tool.The user must read and understand these details before any use of the tool.
This manual must be retained for future reference.
2. CLOSE the valve located on the FRONT of the pump assembly by turning CLOCKWISE. Connect using a 3/8" line. Do not exceed air pressure of 90-120 psig.
3. Squeeze air hose trigger until ram comes into contact with item to be pressed.
4. Once ram is in contact with the item to be pressed,insert pump handle into high pressure cradle. Using the high pressure pump moves the ram less with each stroke and requires less effort to apply pressure.
5. To relieve pressure and retract ram, turn valve located on FRONT of pump assembly ONE FULL TURN COUNTERCLOCKWISE.
Air Hose Trigger High Pressure Cradle
PUMP AND RAM ASSEMBLY INSTRUCTIONS
8
A
B
Note: There are two sets of holes for bolts. Use centermost holes on the side.
Note: Hose from pump’s outer side must run BEHIND the frame. Hose with nozzle will be used later.
This end up
Top of press frame, looking down
This end up
Note: Allow ram to rest on press bed while installing pump.
Note: Handle ram carefully to avoid damage to gauge or gauge face. Do not disconnect hoses prior to assembly.
Note: Position press feet on each side of the press.Attach one bolt, washer and nut on each side. Bolts should be attached OFFSET from one another.
Front view
Stand frame upside down Slide bed onto frame Slide bed down to bottom of frame
ASSEMBLY INSTRUCTIONS
1
3
2
Inside of frame
WARNINGBe aware of jagged edges on frame. Not all welds are smooth.Press bed can pinch or crush fingers.Wear safety gloves.
Note: In the upright position,inner bracing should form an inverted "v" with the narrower space facing the top of the press.
Note: Air motor must be operating at the same time.
PROCEDURE FOR BLEEDING AIR
9 1. Turn valve handle on FRONT of pump CLOCKWISE until closed. DO NOT OVERTIGHTEN.
3. Move press bed into highest position and lock bed into place with all four pins.
Air Hose Trigger
WARNING
Do not allow the ram to extend more than 5.5".
4. Place press plates DIRECTLY under ram, on press bed.
7. Squeeze trigger on air hose. Air will enter motor and extend the ram. Pump ram against press plates until gauge reads "5 Tons".
8. Insert pump handle into HIGH PRESSURE CRADLE for more precise control. Pump ram against press plates until gauge reads "10 Tons".
High Pressure Cradle
US TONSUS TONS
WARNINGDO NOT attempt to operate pump unless the BREATHER VALVE IS OPEN.Valve is closed prior to shipping to prevent the loss of hydraulic fluid.
CAUTION Bed must be in UP position, or you will over extend ram.
PARTS LIST
Press Frame - 1
Press Bed - 1
Press Feet - 2
Z Bar - 1
1/2"-13 x 1-1/2" Hex Head Bolts - 10
1/2" Nuts - 10
Washers - 10
1-1/4" x 14" Press Pins - 4
Air MotorPump and Ram - 1
Pump Extension Handle - 1
1" x 3" x 14"Press Plates - 2
Accessory only - Not needed for assembly
Pushing Adapter - 1
Accessory only - Not needed for assembly
Bearing Shield - 1
Accessory only - Not needed for assembly
ESTIMATED ASSEMBLY TIME: 30 MINUTES
Examine box contents, then proceed with the following instructions.
TOOLS NEEDED
3/4" and 9/16" sockets and wrenches
ACCESSORIES
WARNINGLeg ends and press feet are sharp and potentially dangerous. Wear safety gloves and safety goggles.
Top view of pump
REPLACEMENT PARTS LIST
Air/Hydraulic Shop Press
12
15
8
2
1
14
13
3
4
55
18
11
10
55
Only items identified by part number are available separately.
10
9
17
8
6
7
1. BEFORE OPERATING PUMP, open petcock valve (breather) located on TOP of pump assembly by turning COUNTERCLOCKWISE.
5. Put cradle in the DOWN position. Use an adapter on your air hose and allow air to flow through the opening in the petcock valve into the pump.
6. Air that has flowed into the pump causes the cradle to move up and the ram to move down. If this happens,proceed to step 7. If not, check all hoses and connections and repeat the procedure.
9. Turn valve handle on pump COUNTERCLOCKWISE
a maximum of one (1) turn to open valve. Ram will retract as pressure is released.
2. Turn petcock valve (breather) on TOP of pump COUNTERCLOCKWISE to open.
SAFETY INFORMATION
This symbol alerts you to the possibility of serious injury or death if instructions are not followed.
This symbol alerts you to the possibility of damage to or destruction of equipment if instructions are not followed.
Failure to heed these warnings may result in loss of load, damage to the press and/or failure resulting in property damage, personal or fatal injury. This operating manual contains important details concern-
ing the safe operation of this tool. The user must read and understand these details before any use of the tool. This manual must be retained for future reference.
• Read, study, understand and follow all instructions before operating this press.• Always wear safety goggles, (users and bystanders).• Parts being pressed may splinter, shatter, or be ejected from the press at a dangerous
rate of speed. Because there are a variety of press applications, it is the responsibility of the press owner to provide adequate guards, eye protection and protective clothing to the press operator.
• Visual inspection of the press should be made before use, checking for signs of cracked welds, bent bed pins, loose or missing bolts, leaks, or any other structural damage. Corrections must be made before using the press.
• Do not go near leaks. High pressure hydraulic fluid can puncture skin and cause serious injury, gangrene, or death. If injured, seek emergency medical help as immediate surgery is required to remove the fluid.
• Prior to use make sure the press is securely anchored to a concrete floor.• Keep hands, arms, feet, and legs out of work area. Accidental slippage can result in
personal injury.• Always use an accurate force gauge to measure pressing force.• Do not exceed the rated capacity or tamper with the pressure/force settings. When
attachments and adapters are used the rated capacity of the system shall be no greater than the rated capacity of the lowest rated component or combination of components that make up the system.
• Avoid off-center loads. Offset loads can damage ram and may cause load to eject at a dangerous rate of speed. Do not use any spacer or extender between the press ram plunger and the item being pressed. If there is not enough ram stroke, adjust the height of the movable bolster.
• Remove all loads from movable bolster before attempting to adjust bolster height. Beware of possible falling bolster.
• Press only on loads supported by movable bolster and press plates included. Do not support loads on floor or press frame legs.
• When using any accessories such as press plates or arbor plates, be certain they are centered on the movable bolster and in full contact with both sides of the bolster.
• Before applying load, be certain all movable bolster supporting pins are fully engaged. Verify lift cables (if equipped) are slack before pressing on the bolster.
• Always use a bearing shield when pressing bearings.• Use caution when positioning work to be pressed to ensure the item to be pressed
cannot be ejected at a dangerous rate of speed.• Release hydraulic pressure before loosening any fittings.• Maintain proper hydraulic fluid levels.• Do not make any alterations or modifications to the press.• This product may contain one or more chemicals known to the State of California to
cause cancer and birth defects or other reproductive harm. Wash hands thoroughly after handling.
• Failure to heed and understand these markings may result in serious or fatal personal injury and/or property damage.
OWNER/USER RESPONSIBILITYThe owner and/or user must have an understanding of the manufacturer's operating instructions and warnings before using this press. Personnel involved in the use and operation of equipment shall be careful, competent, trained, and qualified in the safe operation of the equipment and its proper use when servicing motor vehicles and their components. Warning information should be emphasized and understood. If the operator is not fluent in English, the manufacturer's instructions and warnings shall be read to and discussed with the operator in the operator's native language by the purchaser/owner, making sure that the operator comprehends its contents.
Owner and/or user must study and maintain for future reference the manufacturer’s instructions. Owner and/or user is responsible for keeping all warning labels and instruction manuals legible and intact. Replacement labels and literature are available from the manufacturers.INSPECTIONVisual inspection of the shop press should be made before each use of the press, checking for damaged, loose or missing parts. Each press must be inspected by a manufacturer’s repair facility immediately, if subjected to an abnormal load or shock. Any press which appears to be damaged in any way, is found to be badly worn, or operates abnormally must be removed from service until necessary repairs are made by a manufacturers's authorized repair facility. It is recommended that an annual inspection of the press be made by a manufacturer’s authorized repair facility and that any defective parts, decals or warning labels be replaced with manufacturer’s specified parts. A list of authorized repair facilities is available from the manufacturer.
SAFETY INSTRUCTIONS• CHECK YOUR LOCAL, STATE AND FEDERAL REGULATIONS
REGARDING THE SAFE USE OF THIS EQUIPMENT. • Your safety is top priority. Please handle equipment with care.• Fully retract unit and remove all items from the press bed frame. • Support the press bed, and remove the pins. • Raise or lower bed to desired height and reinstall press pins. Be certain
pins are fully engaged in the parallel flanges of the upright columns.• Position press on a flat, level, hard surface, preferably concrete.
Make sure all nuts and bolts are tight.• Clear the area of bystanders, especially small children, before using.• Set the press bed to the required height. The press is most effective
when the work piece is located 1 inch below the ram’s retracted position. The compression stroke can include the entire 5 inch working range.
• The press is designed to exert a force on anything which is positioned beneath its ram. The work piece can pop out from under the ram at a high rate of speed and injure someone.
• Pressing Bearings: It is essential that you use the bearing shield when pressing bearings on or off.
LIMITED WARRANTY:SUNEX INTERNATIONAL, INC. WARRANTS TO ITS CUSTOMERS THAT THE COMPANY’S SUNEX TOOLS® BRANDED PRODUCTS ARE FREE FROM DEFECTS IN WORKMANSHIP AND MATERIALS.Sunex International, Inc. will repair or replace its Sunex Tools® branded products which fail to give satisfactory service due to defective workmanship or materials, based upon the terms and conditions of the following described warranty plans attributed to that specific product. This product carries a ONE-YEAR warranty. During this warranty period, Sunex Tools® will repair or replace at our option any part or unit which proves to be defective in material or workmanship. Other important warranty information....This warranty does not cover damage to equipment or tools arising from alteration, abuse, misuse, damage and does not cover any repairs or replace-ment made by anyone other than Sunex Tools® or its authorized warranty service centers. The foregoing obligation is Sunex Tools®’ sole liability under this or any implied warranty and under no circumstances shall we be liable for any incidental or consequential damages. Note: Some states do not allow the exclusion or limitation of incidental or consequential damages, so the above limitation or exclusion may not apply to you.Return equipment or parts to Sunex Tools®, transportation prepaid. Be certain to include your name and address, evidence of the purchase date, and description of the suspected defect.If you have any questions about warranty service, please write to Sunex Tools®. This warranty gives you specific legal rights and you may also have other rights which vary from state to state. Repair kits and replacement parts are available for many of Sunex Tools® products regardless of whether or not the product isstill covered by a warranty plan.SHIPPING ADDRESS: MAILING ADDRESS:Sunex Tools Sunex Tools315 Hawkins Rd. P.O. Box 4215Travelers Rest, South Carolina 29690 Greenville, South Carolina 29608
WARNING
WARNING
CAUTION
THIS OPERATING MANUAL CONTAINS IMPORTANT SAFETY INFORMATION. READ CAREFULLY AND UNDERSTAND ALL INFORMATION BEFORE OPERATING THIS TOOL. SAVE THIS MANUAL FOR FUTURE USE.
5740AH - 40 Ton Air/Hydraulic Shop Press5750AH - 50 Ton Air/Hydraulic Shop Press
Sunex Part No. Total Height Inside Width Press Feet Length Bed Width Ram Stroke Pin Diameter PB Winch Sliding Head Press Plates Included
5740AH 74" 35" 29.75" 8.25" 6" 1.25" Y Y Y(2)
5750AH 74" 35" 29.75" 8.25" 6" 1.25" Y Y Y(2)
PRESS SPECIFICATIONS
OWNER'S MANUAL
CONTENTS:Page 1 Specifications
2 Safety Information and Warranty Information3 Parts List
4-6 Assembly Instructions 789
Pump and Ram Assembly InstructionsProcedure for Bleeding AirPump Instructions
10-11 Winch Kit Parts List and Winch Installation Instructions12 Replacement Parts List
© Copyright 2014, Sunex Tools®
5740AH, 5750AH rev. 12/05/14
5740AH - 40 Ton Air/Hydraulic Shop Press5750AH - 50 Ton Air/Hydraulic Shop Press
5740AH - 40 Ton Air/Hydraulic Shop Press5750AH - 50 Ton Air/Hydraulic Shop Press
5740AH - 40 Ton Air/Hydraulic Shop Press5750AH - 50 Ton Air/Hydraulic Shop Press
5740AH - 40 Ton Air/Hydraulic Shop Press5750AH - 50 Ton Air/Hydraulic Shop Press
5740AH - 40 Ton Air/Hydraulic Shop Press5750AH - 50 Ton Air/Hydraulic Shop Press
5740AH - 40 Ton Air/Hydraulic Shop Press5750AH - 50 Ton Air/Hydraulic Shop Press
5740AH - 40 Ton Air/Hydraulic Shop Press5750AH - 50 Ton Air/Hydraulic Shop Press
5740AH - 40 Ton Air/Hydraulic Shop Press5750AH - 50 Ton Air/Hydraulic Shop Press
5740AH - 40 Ton Air/Hydraulic Shop Press5750AH - 50 Ton Air/Hydraulic Shop Press
5740AH - 40 Ton Air/Hydraulic Shop Press5750AH - 50 Ton Air/Hydraulic Shop Press
5740AH - 40 Ton Air/Hydraulic Shop Press5750AH - 50 Ton Air/Hydraulic Shop Press
5740AH, 5750AH 2 rev. 12/05/14 5740AH, 5750AH 3 rev. 12/05/14
5740AH, 5750AH 4 rev. 12/05/14 5740AH, 5750AH 5 rev. 12/05/14
5740AH, 5750AH 6 rev. 12/05/14 5740AH, 5750AH 7 rev. 12/05/14
5740AH, 5750AH 8 rev. 12/05/14 5740AH, 5750AH 9 rev. 12/05/14
5740AH, 5750AH 10 rev. 12/05/14 5740AH, 5750AH 11 rev. 12/05/14
5740AH, 5750AH 12
PUMP AND RAM EXPLODED PARTS DIAGRAM
8.886"
9.113"
ITEM NO. DESCRIPTION QTY.
1 Base Weldment 12 Plug 13 * Polypak Seal (Parker) 24 1/2-13 x 2 Hex HD C-S GR 2 Zinc 15 Piston 16 * O-Ring (Parker) 17 Rod 18 Retaining Ring Int. 3.5 NOM 19 Piston Guide 110 Retractor Plate 111 Spring 212 Fitting Gauge 1.75 113 Gauge 114 90˚ Elbow 1/4 NPTF to -6 JIC 115 Hose Hydraulic 41 1/2 LG 7/16-20 JICF 1
RAM
PUMPITEM NO. DESCRIPTION QTY.
1 Tank 12 Tie Rod 43 1" Piston Body 14 1/2" Piston Body 15 1" Piston 16 1/2" Piston 17 1/4" MNPT Pressure Plug 18 Pump Body 19 Pump Lid 110 Pump Bracket 211 Valve Assembly 112 Pivot Pin 213 * 5/16" Steel Ball 514 Brass Drain Cock 115 Cradle Assembly 216 Hydraulic Hose 41-1/2" L 7/16-20 JICF 117 7/16-14 Fin Hex Nut Zinc 419 * O-Ring 120 * O-Ring 121 * 3-1/2" Seal 222 * 3-5/16" Seal 123 * 3-3/16" Seal 124 SHCS 7/16 14 x 1/2" 425 SHCS 7/16 14 x 3/4" 426 * Light Spring 227 * Heavy Spring 228 7/16" Split Lock Washer 629 Pump Filter 130 Pump Fitting 1/4" MNPT 7/16" JICF 131 7/8" Grip 132 Handle for Pump 133 * O-Ring 1
# 23 (Pump)QTY: 1
# 21 (Pump)QTY: 2
# 19 (Pump)QTY: 1
# 22 (Pump)QTY: 1
See Replacement Parts List for parts available separately.Parts with (*) are only available in Seal Kit, part number RSCBP1217.
10
9
15
1
7
6
4
8
5
3
1111
1
14
13
12
3
2
7
21
17
30
16
9
# 3 (Ram)(Poly Pak - Note: Only the upper seal normally needs replacement)QTY: 1
# 33 (Pump)(O-Ring for # 11 Valve Assembly on Pump)QTY: 1
# 6 (Ram)QTY: 1
# 20 (Pump)QTY: 1
# 13 (Pump)QTY: 5
2
28
14
1
25
2411
1327
10
31
32
15
20
6
4
23
28
25
241028
13
29
21
8
26 24
12
22
3
19
5
15
# 26 (Pump)QTY: 2
# 27 (Pump)QTY: 2
Individual parts pictured are components of the Seal Kit, RSCBP1217.
Air Motor not shown
5740AH - 40 Ton Air/Hydraulic Shop Press5750AH - 50 Ton Air/Hydraulic Shop Press
5740AH, 5750AH 13 rev. 12/05/14
ITEM NO. SUNEX PART NO. DESCRIPTION QTY.
1 RS345009 2" Pushing Adaptor (Spring) 22 Press Bed 13 Press Frame 14 Ram Frame 15 RSCBP1225 Press Pin 46 RS310012 Pushing Adapter 17 RSBS1 Bearing Shield 18 RSCBP1205 Press Plate 29 RSCBP1211 Press Feet 210 RSCBP1212 Z Bar 111 RSCBP1209 Pump Handle 112 RS40AOPAM Pump (with air motor) 113 RSCBP1202 Ram (includes gauge) (5740AH) 1
RSCBP1202GG Ram (includes gauge) (5750AH) 114 RSCBP1206 Gauge (5740AH) 1
RSCBP1206G Liquid Filled Gauge (5750AH) 1
ITEM NO. SUNEX PART NO. DESCRIPTION QTY.
15 RSCBP1204 Hose & Fitting 116 RSCBP1217 Seal Kit for Pump and Ram (not shown) 117 RS40MPPHK Press Hardware Kit 1 set
1/2"-13 x 1-1/2" Hex Head Bolt 10 1/2" Nut 10 Washer 10
18 RSAAMO2 Air Motor (shown with pump) 119 RS4050WCH Winch 1not shown RSWHK Winch Hardware Kit 1 set
Cable Clamp 1 1/2"-13 x 1-1/2" Hex Head Bolt 2 1/2" Nut 2 Washer 2 Winch 1 Short Cable (includes eye bolt) 1 Long Cable 1
not shown RS5740AHLK Product Label Kit 1 not shown RS5750AHLK Product Label Kit 1
12 Dark Gray- Long Cable
Light Gray- Short Cable
1. Move press bed into LOWEST position so it is resting on top of pins 1 and 2.
Right side of press
3. Thread the BARE end of the LONGER of the two steel cables up and through the pump bracket.
Right side of press,under pump assembly
2. Install pre-attached eye bolt on LONGER cable to press bed handle located under pump assembly. DO NOT FULLY TIGHTEN. Center with side of press bed and make sure there is enough room to lower or raise both nuts on eye bolt for precise alignment.
WARNINGDO NOT FULLY TIGHTEN.
WINCH KIT PARTS LIST
Winch - 1
Long Cable - 1
Short Cable- 1
Cable Clamp - 1
1/2"-13 x 1-1/2" Hex Head Bolts - 2
1/2" Nuts - 2
Washers - 2
WINCH INSTALLATION INSTRUCTIONS
4. Run the long cable up and OVER BOTH ROLLER BRACKETS and feed into winch. Be sure to thread 12 inches (1 foot) of extra cable through winch.
5. Once winch cable has been threaded, pull excess cable back through winch as shown in diagramabove. The cable should be locked tightly around itself with no excess cable left hanging. Operate winch enough to remove slack from longer cable.
WARNINGMount winch to frame AFTER threading cable.
6. Mount winch to frame using the provided washers, 1/2" nuts and 1/2"-13 x 1-1/2" bolts.
Left side of press, under winch
8. Install pre-attached eye bolt on SHORTER cable to press bed handle located under winch after feeding it around in step 7.
7. Feed the short cable by running it up and OVER first roller, then UNDER second roller. Loop the short cable back toward the winch and securely attach to the longer cable using the cable clamp. Remove slack from short cable before securing to long cable. Clamp should be NO LESS THAN ONE INCH (1") from roller.
9. Turn eye hooks to adjust and level press bed. Once bed is level,firmly tighten eye hook mounting hardware. The steel cable will stretch with use. It may be necessary to repeat this leveling procedure in the future.
10. Test the winch kit by raising and lowering the press bed from its lowest to highest position. Repeat and adjust until bed is level and moves freely throughout its entire range of motion.Cut excess cable when all adjustments are complete.
LONG CABLE top view of press
Top view of press with bed in lowest position
This end feeds into winch.
SHIPPING ADDRESS:Sunex Tools315 Hawkins Rd.Travelers Rest, South Carolina 29690
MAILING ADDRESS:Sunex ToolsP.O. Box 4215Greenville, South Carolina 29608
Note: Refer to manual from winch manufacturer for detailed instructions on winch assembly and cable threading procedure.
WINCH INSTALLATION INSTRUCTIONS CONTINUED
Learn more about hydraulic tools & equipment we offer on our website.
Recommended