STK X Tutorial – MATLAB with GUIDE 1
STK X Tutorial - MATLAB with GUIDE In this exercise you will gain hands-on experience using STK X to embed STK functionality in a container application created with MATLAB with GUIDE (Graphical User Interface).
Note: For the latest versions of MATLAB that STK 11 supports go to the web page www.agi.com/Matlab
CONTENTS CREATE THE PROJECT ............................................................................ 1 ADD THE STK X CONTROLS TO THE FORM ................................................ 3 SEND COMMANDS TO STK X ................................................................... 6 ADD ZOOM IN/OUT TO THE MAP CONTROL ............................................. 12 RESPOND TO EVENTS RAISED BY STK X ................................................. 13 ADD MAP PICKING ............................................................................... 16 ADD CONNECT COMMAND INTERFACE .................................................... 23
Tutorial Source Code Completed MATLAB files can be found in the STK / STK Engine install at the following location:
<STK Install Folder>/CodeSamples/CustomApplications/Matlab/Tutorial
Create the Project 1) Start MATLAB
2) From the MATLAB main panel
a) In MATLAB 2012a and earlier select the GUIDE button to bring up the GUIDE Quick Start dialog:

STK X Tutorial – MATLAB with GUIDE 2
b) In MATLAB 2012b and later select the Graphical User Interface menu item under the Home/New button to bring up the GUIDE Quick Start dialog:
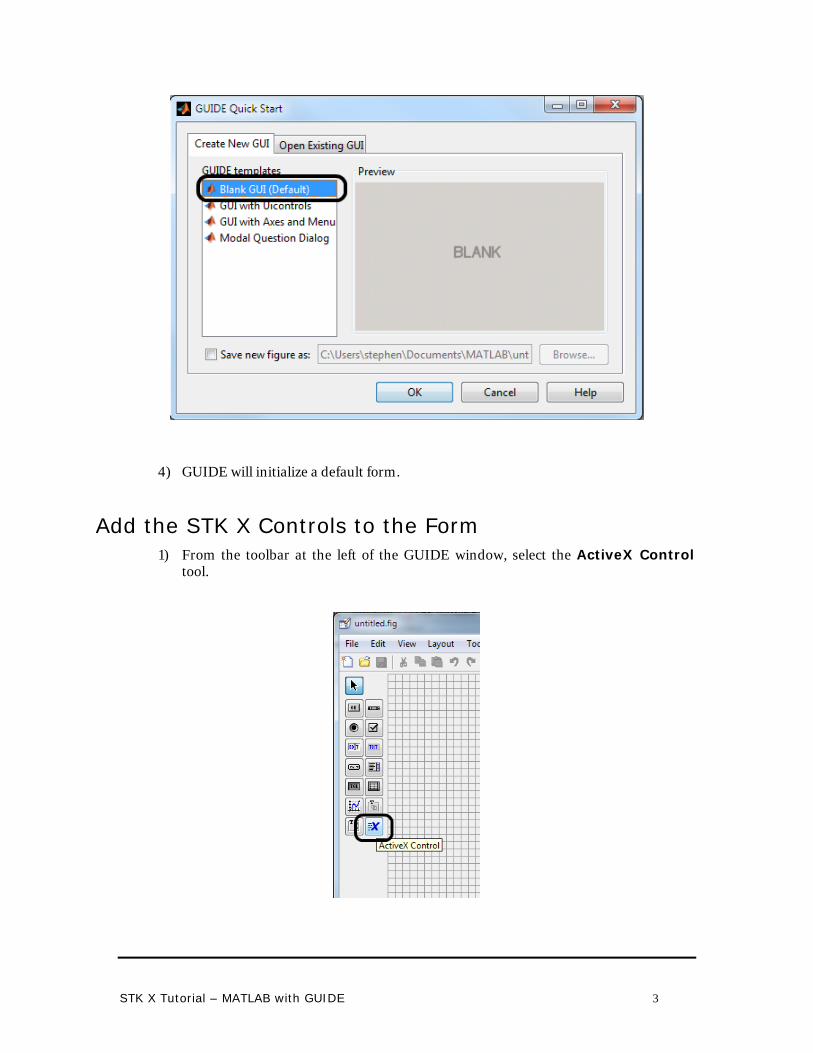
3) Select Blank GUI (Default) from GUIDE Quick Start:
STK X Tutorial – MATLAB with GUIDE 3
4) GUIDE will initialize a default form.
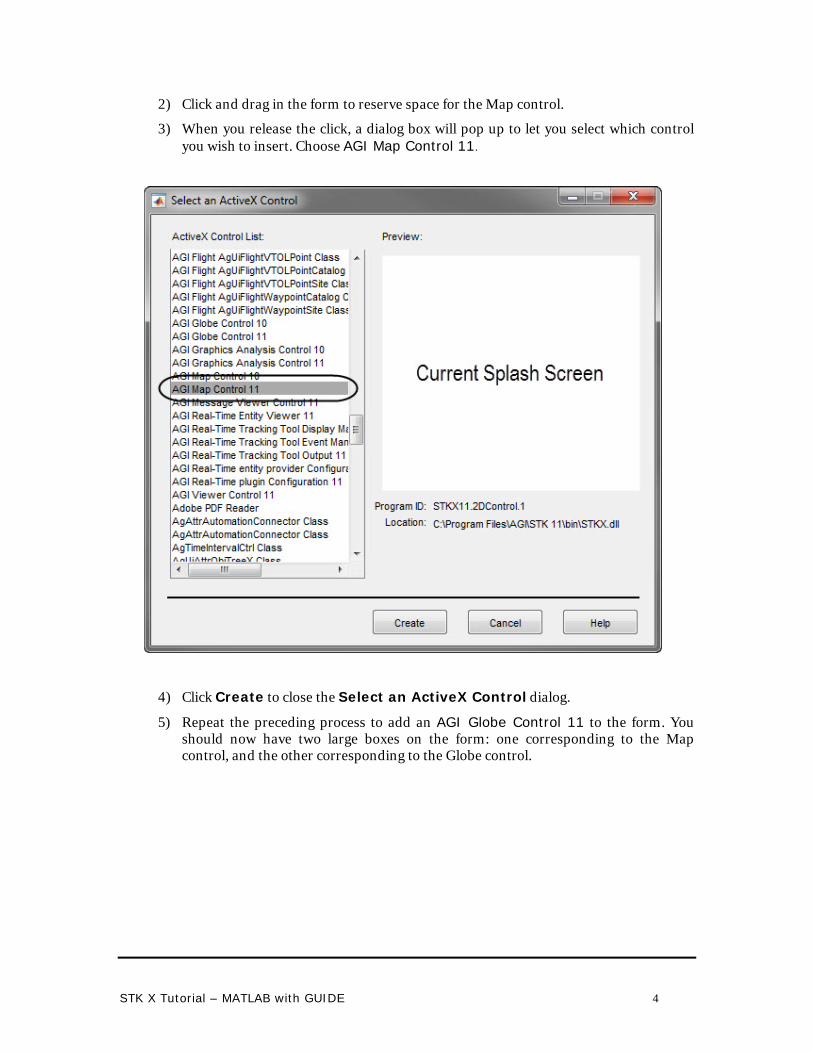
Add the STK X Controls to the Form 1) From the toolbar at the left of the GUIDE window, select the ActiveX Control
tool.
STK X Tutorial – MATLAB with GUIDE 4
2) Click and drag in the form to reserve space for the Map control.
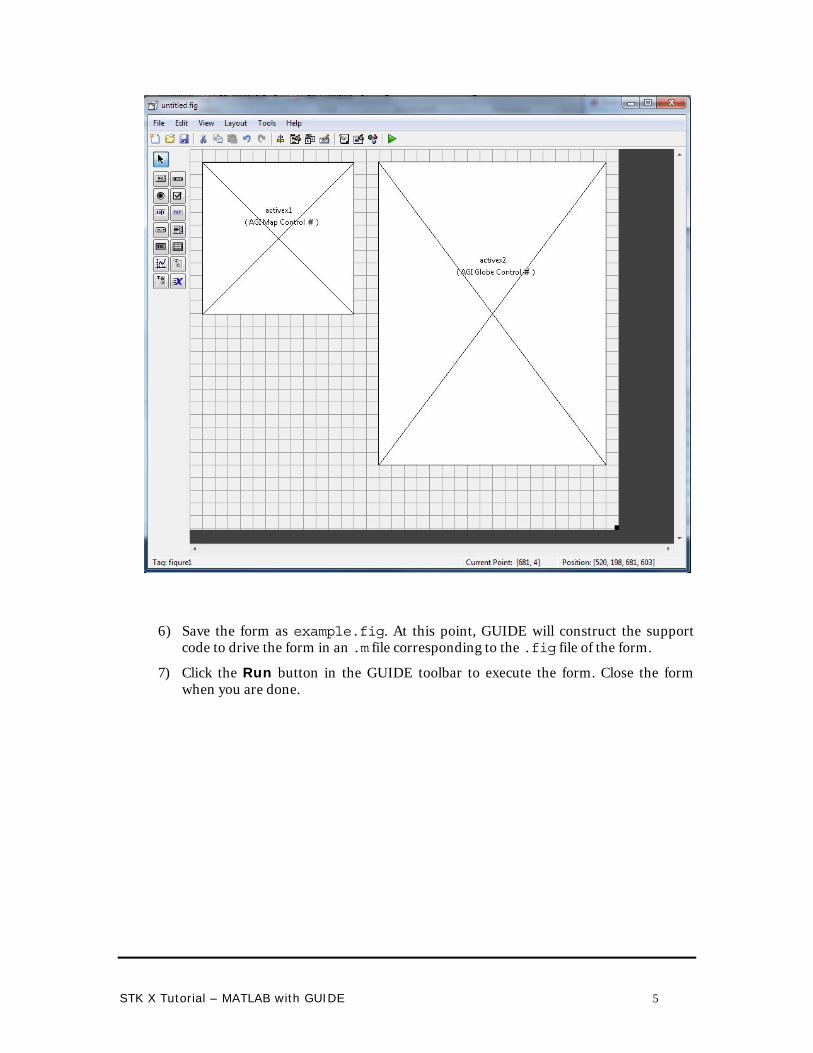
3) When you release the click, a dialog box will pop up to let you select which control you wish to insert. Choose AGI Map Control 11.
4) Click Create to close the Select an ActiveX Control dialog.
5) Repeat the preceding process to add an AGI Globe Control 11 to the form. You should now have two large boxes on the form: one corresponding to the Map control, and the other corresponding to the Globe control.
STK X Tutorial – MATLAB with GUIDE 5
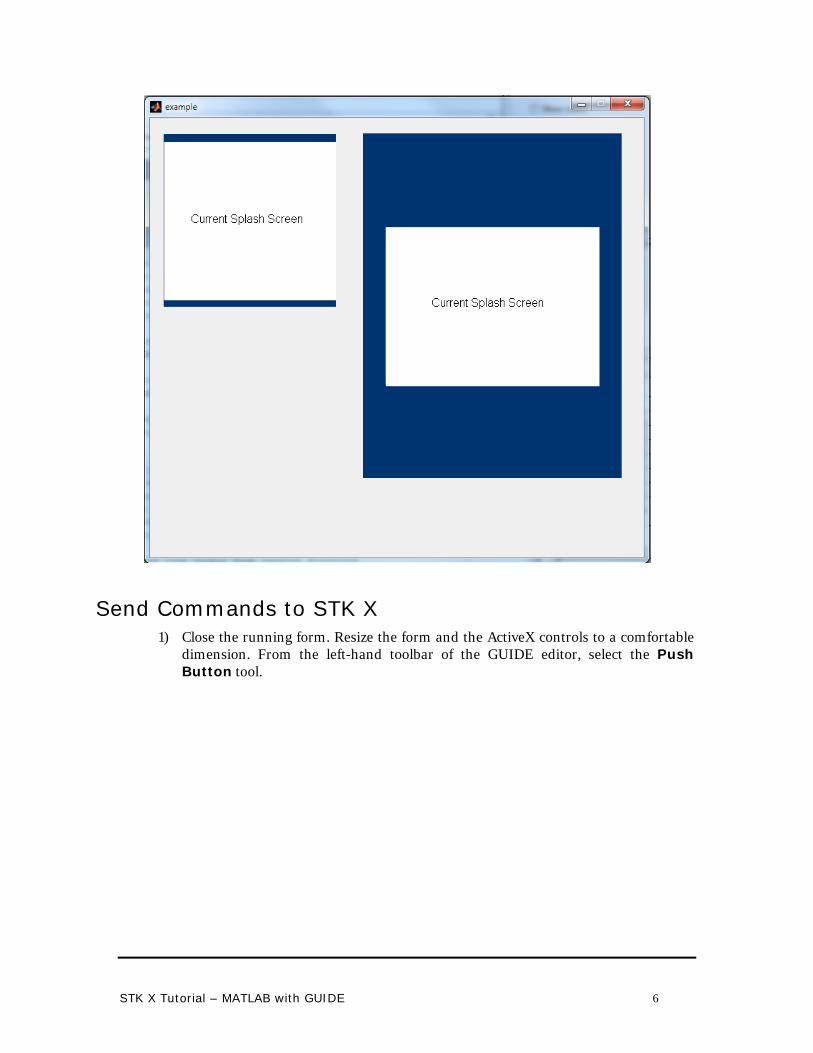
6) Save the form as example.fig. At this point, GUIDE will construct the support code to drive the form in an .m file corresponding to the .fig file of the form.
7) Click the Run button in the GUIDE toolbar to execute the form. Close the form when you are done.
STK X Tutorial – MATLAB with GUIDE 6
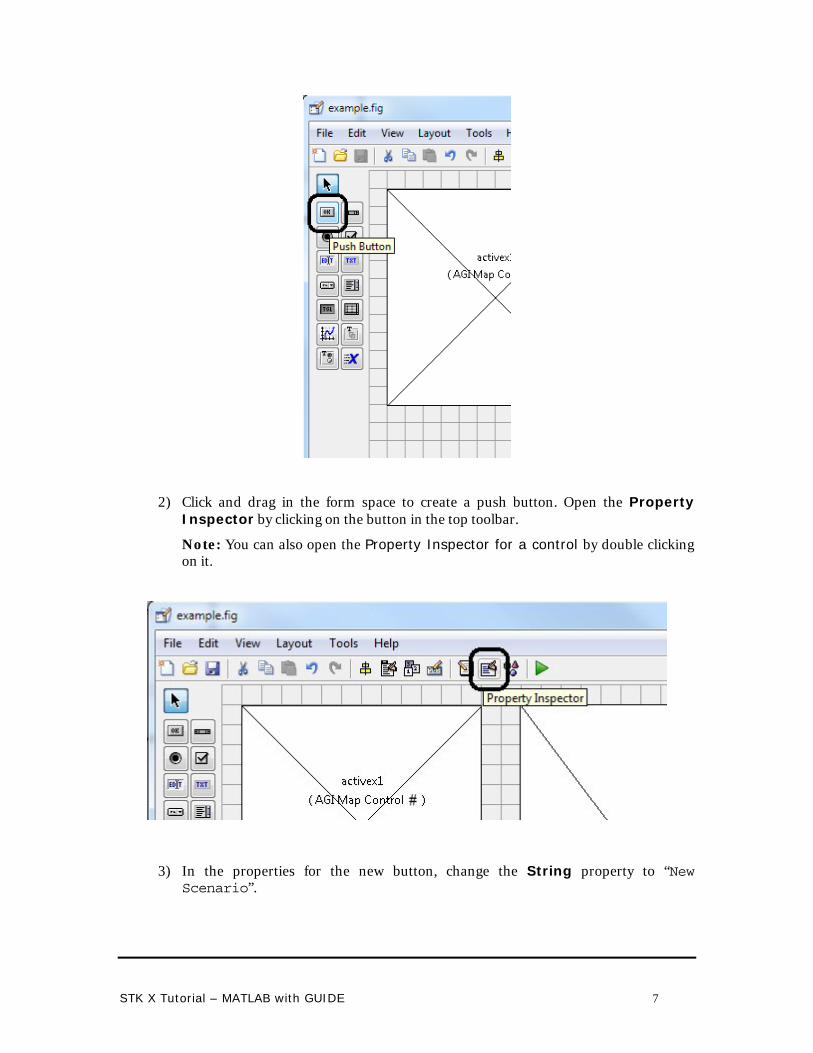
Send Commands to STK X 1) Close the running form. Resize the form and the ActiveX controls to a comfortable
dimension. From the left-hand toolbar of the GUIDE editor, select the Push Button tool.
STK X Tutorial – MATLAB with GUIDE 7
2) Click and drag in the form space to create a push button. Open the Property Inspector by clicking on the button in the top toolbar.
Note: You can also open the Property Inspector for a control by double clicking on it.
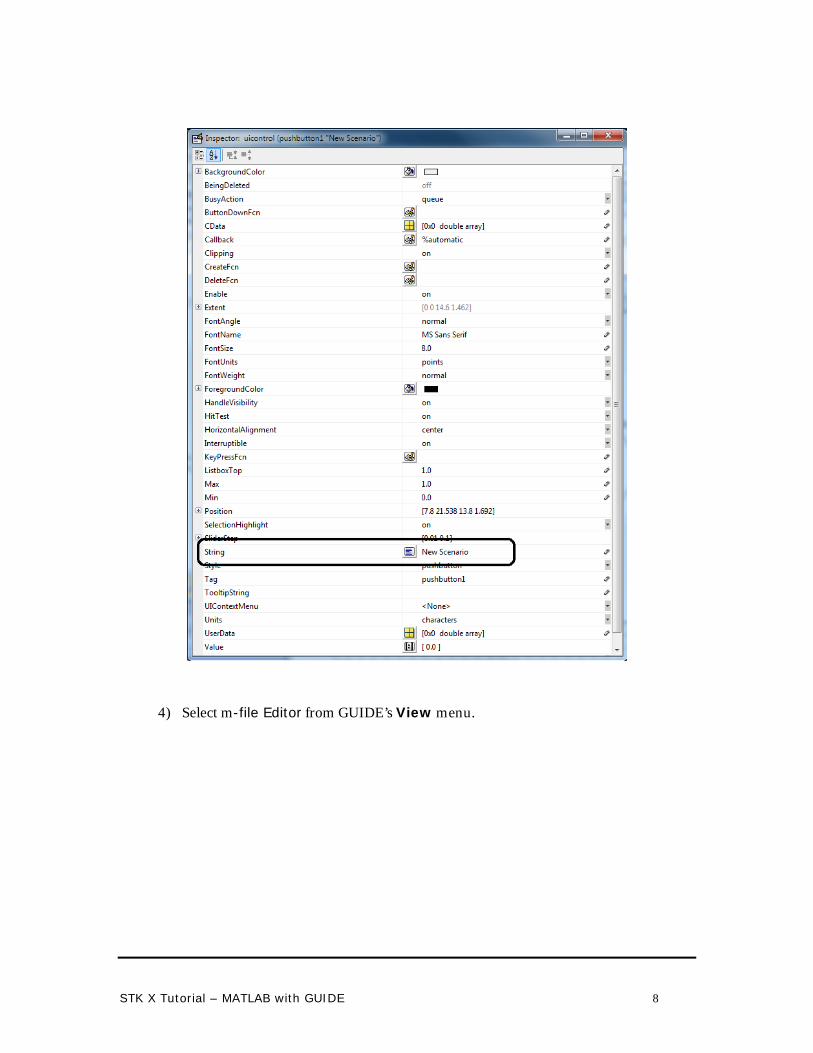
3) In the properties for the new button, change the String property to “New Scenario”.
STK X Tutorial – MATLAB with GUIDE 8
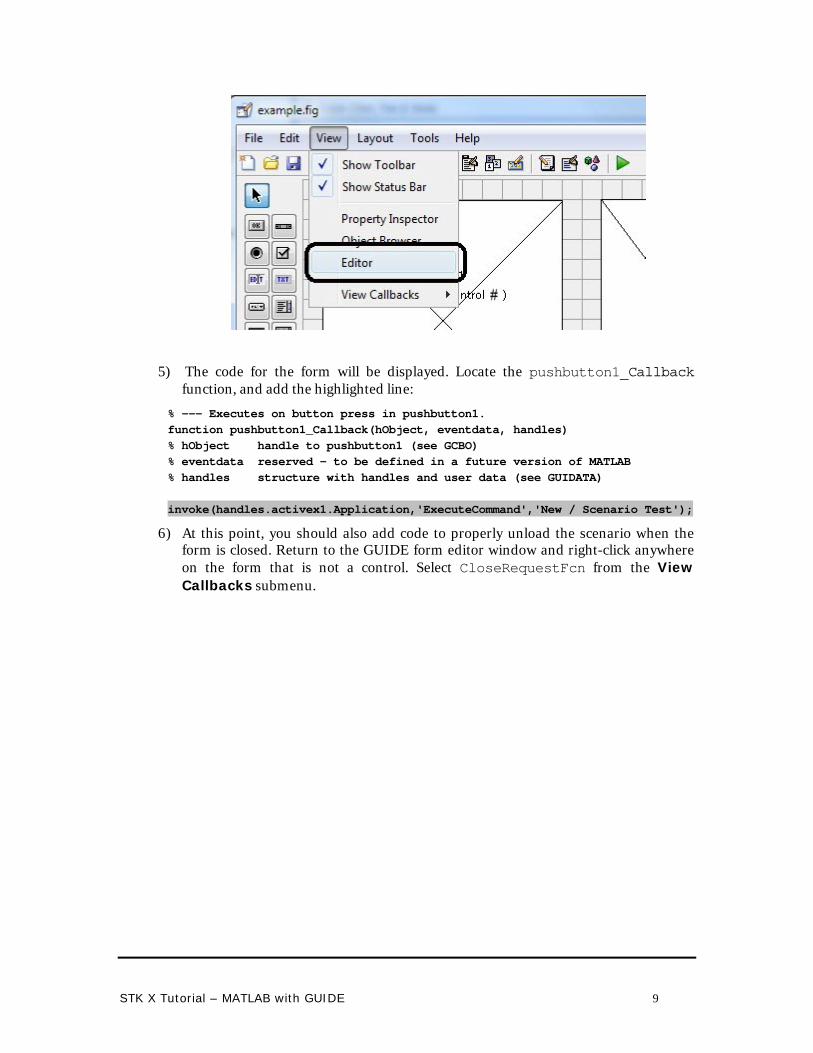
4) Select m-file Editor from GUIDE’s View menu.
STK X Tutorial – MATLAB with GUIDE 9
5) The code for the form will be displayed. Locate the pushbutton1_Callback function, and add the highlighted line:
% --- Executes on button press in pushbutton1. function pushbutton1_Callback(hObject, eventdata, handles) % hObject handle to pushbutton1 (see GCBO) % eventdata reserved - to be defined in a future version of MATLAB % handles structure with handles and user data (see GUIDATA) invoke(handles.activex1.Application,'ExecuteCommand','New / Scenario Test');
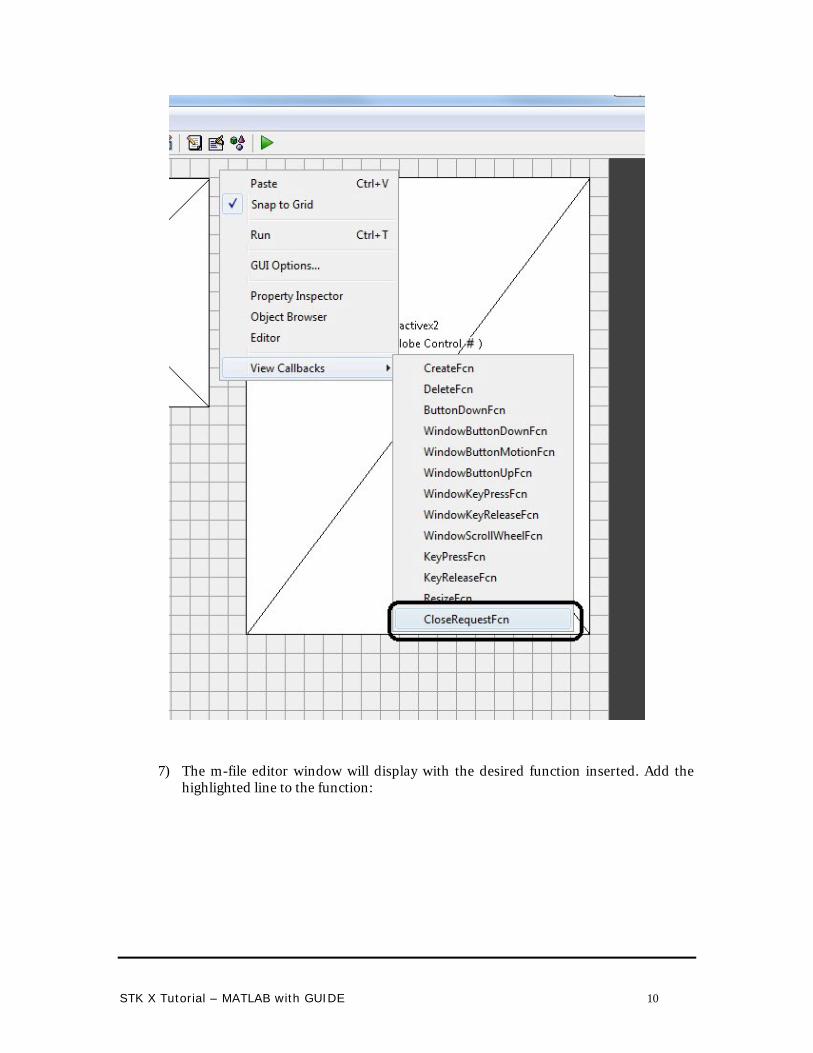
6) At this point, you should also add code to properly unload the scenario when the form is closed. Return to the GUIDE form editor window and right-click anywhere on the form that is not a control. Select CloseRequestFcn from the View Callbacks submenu.
STK X Tutorial – MATLAB with GUIDE 10
7) The m-file editor window will display with the desired function inserted. Add the highlighted line to the function:
STK X Tutorial – MATLAB with GUIDE 11
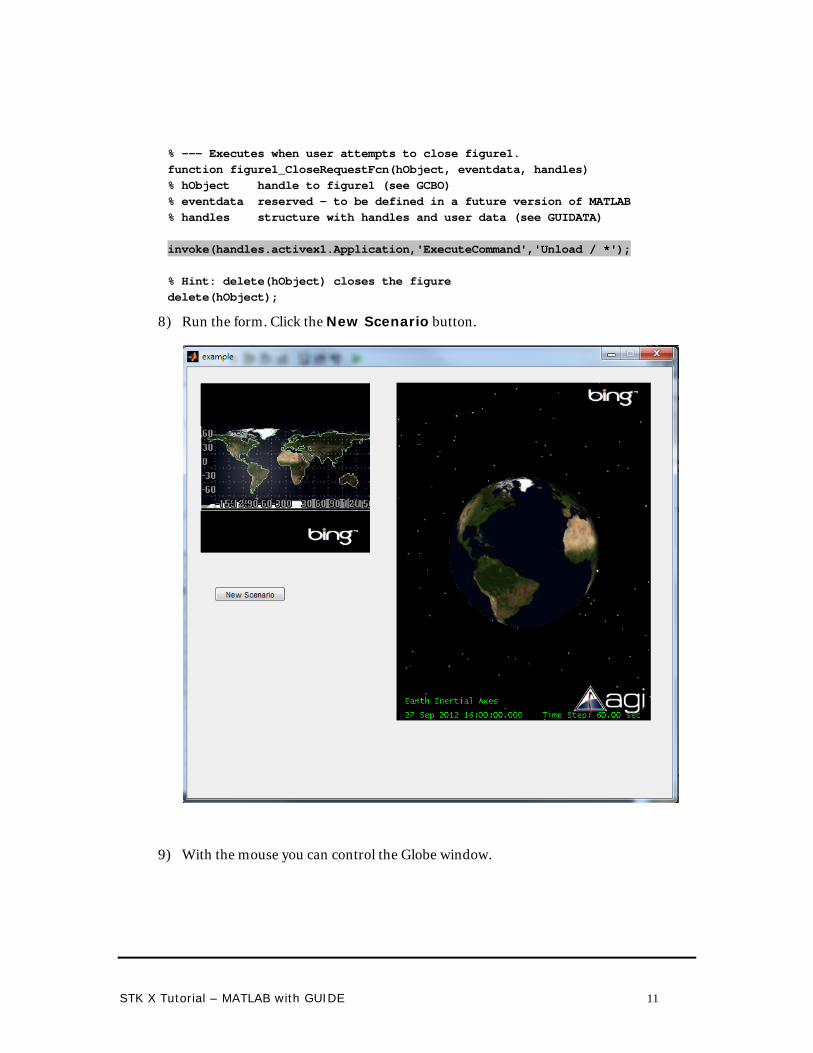
% --- Executes when user attempts to close figure1. function figure1_CloseRequestFcn(hObject, eventdata, handles) % hObject handle to figure1 (see GCBO) % eventdata reserved - to be defined in a future version of MATLAB % handles structure with handles and user data (see GUIDATA) invoke(handles.activex1.Application,'ExecuteCommand','Unload / *'); % Hint: delete(hObject) closes the figure delete(hObject);
8) Run the form. Click the New Scenario button.
9) With the mouse you can control the Globe window.
STK X Tutorial – MATLAB with GUIDE 12
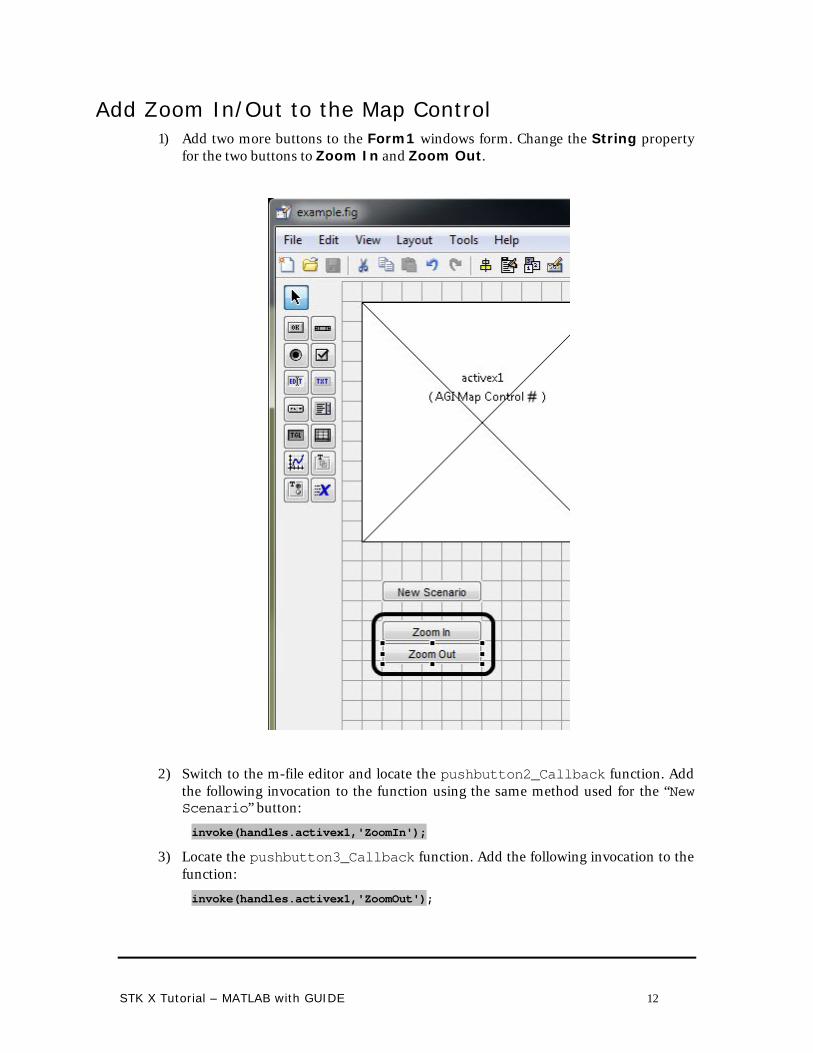
Add Zoom In/Out to the Map Control 1) Add two more buttons to the Form1 windows form. Change the String property
for the two buttons to Zoom In and Zoom Out.
2) Switch to the m-file editor and locate the pushbutton2_Callback function. Add the following invocation to the function using the same method used for the “New Scenario” button:
invoke(handles.activex1,'ZoomIn');
3) Locate the pushbutton3_Callback function. Add the following invocation to the function:
invoke(handles.activex1,'ZoomOut');
STK X Tutorial – MATLAB with GUIDE 13
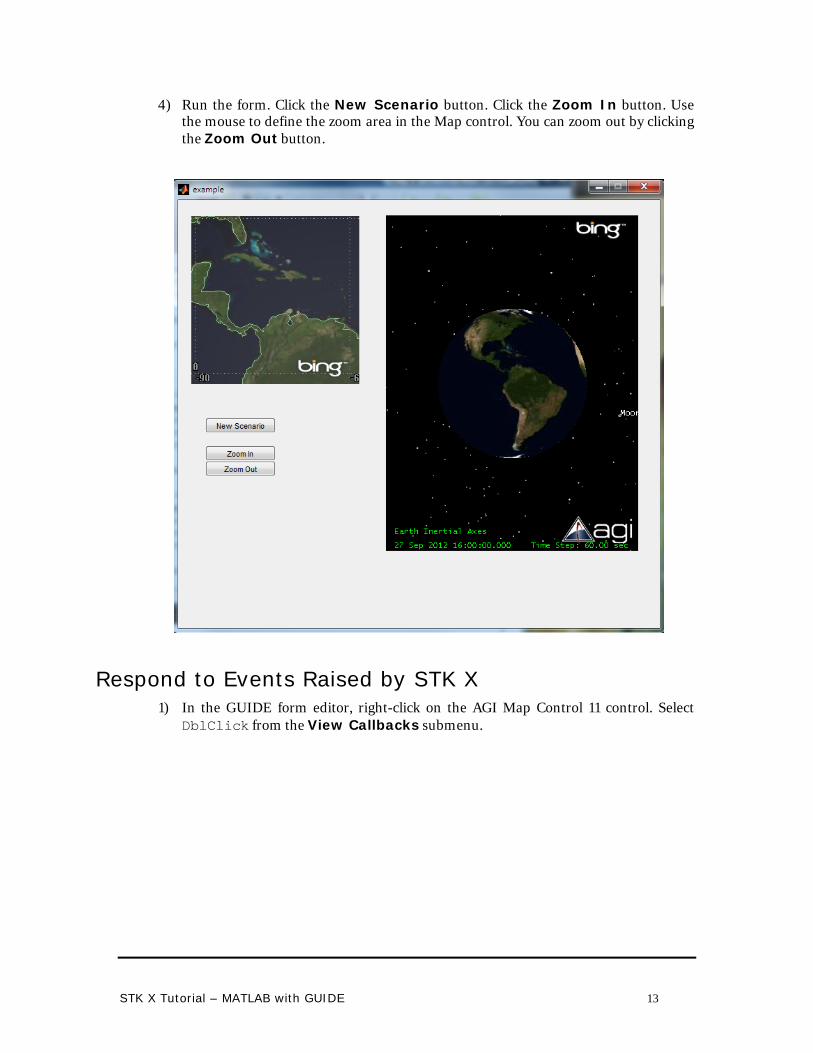
4) Run the form. Click the New Scenario button. Click the Zoom In button. Use the mouse to define the zoom area in the Map control. You can zoom out by clicking the Zoom Out button.
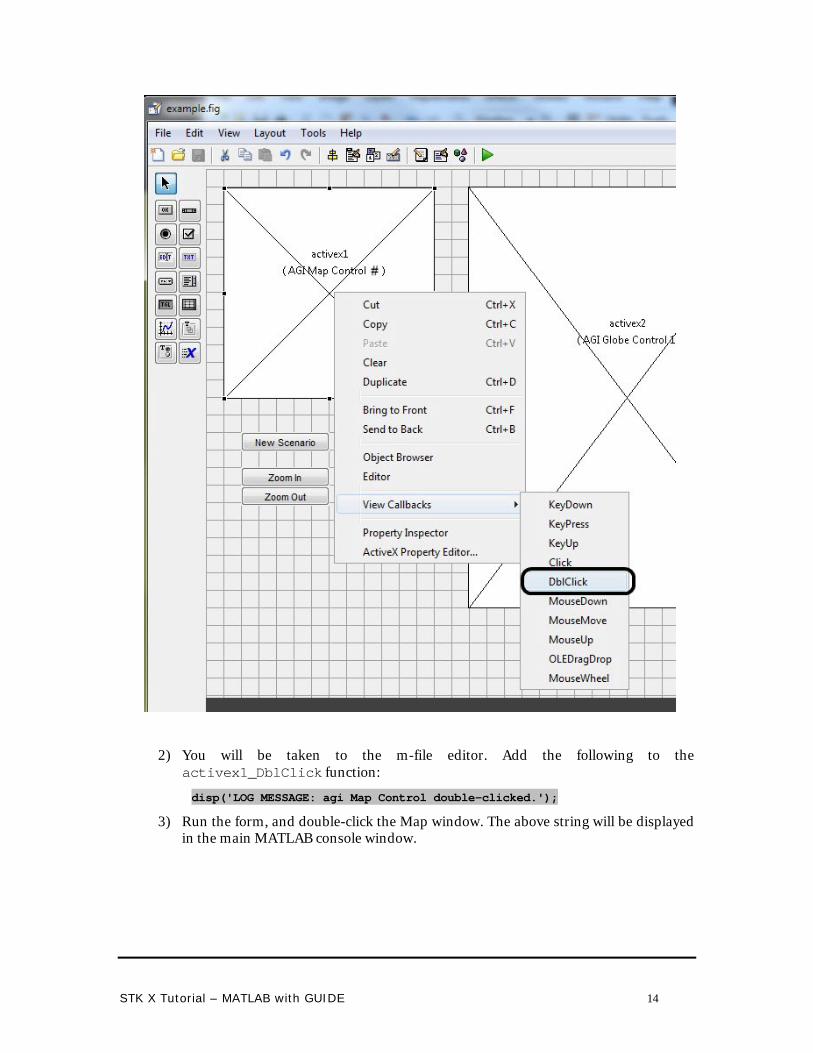
Respond to Events Raised by STK X 1) In the GUIDE form editor, right-click on the AGI Map Control 11 control. Select
DblClick from the View Callbacks submenu.
STK X Tutorial – MATLAB with GUIDE 14
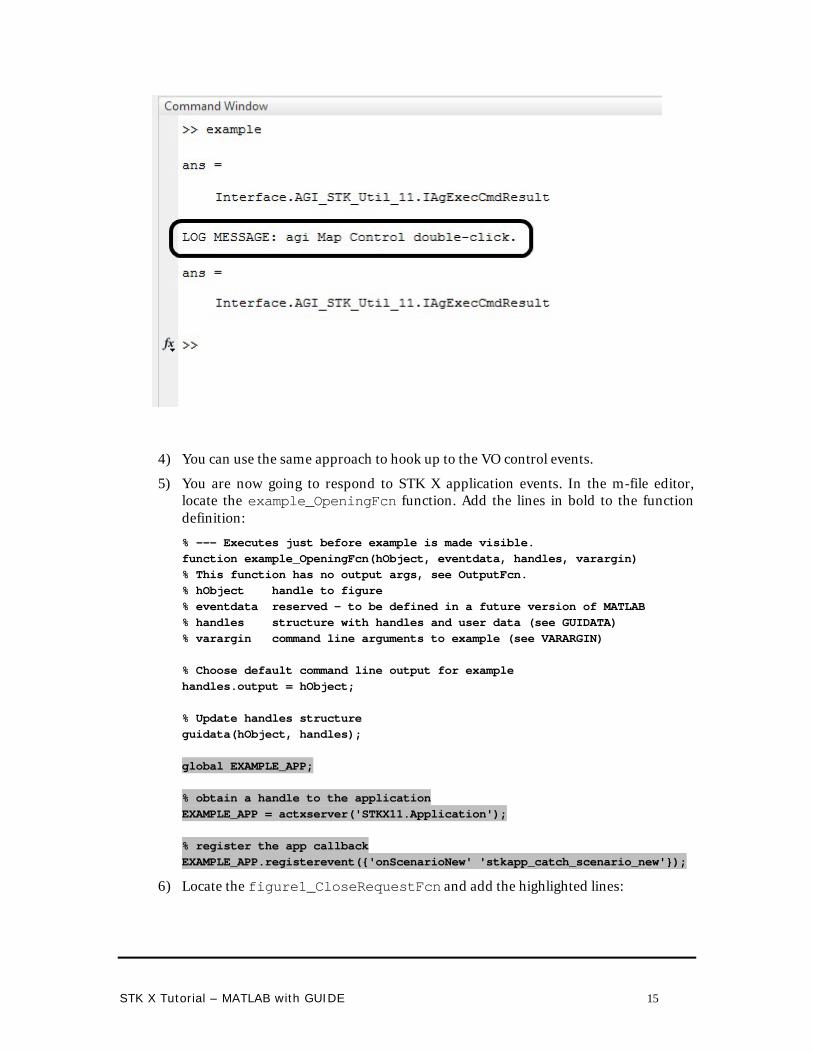
2) You will be taken to the m-file editor. Add the following to the activex1_DblClick function:
disp('LOG MESSAGE: agi Map Control double-clicked.');
3) Run the form, and double-click the Map window. The above string will be displayed in the main MATLAB console window.
STK X Tutorial – MATLAB with GUIDE 15
4) You can use the same approach to hook up to the VO control events.
5) You are now going to respond to STK X application events. In the m-file editor, locate the example_OpeningFcn function. Add the lines in bold to the function definition:
% --- Executes just before example is made visible. function example_OpeningFcn(hObject, eventdata, handles, varargin) % This function has no output args, see OutputFcn. % hObject handle to figure % eventdata reserved - to be defined in a future version of MATLAB % handles structure with handles and user data (see GUIDATA) % varargin command line arguments to example (see VARARGIN) % Choose default command line output for example handles.output = hObject; % Update handles structure guidata(hObject, handles); global EXAMPLE_APP; % obtain a handle to the application EXAMPLE_APP = actxserver('STKX11.Application'); % register the app callback EXAMPLE_APP.registerevent({'onScenarioNew' 'stkapp_catch_scenario_new'});
6) Locate the figure1_CloseRequestFcn and add the highlighted lines:
STK X Tutorial – MATLAB with GUIDE 16
% --- Executes when user attempts to close figure1. function figure1_CloseRequestFcn(hObject, eventdata, handles) % hObject handle to figure1 (see GCBO) % eventdata reserved - to be defined in a future version of MATLAB % handles structure with handles and user data (see GUIDATA) invoke(handles.activex1.Application,'ExecuteCommand','Unload / *'); global EXAMPLE_APP; release(EXAMPLE_APP); EXAMPLE_APP=0; % Hint: delete(hObject) closes the figure delete(hObject);
7) Create a new m-file by selecting New from the m-file Editor menu. In the file, add the following handler function:
%handles scenario new events in the example program function stkapp_catch_scenario_new(varargin) global EXAMPLE_APP; disp('New Scenario created.'); disp(varargin{3});
NOTE: For more information on the format of the varargin string array, see the MATLAB documentation "Writing Event Handlers :: COM and DDE Support (External Interfaces)."
8) Save the m-file you have created as stkapp_catch_scenario_new.m, and then return to the GUIDE form editor and run the form. When you click the New Scenario button, you will see a message appear in the main MATLAB window describing the file path of the scenario created.
Add Map Picking 1) Return to the GUIDE form designer. From the toolbar on the left, select a Static
Text object and insert it in the form.

STK X Tutorial – MATLAB with GUIDE 17
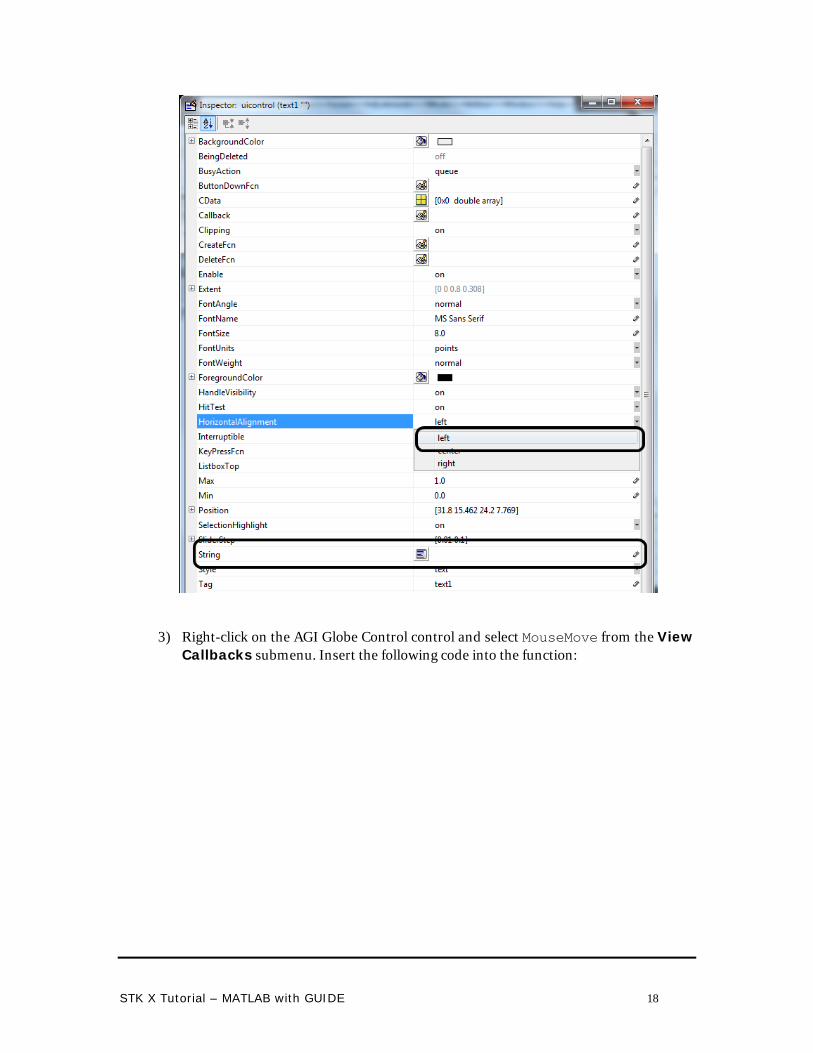
2) Double-click on the label to bring up the properties window. Delete the contents of the String property to clear the label and set the HorizontalAlignment property to left.
STK X Tutorial – MATLAB with GUIDE 18
3) Right-click on the AGI Globe Control control and select MouseMove from the View Callbacks submenu. Insert the following code into the function:
STK X Tutorial – MATLAB with GUIDE 19
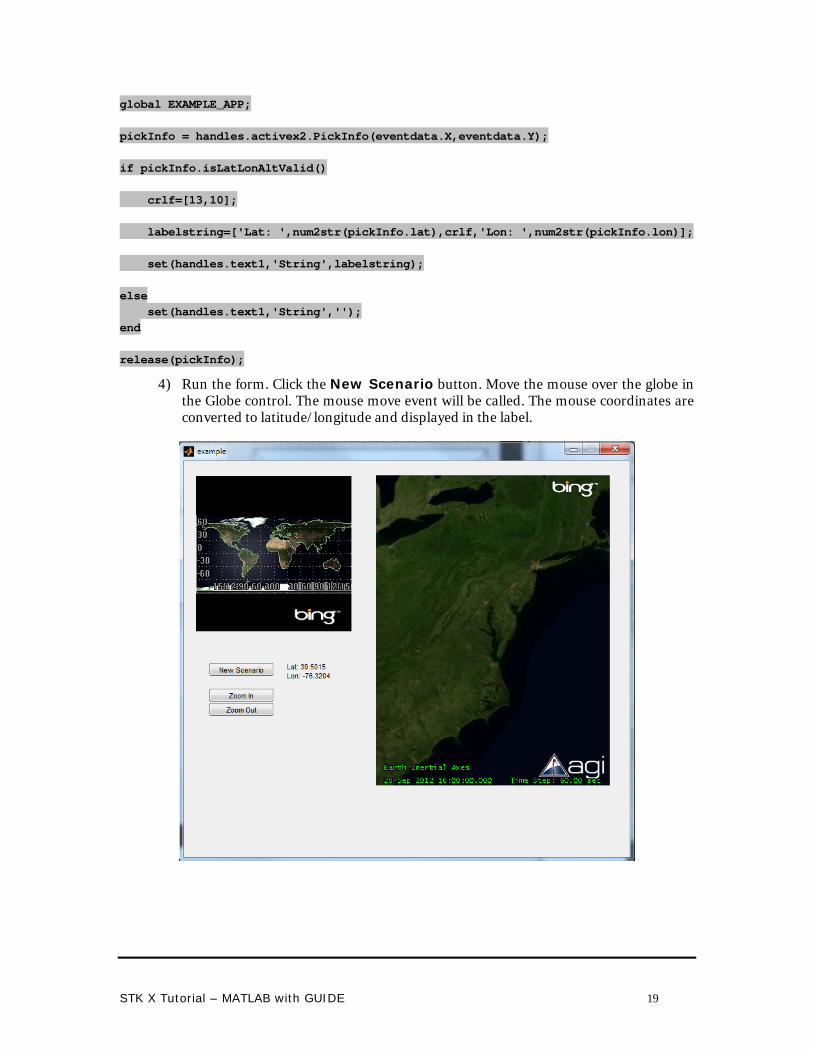
global EXAMPLE_APP; pickInfo = handles.activex2.PickInfo(eventdata.X,eventdata.Y); if pickInfo.isLatLonAltValid() crlf=[13,10]; labelstring=['Lat: ',num2str(pickInfo.lat),crlf,'Lon: ',num2str(pickInfo.lon)]; set(handles.text1,'String',labelstring); else set(handles.text1,'String',''); end release(pickInfo);
4) Run the form. Click the New Scenario button. Move the mouse over the globe in the Globe control. The mouse move event will be called. The mouse coordinates are converted to latitude/longitude and displayed in the label.
STK X Tutorial – MATLAB with GUIDE 20
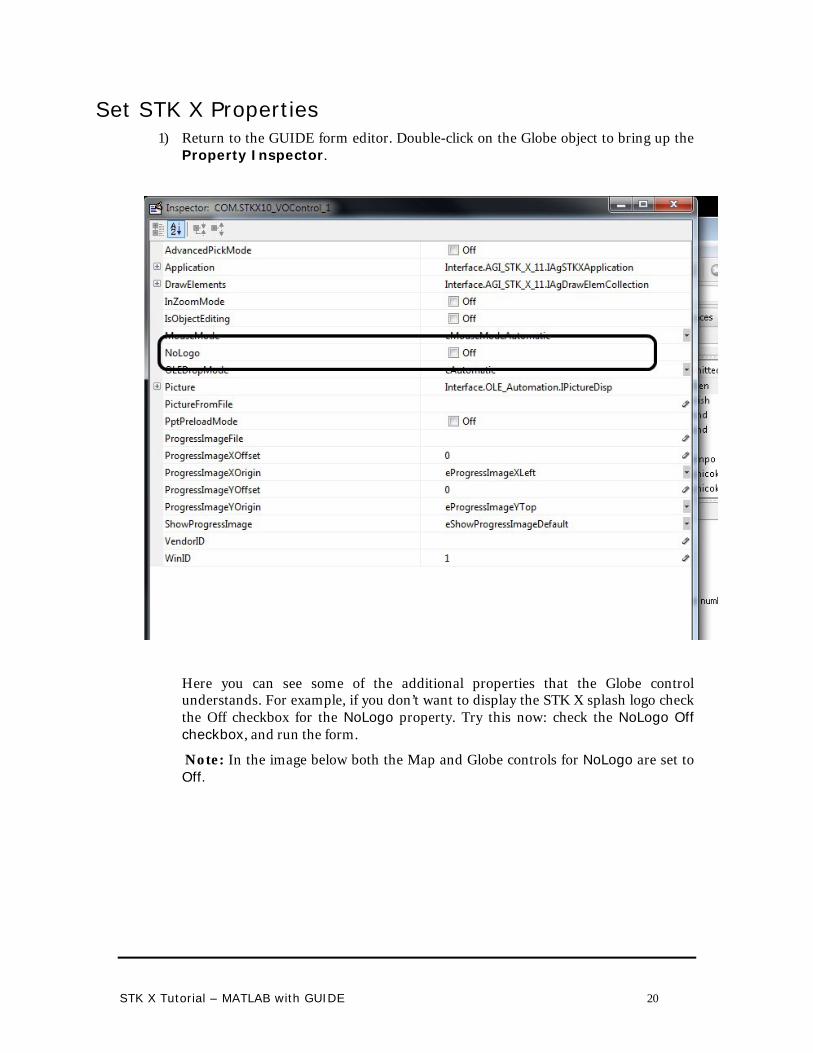
Set STK X Properties 1) Return to the GUIDE form editor. Double-click on the Globe object to bring up the
Property Inspector.
Here you can see some of the additional properties that the Globe control understands. For example, if you don’t want to display the STK X splash logo check the Off checkbox for the NoLogo property. Try this now: check the NoLogo Off checkbox, and run the form.
Note: In the image below both the Map and Globe controls for NoLogo are set to Off.
STK X Tutorial – MATLAB with GUIDE 21
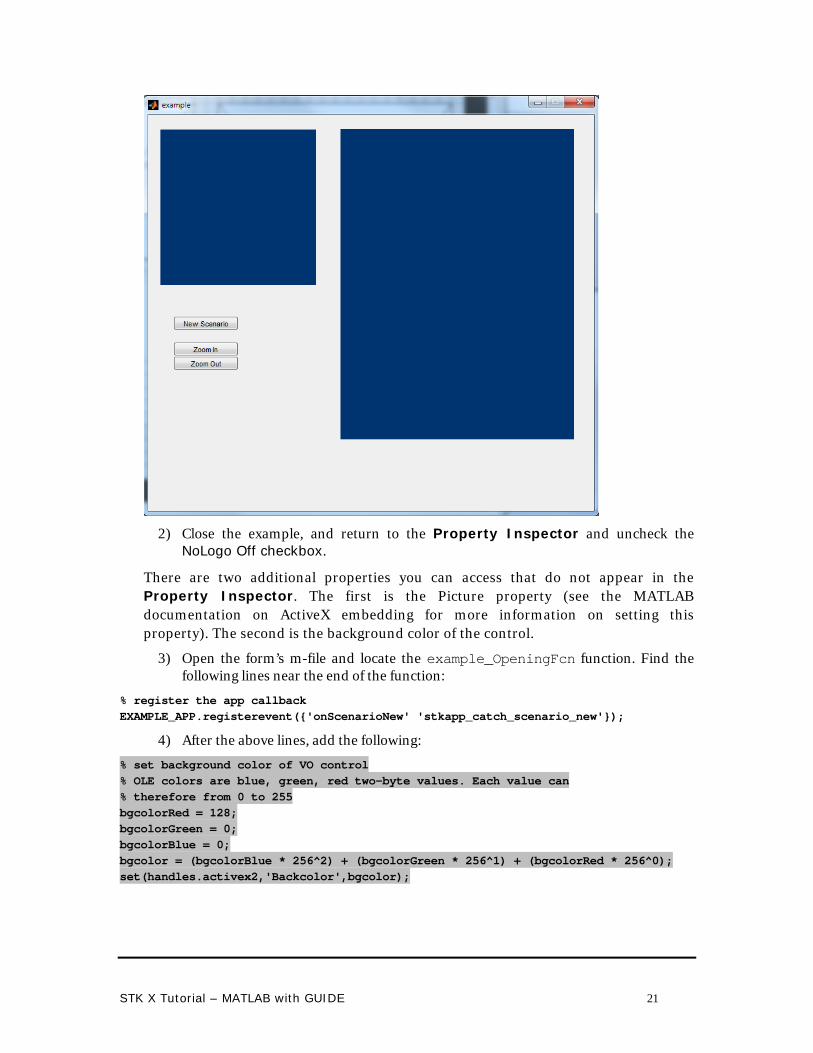
2) Close the example, and return to the Property Inspector and uncheck the NoLogo Off checkbox.
There are two additional properties you can access that do not appear in the Property Inspector. The first is the Picture property (see the MATLAB documentation on ActiveX embedding for more information on setting this property). The second is the background color of the control.
3) Open the form’s m-file and locate the example_OpeningFcn function. Find the following lines near the end of the function:
% register the app callback EXAMPLE_APP.registerevent({'onScenarioNew' 'stkapp_catch_scenario_new'});
4) After the above lines, add the following:
% set background color of VO control % OLE colors are blue, green, red two-byte values. Each value can % therefore from 0 to 255 bgcolorRed = 128; bgcolorGreen = 0; bgcolorBlue = 0; bgcolor = (bgcolorBlue * 256^2) + (bgcolorGreen * 256^1) + (bgcolorRed * 256^0); set(handles.activex2,'Backcolor',bgcolor);
STK X Tutorial – MATLAB with GUIDE 22
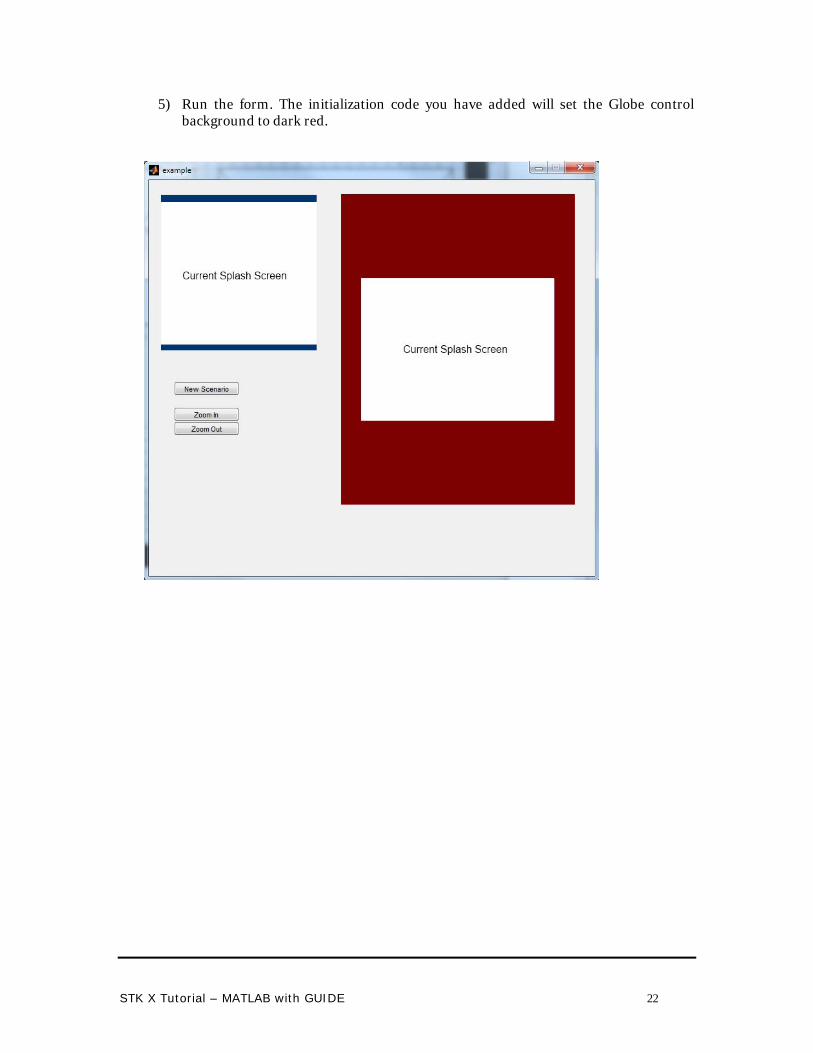
5) Run the form. The initialization code you have added will set the Globe control background to dark red.
STK X Tutorial – MATLAB with GUIDE 23
Add Connect Command Interface Note: This exercise is optional, you only need this if you want your application to accept Connect commands.
Note: If you are running on Windows Vista or later you may be required provide administrator permissions when running the form.
Open the form’s m-file and locate the example_OpeningFcn function. Find the following lines near the end of the function:
bgcolorBlue = 0; bgcolor = (bgcolorBlue * 256^2) + (bgcolorGreen * 256^1) + (bgcolorRed * 256^0); set(handles.activex2,'Backcolor',bgcolor);
After the above lines, add the following:
% Enables the connect command interface set(EXAMPLE_APP,'EnableConnect',true); set(EXAMPLE_APP,'ConnectPort',5001);
Run the form. Your application is ready to accept Connect commands now.
Recommended