InstallatIon InstructIonssplit shake, staggered shake, shingle,
Perfection shingle, and shapes
Installation• Ifyou’reusingShinglesorShakesforanentirewall,startbyinstallingastarterstrip.(1)Ifavinyl
starterstripisused,besureitislevelandplumb.note: Different manufacturers’ starter strip locks vary in size. It may be necessary to hold the first siding panel in place while nailing.
• Wheninstalling5"Shinglesmakesuretotrimleftsideflushwhenstartinganewcourse.Onlythefirstpanelofeachcourseneedstobetrimmed.
• Install3/4inchJ-Channelatthecorners,doorsandwindows,orconstructwoodreceivingframes. Use1"J-ChannelforStaggeredShakes.• Layoutthecoursesonthewall,usingachalklinetoestablishlevelreferencelines.• Installthepanelsworkinglefttoright.Positionthepanelssothatthejointlinesarestaggered.Forthebestappearance,
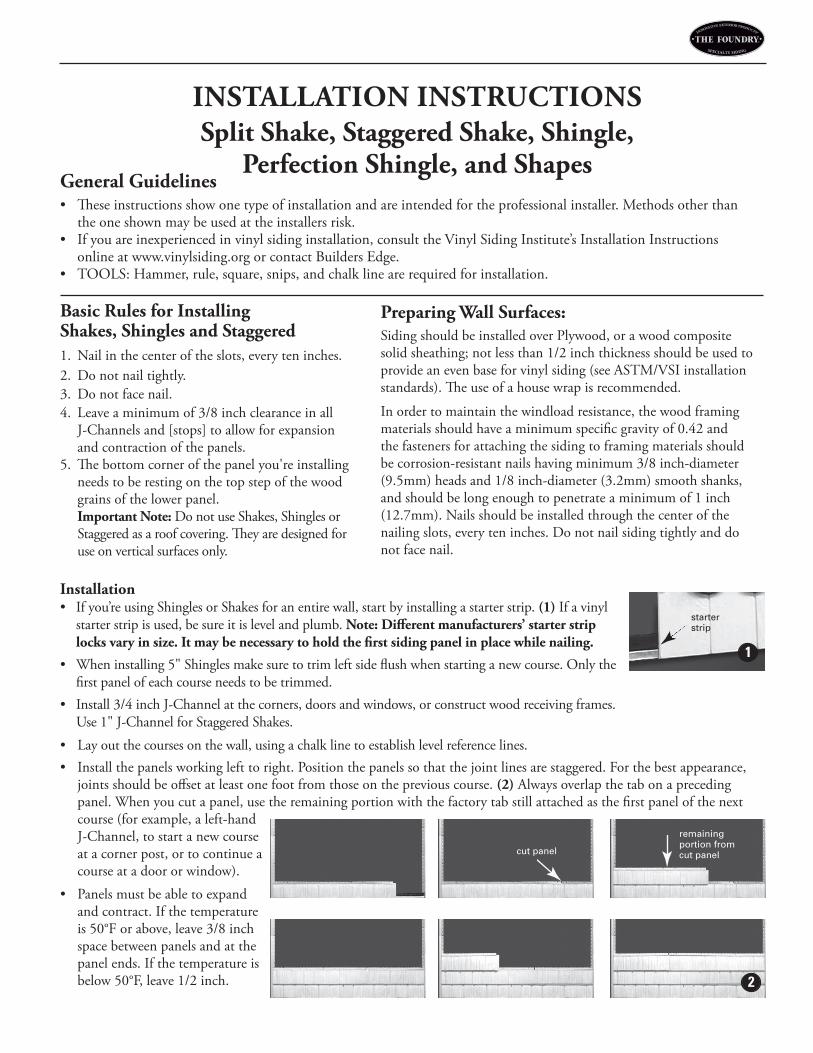
jointsshouldbeoffsetatleastonefootfromthoseonthepreviouscourse.(2)Alwaysoverlapthetabonaprecedingpanel.Whenyoucutapanel,usetheremainingportionwiththefactorytabstillattachedasthefirstpanelofthenextcourse(forexample,aleft-handJ-Channel,tostartanewcourseatacornerpost,ortocontinueacourseatadoororwindow).
• Panelsmustbeabletoexpandandcontract.Ifthetemperatureis50°Forabove,leave3/8inchspacebetweenpanelsandatthepanelends.Ifthetemperatureisbelow50°F,leave1/2inch.
Basic rules for Installing shakes, shingles and staggered1.Nailinthecenteroftheslots,everyteninches.2.Donotnailtightly.3.Donotfacenail.4.Leaveaminimumof3/8inchclearanceinall
J-Channelsand[stops]toallowforexpansionandcontractionofthepanels.
5.Thebottomcornerofthepanelyou'reinstallingneedstoberestingonthetopstepofthewoodgrainsofthelowerpanel.
Important note:DonotuseShakes,ShinglesorStaggeredasaroofcovering.Theyaredesignedforuseonverticalsurfacesonly.
1
starterstrip
2
remaining portion from cut panelcut panel
Preparing Wall surfaces:SidingshouldbeinstalledoverPlywood,orawoodcompositesolidsheathing;notlessthan1/2inchthicknessshouldbeusedtoprovideanevenbaseforvinylsiding(seeASTM/VSIinstallationstandards).Theuseofahousewrapisrecommended.
Inordertomaintainthewindloadresistance,thewoodframingmaterialsshouldhaveaminimumspecificgravityof0.42andthefastenersforattachingthesidingtoframingmaterialsshouldbecorrosion-resistantnailshavingminimum3/8inch-diameter(9.5mm)headsand1/8inch-diameter(3.2mm)smoothshanks,andshouldbelongenoughtopenetrateaminimumof1inch(12.7mm).Nailsshouldbeinstalledthroughthecenterofthenailingslots,everyteninches.Donotnailsidingtightlyanddonotfacenail.
General Guidelines• Theseinstructionsshowonetypeofinstallationandareintendedfortheprofessionalinstaller.Methodsotherthan
theoneshownmaybeusedattheinstallersrisk.• Ifyouareinexperiencedinvinylsidinginstallation,consulttheVinylSidingInstitute’sInstallationInstructions
onlineatwww.vinylsiding.orgorcontactBuildersEdge.• TOOLS:Hammer,rule,square,snips,andchalklinearerequiredforinstallation.
General Guidelines• Theseinstructionsshowonetypeofinstallationandareintendedfortheprofessionalinstaller.Methodsotherthanthe
oneshownmaybeusedattheinstallersrisk.• Ifyouareinexperiencedinvinylsidinginstallation,consulttheVinylSidingInstitute’sInstallationInstructionsonlineat
www.vinylsiding.orgorcontactBuildersEdge.• TOOLS:Hammer,rule,square,snips,andchalklinearerequiredforinstallation.
Installation Instructions for shapes
alternate Methods of starting
Round shapes panels shown
starterstrip
Transition starterpanel
Cut starterpanel
Roundshapes panel
J-Channel
Cut shapespanel
J-ChannelTrim Coil
Siding panel
Barge Board or utility trim
Utility Trim
Siding Panel
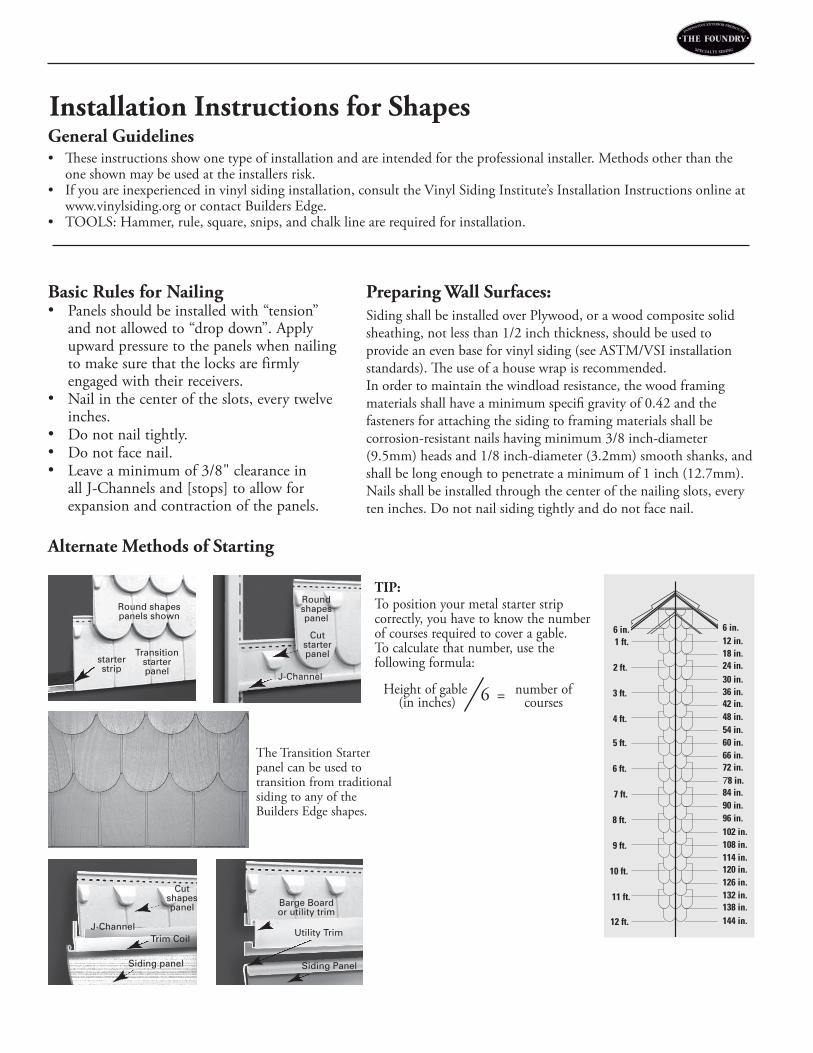
Heightofgable 6 = numberof (ininches) courses
tIP:Topositionyourmetalstarterstripcorrectly,youhavetoknowthenumberofcoursesrequiredtocoveragable.Tocalculatethatnumber,usethefollowingformula:
TheTransitionStarterpanelcanbeusedtotransitionfromtraditionalsidingtoanyoftheBuildersEdgeshapes.
Preparing Wall surfaces:SidingshallbeinstalledoverPlywood,orawoodcompositesolidsheathing,notlessthan1/2inchthickness,shouldbeusedtoprovideanevenbaseforvinylsiding(seeASTM/VSIinstallationstandards).Theuseofahousewrapisrecommended.Inordertomaintainthewindloadresistance,thewoodframingmaterialsshallhaveaminimumspecifigravityof0.42andthefastenersforattachingthesidingtoframingmaterialsshallbecorrosion-resistantnailshavingminimum3/8inch-diameter(9.5mm)headsand1/8inch-diameter(3.2mm)smoothshanks,andshallbelongenoughtopenetrateaminimumof1inch(12.7mm).Nailsshallbeinstalledthroughthecenterofthenailingslots,everyteninches.Donotnailsidingtightlyanddonotfacenail.
Basic rules for nailing• Panelsshouldbeinstalledwith“tension”
andnotallowedto“dropdown”.Applyupwardpressuretothepanelswhennailingtomakesurethatthelocksarefirmlyengagedwiththeirreceivers.
• Nailinthecenteroftheslots,everytwelveinches.
• Donotnailtightly.• Donotfacenail.• Leaveaminimumof3/8"clearancein
allJ-Channelsand[stops]toallowforexpansionandcontractionofthepanels.
Basic rules for nailing• Panelsshouldbeinstalledwith“tension”andnotallowedto“drop
down”.Applyupwardpressuretothepanelswhennailingtomakesurethatthelocksarefirmlyengagedwiththeirreceivers.
• Nailinthecenteroftheslots,everytwelveinches.• Donotnailtightly.• Donotfacenail.• Leaveaminimumof3/8"clearanceinallJ-channelsand[stops]to
allowforexpansionandcontractionofthepanels.Installing scallops in a Gable•Install3/4"J-Channelalongsidewallandgableends.
•ThefinishedgableshouldhaveasingleScallopcenteredatthepeak.Todothat,youmustfirstcarefullypositionthefirstcourseofScalloppanels.
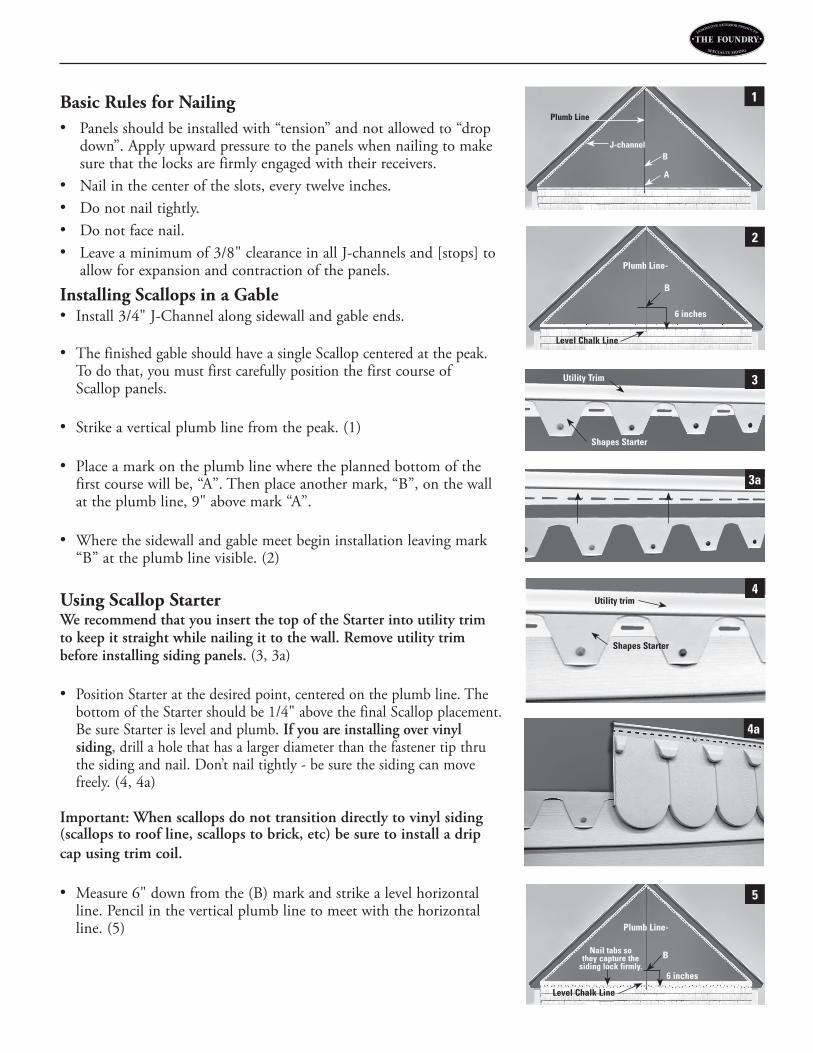
•Strikeaverticalplumblinefromthepeak.(1)
•Placeamarkontheplumblinewheretheplannedbottomofthefirstcoursewillbe,“A”.Thenplaceanothermark,“B”,onthewallattheplumbline,9"abovemark“A”.
•Wherethesidewallandgablemeetbegininstallationleavingmark“B”attheplumblinevisible.(2)
using scallop starterWe recommend that you insert the top of the Starter into utility trimto keep it straight while nailing it to the wall. Remove utility trimbefore installing siding panels.(3,3a)
• PositionStarteratthedesiredpoint,centeredontheplumbline.ThebottomoftheStartershouldbe1/4"abovethefinalScallopplacement.BesureStarterislevelandplumb.If you are installing over vinylsiding,drillaholethathasalargerdiameterthanthefastenertipthruthesidingandnail.Don’tnailtightly-besurethesidingcanmovefreely. (4,4a)
Important: When scallops do not transition directly to vinyl siding(scallops to roof line, scallops to brick, etc) be sure to install a dripcap using trim coil.
• Measure6"downfromthe(B)markandstrikealevelhorizontalline.Pencilintheverticalplumblinetomeetwiththehorizontalline.(5)
Utility Trim
Shapes Starter
3
3a
Shapes Starter
Utility trim4
4a
A
B
Plumb Line
J-channel
1
Level Chalk Line
Plumb Line-
B
6 inches
2
Level Chalk Line
Plumb Line-
B
5
Nail tabs so they capture the
siding lock firmly. 6 inches
Plumb Line-
6
7Nailing hem cut from more than two
Scallops.
Center a “V” if an even number of courses is calculated
Center a single Scallop if an oddnumber of courses is calculated
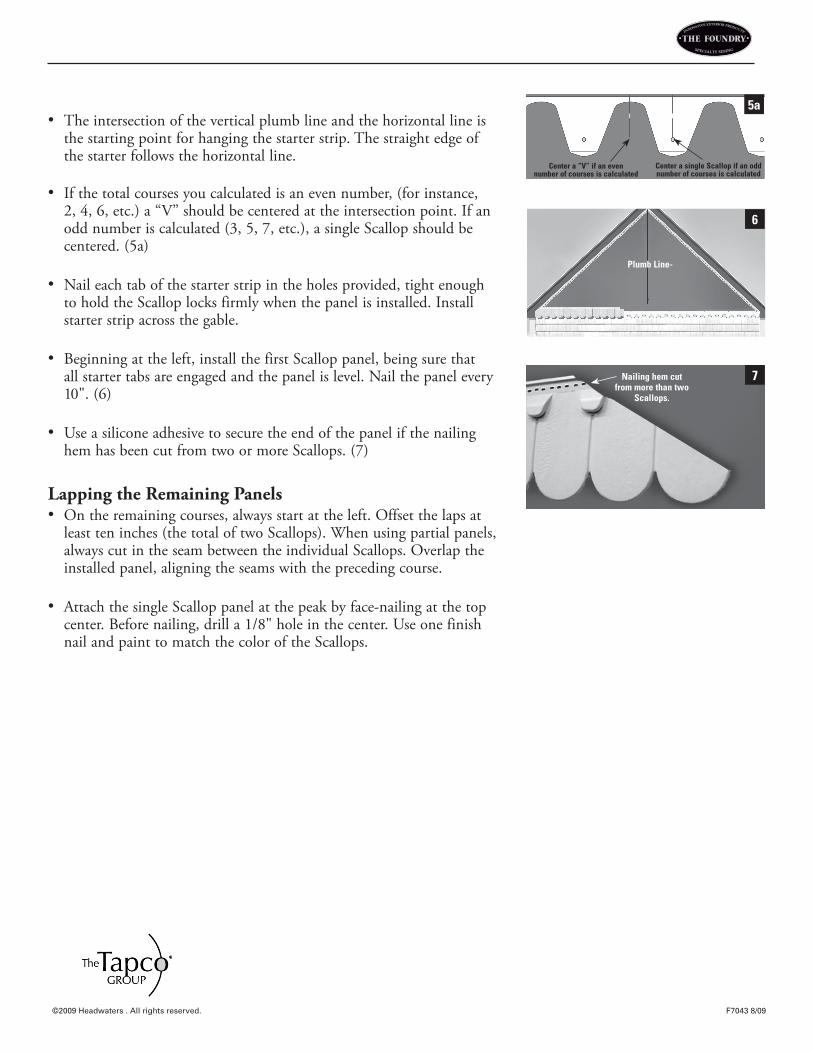
5a• Theintersectionoftheverticalplumblineandthehorizontallineisthestartingpointforhangingthestarterstrip.Thestraightedgeofthestarterfollowsthehorizontalline.
• Ifthetotalcoursesyoucalculatedisanevennumber,(forinstance,2,4,6,etc.)a“V”shouldbecenteredattheintersectionpoint.Ifanoddnumberiscalculated(3,5,7,etc.),asingleScallopshouldbecentered.(5a)
• Naileachtabofthestarterstripintheholesprovided,tightenoughtoholdtheScalloplocksfirmlywhenthepanelisinstalled.Installstarterstripacrossthegable.
• Beginningattheleft,installthefirstScalloppanel,beingsurethatallstartertabsareengagedandthepanelislevel.Nailthepanelevery10".(6)
• UseasiliconeadhesivetosecuretheendofthepanelifthenailinghemhasbeencutfromtwoormoreScallops.(7)
lapping the remaining Panels• Ontheremainingcourses,alwaysstartattheleft.Offsetthelapsatleastteninches(thetotaloftwoScallops).Whenusingpartialpanels,alwayscutintheseambetweentheindividualScallops.Overlaptheinstalledpanel,aligningtheseamswiththeprecedingcourse.
• AttachthesingleScalloppanelatthepeakbyface-nailingatthetopcenter.Beforenailing,drilla1/8"holeinthecenter.UseonefinishnailandpainttomatchthecoloroftheScallops.
©2009 Headwaters . All rights reserved. F7043 8/09
Recommended