LEM-HD1 - HD Digital encoder modulator
For further information or any queries please contactCustomer Careline: 08457 573479 (Local rate – UK only)Technical Support: www.labgear.co.uk/support
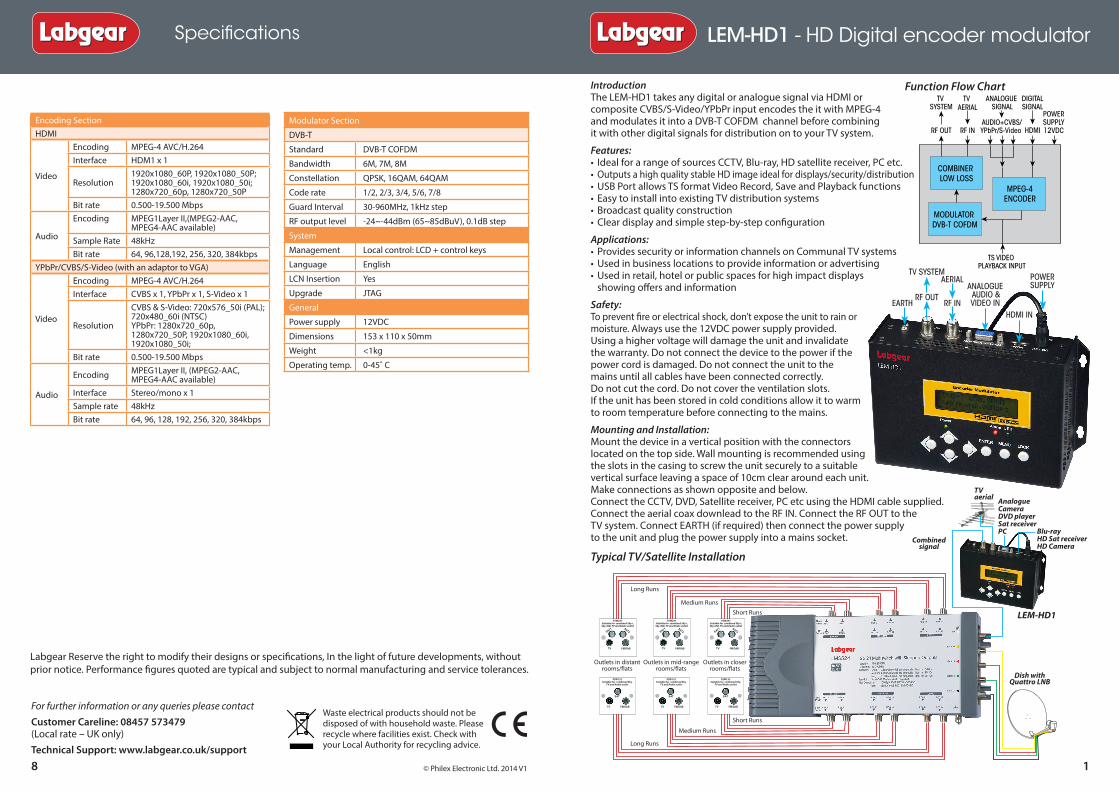
IntroductionThe LEM-HD1 takes any digital or analogue signal via HDMI or composite CVBS/S-Video/YPbPr input encodes the it with MPEG-4 and modulates it into a DVB-T COFDM channel before combining it with other digital signals for distribution on to your TV system.
Features: • Ideal for a range of sources CCTV, Blu-ray, HD satellite receiver, PC etc. • Outputs a high quality stable HD image ideal for displays/security/distribution• USB Port allows TS format Video Record, Save and Playback functions • Easy to install into existing TV distribution systems• Broadcast quality construction• Clear display and simple step-by-step configuration
Applications: • Provides security or information channels on Communal TV systems • Used in business locations to provide information or advertising• Used in retail, hotel or public spaces for high impact displays showing offers and information
Safety: To prevent fire or electrical shock, don’t expose the unit to rain or moisture. Always use the 12VDC power supply provided. Using a higher voltage will damage the unit and invalidate the warranty. Do not connect the device to the power if the power cord is damaged. Do not connect the unit to the mains until all cables have been connected correctly. Do not cut the cord. Do not cover the ventilation slots. If the unit has been stored in cold conditions allow it to warm to room temperature before connecting to the mains.
Mounting and Installation: Mount the device in a vertical position with the connectors located on the top side. Wall mounting is recommended using the slots in the casing to screw the unit securely to a suitable vertical surface leaving a space of 10cm clear around each unit.Make connections as shown opposite and below. Connect the CCTV, DVD, Satellite receiver, PC etc using the HDMI cable supplied. Connect the aerial coax downlead to the RF IN. Connect the RF OUT to the TV system. Connect EARTH (if required) then connect the power supply to the unit and plug the power supply into a mains socket.
1
Specifications
Waste electrical products should not be disposed of with household waste. Please recycle where facilities exist. Check with your Local Authority for recycling advice.
© Philex Electronic Ltd. 2014 V18
Typical TV/Satellite Installation
Labgear Reserve the right to modify their designs or specifications, In the light of future developments, without prior notice. Performance figures quoted are typical and subject to normal manufacturing and service tolerances.
Function Flow Chart
COMBINER LOW LOSS
MPEG-4 ENCODER
MODULATOR DVB-T COFDM
RF OUT RF IN
TV AERIAL
TV SYSTEM
AUDIO+CVBS/YPbPr/S-Video
ANALOGUE SIGNAL
POWERSUPPLY12VDC
TS VIDEO PLAYBACK INPUT
DIGITALSIGNAL
HDMI
Dish with Quattro LNB
Outlets in closer rooms/flats
TV FM/DAB
PSW241Suitable for combined Sky+, Sky+HD, TV and Radio outlet
SAT1 SAT2
PSW132Suitable for combined Sky,
TV and Radio outlet
TV FM/DAB
SAT
Long Runs
Long Runs
Medium Runs
Medium Runs
Short Runs
Short Runs
Outlets in mid-range rooms/flats
TV FM/DAB
PSW241Suitable for combined Sky+, Sky+HD, TV and Radio outlet
SAT1 SAT2
PSW132Suitable for combined Sky,
TV and Radio outlet
TV FM/DAB
SAT
Outlets in distant rooms/flats
TV FM/DAB
PSW241Suitable for combined Sky+, Sky+HD, TV and Radio outlet
SAT1 SAT2
PSW132Suitable for combined Sky,
TV and Radio outlet
TV FM/DAB
SAT
AnalogueCameraDVD playerSat receiverPC
Combinedsignal
LEM-HD1
TV aerial
Blu-rayHD Sat receiverHD Camera
TV SYSTEM
RF OUT
AERIAL
RF IN
POWER SUPPLYANALOGUE
AUDIO & VIDEO INEARTH
HDMI IN
Encoding SectionHDMI
Video
Encoding MPEG-4 AVC/H.264Interface HDM1 x 1
Resolution1920x1080_60P, 1920x1080_50P;1920x1080_60i, 1920x1080_50i;1280x720_60p, 1280x720_50P
Bit rate 0.500-19.500 Mbps
Audio
Encoding MPEG1Layer II,(MPEG2-AAC, MPEG4-AAC available)
Sample Rate 48kHzBit rate 64, 96,128,192, 256, 320, 384kbps
YPbPr/CVBS/S-Video (with an adaptor to VGA)
Video
Encoding MPEG-4 AVC/H.264Interface CVBS x 1, YPbPr x 1, S-Video x 1
Resolution
CVBS & S-Video: 720x576_50i (PAL); 720x480_60i (NTSC)YPbPr: 1280x720_60p, 1280x720_50P, 1920x1080_60i, 1920x1080_50i;
Bit rate 0.500-19.500 Mbps
Audio
Encoding MPEG1Layer II, (MPEG2-AAC, MPEG4-AAC available)
Interface Stereo/mono x 1Sample rate 48kHzBit rate 64, 96, 128, 192, 256, 320, 384kbps
Modulator Section
DVB-T
Standard DVB-T COFDM
Bandwidth 6M, 7M, 8M
Constellation QPSK, 16QAM, 64QAM
Code rate 1/2, 2/3, 3/4, 5/6, 7/8
Guard Interval 30-960MHz, 1kHz step
RF output level -24~-44dBm (65~85dBuV), 0.1dB step
System
Management Local control: LCD + control keys
Language English
LCN Insertion Yes
Upgrade JTAG
General
Power supply 12VDC
Dimensions 153 x 110 x 50mm
Weight <1kg
Operating temp. 0-45˚ C
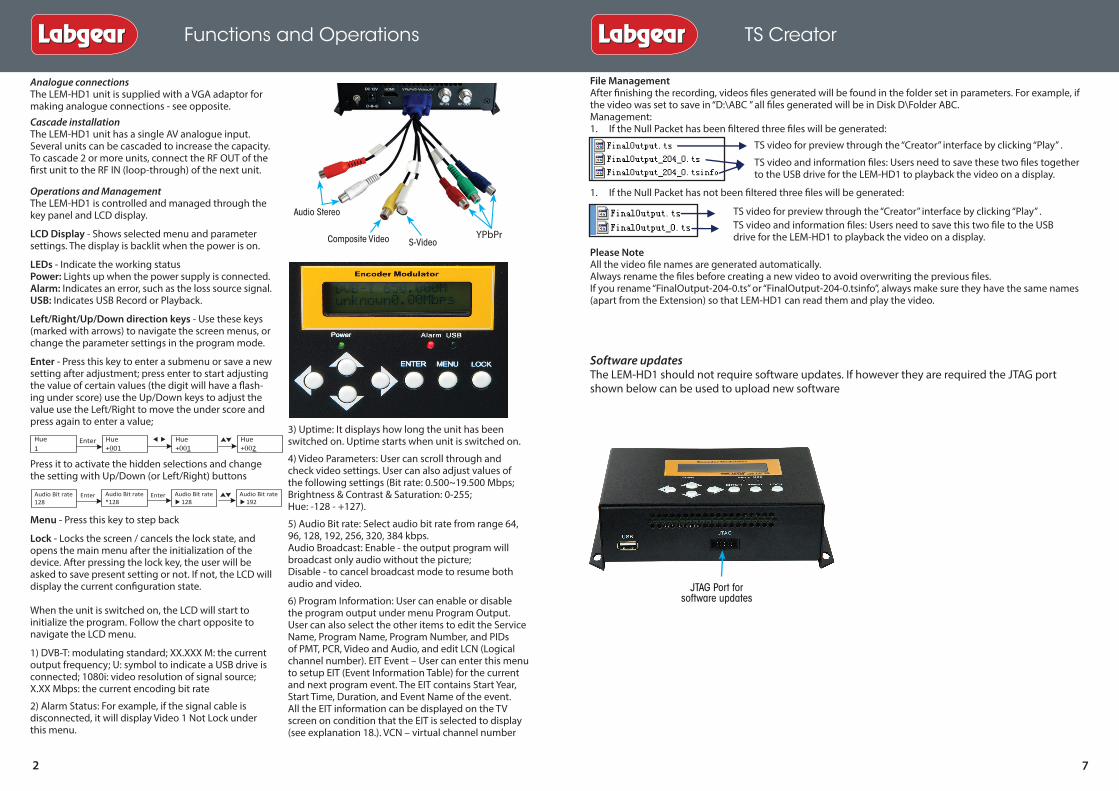
Analogue connectionsThe LEM-HD1 unit is supplied with a VGA adaptor for making analogue connections - see opposite.Cascade installationThe LEM-HD1 unit has a single AV analogue input. Several units can be cascaded to increase the capacity. To cascade 2 or more units, connect the RF OUT of the first unit to the RF IN (loop-through) of the next unit.
Operations and ManagementThe LEM-HD1 is controlled and managed through the key panel and LCD display.
LCD Display - Shows selected menu and parameter settings. The display is backlit when the power is on.
LEDs - Indicate the working statusPower: Lights up when the power supply is connected.Alarm: Indicates an error, such as the loss source signal.USB: Indicates USB Record or Playback.
Left/Right/Up/Down direction keys - Use these keys (marked with arrows) to navigate the screen menus, or change the parameter settings in the program mode.
Enter - Press this key to enter a submenu or save a new setting after adjustment; press enter to start adjusting the value of certain values (the digit will have a flash-ing under score) use the Up/Down keys to adjust the value use the Left/Right to move the under score and press again to enter a value;
Press it to activate the hidden selections and change the setting with Up/Down (or Left/Right) buttons
Menu - Press this key to step back
Lock - Locks the screen / cancels the lock state, and opens the main menu after the initialization of the device. After pressing the lock key, the user will be asked to save present setting or not. If not, the LCD will display the current configuration state.
When the unit is switched on, the LCD will start to initialize the program. Follow the chart opposite to navigate the LCD menu.
1) DVB-T: modulating standard; XX.XXX M: the current output frequency; U: symbol to indicate a USB drive is connected; 1080i: video resolution of signal source; X.XX Mbps: the current encoding bit rate
2) Alarm Status: For example, if the signal cable is disconnected, it will display Video 1 Not Lock under this menu.
3) Uptime: It displays how long the unit has been switched on. Uptime starts when unit is switched on.
4) Video Parameters: User can scroll through and check video settings. User can also adjust values of the following settings (Bit rate: 0.500~19.500 Mbps; Brightness & Contrast & Saturation: 0-255; Hue: -128 - +127).
5) Audio Bit rate: Select audio bit rate from range 64, 96, 128, 192, 256, 320, 384 kbps.Audio Broadcast: Enable - the output program will broadcast only audio without the picture; Disable - to cancel broadcast mode to resume both audio and video.
6) Program Information: User can enable or disable the program output under menu Program Output. User can also select the other items to edit the Service Name, Program Name, Program Number, and PIDs of PMT, PCR, Video and Audio, and edit LCN (Logical channel number). EIT Event – User can enter this menu to setup EIT (Event Information Table) for the current and next program event. The EIT contains Start Year, Start Time, Duration, and Event Name of the event. All the EIT information can be displayed on the TV screen on condition that the EIT is selected to display (see explanation 18.). VCN – virtual channel number
72
Functions and Operations TS Creator
Audio Bit rate128
Audio Bit rate*128
Audio Bit rate128
Audio Bit rate192
Enter Enter
Software updatesThe LEM-HD1 should not require software updates. If however they are required the JTAG port shown below can be used to upload new software
JTAG Port for software updates
File Management After finishing the recording, videos files generated will be found in the folder set in parameters. For example, if the video was set to save in “D:\ABC ” all files generated will be in Disk D\Folder ABC.Management:1. If the Null Packet has been filtered three files will be generated:
1. If the Null Packet has not been filtered three files will be generated:
Please NoteAll the video file names are generated automatically.Always rename the files before creating a new video to avoid overwriting the previous files.If you rename “FinalOutput-204-0.ts” or “FinalOutput-204-0.tsinfo”, always make sure they have the same names (apart from the Extension) so that LEM-HD1 can read them and play the video.
TS video for preview through the “Creator” interface by clicking “Play” .
TS video and information files: Users need to save these two files together to the USB drive for the LEM-HD1 to playback the video on a display.
TS video for preview through the “Creator” interface by clicking “Play” .TS video and information files: Users need to save this two file to the USB drive for the LEM-HD1 to playback the video on a display.
Hue1
Hue+001
Hue+001
Hue+002
Enter
Audio Stereo
Composite Video S-VideoYPbPr

Main MenuModulator
ModulatorBandwidth
ModulatorConstellation
ModulatorFFT
ModulatorGuard Interval
ModulatorCode Rate
ModulatorRF Frequency
ModulatorRF Level
ModulatorRF On
ModulatorBit Rate
Bandwidth8M 7M 6M
Constellation64QAM
FFT2K
Guard Interval1/32
Code Rate7/8
RF Frequency650.000 MHz
RF Level-10.0 dBm
RF OnOff *On
Bit Rate(val/max)6.986M/31.668M
7
8
9
10
11
12
13
14
15
Initializing
DVB-T 650.000M U1080i 6.93Mbps
Main MenuStatus
Lock Enter Menu
StatusAlarm 2
StatusUptime 3
6
Main MenuEncoder
EncoderVideo
EncoderAudio
EncoderProgram Info
4
AudioAudio BitrateAudio Format
VideoInterfaceVideo In StatusResolution
.
.
.Video Norm
Program InfoProgram OutputProgram Name
.
.
.LCNEIT EventVCN
5
1
Up Down
▶
▶
▶
▶
TS Creator Software Menus
36
Introduction Users can create .ts videos containing pictures, videos and audio with TS Creator software on a PC and save them to a USB flash drive. (If you require TS Creator software call our Technical Support line on 08457 573479, 9am to 5pm, Mon - Fri. for current download details)Formats supported include: Images: JPG, PNG, BMP & GIF Audio: MP3, WAV Video: INMV, MPG, MP4, TS, AVI, WMV & MKV
Installation Download the “TS Creator” software package on to your PC to get the installer and its auxiliary routine.In some cases, if your PC doesn’t have “Net Frame 2.0” installed, you will need to double-click on “NetFx20SP2_x86.exe” to load it and complete the installation.Double-click “Setup.exe” application to install the “Creator” and generate a desktop shortcut.
Using TS CreatorDouble-click the “Creator” shortcut icon, it will open a window similar to the one shown opposite:
Click to add Images and videos
Click to adjust the order of Images/videos
Click to delete the Images/videos
Click to add audio files.
Click to set a save path for the TS video to be created.
Sets length of time every picture in the video is on screen.
Sets output resolution for the video.
The video is recorded based on VBR (Variable Bit Rate). This number setting sets maximum bit rate. NB the higher the bit rate the better the quality but the greater the file size and time to record.
Sets the encoding format, should match the format the display uses.
Select yes to filter the null packet to boost the video’s effective bit rate.
Sets the maximum size for each video - Max. size 2GB for LEM-HD1.
After setting the parameters, click to start recording. Click “OK” when the prompt “The operation completed normally” appears. Click this button to stop the recording before it is completed. After finishing the transform operation, users can click this button to play the generated TS video.
7) Bandwidth: choose between 6M, 7M and 8M.
8) Constellation: DVB-T modulator contains 3 constellation modes – 64 QAM, QPSK and 16QAM.
9) FFT (Transmission Mode): 2K
10) Guard Interval: Select from 1/32, 1/16, 1/8 and 1/4.
11) Code Rate: Refers to FEC-Forward Error Correction rate. Range covers 1/2, 2/3, 3/4, 5/6 and 7/8.
NOTE: The different combinations of bandwidth, constellation, guard interval and code rate (FEC) will form a different output code rate. Please refer to appendix - MPEG-2 code rate table.
12) RF Frequency: Select a frequency within the range of 30 to 990MHz. Set it according to the frequency you want to modulate.
13) RF Level: Adjust within the range of -16~ -36dBm.
14) RF On: User can choose to turn the RF on or off in this menu.
15) Bit Rate: User can read the current modulating bit rate and the maximum bit rate
16) TSID: (Transport Stream ID) - User can view or adjust in this menu.
17) ONID: (Original Network ID) - User can view or adjust in this menu.
18) NIT: (Network Information Table) NIT table is a very important table for describing the network and TS. User can enter the submenus displayed and edit the values or select the LCN (Logical channel number) mode, and choose whether to insert the NIT. If the user chooses to insert the NIT, information (Network
Main MenuSystem
SystemSave Config
SystemLoad Saved CFG
SystemLock Keyboard
SystemProduct ID
SystemVersion
Save Config?Yes No
Load SavedCFG?Yes No
Lock KeyboardYes No
003556490565670ec8f7b0000f
Encoder ModulatorSW:0.04 HW:1.5A
Main MenuStream
StreamTSID
StreamONID
StreamNIT
NITNetwork IDNetwork NameLCN ModePrivate DataNIT Insert
StreamEIT EIT
LanguageEIT Insert
SystemFactory Reset
SystemLCD Time-out
Reset all sets?Yes No
LCD Time-out� 30 s
SystemKey Password
Set Password000000
Main MenuUSB Device
USB DeviceRecord TS
USB DevicePlay TS
USB DeviceDisk Usage
Total: xx.xxx GBFree: xx.xxx GB
USB DeviceUpdate
USB DeviceRemove device
Record TSStart RecordAdvanced Config
Play TSFile browsePlay mode
Software update?Yes No
Remove device?Yes No
27
28
29
16
22
23
24
25
26
StreamVCT VCT
Modulation modeVCT insert
17
21
20
19
18
30
31
32
33
▶
▶
▶
▶
▶
▶

Using a USB flash drive connected to the USB port the LEM-HD1 can record and play back video.Videos for playback need to be in .ts format. The .ts files can be recorded from a connected video source, or copied onto the USB drive from a computer.You can also download .ts Video Creation Softwareand create .ts videos containing pictures, videos and music with TS Creator software on a PC and save them to a USB flash drive (see page 6 for more information on using the software).
Functions and Operations TS Video Record and Play
54
ID, Network Name, LCN Mode, Private Data and LCN number of the program mentioned in paragraph 6) will be added to the transport stream.
NOTE: when the Private Data is set as 0*0, it is invalid.
19) VCT: Virtual Channel Table. This menu contains two sub-menus, Modulation Mode and VCT Insert. User can edit modulation mode within the range of 0-255.
20) EIT: EIT Insert - As mentioned above (6), you can choose if you do or don’t want to insert the event information table into the TS using this menu. If yes, the EIT information set above (6) will be displayed on the TV screen. Language Code – to set the EIT language e.g. the code for English language is eng. If you set the code as eng, the EIT will be displayed in English.
21) – 25) Please refer to Pages 5-7 for details.
26) Save Config: Yes/No-to save/keep previous setting.
27) Load Saved CFG: Yes/No-to load/ not to load the saved configuration.
28) Reset all settings: Yes/No-choose/not choose the factory’s default configuration.
29) LCD Time out: The time limit for the LCD light to switch off. Choose from 5s, 10s, 45s, 60s, 90s and120s (seconds).
30) Key Password: User can set a 6-digital password used to unlock the keyboard.
31) Lock Keyboard: Choose “Yes” to lock the keyboard, and the keyboard will not operate without the password being entered. This operation is one-off. (If you forget your password, use the universal code “005599”.)
32) Product ID: User can view the serial number of this device. It is read-only and unique
33) Version: Displays system information for this device. Encoder Modulator: the name of the device; SW: software version number; HW: hardware version number. User can also press ENTER again to view the date of last system modification.
TS Video Record and Play
Main MenuUSB Device
USB DeviceR ecord T S
R ecord T SStart R ecord
R ecord T SA dvanced C onfig
Start R ecord▶ Y es No
A dvanced C onfigFile sizeFilter Null PK TFile save modeFile nameA utomatic record
.ts Recording and Saving: 1) Connect the signal source, enter “Start Record” and choose “Yes” to start recording the encoded TS.
2) Advanced Config:File size: users can set the file size for the *.ts to be recorded. A single file can be a max. 2000MB in size.Filter null PKT: Users can decide whether to filter the null packet for the *.ts files to be recorded.File save mode: there are 3 modes available: “Single file” (For example, when the file size is set as 1000MB the *.ts file is recorded up to 1000MB, then automatically stops recording the TS file). “Segmented file” (For example in segmented file mode, when the file size is set as 1000MB the *.ts video is recorded up to 1000MB and automatically saved as an individual file, however the LEM-HD1 continues to record the video and saves it as the next .ts file until the USB memory is full then stops recording).
TS Playback: 1) Connect the signal source, enter “Start Record” and choose “Yes” to start recording the encoded TS.
USB DevicePlay T S
Main MenuUSB Device
Play T SFile B rowse
Play T SPlay Mode
▶ R ecord-001.tsR ecord-002.ts
Play modePlay allL oop allS ingle fileSingle loop
1) File browse: There is a video list under this menu, choose one file and press “Enter” button to start playback.2) Play mode: User can select a play mode for the saved *.ts files as preferred before playing the *.ts file.When the *.ts is being playing, LEM-HD1 LCD will present a playing interface as shown below.
DV B -C 650.000MHzxx.x% xx.xxM
DV B -C 650.000MR ecord-001.ts
File being played
Percentage of current file played
File playing symbol
Size of current file
single loop; A play all; A loop all; 1 single file
Select File Stop Playing
Return to main menu
Play/Pause
Rewind/Forward
Disk Usage: Shows remaining space on USB drive.
USB DeviceDisk Usage
T otal: xx.xxx GBFree: xx.xxx GB
Main MenuUSB Device
Main MenuUSB Device
USB DeviceUpdate
Software Update?Y es ▶ No
Main MenuUSB Device
USB DeviceR emove device
R emove device?Y es ▶ No
Update: Choose “Yes” to update the LEM-HD1 with the updated file stored on the USB drive.
Remove Device: Choose “Yes” to safely remove the USB drive. LEM-HD1 will then automatically resumeencoding and playing the program input from the encoder module.
“Loop record”: (in this mode videos are automatically saved and LEM-HD1 continues to record sequential files. When the USB memory is full, it continues to record replacing the previously recorded files.)
File name: Users can enter this menu to edit the name for the *.ts files to be recorded. For example, if users name it “Record-”, it will give the following names to the saved *.ts files “Record-001.ts”, “Record-002.ts”… “Record-00N.ts”.
Automatic Record: Users can choose whether to set LEM-HD1 to record the TS automatically or manually.
Recommended