1
www.transomic.com 866-833-0712 [email protected]
shERWOOD UltramiR Retroviral shRNA (pLMN)
Bacterial glycerol stock format
TRHSU2000, TRMSU2000
shERWOOD-UltramiR shRNA
shERWOOD-UltramiR short hairpin RNA (shRNA) are vector-based RNAi triggers with a new generation shRNA-specific
design and an optimized microRNA scaffold “ultramiR” which has been shown to produce more potent and consistent
knockdown performance than existing shRNA reagents. The UltramiR scaffold has been optimized for efficient primary
microRNA processing (Auyeung et al., 2013) and shRNA designs are predicted using the proprietary shERWOOD
algorithm developed in Dr. Gregory Hannon’s laboratory at Cold Spring Harbor Laboratory. Based on the functional
testing of 270,000 shRNA sequences using a high-throughput sensor assay (Knott et al., 2014), the shERWOOD algorithm
has been trained to select the rare shRNA designs that are consistently potent even at single copy representation in the
genome.
Figure 1. Schematic of shERWOOD-UltramiR shRNA. (A) Passenger (green) and Guide (orange) strand are shown with Dicer and
Drosha nuclease cleavage sites are in red. (B) The final step of shRNA processing loads the Guide Strand (orange) into the RISC
complex which associates with the target mRNA (blue) in a sequence specific manner.
2
www.transomic.com 866-833-0712 [email protected]
Optimized microRNA scaffold sequence increases small RNA processing
Previous generation microRNA-adapted shRNA libraries have
alterations in conserved regions of the flanking sequences that
were thought to disrupt processing and reduce knockdown
efficiency. The miR-30 scaffold for shERWOOD-UltramiR
designs have been optimized based on knowledge of key
microRNA determinants for optimal primary microRNA
processing (Auyeung et al. 2013).
This new scaffold increases small RNA levels presumably by
improving maturation through the microRNA biogenesis
pathway. When shRNA were placed into the UltramiR scaffold,
mature small RNA levels were increased roughly two
fold relative to levels observed using the standard miR-30
scaffold (Knott et al 2014).
Guaranteed knockdown
All shRNA constructs in a target gene set are guaranteed to knock down mRNA expression by >70%.
Cell line of choice should demonstrate expression of the target gene using the non-targeting controls and should
demonstrate gene knockdown using a positive control shRNA.
Figure 2. Relative abundances of processed guide
sequences for two shRNA as determined by small RNA
cloning and NGS analysis when cloned into traditional miR-
30 and UltramiR scaffolds. Values represent log-fold
enrichment of shRNA guides with respect to sequences
corresponding to the top 10 most highly expressed
endogenous microRNA.
3
www.transomic.com 866-833-0712 [email protected]
I. Introduction This manual provides information for the propagation, transfection, transduction and viral packaging of the LMN
retroviral vector. Review local safety guidelines for complete regulations.
The pLMN shRNA expression vector allows transient and stable transfection; as well as the stable delivery of the shRNA
expression into a target cell’s genome via a replication-incompetent retrovirus.
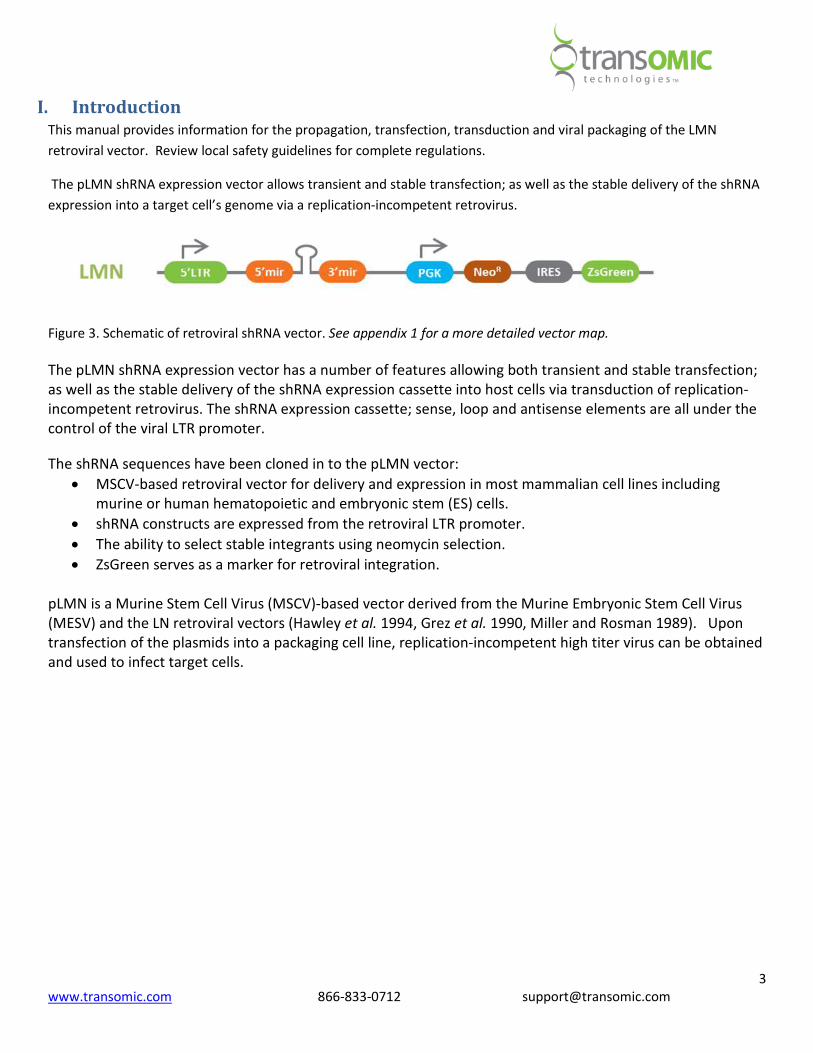
Figure 3. Schematic of retroviral shRNA vector. See appendix 1 for a more detailed vector map.
The pLMN shRNA expression vector has a number of features allowing both transient and stable transfection;
as well as the stable delivery of the shRNA expression cassette into host cells via transduction of replication-
incompetent retrovirus. The shRNA expression cassette; sense, loop and antisense elements are all under the
control of the viral LTR promoter.
The shRNA sequences have been cloned in to the pLMN vector:
• MSCV-based retroviral vector for delivery and expression in most mammalian cell lines including
murine or human hematopoietic and embryonic stem (ES) cells.
• shRNA constructs are expressed from the retroviral LTR promoter.
• The ability to select stable integrants using neomycin selection.
• ZsGreen serves as a marker for retroviral integration.
pLMN is a Murine Stem Cell Virus (MSCV)-based vector derived from the Murine Embryonic Stem Cell Virus
(MESV) and the LN retroviral vectors (Hawley et al. 1994, Grez et al. 1990, Miller and Rosman 1989). Upon
transfection of the plasmids into a packaging cell line, replication-incompetent high titer virus can be obtained
and used to infect target cells.
4
www.transomic.com 866-833-0712 [email protected]
II. Propagation and plasmid purification protocols for glycerol stocks
Materials for individual and plate replication
#
LB-Lennox Broth (low salt) VWR EM1.00547.0500
Glycerol VWR EM-4760
Carbenicillin VWR 97063-144
Propagate culture for storage
pLMN shRNA cultures should be propagated in LB broth with ampicillin or carbenicillin (100 μg/ml) at 30°C for 30 hours
or until the culture appears turbid. 2-10 ml starter cultures can be inoculated using 2 to 10 μl of the glycerol stock
provided. Once turbid, place 920 μl of culture into a polypropylene tube and add 80 μl sterile glycerol (8% glycerol). Mix
well and store at –80˚C. Glycerol stocks kept at -80°C are stable indefinitely as long as freeze/thaw cycles are minimized.
Plasmid preparation
For transfection and transduction (infection) experiments the pLMN plasmid DNA will first have to be
extracted from the bacterial cells. When transforming directly into an experimental cell line, either a standard
plasmid mini-preparation can be used or one that yields endotoxin free DNA. When extracting plasmid DNA to
make virus for transduction, more DNA is required and using and endotoxin free kit will generally yield higher
viral titers
5
www.transomic.com 866-833-0712 [email protected]
III. Neomycin selection (Neomycin kill curve)
The pLMN retroviral vector has a neomycin resistance marker for selection in mammalian cells. To establish
stable cell lines, once transfection/transduction has occurred, the cells can be placed on neomycin to select for
stable integrants. Since each cell line potentially has a different sensitivity to neomycin, the optimal
concentration (pre-transfection/transduction) should be determined. Below is the protocol for titrating
neomycin (kill curve), using as an example a 24 well tissue culture dish.
Required materials
• Complete media experimental cell line
• Neomycin or G418 (200 µg/µl stock solution)
• 24-well tissue culture plate
Equipment
• Automatic pipetter /Pipette-aid
• Disposable or autoclaved tissue culture pipettes
• CO2 cell culture incubator at 37°C
Protocol
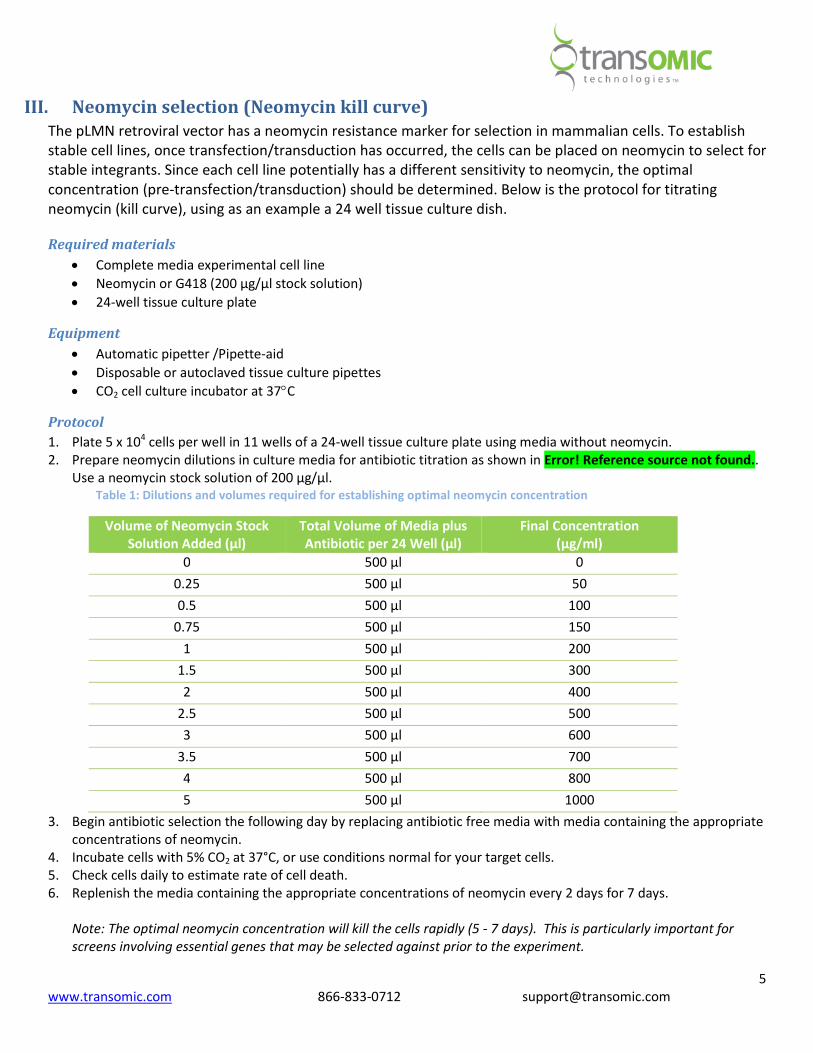
1. Plate 5 x 10⁴ cells per well in 11 wells of a 24-well tissue culture plate using media without neomycin.
2. Prepare neomycin dilutions in culture media for antibiotic titration as shown in Error! Reference source not found..
Use a neomycin stock solution of 200 µg/µl.
Table 1: Dilutions and volumes required for establishing optimal neomycin concentration
Volume of Neomycin Stock
Solution Added (µl)
Total Volume of Media plus
Antibiotic per 24 Well (µl)
Final Concentration
(µg/ml)
0 500 µl 0
0.25 500 µl 50
0.5 500 µl 100
0.75 500 µl 150
1 500 µl 200
1.5 500 µl 300
2 500 µl 400
2.5 500 µl 500
3 500 µl 600
3.5 500 µl 700
4 500 µl 800
5 500 µl 1000
3. Begin antibiotic selection the following day by replacing antibiotic free media with media containing the appropriate
concentrations of neomycin.
4. Incubate cells with 5% CO2 at 37°C, or use conditions normal for your target cells.
5. Check cells daily to estimate rate of cell death.
6. Replenish the media containing the appropriate concentrations of neomycin every 2 days for 7 days.
Note: The optimal neomycin concentration will kill the cells rapidly (5 - 7 days). This is particularly important for
screens involving essential genes that may be selected against prior to the experiment.
6
www.transomic.com 866-833-0712 [email protected]
IV. Transfection Use the following procedure to transfect plasmid DNA into mammalian cells in a 24-well format. For other plate formats,
scale up or down the amounts of DNA and OMNIfect reagent proportionally to the total transfection volume (Table 2).
Adherent cells: One day prior to transfection, plate cells in 500 μl of growth medium without antibiotics so that cells will
be 70–95% confluent at the time of transfection. The number of cells to plate will vary based on the double time.
Suspension cells: On the same day of transfection just prior to preparing transfection complex plate 160,000/well cells
in 500 μl of growth medium without antibiotics.
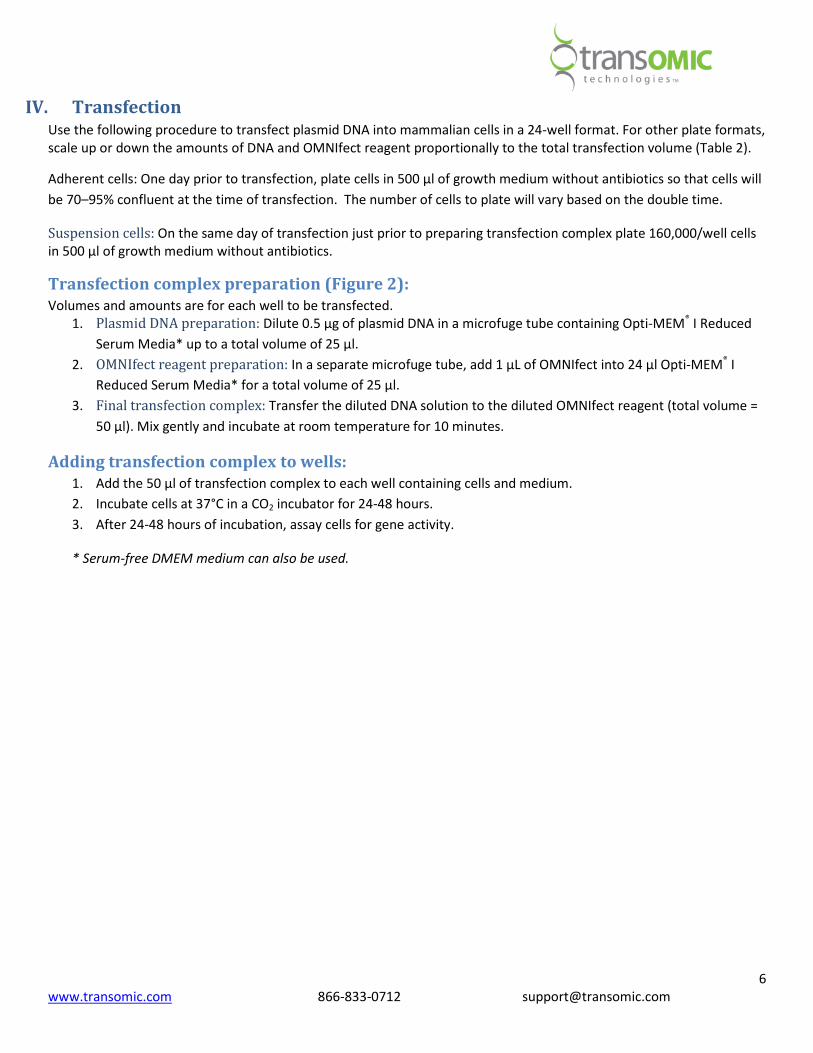
Transfection complex preparation (Figure 2):
Volumes and amounts are for each well to be transfected.
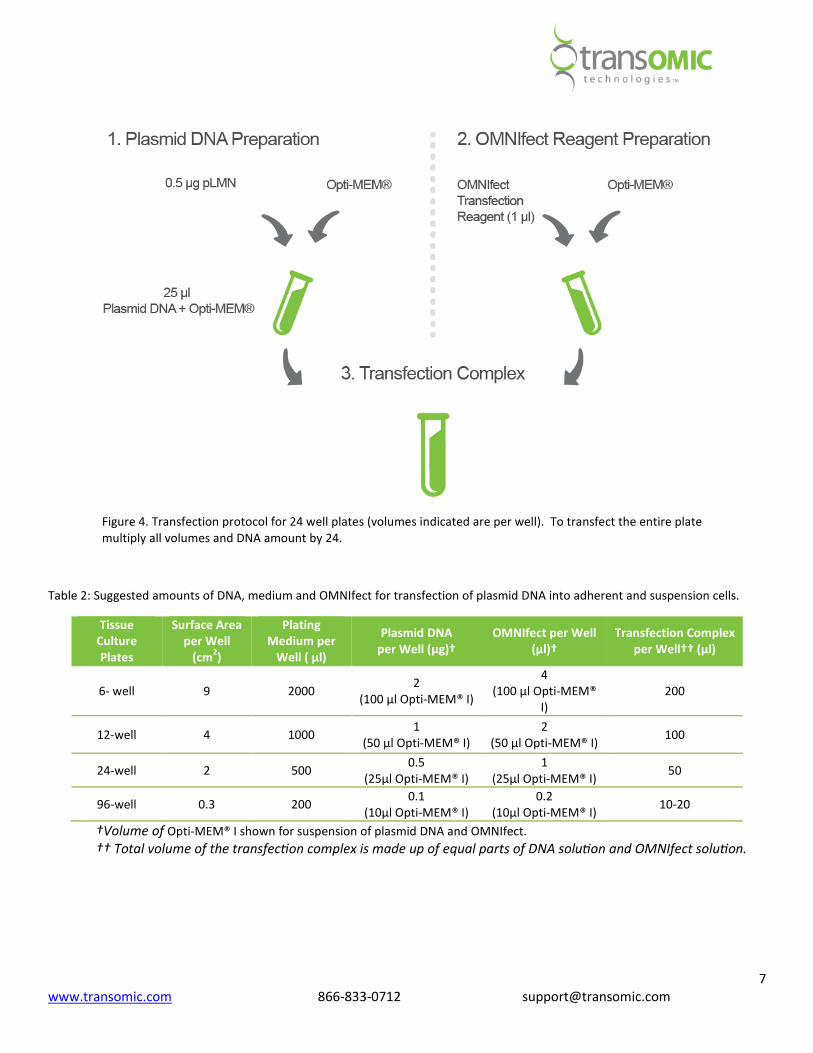
1. Plasmid DNA preparation: Dilute 0.5 µg of plasmid DNA in a microfuge tube containing Opti-MEM® I Reduced
Serum Media* up to a total volume of 25 µl.
2. OMNIfect reagent preparation: In a separate microfuge tube, add 1 µL of OMNIfect into 24 µl Opti-MEM® I
Reduced Serum Media* for a total volume of 25 µl.
3. Final transfection complex: Transfer the diluted DNA solution to the diluted OMNIfect reagent (total volume =
50 µl). Mix gently and incubate at room temperature for 10 minutes.
Adding transfection complex to wells:
1. Add the 50 µl of transfection complex to each well containing cells and medium.
2. Incubate cells at 37°C in a CO2 incubator for 24-48 hours.
3. After 24-48 hours of incubation, assay cells for gene activity.
* Serum-free DMEM medium can also be used.
7
www.transomic.com 866-833-0712 [email protected]
Figure 4. Transfection protocol for 24 well plates (volumes indicated are per well). To transfect the entire plate
multiply all volumes and DNA amount by 24.
Table 2: Suggested amounts of DNA, medium and OMNIfect for transfection of plasmid DNA into adherent and suspension cells.
Tissue
Culture
Plates
Surface Area
per Well
(cm2)
Plating
Medium per
Well ( µl)
Plasmid DNA
per Well (µg)†
OMNIfect per Well
(µl)†
Transfection Complex
per Well†† (µl)
6- well 9 2000 2
(100 µl Opti-MEM® I)
4
(100 µl Opti-MEM®
I)
200
12-well 4 1000 1
(50 µl Opti-MEM® I)
2
(50 µl Opti-MEM® I) 100
24-well 2 500 0.5
(25µl Opti-MEM® I)
1
(25µl Opti-MEM® I) 50
96-well 0.3 200 0.1
(10µl Opti-MEM® I)
0.2
(10µl Opti-MEM® I) 10-20
†Volume of Opti-MEM® I shown for suspension of plasmid DNA and OMNIfect.
†† Total volume of the transfec-on complex is made up of equal parts of DNA solu-on and OMNIfect solu-on.
8
www.transomic.com 866-833-0712 [email protected]
Transfection Optimization:
It is important to optimize transfection conditions to obtain the highest transfection efficiency with lowest toxicity for
various cell types. The optimal ratio of OMNIfect to DNA is relatively consistent across many cell types. For further
optimization try the following steps in order.
1. Use the recommended ratio of DNA: transfection reagent (at 1 μg DNA: 2 μl OMNIfect), but vary the volume.
a. Start with a range of volumes that cover +20% to -20%.
For example, in a 24-well plate a range of 40 μl to 60 μl of transfection complex would be added to the
well. (The plating media would remain the same.)
2. If further optimization is needed, transfection efficiency and cytotoxicity may be altered by adjusting the ratio of
DNA (μg) to OMNIfect reagent (μl). A range of ratios from 1:1.5 to 1:2.5 is recommended.
Note: If transfection conditions result in unacceptable cytotoxicity in a particular cell line the following modifications are
recommended:
1. Decrease the volume of transfection complex that is added to each well.
2. Higher transfection efficiencies are normally achieved if the transfection medium is not removed. However, if
toxicity is a problem, aspirate the transfection complex after 6 hours of transfection and replace with fresh
growth medium.
3. Increase the cell density in your transfection.
4. Assay cells for gene activity 24 hours following the addition of transfection complex to cells.
Neomycin selection of transfected cells
If less than 90% of all cells are green use neomycin selection to reduce background from untransfected cells. Refer to the
protocol for the neomycin kill curve to determine the optimal concentration for each cell line.
1. After incubating for 48-72 hours, examine the cells microscopically for ZsGreen expression.
2. Begin the antibiotic selection by replacing the medium with complete medium supplemented neomycin.
3. Replace the selective media every 2-3 days. Monitor the cells daily and observe the percentage of surviving cells.
a. All untransfected cells should be removed within 3-5 days.
4. Collect samples for assay.
If selecting stably transfected cells, continue to replace the media containing neomycin. Observe the cells for
approximately 7 days until you see single colonies surviving the selection. Colonies can be isolated and expanded for
analysis.
9
www.transomic.com 866-833-0712 [email protected]
V. Packaging retroviral particles
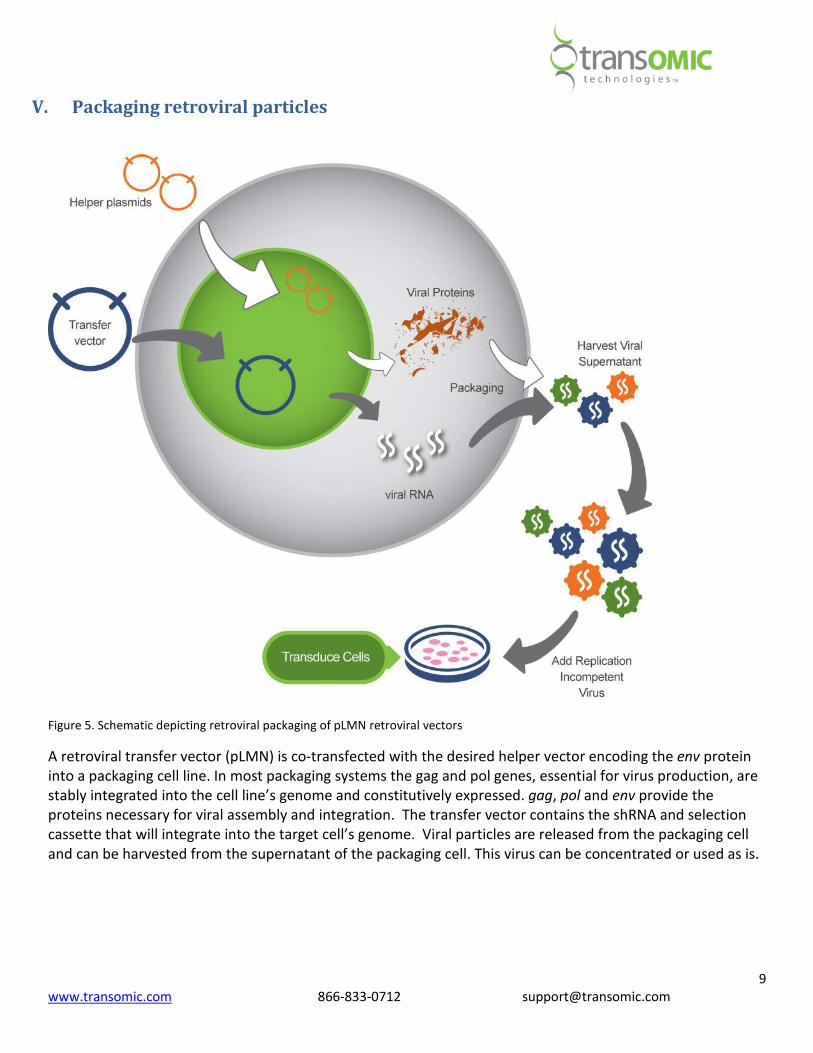
Figure 5. Schematic depicting retroviral packaging of pLMN retroviral vectors
A retroviral transfer vector (pLMN) is co-transfected with the desired helper vector encoding the env protein
into a packaging cell line. In most packaging systems the gag and pol genes, essential for virus production, are
stably integrated into the cell line’s genome and constitutively expressed. gag, pol and env provide the
proteins necessary for viral assembly and integration. The transfer vector contains the shRNA and selection
cassette that will integrate into the target cell’s genome. Viral particles are released from the packaging cell
and can be harvested from the supernatant of the packaging cell. This virus can be concentrated or used as is.
10
www.transomic.com 866-833-0712 [email protected]
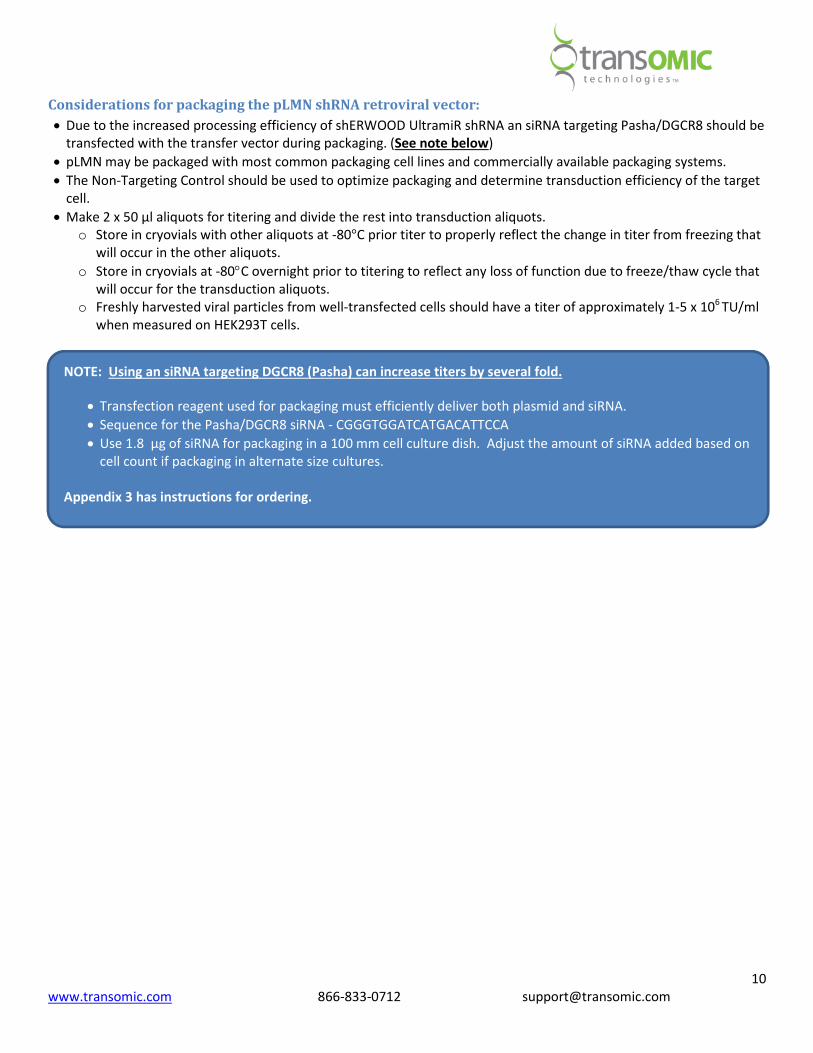
Considerations for packaging the pLMN shRNA retroviral vector:
• Due to the increased processing efficiency of shERWOOD UltramiR shRNA an siRNA targeting Pasha/DGCR8 should be
transfected with the transfer vector during packaging. (See note below)
• pLMN may be packaged with most common packaging cell lines and commercially available packaging systems.
• The Non-Targeting Control should be used to optimize packaging and determine transduction efficiency of the target
cell.
• Make 2 x 50 µl aliquots for titering and divide the rest into transduction aliquots.
o Store in cryovials with other aliquots at -80°C prior titer to properly reflect the change in titer from freezing that
will occur in the other aliquots.
o Store in cryovials at -80°C overnight prior to titering to reflect any loss of function due to freeze/thaw cycle that
will occur for the transduction aliquots.
o Freshly harvested viral particles from well-transfected cells should have a titer of approximately 1-5 x 10⁶
TU/ml
when measured on HEK293T cells.
NOTE: Using an siRNA targeting DGCR8 (Pasha) can increase titers by several fold.
• Transfection reagent used for packaging must efficiently deliver both plasmid and siRNA.
• Sequence for the Pasha/DGCR8 siRNA - CGGGTGGATCATGACATTCCA
• Use 1.8 µg of siRNA for packaging in a 100 mm cell culture dish. Adjust the amount of siRNA added based on
cell count if packaging in alternate size cultures.
Appendix 3 has instructions for ordering.
11
www.transomic.com 866-833-0712 [email protected]
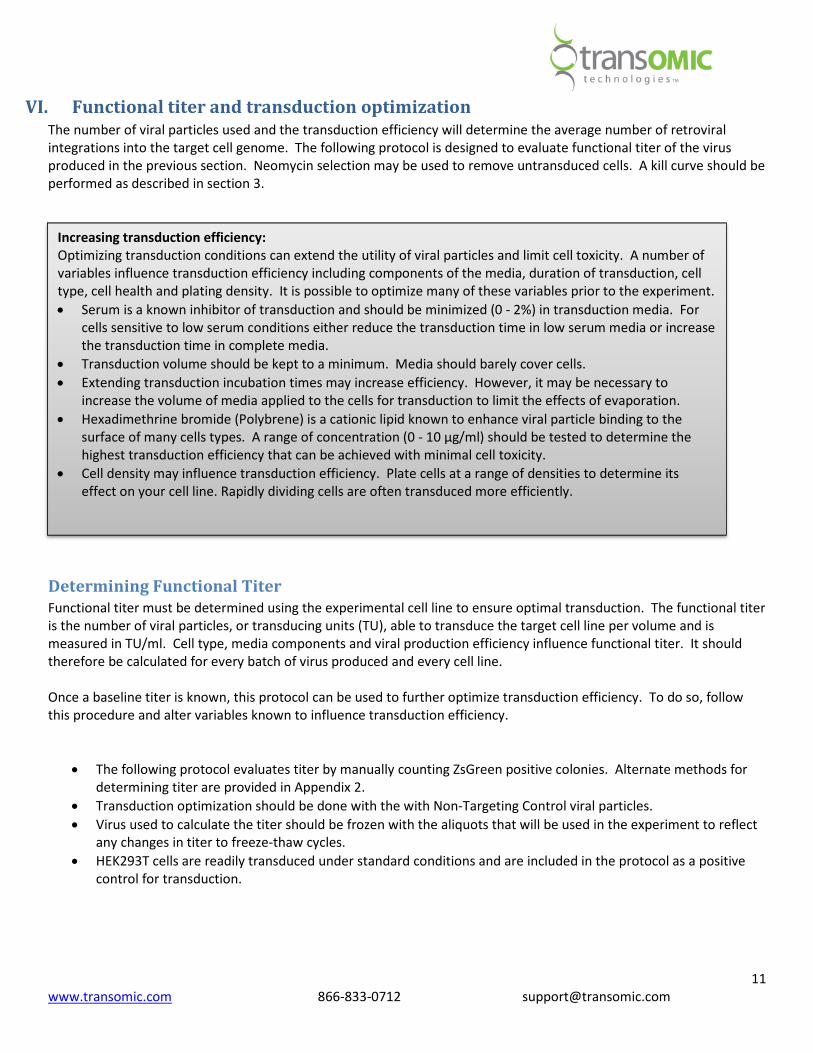
VI. Functional titer and transduction optimization The number of viral particles used and the transduction efficiency will determine the average number of retroviral
integrations into the target cell genome. The following protocol is designed to evaluate functional titer of the virus
produced in the previous section. Neomycin selection may be used to remove untransduced cells. A kill curve should be
performed as described in section 3.
Determining Functional Titer
Functional titer must be determined using the experimental cell line to ensure optimal transduction. The functional titer
is the number of viral particles, or transducing units (TU), able to transduce the target cell line per volume and is
measured in TU/ml. Cell type, media components and viral production efficiency influence functional titer. It should
therefore be calculated for every batch of virus produced and every cell line.
Once a baseline titer is known, this protocol can be used to further optimize transduction efficiency. To do so, follow
this procedure and alter variables known to influence transduction efficiency.
• The following protocol evaluates titer by manually counting ZsGreen positive colonies. Alternate methods for
determining titer are provided in Appendix 2.
• Transduction optimization should be done with the with Non-Targeting Control viral particles.
• Virus used to calculate the titer should be frozen with the aliquots that will be used in the experiment to reflect
any changes in titer to freeze-thaw cycles.
• HEK293T cells are readily transduced under standard conditions and are included in the protocol as a positive
control for transduction.
Increasing transduction efficiency:
Optimizing transduction conditions can extend the utility of viral particles and limit cell toxicity. A number of
variables influence transduction efficiency including components of the media, duration of transduction, cell
type, cell health and plating density. It is possible to optimize many of these variables prior to the experiment.
• Serum is a known inhibitor of transduction and should be minimized (0 - 2%) in transduction media. For
cells sensitive to low serum conditions either reduce the transduction time in low serum media or increase
the transduction time in complete media.
• Transduction volume should be kept to a minimum. Media should barely cover cells.
• Extending transduction incubation times may increase efficiency. However, it may be necessary to
increase the volume of media applied to the cells for transduction to limit the effects of evaporation.
• Hexadimethrine bromide (Polybrene) is a cationic lipid known to enhance viral particle binding to the
surface of many cells types. A range of concentration (0 - 10 µg/ml) should be tested to determine the
highest transduction efficiency that can be achieved with minimal cell toxicity.
• Cell density may influence transduction efficiency. Plate cells at a range of densities to determine its
effect on your cell line. Rapidly dividing cells are often transduced more efficiently.
12
www.transomic.com 866-833-0712 [email protected]
Required materials
• HEK293T cells
• Complete media for HEK293T cells and experimental cell line
• Serum free media for each cell line
• 24-well tissue culture plate
• Retroviral particles (Harvested or purchased)
• Microcentrifuge tubes
• Polybrene
Equipment
• Automatic pipetter /Pipette-aid
• Disposable or autoclaved tissue culture pipettes
• CO2 cell culture incubator at 37°C
• Fluorescent microscope with a GFP filter (Refer to Appendix 2 for alternative methods that do not require this.)
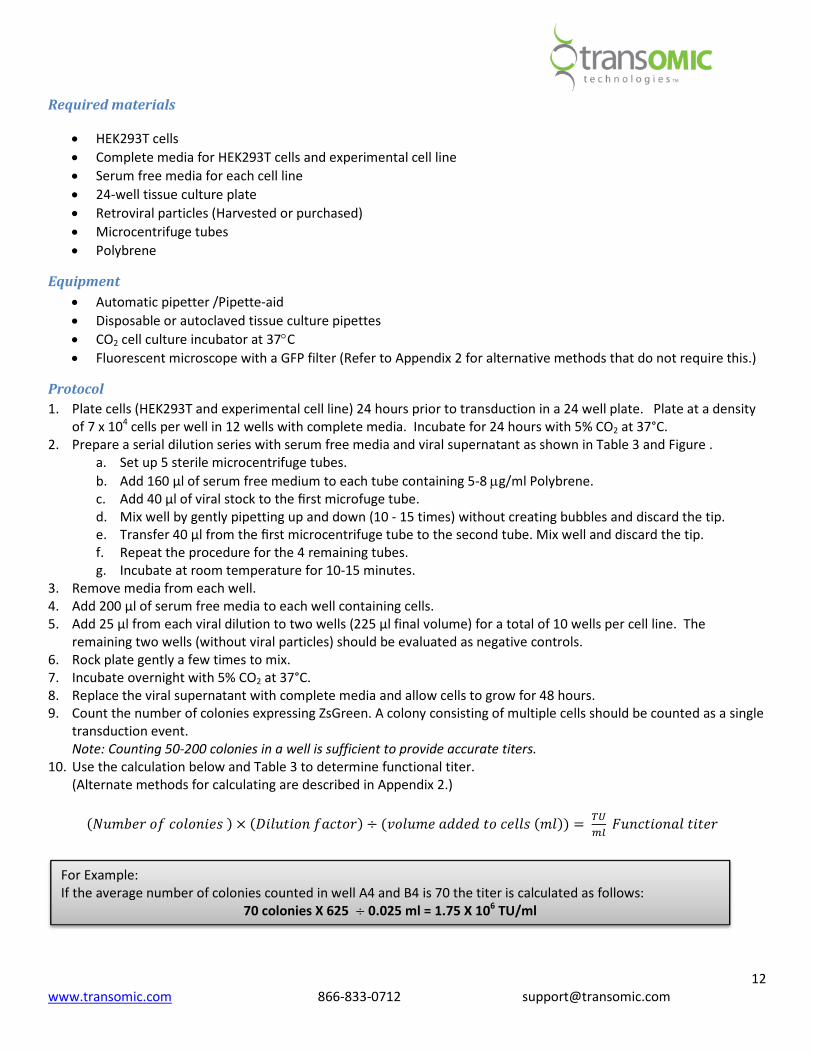
Protocol
1. Plate cells (HEK293T and experimental cell line) 24 hours prior to transduction in a 24 well plate. Plate at a density
of 7 x 10⁴ cells per well in 12 wells with complete media. Incubate for 24 hours with 5% CO2 at 37°C.
2. Prepare a serial dilution series with serum free media and viral supernatant as shown in Table 3 and Figure .
a. Set up 5 sterile microcentrifuge tubes.
b. Add 160 µl of serum free medium to each tube containing 5-8 µg/ml Polybrene.
c. Add 40 µl of viral stock to the first microfuge tube.
d. Mix well by gently pipetting up and down (10 - 15 times) without creating bubbles and discard the tip.
e. Transfer 40 µl from the first microcentrifuge tube to the second tube. Mix well and discard the tip.
f. Repeat the procedure for the 4 remaining tubes.
g. Incubate at room temperature for 10-15 minutes.
3. Remove media from each well.
4. Add 200 µl of serum free media to each well containing cells.
5. Add 25 µl from each viral dilution to two wells (225 µl final volume) for a total of 10 wells per cell line. The
remaining two wells (without viral particles) should be evaluated as negative controls.
6. Rock plate gently a few times to mix.
7. Incubate overnight with 5% CO2 at 37°C.
8. Replace the viral supernatant with complete media and allow cells to grow for 48 hours.
9. Count the number of colonies expressing ZsGreen. A colony consisting of multiple cells should be counted as a single
transduction event.
Note: Counting 50-200 colonies in a well is sufficient to provide accurate titers.
10. Use the calculation below and Table 3 to determine functional titer.
(Alternate methods for calculating are described in Appendix 2.)
��������� ���� � ������� ����� � ���������������������� � ��
���� ��� �������
For Example:
If the average number of colonies counted in well A4 and B4 is 70 the titer is calculated as follows:
70 colonies X 625 � 0.025 ml = 1.75 X 10⁶ TU/ml
13
www.transomic.com 866-833-0712 [email protected]
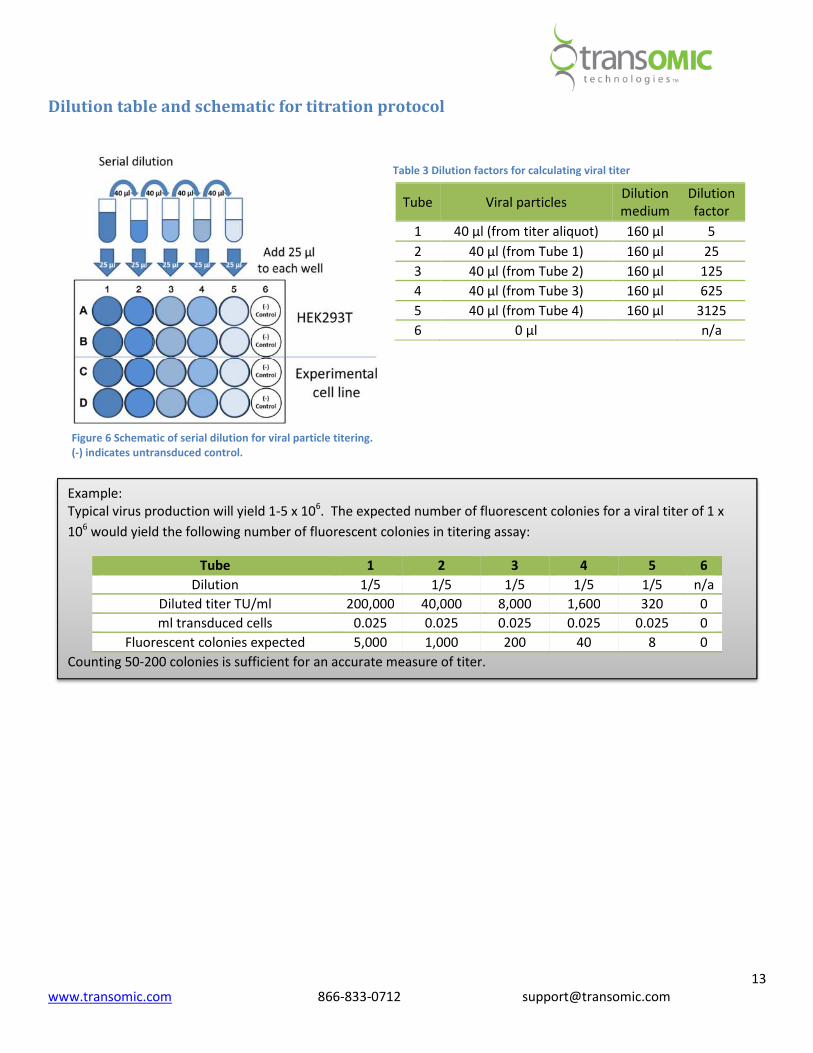
Dilution table and schematic for titration protocol
Tube Viral particles Dilution
medium
Dilution
factor
1 40 µl (from titer aliquot) 160 µl 5
2 40 µl (from Tube 1) 160 µl 25
3 40 µl (from Tube 2) 160 µl 125
4 40 µl (from Tube 3) 160 µl 625
5 40 µl (from Tube 4) 160 µl 3125
6 0 µl n/a
Example:
Typical virus production will yield 1-5 x 10⁶. The expected number of fluorescent colonies for a viral titer of 1 x
106 would yield the following number of fluorescent colonies in titering assay:
Tube 1 2 3 4 5 6
Dilution 1/5 1/5 1/5 1/5 1/5 n/a
Diluted titer TU/ml 200,000 40,000 8,000 1,600 320 0
ml transduced cells 0.025 0.025 0.025 0.025 0.025 0
Fluorescent colonies expected 5,000 1,000 200 40 8 0
Counting 50-200 colonies is sufficient for an accurate measure of titer.
Figure 6 Schematic of serial dilution for viral particle titering.
(-) indicates untransduced control.
Table 3 Dilution factors for calculating viral titer
14
www.transomic.com 866-833-0712 [email protected]
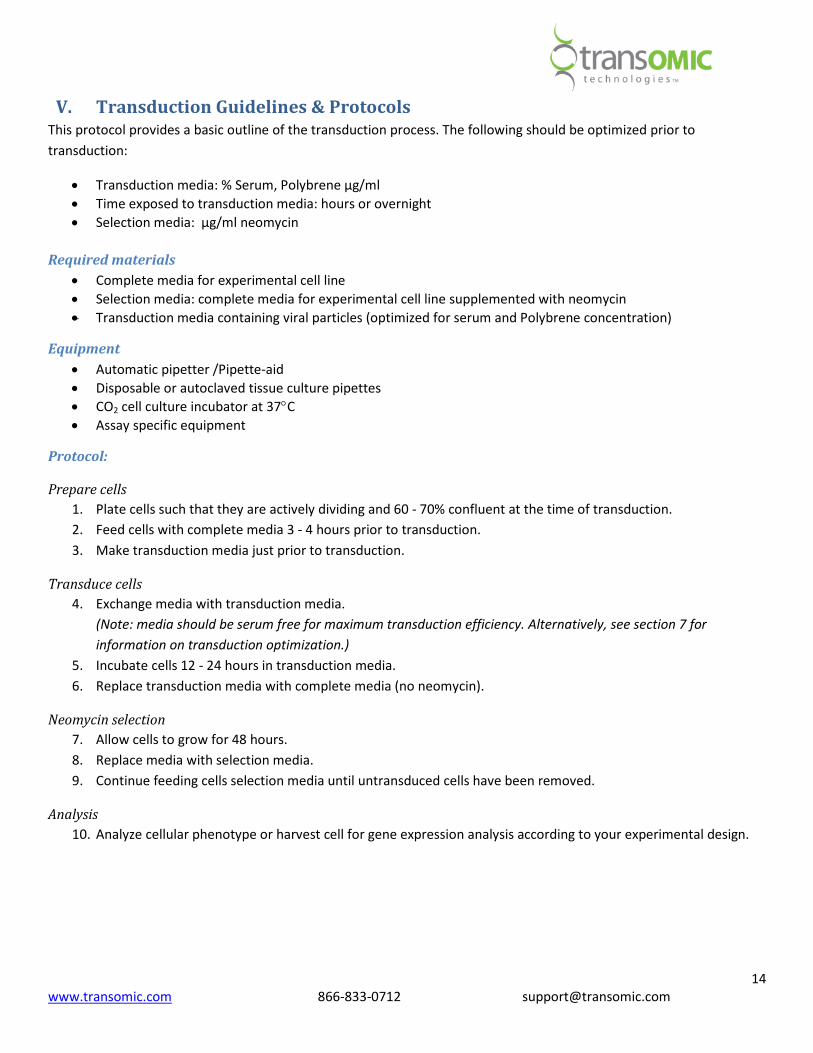
V. Transduction Guidelines & Protocols This protocol provides a basic outline of the transduction process. The following should be optimized prior to
transduction:
• Transduction media: % Serum, Polybrene µg/ml
• Time exposed to transduction media: hours or overnight
• Selection media: µg/ml neomycin
Required materials
• Complete media for experimental cell line
• Selection media: complete media for experimental cell line supplemented with neomycin
• Transduction media containing viral particles (optimized for serum and Polybrene concentration)
Equipment
• Automatic pipetter /Pipette-aid
• Disposable or autoclaved tissue culture pipettes
• CO2 cell culture incubator at 37°C
• Assay specific equipment
Protocol:
Prepare cells
1. Plate cells such that they are actively dividing and 60 - 70% confluent at the time of transduction.
2. Feed cells with complete media 3 - 4 hours prior to transduction.
3. Make transduction media just prior to transduction.
Transduce cells
4. Exchange media with transduction media.
(Note: media should be serum free for maximum transduction efficiency. Alternatively, see section 7 for
information on transduction optimization.)
5. Incubate cells 12 - 24 hours in transduction media.
6. Replace transduction media with complete media (no neomycin).
Neomycin selection
7. Allow cells to grow for 48 hours.
8. Replace media with selection media.
9. Continue feeding cells selection media until untransduced cells have been removed.
Analysis
10. Analyze cellular phenotype or harvest cell for gene expression analysis according to your experimental design.
15
www.transomic.com 866-833-0712 [email protected]
Appendices
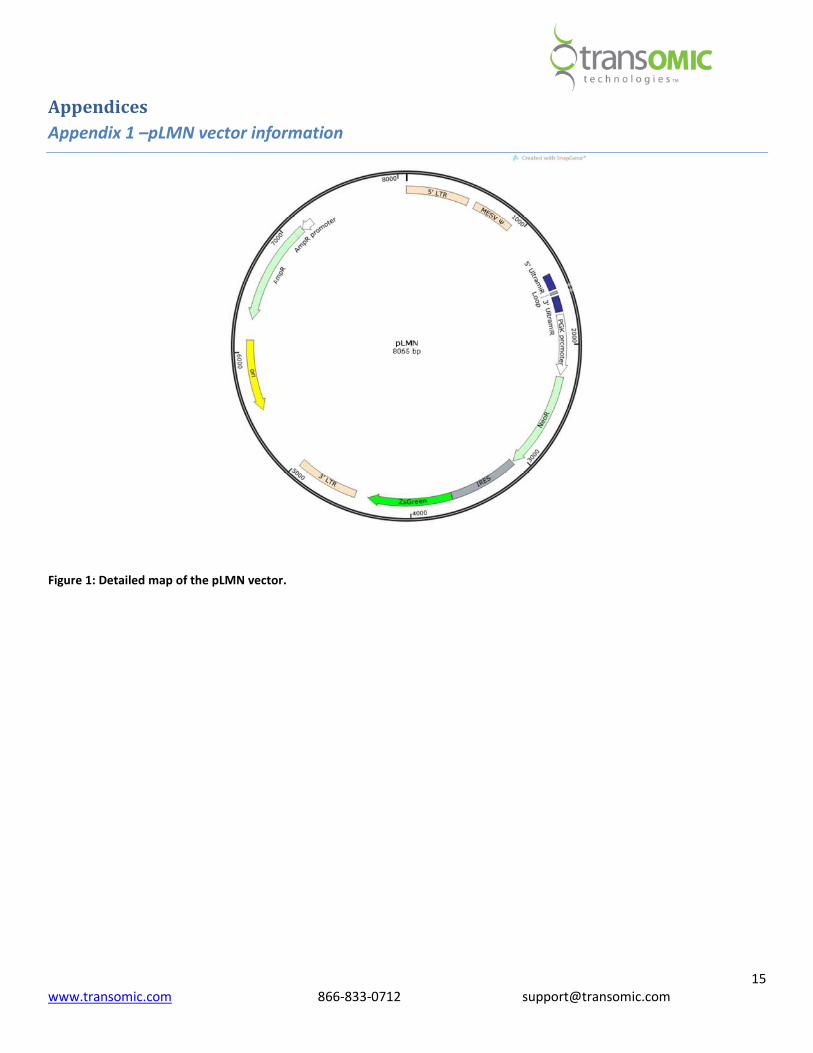
Appendix 1 –pLMN vector information
Figure 1: Detailed map of the pLMN vector.
16
www.transomic.com 866-833-0712 [email protected]
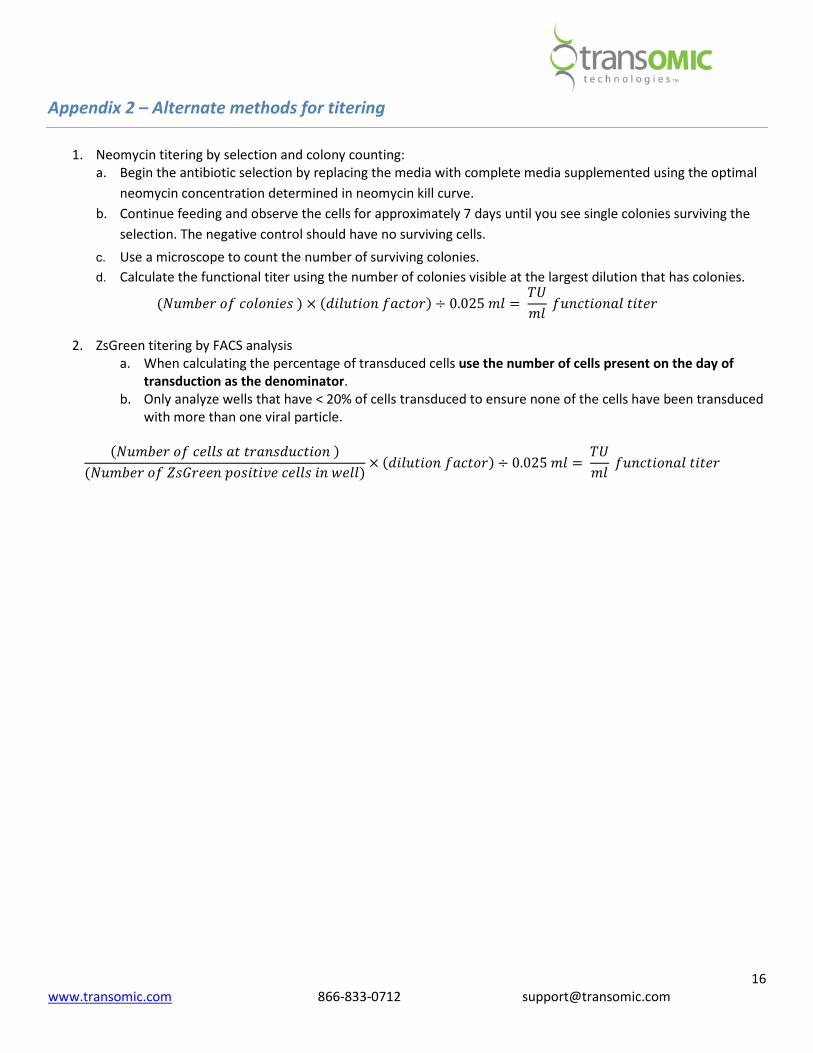
Appendix 2 – Alternate methods for titering
1. Neomycin titering by selection and colony counting:
a. Begin the antibiotic selection by replacing the media with complete media supplemented using the optimal
neomycin concentration determined in neomycin kill curve.
b. Continue feeding and observe the cells for approximately 7 days until you see single colonies surviving the
selection. The negative control should have no surviving cells.
c. Use a microscope to count the number of surviving colonies. d. Calculate the functional titer using the number of colonies visible at the largest dilution that has colonies.
��������� ���� � ������� ����� � 0.025�� � "#
��� ��� �������
2. ZsGreen titering by FACS analysis
a. When calculating the percentage of transduced cells use the number of cells present on the day of
transduction as the denominator.
b. Only analyze wells that have < 20% of cells transduced to ensure none of the cells have been transduced
with more than one viral particle.
����������������� ������ �
�������$�%��� &������������ '����� ������� ����� � 0.025�� �
"#
��� ��� �������
17
www.transomic.com 866-833-0712 [email protected]
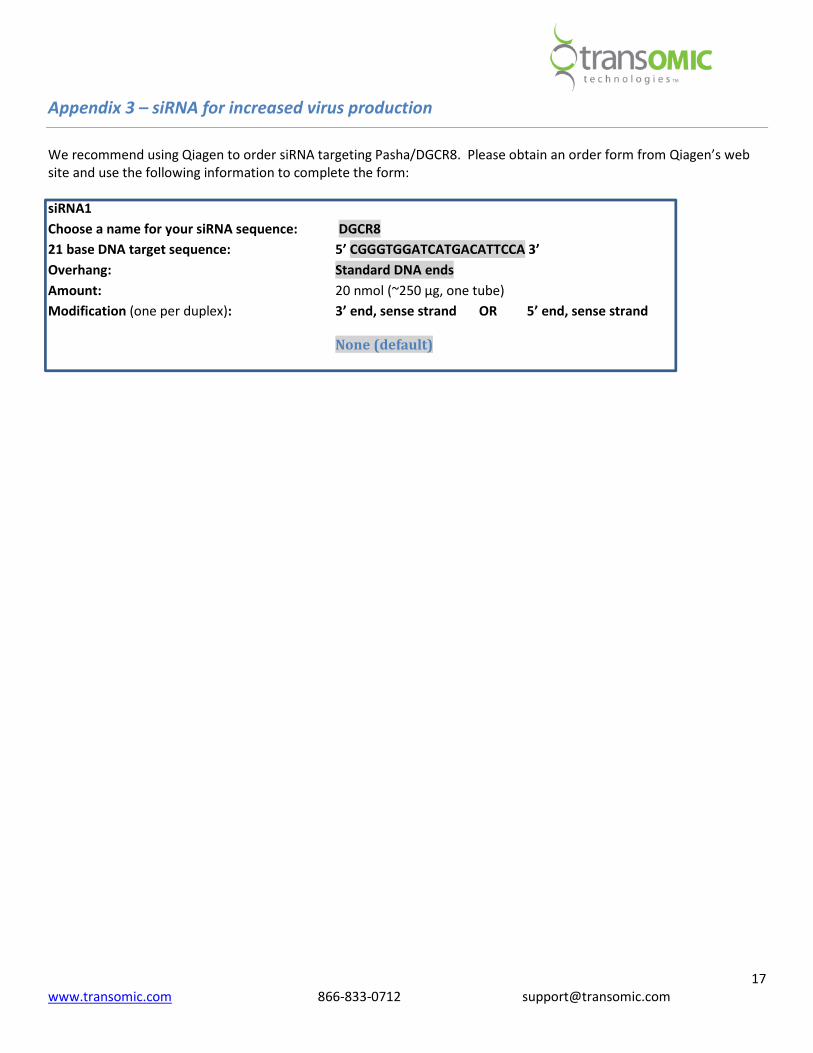
Appendix 3 – siRNA for increased virus production
We recommend using Qiagen to order siRNA targeting Pasha/DGCR8. Please obtain an order form from Qiagen’s web
site and use the following information to complete the form:
siRNA1
Choose a name for your siRNA sequence: DGCR8
21 base DNA target sequence: 5’ CGGGTGGATCATGACATTCCA 3’
Overhang: Standard DNA ends
Amount: 20 nmol (~250 µg, one tube)
Modification (one per duplex): 3’ end, sense strand OR 5’ end, sense strand
None (default)
18
www.transomic.com 866-833-0712 [email protected]
Appendix 4 - References
Safety guidelines for working with retrovirus
http://oba.od.nih.gov/rdna/nih_guidelines_oba.html
www.fda.gov/downloads/AdvisoryCommittees/.../UCM232592.pdf
Biosafety in Microbiological and Biomedical Laboratories, Fourth Edition (May 1999) HHS Pub. No. (CDC) 93-8395. U.S.
Department of Health and Human Services, PHS, CDC, NIH.
shRNA–mir and design
Knott et al., A computational algorithm to predict shRNA potency. Molecular Cell (2014),
http://www.cell.com/molecular-cell/pdfExtended/S1097-2765%2814%2900835-1
Auyeung, V.C., I. Ulitsky, S.E. McGeary, and D.P. Bartel. 2013. Beyond Secondary Structure: Primary-Sequence
Determinants License Pri-miRNA Hairpins for Processing. Cell 152:844-858.

19
www.transomic.com 866-833-0712 [email protected]
Limited use licenses
This product is covered by several limited use licenses. For updated information please refer to
www.transomic.com/support/productlicenses
Recommended