Sendroid Ultimate Quick-Start Manual
[Type the abstract of the document here. The abstract is typically a short summary of the contents of
the document. Type the abstract of the document here. The abstract is typically a short summary of the
contents of the document.]
1
Contents Overview ................................................................................................. 2
System Requirements ............................................................................. 3
Installation .............................................................................................. 4
Initial Setups ........................................................................................... 8
SMS Gateway & Routing Setup ............................................................. 10
Payment Gateway Setup ....................................................................... 14
Spam Control and Content Blocking ..................................................... 16
White-label Reseller System (Pro License Only) .................................... 17
Sendroid Ultimate Modules .................................................................. 20
Getting Help .......................................................................................... 21
2
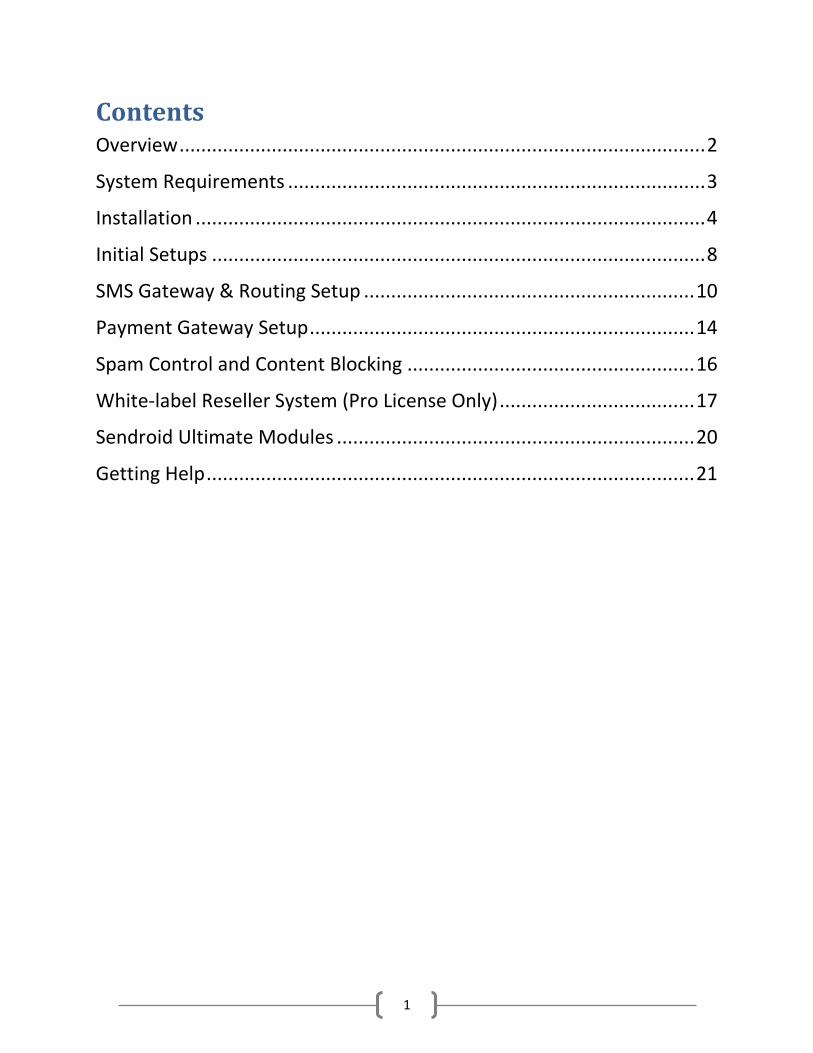
Overview Sendroid Ultimate is an ultimate bulk SMS portal software and SMS reseller system designed
for bulk SMS service providers, SMS resellers and bulk SMS marketers.
Sendroid Ultimate offers complete messaging solution including support for Text Messaging,
Voice Messaging, WhatsApp Messaging, Unicode Messaging, Multi-media Messaging, Flash
Messaging and 2-Way Messaging.
Sendroid Ultimate is built with amazing tools and features like; Dynamic/Static Sender ID support, SMS
Gateway Cutting, SMS Gateway hour limits, Dynamic Routing, Short-code Reselling, SMS Plans, SMS
Vouchers , Robust APIs and a lot more tools designed to fit perfectly into any bulk SMS business,
irrespective of your business model.
Sendroid Ultimate is scalable, flexible, and developer friendly. You can expand the features on Sendroid
Ultimate with modules and plugins.
The most interesting part is that with all these rich features and vast functionalities, installing setting up
Sendroid Ultimate is done in a few clicks.
3
System Requirements Before you install Sendroid on your server, you need to check carefully and be certain that your
server met the following requirements;
Linux or Windows OS
Apache
PHP Version 5.6.3 or higher
MySQL Version 5.6 or higher (MySQL Strict Mode disabled)
ionCube Loader 10 or higher (Latest Release recommended)
cURL Support
PHP iconv Extension
ZIP Archive Perl Module
Multibyte String Extension (mbstring)
Cron Job
PHP Memory Limit: 256 MB or higher
Dedicated IP required for White-label reseller system
Please note that your Sendroid Ultimate may not function correctly if any of these
requirements are not met by your server.
Ynet Interactive will not take responsibility for damages caused by non-compliant to these
requirements.
Visit https://my.ynetinteractive.com/cart.php?gid=2 to checkout our affordable shared
hosting plans or https://my.ynetinteractive.com/cart.php?gid=10 to checkout our VPS plans.
4
Installation Before you begin the installation process, it is very important to your confirm with your hosting
company or server admin that your server met all the system requirements listed above.
Installing ionCube Loader
Sendroid Ultimate required ionCube Loader to function. If ionCube Loader is not installed on your
server, Sendroid Ultimate will automatically call-up the inbuilt ionCube Loader wizard that will guide you
through the process of installing the correct ionCube Loader for your server.
Please read and follow the instructions on the wizard to install ionCube Loader.
Once completed, simply refresh the page or click on the “click here to test the Loader” link. If ionCube
Loader was successfully installed, Sendroid Ultimate Installer will now start.
Please note that the above process may require good knowledge of your server environment.
If you are not familiar with it, please contact your hosting company for assistance or hire a
Webmaster to get it done for you
Installing Sendroid Ultimate
Before you start installation, please confirm that your server met all the system requirements,
especially PHP version and ioncube loader.
Step 1, Download the latest Sendroid Ultimate installation files from your vendor and upload
the Zip file to your server using FTP or your File Manager.
Step 2, Extract the Zip file to the desired location on your server. You will now see a folder
named installer
Step 3, Copy the entire contents in the “installer” folder to the desired location on your server.
Make sure you copy the .htaccess file too. (Enable hidden files if you don’t see it)
Step 4, Create a Fresh database and database user for your Sendroid Ultimate installation.
Step 5, Navigate to the location of your Sendroid ultimate main installation files from your
browser to launch the installer (Eg. Yourdomain.com/Sendroid_directory)
Step 6, Read the instructions on the welcome screen then click “Start Fresh Installation” to
continue
5
Step 7, Read the End-User License terms and check the “I Accept….” Check box then click on
the “Proceed” button to move on.
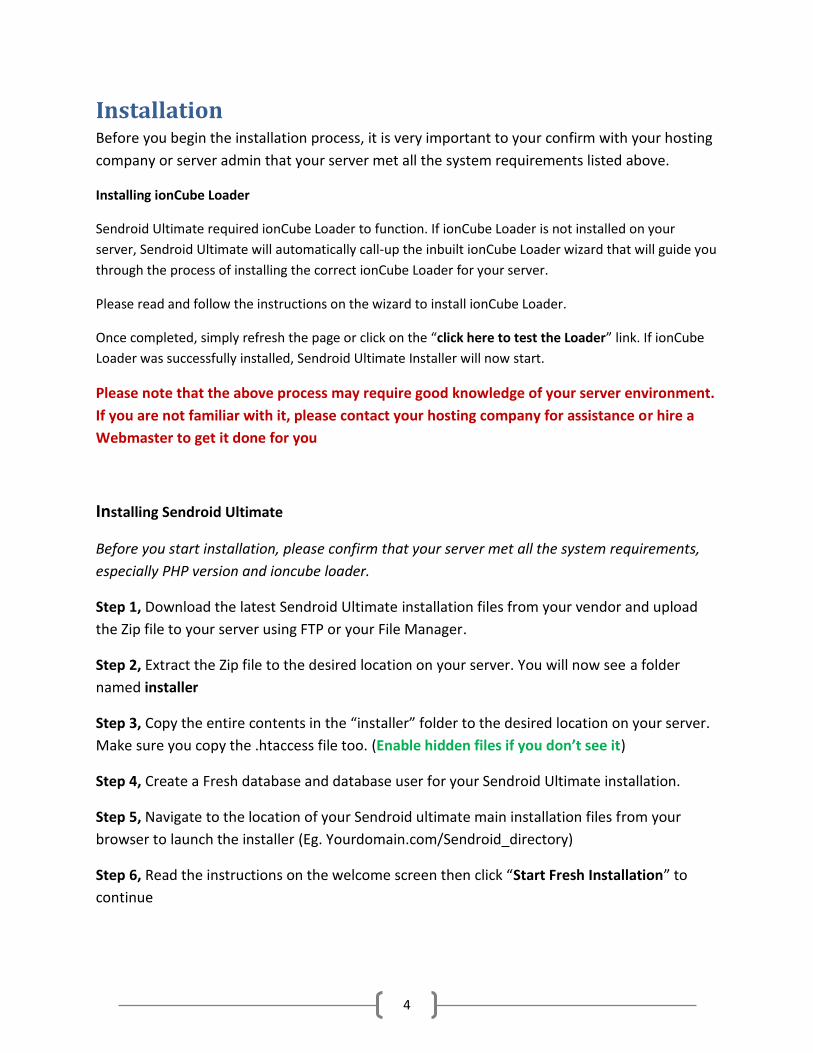
Step 8, Enter your database connection details and super admin email address on the next
screen and click on “Proceed” to continue.
Step 9, If everything went well with the installation, you will see a confirmation page containing
your installation details, including your Super Admin login details
6
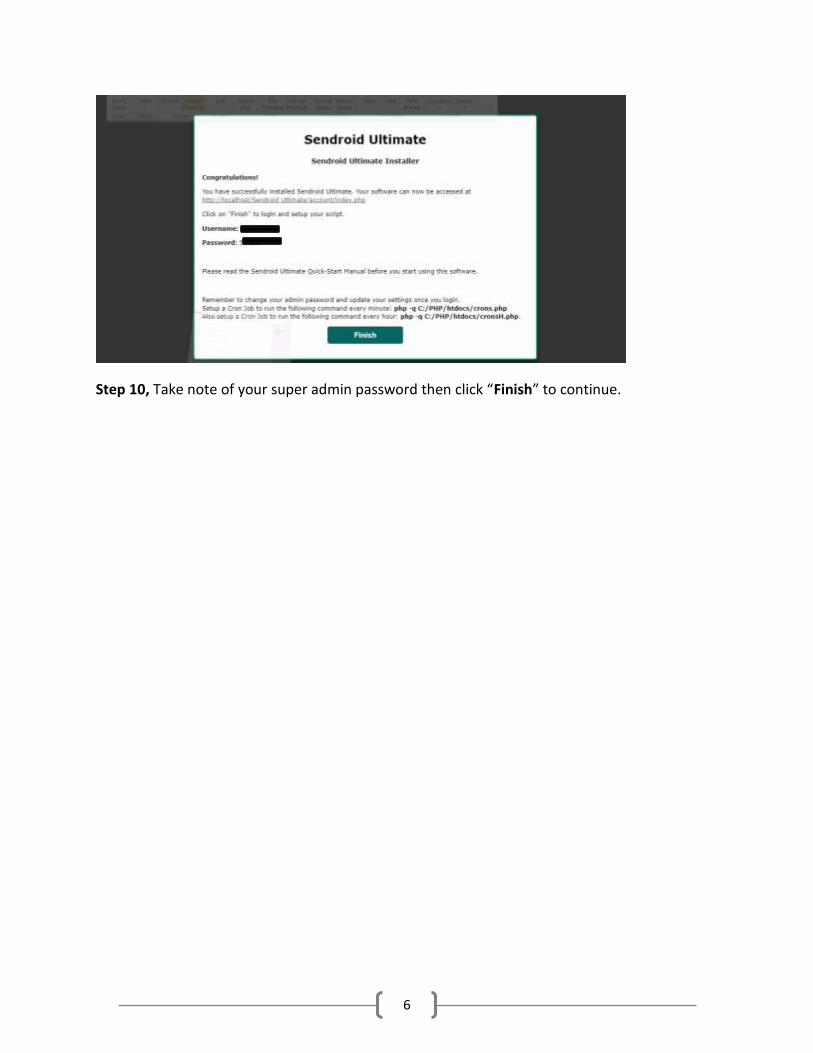
Step 10, Take note of your super admin password then click “Finish” to continue.

7
Licensing Your Sendroid Ultimate
Every authorized purchase of Sendroid Ultimate includes a License Key or Purchase Code.
Please contact your vendor or seller if you have not received any or visit
http://sendroidultimate.com.ng to purchase a valid license if you haven’t done so.
When prompted to, please enter your valid license key or purchase code and click “Validate” to
apply your license.
Please note that your license is only valid for one instance and can only be used on a single
domain. You will need to purchase multiple licenses if you wish to use this product on
multiple domains.
Setting-up Cron Jobs
Sendroid Ultimate depends on your server’s cron jobs to run its process automations, including
sending queued messages, birthday messages, automatic backups, subscription renewals and
other system automations.
Sendroid Ultimate requires that you set cron jobs to run the following scripts located in the
Sendroid Ultimate root directory at the respective intervals.
/crons.php (once every 1 minutes)
/cronsH (once every 1 hour)
Sendroid Ultimate will not function correctly if any of these two crons are not set correctly.
You can find more information about what cron jobs need to be set by navigating to the
Automation page located under Settings -> Automation.
Please visit https://ynetinteractive.com/blog/How-To-Setup-a-Cron-Job-on-cPanel-9 to learn
more about setting up cron jobs in cPanel or contact your Hosting Company for help.
8
Initial Setups Before you start using Sendroid Ultimate, you need to complete all initial setup process
including Branding, Notifications, Features, Payment Gateways, SMS Gateway and SMS routing.
In this section, we will be looking at the General Settings
First, you need to login as a super admin to access the settings page. Simply navigate to your
Sendroid Ultimate link and login with your super admin email address and password.
If you have not completed the setup, Sendroid Ultimate will always take you strait to the
Settings page.
You can also access any setting under the Setting link on the main menu.
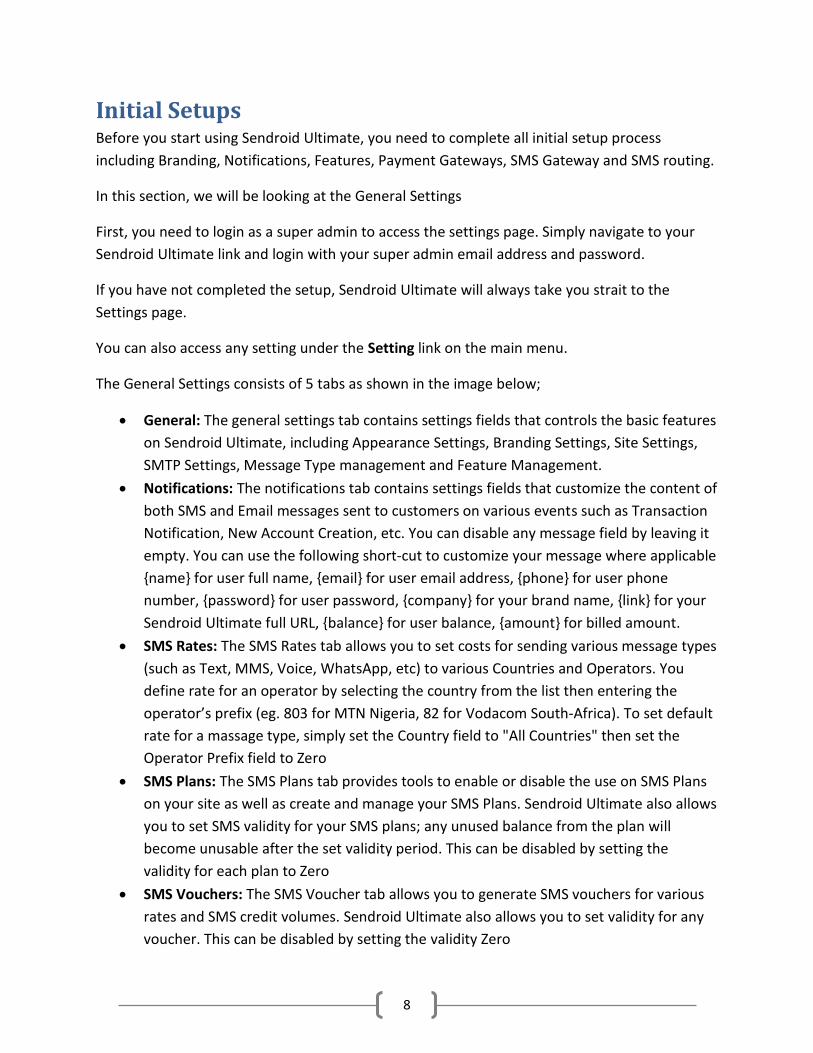
The General Settings consists of 5 tabs as shown in the image below;
General: The general settings tab contains settings fields that controls the basic features
on Sendroid Ultimate, including Appearance Settings, Branding Settings, Site Settings,
SMTP Settings, Message Type management and Feature Management.
Notifications: The notifications tab contains settings fields that customize the content of
both SMS and Email messages sent to customers on various events such as Transaction
Notification, New Account Creation, etc. You can disable any message field by leaving it
empty. You can use the following short-cut to customize your message where applicable
{name} for user full name, {email} for user email address, {phone} for user phone
number, {password} for user password, {company} for your brand name, {link} for your
Sendroid Ultimate full URL, {balance} for user balance, {amount} for billed amount.
SMS Rates: The SMS Rates tab allows you to set costs for sending various message types
(such as Text, MMS, Voice, WhatsApp, etc) to various Countries and Operators. You
define rate for an operator by selecting the country from the list then entering the
operator’s prefix (eg. 803 for MTN Nigeria, 82 for Vodacom South-Africa). To set default
rate for a massage type, simply set the Country field to "All Countries" then set the
Operator Prefix field to Zero
SMS Plans: The SMS Plans tab provides tools to enable or disable the use on SMS Plans
on your site as well as create and manage your SMS Plans. Sendroid Ultimate also allows
you to set SMS validity for your SMS plans; any unused balance from the plan will
become unusable after the set validity period. This can be disabled by setting the
validity for each plan to Zero
SMS Vouchers: The SMS Voucher tab allows you to generate SMS vouchers for various
rates and SMS credit volumes. Sendroid Ultimate also allows you to set validity for any
voucher. This can be disabled by setting the validity Zero
9
10
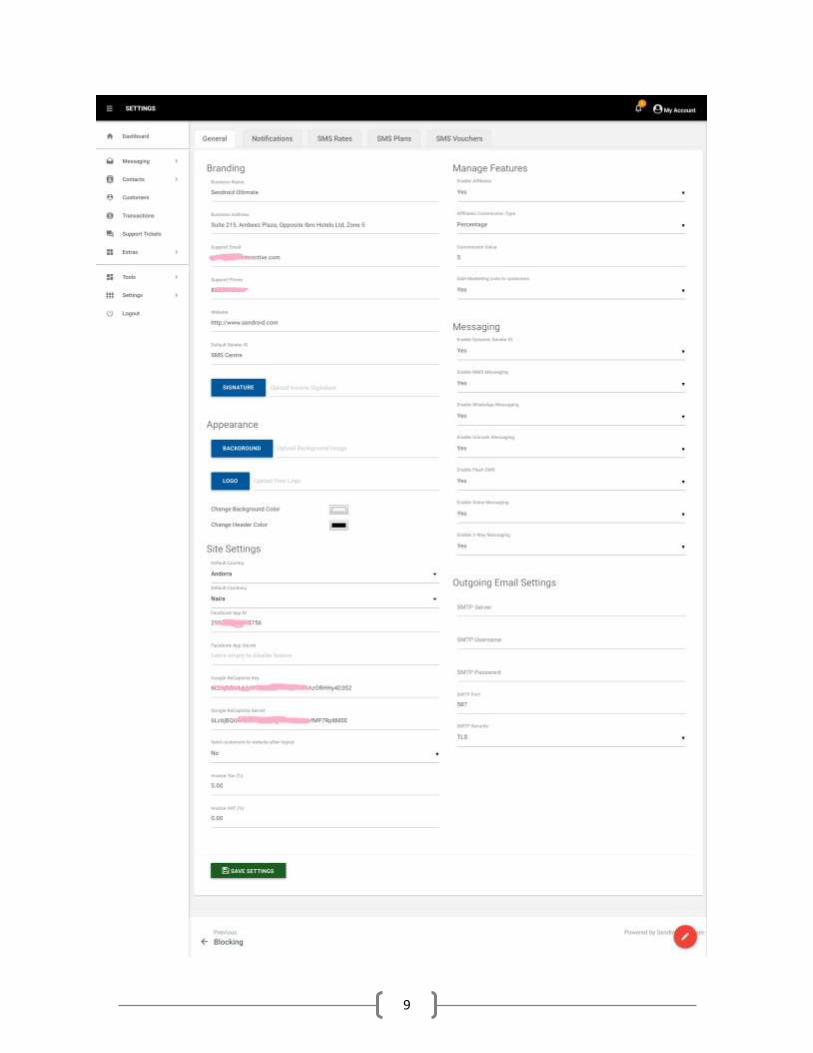
SMS Gateway & Routing Setup SMS gateway and routing rule setup is a very important aspect of setting up Sendroid Ultimate.
Without this, you and your customers will never be able to send messages.
Sendroid supports the following message type;
Text
Multi-media
Unicode
Voice
Flash
2-Way SMS
Sendroid Ultimate allows you to define SMS routes as well as rate per SMS to various
destination and message types.
You must define atleat a gateway and default routing rule for each of the message types before
they can work on your site.
If you do not want to use any of the message types, simply disable it under Messaging section
at the General Settings page so Sendroid Ultimate won’t display them on message type lists.
Message Gateways
Sendroid Ultimate is design with a flexible and friendly SMS gateway setup tool. The tool allows
you to load gateway settings from pre-installed Gateway Template or create custom ones.
11
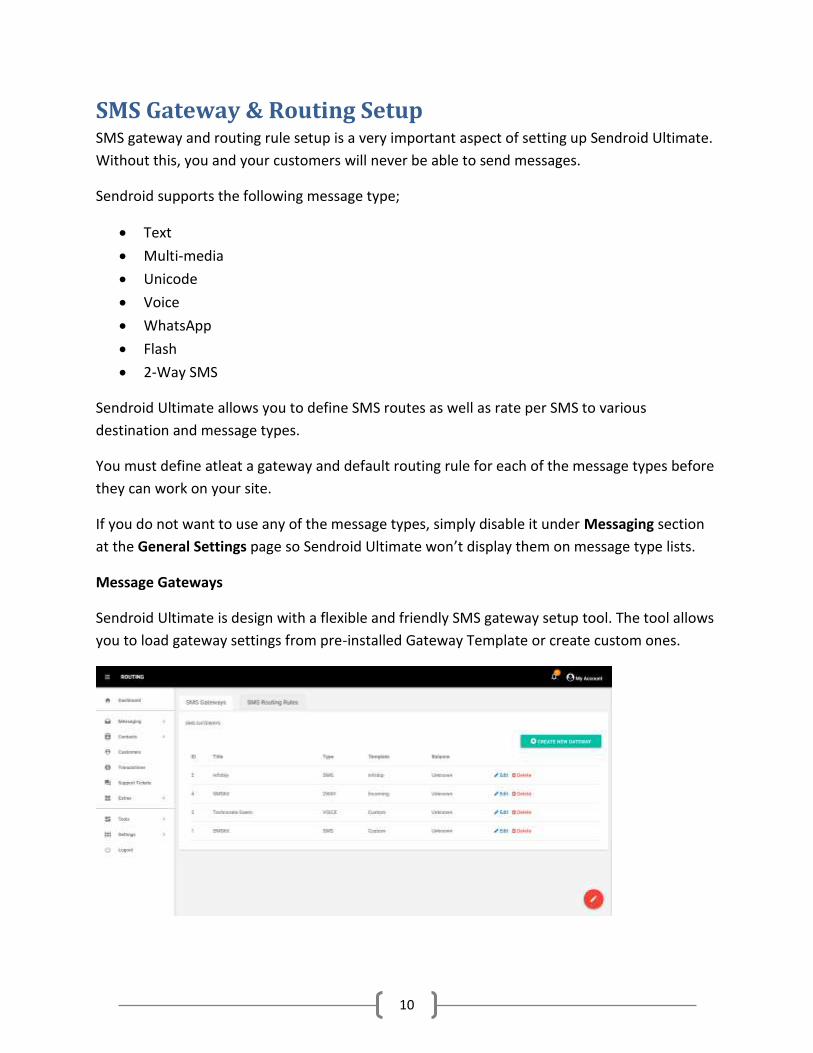
To create a new message gateway, Navigate to Settings -> SMS Gateways and click the “Create
New Gateway” button
On the Add New SMS Gateway dialogue, select a gateway template to use or select Custom
Gateway to use standard HTTP gateway template
If you are trying to create an Incoming SMS gateway, you will need to select the 2-Way SMS
Gateway option.
Once you choose your desired gateway template, the system will automatically load the
required fields based on your selection.
If you have selected Custom Gateway option, you will be required to choose message type also
(e.g. Text, Voice, WhatsApp, etc)
Fill the fields correctly as required by your SMS provider’s API.
If you gateway has a maximum number of message allowed per hour, define it in the Max.
Traffic Per Hour field or set the field to 0 to disable the feature.
Set desired value for the Cutting Limit and Percentage to send fields if you want to use
Gateway Cutting feature, which limits the volume of traffic that can be sent through the
gateway by processing only a certain percentage of a message job if it exceeds certain volume.
Please contact your SMS Providers for help with what parameters are required and the
correct value to use for each field.
12
If your SMS Gateway is not on the list, no worries, we are creating new SMS Modules every
time. Check the Market Place Sections at http://sendroidultimate.com.ng to find and
download your favorite SMS gateway module.
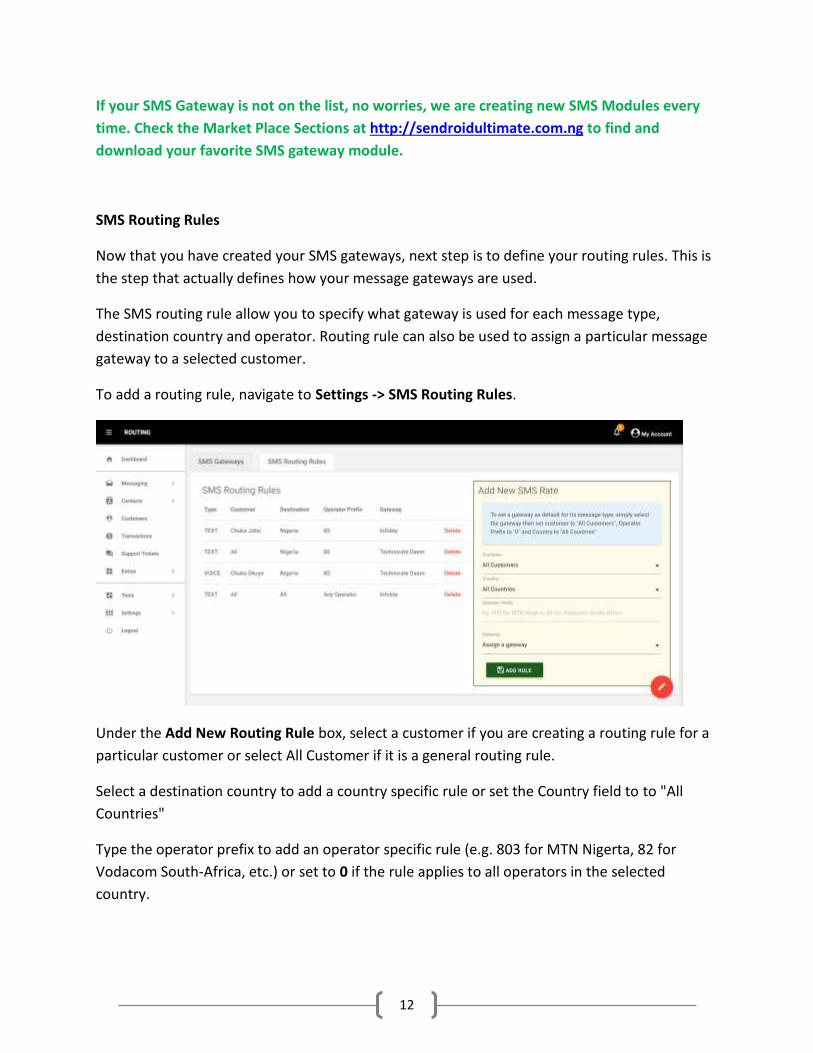
SMS Routing Rules
Now that you have created your SMS gateways, next step is to define your routing rules. This is
the step that actually defines how your message gateways are used.
The SMS routing rule allow you to specify what gateway is used for each message type,
destination country and operator. Routing rule can also be used to assign a particular message
gateway to a selected customer.
To add a routing rule, navigate to Settings -> SMS Routing Rules.
Under the Add New Routing Rule box, select a customer if you are creating a routing rule for a
particular customer or select All Customer if it is a general routing rule.
Select a destination country to add a country specific rule or set the Country field to to "All
Countries"
Type the operator prefix to add an operator specific rule (e.g. 803 for MTN Nigerta, 82 for
Vodacom South-Africa, etc.) or set to 0 if the rule applies to all operators in the selected
country.

13
Finally assign an appropriate message gateway for the routing rule (i.e. Select a Voice gateway
if you are creating a Voice routing rule, etc.) then click the Add Rule button to save.
To set a gateway as default for its message type, simply select the gateway then set customer
to "All Customers", Operator Prefix to "0" and Country to "All Countries"
Please note that the system will override a routing rule if it already exists. This means that
you can modify a routing rule by simply creating it again and assigning the new gateway to
the rule.
14
Payment Gateway Setup Sendroid Ultimate offers both online and offline payment gateways. The payment gateway
page allows you to create new payment gateways or manage existing ones. You must setup at-
least 1 payment gateway before your customers can buy SMS credits from you.
Sendroid Ultimate comes with the following pre-installed payment gateway modules;
PayPal
PayStack
2checkout
Stripe
GTPay
WebPay (Interswitch)
Qucikteller
Custom or Offline Payment Module
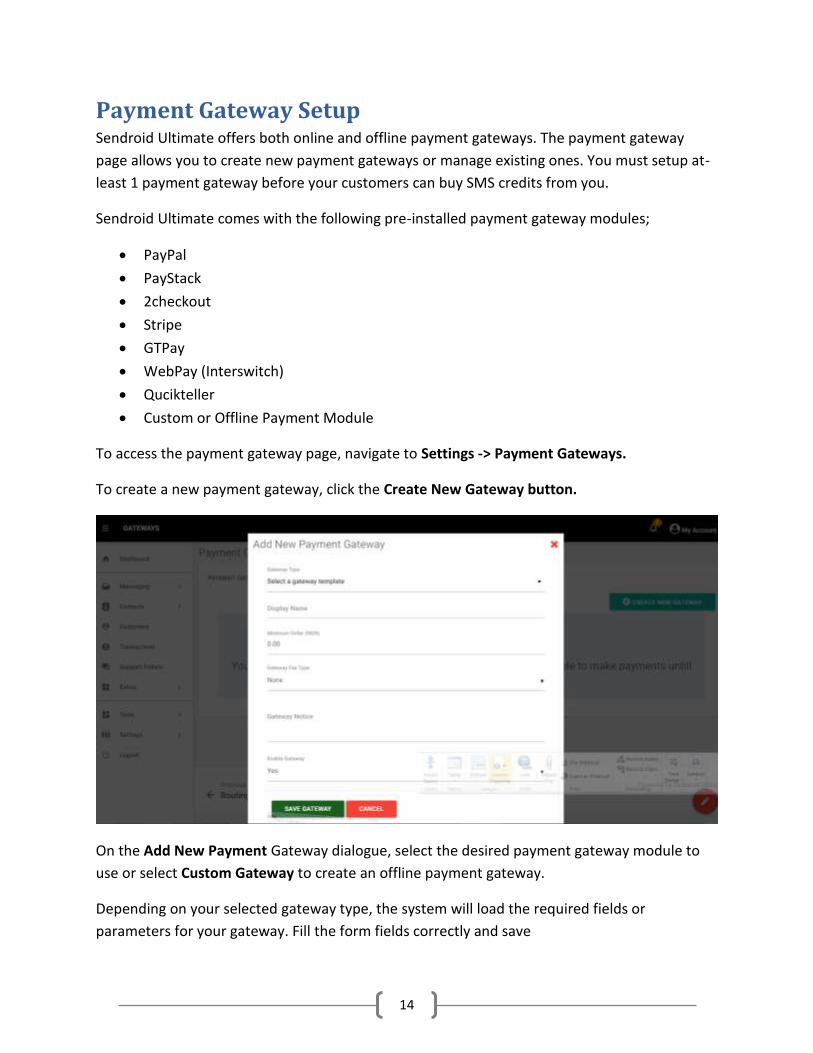
To access the payment gateway page, navigate to Settings -> Payment Gateways.
To create a new payment gateway, click the Create New Gateway button.
On the Add New Payment Gateway dialogue, select the desired payment gateway module to
use or select Custom Gateway to create an offline payment gateway.
Depending on your selected gateway type, the system will load the required fields or
parameters for your gateway. Fill the form fields correctly and save
15
You can set a minimum order volume for a payment gateway by specifying a value in your
default currency in the Minimum Order field.
You can add a gateway charge to the payment gateway by selecting a charge type under the
Gateway Fee type field and specifying a value in your default currency under the Gateway Fee
Amount field. The value will be calculated and added to your customer’s invoice.
You can set payment instruction, notice or other gateway messages to the payment gateway
using the Gateway Notice field. And text typed here will be display on your customer’s invoices
when they chose to pay with the gateway.
Please contact your Payment Gateway Company for help with what values to use in each
field.
If your Payment Gateway is not on the list, no worries, we are creating new Payment
Modules every time. Check the Market Place Sections at http://sendroidultimate.com.ng to
find and download your favorite payment module.
16
Spam Control and Content Blocking On the Internet these days, spam is a big problem so Sendroid Ultimate comes with spam
control and content filters for trying to reduce the amount of spam you receive.
The spam control features will allow you to block User Counties, Email address, IP address,
Sender ID, and Message Keywords or Phrases which appear in the message body.
Sendroid Ultimate also includes the latest Google reCaptcha tool to protect your sign-up form
from spam. This feature is enabled by providing a valid reCaptcha API credentials under the
Feature Management section at the General Settings page.
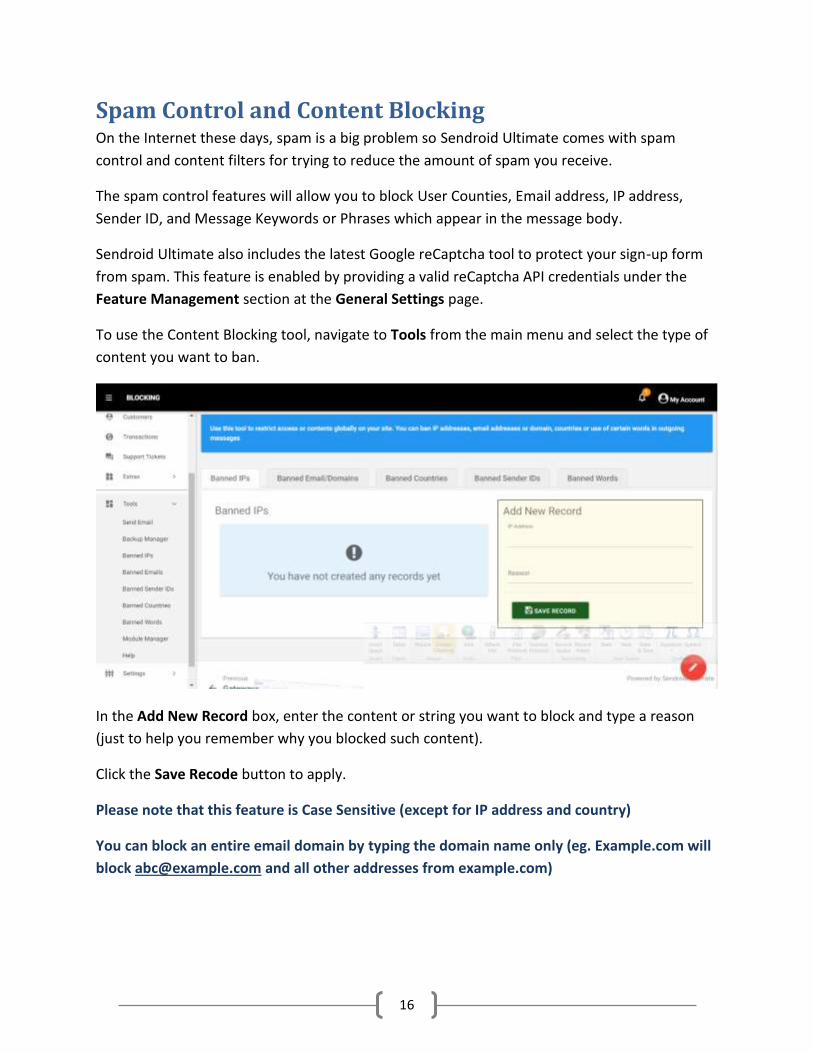
To use the Content Blocking tool, navigate to Tools from the main menu and select the type of
content you want to ban.
In the Add New Record box, enter the content or string you want to block and type a reason
(just to help you remember why you blocked such content).
Click the Save Recode button to apply.
Please note that this feature is Case Sensitive (except for IP address and country)
You can block an entire email domain by typing the domain name only (eg. Example.com will
block [email protected] and all other addresses from example.com)
17
White-label Reseller System (Pro License Only)
The Sendroid Ultimate white label reseller system is a feature on Sendroid Ultimate, which
allows bulk SMS providers to offer white label reseller solution to their customer. With this
feature, your customers can become resellers of your bulk sms services and even get to sell
your services under their own domain and brand, without having to install Sendroid on their
server.
The Sendroid Ultimate white-label reseller feature allows your resellers to customize the
appearance of the system by applying their own Logo, Site Name and Background. This
branding can only be seen by the reseller's own customer.
Sendroid Ultimate also allows a reseller to define its own Payment Gateways, SMS rates and
other customizations.
The White Label Reseller Feature is only available on Pro License. Please upgrade to Pro
License if you want to use this feature.
How Does It Work?
When a reseller's customer (Resold Customer) access Sendroid from the reseller's set domain,
Sendroid Ultimate automatically uses the referring domain to find the resellers settings (Logo,
Title and Background image).
The resold customers will be able to login or register as the case may be (but under the
reseller's brand). Upon login, the resold customer will be able to use all features on Sendroid
Ultimate,
What You Need To Set Up a Reseller
Before you can use the White-Label reseller feature on Sendroid Ultimate, you will need to
meet the following requirements;
1. You must have installed and setup the Latest version of Sendroid with a Valid Sendroid
Ultimate License
2. You must install Sendroid Ultimate an under its own Domain or Sub-domain
3. Your Sendroid Ultimate's domain or sub-domain Must have its own Dedicated IP
Address (That is, an IP address that points directly to your Sendroid Ultimate Login page)
4. Your reseller must have a valid and working domain name
18
5. Your reseller's Reseller Domain and IP Address must be different from that of Sendroid
(A separate cPanel account is recommended. You can sign-up for a cPanel hosting here)
6. You must have a Basic understanding your server and of how DNS works NB: You need to Pay Attention to item #3 on the list of requirements above. Your reseller system will never work if you don’t get it right. You can ask your Hosting Company or Server Admin assign a Dedicated IP address to your Sendroid Ultimate Directory if you are not sure of how to get that done. Assigning A Dedicated IP Address to Sendroid Ultimate As you probably know already, a Dedicated IP address is an IP address that is assigned to a specific resource or domain. To assign a dedicated IP Address to Sendroid Ultimate, you need to do the following;
1. Install Sendroid Ultimate under a domain or sub-domain (eg, sms.yourdomain.com)
2. Purchase a fresh Dedicated IP Address from your Hosting Company
3. Setup or Ask your hosting company to setup your new dedicated IP address to point to
your Sendroid domain or sub-domain as the case may be (That is, when you type the IP
address on a browser, it should open your Sendroid Login screen)
After you have completed the above steps, you might want to double check that everything is
working fine by typing your new IP address on a browser. If it opens up your Sendroid customer
login page, then you are good to go. If not, you will need to work with your hosting company to
correctly setup / point the dedicated IP address to Sendroid's domain.
Setting Up A Reseller
Now to setup a reseller, you need to create a new customer (or modify an existing customer's
account), then update the account type to SMS Reseller.
Configuring the Reseller's Account
Once the reseller logs into his new reseller account, Sendroid Ultimate will prompt it to setup
its Reseller System
19
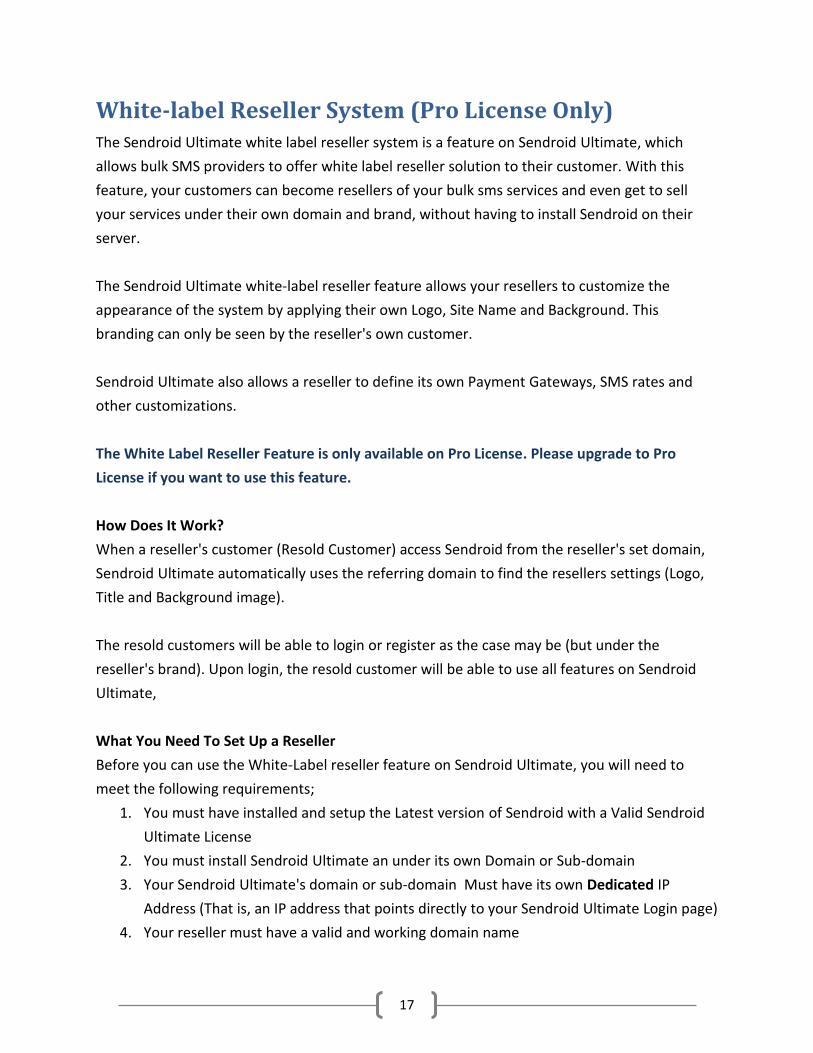
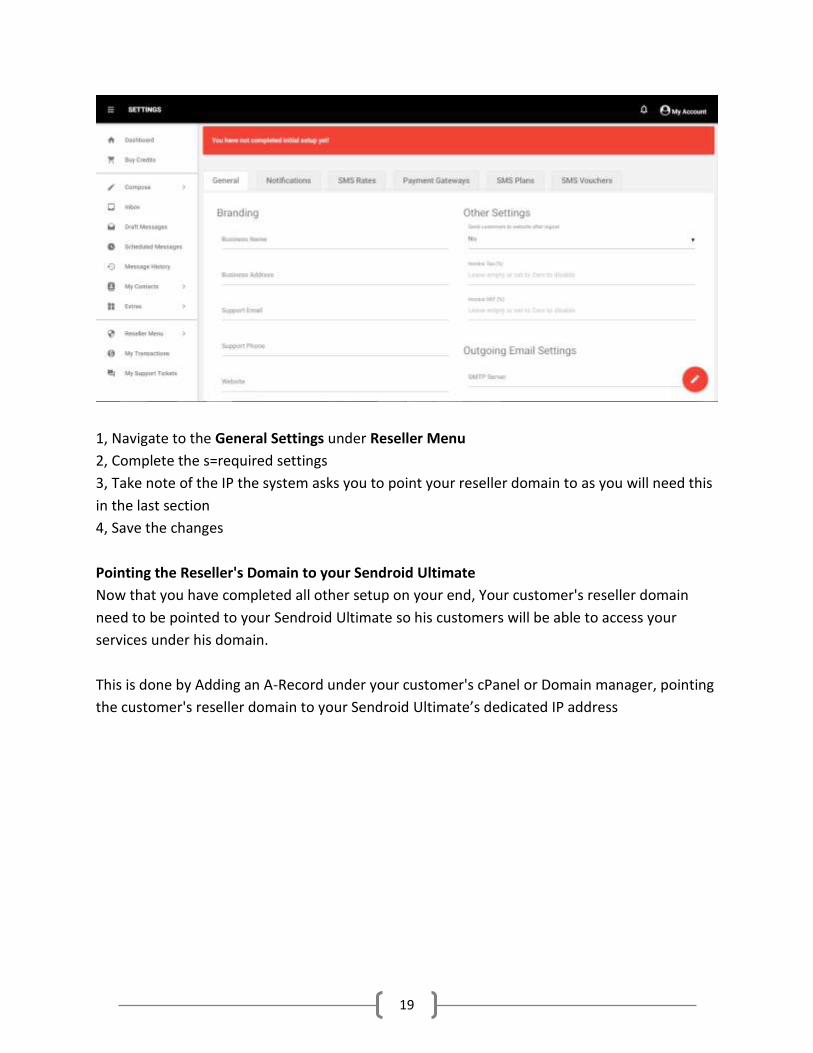
1, Navigate to the General Settings under Reseller Menu
2, Complete the s=required settings
3, Take note of the IP the system asks you to point your reseller domain to as you will need this
in the last section
4, Save the changes
Pointing the Reseller's Domain to your Sendroid Ultimate
Now that you have completed all other setup on your end, Your customer's reseller domain
need to be pointed to your Sendroid Ultimate so his customers will be able to access your
services under his domain.
This is done by Adding an A-Record under your customer's cPanel or Domain manager, pointing
the customer's reseller domain to your Sendroid Ultimate’s dedicated IP address
20
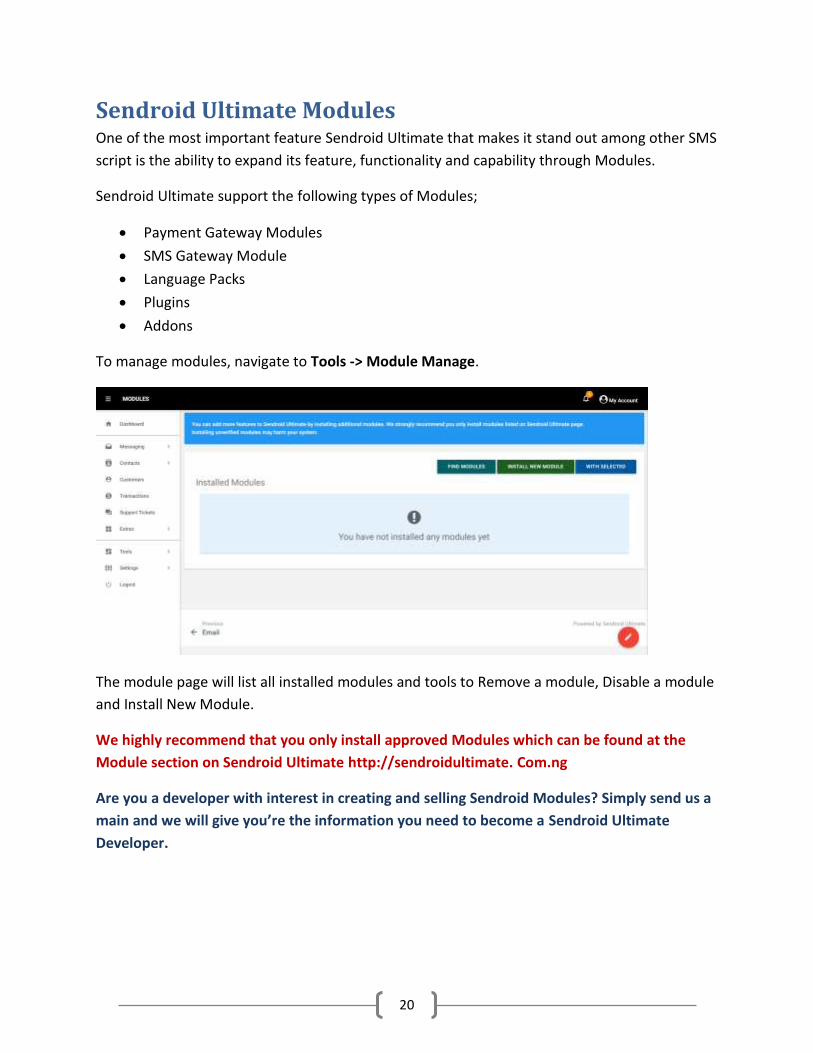
Sendroid Ultimate Modules One of the most important feature Sendroid Ultimate that makes it stand out among other SMS
script is the ability to expand its feature, functionality and capability through Modules.
Sendroid Ultimate support the following types of Modules;
Payment Gateway Modules
SMS Gateway Module
Language Packs
Plugins
Addons
To manage modules, navigate to Tools -> Module Manage.
The module page will list all installed modules and tools to Remove a module, Disable a module
and Install New Module.
We highly recommend that you only install approved Modules which can be found at the
Module section on Sendroid Ultimate http://sendroidultimate. Com.ng
Are you a developer with interest in creating and selling Sendroid Modules? Simply send us a
main and we will give you’re the information you need to become a Sendroid Ultimate
Developer.
21
Getting Help Need further support with anything about Sendroid Ultimate?
The following channels have been made available for you.
1. Sendroid Ultimate Documentation and Quick Start manual available at
https://sendroidultimate.com.ng.
2, Sendroid Ultimate community at http://forum.sendroidultimate.com.ng/
3, Sendroid Ultimate Knowledgebase at http://sendroidultimate.com.ng/knowledgebase.php
4. Support Tickets at Ynet Interactive Client Area at https://my.ynetintective.com/
5. Live Support System available at https://www.ynetinteractive.com
Please note that our support service is only available to Licensed users.
Recommended