SAP NetWeaver® Identity Management
Identity Center
Tutorial - Working with roles and privileges
Version 7.2 Rev 1
© Copyright 2011 SAP AG. All rights reserved.
No part of this publication may be reproduced or transmitted in any form or for any purpose without the expresspermission of SAP AG. The information contained herein may be changed without prior notice.
Some software products marketed by SAP AG and its distributors contain proprietary software components of othersoftware vendors.
Microsoft, Windows, Excel, Outlook, and PowerPoint are registered trademarks of Microsoft Corporation.
IBM, DB2, DB2 Universal Database, System i, System i5, System p, System p5, System x, System z, System z10,System z9, z10, z9, iSeries, pSeries, xSeries, zSeries, eServer, z/VM, z/OS, i5/OS, S/390, OS/390, OS/400, AS/400,S/390 Parallel Enterprise Server, PowerVM, Power Architecture, POWER6+, POWER6, POWER5+, POWER5,POWER, OpenPower, PowerPC, BatchPipes, BladeCenter, System Storage, GPFS, HACMP, RETAIN, DB2 Connect,RACF, Redbooks, OS/2, Parallel Sysplex, MVS/ESA, AIX, Intelligent Miner, WebSphere, Netfinity, Tivoli andInformix are trademarks or registered trademarks of IBM Corporation.
Linux is the registered trademark of Linus Torvalds in the U.S. and other countries.
Adobe, the Adobe logo, Acrobat, PostScript, and Reader are either trademarks or registered trademarks of AdobeSystems Incorporated in the United States and/or other countries.
Oracle is a registered trademark of Oracle Corporation.
UNIX, X/Open, OSF/1, and Motif are registered trademarks of the Open Group.
Citrix, ICA, Program Neighborhood, MetaFrame, WinFrame, VideoFrame, and MultiWin are trademarks or registeredtrademarks of Citrix Systems, Inc.
HTML, XML, XHTML and W3C are trademarks or registered trademarks of W3C®, World Wide Web Consortium,Massachusetts Institute of Technology.
Java is a registered trademark of Sun Microsystems, Inc.
JavaScript is a registered trademark of Sun Microsystems, Inc., used under license for technology invented andimplemented by Netscape.
SAP, R/3, SAP NetWeaver, Duet, PartnerEdge, ByDesign, SAP Business ByDesign, and other SAP products andservices mentioned herein as well as their respective logos are trademarks or registered trademarks of SAP AG inGermany and other countries.
Business Objects and the Business Objects logo, BusinessObjects, Crystal Reports, Crystal Decisions, WebIntelligence, Xcelsius, and other Business Objects products and services mentioned herein as well as their respectivelogos are trademarks or registered trademarks of Business Objects S.A. in the United States and in other countries.Business Objects is an SAP company.
All other product and service names mentioned are the trademarks of their respective companies. Data contained in thisdocument serves informational purposes only. National product specifications may vary.
These materials are subject to change without notice. These materials are provided by SAP AG and its affiliatedcompanies ("SAP Group") for informational purposes only, without representation or warranty of any kind, and SAPGroup shall not be liable for errors or omissions with respect to the materials. The only warranties for SAP Groupproducts and services are those that are set forth in the express warranty statements accompanying such products andservices, if any. Nothing herein should be construed as constituting an additional warranty.
Page 3 of 96
i
© Copyright 2011 SAP AG. All rights reserved.
Preface
The productSAP NetWeaver Identity Center is a high-end identity management solution, capable ofhandling a large amount of repositories containing an unlimited amount of information. TheIdentity Center offers a robust, flexible and scalable high-availability solution for workflow,provisioning, data synchronization and joining for a large number of data repositories. TheIdentity Center provides a framework for a number of jobs.
The readerThis manual is written for people who need an introduction to the SAP NetWeaver IdentityManagement User Interface and the managing of roles and privileges.
PrerequisitesTo get the most benefit from this manual, you should have the following knowledge:
General knowledge about the Identity Center and job definitions for instance as described inSAP NetWeaver Identity Management Identity Center Initial Configuration and SAPNetWeaver Identity Management Identity Center Tutorial: Basic Synchronization.
General knowledge about provisioning and task definitions as described in SAP NetWeaverIdentity Management Identity Center Tutorial – Provisioning.
Knowledge of Microsoft SQL Server or Oracle.
The following software is required:
SAP NetWeaver Identity Management Identity Center version 7.2 or newer must becorrectly installed and licensed.
SAP NetWeaver Identity Management User Interface must be installed and configured forthis Identity Center and identity store (according to SAP NetWeaver Identity ManagementIdentity Center: Installing the Identity Management User Interface).
An Identity Center where at least one dispatcher has been configured and is running.
The data source used in this tutorial (hr.csv) is stored together with this document on theSAP Developer Network, SDN (https://www.sdn.sap.com/).
The manualThe manual is a tutorial giving an introduction to the privileges, roles and workflow functions ofthe Identity Center.
This tutorial is not a substitution for training.
Person names used in this tutorial are fictional.
ii
© Copyright 2011 SAP AG. All rights reserved.
Related documentsYou can find useful information in the following documents:
SAP NetWeaver Identity Management Identity Center: Installation overview
SAP NetWeaver Identity Management Identity Center: Installing the database (MicrosoftSQL Server/Oracle)
SAP NetWeaver Identity Management Identity Center: Installing the Identity ManagementUser Interface
SAP NetWeaver Identity Management Identity Center Initial Configuration
SAP NetWeaver Identity Management Identity Center Tutorial: Basic Synchronization
SAP NetWeaver Identity Management Identity Center Tutorial – Provisioning
For information on SAP NetWeaver see http://help.sap.com.
Page 5 of 96
iii
© Copyright 2011 SAP AG. All rights reserved.
Table of contentsIntroduction .................................................................................................................................. 1
Roles and role-based provisioning ......................................................................................................... 1The identity store .................................................................................................................................. 2Identity Management User Interface...................................................................................................... 3Access control on tasks ......................................................................................................................... 3Use case ............................................................................................................................................... 4Tasks, roles and privileges .................................................................................................................... 5The data source ..................................................................................................................................... 7The data flow and the task structure ...................................................................................................... 8Preparations .......................................................................................................................................... 8Section overview ................................................................................................................................ 12
Section 1: Building the identity store ......................................................................................... 13Disabling automatic attribute creation ................................................................................................. 13Defining a repository definition for the data source ............................................................................. 14Reading the source data into the identity store ..................................................................................... 16Verifying the contents of the identity store .......................................................................................... 22Enabling the delta ............................................................................................................................... 24
Section 2: Creating the privileges ............................................................................................... 26Creating folder for privileges .............................................................................................................. 26Defining repository definition for folder .............................................................................................. 27Creating the privileges ........................................................................................................................ 29
Section 3: Creating the User Interface tasks .............................................................................. 30Creating the folder .............................................................................................................................. 30Adding the User Interface tasks ........................................................................................................... 32
Section 4: Use case Physical access control ................................................................................ 46Creating roles ..................................................................................................................................... 47Building the role hierarchy .................................................................................................................. 51Adding the privileges .......................................................................................................................... 55Creating the task #BUILDING_AddEntry ........................................................................................... 56Defining the task on the repository definition ...................................................................................... 68Running #BUILDING_AddEntry........................................................................................................ 69Creating the task #BUILDING_RemoveEntry ..................................................................................... 76Running #BUILDING_RemoveEntry ................................................................................................. 84
Section 5: Deleting roles .............................................................................................................. 86Section 6: Privilege dependencies ............................................................................................... 88

iv
© Copyright 2011 SAP AG. All rights reserved.
Page 7 of 96

1IntroductionSAP NetWeaver Identity Management Identity Center Tutorial - Working with roles and privileges
© Copyright 2011 SAP AG. All rights reserved.
IntroductionThe purpose of this tutorial is to give an introduction to managing and assigning roles andprivileges, and the SAP NetWeaver Identity Management User Interface. The tutorial showshow to create roles and privileges, and how to define mechanisms for assigning these to identitystore entries using the User Interface. We create User Interface tasks to create roles and managethe roles and privileges. The privileges and provisioning tasks are created directly in the IdentityCenter Management Console.
Roles and role-based provisioningWhen implementing a provisioning solution, you can use two different provisioningmechanisms:
Role-based provisioning: The Identity Center supports the use of roles to assign privilegesto users.
Rule-based provisioning: Some users need privilege assignments which do not easily fit intothe roles. These can be assigned by defining rules. In this case, if a user entry matches agiven set of rules, a privilege is assigned and thereby also the required provisioning.
In this tutorial, we illustrate role-based provisioning.
A role hierarchy can be defined, where each role can be associated with any number ofprivileges.
By assigning one or more roles to a user, the necessary provisioning is done automatically forthis user, to grant access or set other information in the required applications. When roles areremoved from a user, de-provisioning will ensure that the privileges are removed.
Normally, only a limited number of roles should be defined, and these should be used to handle80% of the privilege assignments. To handle the remaining 20%, rules should be the preferredmethod, although direct assignments are also possible.
2Introduction
SAP NetWeaver Identity Management Identity Center Tutorial - Working with roles and privileges
© Copyright 2011 SAP AG. All rights reserved.
The use of temporary roles is also supported for cases where a role should be assigned for alimited time. A role can be defined with a time limit, and when this time limit is reached, theaccount is automatically de-provisioned.
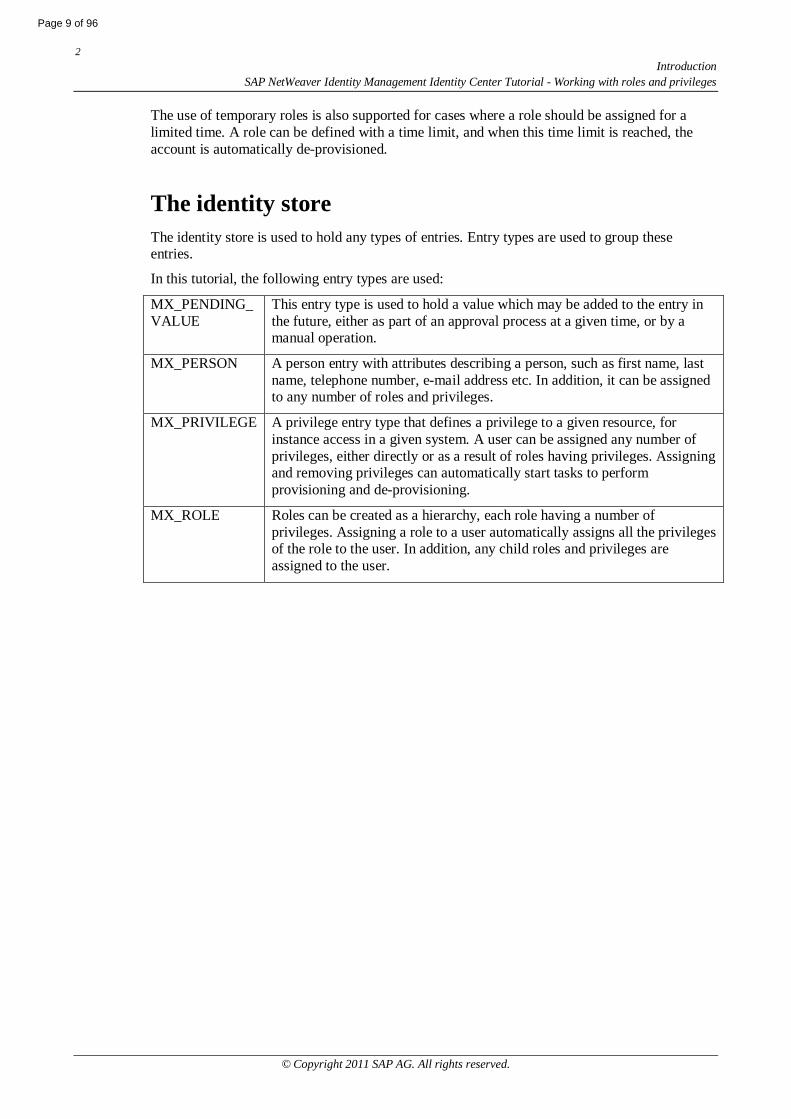
The identity storeThe identity store is used to hold any types of entries. Entry types are used to group theseentries.
In this tutorial, the following entry types are used:
MX_PENDING_VALUE
This entry type is used to hold a value which may be added to the entry inthe future, either as part of an approval process at a given time, or by amanual operation.
MX_PERSON A person entry with attributes describing a person, such as first name, lastname, telephone number, e-mail address etc. In addition, it can be assignedto any number of roles and privileges.
MX_PRIVILEGE A privilege entry type that defines a privilege to a given resource, forinstance access in a given system. A user can be assigned any number ofprivileges, either directly or as a result of roles having privileges. Assigningand removing privileges can automatically start tasks to performprovisioning and de-provisioning.
MX_ROLE Roles can be created as a hierarchy, each role having a number ofprivileges. Assigning a role to a user automatically assigns all the privilegesof the role to the user. In addition, any child roles and privileges areassigned to the user.
Page 9 of 96

3IntroductionSAP NetWeaver Identity Management Identity Center Tutorial - Working with roles and privileges
© Copyright 2011 SAP AG. All rights reserved.
Identity Management User Interface
The SAP NetWeaver Identity Management User Interface is configured from the ManagementConsole. A workflow is started every time a provisioning request is initiated. The User Interfacecan be used to:
Collect identity information from the specific individuals.
Enforce single- or multi-stage approvals from authorized personnel.
Generate notifications to designated users when manual actions need to be performed, orreport the outcome of completed tasks.
Execute new workflow tasks (such as notifications and escalation) when pre-defined time-outs are reached.
Access control on tasksThe SAP NetWeaver Identity Management User Interface is based on executing tasks. Who isallowed to execute which tasks is controlled by the task access control that can be setindividually on each task. The access control consists of two components:
Who is allowed to execute the task.
On which entries can the task be executed.
When defining who can execute a task, it is possible to define one of the following:
Anonymous, which means that the user doesn't have to be logged-in to be able to executethe task (the task will usually appear on the log-in site).
Logged-in user or identity store entry (usually a person, but it could be a privilege, a role ora dynamic group as well).
Filter, used to specify to whom the task should be available by defining a SQL query. Thisoption is only available if "Use simplified access control" is deselected for the identity store.Use of complex access control (filters) should be avoided due to very costly runtime, andthe use of relational access control is preferred whenever possible.
4Introduction
SAP NetWeaver Identity Management Identity Center Tutorial - Working with roles and privileges
© Copyright 2011 SAP AG. All rights reserved.
Referral, where the access is given through a referral via an attribute specified with the"Referral attribute" field. The task is available to all users who are referred to by the givenreferral attribute.
The MSKEYVALUE attribute of the entry is used for identification. Also note that multipleaccess control rules can be defined in each task.
When defining on which (on behalf of which) entries a task can be executed, the followingoptions can be used:
Everybody.
Logged-in user or identity store entry/self service – a given user, privilege or role, meaningthat the task can be executed on the given user, all users with the given privilege or all userswith the given role.
Relational access control, e.g. subject-object relations determine the access rights thesubject has on the object. The subject is always a person, which is the logged in user (Self,Manager, Owner, Role Manager, Group Manager, Dynamic Group Manager, PrivilegeManager, Role Member, Dynamic Group Member, Privilege Member, Group Member,Member of same role/privilege/group/dynamic group, Anonymous).
Filter – a filter (typically an SQL statement) can be used to define a set of entries on behalfof which the task can be executed. Use of complex access control (filters) should be avoideddue to very costly runtime, and the use of relational access control is preferred wheneverpossible.
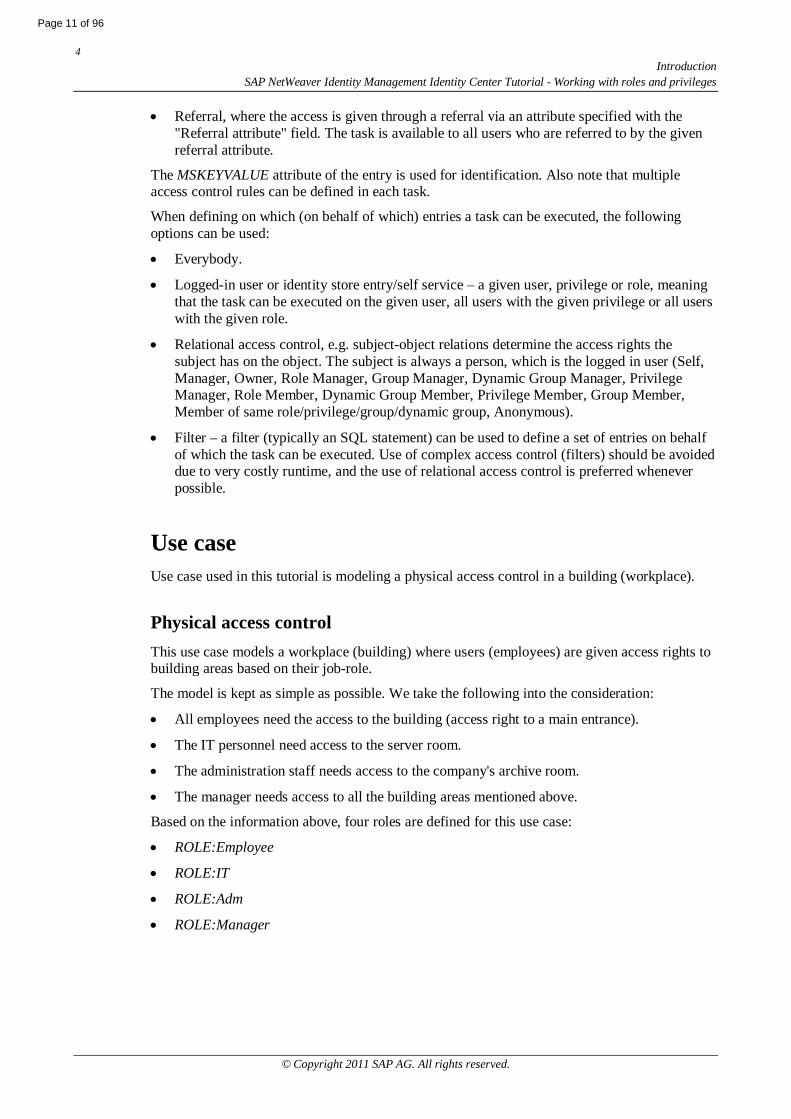
Use caseUse case used in this tutorial is modeling a physical access control in a building (workplace).
Physical access controlThis use case models a workplace (building) where users (employees) are given access rights tobuilding areas based on their job-role.
The model is kept as simple as possible. We take the following into the consideration:
All employees need the access to the building (access right to a main entrance).
The IT personnel need access to the server room.
The administration staff needs access to the company's archive room.
The manager needs access to all the building areas mentioned above.
Based on the information above, four roles are defined for this use case:
ROLE:Employee
ROLE:IT
ROLE:Adm
ROLE:Manager
Page 11 of 96
5IntroductionSAP NetWeaver Identity Management Identity Center Tutorial - Working with roles and privileges
© Copyright 2011 SAP AG. All rights reserved.
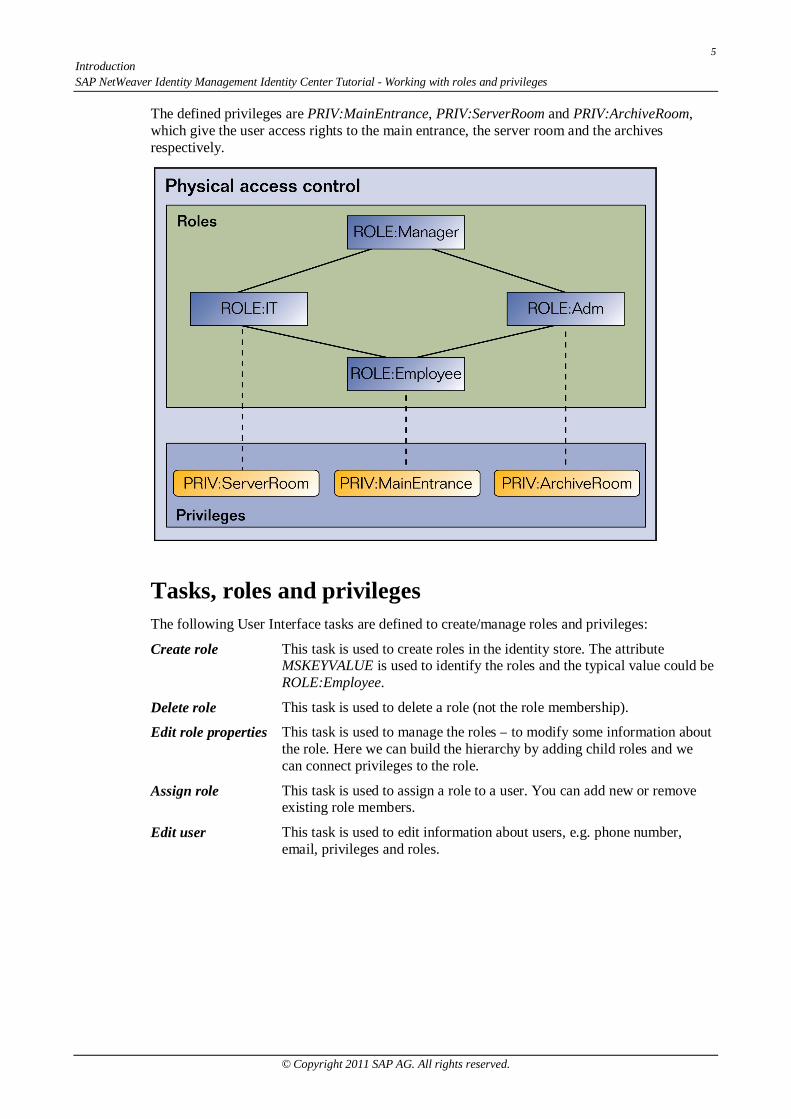
The defined privileges are PRIV:MainEntrance, PRIV:ServerRoom and PRIV:ArchiveRoom,which give the user access rights to the main entrance, the server room and the archivesrespectively.
Tasks, roles and privilegesThe following User Interface tasks are defined to create/manage roles and privileges:
Create role This task is used to create roles in the identity store. The attributeMSKEYVALUE is used to identify the roles and the typical value could beROLE:Employee.
Delete role This task is used to delete a role (not the role membership).
Edit role properties This task is used to manage the roles – to modify some information aboutthe role. Here we can build the hierarchy by adding child roles and wecan connect privileges to the role.
Assign role This task is used to assign a role to a user. You can add new or removeexisting role members.
Edit user This task is used to edit information about users, e.g. phone number,email, privileges and roles.
6Introduction
SAP NetWeaver Identity Management Identity Center Tutorial - Working with roles and privileges
© Copyright 2011 SAP AG. All rights reserved.
Two provisioning tasks are also created, one for provisioning and one for de-provisioning ofusers for the repository definition BUILDING. Every time a user is given a particular privilege,a file will be created (containing the timestamp of when the privilege was assigned to the user)and provisioned to the respective folder:
#Building_AddEntry This ordered task group is referenced from the BUILDINGrepository definition using the attributeMX_ADD_MEMBER_TASK. The task group contains twotasks – task Get privilege MSKEY which saves the MSKEY ofthe assigned privilege to a context variable, and Add file tobuilding folder which creates a file containing the timestamp ofwhen a privilege is assigned to user and provisions it to thebuilding folder. The task Get privilege MSKEY is the same forboth ordered task groups.
#Building_RemoveEntry This ordered task group is referenced from the BUILDINGrepository definition using the attributeMX_DEL_MEMBER_TASK. The task group contains two tasks– task Get privilege MSKEY which saves the MSKEY of theassigned privilege to a context variable, and the task Delete filefrom building folder which deletes the previously created filefrom the building folder.
We define four roles in this tutorial:
ROLE:Employee This role gives the privilege PRIV:MainEntrance.
ROLE:IT This role gives the privilege PRIV:ServerRoom. In addition, it inheritsthe privilege PRIV:MainEntrance from its child role ROLE:Employee.
ROLE:Adm This role gives the privilege PRIV:ArchiveRoom. In addition, itinherits the privilege PRIV:MainEntrance from its child roleROLE:Employee.
ROLE:Manager This role has two child roles – ROLE:IT and ROLE:Adm, and thusinherits the privileges PRIV:MainEntrance, PRIV:ServerRoom andPRIV:ArchiveRoom.
Three privileges are defined in this tutorial:
PRIV:MainEntrance This privilege gives the users the right to access the building (mainentrance).
PRIV:ServerRoom The privilege gives the user access to the server room. Often given toIT personnel.
PRIV:ArchiveRoom The privilege gives the user access to the archive. Often given to theadministration staff.
Page 13 of 96
7IntroductionSAP NetWeaver Identity Management Identity Center Tutorial - Working with roles and privileges
© Copyright 2011 SAP AG. All rights reserved.
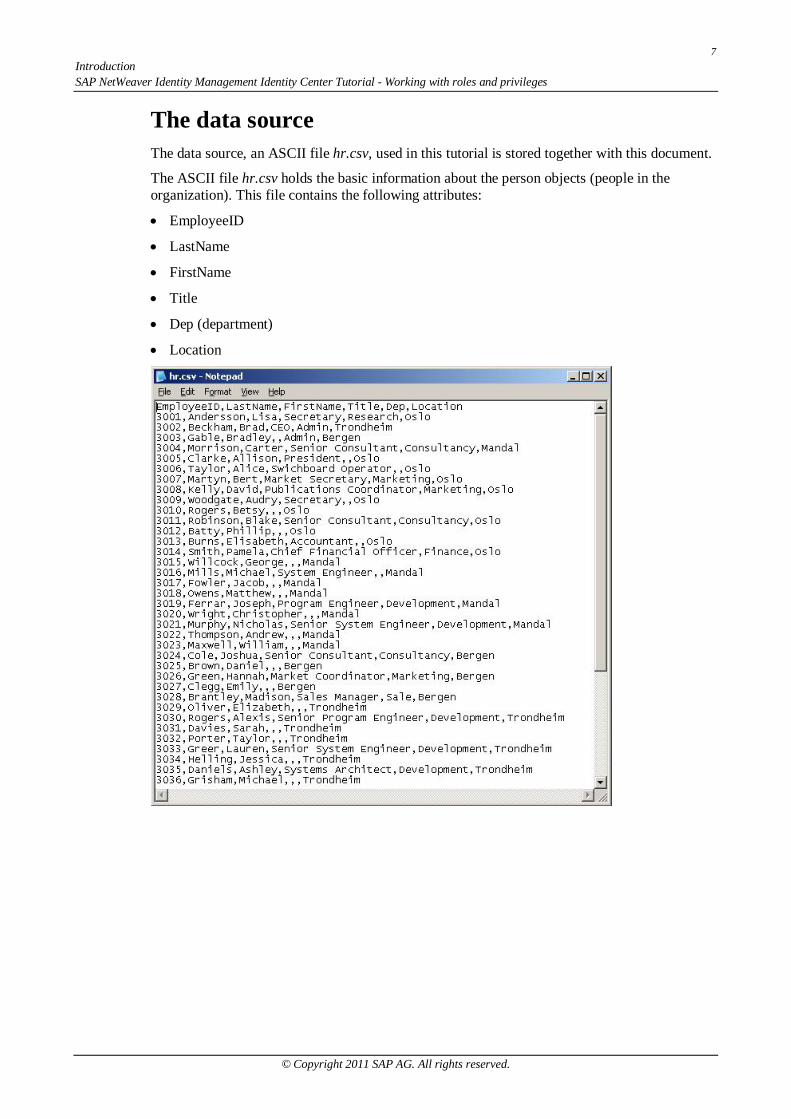
The data sourceThe data source, an ASCII file hr.csv, used in this tutorial is stored together with this document.
The ASCII file hr.csv holds the basic information about the person objects (people in theorganization). This file contains the following attributes:
EmployeeID
LastName
FirstName
Title
Dep (department)
Location
8Introduction
SAP NetWeaver Identity Management Identity Center Tutorial - Working with roles and privileges
© Copyright 2011 SAP AG. All rights reserved.
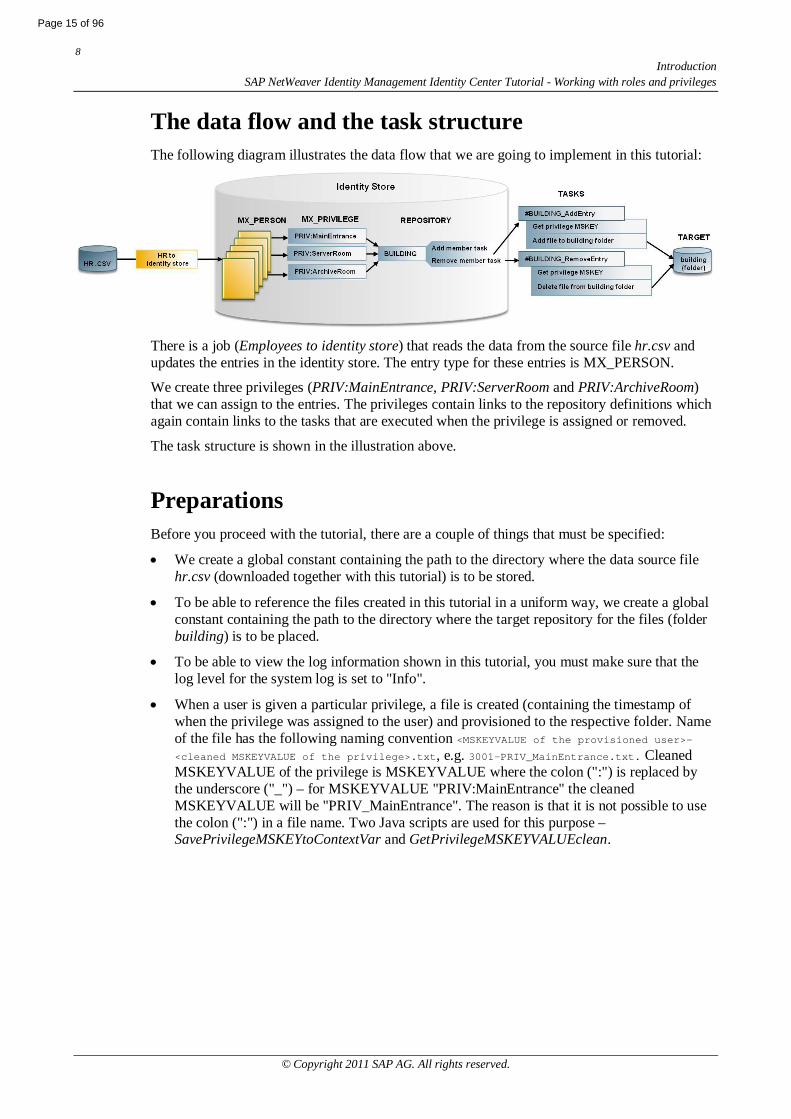
The data flow and the task structureThe following diagram illustrates the data flow that we are going to implement in this tutorial:
There is a job (Employees to identity store) that reads the data from the source file hr.csv andupdates the entries in the identity store. The entry type for these entries is MX_PERSON.
We create three privileges (PRIV:MainEntrance, PRIV:ServerRoom and PRIV:ArchiveRoom)that we can assign to the entries. The privileges contain links to the repository definitions whichagain contain links to the tasks that are executed when the privilege is assigned or removed.
The task structure is shown in the illustration above.
PreparationsBefore you proceed with the tutorial, there are a couple of things that must be specified:
We create a global constant containing the path to the directory where the data source filehr.csv (downloaded together with this tutorial) is to be stored.
To be able to reference the files created in this tutorial in a uniform way, we create a globalconstant containing the path to the directory where the target repository for the files (folderbuilding) is to be placed.
To be able to view the log information shown in this tutorial, you must make sure that thelog level for the system log is set to "Info".
When a user is given a particular privilege, a file is created (containing the timestamp ofwhen the privilege was assigned to the user) and provisioned to the respective folder. Nameof the file has the following naming convention <MSKEYVALUE of the provisioned user>-
<cleaned MSKEYVALUE of the privilege>.txt, e.g. 3001-PRIV_MainEntrance.txt. CleanedMSKEYVALUE of the privilege is MSKEYVALUE where the colon (":") is replaced bythe underscore ("_") – for MSKEYVALUE "PRIV:MainEntrance" the cleanedMSKEYVALUE will be "PRIV_MainEntrance". The reason is that it is not possible to usethe colon (":") in a file name. Two Java scripts are used for this purpose –SavePrivilegeMSKEYtoContextVar and GetPrivilegeMSKEYVALUEclean.
Page 15 of 96
9IntroductionSAP NetWeaver Identity Management Identity Center Tutorial - Working with roles and privileges
© Copyright 2011 SAP AG. All rights reserved.
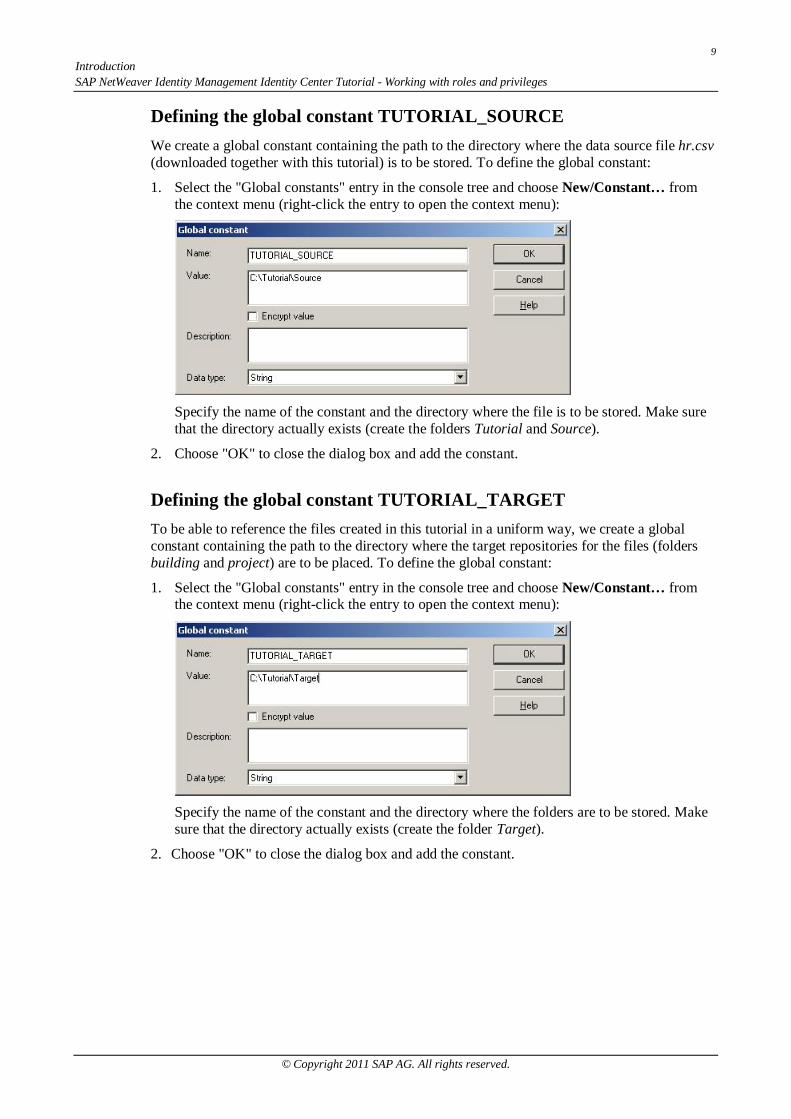
Defining the global constant TUTORIAL_SOURCEWe create a global constant containing the path to the directory where the data source file hr.csv(downloaded together with this tutorial) is to be stored. To define the global constant:
1. Select the "Global constants" entry in the console tree and choose New/Constant… fromthe context menu (right-click the entry to open the context menu):
Specify the name of the constant and the directory where the file is to be stored. Make surethat the directory actually exists (create the folders Tutorial and Source).
2. Choose "OK" to close the dialog box and add the constant.
Defining the global constant TUTORIAL_TARGETTo be able to reference the files created in this tutorial in a uniform way, we create a globalconstant containing the path to the directory where the target repositories for the files (foldersbuilding and project) are to be placed. To define the global constant:
1. Select the "Global constants" entry in the console tree and choose New/Constant… fromthe context menu (right-click the entry to open the context menu):
Specify the name of the constant and the directory where the folders are to be stored. Makesure that the directory actually exists (create the folder Target).
2. Choose "OK" to close the dialog box and add the constant.
10Introduction
SAP NetWeaver Identity Management Identity Center Tutorial - Working with roles and privileges
© Copyright 2011 SAP AG. All rights reserved.
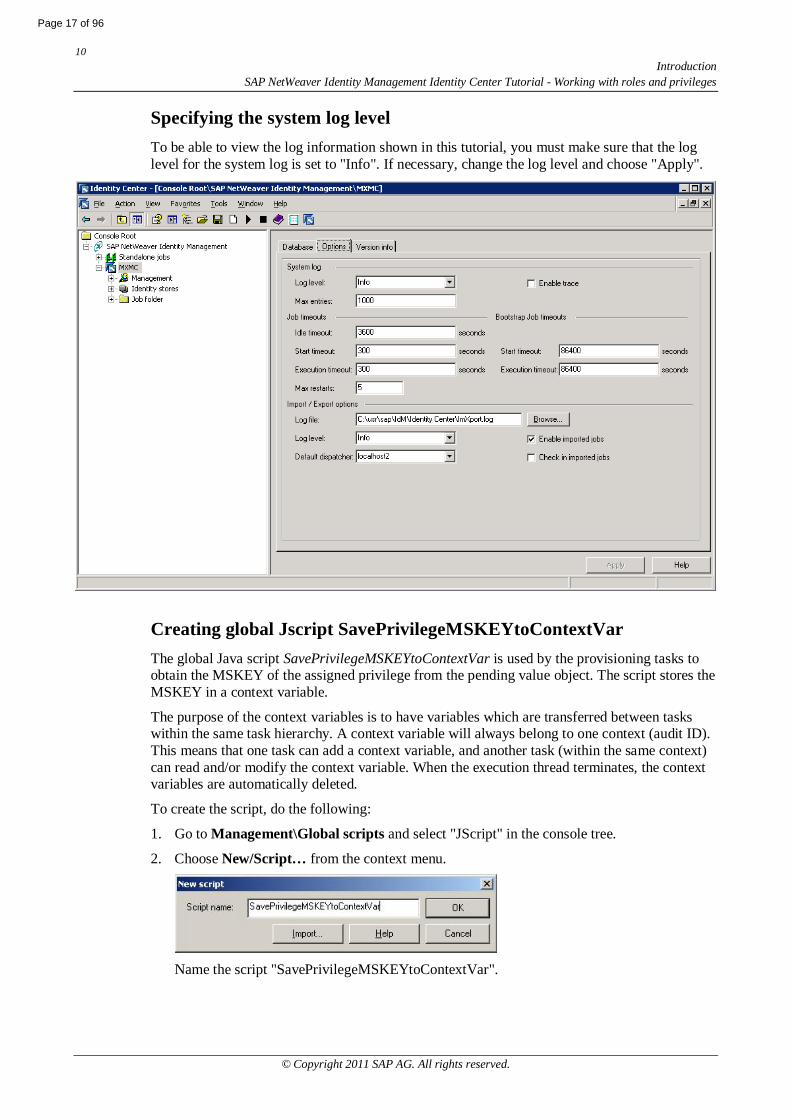
Specifying the system log levelTo be able to view the log information shown in this tutorial, you must make sure that the loglevel for the system log is set to "Info". If necessary, change the log level and choose "Apply".
Creating global Jscript SavePrivilegeMSKEYtoContextVarThe global Java script SavePrivilegeMSKEYtoContextVar is used by the provisioning tasks toobtain the MSKEY of the assigned privilege from the pending value object. The script stores theMSKEY in a context variable.
The purpose of the context variables is to have variables which are transferred between taskswithin the same task hierarchy. A context variable will always belong to one context (audit ID).This means that one task can add a context variable, and another task (within the same context)can read and/or modify the context variable. When the execution thread terminates, the contextvariables are automatically deleted.
To create the script, do the following:
1. Go to Management\Global scripts and select "JScript" in the console tree.
2. Choose New/Script… from the context menu.
Name the script "SavePrivilegeMSKEYtoContextVar".
Page 17 of 96
11IntroductionSAP NetWeaver Identity Management Identity Center Tutorial - Working with roles and privileges
© Copyright 2011 SAP AG. All rights reserved.
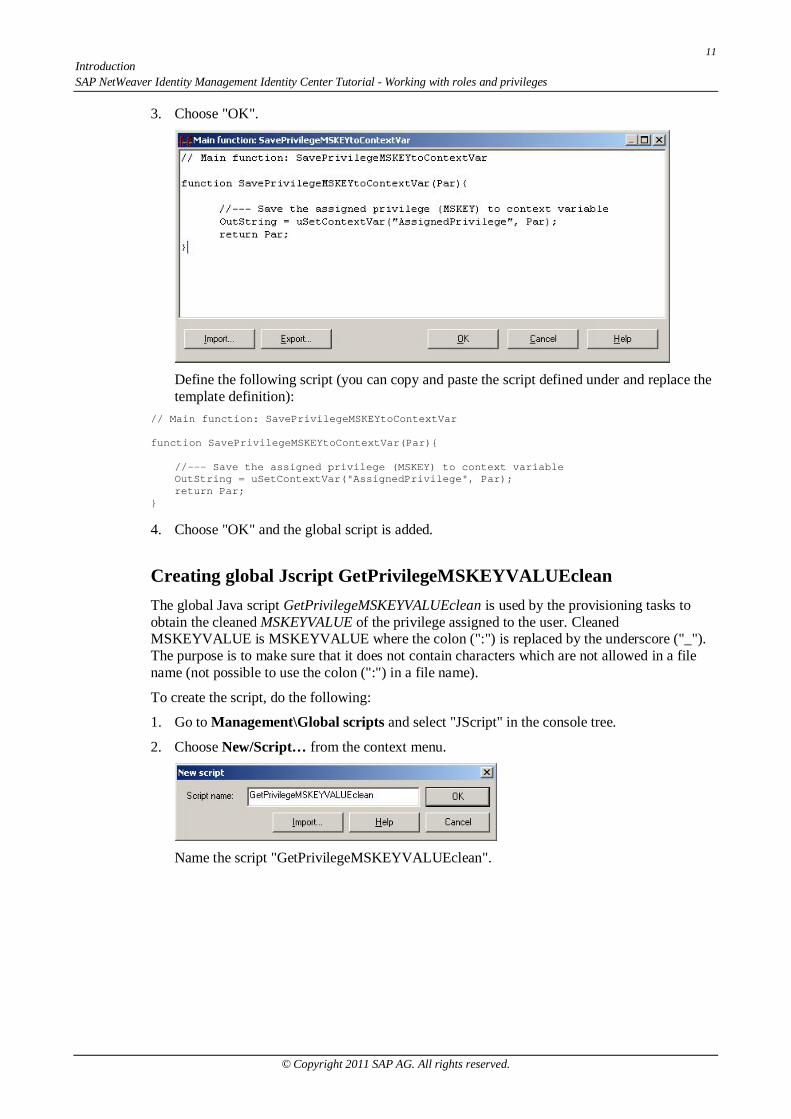
3. Choose "OK".
Define the following script (you can copy and paste the script defined under and replace thetemplate definition):
// Main function: SavePrivilegeMSKEYtoContextVar
function SavePrivilegeMSKEYtoContextVar(Par){
//--- Save the assigned privilege (MSKEY) to context variableOutString = uSetContextVar("AssignedPrivilege", Par);return Par;
}
4. Choose "OK" and the global script is added.
Creating global Jscript GetPrivilegeMSKEYVALUEcleanThe global Java script GetPrivilegeMSKEYVALUEclean is used by the provisioning tasks toobtain the cleaned MSKEYVALUE of the privilege assigned to the user. CleanedMSKEYVALUE is MSKEYVALUE where the colon (":") is replaced by the underscore ("_").The purpose is to make sure that it does not contain characters which are not allowed in a filename (not possible to use the colon (":") in a file name).
To create the script, do the following:
1. Go to Management\Global scripts and select "JScript" in the console tree.
2. Choose New/Script… from the context menu.
Name the script "GetPrivilegeMSKEYVALUEclean".
12Introduction
SAP NetWeaver Identity Management Identity Center Tutorial - Working with roles and privileges
© Copyright 2011 SAP AG. All rights reserved.
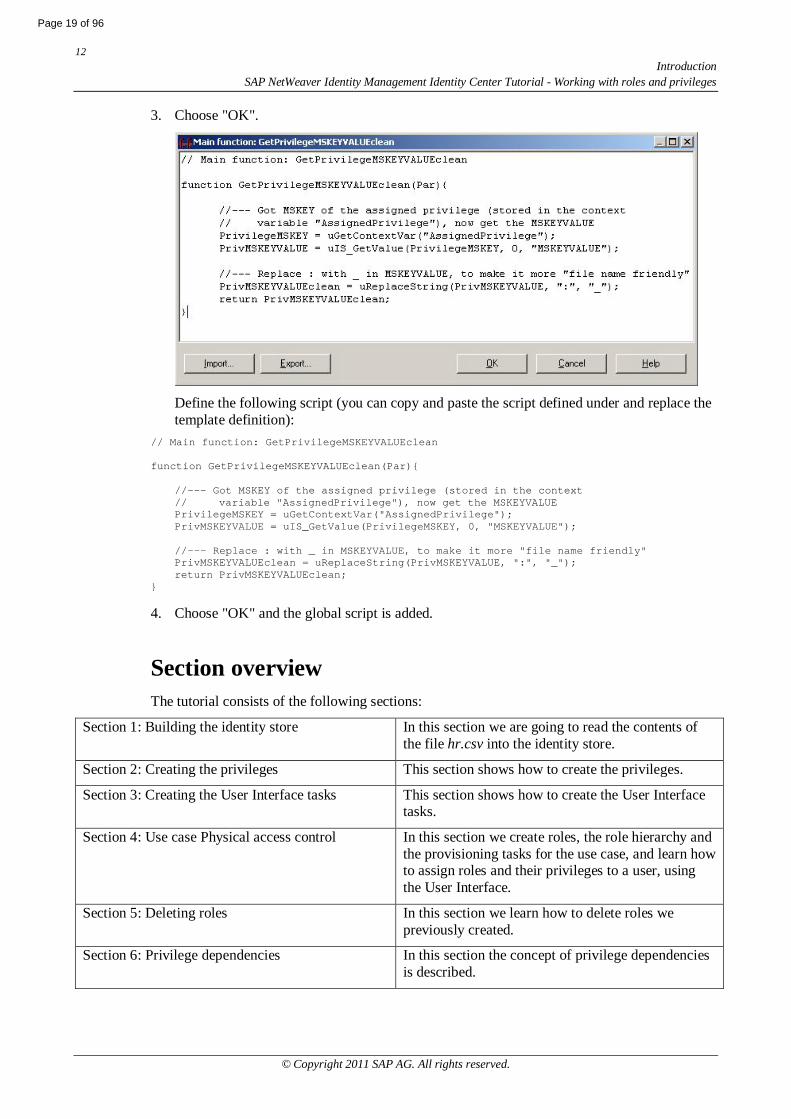
3. Choose "OK".
Define the following script (you can copy and paste the script defined under and replace thetemplate definition):
// Main function: GetPrivilegeMSKEYVALUEclean
function GetPrivilegeMSKEYVALUEclean(Par){
//--- Got MSKEY of the assigned privilege (stored in the context// variable "AssignedPrivilege"), now get the MSKEYVALUEPrivilegeMSKEY = uGetContextVar("AssignedPrivilege");PrivMSKEYVALUE = uIS_GetValue(PrivilegeMSKEY, 0, "MSKEYVALUE");
//--- Replace : with _ in MSKEYVALUE, to make it more "file name friendly"PrivMSKEYVALUEclean = uReplaceString(PrivMSKEYVALUE, ":", "_");return PrivMSKEYVALUEclean;
}
4. Choose "OK" and the global script is added.
Section overviewThe tutorial consists of the following sections:
Section 1: Building the identity store In this section we are going to read the contents ofthe file hr.csv into the identity store.
Section 2: Creating the privileges This section shows how to create the privileges.
Section 3: Creating the User Interface tasks This section shows how to create the User Interfacetasks.
Section 4: Use case Physical access control In this section we create roles, the role hierarchy andthe provisioning tasks for the use case, and learn howto assign roles and their privileges to a user, usingthe User Interface.
Section 5: Deleting roles In this section we learn how to delete roles wepreviously created.
Section 6: Privilege dependencies In this section the concept of privilege dependenciesis described.
Page 19 of 96
13Section 1: Building the identity storeSAP NetWeaver Identity Management Identity Center Tutorial - Working with roles and privileges
© Copyright 2011 SAP AG. All rights reserved.
Section 1: Building the identity storeIn this section we are going to read the contents of the source file hr.csv into the identity store.
Here we use and populate the default identity store Enterprise People. Make sure that theIdentity Management User Interface is installed and configured for the Identity Center you areusing and the default identity store according to SAP NetWeaver Identity Management IdentityCenter Installing and configuring the Identity Management User Interface. It also implies themanager and administrator user, with access to at least "Self Services", "Monitoring" and"Manage" tabs in the User Interface.
Disabling automatic attribute creationDisable the automatic attribute creation. This option is used to control what happens when anattribute which does not exist or an attribute which is not defined as a legal attribute on an entrytype is written to the identity store.
If the "Automatically create new attributes" is enabled, the new attribute is created and added tothe entry type. If the option is disabled, an error is returned. To disable the automatic attributecreation on the identity store Enterprise People, do the following:
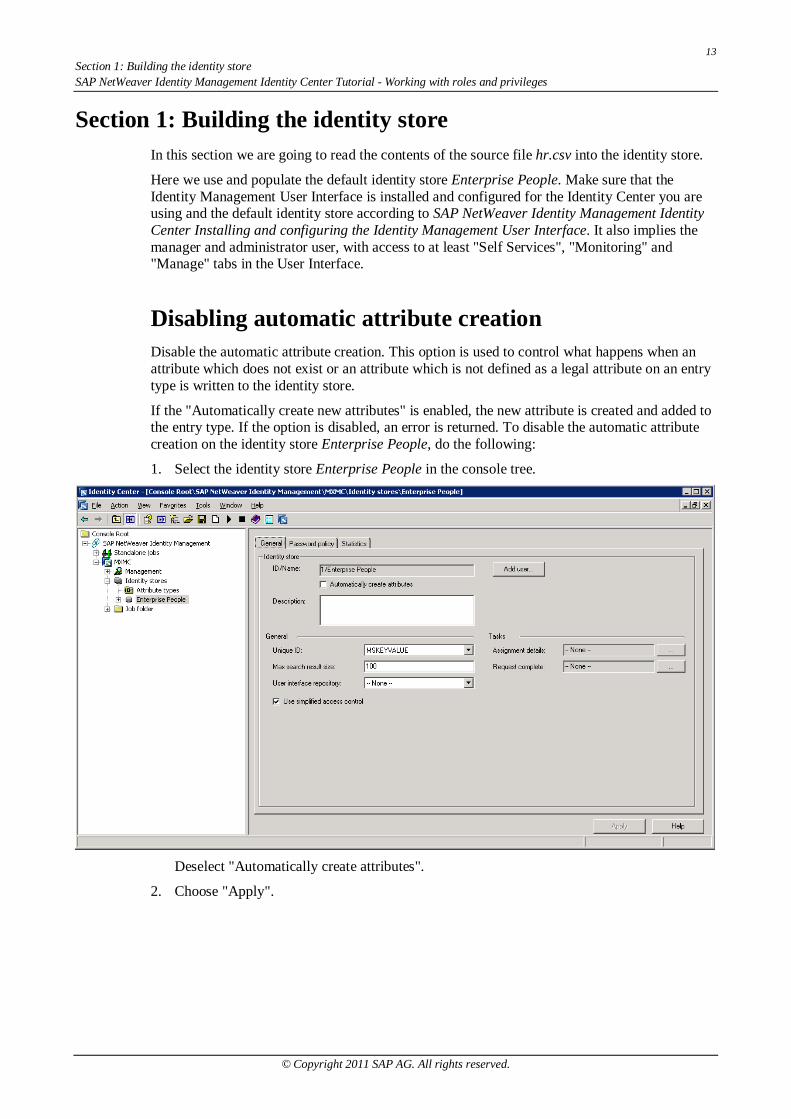
1. Select the identity store Enterprise People in the console tree.
Deselect "Automatically create attributes".
2. Choose "Apply".
14Section 1: Building the identity store
SAP NetWeaver Identity Management Identity Center Tutorial - Working with roles and privileges
© Copyright 2011 SAP AG. All rights reserved.
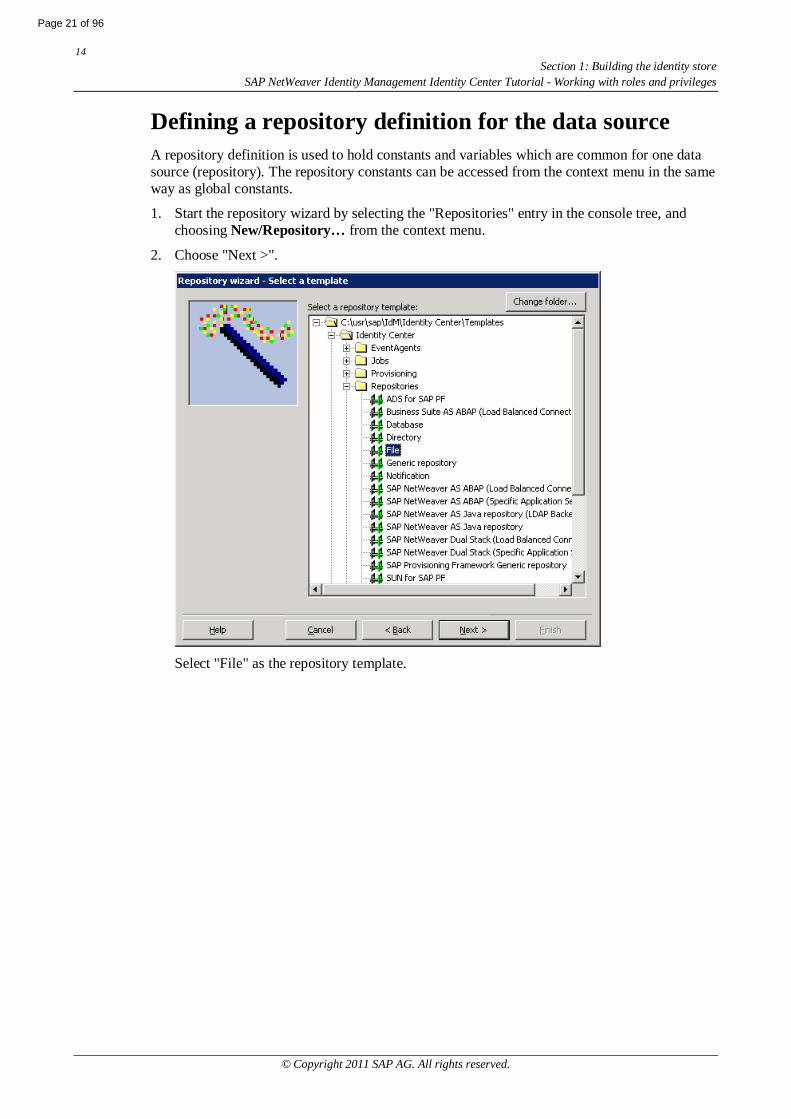
Defining a repository definition for the data sourceA repository definition is used to hold constants and variables which are common for one datasource (repository). The repository constants can be accessed from the context menu in the sameway as global constants.
1. Start the repository wizard by selecting the "Repositories" entry in the console tree, andchoosing New/Repository… from the context menu.
2. Choose "Next >".
Select "File" as the repository template.
Page 21 of 96
15Section 1: Building the identity storeSAP NetWeaver Identity Management Identity Center Tutorial - Working with roles and privileges
© Copyright 2011 SAP AG. All rights reserved.
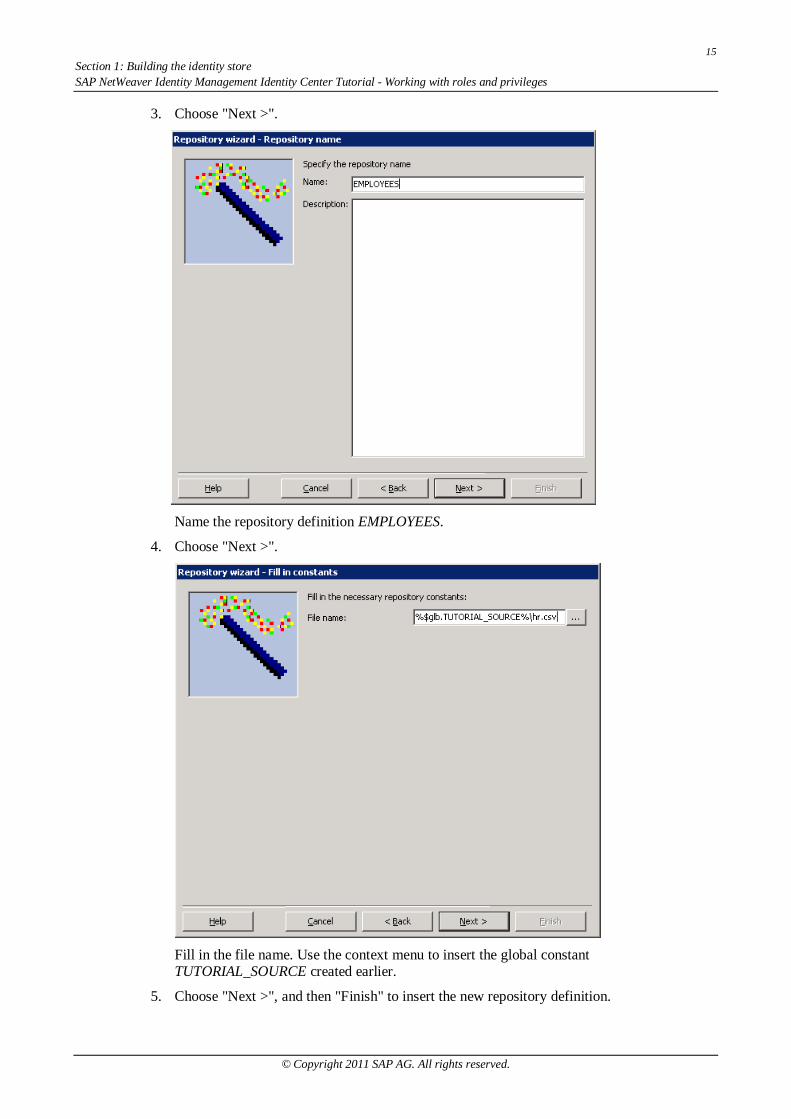
3. Choose "Next >".
Name the repository definition EMPLOYEES.
4. Choose "Next >".
Fill in the file name. Use the context menu to insert the global constantTUTORIAL_SOURCE created earlier.
5. Choose "Next >", and then "Finish" to insert the new repository definition.
16Section 1: Building the identity store
SAP NetWeaver Identity Management Identity Center Tutorial - Working with roles and privileges
© Copyright 2011 SAP AG. All rights reserved.
Reading the source data into the identity storeWe have now created a repository definition for the hr.csv file and defined an identity store thatwe can use when creating the job which will read the source data to the identity store.
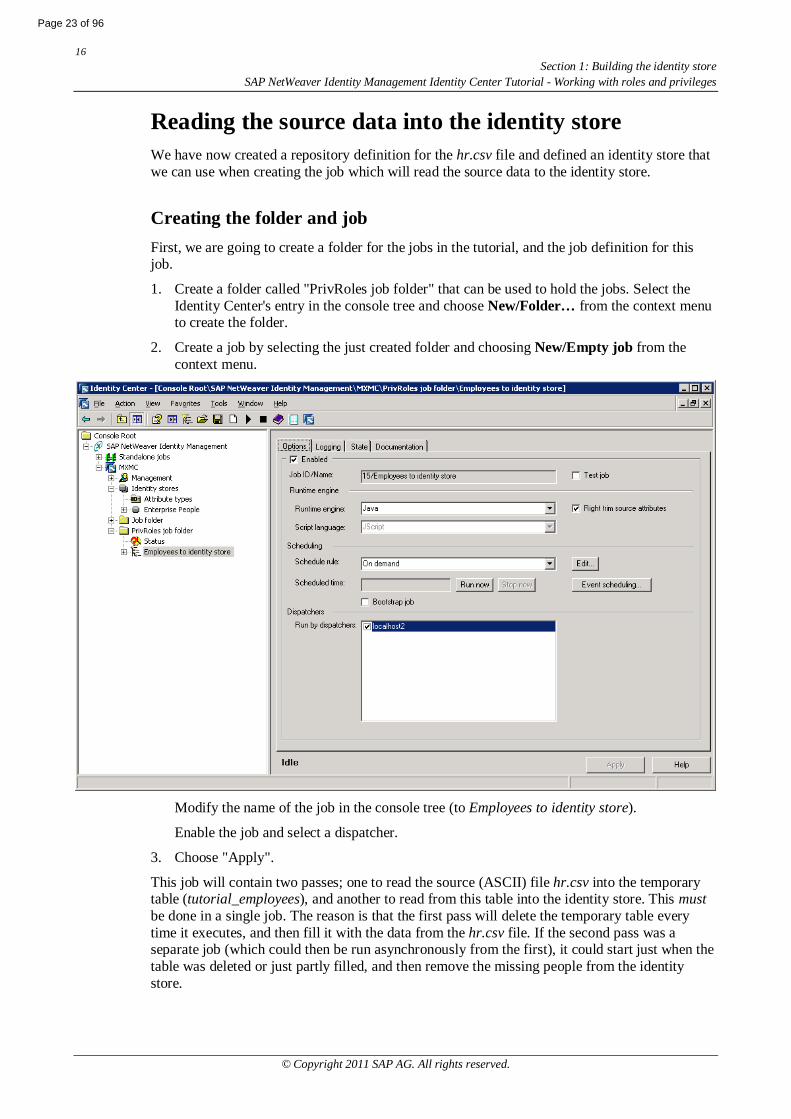
Creating the folder and jobFirst, we are going to create a folder for the jobs in the tutorial, and the job definition for thisjob.
1. Create a folder called "PrivRoles job folder" that can be used to hold the jobs. Select theIdentity Center's entry in the console tree and choose New/Folder… from the context menuto create the folder.
2. Create a job by selecting the just created folder and choosing New/Empty job from thecontext menu.
Modify the name of the job in the console tree (to Employees to identity store).
Enable the job and select a dispatcher.
3. Choose "Apply".
This job will contain two passes; one to read the source (ASCII) file hr.csv into the temporarytable (tutorial_employees), and another to read from this table into the identity store. This mustbe done in a single job. The reason is that the first pass will delete the temporary table everytime it executes, and then fill it with the data from the hr.csv file. If the second pass was aseparate job (which could then be run asynchronously from the first), it could start just when thetable was deleted or just partly filled, and then remove the missing people from the identitystore.
Page 23 of 96
17Section 1: Building the identity storeSAP NetWeaver Identity Management Identity Center Tutorial - Working with roles and privileges
© Copyright 2011 SAP AG. All rights reserved.
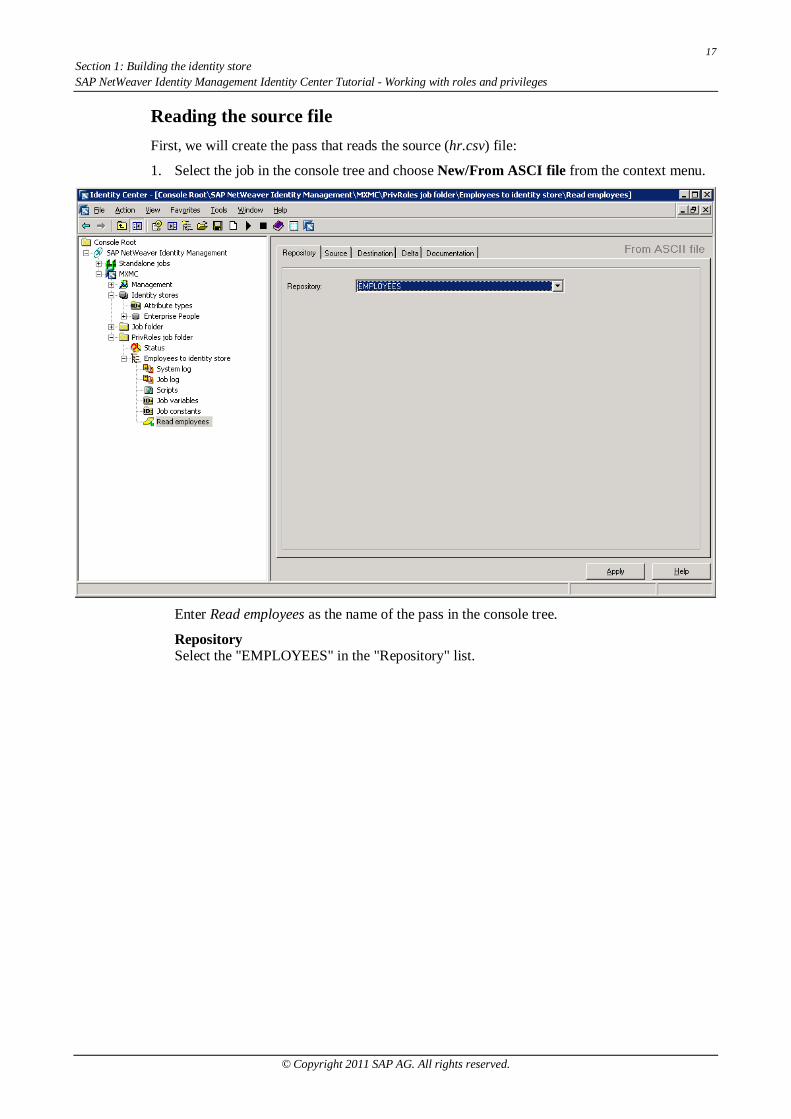
Reading the source fileFirst, we will create the pass that reads the source (hr.csv) file:
1. Select the job in the console tree and choose New/From ASCI file from the context menu.
Enter Read employees as the name of the pass in the console tree.
RepositorySelect the "EMPLOYEES" in the "Repository" list.
18Section 1: Building the identity store
SAP NetWeaver Identity Management Identity Center Tutorial - Working with roles and privileges
© Copyright 2011 SAP AG. All rights reserved.
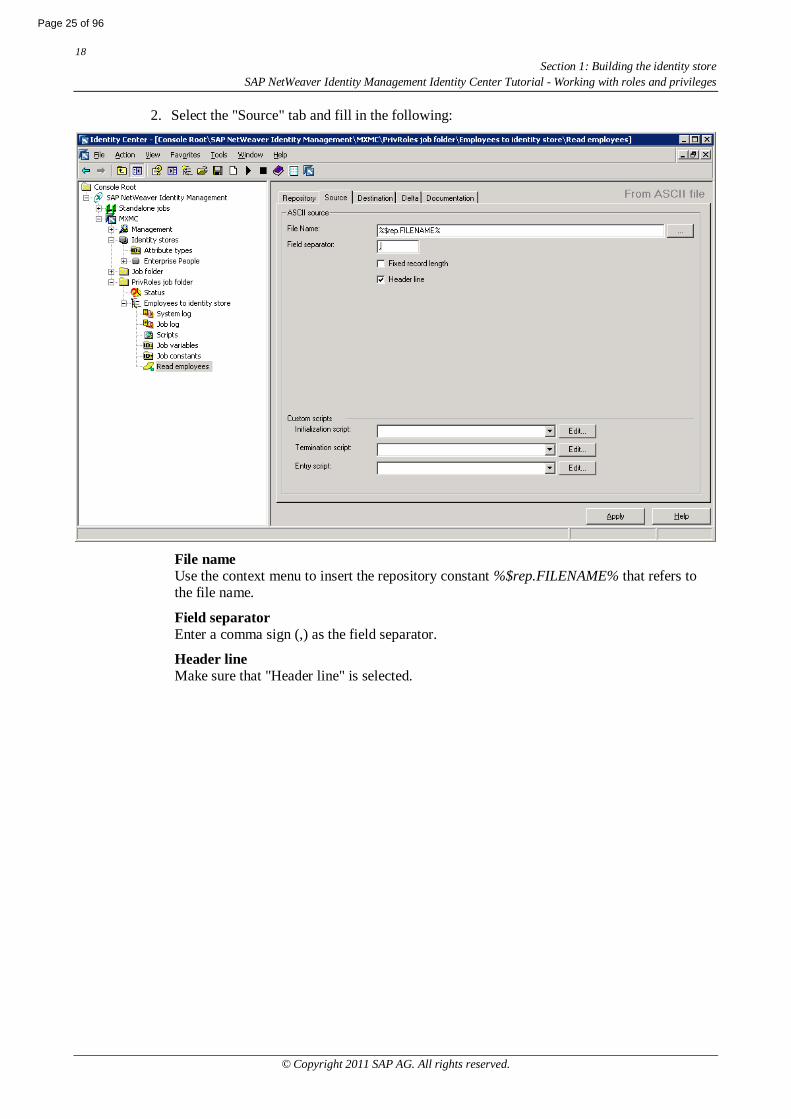
2. Select the "Source" tab and fill in the following:
File nameUse the context menu to insert the repository constant %$rep.FILENAME% that refers tothe file name.
Field separatorEnter a comma sign (,) as the field separator.
Header lineMake sure that "Header line" is selected.
Page 25 of 96
19Section 1: Building the identity storeSAP NetWeaver Identity Management Identity Center Tutorial - Working with roles and privileges
© Copyright 2011 SAP AG. All rights reserved.
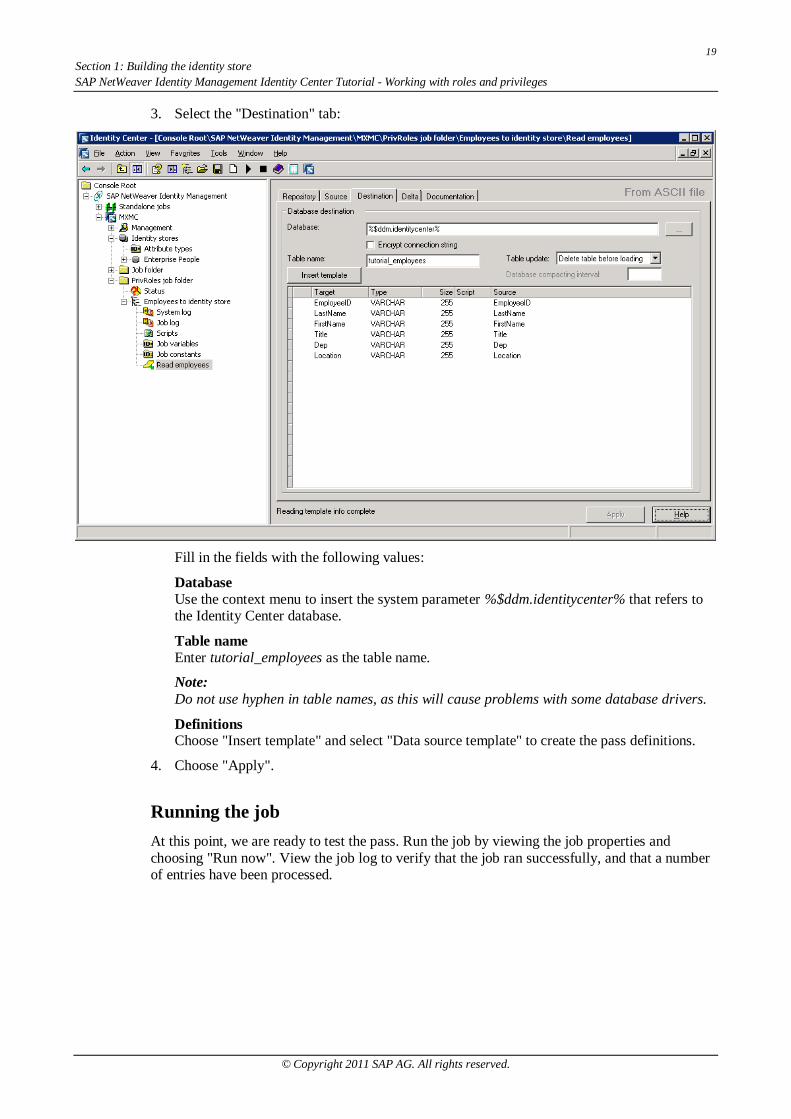
3. Select the "Destination" tab:
Fill in the fields with the following values:
DatabaseUse the context menu to insert the system parameter %$ddm.identitycenter% that refers tothe Identity Center database.
Table nameEnter tutorial_employees as the table name.
Note:Do not use hyphen in table names, as this will cause problems with some database drivers.
DefinitionsChoose "Insert template" and select "Data source template" to create the pass definitions.
4. Choose "Apply".
Running the jobAt this point, we are ready to test the pass. Run the job by viewing the job properties andchoosing "Run now". View the job log to verify that the job ran successfully, and that a numberof entries have been processed.
20Section 1: Building the identity store
SAP NetWeaver Identity Management Identity Center Tutorial - Working with roles and privileges
© Copyright 2011 SAP AG. All rights reserved.
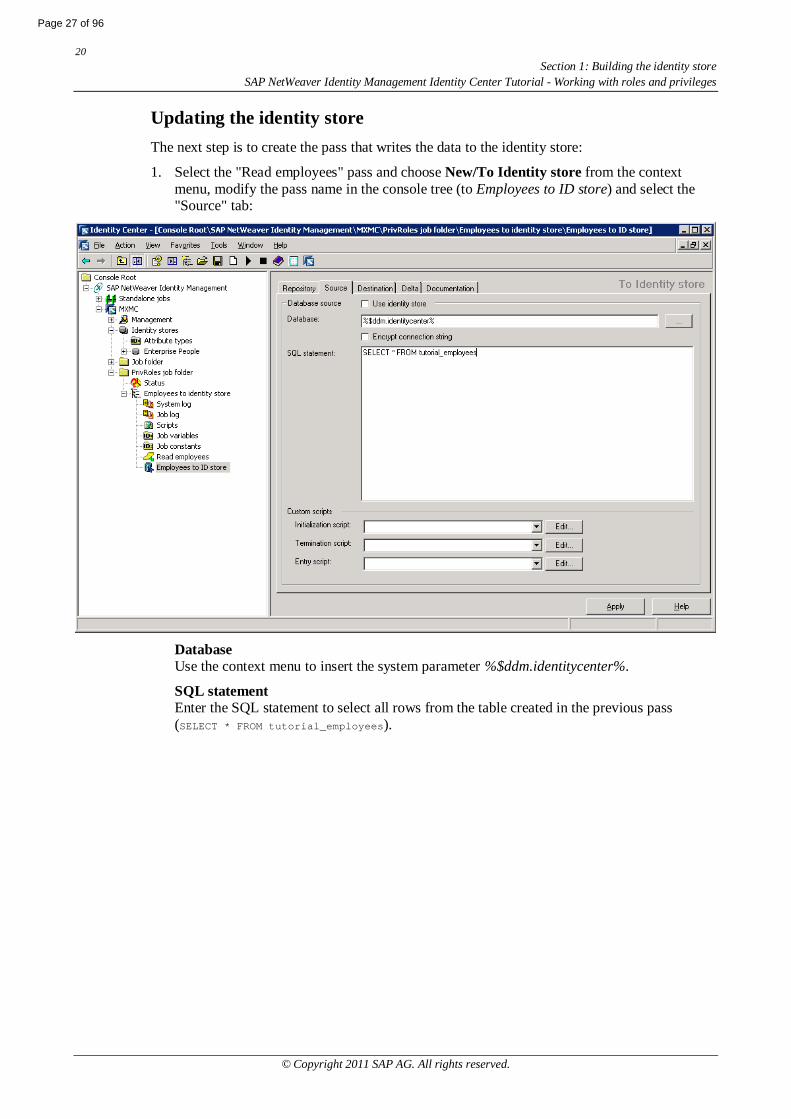
Updating the identity storeThe next step is to create the pass that writes the data to the identity store:
1. Select the "Read employees" pass and choose New/To Identity store from the contextmenu, modify the pass name in the console tree (to Employees to ID store) and select the"Source" tab:
DatabaseUse the context menu to insert the system parameter %$ddm.identitycenter%.
SQL statementEnter the SQL statement to select all rows from the table created in the previous pass(SELECT * FROM tutorial_employees).
Page 27 of 96
21Section 1: Building the identity storeSAP NetWeaver Identity Management Identity Center Tutorial - Working with roles and privileges
© Copyright 2011 SAP AG. All rights reserved.
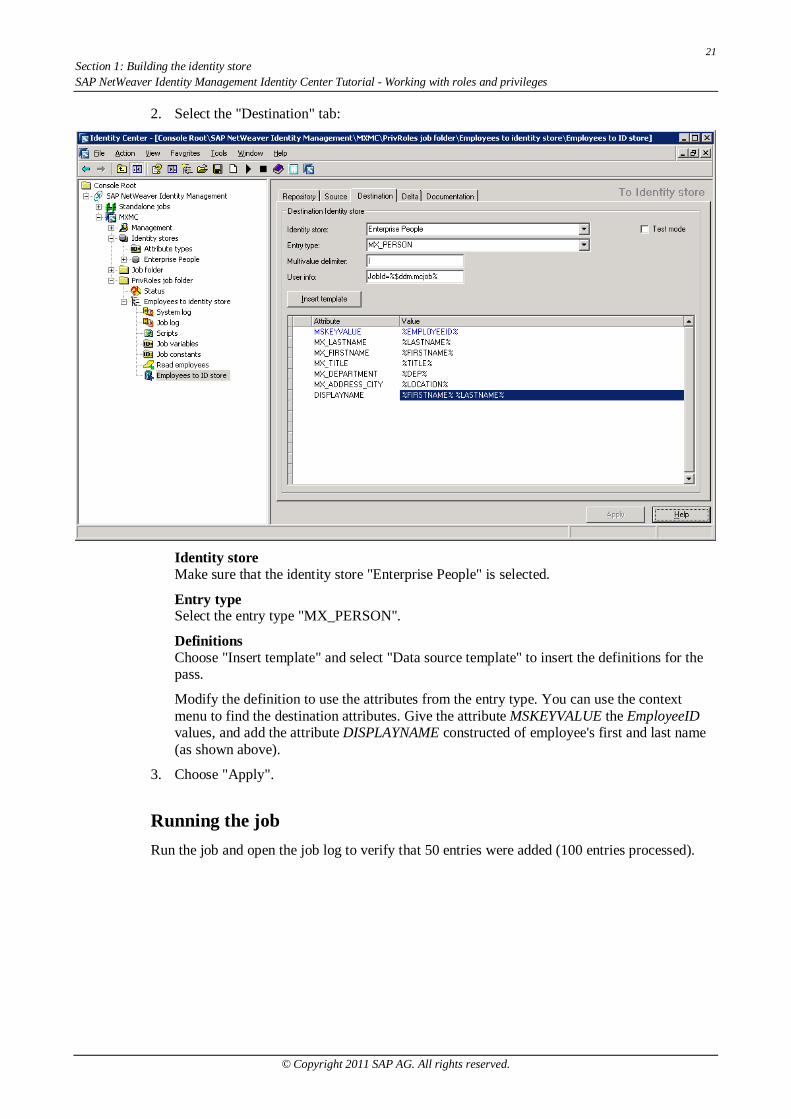
2. Select the "Destination" tab:
Identity storeMake sure that the identity store "Enterprise People" is selected.
Entry typeSelect the entry type "MX_PERSON".
DefinitionsChoose "Insert template" and select "Data source template" to insert the definitions for thepass.
Modify the definition to use the attributes from the entry type. You can use the contextmenu to find the destination attributes. Give the attribute MSKEYVALUE the EmployeeIDvalues, and add the attribute DISPLAYNAME constructed of employee's first and last name(as shown above).
3. Choose "Apply".
Running the jobRun the job and open the job log to verify that 50 entries were added (100 entries processed).
22Section 1: Building the identity store
SAP NetWeaver Identity Management Identity Center Tutorial - Working with roles and privileges
© Copyright 2011 SAP AG. All rights reserved.
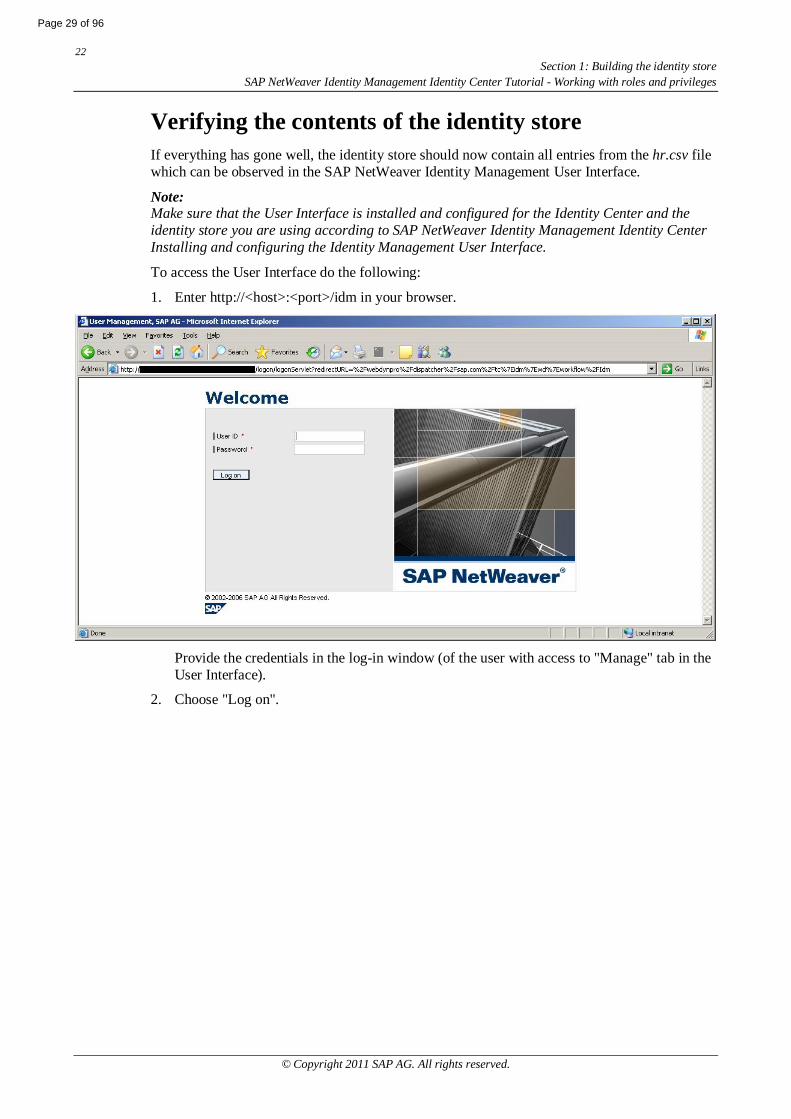
Verifying the contents of the identity storeIf everything has gone well, the identity store should now contain all entries from the hr.csv filewhich can be observed in the SAP NetWeaver Identity Management User Interface.
Note:Make sure that the User Interface is installed and configured for the Identity Center and theidentity store you are using according to SAP NetWeaver Identity Management Identity CenterInstalling and configuring the Identity Management User Interface.
To access the User Interface do the following:
1. Enter http://<host>:<port>/idm in your browser.
Provide the credentials in the log-in window (of the user with access to "Manage" tab in theUser Interface).
2. Choose "Log on".
Page 29 of 96

23Section 1: Building the identity storeSAP NetWeaver Identity Management Identity Center Tutorial - Working with roles and privileges
© Copyright 2011 SAP AG. All rights reserved.
3. Select the "Manage" tab.
Make sure that the "Person" is selected in the "Show" field and choose "Go".
4. Verify that the entries are present in the identity store.
24Section 1: Building the identity store
SAP NetWeaver Identity Management Identity Center Tutorial - Working with roles and privileges
© Copyright 2011 SAP AG. All rights reserved.
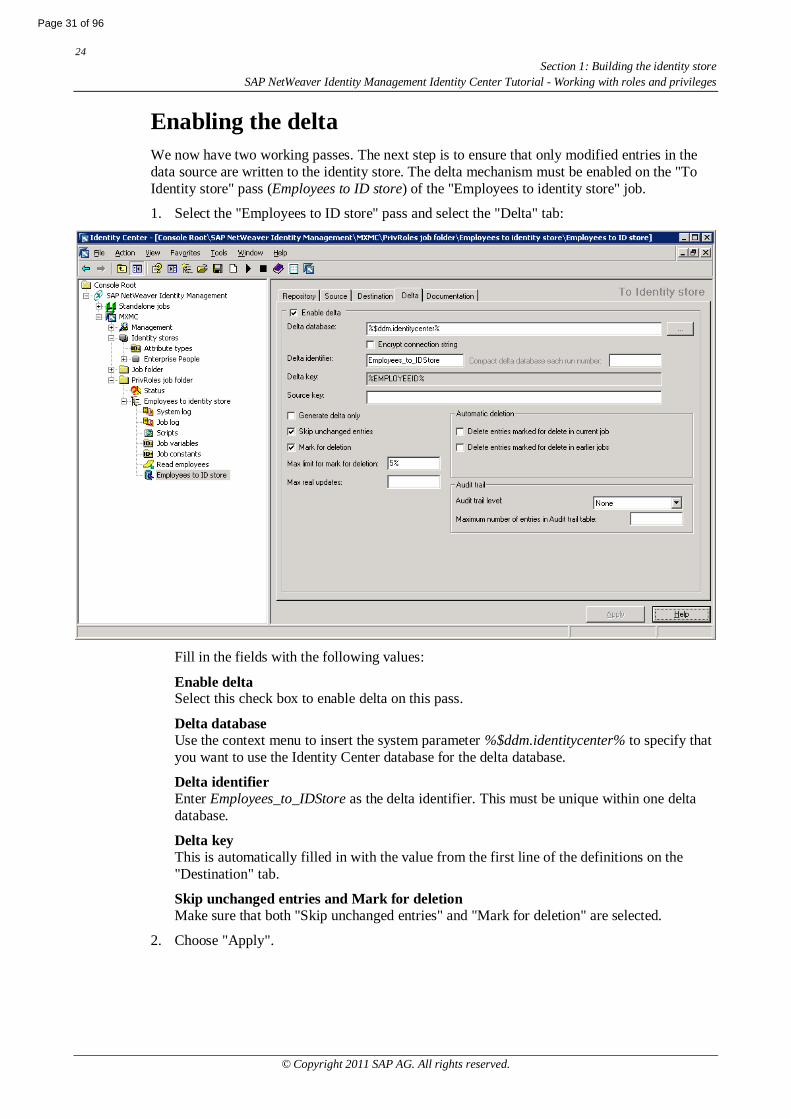
Enabling the deltaWe now have two working passes. The next step is to ensure that only modified entries in thedata source are written to the identity store. The delta mechanism must be enabled on the "ToIdentity store" pass (Employees to ID store) of the "Employees to identity store" job.
1. Select the "Employees to ID store" pass and select the "Delta" tab:
Fill in the fields with the following values:
Enable deltaSelect this check box to enable delta on this pass.
Delta databaseUse the context menu to insert the system parameter %$ddm.identitycenter% to specify thatyou want to use the Identity Center database for the delta database.
Delta identifierEnter Employees_to_IDStore as the delta identifier. This must be unique within one deltadatabase.
Delta keyThis is automatically filled in with the value from the first line of the definitions on the"Destination" tab.
Skip unchanged entries and Mark for deletionMake sure that both "Skip unchanged entries" and "Mark for deletion" are selected.
2. Choose "Apply".
Page 31 of 96
25Section 1: Building the identity storeSAP NetWeaver Identity Management Identity Center Tutorial - Working with roles and privileges
© Copyright 2011 SAP AG. All rights reserved.
Run the job a couple of times and view the job log. You can observe that the first time the job isrun after the delta is enabled, 50 entries are modified, while the next time, the job detects thatthe entries are unmodified.
Note:The count is the total for the job, including the entries handled by the "Read employees" pass.These entries are always included in the "Add" column, as no delta has been defined for thispass.
26Section 2: Creating the privileges
SAP NetWeaver Identity Management Identity Center Tutorial - Working with roles and privileges
© Copyright 2011 SAP AG. All rights reserved.
Section 2: Creating the privilegesIn this section you will learn how to create privileges. The privileges that need to be created are:
PRIV:MainEntrance
PRIV:ServerRoom
PRIV:ArchiveRoom
The focus in this tutorial is to show the principles and mechanisms of working with roles andprivileges, and not so much on configuration of the external systems. So when a user is given aparticular privilege, a file will be created (containing the timestamp of when the privilege wasassigned to the user) and provisioned to the respective folder. In a production system, theseprivileges would create and delete users or grant or revoke access rights in target systems.
Creating folder for privilegesBefore creating privileges, create a folder where users with the given privilege will beprovisioned to. This folder will function as target repository for the provisioning data. We createa folder in C:\Tutorial\Target (the directory which we created a global constant for):
building: folder where the users assigned the privileges PRIV:MainEntrance,PRIV:ServerRoom and PRIV:ArchiveRoom are provisioned to.
Page 33 of 96
27Section 2: Creating the privilegesSAP NetWeaver Identity Management Identity Center Tutorial - Working with roles and privileges
© Copyright 2011 SAP AG. All rights reserved.
Defining repository definition for folderHere we will create a repository definition BUILDING for the target folder building.
To create repository definitions for the folder building, do the following:
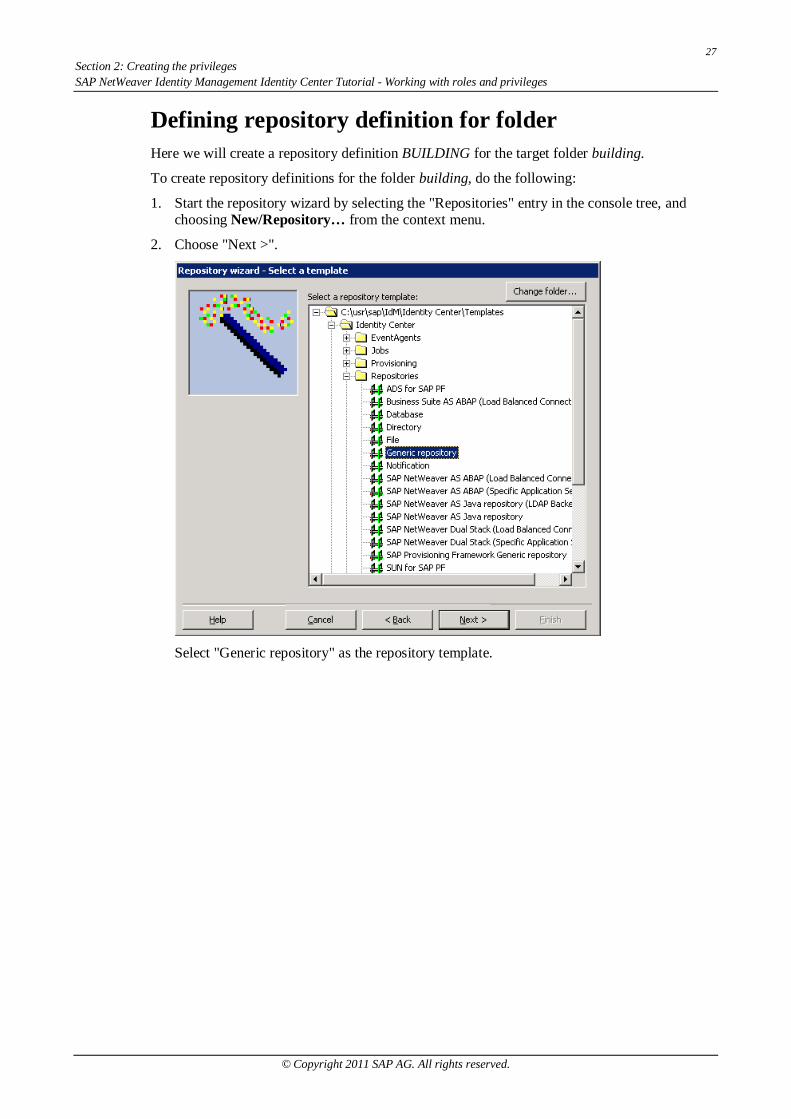
1. Start the repository wizard by selecting the "Repositories" entry in the console tree, andchoosing New/Repository… from the context menu.
2. Choose "Next >".
Select "Generic repository" as the repository template.
28Section 2: Creating the privileges
SAP NetWeaver Identity Management Identity Center Tutorial - Working with roles and privileges
© Copyright 2011 SAP AG. All rights reserved.
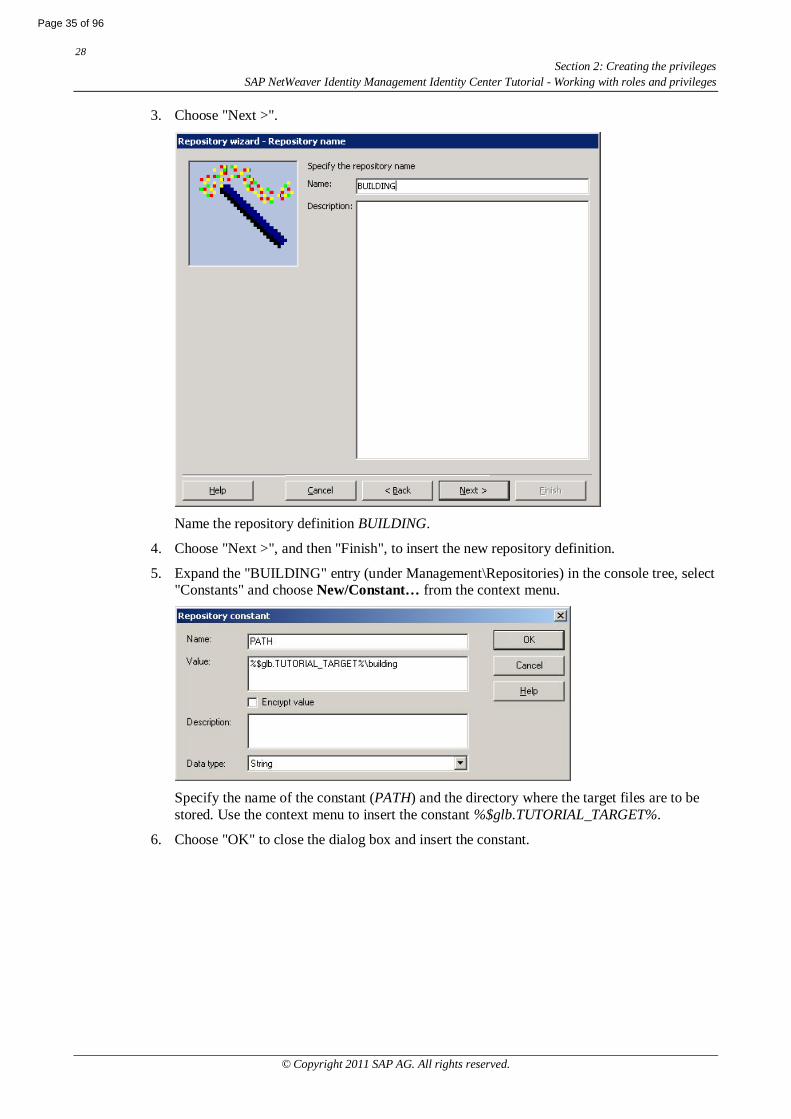
3. Choose "Next >".
Name the repository definition BUILDING.
4. Choose "Next >", and then "Finish", to insert the new repository definition.
5. Expand the "BUILDING" entry (under Management\Repositories) in the console tree, select"Constants" and choose New/Constant… from the context menu.
Specify the name of the constant (PATH) and the directory where the target files are to bestored. Use the context menu to insert the constant %$glb.TUTORIAL_TARGET%.
6. Choose "OK" to close the dialog box and insert the constant.
Page 35 of 96
29Section 2: Creating the privilegesSAP NetWeaver Identity Management Identity Center Tutorial - Working with roles and privileges
© Copyright 2011 SAP AG. All rights reserved.
Creating the privilegesThe target folders and their repository definitions are defined and we can now add theprivileges:
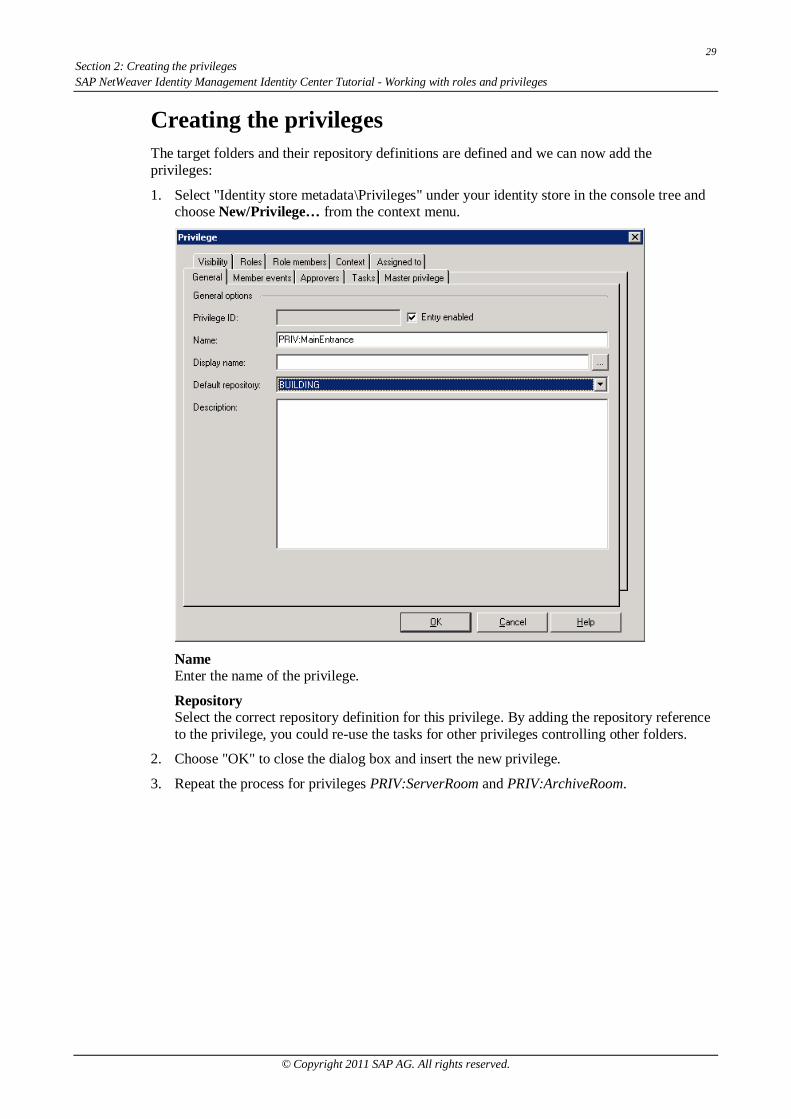
1. Select "Identity store metadata\Privileges" under your identity store in the console tree andchoose New/Privilege… from the context menu.
NameEnter the name of the privilege.
RepositorySelect the correct repository definition for this privilege. By adding the repository referenceto the privilege, you could re-use the tasks for other privileges controlling other folders.
2. Choose "OK" to close the dialog box and insert the new privilege.
3. Repeat the process for privileges PRIV:ServerRoom and PRIV:ArchiveRoom.
30Section 3: Creating the User Interface tasks
SAP NetWeaver Identity Management Identity Center Tutorial - Working with roles and privileges
© Copyright 2011 SAP AG. All rights reserved.
Section 3: Creating the User Interface tasksTo be able to define and manage roles and role assignments through the User Interface, thenecessary tasks must be created. We will create the following five User Interface tasks:
Create role – task is used to create new roles.
Edit role properties – this task is used to edit role hierarchy by adding child roles andprivileges to a role. The task is also used to change role name and it is possible to add ashort description of the role.
Assign role – task is used to add members to a role.
Delete role – this task deletes the role.
Edit user – this task is used to edit information about users, e.g. phone number, email,privileges and roles.
Creating the folderBefore creating the User Interface tasks, create a separate folder for them:
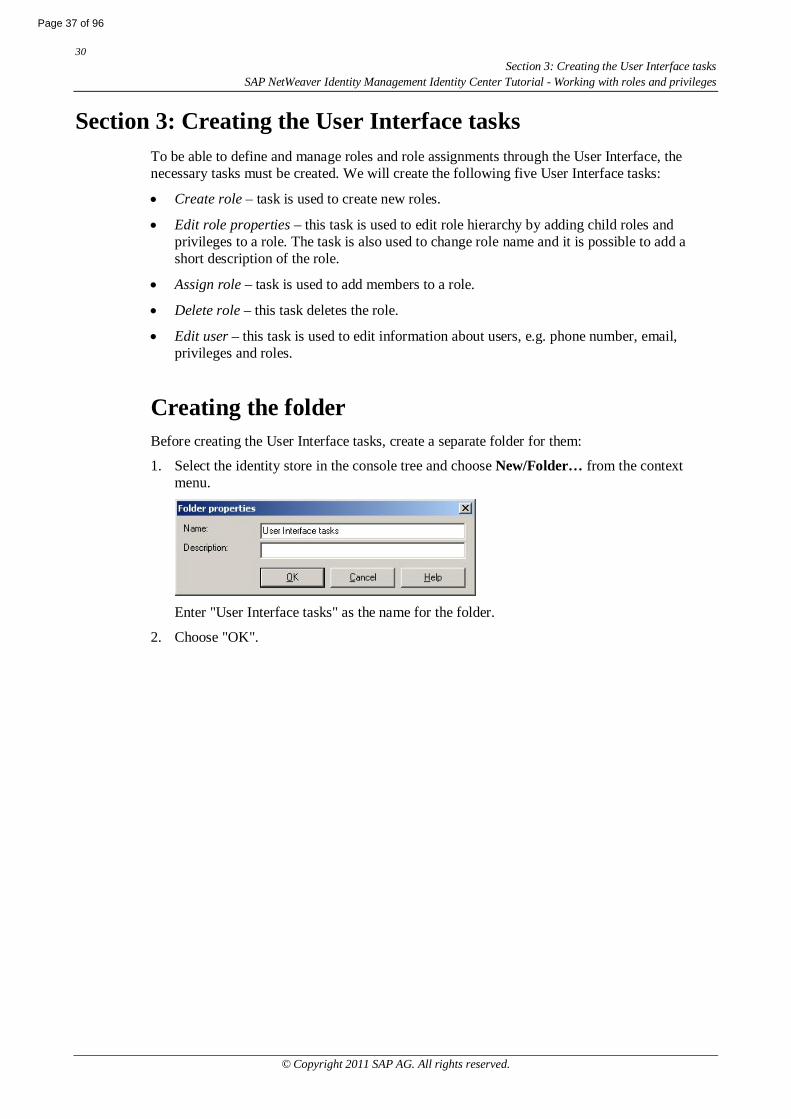
1. Select the identity store in the console tree and choose New/Folder… from the contextmenu.
Enter "User Interface tasks" as the name for the folder.
2. Choose "OK".
Page 37 of 96
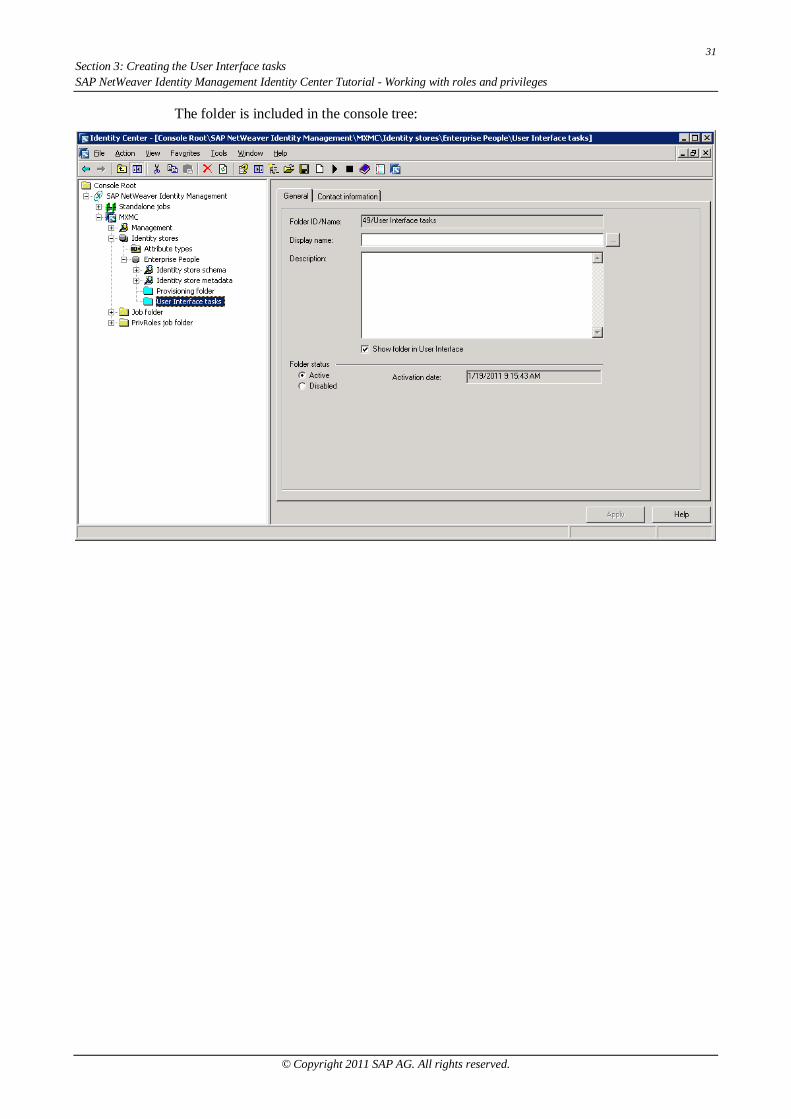
31Section 3: Creating the User Interface tasksSAP NetWeaver Identity Management Identity Center Tutorial - Working with roles and privileges
© Copyright 2011 SAP AG. All rights reserved.
The folder is included in the console tree:
32Section 3: Creating the User Interface tasks
SAP NetWeaver Identity Management Identity Center Tutorial - Working with roles and privileges
© Copyright 2011 SAP AG. All rights reserved.
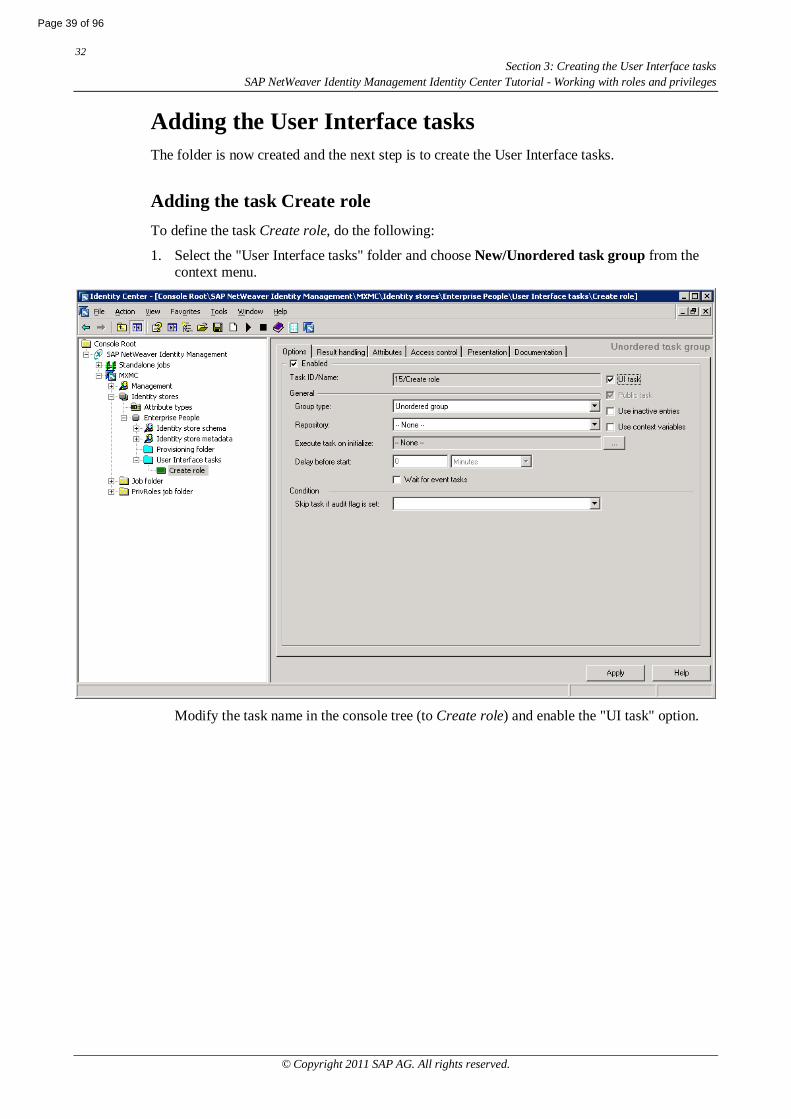
Adding the User Interface tasksThe folder is now created and the next step is to create the User Interface tasks.
Adding the task Create roleTo define the task Create role, do the following:
1. Select the "User Interface tasks" folder and choose New/Unordered task group from thecontext menu.
Modify the task name in the console tree (to Create role) and enable the "UI task" option.
Page 39 of 96

33Section 3: Creating the User Interface tasksSAP NetWeaver Identity Management Identity Center Tutorial - Working with roles and privileges
© Copyright 2011 SAP AG. All rights reserved.
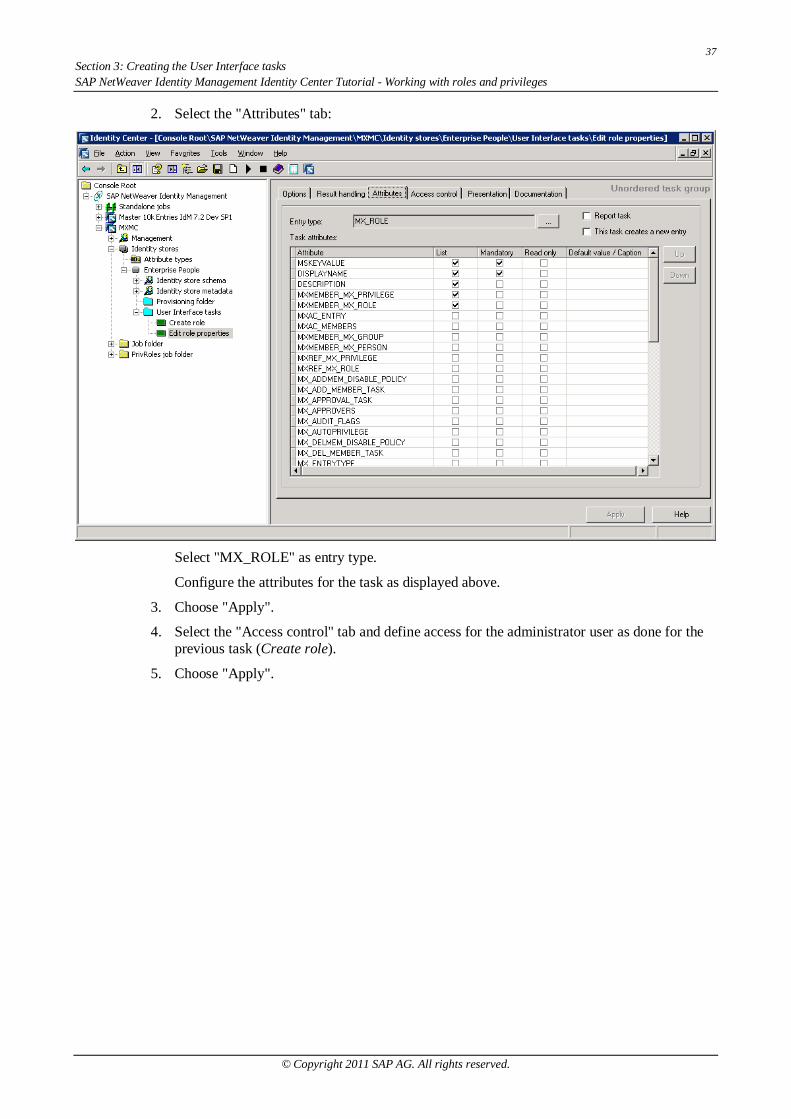
2. Select the "Attributes" tab:
Select "MX_ROLE" as entry type.
Note:A dialog box will appear asking you to confirm your choice. Choose "Yes" to confirm and toclose the dialog box.
Configure the attributes for the task as displayed above. Use "Up" (or "Down") to place theattributes in the exact same order as shown in the picture above.
Select "This task creates a new entry".
3. Choose "Apply".

34Section 3: Creating the User Interface tasks
SAP NetWeaver Identity Management Identity Center Tutorial - Working with roles and privileges
© Copyright 2011 SAP AG. All rights reserved.
4. Select the "Access control" tab and choose "Add…".
Select "Logged-in user or identity store entry" in the "Allow access for" list.
Enter the name of the identity store user with the access to the "Manage" tab in the UserInterface (here Administrator). You might use "Check name" to ensure that the name youentered is correct and exists. This allows the administrator user to create new roles.
5. Choose "OK".
Page 41 of 96
35Section 3: Creating the User Interface tasksSAP NetWeaver Identity Management Identity Center Tutorial - Working with roles and privileges
© Copyright 2011 SAP AG. All rights reserved.
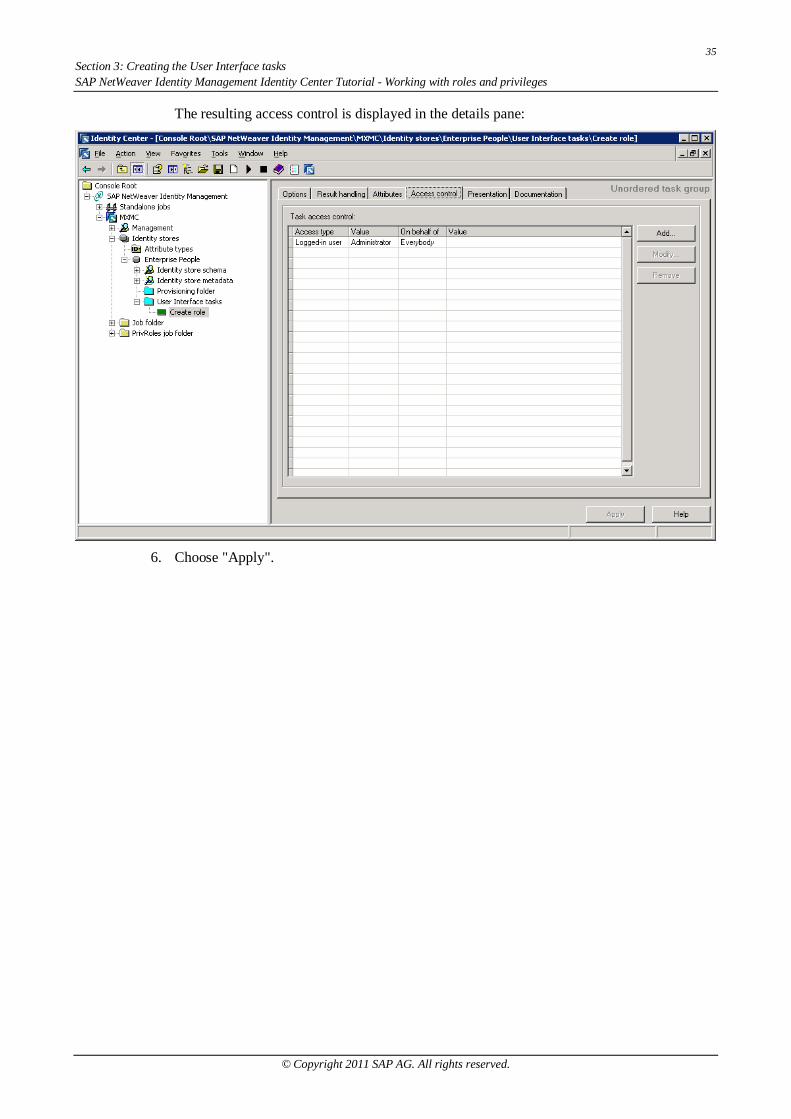
The resulting access control is displayed in the details pane:
6. Choose "Apply".

36Section 3: Creating the User Interface tasks
SAP NetWeaver Identity Management Identity Center Tutorial - Working with roles and privileges
© Copyright 2011 SAP AG. All rights reserved.
Adding the task Edit role propertiesThe task Edit role properties is used to add child roles and privileges to a role. The task is alsoused to change role name and it is possible to add a short description of the role.
To define task Edit role properties, do the following:
1. Select the "User Interface tasks" folder and choose New/Unordered task group from thecontext menu.
Modify the task name in the console tree (to Edit role properties) and enable the "UI task"option.
Page 43 of 96
37Section 3: Creating the User Interface tasksSAP NetWeaver Identity Management Identity Center Tutorial - Working with roles and privileges
© Copyright 2011 SAP AG. All rights reserved.
2. Select the "Attributes" tab:
Select "MX_ROLE" as entry type.
Configure the attributes for the task as displayed above.
3. Choose "Apply".
4. Select the "Access control" tab and define access for the administrator user as done for theprevious task (Create role).
5. Choose "Apply".
38Section 3: Creating the User Interface tasks
SAP NetWeaver Identity Management Identity Center Tutorial - Working with roles and privileges
© Copyright 2011 SAP AG. All rights reserved.
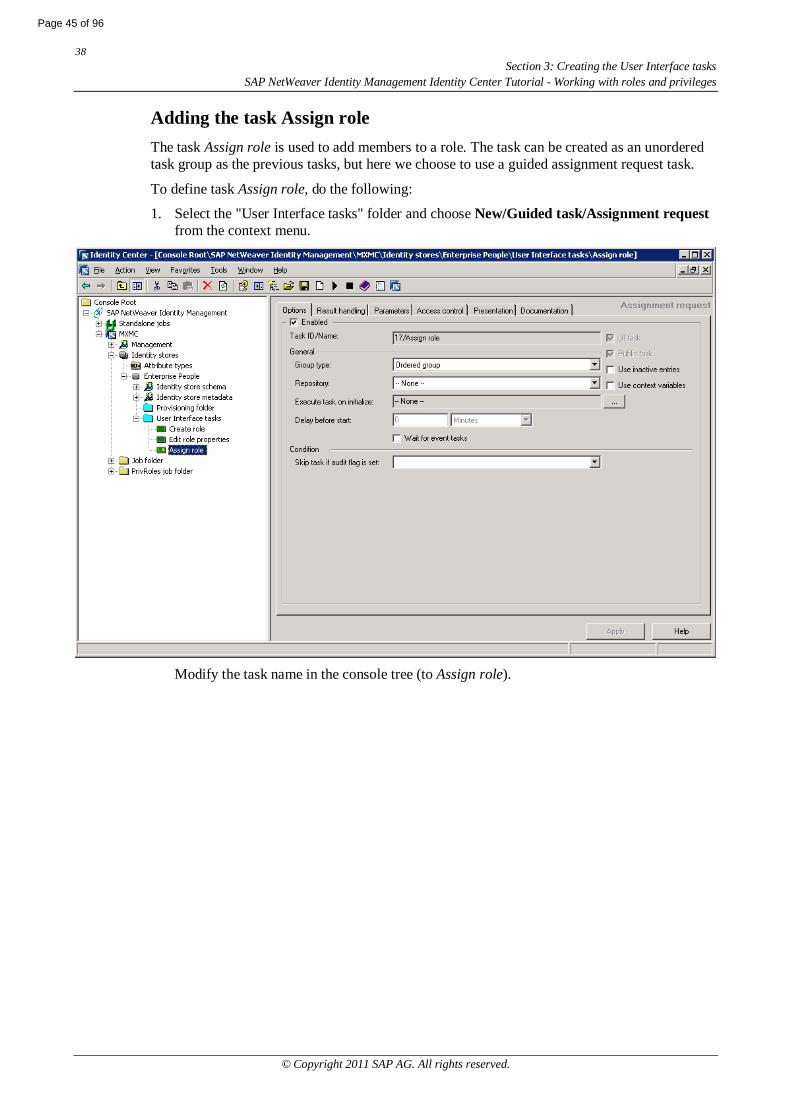
Adding the task Assign roleThe task Assign role is used to add members to a role. The task can be created as an unorderedtask group as the previous tasks, but here we choose to use a guided assignment request task.
To define task Assign role, do the following:
1. Select the "User Interface tasks" folder and choose New/Guided task/Assignment requestfrom the context menu.
Modify the task name in the console tree (to Assign role).
Page 45 of 96
39Section 3: Creating the User Interface tasksSAP NetWeaver Identity Management Identity Center Tutorial - Working with roles and privileges
© Copyright 2011 SAP AG. All rights reserved.
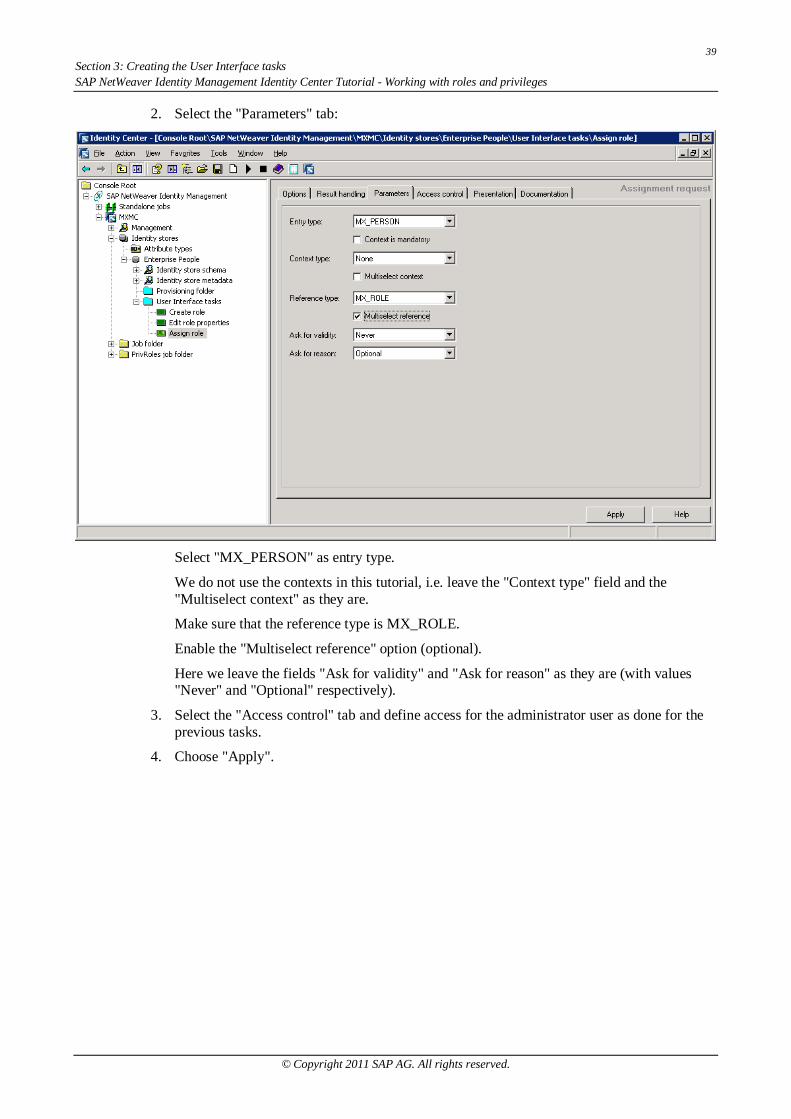
2. Select the "Parameters" tab:
Select "MX_PERSON" as entry type.
We do not use the contexts in this tutorial, i.e. leave the "Context type" field and the"Multiselect context" as they are.
Make sure that the reference type is MX_ROLE.
Enable the "Multiselect reference" option (optional).
Here we leave the fields "Ask for validity" and "Ask for reason" as they are (with values"Never" and "Optional" respectively).
3. Select the "Access control" tab and define access for the administrator user as done for theprevious tasks.
4. Choose "Apply".
40Section 3: Creating the User Interface tasks
SAP NetWeaver Identity Management Identity Center Tutorial - Working with roles and privileges
© Copyright 2011 SAP AG. All rights reserved.
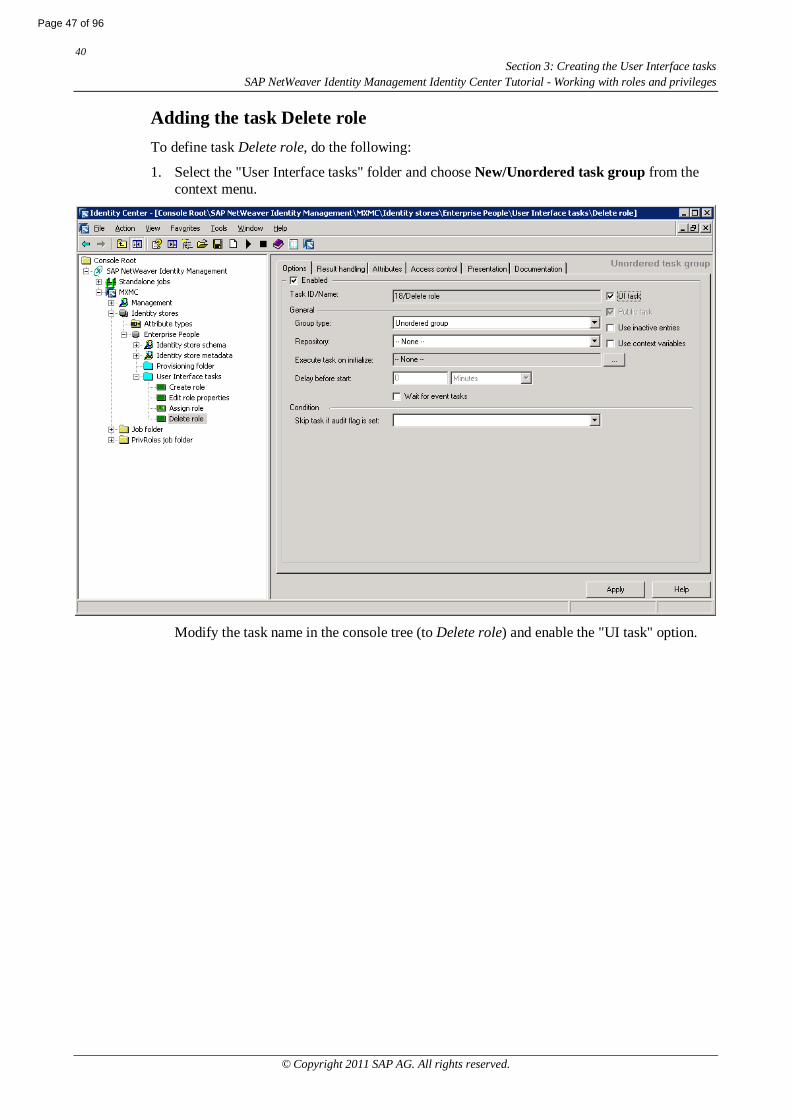
Adding the task Delete roleTo define task Delete role, do the following:
1. Select the "User Interface tasks" folder and choose New/Unordered task group from thecontext menu.
Modify the task name in the console tree (to Delete role) and enable the "UI task" option.
Page 47 of 96
41Section 3: Creating the User Interface tasksSAP NetWeaver Identity Management Identity Center Tutorial - Working with roles and privileges
© Copyright 2011 SAP AG. All rights reserved.
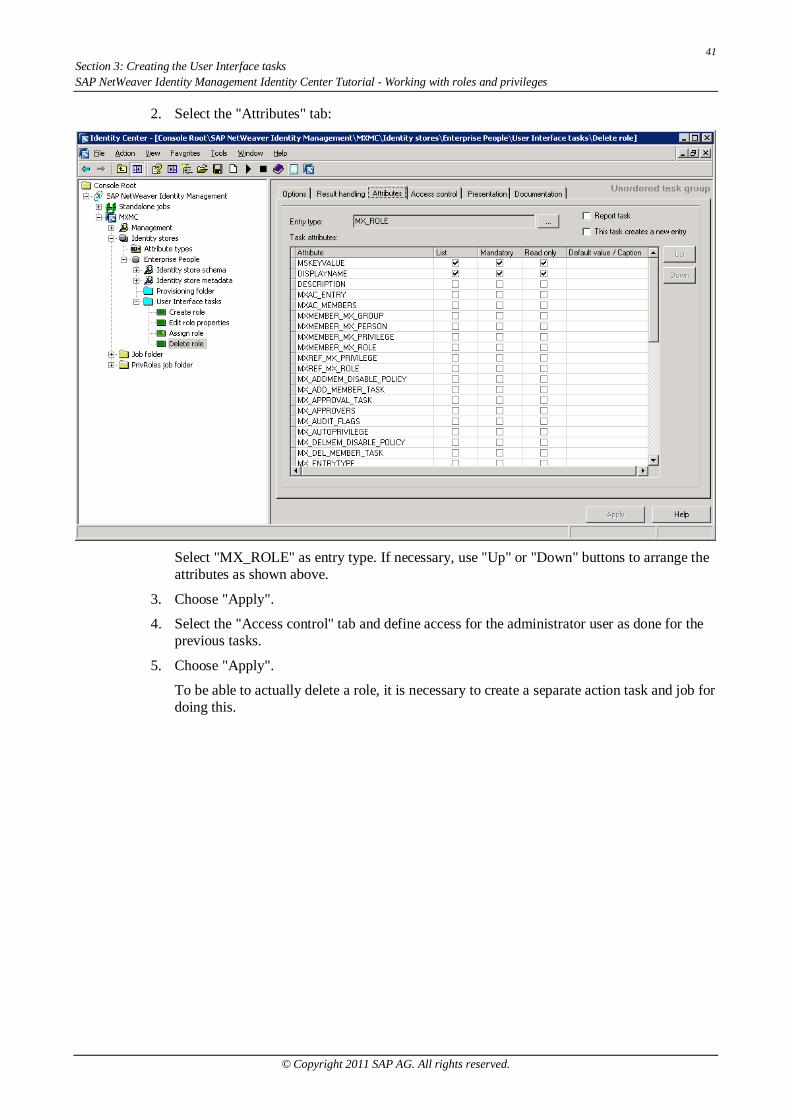
2. Select the "Attributes" tab:
Select "MX_ROLE" as entry type. If necessary, use "Up" or "Down" buttons to arrange theattributes as shown above.
3. Choose "Apply".
4. Select the "Access control" tab and define access for the administrator user as done for theprevious tasks.
5. Choose "Apply".
To be able to actually delete a role, it is necessary to create a separate action task and job fordoing this.
42Section 3: Creating the User Interface tasks
SAP NetWeaver Identity Management Identity Center Tutorial - Working with roles and privileges
© Copyright 2011 SAP AG. All rights reserved.
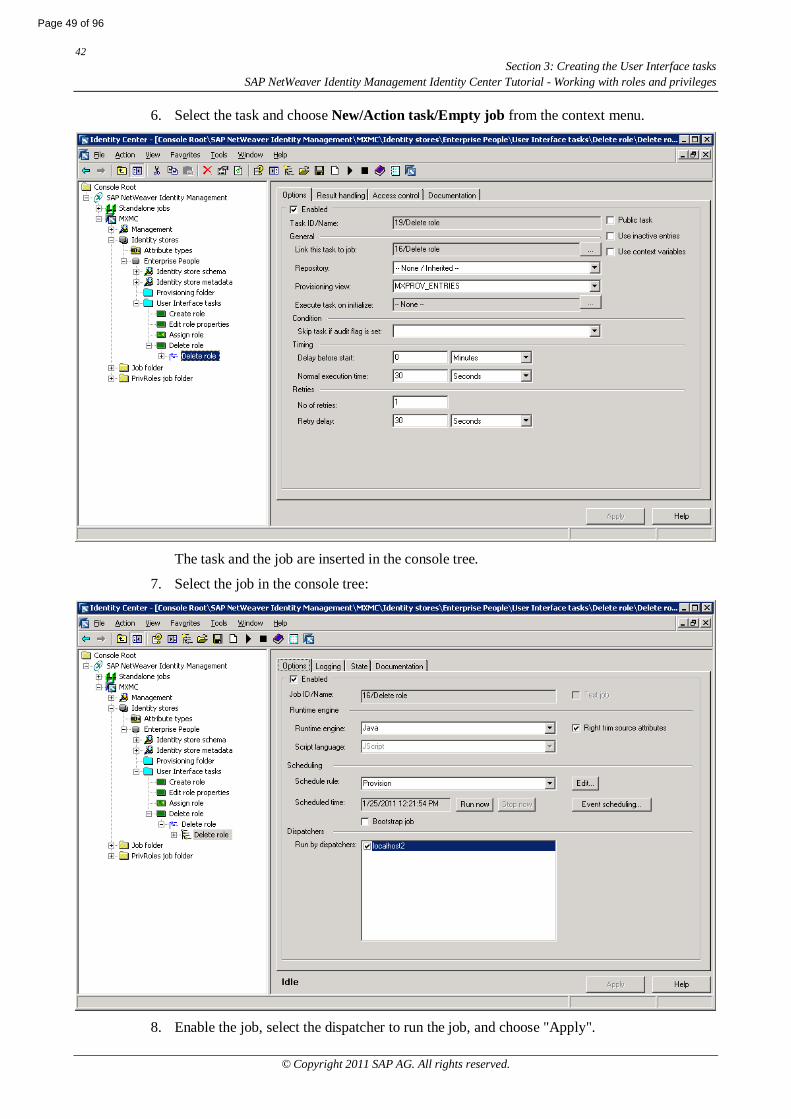
6. Select the task and choose New/Action task/Empty job from the context menu.
The task and the job are inserted in the console tree.
7. Select the job in the console tree:
8. Enable the job, select the dispatcher to run the job, and choose "Apply".
Page 49 of 96
43Section 3: Creating the User Interface tasksSAP NetWeaver Identity Management Identity Center Tutorial - Working with roles and privileges
© Copyright 2011 SAP AG. All rights reserved.
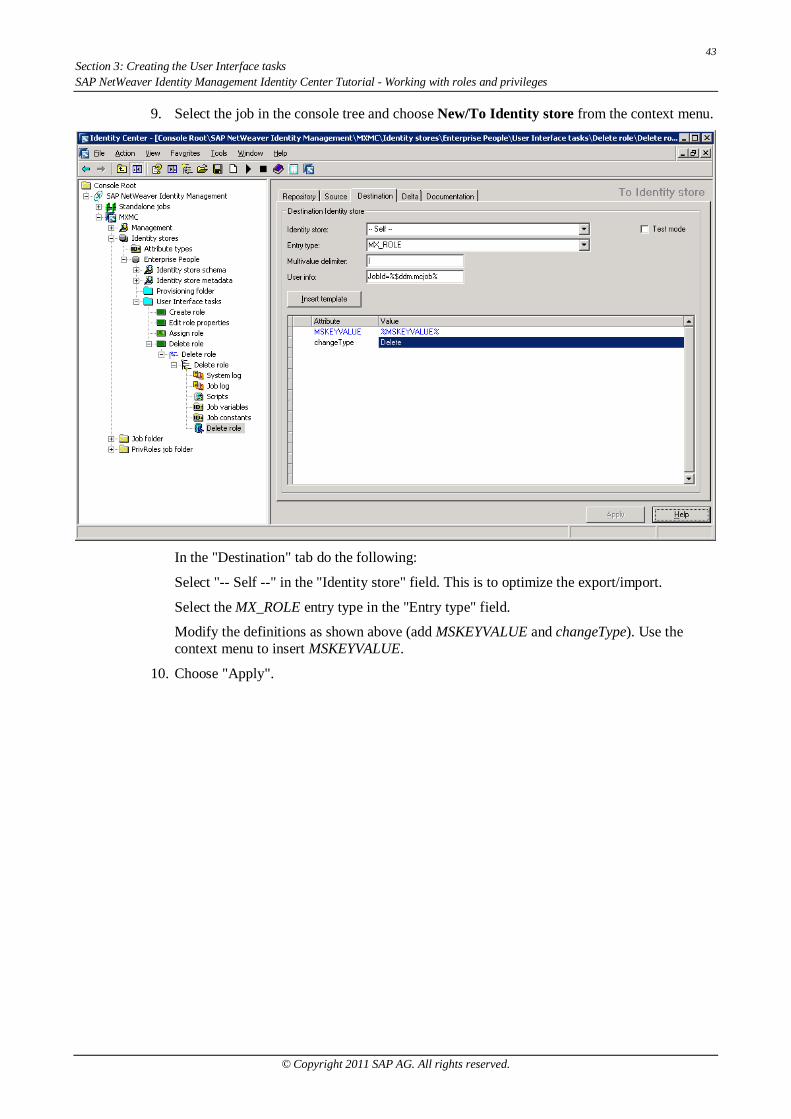
9. Select the job in the console tree and choose New/To Identity store from the context menu.
In the "Destination" tab do the following:
Select "-- Self --" in the "Identity store" field. This is to optimize the export/import.
Select the MX_ROLE entry type in the "Entry type" field.
Modify the definitions as shown above (add MSKEYVALUE and changeType). Use thecontext menu to insert MSKEYVALUE.
10. Choose "Apply".
44Section 3: Creating the User Interface tasks
SAP NetWeaver Identity Management Identity Center Tutorial - Working with roles and privileges
© Copyright 2011 SAP AG. All rights reserved.
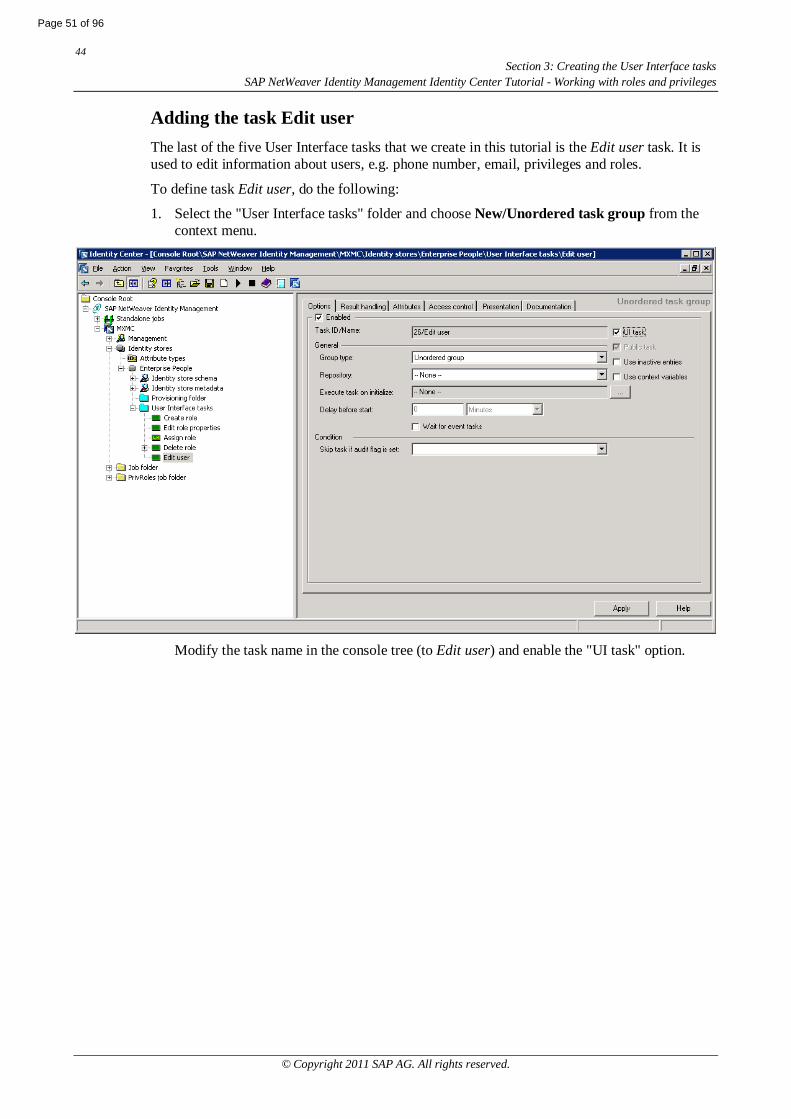
Adding the task Edit userThe last of the five User Interface tasks that we create in this tutorial is the Edit user task. It isused to edit information about users, e.g. phone number, email, privileges and roles.
To define task Edit user, do the following:
1. Select the "User Interface tasks" folder and choose New/Unordered task group from thecontext menu.
Modify the task name in the console tree (to Edit user) and enable the "UI task" option.
Page 51 of 96
45Section 3: Creating the User Interface tasksSAP NetWeaver Identity Management Identity Center Tutorial - Working with roles and privileges
© Copyright 2011 SAP AG. All rights reserved.
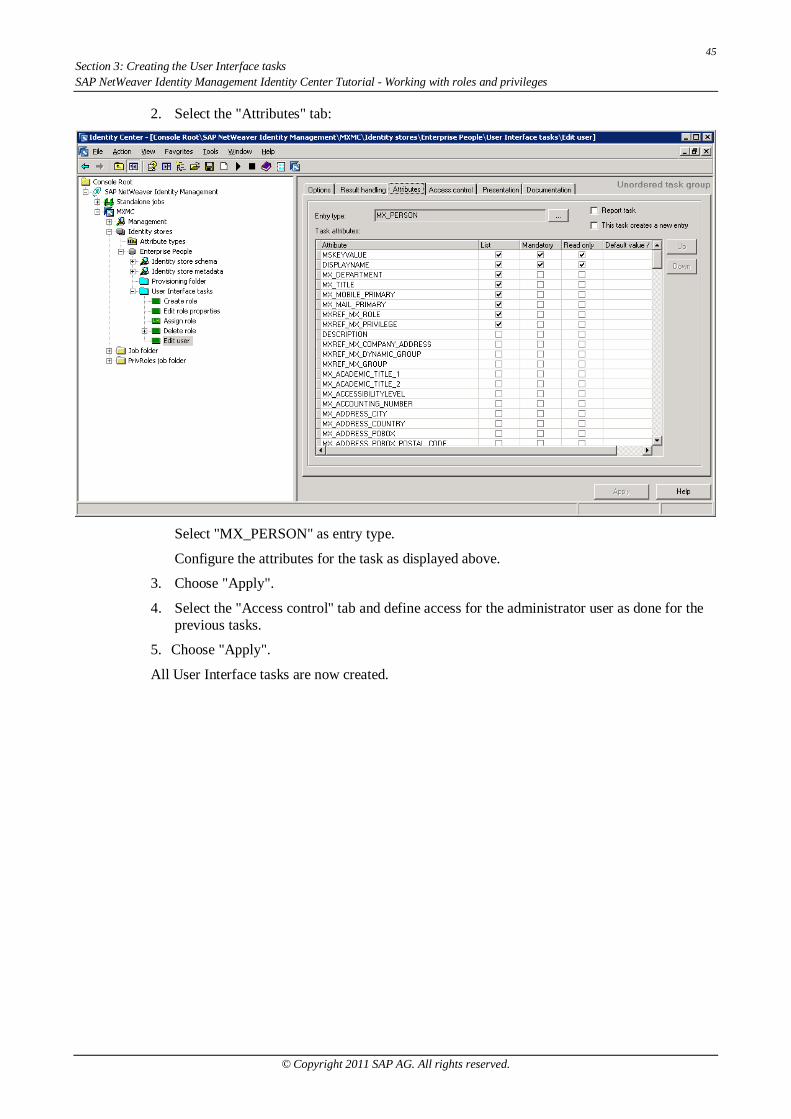
2. Select the "Attributes" tab:
Select "MX_PERSON" as entry type.
Configure the attributes for the task as displayed above.
3. Choose "Apply".
4. Select the "Access control" tab and define access for the administrator user as done for theprevious tasks.
5. Choose "Apply".
All User Interface tasks are now created.
46Section 4: Use case Physical access control
SAP NetWeaver Identity Management Identity Center Tutorial - Working with roles and privileges
© Copyright 2011 SAP AG. All rights reserved.
Section 4: Use case Physical access controlThis use case models a workplace (building) where users (employees) are given access rights tobuilding areas based on their job-role. In this use case, you will learn how to use the createdUser Interface tasks to do the following:
Create the roles (ROLE:Employee, ROLE:IT, ROLE:Adm and ROLE:Manager).
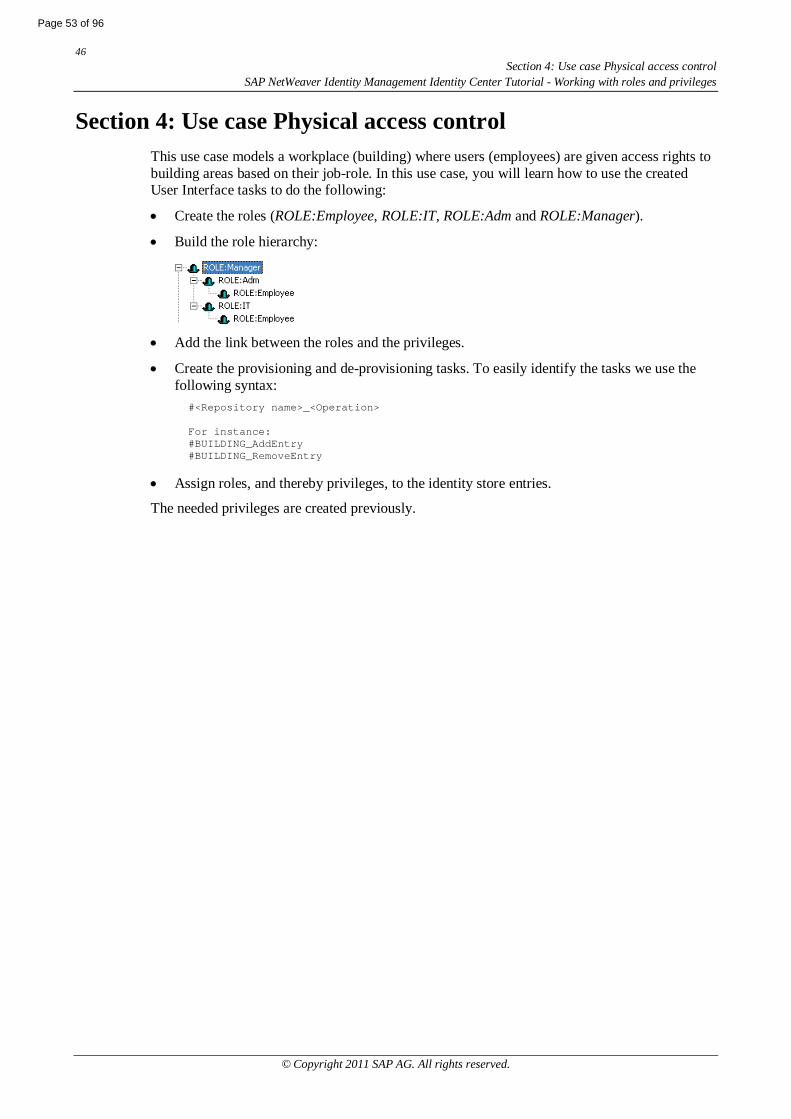
Build the role hierarchy:
Add the link between the roles and the privileges.
Create the provisioning and de-provisioning tasks. To easily identify the tasks we use thefollowing syntax:
#<Repository name>_<Operation>
For instance:#BUILDING_AddEntry#BUILDING_RemoveEntry
Assign roles, and thereby privileges, to the identity store entries.
The needed privileges are created previously.
Page 53 of 96
47Section 4: Use case Physical access controlSAP NetWeaver Identity Management Identity Center Tutorial - Working with roles and privileges
© Copyright 2011 SAP AG. All rights reserved.
Creating rolesUse the User Interface task Create role to create the following roles:
ROLE:Employee
ROLE:IT
ROLE:Adm
ROLE:Manager
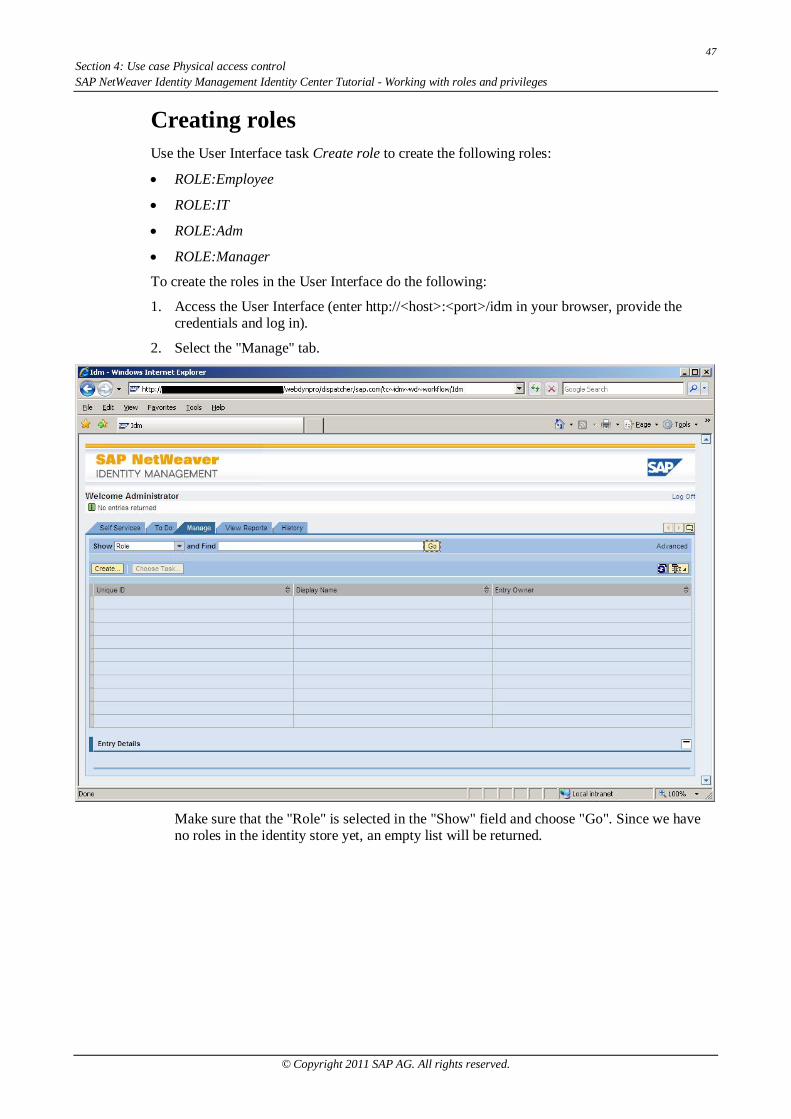
To create the roles in the User Interface do the following:
1. Access the User Interface (enter http://<host>:<port>/idm in your browser, provide thecredentials and log in).
2. Select the "Manage" tab.
Make sure that the "Role" is selected in the "Show" field and choose "Go". Since we haveno roles in the identity store yet, an empty list will be returned.
48Section 4: Use case Physical access control
SAP NetWeaver Identity Management Identity Center Tutorial - Working with roles and privileges
© Copyright 2011 SAP AG. All rights reserved.
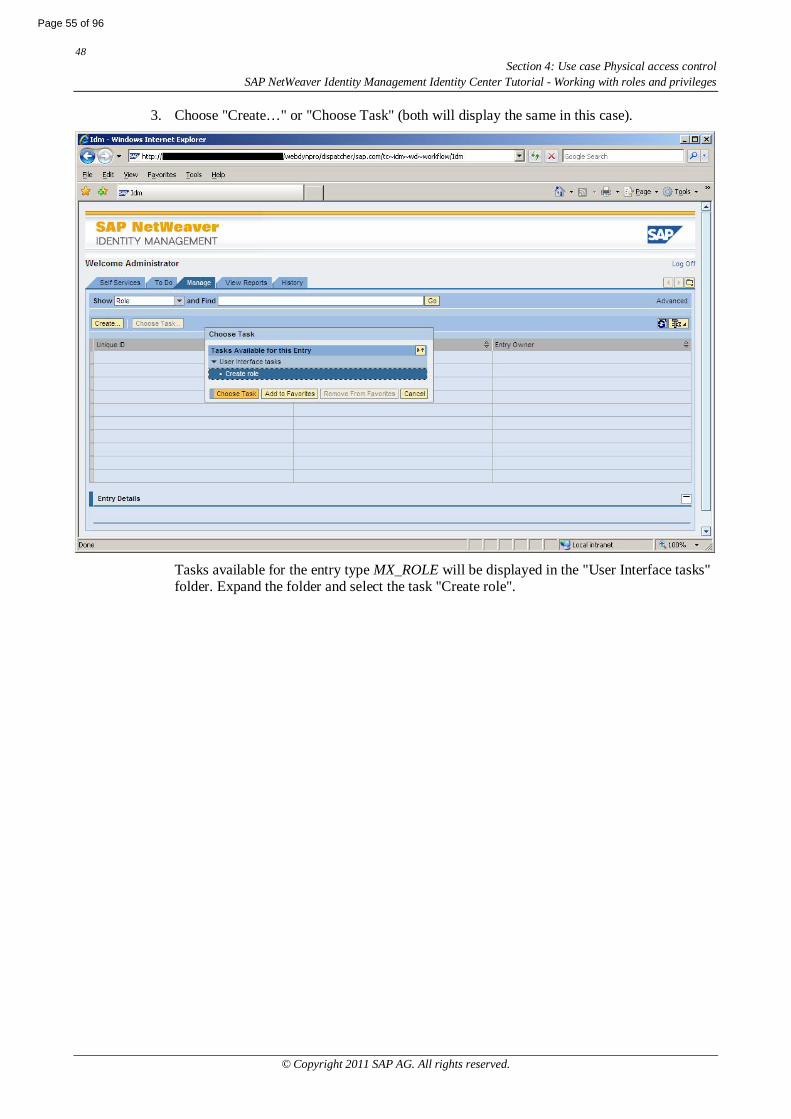
3. Choose "Create…" or "Choose Task" (both will display the same in this case).
Tasks available for the entry type MX_ROLE will be displayed in the "User Interface tasks"folder. Expand the folder and select the task "Create role".
Page 55 of 96
49Section 4: Use case Physical access controlSAP NetWeaver Identity Management Identity Center Tutorial - Working with roles and privileges
© Copyright 2011 SAP AG. All rights reserved.
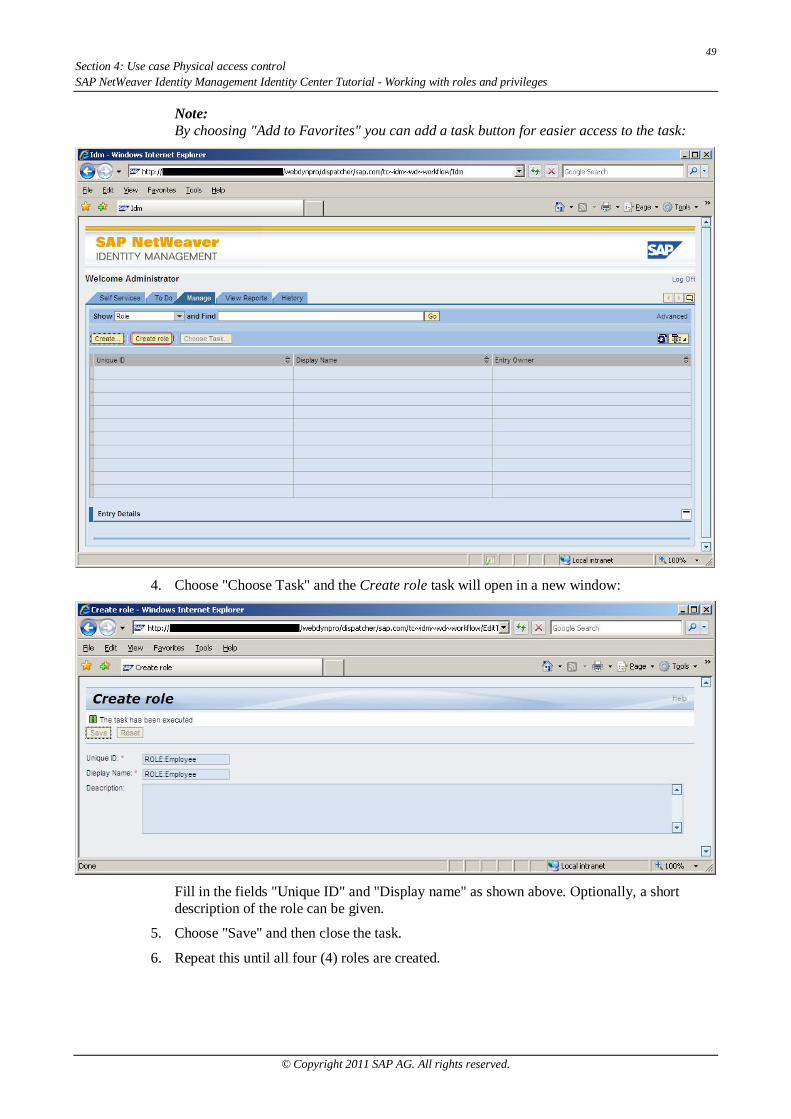
Note:By choosing "Add to Favorites" you can add a task button for easier access to the task:
4. Choose "Choose Task" and the Create role task will open in a new window:
Fill in the fields "Unique ID" and "Display name" as shown above. Optionally, a shortdescription of the role can be given.
5. Choose "Save" and then close the task.
6. Repeat this until all four (4) roles are created.
50Section 4: Use case Physical access control
SAP NetWeaver Identity Management Identity Center Tutorial - Working with roles and privileges
© Copyright 2011 SAP AG. All rights reserved.
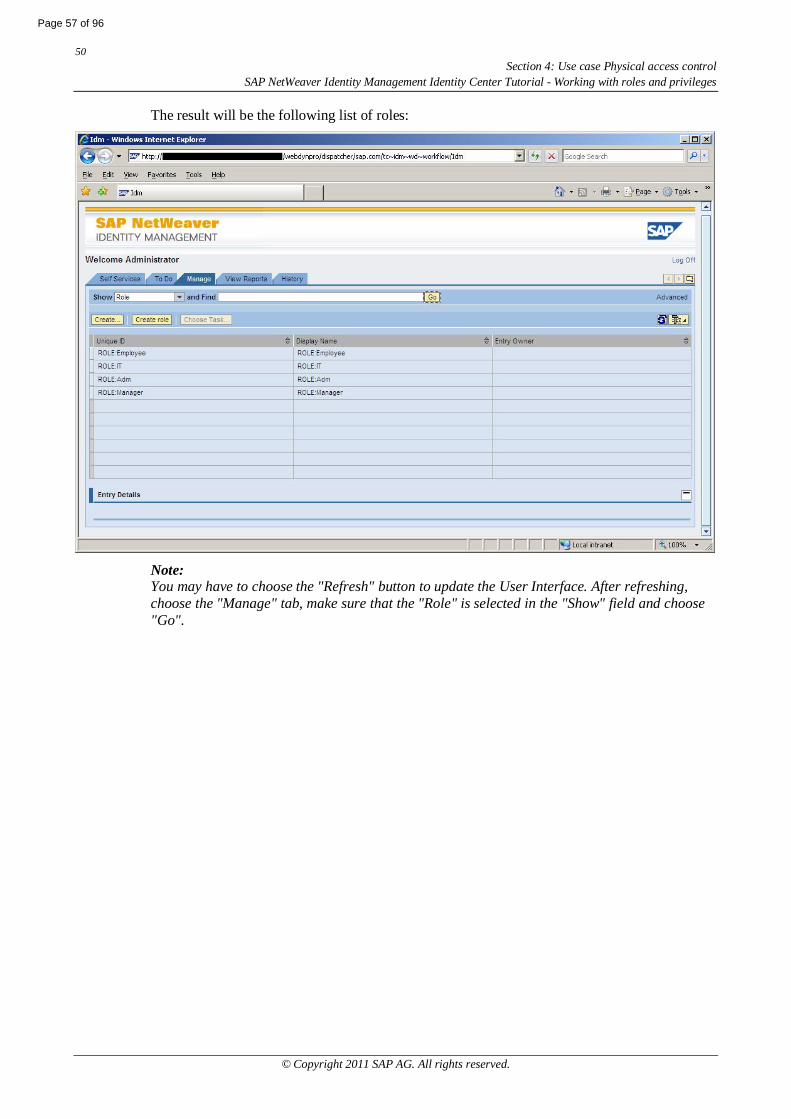
The result will be the following list of roles:
Note:You may have to choose the "Refresh" button to update the User Interface. After refreshing,choose the "Manage" tab, make sure that the "Role" is selected in the "Show" field and choose"Go".
Page 57 of 96
51Section 4: Use case Physical access controlSAP NetWeaver Identity Management Identity Center Tutorial - Working with roles and privileges
© Copyright 2011 SAP AG. All rights reserved.
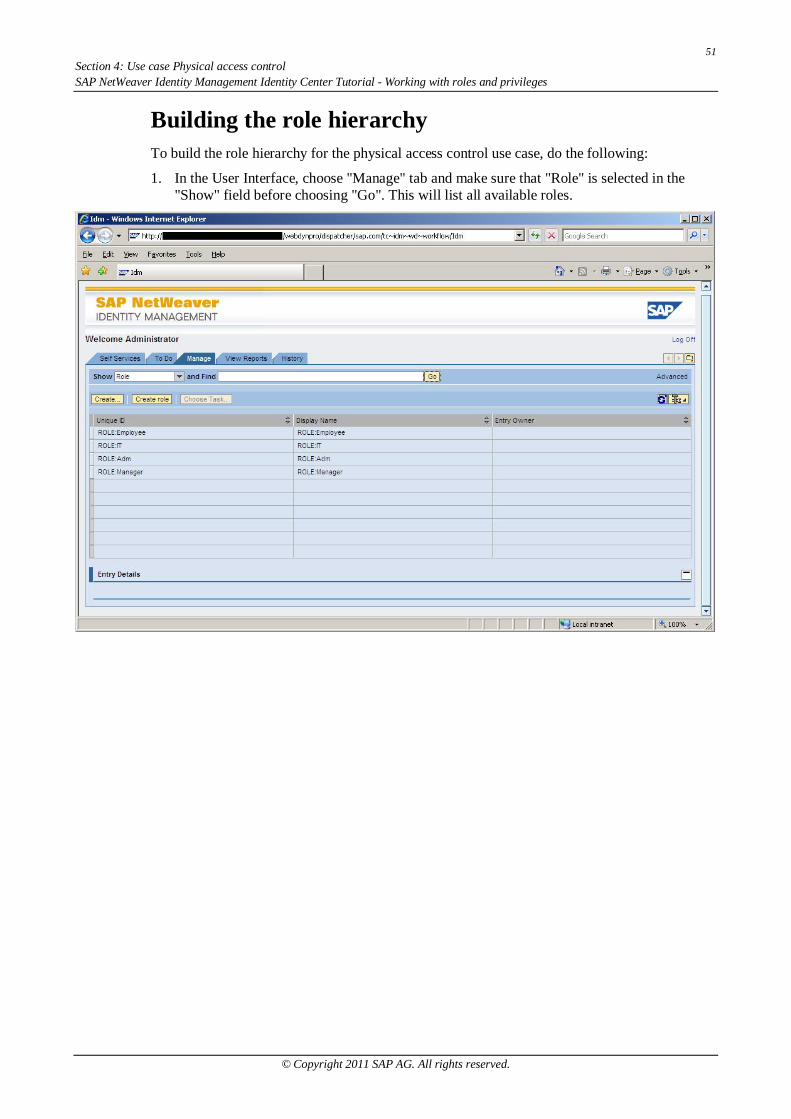
Building the role hierarchyTo build the role hierarchy for the physical access control use case, do the following:
1. In the User Interface, choose "Manage" tab and make sure that "Role" is selected in the"Show" field before choosing "Go". This will list all available roles.
52Section 4: Use case Physical access control
SAP NetWeaver Identity Management Identity Center Tutorial - Working with roles and privileges
© Copyright 2011 SAP AG. All rights reserved.
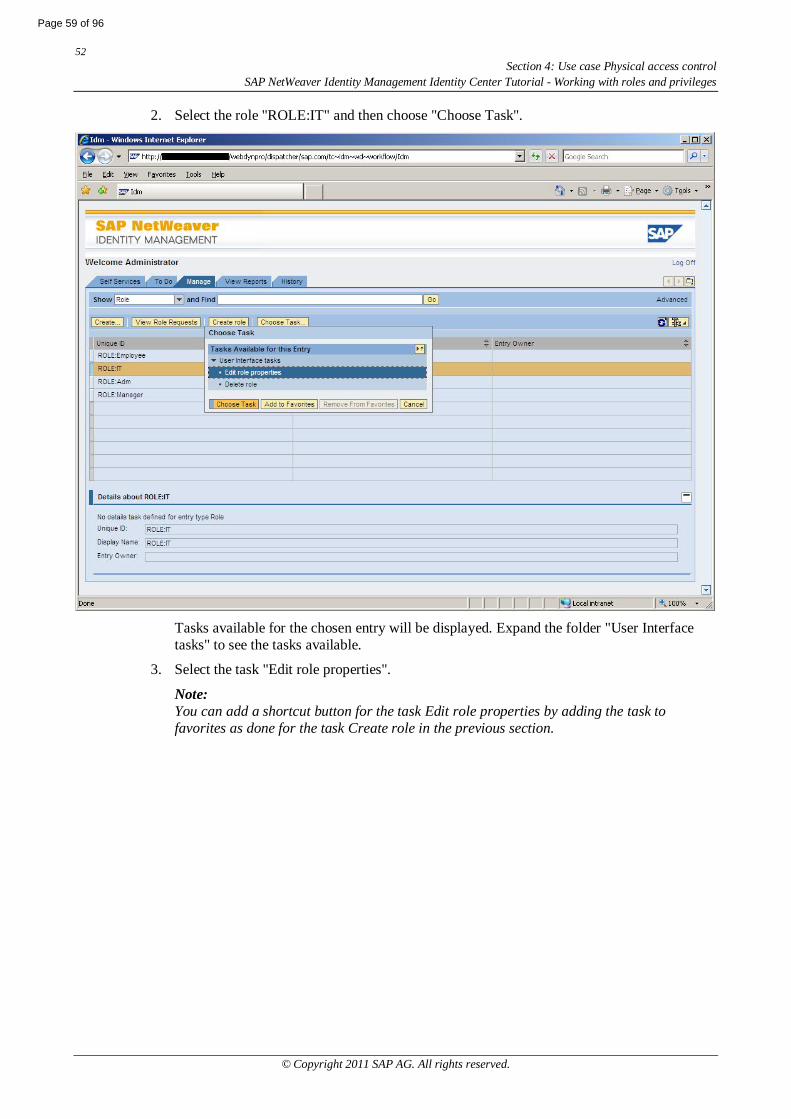
2. Select the role "ROLE:IT" and then choose "Choose Task".
Tasks available for the chosen entry will be displayed. Expand the folder "User Interfacetasks" to see the tasks available.
3. Select the task "Edit role properties".
Note:You can add a shortcut button for the task Edit role properties by adding the task tofavorites as done for the task Create role in the previous section.
Page 59 of 96
53Section 4: Use case Physical access controlSAP NetWeaver Identity Management Identity Center Tutorial - Working with roles and privileges
© Copyright 2011 SAP AG. All rights reserved.
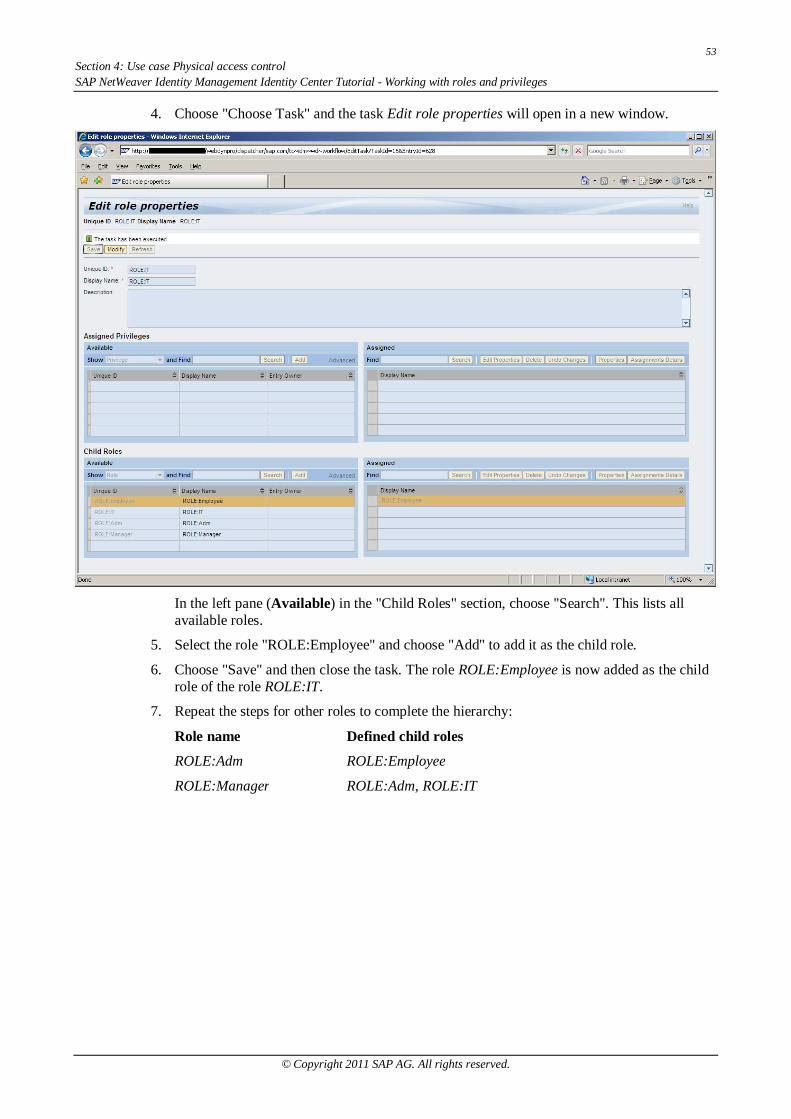
4. Choose "Choose Task" and the task Edit role properties will open in a new window.
In the left pane (Available) in the "Child Roles" section, choose "Search". This lists allavailable roles.
5. Select the role "ROLE:Employee" and choose "Add" to add it as the child role.
6. Choose "Save" and then close the task. The role ROLE:Employee is now added as the childrole of the role ROLE:IT.
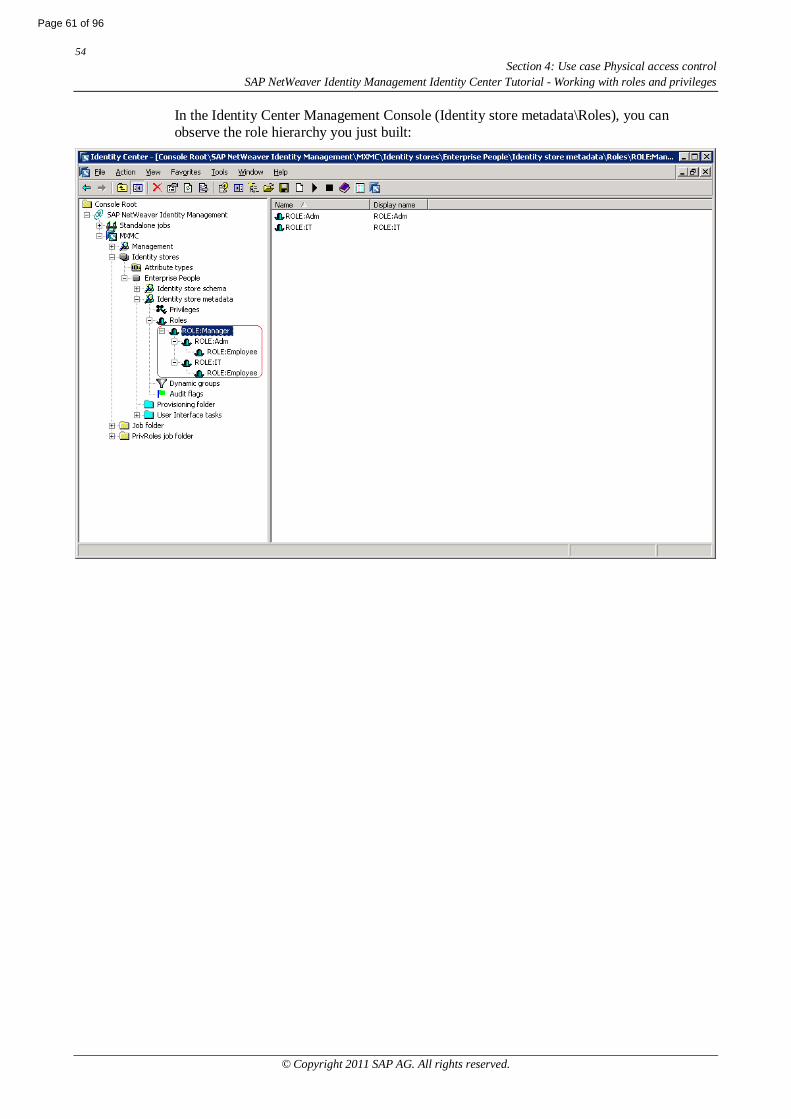
7. Repeat the steps for other roles to complete the hierarchy:
Role name Defined child roles
ROLE:Adm ROLE:Employee
ROLE:Manager ROLE:Adm, ROLE:IT
54Section 4: Use case Physical access control
SAP NetWeaver Identity Management Identity Center Tutorial - Working with roles and privileges
© Copyright 2011 SAP AG. All rights reserved.
In the Identity Center Management Console (Identity store metadata\Roles), you canobserve the role hierarchy you just built:
Page 61 of 96
55Section 4: Use case Physical access controlSAP NetWeaver Identity Management Identity Center Tutorial - Working with roles and privileges
© Copyright 2011 SAP AG. All rights reserved.
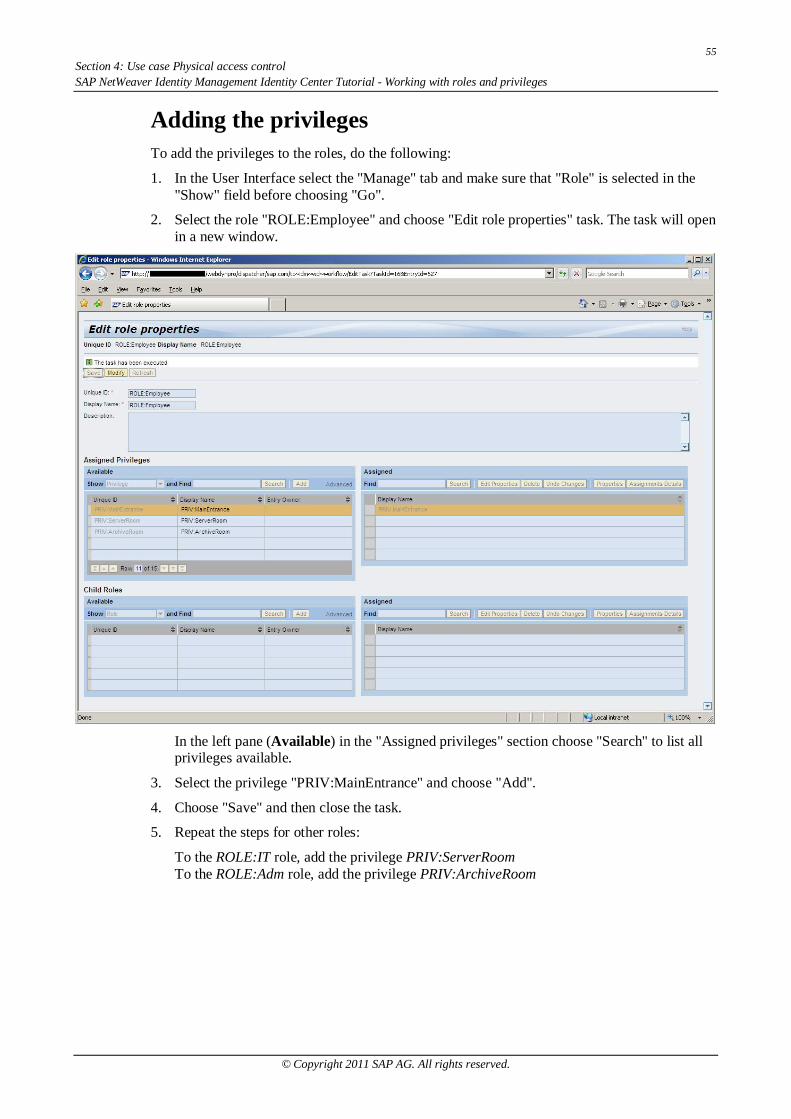
Adding the privilegesTo add the privileges to the roles, do the following:
1. In the User Interface select the "Manage" tab and make sure that "Role" is selected in the"Show" field before choosing "Go".
2. Select the role "ROLE:Employee" and choose "Edit role properties" task. The task will openin a new window.
In the left pane (Available) in the "Assigned privileges" section choose "Search" to list allprivileges available.
3. Select the privilege "PRIV:MainEntrance" and choose "Add".
4. Choose "Save" and then close the task.
5. Repeat the steps for other roles:
To the ROLE:IT role, add the privilege PRIV:ServerRoomTo the ROLE:Adm role, add the privilege PRIV:ArchiveRoom
56Section 4: Use case Physical access control
SAP NetWeaver Identity Management Identity Center Tutorial - Working with roles and privileges
© Copyright 2011 SAP AG. All rights reserved.
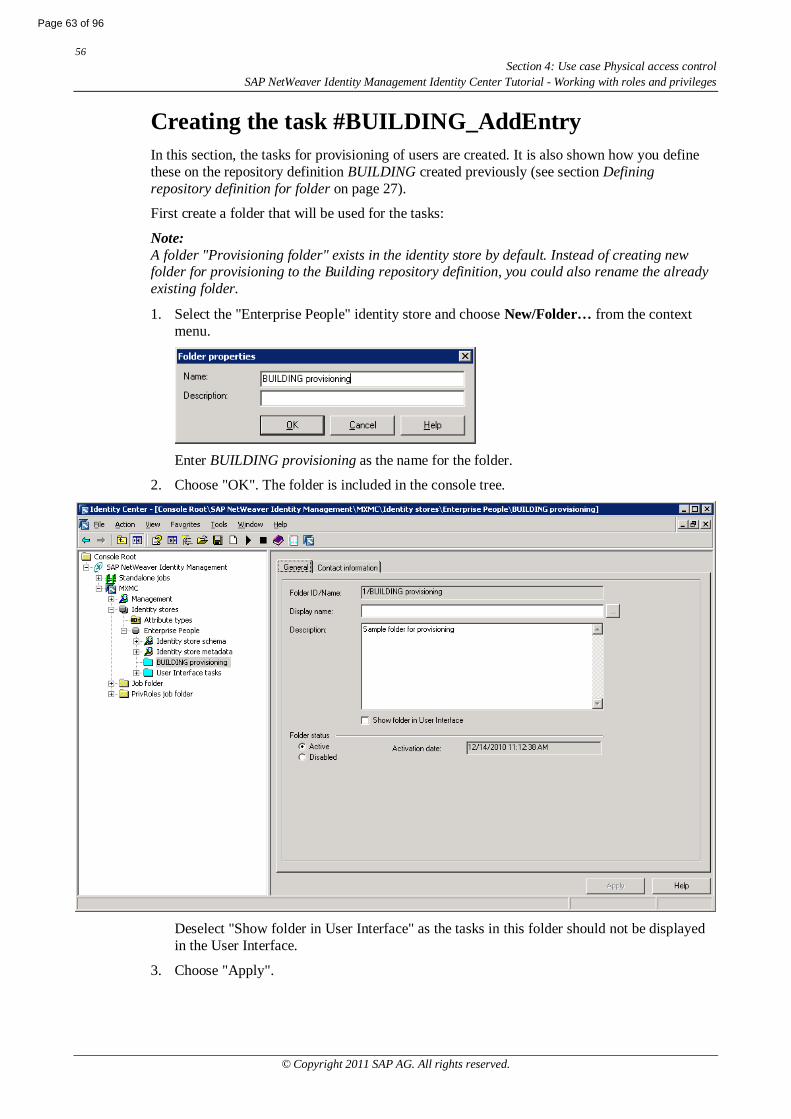
Creating the task #BUILDING_AddEntryIn this section, the tasks for provisioning of users are created. It is also shown how you definethese on the repository definition BUILDING created previously (see section Definingrepository definition for folder on page 27).
First create a folder that will be used for the tasks:
Note:A folder "Provisioning folder" exists in the identity store by default. Instead of creating newfolder for provisioning to the Building repository definition, you could also rename the alreadyexisting folder.
1. Select the "Enterprise People" identity store and choose New/Folder… from the contextmenu.
Enter BUILDING provisioning as the name for the folder.
2. Choose "OK". The folder is included in the console tree.
Deselect "Show folder in User Interface" as the tasks in this folder should not be displayedin the User Interface.
3. Choose "Apply".
Page 63 of 96
57Section 4: Use case Physical access controlSAP NetWeaver Identity Management Identity Center Tutorial - Working with roles and privileges
© Copyright 2011 SAP AG. All rights reserved.
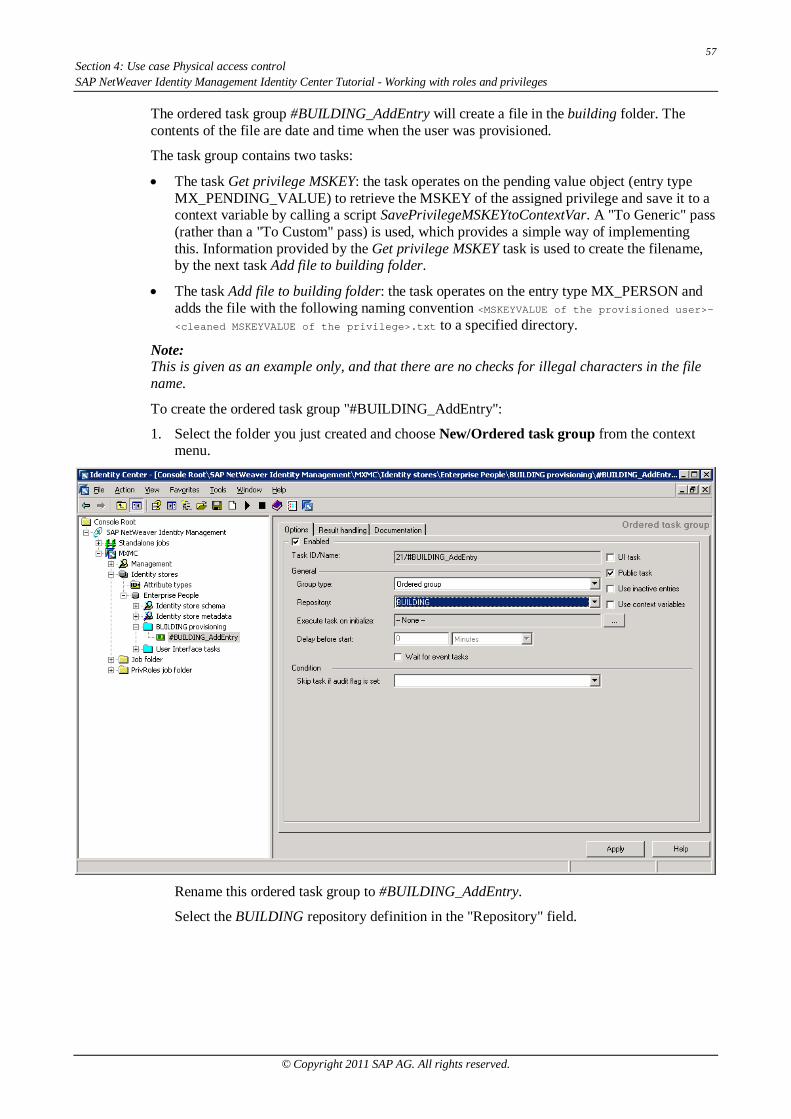
The ordered task group #BUILDING_AddEntry will create a file in the building folder. Thecontents of the file are date and time when the user was provisioned.
The task group contains two tasks:
The task Get privilege MSKEY: the task operates on the pending value object (entry typeMX_PENDING_VALUE) to retrieve the MSKEY of the assigned privilege and save it to acontext variable by calling a script SavePrivilegeMSKEYtoContextVar. A "To Generic" pass(rather than a "To Custom" pass) is used, which provides a simple way of implementingthis. Information provided by the Get privilege MSKEY task is used to create the filename,by the next task Add file to building folder.
The task Add file to building folder: the task operates on the entry type MX_PERSON andadds the file with the following naming convention <MSKEYVALUE of the provisioned user>-
<cleaned MSKEYVALUE of the privilege>.txt to a specified directory.
Note:This is given as an example only, and that there are no checks for illegal characters in the filename.
To create the ordered task group "#BUILDING_AddEntry":
1. Select the folder you just created and choose New/Ordered task group from the contextmenu.
Rename this ordered task group to #BUILDING_AddEntry.
Select the BUILDING repository definition in the "Repository" field.
58Section 4: Use case Physical access control
SAP NetWeaver Identity Management Identity Center Tutorial - Working with roles and privileges
© Copyright 2011 SAP AG. All rights reserved.
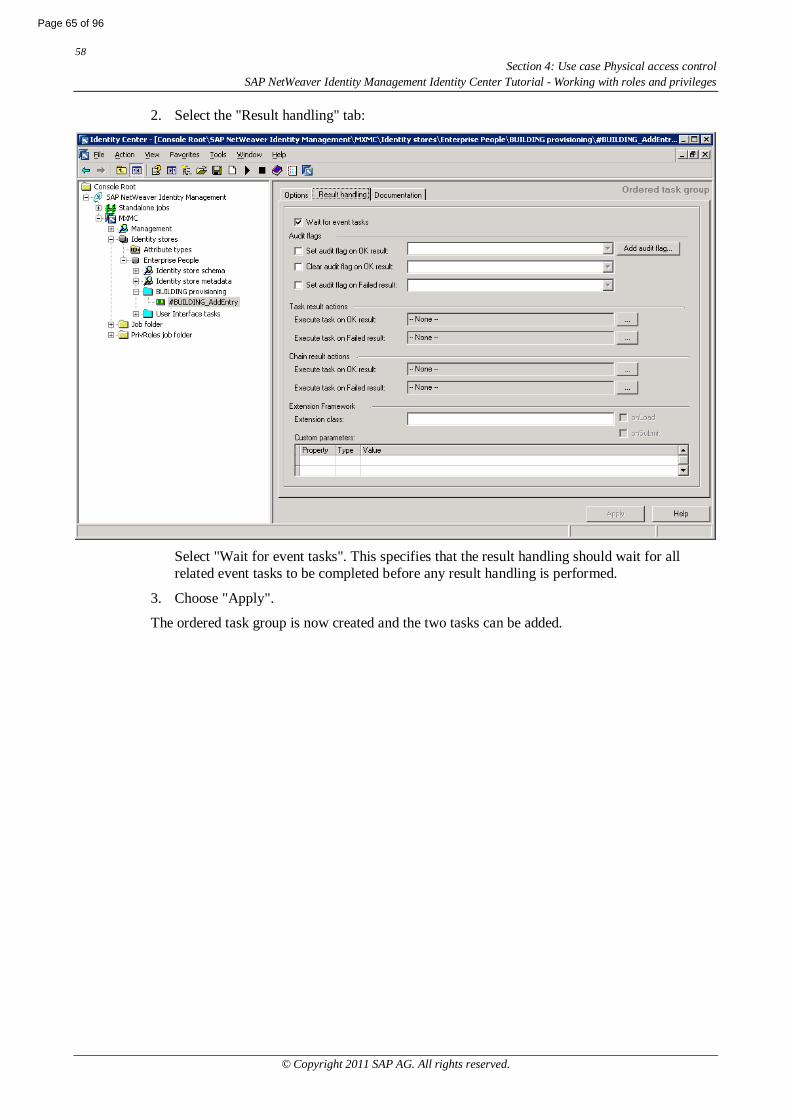
2. Select the "Result handling" tab:
Select "Wait for event tasks". This specifies that the result handling should wait for allrelated event tasks to be completed before any result handling is performed.
3. Choose "Apply".
The ordered task group is now created and the two tasks can be added.
Page 65 of 96
59Section 4: Use case Physical access controlSAP NetWeaver Identity Management Identity Center Tutorial - Working with roles and privileges
© Copyright 2011 SAP AG. All rights reserved.
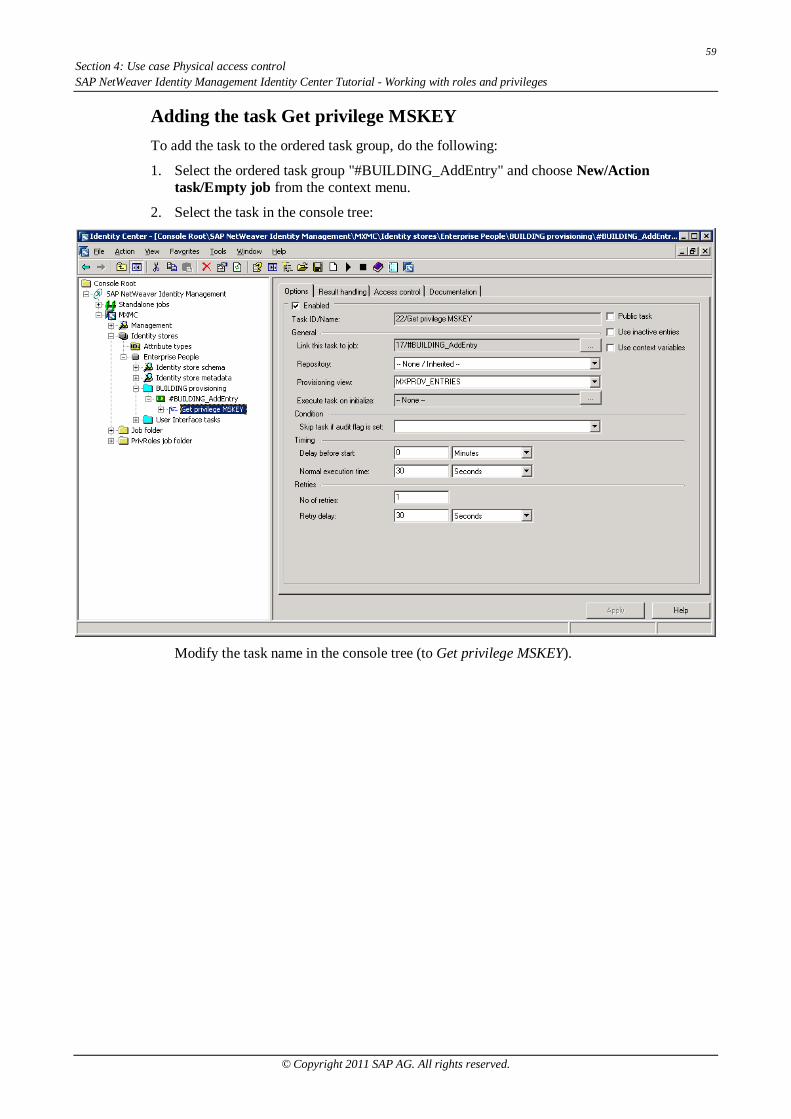
Adding the task Get privilege MSKEYTo add the task to the ordered task group, do the following:
1. Select the ordered task group "#BUILDING_AddEntry" and choose New/Actiontask/Empty job from the context menu.
2. Select the task in the console tree:
Modify the task name in the console tree (to Get privilege MSKEY).
60Section 4: Use case Physical access control
SAP NetWeaver Identity Management Identity Center Tutorial - Working with roles and privileges
© Copyright 2011 SAP AG. All rights reserved.
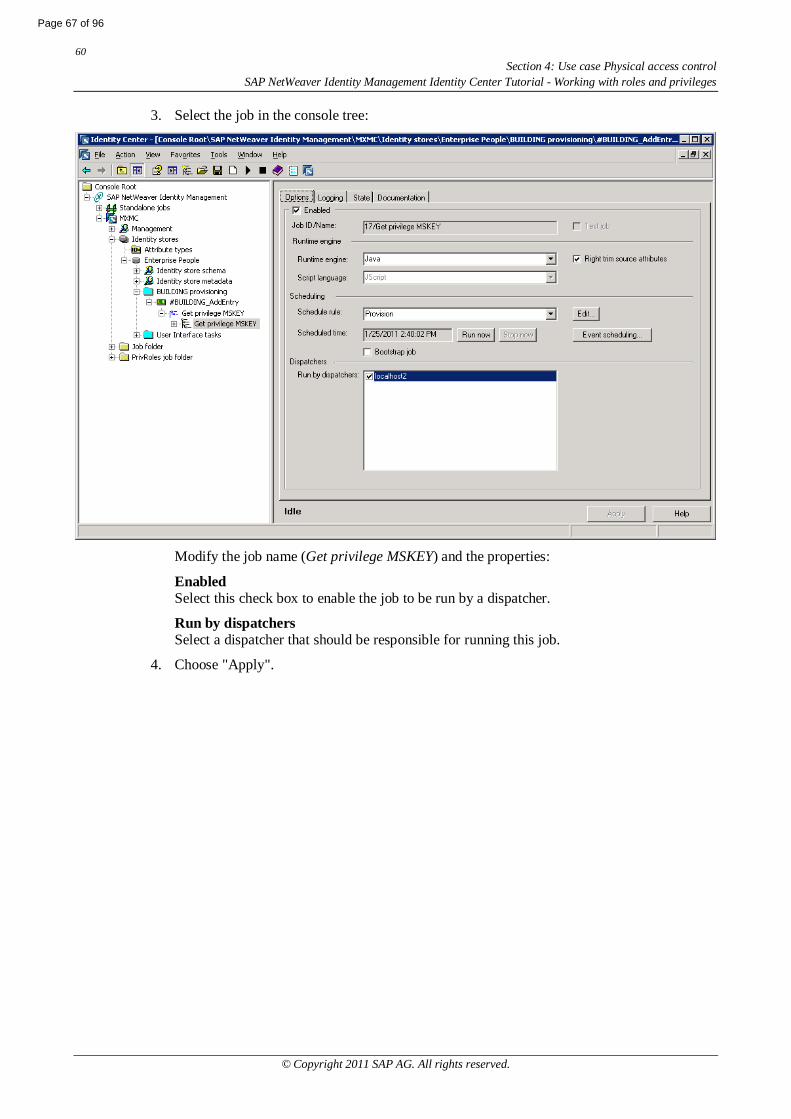
3. Select the job in the console tree:
Modify the job name (Get privilege MSKEY) and the properties:
EnabledSelect this check box to enable the job to be run by a dispatcher.
Run by dispatchersSelect a dispatcher that should be responsible for running this job.
4. Choose "Apply".
Page 67 of 96
61Section 4: Use case Physical access controlSAP NetWeaver Identity Management Identity Center Tutorial - Working with roles and privileges
© Copyright 2011 SAP AG. All rights reserved.
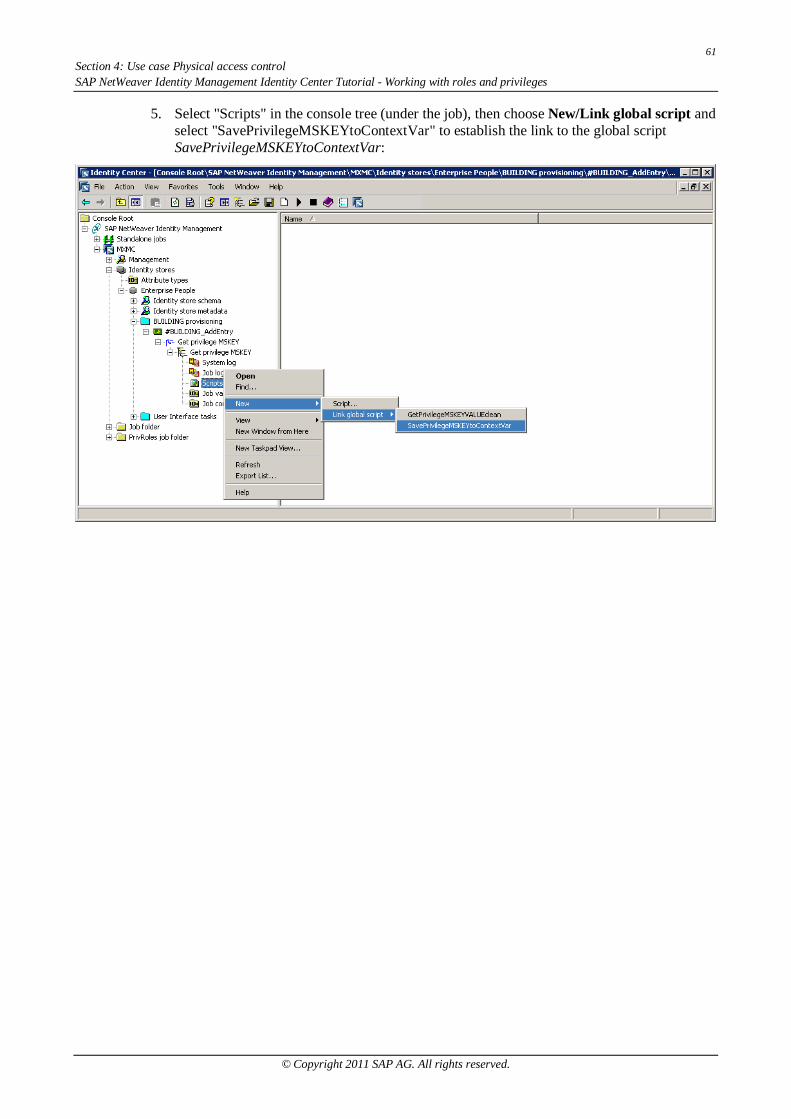
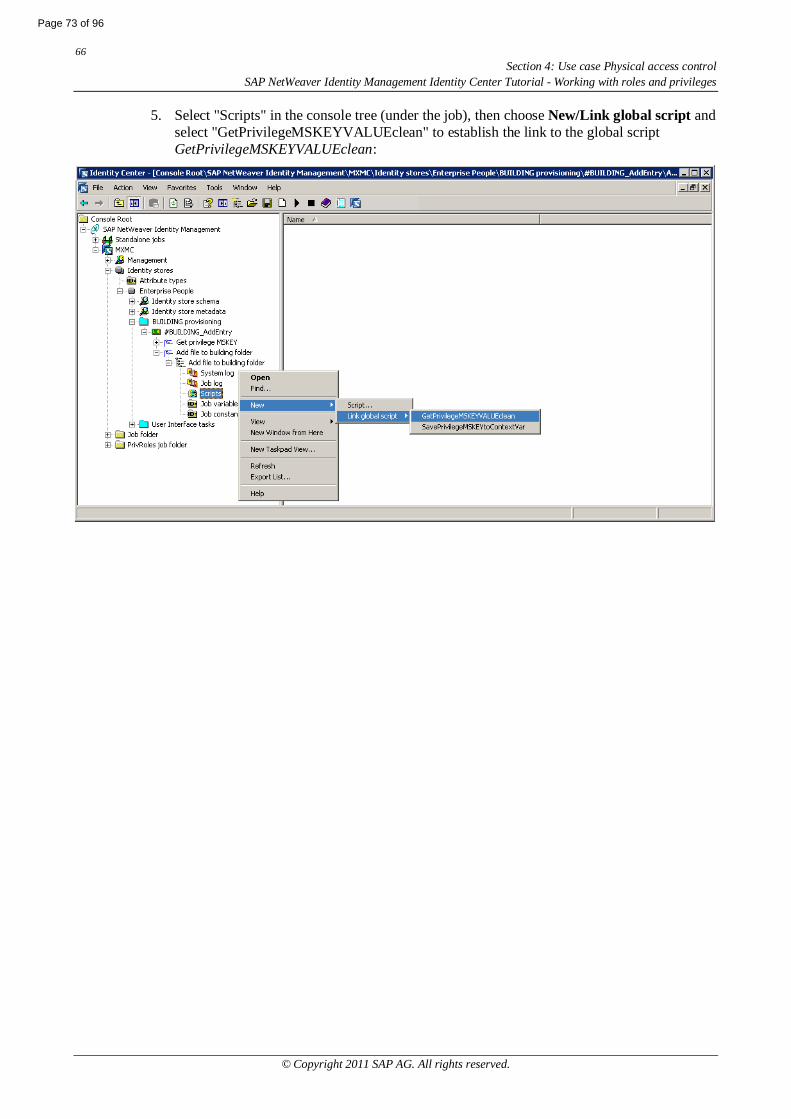
5. Select "Scripts" in the console tree (under the job), then choose New/Link global script andselect "SavePrivilegeMSKEYtoContextVar" to establish the link to the global scriptSavePrivilegeMSKEYtoContextVar:
62Section 4: Use case Physical access control
SAP NetWeaver Identity Management Identity Center Tutorial - Working with roles and privileges
© Copyright 2011 SAP AG. All rights reserved.
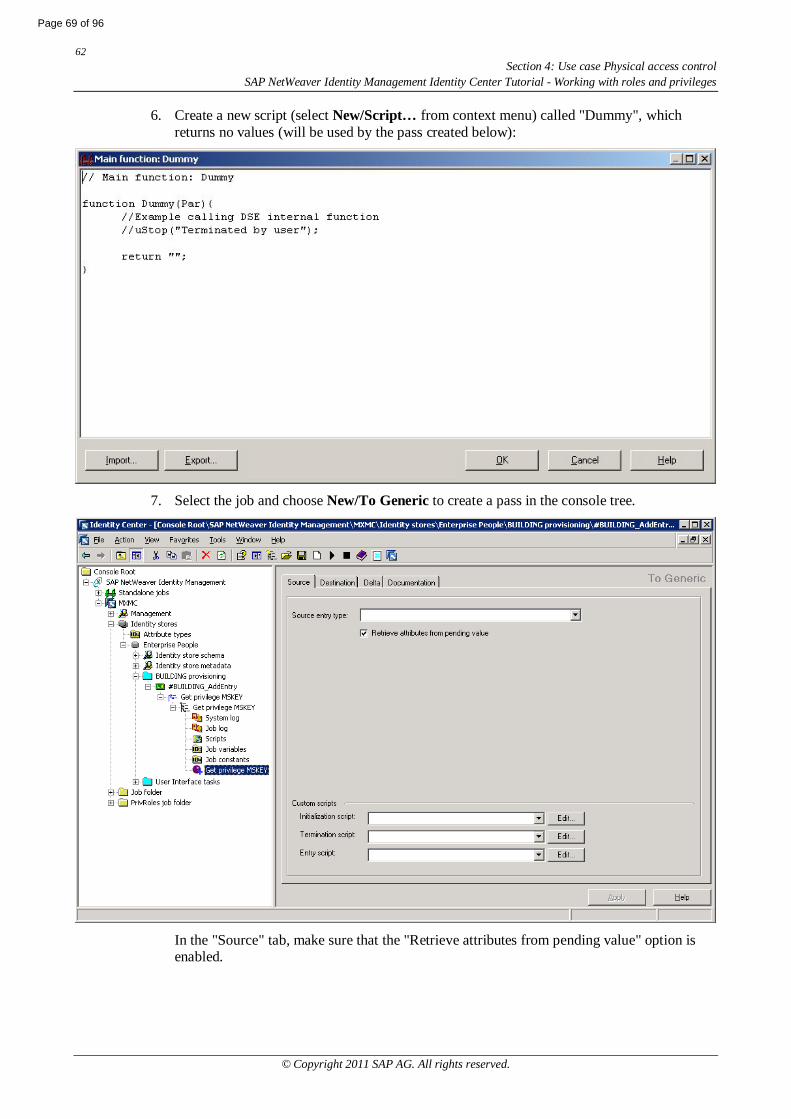
6. Create a new script (select New/Script… from context menu) called "Dummy", whichreturns no values (will be used by the pass created below):
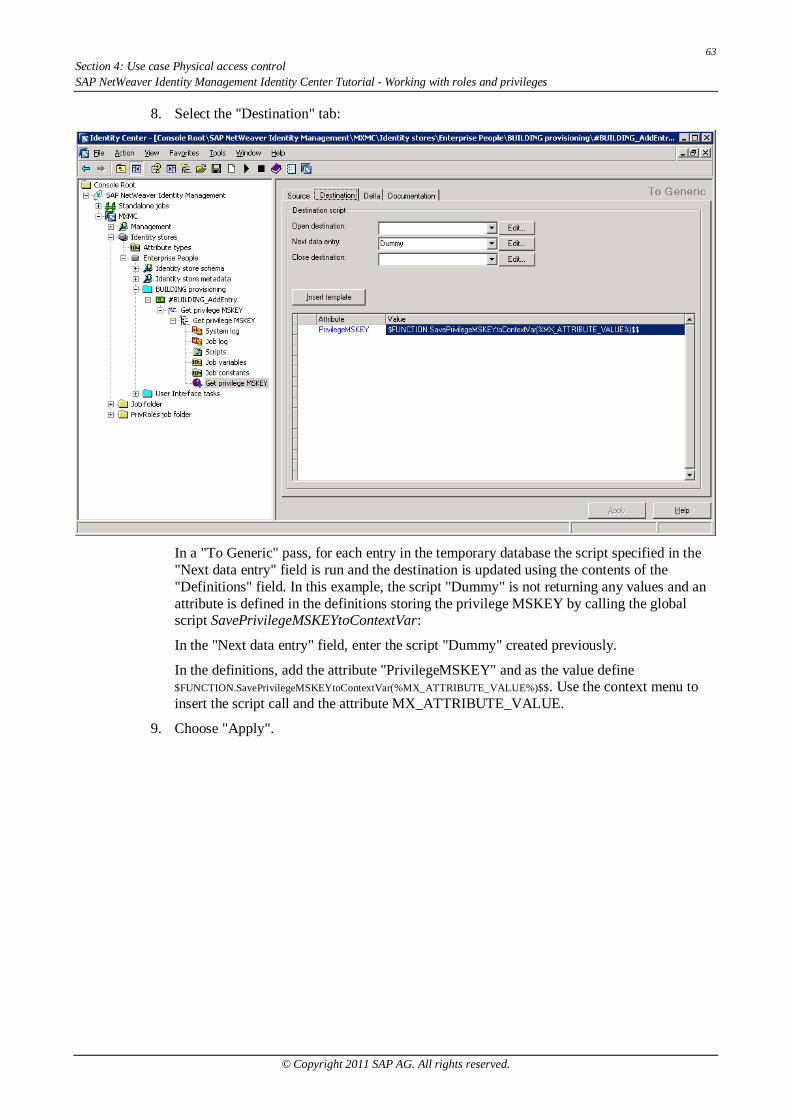
7. Select the job and choose New/To Generic to create a pass in the console tree.
In the "Source" tab, make sure that the "Retrieve attributes from pending value" option isenabled.
Page 69 of 96
63Section 4: Use case Physical access controlSAP NetWeaver Identity Management Identity Center Tutorial - Working with roles and privileges
© Copyright 2011 SAP AG. All rights reserved.
8. Select the "Destination" tab:
In a "To Generic" pass, for each entry in the temporary database the script specified in the"Next data entry" field is run and the destination is updated using the contents of the"Definitions" field. In this example, the script "Dummy" is not returning any values and anattribute is defined in the definitions storing the privilege MSKEY by calling the globalscript SavePrivilegeMSKEYtoContextVar:
In the "Next data entry" field, enter the script "Dummy" created previously.
In the definitions, add the attribute "PrivilegeMSKEY" and as the value define$FUNCTION.SavePrivilegeMSKEYtoContextVar(%MX_ATTRIBUTE_VALUE%)$$. Use the context menu toinsert the script call and the attribute MX_ATTRIBUTE_VALUE.
9. Choose "Apply".
64Section 4: Use case Physical access control
SAP NetWeaver Identity Management Identity Center Tutorial - Working with roles and privileges
© Copyright 2011 SAP AG. All rights reserved.
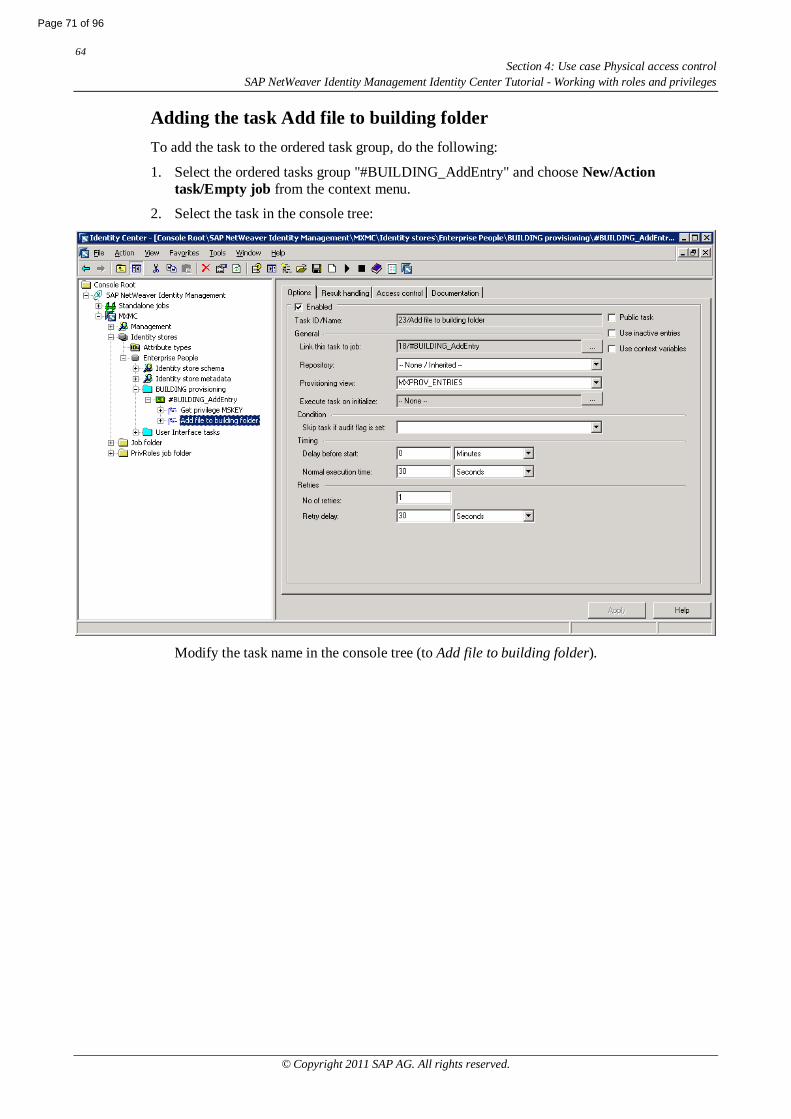
Adding the task Add file to building folderTo add the task to the ordered task group, do the following:
1. Select the ordered tasks group "#BUILDING_AddEntry" and choose New/Actiontask/Empty job from the context menu.
2. Select the task in the console tree:
Modify the task name in the console tree (to Add file to building folder).
Page 71 of 96
65Section 4: Use case Physical access controlSAP NetWeaver Identity Management Identity Center Tutorial - Working with roles and privileges
© Copyright 2011 SAP AG. All rights reserved.
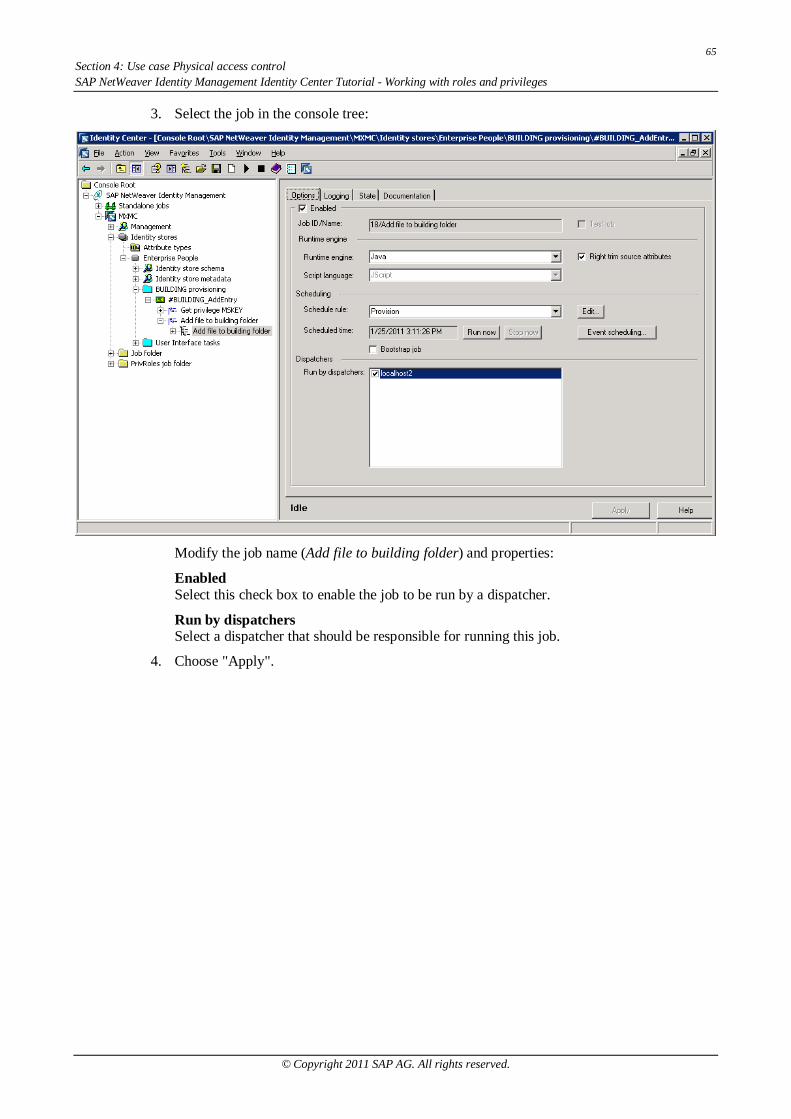
3. Select the job in the console tree:
Modify the job name (Add file to building folder) and properties:
EnabledSelect this check box to enable the job to be run by a dispatcher.
Run by dispatchersSelect a dispatcher that should be responsible for running this job.
4. Choose "Apply".
66Section 4: Use case Physical access control
SAP NetWeaver Identity Management Identity Center Tutorial - Working with roles and privileges
© Copyright 2011 SAP AG. All rights reserved.
5. Select "Scripts" in the console tree (under the job), then choose New/Link global script andselect "GetPrivilegeMSKEYVALUEclean" to establish the link to the global scriptGetPrivilegeMSKEYVALUEclean:
Page 73 of 96
67Section 4: Use case Physical access controlSAP NetWeaver Identity Management Identity Center Tutorial - Working with roles and privileges
© Copyright 2011 SAP AG. All rights reserved.
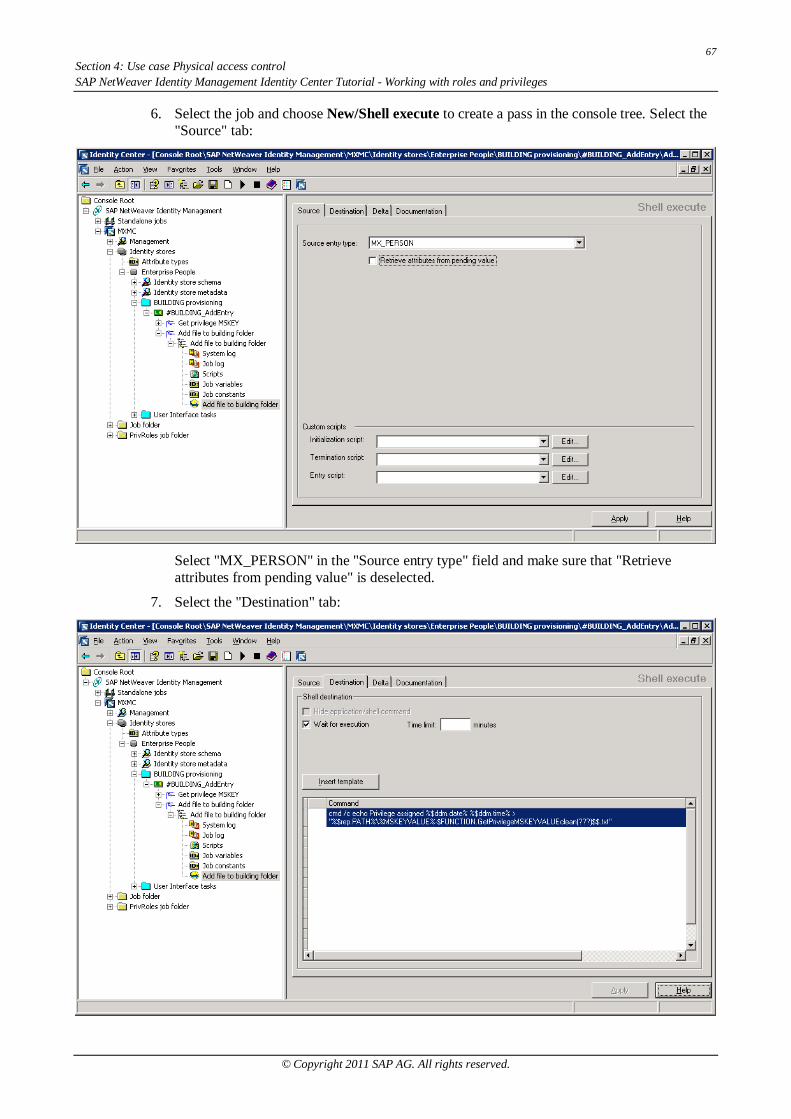
6. Select the job and choose New/Shell execute to create a pass in the console tree. Select the"Source" tab:
Select "MX_PERSON" in the "Source entry type" field and make sure that "Retrieveattributes from pending value" is deselected.
7. Select the "Destination" tab:
68Section 4: Use case Physical access control
SAP NetWeaver Identity Management Identity Center Tutorial - Working with roles and privileges
© Copyright 2011 SAP AG. All rights reserved.
Add the following line to the definitions (you can use the context menu to insert theconstants/attributes/scripts or copy and paste the lines below):
cmd /c echo Privilege assigned %$ddm.date% %$ddm.time% >"%$rep.PATH%\%MSKEYVALUE%-$FUNCTION.GetPrivilegeMSKEYVALUEclean(???)$$.txt"
8. Choose "Apply".
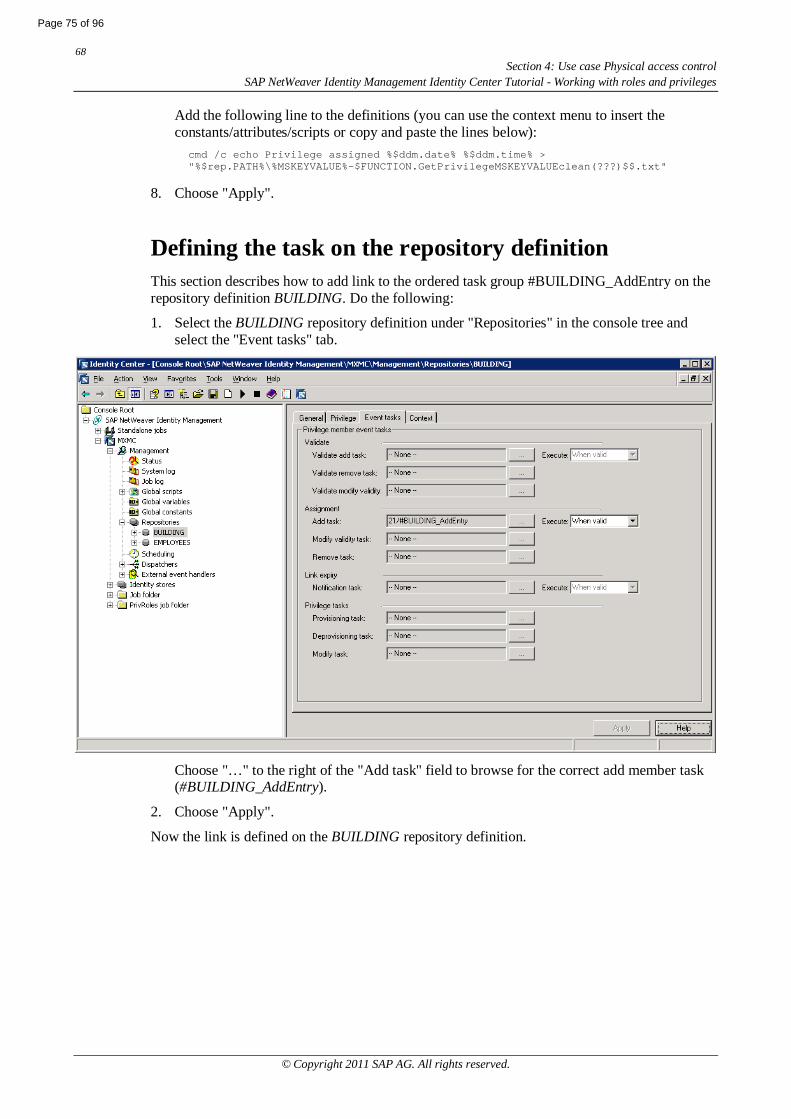
Defining the task on the repository definitionThis section describes how to add link to the ordered task group #BUILDING_AddEntry on therepository definition BUILDING. Do the following:
1. Select the BUILDING repository definition under "Repositories" in the console tree andselect the "Event tasks" tab.
Choose "…" to the right of the "Add task" field to browse for the correct add member task(#BUILDING_AddEntry).
2. Choose "Apply".
Now the link is defined on the BUILDING repository definition.
Page 75 of 96
69Section 4: Use case Physical access controlSAP NetWeaver Identity Management Identity Center Tutorial - Working with roles and privileges
© Copyright 2011 SAP AG. All rights reserved.
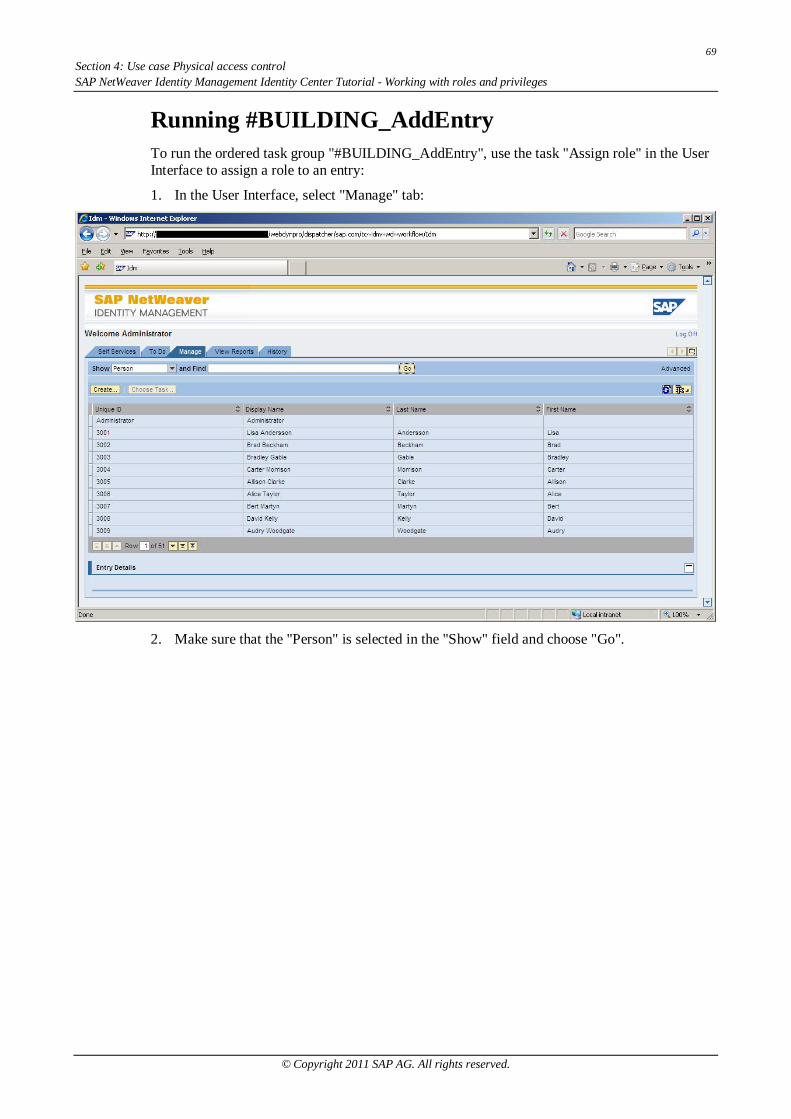
Running #BUILDING_AddEntryTo run the ordered task group "#BUILDING_AddEntry", use the task "Assign role" in the UserInterface to assign a role to an entry:
1. In the User Interface, select "Manage" tab:
2. Make sure that the "Person" is selected in the "Show" field and choose "Go".
70Section 4: Use case Physical access control
SAP NetWeaver Identity Management Identity Center Tutorial - Working with roles and privileges
© Copyright 2011 SAP AG. All rights reserved.
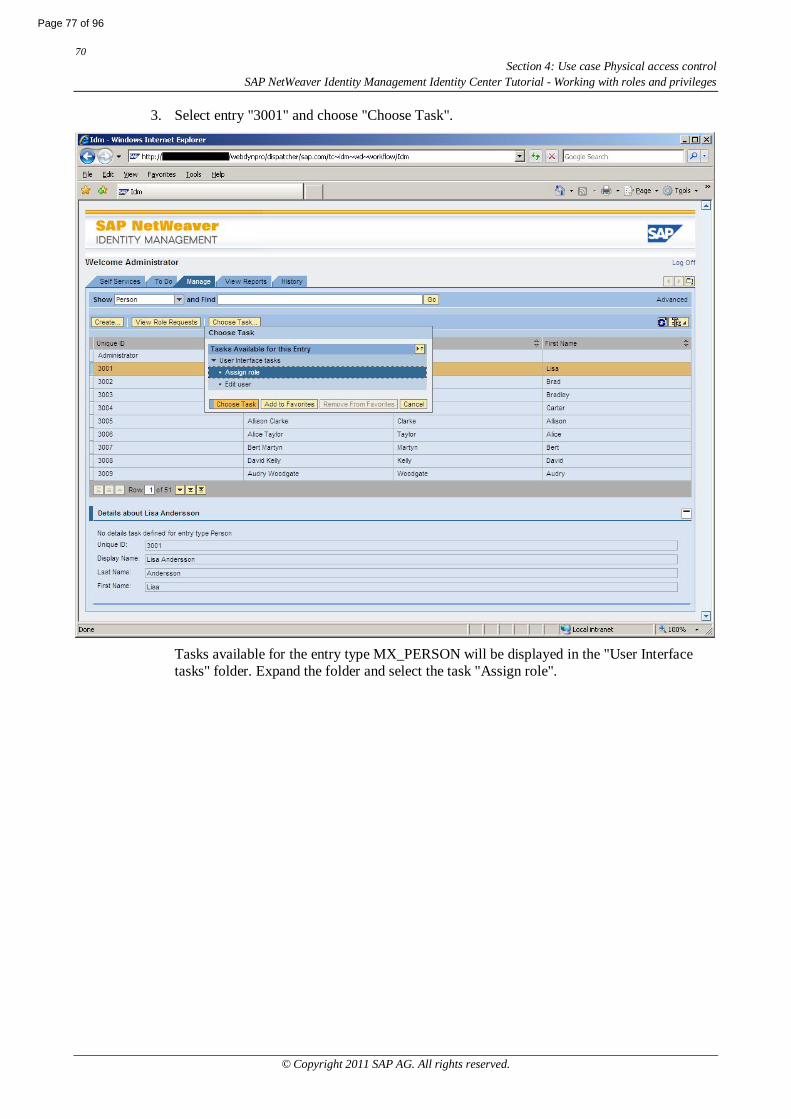
3. Select entry "3001" and choose "Choose Task".
Tasks available for the entry type MX_PERSON will be displayed in the "User Interfacetasks" folder. Expand the folder and select the task "Assign role".
Page 77 of 96
71Section 4: Use case Physical access controlSAP NetWeaver Identity Management Identity Center Tutorial - Working with roles and privileges
© Copyright 2011 SAP AG. All rights reserved.
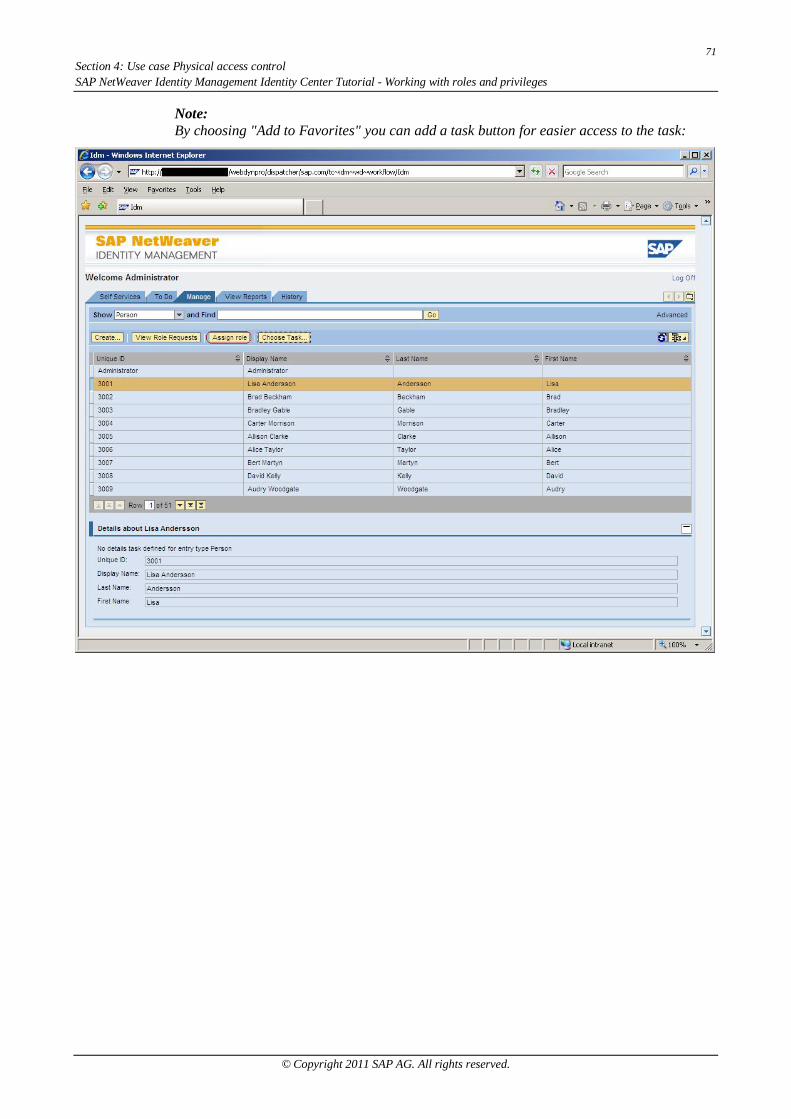
Note:By choosing "Add to Favorites" you can add a task button for easier access to the task:
72Section 4: Use case Physical access control
SAP NetWeaver Identity Management Identity Center Tutorial - Working with roles and privileges
© Copyright 2011 SAP AG. All rights reserved.
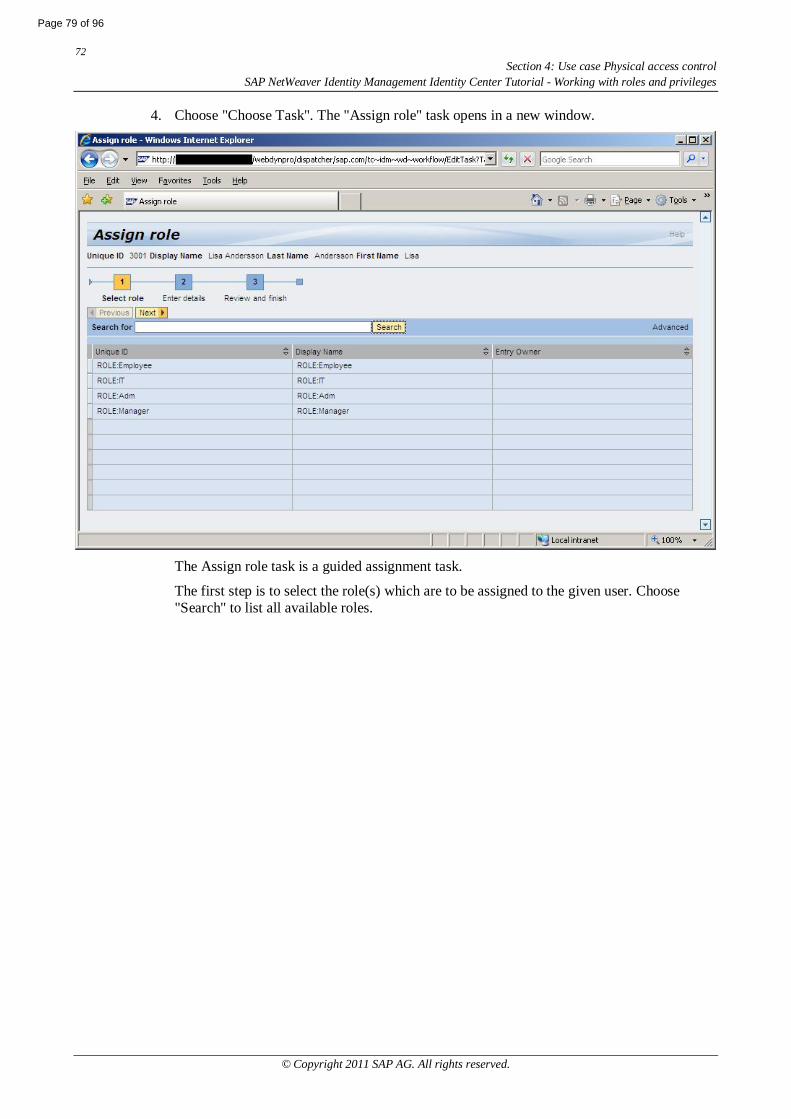
4. Choose "Choose Task". The "Assign role" task opens in a new window.
The Assign role task is a guided assignment task.
The first step is to select the role(s) which are to be assigned to the given user. Choose"Search" to list all available roles.
Page 79 of 96
73Section 4: Use case Physical access controlSAP NetWeaver Identity Management Identity Center Tutorial - Working with roles and privileges
© Copyright 2011 SAP AG. All rights reserved.
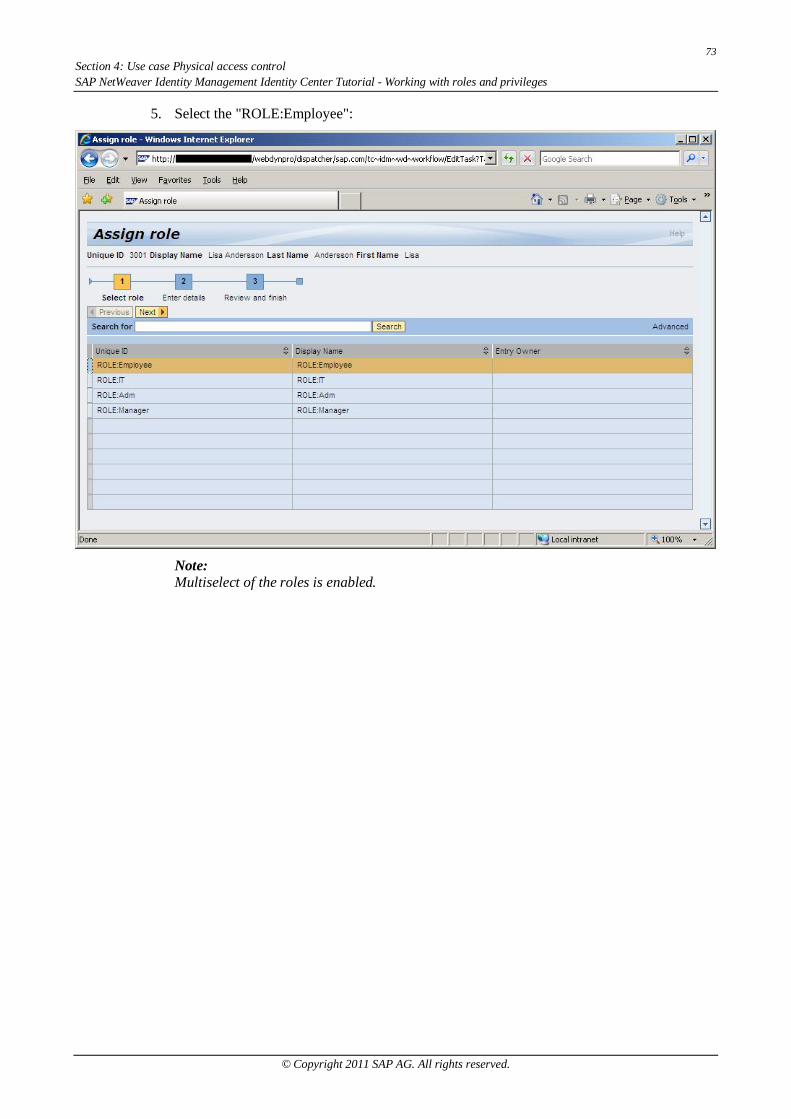
5. Select the "ROLE:Employee":
Note:Multiselect of the roles is enabled.
74Section 4: Use case Physical access control
SAP NetWeaver Identity Management Identity Center Tutorial - Working with roles and privileges
© Copyright 2011 SAP AG. All rights reserved.
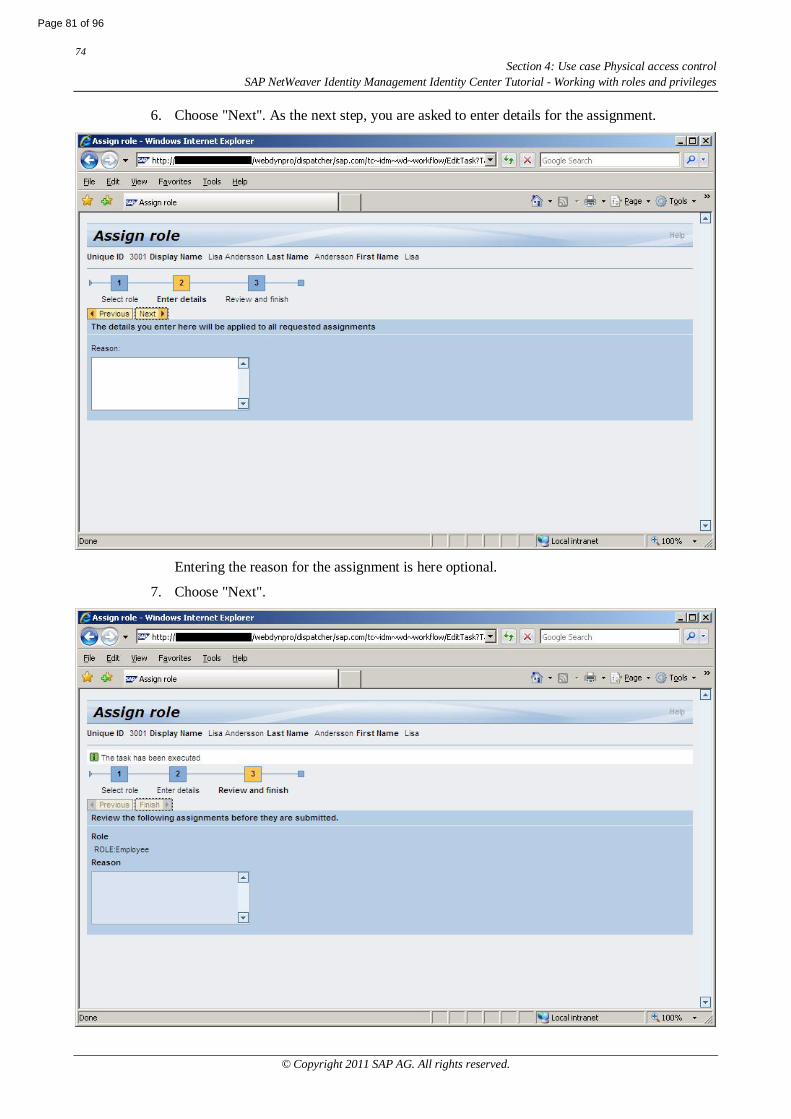
6. Choose "Next". As the next step, you are asked to enter details for the assignment.
Entering the reason for the assignment is here optional.
7. Choose "Next".
Page 81 of 96
75Section 4: Use case Physical access controlSAP NetWeaver Identity Management Identity Center Tutorial - Working with roles and privileges
© Copyright 2011 SAP AG. All rights reserved.
Review the assignment request details.
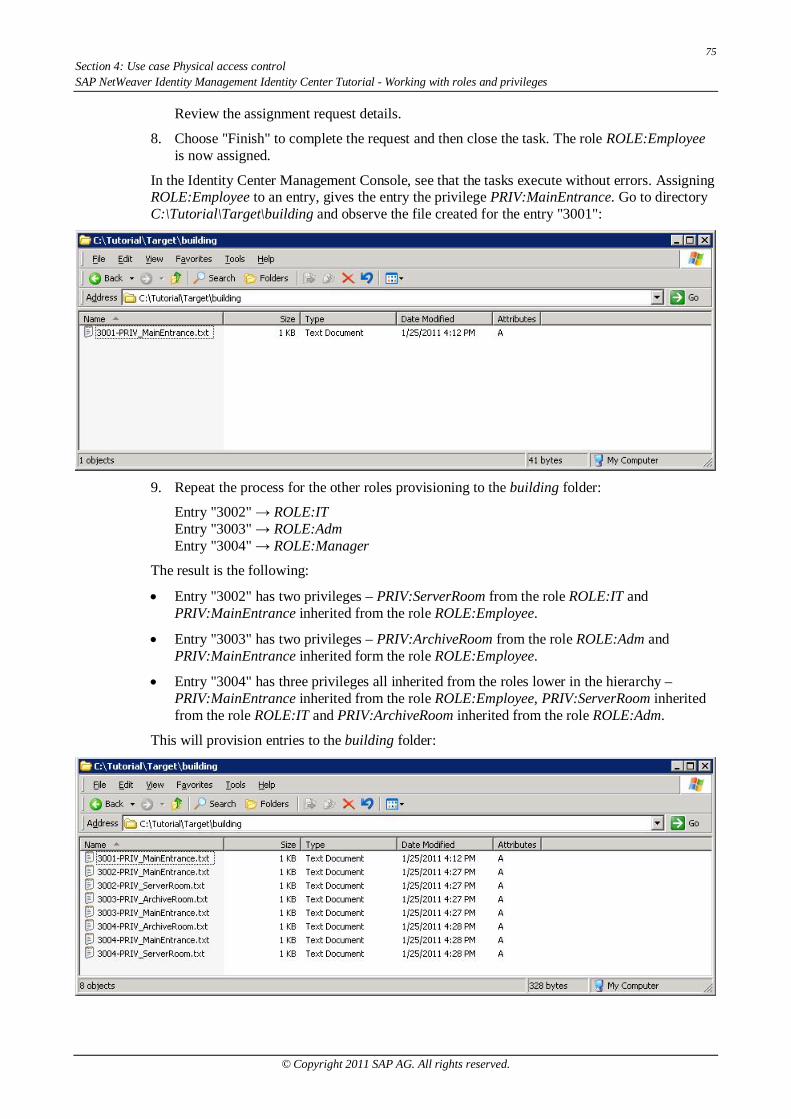
8. Choose "Finish" to complete the request and then close the task. The role ROLE:Employeeis now assigned.
In the Identity Center Management Console, see that the tasks execute without errors. AssigningROLE:Employee to an entry, gives the entry the privilege PRIV:MainEntrance. Go to directoryC:\Tutorial\Target\building and observe the file created for the entry "3001":
9. Repeat the process for the other roles provisioning to the building folder:
Entry "3002" ROLE:ITEntry "3003" ROLE:AdmEntry "3004" ROLE:Manager
The result is the following:
Entry "3002" has two privileges – PRIV:ServerRoom from the role ROLE:IT andPRIV:MainEntrance inherited from the role ROLE:Employee.
Entry "3003" has two privileges – PRIV:ArchiveRoom from the role ROLE:Adm andPRIV:MainEntrance inherited form the role ROLE:Employee.
Entry "3004" has three privileges all inherited from the roles lower in the hierarchy –PRIV:MainEntrance inherited from the role ROLE:Employee, PRIV:ServerRoom inheritedfrom the role ROLE:IT and PRIV:ArchiveRoom inherited from the role ROLE:Adm.
This will provision entries to the building folder:
76Section 4: Use case Physical access control
SAP NetWeaver Identity Management Identity Center Tutorial - Working with roles and privileges
© Copyright 2011 SAP AG. All rights reserved.
TroubleshootingIf any problems should occur during the execution, you can check some of the following:
Verify that the dispatcher is running and that it is enabled for provisioning jobs.
Verify that all tasks and jobs are enabled.
Verify that the job has been defined for the given dispatcher.
View the logs.
System logVerify that the dispatcher has requested the given job.
Job logView any error messages in the job log to see if you can find the cause of the problem.
If you need to investigate a job more thoroughly, you can specify a different log file namefor the job in the "Logging" tab of the job properties. You can also deselect the check box"Reset log file" to avoid overwriting the log file each time the job is run. This can be usefulwhen debugging a provisioning job that may be run several times in sequence.
If you need more logging info from a specific job, you can create a specific dispatcher andincrease the log level in the dispatcher's .prop file. Specify that the job is to be run by thisspecific dispatcher. Make sure that the dispatcher is not running. To run the job, start thedispatcher from the command line with the following command:
dispatcher_service_<dispatcher name> test runonce
The job will then be run once and a detailed log file will be created.
Creating the task #BUILDING_RemoveEntryIn this section, the tasks for de-provisioning of users are created. It is also shown how youdefine these on the repository definition BUILDING.
The ordered task group #BUILDING_RemoveEntry will remove a file in the building folder.
The task group contains two tasks:
Task Get privilege MSKEY: the task operates on the pending value object (entry typeMX_PENDING_VALUE) to retrieve the MSKEY of the assigned privilege. This is thesame task as in the ordered task group #BUILDING_AddEntry.
Task Delete file from building folder: the task operates on the entry type MX_PERSON anddeletes the file created when the user was provisioned.
Note:Note that this is given as an example only, and that there are no checks for illegal characters inthe file name.
Page 83 of 96
77Section 4: Use case Physical access controlSAP NetWeaver Identity Management Identity Center Tutorial - Working with roles and privileges
© Copyright 2011 SAP AG. All rights reserved.
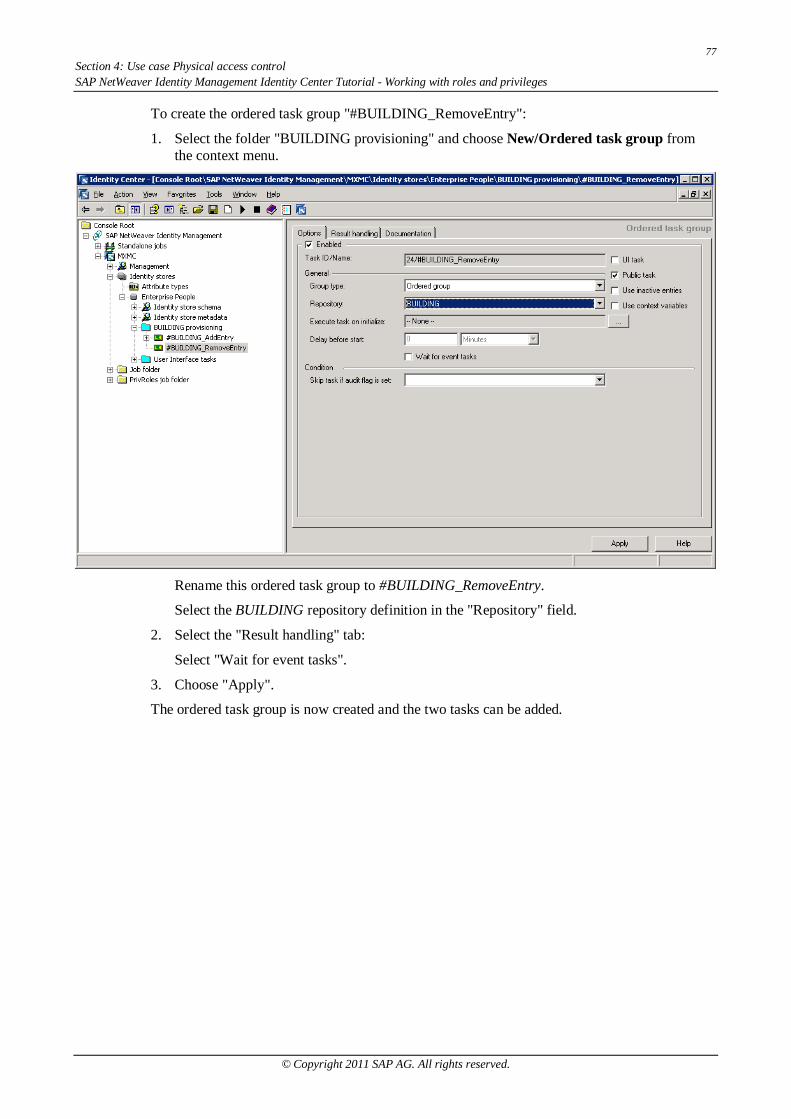
To create the ordered task group "#BUILDING_RemoveEntry":
1. Select the folder "BUILDING provisioning" and choose New/Ordered task group fromthe context menu.
Rename this ordered task group to #BUILDING_RemoveEntry.
Select the BUILDING repository definition in the "Repository" field.
2. Select the "Result handling" tab:
Select "Wait for event tasks".
3. Choose "Apply".
The ordered task group is now created and the two tasks can be added.
78Section 4: Use case Physical access control
SAP NetWeaver Identity Management Identity Center Tutorial - Working with roles and privileges
© Copyright 2011 SAP AG. All rights reserved.
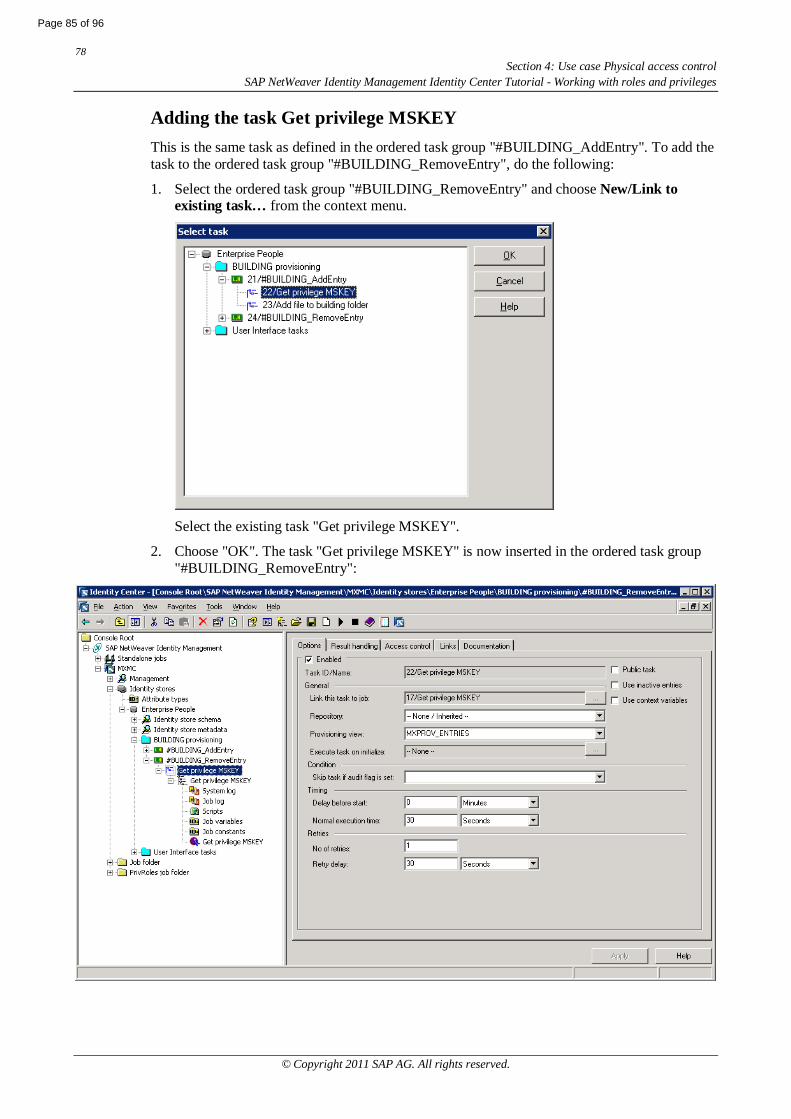
Adding the task Get privilege MSKEYThis is the same task as defined in the ordered task group "#BUILDING_AddEntry". To add thetask to the ordered task group "#BUILDING_RemoveEntry", do the following:
1. Select the ordered task group "#BUILDING_RemoveEntry" and choose New/Link toexisting task… from the context menu.
Select the existing task "Get privilege MSKEY".
2. Choose "OK". The task "Get privilege MSKEY" is now inserted in the ordered task group"#BUILDING_RemoveEntry":
Page 85 of 96
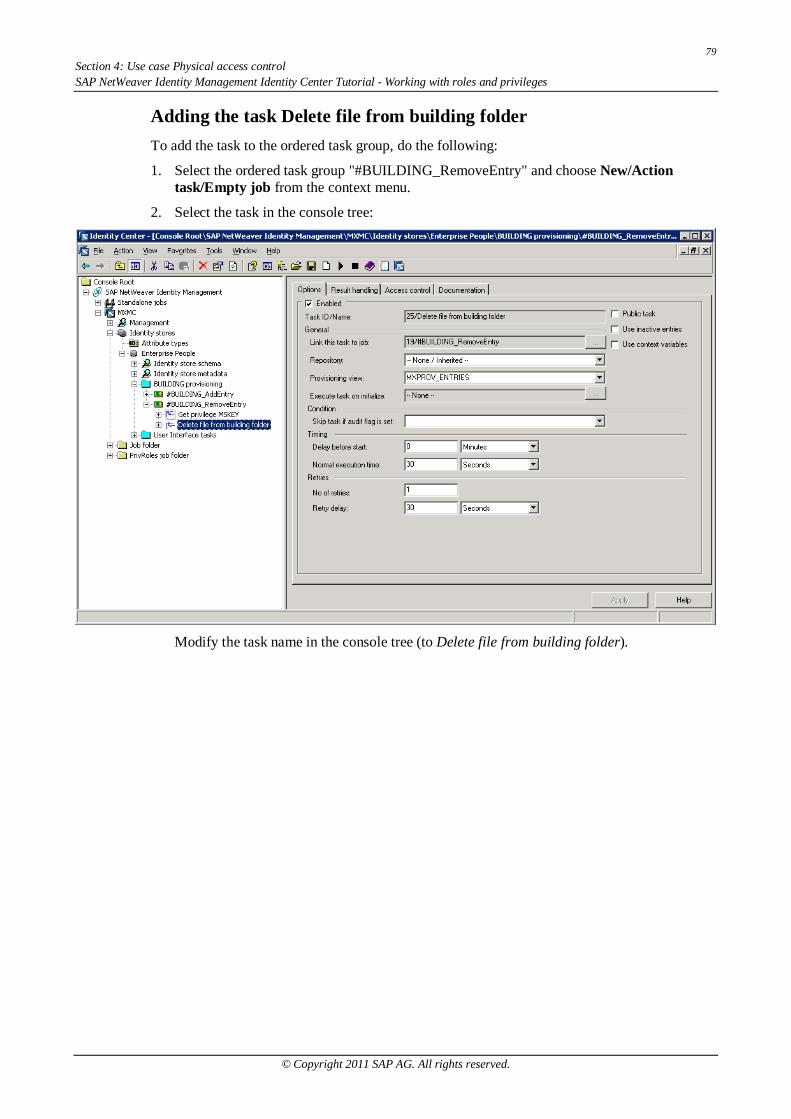
79Section 4: Use case Physical access controlSAP NetWeaver Identity Management Identity Center Tutorial - Working with roles and privileges
© Copyright 2011 SAP AG. All rights reserved.
Adding the task Delete file from building folderTo add the task to the ordered task group, do the following:
1. Select the ordered task group "#BUILDING_RemoveEntry" and choose New/Actiontask/Empty job from the context menu.
2. Select the task in the console tree:
Modify the task name in the console tree (to Delete file from building folder).
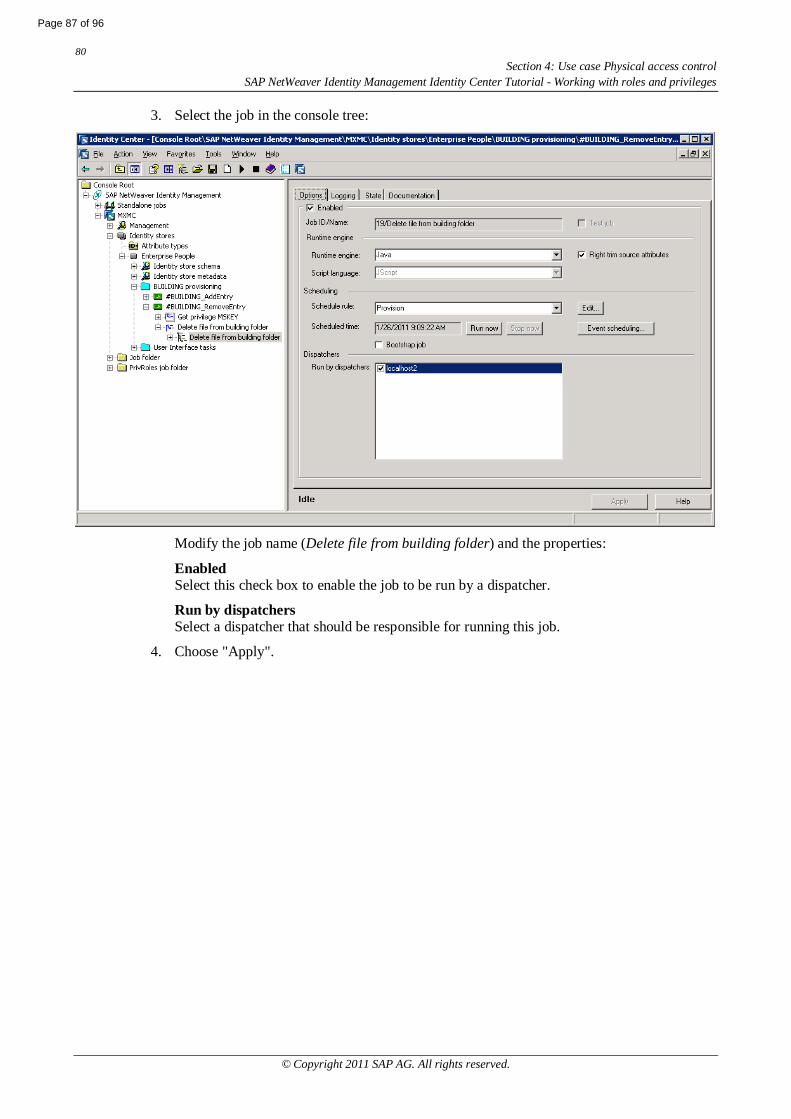
80Section 4: Use case Physical access control
SAP NetWeaver Identity Management Identity Center Tutorial - Working with roles and privileges
© Copyright 2011 SAP AG. All rights reserved.
3. Select the job in the console tree:
Modify the job name (Delete file from building folder) and the properties:
EnabledSelect this check box to enable the job to be run by a dispatcher.
Run by dispatchersSelect a dispatcher that should be responsible for running this job.
4. Choose "Apply".
Page 87 of 96
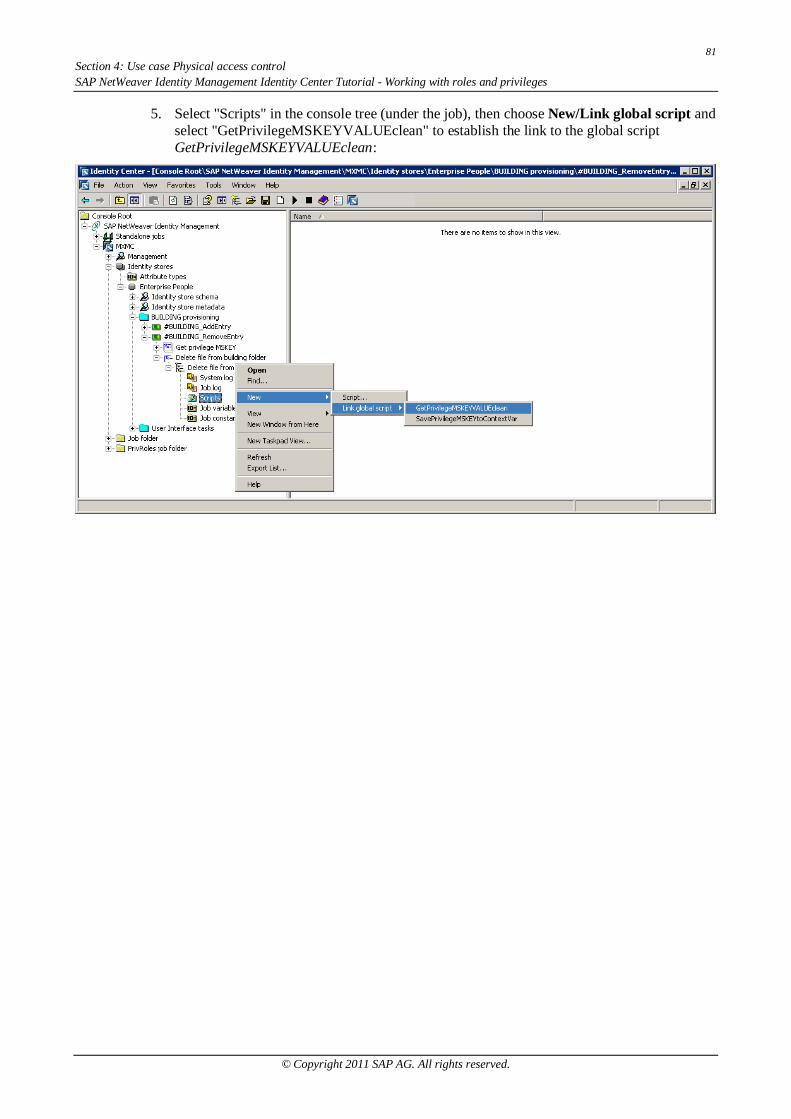
81Section 4: Use case Physical access controlSAP NetWeaver Identity Management Identity Center Tutorial - Working with roles and privileges
© Copyright 2011 SAP AG. All rights reserved.
5. Select "Scripts" in the console tree (under the job), then choose New/Link global script andselect "GetPrivilegeMSKEYVALUEclean" to establish the link to the global scriptGetPrivilegeMSKEYVALUEclean:
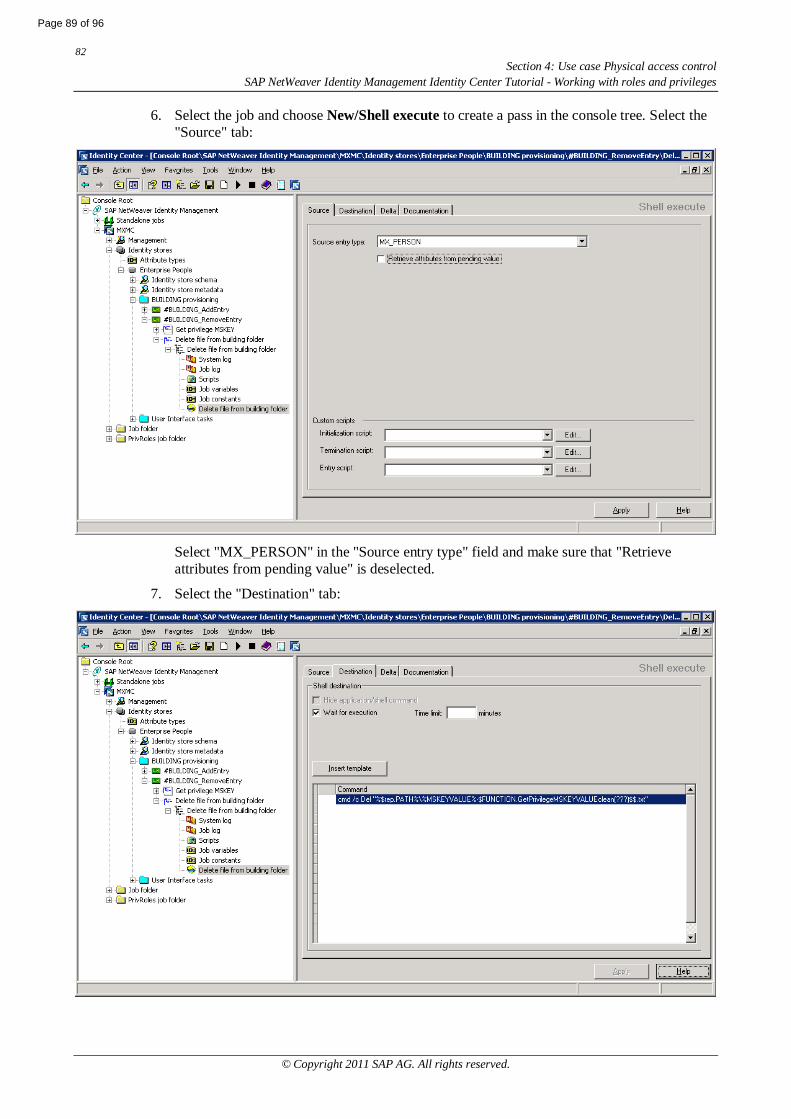
82Section 4: Use case Physical access control
SAP NetWeaver Identity Management Identity Center Tutorial - Working with roles and privileges
© Copyright 2011 SAP AG. All rights reserved.
6. Select the job and choose New/Shell execute to create a pass in the console tree. Select the"Source" tab:
Select "MX_PERSON" in the "Source entry type" field and make sure that "Retrieveattributes from pending value" is deselected.
7. Select the "Destination" tab:
Page 89 of 96
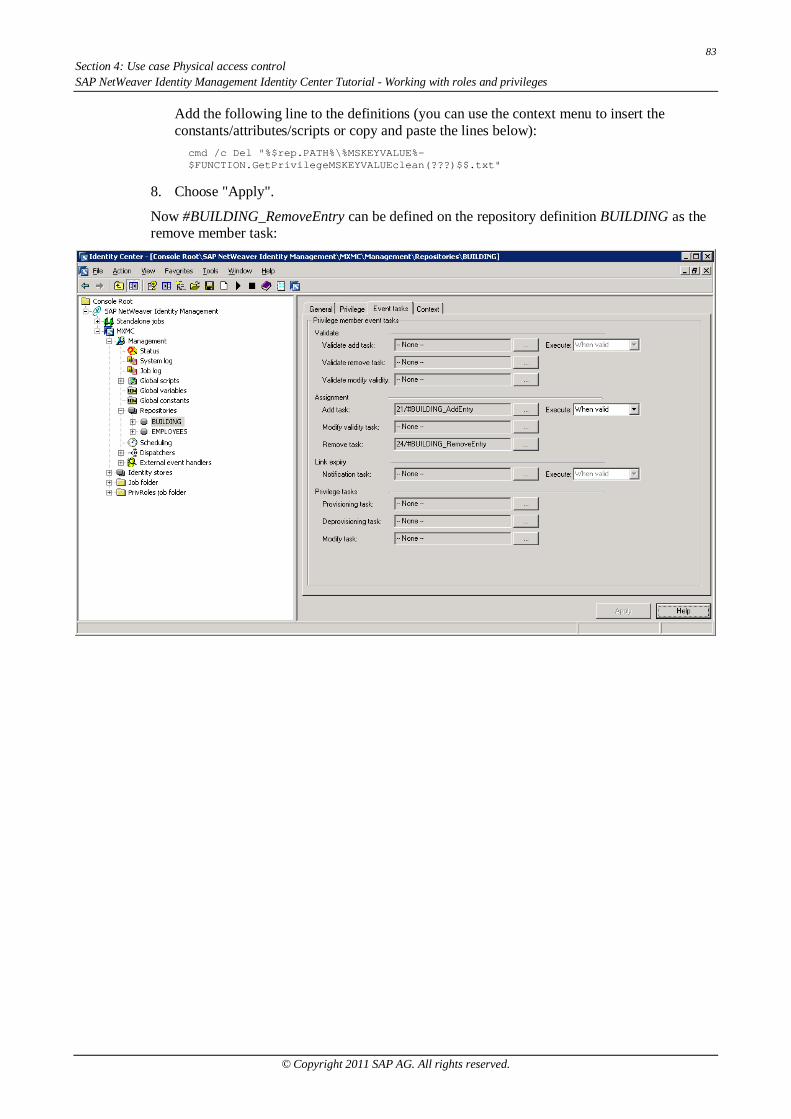
83Section 4: Use case Physical access controlSAP NetWeaver Identity Management Identity Center Tutorial - Working with roles and privileges
© Copyright 2011 SAP AG. All rights reserved.
Add the following line to the definitions (you can use the context menu to insert theconstants/attributes/scripts or copy and paste the lines below):
cmd /c Del "%$rep.PATH%\%MSKEYVALUE%-$FUNCTION.GetPrivilegeMSKEYVALUEclean(???)$$.txt"
8. Choose "Apply".
Now #BUILDING_RemoveEntry can be defined on the repository definition BUILDING as theremove member task:
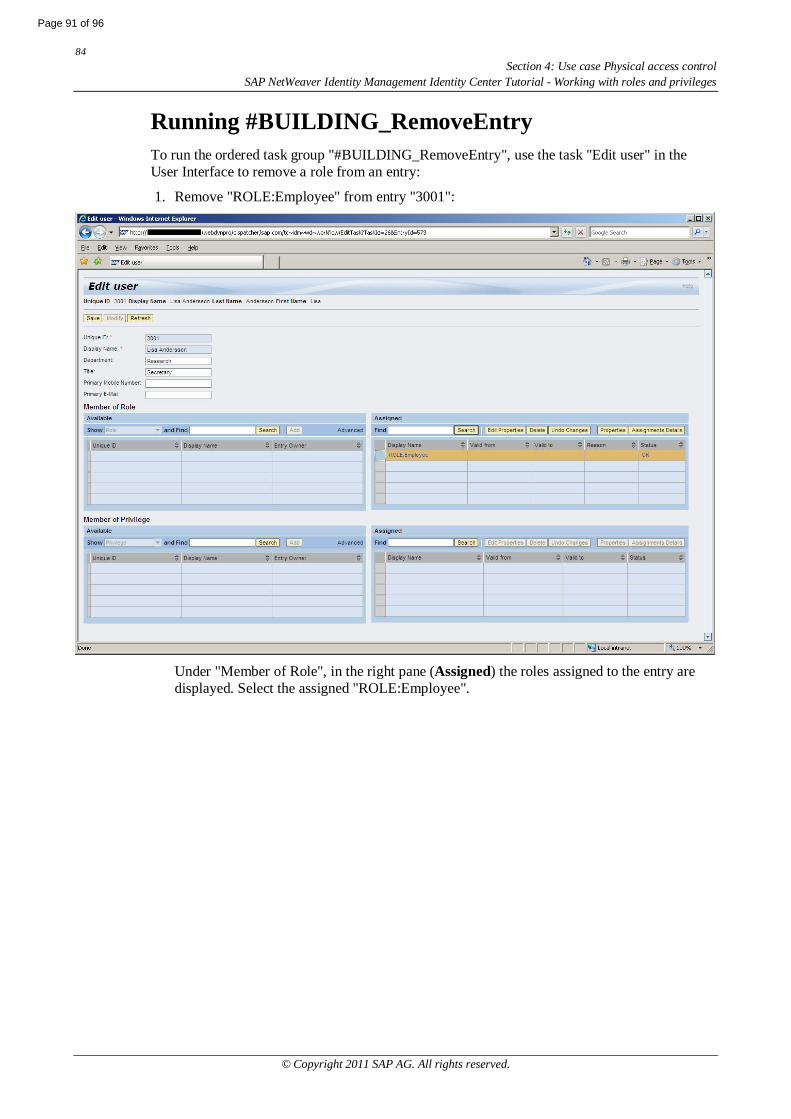
84Section 4: Use case Physical access control
SAP NetWeaver Identity Management Identity Center Tutorial - Working with roles and privileges
© Copyright 2011 SAP AG. All rights reserved.
Running #BUILDING_RemoveEntryTo run the ordered task group "#BUILDING_RemoveEntry", use the task "Edit user" in theUser Interface to remove a role from an entry:
1. Remove "ROLE:Employee" from entry "3001":
Under "Member of Role", in the right pane (Assigned) the roles assigned to the entry aredisplayed. Select the assigned "ROLE:Employee".
Page 91 of 96
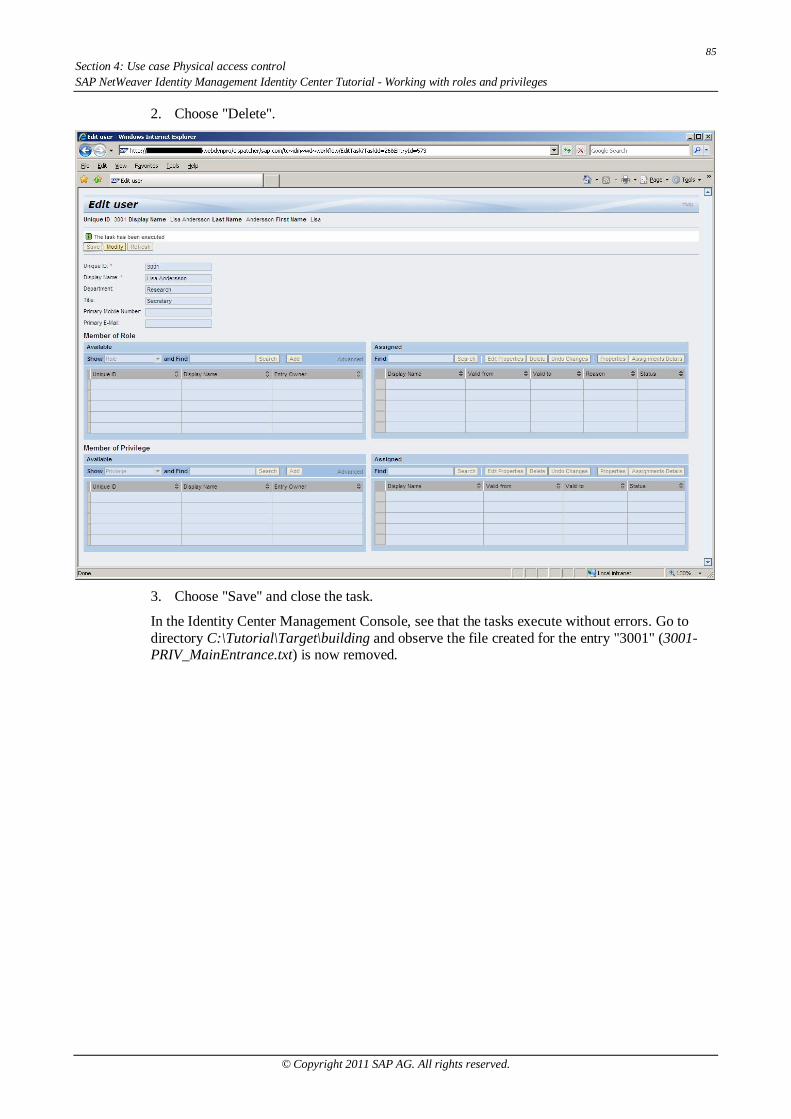
85Section 4: Use case Physical access controlSAP NetWeaver Identity Management Identity Center Tutorial - Working with roles and privileges
© Copyright 2011 SAP AG. All rights reserved.
2. Choose "Delete".
3. Choose "Save" and close the task.
In the Identity Center Management Console, see that the tasks execute without errors. Go todirectory C:\Tutorial\Target\building and observe the file created for the entry "3001" (3001-PRIV_MainEntrance.txt) is now removed.
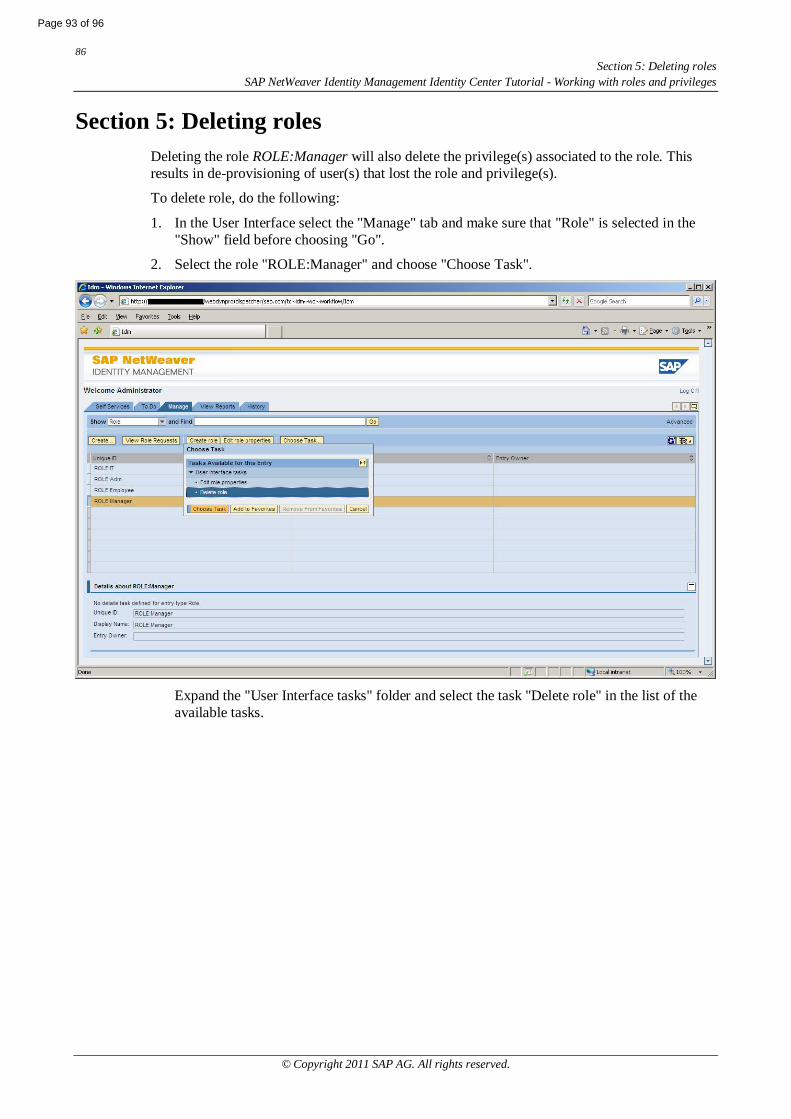
86Section 5: Deleting roles
SAP NetWeaver Identity Management Identity Center Tutorial - Working with roles and privileges
© Copyright 2011 SAP AG. All rights reserved.
Section 5: Deleting rolesDeleting the role ROLE:Manager will also delete the privilege(s) associated to the role. Thisresults in de-provisioning of user(s) that lost the role and privilege(s).
To delete role, do the following:
1. In the User Interface select the "Manage" tab and make sure that "Role" is selected in the"Show" field before choosing "Go".
2. Select the role "ROLE:Manager" and choose "Choose Task".
Expand the "User Interface tasks" folder and select the task "Delete role" in the list of theavailable tasks.
Page 93 of 96
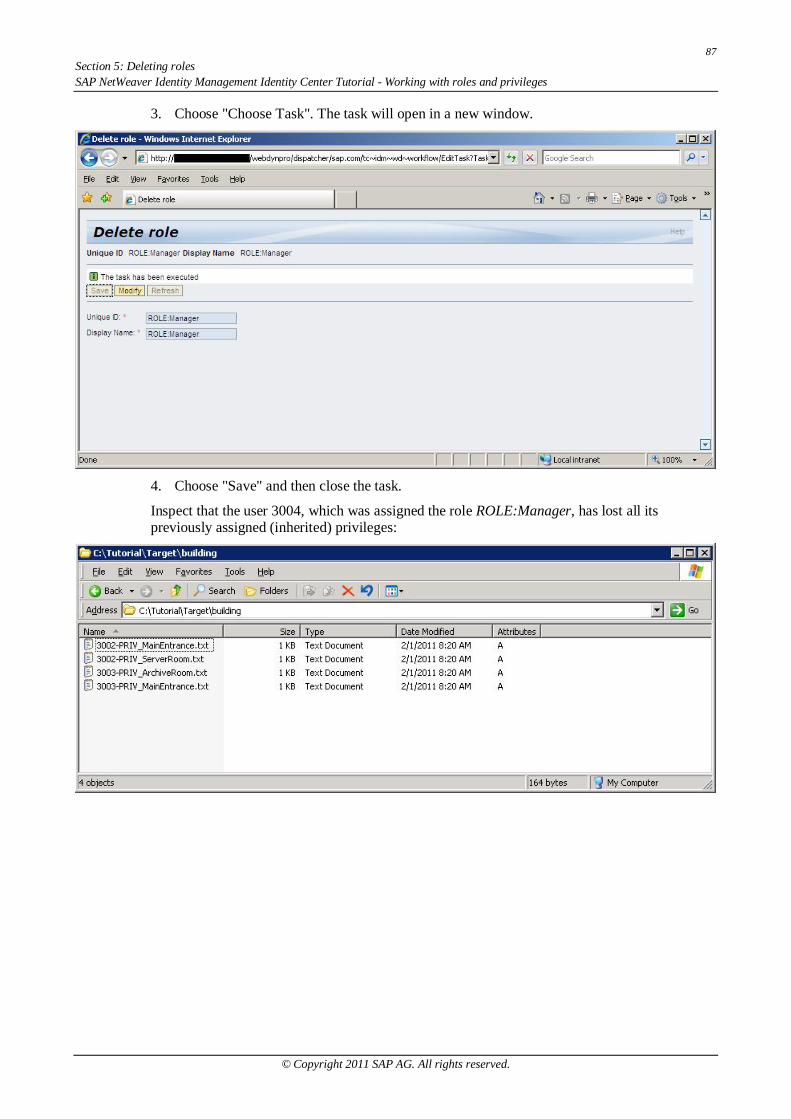
87Section 5: Deleting rolesSAP NetWeaver Identity Management Identity Center Tutorial - Working with roles and privileges
© Copyright 2011 SAP AG. All rights reserved.
3. Choose "Choose Task". The task will open in a new window.
4. Choose "Save" and then close the task.
Inspect that the user 3004, which was assigned the role ROLE:Manager, has lost all itspreviously assigned (inherited) privileges:
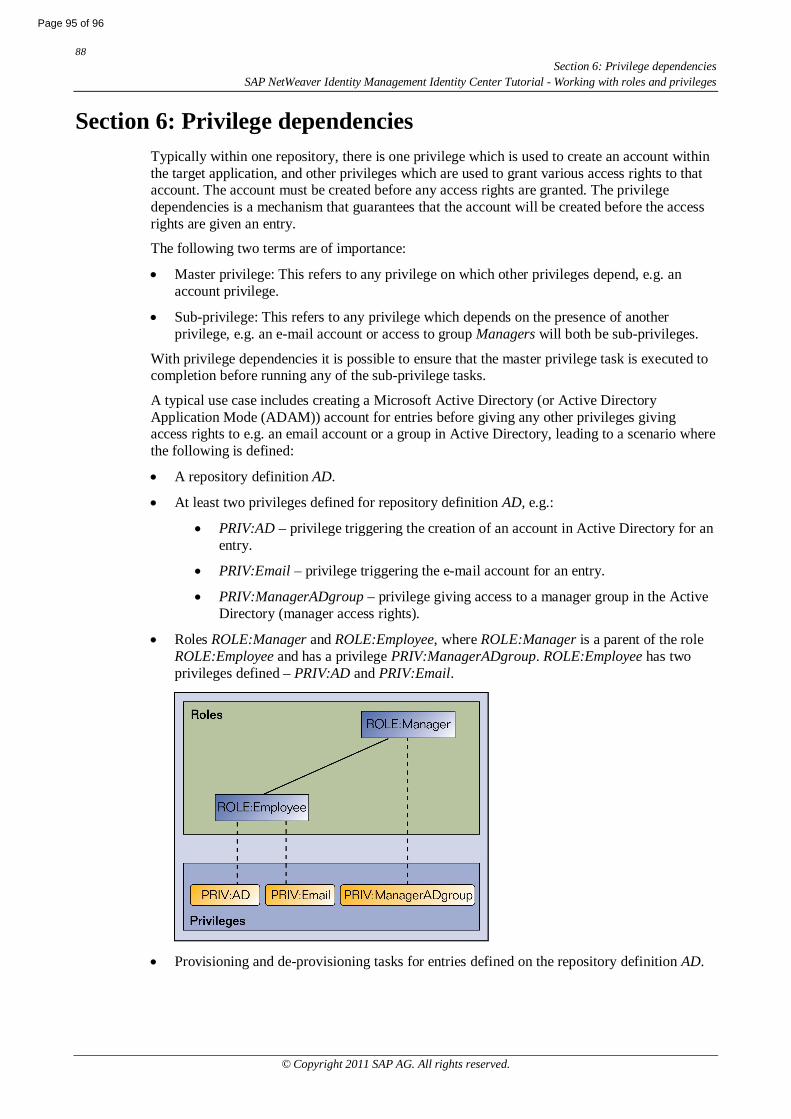
88Section 6: Privilege dependencies
SAP NetWeaver Identity Management Identity Center Tutorial - Working with roles and privileges
© Copyright 2011 SAP AG. All rights reserved.
Section 6: Privilege dependenciesTypically within one repository, there is one privilege which is used to create an account withinthe target application, and other privileges which are used to grant various access rights to thataccount. The account must be created before any access rights are granted. The privilegedependencies is a mechanism that guarantees that the account will be created before the accessrights are given an entry.
The following two terms are of importance:
Master privilege: This refers to any privilege on which other privileges depend, e.g. anaccount privilege.
Sub-privilege: This refers to any privilege which depends on the presence of anotherprivilege, e.g. an e-mail account or access to group Managers will both be sub-privileges.
With privilege dependencies it is possible to ensure that the master privilege task is executed tocompletion before running any of the sub-privilege tasks.
A typical use case includes creating a Microsoft Active Directory (or Active DirectoryApplication Mode (ADAM)) account for entries before giving any other privileges givingaccess rights to e.g. an email account or a group in Active Directory, leading to a scenario wherethe following is defined:
A repository definition AD.
At least two privileges defined for repository definition AD, e.g.:
PRIV:AD – privilege triggering the creation of an account in Active Directory for anentry.
PRIV:Email – privilege triggering the e-mail account for an entry.
PRIV:ManagerADgroup – privilege giving access to a manager group in the ActiveDirectory (manager access rights).
Roles ROLE:Manager and ROLE:Employee, where ROLE:Manager is a parent of the roleROLE:Employee and has a privilege PRIV:ManagerADgroup. ROLE:Employee has twoprivileges defined – PRIV:AD and PRIV:Email.
Provisioning and de-provisioning tasks for entries defined on the repository definition AD.
Page 95 of 96
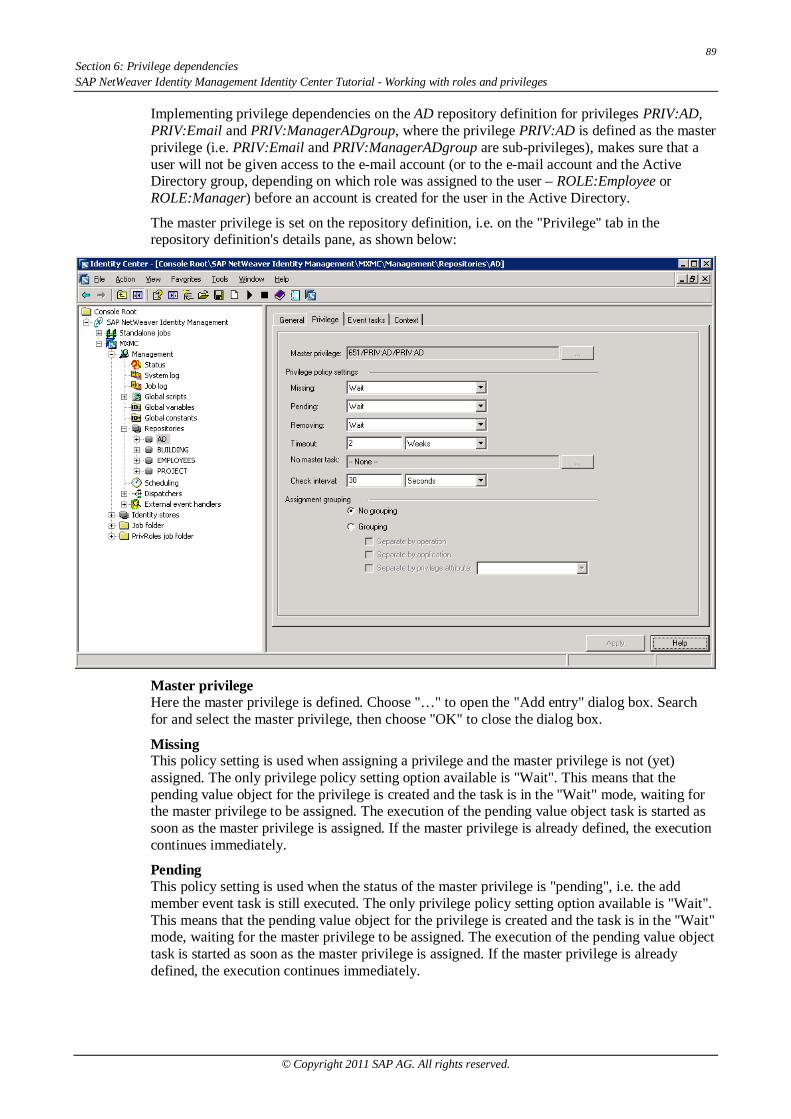
89Section 6: Privilege dependenciesSAP NetWeaver Identity Management Identity Center Tutorial - Working with roles and privileges
© Copyright 2011 SAP AG. All rights reserved.
Implementing privilege dependencies on the AD repository definition for privileges PRIV:AD,PRIV:Email and PRIV:ManagerADgroup, where the privilege PRIV:AD is defined as the masterprivilege (i.e. PRIV:Email and PRIV:ManagerADgroup are sub-privileges), makes sure that auser will not be given access to the e-mail account (or to the e-mail account and the ActiveDirectory group, depending on which role was assigned to the user – ROLE:Employee orROLE:Manager) before an account is created for the user in the Active Directory.
The master privilege is set on the repository definition, i.e. on the "Privilege" tab in therepository definition's details pane, as shown below:
Master privilegeHere the master privilege is defined. Choose "…" to open the "Add entry" dialog box. Searchfor and select the master privilege, then choose "OK" to close the dialog box.
MissingThis policy setting is used when assigning a privilege and the master privilege is not (yet)assigned. The only privilege policy setting option available is "Wait". This means that thepending value object for the privilege is created and the task is in the "Wait" mode, waiting forthe master privilege to be assigned. The execution of the pending value object task is started assoon as the master privilege is assigned. If the master privilege is already defined, the executioncontinues immediately.
PendingThis policy setting is used when the status of the master privilege is "pending", i.e. the addmember event task is still executed. The only privilege policy setting option available is "Wait".This means that the pending value object for the privilege is created and the task is in the "Wait"mode, waiting for the master privilege to be assigned. The execution of the pending value objecttask is started as soon as the master privilege is assigned. If the master privilege is alreadydefined, the execution continues immediately.
90Section 6: Privilege dependencies
SAP NetWeaver Identity Management Identity Center Tutorial - Working with roles and privileges
© Copyright 2011 SAP AG. All rights reserved.
RemovingThis policy setting is used when the status of the master privilege is "removing", i.e. theprivilege has been removed and the removal task (remove member event task) is still executing(pending remove). The only privilege policy setting option available is "Wait". This means thatthe pending value object for the privilege is created and the task is in the "Wait" mode, waitingfor the master privilege to be assigned. The execution of the pending value object task is startedas soon as the master privilege is assigned. If the master privilege is already defined, theexecution continues immediately.
TimeoutThe timeout (MX_PRIV_REQ_TIMEOUT) indicates how long the task should wait for themissing, pending or removing master privilege. Default value is two weeks. If the value is "0"(zero) or missing, it means no timeout. When the time expires, the task will enter error state, andthe error processing will be executed. The task may then assign/not assign the privilege.
No master taskHere a task is defined, which is executed if the master privilege is missing and the policy is"Wait". This task is executed when a privilege that requires the presence of the master privilegeis assigned. The "No master" task is typically used to assign the master privilege by assigningthe privilege directly or by assigning a role that references the privilege. When the masterprivilege is assigned, any assignments waiting for the master privilege will also be assigned.Choose "…" to open the "Select task" dialog box, then browse and select the task. Choose "OK"to close the dialog box.
Note:There is no automatic removal of a master privilege assigned with the "No master" task if alldepending privileges are removed from an entry.
Check intervalThis attribute is used to define the check interval when waiting for the master privilege to beassigned. Default check interval value is 30 seconds.
Choose "Apply" to save the configuration on the repository definition.
Page 97 of 96
Recommended