Installation GuideSAP ERP 6.0 Including SAP Enhancement Package 5 - Technical Usage “Central Applications” ABAP on HP-UX: OracleBased on SAP NetWeaver 7.0 Including Enhancement Package 2
Target Audience ■ System administrators ■ Technology consultants
PUBLICDocument version: 1.0 – 2010-12-20
About this Installation Guide
SAP System Installation
SAP system installations should only be performed by SAP Technical Consultants certified for your
operating system, your database, and the SAP system that you are installing
SAP Installation Tool
You must only use the SAP installation tools according to the instructions and for the purposes
described in the SAP installation document. Improper use of the SAP installation tools can damage files
and systems already installed.
Downward Compatibility of Databases
For downward-compatible releases of DB/OS platforms for SAP products, SAP plans to regularly release
the newest database (DB) and operating-system (OS) versions of SAP products. These releases are
downward-compatible with earlier SAP system releases.
Note that for already shipped SAP components, we only support the installation for database versions
proposed by the installation tool. Therefore, you must install an SAP component or perform a system
copy using a downward-compatible database. That is, you either install the component with the old
proposed database version or you upgrade the old database version to the downward-compatible new
version.
2/148 PUBLIC 2010-12-20
Document History
CAUTION
Before you start the implementation, make sure you have the latest version of this document.
You can find the latest version at the following location:http://service.sap.com/erp-inst.
The following table provides an overview of the most important document changes.
Version Date Description
1.0 2010-12-20 Initial Version
2010-12-20 PUBLIC 3/148
Table of Contents
Chapter 1 Introduction . . . . . . . . . . . . . . . . . . . . . . . . . . . . . . . . . . . . . . . . . . . . . . . . . . 9
1.1 New Features . . . . . . . . . . . . . . . . . . . . . . . . . . . . . . . . . . . . . . . . . . . . . . . . . . 10
1.2 SAP Notes for the Installation . . . . . . . . . . . . . . . . . . . . . . . . . . . . . . . . . . . . . 10
1.3 How to Use This Guide . . . . . . . . . . . . . . . . . . . . . . . . . . . . . . . . . . . . . . . . . . . 12
Chapter 2 Installation Options Covered by this Guide . . . . . . . . . . . . . . . . . . . . . . . 13
2.1 Central System . . . . . . . . . . . . . . . . . . . . . . . . . . . . . . . . . . . . . . . . . . . . . . . . . 13
2.2 Distributed System . . . . . . . . . . . . . . . . . . . . . . . . . . . . . . . . . . . . . . . . . . . . . . 14
2.3 High-Availability System . . . . . . . . . . . . . . . . . . . . . . . . . . . . . . . . . . . . . . . . . 15
2.4 Dialog Instance . . . . . . . . . . . . . . . . . . . . . . . . . . . . . . . . . . . . . . . . . . . . . . . . . 16
2.5 Host Agent as a Separate Installation . . . . . . . . . . . . . . . . . . . . . . . . . . . . . . . . 19
Chapter 3 Planning . . . . . . . . . . . . . . . . . . . . . . . . . . . . . . . . . . . . . . . . . . . . . . . . . . . . . 21
3.1 Planning Checklist . . . . . . . . . . . . . . . . . . . . . . . . . . . . . . . . . . . . . . . . . . . . . . 21
3.2 Hardware and Software Requirements . . . . . . . . . . . . . . . . . . . . . . . . . . . . . . . 22
3.2.1 Running the Prerequisite Checker in Standalone Mode
(Optional) . . . . . . . . . . . . . . . . . . . . . . . . . . . . . . . . . . . . . . . . . . . . . . . . . . . . 23
3.2.2 Hardware and Software Requirements Tables . . . . . . . . . . . . . . . . . . . . . . . . . 23
3.3 Planning User and Access Management . . . . . . . . . . . . . . . . . . . . . . . . . . . . . . 28
3.4 Basic SAP System Installation Parameters . . . . . . . . . . . . . . . . . . . . . . . . . . . . . 28
3.5 SAP Transport Host . . . . . . . . . . . . . . . . . . . . . . . . . . . . . . . . . . . . . . . . . . . . . 35
3.6 Internet Pricing and Configurator . . . . . . . . . . . . . . . . . . . . . . . . . . . . . . . . . . 35
3.7 High Availability: Planning the Switchover Cluster . . . . . . . . . . . . . . . . . . . . . 36
Chapter 4 Preparation . . . . . . . . . . . . . . . . . . . . . . . . . . . . . . . . . . . . . . . . . . . . . . . . . . . 39
4.1 Preparation Checklist . . . . . . . . . . . . . . . . . . . . . . . . . . . . . . . . . . . . . . . . . . . . 39
4.2 Creating Operating System Users and Groups . . . . . . . . . . . . . . . . . . . . . . . . . 40
4.3 Required File Systems and Directories . . . . . . . . . . . . . . . . . . . . . . . . . . . . . . . 42
4.3.1 SAP Directories . . . . . . . . . . . . . . . . . . . . . . . . . . . . . . . . . . . . . . . . . . . . . . . . . 42
4.3.2 Oracle Directories . . . . . . . . . . . . . . . . . . . . . . . . . . . . . . . . . . . . . . . . . . . . . . . 48
4.3.3 Setting Up File Systems for a High-Availability System . . . . . . . . . . . . . . . . . . 50
4.4 Using Virtual Host Names . . . . . . . . . . . . . . . . . . . . . . . . . . . . . . . . . . . . . . . . 52
4/148 PUBLIC 2010-12-20
4.5 Performing Switchover Preparations for High Availability . . . . . . . . . . . . . . . . 53
4.6 Installing the Front-End Software . . . . . . . . . . . . . . . . . . . . . . . . . . . . . . . . . . 53
4.7 Generating the SAP Solution Manager Key . . . . . . . . . . . . . . . . . . . . . . . . . . . 53
4.8 Downloading JCE Policy Files . . . . . . . . . . . . . . . . . . . . . . . . . . . . . . . . . . . . . . 54
4.9 Installing the Java Runtime Environment . . . . . . . . . . . . . . . . . . . . . . . . . . . . 54
4.10 Preparing the Installation Media . . . . . . . . . . . . . . . . . . . . . . . . . . . . . . . . . . . 55
Chapter 5 Installation . . . . . . . . . . . . . . . . . . . . . . . . . . . . . . . . . . . . . . . . . . . . . . . . . . . 59
5.1 Installation Checklist . . . . . . . . . . . . . . . . . . . . . . . . . . . . . . . . . . . . . . . . . . . . 59
5.2 Exporting and Mounting the Global Transport Directory . . . . . . . . . . . . . . . . 63
5.3 Exporting and Mounting Global Directories . . . . . . . . . . . . . . . . . . . . . . . . . . 64
5.4 Running SAPinst . . . . . . . . . . . . . . . . . . . . . . . . . . . . . . . . . . . . . . . . . . . . . . . 66
5.5 Additional Information About SAPinst . . . . . . . . . . . . . . . . . . . . . . . . . . . . . . 73
5.5.1 Interrupted Installation with SAPinst . . . . . . . . . . . . . . . . . . . . . . . . . . . . . . . . 73
5.5.2 Performing a Remote Installation with SAPinst . . . . . . . . . . . . . . . . . . . . . . . . 75
5.5.3 Starting SAPinst GUI Separately . . . . . . . . . . . . . . . . . . . . . . . . . . . . . . . . . . . . 76
5.5.4 Running SAPinst in Accessibility Mode . . . . . . . . . . . . . . . . . . . . . . . . . . . . . . 78
5.5.5 Entries in the Services File Created by SAPinst . . . . . . . . . . . . . . . . . . . . . . . . . 79
5.6 Oracle Database Software Installation . . . . . . . . . . . . . . . . . . . . . . . . . . . . . . . 79
5.6.1 Oracle 10 Database Software Installation . . . . . . . . . . . . . . . . . . . . . . . . . . . . . 79
5.6.1.1 Updating SAP-Specific Files in the Oracle Staging Area . . . . . . . . . . . . . . . . . . 80
5.6.1.2 Running the Oracle Universal Installer . . . . . . . . . . . . . . . . . . . . . . . . . . . . . . 80
5.6.1.3 Installing the Current Patch Set . . . . . . . . . . . . . . . . . . . . . . . . . . . . . . . . . . . . 82
5.6.1.4 Installing Required Interim Patches . . . . . . . . . . . . . . . . . . . . . . . . . . . . . . . . . 83
5.6.2 Oracle 11 Database Software Installation . . . . . . . . . . . . . . . . . . . . . . . . . . . . . 83
5.6.2.1 Running the Oracle Universal Installer . . . . . . . . . . . . . . . . . . . . . . . . . . . . . . 84
5.6.2.2 Installing the Current Patch Set . . . . . . . . . . . . . . . . . . . . . . . . . . . . . . . . . . . . 85
5.6.2.3 Installing the Required SAP Bundle Patch . . . . . . . . . . . . . . . . . . . . . . . . . . . . 86
Chapter 6 Post-Installation . . . . . . . . . . . . . . . . . . . . . . . . . . . . . . . . . . . . . . . . . . . . . . 87
6.1 Post-Installation Checklist . . . . . . . . . . . . . . . . . . . . . . . . . . . . . . . . . . . . . . . . 87
6.2 Performing Post-Installation Steps for the Operating System . . . . . . . . . . . . . . 88
6.3 Logging On to the Application Server . . . . . . . . . . . . . . . . . . . . . . . . . . . . . . . 88
6.4 Configuring User Management . . . . . . . . . . . . . . . . . . . . . . . . . . . . . . . . . . . . 89
6.5 Installing the SAP License . . . . . . . . . . . . . . . . . . . . . . . . . . . . . . . . . . . . . . . . . 90
6.6 High Availability: Setting Up Licenses . . . . . . . . . . . . . . . . . . . . . . . . . . . . . . . . 90
6.7 Applying the Latest Kernel and Support Package Stacks . . . . . . . . . . . . . . . . . 91
2010-12-20 PUBLIC 5/148
6.8 Dialog Instances in a Heterogeneous UNIX Environment only: Updating the
Kernel . . . . . . . . . . . . . . . . . . . . . . . . . . . . . . . . . . . . . . . . . . . . . . . . . . . . . . . . 92
6.9 Configuring Remote Connection to SAP Support . . . . . . . . . . . . . . . . . . . . . . 92
6.10 Installing the SAP Online Documentation . . . . . . . . . . . . . . . . . . . . . . . . . . . . 92
6.11 Performing Post-Installation Steps for the ABAP Application
Server . . . . . . . . . . . . . . . . . . . . . . . . . . . . . . . . . . . . . . . . . . . . . . . . . . . . . . . . 93
6.12 Ensuring User Security . . . . . . . . . . . . . . . . . . . . . . . . . . . . . . . . . . . . . . . . . . . 97
6.13 Performing Oracle-Specific Post-Installation Steps . . . . . . . . . . . . . . . . . . . . . . 99
6.14 Configuring the Connection to a Central System Landscape
Directory . . . . . . . . . . . . . . . . . . . . . . . . . . . . . . . . . . . . . . . . . . . . . . . . . . . . 100
6.15 Activating Internet Pricing and Configurator . . . . . . . . . . . . . . . . . . . . . . . . . 101
6.16 Implementing SAP ERP ABAP Add-On Components . . . . . . . . . . . . . . . . . . 101
6.17 Performing the Client Copy . . . . . . . . . . . . . . . . . . . . . . . . . . . . . . . . . . . . . . 101
6.18 Post-Installation Steps for the Diagnostics Agent . . . . . . . . . . . . . . . . . . . . . . 102
6.19 Post-Installation Steps for the Host Agent . . . . . . . . . . . . . . . . . . . . . . . . . . . 102
6.20 Performing a Full Installation Backup . . . . . . . . . . . . . . . . . . . . . . . . . . . . . . 103
6.21 Accessing Configuration Documentation in SAP Solution
Manager . . . . . . . . . . . . . . . . . . . . . . . . . . . . . . . . . . . . . . . . . . . . . . . . . . . . . 104
Chapter 7 Additional Information . . . . . . . . . . . . . . . . . . . . . . . . . . . . . . . . . . . . . . . 105
7.1 Installation of Multiple Components in One Database . . . . . . . . . . . . . . . . . . 105
7.2 Integration of LDAP Directory Services . . . . . . . . . . . . . . . . . . . . . . . . . . . . . 107
7.3 Checking and Modifying the HP-UX Kernel . . . . . . . . . . . . . . . . . . . . . . . . . . 111
7.4 Setting up Swap Space for HP-UX . . . . . . . . . . . . . . . . . . . . . . . . . . . . . . . . . . 113
7.5 Creating HP-UX Groups and Users . . . . . . . . . . . . . . . . . . . . . . . . . . . . . . . . . 115
7.6 Setting Up File Systems for HP-UX . . . . . . . . . . . . . . . . . . . . . . . . . . . . . . . . . 116
7.7 Dialog Instance Installation for an Upgraded System only: Updating
Profiles . . . . . . . . . . . . . . . . . . . . . . . . . . . . . . . . . . . . . . . . . . . . . . . . . . . . . . 119
7.8 Mounting Installation Media for HP-UX . . . . . . . . . . . . . . . . . . . . . . . . . . . . 120
7.9 Exporting and Mounting Directories via NFS for HP-UX . . . . . . . . . . . . . . . . 122
7.10 Installing the Host Agent Separately . . . . . . . . . . . . . . . . . . . . . . . . . . . . . . . . 123
7.11 Starting and Stopping SAP System Instances . . . . . . . . . . . . . . . . . . . . . . . . . 126
7.11.1 Starting and Stopping SAP System Instances Using the SAP Management
Console . . . . . . . . . . . . . . . . . . . . . . . . . . . . . . . . . . . . . . . . . . . . . . . . . . . . . . 126
7.11.2 Starting and Stopping SAP System Instances Using Commands . . . . . . . . . . . 128
7.12 Creating a User for LDAP Directory Access . . . . . . . . . . . . . . . . . . . . . . . . . . 132
7.13 Heterogeneous SAP System Installation . . . . . . . . . . . . . . . . . . . . . . . . . . . . . 132
7.14 Troubleshooting . . . . . . . . . . . . . . . . . . . . . . . . . . . . . . . . . . . . . . . . . . . . . . . 132
6/148 PUBLIC 2010-12-20
7.14.1 Troubleshooting with SAPinst . . . . . . . . . . . . . . . . . . . . . . . . . . . . . . . . . . . . 133
7.15 Deleting an SAP System or Single Instances . . . . . . . . . . . . . . . . . . . . . . . . . . 133
7.16 Oracle Database Software Deinstallation . . . . . . . . . . . . . . . . . . . . . . . . . . . . 136
7.16.1 Deinstalling the Oracle 10 Database Software . . . . . . . . . . . . . . . . . . . . . . . . . 136
7.16.2 Deinstalling the Oracle 11 Database Software . . . . . . . . . . . . . . . . . . . . . . . . . 137
Chapter A Appendix . . . . . . . . . . . . . . . . . . . . . . . . . . . . . . . . . . . . . . . . . . . . . . . . . . . . 139
A.1 Online Information from SAP . . . . . . . . . . . . . . . . . . . . . . . . . . . . . . . . . . . . 139
2010-12-20 PUBLIC 7/148

This page is left blank for documents that are printed on both sides.
1 Introduction
This document explains how to install SAP ERP 6.0 including SAP enhancement package 5 - technical
usage “Central Applications” ABAP. You perform the installation using SAPinst.
SAP ERP 6.0 including SAP enhancement package 5 - technical usage “Central Applications” is based
on the technology of SAP NetWeaver 7.0 including enhancement package 2. For more information
about the technology provided by SAP ERP and SAP NetWeaver, see http://service.sap.com/erp
and http://sdn.sap.com/irj/sdn/netweaver.
Make sure you read the corresponding Master Guides before you start with this installation guide.
The Master Guides are available as follows:
http://service.sap.com/erp-inst SAP ERP 6.0 SAP enhancement packages for SAP ERP 6.0 SAP
enhancement package <version> for SAP ERP 6.0
You can install SAP ERP 6.0 including SAP enhancement package 5 - technical usage “Central
Applications” with the following software units:
■ SAP ERP Central Component (ECC)
NOTE
You also install SAP NetWeaver Application Server ABAP (AS ABAP) with SAP ERP Central
Component.
For more information about the usage types of SAP NetWeaver and their interdependencies, see the
document Master Guide – SAP NetWeaver 7.0 at http://service.sap.com/instguidesNW70.
Constraints
You need to consider the following constraints before you start your installation:
■ Your operating system platform must be 64-bit.
NOTE
The only instance, you can still install on 32-bit is the dialog instance.
■ The database must be Oracle 10.2.0.4 or 11.2.0, and higher.
Naming Conventions
■ SAP system refers to SAP ERP 6.0 including SAP enhancement package 5 - technical usage "Central Applications”.
■ ABAP system refers to SAP ERP 6.0 including SAP enhancement package 5 - technical usage "Central Applications”
ABAP
■ diagnostics refers to diagnostics in SAP Solution Manager.
■ diagnostics agent refers to the agent of diagnostics in SAP Solution Manager.
1 Introduction
2010-12-20 PUBLIC 9/148
Profiling for High Availability
Only valid for: HA (UNIX) |
The profile bars with the wording Only valid for: HA (UNIX) – for example, as in this section – refer to
content that is only valid if you are installing a high-availability (HA) system on UNIX.End of: HA (UNIX) |
1.1 New Features
The table below provides an overview of the new features related to the installation.
Make sure that you also read the release notes at http://service.sap.com/releasenotes.
Area Description
SAPinst ■ Running SAPinst with accessibility mode: ● Keyboard access:
This feature is generally available for all operating systems.
● High-color contrast:This feature is derived from the Windows display properties. Therefore, to use this feature, you must perform a remote installation with SAPinst GUI running on a Windows host. For more information, see Running SAPinst in Accessibility Mode [page 78].
● Custom font setting:This feature is derived from the Windows display properties. Therefore, to enable this feature, you must perform a remote installation with SAPinst GUI running on a Windows host. For more information, see Running SAPinst in Accessibility Mode [page 78].
■ Only valid for: HA (UNIX) |
You can now install the enqueue replication server (ERS) with SAPinst. There is a new installation option called Enqueue Replication Server Instance, which is available for the installation options High-Availability System.End of: HA (UNIX) |
Additional ABAP Technical Usage The installation of SAP ERP 6.0 including enhancement package 5 already contains the technical usage “Central applications”. If you want to install an additional ABAP technical usage, you have to use transaction SAINT.
1.2 SAP Notes for the Installation
You must read the following SAP Notes before you start the installation. These SAP Notes contain
the most recent information on the installation, as well as corrections to the installation
documentation.
Make sure that you have the up-to-date version of each SAP Note, which you can find at http://
service.sap.com/notes.
1 Introduction
1.1 New Features
10/148 PUBLIC 2010-12-20
SAP Notes for the Installation
SAP Note Number Title Description
998833 Release Restrictions SAP ERP 6.0 - Enhancement Packages
At the time of the release of SAP ERP 6.0 including SAP enhancement package 5, limitations affect the productive usage of certain functions. This note provides customer information on these restrictions.
1323537 Release Info SAP Enhancement Package 5 for SAP ERP 6.0
SAP Enhancement Package 5 for SAP ERP 6.0 release information.
1313850 Release Restrictions for SAP EHP 2 for SAP NetWeaver 7.0
Customer information on restrictions in the production use of certain functions.
1341276 Inst. NetWeaver 7.0 EHP2 / Business Suite 7i2010- UNIX
UNIX-specific information about the SAP system and corrections to this documentation.
NOTE
This note also contains UNIX-specific information referring to SAP ERP.
1341277 Inst. NetWeaver 7.0 EHP2/ Business Suite 7i2010 - UNIX/Oracle
Oracle-specific information about the SAP system installation and corrections to this documentation.
NOTE
This note also contains Oracle-specific information referring to SAP ERP.
828268 Oracle 10g: New functions Information about new Oracle features released for the SAP system
1431800 1431800 Oracle 11.2.0: Central Technical Note
Information about Oracle 11g with multiple links to notes on Oracle 11g
98252 Installing two Oracle databases on a host
This SAP Note is only required if you plan to install more than one Oracle database on the same host.
855498 Installation Prerequisite Checker SAP Software on UNIX, Windows, and IBM i: Checking OS Dependencies
73606 Supported Languages and Code Pages
Information on possible languages and language combinations in SAP systems
1075118 SAP on HP-UX: FAQ This SAP Note contains information that is specific to the SAP system installation on HP-UX.
1067221 Central Note for Heterogeneous Installation
This SAP Note and its related SAP Notes describe the released operating system and database combinations for heterogeneous SAP systems landscapes.
789220 Support Package level for NetWeaver Installations/Upgrades
Information about the ABAP Support Package levels and kernel patch levels contained in the current SAP NetWeaver release.
774615 Support Package levels of ERP/ECC installations/upgrades
Information about the ABAP Support Package levels and kernel patch levels contained in the current SAP ERP release.
1 Introduction
1.2 SAP Notes for the Installation
2010-12-20 PUBLIC 11/148
SAP Note Number Title Description
1258912 PLM Core 7.00 Release Notes and Information
Information and references to other notes about installing PLM Core 7.00 and importing PLM Core 7.00 Support Packages.
1.3 How to Use This Guide
1. You decide on the installation option that you want to install.
The following installation options are described in this installation guide:
■ Central system
■ Distributed system
■ Only valid for: HA (UNIX) |
High-availability systemEnd of: HA (UNIX) |
■ Dialog instances
■ Host Agent as a separate installation
For more information, see Installation Options Covered by This Guide [page 13].
2. You follow the list of steps at the beginning of each installation phase:
■ Planning [page 21]
■ Preparation [page 39]
■ Installation [page 59]
■ Post-Installation [page 87]
NOTE
This applies to all installation options except the Host Agent as a Separate Installation [page 19].
This installation option has its own section in Additional Information [page 105].
In Additional Information [page 105] you can find special installation options and more information
about how to perform certain steps described in the main part of the guide.
1 Introduction
1.3 How to Use This Guide
12/148 PUBLIC 2010-12-20
2 Installation Options Covered by this Guide
This section shows the installation options covered by this guide. You have to decide what exactly you
want to install because the steps you have to perform vary according to the installation option you
choose.
■ Central system [page 13]
■ Distributed system [page 14]
■ Only valid for: HA (UNIX) |
High-availability system [page 15]End of: HA (UNIX) |
■ You can install dialog instances [page 16] to an existing system.
■ You can install a host agent [page 19] separately.
2.1 Central System
You can install a central system on a single host.
These are the following instances:
■ Database instance (DB instance)
■ Central instance
Optionally you can install one or more dialog instances. For more information, see Dialog Instance [page
16].
The following figure shows an example of SAP instances in a central system.
2 Installation Options Covered by this Guide
2.1 Central System
2010-12-20 PUBLIC 13/148
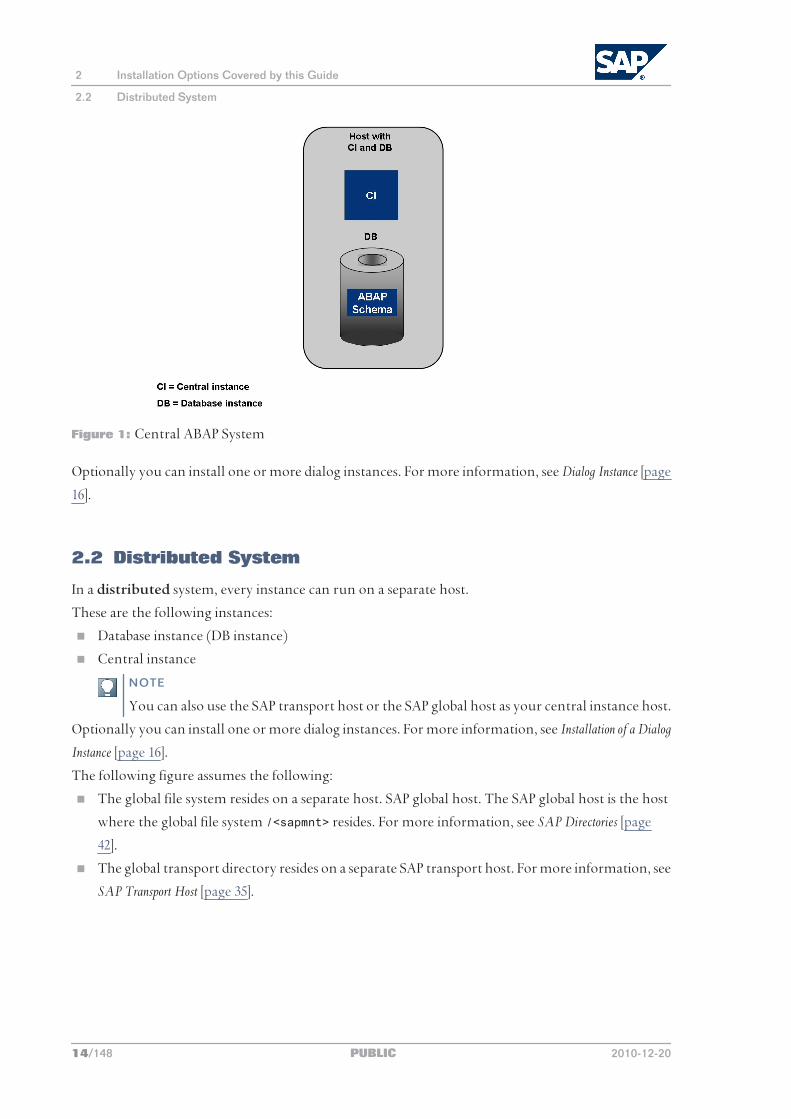
Figure 1: Central ABAP System
Optionally you can install one or more dialog instances. For more information, see Dialog Instance [page
16].
2.2 Distributed System
In a distributed system, every instance can run on a separate host.
These are the following instances:
■ Database instance (DB instance)
■ Central instance
NOTE
You can also use the SAP transport host or the SAP global host as your central instance host.
Optionally you can install one or more dialog instances. For more information, see Installation of a Dialog
Instance [page 16].
The following figure assumes the following:
■ The global file system resides on a separate host. SAP global host. The SAP global host is the host
where the global file system /<sapmnt> resides. For more information, see SAP Directories [page
42].
■ The global transport directory resides on a separate SAP transport host. For more information, see
SAP Transport Host [page 35].
2 Installation Options Covered by this Guide
2.2 Distributed System
14/148 PUBLIC 2010-12-20
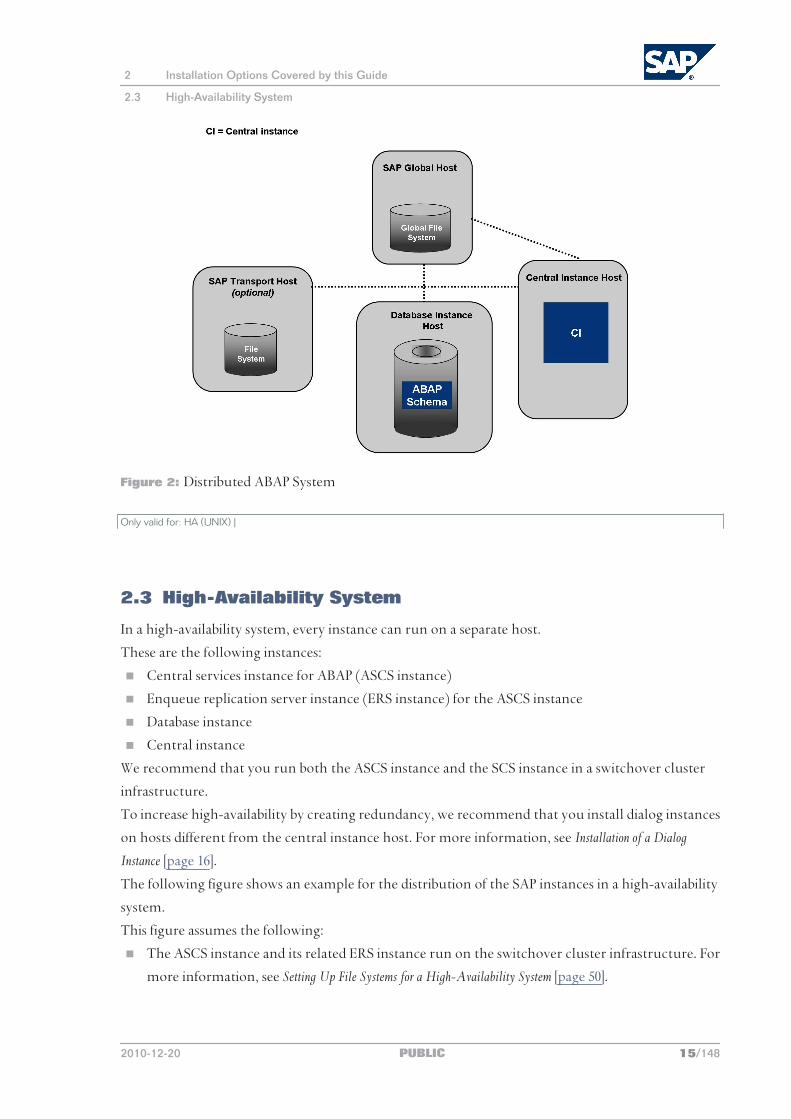
Figure 2: Distributed ABAP System
Only valid for: HA (UNIX) |
2.3 High-Availability System
In a high-availability system, every instance can run on a separate host.
These are the following instances:
■ Central services instance for ABAP (ASCS instance)
■ Enqueue replication server instance (ERS instance) for the ASCS instance
■ Database instance
■ Central instance
We recommend that you run both the ASCS instance and the SCS instance in a switchover cluster
infrastructure.
To increase high-availability by creating redundancy, we recommend that you install dialog instances
on hosts different from the central instance host. For more information, see Installation of a Dialog
Instance [page 16].
The following figure shows an example for the distribution of the SAP instances in a high-availability
system.
This figure assumes the following:
■ The ASCS instance and its related ERS instance run on the switchover cluster infrastructure. For
more information, see Setting Up File Systems for a High-Availability System [page 50].
2 Installation Options Covered by this Guide
2.3 High-Availability System
2010-12-20 PUBLIC 15/148
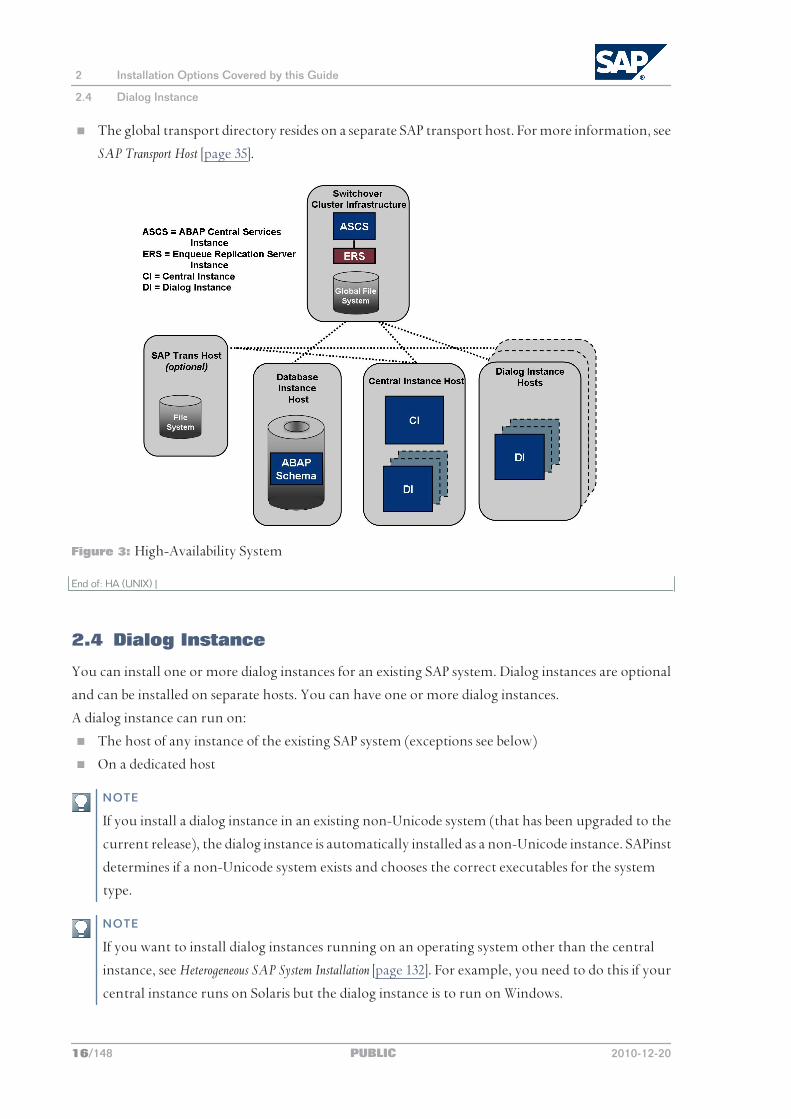
■ The global transport directory resides on a separate SAP transport host. For more information, see
SAP Transport Host [page 35].
Figure 3: High-Availability System
End of: HA (UNIX) |
2.4 Dialog Instance
You can install one or more dialog instances for an existing SAP system. Dialog instances are optional
and can be installed on separate hosts. You can have one or more dialog instances.
A dialog instance can run on:
■ The host of any instance of the existing SAP system (exceptions see below)
■ On a dedicated host
NOTE
If you install a dialog instance in an existing non-Unicode system (that has been upgraded to the
current release), the dialog instance is automatically installed as a non-Unicode instance. SAPinst
determines if a non-Unicode system exists and chooses the correct executables for the system
type.
NOTE
If you want to install dialog instances running on an operating system other than the central
instance, see Heterogeneous SAP System Installation [page 132]. For example, you need to do this if your
central instance runs on Solaris but the dialog instance is to run on Windows.
2 Installation Options Covered by this Guide
2.4 Dialog Instance
16/148 PUBLIC 2010-12-20
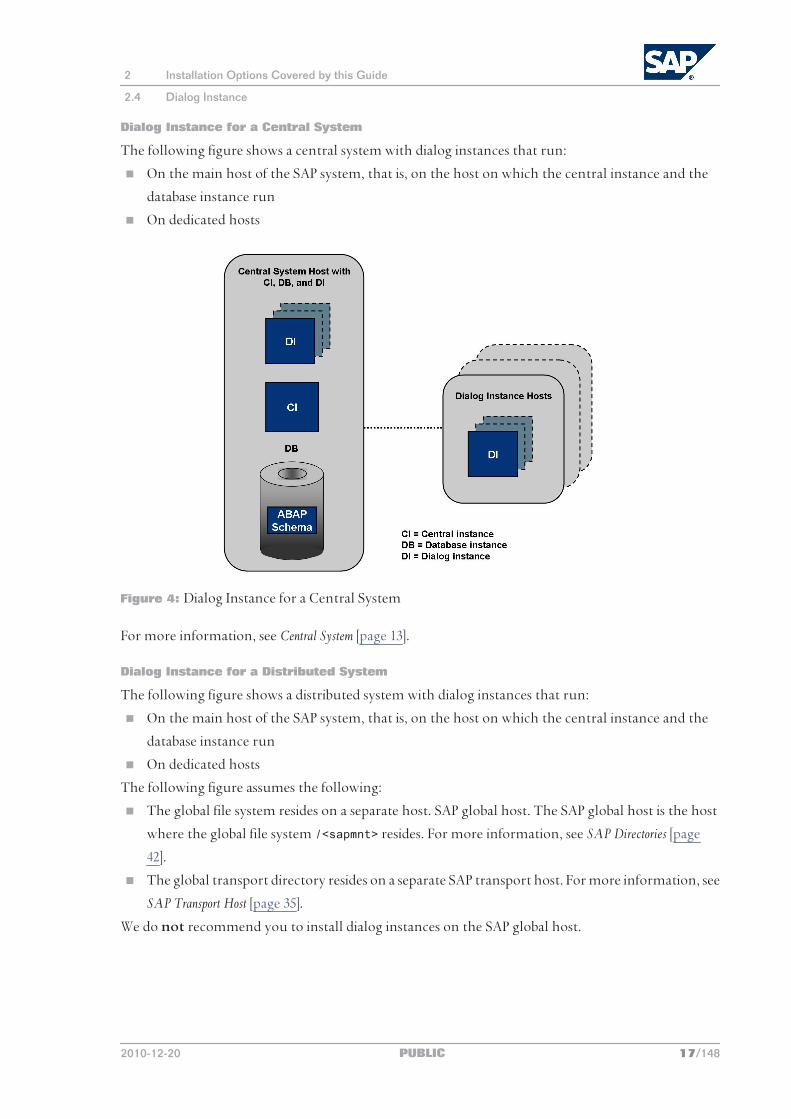
Dialog Instance for a Central System
The following figure shows a central system with dialog instances that run:
■ On the main host of the SAP system, that is, on the host on which the central instance and the
database instance run
■ On dedicated hosts
Figure 4: Dialog Instance for a Central System
For more information, see Central System [page 13].
Dialog Instance for a Distributed System
The following figure shows a distributed system with dialog instances that run:
■ On the main host of the SAP system, that is, on the host on which the central instance and the
database instance run
■ On dedicated hosts
The following figure assumes the following:
■ The global file system resides on a separate host. SAP global host. The SAP global host is the host
where the global file system /<sapmnt> resides. For more information, see SAP Directories [page
42].
■ The global transport directory resides on a separate SAP transport host. For more information, see
SAP Transport Host [page 35].
We do not recommend you to install dialog instances on the SAP global host.
2 Installation Options Covered by this Guide
2.4 Dialog Instance
2010-12-20 PUBLIC 17/148
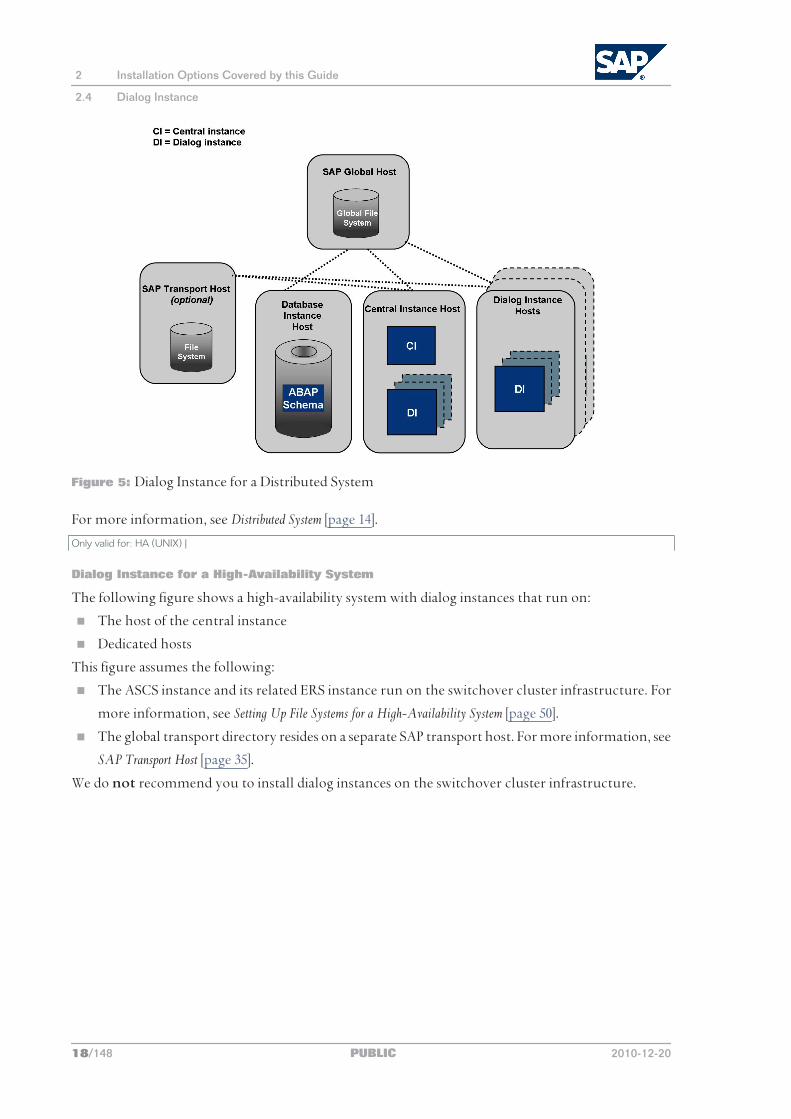
Figure 5: Dialog Instance for a Distributed System
For more information, see Distributed System [page 14].
Only valid for: HA (UNIX) |
Dialog Instance for a High-Availability System
The following figure shows a high-availability system with dialog instances that run on:
■ The host of the central instance
■ Dedicated hosts
This figure assumes the following:
■ The ASCS instance and its related ERS instance run on the switchover cluster infrastructure. For
more information, see Setting Up File Systems for a High-Availability System [page 50].
■ The global transport directory resides on a separate SAP transport host. For more information, see
SAP Transport Host [page 35].
We do not recommend you to install dialog instances on the switchover cluster infrastructure.
2 Installation Options Covered by this Guide
2.4 Dialog Instance
18/148 PUBLIC 2010-12-20
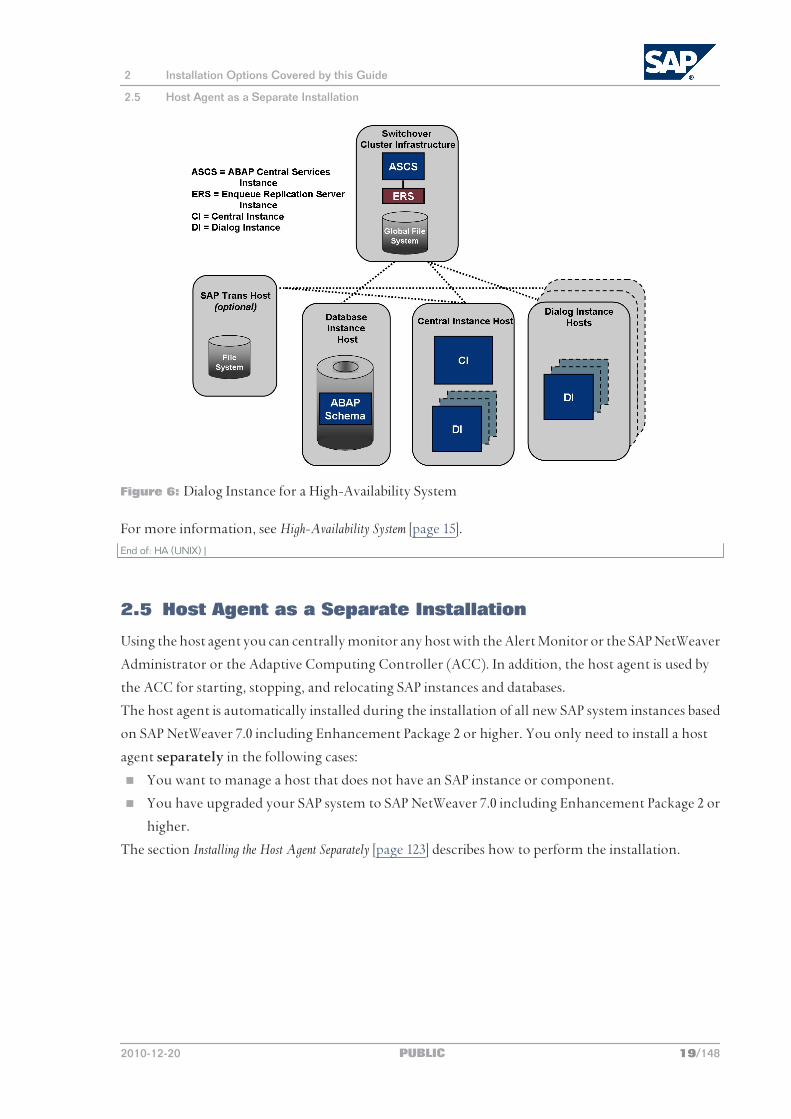
Figure 6: Dialog Instance for a High-Availability System
For more information, see High-Availability System [page 15].End of: HA (UNIX) |
2.5 Host Agent as a Separate Installation
Using the host agent you can centrally monitor any host with the Alert Monitor or the SAP NetWeaver
Administrator or the Adaptive Computing Controller (ACC). In addition, the host agent is used by
the ACC for starting, stopping, and relocating SAP instances and databases.
The host agent is automatically installed during the installation of all new SAP system instances based
on SAP NetWeaver 7.0 including Enhancement Package 2 or higher. You only need to install a host
agent separately in the following cases:
■ You want to manage a host that does not have an SAP instance or component.
■ You have upgraded your SAP system to SAP NetWeaver 7.0 including Enhancement Package 2 or
higher.
The section Installing the Host Agent Separately [page 123] describes how to perform the installation.
2 Installation Options Covered by this Guide
2.5 Host Agent as a Separate Installation
2010-12-20 PUBLIC 19/148

This page is left blank for documents that are printed on both sides.
3 Planning
3.1 Planning Checklist
This section includes the planning steps that you have to perform for the following installation options:
■ Central, distributed, or high-availability system
■ Dialog instance
Detailed information about the steps is available in the relevant chapter.
Prerequisites
1. You have planned your SAP system landscape according to the Master Guide at http://
service.sap.com/erp-inst and the Technical Infrastructure Guide at https://
cw.sdn.sap.com/cw/community/docupedia/tig.
2. You have decided on your installation option [page 13].
Central, Distributed, or High-Availability System
NOTE
In a central system, all mandatory instances are installed on one host. Therefore, if you are
installing a central system, you can ignore references to other hosts.
1. You check the hardware and software requirements [page 22] for each installation host.
2. You plan how to set up user and access management [page 28].
3. You identify basic SAP system installation parameters [page 28].
4. You decide on the transport host to use [page 35].
5. You decide if you want to use Internet Pricing and Configurator [page 35].
6. Only valid for: HA (UNIX) |
To install a high-availability system, you read Planning the Switchover Cluster [page 36].End of: HA (UNIX) |
7. You can continue with Preparation [page 39].
Dialog Instance
1. You check the hardware and software requirements [page 22] for the installation host on which you want
to install one or more dialog instances.
2. You identify basic SAP system installation parameters [page 28].
3. You can now continue with Preparation [page 39].
3 Planning
3.1 Planning Checklist
2010-12-20 PUBLIC 21/148
3.2 Hardware and Software Requirements
You check that your hosts meet the hardware and software requirements for your operating system
and the SAP instances.
CAUTION
If your hosts do not fully meet the requirements, you might experience problems when working
with the SAP system.
Prerequisites
■ Make sure that the host name meets the requirements listed in SAP Note 611361.
■ Check SAP Note 837670 for HP-UX OS Patch recommendations.
■ For “Frequently Asked Questions” about SAP on HP-UX, see SAP Note 1075118.
■ SAP only supports the use of native binaries. Always use the appropriate SAP binaries for your
processor.
■ Check your keyboard definitions.
■ If you want to install a printer on a host other than the central instance host (for example, on a
separate database instance host), make sure that the printer can be accessed under UNIX.
Process Flow
1. Check the Product Availability Matrix at http://service.sap.com/pam for supported operating
system releases.
2. Check the hardware and software requirements using:
■ The Prerequisite Checker in one of two modes:
● Standalone mode (optional) before the installation process
For more information, see Running the Prerequisite Checker Standalone [page 23].
● Integrated in SAPinst (mandatory) during the installation process
For more information, see Running SAPinst [page 66].
NOTE
For the most recent updates to the Prerequisite Checker, always check SAP Note 855498.
■ The Hardware and Software Requirements Tables [page 23]
3. If you want to install a production system, the values provided by the Prerequisite Checker and
the hardware and software requirements checklists are not sufficient. In addition, do the following:
■ You use the Quick Sizer tool available at http://service.sap.com/sizing.
For more information about the Quick Sizer and available sizing guides, see the Master Guide
– SAP NetWeaver 7.0 at http://service.sap.com/installnw70 Planning .
■ You contact your hardware vendor, who can analyze the load and calculate suitable hardware
sizing depending on:
● The set of applications to be deployed
● How intensively the applications are to be used
3 Planning
3.2 Hardware and Software Requirements
22/148 PUBLIC 2010-12-20
● The number of users
3.2.1 Running the Prerequisite Checker in Standalone Mode (Optional)
Before installing your SAP system, you can run the Prerequisite Checker in standalone mode to check the
hardware and software requirements for your operating system (OS) and the SAP instances.
RECOMMENDATION
We recommend that you use both the Prerequisite Checker and the requirements tables for reference.
NOTE
When installing your SAP system, SAPinst automatically starts the Prerequisite Checker and checks
the hardware and software requirements in the background.
Prerequisites
■ You have prepared the installation master DVD on the required installation host [page 55].
Procedure
1. You start SAPinst [page 66].
2. On the Welcome screen, choose <Your SAP product> Software Life-Cycle Options Additional Preparations
Prerequisites Check .
3. Follow the instructions in the SAPinst dialogs and enter the required parameters.
NOTE
For more information about each parameter, position the cursor on the parameter field and
choose F1 in SAPinst.
When you have finished, the Parameter Summary screen appears summarizing all parameters you have
entered and want to have checked. If you want to make a change, select the relevant parameters
and choose Revise.
4. To start the prerequisites check, choose Next.
Result
The Prerequisite Checker Results screen displays the results found. If required, you can also check the results
in file prerequisite_checker_results.html, which you can find in the installation directory.
3.2.2 Hardware and Software Requirements Tables
Every installation host must meet at least the requirements listed in the following tables. Most of the
requirements are valid for every installation host whereas some requirements are instance-specific and
are marked accordingly.
3 Planning
3.2 Hardware and Software Requirements
2010-12-20 PUBLIC 23/148
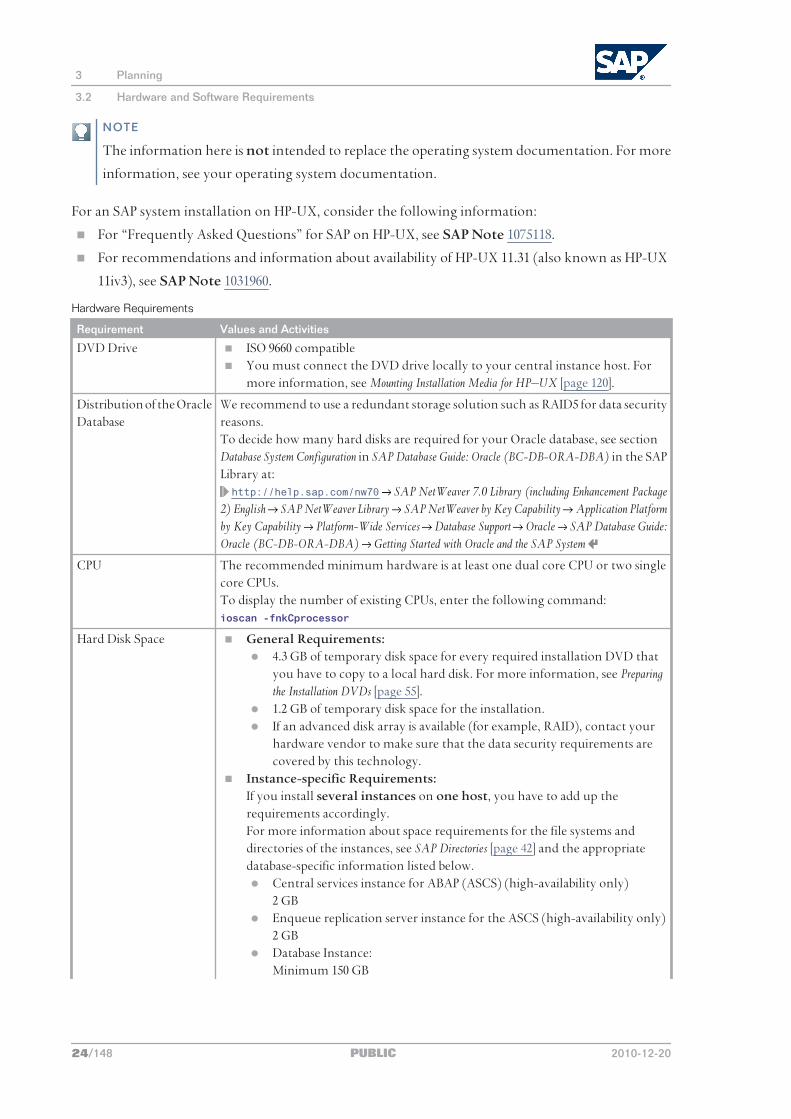
NOTE
The information here is not intended to replace the operating system documentation. For more
information, see your operating system documentation.
For an SAP system installation on HP-UX, consider the following information:
■ For “Frequently Asked Questions” for SAP on HP-UX, see SAP Note 1075118.
■ For recommendations and information about availability of HP-UX 11.31 (also known as HP-UX
11iv3), see SAP Note 1031960.
Hardware Requirements
Requirement Values and Activities
DVD Drive ■ ISO 9660 compatible ■ You must connect the DVD drive locally to your central instance host. For
more information, see Mounting Installation Media for HP–UX [page 120].
Distribution of the Oracle Database
We recommend to use a redundant storage solution such as RAID5 for data security reasons.To decide how many hard disks are required for your Oracle database, see section Database System Configuration in SAP Database Guide: Oracle (BC-DB-ORA-DBA) in the SAP Library at:http://help.sap.com/nw70 SAP NetWeaver 7.0 Library (including Enhancement Package
2) English SAP NetWeaver Library SAP NetWeaver by Key Capability Application Platform by Key Capability Platform-Wide Services Database Support Oracle SAP Database Guide: Oracle (BC-DB-ORA-DBA) Getting Started with Oracle and the SAP System
CPU The recommended minimum hardware is at least one dual core CPU or two single core CPUs.To display the number of existing CPUs, enter the following command:ioscan -fnkCprocessor
Hard Disk Space ■ General Requirements: ● 4.3 GB of temporary disk space for every required installation DVD that
you have to copy to a local hard disk. For more information, see Preparing the Installation DVDs [page 55].
● 1.2 GB of temporary disk space for the installation. ● If an advanced disk array is available (for example, RAID), contact your
hardware vendor to make sure that the data security requirements are covered by this technology.
■ Instance-specific Requirements:If you install several instances on one host, you have to add up the requirements accordingly.For more information about space requirements for the file systems and directories of the instances, see SAP Directories [page 42] and the appropriate database-specific information listed below. ● Central services instance for ABAP (ASCS) (high-availability only)
2 GB ● Enqueue replication server instance for the ASCS (high-availability only)
2 GB ● Database Instance:
Minimum 150 GB
3 Planning
3.2 Hardware and Software Requirements
24/148 PUBLIC 2010-12-20
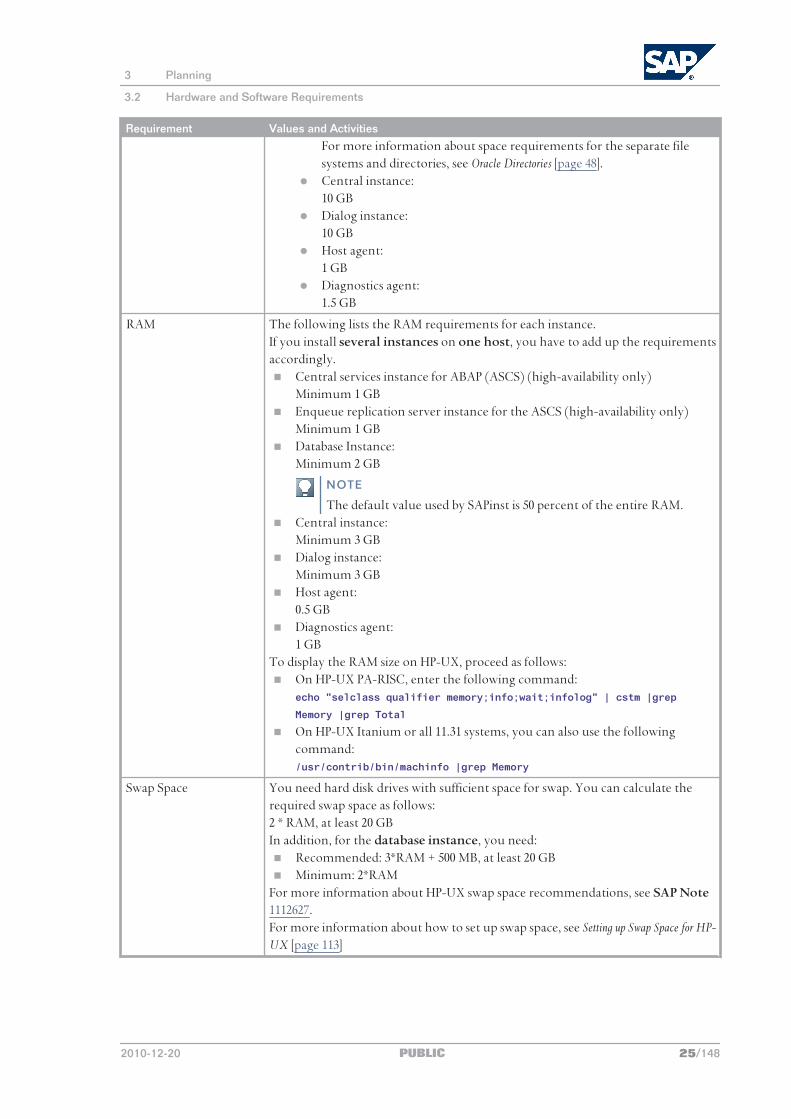
Requirement Values and ActivitiesFor more information about space requirements for the separate file systems and directories, see Oracle Directories [page 48].
● Central instance:10 GB
● Dialog instance:10 GB
● Host agent:1 GB
● Diagnostics agent:1.5 GB
RAM The following lists the RAM requirements for each instance.If you install several instances on one host, you have to add up the requirements accordingly. ■ Central services instance for ABAP (ASCS) (high-availability only)
Minimum 1 GB ■ Enqueue replication server instance for the ASCS (high-availability only)
Minimum 1 GB ■ Database Instance:
Minimum 2 GB
NOTE
The default value used by SAPinst is 50 percent of the entire RAM. ■ Central instance:
Minimum 3 GB ■ Dialog instance:
Minimum 3 GB ■ Host agent:
0.5 GB ■ Diagnostics agent:
1 GBTo display the RAM size on HP-UX, proceed as follows: ■ On HP-UX PA-RISC, enter the following command:
echo "selclass qualifier memory;info;wait;infolog" | cstm |grep
Memory |grep Total
■ On HP-UX Itanium or all 11.31 systems, you can also use the following command:/usr/contrib/bin/machinfo |grep Memory
Swap Space You need hard disk drives with sufficient space for swap. You can calculate the required swap space as follows:2 * RAM, at least 20 GBIn addition, for the database instance, you need: ■ Recommended: 3*RAM + 500 MB, at least 20 GB ■ Minimum: 2*RAMFor more information about HP-UX swap space recommendations, see SAP Note 1112627.For more information about how to set up swap space, see Setting up Swap Space for HP-UX [page 113]
3 Planning
3.2 Hardware and Software Requirements
2010-12-20 PUBLIC 25/148
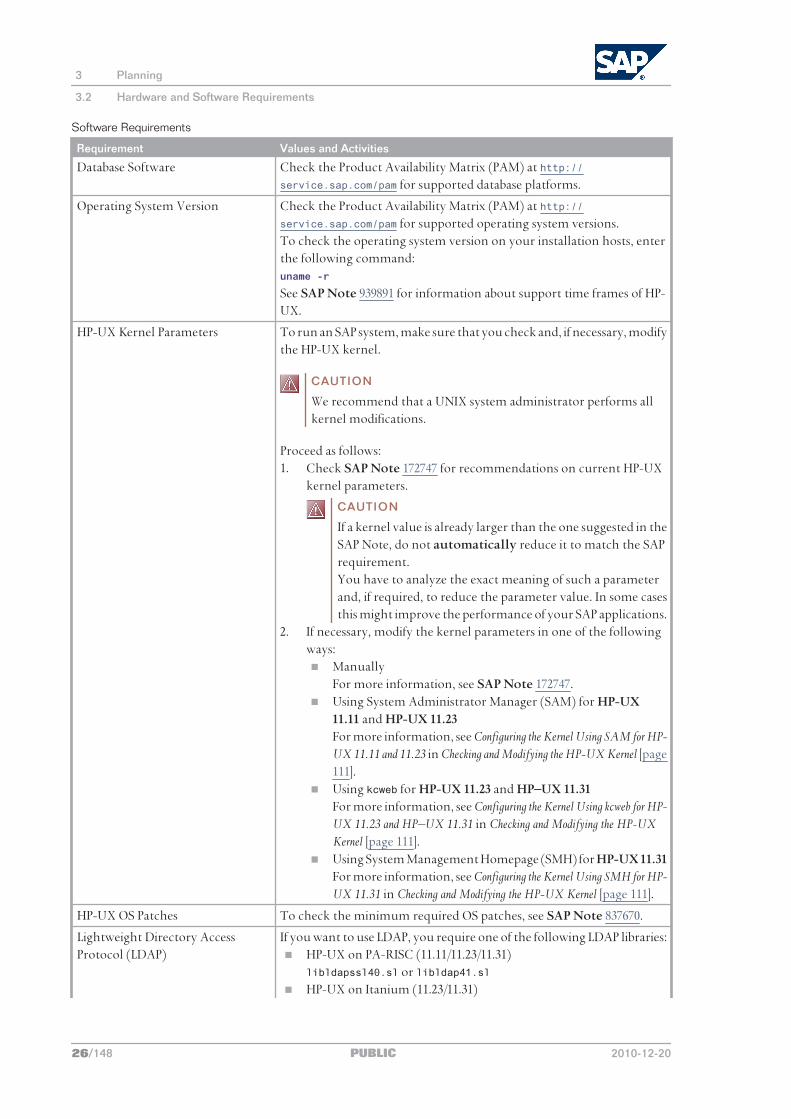
Software Requirements
Requirement Values and Activities
Database Software Check the Product Availability Matrix (PAM) at http://service.sap.com/pam for supported database platforms.
Operating System Version Check the Product Availability Matrix (PAM) at http://service.sap.com/pam for supported operating system versions.To check the operating system version on your installation hosts, enter the following command:uname -r
See SAP Note 939891 for information about support time frames of HP-UX.
HP-UX Kernel Parameters To run an SAP system, make sure that you check and, if necessary, modify the HP-UX kernel.
CAUTION
We recommend that a UNIX system administrator performs all kernel modifications.
Proceed as follows:1. Check SAP Note 172747 for recommendations on current HP-UX
kernel parameters.
CAUTION
If a kernel value is already larger than the one suggested in the SAP Note, do not automatically reduce it to match the SAP requirement.You have to analyze the exact meaning of such a parameter and, if required, to reduce the parameter value. In some cases this might improve the performance of your SAP applications.
2. If necessary, modify the kernel parameters in one of the following ways: ■ Manually
For more information, see SAP Note 172747. ■ Using System Administrator Manager (SAM) for HP-UX
11.11 and HP-UX 11.23For more information, see Configuring the Kernel Using SAM for HP-UX 11.11 and 11.23 in Checking and Modifying the HP-UX Kernel [page 111].
■ Using kcweb for HP-UX 11.23 and HP–UX 11.31For more information, see Configuring the Kernel Using kcweb for HP-UX 11.23 and HP–UX 11.31 in Checking and Modifying the HP-UX Kernel [page 111].
■ Using System Management Homepage (SMH) for HP-UX 11.31For more information, see Configuring the Kernel Using SMH for HP-UX 11.31 in Checking and Modifying the HP-UX Kernel [page 111].
HP-UX OS Patches To check the minimum required OS patches, see SAP Note 837670.
Lightweight Directory Access Protocol (LDAP)
If you want to use LDAP, you require one of the following LDAP libraries: ■ HP-UX on PA-RISC (11.11/11.23/11.31)
libldapssl40.sl or libldap41.sl ■ HP-UX on Itanium (11.23/11.31)
3 Planning
3.2 Hardware and Software Requirements
26/148 PUBLIC 2010-12-20
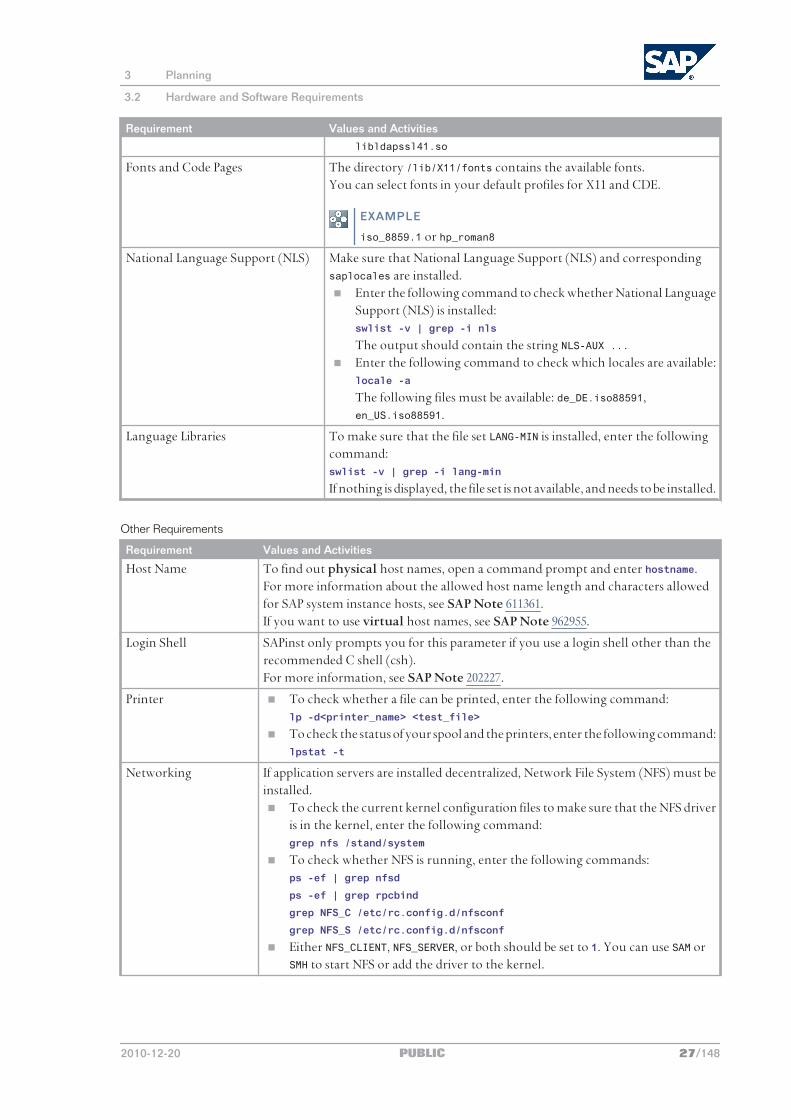
Requirement Values and Activitieslibldapssl41.so
Fonts and Code Pages The directory /lib/X11/fonts contains the available fonts.You can select fonts in your default profiles for X11 and CDE.
EXAMPLE
iso_8859.1 or hp_roman8
National Language Support (NLS) Make sure that National Language Support (NLS) and corresponding saplocales are installed. ■ Enter the following command to check whether National Language
Support (NLS) is installed:swlist -v | grep -i nls
The output should contain the string NLS-AUX ... ■ Enter the following command to check which locales are available:
locale -a
The following files must be available: de_DE.iso88591, en_US.iso88591.
Language Libraries To make sure that the file set LANG-MIN is installed, enter the following command:swlist -v | grep -i lang-min
If nothing is displayed, the file set is not available, and needs to be installed.
Other Requirements
Requirement Values and Activities
Host Name To find out physical host names, open a command prompt and enter hostname.For more information about the allowed host name length and characters allowed for SAP system instance hosts, see SAP Note 611361.If you want to use virtual host names, see SAP Note 962955.
Login Shell SAPinst only prompts you for this parameter if you use a login shell other than the recommended C shell (csh).For more information, see SAP Note 202227.
Printer ■ To check whether a file can be printed, enter the following command:lp -d<printer_name> <test_file>
■ To check the status of your spool and the printers, enter the following command:lpstat -t
Networking If application servers are installed decentralized, Network File System (NFS) must be installed. ■ To check the current kernel configuration files to make sure that the NFS driver
is in the kernel, enter the following command:grep nfs /stand/system
■ To check whether NFS is running, enter the following commands:ps -ef | grep nfsd
ps -ef | grep rpcbind
grep NFS_C /etc/rc.config.d/nfsconf
grep NFS_S /etc/rc.config.d/nfsconf
■ Either NFS_CLIENT, NFS_SERVER, or both should be set to 1. You can use SAM or SMH to start NFS or add the driver to the kernel.
3 Planning
3.2 Hardware and Software Requirements
2010-12-20 PUBLIC 27/148
Requirement Values and Activities
C++ Runtime Environment
Make sure that the patch level of C++ runtime library is equal to or newer than the version recommended in the general HP-UX patch recommendations. For more information, see SAP Note 837670.
3.3 Planning User and Access Management
You have to plan how you want to configure user and access management for your SAP system to be
installed.
Before you add a newly installed SAP system to your system landscape, you must decide which kind
of user management you want to use:
■ Use Central User Administration (CUA).
■ Use an LDAP directory as the data source for user data.
Procedure
Using Central User Management
1. You install your SAP system as described in this installation guide.
2. Add the system to Central User Administration (CUA). For more information, see Configuring User
Management [page 89].
Using an LDAP directory as Source for User Data
1. You install your SAP system as described in this installation guide.
2. Configure the user management of the newly installed SAP system to use and LDAP directory.
For more information, see Configuring User Management [page 89].
More Information
For more information about configuring the user management of your SAP system to be installed, see
the SAP Library at:
http://help.sap.com/nw70 SAP NetWeaver 7.0 Library (including Enhancement Package 2) English SAP
NetWeaver Library SAP NetWeaver by Key Capability Security Identity Management Identity Management for
System Landscapes Integration of User Management in Your System Landscape
3.4 Basic SAP System Installation Parameters
SAPinst prompts for input parameters during the Define Parameters phase of the installation.
You can install your SAP system either in Typical or Custom mode:
■ Typical
3 Planning
3.3 Planning User and Access Management
28/148 PUBLIC 2010-12-20
If you choose Typical, you perform the installation with default settings. This means that you only
have to respond to a small selection of prompts including at least the following, which are described
in the corresponding tables below:
● SAP system ID and database ID
● SAP system profile directory – only for systems with instances on separate hosts
● Master password
● Java Runtime Environment (JRE) – only prompted if not already available on the installation
host
● Java Cryptographic Extension (JCE) Unlimited Strength Jurisdiction Policy files archive – only
prompted if not already available on the installation host
● System Landscape Directory (SLD) destination
● SAP Solution Manager Key
If you want to change any of the default settings, you can do so on the Parameter Summary screen.
■ Custom
If you choose Custom, you are prompted for all parameters. At the end, you can still change any of
these parameters on the Parameter Summary screen.
NOTE
You cannot change from Custom to Typical mode or from Typical to Custom mode on the Parameter
Summary screen.
The following tables list the basic system parameters that you need to specify before installing your
SAP system:
■ SAP System Parameters
■ SAP System Database Parameters
■ Diagnostics Agent Parameters
For all other installation parameters, use the F1 help in the SAPinst screens.
SAP System Parameters
Parameters Description
SAP System ID <SAPSID>
The SAP System ID <SAPSID> identifies the whole SAP system.
CAUTION
Choose your SAP system ID carefully. You cannot change the SAP system ID after the installation.
Make sure that your SAP system ID: ■ Is unique throughout your organization. Do not use an existing <SAPSID> when
installing a new SAP system. ■ Consists of exactly three alphanumeric characters ■ Contains only uppercase letters ■ Has a letter for the first character ■ Does not include any of the following, which are reserved IDs:
3 Planning
3.4 Basic SAP System Installation Parameters
2010-12-20 PUBLIC 29/148
Parameters DescriptionADD ALL AMD AND ANY ARE ASC AUX AVG BIT CDC COM CON DBA END EPS FOR GET GID
IBM INT KEY LOG LPT MAP MAX MIN MON NIX NOT NUL OFF OLD OMS OUT PAD PRN RAW
REF ROW SAP SET SGA SHG SID SQL SUM SYS TMP TOP UID USE USR VAR
■ If you want to install a dialog instance, make sure that no gateway instance with the same SAP system ID (SAPSID) exists in your SAP system landscape.
SAP System Instance Numbers
Technical identifier for internal processes. It consists of a two-digit number from 00 to 97.The instance number must be unique on a host. That is, if more than one SAP instance is running on the same host, these instances must be assigned different numbers.If you do not enter a specific value, the instance number is set automatically to the next free and valid instance number that has not yet been assigned to the SAP system to be installed or to SAP systems that already exist on the installation host.To find out instance numbers of SAP systems that already exist on the installation host, look for subdirectories ending with <nn> of local (not mounted) /usr/sap/<SAPSID> directories.The value <nn> is the number assigned to the instance.For more information about the naming of SAP system instances, see SAP Directories [page 42].
CAUTION
Do not use 75 for the instance number because this number is already used by the operating system. For more information, see SAP Note 29972.
CAUTION
Do not use 02 as the instance number because this number is used to determine the port number for report RSLGCOLL, which is 14<instance_number> by default. The port 1402 however is already used by the OS process rstlisten. If you decide to use 02 as the instance number anyway, the instance fails to start during the installation process. You then have to change the port number for report RSLGCOLL manually to continue with the installation. For more information, see Running SAPinst [page 66].
Master Password Common password for all users created during the installation: ■ Operating system users (for example <sapsid>adm)
CAUTION
If you did not create the operating system users manually before the installation, SAPinst creates them with the common master password. In this case, make sure that the master password meets the requirements of your operating system and of your database.
■ ABAP users SAP* and DDIC
CAUTION
SAPinst applies the master password to users SAP*and DDIC for SAP system clients 000 and 001 only, but not to users SAP*, DDIC, and EARLYWATCH in SAP system client 066.Instead, SAPinst always assigns the following passwords to these users in client 066:SAP*: 06071992EARLYWATCH: supportSee also Ensuring User Security [page 97].
■ Database users(for example ora<dbsid>
■ Secure Store key phraseFor more information, see table line Key Phrase for Secure Store Settings.
3 Planning
3.4 Basic SAP System Installation Parameters
30/148 PUBLIC 2010-12-20

Parameters DescriptionPassword policyThe master password: ■ Must be 8 to 14 characters long ■ Must contain at least one letter (a-z, A-Z) ■ Must contain at least one digit (0-9) ■ Must not contain \ (backslash) and " (double quote)Depending on the installation option, additional restrictions might apply (for example, the master password must not contain the name of a Java user created during the installation).
Message Server Port
CAUTION
The message server port number must be unique for the SAP system on all hosts. If there are several message port numbers on one host, all must be unique.
Port number of the SAP Message Server: If you do not specify a value, the default port number is used.ABAP Message Server PortThere is an external message server port and an internal message server port.The ABAP message server uses both the internal and the external message server ports. The default profile contains the configuration for both message server ports.The external message server port uses the parameter rdisp/msserv with default value 36<nn>, where <nn> is the instance number of the ABAP message server instance.The internal message server port uses the parameter rdisp/msserv_internal with default value 39<nn>, where <nn> is the instance number of the ABAP message server instance.For more information about the parameters used for message server ports, see SAP Note 821875.
Java Runtime Environment (JRE)
A valid JRE is required for the installation with SAPinst. For more information about JRE versions supported by SAP and about how to install them, see Installing the Java Runtime Environment [page 54].
DNS Domain Name for SAP System
If you want to use HTTP-based URL frameworks such as Web Dynpro applications, you have to specify the DNS domain name for the SAP system.The DNS Domain Name is used to calculate the Fully Qualified Domain Name (FQDN), which is configured in profile parameter SAPLOCALHOSTFULL. FQDN is the fully qualified domain name for an IP address. It consists of the host name and the domain name:<host name>.<domain name>
The DNS Domain Name is needed to define the URLs for the ABAP and Java application servers. It is appended to the server name to calculate the FQDN.For more information, see Configuring Fully Qualified Domain Names (FQDN) in Performing Post-Installation Steps for the ABAP Application Server [page 93].
EXAMPLE
If your application server host is called kirk.wdf.sap.com, the DNS Domain Name is wdf.sap.com.
Path to SAPCRYPTO.SAR
The SAP Cryptographic Library is required to enable Secure Sockets Layer (SSL) encryption of HTTP connections. If you do not have SAPCRYPTO.SAR available, you can download it from:http://service.sap.com/swdc Installations and Upgrades Search for the term “SAP Cryptogaphic
Software”After the installation has finished, you have to perform some post-installation steps to configure AS ABAP for supporting SSL. For more information, see Configuring AS ABAP to
3 Planning
3.4 Basic SAP System Installation Parameters
2010-12-20 PUBLIC 31/148
Parameters DescriptionSupport Secure Socket Layer (SSL) in Performing Post-Installation Steps for the ABAP Application Server [page 93].This software product is subject to export control regulations in Germany as the country of origin and import regulations of your own country. SAP may not yet have a corresponding export license for your user or company. Contact the contract department in your local SAP company. To download the SAP Cryptographic Software from the SAP Service Marketplace, you need a customer user ID. Before any transfer of these software products to persons, companies or other organizations outside your company, in particular in the case of any re-export of the software products, authorization is required from the German export control authorities. This might also be required from your responsible national export control authorities. This also applies to transfers to affiliated companies. Corresponding laws and regulations in the recipient country may also exist which restrict the import or the use of these software products.
SAP Solution Manager key
To install your SAP system, you need to generate an SAP Solution Manager key [page 53], which the installation requires to continue. For more information, see SAP Note 805390.You have already generated an SAP Solution Manager Key for the central instance, so you do not have to do this for the dialog instance.
SAP System Database Parameters
Parameters Description
Database ID <DBSID> The <DBSID> identifies the database instance. SAPinst prompts you for the <DBSID> when you are installing the database instance.The <DBSID> can be the same as the <SAPSID>.
CAUTION
Choose your database ID carefully. Renaming is difficult and requires that you reinstall the SAP system.
■ If you want to install a new database, make sure that your database ID: ● Is unique throughout your organization ● Consists of exactly three alphanumeric characters ● Contains only uppercase letters ● Has a letter for the first character ● Does not include any of the following, which are
reserved IDs:ADD ALL AMD AND ANY ARE ASC AUX AVG BIT CDC COM
CON DBA END EPS FOR GET GID IBM INT KEY LOG LPT
MAP MAX MIN MON NIX NOT NUL OFF OLD OMS OUT PAD
PRN RAW REF ROW SAP SET SGA SHG SID SQL SUM SYS
TMP TOP UID USE USR7 VAR
Code page The code page that is used by your database (Unicode or Non-Unicode).
NOTE
You only need to enter this parameter if you perform a target system installation as part of a system copy.
Database schema, Passwords The ABAP database schema is named SAP<SCHEMA_ID>.
3 Planning
3.4 Basic SAP System Installation Parameters
32/148 PUBLIC 2010-12-20
Parameters DescriptionDefault name is SAPSR3.
RECOMMENDATION
Choose a <SCHEMAID> that is different from your <SAPSID>.It might cause problems when you copy a system where <SCHEMAID> is the same as <SAPSID>, and the database-specific method used for the copy does not allow you to rename the database schemas. In certain situations, you might create a system copy with a new <SAPSID>, but where the database schema has the old <SAPSID>. This is not a technical problem, but might confuse the system administrator.
Oracle Listener Name, Oracle Listener Port ■ If you install the database instance on a host where no other Oracle database is installed, you normally do not have to change the default values for Listener Name and Listener Port.
■ If there is already an Oracle database installed on your installation host, you can either use one listener for both databases or you have to specify an unused Listener Name and an unused Listener Port for the new listener. For more information if you use one listener for both databases, see SAP Note 98252.
■ All dialog instances of an SAP system must use the same Listener Port than the database instance.
Tablespaces, Datafiles An Oracle database consists of one or more logical storage units called tablespaces, which collectively store all of the database's data.Each tablespace in an Oracle database consists of one or more files called datafiles, which are physical structures that conform to the operating system in which Oracle is running.MaxDatafileSize is the initial size of the tablespace datafile and its mapping to the new tablespace layout while importing the external file DBSIZE.XML.SAPinst prompts you to enter MaxDatafileSize in MB: ■ 0: Datafile size defined in DBSIZE.XML is not changed. ■ 2000: Default datafile size. ■ 10000: Maximum datafile size.For more information about space requirements of the SAP datafiles (sapdata 1 - 4), see Oracle Directories [page 48].
Diagnostics Agent Parameters
The diagnostics agent is installed automatically with the SAP system.
Parameters Description
System ID of the Diagnostics Agent <DASID>
SAPinst sets the system ID of the diagnostics agent, <DASID>, to DAA by default.If DAA is already used, SAPinst assigns another default system ID. You can overwrite the default system ID as required.
3 Planning
3.4 Basic SAP System Installation Parameters
2010-12-20 PUBLIC 33/148
Parameters DescriptionCAUTION
Choose the <DASID> carefully. Renaming is difficult and requires you to reinstall the diagnostics agent.
Make sure that the <DASID>: ■ Either does not yet exist on the local installation host or does already
exist but was only used for a diagnostics agent installation ■ Consists of exactly three alphanumeric characters ■ Contains only uppercase letters ■ Has a letter for the first character ■ Does not include any of the following, which are reserved IDs:
ADD ALL AMD AND ANY ARE ASC AUX AVG BIT CDC COM CON DBA END
EPS FOR GET GID IBM INT KEY LOG LPT MAP MAX MIN MON NIX NOT
NUL OFF OLD OMS OUT PAD PRN RAW REF ROW SAP SET SGA SHG SID
SQL SUM SYS TMP TOP UID USE USR VAR
Instance Number of the Diagnostics Agent
Technical identifier for internal processes for the diagnostics agent, consisting of a two-digit number from 00 to 97. Default is 97.If 97 is already used for an instance number, the diagnostics agent instance number is set automatically to the next free and valid instance number.The instance number is used to specify the name of the diagnostics agent instance directory that SAPinst automatically creates during the installation.The directory of the diagnostics agent instance is called SMDA<Instance_Number>.For more information, see SAP Directories [page 42].The same restrictions apply as in “Instance Number of the SAP System” (see above).
Java(TM) Cryptography Extension (JCE) Unlimited Strength Jurisdiction Policy Files Archive
You have to download the JCE Unlimited Strength Jurisdiction Policy Files 6 archive for the SAP JVM that is installed with the diagnostics agent.For more information, see Downloading the JCE Unlimited Strength Jurisdiction Policy Files Archive [page 54].
SLD Destination You can choose between the following options: ■ Register in existing central SLD
Choose this option to register the diagnostics agent you are installing in an existing SAP System Landscape Directory (SLD) by specifying the SLD connection parameters listed below.
RECOMMENDATION
We recommend that you select this option. ■ No SLD destination
If you select this option, SAPinst does not prompt you for further SLD parameters.Choose this option if you do not want to register the diagnostics agent of the SAP system you are installing in an existing SAP System Landscape Directory (SLD).You then have to configure the SLD destination for the diagnostics agent manually after the installation with SAPinst has finished.
3 Planning
3.4 Basic SAP System Installation Parameters
34/148 PUBLIC 2010-12-20
Parameters Description
SLD HTTP Host (FQN) The fully qualified host name of the SAP system with the System Landscape Directory (SLD)
SLD HTTP Port The HTTP port of the SAP system with the System Landscape Directory (SLD). The following naming convention applies:5<instance_number>00.
EXAMPLE
If the instance number of your Java system is 01, the SLD HTTP Port is 50100.
SLD Data Supplier User and password The existing SLD Data Supplier user and password of the existing central SLD
3.5 SAP Transport Host
The SAP transport host contains the transport directory used by the SAP transport system to store
transport data and change SAP system information, such as software programs, data dictionary data,
or customization data. If you have several SAP systems, they are usually organized in transport domains.
In most cases, all SAP systems in a transport domain have a common transport directory.
When you install an SAP system, you have to decide which transport host and directory you want to
use for your SAP system:
■ Use the transport directory that SAPinst creates during the installation of the SAP system by default
on the global host in /usr/sap/trans
■ Use a transport directory located on a host other than the global host (default host):
● You can use an existing transport directory and host in your SAP system landscape.
● You can set up a new transport directory on a different host.
In either case, you must prepare this host for use by the new SAP system. For more information,
see Exporting and Mounting the Global Transport Directory [page 63].
More Information
■ Required File Systems and Directories [page 42]
■ See the SAP Library:
http://help.sap.com/nw70 SAP NetWeaver 7.0 Library (including Enhancement Package 2) English
SAP NetWeaver Library SAP NetWeaver by Key Capability Solution Life Cycle Management by Key Capability
Software Life Cycle Management Software Logistics Change and Transport System Change and Transport System
– Overview (BC-CTS) Basics of the Change and Transport System Transport Management System – Concept
3.6 Internet Pricing and Configurator
We deliver Internet Pricing and Configurator (IPC) as part of SAP AP (Application Platform). It runs
on normal application servers.
3 Planning
3.5 SAP Transport Host
2010-12-20 PUBLIC 35/148
IPC is required for SAP CRM Mobile Application Components that are part of software unit SAP CRM
Java Components (JCRM). For more information, see the Master Guide [page 139].
Prerequisites
The IPC (SAP AP IPC JAVA 7.00) requires the Virtual Machine Container (VMC) as runtime
environment. The VMC is part of SAP Basis 7.02.
Integration
No separate IPC installation steps are necessary. No separate host or separate Java runtime environment
is necessary. IPC functionality is processed on each application server. The IPC does not support any
special methods to support high availability or load balancing. By running on each application server,
SAP standard load balancing or high-availability mechanisms apply.
You need to enable the VMC after the installation of your SAP system. For more information, see
Activating Internet Pricing and Configurator [page 101].
Only valid for: HA (UNIX) |
3.7 High Availability: Planning the Switchover Cluster
You can reduce unplanned downtime for your high-availability (HA) SAP system by setting up a
switchover cluster. This setup replicates critical software units – known as “single points of
failure” (SPOFs) – across multiple host machines in the cluster. In the event of a failure on the primary
node, proprietary switchover software automatically switches the failed software unit to another
hardware node in the cluster. Manual intervention is not required. Applications accessing the failed
software unit experience a short delay but can then resume processing as normal.
Switchover clusters also have the advantage that you can deliberately initiate switchover to free up a
particular node for planned system maintenance. Switchover solutions can protect against hardware
failure and operating system failure but not against human error, such as operator errors or faulty
application software.
Without a switchover cluster, the SAP system SPOFs – central services instance, the database instance,
and the central file share – are vulnerable to failure because they cannot be replicated. All of these can
only exist once in a normal SAP system.
You can protect software units that are not SPOFs against failure by making them redundant, which
means simply installing multiple instances. For example, you can add additional dialog instances (that
is, additional application servers). This complements the switchover solution and is an essential part
of building HA into your SAP system.
RECOMMENDATION
We recommend switchover clusters to ensure HA for your SAP system.
A switchover cluster consists of:
3 Planning
3.7 High Availability: Planning the Switchover Cluster
36/148 PUBLIC 2010-12-20
■ A hardware cluster of two or more physically separate host machines to run multiple copies of
the critical software units, in an SAP system the SPOFs referred to above
■ Switchover software to detect failure in a node and switch the affected software unit to the standby
node, where it can continue operating
■ A mechanism to enable application software to seamlessly continue working with the switched
software unit – normally this is achieved by virtual addressing (although identity switchover is
also possible)
Prerequisites
You must first discuss switchover clusters with your hardware partner because this is a complex
technical area. In particular, you need to choose a proprietary switchover product that works with
your operating system.
We recommend that you read the following documentation before you start:
■ Check the information and the installation guides available at http://sdn.sap.com/irj/sdn/
ha.
■ The enqueue replication server (ERS) is essential for a high-availability system. You need one ERS
for the ABAP SCS (ASCS) installed in your system.
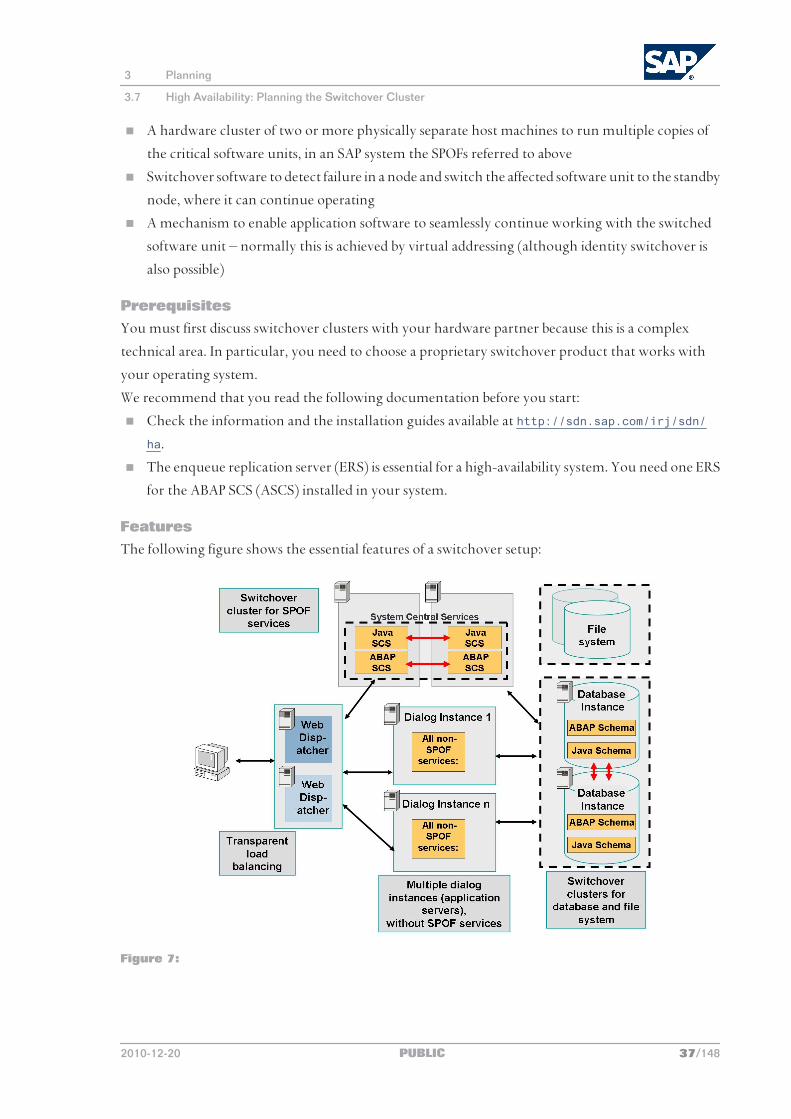
Features
The following figure shows the essential features of a switchover setup:
Figure 7:
3 Planning
3.7 High Availability: Planning the Switchover Cluster
2010-12-20 PUBLIC 37/148
NOTE
This figure and the figures in this section are only examples. Only the instances relevant to the
switchover are shown – for example, the central instance is not shown.
These graphics summarize the overall setup and do not show the exact constellation for an
installation based on one of the available technologies (ABAP, ABAP+Java, or Java).
You need to discuss your individual HA setup with your HA partner.
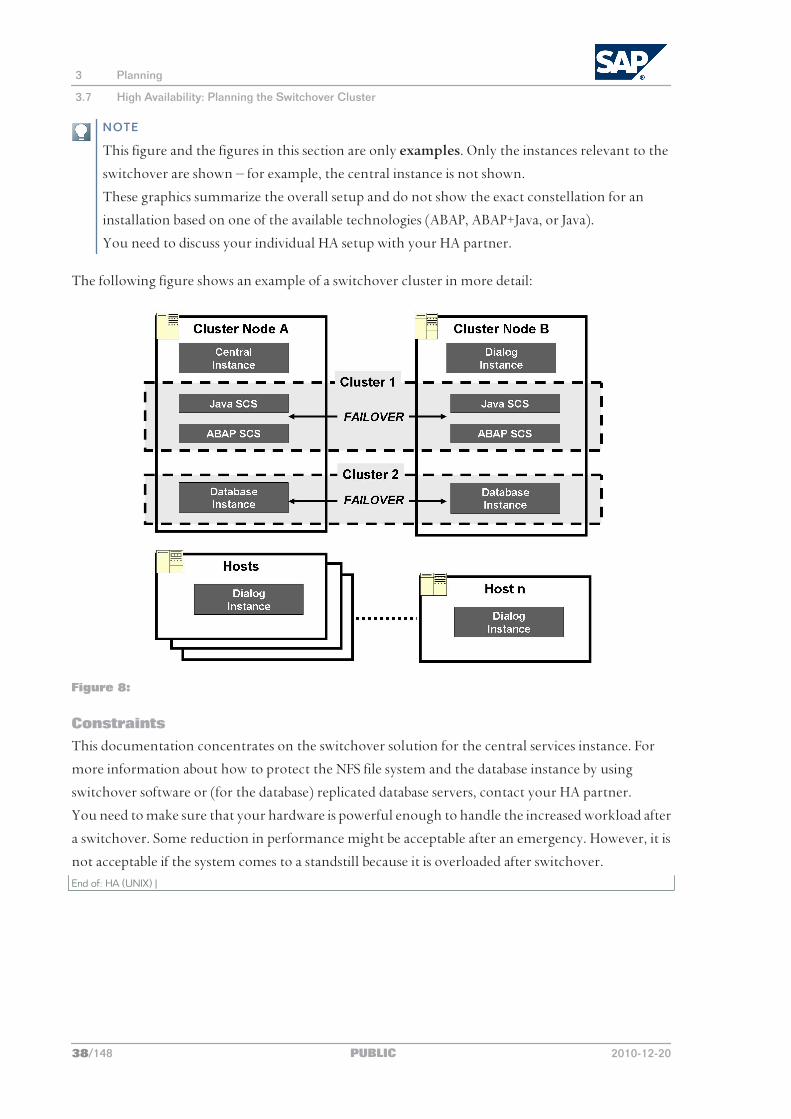
The following figure shows an example of a switchover cluster in more detail:
Figure 8:
Constraints
This documentation concentrates on the switchover solution for the central services instance. For
more information about how to protect the NFS file system and the database instance by using
switchover software or (for the database) replicated database servers, contact your HA partner.
You need to make sure that your hardware is powerful enough to handle the increased workload after
a switchover. Some reduction in performance might be acceptable after an emergency. However, it is
not acceptable if the system comes to a standstill because it is overloaded after switchover.End of: HA (UNIX) |
3 Planning
3.7 High Availability: Planning the Switchover Cluster
38/148 PUBLIC 2010-12-20
4 Preparation
4.1 Preparation Checklist
This section includes the preparation steps that you have to perform for the following installation
options:
■ Central, distributed, or high-availability system
■ Dialog instance
Detailed information about the steps is available in the relevant chapter.
Central, Distributed, or High-Availability System
NOTE
In a central system, all mandatory instances are installed on one host. Therefore, if you are
installing a central system, you can ignore references to other hosts.
1. You make sure that the required operating system users and groups [page 40] are created.
2. You set up file systems [page 42] and make sure that the required disk space is available for the
directories to be created during the installation.
3. If required, you set up virtual host names [page 52].
4. If you want to install a high-availability system, you perform switchover preparations [page 53].
5. If you want to share the transport directory trans from another system, you export [page 63] this
directory to your installation hosts.
6. You install the SAP frontend software [page 53] on the desktop of the end user.
7. You generate the SAP Solution Manager key [page 53] for your SAP system.
8. You download JCE policy files [page 54].
9. You install the Java Runtime Environment [page 54].
10. You make sure that the required installation media [page 55] are available on each host.
11. You can continue with Installation [page 59].
Dialog Instance
You have to perform the following preparations on the host where you install the dialog instance:
1. You make sure that the required operating system users and groups [page 40] are created.
2. You set up file systems [page 42] and make sure that the required disk space is available for the
directories to be created during the installation.
3. If required, you set up virtual host names [page 52].
4 Preparation
4.1 Preparation Checklist
2010-12-20 PUBLIC 39/148
4. If you want to share the transport directory trans from another system, you export [page 63] this
directory to your installation hosts.
5. You make sure that the required installation media [page 55] are available on each host.
6. If you upgraded your SAP system from an earlier source release to a target release lower than SAP
ERP 6.0 SR3 then installed enhancement package 5 with the SAP Enhancement Package Installer
(SAPehpi), and now want to install a dialog instance, you have to update instance profiles of the existing
system [page 119].
7. You can continue with Installation [page 59].
4.2 Creating Operating System Users and Groups
During the installation, SAPinst checks all required accounts (users, groups) and services on the local
machine. SAPinst checks whether the required users and groups already exist. If not, it creates new
users and groups as necessary.
If you do not want SAPinst to create operating systems users, groups, and services automatically, you
can optionally create them before the installation. This might be the case if you use central user
management such as Network Information System (NIS).
SAPinst checks if the required services are available on the host and creates them if necessary. See the
log messages about the service entries and adapt the network-wide (NIS) entries accordingly.
SAPinst checks the NIS users, groups, and services using NIS commands. However, SAPinst does not
change NIS configurations.
Only valid for: HA (UNIX) |
RECOMMENDATION
For a distributed or a high-availability system, we recommend that you distribute account
information (operating system users and groups) over the network, for example by using Network
Information Service (NIS).
End of: HA (UNIX) |
If you want to use global accounts that are configured on a separate host, you can do this in one of the
following ways:
■ You start SAPinst and choose Software Life-Cycle Options Additional Preparations Operating System Users
and Groups . For more information, see Running SAPinst [page 66].
■ You create operating system users and groups manually. Make sure that you also check the settings
for these operating system users.
For more information, see Creating HP-UX Groups and Users [page 115]
Operating System Users and Groups
SAPinst chooses available operating system user IDs and group IDs unless you are installing a dialog
instance. On a dialog instance host you have to enter the same IDs as on the host of the central instance.
4 Preparation
4.2 Creating Operating System Users and Groups
40/148 PUBLIC 2010-12-20
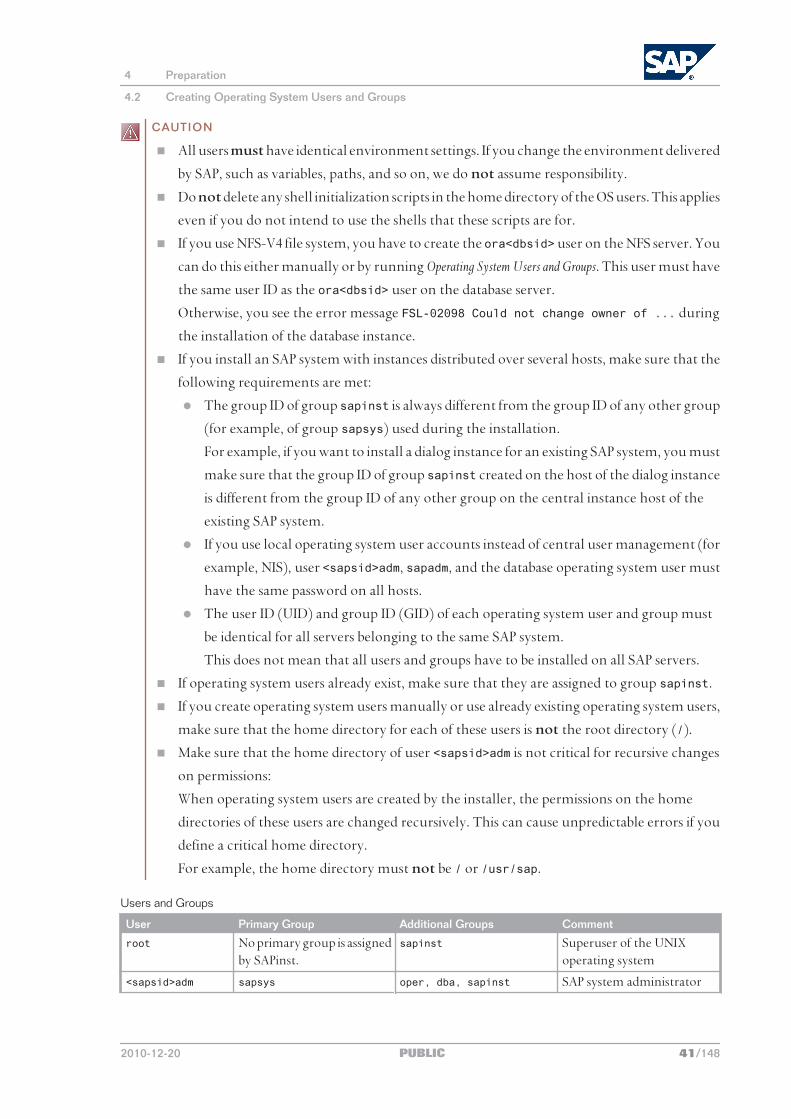
CAUTION
■ All users must have identical environment settings. If you change the environment delivered
by SAP, such as variables, paths, and so on, we do not assume responsibility.
■ Do not delete any shell initialization scripts in the home directory of the OS users. This applies
even if you do not intend to use the shells that these scripts are for.
■ If you use NFS-V4 file system, you have to create the ora<dbsid> user on the NFS server. You
can do this either manually or by running Operating System Users and Groups. This user must have
the same user ID as the ora<dbsid> user on the database server.
Otherwise, you see the error message FSL-02098 Could not change owner of ... during
the installation of the database instance.
■ If you install an SAP system with instances distributed over several hosts, make sure that the
following requirements are met:
● The group ID of group sapinst is always different from the group ID of any other group
(for example, of group sapsys) used during the installation.
For example, if you want to install a dialog instance for an existing SAP system, you must
make sure that the group ID of group sapinst created on the host of the dialog instance
is different from the group ID of any other group on the central instance host of the
existing SAP system.
● If you use local operating system user accounts instead of central user management (for
example, NIS), user <sapsid>adm, sapadm, and the database operating system user must
have the same password on all hosts.
● The user ID (UID) and group ID (GID) of each operating system user and group must
be identical for all servers belonging to the same SAP system.
This does not mean that all users and groups have to be installed on all SAP servers.
■ If operating system users already exist, make sure that they are assigned to group sapinst.
■ If you create operating system users manually or use already existing operating system users,
make sure that the home directory for each of these users is not the root directory (/).
■ Make sure that the home directory of user <sapsid>adm is not critical for recursive changes
on permissions:
When operating system users are created by the installer, the permissions on the home
directories of these users are changed recursively. This can cause unpredictable errors if you
define a critical home directory.
For example, the home directory must not be / or /usr/sap.
Users and Groups
User Primary Group Additional Groups Comment
root No primary group is assigned by SAPinst.
sapinst Superuser of the UNIX operating system
<sapsid>adm sapsys oper, dba, sapinst SAP system administrator
4 Preparation
4.2 Creating Operating System Users and Groups
2010-12-20 PUBLIC 41/148
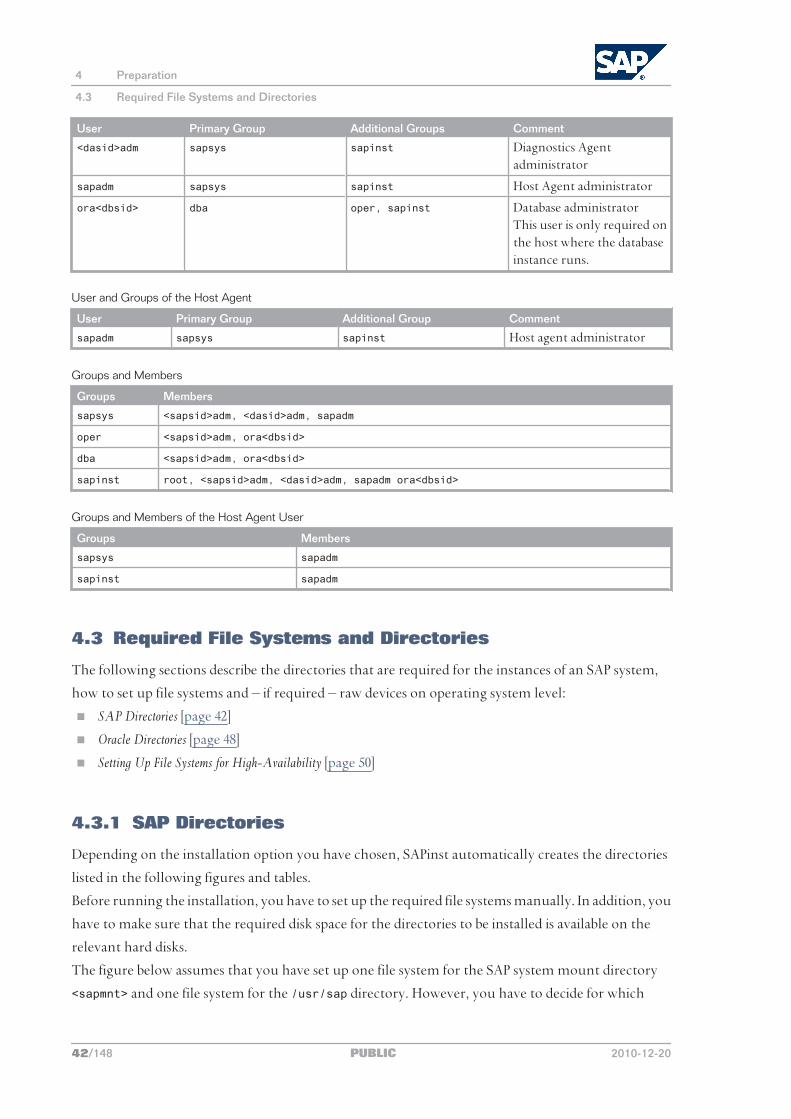
User Primary Group Additional Groups Comment
<dasid>adm sapsys sapinst Diagnostics Agent administrator
sapadm sapsys sapinst Host Agent administrator
ora<dbsid> dba oper, sapinst Database administratorThis user is only required on the host where the database instance runs.
User and Groups of the Host Agent
User Primary Group Additional Group Comment
sapadm sapsys sapinst Host agent administrator
Groups and Members
Groups Members
sapsys <sapsid>adm, <dasid>adm, sapadm
oper <sapsid>adm, ora<dbsid>
dba <sapsid>adm, ora<dbsid>
sapinst root, <sapsid>adm, <dasid>adm, sapadm ora<dbsid>
Groups and Members of the Host Agent User
Groups Members
sapsys sapadm
sapinst sapadm
4.3 Required File Systems and Directories
The following sections describe the directories that are required for the instances of an SAP system,
how to set up file systems and – if required – raw devices on operating system level:
■ SAP Directories [page 42]
■ Oracle Directories [page 48]
■ Setting Up File Systems for High-Availability [page 50]
4.3.1 SAP Directories
Depending on the installation option you have chosen, SAPinst automatically creates the directories
listed in the following figures and tables.
Before running the installation, you have to set up the required file systems manually. In addition, you
have to make sure that the required disk space for the directories to be installed is available on the
relevant hard disks.
The figure below assumes that you have set up one file system for the SAP system mount directory
<sapmnt> and one file system for the /usr/sap directory. However, you have to decide for which
4 Preparation
4.3 Required File Systems and Directories
42/148 PUBLIC 2010-12-20
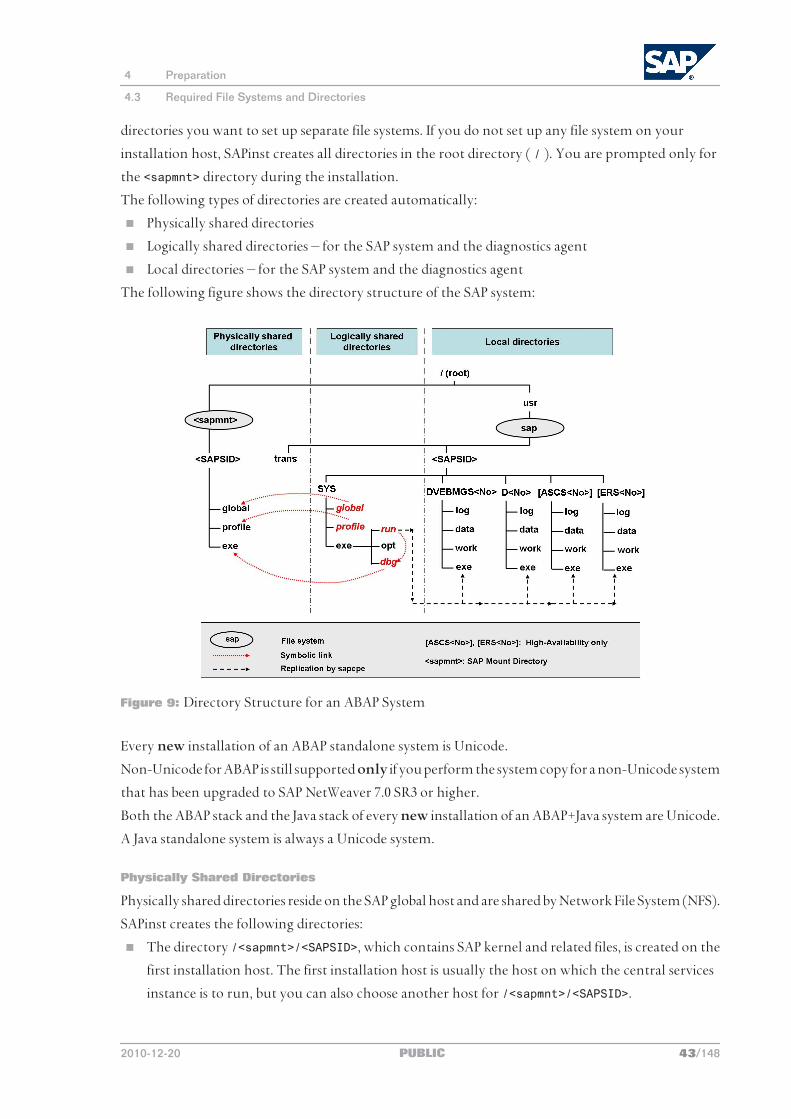
directories you want to set up separate file systems. If you do not set up any file system on your
installation host, SAPinst creates all directories in the root directory ( / ). You are prompted only for
the <sapmnt> directory during the installation.
The following types of directories are created automatically:
■ Physically shared directories
■ Logically shared directories – for the SAP system and the diagnostics agent
■ Local directories – for the SAP system and the diagnostics agent
The following figure shows the directory structure of the SAP system:
Figure 9: Directory Structure for an ABAP System
Every new installation of an ABAP standalone system is Unicode.
Non-Unicode for ABAP is still supported only if you perform the system copy for a non-Unicode system
that has been upgraded to SAP NetWeaver 7.0 SR3 or higher.
Both the ABAP stack and the Java stack of every new installation of an ABAP+Java system are Unicode.
A Java standalone system is always a Unicode system.
Physically Shared Directories
Physically shared directories reside on the SAP global host and are shared by Network File System (NFS).
SAPinst creates the following directories:
■ The directory /<sapmnt>/<SAPSID>, which contains SAP kernel and related files, is created on the
first installation host. The first installation host is usually the host on which the central services
instance is to run, but you can also choose another host for /<sapmnt>/<SAPSID>.
4 Preparation
4.3 Required File Systems and Directories
2010-12-20 PUBLIC 43/148
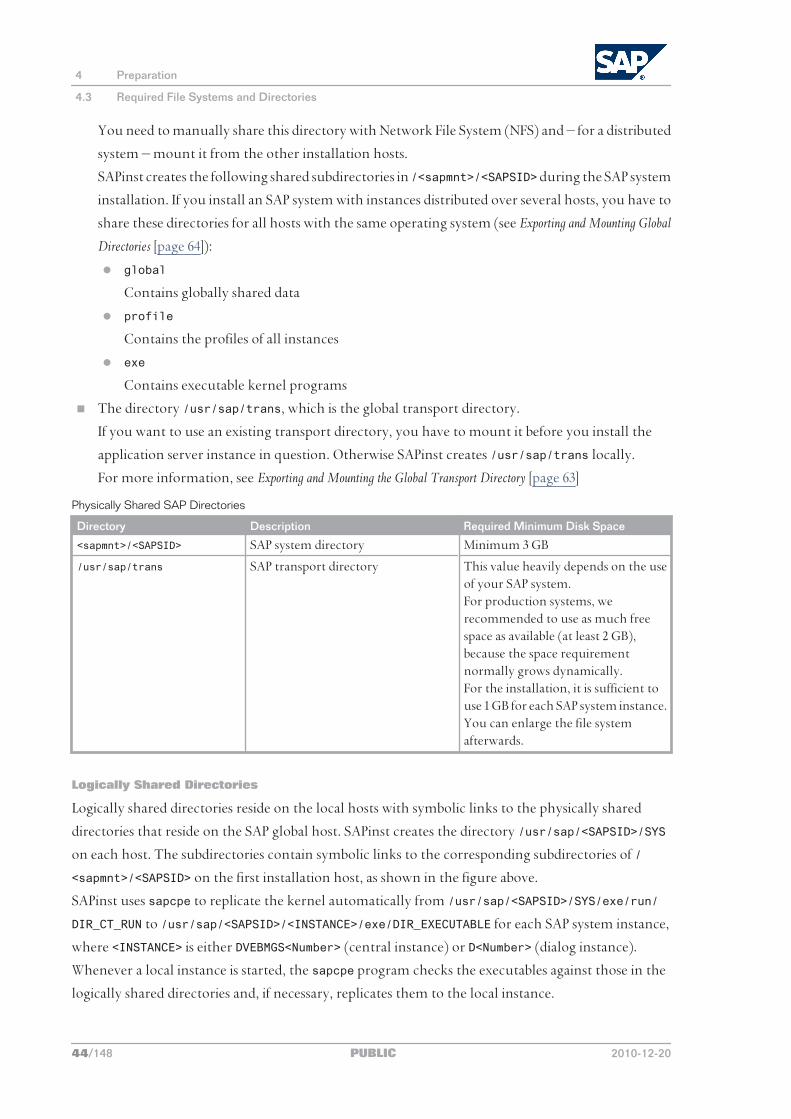
You need to manually share this directory with Network File System (NFS) and – for a distributed
system – mount it from the other installation hosts.
SAPinst creates the following shared subdirectories in /<sapmnt>/<SAPSID> during the SAP system
installation. If you install an SAP system with instances distributed over several hosts, you have to
share these directories for all hosts with the same operating system (see Exporting and Mounting Global
Directories [page 64]):
● global
Contains globally shared data
● profile
Contains the profiles of all instances
● exe
Contains executable kernel programs
■ The directory /usr/sap/trans, which is the global transport directory.
If you want to use an existing transport directory, you have to mount it before you install the
application server instance in question. Otherwise SAPinst creates /usr/sap/trans locally.
For more information, see Exporting and Mounting the Global Transport Directory [page 63]
Physically Shared SAP Directories
Directory Description Required Minimum Disk Space
<sapmnt>/<SAPSID> SAP system directory Minimum 3 GB
/usr/sap/trans SAP transport directory This value heavily depends on the use of your SAP system.For production systems, we recommended to use as much free space as available (at least 2 GB), because the space requirement normally grows dynamically.For the installation, it is sufficient to use 1 GB for each SAP system instance. You can enlarge the file system afterwards.
Logically Shared Directories
Logically shared directories reside on the local hosts with symbolic links to the physically shared
directories that reside on the SAP global host. SAPinst creates the directory /usr/sap/<SAPSID>/SYS
on each host. The subdirectories contain symbolic links to the corresponding subdirectories of /
<sapmnt>/<SAPSID> on the first installation host, as shown in the figure above.
SAPinst uses sapcpe to replicate the kernel automatically from /usr/sap/<SAPSID>/SYS/exe/run/
DIR_CT_RUN to /usr/sap/<SAPSID>/<INSTANCE>/exe/DIR_EXECUTABLE for each SAP system instance,
where <INSTANCE> is either DVEBMGS<Number> (central instance) or D<Number> (dialog instance).
Whenever a local instance is started, the sapcpe program checks the executables against those in the
logically shared directories and, if necessary, replicates them to the local instance.
4 Preparation
4.3 Required File Systems and Directories
44/148 PUBLIC 2010-12-20
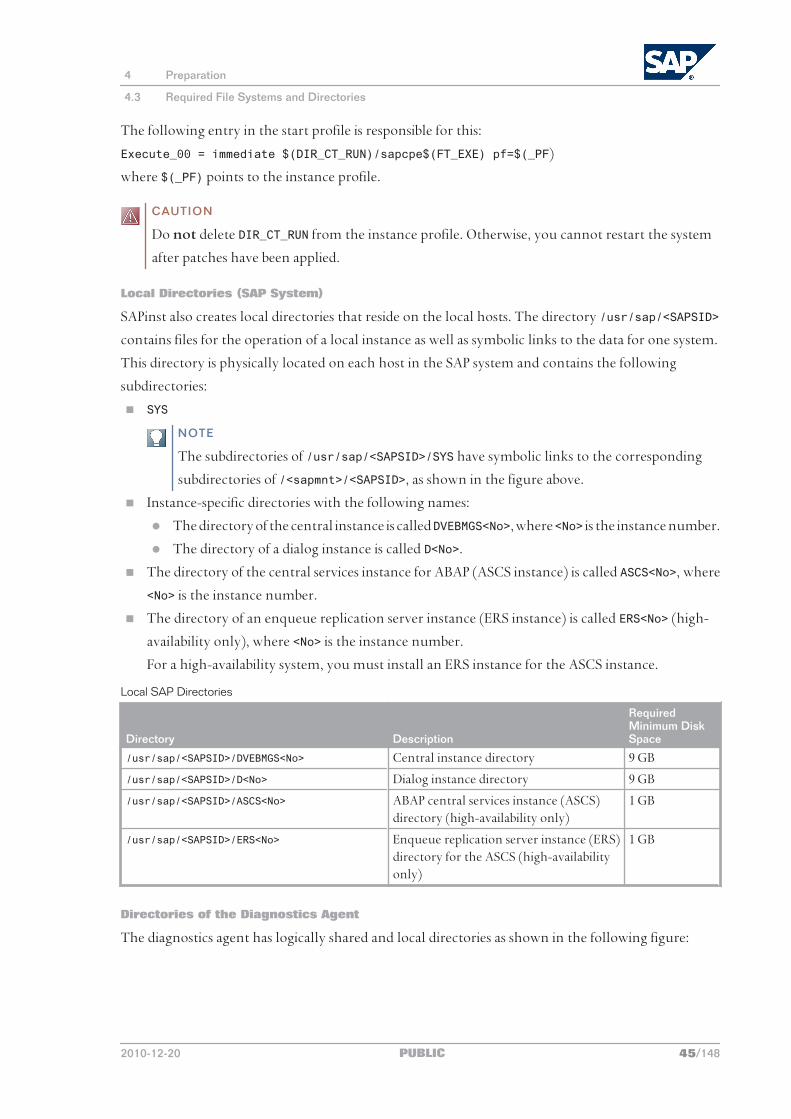
The following entry in the start profile is responsible for this:
Execute_00 = immediate $(DIR_CT_RUN)/sapcpe$(FT_EXE) pf=$(_PF)
where $(_PF) points to the instance profile.
CAUTION
Do not delete DIR_CT_RUN from the instance profile. Otherwise, you cannot restart the system
after patches have been applied.
Local Directories (SAP System)
SAPinst also creates local directories that reside on the local hosts. The directory /usr/sap/<SAPSID>
contains files for the operation of a local instance as well as symbolic links to the data for one system.
This directory is physically located on each host in the SAP system and contains the following
subdirectories:
■ SYS
NOTE
The subdirectories of /usr/sap/<SAPSID>/SYS have symbolic links to the corresponding
subdirectories of /<sapmnt>/<SAPSID>, as shown in the figure above.
■ Instance-specific directories with the following names:
● The directory of the central instance is called DVEBMGS<No>, where <No> is the instance number.
● The directory of a dialog instance is called D<No>.
■ The directory of the central services instance for ABAP (ASCS instance) is called ASCS<No>, where
<No> is the instance number.
■ The directory of an enqueue replication server instance (ERS instance) is called ERS<No> (high-
availability only), where <No> is the instance number.
For a high-availability system, you must install an ERS instance for the ASCS instance.
Local SAP Directories
Directory Description
Required Minimum Disk Space
/usr/sap/<SAPSID>/DVEBMGS<No> Central instance directory 9 GB
/usr/sap/<SAPSID>/D<No> Dialog instance directory 9 GB
/usr/sap/<SAPSID>/ASCS<No> ABAP central services instance (ASCS) directory (high-availability only)
1 GB
/usr/sap/<SAPSID>/ERS<No> Enqueue replication server instance (ERS) directory for the ASCS (high-availability only)
1 GB
Directories of the Diagnostics Agent
The diagnostics agent has logically shared and local directories as shown in the following figure:
4 Preparation
4.3 Required File Systems and Directories
2010-12-20 PUBLIC 45/148
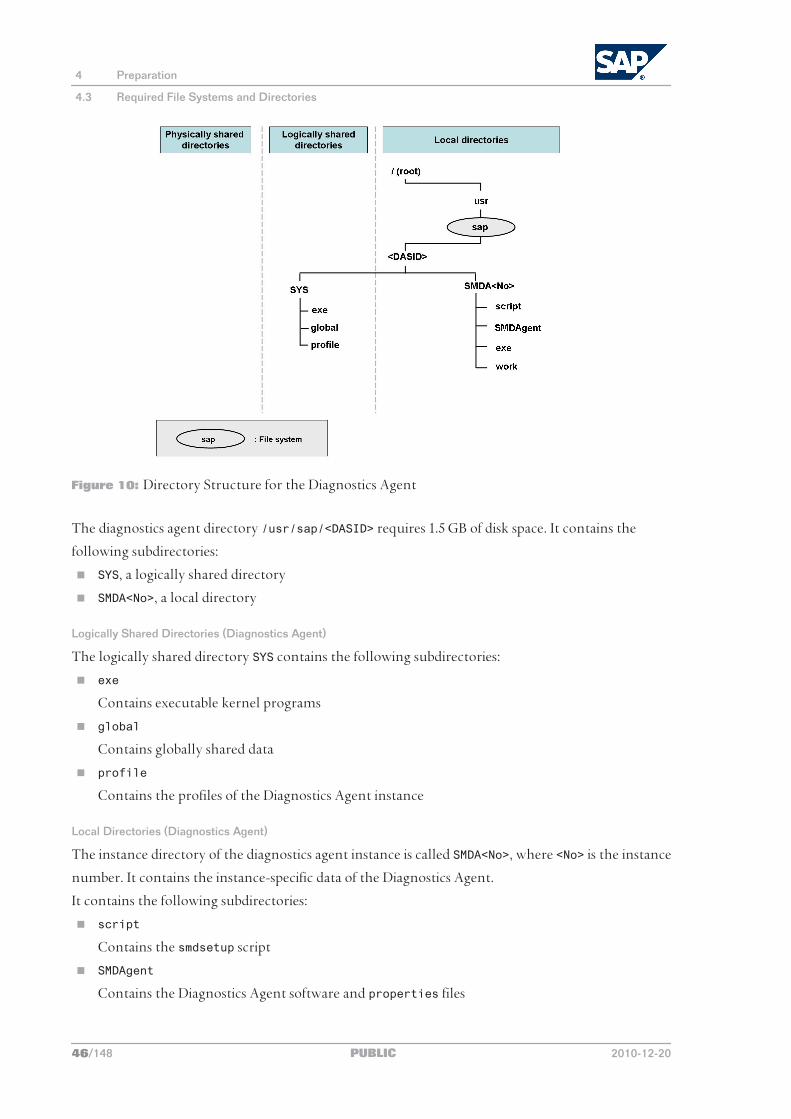
Figure 10: Directory Structure for the Diagnostics Agent
The diagnostics agent directory /usr/sap/<DASID> requires 1.5 GB of disk space. It contains the
following subdirectories:
■ SYS, a logically shared directory
■ SMDA<No>, a local directory
Logically Shared Directories (Diagnostics Agent)
The logically shared directory SYS contains the following subdirectories:
■ exe
Contains executable kernel programs
■ global
Contains globally shared data
■ profile
Contains the profiles of the Diagnostics Agent instance
Local Directories (Diagnostics Agent)
The instance directory of the diagnostics agent instance is called SMDA<No>, where <No> is the instance
number. It contains the instance-specific data of the Diagnostics Agent.
It contains the following subdirectories:
■ script
Contains the smdsetup script
■ SMDAgent
Contains the Diagnostics Agent software and properties files
4 Preparation
4.3 Required File Systems and Directories
46/148 PUBLIC 2010-12-20
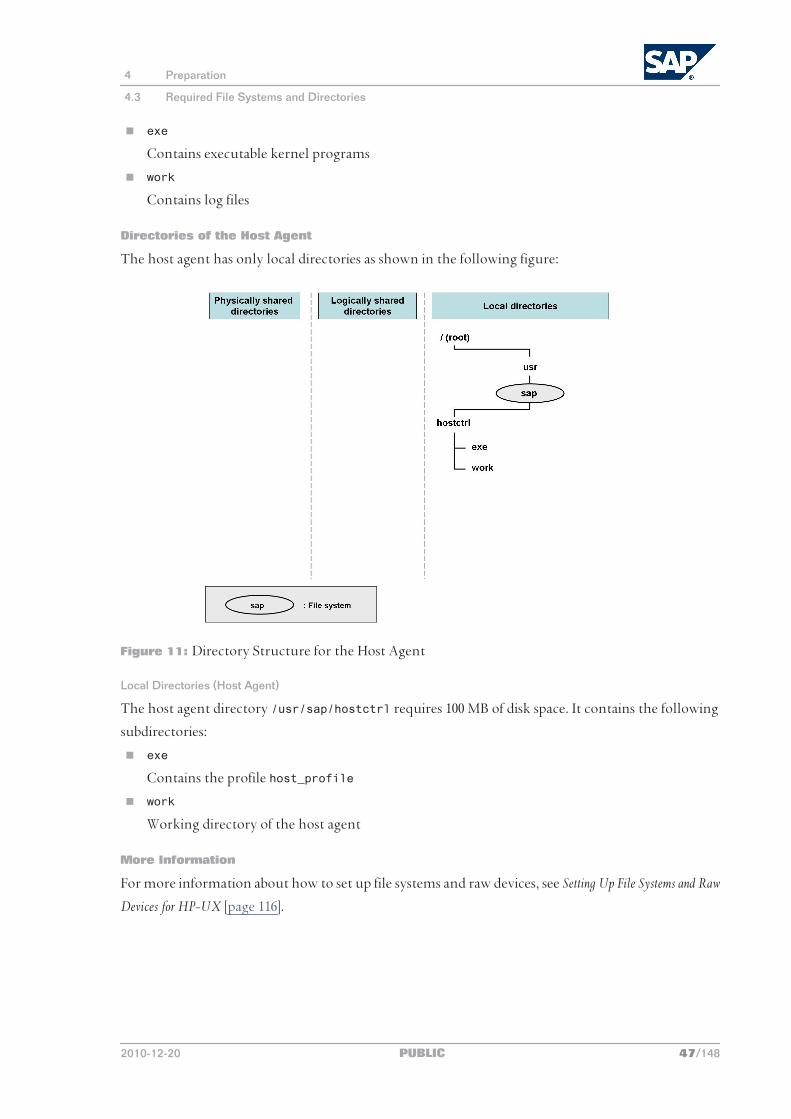
■ exe
Contains executable kernel programs
■ work
Contains log files
Directories of the Host Agent
The host agent has only local directories as shown in the following figure:
Figure 11: Directory Structure for the Host Agent
Local Directories (Host Agent)
The host agent directory /usr/sap/hostctrl requires 100 MB of disk space. It contains the following
subdirectories:
■ exe
Contains the profile host_profile
■ work
Working directory of the host agent
More Information
For more information about how to set up file systems and raw devices, see Setting Up File Systems and Raw
Devices for HP-UX [page 116].
4 Preparation
4.3 Required File Systems and Directories
2010-12-20 PUBLIC 47/148
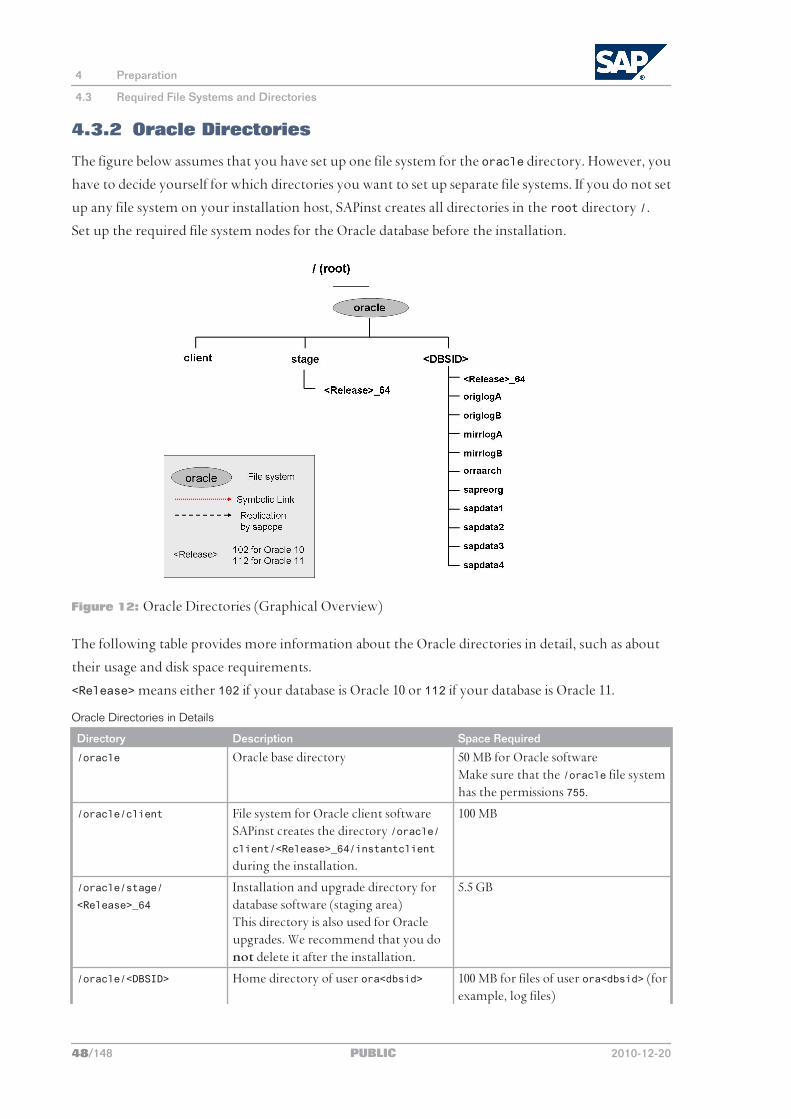
4.3.2 Oracle Directories
The figure below assumes that you have set up one file system for the oracle directory. However, you
have to decide yourself for which directories you want to set up separate file systems. If you do not set
up any file system on your installation host, SAPinst creates all directories in the root directory /.
Set up the required file system nodes for the Oracle database before the installation.
Figure 12: Oracle Directories (Graphical Overview)
The following table provides more information about the Oracle directories in detail, such as about
their usage and disk space requirements.
<Release> means either 102 if your database is Oracle 10 or 112 if your database is Oracle 11.
Oracle Directories in Details
Directory Description Space Required
/oracle Oracle base directory 50 MB for Oracle softwareMake sure that the /oracle file system has the permissions 755.
/oracle/client File system for Oracle client softwareSAPinst creates the directory /oracle/client/<Release>_64/instantclient
during the installation.
100 MB
/oracle/stage/
<Release>_64
Installation and upgrade directory for database software (staging area)This directory is also used for Oracle upgrades. We recommend that you do not delete it after the installation.
5.5 GB
/oracle/<DBSID> Home directory of user ora<dbsid> 100 MB for files of user ora<dbsid> (for example, log files)
4 Preparation
4.3 Required File Systems and Directories
48/148 PUBLIC 2010-12-20
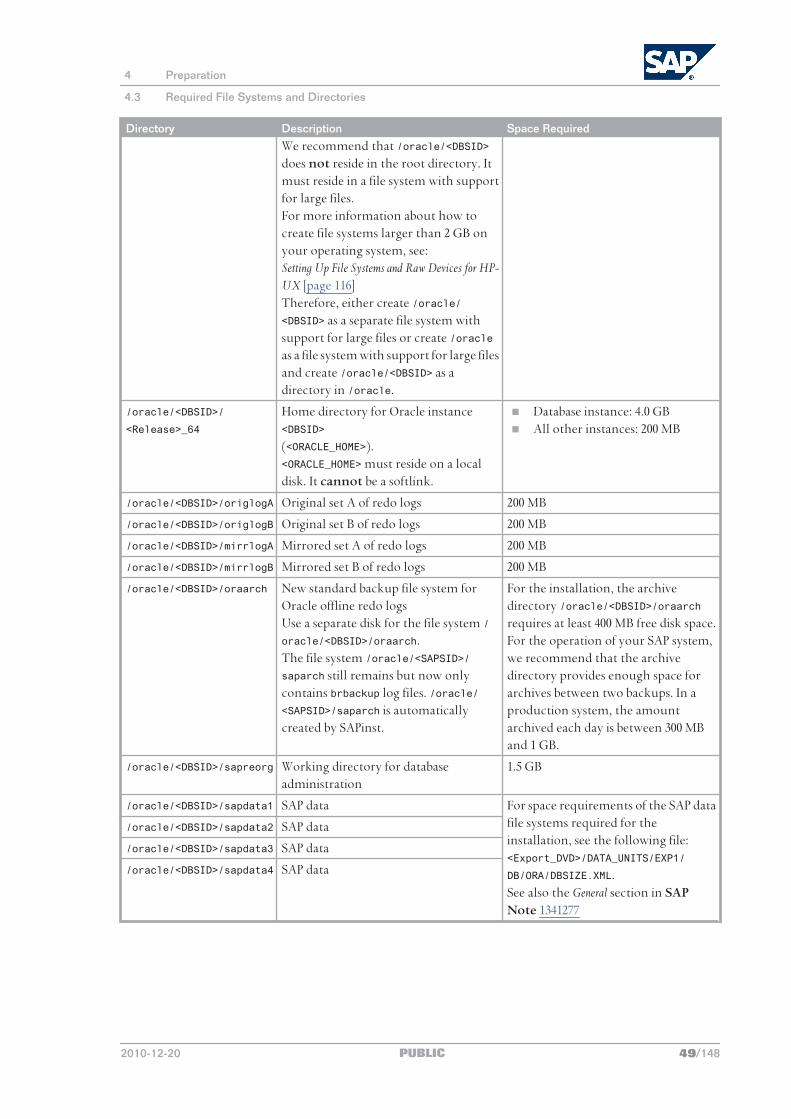
Directory Description Space RequiredWe recommend that /oracle/<DBSID> does not reside in the root directory. It must reside in a file system with support for large files.For more information about how to create file systems larger than 2 GB on your operating system, see:Setting Up File Systems and Raw Devices for HP-UX [page 116]Therefore, either create /oracle/<DBSID> as a separate file system with support for large files or create /oracle as a file system with support for large files and create /oracle/<DBSID> as a directory in /oracle.
/oracle/<DBSID>/
<Release>_64
Home directory for Oracle instance <DBSID>
(<ORACLE_HOME>).<ORACLE_HOME> must reside on a local disk. It cannot be a softlink.
■ Database instance: 4.0 GB ■ All other instances: 200 MB
/oracle/<DBSID>/origlogA Original set A of redo logs 200 MB
/oracle/<DBSID>/origlogB Original set B of redo logs 200 MB
/oracle/<DBSID>/mirrlogA Mirrored set A of redo logs 200 MB
/oracle/<DBSID>/mirrlogB Mirrored set B of redo logs 200 MB
/oracle/<DBSID>/oraarch New standard backup file system for Oracle offline redo logsUse a separate disk for the file system /oracle/<DBSID>/oraarch.The file system /oracle/<SAPSID>/saparch still remains but now only contains brbackup log files. /oracle/<SAPSID>/saparch is automatically created by SAPinst.
For the installation, the archive directory /oracle/<DBSID>/oraarch requires at least 400 MB free disk space. For the operation of your SAP system, we recommend that the archive directory provides enough space for archives between two backups. In a production system, the amount archived each day is between 300 MB and 1 GB.
/oracle/<DBSID>/sapreorg Working directory for database administration
1.5 GB
/oracle/<DBSID>/sapdata1 SAP data For space requirements of the SAP data file systems required for the installation, see the following file:<Export_DVD>/DATA_UNITS/EXP1/
DB/ORA/DBSIZE.XML.See also the General section in SAP Note 1341277
/oracle/<DBSID>/sapdata2 SAP data
/oracle/<DBSID>/sapdata3 SAP data
/oracle/<DBSID>/sapdata4 SAP data
4 Preparation
4.3 Required File Systems and Directories
2010-12-20 PUBLIC 49/148
Only valid for: HA (UNIX) |
4.3.3 Setting Up File Systems for a High-Availability System
Third-party technology is used to make the SAP directories available to the SAP system. The
technologies of choice are NFS, shared disks, and cluster file system. If you have decided to use a high-
availability (HA) solution for your SAP system, make sure that you properly address the HA
requirements of the SAP file systems in your SAP environment with the HA partner of your choice.
From the perspective of an SAP application, there are the following types of SAP Directories [page 42]:
■ Physically shared directories: /<sapmnt>/<SAPSID> and /usr/sap/trans
■ Logically shared directories that are bound to a node such as /usr/sap with the following local
directories:
● /usr/sap/<SAPSID>
● /usr/sap/<SAPSID>/SYS
● /usr/sap/hostctrl
■ Local directories that contain the SAP instances, such as /usr/sap/<SAPSID>/ASCS<Number>
Prerequisites
You have already installed the hardware – that is, hosts, disks, and network – and decided how to
distribute the database, SAP instances, and – if required – Network File System (NFS) server over the
cluster nodes (that is, over the host machines). For more information, see Planning the Switchover Cluster
[page 36] and contact your HA partner.
Procedure
1. Create the file systems or raw partitions for the SAP instances you can switch over in such a way
that the content can be made available to all nodes that can run the service. At least the central
services instance for ABAP (ASCS instance) must be part of the switchover cluster.
The SAP directories /sapmnt/<SAPSID> and /usr/sap/trans are usually mounted from a Network
File System (NFS). However, an SAP instance directory /usr/sap/<SAPSID>/
<INSTTYPE><Number> that you want to prepare for HA has to always be mounted on the cluster
node currently running the instance. Do not mount such directories with NFS.
Therefore, if the host running the central instance is not the NFS server host, you might have to
mount the file systems for /sapmnt/<SAPSID> and /usr/sap/trans on different physical disks
from the file system for /usr/sap/<SAPSID>/<INSTTYPE><Number>.
CAUTION
To start or stop an SAP instance, you have to either make the physically shared SAP directories
under /<sapmnt>/<SAPSID>/ available to the server beforehand or you have to replace the
links in /usr/sap/<SAPSID>/SYS by a physical copy. Consult your HA partner to clarify the
best solution for the cluster software.
4 Preparation
4.3 Required File Systems and Directories
50/148 PUBLIC 2010-12-20
2. Use the following approach for the file system for the /usr/sap/<SAPSID> directory:
The /usr/sap/<SAPSID> directory contains at least two subdirectories (see also SAP Directories [page
42]):
■ SYS, which contains links to the central directory /sapmnt/<SAPSID>
■ <INSTTYPE><Number> – where the name is defined by the type of services and the application
server number:
● DVEBMGS<Number> – which contains data for the central instance
● D<Number> – which contains data for a dialog instance
● ASCS<Number> – which contains data for the ABAP central services instance
Only <INSTTYPE><Number> directories need to be migrated with the SAP instances during the
switchover.
Therefore, instead of /usr/sap/<SAPSID>, create a file system for /usr/sap/<SAPSID>/
<INSTTYPE><Number> with the usual <> substitutions.
The instance-specific directory name for the central services instance is normally ASCS<Number>.
Migrating only these directories avoids mount conflicts when switching over to a node on which
another SAP instance is already running. The ASCS<Number> directory can join the /usr/sap/
<SAPSID> tree instead of mounting on top of it.
NOTE
This approach becomes increasingly important when you want to cluster the central services
instances with other local instances running on the cluster hosts outside the control of the
switchover software. This applies to the Enqueue Replication Server instance (ERS instance)
and dialog instances. The result is a more efficient use of resources. You must use this approach
for integrated installations of the application server with ABAP and Java stacks.
3. You assign the local (non-switching) file systems to permanent mount points.
4. You assign the shared file systems as documented by your HA partner.
EXAMPLE
The graphic below shows an example of the file systems and disks in an HA setup.
Note that this is only an example. For more information on a setup that meets your needs, consult
your HA partner.
4 Preparation
4.3 Required File Systems and Directories
2010-12-20 PUBLIC 51/148
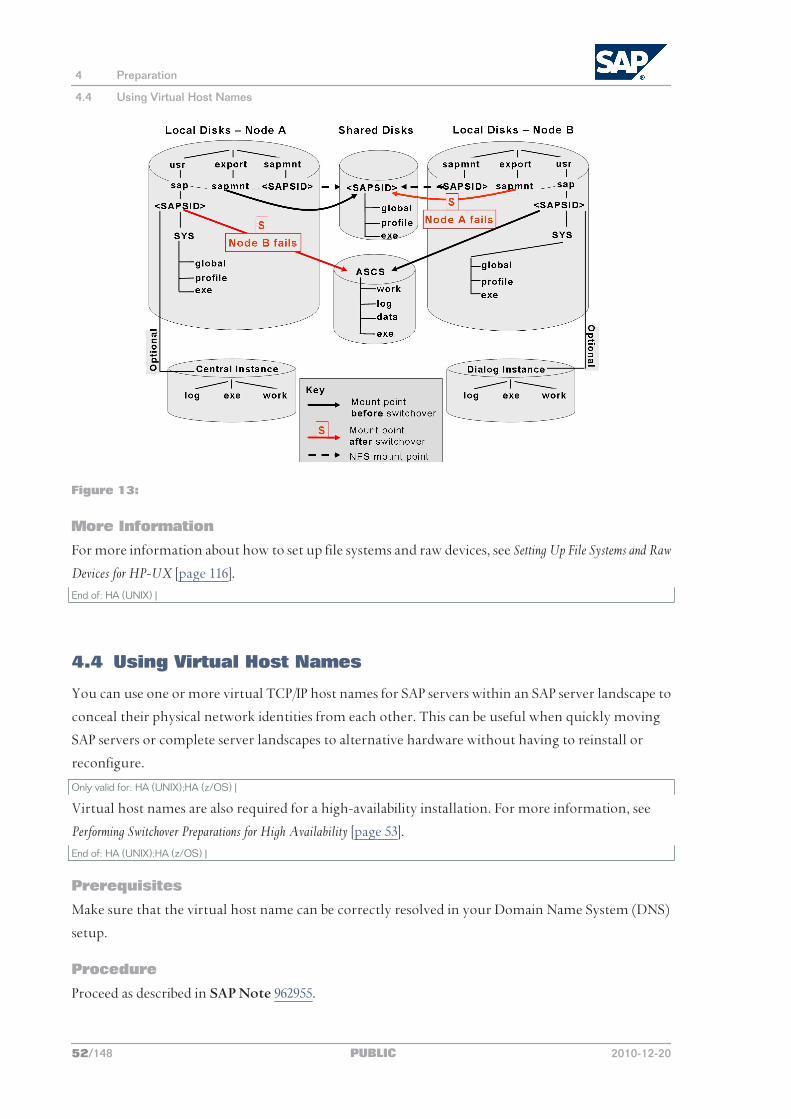
Figure 13:
More Information
For more information about how to set up file systems and raw devices, see Setting Up File Systems and Raw
Devices for HP-UX [page 116].End of: HA (UNIX) |
4.4 Using Virtual Host Names
You can use one or more virtual TCP/IP host names for SAP servers within an SAP server landscape to
conceal their physical network identities from each other. This can be useful when quickly moving
SAP servers or complete server landscapes to alternative hardware without having to reinstall or
reconfigure.
Only valid for: HA (UNIX);HA (z/OS) |
Virtual host names are also required for a high-availability installation. For more information, see
Performing Switchover Preparations for High Availability [page 53].End of: HA (UNIX);HA (z/OS) |
Prerequisites
Make sure that the virtual host name can be correctly resolved in your Domain Name System (DNS)
setup.
Procedure
Proceed as described in SAP Note 962955.
4 Preparation
4.4 Using Virtual Host Names
52/148 PUBLIC 2010-12-20
Only valid for: HA (UNIX) |
4.5 Performing Switchover Preparations for High Availability
If you want to use a virtual host name, you have to set the SAPinst property SAPINST_USE_HOSTNAME
to specify the required virtual host name before you start SAPinst. For more information, see Running
SAPinst [page 66].
Procedure
Assign the virtual IP addresses and host names for the ASCS instance, and (if required) NFS to
appropriate failover groups.
NOTE
For more information on virtual addresses and virtual host names and how to assign resources
to failover groups, ask your HA partner.
End of: HA (UNIX) |
4.6 Installing the Front-End Software
For the installation, make sure that the front-end software is installed on at least one computer in your
system environment.
We recommend that you install SAP front-end release 7.10 or higher.
For more information about installing the front-end software, see the documentation SAP Front End
Installation Guide - <Current Release> at:
http://service.sap.com/installNW70 Installation - Clients
4.7 Generating the SAP Solution Manager Key
You must generate the Solution Manager key because the installation tool prompts for it during the
installation. Without this key, the installation process cannot continue. For more information about
SAP Solution Manager and its role within your system landscape, see the Master Guide of your SAP
application.
Procedure
1. If SAP Solution Manager is not yet available in your system landscape, proceed as follows:
1. Order SAP Solution Manager as described in SAP Note 628901.
2. Install SAP Solution Manager as described in the documentation Installation Guide – SAP Solution
Manager <Current Release> on <OS>: <Database>, which is available at:
4 Preparation
4.5 Performing Switchover Preparations for High Availability
2010-12-20 PUBLIC 53/148
http://service.sap.com/instguides SAP Components SAP Solution Manager <Current
Release>
2. Generate the SAP Solution Manager key as described in SAP Note 811923.
Result
The SAP Solution Manager system displays the key for which you are prompted during the installation
of your SAP system.
4.8 Downloading JCE Policy Files
Strong encryption is mandatory for the diagnostics agent. You need to download the latest version
of the Java(TM) Cryptography Extension (JCE) Unlimited Strength Jurisdiction Policy Files 6 archive for the SAP JVM
so that SAPinst can install them.
Procedure
Download the latest version of the JCE Unlimited Strength Jurisdiction Policy Files 6 archive as described in
SAP Note 1240081.
NOTE
Do not unzip the archive.
More Information
For more information, see Basic SAP System Installation Parameters [page 28]
4.9 Installing the Java Runtime Environment
You need to prepare your system for SAPinst. This includes the installation of a Java Runtime
Environment (JRE), which is required for SAPinst. The JRE is part of the JDK (Java Development Kit)
and not part of the SAP shipment.
NOTE
If required, you can perform a remote installation using a standalone SAPinst GUI on a separate
Windows or UNIX host. This lets you perform the installation on a remote host, controlling it
with the SAPinst GUI from a local host. If you want to perform a remote installation, see Performing
a Remote Installation with SAPinst [page 75].
Procedure
1. Check the JRE versions that are released for SAP systems in the Product Availability Matrix (PAM):
1. Go to http://service.sap.com/pam.
2. Choose Start PAM with navigation by category.
4 Preparation
4.8 Downloading JCE Policy Files
54/148 PUBLIC 2010-12-20
3. On the right-hand panel, choose SAP Application Components <your product> .
4. Choose tabstrip JSE Platforms.
NOTE
For more information about how to download it, see the relevant SAP Note for your operating
system, which is referenced near the beginning of SAP Note 723909.
2. Make sure a valid JRE version is installed, as follows:
■ If the JRE is not already installed, download and install it.
■ If the JRE is already installed, check the installed version of the JRE by entering:
java -version
4.10 Preparing the Installation Media
This section describes how to prepare the installation media, which is available as follows:
■ You obtain the installation media as part of the installation package.
■ You can also download the installation media from SAP Service Marketplace, as described at the
end of this section.
Procedure
1. Identify the required media for your installation as listed below.
Keep them separate from the remaining media as this helps you to avoid mixing up media during
the installation.
CAUTION
The media names listed below are abbreviated.
You can find the full names in section Media List in the corresponding Master Guide for SAP
ERP 6.0 including SAP enhancement package 5 - Technical Usage “Central Applications”:
http://service.sap.com/erp-inst SAP ERP 6.0 SAP enhancement packages for SAP ERP 6.0
SAP enhancement package <current version> for SAP ERP 6.0
NOTE
If you are installing on an existing system using Multiple Components in One Database
(MCOD), the required media differ.
The following table shows the required DVDs for the installation of an SAP system based on the
usage type AS ABAP:
NOTE
For a central system, where all mandatory instances reside on one host, you need the
installation DVDs that are required for the central instance and database instance.
SAP Instance Installation Required DVDs
Global host preparation ■ Installation Master DVD ■ Kernel DVD
4 Preparation
4.10 Preparing the Installation Media
2010-12-20 PUBLIC 55/148
SAP Instance Installation Required DVDs
High-availability system only: ASCS instance, ERS instance
■ Installation Master DVD ■ Kernel DVD
Central instance, dialog instance ■ Installation Master DVD ■ Kernel DVD ■ RDBMS Client DVD
Database instance ■ Installation Master DVD ■ Kernel DVD ■ SAP ERP Installation Export DVD ■ RDBMS DVD ■ RDBMS Patch DVD (if available)
NOTE
For an MCOD system you require the RDBMS Client DVD instead of the RDBMS DVD and the RDBMS Patch DVD (if available).
Standalone Host Agent
SAP Instance Installation Required DVDs
Host Agent (Standalone) ■ Installation Master DVD ■ Kernel DVD
2. Make the required installation media available on each installation host.
If you need information about how to mount DVDs on HP-UX, see Mounting Installation Media for HP-
UX [page 120].
NOTE
Depending on your installation type, one or more instances can reside on the same host. You
need to keep this in mind when you make the required installation media available on each
installation host.
For a central system, you need to make all required installation media available on the single
installation host.
Use one of the following methods to make media available:
■ Before the installation, copy media manually to local hard disks.
■ During the installation, use the SAPinst Media Browser dialog and copy the entire DVDs to
the path you entered in the Copy Package To column.
CAUTION
■ Mount the DVDs locally. We do not recommend you to use Network File System (NFS),
because reading from DVDs mounted with NFS might fail.
■ If you copy the DVDs to disk, make sure that the paths to the destination location of the
copied DVDs do not contain any blanks and commas.
■ If you perform a local installation and there is only one DVD drive available on your
installation host, you must copy at least the Installation Master DVD to the local file
system.
4 Preparation
4.10 Preparing the Installation Media
56/148 PUBLIC 2010-12-20
Downloading the Installation Media from SAP Service Marketplace
You normally obtain the installation media as part of the installation package from SAP.
However, you can also download installation media from the software distribution center on SAP
Service Marketplace using one of the following paths:
■ http://service.sap.com/swdc Installations and Upgrades My companys application components
<your product> <your product version>
■ http://service.sap.com/swdc Installations and Upgrades A-Z index <first letter of your product>
<your product version>
NOTE
If you download installation media, note that they might be split into several files. In this case,
you have to reassemble the required files after the download.
CAUTION
To extract the downloaded SAR files make sure that you use the latest SAPCAR version, which
you can also download from http://service.sap.com/swdc. You need at least SAPCAR 700. For
more information, see SAP Note 212876.
1. Create a download directory on the host on which you want to run SAPinst.
2. Identify all download objects that belong to one installation DVD according to one or both of the
following:
■ Material number
All download objects that are part of an installation DVD have the same material number and
an individual sequence number:
<material_number>_<sequence_number>
EXAMPLE
51031387_1
51031387_2
...
■ Title
All objects that are part of an DVD have the same title, such as <solution><DVD_name><OS>
or <database>RDBMS<OS> for RDBMS DVDs.
3. Download the objects to the download directory.
4. Extract the individual download objects using SAPCAR, starting with the lowest sequence number
– for example 51031387_1, then 51031387_2, and so on.
During the extraction SAPCAR sets up the structure of the DVD.
NOTE
SAPCAR asks if you want to replace existing files, for example LABELIDX.ASC. Always accept
with Yes.
4 Preparation
4.10 Preparing the Installation Media
2010-12-20 PUBLIC 57/148

This page is left blank for documents that are printed on both sides.
5 Installation
5.1 Installation Checklist
This section includes the installation steps that you have to perform for the following installation
options:
■ Central system
■ Distributed system
■ High-availability system
■ Dialog instance
Detailed information about the steps is available in the relevant chapter.
Central System
1. You install the SAP system with SAPinst [page 66].
NOTE
Do not install the Oracle database software before you run SAPinst.
SAPinst stops and prompts you to install the Oracle database [page 79] while the installation of
the database instance is running.
If you install an SAP system in an existing database (MCOD) [page 105] SAPinst prompts you for the
existing database.
2. You continue with Post-Installation [page 87].
Distributed System
1. If you want to share the transport directory trans from another system, you have to mount [page
63] it from this system. Otherwise, we recommend that you share the trans directory that is
created during the installation of the central instance (/usr/sap/trans).
2. On the SAP global host, proceed as follows:
1. You run SAPinst [page 66] to prepare the global host.
This sets up the global directories <sapmnt>/<SAPSID>/exe, <sapmnt>/<SAPSID>/profile,
and <sapmnt>/<SAPSID>/global.
2. You export the global directories [page 64] to the database instance host, to the central instance
host, and – if required – to the hosts where you want to install one or more dialog instances.
3. On the database instance host, proceed as follows:
1. You mount the exported global directories [page 64] from the SAP global host (<sapmnt>/<SAPSID>/
exe, <sapmnt>/<SAPSID>/profile, <sapmnt>/<SAPSID>/global) and SAP transport host (/
usr/sap/trans).
5 Installation
5.1 Installation Checklist
2010-12-20 PUBLIC 59/148
2. You run SAPinst [page 66] to install the database instance.
NOTE
Do not install the Oracle database software before you run SAPinst.
SAPinst stops and prompts you to install the Oracle database software [page 79] while the
installation of the database instance is running.
If you install an SAP system in an existing database (MCOD) [page 105] SAPinst prompts you for
the existing database.
4. On the central instance host, proceed as follows:
NOTE
You can use the SAP transport host or the SAP global host as your central instance host.
1. You mount the exported global directories [page 64] from the SAP global host (<sapmnt>/<SAPSID>/
exe, <sapmnt>/<SAPSID>/profile, <sapmnt>/<SAPSID>/global) and SAP transport host (/
usr/sap/trans).
2. You run SAPinst [page 66] to install the central instance.
5. If required, you install one or more dialog instances on the chosen hosts as described later in this
section.
1. You mount the exported global directories [page 64] from the SAP global host (<sapmnt>/<SAPSID>/
exe, <sapmnt>/<SAPSID>/profile, <sapmnt>/<SAPSID>/global) and SAP transport host (/
usr/sap/trans).
2. You run SAPinst [page 66] to install the dialog instance.
6. You continue with Post-Installation [page 87].
Graphical Overview
The following figure shows how you install the various instances in a distributed system:
5 Installation
5.1 Installation Checklist
60/148 PUBLIC 2010-12-20
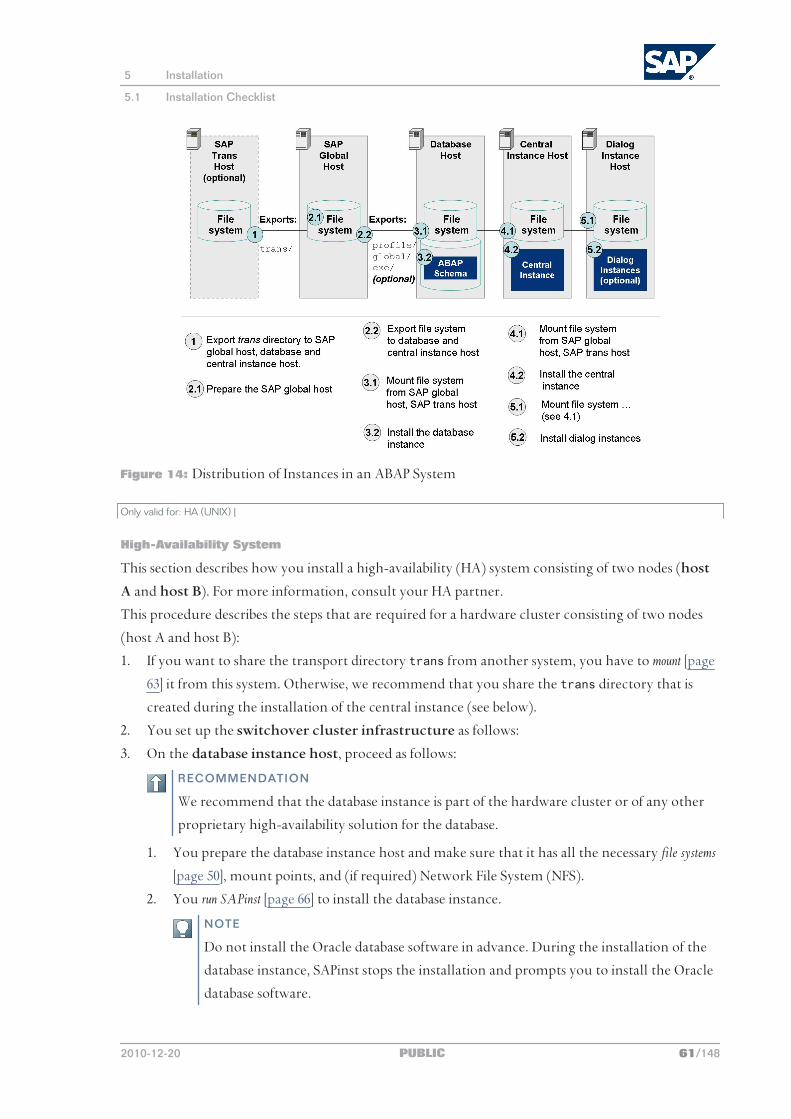
Figure 14: Distribution of Instances in an ABAP System
Only valid for: HA (UNIX) |
High-Availability System
This section describes how you install a high-availability (HA) system consisting of two nodes (host
A and host B). For more information, consult your HA partner.
This procedure describes the steps that are required for a hardware cluster consisting of two nodes
(host A and host B):
1. If you want to share the transport directory trans from another system, you have to mount [page
63] it from this system. Otherwise, we recommend that you share the trans directory that is
created during the installation of the central instance (see below).
2. You set up the switchover cluster infrastructure as follows:
3. On the database instance host, proceed as follows:
RECOMMENDATION
We recommend that the database instance is part of the hardware cluster or of any other
proprietary high-availability solution for the database.
1. You prepare the database instance host and make sure that it has all the necessary file systems
[page 50], mount points, and (if required) Network File System (NFS).
2. You run SAPinst [page 66] to install the database instance.
NOTE
Do not install the Oracle database software in advance. During the installation of the
database instance, SAPinst stops the installation and prompts you to install the Oracle
database software.
5 Installation
5.1 Installation Checklist
2010-12-20 PUBLIC 61/148
If you install an SAP system in an existing database (MCOD) [page 105] SAPinst prompts you for
the existing database.
4. On the central instance host, proceed as follows:
NOTE
In a high-availability installation, the central instance does not need to be part of the cluster
because it is no longer a single point of failure (SPOF). The SPOF is now in the ABAP central
services instance (ASCS instance), which is protected by the cluster.
1. You prepare the central instance host and make sure that it has all the necessary file systems
[page 50], mount points, and (if required) Network File System (NFS).
2. You run SAPinst [page 66] to install the central instance.
3. If you want to use the shared transport directory trans from another system, you also mount
[page 63] this directory (see above).
5. We recommend that you install dialog instances with SAPinst to create redundancy. The
application server instances are not a SPOF. Therefore, you do not need to include these instances
in the cluster.
1. You mount the global directories [page 64] in <sapmnt>/<SAPSID>.
2. You run SAPinst [page 66] to install the dialog instance.
3. If you want to use the shared transport directory trans from another system, you also mount
[page 63] this directory (see above).
6. You continue with Post-Installation [page 87].
Graphical Overview
The following figure provides an overview of how you install the various instances in a high-availability
installation:
5 Installation
5.1 Installation Checklist
62/148 PUBLIC 2010-12-20
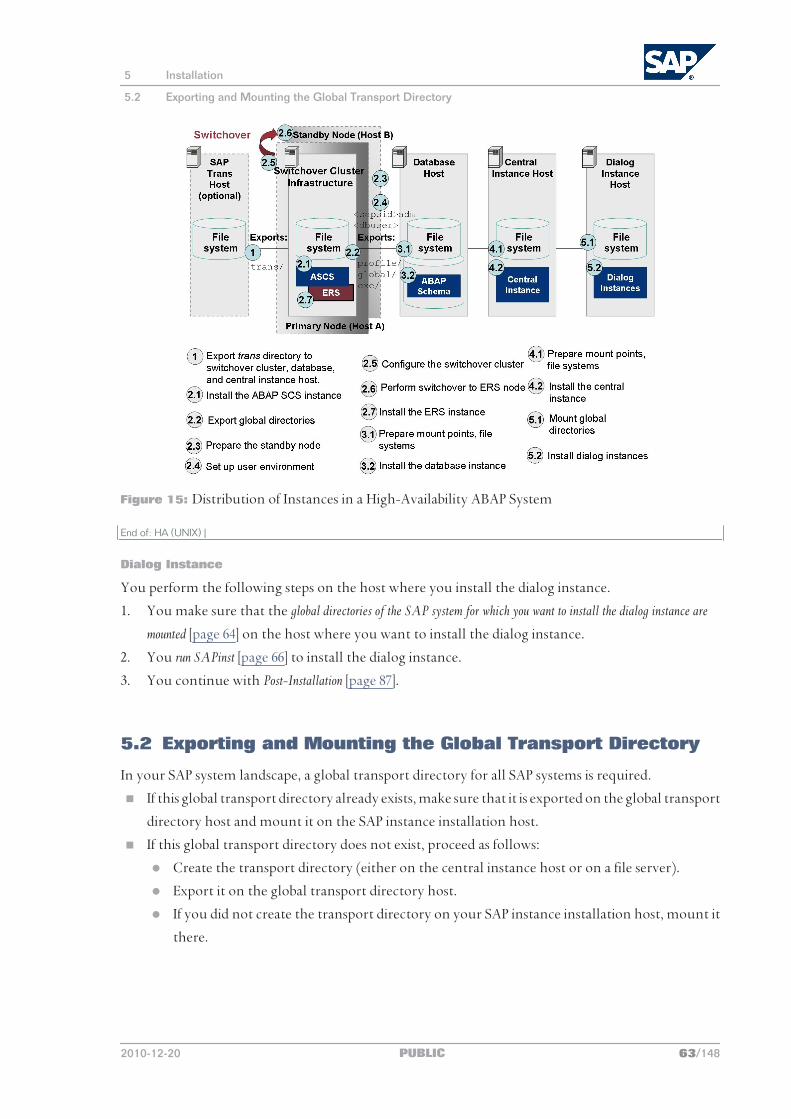
Figure 15: Distribution of Instances in a High-Availability ABAP System
End of: HA (UNIX) |
Dialog Instance
You perform the following steps on the host where you install the dialog instance.
1. You make sure that the global directories of the SAP system for which you want to install the dialog instance are
mounted [page 64] on the host where you want to install the dialog instance.
2. You run SAPinst [page 66] to install the dialog instance.
3. You continue with Post-Installation [page 87].
5.2 Exporting and Mounting the Global Transport Directory
In your SAP system landscape, a global transport directory for all SAP systems is required.
■ If this global transport directory already exists, make sure that it is exported on the global transport
directory host and mount it on the SAP instance installation host.
■ If this global transport directory does not exist, proceed as follows:
● Create the transport directory (either on the central instance host or on a file server).
● Export it on the global transport directory host.
● If you did not create the transport directory on your SAP instance installation host, mount it
there.
5 Installation
5.2 Exporting and Mounting the Global Transport Directory
2010-12-20 PUBLIC 63/148
Procedure
Exporting the Transport Directory
1. Log on as user root to the host where the global transport directory /usr/sap/trans resides.
2. Make sure that /usr/sap/trans belongs to the group sapsys and to the user root.
3. If not already done, export the directory using Network File System (NFS).
Mounting the Transport Directory
NOTE
If the transport directory resides on your local SAP instance installation host, you do not need to
mount it.
1. Log on as user root to the central or dialog instance host where /usr/sap/trans is to be mounted.
2. Create the mount point /usr/sap/trans.
3. Mount /usr/sap/trans using Network File System (NFS) from the exporting host.
More InformationMounting Directories via NFS for HP-UX [page 122]
5.3 Exporting and Mounting Global Directories
If you install an SAP system distributed over several hosts, you have to determine one host as the SAP
global host. This is the host on which the global directories are to reside. You have to make sure that
the global directories are also available on the hosts on which you intend to install the remaining
instances of the SAP system. You do this by exporting the global directories on the SAP global host and
mounting them on the installation hosts of the remaining SAP system instances to be installed.
EXAMPLE
You install an SAP system distributed over several hosts. You decide that the host with the ABAP
central services instance (ASCS instance) is the SAP global host. You then install the ASCS instance
with the physical global directories on the SAP global host. Before you install the remaining
instances (central instance, a database instance, dialog instances), you have to export the global
directories from the SAP global host and mount them on the installation hosts for the remaining
instances.
ProcedureChoose one of the following ways to proceed, depending on whether you perform a homogeneous or
heterogeneous installation:
Exporting and Mounting Global Directories for a Homogeneous Installation
Homogeneous installation means that all SAP system instances are installed on hosts with the same
UNIX operating system.
5 Installation
5.3 Exporting and Mounting Global Directories
64/148 PUBLIC 2010-12-20
Proceed as follows:
1. Log on to the SAP global host as user root and export the following directories with root access
to the host on which you want to install the new instance:
<sapmnt>/<SAPSID>/exe
<sapmnt>/<SAPSID>/profile
<sapmnt>/<SAPSID>/global
For more information, see Mounting Directories via NFS for HP-UX [page 122].
CAUTION
Make sure that the global transport directory is mounted on every host where you want to
install an SAP system instance. For more information, see Exporting and Mounting the Global Transport
Directory [page 63]. Otherwise, the installation of this SAP system instance fails.
2. Log on to the host of the new instance as user root.
3. Create the following mount points and mount them from the SAP global host:
<sapmnt>/<SAPSID>/exe
<sapmnt>/<SAPSID>/profile
<sapmnt>/<SAPSID>/global
CAUTION
Make sure that these mount points are permanent. Otherwise, automatic start of the instance
services does not work when you reboot the system.
Exporting and Mounting Global Directories for a Heterogeneous Installation
Heterogeneous installation means here that the instances of an SAP system are installed on hosts with
different UNIX operating systems. If you need information about the installation of application
servers on Windows in a UNIX environment, see Heterogeneous SAP System Installations [page 132].
Proceed as follows for a heterogeneous installation with different UNIX operating systems:
1. Log on to the SAP global host as user root and export the following directories with root access
to the host on which you want to install the new instance:
<sapmnt>/<SAPSID>/profile
<sapmnt>/<SAPSID>/global
For more information, see Mounting Directories via NFS for HP-UX [page 122].
CAUTION
Do not export <sapmnt>/<SAPSID>/exe.
CAUTION
Make sure that the global transport directory is mounted on every host where you want to
install an SAP instance. For more information, see Exporting and Mounting the Global Transport
Directory [page 63]. Otherwise, the installation fails.
2. Log on to the host of the new instance as user root.
3. Create the following mount points and mount them from the SAP global host:
5 Installation
5.3 Exporting and Mounting Global Directories
2010-12-20 PUBLIC 65/148

<sapmnt>/<SAPSID>/profile
<sapmnt>/<SAPSID>/global
CAUTION
Make sure that these mount points are permanent. Otherwise automatic start of the instance
services does not work when you reboot the system.
CAUTION
Do not mount <sapmnt>/<SAPSID>/exe and do not create it locally. It is created automatically
during the installation.
5.4 Running SAPinst
This section describes how to run the installation tool SAPinst. SAPinst includes a GUI client and a GUI
server, which both use Java.
This section describes an installation where SAPinst, GUI client, and GUI server are running on the
same host. In the following, GUI client and GUI server are addressed as “SAPinst GUI”.
If you need to see the installation on a remote display, we recommend that you perform a remote installation
with SAPinst [page 75], where the SAPinst GUI is running on a separate host from SAPinst.
Alternatively, you can use an X server for Microsoft Windows or other remote desktop tools like
vncviewer or nxserver/nxclient – offered by various vendors or open source – for remote access to
the GUI on Windows workstations. We recommend you use the Hummingbird Exceed X Server, which
we use to validate installations with SAPinst. For more information, see SAP Note 1170809.
Useful Information About SAPinst
■ When you start SAPinst, it automatically starts the SAPinst GUI.
■ SAPinst creates the installation directory sapinst_instdir directly below the temporary directory.
SAPinst finds the temporary directory by checking the value of the following environment variables
in the following sequence: TEMP, TMP, and TMPDIR. If no value is set for these variables, SAPinst
creates the installation directory sapinst_instdir directly below the /tmp directory by default.
If you want SAPinst to create the installation directory sapinst_instdir in another directory, set
the environment variable TEMP to this directory before you start SAPinst.
Shell Used Command
Bourne shell (sh) TEMP=<directory>
export TEMP
C shell (csh) setenv TEMP <directory>
Korn shell (ksh) export TEMP=<directory>
CAUTION
Make sure that the installation directory is not mounted with NFS, or there might be problems
when the Java Virtual Machine is started.
5 Installation
5.4 Running SAPinst
66/148 PUBLIC 2010-12-20
RECOMMENDATION
We recommend that you keep all installation directories until the system is completely and
correctly installed.
■ SAPinst creates a subdirectory for each installation option called sapinst_instdir/
<installation_option_directory>.
■ SAPinst extracts itself to a temporary directory called sapinst_exe.xxxxxx.xxxx, which is located
in the environment variables TEMP, TMP, or TMPDIR. These files are deleted after SAPinst has stopped
running.
The temporary directory sapinst_exe.xxxxxx.xxxx sometimes remains undeleted. You can safely
delete it.
The temporary directory also contains the log file dev_selfex.out from the extraction process,
which might be useful if an error occurs.
CAUTION
If SAPinst cannot find a temporary directory, the installation terminates with the error
FCO-00058.
■ During the installation, the default ports 21200, 21212, and 4239 are used for communication
between SAPinst, GUI server, GUI, and HTTP server, as follows:
● SAPinst uses port 21200 to communicate with the GUI server.
● The GUI server uses port 21212 to communicate with the GUI client.
● 4239 is the port of the HTTP server, which is part of the GUI server.
If the ports for SAPinst and the GUI server are already in use, SAPinst automatically searches for
free port numbers. If the search fails, SAPinst exits.
In this case or if you want SAPinst to use specific ports, you can assign them by executing the
sapinst executable with the following command line parameters:
● SAPINST_DIALOG_PORT=<port_number_sapinst_to_gui_server>
● GUISERVER_DIALOG_PORT=<port_number_gui_server_to_gui_client>
● GUISERVER_HTTP_PORT=<port_number_http_server>
■ To see a list of all available SAPinst properties, start SAPinst as described above with command line
parameter -p:
./sapinst -p.
■ If you need to run SAPinst in accessibility mode, proceed as described in Running SAPinst in Accessibility
Mode [page 78].
■ If required, you can stop SAPinst by choosing SAPinst Cancel in the SAPinst GUI menu.
NOTE
If you need to terminate SAPinst, you can do this by pressing Ctrl + C .
5 Installation
5.4 Running SAPinst
2010-12-20 PUBLIC 67/148
Prerequisites
■ We recommend that you use the csh shell for the installation with SAPinst. If you want to use
another shell, make sure that you have read SAP Note 202227.
SAPinst uses csh scripts during the installation to obtain the environment for user <sapsid>adm.
This is also true if user <sapsid>adm already exists from an earlier SAP system installation, and the
shell of this user is not csh. Before you start SAPinst, execute the following command as user
<sapsid>adm to make sure that the csh scripts are up-to-date:
/bin/csh -c "source /<home>/<sapsid>adm/.cshrc;env"
■ Make sure that you have specified the most important SAP system parameters as described in Basic
SAP System Installation Parameters [page 28] before you start the installation.
■ Check that your installation hosts meet the requirements for the installation options that you
want to install.
For more information, see Running the Prerequisite Checker [page 23].
■ If you want to perform a distributed or a high-availability installation, make sure that you have
exported and mounted global directories [page 64].
■ If you are installing a second or subsequent SAP system into an existing database (MCOD), make
sure that the database is up and running before starting the installation.
Check that the SYSTEM tablespace contains at least 400 MB of free space. If there is not enough
space left, increase the size of this tablespace with BRSPACE or BRTOOLS.
For more information, see Installation of Multiple Components in One Database [page 105].
■ Check the value of the environment variable TEMP, TMP, or TMPDIR:
Shell Used Command
Bourne shell (sh) TEMP=<directory>
export TEMP
C shell (csh) setenv TEMP <directory>
Korn shell (ksh) export TEMP=<directory>
● Make sure that your operating system does not delete the contents of the temporary
directory /tmp or the contents of the directories to which the variable TEMP, TMP, or TMPDIR
points – for example, by using a crontab entry.
● Make sure that you have at least 60 MB of free space in the installation directory for each
installation option. In addition, you need 200 MB free space for the SAPinst executables. If you
cannot provide 200 MB free space in the temporary directory, you can set one of the
environment variables TEMP, TMP, or TMPDIR to another directory with 200 MB free space for
the SAPinst executables.
● Make sure that the temporary directory has the permissions 1777.
■ Make sure that your DISPLAY environment variable is set to <host_name>:0.0, where
<host_name> is the host on which you want to display the GUI.
5 Installation
5.4 Running SAPinst
68/148 PUBLIC 2010-12-20
Shell Used Command
Bourne shell (sh) DISPLAY=<host_name>:0.0
export DISPLAY
C shell (csh) setenv DISPLAY <host_name>:0.0
Korn shell (ksh) export DISPLAY=<host_name>:0.0
■ Make sure that umask is set to 022 for user root.
As user root, enter the following command: umask 022
■ Check the following values for user root:
● In csh, execute limit
Output Properties
cputime unlimited
filesize unlimited
datasize unlimited
stacksize 8192 KB
coredumpsize unlimited
descriptors 8192
memorysize unlimited
● In sh or ksh, execute ulimit -a
Output Properties
time(seconds) unlimited
file(blocks) unlimited
data(kbytes) unlimited
stack(kbytes) 8192
coredump(blocks) unlimited
nofiles(descriptors) 8192
memory(KBytes) unlimited
If your parameter settings differ from the settings above, change these values accordingly.
EXAMPLE
If you have to change the value for descriptors to 8192, proceed as follows:
◆ In csh, execute:
limit descriptors 8192
◆ In sh or ksh execute:
ulimit -n 8192
■ If you want to install a dialog instance to an existing SAP system, make sure that:
● There is exactly one entry in the /usr/sap/sapservices file for each SAP instance installed
on this host. Make sure that you check that the entry refers to the correct profile.
● There are no profile backup files with an underscore “_” in their profile name. If so, you must
replace the “_” with a “.”.
5 Installation
5.4 Running SAPinst
2010-12-20 PUBLIC 69/148
EXAMPLE
Rename /usr/sap/S14/SYS/profile/S14_DVEBMGS20_zsi-aix693p2_D20081204 to /
usr/sap/S14/SYS/profile/S14_DVEBMGS20_zsi-aix693p2.D20081204.
Procedure1. Log on to the installation host as user root.
CAUTION
Do not use an existing <sapsid>adm user.
CAUTION
Make sure that the root user has not set any environment variables for a different SAP system
or database.
2. Mount the Installation Master DVD.
Mount the DVDs locally. We do not recommend that you use Network File System (NFS), because
reading from DVDs mounted with NFS might fail.
For more information about mounting DVDs, see Mounting a CD / DVD for HP-UX [page 120].
3. Change to the directory with the sapinst executable for your operating system by entering the
following command:
cd <Mountpoint of Installation Master DVD>/IM_<your OS>
4. Start SAPinst by executing the following command:
./sapinst
NOTE
If you want to use a virtual host name, start SAPinst with the SAPinst property
SAPINST_USE_HOSTNAME as follows:
./sapinst SAPINST_USE_HOSTNAME=<virtual host name>
CAUTION
Make sure that the installation directory is not mounted with NFS, or there might be problems
when the Java Virtual Machine is started.
5. In the Welcome screen, choose your SAP system. You can do either one of the following:
■ Install an SAP system
Choose <Your SAP product> SAP Application Server ABAP <Database> <System Variant>
You can install the following system variants:
System Variants Remarks
Central System Installs an SAP system with all mandatory instances on one host
Distributed System Installs an SAP system with all mandatory instances on different hostsPerform the installation options exactly in the order they appear. You have to restart SAPinst on the relevant host for each installation option.
High-Availability System Installs a high-availability SAP system with all mandatory instances on different hostsPerform the installation options exactly in the order they appear. You have to restart SAPinst on the relevant host for each installation option.
5 Installation
5.4 Running SAPinst
70/148 PUBLIC 2010-12-20
NOTE
When you start the installation from a 32-bit installation master DVD, all you see is the
folder Software Life-Cycle Options on the Welcome screen.
■ Perform other tasks or install additional components
Choose <Your SAP product> Software Life-Cycle Options .
The following software life-cycle options are available:
Software Life-Cycle Installation Options Remarks
Additional Preparation Options
These options comprise the following tasks: ● Host Agent
Installs a standalone host agent. For more information, see Installing the Host Agent Separately [page 123].
● Operating System Users and GroupsAllows you to use global accounts that are configured on a separate hostRun this installation option before you start the installation of the SAP system.
● Prerequisites CheckChecks your hardware and software requirements before you start the installation. For more information, see Running the Prerequisites Checker in Standalone Mode [page 23].
Application Server Installs one or more dialog instances in an already installed SAP system, if required
LDAP Registration Sets up LDAP support for an application server instanceFor more information about LDAP and Active Directory, see Integration of LDAP Directory Services [page 107].
System Copy Performs a system copy
Uninstall Uninstalls your SAP system, standalone engines, or optional standalone unitsFor more information, see Deleting an SAP System [page 133].
6. Choose Next.
7. Follow the instructions in the SAPinst input screens and enter the required parameters.
NOTE
For more information about the input parameters, position the cursor on the parameter and
press F1 .
After you have entered all requested input parameters, SAPinst displays the Parameter Summary screen.
This screen shows both the parameters that you entered and those that SAPinst set by default. If
required, you can revise the parameters before starting the installation.
8. To start the installation, choose Start.
SAPinst starts the installation and displays the progress of the installation.
NOTE
■ During the installation of the Oracle database instance, SAPinst stops the installation and
prompts you to install the Oracle database software [page 79].
5 Installation
5.4 Running SAPinst
2010-12-20 PUBLIC 71/148
This action is not required if you install a system into an existing database (MCOD).
After you have finished the installation of the Oracle database, you continue the database
instance installation by choosing OK in the GUI of the database instance installation.
■ For Oracle 10, check SAP Note 841728 for known installation problems with Oracle 10
g.
■ For Oracle 11, check SAP Note 1431800 for technical information about Oracle Release
11.2 in SAP environments.
CAUTION
If you decided to use 02 as the instance number, the instance fails to start during the installation
process. For more information about the cause, see Basic SAP System Installation Parameters [page
28]. You have to manually change the port number for report RSLGCOLL to continue with the
installation.
Proceed as follows:
1. Go to directory /<sapmnt>/<SAPSID>/profile
2. Edit DEFAULT.PFL.
3. Set the parameter rslg/collect_daemon/listen_port to a free port number.
9. If required, install a dialog instance for a central system or distributed system.
10. If required, delete directories with the name sapinst_exe.xxxxxx.xxxx after SAPinst has finished.
Sometimes these remain in the temporary directory.
NOTE
If there are errors with the SAPinst extraction process, you can find the log file
dev_selfex.out in the temporary directory.
RECOMMENDATION
Keep all installation directories until you are sure that the system, including all instances, is
completely and correctly installed. Once the system is completely and correctly installed,
make a copy of the installation directories with all their contents. Save the copy to a physically
separate medium, such as a DVD or a USB drive that is separate from your installation hosts.
This might be useful for analyzing issues occurring later when you use the system. For security
reasons, do not keep installation directories on installation hosts, but make sure that you
delete them after saving them separately.
11. We recommend that you delete the directory <user_home>/.sdtgui/.
12. If you copied installation DVDs to your hard disk, you can delete these files when the installation
has successfully completed.
More Information
■ Interrupted Installation with SAPinst [page 73]
■ Performing a Remote Installation with SAPinst [page 75]
■ Starting SAPinst GUI Separately [page 76]
5 Installation
5.4 Running SAPinst
72/148 PUBLIC 2010-12-20
■ Running SAPinst in Accessibility Mode [page 78]
■ Entries in the Services File Created by SAPinst [page 79]
■ Troubleshooting with SAPinst [page 133]
5.5 Additional Information About SAPinst
The following sections provide additional information about SAPinst:
■ Interrupted Installation with SAPinst [page 73]
■ Performing a Remote Installation with SAPinst [page 75]
■ Starting SAPinst GUI Separately [page 76]
■ Running SAPinst with Accessibility Mode [page 78]
■ Entries in the Services File Created by SAPinst [page 79]
5.5.1 Interrupted Installation with SAPinst
The SAP system installation might be interrupted for one of the following reasons:
■ An error occurred during the Define Parameters or Execute phase:
SAPinst does not abort the installation in error situations. If an error occurs, the installation pauses
and a dialog box appears. The dialog box contains a short description of the choices listed in the
table below as well as a path to a log file that contains detailed information about the error.
■ You interrupted the installation by choosing Cancel in the SAPinst menu.
CAUTION
If you stop an option in the Execute phase, any system or component installed by this option
is incomplete and not ready to be used. Any system or component uninstalled by this option
is not completely uninstalled.
The following table describes the options in the dialog box:
Option Definition
Retry SAPinst retries the installation from the point of failure without repeating any of the previous steps.This is possible because SAPinst records the installation progress in the keydb.xml file.We recommend that you view the entries in the log files, try to solve the problem, and then choose Retry.If the same or a different error occurs, SAPinst displays the same dialog box again.
Stop SAPinst stops the installation, closing the dialog box, the SAPinst GUI, and the GUI server.SAPinst records the installation progress in the keydb.xml file. Therefore, you can continue the installation from the point of failure without repeating any of the previous steps (see the procedure below).
5 Installation
5.5 Additional Information About SAPinst
2010-12-20 PUBLIC 73/148
Option Definition
Continue SAPinst continues the installation from the current point.
View Log Access installation log files.
NOTE
You can also terminate SAPinst by choosing Ctrl + C . However, we do not recommend that
you use Ctrl + C , because this kills the process immediately.
Procedure
This procedure describes the steps to restart an installation, which you stopped by choosing Stop, or to
continue an interrupted installation after an error situation.
1. Log on to your local UNIX host as user root.
CAUTION
Make sure that the root user has not set any environment variables for a different SAP system
or database.
2. Mount your Installation Master DVD.
NOTE
Mount the DVD locally. We do not recommend using Network File System (NFS).
3. Start SAPinst using the following commands:
cd <Installation_Master_DVD>/IM_<OS>
./sapinst
4. From the tree structure in the Welcome screen, select the installation option that you want to
continue and choose Next.
The What do you want to do? screen appears.
5. In the What do you want to do? screen, decide between the following alternatives and continue with
Next:
Alternative Behavior
Run a new option SAPinst does not continue the interrupted installation option. Instead, it moves the content of the old installation directory and all installation-specific files to a backup directory. Afterwards, you can no longer continue the old installation option.For the backup directory, the following naming convention is used:<log_day_month_year_hours_minutes_seconds>
EXAMPLE
log_01_Oct_2008_13_47_56
CAUTION
SAPinst moves all the files and folders to a new log directory, even if these files and folders are owned by other users. If there are any processes currently running on these files and folders, they might no longer function properly.
5 Installation
5.5 Additional Information About SAPinst
74/148 PUBLIC 2010-12-20
Alternative Behavior
Continue with the old option SAPinst continues the interrupted installation option from the point of failure.
5.5.2 Performing a Remote Installation with SAPinst
You use this procedure to install your SAP system on a remote host. In this case, SAPinst runs on the
remote host, and the SAPinst GUI runs on the local host. The local host is the host from which you
control the installation with the SAPinst GUI. The SAPinst GUI connects using a secure SSL connection
to SAPinst.
Alternatively you can use an X server for Microsoft Windows or other remote desktop tools such as
VNC Viewer or NX Server / NX Client – offered by various vendors or open source – for remote access
to SAPinst GUI on Windows workstations. We recommend that you use the Hummingbird Exceed X
Server, which we use to validate installations with SAPinst. For more information, see SAP Note
1170809.
Prerequisites
■ The remote host meets the prerequisites for starting SAPinst as described in Running SAPinst [page
66]
■ Both computers are in the same network and can ping each other.
To test this:
1. Log on to your remote host and enter the command ping <local host>.
2. Log on to the local host and enter the command ping <remote host>.
Procedure
1. Log on to your remote host as user root.
CAUTION
Make sure that the root user has not set any environment variables for a different SAP system
or database.
2. Mount the Installation Master DVD.
3. Change to the directory of the sapinst executable by entering the following command:
cd <Mountpoint of Installation Master DVD>/IM_<OS>
4. Start SAPinst by executing the following command:
./sapinst -nogui
SAPinst now starts and waits for the connection to the SAPinst GUI. You see the following at the
command prompt:
guiengine: no GUI connected; waiting for a connection on host <host_name>, port
<port_number> to continue with the installation
5 Installation
5.5 Additional Information About SAPinst
2010-12-20 PUBLIC 75/148
5. Start the SAPinst GUI on your local host as described in Starting the SAPinst GUI Separately [page
76].
5.5.3 Starting SAPinst GUI Separately
You use this procedure to start the SAPinst GUI separately. You need to start the SAPinst GUI separately
in the following cases:
■ You closed the SAPinst GUI using File Exit from the SAPinst menu while SAPinst is still
running.
■ You want to perform a remote installation, where the SAPinst GUI runs on a different host from
SAPinst. For more information, see Performing a Remote Installation with SAPinst [page 75].
■ You want to run SAPinst in accessibility mode. In this case, you have to start the SAPinst GUI
separately on a Windows host as described below with the additional command line parameter –
accessible. For more information, see Running SAPinst in Accessibility Mode [page 78].
Prerequisites
The host on which you want to start the SAPinst GUI meets the prerequisites for starting SAPinst as
described in Running SAPinst [page 66].
Procedure
Starting SAPinst GUI on Windows
1. Insert the SAP Installation Master DVD into your DVD drive.
2. Change to the directory of the sapinstgui executable:
<Drive>:\<Installation_Master_DVD>\IM_WINDOWS_<platform>
NOTE
If you want to start the SAPinst GUI on a Windows 32-bit operating system, change to the
following directory:
<Drive>:\<Installation_Master_DVD>\IM_WINDOWS_I386
3. Start the SAPinst GUI from a command prompt by executing sapinstgui.exe with the relevant
command line parameters:
■ If you want to perform a remote installation, execute the following command:
sapinstgui.exe -host <remote_host> -port
<port_number_gui_server_to_gui_client>
– where <remote_host> is the name of the remote host, and
<port_number_gui_server_to_gui_client> is the port the GUI server uses to communicate
with the GUI client (21212 by default).
■ If you closed the SAPinst GUI using File Exit and want to reconnect to SAPinst, proceed
as follows:
5 Installation
5.5 Additional Information About SAPinst
76/148 PUBLIC 2010-12-20
● If you are performing a local installation with SAPinst and SAPinst GUI running on the
same host, execute the following command:
sapinstgui.exe -port <port_number_gui_server_to_gui_client>
– where <port_number_gui_server_to_gui_client> is the port the GUI server uses to
communicate with the GUI client (21212 by default).
● If you are performing a remote installation with SAPinst and SAPinst GUI running on
different hosts, execute the following command:
sapinstgui.exe -host <remote_host> -port
<port_number_gui_server_to_gui_client>
– where <remote_host> is the name of the remote host, and
<port_number_gui_server_to_gui_client> is the port the GUI server uses to
communicate with the GUI client (21212 by default).
The SAPinst GUI starts and connects to SAPinst.
Starting SAPinst GUI on UNIX
1. Mount the Installation Master DVD.
NOTE
Mount the DVD locally.
We do not recommend that you use Network File System (NFS).
2. Change to the directory of the sapinstgui executable by entering the following command:
cd <Mountpoint of Installation Master DVD>/IM_<OS>
NOTE
If you want to start the SAPinst GUI on a Linux 32–bit platform, enter the following command:
cd <Mountpoint of Installation Master DVD>/IM_LINUX_I386
3. Start the SAPinst GUI by executing ./sapinstgui with the relevant command line parameters:
■ If you want to perform a remote installation, execute the following command:
./sapinstgui -host <remote_host> -port <port_number_gui_server_to_gui_client>
– where <remote_host> is the name of the remote host, and
<port_number_gui_server_to_gui_client> is the port the GUI server uses to communicate
with the GUI client (21212 by default).
■ If you closed the SAPinst GUI using File Exit and want to reconnect to SAPinst, proceed
as follows:
● If you are performing a local installation with SAPinst and SAPinst GUI running on the
same host, execute the following command:
sapinstgui -port <port_number_gui_server_to_gui_client>
– where <port_number_gui_server_to_gui_client> is the port the GUI server uses to
communicate with the GUI client (21212 by default).
5 Installation
5.5 Additional Information About SAPinst
2010-12-20 PUBLIC 77/148
● If you are performing a remote installation with SAPinst and SAPinst GUI running on
different hosts, execute the following command:
sapinstgui -host <remote_host> -port
<port_number_gui_server_to_gui_client>
– where <remote_host> is the name of the remote host, and
<port_number_gui_server_to_gui_client> is the port the GUI server uses to
communicate with the GUI client (21212 by default).
The SAPinst GUI starts and connects to SAPinst.
5.5.4 Running SAPinst in Accessibility Mode
You can also run SAPinst in accessibility mode. The following features are available:
■ Keyboard access:
This feature is generally available for all operating systems.
■ High-contrast color:
This feature is derived from the Windows display properties. Therefore, to enable this feature, you
must perform a remote installation with the SAPinst GUI running on a Windows host.
■ Custom font setting:
This feature is derived from the Windows display properties. Therefore, to enable this feature, you
must perform a remote installation with the SAPinst GUI running on a Windows host.
Procedure
Activating and Adjusting Accessibility Settings on Windows
You first have to activate and adjust the relevant settings for the font size and color schemes before
you start SAPinst or the SAPinst GUI.
NOTE
The following procedure applies for Windows Server 2008 and might be different when using
another Windows operating system.
1. Right click on your Windows desktop and choose Personalize.
2. Select Adjust font size (DPI) and choose Larger scale (120 DPI).
To define other font size schemes, choose Custom DPI.
3. In the right-hand pane, select Window Color and Appearance.
Select a color scheme from the Color scheme drop-down box.
To define your own color schemes, choose Advanced.
Running SAPinst in Accessibility Mode
You perform a remote installation as follows:
5 Installation
5.5 Additional Information About SAPinst
78/148 PUBLIC 2010-12-20
1. Start SAPinst on the remote host by executing the following command from the command line
as described in Performing a Remote Installation with SAPinst [page 75]:
./sapinst –nogui
2. Start SAPinst GUI on a local Windows host by executing the following command from the
command line as described in Starting the SAPinst GUI Separately for a Remote Installation [page 76]:
sapinstgui.exe -accessible –host <remote_host> -port
<port_number_gui_server_to_gui_client>
5.5.5 Entries in the Services File Created by SAPinst
After the installation has finished successfully, SAPinst has created the following entries in /etc/
services:
sapdp<nn> = 32<nn>/tcp
sapdp<nn>s = 47<nn>/tcp
sapgw<nn> = 33<nn>/tcp
sapgw<nn>s = 48<nn>/tcp
sapms<SAPSID> = 36<nn>/tcp (unless you specified another value during the installation)
NOTE
■ <nn> is the instance number. There is a port created for every possible instance number,
regardless of which instance number you specified during the installation. For example, for
sapgw<nn> = 33<nn>/tcp the following range of entries is created:
sapgw00 = 3300/tcp
sapgw01 = 3301/tcp
sapgw02 = 3302/tcp
[...]
sapgw98 = 3398/tcp
sapgw99 = 3399/tcp
■ If there is more than one entry for the same port number, this is not an error.
5.6 Oracle Database Software Installation
Continue with the section relevant for the release of the Oracle database that you want to install:
■ Oracle 10 Database Software Installation [page 79]
■ Oracle 11 Database Software Installation [page 83]
5.6.1 Oracle 10 Database Software Installation
SAPinst prompts you to install the Oracle database.
5 Installation
5.6 Oracle Database Software Installation
2010-12-20 PUBLIC 79/148
Proceed as follows to install the Oracle 10 database software:
Process Flow
1. You update SAP-specific files in the Oracle stage area [page 80].
2. You run the Oracle Universal Installer [page 80]
3. You install the current patch set [page 82]
4. You install required interim patches [page 83]
5.6.1.1 Updating SAP-Specific Files in the Oracle Staging Area
SAPinst extracts the Oracle RDBMS software to the staging area, usually /oracle/stage/102_64/
database.
The SAP folder located in /oracle/stage/102_64/database contains SAP-specific scripts as well as the
response files.
Before starting the Oracle software installation, you need to update this SAP folder so that the updated
versions of the scripts or response files are used.
Procedure
1. Rename the original SAP folder by performing one of the following:
■ mv /oracle/stage/102_64/database/Disk1/SAP
/oracle/stage/102_64/database/Disk1/SAP_ORIG
■ mv /oracle/stage/102_64/database/SAP
/oracle/stage/102_64/database/SAP_ORIG
2. Download the file RDBMS_SAP_64.zip attached to SAP Note 819830 and copy it to a temporary
location such as /tmp.
3. Extract the zip file by performing one of the following:
■ cd /oracle/stage/102_64/database
unzip /tmp/RDBMS_SAP_64.zip
■ cd /oracle/stage/102_64/database/Disk1
unzip /tmp/RDBMS_SAP_64.zip
You should now see the directory SAP extracted with the updated version of SAP-specific files.
5.6.1.2 Running the Oracle Universal Installer
To install the Oracle database software; you run the Oracle Universal Installer (OUI).
Prerequisites
A graphical user interface (GUI) is required for the database installation with Oracle Universal Installer.
5 Installation
5.6 Oracle Database Software Installation
80/148 PUBLIC 2010-12-20
CAUTION
Check SAP Note 841728 for known problems that occur during the installation of Oracle 10g
database software.
Procedure
1. Log on as user ora<dbsid>.
Since you are already logged on as user root, you can switch to user ora<dbsid> by entering the
following command:
su – ora<dbsid>
2. Make sure that umask is set to 022 by entering the following command:
umask 022
3. If you install Oracle database software with Release 10.2.0.1 or 10.2.0.x on a new operating system
or a new operating system version, the Oracle Universal Installer might not yet recognize or support
this operating system. Follow the instructions in SAP Note 980426.
4. Make sure that the DISPLAY environment variable is set to <host_name>:0.0, where
<host_name> is the host on which you want to display the GUI of the Oracle Universal Installer
(OUI).
Shell Used Command
Bourne shell (sh) DISPLAY=<host_name>:0.0
export DISPLAY
C shell (csh) setenv DISPLAY <host_name>:0.0
Korn shell (ksh) export DISPLAY=<host_name>:0.0
5. Start the OUI with the user ora<dbsid> by entering one of the following:
■ cd /oracle/stage/102_64/database/Disk1/SAP
./RUNINSTALLER
■ cd /oracle/stage/102_64/database/SAP
./RUNINSTALLER
You see a message that a response file is being generated. It might take several minutes before you
see the OUI screen.
6. Respond to the OUI as follows:
Prompt or Condition Action
When you run the OUI for the first time on this host, a dialog box, Specify File Locations Destination..., appears.This dialog box proposes the inventory location as /oracle/oraInventory and the installation group as dba.
Accept the OUI proposal and continue by choosing Next.
Available Product Components Confirm the default selections by choosing Next.
Product-Specific Prerequisite Checks For items that are flagged as warnings or failed, review the cause for the warning or failure on screen and fix the problem if possible.
5 Installation
5.6 Oracle Database Software Installation
2010-12-20 PUBLIC 81/148
Prompt or Condition ActionThis phase checks if all necessary requirements for installing and running the database have been met.
Alternatively you can verify the items manually and confirm them by clicking the checkbox. You can find details about each check by clicking on the relevant item.
Summary page Check the information on this page and then start the installation.
When the Install step has completed, a dialog box appears.
Execute the file $ORACLE_HOME/root.sh with the user root, and confirm the dialog box by choosing OK.If this is the first time that the Oracle software has been installed on this host, the OUI also asks you to execute a second script, /oracle/oraInventory/orainstRoot.sh, as the root user. Execute this script as well.Continue by choosing Next.
7. At the end of the installation, in case there are any Configuration Assistants that have been started
automatically (for example, Oracle Net) choose Cancel and terminate the Net Config Assistant. You
can ignore messages that some of the config assistants failed to complete successfully.
The Installer finishes, reporting that the Oracle installation was successful. It also informs you
about the services that it started. You can find the port numbers for these services in the
$ORACLE_HOME/install/portlist.ini file.
8. To exit the OUI, choose Exit and confirm the dialog box that appears.
NOTE
You can now access the Oracle 10.2 online documentation, which was installed during the
last step. You can find the entry point to the Oracle online documentation at $ORACLE_BASE/
doc/index.htm.
5.6.1.3 Installing the Current Patch Set
After the database software installation [page 80], you need to install the current Oracle Database 10g Release
2 (10.2) patch set.
Prerequisites
■ For more information on the latest patch set available for Oracle 10.2, see SAP Note 839187.
■ For more information about how to install the patch set, see the patch set README file.
CAUTION
Do not perform any of the post-installation steps mentioned in the patch set README file. The
post-installation steps are to be performed only on an existing Oracle 10.2 database.
At this stage you have only installed the Oracle 10.2 software. The database itself is still not
Oracle 10.2. Therefore, make sure that you do not perform the post-installation steps
mentioned in the README file.
5 Installation
5.6 Oracle Database Software Installation
82/148 PUBLIC 2010-12-20
■ You only have to install the latest (that is, the current) patch set.
Procedure
1. Log on at the operating system level with the ora<dbsid> user.
2. Install the patch set as described on the patch set README file.
For more information, see SAP Note 839187.
5.6.1.4 Installing Required Interim Patches
After the Oracle database software installation, you need to install required interim patches, using the
Oracle tool OPatch. You need these interim patches in addition to the current patch set.
RECOMMENDATION
You can install all the required interim patches in a single step using the Oracle tool MOPatch,
which you can find at SAP Note 1027012.
MOPatch can also download patches directly from SAP Service Marketplace and check for any
potential patch conflicts.
Prerequisites
■ Make sure you have already installed the current patch set [page 82].
■ Check SAP Note 871096 and 1137346 to find the list of required patches to be installed.
■ Check SAP Note 839182 for instructions on how to use OPatch.
Procedure
1. Log on at the operating system level as the ora<dbsid> user.
2. Install the patches, following the instructions in SAP Note 839182.
NOTE
You can apply the patches in any order.
We recommend that you first copy the patches to a directory called ora_patches in
$ORACLE_HOME.
3. After all the patches have been successfully applied, you can query the status with the following
command:
$ORACLE_HOME/OPatch/opatch lsinventory
This command lists all the patches that have been applied to the software installation.
5.6.2 Oracle 11 Database Software Installation
SAPinst prompts you to install the Oracle database.
Proceed as follows to install the Oracle database software:
5 Installation
5.6 Oracle Database Software Installation
2010-12-20 PUBLIC 83/148
Process Flow
1. You run the Oracle Universal Installer [page 84]
2. You install the current patch set [page 85]
3. You install the required SAP bundle patch [page 86]
5.6.2.1 Running the Oracle Universal Installer
To install the database software, you run the Oracle Universal Installer (OUI).
Prerequisites
A graphical user interface (GUI), for example X11, is required for the Oracle database software
installation with runInstaller. For more information, see the documentation of your operating
system.
Procedure
1. Log on as user ora<dbsid>.
Since you are already logged on as user root, you can switch to user ora<dbsid> by entering the
following command:
su – ora<dbsid>.
2. Make sure that umask is set to 022 by entering the following command:
umask 022
3. Make sure that the DISPLAY environment variable is set to <host_name>:0.0, where
<host_name> is the host on which you want to display the GUI of the Oracle Universal Installer
(OUI).
Shell Used Command
Bourne shell (sh) DISPLAY=<host_name>:0.0
export DISPLAY
C shell (csh) setenv DISPLAY <host_name>:0.0
Korn shell (ksh) export DISPLAY=<host_name>:0.0
4. Start the OUI with the user ora<dbsid> by entering the following:
cd /oracle/stage/112_64/database/SAP
./RUNINSTALLER
You see a message that a response file is being generated. It might take several minutes before you
see the OUI screen.
5. Respond to the OUI as follows:
Prompt or Condition Action
Configure Security Updates Do not select the checkbox.The runInstaller issues a warning.Choose OK and then Next.
Select Installation Option Confirm the default selections by choosing Next.
5 Installation
5.6 Oracle Database Software Installation
84/148 PUBLIC 2010-12-20
Prompt or Condition Action
Grid Installation Options Confirm the default selection Single Instance Installation and then choose Next.
Select Product Language Confirm the default option English and then choose Next.
Select Database Edition Confirm the default option Enterprise Edition and then choose Next.
Specify Installation Location This screen displays the value for ORACLE_BASE which is set in the environment. It also displays the value for ORACLE_HOME, which should be /oracle/DBSID/112_64.Select this option and then Next.
Privileged OS Groups This screen displays the operating system groups for the DBA and the operator. Normally, these are dba and oper.
Perform Prerequisite Checks This screen checks if all the required system prerequisites for installation of the database software have been met. If some of the checks are displayed as Failed, you can fix these problems (either by installing the missing patches or configuring the kernel parameters) and run the check again by choosing Check Again.
RECOMMENDATION
We strongly recommend you to make sure that there are no failed checks before starting the software installation.
Summary Review the information displayed on this screen and choose Finish.
Finish Finish the software installation by executing the root.sh script as the root user from another session.
6. To exit the OUI, choose Exit and confirm the dialog box that appears.
5.6.2.2 Installing the Current Patch Set
After the Oracle database software installation, you need to install the current patch set for Oracle
Database 11g Release 2 (11.2).
Prerequisites
■ For more information on the latest patch set available for Oracle 11.2, see SAP Note 1431799.
■ For more information about how to install the patch set, see the patch set README file.
CAUTION
Do not perform any of the post-installation steps mentioned in the patch set README file.
Only perform the post-installation steps on an existing Oracle 11.2 database.
5 Installation
5.6 Oracle Database Software Installation
2010-12-20 PUBLIC 85/148
At this stage, you have only installed the Oracle 11.2 software. The database itself is still not
Oracle 11.2. Therefore, make sure that you do not perform the post-installation steps
mentioned in the README file.
■ You only have to install the latest (that is, the current) patch set.
Procedure
1. Log on at the operating system level with the ora<dbsid> user.
2. Install the patch set as described in the patch set README file.
For more information, see SAP Note 1431799.
5.6.2.3 Installing the Required SAP Bundle Patch
After the Oracle database software installation, you need to install the required SAP bundle patch, using
the Oracle tool MOPatch. You need the SAP bundle patch in addition to the current patch set.
NOTE
You must install the SAP bundle patch in a single step using the Oracle tool MOPatch, which you
can find at SAP Note 1027012.
You only need to install the latest SAP bundle patch because these patches are cumulative. After
installing the SAP bundle patch, you do not need to install any critical patch updates (CPUs).
The SAP bundle patch also delivers a set of upgrade scripts that automate most of the pre-upgrade and
post-upgrade tasks.
Prerequisites
■ Make sure you have downloaded and installed OPatch from SAP Service Marketplace as described
in SAP Note 839182.
■ Make sure you have already installed the current patch set [page 85].
■ Check SAP Note 1431800 to find a cross-reference to the current SAP Note with the list of required
patches to be installed.
■ Check SAP Note 1027012 for instructions on how to use MOPatch.
Procedure
1. Log on at the operating system level as the ora<dbsid> user.
2. Install the SAP bundle patch according to the instructions in the SAP bundle patch README file.
3. After the software installation has finished, create a symbolic link in ORACLE_HOME as follows:
ln –s /oracle/DBSID/112_64/lib/libnnz11.so libnnz10.so
5 Installation
5.6 Oracle Database Software Installation
86/148 PUBLIC 2010-12-20
6 Post-Installation
6.1 Post-Installation Checklist
This section includes the post-installation steps that you have to perform for the following installation
options:
■ Central, distributed, or high-availability system
■ Dialog instance
Detailed information about the steps is available in the relevant chapter.
Central, Distributed, or High-Availability System
NOTE
In a central system, all mandatory instances are installed on one host. Therefore, if you are
installing a central system, you can ignore references to other hosts.
You have to complete the following post-installation steps, which are described in more detail in the
linked chapters:
1. If required, you perform a full installation backup [page 103] immediately after the installation has finished.
2. You perform post-installation steps for the operating system [page 88].
3. You check whether you can log on to the application server [page 88].
NOTE
In a distributed or high-availability system, you check whether you can log on to every
instance of the SAP system that you installed.
4. You install the SAP license [page 90].
5. Only valid for: HA (UNIX) |
If you installed a high-availability system, you set up the licenses for high availability [page 90].End of: HA (UNIX) |
6. You apply the latest kernel and Support Package stacks [page 91].
7. You configure the remote connection to SAP support [page 92].
8. You install the SAP Online Documentation [page 92].
9. You perform post-installation steps for the ABAP application server [page 93].
10. You ensure user security [page 97].
11. On the database instance host, you perform the Oracle-specific post-installation steps [page 99].
12. To connect your SAP system to an existing central system landscape directory (SLD), you configure
the connection to a central System Landscape Directory (SLD) [page 100].
13. You implement SAP ERP ABAP Add-On Components [page 101].
6 Post-Installation
6.1 Post-Installation Checklist
2010-12-20 PUBLIC 87/148
14. You perform the client copy [page 101].
15. If you want or need to implement the E2E Root Cause Analysis scenario, you have to perform post-
installation steps for the Diagnostics Agent [page 102] on your central and dialog instances.
16. You perform a full backup of the installation [page 103].
Dialog Instance
You have to complete the following post-installation steps, which are described in more detail in the
linked chapters:
1. If required, you perform an installation backup [page 103] for the dialog instance immediately after the
installation has finished.
2. You perform post-installation steps for the operating system [page 88].
3. You check whether you can log on to the application server [page 88] of the dialog instance.
4. You configure user management [page 89].
5. You ensure user security [page 97].
6. If you installed a dialog instance on a host with a UNIX operating system different from the UNIX
operating system of the central instance, you have to update the kernel of the dialog instance [page 92].
7. You install the SAP Online Documentation [page 92].
8. You activate the Internet Pricing and Configurator [page 101].
9. You implement SAP ERP ABAP Add-On Components [page 101].
10. You perform an installation backup [page 103] for the dialog instance.
6.2 Performing Post-Installation Steps for the Operating System
You have to perform the following post-installation steps for the operating system.
Procedure
1. You check and if necessary modify the settings for the operating system users for your SAP system
if they were created by SAPinst.
For more information, see Creating Operating System Users and Groups [page 40].
2. You set the required permissions for sapstartsrv and sapuxuserchk in the /<sapmnt>/<SAPSID>/
exe, and /usr/sap/<SAPSID>/SYS/exe, and /usr/sap/<SAPSID>/<Instance_Name>/exe
directories as described in SAP Note 927637.
See also Starting and Stopping SAP System Instances Using the SAP Management Console [page 126].
6.3 Logging On to the Application Server
You need to check that you can log on to the SAP system with the standard users, given in the table
below.
6 Post-Installation
6.2 Performing Post-Installation Steps for the Operating System
88/148 PUBLIC 2010-12-20
ABAP Users
User User Name Client
SAP system user SAP* 000, 001, 066
DDIC 000, 001
Prerequisites
■ The SAP system is up and running.
■ You have already installed a front end.
Procedure
Logging On to the ABAP Application Server
1. Start SAP Logon on the host where you have installed the front end as follows:
■ SAP GUI for Windows:
Choose Start All Programs SAP Front End SAP Logon .
■ SAP GUI for Java:
Choose Start All Programs SAP Clients SAP GUI for Java<Release> .
NOTE
You can alternatively enter the command guilogon in the SAP GUI installation directory
to start SAP GUI for Java.
The SAP Logon appears.
2. Create a logon entry for the newly installed system in the SAP Logon.
For more information about creating new logon entries, press F1 .
3. When you have created the entry, log on as user SAP* or DDIC.
6.4 Configuring User Management
After the installation of your SAP system has finished, you must decide whether you want to do the
following:
■ Add the system to Central User Administration (CUA)
■ Use Lightweight Directory Access Protocol (LDAP) synchronization
For more information, see the SAP Library at:
http://help.sap.com/nw70 SAP NetWeaver 7.0 Library (including Enhancement Package 2) English SAP
NetWeaver Library SAP NetWeaver by Key Capability Security Identity Management Identity Management for
System Landscapes Integration of User Management in Your System Landscape Adding an ABAP System to Your System
Landscape
6 Post-Installation
6.4 Configuring User Management
2010-12-20 PUBLIC 89/148
6.5 Installing the SAP License
You must install a permanent SAP license. When you install your SAP system, a temporary license
is automatically installed.
CAUTION
Before the temporary license expires, you must apply for a permanent license key from SAP.
We recommend that you apply for a permanent license key as soon as possible after installing
your system.
Procedure
Install the SAP license as described in the SAP Library at:
http://help.sap.com/nw70 SAP NetWeaver 7.0 Library (including Enhancement Package 2) English SAP
NetWeaver Library Technology Consultant's Guide Cross-NetWeaver Configurations SAP License Keys
Only valid for: HA (UNIX) |
If you have installed a high-availability system, proceed as described in High Availability: Setting Up
Licenses [page 90].End of: HA (UNIX) |
More Information
For more information about SAP license keys and how to obtain them, see
http://service.sap.com/licensekey.
Only valid for: HA (UNIX) |
6.6 High Availability: Setting Up Licenses
Every SAP system needs a central license, which is determined by the environment of the message
server. Since SAP's high-availability (HA) solution stipulates 2 or more cluster nodes (host machines)
where the message server is enabled to run, you have to order as many license keys [page 90] as you have
cluster nodes.
When we receive confirmation from your vendor that you are implementing a switchover
environment, we provide the required license keys for your system, 1 key for each machine.
SAP has implemented a license mechanism for transparent and easy use with switchover solutions and
clustered environments. Your customer key is calculated on the basis of local information on the
message server host. This is the host machine where the ABAP central services instance (ASCS instance)
runs. There is no license problem when only the database is switched over.
Prerequisites
The SAP system is up and running.
6 Post-Installation
6.5 Installing the SAP License
90/148 PUBLIC 2010-12-20

Procedure
1. Make sure that the ABAP central services instance (ASCS instance) on the primary host, node A,
is running.
2. To find the hardware ID of the primary host, log on to any application server instance of the SAP
system and call transaction SLICENSE.
3. Perform a switchover of the ABAP central services instance (ASCS instance) to another node in
the cluster and repeat the previous step.
Repeat this for all remaining nodes in the cluster.
4. To obtain the two license keys, enter the hardware IDs for the primary and backup hosts at:
http://service.sap.com/licensekey
5. To import the files containing the two licenses, log on to any application server instance of the
SAP system and call transaction SLICENSE.
6. Perform a switchover of the ABAP central services instance (ASCS instance) to another node in
the cluster and repeat the previous step.
Repeat this for all remaining nodes in the cluster.
Result
The license is no longer a problem during switchover. This means you do not need to call
saplicense in your switchover scripts.End of: HA (UNIX) |
6.7 Applying the Latest Kernel and Support Package Stacks
We strongly recommend that you apply the latest kernel and Support Package stacks from SAP Service
Marketplace before you start configuring your SAP system.
Prerequisites
Make sure that you read the release notes for your SAP system before you apply Support Package stacks.
The release notes might include information about steps you have to perform after you have applied
the Support Package stacks. For more information, see http://service.sap.com/releasenotes.
Procedure
Download and apply the latest kernel and Support Package stacks as described in the SAP NetWeaver 7.0
– Support Package Stack Guide <current version> at http://service.sap.com/maintenancenw70
For up-to-date release information on SAP NetWeaver Support Package stacks, see SAP Note 789220.
For up-to-date release information on Support Package stacks, see SAP Note 849887.
6 Post-Installation
6.7 Applying the Latest Kernel and Support Package Stacks
2010-12-20 PUBLIC 91/148
6.8 Dialog Instances in a Heterogeneous UNIX Environment only: Updating the Kernel
If you have installed dialog instances on hosts that have a different UNIX operating system than the
central instance, you have to update the kernel of the newly installed dialog instances.
Procedure
1. Stop the dialog instance as described in Starting and Stopping SAP System Instances [page 126].
2. Update the kernel to the same level as the central instance by replacing the old kernel with the
new one as follows:
1. Log on as user <sapsid>adm to the host of the dialog instance to be updated.
2. Download the required kernel, as described in SAP Note 19466.
3. Back up the kernel directory specified by the profile parameter DIR_CT_RUN.
4. Extract the SAR files of the kernel Support Packages of the target SP level to a temporary
directory using the SAPCAR tool.
5. Copy or move the extracted programs from the temporary directory to the local kernel
directory.
6. Adjust the ownership and permissions of the kernel binaries by entering the following
command sequence (execute the saproot.sh script located in the kernel directory):
su - root
cd <kernel directory>
./saproot.sh <SAPSID>
exit
3. Restart the dialog instance as described in Starting and Stopping SAP System Instances [page 126].
6.9 Configuring Remote Connection to SAP Support
SAP offers its customers access to support and to a number of remote services such as the SAP EarlyWatch
service or the SAP GoingLive service. Therefore, you have to set up a remote network connection to
SAP. For more information, see SAP Service Marketplace at http://service.sap.com/
remoteconnection.
6.10 Installing the SAP Online Documentation
SAP currently provides an HTML-based solution for the online documentation, including the
Application Help, Glossary, Implementation Guide (IMG), and Release Notes. You can display the
documentation with a Java-compatible Web browser on all front-end platforms supported by SAP.
6 Post-Installation
6.8 Dialog Instances in a Heterogeneous UNIX Environment only: Updating the Kernel
92/148 PUBLIC 2010-12-20
Process
Install the SAP online documentation in your SAP system as described in the README.TXT file contained
in the root directory of the online documentation DVD, delivered as part of the installation package.
6.11 Performing Post-Installation Steps for the ABAP Application Server
You have to perform the following post-installation steps for the ABAP application server:
■ Perform a consistency check
■ Maintain your company address for initial users
■ Configure the transport management system
■ Perform basic operations
■ Configure system parameters
■ Configure the number of work processes
■ Install languages and performing language transport
■ Configure the integrated Internet Transaction Server (ITS)
■ Make your newly installed SAP system known to your SAP Solution Manager
■ Configure AS ABAP to support Secure Socket Layer (SSL)
■ Configure Fully Qualified Domain Names (FQDN)
■ Configure business applications
For more information, see the appropriate sections below.
Prerequisites
You have logged on to the ABAP application server as described in Logging On to the Application Server [page
88].
Procedure
Performing a Consistency Check
We recommend that you check the consistency of the newly installed SAP ABAP system. When logging
on to the system for the first time, you need to trigger a consistency check manually. The function is
then called automatically whenever you start the system or an application server.
This checks the following:
■ Completeness of installation
■ Version compatibility between the SAP release and the operating system
The initial consistency check determines whether:
● The release number in the SAP kernel matches the release number defined in the database
system
● The character set specified in the SAP kernel matches the character set specified in the database
system
6 Post-Installation
6.11 Performing Post-Installation Steps for the ABAP Application Server
2010-12-20 PUBLIC 93/148
● Critical structure definitions that are defined in both the data dictionary and the SAP kernel
are identical. The structures checked by this function include SYST, T100, TSTC, TDCT, and
TFDIR.
■ Accessibility of the message server
■ Availability of all work process types
■ Information about the enqueue server and the update service
To perform a consistency check, you can either call transaction SICK (SAP initial consistency check)
or choose Tools Administration Administration Installation Check from the menu.
For more information, see the SAP Library at:
http://help.sap.com/nw70 SAP NetWeaver 7.0 Library (including Enhancement Package 2) English SAP
NetWeaver Library SAP NetWeaver by Key Capability Solution Life Cycle Management by Key Capability System
Management Tools for Monitoring the System Consistency Check
Maintaining Your Company Address for Initial Users
Maintain your company address in your ABAP system using transaction SU01 as described in the SAP
Library at:
http://help.sap.com/nw70 SAP NetWeaver 7.0 Library (including Enhancement Package 2) English SAP
NetWeaver Library SAP NetWeaver by Key Capability Application Platform by Key Capability Business Services
Business Address Services (BC-SRV-ADR) Addresses in User Administration Maintenance of Address Data
NOTE
You must maintain your company address to create ABAP system users.
Configuring the Transport Management System
You have to perform some steps to be able to use the Transport Management System.
1. Perform post-installation steps for the transport organizer:
1. Call transaction SE06.
2. Select Standard Installation.
3. Choose Perform Post-Installation Actions.
2. Call transaction STMS in the ABAP system to configure the domain controller in the Transport
Management System (TMS).
For more information, see the SAP Library at:
http://help.sap.com/nw70 SAP NetWeaver 7.0 Library (including Enhancement Package 2) English SAP
NetWeaver Library SAP NetWeaver by Key Capability Solution Life Cycle Management by Key Capability Software
Life Cycle Management Software Logistics Change and Transport System
Performing Basic Operations
1. Go to the SAP Library at:
http://help.sap.com/nw70 SAP NetWeaver 7.0 Library (including Enhancement Package 2) English
SAP NetWeaver Library SAP NetWeaver by Key Capability
6 Post-Installation
6.11 Performing Post-Installation Steps for the ABAP Application Server
94/148 PUBLIC 2010-12-20
2. Choose the relevant sections to perform the following operations:
Operation Section in SAP Documentation
Set up operation modes – transaction RZ04
Solution Life Cycle Management by Key Capability System Management ConfigurationOperation Modes
Set up logon groups – transaction SMLG
Solution Life Cycle Management by Key Capability System Management ConfigurationLogon Load Balancing SAP Logon
Set up administrators Solution Life Cycle Management by Key Capability System Management Background Processing Authorizations for Background Processing
Schedule background jobs Solution Life Cycle Management by Key Capability System Management Background Processing
Install a printer Solution Life Cycle Management by Key Capability System Management SAP Printing Guide
Configure the system log Solution Life Cycle Management by Key Capability System Management Tools for Monitoring the System System log Configuring the System Log
Configuring System Parameters
For more information about system profiles, which is where work processes and profile parameters are
defined, and how to configure them, see the SAP Library at:
http://help.sap.com/nw70 SAP NetWeaver 7.0 Library (including Enhancement Package 2) English SAP
NetWeaver Library SAP NetWeaver by Key Capability Solution Life Cycle Management by Key Capability System
Management Tools for Monitoring the System Configuration Profiles
Checking the Configured Number of Work Processes
SAPinst installs ABAP systems with a minimum number of work processes. This is only an initial
configuration so that you can start working after the installation. You have to adapt the number of
work processes in a production system to the system resources and the number of users working in
each ABAP system application
For more information about how to configure work processes, see the SAP Library at http://
help.sap.com/nw70 SAP NetWeaver 7.0 Library (including Enhancement Package 2) English SAP NetWeaver
Library SAP NetWeaver by Key Capability Solution Life Cycle Management by Key Capability System Management
Tools for Monitoring the System Displaying and Controlling Work Processes
Configuring Kernel Parameters
To configure your kernel parameters, follow the recommendations in SAP Notes 146289 and 835474.
Installing Languages and Performing Language Transports
■ Install languages using transaction I18N:
● If you want to use English only, you must activate the default language settings once.
● If you want to use languages other than English, you must install them and activate the
language settings.
6 Post-Installation
6.11 Performing Post-Installation Steps for the ABAP Application Server
2010-12-20 PUBLIC 95/148
For more information about configuring the language settings, see the online documentation in
transaction I18N at I18N Menue I18N Customizing .
■ Perform language transport using transaction SMLT as described in the SAP Library at:
http://help.sap.com/nw70 SAP NetWeaver 7.0 Library (including Enhancement Package 2) English
SAP NetWeaver Library SAP NetWeaver by Key Capability Solution Life Cycle Management by Key Capability
Software Life Cycle Management Software Logistics Change and Transport System Language Transport
Using and Configuring the SAP ITS Integrated ICM
The SAP Internet Transaction Server (SAP ITS) is integrated in the SAP NetWeaver Application Server
ABAP (AS ABAP) as an Internet Communication Framework (ICF) service. You can access this, like
other services, with the Internet Communication Manager (ICM). With the SAP ITS integrated in AS
ABAP, the Web browser now communicates directly with the SAP system. Furthermore, all SAP ITS-
related sources, such as service files, HTML templates, or MIME files, are now stored in the database of
the system.
The SAP ITS supports the following functions:
■ SAP GUI for HTML
■ Internet Application Component (IAC) runtime or Web Transaction technology
For more information about how to configure the integrated SAP ITS, see the SAP Library at:
http://help.sap.com/nw70 SAP NetWeaver 7.0 Library (including Enhancement Package 2) English SAP
NetWeaver Library SAP NetWeaver by Key Capability Application Platform by Key Capability ABAP Technology
UI Technology Web UI Technology SAP ITS in the SAP NetWeaver Application Server Configuration
Making your Newly Installed SAP System Known to your SAP Solution Manager
Make your newly installed SAP system known to your SAP Solution Manager as described in the SAP
Library at:
http://help.sap.com SAP Solution Manager SAP Solution Manager <Release of your SAP Solution Manager
system> SAP Solution Manager Basic Settings Solution Manager System Landscape Create Systems
Configuring AS ABAP to Support Secure Socket Layer (SSL)
If you installed the SAP Cryptographic Library – see Basic SAP System Installation Parameters [page 28] – you
have to configure AS ABAP to support Secure Socket Layer (SSL), as described in the SAP Library at:
http://help.sap.com/nw70 SAP NetWeaver 7.0 Library (including Enhancement Package 2) English SAP
NetWeaver Library SAP NetWeaver by Key Capability Security System Security System Security for SAP Web
AS ABAP Only Trust Manager Example Configuring the SAP Web AS for Supporting SSL
Configuring Fully Qualified Domain Names (FQDN)
If you want to use Web Dynpro ABAP as UI technology and you assigned a DNS Domain Name to your
SAP System – see Basic SAP System Installation Parameters [page 28] – you have to perform the required
configuration steps.
For more information, see SAP Note 654982 and the SAP Library at:
6 Post-Installation
6.11 Performing Post-Installation Steps for the ABAP Application Server
96/148 PUBLIC 2010-12-20
http://help.sap.com/nw70 SAP NetWeaver 7.0 Library (including Enhancement Package 2) SAP NetWeaver
Library SAP NetWeaver by Key Capability Application Platform by Key Capability ABAP Technology UI
Technology Web UI Technology Web Dynpro ABAP Web Dynpro ABAP Configuration Fully Qualified Domain
Names (FQDN)
Configuring Business Applications
Prepare the SAP system for using business applications, which includes customizing the ABAP system
and the business components, as described in the SAP Library at:
http://help.sap.com/nw70 SAP NetWeaver 7.0 Library (including Enhancement Package 2) English SAP
NetWeaver Library SAP NetWeaver by Key Capability Solution Life Cycle Management by Key Capability
Customizing
6.12 Ensuring User Security
You need to ensure the security of the users that SAPinst created during the installation. The tables
below at the end of this section list these users:
■ Operating system users
■ SAP system users
During the installation, SAPinst by default assigned the master password to all users created during the
installation unless you specified other passwords.
If you change user passwords, be aware that SAP system users might exist in multiple SAP system clients
(for example, if a user was copied as part of the client copy). Therefore, you need to change the passwords
in all the relevant SAP system clients.
CAUTION
SAPinst applied the master password to users SAP* and DDIC only for SAP system clients 000 and
001, but not to users SAP*, DDIC, and EARLYWATCH in client 066.
Instead, SAPinst always assigns the following passwords to these users in client 066:
SAP*: 06071992
EARLYWATCH: support
See also Master Password in Basic SAP System Installation Parameters [page 28].
RECOMMENDATION
User ID and password are encoded only when transported across the network. Therefore, we
recommend using encryption at the network layer, either by using the Secure Sockets Layer (SSL)
protocol for HTTP connections or Secure Network Communications (SNC) for the SAP protocols
dialog and RFC.
For more information, see:
6 Post-Installation
6.12 Ensuring User Security
2010-12-20 PUBLIC 97/148
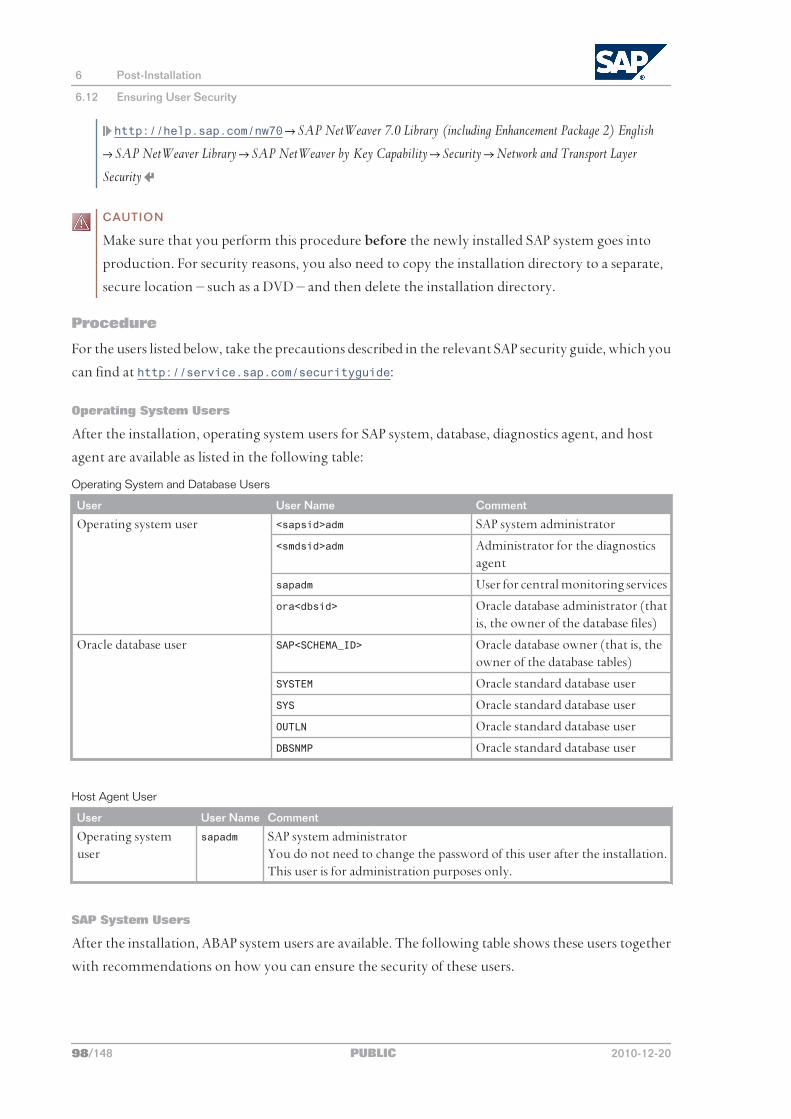
http://help.sap.com/nw70 SAP NetWeaver 7.0 Library (including Enhancement Package 2) English
SAP NetWeaver Library SAP NetWeaver by Key Capability Security Network and Transport Layer
Security
CAUTION
Make sure that you perform this procedure before the newly installed SAP system goes into
production. For security reasons, you also need to copy the installation directory to a separate,
secure location – such as a DVD – and then delete the installation directory.
Procedure
For the users listed below, take the precautions described in the relevant SAP security guide, which you
can find at http://service.sap.com/securityguide:
Operating System Users
After the installation, operating system users for SAP system, database, diagnostics agent, and host
agent are available as listed in the following table:
Operating System and Database Users
User User Name Comment
Operating system user <sapsid>adm SAP system administrator
<smdsid>adm Administrator for the diagnostics agent
sapadm User for central monitoring services
ora<dbsid> Oracle database administrator (that is, the owner of the database files)
Oracle database user SAP<SCHEMA_ID> Oracle database owner (that is, the owner of the database tables)
SYSTEM Oracle standard database user
SYS Oracle standard database user
OUTLN Oracle standard database user
DBSNMP Oracle standard database user
Host Agent User
User User Name Comment
Operating system user
sapadm SAP system administratorYou do not need to change the password of this user after the installation.This user is for administration purposes only.
SAP System Users
After the installation, ABAP system users are available. The following table shows these users together
with recommendations on how you can ensure the security of these users.
6 Post-Installation
6.12 Ensuring User Security
98/148 PUBLIC 2010-12-20
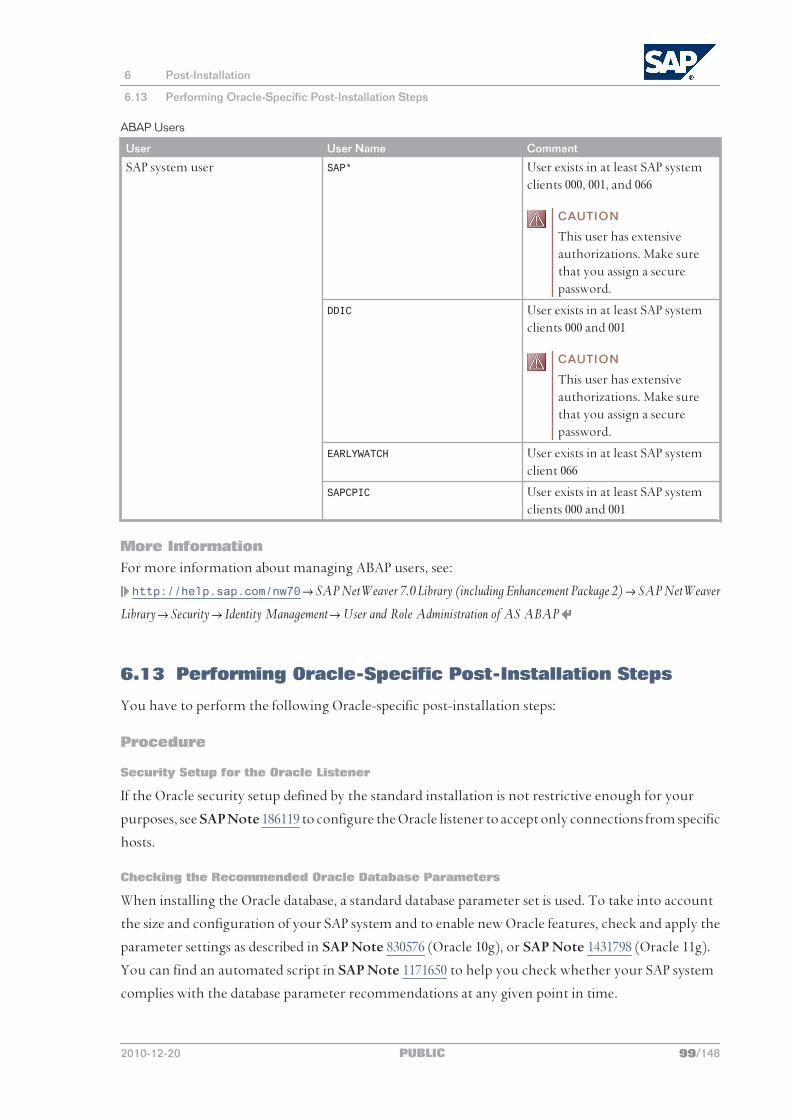
ABAP Users
User User Name Comment
SAP system user SAP* User exists in at least SAP system clients 000, 001, and 066
CAUTION
This user has extensive authorizations. Make sure that you assign a secure password.
DDIC User exists in at least SAP system clients 000 and 001
CAUTION
This user has extensive authorizations. Make sure that you assign a secure password.
EARLYWATCH User exists in at least SAP system client 066
SAPCPIC User exists in at least SAP system clients 000 and 001
More InformationFor more information about managing ABAP users, see:
http://help.sap.com/nw70 SAP NetWeaver 7.0 Library (including Enhancement Package 2) SAP NetWeaver
Library Security Identity Management User and Role Administration of AS ABAP
6.13 Performing Oracle-Specific Post-Installation Steps
You have to perform the following Oracle-specific post-installation steps:
Procedure
Security Setup for the Oracle Listener
If the Oracle security setup defined by the standard installation is not restrictive enough for your
purposes, see SAP Note 186119 to configure the Oracle listener to accept only connections from specific
hosts.
Checking the Recommended Oracle Database Parameters
When installing the Oracle database, a standard database parameter set is used. To take into account
the size and configuration of your SAP system and to enable new Oracle features, check and apply the
parameter settings as described in SAP Note 830576 (Oracle 10g), or SAP Note 1431798 (Oracle 11g).
You can find an automated script in SAP Note 1171650 to help you check whether your SAP system
complies with the database parameter recommendations at any given point in time.
6 Post-Installation
6.13 Performing Oracle-Specific Post-Installation Steps
2010-12-20 PUBLIC 99/148
Updating Oracle Optimizer Statistics
To update the Oracle optimizer statistics, perform the following:
1. Execute the following commands as the ora<dbsid> user:
brconnect -u / -c -f stats -t system_stats;
brconnect -u / -c -f stats -t oradict_stats;
2. Execute the following commands with SQLPlus:
SQL> exec dbms_scheduler.disable('GATHER_STATS_JOB');
SQL> exec dbms_scheduler.disable('ORACLE_OCM.MGMT_CONFIG_JOB');
SQL> exec dbms_scheduler.disable('ORACLE_OCM.MGMT_STATS_CONFIG_JOB');
For Oracle 11g, also execute the following command:
SQL> exec DBMS_AUTO_TASK_ADMIN.DISABLE
For more information, see SAP Note 974781.
Checking the Version of the Oracle Instant Client
If necessary, install the most up-to-date version of the Oracle Instant Client, as described in SAP Note
819829.
Configuring and Operating the Oracle Database
You have to configure your Oracle database before you start operating it with the SAP system.
For information about Oracle database configuration and administration, see the documentation in
the SAP Library at:
http://help.sap.com/nw70 SAP NetWeaver 7.0 Library (including Enhancement Package 2) English SAP
NetWeaver Library SAP NetWeaver by Key Capability Application Platform by Key Capability Platform-Wide
Services Database Support Oracle .
6.14 Configuring the Connection to a Central System Landscape Directory
For each system in your landscape that reports data to a central System Landscape Directory (SLD),
you have to configure a corresponding SLD data supplier.
Procedure
Configure the SLD data suppliers and the API for the SLD as described in the SAP Library at:
http://help.sap.com/nw70 SAP NetWeaver 7.0 Library (including Enhancement Package 2) English SAP
NetWeaver Library SAP NetWeaver by Key Capability Solution Life Cycle Management by Key Capability Software
Life Cycle Management System Landscape Directory Configuring Systems to Connect to SLD
More Information
This documentation is also available in PDF form in the User Manual – SLD of SAP NetWeaver 7.0 at:
http://www.sdn.sap.com/irj/sdn/nw-sld
6 Post-Installation
6.14 Configuring the Connection to a Central System Landscape Directory
100/148 PUBLIC 2010-12-20
6.15 Activating Internet Pricing and Configurator
If you want to use Internet Pricing and Configurator, you have to enable the Virtual Machine Container
(VMC).
ProcedureTo enable the VMC, proceed as described in SAP Note 854170.
6.16 Implementing SAP ERP ABAP Add-On Components
You can install several Add-On Components to your SAP ERP ABAP system.
ProcedureYou can find a detailed description on how to implement each available SAP ERP Add-On Component
in the related SAP Notes on SAP Service Marketplace at https://service.sap.com/erp-inst SAP
ERP 6.0 SAP Notes .
6.17 Performing the Client Copy
SAPinst creates three ABAP clients during the installation, client 000, client 001, and client 066.
Client 000 is the SAP reference client for ABAP.
Use client 000 as source client for the client copy.
Procedure1. Maintain the new client with transaction SCC4.
2. Activate kernel user SAP*:
1. Set the profile parameter login/no_automatic_user_sapstar to 0.
2. Restart the application server.
3. Log on to the new client with kernel user SAP* and password PASS.
4. Copy the client with transaction SCCL and profile SAP_CUST.
5. Check the log files with transaction SCC3.
6. Create the required users. These users must have at least the authorizations required for user
administration and system administration. Create a user SAP* with all required authorizations for
this user. If you want to have other users for system administration, you can also create user
SAP* without authorizations.
7. Deactivate kernel user SAP*:
1. Reset login/no_automatic_user_sapstar to 1.
2. Restart the application server.
More InformationFor more information about the client copy and about how to perform it, see the SAP Library at:
6 Post-Installation
6.15 Activating Internet Pricing and Configurator
2010-12-20 PUBLIC 101/148
http://help.sap.com/nw70 SAP NetWeaver 7.0 Library (including Enhancement Package 2) English SAP
NetWeaver Library SAP NetWeaver by Key Capability Solution Life Cycle Management by Key Capability Software
Lifecycle Management Software Logistics Change and Transport System BC – Client Copy and Transport
6.18 Post-Installation Steps for the Diagnostics Agent
The Solution Manager Diagnostics Agent (diagnostics agent) is the remote component of the E2E Root
Cause Analysis. It allows you to perform a connection between SAP Solution Manager as the managing
system and the managed system(s) and then to gather information from the managed systems and
reports them to the Solution Manager system.
To implement the E2E Root Cause Analysis scenario, you have to configure the diagnostics agents on
the application server instances of your SAP system.
Procedure
Proceed as described at http://service.sap.com/diagnostics.
6.19 Post-Installation Steps for the Host Agent
You have to perform the following steps on each host where the host agent is installed. This applies
whether the host agent is installed on a host within the SAP system or standalone on another host.
Procedure
1. Log on as user sapadm.
2. Check whether the following services are available:
■ The control program saphostexec
■ The SAP NetWeaver Management agent SAPHostControl (sapstartsrv in host mode)
NOTE
When the host is booted, the startup script sapinit automatically starts the required
executables.
3. Configure the host agent according to your requirements.
More Information
For more information, see the SAP Library at:
http://help.sap.com SAP NetWeaver Library SAP NetWeaver by Key Capability Solution Life Cycle
Management by Key Capability Solution Monitoring Monitoring in the CCMS Infrastructure of the NetWeaver
Management Agents
6 Post-Installation
6.18 Post-Installation Steps for the Diagnostics Agent
102/148 PUBLIC 2010-12-20
6.20 Performing a Full Installation Backup
You must perform a full offline backup at the end of the installation. This procedure also describes
how to use the back-up data for a restore.
CAUTION
Make sure that you fully back up your database so that you can recover it later if necessary.
Prerequisites ■ If required, you have completed client maintenance, such as the client copy [page 101].
■ You have logged on [page 88] as user <sapsid>adm and stopped the SAP system and database [page 128].
ProcedureUse the backup tool of your choice, for example the HP DataProtector and refer to the backup software
documentation. You can also use the standard UNIX commands as described below.
Backing Up the Installation
NOTE
The following only applies to a standard installation.
1. Back up the following file systems:
■ /usr/sap/<SAPSID>
■ /usr/sap/trans
■ <sapmnt>/<SAPSID>
■ Home directory of the user <sapsid>adm
■ All database-specific directories
Proceed as follows:
1. Log on as user root.
2. Manually create a compressed tar archive that contains all installed files:
■ Saving to tape:
tar —cf — <file_system> | compress —c > <tape_device>
■ Saving to the file system:
tar —cf — <file_system> | compress —c > ARCHIVENAME.tar.Z
2. Back up the operating system using operating system means.
This saves the structure of the system and all configuration files, such as file system size, logical
volume manager configuration and database configuration data.
Restoring Your Backup
If required, you can restore the data that you previously backed up.
CAUTION
Check for modifications to the existing parameter files before you overwrite them when restoring
the backup.
6 Post-Installation
6.20 Performing a Full Installation Backup
2010-12-20 PUBLIC 103/148
1. Log on as user root.
2. Go to the location in your file system where you want to restore the backup image.
3. Execute the following commands to restore the data:
■ Restoring the data from tape:
cat <tape_device> | compress —cd | tar —xf —
■ Restoring the data from the file system:
cat ARCHIVENAME.tar.Z | compress —cd | tar —xf —
Performing a Full Database Backup
1. Configure your third-party backup tool, if used.
2. Perform a full database backup (preferably offline).
If you use BR*TOOLS for the backup, refer to BR*Tools for Oracle DBA in the SAP Database Guide: Oracle
(BC-DB-ORA-DBA). This documentation is available in the SAP Library at:
http://help.sap.com/nw70 SAP NetWeaver 7.0 Library (including Enhancement Package 1) English
SAP NetWeaver Library SAP NetWeaver by Key Capability Application Platform by Key Capability
Platform-Wide Services Database Support Oracle SAP Database Guide: Oracle (BC-DB-ORA-DBA)
6.21 Accessing Configuration Documentation in SAP Solution Manager
To access configuration documentation in SAP Solution Manager, you have to connect your newly
installed SAP system to SAP Solution Manager.
NOTE
For SAP NetWeaver, you can also find configuration documentation in the Technology Consultant's
Guide at:
http://help.sap.com/nw70 SAP NetWeaver 7.0 Library (including Enhancement Package 2) English
SAP NetWeaver Library Technology Consultant's Guide
Procedure
Create a configuration project with the related configuration guide as described in the following
documentation:
http://help.sap.com SAP Solutions SAP Solution Manager Documentation for SAP Solution Manager
<current release> SAP Solution Manager Implementing and Upgrading SAP Solutions Projects
Configuration .
More Information
http://service.sap.com/solutionmanager Media Library How-To Documents How to Create a
Configuration Guide using SAP Solution Manager
6 Post-Installation
6.21 Accessing Configuration Documentation in SAP Solution Manager
104/148 PUBLIC 2010-12-20
7 Additional Information
The following sections provide additional information about optional preparation, installation, and
post-installation tasks.
There is also a section describing how to delete an SAP system.
Preparation
■ Installation of Multiple Components in One Database [page 105]
■ Integration of LDAP Directory Services [page 107]
■ Checking and Modifying the HP-UX Kernel [page 111]
■ Setting up Swap Space for HP-UX [page 113]
■ Creating HP-UX Groups and Users [page 115]
■ Setting Up File Systems and Raw Devices for HP-UX [page 116]
■ Dialog Instance Installation for an Upgraded System: Updating Instance Profiles [page 119]
■ Mounting Installation Media for HP-UX [page 120]
■ Exporting and Mounting Directories via NFS for HP-UX [page 122]
Installation
■ Installing the Host Agent Separately [page 123]
Post-Installation
■ Starting and stopping SAP System Instances [page 126]
■ If you decided to use a generic LDAP directory, you have to create a user for LDAP directory access [page
132]
■ Heterogeneous SAP System Installation [page 132]
■ Troubleshooting [page 132]
Deleting an SAP System or SAP Instance
■ Deleting an SAP System [page 133]
■ Deleting the Oracle Database Software [page 136]
7.1 Installation of Multiple Components in One Database
You can install multiple SAP systems in a single database. This is called Multiple Components in One
Database (MCOD). MCOD is available with all SAP components and all the major databases for the
SAP system. No extra effort is required because the MCOD installation is fully integrated into the
7 Additional Information
7.1 Installation of Multiple Components in One Database
2010-12-20 PUBLIC 105/148
standard installation procedure. MCOD is not an additional installation option. Instead, it is an option
of the database instance installation.
With MCOD we distinguish two scenarios:
■ The installation of an SAP system in a new database
The system then creates new tablespaces and a new database schema.
■ The installation of an additional SAP system in an existing database (MCOD)
The system then automatically creates additional tablespaces in the existing database and a schema
user in the existing database.
Prerequisites
■ For more information about MCOD and its availability on different platforms, see http://
www.sdn.sap.com/irj/sdn/dbos Key Topics Multiple Components in One Database (MCOD) .
■ We have released MCOD for Unicode installations. A prerequisite is that the MCOD system contains
Unicode instances only. SAP does not support mixed solutions.
■ Improved sizing required
In general, you calculate the CPU usage for an MCOD database by adding up the CPU usage for
each individual SAP system. You can do the same for memory resources and disk space.
You can size multiple components in one database by sizing each individual component using the
Quick Sizer tool and then adding the requirements together. For more information about the
Quick Sizer, see http://service.sap.com/sizing.
Features
■ Reduced administration effort
■ Consistent system landscape for backup, system copy, administration, and recovery
■ Increased security and reduced database failure for multiple SAP systems due to monitoring and
administration of only one database
■ Independent upgrade
In an MCOD landscape, you can upgrade a single component independently from the other
components running in the same database, assuming that the upgraded component runs on the
same database version. However, if you need to restore a backup, be aware that all other components
are also affected.
NOTE
Special MCOD considerations and differences from the standard procedure are listed where
relevant in the installation documentation.
Constraints
RECOMMENDATION
We strongly recommend that you test MCOD in a test or development system.
7 Additional Information
7.1 Installation of Multiple Components in One Database
106/148 PUBLIC 2010-12-20
We recommend that you run MCOD systems in the same context. We do not recommend that
you mix test, development, and production systems in the same MCOD.
■ In the event of database failure, all SAP systems running on the single database are affected.
■ Automated support in an MCOD landscape for the following administrative tasks depends on your
operating system and database:
● Copying a single component from an MCOD landscape to another database at database level.
● Uninstalling a single component from an MCOD landscape requires some additional steps.
You can use a remote connection to SAP support to request help with these tasks. For more
information, see http://service.sap.com/remoteconnection.
■ You cannot install a Unicode ABAP system with a non-Unicode ABAP system in one database.
■ For the second SAP system, you must use the same DBSID as for the first SAP system.
■ If you install an MCOD system, the SYSTEM tablespace must contain at least 400 MB of free space.
If there is not enough space left, increase the size of this tablespace with BRSPACE or BRTOOLS.
■ If you decide to turn off archive log mode during the database load phase of the installation, you
need to plan downtime for all MCOD systems sharing the database.
7.2 Integration of LDAP Directory Services
This section explains the benefits of using the SAP system with the Lightweight Directory Access
Protocol (LDAP) directory and gives an overview of the configuration steps required to use an SAP
system with the directory.
LDAP defines a standard protocol for accessing directory services, which is supported by various
directory products such as Microsoft Active Directory, and OpenLDAP slapd. Using directory services
enables important information in a corporate network to be stored centrally on a server. The advantage
of storing information centrally for the entire network is that you only have to maintain data once,
which avoids redundancy and inconsistency.
If an LDAP directory is available in your corporate network, you can configure the SAP system to use
this feature. For example, a correctly configured SAP system can read information from the directory
and also store information there.
NOTE
The SAP system can interact with the Active Directory using the LDAP protocol, which defines:
■ The communication protocol between the SAP system and the directory
■ How data in the directory is structured, accessed, or modified
If a directory other than the Active Directory also supports the LDAP protocol, the SAP system
can take advantage of the information stored there. For example, if there is an LDAP directory on
a UNIX or Windows server, you can configure the SAP system to use the information available
7 Additional Information
7.2 Integration of LDAP Directory Services
2010-12-20 PUBLIC 107/148
there. In the following text, directories other than the Active Directory that implement the LDAP
protocol are called generic LDAP directories.
CAUTION
This section does not provide information about the use of LDAP directories with the LDAP
Connector. For more information about using and configuring the LDAP Connector for an ABAP
system, see the SAP Library at:
http://help.sap.com/nw70 SAP NetWeaver 7.0 Library (including Enhancement Package 2) English
SAP NetWeaver Library SAP NetWeaver by Key Capability Security Identity Management User and
Role Administration of AS ABAP Configuration of User and Role Administration Directory Services LDAP
Connector
Prerequisites
You can only configure the SAP system for Active Directory services or other LDAP directories if these
are already available on the network. As of Windows 2000 or higher, the Active Directory is
automatically available on all domain controllers. A generic LDAP directory is an additional component
that you must install separately on a UNIX or Windows server.
Features
In the SAP environment, you can exploit the information stored in an Active Directory or generic
LDAP directory by using:
■ SAP Logon
■ The SAP Microsoft Management Console (SAP MMC)
■ The SAP Management Console (SAP MC)
For more information about the automatic registration of SAP components in LDAP directories and
the benefits of using it in SAP Logon and SAP MMC, see the documentation SAP System Information in
Directory Services at:
http://www.sdn.sap.com/irj/scn/go/portal/prtroot/docs/library/uuid/ d0a0d051-
eae2-2b10-e1ac-f3a7f6494c53
For more information about the SAP MC and about how to configure it to access LDAP Directories,
see the documentation SAP Management Console at:
http://help.sap.com/nw70 SAP NetWeaver 7.0 Library (including Enhancement Package 2) English SAP
NetWeaver Library SAP NetWeaver by Key Capability Application Platform by Key Capability Java Technology
Administration Manual J2EE Engine J2EE Engine Administration Tools SAP Management Console
SAP Logon
Instead of using a fixed list of systems and message servers, you can configure the SAP Logon in the
sapmsg.ini configuration file to find SAP systems and their message servers from the directory. If you
configure SAP logon to use the LDAP directory, it queries the directory each time Server or Group selection
is chosen to fetch up-to-date information on available SAP systems.
7 Additional Information
7.2 Integration of LDAP Directory Services
108/148 PUBLIC 2010-12-20
To use LDAP operation mode, make sure that the sapmsg.ini file contains the following:
[Address]
Mode=LDAPdirectory
LDAPserver=
LDAPnode=
LDAPoptions=
Distinguish the following cases:
■ If you use an Active Directory, you must set LDAPoptions=“DirType=NT5ADS”. For more
information, see the SAP system profile parameter ldap/options.
■ You must specify the directory servers (for example, LDAPserver=pcintel6 p24709) if either of
the following is true:
● The client is not located in the same domain forest as the Active Directory
● The operating system does not have a directory service client (Windows NT and Windows 9X
without installed dsclient).
For more information, see the SAP system profile parameter ldap/servers.
■ For other directory services, you can use LDAPnode to specify the distinguished name of the SAP
root node. For more information, see the SAP system profile parameter ldap/saproot.
SAP MMC
The SAP MMC is a graphical user interface (GUI) for administering and monitoring SAP systems from
a central location. It is automatically set up when you install an SAP system on Windows. If the SAP
system has been prepared correctly, the SAP MMC presents and analyzes system information that it
gathers from various sources, including the Active Directory.
Integrating the Active Directory as a source of information has advantages for the SAP MMC. It can
read system information straight from the directory that automatically registers changes to the system
landscape. As a result, up-to-date information about all SAP application servers, their status, and
parameter settings is always available in the SAP MMC.
If you need to administer distributed systems, we especially recommend that you use the SAP MMC
together with Active Directory services. You can keep track of significant events in all of the systems
from a single SAP MMC interface. You do not need to manually register changes in the system
configuration. Instead, such changes are automatically updated in the directory and subsequently
reflected in the SAP MMC.
If your SAP system is part of a heterogeneous SAP system landscape that comprises systems or instances
both on UNIX and Windows operating systems, you can also use the SAP MMC for operating and
monitoring the instances running on UNIX.
7 Additional Information
7.2 Integration of LDAP Directory Services
2010-12-20 PUBLIC 109/148
SAP MC
The SAP MC is a graphical user interface (GUI) for administering and monitoring SAP systems from a
central location. If the SAP system has been prepared correctly, the SAP MC presents and analyzes
system information that it gathers from various sources, including generic LDAP Directory.
Integrating a generic LDAP Directory as a source of information has advantages for the SAP MC. It can
read system information straight from the directory that automatically registers changes to the system
landscape. As a result, up-to-date information about all SAP application servers, their status, and
parameter settings is always available in the SAP MC.
Configuration Tasks for LDAP Directories
This section describes the configuration tasks you have to perform for the Active Directory or other
(generic) LDAP directories.
Configuration Tasks for Active Directory
To enable an SAP system to use the features offered by the Active Directory, you must configure the
Active Directory so that it can store SAP system data.
To prepare the directory, you use SAPinst to automatically:
■ Extend the Active Directory schema to include the SAP-specific data types
■ Create the domain accounts required to enable the SAP system to access and modify the Active
Directory. These are the group SAP_LDAP and the user sapldap.
■ Create the root container where information related to SAP is stored
■ Control access to the container for SAP data by giving members of the SAP_LDAP group permission
to read and write to the directory
You do this by running SAPinst on the Windows server where you want to use Active Directory Services
and choosing <Your SAP product> Software Life-Cycle Options LDAP Registration Active Directory
Configuration . For more information about running SAPinst on Windows, see the documentation
Installation Guide — <Your SAP product> on Windows: <Database>.
NOTE
You have to perform the directory server configuration only once. Then all SAP systems that
need to register in this directory server can use this setup.
Configuration Tasks for Generic LDAP Directories
To configure other LDAP directories, refer to the documentation of your directory vendor.
Enabling the SAP System LDAP Registration
Once you have correctly configured your directory server, you can enable the LDAP registration of the
SAP system by setting some profile parameters in the default profile.
To do this, run SAPinst once for your system and choose <Your SAP product> Software Life-Cycle Options
LDAP Registration LDAP Support
7 Additional Information
7.2 Integration of LDAP Directory Services
110/148 PUBLIC 2010-12-20
If you use a directory server other than Microsoft Active Directory and/or non-Windows application
servers, you have to store the directory user and password information by using ldappasswd
pf=<any_instance_profile>. The information is encrypted for storage in DIR_GLOBAL and is therefore
valid for all application servers. After restarting all application servers and start services, the system is
registered in your directory server. The registration protocols of the components are dev_ldap*. The
registration is updated every time a component starts.
7.3 Checking and Modifying the HP-UX Kernel
To run an SAP system, make sure that you check and, if necessary, modify the HP-UX kernel.
RECOMMENDATION
We recommend that a UNIX system administrator performs all kernel modifications.
Procedure
1. Check SAP Note 172747 for recommendations on current HP-UX kernel parameters.
CAUTION
If a kernel value is already larger than the one suggested in the SAP Note, do not
automatically reduce it to match the SAP requirement.
You have to analyze the exact meaning of such a parameter and, if required, to reduce the
parameter value. In some cases this might improve the performance of your SAP applications.
2. If necessary, modify the kernel parameters in one of the following ways:
■ Manually
For more information, see SAP Note 172747.
■ Using System Administrator Manager (SAM) for HP-UX 11.11 and HP-UX 11.23
For more information, see section Configuring the Kernel Using SAM for HP-UX 11.11 and 11.23
below.
■ Using kcweb for HP-UX 11.23 and HP–UX 11.31
For more information, see section Configuring the Kernel Using kcweb for HP-UX 11.23 and HP–UX
11.3 below.
■ Using System Management Homepage (SMH) for HP-UX 11.31
For more information, see section Configuring the Kernel Using kcweb for HP-UX 11.31 below.
Configuring the Kernel Using SAM for HP-UX 11.11 and HP–UX 11.23
1. Enter the following command:
/usr/sbin/sam
2. Choose Kernel Configuration Configurable Parameters .
3. Choose the parameter to be modified and choose Actions Modify Configurable Parameter
.
7 Additional Information
7.3 Checking and Modifying the HP-UX Kernel
2010-12-20 PUBLIC 111/148
4. Modify all kernel parameters according to the table above.
5. From the Actions menu, choose Process New Kernel.
6. Exit SAM.
7. Reboot the system.
Configuring the Kernel Using kcweb for HP-UX 11.23 and HP-UX 11.31
Kernel configuration using kcweb is a combination of a command set and a Web-based graphical user
interface (GUI) that lets you configure an HP-UX kernel and monitor consumption of kernel resources
controlled by parameters.
The kcweb application replaces the kernel configuration portion of SAM and adds the following
commands for kernel configuration and monitoring to the system:
■ kcweb(1M)
■ kcusage(1M)
■ kcalarm(1M)
There is also the daemon kcmond(1M) , which replaces the obsolete krmond(1M).
The kcweb application provides the following new features:
■ New Web-based, PC-supported GUI that is faster and easier to use remotely than the current SAM
interface
■ Kernel parameter documentation that you can view within the GUI
■ Support for dynamic (no reboot) kernel tuning
■ Parameter monitoring that lets you continually monitor the usage of kernel resources (with
kcmond) and proactively tune the kernel instead of waiting for an application to fail
Parameter monitoring offers you:
● Tables and graphs of kernel resources controlled by kernel parameters
● User-created threshold alarms that issue alerts when consumption of a kernel resource exceeds
a specified percentage of the parameter value
■ Improved command line interface (CLI) that offers all functionality available in the GUI
■ Improved separation between GUI and kernel so that the application does not need to be patched
so frequently
Less than 12 MB of disk is necessary for kcweb, and minimal memory is required by CLIs (approximately
20 MB memory for HP Apache-based Web Server and Netscape).
Additionally, the kcweb application GUI offers online help.
Configuring the Kernel Using SMH for HP-UX 11.31
1. Enter one of the following commands:
■ /usr/sbin/smh
■ http://<hostname>:<port>
where <port> is either the default port 2381 or your defined port (for example 2301)
2. Choose Kernel Configuration Tunables .
7 Additional Information
7.3 Checking and Modifying the HP-UX Kernel
112/148 PUBLIC 2010-12-20
3. Choose the parameter to be modified and enter m (m-Modify).
4. Modify all kernel parameters according to the table above.
5. Choose Modify.
6. Exit SMH.
7. Reboot the system.
7.4 Setting up Swap Space for HP-UX
Here, you can find information about how to set up swap space for HP-UX.
Procedure
1. Check whether there is sufficient swap space (see Hardware and Software Requirements [page 22]).
You can determine the size of the installed RAM in one of the following ways:
■ Using the System Administration Manager (SAM):
Choosing Performance Monitors System Properties Memory
■ Manually:
● To display the RAM size on HP-UX PA-RISC, enter the following command:
echo "selclass qualifier memory;info;wait;infolog" | cstm |grep Memory |
grep Total
● To display the RAM size on HP-UX Itanium or all HP–UX 11.31 systems, you may also
use the following command:
/usr/contrib/bin/machinfo |grep Memory
2. To check whether enough swap space is currently configured on your system, enter the following
command and add up the total device swap space:
/usr/sbin/swapinfo –dm
EXAMPLE
/usr/sbin/swapinfo -dm
Mb Mb Mb PCT Mb
TYPE AVAIL USED FREE USED START RESERVE PRI NAME
dev 10000 82 9918 1% 0 - 1 /dev/vg00/lvol2
dev 20000 83 19917 0% 0 - 1 /dev/vg01/lvol9
In this case, the total device swap space is 30000 MB.
3. If necessary, increase the swap space in one of the following ways:
■ Manually, as described below in Setting Up Swap Space Manually
■ Using SAM, as described below in Setting up Swap Space Using SAM for HP-UX 11.11/11.23
■ Using SMH, as described below in Setting up Swap Space Using SMH for HP-UX 11.31
4. If you are not installing a standalone database server, check the paging size and the kernel settings,
as described below in Checking Paging Space Size and Kernel Settings.
7 Additional Information
7.4 Setting up Swap Space for HP-UX
2010-12-20 PUBLIC 113/148
Setting up Swap Space Manually
1. To create a logical volume, enter the following command:
lvcreate –C y —n <LVName> /dev/<VGName>
2. To define the size and allocate the logical volume to a disk, enter the following commands:
lvextend —L <size in MB> /dev/<VGName>/<LVName> \
/dev/dsk/<diskdevice>
3. To enable automatic swap activation at boot time, add the following entry to /etc/fstab:
/dev/<VGName>/<LVName> /swap swap defaults 0 0
4. To manually activate the space for swap devices defined in /etc/fstab, enter the following
command:
/usr/sbin/swapon -a
5. To check if the swap space has been activated, enter the following command:
/usr/sbin/swapinfo –tm
Setting up Swap Space Using SAM for HP-UX 11.11/11.23
1. To start SAM, enter the following command:
/usr/sbin/sam
2. Choose
Disks and Filesystems Swap Actions Add Device Swap Using the LVM
3. Select a partition for swap and choose OK.
4. Exit SAM.
NOTE
You cannot set the swap space on HP-UX 11.31 with SMH. On HP-UX 11.31 you have to configure
the swap space manually.
Checking Paging Space Size and Kernel Settings
NOTE
If you are installing a standalone database server do not execute this step.
1. Make sure that the UNIX kernel, paging space, and user limits are already configured for the SAP
system.
2. Execute memlimits to verify paging space size and kernel settings as follows:
1. To unpack file memlimits, enter the following commands:
cd <INSTDIR>
<DVD-DIR>/K0<x>/UNIX/<OS>SAPCAR \
—xvfg <DVD-DIR>/K0<x>/UNIX/<OS>/SAPEXE.SAR memlimits
2. To start memlimits, enter the following command:
./memlimits —l 20000
7 Additional Information
7.4 Setting up Swap Space for HP-UX
114/148 PUBLIC 2010-12-20
3. If you see error messages, increase the paging space and rerun memlimits until there are no more
errors.
7.5 Creating HP-UX Groups and Users
Here you can find information about how to create operating system users and groups on HP-UX.
NOTE
To prevent terminal query errors in the <sapsid>adm environment, change the following shell
template as follows:
1. Edit /etc/skel/.login.
2. Comment out (with #) the following line:
#eval `tset -s -Q -m ':?hp'
For more information, see SAP Note 1038842.
Procedure
Choose one of the following procedures, depending on the version of your operating system:
Creating Groups and Users for HP-UX 11.11/11.23
1. Enter the following command:
/usr/sbin/sam
2. Choose Accounts for Users and Groups Local Users Actions Add
3. Enter the required users.
4. Choose Accounts for Users and Groups Groups Actions Add .
5. Enter the required groups.
6. Exit the System Administration Manager (SAM).
7. Verify that the TZ settings in the following are consistent:
/etc/TIMEZONE
/etc/profile
/etc/csh.login
Creating Groups and Users for HP-UX 11.31
1. Enter one of the following commands:
■ /usr/sbin/smh
■ http://<hostname>:<port>
where <port> is either the default port 2381 or your defined port (for example 2301)
2. Choose Accounts for Users and Groups Local Users Add User Account
3. Enter the required users.
4. Choose Accounts for Users and Groups Groups Add new Group .
5. Enter the required groups.
7 Additional Information
7.5 Creating HP-UX Groups and Users
2010-12-20 PUBLIC 115/148
6. Exit SMH.
7. Verify that the TZ settings in the following are consistent:
/etc/TIMEZONE
/etc/profile
/etc/csh.login
More Information
For more information about required operating system users and groups, see Creating Operating System
Users and Groups [page 40].
7.6 Setting Up File Systems for HP-UX
Here you can find information about how to set up file systems for HP-UX.
Using a Logical Volume Manager (LVM) lets you distribute logical volumes across several disks or LUNs
(physical volumes). The individual logical volumes are grouped together into volume groups.
Procedure
HP-UX 11i v3 introduces a new agile addressing scheme for mass storage devices, with opaque minor
numbers, persistent device special files (DSFs), and new hardware path types and formats. The
addressing scheme used in previous HP-UX releases – called “legacy addressing” – coexists with this
new scheme to ensure backward compatibility. The legacy addressing is to be deprecated in a future
HP-UX release. For more information about the changes between HP-UX 11.23 and 11.31, see the
document HP-UX 11i v3 Mass Storage Device Naming at the HP website.
NOTE
Consider the SAP recommendations for data security when planning the distribution of data in
LVM.
RECOMMENDATION
Refer to SAP Note 1077887 for recommendations on blocksize and mount option configuration.
You can create file sytems in one of the following ways:
■ Manually, as described below in “Setting up File Systems Manually Using LVM”.
■ Using the interactive tools SAM (HP-UX 11.11 or 11.23) or SMH (HP-UX 11.31)., See Table 2-4 in
the "SAM-HP SMH Cross Reference Guide HP-UX 11i" (http://www.hp.com/go/hpux-core-docs
under “HP-UX 11i v3”).).
Setting up File Systems Manually Using LVM
1. Examine the device configuration:
7 Additional Information
7.6 Setting Up File Systems for HP-UX
116/148 PUBLIC 2010-12-20
■ The ioscan command provides the device file name and the hardware addresses of all available
devices, using the device class disk:
● For persistent device files (HP-UX 11.31 only), enter:
ioscan -m lun
● For legacy device files, enter:
ioscan -f -C disk
■ To show the mapping of the legacy device files and the persistent device files (HP-UX 11.31
only), enter:
ioscan -m dsf
■ Device file name format:
● Persistent device filenames (HP-UX 11.31 only) have the following format: /dev/disk/
disk<number>
EXAMPLE
/dev/disk/disk6(block device)
/dev/rdisk/disk6(raw device)
● Legacy device filenames have the following format: /dev/dsk/
c<number>t<number>d<number>
EXAMPLE
/dev/dsk/c2t5d0(block device)
/dev/rdsk/c2t5d0 (raw device)
■ The following command scans all disks for the current LVM:
vgscan -pv
NOTE
Make sure that you use option -p (preview), otherwise /etc/lvmtab is updated.
2. You can determine disk or LUN size using the following command:
diskinfo /dev/rdisk/<raw device file name>
3. Prepare disks for LVM by using the following command:
pvcreate /dev/rdisk/<diskdevice>
4. Create one or more volume group directories <VG Name> and group device files. For each volume
group in the system, there must be a volume group directory that has a character device file named
group in it.
Execute the following commands:
mkdir /dev/<VG Name>
mknod /dev/<VG Name>/group c 64 0x<nn>000
NOTE
HP-UX 11.11 and 11.23 only: <nn> cannot exceed the kernel parameter maxvgs.
5. Create the volume group by specifying which physical volumes (disks or LUNs) belong to the
group:
7 Additional Information
7.6 Setting Up File Systems for HP-UX
2010-12-20 PUBLIC 117/148
vgcreate /dev/<VG Name> /dev/disk/<diskdevice>
NOTE
For large disk sizes and large numbers of disks one might need to increase the volume group
physical extent (PE) size with –s option and the maximum physical volume option -p.
Proceed as follows to add other disks or LUNs to an existing volume group:
vgextend /dev/<VG Name> <block device file name>
6. To check the size and number of physical volumes or disks in a volume group, use the following
command:
vgdisplay -v /dev/<VG Name>
7. Create logical volumes.
Create one logical volume for each file system as follows:
1. Enter the following command:
lvcreate /dev/<VG Name>
2. Allocate the required logical volume size to disks or LUNs as follows:
lvextend -L <size in MB> /dev/<VGName>/<LVName> <block device filename>
<size in MB> needs to be a multiple of the physical extent size, otherwise the size is rounded
up.
You can determine the size of the logical volumes can be determined with either of the
following commands:
■ vgdisplay -v /dev/<VG Name>
■ lvdisplay /dev/<VG Name>/<LV Name>
For the required size for each file system, see SAP Directories [page 42].
8. Create the file systems that are required by SAP as follows:
newfs -F vxfs -b 8192 /dev/<VG Name>/r<LV Name>
NOTE
Refer to SAP Note 1077887 for block size recommendations which are database dependent.
9. Create mount directories using the following command:
mkdir <mountdir>
10. Add the new file system to /etc/fstab.
EXAMPLE
/dev/<VG Name>/<LV Name> /<mountdir> vxfs delaylog,nodatainlog 0 2
NOTE
Refer to SAP Note 1077887 for mount option recommendations (for example using
Concurrent I/O (CIO), Direct I/O (DIO) or buffered I/O) which are database dependent.
7 Additional Information
7.6 Setting Up File Systems for HP-UX
118/148 PUBLIC 2010-12-20
NOTE
When defining the mount order sequence in /etc/fstab, you have to consider mount order
dependencies. For example, /sapmnt/<SAPSID> must be mounted before /sapmnt/
<SAPSID>/profile.
11. Mount the file systems by entering the following command:
mount -a
7.7 Dialog Instance Installation for an Upgraded System only: Updating Profiles
You only need to perform the Procedure further below if you want to install a dialog instance and you
have already performed the following steps:
1. You upgraded your SAP system from an earlier source release to a target release lower than SAP
ERP 6.0 SR3.
2. You installed the current Enhancement Package with the SAP Enhancement Package Installer.
Procedure
1. On the SAP Global host, go to folder /<sapmnt>/<SAPSID>/profile.
NOTE
SAP system profiles are named as follows:
Instance profiles: <SAPSID>_<INSTANCE_ID>_<hostname>.pfl
Start profiles: START_<INSTANCE_ID>_<hostname>.pfl
2. Make sure that the parameter DIR_CT_RUN, if set, has identical values in the instance profile and
the start profile of the central instance:
■ If it is set in the instance profile, it must also be set in the start profile.
■ If it is not set in the instance profile, it must not be set in the start profile either.
3. Edit the default profile DEFAULT.PFL by setting rdisp/msserv_internal to a free port number.
EXAMPLE
DEFAULT.PFL
Before the change:
...
rdisp/msserv = sapms<SAPSID>
...
After the change:
...
rdisp/msserv = sapms<SAPSID>
rdisp/msserv_internal = <free port number>
...
7 Additional Information
7.7 Dialog Instance Installation for an Upgraded System only: Updating Profiles
2010-12-20 PUBLIC 119/148
4. Only valid for: HA (UNIX) |
In a high-availability system, edit the instance profile of the central services instance for ABAP
(ASCS) and do the following:End of: HA (UNIX) |
■ Set rdisp/msserv to 0.
■ Set rdisp/msserv_internal to the port number assigned to rdisp/msserv.
EXAMPLE
Instance profile of the central services instance:
Before the change:
...
rdisp/msserv = 4711
...
After the change:
...
rdisp/msserv = 0
rdisp/msserv_internal = 4711
...
5. Restart all SAP services and instances of your SAP system.
7.8 Mounting Installation Media for HP-UX
Proceed as follows to mount a CD or DVD.
NOTE
The placeholder <medium-mountdir> is used for either <cd-mountdir> or <dvd-mountdir>.
Procedure
Mounting a CD / DVD Manually
1. Log on as user root.
2. To create a mount point for CD / DVD, enter the following command:
mkdir /<medium-mountdir>
EXAMPLE
<medium-mountdir> is /sapcd
3. To find out the hardware address of the CD/DVD drive, proceed as follows:
1. Enter the following command:
ioscan -fnkCdisk
A list of all devices is displayed
2. Note the hardware address of the CD/DVD drive, for example c0t4d0.
7 Additional Information
7.8 Mounting Installation Media for HP-UX
120/148 PUBLIC 2010-12-20
4. To check that the driver is part of the kernel (skip this step if the CD / DVD drive is already working),
enter the following command:
grep cdfs /stand/system
If the driver is not configured, you have to add the string cdfs to the file /stand/system and rebuild
the kernel. For more information about how to build a new kernel, see Checking and Modifying the
HP-UX Kernel [page 111]. After rebuilding the kernel, reboot the system.
5. To mount the CD / DVD on HP-UX 11.11 or 11.23, enter the following command:
mount -r -F cdfs -o rr /dev/dsk/<diskdevice> <medium-mountdir>
To mount the CD / DVD on HP-UX 11.31, enter the following command:
mount -r -F cdfs -o rr /dev/disk/<diskdevice> <medium-mountdir>
EXAMPLE
HP-UX 11.11 or 11.23: mount -r -F cdfs -o rr /dev/dsk/c0t4d0 /sapcd
HP-UX 11.31: mount -r -F cdfs -o rr /dev/disk/disk2 /sapcd
Mounting a CD / DVD Using SAM for HP-UX 11.11 or HP–UX 11.23
1. Enter the command:
/usr/sbin/sam
2. Choose Disks and Filesystems Disk Devices Actions Mount
3. Enter the mount directory:
<medium-mountdir>
EXAMPLE
For example, <medium-mountdir> is /sapcd.
4. Perform task.
5. Exit SAM.
Mounting a CD / DVD Using SMH for HP-UX 11.31
1. Enter one of the following commands:
■ /usr/sbin/smh
■ http://<hostname>:<port>
where <port> is either the default port 2381 or your defined port (for example 2301)
2. Choose Disks and Filesystems File Systems Add CDFS
3. Enter the mount directory:
<medium-mountdir>
EXAMPLE
For example, <medium-mountdir> is /sapcd.
4. Choose the hardware path.
5. Choose New CDFS
6. Exit SMH.
7 Additional Information
7.8 Mounting Installation Media for HP-UX
2010-12-20 PUBLIC 121/148
7.9 Exporting and Mounting Directories via NFS for HP-UX
You can configure NFS on HP-UX in one of the following ways:
■ Manually (HP-UX 11.11 and 11.23) as described below in Configuring NFS manually on HP-UX 11.11 or
11.23
■ Manually (HP-UX 11.31) as described below inConfiguring NFS manually on HP-UX 11.31
■ Using the interactive tools SAM (HP-UX 11.11 or 11.23) or SMH (HP-UX 11.31).
For more information on NFS for HP-UX, see the document NFS Services Administrator's Guide HP-UX 11i
version 3 at the HP website.
Procedure
Configuring NFS manually on HP-UX 11.11/11.23
Procedure on the Host where the Main Instance Runs (export NFS volumes)
1. Add the file system that you want to export to the file /etc/exports using the following syntax:
<file system to share> -root= <client_1>:<client_n>,> \
access= <nfs_cli_hostname_1>:...:< nfs_cli_hostname_n>
EXAMPLE
/sapmnt/C11/exe root=hw5111:hw5115, access=hw5111:hw5115
If you encounter problems, try using the FQDN (Fully Qualified Domain Name) of the NFS clients.
2. To make the file system available to NFS clients, enter the following command:
/usr/sbin/exportfs -a
Procedure on the Host where the Additional Instance Runs (mount NFS volumes)
1. Add the remote file system to /etc/fstab.
EXAMPLE
hwi173:/sapmnt/C11 /sapmnt/C11 nfs defaults 0 0
2. Mount the file system.
EXAMPLE
mount -a
Configuring Directories via NFS manually on HP-UX 11.31
Procedure on the Host where the Main Instance Runs (export NFS volumes)
1. Add the file system that you want to export to the file /etc/dfs/dfstab using the following syntax:
share –F nfs –o root= <client_1>:<client_n>,> \
access= <client_1>:<client_n> <file system to share>
EXAMPLE
share –F nfs –o root=hw5111:hw5115, access=hw511:hw5115 /sapmnt/C11/exe
7 Additional Information
7.9 Exporting and Mounting Directories via NFS for HP-UX
122/148 PUBLIC 2010-12-20
NOTE
If you are moving from a legacy system with the /etc/exports NFS configuration file you
can use /usr/contrib/bin/exp2dfs to automatically convert the legacy syntax to the new
syntax in /etc/dfs/dfstab.
If you encounter problems, try using the FQDN (Fully Qualified Domain Name).
2. To make the file system available to NFS clients, enter the following command:
/usr/sbin/shareall
Procedure on the Host where the Additional Instance Runs (mount NFS volumes)
1. Add the remote file system to /etc/fstab.
EXAMPLE
hwi173:/sapmnt/C11 /sapmnt/C11 nfs defaults 0 0
2. Mount the file system.
EXAMPLE
mount -a
7.10 Installing the Host Agent Separately
This procedure tells you how to install a host agent separately.
The host agent is automatically installed during the installation of all new SAP system instances based
on SAP NetWeaver 7.1 or higher. You only need to install a host agent separately in the following
cases:
■ You want to manage a host that does not have an SAP instance or component.
■ You have upgraded your SAP system to SAP NetWeaver 7.0 EHP2 or higher and want the instances
of the upgraded system to be managed by the ACC.
7 Additional Information
7.10 Installing the Host Agent Separately
2010-12-20 PUBLIC 123/148
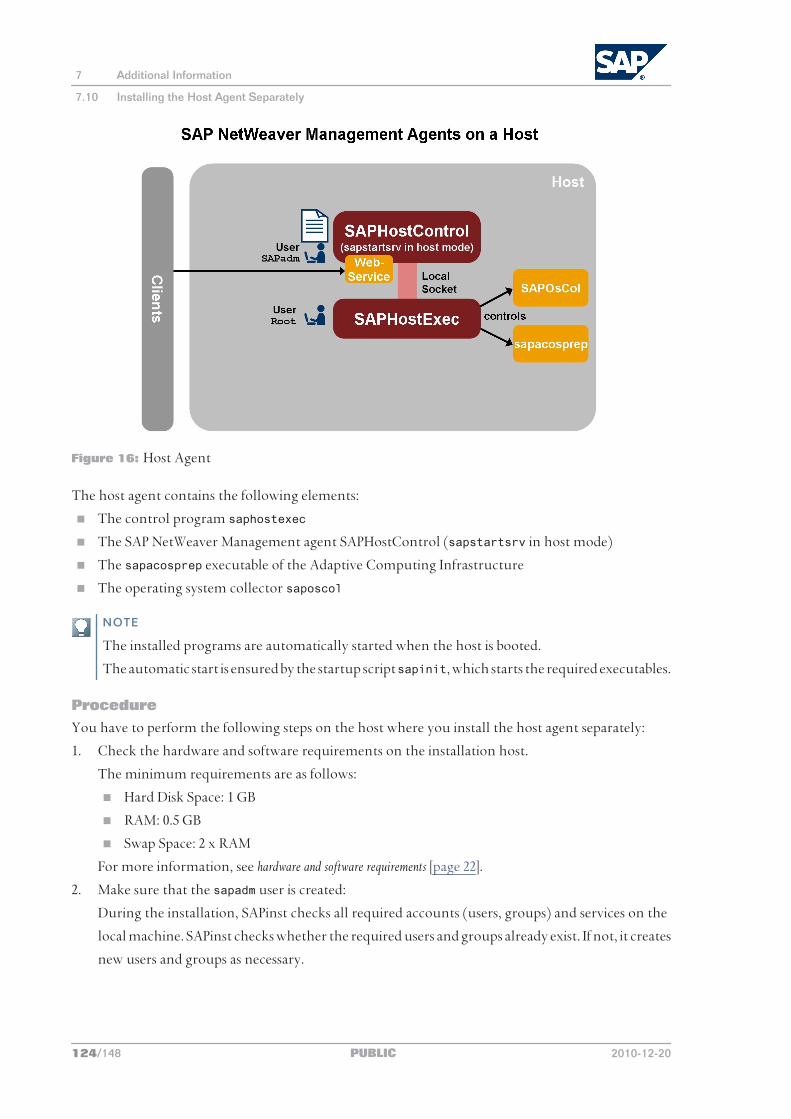
Figure 16: Host Agent
The host agent contains the following elements:
■ The control program saphostexec
■ The SAP NetWeaver Management agent SAPHostControl (sapstartsrv in host mode)
■ The sapacosprep executable of the Adaptive Computing Infrastructure
■ The operating system collector saposcol
NOTE
The installed programs are automatically started when the host is booted.
The automatic start is ensured by the startup script sapinit, which starts the required executables.
Procedure
You have to perform the following steps on the host where you install the host agent separately:
1. Check the hardware and software requirements on the installation host.
The minimum requirements are as follows:
■ Hard Disk Space: 1 GB
■ RAM: 0.5 GB
■ Swap Space: 2 x RAM
For more information, see hardware and software requirements [page 22].
2. Make sure that the sapadm user is created:
During the installation, SAPinst checks all required accounts (users, groups) and services on the
local machine. SAPinst checks whether the required users and groups already exist. If not, it creates
new users and groups as necessary.
7 Additional Information
7.10 Installing the Host Agent Separately
124/148 PUBLIC 2010-12-20
User and Groups of the Host Agent
User Primary Group Additional Group Comment
sapadm sapsys sapinst Host agent administrator
Groups and Members of the Host Agent User
Groups Members
sapsys sapadm
sapinst sapadm
3. Set up the required file system for the host agent.
Directories Description Required Disk Space
/usr/sap/hostctrl Contains the following directories: ■ exe
Contains the profile host_profile
■ work
Working directory of the host agent
100 MB
For more information, see Setting up file systems and raw devices [page 42]
4. Mount the Installation Master DVD.
For more information, see Preparing the Installation Media [page 55].
5. You start SAPinst [page 66] to install the host agent.
On the Welcome screen, choose Software Life-Cycle Options Additional Preparation Options Host
Agent .
6. You perform the following post-installation steps:
1. Check whether the installed services are available as follows:
1. Log on as user sapadm.
2. Check whether the following services are available:
■ The control program saphostexec
■ The SAP NetWeaver Management agent SAPHostControl (sapstartsrv in host
mode)
NOTE
When the host is booted, the startup script sapinit automatically starts the required
executables.
2. You configure the monitoring architecture with the installed host agent as described in the
SAP Library at:
http://help.sap.com SAP NetWeaver Library SAP NetWeaver by Key Capability Solution Life
Cycle Management by Key Capability Solution Monitoring Monitoring in the CCMS Infrastructure of the
NetWeaver Management Agents
7 Additional Information
7.10 Installing the Host Agent Separately
2010-12-20 PUBLIC 125/148
7.11 Starting and Stopping SAP System Instances
You can start or stop SAP system instances in one of the following ways:
■ Using the SAP Management Console (SAP MC) [page 126]
■ Using commands [page 128].
7.11.1 Starting and Stopping SAP System Instances Using the SAP Management Console
You can start and stop all SAP system instances (except the database instance) and the Diagnostics
Agent using the SAP Management Console (SAP MC). You have to start and stop the database
instance as described in Starting and Stopping the SAP System Using startsap and stopsap [page 128].
NOTE
If your newly installed SAP system is part of a heterogeneous SAP system landscape comprising
systems or instances on Windows platforms, you can also start and stop it from a Windows system
or instance using the Microsoft Management Console (SAP MMC).
For more information about handling the MMC, see:
http://help.sap.com/nw70 SAP NetWeaver 7.0 Library (including Enhancement Package 2) English
SAP NetWeaver Library SAP NetWeaver by Key Capability Solution Life Cycle Management by Key
Capability Solution Monitoring Monitoring in the CCMS SAP Microsoft Management Console: Windows
Prerequisites
■ Make sure that the host names defined in the DNS server match the names of the SAP system
instance hosts. In particular, keep in mind that host names are case-sensitive. For example, if the
names of the SAP system instance hosts are in upper case, but the same host names are defined in
the DNS server in lower case, starting and stopping the system does not work.
■ Make sure that the host where you want to start SAP MC meets the following requirements:
● At least Java Runtime Environment (JRE) 5.0 is installed.
● The browser supports Java.
● The browser's Java plug-in is installed and activated.
● You have set the required permissions for sapstartsrv and sapuxuserchk in the /<sapmnt>/
<SAPSID>/exe, and /usr/sap/<SAPSID>/SYS/exe, and /usr/sap/<SAPSID>/
<Instance_Name>/exe directories as described in SAP Note 927637.
See also Performing Post-Installation Steps for the Operating System [page 88].
■ You have logged on to the host as user <sapsid>adm.
7 Additional Information
7.11 Starting and Stopping SAP System Instances
126/148 PUBLIC 2010-12-20
Procedure
Starting the Web-Based SAP Management Console
1. Start a Web browser and enter the following URL:
http://<hostname>:5<instance_number>13
EXAMPLE
If the instance number is 53 and the host name is saphost06, you enter the following URL:
http://saphost06:55313
This starts the SAP MC Java applet.
NOTE
If your browser displays a security warning message, choose the option that indicates that
you trust the applet.
2. Choose Start.
The SAP Management Console appears.
By default, the instances installed on the host you have connected to are already added in the SAP
Management Console.
NOTE
If the instances have not been added or if you want to change the configuration to display
systems and instances on other hosts, you have to register your system manually. This is
described in Registering Systems and Instances in the SAP Management Console below.
Starting and Stopping SAP System Instances
Starting SAP Systems or Instances
1. In the navigation pane, open the tree structure and navigate to the system node that you want to
start.
2. Select the system or instance and choose Start from the context menu.
3. In the Start SAP System(s) dialog box, choose the required options.
4. Choose OK.
The SAP MC starts the specified system or system instances.
NOTE
The system might prompt you for the credentials of the SAP system administrator. To
complete the operation, you must have administration permissions. Log in as user
<sapsid>adm.
Starting the Instances of a Distributed SAP System Separately
If you need to start the instances of an SAP system separately – for example when you want to start a
distributed or a high-availability system – proceed as follows:
1. Start the database instance.
7 Additional Information
7.11 Starting and Stopping SAP System Instances
2010-12-20 PUBLIC 127/148
2. Only valid for: HA (UNIX) |
If your system is a high-availability system, start the ABAP central services instance
ASCS<Instance_Number>.End of: HA (UNIX) |
3. Start the central instance DVEBMGS<Instance_Number>.
4. Start dialog instances D<Instance_Number>, if there are any.
Stopping SAP Systems or Instances
1. Select the system or instance you want to stop and choose Stop from the context menu.
2. In the Stop SAP System(s) dialog box, choose the required options.
3. Choose OK.
The SAP MC stops the specified system or system instances.
NOTE
The system might prompt you for the SAP system administrator credentials. To complete
the operation, you must have administration permissions. Log in as user <sapsid>adm.
Similarly, you can start, stop, or restart all SAP systems and individual instances registered in the SAP
MC.
Stopping the Instances of a Distributed SAP System Separately
If you need to stop the instances of an SAP system separately – for example when you want to start a
distributed or a high-availability system – proceed as follows:
1. Stop dialog instances D<Instance_Number>, if there are any.
2. Stop the central instance DVEBMGS<Instance_Number>.
3. Only valid for: HA (UNIX) |
If your system is a high-availability system, stop the ABAP central services instance
ASCS<Instance_Number>.End of: HA (UNIX) |
4. Stop the database instance.
More InformationFor more information about the SAP Management Console, see:
http://help.sap.com/nw70 SAP NetWeaver 7.0 Library (including Enhancement Package 2) English SAP
NetWeaver Library SAP NetWeaver by Key Capability Solution Life Cycle Management by Key Capability Solution
Monitoring Monitoring in the CCMS SAP Management Console
7.11.2 Starting and Stopping SAP System Instances Using Commands
You can start and stop SAP system instances using the startsap and stopsap commands.
You can use command line options to specify these commands. Command line options are available
in new style or old style.
7 Additional Information
7.11 Starting and Stopping SAP System Instances
128/148 PUBLIC 2010-12-20
Using New Style for Command Line Options and Parameters
Using new style, the syntax is as follows:
stopsap | stopsap [-t | -task <task>] [-i | -instance <instance>] [-v | -vhost
"<virtual hostname>[ <virtual hostname>]*"][-c | -check] [-h | -help] [-V | -VERSION]
[-C | -checkVHost]
EXAMPLE
If you want to start a central instance DVEBGMS00 that has the virtual host names cic11 and
cic12, enter the following commands :
startsap -t r3 -i DVEBGMS00 -v "cic11 cic12"
The following command line options and parameters are available:
Command Line Options (New Style)
Parameter Name Description
[-t | -task <task>] Specify task
[-i | -instance <instance>] Specify SAP system instance
[-v | -vhost "<virtual hostname>[ <virtual hostname>]*"] Specify virtual host names
[-c | -check] Check database and SAP instance status
[-h | -help] Display help
[-V | -VERSION] Display startsap script version
[-C | -checkVHost] Check virtual host name
Parameters for <task> (New Style)
Parameter Name Description
check Check status of database and SAP system instances
r3 Start or stop SAP instances only.
db Start or stop database only
all | <blank> Start or stop database and SAP instance
startupsrv Start or stop sapstartsrv program
Parameters for <instance> where <nn> is the instance number
Parameter Name Description
DVEBMGS<nn> Central Instance
D<nn> Dialog instance
ASCS<nn> ABAP central services instance (ASCS instance)
ERS<nn> Enqueue replication server instance (ERS instance)
SMDA<nn> Diagnostics agent instance
W<nn> Web services instance
G<nn> Gateway instance
Using Old Style for Command Line Options and Parameters
Using old style, the syntax is as follows:
7 Additional Information
7.11 Starting and Stopping SAP System Instances
2010-12-20 PUBLIC 129/148
stopsap | stopsap [db|r3|all|check|startupsrv] [<instance>] [<virtual hostname>]
EXAMPLE
If you want to start a central instance DVEBGMS00 that has the virtual host names cic11 and
cic12, enter the following commands :
startsap r3 DVEBGMS00 cic11 cic12
The following command line options and parameters are available:
Command Line Options (Old Style)
Parameter Name Description
check [<instance>] [<virtual hostname>] Check status of database and SAP system instances
r3 [<instance>] [<virtual hostname>] Start or stop SAP instances only
db [<instance>] [<virtual hostname>] Start or stop database only
all | <blank> Start or stop database and all SAP system instances running on the same physical host
startupsrv Start or stop sapstartsrv program
Parameters for <instance> where <nn> is the instance number
Parameter Name Description
DVEBMGS<nn> Central Instance
D<nn> Dialog instance
ASCS<nn> ABAP central services instance (ASCS instance)
ERS<nn> Enqueue replication server instance (ERS instance)
SMDA<nn> Diagnostics agent instance
W<nn> Web services instance
G<nn> Gateway instance
Prerequisites
■ Make sure that you have logged on to the physical host of the SAP system instances as user
<sapsid>adm.
■ Make sure that the host names defined in the DNS server match the names of the SAP system
instance hosts. In particular, keep in mind that host names are case-sensitive. For example, if the
names of the SAP system instance hosts are in upper case, but the same host names are defined in
the DNS server in lower case, starting and stopping the system does not work.
■ If you want to use startsap or stopsap (for example, in a script) and require the fully qualified
name of these SAP scripts, create a link to the startsap script in the home directory of the
corresponding user.
■ You cannot use startsap or stopsap commands in a switchover cluster environment. Therefore
in a high-availability (HA) system you must use the failover cluster software of your HA partner
to start or stop instances running on the switchover cluster.
7 Additional Information
7.11 Starting and Stopping SAP System Instances
130/148 PUBLIC 2010-12-20

■ You cannot use startsap or stopsap commands to start or stop database-specific tools. For more
information about how to start or stop database-specific tools, see the database-specific information
in this documentation and the documentation from the database manufacturer.
■ Make sure that no SAP instance is running before you execute stopsap on a standalone database
server. No automatic check is made.
■ When you use stopsap in a Multiple Components in One Database (MCOD) system with two
central instances, only one central instance and the database are shut down. Therefore, you must
first stop the other SAP system or make sure that it has already been stopped.
Procedure
Starting an SAP System
■ If you want to start all SAP system instances running on the same host, execute the following
command:
New style: startsap or startsap -t all
Old style:startsap or startsap all
■ If you want to start SAP system instances separately, enter the following command:
New style:startsap -t r3 -i <instance> [-v "<virtual host name>"]
Old style:startsap r3 <instance> [<virtual host name>]
Make sure that you adhere to the following sequence when starting the instances:
1. Database instance
2. Central instance
3. Dialog instances (if available)
Stopping an SAP System
■ If you want to stop all SAP system instances running on the same host, execute the following
command:
New style: stopsap or stopsap -t all
Old style:stopsap or stopsap all
■ If you want to stop SAP system instances separately, enter the following command:
New style:stopsap -t r3 -i <instance> [-v "<virtual host name>"]
Old style:stopsap r3 <instance> [<virtual host name>]
Make sure that you adhere to the following sequence when stopping the instances:
1. Dialog instances (if available)
2. Central instance
3. Database instance
7 Additional Information
7.11 Starting and Stopping SAP System Instances
2010-12-20 PUBLIC 131/148

7.12 Creating a User for LDAP Directory Access
If you use LDAP directory services, you have to set up a user with a password on the host where the
SAP system is running. This permits the SAP system to access and modify the LDAP directory.
For more information, see Preparing the Active Directory in the Windows installation guide for your SAP
system solution and database.
Prerequisites
During the SAP instance installation you chose to configure the SAP system to integrate LDAP services.
Procedure
1. Log on as user <sapsid>adm.
2. Enter:
ldappasswd pf=<path_and_name_of_instance_profile>
3. Enter the required data.
EXAMPLE
The following is an example of an entry to create an LDAP Directory User:
CN=sapldap,CN=Users,DC=nt5,DC=sap-ag,DC=de
7.13 Heterogeneous SAP System Installation
This section provides information on the installation of an SAP system in a heterogeneous system
landscape. “Heterogeneous system landscape” means that application servers run on different
operating systems.
Procedure
See SAP Note 1067221 for more information on:
■ Supported combinations of operating systems and database systems
■ How to install an application server on Windows in a heterogeneous (UNIX) SAP system
environment
■ Heterogeneous SAP system landscapes with different UNIX operating systems (see also Exporting and
Mounting Global Directories: Distributed and High-Availability Systems [page 64])
7.14 Troubleshooting
The following sections describe the steps that you need to perform manually if SAPinst fails:
■ Troubleshooting with SAPinst [page 133]
7 Additional Information
7.12 Creating a User for LDAP Directory Access
132/148 PUBLIC 2010-12-20
7.14.1 Troubleshooting with SAPinst
This section tells you how to proceed when errors occur during the installation with SAPinst.
If an error occurs, SAPinst:
■ Stops the installation.
■ Displays a dialog informing you about the error.
Procedure
1. To view the log file, choose View Logs.
2. If an error occurs during the Define Parameters or Execute phase, do either of the following:
■ Try to solve the problem
■ Stop the installation by choosing Cancel in the SAPinst menu.
For more information, see Interrupted Installation with SAPinst [page 73].
■ After resolving the problem, you can continue the installation by choosing Retry.
3. Check the log and trace files of the GUI server and SAPinst GUI in the directory
<user_home>/.sdtgui/ for errors.
■ If the SAPinst GUI does not start, check the file sdtstart.err in the current <user_home>
directory.
■ If you use an X Server for Microsoft Windows or other remote desktop tools for the Remote
Access of SAPinst GUI on Windows Workstations and you experience display problems such
as missing repaints or refreshes, contact your X Server vendor. The vendor can give you
information about whether this X Server supports Java Swing-based GUIs and also tell you
about further requirements and restrictions. See also SAP Note 1170809.
4. If you cannot resolve the problem, create a customer message using component BC-INS.
7.15 Deleting an SAP System or Single Instances
This section describes how to delete a complete SAP system or single SAP instances with the Uninstall
option of SAPinst.
NOTE
With this SAPinst option you do not delete the database software.
Note the following when deleting an SAP system:
■ We strongly recommend that you delete an SAP system using SAPinst. To delete an SAP system
manually, proceed as described in SAP Note 1229586.
■ You cannot delete an SAP system remotely.
■ SAPinst deletes the database instance but not the database software. You have to delete the database
software manually.
7 Additional Information
7.15 Deleting an SAP System or Single Instances
2010-12-20 PUBLIC 133/148
■ If you delete network-wide users, groups, or service entries in an environment with Network
Information System (NIS), other SAP installations might also be affected. Make sure that the users,
groups, and service entries to be deleted are no longer required.
■ During the uninstall process, all file systems and subdirectories of the selected SAP system or single
instance are deleted. Before you start uninstalling, make sure that you have saved a copy of all files
and directories that you want to keep in a secure location.
■ The uninstall process is designed to remove as much as possible of the SAP system to be deleted. If
an item cannot be removed, a message informs you that you have to remove this item manually.
You can do this either at once or after the uninstall process has finished. As soon as you confirm
the message, the uninstall process continues.
Prerequisites
■ You have installed your SAP system with standard SAP tools according to the installation
documentation.
■ You are logged on as user root.
■ Make sure that the SAP system, or single instance, or standalone engine, or optional standalone
unit to be deleted is down and that you are not logged on as one of the SAP system users. If there
is a lock on one of the SAP system objects, this breaks the uninstall. Make also sure that all SAP-
related processes are stopped.
NOTE
You do not have to stop the host agent. The host agent is stopped automatically during the
uninstall process.
■ Make sure that there are no open sessions by one of the SAP system users when starting the uninstall.
Procedure
1. Start SAPinst as described in Running SAPinst [page 66].
2. On the Welcome screen, choose:
<Your SAP product> Software Life-Cycle Options Uninstall Uninstall System / Standalone Engine / Optional
Standalone Unit
3. Follow the instructions in the SAPinst input dialogs to delete a complete SAP system or single
instances.
NOTE
For more information about the input parameters, place the cursor on the relevant field and
press F1 in SAPinst.
The following table provides information about deleting a complete system or single instances
with SAPinst.
Deletion of Remarks
Central system You can delete a central system (where all instances reside on the same host), in one SAPinst run.
7 Additional Information
7.15 Deleting an SAP System or Single Instances
134/148 PUBLIC 2010-12-20
Deletion of Remarks
Distributed or high-availability system
If you want to delete a distributed or high-availability system, you have to run SAPinst to delete the required instances locally on each of the hosts belonging to the SAP system in the following sequence:1. Dialog instances, if there are any2. Central instance
1. Close SAPinst with Cancel and Exit.2. Log off and log on again.3. To finish uninstalling the central instance, restart SAPinst.
3. Database instanceChoose whether you want to drop the entire database instance or only one or more database schemas.Since SAPinst only stops local instances automatically, make sure that before deleting the database instance of a distributed system, you stop all remaining instances. You must stop the instance with the message server only after having entered all SAPinst parameters for the deletion of the database instance.Before deleting any database schema, make sure that: ■ You have performed a recent offline database backup. ■ You have stopped or deleted all SAP instances belonging to this
database schema. ■ If you have installed a Java system, you have stopped the AS Java
with transaction SMICM. ■ You only delete the tablespaces that belong to the selected schema.
The Java schema SAP<SCHEMAID>DB by default belongs to the database tablespace PSAP<SCHEMAID<DB. All other SAP tablespaces belong to the ABAP schema SAP<SCHEMAID> (or SAPR3 for older SAP systems.
4. Only valid for: HA (UNIX) |
Central services instance for ABAP (ASCS)End of: HA (UNIX) |
NOTE
To delete system directories mounted from an NFS server, make sure that you run SAPinst on the NFS server.
Dialog instance If you want to delete dialog instances of an existing SAP system, you have to run SAPinst to delete them locally on each dialog instance host.
Standalone host agent The host agent is automatically uninstalled from a host together with the last remaining SAP system instance.If you want to uninstall a standalone host agent, deselect Profiles Available and select Uninstall Standalone Host Agent on the General SAP System Parameters screen.
Diagnostics agent If you want to delete a diagnostics agent instance, enter the location of the profile directory of the diagnostics agent that you want to uninstall on the General SAP System Parameters screen:/usr/sap/<DASID>/SYS/profile
4. When you have finished, delete the relevant directory structure on the global host.
5. Delete the Oracle database software with the Oracle Universal Installer (OUI).
For more information, see Deleting the Oracle Database Software [page 136].
6. If required, you can delete the directory /usr/sap/trans and its content manually.
7 Additional Information
7.15 Deleting an SAP System or Single Instances
2010-12-20 PUBLIC 135/148
SAPinst does not delete /usr/sap/trans because it might be shared.
7. If you created the directories /usr/sap/<SAPSID> and /<sapmnt>/<SAPSID> as mount points, but
not as directories on the local file system, you have to remove them manually.
7.16 Oracle Database Software Deinstallation
You have to deinstall the Oracle database software to complete the deletion of the Oracle database
instance.
■ Deinstalling the Oracle 10 Database Software [page 136]
■ Deinstalling the Oracle 11 Database Software [page 137]
7.16.1 Deinstalling the Oracle 10 Database Software
Here you find information how to delete the Oracle 10 database software with the Oracle Universal
Installer (OUI).
NOTE
This section only applies if you have deleted your SAP system using the Uninstall option of SAPinst.
We strongly recommend that you delete a database instance with SAPinst and then remove the
database software manually. To delete the complete database instance manually, proceed as
described in SAP Note1229689.
Procedure
1. Start the OUI with the user ora<dbsid> by entering one of the following:
■ cd /oracle/stage/102_64/database/Disk1/SAP
./runInstaller
■ cd /oracle/stage/102_64/database/SAP
./runInstaller
You see a message that a response file is being generated. It might take several minutes before you
see the OUI screen.
2. Choose Installed Products or Uninstall Products.
3. Select the database schema you want to uninstall: <DBSID>_102_64.
4. Mark the Oracle database within the selected product.
5. Choose Remove.
6. Confirm your selection with Yes.
7. Choose EXIT.
7 Additional Information
7.16 Oracle Database Software Deinstallation
136/148 PUBLIC 2010-12-20
7.16.2 Deinstalling the Oracle 11 Database Software
This procedure tells you how to deinstall the database software, starting with Oracle Database 11g
Release 2 (11.2). For more information, see SAP Note 1525025.
CAUTION
Do not use RunInstaller or the new deinstall tool to remove an Oracle 11.2 database installation.
The deinstall tool might not only delete the software from the Oracle home, but also other files
(database files, logs, traces, configuration files, inventory) in <ORACLE_BASE>.
Therefore, we strongly recommend you to use the procedure below to remove the 11.2 Oracle
home software.
Procedure
1. Back up the central Oracle inventory, which is normally located at $ORACLE_BASE:
OS> cd $ORACLE_BASE
OS> zip -r oraInventory.zip oraInventory
2. Check whether Oracle home is registered in the central Oracle inventory:
OS> $ORACLE_HOME/OPatch/opatch \
lsinventory -all
-invPtrLoc $ORACLE_HOME/oraInst.loc
If Oracle home is registered, it appears in the displayed List of Oracle Homes. Otherwise, opatch
returns error code 73.
Oracle home must be registered in order to detach it.
3. Detach Oracle home from the central Oracle inventory:
OS> $ORACLE_HOME/oui/bin/runInstaller \
-silent \
-detachHome ORACLE_HOME=$ORACLE_HOME \
-waitForCompletion \
-invPtrLoc $ORACLE_HOME/oraInst.loc
At the end of the procedure, you see the message:
'DetachHome' was successful
4. Remove the Oracle home software from the file system:
OS> rm -rf $ORACLE_HOME
7 Additional Information
7.16 Oracle Database Software Deinstallation
2010-12-20 PUBLIC 137/148

This page is left blank for documents that are printed on both sides.
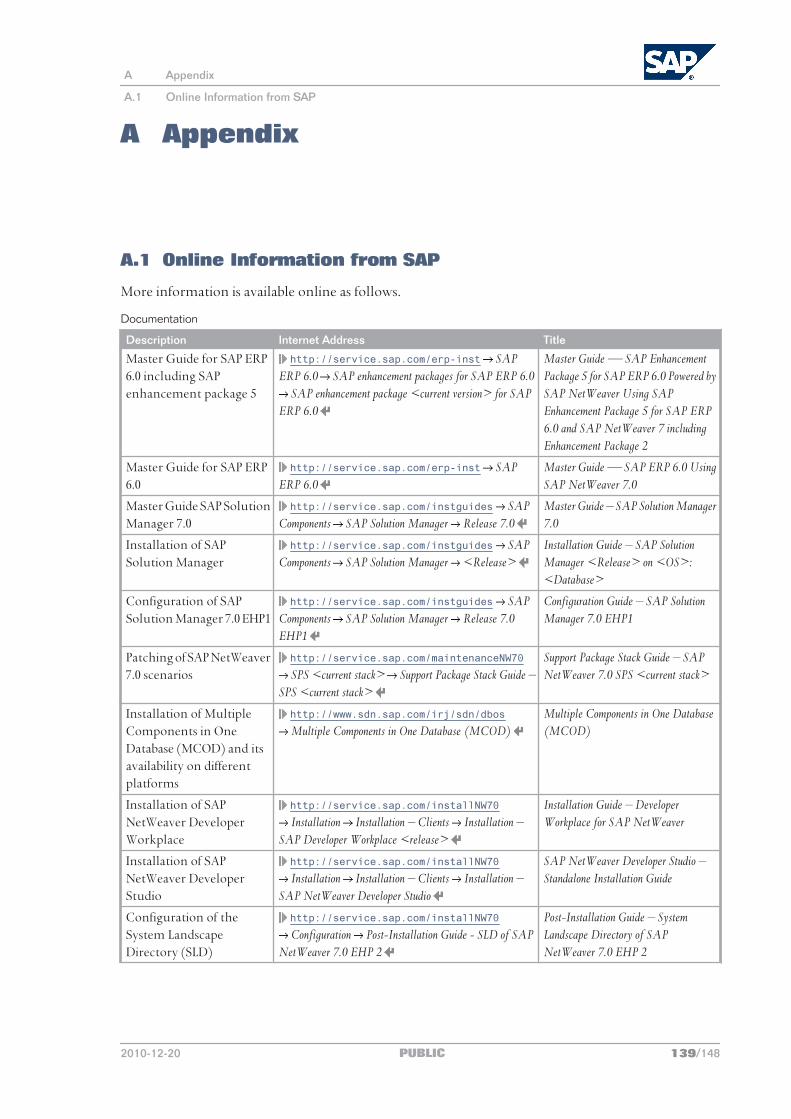
A Appendix
A.1 Online Information from SAP
More information is available online as follows.
Documentation
Description Internet Address Title
Master Guide for SAP ERP 6.0 including SAP enhancement package 5
http://service.sap.com /erp-inst SAP ERP 6.0 SAP enhancement packages for SAP ERP 6.0
SAP enhancement package <current version> for SAP ERP 6.0
Master Guide — SAP Enhancement Package 5 for SAP ERP 6.0 Powered by SAP NetWeaver Using SAP Enhancement Package 5 for SAP ERP 6.0 and SAP NetWeaver 7 including Enhancement Package 2
Master Guide for SAP ERP 6.0
http://service.sap.com /erp-inst SAP ERP 6.0
Master Guide — SAP ERP 6.0 Using SAP NetWeaver 7.0
Master Guide SAP Solution Manager 7.0
http://service.sap.com/instguides SAP Components SAP Solution Manager Release 7.0
Master Guide – SAP Solution Manager 7.0
Installation of SAP Solution Manager
http://service.sap.com /instguides SAP Components SAP Solution Manager <Release>
Installation Guide – SAP Solution Manager <Release> on <OS>: <Database>
Configuration of SAP Solution Manager 7.0 EHP1
http://service.sap.com /instguides SAP Components SAP Solution Manager Release 7.0 EHP1
Configuration Guide – SAP Solution Manager 7.0 EHP1
Patching of SAP NetWeaver 7.0 scenarios
http://service.sap.com /maintenanceNW70
SPS <current stack> Support Package Stack Guide – SPS <current stack>
Support Package Stack Guide – SAP NetWeaver 7.0 SPS <current stack>
Installation of Multiple Components in One Database (MCOD) and its availability on different platforms
http://www.sdn.sap.com/irj/sdn/dbos
Multiple Components in One Database (MCOD)Multiple Components in One Database (MCOD)
Installation of SAP NetWeaver Developer Workplace
http://service.sap.com /installNW70
Installation Installation – Clients Installation – SAP Developer Workplace <release>
Installation Guide – Developer Workplace for SAP NetWeaver
Installation of SAP NetWeaver Developer Studio
http://service.sap.com /installNW70
Installation Installation – Clients Installation – SAP NetWeaver Developer Studio
SAP NetWeaver Developer Studio – Standalone Installation Guide
Configuration of the System Landscape Directory (SLD)
http://service.sap.com /installNW70
Configuration Post-Installation Guide - SLD of SAP NetWeaver 7.0 EHP 2
Post-Installation Guide – System Landscape Directory of SAP NetWeaver 7.0 EHP 2
A Appendix
A.1 Online Information from SAP
2010-12-20 PUBLIC 139/148
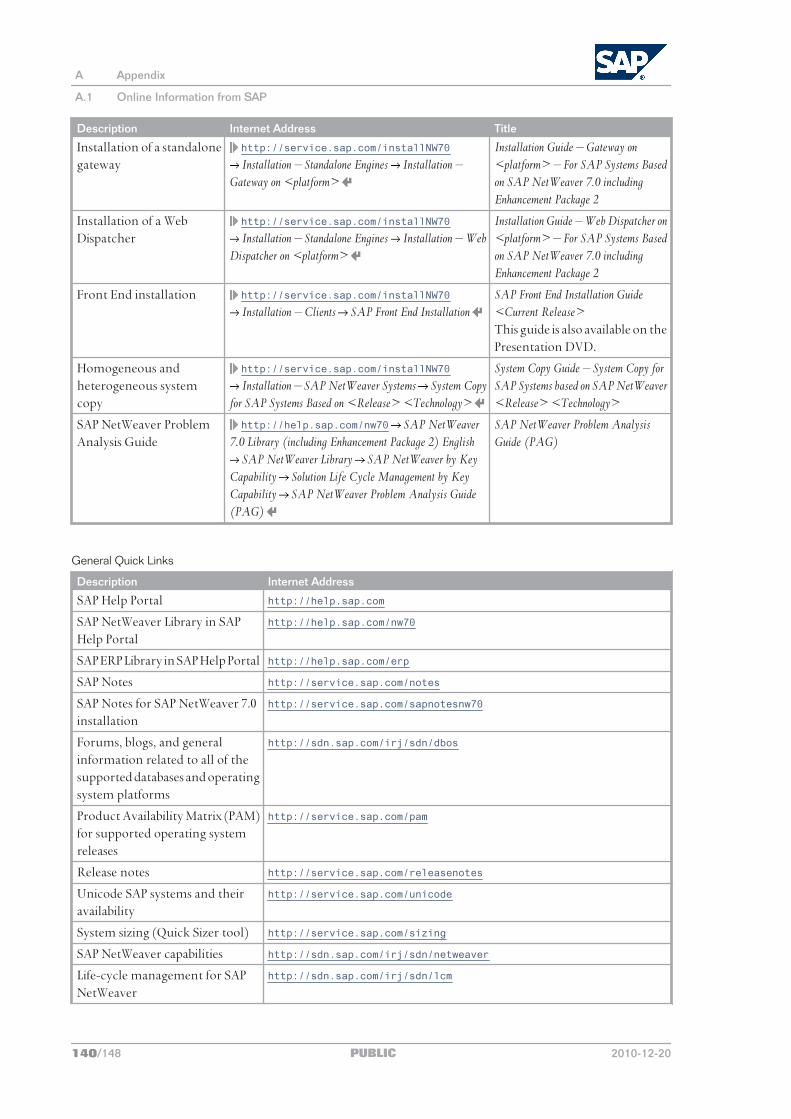
Description Internet Address Title
Installation of a standalone gateway
http://service.sap.com /installNW70
Installation – Standalone Engines Installation – Gateway on <platform>
Installation Guide – Gateway on <platform> – For SAP Systems Based on SAP NetWeaver 7.0 including Enhancement Package 2
Installation of a Web Dispatcher
http://service.sap.com /installNW70
Installation – Standalone Engines Installation – Web Dispatcher on <platform>
Installation Guide – Web Dispatcher on <platform> – For SAP Systems Based on SAP NetWeaver 7.0 including Enhancement Package 2
Front End installation http://service.sap.com /installNW70
Installation – Clients SAP Front End InstallationSAP Front End Installation Guide <Current Release>This guide is also available on the Presentation DVD.
Homogeneous and heterogeneous system copy
http://service.sap.com /installNW70
Installation – SAP NetWeaver Systems System Copy for SAP Systems Based on <Release> <Technology>
System Copy Guide – System Copy for SAP Systems based on SAP NetWeaver <Release> <Technology>
SAP NetWeaver Problem Analysis Guide
http://help.sap.com/nw70 SAP NetWeaver 7.0 Library (including Enhancement Package 2) English
SAP NetWeaver Library SAP NetWeaver by Key Capability Solution Life Cycle Management by Key Capability SAP NetWeaver Problem Analysis Guide (PAG)
SAP NetWeaver Problem Analysis Guide (PAG)
General Quick Links
Description Internet Address
SAP Help Portal http://help.sap.com
SAP NetWeaver Library in SAP Help Portal
http://help.sap.com/nw70
SAP ERP Library in SAP Help Portal http://help.sap.com/erp
SAP Notes http://service.sap.com/notes
SAP Notes for SAP NetWeaver 7.0 installation
http://service.sap.com/sapnotesnw70
Forums, blogs, and general information related to all of the supported databases and operating system platforms
http://sdn.sap.com/irj/sdn/dbos
Product Availability Matrix (PAM) for supported operating system releases
http://service.sap.com/pam
Release notes http://service.sap.com/releasenotes
Unicode SAP systems and their availability
http://service.sap.com/unicode
System sizing (Quick Sizer tool) http://service.sap.com/sizing
SAP NetWeaver capabilities http://sdn.sap.com/irj/sdn/netweaver
Life-cycle management for SAP NetWeaver
http://sdn.sap.com/irj/sdn/lcm
A Appendix
A.1 Online Information from SAP
140/148 PUBLIC 2010-12-20
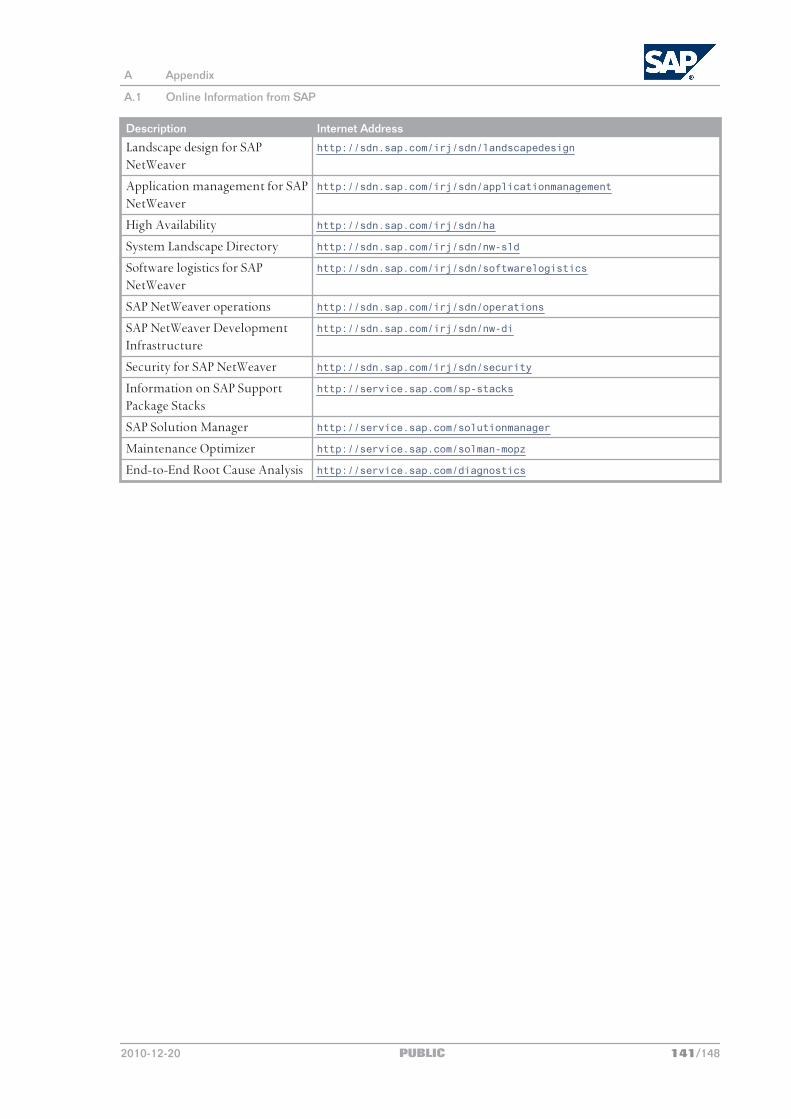
Description Internet Address
Landscape design for SAP NetWeaver
http://sdn.sap.com/irj/sdn/landscapedesign
Application management for SAP NetWeaver
http://sdn.sap.com/irj/sdn/applicationmanagement
High Availability http://sdn.sap.com/irj/sdn/ha
System Landscape Directory http://sdn.sap.com/irj/sdn/nw-sld
Software logistics for SAP NetWeaver
http://sdn.sap.com/irj/sdn/softwarelogistics
SAP NetWeaver operations http://sdn.sap.com/irj/sdn/operations
SAP NetWeaver Development Infrastructure
http://sdn.sap.com/irj/sdn/nw-di
Security for SAP NetWeaver http://sdn.sap.com/irj/sdn/security
Information on SAP Support Package Stacks
http://service.sap.com/sp-stacks
SAP Solution Manager http://service.sap.com/solutionmanager
Maintenance Optimizer http://service.sap.com/solman-mopz
End-to-End Root Cause Analysis http://service.sap.com/diagnostics
A Appendix
A.1 Online Information from SAP
2010-12-20 PUBLIC 141/148
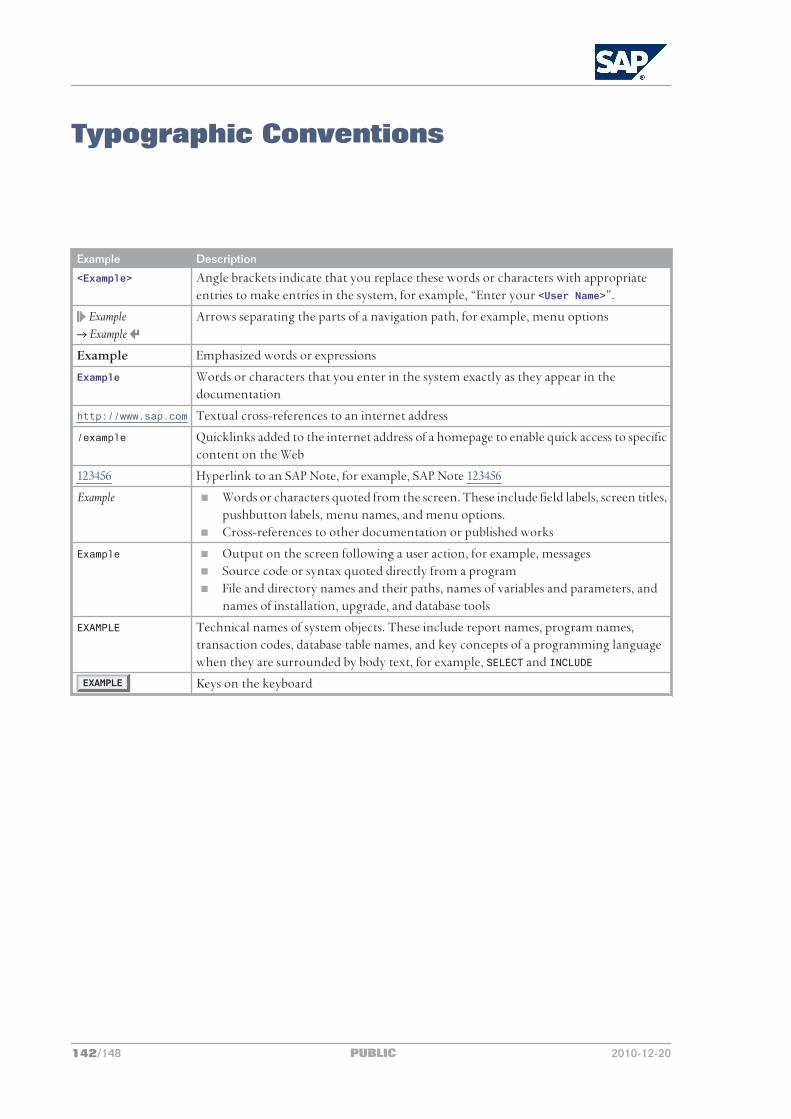
Typographic Conventions
Example Description
<Example> Angle brackets indicate that you replace these words or characters with appropriate entries to make entries in the system, for example, “Enter your <User Name>”.
ExampleExample
Arrows separating the parts of a navigation path, for example, menu options
Example Emphasized words or expressions
Example Words or characters that you enter in the system exactly as they appear in the documentation
http://www.sap.com Textual cross-references to an internet address
/example Quicklinks added to the internet address of a homepage to enable quick access to specific content on the Web
123456 Hyperlink to an SAP Note, for example, SAP Note 123456
Example ■ Words or characters quoted from the screen. These include field labels, screen titles, pushbutton labels, menu names, and menu options.
■ Cross-references to other documentation or published works
Example ■ Output on the screen following a user action, for example, messages ■ Source code or syntax quoted directly from a program ■ File and directory names and their paths, names of variables and parameters, and
names of installation, upgrade, and database tools
EXAMPLE Technical names of system objects. These include report names, program names, transaction codes, database table names, and key concepts of a programming language when they are surrounded by body text, for example, SELECT and INCLUDE
EXAMPLE Keys on the keyboard
142/148 PUBLIC 2010-12-20
SAP AGDietmar-Hopp-Allee 16
69190 WalldorfGermany
T +49/18 05/34 34 34F +49/18 05/34 34 20
www.sap.com
© Copyright 2010 SAP AG. All rights reserved.
No part of this publication may be reproduced or transmitted in any form or for any purpose without the express permission of SAP AG. The information contained herein may be changed without prior notice.Some software products marketed by SAP AG and its distributors contain proprietary software components of other software vendors.
No part of this publication may be reproduced or transmitted in any form or for any purpose without the express permission of SAP AG. The information contained herein may be changed without prior notice.Some software products marketed by SAP AG and its distributors contain proprietary software components of other software vendors.Microsoft, Windows, Excel, Outlook, and PowerPoint are registered trademarks of Microsoft Corporation.IBM, DB2, DB2 Universal Database, System i, System i5, System p, System p5, System x, System z, System z10, System z9, z10, z9, iSeries, pSeries, xSeries, zSeries, eServer, z/VM, z/OS, i5/OS, S/390, OS/390, OS/400, AS/400, S/390 Parallel Enterprise Server, PowerVM, Power Architecture, POWER6+, POWER6, POWER5+, POWER5, POWER, OpenPower, PowerPC, BatchPipes, BladeCenter, System Storage, GPFS, HACMP, RETAIN, DB2 Connect, RACF, Redbooks, OS/2, Parallel Sysplex, MVS/ESA, AIX, Intelligent Miner, WebSphere, Netfinity, Tivoli and Informix are trademarks or registered trademarks of IBM Corporation.Linux is the registered trademark of Linus Torvalds in the U.S. and other countries.Adobe, the Adobe logo, Acrobat, PostScript, and Reader are either trademarks or registered trademarks of Adobe Systems Incorporated in the United States and/or other countries.Oracle is a registered trademark of Oracle Corporation.UNIX, X/Open, OSF/1, and Motif are registered trademarks of the Open Group.Citrix, ICA, Program Neighborhood, MetaFrame, WinFrame, VideoFrame, and MultiWin are trademarks or registered trademarks of Citrix Systems, Inc.HTML, XML, XHTML and W3C are trademarks or registered trademarks of W3C®, World Wide Web Consortium, Massachusetts Institute of Technology.Java is a registered trademark of Sun Microsystems, Inc.JavaScript is a registered trademark of Sun Microsystems, Inc., used under license for technology invented and implemented by Netscape.SAP, R/3, xApps, xApp, SAP NetWeaver, Duet, PartnerEdge, ByDesign, SAP Business ByDesign, and other SAP products and services mentioned herein as well as their respective logos are trademarks or registered trademarks of SAP AG in Germany and in several other countries all over the world. All other product and service names mentioned are the trademarks of their respective companies. Data contained in this document serves informational purposes only. National product specifications may vary.These materials are subject to change without notice. These materials are provided by SAP AG and its affiliated companies (“SAP Group”) for informational purposes only, without representation or warranty of any kind, and SAP Group shall not be liable for errors or omissions with respect to the materials. The only warranties for SAP Group products and services are those that are set forth in the express warranty statements accompanying such products and services, if any. Nothing herein should be construed as constituting an additional warranty.
DisclaimerSome components of this product are based on Java™. Any code change in these components may cause unpredictable and severe malfunctions and is therefore expressly prohibited, as is any decompilation of these components.Any Java™ Source Code delivered with this product is only to be used by SAP’s Support Services and may not be modified or altered in any way.
2010-12-20 PUBLIC 143/148
Legal Software Terms
Terms for Included Open Source Software
This SAP software contains also the third party open source software products listed below. Note that for these third party products the following special terms and conditions shall apply.1. This software was developed using ANTLR.2. SAP License Agreement for STLport
SAP License Agreement for STLPort betweenSAP AktiengesellschaftSystems, Applications, Products in Data ProcessingDietmar-Hopp-Allee 1669190 Walldorf, Germany(hereinafter: SAP)andyou(hereinafter: Customer)1. Subject Matter of the Agreement
1. SAP grants Customer a non-exclusive, non-transferable, royalty-free license to use the STLport.org C++ library (STLport) and its documentation without fee.
2. By downloading, using, or copying STLport or any portion thereof Customer agrees to abide by the intellectual property laws, and to all of the terms and conditions of this Agreement.
3. The Customer may distribute binaries compiled with STLport (whether original or modified) without any royalties or restrictions.
4. Customer shall maintain the following copyright and permissions notices on STLport sources and its documentation unchanged: Copyright 2001 SAP AG
5. The Customer may distribute original or modified STLport sources, provided that: ■ The conditions indicated in the above permissions notice are met; ■ The following copyright notices are retained when present, and conditions provided in accompanying
permission notices are met:Copyright 1994 Hewlett-Packard CompanyCopyright 1996,97 Silicon Graphics Computer Systems Inc.Copyright 1997 Moscow Center for SPARC Technology.Copyright 1999,2000 Boris FomitchevCopyright 2001 SAP AG
Permission to use, copy, modify, distribute and sell this software and its documentation for any purposes is hereby granted without fee, provided that the above copyright notice appear in all copies and that both that copyright notice and this permission notice appear in supporting documentation. Hewlett-Packard Company makes no representations about the suitability of this software for any purpose. It is provided “as is” without express or implied warranty.Permission to use, copy, modify, distribute and sell this software and its documentation for any purpose is hereby granted without fee, provided that the above copyright notice appear in all copies and that both that copyright notice and this permission notice appear in supporting documentation. Silicon Graphics makes no representations about the suitability of this software for any purpose. It is provided “as is” without express or implied warranty.Permission to use, copy, modify, distribute and sell this software and its documentation for any purposes is hereby granted without fee, provided that the above copyright notice appear in all copies and that both that copyright notice and this permission notice appear in supporting documentation. Moscow Center for SPARC makes no representations about the suitability of this software for any purpose. It is provided “as is” without express or implied warranty.Boris Fomitchev makes no representations about the suitability of this software for any purpose. This material is provided "as is", with absolutely no warranty expressed or implied. Any use is at your own risk. Permission to use or copy this software for any purpose is hereby granted without fee, provided the above notices are retained on all copies. Permission to modify the code and to distribute modified code is granted, provided the above notices are retained, and a notice that the code was modified is included with the above copyright notice.
144/148 PUBLIC 2010-12-20
Permission to use, copy, modify, distribute and sell this software and its documentation for any purposes is hereby granted without fee, provided that the above copyright notice appear in all copies and that both that copyright notice and this permission notice appear in supporting documentation. SAP makes no representations about the suitability of this software for any purpose. It is provided with a limited warranty and liability as set forth in the License Agreement distributed with this copy. SAP offers this liability and warranty obligations only towards its customers and only referring to its modifications.
2. Support and MaintenanceSAP does not provide software maintenance for the STLport. Software maintenance of the STLport therefore shall be not included.All other services shall be charged according to the rates for services quoted in the SAP List of Prices and Conditions and shall be subject to a separate contract.
3. Exclusion of warrantyAs the STLport is transferred to the Customer on a loan basis and free of charge, SAP cannot guarantee that the STLport is error-free, without material defects or suitable for a specific application under third-party rights. Technical data, sales brochures, advertising text and quality descriptions produced by SAP do not indicate any assurance of particular attributes.
4. Limited Liability1. Irrespective of the legal reasons, SAP shall only be liable for damage, including unauthorized operation, if this
(i) can be compensated under the Product Liability Act or (ii) if caused due to gross negligence or intent by SAP or (iii) if based on the failure of a guaranteed attribute.
2. If SAP is liable for gross negligence or intent caused by employees who are neither agents or managerial employees of SAP, the total liability for such damage and a maximum limit on the scope of any such damage shall depend on the extent to which its occurrence ought to have anticipated by SAP when concluding the contract, due to the circumstances known to it at that point in time representing a typical transfer of the software.
3. In the case of Art. 4.2 above, SAP shall not be liable for indirect damage, consequential damage caused by a defect or lost profit.
4. SAP and the Customer agree that the typical foreseeable extent of damage shall under no circumstances exceed EUR 5,000.
5. The Customer shall take adequate measures for the protection of data and programs, in particular by making backup copies at the minimum intervals recommended by SAP. SAP shall not be liable for the loss of data and its recovery, notwithstanding the other limitations of the present Art. 4 if this loss could have been avoided by observing this obligation.
6. The exclusion or the limitation of claims in accordance with the present Art. 4 includes claims against employees or agents of SAP.
3. Adobe Document ServicesAdobe, the Adobe logo, Acrobat, PostScript, and Reader are either registered trademarks or trademarks of Adobe Systems Incorporated in the United States and / or other countries. For information on Third Party software delivered with Adobe document services and Adobe LiveCycle Designer, see SAP Note 854621.
4. Apache License, Version 2.01. Definitions:
■ "License" shall mean the terms and conditions for use, reproduction, and distribution as defined by Sections 1 through 9 of this document.
■ "Licensor" shall mean the copyright owner or entity authorized by the copyright owner that is granting the License.
■ "Legal Entity" shall mean the union of the acting entity and all other entities that control, are controlled by, or are under common control with that entity. For the purposes of this definition, "control" means (i) the power, direct or indirect, to cause the direction or management of such entity, whether by contract or otherwise, or (ii) ownership of fifty percent (50%) or more of the outstanding shares, or (iii) beneficial ownership of such entity.
■ "You" (or "Your") shall mean an individual or Legal Entity exercising permissions granted by this License. ■ "Source" form shall mean the preferred form for making modifications, including but not limited to software
source code, documentation source, and configuration files.
2010-12-20 PUBLIC 145/148
■ "Object" form shall mean any form resulting from mechanical transformation or translation of a Source form, including but not limited to compiled object code, generated documentation, and conversions to other media types.
■ "Work" shall mean the work of authorship, whether in Source or Object form, made available under the License, as indicated by a copyright notice that is included in or attached to the work (an example is provided in the Appendix below).
■ "Derivative Works" shall mean any work, whether in Source or Object form, that is based on (or derived from) the Work and for which the editorial revisions, annotations, elaborations, or other modifications represent, as a whole, an original work of authorship. For the purposes of this License, Derivative Works shall not include works that remain separable from, or merely link (or bind by name) to the interfaces of, the Work and Derivative Works thereof.
■ "Contribution" shall mean any work of authorship, including the original version of the Work and any modifications or additions to that Work or Derivative Works thereof, that is intentionally submitted to Licensor for inclusion in the Work by the copyright owner or by an individual or Legal Entity authorized to submit on behalf of the copyright owner. For the purposes of this definition, "submitted" means any form of electronic, verbal, or written communication sent to the Licensor or its representatives, including but not limited to communication on electronic mailing lists, source code control systems, and issue tracking systems that are managed by, or on behalf of, the Licensor for the purpose of discussing and improving the Work, but excluding communication that is conspicuously marked or otherwise designated in writing by the copyright owner as "Not a Contribution."
■ "Contributor" shall mean Licensor and any individual or Legal Entity on behalf of whom a Contribution has been received by Licensor and subsequently incorporated within the Work.
2. Grant of Copyright LicenseSubject to the terms and conditions of this License, each Contributor hereby grants to You a perpetual, worldwide, non-exclusive, no-charge, royalty-free, irrevocable copyright license to reproduce, prepare Derivative Works of, publicly display, publicly perform, sublicense, and distribute the Work and such Derivative Works in Source or Object form.
3. Grant of Patent LicenseSubject to the terms and conditions of this License, each Contributor hereby grants to You a perpetual, worldwide, non-exclusive, no-charge, royalty-free, irrevocable (except as stated in this section) patent license to make, have made, use, offer to sell, sell, import, and otherwise transfer the Work, where such license applies only to those patent claims licensable by such Contributor that are necessarily infringed by their Contribution(s) alone or by combination of their Contribution(s) with the Work to which such Contribution(s) was submitted. If You institute patent litigation against any entity (including a cross-claim or counterclaim in a lawsuit) alleging that the Work or a Contribution incorporated within the Work constitutes direct or contributory patent infringement, then any patent licenses granted to You under this License for that Work shall terminate as of the date such litigation is filed.
4. RedistributionYou may reproduce and distribute copies of the Work or Derivative Works thereof in any medium, with or without modifications, and in Source or Object form, provided that You meet the following conditions:1. You must give any other recipients of the Work or Derivative Works a copy of this License; and2. You must cause any modified files to carry prominent notices stating that You changed the files; and3. You must retain, in the Source form of any Derivative Works that You distribute, all copyright, patent,
trademark, and attribution notices from the Source form of the Work, excluding those notices that do not pertain to any part of the Derivative Works; and
4. If the Work includes a "NOTICE" text file as part of its distribution, then any Derivative Works that You distribute must include a readable copy of the attribution notices contained within such NOTICE file, excluding those notices that do not pertain to any part of the Derivative Works, in at least one of the following places: within a NOTICE text file distributed as part of the Derivative Works; within the Source form or documentation, if provided along with the Derivative Works; or, within a display generated by the Derivative Works, if and wherever such third-party notices normally appear. The contents of the NOTICE file are for informational purposes only and do not modify the License. You may add Your own attribution notices within Derivative Works that You distribute, alongside or as an addendum to the NOTICE text from the Work, provided that such additional attribution notices cannot be construed as modifying the License.
You may add Your own copyright statement to Your modifications and may provide additional or different license terms and conditions for use, reproduction, or distribution of Your modifications, or for any such Derivative Works
146/148 PUBLIC 2010-12-20
as a whole, provided Your use, reproduction, and distribution of the Work otherwise complies with the conditions stated in this License.
5. Submission of ContributionsUnless You explicitly state otherwise, any Contribution intentionally submitted for inclusion in the Work by You to the Licensor shall be under the terms and conditions of this License, without any additional terms or conditions. Notwithstanding the above, nothing herein shall supersede or modify the terms of any separate license agreement you may have executed with Licensor regarding such Contributions.
6. TrademarksThis License does not grant permission to use the trade names, trademarks, service marks, or product names of the Licensor, except as required for reasonable and customary use in describing the origin of the Work and reproducing the content of the NOTICE file.
7. Disclaimer of WarrantyUnless required by applicable law or agreed to in writing, Licensor provides the Work (and each Contributor provides its Contributions) on an "AS IS" BASIS, WITHOUT WARRANTIES OR CONDITIONS OF ANY KIND, either express or implied, including, without limitation, any warranties or conditions of TITLE, NON-INFRINGEMENT, MERCHANTABILITY, or FITNESS FOR A PARTICULAR PURPOSE. You are solely responsible for determining the appropriateness of using or redistributing the Work and assume any risks associated with Your exercise of permissions under this License.
8. Limitation of LiabilityIn no event and under no legal theory, whether in tort (including negligence), contract, or otherwise, unless required by applicable law (such as deliberate and grossly negligent acts) or agreed to in writing, shall any Contributor be liable to You for damages, including any direct, indirect, special, incidental, or consequential damages of any character arising as a result of this License or out of the use or inability to use the Work (including but not limited to damages for loss of goodwill, work stoppage, computer failure or malfunction, or any and all other commercial damages or losses), even if such Contributor has been advised of the possibility of such damages.
9. Accepting Warranty or Additional LiabilityWhile redistributing the Work or Derivative Works thereof, You may choose to offer, and charge a fee for, acceptance of support, warranty, indemnity, or other liability obligations and/or rights consistent with this License. However, in accepting such obligations, You may act only on Your own behalf and on Your sole responsibility, not on behalf of any other Contributor, and only if You agree to indemnify, defend, and hold each Contributor harmless for any liability incurred by, or claims asserted against, such Contributor by reason of your accepting any such warranty or additional liability.
Documentation in the SAP Service MarketplaceYou can find this document at the following address: http://service.sap.com/instguides
2010-12-20 PUBLIC 147/148
SAP AGDietmar-Hopp-Allee 1669190 WalldorfGermanyT +49/18 05/34 34 34F +49/18 05/34 34 20www.sap.com
© Copyright 2010 SAP AG. All rights reserved.No part of this publication may be reproduced or transmitted in any form or for any purpose without the express permission of SAP AG. The information contained herein may be changed without prior notice.
Recommended