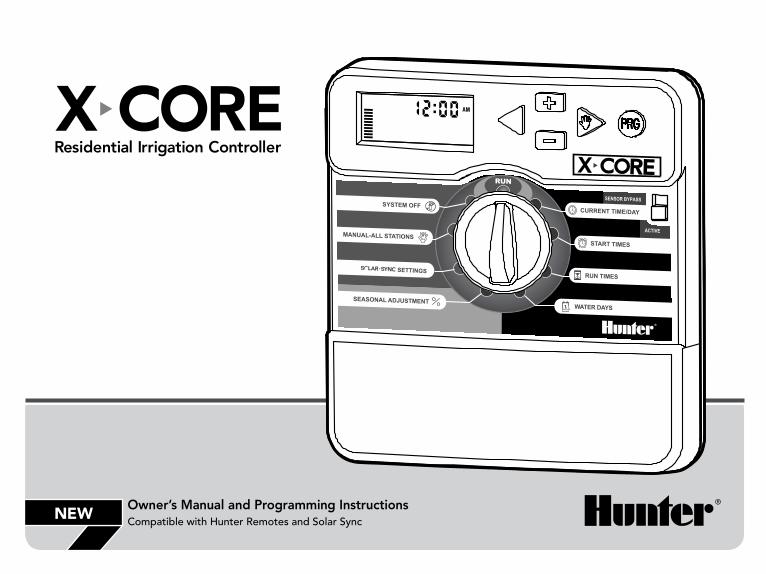
Residential Irrigation Controller
Owner’s Manual and Programming InstructionsCompatible with Hunter Remotes and Solar Sync
SEASONAL ADJUSTMENTWATER DAYS
ALLMANUAL-ALL STATIONS
START TIMES
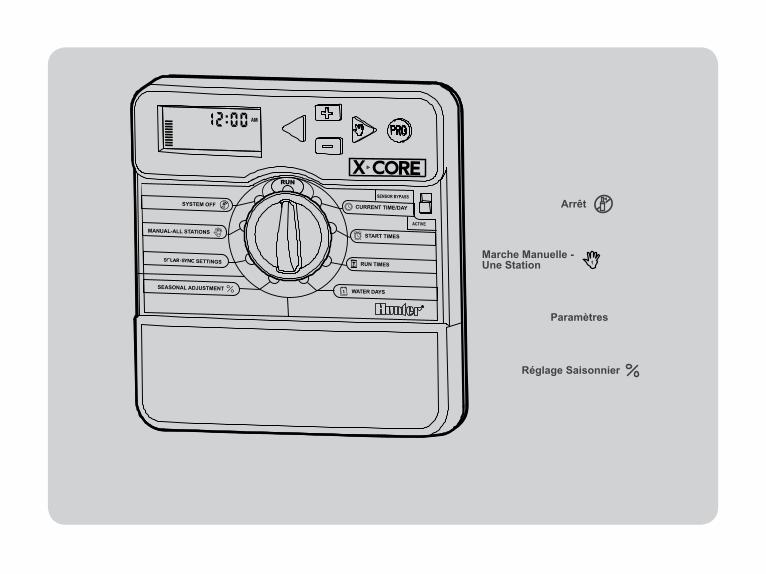
SYSTEM OFFCURRENT TIME/DAY
RUN TIMES
ACTIVE
SENSOR BYPASS
RUN
NEW
SEASONAL ADJUSTMENT WATER DAYS
ALLMANUAL-ALL STATIONS
START TIMES
SYSTEM OFF CURRENT TIME/DAY
RUN TIMES
ACTIVE
SENSOR BYPASS
RUN
X-CORe COMPOnents....................................................................2MOUntInG tHe COntROLLeR tO WALL.......................................6COnneCtInG VALVes AnD tRAnsFORMeR..................................7ACtIVAtInG tHe BAtteRy...............................................................8RePLACInG tHe BAtteRy................................................................8COnneCtInG A MAsteR VALVe.....................................................9COnneCtInG A PUMP stARt ReLAy............................................10COnneCtInG A HUnteR “CLIk” WeAtHeR sensOR..................11
Testing.the.Weather.Sensor.........................................................11Manually.Bypassing.the.Weather.Sensor.....................................11
COnneCtInG A HUnteR sOLAR synC et sensOR....................12Installing.Solar.Sync.Sensor..........................................................12Installing.the.Wireless.Solar.Sync.................................................12Solar.Sync.Settings.......................................................................12Region.
�
...................................................................................13Water.Adjustment.
�
..................................................................14Uninstalling.a.Solar.Sync.Sensor..................................................14Calibration/Setup.........................................................................15
COnneCtInG A HUnteR ReMOte...............................................16Connecting.to.a.Hunter.Remote.(not.included)...........................16To.install.the.SmartPort.connector...............................................16
POWeR FAILURes............................................................................16PROGRAMMInG tHe COntROLLeR..............................................17
Setting.the.Date.and.Time. ......................................................17Setting.the.Program.Start.Time(s). ..........................................18Eliminating.a.Program.Start.Time.................................................18
Setting.Station.Run.Times. .......................................................18Setting.Days.To.Water. ............................................................18Selecting.Specific.Days.of.the.Week.to.Water.............................19Selecting.Odd.or.Even.Days.to.Water.........................................19Selecting.Interval.Watering ...................................................19Setting.Event.Day(s).Off...............................................................20Automatic.Watering. .................................................................20System.Off. .............................................................................20Programmable.Rain.Off................................................................20Seasonal.Adjustment. ..............................................................21Manually.Run.a.Single.Station. 1 ...............................................22One.Touch.Manual.Start.and.Advance.........................................22
ADVAnCeD FeAtURes....................................................................23Programmable.Sensor.Override...................................................23Test.Program.of.All.Stations.........................................................23Hunter.Quick.Check™.Diagnostics..............................................23Easy.Retrieve™.Program.Memory...............................................24Programmable.Delay.Between.Stations.......................................24Clearing.the.Controller’s.Memory/.Resetting.the.Controller...............................................................24
tROUBLesHOOtInG GUIDe...........................................................25sPeCIFICAtIOns..............................................................................28
Operating.Specifications..............................................................28Electrical.Specifications................................................................28Explanation.of.Symbols................................................................28
CeRtIFICAte OF COnFORMIty tO eUROPeAn DIReCtIVes.......29
TablE of CoNTENTs
2
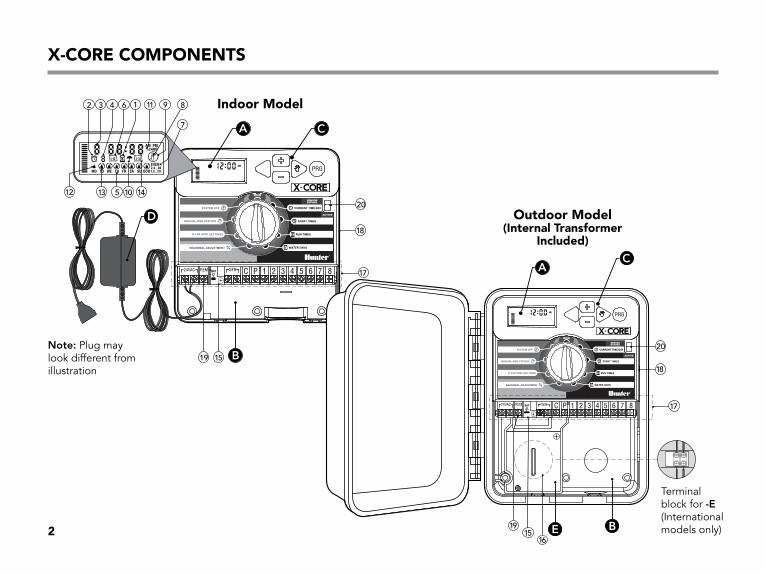
X-CorE CompoNENTs
Terminal.block.for.-e.(International.models.only)
note:.Plug.may.look.different.from.illustration
Indoor model
outdoor model (Internal Transformer
Included)
3
X-CorE CompoNENTs
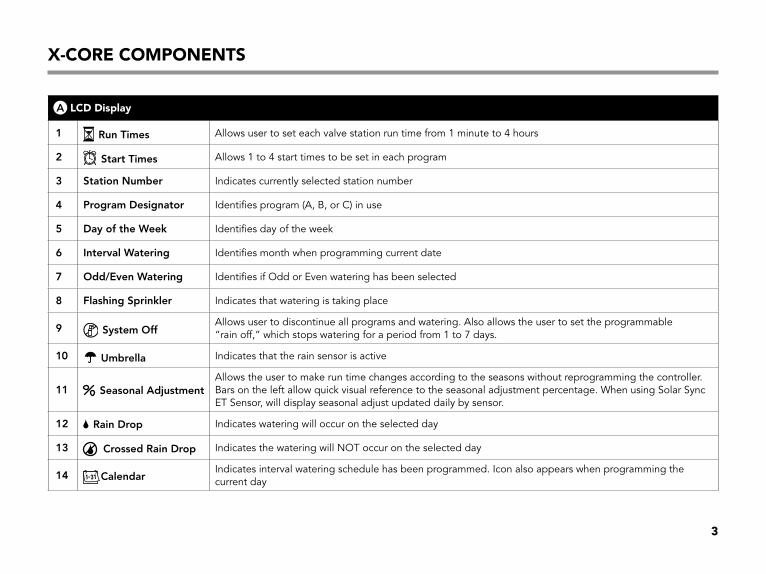
.lCD Display
1 Run times Allows.user.to.set.each.valve.station.run.time.from.1.minute.to.4.hours
2 start times Allows.1.to.4.start.times.to.be.set.in.each.program
3 station number Indicates.currently.selected.station.number
4 Program Designator Identifies.program.(A,.B,.or.C).in.use
5 Day of the Week Identifies.day.of.the.week
6 Interval Watering Identifies.month.when.programming.current.date
7 Odd/even Watering Identifies.if.Odd.or.Even.watering.has.been.selected
8 Flashing sprinkler Indicates.that.watering.is.taking.place
9 system Off Allows.user.to.discontinue.all.programs.and.watering..Also.allows.the.user.to.set.the.programmable..“rain.off,”.which.stops.watering.for.a.period.from.1.to.7.days.
10 Umbrella Indicates.that.the.rain.sensor.is.active
11 seasonal AdjustmentAllows.the.user.to.make.run.time.changes.according.to.the.seasons.without.reprogramming.the.controller..Bars.on.the.left.allow.quick.visual.reference.to.the.seasonal.adjustment.percentage..When.using.Solar.Sync.ET.Sensor,.will.display.seasonal.adjust.updated.daily.by.sensor.
12 Rain Drop Indicates.watering.will.occur.on.the.selected.day
13 Crossed Rain Drop Indicates.the.watering.will.NOT.occur.on.the.selected.day
14 CalendarIndicates.interval.watering.schedule.has.been.programmed..Icon.also.appears.when.programming.the..current.day
4
X-CorE CompoNENTs
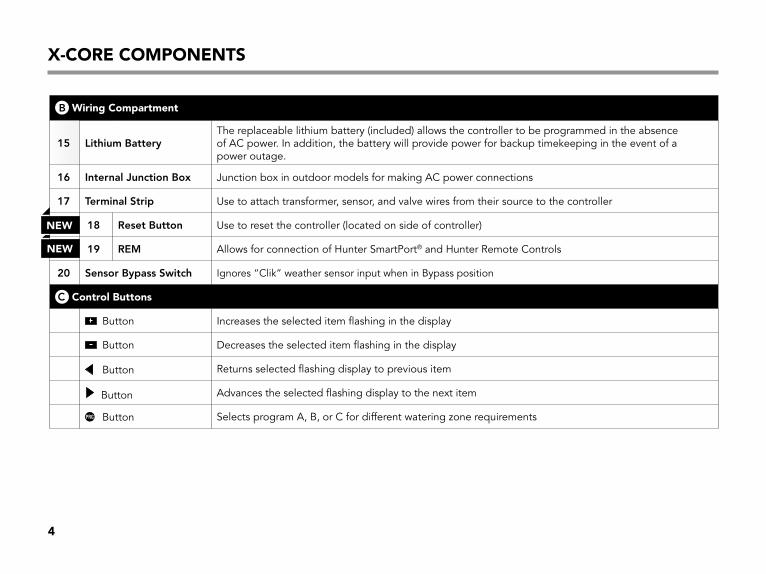
.Wiring Compartment
15 Lithium BatteryThe.replaceable.lithium.battery.(included).allows.the.controller.to.be.programmed.in.the.absence..of.AC.power..In.addition,.the.battery.will.provide.power.for.backup.timekeeping.in.the.event.of.a..power.outage.
16 Internal Junction Box Junction.box.in.outdoor.models.for.making.AC.power.connections
17 terminal strip Use.to.attach.transformer,.sensor,.and.valve.wires.from.their.source.to.the.controller
18 Reset Button Use.to.reset.the.controller.(located.on.side.of.controller)
19 ReM Allows.for.connection.of.Hunter.SmartPort®.and.Hunter.Remote.Controls
20 sensor Bypass switch Ignores.“Clik”.weather.sensor.input.when.in.Bypass.position
.Control buttons
. Button Increases.the.selected.item.flashing.in.the.display
. Button Decreases.the.selected.item.flashing.in.the.display
. Button Returns.selected.flashing.display.to.previous.item
.Button Advances.the.selected.flashing.display.to.the.next.item
. .Button Selects.program.A,.B,.or.C.for.different.watering.zone.requirements
NEW
NEW
5
X-CorE CompoNENTs
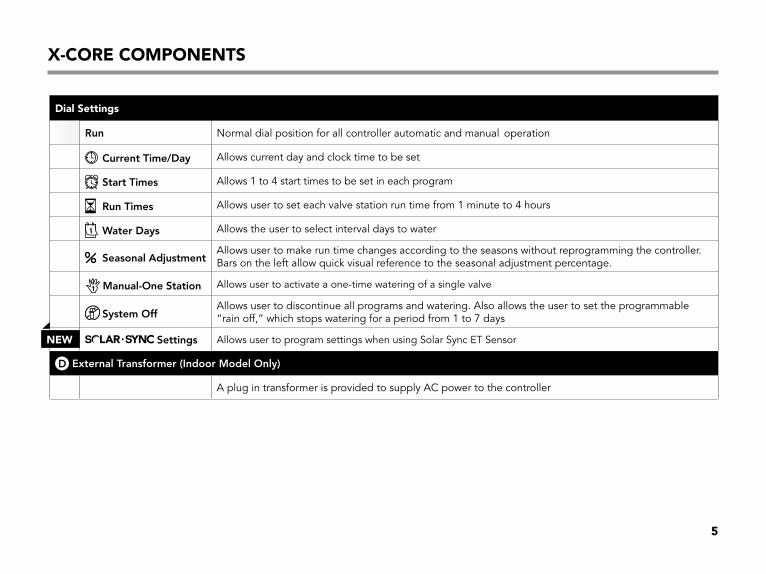
Dial settings
Run Normal.dial.position.for.all.controller.automatic.and.manual..operation
.Current time/Day Allows.current.day.and.clock.time.to.be.set
.start times Allows.1.to.4.start.times.to.be.set.in.each.program
. Run times Allows.user.to.set.each.valve.station.run.time.from.1.minute.to.4.hours
.Water Days Allows.the.user.to.select.interval.days.to.water
.seasonal AdjustmentAllows.user.to.make.run.time.changes.according.to.the.seasons.without.reprogramming.the.controller..Bars.on.the.left.allow.quick.visual.reference.to.the.seasonal.adjustment.percentage.
1 Manual-One station Allows.user.to.activate.a.one-time.watering.of.a.single.valve
.system OffAllows.user.to.discontinue.all.programs.and.watering..Also.allows.the.user.to.set.the.programmable..“rain.off,”.which.stops.watering.for.a.period.from.1.to.7.days
settings Allows.user.to.program.settings.when.using.Solar.Sync.ET.Sensor
external transformer (Indoor Model Only)
A.plug.in.transformer.is.provided.to.supply.AC.power.to.the.controller
NEW
6
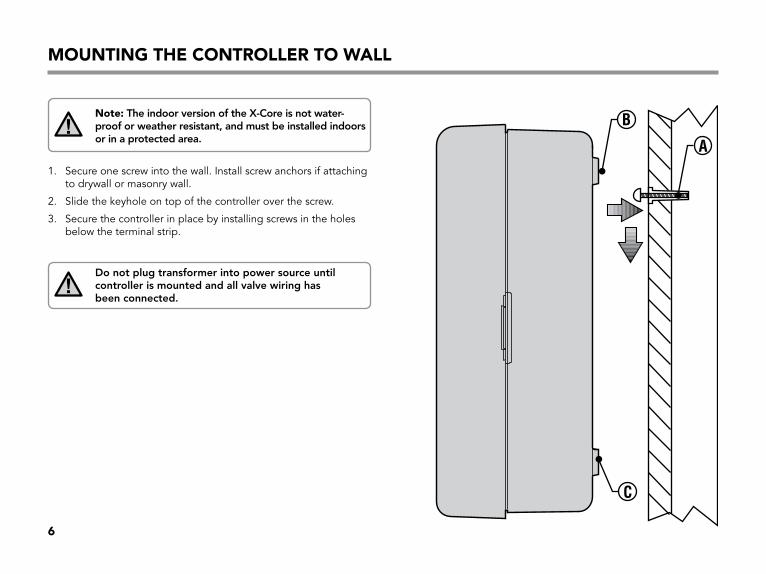
moUNTING THE CoNTrollEr To Wall
Note: the indoor version of the X-Core is not water-proof or weather resistant, and must be installed indoors or in a protected area.
1.. .Secure.one.screw.into.the.wall..Install.screw.anchors.if.attaching.to.drywall.or.masonry.wall.
2.. Slide.the.keyhole.on.top.of.the.controller.over.the.screw.
3.. .Secure.the.controller.in.place.by.installing.screws.in.the.holes.below.the.terminal.strip.
Do not plug transformer into power source until controller is mounted and all valve wiring has been connected.
C
A
B
7
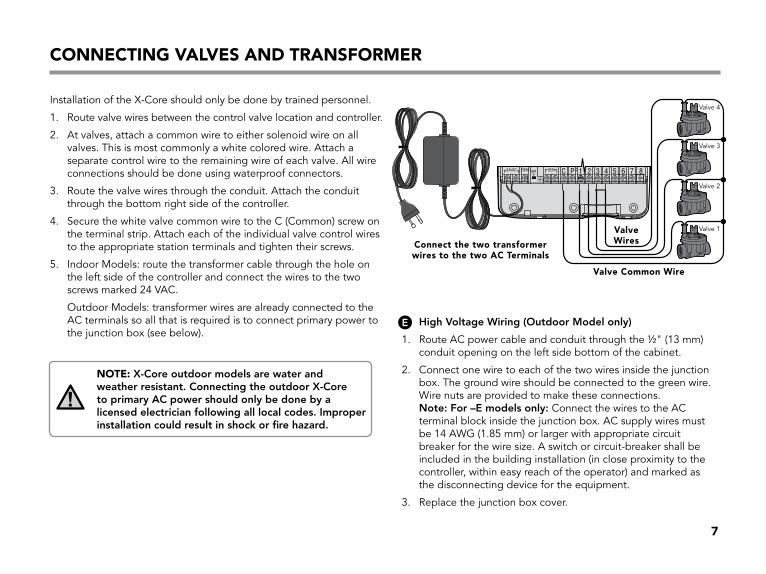
CoNNECTING ValVEs aND TraNsformEr
Installation.of.the.X-Core.should.only.be.done.by.trained.personnel.
1.. Route.valve.wires.between.the.control.valve.location.and.controller.
2.. .At.valves,.attach.a.common.wire.to.either.solenoid.wire.on.all.valves..This.is.most.commonly.a.white.colored.wire..Attach.a.separate.control.wire.to.the.remaining.wire.of.each.valve..All.wire.connections.should.be.done.using.waterproof.connectors.
3.. .Route.the.valve.wires.through.the.conduit..Attach.the.conduit.through.the.bottom.right.side.of.the.controller.
4.. .Secure.the.white.valve.common.wire.to.the.C.(Common).screw.on.the.terminal.strip..Attach.each.of.the.individual.valve.control.wires.to.the.appropriate.station.terminals.and.tighten.their.screws.
5.. .Indoor.Models:.route.the.transformer.cable.through.the.hole.on.the.left.side.of.the.controller.and.connect.the.wires.to.the.two.screws.marked.24.VAC.
. .Outdoor.Models:.transformer.wires.are.already.connected.to.the.AC.terminals.so.all.that.is.required.is.to.connect.primary.power.to.the.junction.box.(see.below).
NoTE: X-Core outdoor models are water and weather resistant. Connecting the outdoor X-Core to primary AC power should only be done by a licensed electrician following all local codes. Improper installation could result in shock or fire hazard.
BAT
High Voltage Wiring (Outdoor Model only)
. 1.. .Route.AC.power.cable.and.conduit.through.the.½".(13.mm).conduit.opening.on.the.left.side.bottom.of.the.cabinet.
. 2.. .Connect.one.wire.to.each.of.the.two.wires.inside.the.junction.box..The.ground.wire.should.be.connected.to.the.green.wire..Wire.nuts.are.provided.to.make.these.connections...note: For –e models only: Connect.the.wires.to.the.AC.terminal.block.inside.the.junction.box..AC.supply.wires.must..be.14.AWG.(1.85.mm).or.larger.with.appropriate.circuit.breaker.for.the.wire.size..A.switch.or.circuit-breaker.shall.be.included.in.the.building.installation.(in.close.proximity.to.the.controller,.within.easy.reach.of.the.operator).and.marked.as.the.disconnecting.device.for.the.equipment.
. 3.. Replace.the.junction.box.cover.
Connect the two transformer wires to the two aC Terminals
Valve Common Wire
Valve.4
Valve.3
Valve.2
Valve.1Valve Wires
8
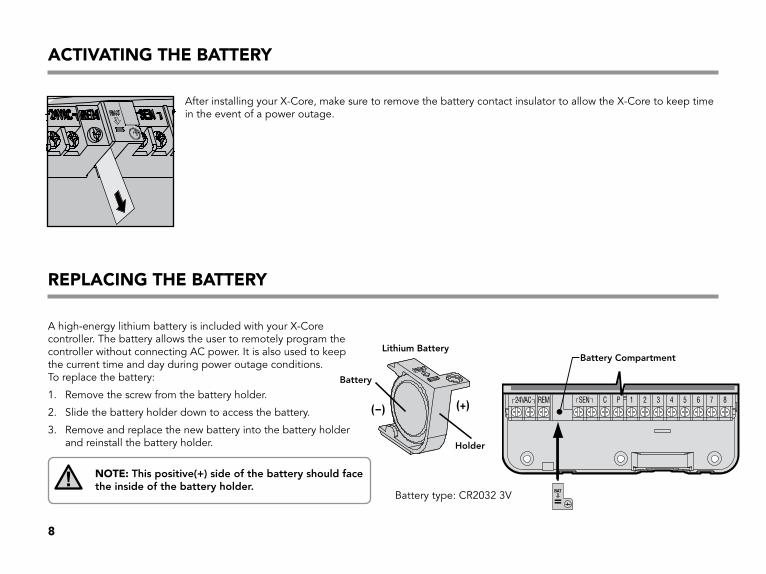
aCTIVaTING THE baTTEry
After.installing.your.X-Core,.make.sure.to.remove.the.battery.contact.insulator.to.allow.the.X-Core.to.keep.time.in.the.event.of.a.power.outage.
rEplaCING THE baTTEry
A.high-energy.lithium.battery.is.included.with.your.X-Core.controller..The.battery.allows.the.user.to.remotely.program.the.controller.without.connecting.AC.power..It.is.also.used.to.keep..the.current.time.and.day.during.power.outage.conditions...To.replace.the.battery:
1.. Remove.the.screw.from.the.battery.holder.
2.. Slide.the.battery.holder.down.to.access.the.battery.
3.. .Remove.and.replace.the.new.battery.into.the.battery.holder..and.reinstall.the.battery.holder.
NoTE: this positive(+) side of the battery should face the inside of the battery holder.
Battery.type:.CR2032.3V
SEN C P 1 2 3 4 5 6 7 8 24VAC
BAT
Battery CompartmentLithium Battery
Battery
Holder
(--) (+)

9
CoNNECTING a masTEr ValVE
NoTE: Complete this section only if you have a master valve installed in your irrigation system. A master valve is a “normally closed” valve installed at the supply point of the main line that opens only when the controller initiates a watering program.
1.. .At.the.Master.Valve,.attach.the.common.wire.to.either.solenoid.wire.of.the.valve..Attach.a.separate.control.wire.to.the.remaining.solenoid.wire.
2.. .The.common.wire.should.be.attached.to.the.C.terminal.inside.the.controller..The.other.wire.coming.from.the.master.valve.should.be.attached.to.the.P.terminal.inside.the.controller..Tighten.each.terminal.screw.
SEN C P 1 2 3 4 5 6 7 8 24VAC BAT
master Valve
Valve.2
Valve.1
Valve.3
Valve.4
master Valve Wire
Valve Common Wire
Valve Wires
10
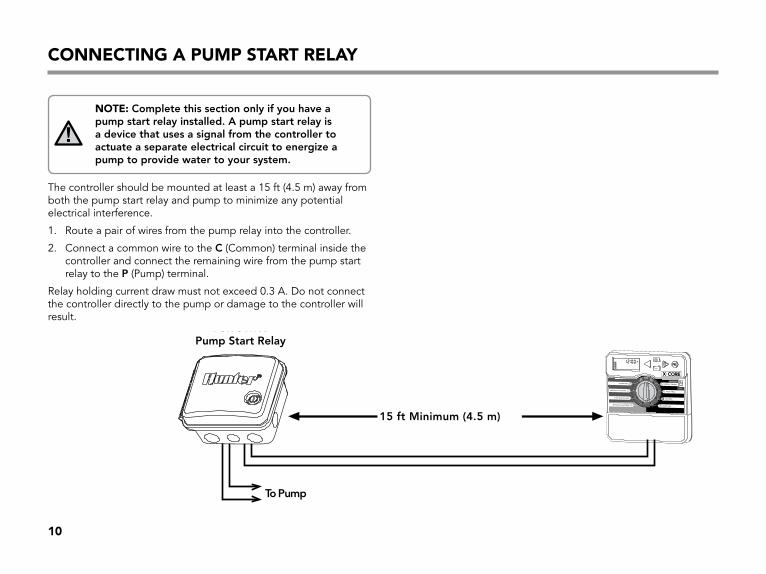
PSR SeriesPump Start Relay
15 ft Minimum (4.5 m)
To Pump
ST AR T TIMES
SEASONAL ADJUSTMENT WATER DAYS
ALLMANUAL-ALL STATIONS
START TIMES
SYSTEM OFF CURRENT TIME/DAY
RUN TIMES
ACTIVE
SENSOR BYPASS
RUN
NoTE: Complete this section only if you have a pump start relay installed. A pump start relay is a device that uses a signal from the controller to actuate a separate electrical circuit to energize a pump to provide water to your system.
The.controller.should.be.mounted.at.least.a.15.ft.(4.5.m).away.from.both.the.pump.start.relay.and.pump.to.minimize.any.potential.electrical.interference.
1.. Route.a.pair.of.wires.from.the.pump.relay.into.the.controller.
2.. .Connect.a.common.wire.to.the.C.(Common).terminal.inside.the.controller.and.connect.the.remaining.wire.from.the.pump.start.relay.to.the.P.(Pump).terminal.
Relay.holding.current.draw.must.not.exceed.0.3.A..Do.not.connect.the.controller.directly.to.the.pump.or.damage.to.the.controller.will.result.
CoNNECTING a pUmp sTarT rElay
11
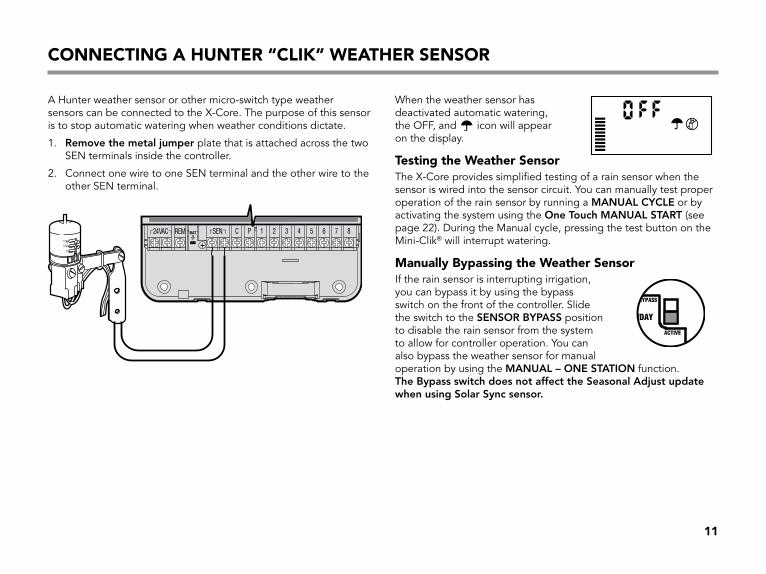
CoNNECTING a HUNTEr “ClIk” WEaTHEr sENsor
A.Hunter.weather.sensor.or.other.micro-switch.type.weather.sensors.can.be.connected.to.the.X-Core..The.purpose.of.this.sensor.is.to.stop.automatic.watering.when.weather.conditions.dictate.
1.. .Remove the metal jumper.plate.that.is.attached.across.the.two.SEN.terminals.inside.the.controller.
2.. .Connect.one.wire.to.one.SEN.terminal.and.the.other.wire.to.the.other.SEN.terminal.
When.the.weather.sensor.has.deactivated.automatic.watering,.the.OFF,.and. .icon.will.appear.on.the.display.
Testing the Weather sensorThe.X-Core.provides.simplified.testing.of.a.rain.sensor.when.the.sensor.is.wired.into.the.sensor.circuit..You.can.manually.test.proper.operation.of.the.rain.sensor.by.running.a.MAnUAL CyCLe.or.by.activating.the.system.using.the.One touch.MAnUAL stARt (see.page.22)..During.the.Manual.cycle,.pressing.the.test.button.on.the.Mini-Clik®.will.interrupt.watering..
manually bypassing the Weather sensorIf.the.rain.sensor.is.interrupting.irrigation,.you.can.bypass.it.by.using.the.bypass.switch.on.the.front.of.the.controller..Slide.the.switch.to.the.sensOR ByPAss.position.to.disable.the.rain.sensor.from.the.system.to.allow.for.controller.operation..You.can.also.bypass.the.weather.sensor.for.manual.operation.by.using.the.MAnUAL – One stAtIOn.function..the Bypass switch does not affect the seasonal Adjust update when using solar sync sensor.
SEN C P 1 2 3 4 5 6 7 8 REM24VAC BAT
/DAY
ACTIVE
BYPASS
12
CoNNECTING a HUNTEr solar syNC ET sENsor
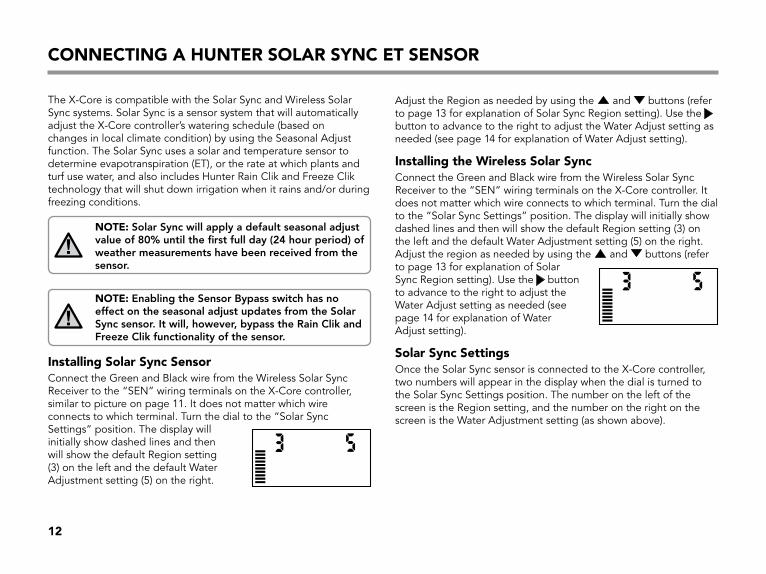
The.X-Core.is.compatible.with.the.Solar.Sync.and.Wireless.Solar.Sync.systems..Solar.Sync.is.a.sensor.system.that.will.automatically.adjust.the.X-Core.controller’s.watering.schedule.(based.on.changes.in.local.climate.condition).by.using.the.Seasonal.Adjust.function..The.Solar.Sync.uses.a.solar.and.temperature.sensor.to.determine.evapotranspiration.(ET),.or.the.rate.at.which.plants.and.turf.use.water,.and.also.includes.Hunter.Rain.Clik.and.Freeze.Clik.technology.that.will.shut.down.irrigation.when.it.rains.and/or.during.freezing.conditions.
NoTE: solar sync will apply a default seasonal adjust value of 80% until the first full day (24 hour period) of weather measurements have been received from the sensor.
NoTE: enabling the sensor Bypass switch has no effect on the seasonal adjust updates from the solar sync sensor. It will, however, bypass the Rain Clik and Freeze Clik functionality of the sensor.
Installing solar sync sensorConnect.the.Green.and.Black.wire.from.the.Wireless.Solar.Sync.Receiver.to.the.“SEN”.wiring.terminals.on.the.X-Core.controller,.similar.to.picture.on.page.11..It.does.not.matter.which.wire.connects.to.which.terminal..Turn.the.dial.to.the.“Solar.Sync.Settings”.position..The.display.will.initially.show.dashed.lines.and.then.will.show.the.default.Region.setting.(3).on.the.left.and.the.default.Water.Adjustment.setting.(5).on.the.right..
Adjust.the.Region.as.needed.by.using.the. .and. .buttons.(refer.to.page.13.for.explanation.of.Solar.Sync.Region.setting)..Use.the. .button.to.advance.to.the.right.to.adjust.the.Water.Adjust.setting.as.needed.(see.page.14.for.explanation.of.Water.Adjust.setting).
Installing the Wireless solar syncConnect.the.Green.and.Black.wire.from.the.Wireless.Solar.Sync.Receiver.to.the.“SEN”.wiring.terminals.on.the.X-Core.controller..It.does.not.matter.which.wire.connects.to.which.terminal..Turn.the.dial.to.the.“Solar.Sync.Settings”.position..The.display.will.initially.show.dashed.lines.and.then.will.show.the.default.Region.setting.(3).on.the.left.and.the.default.Water.Adjustment.setting.(5).on.the.right..Adjust.the.region.as.needed.by.using.the. .and. .buttons.(refer.to.page.13.for.explanation.of.Solar.Sync.Region.setting)..Use.the. .button.to.advance.to.the.right.to.adjust.the.Water.Adjust.setting.as.needed.(see.page.14.for.explanation.of.Water.Adjust.setting).
solar sync settingsOnce.the.Solar.Sync.sensor.is.connected.to.the.X-Core.controller,.two.numbers.will.appear.in.the.display.when.the.dial.is.turned.to.the.Solar.Sync.Settings.position..The.number.on.the.left.of.the.screen.is.the.Region.setting,.and.the.number.on.the.right.on.the.screen.is.the.Water.Adjustment.setting.(as.shown.above).
13
CoNNECTING a HUNTEr solar syNC ET sENsor
region
�
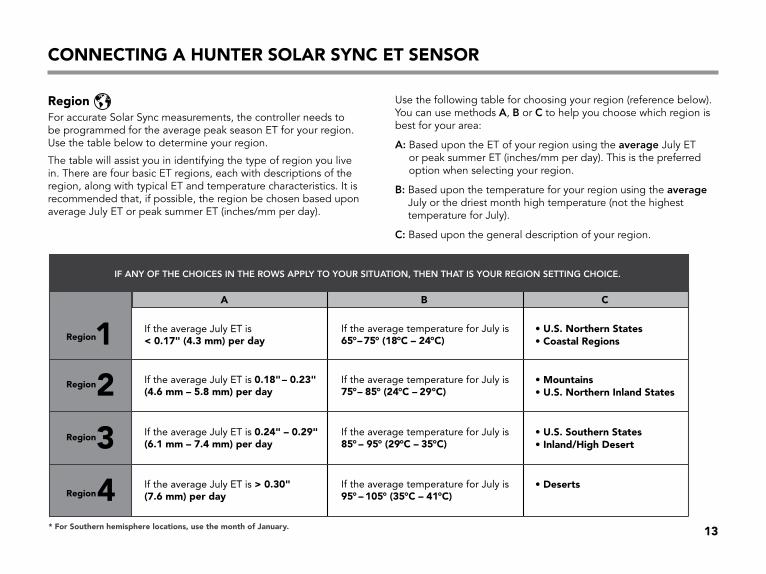
For.accurate.Solar.Sync.measurements,.the.controller.needs.to..be.programmed.for.the.average.peak.season.ET.for.your.region..Use.the.table.below.to.determine.your.region.
The.table.will.assist.you.in.identifying.the.type.of.region.you.live.in..There.are.four.basic.ET.regions,.each.with.descriptions.of.the.region,.along.with.typical.ET.and.temperature.characteristics..It.is.recommended.that,.if.possible,.the.region.be.chosen.based.upon.average.July.ET.or.peak.summer.ET.(inches/mm.per.day).
Use.the.following.table.for.choosing.your.region.(reference.below)..You.can.use.methods.A,.B.or.C.to.help.you.choose.which.region.is.best.for.your.area:
A:..Based.upon.the.ET.of.your.region.using.the.average July.ET.or.peak.summer.ET.(inches/mm.per.day)..This.is.the.preferred.option.when.selecting.your.region.
B:..Based.upon.the.temperature.for.your.region.using.the.average July.or.the.driest.month.high.temperature.(not.the.highest..temperature.for.July).
C:.Based.upon.the.general.description.of.your.region.
• U.S. Northern States • Coastal Regions
If the average July ET is< 0.17" (4.3 mm) per day
If the average temperature for July is65°–75° (18°C – 24°C)
If the average temperature for July is75° – 85° (24°C – 29°C)
• Mountains• U.S. Northern Inland States
If the average July ET is 0.18" – 0.23" (4.6 mm – 5.8 mm) per day
• U.S. Southern States• Inland/High Desert
If the average July ET is 0.24" – 0.29" (6.1 mm – 7.4 mm) per day
If the average temperature for July is85° – 95° (29°C – 35°C)
• DesertsIf the average July ET is > 0.30" (7.6 mm) per day
If the average temperature for July is95° – 105° (35°C – 41°C)
* For Southern hemisphere locations, use the month of January.
Region1Region2Region3
Region4
IF ANY OF THE CHOICES IN THE ROWS APPLY TO YOUR SITUATION, THEN THAT IS YOUR REGION SETTING CHOICE.
A B C
14
CoNNECTING a HUNTEr solar syNC ET sENsor
Water adjustment
�
The.Water.Adjustment.is.a.1.to.10.scale.that.allows.for.easy.adjustment.of.the.Seasonal.Adjust.value.from.the.Solar.Sync.ET.Sensor..Upon.installation.of.the.Solar.Sync.ET.Sensor,.it.is.recommended.that.the.Water.Adjustment.setting.stay.at.the.default.value.of.5..However,.after.installation,.if.you.find.that.the.seasonal.adjust.value.is.lower.or.higher.than.expected,.the.Water.Adjustment.value.can.be.modified.to.modify.the.Seasonal.Adjust.output.value..See.Calibration/Setup.on.page.15.for.explanation.of.how.to.use.Water.Adjustment.scale.to.fine.tune.seasonal.adjust.output.value.
NoTE: If an individual zone is “wetter” or “drier” than the rest of the system, simply increase or decrease the amount of run time on the controller.
Uninstalling a solar sync sensorIf.a.Solar.Sync.sensor.has.been.installed.on.the.X-Core.controller.then.the.seasonal.adjust.value.used.by.the.controller.will.be.calculated.from.the.weather.data.supplied.by.the.Solar.Sync.sensor..If.it.is.decided.that.the.Solar.Sync.sensor.will.no.longer.be.used.with.the.X-Core.controller,.it.must.be.uninstalled..If the solar sync sensor is not uninstalled, the controller will not allow the seasonal adjust value to be manually changed..For.example,.if.the.seasonal.adjust.value.shown.on.the.controller.was.50%.when.the.Solar.Sync.sensor.was.removed,.it.will.remain.50%.until.the.Solar.Sync.sensor.is.uninstalled..
To.uninstall.the.Solar.Sync.sensor,.simply.disconnect.the.green.and.black.wires.from.the.controller.terminal.and.then.turn.the.dial.to.the.“Solar.Sync.Settings”.position..The.display.should.show.dashes,.indicating.that.the.controller.no.longer.recognizes.the.Solar.Sync.sensor.for.calculation.of.seasonal.adjustment..Now.the.seasonal.adjust.value.can.be.changed.manually.by.turning.the.knob.to.the.“Seasonal.Adjust”.position.and.using.the. .or. .button.to.adjust.the.value.
15
CoNNECTING a HUNTEr solar syNC ET sENsor
Calibration/setupAfter.Solar.Sync.has.been.installed.and.programmed,.it.is.recommended.to.allow.the.system.to.run.for.a.few.days.at.the.initial.setting...Because.of.the.variety.in.site.conditions.(including.sensor.location,.amount.of.direct.sunlight.available.to.the.sensor,.reflective.heat.from..surrounding.structures,.etc),.the initial setting may require adjustment in order to arrive at the desired performance. The.calibration.of.the.Solar.Sync.to.a.particular.site.can.easily.be.accomplished.by.adjusting.the.Region.and/or.Water.Adjustment.settings..The.instructions.below.outline.this.process:
1.. Install.Solar.Sync.sensor
2.. .Program.Region.and.allow.system.to.operate.at.initial.setting.for.a.minimum.of.3.days.(see.page.13.for.instructions.on.how.to.determine.proper.Region.setting).
3.. .Observe.the.Seasonal.Adjust.on.the.controller..If.the.Seasonal.Adjust.amount.appears.to.be.lower.or.higher.than.expected.for.that.time.of.year,.the.Solar.Sync.settings.need.to.be.adjusted..
a. seasonal Adjust too low:.Turn.the.dial.to.the.Solar.Sync.settings.position..Increase.the.value.on.the.Water.Adjustment.scale.(10.is.max)..Once.the.setting.is.changed,.the.controller.will.immediately.be.updated.with.the.new.Seasonal.Adjust.%..Increase.the.Water.Adjustment.setting.until.the.desired.Seasonal.Adjust.%.is.shown..If you max out the Water Adjustment scale at 10 and still require more seasonal Adjust, move down to the next lower Region (from Region 4 to 3, for example).
b. seasonal Adjust too high:.Turn.the.dial.to.the.Solar.Sync.settings.position..Decrease.the.value.on.the.Water.Adjustment.scale.(default.setting.is.5)..Once.the.setting.is.changed,.the.controller.will.immediately.be.updated.with.the.new.Seasonal.Adjust.%..Decrease.the.Water.Adjustment.setting.until.the.desired.Seasonal.Adjust.%.is.shown..If you minimize the Water Adjustment scale down to 1 and still require a reduction in seasonal Adjust, move up the next Region (from Region 2 to 3, for example).
station Run times:.It.is.important.to.understand.that.Solar.Sync.provides.a.global.seasonal.adjustment.to.the.controller..This.means.that.all.station.run.times.will.be.modified.by.the.seasonal.adjust.percentage.shown..When.programming.the.controller,.the.run.times.should.be.entered.that.represent.peak.season.watering.schedules..If.the.Solar.Sync.is.adjusting.to.the.appropriate.seasonal.adjust.value.but.the.run.time.for.a.particular.station.appears.to.be.too.long/short,.adjust.the.station.run.time.in.the.controller.program..
16
CoNNECTING a HUNTEr rEmoTE
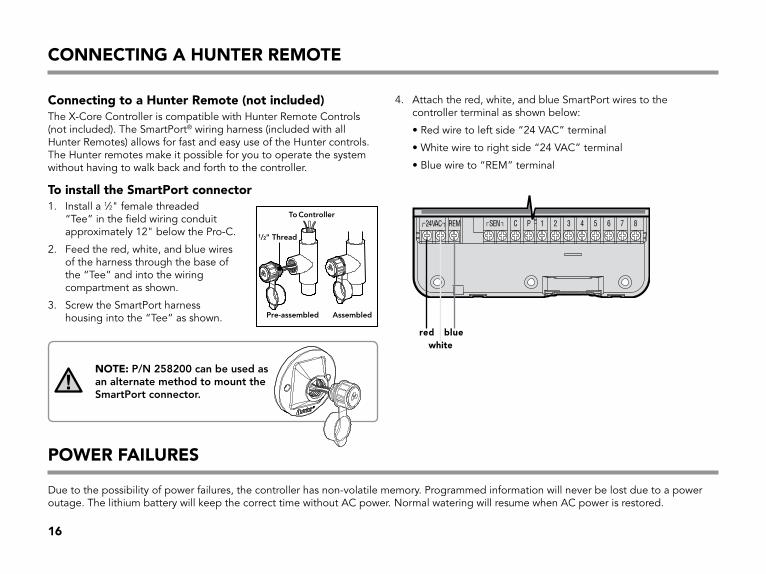
Connecting to a Hunter remote (not included)The.X-Core.Controller.is.compatible.with.Hunter.Remote.Controls.(not.included)..The.SmartPort®.wiring.harness.(included.with.all.Hunter.Remotes).allows.for.fast.and.easy.use.of.the.Hunter.controls..The.Hunter.remotes.make.it.possible.for.you.to.operate.the.system.without.having.to.walk.back.and.forth.to.the.controller.
To install the smartport connector1.. .Install.a.1⁄2".female.threaded.
“Tee”.in.the.field.wiring.conduit..approximately.12".below.the.Pro-C.
2.. .Feed.the.red,.white,.and.blue.wires..of.the.harness.through.the.base.of..the.“Tee”.and.into.the.wiring..compartment.as.shown.
3... .Screw.the.SmartPort.harness..housing.into.the.“Tee”.as.shown..
4... .Attach.the.red,.white,.and.blue.SmartPort.wires.to.the..controller.terminal.as.shown.below:
. •.Red.wire.to.left.side.“24.VAC”.terminal
. •.White.wire.to.right.side.“24.VAC”.terminal
. •.Blue.wire.to.“REM”.terminal
.
1/2" Thread
To Controller
Pre-assembled Assembled
poWEr faIlUrEs
Due.to.the.possibility.of.power.failures,.the.controller.has.non-volatile.memory..Programmed.information.will.never.be.lost.due.to.a.power.outage..The.lithium.battery.will.keep.the.correct.time.without.AC.power..Normal.watering.will.resume.when.AC.power.is.restored.
SEN C P 1 2 3 4 5 6 7 8 24VAC
redwhite
blue
NoTE: P/n 258200 can be used as an alternate method to mount the smartPort connector.
17
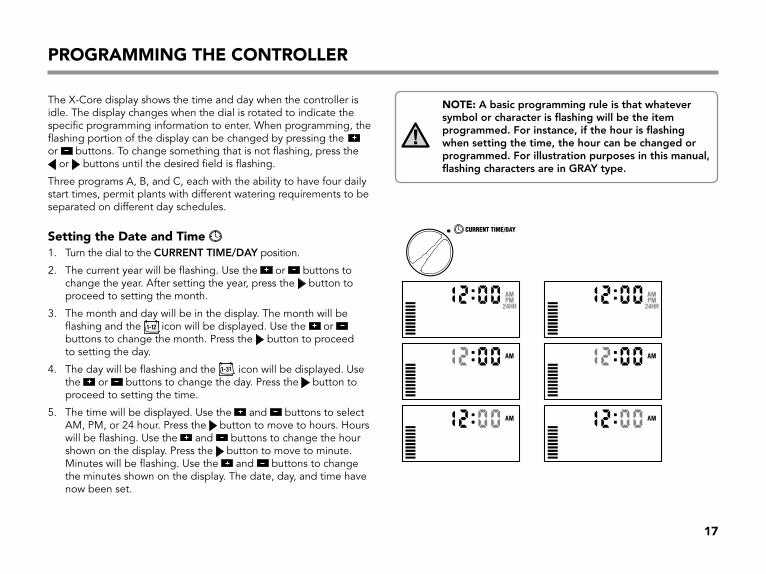
NoTE: A basic programming rule is that whatever symbol or character is flashing will be the item programmed. For instance, if the hour is flashing when setting the time, the hour can be changed or programmed. For illustration purposes in this manual, flashing characters are in GRAy type.
The.X-Core.display.shows.the.time.and.day.when.the.controller.is.idle..The.display.changes.when.the.dial.is.rotated.to.indicate.the.specific.programming.information.to.enter..When.programming,.the.flashing.portion.of.the.display.can.be.changed.by.pressing.the or. .buttons..To.change.something.that.is.not.flashing,.press.the.
.or. .buttons.until.the.desired.field.is.flashing.
Three.programs.A,.B,.and.C,.each.with.the.ability.to.have.four.daily.start.times,.permit.plants.with.different.watering.requirements.to.be.separated.on.different.day.schedules.
proGrammING THE CoNTrollEr
setting the Date and Time 1.. .Turn.the.dial.to.the.CURRent tIMe/DAy.position.
2.. .The.current.year.will.be.flashing..Use.the. .or. .buttons.to.change.the.year..After.setting.the.year,.press.the. button.to.proceed.to.setting.the.month.
3.. .The.month.and.day.will.be.in.the.display..The.month.will.be.flashing.and.the. .icon.will.be.displayed..Use.the. .or. .buttons.to.change.the.month..Press.the. button.to.proceed.to.setting.the.day.
4.. .The.day.will.be.flashing.and.the. ..icon.will.be.displayed..Use.the. .or. .buttons.to.change.the.day..Press.the. button.to.proceed.to.setting.the.time.
5.. .The.time.will.be.displayed..Use.the. .and. .buttons.to.select.AM,.PM,.or.24.hour..Press.the. button.to.move.to.hours..Hours.will.be.flashing..Use.the. .and. .buttons.to.change.the.hour.shown.on.the.display..Press.the. button.to.move.to.minute..Minutes.will.be.flashing..Use.the. .and. .buttons.to.change.the.minutes.shown.on.the.display..The.date,.day,.and.time.have.now.been.set.
CURRENT TIME/DAY CURRENT TIME/DAY
18
setting the program start Time(s) 1.. Turn.the.dial.to.the.stARt tIMes.position.
2.. .The.factory.preset.is.set.on.program.A..If.necessary,.you.can.select.program.B,.or.C.by.pressing.the. .button.
3.. .Use.the. .or. .button.to.change.the.start.time..(The.start.times..advance.in.15.minute.increments).
4.. .Press.the. .button.to.add.an.additional.start.time,.or. .button.for.the.next.program.
NoTE: One start time will activate all stations sequentially in that program. this eliminates the need to enter each station’s start time. Multiple start times in a program can be used for separate morning, afternoon, or evening watering cycles. start times may be entered in any order. the X-Core will automatically sort them.
Eliminating a program start TimeWith.the.dial.set.to.stARt tIMes.position,.push.the. .or. .button.until.you.reach.12:00.AM.(Midnight)..From.here.push.the. .button.once.to.reach.the.OFF.position.
proGrammING THE CoNTrollEr
setting station run Times 1.. Turn.the.dial.to.RUn tIMes.position.
2.. .The.display.will.show.the.last.program.selected.(A,.B,.or.C),.the.station.number.selected,. .icon,.and.the.station.will.be.flashing..You.can.switch.to.another..program.by.pressing.the. .button.
3.. .Use.the. .or. .button.to.change.the.station.run.time.on.the.display..You.can..set.the.run.times.from.0.to.4.hours.
4.. .Press.the. .button.to.advance.to.the.next.station.
setting Days To Water 1.. Turn.the.dial.to.the.WAteR DAys.position.
2.. .The.display.will.show.the.last.program..selected.(A,.B,.or.C)..You.can.switch.to..another.program.by.pressing.the. .button.
3.. .The.controller.will.display.the.seven.days.of.the.week.(MO,.TU,.WE,.TH,.FR,.SA,.SU)..Each.day.will.have.a. .icon.or.a. .icon.above.the.day..The. .icon.would.represent.an.“On”.water.day,.while.a. .icon.would.represent.an.“Off”.watering.day.
WATER DAYS
START TIMES
RUN TIMESSTART TIMES
19
selecting specific Days of the Week to Water1.. .With.the. .cursor.on.a.specific.day.
(the.cursor.will.always.start.with.MO),.press.the. .button.to.activate.a.particular.day.of.the.week.to.water..Press.the. .button.to.cancel.watering.for.that.day..After.pressing.a.button.the.cursor.automatically.advances.to.the.next.day.
2.. .Repeat.step.1.until.all.desired.days.have.been.selected...The.selected.days.will.show.a. .to.indicate.their.status.is.ON..The.last. .is.the.last.day.of.watering.for.that.program.
selecting odd or Even Days to WaterThis.feature.uses.numbered.day(s).of.the.month.for.watering.instead.of.specific.days.of.the.week.(odd.days:.1st,.3rd,.5th,.etc.;.even.days:.2nd,.4th,.6th,.etc.).
1.. .With.the. .cursor.on.SU.press.the. .button.once..The. .icon.and.odd.will.be.displayed.
2.. .If.odd.day.watering.is.desired,.turn..the.dial.back.to.the.run.position.
3.. .If.even.day.watering.is.desired,.press.the. .button.once..The. .icon.and.eVen.will.be.displayed..You.can.move.back.and.forth.from.ODD.to.eVen.by.pressing.the. .and. .buttons.
NoTE: the 31st of any month and February 29th are always “off” days if Odd watering is selected.
proGrammING THE CoNTrollEr
selecting Interval Watering With.this.option.you.can.select.interval.watering.from.1.to.31.days.
1.. .With.the.cursor.on.eVen,.press.the. .button.once.and.the. .icon.will.appear.and.a.1.flashing.in.the.display..Interval.watering.schedule.appears.on.the.display.
2.. .Press.the. .or. .button.to.select.the.number.of.days.between.watering.days.(from.1.to.31.days)..This.is.called.the.interval.
The.controller.will.water.the.selected.program.at.the.next.start.time.and.will.then.water.at.the.interval.programmed.
SuSuMoMo TuTu WeWe ThTh FrFr SaSa
Even 2, 4,...30
20
proGrammING THE CoNTrollEr
setting Event Day(s) offThe.X-Core.allows.you.to.program.a.No.Water.Day(s)..This.feature.is.useful.to.inhibit.watering.on.specific.day(s)..For.example,.if.you.always.mow.the.lawn.on.Saturdays,.you.would.designate.Saturday.as.a.no Water Day.so.that.you.are.not.mowing.wet.grass..
1.. Turn.the.dial.to.the.WAteR DAys.position.
2.. Enter.an.interval.watering.schedule.as.described.on.page.19.
3.. .Press.the. button.to.scroll.to.the.no Water Days.at.the.bottom.of.the.display..MO.will.be.flashing.
4.. .Use.the. button.until.the.cursor.is.at.the.day.of.the.week.you.wish.to.set.as.a.No.Water.Day.
5.. .Press.the. .button.to.set.this.day.as.a.no.water.day..The. .will.illuminate.over.this.day.
6.. Repeat.steps.4.and.5.until.all.desired.event.day(s).are.off.
NoTE: you also have the option in the interval watering schedule to program Odd or even days off.
automatic Watering After.programming.the.X-Core,.set.the.dial.to.the.RUn.position.to.enable.automatic.execution.of.all.selected.watering.programs.and.start.times.
system off Valves.currently.watering.will.be.shut.off.after.the.dial.is.turned.to.the systeM OFF position.for.two.seconds..All.active.programs.are.discontinued.and.watering.is.stopped..To.return.the.controller.to.normal.automatic.operation,.simply.return.the.dial.to.the.RUn.position.
programmable rain offThis.feature.permits.the.user.to.stop.all.programmed.waterings.for.a.designated.period.from.1.to.7.days..At.the.end.of.the.programmed.rain.off.period,.the.controller.will.resume.normal.automatic.operation.
1.. .Turn.the.dial.to.the.systeM OFF.position..Wait.for.OFF to.be.displayed.
2.. .Press.the. .button.as.many.times.as.needed.to.set.the.number.of.days.off..(up.to.7.days).
3.. .Turn.the.dial.back.to.the.RUN.position.at.which.OFF,.a.number,.the. .and. icons.will.be.displayed.
The.days.off.remaining.will.decrease.at.midnight.each.day..When.it.goes.to.zero,.the.display.will.show.normal.time.of.day.and.normal.irrigation.will.resume.at.the.next.scheduled.start.time.
RUN
SYSTEM OFF
RUN
SYSTEM OFF
21
seasonal adjustment Seasonal.Adjustment.is.used.to.make.global.run.time.changes.without.re-programming.the.entire.controller..To.use.the.Seasonal.Adjustment.feature:
1.. Turn.the.dial.to.the.seAsOnAL ADJUstMent.position.
2.. .The.display.will.now.show.a.flashing.number.followed.by.a.%,.as.well.as.the.bar.graph.which.always.remains.on.the.display..Press.the. .or. .button.to.adjust.the.percentage.of.the.seasonal.adjustment..Each.bar.on.the.graph.represents.10%..This.feature.can.adjust.the.controller.from.10%.to.150%.of.the.original.program.
To.view.the.adjusted.run.times,.simply.turn.the.dial.to.the.RUn tIMes position,.the.displayed.run.time.will.be.updated.accordingly.as.the.seasonal.adjustment.is.made.
NoTE: the controller should always be initially programmed in the 100% position.
proGrammING THE CoNTrollEr
When.using.a.Hunter.“Clik”.weather.sensor,.the.Seasonal.Adjustment.value.can.be.adjusted.as.described.
When.using.the.Solar.Sync.ET.sensor,.the.Seasonal.Adjustment.value.is.automatically.updated.daily.based.on.the.Solar.Sync.sensor..The.Solar.Sync.ET.sensor.measures.weather.patterns,.determines.the.optimal.Seasonal.Adjustment.value,.and.then.updates.the.controller.on.a.daily.basis..This.value.can.be.overridden.manually.by.pressing.the. .or. .buttons.to.the.desired.Seasonal.Adjustment.value..However, it is important to understand that the manually adjusted Seasonal Adjustment value will be replaced at midnight by the new updated value from the Solar Sync sensor.
To.revert.to.a.manually.adjusted.mode,.the.Solar.Sync.sensor.must.be.uninstalled..See.page.14.for.instructions.on.how.to.uninstall.the.Solar.Sync.sensor.
SEASONAL ADJUSTMENT
22
proGrammING THE CoNTrollEr
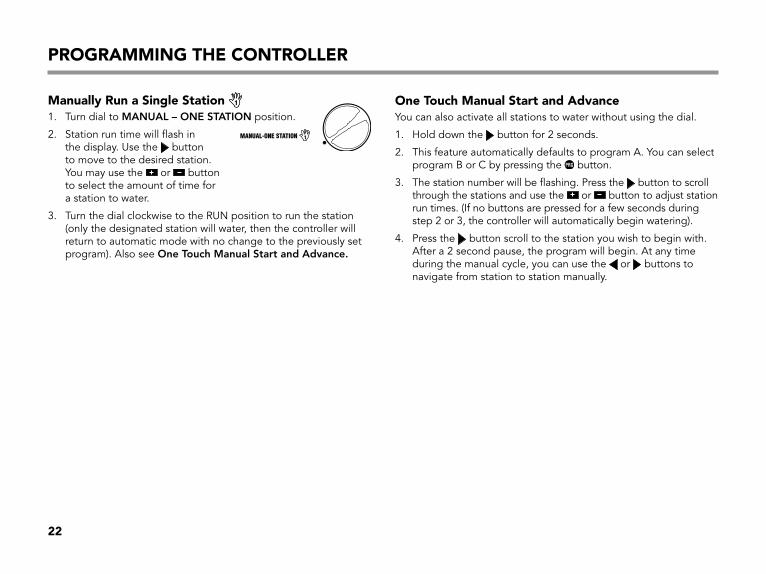
manually run a single station 1
1.. Turn.dial.to.MAnUAL – One stAtIOn.position.
2.. .Station.run.time.will.flash.in..the.display..Use.the. .button.to.move.to.the.desired.station...You.may.use.the. .or. .button.to.select.the.amount.of.time.for..a.station.to.water.
3.. .Turn.the.dial.clockwise.to.the.RUN.position.to.run.the.station.(only.the.designated.station.will.water,.then.the.controller.will.return.to.automatic.mode.with.no.change.to.the.previously.set.program)..Also.see.One touch Manual start and Advance.
one Touch manual start and advanceYou.can.also.activate.all.stations.to.water.without.using.the.dial.
1.. Hold.down.the. .button.for.2.seconds.
2.. .This.feature.automatically.defaults.to.program.A..You.can.select.program.B.or.C.by.pressing.the. .button.
3.. .The.station.number.will.be.flashing..Press.the. .button.to.scroll.through.the.stations.and.use.the. .or. .button.to.adjust.station.run.times..(If.no.buttons.are.pressed.for.a.few.seconds.during.step.2.or.3,.the.controller.will.automatically.begin.watering).
4.. .Press.the. .button.scroll.to.the.station.you.wish.to.begin.with..After.a.2.second.pause,.the.program.will.begin..At.any.time.during.the.manual.cycle,.you.can.use.the. .or. .buttons.to.navigate.from.station.to.station.manually.
MANUAL-ONE STATION 1
23
aDVaNCED fEaTUrEs
programmable sensor overrideThe.X-Core.allows.the.user.to.program.the.controller.so.that.the.sensor.disables.watering.on.only.desired.stations..For.example,.patio.gardens.that.have.pots.under.overhangs.and.roofs.may.not.receive.water.when.it.rains.and.will.continue.to.need.to.be.watered.during.periods.of.rain..To.program.sensor.override:
1.. Turn.the.dial.to.the.RUn.position.
2.. .Press.and.hold.the. .button.down.while.turning.the.dial.to.stARt tIMes.position.
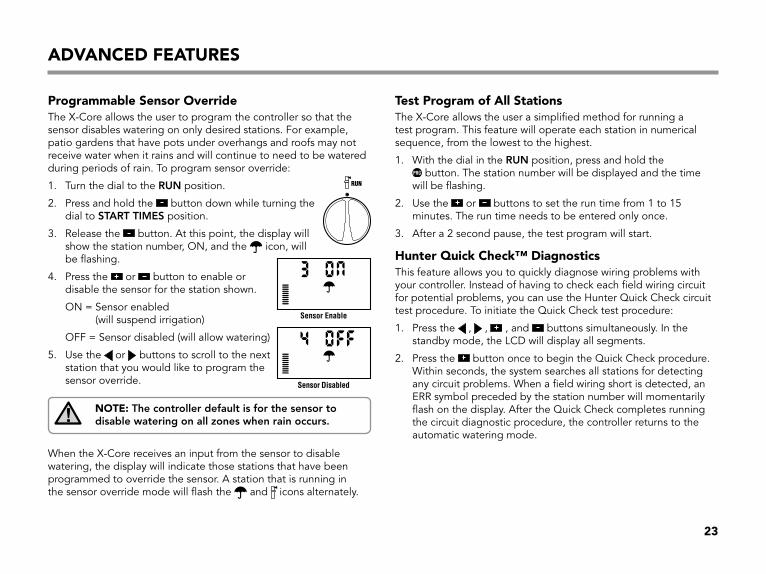
3.. .Release.the. .button..At.this.point,.the.display.will.show.the.station.number,.ON,.and.the. .icon,.will.be.flashing..
4.. .Press.the. .or. .button.to.enable.or.disable.the.sensor.for.the.station.shown.
. ON.=..Sensor.enabled..(will.suspend.irrigation)
. OFF.=.Sensor.disabled.(will.allow.watering)
5.. .Use.the. .or. .buttons.to.scroll.to.the.next.station.that.you.would.like.to.program.the.sensor.override.
NoTE: the controller default is for the sensor to disable watering on all zones when rain occurs.
When.the.X-Core.receives.an.input.from.the.sensor.to.disable.watering,.the.display.will.indicate.those.stations.that.have.been.programmed.to.override.the.sensor..A.station.that.is.running.in..the.sensor.override.mode.will.flash.the. .and. .icons.alternately.
Test program of all stationsThe.X-Core.allows.the.user.a.simplified.method.for.running.a.test.program..This.feature.will.operate.each.station.in.numerical.sequence,.from.the.lowest.to.the.highest..
1.. .With.the.dial.in.the.RUn.position,.press.and.hold.the..button..The.station.number.will.be.displayed.and.the.time.
will.be.flashing..
2.. .Use.the. .or. .buttons.to.set.the.run.time.from.1.to.15.minutes..The.run.time.needs.to.be.entered.only.once.
3.. After.a.2.second.pause,.the.test.program.will.start.
Hunter Quick Check™ DiagnosticsThis.feature.allows.you.to.quickly.diagnose.wiring.problems.with.your.controller..Instead.of.having.to.check.each.field.wiring.circuit.for.potential.problems,.you.can.use.the.Hunter.Quick.Check.circuit.test.procedure..To.initiate.the.Quick.Check.test.procedure:
1.. .Press.the. ,. ,. .,.and. .buttons.simultaneously..In.the.standby.mode,.the.LCD.will.display.all.segments.
2.. .Press.the. .button.once.to.begin.the.Quick.Check.procedure..Within.seconds,.the.system.searches.all.stations.for.detecting.any.circuit.problems..When.a.field.wiring.short.is.detected,.an.ERR.symbol.preceded.by.the.station.number.will.momentarily.flash.on.the.display..After.the.Quick.Check.completes.running.the.circuit.diagnostic.procedure,.the.controller.returns.to.the.automatic.watering.mode..
RUN
Sensor Enable
Sensor Disabled
24
Easy retrieve™ program memoryThe.X-Core.is.capable.of.saving.the.preferred.watering.program.into.memory.for.retrieval.at.a.later.time..This.feature.allows.for.a.quick.way.of.resetting.the.controller.to.the.original.programmed.watering.schedule.
to save the program into the memory
1.. .With.the.dial.in.the.RUn.position,.press.and.hold.the. .and..buttons.for.5.seconds..The.display.will.scroll.three.segments..from.left.to.right.across.the.display.indicating.the.program.is.
being.saved.into.memory.
2.. Release.the. .and. .buttons.
to retrieve a program that was previously saved into memory.
1.. .With.the.dial.in.the.RUn.position,.press.and.hold.the. .and..buttons.for.5.seconds..The.display.will.scroll.three.segments..from.right.to.left.across.the.display.indicating.the.program.is.
being.saved.into.memory.
2.. Release.the. .and. .buttons.
programmable Delay between stationsThis.feature.allows.the.user.to.insert.a.delay.between.stations.between.when.one.station.turns.off.and.the.next.one.turns.on.
1.. Start.with.the.dial.in.the.RUn.position.
2.. .Press.and.hold.the. .button.down.while.turning.the.dial.to.the.RUn tIMes.position.
3.. .Release.the. .button..At.this.point.the.display.will.show.a.delay.time.for.all.stations.in.seconds,.which.will.be.flashing..
4.. .Press.the. .or. .buttons.to.increase.or.decrease.the.delay.time.between.0.and.4.hours.
5.. Return.the.dial.to.the.RUn.position.
Clearing the Controller’s memory/resetting the ControllerIf.you.feel.you.have.misprogrammed.the.controller,.there.is.a.process.that.will.reset.the.memory.to.the.factory.defaults.and.erase.all.programs.and.data.that.have.been.entered.into.the.controller.
1.. Press.and.hold.down.the. ,. ,.and. .buttons.
2.. .Press.and.release.the.reset.button.in.the.lower.wiring..compartment.
3.. .Wait.2.seconds.and.release.the. ,. ,.and. .buttons..The.display.should.now.show.12:00.am..All.the.memory.has.been.cleared.and.the.controller.may.now.be.reprogrammed.
aDVaNCED fEaTUrEs
25
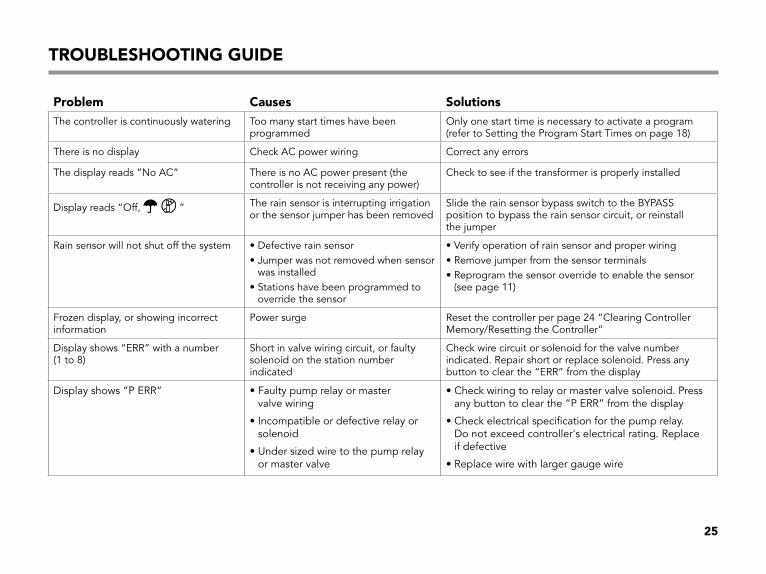
TroUblEsHooTING GUIDE
problem Causes solutionsThe.controller.is.continuously.watering Too.many.start.times.have.been.
programmedOnly.one.start.time.is.necessary.to.activate.a.program.(refer.to.Setting.the.Program.Start.Times.on.page.18)
There.is.no.display Check.AC.power.wiring Correct.any.errors
The.display.reads.“No.AC” There.is.no.AC.power.present.(the.controller.is.not.receiving.any.power).
Check.to.see.if.the.transformer.is.properly.installed
Display.reads.“Off,. . .” The.rain.sensor.is.interrupting.irrigation.or.the.sensor.jumper.has.been.removed
Slide.the.rain.sensor.bypass.switch.to.the.BYPASS.position.to.bypass.the.rain.sensor.circuit,.or.reinstall..the.jumper
Rain.sensor.will.not.shut.off.the.system •.Defective.rain.sensor•..Jumper.was.not.removed.when.sensor..
was.installed•..Stations.have.been.programmed.to.
override.the.sensor
•.Verify.operation.of.rain.sensor.and.proper.wiring•..Remove.jumper.from.the.sensor.terminals•..Reprogram.the.sensor.override.to.enable.the.sensor.
(see.page.11)
Frozen.display,.or.showing.incorrect.information
Power.surge Reset.the.controller.per.page.24.“Clearing.Controller.Memory/Resetting.the.Controller”
Display.shows.“ERR”.with.a.number..(1.to.8)
Short.in.valve.wiring.circuit,.or.faulty.solenoid.on.the.station.number.indicated
Check.wire.circuit.or.solenoid.for.the.valve.number.indicated..Repair.short.or.replace.solenoid..Press.any.button.to.clear.the.“ERR”.from.the.display
Display.shows.“P.ERR” •..Faulty.pump.relay.or.master..valve.wiring
•..Incompatible.or.defective.relay.or.solenoid
•..Under.sized.wire.to.the.pump.relay.or.master.valve
•..Check.wiring.to.relay.or.master.valve.solenoid..Press.any.button.to.clear.the.“P.ERR”.from.the.display
•..Check.electrical.specification.for.the.pump.relay..Do.not.exceed.controller's.electrical.rating..Replace..if.defective
•.Replace.wire.with.larger.gauge.wire
26
TroUblEsHooTING GUIDE
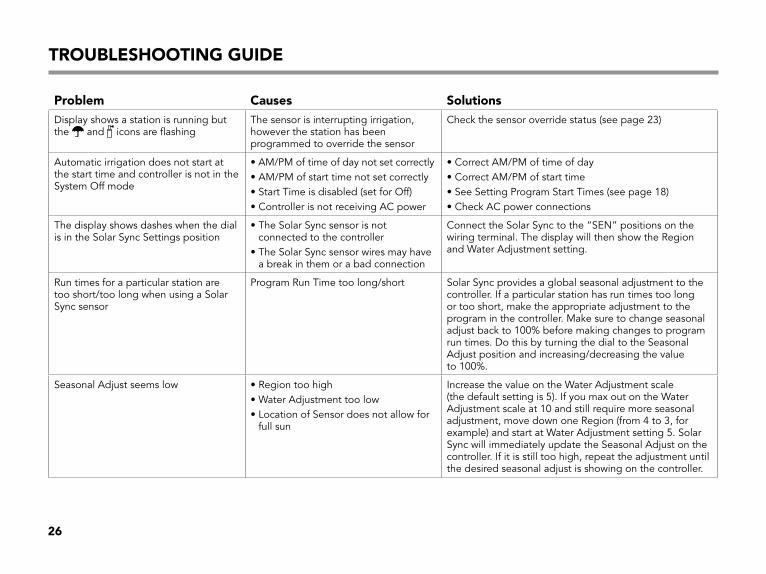
problem Causes solutionsDisplay.shows.a.station.is.running.but.the. .and. .icons.are.flashing
The.sensor.is.interrupting.irrigation,.however.the.station.has.been.programmed.to.override.the.sensor
Check.the.sensor.override.status.(see.page.23)
Automatic.irrigation.does.not.start.at.the.start.time.and.controller.is.not.in.the..System.Off.mode
•.AM/PM.of.time.of.day.not.set.correctly•.AM/PM.of.start.time.not.set.correctly•.Start.Time.is.disabled.(set.for.Off)•.Controller.is.not.receiving.AC.power
•.Correct.AM/PM.of.time.of.day•.Correct.AM/PM.of.start.time•.See.Setting.Program.Start.Times.(see.page.18)•.Check.AC.power.connections
The.display.shows.dashes.when.the.dial.is.in.the.Solar.Sync.Settings.position
•..The.Solar.Sync.sensor.is.not.connected.to.the.controller
•..The.Solar.Sync.sensor.wires.may.have.a.break.in.them.or.a.bad.connection
Connect.the.Solar.Sync.to.the.“SEN”.positions.on.the.wiring.terminal..The.display.will.then.show.the.Region.and.Water.Adjustment.setting.
Run.times.for.a.particular.station.are..too.short/too.long.when.using.a.Solar.Sync.sensor
Program.Run.Time.too.long/short Solar.Sync.provides.a.global.seasonal.adjustment.to.the.controller..If.a.particular.station.has.run.times.too.long.or.too.short,.make.the.appropriate.adjustment.to.the.program.in.the.controller..Make.sure.to.change.seasonal.adjust.back.to.100%.before.making.changes.to.program.run.times..Do.this.by.turning.the.dial.to.the.Seasonal.Adjust.position.and.increasing/decreasing.the.value..to.100%.
Seasonal.Adjust.seems.low •.Region.too.high•.Water.Adjustment.too.low•..Location.of.Sensor.does.not.allow.for.
full.sun
Increase.the.value.on.the.Water.Adjustment.scale.(the.default.setting.is.5)..If.you.max.out.on.the.Water.Adjustment.scale.at.10.and.still.require.more.seasonal.adjustment,.move.down.one.Region.(from.4.to.3,.for.example).and.start.at.Water.Adjustment.setting.5..Solar.Sync.will.immediately.update.the.Seasonal.Adjust.on.the.controller..If.it.is.still.too.high,.repeat.the.adjustment.until.the.desired.seasonal.adjust.is.showing.on.the.controller.

27
problem Causes solutionsSeasonal.Adjust.seems.high •.Region.too.low
•.Water.Adjustment.setting.too.highDecrease.the.value.of.the.Water.Adjustment.setting..If.you.minimize.the.Water.Adjustment.scale.at.1.and.still.require.reduced.seasonal.adjustment,.move.up.one.Region.(from.2.to.3,.for.example).and.start.at.Water.Adjustment.setting.5..Solar.Sync.will.immediately.update.the.Seasonal.Adjust.on.the.Controller..If.it.is.still.too.high,.repeat.the.adjustment.until.the.desired.seasonal.adjust.is.showing.on.the.controller.
Solar.Sync.still.sending.Seasonal.Adjust.when.Controller.Bypass.switch.is.in.the.“Bypass”.position
Solar.Sync’s.automated.Seasonal.Adjustment.cannot.be.de-activated.by.the.Bypass.switch..The.Bypass.switch.only.controls.the.Rain/Freeze.shutoff.function.of.the.Solar.Sync.
After.removing.the.Solar.Sync.sensor.from.the.controller,.the.seasonal.adjust.value.cannot.be.changed.manually
The.Solar.Sync.sensor.needs.to.be.uninstalled.if.permanently.removing.it.from.the.controller
After.removing.the.Solar.Sync.sensor.from.the.controller,.turn.the.knob.to.Solar.Sync.Settings..The.screen.should.show.dashed.lines..The.sensor.is.now.uninstalled.(see.page.14).
Display.shows.“no.SS” •..Solar.Sync.sensor.has.been.disconnected.from.controller.but..not.uninstalled
•..Wiring.connection.from.Solar.Sync.connection.is.faulty
•..Check.Solar.Sync.sensor.wiring.connection.to.controller•..Uninstall.Solar.Sync.sensor.if.intent.is.to.permanently.
remove.sensor.from.controller.(see.page.14)
TroUblEsHooTING GUIDE

28
operating specifications•. Station.Run.Times:.0.to.4.hours.in.1-minute.increments
•. 3.Independent.Watering.Programs
•. Start.Times:.4.per.day.per.program.for.up.to.12.daily.starts
•. .Watering.Schedule:.365-day.calendar,.interval.watering,..odd/even.watering
•. AM/PM,.24-hour.clock
•. Simple.manual.operation
•. Sensor.override.by.station
•. Programmable.rain.delay.(1.to.7.days)
•. Manual.Seasonal.Adjustment.(10%.to.150%)
•. Automatic.Seasonal.Adjustment.using.Solar.Sync.sensor
•. Sensor.bypass.switch
•. X-Core-x00i.for.indoor.use..X-Core-x00.for.outdoor.use
•. Sea.level.to.6500.ft.(2000.m).at.0˚.F.to.140˚.F.(-18°.C.to.60°.C)
spECIfICaTIoNs
Electrical specifications•. .Transformer.input.120.VAC.±10%.60.Hz..
(230.VAC.±10%.50/60.Hz.International.Models)
•. Transformer.Output:.24.VAC.1.0.amp
•. Station.Output:.0.56.amps.per.station
•. Maximum.Output:.0.84.amps.(includes.master.valve)
•. .Battery:.3.V.Lithium.(included).used.for.remote.programming.and.backup.timekeeping..Use.CR2032.3-volt.
•. Electronic.short.circuit.protection
•. Non-volatile.memory.for.program.data
•. UL.Listed
•. Model.X-Core-x00.has.an.IP2X.Rating
•. Clean.only.with.a.cloth.dampened.with.mild.soap.and.water
Explanation of symbols..=.AC
..=.Consult.Documentation
..=.Hazardous.Voltages.Present
. .=.Ground

29
Hunter.Industries.declares.that.the.irrigation.controller.Model.X-Core.complies.with.the.standards.of.the.European.Directives.of..“electromagnetic.compatibility”.87/336/EEC.and.“low.voltage”.73/23/EEC.
__________________________________. . . . . . . . . Project.Engineer
This.product.should.not.be.used.for.anything.other.than.what.is.described.in.this.document..This.product.should.only.be.serviced.by.trained.and.authorized.personnel.
fCC part 15:This.equipment.has.been.tested.and.found.to.comply.with.the.limits.for.a.Class.B.digital.device,.pursuant.to.part.15.of.the.FCC.Rules..These.limits.are.designed.to.provide.reasonable.protection.against.harmful.interference.in.a.residential.installation..This.equipment.generates,.uses.and.can.radiate.radio.frequency.energy.and,.if.not.installed.and.used.in.accordance.with.the.instructions,.may.cause.harmful.interference.to.radio.communications..However,.there.is.no.guarantee.that.interference.will.not.occur.in.a.particular.installation..If.this.equipment.does.cause.harmful.interference.to.radio.or.television.reception,.which.can.be.determined.by.turning.the.equipment.off.and.on,.the.user.is.encouraged.to.try.to.correct.the.interference.by.one.or.more.of.the.following.measures:.
•. Reorient.or.relocate.the.receiving.antenna
•. Increase.the.separation.between.the.equipment.and.receiver
•. Connect.the.equipment.into.an.outlet.on.a.circuit.different.from.that.to.which.the.receiver.is.connected
•. Consult.the.dealer.or.an.experienced.radio/TV.technician.for.help
CErTIfICaTE of CoNformITy To EUropEaN DIrECTIVEs

Hunter Industries Incorporated • The Irrigation Innovators ©.2010.Hunter.Industries.Incorporated
1940.Diamond.Street.•.San.Marcos,.California.92078.USA. INT-784.....3/10
www.hunterindustries.com
Recommended