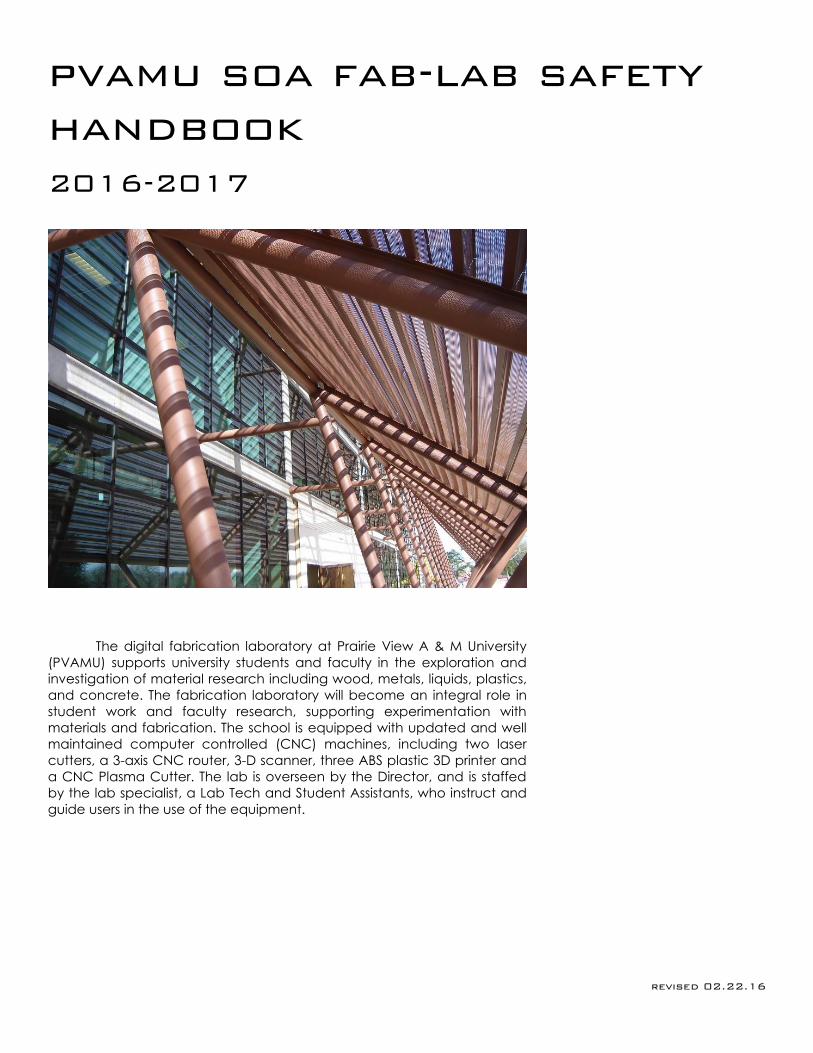
pvamu soa fab-lab safety
handbook
2016-2017
The digital fabrication laboratory at Prairie View A & M University
(PVAMU) supports university students and faculty in the exploration and
investigation of material research including wood, metals, liquids, plastics,
and concrete. The fabrication laboratory will become an integral role in
student work and faculty research, supporting experimentation with
materials and fabrication. The school is equipped with updated and well
maintained computer controlled (CNC) machines, including two laser
cutters, a 3-axis CNC router, 3-D scanner, three ABS plastic 3D printer and
a CNC Plasma Cutter. The lab is overseen by the Director, and is staffed
by the lab specialist, a Lab Tech and Student Assistants, who instruct and
guide users in the use of the equipment.
revised 02.22.16

TABLE OF CONTENTS
General Information
Fab Lab Mission
Overview
Policies and Procedures
Fab Lab Access
Student Prices
Research
Safety
Lab Guests and Visitors
Fab Lab Use and Safety Training
Test Requirements
Fab Lab Occupancy Limit
Reserving the Lab for Class Use
Open Lab Hours
Personal Projects
General Terminology
General Lab Safety Rules
Eye Protection
Non-Injury Accidents
Injury-Causing Accidents
Storage of Materials and Projects
Cleaning of Fabrication Lab Facility
Materials
Hand Tool Safety
Understanding Power Tools
Hand-held Power Tools
Machine Safety
Machine Instructions
Conclusion
Agreement Form
Test
GENERAL INFORMATION
Prairie View A&M University
P.O. Box 519 Mail Stop 2100
L.W. Minor Street, Rm 128
Prairie View, Texas 77446
Dean of School of Architecture Dr. Ikhlas Sabouni
Digital Media Coordinator- Yunsik Song
Fabrications Lab Specialist- Brandon Gassaway
FAB LAB MISSION
The digital fabrication laboratory at Prairie View A & M University (PVAMU)
supports university students and faculty in the exploration and
investigation of material research including wood, metals, liquids, plastics,
and concrete. The fabrication laboratory will become an integral role in
student work and faculty research, supporting experimentation with
materials and fabrication. The school is equipped with updated and well
maintained computer controlled (CNC) machines, including two laser
cutters, a 3-axis CNC router, 3-D scanner, three ABS plastic 3D printer and
a CNC Plasma Cutter. The lab is overseen by the Director, and is staffed
by the lab specialist, a Lab Tech and Student Assistants, who instruct and
guide users in the use of the equipment.
POLICIES AND PROCEDURES
The Fabrication Lab is located on the first floor of Nathelyne A. Kennedy
building and is a support and research facility for the students, faculty,
and staff of the SOA. The safety of students, faculty, staff, and guests is a
prime consideration in every activity. The goal of the PVAMU School of
Architecture Safety Plan is to develop practical approaches regarding
safety among all members. It will be necessary for the dean(s), directors,
department heads, faculty and staff supervisors take an active role in
initiating preventive measures to control the perils associated with
activities under their direction. The success of this plan depends upon the
cooperation and support of all entities. The rules and guidelines in this
document apply to the entire fab lab area including the sidewalk
accessed by the garage door and any other lab related work
environment including impromptu installation work locations. All tools must
remain in the Fabrication Lab at all times and may NOT be checked out.
At no point will tools will be allowed outside of the lab and its adjacent
supporting areas.
SPECIAL ATTENTION AND/OR PERSONAL NEEDS
The fab lab requires any student with a medical condition to consult with
their personal physician prior to using the fab lab, PVAMU does not
assume responsibility for any harm that might occur to anyone as a result
of a prior medical condition. Should such a medical condition be present,
a doctor’s approval in writing must be provided to the lab. Once read,
please sign your initials next to each condition that may apply to you.
Please inform the Fab-Lab supervisor immediately if you are sensitive to
the following or have issues with any of the following. It will be your
responsibility to inform the Fab-Lab supervisor on duty each time you enter
the lab.
1. Dust allergies.
2. Latex allergies
3. Any other allergies that may be present.
4. Physical contact with your Fab-Lab supervisor. (If a supervisor notices
you working improperly they may physically move you for guidance or
safety purposes.)
5. Loud background noises and/or commotion caused by machines.
6. Any other need that may require special attention.
OVERVIEW
An important part of your experience in woodworking will be learning to
follow practices and procedures that will prevent injuries to YOURSELF and
OTHERS. Develop a positive attitude toward safety. This means that you
have a strong desire toward safety and are willing to give time and
attention to learning the safest way to perform your work. It means that
you will be certain to work carefully and follow the rules – even when no
one is directly watching you. Carefully study the safety rules which follow.
The Lab supervisor may also recommend some additional rules. If you
follow the rules and directions carefully, many of them will soon become
safety habits that you will perform automatically. Please note that
experience in a Lab does not equal good safety awareness. Many
accidents occur not to beginners but from experienced workers that feel
more comfortable in the Lab and therefore become more casual in their
approach to safety guidelines.
NEVER be afraid to ask a supervisor for help.
NEVER use a new machine without first asking for assistance from a
supervisor.
FAB LAB ACCESS
Currently enrolled SOA students, full-time faculty and staff may access the
Lab during open Lab hours or by appointment to work on research
related projects (see section on personal projects). Adjunct faculty may
use the lab upon written request and written approval of the Fabrications
Lab Specialist. Adjunct faculty use is limited to research and development
of course related material only. All users must attend a Safety Training
session lecture, pass the safety exam and perform and pass skills tests on
selected tools to become certified all users will gain access to the
Fabrication Lab upon completion of mandatory trainings and exams.
Access will remain valid for a term of one year from date of signed Safety
Agreement form. Any Faculty member that does not access the lab for a
period of one year must re-take the Use and Safety training. Under no
circumstances will anyone be allowed to have extended usage outside of
standard operating hours. Faculty/Staff who are interested in using the
Laser Cutter must sign up in advance of using the laser. Lab access may
be limited during peak times. Any faculty or staff who use the Fab Lab
must fill out a record of use form at time of use. The Record of Use form is
available by request only.
SAFETY
Safety in the Fabrication Lab is the highest priority. Accidents may result in
serious bodily harm or death. Following proper safety procedures and
conforming to the Fabrication Lab policies as outlined in this handbook
will greatly reduce any chance of injury. Do not experiment with the tools
or try to figure out how to use a machine on your own. If you do not use a
tool or machine exactly how you have been shown or neglect to follow
all safety rules, severe injury could result and your privileges to utilize the
lab may be revoked.
LAB GUESTS AND VISITORS
Any individual who has completed the requirements for access may
accompany Lab guests and visitors. He or she is responsible for that guest.
Guests and visitors are not permitted to use any machines or tools and are
not allowed in the machine use areas. Visits must be scheduled and
approved by the Fab Lab Director or Manager. Visits should be as brief as
possible.
TEST REQUIREMENTS
All users of the lab must complete the Use and Safety Training module to
gain access to the Lab and become certified. Lab certification consists of:
attending the Use and safety session, complete the required video
trainings, reading and completing the safety policy, successfully
completing the written test and demonstrating safe practices during the
skills tests on selected pieces of equipment. Test scores must be 90% or
greater to gain access. Users can take the test a maximum of two times
before they have to re-take training. The Safety Training schedule will be
made available to you by the Director of the Fab Lab. Individuals must
receive additional training for machines not included in the standard
orientation. Certification is good for one year from date of signed Safety
Agreement Form. All requirements must be completed within the same
semester.
FAB LAB OCCUPANCY LIMIT
In order to maintain a safe work environment, strict user limits will be
enforced. Faculty need to be aware of this limit when planning Lab use
and should utilize a laconic rotation or other strategy to avoid exceeding
the occupancy limit. The maximum number of individuals allowed to work
in the Lab at any given time is 5 students per employee.
RESERVING THE LAB FOR CLASS USE
At least one weeks’ notice must be given to reserve the Lab for class use
and should include a brief description of what the lab will be utilized for.
This includes demonstrations and student use. In order to ensure that there
are sufficient open Lab hours for all users, only one class per day may
reserve the Lab. A trained monitor must be present at all times while
students are working in the Lab. When the Lab is reserved for a class, it is
closed to other students. The Lab can be reserved Monday, Wednesday
and Friday between 1:00pm and 5:00pm.
OPEN LAB HOURS
Hours are posted on the Lab window on a semester basis. Lab hours may
vary, depending on the activities taking place in Pearl Hall. If the Lab is
reserved for a class, there are no open hours during that time. At the
discretion of the Lab supervisor, the Lab may be closed. If the university is
closed, so is the Lab. Staff absence may cause closure of the Lab.
GENERAL LAB SAFETY RULES
The hazards associated with fabrication work require special safety
considerations. Whether you work in a metal lab, wood lab, or any other
lab, the potential hazards for injury can be numerous. In an emergency
call 9-911 from the fab lab office phone, or 911 from a cell phone. The
fabrication lab is located in Nathelyne A. Kennedy Building room 128. All
students entering the fab lab must acquire the appropriate safety gear
prior to operating any machine or tool. All students must clean up after
themselves; students who do not clean up after themselves will lose all lab
privileges for a minimum of 1 week. Lab privileges will not be re-instated
until the offending student returns to clean the entire lab.
PERSONAL PROTECTION
There are several measures you must take to protect yourself from work
hazards.
1. Put on your safety glasses/goggles as soon as you enter the lab.
2. Do not wear loose fitting clothing.
3. Do not wear loose fitting long sleeve shirts/sweatshirts.
4. Do not wear neckties.
5. No jewelry should be worn in the fabrication lab. (Including earrings,
watches and excessive rings)
6. Snug fitting clothing is essential to your safety.
7. Make certain that long hair is not loose, but is pulled back away from
equipment.
8. Always wear safety glasses when working with any lab equipment.
Additional protection using goggles or face shields may be necessary for
work such as grinding, chiseling or chipping. Notify your
supervisor/professor if you notice any unsafe work conditions. Inform other
employees if you see an unsafe work practice; however, be careful not to
distract a person who is working with power tools.
******* If you neglect to follow all safety rules and practices, severe injury
could result and your privileges to utilize the lab may be revoked. *******
SAFETY GUIDELINES
Follow these guidelines for general work safety:
1. Never work alone. There must always be at least two adults present in
the fabrication lab.
2. Always wear appropriate safety gear and protective clothing, including
closed toed shoes.
3. Eye protection is required while operating any machine.
4. Know where the fire extinguishers are located and how to use them.
5. Never work impaired. This also does not simply mean impaired from
drugs or alcohol, but also from sleep deprivation.
6. Know the hazards associated with your work. Be sure you are fully
educated on the proper use and operation of any tool before beginning
a job. If you cannot do a job safely in the fabrication lab, don’t do it. Think
through the entire job before starting.
7. If you are unsure about how to safely execute the operation of a tool,
ask for help. Have the fabrication lab supervisors assist, demonstrate, and
observe to help you become familiar and comfortable.
8. If you have not worked with a specific material before, consult the
fabrication lab supervisor for precautions, methods and instruction prior to
beginning work.
9. Do not work in the lab if you are in a hurry, this almost always ruins the
work and often results in injury.
10. Leave tool and equipment guards in place. This is especially true with
the table saw. The guard with the anti-kickback device should always be
on the saw unless the operation is not possible with it in place.
11. Before starting any machine be sure to check that it is set up correctly
and fully operational.
12. Check power cords and plugs on portable tools before using them.
13. Use a brush, or special tool for the removal of chips, shavings and
debris. Do not use your hands to clean shavings or cuttings – they can be
sharp!
14. When doing heavy sanding face masks or respirators should always be
worn.
15. Keep your fingers clear from the point of operation of machines by
using special tools and devices such as push sticks and paddles. Never
use a rag near moving machinery.
16. Keep the work area free from debris, clean spills immediately and
remove all sawdust and wood chips. Do not bring food or drink in to the
fabrication lab.
17. Clean up after yourself. Before you leave the lab be sure all tools are
returned to their appropriate position and all the machines are clean and
the floor is swept. Allow a minimum of 20 minutes for your cleanup
procedure.
18. Earphones, cell phone use and texting are not allowed in the Lab. We
need to be able to get your attention and you need to hear what’s going
on around you. Cell phone use and texting are distractions. Simply go
elsewhere to use your phone.
EYE PROTECTION
Eye protection must be worn at all times while working in the Lab - Safety
glasses are provided. Consistent failure to wear eye protection will result in
loss of access.
NON-INJURY CAUSING ACCIDENTS
In the event of accidents resulting in machine damage, material “kick-
back” or other unsafe events, the following procedure must be followed:
If gross negligence is determined to be involved in the course of a non-
injury accident a meeting is required between the user(s) and the Lab
supervisor before Lab access may resume. If an individual is consistently
working in an unsafe manner, Lab privileges will be revoked.
INJURY-CAUSING ACCIDENTS
In the event of an injury-causing accident, the following procedures must
be followed: Notify the Lab supervisor or monitor on duty immediately.
Lab personnel will follow established first-aid procedures. All injury-causing
accidents requiring outside medical attention requires a meeting with the
Lab supervisor to determine the cause of the accident and as a
preventive measure against similar accidents in the future before Lab
access may resume.
STORAGE OF MATERIALS AND PROJECTS
Storage of materials in the Lab is prohibited. The lab is not responsible for
any projects left unattended. Any project left overnight should have all
necessary contact information. Projects left overnight must be retrieved
by 9:00 am the following morning. Projects left for one week will be
disposed of.
CLEANING OF FABRICATION LAB FACILITY
Each user is responsible for clean-up and tool return. Each machine and
work area should be cleaned immediately after use. Machines should be
blown off using the air hose and the floor area around it should be swept
clean. The last person to use a machine is responsible for cleaning the
machine and surrounding work area, users who consistently fail in their
clean-up responsibilities will be denied Lab access.
MATERIALS
Tools and Machinery in the Lab each have an intended use to specific
materials. Please see the Lab supervisor if you wish to work with unique
materials in the Lab. Used wood and wood based materials may be
processed in the Lab as long as the material is clean, free of dirt, grit,
grime, metal, paint, varnishes, enamel, moisture or abrasive materials.
Material that is excessively contaminated with any of the above will not
be permitted. Lab users using used materials may be found liable for
damage to the tools and equipment caused by those materials,
No pressure treated/chemically treated wood allowed in the Lab. No
green wood - tree limbs, etc. unless they are completely dry. Consult with
Brandon Gassaway before attempting to cut unstable materials (limbs,
etc.) as they pose potential dangers when processing. Plaster objects
may not be worked on any of the equipment or machines in the Lab.
These rules are meant to insure a safe and orderly work environment;
please respect them.
HAND TOOL SAFETY
These tools, while they do not involve the same dangers as power
machinery, should be used cautiously. Often, the type of injury sustained
while misusing these tools are small cuts and lacerations - sometimes
requiring stitches. Please observe the following guidelines while using hand
tools. Hand tools are non-powered tools. They include wrenches,
hammers, chisels, screw drivers, and other hand-operated mechanisms.
Even though hand tool injuries tend to be less severe than power tool
injuries, hand tool injuries are more common. Because people take
everyday hand tools for granted, simple precautions for safety are easily
forgotten. Hand tools must remain in the Fabrication Lab at all times and
may NOT be checked out. At no point will tools will be allowed outside of
the lab and its adjacent support areas.
The most common hand tool accidents are caused by the following:
1. Failure to use the right tool
2. Failure to use a tool correctly
3. Failure to keep edged tools sharp
4. Failure to replace or repair a defective tool
5. Failure to safely store tools
IMPORTANT: Use the right tool for the job to complete a job safely,
quickly, and efficiently.
Follow these guidelines for general hand tool safety:
1. Wear safety glasses whenever you hammer or cut, especially when
working with surfaces that chip or splinter.
2. Do not use a screwdriver as a chisel. The tool can slip and cause a
deep puncture wound.
3. Do not use a chisel as a screwdriver. The tip of the chisel may break and
cause an injury.
4. Do not use a knife as a screwdriver. The blade can snap and cause an
injury.
5. Never carry a screwdriver or chisel in your pocket. If you fall, the tool
could cause a serious injury. Instead, use a tool belt.
6. Use the proper wrench to tighten or loosen nuts. Pliers can chew the
corners off a nut and the pliers can become damaged.
7. When using a chisel, always chip or cut away from yourself.
8. Do not use a wrench if the jaws are sprung.
9. Direct saw blades, knives, and other tools away from aisle areas,
students and employees.
10. Keep knives and scissors sharp. Dull tools are more dangerous than
sharp tools. Improper tool storage is responsible for many fab lab
accidents. Return each tool to its marked location for proper tool storage.
Never use a dull tool - it is actually much more dangerous than a sharp
one. Think about the direction your energy is going while performing an
operation. If you are holding material in your hands, be sure the action if
going away from your body. Better yet, clamp the material in a vise or to
the surface of a workbench. Like power tools, think through a procedure
before you attempt it. Many times, we become complacent or are
rushing through a job - that is when accidents are most likely to occur.
HAND-HELD POWER TOOLS
Only change blades, bits, etc., when the tool is off and unplugged. It is
very easy to accidentally turn the tool on. Know what direction it moves
and be prepared to compensate for the torque of the motor. Wear eye
protection at all times - some tools such as the lathe may also require the
use of a face shield. Always keep your hands a safe distance from cutters
and blades. Make sure all guards and safety devices are in place. Do not
use a machine without the proper guards. Keep the machine clean.
Know the physics of the machine and where the cutting force wants to
throw the material. Make sure to turn all power tools off before
unplugging, and always check that it is turned off before plugging in. All
hand held power tools must remain in the lab and may NOT be checked
out. At no point will tools will be allowed outside of the lab and its
adjacent support areas.
UNDERSTANDING POWER TOOLS
The most dangerous parts of power tools are the moving parts. All of the
machinery in this Lab is powered by electric motors, and the radial forces
produced by spinning shafts, pulleys, blades and belts can be particularly
dangerous. This danger arises from two effects of spinning parts: (1)
outward forces—wood and debris can become violent projectiles when
thrown by spinning blades, and (2) inward forces—loose clothing, jewelry,
hair, and fingers can be grabbed, wound up, and pulled in and mangled
by any spinning machinery. Always be aware of the danger of these
radial forces. Always wear eye protection, never stand in line with circular
blades, and always maintain a safe distance from spinning parts when the
tool is operating. Power tools can be extremely dangerous if they are used
improperly. Common accidents associated with power tools include
abrasions, cuts, lacerations, amputations, burns, electrocution, and
broken bones. These accidents are often caused by the following:
1. Touching the cutting, drilling, or grinding components
2. Getting caught in moving parts
3. Suffering electrical shock due to improper grounding, equipment
defects, or operator misuse
4. Being struck by particles that normally eject during operation
5. Touching hot tools or work-pieces
6. Falling in the work area
7. Being struck by falling tools when working around power tools, you must
wear personal protective equipment and avoid wearing loose clothing or
jewelry that could catch in moving machinery. In addition to general lab
guidelines, follow these guidelines for working with power tools:
1. University employees or students shall not turn on, use, repair, or operate
any machine, tool, equipment unless authorized by a fabrication lab
supervisor.
2. Use the correct tool for the job. Do not use a tool or an attachment for
something it was not designed to do.
3. Select the correct bit, blade, cutter, or grinder wheel for the material at
hand. This precaution will reduce the chance for an accident and
improve the quality of your work.
4. Keep all guards in place. Cover exposed belts, pulleys, gears, and
shafts that could cause injury.
5. Always operate tools at the correct speed for the job at hand. Working
too slowly can cause an accident just as easily as working too fast.
6. Watch your work when operating power tools. Stop working if
something distracts you.
7. Do not rely on strength to perform an operation. The correct tool, blade,
and method should not require excessive force. If undue force is
necessary, you may be using the wrong tool or have a dull blade.
8. Before clearing jams or blockages on power tools, disconnect from
power source. Do not use your hand to clear jams or blockages, use an
appropriate tool.
9. Never reach over equipment while it is running.
10. Never disable or tamper with safety releases or other automatic
switches.
11. When the chance for operator injury is great, use a push stick to move
material through a machine.
12. Disconnect power tools before performing maintenance or changing
components.
13. Keep a firm grip on portable power tools. These tools tend to "get
away" from operators and can be difficult to control.
14. Never leave chuck key in chuck.
15. Keep bystanders away from moving machinery.
16. Do not operate power tools when you are sick, fatigued, or taking
strong medication.
17. When possible, secure work pieces with a clamp or vise to free the
hands and minimize the chance of injury. Use a jig for pieces that are
unstable or do not lie flat.
18. Always work in a clean environment. An unkempt work place can
result in injury, especially when sawdust accumulates on concrete floors.
You must always be responsible for cleaning up after yourself.
MACHINE SAFETY
To operate a machine safely, you must know more than just how to turn it
on and off. You must know how to perform the basic operations and how
to make simple adjustments. Always maintain a healthy respect for the
tool’s capabilities and limits. Never use a machine for a job it was not
designed for and never experiment – if you are unsure about how to
perform a certain operation, ask for help. The more you know about a
machine, the safer you will be. Don’t become over confident - that leads
to carelessness, which causes accidents. The following are general
guidelines for stationary machines. Wear eye protection at all times -
some tools may also require the use of a face shield. Always keep your hands a safe distance from cutters and blades. Make
sure all guards and safety devices are in place and in perfect operating
order. Do not use a machine without the proper guards. Know the physics
of the machine and where the cutting force wants to throw the material. When feeding material through a machine with the hands, be aware of
the direction you are pushing (away from blade or cutter). Never operate
a power tool when alone in the Lab. Defects in material can be dangerous. Check the stock carefully for knots,
splits, and other defects. Keep the machine clean. Remove all tools,
lumber, and unnecessary materials. Objects left on the machine can
vibrate into revolving cutters. They can then be thrown from the machine
with great force. Never clean a machine while it is running. Always work
with a plan of procedure. Consider and think through each step ahead of
time. Never make an adjustment unless the power is off.
The tool must come to a complete stop. Your stance is also important -
stand in a comfortable, balanced (defensive) position when working with
power tools. Both feet should be firmly on the floor. If something doesn’t
sound right, or feel right - turn off the machine and inform the supervisor or monitor. Above all, think before you perform any task. Know the tool’s
capabilities and the work it is intended for. If you feel unsure, STOP and
ask for assistance.
LASER CUTTER USE AND SAFETY
There are 3 procedures that must be done prior to laser cutting.
1. Make sure the laser exhaust system is properly turned on.
2. Make sure the air-valve is connected to the lasers.
3. Properly "Z" the laser.
ACCEPTABLE MATERIALS:
-Chipboard up to 4-Ply
-Museum board up to 1/8” thick
-Basswood and Hobby Plywood up to 1/8” thick
-Limited Acrylics up to 1/4” thick (Absolutely no PVC material, such as
Lexan, or other Polycarbonates)
-Styrene up to 1/4" thick
Important:
If cutting acrylic, the material must have some type of label stating that it
is in fact acrylic. If the material does not have this, it will not be cut or
engraved. The appropriate acrylic material is stocked in the Fab Lab.
When cutting acrylic please bring tape to cover the gaps in the laser door.
Cardboard is prohibited from the laser unless prior consent from a Fab Lab
supervisor is given.
ILLUSTRATOR BASIC VECTOR
CUTTING/SCORING
Open the Illustrator template the template is sized to the bed of the laser
cutter (32” x 18”)
Go to FILE > PLACE your work into the template.
Make sure all lines are inside bounding box and are as close as possible to
maximize the material.
Ungroup everything go to OBJECT > UNGROUP and repeat at least 3
times.
Release any clipping masks go to OBJECT > CLIPPING MASK > RELEASE
CLIPPING MASK repeat a few times
Select and place all cut lines in the cutting layer and assign them a
“MAGENTA CUT” style from the graphic styles menu. There is also a CYAN
Perimeter cut as well. This is for cuts that make up a perimeter around
other cuts or scores, and is meant to be the last cut performed.
ILLUSTRATOR RASTER FILLS/ENGRAVING
Follow the same instructions as above. When setting graphic styles, black
will be the deepest, 50% gray will be half and white would be no
engraving you can use the preset raster fills, or just a grayscale. Your file
may be rejected if there is too much raster fills to be engraved for this is a
very time intensive way to score with the Laser Cutter.
AUTOCAD CUTTING/SCORING:
INITIAL SETUP
Open the laser template. The year (2000, 2004, and 2007) should
correspond to whichever version of AutoCAD you are using.
The template is sized to the bed of the laser cutter (32” x 18”) Copy and
paste your work into the template in model space.
In PAPER SPACE, zoom extents to view your work.
Using the VIEWPORTS toolbar, scale your work so that it fits inside the
bounding box.
Arrange the pieces to be cut so that you use the least amount of
material.
DRAWING PREP
Set all the line weights to 0.00 mm or make sure they are all by layer and
set to the layers provided.
Make sure to have your lines on their proper cutting layer before entering
the lab to save time.
Erase all overlapping lines with the overkill command. Overlapping lines
can cause your file to be cut incorrectly.
Procedure: type EXPLODE > select all > type OVERKILL (make sure the
“ignore” options are unchecked) > select all any text in the file needing
cut should be one of the following fonts: ISCOP, ISOCT, MONOTXT, PROXY,
SIMPLEX, TXT.
LAYERS
The template already has the necessary layers and corresponding line
styles set up but you must assign your work (lines circles, etc.) to the
appropriate layer.
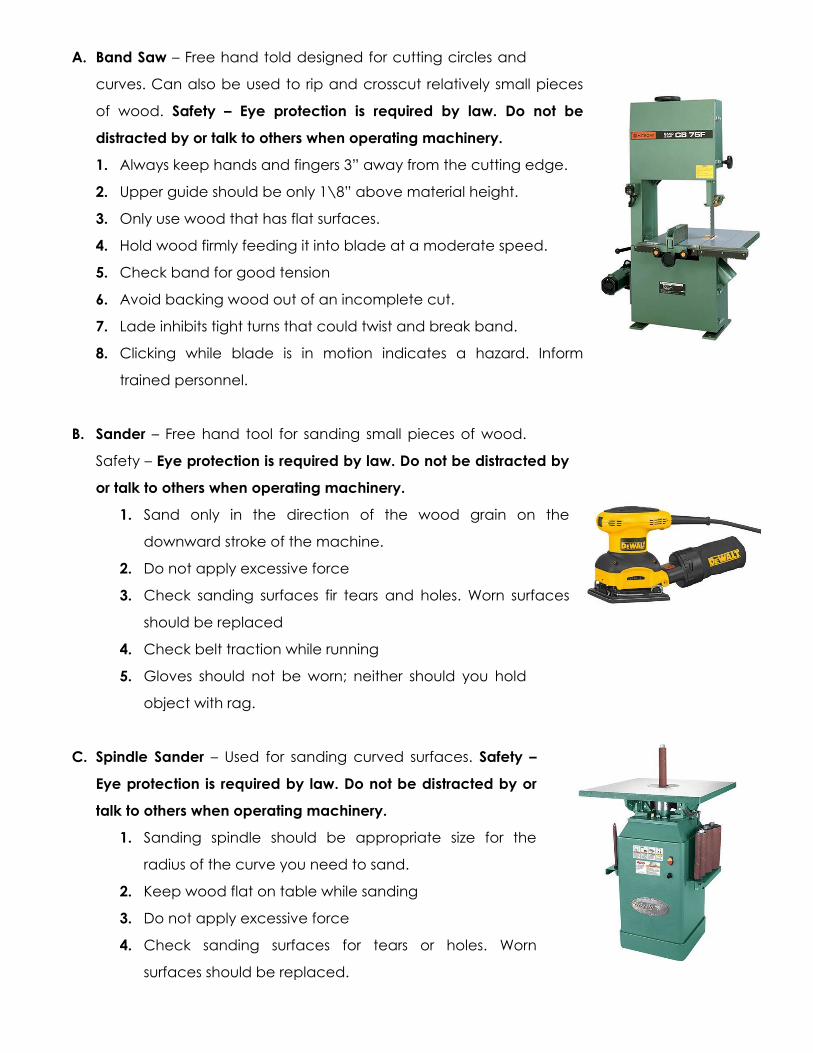
A. Band Saw – Free hand told designed for cutting circles and
curves. Can also be used to rip and crosscut relatively small pieces
of wood. Safety – Eye protection is required by law. Do not be
distracted by or talk to others when operating machinery.
1. Always keep hands and fingers 3” away from the cutting edge.
2. Upper guide should be only 1\8” above material height.
3. Only use wood that has flat surfaces.
4. Hold wood firmly feeding it into blade at a moderate speed.
5. Check band for good tension
6. Avoid backing wood out of an incomplete cut.
7. Lade inhibits tight turns that could twist and break band.
8. Clicking while blade is in motion indicates a hazard. Inform
trained personnel.
B. Sander – Free hand tool for sanding small pieces of wood.
Safety – Eye protection is required by law. Do not be distracted by
or talk to others when operating machinery.
1. Sand only in the direction of the wood grain on the
downward stroke of the machine.
2. Do not apply excessive force
3. Check sanding surfaces fir tears and holes. Worn surfaces
should be replaced
4. Check belt traction while running
5. Gloves should not be worn; neither should you hold
object with rag.
C. Spindle Sander – Used for sanding curved surfaces. Safety –
Eye protection is required by law. Do not be distracted by or
talk to others when operating machinery.
1. Sanding spindle should be appropriate size for the
radius of the curve you need to sand.
2. Keep wood flat on table while sanding
3. Do not apply excessive force
4. Check sanding surfaces for tears or holes. Worn
surfaces should be replaced.
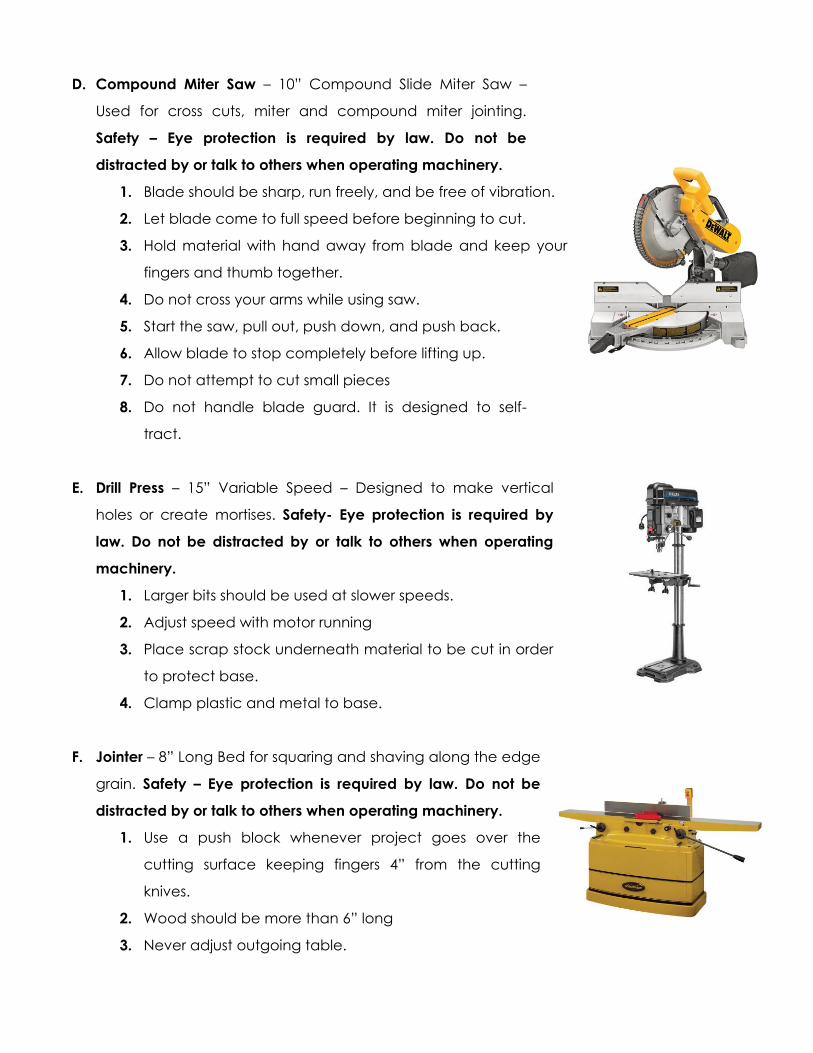
D. Compound Miter Saw – 10” Compound Slide Miter Saw –
Used for cross cuts, miter and compound miter jointing.
Safety – Eye protection is required by law. Do not be
distracted by or talk to others when operating machinery.
1. Blade should be sharp, run freely, and be free of vibration.
2. Let blade come to full speed before beginning to cut.
3. Hold material with hand away from blade and keep your
fingers and thumb together.
4. Do not cross your arms while using saw.
5. Start the saw, pull out, push down, and push back.
6. Allow blade to stop completely before lifting up.
7. Do not attempt to cut small pieces
8. Do not handle blade guard. It is designed to self-
tract.
E. Drill Press – 15” Variable Speed – Designed to make vertical
holes or create mortises. Safety- Eye protection is required by
law. Do not be distracted by or talk to others when operating
machinery.
1. Larger bits should be used at slower speeds.
2. Adjust speed with motor running
3. Place scrap stock underneath material to be cut in order
to protect base.
4. Clamp plastic and metal to base.
F. Jointer – 8” Long Bed for squaring and shaving along the edge
grain. Safety – Eye protection is required by law. Do not be
distracted by or talk to others when operating machinery.
1. Use a push block whenever project goes over the
cutting surface keeping fingers 4” from the cutting
knives.
2. Wood should be more than 6” long
3. Never adjust outgoing table.
4. Feed against blade rotation. Reverse direction can
cause serious injury.
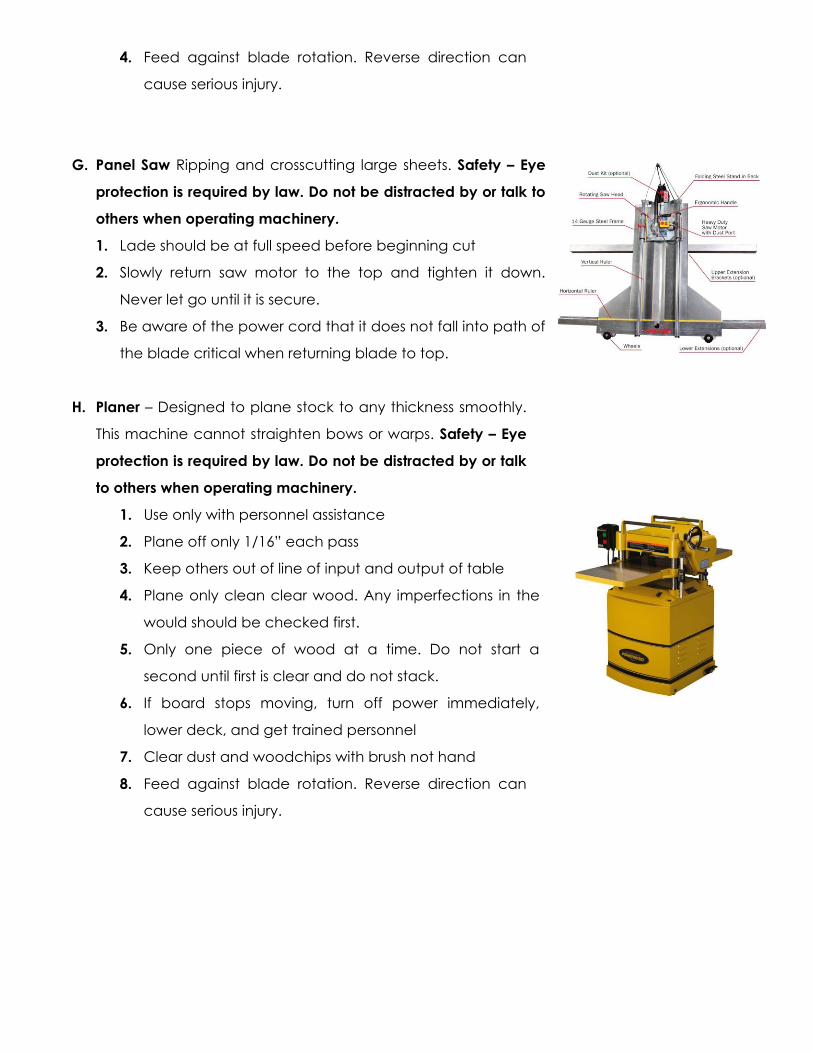
G. Panel Saw Ripping and crosscutting large sheets. Safety – Eye
protection is required by law. Do not be distracted by or talk to
others when operating machinery.
1. Lade should be at full speed before beginning cut
2. Slowly return saw motor to the top and tighten it down.
Never let go until it is secure.
3. Be aware of the power cord that it does not fall into path of
the blade critical when returning blade to top.
H. Planer – Designed to plane stock to any thickness smoothly.
This machine cannot straighten bows or warps. Safety – Eye
protection is required by law. Do not be distracted by or talk
to others when operating machinery.
1. Use only with personnel assistance
2. Plane off only 1/16” each pass
3. Keep others out of line of input and output of table
4. Plane only clean clear wood. Any imperfections in the
would should be checked first.
5. Only one piece of wood at a time. Do not start a
second until first is clear and do not stack.
6. If board stops moving, turn off power immediately,
lower deck, and get trained personnel
7. Clear dust and woodchips with brush not hand
8. Feed against blade rotation. Reverse direction can
cause serious injury.
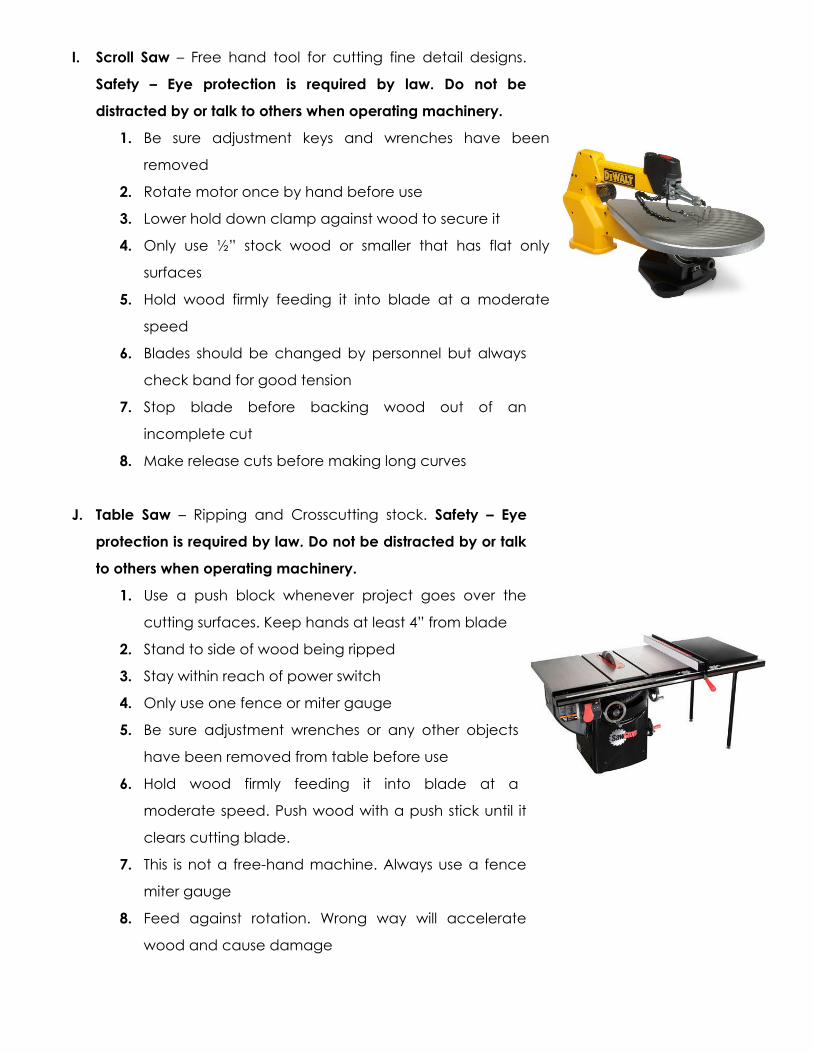
I. Scroll Saw – Free hand tool for cutting fine detail designs.
Safety – Eye protection is required by law. Do not be
distracted by or talk to others when operating machinery.
1. Be sure adjustment keys and wrenches have been
removed
2. Rotate motor once by hand before use
3. Lower hold down clamp against wood to secure it
4. Only use ½” stock wood or smaller that has flat only
surfaces
5. Hold wood firmly feeding it into blade at a moderate
speed
6. Blades should be changed by personnel but always
check band for good tension
7. Stop blade before backing wood out of an
incomplete cut
8. Make release cuts before making long curves
J. Table Saw – Ripping and Crosscutting stock. Safety – Eye
protection is required by law. Do not be distracted by or talk
to others when operating machinery.
1. Use a push block whenever project goes over the
cutting surfaces. Keep hands at least 4” from blade
2. Stand to side of wood being ripped
3. Stay within reach of power switch
4. Only use one fence or miter gauge
5. Be sure adjustment wrenches or any other objects
have been removed from table before use
6. Hold wood firmly feeding it into blade at a
moderate speed. Push wood with a push stick until it
clears cutting blade.
7. This is not a free-hand machine. Always use a fence
miter gauge
8. Feed against rotation. Wrong way will accelerate
wood and cause damage
9. No dead end cuts. Continue ripping all the way
through your board without stopping.
10. Only use wood that has flat surfaces
11. Only one piece of wood at a time. Do not start a
second until first is clear.
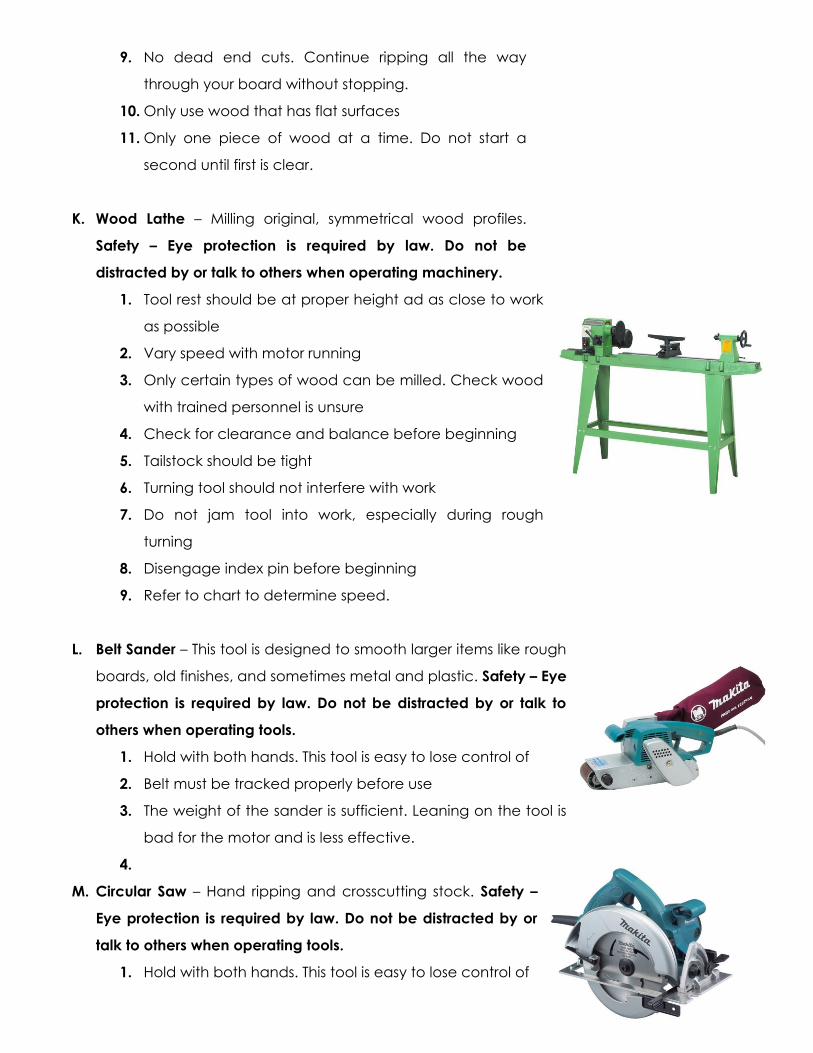
K. Wood Lathe – Milling original, symmetrical wood profiles.
Safety – Eye protection is required by law. Do not be
distracted by or talk to others when operating machinery.
1. Tool rest should be at proper height ad as close to work
as possible
2. Vary speed with motor running
3. Only certain types of wood can be milled. Check wood
with trained personnel is unsure
4. Check for clearance and balance before beginning
5. Tailstock should be tight
6. Turning tool should not interfere with work
7. Do not jam tool into work, especially during rough
turning
8. Disengage index pin before beginning
9. Refer to chart to determine speed.
L. Belt Sander – This tool is designed to smooth larger items like rough
boards, old finishes, and sometimes metal and plastic. Safety – Eye
protection is required by law. Do not be distracted by or talk to
others when operating tools.
1. Hold with both hands. This tool is easy to lose control of
2. Belt must be tracked properly before use
3. The weight of the sander is sufficient. Leaning on the tool is
bad for the motor and is less effective.
4.
M. Circular Saw – Hand ripping and crosscutting stock. Safety –
Eye protection is required by law. Do not be distracted by or
talk to others when operating tools.
1. Hold with both hands. This tool is easy to lose control of

2. Blade guard is designed to self-retract.
N. Detail Sander – This tool provides the ability to sand in corners and in
other detailed spaces. Safety – Eye protection is required by law. Do
not be distracted by or talk to others when operating tools.
1. A moderate grip on the sander insufficient. Excessive forces
are bad for the motor and is less efficient.
O. Drill – This tool is designed to drill various sized straight holes
into wood or metal. Safety – Eye protection is required by law. Do not
be distracted by or talk to others when operating tools.
1. Drill straight in and pull straight out. Twisting or wobbling bit in a
hole will damage the bit and cause bodily harm
2. Bits can be extremely hot after use
3. Be sure to drill with motor in forward direction. Reverse direction
will burn or can ignite wood
4. Pull bit out of deep holes to remove debris. Excess
chips can cause overheating.
P. Finishing Sander – Half and quarter sheet sanders for finishing flat
surfaces. Safety – Eye protection is required by law. Do not be
distracted by or talk to others when operating tools.
1. The weight of the sander is sufficient. Excess pressure on the tool is
bad for the motor and is less effective.4abrasive paper should be
secure before use
2. Abrasive paper should be secure before use.
Q. Grinder – this is a metal working tool for grinding, and
smoothing rough edges. Safety – Eye protection is required by
law. Do not be distracted by or talk to others when operating
tools.
1. Hold with both hands. This tool is easy to lose control of.
2. Lay tool trigger and grinder side up
3. Always position wheel guard between you and your work.

CONCLUSION
While this handbook does cover numerous safety issues, it is not a
replacement for time spent practicing safe work habits in the Lab.
Ultimately, it is the responsibility of the Lab user to follow all safety
procedures as outlined. Failure to do so could result in serious injury.
Completing the process to become Lab Certified in no way makes the
user an expert. Becoming accomplished at fabrication with many
materials and the equipment used to shape them takes time, patience
and hard work. One should plan ahead and ask for assistance. The Lab
staff is available to help and offer advice. Finally, the user needs to
understand the limits of the equipment, the materials, their own technical
ability and the size and scope of the project when considering work in the
Lab.
This body of work was adapted from the UNM SAA+P and re-vised for safety specifications at The PVAMU SOA FAB LAB

SAFETY AGREEMENT FORM
PVAMU SOA Fabrication Lab
Failure to follow these guidelines, procedures and the instructions of the fabrication supervisors will result in the
loss of privileges of the entire fabrication facility indefinitely.
I have read and understand the general guidelines for the operation of the PVAMU SOA Fabrication Laboratory
and agree to comply with them. I agree to attend the introductory safety orientation and to operate all
PVAMU SOA owned equipment in compliance with the applicable safety policies posted in the lab and at
each machine. I also agree to individual instruction and orientation in order to gain certification to use a piece
of equipment on my own. I agree to abide by all of the applicable safety requirements for the use of the lab,
including the wearing of protective safety gear. I agree never to operate any machine without eye protection.
I understand that I may not bring in my own personal tools to work on a project. I agree not to operate any
machine on my own without certification. I am solely responsible for understanding and abiding by the proper
operation of the fabrication lab and that I do so at my own risk. I understand working in a fabrication
environment involves an element of risk, which I accept. I also acknowledge that orientation and certification is
required for my use of the lab. I understand that the Fab-Lab supervisors are present to help ensure my safety. In
order to help me use the tools provided, I understand that they may need to oversee my use and possibly
correct me if a tool is being used incorrectly. This oversight may include a small amount of physical contact
with a Fab-Lab supervisor and I fully understand that this is strictly for my safety and the safety of others. I
understand that users of the fabrication lab should not operate power tools or equipment if they are taking any
medication that impairs their mental faculties or physical ability to operate tools or equipment. I also
understand that the fabrication lab should not be used by persons who are tired or in a hurry. By signing this
form, I confirm that I will not enter the fabrication lab or operate tools or equipment under any impaired state
(mental, physical, or any other, including sleep deprivation).
I HAVE READ AND UNDERSTAND THE TERMS AND CONDITIONS OF THIS POLICY. I UNDERSTAND THE USE OF THE
FABRICATION LAB IS NOT A RIGHT, BUT A PRIVELEGE AND ANY UNSAFE ACTION ON MY PART MAY RESULT IN THE
REVOCATION OF MY PRIVELEGES INDEFINATELY, AT THE DISCRETION OF THE FAB LAB DIRECTOR/ MANAGER. I
HAVE BEEN TRAINED AND INSTRUCTED ON THE PROPER AND SAFE USE OF THE FAB LAB EQUIPMENT. I UNDERSTAND
THAT FAILURE TO FOLLOW THE INSTRUCTIONS OUTLINED IN TRAINING AND IN THIS DOCUMENT WILL RESULT IN LOSS
OF LAB PRIVELEGES AND ACCESS. IF GROSS NEGLIGENCE IS DETERMINED TO BE INVOLVED IN THE COURSE OF A
NON-INJURY ACCIDENT AMEETING IS REQUIRED BETWEEN THE USER(S) AND THE LAB SUPERVISOR BEFORE LAB
ACCESS MAY RESUME. IF AN INDIVIDUAL IS CONSISTENTLY WORKING IN AN UNSAFE MANNER, LAB PRIVILEGES
WILL BE REVOKED.
Student (Legibly Printed) Name _______________________________ Date____________________
Student Signature ____________________________________________ Date____________________
STUDIO SECTION ________________________________GRADUATION DATE____________________
Test Score: Pass______________ Fail________________
No. of Attempts: ____________
Shop Supervisor_____________________________________________ Date____________________
Recommended