Powerful PowerPointfor Educators: Using
Visual Basic forApplications to Make
PowerPoint Interactive
David M. Marcovitz
LIBRARIES UNLIMITED


Pow er ful PowerPointfor Ed u ca tors
Us ing Vi sual Ba sic for Ap plications to MakePowerPoint In ter ac tive
David M. Marcovitz
Westport, Con nect i cut • Lon don
Li brary of Con gress Cat a log ing-in-Pub li ca tion Data
Marcovitz, Da vid M.
Pow er ful PowerPoint for ed u ca tors : us ing Vi sual Ba sic for ap pli ca tions to make
PowerPoint interactive / by David M. Marcovitz
p. cm.
ISBN: 1–59158–095–1 (alk. pa per)
1. Com puter graphics. 2. Microsoft PowerPoint (Computer file) 3. Business
pre sen ta tions—Graphic meth ods—Com puter pro grams. 4. Microsoft Vi sual Basic for
ap plications. I. Ti tle.
T385.M36345 2004
006.6'8682—dc22 2003067183
Brit ish Li brary Cat a logu ing in Pub li ca tion Data is avail able.
Copyright © 2004 by Da vid M. Marcovitz
All rights re served. No por tion of this book may be
reproduced, by any pro cess or technique, without the
express written consent of the pub lisher.
Library of Congress Catalog Card Num ber: 2003067183
ISBN: 1–59158–095–1
First pub lished in 2004
Libraries Un limited, 88 Post Road West, Westport, CT 06881
A Member of the Greenwood Pub lishing Group, Inc.
www.lu.com
Printed in the United States of America
The paper used in this book complies with the
Permanent Paper Standard issued by the Na tional
In for ma tion Stan dards Or ga ni za tion (Z39.48–1984).
10 9 8 7 6 5 4 3 2 1
All terms mentioned in this book that are known as trademarks or ser vice marks have
been appropriately capitalized. Use of a term in this book should not be re garded as
affecting the va lidity of any trademark or service mark.
The pub lisher and the author of this book have no con nection to Microsoft.
The au thor main tains a site of sup ple men tal in for ma tion, in clud ing bib lio graph i cal up-
dates and fur ther read ings. This site is available through Libraries Un limited site at
www.lu.com.

For the three la dies in my life:
Emily, Ella, and Ada

Con tents
List of Figures. . . . . . . . . . . . . . . . . . . . . . . . . . . . . . . . . . . . . . . . . . . . . xi
Pref ace . . . . . . . . . . . . . . . . . . . . . . . . . . . . . . . . . . . . . . . . . . . . . . . . . . xv
Chap ter 1: Mul ti me dia De sign . . . . . . . . . . . . . . . . . . . . . . . . . . . . . . . . . . . 1
In tro duc tion . . . . . . . . . . . . . . . . . . . . . . . . . . . . . . . . . . . . . . . . . . . . . . . 1
Vo cab u lary. . . . . . . . . . . . . . . . . . . . . . . . . . . . . . . . . . . . . . . . . . . . . . . . 1
What Is Mul ti me dia? . . . . . . . . . . . . . . . . . . . . . . . . . . . . . . . . . . . . . . . . 2
The Design Process . . . . . . . . . . . . . . . . . . . . . . . . . . . . . . . . . . . . . . . . . 3
Pro ject Or ga ni za tion . . . . . . . . . . . . . . . . . . . . . . . . . . . . . . . . . . . . . . . . 5
Met a phors . . . . . . . . . . . . . . . . . . . . . . . . . . . . . . . . . . . . . . . . . . . . . . . . 7
Storyboards and Flowcharts. . . . . . . . . . . . . . . . . . . . . . . . . . . . . . . . . . . 7
De sign ing As sign ments for Your Stu dents . . . . . . . . . . . . . . . . . . . . . . . . 8
Con clu sion . . . . . . . . . . . . . . . . . . . . . . . . . . . . . . . . . . . . . . . . . . . . . . . 10
Chap ter 2: Tra di tional Mul ti me dia Fea tures of PowerPoint . . . . . . . . . 13
In tro duc tion . . . . . . . . . . . . . . . . . . . . . . . . . . . . . . . . . . . . . . . . . . . . . . 13
Vo cab u lary. . . . . . . . . . . . . . . . . . . . . . . . . . . . . . . . . . . . . . . . . . . . . . . 13
Before You Be gin . . . . . . . . . . . . . . . . . . . . . . . . . . . . . . . . . . . . . . . . . 14
In sert ing Pic tures . . . . . . . . . . . . . . . . . . . . . . . . . . . . . . . . . . . . . . . . . . 15
Sounds . . . . . . . . . . . . . . . . . . . . . . . . . . . . . . . . . . . . . . . . . . . . . . . . . . 18
Link ing and Em bed ding Sounds . . . . . . . . . . . . . . . . . . . . . . . . . . . . . . 20
Are My Sounds Linked or Embedded? . . . . . . . . . . . . . . . . . . . . . . . . . . 21
Hy per text Links . . . . . . . . . . . . . . . . . . . . . . . . . . . . . . . . . . . . . . . . . . . 21
But tons. . . . . . . . . . . . . . . . . . . . . . . . . . . . . . . . . . . . . . . . . . . . . . . . . . 25
Text for But tons . . . . . . . . . . . . . . . . . . . . . . . . . . . . . . . . . . . . . . . . . . . 27
Sound for Buttons . . . . . . . . . . . . . . . . . . . . . . . . . . . . . . . . . . . . . . . . . 28
Con trol ling Nav i ga tion with Ki osk Mode . . . . . . . . . . . . . . . . . . . . . . . 29
Saving As a PowerPoint Show . . . . . . . . . . . . . . . . . . . . . . . . . . . . . . . . 30
Con clu sion . . . . . . . . . . . . . . . . . . . . . . . . . . . . . . . . . . . . . . . . . . . . . . . 31
Ex er cises to Try . . . . . . . . . . . . . . . . . . . . . . . . . . . . . . . . . . . . . . . . . . . 32
Chap ter 3: In tro duc ing Vi sual Ba sic for Ap pli ca tions . . . . . . . . . . . . . . . 33
In tro duc tion . . . . . . . . . . . . . . . . . . . . . . . . . . . . . . . . . . . . . . . . . . . . . . 33
Vo cab u lary. . . . . . . . . . . . . . . . . . . . . . . . . . . . . . . . . . . . . . . . . . . . . . . 33
What Is Vi sual Ba sic for Ap plications? . . . . . . . . . . . . . . . . . . . . . . . . . 34
What Is an Object-Oriented Pro gramming Language? . . . . . . . . . . . . . . 35
VBA and Vi ruses . . . . . . . . . . . . . . . . . . . . . . . . . . . . . . . . . . . . . . . . . . 37
Con clu sion . . . . . . . . . . . . . . . . . . . . . . . . . . . . . . . . . . . . . . . . . . . . . . . 39
Ex er cises to Try . . . . . . . . . . . . . . . . . . . . . . . . . . . . . . . . . . . . . . . . . . . 39
Chapter 4: Get ting Started with VBA . . . . . . . . . . . . . . . . . . . . . . . . . . . . 41
In tro duc tion . . . . . . . . . . . . . . . . . . . . . . . . . . . . . . . . . . . . . . . . . . . . . . 41
Vo cab u lary. . . . . . . . . . . . . . . . . . . . . . . . . . . . . . . . . . . . . . . . . . . . . . . 41
Ac cess ing the VBA Ed i tor. . . . . . . . . . . . . . . . . . . . . . . . . . . . . . . . . . . 41
Help! I’ve Lost My Windows . . . . . . . . . . . . . . . . . . . . . . . . . . . . . . . . . 43
Tying Your VBA Script to a PowerPoint Button . . . . . . . . . . . . . . . . . . 43
Tying Your VBA Script to Any Ob ject . . . . . . . . . . . . . . . . . . . . . . . . . . 45
Changing a Button . . . . . . . . . . . . . . . . . . . . . . . . . . . . . . . . . . . . . . . . . 46
Securing Your VBA Script from Pry ing Eyes. . . . . . . . . . . . . . . . . . . . . 47
Con clu sion . . . . . . . . . . . . . . . . . . . . . . . . . . . . . . . . . . . . . . . . . . . . . . . 48
Ex er cises to Try . . . . . . . . . . . . . . . . . . . . . . . . . . . . . . . . . . . . . . . . . . . 48
Chapter 5: Let’s Get Scripting . . . . . . . . . . . . . . . . . . . . . . . . . . . . . . . . . . 49
In tro duc tion . . . . . . . . . . . . . . . . . . . . . . . . . . . . . . . . . . . . . . . . . . . . . . 49
Vo cab u lary. . . . . . . . . . . . . . . . . . . . . . . . . . . . . . . . . . . . . . . . . . . . . . . 49
Variables and Getting In put . . . . . . . . . . . . . . . . . . . . . . . . . . . . . . . . . . 50
Vari able Dec la ra tions. . . . . . . . . . . . . . . . . . . . . . . . . . . . . . . . . . . . . . . 51
Vari able Types. . . . . . . . . . . . . . . . . . . . . . . . . . . . . . . . . . . . . . . . . . . . 53
Force the Student to Type Something . . . . . . . . . . . . . . . . . . . . . . . . . . . 55
What Else? A Personal Re sponse and a Short-Answer Question . . . . . . 57
Running Your Scripts . . . . . . . . . . . . . . . . . . . . . . . . . . . . . . . . . . . . . . 59
Call ing a Pro ce dure from An other Pro ce dure . . . . . . . . . . . . . . . . . . . . . 59
Con clu sion . . . . . . . . . . . . . . . . . . . . . . . . . . . . . . . . . . . . . . . . . . . . . . . 61
Ex er cises to Try . . . . . . . . . . . . . . . . . . . . . . . . . . . . . . . . . . . . . . . . . . . 61
Chapter 6: A Scripting Bag of Tricks . . . . . . . . . . . . . . . . . . . . . . . . . . . . 63
In tro duc tion . . . . . . . . . . . . . . . . . . . . . . . . . . . . . . . . . . . . . . . . . . . . . . 63
Vo cab u lary. . . . . . . . . . . . . . . . . . . . . . . . . . . . . . . . . . . . . . . . . . . . . . . 63
Com ments . . . . . . . . . . . . . . . . . . . . . . . . . . . . . . . . . . . . . . . . . . . . . . . 64
Navigation: Mov ing from Slide to Slide . . . . . . . . . . . . . . . . . . . . . . . . . 64
The Secrets of the MsgBox . . . . . . . . . . . . . . . . . . . . . . . . . . . . . . . . . . 66
Hiding and Showing PowerPoint Objects. . . . . . . . . . . . . . . . . . . . . . . . 68
Let’s Get Started: Initializing Your Pre sentation . . . . . . . . . . . . . . . . . . 69
Ref er enc ing Ob jects by Num ber . . . . . . . . . . . . . . . . . . . . . . . . . . . . . . 71
Ref er enc ing Ob jects by Name . . . . . . . . . . . . . . . . . . . . . . . . . . . . . . . . 73
This Slide or Another Slide. . . . . . . . . . . . . . . . . . . . . . . . . . . . . . . . . . . 74
Adding PowerPoint Objects. . . . . . . . . . . . . . . . . . . . . . . . . . . . . . . . . . 75
Putting the Student’s In put into a Box. . . . . . . . . . . . . . . . . . . . . . . . . . . 77
Ma nip u lat ing Text in Ob jects . . . . . . . . . . . . . . . . . . . . . . . . . . . . . . . . 79
Ma nip u lat ing Text: The Mys tery Ex am ple . . . . . . . . . . . . . . . . . . . . . . . 85
Con clu sion . . . . . . . . . . . . . . . . . . . . . . . . . . . . . . . . . . . . . . . . . . . . . . . 89
Ex er cises to Try . . . . . . . . . . . . . . . . . . . . . . . . . . . . . . . . . . . . . . . . . . . 89
viii Con tents
Chapter 7: Quizzes and Tests . . . . . . . . . . . . . . . . . . . . . . . . . . . . . . . . . . . 91
In tro duc tion . . . . . . . . . . . . . . . . . . . . . . . . . . . . . . . . . . . . . . . . . . . . . . 91
Vo cab u lary. . . . . . . . . . . . . . . . . . . . . . . . . . . . . . . . . . . . . . . . . . . . . . . 91
Sim ple Mul ti ple-Choice Tests . . . . . . . . . . . . . . . . . . . . . . . . . . . . . . . . 92
Keep ing Score . . . . . . . . . . . . . . . . . . . . . . . . . . . . . . . . . . . . . . . . . . . . 93
Try Again: An swer Un til It’s Right . . . . . . . . . . . . . . . . . . . . . . . . . . . . 95
Try Again and Again: Answer Again Af ter It’s Right . . . . . . . . . . . . . . . 96
Short-Answer Quiz Questions . . . . . . . . . . . . . . . . . . . . . . . . . . . . . . . . 99
Do Spelling and Spacing Count? . . . . . . . . . . . . . . . . . . . . . . . . . . . . . 100
How Did You Do: Re porting Results to the Teacher. . . . . . . . . . . . . . . 102
Learn First, Ask Questions Later: The Tu torial and Quiz . . . . . . . . . . . 109
Con clu sion . . . . . . . . . . . . . . . . . . . . . . . . . . . . . . . . . . . . . . . . . . . . . . 115
Ex er cises to Try . . . . . . . . . . . . . . . . . . . . . . . . . . . . . . . . . . . . . . . . . . 116
Chapter 8: More Tricks for Your Scripting Bag . . . . . . . . . . . . . . . . . . 117
In tro duc tion . . . . . . . . . . . . . . . . . . . . . . . . . . . . . . . . . . . . . . . . . . . . . 117
Vo cab u lary. . . . . . . . . . . . . . . . . . . . . . . . . . . . . . . . . . . . . . . . . . . . . . 117
Con di tion als: The If State ment . . . . . . . . . . . . . . . . . . . . . . . . . . . . . 118
Loop ing . . . . . . . . . . . . . . . . . . . . . . . . . . . . . . . . . . . . . . . . . . . . . . . . 120
Pa ram e ters . . . . . . . . . . . . . . . . . . . . . . . . . . . . . . . . . . . . . . . . . . . . . . 124
Timed Func tions . . . . . . . . . . . . . . . . . . . . . . . . . . . . . . . . . . . . . . . . . 125
Saving and Quitting . . . . . . . . . . . . . . . . . . . . . . . . . . . . . . . . . . . . . . . 127
What’s in a Name? Finding and Changing Ob ject and Slide Names . . . 130
Ar rays . . . . . . . . . . . . . . . . . . . . . . . . . . . . . . . . . . . . . . . . . . . . . . . . . 134
I Don’t Know How Many Questions: ReDim to the Res cue . . . . . . . . . 136
Which Button Did I Press? . . . . . . . . . . . . . . . . . . . . . . . . . . . . . . . . . . 138
Ran dom Num bers . . . . . . . . . . . . . . . . . . . . . . . . . . . . . . . . . . . . . . . . 143
Choose Questions Randomly from a Pool . . . . . . . . . . . . . . . . . . . . . . 146
Con clu sion . . . . . . . . . . . . . . . . . . . . . . . . . . . . . . . . . . . . . . . . . . . . . . 150
Ex er cises to Try . . . . . . . . . . . . . . . . . . . . . . . . . . . . . . . . . . . . . . . . . . 151
Chap ter 9: De bug ging Tips . . . . . . . . . . . . . . . . . . . . . . . . . . . . . . . . . . . . 153
In tro duc tion . . . . . . . . . . . . . . . . . . . . . . . . . . . . . . . . . . . . . . . . . . . . . 153
Vo cab u lary. . . . . . . . . . . . . . . . . . . . . . . . . . . . . . . . . . . . . . . . . . . . . . 153
My Scripts Al ways Work the First Time. . . . . . . . . . . . . . . . . . . . . . . . 153
Testing for Bugs. . . . . . . . . . . . . . . . . . . . . . . . . . . . . . . . . . . . . . . . . . 154
No News Is Bad News . . . . . . . . . . . . . . . . . . . . . . . . . . . . . . . . . . . . . 155
The Er ror in Red . . . . . . . . . . . . . . . . . . . . . . . . . . . . . . . . . . . . . . . . . 155
I’m Not Seeing Red, But I’m Seeing Red . . . . . . . . . . . . . . . . . . . . . . . 158
Com ment ing Out . . . . . . . . . . . . . . . . . . . . . . . . . . . . . . . . . . . . . . . . . 160
Com pil ing Your Code . . . . . . . . . . . . . . . . . . . . . . . . . . . . . . . . . . . . . 161
Debugger . . . . . . . . . . . . . . . . . . . . . . . . . . . . . . . . . . . . . . . . . . . . . . . 162
An Ounce of Prevention . . . . . . . . . . . . . . . . . . . . . . . . . . . . . . . . . . . 162
Hints from the VBA Ed itor . . . . . . . . . . . . . . . . . . . . . . . . . . . . . . . . . . 166
Con tents ix
Chapter 9: Debugging Tips (cont.)
VBA Help . . . . . . . . . . . . . . . . . . . . . . . . . . . . . . . . . . . . . . . . . . . . . . 168
Com mon Bugs . . . . . . . . . . . . . . . . . . . . . . . . . . . . . . . . . . . . . . . . . . . 168
Final Word on De bugging and Error Prevention. . . . . . . . . . . . . . . . . . 170
Con clu sion . . . . . . . . . . . . . . . . . . . . . . . . . . . . . . . . . . . . . . . . . . . . . . 170
Ex er cises to Try . . . . . . . . . . . . . . . . . . . . . . . . . . . . . . . . . . . . . . . . . . 171
Chapter 10: Templates . . . . . . . . . . . . . . . . . . . . . . . . . . . . . . . . . . . . . . . 173
In tro duc tion . . . . . . . . . . . . . . . . . . . . . . . . . . . . . . . . . . . . . . . . . . . . . 173
Vo cab u lary. . . . . . . . . . . . . . . . . . . . . . . . . . . . . . . . . . . . . . . . . . . . . . 173
What Are Tem plates? . . . . . . . . . . . . . . . . . . . . . . . . . . . . . . . . . . . . . 173
Saving Your Template . . . . . . . . . . . . . . . . . . . . . . . . . . . . . . . . . . . . . 175
The Pick-A-Partner Tem plate Project . . . . . . . . . . . . . . . . . . . . . . . . . 176
Con clu sion . . . . . . . . . . . . . . . . . . . . . . . . . . . . . . . . . . . . . . . . . . . . . . 183
Ex er cises to Try . . . . . . . . . . . . . . . . . . . . . . . . . . . . . . . . . . . . . . . . . . 183
Ep i logue. . . . . . . . . . . . . . . . . . . . . . . . . . . . . . . . . . . . . . . . . . . . . . . . 185
Ref er ences . . . . . . . . . . . . . . . . . . . . . . . . . . . . . . . . . . . . . . . . . . . . . . 187
In dex . . . . . . . . . . . . . . . . . . . . . . . . . . . . . . . . . . . . . . . . . . . . . . . . . . 189
x Con tents
List of Fig ures
1.1 Lin ear Or ga ni za tion . . . . . . . . . . . . . . . . . . . . . . . . . . . . . . . . . . . . . . . . . 5
1.2 Menu Or ga ni za tion . . . . . . . . . . . . . . . . . . . . . . . . . . . . . . . . . . . . . . . . . 6
2.1 No Check Next to “Allow fast saves” . . . . . . . . . . . . . . . . . . . . . . . . . . 14
2.2 Choos ing In sert Picture From File from the Menu . . . . . . . . . . . . . . . . 16
2.3 In sert Clip Art in PowerPoint 2002 . . . . . . . . . . . . . . . . . . . . . . . . . . . . 17
2.4 Right Click the Mouse . . . . . . . . . . . . . . . . . . . . . . . . . . . . . . . . . . . . . . 18
2.5 Flyout Menu to Copy a Pic ture from a Browser . . . . . . . . . . . . . . . . . . 19
2.6 Re cord Sound Dialog Box . . . . . . . . . . . . . . . . . . . . . . . . . . . . . . . . . . . 19
2.7 In sert Hyperlink . . . . . . . . . . . . . . . . . . . . . . . . . . . . . . . . . . . . . . . . . . . 22
2.8 In sert Hyperlink Dialog in PowerPoint 2001 . . . . . . . . . . . . . . . . . . . . 23
2.9 In sert Hyperlink Dialog in PowerPoint 2002 . . . . . . . . . . . . . . . . . . . . 23
2.10 The Twelve Types of But tons . . . . . . . . . . . . . . . . . . . . . . . . . . . . . . . . 25
2.11 Ac tion Settings for a Button . . . . . . . . . . . . . . . . . . . . . . . . . . . . . . . . . 26
2.12 But ton with Ac tion Settings for the Text. . . . . . . . . . . . . . . . . . . . . . . . 28
2.13 Se lect ing Ki osk Mode . . . . . . . . . . . . . . . . . . . . . . . . . . . . . . . . . . . . . . 30
2.14 Sav ing a File As a PowerPoint Show . . . . . . . . . . . . . . . . . . . . . . . . . . 31
2.15 Slides for Tutorial with Menu . . . . . . . . . . . . . . . . . . . . . . . . . . . . . . . . 32
3.1 Do You Want to Enable Macros? . . . . . . . . . . . . . . . . . . . . . . . . . . . . . 38
3.2 Se curity Tab Un der Options . . . . . . . . . . . . . . . . . . . . . . . . . . . . . . . . . 38
3.3 Macro Se cu rity Di a log Box . . . . . . . . . . . . . . . . . . . . . . . . . . . . . . . . . . 39
3.4 Ex ample Chart of the Parts of a PowerPoint Presentation. . . . . . . . . . . 40
4.1 In sert Module1. . . . . . . . . . . . . . . . . . . . . . . . . . . . . . . . . . . . . . . . . . . . 42
4.2 MsgBox Says “Hello” . . . . . . . . . . . . . . . . . . . . . . . . . . . . . . . . . . . . . . 42
4.3 Pro ject Win dow with Module1 . . . . . . . . . . . . . . . . . . . . . . . . . . . . . . . 43
4.4 Getting a Blank Action Button . . . . . . . . . . . . . . . . . . . . . . . . . . . . . . . 44
4.5 Ac tion Set tings Di a log Box . . . . . . . . . . . . . . . . . . . . . . . . . . . . . . . . . . 45
4.6 Set ting a Password. . . . . . . . . . . . . . . . . . . . . . . . . . . . . . . . . . . . . . . . . 47
4.7 Slides for a Sim ple Quiz in the Chapter 4 Exercise. . . . . . . . . . . . . . . . 48
5.1 A Box Called userName . . . . . . . . . . . . . . . . . . . . . . . . . . . . . . . . . . . . 52
5.2 Variable Type Pop-Up Box . . . . . . . . . . . . . . . . . . . . . . . . . . . . . . . . . . 53
5.3 Simple Quiz . . . . . . . . . . . . . . . . . . . . . . . . . . . . . . . . . . . . . . . . . . . . . . 55
5.4 Ask For and Require a Name. . . . . . . . . . . . . . . . . . . . . . . . . . . . . . . . . 56
5.5 YourNameWithPraise Calls YourName and DoingWell . . . . . . . . . 60
6.1 MsgBox with Yes and No But tons . . . . . . . . . . . . . . . . . . . . . . . . . . . . . 67
6.2 Simple Quiz Showing Stars for Cor rect An swers . . . . . . . . . . . . . . . . . 70
6.3 Cus tom Animation to Find Shape Num bers . . . . . . . . . . . . . . . . . . . . . 71
6.4 Find ing the Object Number in PowerPoint 2002. . . . . . . . . . . . . . . . . . 72
6.5 Shapes on a Slide, with Names in Quotations Below . . . . . . . . . . . . . . 73
6.6 Signs of Spring Discussion Slide—Before and Af ter . . . . . . . . . . . . . . 82
6.7 The Mys tery Pre sen ta tion Slides . . . . . . . . . . . . . . . . . . . . . . . . . . . . . . 86
6.8 The Mystery Presentation VBA Code . . . . . . . . . . . . . . . . . . . . . . . . . . 87
7.1 Mul tiple-Choice Test with Scorekeeping . . . . . . . . . . . . . . . . . . . . . . . 93
7.2 Question Slide with Next and Previous But tons . . . . . . . . . . . . . . . . . . 97
7.3 Short-Answer Question Slide . . . . . . . . . . . . . . . . . . . . . . . . . . . . . . . 100
7.4 Ex ample of Printable Slide . . . . . . . . . . . . . . . . . . . . . . . . . . . . . . . . . 107
7.5 Ex ample Tu torial and Quiz PowerPoint Slides . . . . . . . . . . . . . . . . . . 110
7.6 VBA Code for Menus with Feedback in Tu torial and Quiz . . . . . . . . 111
7.7 VBA Code to Hide and Show the Quiz Button . . . . . . . . . . . . . . . . . . 114
8.1 Run ning a Macro in Edit View . . . . . . . . . . . . . . . . . . . . . . . . . . . . . . 132
8.2 VBA Code for Se lecting Five Questions from a Pool of Questions . . 147
9.1 Typ i cal Com pile Er ror . . . . . . . . . . . . . . . . . . . . . . . . . . . . . . . . . . . . . 156
9.2 Typ i cal Com pile Er ror . . . . . . . . . . . . . . . . . . . . . . . . . . . . . . . . . . . . . 157
9.3 Auto-Complete Sug gestions from the VBA Ed itor . . . . . . . . . . . . . . . 166
xii List of Figures

9.4 VBA Ed i tor Sug gests Pa ram e ters for the GotoSlide Method . . . . . 166
9.5 VBA Ed i tor Sug gests Pa ram e ters for the AddShape Method . . . . . . 167
10.1 Template for An imal Pro ject . . . . . . . . . . . . . . . . . . . . . . . . . . . . . . . . 174
10.2 Choos ing Design Template As the File Type . . . . . . . . . . . . . . . . . . . 176
10.3 Slides for Pick-A-Partner Template. . . . . . . . . . . . . . . . . . . . . . . . . . . 177
10.4 Pick-A-Partner VBA Code . . . . . . . . . . . . . . . . . . . . . . . . . . . . . . . . . 179
10.5 Ex ample of Slide Created When Someone Has Cho sen to
Work with You . . . . . . . . . . . . . . . . . . . . . . . . . . . . . . . . . . . . . . . . . . 181
xiii

Pref ace
Most ed u ca tors have cre ated sim ple pre sen ta tions with PowerPoint®.
PowerPoint is a fine tool for add ing me dia to a lec ture, but it falls flat when cre at-
ing in teractive lessons for stu dents to use while sit ting in front of the com puter.
That is, it falls flat un less you use the built-in script ing fea tures of PowerPoint.
Starting with PowerPoint version 97, every copy of PowerPoint comes with
Visual Ba sic® for Applications (VBA). VBA can be used to add to the functional-
ity of Microsoft Of fice® ap pli ca tions, in clud ing Microsoft PowerPoint. With
the advent of PowerPoint 97, teachers can put lim ited interactivity into their pre-
sentations using action settings, hyperlinks, and but tons. These features al low
you to
• add but tons to control navigation (start your slide show with a menu,
for ex ample, rather than requiring lin ear nav igation, from slide to
slide to slide);
• jump to other PowerPoint pre sentations, other files, or Web pages;
and
• cre ate ru di men tary mul ti ple-choice tests (click ing on a but ton with
the correct an swer takes the student to a slide that says “cor rect,” for
example).
While this interactivity is use ful, it is also very lim ited. VBA ex tends this to
nearly un limited dimensions. With VBA, you can change the con tent and ap -
pearance of slides based on student in put, ask for and process typed in put, add
additional slides, hide and show graphics, and much more.
“Wait!” I hear you cry. VBA is a so phisticated pro gramming language. Can
teachers be come programmers? Cer tainly, many teachers can become program-
mers, but the goal is not to create pro gram mers but rather scripters. A pro gram-
mer learns all the sub tleties of a com puter lan guage in min ute de tail. A scripter
might learn some of the details of the lan guage but, more im portant, learns a few
easily mod ifiable scripts that can per form im portant tasks. Script ing is well
within the reach of many teachers, and taking ad vantage of the power of
authoring sys tems like PowerPoint is an important part of the In ternational So ci-
ety for Technology in Ed ucation (2001) standards for programs in technology
facilitation:
• Standard III.A.7—Use methods for teaching con cepts and skills that
support use of web-based and non web-based authoring tools in a
school en vi ron ment.
• Stan dard III.C.1—Use meth ods and fa cil i tate strat e gies for teach ing
prob lem solv ing prin ci ples and skills us ing tech nol ogy resources.
• Standard V.C.7—Use examples of emerging pro gramming, authoring
or prob lem solv ing en vironments that sup port personal and pro fes-
sional de vel op ment
Scripting might not be a use ful technique when used with a stand-alone
programming language, but the real power of us ing VBA with PowerPoint is not
merely that VBA is an ac cessible script ing lan guage but that it is built into
PowerPoint. One of my stu dents created a presentation about Ha waii. It included
pictures, vid eos, re corded voices, and links to Web sites. All of this used tradi-
tional PowerPoint technology (no scripting re quired). On top of that, it added an
interactive menu and a quiz with feedback about how well the user did on the
quiz. Building all of this from scratch with a pro gramming or authoring tool
could be an overwhelming task, but 95 percent of the presentation was done with
traditional PowerPoint tools (things most teachers al ready know how to do or
can learn within a cou ple of hours). When a few scripts are added on top of the
traditional PowerPoint tools, the re sults are rich not only with media but also
with interactivity.
Remember, the more you know, the more you can do. With a few scripts,
you can add short-answer questions (with feedback about right and wrong an-
swers) and keep score. Add a few more scripts and you can have a menu that
keeps track of which sections of your pre sentation have been visited and only
shows the but ton to take the quiz when all sections have been vis ited. Add a few
more scripts and you can have the user type things that change the slides in the
pre sen ta tion. The pos si bil i ties are endless.
The more you know, the more you can do. And you can always add more
traditional PowerPoint without know ing any more VBA.
I have been using this ma terial (be fore writing a book about it) with my stu-
dents, who are mostly teachers, en rolled in a graduate course in multimedia de-
sign for the classroom, for about four years. They have created pow erful pro jects
for their students (like the Hawaii pro ject mentioned earlier). In addition, I have
been speaking about this at con ferences and workshops. The overwhelming re -
action I get is, “That’s great! I didn’t know you could do that.”
While this book is not accessible for com puter nov ices, teachers who are
beyond the level of computer beginner can use this technology to create pow er-
ful material for their students, material that goes be yond a simple page-turner.
For the pro fessional mul timedia designer, PowerPoint might not be the
right choice. How ever, ex pensive and complicated tools are not common in
schools. Using PowerPoint as a framework, teachers are able to add as much or
as lit tle interactivity as their skills allow and their needs re quire. Thus,
PowerPoint is an ap propriate mul timedia tool for teachers and a powerful ad di-
tion to a multimedia design class.
xvi Pref ace
This book can be used as a stand-alone book in a mul timedia design class
for ed ucators or as a com panion for books like Ivers and Barron (2002) or
Agnew, Kellerman, and Meyer (1996), which fo cus on multimedia design and
using mul timedia pro jects in classrooms but do not deal with a specific technol-
ogy for implementing the projects. It also stands by it self without a class. Any -
one with ba sic PowerPoint skills can sit down with this book and be gin to create
pow er ful ed u ca tional ma te rial for them selves, their col leagues, their students, or
their own children.
Chapter 1 begins the book with some important principles of in structional
design, including how to design your own pro jects and create as signments for
your stu dents to de sign their pro jects. If this book is used in conjunction with a
book about design, the first chapter will pro vide an over view of what you will
find in the de sign books, but if this book is used by itself, this chap ter is very im -
portant. Jump ing in and creating things is fine when you are play ing around, but
serious pro jects require some planning and design work, and Chapter 1 will give
you a foundation in that.
Chap ter 2 be gins to ex plore some of the tra di tional in ter ac tive mul ti me dia
features of PowerPoint. Add ing pic tures, sounds, but tons, and hyperlinks is not
difficult, but many PowerPoint users have never used those features before.
Chapter 3 introduces VBA. You’ll un derstand how VBA fits into the world
of ob ject-oriented pro gramming and how that af fects you as a scripter. As a
scripter, you won’t have to un derstand all of VBA and ob ject-oriented pro gram-
ming, but un derstanding ob jects and how to manipulate them will help you un -
derstand your scripts.
Chapter 4 begins the heart of the book as you start to learn about scripting
with VBA. You’ll learn how VBA is connected to PowerPoint and how to write
and run your first script. You’ll also learn about keeping your scripts pri vate so
your stu dents can’t look for the an swers in your scripts.
Chapters 5 and 6 build your bag of scripting tricks. As a scripter, you will
be in terested in taking scripts di rectly from these chapters and ap plying them to
your own pur poses.
While each chap ter contains ex amples that you can use right away, Chapter
7 fo cuses on ex amples that you will be able to use to create quiz zes and tests.
Once you have completed Chap ter 7, you will have a large bag of tricks that
you can use by copy ing scripts di rectly from the book and pos sibly creating
some on your own. Chapter 8 describes some more tricks that you can use, par -
ticularly if you are ready to modify some of the ideas in the book for your own
purposes. It ends with a powerful ex ample that I use with my daugh ter as she is
learning to read.
Once you have mastered a large bag of tricks, you might need some help cor -
recting your mistakes. Whenever you write scripts, even if you just copy them
from the book, you are likely to make a few mistakes. Fix ing mistakes is called
debugging, and you will learn some of the secrets of debugging in Chapter 9.
Pref ace xvii
By the time you fin ish Chapter 9, you will be ex cited to create things your-
self, but you might want to share your knowledge with your colleagues and your
students. Some of them will share your enthusiasm and bor row your copy of this
book (or better yet, buy their own copy) and dive right into powerful
PowerPoint. Others won’t be ready for the technical challenge. Chap ter 10 de-
scribes how you can use templates, so your col leagues and stu dents can take full
advantage of the power of VBA scripting without know ing any of it. You can
use what you learn in Chapter 10 to pro vide a template for your colleagues or
students with the scripting already done for them (by you).
When you have completed the book, you might not be an ex pert at us ing
VBA to cre ate pow erful in teractive mul timedia pro jects, but you will have a
large bag of tricks that can help you do more with technology to make you a
better educator.
Writing this book has been a long pro cess. I began my journey when I at -
tended a presentation at a con ference in which the speaker was talking about all
the exciting ed ucational things that can be done with PowerPoint. I thought that
he was talking about the things this book discusses, but I was wrong. I started ex -
ploring, and I found that no one was talking about these things, at least not for
educators. As I looked for books to help me, I found many (look in the Refer-
ences section at the end of the book), but none was geared to ed ucators or to us -
ing PowerPoint interactively. I wanted to share this with my students, so I started
creating my own hand outs. As the hand outs grew, I began speaking about this at
conferences and giving work shops. Everyone was amazed at what PowerPoint
could do. By the time the hand outs reached sev enty pages, I knew it was time to
move from handouts to a book.
I would like to thank all the people who helped me along the way, but they
are too nu merous to mention, so I will mention only a few. I would like to thank
all my stu dents over the years in Mul timedia Design in the Classroom, particu-
larly the first group, who had to en dure the course with a few pages of handouts
that were be ing written dur ing the course, in most cases the night be fore each
class. I also would like to thank Di ana Sucich, one of my stu dents who reviewed
the manuscript as it was morphing from a seventy-page packet of handouts into a
book. Her com ments were in valuable. I also would like to thank Luis Bango, a
former stu dent who suf fered through Mul timedia Design in the Classroom while
the handouts were not in the best shape and reviewed the fi nal manuscript. I also
would like to thank the PowerPoint MVPs in the Microsoft PowerPoint
newsgroup. Several PowerPoint experts give their time in that newsgroup to an-
swer questions from beginners and ex perts alike with beginning PowerPoint
questions and complex scripting questions.
Finally, I would like to thank my family. My wife Emily has pro vided me
with un ending love and sup port as I have stayed late in the of fice to work on the
book. My daugh ter Ella has been a guinea pig for some of my wacky projects,
particularly the example at the end of Chapter 9. Both my chil dren, Ella and Ada,
have provided me with love and in spiration be cause I hope that my work will
xviii Pref ace

help my chil dren and all children by making the computer a more ef fective tool
for education.
You are about to embark on a great jour ney. At times you will be elated and
at times frus trated. If you per severe, you will have the power to make the com-
puter do what you want it to, so it can be a tool for you and your stu dents’ learn -
ing. The com puter shouldn’t be everything in education, but when it is used, it
should be used powerfully and effectively.
Pref ace xix

1Mul ti me dia De sign
In tro duc tion
Welcome to the world of powerful PowerPoint. This book will help you use
PowerPoint in ways you never thought were pos sible, with the ul timate goal of
creating better learning en vironments for your stu dents. What ever you do as an
educator requires some plan ning, whether it takes the form of de tailed lesson
plans or a few notes jot ted on the back of a nap kin. When creating complex
learn ing en vi ron ments, plan ning is very im por tant. This chap ter in tro duces
some of the basics of planning and design to help you create better learning en vi-
ronments. You will be in troduced to the benefits of multimedia, the de sign pro -
cess, benefits of hav ing your students de sign multimedia, and metaphors and
organizations for multimedia projects.
Vo cab u lary
• De cide • Met a phor
• De sign • Or ga ni za tion
• De velop • Story board
• Eval u ate • Summative eval u a tion
• For ma tive eval u a tion
What Is Mul ti me dia?
Mul ti me dia is a term that has been around for a long time. Be fore comput-
ers, it referred to a com bination of slides (from a slide pro jector) and sounds
(usually music from a tape player). It has been around for so long be cause peo ple
have recognized that we can be en gaged through multiple senses. Some peo ple
are pri mar ily vi sual learn ers, au di tory learn ers, or kin es thetic learn ers, but most
of us are a com bination of all three. Us ing dif ferent senses in creases at tention,
motivation, and, in many cases, learning. “The power of multimedia and
hypermedia presentation soft ware co mes with changes in the ways teachers and
learners have access to and dem onstrate their un derstanding of knowledge, mov -
ing from a sin gle dom i nant pre sen ta tion and dem on stra tion style (ver bal/lin guis-
tic, lin ear/se quen tial) to an in te grated, multisensory learn ing and dem on stra tion
‘microworld’ (Papert, 1992), where learners have more freedom of choice in the
mode of learning and the or der in which learning takes place” (Male, 2003, p. 6).
As this quote sug gests, multimedia involves multiple senses and a degree of
learner control and choice.
Robinette suggests, “Multimedia is about combining sights, sounds, and
in ter ac tive el e ments to cre ate an ex pe ri ence un like that which co mes from sim-
ply reading text or idly viewing a video” (1995, p. 10). Goldberg says, “Mul ti -
media, as I use it to de fine the cool new medium that I’ve been go ing on about, is
the com bination of au dio/visual me dia el ements with interactivity. . . . A typ ical
mul ti me dia ti tle might in clude any com bi na tion of text, pic tures, com puter
graphics, an i ma tion, au dio, and video” (1996, p. 14).
Multimedia is about in cluding a va riety of me dia with interactivity. Typ ical
pre sen ta tions (us ing PowerPoint or other pre sen ta tion tools) em pha size the me-
dia and not the interactivity. When enhancing a lecture to present to an au dience,
interactivity is not al ways im portant. How ever, when creating pro jects that your
students can control, picking and choosing where to go within the pro ject,
well-designed interactivity is very important.
In ter ac tive mul ti me dia helps stu dents learn by in creas ing mo ti va tion, by
giving them con trol over their learning, and by reaching them through different
senses. As you design multimedia presentations for your students, you de cide
what me dia are most appropriate. Sometimes a picture is worth a thou sand
words; sometimes a few words are worth a thousand pictures; and sometimes, in
the case of a struggling reader, for example, spoken words are more important
than everything else. A few bells and whistles, used sparingly and appropriately,
can increase mo tivation and hold your stu dents’ at tention, but a carefully de-
signed pro ject with ap pro pri ate me dia el e ments can be a pow er ful ex pe ri ence for
the learner. The key is to design your projects well.
2 Mul ti me dia De sign
The De sign Process
While play ing around on the computer is useful to help you un derstand the
technology and brainstorm ideas for your pro ject, the best pro jects come from
careful planning. When you first start a project, you might think that you are sav -
ing time by jumping right in and creating the project, but you are not. Agnew,
Kellerman, and Meyer (1996) outline a twelve-step pro cess for designing and
de vel op ing a multimedia project:
1. Understand the scope of the pro ject/assignment.
2. Brainstorm and do research.
3. Select pieces of in formation to in clude in the project.
4. Dis cuss sev eral over all or ga ni za tions.
5. Se lect an or ga ni za tion.
6. De cide on a met a phor for vi su al iz ing the body of in for ma tion.
7. Decide on one or more media to represent each piece of in formation.
8. Prepare scripts and storyboards as required.
9. Fill in the or ganization with me dia.
10. Provide links among pieces of in formation.
11. Test the result with typ ical members of the project’s intended au dience.
12. Revise the pro ject.
Ivers and Barron (2002) pro pose the DDD-E model: decide, de sign, de-
velop, evaluate. Other in structional de sign models are more com plex, but these
two models cap ture the important aspects of in structional design.
Don’t worry about fol lowing a specific step-by-step pro cess. Most of the
steps overlap, and some steps, such as evaluation, are continuous and take place at
every stage of the process. That doesn’t mean you should jump right to developing
your pro ject be fore deciding and designing—there is a gen eral flow from step to
step—but cre at ing a pro ject in volves con tin u ous eval u a tion and may in volve re-
thinking and redesigning parts of the pro ject as the pro ject be gins to take shape.
Be fore be gin ning, you must de cide what you want to do and what you want
your stu dents to get out of the project. This in cludes un derstanding the scope of
the pro ject and brainstorming ideas for the pro ject. Starting with a clear idea of
what you want the pro ject to cover is very useful. If you have certain ob jectives
(from your cur riculum or not), those ob jectives will help you determine what
your pro ject should cover. Try to limit the scope of the project, keeping in mind
the limits of your stu dents’ at tention span. Cre ate a pro ject that is small or build
in features that allow students to quit in the middle and come back to explore
other parts of the project.
The Design Process 3
Don’t be afraid to brainstorm ideas. That means that you can come up with
ideas for what you want to in clude that will be re jected later. This is part of the
power of plan ning. If you create half your pro ject first, you have ei ther locked
yourself into something that might not be what you want, or you have wasted a
great deal of time creating something that you will throw away. By playing with
ideas in the early stages of the design pro cess, you can narrow down what you
want to do without throwing away large amounts of work.
While you are de cid ing what the pro ject should include, re search your sub-
ject. Be sure you un derstand the subject so you can create something that will
help oth ers learn it. As you research, you should de cide what in for ma tion you
want to in clude and be gin to collect the media you will use to represent that
information.
As you de cide, keep in mind that your decisions are not set in stone. You
should complete the de cide phase hav ing a good idea of what you want to do, but
you should un derstand that the de tails can and will change as you move forward
with your project.
Once you have an idea about what your project will en tail, you should be-
gin to de sign it. You will de sign the or ganization and metaphor for the pro ject
(more about this in the next sections), you will create a storyboard for the pro ject
to help you un derstand the flow and interaction of the pro ject, and you will de-
sign the in dividual slides, fig uring out what con tent and me dia go on each slide.
Now your pro ject is taking shape, and you should have a fairly clear picture of
what the fi nal pro ject will look like. But again, this is not set in stone. The de tails
can and will change, but they should change within the over all framework you
have de signed.
Next, it is time to de velop your pro ject. This in volves fill ing in the pieces:
creating or acquiring any media elements you need, creating your slides, placing
your media elements and buttons on your slides, and linking it all to gether. This
is much easier when you know what you want to do, hav ing de cided on the pro -
ject and having de signed the pro ject first. The hard est part will be writ ing your
scripts to make the pro ject do what you want it to do, and you will learn how to
do that beginning in Chapter 3.
The final phase is not really the fi nal phase: eval u ate. Eval u a tion is a con-
tin u ous and on go ing pro cess. You will con duct for ma tive eval u a tion, in which
you check your work to make sure that everything seems to be do ing what you
want, and you enlist oth ers to check your work as well. This can happen at many
different points in the pro cess, and it can be done by many dif ferent people, in-
cluding: you, your colleagues, your stu dents, and other members of the intended
audience for the pro ject. This for mative eval u a tion will pro vide you with
feedback to improve the project.
You also will con duct summative eval u a tion when the pro ject is complete.
As with any lesson, you want to think about specific ways you will know how
well the project worked with your stu dents. This can be used to decide whether
4 Mul ti me dia De sign
or not you want to use the pro ject again, and it can pro vide feedback for things
you might want to change about the project for next time.
Pro ject Or ga ni za tion
As part of the de sign pro cess, you must think about how your pro ject will
be or ganized. Chap ter 2 describes how to create hyperlinks in PowerPoint, and
Chapter 6 describes how to use VBA to move from any slide to any other. How -
ever, just be cause you can make links from any slide to any other doesn’t mean
that you want to. A pro ject with a clear or ganization will help your stu dents find
their way around the project.
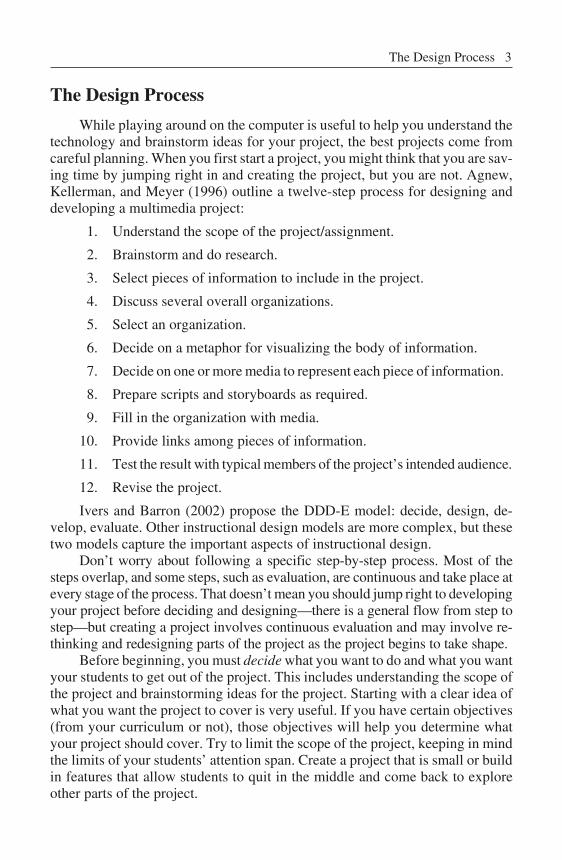
There are sev eral ways to organize a project. The sim plest organization is
linear, in which the user goes from one slide to the next to the next to the next
(see Fig ure 1.1). This works very well for projects in which knowledge is be ing
built from prerequisite knowl edge or in which spe cific steps are followed in a
specific order.
Fig ure 1.1. Lin ear Or ga ni za tion
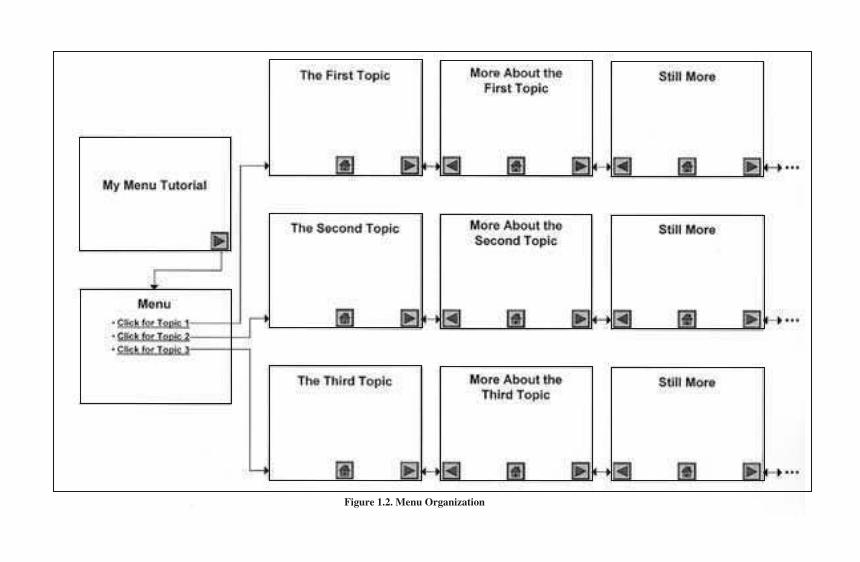
However, many pro jects don’t re quire a lin ear or ganization and would ben -
efit from some other or ganization. Fortunately, hypermedia allows us to link any
slide to any slide that we want. We could fol low a menu organization (see Figure
1.2, page 6). This or ganization allows the user to study the topics in whatever or -
der he or she wants and even allows the user to skip topics.
Some topics lend them selves better to a hi erarchical menu struc ture in
which each subtopic has its own menu. Other pro jects might do better with a
completely hyperlinked or ganization in which any slide can lead to any other
slide.
The or ganization you choose should match the ob jectives of the project. If
it is not ap propriate for students to skip sections, don’t al low it. You pro vide
links where you want your stu dents to go (and in Chap ter 2, you’ll learn about
Kiosk mode so you can make sure they only go where you want).
There are many po tential structural or ganizations, but it is help ful to pick
something that will al low the user to nav igate easily through your in formation. If
the structure is not easy to nav igate, when a user goes through your presentation,
it is easy to get lost in hyperspace.
Pro ject Or ga ni za tion 5
noi ta zi na grOuneM.2.1er ugiF
Met a phors
A metaphor is the way the user will think about the pro ject. For example, a
geography pro ject might choose a map metaphor where users click on certain lo-
cations on a map to visit the lo cation. You might choose a book metaphor, start-
ing with a cover and a ta ble of contents and referring to each slide as a page
(complete with page num bers and graphics that make the slides look like pages).
Metaphors can be complex or simple, with more complex metaphors pro viding
somewhat of an illusion that the user is ac tually in the metaphor. For example, a
travel metaphor might in clude an imations of planes taking off and land ing to
give the il lusion that the user is actually going someplace.
Metaphors can be particularly help ful when you are not creating a pro ject
but are as signing your students to create a pro ject. This helps stu dents to “un-
leash their cre ativ ity by find ing new met a phors for in for ma tion. Met a phors
stim u late vi su al iza tions” (Agnew, Kellerman, and Meyer, 1996, p. 121). Meta-
phors are a pow erful tool to help users nav igate a pro ject and to help de signers
think creatively about a project.
Storyboards and Flowcharts
Once you have chosen an or ganization and a metaphor for your pro ject, you
need to fig ure out how the entire pro ject will work. The more complex the pro -
ject, the more this step is needed. At a min imum, you should sketch in ad vance
your en tire pro ject, not necessarily with all the details, but with enough details so
you can see how the pro ject holds together. In dicate how each slide will be
linked to any other slides and the kinds of (if not the exact) in formation that will
be on each slide.
Although you can do this with a computer drawing pro gram, a small screen
size is lim iting. You might want to map out your pro ject on a large poster board
or a gi ant piece of newsprint. Index cards can represent each slide in your pro -
ject. You can use for mal flowcharting sym bols (see, for ex ample, Ivers and
Barron, 2002, pp. 64–65), or you can use a less formal sys tem, but you must un -
derstand and map out the project.
If you are not creating the project your self but assigning it to your stu dents,
this step becomes even more im portant. Your students are un likely to do any
planning un less you specifically re quire it and require them to hand in their de -
signs. When they don’t plan, the qual ity of their work will suf fer, and the time it
takes for them to com plete their work will increase.
As you design the flow of your pro ject, you also need to map out what will
happen on each slide. You might use your gi ant flowchart to fill in the de tails, or
you might use the cards on your flowchart as placeholders and have a sep arate
drawing of each slide. As you plan the flow of your project and what in formation
goes on each slide, you will be able to broaden and narrow your view of the pro -
ject, alternately seeing an overview of the project and fo cusing on the details.
Storyboards and Flowcharts 7
This will help you ad just your de sign as you need to. It is much easier to move a
card or add a card or de lete a card than it is to take a half-finished project, includ-
ing VBA scripts, and move ev erything around, re writing the scripts to match the
redesign.
This does not mean that your design is fixed once you start developing your
project. But with a good idea of how the pro ject works and most of the de tails in
place, you will find it eas ier to cre ate the project and make changes as needed.
De sign ing As sign ments for Your Stu dents
As pow erful as it is to cre ate mul timedia pro jects for your stu dents, it is
more pow erful to have them create their own multimedia pro jects. While the
project you create can increase mo tivation and tap into different learning styles,
having stu dents create their own pro jects is an out standing ve hicle for creating a
stu dent-cen tered and constructivist learn ing en vi ron ment, for tak ing a
multidisciplinary ap proach to ed ucation, and for helping students understand
information and media.
Projects you assign can be simple or complex, involving a few dif ferent
types of media or several, us ing a simple design structure that you assign or a
complex structure and metaphor that your stu dents choose. As you continue
through this book, you will learn ad vanced techniques for making PowerPoint do
what you want it to do. You might share these techniques with your stu dents, or
you might let them cre ate less com plex projects. Another al ternative is to cre ate
templates for your stu dents in which you create the basic structure of the pro ject,
using simple or advanced PowerPoint techniques, and have your students fill in
the template with con tent and me dia. Templates are discussed in Chapter 10.
Student pro jects need to follow a similar design pro cess to any other multi-
media pro jects. However, as a teacher, you must de cide (1) how much you want
to pro vide for your stu dents and (2) how much help you want to give your stu -
dents at each step.
First, you must create an assignment in a way that stu dents can un derstand.
Agnew, Kellerman, and Meyer (1996, pp. 120–121) out line four keys to help
stu dents cre ate a well-or ga nized mul ti me dia project:
1. “[A]rticulate a well-thought-out assignment.”
2. “[D]emonstrate excellent examples of projects that others have cre -
ated.”
3. “[E]ncourage stu dents to un leash their creativity by find ing new meta-
phors for in for ma tion.”
4. Help “stu dents ex e cute an ef fec tive pro cess.”
As an ed u ca tor, you prob a bly are com fort able cre at ing as sign ments for
your stu dents. How ever, mul timedia pro jects can be larger and more complex
than or dinary assignments. Being clear abut your pur pose and ex pectations can
8 Mul ti me dia De sign
help students un derstand what they are supposed to do and help them meet and
exceed your ex pectations. Be sure to match the pro ject you assign to your cur ric-
ular goals and the technical skills of your students. If you plan to have stu dents
create sev eral multimedia projects, you can make the first project sim ple to help
them un derstand the technology. As their technology skills grow, the projects
can be more complex.
Many students need concrete examples. The more multimedia you do (for
yourself or your students), the more ex amples you will have to show students.
You also want to en courage creative think ing, in cluding brainstorming
ideas for metaphors. A metaphor helps a user nav igate through a project by giv -
ing the user something from the real world to relate to what the controls (such as
buttons and hy pertext links) do. Met aphors can be closely re lated to the project
or can be an un related nav igation and visualization tools. You can pro vide your
students with a metaphor (this might be ap propriate for early pro jects), you can
brainstorm dif ferent metaphors for dif ferent pro jects as a class, you can brain-
storm with groups about metaphors for a specific pro ject, or you can have groups
brainstorm on their own.
Finally, you will want to help your stu dents with the de sign pro cess. Stu -
dents might need help with all the de sign steps. You can give your students help
with all of the fol lowing:
• The Idea—A good assignment will have a clear set of ob jectives,
but it might allow students a great deal of latitude in picking a topic.
You might need to work with students to help them generate ideas
for their topic.
• The Re search—Since one pur pose of mul timedia pro jects is to en -
hance learning in curricular areas, you will have to de cide how much
of the research you will pro vide for the students. You could pro vide
all the in formation that will be used in the pro ject. You could pro -
vide specific resources for stu dents. You could help students find
materials (in the li brary or on the Internet, for example). You could
brainstorm ideas with stu dents about where they might find the
information they need.
• Se lect ing In for ma tion—Many students have trouble finding
enough in formation, and many have trou ble selecting the informa-
tion to in clude. You might need to help students nar row down the
appropriate in formation to in clude; they might not be able to in clude
everything they find.
• The Or ga ni za tion and the Met a phor—You might pick an or gani-
zation and a metaphor for your stu dents or help them find an appro-
pri ate or ga ni za tion and metaphor.
De sign ing As sign ments for Your Stu dents 9
• The Me dia—Students might need help se lecting and preparing the
media representations of their in formation. You might help them de -
cide what me dium to use for each kind of in formation, and you
might help them with the technical pro cess of creating or find ing the
media representations. In the extreme case, you might give them
prepared me dia to use in their projects.
• Tem plates—You might pro vide a template for your students. This
can provide a metaphor, or ganization, and/or types of media.
In any of the above cases, you need to de cide what is appropriate for your
students. Sometimes the best pol icy is to leave the stu dents alone. At other times,
you will need to coach them through out the entire pro ject. At a min imum, your
students will need to check in with you on a regular basis, show ing you the de-
sign at var ious phases. It is of ten a good idea to set deadlines for various parts of
the pro ject, requiring stu dents to turn in something to you at each of the twelve
steps of the de sign pro cess (see “The Design Process” above) or at one or more
points along the way.
Mul ti me dia pro jects are of ten an ex cel lent ve hi cle for group pro jects. But
groups can be difficult. You may de cide whether you want to group stu dents by
ability levels, in terests, skills, or their own choice. Once you have groups, gener-
ally of be tween two and five stu dents, you need to help students work out the
roles they will play in the group. Some pro jects have natural roles that students
can play, di viding the project ei ther by subject matter or technical spe cialty
(gath er ing in for ma tion, video pro duc tion, VBA script ing, etc.). Learn ing to
work with a group can be an important ob jective of the pro ject, but group dy -
namics can be dif ficult, and you will have to mon itor how well members of the
groups are working together.
Be careful about se lecting the requirements for your pro ject. Make sure that
they are suitable for your goals. Remember that part of the idea of learning mul -
timedia is to see that great artwork or sounds do not necessarily mean great in for-
mation. Make sure that, if your goal is to have worth while in formation, students
are aware that that is important.
Finally, try to save time for reflection. A great deal of the learning (for you
and your students) can come from look ing back at the pro jects and seeing what
went right and what went wrong and what was learned.
Con clu sion
This chapter has given you a brief in troduction to multimedia, including
what it is and what its ben efits are, and has in troduced you to the design pro cess.
If you plan carefully, you will save yourself time and limit frus tration, and you
will cre ate better projects. Finally, the chapter introduced some ideas for having
your stu dents be mul ti me dia de sign ers. This chap ter was an in tro duc tion to,
rather than complete cov erage of, the design pro cess. You might want to check
10 Mul ti me dia De sign

out Ivers and Barron (2002) or Agnew, Kellerman, and Meyer (1996), which
provide more details about the design pro cess and using multimedia with
students.
Now that you have a ba sic un derstanding of the de sign pro cess, you are
ready to ap ply it to PowerPoint. The next chapter introduces some of the interac-
tive and mul timedia features of PowerPoint and pre pares you to conquer the ad -
vanced scripting features of PowerPoint in later chapters.
Con clu sion 11

2Tra di tional Mul ti me diaFeatures of PowerPoint
In tro duc tion
Some peo ple, even long-time PowerPoint users, are not aware of many of
the multimedia and in teractive features of PowerPoint. Most of this book de-
scribes how you can use scripting features of PowerPoint to make pre sentations
interactive. This chapter briefly de scribes some of the mul timedia and interac-
tive features that do not re quire scripting. You will learn about media elements,
such as pictures and sounds, and you will learn about in teractive elements such
as hyperlinks and action but tons. In ad dition, you will learn about the important
differences in Slide Show View and Edit View when ed iting your slides. Fi nally,
you will learn about Kiosk mode and saving your pro ject as a PowerPoint Show
to con trol how your students navigate through your presentation.
Vo cab u lary
• Ac tion but tons • Hyperlinks
• Clip art • Hy per text
• Copy right • Ki osk mode
• Edit View • Linked
• Em bed ded • PowerPoint Show (.pps)
• Fair use • Slide Show View
Before You Be gin
This book assumes that you know the ba sics of PowerPoint. If you don’t,
you should spend a couple of hours playing with PowerPoint and/or buy an in-
troductory book about PowerPoint. Try to get one that is specific to the ver sion
of PowerPoint that you own. While most features are iden tical from ver sion to
version, there are a few subtle differences in each version.
Before you begin, you should check a few of PowerPoint’s set tings. Start
PowerPoint, and choose “Op tions” from the Tools menu if you are us ing a Win-
dows computer, choose “Pref er ences” from the Edit menu if you are us ing a
Macintosh with OS 9 or earlier, and choose “Pref er ences” from the PowerPoint
menu if you are us ing a Macintosh with OS X. Regardless of which version you
are us ing, you will have sev eral tabs at the top of the di alog box. These tabs in-
clude View, General, Edit, and Save. The re maining tabs will vary by which
version you have.
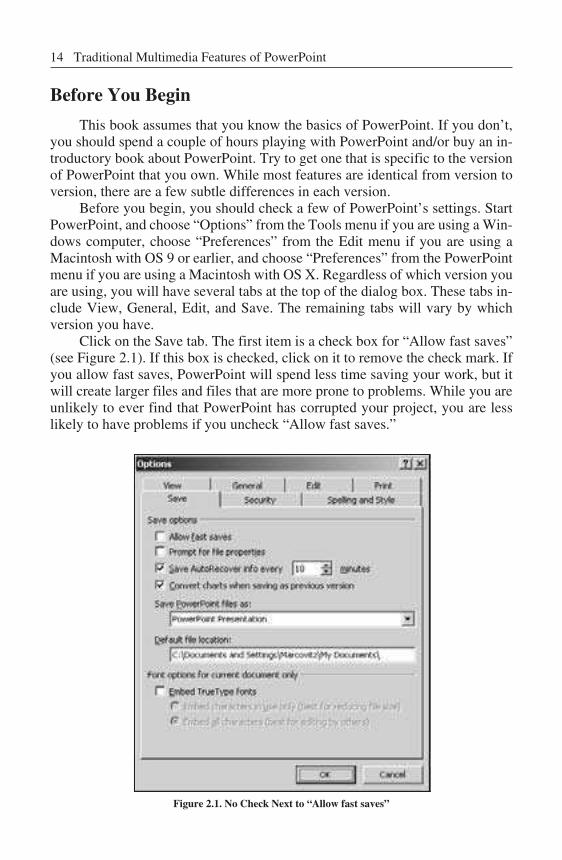
Click on the Save tab. The first item is a check box for “Allow fast saves”
(see Fig ure 2.1). If this box is checked, click on it to remove the check mark. If
you al low fast saves, PowerPoint will spend less time sav ing your work, but it
will cre ate larger files and files that are more prone to problems. While you are
unlikely to ever find that PowerPoint has corrupted your pro ject, you are less
likely to have prob lems if you uncheck “Allow fast saves.”
Figure 2.1. No Check Next to “Allow fast saves”
14 Tra di tional Mul ti me dia Fea tures of PowerPoint
Next, click on the Edit tab. Find the “Undo” section. Change the setting for
“Max i mum num ber of undos” to 10. In many ap plications, when you make a
mistake, if you don’t do any thing else, you can fix it by choosing “Undo” from
the Edit menu. In PowerPoint, you can fix not only the last mistake but several
mistakes be fore that. This setting tells PowerPoint how many things it has to re -
member so you can undo them. In the ory, you might want to have as many as
possible, but sev eral PowerPoint experts have no ticed that the higher this num -
ber is the more likely you are to have prob lems with PowerPoint. Set ting it to 10
gives you enough ability to correct your mistakes while minimizing the likeli-
hood that you will have a problem.
Another setting you might want to change can be found un der the Gen eral
tab. You might want to change the setting for “Link sounds with file size greater
than.” This set ting is dis cussed later in this chap ter.
Once you have changed the settings to not al low fast saves and to limit the
number of undos, click OK to save the settings.
Next, choose “Cus tom ize” from the Tools menu. Click on the Toolbars tab
and make sure there is a check next to “Draw ing.” The “Draw ing” toolbar will
be very use ful for drawing your own shapes and mod ifying the appearance of
shapes that are drawn for you.
Finally, be fore you start work ing on a PowerPoint pro ject, create a folder
on your disk for your pro ject and save your pre sentation to that folder. This will
be important when you start including hyperlinks and mul timedia ob jects in
your pre sentation. Most el ements of your presentation will be embedded in your
presentation. That is, they will be part of the PowerPoint file. Other el ements
will be stored in other files, and your presentation will link to those other files. If
you save your pre sentation first and you save any linked files to the same place
you save your pre sentation (that is, the same folder on the same disk), your links
will con tinue to work when you move the presentation (along with all the linked
files) to another place, such as another folder, an other disk, or another computer.
If you don’t save your files first, the links are likely to stop working.
In sert ing Pic tures
You can in sert pic tures into a PowerPoint presentation in several dif ferent
ways, in cluding by in serting from the clip art li brary, by in serting from an ex ist-
ing file, and by copying and pasting from an other place, in cluding the World
Wide Web. In ad dition, if you are ar tistically in clined, you can use the drawing
tools to draw your own pictures. Gen erally pictures are em bedded in your
PowerPoint presentation. That is, once you insert them, they become part of the
presentation, regardless of what happens to the original picture.
PowerPoint recognizes many dif ferent types of picture files, in cluding
most of the common ones you are likely to en counter, such as Graphic In ter-
change For mat (.gif), Joint Pho tographic Ex perts Group (.jpg), Tag Im age File
Format (.tif or .tiff), and Bitmap (.bmp). If you try to in sert a picture into your
In sert ing Pic tures 15
presentation and PowerPoint gives you an error or asks you how to con vert it,
you will need to find a program (such as GraphicConverter™ or Adobe
Photoshop™) that can read that file type and cre ate files of one of the types that
PowerPoint can read.
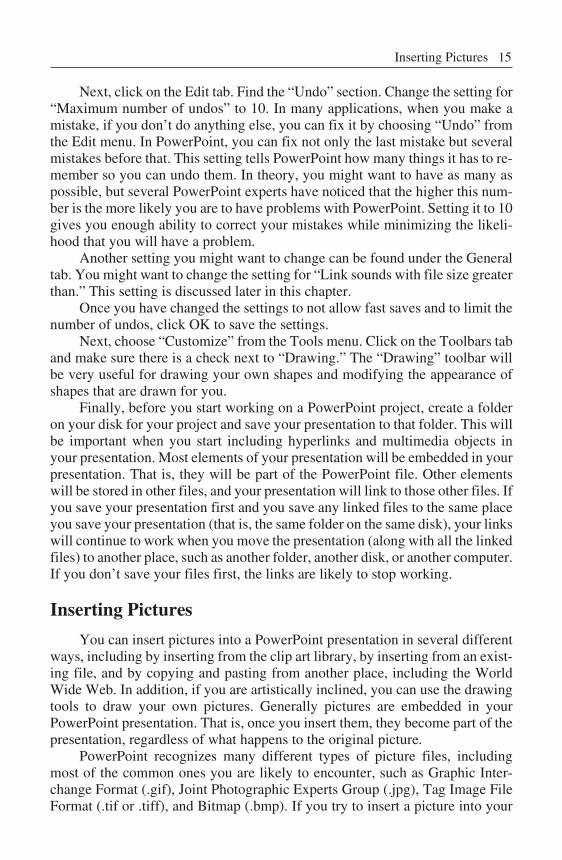
To in sert a picture from a file, choose “Pic ture” from the In sert menu and
choose “From File . . . ” from the flyout menu (see Fig ure 2.2).
Figure 2.2. Choosing In sert Pic ture From File from the Menu
Although the dialog box you see will vary slightly de pending upon which ver -
sion of PowerPoint you are using, it should look similar to the di alog box you see
whenever you try to open a file on your computer. From this point, lo cate the file
with the picture you want to insert and click on the “In sert” button.
While in serting a pic ture from a file has remained fairly con sistent from
version to version of PowerPoint, in serting clip art has changed quite a bit. You
start by choosing “Clip Art . . . ” from the flyout menu in stead of “From File . . . ”
(see Fig ure 2.2). In PowerPoint 2002, you can search for clip art us ing the dialog
shown in Fig ure 2.3, use the Clip Or ganizer, or search Microsoft’s fairly ex ten-
sive col lection of clip art on the Web. From Microsoft’s Web col lection, you can
download clip art into your own col lection so you can use it later without going
to the Web.
16 Tra di tional Mul ti me dia Fea tures of PowerPoint
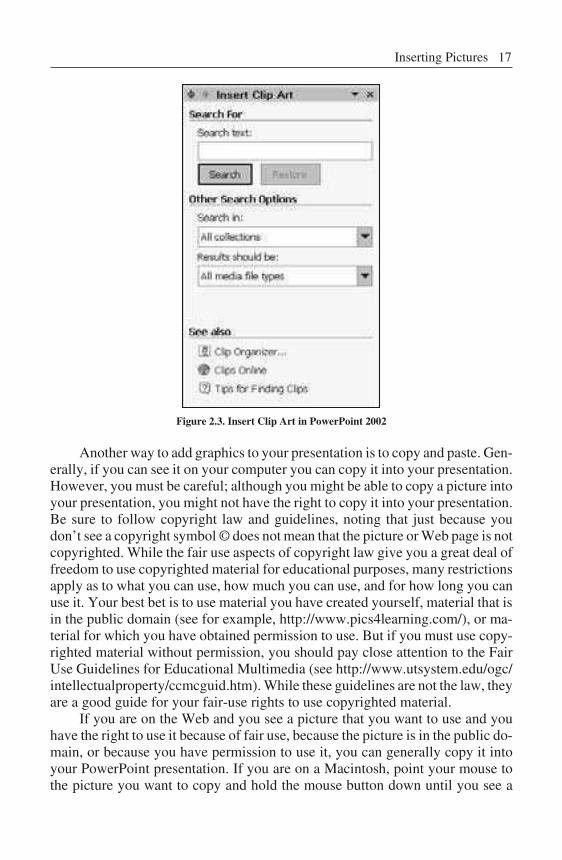
Figure 2.3. In sert Clip Art in PowerPoint 2002
Another way to add graphics to your presentation is to copy and paste. Gen-
erally, if you can see it on your computer you can copy it into your presentation.
However, you must be careful; although you might be able to copy a picture into
your pre sentation, you might not have the right to copy it into your pre sentation.
Be sure to follow copyright law and guidelines, not ing that just because you
don’t see a copyright symbol © does not mean that the picture or Web page is not
copyrighted. While the fair use as pects of copyright law give you a great deal of
free dom to use copy righted ma te rial for ed u ca tional pur poses, many re stric tions
apply as to what you can use, how much you can use, and for how long you can
use it. Your best bet is to use ma terial you have cre ated yourself, ma terial that is
in the pub lic do main (see for example, http://www.pics4learning.com/), or ma-
terial for which you have ob tained per mission to use. But if you must use copy -
righted ma terial with out per mission, you should pay close at tention to the Fair
Use Guide lines for Ed u ca tional Mul ti me dia (see http://www.utsystem.edu/ogc/
intellectualproperty/ccmcguid.htm). While these guide lines are not the law, they
are a good guide for your fair-use rights to use copyrighted material.
If you are on the Web and you see a picture that you want to use and you
have the right to use it be cause of fair use, be cause the pic ture is in the pub lic do -
main, or be cause you have per mission to use it, you can generally copy it into
your PowerPoint presentation. If you are on a Macintosh, point your mouse to
the picture you want to copy and hold the mouse but ton down un til you see a
In sert ing Pic tures 17
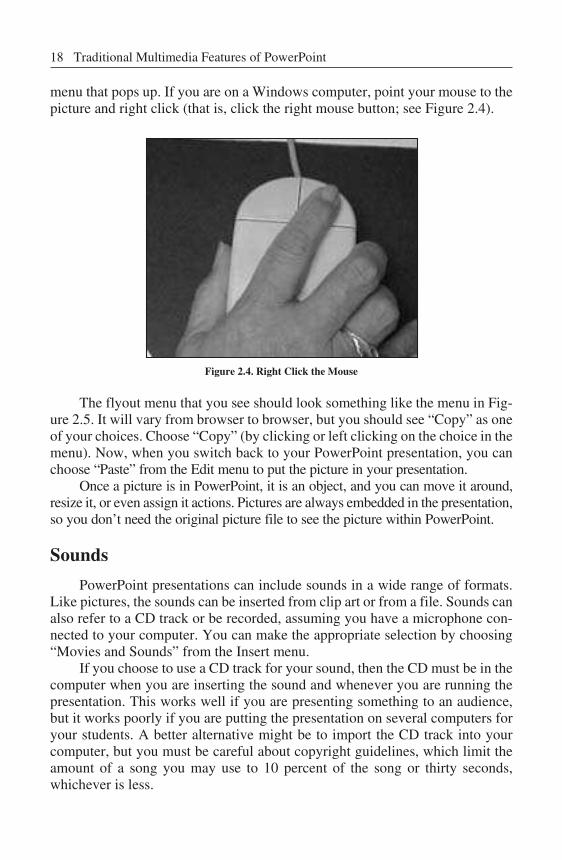
menu that pops up. If you are on a Win dows computer, point your mouse to the
picture and right click (that is, click the right mouse but ton; see Figure 2.4).
Figure 2.4. Right Click the Mouse
The flyout menu that you see should look something like the menu in Fig-
ure 2.5. It will vary from browser to browser, but you should see “Copy” as one
of your choices. Choose “Copy” (by clicking or left clicking on the choice in the
menu). Now, when you switch back to your PowerPoint presentation, you can
choose “Paste” from the Edit menu to put the pic ture in your presentation.
Once a picture is in PowerPoint, it is an ob ject, and you can move it around,
resize it, or even as sign it ac tions. Pic tures are al ways em bedded in the pre sentation,
so you don’t need the orig inal picture file to see the picture within PowerPoint.
Sounds
PowerPoint presentations can in clude sounds in a wide range of formats.
Like pictures, the sounds can be in serted from clip art or from a file. Sounds can
also re fer to a CD track or be recorded, assuming you have a microphone con -
nected to your computer. You can make the appropriate se lection by choosing
“Movies and Sounds” from the Insert menu.
If you choose to use a CD track for your sound, then the CD must be in the
computer when you are in serting the sound and whenever you are run ning the
presentation. This works well if you are presenting something to an au dience,
but it works poorly if you are putt ing the presentation on several computers for
your stu dents. A better alternative might be to im port the CD track into your
computer, but you must be careful about copy right guidelines, which limit the
amount of a song you may use to 10 percent of the song or thirty seconds,
whichever is less.
18 Tra di tional Mul ti me dia Fea tures of PowerPoint
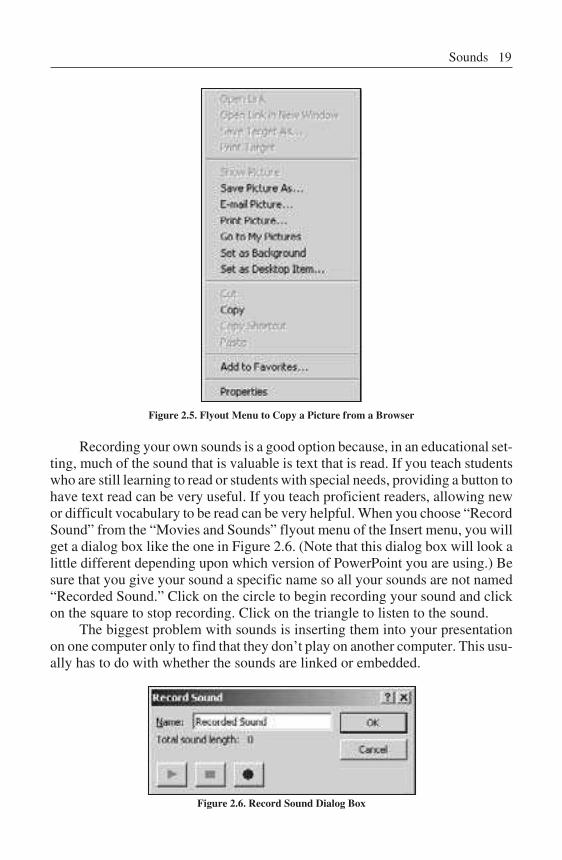
Figure 2.5. Flyout Menu to Copy a Pic ture from a Browser
Recording your own sounds is a good op tion be cause, in an ed ucational set-
ting, much of the sound that is valuable is text that is read. If you teach students
who are still learning to read or students with special needs, pro viding a but ton to
have text read can be very use ful. If you teach pro ficient readers, al lowing new
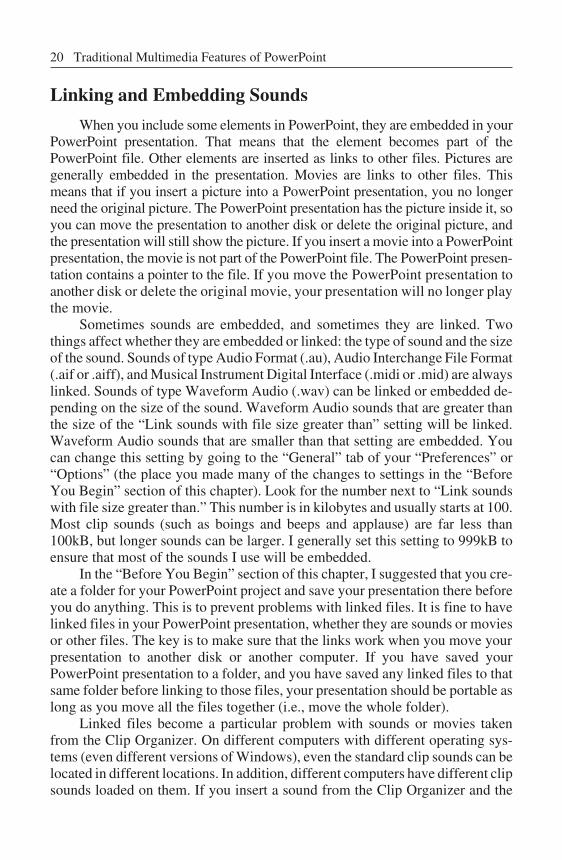
or dif ficult vo cabulary to be read can be very help ful. When you choose “Re cord
Sound” from the “Movies and Sounds” flyout menu of the In sert menu, you will
get a di alog box like the one in Fig ure 2.6. (Note that this di alog box will look a
little different depending upon which ver sion of PowerPoint you are using.) Be
sure that you give your sound a specific name so all your sounds are not named
“Re corded Sound.” Click on the circle to be gin re cording your sound and click
on the square to stop recording. Click on the triangle to listen to the sound.
The big gest prob lem with sounds is in serting them into your presentation
on one computer only to find that they don’t play on another computer. This usu-
ally has to do with whether the sounds are linked or embedded.
Figure 2.6. Re cord Sound Di alog Box
Sounds 19
Link ing and Em bed ding Sounds
When you in clude some el ements in PowerPoint, they are em bedded in your
PowerPoint presentation. That means that the el ement be comes part of the
PowerPoint file. Other el ements are in serted as links to other files. Pic tures are
generally embedded in the pre sentation. Mov ies are links to other files. This
means that if you in sert a picture into a PowerPoint pre sentation, you no lon ger
need the orig inal picture. The PowerPoint pre sentation has the picture inside it, so
you can move the pre sentation to another disk or delete the original picture, and
the presentation will still show the pic ture. If you in sert a movie into a PowerPoint
presentation, the movie is not part of the PowerPoint file. The PowerPoint pre sen-
tation con tains a pointer to the file. If you move the PowerPoint presentation to
another disk or de lete the original movie, your pre sentation will no lon ger play
the movie.
Sometimes sounds are em bedded, and sometimes they are linked. Two
things affect whether they are embedded or linked: the type of sound and the size
of the sound. Sounds of type Audio For mat (.au), Au dio In terchange File For mat
(.aif or .aiff), and Musical In strument Dig ital In terface (.midi or .mid) are al ways
linked. Sounds of type Waveform Au dio (.wav) can be linked or embedded de -
pending on the size of the sound. Waveform Au dio sounds that are greater than
the size of the “Link sounds with file size greater than” set ting will be linked.
Waveform Au dio sounds that are smaller than that setting are embedded. You
can change this setting by go ing to the “Gen eral” tab of your “Pref er ences” or
“Op tions” (the place you made many of the changes to settings in the “Be fore
You Begin” section of this chapter). Look for the num ber next to “Link sounds
with file size greater than.” This number is in ki lobytes and usu ally starts at 100.
Most clip sounds (such as boings and beeps and ap plause) are far less than
100kB, but lon ger sounds can be larger. I gen erally set this setting to 999kB to
ensure that most of the sounds I use will be embedded.
In the “Before You Be gin” section of this chapter, I sug gested that you cre-
ate a folder for your PowerPoint pro ject and save your pre sentation there before
you do any thing. This is to pre vent prob lems with linked files. It is fine to have
linked files in your PowerPoint pre sentation, whether they are sounds or mov ies
or other files. The key is to make sure that the links work when you move your
presentation to another disk or another computer. If you have saved your
PowerPoint presentation to a folder, and you have saved any linked files to that
same folder be fore linking to those files, your pre sentation should be por table as
long as you move all the files to gether (i.e., move the whole folder).
Linked files be come a particular problem with sounds or movies taken
from the Clip Or ga nizer. On dif fer ent com put ers with dif fer ent op er at ing sys-
tems (even dif ferent versions of Win dows), even the standard clip sounds can be
lo cated in dif fer ent lo ca tions. In ad di tion, dif fer ent com put ers have dif fer ent clip
sounds loaded on them. If you in sert a sound from the Clip Organizer and the
20 Tra di tional Mul ti me dia Fea tures of PowerPoint
sound is linked, there is a good chance that the sound will not play on other com-
puters. To alleviate this, you should find out where the sound is lo cated on your
computer and copy the sound you in tend to use into your folder with the presen-
tation. On my Win dows computer, many of the standard clip sounds can be
found in the folder: “C:\Pro gram Files\Microsoft Of fice\me dia\CntCD1\
Sounds,” but that is un likely to be where they are on your com puter. On my
Macintosh, the standard clip sounds can be found in “Macintosh HD:Ap pli ca-
tions:Microsoft Office X:Office:Sounds.”
Are My Sounds Linked or Embedded?
If you have in serted a sound and it is embedded, you do not need to worry
about where the sound file is. If it is linked, you do need to worry about it. While
knowing the size of the sound, the size of your setting for “Link sounds with file
size greater than,” and the type of sound will help you predict whether the sound
will be linked or embedded, you will want to check to be sure.
Once you have inserted a sound, click on the sound icon and choose “Sound
Ob ject” from the Edit menu. At the bot tom of the di alog box, you will see “File:”
and either “[Con tained in pre sen ta tion]” or a path to the file. The former in di-
cates an em bedded file, and the lat ter indicates a linked file. While the path to the
file might help you lo cate the file (so you can copy it to your project folder), the
dialog box is generally too small to show the entire path.
Hy per text Links
Before version 97, PowerPoint was simply a tool to present material. Pre-
senters would stand up in front of an au dience and go through slide after slide.
PowerPoint’s ad vantage was that media (text, graphics, sounds, vid eos, etc.)
could be in corporated into the pre sentation to add bells and whistles and to pres-
ent in formation in a va riety of formats. PowerPoint 97 changed all that. OK,
PowerPoint 97 changed very lit tle of that because most peo ple still use
PowerPoint for lin ear pre sentations. How ever, PowerPoint 97 allows you to use
it in different ways.
One tool that was added to PowerPoint was hyperlinks. Hyperlinks allow
you to create pre sentations that are non linear. With the pop ularity of the World
Wide Web, ev eryone is used to clicking on text to jump somewhere, and
PowerPoint gives you that capability. You can create hy pertext links to other
places in your presentation, to Web pages, and to other files.
Link ing Within Your Pre sen ta tion
Being able to link to other places in your file makes PowerPoint a more
powerful presentation tool, but it also gives you the power to create pro jects that
users nav igate themselves. Pre sentations no longer have to go from one slide to
Hy per text Links 21
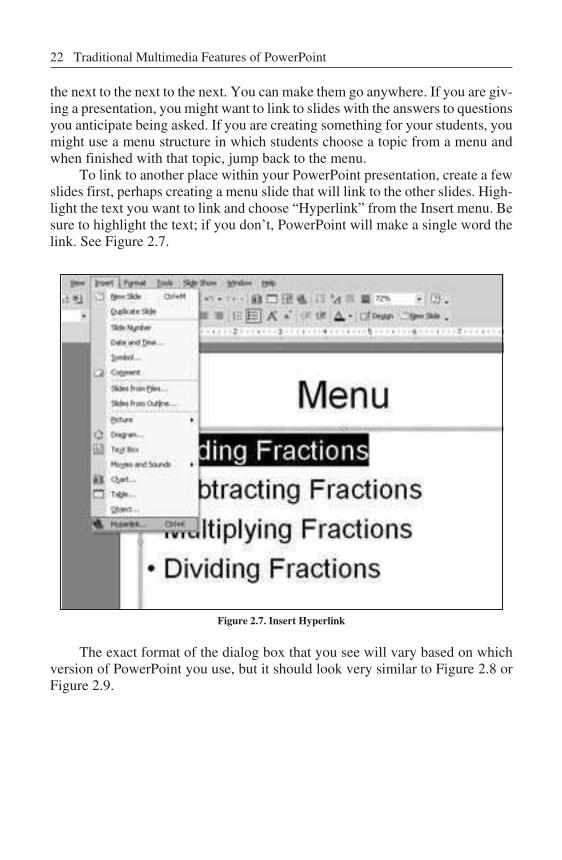
the next to the next to the next. You can make them go any where. If you are giv -
ing a presentation, you might want to link to slides with the answers to questions
you an ticipate be ing asked. If you are creating something for your stu dents, you
might use a menu structure in which stu dents choose a topic from a menu and
when finished with that topic, jump back to the menu.
To link to another place within your PowerPoint presentation, create a few
slides first, per haps cre ating a menu slide that will link to the other slides. High -
light the text you want to link and choose “Hyperlink” from the In sert menu. Be
sure to high light the text; if you don’t, PowerPoint will make a sin gle word the
link. See Fig ure 2.7.
Figure 2.7. In sert Hyperlink
The exact for mat of the dialog box that you see will vary based on which
version of PowerPoint you use, but it should look very similar to Fig ure 2.8 or
Fig ure 2.9.
22 Tra di tional Mul ti me dia Fea tures of PowerPoint
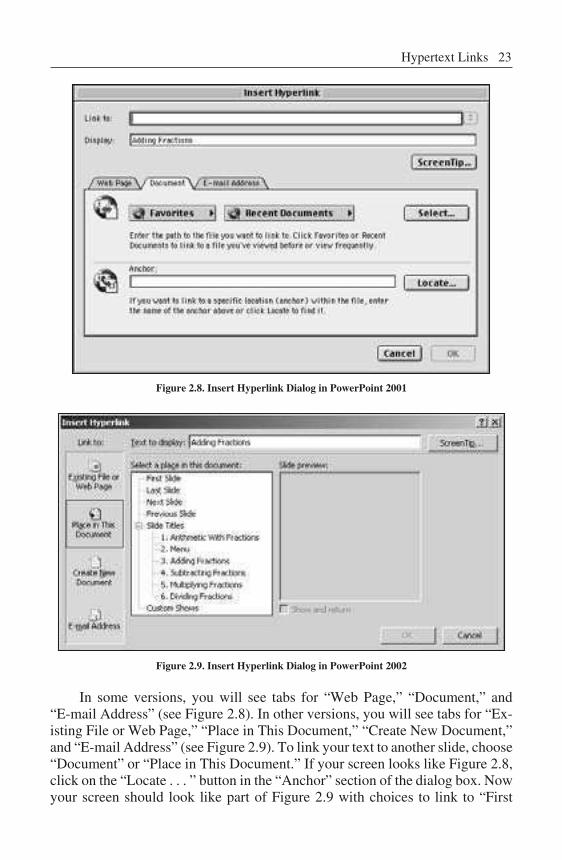
Figure 2.8. In sert Hyperlink Di alog in PowerPoint 2001
Figure 2.9. In sert Hyperlink Di alog in PowerPoint 2002
In some versions, you will see tabs for “Web Page,” “Doc u ment,” and
“E-mail Ad dress” (see Fig ure 2.8). In other ver sions, you will see tabs for “Ex-
isting File or Web Page,” “Place in This Document,” “Cre ate New Doc u ment,”
and “E-mail Ad dress” (see Fig ure 2.9). To link your text to an other slide, choose
“Doc u ment” or “Place in This Document.” If your screen looks like Figure 2.8,
click on the “Locate . . . ” but ton in the “An chor” section of the di alog box. Now
your screen should look like part of Figure 2.9 with choices to link to “First
Hy per text Links 23
Slide,” “Last Slide,” “Next Slide,” “Pre vi ous Slide,” “Slide Ti tles,” and “Cus-
tom Shows.” If you don’t have any choices for slides un der “Slide Ti tles,” click
on the triangle or plus sign next to “Slide Ti tles” and the names of all your slides
should appear. This is where you can choose a particular slide to link to. Click on
the slide title to which you want to link and click OK. The high lighted text
should become un derlined and change color (based on the colors in the template
you are using).
Some of you tried to click on your text, and it didn’t take you any where.
That’s OK. As you know, PowerPoint has dif ferent views or modes in which
you can see your slides. We can edit our slides in Edit View (sometimes called
Normal View), but we run our presentation in Slide Show View. Our links will
only work in Slide Show View. Choose “View Show” from the Slide Show
menu to take you into Slide Show View (that’s the view where you only see your
slide on the screen with no menus or toolbars). Now you should be able to click
on your hy pertext link to take you to another slide. You’ll no tice that when you
point to a hy pertext link (or any el ement of PowerPoint on which you can click),
your cur sor changes from an arrow to a hand. Watch for that change in Slide
Show View so you can see what is clickable and what is not.
Once you have linked one part of a menu, it is easy to fol low the same steps
to link the rest of the items in the menu: High light the text you want linked,
choose “Hyperlink . . . ” from the In sert menu, choose “Doc u ment” or “Place in
This Doc u ment,” click on the plus sign or triangle if nec essary to see the ti tles of
your slides, click the ap propriate slide ti tle, and click OK.
Link ing Out side Your Pre sen ta tion:
Web Pages and Other Doc uments
While link ing within your presentation allows your presentation to be in ter-
active, link ing out side your pre sentation allows the interactivity to ex tend be-
yond PowerPoint and al lows your PowerPoint document to serve as a
springboard to other resources. Dur ing a lecture, you can jump to a rel evant Web
site via a link in your presentation or jump to any other doc ument on your com-
puter. An in teractive project can in clude some of the content within the
PowerPoint pro ject and use hyperlinks to con nect to Web pages with more de -
tails, Word documents with ex tensive ru brics for matted as tables, mov ies or
sounds in formats that PowerPoint cannot recognize, etc.
To link to a Web page, choose the “Web Page” tab in Figure 2.8 (page 23)
or “Existing File or Web Page” in Fig ure 2.9 (page 23). From there, simply type
the URL (uniform re source lo cator; that’s the Web address) in the box labeled
“Ad dress” or “Link to.” Be sure to include the complete ad dress (which gener-
ally starts with “http://”). Alternatively, click on the but ton la beled “Launch
Web Browser” or the “Browse the Web” icon (it looks like a globe with a magni-
fying glass) to launch your Web browser. In some versions of PowerPoint, wher-
ever you browse will au tomatically be in serted as the link; in other versions, you
24 Tra di tional Mul ti me dia Fea tures of PowerPoint
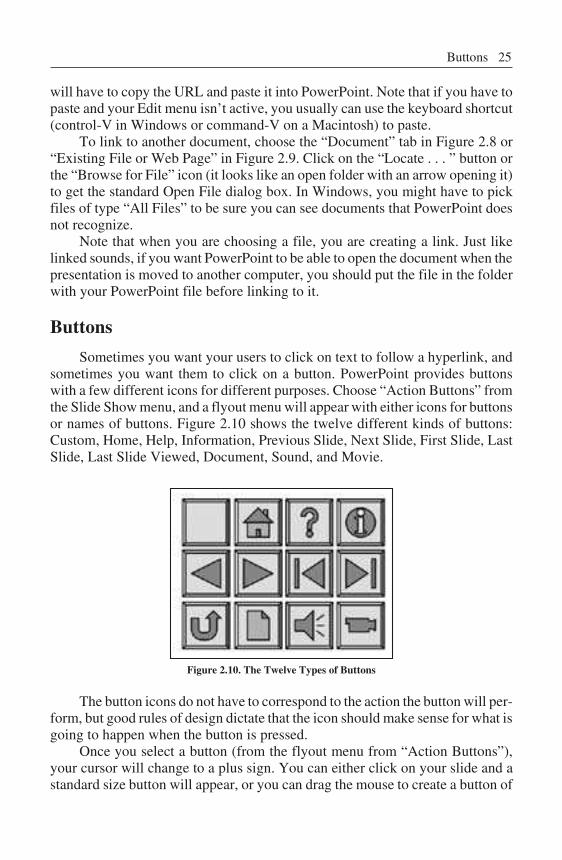
will have to copy the URL and paste it into PowerPoint. Note that if you have to
paste and your Edit menu isn’t active, you usu ally can use the keyboard shortcut
(control-V in Win dows or command-V on a Macintosh) to paste.
To link to another document, choose the “Doc u ment” tab in Figure 2.8 or
“Existing File or Web Page” in Fig ure 2.9. Click on the “Locate . . . ” but ton or
the “Browse for File” icon (it looks like an open folder with an arrow opening it)
to get the standard Open File di alog box. In Windows, you might have to pick
files of type “All Files” to be sure you can see doc uments that PowerPoint does
not recognize.
Note that when you are choosing a file, you are creating a link. Just like
linked sounds, if you want PowerPoint to be able to open the doc ument when the
presentation is moved to an other computer, you should put the file in the folder
with your PowerPoint file before linking to it.
But tons
Sometimes you want your us ers to click on text to fol low a hyperlink, and
sometimes you want them to click on a button. PowerPoint provides but tons
with a few dif ferent icons for different pur poses. Choose “Ac tion But tons” from
the Slide Show menu, and a flyout menu will ap pear with either icons for but tons
or names of but tons. Figure 2.10 shows the twelve dif ferent kinds of but tons:
Custom, Home, Help, In formation, Previous Slide, Next Slide, First Slide, Last
Slide, Last Slide Viewed, Document, Sound, and Movie.
Figure 2.10. The Twelve Types of Buttons
The but ton icons do not have to cor respond to the ac tion the but ton will per -
form, but good rules of design dictate that the icon should make sense for what is
going to hap pen when the but ton is pressed.
Once you se lect a but ton (from the flyout menu from “Ac tion But tons”),
your cur sor will change to a plus sign. You can either click on your slide and a
standard size but ton will ap pear, or you can drag the mouse to create a but ton of
But tons 25
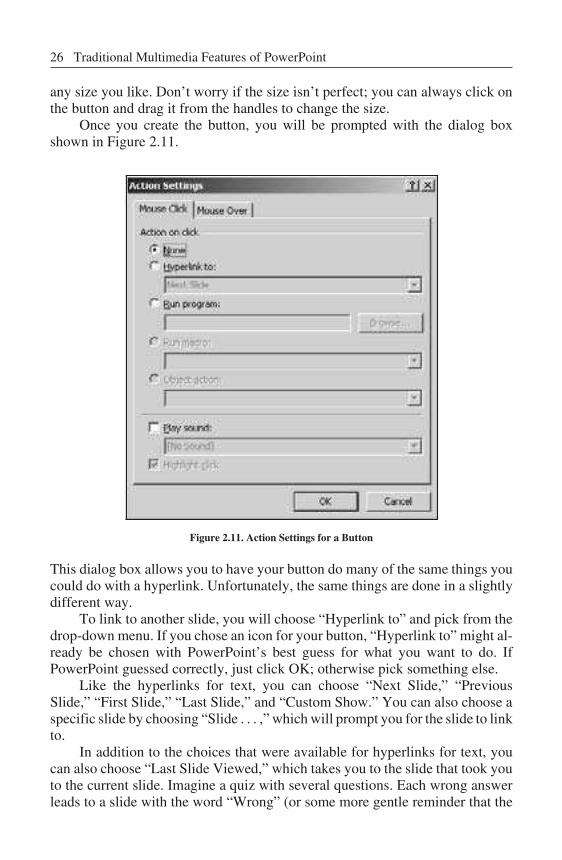
any size you like. Don’t worry if the size isn’t per fect; you can al ways click on
the but ton and drag it from the handles to change the size.
Once you create the but ton, you will be prompted with the di alog box
shown in Fig ure 2.11.
Figure 2.11. Ac tion Set tings for a But ton
This dialog box al lows you to have your but ton do many of the same things you
could do with a hyperlink. Unfortunately, the same things are done in a slightly
dif fer ent way.
To link to another slide, you will choose “Hyperlink to” and pick from the
drop-down menu. If you chose an icon for your button, “Hyperlink to” might al -
ready be cho sen with PowerPoint’s best guess for what you want to do. If
PowerPoint guessed cor rectly, just click OK; oth erwise pick something else.
Like the hyperlinks for text, you can choose “Next Slide,” “Pre vi ous
Slide,” “First Slide,” “Last Slide,” and “Cus tom Show.” You can also choose a
specific slide by choosing “Slide . . . ,” which will prompt you for the slide to link
to.
In ad dition to the choices that were available for hyperlinks for text, you
can also choose “Last Slide Viewed,” which takes you to the slide that took you
to the current slide. Imagine a quiz with several questions. Each wrong answer
leads to a slide with the word “Wrong” (or some more gen tle reminder that the
26 Tra di tional Mul ti me dia Fea tures of PowerPoint
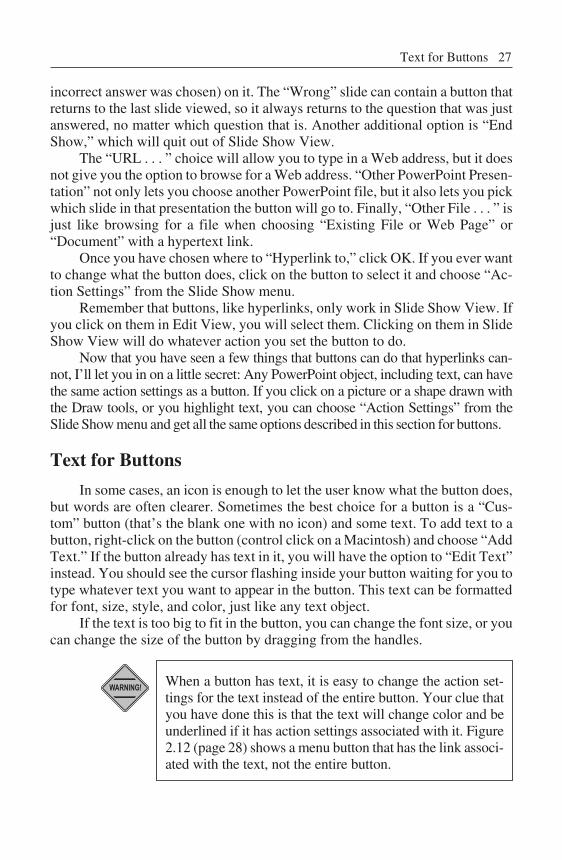
incorrect an swer was cho sen) on it. The “Wrong” slide can contain a but ton that
returns to the last slide viewed, so it al ways re turns to the ques tion that was just
answered, no matter which question that is. An other additional op tion is “End
Show,” which will quit out of Slide Show View.
The “URL . . . ” choice will allow you to type in a Web address, but it does
not give you the op tion to browse for a Web ad dress. “Other PowerPoint Presen-
ta tion” not only lets you choose another PowerPoint file, but it also lets you pick
which slide in that pre sentation the but ton will go to. Fi nally, “Other File . . . ” is
just like browsing for a file when choosing “Existing File or Web Page” or
“Doc u ment” with a hypertext link.
Once you have chosen where to “Hyperlink to,” click OK. If you ever want
to change what the button does, click on the but ton to select it and choose “Ac-
tion Set tings” from the Slide Show menu.
Remember that but tons, like hyperlinks, only work in Slide Show View. If
you click on them in Edit View, you will se lect them. Clicking on them in Slide
Show View will do whatever ac tion you set the button to do.
Now that you have seen a few things that buttons can do that hyperlinks can-
not, I’ll let you in on a little secret: Any PowerPoint ob ject, in cluding text, can have
the same ac tion settings as a button. If you click on a pic ture or a shape drawn with
the Draw tools, or you high light text, you can choose “Action Settings” from the
Slide Show menu and get all the same op tions described in this section for but tons.
Text for Buttons
In some cases, an icon is enough to let the user know what the but ton does,
but words are of ten clearer. Sometimes the best choice for a but ton is a “Cus-
tom” but ton (that’s the blank one with no icon) and some text. To add text to a
button, right-click on the but ton (con trol click on a Macintosh) and choose “Add
Text.” If the but ton al ready has text in it, you will have the op tion to “Edit Text”
instead. You should see the cur sor flashing in side your but ton waiting for you to
type whatever text you want to appear in the button. This text can be formatted
for font, size, style, and color, just like any text object.
If the text is too big to fit in the but ton, you can change the font size, or you
can change the size of the but ton by drag ging from the handles.
When a but ton has text, it is easy to change the ac tion set-
tings for the text in stead of the en tire but ton. Your clue that
you have done this is that the text will change color and be
underlined if it has ac tion set tings as sociated with it. Fig ure
2.12 (page 28) shows a menu but ton that has the link associ-
ated with the text, not the en tire but ton.
Text for Buttons 27
WARNING!
Figure 2.12. But ton with Ac tion Set tings for the Text
The prob lem with this is that if a user clicks any place on the but ton ex cept
the text, the but ton will not work. This situation can be even worse, if the but ton
itself has ac tion settings to do one thing, and the text of the but ton has ac tion set-
tings to do something else. If this hap pens, high light the text in the but ton,
choose “Ac tion Set tings” from the Slide Show menu, and click “None” for the
action.
To be sure that you are setting your settings for the button it self and not just
the text, click once on the but ton. If you see a flashing cur sor in the text, click on
the but ton again, but be sure to click somewhere out side of the text. Watch the
shape of the cursor for the mouse. If it is the text cursor (known as the “I bar” be -
cause it looks like a capital I), then you are clicking in the text. Oth erwise you are
clicking out side of the text. Once you have selected the but ton, and not the text,
you can choose “Ac tion Set tings” from the Slide Show menu.
Sound for Buttons
In Fig ure 2.11 (page 26), you will no tice that you can check “Play Sound”
at the bot tom of the Action Settings dialog box. From the drop-down menu be -
low that, you can choose from a few of the canned sounds that come with
PowerPoint. You can also pick a sound file by choosing “Other Sound . . . ” from
the bot tom of the list.
You might no tice, how ever, that there is no op tion for recording your own
sound. Because this is the most use ful op tion for sounds for educational pur -
poses, it is im portant to be able to do this. You might want a but ton to say where
you are go ing when you click on it, you might want a but ton to read the text on a
slide, or you might want to pro nounce a vo cabulary word when the word is
clicked. This is all pos sible in PowerPoint.
Earlier in this chap ter you learned how to re cord a sound to place it into
your pre sen ta tion by choos ing “Movies and Sounds” from the In sert menu. Un -
fortunately, you did not have a choice about the icon used for the sound. The
icon was al ways a little speaker. Per haps you can com promise and use that icon
instead of a but ton, but that will not work for vo cabulary words. The so lution is
to add the sound with the speaker icon and then delete the icon. Re member that I
warned you to always give your sound a sensible name when recording it? Now
is the time you will use that name. Once you have recorded a sound, it is part of
the presentation. It re mains part of the pre sentation even if you delete the icon
that plays the sound.
28 Tra di tional Mul ti me dia Fea tures of PowerPoint
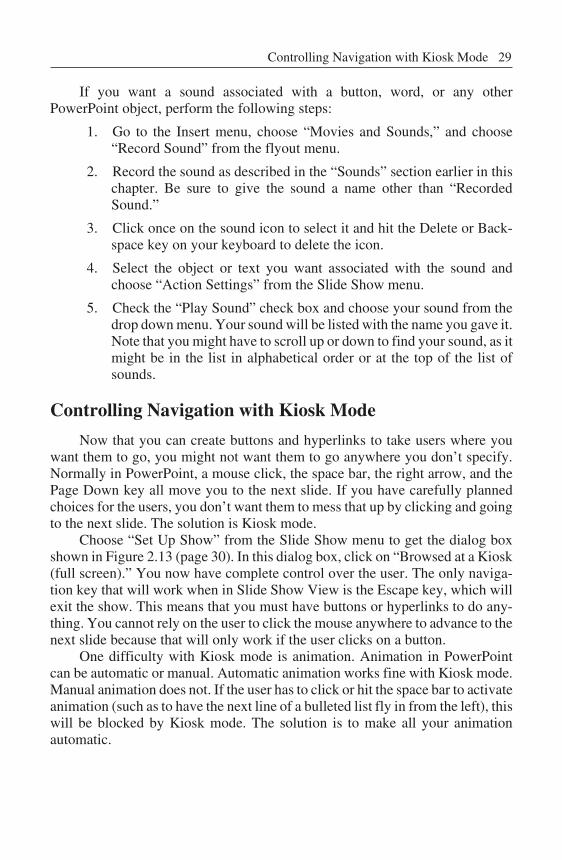
If you want a sound as sociated with a but ton, word, or any other
PowerPoint ob ject, perform the following steps:
1. Go to the In sert menu, choose “Movies and Sounds,” and choose
“Re cord Sound” from the flyout menu.
2. Record the sound as de scribed in the “Sounds” section earlier in this
chapter. Be sure to give the sound a name other than “Re corded
Sound.”
3. Click once on the sound icon to select it and hit the De lete or Back-
space key on your key board to delete the icon.
4. Select the ob ject or text you want associated with the sound and
choose “Ac tion Set tings” from the Slide Show menu.
5. Check the “Play Sound” check box and choose your sound from the
drop down menu. Your sound will be listed with the name you gave it.
Note that you might have to scroll up or down to find your sound, as it
might be in the list in al phabetical or der or at the top of the list of
sounds.
Con trol ling Nav i ga tion with Ki osk Mode
Now that you can create but tons and hyperlinks to take us ers where you
want them to go, you might not want them to go any where you don’t spec ify.
Normally in PowerPoint, a mouse click, the space bar, the right arrow, and the
Page Down key all move you to the next slide. If you have carefully planned
choices for the users, you don’t want them to mess that up by clicking and go ing
to the next slide. The so lution is Kiosk mode.
Choose “Set Up Show” from the Slide Show menu to get the di alog box
shown in Fig ure 2.13 (page 30). In this di alog box, click on “Browsed at a Ki osk
(full screen).” You now have complete con trol over the user. The only naviga-
tion key that will work when in Slide Show View is the Es cape key, which will
exit the show. This means that you must have but tons or hyperlinks to do any -
thing. You cannot rely on the user to click the mouse any where to advance to the
next slide because that will only work if the user clicks on a button.
One dif fi culty with Ki osk mode is an i ma tion. An i ma tion in PowerPoint
can be au tomatic or manual. Automatic animation works fine with Kiosk mode.
Manual animation does not. If the user has to click or hit the space bar to activate
animation (such as to have the next line of a bulleted list fly in from the left), this
will be blocked by Kiosk mode. The solution is to make all your animation
automatic.
Con trol ling Nav i ga tion with Ki osk Mode 29
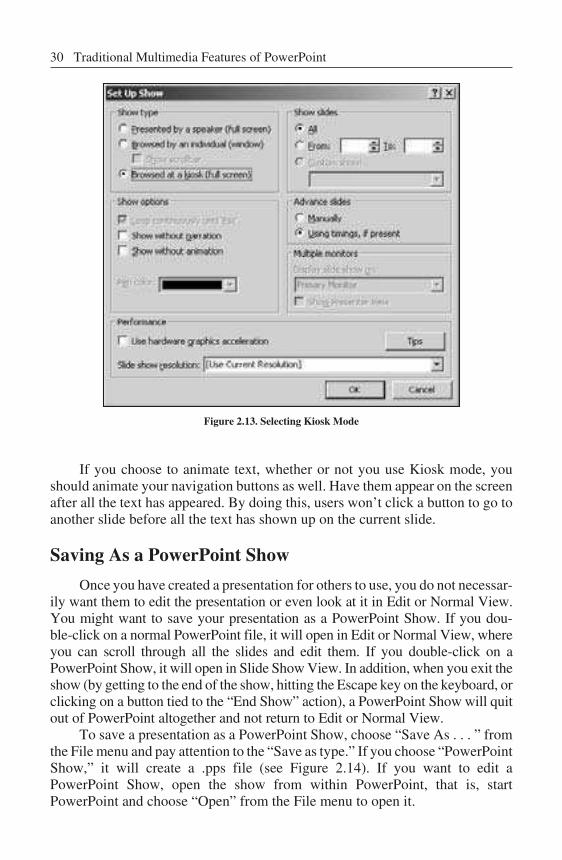
Fig ure 2.13. Se lect ing Ki osk Mode
If you choose to an imate text, whether or not you use Ki osk mode, you
should animate your navigation but tons as well. Have them ap pear on the screen
after all the text has ap peared. By do ing this, us ers won’t click a button to go to
another slide before all the text has shown up on the current slide.
Saving As a PowerPoint Show
Once you have created a presentation for others to use, you do not necessar-
ily want them to edit the presentation or even look at it in Edit or Normal View.
You might want to save your presentation as a PowerPoint Show. If you dou -
ble-click on a nor mal PowerPoint file, it will open in Edit or Nor mal View, where
you can scroll through all the slides and edit them. If you dou ble-click on a
PowerPoint Show, it will open in Slide Show View. In ad dition, when you exit the
show (by get ting to the end of the show, hitting the Es cape key on the key board, or
clicking on a but ton tied to the “End Show” ac tion), a PowerPoint Show will quit
out of PowerPoint al together and not return to Edit or Normal View.
To save a presentation as a PowerPoint Show, choose “Save As . . . ” from
the File menu and pay at tention to the “Save as type.” If you choose “PowerPoint
Show,” it will create a .pps file (see Fig ure 2.14). If you want to edit a
PowerPoint Show, open the show from within PowerPoint, that is, start
PowerPoint and choose “Open” from the File menu to open it.
30 Tra di tional Mul ti me dia Fea tures of PowerPoint
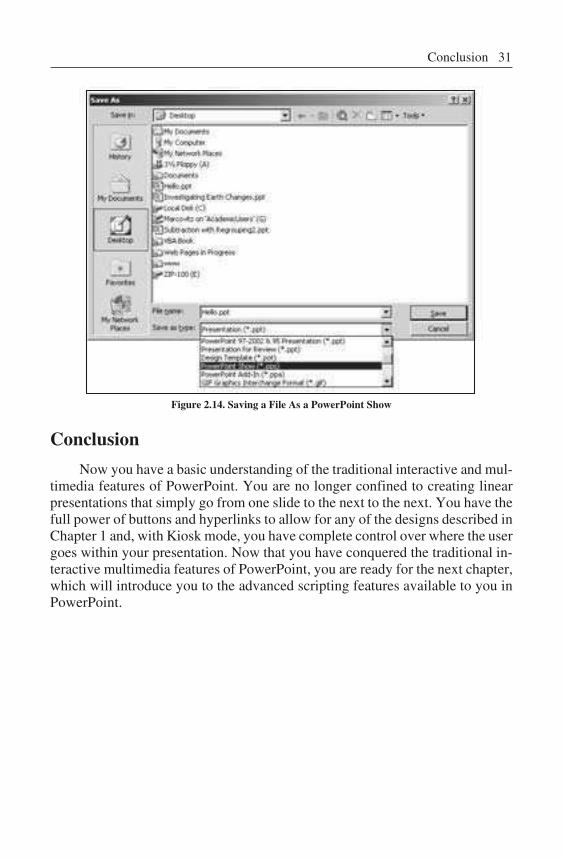
Figure 2.14. Sav ing a File As a PowerPoint Show
Con clu sion
Now you have a basic un derstanding of the tra ditional in teractive and mul -
timedia features of PowerPoint. You are no lon ger confined to creating lin ear
presentations that simply go from one slide to the next to the next. You have the
full power of buttons and hyperlinks to allow for any of the de signs de scribed in
Chapter 1 and, with Kiosk mode, you have com plete con trol over where the user
goes within your presentation. Now that you have con quered the traditional in -
teractive multimedia features of PowerPoint, you are ready for the next chapter,
which will in troduce you to the advanced scripting features available to you in
PowerPoint.
Con clu sion 31
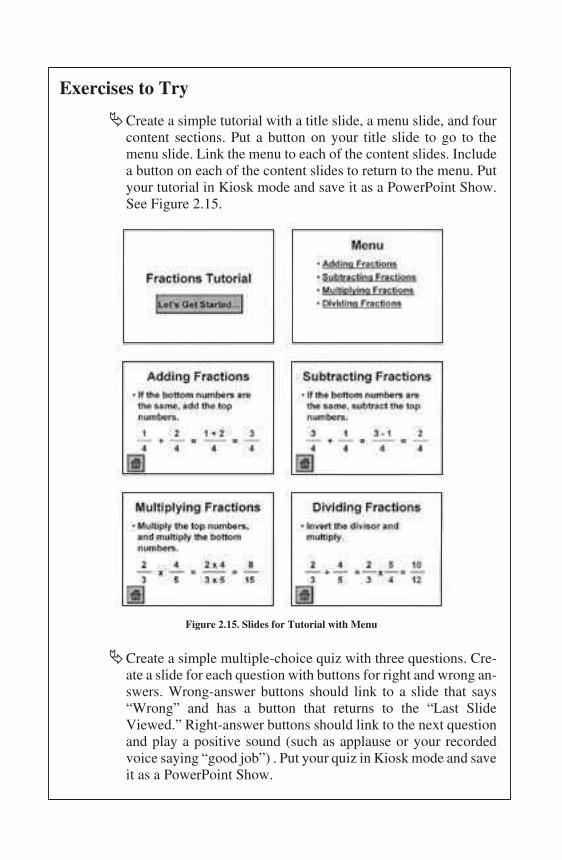
Ex er cises to Try
�Create a simple tu torial with a ti tle slide, a menu slide, and four
content sections. Put a button on your ti tle slide to go to the
menu slide. Link the menu to each of the content slides. In clude
a but ton on each of the con tent slides to re turn to the menu. Put
your tu torial in Ki osk mode and save it as a PowerPoint Show.
See Fig ure 2.15.
Figure 2.15. Slides for Tu torial with Menu
�Create a simple mul tiple-choice quiz with three ques tions. Cre -
ate a slide for each ques tion with but tons for right and wrong an-
swers. Wrong-answer but tons should link to a slide that says
“Wrong” and has a but ton that re turns to the “Last Slide
Viewed.” Right-answer but tons should link to the next ques tion
and play a pos itive sound (such as applause or your recorded
voice say ing “good job”) . Put your quiz in Kiosk mode and save
it as a PowerPoint Show.
3In tro duc ing Vi sual Ba sic
for Ap pli ca tions
In tro duc tion
In Chapter 2 you learned some of the tra ditional mul timedia features of
PowerPoint, such as pic tures, sounds, hyperlinks, and ac tion but tons. These are
important features of PowerPoint, and even if you be come a VBA ex pert, you
will use these features over and over again. But you might be won dering what
VBA is and what it can do for you. This chapter explains what VBA is, describes
how VBA fits into the world of ob ject-oriented com puter languages, and re-
lieves your concerns about VBA and computer viruses.
Vo cab u lary
• Class • OOP
• In her i tance • Pa ram e ter
• Macro vi rus pro tec tion • Prop erty
• Method • VBA
• Ob ject • Vi rus
• Ob ject-ori ented • Vi sual Ba sic for Ap pli ca tions
pro gram ming lan guage
What Is Vi sual Ba sic for Ap plications?
Visual Ba sic for Ap plications (VBA) is a very powerful ob ject-oriented
programming language that can be used to add to the functionality of Microsoft
Office ap plications, in cluding Microsoft PowerPoint. You might have got ten
stuck on the phrase “powerful ob ject-oriented pro gramming language.” Don’t
let that bother you. Your car is a pow erful electrical, mechanical, and thermody-
namic transportation de vice, but you can still drive (or if you are too young to
drive, your par ents can drive, so how hard can it be?). Later in this chapter,
you’ll learn what it means to be a “powerful ob ject-oriented pro gramming lan-
guage,” but remember the premise of this book: You are learning to be a scripter,
not a pro grammer. Just like you don’t need to un derstand the thermodynamics of
the combustion en gine to drive your car, you can become a scripter without a
degree in computer science.
Originally, PowerPoint was a presentation tool, used by many to enhance
lectures, sometimes making them better and sometimes making them worse.
PowerPoint served as an au tomated overhead projector. Slides could be changed
with the click of a but ton. Pictures and sounds could be added. Text could fly
onto the screen as points were in troduced, sav ing the need for a piece of paper to
cover half the pro jector (and an noy half the audience).
Enter PowerPoint 97. Starting with that version, PowerPoint was trans-
formed from a pre sentation tool to an in teractive tool. While it still can be used
as a pre sentation tool, it be comes more pow erful as an in teractive tool. As you
saw in Chapter 2, in ad dition to multimedia elements (pictures, sounds, vid eos),
newer ver sions of PowerPoint al low in ter ac tive el e ments, in clud ing buttons and
hyperlinks. You can
• add but tons to control navigation (start your slide show with a menu,
for ex ample, rather than requiring lin ear nav igation, from slide to
slide to slide);
• jump to other slide shows, files, or Web pages; and
• cre ate ru di men tary mul ti ple-choice tests (click ing on a but ton with
the correct an swer takes the student to a slide that says “correct,” for
example).
While PowerPoint’s interactivity is very powerful and useful, it is also very
limited. VBA ex tends this to nearly un limited dimensions. With VBA, you can
change the content and ap pearance of slides based on student in put, you can ask
for and process typed in put, you can add ad ditional slides, you can hide and
show graphics, and much more. You will learn the basics of scripting in VBA
beginning in Chapter 4. First, we’ll pause to learn a little bit about what ob -
ject-oriented programming is.
34 In tro duc ing Vi sual Ba sic for Ap pli ca tions
Note that the VBA features of PowerPoint work in all ver -
sions of PowerPoint starting with ver sion 97, but they do
not work in the PowerPoint Viewer or when saved as a
Web page. PowerPoint pre sentations that use VBA can be
placed on the Web, but they must be downloaded from the
Web and run di rectly on a machine with a full version of
PowerPoint.
What Is an Object-Oriented Programming Language?
First of all, VBA is a pro gramming language. Don’t let this scare you . . .
too much. Hav ing a background in computer science and pro gramming would
be helpful, and you will not be able to take full ad vantage of VBA with out be -
coming (at least) a nov ice pro grammer. How ever, this book guides you through
some of the basic things you might want to do with VBA with out the need of any
pro gram ming background.
To top it off, VBA isn’t just an or dinary pro gramming language; it is an ob -
ject-oriented pro gramming (OOP) lan guage. An OOP lan guage has three key
features: classes, objects, and methods. Classes are types of things, objects are
specific things, and methods are what you do to things. For example, there is a
class of things called “phone books.” The spe cific phone book on my desk is an
object. I can do many things with a phone book, such as look up a person’s phone
number, turn to a page, put it on a chair for my four-year-old daughter to sit on,
etc. All the things that I could do to the phone book are methods. If we convert
this phone book ex ample to computerese (computerese is not a real computer
language, but it plays one on TV), we might have the following:
Dim myPhoneBook As PhoneBookmyPhoneBook.LookUpPerson("John Smith")
The first line says that myPhoneBook is a spe cific instance (an ob ject) of
the class PhoneBook. This tells us that all the things we can do with phone
books in general can be done to this specific phone book. Since one of the things
that we can do with phone books is look up a specific person, we do that on the
sec ond line. myPhoneBook.LookUpPerson says that for this spe cific phone
book, call the method (do the action) LookUpPerson. Since we need to know
which per son to look up, this method takes an ar gument (in formation that the
method needs to complete its job). That in formation is put in pa rentheses af ter
the method. Since the in formation is text, we put it in quotes, too.
Computers are very picky. All the de tails are important. The dot (that pe-
riod be tween myPhoneBook and LookUpPerson) is nec essary to tell the com -
puter that LookUpPerson is the thing to do (method) with the ob ject
myPhoneBook. The parentheses tell the computer that the stuff in side is impor-
tant information (parameters) for knowing what the method should do. The
What Is an Ob ject-Oriented Pro gramming Language? 35
!
quotes tell the computer that what’s in side them is text. Leave out any de tail, and
nothing will work.
Another critical point about ob jects is that they can have parts. Think about
our phone book example. Think about what parts there are to a phone book. Here
are a few ex amples: the cover, pages, the blue pages (for gov ernment listings),
and the phone company in formation (such as how to contact the phone com pany
if your phone stops work ing). Each of these parts is its own ob ject (a particular
page might be an ex ample of the class Page, or a range of pages might be an ex -
ample of the class Pages). You might access the phone book by accessing a part
of the book. For example,
myPhoneBook.Pages.TurnToTheNextPage
might take the set of pages and turn them to the next one, so if you are on page
57, for example, you will find your self on page 59 (if the page is two-sided).
Now the dot is serving two purposes. The first dot says that Pages is a part of the
ob ject myPhoneBook, and the second dot tells the com puter to do the thing (run
the method) TurnToTheNextPage, which is something that can be done to
Pages.
While some parts of an ob ject are other objects, some parts are properties.
For ex ample, a phone book has a color, a number of pages, and a thickness. So
for ex ample, if I wanted to see how thick my phone book is, I might look at that
prop erty:
myPhoneBook.thick ness
or I might want to add two thicknesses together to get something tall enough for
my daugh ter to sit on and be able to reach the table:
myPhoneBook.thickness + myNeighborsPhoneBook.thick ness
Finally, we turn to in heritance, and then you won’t be an ex pert in OOP, but
you will be able to play one on TV. We have been look ing at the class
PhoneBook. Well, is n’t a phone book just a spe cific type of book? Therefore,
we could think of a PhoneBook as a type of Book that in herits all the prop erties
and methods from books. The ob ject I am work ing with is still myPhoneBook,
but it is not only a member of the class PhoneBook, it is (since PhoneBook is a
sub class of Book) also a mem ber of the class Book. Ev erything you can do with
a book, in general, you can do with a phone book . . . and more. For example, you
can turn pages in a book, look at the cover, weigh down pa pers, etc. You can also
look up a phone num ber or find in formation about area codes in a phone book,
but not in all books.
Now, with this ba sic un derstanding of ob jects, classes, and methods, you
will be able to un derstand the basics of OOP when these terms come up.
Before leaving OOP, think about how it re lates to PowerPoint. PowerPoint
has many ob jects and classes. A typical PowerPoint presentation con tains many
36 In tro duc ing Vi sual Ba sic for Ap pli ca tions
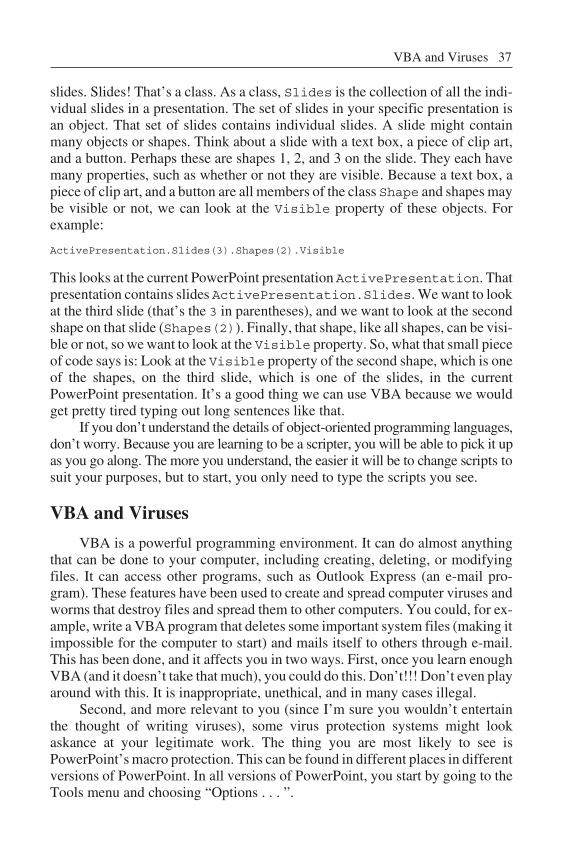
slides. Slides! That’s a class. As a class, Slides is the col lection of all the in di-
vidual slides in a presentation. The set of slides in your specific presentation is
an ob ject. That set of slides con tains in dividual slides. A slide might con tain
many ob jects or shapes. Think about a slide with a text box, a piece of clip art,
and a button. Perhaps these are shapes 1, 2, and 3 on the slide. They each have
many properties, such as whether or not they are vis ible. Because a text box, a
piece of clip art, and a button are all mem bers of the class Shape and shapes may
be visible or not, we can look at the Vis i ble property of these objects. For
example:
ActivePresentation.Slides(3).Shapes(2).Vis i ble
This looks at the current PowerPoint presentation ActivePresentation. That
pre sen ta tion con tains slides ActivePresentation.Slides. We want to look
at the third slide (that’s the 3 in pa rentheses), and we want to look at the second
shape on that slide (Shapes(2)). Finally, that shape, like all shapes, can be vis i-
ble or not, so we want to look at the Vis i ble prop erty. So, what that small piece
of code says is: Look at the Vis i ble prop erty of the second shape, which is one
of the shapes, on the third slide, which is one of the slides, in the current
PowerPoint presentation. It’s a good thing we can use VBA be cause we would
get pretty tired typ ing out long sentences like that.
If you don’t un derstand the details of ob ject-oriented pro gramming languages,
don’t worry. Because you are learning to be a scripter, you will be able to pick it up
as you go along. The more you un derstand, the easier it will be to change scripts to
suit your pur poses, but to start, you only need to type the scripts you see.
VBA and Vi ruses
VBA is a pow erful pro gramming environment. It can do almost any thing
that can be done to your computer, in cluding creating, de leting, or modifying
files. It can access other pro grams, such as Outlook Ex press (an e-mail pro-
gram). These fea tures have been used to cre ate and spread com puter vi ruses and
worms that de stroy files and spread them to other computers. You could, for ex-
ample, write a VBA pro gram that de letes some im portant sys tem files (mak ing it
impossible for the computer to start) and mails itself to oth ers through e-mail.
This has been done, and it affects you in two ways. First, once you learn enough
VBA (and it does n’t take that much), you could do this. Don’t!!! Don’t even play
around with this. It is in appropriate, unethical, and in many cases illegal.
Second, and more relevant to you (since I’m sure you would n’t en tertain
the thought of writing vi ruses), some virus pro tection systems might look
askance at your legitimate work. The thing you are most likely to see is
PowerPoint’s macro pro tection. This can be found in different places in dif ferent
versions of PowerPoint. In all ver sions of PowerPoint, you start by go ing to the
Tools menu and choosing “Options . . . ”.
VBA and Viruses 37
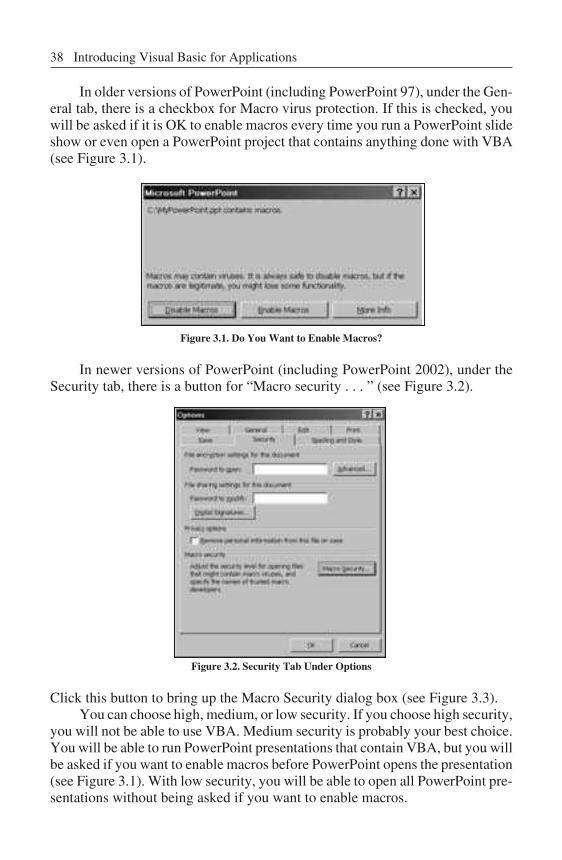
In older ver sions of PowerPoint (including PowerPoint 97), un der the Gen -
eral tab, there is a checkbox for Macro vi rus pro tection. If this is checked, you
will be asked if it is OK to enable macros every time you run a PowerPoint slide
show or even open a PowerPoint project that con tains any thing done with VBA
(see Figure 3.1).
Figure 3.1. Do You Want to Enable Macros?
In newer versions of PowerPoint (including PowerPoint 2002), un der the
Security tab, there is a but ton for “Macro security . . . ” (see Figure 3.2).
Figure 3.2. Se curity Tab Un der Op tions
Click this button to bring up the Macro Security di alog box (see Fig ure 3.3).
You can choose high, medium, or low security. If you choose high security,
you will not be able to use VBA. Medium security is prob ably your best choice.
You will be able to run PowerPoint presentations that contain VBA, but you will
be asked if you want to enable macros before PowerPoint opens the pre sentation
(see Fig ure 3.1). With low se curity, you will be able to open all PowerPoint pre-
sentations without be ing asked if you want to enable macros.
38 In tro duc ing Vi sual Ba sic for Ap pli ca tions
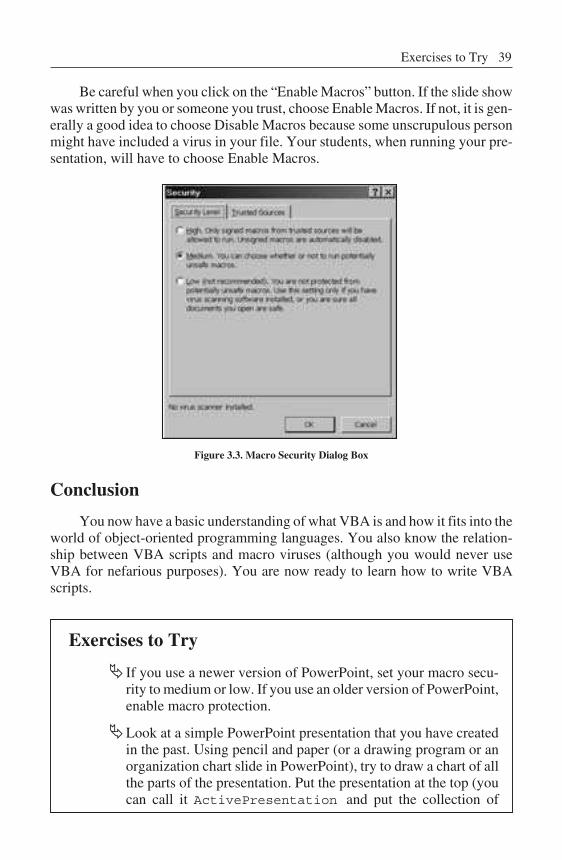
Be careful when you click on the “Enable Macros” but ton. If the slide show
was written by you or someone you trust, choose En able Macros. If not, it is gen-
erally a good idea to choose Disable Macros because some un scrupulous person
might have in cluded a vi rus in your file. Your students, when running your pre-
sentation, will have to choose Enable Macros.
Fig ure 3.3. Macro Se cu rity Di a log Box
Con clu sion
You now have a basic un derstanding of what VBA is and how it fits into the
world of ob ject-oriented pro gramming languages. You also know the relation-
ship between VBA scripts and macro vi ruses (although you would never use
VBA for ne farious pur poses). You are now ready to learn how to write VBA
scripts.
Ex er cises to Try
� If you use a newer version of PowerPoint, set your macro se cu-
rity to medium or low. If you use an older ver sion of PowerPoint,
en able macro pro tec tion.
�Look at a simple PowerPoint pre sentation that you have created
in the past. Using pen cil and pa per (or a drawing pro gram or an
organization chart slide in PowerPoint), try to draw a chart of all
the parts of the presentation. Put the presentation at the top (you
can call it ActivePresentation and put the col lection of
Ex er cises to Try 39
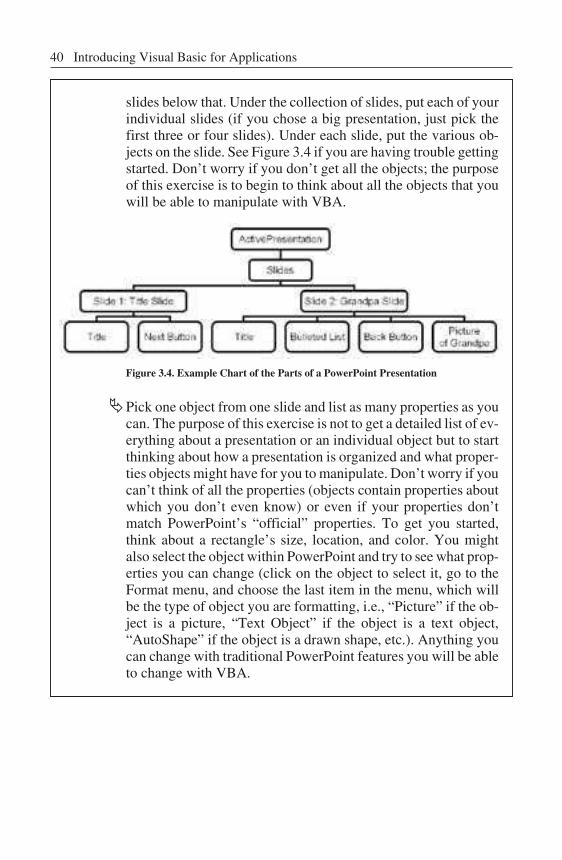
slides be low that. Un der the col lection of slides, put each of your
individual slides (if you chose a big pre sentation, just pick the
first three or four slides). Under each slide, put the various ob -
jects on the slide. See Fig ure 3.4 if you are hav ing trou ble getting
started. Don’t worry if you don’t get all the ob jects; the pur pose
of this ex ercise is to be gin to think about all the ob jects that you
will be able to ma nipulate with VBA.
Figure 3.4. Ex ample Chart of the Parts of a PowerPoint Pre sentation
�Pick one ob ject from one slide and list as many prop erties as you
can. The pur pose of this exercise is not to get a de tailed list of ev -
erything about a presentation or an in dividual ob ject but to start
thinking about how a presentation is or ganized and what prop er-
ties ob jects might have for you to manipulate. Don’t worry if you
can’t think of all the prop erties (ob jects contain properties about
which you don’t even know) or even if your prop erties don’t
match PowerPoint’s “official” prop erties. To get you started,
think about a rectangle’s size, lo cation, and color. You might
also se lect the ob ject within PowerPoint and try to see what prop -
erties you can change (click on the ob ject to select it, go to the
Format menu, and choose the last item in the menu, which will
be the type of ob ject you are for matting, i.e., “Picture” if the ob -
ject is a picture, “Text Object” if the object is a text object,
“AutoShape” if the ob ject is a drawn shape, etc.). Any thing you
can change with traditional PowerPoint features you will be able
to change with VBA.
40 In tro duc ing Vi sual Ba sic for Ap pli ca tions

4Getting Started with VBA
In tro duc tion
In pre vious chapters you learned some basic features of PowerPoint and
what VBA is. This chapter shows you how to access the VBA Ed itor, how to
write simple scripts in VBA, how to at tach those scripts to but tons and ob jects,
and how to pro tect your scripts with a password. When you have completed this
chapter, you will know the me chanics of writing a script and us ing it in a
PowerPoint presentation, and you will be ready to learn how to do some in terest-
ing things with VBA.
Vo cab u lary
• Ac tion set tings • Mod ule
• Add Text • MsgBox
• But ton • Pass word
• Macro • Vi sual Ba sic Ed i tor
Ac cess ing the VBA Ed i tor
Once you start a PowerPoint pro ject, you get into VBA by hold ing down
the ALT key and hit ting the F11 key (op tion-F11 on a Macintosh). Al terna-
tively, go to the Tools menu, choose “Macro,” and choose “Vi sual Ba sic Ed i tor”
from the flyout menu. At this point, you should see two small windows on the
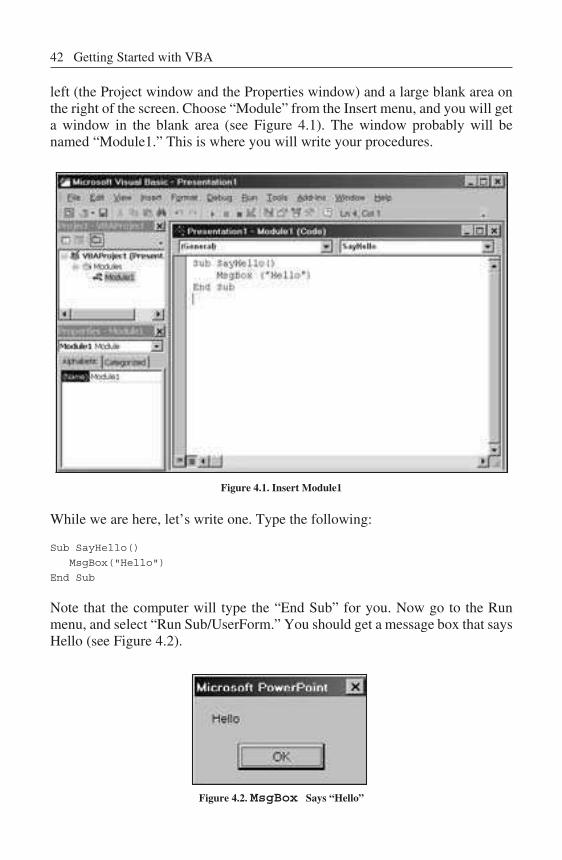
left (the Project win dow and the Prop erties win dow) and a large blank area on
the right of the screen. Choose “Mod ule” from the In sert menu, and you will get
a window in the blank area (see Fig ure 4.1). The window prob ably will be
named “Module1.” This is where you will write your procedures.
Figure 4.1. In sert Module1
While we are here, let’s write one. Type the fol lowing:
Sub SayHello()
MsgBox("Hello")
End Sub
Note that the com puter will type the “End Sub” for you. Now go to the Run
menu, and se lect “Run Sub/UserForm.” You should get a message box that says
Hello (see Fig ure 4.2).
Fig ure 4.2. MsgBox Says “Hello”
42 Getting Started with VBA

Congratulations! You have just written and ex ecuted your first VBA pro ce-
dure. Click the OK but ton, and you can do some more.
Help! I’ve Lost My Win dows
You’re adventurous. You like to play around. You were trying some things,
and you lost your Pro ject win dow in the VBA Ed itor. No prob lem. Keep play ing
around; it is the best way to learn. Oh yeah, and you want to get your Pro ject win -
dow back. Simply go to the View menu and choose “Pro ject Ex plorer.” What’s
that? You lost your module window, too? You are ad ven tur ous. Just dou-
ble-click on Module1 in the Pro ject Win dow, as shown in Figure 4.3.
Figure 4.3. Pro ject Win dow with Module1
If you don’t see Module1 in the Project win dow, but you do see Modules, you
should have a + next to Modules; click on that and you should see Module1. If
you don’t see Mod ules, but you do see VBAProject, you should have a + next to
VBAProject; click on that to see Modules, click on the + next to Mod ules to see
Module1, and dou ble-click on Module1 to see the Module1 win dow. Fi nally, if
you don’t see Mod ules, and you don’t see a + next to VBA Project, then you
don’t have a mod ule (either you never in serted it, or you de leted it). Go to the In-
sert menu, and choose “Mod ule,” and you should be OK.
If you accidentally add more than one mod ule, your mod ules will be num -
bered con secutively (Module1, Module2, Module3, . . . ). While it is not a prob -
lem to have more than one mod ule, you should avoid confusion by keeping all
your scripts in the same mod ule. Delete any ex tra modules by clicking on them
in the Project win dow and choosing “De lete Mod ule” from the File menu.
Tying Your VBA Script to a PowerPoint Button
Now that you have a script writ ten, you will want to ac cess it from within
PowerPoint. You can do this by associating the script with a but ton (or any draw-
ing shape that you want).
Tying Your VBA Script to a PowerPoint Button 43
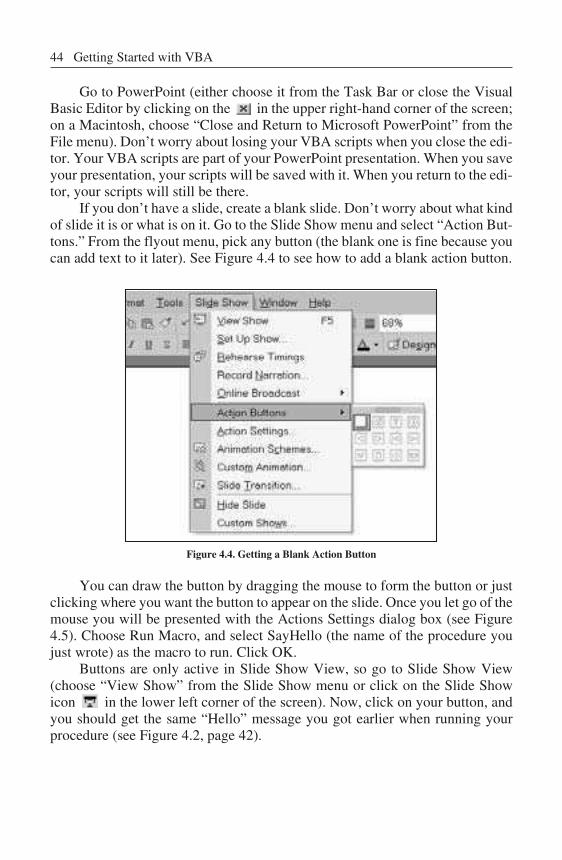
Go to PowerPoint (either choose it from the Task Bar or close the Visual
Basic Ed itor by clicking on the in the up per right-hand corner of the screen;
on a Macintosh, choose “Close and Return to Microsoft PowerPoint” from the
File menu). Don’t worry about losing your VBA scripts when you close the edi-
tor. Your VBA scripts are part of your PowerPoint presentation. When you save
your pre sentation, your scripts will be saved with it. When you return to the ed i-
tor, your scripts will still be there.
If you don’t have a slide, cre ate a blank slide. Don’t worry about what kind
of slide it is or what is on it. Go to the Slide Show menu and se lect “Ac tion But-
tons.” From the flyout menu, pick any but ton (the blank one is fine be cause you
can add text to it later). See Fig ure 4.4 to see how to add a blank ac tion but ton.
Figure 4.4. Get ting a Blank Ac tion But ton
You can draw the but ton by drag ging the mouse to form the but ton or just
clicking where you want the but ton to ap pear on the slide. Once you let go of the
mouse you will be presented with the Actions Settings dialog box (see Fig ure
4.5). Choose Run Macro, and se lect SayHello (the name of the pro cedure you
just wrote) as the macro to run. Click OK.
Buttons are only active in Slide Show View, so go to Slide Show View
(choose “View Show” from the Slide Show menu or click on the Slide Show
icon in the lower left cor ner of the screen). Now, click on your but ton, and
you should get the same “Hello” message you got earlier when running your
procedure (see Figure 4.2, page 42).
44 Getting Started with VBA
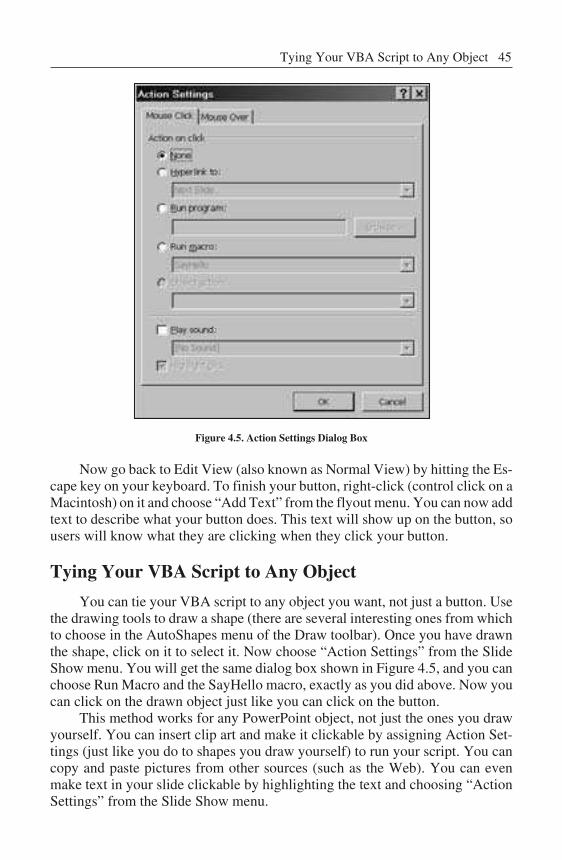
Fig ure 4.5. Ac tion Set tings Di a log Box
Now go back to Edit View (also known as Normal View) by hitting the Es -
cape key on your keyboard. To fin ish your button, right-click (control click on a
Macintosh) on it and choose “Add Text” from the flyout menu. You can now add
text to de scribe what your button does. This text will show up on the but ton, so
users will know what they are clicking when they click your but ton.
Tying Your VBA Script to Any Object
You can tie your VBA script to any ob ject you want, not just a but ton. Use
the drawing tools to draw a shape (there are several in teresting ones from which
to choose in the AutoShapes menu of the Draw toolbar). Once you have drawn
the shape, click on it to select it. Now choose “Ac tion Set tings” from the Slide
Show menu. You will get the same di alog box shown in Fig ure 4.5, and you can
choose Run Macro and the SayHello macro, exactly as you did above. Now you
can click on the drawn ob ject just like you can click on the button.
This method works for any PowerPoint ob ject, not just the ones you draw
yourself. You can in sert clip art and make it clickable by assigning Action Set-
tings (just like you do to shapes you draw your self) to run your script. You can
copy and paste pic tures from other sources (such as the Web). You can even
make text in your slide clickable by high lighting the text and choos ing “Ac tion
Set tings” from the Slide Show menu.
Tying Your VBA Script to Any Ob ject 45
Changing a But ton
You might want to make three types of changes to your but ton: changing
the PowerPoint at tributes of a but ton, such as size shape, or text; changing which
script a button uses (in cluding add ing a script if the but ton isn’t tied to one); and
changing what the script does that the but ton uses.
To change the at tributes of a but ton, you would use traditional PowerPoint
features. For example, you can change the text in the but ton by right-clicking on
the but ton and choosing “Edit Text” (“Add Text” if the but ton doesn’t al ready
have any text) from the flyout menu. You can use any of the drawing tools to
change the size, shape, color, etc., of the button.
If you created your but ton and didn’t tie it to a script, you can right-click on
the but ton and choose “Ac tion Set tings” from the flyout menu. Al ternatively,
you can left-click on the but ton to select it, go to the Slide Show menu, and
choose “Ac tion Set tings.” Once in the Action Settings dialog box (see Fig ure
4.5, page 45), you can choose Run Macro. If you had as sociated your but ton with
the wrong script, you can change which script the but ton runs in the Action Set-
tings dialog box. If you have more than one script, you can choose a different
script from the pull-down menu un der Run Macro. If you don’t want your but ton
to run any script, click None in the Action Settings dialog box.
Be ware! If you have added text to your but ton, it is easy to
accidentally link the text rather than the but ton. Generally,
you want the entire but ton to activate your script, not just
the text in side the but ton. You can tell that you have linked
the text be cause PowerPoint will generally un derline
linked text. To en sure that you link the entire but ton, left
click on the but ton to select it. Be sure that you do not have
a cursor flashing in the text. If you do, left click anywhere
on the but ton that is out side of the text. At this point you
can ei ther choose “Ac tion Set tings” from the Slide Show
menu or right-click on the bor der of your but ton and
choose “Ac tion Set tings” from the flyout menu. Be cause
PowerPoint allows you to link text separately from a but -
ton, you easily can get confused. If you have linked the text
and you later check to see which script the but ton activates,
your Action Settings dialog box will in dicate “None.” Be
careful to always link the entire button to avoid this
confusion.
46 Getting Started with VBA
WARNING!
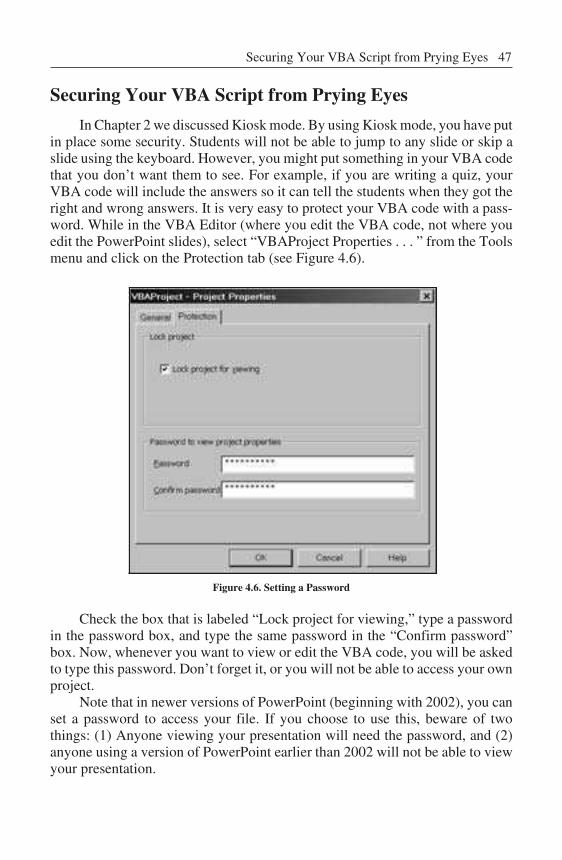
Securing Your VBA Script from Prying Eyes
In Chapter 2 we discussed Kiosk mode. By us ing Ki osk mode, you have put
in place some security. Students will not be able to jump to any slide or skip a
slide us ing the keyboard. However, you might put something in your VBA code
that you don’t want them to see. For ex ample, if you are writing a quiz, your
VBA code will in clude the answers so it can tell the students when they got the
right and wrong answers. It is very easy to pro tect your VBA code with a pass-
word. While in the VBA Ed itor (where you edit the VBA code, not where you
edit the PowerPoint slides), se lect “VBAProject Prop erties . . . ” from the Tools
menu and click on the Protection tab (see Figure 4.6).
Figure 4.6. Set ting a Password
Check the box that is labeled “Lock pro ject for viewing,” type a password
in the password box, and type the same password in the “Con firm pass word”
box. Now, when ever you want to view or edit the VBA code, you will be asked
to type this password. Don’t for get it, or you will not be able to access your own
project.
Note that in newer ver sions of PowerPoint (beginning with 2002), you can
set a password to access your file. If you choose to use this, be ware of two
things: (1) Any one viewing your presentation will need the password, and (2)
anyone us ing a version of PowerPoint earlier than 2002 will not be able to view
your presentation.
Securing Your VBA Script from Prying Eyes 47
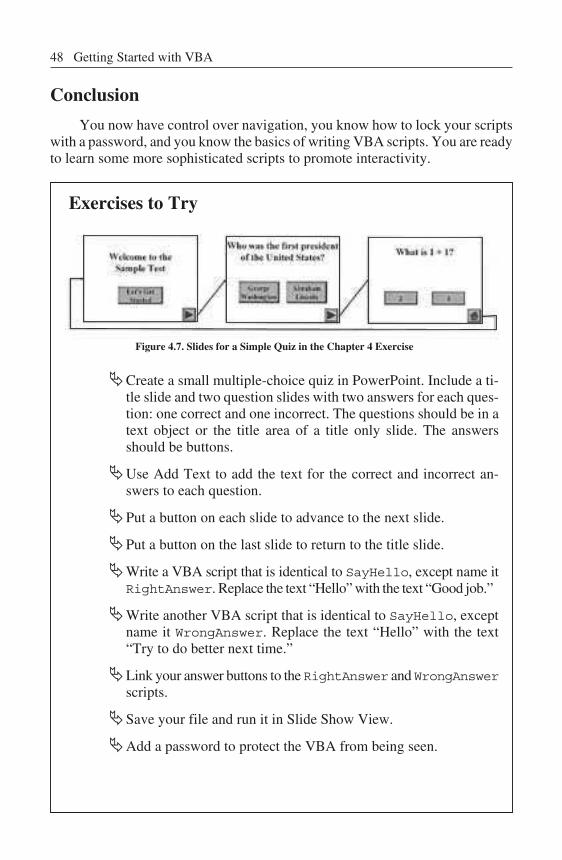
Con clu sion
You now have con trol over nav igation, you know how to lock your scripts
with a password, and you know the ba sics of writing VBA scripts. You are ready
to learn some more sophisticated scripts to pro mote interactivity.
Ex er cises to Try
Figure 4.7. Slides for a Sim ple Quiz in the Chap ter 4 Ex ercise
�Create a small mul tiple-choice quiz in PowerPoint. In clude a ti -
tle slide and two question slides with two an swers for each ques -
tion: one cor rect and one in correct. The ques tions should be in a
text ob ject or the ti tle area of a ti tle only slide. The an swers
should be but tons.
�Use Add Text to add the text for the cor rect and in correct an -
swers to each question.
�Put a button on each slide to advance to the next slide.
�Put a but ton on the last slide to re turn to the ti tle slide.
�Write a VBA script that is iden tical to SayHello, ex cept name it
RightAnswer. Replace the text “Hello” with the text “Good job.”
�Write an other VBA script that is iden tical to SayHello, ex cept
name it WrongAnswer. Replace the text “Hello” with the text
“Try to do better next time.”
�Link your answer but tons to the RightAnswer and WrongAnswer
scripts.
�Save your file and run it in Slide Show View.
�Add a password to protect the VBA from be ing seen.
48 Getting Started with VBA
5Let’s Get Script ing
In tro duc tion
In Chapter 4 you learned how to ac cess the VBA Ed itor and write a simple
script. In this chapter you will begin to learn a few more ba sic scripts, in cluding
some scripts that allow you to get in put from the user. In the pro cess, you will
learn a little bit about variables, which are used to store in formation, so you can
use it when you give feedback. What good would it be to ask for the user’s name,
if you don’t use it as part of the feedback? You will get a pre view of how to use
some of the same scripts to get other kinds of in put, such as answers to short-
answer questions. Fi nally, in this chap ter you will learn some details about run -
ning your scripts and associating them with buttons, including how to associate a
button with more than one script.
Vo cab u lary
• Am per sand (&) • String
• De clare • Un der score
• Dim • Vari able
• InputBox • Vari able type
• Scope
Variables and Getting In put
Earlier, you used a MsgBox to pop up a message on the screen. You can use
a similar box to get in put from your stu dents. The only dif ference is that the new
dialog box will have a space for your students to type something. We’ll start with
something simple: asking for the stu dent’s name.
Sub YourName() userName = InputBox(Prompt:="Type your name", _ Ti tle:="Input Name")End Sub
There are a few important things about this simple pro cedure. First, pay at-
tention to the space and un derscore at the end of the line. The last three charac-
ters on the second line are comma, space, and un derscore. Without the space, the
computer won’t recognize the un derscore that fol lows. The un derscore is a spe-
cial VBA character that tells VBA that what is on the next line is part of this line.
Therefore that entire line could have been written on one line without the
underscore:
userName = InputBox(Prompt:="Type your name", Ti tle:="Input Name")
The un derscore simply al lows you to di vide long lines so you don’t have to
scroll to the right to see what is on each line. Feel free to write long lines on one
line or di vide them up among sev eral lines as you see fit.
The next thing that is im portant about this small piece of code is that it uses
a vari able: userName. Since we don’t do any thing with the variable at this point,
it is not terribly in teresting, but we should note a few things about variables.
Variables are places to store in formation. You can think of them as boxes in the
computer’s memory. Un like algebraic vari ables, which represent one (or more
than one) specific, un changing value in an equation or series of equations, com -
puter variables change values. That is, you can take something out of a box and
put something else into the box. In al gebra, the equation
x = x + 1
would not make any sense. In the computer, it makes perfect sense for two reasons:
1. While the variable x can only hold one value at a time, that value can
change. At one time x might hold the value 7, and a mo ment later, x
might hold the value 8.
2. The equal sign (=) is not a state ment of equal ity. It is an as signment
operator. It says, take the value on the right side and store it in the
variable named on the left side. Therefore, the above equation is not a
statement of al gebraic fact; it is an ac tion. The part on the right (x + 1)
says, find what the value ofx is and add one to it; the rest (x =) says,
50 Let’s Get Scripting
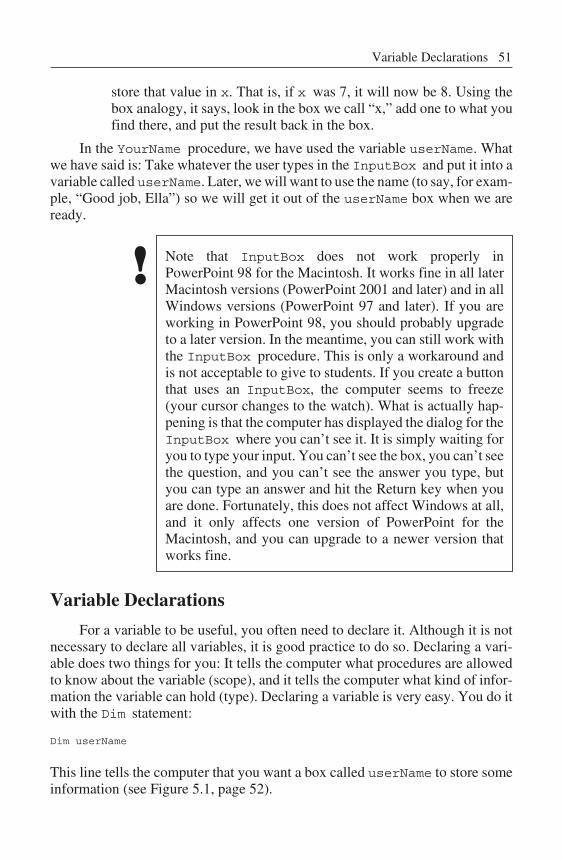
store that value in x. That is, if x was 7, it will now be 8. Us ing the
box analogy, it says, look in the box we call “x,” add one to what you
find there, and put the result back in the box.
In the YourName procedure, we have used the variable userName. What
we have said is: Take whatever the user types in the InputBox and put it into a
vari able called userName. Later, we will want to use the name (to say, for ex am-
ple, “Good job, Ella”) so we will get it out of the userName box when we are
ready.
Note that InputBox does not work prop erly in
PowerPoint 98 for the Macintosh. It works fine in all later
Macintosh versions (PowerPoint 2001 and later) and in all
Windows versions (PowerPoint 97 and later). If you are
working in PowerPoint 98, you should prob ably up grade
to a later version. In the meantime, you can still work with
the InputBox procedure. This is only a workaround and
is not acceptable to give to stu dents. If you create a but ton
that uses an InputBox, the computer seems to freeze
(your cursor changes to the watch). What is actually hap-
pening is that the com puter has displayed the di alog for the
InputBox where you can’t see it. It is simply wait ing for
you to type your in put. You can’t see the box, you can’t see
the question, and you can’t see the an swer you type, but
you can type an answer and hit the Return key when you
are done. Fortunately, this does not af fect Win dows at all,
and it only af fects one ver sion of PowerPoint for the
Macintosh, and you can up grade to a newer ver sion that
works fine.
Vari able Dec la ra tions
For a variable to be useful, you of ten need to declare it. Al though it is not
necessary to de clare all variables, it is good prac tice to do so. De claring a vari -
able does two things for you: It tells the com puter what pro cedures are al lowed
to know about the variable (scope), and it tells the computer what kind of in for-
mation the vari able can hold (type). De claring a variable is very easy. You do it
with the Dim state ment:
Dim userName
This line tells the computer that you want a box called userName to store some
information (see Figure 5.1, page 52).
Vari able Dec la ra tions 51
!
Figure 5.1. A Box Called userName
Be ware! All Dim statements must go to gether at the top of
your mod ule (or right after the Sub line in a pro cedure).
Never put a Dim statement be tween pro cedures. If you add
a new pro cedure that needs a new variable, put the pro ce-
dure where you want, and put the Dim state ment for the
variable with the other Dim statements at the beginning of
the module.
The most important part about the Dim state ment is where to put it. You
have two choices: You can put it at the be ginning of your procedure (right after
the Sub statement) or at the beginning of your module (before any Sub state -
ments). If you put it any place else, it will not work. While pro grammers have
lots of good reasons to put Dim statements in procedures, we are scripters, so for
the pur poses of this book, we will put most of our Dim state ments at the be gin-
ning of the mod ule. A Dim statement at the be ginning of a module means that
every procedure in the mod ule can ac cess that variable. That is, the scope of the
variable is the en tire mod ule.
Alternatively, if you put the Dim statement at the be ginning of the pro ce-
dure, only that procedure can use the variable; that is, the scope of the vari able is
the pro cedure. For the YourName procedure, it would be pretty silly to create
the userName variable so that only YourName could use it. If we did that,
when we add a second pro cedure (such as the DoingWell procedure to tell the
user how well he or she is do ing), we won’t be able to use the name typed by the
user. That is, we would be stuck saying “Good job” in stead of “Good job, Ada.”
Therefore, we want to add a Dim statement at the be ginning of the mod ule:
52 Let’s Get Scripting
WARNING!
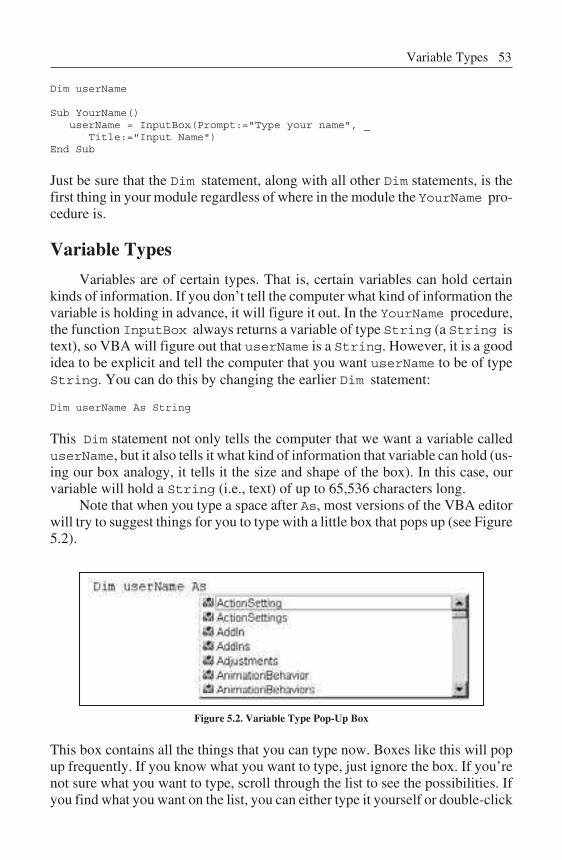
Dim userName
Sub YourName() userName = InputBox(Prompt:="Type your name", _ Ti tle:="Input Name")End Sub
Just be sure that the Dim statement, along with all other Dim state ments, is the
first thing in your mod ule regardless of where in the module the YourName pro-
ce dure is.
Vari able Types
Variables are of cer tain types. That is, cer tain variables can hold cer tain
kinds of information. If you don’t tell the com puter what kind of in formation the
variable is hold ing in ad vance, it will fig ure it out. In the YourName pro ce dure,
the function InputBox always re turns a vari able of type String (a String is
text), so VBA will fig ure out that userName is a String. How ever, it is a good
idea to be explicit and tell the com puter that you want userName to be of type
String. You can do this by changing the earlier Dim state ment:
Dim userName As String
This Dim state ment not only tells the com puter that we want a vari able called
userName, but it also tells it what kind of in formation that variable can hold (us -
ing our box analogy, it tells it the size and shape of the box). In this case, our
variable will hold a String (i.e., text) of up to 65,536 characters long.
Note that when you type a space after As, most ver sions of the VBA editor
will try to suggest things for you to type with a lit tle box that pops up (see Fig ure
5.2).
Figure 5.2. Vari able Type Pop-Up Box
This box contains all the things that you can type now. Boxes like this will pop
up fre quently. If you know what you want to type, just ig nore the box. If you’re
not sure what you want to type, scroll through the list to see the pos sibilities. If
you find what you want on the list, you can either type it yourself or dou ble-click
Vari able Types 53
on it in the box. When you dou ble-click it will ap pear just as if you typed it, ex -
cept that the com puter will never spell it wrong.
For Dim userName As, you’ll see all the types of things that userName
can contain. There are about 300 of them, but there are just a few that you will
care about now. Common types you will use are:
Boolean True or False val ues
In te ger Any in teger from –32,768 to 32,767
Long Any in teger from –2,147,483,648 to 2,147,483,647
Shape Any PowerPoint shape (such as those things that can be drawnwith the Draw tools)
Sin gle Non-integers (i.e., numbers with something af ter the decimalpoint, such as 3.14 and 98.6)
String Any text up to 65,536 characters long
Ob ject Any ob ject
Now, we are ready to put it all to gether with a Dim statement and two pro -
ce dures:
Dim userName As String
Sub YourName() userName = InputBox(prompt:="Type your name", _ Ti tle:="Input Name")End Sub
Sub DoingWell() MsgBox("You are do ing well, " & userName)End Sub
The first procedure could be associated with a but ton on the first slide, and
the second pro cedure could be associated with a but ton on a later slide. The re-
sult would be that when the first button was pressed, the student would be asked
to “Type your name.” If the stu dent types “Ada,” when the second but ton is
pressed, a message would pop up on the screen saying, “You are do ing well,
Ada.” The & (am per sand) char ac ter used in the MsgBox procedure is for con cat-
enation of strings; i.e., the two strings “You are do ing well,” and whatever is
stored in the variable userName (in this case “Ada”) are joined to gether to
make one string, “You are do ing well, Ada,” which is dis played in the box on the
screen.
Of course this is a simple ex ample, but it is re ally easy to turn it into a mul ti-
ple-choice quiz with feedback that uses the student’s name. Fig ure 5.3 shows the
VBA script and slides for a short quiz. The arrows show which but ton should be
connected to which pro cedure. The Next but tons and Quit button do not use
54 Let’s Get Scripting
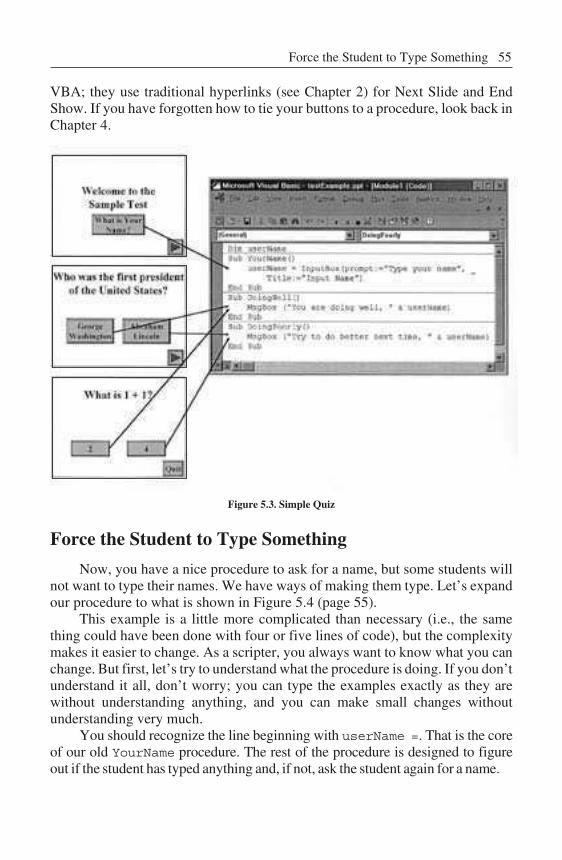
VBA; they use traditional hyperlinks (see Chapter 2) for Next Slide and End
Show. If you have forgotten how to tie your but tons to a pro cedure, look back in
Chapter 4.
Figure 5.3. Sim ple Quiz
Force the Stu dent to Type Something
Now, you have a nice procedure to ask for a name, but some students will
not want to type their names. We have ways of mak ing them type. Let’s ex pand
our pro cedure to what is shown in Fig ure 5.4 (page 55).
This example is a little more com plicated than nec essary (i.e., the same
thing could have been done with four or five lines of code), but the com plexity
makes it easier to change. As a scripter, you al ways want to know what you can
change. But first, let’s try to un derstand what the pro cedure is do ing. If you don’t
understand it all, don’t worry; you can type the examples ex actly as they are
without un derstanding any thing, and you can make small changes without
understanding very much.
You should recognize the line be ginning with userName =. That is the core
of our old YourName pro cedure. The rest of the pro cedure is de signed to fig ure
out if the stu dent has typed any thing and, if not, ask the stu dent again for a name.
Force the Student to Type Something 55
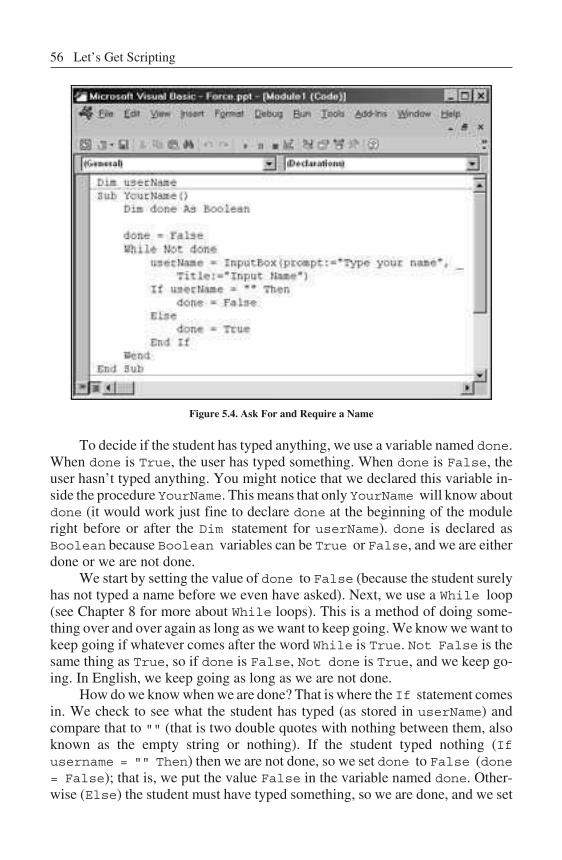
Figure 5.4. Ask For and Re quire a Name
To de cide if the stu dent has typed any thing, we use a vari able named done.
When done is True, the user has typed something. When done is False, the
user has n’t typed any thing. You might no tice that we de clared this variable in -
side the pro cedure YourName. This means that only YourName will know about
done (it would work just fine to declare done at the be ginning of the mod ule
right be fore or af ter the Dim state ment for userName). done is de clared as
Boolean be cause Boolean variables can be True or False, and we are ei ther
done or we are not done.
We start by setting the value of done to False (be cause the stu dent surely
has not typed a name before we even have asked). Next, we use a While loop
(see Chapter 8 for more about While loops). This is a method of do ing some-
thing over and over again as long as we want to keep go ing. We know we want to
keep go ing if whatever co mes af ter the word While is True. Not False is the
same thing as True, so if done is False, Not done is True, and we keep go -
ing. In Eng lish, we keep go ing as long as we are not done.
How do we know when we are done? That is where the If state ment co mes
in. We check to see what the student has typed (as stored in userName) and
compare that to "" (that is two dou ble quotes with noth ing be tween them, also
known as the empty string or nothing). If the student typed noth ing (If
username = "" Then) then we are not done, so we set done to False (done
= False); that is, we put the value False in the vari able named done. Oth er-
wise (Else) the student must have typed something, so we are done, and we set
56 Let’s Get Scripting

done to True (done = True). The Wend just says that we are at the end of our
While loop. Ev erything be tween the While and Wend will be ex ecuted over
and over again un til we are done (in this case, un til the stu dent types something).
If the user types noth ing, the If statement will set done to False, and loop
back up to the While state ment. The While state ment will see that we are not
done, so we should keep go ing and execute the stuff between While and Wend
again. If the user types something, the If state ment will set done to True and
loop back up to the While state ment. The While statement will see that we are
done and move to whatever is after the Wend (we could do something else after
the Wend, but we don’t in this ex ample).
Two things to note:
1. Students will be forced to type something, but that something could
be any thing: a sin gle space, a dirty word, a pe riod, etc.
2. Students will only be forced to type something if they click on the
but ton as so ci ated with this script.
In later chapters, you’ll learn how to check what was typed to make sure it
is OK, as well as how to force the student to click on the but ton (don’t worry; it
doesn’t in volve physical force or shock ther apy).
What Else? A Personal Response and a
Short-An swer Ques tion
Now that you have a ba sic script that re sponds to what the student typed, we
can extend it just a lit tle to give a more per sonal re sponse. Then with almost no
effort, we can change the script from ask ing for a name to asking for the an swer
to a short-answer question.
The first step is to add ElseIf to the YourName pro ce dure.
Sub YourName() Dim done As Boolean
done = False While Not done userName = InputBox(prompt:="Type your name", _ Ti tle:="Input Name") If userName = "" Then done = False ElseIf userName = "Em ily" Then MsgBox("Fin ish your home work be fore do ing this.") done = False Else done = True End If WendEnd Sub
What Else? A Personal Re sponse and a Short-Answer Question 57
After we ask the question about the student typ ing noth ing, we ask one
more ques tion. So first, we check to see if userName is noth ing. If it is n’t, we
ask if userName is “Em ily.” If userName isn’t noth ing, and it is n’t Em ily, then
we look at what co mes af ter Else. If userName is “Emily,” we have two things
to do: put up a message telling Em ily to do her homework, and set done to
False. Be cause done is False (just like it would be if the stu dent typed noth -
ing), we’ll ask for the name again.
This could be expanded to ask as many ques tions as you want by add ing
more ElseIf questions. Each one could check for a different name (or an un ac-
cept able an swer, like pro fan ity) and re spond ap pro pri ately. Note that ElseIf
does not have a space between “Else” and “If” while End If does have a space
between “End” and “If.”
Using the exact same structure, we can change this from ask ing for a stu -
dent’s name to asking for the an swer to a question. The main structure of the
VBA looks like this:
Sub Ques tion() Dim done As Boolean
done = False While Not done an swer = InputBox(prompt:="What color is the sky?", _ Ti tle:="Question") If an swer = "" Then done = False ElseIf an swer = "blue" Then MsgBox("Good job.") done = True Else MsgBox("Try Again.") done = False End If WendEnd Sub
You should notice that this is al most iden tical to YourName, with the fol lowing
ex cep tions:
• We changed the name of the pro cedure; you can name pro cedures
anything you want as long as they make sense to you.
• We changed the name of the variable; you can name variables any-
thing you want as long as they make sense to you.
• We changed the text in the InputBox; as a scripter, you always
should look for text be tween quotes that you can change.
• We changed the text in the ElseIf line to check to compare what
was typed to the right an swer; remember, as a scripter, you should be
looking to change the text for the question and the text for the an -
swer to whatever you want.
58 Let’s Get Scripting
• We changed the done = False to done = True af ter ElseIf
and done = True to done = False af ter Else; this is be cause
you are done (done = True) when you get the right answer.
• Finally, we added some feedback. If what was typed wasn’t noth ing
and it wasn’t the right answer, we pop up a MsgBox to tell the stu -
dent to try again.
Think about the small dif ferences be tween the YourName and Ques tion
procedures. As a scripter, you should think about ways to change a script to make it
do something dif ferent. Simply changing some text should be easy for you. Trans-
form ing YourName into Ques tion might be a bit dif ficult at this point, but with
practice, you should be able to find more and more things that you can change.
Running Your Scripts
Before we write any more pro cedures, you should be re minded how to run
procedures. There are three ways to run a pro cedure:
1. Select “Run Sub/UserForm” from the Run menu in the VBA Ed itor.
2. Associate your pro cedure with a button so it runs when the user clicks
on it in Slide Show View.
3. Call the procedure from an other procedure.
Generally, we won’t use method 1. Al though it will work for some of the
simple scripts we have written so far, it will not work for most of our scripts be-
cause we will de sign our scripts to be run in Slide Show View. When we choose
“Run Sub/UserForm,” we are not in Slide Show View.
Most of the time, we will use method 2, associate the pro cedure with a but-
ton. We did this at the beginning of Chapter 4. Re member that pro cedures aren’t
magic; they have to be told to run. The best way to tell them to run is to associate
them with a but ton and to click on that but ton in Slide Show View.
Sometimes we will want to use method 3. In this method we write one
script that in cludes the names of other scripts in it. Our but ton will be as sociated
with the first script, but when that script is run, the other scripts will run as well.
The next section de scribes this in more de tail.
Call ing a Pro ce dure from An other Pro ce dure
Not all pro cedures are tied directly to but tons. Many pro cedures are de -
signed to do part of what you want a but ton to do. These procedures are called
from other procedures. For ex ample, let’s take two procedures we have already
writ ten: YourName and DoingWell (for sim plicity we’ll use our first
YourName pro cedure, but you could use any of the YourName pro ce dures from
this chapter):
Call ing a Pro ce dure from An other Pro ce dure 59
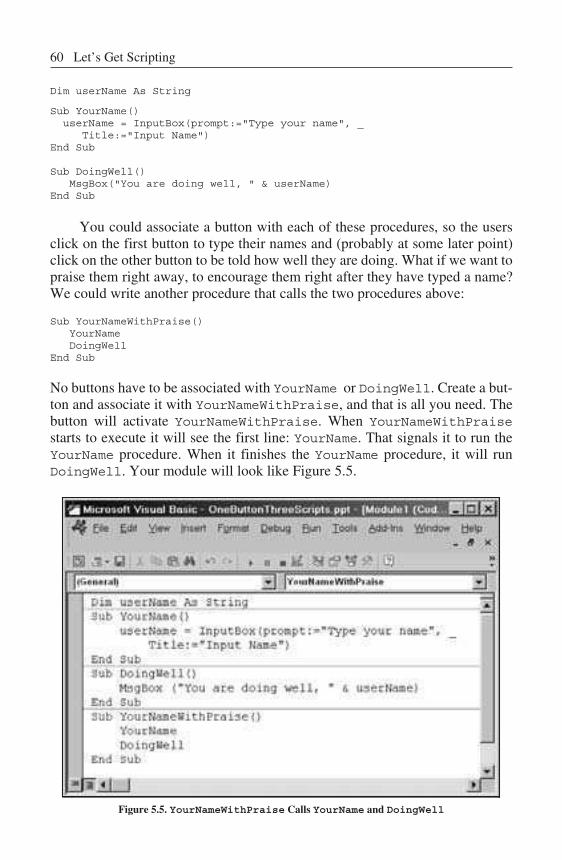
Dim userName As String
Sub YourName() userName = InputBox(prompt:="Type your name", _ Ti tle:="Input Name")End Sub
Sub DoingWell() MsgBox("You are do ing well, " & userName)End Sub
You could as sociate a but ton with each of these pro cedures, so the us ers
click on the first button to type their names and (probably at some later point)
click on the other but ton to be told how well they are do ing. What if we want to
praise them right away, to encourage them right after they have typed a name?
We could write another procedure that calls the two pro cedures above:
Sub YourNameWithPraise() YourName DoingWellEnd Sub
No but tons have to be as sociated with YourName or DoingWell. Cre ate a but-
ton and as sociate it with YourNameWithPraise, and that is all you need. The
but ton will ac ti vate YourNameWithPraise. When YourNameWithPraise
starts to ex ecute it will see the first line: YourName. That sig nals it to run the
YourName pro cedure. When it finishes the YourName pro cedure, it will run
DoingWell. Your module will look like Figure 5.5.
Fig ure 5.5. YourNameWithPraise Calls YourName and DoingWell
60 Let’s Get Scripting
Con clu sion
You now have learned a few ba sic scripts to in teract with your stu dents.
You can get in put and use it in feedback, ei ther to in clude a student’s name in the
feedback or to judge a short-answer question. In the next chap ter you will ex-
pand your bag of VBA tricks, in cluding ways to manipulate your PowerPoint
slides, such as moving from slide to slide and hiding ob jects on your slides.
Ex er cises to Try
� If you completed the “Exercise to Try” in Chapter 4, edit your
pre sen ta tion to change the RightAnswer and WrongAnswer
scripts to in clude the student’s name. Be sure to add a but ton on
the first slide, to ask for the stu dent’s name (us ing the YourName
procedure in this chapter).
�Add an other slide to your quiz with a short-answer question. Put
a single but ton on the slide that pops up the question. Use a dif-
ferent question than the one in this chap ter. Don’t worry if you
can’t fig ure this out. Chapter 7 includes de tailed in structions on
how to do this.
Ex er cises to Try 61


6A Scripting Bag of Tricks
In tro duc tion
In Chapter 5 you began to expand your single trick (the MsgBox) into a
small bag of tricks. On the way you learned some important lessons about vari-
ables, loops, and If statements. With this, you have the power to do some in ter-
esting things to your PowerPoint pro jects. You can create an in teractive
multimedia ex travaganza as long as you only want it to be a lit tle in teractive. In
this chapter, you’ll expand your bag of tricks to in clude sev eral in teractive fea-
tures in cluding nav igation (i.e., moving around from slide to slide); hid ing and
showing PowerPoint ob jects; and chang ing text, font, size, and style in ob jects.
You’ll fin ish off the chapter with an example that ties some of the tricks to -
gether: You’ll cre ate a sim ple mystery with a clue sheet on which us ers can keep
track of clues.
Vo cab u lary
• Com ment • Place holder
• Con stant • Prop erty
• Ini tial ize • RGB
• Nav i ga tion • TextRange
• With Block
Com ments
Starting in this chap ter, our ex amples are go ing to get a little more compli-
cated. That makes this a good time to talk about comments. So far, any explana-
tion of the VBA code has been placed in the text, but it might be helpful to have
some ex planation built right into the code. This will be useful for me to ex plain
things to you, and it will be useful for you to ex plain things to yourself. Com-
ments are good at the beginning of pro cedures, as a brief note at the end of a line,
and as a note in side a pro cedure. In ad dition, comments are helpful to point out
obvious things be cause what is ob vious to me might not be ob vious to you, and
what is ob vious to you now might not make as much sense when you look at it
later. And comments are helpful to point out things that are not obvious. A line
like
If an swer = "" Then
obviously checks to see if the variable an swer con tains noth ing, but it might be
helpful to put a com ment, such as “The user did n’t type any thing.”
If an swer = "" Then 'The user did n’t type any thing.
The comment starts with a single quote. This tells the computer to ig nore every-
thing else on the line. That is, comments are for people look ing at VBA code, not
for computers run ning VBA code; the computer ignores the comments. As in
this example, the com ment can ap pear at the end of a line, or it can ap pear on a
line by itself or even on sev eral lines each starting with a single quote:
'This pro cedure is our very first pro cedure.'It puts a mes sage on the user’s screen that says "Hello."Sub SayHello() MsgBox("Hello") 'This is the line that puts up the mes sage.End Sub
If you type this example into your VBA Ed itor, you will no tice that the
comments turn green. That will help you dis tinguish VBA code for the computer
from com ments for you.
The next section discusses how VBA can be used to move from one slide to
another. This is an excellent place for a com ment. The VBA command will tell
you that you are moving to slide 3, for ex ample, but it won’t tell you why. If, for
example, slide 3 is your menu, a com ment that says “Returning to the main
menu” will help you un derstand what your script is supposed to do.
Navigation: Mov ing from Slide to Slide
The traditional features of PowerPoint that you have used in clude the abil-
ity of moving from one slide to another with action but tons or hy pertext links. If
64 A Scripting Bag of Tricks
you had n’t seen this be fore, you learned about it in Chapter 2. In fact, almost
anywhere you can go with VBA you can go with traditional PowerPoint
hyperlinks. So why would you want to complicate your life by do ing something
with VBA that you al ready can do without it? This is a trick question. While you
can link to the same places with out VBA, your hyperlinks only work when you
click a but ton or text, and linking will be the only thing that but ton or text does.
With VBA, you can link and do something else, or you can link to different
places depending upon the answer to a question (using something like what we
did in Chapter 5 with the YourName pro cedure or the Ques tion procedure).
At the end of Chapter 5 you saw the pro cedure YourNameWithPraise.
This procedure did two things: It asked for the student’s name and it said, “You
are do ing well.” Let’s start with that and make one small addition:
Sub YourNameWithPraise() YourName DoingWell ActivePresentation.SlideShowWindow.View.NextEnd Sub
The line that we added moves to the next slide. Don’t worry how it does it; just
remember that any time you want to use VBA to move to the next slide, you can
insert that line into your pro cedure.
Imagine a ti tle slide of your pre sentation. The only but ton on the slide
would be as sociated with this pro cedure (of course, you would need the
YourName and DoingWell pro cedures in your module, but only
YourNameWithPraise would be tied directly to a but ton). When the user
clicks on the but ton, YourName is called (the user is asked to type a name),
DoingWell is called (the user is told by name, “You are do ing well”) and the
pre sen ta tion au to mat i cally be gins by mov ing to the next slide.
Of course, you don’t always want to go to the next slide. To move around
within your presentation, you can use any of the fol lowing:
ActivePresentation.SlideShowWindow.View.GotoSlide (3) Go to slide 3
ActivePresentation.SlideShowWindow.View.GotoSlide (4) Go to slide 4
ActivePresentation.SlideShowWindow.View.Next Go to the next slide
ActivePresentation.SlideShowWindow.View.Pre vi ous Go to the pre vious slide
ActivePresentation.SlideShowWindow.View.First Go to the first slide
ActivePresentation.SlideShowWindow.View.Last Go to the last slide
ActivePresentation.SlideShowWindow.View.Exit Exit the slideshow
Navigation: Moving from Slide to Slide 65
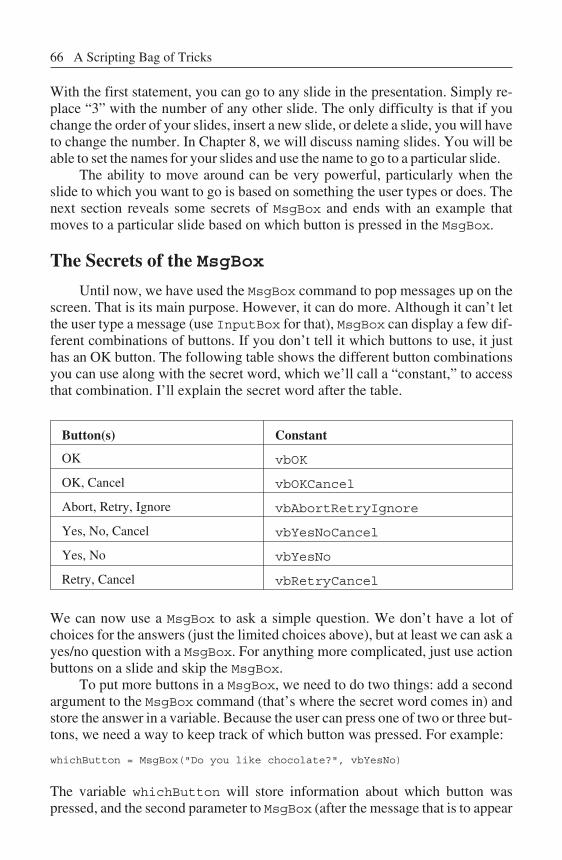
With the first statement, you can go to any slide in the presentation. Simply re -
place “3” with the num ber of any other slide. The only difficulty is that if you
change the or der of your slides, in sert a new slide, or de lete a slide, you will have
to change the num ber. In Chap ter 8, we will discuss nam ing slides. You will be
able to set the names for your slides and use the name to go to a particular slide.
The ability to move around can be very powerful, particularly when the
slide to which you want to go is based on something the user types or does. The
next sec tion re veals some se crets of MsgBox and ends with an ex ample that
moves to a particular slide based on which but ton is pressed in the MsgBox.
The Secrets of the MsgBox
Until now, we have used the MsgBox com mand to pop messages up on the
screen. That is its main pur pose. How ever, it can do more. Although it can’t let
the user type a mes sage (use InputBox for that), MsgBox can display a few dif-
ferent combinations of but tons. If you don’t tell it which but tons to use, it just
has an OK but ton. The fol lowing ta ble shows the dif ferent but ton combinations
you can use along with the se cret word, which we’ll call a “constant,” to ac cess
that com bination. I’ll ex plain the secret word after the table.
But ton(s) Con stant
OK vbOK
OK, Cancel vbOKCancel
Abort, Retry, Ig nore vbAbortRetryIgnore
Yes, No, Can cel vbYesNoCancel
Yes, No vbYesNo
Re try, Can cel vbRetryCancel
We can now use a MsgBox to ask a simple question. We don’t have a lot of
choices for the an swers (just the limited choices above), but at least we can ask a
yes/no ques tion with a MsgBox. For anything more complicated, just use ac tion
buttons on a slide and skip the MsgBox.
To put more but tons in a MsgBox, we need to do two things: add a second
ar gu ment to the MsgBox com mand (that’s where the se cret word co mes in) and
store the an swer in a variable. Because the user can press one of two or three but-
tons, we need a way to keep track of which but ton was pressed. For example:
whichButton = MsgBox("Do you like choc olate?", vbYesNo)
The variable whichButton will store in formation about which but ton was
pressed, and the sec ond pa rameter to MsgBox (af ter the mes sage that is to ap pear
66 A Scripting Bag of Tricks

and the comma) is the constant that tells MsgBox which but tons to use. Fig ure
6.1 shows the MsgBox.
Fig ure 6.1. MsgBox with Yes and No Buttons
The se cret words are called constants because they represent constant val-
ues (unlike variables, which can change value). In this case, the constants are
mne mon ics for num bers. For ex am ple, vbYesNo is really the num ber 4. Wher-
ever you see the constant vbYesNo, you could type 4 in stead. However, it might
be eas ier to re member that vbYesNo means “I want Yes and No buttons” than
remembering what 4 means in a MsgBox com mand. You can make your own
constants, but we’ll just use the ones that come with VBA; these usu ally start
with the let ters vb (for Vi sual Ba sic) or mso (for Microsoft Of fice), so if you
ever see something that starts with vb or mso, it is prob ably a constant.
VBA co mes with hun dreds of con stants that can be used with different
commands, and it co mes with a few more for the MsgBox com mand. The most
important ones are values returned by MsgBox de pending on which but ton was
pressed. The following are the possible values: vbOK, vbCancel, vbAbort,
vbRetry, vbIgnore, vbYes, and vbNo. For ex ample, if the user clicks the Yes
but ton, MsgBox re turns vbYes. We might want to do something based on the
button pressed. For example:
'Ask if you like choc olate. Give an ap propriate re sponse.Sub Choc o late() Dim chocolateAnswer
chocolateAnswer = MsgBox("Do you like choc olate?", vbYesNo) If chocolateAnswer = vbYes Then 'The user likes choc olate. MsgBox ("I like choc olate, too.") Else 'The user does not like choc olate. MsgBox ("Va nilla is a good choice.") End IfEnd Sub
Here is an ex ample for a commonly used feature: a quit button. Sometimes
users ac cidentally choose quit (by clicking on a but ton that calls a pro cedure
with ActivePresentation.SlideShowWindow.View.Exit). To prevent
quitting your presentation by accident, you might want to ask if the user re ally
wants to quit. As sociate the following pro cedure with your quit but ton:
The Se crets of the MsgBox 67
'Ask if you are sure you want to quit. If the an swer is Yes,'exit the pre sentation. If the an swer is No, go to the next slide.Sub QuitOK() 're sult is a vari able to keep track of which but ton is clicked. Dim re sult
'MsgBox re turns (will set the vari able re sult to) vbYes if the 'Yes but ton is clicked and vbNo if the No but ton is clicked. re sult = MsgBox("Are you sure you want to quit", vbYesNo) If re sult = vbYes Then 'Was the Yes but ton clicked? ActivePresentation.SlideShowWindow.View.Exit Else 'Since Yes was n’t clicked, it must be No ActivePresentation.SlideShowWindow.View.Next End IfEnd Sub
With the ad ditional power of MsgBox, you have an other tool to do somethingbased on the answers to simple questions. By combining this with navigational com -mands from the previous section, you can let the user go anywhere in your presenta-tion based on the an swers to questions. But moving from slide to slide isn’t the onlyresponse. You might want to stay on the same slide and have something magical hap -pen. In the next section, you will learn how to make ob jects appear and disappear.
Hiding and Show ing PowerPoint Ob jects
In PowerPoint, ev ery ob ject that you see on the screen (text boxes, but tons,pictures, etc.) has sev eral prop erties that can be controlled by VBA. These mightinclude the height and width of the ob ject, the text displayed in the ob ject, thecolor of the ob ject, etc. An other property is whether or not the ob ject is visible. Ifyou want to be able to see the ob ject, you can set its Vis i ble prop erty to True(note that VBA has a value that is msoTrue; this is the same as True for all yourpurposes, so don’t worry if the VBA Ed itor sug gests msoTrue; you can usemsoTrue or True and it will work). If you want to hide the ob ject, you set itsVis i ble prop erty to False (or msoFalse). For example, if you want to hidethe fifth ob ject on the second slide (see “Referencing Ob jects by Number” be lowif you don’t know which is the fifth ob ject), you could use the following line:
ActivePresentation.Slides(2).Shapes(5).Vis i ble = False
Change False to True, and you show the ob ject once again:
ActivePresentation.Slides(2).Shapes(5).Vis i ble = True
For ex ample, you might want a star to ap pear on a slide when a user gets thecorrect an swer. To do this, create the star where you want it (using reg ularPowerPoint drawing tools). Even add text, such as “Good job!” See “Manipulat-ing Text in Ob jects” be low for more about changing the text on the fly to in cludethe current score or the user’s name. Be fore this can work ef fectively, we’ll needto set up the presentation be fore the user gets to the slide with the star. This willre quire us to ini tial ize the pre sen ta tion.
68 A Scripting Bag of Tricks
Let’s Get Started: Initializing Your Presentation
Up to this point, the user could go to any slide and not worry how it looked
or even what was in any of the variables ex cept pos sibly userName. As our pre -
sentations get more complicated, we will need to keep track of many dif ferent
things. It will be important that everything in the pre sentation starts out how you
want it. You don’t want the user to go to a slide that has a star before choosing
the right an swer that is supposed to show the star. If you’re keep ing score, you
want to be sure that the score starts at 0.
These kinds of things should be set up at the be ginning of the pre sentation.
One of the best ways to do this is with a but ton on the ti tle slide. If it is the only
button on that slide and you are in Kiosk mode, you know the user has to click
that button to con tinue. All that the user might see is that the button goes to the
next slide or asks for a name, but be hind the scenes, your procedure is cleaning
up ev erything (making the beds, dusting the furniture, setting up variables, hid -
ing the toys and stars—all the things that you do before company comes).
In the hide and show ex ample from the pre vious section, the one thing we
want to do is hide our star. We will use a pro cedure called Ini tial ize to do
this (you could call it any thing you want, like House keeper, Maid, or Mom).
Let’s imagine that you have two slides (slides 2 and 3) that will show stars when
the correct an swer is chosen. If the stars are the fourth ob ject on the slides, your
Ini tial ize pro cedure might look something like this:
Sub Ini tial ize() ActivePresentation.Slides(2).Shapes(4).Vis ible = False ActivePresentation.Slides(3).Shapes(4).Vis ible = FalseEnd Sub
You could add something to this pro cedure to move to the next slide, or you
can do all your initializing from this pro cedure and have another procedure take
care of other stuff. So let’s add a GetStarted pro cedure to do the other stuff as
well as call the procedure Ini tial ize.
Sub GetStarted() Ini tialize 'Hide the stars YourName 'Ask for the name ActivePresentation.SlideShowWindow.View.Next 'Go to the next slideEnd Sub
This procedure will be linked to the but ton on the title slide. As the comments in -
dicate, it will use the Ini tial ize pro cedure to hide the stars, it will use the
YourName procedure to ask for a name, and it will use
ActivePresentation.SlideShowWindow.View.Next to go to the next
slide. As al ways, because this procedure calls the YourName pro cedure and the
Ini tial ize pro cedure, these pro cedures must be in cluded in your module
along with the dec laration (Dim state ment) for the userName vari able.
Let’s Get Started: Initializing Your Pre sentation 69
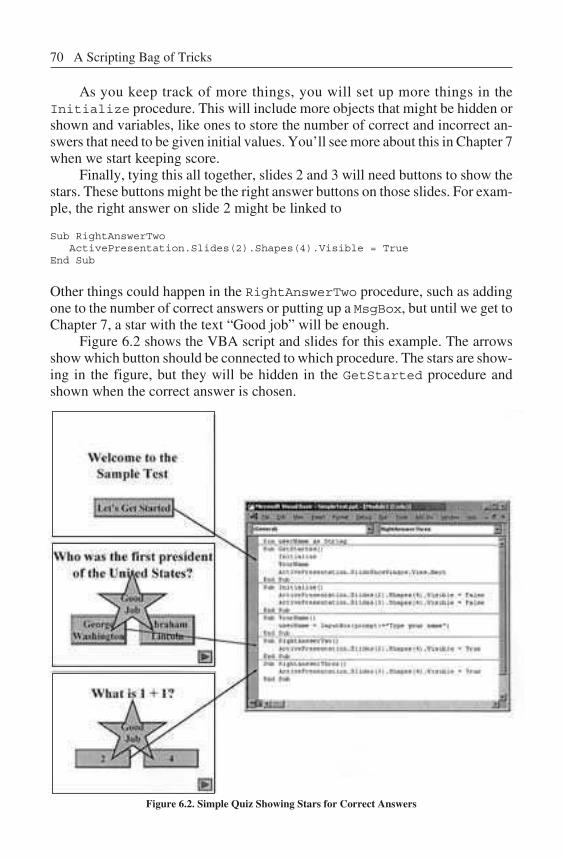
As you keep track of more things, you will set up more things in the
Ini tial ize pro cedure. This will in clude more ob jects that might be hid den or
shown and vari ables, like ones to store the num ber of correct and in correct an -
swers that need to be given ini tial val ues. You’ll see more about this in Chapter 7
when we start keeping score.
Finally, ty ing this all together, slides 2 and 3 will need but tons to show the
stars. These but tons might be the right an swer but tons on those slides. For exam-
ple, the right an swer on slide 2 might be linked to
Sub RightAnswerTwo ActivePresentation.Slides(2).Shapes(4).Vis ible = TrueEnd Sub
Other things could happen in the RightAnswerTwo pro cedure, such as add ing
one to the num ber of correct an swers or putting up a MsgBox, but un til we get to
Chapter 7, a star with the text “Good job” will be enough.
Figure 6.2 shows the VBA script and slides for this example. The arrows
show which but ton should be con nected to which pro cedure. The stars are show -
ing in the fig ure, but they will be hid den in the GetStarted pro ce dure and
shown when the cor rect an swer is chosen.
Figure 6.2. Sim ple Quiz Show ing Stars for Correct An swers
70 A Scripting Bag of Tricks
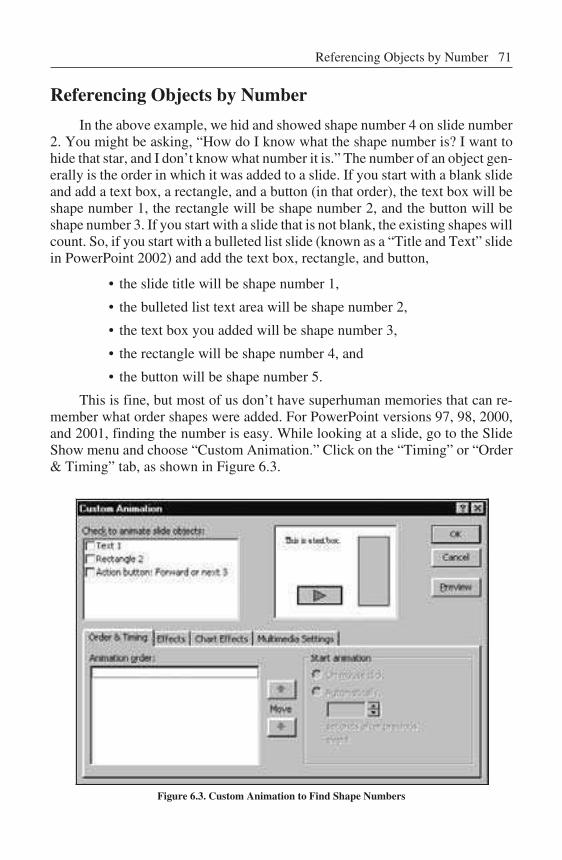
Ref er enc ing Ob jects by Num ber
In the above ex ample, we hid and showed shape num ber 4 on slide number
2. You might be asking, “How do I know what the shape number is? I want to
hide that star, and I don’t know what number it is.” The number of an ob ject gen -
erally is the or der in which it was added to a slide. If you start with a blank slide
and add a text box, a rectangle, and a but ton (in that or der), the text box will be
shape num ber 1, the rectangle will be shape num ber 2, and the but ton will be
shape num ber 3. If you start with a slide that is not blank, the existing shapes will
count. So, if you start with a bulleted list slide (known as a “Ti tle and Text” slide
in PowerPoint 2002) and add the text box, rectangle, and button,
• the slide ti tle will be shape num ber 1,
• the bulleted list text area will be shape num ber 2,
• the text box you added will be shape num ber 3,
• the rectangle will be shape num ber 4, and
• the but ton will be shape number 5.
This is fine, but most of us don’t have su perhuman memories that can re-
member what or der shapes were added. For PowerPoint ver sions 97, 98, 2000,
and 2001, finding the number is easy. While look ing at a slide, go to the Slide
Show menu and choose “Custom Animation.” Click on the “Timing” or “Order
& Timing” tab, as shown in Figure 6.3.
Figure 6.3. Cus tom An imation to Find Shape Num bers
Ref er enc ing Ob jects by Num ber 71
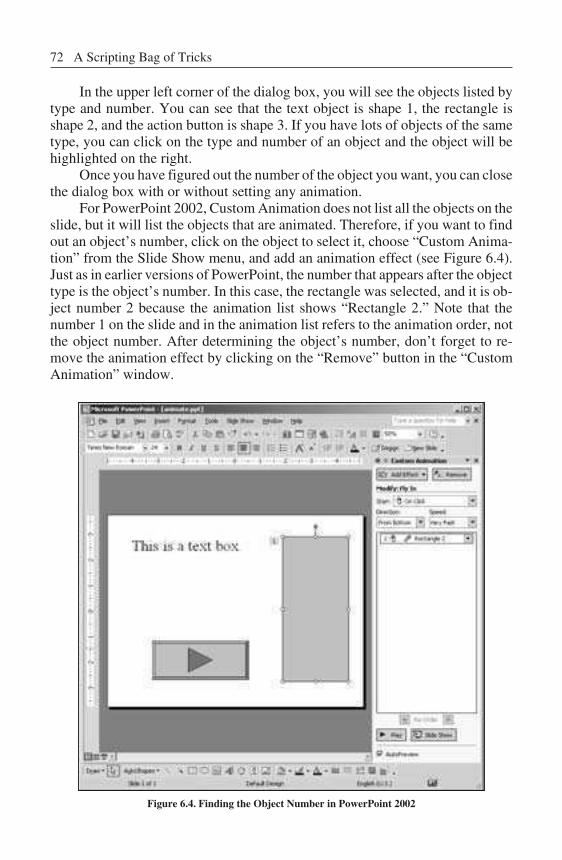
In the up per left corner of the di alog box, you will see the ob jects listed by
type and num ber. You can see that the text ob ject is shape 1, the rectangle is
shape 2, and the ac tion but ton is shape 3. If you have lots of ob jects of the same
type, you can click on the type and num ber of an ob ject and the ob ject will be
highlighted on the right.
Once you have figured out the num ber of the ob ject you want, you can close
the di alog box with or without setting any animation.
For PowerPoint 2002, Cus tom Animation does not list all the ob jects on the
slide, but it will list the ob jects that are an imated. There fore, if you want to find
out an ob ject’s number, click on the ob ject to select it, choose “Custom Anima-
tion” from the Slide Show menu, and add an animation effect (see Fig ure 6.4).
Just as in earlier ver sions of PowerPoint, the number that ap pears after the ob ject
type is the object’s number. In this case, the rect angle was se lected, and it is ob-
ject number 2 be cause the an imation list shows “Rect angle 2.” Note that the
number 1 on the slide and in the an imation list re fers to the animation or der, not
the ob ject num ber. After determining the ob ject’s number, don’t for get to re-
move the an imation effect by clicking on the “Remove” button in the “Custom
Animation” window.
Figure 6.4. Find ing the Ob ject Num ber in PowerPoint 2002
72 A Scripting Bag of Tricks
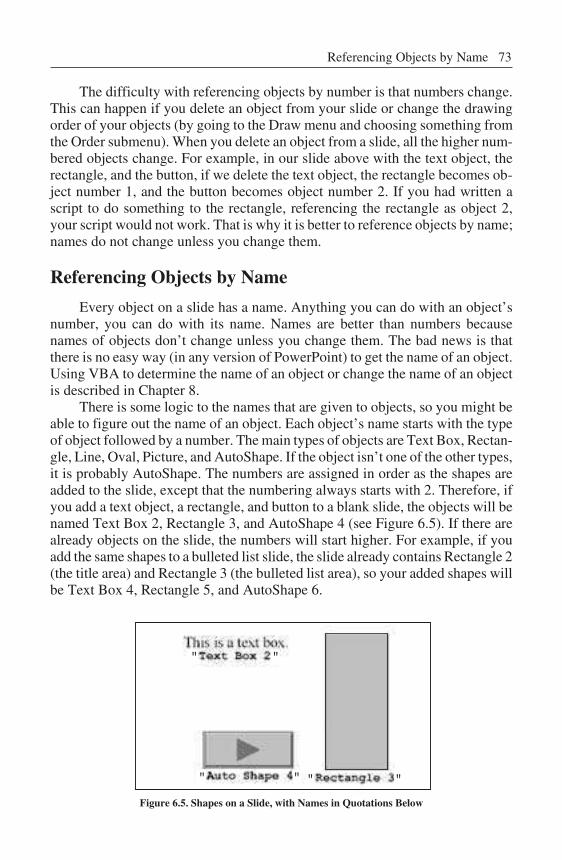
The difficulty with referencing ob jects by number is that numbers change.
This can hap pen if you delete an ob ject from your slide or change the drawing
order of your ob jects (by go ing to the Draw menu and choosing something from
the Order submenu). When you delete an ob ject from a slide, all the higher num-
bered ob jects change. For ex ample, in our slide above with the text ob ject, the
rectangle, and the button, if we delete the text object, the rect angle becomes ob-
ject num ber 1, and the but ton be comes ob ject num ber 2. If you had written a
script to do something to the rectangle, referencing the rectangle as ob ject 2,
your script would not work. That is why it is better to reference ob jects by name;
names do not change unless you change them.
Ref er enc ing Ob jects by Name
Every ob ject on a slide has a name. Any thing you can do with an ob ject’s
number, you can do with its name. Names are better than numbers be cause
names of ob jects don’t change un less you change them. The bad news is that
there is no easy way (in any ver sion of PowerPoint) to get the name of an ob ject.
Using VBA to de termine the name of an ob ject or change the name of an ob ject
is described in Chapter 8.
There is some logic to the names that are given to ob jects, so you might be
able to fig ure out the name of an ob ject. Each ob ject’s name starts with the type
of ob ject fol lowed by a num ber. The main types of ob jects are Text Box, Rectan-
gle, Line, Oval, Picture, and AutoShape. If the ob ject is n’t one of the other types,
it is prob ably AutoShape. The num bers are as signed in or der as the shapes are
added to the slide, ex cept that the num bering al ways starts with 2. Therefore, if
you add a text ob ject, a rectangle, and but ton to a blank slide, the ob jects will be
named Text Box 2, Rectangle 3, and AutoShape 4 (see Figure 6.5). If there are
already ob jects on the slide, the numbers will start higher. For example, if you
add the same shapes to a bulleted list slide, the slide al ready con tains Rectangle 2
(the title area) and Rect angle 3 (the bulleted list area), so your added shapes will
be Text Box 4, Rectangle 5, and AutoShape 6.
Figure 6.5. Shapes on a Slide, with Names in Quo tations Be low
Ref er enc ing Ob jects by Name 73
" "
" " " "
These names do not change un less you change them. If you de lete Text Box
4, Rectangle 5 and AutoShape 6 will keep the same name, and noth ing will have
a name with 4 in it. The number added to new names keeps go ing up even when
you de lete shapes. Thus, if you add the above shapes and then delete them and
then in sert a picture from clip art, the picture will be named Pic ture 7 even
though no ob jects in clude 4, 5, and 6 in their names.
In or der to use the name of an ob ject, use it in quotes in the same place you
would use the ob ject num ber. Thus, to hide a shape named Text Box 4 on slide
number 5, you could use the following line:
ActivePresentation.Slides(5).Shapes("Text Box 4").Vis ible = False
Of course, re membering shape names is just as hard as re membering shape
numbers. Check out the scripts in Chapter 8 that will let you make up your own
shape names.
This Slide or An other Slide
In the above ex amples, our scripts to hide and show ob jects specified which
slides con tained the ob jects. Sometimes you want an action to affect the current
slide with out re gard to which number slide it is. For ex ample, you might want to
show an ob ject on the current slide or add some text to a text box on the cur rent
slide or change the color of a menu item on the current slide. This is particularly
useful when you want to write one pro cedure that will work on several slides. For
ex am ple, if our DoingWell procedure re vealed a star and each slide had a star
with the same name or num ber, we could add a line to DoingWell to show the star
on the current slide. One DoingWell pro cedure would be used for all the slides.
Sometimes you might want an action to affect an other slide. You might be
on one slide but wish to have something change on an other slide, as we saw in
our Ini tial ize pro cedure. In the Ini tial ize ex ample, we wanted the slide
to be set up prop erly before the user got there, so the change happened to the
other slides when the user was on the first slide. We also want changes to happen
before we arrive at a slide. If we hide our star (or change text on a slide or change
the color of menu items) just as we ar rive at a slide, the hid den ob ject will be on
the screen for a split second be fore disappearing. In some cases, this might not be
a big prob lem, but if the action is to hide the an swer to the ques tion, this could be
very important.
Anything af fecting the cur rent slide will start with
ActivePresentation.SlideShowWindow.View.Slide
So, for example, if you want to hide shape num ber 7 on the cur rent slide, you
would use this line:
ActivePresentation.SlideShowWindow.View.Slide.Shapes(7).Vis i ble = False
74 A Scripting Bag of Tricks
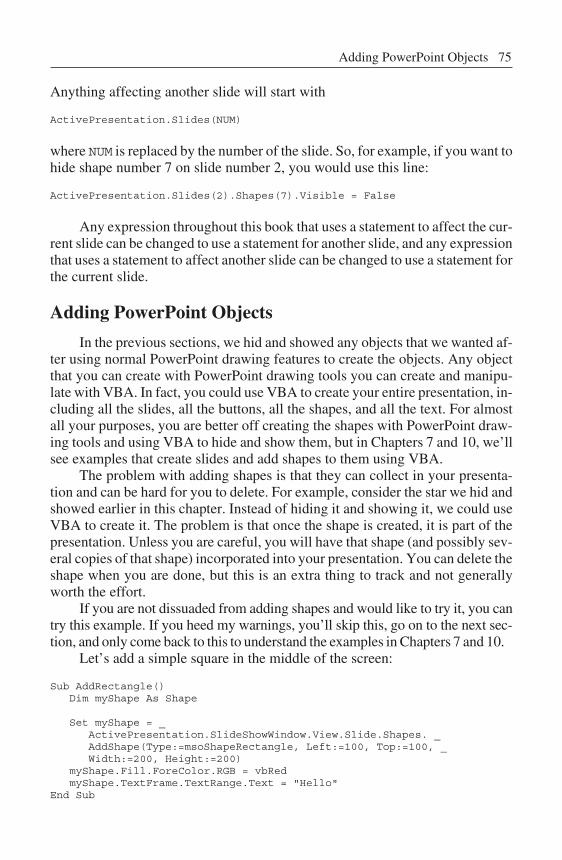
Anything af fecting an other slide will start with
ActivePresentation.Slides(NUM)
where NUM is replaced by the num ber of the slide. So, for ex ample, if you want to
hide shape number 7 on slide number 2, you would use this line:
ActivePresentation.Slides(2).Shapes(7).Vis i ble = False
Any ex pression throughout this book that uses a statement to af fect the cur-
rent slide can be changed to use a statement for an other slide, and any expression
that uses a state ment to af fect an other slide can be changed to use a state ment for
the cur rent slide.
Adding PowerPoint Ob jects
In the previous sections, we hid and showed any ob jects that we wanted af-
ter using nor mal PowerPoint drawing features to create the ob jects. Any ob ject
that you can create with PowerPoint drawing tools you can create and manipu-
late with VBA. In fact, you could use VBA to create your en tire pre sentation, in -
cluding all the slides, all the but tons, all the shapes, and all the text. For al most
all your pur poses, you are better off creating the shapes with PowerPoint draw-
ing tools and us ing VBA to hide and show them, but in Chapters 7 and 10, we’ll
see ex amples that cre ate slides and add shapes to them using VBA.
The prob lem with adding shapes is that they can collect in your presenta-
tion and can be hard for you to de lete. For example, consider the star we hid and
showed earlier in this chap ter. In stead of hid ing it and show ing it, we could use
VBA to create it. The problem is that once the shape is cre ated, it is part of the
presentation. Un less you are careful, you will have that shape (and pos sibly sev-
eral cop ies of that shape) in corporated into your presentation. You can de lete the
shape when you are done, but this is an ex tra thing to track and not generally
worth the effort.
If you are not dis suaded from add ing shapes and would like to try it, you can
try this ex ample. If you heed my warnings, you’ll skip this, go on to the next sec-
tion, and only come back to this to un derstand the examples in Chapters 7 and 10.
Let’s add a sim ple square in the middle of the screen:
Sub AddRectangle() Dim myShape As Shape
Set myShape = _ActivePresentation.SlideShowWindow.View.Slide.Shapes. _AddShape(Type:=msoShapeRectangle, Left:=100, Top:=100, _Width:=200, Height:=200)
myShape.Fill.ForeColor.RGB = vbRed myShape.TextFrame.TextRange.Text = "Hello"End Sub
Adding PowerPoint Ob jects 75
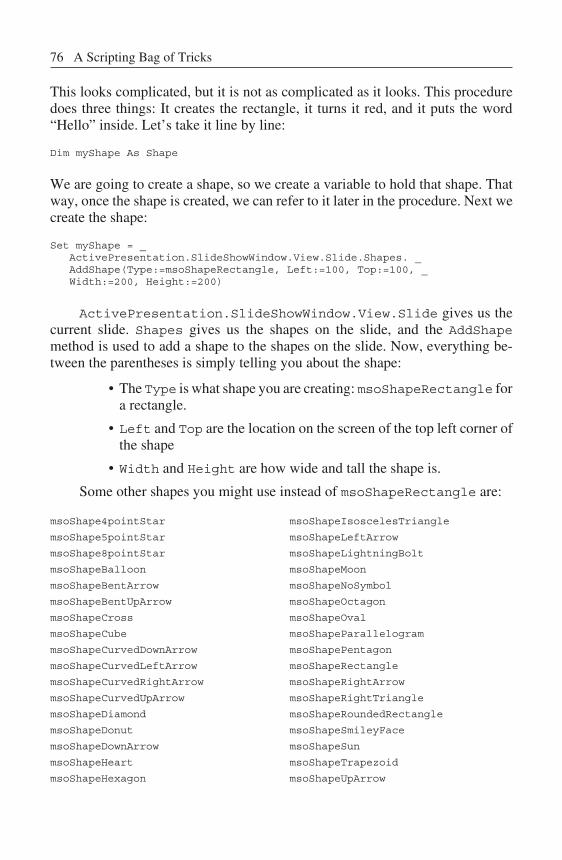
This looks complicated, but it is not as complicated as it looks. This procedure
does three things: It cre ates the rectangle, it turns it red, and it puts the word
“Hello” in side. Let’s take it line by line:
Dim myShape As Shape
We are going to cre ate a shape, so we create a variable to hold that shape. That
way, once the shape is cre ated, we can re fer to it later in the procedure. Next we
create the shape:
Set myShape = _ ActivePresentation.SlideShowWindow.View.Slide.Shapes. _
AddShape(Type:=msoShapeRectangle, Left:=100, Top:=100, _ Width:=200, Height:=200)
ActivePresentation.SlideShowWindow.View.Slide gives us the
cur rent slide. Shapes gives us the shapes on the slide, and the AddShape
method is used to add a shape to the shapes on the slide. Now, ev erything be -
tween the pa rentheses is simply telling you about the shape:
• The Type is what shape you are cre ating: msoShapeRectangle for
a rect an gle.
• Left and Top are the lo cation on the screen of the top left corner of
the shape
• Width and Height are how wide and tall the shape is.
Some other shapes you might use in stead of msoShapeRectangle are:
msoShape4pointStar msoShapeIsoscelesTriangle
msoShape5pointStar msoShapeLeftArrow
msoShape8pointStar msoShapeLightningBolt
msoShapeBalloon msoShapeMoon
msoShapeBentArrow msoShapeNoSymbol
msoShapeBentUpArrow msoShapeOctagon
msoShapeCross msoShapeOval
msoShapeCube msoShapeParallelogram
msoShapeCurvedDownArrow msoShapePentagon
msoShapeCurvedLeftArrow msoShapeRectangle
msoShapeCurvedRightArrow msoShapeRightArrow
msoShapeCurvedUpArrow msoShapeRightTriangle
msoShapeDiamond msoShapeRoundedRectangle
msoShapeDonut msoShapeSmileyFace
msoShapeDownArrow msoShapeSun
msoShapeHeart msoShapeTrapezoid
msoShapeHexagon msoShapeUpArrow
76 A Scripting Bag of Tricks
Try re plac ing msoShapeRectangle with some of the other shapes from this
list.
Finally, we set some properties of the shape. Since the shape is stored in the
vari able myShape, we can use myShape to manipulate some of the shape’s
prop er ties:
myShape.Fill.ForeColor.RGB = vbRed
This line takes the shape we just cre ated and stored in the variable myShape and
adjusts its color. This looks com plicated, but you just have to remember that if
you want to change the color of a shape, you need to adjust the
.Fill.ForeColor.RGB. Af ter the equal sign is the color we want. There are
many ways to specify the ex act color, but you can use the fol lowing ba sic col ors:
vbBlack, vbRed, vbGreen, vbYellow, vbBlue, vbMagenta, vbCyan, and
vbWhite.
Shapes can also have words in them. If you want to set the text in the shape
to “Hello,” use the fol lowing line:
myShape.TextFrame.TextRange.Text = "Hello"
This is simply a long way of saying that the text in this shape should be set to
“Hello.”
Adding ob jects can be useful, especially if you want the user to make sig-
nificant changes to the pre sentation. In the ex ample in Chapter 10, the user adds
slides to the pre sentation. These slides be come part of the presentation, and there
are an un determined num ber of them (every user that goes through the pre senta-
tion can add slides to it). In most cases, how ever, you will have a few shapes that
you have determined in ad vance. Rather than creating those shapes in VBA, you
would do better to create them in PowerPoint and hide and show them with
VBA. This will prevent your presentation from get ting cluttered with extra
shapes when a user hits a but ton too many times and adds several extra shapes.
Putting the Stu dent’s In put into a Box
When we cre ated a shape ourselves, we could eas ily add text to it. Since the
vari able myShape pointed to the shape, we were able to use myShape to change
any of the shape’s prop erties, in cluding the text in the shape. We can do the same
thing with a shape that we created with PowerPoint’s drawing tools.
ActivePresentation.SlideShowWindow.View.Slide.Shapes(3)
refers to the third shape on the cur rent slide, so
ActivePresentation.SlideShowWindow.View.Slide.Shapes(3) _.TextFrame.TextRange.Text
Putting the Student’s In put into a Box 77
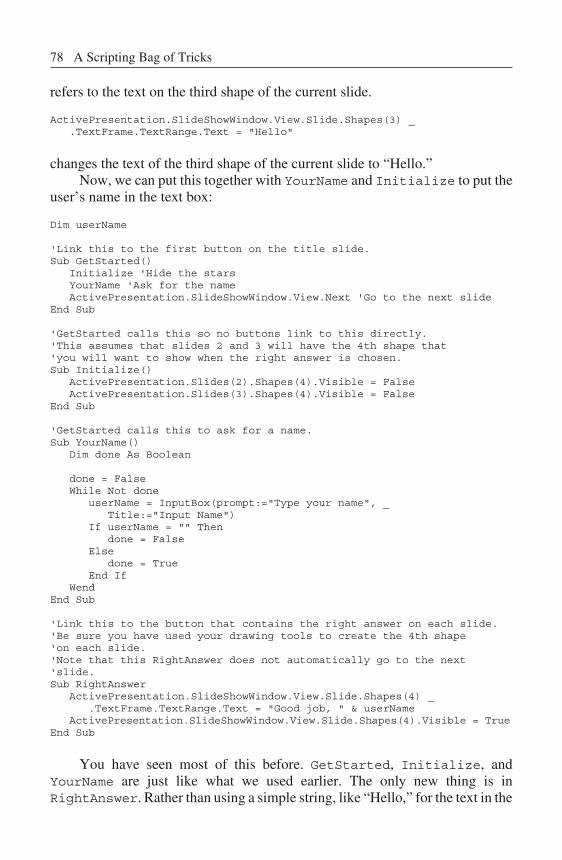
refers to the text on the third shape of the current slide.
ActivePresentation.SlideShowWindow.View.Slide.Shapes(3) _ .TextFrame.TextRange.Text = "Hello"
changes the text of the third shape of the cur rent slide to “Hello.”
Now, we can put this to gether with YourName and Ini tial ize to put the
user’s name in the text box:
Dim userName
'Link this to the first but ton on the ti tle slide.Sub GetStarted() Ini tialize 'Hide the stars YourName 'Ask for the name ActivePresentation.SlideShowWindow.View.Next 'Go to the next slideEnd Sub
'GetStarted calls this so no but tons link to this di rectly.'This as sumes that slides 2 and 3 will have the 4th shape that'you will want to show when the right an swer is cho sen.Sub Ini tial ize()
ActivePresentation.Slides(2).Shapes(4).Vis i ble = FalseActivePresentation.Slides(3).Shapes(4).Vis i ble = False
End Sub
'GetStarted calls this to ask for a name.Sub YourName()
Dim done As Boolean
done = FalseWhile Not done
userName = InputBox(prompt:="Type your name", _ Ti tle:="Input Name") If userName = "" Then
done = FalseElse
done = TrueEnd If
WendEnd Sub
'Link this to the but ton that con tains the right an swer on each slide.'Be sure you have used your draw ing tools to cre ate the 4th shape'on each slide.'Note that this RightAnswer does not au tomatically go to the next'slide.Sub RightAnswer
ActivePresentation.SlideShowWindow.View.Slide.Shapes(4) _ .TextFrame.TextRange.Text = "Good job, " & userName
ActivePresentation.SlideShowWindow.View.Slide.Shapes(4).Vis i ble = TrueEnd Sub
You have seen most of this be fore. GetStarted, Ini tial ize, and
YourName are just like what we used earlier. The only new thing is in
RightAnswer. Rather than us ing a sim ple string, like “Hello,” for the text in the
78 A Scripting Bag of Tricks
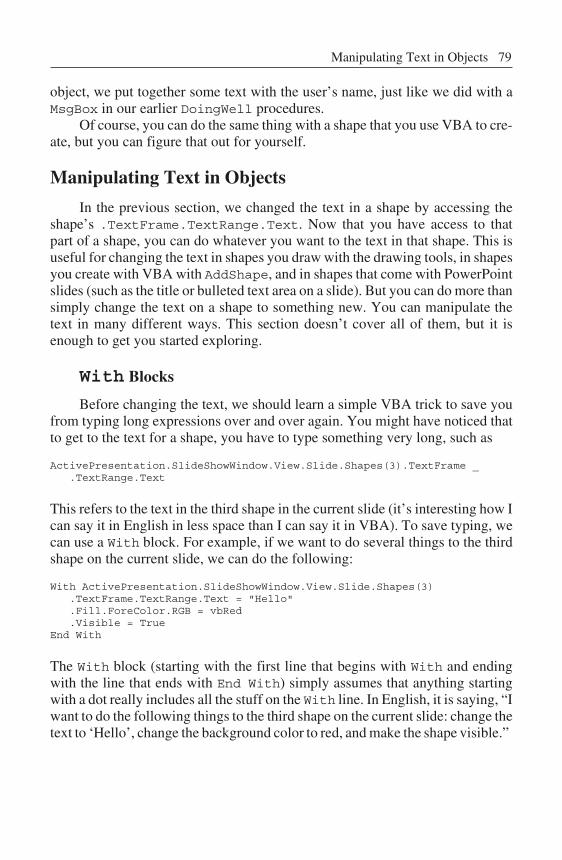
object, we put to gether some text with the user’s name, just like we did with a
MsgBox in our earlier DoingWell pro ce dures.
Of course, you can do the same thing with a shape that you use VBA to cre-
ate, but you can fig ure that out for yourself.
Ma nip u lat ing Text in Ob jects
In the previous section, we changed the text in a shape by accessing the
shape’s .TextFrame.TextRange.Text. Now that you have access to that
part of a shape, you can do whatever you want to the text in that shape. This is
useful for chang ing the text in shapes you draw with the drawing tools, in shapes
you cre ate with VBA with AddShape, and in shapes that come with PowerPoint
slides (such as the title or bulleted text area on a slide). But you can do more than
simply change the text on a shape to something new. You can ma nipulate the
text in many different ways. This section doesn’t cover all of them, but it is
enough to get you started exploring.
With Blocks
Before changing the text, we should learn a simple VBA trick to save you
from typ ing long ex pressions over and over again. You might have no ticed that
to get to the text for a shape, you have to type something very long, such as
ActivePresentation.SlideShowWindow.View.Slide.Shapes(3).TextFrame _.TextRange.Text
This re fers to the text in the third shape in the cur rent slide (it’s in teresting how I
can say it in Eng lish in less space than I can say it in VBA). To save typ ing, we
can use a With block. For ex ample, if we want to do several things to the third
shape on the current slide, we can do the fol lowing:
With ActivePresentation.SlideShowWindow.View.Slide.Shapes(3) .TextFrame.TextRange.Text = "Hello" .Fill.ForeColor.RGB = vbRed .Vis ible = TrueEnd With
The With block (start ing with the first line that be gins with With and end ing
with the line that ends with End With) simply assumes that any thing starting
with a dot re ally in cludes all the stuff on the With line. In Eng lish, it is say ing, “I
want to do the following things to the third shape on the cur rent slide: change the
text to ‘Hello’, change the background color to red, and make the shape visible.”
Ma nip u lat ing Text in Ob jects 79
Add ing Text
Now, suppose you want to add something to the text in your shape, rather
than re place the text. Re member the am persand (&). This is used to join two
pieces of text together. We used it when we wanted to dis play text in a MsgBox
that included “You are do ing well” and the user’s name. We can use it here to
join what is already in the text box with some ad ditional text. Once we join to -
gether the text we need to stick the joined together text into the .Text of the
shape.
Sub AddHello() With ActivePresentation.SlideShowWindow.View.Slide _ .Shapes("Rect angle 3") .TextFrame.TextRange.Text = _ .TextFrame.TextRange.Text & Chr$(13) & "Hello Mother" End WithEnd Sub
The With line (including the next line that is really part of that line due to the un -
derscore) tells the computer that we are go ing to do something with the shape
named “Rectangle 3” on the current slide. If the current slide is a Bulleted List
slide, “Rect angle 3” re fers to the bulleted list area (the main area for text).
.TextFrame.TextRange.Text = _
tells the com puter that we are go ing to put something into the text area of that
slide. Af ter the equal sign, the next line
.TextFrame.TextRange.Text & Chr$(13) & "Hello Mother"
tells the com puter what we are go ing to put into the text area. We are go ing to
• start with what is already there ( .TextFrame.TextRange.Text );
• add to that a spe cial character, Chr$(13), which is the New Para -
graph symbol (just like hit ting “Enter” or “Return” if you were typ -
ing the text into the text area your self); and
• add the text “Hello Mother”.
This will have the ef fect of taking what was already in the bulleted list and add -
ing a new line with the words “Hello Mother.” Remember, you can do any thing
with the text that you want. We added “Hello Mother” as a simple example. You
could have added the user’s name. For example, you might write an in teractive
story with your students in which the student types a name at the beginning of
the story, and the name is used dur ing the story by replacing or modifying the
text in one of the slides:
80 A Scripting Bag of Tricks
Sub BrickPig() With ActivePresentation.Slides(7).Shapes("Rect angle 3")
.TextFrame.TextRange.Text = .TextFrame.TextRange.Text & _ "And then the third pig, " & userName & _ ", built a house of bricks. The brick house " & _ "was very strong."
End WithEnd Sub
This takes the shape named “Rectangle 3” on the seventh slide and adds text to itthat includes the user’s name (assuming you have used the YourName pro ce dure at some previous point to get the user’s name). If “Rectangle 3” is a Placeholder(see be low for in formation about Placeholders), be sure it has something in itwhen you try to run this code, or your text will not show up un til after you exitSlide Show View.
As another example, imagine that you are hav ing a class discussion, andyou want to re cord the stu dents’ comments in your PowerPoint presentation.Perhaps you are discussing the signs of spring, and you want the class to tell yousigns of spring re lated to plants and animals. Without technology, you wouldwrite the in formation on the blackboard. However, this is awkward if you are us -ing PowerPoint as part of the dis cussion; it is awkward to run from the com puterto the blackboard, and it is awk ward to flip the lights off and on so students cansee the screen and the blackboard alternately. In stead, use this simple code to put the text right into the PowerPoint presentation:
Sub AddPlants()Dim newstuff As String
newstuff = InputBox("What is a plant sign of Spring?") If newstuff "" Then
With ActivePresentation.SlideShowWindow.View.Slide _.Shapes(2).TextFrame.TextRange.Text = .Text + Chr$(13) + newstuff
End WithEnd If
End Sub
Sub AddAnimals()Dim newstuff As String
newstuff = InputBox("What is an an imal sign of Spring?") If newstuff "" Then
With ActivePresentation.SlideShowWindow.View.Slide. _Shapes(3).TextFrame.TextRange.Text = .Text + Chr$(13) + newstuff
End WithEnd If
End Sub
This code works on a slide with two text boxes that you add as the second
and third shapes on the slide, and it works with a 2-Col umn Text slide. Just be-
ware that if you add text to an empty Placeholder (that’s one of those text boxes
that says “Click to add text” or “Click to add title” be fore you put any thing in it,
Ma nip u lat ing Text in Ob jects 81
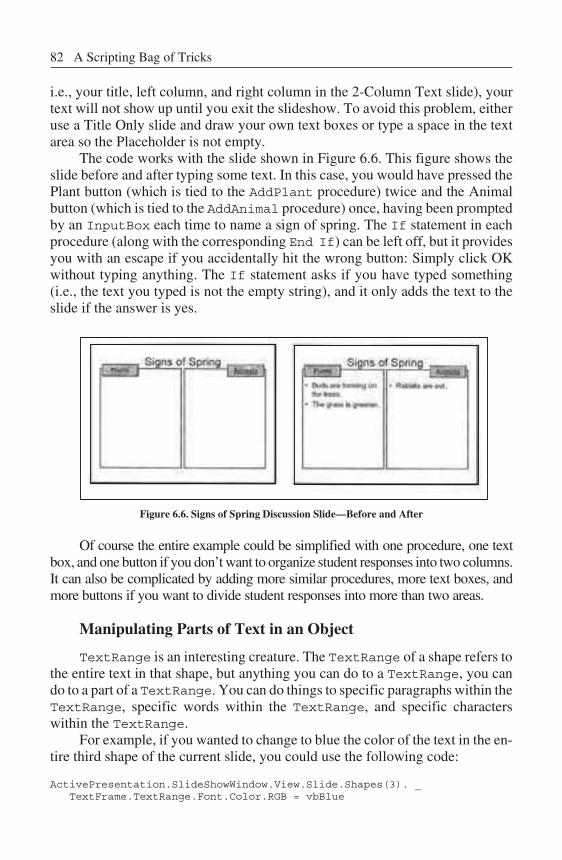
i.e., your ti tle, left col umn, and right column in the 2-Col umn Text slide), your
text will not show up un til you exit the slideshow. To avoid this prob lem, ei ther
use a Ti tle Only slide and draw your own text boxes or type a space in the text
area so the Place holder is not empty.
The code works with the slide shown in Fig ure 6.6. This figure shows the
slide be fore and af ter typing some text. In this case, you would have pressed the
Plant but ton (which is tied to the AddPlant pro cedure) twice and the An imal
button (which is tied to the AddAnimal pro cedure) once, having been prompted
by an InputBox each time to name a sign of spring. The If state ment in each
pro ce dure (along with the cor re spond ing End If) can be left off, but it provides
you with an es cape if you accidentally hit the wrong but ton: Simply click OK
with out typ ing any thing. The If statement asks if you have typed something
(i.e., the text you typed is not the empty string), and it only adds the text to the
slide if the answer is yes.
Figure 6.6. Signs of Spring Dis cussion Slide—Before and Af ter
Of course the entire ex ample could be simplified with one procedure, one text
box, and one but ton if you don’t want to or ganize stu dent responses into two columns.
It can also be complicated by add ing more similar procedures, more text boxes, and
more but tons if you want to di vide student responses into more than two areas.
Manipulating Parts of Text in an Ob ject
TextRange is an interesting crea ture. The TextRange of a shape re fers to
the entire text in that shape, but any thing you can do to a TextRange, you can
do to a part of a TextRange. You can do things to spe cific paragraphs within the
TextRange, spe cific words within the TextRange, and spe cific characters
within the TextRange.
For ex ample, if you wanted to change to blue the color of the text in the en -
tire third shape of the current slide, you could use the fol lowing code:
ActivePresentation.SlideShowWindow.View.Slide.Shapes(3). _TextFrame.TextRange.Font.Color.RGB = vbBlue
82 A Scripting Bag of Tricks
Almost iden tical code can be used to change the second para graph of the third
shape on the current slide to blue:
ActivePresentation.SlideShowWindow.View.Slide.Shapes(3). _TextFrame.TextRange.Paragraphs(2).Font.Color.RGB = vbBlue
Note that paragraphs in clude the New Paragraph symbol, Chr$(13), as part of
the paragraph. Thus, you must be careful when chang ing the text of a paragraph
to be sure that each paragraph ends with Chr$(13). See the Mys tery Example
later in this chap ter for an example of this. With an other small change, the sec-
ond word becomes blue:
ActivePresentation.SlideShowWindow.View.Slide.Shapes(3). _TextFrame.TextRange.Words(2).Font.Color.RGB = vbBlue
Note that VBA counts punctuation marks as words. For example, the text
“Hello, my name is David” has six words (by VBA’s count; who said computers
were smart?), with the comma be ing the second word. With an other small
change, the second char ac ter be comes blue:
ActivePresentation.SlideShowWindow.View.Slide.Shapes(3). _TextFrame.TextRange.Char ac ters(2).Font.Color.RGB = vbBlue
Finally, any of these statements can be altered slightly to in clude a range of para-
graphs, words, or characters. Simply in clude a second num ber after the “2” to
tell how many paragraphs, words, or characters you want to af fect. For example,
if you want to make seven characters blue, starting with the second one, you
would use the following:
ActivePresentation.SlideShowWindow.View.Slide.Shapes(3). _ TextFrame.TextRange.Char acters(2,7).Font.Color.RGB = vbBlue
If the text is “Hello, mother,” then the characters “ello, m” would turn blue (the
comma and space count as the fifth and sixth char acters).
What Can You Change?
All of the examples above changed the color of the text using
.Font.Color.RGB. This is one of many things that you can change about the
font of the text. You can change Bold, Italic, Shadow, and Un der line to
True or False. For example:
ActivePresentation.SlideShowWindow.View.Slide.Shapes(3). _TextFrame.TextRange.Font.Bold = True
This is the same as if you had selected the text and clicked on the Bold but ton in
the toolbar.
Ma nip u lat ing Text in Ob jects 83
You can also set the Size of the text to a par ticular point size. For ex ample, if
you wanted to change the text to a 12-point font size, you could use the fol lowing:
ActivePresentation.SlideShowWindow.View.Slide.Shapes(3). _TextFrame.TextRange.Font.Size = 12
You can change the Name of the font, but you should be ware; if this presen-
tation is run ning on a variety of computers, you should stay away from fonts that
are not standard because your font will only show up prop erly if the computer on
which the presentation is run ning has the font. To change the font to Helvetica,
you can use the fol lowing example:
ActivePresentation.SlideShowWindow.View.Slide.Shapes(3). _ TextFrame.TextRange.Font.Name = "Helvetica"
Finally, you can change the color in a number of ways. You have al ready
seen that you can choose from some VBA con stant col ors: vbBlack, vbRed,
vbGreen, vbYellow, vbBlue, vbMagenta, vbCyan, and vbWhite. You can
also set col ors by using an RGB value. RGB stands for Red Green Blue. You
will specify a color by in dicating how much red, how much green, and how
much blue the color contains. For example, to make the text red, you could use
the following:
ActivePresentation.SlideShowWindow.View.Slide.Shapes(3). _TextFrame.TextRange.Font.Color.RGB = RGB(255,0,0)
This means that you want lots of red, no green, and no blue (the numbers range
from 0 to 255). You can experiment with the num bers to find just the right shade
you want. For example, RGB(150,0,75) gives a lovely shade of purple.
Other Things You Can Do to Text
Many things that traditional PowerPoint can do to text, VBA can do as
well. If you want to make changes while creating a presentation, using
PowerPoint’s menus to do things is prob ably easiest. VBA is useful when you
want to change things in re sponse to something the user does. You can use VBA
to Cut, Copy, De lete, or Paste text:
ActivePresentation.SlideShowWindow.View.Slide.Shapes(3). _ .TextFrame.TextRange.Words(3,2).CutActivePresentation.SlideShowWindow.View.Slide.Shapes(3). _
.TextFrame.TextRange.Words(4,2).Paste
This will cut the third and fourth words in the third shape of the current slide (re-
member the “3,2” means start with the third word and do this for two words).
Next it will find the fourth and fifth words (count ing words with out the text that
was just cut) and replace them with what you cut. So if the text was “one two
84 A Scripting Bag of Tricks
three four five six seven eight nine ten,” the Cut will change the text to “one two
five six seven eight nine ten,” and the Paste will change it to “one two five three
four eight nine ten.” Change the Cut to De lete to get rid of the text with out the
ability to paste it, and change it to Copy to copy the text without re moving it
from the original location.
You can also find out how long (i.e., how many characters) a TextRange is
with Length:
MsgBox (ActivePresentation.SlideShowWindow.View.Slide.Shapes(3). _.TextFrame.TextRange.Length)
This will pop up a MsgBox with the num ber of characters in the third shape of the
cur rent slide.
Finally, you might want to know how many words or paragraphs are in a
TextRange. You can use Count to find this out:
MsgBox (ActivePresentation.SlideShowWindow.View.Slide.Shapes(3). _.TextFrame.TextRange.Para graphs.Count)
This will pop up a MsgBox with the num ber of paragraphs (change Para graphs
to Words to get the num ber of words).
Ma nip u lat ing Text: The Mys tery Ex am ple
You have seen many tricks for manipulating text, but you might be wonder-
ing how they might fit into a real ex ample. This section in cludes a simple exam-
ple of a pre sentation that solves a mystery. This is a simple mystery with only
two clues, but you should be able to expand it to in clude more clues. Fig ure 6.7
(page 86) shows the slides in this mystery. Fig ure 6.8 (page 87) shows the VBA
code for the presentation.
In this simple example, most of the nav igation is done with traditional
PowerPoint but tons. The for ward and back ar rows are linked to the next and pre-
vious slides, the “Update Clue Sheet” but ton is linked to the last slide, and the
“Return to Mystery” but ton is linked to the last slide viewed (i.e., if the user just
came from Mys tery Clue #1, it will go back to Mystery Clue #1).
The but tons that use VBA are on the first and last slides. The first slide has
the “Let’s Get Started” but ton that links to the GetStarted script. Although we
don’t have to ini tialize any variables, we do have to set up the last slide. This in-
volves setting up the text area (which is the second shape) on the fifth slide with
two paragraphs:
With ActivePresentation.Slides(5).Shapes(2).TextFrame.TextRange .Para graphs(1).Text = "Eye Color:" & Chr$(13) .Para graphs(2).Text = "Hair Color:"End With
Ma nip u lat ing Text: The Mys tery Ex am ple 85
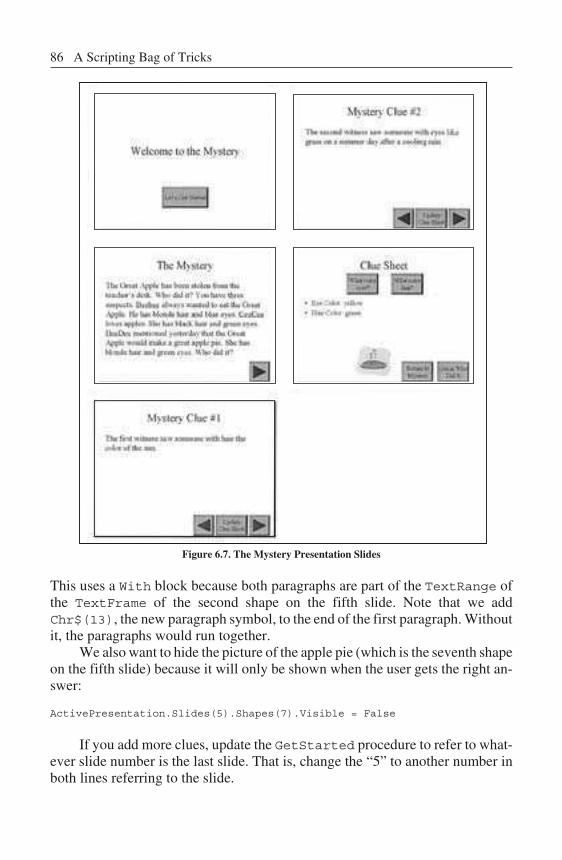
Fig ure 6.7. The Mys tery Pre sen ta tion Slides
This uses a With block because both paragraphs are part of the TextRange of
the TextFrame of the second shape on the fifth slide. Note that we add
Chr$(13), the new paragraph symbol, to the end of the first paragraph. Without
it, the paragraphs would run together.
We also want to hide the pic ture of the apple pie (which is the sev enth shape
on the fifth slide) because it will only be shown when the user gets the right an -
swer:
ActivePresentation.Slides(5).Shapes(7).Vis i ble = False
If you add more clues, up date the GetStarted pro cedure to refer to what-
ever slide num ber is the last slide. That is, change the “5” to an other number in
both lines referring to the slide.
86 A Scripting Bag of Tricks
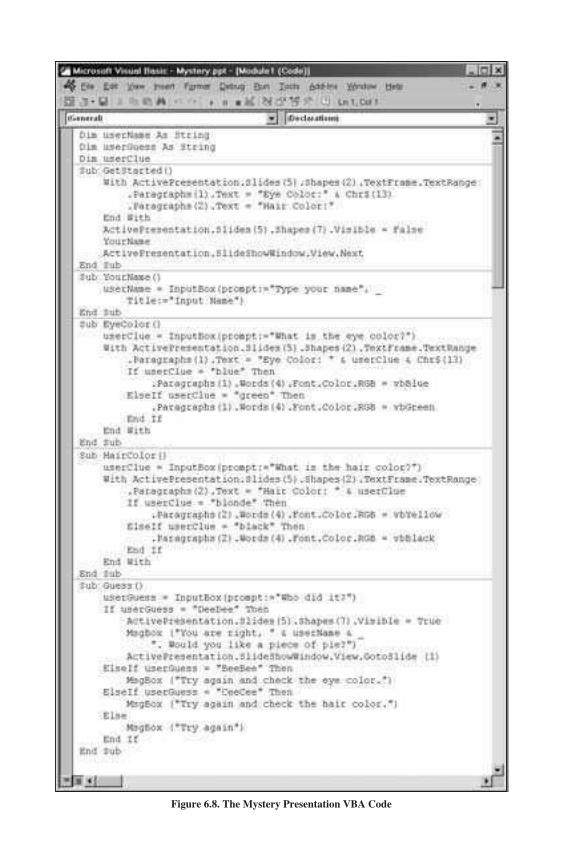
Figure 6.8. The Mys tery Pre sentation VBA Code

EyeColor and HairColor are al most identical. The main difference is
that EyeColor changes the text in the first paragraph and HairColor changes
the text in the second paragraph. EyeColor uses an InputBox to prompt for the
eye color and stores what the user types in the vari able userClue. The With
statement is just like the With in GetStarted, re ferring to the TextRange
where the clues are stored. The code:
.Paragraphs(1).Text = "Eye Color: " & userClue & Chr$(13)
changes the first paragraph (the one that in cludes the eye color clue) to whatever
the user typed. The If state ment then checks to see if what was typed was
“blue”:
If userClue = "blue" Then
If it is, it changes the color of the fourth word (which would be the word “blue”)
to blue:
.Paragraphs(1).Words(4).Font.Color.RGB = vbBlue
The ElseIf part checks to see if the user typed green and changes the color of
the text to green.
Guess uses an InputBox to ask for the user’s guess. The part that checks
for the correct an swer is a se ries of If, ElseIf, ElseIf, ElseIf, and Else
state ments. The If section is for the right answer. It shows the picture of the ap-
ple pie (be cause DeeDee wanted the ap ple to make pie):
ActivePresentation.Slides(5).Shapes(7).Vis i ble = True
It shows a MsgBox tell ing the user that the answer is correct:
MsgBox ("You are right, " & userName & _ ". Would you like a piece of pie?")
And when the user clicks OK on the MsgBox, it jumps back to the beginning:
ActivePresentation.SlideShowWindow.View.GotoSlide (1)
The two ElseIf clauses each bring up a MsgBox with specific feedback
about what was wrong, and the Else clause (if the user typed anything be sides
“DeeDee,” “BeeBee,” or “CeeCee”) brings up a MsgBox that gives the ge neric
feedback “Try again.”
To create your own mystery, simply change text on the mystery and clue
slides, change the text in the VBA code that re fers spe cifically to eye color and hair
color (in case your clues are about something else), change the text on the eye color
and hair color but tons, and change the If block in the Guess pro cedure to give ap -
propriate feedback for the possible guesses in your mystery. You might also want to
88 A Scripting Bag of Tricks
change the picture of the apple pie to something else. If you add more clues, simply
copy one of the clue slides, change the text, and change Slides(5) to Slides(6)
or Slides(7) or whatever num ber the last slide is. Fi nally, you might have to ad -
just some of the shape numbers. For example, when you create this yourself, your
picture (replacing the apple pie pic ture) might not be Shapes(7).
Con clu sion
In this chap ter you learned some pow erful VBA tricks that allow you to
move around in your presentation and manipulate the ob jects on your slides.
You now have the power to hide and show ob jects and ma nipulate the text in
your ob jects. This allows you to ex pand feedback from a simple MsgBox to
something that changes the text in the slides. For simple feedback, a MsgBox is
fine, but to in corporate what your stu dents have to say into the fabric of the pre-
sentation, noth ing beats changing the text on your slides. The discussion ended
with a creative mys tery example that shows how this technology can go beyond
simple tu torials and quizzes. In the next chapter you will see how to build quiz-
zes of vary ing complexity with dif ferent types of questions and different ways of
tracking and reporting scores.
Ex er cises to Try
�Take the mystery example at the end of this chap ter and re write
it to in clude your own mystery. Start by changing the text of the
mystery and up dating the questions. Next, change the clue sheet
to match your clues and change the ap ple pie pic ture to match
your mystery.
� If you are feeling ad venturous, try ex panding the mystery beyond
two clues by add ing more clue slides and more paragraphs on the
clue sheet.
Ex er cises to Try 89

7Quizzes and Tests
In tro duc tion
In Chapter 6 you learned a number of powerful tricks. In fact, you now have
most of the basic skills you need to create a wide range of in teractive projects. If
you fancy your self a pro grammer, you can stop here and fig ure everything else
out for yourself. However, since this book is for scripters, we will con tinue with
a few more tricks and many more examples.
In this chap ter you will learn about dif ferent ways to create quiz zes and
tests with VBA. We’ll start with sim ple mul tiple-choice tests, add scripts to keep
score, give op tions for tests that only allow one try to get the right an swer or al-
low multiple tries, add short-answer questions, add a script that creates a new
slide with com plete test re sults suit able for print ing, and add a mul tiple-part tu -
torial that won’t let your students take the test un til they have completed the en-
tire tu torial. By the time you fin ish this chap ter, you will have the skills
necessary to cre ate tests in a variety of different ways.
Vo cab u lary
• ActivePresentation.Slides.Add • numIncorrect
• LCase • Round
• numCorrect • Trim
Sim ple Mul ti ple-Choice Tests
In Chapter 2 you learned about but tons and hyperlinks. This gave you thepower to cre ate a simple mul tiple-choice test with feedback. With out us ingVBA, you could create a text ob ject and type the question in the text ob ject. Be-low the text ob ject, create but tons with pos sible answers. Link the button withthe cor rect an swer to a slide that has a text ob ject that tells the student that the an -swer is correct. Link the but tons with the in correct an swers to a slide that has atext ob ject that tells the student that the an swer is in correct. On the (cor rect andincorrect) feedback slides, create a but ton that leads to the next question, and re -peat these steps for each question. This works, but it is a lit tle bit cumbersome.
With a lit tle bit of VBA from Chap ter 4, you could eliminate the feedbackslides and use a simple MsgBox for feedback, ty ing your but tons with right andwrong an swers to the fol low ing pro ce dures, re spec tively:
Sub RightAnswer() MsgBox ("Good job.")End Sub
Sub WrongAnswer() MsgBox ("Try to do better.")End Sub
With a lit tle help from Chap ter 5, you can include the user’s name in your
feed back:
Dim userName
Sub YourName() userName = InputBox(prompt:="What is your name?")End Sub
Sub RightAnswer() MsgBox ("Good job, " & userName)End Sub
Sub WrongAnswer() MsgBox ("Try to do better, " & userName)End Sub
Next, add a lit tle bit of help from Chap ter 6 to au tomatically jump to the
next question after the right an swer is chosen:
Sub RightAnswer() MsgBox ("Good job, " & userName)
ActivePresentation.SlideShowWindow.View.NextEnd Sub
As usual, with a small amount of VBA, we have added a small amount of
power: add ing the user’s name to the feedback and cut ting down on the num ber
of slides. These are small advantages over tra ditional PowerPoint. In the next
section, we’ll add more power by keep ing score.
92 Quizzes and Tests
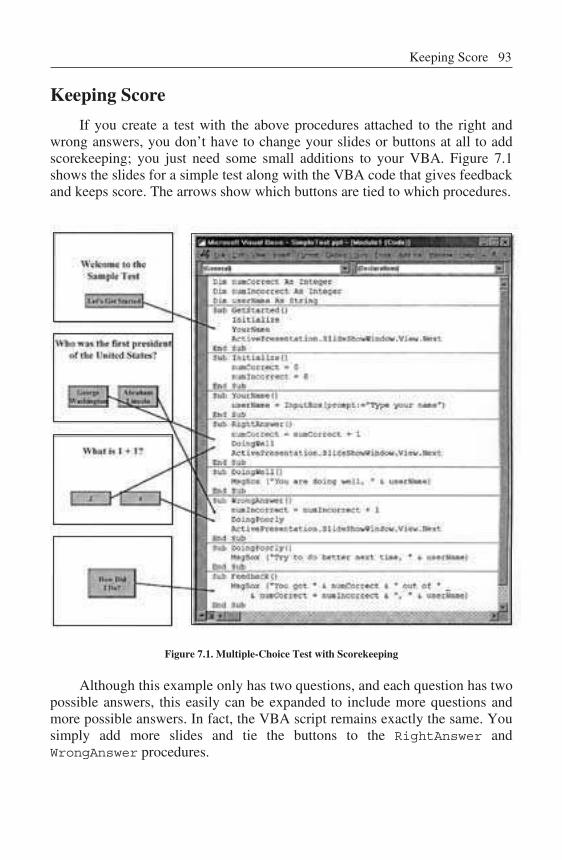
Keep ing Score
If you create a test with the above procedures at tached to the right and
wrong answers, you don’t have to change your slides or but tons at all to add
scorekeeping; you just need some small ad ditions to your VBA. Fig ure 7.1
shows the slides for a simple test along with the VBA code that gives feedback
and keeps score. The arrows show which but tons are tied to which procedures.
Figure 7.1. Mul tiple-Choice Test with Scorekeeping
Although this ex ample only has two ques tions, and each question has two
possible answers, this easily can be ex panded to in clude more ques tions and
more possible answers. In fact, the VBA script re mains exactly the same. You
simply add more slides and tie the but tons to the RightAnswer and
WrongAnswer procedures.
Keep ing Score 93
In Chapter 6, we did something similar with GetStarted, Ini tial ize,
RightAnswer, and WrongAnswer, us ing stars for feedback and not keeping
score. The sig nificant ad ditions to this script are the vari ables: numCorrect and
numIncorrect. numCorrect con tains the number of questions answered cor-
rectly. numIncorrect con tains the number of questions answered in correctly.
Each time a cor rect an swer is chosen, the procedure RightAnswer is called in
which numCorrect is in creased by one (numCorrect = numCorrect + 1).
Each time a wrong an swer is chosen, the pro cedure WrongAnswer is called in
which numIncorrect is in creased by one (numIncorrect =
numIncorrect + 1). When you want to find out how you are do ing, call the
pro ce dure Feed back to dis play a MsgBox with how many questions were right
(numCorrect) out of how many were an swered (numCorrect +
numIncorrect). In addition, before the test starts, call the pro cedure
GetStarted to ini tialize the vari ables (set numCorrect and numIncorrect
to 0), ask for the student’s name, and move to the first question. Other than the
variables, all the parts of this script are things you have seen before.
You might want to report the score in other forms. Now that we know how
many questions were an swered correctly and how many were an swered in cor-
rectly, you can ad just the MsgBox com mand in the Feed back pro cedure to re-
port in other ways. If you just want to report the num ber of right an swers, try
this:
MsgBox("You got " & numCorrect & "right, " & userName)
If you want to report the num ber of right an swers and the number of wrong
answers but not the to tal, you can use this:
MsgBox("You got " & numCorrect & " right and " _ numIncorrect & " wrong, " & userName)
If you would like to re port a percentage score, you can use this:
MsgBox ("You got " & _ 100 * numCorrect / (numIncorrect + numCorrect) & "%, " & userName)
Finally, if you want that per centage score rounded off, you can use this:
MsgBox ("You got " & _Round(100 * numCorrect / (numIncorrect + numCorrect), 0) & _
"%, " & userName)
Note that the 0 rep resents how many places af ter the decimal point to show, so if
you like the result “33%,” use 0; if you like the re sult “33.3%,” use 1; etc.
This is just the tip of the iceberg with what you can do with tests. Variables
can be used to keep track of any in formation you want; for example, you could
allow students to try answering a question again but only count the first try.
94 Quizzes and Tests
More complicated scripts can be used to judge other kinds of test questions;
short-answer ques tions are a small step away. With VBA, the pos sibilities are
endless.
Try Again: An swer Un til It’s Right
Keeping score is easy when you only get one chance to answer each ques-
tion. What if you want your students to an swer the questions un til they get them
right? How difficult this is de pends on how you want to keep score. If you want
to count every attempt, you don’t have to change much. Simply de lete
ActivePresentation.SlideShowWindow.View.Next from the
WrongAnswer pro cedure. This will stop the presentation from go ing to the next
question after a wrong answer, but it will count every click on the wrong an swer
as well as the click on the right an swer. For example, if you use the questions
from Fig ure 7.1 (page 93) and click on Abraham Lincoln (the wrong an swer for
question 1), then George Washington (the right answer for question 1), then 2
(the right an swer for question 2), your score will be two out of three be cause you
got the first ques tion wrong once then right once, and you got the second
question right once.
If you want to count only the first try, in the above ex ample you would want
a score of one out of two. That is because you got the first question wrong on the
first try, and you got the second ques tion right on the first try. This re quires no
changes to your slides, in cluding which but tons are tied to which pro cedures. It
only re quires the following code; changes from the code in Fig ure 7.1 are
marked with comments (‘ADDED for ad ditions and ‘DELETED for the line that is
deleted):
Dim numCorrect As In tegerDim numIncorrect As In tegerDim userName As StringDim qAnswered As Boolean 'ADDED
Sub GetStarted()Ini tial izeYourNameActivePresentation.SlideShowWindow.View.Next
End Sub
Sub Ini tial ize()numCorrect = 0numIncorrect = 0
qAnswered = False 'ADDEDEnd Sub
Sub YourName() userName = InputBox(prompt:="Type your name")End Sub
Try Again: An swer Un til It’s Right 95
Sub RightAnswer() If qAnswered = False Then 'ADDED
numCorrect = numCorrect + 1 End If 'ADDED qAnswered = False 'ADDED
DoingWellActivePresentation.SlideShowWindow.View.Next
End Sub
Sub DoingWell() MsgBox ("You are do ing well, " & userName)End Sub
Sub WrongAnswer() If qAnswered = False Then 'ADDED
numIncorrect = numIncorrect + 1 End If 'ADDED qAnswered = True 'ADDED
DoingPoorly 'DELETED ActivePresentation.SlideShowWindow.View.NextEnd Sub
Sub DoingPoorly() MsgBox ("Try to do better next time, " & userName)End Sub
Sub Feed back() MsgBox ("You got " & numCorrect & " out of " _ & numCorrect + numIncorrect & ", " & userName)End Sub
The heart of this pro cedure is the variable qAnswered. It keeps track of
whether or not the current question has been answered yet. If it is False, the ques-
tion has not yet been an swered; if it is True, the question has been answered.
A small amount of code is added to the Dim sec tion to declare qAnswered
so that all the pro cedures know about it. It also must be in itialized to False in
the Initialize pro cedure so it is False when you get to the first question. Fi -
nally, RightAnswer and WrongAnswer must check and ad just the value of
qAnswered.
RightAnswer and WrongAnswer check to see if the question has not been
answered yet If (qAnswered = False) Then and only add one to numCorrect
or numIncorrect if qAnswered is False; that is, the question has not yet been
an swered. In ad di tion RightAnswer sets qAnswered to False be fore go ing to
the next question, and WrongAnswer sets qAnswered to True be fore let ting
you try again (by not go ing to the next question).
Try Again and Again: An swer Again Af ter It’s Right
The previous ex ample works fine as long as your stu dents are forced to
move to the next question (and can’t come back) once they have got ten the right
answer. This gets more com plicated if you allow students to come back to ques-
tions later. The prob lem is that we need to keep track of more things; that is, we
96 Quizzes and Tests
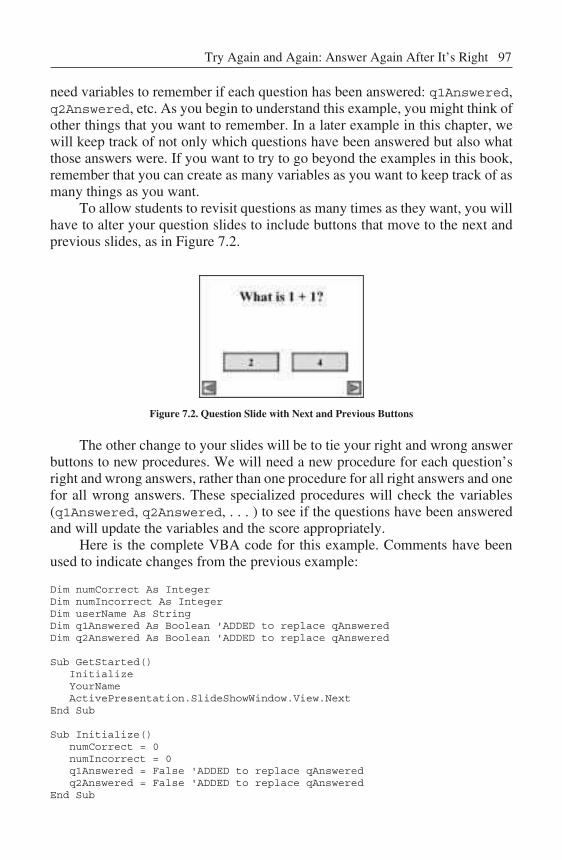
need variables to re member if each question has been an swered: q1Answered,
q2Answered, etc. As you begin to un derstand this example, you might think of
other things that you want to remember. In a later example in this chapter, we
will keep track of not only which questions have been an swered but also what
those an swers were. If you want to try to go be yond the examples in this book,
remember that you can create as many vari ables as you want to keep track of as
many things as you want.
To al low students to re visit ques tions as many times as they want, you will
have to al ter your ques tion slides to in clude but tons that move to the next and
previous slides, as in Fig ure 7.2.
Figure 7.2. Ques tion Slide with Next and Previous But tons
The other change to your slides will be to tie your right and wrong an swer
buttons to new pro cedures. We will need a new pro cedure for each ques tion’s
right and wrong answers, rather than one pro cedure for all right an swers and one
for all wrong an swers. These spe cialized procedures will check the vari ables
(q1Answered, q2Answered, . . . ) to see if the ques tions have been an swered
and will up date the variables and the score appropriately.
Here is the com plete VBA code for this ex ample. Comments have been
used to in dicate changes from the previous ex ample:
Dim numCorrect As In tegerDim numIncorrect As In tegerDim userName As StringDim q1Answered As Boolean 'ADDED to re place qAnsweredDim q2Answered As Boolean 'ADDED to re place qAnswered
Sub GetStarted() Ini tialize
YourName ActivePresentation.SlideShowWindow.View.NextEnd Sub
Sub Ini tial ize()numCorrect = 0
numIncorrect = 0 q1Answered = False 'ADDED to re place qAnswered q2Answered = False 'ADDED to re place qAnsweredEnd Sub
Try Again and Again: An swer Again Af ter It’s Right 97
Sub YourName() userName = InputBox(prompt:="Type your name")End Sub
Sub RightAnswer1() 'ADDED to re place RightAnswerIf q1Answered = False Then
numCorrect = numCorrect + 1End If
q1Answered = True 'Do not re set q1Answered to FALSEDoingWell
'DELETED ActivePresentation.SlideShowWindow.View.NextEnd Sub
Sub RightAnswer2() 'Same as RightAnswer1 with 1 changed to 2If q2Answered = False Then
numCorrect = numCorrect + 1End Ifq2Answered = TrueDoingWell
End Sub
Sub DoingWell() MsgBox ("You are do ing well, " & userName)End Sub
Sub WrongAnswer1() 'ADDED to re place WrongAnswerIf q1Answered = False Then
numIncorrect = numIncorrect + 1End Ifq1Answered = TrueDoingPoorly
End Sub
Sub WrongAnswer2() 'Same as WrongAnswer1 with 1 changed to 2 If q2Answered = False Then
numIncorrect = numIncorrect + 1End Ifq2Answered = TrueDoingPoorly
End Sub
Sub DoingPoorly() MsgBox ("Try to do better next time, " & userName)End Sub
Sub Feed back() MsgBox ("You got " & numCorrect & " out of " _ & numCorrect + numIncorrect & ", " & userName)End Sub
The most significant ad ditions are the new variables q1Answered and
q2Answered and the spe cial right and wrong answer pro cedures for each ques-
tion. The vari ables keep track of which ques tions have already been answered.
q1Answered is True if question 1 has been answered, and it is False if ques-
tion 1 has not been an swered. q2Answered is True if question 2 has been an-
swered, and it is False if question 2 has not been an swered. If you have more
than two ques tions, you need a q3Answered, q4Answered, etc.; that is, you
98 Quizzes and Tests

need one variable for each question. These vari ables are declared at the begin-
ning with the Dim statements:
Dim q1Answered As BooleanDim q2Answered As Boolean
Then, in Ini tial ize they are in itialized (set to False be cause none of the
questions have been an swered yet):
q1Answered = Falseq2Answered = False
Remember that if you have more questions, you need to re peat both of these sets
of statements for each additional variable.
Next, we need our specialized RightAnswer and WrongAnswer pro ce-
dures. RightAnswer1 is tied to the right answer but ton for question 1.
WrongAnswer1 is tied to the wrong answer but ton(s) for question 1.
RightAnswer2 and WrongAnswer2 are for question 2. And, if we had more
ques tions, RightAnswer3 and WrongAnswer3 would be for question 3;
RightAnswer4 and WrongAnswer4 would be for question 4; etc.
These pro cedures simply check the ap propriate vari able to see if the ques-
tion has been answered. If it hasn’t (If q1Answered = False Then), we up -
date the score (numCorrect = numCorrect + 1 or numIncorrect =
numIncorrect + 1). Regardless of whether or not it has been an swered be-
fore, we set the variable to True (e.g., q1Answered = True for question 1) and
give the ap pro pri ate feed back (call ing DoingWell or DoingPoorly).
Short-Answer Quiz Questions
The above examples can be ex tended very easily to in clude short-answer ques-
tions. If we were to add a third ques tion that was short an swer, we would first need
the variable q3Answered, just like q1Answered and q2Answered, de clared with
a Dim state ment and in itialized in the Ini tial ize pro cedure. We would also need
the pro ce duresRightAnswer3 and WrongAnswer3, just like RightAnswer1 and
WrongAnswer1 (ex cept us ing q3Answered in stead of q1Answered). Then we
would need a procedure to ask a question and judge the an swer:
Sub Question3()Dim an swer
answer = InputBox(Prompt:="What is the cap ital of Mary land?", _ Ti tle:="Question 3") If an swer = "Annapolis" Then
RightAnswer3Else
WrongAnswer3End If
End Sub
Short-Answer Quiz Ques tions 99
This procedure uses the variable an swer to store the an swer typed by the
student. Because only this pro cedure needs to know about it, it can be de clared
in side the pro ce dure (Dim an swer). Next, we use InputBox, just like in the
YourName pro cedure, to ask the student to type the an swer, which is stored in
the variable an swer.
In our multiple-choice ques tions, but tons were tied to our RightAnswer
and WrongAnswer pro cedures. With a short-answer question, we don’t have
buttons to call these pro cedures, so we use an If state ment. If the an swer is right,
call the ap pro pri ate RightAnswer pro cedure; if the answer is wrong, call the
ap pro pri ate WrongAnswer procedure.
The last thing you need is a way for the question to be asked. Fig ure 7.3
shows an ex ample slide. Just con nect the “Click to an swer” but ton to the
Question3 (or whatever num ber you use) pro cedure, and when the user clicks
on the but ton, the InputBox will pop up ask ing for an an swer. The fig ure shows
a but ton with the words “Click to an swer,” but your but ton can con tain the ques-
tion it self, the word “Question,” a question mark, or whatever else you like (as
long as the user knows to press the but ton to get and/or answer the question).
Figure 7.3. Short-An swer Ques tion Slide
Note that this pro cedure was set up to work with the previous ex ample in
which stu dents can answer questions over and over again. To have it work with
any other examples, change the calls to RightAnswer3 and WrongAnswer3 to
RightAnswer and WrongAnswer.
Do Spelling and Spac ing Count?
Now we have a short-answer question, but even peo ple who live in Mary land
have trouble spelling “Annapolis.” If spelling is important in your test, then leave the
Question3 pro cedure alone. However, you might be tol erant of several mistakes that
your stu dents might make, so you might want to be more lenient. You might want to
ig nore ex tra spaces, ig nore cap i tal iza tion, and ac cept al ter na tive spell ings.
Spaces before and after the an swer can be han dled eas ily with the Trim com -
mand. In sert the following line af ter the InputBox state ment:
answer = Trim(an swer)
100 Quizzes and Tests
This will take the an swer that was typed, remove any spaces at the beginning or
end, and put the result (without the extra spaces) back into the an swer vari able.
Trim will turn “ Annapolis ” into “Annapolis.” This will not elim inate any
spaces in the middle, so “Ann apolis” will re main “Ann apolis.” If for some rea-
son you only want to remove the spaces be fore the an swer or after the an swer,
use LTrim or RTrim re spec tively.
If you are not concerned with how your students cap italize their an swers,
LCase can set the an swer to lowercase by adding:
answer = LCase(an swer)
This takes the an swer that the stu dent typed, con verts all cap ital let ters to low er-
case let ters, and puts the lowercase ver sion back in the vari able an swer. This
will change “Annapolis,” “AnNaPolis,” and “AnnApolis” to “annapolis.” If you
are test ing to make sure the stu dent knows to cap italize the first let ter of a city
name, don’t use LCase.
Warn ing! The answer is now lowercase. This means that
your If state ment needs to com pare it to a lowercase re -
sponse. If an swer = “Annapolis” Then will never
be True be cause “annapolis” is not the same as
“Annapolis” and LCase changes all cap i tal iza tions of
“Annapolis” to “annapolis.” So even if the student types
“Annapolis,” LCase will change it to “annapolis” and
mark it wrong when comparing it to “Annapolis.”
If you are willing to accept al ternative spellings or alternative answers, you
can test for all the alternatives that you want in your If statement:
If an swer = "annapolis" Or _ an swer = "anapolis" Or _ an swer = "annappolis" Or _ an swer = "anappolis" Then
Include as many or as few different al ternatives as you like. Just re member that if
you used LCase, all your al ternatives must be lowercase.
If we use all our tricks (ig noring ex tra spaces, ac cepting any capitalization,
and allowing al ternative answers), our pro cedure will look like this:
Do Spelling and Spacing Count? 101
WARNING!
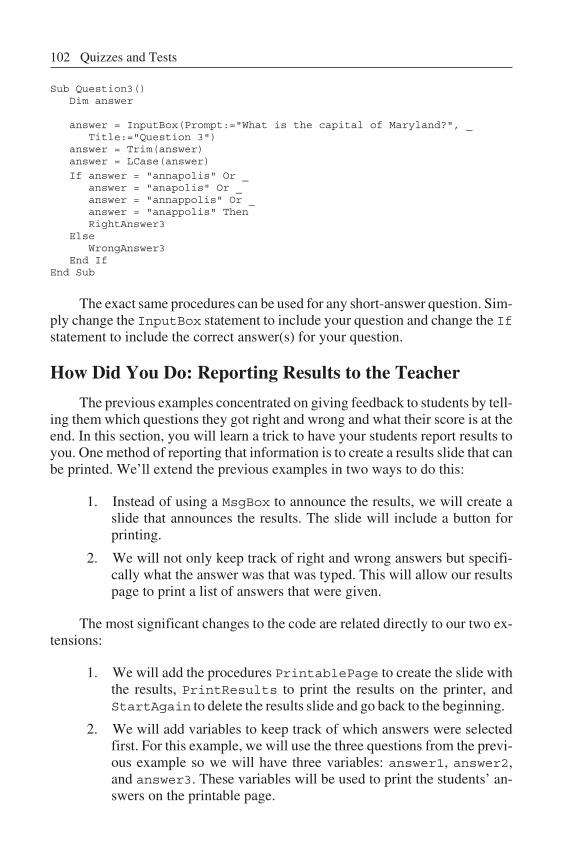
Sub Question3()Dim an swer
answer = InputBox(Prompt:="What is the cap ital of Mary land?", _ Ti tle:="Question 3")
answer = Trim(an swer)answer = LCase(an swer)
If an swer = "annapolis" Or _ an swer = "anapolis" Or _ an swer = "annappolis" Or _ an swer = "anappolis" Then
RightAnswer3Else
WrongAnswer3End If
End Sub
The exact same pro cedures can be used for any short-answer question. Sim-
ply change the InputBox statement to in clude your question and change the If
statement to in clude the correct an swer(s) for your question.
How Did You Do: Reporting Results to the Teacher
The previous ex amples con centrated on giv ing feedback to stu dents by tell-
ing them which ques tions they got right and wrong and what their score is at the
end. In this section, you will learn a trick to have your stu dents re port results to
you. One method of reporting that in formation is to create a results slide that can
be printed. We’ll extend the pre vious ex amples in two ways to do this:
1. Instead of using a MsgBox to announce the re sults, we will cre ate a
slide that announces the results. The slide will in clude a but ton for
print ing.
2. We will not only keep track of right and wrong an swers but specifi-
cally what the an swer was that was typed. This will al low our re sults
page to print a list of an swers that were given.
The most significant changes to the code are related di rectly to our two ex -
ten sions:
1. We will add the pro cedures PrintablePage to cre ate the slide with
the re sults, PrintResults to print the results on the printer, and
StartAgain to de lete the results slide and go back to the beginning.
2. We will add variables to keep track of which an swers were se lected
first. For this example, we will use the three questions from the previ-
ous example so we will have three variables: answer1, answer2,
and answer3. These variables will be used to print the students’ an -
swers on the print able page.
102 Quizzes and Tests
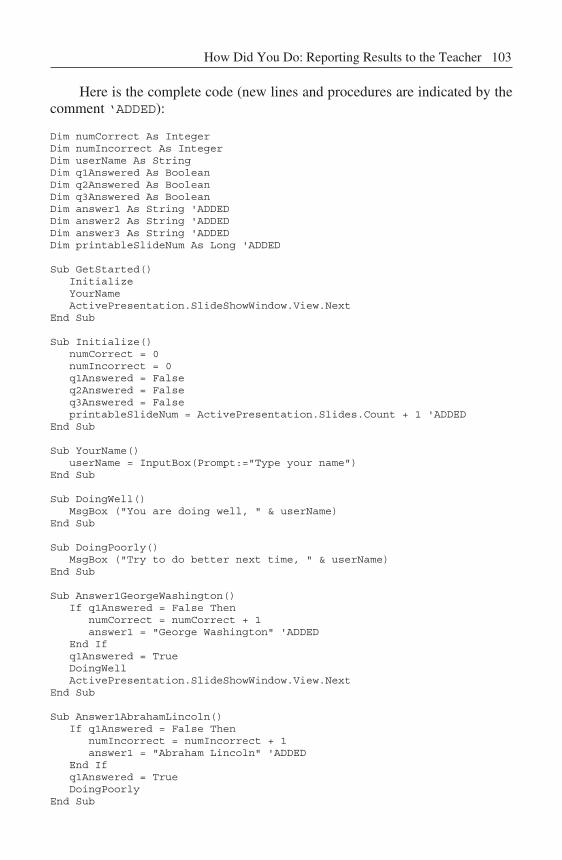
Here is the com plete code (new lines and procedures are in dicated by the
com ment ‘ADDED):
Dim numCorrect As In tegerDim numIncorrect As In tegerDim userName As StringDim q1Answered As BooleanDim q2Answered As BooleanDim q3Answered As BooleanDim answer1 As String 'ADDEDDim answer2 As String 'ADDEDDim answer3 As String 'ADDEDDim printableSlideNum As Long 'ADDED
Sub GetStarted()Ini tial izeYourNameActivePresentation.SlideShowWindow.View.Next
End Sub
Sub Ini tial ize()numCorrect = 0numIncorrect = 0q1Answered = Falseq2Answered = Falseq3Answered = False
printableSlideNum = ActivePresentation.Slides.Count + 1 'ADDEDEnd Sub
Sub YourName() userName = InputBox(Prompt:="Type your name")End Sub
Sub DoingWell() MsgBox ("You are do ing well, " & userName)End Sub
Sub DoingPoorly() MsgBox ("Try to do better next time, " & userName)End Sub
Sub Answer1GeorgeWashington()If q1Answered = False Then
numCorrect = numCorrect + 1 answer1 = "George Wash ington" 'ADDED
End Ifq1Answered = TrueDoingWellActivePresentation.SlideShowWindow.View.Next
End Sub
Sub Answer1AbrahamLincoln()If q1Answered = False Then
numIncorrect = numIncorrect + 1 answer1 = "Abra ham Lin coln" 'ADDED
End Ifq1Answered = TrueDoingPoorly
End Sub
How Did You Do: Re porting Results to the Teacher 103
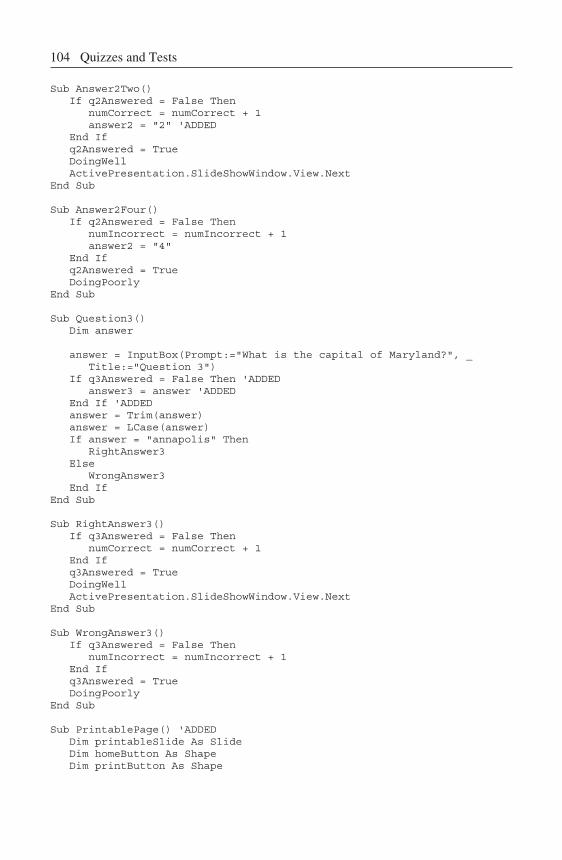
Sub Answer2Two()If q2Answered = False Then
numCorrect = numCorrect + 1 answer2 = "2" 'ADDED
End Ifq2Answered = TrueDoingWellActivePresentation.SlideShowWindow.View.Next
End Sub
Sub Answer2Four()If q2Answered = False Then
numIncorrect = numIncorrect + 1 answer2 = "4"
End If q2Answered = True
DoingPoorlyEnd Sub
Sub Question3()Dim an swer
answer = InputBox(Prompt:="What is the cap ital of Mary land?", _ Ti tle:="Question 3") If q3Answered = False Then 'ADDED answer3 = an swer 'ADDED End If 'ADDED
answer = Trim(an swer)answer = LCase(an swer)
If an swer = "annapolis" ThenRightAnswer3
ElseWrongAnswer3
End IfEnd Sub
Sub RightAnswer3()If q3Answered = False Then
numCorrect = numCorrect + 1End Ifq3Answered = True
DoingWellActivePresentation.SlideShowWindow.View.Next
End Sub
Sub WrongAnswer3()If q3Answered = False Then
numIncorrect = numIncorrect + 1End Ifq3Answered = TrueDoingPoorly
End Sub
Sub PrintablePage() 'ADDEDDim printableSlide As SlideDim homeButton As ShapeDim printButton As Shape
104 Quizzes and Tests
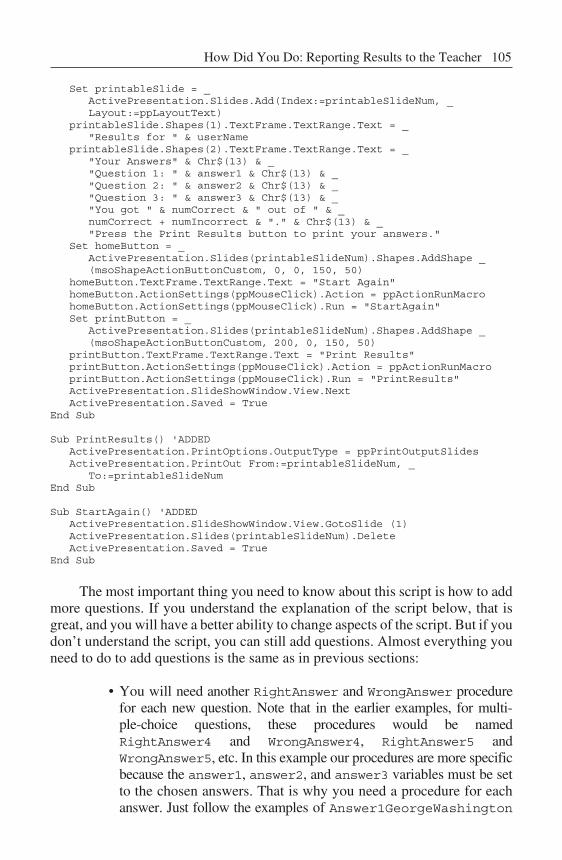
Set printableSlide = _ActivePresentation.Slides.Add(In dex:=printableSlideNum, _Lay out:=ppLayoutText)
printableSlide.Shapes(1).TextFrame.TextRange.Text = _ "Re sults for " & userName
printableSlide.Shapes(2).TextFrame.TextRange.Text = _ "Your An swers" & Chr$(13) & _ "Ques tion 1: " & answer1 & Chr$(13) & _ "Ques tion 2: " & answer2 & Chr$(13) & _ "Ques tion 3: " & answer3 & Chr$(13) & _ "You got " & numCorrect & " out of " & _ numCorrect + numIncorrect & "." & Chr$(13) & _ "Press the Print Re sults but ton to print your an swers."
Set homeButton = _ActivePresentation.Slides(printableSlideNum).Shapes.AddShape _(msoShapeActionButtonCustom, 0, 0, 150, 50)
homeButton.TextFrame.TextRange.Text = "Start Again"homeButton.ActionSettings(ppMouseClick).Action = ppActionRunMacro
homeButton.ActionSettings(ppMouseClick).Run = "StartAgain"Set printButton = _
ActivePresentation.Slides(printableSlideNum).Shapes.AddShape _(msoShapeActionButtonCustom, 200, 0, 150, 50)
printButton.TextFrame.TextRange.Text = "Print Re sults"printButton.ActionSettings(ppMouseClick).Action = ppActionRunMacro
printButton.ActionSettings(ppMouseClick).Run = "PrintResults"ActivePresentation.SlideShowWindow.View.NextActivePresentation.Saved = True
End Sub
Sub PrintResults() 'ADDEDActivePresentation.PrintOptions.OutputType = ppPrintOutputSlidesActivePresentation.PrintOut From:=printableSlideNum, _
To:=printableSlideNumEnd Sub
Sub StartAgain() 'ADDEDActivePresentation.SlideShowWindow.View.GotoSlide (1)ActivePresentation.Slides(printableSlideNum).De leteActivePresentation.Saved = True
End Sub
The most important thing you need to know about this script is how to add
more ques tions. If you un derstand the explanation of the script be low, that is
great, and you will have a better abil ity to change aspects of the script. But if you
don’t un derstand the script, you can still add questions. Al most ev erything you
need to do to add questions is the same as in pre vious sections:
• You will need another RightAnswer and WrongAnswer pro ce dure
for each new question. Note that in the earlier ex amples, for multi-
ple-choice ques tions, these pro cedures would be named
RightAnswer4 and WrongAnswer4, RightAnswer5 and
WrongAnswer5, etc. In this ex ample our procedures are more specific
be cause the answer1, answer2, and answer3 variables must be set
to the chosen answers. That is why you need a pro cedure for each
answer. Just fol low the examples of Answer1GeorgeWashington
How Did You Do: Re porting Results to the Teacher 105
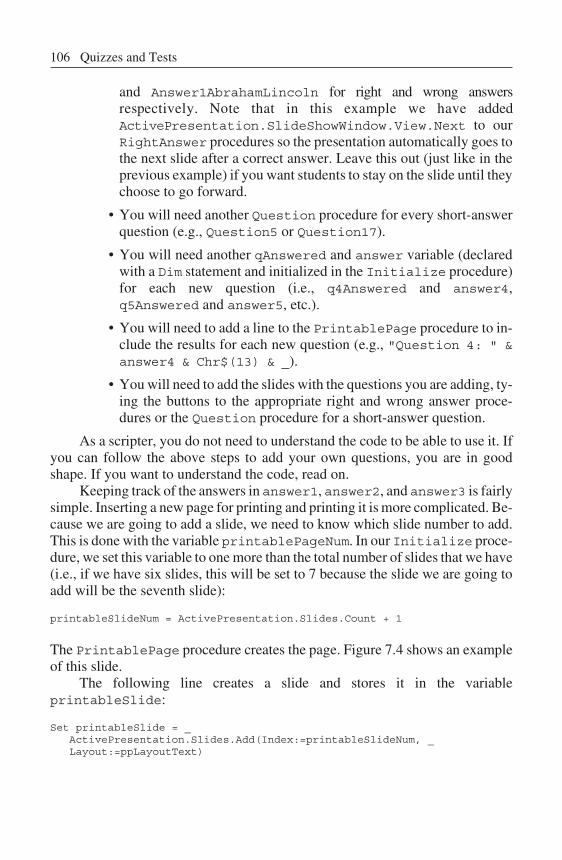
and Answer1AbrahamLincoln for right and wrong an swers
respectively. Note that in this ex ample we have added
ActivePresentation.SlideShowWindow.View.Next to our
RightAnswer pro ce dures so the pre sen ta tion au to mat i cally goes to
the next slide af ter a correct an swer. Leave this out (just like in the
previous ex ample) if you want stu dents to stay on the slide un til they
choose to go for ward.
• You will need an other Ques tion pro cedure for ev ery short-answer
ques tion (e.g., Question5 or Question17).
• You will need an other qAnswered and an swer vari able (declared
with a Dim state ment and in itialized in the Ini tial ize pro ce dure)
for each new ques tion (i.e., q4Answered and answer4,
q5Answered and answer5, etc.).
• You will need to add a line to the PrintablePage pro cedure to in-
clude the results for each new ques tion (e.g., "Ques tion 4: " &
answer4 & Chr$(13) & _).
• You will need to add the slides with the questions you are adding, ty -
ing the buttons to the ap propriate right and wrong answer pro ce-
dures or the Ques tion pro cedure for a short-answer question.
As a scripter, you do not need to un derstand the code to be able to use it. If
you can follow the above steps to add your own ques tions, you are in good
shape. If you want to un derstand the code, read on.
Keeping track of the an swers in answer1, answer2, and answer3 is fairly
simple. Inserting a new page for printing and printing it is more com plicated. Be-
cause we are go ing to add a slide, we need to know which slide num ber to add.
This is done with the vari able printablePageNum. In our Ini tial ize pro ce-
dure, we set this vari able to one more than the to tal number of slides that we have
(i.e., if we have six slides, this will be set to 7 be cause the slide we are go ing to
add will be the seventh slide):
printableSlideNum = ActivePresentation.Slides.Count + 1
The PrintablePage pro cedure creates the page. Fig ure 7.4 shows an ex ample
of this slide.
The fol lowing line cre ates a slide and stores it in the vari able
printableSlide:
Set printableSlide = _ActivePresentation.Slides.Add(In dex:=printableSlideNum, _Lay out:=ppLayoutText)
106 Quizzes and Tests
Figure 7.4. Ex ample of Printable Slide
In dex:=printableSlideNum cre ates a new slide af ter the last slide.
Lay out:=ppLayoutText makes the slide a nor mal Bulleted List slide with
two text ar eas: (1) a ti tle area and (2) a bulleted list area. The fol lowing lines set
the text in those areas (this is where you would add the answers for more ques -
tions):
printableSlide.Shapes(1).TextFrame.TextRange.Text = _ "Re sults for " & userNameprintableSlide.Shapes(2).TextFrame.TextRange.Text = _ "Your An swers" & Chr$(13) & _ "Ques tion 1: " & answer1 & Chr$(13) & _ "Ques tion 2: " & answer2 & Chr$(13) & _ "Ques tion 3: " & answer3 & Chr$(13) & _ "You got " & numCorrect & " out of " & _ numCorrect + numIncorrect & "." & Chr$(13) & _ "Press the Print Re sults but ton to print your an swers."
printableSlide.Shapes(1) re fers to the title area of the slide, and
printableSlide.Shapes(2) re fers to the bulleted list area of the slide. Note
that if you have sev eral questions, you might want to play with for matting the
display of your an swers, possibly us ing a two-column text slide
(ppLayoutTwoColumnText in stead of ppLayoutText and putt ing some text
in shape 2 and other text in shape 3) or adjusting the font size of the text area by
putting the following line af ter the above code:
printableSlide.Shapes(2).TextFrame.TextRange.Font.Size = 9
9 is the size of the font, so you can choose a dif ferent number for a smaller or
larger font. Note that some versions of PowerPoint (2002 and above) au tomati-
cally change the font size for you so your text fits the text box. How ever, if you
use those versions, you might con sider changing the font your self in case your
presentation is used with an earlier ver sion of PowerPoint.
Next we need to add but tons to our new slide. The following line adds a
custom but ton in the top left of the screen (coordinates 0,0) that is 150 pix els
wide and 50 pix els tall. A custom but ton has no icon in it.
How Did You Do: Re porting Results to the Teacher 107
Set homeButton = _ActivePresentation.Slides(printableSlideNum).Shapes.AddShape _
(msoShapeActionButtonCustom, 0, 0, 150, 50)
Because we stored the but ton in the vari able homeButton, we can use that
variable to change the at tributes of the button. We need to put some text in the
button. The text “Start Again” will appear in the button:
homeButton.TextFrame.TextRange.Text = "Start Again"
Then we make the but ton clickable and assign a pro cedure (in this case, the
StartAgain pro cedure) to the but ton:
homeButton.ActionSettings(ppMouseClick).Action = ppActionRunMacrohomeButton.ActionSettings(ppMouseClick).Run = "StartAgain"
The code for the Print Results but ton is almost iden tical, so if you un der-
stood the code above you don’t need any explanation for the Print Results button.
Finally, we want to go to the slide (ActivePresentation.SlideShowWindow.
View.Next) that we just created and fool PowerPoint into think ing that the
presentation does not need to be saved (ActivePresentation.Saved = True—
see “Saving and Quitting” in Chap ter 8 for more in formation about this line).
The PrintResults pro cedure has two lines:
ActivePresentation.PrintOptions.OutputType = ppPrintOutputSlidesActivePresentation.PrintOut From:=printableSlideNum, _
To:=printableSlideNum
The first line makes sure that PowerPoint knows it is go ing to print one slide per
page. The second line actually prints the single slide that we just created. If our
printable slide is slide number 6 (and thus printableSlideNum is 6), that line
says to print from slide 6 to 6.
The last pro cedure is StartAgain. This sim ply goes to the first slide, de -
letes the slide that was just printed (ActivePresentation.Slides
(printableSlideNum).De lete), and makes sure that PowerPoint doesn’t
ask you to save.
You might want to know what but tons will be tied to the last three proce-
dures. PrintablePage, in stead of the Feed back procedure from ear lier exam-
ples, will be tied to the “How Did I Do” but ton. But what about the last two
procedures? That is a trick ques tion. You don’t tie them to any but tons. We have
used VBA to create the but tons and tie them to pro cedures as part of the
PrintablePage pro cedure. Creation of the but tons and ty ing them to pro ce-
dures is taken care of automatically with our VBA.
108 Quizzes and Tests
Learn First, Ask Ques tions Later:
The Tu torial and Quiz
This chapter has explained sev eral ways to cre ate tests and quizzes. Now
we are go ing to add a tu torial to our presentation. You could do this easily by
creating some slides with some information that pre cede your quiz slides. If each
information slide has a button to move for ward, stu dents are forced to go
through the in formation slides before reaching the quiz.
This works very well for a simple, lin ear tu torial. What if your tu torial is more
complex? What if your tu torial has several parts, each of which can be reached by a
menu? That is not a prob lem. Simply put but tons on your menu slide for each part of
the tu torial and put a but ton for your quiz on the menu slide as well.
This leaves you with two problems: getting lost in hyperspace and forcing
your stu dents to go through the tu torial be fore taking the quiz. We’ll deal with
these is sues one at a time.
Lost in Hyperspace: Where Have I Been?
In a linear tu torial, that is, one where you force the student to go from one slide
to the next to the next, there is no prob lem with getting lost. Once you allow the stu -
dent choices about where to go, getting lost is an im portant concern. That can hap-
pen when us ers don’t know where they are, where they are go ing, where they have
been, and how to get where they want to go. In the real world, there are land marks
and street signs to help you get around. Com puter screens are of ten missing those
things. Even something as simple as a tutorial with sections linked by a menu can
get confusing. The most con fusing part of a menu is know ing where you have been:
“Did I al ready do section 2 and section 3 or section 3 and section 4?” One solution to
this is to leave some indication in the menu about where the user has been.
There are many ways to do this. One thing that you have probably seen in
your Web browser is that it changes the color of vis ited links: A blue link to an -
other Web page turns purple after you have fol lowed that link. If your menus are
all text, PowerPoint will do this au tomatically for you (although the results
might not be ex actly what you want). If you use buttons for your menu, one solu-
tion is to turn the but tons a dif ferent color. For ex ample, you can change the
color of the fourth shape on the second slide to magenta with:
ActivePresentation.Slides(2).Shapes(4).Fill.ForeColor.RGB = vbMagenta
Another possibility is to in dicate that a menu item has been visited by putting
a sym bol next to it, such as a check mark or a smiley face. You might cre ate a tu to-
rial and quiz like the one shown in Figure 7.5 (page 110). This simple tu torial has
three parts: The Ex ecutive Branch, The Leg islative Branch, and The Judicial
Branch. Students may choose these parts of the tutorial in any or der. Smiling
sunshines next to the but tons in dicate those sections of the tu torial that have already
Learn First, Ask Ques tions Later: The Tu torial and Quiz 109

been completed. The smiling sunshines (or whatever sym bols or pictures you like)
can be created with any tra ditional PowerPoint tools (drawing, clip art, in serting a
pic ture, etc.).
Figure 7.5. Ex ample Tu torial and Quiz PowerPoint Slides
In the figure, slide numbers are shown in the up per left corner of the slide,
and the boxes indicate which pro cedures are tied to which but tons. Notice in the
figure that some of the but tons do not use VBA; they use traditional PowerPoint
hyperlinks. Fig ure 7.6 shows the VBA code. Note that the quiz por tion of this
example is fairly simple (it doesn’t keep score), but you can use any of the
110 Quizzes and Tests
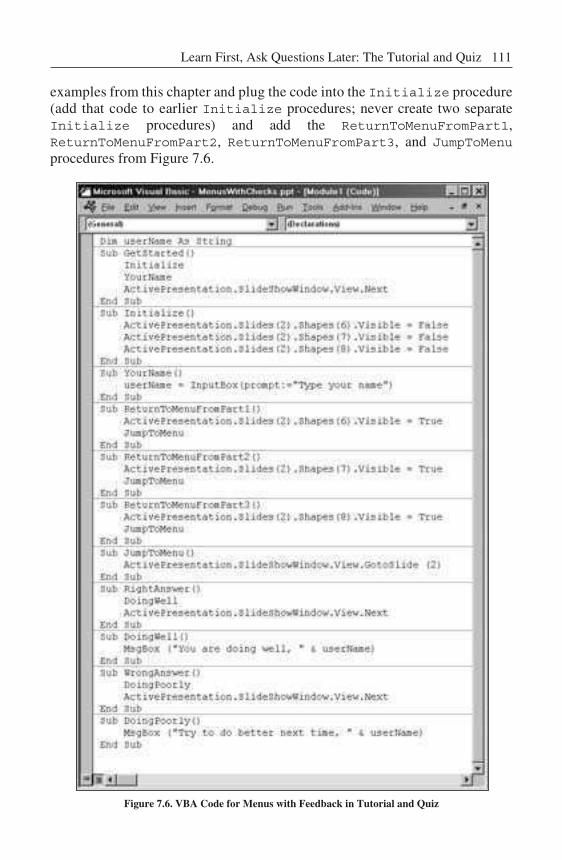
examples from this chapter and plug the code into the Ini tial ize pro ce dure
(add that code to earlier Ini tial ize procedures; never cre ate two separate
Ini tial ize pro cedures) and add the ReturnToMenuFromPart1,
ReturnToMenuFromPart2, ReturnToMenuFromPart3, and JumpToMenu
pro ce dures from Fig ure 7.6.
Figure 7.6. VBA Code for Menus with Feed back in Tu torial and Quiz
Learn First, Ask Ques tions Later: The Tu torial and Quiz 111
The important parts of this example are shapes 6, 7, and 8 on slide 2 (the
menu slide). These are the smil ing sun shine pic tures that indicate that a sec tion
of the tutorial has been completed. Of course, the numbers might change de-
pending on how you create the menu slide, and you might have more menu items
and thus more smiling sunshines (or whatever pic ture you choose).
As the shapes are the im portant parts, all but one of the new procedures deal
with the shapes. The three lines in the Ini tial ize pro ce dure, like
ActivePresentation.Slides(2).Shapes(6).Vis i ble = False
hide the shapes so that when the stu dent reaches the menu for the first time, the
shapes are hid den. If your menu is not on slide 2, change the 2 to something else.
In ad dition, this hides shape 6, so there is one line for each smiling sun shine,
each with a dif ferent number.
Next we need to show the shapes at the appropriate time. They will be
shown when clicking on the button that re turns from each part of the tu torial.
The three ReturnFromMenuFromPart pro ce dures show the ap pro pri ate shape
with
ActivePresentation.Slides(2).Shapes(6).Vis i ble = True
and use JumpToMenu to re turn to the menu slide.
The tricky part about this example is get ting the shape num bers to match
the shapes that you use. Fig uring out the num ber of each shape is discussed in
“Referencing Ob jects by Number” in Chapter 6.
If you prefer to change the color of your but tons in stead of showing a goofy
icon, you can do that with a very small change to the above code. In the
Ini tial ize pro cedure, instead of hid ing ob jects, we can set the color of our
menu buttons to blue, for ex ample:
ActivePresentation.Slides(2).Shapes(2).Fill.ForeColor.RGB = vbBlueActivePresentation.Slides(2).Shapes(3).Fill.ForeColor.RGB = vbBlueActivePresentation.Slides(2).Shapes(4).Fill.ForeColor.RGB = vbBlue
Note that the shape num bers are 2, 3, and 4 because we are re ferring to the num -
bers of the buttons, not the numbers of the smiling sunshines. In our
ReturnFromMenuFromPart pro cedures, we need to change the color of the
buttons to a dif ferent color, using lines like the following:
ActivePresentation.Slides(2).Shapes(2).Fill.ForeColor.RGB = vbMagenta
Now that your students know where they have been, in the next section, we
will add a few lines so they have to com plete the tu torial be fore taking the quiz.
112 Quizzes and Tests
Hide the Quiz But ton
With a but ton on the menu slide, your stu dents can choose to take the quiz
whenever they want. Sometimes this is appropriate; sometimes it is not. For those
times when you want your stu dents to complete the tu torial be fore taking the quiz,
we will combine variables (to keep track of what the stu dents have done) with hid -
ing and showing ob jects (see “Hiding and Showing PowerPoint Objects” in Chapter
6). We will hide the Quiz but ton on the menu slide un til all sections of our tu torial
have been visited. Use the code in Figure 7.7 (page 114) to do this. Lines and proce-
dures noted with the com ment ‘ADDED have been added to the code from the pre vi-
ous ex am ple.
Note that this figure does not in clude the RightAnswer, WrongAnswer,
DoingWell, and DoingPoorly pro cedures. Ei ther use the simple ones from
the previous ex ample (see Figure 7.6, page 111) or use more com plicated quiz-
zes from other examples in this chapter.
If you are add ing onto the pre vious ex ample, all you need to change is the
VBA; all the but tons are tied to the same pro cedures. If you are starting with a
new file, use Figure 7.5 (page 110) to guide you in creating the PowerPoint
slides and tying the buttons to procedures.
The variables visitedPart1, visitedPart2, and visitedPart3 are
the keys to this ex ample. They tell us whether the student has completed each
part of the tu torial. They are set to False in the Ini tial ize pro ce dure be cause
no part of the tu torial has been completed. They are set to True in the
ReturnToMenuFromPart pro cedures to in dicate when each part of the tu torial
has been completed.
Finally, three new procedures have been added: HideQuizButton,
ShowQuizButton, and DoWeShowQuizButton. In my example, the Quiz but -
ton is shape number 5 on the menu slide (slide num ber 2) so I can hide it in
HideQuizButton with
ActivePresentation.Slides(2).Shapes(5).Vis i ble = False
Change False to True to show it, and change 5 to some other num ber if your
Quiz but ton is not shape 5. Also note that the Quiz but ton should be hid den at the
be gin ning so HideQuizButton is added to Ini tial ize.
DoWeShowQuizButton asks a three-part question: Is part 1 of the tu torial
completed, is part 2 of the tu torial com pleted, and is part 3 of the tu torial com pleted?
If all three parts have been completed—(visitedPart1, visitedPart2, and
visitedPart3 have each been set to True)—then we show the Quiz but ton. If
any part has not been com pleted (any visitedPart is not True), then we hide
the Quiz but ton.
Learn First, Ask Ques tions Later: The Tu torial and Quiz 113
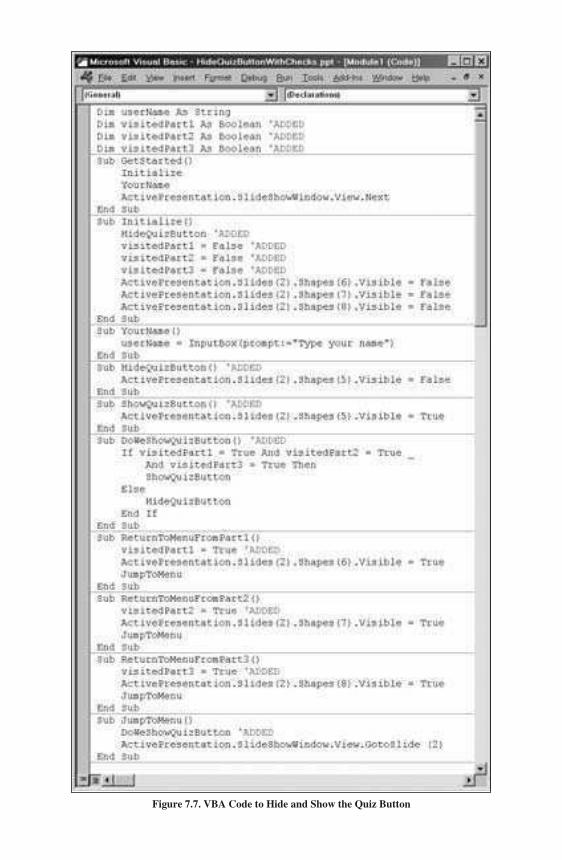
Figure 7.7. VBA Code to Hide and Show the Quiz But ton

If your tutorial has more parts, you will need to do the following:
• Add more variables, such as visitedPart4 and visitdPart5,
and declare them with Dim state ments.
• Initialize the added vari ables in the Ini tial ize pro ce dure, with
lines like visitedPart4 = False.
• Add more pro cedures (such as ReturnToMenuFromPart4 and
ReturnToMenuFromPart5) to re turn to the menu from the added parts
of the tutorial. Be sure to tie the menu buttons to those parts of the tu torial.
• Add more parts to the If ques tion in DoWeShowQuizButton. For
ex am ple:
If visitedPart1 = True And visitedPart2 = True _And visitedPart3 = True And visitedPart4 = True _And visitedPart5 = True Then
• Add more smiling sun shine pic tures next to the ad ditional menu but-
tons. Hide them in the Ini tial ize pro cedure and show them in the
ad di tional ReturnToMenuFromPart pro ce dures.
Of course, this same structure does not need to be used for a tu torial and
quiz; it could be used for any thing with several parts. If you want your stu dents
to complete certain parts before completing some other parts, you can use ex -
actly the same code.
Con clu sion
You now have seen several ex amples of ways to create tu torials and quiz-
zes. You can create dif ferent kinds of questions and keep and re port scores in
different ways. In the next chapter, you learn a few more scripting tricks and get
some more ex planation about some pro gramming structures.
Con clu sion 115
Ex er cises to Try
� In the section “Try Again and Again: Answer Again Af ter It’s
Right,” we cre ated a sim ple multiple-choice quiz that only
counts the student’s first try on each question. Try to add two
more mul tiple-choice ques tions to the quiz. Re member that you
will need ad ditional vari ables q3answered and q4answered as
well as RightAnswer3, WrongAnswer3, RightAnswer4, and
WrongAnswer4 pro ce dures.
� In the section “Short-Answer Quiz Questions,” we added
short-answer questions to our multiple-choice quiz. Try add ing
two more short-answer questions to your quiz. Re member that
you will need additional Ques tion, RightAnswer, and
WrongAnswer pro ce dures.
� In the section “How Did You Do: Reporting Results to the
Teacher,” we cre ated a slide with the re sults that was ready to be
printed. Fol low the di rections in that section to add two addi-
tional ques tions to your quiz. One should be a mul tiple-choice
question, and the other should be a short-answer question.
� In the section “Learn First, Ask Questions Later: The Tu torial
and Quiz,” you created a simple tu torial and quiz with the shapes
hidden and shown—to indicate which sections of the tu torial
were completed—and a Quiz but ton that is hid den un til all sec-
tions of the tu torial are fin ished. Add a fourth section to your tu-
torial and use one of the more com plex quiz structures (at least
something that keeps score) for your quiz.
116 Quizzes and Tests
8More Tricks for Your
Script ing Bag
In tro duc tion
In Chapter 7 you used all the tricks you had learned in pre vious chapters to
create quiz zes and tests. This chapter will add to your scripting bag of tricks to
help you do more with the ex amples from pre vious chapters, create some of your
own ex amples, and un derstand some of the things you have already used. You
will learn more about If statements and loops (like the While loops you have
already seen) and about timed functions, au tomatically saving or not saving your
presentation, naming ob jects and slides, and ran dom numbers. The chapter con-
cludes with a complete ex ample that uses random numbers to ran domly show
different questions from a large pool.
Vo cab u lary
• Ar ray • Loop
• Con di tional • Nested If
• Dirty • Pa ram e ter
• In fi nite loop • Stop ping con di tion
Con di tion als: The If State ment
It is com mon to want to do one thing un der certain circumstances and
something else un der other circumstances. If it is raining, we will play in side.
Otherwise, we will play out side. We like to do this in VBA as well. We might
say:
If rain ing = True Then PlayInsideElse PlayOutsideEnd If
The If statement asks a question. If the answer is yes, we do the first thing. If the
answer is no, we do what co mes af ter the Else. The above code is exactly the
same as the English sentences:
If it is rain ing ThenWe will play in side
Oth er wiseWe will play out side
The question can be any thing that re turns a True or False an swer. We might
compare the value of a vari able to something. For ex ample:
If numCorrect > 6 Then MsgBox("You got a lot of ques tions right.")Else MsgBox("You can do better than that.")End If
In this case, if the variable numCorrect (pre sumably that was used by some
other procedures to count the num ber of questions that were an swered correctly)
is greater than 6, a MsgBox will pop up say ing “You got a lot of questions right.”
If the vari able numCorrect is not greater than 6 (it is 6 or less), then the MsgBox
will say “You can do better than that.”
This can be extended to check more than one thing using ElseIf. You
might say: if it is rain ing, we will play in side; if it is snow ing, we will build
snowmen; oth erwise, we will play baseball.
If rain ing = True Then PlayInsideElseIf snow ing = True Then BuildSnowmenElse PlayBaseballEnd If
118 More Tricks for Your Scripting Bag
In this case, we ask one ques tion. If the answer is yes, we do the first thing. If the
answer is no, we ask a second ques tion. If the answer to the second ques tion is
yes, we do the second thing. If the answer to the first question is no, and the an -
swer to the second ques tion is no, we do the third thing. Note, we can ask as
many questions as we want by putt ing more and more ElseIf state ments. Imag-
ine a grad ing pro gram that converts num bers to letter grades:
Sub WhatsMyGrade() If gradeNum >= 90 Then MsgBox("You got an A") ElseIf gradeNum >= 80 Then MsgBox("You got a B") ElseIf gradeNum >= 70 Then MsgBox("You got a C") ElseIf gradeNum >= 60 Then MsgBox("You got a D") Else MsgBox("You got an F") End IfEnd Sub
This assumes that a variable named gradeNum has been given a value some-
where else. It then asks the question, is this grade greater than or equal to 90? If
the answer is yes, it pops up a box with the message “You got an A,” and it stops.
However, if the an swer is no, it asks the next question: is this grade greater than
or equal to 80? If the answer to this ques tion is yes, it pops up a box with the mes-
sage “You got a B,” and it stops. It keeps asking questions as long as the an swers
are no. If all the answers are no, it reaches the Else statement and pops up a box
with the message, “You got an F.”
Note that you can do more than one thing in re sponse to a yes an swer. You
might, for ex ample, pop up a MsgBox and then move to the next slide un der one
condition, but pop up a dif ferent MsgBox and then move to the previous slide un -
der a dif ferent condition:
If gradeNum >= 90 Then MsgBox ("You got an A.") ActivePresentation.SlideShowWindow.View.NextElse MsgBox ("You need to work harder.") ActivePresentation.SlideShowWindow.View.Pre viousEnd If
Because you can do sev eral things in re sponse to a yes an swer, you can do sev -
eral complicated things. The above ex ample uses two simple statements, but you
can have as many statements as you want. Some of these state ments might be
complicated structures like loops (see the next section) and other If state ments.
When you put an If block in side an If block, it is called a nested If. If the an -
swer to your question is yes, you might want to ask other questions:
Con di tion als: The If State ment 119

If gradeNum >= 90 Then MsgBox ("You got an A.") If previousGradeNum >= 90 Then MsgBox ("Good job. Two A grades in a row!") End If ActivePresentation.SlideShowWindow.View.NextElse MsgBox ("You need to work harder.") ActivePresentation.SlideShowWindow.View.Pre viousEnd If
Pay careful attention to the way this example is in dented. Al though you don’t
have to type it in dented in this way, it is much easier to un derstand with the in dent-
ing. You can see that the question is asked: Is gradeNum greater than 90? Every-
thing be tween the first If and the Else is in dented to show that it is what to do if
the answer is yes. Part of what to do is to ask an other question. That question asks
if previousGradeNum also is greater than 90. This question will only get asked
if gradeNum is greater than 90. The in denting helps to see the nesting. It is partic-
ularly help ful if the nested If block is more com plicated, with its own Else, for
ex am ple. The Else should always be lined up with the If with which it goes.
The If statement is very pow erful. It is one of the things that al lows for in -
teraction. Without con ditional statements, every user would do ex actly the same
thing as the previous user.
Loop ing
If statements allow you to make choices based on whether or not a condi-
tion is true. Loop ing al lows you to do something over and over again. How many
times is based on a con dition, that is, a question like what you ask in an If state -
ment. This is known as the stop ping con dition. In some types of loops (such as a
While loop), this question is phrased as a keep go ing ques tion, and in other
types of loops (such as a For Next loop), the con dition is based on how many
times you say you want to loop. However the question is phrased, the loop needs
to know when to stop.
While Loops
There are sev eral types of loops, and you might want to ex plore different
ones, but once you know one, you can do just about any thing you might want to
do. Let’s look at the While loop. The While loop asks a question and keeps loop-
ing while the answer to the ques tion is yes. My four-year-old daugh ter might ask
“Is it still raining?” She might ask this over and over again un til it has stopped rain-
ing. As long as it is rain ing, she will add an other block to her tower and ask again:
While StillRaining AddBlockToTowerWendPlayOutside()
120 More Tricks for Your Scripting Bag
In this case, the ques tion is: Is it still rain ing? If the an swer is yes, add an other
block to the tower. The Wend state ment stands for While END and sim ply lim its
the loop. What ever is between the While and Wend statements will hap pen over
and over again un til the an swer to the ques tion is no. Many things can hap pen
be tween a While and Wend; it is not lim ited to one state ment. This loop will
keep executing as long as it is still raining. Once it stops, the an swer to the ques -
tion will be no, and whatever is after the Wend will be ex ecuted. In this case, my
daughter will fi nally go play outside.
We could use this to ask a ques tion un til the right answer is entered. For
ex am ple:
Sub HowManyPlanets() Dim an swer As String
an swer = "" While an swer <> "nine" And an swer <> "9" And an swer <> "Nine" an swer = InputBox _ ("How many plan ets are there in our so lar sys tem?") WendEnd Sub
In this ex ample, the pro cedure HowManyPlanets con tains a While loop with a
slightly complicated question. The ques tion ba sically asks: Is the answer wrong?
That is, is whatever the user typed not “nine,” “9,” or “Nine”? If it is not any of
those, it will ask for the an swer again and again and again un til one of those an -
swers is entered in the InputBox.
Sometimes we might not want our us ers to get stuck in a loop if they re ally
don’t know the an swer. We might want to limit the number of times we ask the
question. In this example, the user will be asked three times, so our While ques -
tion checks to be sure that the answer is wrong and that we have asked fewer than
three times.
Sub HowManyPlanets() Dim an swer As String Dim count As In teger
an swer = "" count = 0 While an swer <> "nine" And an swer <> "9" And an swer <> "Nine" _ And count < 3 an swer = InputBox _ ("How many plan ets are there in our so lar sys tem?") count = count + 1 WendEnd Sub
The variable count is a num ber (an In te ger). We started it out as 0 (count =
0) be cause at the be ginning, we haven’t asked at all. Then we check to see
whether the an swer is not one of the right answers (nine, 9, or Nine), and we also
check whether the count is still less than 3. If the an swer is still wrong, and the
Loop ing 121
count is still less than 3, we ask for the an swer again and add 1 to count (count
= count + 1). Once we have asked three times, count will be 3. Then, the
question in our While state ment will be no be cause count < 3 will be False.
In that case, we will stop looping.
When the con ditions are complicated, we might want to do what we have
done with the YourName procedure (see Chapter 5):
Sub YourName() Dim done As Boolean
done = False While Not done userName = InputBox(prompt:="Type your name", _ Ti tle:="Input Name") If userName = "" Then done = False Else done = True End If WendEnd Sub
In this procedure, we use the variable done to determine whether we are fin ished
loop ing. The If block could have all been in cluded in the While state ment, elim i-
nating the need for done. This would have made for short VBA code, but it would
have been very dif ficult to un derstand, par ticularly if the stop ping con dition was
more and more complicated. Setting up an If block allows you to check as many
conditions as you like and set done based on those con ditions. Then, the only
ques tion for While is: Are we done or not? If we are not done, keep loop ing.
Do Loops
Do loops are sim ilar to While loops. They al low you to specify either a
While con dition (keep go ing while something is True) or an Un til con di tion
(keep go ing un til something is True). They also let you specify the con dition
(ask the stopping question) at the beginning or the end. If the condition is at the
beginning, the loop might never run (not even once). If the con dition is at the
end, the loop will al ways run at least once. Here are some simple examples:
Do an swer = InputBox("How many plan ets are in the so lar sys tem?")Loop Un til an swer = "9"
Do an swer = InputBox("How many plan ets are in the so lar sys tem?")Loop While an swer <> "9"
Do While count < 3 an swer = InputBox("What do you like to eat?")
count = count + 1Loop
122 More Tricks for Your Scripting Bag
Do Un til count >= 3 an swer = InputBox("What do you like to eat?") count = count + 1Loop
In the first example, the loop will run at least once and ask the ques tion: How
many planets are in the solar system? After running the loop once, it will check to
see if an swer is 9. If it is, it will stop. If it is n’t, it will loop un til the answer is 9.
In the second ex ample, the loop will run at least once and ask the ques tion:
How many planets are in the solar system? After running the loop once, it will
check to see whether an swer is not 9. It will keep loop ing while the answer is
not 9. Note, this works ex actly the same as the first ex ample, but some times it is
easier to ask a pos itive question than a neg ative question, particularly if the ques -
tion has many parts with And and Or.
In the third and fourth ex amples the condition will be checked be fore the
loop runs. In the third ex ample, the loop will only run if count is less than 3, and
it will keep loop ing while count is less than 3. In the fourth ex ample, the loop
will stop run ning if count is greater than or equal to 3, and it will keep loop ing
un til count is greater than or equal to 3. Like the first two ex amples, these ex -
amples have ex actly the same re sults, but some times it is eas ier to ask a positive
question, and sometimes it is easier to ask a negative question.
For Next Loops
Sometimes you have a specific num ber of times you want to loop. For
Next loops allow you to do this and keep a count of the loop. This could be done
with a While or Do loop by add ing one to a count vari able in side the loop, but it
can be eas ier with a For Next loop.
A sim ple example of a For Next loop fol lows:
For i = 1 To 10 MsgBox("Count ing..." & i)Next i
This uses the variable i and counts from 1 to 10. That is, i starts out at 1, and the
loop keeps loop ing (ev erything be tween the For line and the Next line is run)
over and over again, adding 1 to i, up to and including the time that i be comes
10. Next i says to go back to the beginning of the loop and in crease i. As with
all the other loops, you can put as many lines as you like between the For line
and the Next line, and all those lines will be ex ecuted over and over again.
For Next, Do, and While loops can get more com plicated, but these ba sic
loops should suit most of your pur poses.
Loop ing 123
In fi nite Loops
Before we leave looping, a word of warning about infinite loops: In all of
our loops, we have set stop ping con ditions; that is, we have told the loop when to
stop loop ing. What if the stop ping con dition is never met? Then you have an in -
finite loop, a loop that never stops. Here is a simple example (don’t type this):
While 8 > 7 MsgBox ("Eight is still greater than seven.")Wend
Be cause 8 > 7 is al ways True (i.e., 8 is always greater than 7), this loop will
never stop. Usually, you won’t have something so ob vious. You will either type
something wrong (per haps > when you meant <), or you will have a complicated
expression with variables, and you won’t realize that the con dition for stopping
never can be met.
If you get stuck in an in finite loop, it will ap pear that PowerPoint has
frozen. In all likelihood, you will have to force PowerPoint to quit. On a Win -
dows computer, you can use Ctrl-Alt-Delete (i.e., hold down the Ctrl and Alt
keys while hitting the De lete key). Depending on the version of Windows you
are run ning, you will ei ther restart your computer or be given the op tion to stop
an un responsive ap plication (PowerPoint, in this case). If you are on a
Macintosh, you will have to hit Command-Option-Esc (i.e., hold down the Com-
mand and Op tion keys while hit ting the Esc key; note that the Command key is
the one with the picture of the apple on it). If you do this, you will lose any
changes you made to your presentation since you saved it last. That is why it is
very important to save changes of ten, particularly when you are working with
loops. In fact, when testing out a loop, you should probably save your changes
before you put PowerPoint in Slide Show View.
Pa ram e ters
Sometimes a procedure has all the information it needs when you write it.
Sometimes it gets in formation from vari ables where we have stored in formation
(as long as the variables are de clared at the beginning of the mod ule). At other
times we want to give a pro cedure extra information as we go. We can do this
with something called a pa rameter. A parameter is extra information sent to a
procedure when it is called. We have used pa rameters when call ing procedures
(something as simple as a MsgBox takes a parameter: the text to display), but we
have not used pa rameters in procedures we have written. Parameters are a very
useful tool for pro grammers, but they can be a bit tricky. Fol lowing is a brief ex -
planation of parameters, so when you see them in ex amples (such as the timed
functions in the next section), you’ll understand them.
Imagine that you wanted to put up a MsgBox with different mes sages for
different occasions. Perhaps the message is the same ex cept for one thing. For
124 More Tricks for Your Scripting Bag
example, you might want to say, “You are do ing well, Ella” at some point and
“You are do ing poorly, Ella” at another time. We have done this with two sep a-
rate pro cedures in the past, but we could write one pro cedure with a parameter:
Sub Do ing(doingHow As String) MsgBox ("You are do ing " & doingHow & ", " & username)End Sub
For something this simple, the pa rameter may not be worth the effort, but it can
be very use ful if the procedure that takes the pa rameter is more com plicated. In
this case doingHow is the parameter. It is a String be cause it is de clared in the
Sub state ment to be a String, so another procedure would call doingHow with
a String in pa ren the ses. For example Do ing("well") would pop up a
MsgBox that says, “You are do ing well, Ella” (assuming the userName was
“Ella”) . This might be called from a pro cedure that in cluded the following If
block:
If numCorrect > 10 Then Do ing ("su perbly")ElseIf numCorrect > 8 Then Do ing ("well")ElseIf numCorrect > 5 Then Do ing ("OK")ElseIf numCorrect > 3 Then Do ing ("Poorly")Else Do ing ("Very Poorly")End If
Parameters can be of any type. We used a String in this ex ample, but you can
pass var ious kinds of num bers or Booleans or even ob jects such as shapes. You
can pass more than one pa rameter as well if you need dif ferent kinds of in forma-
tion passed to a pro cedure, but for most of your pur poses, if you need a parame-
ter at all, one will suffice. Parameters can be tricky and com plicated, so we will
not use them a lot, but now you have a basic un derstanding of how they work in
case you see them in some examples.
Timed Functions
Most actions in PowerPoint happen be cause the user did something, such
as pressing a but ton to go to another slide. Sometimes, how ever, you want things
to hap pen whether or not the user has done anything. For ex ample, you might
want a sound to start playing a few seconds after the slide is shown. You might
want the presentation to go from slide to slide on its own. You might want in for-
mation to pop up on the screen, then go away, and then have other in formation
pop up on the screen.
As soon as the user clicks on a but ton tied to a script with timing features
(such as the but ton to go to another slide), you can start any thing hap pening af ter
Timed Functions 125
any length of time. Of course, the standard “Custom Animation” choice from the
Slide Show menu can al low ob jects to appear with timing, but you might want to
do more. If you want something to happen after a short delay, you can use the
following procedure:
Sub Wait() waitTime = 5 start = Timer While Timer < start + waitTime DoEvents WendEnd Sub
This procedure waits five seconds. Timer is a func tion that re turns the num ber
of seconds since midnight (e.g., at 12:01 A.M., Timer will re turn 60). waitTime
is a vari able used to tell how many seconds to wait (change the number 5 to any
number to have this pro cedure wait that number of seconds). At the beginning of
the pro cedure, the variable start is set to the current time in sec onds (as re -
turned by Timer). Next, we loop un til the cur rent time is less than the time we
started plus the waitTime (which is five seconds in our example). In side the
loop (be tween the While state ment and the Wend state ment), we run DoEvents.
This lets VBA check to see if anything else is hap pening, particularly things that
the user might do, such as hit the Es cape key or click on another button. If you
don’t want the user to do anything while you are waiting, leave out DoEvents.
Be careful! If you make a mistake (perhaps you set the waitTime to five mil -
lion seconds in stead of five seconds or you mistyped Timer in the Do While state -
ment), you could end up in an in finite loop, essentially freezing PowerPoint. If you
feel you must stop the user from do ing any thing while VBA waits, leave DoEvents
in your pro cedure un til you are sure everything works. Once you are certain every-
thing works, delete the DoEvents line. This will allow you to stop your presenta-
tion by hit ting the Es cape key while you are still testing your pro cedure.
Before we con tinue, get a new PowerPoint pre sentation and type the Wait
pro ce dure. Then add the fol low ing pro ce dure:
Sub HelloWaitGoodbye() MsgBox ("Hello") Wait MsgBox ("Good bye")End Sub
When you run HelloWaitGoodbye, you should see a MsgBox that says
“Hello.” Af ter you click OK to dis miss the MsgBox, you should see a MsgBox
that says “Goodbye,” but only after a de lay of five seconds.
Now suppose that you want to wait, but not always for five seconds. You
could write sev eral dif fer ent pro ce dures (Wait5, Wait10, Wait60, etc.) to wait
different amounts of time, but we can use a sim ple parameter to write one proce-
dure that can wait dif ferent amounts of time.
126 More Tricks for Your Scripting Bag
Sub Wait(waitTime As Long) start = Timer While Timer < start + waitTime DoEvents WendEnd Sub
In this pro cedure, instead of setting the waitTime to five, we call Wait with
however long we want to wait (e.g., Wait (60) would wait sixty seconds).
Timed func tions are useful if you want to give your users a chance to do
something be fore moving on. For example, you might display a text box, wait a
short time, then display a second text box. This allows the user to focus on the
first text box be fore getting too much in formation. Be careful with timed func-
tions, be cause dif ferent people read at dif ferent speeds. If you set your wait times
too long, some people will get restless waiting for the next thing to hap pen. If
you set them too short, some peo ple will not have time to finish the first thing.
Some tim ing can be done automatically without VBA. You can use Custom
Animation to have things ap pear and disappear as much as you like. How ever, as
with many things that you can do without VBA, you might find that you can do
more with VBA. For ex ample, you might ask the user how fast to go:
speed = InputBox ("How fast do you read [fast, me dium, slow]?")
Now when it is time to wait, you might do something like the following:
If speed = "fast" Then Wait (5)ElseIf speed = "me dium" Then Wait (10)Else Wait (15)End If
You should note that wait times are approximate. This does not work well if you
need precise timing, but it should do roughly what you want.
Saving and Quit ting
When you use VBA to change your pre sentation in any way (including
adding shapes, hid ing shapes, chang ing text, etc.), PowerPoint recognizes that
your pro ject has been changed. When ever a pro ject has been changed,
PowerPoint wants to save it. If you don’t save it, and you exit PowerPoint,
PowerPoint will ask you if you want to save. This is a good thing if you are de -
signing a pro ject and forgot to save be fore exiting. This might not be such a good
thing if one of your students is run ning your project.
As the de signer of an interactive multimedia pro ject, you should know
when you want to save and when you don’t. In “How Did You Do: Re porting
Results to the Teacher” in Chapter 7, we added a slide to re port the re sults, but
Saving and Quitting 127
we didn’t want to save the slide. In this case, PowerPoint knows that the presen-
tation has been changed, so we needed to make it think that it was not changed.
Of course, changes that PowerPoint thinks need to be saved do not have to be as
large as adding a slide. Changes as small as hid ing or showing an ob ject, such as
a shape that in dicates the student has vis ited part of the tu torial in “Learn First,
Ask Questions Later” in Chapter 7, will make PowerPoint think your presenta-
tion needs to be saved.
In other cases, we might want the changes to be saved. In Chapter 10 is an
example in which important slides are be ing added to the presentation. As us ers
go through the pro ject, they might be asked for in formation, which is stored on a
newly created slide. Later, the de signer will go through the pre sentation and look
at those slides . . . only if they were saved.
Fortunately, it is very easy to con trol whether or not your pre sentation is
saved. Four simple pro cedures will help you:
Sub MakeNotDirty() ActivePresentation = TrueEnd Sub
Sub Save() ActivePresentation.SaveEnd Sub
Sub Quit() Ap plication.QuitEnd Sub
Sub QuitAndSave() Save QuitEnd Sub
In computer terms, a pre sentation that is changed but not saved is called dirty.
The status of the current presentation (whether it is dirty or not, i.e., whether it
has been changed or not since the last time it was saved) is stored in the variable
ActivePresentation.Saved. Even if the presentation has been changed, we
can fool PowerPoint into think ing that it hasn’t been changed by setting the
ActivePresentation.Saved to True as in the MakeNotDirty pro ce dure
above. If you call this pro cedure (or simply put the line ActivePresentation.
Saved = True into some other pro cedure), PowerPoint will not ask you if you
want to save the pre sentation when you quit. Be sure you do this every time you
make a change be cause the next change you make will make the pre sentation
dirty again, set ting ActivePresentation.Saved back to False.
You prob ably want to do this right away when you make a change. In fact,
you should do it in the procedure that makes the change. For ex ample:
128 More Tricks for Your Scripting Bag
Sub StartAgain() ActivePresentation.SlideShowWindow.View.GotoSlide (1) ActivePresentation.Slides(printableSlideNum).De lete ActivePresentation.Saved = TrueEnd Sub
This procedure is from the example in “How Did You Do: Re porting Results to
the Teacher” in Chapter 7. This procedure jumps to the first slide and deletes the
last slide (which had been cre ated tem porarily in an ear lier procedure). Once it
deletes the last slide, the pre sentation is dirty, but we don’t want any one to be
asked to save it. By setting ActivePresentation.Saved to True, the stu -
dents won’t be asked.
For the cases where you want to save a presentation, you can use the Save
procedure above. As long as the place where the presentation is run ning is a lo -
cation that can be saved (un locked disk, network folder where the user has write
priv i leges, etc.), Save will save the presentation without the user even know ing
(unless it is saving something to a slow de vice like a floppy disk, in which case it
might take a few seconds to save). You would use this (or simply the line
ActivePresentation.Save) im me di ately af ter do ing some thing that you
want saved. An ex ample of this can be found in Chapter 10:
Sub WorkTogether() GetNameEmailIdea GoToWorkTogether AddWorkTogetherSlide SaveEnd Sub
In this ex am ple, in for ma tion is col lected (us ing the GetNameEmailIdea pro ce-
dure), the presentation jumps to another slide (using the GoToWorkTogether
procedure), and a new slide is added to the presentation (using the
AddWorkTogetherSlide pro cedure, which is where the pre sentation be comes
dirty). Fi nally, the presentation is saved (us ing the Save pro cedure). The saving
happens automatically without the user’s knowl edge. Of course, the Save pro -
cedure from above must be in cluded in your VBA module.
Finally, you might want to quit the presentation (possibly when a user
presses an Exit but ton). If you weren’t worried about saving, you could simply
hyperlink a but ton to End Show (us ing traditional PowerPoint and no VBA). If
you are wor ried about saving, you will need something like the last two pro ce-
dures. Quit will quit the pre sentation without saving and without asking the
user whether or not to save. Be careful with this. If you are trying out your Quit
procedure while you are creating your presentation and you haven’t saved, your
changes will be lost. This in cludes changes to your VBA code. Therefore, you
should always save your presentation before trying it out.
QuitAndSave sim ply calls our Save pro cedure before quitting, so the pre-
sentation will be saved. Note that Save ig nores whether or not the presentation
Saving and Quitting 129
is dirty; it saves re gardless. Thus, you don’t want to save if you have made
changes that you don’t want saved (even if you have called MakeNotDirty).
Being sure that changes are saved or not saved as you, the designer, know
they should be is very important. Your students won’t know whether they should
save or not, and they shouldn’t be bothered by be ing asked. The pro cedures in
this section will help you man age the saving or not saving of your presentation.
What’s in a Name? Finding and Chang ing
Object and Slide Names
Ob ject Names
In Chapter 6 we discussed how to ref erence ob jects by their names, and we
noted how dif ficult it is to re member the name of an ob ject. The fol lowing
scripts can be used to find the name of an ob ject and set the name of an ob ject.
Note that all other scripts in this book are de signed to be run in Slide Show View.
These scripts are de signed to be run in Edit View.
The two procedures that we need are GetObjectName and
SetObjectName. GetObjectName finds out what the name of an ob ject is.
SetObjectName asks you to type a new name for an ob ject.
If you run the GetObjectName script while an ob ject is selected, a
MsgBox will pop up with the ob ject’s name. If you run SetObjectName, an
InputBox will al low you to en ter a name for an object. These scripts check to
make sure that one and only one ob ject is selected, because you can’t get or
change the name of more than one object at a time.
Sub GetObjectName() If ActiveWindow.Se lection.Type = ppSelectionShapes _ Or ActiveWindow.Se lection.Type = ppSelectionText Then If ActiveWindow.Se lection.ShapeRange.count = 1 Then MsgBox (ActiveWindow.Se lection.ShapeRange.Name) Else MsgBox ("You have se lected more than one shape.") End If Else MsgBox ("No shapes are se lected.") End IfEnd Sub
Sub SetObjectName() Dim objectName As String
If ActiveWindow.Se lection.Type = ppSelectionShapes _ Or ActiveWindow.Se lection.Type = ppSelectionText Then If ActiveWindow.Se lection.ShapeRange.count = 1 Then objectName = InputBox(prompt:="Type a name for the ob ject")
objectName = Trim(objectName)
130 More Tricks for Your Scripting Bag
If objectName = "" Then MsgBox ("You did not type any thing. " & _ "The name will re main " & _
ActiveWindow.Se lec tion.ShapeRange.Name)Else
ActiveWindow.Se lec tion.ShapeRange.Name = objectNameEnd If
Else MsgBox _ ("You can not name more than one shape at a time. " _ & "Se lect only one shape and try again.")
End IfElse
MsgBox ("No shapes are se lected.")End If
End Sub
If you are try ing to un derstand these pro cedures, pay careful attention to the
nested If statements and how they are in dented in the example.
The heart of these pro cedures is ActiveWindow.Se lec tion.
ShapeRange.Name. This looks at the Name prop erty of the currently se lected
shape. In GetObjectName, we simply re turn this name in a MsgBox. In
SetObjectName, we set this with what ever is typed in an InputBox. The rest
of each of the procedures is to make sure an ob ject is se lected and to clean up
what you typed for the ob ject’s name.
If you run the GetObjectName script while an ob ject is selected, a
MsgBox will pop up with the ob ject’s name. You can then use this name in
quotes in stead of an ob ject’s number. For ex ample, if you wanted to hide an ob -
ject named “Pic ture 6,” you can use:
ActivePresentation.SlideShowWindow.View.Slide. _ Shapes("Pic ture 6").Vis ible = False
As you recall from Chap ter 6, once you add an ob ject to your slide, its name, un -
like its number, will not change un less you change it, so this line of code will al-
ways work even if you change the an imation or der or delete other ob jects on the
slide. Even if you don’t name your own ob jects, each new ob ject that is added to
a slide is given a name that is different from all other objects that have ever been
added to that slide.
When you run SetObjectName, an InputBox will al low you to en ter a
name for an object. Trim is used to delete any ex tra spaces before and af ter the
name you type. The pro cedure also checks to make sure you typed something,
because you don’t want to give an ob ject a blank name.
GetObjectName and SetObjectName check to make sure that one and
only one ob ject is selected, because you can’t get or set the name of more than
one ob ject at a time. If you are look ing for a simpler way to do the same things,
you can try the following scripts, but you are responsible for mak ing sure that
you have selected one and only one object.
What’s in a Name? Finding and Changing Ob ject and Slide Names 131
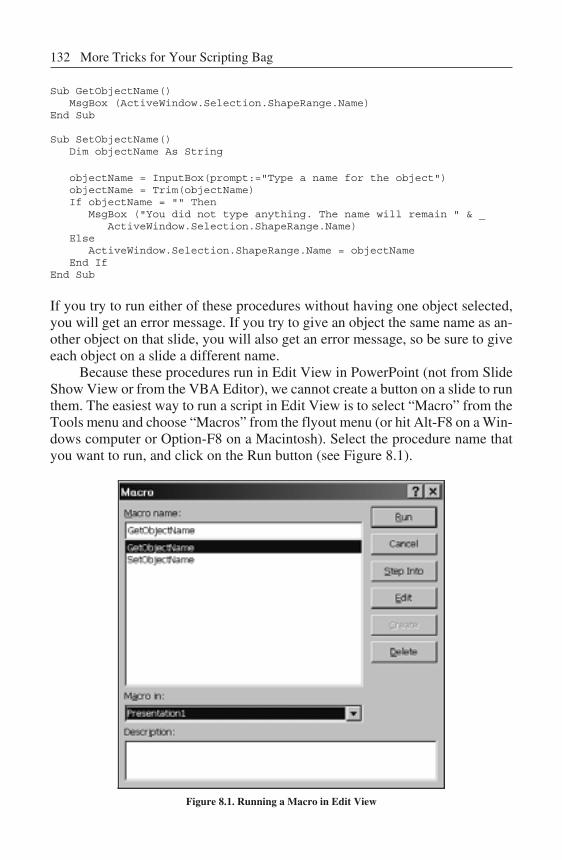
Sub GetObjectName() MsgBox (ActiveWindow.Se lection.ShapeRange.Name)End Sub
Sub SetObjectName() Dim objectName As String
objectName = InputBox(prompt:="Type a name for the ob ject") objectName = Trim(objectName) If objectName = "" Then MsgBox ("You did not type any thing. The name will re main " & _ ActiveWindow.Se lection.ShapeRange.Name) Else ActiveWindow.Se lection.ShapeRange.Name = objectName End IfEnd Sub
If you try to run either of these pro cedures with out hav ing one ob ject selected,
you will get an er ror message. If you try to give an ob ject the same name as an-
other ob ject on that slide, you will also get an er ror message, so be sure to give
each object on a slide a different name.
Because these procedures run in Edit View in PowerPoint (not from Slide
Show View or from the VBA Ed itor), we cannot create a but ton on a slide to run
them. The eas iest way to run a script in Edit View is to se lect “Macro” from the
Tools menu and choose “Macros” from the flyout menu (or hit Alt-F8 on a Win -
dows computer or Op tion-F8 on a Macintosh). Se lect the procedure name that
you want to run, and click on the Run but ton (see Figure 8.1).
Figure 8.1. Run ning a Macro in Edit View
132 More Tricks for Your Scripting Bag
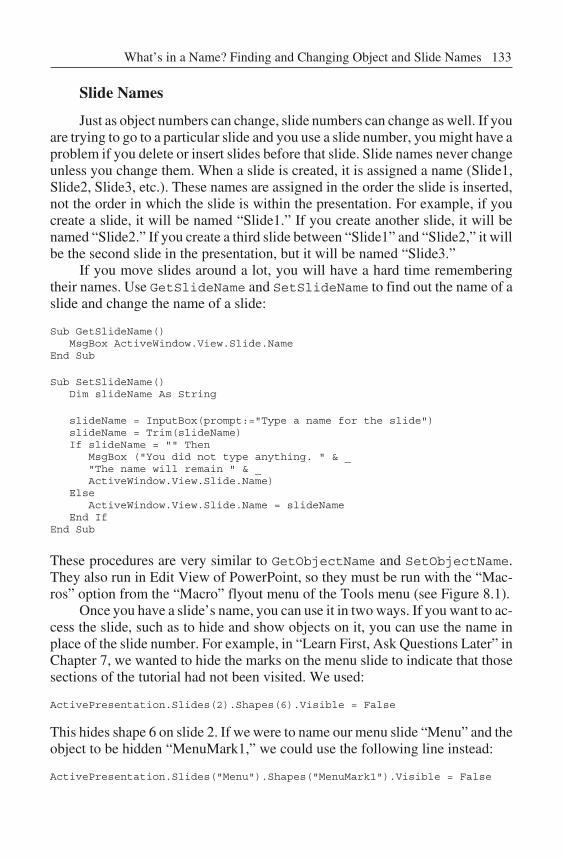
Slide Names
Just as ob ject num bers can change, slide num bers can change as well. If you
are try ing to go to a par ticular slide and you use a slide num ber, you might have a
problem if you de lete or in sert slides before that slide. Slide names never change
unless you change them. When a slide is created, it is as signed a name (Slide1,
Slide2, Slide3, etc.). These names are as signed in the order the slide is in serted,
not the order in which the slide is within the pre sentation. For ex ample, if you
create a slide, it will be named “Slide1.” If you cre ate an other slide, it will be
named “Slide2.” If you create a third slide be tween “Slide1” and “Slide2,” it will
be the second slide in the presentation, but it will be named “Slide3.”
If you move slides around a lot, you will have a hard time re membering
their names. Use GetSlideName and SetSlideName to find out the name of a
slide and change the name of a slide:
Sub GetSlideName() MsgBox ActiveWindow.View.Slide.NameEnd Sub
Sub SetSlideName() Dim slideName As String
slideName = InputBox(prompt:="Type a name for the slide") slideName = Trim(slideName) If slideName = "" Then MsgBox ("You did not type any thing. " & _ "The name will re main " & _ ActiveWindow.View.Slide.Name) Else ActiveWindow.View.Slide.Name = slideName End IfEnd Sub
These procedures are very sim ilar to GetObjectName and SetObjectName.
They also run in Edit View of PowerPoint, so they must be run with the “Mac-
ros” op tion from the “Macro” flyout menu of the Tools menu (see Figure 8.1).
Once you have a slide’s name, you can use it in two ways. If you want to ac-
cess the slide, such as to hide and show ob jects on it, you can use the name in
place of the slide num ber. For ex ample, in “Learn First, Ask Questions Later” in
Chapter 7, we wanted to hide the marks on the menu slide to in dicate that those
sections of the tu torial had not been visited. We used:
ActivePresentation.Slides(2).Shapes(6).Vis i ble = False
This hides shape 6 on slide 2. If we were to name our menu slide “Menu” and the
object to be hidden “MenuMark1,” we could use the fol lowing line in stead:
ActivePresentation.Slides("Menu").Shapes("MenuMark1").Vis i ble = False
What’s in a Name? Finding and Changing Ob ject and Slide Names 133
It is slightly more dif ficult to jump to a named slide. ActivePresentation.
SlideShowWindow.View.GotoSlide re quires a num ber; that is, it cannot
use the name of the slide in place of the num ber. Fortunately, we can get the slide
number by using the name. To jump to the slide named “Menu,” we could use
the fol lowing two lines:
theSlideIndex = ActivePresentation.Slides("Menu").SlideIndexActivePresentation.SlideShowWindow.View.GotoSlide (theSlideIndex)
Although this is a lit tle more com plicated than sim ply us ing a num ber, it is a lot
safer be cause slide names never change unless you change them.
You never have to use ob ject names or slide names. You can do ev erything
you want with numbers. How ever, as you make more com plicated presentations
with more slides and more ob jects, and you be gin to change slides and ob jects
around, using names will save you a lot of grief. When you move ob jects, delete
slides, reorder slides, in sert slides, change the animation or der of ob jects, etc.,
your slide names will remain the same, and your VBA code will continue to
work.
Ar rays
Computer programs can use many dif ferent kinds of data structures. Un der-
standing data structures is an im portant part of computer programming. How-
ever, through out this book I have avoided turn ing you into a pro grammer and
only shown you what you need to know to be a scripter. The topic of data struc-
tures is something you can avoid, but if you un derstand some ba sic data struc-
tures, they can make your life easier. In fact, some of the ex amples that you have
seen could have been simpler with some more ad vanced data structures. I have
made some earlier ex amples lon ger so that they would be easier to understand.
Data structures are a way to store in formation. In Chapter 5 we used the box
analogy to show how variables can be used to store in formation, but sometimes
information can be stored more easily in something other than a sin gle box. A
collection of numbered boxes might be more suitable. This collection of num-
bered boxes is an array. You might think of an array as an egg carton, with sec-
tions for each of several eggs.
In several ear lier examples, such as the ex ample in “Try Again and Again:
Answer Again Af ter It’s Right” from Chapter 7, we created our own numbered
variables. In that ex ample, we used q1Answered and q2Answered to store the
information about whether question 1 was an swered and whether question 2 was
answered. If we had more questions, we would add more variables. This is easy
to un derstand but dif ficult to type, particularly if we have a lot of questions. This
could be simplified with an array.
134 More Tricks for Your Scripting Bag
The first step is to de clare the ar ray. Suppose we have five questions. With -
out an array we would do the following to de clare our five variables:
Dim q1Answered As BooleanDim q2Answered As BooleanDim q3Answered As BooleanDim q4Answered As BooleanDim q5Answered As Boolean
If we were to use an array, we would have one line:
Dim qAnswered(5) As Boolean
This will give us an array that con tains six boxes, numbered 0 through 5:
qAnswered(0), qAnswered(1), qAnswered(2), qAnswered(3),
qAnswered(4), and qAnswered(5). Note that we really only need five
boxes in our ex ample, and we got six. There are many ways to avoid getting the
extra box, but un less you are an aspiring pro grammer, the easiest thing to do is
simply ig nore box number 0.
Now, we can shorten our Ini tial ize pro cedure. It won’t be shorter with
two questions (or sig nificantly shorter with five), but when you create some-
thing with ten or twenty questions it will be much shorter:
Sub Ini tial ize() Dim i As Long
numCorrect = 0 numIncorrect = 0 For i = 1 to 5 qAnswered(i) = False Next iEnd Sub
This procedure uses a For loop, just like what we saw above in “Looping.” It
loops through each of the members of the qAnswered ar ray and sets each to
False. In the orig inal version, every time you added a new question, you would
need to add a new Dim state ment and a new line in Ini tial ize. Now, the only
thing you have to change is the number “5” in your Dim state ment and in the For
line of your Ini tial ize pro ce dure.
Having a separate vari able for each question was only a lit tle inconvenient.
The big gest in con ve nience was hav ing a sep a rate RightAnswer and
WrongAnswer pro cedure for each ques tion. We needed this
1. to assign True or False to the cor rect qAnswered vari able;
2. to know which question was be ing an swered so we could know which
was the ap pro pri ate qAnswered vari able for number 1; and
3. in later ex amples, to as sign the ac tual answer to the correct an swer
vari able.
Ar rays 135

Our array takes care of num ber 1. Number 2 can be handled easily if our
questions are all in or der. In our ex amples with the questions beginning on slide
2, each question is one less than the slide num ber (i.e., question 1 is on slide 2,
question 2 is on slide 3, etc.), so to get the ques tion num ber, we simply sub tract
one from the slide number (ActivePresentation.SlideShowWindow.
View.Slide.SlideIndex - 1). We’ll take care of num ber 3 in the next section.
Us ing the Dim state ments and Ini tial ize pro cedure from above and the
GetStarted, YourName, DoingWell, and DoingPoorly pro ce dures from
any of the earlier examples, we can use the following RightAnswer pro ce dure
and WrongAnswer procedure to re place all the specialized RightAnswer and
WrongAnswer pro cedures. The only thing you ever have to change is the num-
ber 5 in the Dim state ment and the Ini tial ize pro cedure. Just make this num-
ber equal to the num ber of questions you have.
Sub RightAnswer() Dim thisQuestionNum As Long
thisQuestionNum = _ ActivePresentation.SlideShowWindow.View.Slide.SlideIndex - 1 If qAnswered(thisQuestionNum) = False Then numCorrect = numCorrect + 1 End If qAnswered(thisQuestionNum) = True DoingWellEnd Sub
Sub WrongAnswer() Dim thisQuestionNum As Long
thisQuestionNum = _ ActivePresentation.SlideShowWindow.View.Slide.SlideIndex - 1 If qAnswered(thisQuestionNum) = False Then numIncorrect = numIncorrect + 1 End If qAnswered(thisQuestionNum) = True DoingPoorlyEnd Sub
I Don’t Know How Many Questions:
ReDim to the Rescue
It is very nice to cut down on the amount of VBA code that needs to be
changed, but would n’t it be nice to have the above pro cedures work without
changing any VBA code? The prob lem is that we need to know how many ques-
tions we have so we can declare and ini tialize our qAnswered ar ray. VBA is
very nice about this; if you don’t know how many items you need in an ar ray, it
lets you tell it whenever you know. We can declare the ar ray with the fol lowing
Dim statement (note that noth ing is between the parentheses):
Dim qAnswered() As Boolean
136 More Tricks for Your Scripting Bag
This says that we need an ar ray qAnswered to hold Boolean val ues, but we
don’t know how many values we’ll need to hold. When we do know how many
values, we can use the ReDim state ment to tell VBA.
The question is, how and when do we know how many values we need?
The answer is that we know right away, and we can tell by how many slides we
have. In our ex ample, we have five question slides, one title slide, and one re-
sults slide, for a to tal of seven slides. That is, all but two of our slides (the ti tle
slide and the re sults slide) are ques tion slides. Thus our to tal number of ques-
tions is the to tal number of slides minus two:
ActivePresentation.Slides.Count - 2
We can use this in our Ini tial ize pro cedure by assigning this value to a vari-
able (we’ll use numQuestions), us ing ReDim to tell VBA how many items we
need in qAnswered, and using this value in our For loop to initialize each item.
Sub Ini tial ize() Dim i As Long Dim numQuestions As Long
numCorrect = 0 numIncorrect = 0 numQuestions = ActivePresentation.Slides.Count - 2 ReDim qAnswered(numQuestions) For i = 1 To numQuestions qAnswered(i) = False Next iEnd Sub
Two words of warning about ReDim:
1. Because you have al ready told VBA what kind of variable
numQuestions is with the Dim state ment, you do not tell it again
(no tice that ReDim leaves off the As Boolean in our ex ample).
2. ReDim erases the contents of the array, so be sure that you use it be -
fore you put any thing in the ar ray.
Using the new Dim state ment and the new Ini tial ize pro ce dure, you
never have to change the VBA. This makes it easier for you be cause you can add
and change questions with no VBA changes, and it turns this into a pow erful tool
for your students; they can make their own quizzes that use your VBA (see
Chapter 10 for more about templates). Some of you will want to teach your stu -
dents VBA, but most of you will not. If you can write the code, all they have to
do is create the questions and tie the but tons to the RightAnswer and
WrongAnswer procedures.
I Don’t Know How Many Questions: ReDim to the Rescue 137
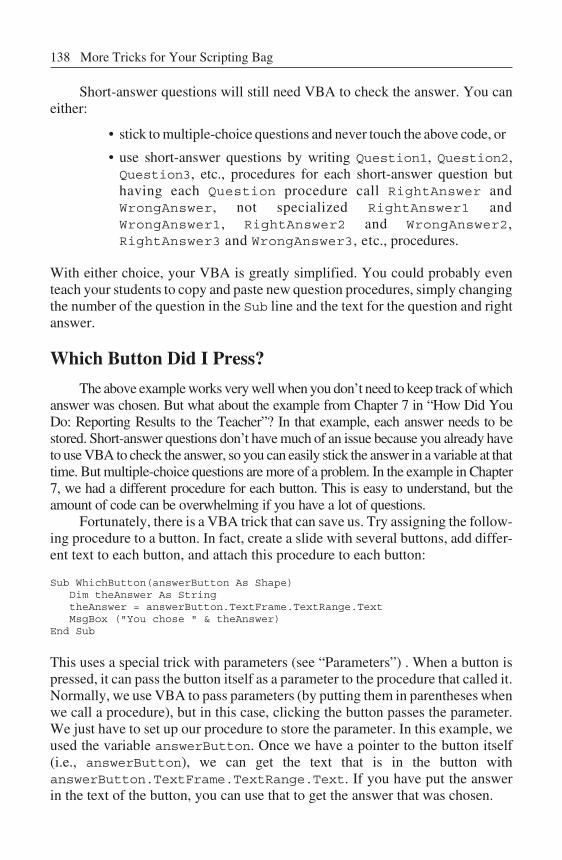
Short-answer questions will still need VBA to check the an swer. You can
ei ther:
• stick to mul tiple-choice ques tions and never touch the above code, or
• use short-answer questions by writing Question1, Question2,
Question3, etc., pro cedures for each short-answer question but
hav ing each Ques tion pro ce dure call RightAnswer and
WrongAnswer, not spe cialized RightAnswer1 and
WrongAnswer1, RightAnswer2 and WrongAnswer2,
RightAnswer3 and WrongAnswer3, etc., pro ce dures.
With either choice, your VBA is greatly simplified. You could prob ably even
teach your students to copy and paste new ques tion pro cedures, simply changing
the number of the question in the Sub line and the text for the ques tion and right
answer.
Which Button Did I Press?
The above ex ample works very well when you don’t need to keep track of which
answer was cho sen. But what about the ex ample from Chapter 7 in “How Did You
Do: Re porting Re sults to the Teacher”? In that ex ample, each an swer needs to be
stored. Short-answer questions don’t have much of an issue because you already have
to use VBA to check the an swer, so you can eas ily stick the an swer in a variable at that
time. But multiple-choice ques tions are more of a prob lem. In the ex ample in Chapter
7, we had a different pro cedure for each but ton. This is easy to un derstand, but the
amount of code can be over whelming if you have a lot of questions.
Fortunately, there is a VBA trick that can save us. Try as signing the follow-
ing pro cedure to a but ton. In fact, create a slide with several but tons, add dif fer-
ent text to each but ton, and attach this procedure to each button:
Sub WhichButton(answerButton As Shape) Dim theAnswer As String theAnswer = answerButton.TextFrame.TextRange.Text MsgBox ("You chose " & theAnswer)End Sub
This uses a spe cial trick with pa rameters (see “Pa rameters”) . When a button is
pressed, it can pass the button it self as a pa rameter to the procedure that called it.
Normally, we use VBA to pass parameters (by putt ing them in pa rentheses when
we call a procedure), but in this case, click ing the button passes the pa rameter.
We just have to set up our pro cedure to store the pa rameter. In this ex ample, we
used the variable answerButton. Once we have a pointer to the but ton it self
(i.e., answerButton), we can get the text that is in the but ton with
answerButton.TextFrame.TextRange.Text. If you have put the an swer
in the text of the but ton, you can use that to get the answer that was chosen.
138 More Tricks for Your Scripting Bag
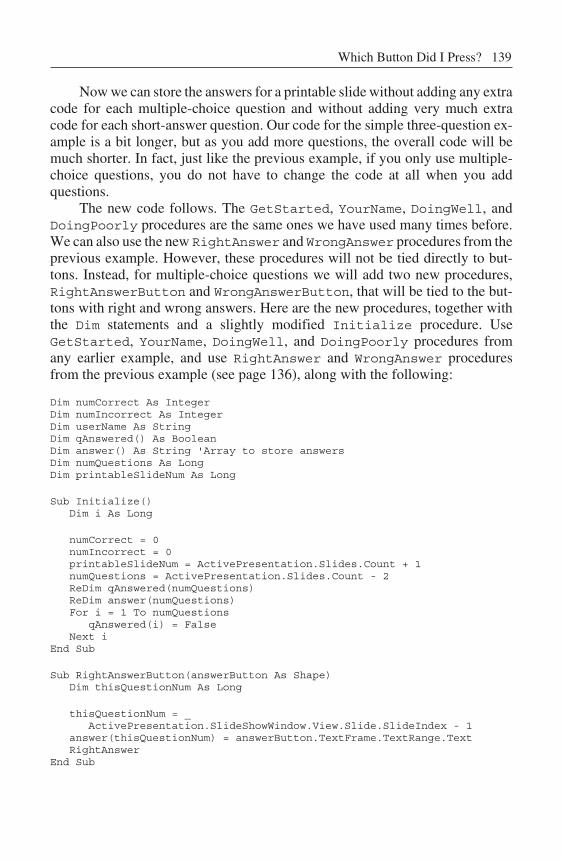
Now we can store the answers for a printable slide with out add ing any extra
code for each multiple-choice ques tion and without add ing very much ex tra
code for each short-answer question. Our code for the simple three-question ex -
ample is a bit longer, but as you add more ques tions, the overall code will be
much shorter. In fact, just like the pre vious ex ample, if you only use mul tiple-
choice questions, you do not have to change the code at all when you add
questions.
The new code fol lows. The GetStarted, YourName, DoingWell, and
DoingPoorly procedures are the same ones we have used many times before.
We can also use the new RightAnswer and WrongAnswer pro cedures from the
previous ex ample. However, these pro cedures will not be tied di rectly to but -
tons. Instead, for mul tiple-choice ques tions we will add two new pro cedures,
RightAnswerButton and WrongAnswerButton, that will be tied to the but -
tons with right and wrong an swers. Here are the new pro cedures, to gether with
the Dim state ments and a slightly mod ified Ini tial ize pro ce dure. Use
GetStarted, YourName, DoingWell, and DoingPoorly pro ce dures from
any earlier example, and use RightAnswer and WrongAnswer pro ce dures
from the previous ex ample (see page 136), along with the following:
Dim numCorrect As In tegerDim numIncorrect As In tegerDim userName As StringDim qAnswered() As BooleanDim an swer() As String 'Ar ray to store an swersDim numQuestions As LongDim printableSlideNum As Long
Sub Ini tial ize() Dim i As Long
numCorrect = 0 numIncorrect = 0 printableSlideNum = ActivePresentation.Slides.Count + 1 numQuestions = ActivePresentation.Slides.Count - 2 ReDim qAnswered(numQuestions) ReDim an swer(numQuestions) For i = 1 To numQuestions qAnswered(i) = False Next iEnd Sub
Sub RightAnswerButton(answerButton As Shape) Dim thisQuestionNum As Long
thisQuestionNum = _ ActivePresentation.SlideShowWindow.View.Slide.SlideIndex - 1 an swer(thisQuestionNum) = answerButton.TextFrame.TextRange.Text RightAnswerEnd Sub
Which Button Did I Press? 139
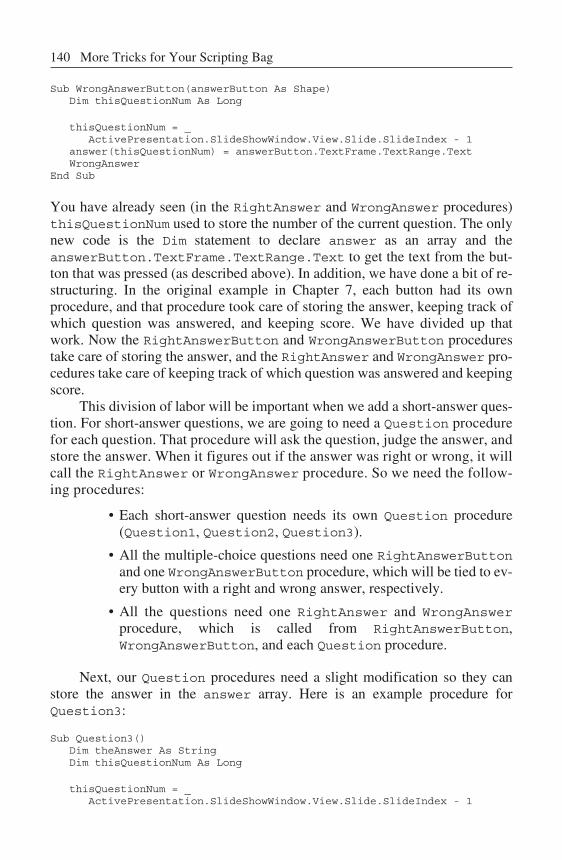
Sub WrongAnswerButton(answerButton As Shape) Dim thisQuestionNum As Long
thisQuestionNum = _ ActivePresentation.SlideShowWindow.View.Slide.SlideIndex - 1 an swer(thisQuestionNum) = answerButton.TextFrame.TextRange.Text WrongAnswerEnd Sub
You have al ready seen (in the RightAnswer and WrongAnswer pro ce dures)
thisQuestionNum used to store the number of the current question. The only
new code is the Dim state ment to de clare an swer as an ar ray and the
answerButton.TextFrame.TextRange.Text to get the text from the but -
ton that was pressed (as described above). In ad dition, we have done a bit of re -
structuring. In the orig inal example in Chapter 7, each but ton had its own
procedure, and that procedure took care of storing the answer, keeping track of
which ques tion was an swered, and keep ing score. We have di vided up that
work. Now the RightAnswerButton and WrongAnswerButton pro ce dures
take care of storing the answer, and the RightAnswer and WrongAnswer pro -
cedures take care of keeping track of which question was answered and keeping
score.
This division of labor will be important when we add a short-answer ques-
tion. For short-answer questions, we are go ing to need a Ques tion pro ce dure
for each question. That pro cedure will ask the ques tion, judge the answer, and
store the answer. When it fig ures out if the an swer was right or wrong, it will
call the RightAnswer or WrongAnswer pro cedure. So we need the fol low-
ing pro ce dures:
• Each short-answer question needs its own Ques tion pro ce dure
(Question1, Question2, Question3).
• All the multiple-choice ques tions need one RightAnswerButton
and one WrongAnswerButton pro cedure, which will be tied to ev -
ery but ton with a right and wrong an swer, respectively.
• All the questions need one RightAnswer and WrongAnswer
procedure, which is called from RightAnswerButton,
WrongAnswerButton, and each Ques tion pro ce dure.
Next, our Ques tion pro cedures need a slight mod ification so they can
store the answer in the an swer ar ray. Here is an example procedure for
Question3:
Sub Question3() Dim theAnswer As String Dim thisQuestionNum As Long
thisQuestionNum = _ActivePresentation.SlideShowWindow.View.Slide.SlideIndex - 1
140 More Tricks for Your Scripting Bag
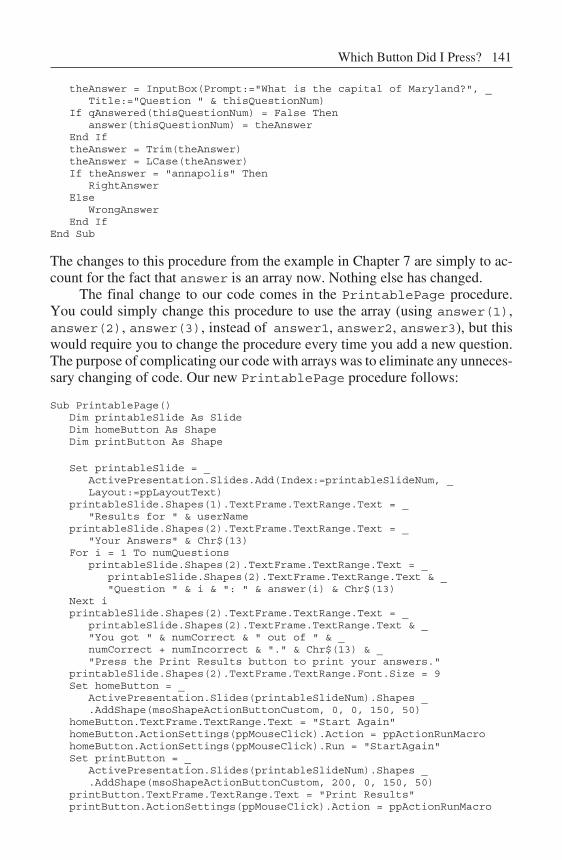
theAnswer = InputBox(Prompt:="What is the cap ital of Mary land?", _ Ti tle:="Question " & thisQuestionNum) If qAnswered(thisQuestionNum) = False Then an swer(thisQuestionNum) = theAnswer End If theAnswer = Trim(theAnswer) theAnswer = LCase(theAnswer) If theAnswer = "annapolis" Then RightAnswer Else WrongAnswer End IfEnd Sub
The changes to this pro cedure from the ex ample in Chapter 7 are simply to ac-
count for the fact that an swer is an ar ray now. Noth ing else has changed.
The final change to our code co mes in the PrintablePage pro ce dure.
You could simply change this pro cedure to use the ar ray (using an swer(1),
an swer(2), an swer(3), in stead of answer1, answer2, answer3), but this
would require you to change the pro cedure every time you add a new ques tion.
The pur pose of com plicating our code with arrays was to eliminate any un neces-
sary chang ing of code. Our new PrintablePage pro ce dure fol lows:
Sub PrintablePage() Dim printableSlide As Slide Dim homeButton As Shape Dim printButton As Shape
Set printableSlide = _ ActivePresentation.Slides.Add(In dex:=printableSlideNum, _ Lay out:=ppLayoutText) printableSlide.Shapes(1).TextFrame.TextRange.Text = _ "Re sults for " & userName printableSlide.Shapes(2).TextFrame.TextRange.Text = _ "Your An swers" & Chr$(13) For i = 1 To numQuestions printableSlide.Shapes(2).TextFrame.TextRange.Text = _ printableSlide.Shapes(2).TextFrame.TextRange.Text & _ "Ques tion " & i & ": " & an swer(i) & Chr$(13) Next i printableSlide.Shapes(2).TextFrame.TextRange.Text = _ printableSlide.Shapes(2).TextFrame.TextRange.Text & _ "You got " & numCorrect & " out of " & _ numCorrect + numIncorrect & "." & Chr$(13) & _ "Press the Print Re sults but ton to print your an swers." printableSlide.Shapes(2).TextFrame.TextRange.Font.Size = 9 Set homeButton = _ ActivePresentation.Slides(printableSlideNum).Shapes _ .AddShape(msoShapeActionButtonCustom, 0, 0, 150, 50) homeButton.TextFrame.TextRange.Text = "Start Again" homeButton.ActionSettings(ppMouseClick).Ac tion = ppActionRunMacro homeButton.ActionSettings(ppMouseClick).Run = "StartAgain" Set printButton = _ ActivePresentation.Slides(printableSlideNum).Shapes _ .AddShape(msoShapeActionButtonCustom, 200, 0, 150, 50) printButton.TextFrame.TextRange.Text = "Print Re sults" printButton.ActionSettings(ppMouseClick).Ac tion = ppActionRunMacro
Which Button Did I Press? 141
printButton.ActionSettings(ppMouseClick).Run = "PrintResults" ActivePresentation.SlideShowWindow.View.Next ActivePresentation.Saved = TrueEnd Sub
Other than using the an swer ar ray, the main change to this pro cedure is that we
must loop through all the an swers so we can display them. We can not put a line
for each an swer, as we have done in the past, because we do not know how many
questions we will have. In stead, we use a For loop to cy cle through the an swers
and add them to the slide:
For i = 1 To numQuestions printableSlide.Shapes(2).TextFrame.TextRange.Text = _ printableSlide.Shapes(2).TextFrame.TextRange.Text & _ "Ques tion " & i & ": " & an swer(i) & Chr$(13)Next i
In English, this code says: For each an swer in the an swer ar ray, take all the
text we have already put in Shape2 of the slide (printableSlide.
Shapes(2).TextFrame.TextRange.Text) and add (&) to that the question
num ber ("Ques tion " & i) and the an swer with a new line (an swer(i) &
Chr$(13)). Af ter the For loop, we also add to all of that the score and the in -
structions for print ing the slide.
Finally, if you are us ing a version of PowerPoint that does not au tomati-
cally change the size of the text to fit the text box, you will want to be sure to
change the size of the text so you can fit more than three or four answers on the
slide:
printableSlide.Shapes(2).TextFrame.TextRange.Font.Size = 9
Just change the 9 to a smaller number if you have more questions.
As a scripter, your burn ing question should be: How do I add ques tions to
my presentation? If you have put all the above code in your presentation, you
must do the following things to add questions:
1. For each multiple-choice ques tion, do not touch the VBA; just add the
question slide and tie the but ton for the right answer to
RightAnswerButton and the but tons for wrong answers to
WrongAnswerButton.
2. For each short-answer question, add a slide with the ques tion and tie
the question but ton to a new pro cedure that is exactly like
Question3, ex cept that it will have a dif ferent number for the name
of the procedure (Question4, Question5, etc.) and it will change
the text of the ques tion in the InputBox state ment and the cor rect an -
swer(s) to check for in the If statement.
3. If you have a lot of questions, change the font size of the text box in
the PrintablePage pro cedure to 9 or smaller.
142 More Tricks for Your Scripting Bag
Ran dom Num bers
Random numbers are a pow erful tool. Of ten you know ex actly what you
want in your presentation and in ex actly what or der. At other times you want to
mix things up randomly. For ex ample, you might want to practice ad dition facts,
but you don’t want to specify ev ery possible combination of one-digit numbers.
Instead you want the computer to ran domly generate prob lems for you. In an -
other example, you might have a large pool of ques tions, but you only want to
ask a few that are randomly se lected. This section explores these examples.
To have the computer generate ran dom numbers, you need to know three
things: Ran dom ize, Rnd, and Int. For you math pur ists, computers can not gen -
erate truly random numbers, but they can come close enough for al most any
purpose.
To be sure they are close enough for our pur poses, we need to make sure
that they are not the same every time. That is why we start with a Ran dom ize
statement. Just put this somewhere where it will be run before you need any ran -
dom numbers (such as in your Ini tial ize pro cedure). Imagine that the com-
puter has a big deck of cards with num bers on them. When you ask for a ran dom
number, it picks the first card off the top of the deck and gives you the num ber on
it. When you ask for an other random number, it picks the next card. This deck of
cards starts out in the same or der every time, so ev ery time you start the presenta-
tion and ask for a bunch of cards, you will get the same cards. This isn’t very
good. What we need is to shuffle the cards. Ran dom ize shuffles the cards. We
only need to do this once when we run the presentation, because the deck of
cards is very large. That is why we do this in our Ini tial ize procedure.
Next, we want to get a random number. This is done with the Rnd state -
ment. You could have a pro cedure that in cludes:
myRandomNumber = RndMsgBox(myRandomNumber)
This will pop up a MsgBox with a ran dom number in it. The prob lem is that the
number that is generated is somewhere be tween 0 and 1. Nor mally, we want ran -
dom numbers that are positive integers (you know: 1, 2, 3, 4, 5, 6, . . . ). Have no
fear. That is where Int co mes in. Int takes a real num ber and chops off ev ery-
thing after the decimal point. For ex ample, Int(3.1415926) re turns 3, and
Int(.4567) re turns 0. We can gen erate a random number between 0 and 9
with:
myRandomDigit = Int(10 * Rnd)
By multiplying a number between 0 and 1 by 10, we get a number from 0 up to
9.99999999. By taking the Int of that we get 0, 1, 2, 3, 4, 5, 6, 7, 8, or 9. We can
get a ran dom number in any range by us ing the following formula:
Ran dom Num bers 143
Int((upper – lower + 1) * Rnd + lower)
up per is the big gest num ber you would want, and lower is the small est num ber
you would want. For our 0 through 9 ex ample, we would have Int((9 – 0 +
1) * Rnd + 0) or Int(10 * Rnd) + 0) or just Int(10 * Rnd). If we
wanted num bers from 1 to 100, we would have Int((100 – 1 + 1) * Rnd +
1) or Int(100 * Rnd + 1). If we wanted numbers from 50 to 100, we would
have Int((100 – 50 + 1) * Rnd + 50) or Int(51 * Rnd + 50). Don’t
worry if you don’t quite un derstand the math; just use the simple formula, and
you will be fine.
Ran domly Gen er ated Ques tions
Let’s use ran dom numbers with a simple example. In this example, we will
want to ran domly generate one-digit ad dition prob lems. We will have a ti tle card
with a but ton linked to GetStarted and a question card with a but ton linked to
RandomQuestion. The code follows:
Sub GetStarted() Ini tialize ActivePresentation.SlideShowWindow.View.NextEnd Sub
Sub Ini tial ize() Ran domizeEnd Sub
Sub RandomQuestion() Dim first As In teger Dim sec ond As In teger first = Int(10 * Rnd) sec ond = Int(10 * Rnd) an swer = InputBox("What is " & first & " + " & sec ond & "?") If an swer = first + sec ond Then DoingWell Else DoingPoorly End IfEnd Sub
Sub DoingWell() MsgBox ("Good job")End Sub
Sub DoingPoorly() MsgBox ("Try to do better")End Sub
GetStarted is the same as our usual GetStarted al though in this ex ample we
don’t use the student’s name so we don’t call YourName. You could add the Dim
userName, the YourName pro ce dure, and ap pro pri ate ref er ences to userName
144 More Tricks for Your Scripting Bag
in DoingWell and DoingPoorly if you want. Be cause we are not keeping
track of any thing, Ini tial ize just shuffles the deck by calling Ran dom ize.
The heart of the pro cedure is RandomQuestion. This generates two ran -
dom numbers from 0 to 9 and stores them in the variables first and sec ond. If
you want them to be something other than from 0 to 9, use the earlier for mula to
figure it out. Next, it puts up an InputBox ask ing for the stu dent to type the sum
of those two numbers. Then, it checks to see whether the an swer was right by
comparing what was typed to first + sec ond, which is the right answer. You
can change this to multiplication or subtraction by us ing * or – in stead of +. You
can add a third vari able to make this into a problem with three num bers. You
can even display the prob lem in a text box by us ing some of the tools for manipu-
lating text from Chap ter 6. You might have an easier time for matting the num -
bers into columns if you use a text box or more than one text box.
Keep ing Score
With some minor mod ifications, we can plug RandomQuestion into some
of our other quiz zes from Chap ter 7. We’ll start by keeping score. Start with the
code from “Keeping Score” in Chap ter 7 (see Fig ure 7.1, page 93). Add the fol -
low ing RandomQuestion pro cedure (this is the same as the previous
RandomQuestion procedure, ex cept that it calls RightAnswer and
WrongAnswer in stead of DoingWell and DoingPoorly):
Sub RandomQuestion() Dim first As In teger Dim sec ond As In teger first = Int(10 * Rnd) sec ond = Int(10 * Rnd) an swer = InputBox("What is " & first & " + " & sec ond & "?") If an swer = first + sec ond Then RightAnswer Else WrongAnswer End IfEnd Sub
Add Ran dom ize to the Ini tial ize pro ce dure. Remove
ActivePresentation.SlideShowWindow.View.Next from RightAnswer
and WrongAnswer so it does not automatically ad vance to the next slide.
For this to work properly, you need three slides: a ti tle slide, a question
slide, and a feedback slide. The title slide has a button tied to GetStarted. The
question slide has a button tied to RandomQuestion and a button that goes to
the next card. And the feedback slide has a button tied to Feed back.
If you are ad venturous, you might try to eliminate the feedback slide and
keep a run ning to tal in a text box on the slide. Af ter each question, up date the
text in the text box. You already have the num ber of correct and in correct an -
swers stored in numCorrect and numIncorrect. You simply need to use this
to up date a text box af ter each question is answered.
Ran dom Num bers 145
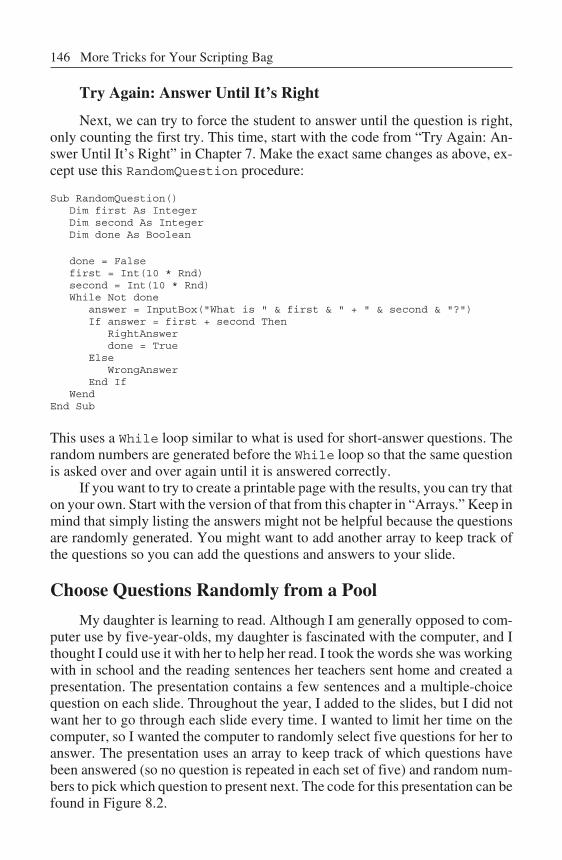
Try Again: Answer Until It’s Right
Next, we can try to force the student to answer un til the ques tion is right,
only count ing the first try. This time, start with the code from “Try Again: An-
swer Un til It’s Right” in Chapter 7. Make the ex act same changes as above, ex-
cept use this RandomQuestion pro ce dure:
Sub RandomQuestion() Dim first As In teger Dim sec ond As In teger Dim done As Boolean
done = False first = Int(10 * Rnd) sec ond = Int(10 * Rnd) While Not done an swer = InputBox("What is " & first & " + " & sec ond & "?") If an swer = first + sec ond Then RightAnswer done = True Else WrongAnswer End If WendEnd Sub
This uses a While loop similar to what is used for short-answer questions. The
ran dom num bers are gen er ated be fore the While loop so that the same ques tion
is asked over and over again un til it is answered correctly.
If you want to try to create a printable page with the re sults, you can try that
on your own. Start with the ver sion of that from this chap ter in “Arrays.” Keep in
mind that simply listing the answers might not be help ful be cause the ques tions
are ran domly generated. You might want to add another array to keep track of
the questions so you can add the questions and an swers to your slide.
Choose Questions Ran domly from a Pool
My daugh ter is learning to read. Although I am gen erally op posed to com -
puter use by five-year-olds, my daughter is fascinated with the computer, and I
thought I could use it with her to help her read. I took the words she was working
with in school and the read ing sen tences her teach ers sent home and cre ated a
pre sen ta tion. The pre sen ta tion con tains a few sen tences and a mul ti ple-choice
question on each slide. Throughout the year, I added to the slides, but I did not
want her to go through each slide every time. I wanted to limit her time on the
computer, so I wanted the computer to ran domly select five ques tions for her to
answer. The pre sentation uses an array to keep track of which questions have
been answered (so no ques tion is re peated in each set of five) and ran dom num-
bers to pick which question to present next. The code for this presentation can be
found in Figure 8.2.
146 More Tricks for Your Scripting Bag

Figure 8.2. VBA Code for Se lecting Five Questions from a Pool of Questions
This pre sentation con sists of a ti tle slide, a last slide, and as many ques tion
slides as we want. The ti tle slide has a but ton that is tied to the GetStarted pro -
cedure. The question slides have buttons for right and wrong answers that are
tied to the RightAnswer and WrongAnswer pro ce dures, re spec tively. The last
slide has a but ton that is hyperlinked to the first slide (no VBA) and plays the ap -
plause sound. This version does not keep score.
Choose Ques tions Randomly from a Pool 147
The key el ements of this pre sentation are the array vis ited and the pro ce-
dure RandomNext. vis ited has an el ement for each question. Actually, it has
an el ement for each slide, but the first and last elements are ignored. The el e-
ments are each set to False in Ini tial ize. When a ques tion is an swered cor-
rectly, the element of vis ited for that ques tion is set to True in the
RightAnswer pro cedure. In ad dition, one is added to numRead, a variable that
keeps track of how many questions have been read.
RandomNext is used to go to the next ques tion in stead of
ActivePresentation.SlideShowWindow.View.Next. In the past, the
next question has al ways been the next slide. Now, we want to randomly select a
slide, so we can’t simply go to the next slide. RandomNext first checks to see
whether we have an swered five or more questions. Just in case the presentation
doesn’t have five questions, it also checks to be sure we have n’t an swered as
many questions as there are:
If numRead >= numWanted Or numRead >= numSlides - 2 Then
numWanted was set in Ini tial ize to be 5; that is, we want to ask five ques -
tions at a time. You can change that number in Ini tial ize if you want to ask
more or fewer than five questions at a time, or you can ask the user how many
questions to do (see be low).
If we have asked enough ques tions, RandomNext jumps to the last slide.
Otherwise, it ran domly picks a new slide to jump to. Randomly picking an other
slide is very easy us ing Rnd, but we want to make sure we are jump ing to a slide
that we haven’t seen yet. First we ran domly pick a slide:
nextSlide = Int((numSlides - 2) * Rnd + 2)
This assigns the randomly chosen slide to nextSlide. The While loop keeps
looping as long as we have seen the cho sen slide (vis ited(nextSlide) =
True). That is, if we pick slide 7 as our next slide, vis ited(7) will be True if
we have seen slide 7, so we will keep loop ing, and pick an other slide with
nextSlide = Int((numSlides - 2) * Rnd + 2). Once we have picked the
next slide, we can go there with:
ActivePresentation.SlideShowWindow.View.GotoSlide (nextSlide)
That is all you need to choose a few questions from a pool of questions. To add
more ques tions, you don’t have to change any VBA at all; just add more question
slides be tween the first and last slide. If you want to ask a dif ferent number of
questions, you can either change numWanted = 5 to an other number in the
Ini tial ize pro cedure, or you can try out the code in the next section.
This is a good place to re mind you that you can and should use all the tra di-
tional PowerPoint tools at your dis posal. For many of the ques tions I have made
148 More Tricks for Your Scripting Bag
for my daugh ter, I in clude pic tures from clip art for the answers in stead of regu-
lar buttons. I also use sounds lib erally. The most important use of sound (aside
from the applause at the end) is sound for difficult words or sentences. If I in-
clude a word or sentence that might be be yond my daughter’s skills, I add a re -
corded sound of me reading the word or sentence. She knows that she can click
on any speaker icon to have something read to her. While I am not a big fan of
bells and whistles, you should use as many traditional features of PowerPoint as
you think are appropriate.
Ask How Many Ques tions You Want
In the above ex ample, a simple line of VBA was used to determine the
number of questions to be asked at a time. Perhaps you want the user to pick. To
do this, simply re place numWanted = 5 with HowMany in the Ini tial ize pro -
cedure, and add the fol lowing HowMany procedure:
Sub HowMany() done = False While Not done numWanted = InputBox("How many ques tions would you like?") If numWanted >= 1 And numWanted <= 10 Then done = True Else MsgBox ("Pick a num ber from 1 to 10") done = False End If WendEnd Sub
The heart of this procedure is the InputBox state ment. That is re ally all that is
needed. How ever, my daughter might be inclined to type a very large number
and get a lot of ques tions (so she can put off go ing to bed). The While sim ply
checks to make sure the num ber chosen is be tween 1 and 10 inclusive. If you
don’t care what number is cho sen, leave out the While loop. If you want to al-
low a dif ferent range of numbers, change the num bers in the While state ment.
Keep ing Score
For my daughter at the age of five, I don’t keep score, but you might want to
report a score at the end. Add ing scorekeeping is not hard. We will need
numCorrect and numIncorrect to be de clared (Dim numCorrect and Dim
numIncorrect) at the be ginning of the mod ule and in itialized in the Ini-
tial ize pro ce dure (numCorrect = 0 and numIncorrect = 0), just like in
any example that keeps score. Be cause we are asked to re peat a question un til it
is cor rect, we need qAnswered to be de clared Dim qAnswered at the be ginning
of the module and in itialized in the Ini tial ize pro ce dure (qAnswered =
False). Fi nally, RightAnswer and WrongAnswer need to ad just the score if
the question has been answered:
Choose Ques tions Randomly from a Pool 149
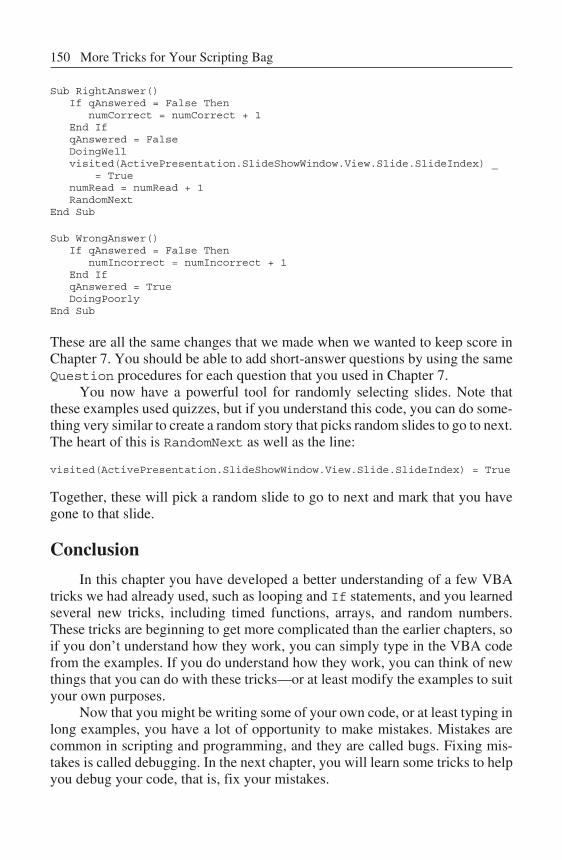
Sub RightAnswer() If qAnswered = False Then numCorrect = numCorrect + 1 End If qAnswered = False DoingWell vis ited(ActivePresentation.SlideShowWindow.View.Slide.SlideIndex) _ = True numRead = numRead + 1 RandomNextEnd Sub
Sub WrongAnswer() If qAnswered = False Then numIncorrect = numIncorrect + 1 End If qAnswered = True DoingPoorlyEnd Sub
These are all the same changes that we made when we wanted to keep score in
Chapter 7. You should be able to add short-answer questions by using the same
Ques tion pro cedures for each question that you used in Chapter 7.
You now have a powerful tool for ran domly selecting slides. Note that
these ex amples used quizzes, but if you un derstand this code, you can do some-
thing very similar to create a random story that picks ran dom slides to go to next.
The heart of this is RandomNext as well as the line:
visited(ActivePresentation.SlideShowWindow.View.Slide.SlideIndex) = True
Together, these will pick a random slide to go to next and mark that you have
gone to that slide.
Con clu sion
In this chap ter you have de veloped a better un derstanding of a few VBA
tricks we had already used, such as loop ing and If statements, and you learned
several new tricks, in cluding timed functions, ar rays, and random numbers.
These tricks are beginning to get more com plicated than the ear lier chapters, so
if you don’t understand how they work, you can simply type in the VBA code
from the examples. If you do un derstand how they work, you can think of new
things that you can do with these tricks—or at least mod ify the ex amples to suit
your own purposes.
Now that you might be writing some of your own code, or at least typ ing in
long ex amples, you have a lot of op portunity to make mistakes. Mistakes are
common in scripting and pro gramming, and they are called bugs. Fix ing mis-
takes is called debugging. In the next chapter, you will learn some tricks to help
you de bug your code, that is, fix your mistakes.
150 More Tricks for Your Scripting Bag
Ex er cises to Try
�Create a tem plate of a mul tiple-choice quiz using the code from
this chapter. Teach three of your friends, colleagues, or stu dents
to create their own multiple-choice quiz zes us ing your template.
Remember that they don’t have to change any of the VBA to do
this.
�Create a template of a quiz with short-answer questions using
the code from this chapter. Teach three of your friends, col -
leagues, or stu dents to create their own quizzes with short-an-
swer questions using your template. Re member that they will
have to edit the VBA, so you will have to teach them how to get
to the VBA Ed itor, but they will only have to copy and paste
your Ques tion code and change the question num ber, the text
of the question, and the answer to the ques tion in VBA.
Ex er cises to Try 151


9De bug ging Tips
In tro duc tion
In Chapter 8 you added to your bag of tricks. Whether you are ready to ven-
ture out on your own, writing scripts that are more than mi nor mod ifications of
the examples in this book, or are simply copy ing more and more complex exam-
ples, you are bound to make mistakes. This chap ter describes sev eral ways to
track down your mistakes and avoid making mistakes in the first place, and
points you to some com mon mistakes for which you can look when your code
seems like it should work, but it doesn’t.
Vo cab u lary
• Bug • Debug
• Cap i tal iza tion • In dent ing
• Com pile er ror • Run time error
• Com ment ing out
My Scripts Al ways Work the First Time
If you have tried more than one or two ex amples in this book, you are al -
most cer tain to have made at least one mistake. In com puter terms, mistakes are
called bugs. This term co mes from the time when com puters were as big as en -
tire rooms and real bugs were a problem:
American en gineers have been call ing small flaws in ma -
chines “bugs” for over a century. Thomas Edison talked about
bugs in electrical cir cuits in the 1870s. When the first comput-
ers were built dur ing the early 1940s, peo ple working on them
found bugs in both the hardware of the ma chines and in the
programs that ran them.
In 1947, en gineers working on the Mark II com puter at Har-
vard University found a moth stuck in one of the components.
They taped the in sect in their log book and labeled it “first ac -
tual case of bug be ing found.” The words “bug” and “debug”
soon be came a standard part of the lan guage of com puter pro-
gram mers. (Smith so nian Na tional Mu seum of Amer i can His-
tory, n.d.)
The pro cess of fixing bugs is called debugging. If you follow the ex amples
in this book ex actly, de bugging is not dif ficult; you simply compare what you
typed to the ex ample and find the dif ference. Once you get a lit tle more adven-
turous and try to make a few small changes to the scripts, you will need some
ideas to help you solve problems.
Testing for Bugs
There are two main types of bugs: (1) those that cause your script not to
work, and (2) those that cause your script to work but not work prop erly. The
first type is easy to detect be cause you will either get an error message or noth ing
will hap pen (see below). The second type is much harder to de tect be cause ev -
erything will ap pear to work fine, but the results you get will not be right (e.g.,
the computer tells you how many ques tions were an swered correctly, but the
number it gives is not the right num ber). Both kinds of bugs require you to test
your pro ject to make sure it is working properly.
When you write a pro cedure, you should try to tie it to a but ton as soon as
possible. Then go to Slide Show View and click on the but ton. If you get an error
message or, more likely, noth ing hap pens, you know you have a prob lem. This is
probably the first type of error, and you can go back to your script to find out
what is wrong.
If something hap pens, but it is the wrong thing, you know you have a prob -
lem. This is the second type of error. Unfortunately, the second type of error is
usually harder to spot and re quires much more extensive testing as well as pay -
ing close attention to what happens. For something as simple as the DoingWell
procedure, it might be easy to see that you have a problem, but this pro cedure re-
lies on the YourName pro cedure to give it the correct an swer. If DoingWell
brings up a MsgBox with “You are do ing well,” and no name, there is a prob lem,
but where is it? Before you even track down where the prob lem is, you must
154 De bug ging Tips
notice that a prob lem ex ists. If you are not paying close attention, you will see a
MsgBox pop up, but you will not no tice that anything is wrong.
As our pro cedures be come more and more complicated and more and more
interdependent, spotting a problem can be very difficult. If a pro cedure isn’t tied to a
button but called from another procedure, you can’t simply tie the pro cedure to a
button and expect it to work. A procedure that de pends on other things hap pening
first is hard to test. If you tie DoingWell to a but ton and click on the but ton, you
might not get the results you ex pect, but it might be because something is wrong, or
it might be because you haven’t clicked on a but ton that is tied to YourName yet.
This could be because some of your pro cedures are written in correctly, you are test-
ing out an isolated pro cedure before putting the whole presentation to gether, or you
didn’t force the student to type a name before moving through the pre sentation.
This is an example of why thor oughly testing your pro cedures is very im-
portant. If you create a presentation, you know what you are sup posed to do. If
you al ways do what you are sup posed to do and ev erything works, you know the
project works when your stu dents al ways do what they are supposed to do. Do
your stu dents al ways do what they are supposed to do? Of course not. They will
get answers wrong. They will click on one but ton when you gave them direc-
tions to click on an other button first. They will use arrow keys and the space bar
to move to the next slide if you forgot to put your presentation in Kiosk mode.
They will click the same button fifty times in a row, just to hear the sound that
the wrong-answer but tons make. In short, they will not do everything right, and
when you are testing your program, you should not either.
No News Is Bad News
VBA is not very talkative when it co mes to bugs. Once it en counters a bug
in a pro cedure, it just stops. You could have a pro cedure that is 100 lines long,
but if there is bug on the first line, the last 99 won’t ex ecute. And VBA will be si-
lent. If you’re like me, you click on the but ton again (and again and again and
again), muttering to your self that this has to work. On the one hand, it would be
nice if VBA told you something was wrong, a po lite MsgBox say ing, “I’m sorry,
but you have a prob lem in your pro cedure. I can not con tinue.” On the other
hand, com puter er ror mes sages are no to ri ous for be ing in com pre hen si ble. So,
would you rather get noth ing or “36549 invalid register access”?
Just treat noth ing as your pri vate er ror message. If you expect something
and noth ing hap pens, you know something is wrong, and it is time to start look -
ing for bugs.
The Er ror in Red
Sometimes the VBA Ed itor will catch an er ror and highlight it in red. As
you type your code and hit the Enter key (Return key on a Macintosh) af ter you
type a line, certain types of er rors will turn red. You can also get those same
The Er ror in Red 155
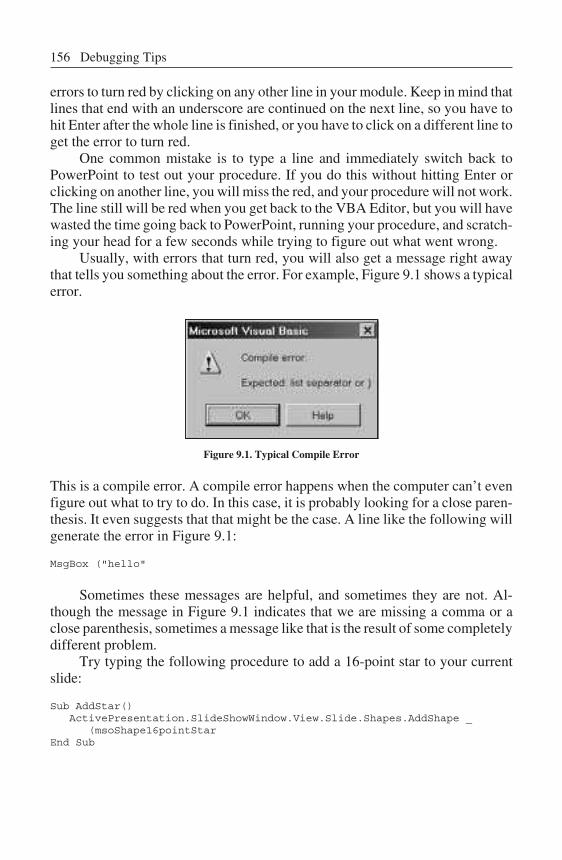
errors to turn red by clicking on any other line in your module. Keep in mind that
lines that end with an un derscore are con tinued on the next line, so you have to
hit En ter after the whole line is finished, or you have to click on a different line to
get the er ror to turn red.
One common mistake is to type a line and im mediately switch back to
PowerPoint to test out your pro cedure. If you do this with out hit ting En ter or
clicking on an other line, you will miss the red, and your procedure will not work.
The line still will be red when you get back to the VBA Ed itor, but you will have
wasted the time go ing back to PowerPoint, run ning your pro cedure, and scratch-
ing your head for a few seconds while trying to fig ure out what went wrong.
Usually, with errors that turn red, you will also get a message right away
that tells you something about the error. For ex ample, Figure 9.1 shows a typ ical
error.
Fig ure 9.1. Typ i cal Com pile Er ror
This is a compile error. A com pile error hap pens when the com puter can’t even
figure out what to try to do. In this case, it is prob ably look ing for a close pa ren-
thesis. It even sug gests that that might be the case. A line like the fol lowing will
generate the error in Figure 9.1:
MsgBox ("hello"
Sometimes these mes sages are helpful, and sometimes they are not. Al-
though the message in Fig ure 9.1 indicates that we are missing a comma or a
close parenthesis, sometimes a mes sage like that is the re sult of some completely
dif fer ent problem.
Try typ ing the following pro cedure to add a 16-point star to your current
slide:
Sub AddStar() ActivePresentation.SlideShowWindow.View.Slide.Shapes.AddShape _ (msoShape16pointStarEnd Sub
156 De bug ging Tips
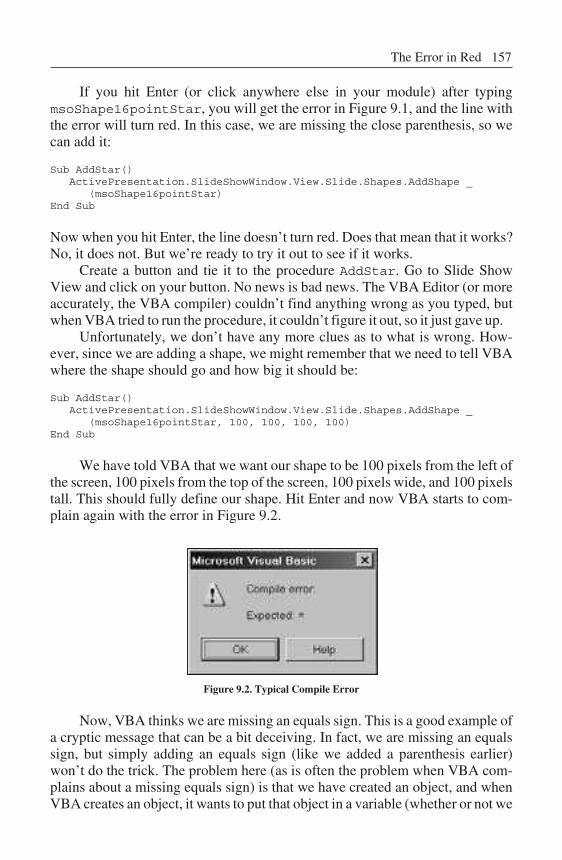
If you hit Enter (or click any where else in your mod ule) after typing
msoShape16pointStar, you will get the er ror in Figure 9.1, and the line with
the er ror will turn red. In this case, we are miss ing the close pa renthesis, so we
can add it:
Sub AddStar() ActivePresentation.SlideShowWindow.View.Slide.Shapes.AddShape _ (msoShape16pointStar)End Sub
Now when you hit Enter, the line doesn’t turn red. Does that mean that it works?
No, it does not. But we’re ready to try it out to see if it works.
Create a but ton and tie it to the pro cedure AddStar. Go to Slide Show
View and click on your but ton. No news is bad news. The VBA Ed itor (or more
accurately, the VBA com piler) could n’t find anything wrong as you typed, but
when VBA tried to run the pro cedure, it could n’t fig ure it out, so it just gave up.
Unfortunately, we don’t have any more clues as to what is wrong. How-
ever, since we are adding a shape, we might re member that we need to tell VBA
where the shape should go and how big it should be:
Sub AddStar() ActivePresentation.SlideShowWindow.View.Slide.Shapes.AddShape _ (msoShape16pointStar, 100, 100, 100, 100)End Sub
We have told VBA that we want our shape to be 100 pix els from the left of
the screen, 100 pix els from the top of the screen, 100 pix els wide, and 100 pix els
tall. This should fully define our shape. Hit Enter and now VBA starts to com-
plain again with the er ror in Figure 9.2.
Fig ure 9.2. Typ i cal Com pile Er ror
Now, VBA thinks we are missing an equals sign. This is a good ex ample of
a cryptic mes sage that can be a bit deceiving. In fact, we are miss ing an equals
sign, but simply add ing an equals sign (like we added a pa renthesis earlier)
won’t do the trick. The prob lem here (as is of ten the prob lem when VBA com-
plains about a missing equals sign) is that we have created an ob ject, and when
VBA creates an ob ject, it wants to put that ob ject in a variable (whether or not we
The Er ror in Red 157
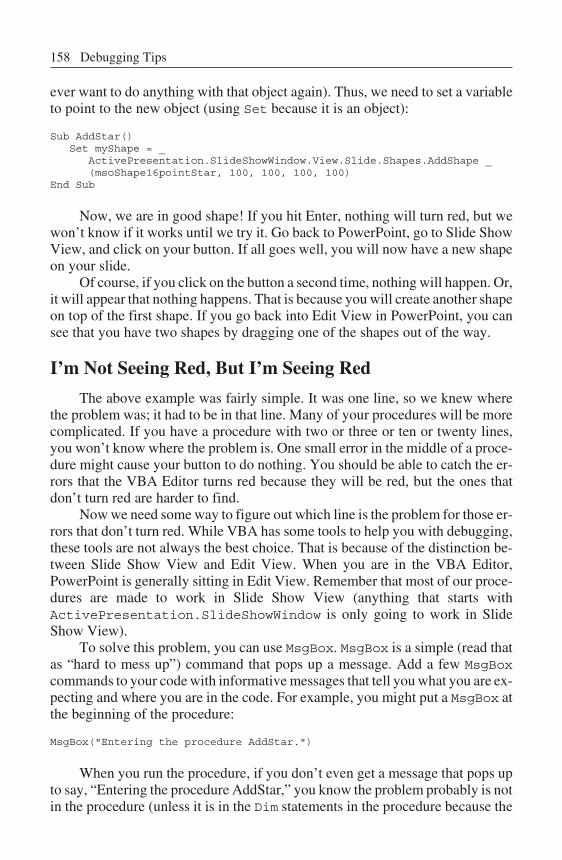
ever want to do any thing with that ob ject again). Thus, we need to set a vari able
to point to the new ob ject (us ing Set because it is an object):
Sub AddStar() Set myShape = _ ActivePresentation.SlideShowWindow.View.Slide.Shapes.AddShape _ (msoShape16pointStar, 100, 100, 100, 100)End Sub
Now, we are in good shape! If you hit En ter, noth ing will turn red, but we
won’t know if it works un til we try it. Go back to PowerPoint, go to Slide Show
View, and click on your but ton. If all goes well, you will now have a new shape
on your slide.
Of course, if you click on the but ton a second time, noth ing will hap pen. Or,
it will ap pear that nothing hap pens. That is be cause you will create an other shape
on top of the first shape. If you go back into Edit View in PowerPoint, you can
see that you have two shapes by dragging one of the shapes out of the way.
I’m Not Seeing Red, But I’m Seeing Red
The above ex ample was fairly simple. It was one line, so we knew where
the prob lem was; it had to be in that line. Many of your pro cedures will be more
complicated. If you have a pro cedure with two or three or ten or twenty lines,
you won’t know where the prob lem is. One small error in the mid dle of a pro ce-
dure might cause your but ton to do noth ing. You should be able to catch the er-
rors that the VBA Ed itor turns red because they will be red, but the ones that
don’t turn red are harder to find.
Now we need some way to fig ure out which line is the prob lem for those er-
rors that don’t turn red. While VBA has some tools to help you with de bugging,
these tools are not al ways the best choice. That is because of the dis tinction be -
tween Slide Show View and Edit View. When you are in the VBA Ed itor,
PowerPoint is gen erally sitting in Edit View. Remember that most of our proce-
dures are made to work in Slide Show View (anything that starts with
ActivePresentation.SlideShowWindow is only go ing to work in Slide
Show View).
To solve this problem, you can use MsgBox. MsgBox is a sim ple (read that
as “hard to mess up”) command that pops up a message. Add a few MsgBox
commands to your code with informative messages that tell you what you are ex -
pecting and where you are in the code. For ex ample, you might put a MsgBox at
the beginning of the procedure:
MsgBox("En ter ing the pro ce dure AddStar.")
When you run the pro cedure, if you don’t even get a message that pops up
to say, “En tering the procedure AddStar,” you know the prob lem prob ably is not
in the procedure (un less it is in the Dim state ments in the procedure be cause the
158 De bug ging Tips
first MsgBox has to come af ter the procedure’s Dim state ments). It could be that
you linked your but ton to the wrong pro cedure or, in a more complicated script,
it could be that the problem is in another procedure that calls this one. If you get
the message, you know you have got ten into the pro cedure. Now, you can add
some more MsgBox com mands to try to locate the problem. For example:
Sub AddStar() Dim myShape As Shape
MsgBox ("En tering the pro cedure AddStar.") Set myShape = _ ActivePresentation.SlideShowWindow.View.Slide.Shapes.AddShape _ (msoShape16pointStar, 100, 100, 100, 100) MsgBox ("I just added the shape, and I’m about to add some text.") myShape.TextFrame.TextRange.Text = "Good job!" MsgBox ("I just added some text, and I’m about to change the color.") mShape.Fill.ForeColor.RGB = vbBlue MsgBox ("Color is changed; now I’ll change the size.") myShape.Height = 200 myShape.Width = 200 MsgBox ("I am about to leave AddStar.")End Sub
Try run ning the above pro cedure. See if you can find the er ror. As you run
the pro cedure, you should get the messages:
• En ter ing the pro ce dure AddStar.
• I just added the shape, and I’m about to add some text.
• I just added some text, and I’m about to change the color.
But that will be it. You will know that the prob lem is prob ably in the fol -
lowing line. If you look closely, you will see that the line has a small typo; it uses
mShape in stead of myShape. Once the prob lem is fixed, try it out again. If it
works, you can de lete all the MsgBox lines.
You can also use a MsgBox to tell you what is in a variable. For example,
if something is wrong with the scoring in a quiz, you might want to use the fol-
lowing line at various places to get up dates about what the computer thinks the
score is:
MsgBox ("The value of numCorrect is " & numCorrect)
This will work most of the time. Un fortunately, certain kinds of errors will
not turn red and will not allow the pro cedure to run at all (for ex ample, instead of
mis spell ing myShape, try mis spelling RGB). These are harder to find and are a
good reason to use some tricks to pre vent errors in the first place (see “An Ounce
of Pre ven tion”).
I’m Not See ing Red, But I’m Seeing Red 159
Com ment ing Out
Be cause the MsgBox method, in the pre vious section, works sometimes and
doesn’t work other times, you might need an other old pro gram mer’s trick to
find your error: commenting out. Remember that ev erything on a VBA line after
a single quote is ig nored; that is, it is a comment. You can put a single quote at
the beginning of a line and that entire line will be ig nored. This is better than de-
leting the line because you still have the code there, and you can get it to run
again by de leting the single quote. Note that the VBA Ed itor turns com ments
green, so if you have anything that is green in your code, it is ignored by VBA.
Sub AddStar() Dim myShape As Shape
MsgBox ("En tering the pro cedure AddStar.") Set myShape = _ ActivePresentation.SlideShowWindow.View.Slide.Shapes.AddShape _ (mso16pointStar, 100, 100, 100, 100) MsgBox ("I just added the shape, and I’m about to add some text.") myShape.TextFrame.TextRange.Text = "Good job!" MsgBox ("I just added some text, and I’m about to change the color.") myShape.Fill.ForeColor.RGB = vbBlue MsgBox ("Color is changed; now I’ll change the size.") myShape.Height = 200 myShape.Width = 200 MsgBox ("I am about to leave AddStar.")End Sub
The above procedure is sim ilar to the one ear lier, except there is a different
error. If you try run ning the procedure with this er ror, noth ing will hap pen. You
won’t even get “En tering the procedure AddStar.” That means that it is time to
comment out some lines to try to track down the prob lem. Since noth ing can
work un til the shape is created, you prob ably want to start with the line after Set
myShape . . . .
Sub AddStar() Dim myShape As Shape
MsgBox ("En tering the pro cedure AddStar") Set myShape = _ ActivePresentation.SlideShowWindow.View.Slide.Shapes.AddShape _ (mso16pointStar, 100, 100, 100, 100) 'MsgBox ("I just added the shape, and I’m about to add some text.") 'myShape.TextFrame.TextRange.Text = "Good job!" 'MsgBox ("I just added some text, and I’m about to change the color.") 'myShape.Fill.ForeColor.RGB = vbBlue 'MsgBox ("Color is changed; now I’ll change the size.") 'myShape.Height = 200 'myShape.Width = 200 'MsgBox ("I am about to leave AddStar.")End Sub
160 De bug ging Tips
You’ll no tice that all the lines after the Set myShape (ex cept End Sub) line are
green in the VBA Ed itor. These lines will not run. As far as VBA is concerned,
they are not even there.
Try run ning the procedure with all the comments. If it works, start remov-
ing the comments (just the single quotes, not the whole lines) from the line be-
low Set myShape. Run it again. If it works, remove the comment from the next
line and run it again. Keep removing one comment and run ning it again un til it
stops work ing. When it stops work ing, you have found the problem line. It must
be the last line from which you re moved the comment. If you have removed all
the comments and it still doesn’t work, then the prob lem is prob ably the Dim
statement or the Set myShape line.
If you go through this exercise, you’ll find that the problem is with the Set
myShape line. mso16PointStar should be msoShape16PointStar. Of ten
the parameters of procedures are the kinds of er rors that will cause a procedure to
not work at all, rather than work un til it reaches an error. But the best way to
eliminate er rors is to practice some pre vention techniques. They won’t prevent
all errors, but they will cut down on errors.
Com pil ing Your Code
Sometimes your code will not work, and you won’t know why. You might
have tried all the techniques above, but you still can’t find the bug. There is one
more technique that sometimes gives more in formation: compiling your code.
Certain kinds of errors are run time er rors. These hap pen when your code is
running. The com puter doesn’t know that there is a bug un til it tries to run the
code. Other kinds of er rors are com pile er rors. These are er rors in which the
computer can see a problem be fore you run the code. Errors that turn red are one
type of compile error, gen erally errors that af fect one spe cific line of code. Other
errors do not turn red, but they make all the code stop working.
You can find compile errors by choosing “Compile VBAProject” from the
Debug menu in the VBA Ed itor. This will look over your code for any er rors that
the computer can catch before your code is run.
If you get a message that includes “Compile error,” you will prob ably get
some use ful in formation about what is wrong. It will prob ably high light where
the prob lem is in your code and de scribe the prob lem. For example, the error
“Argument not op tional” tells you that you are missing an argument for a proce-
dure or method. And you will know which pro cedure or method is missing the
argument be cause it will be high lighted. If you have more than one compile er-
ror, then you will have to do this again because the com piler stops on the first er-
ror it finds. Fix the first error and compile your pro ject again to see if there are
any more errors.
Com pil ing Your Code 161
Debugger
The VBA Ed itor co mes with a debugger. In some cases, this will be useful,
but it will not work well for most of our code. The debugger lets you set break-
points to stop your code at certain points as it runs. Un fortunately, this does not
work well for code that runs in Slide Show View, so it is not use ful for most of
our pur poses.
An Ounce of Prevention
As you write your code, you can use several techniques to help you catch
bugs as you type. These techniques will not pre vent all bugs, but they will cut
down on the num ber you have to find later. If you are perfect and never make
mistakes, these techniques won’t affect any thing. The techniques are for hu man
eyes; the computer will be able to run your code without them. But for those of
us who are not perfect, our hu man eyes need all the help we can get to catch bugs
or pre vent them from happening.
Cap i tal iza tion
You might have looked at some of the ex amples and won dered why certain
things were cap italized in certain ways. Some of it is part of the technique to pre-
vent bugs, and some of it is forced upon you by VBA. There are five kinds of
things you can type into the VBA Editor:
1. Comments
2. Text between quotes
3. Variable names
4. Pro ce dure names
5. VBA stuff (built-in func tion names, pro cedure names, ob ject names,
etc.)
Comments can be cap italized any way that you like because they are for
you to read. Pay close at tention to capitalization of text be tween quotes be cause
that will usually be dis played for your students, but for the pur poses of de bug-
ging, it doesn’t mat ter how you cap italize it. Cap italization of the last three items
can be important for debugging.
In this book, I have used the fol lowing con vention: Variable names be gin
with a lowercase let ter; and procedure names be gin with an up percase let ter.
Furthermore, since variable names and procedure names can not con tain spaces,
any new word in the name be gins with an up percase letter. This is a convention,
a technique, a trick. I could have used yourName in stead of YourName and
UserName in stead of userName. It would have worked fine. How ever, if you
use this convention, you can look at your code and always tell whether a name
162 De bug ging Tips
re fers to a vari able or a pro ce dure by look ing at the cap i tal iza tion. Cap i tal iz ing
the first letter of each sub sequent word in a variable or pro cedure name simply
helps you read it more easily. You want to be able to read the names because you
picked names that make sense to you.
You should be able to tell immediately that the following are vari ables, and
you prob ably even have a reasonable idea of what in formation they hold:
myShape, numCorrect, userName, printableSlide. You should be able to
tell im me di ately that the fol low ing are pro ce dures: YourName, RightAnswer,
AddStar.
For the VBA stuff, you don’t have a choice about capitalization. Most VBA
stuff will be capitalized for you, no matter how you type it. This is a good thing
that can help pre vent bugs.
Don’t Cap i tal ize to Pre vent Bugs
While you are writing your scripts, the VBA Ed itor tries to be helpful. You
might find this an noying at times, but many of its helpful features can prevent fu -
ture problems.
The VBA Ed i tor will au to mat i cally ad just your cap i tal iza tion for you. This
might seem ex cessively meticulous, but you can use it to catch typ ing mistakes.
You’ll no tice that built-in procedures and commands (such as MsgBox and Dim)
all start with capitals. The only times you should cap italize words your self are in
Dim state ments (de clar ing vari ables), Sub statements (at the beginning of
procedures), and inside quotes.
If you follow the cap italization con vention, after you have de clared a vari -
able with a Dim state ment, always type it in lowercase. And af ter you write a pro-
cedure and cap italize it prop erly in the Sub statement, if you call the pro cedure
from an other procedure, you can type its name in low ercase. Not only is it easier
to type in low ercase, it will help you catch mistakes.
After you type a line and hit En ter (or click somewhere else in your script),
the VBA Ed i tor will au to mat i cally ad just the cap i tal iza tion. For ex am ple, type
the following:
activepresentation.slideshowwindow.view.next
When you hit En ter, the VBA Ed itor will change it to:
ActivePresentation.SlideShowWindow.View.Next
The power of this is ap parent when you type something wrong. If you left
out a “t” in ActivePresentation, for example, that would not be capitalized.
For ex ample, type the fol lowing:
activepresenation.slideshowwindow.view.next
An Ounce of Prevention 163
When you hit En ter, it changes to:
activepresenation.SlideShowWindow.View.Next
The fact that activepresenation did not change in capitalization is a tip-off
that something is wrong.
This also works for any variables that you have de clared and pro cedures
you have written. The VBA Ed itor gets the cap italization that you want to use
from the Dim state ment and the Sub statement (that’s why you have to type with
proper cap i tal iza tion in the Dim and Sub state ments) and au to mat i cally ad justs
the capitalization as you type the vari able or pro cedure name in the fu ture. If the
cap i tal iza tion is not au to mat i cally ad justed for you, you have ei ther mis spelled
the name of the variable or pro cedure or have forgotten to declare the variable.
Misspelling the name of a variable or pro cedure gives the same results as
misspelling a keyword: The capitalization will not be changed by the VBA Ed i-
tor. For ex ample, type the following:
Dim userName As StringSub YourName() usernam = InputBox(prompt:="Type your name")End Sub
Be cause userName is mis spelled as usernam, the n did not get cap italized.
In dent ing
You might have no ticed that throughout the text, code ex amples were in -
dented in a very specific way. In denting helps you read the code. The com puter
will un derstand your code just fine without in denting, but you are more likely to
make mistakes without it. “Conditionals” in Chapter 8 discussed in denting briefly
because in denting is very help ful for reading If state ments. It is also help ful for
reading loops. The more complex the code, the more helpful in denting is.
You can use your own style for in denting, but whatever you de cide, you
should stick with it. The easiest way to in dent in the VBA Ed itor is to use the Tab
key. When you hit Tab at the be ginning of a line, the line will be in dented once.
When you hit En ter to go to the next line, the next line will be in dented at the
same level. If you don’t want it in dented, simply hit the Backspace key (Delete
on a Macintosh) or hold down the Shift key and hit Tab (shift-Tab). If you have a
block of lines that you want to indent, you can high light them and hit Tab (or
shift-Tab if you want to un-indent them).
In this book, I have in dented three kinds of statements:
1. Ev ery thing be tween a Sub and an End Sub is in dented one level.
2. Everything that is part of a block is in dented. This includes parts of an
If block (such as ev erything be tween an If and ElseIf or ev erything
164 De bug ging Tips
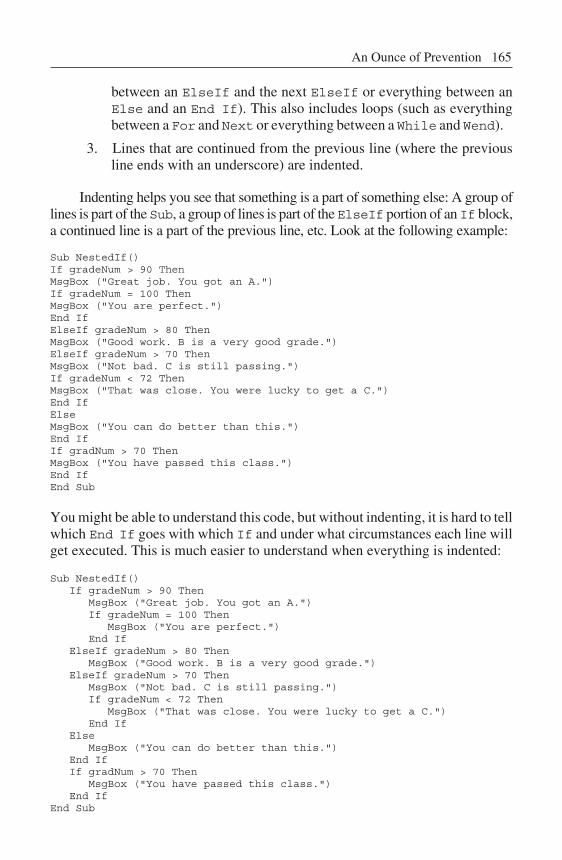
be tween an ElseIf and the next ElseIf or ev erything be tween an
Else and an End If). This also in cludes loops (such as everything
be tween a For and Next or ev erything be tween a While and Wend).
3. Lines that are continued from the previous line (where the pre vious
line ends with an un derscore) are in dented.
Indenting helps you see that something is a part of something else: A group of
lines is part of the Sub, a group of lines is part of the ElseIf por tion of an If block,
a con tinued line is a part of the previous line, etc. Look at the following ex ample:
Sub NestedIf()If gradeNum > 90 ThenMsgBox ("Great job. You got an A.")If gradeNum = 100 ThenMsgBox ("You are per fect.")End IfElseIf gradeNum > 80 ThenMsgBox ("Good work. B is a very good grade.")ElseIf gradeNum > 70 ThenMsgBox ("Not bad. C is still pass ing.")If gradeNum < 72 ThenMsgBox ("That was close. You were lucky to get a C.")End IfElseMsgBox ("You can do better than this.")End IfIf gradNum > 70 ThenMsgBox ("You have passed this class.")End IfEnd Sub
You might be able to un derstand this code, but without in denting, it is hard to tell
which End If goes with which If and under what cir cumstances each line will
get executed. This is much easier to un derstand when everything is indented:
Sub NestedIf() If gradeNum > 90 Then MsgBox ("Great job. You got an A.") If gradeNum = 100 Then MsgBox ("You are per fect.") End If ElseIf gradeNum > 80 Then MsgBox ("Good work. B is a very good grade.") ElseIf gradeNum > 70 Then MsgBox ("Not bad. C is still pass ing.") If gradeNum < 72 Then MsgBox ("That was close. You were lucky to get a C.") End If Else MsgBox ("You can do better than this.") End If If gradNum > 70 Then MsgBox ("You have passed this class.") End IfEnd Sub
An Ounce of Prevention 165
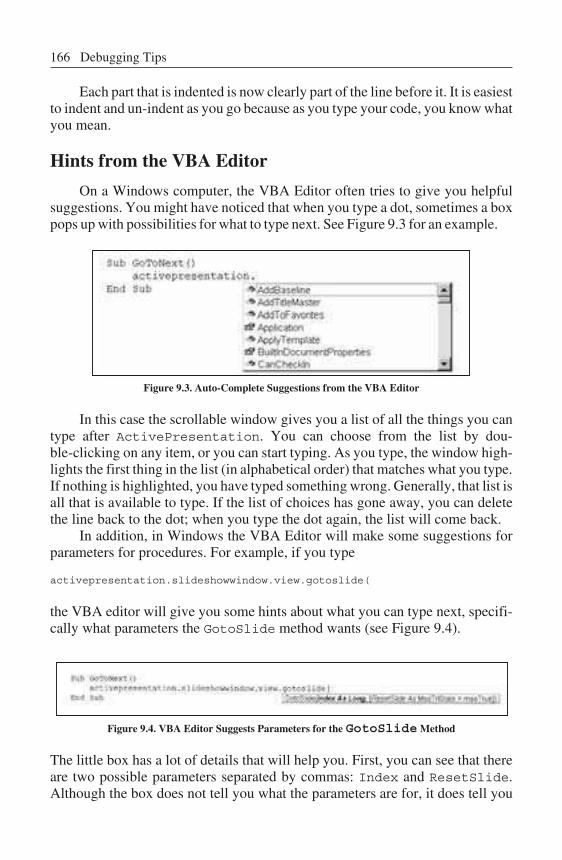
Each part that is in dented is now clearly part of the line be fore it. It is eas iest
to in dent and un-in dent as you go be cause as you type your code, you know what
you mean.
Hints from the VBA Editor
On a Windows computer, the VBA Ed itor of ten tries to give you helpful
suggestions. You might have no ticed that when you type a dot, sometimes a box
pops up with pos sibilities for what to type next. See Fig ure 9.3 for an example.
Figure 9.3. Auto-Complete Sug gestions from the VBA Ed itor
In this case the scrollable window gives you a list of all the things you can
type af ter ActivePresentation. You can choose from the list by dou -
ble-clicking on any item, or you can start typ ing. As you type, the window high -
lights the first thing in the list (in al phabetical or der) that matches what you type.
If noth ing is highlighted, you have typed something wrong. Gen erally, that list is
all that is available to type. If the list of choices has gone away, you can de lete
the line back to the dot; when you type the dot again, the list will come back.
In ad dition, in Windows the VBA Ed itor will make some sug gestions for
pa ram e ters for pro ce dures. For ex am ple, if you type
activepresentation.slideshowwindow.view.gotoslide(
the VBA editor will give you some hints about what you can type next, specifi-
cally what pa ram e ters the GotoSlide method wants (see Figure 9.4).
Fig ure 9.4. VBA Ed i tor Sug gests Pa ram e ters for the GotoSlide Method
The lit tle box has a lot of de tails that will help you. First, you can see that there
are two pos si ble pa ram e ters sep a rated by com mas: In dex and ResetSlide.
Although the box does not tell you what the parameters are for, it does tell you
166 De bug ging Tips

what kind of in formation they need. In this case, In dex is a Long vari able
(that’s a kind of in teger). You can prob ably fig ure out that it is the slide num ber
of the slide to go to. ResetSlide is an MsoTriState vari able (which is usu-
ally just a True or False value).
You should also no tice that In dex is not in square brackets, but
ResetSlide is. This tells us that In dex is required and ResetSlide is not.
That is, you have to tell GotoSlide which slide to go to, but you don’t have to
tell it whether or not to re set (the ResetSlide tells it whether or not to re set the
animation ef fects on the slide; i.e., leave them in their fi nal state or put them back
at the be ginning state). Also, no tice that ResetSlide has a de fault value. That
is, if you don’t include a value for ResetSlide, it will as sume you wanted
msoTrue (which is ba sically the same as True), which means that the slide will
be re set. Fi nally, you will notice that In dex is in bold. That means that the next
thing I type will be the value used for In dex. If I type a number and then a
comma, ResetSlide will be come bold, meaning that the next value I type will
be the value for ResetSlide. If you type pa rameters in or der, you can just type
the values as in the following:
ActivePresentation.SlideShowWindow.View.GotoSlide(5,True)
If you don’t type them in order, you can use the parameter name, fol lowed by co -
lon equals sign (:=), fol lowed by the value, as in the fol lowing:
ActivePresentation.SlideShowWindow.View.GotoSlide(ResetSlide:=True, _ In dex:=5)
This is very help ful for a cou ple of reasons. First, you don’t always have to
look up which pa rameters are needed. For example, when add ing a shape, I can
never re member which comes first and sec ond: Top and Left or Width and
Height. I don’t need to remember because VBA will tell me, as in Figure 9.5.
Fig ure 9.5. VBA Ed i tor Sug gests Pa ram e ters for the AddShape Method
Second, you al ways know what the procedure expects. If you leave off any re -
quired parameters (such as forgetting to specify Width and Height), it won’t
work.
Hints from the VBA Ed itor 167
VBA Help
While Win dows versions of the VBA Ed itor are better at sug gesting things
as you type, Macintosh ver sions have help that is a bit easier to use. In ei ther ver-
sion of VBA, you can choose one of the selections from the Help menu to search
for a keyword. In the Macintosh ver sion, you can high light a key word, ob ject, or
method in your code and hit the Help key on your keyboard. This will bring up
help that is directly related to what you are trying to do.
When you are using help, you can get all the in formation that pops up on
your screen when you type open parenthesis and VBA sug gests pa rameters. You
should also check out the examples to help you un derstand what you are doing
better.
Com mon Bugs
Everyone makes mistakes, and ev eryone makes their own mistakes. How-
ever, a few mistakes are fairly common. If you can’t track down a bug, you
might look for some of these things. The bugs listed below are particularly tricky
to find because they are not a prob lem with a spe cific pro cedure. If one pro ce-
dure is not work ing at all or is giv ing the wrong re sults, you can usu ally find the
bug if you stare at that pro cedure long enough (or use some of the above tech-
niques to track it down). However, the following bugs cause prob lems for proce-
dures that are completely cor rect and might have been working a minute earlier.
No matter how long you stare at a pro cedure, you won’t find the bug if it is
caused by something outside the procedure.
Mul ti ple Mod ules
You were warned early in this book that you should have only one module
for each presentation. If you have gotten this far in the book, you have prob ably
heeded that warning. However, some peo ple get con fused and add a second
module. Some things will work with more than one mod ule, and some things
won’t. Check the Project win dow to be sure that you have only one mod ule. If
you can’t re member how to check the mod ules in your Pro ject win dow, look
back at Chapter 4 in “Help! I’ve Lost My Windows.”
Usually, when you add one mod ule, it will be named “Module1.” How ever,
if you played around with modules or accidentally de leted a mod ule, your mod -
ule might be “Module2” or “Module3.” That is OK as long as there is only one
module, whatever it is named. If you have put code in more than one mod ule, use
cut and paste to move all the code into one mod ule. If you had Dim state ments at
the top of each mod ule, be sure you put them all together at the top of your one
module and re move any duplicates.
168 De bug ging Tips
Du pli cate Vari ables
When we de clare our variables at the be ginning of a mod ule, we cre ate a
box to put in formation in, and we give that box a name. What if two boxes have
the same name? That would be a prob lem, and VBA would not know what to do.
In fact, noth ing in your module would work at all. You could have buttons tied to
procedures that have noth ing to do with the variable that is de clared twice, but
they would not work. Noth ing would work.
You might have this problem if you are combining two examples or have a
long list of variables that you de clare at the beginning of your module, and you
forgot you al ready de clared a vari able. If none of your VBA works, check the
variable dec larations at the beginning of the mod ule and de lete any du plicate
Dim statements.
Du pli cate Pro ce dures
Just like VBA doesn’t know what to do when you have two variables with
the same name, it doesn’t know what to do when you have two pro cedures with
the same name. You might have been playing around with the ex amples in this
book and accidentally wrote two YourName pro cedures. They might be exactly
the same or dif ferent, but if they have the same name, noth ing will work. Fig ure
out which pro cedure does what you want and delete the du plicate. Or, if the two
procedures are re ally supposed to be do ing dif ferent things, give one of them a
different name. You might also want to add a com ment to ex plain what each
procedure does.
Note that variables and procedures are not al lowed to have
the same name. If you give a procedure the same name as a
variable, it will not work.
Ex tra End Sub
The VBA Ed itor is nice. It never requires you to type End Sub. When you
hit the En ter key af ter typing a Sub line, the ed i tor au to mat i cally types the End
Sub. Most of the time, this is a good thing. Occasionally, it is not, such as when it
leads to your code hav ing too many End Sub lines. Since you don’t type the End
Sub lines, it is easy for ex tra ones to be added to your code.
If your code stops working, check for extra End Sub lines. They might be
at the end of the mod ule or at the end of a procedure. Usually they’re in a place
that is not showing on your screen, so you’ll have to scroll to see them. De lete
the extra End Sub, and your code might work again.
Com mon Bugs 169
!
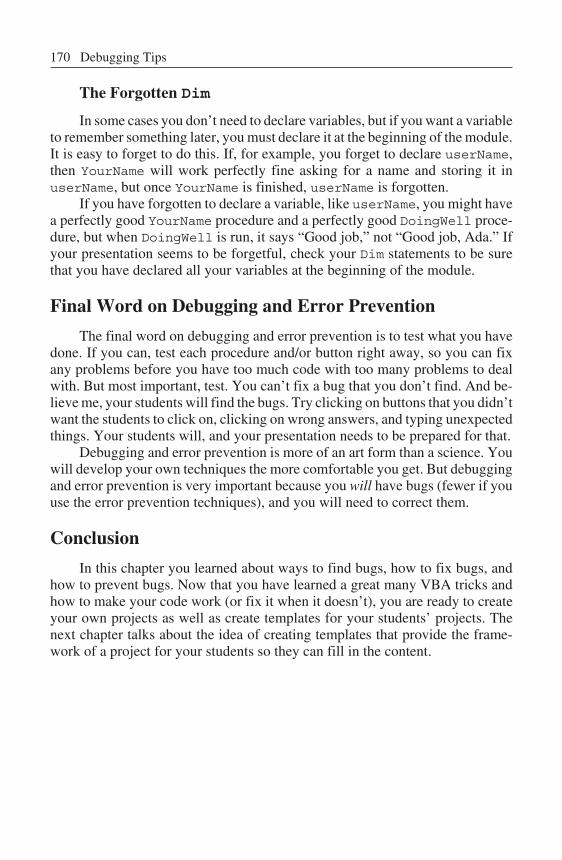
The For got ten Dim
In some cases you don’t need to de clare variables, but if you want a variable
to re member something later, you must de clare it at the be ginning of the mod ule.
It is easy to for get to do this. If, for example, you forget to declare userName,
then YourName will work perfectly fine ask ing for a name and storing it in
userName, but once YourName is fin ished, userName is forgotten.
If you have for gotten to declare a vari able, like userName, you might have
a perfectly good YourName pro cedure and a perfectly good DoingWell pro ce-
dure, but when DoingWell is run, it says “Good job,” not “Good job, Ada.” If
your pre sentation seems to be forgetful, check your Dim state ments to be sure
that you have de clared all your variables at the beginning of the module.
Final Word on Debugging and Er ror Prevention
The final word on de bugging and error prevention is to test what you have
done. If you can, test each pro cedure and/or but ton right away, so you can fix
any prob lems be fore you have too much code with too many problems to deal
with. But most im portant, test. You can’t fix a bug that you don’t find. And be-
lieve me, your stu dents will find the bugs. Try clicking on but tons that you did n’t
want the students to click on, clicking on wrong answers, and typ ing un expected
things. Your students will, and your presentation needs to be prepared for that.
Debugging and error prevention is more of an art form than a science. You
will de velop your own techniques the more comfortable you get. But de bugging
and error prevention is very important because you will have bugs (fewer if you
use the error prevention techniques), and you will need to correct them.
Con clu sion
In this chap ter you learned about ways to find bugs, how to fix bugs, and
how to prevent bugs. Now that you have learned a great many VBA tricks and
how to make your code work (or fix it when it doesn’t), you are ready to create
your own pro jects as well as create templates for your stu dents’ pro jects. The
next chapter talks about the idea of creating templates that pro vide the frame-
work of a pro ject for your stu dents so they can fill in the content.
170 De bug ging Tips
Ex er cises to Try
�The following code is not indented. What will happen if Ella
types 5? What will hap pen if anyone else types 5? What will hap-
pen if Ella types 10? What will happen if anyone else types 10?
Try to figure it out without run ning the code. Type it into the
VBA Ed itor and indent it prop erly; see if you come up with a dif-
ferent answer now that it is in dented. Run the code to see if you
got the right an swer.
Sub HowDoYouFeel() Dim score As In teger Dim userName As String userName = InputBox("What is your name?")score = InputBox("On a scale of 1 to 10, how do you feel?") If score > 5 Then If score > 7 Then If score > 9 Then If userName = "Ella" Then If score > 10 Then MsgBox ("That’s amaz ing") Else MsgBox ("That’s per fect") End If ElseIf score < 6 Then MsgBox ("That’s mid dling") Else MsgBox ("You’re per fect.") End If ElseIf score = 5 Then MsgBox ("Are you mid dling?") Else MsgBox ("Are you above av erage?") End If ElseIf score = 5 Then MsgBox ("Right in the mid dle") Else MsgBox ("That’s good") End If Else MsgBox ("Not too good.") End If End Sub
Ex er cises to Try 171

�The following is the en tire con tents of a module. It con tains four
bugs. Try to find all four by typ ing the code into the VBA Ed itor
and us ing the debugging and error prevention methods in this
chap ter.
Sub YourName() userName = InputBox("What is your name?") End Sub End Sub Sub BadProcedure() YorName If userName = "Ella" Then MsgBox ("Hello, big girl.") ElseIf userName = "Ada" MsgBox ("Hello, lit tle girl.") Else MsgBox ("Hello, " & userName) End If End Sub
172 De bug ging Tips
10Tem plates
In tro duc tion
In Chapter 9 you learned the last technical tricks presented in this book and
developed a bag of tricks to help you fix any prob lems that you might en counter.
Now you are ready to embark on using all the tricks you have learned to make
powerful in teractive projects. However, your students might not be ready to
make their own pow erful interactive projects. This chapter de scribes templates,
a tool you can use to do the technical and de sign work for your stu dents, al low-
ing them to con centrate on the con tent. With a template, you can use all the VBA
features that you want, and your stu dents can use all those VBA features with out
even knowing how to open the VBA Ed itor. This chapter describes templates
and pro vides sev eral ex am ples, in clud ing a so phis ti cated ex am ple that asks the
user for information and adds a slide with that information.
Vo cab u lary
• Design Tem plate (.pot) File • Tem plate
What Are Tem plates?
Previous chapters em phasized the use of mul timedia projects that are cre -
ated by the educator. As you have read this book and worked through the ex am-
ples, I hope you have got ten several ideas for projects that you want to create for
your stu dents. A more powerful use of multimedia is to have stu dents create their
own pro jects. Many stud ies have shown the pos itive educational im pact of students
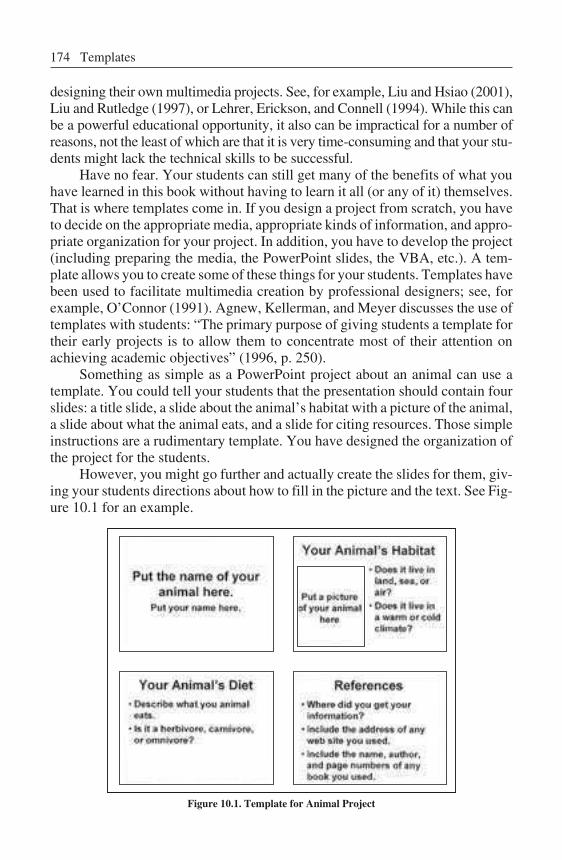
designing their own multimedia pro jects. See, for ex ample, Liu and Hsiao (2001),
Liu and Rutledge (1997), or Lehrer, Erickson, and Connell (1994). While this can
be a powerful ed ucational op portunity, it also can be im practical for a number of
reasons, not the least of which are that it is very time-consuming and that your stu-
dents might lack the technical skills to be suc cessful.
Have no fear. Your stu dents can still get many of the benefits of what you
have learned in this book without hav ing to learn it all (or any of it) themselves.
That is where templates come in. If you de sign a pro ject from scratch, you have
to de cide on the ap pro pri ate me dia, ap pro pri ate kinds of in for ma tion, and ap pro -
priate or ganization for your pro ject. In addition, you have to develop the pro ject
(including pre paring the media, the PowerPoint slides, the VBA, etc.). A tem-
plate al lows you to create some of these things for your students. Templates have
been used to fa cil i tate mul ti me dia cre ation by pro fes sional de sign ers; see, for
example, O’Connor (1991). Agnew, Kellerman, and Meyer discusses the use of
templates with stu dents: “The pri mary pur pose of giv ing stu dents a template for
their early pro jects is to al low them to con centrate most of their attention on
achieving academic objectives” (1996, p. 250).
Something as simple as a PowerPoint pro ject about an an imal can use a
template. You could tell your stu dents that the presentation should con tain four
slides: a ti tle slide, a slide about the an imal’s hab itat with a pic ture of the an imal,
a slide about what the animal eats, and a slide for cit ing re sources. Those simple
in struc tions are a ru di men tary tem plate. You have de signed the or ga ni za tion of
the project for the students.
However, you might go fur ther and ac tually create the slides for them, giv -
ing your students di rections about how to fill in the picture and the text. See Fig -
ure 10.1 for an example.
Figure 10.1. Tem plate for An imal Pro ject
174 Tem plates
Although this is not a com plex pro ject, it might be a good one for second
graders, for example, who are first be ing in troduced to PowerPoint. This pro ject
does not re quire VBA or hyperlinks or an imations or any thing but the most ba sic
features of PowerPoint. For a class of students who are new to PowerPoint, by
getting them started you can save them hours of computer work and allow them
to con centrate on the content.
As projects be come more complex, tem plates become more powerful. You
might want to introduce your stu dents slowly to ad vanced features of
PowerPoint, or you might not want to in troduce them to some features at all. But
you might want them to take full ad vantage of these features right away.
In Chapter 8 we saw ex amples of pro jects that easily can be turned into tem-
plates. You might want your students to write quizzes with all the features of
VBA that we discussed, but you might not want them to have to deal with VBA.
Using the examples from Chap ter 8, you can set up a template with no questions
or a fake question and give your students in structions about how to add slides
and tie the but tons to the ap propriate pro cedures. For the mul tiple-choice ex am-
ples, they don’t need to change the VBA code at all.
As an other tem plate example, chapter 7 of Agnew, Kellerman, and Meyer
(1996) discusses a cur rent events pro ject. In this pro ject, each student or group
of stu dents creates a single slide about a current event. The slide contains a brief
paragraph about the event and a but ton for the ci tation and pho tograph of the
event. This project could be done as a tem plate in which the teacher creates all
the parts of the pro ject and the stu dents simply add the pic tures, ci tations, and
news sum maries. In the end, all the slides are put to gether to form a class
collection of current events.
Many top ics would work well in a template for mat. Pro jects that work es-
pecially well are ones in which you would like the stu dents to in clude a fixed
body of in formation, and each stu dent or group in cludes the same kind of infor-
mation about a dif ferent topic. For ex ample, school clubs, U.S. presidents, coun -
tries in Eu rope, Spanish verbs, and state flags are all top ics that lend themselves
well to templates.
Saving Your Template
When you cre ate a tem plate in PowerPoint, you can save it as a reg ular
PowerPoint presentation or as a Design Template. If you save it as a regular
PowerPoint presentation, you can have your stu dents edit it, and you have to be
sure they choose “Save As” from the File menu to save it un der a new name. If
they choose “Save,” it might overwrite the orig inal file and lose the template.
If you save your template as a De sign Template, when students dou -
ble-click on the file to open it, they will be taken to a new presentation that is
based on the template. When they save this file, they will be asked to choose a
new name and lo cation for the presentation, so it will not overwrite the orig inal
template.
Saving Your Template 175

To save your presentation as a Design Template, you will have to pay atten-
tion to the “Save as type.” If you choose, “Design Template” as your file type, it
will cre ate a .pot file (see Figure 10.2).
Figure 10.2. Choos ing De sign Tem plate As the File Type
If you save a file as a De sign Tem plate, you can edit the template (rather than
a pro ject based on the template) by open ing the project from within PowerPoint.
That is, start PowerPoint and choose “Open” from the File menu to open it.
Once you have cre ated a tem plate, ei ther as a .pot file or as a reg ular
PowerPoint presentation, you might want to set it to be “Read-only.” To do this,
quit out of PowerPoint and click once on the file to select it. If you are in Win -
dows, choose “Properties” from the File menu and check the box labeled
“Read-only.” If you are on a Macintosh, choose “Get Info” from the File menu
and check the box la beled “Locked.” This will prevent the template from be ing
changed accidentally.
The Pick-A-Partner Tem plate Project
In my Multimedia Design in the Classroom class, I encourage students to
form groups to complete their fi nal pro jects. While this could be done in a num -
ber of ways (with or with out technology), I also want to be sure my students are
176 Tem plates
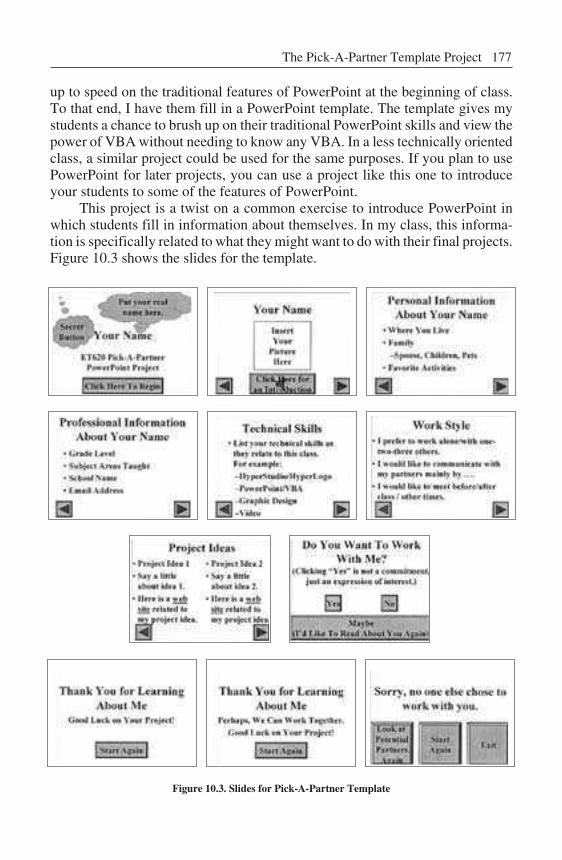
up to speed on the tra ditional features of PowerPoint at the beginning of class.
To that end, I have them fill in a PowerPoint tem plate. The tem plate gives my
students a chance to brush up on their traditional PowerPoint skills and view the
power of VBA with out needing to know any VBA. In a less technically ori ented
class, a similar project could be used for the same pur poses. If you plan to use
PowerPoint for later pro jects, you can use a pro ject like this one to in troduce
your stu dents to some of the features of PowerPoint.
This project is a twist on a common ex ercise to in troduce PowerPoint in
which stu dents fill in in formation about themselves. In my class, this in forma-
tion is spe cifically re lated to what they might want to do with their fi nal pro jects.
Figure 10.3 shows the slides for the template.
Figure 10.3. Slides for Pick-A-Partner Tem plate
The Pick-A-Partner Tem plate Pro ject 177
In the template, clouds rep resent in structions to the students who will be
filling in the con tent. The students are told to follow the in structions in the
clouds and de lete the clouds when they are done. In Figure 10.3, the cloud in -
structions are only shown on the first slide, but I gen erally include them on all
slides.
Once all stu dents fill in the con tent for their pre sentations, stu dents ro tate
around the room looking at each others’ pre sentations. When they reach the “Do
You Want To Work With Me?” slide, if they choose “Yes,” they are asked for a
name, an e-mail ad dress, and a project idea.
Most of the pro ject uses traditional PowerPoint features. The first seven
slides use features such as text, sound, pictures, but tons, and hyperlinks. VBA is
used in the first slide, the eighth slide, and the last slide to do the following:
• Some mi nor nav igation tricks were achieved with VBA.
• Users are asked to input name, e-mail ad dress, and project ideas.
• A new slide is created with the in formation the user in puts and a but -
ton to ad vance to the next slide.
• A but ton is used to navigate to a particular slide number (not a
named slide as is done with standard PowerPoint) so it can reach the
slide that was cre ated with VBA.
Figure 10.4 shows the complete code for this pro ject. Remember that, be -
cause this is a template, my students do not type any of this code. They simply
fill in the con tent in the first seven slides.
On the first slide, the se cret but ton (the in visible but ton in the up per left cor-
ner) is tied to the procedure GoToPartners. This procedure goes to the elev-
enth slide. Nor mally, this could be done with a traditional hyperlink, but in this
case, the eleventh slide is go ing to be created with VBA. A tra ditional hyperlink
cannot link to a slide that does not yet ex ist. On the last slide, the “Look at Po ten-
tial Part ners Again” but ton also is tied to GoToPartners for the same reason.
The only other but ton that uses VBA is the “Yes” button on the eighth slide.
When users de cide they want to work with you, they click on this but ton to ini ti-
ate a series of events. This but ton is tied to the WorkTogether pro ce dure, which
controls this series of events.
178 Tem plates
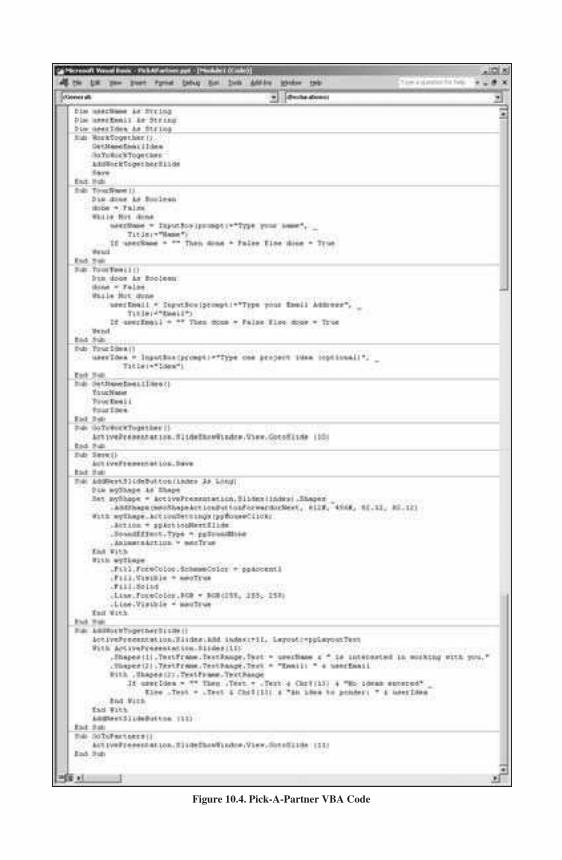
Figure 10.4. Pick-A-Partner VBA Code
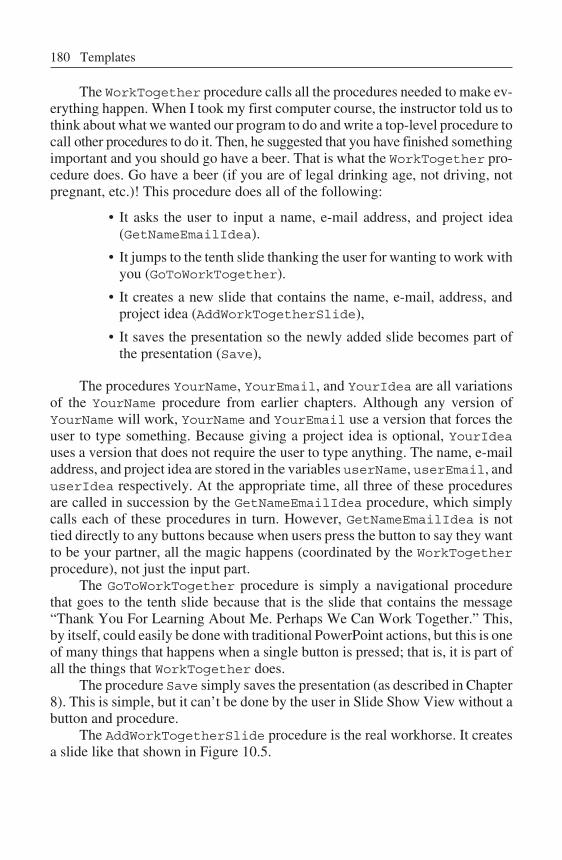
The WorkTogether procedure calls all the procedures needed to make ev -
erything hap pen. When I took my first computer course, the instructor told us to
think about what we wanted our pro gram to do and write a top-level pro cedure to
call other procedures to do it. Then, he sug gested that you have fi nished something
important and you should go have a beer. That is what the WorkTogether pro -
cedure does. Go have a beer (if you are of le gal drinking age, not driv ing, not
pregnant, etc.)! This pro cedure does all of the fol lowing:
• It asks the user to in put a name, e-mail address, and pro ject idea
(GetNameEmailIdea).
• It jumps to the tenth slide thanking the user for wanting to work with
you (GoToWorkTogether).
• It cre ates a new slide that contains the name, e-mail, address, and
project idea (AddWorkTogetherSlide),
• It saves the presentation so the newly added slide be comes part of
the pre sen ta tion (Save),
The pro ce dures YourName, YourEmail, and YourIdea are all variations
of the YourName pro cedure from earlier chap ters. Al though any version of
YourName will work, YourName and YourEmail use a ver sion that forces the
user to type something. Because giv ing a pro ject idea is op tional, YourIdea
uses a version that does not re quire the user to type any thing. The name, e-mail
address, and project idea are stored in the variables userName, userEmail, and
userIdea re spectively. At the appropriate time, all three of these procedures
are called in succession by the GetNameEmailIdea pro cedure, which simply
calls each of these pro cedures in turn. However, GetNameEmailIdea is not
tied directly to any but tons because when us ers press the but ton to say they want
to be your partner, all the magic hap pens (coordinated by the WorkTogether
procedure), not just the input part.
The GoToWorkTogether pro ce dure is sim ply a nav i ga tional pro ce dure
that goes to the tenth slide be cause that is the slide that con tains the mes sage
“Thank You For Learning About Me. Perhaps We Can Work To gether.” This,
by it self, could easily be done with traditional PowerPoint actions, but this is one
of many things that happens when a single but ton is pressed; that is, it is part of
all the things that WorkTogether does.
The pro ce dure Save simply saves the presentation (as de scribed in Chapter
8). This is simple, but it can’t be done by the user in Slide Show View without a
but ton and pro ce dure.
The AddWorkTogetherSlide procedure is the real workhorse. It cre ates
a slide like that shown in Fig ure 10.5.
180 Tem plates
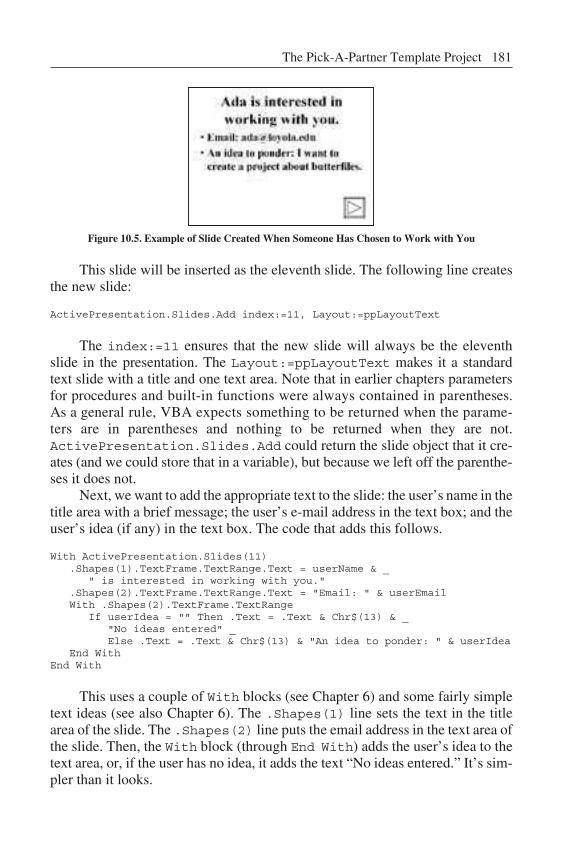
Figure 10.5. Ex ample of Slide Cre ated When Some one Has Cho sen to Work with You
This slide will be in serted as the eleventh slide. The fol lowing line cre ates
the new slide:
ActivePresentation.Slides.Add in dex:=11, Lay out:=ppLayoutText
The in dex:=11 en sures that the new slide will al ways be the eleventh
slide in the presentation. The Lay out:=ppLayoutText makes it a standard
text slide with a ti tle and one text area. Note that in earlier chapters pa rameters
for procedures and built-in functions were al ways con tained in parentheses.
As a general rule, VBA ex pects something to be re turned when the pa rame-
ters are in pa rentheses and noth ing to be returned when they are not.
ActivePresentation.Slides.Add could re turn the slide ob ject that it cre -
ates (and we could store that in a variable), but be cause we left off the pa renthe-
ses it does not.
Next, we want to add the appropriate text to the slide: the user’s name in the
title area with a brief mes sage; the user’s e-mail ad dress in the text box; and the
user’s idea (if any) in the text box. The code that adds this fol lows.
With ActivePresentation.Slides(11) .Shapes(1).TextFrame.TextRange.Text = userName & _ " is in terested in work ing with you." .Shapes(2).TextFrame.TextRange.Text = "Email: " & userEmail With .Shapes(2).TextFrame.TextRange If userIdea = "" Then .Text = .Text & Chr$(13) & _ "No ideas en tered" _ Else .Text = .Text & Chr$(13) & "An idea to pon der: " & userIdea End WithEnd With
This uses a cou ple of With blocks (see Chapter 6) and some fairly simple
text ideas (see also Chapter 6). The .Shapes(1) line sets the text in the ti tle
area of the slide. The .Shapes(2) line puts the email ad dress in the text area of
the slide. Then, the With block (through End With) adds the user’s idea to the
text area, or, if the user has no idea, it adds the text “No ideas en tered.” It’s sim -
pler than it looks.
The Pick-A-Partner Tem plate Pro ject 181
Fi nally, the AddNextSlideButton pro cedure is called to add a but ton
to go to the next slide:
AddNextSlideButton (11)
The AddNextSlideButton pro cedure creates a button on any slide. We
call it with 11 so it will cre ate a but ton on the elev enth slide and in dex will be
set to whatever num ber you call AddNextSlideButton with (see “Pa rame-
ters” in Chapter 8 for more in formation about parameters).
Sub AddNextSlideButton(in dex As Long) Dim myShape As Shape Set myShape = ActivePresentation.Slides(in dex).Shapes. _ AddShape(msoShapeActionButtonForwardorNext, _ 612#, 456#, 82.12, 82.12) With myShape.ActionSettings(ppMouseClick) .Ac tion = ppActionNextSlide .SoundEffect.Type = ppSoundNone .AnimateAction = msoTrue End With With myShape .Fill.ForeColor.SchemeColor = ppAccent1 .Fill.Vis ible = msoTrue .Fill.Solid .Line.ForeColor.RGB = RGB(255, 255, 255) .Line.Vis ible = msoTrue End WithEnd Sub
In this pro cedure, the Set line creates the but ton and sets myShape to point
to it. msoShapeActionButtonForwardorNext cre ates it as a but ton with a
for ward-point ing ar row. The first With block sets the ac tion (this is what makes
it go to the next slide) with the line .Action = ppActionNextSlide. The
other lines in the first With block aren’t re ally necessary but complete the ac tion
features of the button.
The second With block sets colors (specifically Fill and Line col ors). If
you are us ing the default color scheme, this en tire With block is un necessary,
but you can play with the pa rameters to see how the but tons that are created
change.
The last thing you should note about this pro cedure is that it was created us -
ing a macro. You can do some things by creating macros by go ing to the Tools
menu and choos ing “Record Macro.” What ever you do will be placed into a
VBA pro cedure. This is very good for setting up pa rameters, such as colors and
shapes and locations. How ever, a macro created in Edit View will not run prop -
erly in Slide Show View. Therefore, use the macro to guide you in creating
shapes and picking col ors, but put those pa rameters into your own code that will
run in Slide Show View. This requires un derstanding some complicated con -
cepts, so don’t worry if you don’t get it right away.
182 Tem plates
Con clu sion
In this chap ter, you have learned the power of templates. Sometimes you
want your stu dents to work on technical skills, but technology in the classroom
primarily is a tool for learning the curriculum. As a teacher, you need to balance
the use of technology with the needs of the cur riculum. If the technology de -
mands are too great, the curriculum will be lost. Tem plates are the perfect so lu-
tion for many tasks. If you want your students to use pow erful technological
features, such as the VBA features of PowerPoint, but you don’t want them to
focus on the technology, you can create a template with all the features they
need, so they can focus on the curriculum but still get the advantage of the
powerful features.
You can use templates with your students with early projects while they are
still get ting used to PowerPoint, or you can use templates for all pro jects. Tem-
plates do not need to in clude ad vanced features like VBA. Even the simplest
templates (like the An imal Pro ject in Fig ure 10.1, page 174) can be used to fo cus
your stu dents and limit the amount of technology and de sign they have to
understand.
Ex er cises to Try
�Cre ate a sim ple pre sen ta tion (pos si bly some thing like the An i -
mal Pro ject shown in Fig ure 10.1). Save it as a Design Template.
Quit PowerPoint and dou ble-click on your template. Ob serve
what hap pens when you try to save the presentation that is
opened.
�Pick one of the projects from earlier chap ters in this book (the
quizzes in Chapter 8 work well as tem plates) and create a tem -
plate for your students. Set it up to in clude all the VBA that is
needed, all the basic slides that are needed, and in structions for
your stu dents so they know what to do with the project. For ex-
ample, if you choose a quiz for mat, you can create the title slide,
one question slide, and the feedback slide while giving in struc-
tions for how to add new slides and tie the right and wrong an -
swers to the pro cedures that you have already in cluded.
Ex er cises to Try 183

Ep i logue
We have con cluded our jour ney through the scripting features of
PowerPoint. But I hope this journey has been only a be ginning for you. The book
has focused on technical features of PowerPoint, but along the way you have
learned some interesting ways to apply the technology with your stu dents be -
cause that is the most im portant thing. You might find it fun to sit around and
play with the tech nical fea tures of PowerPoint, but the bot tom line is how it will
improve your teaching and your students’ learning.
Start small. Create some simple presentations for your students. Don’t try
to con quer PowerPoint and VBA all at once. A few in teractive quizzes won’t
revolutionize your classroom, but it is a be ginning. As you con quer more and
more of the examples in this book, you might be ready to create your own exam-
ples, or you might want to find more examples. Check out the Web site that ac-
companies this book at http://www.lu.com. It contains more ex amples from the
author and the op portunity for you to post your own ex amples and find examples
that other readers have posted.
This book was written for scripters. You should be able to copy ex amples
directly from the book and make mi nor mod ifications to in sert your own con-
tent. Many of you will be satisfied to re main a scripter. Just us ing what is in the
book and on the Web site should pro vide you with a rich set of examples that you
can apply to many sit uations. How ever, some of you will want more. You will
want to create things un like anything in this book. You will want to become pro -
grammers. While there currently are no books geared to educational uses of
PowerPoint and VBA, you might be ready for a book that focuses on VBA. Look
in the References section for McFedries (1999) or Boctor (1999) or, better yet,
go to your lo cal book store and browse through a few books. Learning to pro -
gram is a very personal ex perience, and a book that one per son likes won’t make
any sense to an other. Find one with the right balance of ex planations and ex am-
ples and de tails that work for you.
As an ed ucator, your focus has to be on the learning of your students. The
most im portant next step is to expand how you can ap ply mul timedia in your
classroom. You can do this by creating more and more sophisticated presenta-
tions for your students or by ex panding your students’ role in mul timedia pro -
duction. Chapters 1 and 10 in troduced this topic briefly, and you can find more
information in Ivers and Barron (2002) and Agnew, Kellerman, and Meyer
(1996). If you want to make media pro duction a focal point of your classroom,
you might want to check out Counts (2004). If your fo cus is more on your own
media pro duction in a school setting or out side of the schools, you might be in -
terested in Alessi and Trollip (2001), which will take you in the di rection of
becoming a professional multimedia designer.
Using mul timedia that you create and hav ing your students create mul time-
dia can have a pow erful impact on the curriculum, and it can help students un -
derstand me dia and gain a level of media literacy. For more in formation about
media literacy, look for the Al liance for a Me dia Literate America at
http://www.nmec.org/.
Your journey is just beginning. You have the power to im prove your stu -
dents’ learning. You have the power to use PowerPoint to engage and in teract
with your stu dents. Technology is not always easy to use, but if you have come
this far, you have mastered an other piece of pow erful technology to help your
students learn. Don’t stop here. Cre ate ex cit ing in ter ac tive pre sen ta tions. Have
your stu dents cre ate ex cit ing in ter ac tive pre sen ta tions. Share your suc cesses, get
help with your frustrations, and keep in touch at our Web site, www.lu.com.
186 Ep i logue

Ref er ences
Agnew, P. W., Kellerman, A. S., & Meyer, J. M. (1996). Mul ti me dia in the
class room. Boston: Allyn and Ba con.
Alessi, S. M. & Trollip, S. R. (2001). Mul ti me dia for learn ing: Meth ods and de-
vel op ment (3rd ed.). Boston: Allyn and Bacon.
Alliance for a Me dia Lit erate America. (n.d.). Avail able: http://www.nmec.org/
(ac cessed Jan u ary 26, 2004).
Boctor, D. (1999). Microsoft Of fice 2000 Vi sual Ba sic for Ap plications funda-
men tals. Redmond, WA: Microsoft Press.
Counts, E. L., Jr. (2004). Mul ti me dia de sign and pro duc tion for stu dents and
teach ers. Boston: Pearson Ed ucation.
Ed u ca tional Mul ti me dia Fair Use Guide lines De vel op ment Com mit tee (1996,
July 17). Fair use guide lines for ed u ca tional mul ti me dia. Avail able:
http://www.utsystem.edu/ogc/intellectualproperty/ccmcguid.htm (ac cessed
Jan u ary 26, 2004).
Goldberg, R. (1996). The mul ti me dia pro duc ers bi ble. Chi cago: IDG Books
World wide.
In ter na tional So ci ety for Tech nol ogy in Ed u ca tion. (2001). Ed u ca tional Com-
puting and Technology Stan dards for Technology Fa cil i ta tion Ini tial
Endorsement. Avail able: http://cnets.iste.org/ncate/n_fac-stands.html
(accessed Jan uary 26, 2004).
Ivers, K. S. & Barron, A. E. (2002). Mul ti me dia pro jects in ed u ca tion: De sign-
ing, pro duc ing, and as sess ing (2nd ed.). Westport, CT: Li braries
Unlimited.
Lehrer, R., Erickson, J., & Connell, T. (1994). Learning by de signing
hypermedia doc u ments. Computers in the Schools 10(1), 227–254.
Liu, M. & Hsiao, Y. (2001). Middle school students as multimedia designers: A
project-based learning ap proach. Pa per presented at the National Ed uca-
tional Com puting Con ference, Chi cago, July 25-27, 2001.
Liu, M. & Rutledge, K. (1997). The ef fect of a “learner as mul ti me dia de signer”
environment on at-risk high school students’ mo tivation and learning of de -
sign knowledge. Jour nal of Ed u ca tional Com put ing 16(2), 145–177.
Male, M. (2003). Technology for in clusion: Meeting the special needs of all stu-
dents (4th ed.). Boston: Allyn and Bacon.
McFedries, P. (1999). VBA for Microsoft Of fice 2000 un leashed. In di a nap o lis,
IN: Sams Pub lishing.
O’Connor, R. J. (1991). Fa cilitating CAI de velopment via an authoring tem-
plate. Computers in the Schools 8(1/2/3), 249–250.
Pics4Learning copy right-friendly im ages for ed u ca tion. (n.d.) Available:
http://www.pics4learning.com/ (accessed January 26, 2004).
Rindsberg, S. (2003). PowerPoint FAQ. Avail able: http://www.rdpslides.com/
pptfaq/ (accessed January 26, 2004).
Robinette, M. (1995). Mac mul timedia for the teacher. Braintree, MA: IDG
Books Worldwide.
Smith so nian Na tional Mu seum of Amer i can His tory. (n.d.). First computer bug.
Avail able: http://americanhistory.si.edu/csr/comphist/ob jects/bug.htm
(ac cessed Jan u ary 26, 2004).
188 Ref er ences
In dex
Ac tion but tons, 13Ac tion set tings, 26–27Ac tions
for an other slide, 75for cur rent slide, 74–75
ActivePresentation, 39–40
ActivePresentation.Saved,108, 128
ActivePresentation.Slides,75
ActivePresentation.Slides.Add, 181
ActivePresentation.SlideShowWindow.View.Slide, 74
Adding ob jects, 75, 157Adding slides, 102Add ing text. See Ma nip u lat ing text,
add ing textAddShape, 75, 156–161Al li ance for a Me dia Lit er ate Amer ica,
186Ampersand (&), 54, 80An i ma tion, 29–30Ar gu ments. See Pa ram e tersAr rays, 134–138, 146–148As sign ment op er a tor, 50–51, 158
equal sign, 50–51Set, 158
As sign ments for stu dents, 8–10. See
also Tem platesAu dio. See Sounds.Audio for mat (.au), 18Audio In terchange File For mat (.aif or
.aiff), 18Authoring, xi–xiiAutoShapes
action settings for, 27
Boolean. See Vari ables, type, BooleanBrainstorming, 3, 4, 9Bugs, 150, 153–155, 168–170. See also
De bug ging; Er rorscom mon 168–170
du pli cate vari ables, 169du pli cate, pro ce dures, 169ex tra End Sub, 169for got ten Dim, 170mul ti ple mod ules, 168
But tons, 25–29, 43–45, 46. See also
Hyperlinksaction settings for, 26, 27–28, 44–45,
46add ing, 25–29, 44, 107adding text to, 27–28, 45, 46, 48changing attributes of, 46, 108changing color of, 46, 109, 112changing size of, 26, 46cus tom, 27draw ing, 25–26, 44editing text in, 46finding text in, 138–142. See also
Ma nip u lat ing texthyperlinks, 26–27icons for, 25recording sounds in, 28–29tying scripts to, 43–45, 46, 59–60
Cap i tal iza tion, 100–101, 162–164in Dim statements, 163–164pro ce dure names, 162–163stu dent an swers, 100–101in Sub statements, 163–164variable names, 162–163VBA stuff, 163–164
Chr$(13), 80, 83, 86Classes, 35–37Clip art. See Pic tures, in sert ing; Me dia,
pic turestying scripts to, 45
Clip or ganizer, 16, 20. See also Pic tures;Sounds
Com ment char ac ter ('), 64, 160Com ment ing out. See De bug ging,
com ment ing outComments, 64, 160–161Com pile er ror. See Er rors, compileCom pil ing, 161
Computerese, 35Con cat e na tion, 54Con di tion als, 56–58, 118–120, 164–166Con stants, 66–67
color, 77, 84in MsgBox, 66–67shape, 76
Con tin u ing lines. See Un der scoreCopyright, 17, 18Cre at ing shapes. See Shapes, add ingCur sor
ar row, 24hand, 24I bar, 27plus sign, 25text, 27
Cus tom an i ma tion, 71–72, 126, 127
Data struc tures, 134DDD-E Model, 3–5
de cide, 3–4de sign, 4de velop, 4eval u ate, 3–4
Debugger, 162De bug ging, 150, 153–172
com ment ing out, 160–161com pil ing, 161with MsgBox, 158–159
De cide. See DDD-E ModelDe clar ing. See DimDe lay. See Tim ingDe let ing slides, 108Design, 1, 2–11. See also DDD-E
ModelDesign Tem plate (.pot) File. See File
types, De sign Template (.pot)De velop. See DDD-E ModelDi a log box
Action Settings, 26, 28, 29, 44–45,46
Cus tom An i ma tion, 71, 72Do you like chocolate?, 67en able mac ros, 38Hello, 42Insert Hyperlink, 22–23Macro Se cu rity, 38–39
Pass word. See Di alog box, ProjectProp er ties
Pro ject Prop er ties, 47Record Sound, 19Save As, 30–31, 176Set Up Show, 29–30Sound Ob ject, 21
Dim, 51–53, 135, 168, 169, 170Dirty, 128, 129–130DoEvents, 126Dot, 36. 79, 166Drawing toolbar, 15, 45Du pli cates, 168–169. See also Bugs,
com monmod ules, 168pro ce dures, 169vari ables, 169
Edit View, 13, 24, 27, 30, 45, 132, 133,158, 182
Elements of an array. See Ar raysEm bed ded el e ments, 15, 18. See also
Sounds, in sert ing; Pic tures,in sert ing
Empty string, 56, 82End Sub, 42, 162Equal sign (=). See As sign ment op er a torError messages, 154, 155, 156, 157Er rors. See Bugs; De bugging
com pile, 156 –158, 161pre vent ing, 159
cap i tal iza tion, 162–164. See also
Cap i tal iza tionin dent ing, 164–166. See also
In dent ingred, 155–158, 161run time, 161testing for, 154–155
Escape key, 29, 30, 45, 126Eval u ate. See also DDD-E Model;
Eval u a tionEval u a tion, 4–5
for ma tive, 4summative, 4–5
Ex am plesAn i mal Pro ject tem plate, 174in ter ac tive story, 80–81, 150mys tery, 85–89
190 In dex
pool of questions, 146–150asking how many questions, 149keeping score, 149–150
quiz zesmul ti ple-choice with mul ti ple
tries, 95–99mul ti ple-choice with
scorekeeping, 93multiple-choice with stars for
feed back, 70print ing re sults, 102–108printing re sults with ar rays,
139–142ran dom prob lems, 145–146ran dom prob lems with mul ti ple
tries, 146short-an swer, 99–100sim ple mul ti ple-choice, 55
Pick-A-Part ner, 176–182ran dom prob lems, 144–145signs of spring, 81–82tutorial and quiz, 109–115
hiding the quiz but ton, 113–115menu with feed back, 109–112
on the Web site, 185, 186
Fair use, 17, 18Fair Use Guidelines for Educational
Mul ti me dia, 17Feedback, 49, 54–55, 89, 92. See also
Pro ce dures, Feed back;Re port ing scores
File typesDesign Template (.pot), 175–176,
183PowerPoint Pre sen ta tion (.ppt), 175PowerPoint Show (.pps), 30–31, 32
Flowchart, 7–8Force quit, 124For ma tive eval u a tion. See Eval u a tion,
for ma tive
GetStarted, See Pro ce dures,GetStarted
Going to slides. See Mov ing from slideto slide
GraphicConverter, 16Groups, 10
Ha waii, xiiHelp, 168
Hiding ob jects, 68, 71, 75, 112,113–115, 128
Hyperlinks, 13, 21–27, 34, 64–65files, 24–25Web pages, 24–25, 27within a pre sen ta tion, 21–22, 26
Hyperspace, lost in, 5, 109Hy per text 21–25, 45. See also
Hyperlinks
Icon, sound, 28Icons, button. See Buttons, icons forIf. See Con di tional
nested, 119–120, 131, 165–166Indenting, 120, 131, 164–166In fi nite loops. See Loops, infiniteIn her i tance, 36Ini tial ize. See Pro ce dures,
Ini tial izeInitializing, 68–70In put, 49InputBox, 50–51. See also
Pro ce dures, Question3;Pro ce dures, YourName;Quiz zes, short-an swer
Int, 143–144. See also Ran domnum bers
In te ger. See Vari ables, type, In tegerInteractivity, xi, xii, 2, 13, 24, 34In ter na tional So ci ety for Tech nol ogy in
Ed u ca tion, xi–xii
Keeping score, 93–99mul ti ple tries, 95
Kiosk mode, 5, 13, 29–30, 32, 47, 155
Land marks, 109LCase, 100–101Learn ing en vi ron ments, 8
constructivist, 8stu dent-cen tered, 8
Learning styles, 2Link sounds with file size greater than.
See PowerPoint, settingsLinked files, 15, 25Lock pro ject for viewing, 47
In dex 191
Long. See Variables, type, LongLoops, 56–57, 120–124Do, 122–123In fi nite, 124, 126For Next, 120, 123stop ping con di tion, 120–124While, 56–57, 120–122, 124
Low er case, 100–101LTrim, 101
Macro, run ning. See Pro ce dures,run ning
Macro vi rus pro tec tion, 37–38Ma nip u lat ing text, 68, 77–78, 79–89
adding text, 80bold, 83char ac ters, 83color, 82–83, 84copy, 84–85count, 85cut, 84–85de lete, 84–85italic, 83length, 85name of font, 84para graphs, 83paste, 84–85range, 83size, 84, 107, 142un der line, 83words, 83
Max i mum num ber of undos. See
PowerPoint, settingsMedia, xii, 3, 10, 13
clip art, 16pic tures, 16sounds, 18–21, 28–29spoken words, 2, 19vid eos, 20
Me dia lit er acy, 10, 186Menu. See Or ga ni za tion, menuMetaphor, 1, 3, 4, 7, 9Meth ods, 35–37Mod ules
de let ing, 43in sert ing, 42mul ti ple, 43, 168win dow, 43
Mo ti va tion. See Mul ti me dia, ben e fitsMov ies. See VideoMoving from slide to slide, 64–66, 68,
92, 134MsgBox, 66–68, 124
for de bug ging, 158–159msoFalse, 68msoTrue, 68Mul ti me dia
benefits, 1, 2, 8, 9, 173–174,185–186
def i ni tion, 2Mu si cal In stru ment Dig i tal In ter face
(.midi or .mid), 20
Namesob jects, 73–74, 130–132slides, 66, 133–134sounds, 19, 28–29
Nav i ga tion, 7, 64–66, 68. See also
Or ga ni za tion; Mov ing from slideto slide
con trol ling. See Ki osk modeNested If. See If, nestedNew para graph. See Chr$(13)News print, 7Nor mal View. See Edit ViewNum bers
of ob jects, 71–73, 112ran dom. See Ran dom numbersof slides, 65–66, 74–75, 106, 133,
136
Ob ject-ori ented pro gram ming, 34–37Ob jects, 35–37
add ing. See Add ing ob jectsref er enc ing by name, 73–74,
130–131, 133ref er enc ing by num ber, 71–73
OOP. See Ob ject-ori ented pro gram mingOp tions. See PowerPoint, settingsOr ga ni za tion, 1, 3, 4, 5–6
linear, 5, 31, 34, 109menu, 5–6, 22, 24, 34, 109–115
hi er ar chi cal, 5templates for, 8, 174–175. See also
Tem plates
192 In dex
Pa ram e ters, 35, 124–125, 138, 161,166–167, 168, 181, 182
de fault val ues, 167in pa ren the ses, 181MsgBox, 66–67re quired, 167
Password, 47, 48Paste key board shortcut, 25Photoshop, 16Pick-A-Part ner Pro ject. See Ex am ples,
Pick-A-Part nerPic tures
for mats, 15–16.bmp, 15.gif, 15.jpg, 15.tif, 15
in sert ing, 15–18clip art, 15, 16–17copying and pasting, 15, 17–18drawing tools, 15from file, 15, 16
tying scripts to, 45Place holder, 81–82Planning, 1, 3, 7Pool of questions, 146–150Poster board, 7PowerPoint
set tingsAllow fast saves, 14Browsed at a ki osk, 29–30Link sounds with file size greater
than, 15, 20Lock pro ject for viewing, 47Maximum num ber of undos, 15
tra di tional fea tures, xii, 13–32,148–149, 178
versions, 14, 34, 35, 51, 71–72, 107,168
PowerPoint Show (.pps). See File types,PowerPoint Show (.pps)
Pref er ences. See PowerPoint, settingsPrintable page, 106–108Print ing, 106–108Pro ce duresAddAnimals, 81AddHello, 80AddNextSlideButton, 179, 182
AddPlants, 81AddRectangle, 75AddStar, 156, 157, 158, 159, 160AddWorkTogetherSlide, 179Answer1AbrahamLincoln, 103Answer1GeorgeWashington,
103Answer2Four, 104Answer2Two, 104BadProcdureBrickPig, 80–81calling, 60, 180Choc o late, 67Do ing, 125DoingPoorly, 55, 93, 96, 98, 103,
111, 144, 147DoingWell, 54, 55, 60, 93, 96, 98,
103, 111, 144, 147DoWeShowQuizButton, 114EyeColor, 87Feed back, 93, 96, 98GetNameEmailIdea, 179GetObjectName, 130, 132GetSlideName, 133GetStarted, 69, 70, 78, 87, 93,
95, 97, 103, 111, 114, 144,147
GoToPartners, 179GoToWorkTogether, 179Guess, 87HairColor, 87HelloWaitGoodbye, 126HideQuizButton, 114HowDoYouFeel, 171HowMany, 149HowManyPlanets, 121Ini tial ize, 69, 70, 78, 93, 95,
97, 103, 111, 114, 135, 137,139, 144, 147
JumpToMenu, 111, 114MakeNotDirty, 128names, 162–163, 169NestedIf, 165PrintablePage, 104–105,
141–142PrintResults, 105Ques tion, 58Question3, 99, 102, 104, 140–141
In dex 193
Pro ce dures (cont.)
Quit, 128QuitAndSave, 128QuitOK, 68RandomNext, 147RandomQuestion, 144, 145, 146ReturnToMenuFromPart1, 111,
114ReturnToMenuFromPart2, 111,
114ReturnToMenuFromPart3, 111,
114RightAnswer, 78, 92, 93, 96, 111,
136, 147, 150RightAnswerButton, 139RightAnswer1, 98RightAnswer2, 98RightAnswerTwo, 70RightAnswer3, 104RightAnswerThree, 70running, 42, 43–45, 46, 49, 59–60,
180running in Edit View, 132, 133Save, 128, 179sav ing, 44SayHello, 42SetObjectName, 130–131, 132SetSlideName, 133ShowQuizButton, 114StartAgain, 105, 129tying to a but ton, 43–45, 46Wait, 126, 127WhatsMyGrade, 119WhichButton, 138WorkTogether, 129, 179WrongAnswer, 92, 93, 96, 111,
136, 147, 150WrongAnswerButton, 139WrongAnswer1, 98WrongAnswer2, 98WrongAnswer3, 104YourEmail, 179YourIdea, 179YourName, 50, 53, 54, 55, 56, 57,
60, 70, 78, 87, 92, 93, 95, 98,103, 111, 114, 122, 147, 172,179
YourNameWithPraise, 60, 65
Programmer, xi, 34, 52, 91, 134, 135,185
Pro ject win dow, 41–42, 43, 168Projects, stu dents, 7, 8–10
brain storm ing, 9groups, 10idea, 9in for ma tion, se lect ing, 9me dia, 10met a phor, 7, 9or ga ni za tion, 9plan ning, 7re flec tion, 10re search, 9templates, 8, 10
Prop er ties, 36–37, 40ob ject, 68shape, 77, 76–77text. See Ma nip u lat ing text
Prop er ties win dow, 41–42
Ques tions. See Quiz zesQuit ting, 67–68, 129Quiz but ton, 113–115Quizzes, xii, 26–27, 32, 34, 47, 48,
54–55, 58–59, 61, 91–116multiple-choice, 32, 34, 48, 54–55,
92, 136–137, 138–142, 151short-an swer, 58–59, 61, 99–102,
116, 138, 151
Ran dom num bers, 143–150Ran dom ize, 143–144. See also
Ran dom num bersRecord Macro, 182ReDim, 136–138Ref er enc ing ob jects
by name. See Ob jects, ref er enc ing byname
by num ber. See Ob jects, ref er enc ingby num ber
Re flec tion, 10Re port ing scores, 92–99
percent scores, 94print ing re sults, 102–108, 139–142right and wrong an swers, 94right an swers, 94
Re search ing, 3, 4
194 In dex

ResetSlide, 167RGB, 75–77, 84Right click, 18Rnd, 143–144. See also Ran dom
num bersRound, 94RTrim, 101Run time er ror. See Er rors, run time
Sav ing, 127–130Saving as a Design Tem plate. See File
types, De sign Template (.pot)Saving as a PowerPoint Show. See File
types, PowerPoint ShowScope. See Vari ables, scopeScore. See Keep ing scoreScripter, xi, 34, 37, 52, 55, 58–59, 91,
106, 134, 142, 185Script ing, xiScripts. See Pro ce duresSe cu rity
macro. See Macro vi rus pro tectionpass word pro tec tion, 47, 48
Set tings, PowerPoint. See PowerPoint,set tings
Shape, 37, 76Shapes
adding, 75, 157adding text to, 77–78changing color of, 75–77. See also
Buttons, changing color ofdraw ing, 45ma nip u lat ing text in, 77–78, 79–89.
See also Ma nip u lat ing textmul ti ple, 158tying scripts to, 45types, 76
Shift-Tab, 164Showing ob jects, 68, 71, 75, 112,
113–115, 128Shuffling the deck. See Ran dom izeSin gle. See Variables, type, sin gleSlide Show View, 13, 24, 27, 30, 44,
124, 132, 158, 162, 182Slide types
blank, 71
bulleted list, 71, 73, 80, 107title only, 82two-column text, 81–82, 107
Slides, 37Slides, names of. See Names, slidesSounds, 18–21
for but tons, 28–29in sert ing, 18–21
CD, 18clip art, 20from file, 29–21, 28linked vs. embedded, 19–21recorded, 19, 28–29
names of, 19, 28–29types, 18, 20
Spac ing, 100–101Spell ing, 100–102Stop ping con di tion, See Loops, stopping
con di tionStoryboard, 3, 4, 7–8String. See Variables, type, String;
TextSummative eval u a tion. See Eval u a tion,
summative
Tab key, 164.Templates, 8, 137–138, 151, 173–183Testing, 3, 154–155, 170Tests. See Quiz zesText 27–28, 45–46, 68, 77–89. See also
Ma nip u lat ing textaction settings for, 27in buttons, 27–28, 45, 46con cat e na tion of, 54ma nip u lat ing, 68, 77–78, 79–89parts of, 82–85tying scripts to, 45
TextRange, 82–85Tim ing, 125–127Trim, 100–101, 131Tu to rial, 32, 109–116Type. See Vari ables, type
Underscore, 50, 156, 165Un til, 122–123URL, 24–25, 27
In dex 195
Variables, 49, 50–54, 58, 94, 96–97,98–99, 100, 113, 118–120, 134
ar rays. See Ar raysde clar ing, 51–53, 135, 136–137names, 58scope, 51, 52type, 51, 53–54
Boolean, 54, 56In te ger, 54Long, 54Ob ject, 54Shape, 54Sin gle, 54String, 53–54
VBA, See Vi sual Ba sic for Ap pli ca tionsVBA Ed itor, 41, 53, 166–168Video, 20
Viewer, PowerPoint, 35Views. See Edit View; Slide Show ViewVi ruses, 37Vis i ble prop erty, 37, 68. See also
Hid ing ob jects; Show ing ob jectsVi sual Ba sic Ed i tor. See VBA Ed itorVi sual Ba sic for Ap pli ca tions, xi, 33–39
Waveform Audio (.wav), 20Web ad dress. See URLWend, 57, 121While, See Loops, WhileWith Block, 79Words, spo ken, 18, 28
YourName. See Pro ce dures,YourName
196 In dex
About the Au thor
DAVID M. MARCOVITZ is As sistant Professor in the Ed ucation Depart-
ment and Co or di na tor of Grad u ate Pro grams in Ed u ca tional Tech nol ogy. He re-
ceived his Ph.D. in Ed ucational Technology from the University of Il linois,
Ur bana-Cham paign, where he stud ied sup port for tech nol ogy in el e men tary
schools. He’s taught computer applications and com puter programming at the
high school level, and he has worked as a technology spe cialist in a high school.
Prior to teaching at Loyola College, he taught in the Ed ucational Technology
Program at Florida Atlantic University. He was hired by Loyola College in 1997
to de velop a Mas ters pro gram in Ed ucational Technology, a pro gram he co ordi-
nates and for which he teaches many of the classes, in cluding Mul timedia De-
sign in the Classroom. He is the author of several ar ticles about ed ucational
tech nol ogy.
Recommended