Page 1 www.peakindicators.com [email protected]
Peak Indicators Limited 92 Malthouse Lane
Ashover Derbyshire S45 0BU England
+44 7811 453781
Oracle BI Enterprise Edition
With Single-Sign-On
Installation and Configuration Guide
Antony Heljula
Technical Architect
27th
May 2009
Helping Your Business Intelligence Journey
Page 2 www.peakindicators.com [email protected]
TABLE OF CONTENTS
About The Installation ...................................................................................................................................... 4
Pre-Requisites .................................................................................................................................................. 5
Create OS User Account ............................................................................................................................... 5
Install Oracle Database Client ........................................................................................................................... 6
Install Oracle Application Server ....................................................................................................................... 7
Install Oracle Identity Management ................................................................................................................ 12
Running The Installer.................................................................................................................................. 12
Configure Shell Script ................................................................................................................................. 18
Start up Oracle Identity Management ......................................................................................................... 18
Install Oracle BI Enterprise Edition (CLIENT) .................................................................................................... 19
Install Java Development Kit (JDK) .............................................................................................................. 19
Download and Extract Oracle BI EE Software (for Windows) ....................................................................... 19
Running The Installer.................................................................................................................................. 19
Install Oracle BI Enterprise Edition (SERVER) ................................................................................................... 22
Create Installation Folders for Oracle BI EE ................................................................................................. 22
Create BIEE Schema on Data-Warehouse .................................................................................................... 22
Install Java Development Kit (JDK) .............................................................................................................. 23
Download and Extract Oracle BI EE Software (for Linux).............................................................................. 23
Configure Operating System Limits ............................................................................................................. 23
Run UnixChk.sh Script ................................................................................................................................ 24
Running The Installer.................................................................................................................................. 24
Configure Shell Scripts ................................................................................................................................ 27
Configure BI Delivers Scheduler .................................................................................................................. 28
Create “BI Delivers Scheduler” and “Usage Tracking” tables ....................................................................... 29
Enable Usage Tracking ................................................................................................................................ 30
Configure Credential Store ......................................................................................................................... 31
Configure BI Repository (RPD) .................................................................................................................... 32
Configure Presentation Catalogue .............................................................................................................. 32
Page 3 www.peakindicators.com [email protected]
Start Up Oracle AS and BI EE Processes ....................................................................................................... 33
Configure BI Publisher ................................................................................................................................ 34
Configure Security For Oracle OID and Oracle SSO (OPTIONAL) ....................................................................... 35
Configure BI Repository (RPD) For LDAP Authentication .............................................................................. 35
Enable Authorization With Oracle Internet Directory .................................................................................. 37
Register Oracle BI EE As A Partner Application ............................................................................................ 40
Configure HTTP Server................................................................................................................................ 41
Create Impersonator User In BI Repository ................................................................................................. 43
Configure Credential Store for Impersonator User ...................................................................................... 43
Configure Presentation Services ................................................................................................................. 44
Configure BI Publisher for /analyticsSOAP................................................................................................... 45
Deploy /analyticsSOAP and Re-start BI Publisher ........................................................................................ 46
Restart HTTP and Presentation Services...................................................................................................... 49
Configure Security For Active Directory (OPTIONAL) ....................................................................................... 50
Enable Authentication With Active Directory .............................................................................................. 50
Enable Authorization With Active Directory ................................................................................................ 53
Page 4 www.peakindicators.com [email protected]
ABOUT THE INSTALLATION
This document details the installation of Oracle BI Enterprise Edition 10.1.3.4 configured for Single-Sign-On
with the Oracle Identity Management suite.
The following server build is required:
• Red-Hat Linux 4
• 32-bit
It is assumed that a Data-Warehouse (DW) database is already available and populated in advance of this
installation procedure.
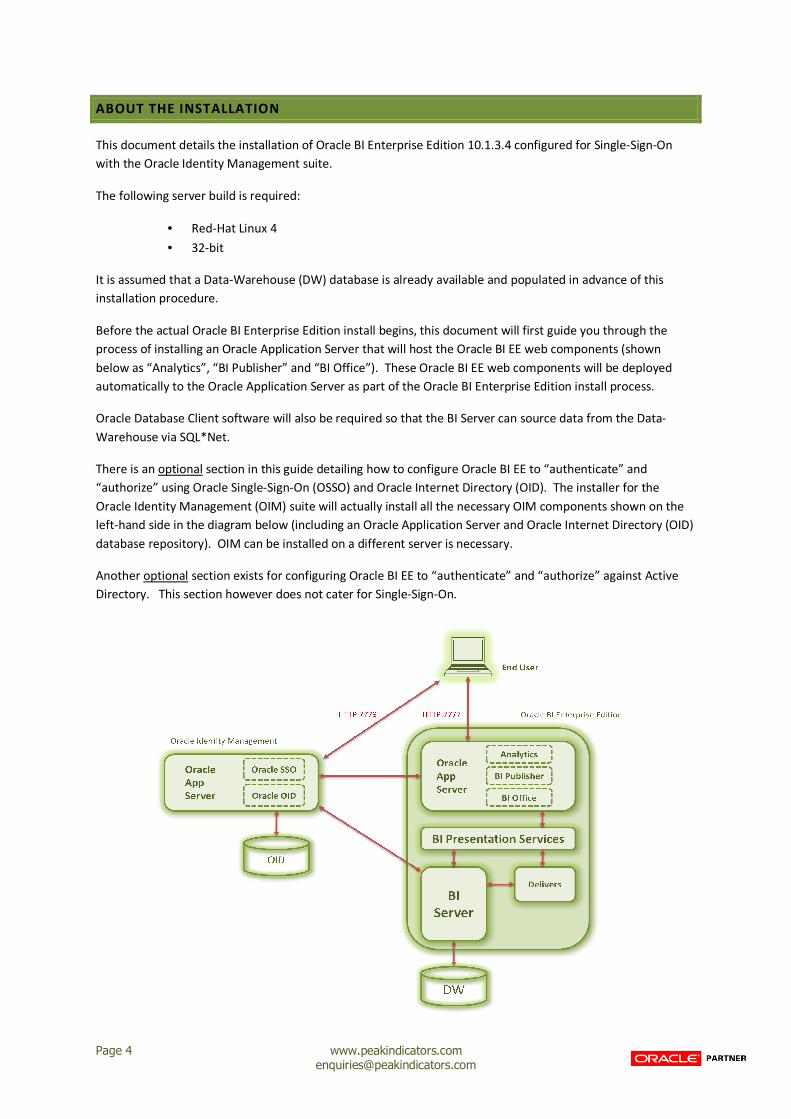
Before the actual Oracle BI Enterprise Edition install begins, this document will first guide you through the
process of installing an Oracle Application Server that will host the Oracle BI EE web components (shown
below as “Analytics”, “BI Publisher” and “BI Office”). These Oracle BI EE web components will be deployed
automatically to the Oracle Application Server as part of the Oracle BI Enterprise Edition install process.
Oracle Database Client software will also be required so that the BI Server can source data from the Data-
Warehouse via SQL*Net.
There is an optional section in this guide detailing how to configure Oracle BI EE to “authenticate” and
“authorize” using Oracle Single-Sign-On (OSSO) and Oracle Internet Directory (OID). The installer for the
Oracle Identity Management (OIM) suite will actually install all the necessary OIM components shown on the
left-hand side in the diagram below (including an Oracle Application Server and Oracle Internet Directory (OID)
database repository). OIM can be installed on a different server is necessary.
Another optional section exists for configuring Oracle BI EE to “authenticate” and “authorize” against Active
Directory. This section however does not cater for Single-Sign-On.

Page 5 www.peakindicators.com [email protected]
PRE-REQUISITES
CREATE OS USER ACCOUNT
In order to perform the installation, create a new account on the Linux server called, for example, “orabiee”.
Configure this new user account to be a member of the “dba” group.

Page 6 www.peakindicators.com [email protected]
INSTALL ORACLE DATABASE CLIENT
Install the Oracle Database Client version 10.2 on the Linux server.
Example install location: /vol1/oracle/product/10.2
NOTE: The above folder will from now on be referred to as [ORA HOME]
You only need to choose the “Runtime” installation type.
After the install is complete, configure the tnsnames.ora file with the connection to the Data-Warehouse.
Page 7 www.peakindicators.com [email protected]
INSTALL ORACLE APPLICATION SERVER
Install Oracle Application Server 10.1.3.x on the Linux server. The software can be downloaded from Oracle
Technology Network:
http://download.oracle.com/otn/linux/ias/101310/soa_linux_x86_101310_disk1.cpio
NOTE: This is the “Oracle SOA Suite” application download
Copy the downloaded file to the Linux machine and extract the contents using the following command:
cpio -idvm < soa_linux_x86_101310_disk1.cpio
Start the installation process by running the “runInstaller” utility.
./runInstaller
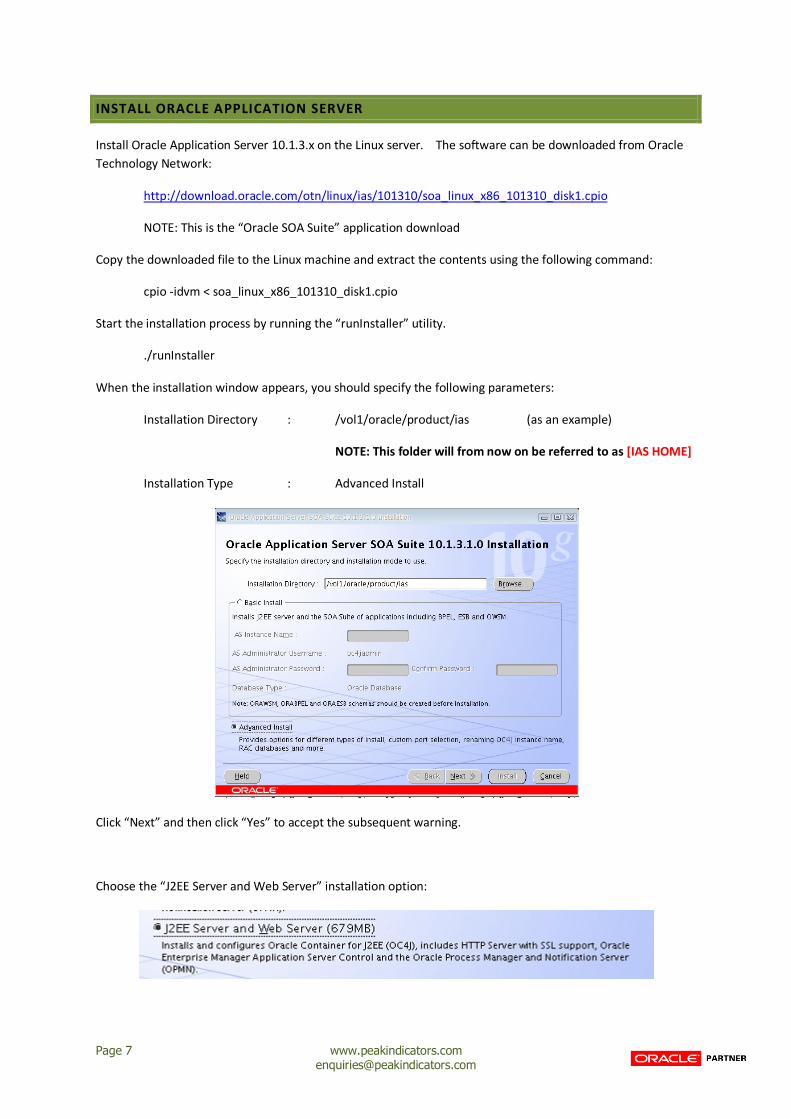
When the installation window appears, you should specify the following parameters:
Installation Directory : /vol1/oracle/product/ias (as an example)
NOTE: This folder will from now on be referred to as [IAS HOME]
Installation Type : Advanced Install
Click “Next” and then click “Yes” to accept the subsequent warning.
Choose the “J2EE Server and Web Server” installation option:
Page 8 www.peakindicators.com [email protected]
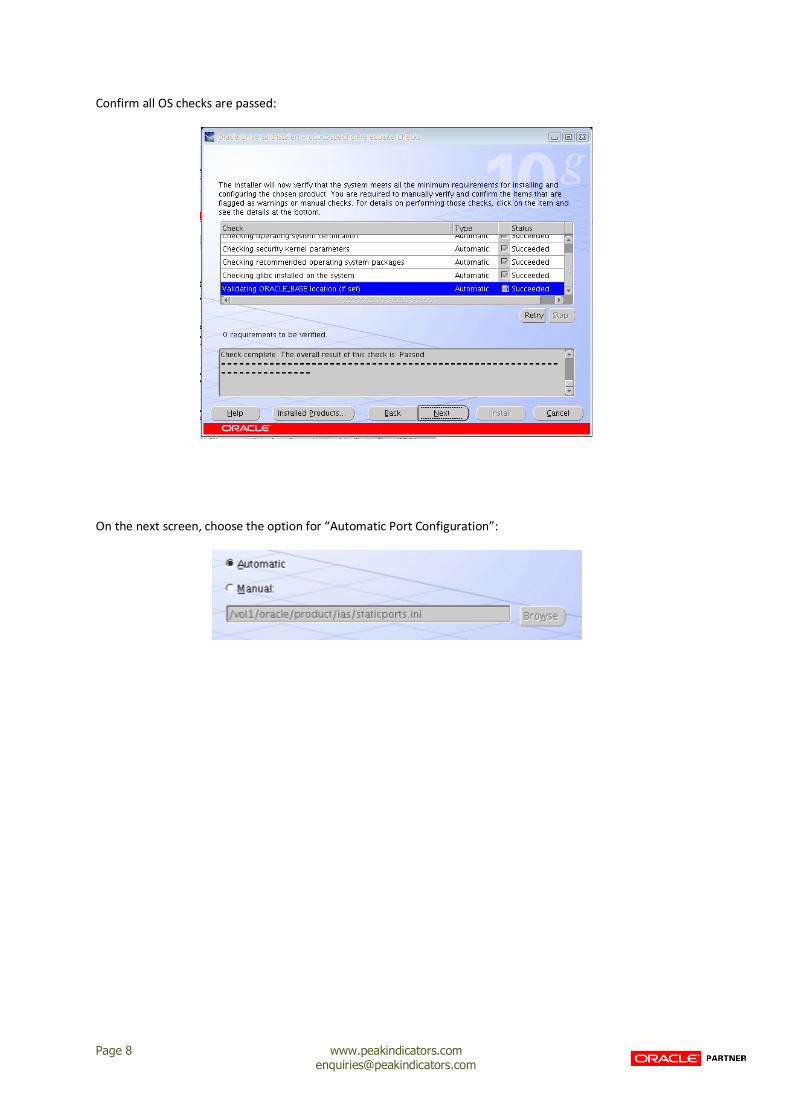
Confirm all OS checks are passed:
On the next screen, choose the option for “Automatic Port Configuration”:
Page 9 www.peakindicators.com [email protected]
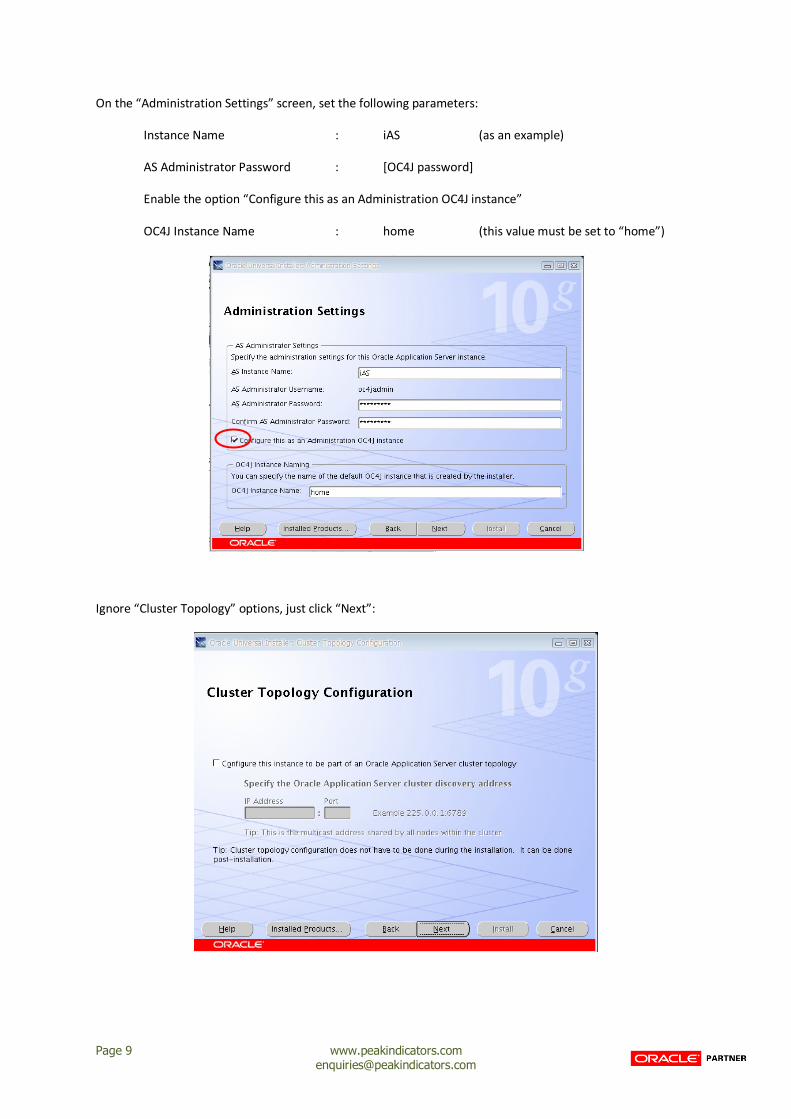
On the “Administration Settings” screen, set the following parameters:
Instance Name : iAS (as an example)
AS Administrator Password : [OC4J password]
Enable the option “Configure this as an Administration OC4J instance”
OC4J Instance Name : home (this value must be set to “home”)
Ignore “Cluster Topology” options, just click “Next”:
Page 10 www.peakindicators.com [email protected]
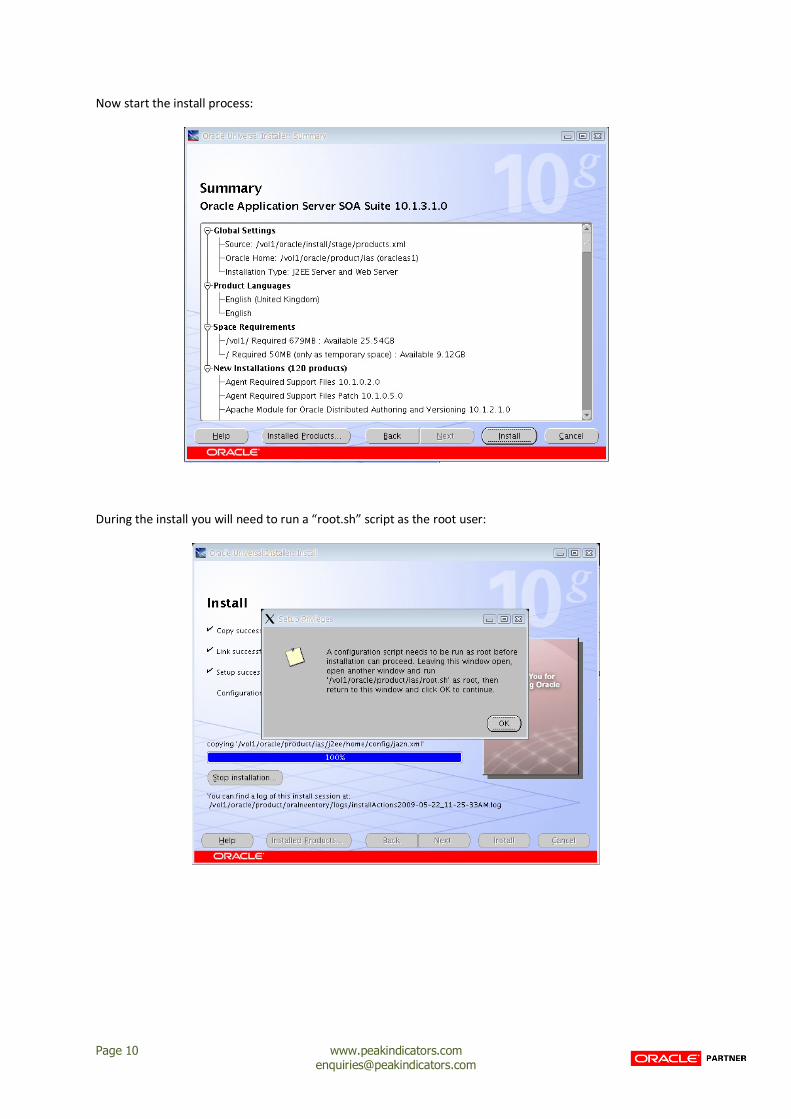
Now start the install process:
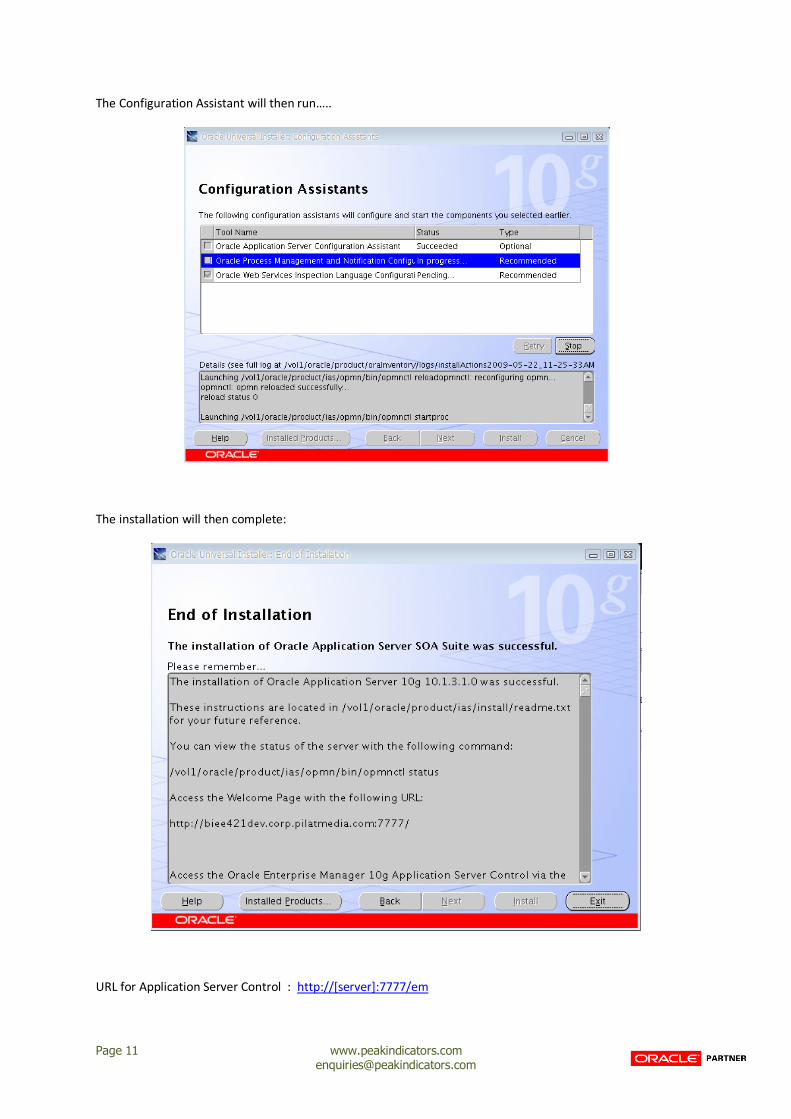
During the install you will need to run a “root.sh” script as the root user:
Page 11 www.peakindicators.com [email protected]
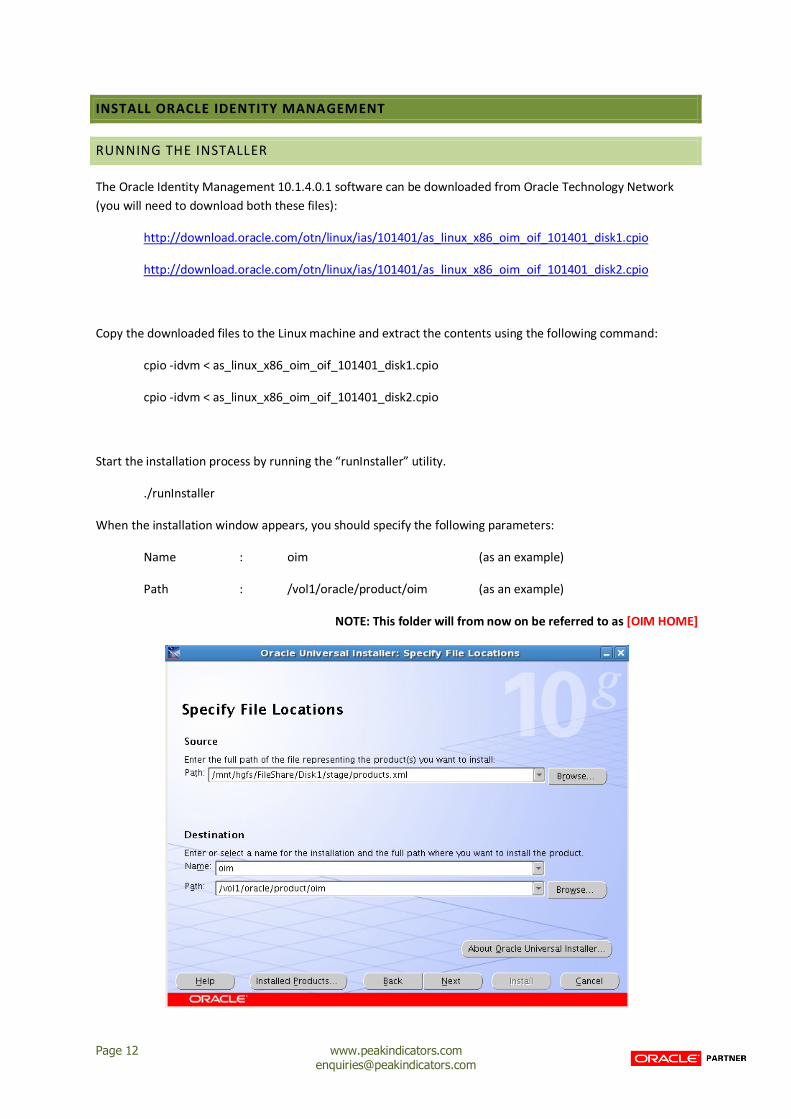
The Configuration Assistant will then run…..
The installation will then complete:
URL for Application Server Control : http://[server]:7777/em
Page 12 www.peakindicators.com [email protected]
INSTALL ORACLE IDENTITY MANAGEMENT
RUNNING THE INSTALLER
The Oracle Identity Management 10.1.4.0.1 software can be downloaded from Oracle Technology Network
(you will need to download both these files):
http://download.oracle.com/otn/linux/ias/101401/as_linux_x86_oim_oif_101401_disk1.cpio
http://download.oracle.com/otn/linux/ias/101401/as_linux_x86_oim_oif_101401_disk2.cpio
Copy the downloaded files to the Linux machine and extract the contents using the following command:
cpio -idvm < as_linux_x86_oim_oif_101401_disk1.cpio
cpio -idvm < as_linux_x86_oim_oif_101401_disk2.cpio
Start the installation process by running the “runInstaller” utility.
./runInstaller
When the installation window appears, you should specify the following parameters:
Name : oim (as an example)
Path : /vol1/oracle/product/oim (as an example)
NOTE: This folder will from now on be referred to as [OIM HOME]
Page 13 www.peakindicators.com [email protected]
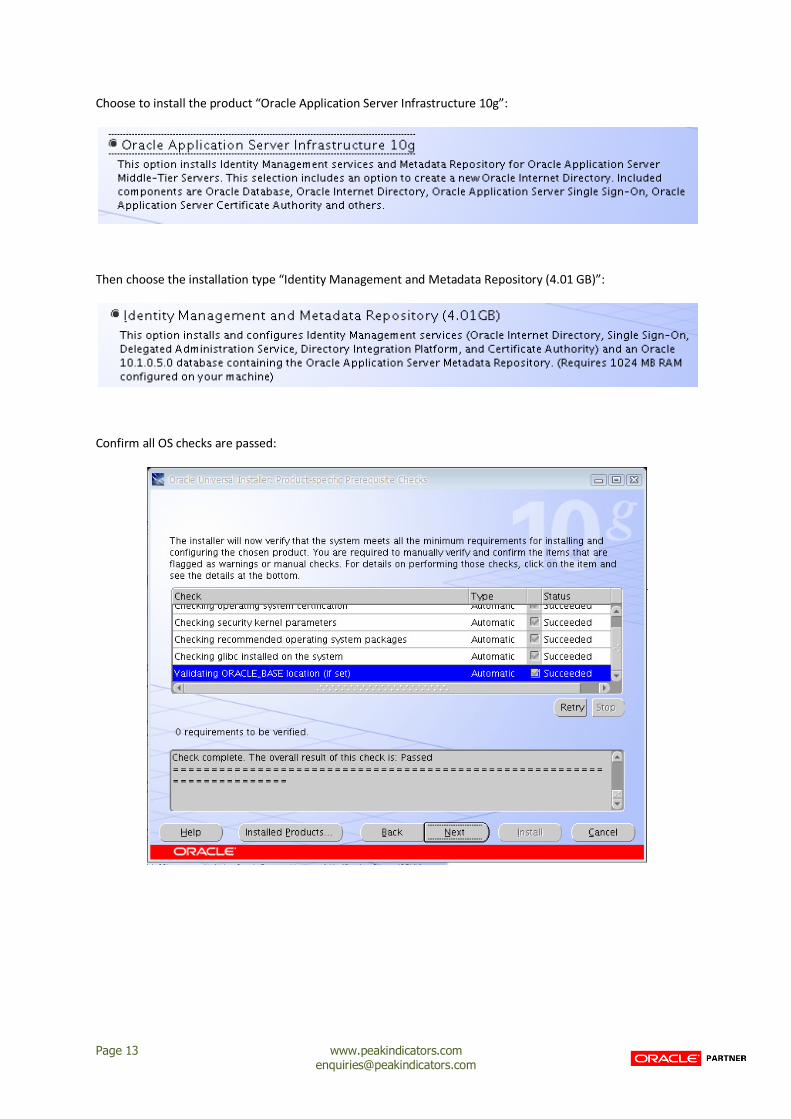
Choose to install the product “Oracle Application Server Infrastructure 10g”:
Then choose the installation type “Identity Management and Metadata Repository (4.01 GB)”:
Confirm all OS checks are passed:
Page 14 www.peakindicators.com [email protected]
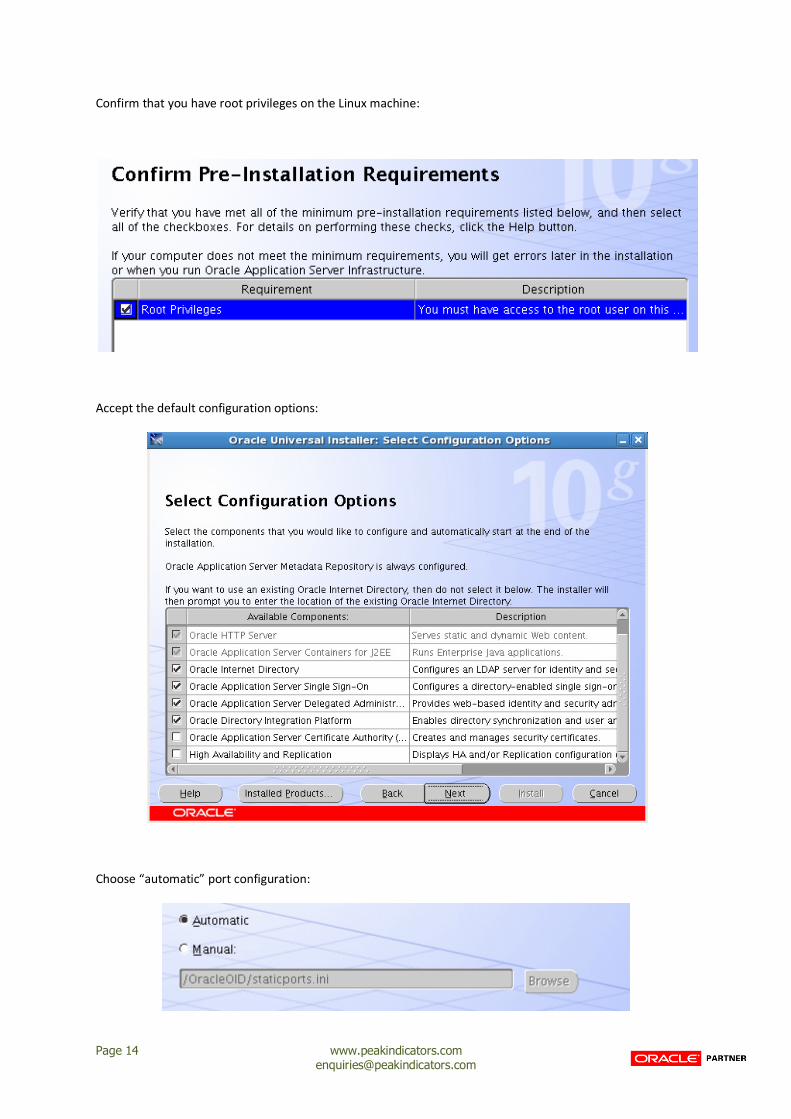
Confirm that you have root privileges on the Linux machine:
Accept the default configuration options:
Choose “automatic” port configuration:
Page 15 www.peakindicators.com [email protected]
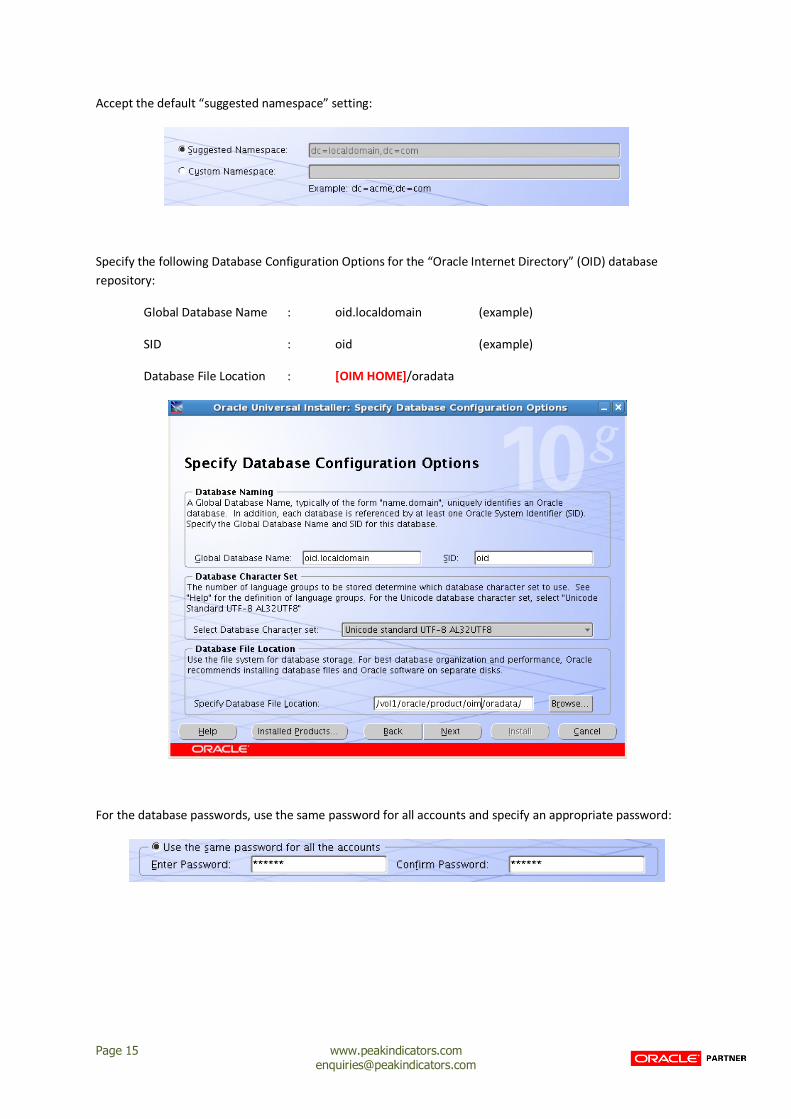
Accept the default “suggested namespace” setting:
Specify the following Database Configuration Options for the “Oracle Internet Directory” (OID) database
repository:
Global Database Name : oid.localdomain (example)
SID : oid (example)
Database File Location : [OIM HOME]/oradata
For the database passwords, use the same password for all accounts and specify an appropriate password:
Page 16 www.peakindicators.com [email protected]
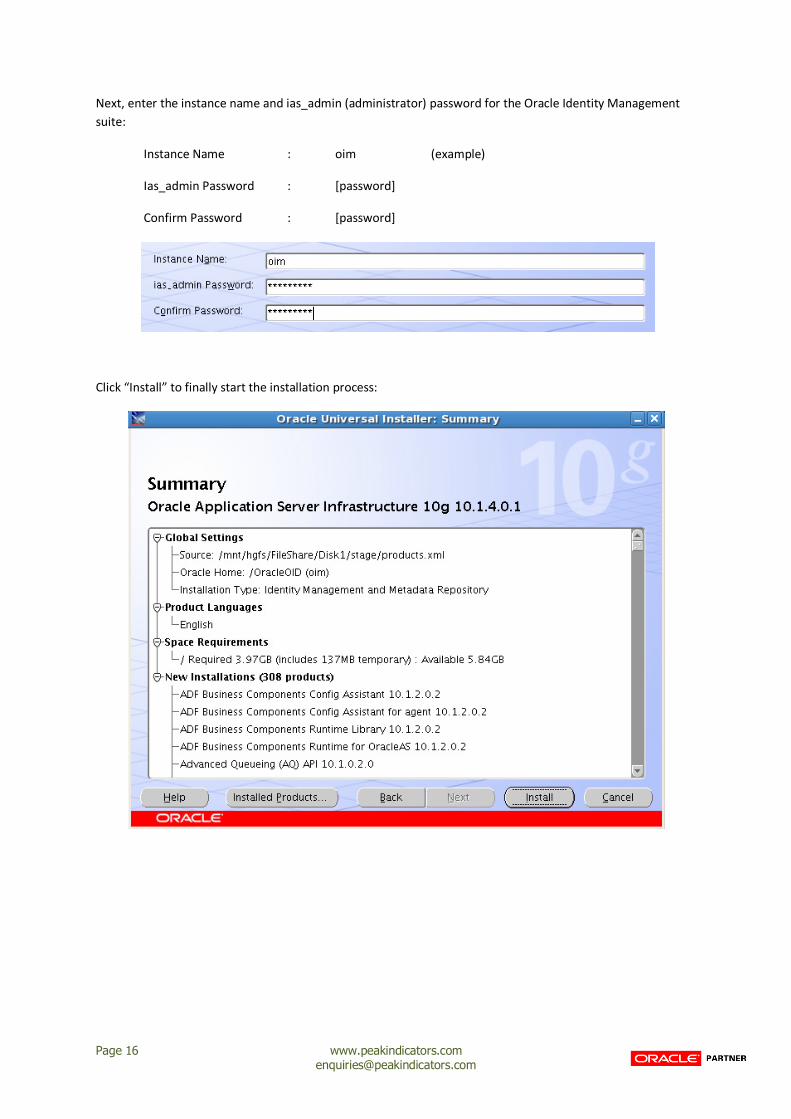
Next, enter the instance name and ias_admin (administrator) password for the Oracle Identity Management
suite:
Instance Name : oim (example)
Ias_admin Password : [password]
Confirm Password : [password]
Click “Install” to finally start the installation process:
Page 17 www.peakindicators.com [email protected]
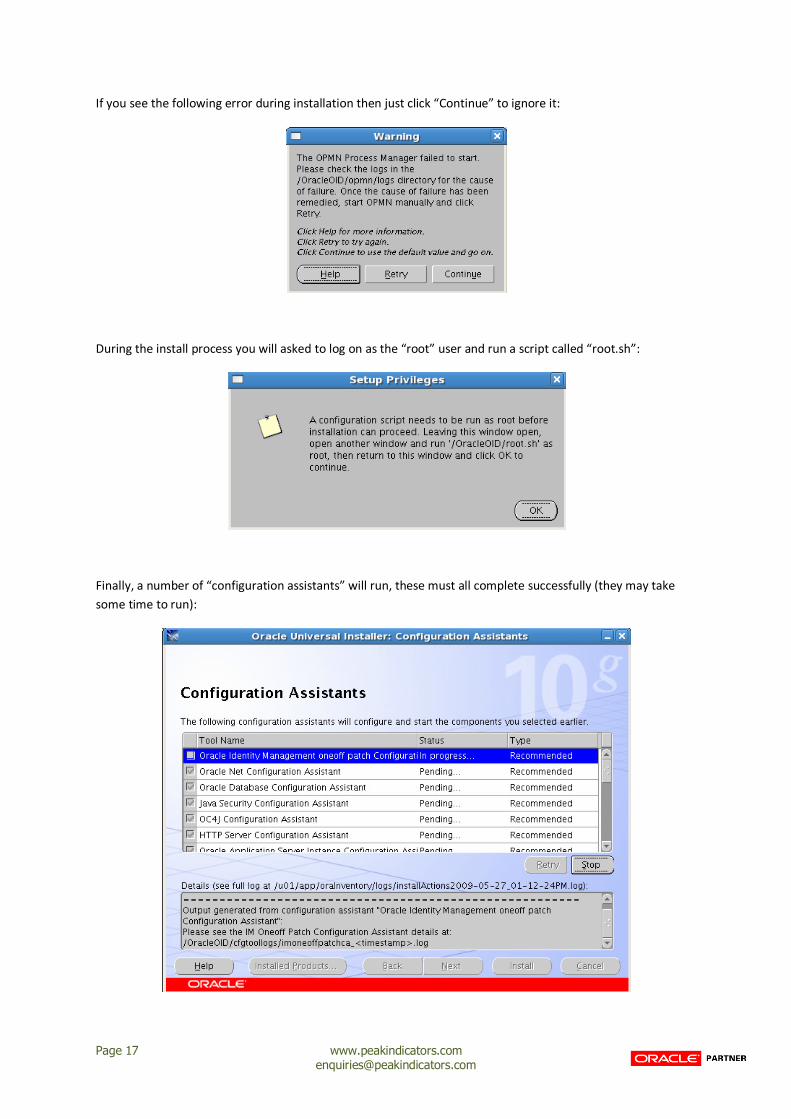
If you see the following error during installation then just click “Continue” to ignore it:
During the install process you will asked to log on as the “root” user and run a script called “root.sh”:
Finally, a number of “configuration assistants” will run, these must all complete successfully (they may take
some time to run):
Page 18 www.peakindicators.com [email protected]
CONFIGURE SHELL SCRIPT
Log on to the Linux machine as the “orabiee” user.
In the “orabiee” home directory, create a new script called “startoid.sh”:
# set OIM Client Environment Variables
export ORACLE_HOME=[OIM HOME]
export TNS_ADMIN=$ORACLE_HOME/network/admin
export LD_LIBRARY_PATH=$ORACLE_HOME/lib:/lib:/usr/lib
# Start up Oracle Internet Directory database repository and listener
$ORACLE_HOME/bin/dbstart
$ORACLE_HOME/bin/lsnrctl start
# Start OIM Application Server
$ORACLE_HOME/opmn/bin/opmnctl start
START UP ORACLE IDENTITY MANAGEMENT
Log on to the Linux machine as the “orabiee” user.
Open up a Terminal window and execute the following command:
. startoid.sh
Page 19 www.peakindicators.com [email protected]
INSTALL ORACLE BI ENTERPRISE EDITION (CLIENT)
INSTALL JAVA DEVELOPMENT KIT (JDK)
Download the latest “Java SE Development Kit” (JDK) for Windows from the following web-site:
http://java.sun.com/javase/downloads/index.jsp
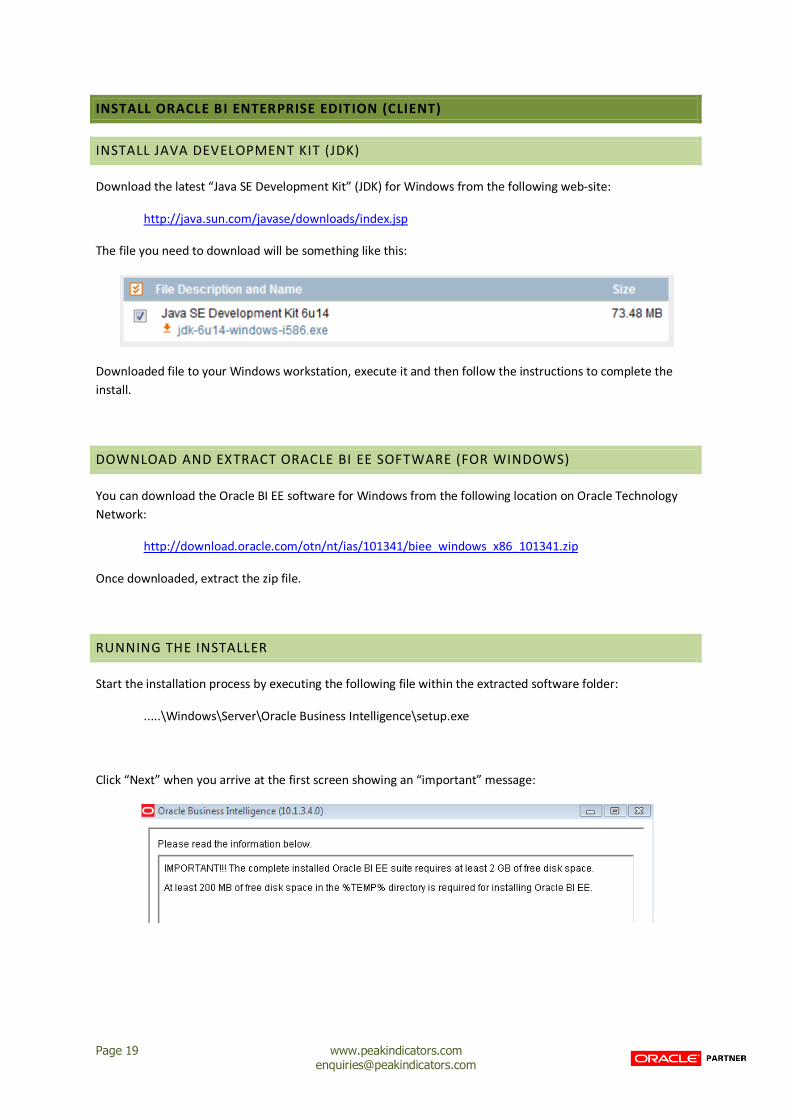
The file you need to download will be something like this:
Downloaded file to your Windows workstation, execute it and then follow the instructions to complete the
install.
DOWNLOAD AND EXTRACT ORACLE BI EE SOFTWARE (FOR WINDOWS)
You can download the Oracle BI EE software for Windows from the following location on Oracle Technology
Network:
http://download.oracle.com/otn/nt/ias/101341/biee_windows_x86_101341.zip
Once downloaded, extract the zip file.
RUNNING THE INSTALLER
Start the installation process by executing the following file within the extracted software folder:
.....\Windows\Server\Oracle Business Intelligence\setup.exe
Click “Next” when you arrive at the first screen showing an “important” message:
Page 20 www.peakindicators.com [email protected]
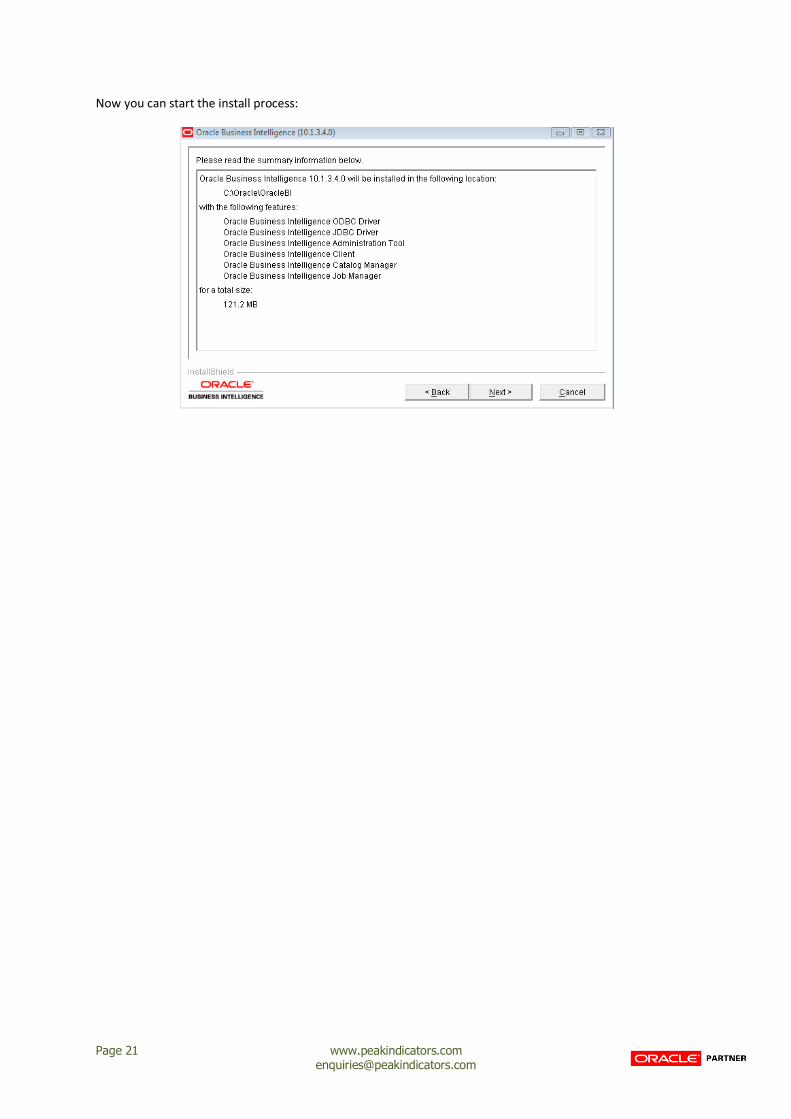
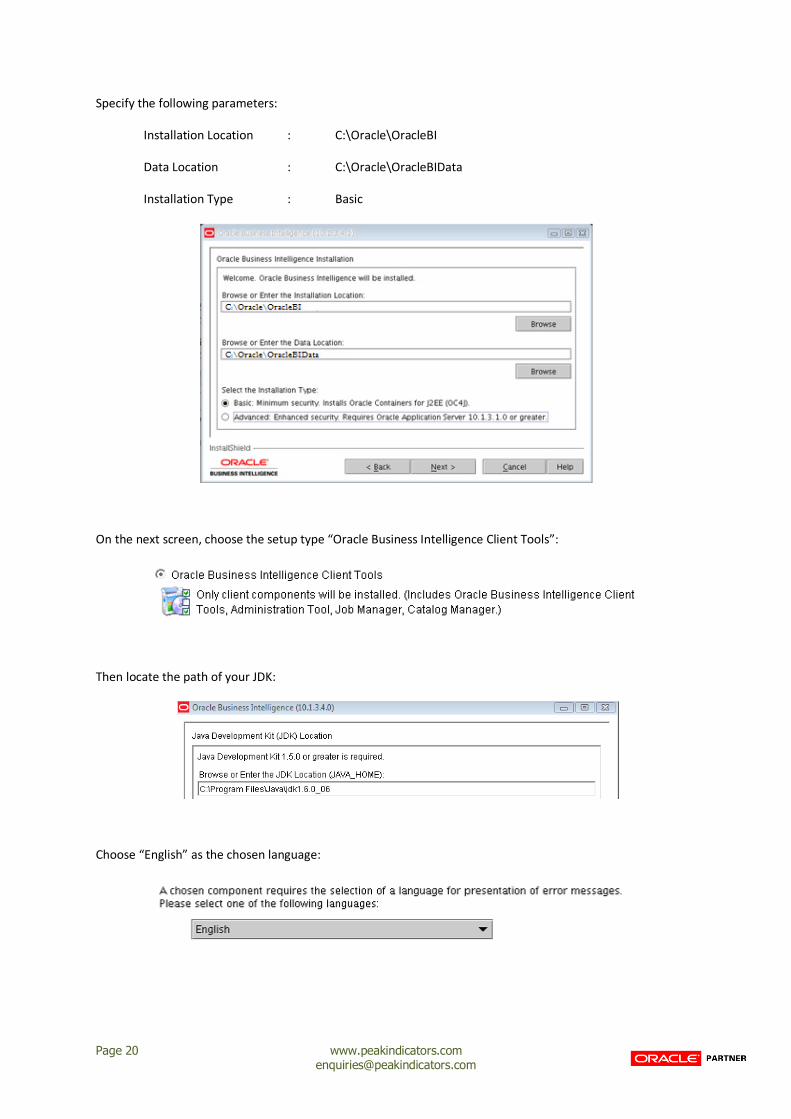
Specify the following parameters:
Installation Location : C:\Oracle\OracleBI
Data Location : C:\Oracle\OracleBIData
Installation Type : Basic
On the next screen, choose the setup type “Oracle Business Intelligence Client Tools”:
Then locate the path of your JDK:
Choose “English” as the chosen language:
Page 22 www.peakindicators.com [email protected]
INSTALL ORACLE BI ENTERPRISE EDITION (SERVER)
CREATE INSTALLATION FOLDERS FOR ORACLE BI EE
Create a new “base” directory on the Linux server for the Oracle BI EE install. For example:
mkdir /vol1/oracle/product/biee
NOTE: The above folder path will from now on be referred to as [BI HOME]
Then create two sub-folders for the “OracleBI” and “OracleBIData” locations that need to be specified during
the installation process:
mkdir [BI HOME]/OracleBI
mkdir [BI HOME]/OracleBIData
Set the appropriate ownership permissions for the “orabiee” user account:
chown orabiee:dba [BI HOME]/biee
chown orabiee:dba [BI HOME]/OracleBI
chown orabiee:dba [BI HOME]/OracleBIData
CREATE BIEE SCHEMA ON DATA-WAREHOUSE
On the Data-Warehouse, create a new “BIEE” schema for storing the following database objects:
Oracle BI Delivers “Scheduler” tables
Oracle BI “Usage Tracking” tables
Oracle BI Publisher “Scheduler” tables
You can do this by logging on via SQL*Plus as a SYSTEM user and running the following commands:
create user biee identified by [password] default tablespace [tablespace] quota unlimited on
[tablespace];
grant create session, create table, create procedure, create sequence, create view, create trigger to
biee;
Page 23 www.peakindicators.com [email protected]
INSTALL JAVA DEVELOPMENT KIT (JDK)
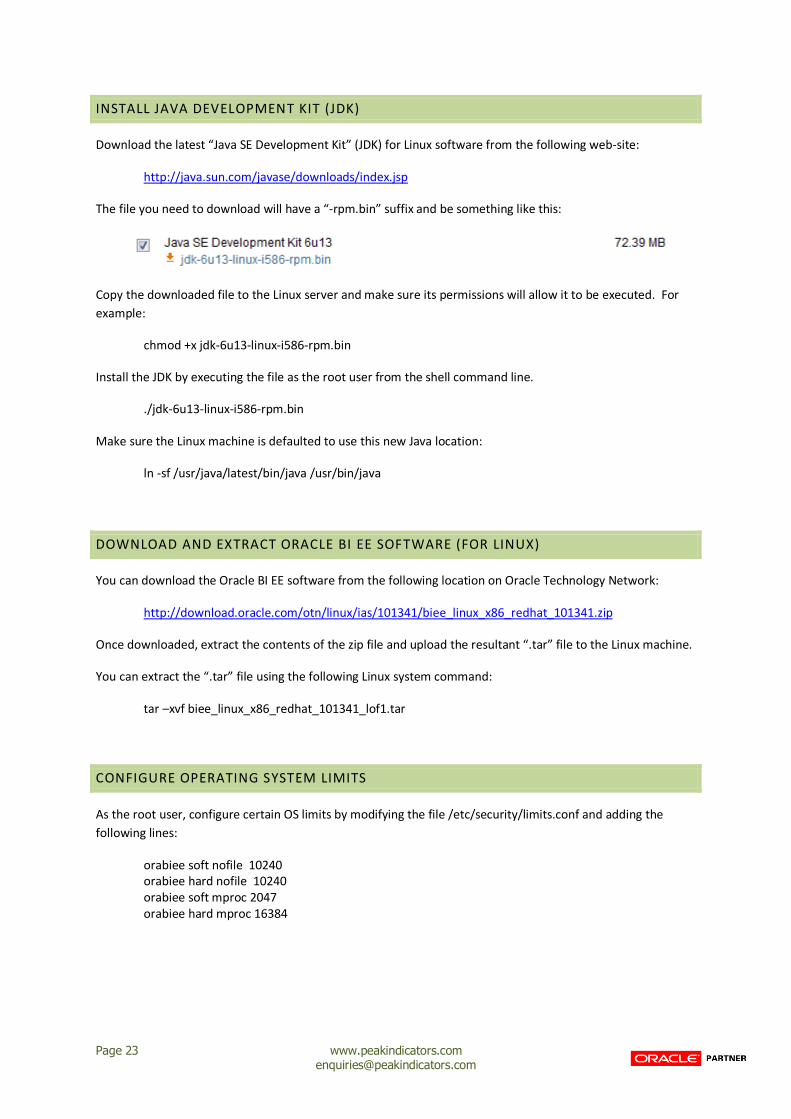
Download the latest “Java SE Development Kit” (JDK) for Linux software from the following web-site:
http://java.sun.com/javase/downloads/index.jsp
The file you need to download will have a “-rpm.bin” suffix and be something like this:
Copy the downloaded file to the Linux server and make sure its permissions will allow it to be executed. For
example:
chmod +x jdk-6u13-linux-i586-rpm.bin
Install the JDK by executing the file as the root user from the shell command line.
./jdk-6u13-linux-i586-rpm.bin
Make sure the Linux machine is defaulted to use this new Java location:
ln -sf /usr/java/latest/bin/java /usr/bin/java
DOWNLOAD AND EXTRACT ORACLE BI EE SOFTWARE (FOR LINUX)
You can download the Oracle BI EE software from the following location on Oracle Technology Network:
http://download.oracle.com/otn/linux/ias/101341/biee_linux_x86_redhat_101341.zip
Once downloaded, extract the contents of the zip file and upload the resultant “.tar” file to the Linux machine.
You can extract the “.tar” file using the following Linux system command:
tar –xvf biee_linux_x86_redhat_101341_lof1.tar
CONFIGURE OPERATING SYSTEM LIMITS
As the root user, configure certain OS limits by modifying the file /etc/security/limits.conf and adding the
following lines:
orabiee soft nofile 10240
orabiee hard nofile 10240
orabiee soft mproc 2047
orabiee hard mproc 16384
Page 24 www.peakindicators.com [email protected]
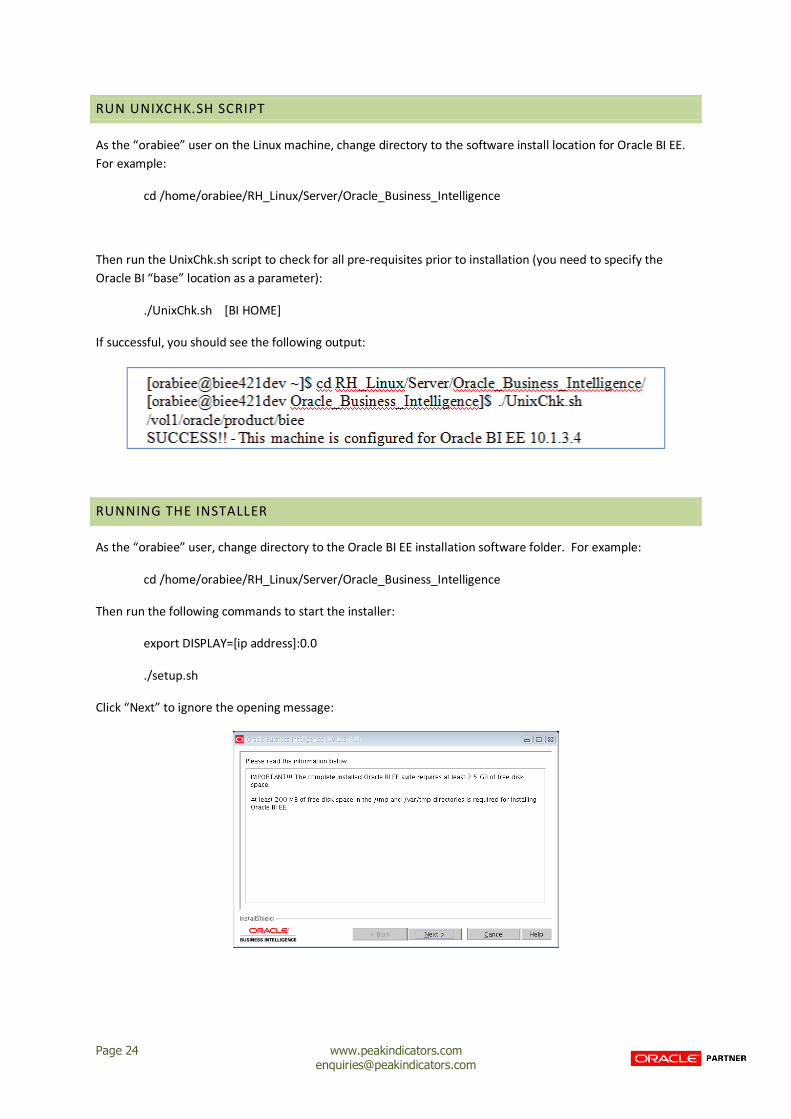
RUN UNIXCHK.SH SCRIPT
As the “orabiee” user on the Linux machine, change directory to the software install location for Oracle BI EE.
For example:
cd /home/orabiee/RH_Linux/Server/Oracle_Business_Intelligence
Then run the UnixChk.sh script to check for all pre-requisites prior to installation (you need to specify the
Oracle BI “base” location as a parameter):
./UnixChk.sh [BI HOME]
If successful, you should see the following output:
RUNNING THE INSTALLER
As the “orabiee” user, change directory to the Oracle BI EE installation software folder. For example:
cd /home/orabiee/RH_Linux/Server/Oracle_Business_Intelligence
Then run the following commands to start the installer:
export DISPLAY=[ip address]:0.0
./setup.sh
Click “Next” to ignore the opening message:
Page 25 www.peakindicators.com [email protected]
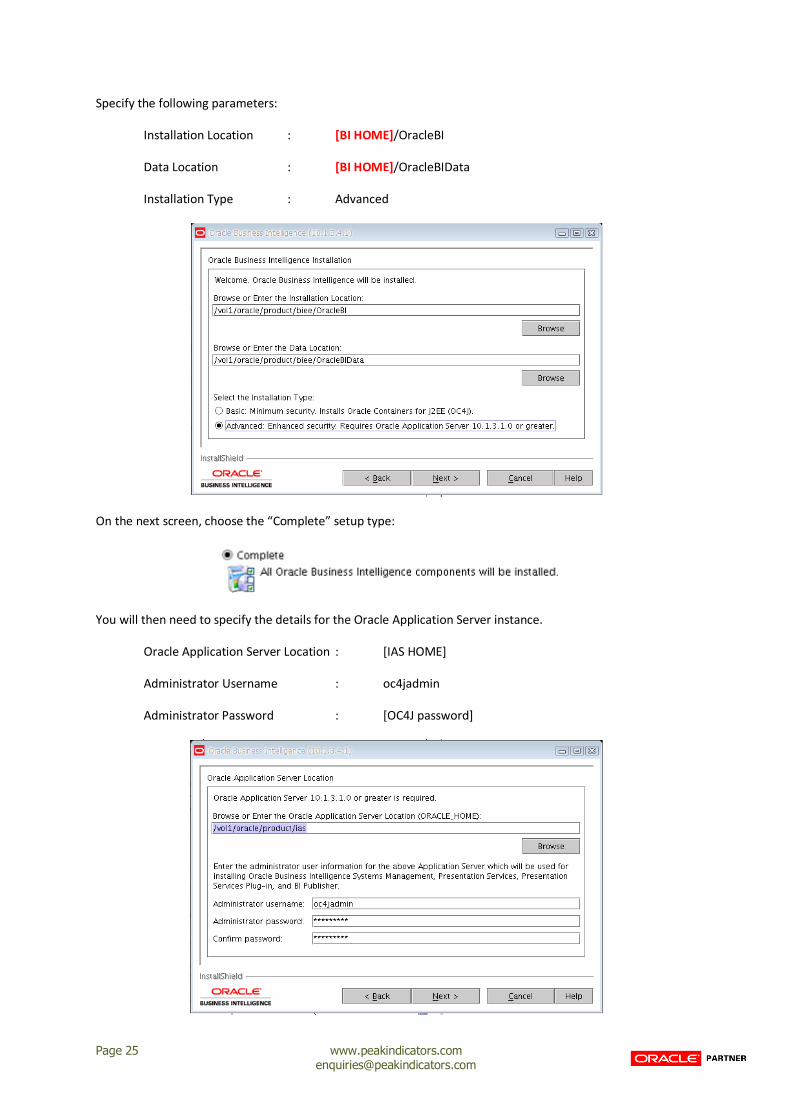
Specify the following parameters:
Installation Location : [BI HOME]/OracleBI
Data Location : [BI HOME]/OracleBIData
Installation Type : Advanced
On the next screen, choose the “Complete” setup type:
You will then need to specify the details for the Oracle Application Server instance.
Oracle Application Server Location : [IAS HOME]
Administrator Username : oc4jadmin
Administrator Password : [OC4J password]
Page 26 www.peakindicators.com [email protected]
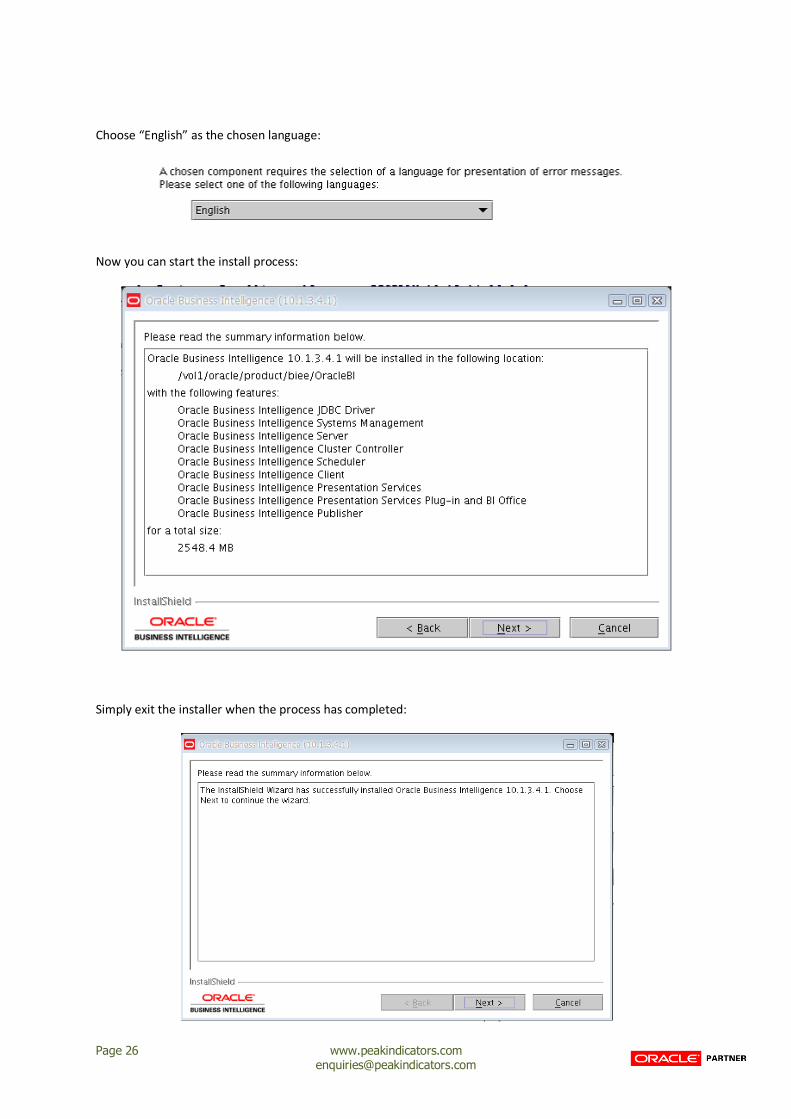
Choose “English” as the chosen language:
Now you can start the install process:
Simply exit the installer when the process has completed:
Page 27 www.peakindicators.com [email protected]
CONFIGURE SHELL SCRIPTS
Log on to the Linux machine as the “orabiee” user.
Open up the “.bash_profile” script for editing. Add the following lines (checking the paths in red are correct):
# set Oracle DB Client Environment Variables
export ORACLE_HOME=[ORA HOME]
export TNS_ADMIN=$ORACLE_HOME/network/admin
export LD_LIBRARY_PATH=[IAS HOME]/lib:$ORACLE_HOME/lib:/lib:/usr/lib
# Configure PATH to include binaries for Oracle DB Client, Oracle BI EE and Oracle AS
PATH=$PATH:$ORACLE_HOME/bin:$HOME/bin:[IAS HOME]/opmn/bin:.
export PATH
# Run the provided script for setting up other the Oracle BI EE environment variables
. [BI HOME]/OracleBI/setup/sa-init.sh
In the “orabiee” home directory, create a new script called “startbiee.sh”:
# Start Oracle Application Server for BI EE
[IAS HOME]/opmn/bin/opmnctl start
# Start Oracle BI Server
run-sa.sh start
# Start Oracle BI Presentation Services
run-saw.sh start
# Start Oracle BI Scheduler
run-sch.sh start

Page 28 www.peakindicators.com [email protected]
CONFIGURE BI DELIVERS SCHEDULER
Open up a new session as the “orabiee” user on the Linux machine (open a new session to make sure all the
environment variables get set correctly).
Configure the BI Delivers scheduler by running the following command:
schconfig
Then configure the scheduler by specify the following menu options and parameters:
1 – Configure Scheduler
1 – Database
3 – Data Source Name : TNS Connect string to Data Warehouse e.g. biee421dev
4 – User Name : biee
5 – Password : [biee password]
0 – Quit
“Y” to save changes
2 – General
11 – Administrator Password : Administrator
0 – Quit
“Y” to save changes
0 - Quit
2 – Configure Mail
1 – General
2 – Sender Address : [email protected]
3 – SMTP Server : your.smtp.mail.server
0 – Quit
“Y” to save changes
0 - Quit
0 - Quit
Page 29 www.peakindicators.com [email protected]
CREATE “BI DELIVERS SCHEDULER” AND “USAGE TRACKING” TABLES
As the “orabiee” user on the Linux machine, change directory to the BI EE “Schema” location:
cd [BI HOME]/OracleBI/server/Schema
The create the Scheduler and Usage Tracking tables on the Data-Warehouse “biee” schema using SQL*Plus:
sqlplus biee/[password]@[dw]
@SAJOBS.Oracle.sql
@SAACCT.Oracle.sql
exit
There are two “Time” dimension tables that also need to be imported into the “biee” schema (used for Usage
Tracking reporting):
S_ETL_DAY
S_ETL_TIME_DAY
To do this, uncompress the “usage.zip” file thas provided along with this installation guide. Import the
resultant “usage.dmp” file into the “biee” schema:
Imp biee/[bieepw]@[dw] file=usage.dmp full=y
Page 30 www.peakindicators.com [email protected]
ENABLE USAGE TRACKING
A dedicated “Connection Pool” should exist in the Physical Layer of the BI Repository (RPD) that allows write
access to the “Usage Tracking” table (S_NQ_ACCT) on the BIEE schema:
Open up the following configuration file for editing:
[BI HOME]/OracleBI/server/Config/NQSConfig.ini
Modify the following parameters:
[ USAGE_TRACKING ]
ENABLE = YES;
DIRECT_INSERT = YES;
PHYSICAL_TABLE_NAME = "Oracle BI EE"."BIEE"."S_NQ_ACCT";
CONNECTION_POOL = "Oracle BI EE"."Oracle BI EE Writer Connection Pool";
Save the file and exit.
NOTE:
The text in red reflects the BI Repository configuration shown in the above diagram. You should configure
these parameters to be in line with your own custom BI Repository file.

Page 31 www.peakindicators.com [email protected]
CONFIGURE CREDENTIAL STORE
The “Credential Store” is used to hold certain user credentials so that it is possible for external applications to
integrate with Oracle BI EE. We need to configure this Credential Store for the BI Delivers and BI Publisher.
Log on as “orabiee” to the Linux machine and run the following 2 commands (checking the Path and
Administrator password in red are correct):
cryptotools credstore –add –encr –username Administ rator –password Administrator –
alias admin –passphrase password –writePassphrase Y –batch –InFile [BI HOME]/OracleBIData/web/config/credentialstore.xml
cryptotools credstore –add –encr –username Administ rator –password Administrator –
alias bipublisheradmin –passphrase password –writeP assphrase Y –batch –InFile [BI HOME]/OracleBIData/web/config/credentialstore.xml
Page 32 www.peakindicators.com [email protected]
CONFIGURE BI REPOSITORY (RPD)
Copy your custom BI Repository (RPD) file to the following location on the Linux machine:
[BI HOME]/OracleBI/server/Repository
Open up the following configuration file for editing:
[BI HOME]/OracleBI/server/Config/NQSconfig.ini
Configure the following parameter within the config file so that it corresponds to your custom BI Repository
(RPD) file name:
[ REPOSITORY ]
Star = samplesales.rpd, DEFAULT;
CONFIGURE PRESENTATION CATALOGUE
Copy your custom BI Presentation Catalogue folder structure to the following location on the Linux machine:
[BI HOME]/OracleBIData/web/catalog
Open up the following configuration file for editing:
[BI HOME]/OracleBIData/web/config/instanceconfig.xml
Configure the following parameter within the config file so that it corresponds to your custom BI Presentation
Catalogue path:
<CatalogPath[BI HOME]/OracleBIData/web/catalog/samplesales</CatalogPath>
Page 33 www.peakindicators.com [email protected]
START UP ORACLE AS AND BI EE PROCESSES
As the “orabiee” user on the Linx machine, initiate the following command to start up the Oracle Application
Server and BI EE processes:
. $HOME/startbiee.sh
Wait a few moments.....then try logging on to the BI Dashboards:
http://[host]:7777/analytics
Use the following credentials to log in:
Username : Administrator
Password : Administrator
Page 34 www.peakindicators.com [email protected]
CONFIGURE BI PUBLISHER
Log on to the BI Dashboards:
http://[host]:7777/analytics (Administrator / Administrator)
At the top-right, choose the menu option: “More Products �BI Publisher”
BI Publisher will now open up.
Click on the “Admin” tab and choose “Scheduler Configuration”.
Specify the following parameters:
Connection String : jdbc:oracle:thin:@devsrv02:1521:bidev421 (example host:port:sid)
Username : biee
Password : [biee password]
Click “Test Connection”:
Click “Install Schema”:
Page 35 www.peakindicators.com [email protected]
CONFIGURE SECURITY FOR ORACLE OID AND ORACLE SSO (OPTIONAL)
CONFIGURE BI REPOSITORY (RPD) FOR LDAP AUTHENTICATION
The Development team should have configured the BI Repository (RPD) file for LDAP Authentication.
You should however configure the RPD file to authenticate against the appropriate LDAP server (in our case,
this will be Oracle Internet Directory).
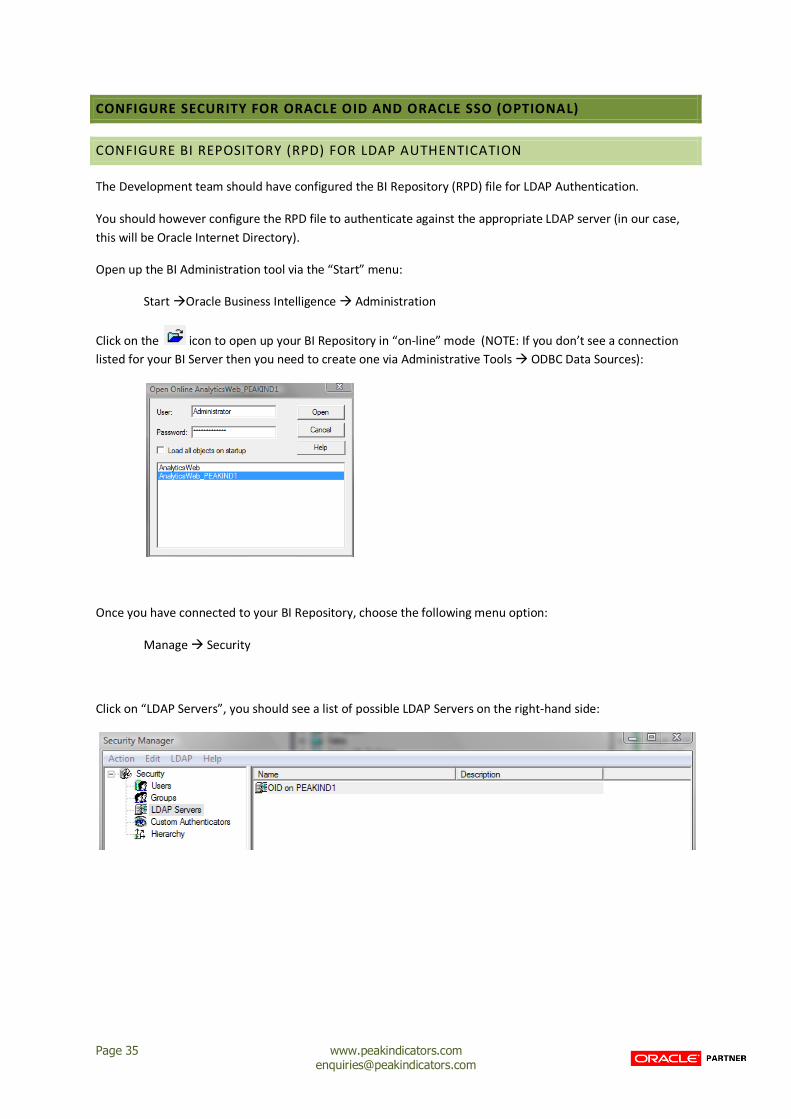
Open up the BI Administration tool via the “Start” menu:
Start �Oracle Business Intelligence � Administration
Click on the icon to open up your BI Repository in “on-line” mode (NOTE: If you don’t see a connection
listed for your BI Server then you need to create one via Administrative Tools � ODBC Data Sources):
Once you have connected to your BI Repository, choose the following menu option:
Manage � Security
Click on “LDAP Servers”, you should see a list of possible LDAP Servers on the right-hand side:
Page 36 www.peakindicators.com [email protected]
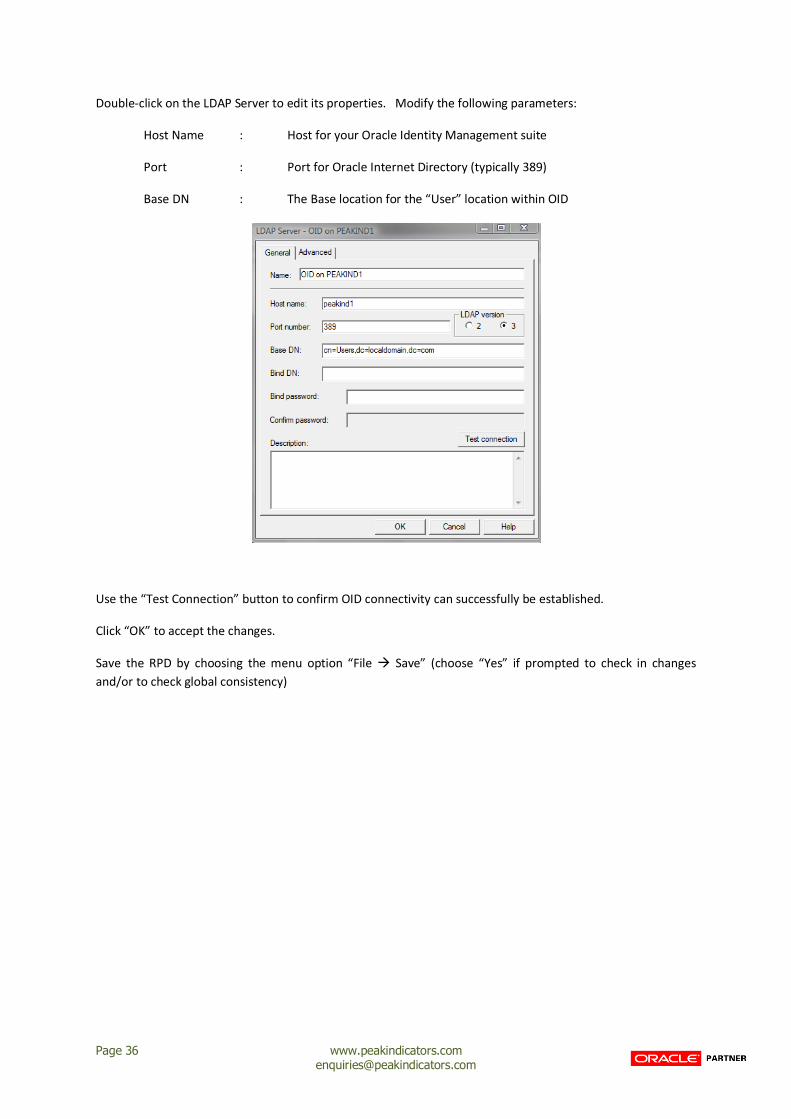
Double-click on the LDAP Server to edit its properties. Modify the following parameters:
Host Name : Host for your Oracle Identity Management suite
Port : Port for Oracle Internet Directory (typically 389)
Base DN : The Base location for the “User” location within OID
Use the “Test Connection” button to confirm OID connectivity can successfully be established.
Click “OK” to accept the changes.
Save the RPD by choosing the menu option “File � Save” (choose “Yes” if prompted to check in changes
and/or to check global consistency)
Page 37 www.peakindicators.com [email protected]
ENABLE AUTHORIZATION WITH ORACLE INTERNET DIRECTORY
Oracle BI EE cannot actually integrate directly with LDAP / Oracle Internet Directory to automatically obtain
the “groups” associated to a user.
We will actually create a database PL/SQL Function that utilises the DBMS_LDAP package to perform the OID
lookup process.
A new “Initialization Block” within the BI Repository will then be created to call this PL/SQL Function and assign
the results to the “GROUP” session variable.
There are two steps to this task:
1) Create GETLDAPGROUPS PL/SQL Function
Open up the supplied “OID_Authorization.sql” file for editing.
At the top, modify the top 4 parameters to suit your implementation:
l_ldap_host : [LDAP hostname]
l_ldap_port : [LDAP port]
l_ldap_base : [The DN location within OID where the GROUPS are stored]
For example:
-- Adjust as necessary.
l_ldap_host VARCHAR2(256) := 'peakdin1.localdomain';
l_ldap_port VARCHAR2(256) := '13060';
l_ldap_base VARCHAR2(256) := ' cn=Groups,dc=localdomain,dc=com';
Save the file.
Log on to the Data-Warehouse as the “biee” user and then execute the “AD_Authorization.sql” file to create
the PL/SQL Function:
sqlplus biee/[biee pw]@[dw]
@OID_Authorization.sql

Page 38 www.peakindicators.com [email protected]
2) Create “Authorization” Initialization Block
Open up the BI Repository and choose the menu option “Manage � Variables”.
On the left-hand side of the Variable Manager window, click on “Session � Initialization Blocks”:
Then on the right-hand side, right-mouse click and choose “New Initialization Block”:
A new window should appear for the new Initialization Block. Specify the following parameters:
Name : Authorization
Click on the “Edit Data Source” button and configure as follows:
Data Source Type : Database
Default Init String : SELECT GETLDAPGROUPS(LOWER(':USER')) FROM DUAL
Connection Pool : [Any connection pool with access to the BI EE schema]
Page 39 www.peakindicators.com [email protected]
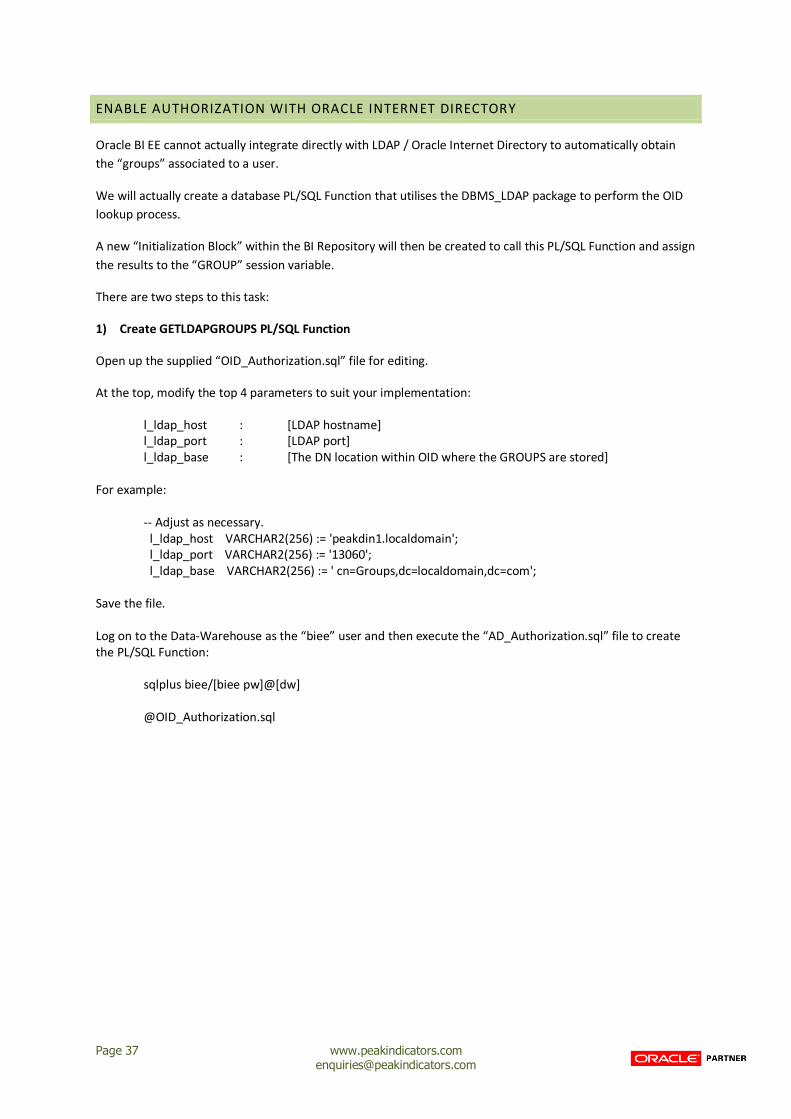
Click on “OK” to go back to the main Initialization Block edit window and click on the “Edit Data Target” button.
Specify “Row-wise initialization” (BUT DO NOT ENABLE THE “Use Caching” OPTION):
Click on “OK”, then click the “Edit Execution Precedence” button.
Click “Add” and the choose the “Authentication” Initialization Block:
Click on “OK” and then “OK” again to exit the Initialization Block edit window.
Save the Repository (<CTRL> + S).

Page 40 www.peakindicators.com [email protected]
REGISTER ORACLE BI EE AS A PARTNER APPLICATION
Oracle BI EE needs to be registered as a “Partner Application” on the SSO Server.
The command-line has the following syntax:
ssoreg.sh -oracle_home_path [Oracle SSO Home]
-site_name [HTTP Server : Port]
-config_mod_osso TRUE
-mod_osso_url [http://HTTP Server : Port]
-config_file [Location of generated .conf file]
Open up a Terminal session on the Linux machine hosting the Oracle Identity Management suite. Enter the
following commands:
cd [OIM HOME]/sso/bin
./ssoreg.sh -oracle_home_path [OIM HOME] -site_name [BI HOST]:[BI PORT] -config_mod_osso
TRUE -mod_osso_url http://[BI HOST]:[BI PORT] -config_file [OIM
HOME]/Apache/Apache/conf/osso/biosso.conf
NOTES:
[BI HOST] is the Linux machine hosting Oracle BI EE
[BI PORT] is the HTTP port on which Oracle BI EE is running (typically 7777)
After approximately 30 seconds you should see the following success message:
SSO registration tool finished successfully
The process will generate a configuration file called “biosso.conf”, this file will be needed later on in the SSO
configuration process.
Page 41 www.peakindicators.com [email protected]
CONFIGURE HTTP SERVER
1) Copy “biosso” File
The “biosso.conf” file generated in the previous section needs to be copied from the OIM “HTTP Server” over
to BI EE’s “HTTP Server” (hosted on the Oracle Application Server instance “IAS”).
From location : [OIM HOME]/Apache/Apache/conf/osso/biosso.conf
To location : [IAS HOME]/Apache/Apache/conf/osso/biosso.conf
If both OIM and IAS are hosted on the same machine, then you can use the following copy command to
achieve this:
cp [OIM HOME]/Apache/Apache/conf/osso/biosso.conf [IAS HOME]/Apache/Apache/conf/osso/biosso.conf
2) Modify “mod_osso.conf” File
Open up the following file for editing:
[IAS HOME]/Apache/Apache/conf/mod_osso.conf
Within the <IfModule mod_osso.c> section, add the following text to register the new “biosso.conf” file:
OssoConfigFile [IAS HOME]/Apache/Apache/conf/osso/biosso.conf
Then add the following text to protect the URLs for /analytics and /analyticsSOAP:
<Location /analytics>
Header unset Pragma
OssoSendCacheHeaders off
AuthType Basic
require valid-user
</Location>
<Location /analyticsSOAP>
require valid-user
AuthType Basic
Allow from All
Satisfy any
</Location>
Page 42 www.peakindicators.com [email protected]
Your “mod_osso.conf” file should look like something like this:
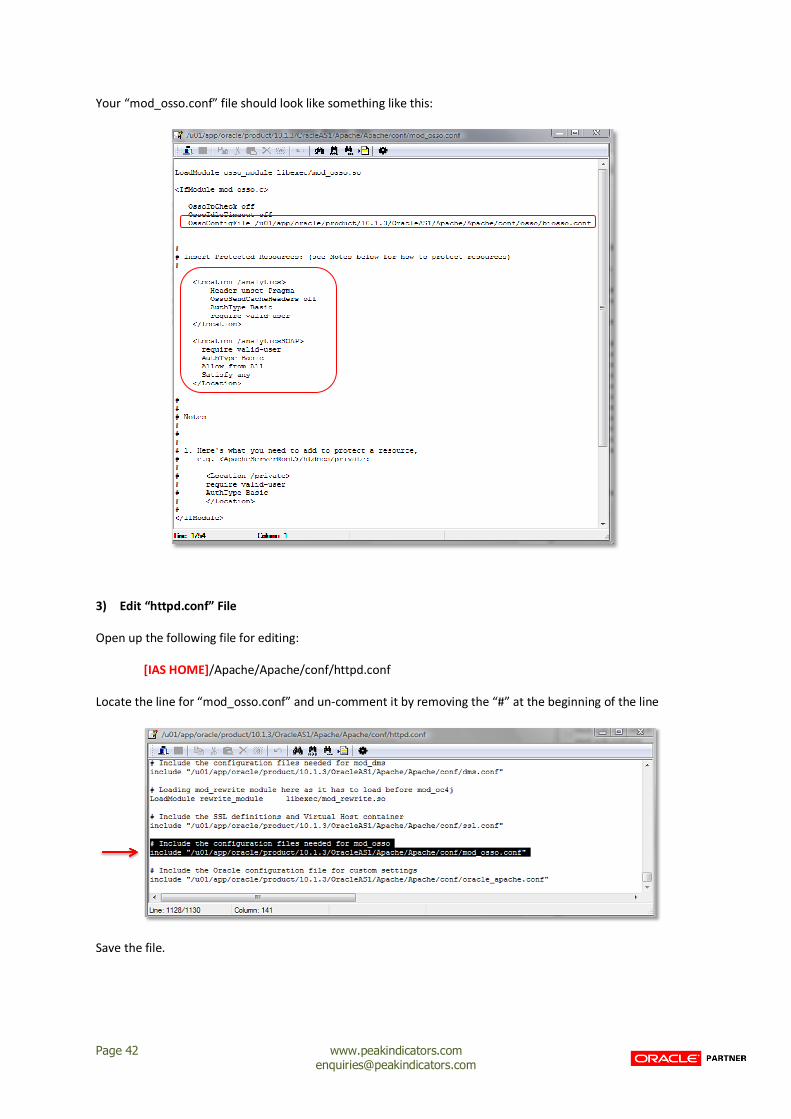
3) Edit “httpd.conf” File
Open up the following file for editing:
[IAS HOME]/Apache/Apache/conf/httpd.conf
Locate the line for “mod_osso.conf” and un-comment it by removing the “#” at the beginning of the line
Save the file.
Page 43 www.peakindicators.com [email protected]
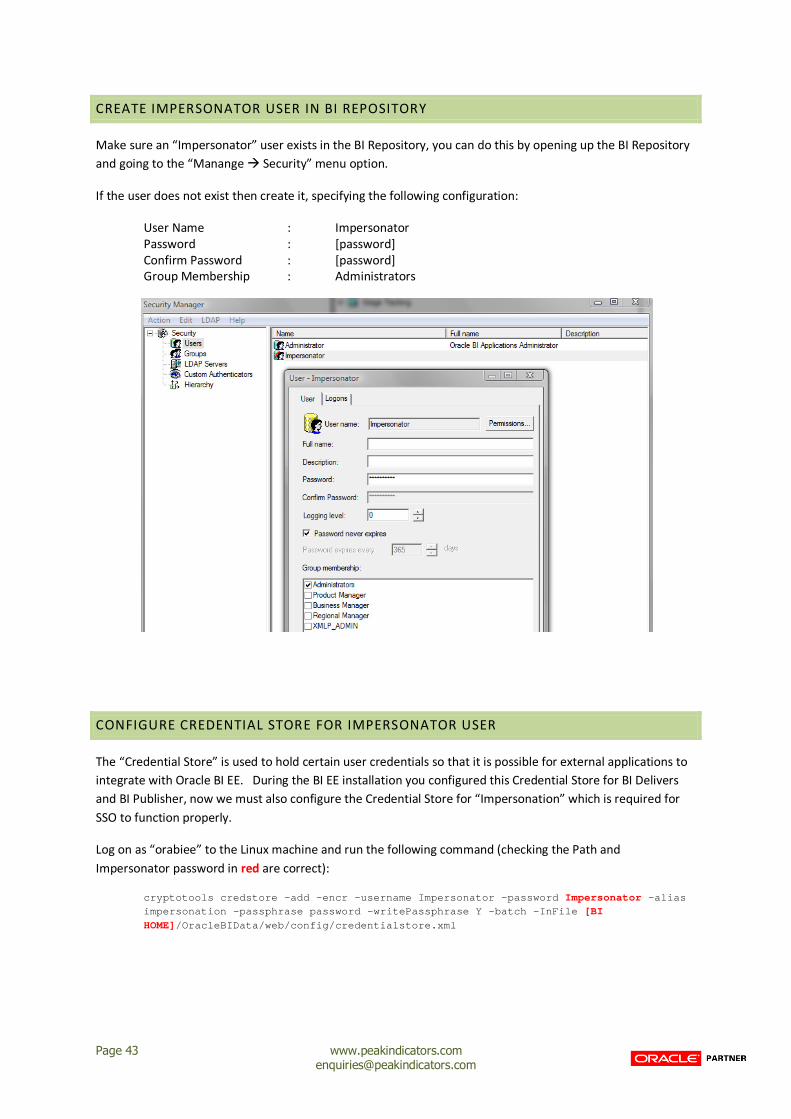
CREATE IMPERSONATOR USER IN BI REPOSITORY
Make sure an “Impersonator” user exists in the BI Repository, you can do this by opening up the BI Repository
and going to the “Manange � Security” menu option.
If the user does not exist then create it, specifying the following configuration:
User Name : Impersonator
Password : [password]
Confirm Password : [password]
Group Membership : Administrators
CONFIGURE CREDENTIAL STORE FOR IMPERSONATOR USER
The “Credential Store” is used to hold certain user credentials so that it is possible for external applications to
integrate with Oracle BI EE. During the BI EE installation you configured this Credential Store for BI Delivers
and BI Publisher, now we must also configure the Credential Store for “Impersonation” which is required for
SSO to function properly.
Log on as “orabiee” to the Linux machine and run the following command (checking the Path and
Impersonator password in red are correct):
cryptotools credstore –add –encr –username Imperson ator –password Impersonator –alias impersonation –passphrase password –writePassphrase Y –batch –InFile [BI
HOME]/OracleBIData/web/config/credentialstore.xml
Page 44 www.peakindicators.com [email protected]
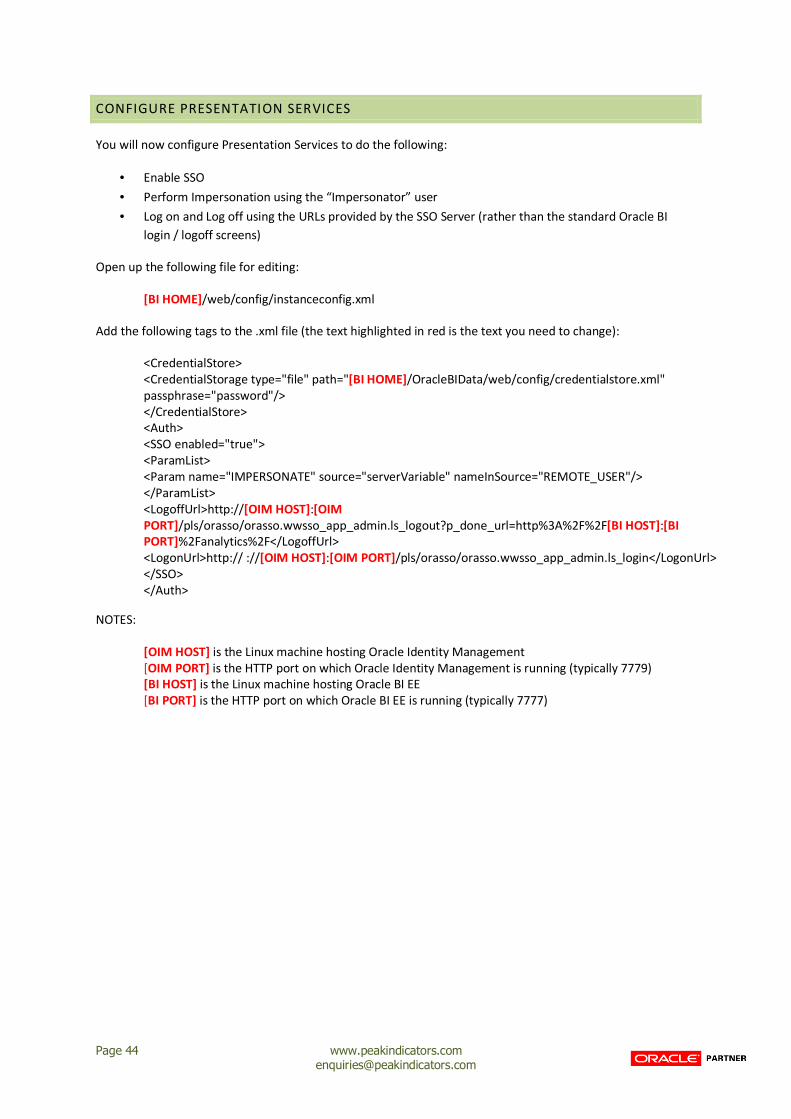
CONFIGURE PRESENTATION SERVICES
You will now configure Presentation Services to do the following:
• Enable SSO
• Perform Impersonation using the “Impersonator” user
• Log on and Log off using the URLs provided by the SSO Server (rather than the standard Oracle BI
login / logoff screens)
Open up the following file for editing:
[BI HOME]/web/config/instanceconfig.xml
Add the following tags to the .xml file (the text highlighted in red is the text you need to change):
<CredentialStore>
<CredentialStorage type="file" path="[BI HOME]/OracleBIData/web/config/credentialstore.xml"
passphrase="password"/>
</CredentialStore>
<Auth>
<SSO enabled="true">
<ParamList>
<Param name="IMPERSONATE" source="serverVariable" nameInSource="REMOTE_USER"/>
</ParamList>
<LogoffUrl>http://[OIM HOST]:[OIM
PORT]/pls/orasso/orasso.wwsso_app_admin.ls_logout?p_done_url=http%3A%2F%2F[BI HOST]:[BI
PORT]%2Fanalytics%2F</LogoffUrl>
<LogonUrl>http:// ://[OIM HOST]:[OIM PORT]/pls/orasso/orasso.wwsso_app_admin.ls_login</LogonUrl>
</SSO>
</Auth>
NOTES:
[OIM HOST] is the Linux machine hosting Oracle Identity Management
[OIM PORT] is the HTTP port on which Oracle Identity Management is running (typically 7779)
[BI HOST] is the Linux machine hosting Oracle BI EE
[BI PORT] is the HTTP port on which Oracle BI EE is running (typically 7777)
Page 45 www.peakindicators.com [email protected]
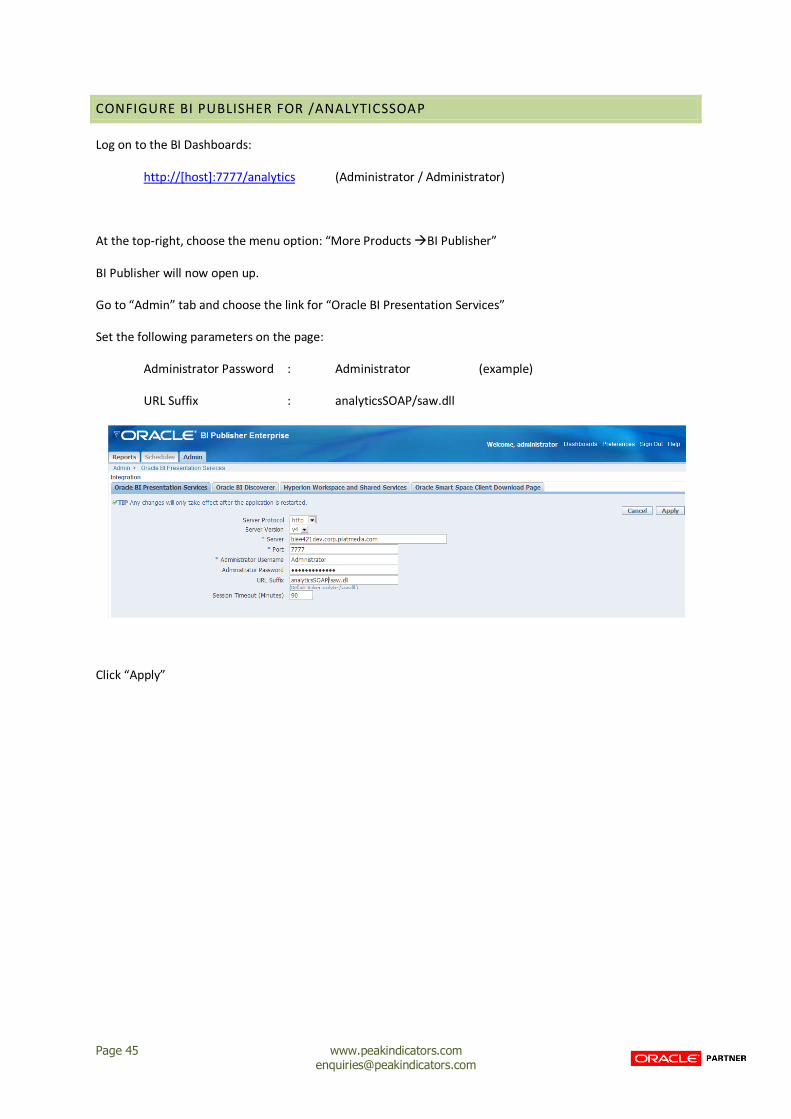
CONFIGURE BI PUBLISHER FOR /ANALYTICSSOAP
Log on to the BI Dashboards:
http://[host]:7777/analytics (Administrator / Administrator)
At the top-right, choose the menu option: “More Products �BI Publisher”
BI Publisher will now open up.
Go to “Admin” tab and choose the link for “Oracle BI Presentation Services”
Set the following parameters on the page:
Administrator Password : Administrator (example)
URL Suffix : analyticsSOAP/saw.dll
Click “Apply”
Page 46 www.peakindicators.com [email protected]
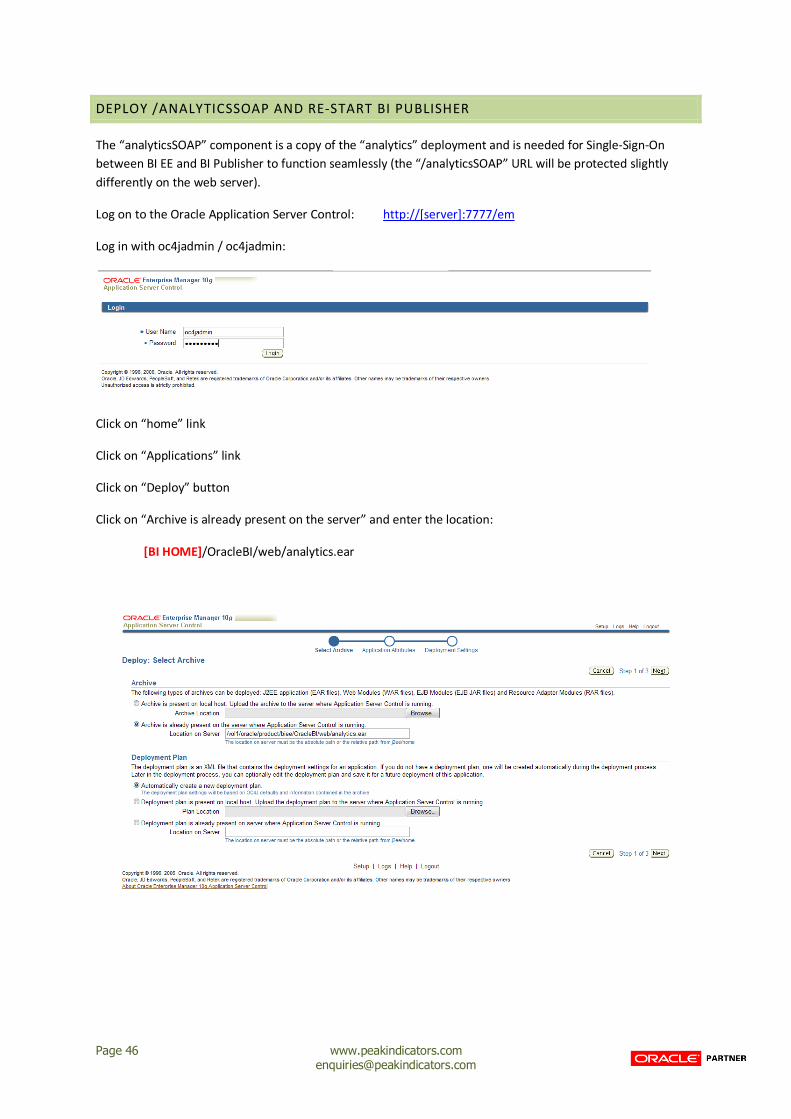
DEPLOY /ANALYTICSSOAP AND RE-START BI PUBLISHER
The “analyticsSOAP” component is a copy of the “analytics” deployment and is needed for Single-Sign-On
between BI EE and BI Publisher to function seamlessly (the “/analyticsSOAP” URL will be protected slightly
differently on the web server).
Log on to the Oracle Application Server Control: http://[server]:7777/em
Log in with oc4jadmin / oc4jadmin:
Click on “home” link
Click on “Applications” link
Click on “Deploy” button
Click on “Archive is already present on the server” and enter the location:
[BI HOME]/OracleBI/web/analytics.ear
Page 47 www.peakindicators.com [email protected]
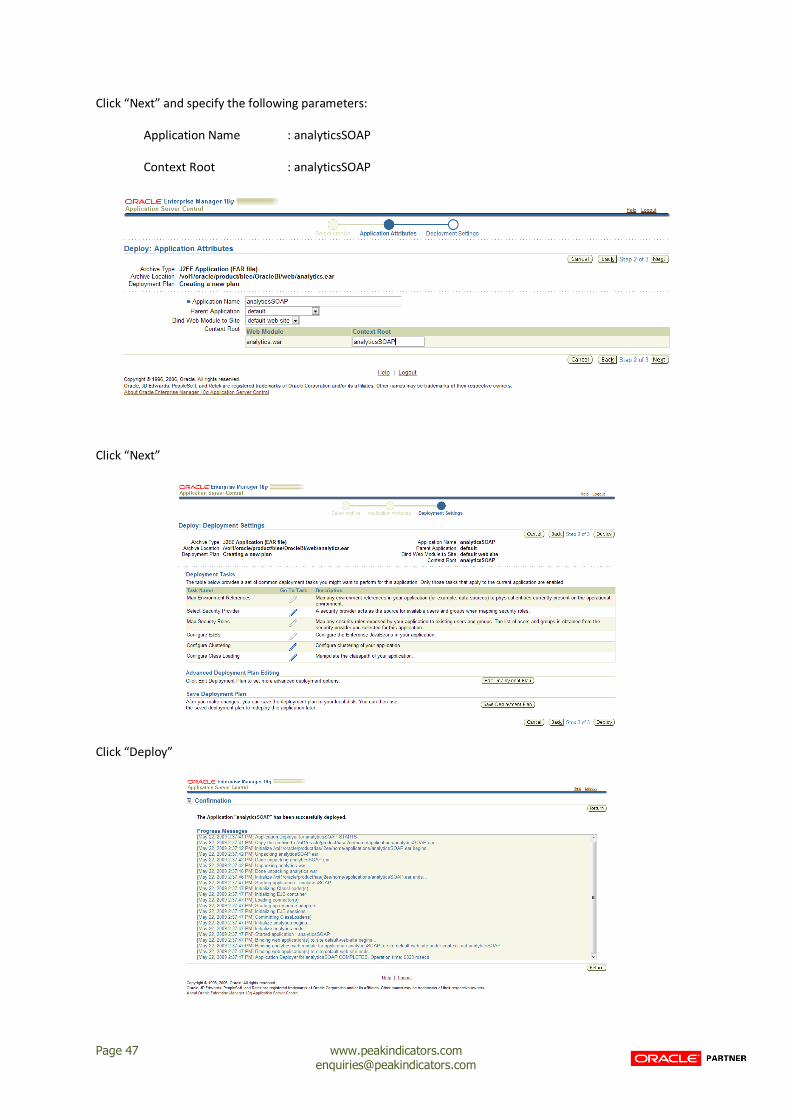
Click “Next” and specify the following parameters:
Application Name : analyticsSOAP
Context Root : analyticsSOAP
Click “Next”
Click “Deploy”
Page 48 www.peakindicators.com [email protected]
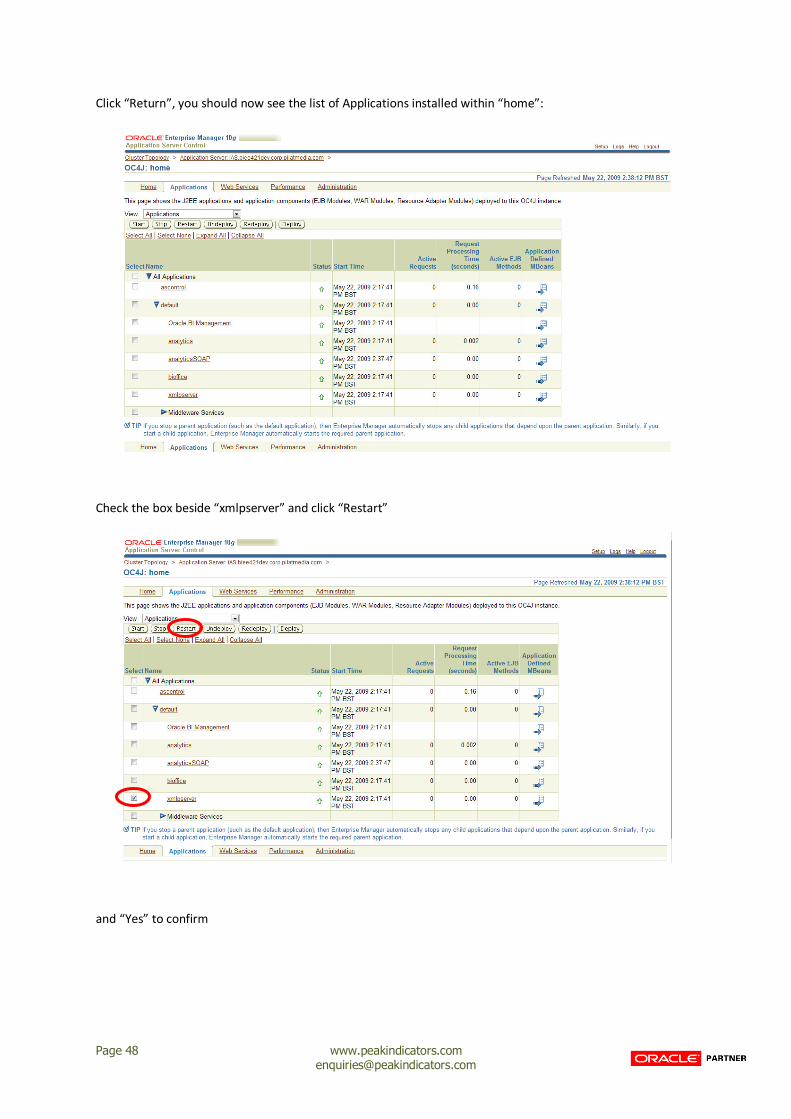
Click “Return”, you should now see the list of Applications installed within “home”:
Check the box beside “xmlpserver” and click “Restart”
and “Yes” to confirm

Page 49 www.peakindicators.com [email protected]
RESTART HTTP AND PRESENTATION SERVICES
As the “orabiee” user on the Linux machine, initiate the following commands to restart the BI EE “HTTP Server”
and BI Presentation Services:
[IAS HOME]/opmn/bin/opmnctl restartproc process-type=HTTP_Server
run-saw.sh stop
[wait a minute or two….]
run-saw.sh start
Page 50 www.peakindicators.com [email protected]
CONFIGURE SECURITY FOR ACTIVE DIRECTORY (OPTIONAL)
ENABLE AUTHENTICATION WITH ACTIVE DIRECTORY
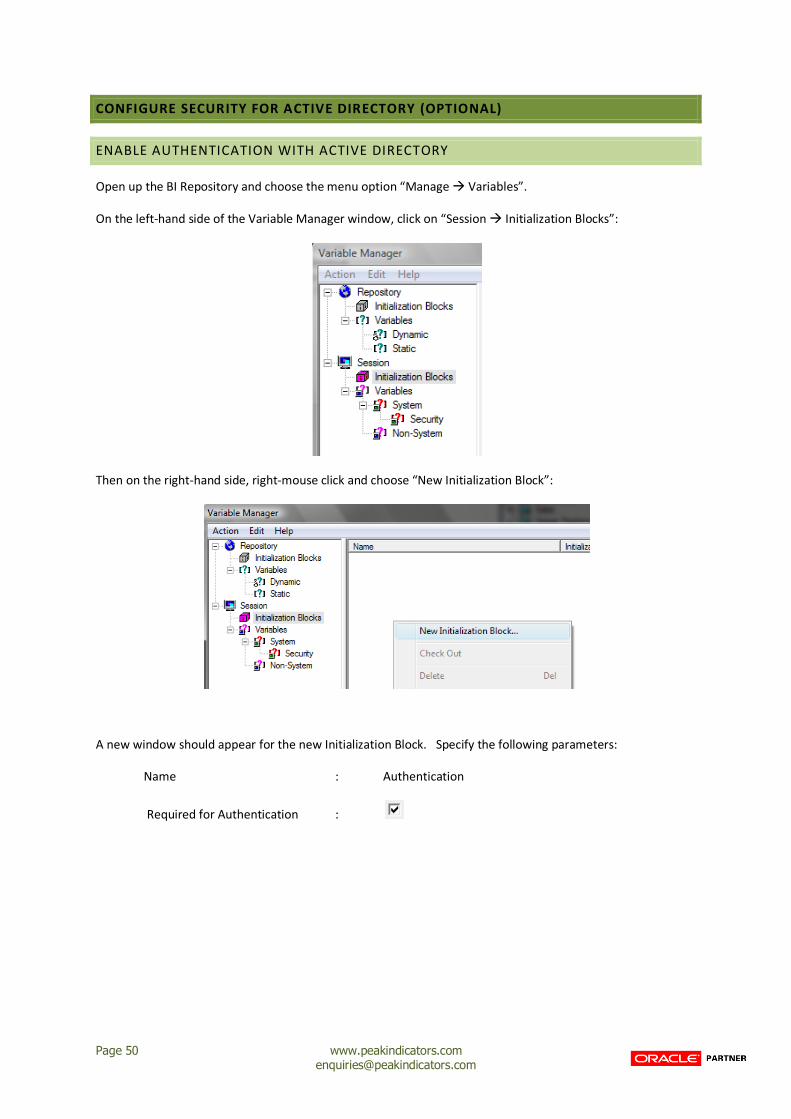
Open up the BI Repository and choose the menu option “Manage � Variables”.
On the left-hand side of the Variable Manager window, click on “Session � Initialization Blocks”:
Then on the right-hand side, right-mouse click and choose “New Initialization Block”:
A new window should appear for the new Initialization Block. Specify the following parameters:
Name : Authentication
Required for Authentication :
Page 51 www.peakindicators.com [email protected]
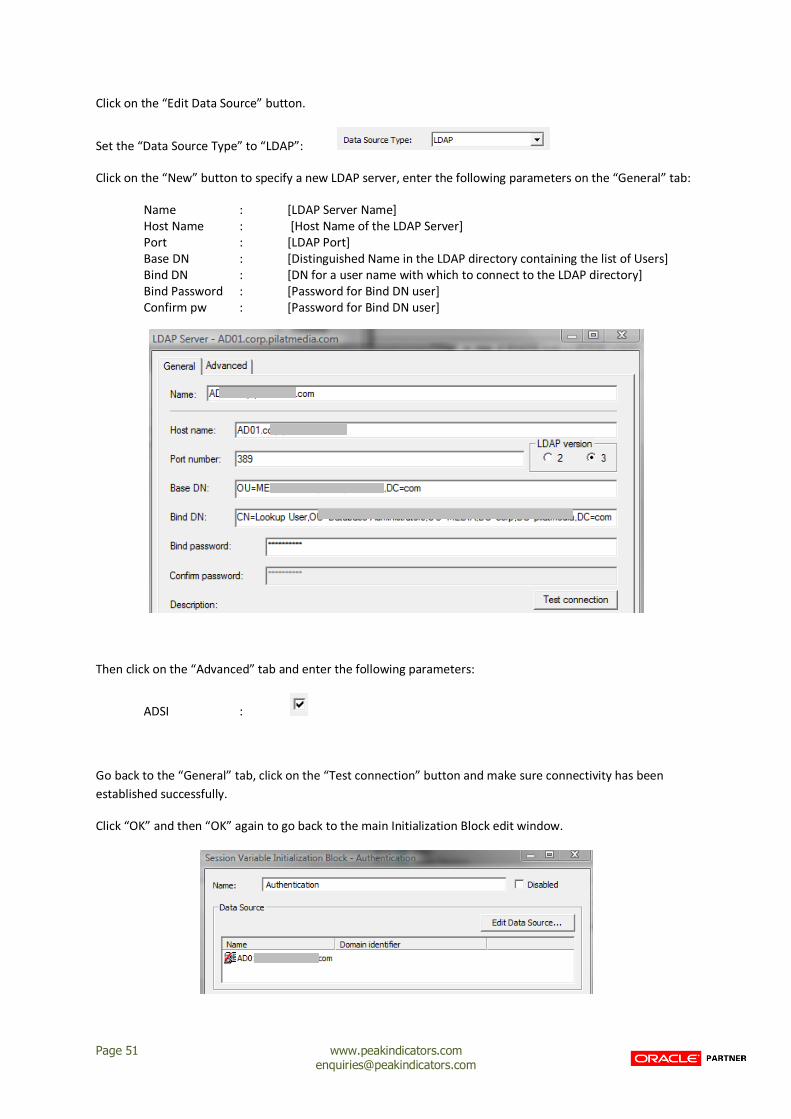
Click on the “Edit Data Source” button.
Set the “Data Source Type” to “LDAP”:
Click on the “New” button to specify a new LDAP server, enter the following parameters on the “General” tab:
Name : [LDAP Server Name]
Host Name : [Host Name of the LDAP Server]
Port : [LDAP Port]
Base DN : [Distinguished Name in the LDAP directory containing the list of Users]
Bind DN : [DN for a user name with which to connect to the LDAP directory]
Bind Password : [Password for Bind DN user]
Confirm pw : [Password for Bind DN user]
Then click on the “Advanced” tab and enter the following parameters:
ADSI :
Go back to the “General” tab, click on the “Test connection” button and make sure connectivity has been
established successfully.
Click “OK” and then “OK” again to go back to the main Initialization Block edit window.

Page 52 www.peakindicators.com [email protected]
Now click the “Edit Data Target” button, and specify the following new Variables as targets (by clicking on the
“New” button for each one):
Variable LDAP variable
USER sAMAccountName
DISPLAYNAME cn
DN distinguishedName
Click “OK” to go back to the main Initialization Block edit window:
Test for successful configuration by clicking the “Test” button and specifying “Use Bind Parameters”:
You should see each of the three above variables have been populated.
Click on “OK” and then “OK” again to exit the Initialization Block edit window.
Save the BI Repository (<CTRL> + S).
Page 53 www.peakindicators.com [email protected]
ENABLE AUTHORIZATION WITH ACTIVE DIRECTORY
Oracle BI EE cannot actually integrate directly with LDAP / Active Directory to automatically obtain the
“groups” associated to a user.
We will actually create a database PL/SQL Function that utilises the DBMS_LDAP package to perform the
Active Directory lookup process.
A new “Initialization Block” within the BI Repository will then be created to call this PL/SQL Function and assign
the results to the “GROUP” session variable.
There are two steps to this task:
3) Create GETLDAPGROUPS PL/SQL Function
Open up the supplied “AD_Authorization.sql” file for editing.
At the top, modify the top 4 parameters to suit your implementation:
l_ldap_host : [LDAP hostname]
l_ldap_port : [LDAP port]
l_ldap_user : [Username with which to connect up to the LDAP Server]
l_ldap_passwd : [Password for the lookup username]
For example:
-- Adjust as necessary.
l_ldap_host VARCHAR2(256) := 'your.ldap.server.com';
l_ldap_port VARCHAR2(256) := '389';
l_ldap_user VARCHAR2(256) := 'MEDIA\Lookup User';
l_ldap_passwd VARCHAR2(256) := 'xyz123';
Save the file.
Log on to the Data-Warehouse as the “biee” user and then execute the “AD_Authorization.sql” file to create
the PL/SQL Function:
sqlplus biee/[biee pw]@[dw]
@AD_Authorization.sql
NOTE:
The PL/SQL Function contains a hard-coded username and password. If you wish to hide this then you can
“wrap” the PL/SQL Function so that the contents are encrypted. Please refer to the Oracle Database
documentation on how to do this.
Page 54 www.peakindicators.com [email protected]
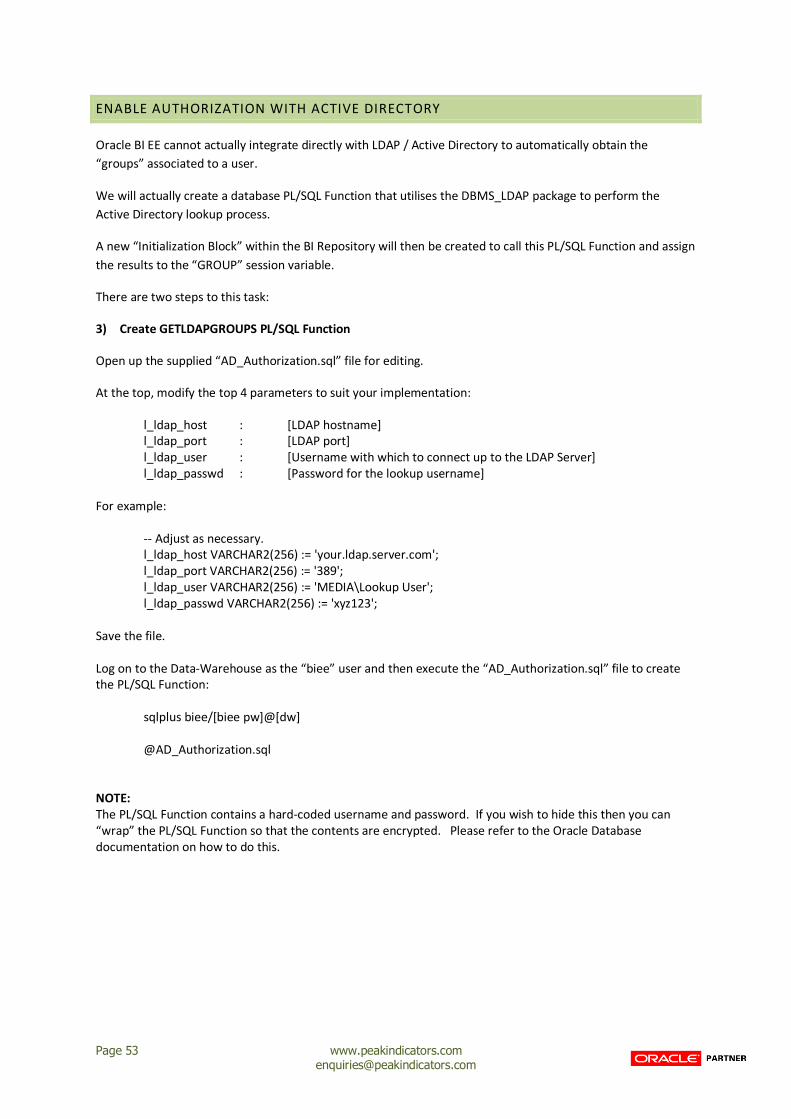
4) Create “Authorization” Initialization Block
Open up the BI Repository and choose the menu option “Manage � Variables”.
On the left-hand side of the Variable Manager window, click on “Session � Initialization Blocks”:
Then on the right-hand side, right-mouse click and choose “New Initialization Block”:
A new window should appear for the new Initialization Block. Specify the following parameters:
Name : Authorization
Click on the “Edit Data Source” button and configure as follows:
Data Source Type : Database
Default Init String : select GETLDAPGROUPS('VALUEOF(NQ_SESSION.DN)') from dual
Connection Pool : [Any connection pool with access to the BI EE schema]
Page 55 www.peakindicators.com [email protected]
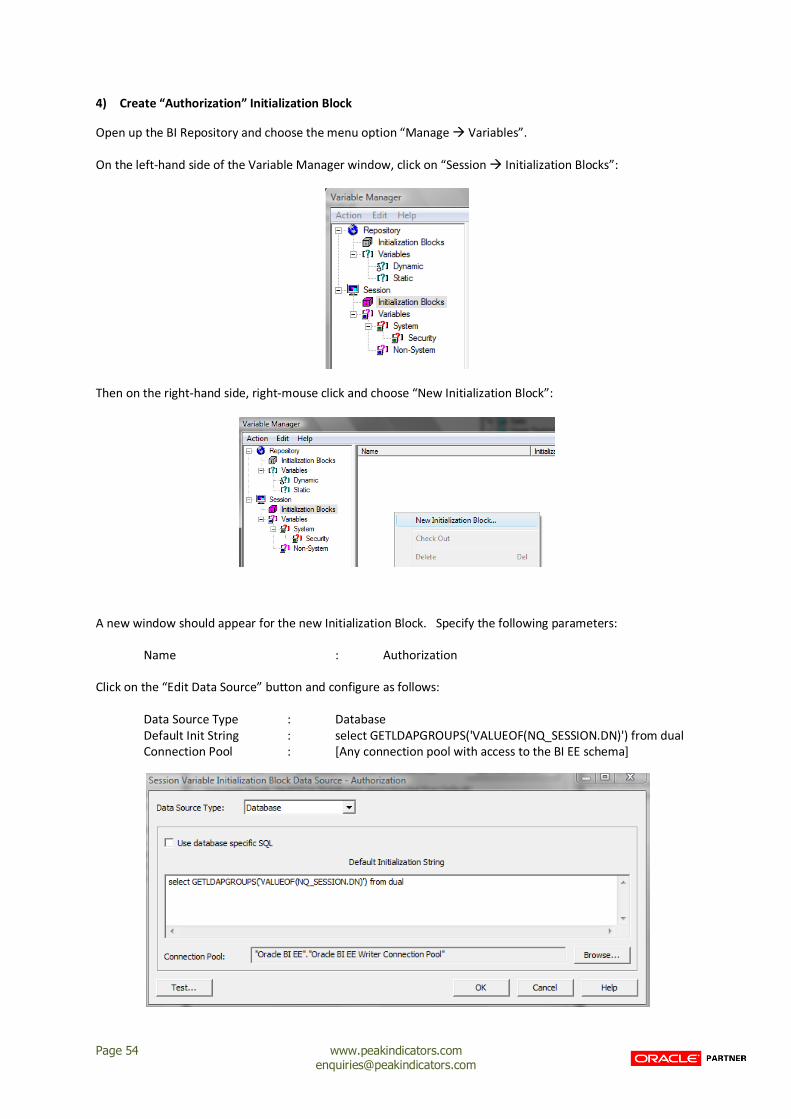
Click on “OK” to go back to the main Initialization Block edit window and click on the “Edit Data Target” button.
Define a single target Variable called “GROUP”:
Click on “OK”, then click the “Edit Execution Precedence” button.
Click “Add” and the choose the “Authentication” Initialization Block:
Click on “OK” and then “OK” again to exit the Initialization Block edit window.
Save the Repository (<CTRL> + S).
INSTALL COMPLETE
You can now test by logging on to http://[BI HOST]:[BI PORT]/analytics
Recommended