EPOXY BOND INSTALLATION
UST TANK COLLAR INSTALLATION
BUNG ADAPTOR AND MANWAY INSTALLATION
SUMP BASE WITH BOTTOM
PC48 SERIES TANK PIPING SUMP
INSTALLATION INSTRUCTIONS
APPLY DUCT
TAPE TO
EXTERIOR SIDE
OF SEAM TO
PREVENT ANY
EPOXY FROM
ESCAPING UNTIL
CURED.
UST COLLAR
Sand and wipe clean with
Acetone the
tapered area for epoxy seam
UNDERGROUND STORAGE TANK
APPLY
PRE-MEASURED
EPOXY BONDING
KIT PER IT'S
LABELED
INSTRUCTIONS
FIGURE 3
EPOXY
UNDERGROUND STORAGE TANK
FIGURE 2
UST COLLAR
LOWER BASE OVER TAPER OF UST
COLLAR MAKING SURE IT IS LEVEL
AND PLUMB
Sand and wipe clean with
Acetone the
interior side of
sump base where base joins collar.
FIGURE 1
CENTER OF BASE
IMPORTANT: Please read all warnings and follow the installation instructions completely and carefully. Failure to do so
may cause product failure, or result in environmental contamination, creating hazardous spill conditions.
WARNING - DANGER: Using electrically-operated equipment near gasoline or gasoline vapors may result in fire or
explosion, causing personal injury and property damage. Be sure that the working area is free from such hazards, and always use proper
precautions.
STEP 1 BUNG ADAPTOR AND OR MANWAY INSTALLATIONS
IF MOUNTING TO A UST FIBERGLASS COLLAR SKIP STEP 1
AND GO TO STEP 2.
For bung adaptor mounting flanges or manway style installations,
locate center indication mark in base for proper alignment of template.
(See Figure 1) After holes are drilled, sand surrounding areas with a
minimum of 40 grit or coarser sandpaper or grinder. Clean all sanded
surfaces with Acetone to remove any debris, oils, mold waxes or
release agents. Apply a generous bead of Bostik 920 adhesive to the
exterior side of the sump, all around the hole pattern. Mount sump
and tighten nuts using a star pattern to ensure an even seal. Backfill
the void between the tank top and the bottom of the sump base with
clean fill or pea rock making sure there are no voids left.
(Go to Step 5)
STEP 2 UST FIBERGLASS COLLAR INSTALLATIONS USING
EPOXY BONDING KIT
IF USING FIBERGLASS BONDING KIT SKIP STEP 2 AND GO TO
STEP 4
If your sump base came from the factory with the bottom already
removed you are ready to start. If your base came from the factory
with a bottom in it, first remove the bottom by measuring up 3
4' from
the bottom of the sump base and cut sidewalls at this point to remove the bottom.
Sand the entire interior section of sump base where it will be joined to the UST collar and the exterior side of the UST collar on the
tapered area with a minimum of 40 grit or coarser sandpaper or
grinder. After sanding all of these areas wipe them with a clean rag
using Acetone to remove all debris, oils, mold waxes or release
agents. (Refer to Figure 2)
Carefully lower the sump base over the UST collar making sure that it
is level. Seal exterior side of sump at joining surfaces with duct tape
to prevent epoxy from escaping during the pouring process. Mix and
pour epoxy per it's labeled instructions between the tapered portion of
the UST collar and the sump base. (Refer to Figure 3). Allow epoxy
to set until it is completely hard before proceeding.
STEP 3 EPOXY BONDING KIT
EP RET LC MNO T NIA EN I
,T
MUN .C
PC48 SERIES TANK PIPING SUMP INSTALLATION INSTRUCTIONS
EP RET LC MNO T NIA EN I
,T
MUN .C
UNDERGROUND STORAGE TANK
FIGURE 6
FIGURE 5
FIGURE 7
TRANSITIONAL CANOPY INSTALLATION
FIBERGLASS BOND INSTALLATION
APPLY 3-LAYERS OF
SUPPLIED FIBERGLASS
MAT WITH RESIN
(1-LAYER AT A TIME) THEN TOP COAT WITH
SUPPLIED GELCOAT.
UNDERGROUND STORAGE TANK
FIGURE 4
UST COLLAR
UNDERGROUND STORAGE TANK
UST COLLAR
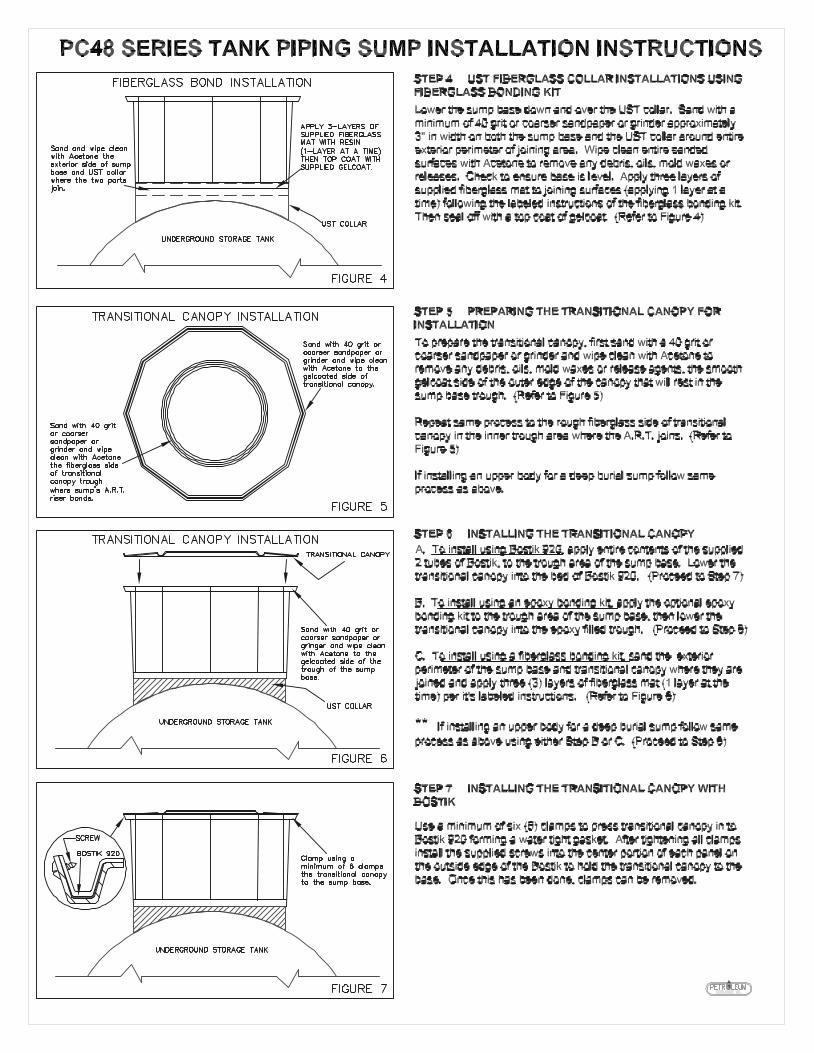
STEP 4 UST FIBERGLASS COLLAR INSTALLATIONS USING
FIBERGLASS BONDING KIT
Lower the sump base down and over the UST collar. Sand with a
minimum of 40 grit or coarser sandpaper or grinder approximately
3" in width on both the sump base and the UST collar around entire
exterior perimeter of joining area. Wipe clean entire sanded
surfaces with Acetone to remove any debris, oils, mold waxes or
releases. Check to ensure base is level. Apply three layers of
supplied fiberglass mat to joining surfaces (applying 1 layer at a
time) following the labeled instructions of the fiberglass bonding kit.
Then seal off with a top coat of gelcoat. (Refer to Figure 4)
Sand and wipe clean with Acetone the
exterior side of sump base and UST collar
where the two parts join.
STEP 5 PREPARING THE TRANSITIONAL CANOPY FOR
INSTALLATION
To prepare the transitional canopy, first sand with a 40 grit or
coarser sandpaper or grinder and wipe clean with Acetone to
remove any debris, oils, mold waxes or release agents, the smooth
gelcoat side of the outer edge of the canopy that will rest in the
sump base trough. (Refer to Figure 5)
Repeat same process to the rough fiberglass side of transitional
canopy in the inner trough area where the A.R.T. joins. (Refer to
Figure 5)
If installing an upper body for a deep burial sump follow same
process as above.
Sand with 40 grit or coarser sandpaper or grinder and wipe clean with Acetone to the
gelcoated side of transitional canopy.
Sand with 40 grit or coarser
sandpaper or grinder and wipe clean with Acetone
the fiberglass side of transitional
canopy trough
where sump's A.R.T. riser bonds.
Sand with 40 grit or coarser sandpaper or gringer and wipe clean with Acetone to the
gelcoated side of the trough of the sump base.
TRANSITIONAL CANOPY INSTALLATION
TRANSITIONAL CANOPY
STEP 6 INSTALLING THE TRANSITIONAL CANOPY
A. To install using Bostik 920, apply entire contents of the supplied
2 tubes of Bostik, to the trough area of the sump base. Lower the
transitional canopy into the bed of Bostik 920. (Proceed to Step 7)
B. To install using an epoxy bonding kit, apply the optional epoxy
bonding kit to the trough area of the sump base, then lower the
transitional canopy into the epoxy filled trough. (Proceed to Step 8)
C. To install using a fiberglass bonding kit, sand the exterior
perimeter of the sump base and transitional canopy where they are
joined and apply three (3) layers of fiberglass mat (1 layer at the
time) per it's labeled instructions. (Refer to Figure 8)
** If installing an upper body for a deep burial sump follow same
process as above using either Step B or C. (Proceed to Step 8)
STEP 7 INSTALLING THE TRANSITIONAL CANOPY WITH
BOSTIK
Use a minimum of six (6) clamps to press transitional canopy in to
Bostik 920 forming a water tight gasket. After tightening all clamps
install the supplied screws into the center portion of each panel on
the outside edge of the Bostik to hold the transitional canopy to the
base. Once this has been done, clamps can be removed.
Clamp using a minimum of 6 clamps the transitional canopy to the sump base.
SCREW
BOSTIK 920

UNDERGROUND STORAGE TANK
UNDERGROUND STORAGE TANK
FIGURE 9
EPOXY BONDING KIT
Sand with 40 grit or coarser
sandpaper or
grinder, then wipe clean with Acetone
to rebove any debris, oils, mold waxes or releases.
Fill trough with
epoxy per it's labeled instructions
and lower A.R.T.
Riser into epoxy.
Take measurement
determined from final
grade and cut from bottom of A.R.T.
Riser. Sand and
wipe clean with Acetone bottom
interior and exterior
portion of A.R.T. Riser.
FIGURE 8
PC48 SERIES TANK PIPING SUMP INSTALLATION INSTRUCTIONS
FIGURE 10
To determine the proper height needed for the sump,
lower the A.R.T. Riser into the trough of the transitional
canopy. Use a string or transit to determine finished
grade. Sump with lid installed should be between 4" - 8"
lower than the finished grade. To determine how much of
the A.R.T. Riser to cut off to make it the correct height,
subtract the height of the sump with riser and lid from
your finished grade height. (Refer to Figure 8)
If installing a upper body for a deep burial sump, follow
the steps above for proper installation.
STEP 8 A.R.T. RISERS PREPERATION
String representing Finished Grade.
A.R.T. RISER WITH LID
STEP 9 PREPARING AND INSTALLING A.R.T. RISER
A. To cut your A.R.T. Riser to the correct height
needed for your installation take the measurement you
got when you subtracted the finished grade height from
the overall height of the sump and add 4" more to that. This will be the total measurement needed to remove
from the bottom fortion of the A.R.T. Riser. (Refer to
Figure 8 and 9)
B. After cutting A.R.T. Riser to correct height, sand the
bottom interior and exterior with 40 grit or coarser
sandpaper or grinder and wipe clean with Acetone to
remove any debris, oil, mold waxes or releases.
C. Sand and wipe clean with Acetone the trough area of
transitional canopy and fill with epoxy bonding kit per it's
labeled instructions and lower A.R.T. Riser into trough
with slight twisting motion.
D. If using fiberglass bonding kit apply three layers of
fiberglass mat (1 layer at the time) per it's labled
instructions. (Refer to Figure 9)
E. If using an upper body for deep burial sump follow
same procedures as above.
FIBERGLASS BONDING KIT
Lower cut A.R.T. Riser
into transitional canopy.
Apply three layers of
fiberglass mat (1 layer at a time) where parts join.
STEP 10 COMPLETE INSTALLATION
Warranty_____ PETROLEUM CONTAINMENT, INC., WARRANTS that the Fiberglass Tank Piping Sumps, if installed in accordance with PETROLEUM CONTAINMENT INC.'s published
instructions will meet PETROLEUM CONTAINMENT INC.'s published specifications and will be free from material defects and workmanship for a period of one (1) year following the date of original
delivery by PETROLEUM CONTAINMENT, provided the system is used exclusively for gasoline, ethanol,methanol, jet-fuel, av-gas, kerosene or motor oil at ambient underground temperature of
used for fueloil not to exceed 150 degrees farrenheit. PETROLEUM CONTAINMENT's liability under this warranty shall be limited to at our option: (a) deliver a replacement part to point of the
original delivery, (b) repair of the part by PETROLEUM CONTAINMENT: or a third party of our choice: or (c) refund the original purchase price to the original purchaser.
PETROLEUM CONTAINMENT shall in no way be liable for any labor, removal or installation cost, indirect or consequential damage in connection with such parts. The foregoing constitues
PETROLEUM CONTAINMENT, INC.'s exclusive obligation. PETROLEUM CONTAINMENT, INC. makes no expressed or implied warranties for merchantability or fitness for any particular purpose
whatsoever except as stated above.
Lid should be no
less than 2" and
no more than 6"
below the bottom
side of manhole
cover.
A. To complete installation check gasket area and
sealing surface to make sure it is clean and free from any
type of debris that could be an interference in the gasket
sealing properly.
B. Inspect the gasket to make sure there are no cuts,
tears or deformaties that would prevent proper sealing.
C. Apply a liberal amount of lithium grease or vasoline
lubricant to the gasket to ease opening and closing and to
prevent gasket from adhearing to fiberglass sealing surface.
D. Lower lid onto sump opening and twist slightly
clockwise until resistance is felt. Stop at this point as a
watertight seal has now been applied. Over tightening
will only make opening difficult.E. Fill out PCI Installation Checklist when finished and
return to PCI to register installation for warranty.
(Refer to Figure 10)
Amount to
remove from
bottom of A.R.T.
Riser
17.4557
48.4362
4" to 8"
Recommended