Oracle FLEXCUBE Direct Banking
Release 12.0.0
Android Application Based Mobile Banking
User Manual
Part No. E52305-01
Android Application Based Mobile Banking User Manual
Table of Contents
1. Transaction Host Integration Matrix ..................................................................................................... 4
2. Log In / Landing Screen ......................................................................................................................... 7
3. Menu Navigation ................................................................................................................................... 10
3.1. Navigating through Landing Screen ................................................................................................ 11
3.2. Navigating through Menu bar .......................................................................................................... 14
4. Logout .................................................................................................................................................... 16
5. Setting any Transaction as Favorite ................................................................................................... 18
6. Account Activity .................................................................................................................................... 23
7. Account Details ..................................................................................................................................... 30
8. Account Summary ................................................................................................................................ 36
9. Ad-hoc Statement ................................................................................................................................. 39
10. Stop Cheque ........................................................................................................................................ 45
11. My Cheques/Cheque Status Inquiry .................................................................................................. 51
12. New Cheque Book ............................................................................................................................... 56
13. Pay Bill ................................................................................................................................................. 62
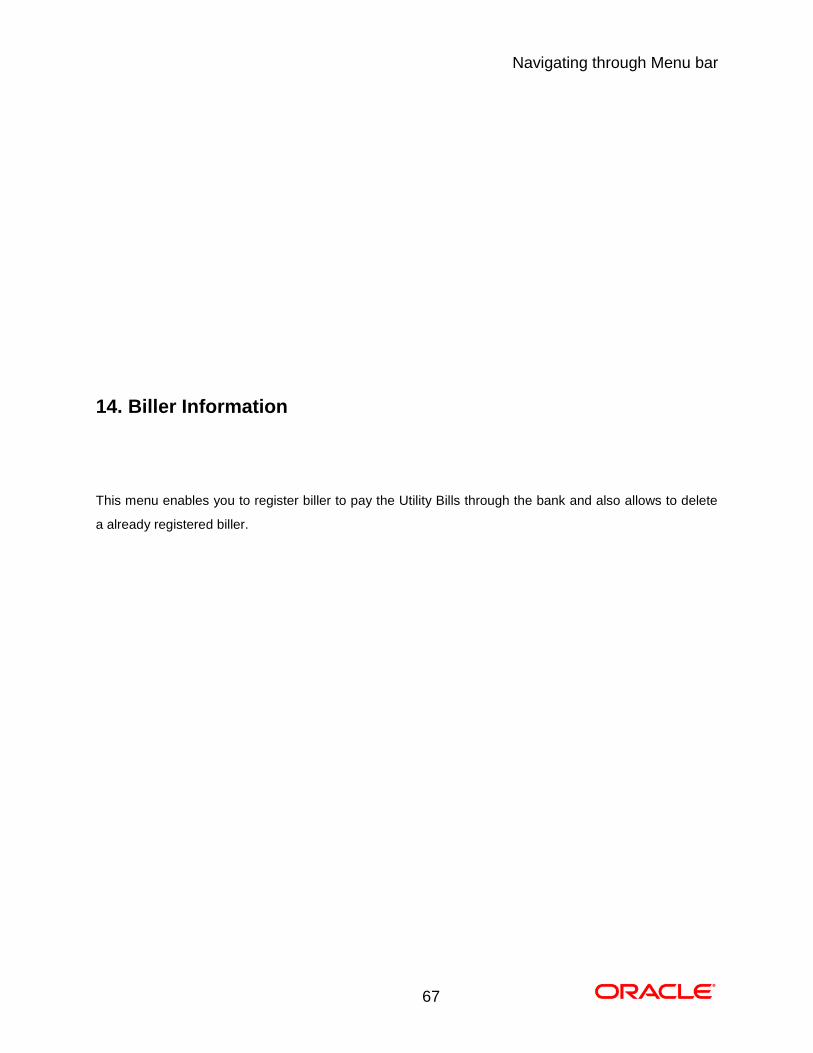
14. Biller Information ................................................................................................................................ 67
14.1. Register Biller ................................................................................................................................ 68
14.2. Delete Biller ................................................................................................................................... 73
15. Loan Details ......................................................................................................................................... 77
16. Islamic Financing ................................................................................................................................ 83
17. Forex Rate Inquiry ............................................................................................................................... 90
18. Own Account Transfer ........................................................................................................................ 95
19. Internal Transfer ................................................................................................................................ 103
20. Domestic Payment ............................................................................................................................ 111
21. Deposit Redemption ......................................................................................................................... 119
22. Pending Authorization ...................................................................................................................... 126
23. Mailbox/Notifications ........................................................................................................................ 133
23.1. Compose Message ...................................................................................................................... 134
23.2. Interactions .................................................................................................................................. 138
23.3. Bulletins ....................................................................................................................................... 141
23.4. Alerts/Tasks ................................................................................................................................. 144
23.5. Sent Messages ............................................................................................................................ 147
23.6. Service Request .......................................................................................................................... 150
Mobile Banking Android Application Based User Manual
2 3
24. Reminders .......................................................................................................................................... 153
24.1. Register Reminder ....................................................................................................................... 154
24.2. View Reminder ............................................................................................................................ 160
25. Credit Card Details ............................................................................................................................ 163
26. Credit Card Statement ...................................................................................................................... 170
27. Change Password ............................................................................................................................. 175
28. Deposit Details .................................................................................................................................. 181
29. Contract Deposits ............................................................................................................................. 187
30. Force Change Password .................................................................................................................. 194
31. Buy Funds .......................................................................................................................................... 200
32. Redeem Funds .................................................................................................................................. 210
33. Portfolio ............................................................................................................................................. 219
34. Switch Funds ..................................................................................................................................... 225
35. Order Status ...................................................................................................................................... 236
36. Transaction Password Behavior ..................................................................................................... 240
37. ATM Branch Locator ......................................................................................................................... 246
38. Help..................................................................................................................................................... 251
39. Offers .................................................................................................................................................. 254
40. Live Help/Call ..................................................................................................................................... 257
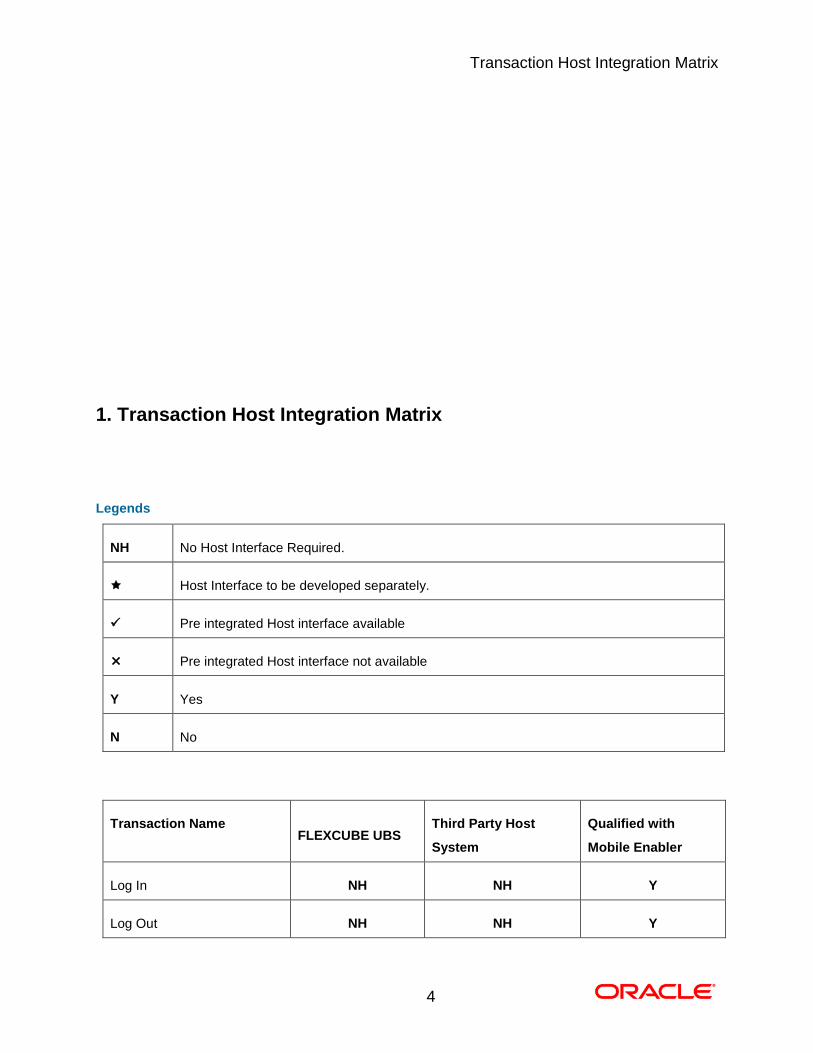
Transaction Host Integration Matrix
4
1. Transaction Host Integration Matrix
Legends
NH No Host Interface Required.
Host Interface to be developed separately.
Pre integrated Host interface available
Pre integrated Host interface not available
Y Yes
N No
Transaction Name FLEXCUBE UBS
Third Party Host
System
Qualified with
Mobile Enabler
Log In NH NH Y
Log Out NH NH Y
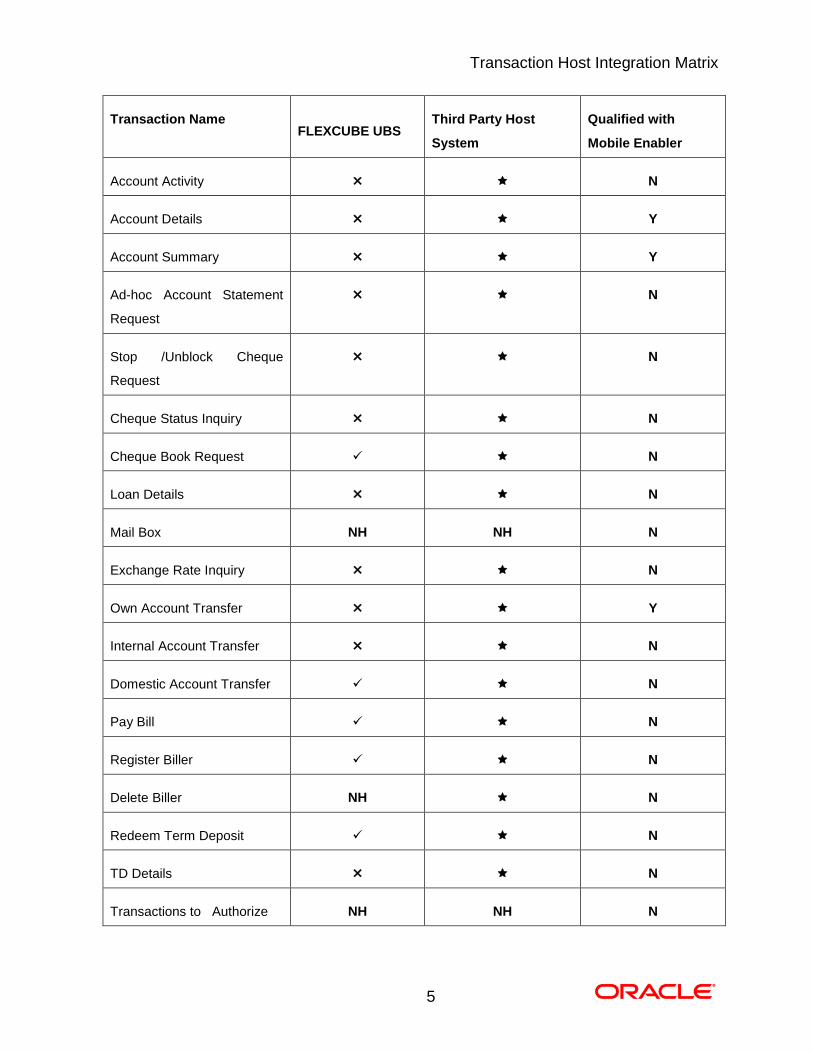
Transaction Host Integration Matrix
5
Transaction Name FLEXCUBE UBS
Third Party Host
System
Qualified with
Mobile Enabler
Account Activity N
Account Details Y
Account Summary Y
Ad-hoc Account Statement
Request
N
Stop /Unblock Cheque
Request
N
Cheque Status Inquiry N
Cheque Book Request N
Loan Details N
Mail Box NH NH N
Exchange Rate Inquiry N
Own Account Transfer Y
Internal Account Transfer N
Domestic Account Transfer N
Pay Bill N
Register Biller N
Delete Biller NH N
Redeem Term Deposit N
TD Details N
Transactions to Authorize NH NH N

Transaction Host Integration Matrix
6
Transaction Name FLEXCUBE UBS
Third Party Host
System
Qualified with
Mobile Enabler
Change Password NH NH Y
Credit Card Details N
Credit Card Statement N
Force Change Password NH NH Y
Contract TD View N
Buy Mutual Fund N
Redeem Mutual Fund N
Portfolio N
Switch Mutual Fund N
Order Status N
Transaction Password
Behavior
NH Y
ATM / Branch Locator NH N
Financing Details N
Log In / Landing Screen
7
2. Log In / Landing Screen
This option allows you to perform the transaction through Oracle FLEXCUBE Direct Banking system
using the Android application based mobile.
To login into the Android application based Mobile Banking
1. Click the appropriate application icon provided for Android application based mobile banking. The system
displays Login Screen.

Log In / Landing Screen
8
Login
2. Enter the user id and password provided to login.
3. Click the icon. The system displays Account Overview screen.
Log In / Landing Screen
9
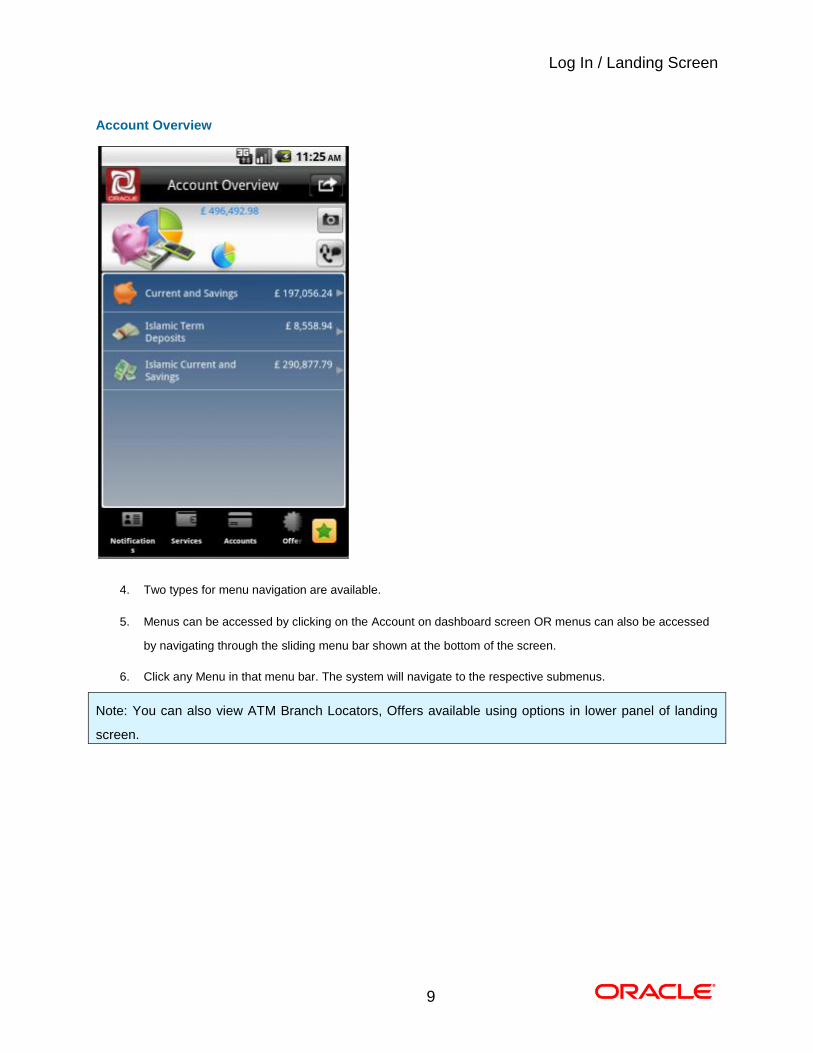
Account Overview
4. Two types for menu navigation are available.
5. Menus can be accessed by clicking on the Account on dashboard screen OR menus can also be accessed
by navigating through the sliding menu bar shown at the bottom of the screen.
6. Click any Menu in that menu bar. The system will navigate to the respective submenus. 0.
Note: You can also view ATM Branch Locators, Offers available using options in lower panel of landing
screen.
Menu Navigation
10
3. Menu Navigation
This section explains the ways by which you can navigate through menus for any transaction. Own
Account Transfer transaction has been explained below for both the navigations.
Note: All the Transactions cannot be accessed through both the navigations. Transactions like Internal
Transfer, Ad hoc Statement etc are provided with both the navigations. Transactions like Account Activity,
Account Details etc can be accessed through Landing Screen only.
Two Types of Navigations are available.
Navigating through Landing Screen
Navigating through Menu Bar
Menu Navigation
11
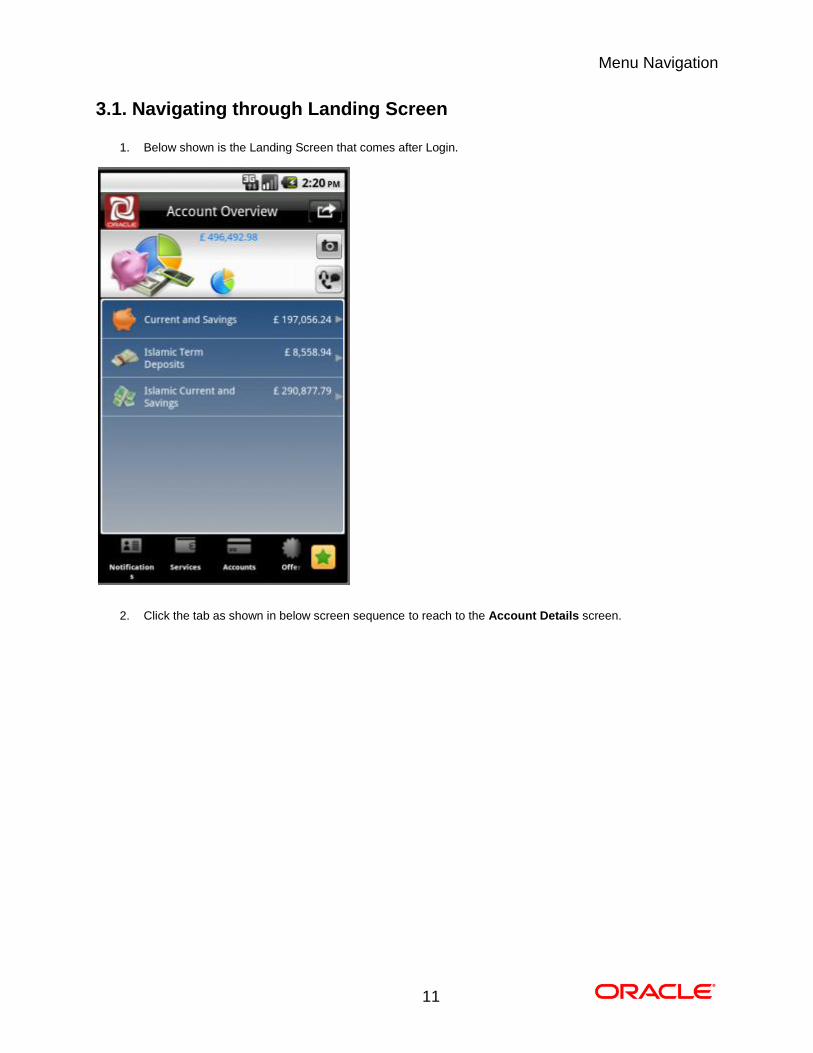
3.1. Navigating through Landing Screen
1. Below shown is the Landing Screen that comes after Login.
2. Click the tab as shown in below screen sequence to reach to the Account Details screen.
Menu Navigation
12
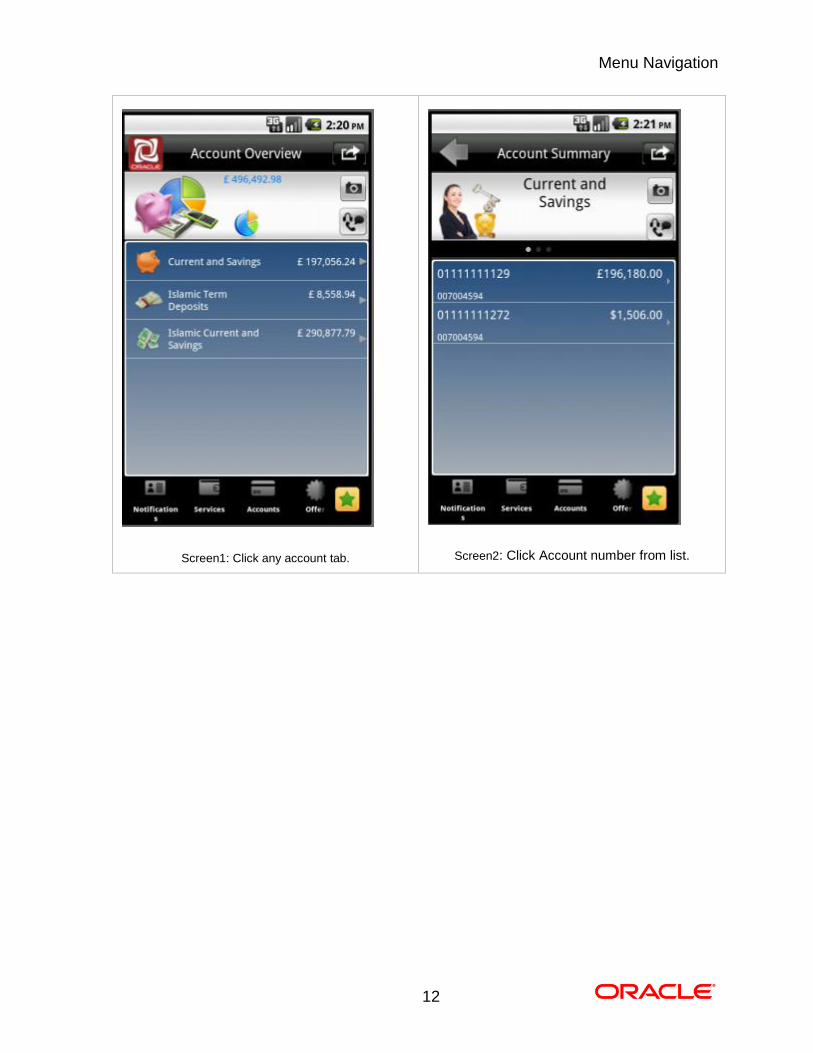
Screen1: Click any account tab.
Screen2: Click Account number from list.
Menu Navigation
13
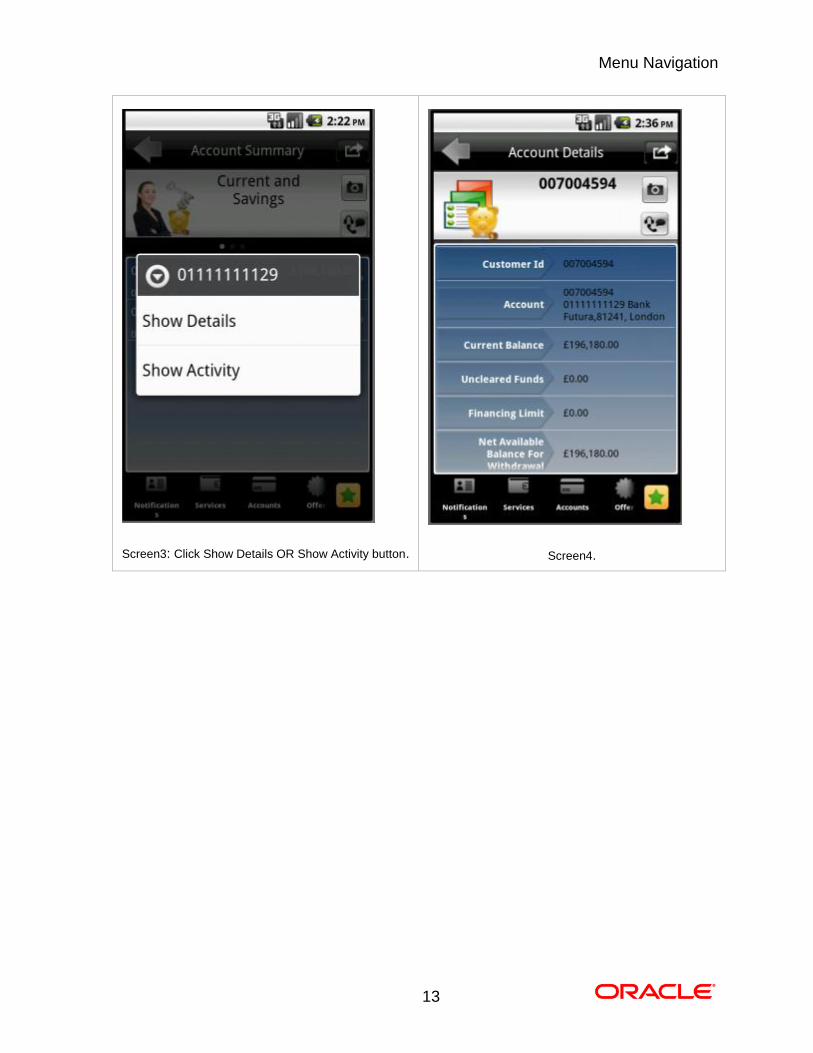
Screen3: Click Show Details OR Show Activity button.
Screen4.
Menu Navigation
14
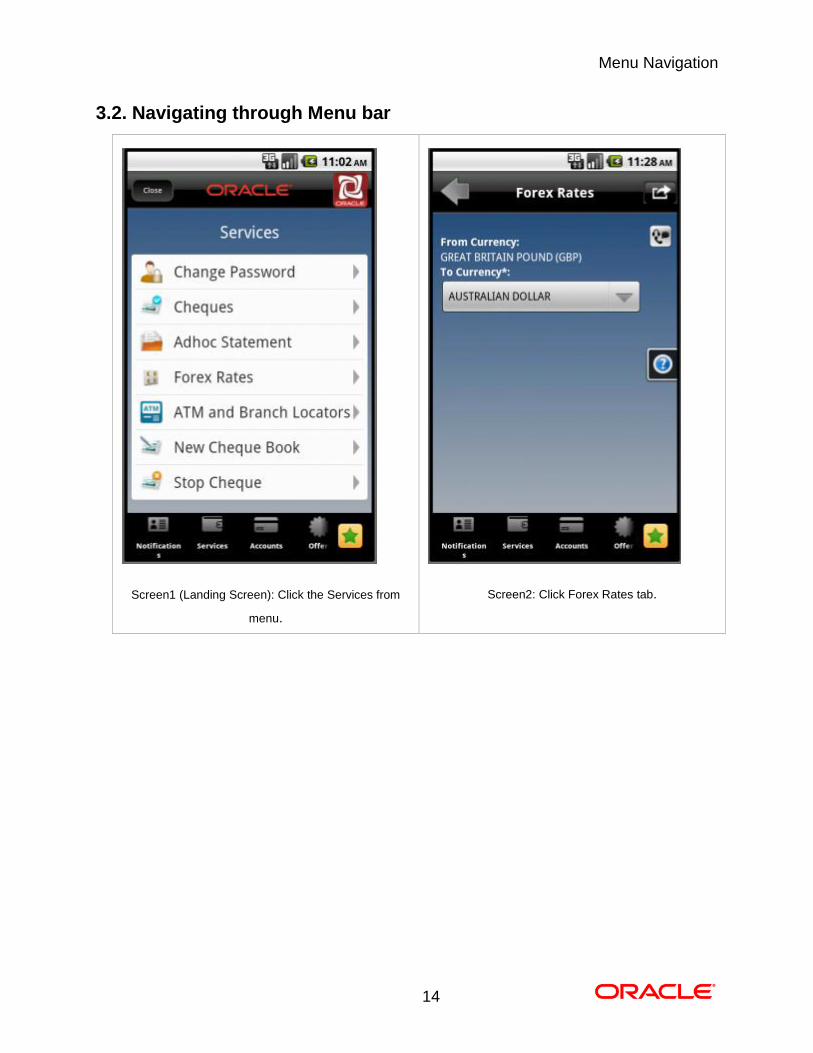
3.2. Navigating through Menu bar
Screen1 (Landing Screen): Click the Services from
menu.
Screen2: Click Forex Rates tab.

Menu Navigation
15
Screen3: Forex rates Details
Logout
16
4. Logout
This option enables you to log off the application.
To log out of the Android application based Mobile Banking
1. Log on to the application based Mobile Banking application.
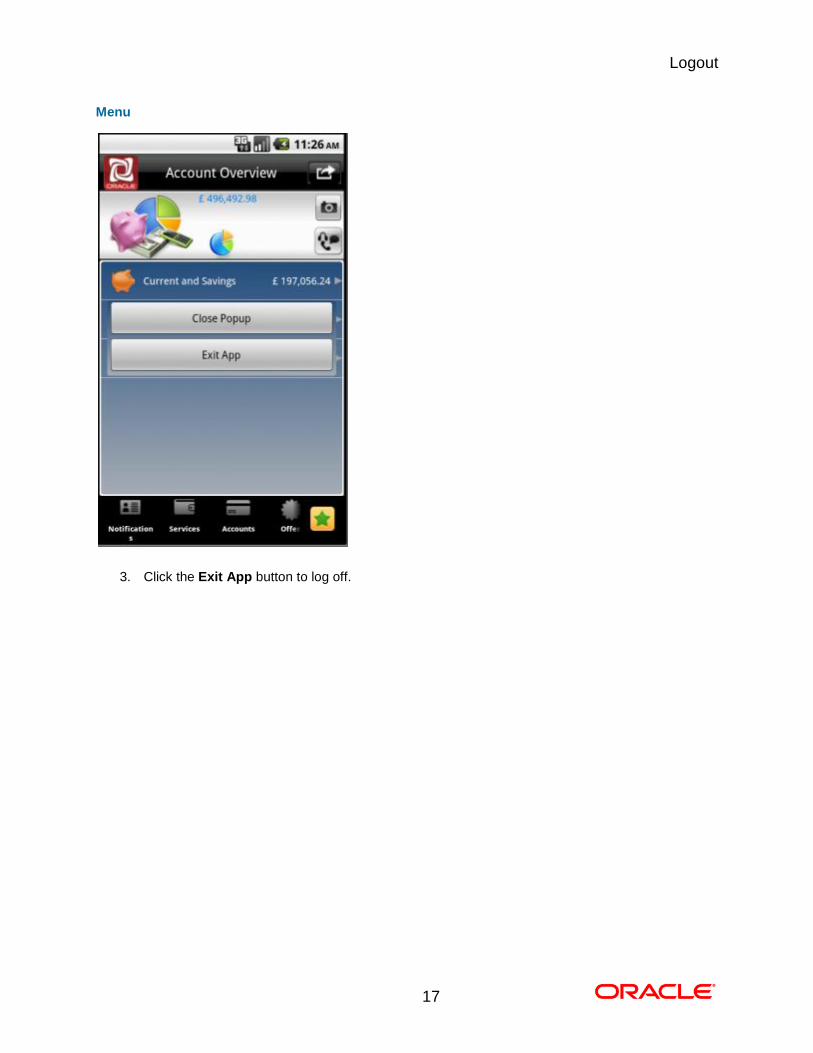
2. Click the button at the upper right corner of the screen.
Logout
17
Menu
3. Click the Exit App button to log off.
Setting any Transaction as Favorite
18
5. Setting any Transaction as Favorite
This option enables you to set any transaction as Favorite. That transaction will be available under the
Favorites tab for direct access without navigating through Menu and submenus.
To set any transaction as Favorite
Setting any Transaction as Favorite
19
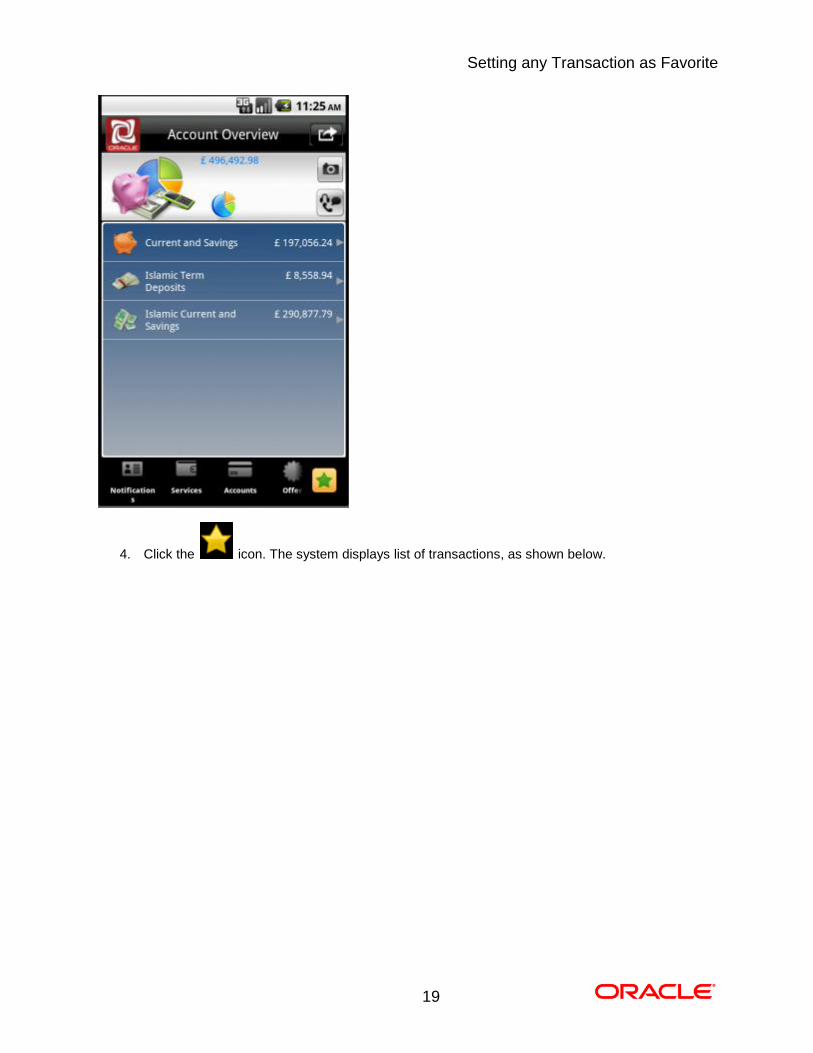
4. Click the icon. The system displays list of transactions, as shown below.
Setting any Transaction as Favorite
20
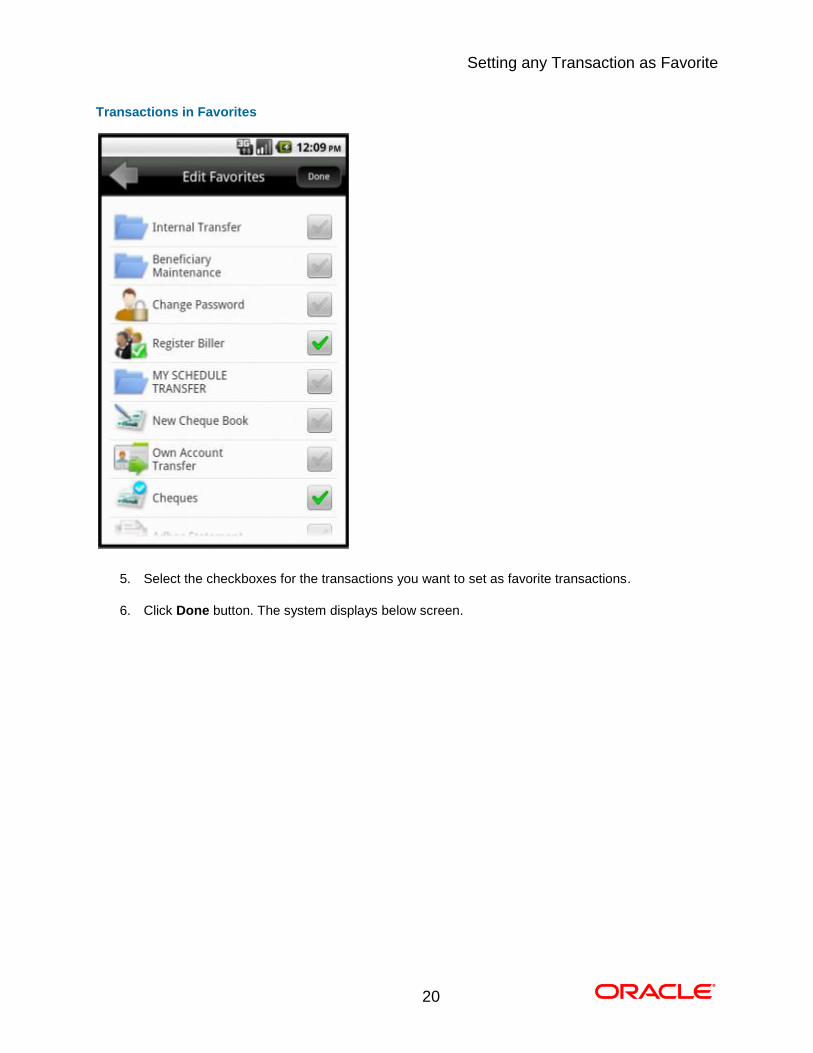
Transactions in Favorites
5. Select the checkboxes for the transactions you want to set as favorite transactions.
6. Click Done button. The system displays below screen.
Setting any Transaction as Favorite
21
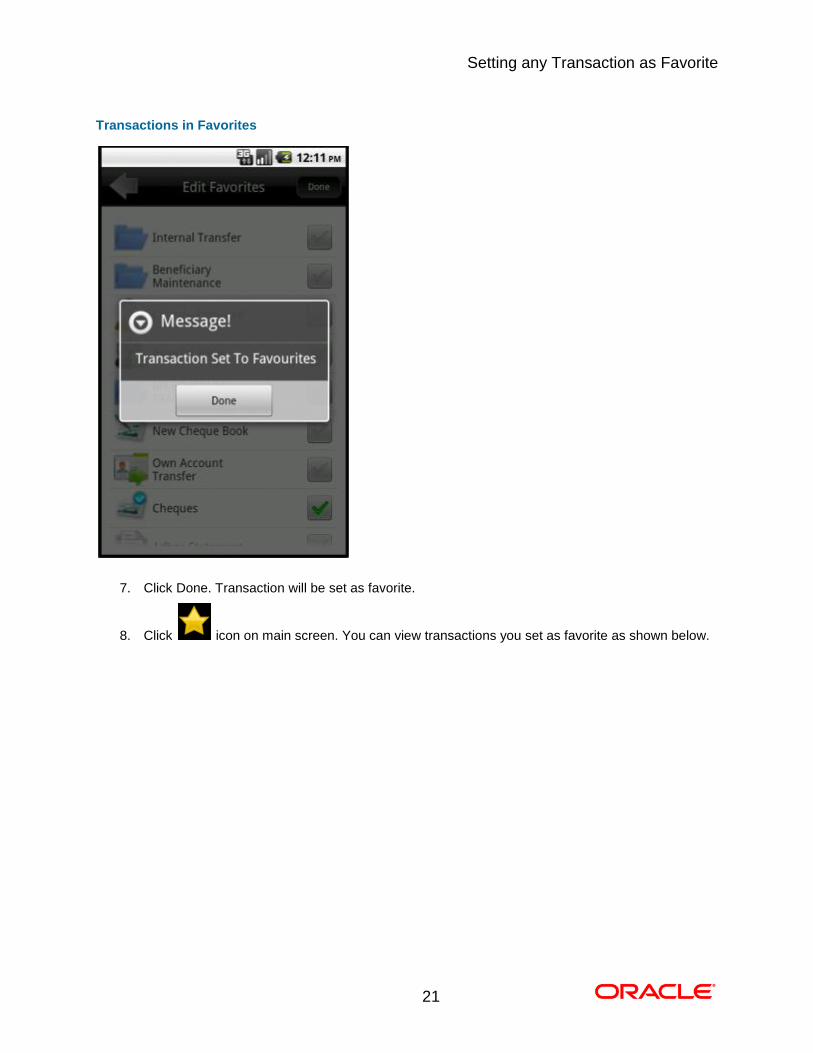
Transactions in Favorites
7. Click Done. Transaction will be set as favorite.
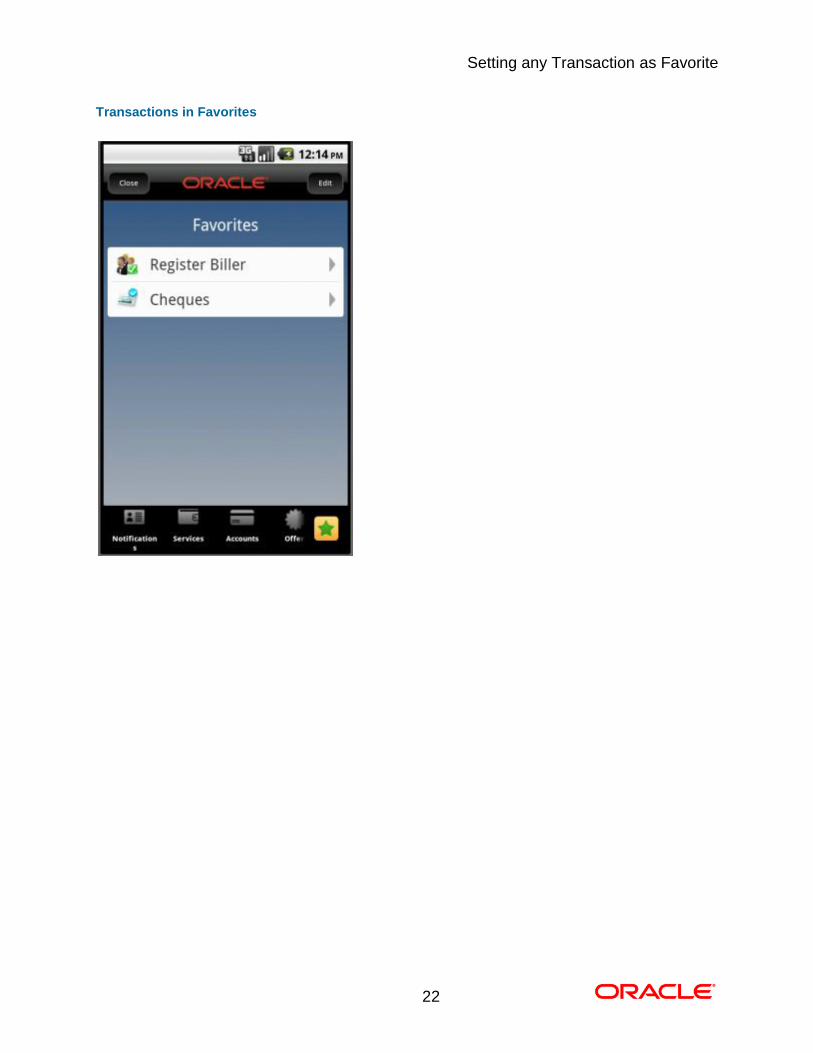
8. Click icon on main screen. You can view transactions you set as favorite as shown below.
0.
Setting any Transaction as Favorite
22
Transactions in Favorites
Account Activity
23
6. Account Activity
This option enables you to get the account activity details for a selected account and a specified period.
To view the account activity details
1. Log on to the Android application based Mobile Banking application. The system shows initial
landing screen Accounts Overview as shown below.
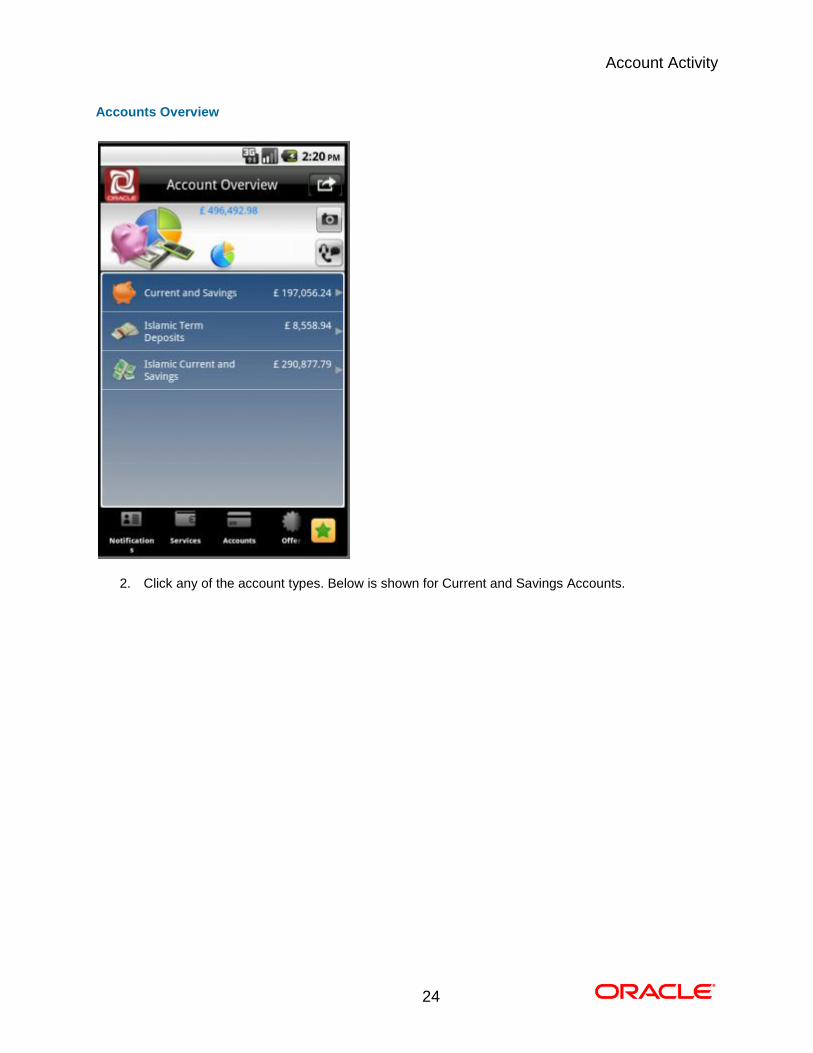
Account Activity
24
Accounts Overview
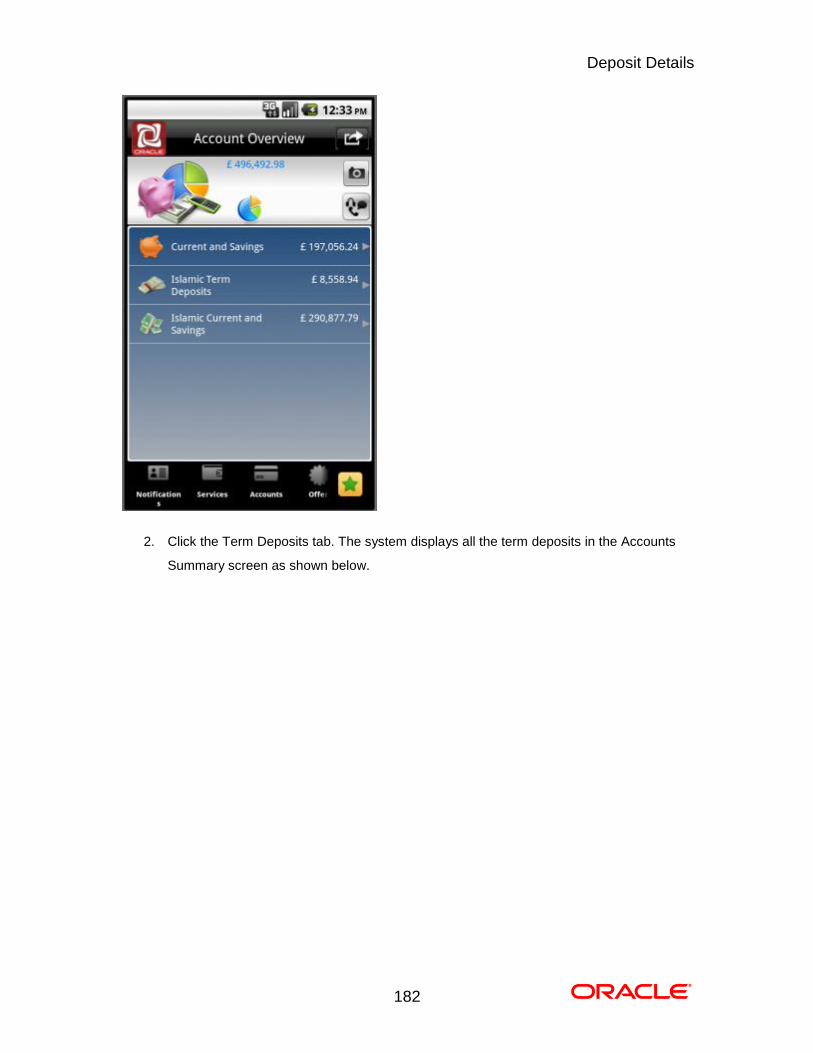
2. Click any of the account types. Below is shown for Current and Savings Accounts.
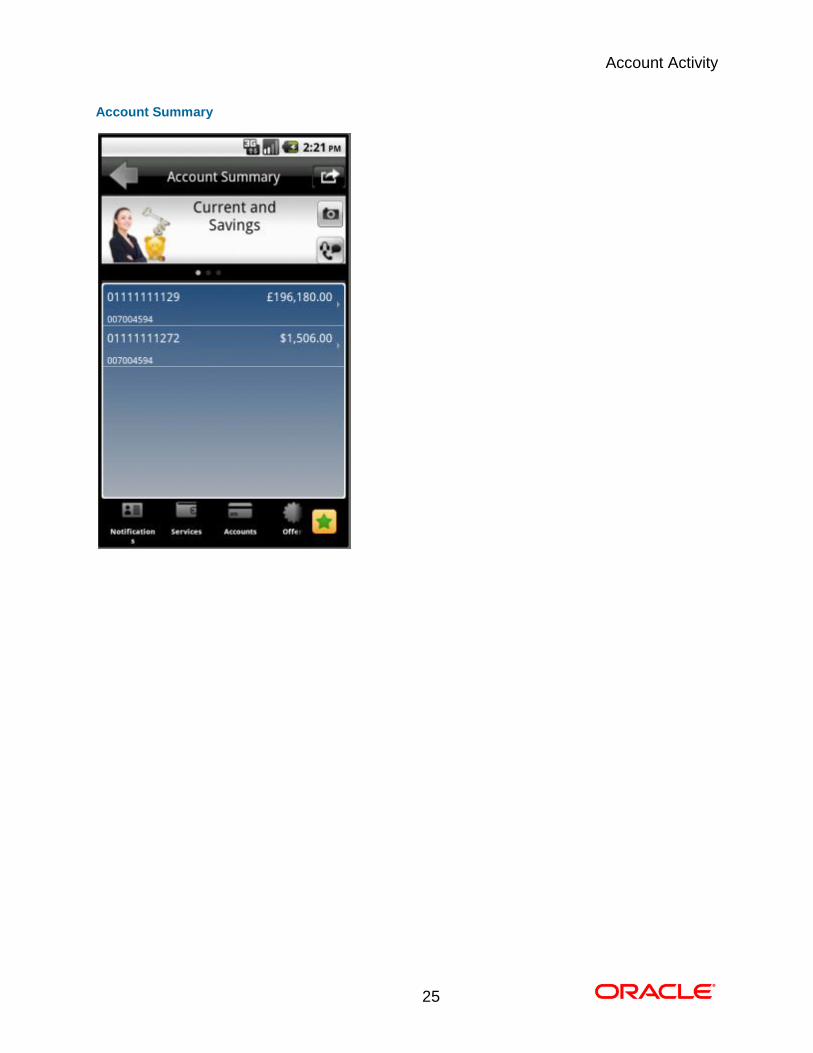
Account Activity
25
Account Summary
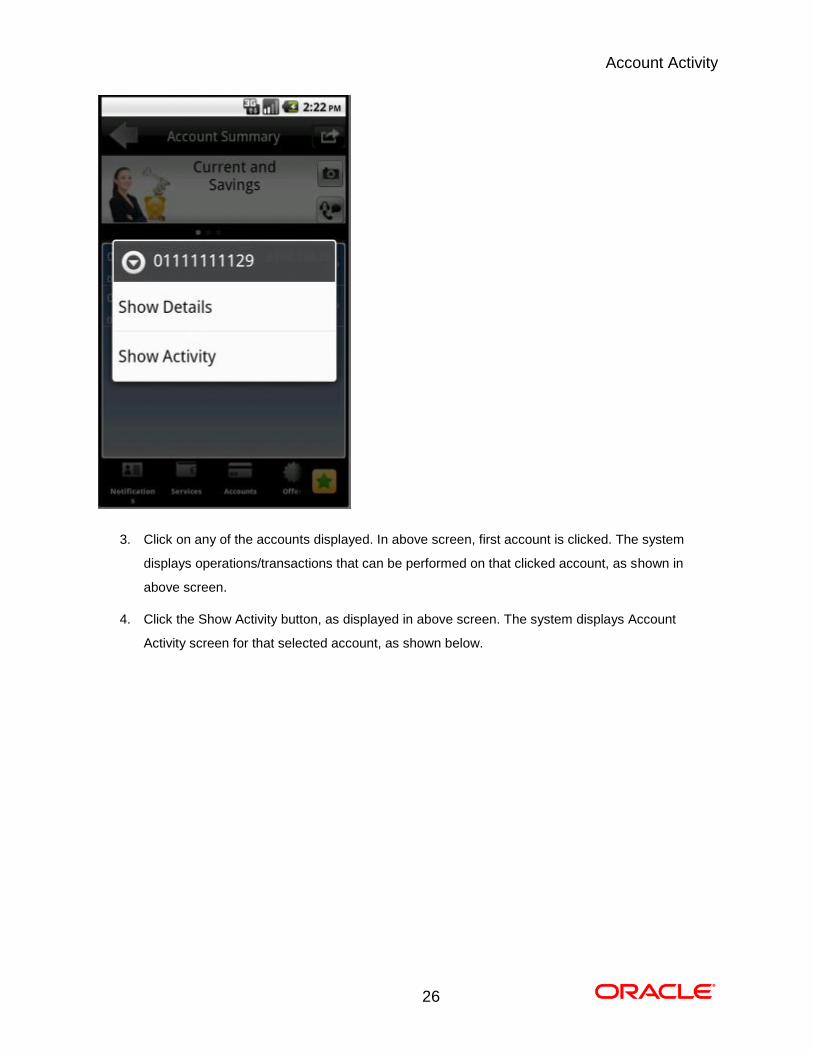
Account Activity
26
3. Click on any of the accounts displayed. In above screen, first account is clicked. The system
displays operations/transactions that can be performed on that clicked account, as shown in
above screen.
4. Click the Show Activity button, as displayed in above screen. The system displays Account
Activity screen for that selected account, as shown below.
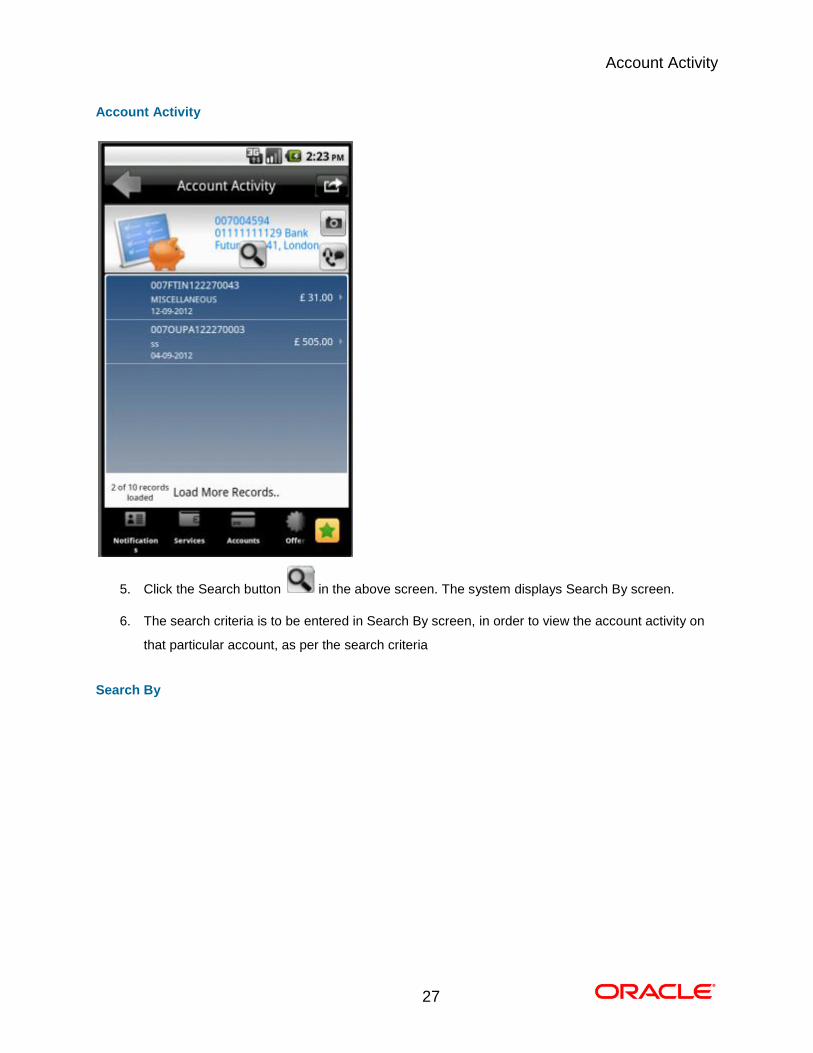
Account Activity
27
Account Activity
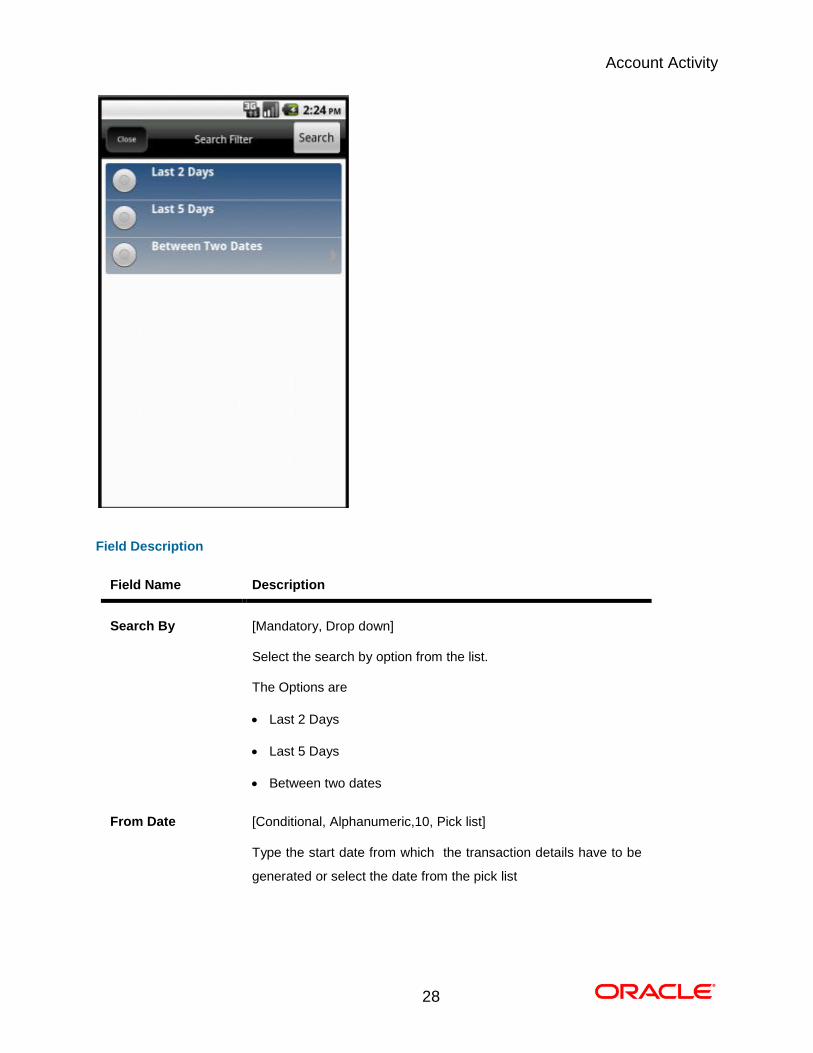
5. Click the Search button in the above screen. The system displays Search By screen.
6. The search criteria is to be entered in Search By screen, in order to view the account activity on
that particular account, as per the search criteria
Search By
Account Activity
28
Field Description
Field Name Description
Search By [Mandatory, Drop down]
Select the search by option from the list.
The Options are
Last 2 Days
Last 5 Days
Between two dates
From Date [Conditional, Alphanumeric,10, Pick list]
Type the start date from which the transaction details have to be
generated or select the date from the pick list
Account Activity
29
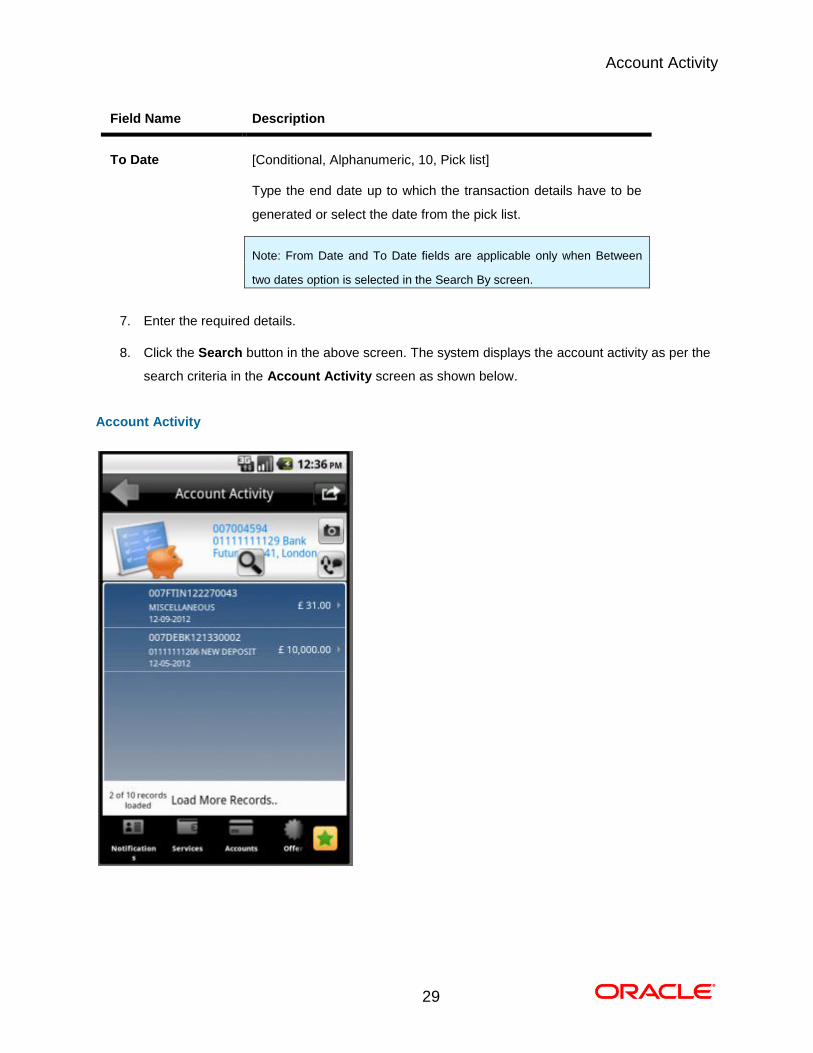
Field Name Description
To Date [Conditional, Alphanumeric, 10, Pick list]
Type the end date up to which the transaction details have to be
generated or select the date from the pick list.
Note: From Date and To Date fields are applicable only when Between
two dates option is selected in the Search By screen.
7. Enter the required details.
8. Click the Search button in the above screen. The system displays the account activity as per the
search criteria in the Account Activity screen as shown below. 0.
Account Activity
Account Details
30
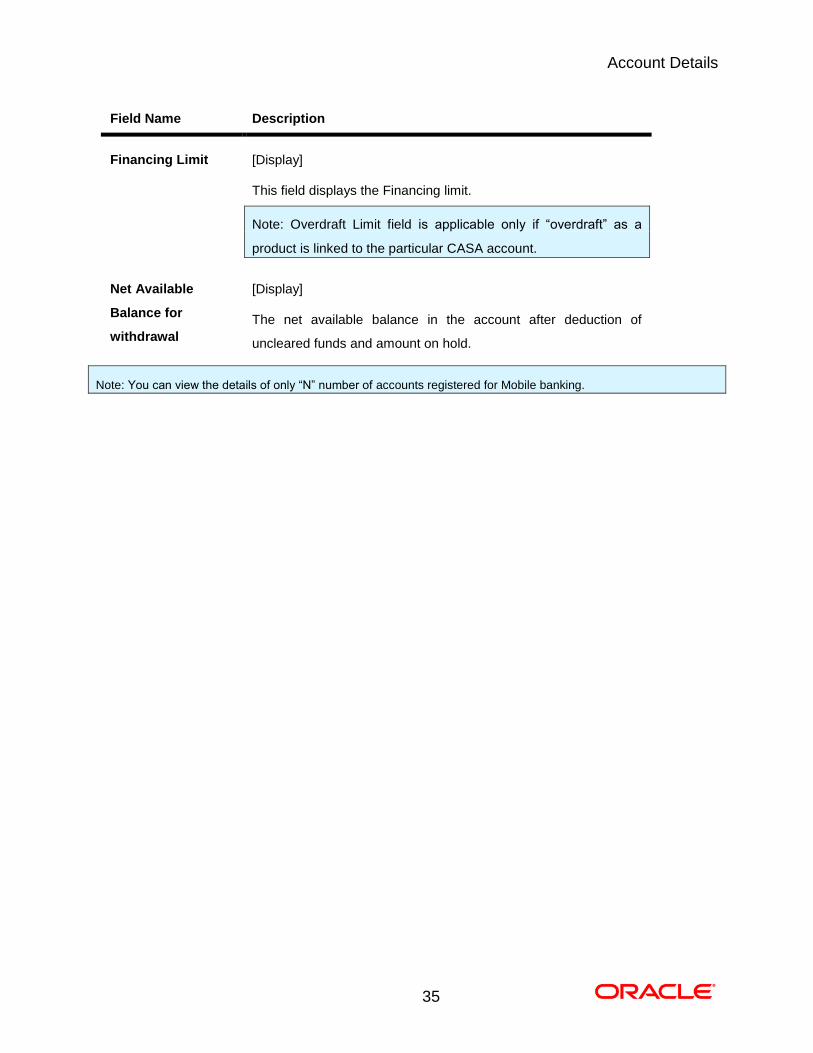
7. Account Details
This menu allows you to view the account details of the selected account.
To view the account details
1. Log on to the Android application based Mobile Banking application. The system shows initial
landing screen Accounts Overview as shown below.

Account Details
31
Accounts Overview
2. Click any of the account types. Below is shown for Current and Savings Accounts.

Account Details
32
Account Summary

Account Details
33
3. Click on any of the accounts displayed. In above screen, first account is clicked. The system
displays operations/transactions that can be performed on that clicked account, as shown in
above screen.
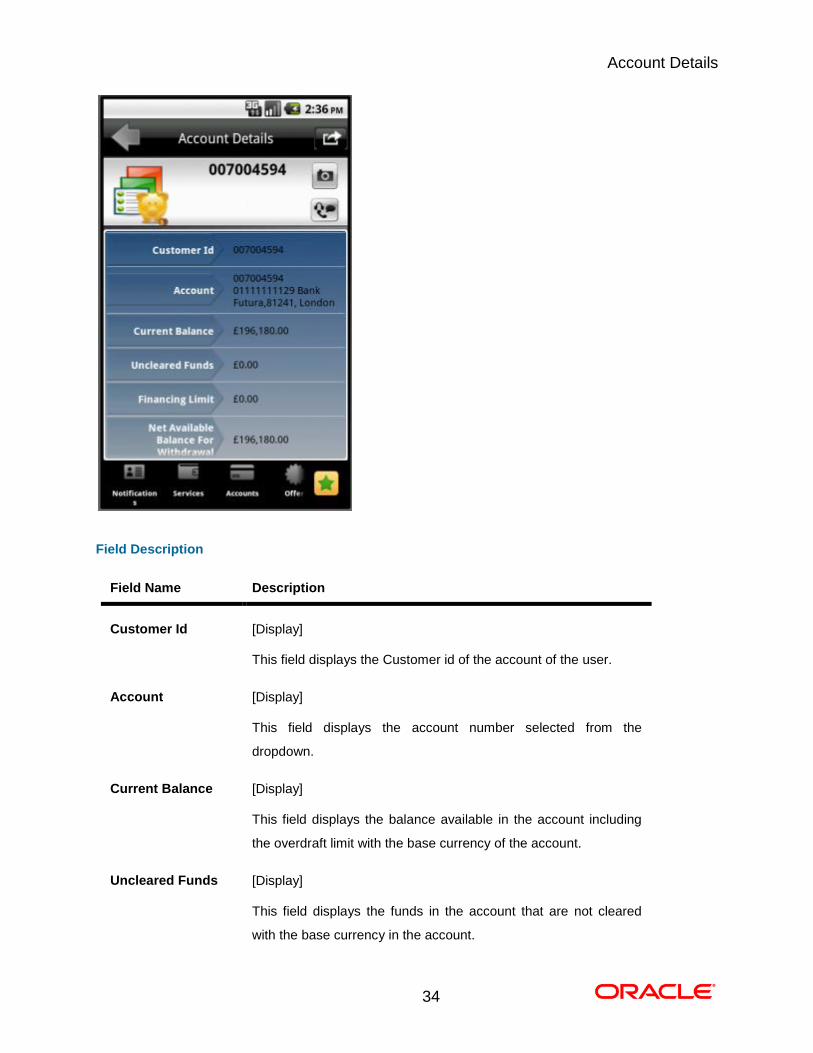
4. Click the Show Details button, as displayed in above screen. The system displays Account
Details screen for that selected account, as shown below. 0.
Account Details
Account Details
34
Field Description
Field Name Description
Customer Id [Display]
This field displays the Customer id of the account of the user.
Account [Display]
This field displays the account number selected from the
dropdown.
Current Balance [Display]
This field displays the balance available in the account including
the overdraft limit with the base currency of the account.
Uncleared Funds [Display]
This field displays the funds in the account that are not cleared
with the base currency in the account.
Account Details
35
Field Name Description
Financing Limit [Display]
This field displays the Financing limit.
Note: Overdraft Limit field is applicable only if “overdraft” as a
product is linked to the particular CASA account.
Net Available
Balance for
withdrawal
[Display]
The net available balance in the account after deduction of
uncleared funds and amount on hold.
Note: You can view the details of only “N” number of accounts registered for Mobile banking.

Account Summary
36
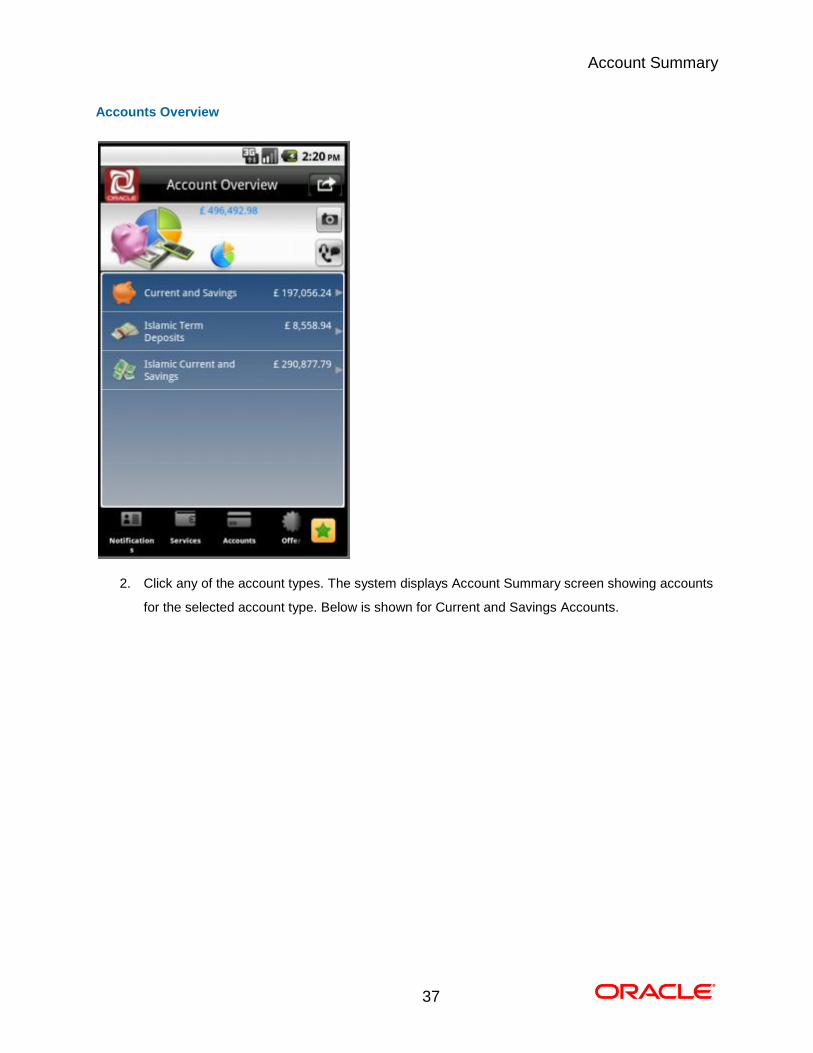
8. Account Summary
Account summary provides you a summarized view of all the accounts mapped to customer id.
To view the account summary
1. Log on to the Android application based Mobile Banking application. The system shows initial
landing screen Accounts Overview as shown below.
Account Summary
37
Accounts Overview
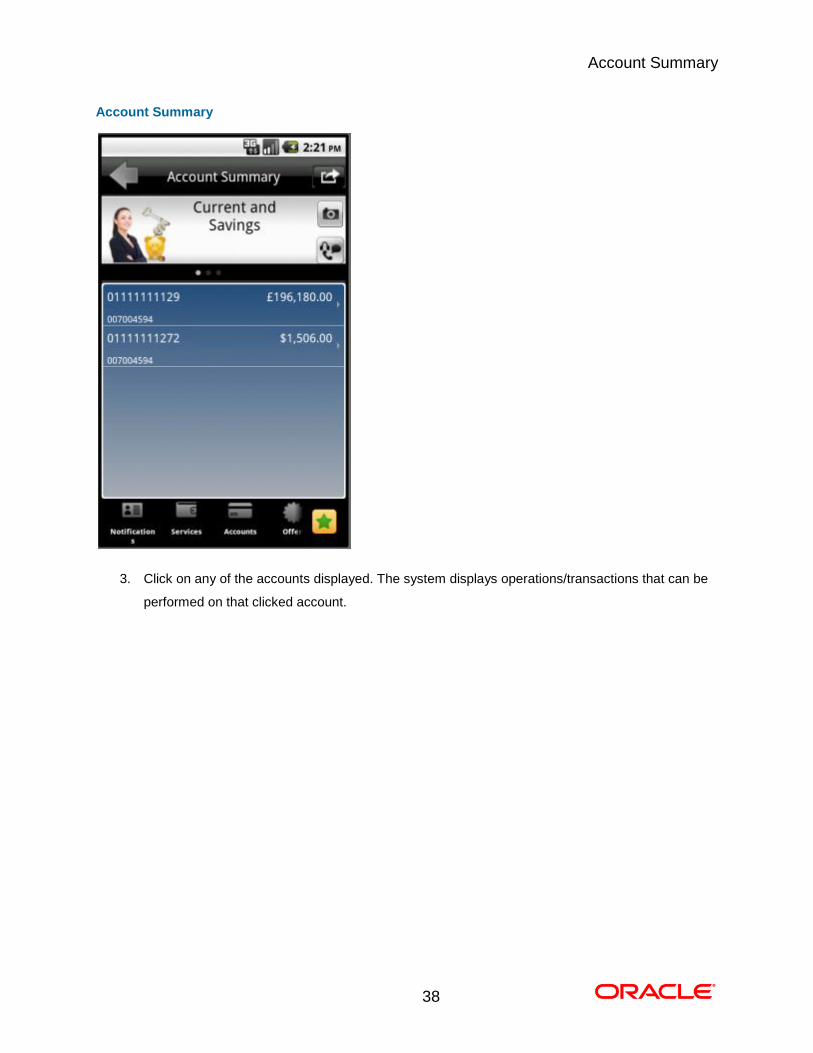
2. Click any of the account types. The system displays Account Summary screen showing accounts
for the selected account type. Below is shown for Current and Savings Accounts.
Account Summary
38
Account Summary
3. Click on any of the accounts displayed. The system displays operations/transactions that can be
performed on that clicked account. 0.
Ad-hoc Statement
39
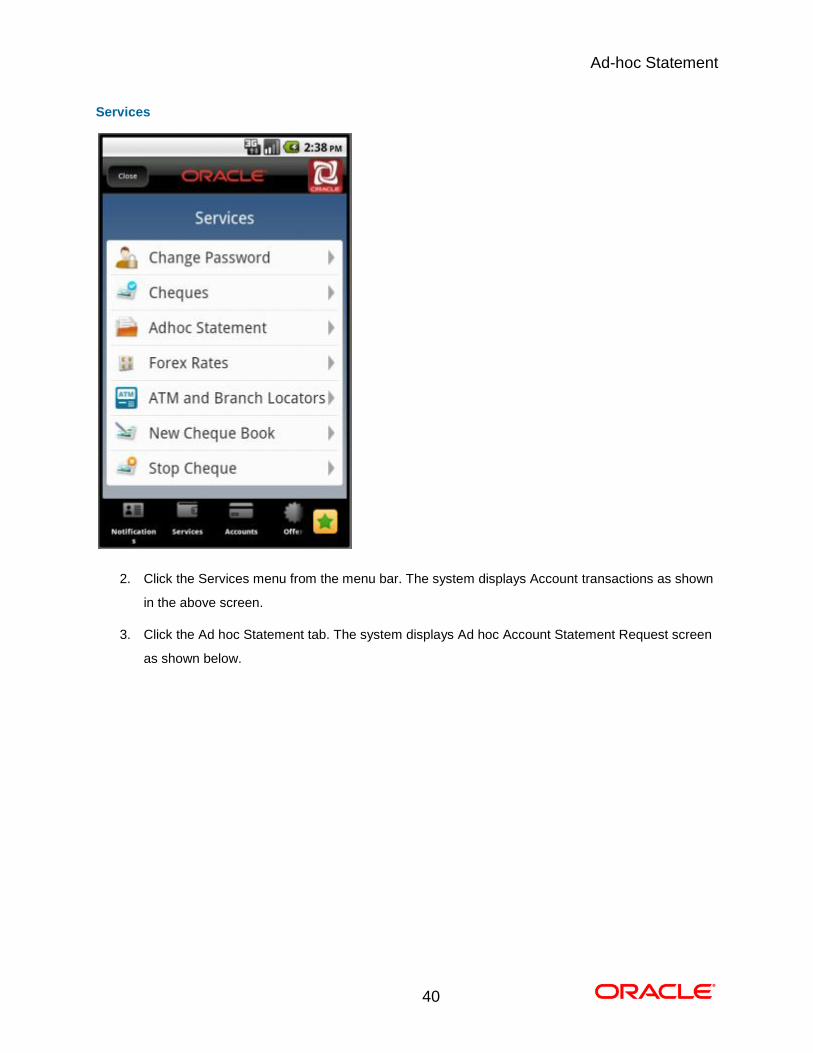
9. Ad-hoc Statement
This transaction allows you to request for an account statement for the period specified.
To request the Adhoc Statement
1. Log on to the Android application based Mobile Banking application.
Ad-hoc Statement
40
Services
2. Click the Services menu from the menu bar. The system displays Account transactions as shown
in the above screen.
3. Click the Ad hoc Statement tab. The system displays Ad hoc Account Statement Request screen
as shown below.
Ad-hoc Statement
41
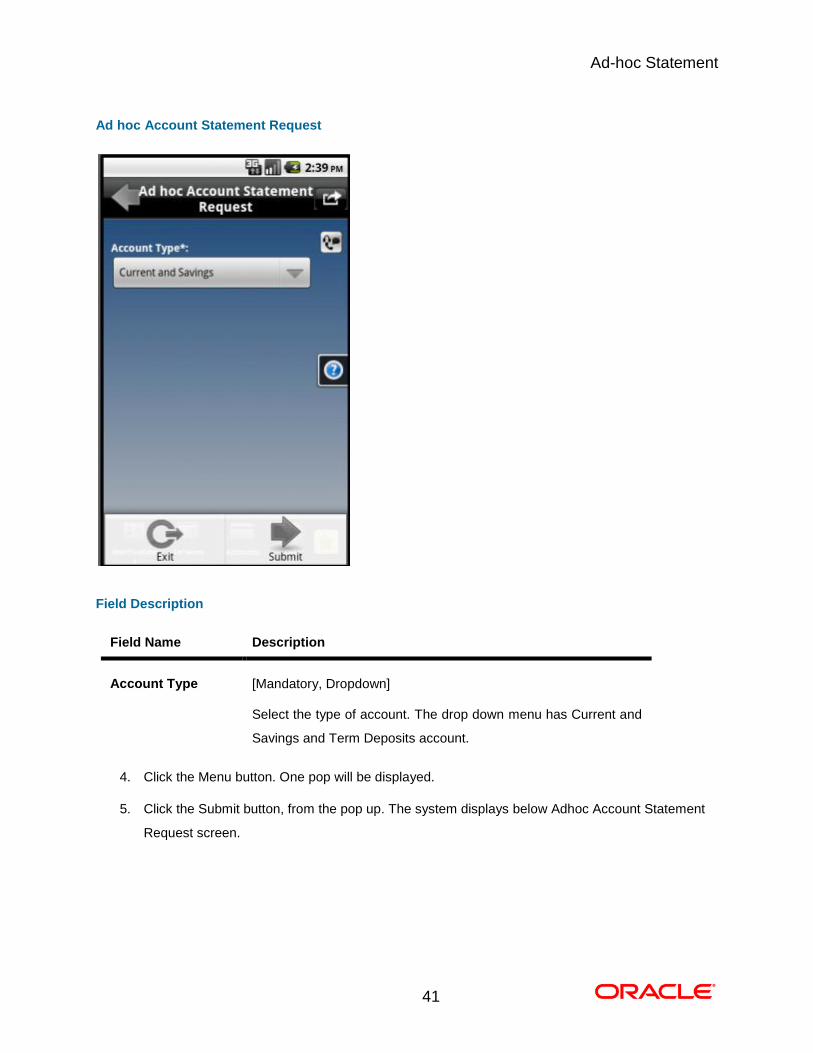
Ad hoc Account Statement Request
Field Description
Field Name Description
Account Type [Mandatory, Dropdown]
Select the type of account. The drop down menu has Current and
Savings and Term Deposits account.
4. Click the Menu button. One pop will be displayed.
5. Click the Submit button, from the pop up. The system displays below Adhoc Account Statement
Request screen.
Ad-hoc Statement
42
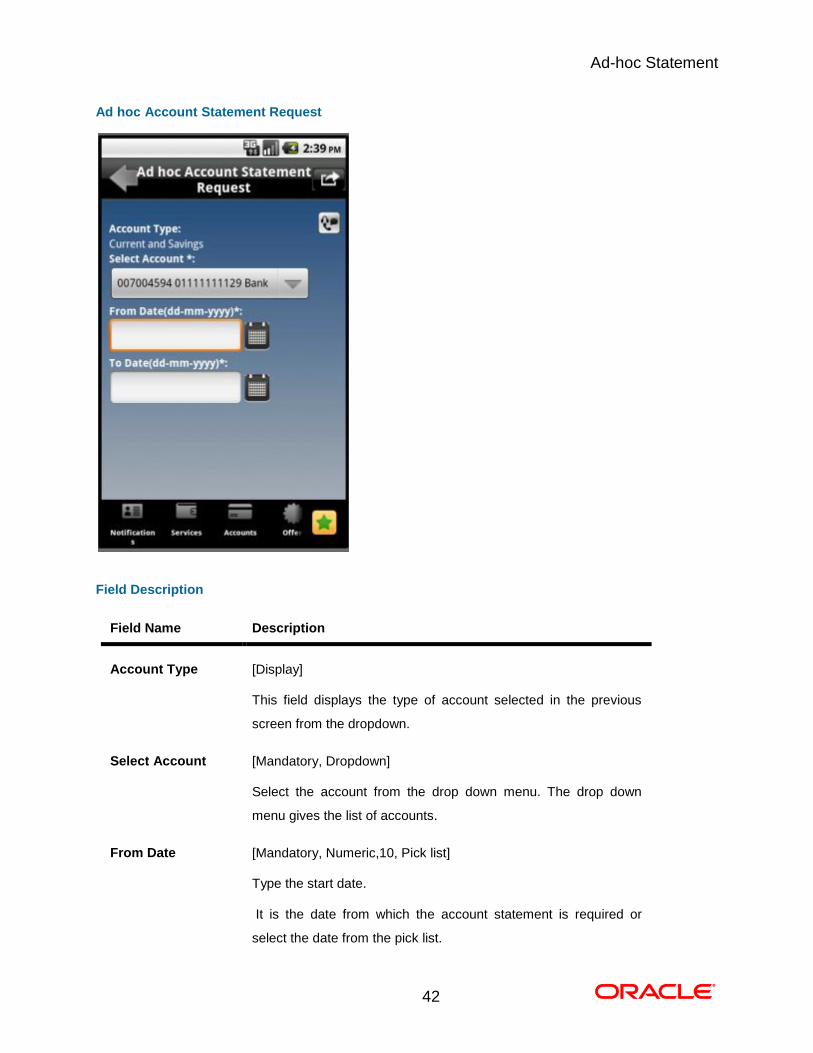
Ad hoc Account Statement Request
Field Description
Field Name Description
Account Type [Display]
This field displays the type of account selected in the previous
screen from the dropdown.
Select Account [Mandatory, Dropdown]
Select the account from the drop down menu. The drop down
menu gives the list of accounts.
From Date [Mandatory, Numeric,10, Pick list]
Type the start date.
It is the date from which the account statement is required or
select the date from the pick list.
Ad-hoc Statement
43
Field Name Description
To Date [Mandatory, Numeric,10, Pick list]
Type the end date. It is the date up to which the account
statement is required. Or select the date from the pick list.
6. Click the Menu button. One pop up will be displayed.
7. Click the Submit button from that popup screen. The system displays Ad hoc Account Statement
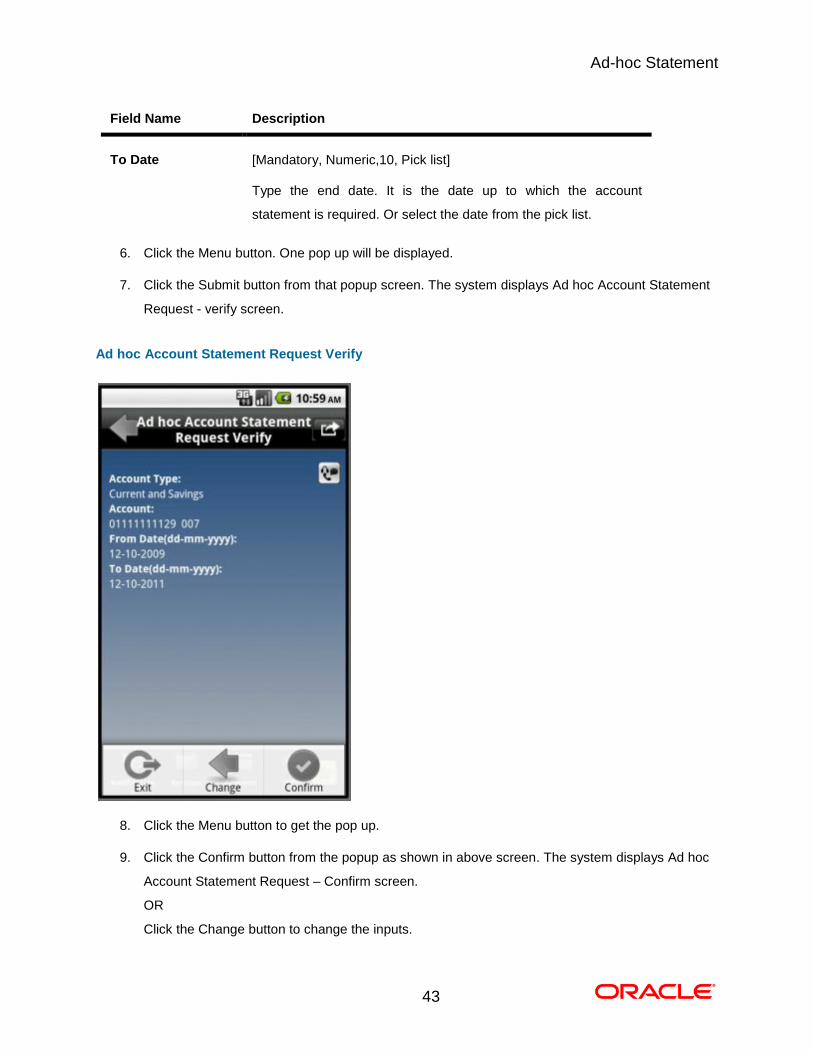
Request - verify screen.
Ad hoc Account Statement Request Verify
8. Click the Menu button to get the pop up.
9. Click the Confirm button from the popup as shown in above screen. The system displays Ad hoc
Account Statement Request – Confirm screen.
OR
Click the Change button to change the inputs.

Ad-hoc Statement
44
Ad hoc Account Statement Request – Confirm
10. Click the Close button. The system displays below Confirm screen. 0.
.
Stop Cheque
45
10. Stop Cheque
This menu allows you to stop unpaid cheque issued from the account or unblock a blocked/stopped
cheque. Only single cheque can be stopped or unblocked.
To stop or unblock cheque request
1. Log on to the Android application based Mobile Banking application.
Stop Cheque
46
2. Click the Services menu from the menu bar. The system displays transactions under services
menu, as shown in above screen.
3. Click the Stop Cheque tab. The system displays Stop Cheque screen as shown below.
Stop Cheque
47
Stop Cheque
Field Description
Field Name Description
Select Action [Mandatory, Dropdown]
Select the action from drop down menu. The options are
Stop Cheque payment
Cancel stopped Cheque
Select Account [Mandatory, Dropdown]
Select the account from the drop down list. The drop down menu
gives the list of accounts.
Cheque Number [Mandatory, Numeric, 20]
Type the cheque number to be stopped/Cancel stopped cheque.
Stop Cheque
48
Field Name Description
Reason [Mandatory, Alphanumeric, 40]
Type the reason to Stop/Cancel stopped cheque request.
This field is an optional field for cancel stopped cheque request.
4. Click the Menu button in the above screen. The system will display popup.
5. Click the Submit button from the popup. The system displays Stop Cheque Verify screen.
Stop Cheque Verify
6. Click the encircled button to get the popup options. Click the Confirm as shown in the above
screen. The system will display Stop Cheque Confirm screen as shown below.
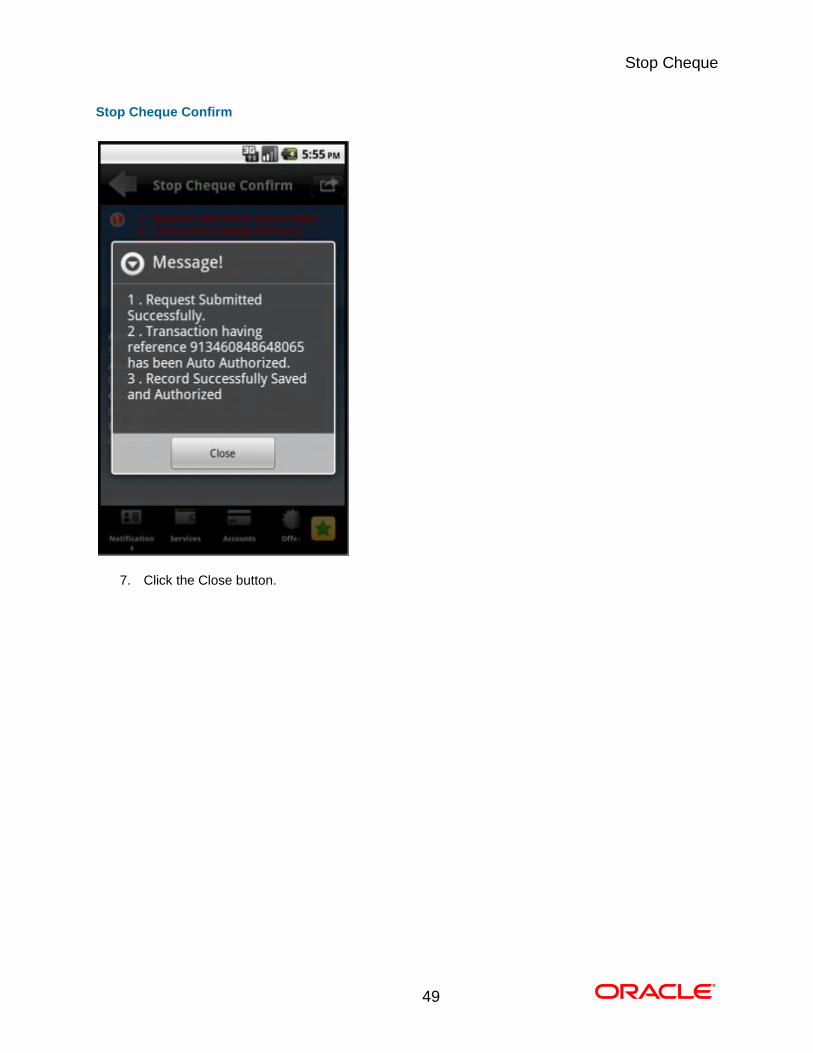
Stop Cheque
49
Stop Cheque Confirm
7. Click the Close button.
Stop Cheque
50
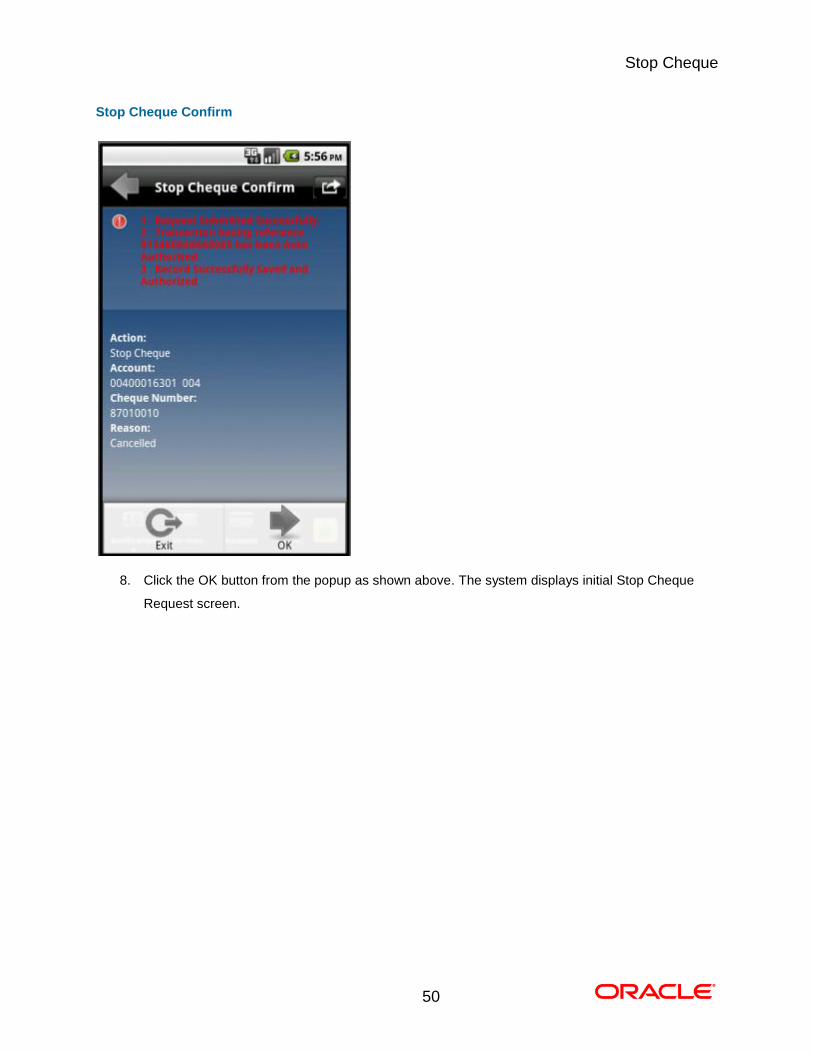
Stop Cheque Confirm
8. Click the OK button from the popup as shown above. The system displays initial Stop Cheque
Request screen. 0.
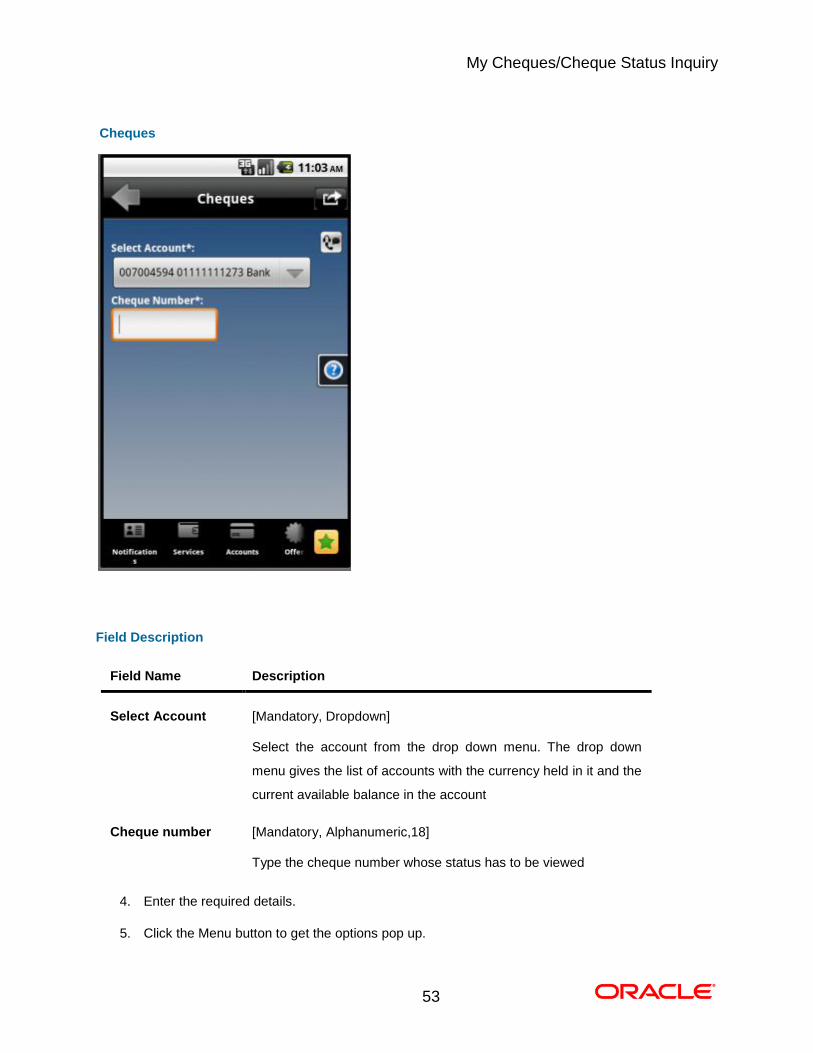
My Cheques/Cheque Status Inquiry
51
11. My Cheques/Cheque Status Inquiry
This menu enables you to view the status of a cheque issued.
To inquire the cheque status
1. Log on to the Android application based Mobile Banking application.
My Cheques/Cheque Status Inquiry
52
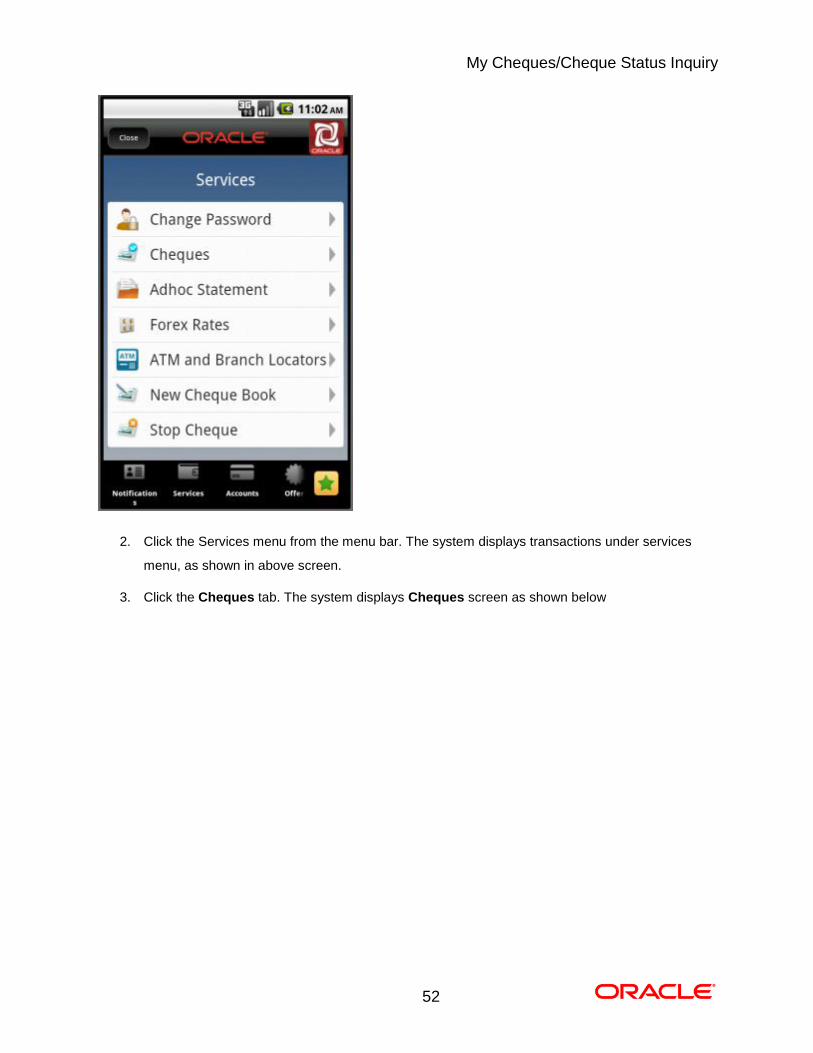
2. Click the Services menu from the menu bar. The system displays transactions under services
menu, as shown in above screen.
3. Click the Cheques tab. The system displays Cheques screen as shown below
My Cheques/Cheque Status Inquiry
53
Cheques
Field Description
Field Name Description
Select Account [Mandatory, Dropdown]
Select the account from the drop down menu. The drop down
menu gives the list of accounts with the currency held in it and the
current available balance in the account
Cheque number [Mandatory, Alphanumeric,18]
Type the cheque number whose status has to be viewed
4. Enter the required details.
5. Click the Menu button to get the options pop up.

My Cheques/Cheque Status Inquiry
54
6. Click the Submit button from that pop up. The system displays cheque number and its status in
the My Cheques details screen.
My Cheques
Field Description
Field Name Description
Account [Display]
This field displays the Account number selected in the previous
screen.
Cheque number [Display]
This field displays the cheque number inquired
Cheque status [Display]
This field displays the status of the cheque.
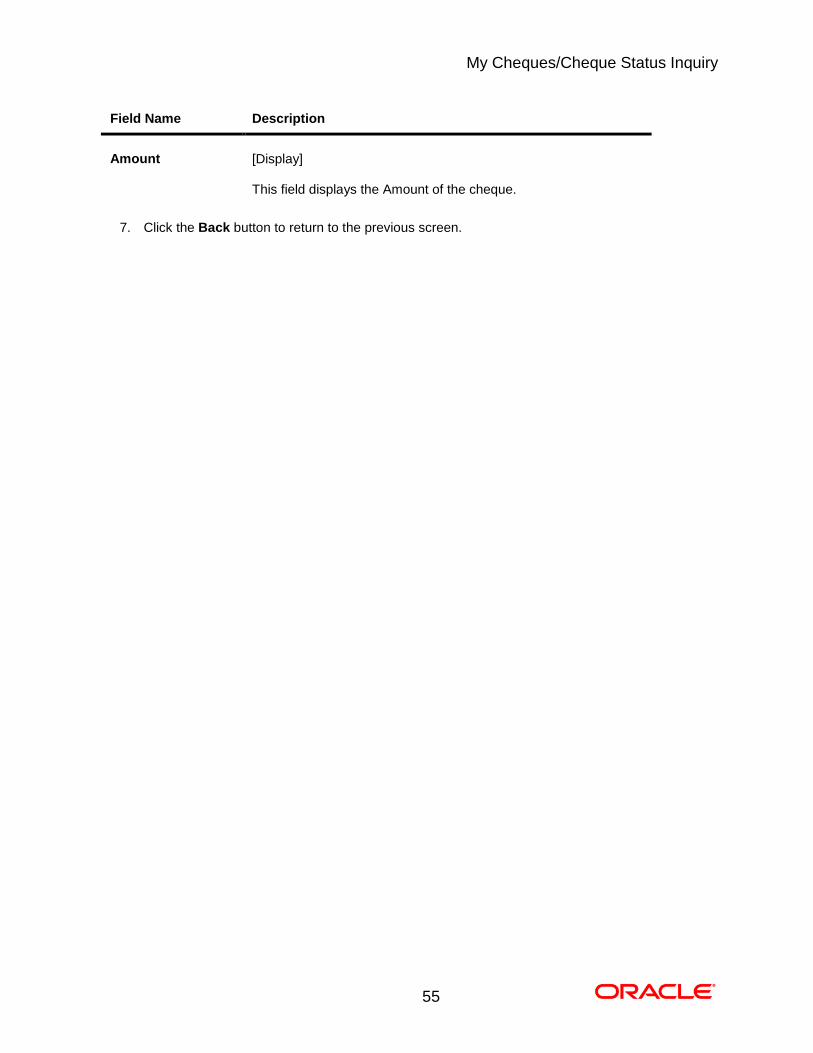
My Cheques/Cheque Status Inquiry
55
Field Name Description
Amount [Display]
This field displays the Amount of the cheque.
7. Click the Back button to return to the previous screen. 0.
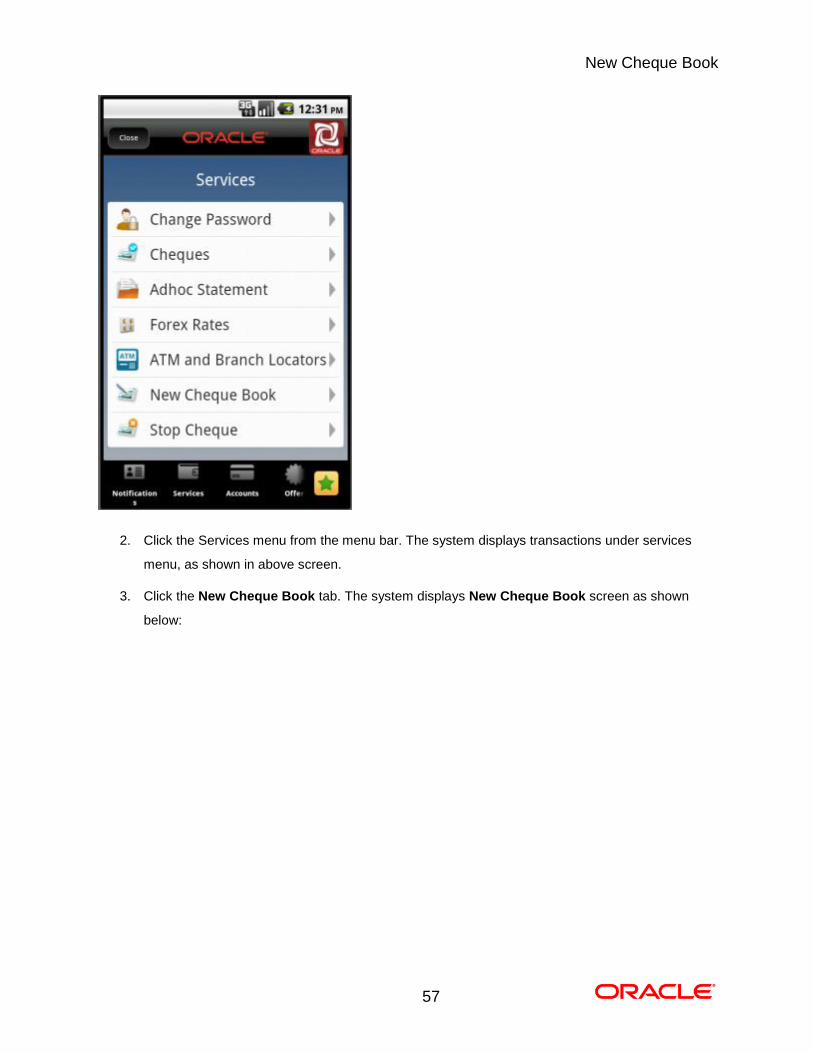
New Cheque Book
56
12. New Cheque Book
This menu enables you to place a request for a new cheque book to the bank.
To request the cheque book
1. Log on to the Android application based Mobile Banking application.
New Cheque Book
57
2. Click the Services menu from the menu bar. The system displays transactions under services
menu, as shown in above screen.
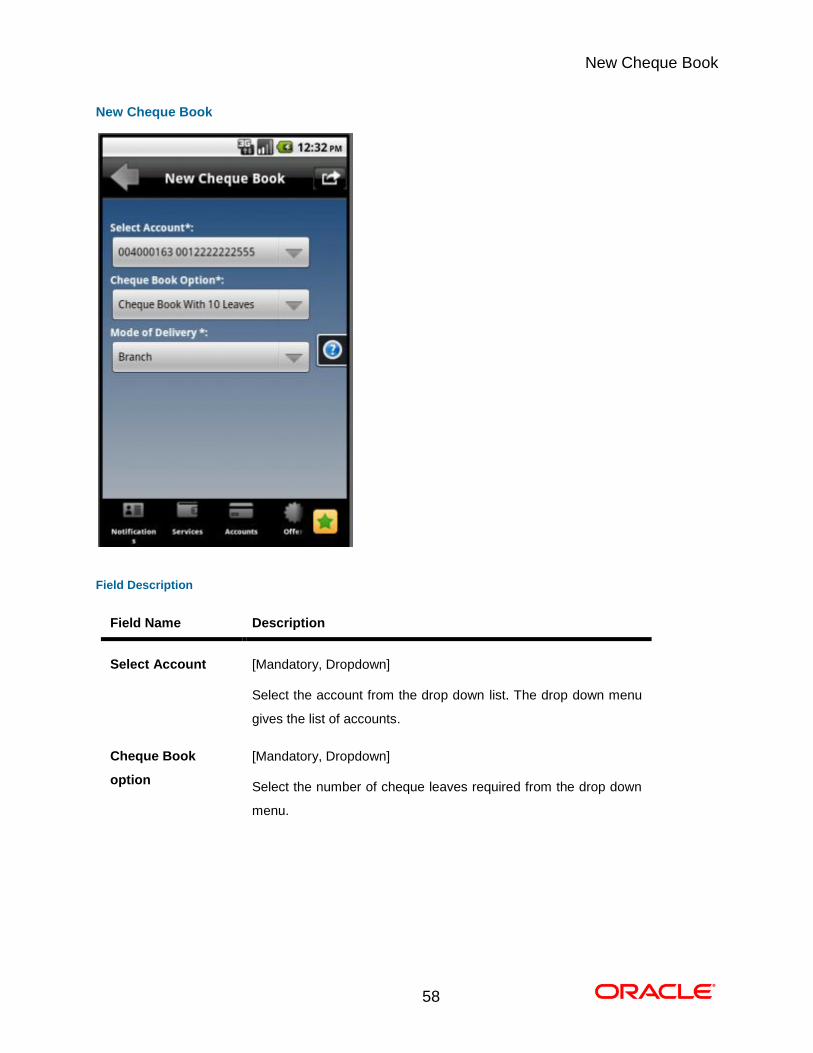
3. Click the New Cheque Book tab. The system displays New Cheque Book screen as shown
below:
New Cheque Book
58
New Cheque Book
Field Description
Field Name Description
Select Account [Mandatory, Dropdown]
Select the account from the drop down list. The drop down menu
gives the list of accounts.
Cheque Book
option
[Mandatory, Dropdown]
Select the number of cheque leaves required from the drop down
menu.
New Cheque Book
59
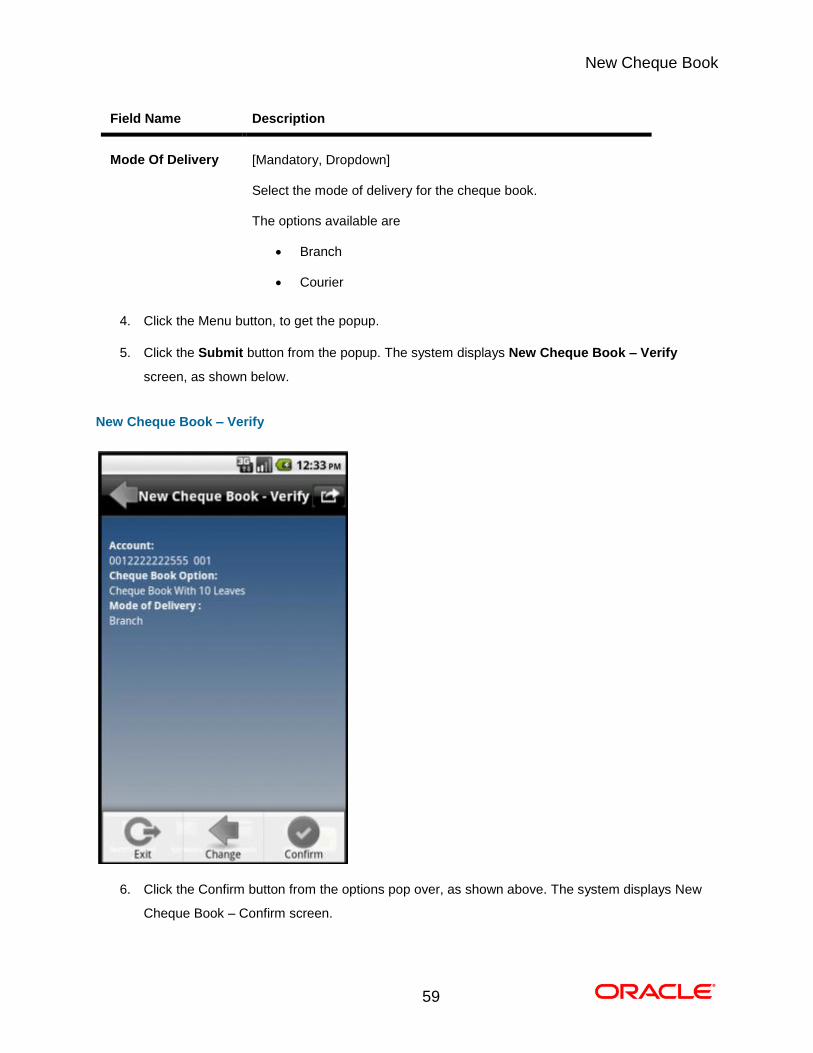
Field Name Description
Mode Of Delivery [Mandatory, Dropdown]
Select the mode of delivery for the cheque book.
The options available are
Branch
Courier
4. Click the Menu button, to get the popup.
5. Click the Submit button from the popup. The system displays New Cheque Book – Verify
screen, as shown below.
New Cheque Book – Verify
6. Click the Confirm button from the options pop over, as shown above. The system displays New
Cheque Book – Confirm screen.
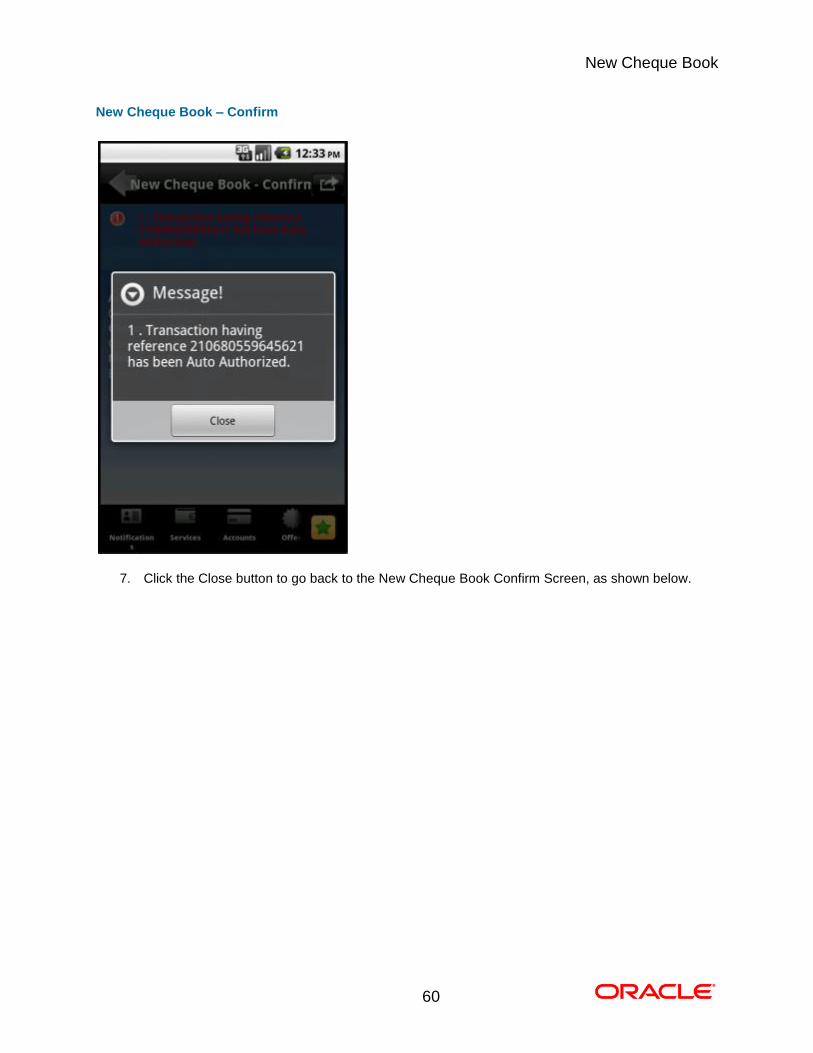
New Cheque Book
60
New Cheque Book – Confirm
7. Click the Close button to go back to the New Cheque Book Confirm Screen, as shown below.
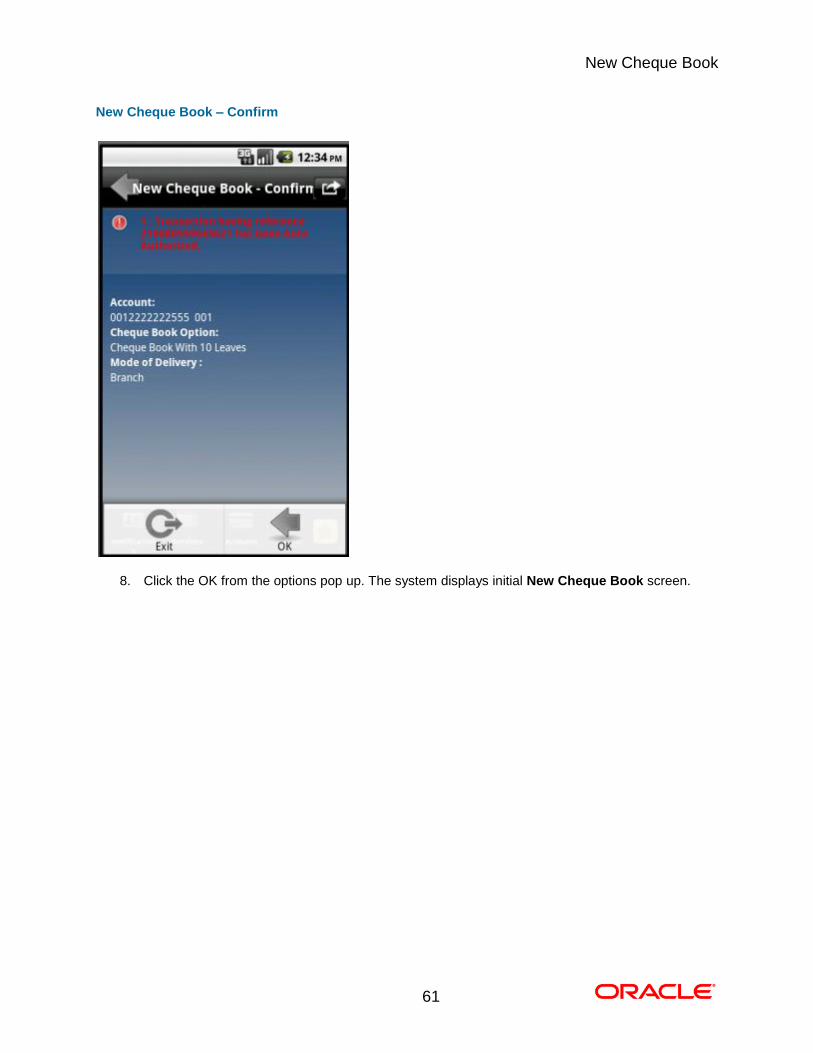
New Cheque Book
61
New Cheque Book – Confirm
8. Click the OK from the options pop up. The system displays initial New Cheque Book screen. 0.
Pay Bill
62
13. Pay Bill
This menu enables you to pay the Utility Bills for the Registered Billers with the Bank.
To pay the bills
1. Log on to the Android application based Mobile Banking application.
Pay Bill
63
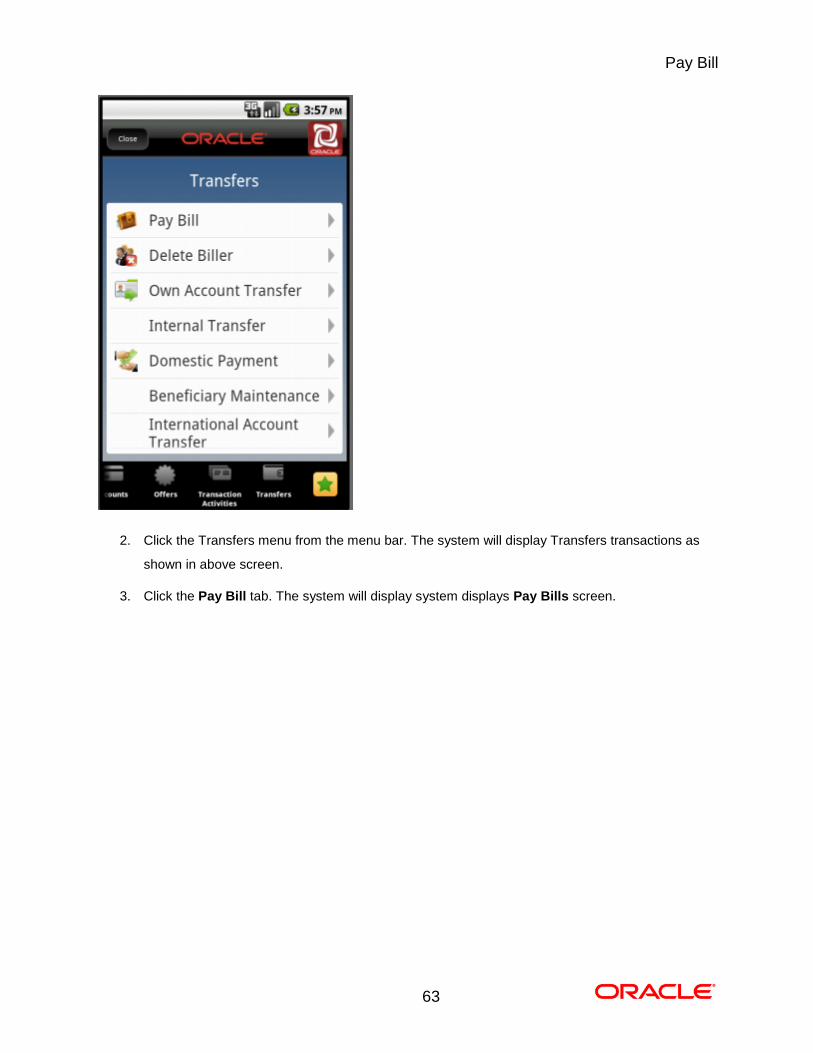
2. Click the Transfers menu from the menu bar. The system will display Transfers transactions as
shown in above screen.
3. Click the Pay Bill tab. The system will display system displays Pay Bills screen.
Pay Bill
64
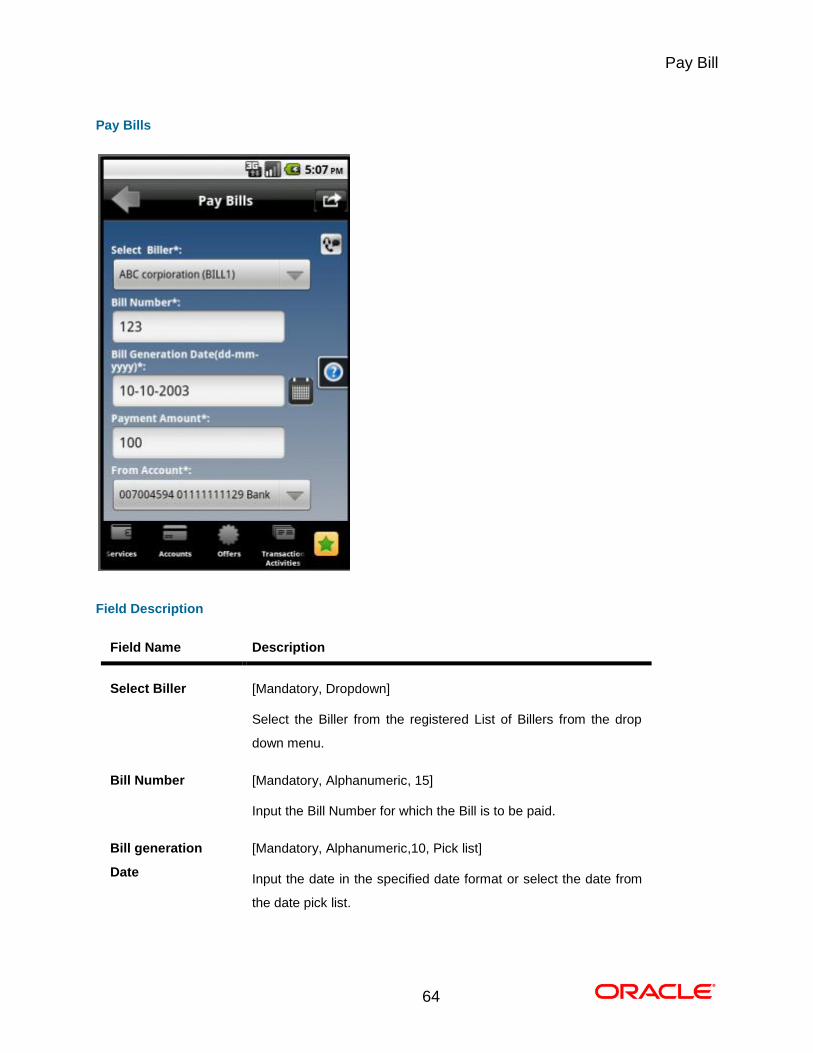
Pay Bills
Field Description
Field Name Description
Select Biller [Mandatory, Dropdown]
Select the Biller from the registered List of Billers from the drop
down menu.
Bill Number [Mandatory, Alphanumeric, 15]
Input the Bill Number for which the Bill is to be paid.
Bill generation
Date
[Mandatory, Alphanumeric,10, Pick list]
Input the date in the specified date format or select the date from
the date pick list.
Pay Bill
65
Field Name Description
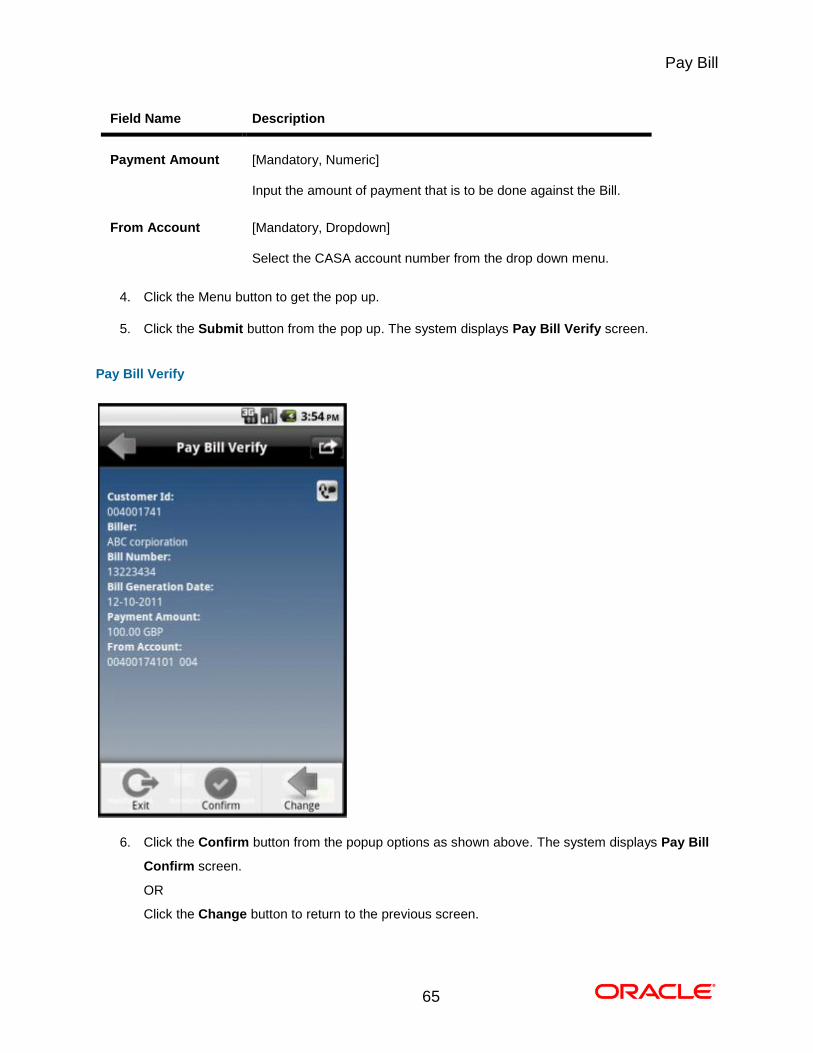
Payment Amount [Mandatory, Numeric]
Input the amount of payment that is to be done against the Bill.
From Account [Mandatory, Dropdown]
Select the CASA account number from the drop down menu.
4. Click the Menu button to get the pop up.
5. Click the Submit button from the pop up. The system displays Pay Bill Verify screen.
Pay Bill Verify
6. Click the Confirm button from the popup options as shown above. The system displays Pay Bill
Confirm screen.
OR
Click the Change button to return to the previous screen.

Pay Bill
66
Pay Bill Confirm
7. Click the Close button. The system displays Pay Bills Confirm screen. Then click the OK button
in that Confirm screen to navigate to the initial Pay Bills screen. 0.
Navigating through Menu bar
67
14. Biller Information
This menu enables you to register biller to pay the Utility Bills through the bank and also allows to delete
a already registered biller.
Register Biller
68
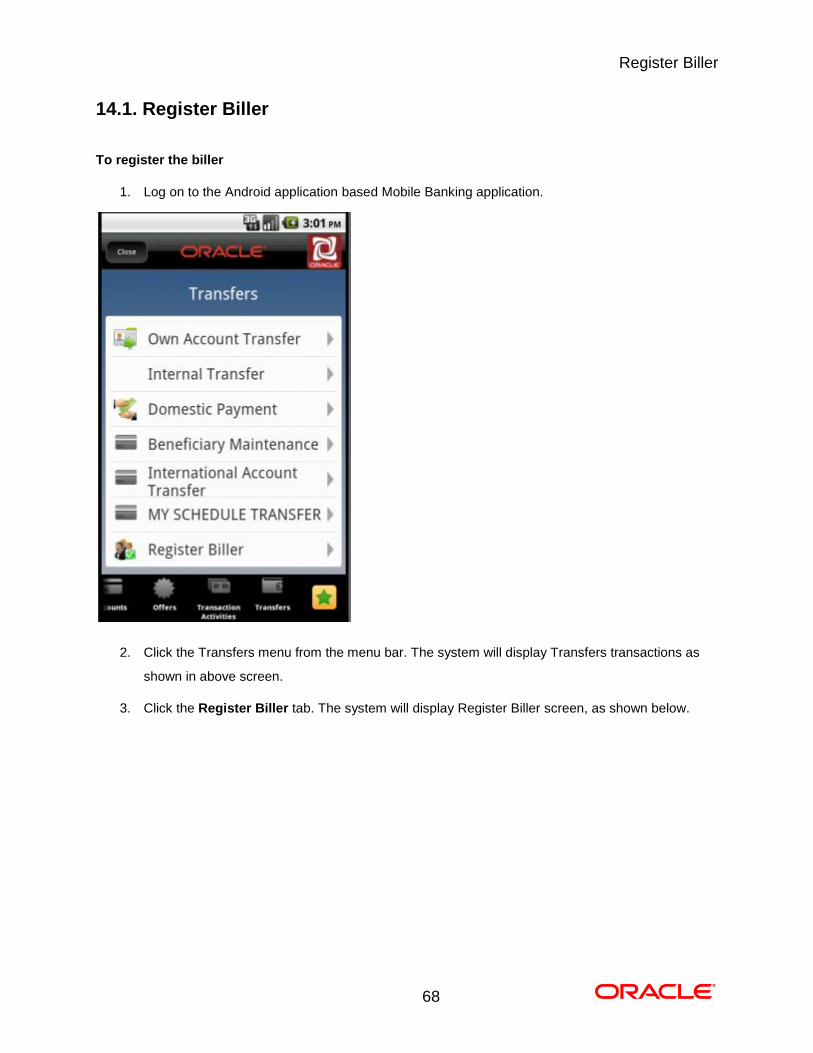
14.1. Register Biller
To register the biller
1. Log on to the Android application based Mobile Banking application.
2. Click the Transfers menu from the menu bar. The system will display Transfers transactions as
shown in above screen.
3. Click the Register Biller tab. The system will display Register Biller screen, as shown below.
Register Biller
69
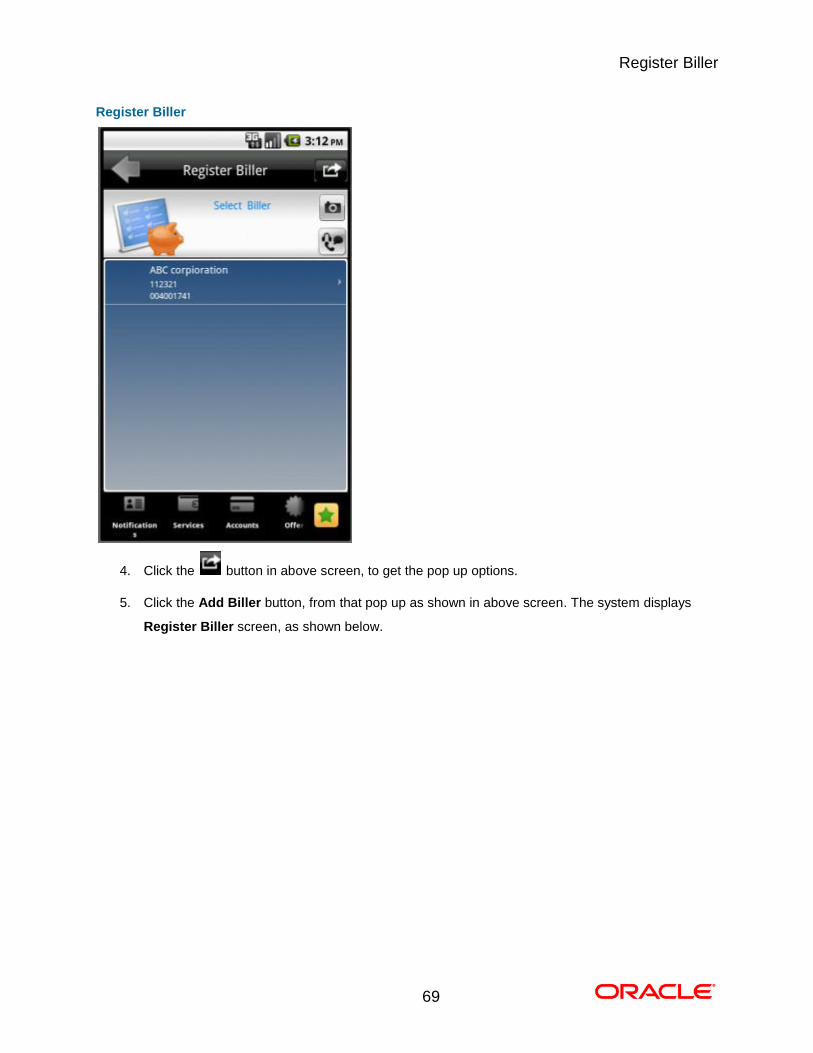
Register Biller
4. Click the button in above screen, to get the pop up options.
5. Click the Add Biller button, from that pop up as shown in above screen. The system displays
Register Biller screen, as shown below.

Register Biller
70
Register Biller
Field Description
Field Name Description
Select Customer [Mandatory ,Dropdown]
Select the Customer from the Dropdown.
Select Biller [Mandatory ,Dropdown]
Select the biller from the dropdown.
Service Account
Number
[Mandatory, Alphanumeric, 15]
Input the service account number available with the Biller for Bill
payment
Biller Nick Name [Mandatory, Alphanumeric, 15]
Input the Nick Name of the Biller.
Register Biller
71
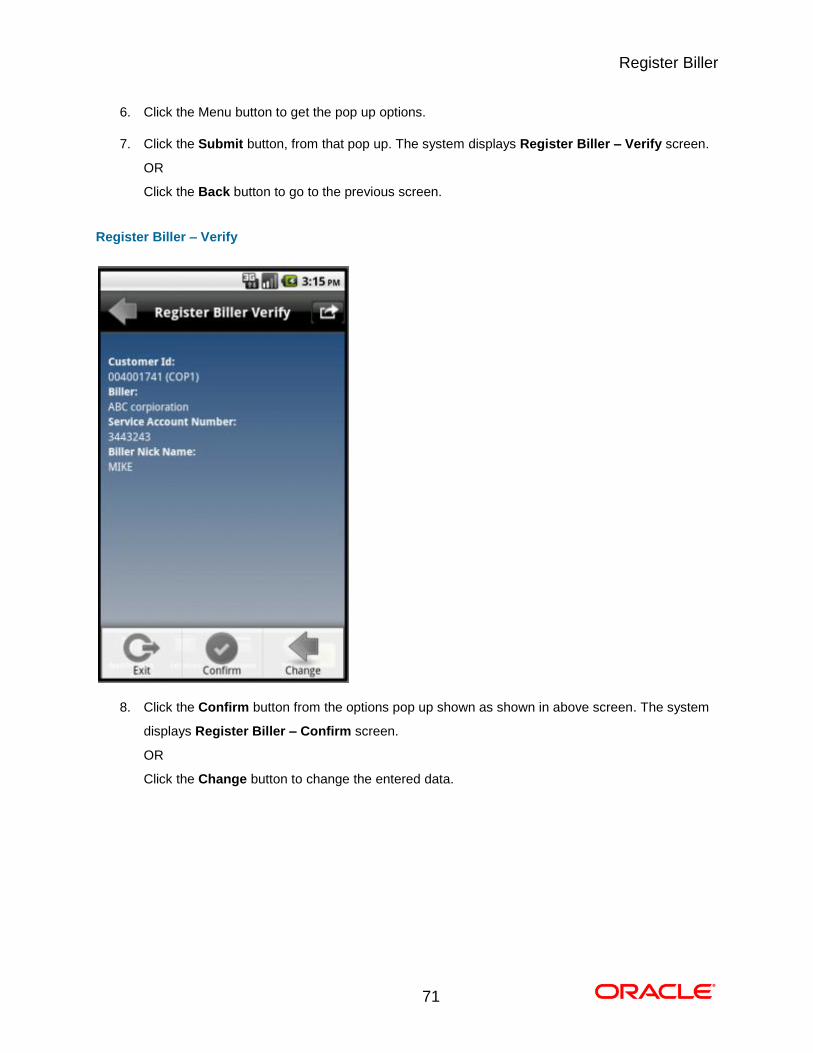
6. Click the Menu button to get the pop up options.
7. Click the Submit button, from that pop up. The system displays Register Biller – Verify screen.
OR
Click the Back button to go to the previous screen.
Register Biller – Verify
8. Click the Confirm button from the options pop up shown as shown in above screen. The system
displays Register Biller – Confirm screen.
OR
Click the Change button to change the entered data.
Register Biller
72
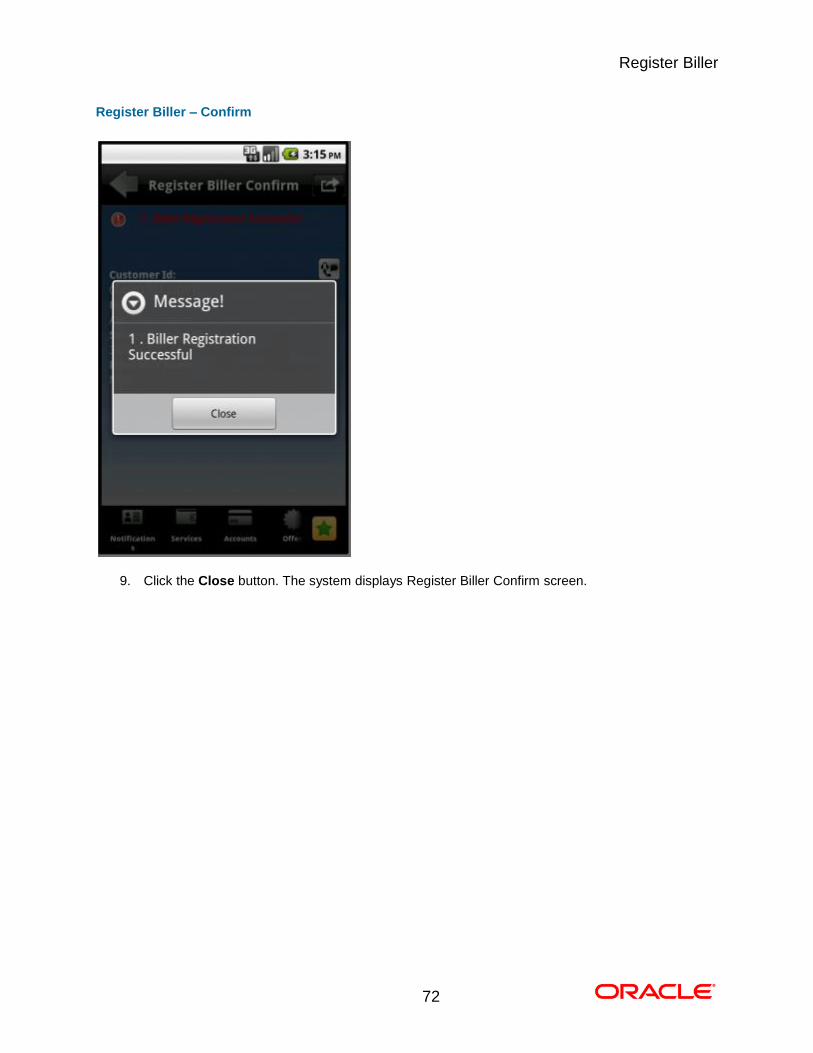
Register Biller – Confirm
9. Click the Close button. The system displays Register Biller Confirm screen. 0.
Delete Biller
73
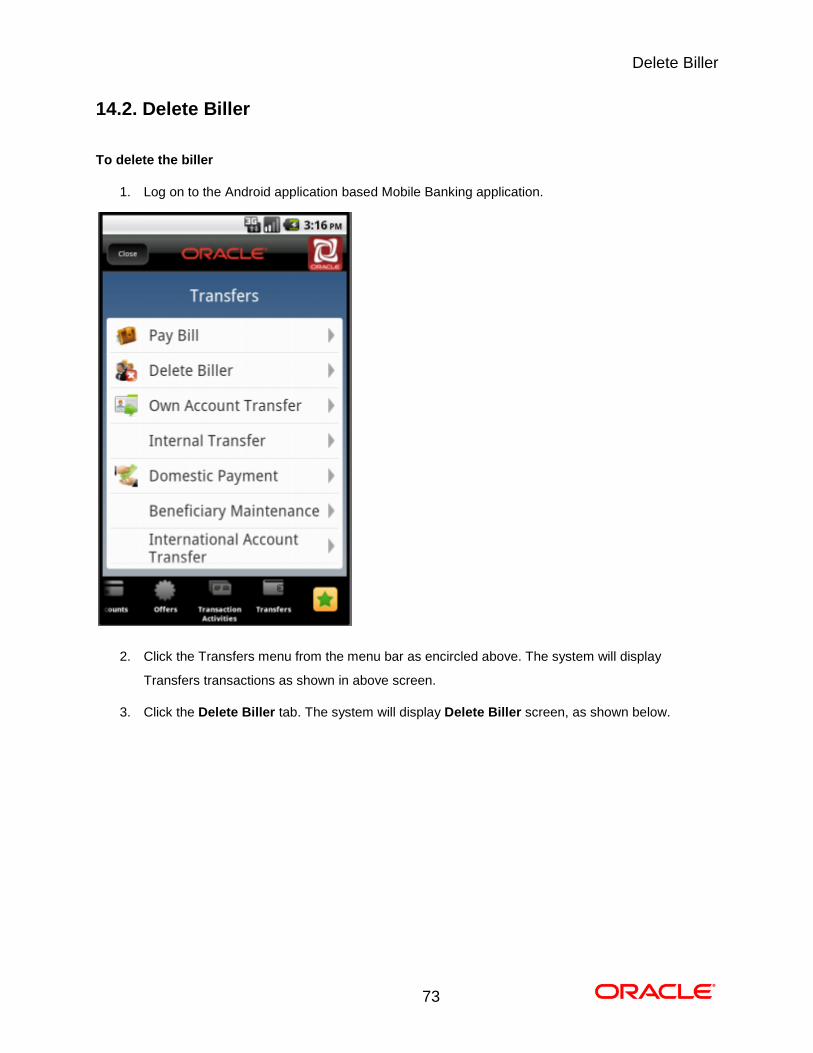
14.2. Delete Biller
To delete the biller
1. Log on to the Android application based Mobile Banking application.
2. Click the Transfers menu from the menu bar as encircled above. The system will display
Transfers transactions as shown in above screen.
3. Click the Delete Biller tab. The system will display Delete Biller screen, as shown below.
Delete Biller
74
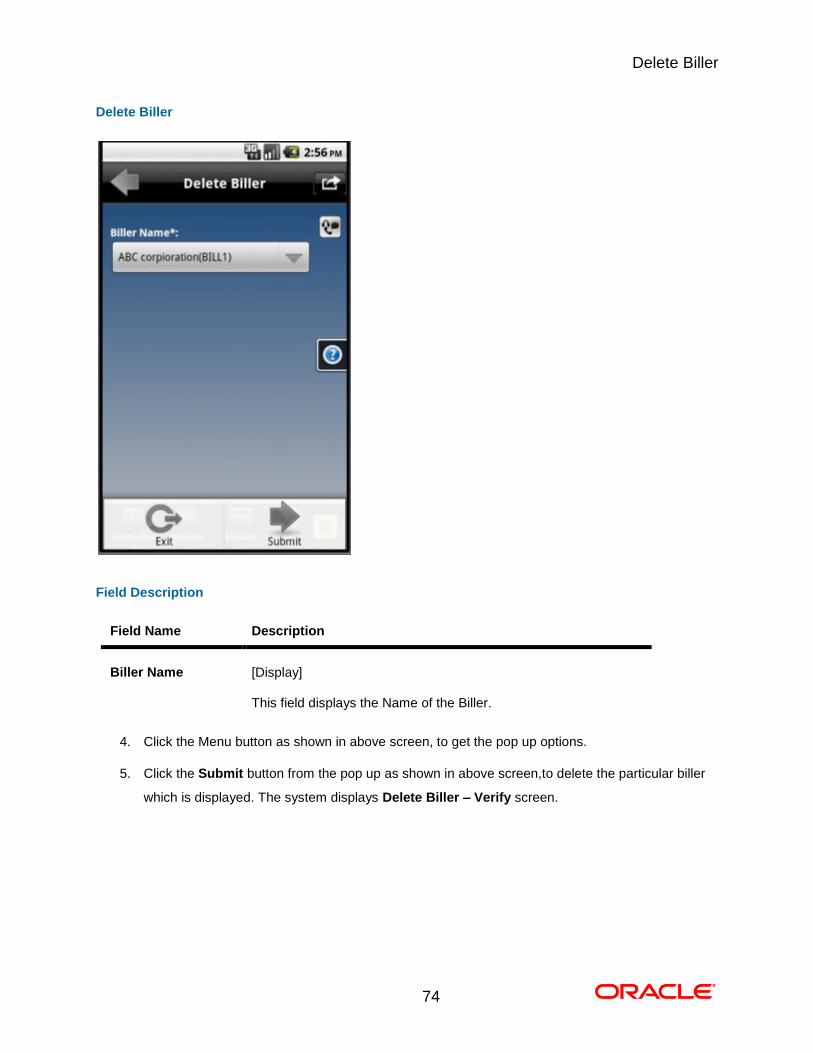
Delete Biller
Field Description
Field Name Description
Biller Name [Display]
This field displays the Name of the Biller.
4. Click the Menu button as shown in above screen, to get the pop up options.
5. Click the Submit button from the pop up as shown in above screen,to delete the particular biller
which is displayed. The system displays Delete Biller – Verify screen.
Delete Biller
75
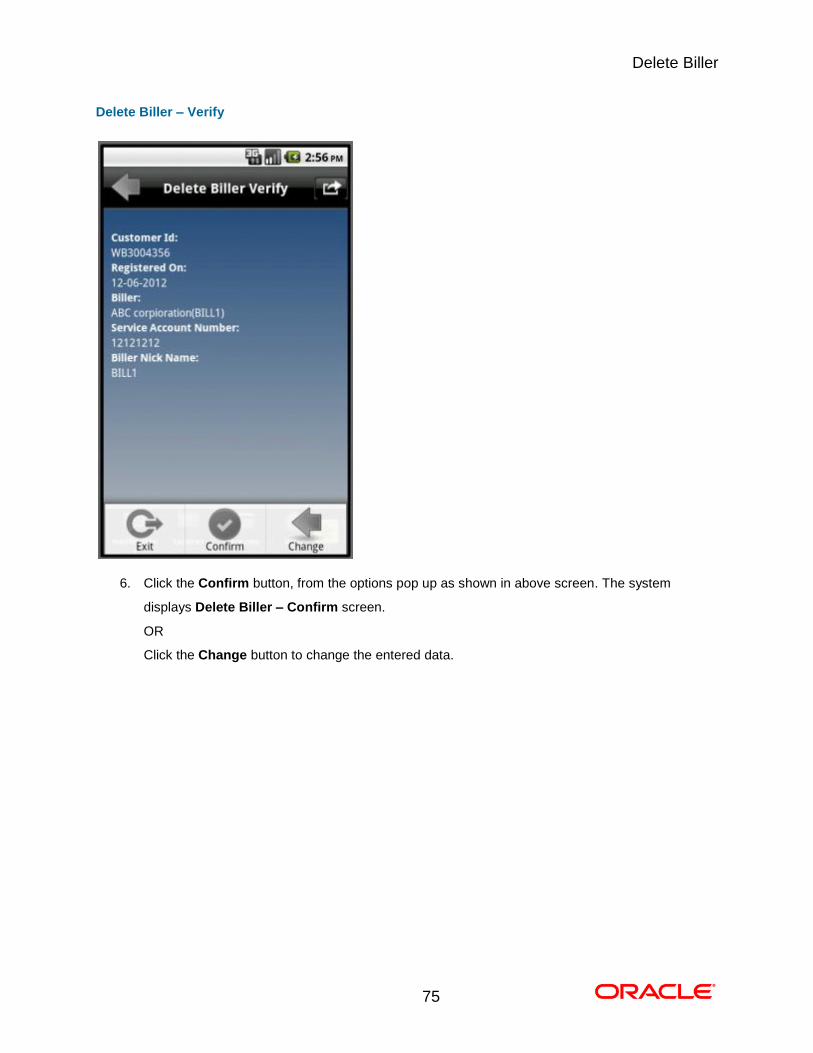
Delete Biller – Verify
6. Click the Confirm button, from the options pop up as shown in above screen. The system
displays Delete Biller – Confirm screen.
OR
Click the Change button to change the entered data.

Delete Biller
76
Delete Biller – Confirm
7. Click the Close button. The system displays Delete Biller Confirm screen. 0.
Loan Details
77
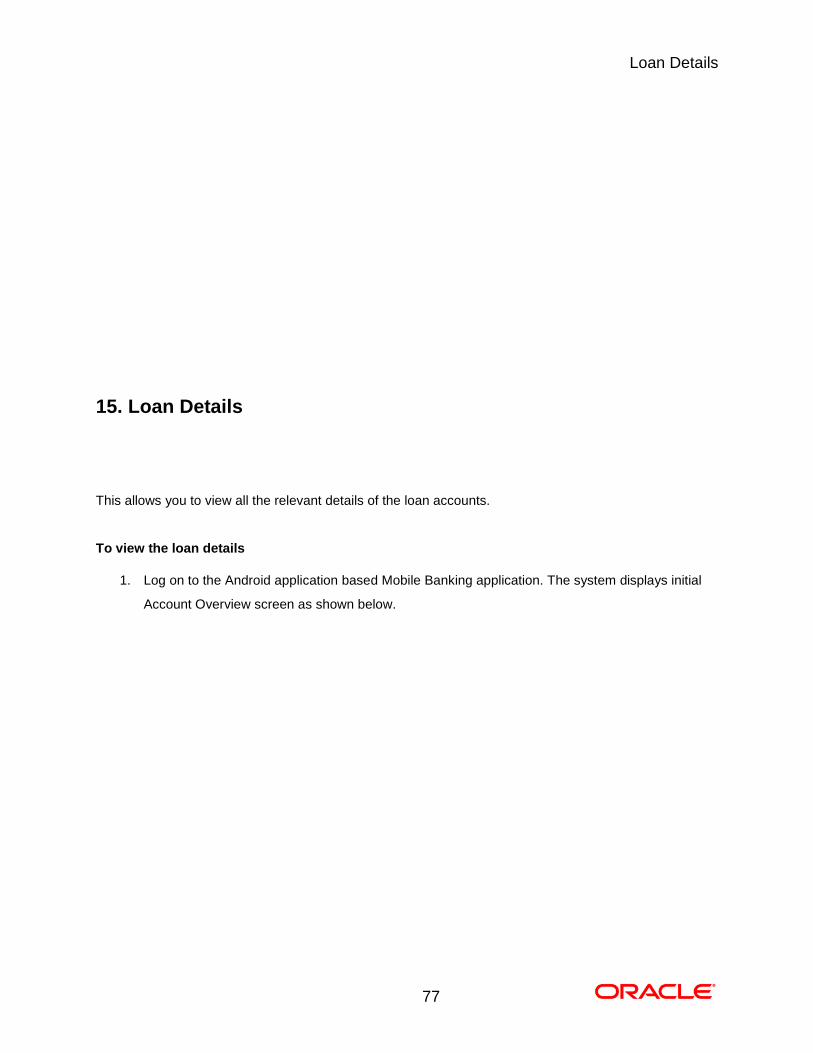
15. Loan Details
This allows you to view all the relevant details of the loan accounts.
To view the loan details
1. Log on to the Android application based Mobile Banking application. The system displays initial
Account Overview screen as shown below.
Loan Details
78
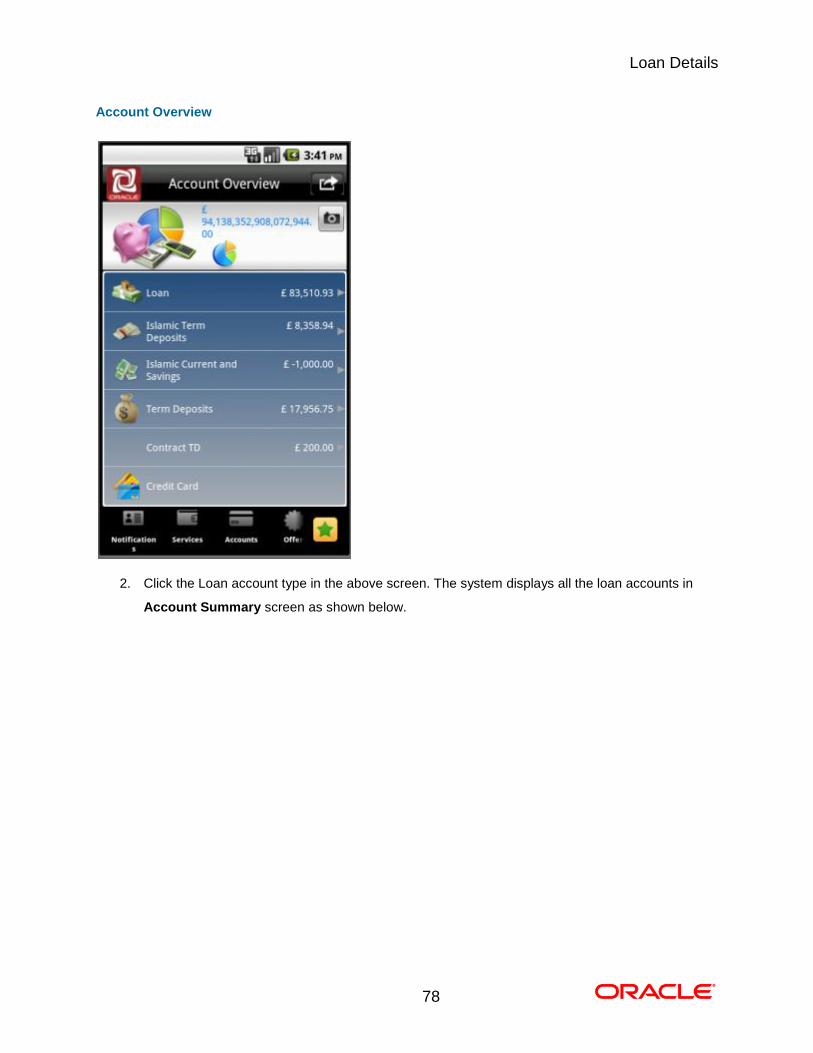
Account Overview
2. Click the Loan account type in the above screen. The system displays all the loan accounts in
Account Summary screen as shown below.
Loan Details
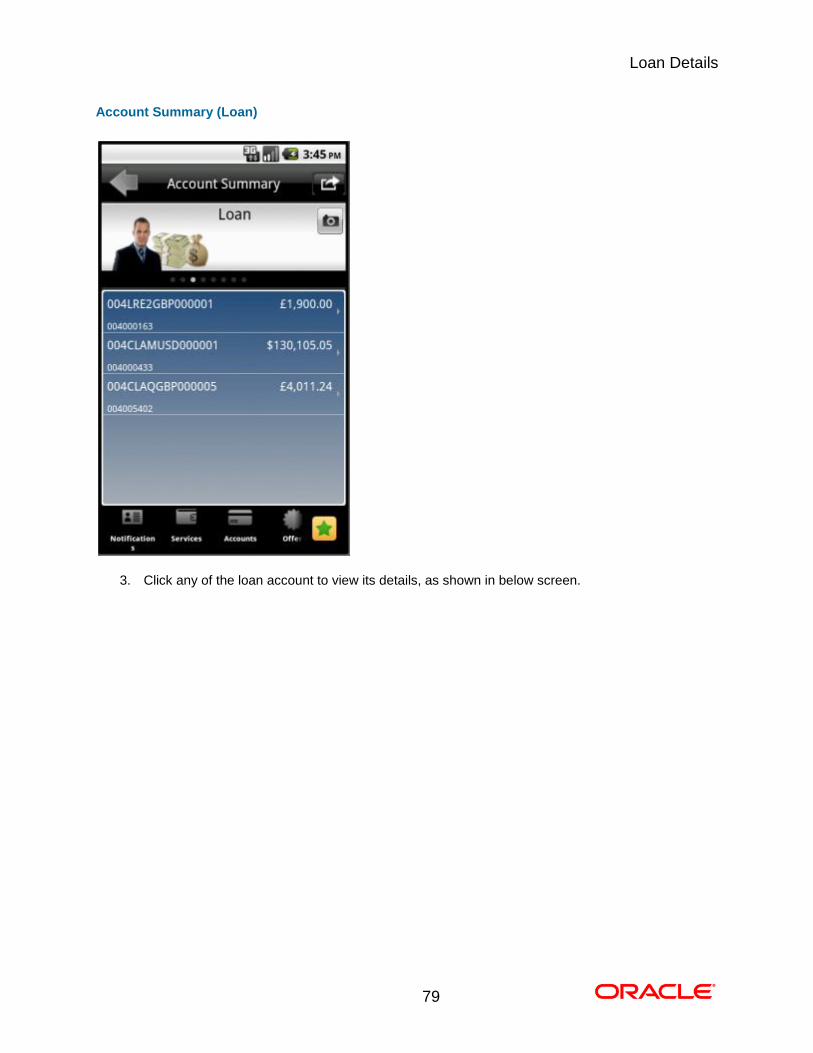
79
Account Summary (Loan)
3. Click any of the loan account to view its details, as shown in below screen.
Loan Details
80
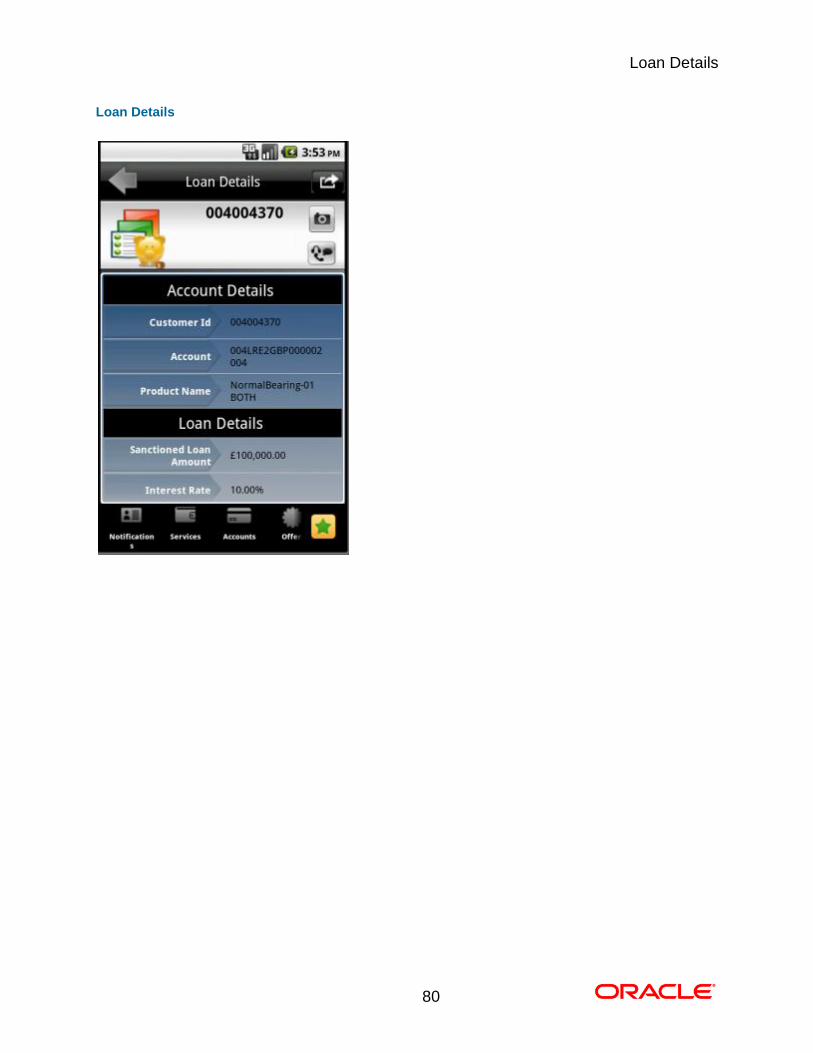
Loan Details
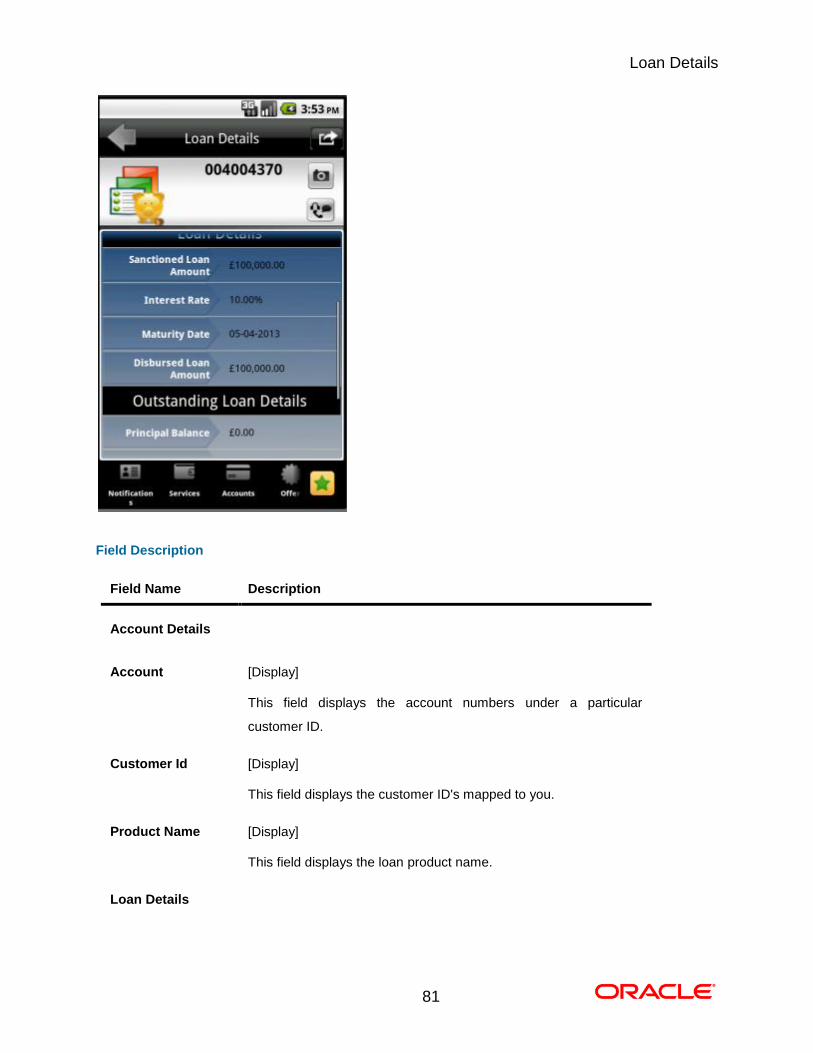
Loan Details
81
Field Description
Field Name Description
Account Details
Account [Display]
This field displays the account numbers under a particular
customer ID.
Customer Id [Display]
This field displays the customer ID's mapped to you.
Product Name [Display]
This field displays the loan product name.
Loan Details
Loan Details
82
Field Name Description
Sanctioned Loan
Amount
[Display]
This field displays the sanctioned loan amount.
Interest Rate [Display]
This field displays the interest rate applicable to the loan account.
Maturity Date [Display]
This field displays the maturity date of the loan account.
Disbursed Loan
Amount
[Display]
This field displays the loan amount disbursed till date.
Outstanding Loan Details
Principal Balance [Display]
This field displays the outstanding balance on the loan account as
on date.
Next Installment
Date
[Display]
This field displays the due date of the next installment.
Next Installment
Amount
[Display]
This field displays the next installment amount.
Installment
Arrears
[Display]
This field displays the unpaid installment amount.
Loan Outstanding [Display]
This field displays the cumulated principal outstanding, penalty
interest, fees/service charges and installment amount.
4. Click the Back button to go to the previous screen. 0.
Islamic Financing
83
16. Islamic Financing
This allows you to view all the relevant details of the Islamic Financing accounts.
To view the Islamic Financing details
1. Log on to the Android application based Mobile Banking application. The system displays initial
Account Overview screen as shown below.
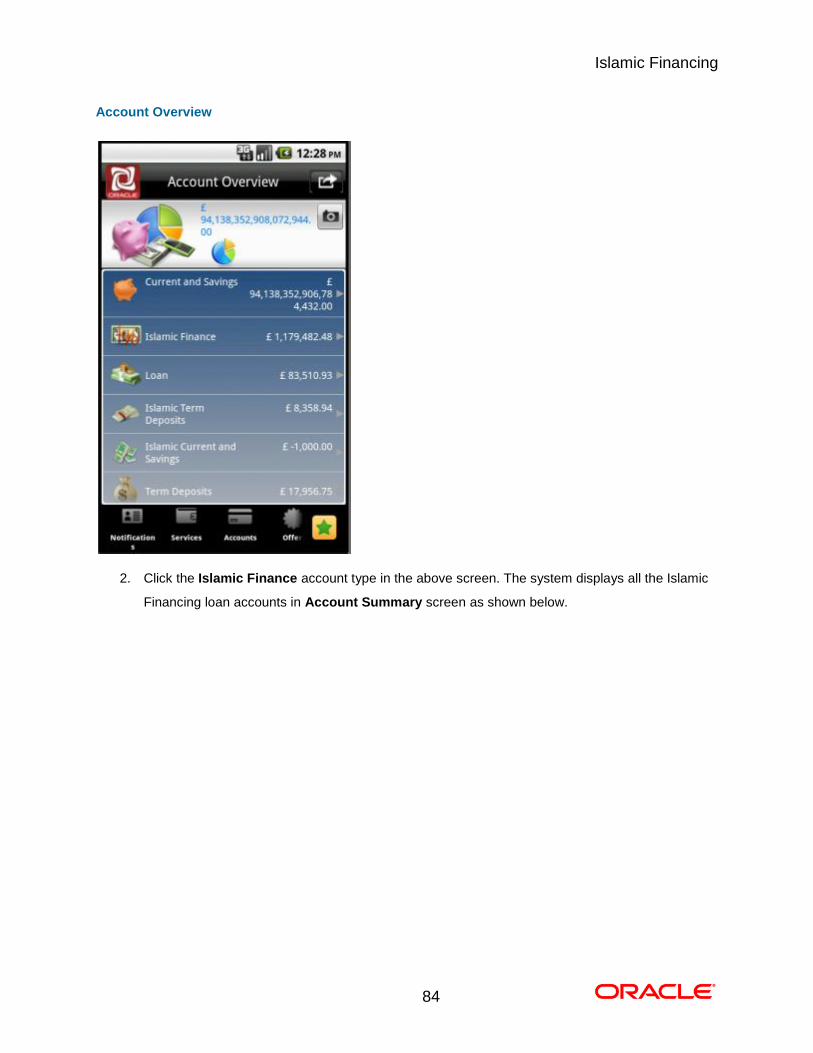
Islamic Financing
84
Account Overview
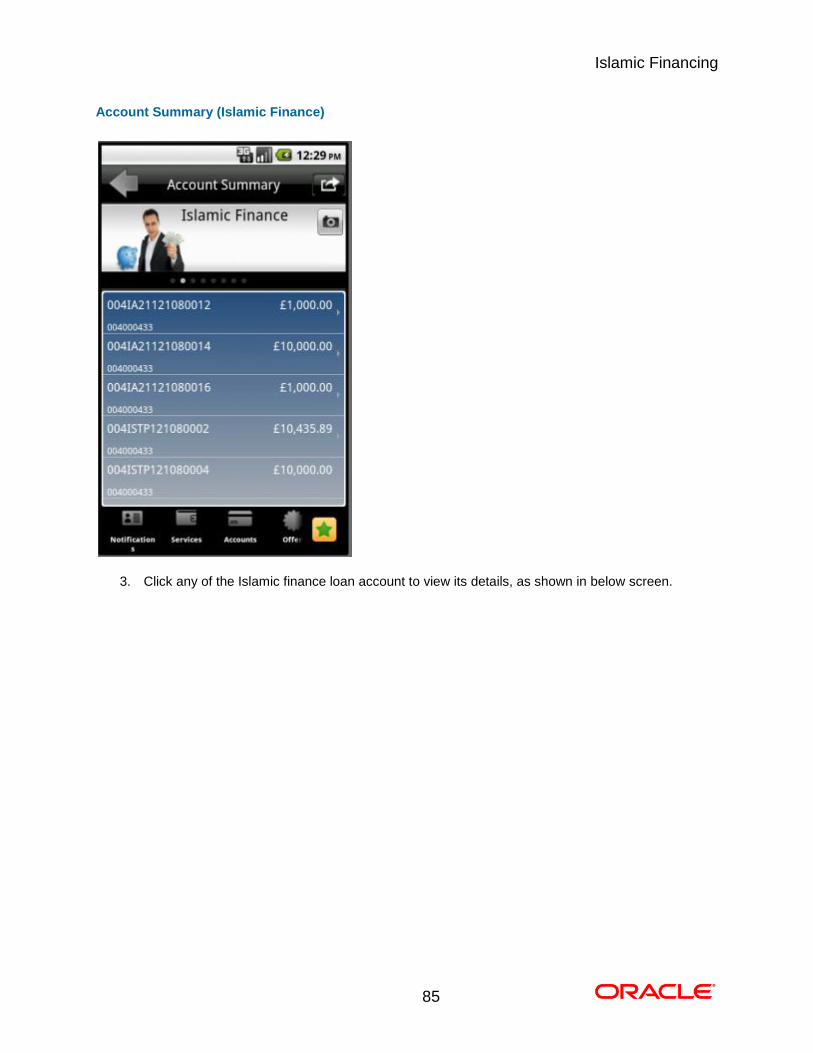
2. Click the Islamic Finance account type in the above screen. The system displays all the Islamic
Financing loan accounts in Account Summary screen as shown below.
Islamic Financing
85
Account Summary (Islamic Finance)
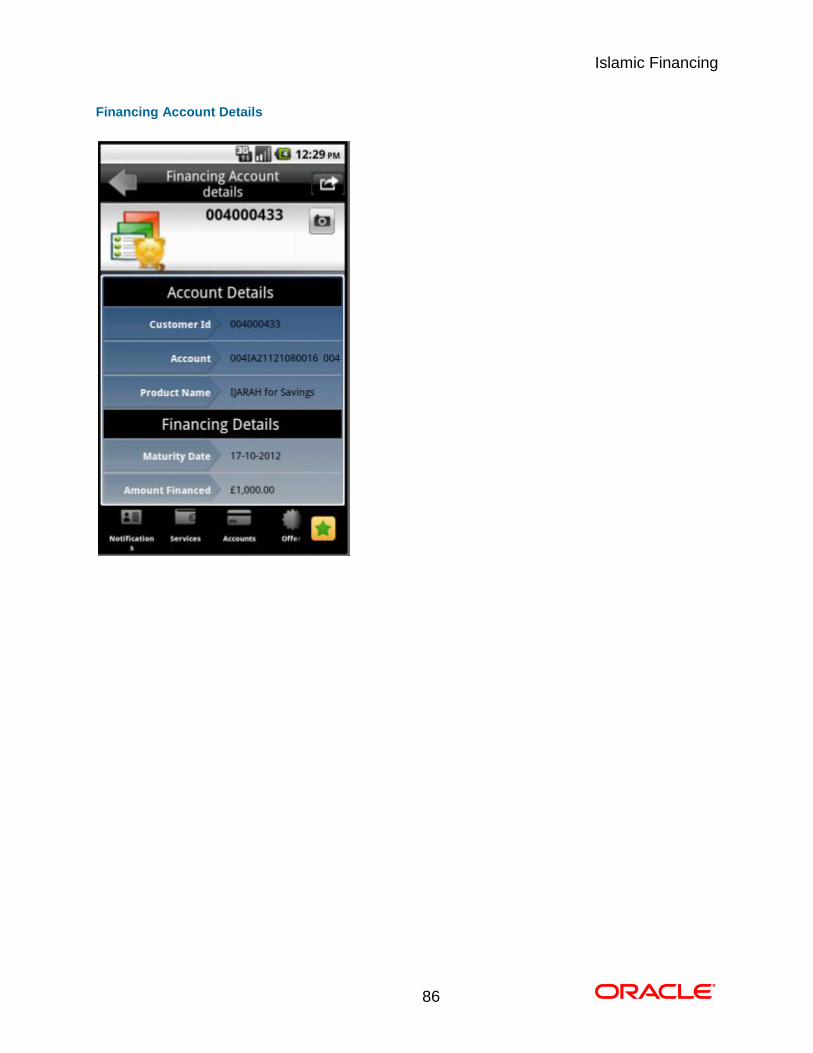
3. Click any of the Islamic finance loan account to view its details, as shown in below screen.
Islamic Financing
86
Financing Account Details
Islamic Financing
87
Islamic Financing
88
Field Description
Field Name Description
Account Details
Account [Display]
This field displays the account numbers under a particular
customer ID.
Customer Id [Display]
This field displays the customer id of the selected account.
Product Name [Display]
This field displays the financing product name.
Financing Details
Amount Financed [Display]
This field displays the financed amount.
Profit Rate [Display]
This field displays the profit rate applicable to the financing
account.
Maturity Date [Display]
This field displays the maturity date of the financing account.
Finance Amount
Disbursed
[Display]
This field displays the financing amount disbursed till date.
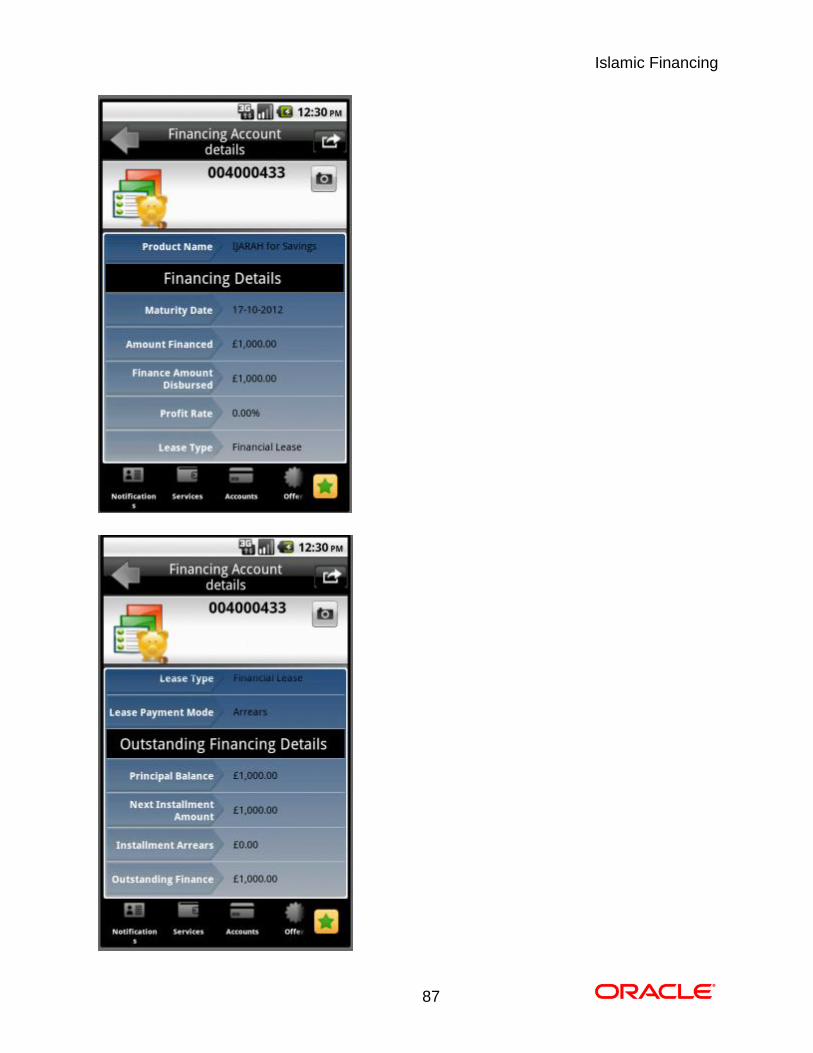
Lease Type [Display]
This field displays the type of the lease.
This field will be displayed when the selected account is opened
under IJARAHA or TAWAROOQ product.
Islamic Financing
89
Field Name Description
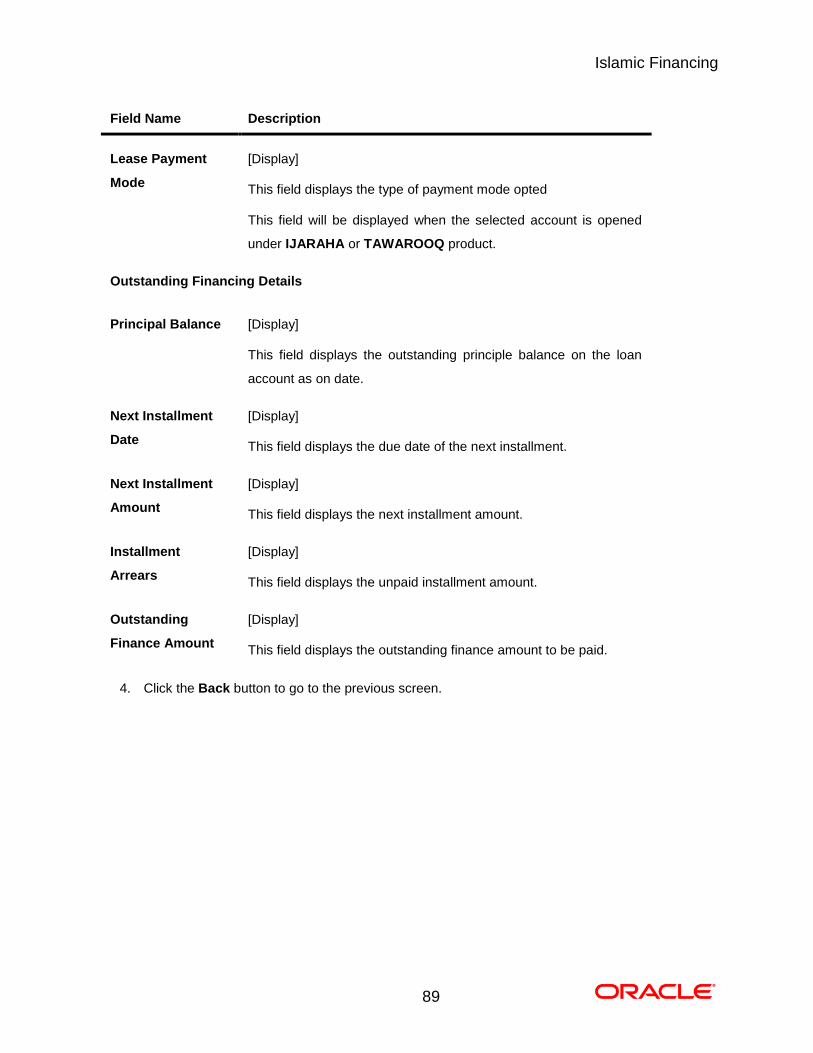
Lease Payment
Mode
[Display]
This field displays the type of payment mode opted
This field will be displayed when the selected account is opened
under IJARAHA or TAWAROOQ product.
Outstanding Financing Details
Principal Balance [Display]
This field displays the outstanding principle balance on the loan
account as on date.
Next Installment
Date
[Display]
This field displays the due date of the next installment.
Next Installment
Amount
[Display]
This field displays the next installment amount.
Installment
Arrears
[Display]
This field displays the unpaid installment amount.
Outstanding
Finance Amount
[Display]
This field displays the outstanding finance amount to be paid.
4. Click the Back button to go to the previous screen. 0.
Forex Rate Inquiry
90
17. Forex Rate Inquiry
This menu allows you to view the foreign exchange rate.
To inquire Foreign Exchange Rates
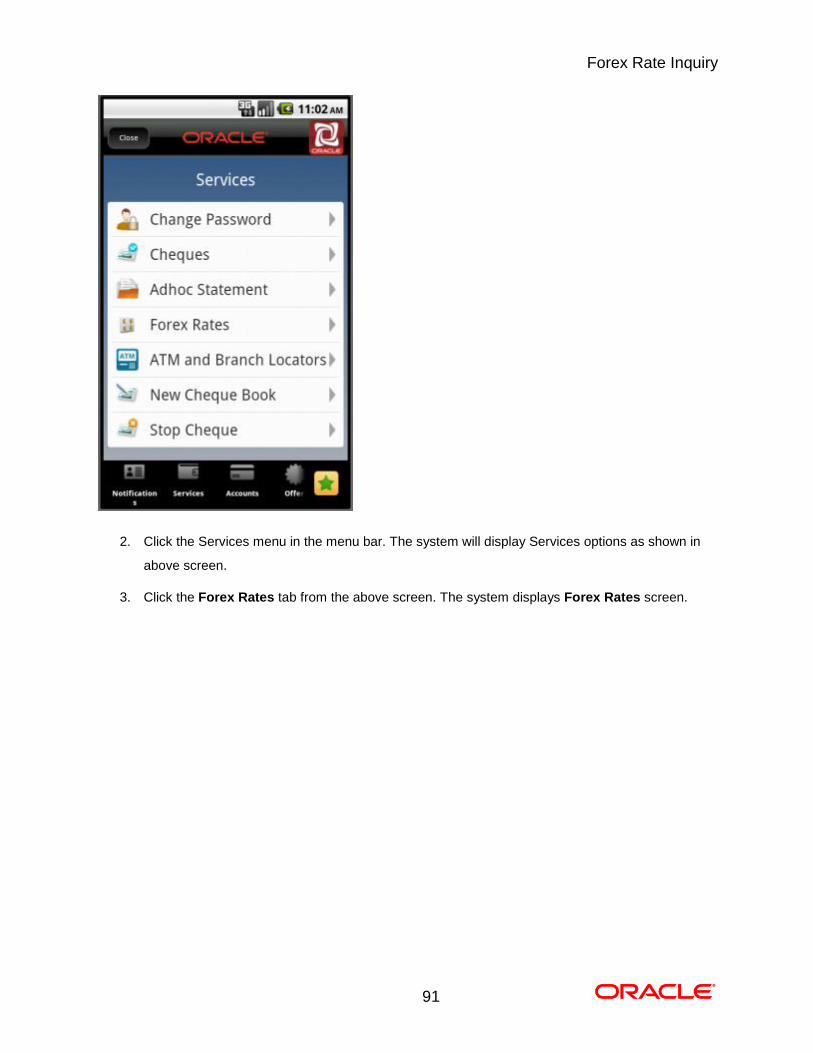
1. Log on to the Android application based Mobile Banking application.
Forex Rate Inquiry
91
2. Click the Services menu in the menu bar. The system will display Services options as shown in
above screen.
3. Click the Forex Rates tab from the above screen. The system displays Forex Rates screen.
Forex Rate Inquiry
92
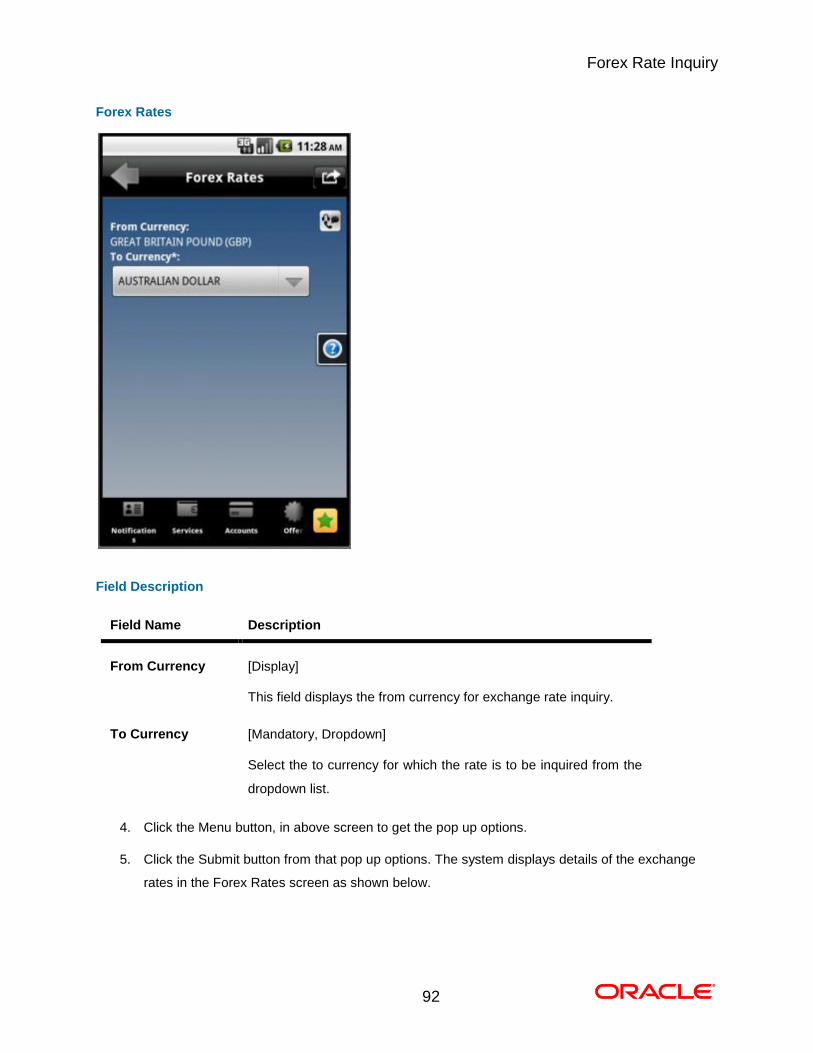
Forex Rates
Field Description
Field Name Description
From Currency [Display]
This field displays the from currency for exchange rate inquiry.
To Currency [Mandatory, Dropdown]
Select the to currency for which the rate is to be inquired from the
dropdown list.
4. Click the Menu button, in above screen to get the pop up options.
5. Click the Submit button from that pop up options. The system displays details of the exchange
rates in the Forex Rates screen as shown below. 0.

Forex Rate Inquiry
93
Forex Rates
Field Description
Field Name Description
Foreign Rate Unit [Display]
Displays the foreign rate unit currency.
To Currency [Display]
Displays the currency with which the Base Currency rates are
displayed.
Cash Buy [Display]
Displays the Cash Buy rate for the currency.
Cash Sell [Display]
Displays the Cash rate sell foe the currency.
Forex Rate Inquiry
94
Field Name Description
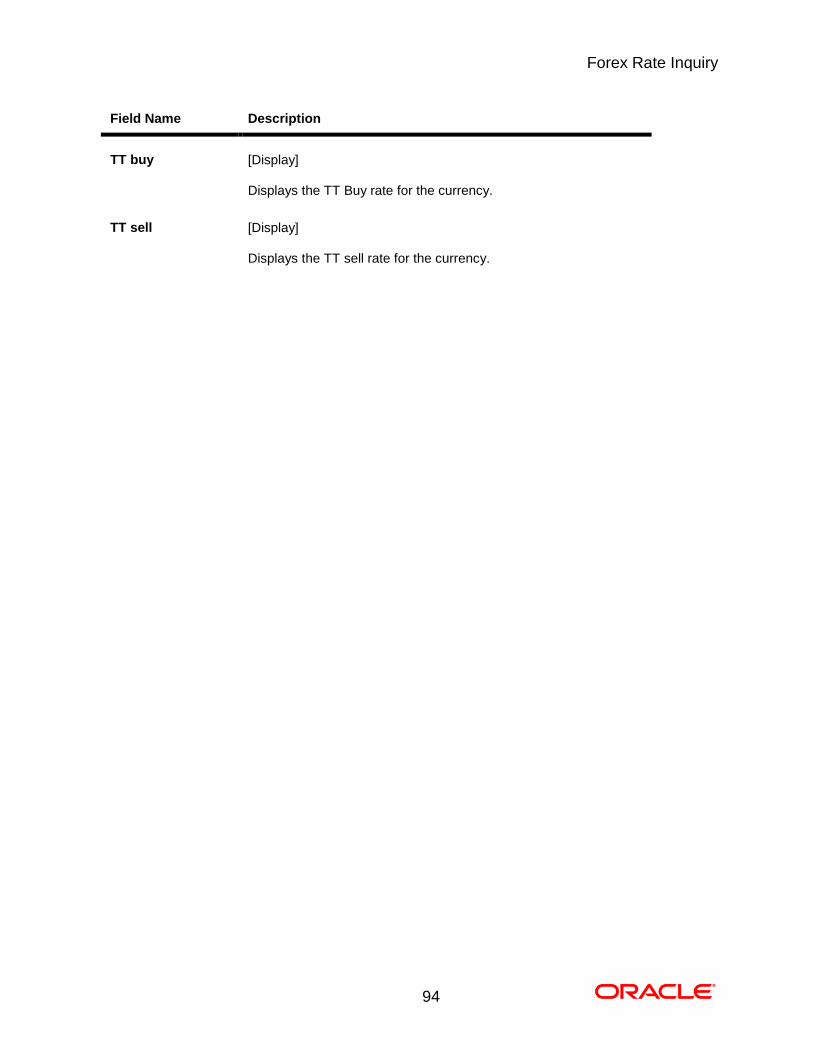
TT buy [Display]
Displays the TT Buy rate for the currency.
TT sell [Display]
Displays the TT sell rate for the currency.
Own Account Transfer
95
18. Own Account Transfer
This menu enables you to initiate an own account transfer. Own account transfer can be done between
any accounts owned by the same user I.e. the accounts that are under the customer ids mapped to you.
To do the own account transfer
1. Log on to the Android application based Mobile Banking application. The system shows initial
landing screen Accounts Overview as shown below.

Own Account Transfer
96
Accounts Overview
2. Click any of the account types. Below is shown for Current and Savings Accounts.
Own Account Transfer
97
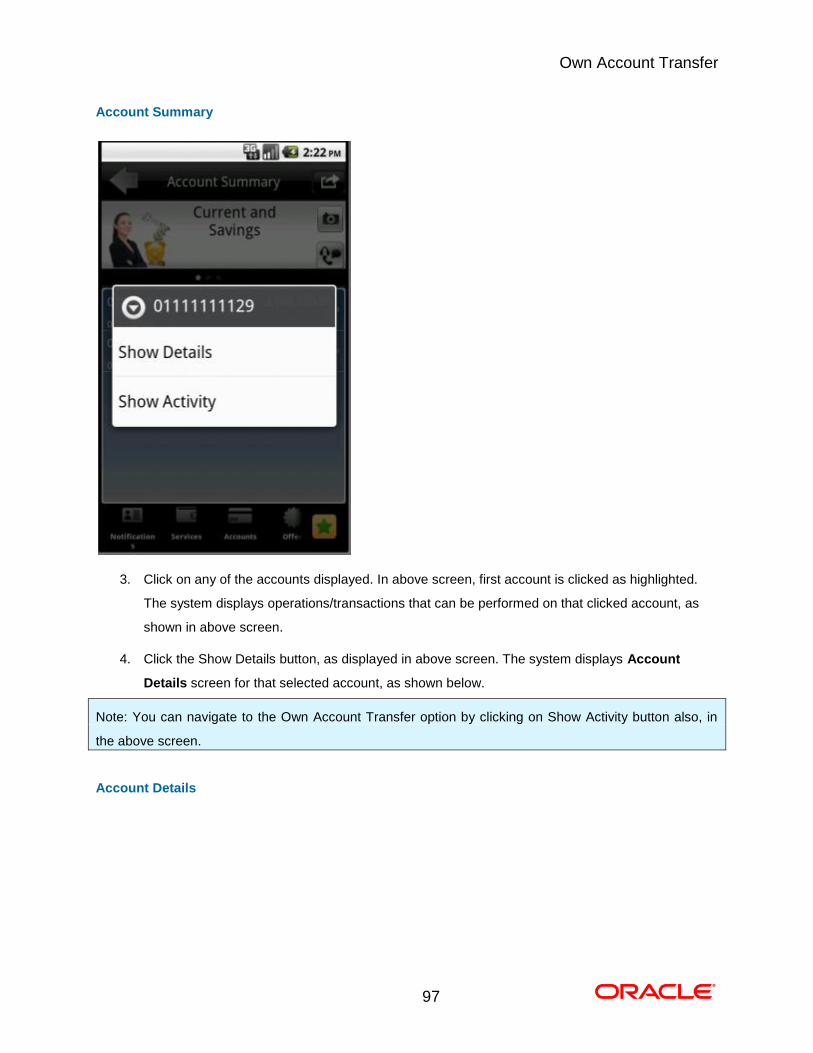
Account Summary
3. Click on any of the accounts displayed. In above screen, first account is clicked as highlighted.
The system displays operations/transactions that can be performed on that clicked account, as
shown in above screen.
4. Click the Show Details button, as displayed in above screen. The system displays Account
Details screen for that selected account, as shown below.
Note: You can navigate to the Own Account Transfer option by clicking on Show Activity button also, in
the above screen.
Account Details
Own Account Transfer
98
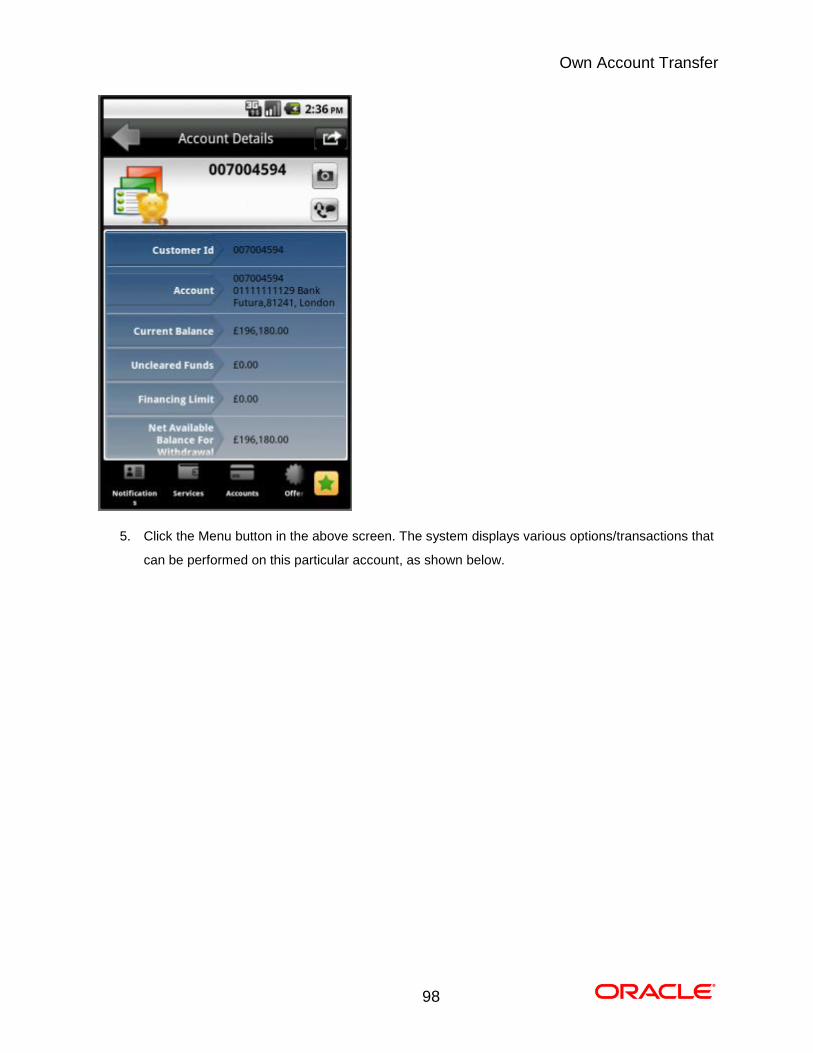
5. Click the Menu button in the above screen. The system displays various options/transactions that
can be performed on this particular account, as shown below.
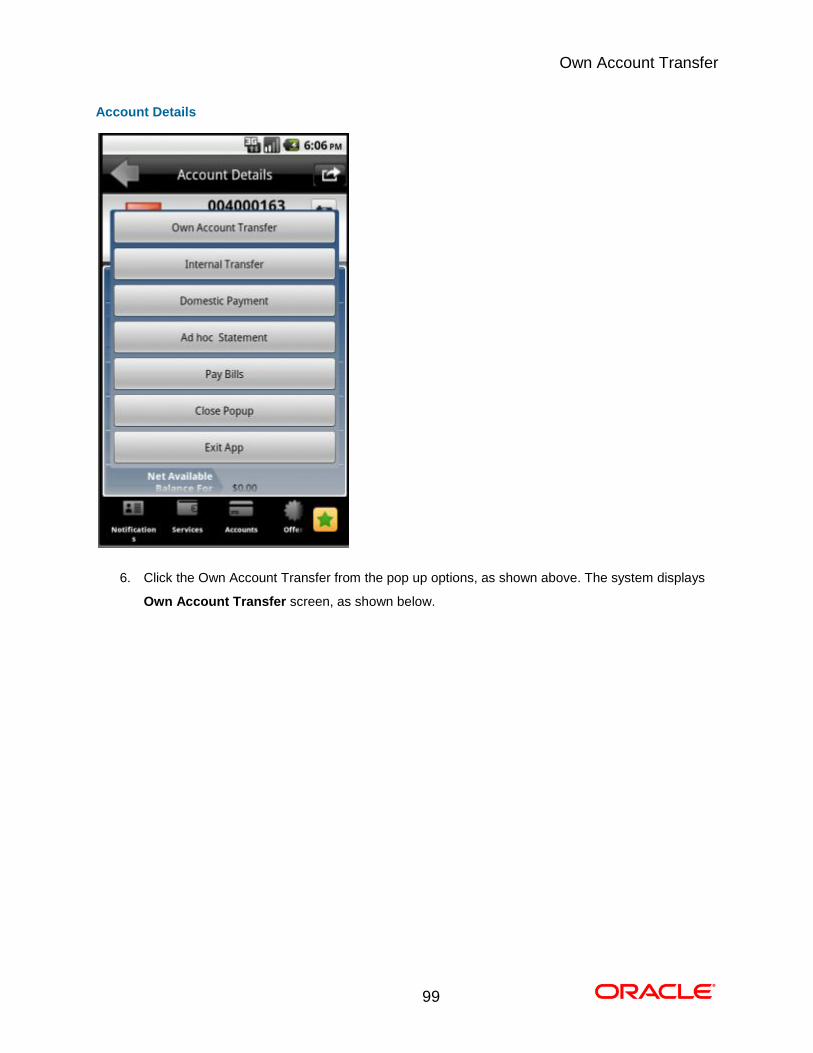
Own Account Transfer
99
Account Details
6. Click the Own Account Transfer from the pop up options, as shown above. The system displays
Own Account Transfer screen, as shown below.
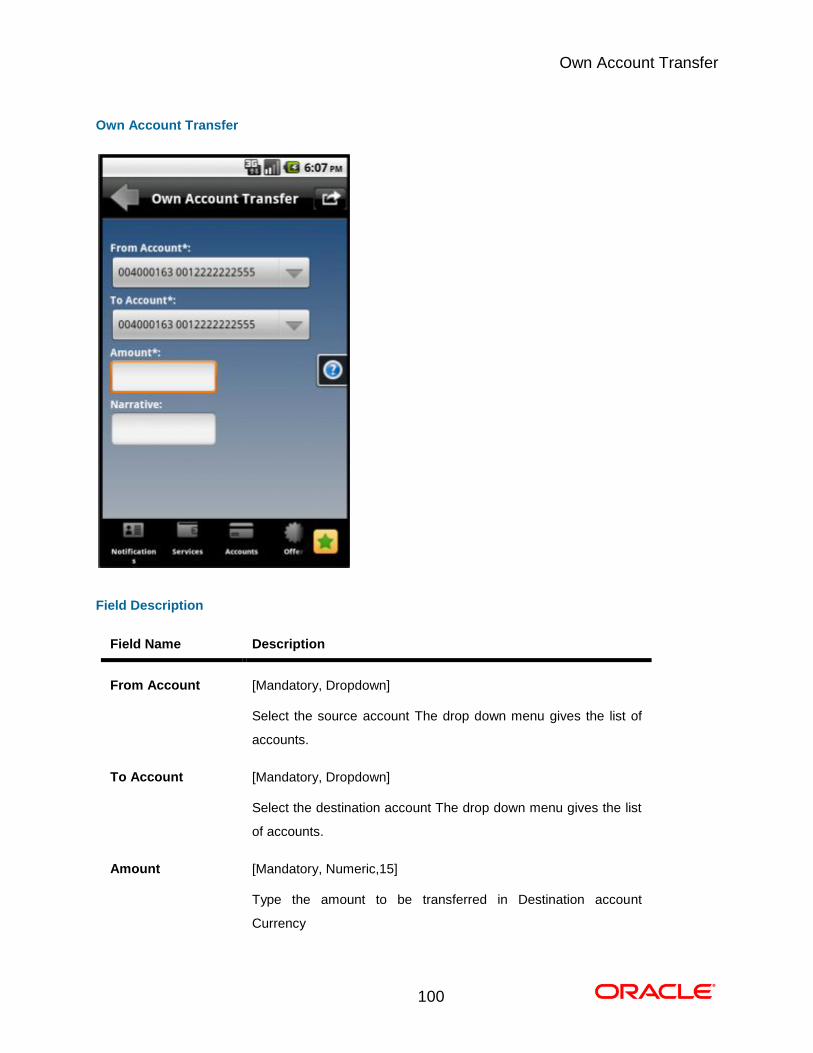
Own Account Transfer
100
Own Account Transfer
Field Description
Field Name Description
From Account [Mandatory, Dropdown]
Select the source account The drop down menu gives the list of
accounts.
To Account [Mandatory, Dropdown]
Select the destination account The drop down menu gives the list
of accounts.
Amount [Mandatory, Numeric,15]
Type the amount to be transferred in Destination account
Currency
Own Account Transfer
101
Field Name Description
Narrative [Optional, Alphanumeric, 80]
Type the details of the payment
7. Click the Menu options button in above screen, to get the pop up.
8. Click the Pay Now button from the pop up. The system displayed Own Account Transfer –
Verify screen.
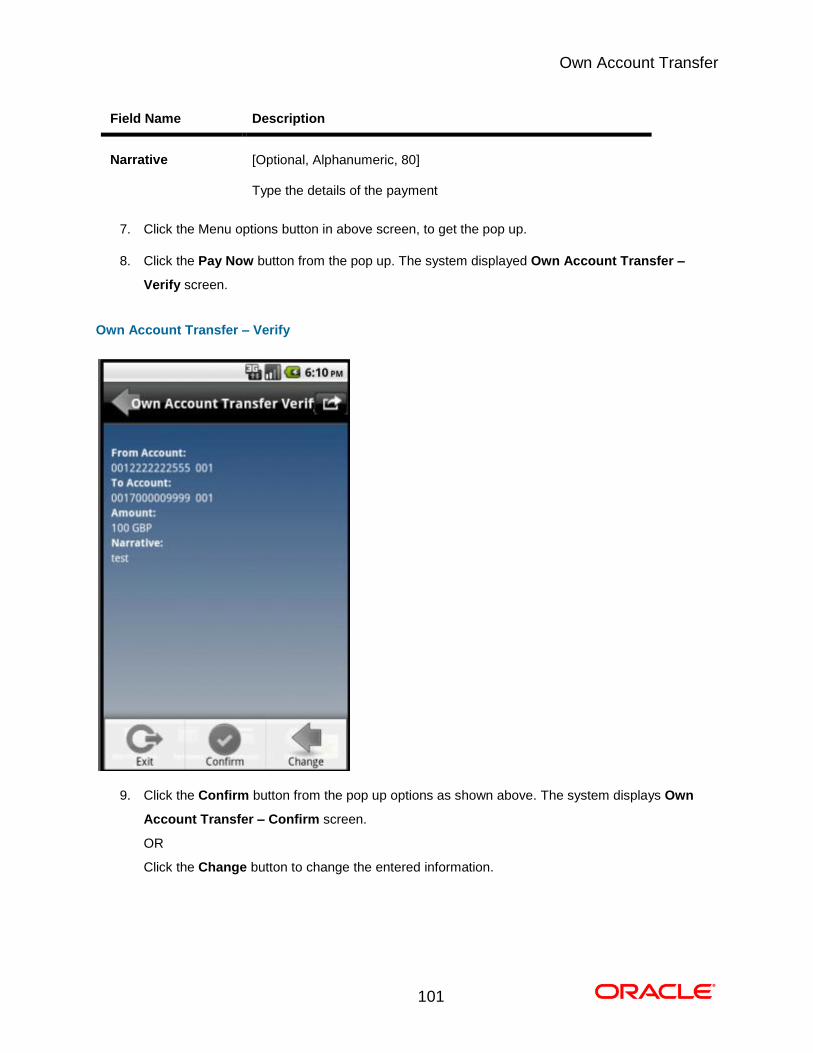
Own Account Transfer – Verify
9. Click the Confirm button from the pop up options as shown above. The system displays Own
Account Transfer – Confirm screen.
OR
Click the Change button to change the entered information.
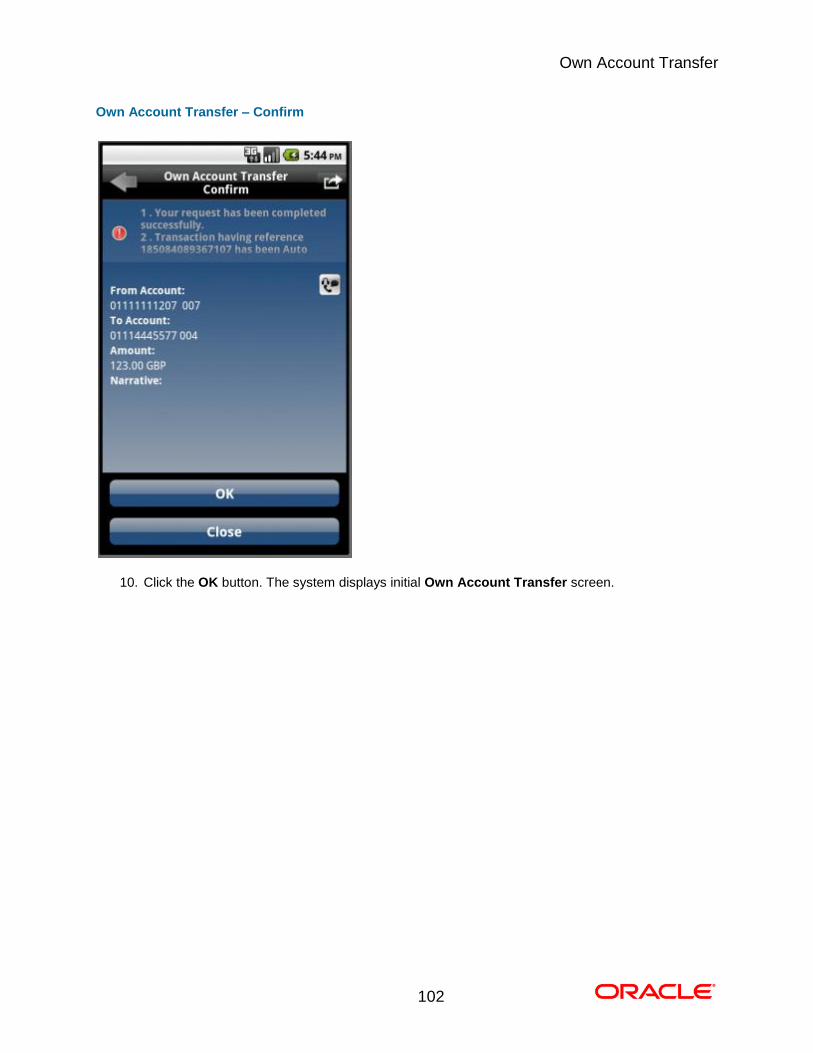
Own Account Transfer
102
Own Account Transfer – Confirm
10. Click the OK button. The system displays initial Own Account Transfer screen. 0.
Internal Transfer
103
19. Internal Transfer
This menu enables you to initiate an internal transfer. Internal Transfer is transfer of amount within
different accounts of the same bank.
To do the internal account transfer
1. Log on to the Android application based Mobile Banking application. The system shows initial
landing screen Accounts Overview as shown below.

Internal Transfer
104
Accounts Overview
2. Click any of the account types. Below is shown for Current and Savings Accounts.

Internal Transfer
105
Account Summary
3. Click on any of the accounts displayed. In above screen, first account is clicked as highlighted.
The system displays operations/transactions that can be performed on that clicked account, as
shown in above screen.
4. Click the Show Details button, as displayed in above screen. The system displays Account
Details screen for that selected account, as shown below.
Note: You can navigate to the Internal Transfer option by clicking on Show Activity button also, in the
above screen.
Internal Transfer
106
Account Details
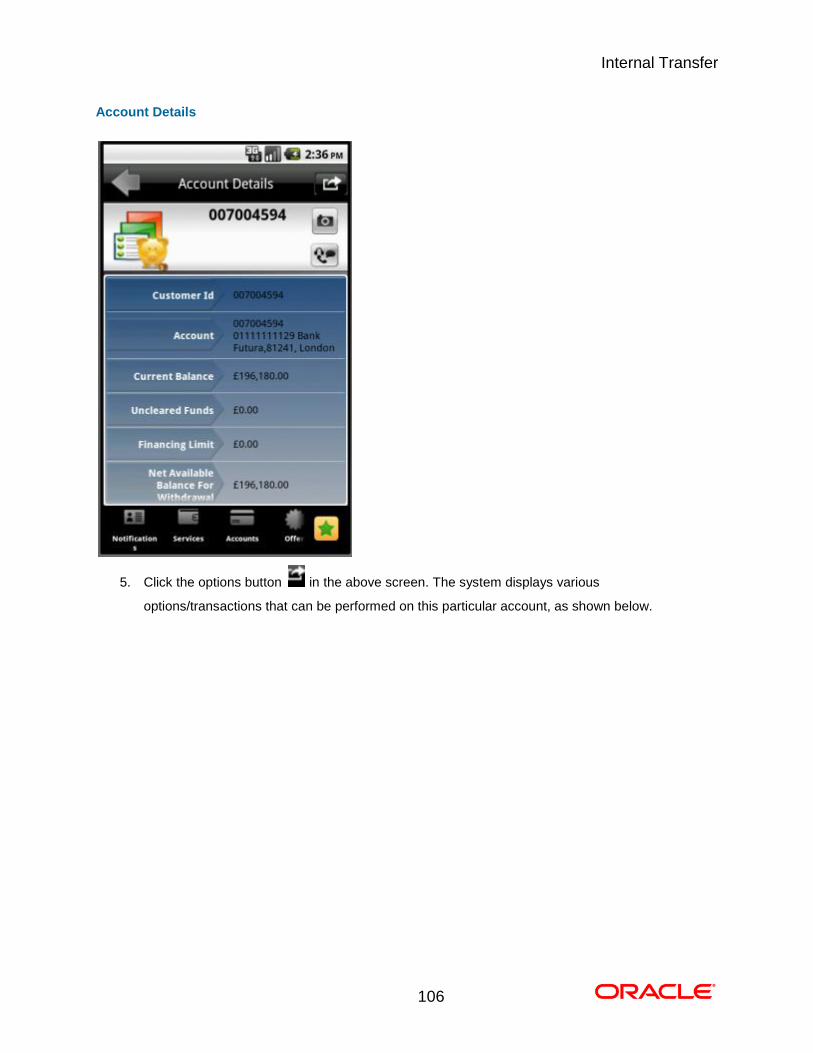
5. Click the options button in the above screen. The system displays various
options/transactions that can be performed on this particular account, as shown below.
Internal Transfer
107
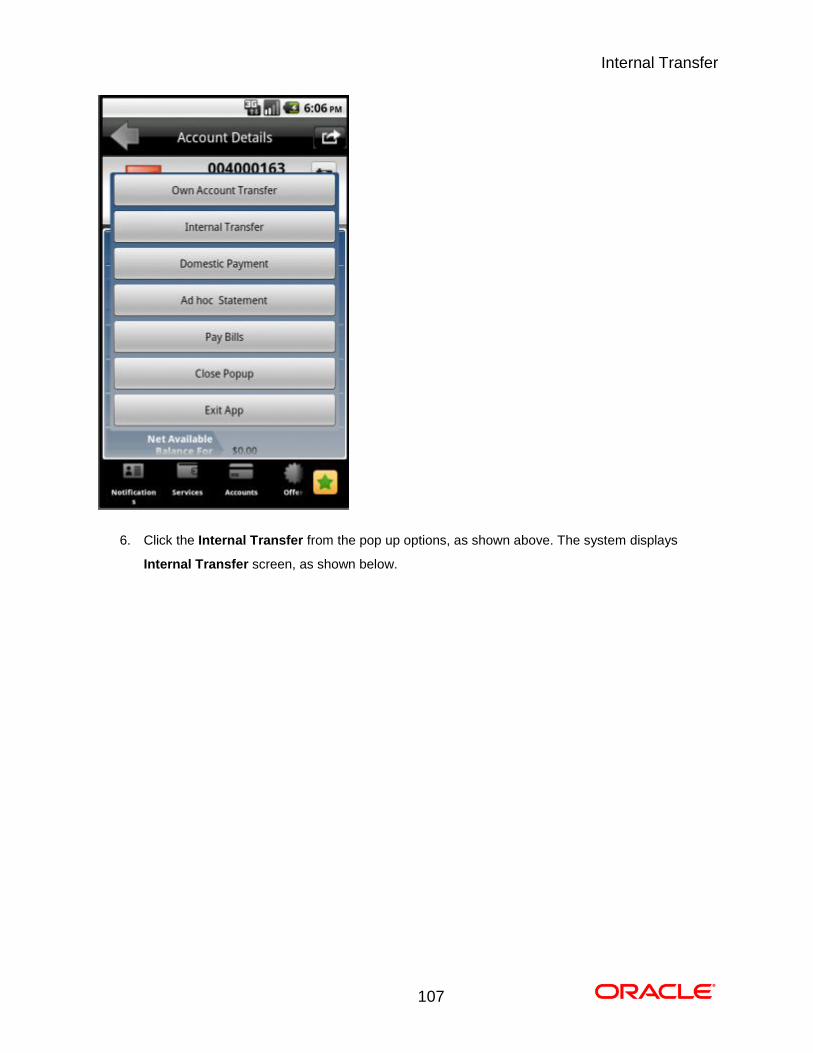
6. Click the Internal Transfer from the pop up options, as shown above. The system displays
Internal Transfer screen, as shown below.
Internal Transfer
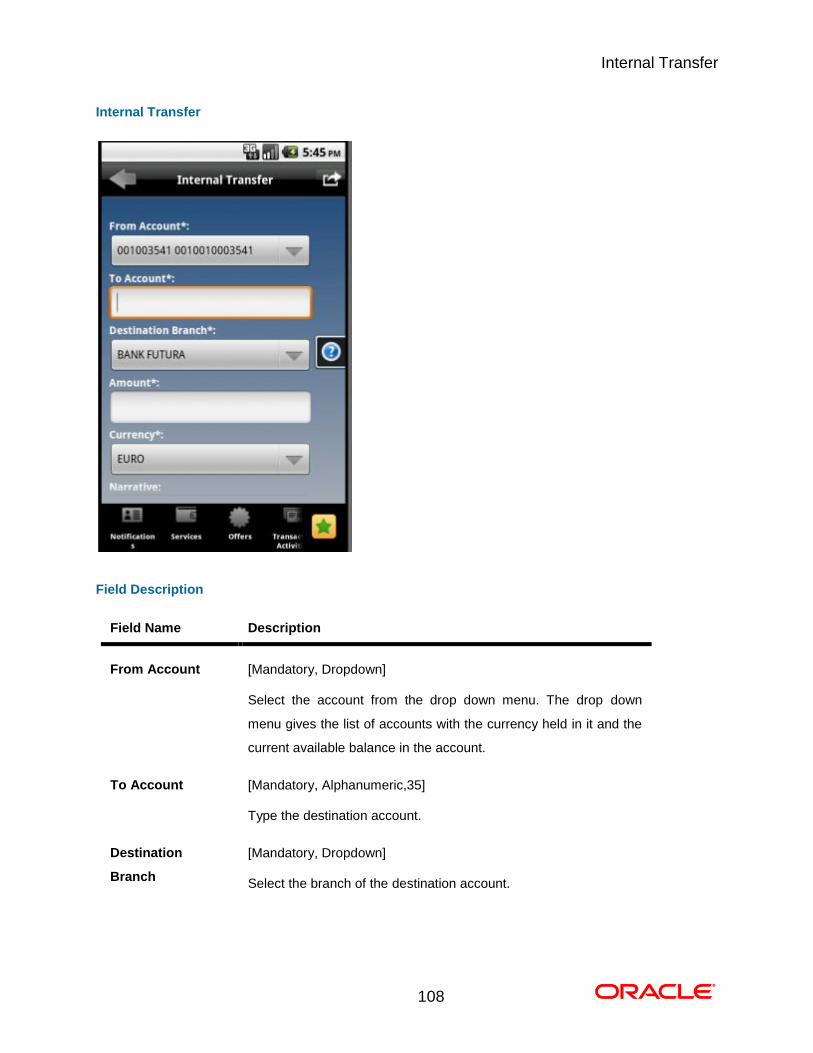
108
Internal Transfer
Field Description
Field Name Description
From Account [Mandatory, Dropdown]
Select the account from the drop down menu. The drop down
menu gives the list of accounts with the currency held in it and the
current available balance in the account.
To Account [Mandatory, Alphanumeric,35]
Type the destination account.
Destination
Branch
[Mandatory, Dropdown]
Select the branch of the destination account.
Internal Transfer
109
Field Name Description
Amount [Mandatory, Numeric , 13,2]
Type the amount to be transferred and also select it’s currency
from the dropdown displayed below that field.
Currency [Mandatory, Dropdown]
Select the currency of transfer from the dropdown list.
Narrative [Optional, Alphanumeric, 80 ]
Type the details of the payment
7. Click the Menu button, to get the pop up.
8. Click the Submit button from that pop up. The system displays Internal Transfer – Verify
screen, as shown below.
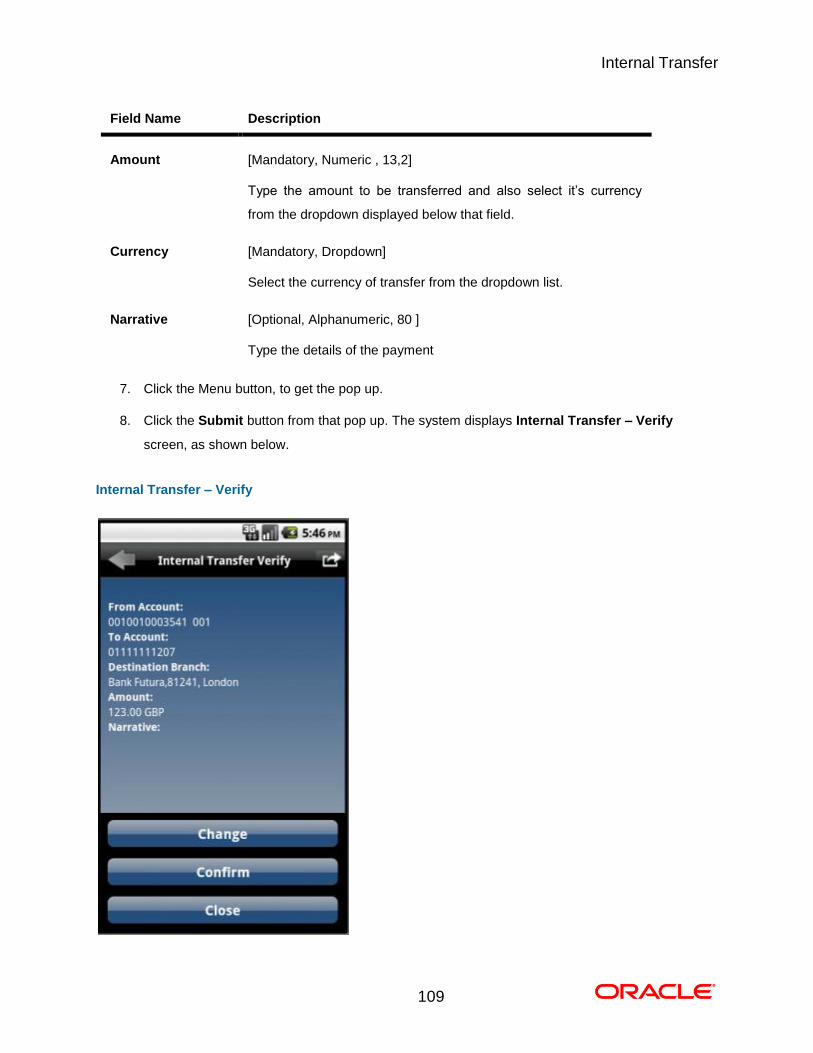
Internal Transfer – Verify
Internal Transfer
110
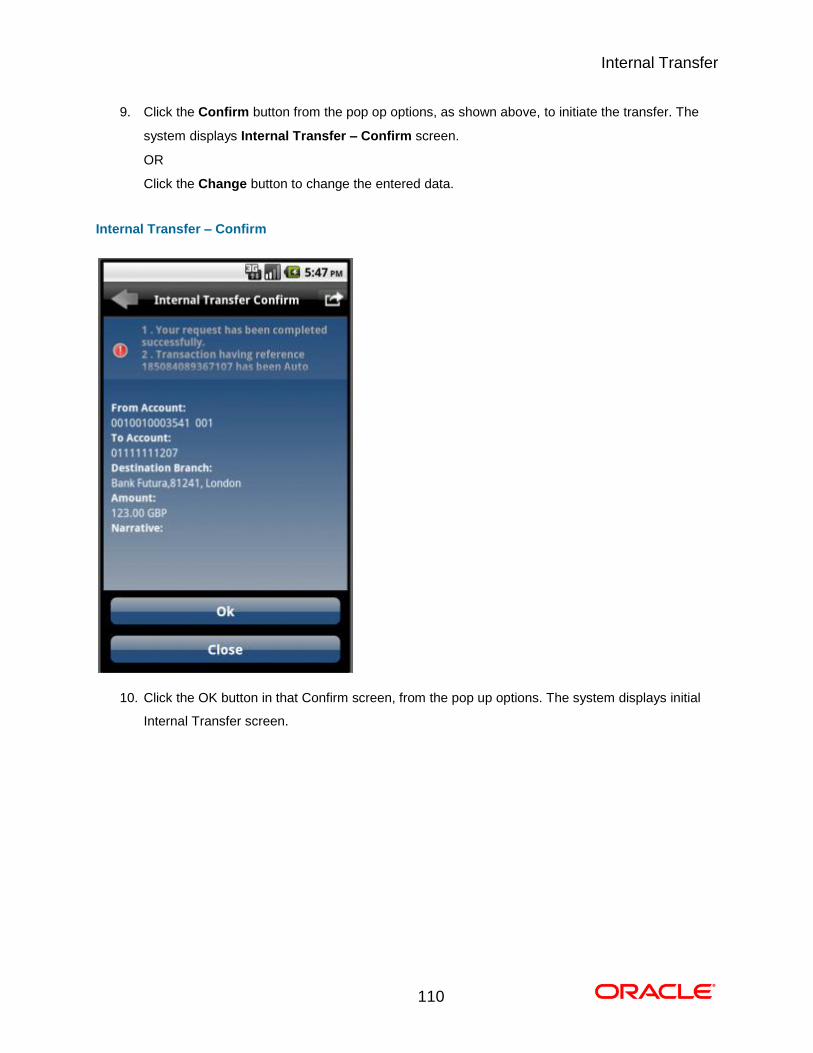
9. Click the Confirm button from the pop op options, as shown above, to initiate the transfer. The
system displays Internal Transfer – Confirm screen.
OR
Click the Change button to change the entered data.
Internal Transfer – Confirm
10. Click the OK button in that Confirm screen, from the pop up options. The system displays initial
Internal Transfer screen. 0.
Domestic Payment
111
20. Domestic Payment
This menu enables you to initiate Domestic account transfer. Domestic Transfer is transfer of amount
within different accounts of the different bank.
To do the domestic account transfer
1. Log on to the Android application based Mobile Banking application.
Domestic Payment
112
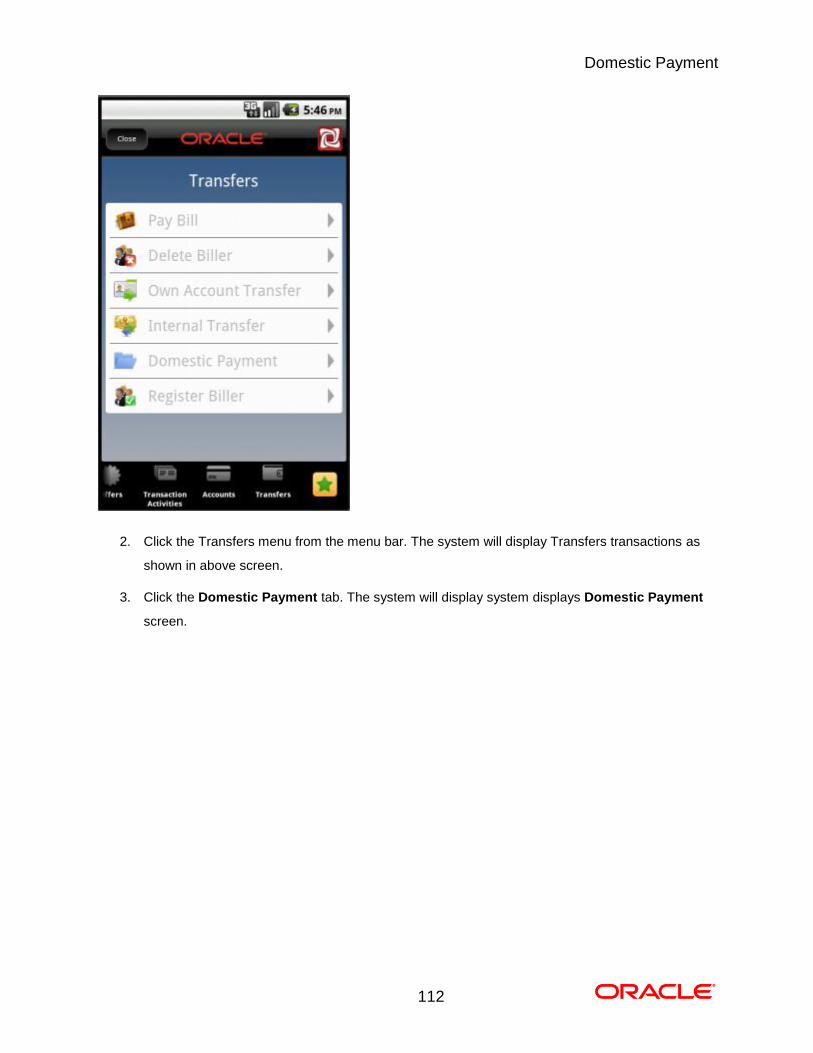
2. Click the Transfers menu from the menu bar. The system will display Transfers transactions as
shown in above screen.
3. Click the Domestic Payment tab. The system will display system displays Domestic Payment
screen.
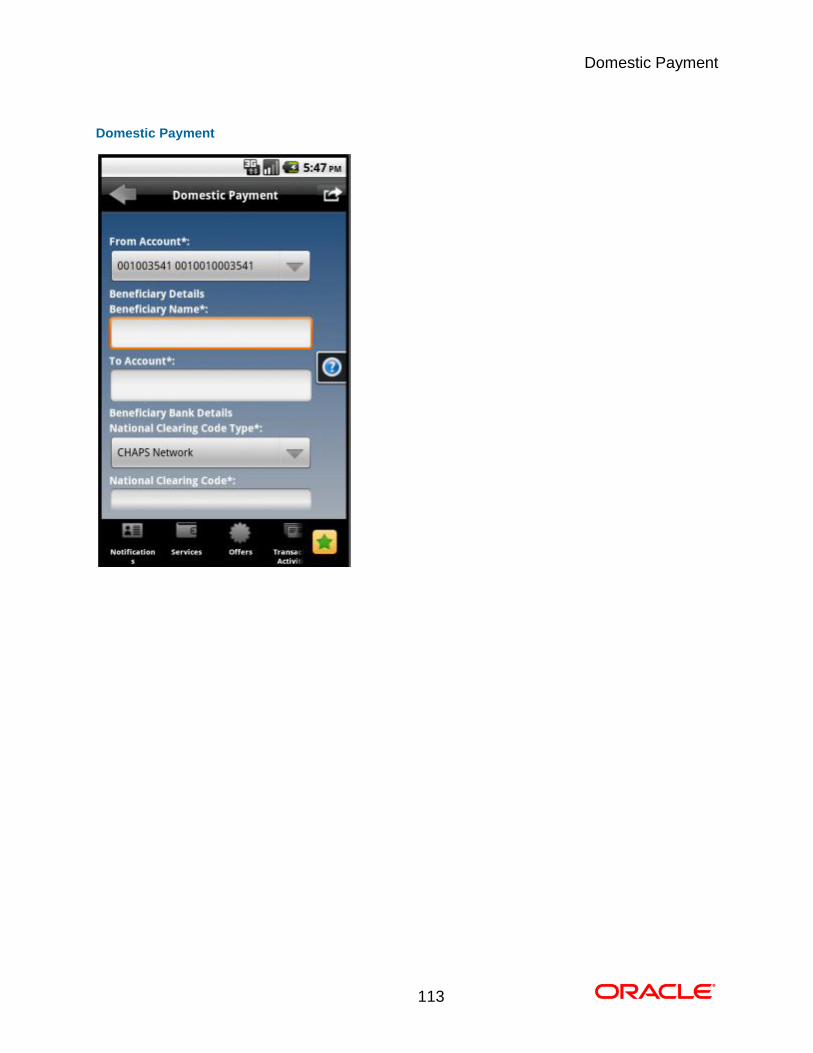
Domestic Payment
113
Domestic Payment

Domestic Payment
114
Field Description
Field Name Description
From Account [Mandatory, Dropdown]
Select the source account from the dropdown list
Beneficiary Details
To Account [Mandatory, Alphanumeric,35]
Type the Destination account number.
Beneficiary Bank Details
National Clearing
Code Type
[Mandatory, Dropdown]
Select the national clearing code type from the dropdown list.
Domestic Payment
115
Field Name Description
National Clearing
Code
[Mandatory, Alphanumeric,20]
Type the national clearing code for the Bank
Payment Details
Amount [Mandatory, Alphanumeric,15]
Type the amount to be transferred.
Currency [Mandatory, Dropdown]
Select the transfer currency from the dropdown list.
Other Details
Narrative [Mandatory]
Type the narrative for further reference
4. Enter the required details
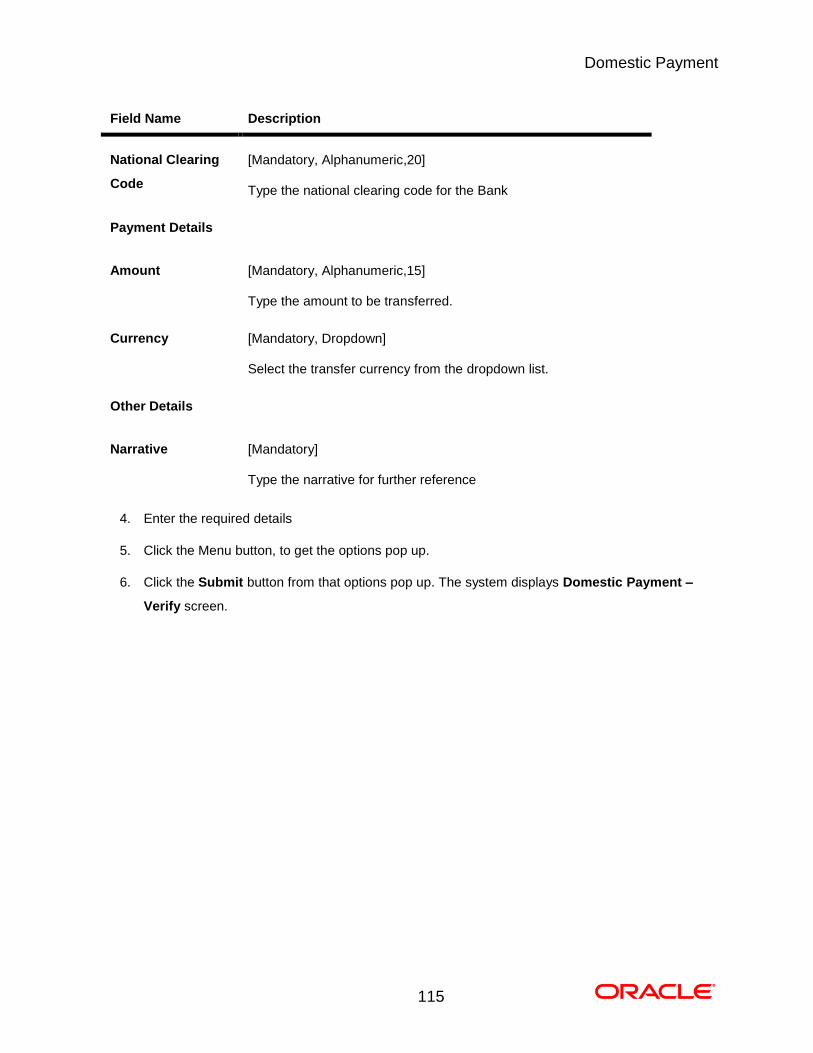
5. Click the Menu button, to get the options pop up.
6. Click the Submit button from that options pop up. The system displays Domestic Payment –
Verify screen.
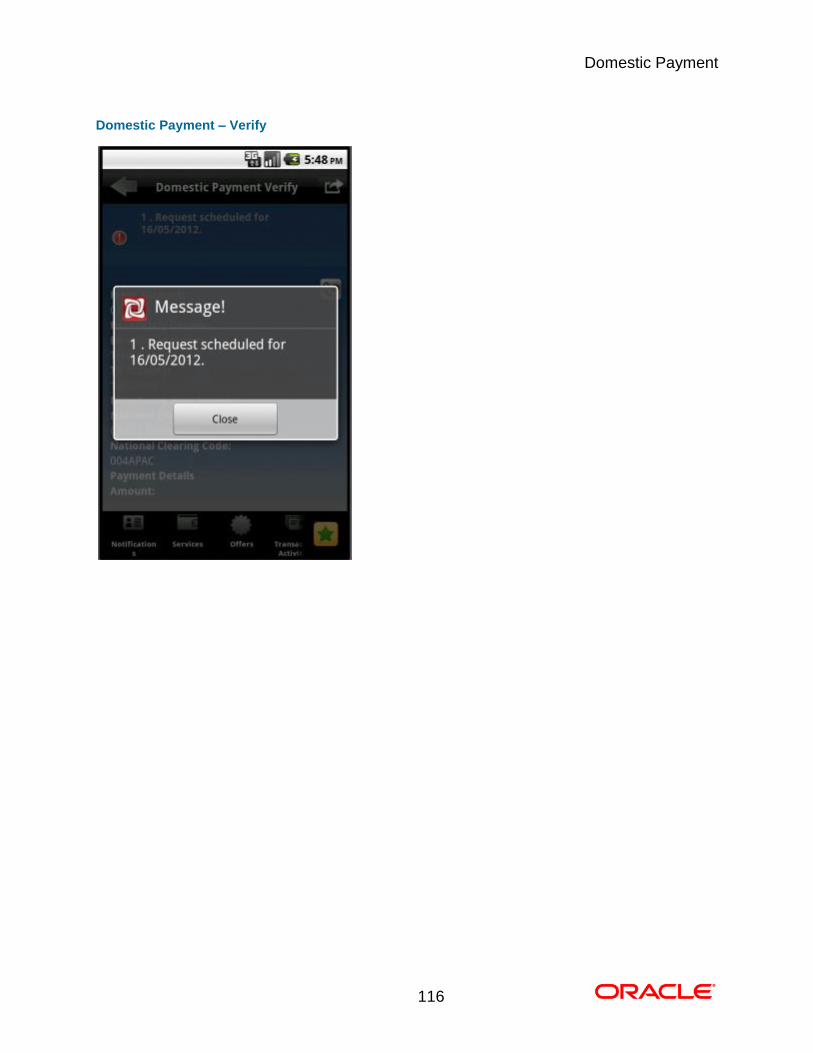
Domestic Payment
116
Domestic Payment – Verify
Domestic Payment
117
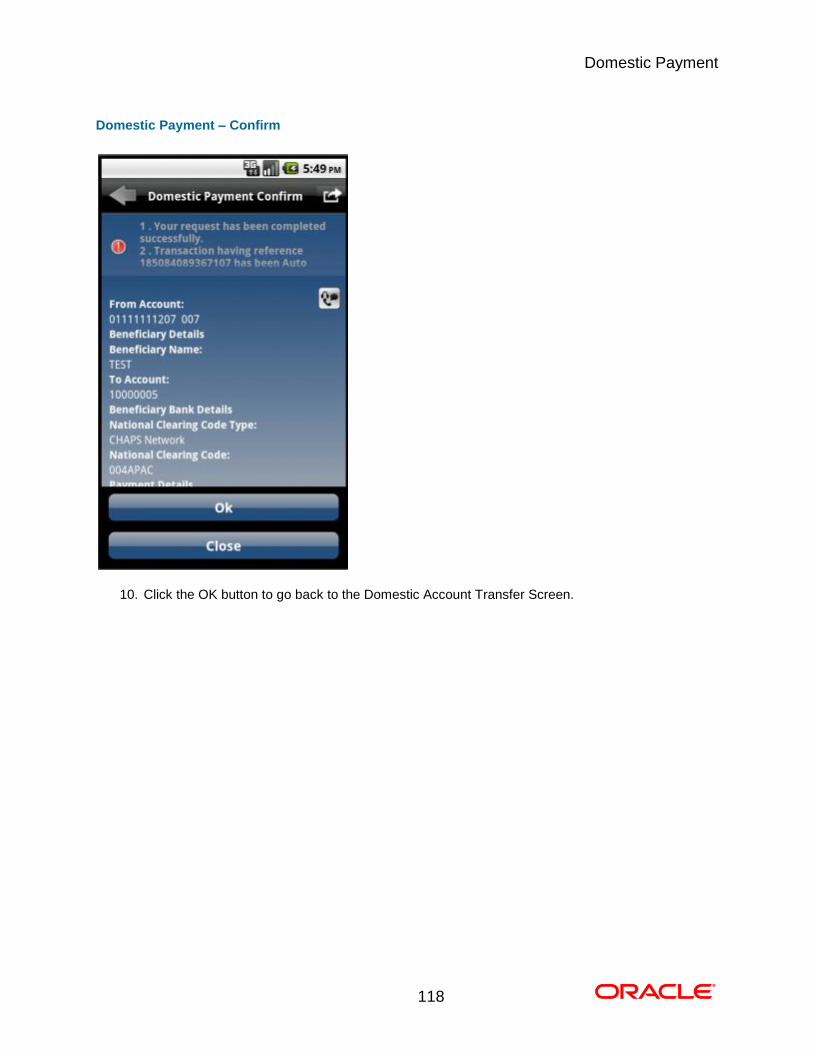
7. Click the Close button to initiate the transfer.
8. Click the Menu options button to get the popup.
9. Click the Confirm button from that pop up options. The system displays Domestic Payment –
Confirm screen
Domestic Payment
118
Domestic Payment – Confirm
10. Click the OK button to go back to the Domestic Account Transfer Screen. 0.
Deposit Redemption
119
21. Deposit Redemption
Redeem Term Deposit allows you to Redeem your term Deposit details either partially or fully through
Android application Based Mobile Banking.
To redeem the term deposit
1. Log on to the Android application based Mobile Banking application.
Deposit Redemption
120
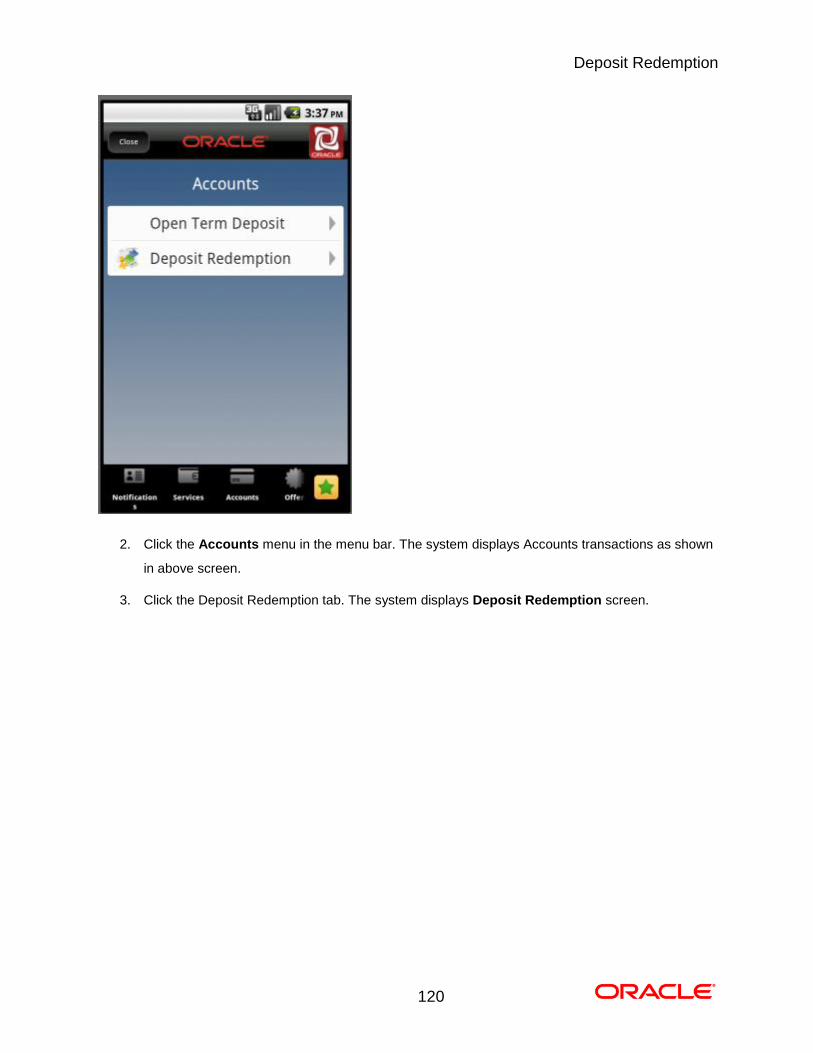
2. Click the Accounts menu in the menu bar. The system displays Accounts transactions as shown
in above screen.
3. Click the Deposit Redemption tab. The system displays Deposit Redemption screen.
Deposit Redemption
121
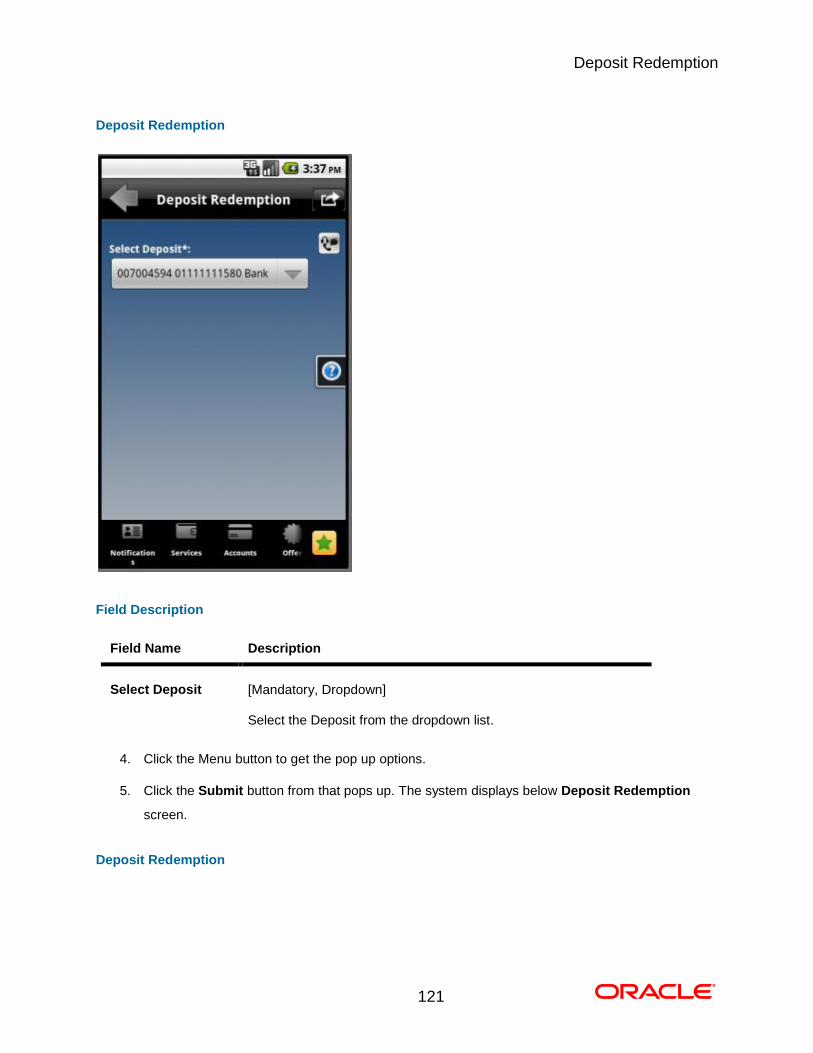
Deposit Redemption
Field Description
Field Name Description
Select Deposit [Mandatory, Dropdown]
Select the Deposit from the dropdown list.
4. Click the Menu button to get the pop up options.
5. Click the Submit button from that pops up. The system displays below Deposit Redemption
screen.
Deposit Redemption
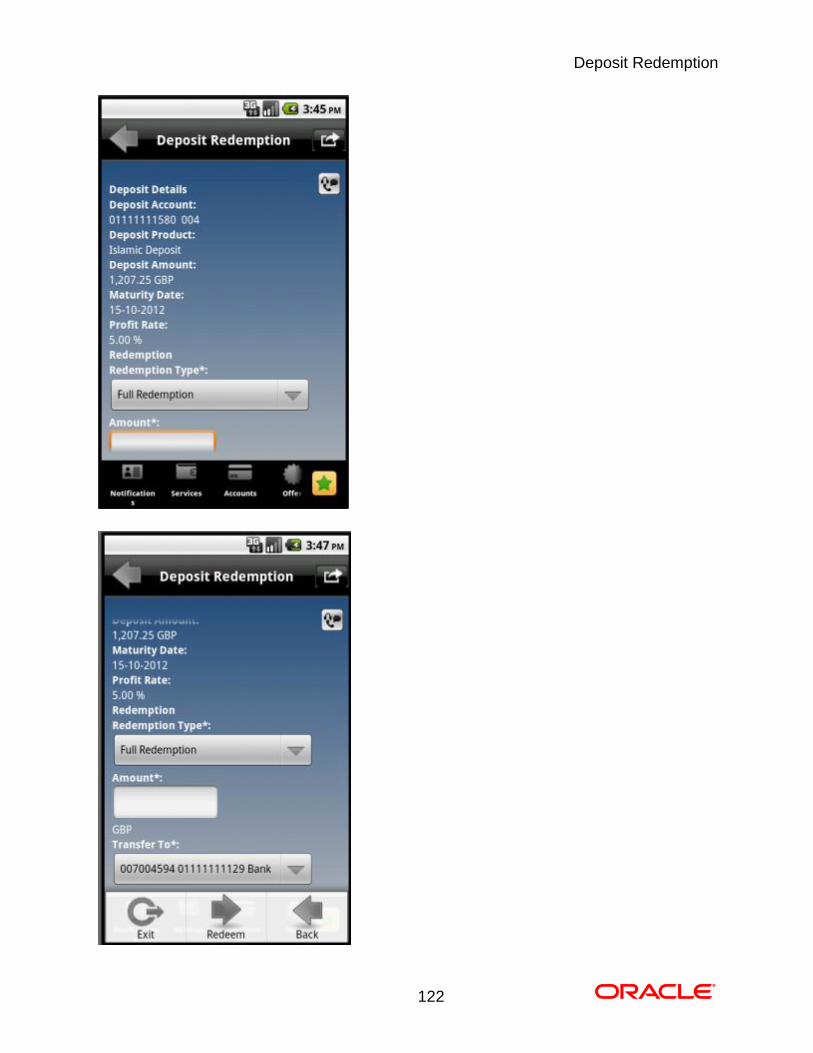
Deposit Redemption
122

Deposit Redemption
123
Field Description
Field Name Description
Deposit Details
Deposit Account [Display]
This field displays the account number of Deposit account.
Deposit Product [Display]
This field displays the name of the Deposit Product.
Account Details
Deposit Amount [Display]
This field displays the Amount of Deposit.
Maturity Date [Display]
This field displays the Maturity date of the deposit.
Interest Rate [Display]
This field displays the Interest rate of the deposit.
Redemption type
Redemption type [Mandatory, Dropdown]
Select the Type of Redemption from the dropdown list.
The options are
Partial
Full
Amount [Display]
This field displays the Amount of the deposit and its currency.
Transfer to [Mandatory, Dropdown]
Select the Account Number to which the amount shall be
transferred from the given CASA account dropdown list..
Deposit Redemption
124
6. Click the Menu button. The system displays pop up options as shown in above screen.
7. Click the Redeem button from the pop up options as shown above. The system displays Deposit
Redemption Verify screen.
OR
Click the Change button to go back to the previous screen to make any changes.
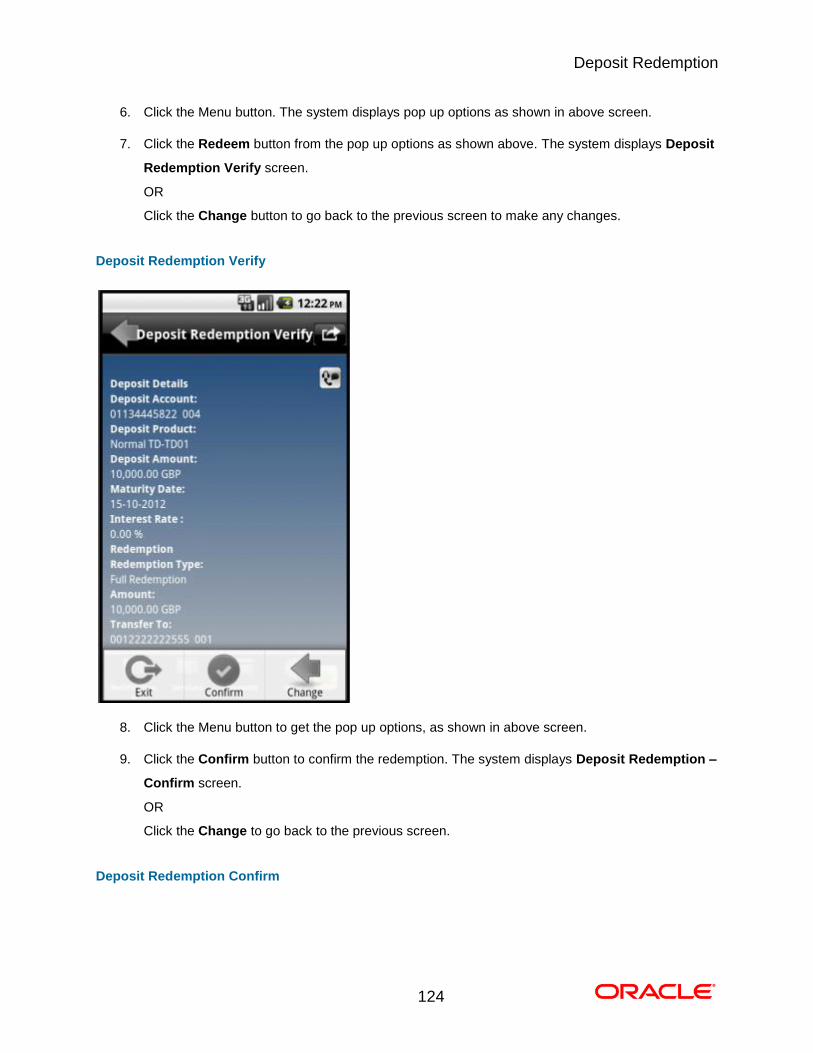
Deposit Redemption Verify
8. Click the Menu button to get the pop up options, as shown in above screen.
9. Click the Confirm button to confirm the redemption. The system displays Deposit Redemption –
Confirm screen.
OR
Click the Change to go back to the previous screen.
Deposit Redemption Confirm

Deposit Redemption
125
10. Click the Close button to return to the Deposit Redemption screen. 0.
Pending Authorization
126
22. Pending Authorization
Transactions to authorize display all the transactions with their status as Pending, semi Authorized or
Initiated.
To view the transactions for authorization
1. Log on to the Android application based Mobile Banking application.
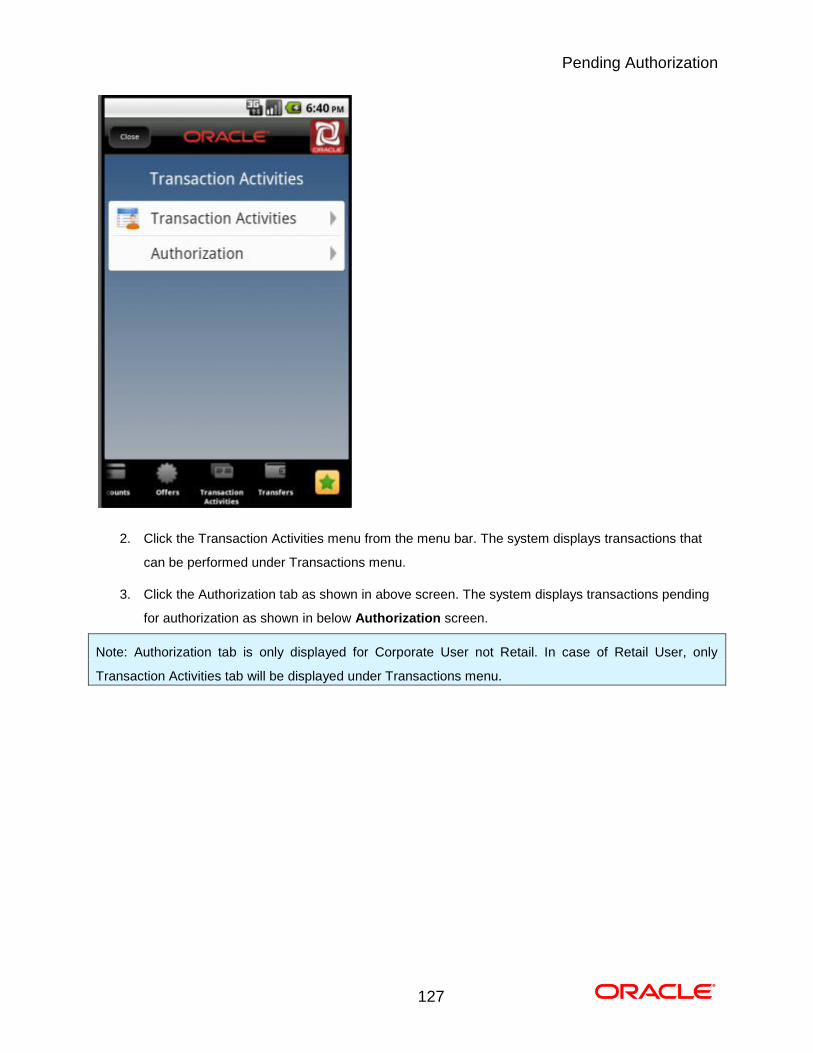
Pending Authorization
127
2. Click the Transaction Activities menu from the menu bar. The system displays transactions that
can be performed under Transactions menu.
3. Click the Authorization tab as shown in above screen. The system displays transactions pending
for authorization as shown in below Authorization screen.
Note: Authorization tab is only displayed for Corporate User not Retail. In case of Retail User, only
Transaction Activities tab will be displayed under Transactions menu.
Pending Authorization
128
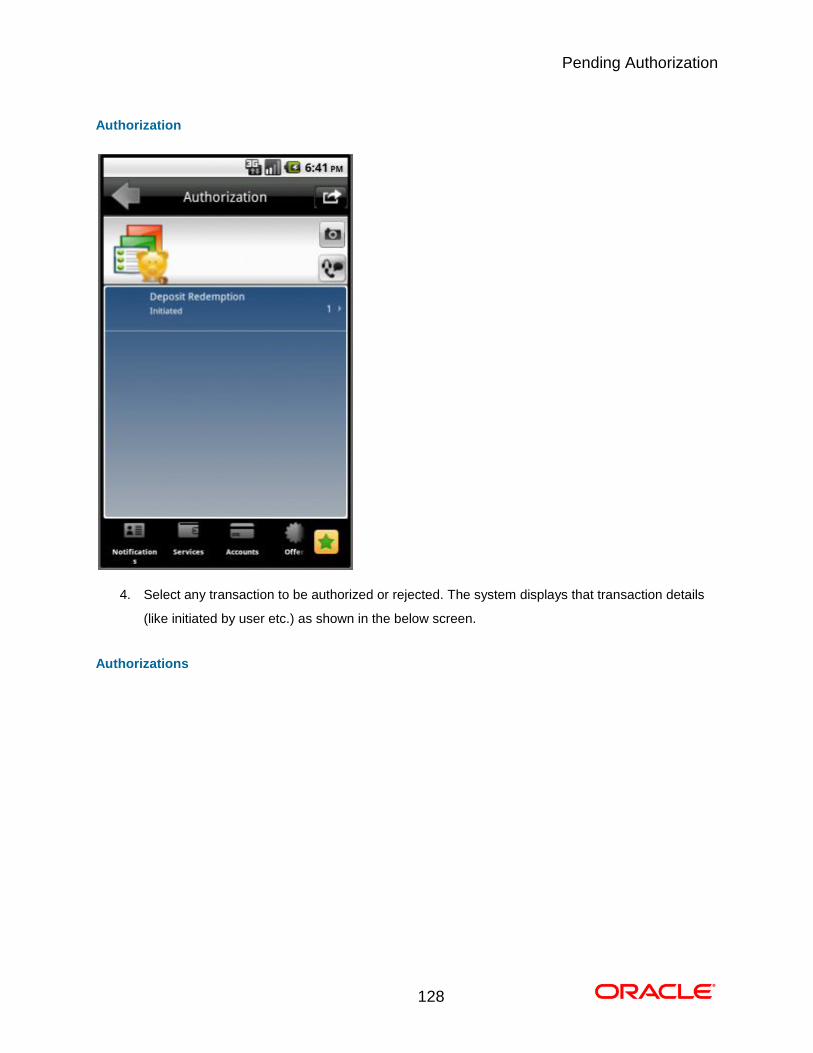
Authorization
4. Select any transaction to be authorized or rejected. The system displays that transaction details
(like initiated by user etc.) as shown in the below screen.
Authorizations
Pending Authorization
129
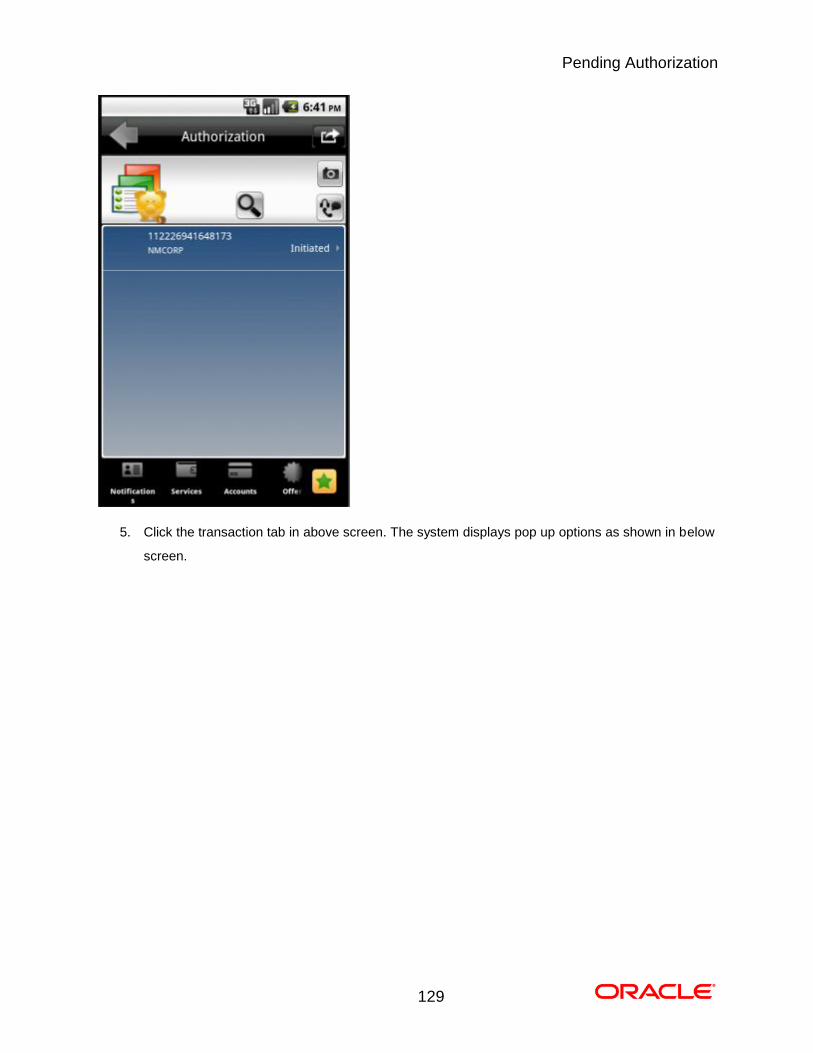
5. Click the transaction tab in above screen. The system displays pop up options as shown in below
screen.
Pending Authorization
130
Authorization
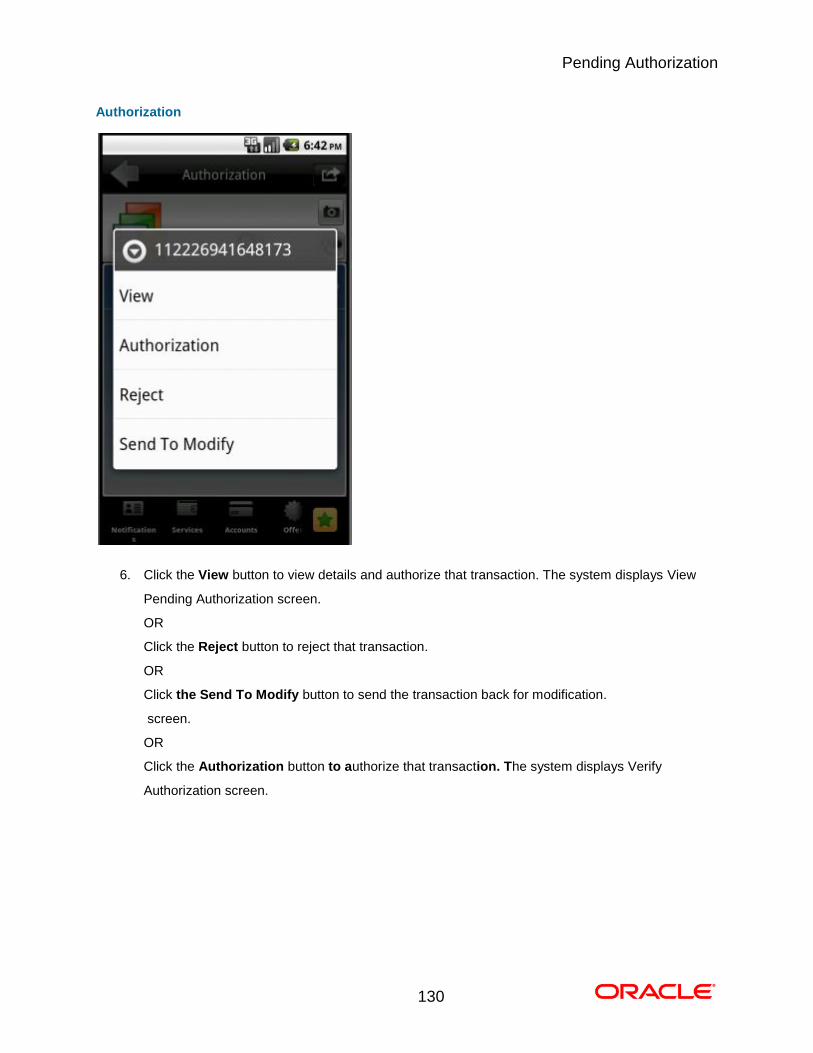
6. Click the View button to view details and authorize that transaction. The system displays View
Pending Authorization screen.
OR
Click the Reject button to reject that transaction.
OR
Click the Send To Modify button to send the transaction back for modification.
screen.
OR
Click the Authorization button to authorize that transaction. The system displays Verify
Authorization screen.
Pending Authorization
131
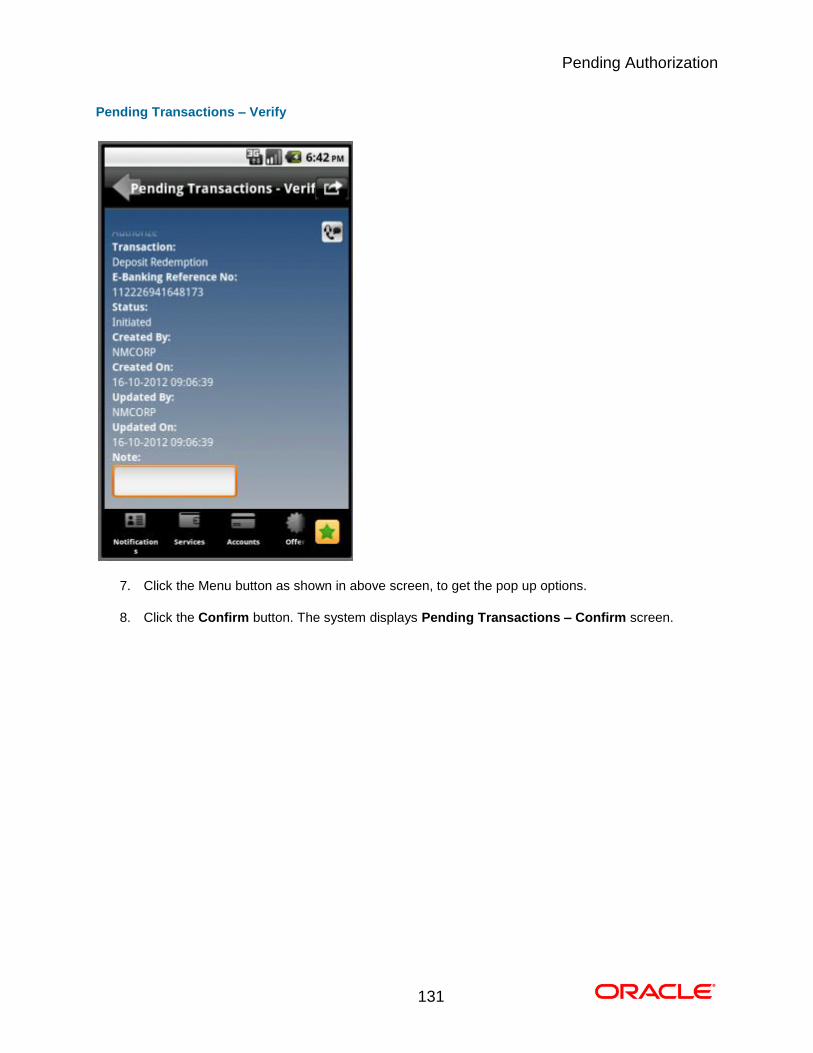
Pending Transactions – Verify
7. Click the Menu button as shown in above screen, to get the pop up options.
8. Click the Confirm button. The system displays Pending Transactions – Confirm screen.
Pending Authorization
132
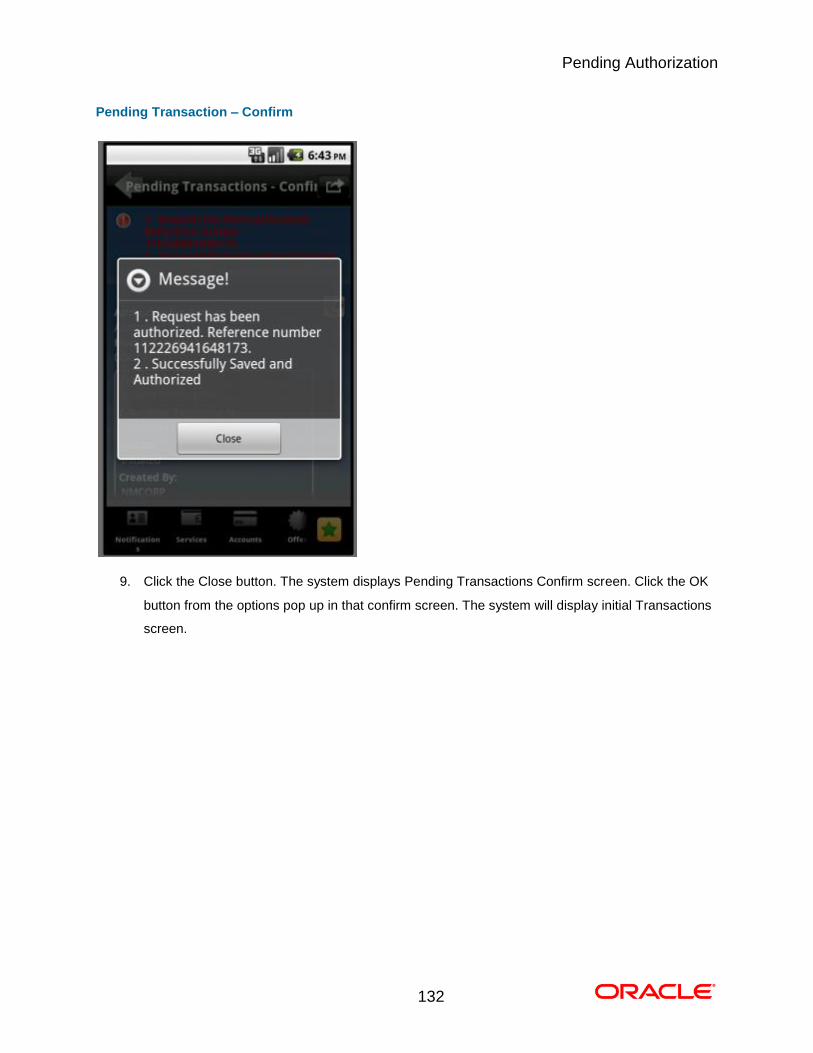
Pending Transaction – Confirm
9. Click the Close button. The system displays Pending Transactions Confirm screen. Click the OK
button from the options pop up in that confirm screen. The system will display initial Transactions
screen. 0.
Mailbox/Notifications
133
23. Mailbox/Notifications
Mailbox allows you to submit a query through Mails to the bank through Mobile Banking. Once the
Response has been posted by the Bank the customer is notified by the mail.
To access the Mailbox options
1. Log on to the Android application based Mobile Banking application.
Mailbox/Notifications
134
23.1. Compose Message
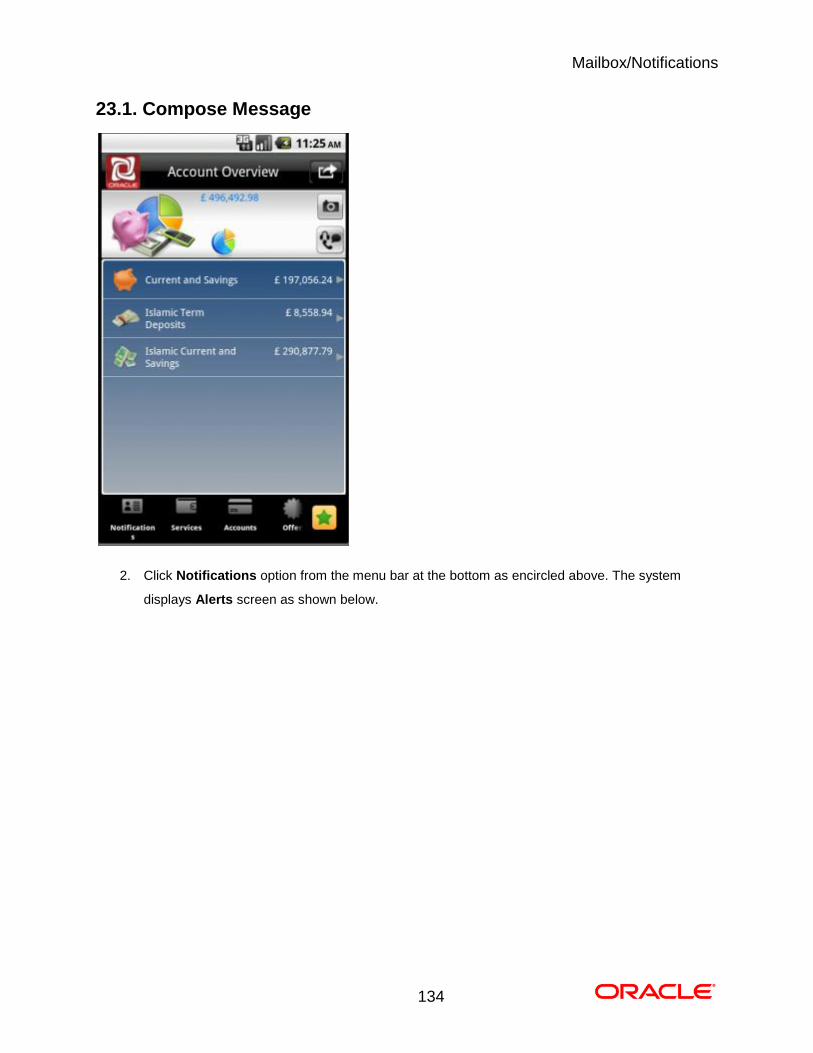
2. Click Notifications option from the menu bar at the bottom as encircled above. The system
displays Alerts screen as shown below.
Mailbox/Notifications
135
Alerts
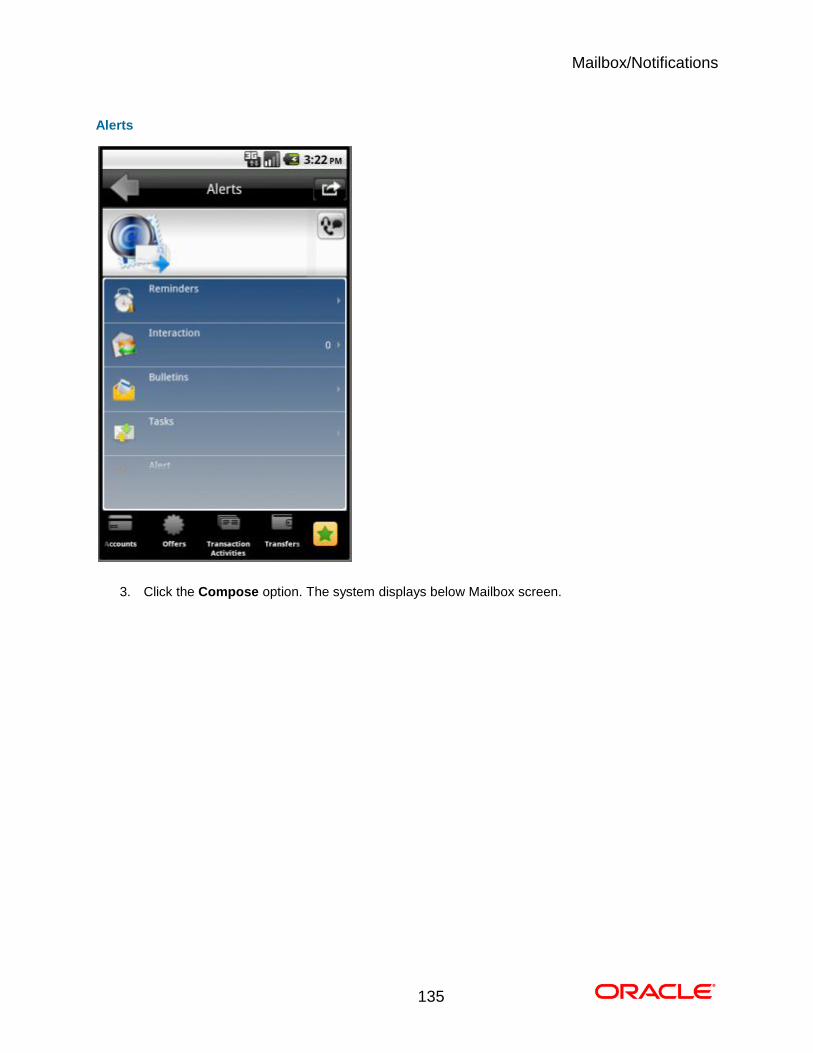
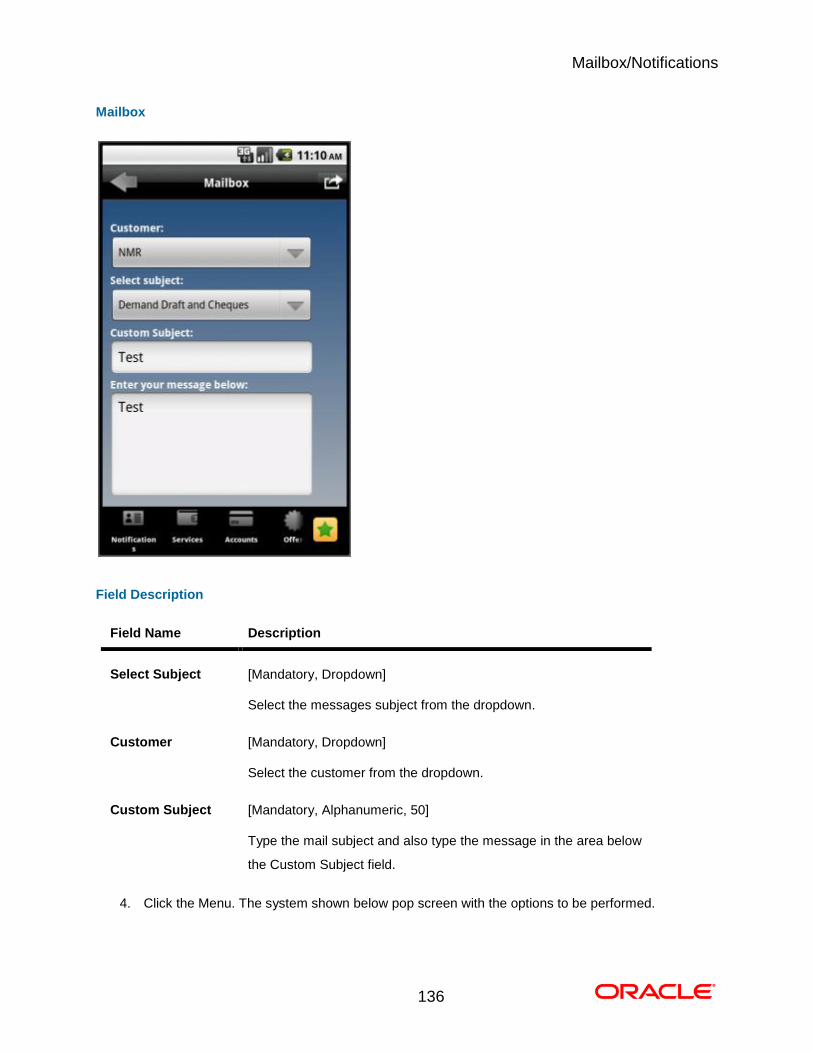
3. Click the Compose option. The system displays below Mailbox screen.
Mailbox/Notifications
136
Mailbox
Field Description
Field Name Description
Select Subject [Mandatory, Dropdown]
Select the messages subject from the dropdown.
Customer [Mandatory, Dropdown]
Select the customer from the dropdown.
Custom Subject [Mandatory, Alphanumeric, 50]
Type the mail subject and also type the message in the area below
the Custom Subject field.
4. Click the Menu. The system shown below pop screen with the options to be performed.
Mailbox/Notifications
137
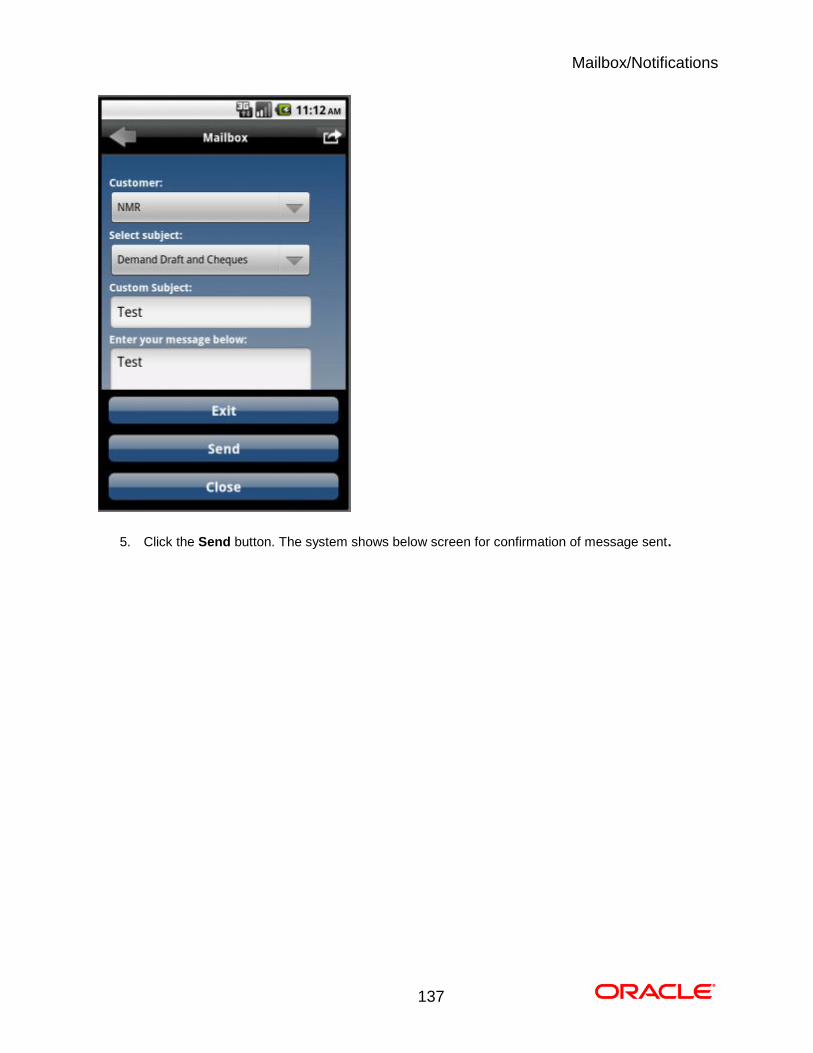
5. Click the Send button. The system shows below screen for confirmation of message sent. 0.
Mailbox/Notifications
138
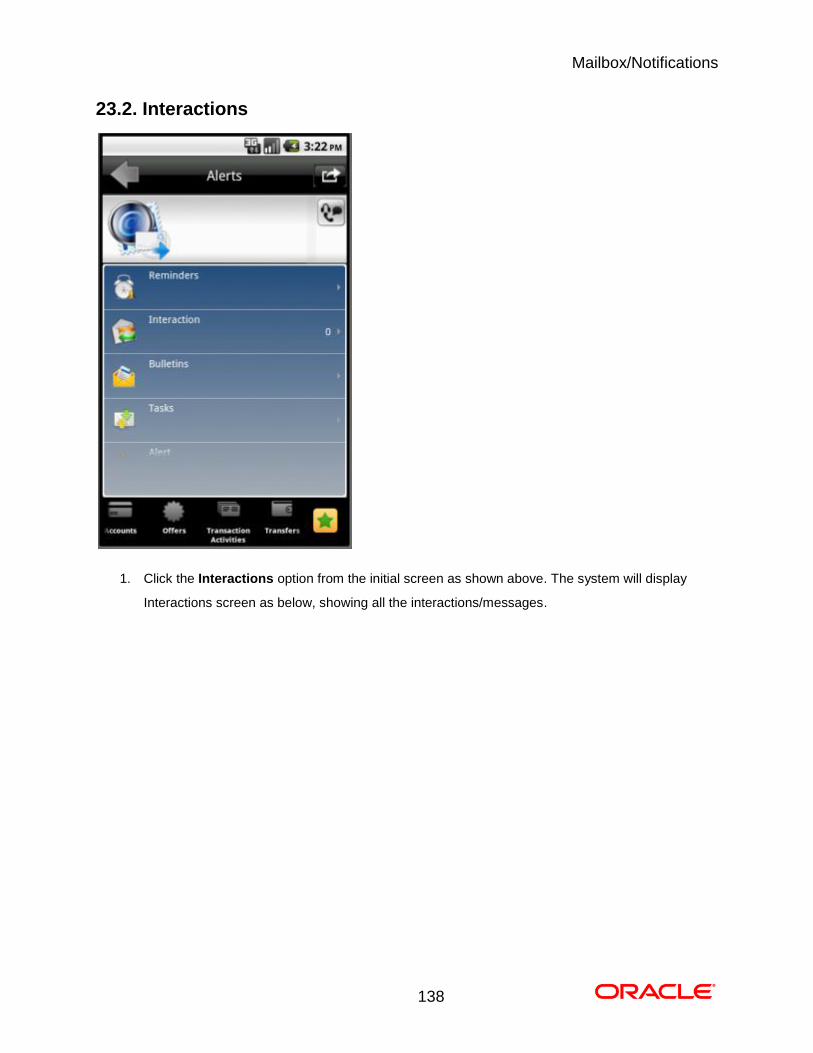
23.2. Interactions
1. Click the Interactions option from the initial screen as shown above. The system will display
Interactions screen as below, showing all the interactions/messages.
Mailbox/Notifications
139
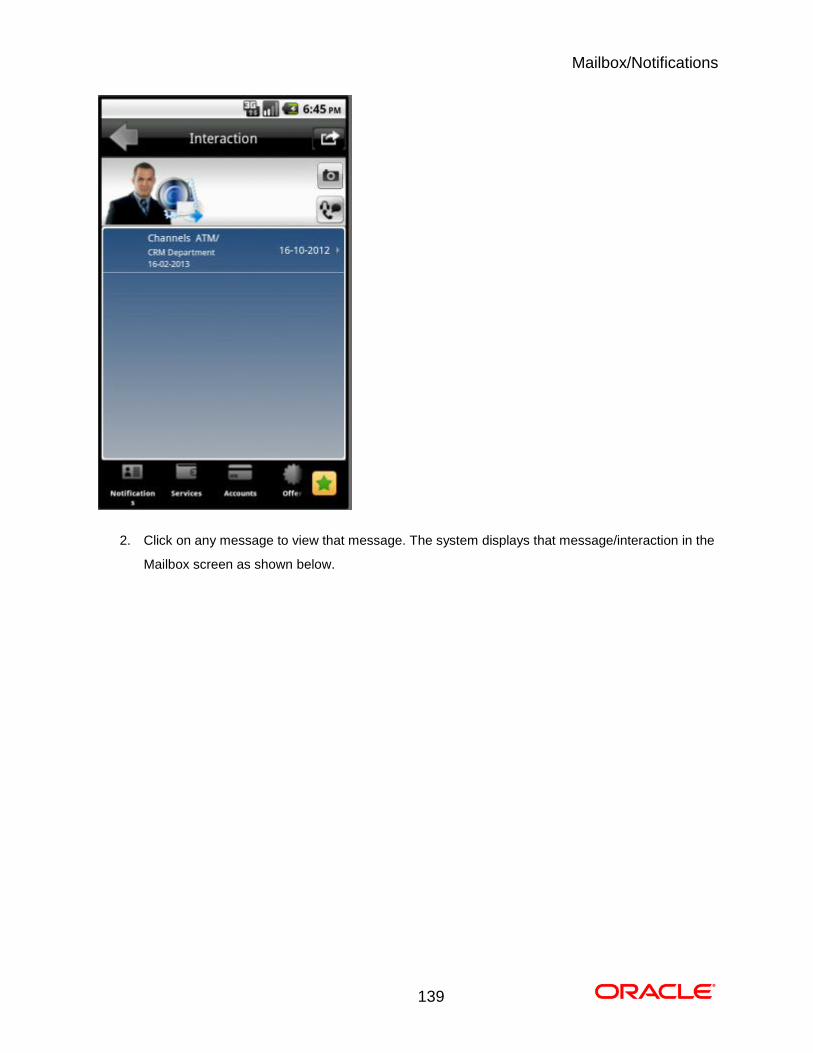
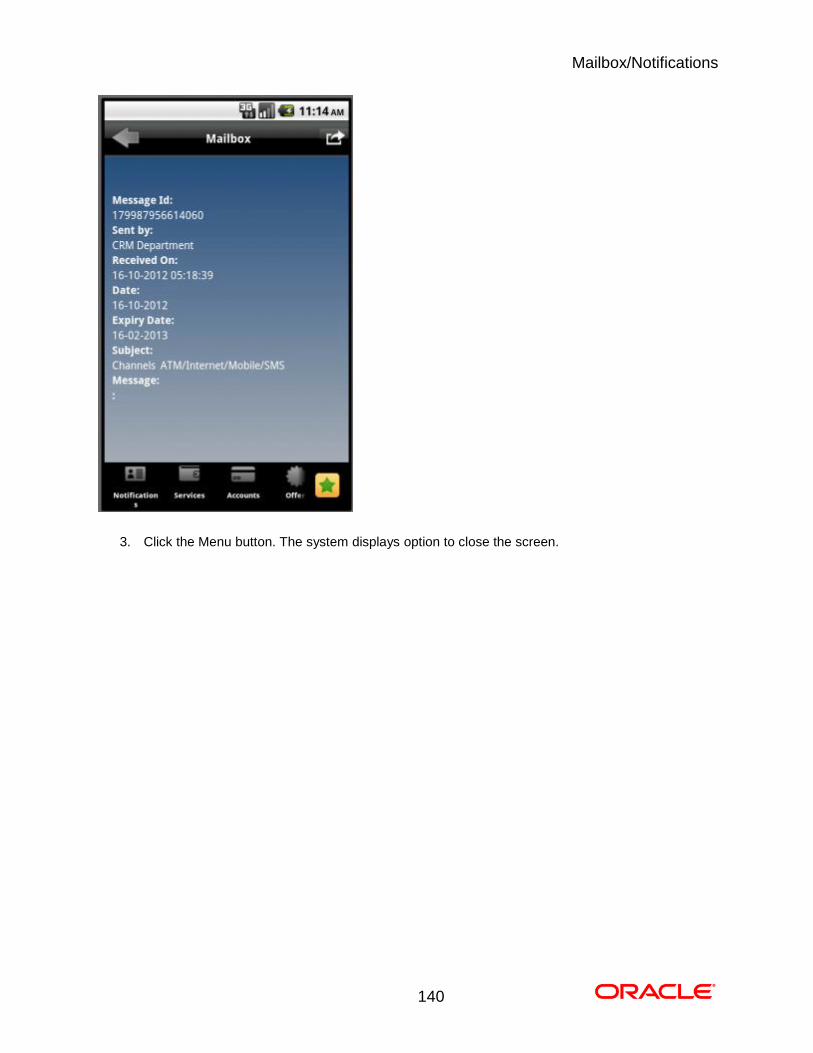
2. Click on any message to view that message. The system displays that message/interaction in the
Mailbox screen as shown below.
Mailbox/Notifications
140
3. Click the Menu button. The system displays option to close the screen. 0.
Mailbox/Notifications
141
23.3. Bulletins
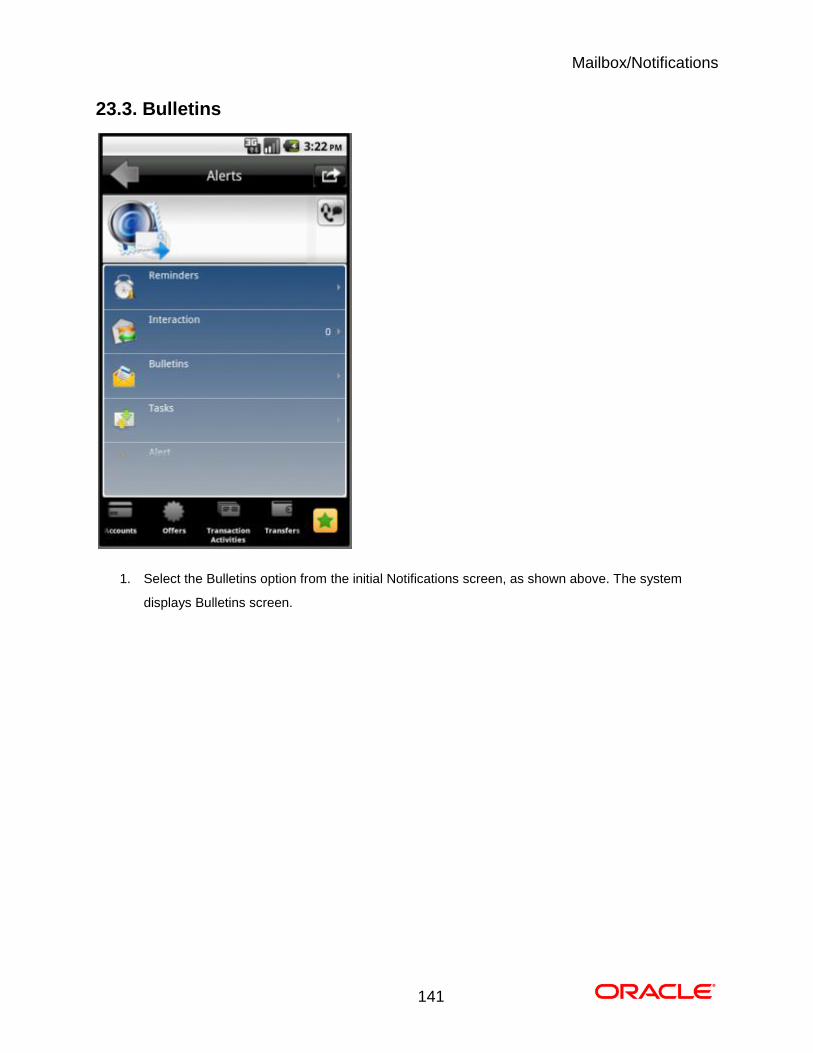
1. Select the Bulletins option from the initial Notifications screen, as shown above. The system
displays Bulletins screen.
Mailbox/Notifications
142
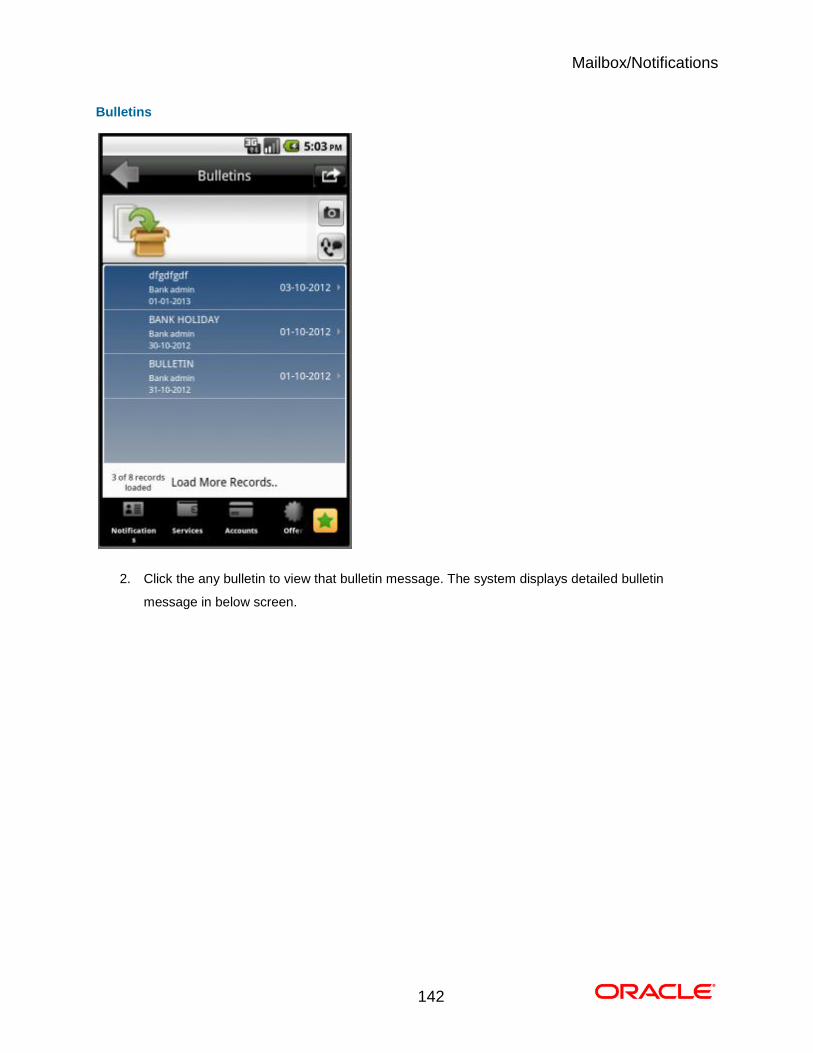
Bulletins
2. Click the any bulletin to view that bulletin message. The system displays detailed bulletin
message in below screen. 0.

Mailbox/Notifications
143
Mailbox/Notifications
144
23.4. Alerts/Tasks
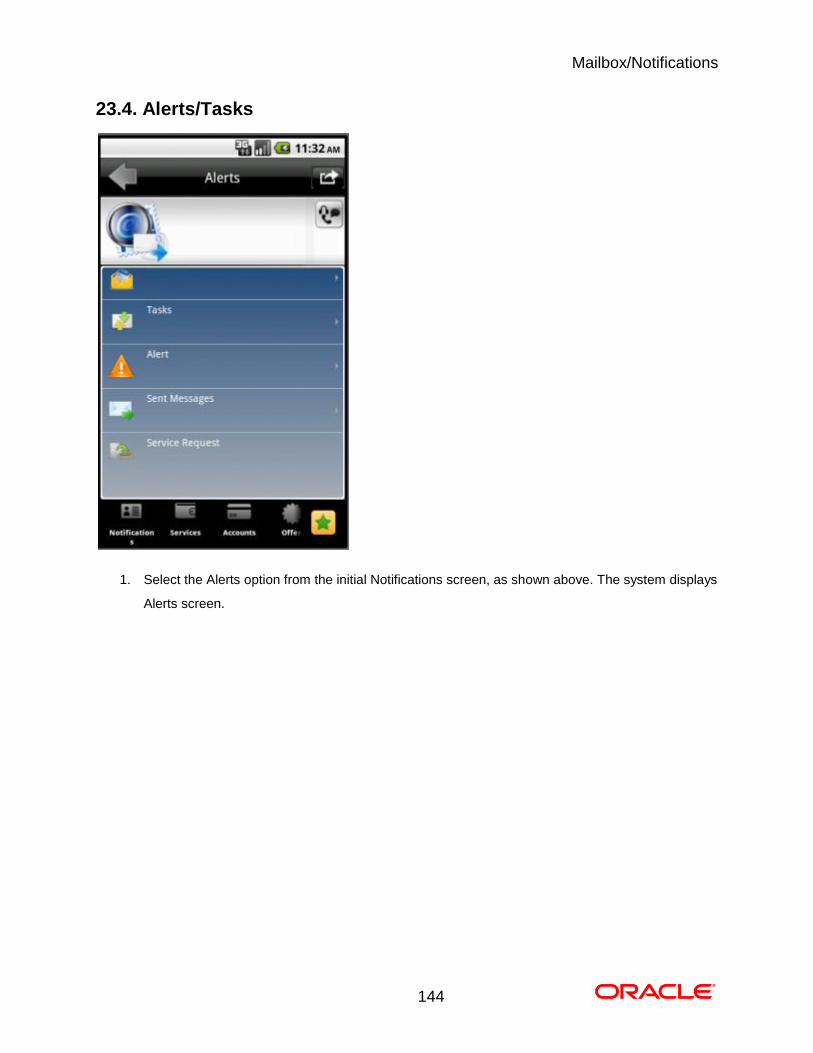
1. Select the Alerts option from the initial Notifications screen, as shown above. The system displays
Alerts screen.

Mailbox/Notifications
145
Alerts
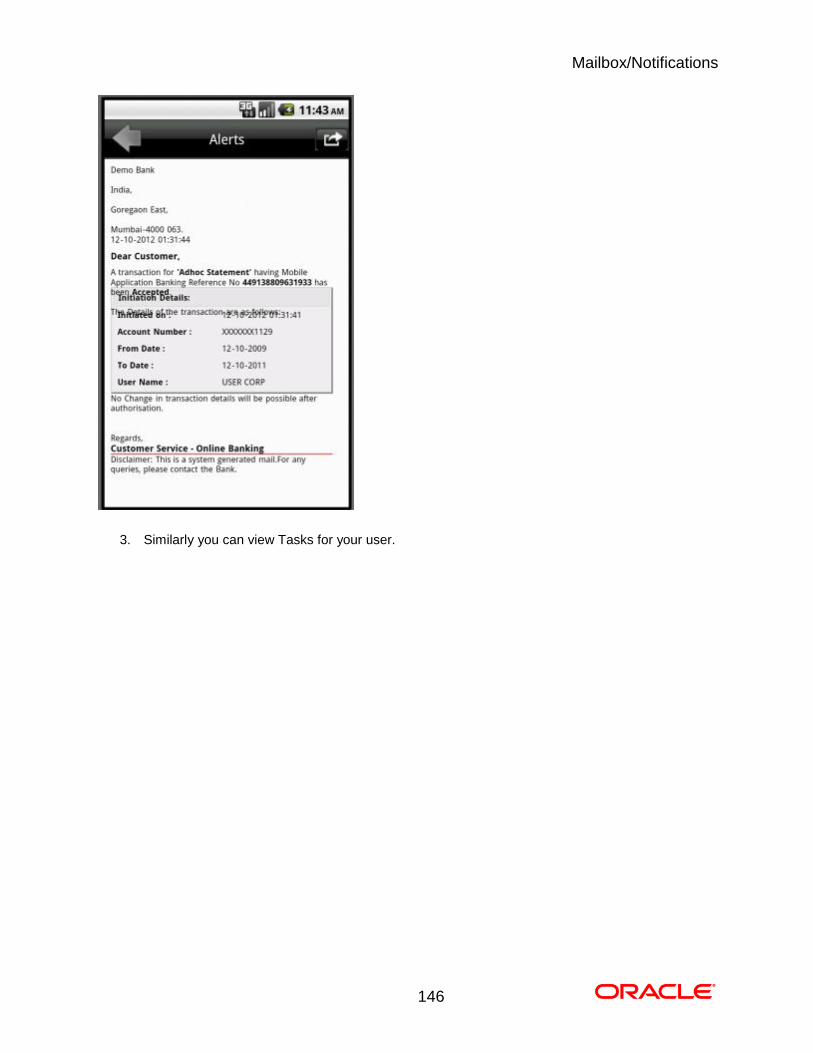
2. Click the any Alerts to view it. The system displays that alert as shown in below screen.
Mailbox/Notifications
146
3. Similarly you can view Tasks for your user. 0.
Mailbox/Notifications
147
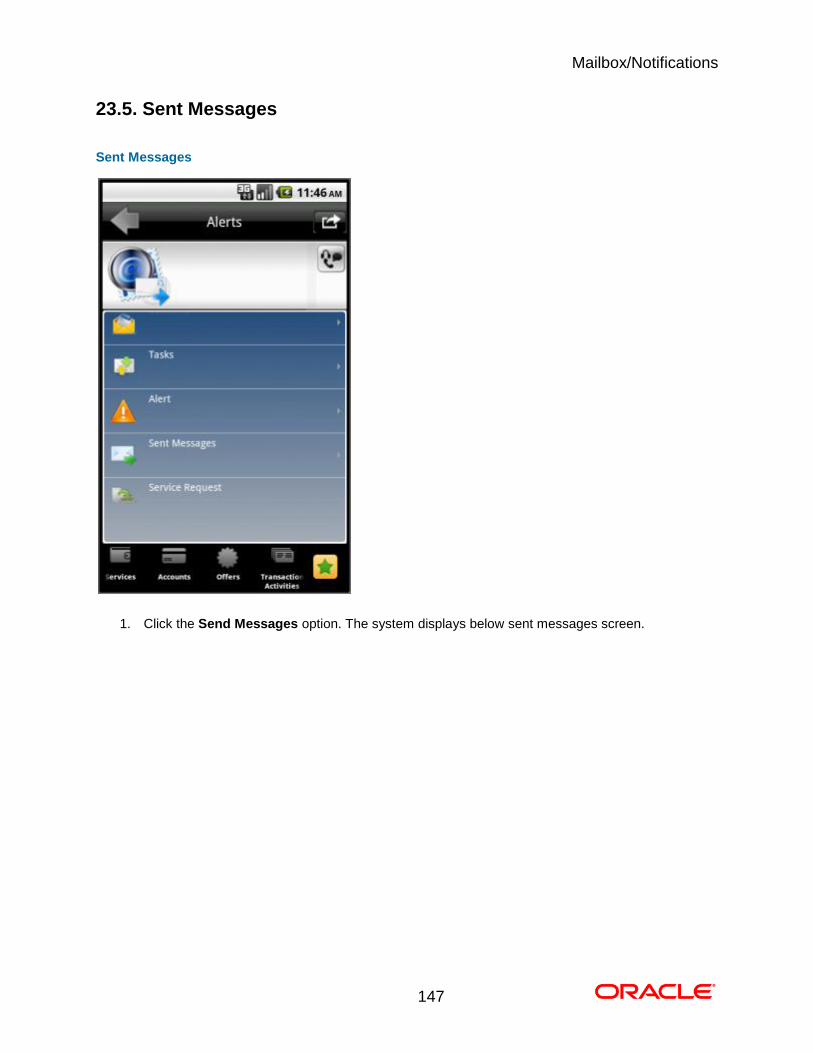
23.5. Sent Messages
Sent Messages
1. Click the Send Messages option. The system displays below sent messages screen.

Mailbox/Notifications
148
Sent Messages
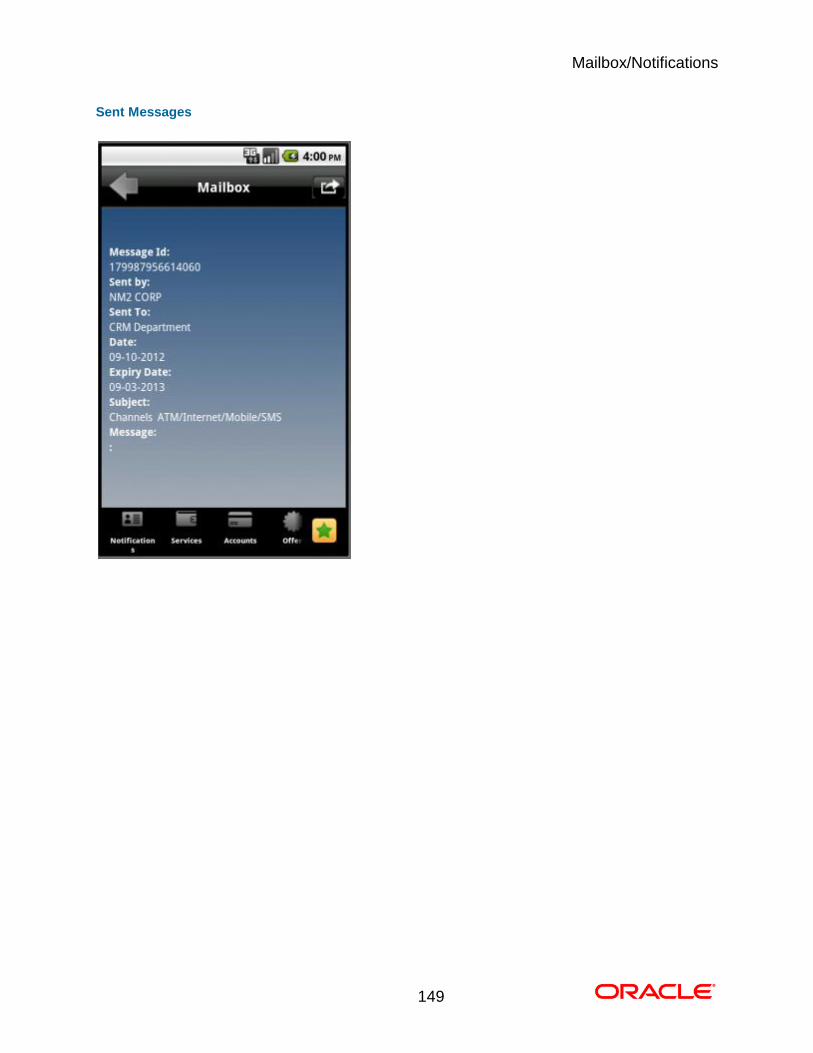
2. Click the on the message. The system displays below sent messages details screen. 0.
Mailbox/Notifications
149
Sent Messages

Mailbox/Notifications
150
23.6. Service Request
Service Request
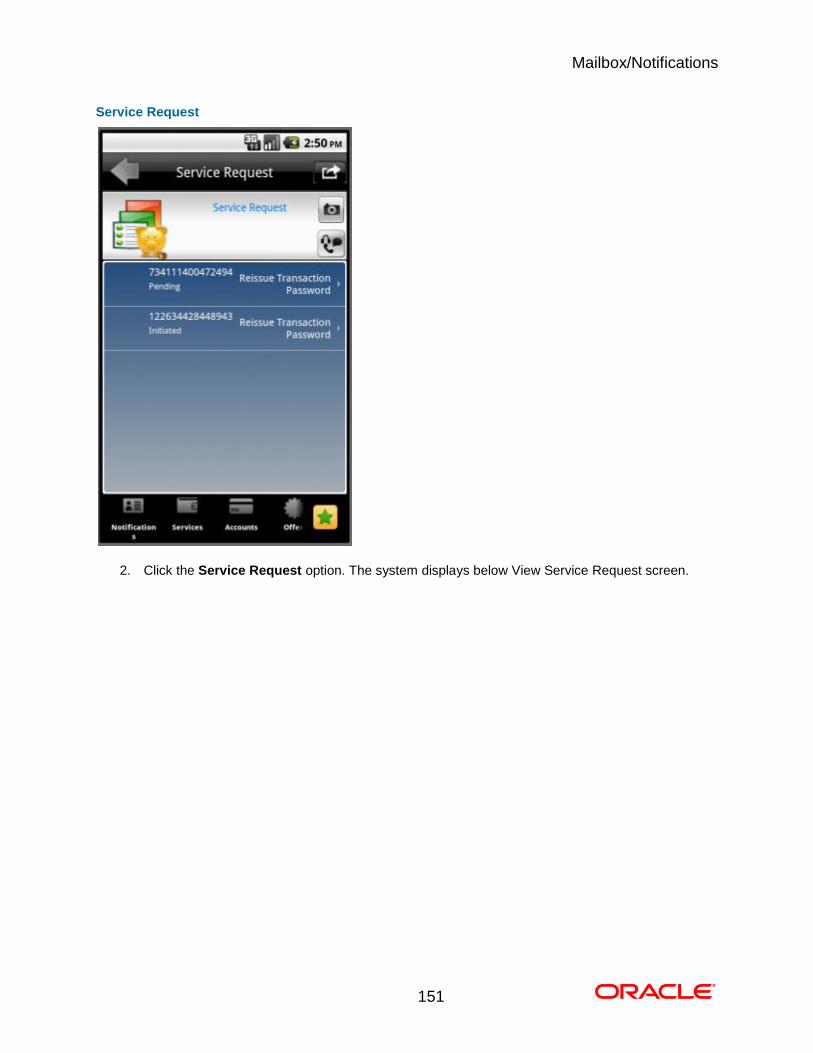
1. Click the Service Request option. The system displays below Service Request screen.
Mailbox/Notifications
151
Service Request
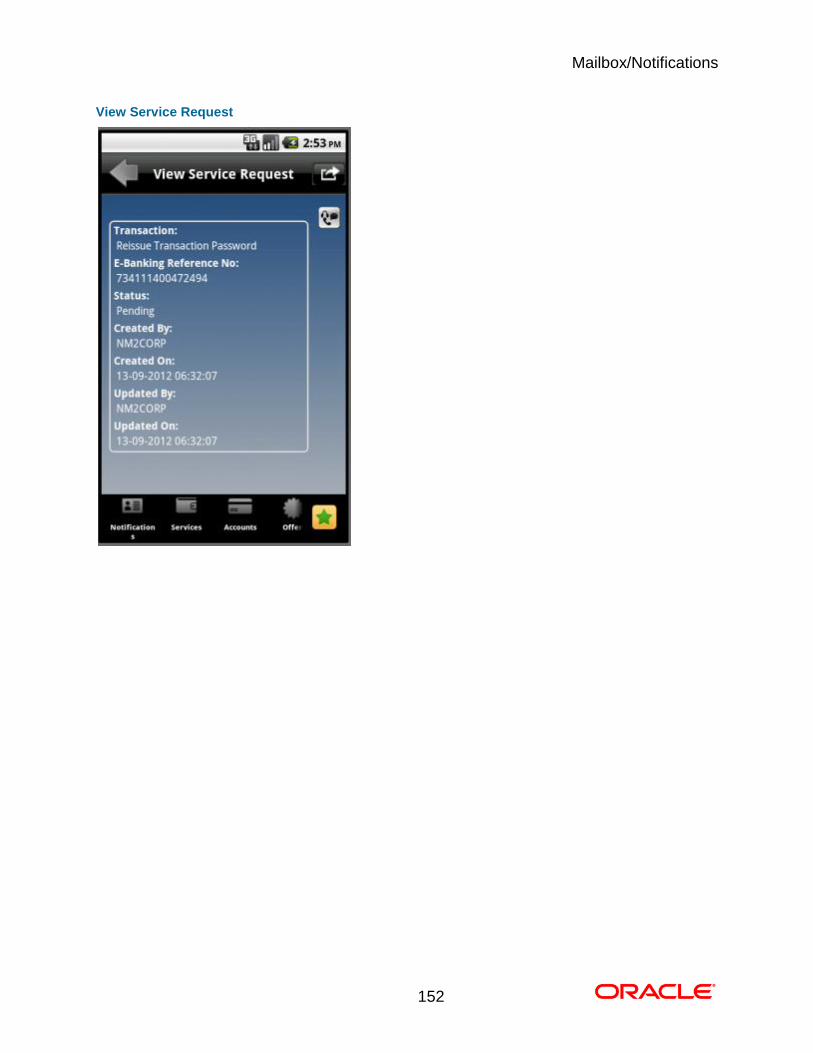
2. Click the Service Request option. The system displays below View Service Request screen. 0.
Mailbox/Notifications
152
View Service Request
Reminders
153
24. Reminders
The Reminder functionality enables business users to register for reminders. Once a reminder is
registered the user can view the reminder under the Reminder schedule. The reminder schedule will
display all registered reminders i.e. reminders that are due on the current date and also reminders that
are due in the future. Once the reminder is due, it appears under the, ‘Reminders for Today’ screen
section of the Reminder schedule. The system will enable the user to take action on the reminder.
To access the Reminder options
1. Log on to the Android application based Mobile Banking application.
Reminders
154
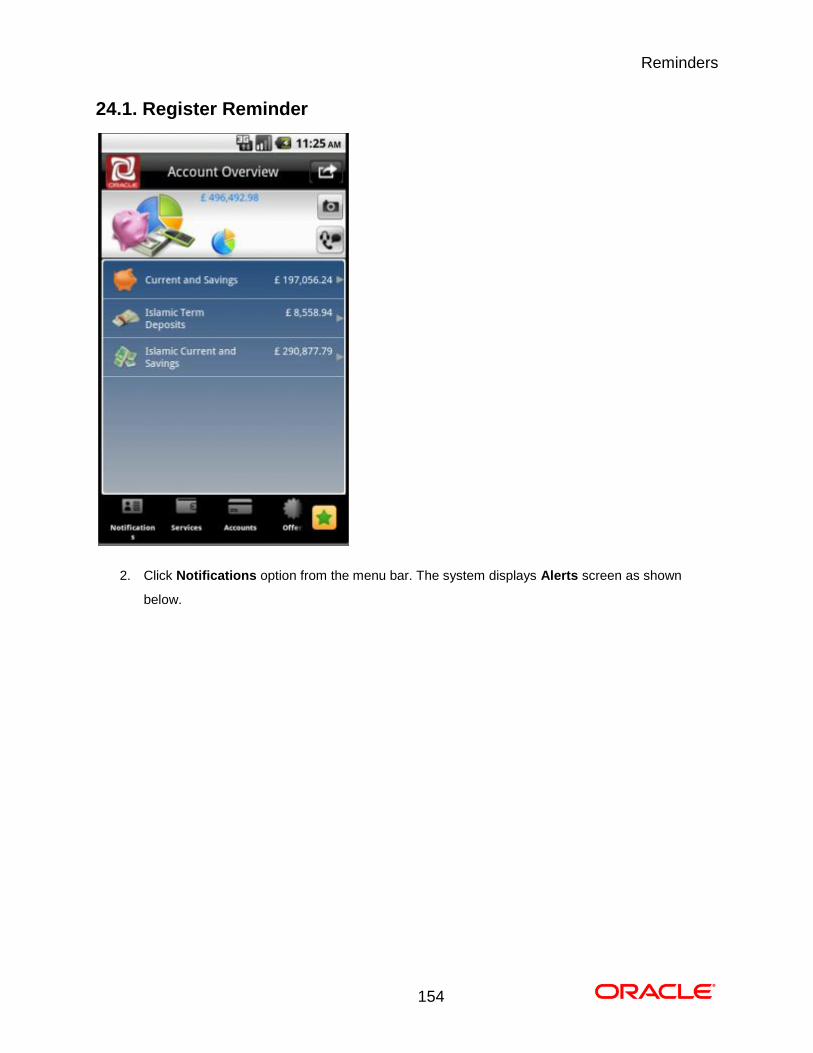
24.1. Register Reminder
2. Click Notifications option from the menu bar. The system displays Alerts screen as shown
below.
Reminders
155
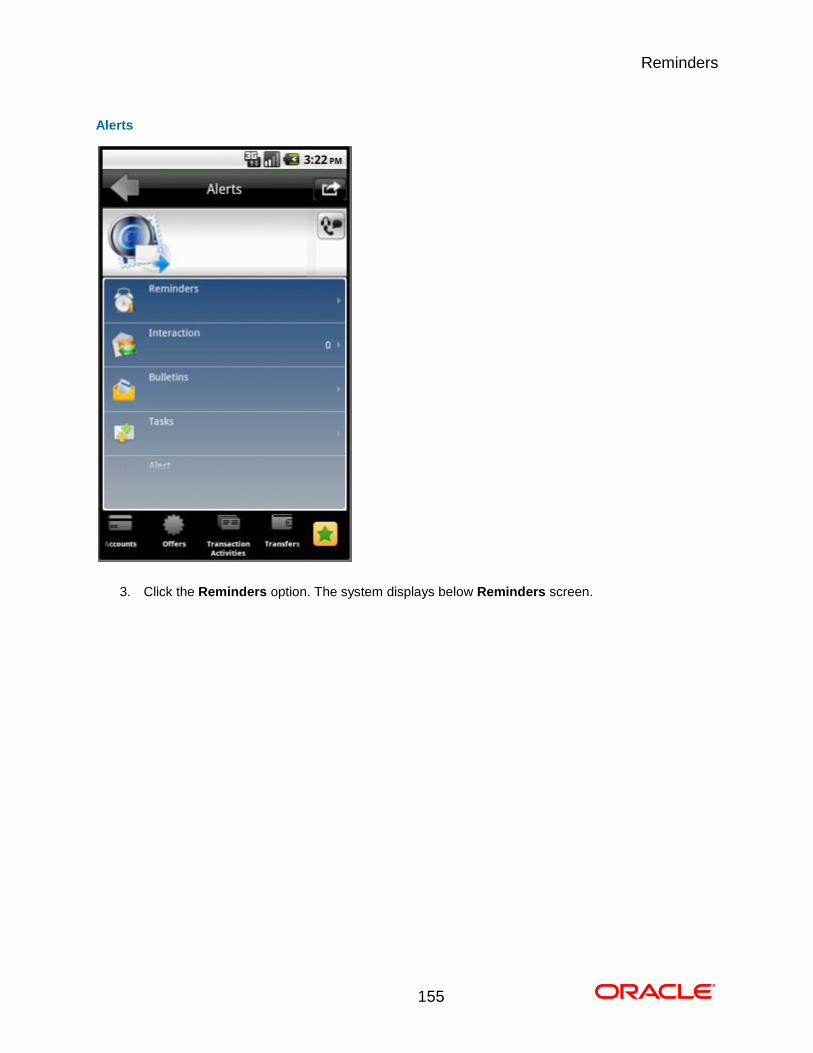
Alerts
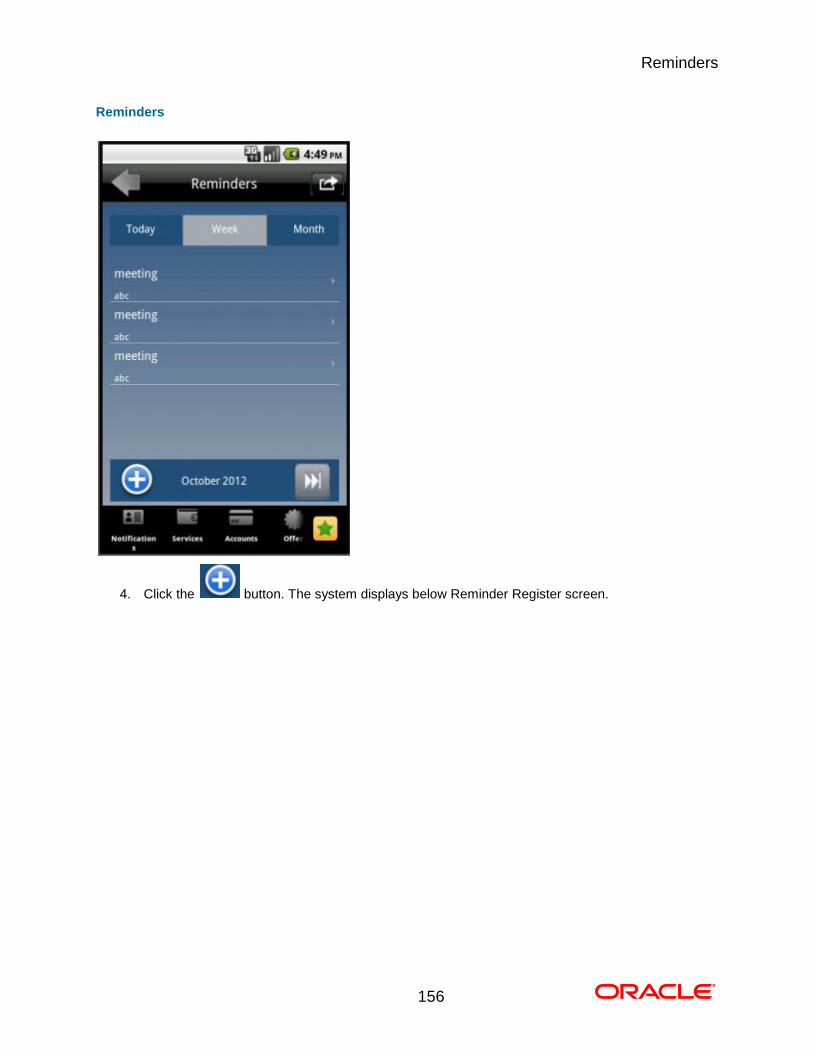
3. Click the Reminders option. The system displays below Reminders screen.
Reminders
156
Reminders
4. Click the button. The system displays below Reminder Register screen.
Reminders
157
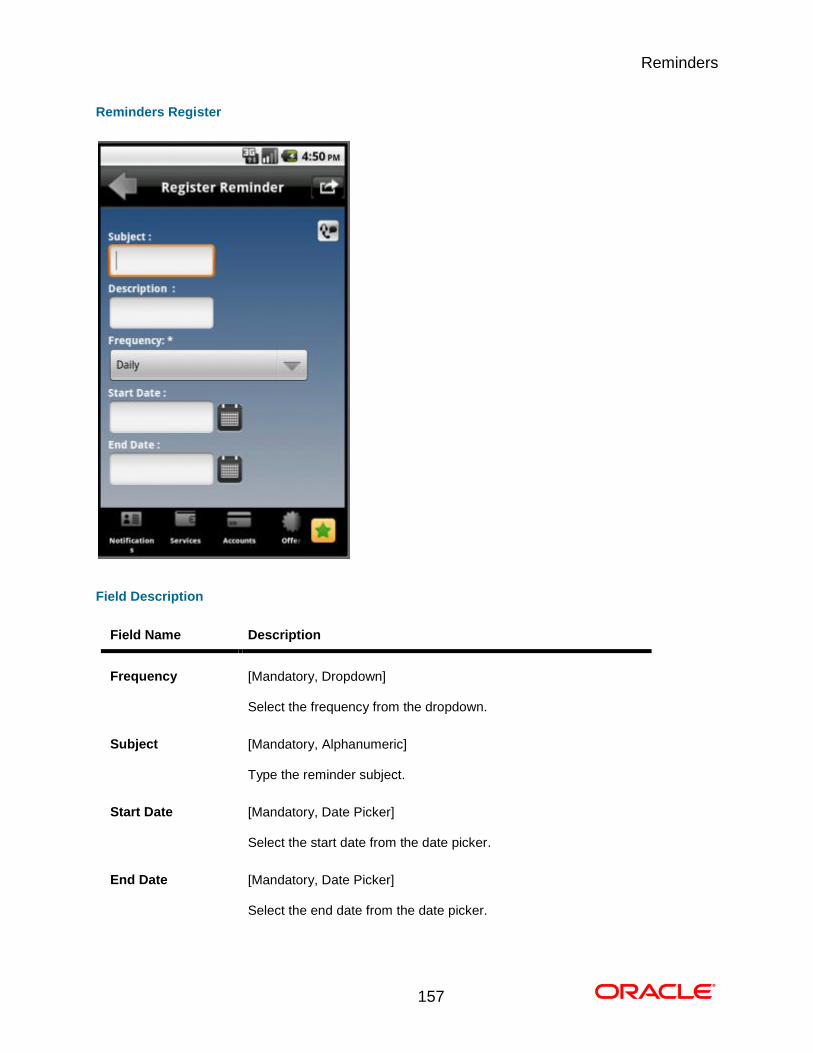
Reminders Register
Field Description
Field Name Description
Frequency [Mandatory, Dropdown]
Select the frequency from the dropdown.
Subject [Mandatory, Alphanumeric]
Type the reminder subject.
Start Date [Mandatory, Date Picker]
Select the start date from the date picker.
End Date [Mandatory, Date Picker]
Select the end date from the date picker.
Reminders
158
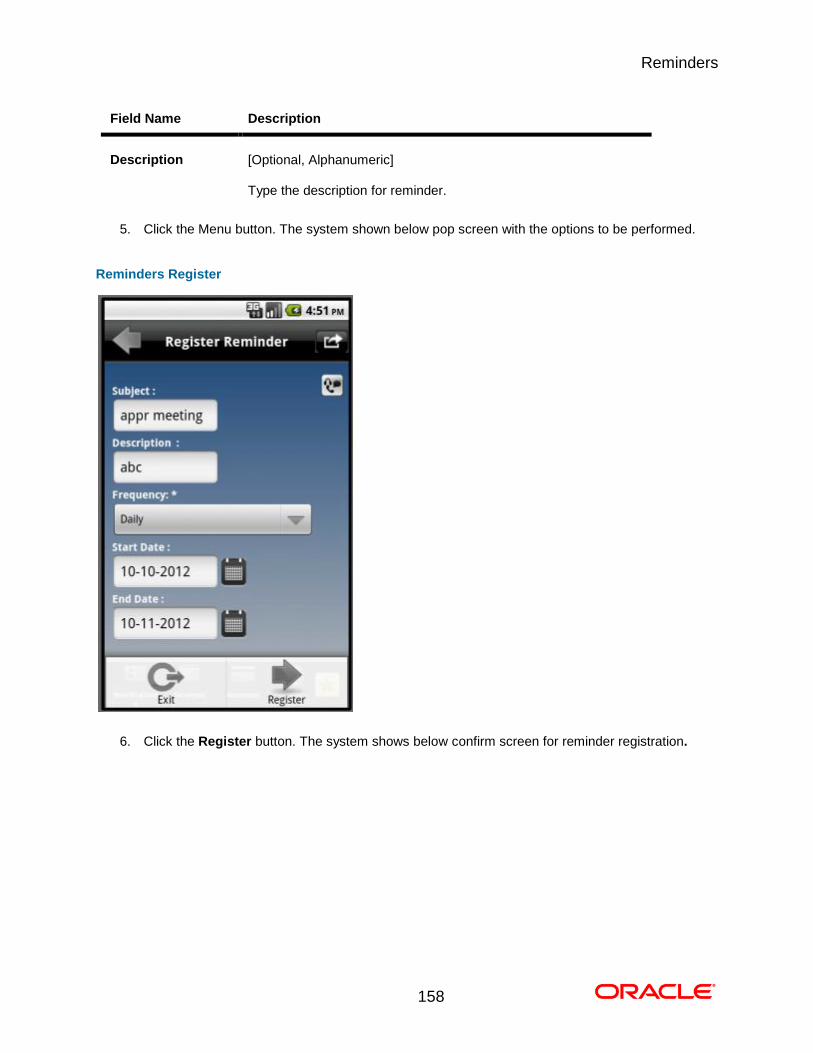
Field Name Description
Description [Optional, Alphanumeric]
Type the description for reminder.
5. Click the Menu button. The system shown below pop screen with the options to be performed.
Reminders Register
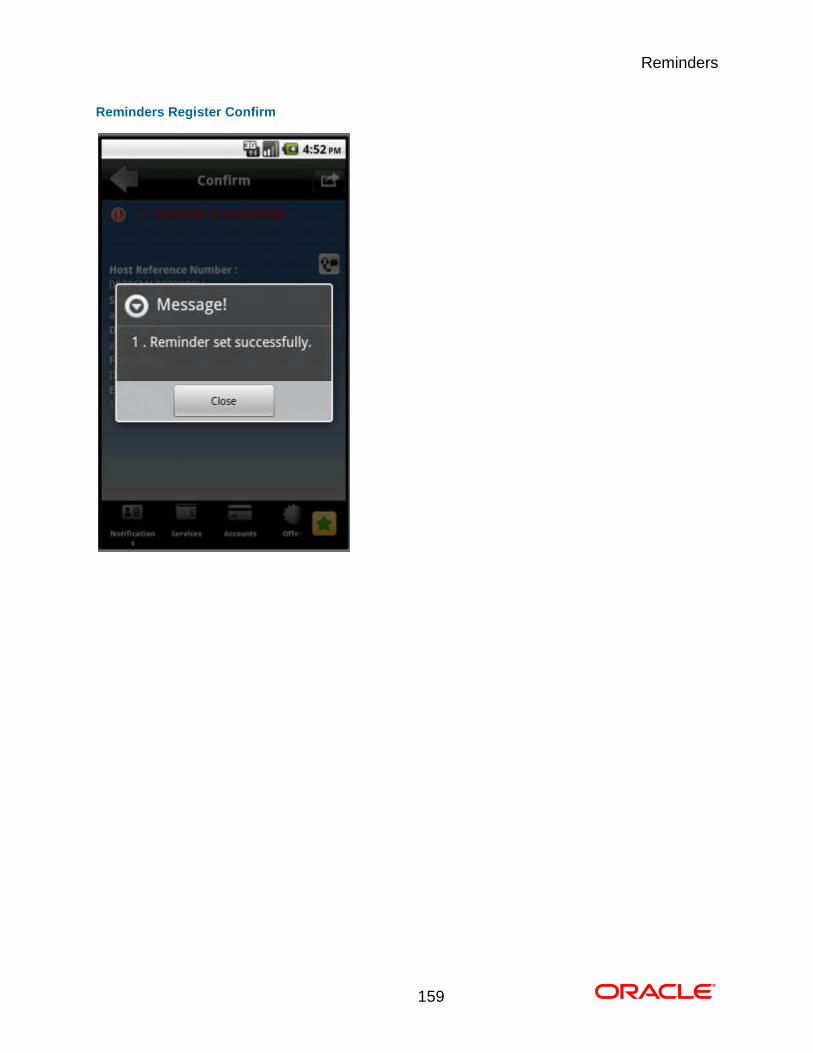
6. Click the Register button. The system shows below confirm screen for reminder registration. 0.
Reminders
159
Reminders Register Confirm
Reminders
160
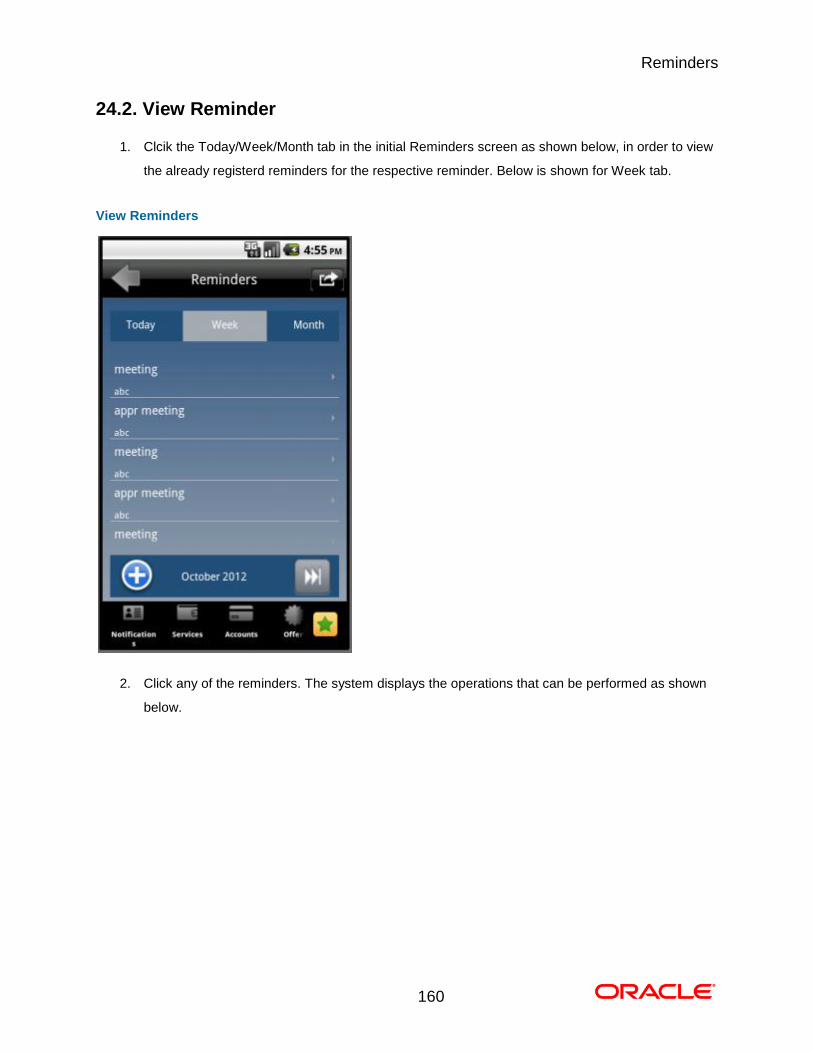
24.2. View Reminder
1. Clcik the Today/Week/Month tab in the initial Reminders screen as shown below, in order to view
the already registerd reminders for the respective reminder. Below is shown for Week tab.
View Reminders
2. Click any of the reminders. The system displays the operations that can be performed as shown
below.
Reminders
161
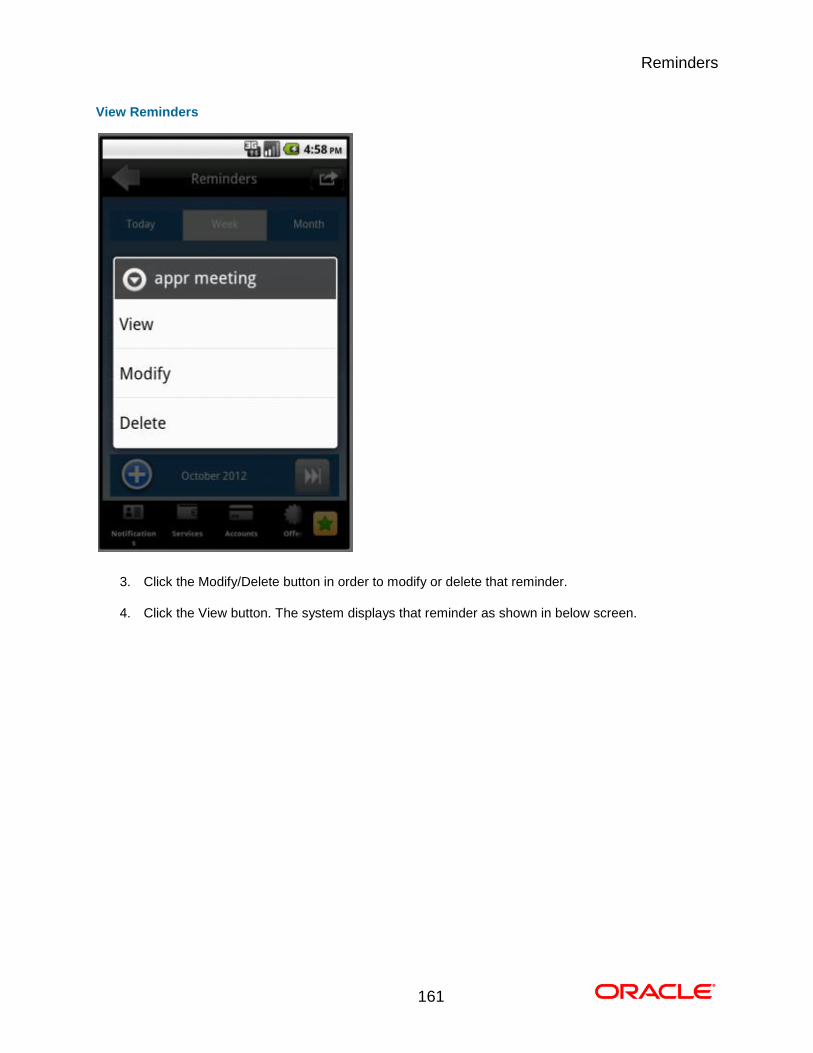
View Reminders
3. Click the Modify/Delete button in order to modify or delete that reminder.
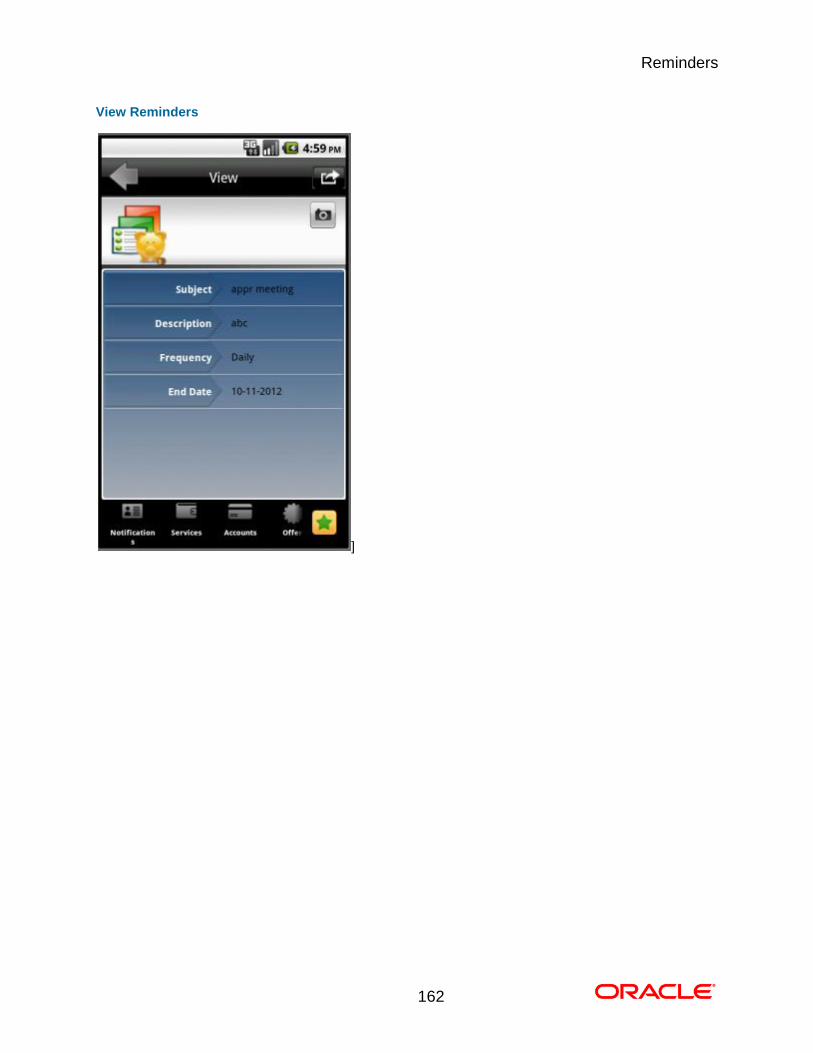
4. Click the View button. The system displays that reminder as shown in below screen. 0.
Reminders
162
View Reminders
]
Credit Card Details
163
25. Credit Card Details
This menu enables you to View the details of the Credit Card.
To view the credit card details
1. Log on to the Android application based Mobile Banking application. The system displays initial
Accounts Overview screen as shown below.
Accounts Overview

Credit Card Details
164
2. Click the Credit Card tab in the above screen. The system displays credit card details in the
Accounts Summary screen as shown below.
Credit Card Details
165
Accounts Summary
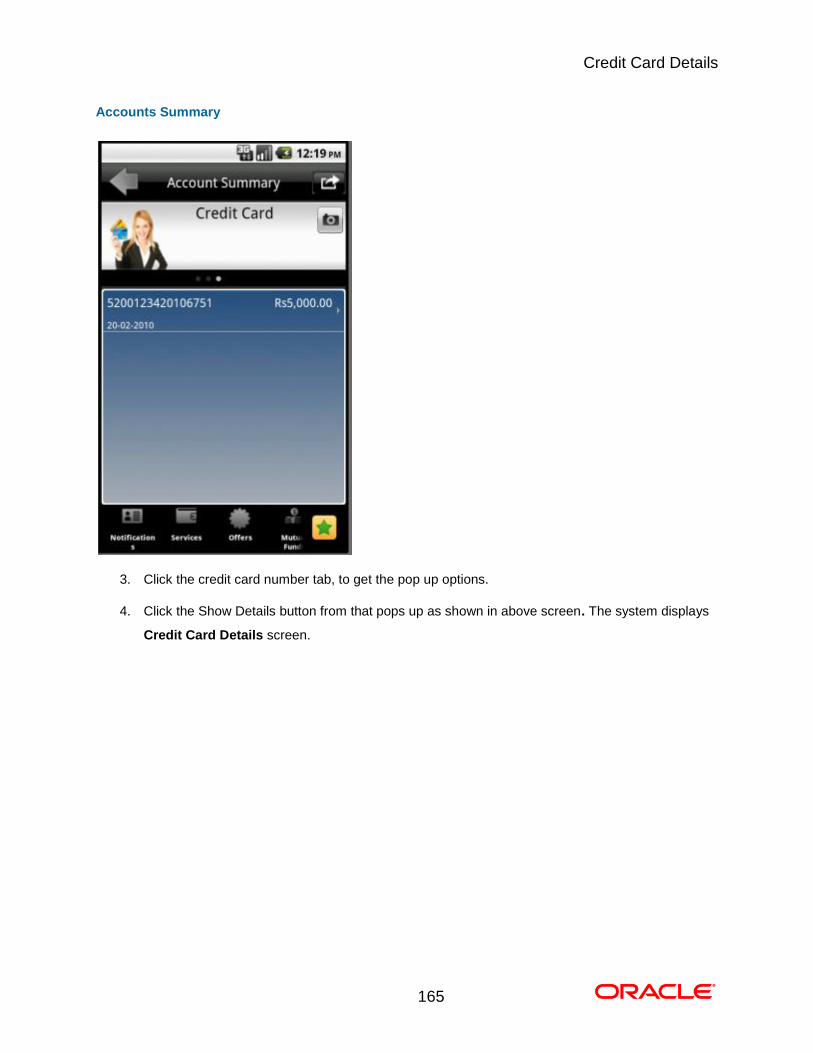
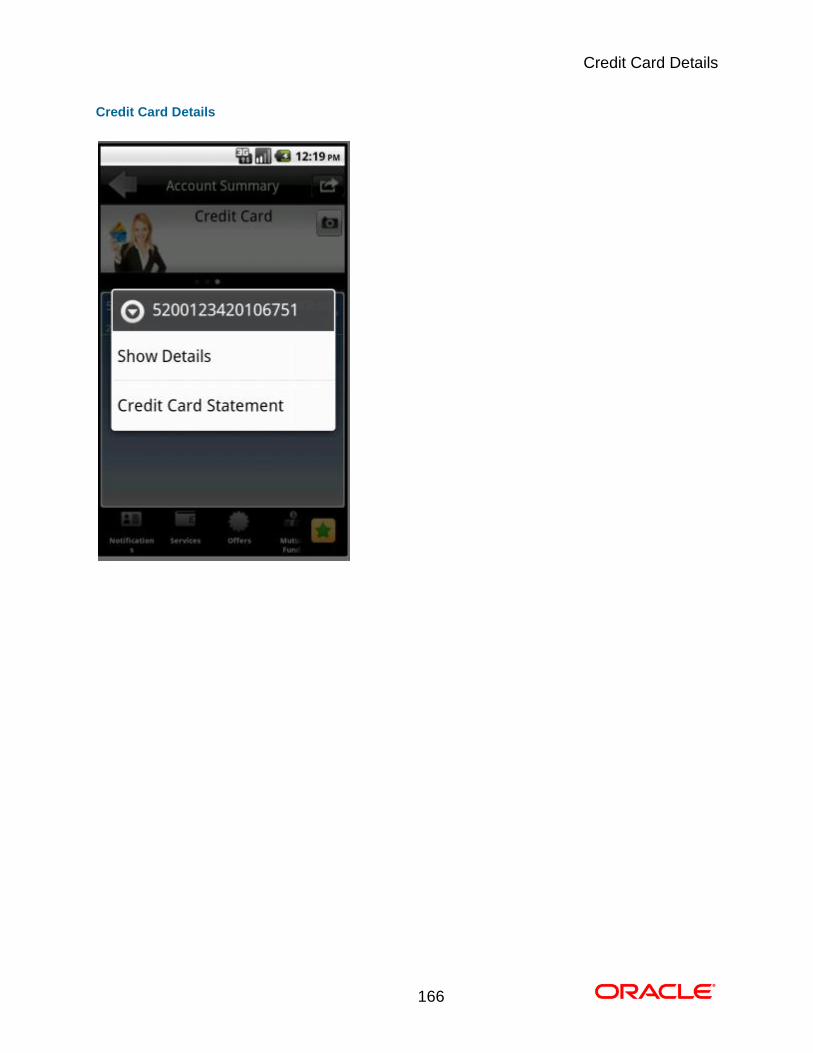
3. Click the credit card number tab, to get the pop up options.
4. Click the Show Details button from that pops up as shown in above screen. The system displays
Credit Card Details screen.
Credit Card Details
166
Credit Card Details
Credit Card Details
167
Credit Card Details
168
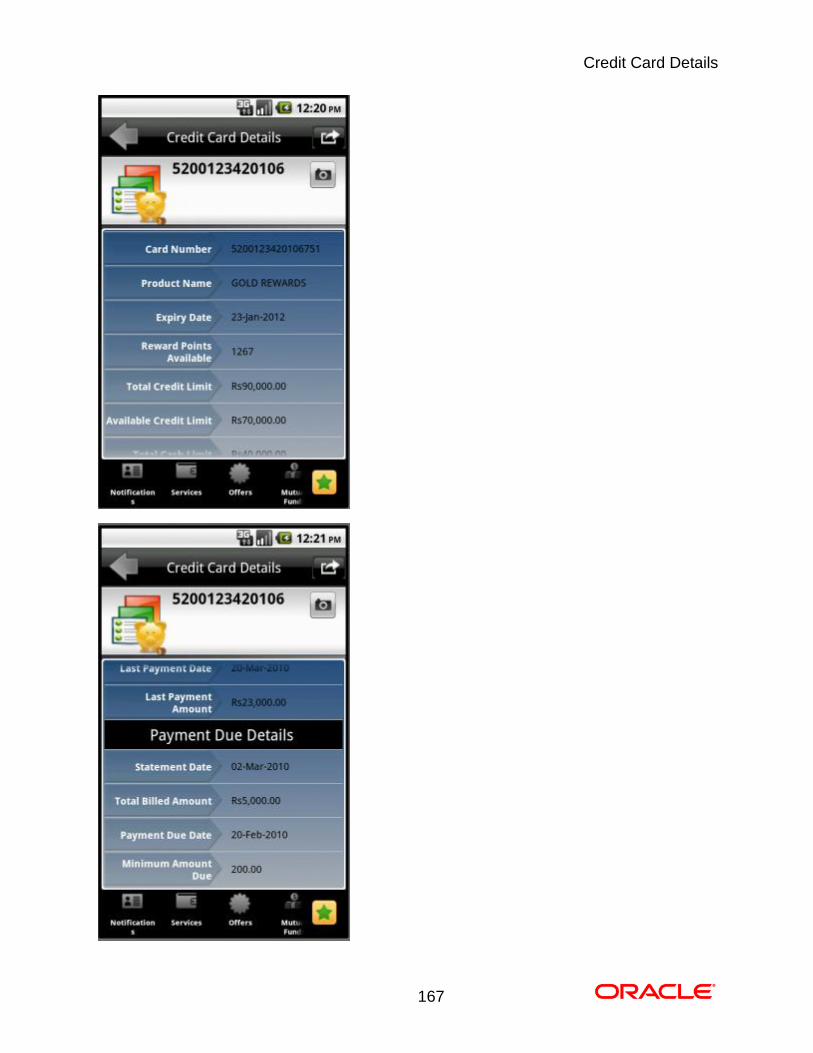
Field Description
Field Name Description
Card Number [Display]
This field displays the credit card number for which the details are
displayed.
Product Name [Display]
This field displays the product name of the credit card.
Expiry Date [Display]
This field displays the expiry date of the credit card.
Reward points
available
[Display]
This field displays the reward points for the credit card.
Total Credit limit [Display]
This field displays the total credit limit available to you.
Available Credit
Limit
[Display]
This field displays the credit limit available to you.
Total Cash Limit [Display]
This field displays the total cash limit available to you.
Available Cash
Limit
[Display]
This field displays the available cash limit available to you.
Total unbilled
Amount
[Display]
This field displays the total unbilled amount.
Last payment date [Display]
This field displays the date of the last payment done.
Last payment
amount
[Display]
This field displays the amount of the last payment done.
Credit Card Details
169
Field Name Description
Payment Due Details
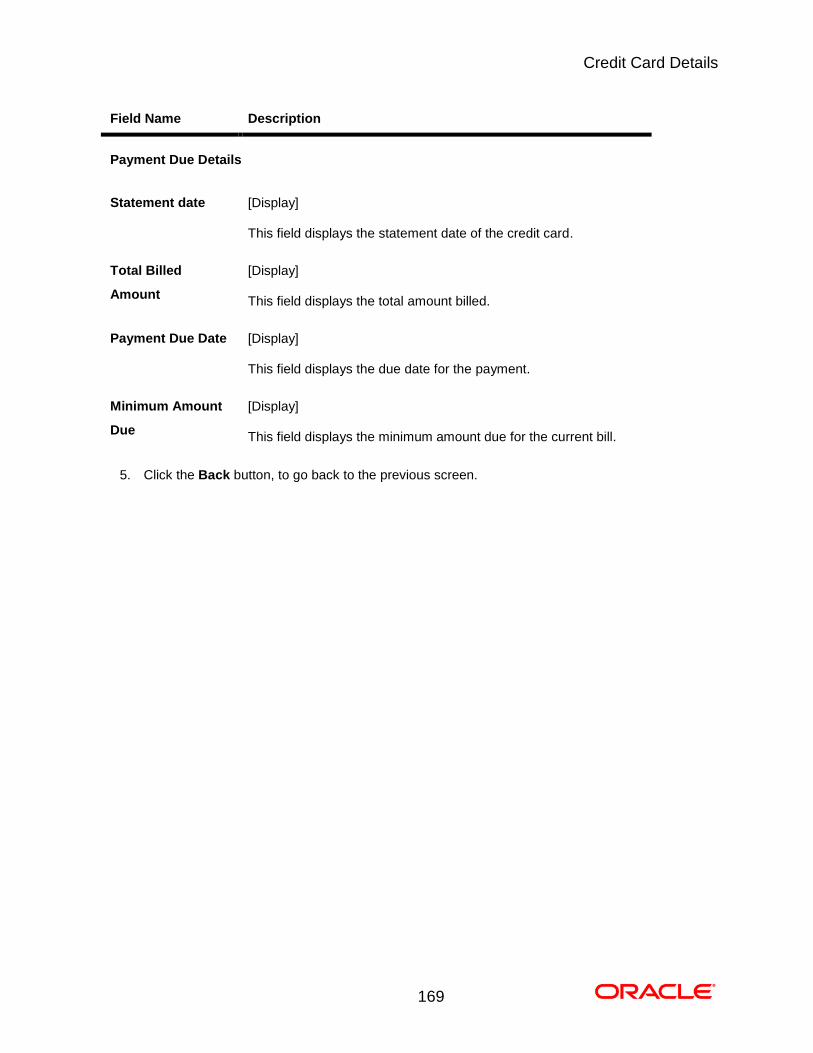
Statement date [Display]
This field displays the statement date of the credit card.
Total Billed
Amount
[Display]
This field displays the total amount billed.
Payment Due Date [Display]
This field displays the due date for the payment.
Minimum Amount
Due
[Display]
This field displays the minimum amount due for the current bill.
5. Click the Back button, to go back to the previous screen. 0.
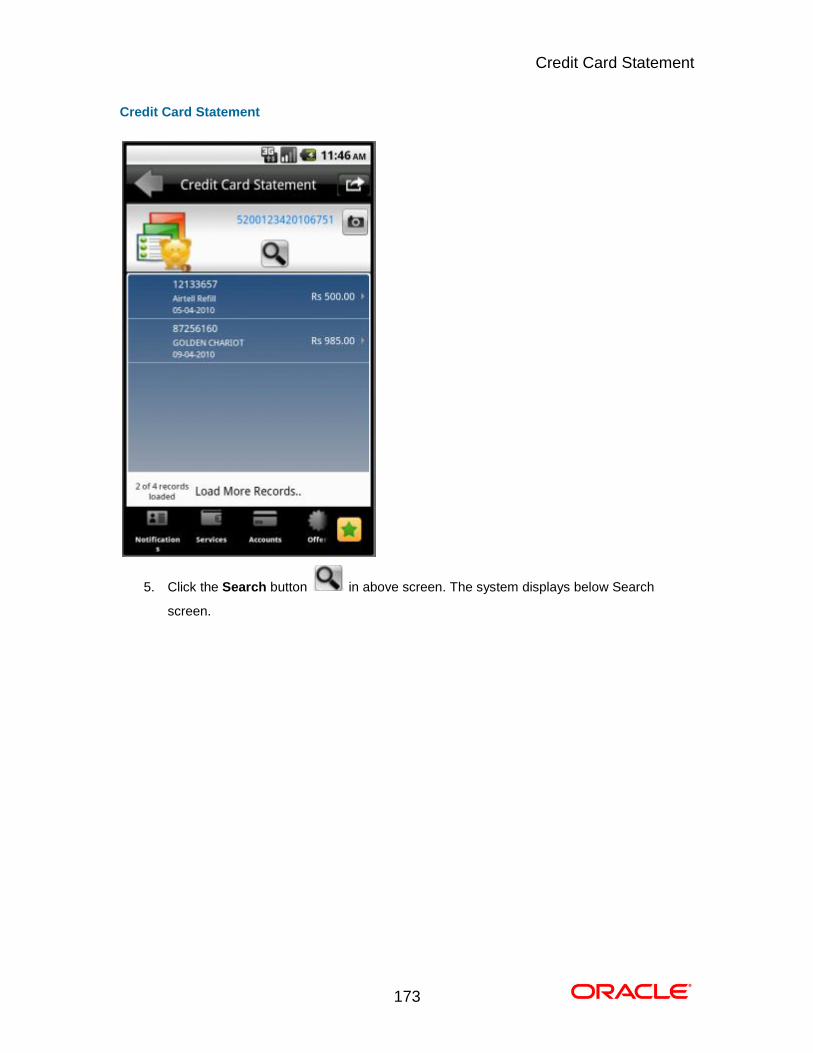
Credit Card Statement
170
26. Credit Card Statement
This menu enables you to View the Statement of the Credit Card.
To view the credit card statement
1. Log on to the Android application based Mobile Banking application.
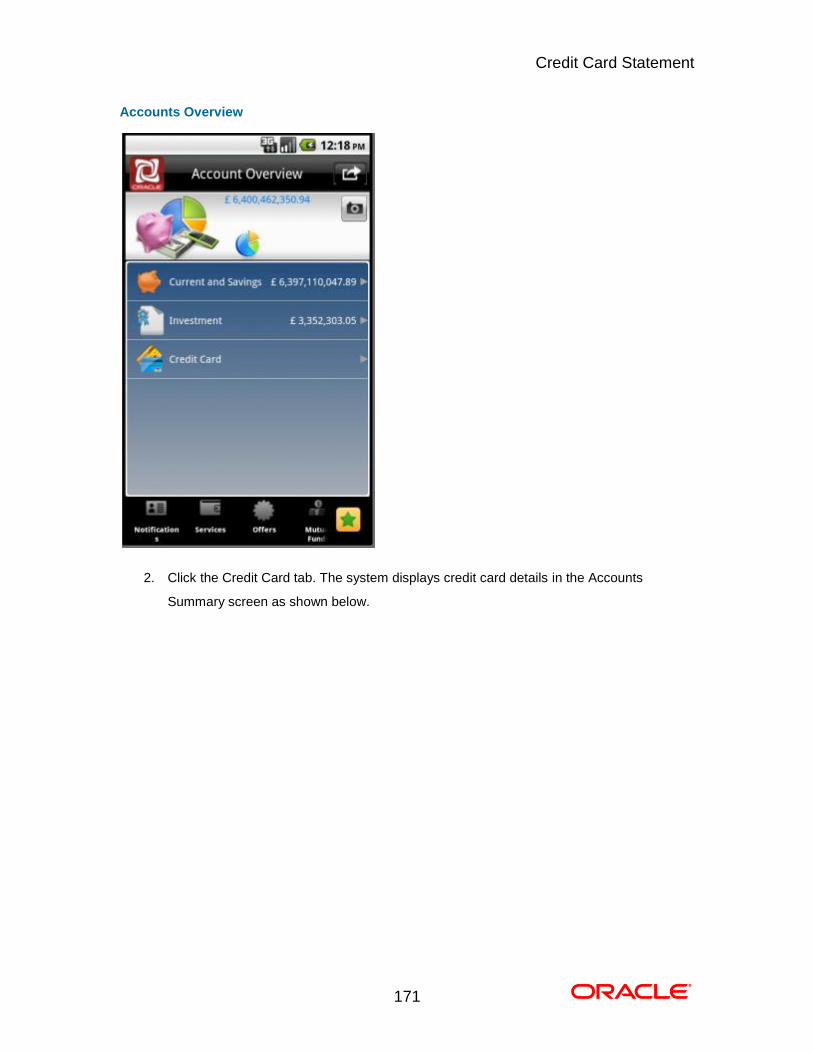
Credit Card Statement
171
Accounts Overview
2. Click the Credit Card tab. The system displays credit card details in the Accounts
Summary screen as shown below.
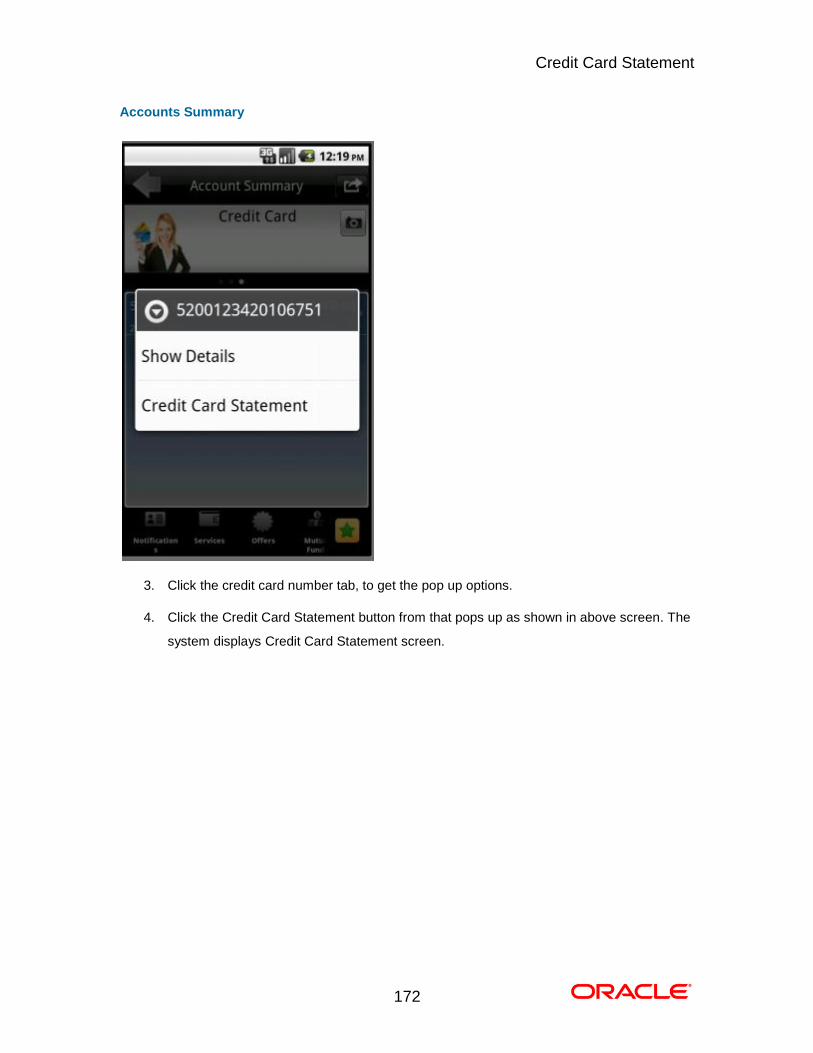
Credit Card Statement
172
Accounts Summary
3. Click the credit card number tab, to get the pop up options.
4. Click the Credit Card Statement button from that pops up as shown in above screen. The
system displays Credit Card Statement screen.
Credit Card Statement
173
Credit Card Statement
5. Click the Search button in above screen. The system displays below Search
screen.
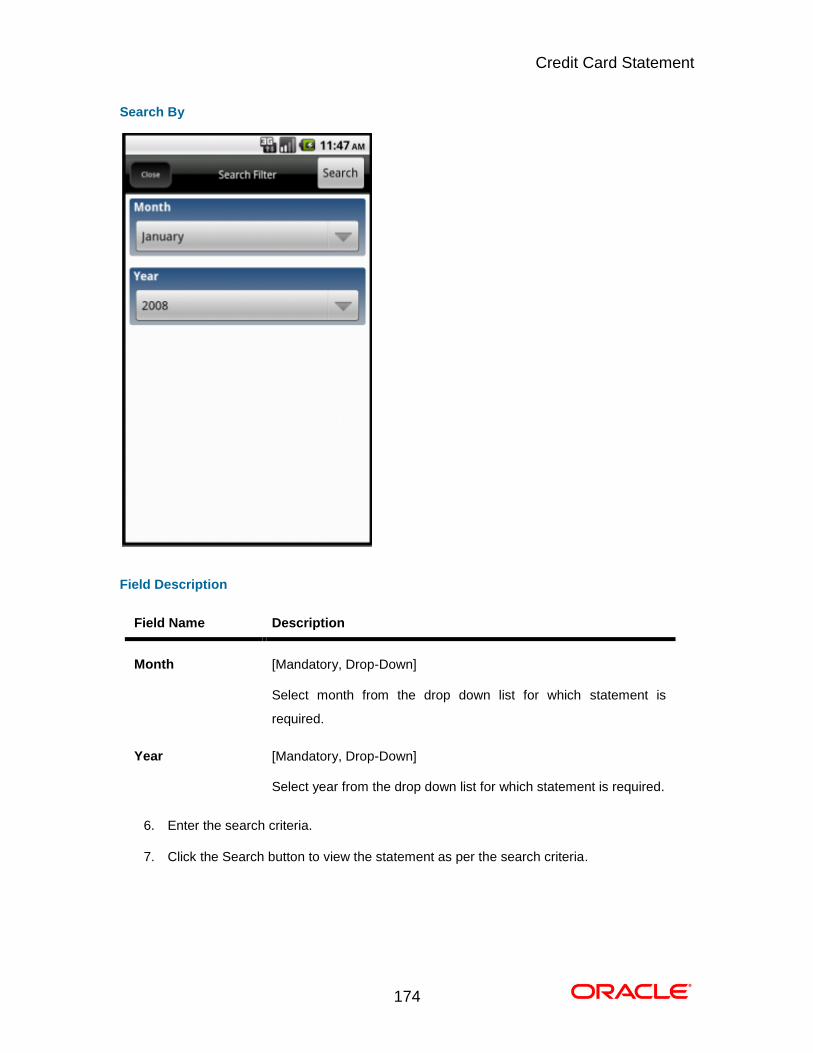
Credit Card Statement
174
Search By
Field Description
Field Name Description
Month [Mandatory, Drop-Down]
Select month from the drop down list for which statement is
required.
Year [Mandatory, Drop-Down]
Select year from the drop down list for which statement is required.
6. Enter the search criteria.
7. Click the Search button to view the statement as per the search criteria. 0.
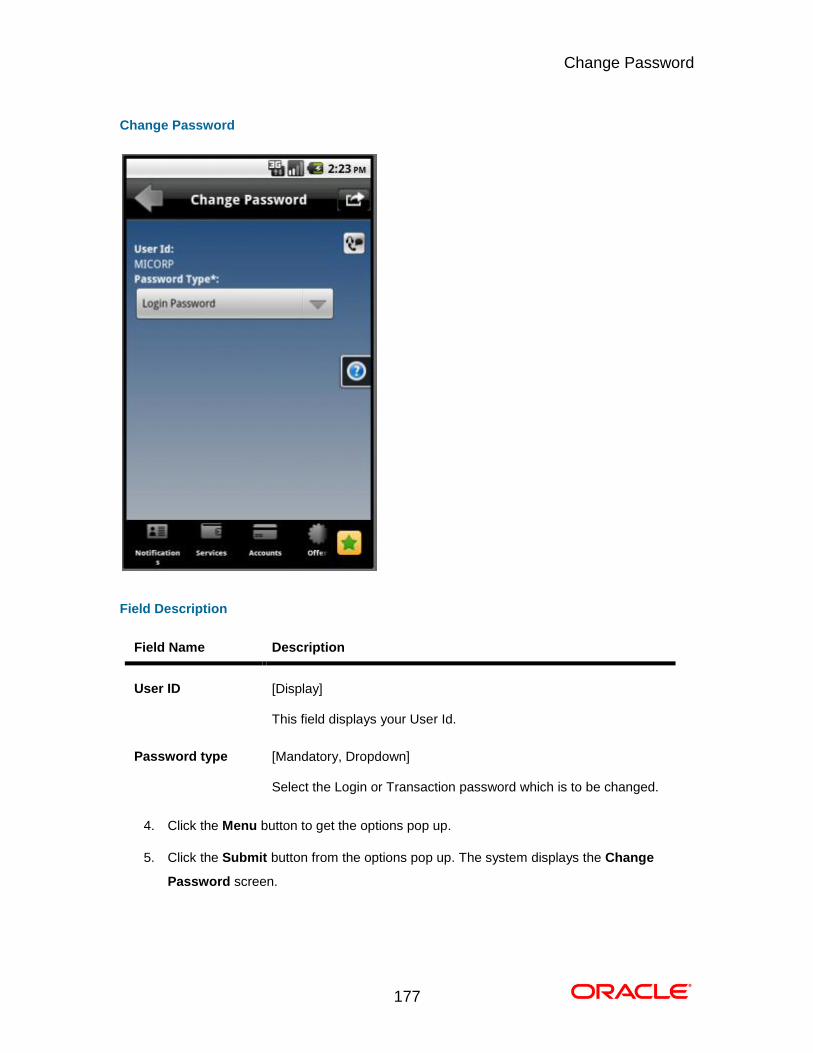
Change Password
175
27. Change Password
This menu enables you to change his login or transaction password.
To change the password
1. Log on to the Android application based Mobile Banking application.

Change Password
176
2. Click the Services menu from the menu bar. The system displays transactions under
services menu, as shown in above screen.
3. Click the Change Password tab. The system displays Change Password screen as
shown below.
Change Password
177
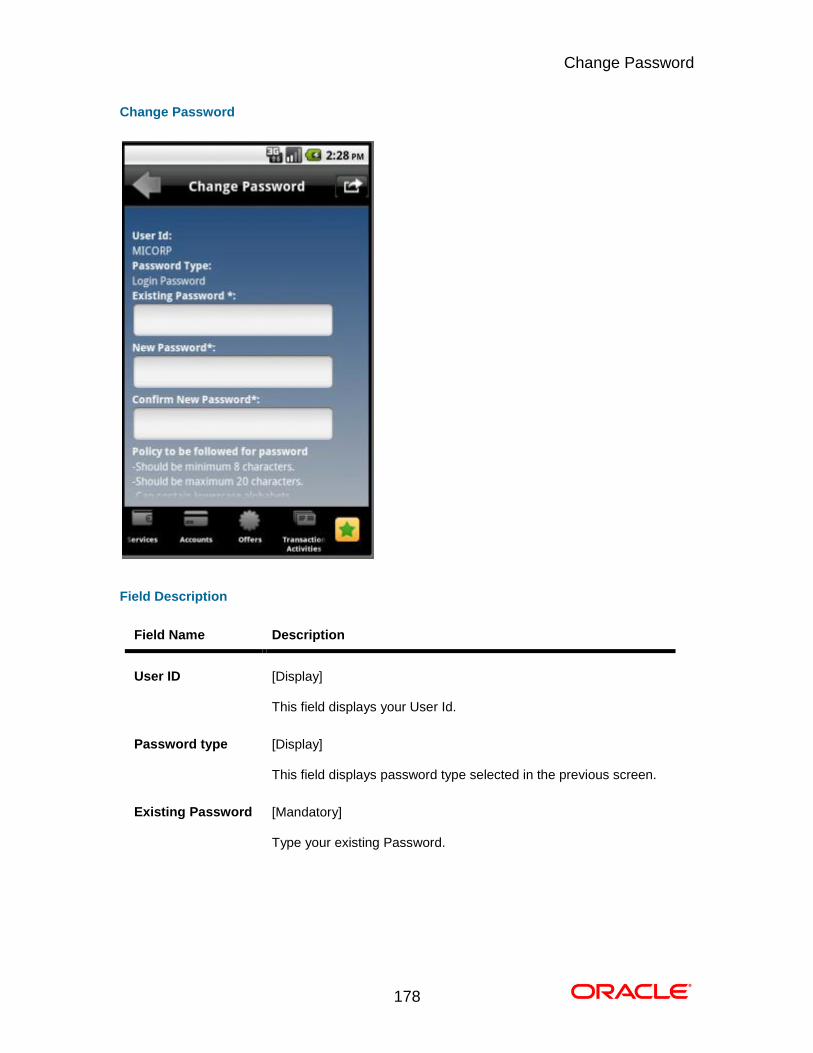
Change Password
Field Description
Field Name Description
User ID [Display]
This field displays your User Id.
Password type [Mandatory, Dropdown]
Select the Login or Transaction password which is to be changed.
4. Click the Menu button to get the options pop up.
5. Click the Submit button from the options pop up. The system displays the Change
Password screen.
Change Password
178
Change Password
Field Description
Field Name Description
User ID [Display]
This field displays your User Id.
Password type [Display]
This field displays password type selected in the previous screen.
Existing Password [Mandatory]
Type your existing Password.
Change Password
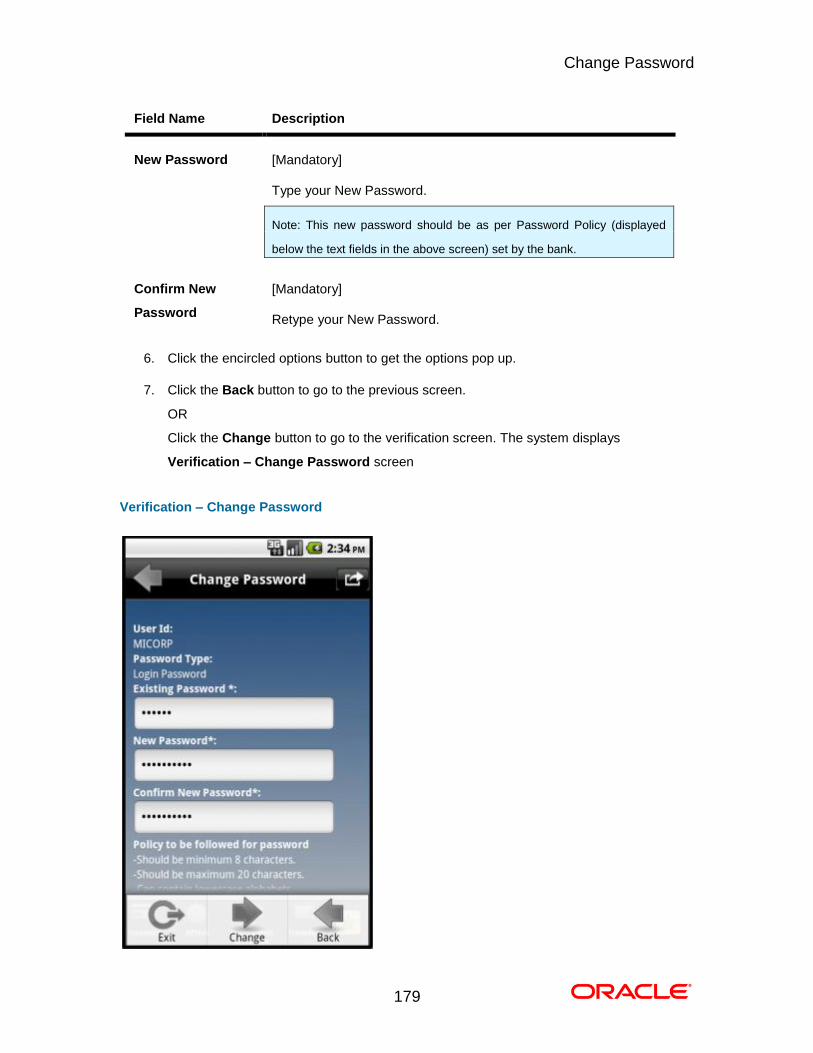
179
Field Name Description
New Password [Mandatory]
Type your New Password.
Note: This new password should be as per Password Policy (displayed
below the text fields in the above screen) set by the bank.
Confirm New
Password
[Mandatory]
Retype your New Password.
6. Click the encircled options button to get the options pop up.
7. Click the Back button to go to the previous screen.
OR
Click the Change button to go to the verification screen. The system displays
Verification – Change Password screen
Verification – Change Password
Change Password
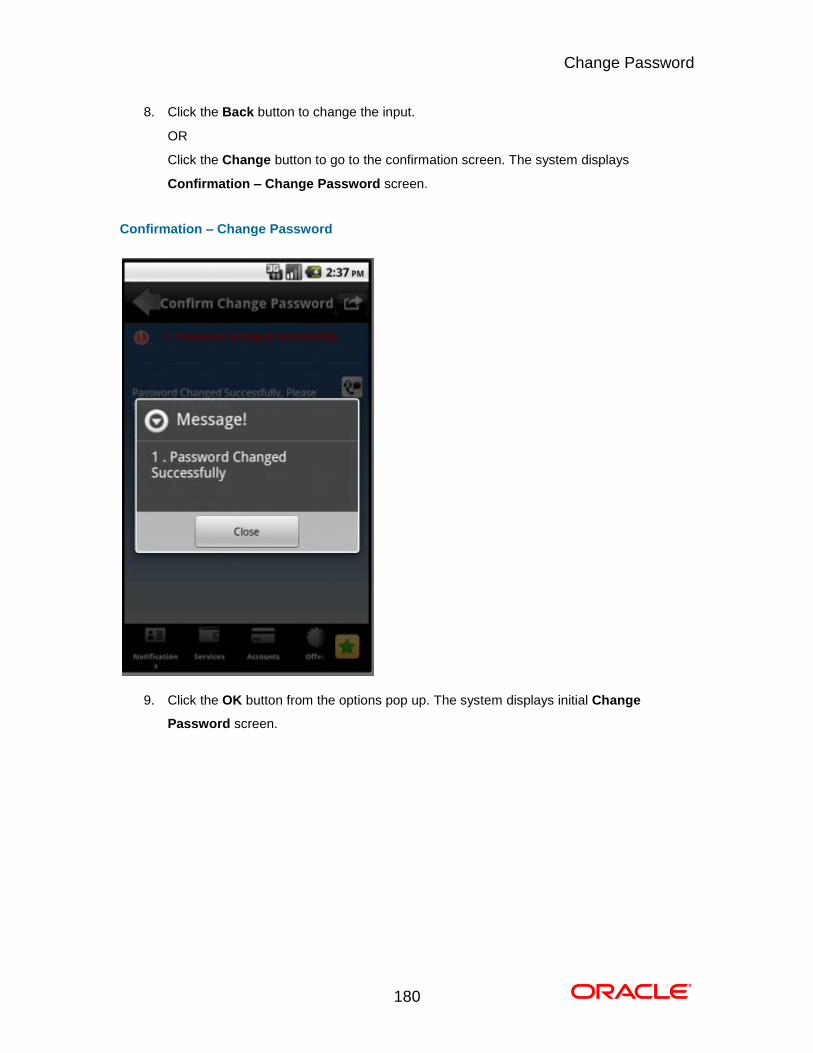
180
8. Click the Back button to change the input.
OR
Click the Change button to go to the confirmation screen. The system displays
Confirmation – Change Password screen.
Confirmation – Change Password
9. Click the OK button from the options pop up. The system displays initial Change
Password screen. 0.
Deposit Details
181
28. Deposit Details
This option is provided to enable you to view the details of Term Deposit Accounts. Term Deposit
Details displays the list of all Term Deposit accounts with details, under all the customer id’s
linked to your login user id.
To view the TD Details
1. Log on to the Android application based Mobile Banking application. The system displays
initial Accounts Overview screen as shown below.
Accounts Overview
Deposit Details
182
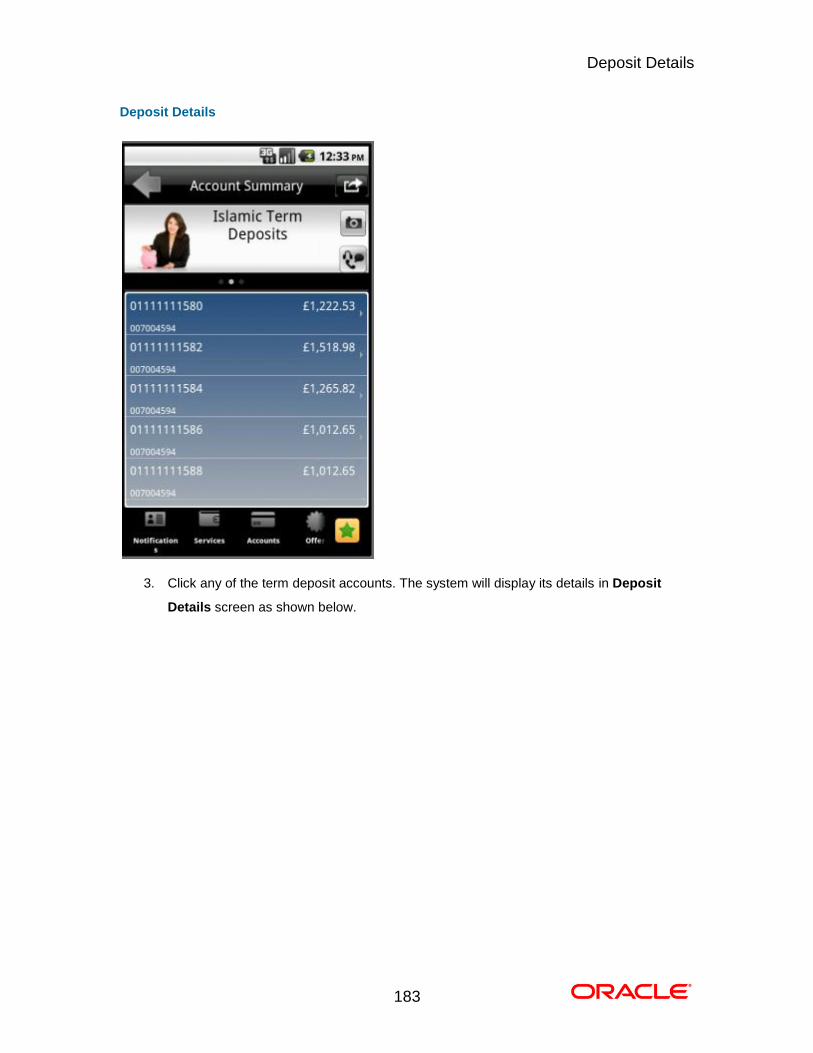
2. Click the Term Deposits tab. The system displays all the term deposits in the Accounts
Summary screen as shown below.
Deposit Details
183
Deposit Details
3. Click any of the term deposit accounts. The system will display its details in Deposit
Details screen as shown below.

Deposit Details
184
Deposit Details
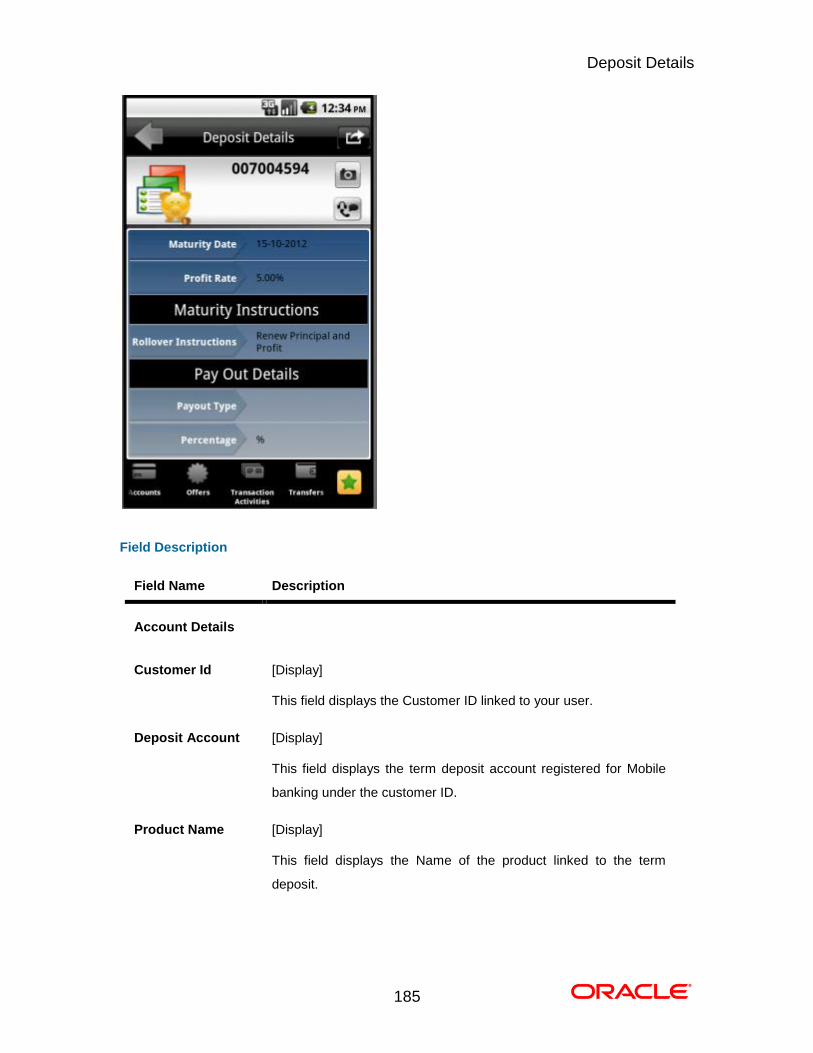
Deposit Details
185
Field Description
Field Name Description
Account Details
Customer Id [Display]
This field displays the Customer ID linked to your user.
Deposit Account [Display]
This field displays the term deposit account registered for Mobile
banking under the customer ID.
Product Name [Display]
This field displays the Name of the product linked to the term
deposit.
Deposit Details
186
Field Name Description
Current Balance [Display]
This field displays the Current available balance of the term
deposit with currency.
Deposits Details
Deposit Date [Display]
This field displays the Date on which the deposit was made.
Maturity Date [Display]
This field displays the Date on which the deposit is getting
matured.
Interest Rate [Display]
This field displays the interest rate percentage on the term deposit.
Maturity instruction
Rollover
instruction
[Display]
This field displays the rollover instructions given for the deposit.
Payout Details
Payout type [Display]
This field displays the payout type instruction given for the deposit.
Percentage [Display]
This field displays the percentage of amount for the stated payout
instruction.
4. Click the Back button to go to the previous screen. 0.
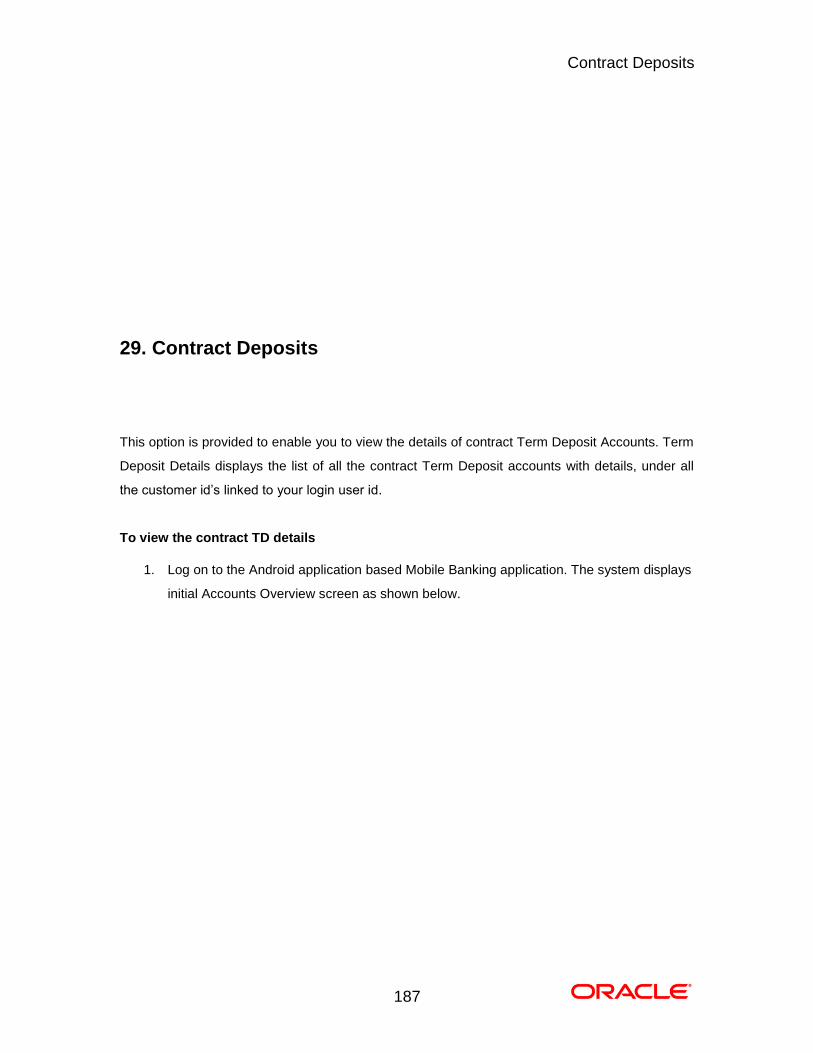
Contract Deposits
187
29. Contract Deposits
This option is provided to enable you to view the details of contract Term Deposit Accounts. Term
Deposit Details displays the list of all the contract Term Deposit accounts with details, under all
the customer id’s linked to your login user id.
To view the contract TD details
1. Log on to the Android application based Mobile Banking application. The system displays
initial Accounts Overview screen as shown below.
Contract Deposits
188
Accounts Overview
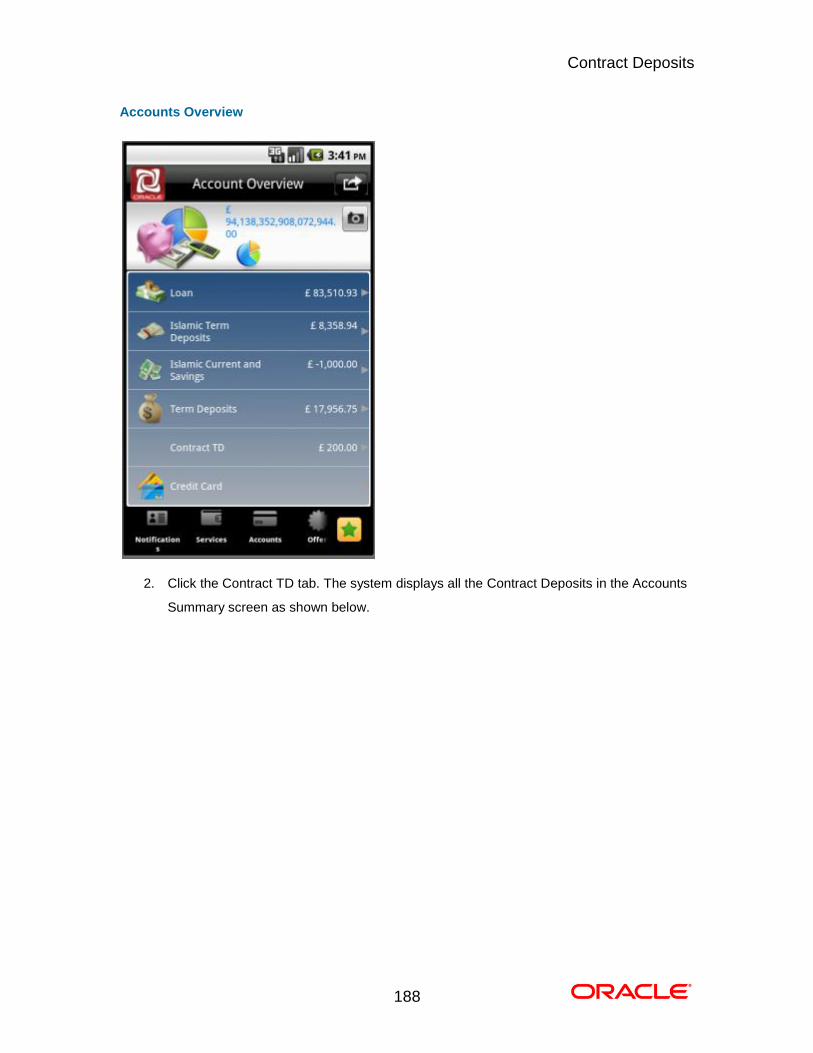
2. Click the Contract TD tab. The system displays all the Contract Deposits in the Accounts
Summary screen as shown below.
Contract Deposits
189
Deposit Details
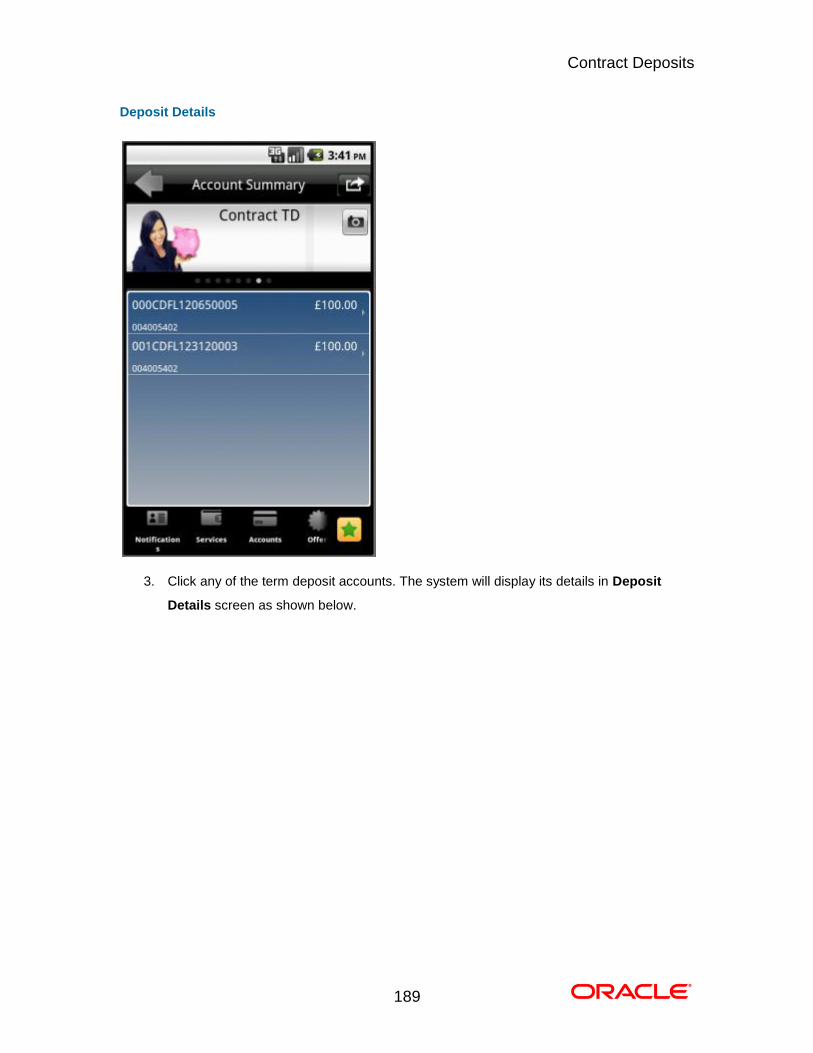
3. Click any of the term deposit accounts. The system will display its details in Deposit
Details screen as shown below.

Contract Deposits
190
Contract Deposit Details
Contract Deposits
191
Contract Deposits
192
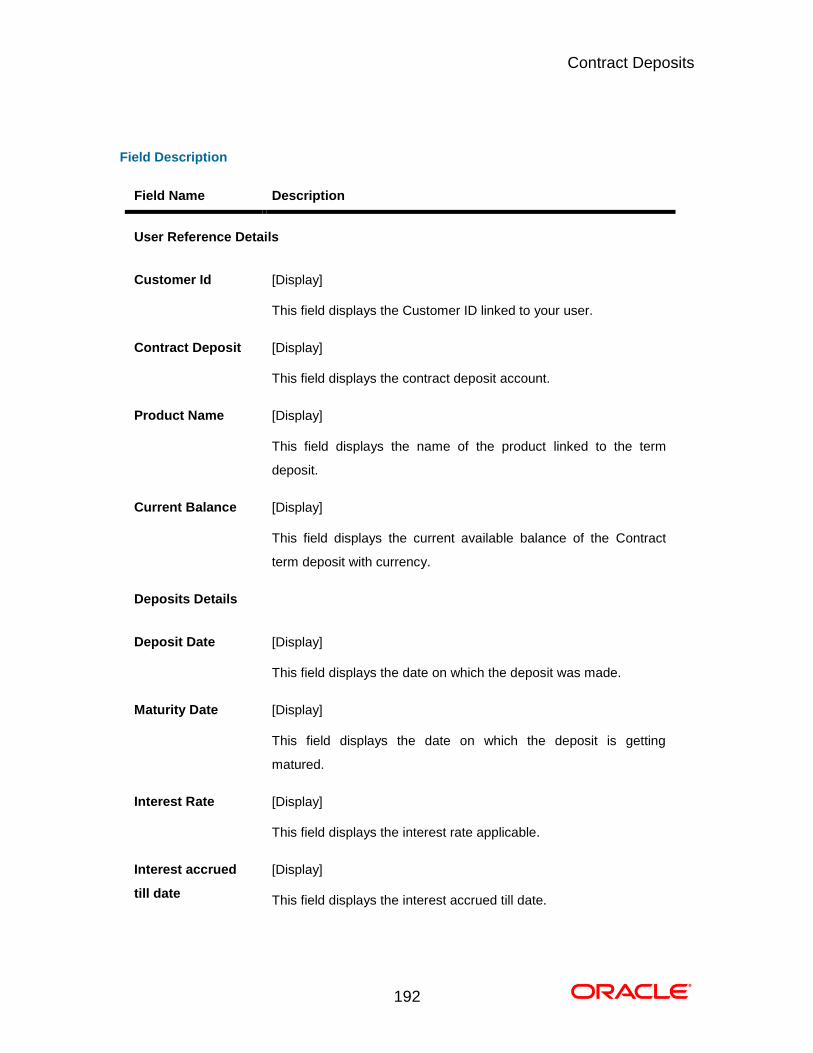
Field Description
Field Name Description
User Reference Details
Customer Id [Display]
This field displays the Customer ID linked to your user.
Contract Deposit [Display]
This field displays the contract deposit account.
Product Name [Display]
This field displays the name of the product linked to the term
deposit.
Current Balance [Display]
This field displays the current available balance of the Contract
term deposit with currency.
Deposits Details
Deposit Date [Display]
This field displays the date on which the deposit was made.
Maturity Date [Display]
This field displays the date on which the deposit is getting
matured.
Interest Rate [Display]
This field displays the interest rate applicable.
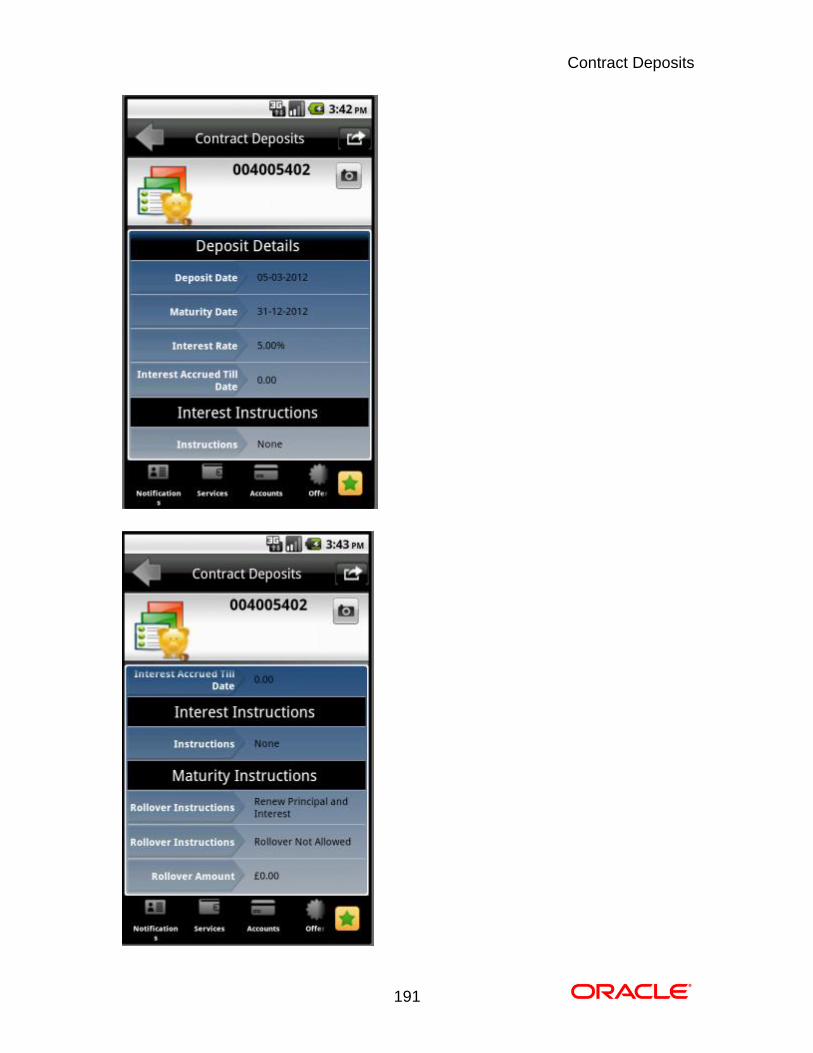
Interest accrued
till date
[Display]
This field displays the interest accrued till date.
Contract Deposits
193
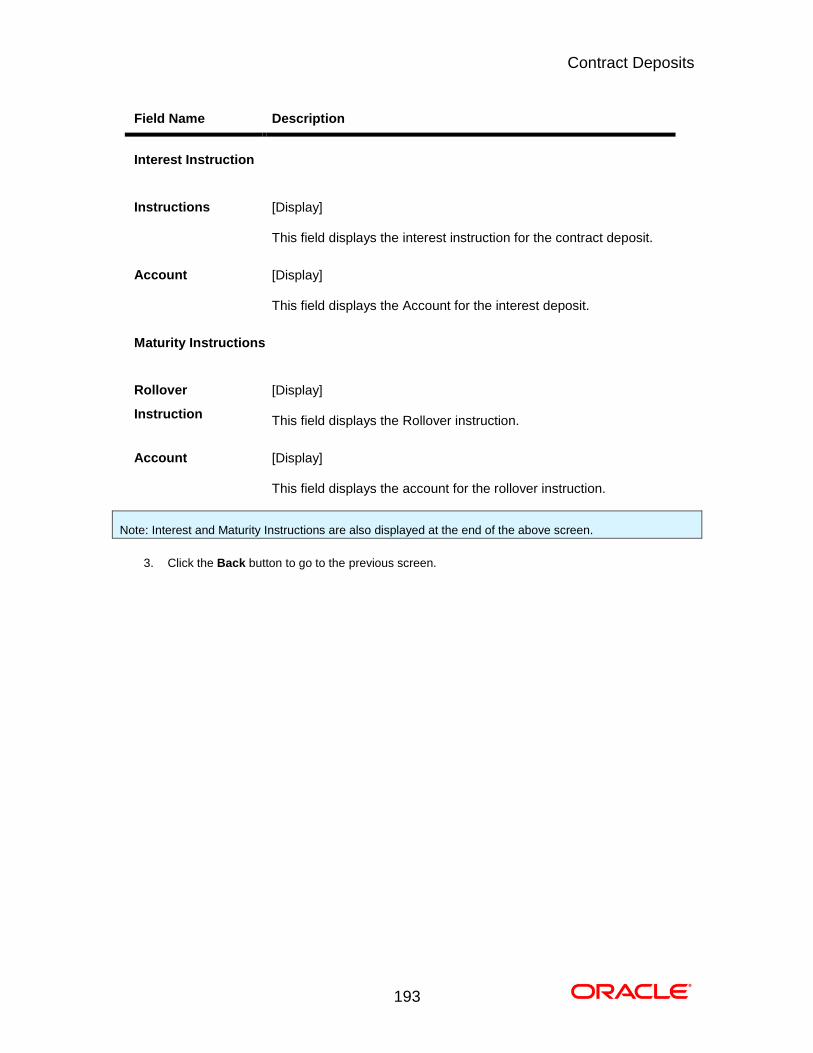
Field Name Description
Interest Instruction
Instructions [Display]
This field displays the interest instruction for the contract deposit.
Account [Display]
This field displays the Account for the interest deposit.
Maturity Instructions
Rollover
Instruction
[Display]
This field displays the Rollover instruction.
Account [Display]
This field displays the account for the rollover instruction.
Note: Interest and Maturity Instructions are also displayed at the end of the above screen.
3. Click the Back button to go to the previous screen. 0.
Force Change Password
194
30. Force Change Password
This option forces you to mandatorily change your password. Force Change Password screen
comes in following scenarios.
If you are login for the first time.
If you have reset your password.
If your password has expired.
To perform the forced change password
1. Log onto the Android application based mobile banking application in the case of above scenarios.
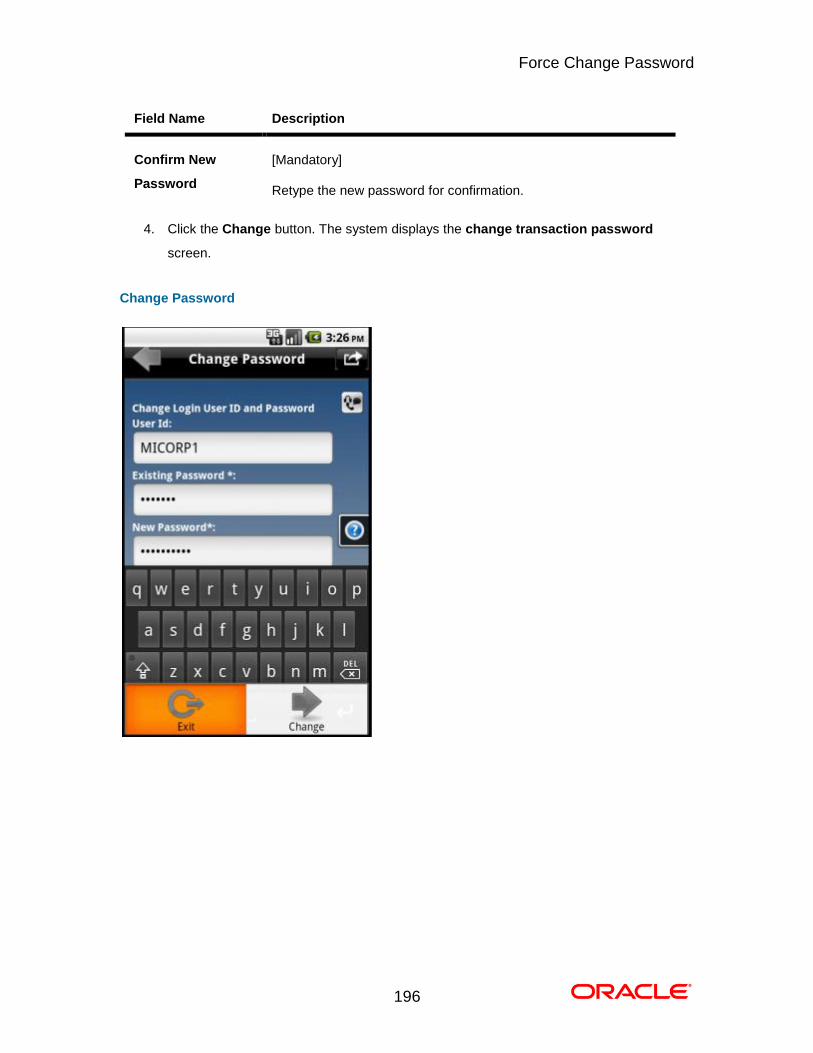
The system forces to change the password by displaying Change Password screen.
Force Change Password
195
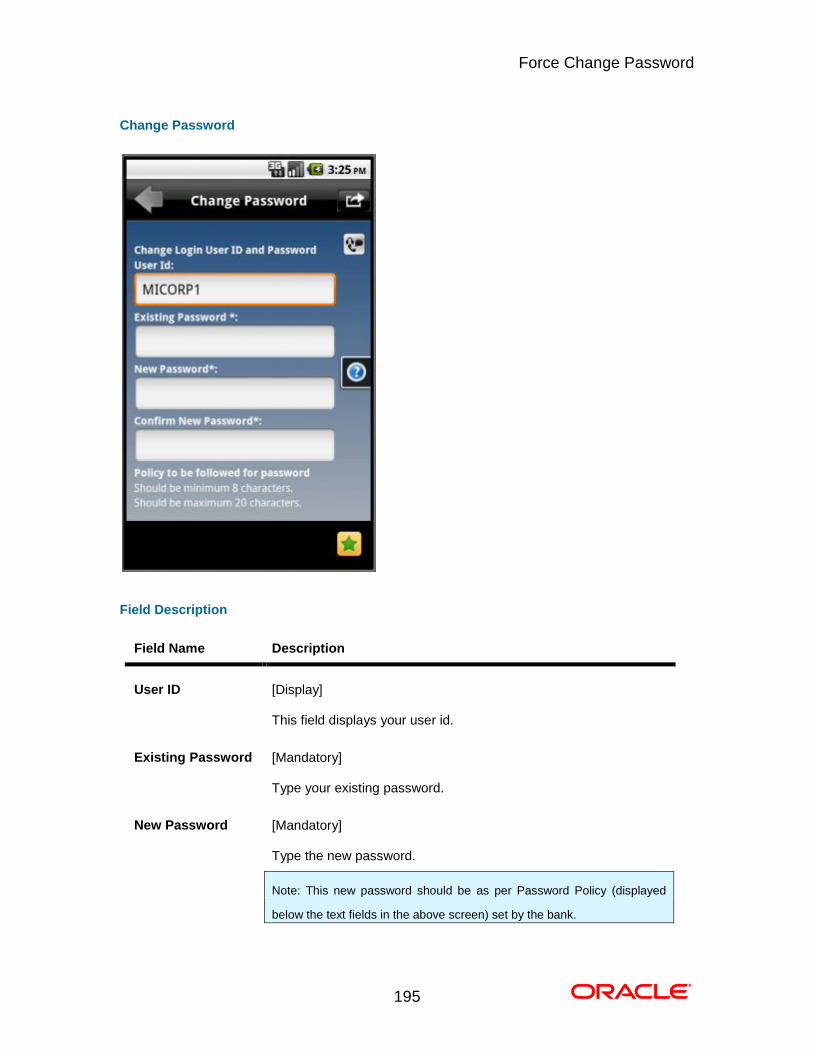
Change Password
Field Description
Field Name Description
User ID [Display]
This field displays your user id.
Existing Password [Mandatory]
Type your existing password.
New Password [Mandatory]
Type the new password.
Note: This new password should be as per Password Policy (displayed
below the text fields in the above screen) set by the bank.
Force Change Password
196
Field Name Description
Confirm New
Password
[Mandatory]
Retype the new password for confirmation.
4. Click the Change button. The system displays the change transaction password
screen.
Change Password
Force Change Password
197
Force Change Password
198
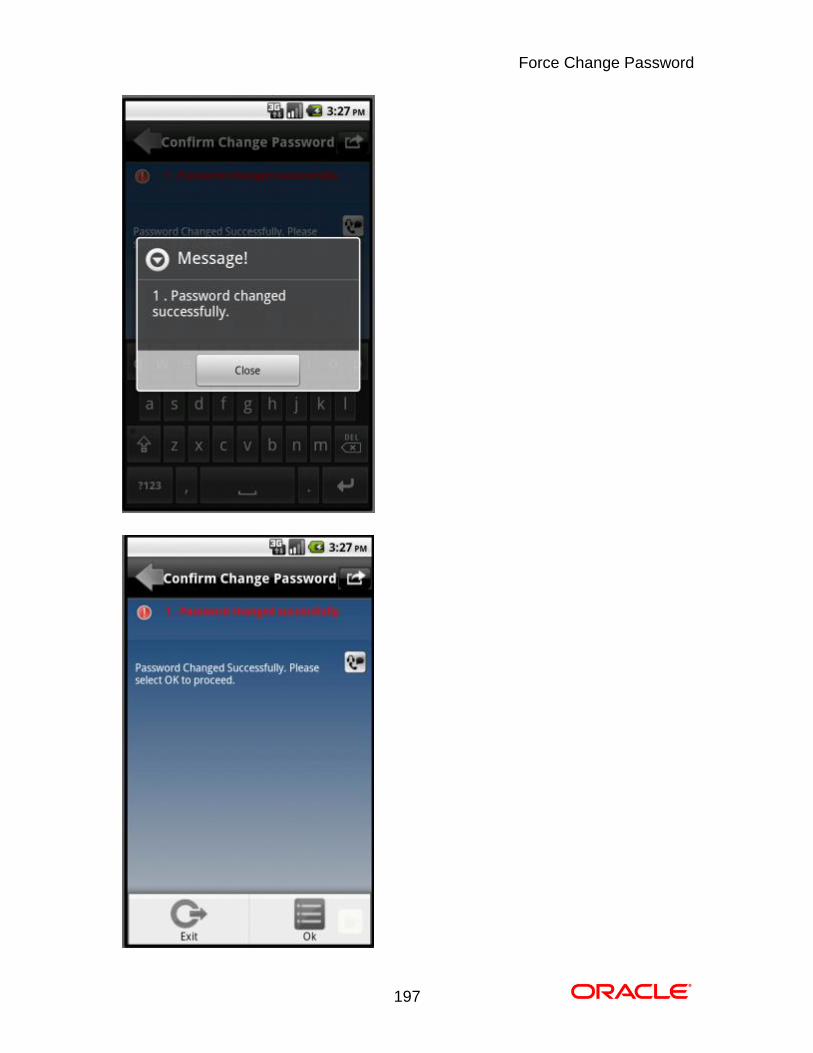
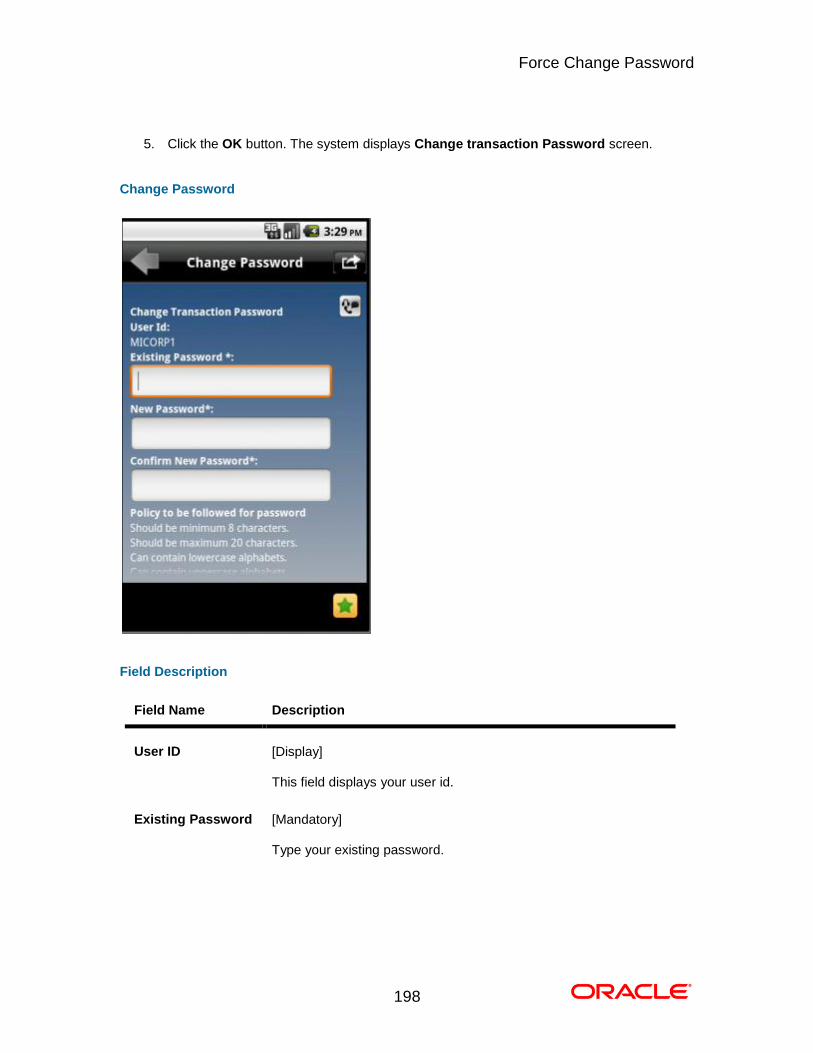
5. Click the OK button. The system displays Change transaction Password screen.
Change Password
Field Description
Field Name Description
User ID [Display]
This field displays your user id.
Existing Password [Mandatory]
Type your existing password.
Force Change Password
199
Field Name Description
New Password [Mandatory]
Type the new password.
Note: This new password should be as per Password Policy (displayed
below the text fields in the above screen) set by the bank.
Confirm New
Password
[Mandatory]
Retype the new password.
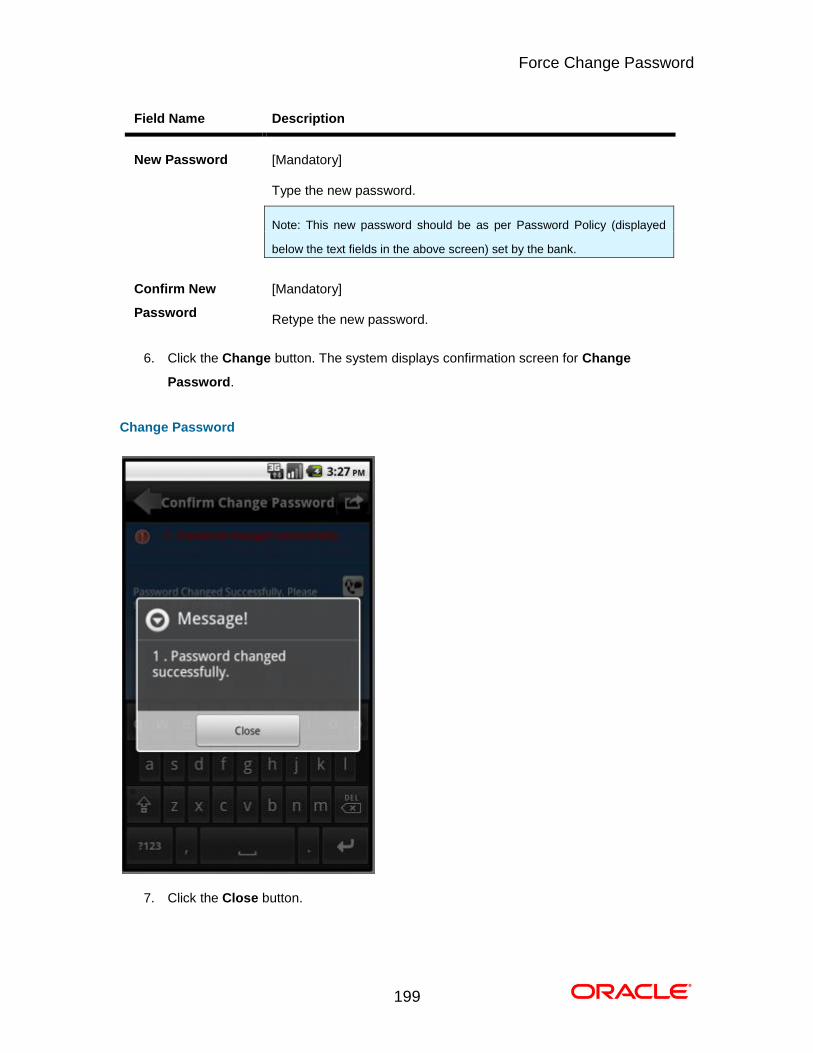
6. Click the Change button. The system displays confirmation screen for Change
Password.
Change Password
7. Click the Close button. 0.
Buy Funds
200
31. Buy Funds
This option allows you to buy the mutual funds.
The fund is open for purchase if:
The fund is in the Initial Public Offering (IPO) stage
The fund is allowed for subscriptions in the given period.
This information is available as part of fund rules definition.
An investor can select for subscription of a fund.
One Time Single Fund Purchase
To buy mutual fund
1. Log on to the Android application based mobile banking application. The system displays
initial Account Overview screen as shown below.

Buy Funds
201
Account Overview
2. Click the Mutual Funds menu from the menu bar. The system displays mutual funds
related transaction in the Mutual Funds screen as shown below.

Buy Funds
202
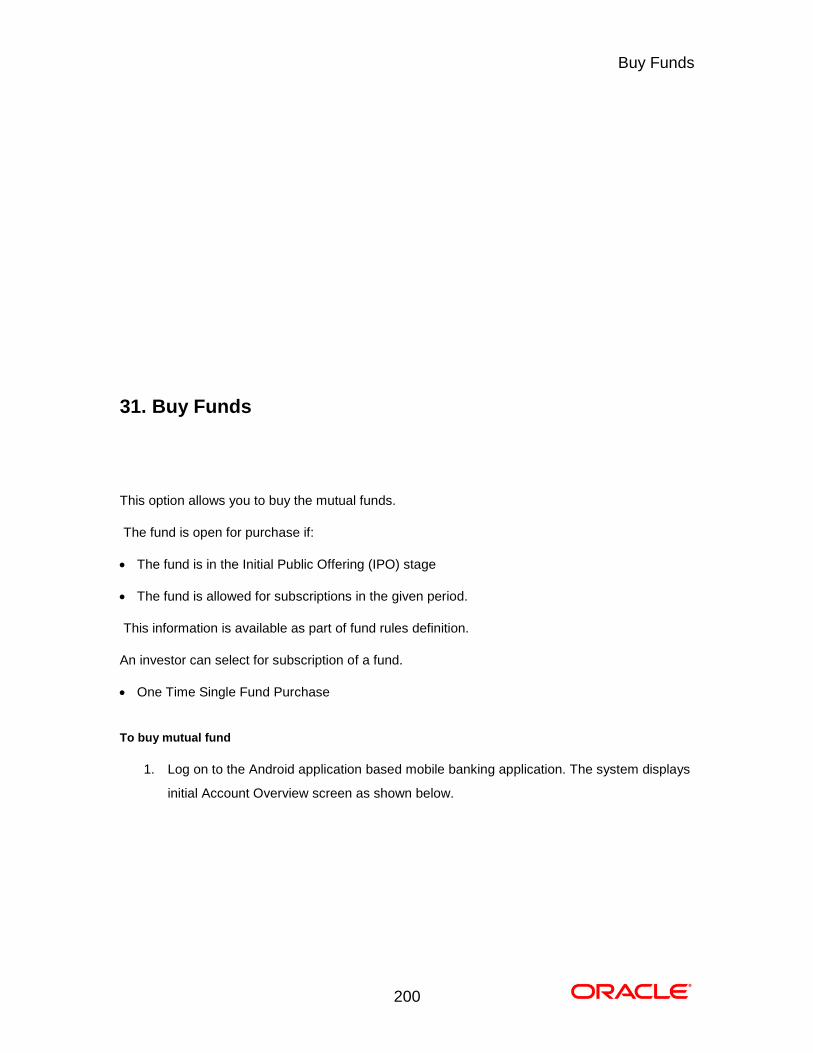
3. Click the Buy Funds transaction tab as shown above. The system displays Buy Funds
screen as shown below.
Buy Funds
203
Buy Funds
Field Description
Field Name Description
Unit Holder [Mandatory, Drop-Down]
Select the unit holder from the drop-down list.
Fund AMC [Mandatory, Drop-Down]
Select the fund AMC from the drop-down list.
4. Click the Menu button to get the options pop up.
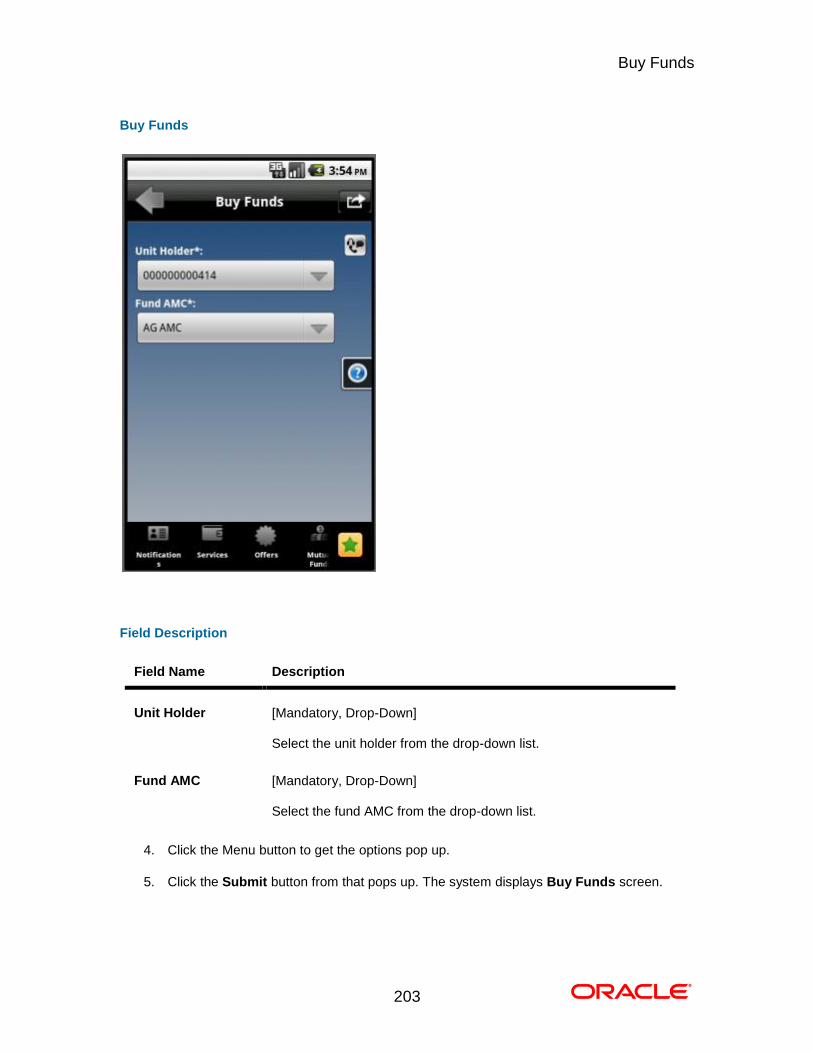
5. Click the Submit button from that pops up. The system displays Buy Funds screen.
Buy Funds
204
Buy Funds
Filed Description
Field Name Description
Unit Holder [Display]
This field displays the unit holder.
Fund AMC [Display]
This field displays the name of the fund AMC..
Fund Name [Display]
This field displays the fund name.
6. Click the Fund Details button from the options pop up as shown in above screen. The
system displays Buy Funds detail screen.
OR
Buy Funds
205
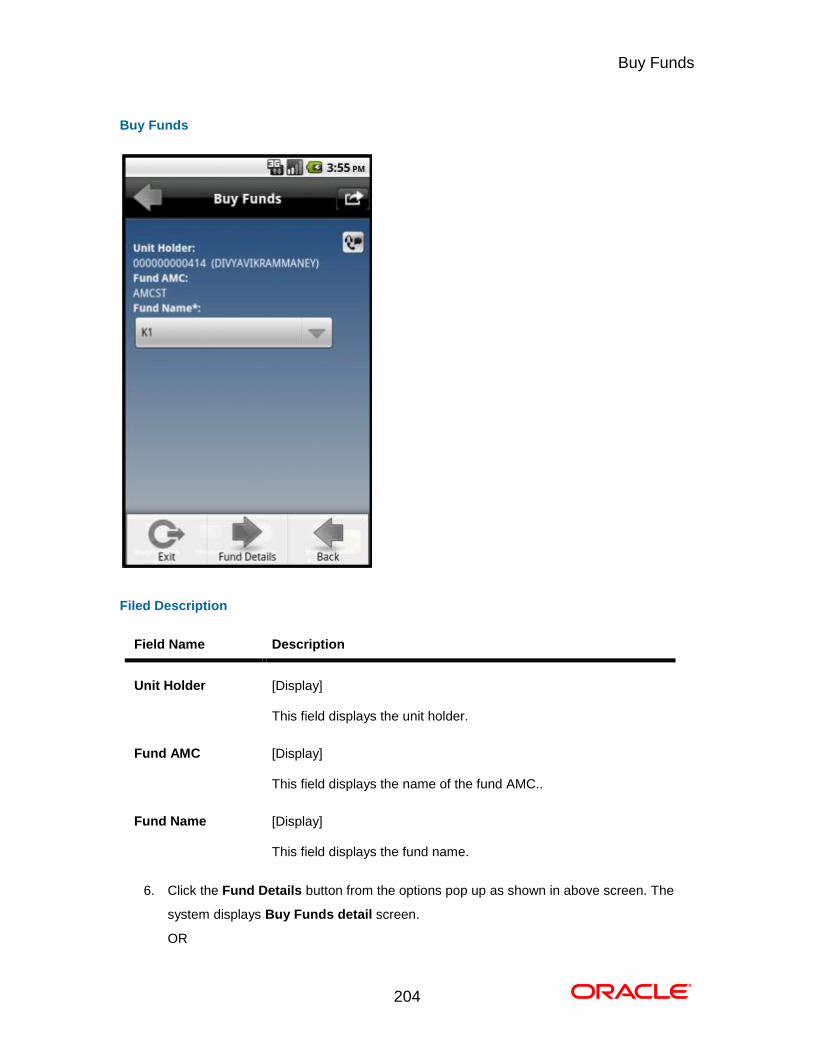
Click the Back button. The system displays the buy funds initial screen.
Buy Funds
Buy Funds
206
Field Description
Field Name Description
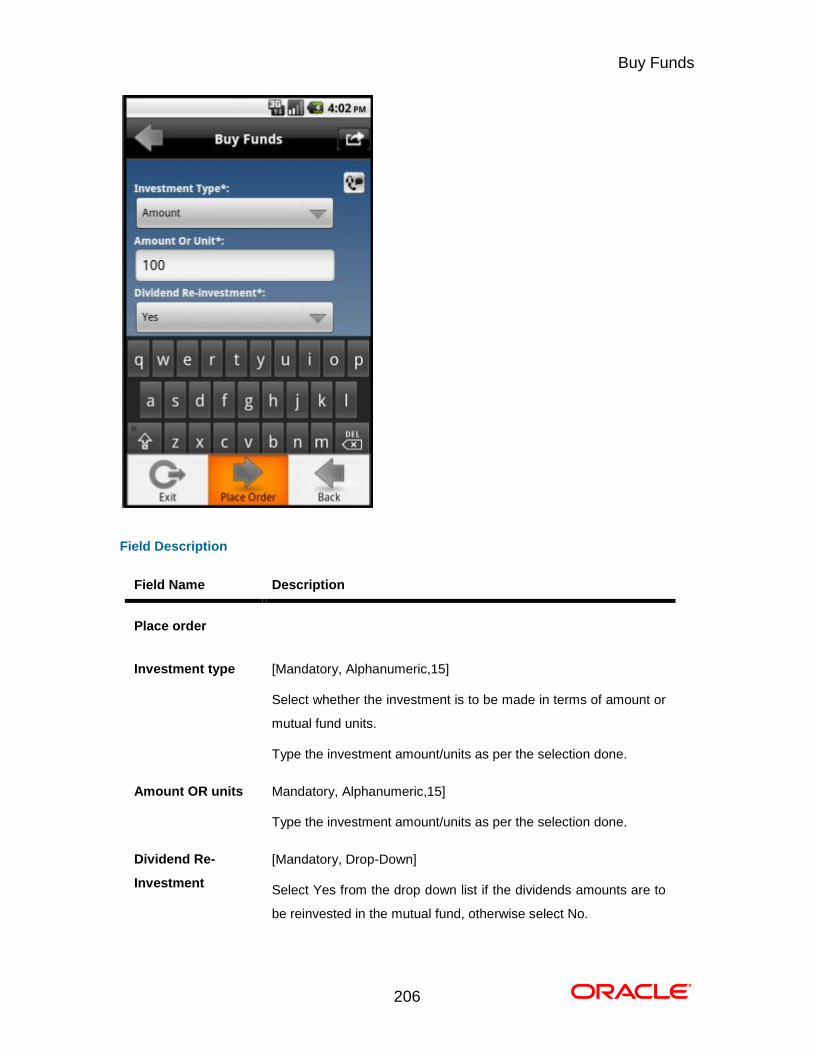
Place order
Investment type [Mandatory, Alphanumeric,15]
Select whether the investment is to be made in terms of amount or
mutual fund units.
Type the investment amount/units as per the selection done.
Amount OR units Mandatory, Alphanumeric,15]
Type the investment amount/units as per the selection done.
Dividend Re-
Investment
[Mandatory, Drop-Down]
Select Yes from the drop down list if the dividends amounts are to
be reinvested in the mutual fund, otherwise select No.

Buy Funds
207
Field Name Description
Fund information
Unit Holder [Display]
This field displays the unit holder.
Fund AMC [Display]
This field displays the fund AMC.
Fund Name [Display]
This field displays the fund name.
Min. Amount [Display]
This field displays the minimum amount to be invested in a fund.
Minimum Units [Display]
This field displays the minimum units of the mutual fund that can
be purchased.
7. Click the Place Order button from the options pop up as shown in 2nd screen, above.
The system displays Buy Funds - Verify screen.
OR
Click the Back button to navigate to the previous screen.
Buy Funds
208
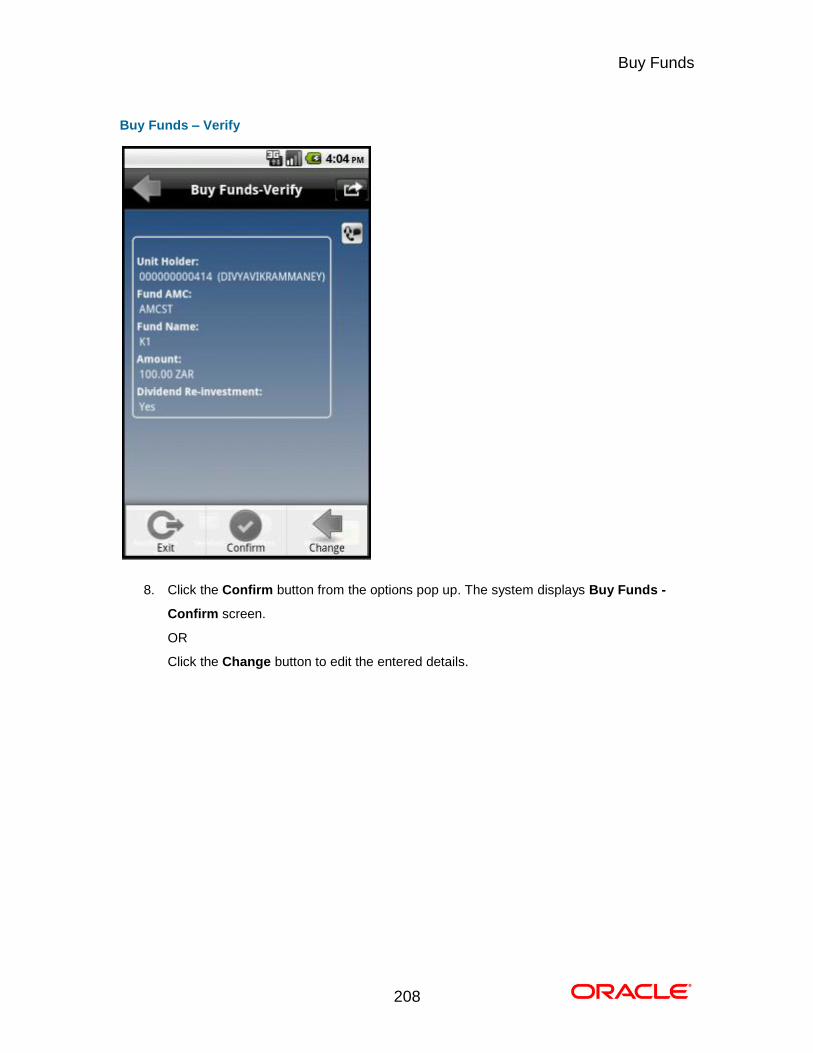
Buy Funds – Verify
8. Click the Confirm button from the options pop up. The system displays Buy Funds -
Confirm screen.
OR
Click the Change button to edit the entered details.
Buy Funds
209
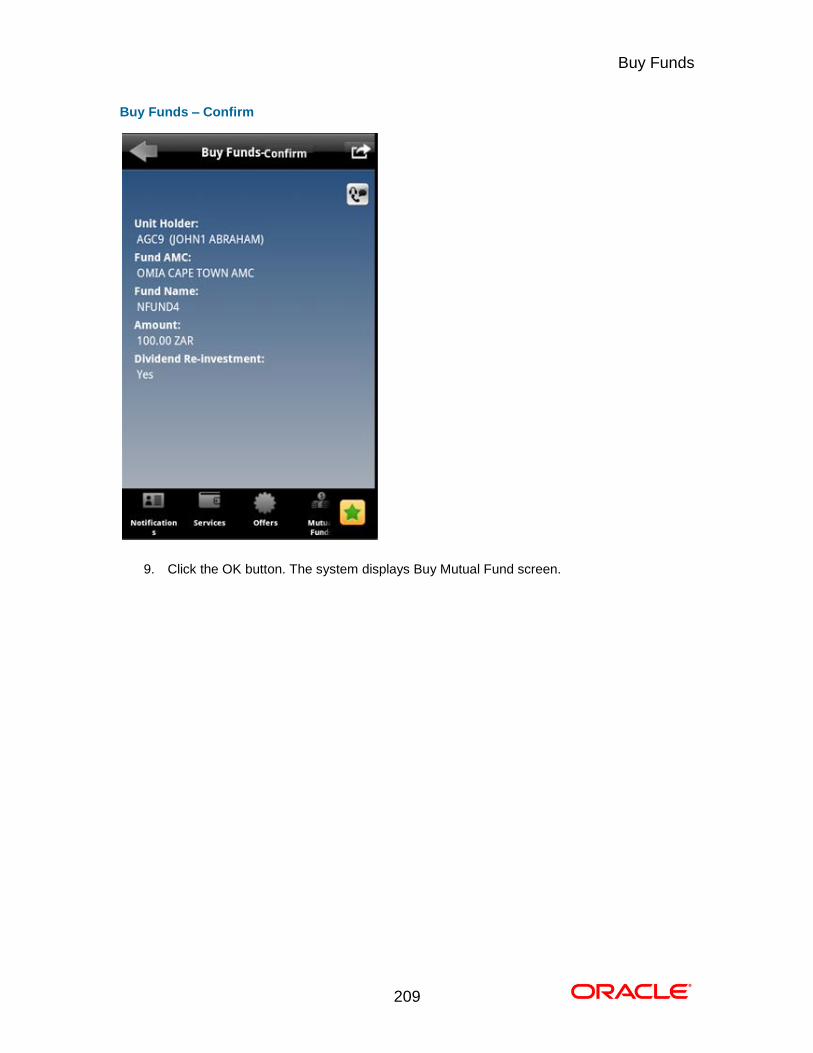
Buy Funds – Confirm
9. Click the OK button. The system displays Buy Mutual Fund screen. 0.
Redeem Funds
210
32. Redeem Funds
This option allows you to redeem mutual fund holdings. You may select to redeem full/part of the
investment made in mutual fund by this option. The fund should be open for redemption.
A fund is open for redemption if:
The fund is allowed for redemption in the given period. This information is available as part of
fund prospectus.
The fund is not in book closure.
The redemption process comprises of the following stages:
Indicating the fund unit holder and the fund to be redeemed.
Specifying redemption details including product, redemption type, transaction currency and
payout mode.
Verifying the details where user can confirm the information specified.
To redeem mutual fund
1. Log on to the Android application based mobile banking application. The system displays
Redeem Funds
211
initial Account Overview screen as shown below.
Account Overview
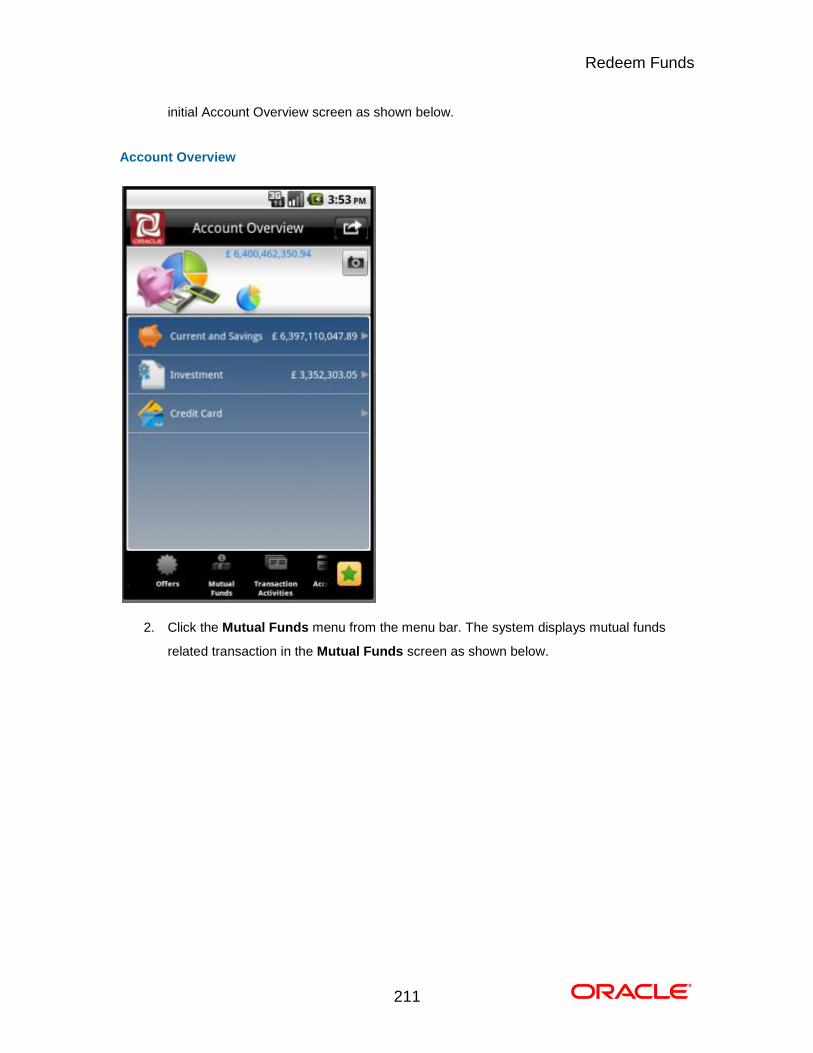
2. Click the Mutual Funds menu from the menu bar. The system displays mutual funds
related transaction in the Mutual Funds screen as shown below.

Redeem Funds
212
3. Click the Redeem Funds transaction tab as shown above. The system displays Redeem
Funds screen as shown below.

Redeem Funds
213
Redeem Funds

Redeem Funds
214
Field Description
Field Name Description
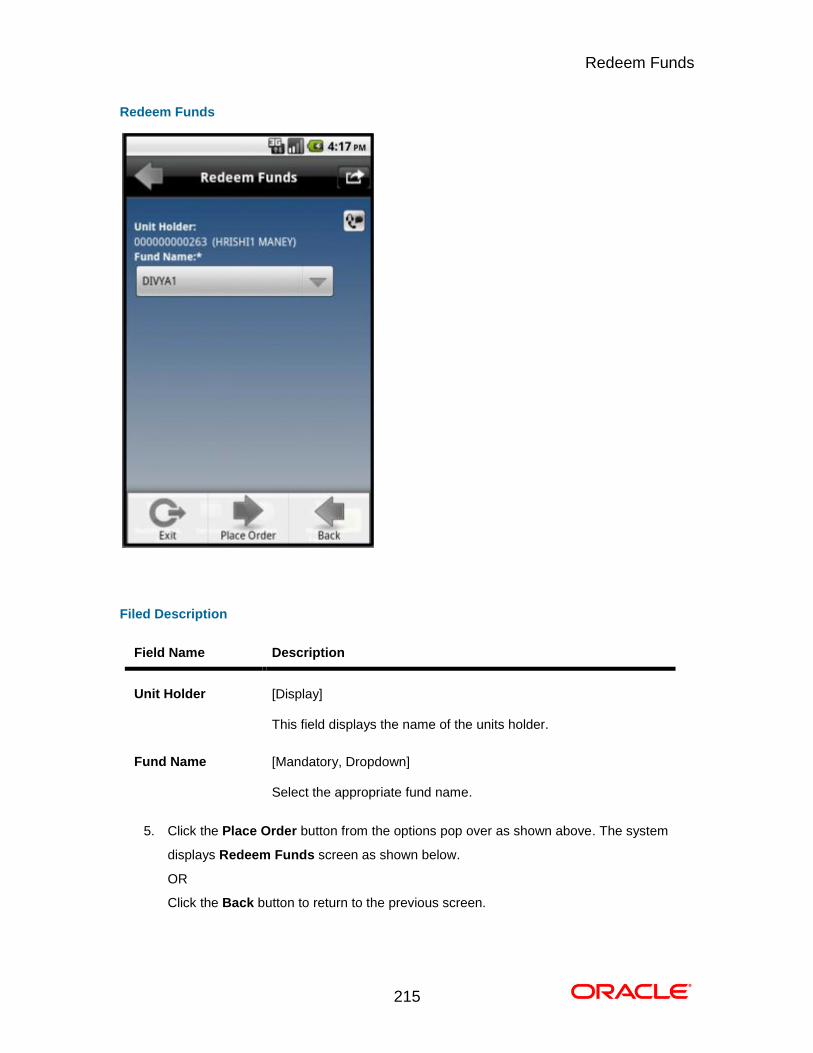
Unit Holder [Mandatory, Drop-Down]
Select the unit holder from the drop-down list.
4. Click the View Holdings button, from the options pop over, that comes after clicking the
Menu button as shown in first screen. The system displays Redeem Funds screen.
Redeem Funds
215
Redeem Funds
Filed Description
Field Name Description
Unit Holder [Display]
This field displays the name of the units holder.
Fund Name [Mandatory, Dropdown]
Select the appropriate fund name.
5. Click the Place Order button from the options pop over as shown above. The system
displays Redeem Funds screen as shown below.
OR
Click the Back button to return to the previous screen.
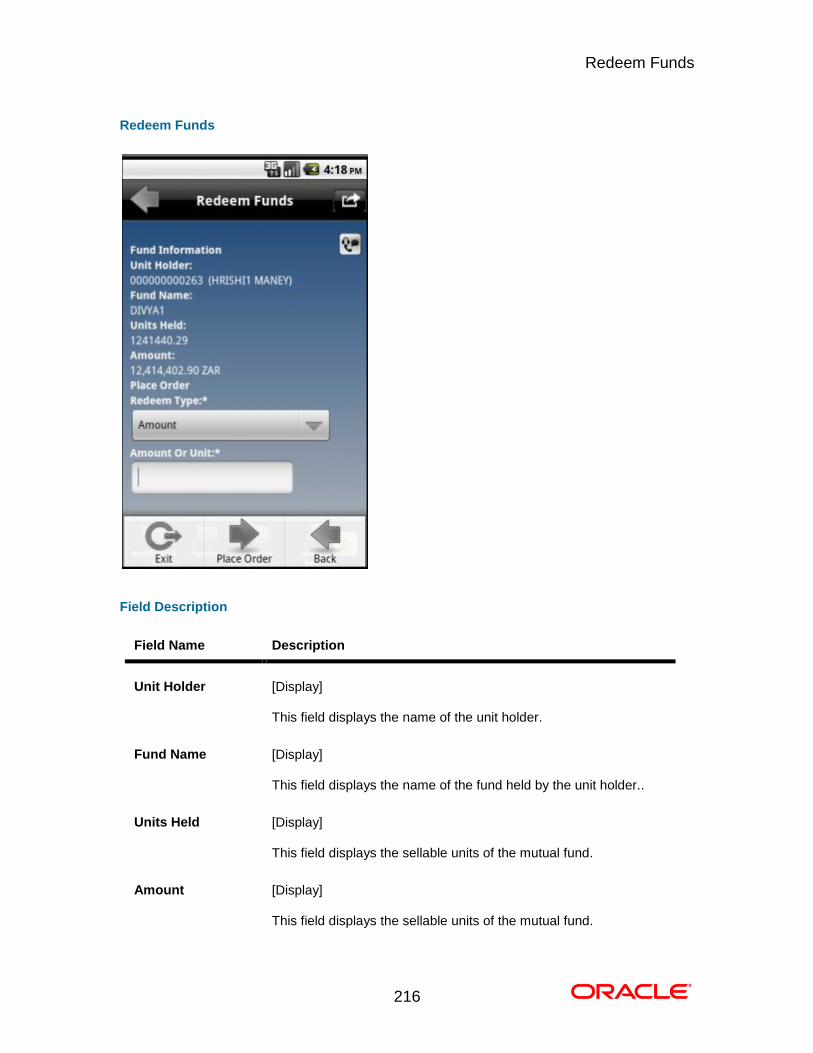
Redeem Funds
216
Redeem Funds
Field Description
Field Name Description
Unit Holder [Display]
This field displays the name of the unit holder.
Fund Name [Display]
This field displays the name of the fund held by the unit holder..
Units Held [Display]
This field displays the sellable units of the mutual fund.
Amount [Display]
This field displays the sellable units of the mutual fund.
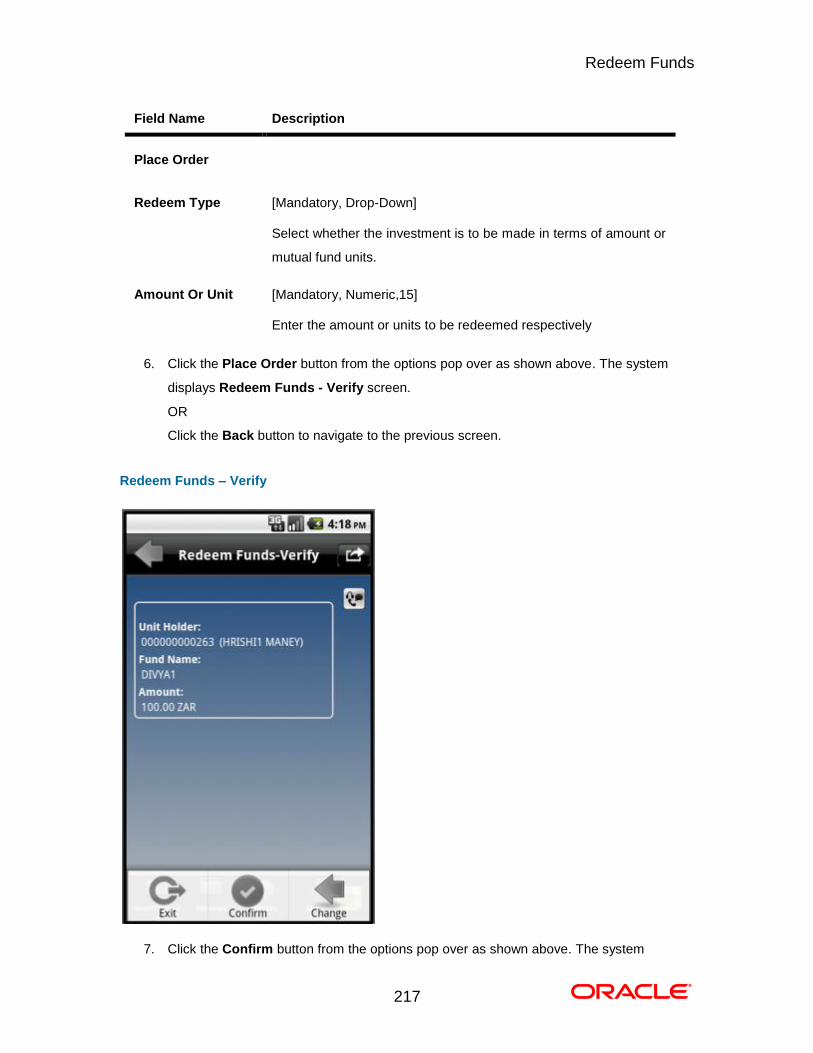
Redeem Funds
217
Field Name Description
Place Order
Redeem Type [Mandatory, Drop-Down]
Select whether the investment is to be made in terms of amount or
mutual fund units.
Amount Or Unit [Mandatory, Numeric,15]
Enter the amount or units to be redeemed respectively
6. Click the Place Order button from the options pop over as shown above. The system
displays Redeem Funds - Verify screen.
OR
Click the Back button to navigate to the previous screen.
Redeem Funds – Verify
7. Click the Confirm button from the options pop over as shown above. The system
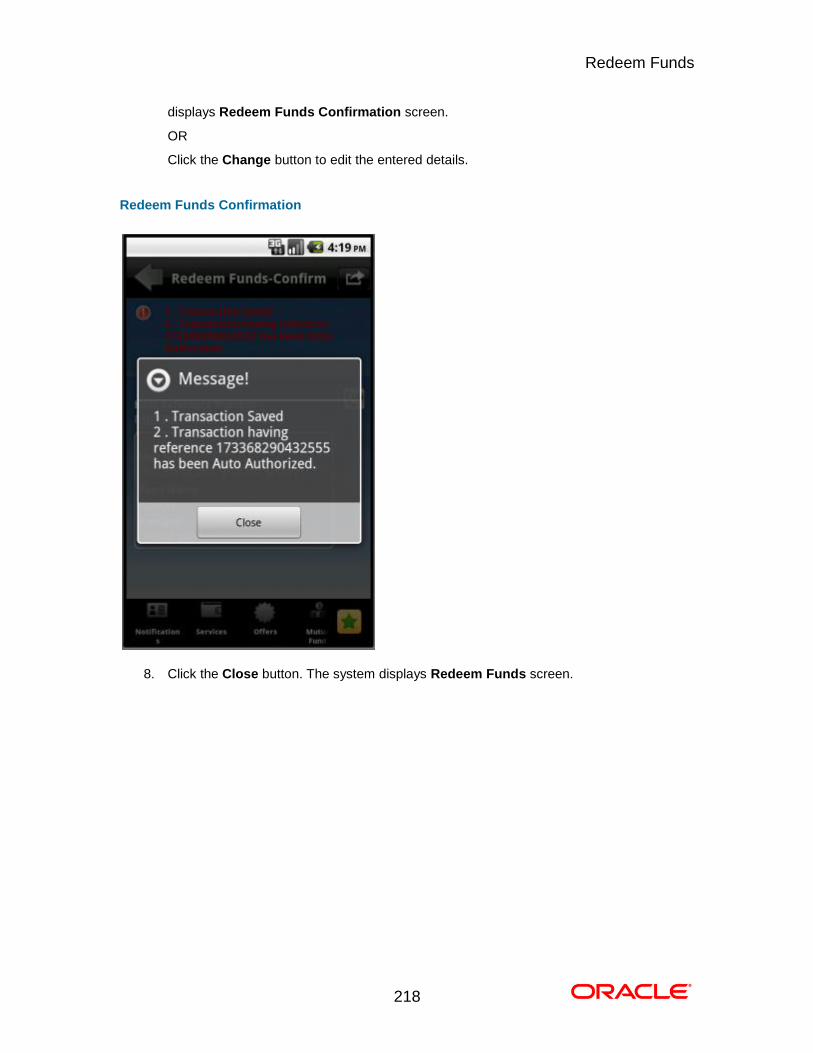
Redeem Funds
218
displays Redeem Funds Confirmation screen.
OR
Click the Change button to edit the entered details.
Redeem Funds Confirmation
8. Click the Close button. The system displays Redeem Funds screen. 0.
Portfolio
219
33. Portfolio
This option allows you to view the details of all the mutual fund holdings.
To view the portfolio
1. Log on to the Android application based mobile banking application.
2. Click the Mutual Funds > Portfolio transaction from the menu. The system displays
Portfolio screen.
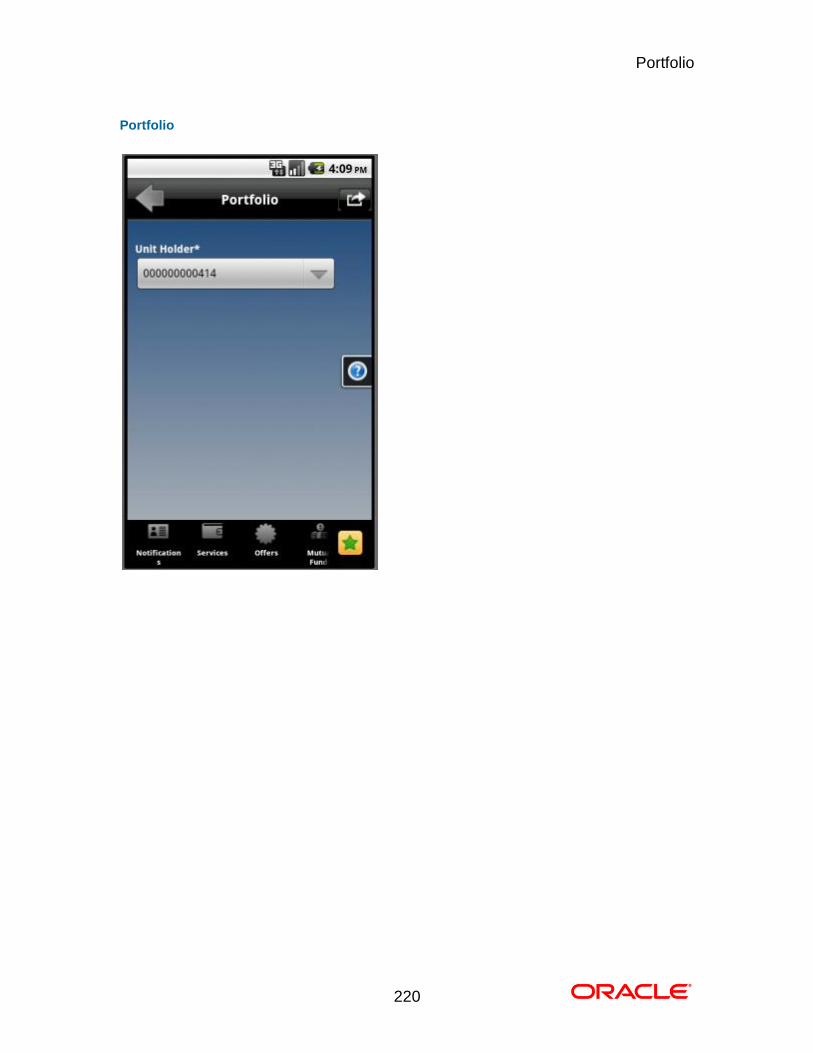
Portfolio
220
Portfolio

Portfolio
221
Field Description
Field Name Description
Unit Holder [Mandatory, Drop-Down]
Select the unit holder from the drop-down list.
3. Click the View Holdings button from the options pop over that comes after clicking Menu
button. The system displays Portfolio screen.
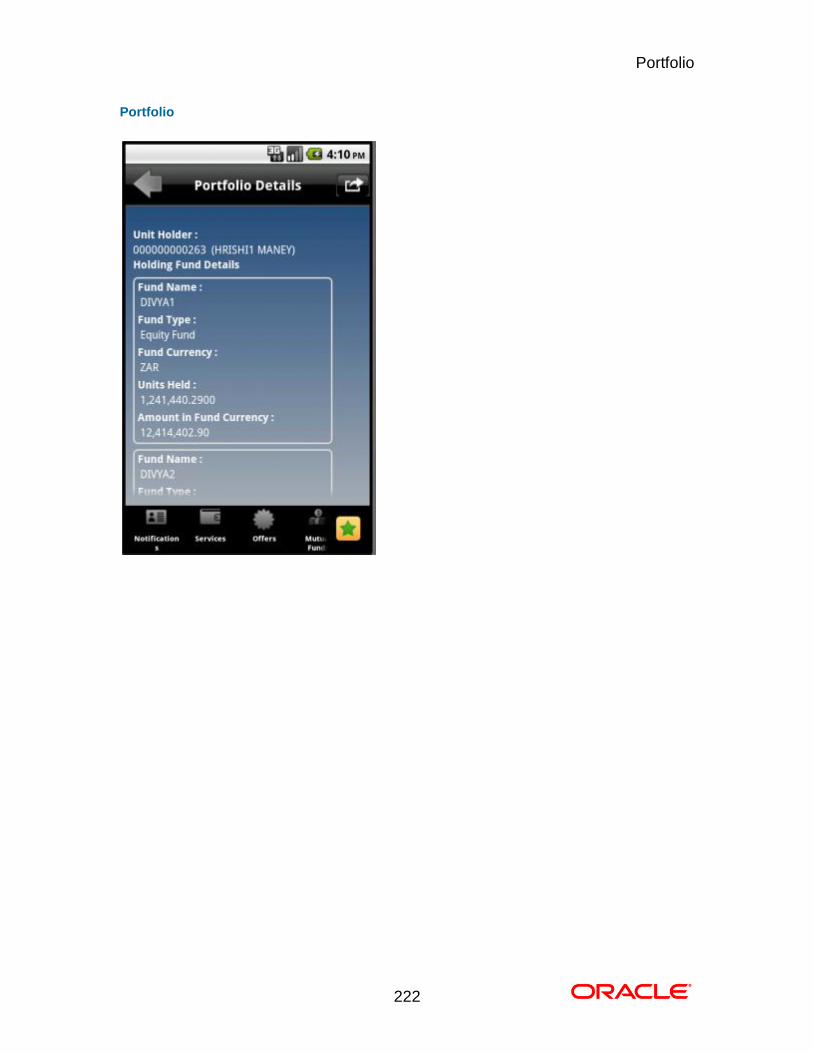
Portfolio
222
Portfolio

Portfolio
223
Field Description
Field Name Description
Portfolio Details
Unit Holder [Display]
This field displays the name of the units holder.
Holding Fund Details
Fund Name [Display]
This field displays the fund name.
Fund Type [Display]
This field displays the fund type.
Portfolio
224
Field Name Description
Fund Currency [Display]
This field displays the fund currency.
Units Held [Display]
This field displays the number of units held.
Amount in Fund
Currency
[Display]
This field displays the amount in fund currency.
4. Click the Back button from the options pop up, to navigate to the previous screen. 0.
Switch Funds
225
34. Switch Funds
This option allows you to switch investment in one mutual fund to another type of mutual fund
using mobile banking. You can switch only a part or the entire investment made in the selected
fund.
A fund is open for switch if
Fund is allowed for switch in the given period. Current date is between switch start date and
switch close date. This information is available as part of Fund Rule definition.
Fund is not in book closure
To switch mutual fund
1. Log on to the Android application based mobile banking application. The system displays
initial Account Overview screen as shown below.
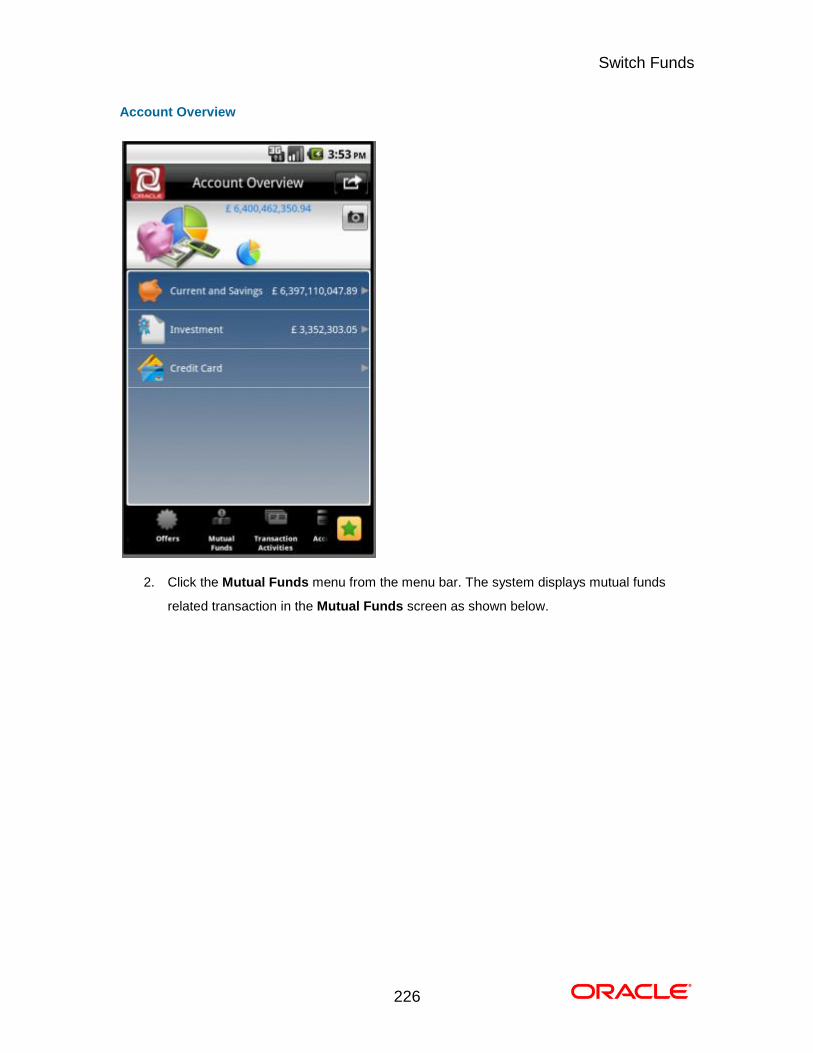
Switch Funds
226
Account Overview
2. Click the Mutual Funds menu from the menu bar. The system displays mutual funds
related transaction in the Mutual Funds screen as shown below.
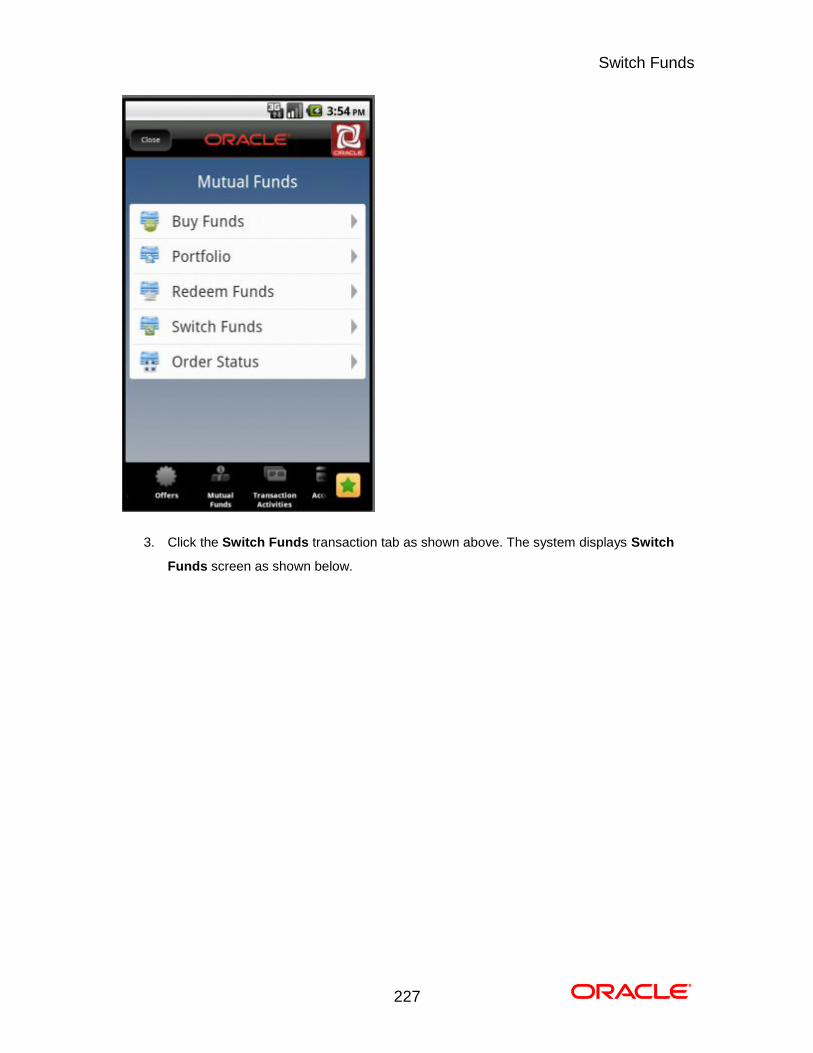
Switch Funds
227
3. Click the Switch Funds transaction tab as shown above. The system displays Switch
Funds screen as shown below.

Switch Funds
228
Switch Funds

Switch Funds
229
Field Description
Field Name Description
Unit Holder [Mandatory, Drop-Down]
Select the unit holder from the drop-down list.
4. Click the View Holdings button from the options pop up that comes after clicking the Menu
button. The system displays Switch Funds screen.
Switch Funds
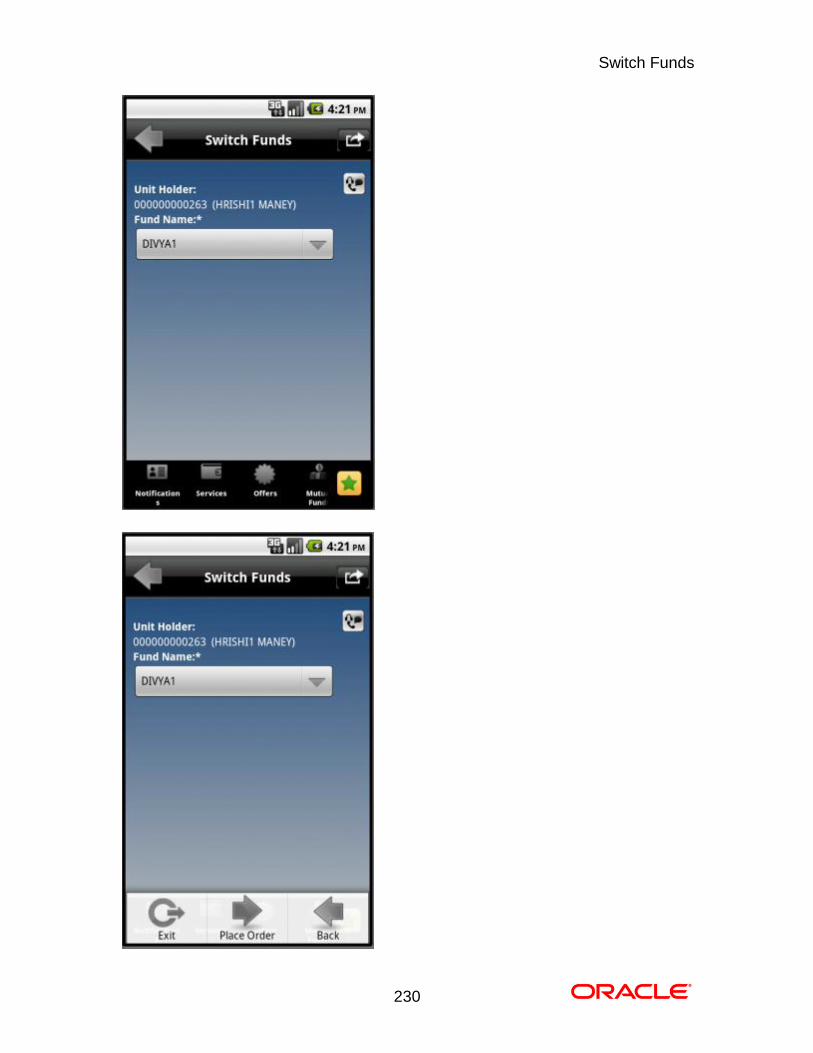
Switch Funds
230
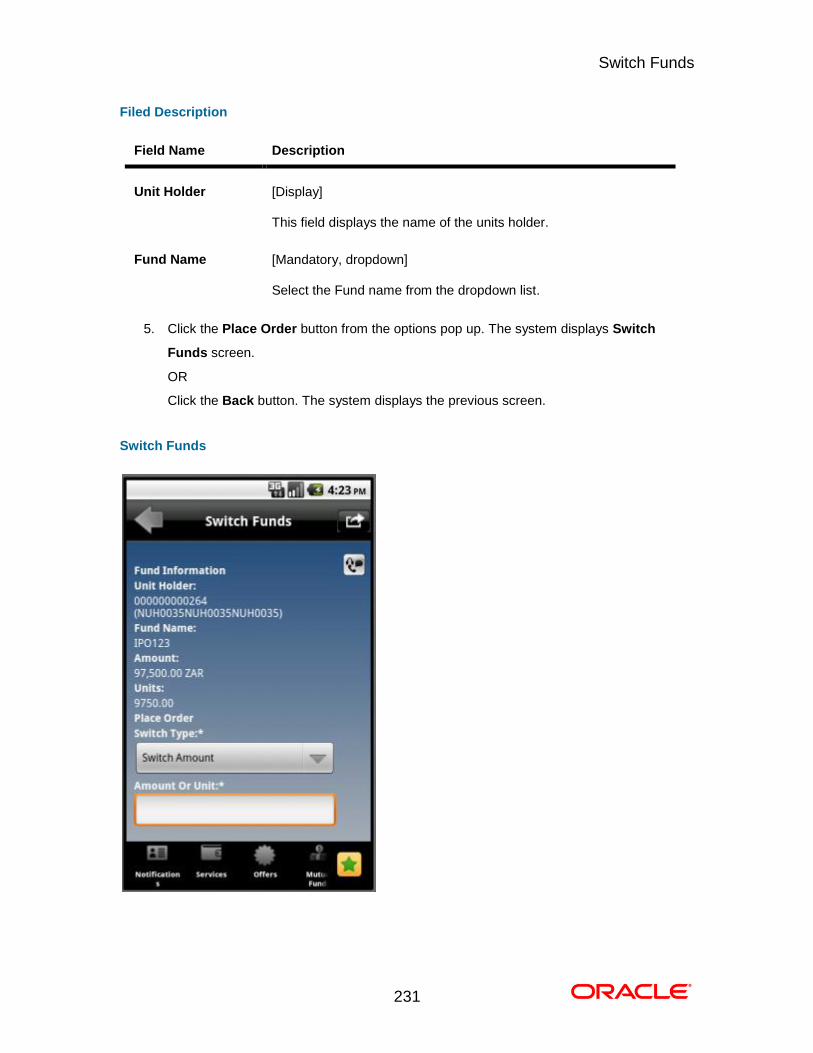
Switch Funds
231
Filed Description
Field Name Description
Unit Holder [Display]
This field displays the name of the units holder.
Fund Name [Mandatory, dropdown]
Select the Fund name from the dropdown list.
5. Click the Place Order button from the options pop up. The system displays Switch
Funds screen.
OR
Click the Back button. The system displays the previous screen.
Switch Funds
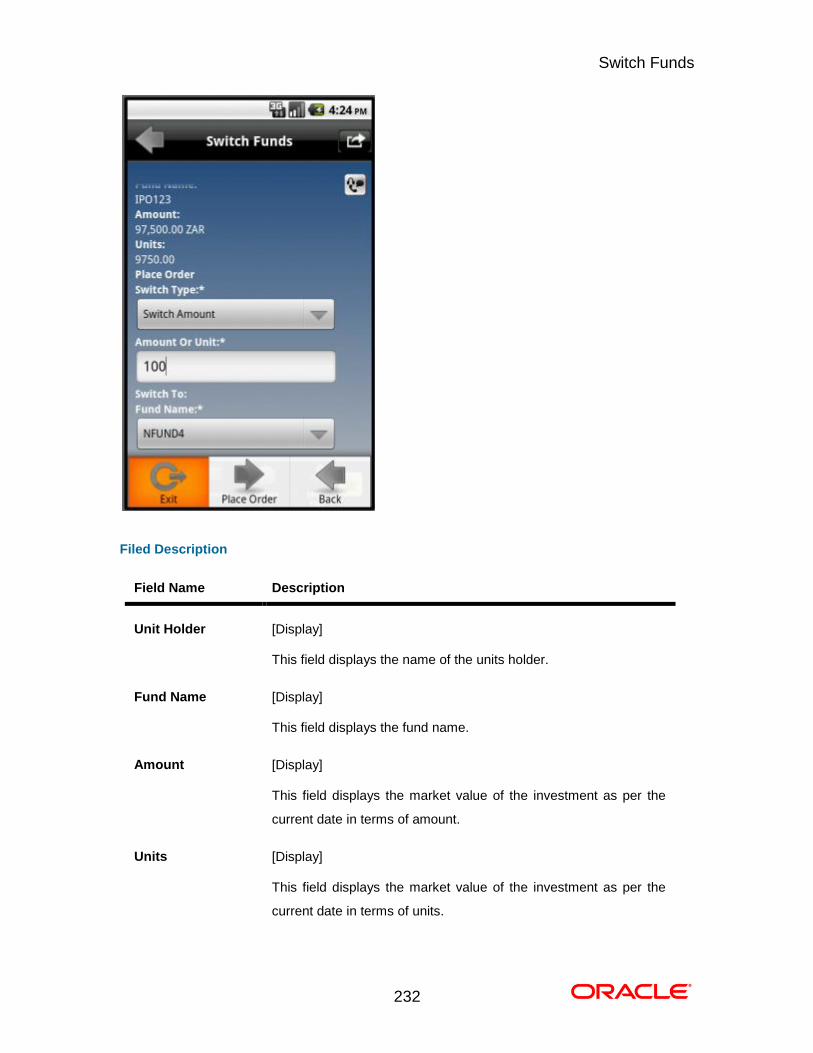
Switch Funds
232
Filed Description
Field Name Description
Unit Holder [Display]
This field displays the name of the units holder.
Fund Name [Display]
This field displays the fund name.
Amount [Display]
This field displays the market value of the investment as per the
current date in terms of amount.
Units [Display]
This field displays the market value of the investment as per the
current date in terms of units.
Switch Funds
233
Field Name Description
Place order
Switch type [Mandatory, Drop-Down]
Select whether the switch is to be made in terms of amount or
mutual fund units. Type the amount in the field.
Amount or unit [Mandatory, Alphanumeric, 15]
Type the amount or units to be switched as per the selection done
in the previous field.
Switch To
Fund Name [Mandatory, Drop-Down]
Select the fund name to which mutual funds are to be switched.
6. Click the Place Order button from the options pop up a shown above. The system
displays Switch Funds - Verify screen.
OR
Click the Back button to navigate to the previous screen.
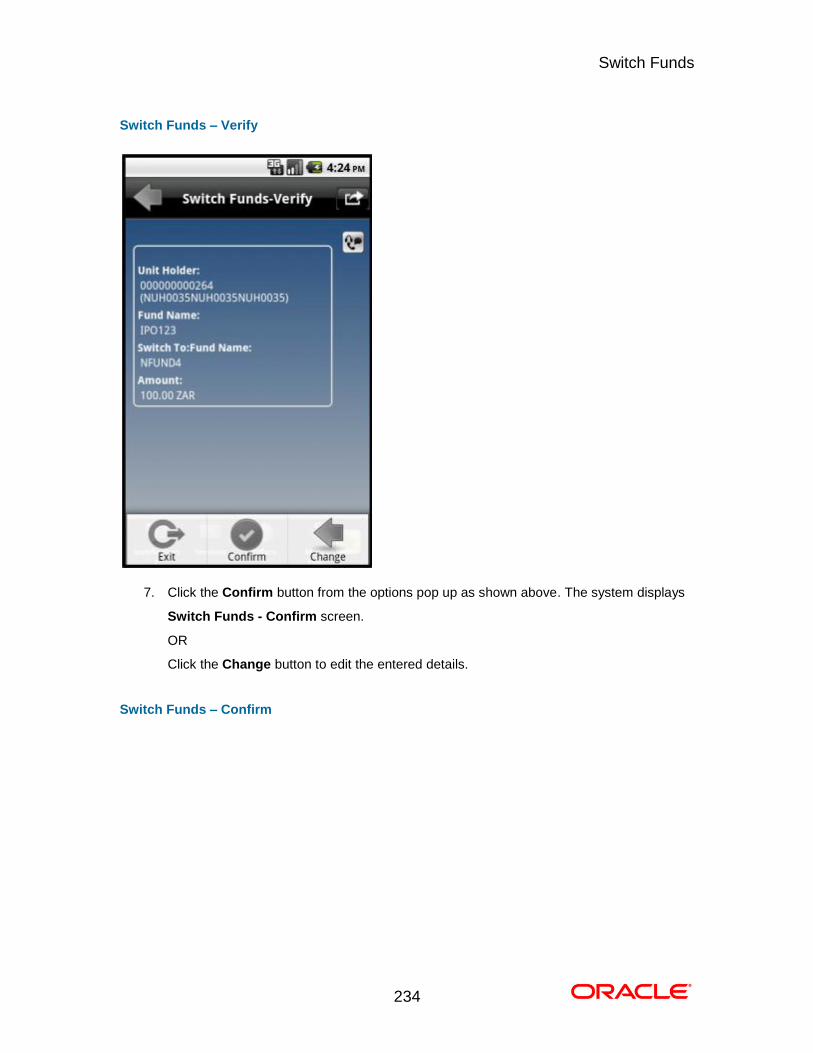
Switch Funds
234
Switch Funds – Verify
7. Click the Confirm button from the options pop up as shown above. The system displays
Switch Funds - Confirm screen.
OR
Click the Change button to edit the entered details.
Switch Funds – Confirm
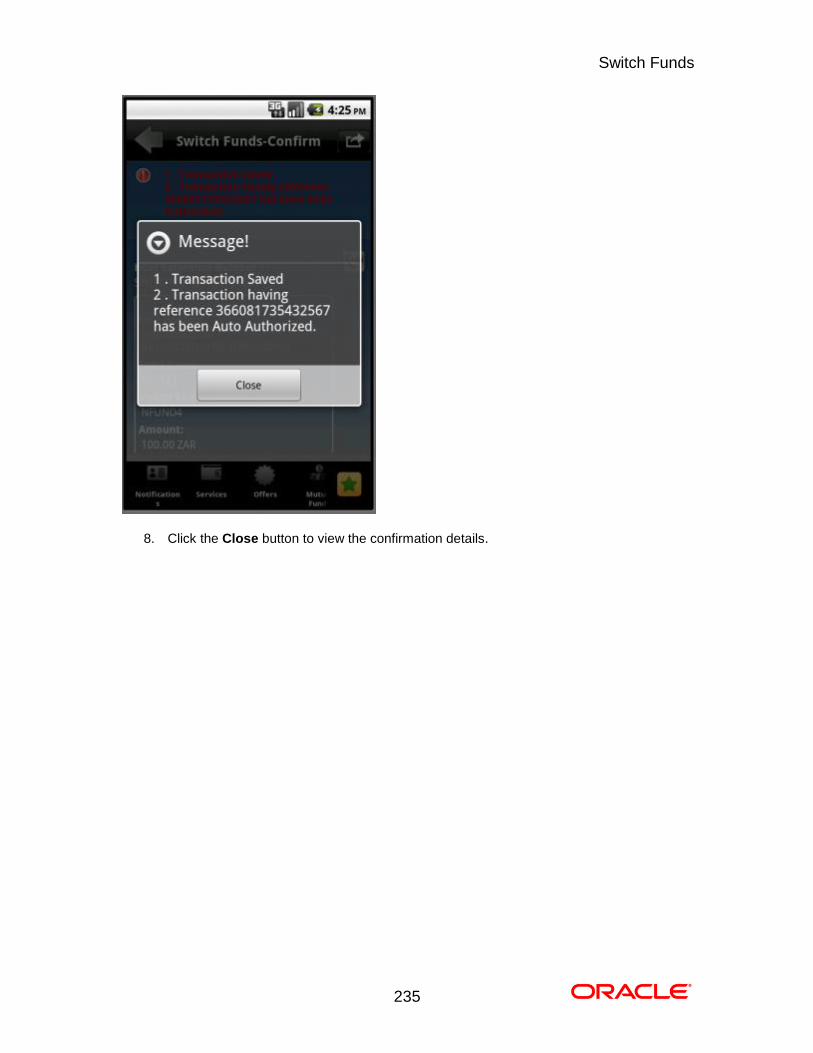
Switch Funds
235
8. Click the Close button to view the confirmation details. 0.
Order Status
236
35. Order Status
You may place several purchase orders across various AMCs. An order goes through various
stages of transfer i.e. placement, processing, allotment, authorization etc. This option displays the
status details of the placed order.
To view the order status
1. Log on to the Android application based mobile banking application.
2. Click the Mutual Funds > Order Status transaction from the menu. The system displays
Order Status screen.
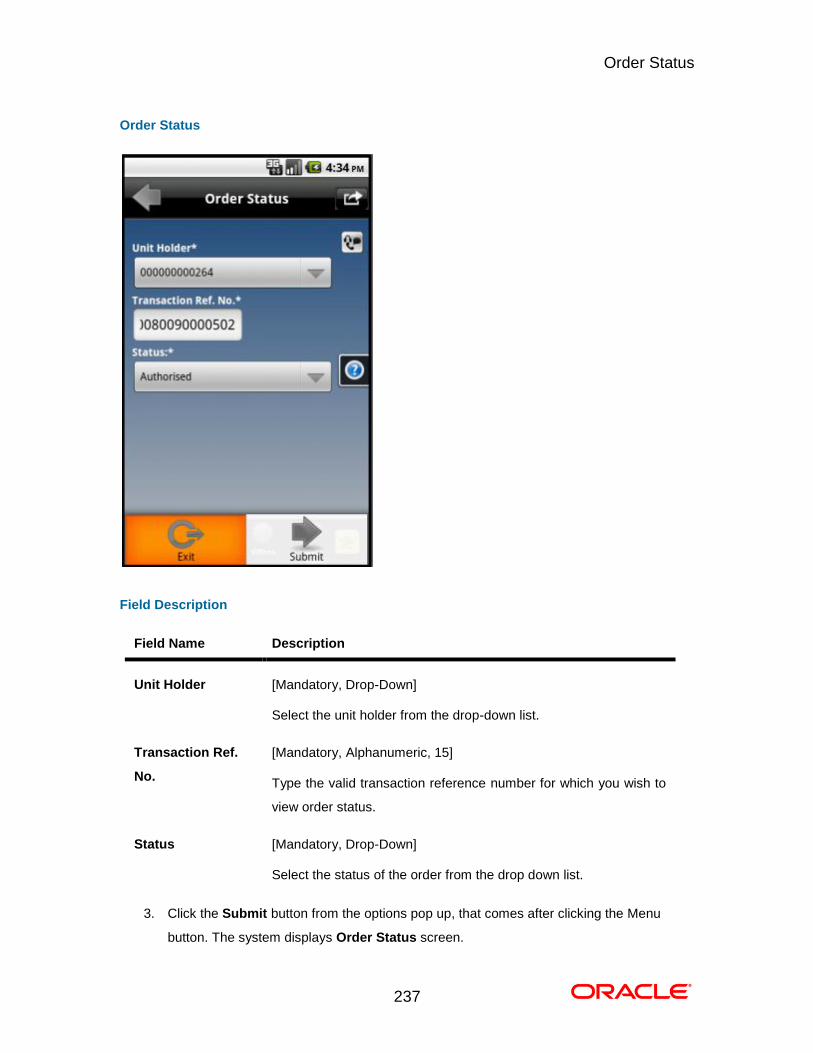
Order Status
237
Order Status
Field Description
Field Name Description
Unit Holder [Mandatory, Drop-Down]
Select the unit holder from the drop-down list.
Transaction Ref.
No.
[Mandatory, Alphanumeric, 15]
Type the valid transaction reference number for which you wish to
view order status.
Status [Mandatory, Drop-Down]
Select the status of the order from the drop down list.
3. Click the Submit button from the options pop up, that comes after clicking the Menu
button. The system displays Order Status screen.
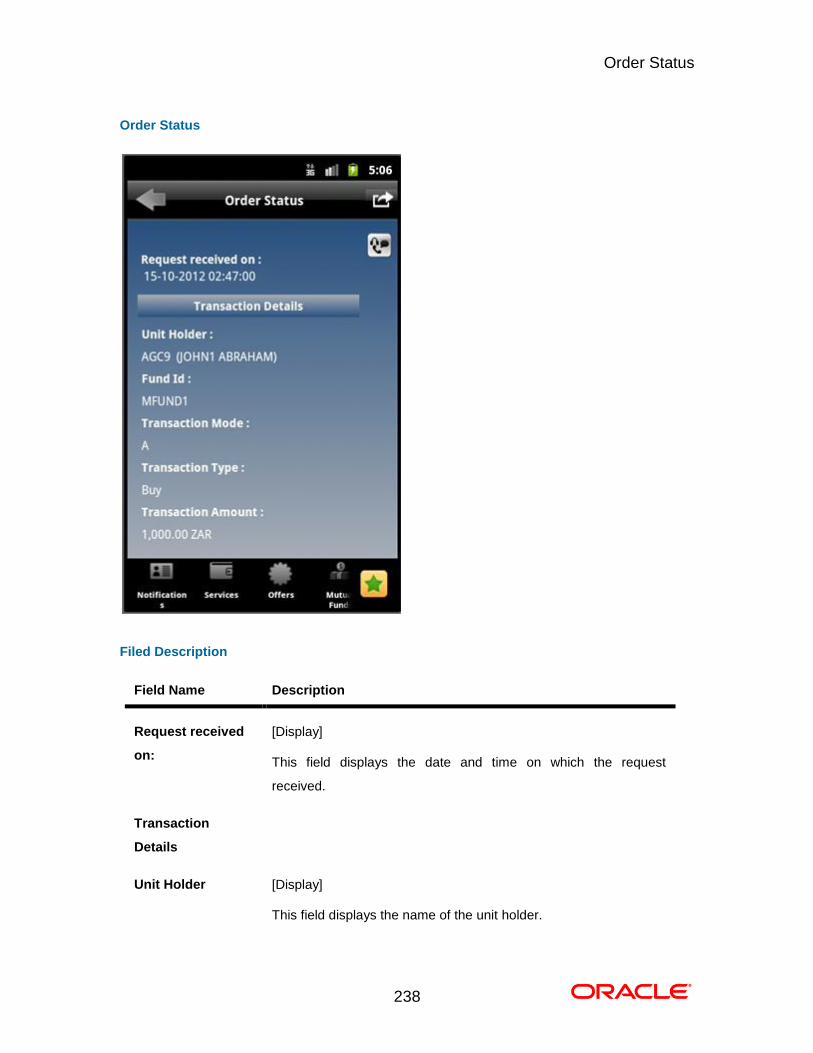
Order Status
238
Order Status
Filed Description
Field Name Description
Request received
on:
[Display]
This field displays the date and time on which the request
received.
Transaction
Details
Unit Holder [Display]
This field displays the name of the unit holder.
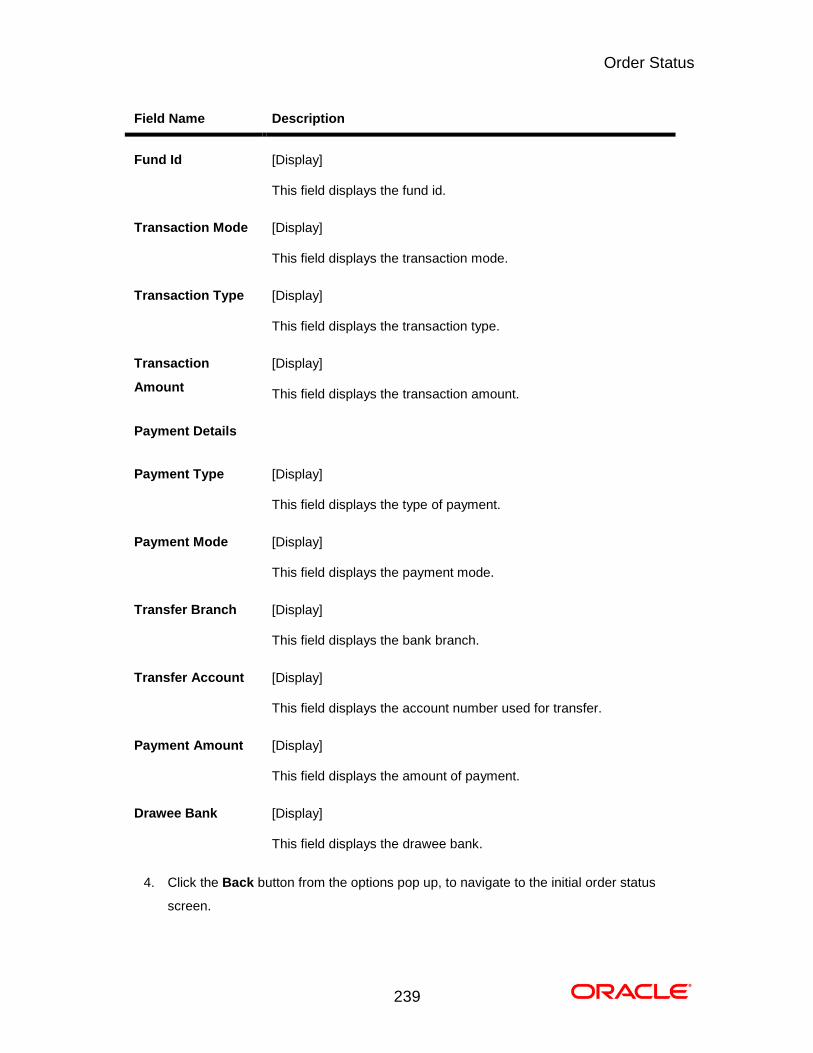
Order Status
239
Field Name Description
Fund Id [Display]
This field displays the fund id.
Transaction Mode [Display]
This field displays the transaction mode.
Transaction Type [Display]
This field displays the transaction type.
Transaction
Amount
[Display]
This field displays the transaction amount.
Payment Details
Payment Type [Display]
This field displays the type of payment.
Payment Mode [Display]
This field displays the payment mode.
Transfer Branch [Display]
This field displays the bank branch.
Transfer Account [Display]
This field displays the account number used for transfer.
Payment Amount [Display]
This field displays the amount of payment.
Drawee Bank [Display]
This field displays the drawee bank.
4. Click the Back button from the options pop up, to navigate to the initial order status
screen. 0.
240
36. Transaction Password Behavior
Transaction password is added security measure in mobile banking required for safer execution
of any transaction. When transaction password is configured for any transaction, then while
accessing that transaction, after clicking Confirm button on the verification screen, the system
asks for transaction password.
Following two kind of the transaction password can be configured for Mobile Banking as per
requirement:
Random Transaction Password
Transaction password
To perform the transaction for which transaction password is configured
1. Log on to the Android application based Mobile Banking application.
2. Access any transaction for which transaction password is configured. (Below shown is for
Pay Bills transaction).
3. Log on to the Android application based Mobile Banking application.
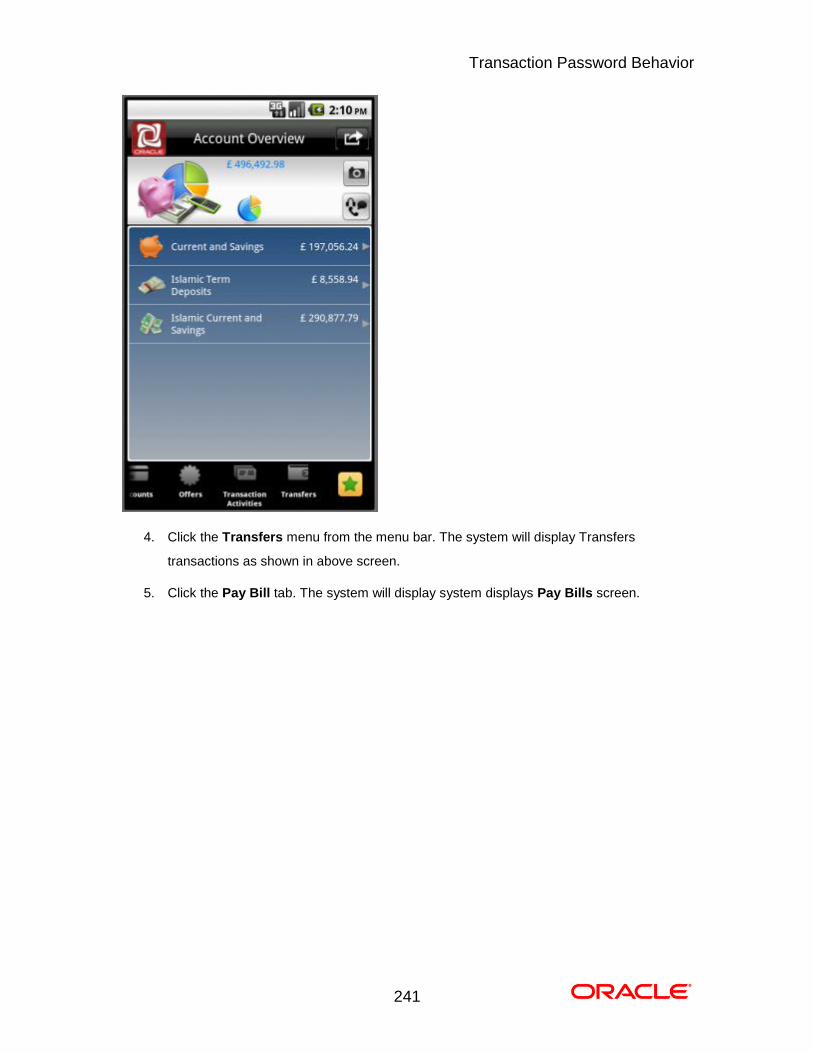
Transaction Password Behavior
241
4. Click the Transfers menu from the menu bar. The system will display Transfers
transactions as shown in above screen.
5. Click the Pay Bill tab. The system will display system displays Pay Bills screen.

Transaction Password Behavior
242
Pay Bills
Field Description
Field Name Description
Select Biller [Mandatory, Dropdown]
Select the Biller from the registered List of Billers from the drop
down menu.
Bill Number [Mandatory, Alphanumeric, 15]
Input the Bill Number for which the Bill is to be paid.
Bill generation
Date
[Mandatory, Alphanumeric,10, Pick list]
Input the date in the specified date format or select the date from
the date pick list.
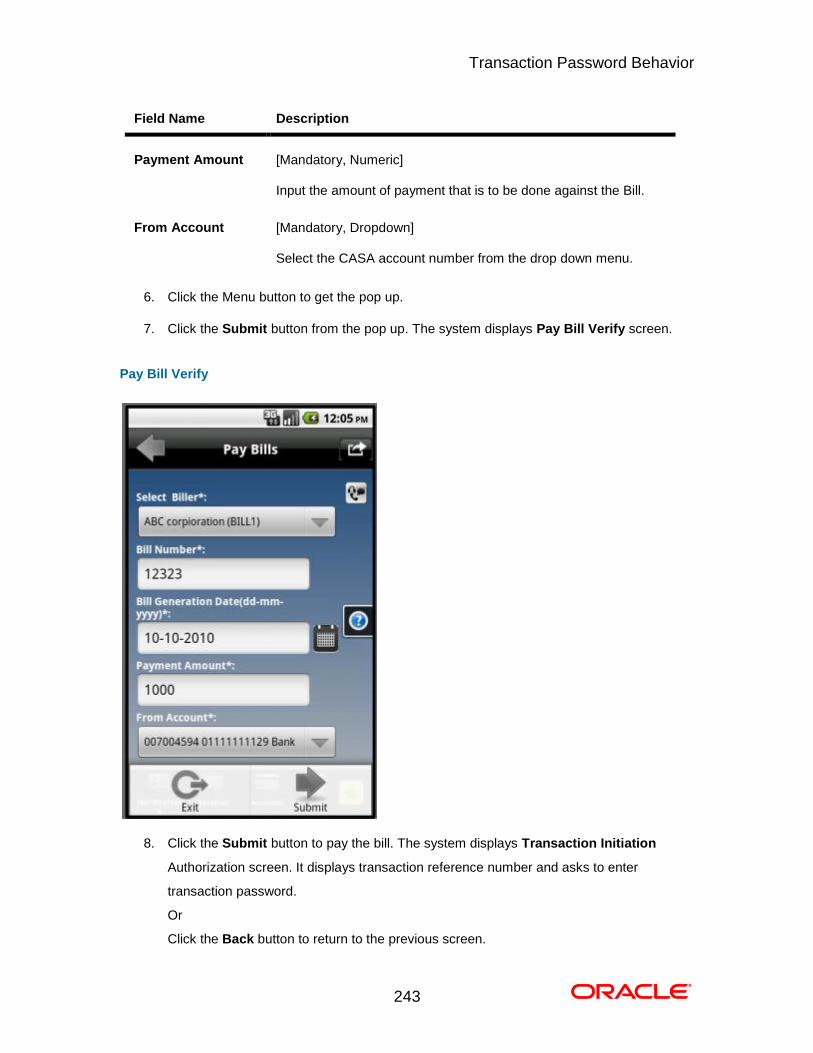
Transaction Password Behavior
243
Field Name Description
Payment Amount [Mandatory, Numeric]
Input the amount of payment that is to be done against the Bill.
From Account [Mandatory, Dropdown]
Select the CASA account number from the drop down menu.
6. Click the Menu button to get the pop up.
7. Click the Submit button from the pop up. The system displays Pay Bill Verify screen.
Pay Bill Verify
8. Click the Submit button to pay the bill. The system displays Transaction Initiation
Authorization screen. It displays transaction reference number and asks to enter
transaction password.
Or
Click the Back button to return to the previous screen.
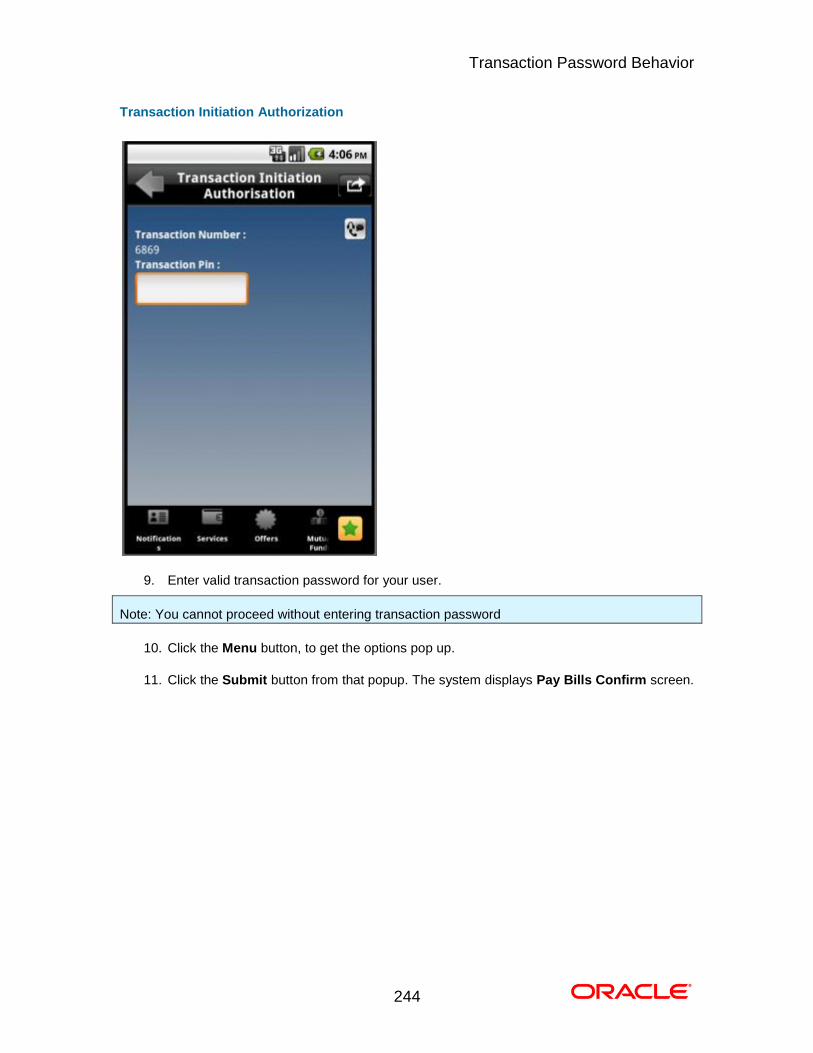
Transaction Password Behavior
244
Transaction Initiation Authorization
9. Enter valid transaction password for your user.
Note: You cannot proceed without entering transaction password
10. Click the Menu button, to get the options pop up.
11. Click the Submit button from that popup. The system displays Pay Bills Confirm screen.
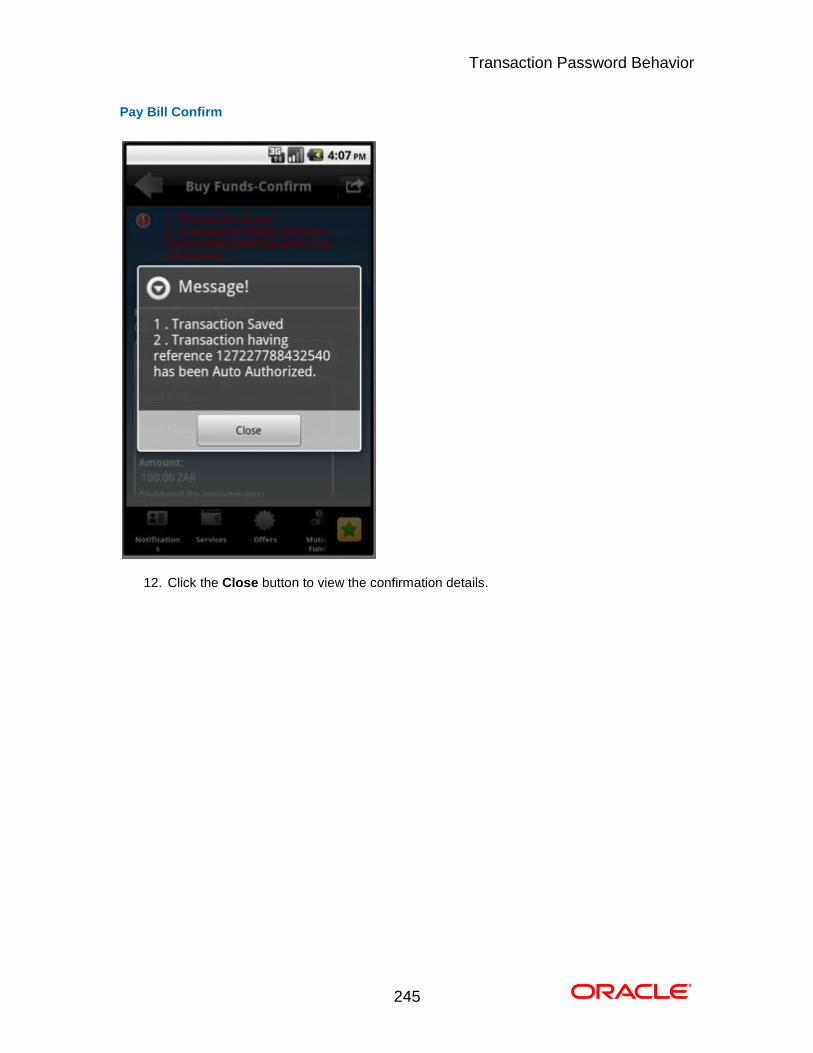
Transaction Password Behavior
245
Pay Bill Confirm
12. Click the Close button to view the confirmation details. 0.
246
37. ATM Branch Locator
This transaction allows you to view the address and the location of ATM/ branch location.
To view the location and address of the ATM and branch
1. Log on to the Android application based Mobile Banking application.
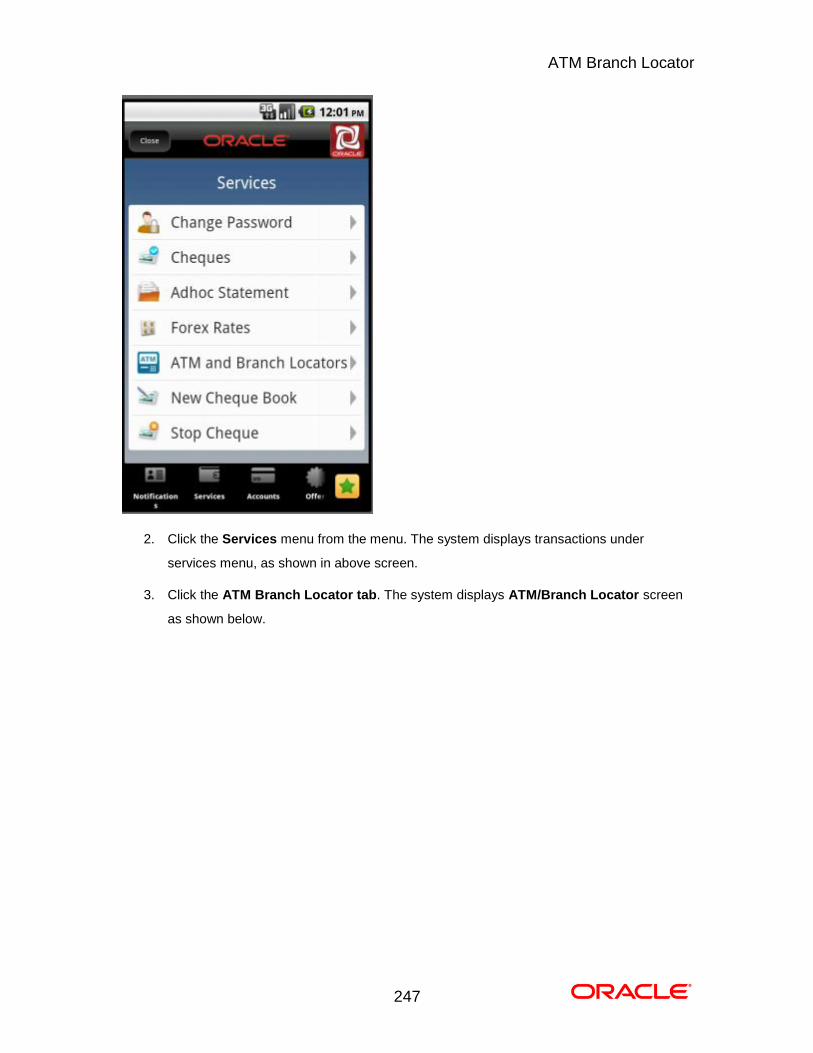
ATM Branch Locator
247
2. Click the Services menu from the menu. The system displays transactions under
services menu, as shown in above screen.
3. Click the ATM Branch Locator tab. The system displays ATM/Branch Locator screen
as shown below.
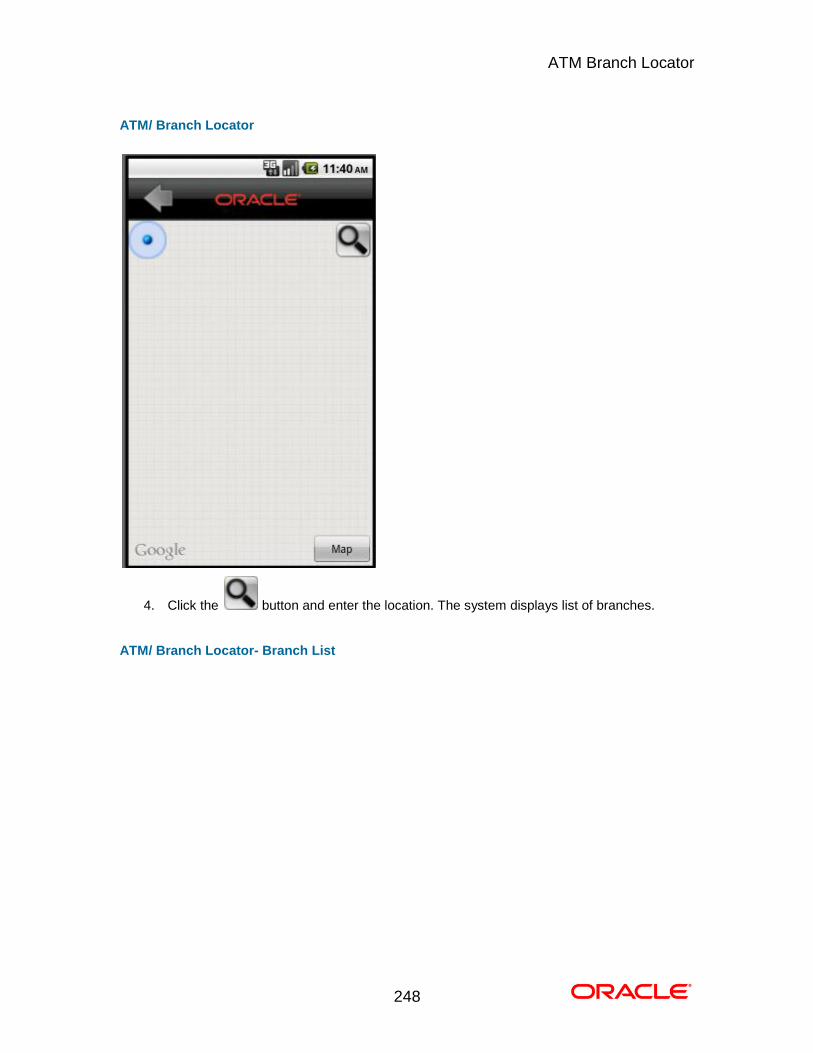
ATM Branch Locator
248
ATM/ Branch Locator
4. Click the button and enter the location. The system displays list of branches.
ATM/ Branch Locator- Branch List
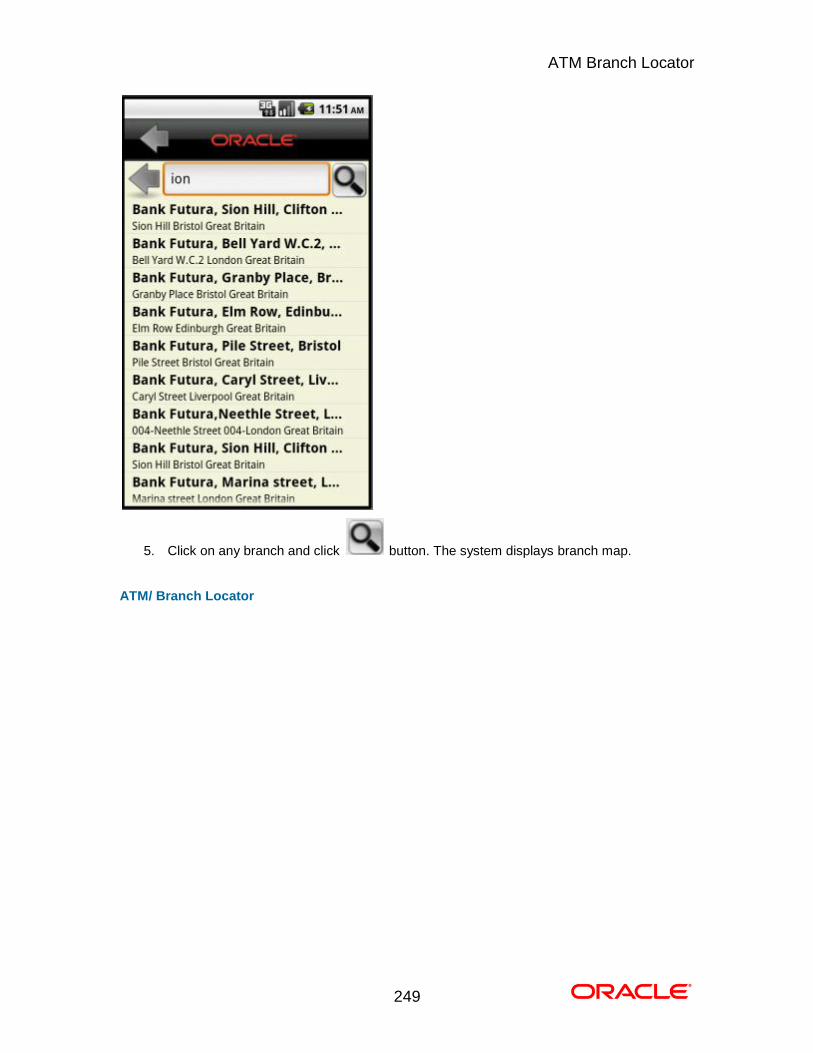
ATM Branch Locator
249
5. Click on any branch and click button. The system displays branch map.
ATM/ Branch Locator
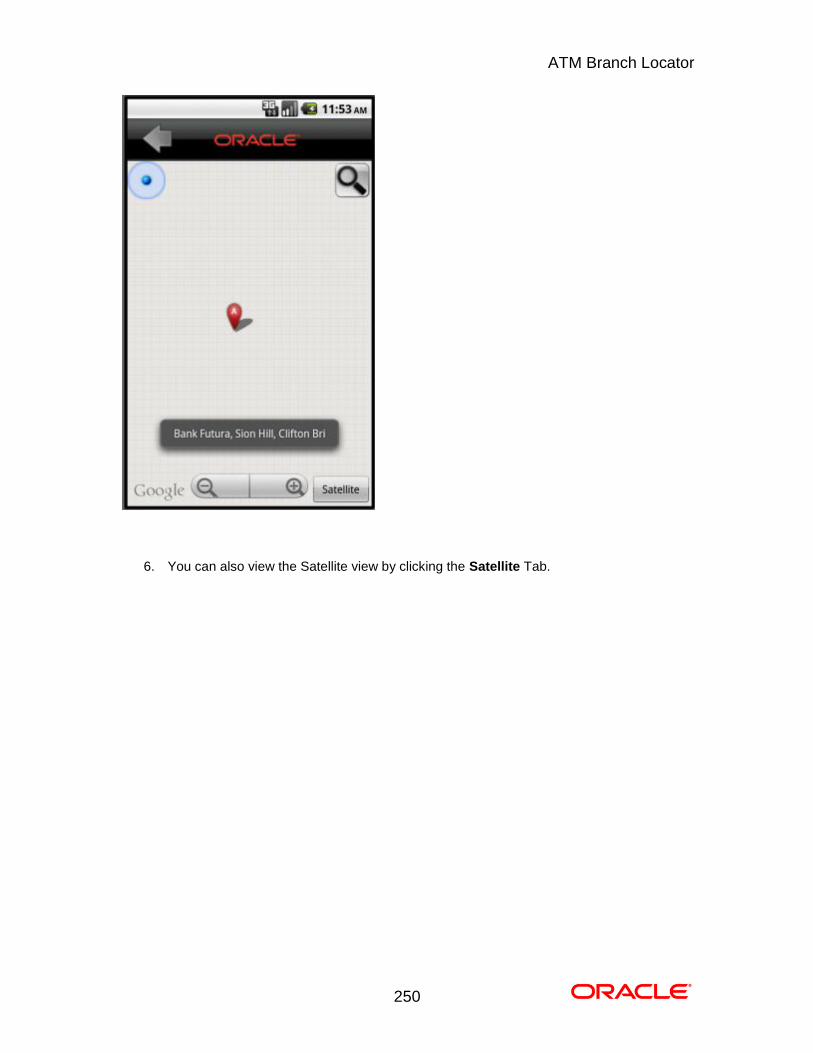
ATM Branch Locator
250
6. You can also view the Satellite view by clicking the Satellite Tab. 0.
251
38. Help
The help button is used to display the summary of the transactions. On clicking on the help button
the user is displayed the summary of the transaction.
To view the details of help
1. Log on to the Android application based Mobile Banking application.
2. Access any transaction (Below shown is for Pay Bill transaction).
Help
252
Pay Bills
3. Click the Help icon as encircled in the above screen, to view the help screen. It
displays brief information about that transaction.
Help
253
4. Click the same help icon to get back to the initial screen. 0.
254
39. Offers
Location Based Offers:
Business user will be able to receive the offers from the bank based on their physical location.
Business user while on move will be able to get the offers available in the specific geo location.
The system will be able to identify the user’s geo location using the GPS option available in the
user’s mobile phone. Location will be maintained in terms of latitude and longitude. Based on
the location identified, the offers available in the area will be identified and displayed to the user.
The offers received can have hyperlinks to display more data. On clicking on an offer that has
more details, a separate screen external to the user’s login window / application will be opened to
display the details.
To access the Offers options
1. Log on to the Android application based Mobile Banking application.
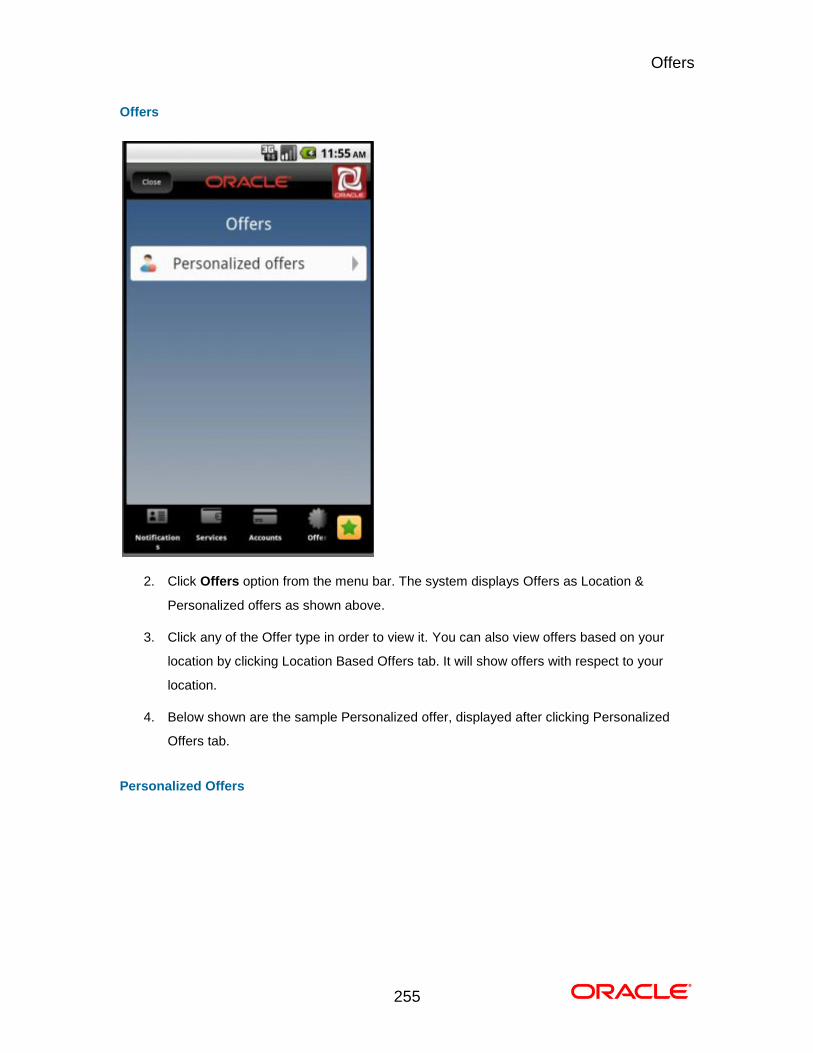
Offers
255
Offers
2. Click Offers option from the menu bar. The system displays Offers as Location &
Personalized offers as shown above.
3. Click any of the Offer type in order to view it. You can also view offers based on your
location by clicking Location Based Offers tab. It will show offers with respect to your
location.
4. Below shown are the sample Personalized offer, displayed after clicking Personalized
Offers tab.
Personalized Offers
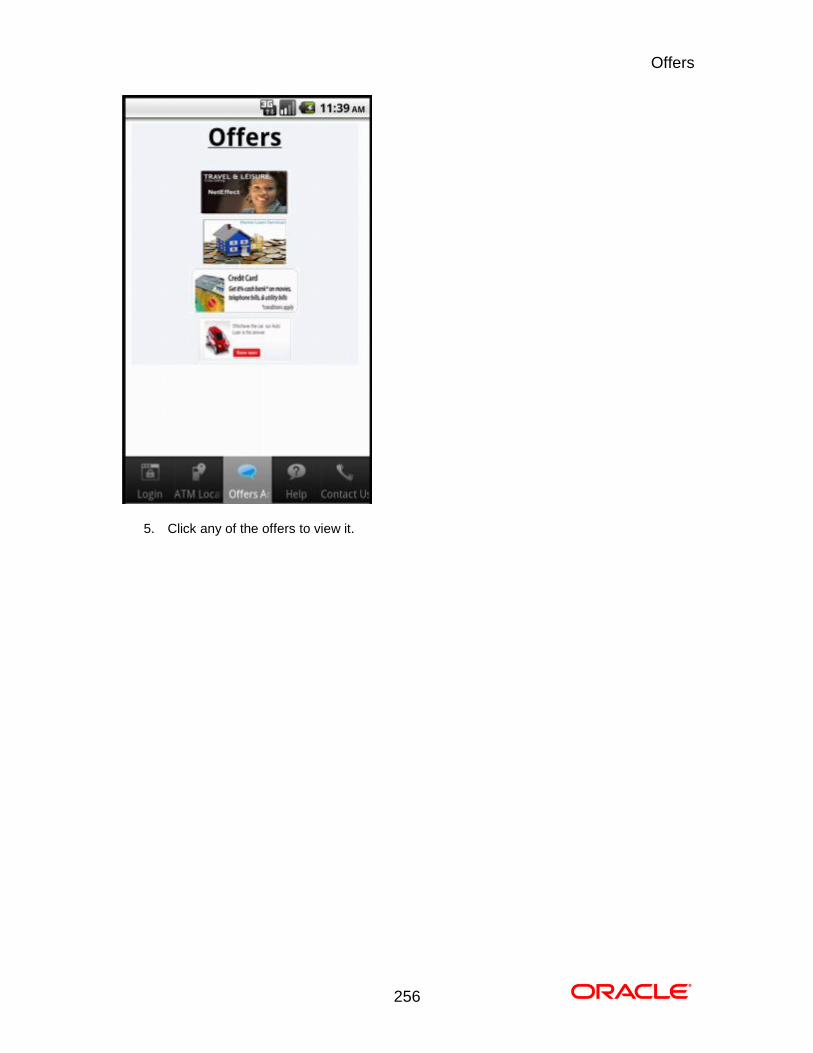
Offers
256
5. Click any of the offers to view it. 0.
257
40. Live Help/Call
Using this option, you can request for a call by the Oracle ATG agents for online assistance.
This feature provides the options to the business users for interactions with bank officials / call
centre executives.
1. Below is shown for Buy Funds transaction. This option will be available for various
transactions.
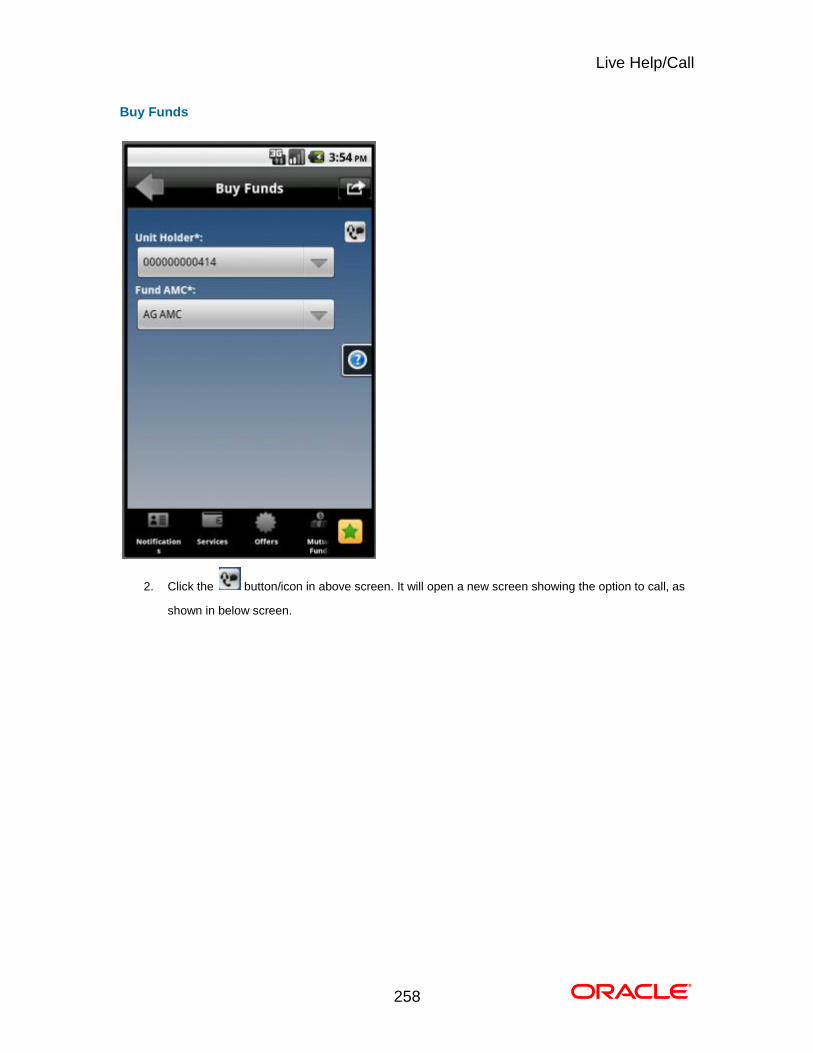
Live Help/Call
258
Buy Funds
2. Click the button/icon in above screen. It will open a new screen showing the option to call, as
shown in below screen.
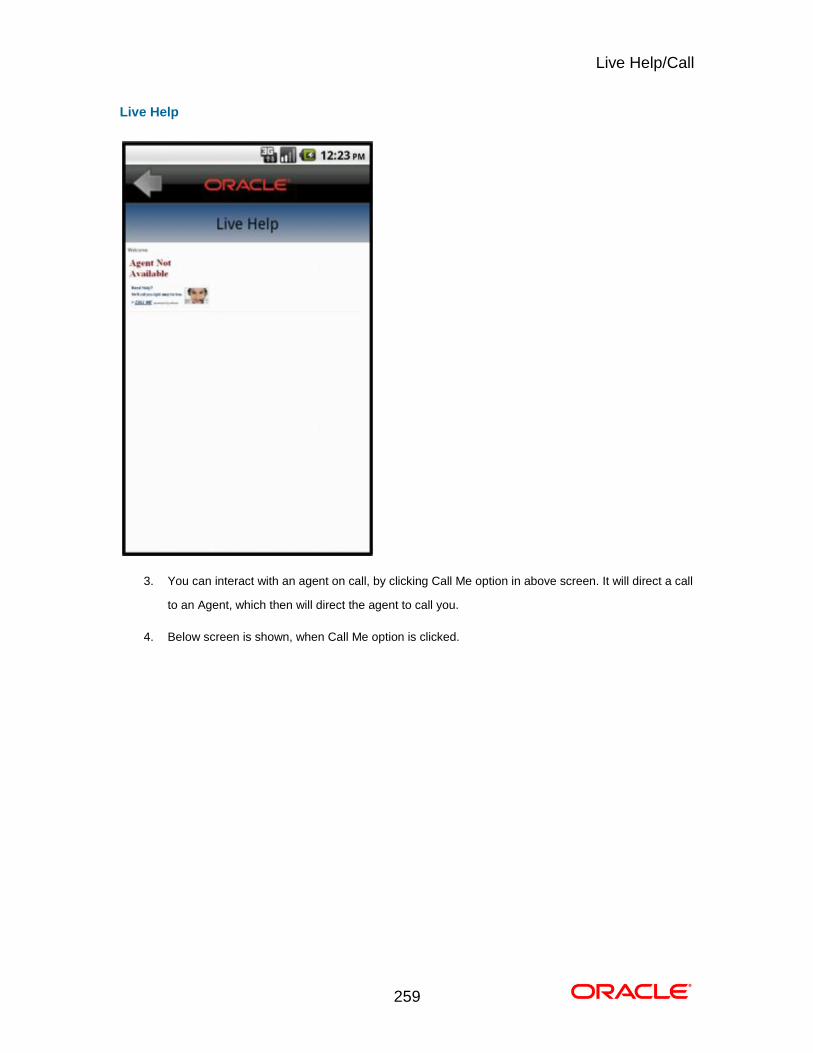
Live Help/Call
259
Live Help
3. You can interact with an agent on call, by clicking Call Me option in above screen. It will direct a call
to an Agent, which then will direct the agent to call you.
4. Below screen is shown, when Call Me option is clicked.
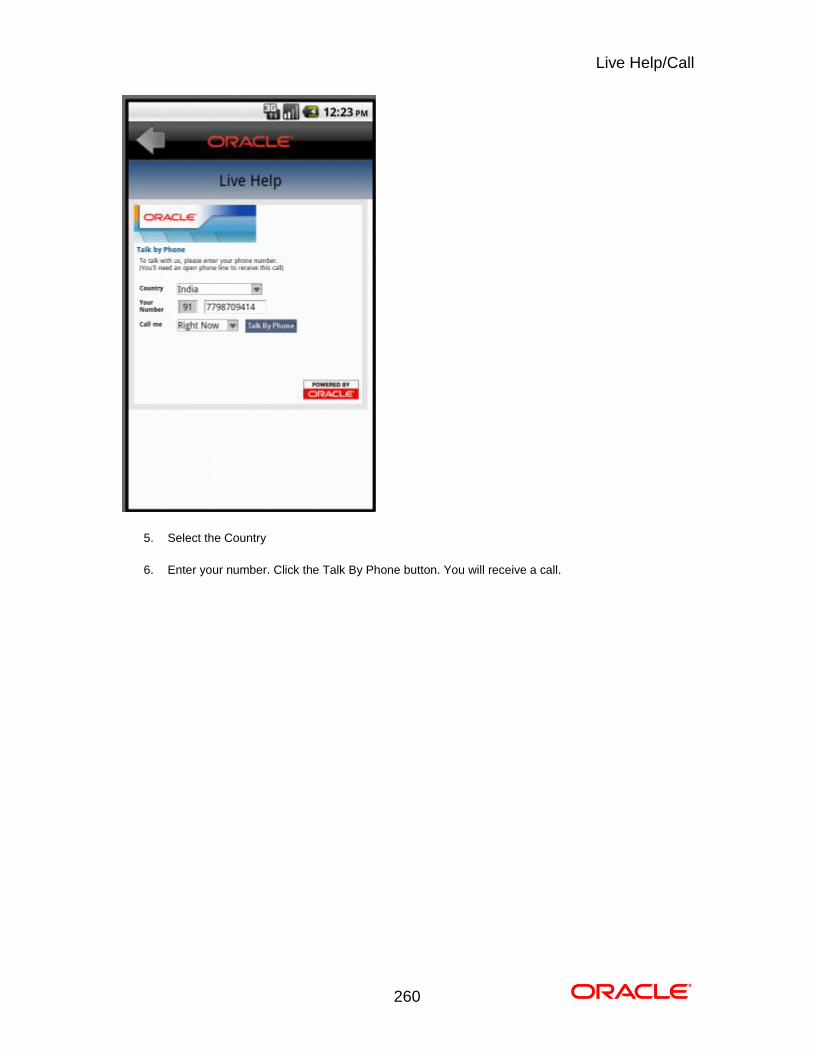
Live Help/Call
260
5. Select the Country
6. Enter your number. Click the Talk By Phone button. You will receive a call.
Live Help/Call
261
Oracle FLEXCUBE Direct Banking
Android Application Based Mobile Banking User Manual
October 2012
Version Number: 12.0.0
Oracle Financial Services Software Limited
Oracle Park
Off Western Express Highway
Goregaon (East)
Mumbai, Maharashtra 400 063
India
Worldwide Inquiries:
Phone: +91 22 6718 3000
Fax:+91 22 6718 3001
www.oracle.com/financialservices/
Copyright © 2008, 2012, Oracle and/or its affiliates. All rights reserved.
Oracle and Java are registered trademarks of Oracle and/or its affiliates. Other names may be trademarks of
their respective owners.
U.S. GOVERNMENT END USERS: Oracle programs, including any operating system, integrated software,
any programs installed on the hardware, and/or documentation, delivered to U.S. Government end users are
“commercial computer software” pursuant to the applicable Federal Acquisition Regulation and agency-
specific supplemental regulations. As such, use, duplication, disclosure, modification, and adaptation of the
programs, including any operating system, integrated software, any programs installed on the hardware,
and/or documentation, shall be subject to license terms and license restrictions applicable to the programs.
No other rights are granted to the U.S. Government.
Live Help/Call
262
This software or hardware is developed for general use in a variety of information management applications.
It is not developed or intended for use in any inherently dangerous applications, including applications that
may create a risk of personal injury. If you use this software or hardware in dangerous applications, then you
shall be responsible to take all appropriate failsafe, backup, redundancy, and other measures to ensure its
safe use. Oracle Corporation and its affiliates disclaim any liability for any damages caused by use of this
software or hardware in dangerous applications.
This software and related documentation are provided under a license agreement containing restrictions on
use and disclosure and are protected by intellectual property laws. Except as expressly permitted in your
license agreement or allowed by law, you may not use, copy, reproduce, translate, broadcast, modify,
license, transmit, distribute, exhibit, perform, publish or display any part, in any form, or by any means.
Reverse engineering, disassembly, or decompilation of this software, unless required by law for
interoperability, is prohibited.
The information contained herein is subject to change without notice and is not warranted to be error-free. If
you find any errors, please report them to us in writing.
This software or hardware and documentation may provide access to or information on content, products
and services from third parties. Oracle Corporation and its affiliates are not responsible for and expressly
disclaim all warranties of any kind with respect to third-party content, products, and services. Oracle
Corporation and its affiliates will not be responsible for any loss, costs, or damages incurred due to your
access to or use of third-party content, products, or services.
Recommended


![Oracle FLEXCUBE Direct Banking Release 12.0.0 Retail ... Manual... · Oracle FLEXCUBE Direct Banking Release 12.0.0 Retail Mutual Funds User Manual ... Check Box] Select the Dividend](https://img.pdfslide.us/doc/110x75/5c8805cf09d3f245798c1c3b/oracle-flexcube-direct-banking-release-1200-retail-manual-oracle-flexcube.jpg)

![Oracle FLEXCUBE Direct Banking Release 12.0.0 Retail Bulk ... Manual Oracle... · Postfix [Mandatory, Drop-Down, Alphanumeric] Type a postfix character that will be used to identify](https://img.pdfslide.us/doc/110x75/5ec4b8c0d0f3cf329673e64a/oracle-flexcube-direct-banking-release-1200-retail-bulk-manual-oracle.jpg)