1
BIOLOGICAL CONTROL OF RHINOCEROS BEETLE
IN THE PACIFIC USING ORYCTES VIRUS OPERATIONAL PROTOCOLS (VERSION A, APRIL 2010)
Trevor Jackson1, Sada Nand Lal2,3, Kuatemane Tuapola4, Shareen Prasad2, Jana Monk1, Nicola Richards1 and Sean Marshall1
1 AgResearch Limited, Private Bag 4749, Christchurch 8140, New Zealand 2 Secretariat of the Pacific Community (SPC), Plant Protection Division, Suva, Fiji 3 11 Johnstone Drive, Palmerston North 4410, New Zealand 4 Ministry of Agriculture and Fisheries, Samoa
5cm

2
BIOLOGICAL CONTROL OF RHINOCEROS BEETLE IN THE PACIFIC USING ORYCTES VIRUS, OPERATIONAL
PROTOCOLS (VERSION A, APRIL 2010) These Operational Protocols were developed as part of the project “Capacity building for improved biocontrol of food crop pests in the South Pacific” funded by the NZ State Sector Development Partnerships Fund (DFP) administered by NZAID. We have put together information in the protocols which we hope will help researchers address the needs of biological control of rhinoceros beetle and other pests in the Pacific. This version has been developed within the project, but we hope that it can be improved and upgraded with feedback from users. Please send us any ideas for improvement; To; Trevor Jackson, AgResearch Ltd, Lincoln Research Centre, Private Bag 4749, Christchurch 8140, New Zealand. Email [email protected] Disclaimer: Although this document has been prepared in good faith from a number of sources believed to be reliable, AgResearch does not give any warranty that all information contained is accurate or complete or that advice given will be appropriate in all circumstances. AgResearch shall not be liable to anyone in respect of any damages suffered as a result of their reliance on the information contained in this document. Mention of product trade names implies neither endorsement of those products nor criticism of similar products not mentioned.

3
Contents
1 Introduction ..................................................................................................................... 4
2 Collection of rhinoceros beetle adults and larvae (Trevor Jackson, Sada Nand Lal and Shareen Prasad) .................................................................................................................... 5
2.1 Pheromone traps ..................................................................................................... 5
2.2 Breeding heaps/traps ............................................................................................... 7
2.3 Collection and storage of beetles ............................................................................. 7
3 Dissection (Trevor Jackson)............................................................................................ 8
3.1 Equipment for extraction of beetle gut...................................................................... 8
3.2 Extraction of mid gut ................................................................................................ 8
3.3 Recording of characteristics and other data ........................................................... 10
3.4 Storage of gut for diagnostics ................................................................................ 10
3.5 Transport of samples ............................................................................................. 10
4 Diagnosis of virus infection by DNA methodology (Jana Monk) .................................... 12
4.1 DNA extraction ...................................................................................................... 12
4.2 Polymerase Chain Reaction (PCR) ........................................................................ 16
5 Diagnosis of virus infection by histology (Sean Marshall) .............................................. 20
5.1 Overview of basic histology processing steps ........................................................ 20
5.2 Step 1: Dissection of beetle midgut sample ........................................................... 21
5.3 Step 2: Fixation of beetle midgut sample ............................................................... 21
5.4 Steps 3-6: Dehydration & Infiltration, Embedding, Sectioning, Staining .................. 23
5.5 Step 7: Analysis ..................................................................................................... 26
6 Diagnosis of virus infection by bioassay (Trevor Jackson and Kuatemane Tuapola) ..... 29
6.1 Collection of beetles .............................................................................................. 29
6.2 Preparing a virus sample from fresh beetle guts .................................................... 30
6.3 Bioassay of beetles for effect of virus..................................................................... 31
7 Release of Oryctes virus for biocontrol (Trevor Jackson and Sean Marshall) ................ 33
7.1 Beetles .................................................................................................................. 33
7.2 Virus Storage ......................................................................................................... 34
7.3 Ordering cell culture produced virus ...................................................................... 34
Appendix 1: ......................................................................................................................... 35

4
1 Introduction
This manual assembles a number of operational protocols developed during the
AgResearch/SPC programme “Capacity building for improved biocontrol of food crop pests in
the South Pacific” carried out with funding from NZAID/ODA between 2004 and 2009. A key
aspect of the programme was to establish an improved capability for management of
rhinoceros beetle within the Pacific through better use of the Oryctes virus for control of the
pest beetle.
The background to rhinoceros beetle (Oryctes rhinoceros) and its control by Oryctes virus is
described in a number of reviews including those of Huger (2004)1 and Jackson (2009)2. This
manual includes methods for collection and handling of beetles for assessment of virus
infection, which were developed and used during the programme. The protocols are often
based on those of earlier researchers but are intended to be a practical guide of techniques
that have worked well for the project team and a guide to new users.
The manual includes sections on collection of beetles from the field, dissection of beetles to
provide samples for diagnosis of virus infection, diagnosis of virus infection by (i) PCR, (ii)
histological methods and/or (ii) bioassays, and release of infected adults into the field. We do
not mean to suggest that these are the only way that these procedures can be carried out,
but they are methods that have worked for us and we hope will help others in their tasks to
reduce the impact of rhinoceros beetle and other pests in the Pacific and other regions.
These methods have been developed within the research programme and would not have
been possible without the help of our colleagues at AgResearch and SPC, Paul Scotti and
the enthusiastic support of staff from LAES, Papua New Guinea and MAFF, Samoa.
References 1Huger, A.M. (2005) The Oryctes virus: Its detection, identification, and implementation in
biological control of the coconut palm rhinoceros beetle, Oryctes rhinoceros
(Coleoptera: Scarabaeidae). Journal of Invertebrate Pathology 89: 78-84.
2Jackson, T.A. (2009). The use of Oryctes virus for control of rhinoceros beetle in the Pacific
Islands. In: Hajek AE, Glare TR, O‟Callaghan M eds. Use of microbes for control and
eradication of invasive arthropods. Springer Science & Business Media BV,
Netherlands. Pp 133-140.

5
2 Collection of rhinoceros beetle adults and larvae (Trevor Jackson, Sada Nand Lal and Shareen Prasad)
Rhinoceros beetle adults and larvae must be collected from the field in order to assess virus
levels or to obtain individuals for bioassay, artificial infection and release. In all cases it is
important to collect robust living specimens and to avoid cross contamination in the presence
of virus. Adult beetles can be collected in traps baited with the synthetic pheromone ethyl 4-
methyloctanoate, which acts as an aggregation pheromone for both sexes. Larvae, pupae
and young adults can be collected from either natural or artificial breeding sites with a large
mass of organic matter.
2.1 Pheromone traps
The pheromone trap can be constructed from a plastic bucket with a lid. Two large holes
(diameter = 2.8 cm) and 2 small holes (in the centre) should be made in the lid as illustrated
below. The holes can be cut using hot wire or hot rod.
The pheromone sachet should be opened and attached with a wire under the bucket lid. The
operator should make sure the sachet is not damaged and that it is placed in an upright
position inside the bucket.

6
The lid should be placed on the bucket (= pheromone trap). In the field, the pheromone trap
should be placed on a strong branch with the bucked hanging upright.
For diagnostic purposes (PCR, histology) beetles should be removed at least once per week
and stored individually in plastic containers. If used for monitoring adult beetle numbers, the
bucket should be emptied at 3-week intervals and the collected beetles destroyed.
Pheromone sachets need to be replaced every 4 weeks.

7
2.2 Breeding heaps/traps
In nature, the rhinoceros beetle lays its eggs in decaying coconut trunks, stumps, heaps of
fronds, husks and other parts of coconut tree or decaying heaps of vegetative matter,
sawdust, compost and animal dung. Compost and heaps of decaying vegetative matter are
favourable breeding sites and can produce extremely large numbers of beetles in a short
time. Artificial breeding traps can be established by laying sections of coconut trunk in
quadrats of 2–3 meters across and filling the centre with decaying sawdust. The breeding
traps should not be exposed to direct sunlight and should be covered with dried fronds or
dried grass.
2.3 Collection and storage of beetles
After beetles are collected from pheromone traps or breeding
sites, they should be placed into individual containers that are
marked with the collection number. The containers should be
transported in a cool bin (so that they do not overheat) to the
laboratory where they must be stored in cool conditions until
needed (e.g. for gut extractions). Beetles can be stored at 4°C
for 2-3 days or frozen and kept at -20°C for long term storage.
Storing beetles individually reduces the risk of virus
contamination.

8
3 Dissection (Trevor Jackson)
Adult beetles must be dissected before disease diagnosis can be carried out. The method of
storage of the dissected sample will depend on the diagnostic test being carried out.
3.1 Equipment for extraction of beetle gut
Heavy and fine dissecting scissors
Fine forceps
Tissues
Gloves
0.1 M HCl* (wash bottle or spray bottle)
70-99% ethanol
2-ml tubes with O-ring
Rubbish bag or bin for used tissues etc.
*inactivates DNA (e.g. on your equipment, bench surface), ethanol doesn‟t inactivate DNA.
3.2 Extraction of mid gut
Before starting, the bench surface and equipment should be wiped with 0.1 M HCl to
inactivate any DNA and with 70% ethanol to remove any residues.
To open the body cavity and expose the gut, the head and pronotum are removed by cutting
across Line A, slightly to the posterior of the junction between the pronotum and the second
thoracic segment with heavy scissors. The posterior section is then opened by cutting with
fine scissors along lines C and D separating the dorsal and ventral cuticle.
Heavy dissecting scissors are used to cut off the head and pronotum along line A.
A
B
C

9
To open up the abdomen it will be necessary to carefully insert the fine dissecting scissors
along the line of the alimentary tract in order to cut through the wing muscles. The abdomen
can then be opened along lines C and D.
Fingers are used to pull apart the dorsal and ventral cuticle to expose the gut. Fine forceps
can then be used to lift out the midgut.
Diseased (left) and healthy gut (right). Record the characteristics of the gut on the data
sheet. The key aspects are: dark or milky, thin or swollen, empty, or full of organic matter.

10
3.3 Recording of characteristics and other data
One line of the data sheet (see example below) should be filled in for each individual beetle.
An insect identification number, the location and trap number, the date of collection, gender
of the beetle, dissection date, and the gut characteristics should be recorded. A copy of this
sheet should be sent to the analytical facility, e.g. SPC Suva, that carries out the diagnosis.
3.4 Storage of gut for diagnostics
The method of storage of the gut sample will depend on the diagnostic method being used.
The midgut can be divided into two pieces to provide samples for both types of analysis.
1. For DNA/PCR analysis, the gut sample should be stored in 70-99% ethanol.
2. For histology, the gut sample can be stored in 10% neutral buffered formalin (10% NBF) or
FAA (5 ml formalin, 2.5 ml glacial acetic acid, 45 ml 99% ethanol). The advantages of FAA
fixative are:
Tissues are fixed with minimal cell disruption and samples can be further processed
for light or electron microscopy if required.
Tissues can be stored in the fixative at room temperature without the samples
becoming brittle or the need to change fixative.
The disadvantage of FAA is that it does not preserve DNA.
3.5 Transport of samples
3.5.1 Packaging
Transportation of samples containing flammable and corrosive
liquids by air requires a special container, LabPak-1, which can be
obtained from Thermofisher Scientific NZ Ltd (3 Atlas Place,
Mairangi Bay, Auckland, New Zealand; http://www.biolab.co.nz).
The gut sample should be placed in a 1.7-ml screw- top tube (O-
ring) containing 0.5 ml 70-99% ethanol (for PCR) or 0.5 ml FAA (5
ml formalin, 2.5 ml glacial acetic acid, 45 ml 99% ethanol) for
Insect
ID
Site Collection
date
gender Dissection
date
Insect and gut condition PCR
result
Histology

11
Description of contents:•Samples for research purposes•Dead, non-infectious insect guts
preserved in ethanol as follows: 1.7ml screw-top tubes each
containing 0.5ml ethanol + insect gut
IATA approved container for transporting flammable liquid *IATA = International Air Transport Association.
histology. Tubes should be labelled with beetle number and the solution (ethanol or FAA).
The International Air Transport Association (IATA) Dangerous Goods Regulations permits
the transport of small volumes of flammable and corrosive liquids in approved containers
(LabPak-1). See web site: www.iata.org.
Use permanent marker pen to label tubes with short codes.
Record detailed information about each sample on a data
sheet (see section 3.3).
Shipping containers protect against potential leakage of
alcohol from the sample tubes. Wrap samples in absorbent
material (e.g. cellulose packing, thick paper towel or cotton
wool) before placing inside shipping container. Bubble wrap
can be used to stop movement of sample package inside
the container. A warning label „Dangerous Goods in
Excepted Quantities‟ must be displayed on the outside of
the package. Complete the label with appropriate details as
follows and glue on one side of the container that shows
“infectious substance” biohazard label.
When sending ethanol samples you only need to tick class 3 and write UN1170. For FAA
samples you need to tick classes 3 and 8 and write UN1170, UN2209 and UN2789.
Under “documentation” attach the information
listed in the box (see right).
3.5.2 Biosecurity documentation
All samples that are to be sent to Fiji should
be accompanied by a Biosecurity Import
permit or the required certificate or document
from the point of origin. Further information
may be obtained from
http://www.quarantine.gov.fj/c_importing.aspx.

12
4 Diagnosis of virus infection by DNA methodology (Jana Monk)
The extraction of virus DNA from the beetle gut is the first step for the molecular, DNA-based
diagnosis of a virus infection. There are different methods for extracting DNA, and the
simplest approach is to use special pre-prepared kits. This chapter describes three extraction
procedures – two are based on commercial kits and the third uses a novel technique:
Qiagen DNeasy Blood and Tissue Kit (which is very good but quite expensive)
Zymo Research Genomic DNA Tissue MiniPrep kit (which is currently giving good
results)
FTA cards
These are described in more detail in the sub-sections below. The selection of method will
mainly depend on cost. Both the Qiagen and Zymo kits have been tested and work equally
well, but the Zymo kit can significantly reduce the costs per DNA extraction.
Once pure DNA has been obtained, the polymerase chain reaction (PCR) is used to detect
the presence of Oryctes virus. PCR is a technique to amplify a few copies of a specific piece
of DNA (in this case virus DNA) across several orders of magnitude, generating thousands to
millions of copies of the target DNA. To check whether the PCR generated the anticipated
DNA fragment (and thus confirming the presence of the virus), agarose gel electrophoresis is
employed for separation of the PCR products. The size of PCR products is determined by
comparison with a DNA ladder (a molecular weight marker), which contains DNA fragments
of known size, run on the gel alongside the PCR products.
4.1 DNA extraction
Three alternative methods for collecting DNA for PCR analysis are described below.

13
4.1.1 DNA extraction (DNeasy Blood & tissue kit, Qiagen)
1. Prepare a 56°C heating block
2. Use a sterile pipette tip to transfer the gut sample (preserved in 70-99% ethanol, as
described in section 3.4) into a sterile Petri dish
3. Wipe scalpel blade with 99% ethanol and excise approx. 25 mg of insect gut (2-3mm)
4. Place piece in a 1.5 ml tube (use scalpel blade and/or a sterile pipette tip)
5. Wipe blade twice with 99% ethanol and new tissues. From here on use Qiagen
DNeasy Blood & Tissue Kit. Buffers ATL and AL may form precipitates upon storage,
if so place at 37°C until crystals dissolve.
6. Add 180 μl ATL buffer and use sterile micropestle to macerate tissue
7. Add 20 μl proteinase K, vortex to mix
8. Incubate at 56°C for 1-3 hours (alternatively, this step can be done at 37°C overnight)
9. After removing samples turn heating block up to 70°C for step 12
10. Vortex samples for 15 sec
11. Add 200 μl buffer AL, vortex to mix
12. Incubate at 70°C for 10 min
13. Add 200 μl ethanol (99%), vortex to mix
14. Centrifuge if sample is not completely lysed: 1 min, 8,000 rpm
15. Transfer sample/supernatant into a DNeasy mini spin column placed in a 2 ml
collection tube
16. Centrifuge 1 min at 8,000 rpm
17. Discard flow through
18. Add 500 μl Buffer AW1
19. Centrifuge 1 min at 8,000 rpm
20. Discard flow through
21. Add 500 μl Buffer AW2
22. Centrifuge 1 min at 8,000 rpm
23. Discard flow through
24. Centrifuge 2 min at 13,000 rpm (to dry column)
25. Place column in new 1.5 ml tube
26. Add 50 μl Buffer AE directly onto column membrane
27. Incubate at room temp for 1 min
28. Centrifuge 1 min at 8,000 rpm to elute DNA
29. Repeat steps 26-28
30. Store DNA at -20°C or keep at 4°C for PCR set up.

14
4.1.2 DNA extraction with the ZR Genomic DNA™-Tissue MiniPrep kit, Zymo Research)
1. Prepare a 55°C heating block
2. Use a sterile pipette tip to transfer the gut sample into a sterile Petri dish
3. Wipe scalpel blade with 99% ethanol and excise approx. 25 mg of insect gut (2-3 mm)
4. Place piece in a 1.5 ml tube (use scalpel blade and/or a sterile pipette tip)
5. Wipe blade twice with 99% ethanol and new tissues
6. From here on use Zymo ZR Genomic Tissue MiniPrep kit.
7. Add 95 µl H2O, 95 µl 2x Digestion buffer, and 10 µl proteinase K to the gut sample
8. Macerate tissue with micro pestle
9. Incubate tube for 3 hours at 55°C
10. Add 700 µl Genomic Lysis buffer to the tube and mix
11. Centrifuge at 10,000 x g for 1 min to remove insoluble debris
12. Transfer supernatant into a Zymo-Spin IIC column in a collection tube
13. Centrifuge at 10,000 x g for 1 min
14. Add 200 µl of DNA Pre-Wash Buffer to the spin column in a new collection tube
15. Centrifuge for 1 min
16. Add 400 µl of g-DNA Wash Buffer to the spin column
17. Centrifuge for 1 min
18. Transfer spin column to a clean tube and add 100 µl DNA Elution buffer or PCR water

15
4.1.3 FTA® Cards
FTA® technology is a novel method designed to simplify the collection, shipment, archiving
and purification of nucleic acids from a wide variety of biological sources. FTA® Cards are
impregnated with a patented chemical formula that lyses cell membranes and denatures
proteins upon contact. Nucleic acids are physically entrapped, immobilized, and stabilized for
storage at room temperature. FTA® Cards protect nucleic acids from nucleases, oxidation,
UV damage and microbial and fungal attack. Infectious pathogens in samples applied to
FTA® Cards are rendered inactive upon contact. Samples collected on FTA® Cards can be
stored at room temperature; the nucleic acids are stable for years. Samples stored on FTA®
Cards and enclosed in a multi-barrier pouch can be shipped through the Postal Service with
no special handling restrictions, making them an extremely useful tool for field collection.
The protocol for preparing beetle gut samples for FTA® card storage and analysis is listed
below.
1. Press fresh insect gut onto the card and allow drying completely.
2. Punch a few disks out of the FTA® matrix impregnated with gut material.
3. Place discs in 1.5 ml tube and wash by adding 200 µl FTA® purification reagent
4. Incubate 5 min at room temperature
5. Remove reagent with pipette
6. Repeat the washing step once
7. Add 200 µl of TE buffer
8. Incubate 5 min at RT
9. Remove TE buffer with pipette
10. Dry discs at RT for ca 1 hour or at 50-
60°C in thermo block
11. Use one disc for PCR (25 µl reaction)

16
4.2 Polymerase Chain Reaction (PCR)
In molecular biology, the polymerase chain reaction (PCR) is a technique to amplify a single
or few copies of a piece of DNA across several orders of magnitude, generating millions or
more copies of a particular DNA sequence. The method relies on thermal cycling, consisting
of cycles of repeated heating and cooling of the reaction for DNA melting and enzymatic
replication of the DNA. Primers (short DNA fragments) containing sequences complementary
to the target region along with a DNA polymerase (after which the method is named) are key
components to enable selective and repeated amplification. As PCR progresses, the DNA
generated is itself used as a template for replication, setting in motion a chain reaction in
which the DNA template is exponentially amplified.
4.2.1 Materials and set-up
The following materials are needed for the PCR method:
ABgene 1.1x Reddy Mix PCR Master Mix (contains 2.5 mM MgCl2)
PCR water (sterile)
Primers OrV15a (5'–ATTACGTCGTAGAGGCAATC–3') and OrV15b (5'–CATGATCGATTCGTCTATGG–3'), which give a PCR product of 945 bp
Bovine serum albumine (BSA)
0.2 ml thin-walled reaction tubes
Thermo cycler
DNA samples
Agarose
DNA dye SYBR safe
0.5x TBE buffer Primers 15a and 15b have been specifically designed for Oryctes virus and can be ordered
from www.invitrogen.com. To make the setup easier and to avoid mistakes with the
calculation of the individual compounds it is helpful to create an Excel file as shown here:
The yellow cell represents the total number of samples prepared for one PCR run (e.g. 14
unknown samples, 1 positive control, 1 negative control = 16 samples). A virus positive DNA
sample can serve as positive control, whereas PCR water can be used as the negative
control.
OrV PCR
microliter x
1x25 l 16
Master Mix 22.3 356.8
Primer 15a 0.5 8
Primer 15b 0.5 8
BSA 0.2 3.2
H2O 0.5 8
Volume 24 a 24
DNA 1 1
Compounds

17
4.2.2 PCR parameters
Once the reaction tubes have been pipetted out, they should be placed in the thermo cycler
to carry out the PCR. The thermo cycler should be set to carry out the following program:
1. 5 min 94°C (denaturation) 2. 30 sec 94°C (denaturation) 3. 45 sec 50°C (annealing) 35 cycles 4. 1 min 72°C (extension) 5. 8 min 72°C (final extension) 6. “forever” 12°C
4.2.3 Preparing, loading and running an agarose gel
To visualise the DNA fragments produced by PCR, an agarose gel should be prepared as follows:
1. For a 1% gel, add 1 g agarose to 100 ml of 0.5x TBE (for small gels) or 0.5 g to 50 ml
of 0.5x TBE into 250ml flask labelled with "DNA gels".
2. Mix by swirling and microwave for about 1-2 minutes (depending on your microwave).
Stop and mix the solution once or twice during the micro waving.
3. Cool to 60-65°C and add the DNA strain SYBR safe (10 µl for 100 ml or 5 µl for 50 ml
gels).
4. Pour your agarose/dye mix into the prepared gel tray (with comb) avoiding bubbles.
5. Multiple combs can be used on a gel to accommodate additional samples.
6. When gel solidifies (after 20-30 min at 20°C), transfer gel and tray into the
electrophoresis chamber filled with 0.5x TBE so that it covers gel completely.
Remove the comb carefully or you may rip out the bottom of the wells.
Following are instructions for loading and running the gel:
Load the samples carefully into the wells.
Load 10 µl of a size marker on the left or right side
Write down what samples are in each well.
Close the lid of the gel chamber and connect voltage (80-100 V)
Run the gel for 30-50 min (depending on your system)
4.2.4 Documentation and interpretation of results
Place the gel on the surface of a transilluminator (wear gloves!). Place the hood with LCD
monitor and digital camera on top of the transilluminator and turn on the UV light. Photograph
the picture with the camera.

18
LCD monitor for
preview
printer
camera
Transilluminator, with set up for viewing and photographing the gel. The following is an example of a gel that displays the DNA fragment obtained from a PCR
with samples from nine different beetle guts, along with a positive and negative control and
the molecular weight marker, as outlined in the Table below.
A1 B3 F6 G4 Y2 D7 C4 H6 V3 pos. neg. Marker
lane µ loaded sample ID PCR result
1 10 A1 +
2 10 B3 (+)
3 10 F6 +
4 10 G4 -
5 10 Y2 +
6 10 D7 -
7 10 C4 ++
8 10 H6 +
9 10 V3 +
10 10 pos. +
11 10 neg. -
12 5 100bp marker
100 bp512
-neg.511
+ pos.510
+ V359
+ H658
++ C457
-D756
+ Y255
-G454
+ F653
(+) B352
+ A151
PCR
result
sample
IDl loadedlane
100 bp512
-neg.511
+ pos.510
+ V359
+ H658
++ C457
-D756
+ Y255
-G454
+ F653
(+) B352
+ A151
PCR
result
sample
IDl loadedlane

19
The first thing to check is that the positive control contains a band of the expected size, and
that there is no band in the negative control. Next look at the bands generated for the
individual beetle samples. Two (G4 and D7) of the nine samples did not produce bands and
therefore, it can be concluded that those gut sections were not infected with virus. The other
seven beetle samples gave a fragment of the expected size, indicating that virus was present
in those gut sections. The lighter intensity band for B3 indicates that less virus was present
(e.g. at an early stage in the infection process) than the other samples, while for beetle C4,
the high intensity band indicates a large amount of virus DNA was present (e.g. heavily
infected beetle).
4.2.5 Disposal of agarose gels and gloves
SYBR safe stained agarose gels should be treated as toxic waste. The gels should be placed
in a plastic colander that sits inside a rubbish bin (with lid). When the colander is full, empty it
into a biohazard bag and dispose of the bag according to the local requirements for toxic
waste. Contaminated gloves should be disposed in a separate bin but can be disposed with
general rubbish.

20
5 Diagnosis of virus infection by histology (Sean Marshall)
Histology is the study of the anatomical features of cells from tissue samples, which are
generally in the format of thin slices or sections. The various combinations of histological
stains employed (e.g. hematoxylin and eosin) are used to provide contrast within the tissue
and can highlight specific structures of interest. The information provided from histological
staining is an essential part of investigating the presence/absence of disease or infection. A
chapter outlining the use of histology has been included in this manual because the
combined use of PCR and histopathology methods is currently the most reliable procedure
for identifying and confirming Oryctes virus infection in rhinoceros beetles. PCR-based
screening is useful to identify samples negative for the presence of the virus, but the high
sensitivity of the PCR method is a drawback for being able to reliably distinguish infected
beetles from beetles whose gut samples have just been contaminated with a small amount of
the virus. Visual inspection of histological sections is a complimentary method to assist in
identifying beetles that have the mid to late stages of virus infection, although it is not
sensitive enough to reliably identify early stages of infection.
5.1 Overview of basic histology processing steps
The following diagram illustrates the steps required to diagnose a virus infection using histology. Steps 1, 2 and 7 are done by the user, while steps 3-6 can be done through a laboratory service.
21
5.2 Step 1: Dissection of beetle midgut sample
See Chapter 3 for details on dissecting midgut tissue from beetles. Before starting the
dissections prepare FAA fixative – see directions below. FAA fixative can be pipetted (1 ml
aliquots) into 1.7 ml sample tubes before dissections begin if a large number of samples are
to be processed.
5.3 Step 2: Fixation of beetle midgut sample
This section describes two alternate fixative solutions, FAA and 10% NBF. By nature these
solutions contain harmful chemicals and should be handled with special precautions.
Formaldehyde is a dangerous chemical that is found in both the FAA and 10% NBF
fixatives. Formaldehyde can be purchased as a liquid or in solid form. More information can
be found at: http://swehsc.pharmacy.arizona.edu/exppath/resources/formaldehyde.php.
Liquid forms of formaldehyde should be stored tightly sealed; since exposure to air
encourages the oxidation of formaldehyde to formic acid (37% formaldehyde is usually
shipped with 10-15% methanol to inhibit this change). Formaldehyde should be stored at
room temperature (cold temperatures encourage the formation of trioxymethylene with a
resulting white precipitate). The shelf life of an unopened 37% formaldehyde stock solution is
ca 1 year if stored in the dark at 20-25°C. Once opened, the solution should be used within
3-4 months. Therefore if possible purchase in small volumes. Solutions containing ca 4%
formaldehyde should be used within 1-2 months, if not sooner. Suggested sources of
formaldehyde include Sigma-Aldrich: #533998-500ML Formaldehyde histological grade, 37
wt. % in H2O or Fluka: #47629 Formaldehyde solution.
An alternative to formaldehyde solutions is crystalline paraformaldehyde, which can be used
to make up the required solutions, but it is hazardous to workers if recommended safety
procedures are not followed. If you are not familiar with making solutions from the crystalline
form, it is recommended that a premade formaldehyde solution is purchased.
Acetic acid is a component of the FAA fixative. Acetic acid is a strong acid and should be
handled with care. It is often purchased as glacial (meaning concentrated), e.g. Scharlau:
#AC0352. Diluted acetic acid solutions can also be used as long as the final concentration in
FAA is 2.5%

22
5.3.1 FAA fixation
1. We have found that FAA (5% formaldehyde : 2.5% acetic acid : 50% ethanol : 35% water)
provides good fixation of midgut tissue. Prepare FAA in small volumes as needed (see
Table). Store at room temperature (20-25°C) and use within ca 2 months. The formaldehyde
should be gently shaken before use to avoid a concentration gradient in the bottle.
Table: Directions for making 200 ml of FAA fixative.
Solution Volume
37% formaldehyde solution 25 ml
Glacial acetic acid 5 ml
95% ethanol 100 ml
distilled water 70 ml
2. Place dissected tissue into a 1.7 ml screw cap sample tube containing 1 ml of FAA
fixative. To make sure the fixative reaches all areas of the tissue sample, the gut fragment
should not be bigger than 5 mm at the thickest point (this should not be a problem for
midgut). Also, the volume of fixative should be at least 10 times more than the volume of
sample tissue (based on approximate volumes). Initial fixation should be at room
temperature since the penetration of formaldehyde is related to the temperature of the
solution.
3. Use a permanent marker pen to label tubes with short codes. Record detailed information
about each sample on a data sheet (see section 3.3).
4. Leave samples in fixative for a minimum of 24 hours. Samples may be left in fixative for
several days to weeks prior to downstream processing.
5. Sample may be sent off to a histology service for further processing after 24-48 hours. You
may be requested to either send the tissue in the original sample tubes they were fixed in, or
be requested to place the tissue in a histology embedding/processing cassette. Further
details on the cassette are provided in the sections describing steps 3-6 of the histology
process.
5.3.2 10% NBF fixation
An alternative fixative to FAA is 10% neutral buffered formalin (10% NBF; 10% formalin is an
old name for a 4% formaldehyde solution). It may be easier and safer to buy premade 10%

23
neutral buffered formalin. Use within printed expiry date if purchased premade or 3 months if
self-made. Store 10% NBF at room temperature.
Table: Directions for making 1000 ml of 10% neutral buffered formalin fixative.
Solution Volume/weight
37-40% formaldehyde 100 ml
Sodium phosphate (monobasic) NaH2PO4 x 1H2O 4.0 g
Sodium phosphate dibasic (anhydrous) Na2HPO4 6.5 g
Distilled water up to 1000 ml ca 900 ml
5.4 Steps 3-6: Dehydration & Infiltration, Embedding, Sectioning, Staining
Dehydration and infiltration involves several processing steps that remove water from the
tissue sample to allow the introduction of a support media (e.g. paraffin) into the tissue,
which helps prevent ripping or tearing of the tissue during sectioning. The embedding
procedure (also referred to as blocking) surrounds and secures the tissue within a support
material that can be hardened (typically paraffin) to allow easy handling of the sample.
Sectioning refers to the cutting of thin slices of tissue (ca 5 µm thick) using a blade
microtome. The tissue slices are then stuck onto glass slides and are ready for staining.
Staining is done to provide contrast and highlight specific features of interest in the tissue.
These steps require specific training and skills to carry out properly. If they are not readily
available to you, there are a number of places that can be contacted to enquire about use of
their histology services.
5.4.1 Histology Services
Prior to directly contacting a histology service, please contact Shareen Prasad at the
Secretariat of the Pacific Community (SPC) in Fiji. They will advise you on the most current
procedure for requesting histology results for dissected midgut samples related to Oryctes
biocontrol management.
Possible sources of histology services include the local university, medical or veterinary
laboratories. Make enquires about whether or not you are able to use their histological
services. If they agree, they will instruct you on how they wish to receive your samples, and
how they typically process tissue samples.
Alternatively, it may be possible to use the histology services of Gribbles Veterinary
Pathology in Christchurch, New Zealand. Since Gribbles Veterinary Pathology normally
processes veterinary samples, it will be necessary to first check with to ensure they are still

24
offering a general histology service. Jennifer Lucas is the histologist and Wilm Nijhof is the
lab manager (phone +64-3-379-9484).
If you are interested in using the Gribbles histology service, you may also contact Sean
Marshall or Trevor Jackson at AgResearch (Lincoln, New Zealand; call reception at +64-3-
321-8800) and we will endeavour to assist in making contact for you. Arrangements will need
to be made for payment to Gribbles for histology services, and depending on the amount of
work involved, AgResearch may need to charge a sample handling fee (to be discussed as
the need arises).
The general process for the Gribbles histology service will likely involve the following steps:
1. Use a pencil to label the histology processing/embedding cassette with the appropriate
sample name (the FAA solution will remove ink). Use one
cassette for each individual tissue sample to avoid mixing
up samples. Gribbles requests that labels are kept short
and simple and correlate to a project. They do not need
your actual sample name. For example, if you are from Fiji,
set up a histology project name called OrV Fiji, and label
your histology samples OrV Fiji 1, 2, 3, etc. (or just Fiji 1, 2,
3, etc.). Be sure to keep an accurate histology project log
that systematically correlates the actual sample label (and
other relevant details, see section 2.3) with the histology sample label.

25
2. Remove fixed tissue sample from the 1.7 ml tube and place into the labelled histology
processing/embedding cassette and close. A biopsy foam pad (blue in photo above) may be
required to help hold the sample in place if midgut tissue is particularly thin.
3. Place cassette containing tissue sample into a plastic jar (with a good tight seal!) filled with
enough fixative to completely cover all cassettes in the jar (a size of 100 or 250 ml is often
sufficient).
4. Package jar in an appropriate shipping container for local delivery to the histology service.
Note that for international shipments it may be necessary to ship the individual sample vials,
and request the histology service provider to place the tissue samples in the cassettes (this
may incur further costs). This is due to restrictions on shipping dangerous goods (see below
for more details).
5. From the service, request hematoxylin and eosin (H&E) staining, and explain that the
midgut is a tube and you are trying to capturing sections located at the midpoint of the tube
(i.e. want to see the 2 gut epithelial sides with the central luminal space). If possible, ask for
3-4 sections per slide and obtain 3 slides.
6. After processing and H&E staining, slides are returned and are ready for analysis.
5.4.2 Couriers and sending samples for histology processing
It will be necessary to contact the local international courier company to ensure they are
willing to deliver the fixed samples. The fixative used to preserve the samples contains
chemicals that are subject to international shipping restrictions (see chapter 3.5 above and
the website: www.iata.org for more details).
Currently we have been advised that a maximum of 30 ml of the fixative per package can be
safely shipped. Check with your chosen courier that this is an allowable quantity to ensure
your package can be delivered to the desired location.
Depending on the shipping destination, an import permit from the destination country may
also be required.
It is important to include a detailed description of contents (see chapter 3.5) on the courier
package. In particular, state that formaldehyde is present in the fixative used for the samples.
Depending on the shipping destination, you may be required to specify the insect species
name, e.g. Oryctes rhinoceros (coconut palm rhinoceros beetle).
26
5.5 Step 7: Analysis
5.5.1 Interpretation of results
Hematoxylin and eosin (H&E) stain is a common staining method in histology. The staining
method involves application of the basic dye hematoxylin, which colours basophilic structures
with blue-purple hue, and alcohol-based acidic eosin Y, which colours eosinophilic structures
bright pink. The basophilic structures are usually the ones containing nucleic acids, e. g. the
nucleus itself, bacteria found in the midgut or the Oryctes virus. The eosinophilic structures
are generally composed of intracellular or extracellular protein. Most of the cytoplasm is
eosinophilic.
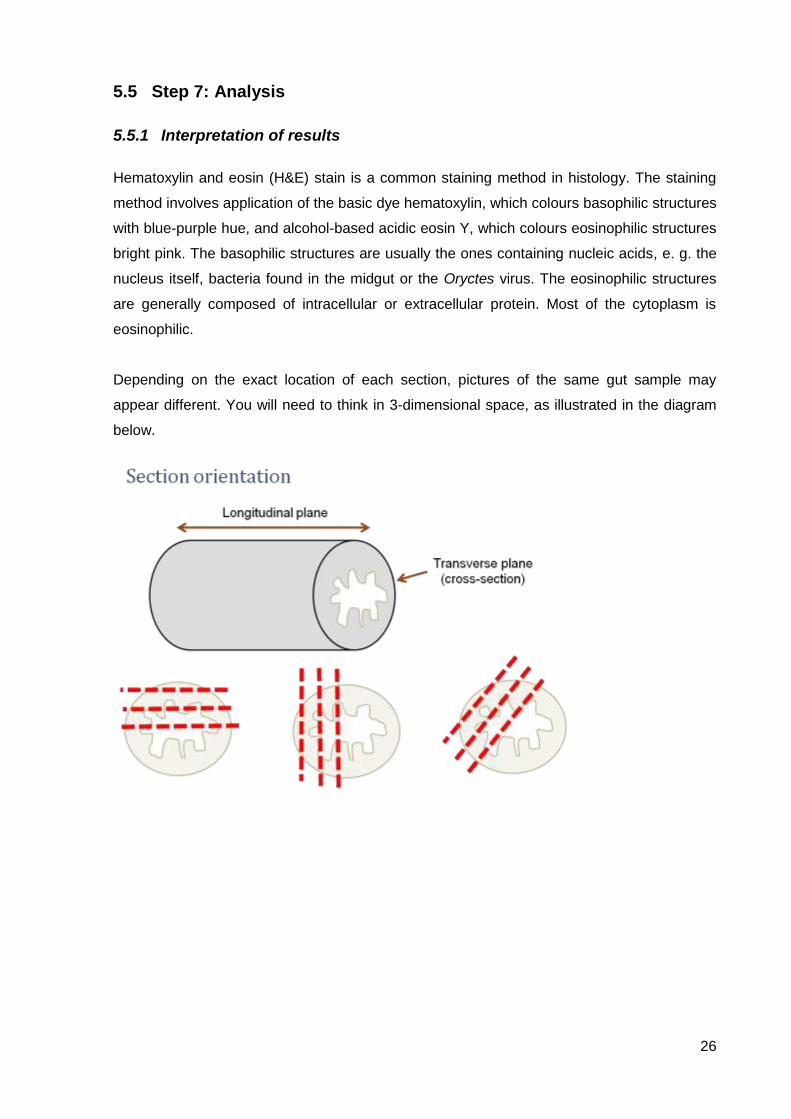
Depending on the exact location of each section, pictures of the same gut sample may
appear different. You will need to think in 3-dimensional space, as illustrated in the diagram
below.
27
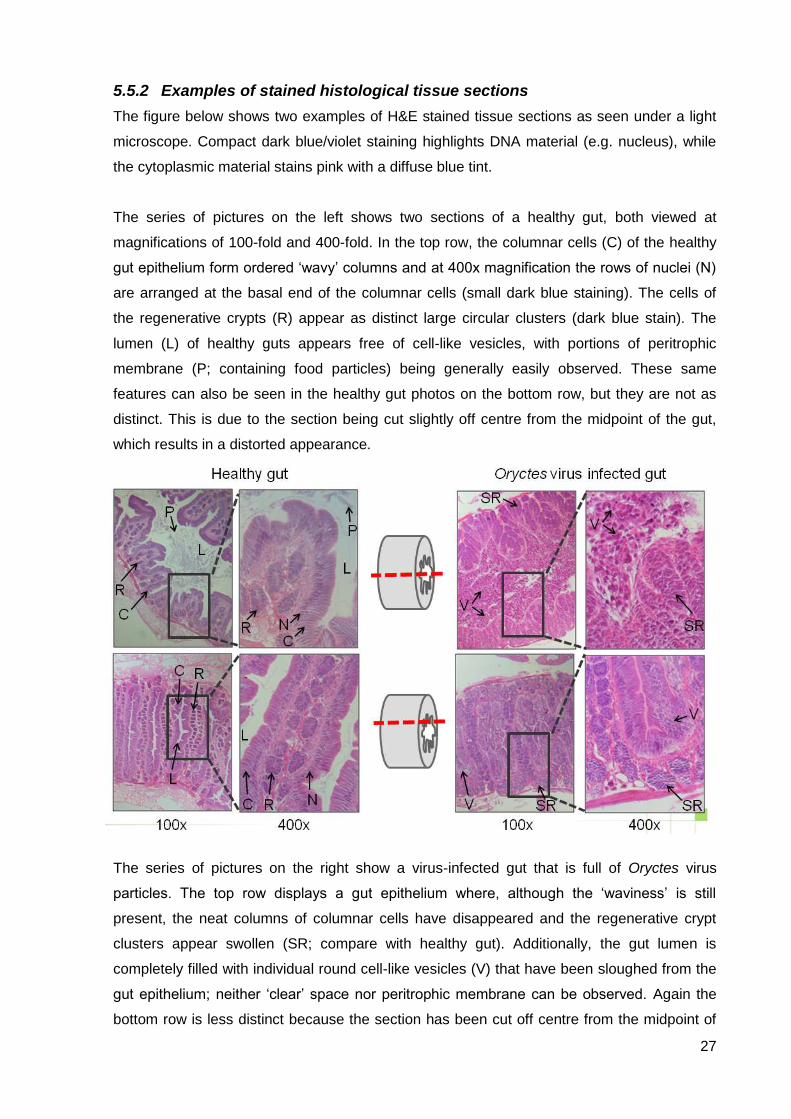
5.5.2 Examples of stained histological tissue sections
The figure below shows two examples of H&E stained tissue sections as seen under a light
microscope. Compact dark blue/violet staining highlights DNA material (e.g. nucleus), while
the cytoplasmic material stains pink with a diffuse blue tint.
The series of pictures on the left shows two sections of a healthy gut, both viewed at
magnifications of 100-fold and 400-fold. In the top row, the columnar cells (C) of the healthy
gut epithelium form ordered „wavy‟ columns and at 400x magnification the rows of nuclei (N)
are arranged at the basal end of the columnar cells (small dark blue staining). The cells of
the regenerative crypts (R) appear as distinct large circular clusters (dark blue stain). The
lumen (L) of healthy guts appears free of cell-like vesicles, with portions of peritrophic
membrane (P; containing food particles) being generally easily observed. These same
features can also be seen in the healthy gut photos on the bottom row, but they are not as
distinct. This is due to the section being cut slightly off centre from the midpoint of the gut,
which results in a distorted appearance.
The series of pictures on the right show a virus-infected gut that is full of Oryctes virus
particles. The top row displays a gut epithelium where, although the „waviness‟ is still
present, the neat columns of columnar cells have disappeared and the regenerative crypt
clusters appear swollen (SR; compare with healthy gut). Additionally, the gut lumen is
completely filled with individual round cell-like vesicles (V) that have been sloughed from the
gut epithelium; neither „clear‟ space nor peritrophic membrane can be observed. Again the
bottom row is less distinct because the section has been cut off centre from the midpoint of

28
the gut.
It is worth remembering that further sections of a given sample may be necessary to provide
a more definitive answer. This may be done by requesting further sections from the
embedded sample block.
An excellent review and a more detailed description of the Oryctes virus pathology may be
found in: Huger, A.M. (2005) The Oryctes virus: Its detection, identification, and
implementation in biological control of the coconut palm rhinoceros beetle, Oryctes
rhinoceros (Coleoptera: Scarabaeidae). Journal of Invertebrate Pathology 89: 78-84.

29
6 Diagnosis of virus infection by bioassay (Trevor Jackson and Kuatemane Tuapola)
This bioassay method for treating beetles with purified cultures of Oryctes virus was
established by AgResearch/MAFF Samoa during the rhinoceros beetle research programme.
The bioassay was designed to compare a pure culture of virus prepared by AgResearch with
a preparation of the virus collected from Samoan beetles. Virus-free adult beetles will be fed
sugar cane dosed with virus and held in individual containers. A control treatment will be fed
sugar cane without virus. There should be 10 beetles for each treatment. The experiment
should be repeated with three different batches (collections) of beetles. The beetles should
be examined every 3 to 4 days when the section of sugar cane should be replaced. The state
of the beetle (live or dead) and the amount of feeding should be recorded. The results should
be analysed to determine time to death of the treated beetles and amount of sugar cane
consumed.
6.1 Collection of beetles
Beetles for virus tests should be collected from breeding sites, as sampling and PCR have
shown that levels of virus are generally low within the logs. The beetles or pupae should be
extracted carefully from the rotting logs and placed individually in 50 ml containers (pink tops)
and placed in the cool bin. The cool bin should contain a cold freezer pad or a bottle or
frozen water to keep the samples cool until returned to the laboratory.
In the laboratory beetles and pupae should be placed carefully into 75 ml containers (yellow
tops) and surrounded with clean sawdust to about 2/3 full. The containers should be labelled
with the site and date of collection on the outside of the container. The containers should be
kept on their sides in a dark area of the insectary until there are enough fresh beetles for
testing. To indicate that the beetles are ready for testing add a small piece of sugar cane to
the tube. The beetles are ready for testing once they have started feeding on the sugar cane.
Collect beetles from breeding sites (log traps).

30
Place beetles in individual plastic containers and transport to the lab as quick as possible.
To infect beetles with Oryctes virus inoculate sugar cane pieces with the virus solution (1
droplet). Place beetle, sugar cane and saw dust into a container.
6.2 Preparing a virus sample from fresh beetle guts
Adult beetles should be collected from pheromone traps. The beetles should be dissected
and guts removed from those showing swollen guts indicating virus infection (see picture).
The swollen guts from five beetles should be
mixed together in 5 ml of clean water (bottled
drinking water) and macerated (mashed)
together to form a suspension of virus. The
mixture should be left to settle for 5 minutes
and the suspension removed by pipette
placing about 0.5 ml into screw top tubes. The
tubes should be labelled with the date of
preparation and placed in the freezer (-20°C)
until use.

31
6.3 Bioassay of beetles for effect of virus
When thirty feeding beetles have been collected they should be placed individually in the 150
ml containers with fresh damp sawdust (It is important that this sawdust is clean and not
contaminated by virus from infected beetles).
The beetles in their containers should be divided randomly into three groups of ten. The
containers should be marked on the side with the letter of the treatment group. Treatments
will be applied to a split section of sugar cane.
The three treatments are:
A. Control - fresh water
B. Fresh virus from beetles
C. Pure virus from AgResearch.
First treat the sugar cane for Group A by adding a droplet of fresh water to the cut side of the
cane so that it absorbs into the core. Place the lids on the containers securely (The lids
should have holes to allow air movement in and out of the container).
Allow the frozen sample container with sample B to thaw. Fill the tube to the 1.5ml mark with
clean water (2/3 full). Transfer two droplets of water onto the cut surface of the sugar cane
and place in each of the containers for the B group. Place on the lids.
Take a sample of the pure virus (Sample C) from the refrigerator. Fill the tube to the 1.5 ml
mark with clean water. Transfer two droplets onto the sugar cane and place in each of the
containers for the C group. Place on the lids.
Samples should be kept in the insectary without being exposed to direct sunlight. The
samples should be assessed twice weekly (at 3-4 day intervals) when the state of the beetle
is noted (Live or dead) and the amount of feeding on the piece of sugar cane is noted as the
percentage consumed (For example, light feeding = 5%; totally consumed = 100%). The
results from each assessment should be written down on a data sheet and transferred to an
Excel file in the computer as soon as convenient. The experiment should be monitored for 60
days or until most of the insects are dead.

32
Containers with sawdust for keeping individual beetles
Treating sugar cane with a droplet of water or virus
Place 2 drops of the virus suspension on the cut surface of the food source
The experiment should be repeated three times with different batches of insects (i.e. different
beetle collections) at each time.

33
7 Release of Oryctes virus for biocontrol (Trevor Jackson and Sean Marshall)
7.1 Beetles
Beetles collected from pheromone traps are not suitable for treating with virus as they are
often too old and will only survive for a few days in the laboratory. Some may already be
infected with virus or contaminated from other infected beetles. For these reasons we
recommend collecting neonate beetles from the breeding sites or rearing them from larvae
and pupae before treating with virus.
7.1.1 Selection of sites for beetle collection
Beetles for virus release should be collected from sites where virus incidence is thought to be
low. Sampling and PCR have shown that levels of virus are generally low within the logs at
breeding sites. Beetles can be collected from special “Log traps” (see chapter 1.2) provided
these have not been treated with virus for beetle control. Areas where PCR is showing low
viral incidence in the general population are particularly useful for collection.
7.1.2 Collection of beetles
Freshly emerged beetles and pupae should be collected from breeding sites in the field. The
beetles or pupae should be extracted carefully from the rotting logs and placed individually in
50 ml containers and placed in the cool bin. The cool bin should contain a cold freezer pad or
a bottle or frozen water to keep the samples cool inside until returned to the laboratory. The
containers should be labelled with the site and date of collection on the outside of the
container. (Larvae can also be placed in groups in containers into the cool bin for transport
back to the laboratory).
7.1.3 Handling of pupae
Place the pupae carefully into 75 ml containers and surrounded with sawdust to about 2/3
full. The containers should be labeled with the site and date of collection on the outside of the
container. The containers with pupae should be kept on their sides in a dark area of the
insectary. The containers should be checked every 3-4 days and
the date when the beetle is first observed should be noted.
7.1.4 Treating the beetles with virus
Pure virus (strain X2B) preparations should be provided by
AgResearch or SPC Suva (see picture). Maintain the virus in the
specified conditions until use (see chapter 6.). Beetles selected

34
as ready for treatment should be provided with a drop of water (control) or a drop of virus
suspension to the mouthparts. (A droplet is about 100 µl in size). The experimenter should
ensure the droplet is absorbed into the gut.
7.1.5 Release of virus treated beetles
Infected beetles should be released into the field in the late afternoon prior to sundown.
They should be placed in shaded positions under trees or covered with leaves or fronds. On
release the beetles should be active and rapidly bury themselves under loose vegetation.
7.2 Virus Storage
Pure cultures of virus prepared by AgResearch are supplied in sealed vials containing 1 ml of
virus suspension (other volumes can be arranged). Upon receiving a shipment, the virus
tubes should be stored in their container in a dark refrigerator (4°C). Do not freeze pure virus,
as virus titer will be reduced. Short periods at room temperature (such as when setting up the
experiment) will not harm the virus, but if the virus is left at room temperature (20°C or
higher) for extended periods the virus will lose its ability to infect.
Once a vial has been opened, the contents should be used on the same day to be sure the
virus has not been affected by growth of microbial contaminants. However, it is possible to
store the remaining portion of the virus at 4°C for use within the next 1-2 weeks, but the
quality of the virus will be unknown, due to the slow growth of bacterial and fungal
contaminants. The exception to this would be if the vial contents have been kept sterile (i.e.
aseptic technique used). Deterioration occurs because the pure virus is stored in cell culture
media, which is a rich solution that will allow bacteria and fungi to grow.
7.3 Ordering cell culture produced virus
7.3.1 Production capacity (time and volume)
AgResearch is able to supply the X2B strain of Oryctes virus at a standardized titre of 1 x 10⁶
infectious units per millilitre (IU/ml), with virus supplied in 1 ml aliquots (other volumes are
also feasible). Other strains of Oryctes virus can also be supplied, on a case by case basis.
The minimum dose recommended to establish infection in a susceptible beetle is 5000 IU. It
is recommended that an excess of virus is applied to ensure all treated beetles will be
infected when released. If 50 µl of virus solution is used to dose an adult beetle, a 10 ml
volume of cell culture-produced virus titred at 1x10⁶ IU/ml will provide enough material to
infect about 200 adult beetles.

35
7.3.2 Notice period
For production of 20 ml AgResearch requires approximately 4-6 weeks advance notice to be
able to prepare a shipment. For volumes larger than 20 ml, please contact us to discuss a
suitable timeframe.
Please keep in mind that this is a biological system and occasionally it behaves in
unexpected ways that cannot always be explained or predicted – a good reminder that
ongoing research is important, particularly in the area of biocontrol.
7.3.3 Import Permits for live virus
An import permit may be required to allow shipments of virus into the country, though may
vary with each country. Generally, you should contract your government department
responsible for importation of biological materials (e.g. Ministry of Agriculture).
Alternatively, if you are unsure of whom to contact, Shareen Prasad from SPC
([email protected]) will be able to advise you. If a permit is required and AgResearch is
shipping directly to the requesting country, please forward a copy of the import permit to
AgResearch (contact Tracey Nelson, [email protected]), so that we can
attach it to the shipment. Please be sure to include all instructions on where and how the
permit should be displayed and any other details that may be required by the requesting
country. Packages will be shipped by the fastest possible route, which is generally via
courier.
7.3.4 Costs
The cost of a virus order will depend on the quantities and strain(s) requested, and this is
subject to regular review. For the latest pricing, please contact AgResearch to discuss your
needs. Pricing reflects our need to recover the basic costs of consumables, staff time, plus
maintenance of the cell line, virus strains and associated equipment. The costs of shipping
and handling are in addition to the virus production and will be added to the final price.
Please direct enquires regarding Oryctes virus to either:
Sean Marshall ([email protected]) or
Trevor Jackson ([email protected])
Fax +64-3-325-9946
Mail AgResearch, Lincoln Research Centre, Private Bag 4749, Christchurch 8140,
New Zealand.

36
Appendix 1: Suppliers of lab equipment and consumables used in 2009
Lab supplies Catalogue
number Supplier Price
1ml filtered tips 6 boxes of 96 LC1187-965 Interlab $90.00
1-100ul filter tip, 10 boxes of 96 (Labcon ) LC 1184-965 Interlab $100.00
0.1-10ul filter tips, 10 boxes of 96 (Labcon ) LC 1181-965 Interlab $95.00
latex gloves (10 pks of 100) #105-108 Interlab $85.00
1.5 ml tubes (bag of 500) AXMCT175C Global Sciences
Agarose, DNA grade, low EEO (Applichem) ApLa-2114-0500 Global Sciences $994.00
Flipper racks 3570 Global Sciences
Flipper freezer racks 3575 Global Sciences
1litre 10xTBE 15581044 Invitrogen $54.40
Dnase/Rnase-free distilled water (500ml) 10977015 Invitrogen $31.00
primers (3a, 15a, 15b) online Invitrogen $40.00
SYBR Safe DNA gel stain (10,000 fold concentrate) SKU# S33102 Invitrogen $119.00
1x TE buffer (100 ml) 12090-015 Invitrogen $40.00
1M Tris-HCl (1 litre) 15568-025 Invitrogen $69.00
Thermoprime plus PCR Master Mix (2.5mM MgCl2) AB-0619 Innovative Sciences $135.00
0.2ml thin-walled tubes with flat caps (x1000) AB-0620 Innovative Sciences $75.00
Qiagen DNeasy Blood and Tissue Kit (x50) QIA69504 Biolab Scientific $435.40
BSA - 60mg 10mg/ml NEBB9001S Biolab Scientific $40.65
Biohazard bags (50) LAB3500/504 Biolab Scientific $71.00
Zymo Research Genomic DNA Tissue MiniPrep D3050 Ngaio Diagnostics Ltd
$259.00
Interlab Ltd, PO Box 13018, Johnsonville, Wellington Ph: +64 4 972 2330; Fax: +64 4 939 6170 Email: [email protected] Biolab Scientific Ltd (Akld), Private Bag 102 922, North Shore Mail Centre, Auckland Ph: +64 9 980 6700; Fax: +64 9 980 6788 http://www.biolab.co.nz Global Science & Technology (Lower Hutt), PO Box 101 253, North Shore Mail Centre, Auckland NSMC. URL: www.globalscience.co.nz Tel: +64 9 443 5867; Fax: +64 9 444 7314 Email: [email protected] Invitrogen New Zealand Ltd (Ecom), PO Box 12-502, Penrose, Auckland Ph: +64 9 579 3024; Fax: +64 9 579 3119 Email: [email protected] URL: http://www.invitrogen.com Innovative Sciences Ltd, PO Box 13108, Dunedin Phone: +64 3 488 3832; Fax: +64 3 488 3837 Email: [email protected] Ngaio Diagnostics Ltd, PO Box 4015, Nelson, New Zealand Ph: +64 3 548 4727; Fax: +64 3 548 4729
Recommended