OpenESB SSL Installation
User Guide
Author Akshay Thakur Designation Technical Consultant
akshaythakur1388gmailcom +91 9923246991
Created 24-Dec-2016
Contents 1 Introduction 3
2 Prerequisites 4
3 SSL Installation 5
Using Self Signed SSL 5
Using CA Signed SSL 10
4 SSL Testing 11
5 OpenESB Project Creation 13
1 Introduction
This document will focus on complete process of SSL installation in OpenESB Integration server v305 It
also covers installing Self signed SSL and CA (Certified Authority) signed SSL certificate process
2 Prerequisites
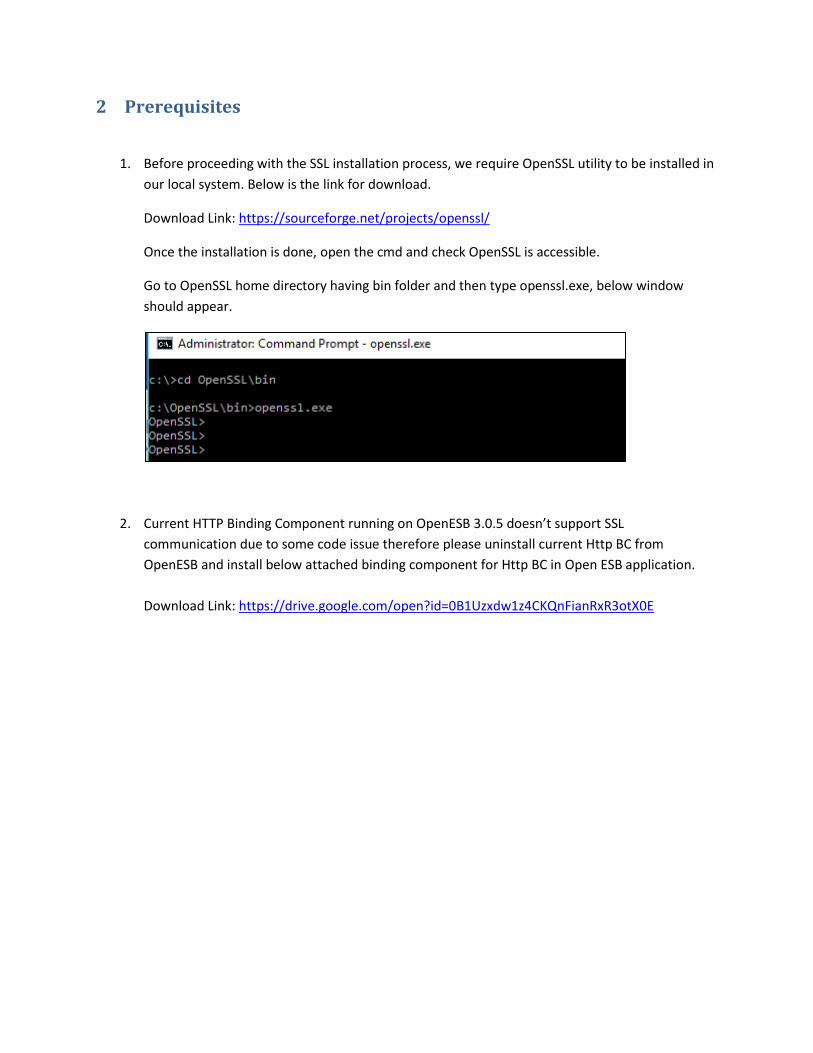
1 Before proceeding with the SSL installation process we require OpenSSL utility to be installed in
our local system Below is the link for download
Download Link httpssourceforgenetprojectsopenssl
Once the installation is done open the cmd and check OpenSSL is accessible
Go to OpenSSL home directory having bin folder and then type opensslexe below window
should appear
2 Current HTTP Binding Component running on OpenESB 305 doesnrsquot support SSL
communication due to some code issue therefore please uninstall current Http BC from
OpenESB and install below attached binding component for Http BC in Open ESB application
Download Link httpsdrivegooglecomopenid=0B1Uzxdw1z4CKQnFianRxR3otX0E
3 SSL Installation
Using Self Signed SSL Steps to follow
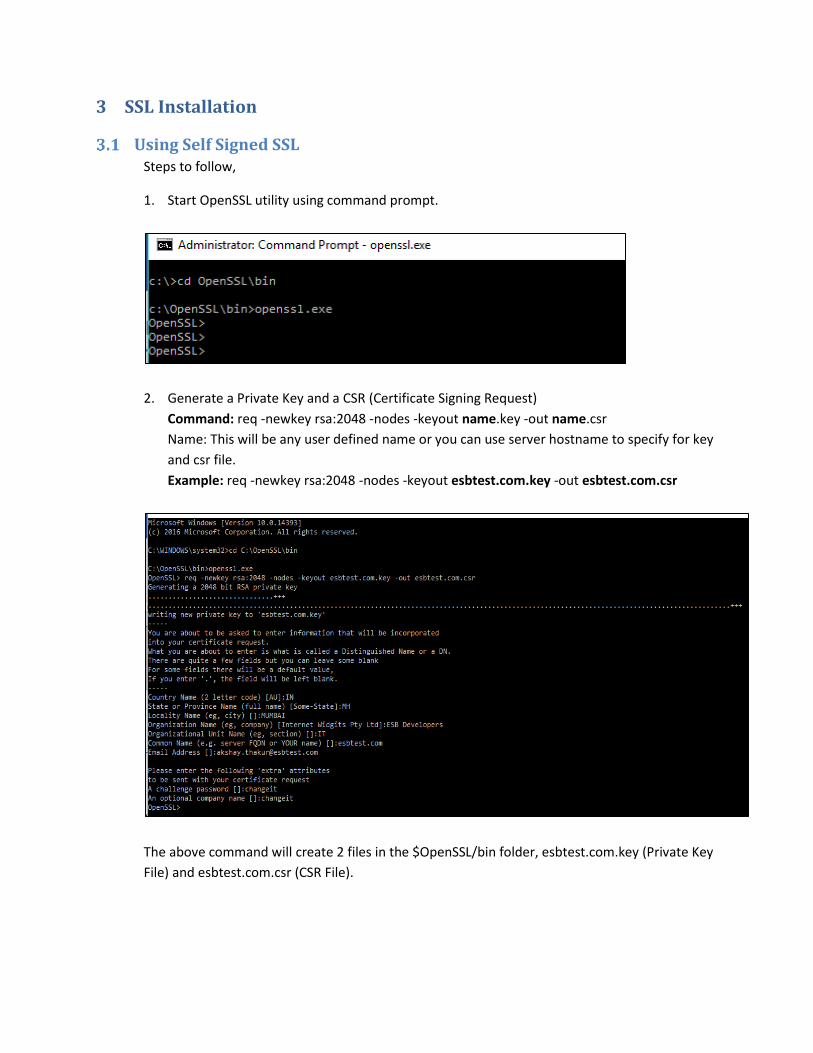
1 Start OpenSSL utility using command prompt
2 Generate a Private Key and a CSR (Certificate Signing Request)
Command req -newkey rsa2048 -nodes -keyout namekey -out namecsr
Name This will be any user defined name or you can use server hostname to specify for key
and csr file
Example req -newkey rsa2048 -nodes -keyout esbtestcomkey -out esbtestcomcsr
The above command will create 2 files in the $OpenSSLbin folder esbtestcomkey (Private Key
File) and esbtestcomcsr (CSR File)
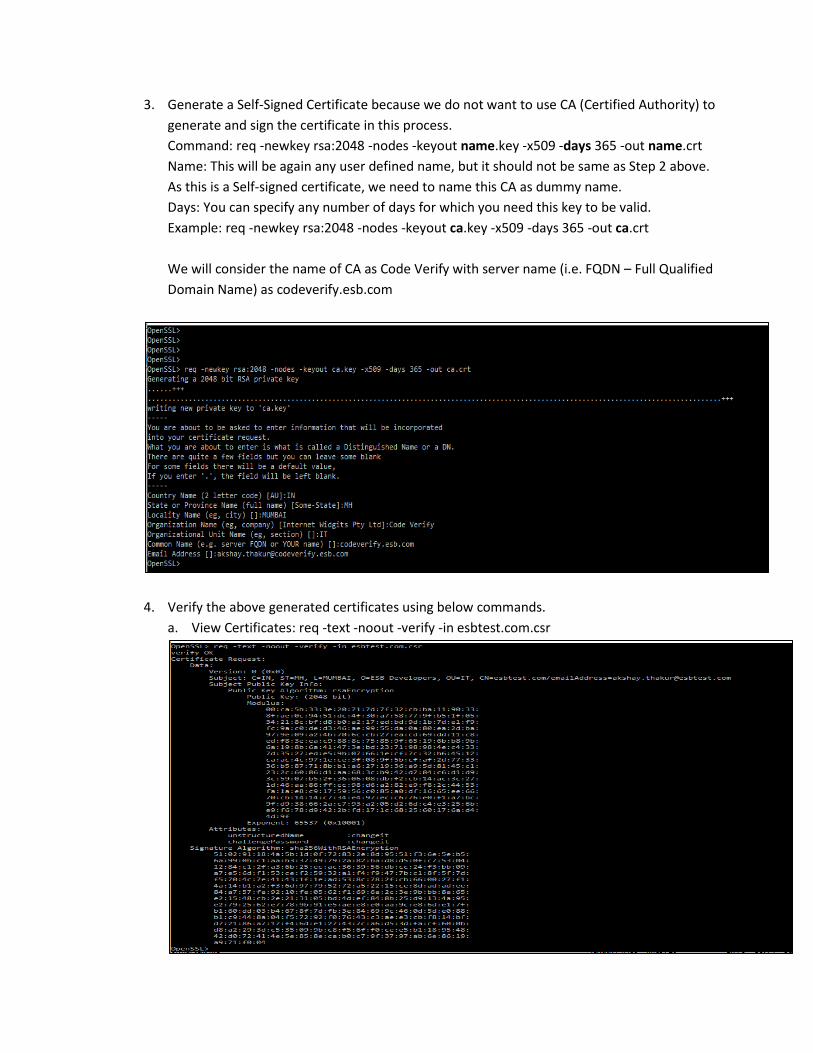
3 Generate a Self-Signed Certificate because we do not want to use CA (Certified Authority) to
generate and sign the certificate in this process
Command req -newkey rsa2048 -nodes -keyout namekey -x509 -days 365 -out namecrt
Name This will be again any user defined name but it should not be same as Step 2 above
As this is a Self-signed certificate we need to name this CA as dummy name
Days You can specify any number of days for which you need this key to be valid
Example req -newkey rsa2048 -nodes -keyout cakey -x509 -days 365 -out cacrt
We will consider the name of CA as Code Verify with server name (ie FQDN ndash Full Qualified
Domain Name) as codeverifyesbcom
4 Verify the above generated certificates using below commands
a View Certificates req -text -noout -verify -in esbtestcomcsr
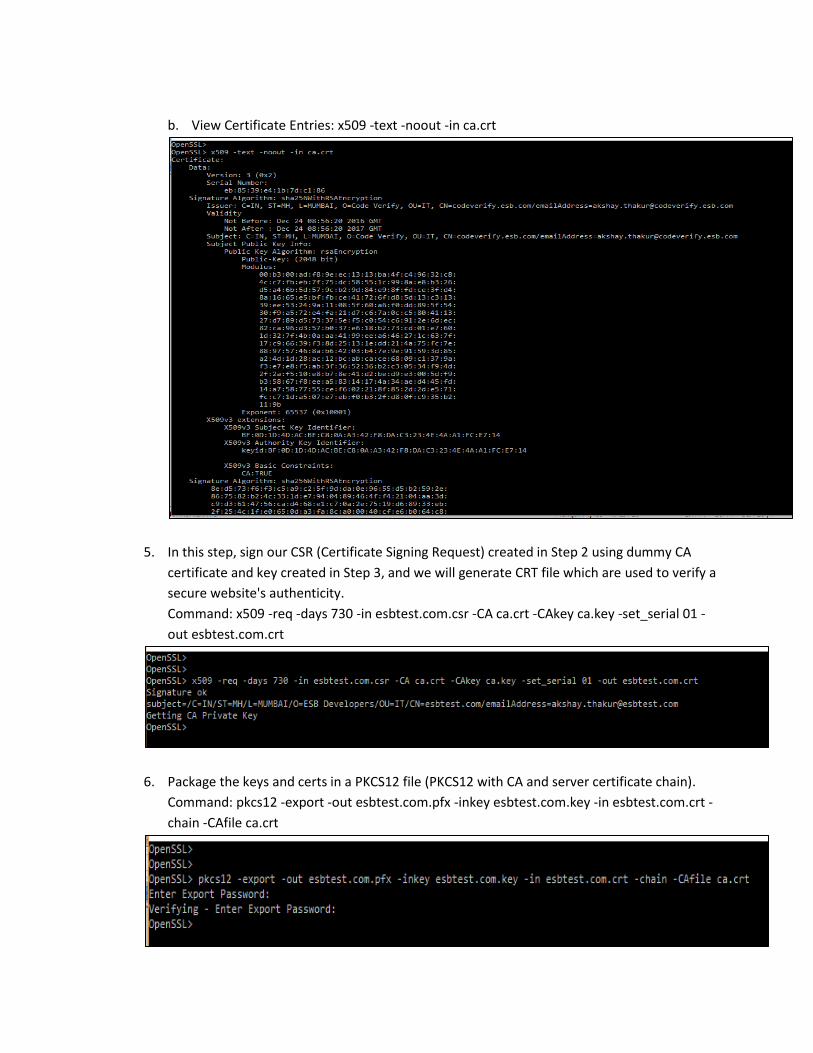
b View Certificate Entries x509 -text -noout -in cacrt
5 In this step sign our CSR (Certificate Signing Request) created in Step 2 using dummy CA
certificate and key created in Step 3 and we will generate CRT file which are used to verify a
secure websites authenticity
Command x509 -req -days 730 -in esbtestcomcsr -CA cacrt -CAkey cakey -set_serial 01 -
out esbtestcomcrt
6 Package the keys and certs in a PKCS12 file (PKCS12 with CA and server certificate chain)
Command pkcs12 -export -out esbtestcompfx -inkey esbtestcomkey -in esbtestcomcrt -
chain -CAfile cacrt
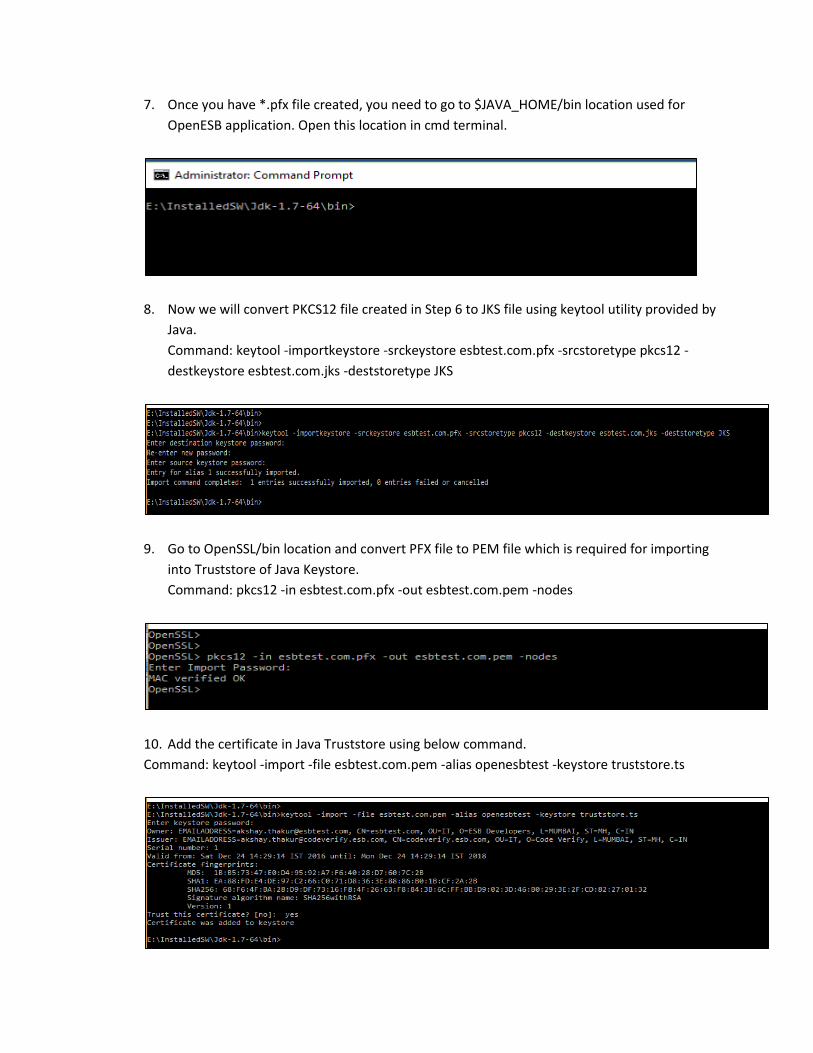
7 Once you have pfx file created you need to go to $JAVA_HOMEbin location used for
OpenESB application Open this location in cmd terminal
8 Now we will convert PKCS12 file created in Step 6 to JKS file using keytool utility provided by
Java
Command keytool -importkeystore -srckeystore esbtestcompfx -srcstoretype pkcs12 -
destkeystore esbtestcomjks -deststoretype JKS
9 Go to OpenSSLbin location and convert PFX file to PEM file which is required for importing
into Truststore of Java Keystore
Command pkcs12 -in esbtestcompfx -out esbtestcompem -nodes
10 Add the certificate in Java Truststore using below command
Command keytool -import -file esbtestcompem -alias openesbtest -keystore truststorets
11 In the Step 10 output please verify your Owner and Issuer Parties Owner will be the one
who is requesting for certificate and Issuer will be one who is providing the Signed
certificate
12 Copy jks file in $OPEN_ESB_HOMEOE-Instance location Screen shot below
13 Go to OpenESB server startup location $OPEN_ESB_HOMEOE-Instancebin and open
openesbbat file for windows or openesbsh for Linux machine and add below VM
parameters
-DjavaxnetsslkeyStore=pathjks
-DjavaxnetssltrustStore=pathjks
-DjavaxnetsslkeyStorePassword=password
-DjavaxnetssltrustStorePassword=password
For Windows
For Linux
Using CA Signed SSL
We will describe the process of obtaining the CA signed SSL certificate therefore screenshots are
not covered here
Steps to Follow
1 Generate a Private Key and a CSR (Certificate Signing Request) The same process which we
covered in Self-signed process The csr file is what you will send to the CA to request your
SSL certificate
2 Based on the CA you choose each one has its own way of providing the SSL certificates
Some of the CA are Namecheap GoDaddy DigiCert etc Based on our CSR CA will provide
us 2 files one is your SSL certificate (which should have a random name) and CA
intermediate certificate bundle Rename the certificate to the domain name with a crt
extension eg examplecomcrt and rename the intermediate certificate bundle as
intermediatecrt
3 So now in this case we have examplecomcrt as our SSL certificate (as per Step 5 in Self-
signed process) and intermediatecrt as our CA certificate (as per Step 3 in Self-signed
process)
4 Now follow the Steps 6 to 13 same as Self-signed process and install the certificate on
OpenESB server
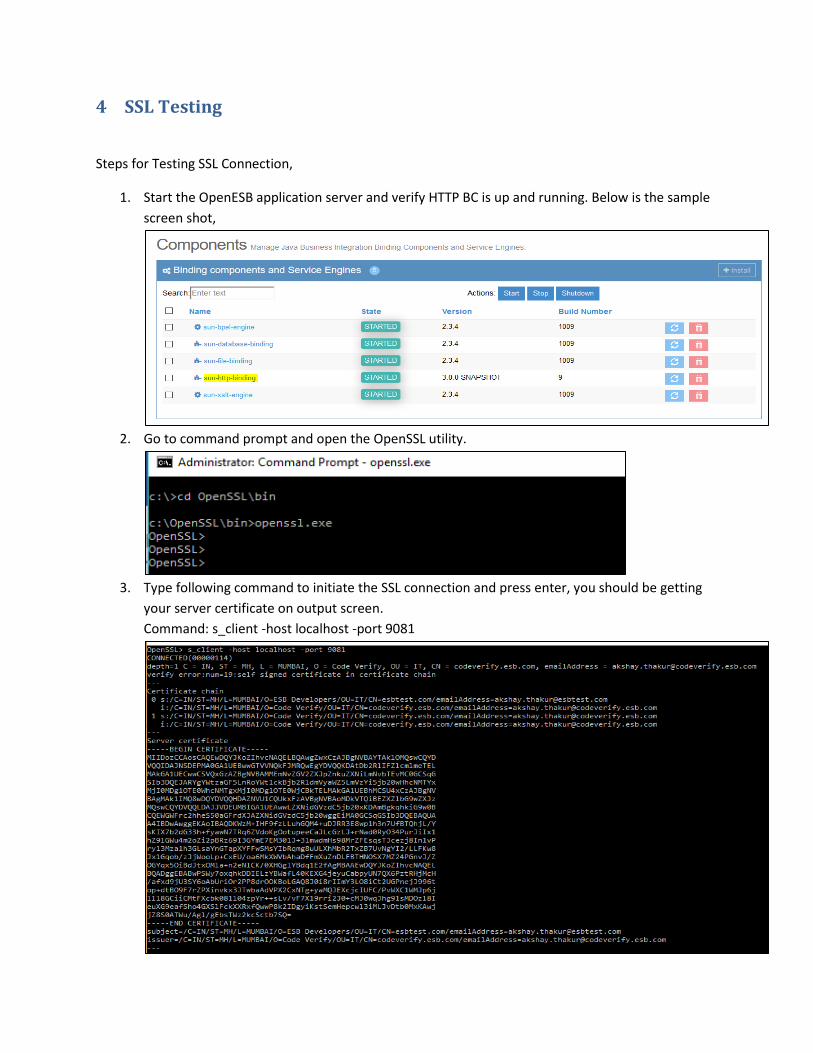
4 SSL Testing
Steps for Testing SSL Connection
1 Start the OpenESB application server and verify HTTP BC is up and running Below is the sample
screen shot
2 Go to command prompt and open the OpenSSL utility
3 Type following command to initiate the SSL connection and press enter you should be getting
your server certificate on output screen
Command s_client -host localhost -port 9081
4 Now type below command to read the Http response from server As we do not have any
application working on 9081 port we will receive Http 404
Command GET HTTP10 and press enter 2 times to get the response
5 If you have any OpenESB application deployed on 9081 port then you will receive Http 200
response Check below screen shot
Command GET newWSDLServicenewWSDLPortwsdl HTTP10
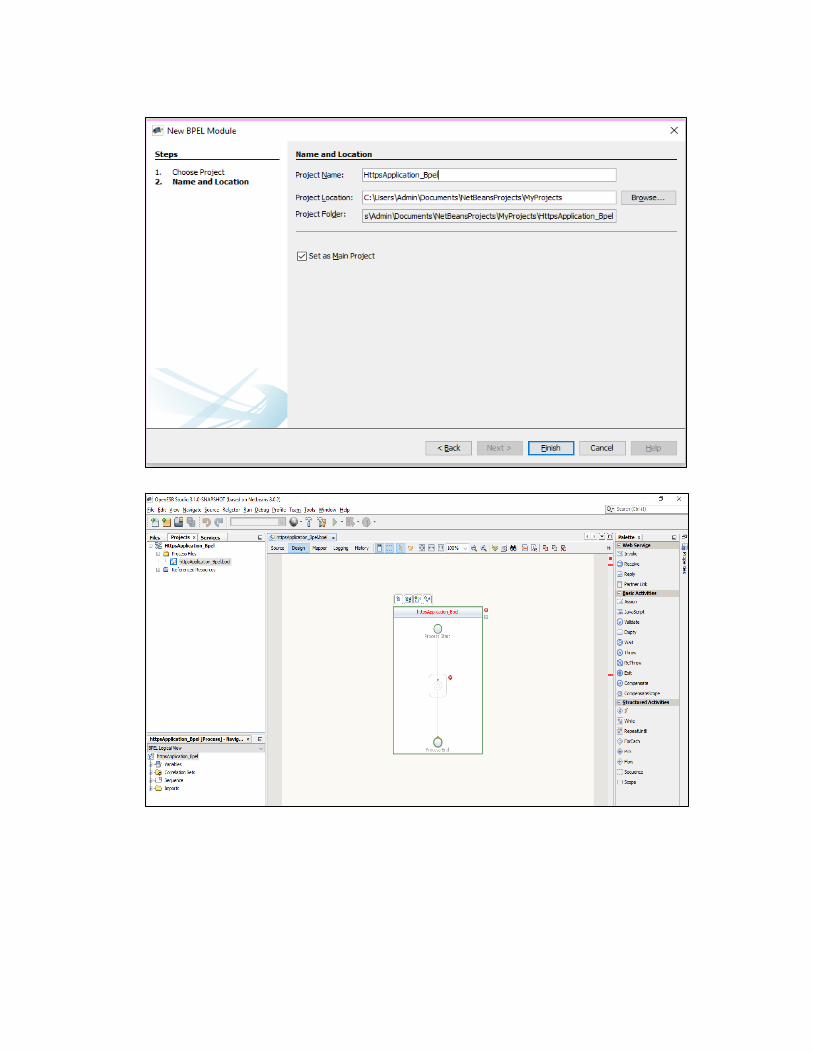
5 OpenESB Project Creation
Create sample HTTPs based project using OpenESB 305 version Follow below steps to develop the
same
1 Start OpenESB NetBeans IDE
2 Create sample BPEL project and name as HttpsApplication_Bpel
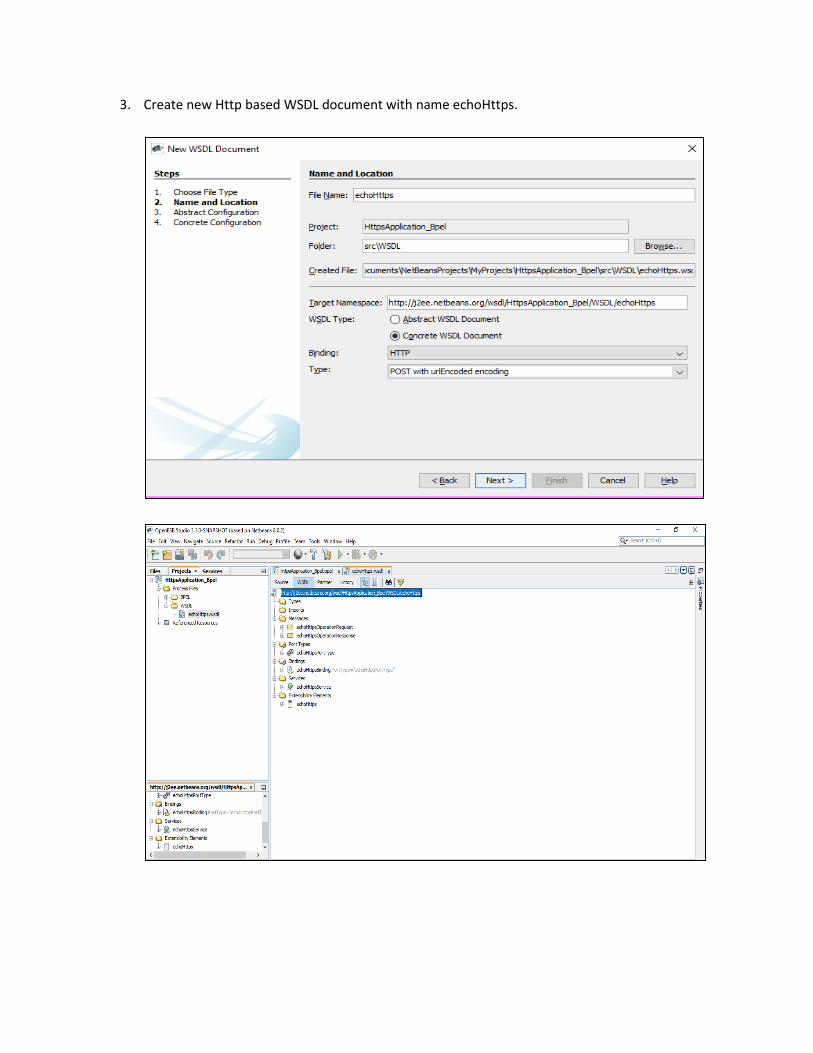
3 Create new Http based WSDL document with name echoHttps
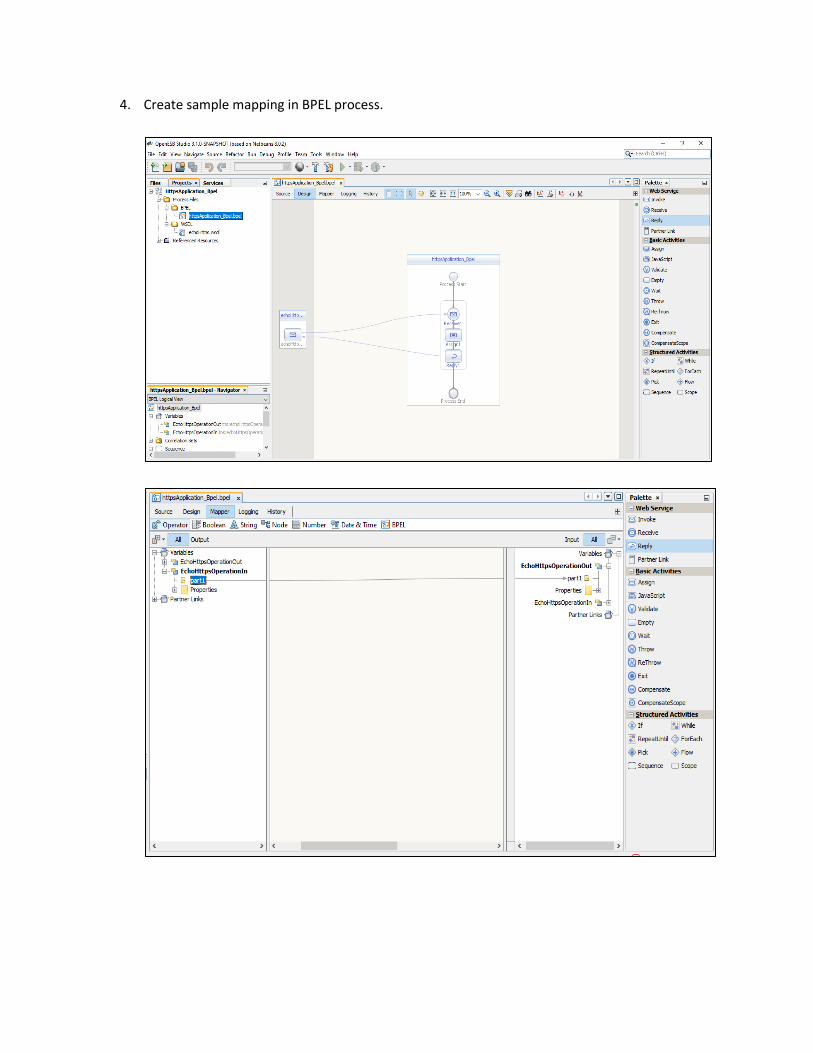
4 Create sample mapping in BPEL process
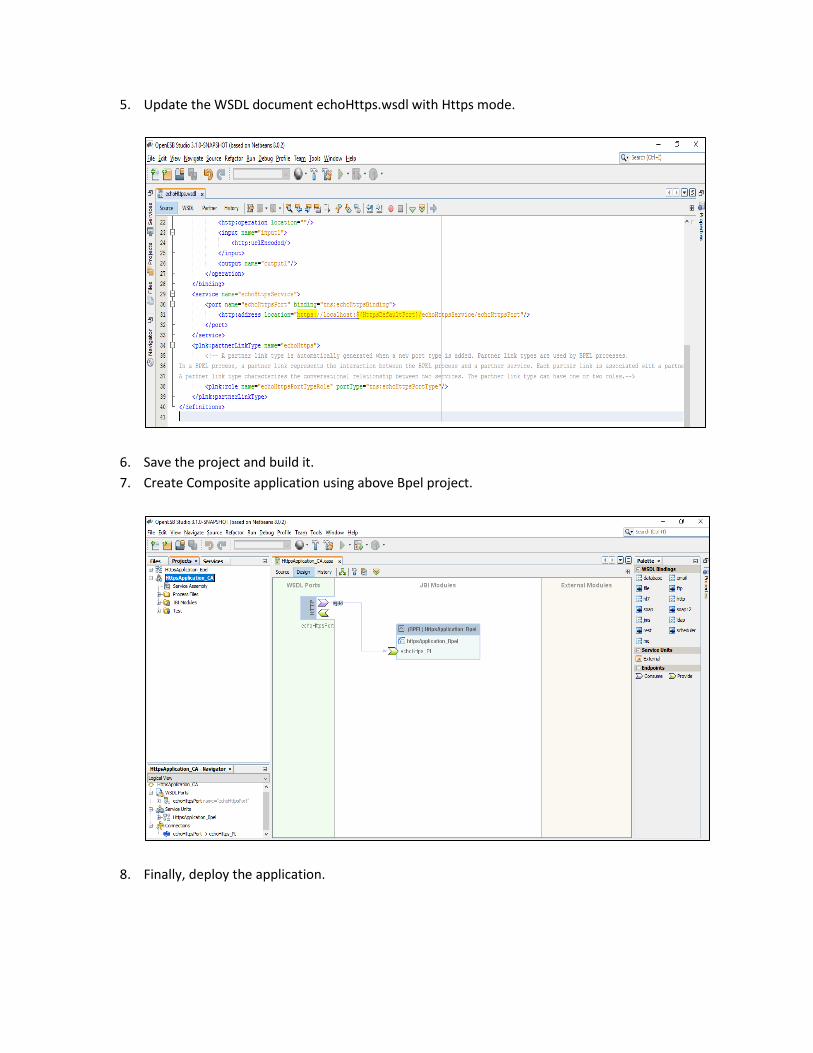
5 Update the WSDL document echoHttpswsdl with Https mode
6 Save the project and build it
7 Create Composite application using above Bpel project
8 Finally deploy the application
9 Use below URL to test on browser and check whether you are able to access your application
with Https mode
URL httpslocalhost$HttpsDefaultPortechoHttpsServiceechoHttpsPortwsdl
While accessing the URL for the first time you will receive warning message regarding your
certificate because we are using self-signed SSL Just add the exception in browser and simply go
ahead
This ensures complete setup of SSL is successful
Contents 1 Introduction 3
2 Prerequisites 4
3 SSL Installation 5
Using Self Signed SSL 5
Using CA Signed SSL 10
4 SSL Testing 11
5 OpenESB Project Creation 13
1 Introduction
This document will focus on complete process of SSL installation in OpenESB Integration server v305 It
also covers installing Self signed SSL and CA (Certified Authority) signed SSL certificate process
2 Prerequisites
1 Before proceeding with the SSL installation process we require OpenSSL utility to be installed in
our local system Below is the link for download
Download Link httpssourceforgenetprojectsopenssl
Once the installation is done open the cmd and check OpenSSL is accessible
Go to OpenSSL home directory having bin folder and then type opensslexe below window
should appear
2 Current HTTP Binding Component running on OpenESB 305 doesnrsquot support SSL
communication due to some code issue therefore please uninstall current Http BC from
OpenESB and install below attached binding component for Http BC in Open ESB application
Download Link httpsdrivegooglecomopenid=0B1Uzxdw1z4CKQnFianRxR3otX0E
3 SSL Installation
Using Self Signed SSL Steps to follow
1 Start OpenSSL utility using command prompt
2 Generate a Private Key and a CSR (Certificate Signing Request)
Command req -newkey rsa2048 -nodes -keyout namekey -out namecsr
Name This will be any user defined name or you can use server hostname to specify for key
and csr file
Example req -newkey rsa2048 -nodes -keyout esbtestcomkey -out esbtestcomcsr
The above command will create 2 files in the $OpenSSLbin folder esbtestcomkey (Private Key
File) and esbtestcomcsr (CSR File)
3 Generate a Self-Signed Certificate because we do not want to use CA (Certified Authority) to
generate and sign the certificate in this process
Command req -newkey rsa2048 -nodes -keyout namekey -x509 -days 365 -out namecrt
Name This will be again any user defined name but it should not be same as Step 2 above
As this is a Self-signed certificate we need to name this CA as dummy name
Days You can specify any number of days for which you need this key to be valid
Example req -newkey rsa2048 -nodes -keyout cakey -x509 -days 365 -out cacrt
We will consider the name of CA as Code Verify with server name (ie FQDN ndash Full Qualified
Domain Name) as codeverifyesbcom
4 Verify the above generated certificates using below commands
a View Certificates req -text -noout -verify -in esbtestcomcsr
b View Certificate Entries x509 -text -noout -in cacrt
5 In this step sign our CSR (Certificate Signing Request) created in Step 2 using dummy CA
certificate and key created in Step 3 and we will generate CRT file which are used to verify a
secure websites authenticity
Command x509 -req -days 730 -in esbtestcomcsr -CA cacrt -CAkey cakey -set_serial 01 -
out esbtestcomcrt
6 Package the keys and certs in a PKCS12 file (PKCS12 with CA and server certificate chain)
Command pkcs12 -export -out esbtestcompfx -inkey esbtestcomkey -in esbtestcomcrt -
chain -CAfile cacrt
7 Once you have pfx file created you need to go to $JAVA_HOMEbin location used for
OpenESB application Open this location in cmd terminal
8 Now we will convert PKCS12 file created in Step 6 to JKS file using keytool utility provided by
Java
Command keytool -importkeystore -srckeystore esbtestcompfx -srcstoretype pkcs12 -
destkeystore esbtestcomjks -deststoretype JKS
9 Go to OpenSSLbin location and convert PFX file to PEM file which is required for importing
into Truststore of Java Keystore
Command pkcs12 -in esbtestcompfx -out esbtestcompem -nodes
10 Add the certificate in Java Truststore using below command
Command keytool -import -file esbtestcompem -alias openesbtest -keystore truststorets
11 In the Step 10 output please verify your Owner and Issuer Parties Owner will be the one
who is requesting for certificate and Issuer will be one who is providing the Signed
certificate
12 Copy jks file in $OPEN_ESB_HOMEOE-Instance location Screen shot below
13 Go to OpenESB server startup location $OPEN_ESB_HOMEOE-Instancebin and open
openesbbat file for windows or openesbsh for Linux machine and add below VM
parameters
-DjavaxnetsslkeyStore=pathjks
-DjavaxnetssltrustStore=pathjks
-DjavaxnetsslkeyStorePassword=password
-DjavaxnetssltrustStorePassword=password
For Windows
For Linux
Using CA Signed SSL
We will describe the process of obtaining the CA signed SSL certificate therefore screenshots are
not covered here
Steps to Follow
1 Generate a Private Key and a CSR (Certificate Signing Request) The same process which we
covered in Self-signed process The csr file is what you will send to the CA to request your
SSL certificate
2 Based on the CA you choose each one has its own way of providing the SSL certificates
Some of the CA are Namecheap GoDaddy DigiCert etc Based on our CSR CA will provide
us 2 files one is your SSL certificate (which should have a random name) and CA
intermediate certificate bundle Rename the certificate to the domain name with a crt
extension eg examplecomcrt and rename the intermediate certificate bundle as
intermediatecrt
3 So now in this case we have examplecomcrt as our SSL certificate (as per Step 5 in Self-
signed process) and intermediatecrt as our CA certificate (as per Step 3 in Self-signed
process)
4 Now follow the Steps 6 to 13 same as Self-signed process and install the certificate on
OpenESB server
4 SSL Testing
Steps for Testing SSL Connection
1 Start the OpenESB application server and verify HTTP BC is up and running Below is the sample
screen shot
2 Go to command prompt and open the OpenSSL utility
3 Type following command to initiate the SSL connection and press enter you should be getting
your server certificate on output screen
Command s_client -host localhost -port 9081
4 Now type below command to read the Http response from server As we do not have any
application working on 9081 port we will receive Http 404
Command GET HTTP10 and press enter 2 times to get the response
5 If you have any OpenESB application deployed on 9081 port then you will receive Http 200
response Check below screen shot
Command GET newWSDLServicenewWSDLPortwsdl HTTP10
5 OpenESB Project Creation
Create sample HTTPs based project using OpenESB 305 version Follow below steps to develop the
same
1 Start OpenESB NetBeans IDE
2 Create sample BPEL project and name as HttpsApplication_Bpel
3 Create new Http based WSDL document with name echoHttps
4 Create sample mapping in BPEL process
5 Update the WSDL document echoHttpswsdl with Https mode
6 Save the project and build it
7 Create Composite application using above Bpel project
8 Finally deploy the application
9 Use below URL to test on browser and check whether you are able to access your application
with Https mode
URL httpslocalhost$HttpsDefaultPortechoHttpsServiceechoHttpsPortwsdl
While accessing the URL for the first time you will receive warning message regarding your
certificate because we are using self-signed SSL Just add the exception in browser and simply go
ahead
This ensures complete setup of SSL is successful
Recommended


![Improving OpenSSL* performance white paperSSL/TLS [2] protocols, and is a commonly deployed library for SSL/TLS world-wide. The SSL/TLS protocols consist of two phases: an initial](https://img.pdfslide.us/doc/110x75/5f0f4b4c7e708231d4437278/improving-openssl-performance-white-paper-ssltls-2-protocols-and-is-a-commonly.jpg)