June 2010374788B-01
GETTING STARTED GUIDE
NI RF Power MetersThis document explains how to install, configure, and set up the NI USB-5680/5681 RF power meters. NI RF power meters make true RMS power measurements. The NI RF power meters ship with the NI-568x instrument driver, which you can use to program the device.
For more information about the NI 5680/5681, refer to the NI RF Power Meters Help, which is located at Start»All Programs»National Instruments»NI-568x»Documentation. Refer to the specifications document that ships with the device for detailed specifications.
For the most current versions of specifications and other documentation, visit ni.com/manuals. For the latest version of NI-568x, visit ni.com/updates.
ContentsConventions ......................................................................................................................................... 11. Verifying the System Requirements ................................................................................................ 22. Unpacking........................................................................................................................................ 23. Verifying the Kit Contents............................................................................................................... 2
Other Required Items................................................................................................................... 34. Installing the Software ..................................................................................................................... 35. Installing the Hardware.................................................................................................................... 36. Windows Device Recognition ......................................................................................................... 47. Connecting Signals .......................................................................................................................... 4
Connector Care and Handling...................................................................................................... 58. Programming the NI RF Power Meter............................................................................................. 6
NI-568x SFP ................................................................................................................................ 6NI-568x Instrument Driver .......................................................................................................... 7NI-568x Examples ....................................................................................................................... 7
Appendix A: Front and Back Panel ..................................................................................................... 7Appendix B: Where to Go for Support ................................................................................................ 8
ConventionsThe following conventions are used in this guide:
» The » symbol leads you through nested menu items and dialog box options to a final action. The sequence File»Page Setup»Options directs you to pull down the File menu, select the Page Setup item, and select Options from the last dialog box.
This icon denotes a tip, which alerts you to advisory information.
This icon denotes a note, which alerts you to important information.
This icon denotes a caution, which advises you of precautions to take to avoid injury, data loss, or a system crash. When this symbol is marked on a product, refer to the Read Me First: Safety and Electromagnetic Compatibility for information about precautions to take.
NI RF Power Meters Getting Started Guide 2 ni.com
bold Bold text denotes items that you must select or click in the software, such as menu items and dialog box options. Bold text also denotes parameter names.
italic Italic text denotes variables, emphasis, a cross-reference, or an introduction to a key concept. Italic text also denotes text that is a placeholder for a word or value that you must supply.
monospace Text in this font denotes text or characters that you should enter from the keyboard, sections of code, programming examples, and syntax examples. This font is also used for the proper names of disk drives, paths, directories, programs, subprograms, subroutines, device names, functions, operations, variables, filenames, and extensions.
NI 5680 Refers to the NI USB-5680 RF power meter.
NI 5681 Refers to the NI USB-5681 RF power meter.
Platform Text in this font denotes a specific platform and indicates the text following it applies only to that platform.
1. Verifying the System RequirementsTo use the NI-568x instrument driver, the system must meet certain requirements. For more information about minimum system requirements, recommended system, and supported application development environments (ADEs), refer to the NI-568x Readme. Before installing NI-568x, you can access this file on the NI-568x software CD. After you install NI-568x, you can access this file at Start»All Programs»National Instruments»NI-568x»Documentation.
2. UnpackingRemove the NI RF power meter from the package and inspect it for loose components or any sign of damage. Notify NI if the device appears damaged in any way. Do not install a damaged device.
Caution The NI RF power meter is a static-sensitive device. Always properly ground yourself and the equipment when handling the NI RF power meter or connecting to it.
3. Verifying the Kit ContentsVerify that the kit contains the following items required to set up and use the NI RF power meter:
❑ NI RF power meter with dust cap
Note The NI 5681 ships from the factory with a protective silicone cover already installed on the device.
❑ One of the following cables:
– NI 5680: USB 2.0 A to Mini-B cable
– NI 5681: USB 2.0 A to Latching Micro-AB cable
❑ A precision Type-N to SMA adapter
❑ NI-568x instrument driver software CD. The NI-568x CD also includes the NI RF Power Meters Help and the NI-568x Readme. After you install the NI-568x driver, you can find these documents at Start»All Programs»National Instruments»NI-568x»Documentation.
© National Instruments Corporation 3 NI RF Power Meters Getting Started Guide
❑ Other included documents:
– NI RF Power Meters Getting Started Guide (this document)
– Specifications document for your device
– Calibration certificate for your device. Contact your local NI sales representative if you need a PDF copy of this document.
– Read Me First: Safety and Electromagnetic Compatibility
Other Required ItemsIn addition to the kit contents, you need the following items:
❑ 1 N · m torque wrench
❑ Desktop or laptop computer with its documentation and one available USB 2.0 or 1.1 compliant slot
4. Installing the SoftwareYou must install the NI-568x software before installing the NI RF power meter. Complete the following steps to install the software:
1. (Optional) If you are developing an NI-568x application, install an ADE, such as LabVIEW or LabWindows™/CVI™.
2. Install the latest service packs for your operating system.
3. Insert the NI-568x CD into the CD drive. The NI-568x installer should open automatically. If the installation window does not appear, navigate to the CD drive, double-click the drive, and double-click setup.exe.
4. Follow the instructions in the installation prompts. For troubleshooting information, contact NI technical support or visit ni.com/support.
(Windows 7/Vista) Users may see access and security messages during installation. Accept the prompts to complete the installation.
5. When the installer completes, a dialog box asks if you want to restart, shut down, or restart later. Select Restart.
5. Installing the HardwareInstall the NI-568x software before installing the hardware.
Note If you connect the NI RF power meter to a PC or chassis before installing the software, the PC or chassis will not recognize the NI RF power meter.
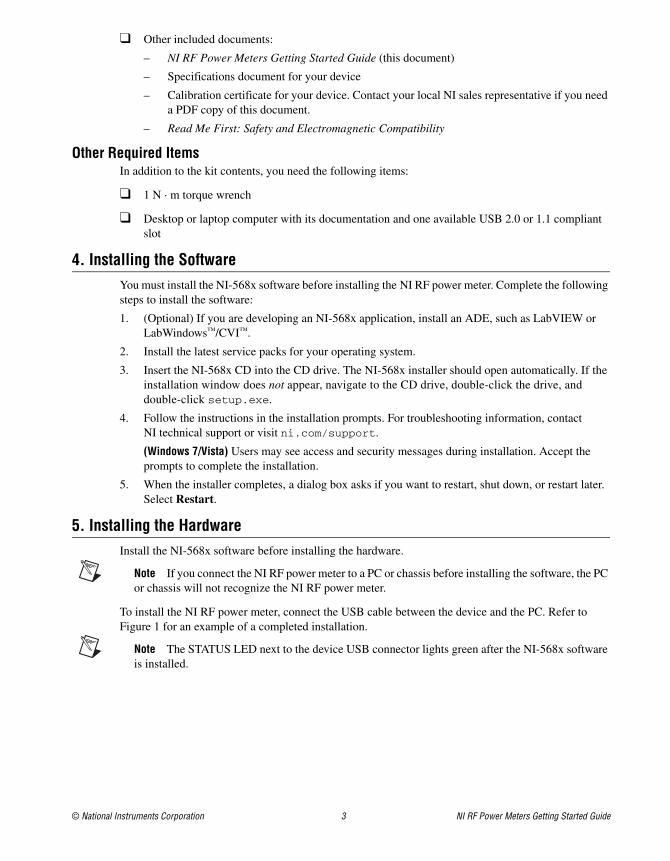
To install the NI RF power meter, connect the USB cable between the device and the PC. Refer to Figure 1 for an example of a completed installation.
Note The STATUS LED next to the device USB connector lights green after the NI-568x software is installed.
NI RF Power Meters Getting Started Guide 4 ni.com
Figure 1. NI USB Power Meter Installation
6. Windows Device RecognitionAfter you install the NI RF power meter, Windows automatically recognizes a new device. You will see a Windows message appear in the Windows task bar that notifies you that a new device has been installed. You do not need to take any further action for Windows to recognize your device.
Note During the Windows device recognition process, Windows assigns a COM number to your device. You can see the COM number that was assigned to your device in Measurement & Automation Explorer (MAX), under Devices and Interfaces.
7. Connecting SignalsConnect signals to the NI RF power meter hardware front panel Type-N connector to perform common power measurements. You can also use the Type N-to-SMA adapter to make the signal connection.
Note You must zero the NI RF power meter before you take power measurements, particularly when the device operates within the lower 20 dB dynamic range of the device. Zero the NI RF power meter every time you connect it to a USB port. If you make frequent low-power measurements, check the sensor zeroing often, and repeat as necessary.
1 PXI Chassis2 USB Cable
3 STATUS LED4 USB Connector
5 NI RF Power Meter
NI PXI-1042
STAT
US
1
3
2
5
4
© National Instruments Corporation 5 NI RF Power Meters Getting Started Guide
The back panel LED indicates the status of the NI RF power meter. Refer to Table 1 for LED information.
For more information about these common measurements, refer to the NI RF Power Meters Help.
Caution Always refer to the specifications document included with the NI RF power meter device before connecting signals. Failure to observe the specified maximum signal ratings can cause shock, a fire hazard, or damage to the devices connected to the NI RF power meter. NI is not liable for any damage or injuries resulting from incorrect signal connections.
Caution Do not overtorque the connectors. Always use the specified torque wrench.
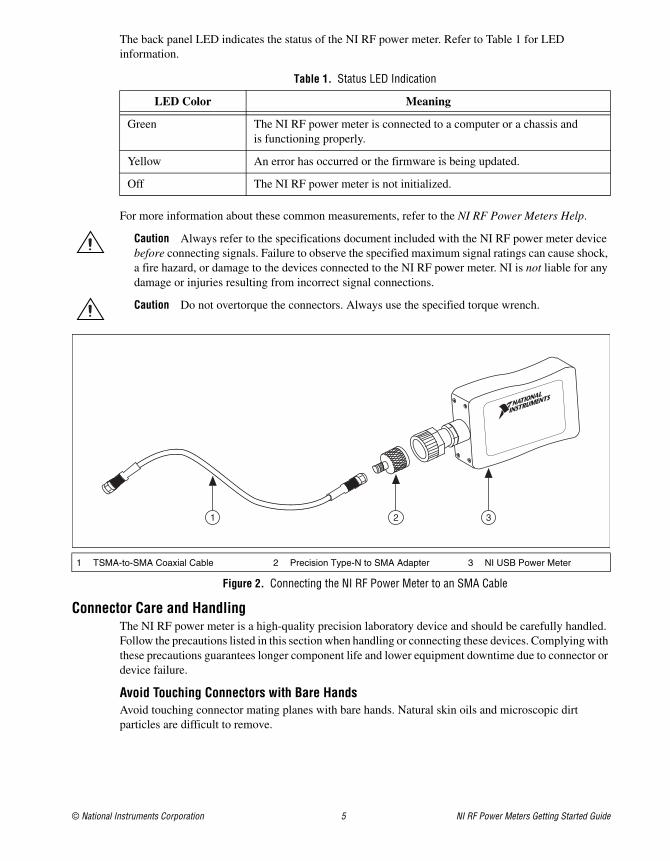
Figure 2. Connecting the NI RF Power Meter to an SMA Cable
Connector Care and HandlingThe NI RF power meter is a high-quality precision laboratory device and should be carefully handled. Follow the precautions listed in this section when handling or connecting these devices. Complying with these precautions guarantees longer component life and lower equipment downtime due to connector or device failure.
Avoid Touching Connectors with Bare HandsAvoid touching connector mating planes with bare hands. Natural skin oils and microscopic dirt particles are difficult to remove.
Table 1. Status LED Indication
LED Color Meaning
Green The NI RF power meter is connected to a computer or a chassis and is functioning properly.
Yellow An error has occurred or the firmware is being updated.
Off The NI RF power meter is not initialized.
1 TSMA-to-SMA Coaxial Cable 2 Precision Type-N to SMA Adapter 3 NI USB Power Meter
21 3
NI RF Power Meters Getting Started Guide 6 ni.com
Observe Pin Depth of Mating ConnectorsMake sure to use the proper connectors to mate with the NI RF power meter. NI recommends that you use precision or industrial grade Type-N connectors or that you use SMA connectors when using the Type N-to-SMA adapter. Always check the pin depth of a connector before use to determine if they are out of the specified range.
Avoid Lateral PressureNever put lateral pressure on the center pin of the connector.
Avoid Overtorquing ConnectorsDo not overtorque connectors; doing so may damage the connector center pin. Always use a 1 N · m torque wrench when tightening connectors. Never use pliers. Never tighten the connectors, adapters, or cables such that the center pin rotates.
Avoid Mechanical ShockPrecision connectors are designed to withstand years of normal bench handling. Handle the connectors carefully and avoid dropping them. Mechanical shock significantly reduces their service life.
Avoid Applying Excessive PowerThe NI RF power meter is rated for a specific maximum continuous input power. Exceeding the maximum input power level permanently damages the internal components.
Clean Connectors CarefullyDirt and other contamination on the connector interfaces can affect the performance of the RF components. To clean the connector interfaces, use only denatured alcohol as a cleaning solvent. Do not use excessive amounts of alcohol, as this prolongs drying time. Use low-pressure compressed air to remove foreign particles and to dry the connector. After cleaning, verify that the center pin has not been bent or damaged.
Tip Most cotton swabs are too large to fit in the smaller connector types. In these cases, remove most of the cotton and then twist the remaining cotton tightly. Ensure that the remaining cotton does not become lodged in the connector, and verify that no cotton or other foreign material remains in the connector after cleaning. Cotton swabs of the appropriate size can be purchased through a medical or laboratory supply center.
Store Connectors ProperlyWhen not in use, keep the connectors covered with the dust cap included in the NI RF power meter shipping kit.
8. Programming the NI RF Power MeterYou can acquire data with the NI RF power meter by using the NI-568x soft front panel (SFP), or you can control the NI RF power meter programmatically with an ADE using the NI-568x instrument driver. In addition, you can run the NI-568x examples to demonstrate the functionality of the device.
NI-568x SFPThe NI-568x SFP is a software representation of a traditional benchtop power meter. Launch the NI-568x SFP to use the NI RF power meter interactively. You can launch the NI-568x SFP from Start»All Programs»National Instruments»NI-568x»NI-568x Soft Front Panel.
© National Instruments Corporation 7 NI RF Power Meters Getting Started Guide
NI-568x Instrument DriverNI-568x features a set of operations and attributes that exercise all the functionality of the NI RF power meter, including configuration, control, and other device-specific functions. Refer to the NI RF Power Meters Help for information about using NI-568x in your applications.
NI-568x ExamplesThe NI-568x examples are instructional tools that demonstrate some of the functionality of the NI RF power meter. You can use these examples separately or integrate them into your systems. NI-568x includes examples for getting started and other power meter functionality. You can access NI-568x examples at Start»All Programs»National Instruments»NI-568x»Examples.
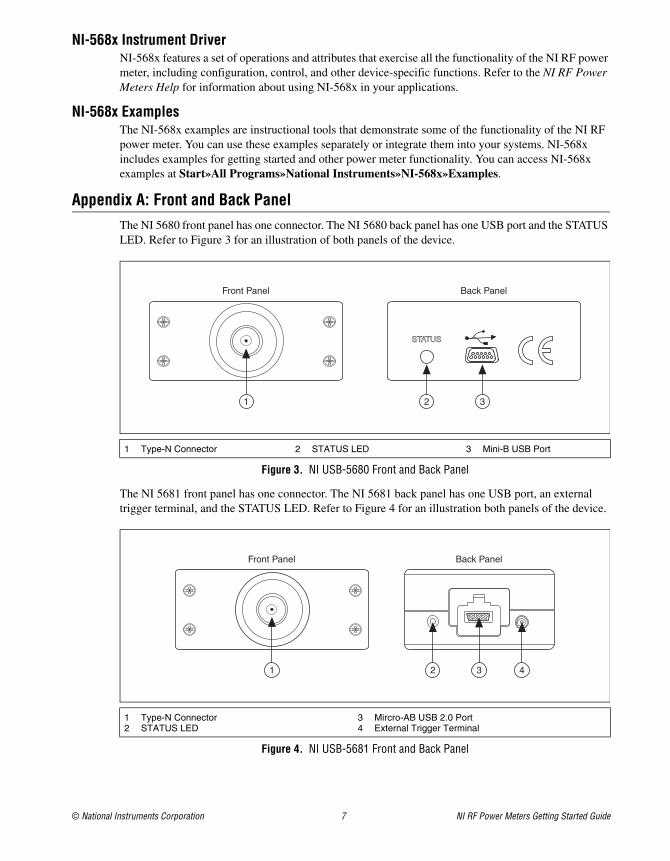
Appendix A: Front and Back PanelThe NI 5680 front panel has one connector. The NI 5680 back panel has one USB port and the STATUS LED. Refer to Figure 3 for an illustration of both panels of the device.
Figure 3. NI USB-5680 Front and Back Panel
The NI 5681 front panel has one connector. The NI 5681 back panel has one USB port, an external trigger terminal, and the STATUS LED. Refer to Figure 4 for an illustration both panels of the device.
Figure 4. NI USB-5681 Front and Back Panel
1 Type-N Connector 2 STATUS LED 3 Mini-B USB Port
1 Type-N Connector2 STATUS LED
3 Mircro-AB USB 2.0 Port4 External Trigger Terminal
STATUS
Front Panel Back Panel
1 2 3
Front Panel Back Panel
1 2 43
CVI, LabVIEW, National Instruments, NI, ni.com, the National Instruments corporate logo, and the Eagle logo are trademarks of National Instruments Corporation. Refer to the Trademark Information at ni.com/trademarks for other National Instruments trademarks. The mark LabWindows is used under a license from Microsoft Corporation. Windows is a registered trademark of Microsoft Corporation in the United States and other countries. Other product and company names mentioned herein are trademarks or trade names of their respective companies. For patents covering National Instruments products/technology, refer to the appropriate location: Help»Patents in your software, the patents.txt file on your media, or the National Instruments Patent Notice at ni.com/patents.
© 2007–2010 National Instruments Corporation. All rights reserved.
Appendix B: Where to Go for SupportThe National Instruments Web site is your complete resource for technical support. At ni.com/support you have access to everything from troubleshooting and application development self-help resources to email and phone assistance from NI Application Engineers.
A Declaration of Conformity (DoC) is our claim of compliance with the Council of the European Communities using the manufacturer’s declaration of conformity. This system affords the user protection for electromagnetic compatibility (EMC) and product safety. You can obtain the DoC for your product by visiting ni.com/certification. If your product supports calibration, you can obtain the calibration certificate for your product at ni.com/calibration.
National Instruments corporate headquarters is located at 11500 North Mopac Expressway, Austin, Texas, 78759-3504. National Instruments also has offices located around the world to help address your support needs. For telephone support in the United States, create your service request at ni.com/support and follow the calling instructions or dial 512 795 8248. For telephone support outside the United States, contact your local branch office:
Australia 1800 300 800, Austria 43 662 457990-0, Belgium 32 (0) 2 757 0020, Brazil 55 11 3262 3599, Canada 800 433 3488, China 86 21 5050 9800, Czech Republic 420 224 235 774, Denmark 45 45 76 26 00, Finland 358 (0) 9 725 72511, France 01 57 66 24 24, Germany 49 89 7413130, India 91 80 41190000, Israel 972 3 6393737, Italy 39 02 41309277, Japan 0120-527196, Korea 82 02 3451 3400, Lebanon 961 (0) 1 33 28 28, Malaysia 1800 887710, Mexico 01 800 010 0793, Netherlands 31 (0) 348 433 466, New Zealand 0800 553 322, Norway 47 (0) 66 90 76 60, Poland 48 22 328 90 10, Portugal 351 210 311 210, Russia 7 495 783 6851, Singapore 1800 226 5886, Slovenia 386 3 425 42 00, South Africa 27 0 11 805 8197, Spain 34 91 640 0085, Sweden 46 (0) 8 587 895 00, Switzerland 41 56 2005151, Taiwan 886 02 2377 2222, Thailand 662 278 6777, Turkey 90 212 279 3031, United Kingdom 44 (0) 1635 523545
Recommended