201
NEUROFIELD X3000 PLUS
& Q20 EEG
SOFTWARE MANUAL
Software Version 7.0 or Later
2014
Nicholas Dogris, Ph.D & Brad Wiiatala, BSEE
Neurofield, Inc.
`2 | NeuroField, Inc.
`
© 2008 - 2014 NeuroField, Inc. All rights reserved.
Except as otherwise permitted by NeuroField, Inc., this publication, or parts thereof, may not be
reproduced in any form, by any method, for any purpose.
Compiled and edited by Cindy Reynolds. Version 2.0.
Published by:
NeuroField, Inc.
PO Box 506
Bishop, CA 93515-0506, USA
Tel: (760) 872-42000
Email: [email protected]
3 | NeuroField, Inc.
Contents
I. Introduction 6
What Is NeuroField?.............................................................................................................................. 6
References ............................................................................................................................................ 7
II. Software Installation 9
Requesting a Download Password ........................................................................................................ 9
Installing 7.x.x Software for the 1st Time .............................................................................................. 9
Accessing the NeuroField Message Board .......................................................................................... 12
Generating the License Activation Key ............................................................................................... 13
Upgrading the Software ...................................................................................................................... 14
Technical Assistance ........................................................................................................................... 17
III. Hardware Setup 18
Setting up X3000 and Q20 Devices ..................................................................................................... 18
Using and Connecting a Cap ............................................................................................................... 21
Powering On the Devices .................................................................................................................... 21
IV. Software Basics 23
Starting the Program ........................................................................................................................... 23
Entering and Selecting a Patient ......................................................................................................... 25
Using the Stim Launch Pad .................................................................................................................. 25
Using Sweep Control ........................................................................................................................... 28
Using the Main Program Side Bar ....................................................................................................... 29
Using the Dehabituator ....................................................................................................................... 30
Using the Q20 in Neuroguide .............................................................................................................. 33
V. NeuroField Stim-Only 34
Reviewing the QEEG ............................................................................................................................ 34
Attaching the Coils and Starting NeuroField ....................................................................................... 36
Selecting the Protocol and Setting Loops ........................................................................................... 36
Running the Stim-Only Session ........................................................................................................... 39
VI. Real Time Z-Scores (RTZ) using Q20 - 19 Channels 40
Prepping for RTZ – 19 Channel............................................................................................................ 40
`4 | NeuroField, Inc.
`
Setting Up the RTZ Session - 19 Channels ........................................................................................... 41
Setting-up Thresholds ......................................................................................................................... 42
Assessing Your Client .......................................................................................................................... 43
Running an RTZ Session – 19 Channels ............................................................................................... 45
Ending a Treatment and Saving Session Data ..................................................................................... 49
VII. Real Time Z-Scores (RTZ) Q20 - 1 to 4 Channels 50
Prepping for 1 – 4 Channel RTZ ........................................................................................................... 50
Attaching the Coils .............................................................................................................................. 51
Setting Up the RTZ Session – 1 to 4 Channels ..................................................................................... 51
Setting-up Thresholds ......................................................................................................................... 52
Running an RTZ Session 1 – 4 Channels .............................................................................................. 54
Ending a Treatment and Saving Session Data ..................................................................................... 56
VIII. Real Time Z-Scores (RTZ) – X2000 with 2 Channels 58
Prepping the Site ................................................................................................................................. 58
Attaching the Coils .............................................................................................................................. 59
Setting Up the RTZ Session – 2 Channels ............................................................................................ 59
Setting-up Thresholds ......................................................................................................................... 60
Running an RTZ Session – 2 Channels ................................................................................................. 61
Ending a Treatment and Saving Session Data ..................................................................................... 64
IX. NeuroField HRV – Body Protocols 65
Nogier Frequencies ............................................................................................................................. 65
HRV-Nogier Custom Protocols – An Overview .................................................................................... 65
Hooking-Up the HRV Sensor & Loading the Nogier Database ............................................................ 67
Attaching Sensor/Coils and Verifying the Heart Rate ......................................................................... 68
Calibrating the PPG Sensor ................................................................................................................. 69
Choosing the Nogier Protocol ............................................................................................................. 72
Scanning the Protocol and Running a Session .................................................................................... 76
Quick Start – Using HRV-Nogier Body Protocols: ................................................................................ 78
Using HRV Custom vs Built-in Nogier Protocols .................................................................................. 79
HRV Advanced Mode - Adjusting the HRV Settings ............................................................................ 79
HRV Advanced Mode – Calibrating Manually ..................................................................................... 81
X. NeuroPlot 84
5 | NeuroField, Inc.
Prepping for NeuroPlot ....................................................................................................................... 84
Opening NeuroPlot and Enabling Macros ........................................................................................... 84
Importing and Reviewing the Data ..................................................................................................... 86
XI. Creating Protocols & Using Provider Database 88
Creating Protocols - Using the Protocol Wizard ................................................................................. 88
Creating Protocols – From Scratch ...................................................................................................... 89
XII. NeuroField Contraindications 91
XIII. Legal 93
XIV. License Agreement 94
XV. Contact Information & RMA’s & Troubleshooting 96
Contact Info:........................................................................................................................................ 96
Mailing Address: ................................................................................................................................. 96
Physical Address: ................................................................................................................................. 96
RMA’s .................................................................................................................................................. 96
I. Introduction
What Is NeuroField?
“I am convinced that the therapy of the future will employ heat, light, electricity and agents yet
unknown. Toxic drugs shall cede their place to physical agents, the employment of which at least
has the advantage of not introducing any foreign body into the organism” Arsene D’Arsonval,
1896
The use of energy to address human ailments has been a source of exploration for centuries, beginning
with the use of electric eels, to the use of static electricity, to various forms of magnetic therapies that
used stones, ore, and the laying of hands to heal those afflicted with various illnesses (Kellaway, 1946;
Payne, 1990; Quinn & Strelkauskas, 1993; Quinn, 1984, 1992; Krieger, 1975). In the past 30 years there
have been many different types of energy techniques offered as a form of valid therapy. One of these
modalities is known as transcranial magnetic stimulation, or TMS.
TMS was originally developed by Anthony Barker at the University of Sheffield in 1985. Barker
demonstrated an evoked motor response (thumb movement) by applying an electromagnetic
stimulation (EMF of 1-2 Tesla) over the motor cortex of humans (Barker, Jalinous, & Freeston, 1985). As
the technology evolved it became possible to give multiple pulses to people which gave rise to repetitive
or rTMS. Since that time a great deal of research has been conducted strongly suggesting that rTMS has
clinical value for the treatment of depression and other psychiatric conditions (Pascual-Leone et al.,
1999; Arns, M., Spronk, D., & Fitzgerald, P. B. (2010); Avery, D. H., Holtzheimer, P. E., Fawaz, W., Russo,
J., Neumaier, J., Dunner, D. L., et al.(2006); Brakemeier, E. L., Wilbertz, G., Rodax, S., Danker-Hopfe, H.,
Zinka, B., Zwanzger, P.,et al. (2008).
rTMS protocols are known as either being high frequency (HF-rTMS, EMF stimulation 5Hz or greater) or
low frequency (LF-rTMS, EMF stimulation 1 Hz or less). The EMF frequency and site of stimulation is
theorized to have clinical effects that can have either an excitatory or inhibitory impact on neuronal
cellular activity. However, due to the high intensity of EMF, giving stimulation faster than 20-30 Hz at
intensities >1 tesla for long durations can result in the generation of heat which can damage tissue. As a
result, rTMS protocols are typically given in short pulses with an ‘on’ and ‘off’ time that prevents tissue
damage, but it also limits the frequency range in which the therapy can be given. The safety of rTMS
therapy was deemed safe by the FDA in 2008 and approved for the treatment of depression in the
United States.
The notion that low intensity pulsed electromagnetic (pEMF) stimulation could be of clinical value was
one of the driving forces behind the development of the NeuroField technology. Unlike rTMS, which
forces a depolarization of the neuron, NeuroField pEMF stimulation is ‘copied’ or ‘mimicked’ by the
brain. In this way the brain can be ‘driven’ at different speeds depending on the clinical needs of the
person. The NeuroField X3000 Plus is a four channel frequency generator that is capable of generating
7 | NeuroField, Inc.
pEMF frequencies ranging from 0.31 – 300,00Hz. The X300 Plus is capable of generating a low intensity
electromagnetic pulse ranging from 1-400 milligauss which is 10,000,000 times weaker than an EMF
pulse given by rTMS devices. Since the output of NeuroField is so low, it is possible to give pulsed EMF
stimulation faster than 10Hz, at long durations, without the concern of generating heat and causing
tissue damage.
The Q20 EEG a 19-channel DC coupled EEG amplifier. The Q20 EEG utilizes the Neuroguide
(www.appliedneuroscience.com) Z-score normative database in order to determine the response of
pEMF on the brain. In this way NeuroField is the only pEMF device in the world to use normative data in
order to guide the brain to a more functional state. The Q20 EEG can also be used with the Neuroguide
platform to run 19 channel surface and/or 19 channel LORETA Z-score neurofeedback.
The NeuroField system was initially evaluated by 10 beta testers around the United States in 2008. All of
which are licensed health care professionals. It was determined that the system is safe and has clinical
utility. Dr. Nicholas Dogris has written well over 50 experimental protocols for the system that have
been rated by NeuroField users as having clinical value. The inflammation reduction protocol has been
given the highest ratings with more than 30 NeuroField users confirming observed inflammation
reduction in their clients. The XX3000\X2000 is currently in the process of obtaining electrical
certification as a medical device from Underwriters Laboratories and is slated for FDA 510K registration
in 2013.
References Arns, M., Spronk, D., & Fitzgerald, P. B. (2010). Potential differential effects of 9Hz rTMS and 10 Hz rTMS
in the treatment of depression. Brain Stimulation, 3, 124-126.
Avery, D. H., Holtzheimer, P. E., Fawaz, W., Russo, J., Neumaier, J., Dunner, D. L., et al.(2006). A
controlled study of repetitive transcranial magnetic stimulation in medication-resistant major
depression. Biological Psychiatry, 59(2), 187-194.
Barker, A. T., Jalinous, R., & Freeston, I. L. (1985). Non-invasive magnetic stimulation ofhuman motor
cortex. Lancet, 1(8437), 1106-1107.
Brakemeier, E. L., Wilbertz, G., Rodax, S., Danker-Hopfe, H., Zinka, B., Zwanzger, P.,et al. (2008).
Patterns of response to repetitive transcranial magnetic stimulation (rTMS) in major depression:
Replication study in dreug-free patients. Journal of Affective Disorders, 108(1-2), 59-70.
Kellaway, P. (1946). The part played by the electric fish in the early history of bioelectricity and
electrotherapy. Bulletin of the History of Medicine. 20, 122-137.
`8 | NeuroField, Inc.
`
Krieger, D. (1975). Therapeutic touch: The imprimatur of nursing. American Jounral of Nursing. 5:784-
787.
Pascual-Leone, A., Tarazona, F., Keenan, J., Tormos, J. M., Hamilton, R., & Catala, M. D. (1999) Catala, M.
D. (1999). Transcranial magnetic stimulation and neuroplasticity. Neuropsychologia, 37(2), 207-217.
Payne, B. (1990). The body magnetic. Privately published. Santa Cruz, California.
Quinn, J.F., Strelkauskas, A.J. (1993). Psychoimmunological effects of therapeutic touch
on practitioners and recently bereaved recipients: a pilot study. Advances in Nursing
Science. 15(4):13-26.
Quinn, J.F. (1984). Therapeutic touch as energy exchange: Testing the theory. Advances
in Nursing Science. 6:42-49.
Quinn, J.F. (1992). The senior’s therapeutic touch education program. Holistic Nurse Practitioner. 7:32-37.
II. Software Installation Thank you for purchasing the NeuroField system. The following instructions are designed to help you
download and install the NeuroField software on your PC for the first time and ensure that you can
access the NeuroField Message board from within NeuroField Yahoo Groups.
Note: If you have already installed a previous version of the NeuroField software, YOU WILL NEED TO
FIRST BACKUP YOUR PATIENT DATATBASE before running the installation program. Proceed to the
section below title “Upgrading the Software” for step-by-step instructions on how to do this. .
The minimum PC specifications for running the NeuroField software are an i5 Intel processor, 4 Gb RAM,
nVidia graphics card capable of 1600x1200 resolution and 100 Mb disk space. At this time NeuroField
supports:
Windows 8
Windows 7
Older operating systems are not supported and NeuroField does not support:
Apple Macintosh systems
Apple PC emulators
Windows XP
Windows Vista
These instructions will walk you through installing the 7.x software for the first time and/or upgrading
an existing 7.x installation to a more recent version. They will also guide you to the Yahoo Groups
message board and show you how to generate “Keys” to run the NeuroField RTZ procedure.
Requesting a Download Password NeuroField, Inc. operates under a ‘green’ standard and does not ship the system with software on CD’s.
If you have purchased a NeuroField system, you must first obtain a password before you can fully
download the software. Once you have a received a password, you will be able to copy the .zip file to
your computer and extract the software files. Full product releases and updates are posted on the
“Downloads” tab from the NeuroField website main menu.
To Obtain a Password:
1. Send an email to [email protected] and request a password. A password will be sent to you
via email.
2. Use this password in the instructions below: “To Download the Software.”
Installing 7.x.x Software for the 1st Time The instructions in this section will walk you through the process of installing the NeuroField 7.x.x
Software for the first time. If you have already installed the 7.x.x software and you simply want to
upgrade it to the latest release, skip to the next section below titled, “Upgrading the 7.x.x Software”.
Note: If you are using an X3000 or Q20 EEG you must use version 7.0 or later. Previous versions of
NeuroField will not work with this hardware.
`10 | NeuroField, Inc.
`
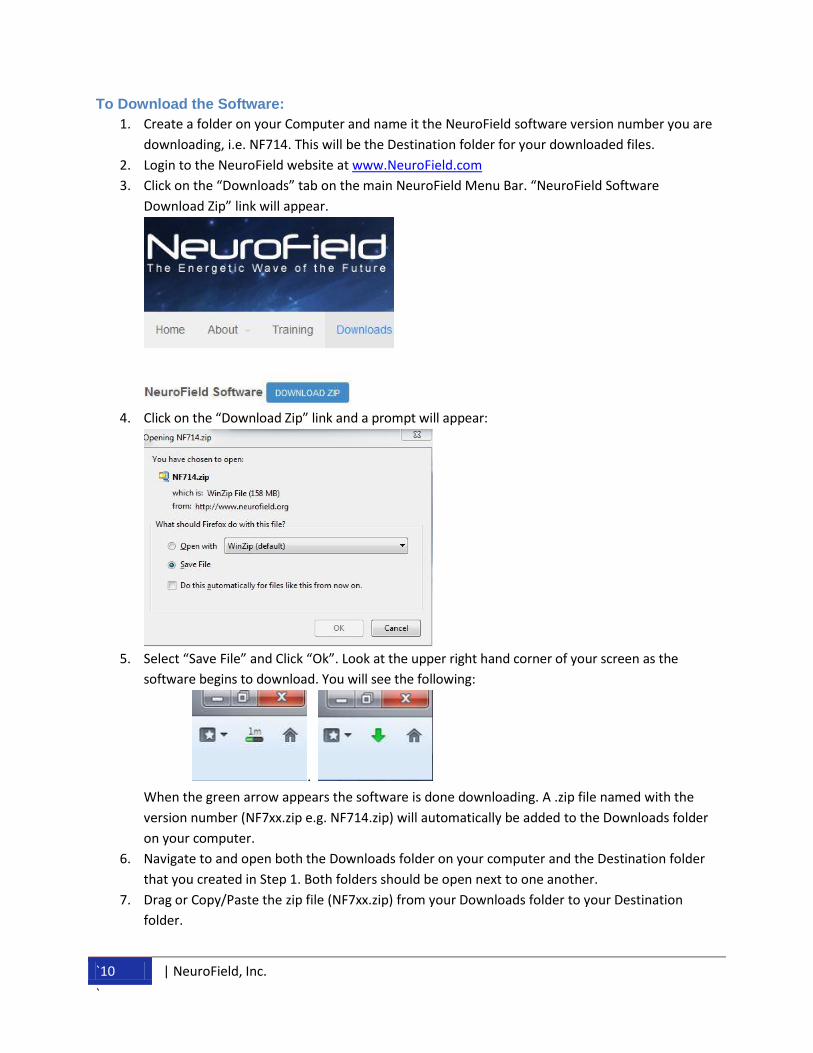
To Download the Software:
1. Create a folder on your Computer and name it the NeuroField software version number you are
downloading, i.e. NF714. This will be the Destination folder for your downloaded files.
2. Login to the NeuroField website at www.NeuroField.com
3. Click on the “Downloads” tab on the main NeuroField Menu Bar. “NeuroField Software
Download Zip” link will appear.
4. Click on the “Download Zip” link and a prompt will appear:
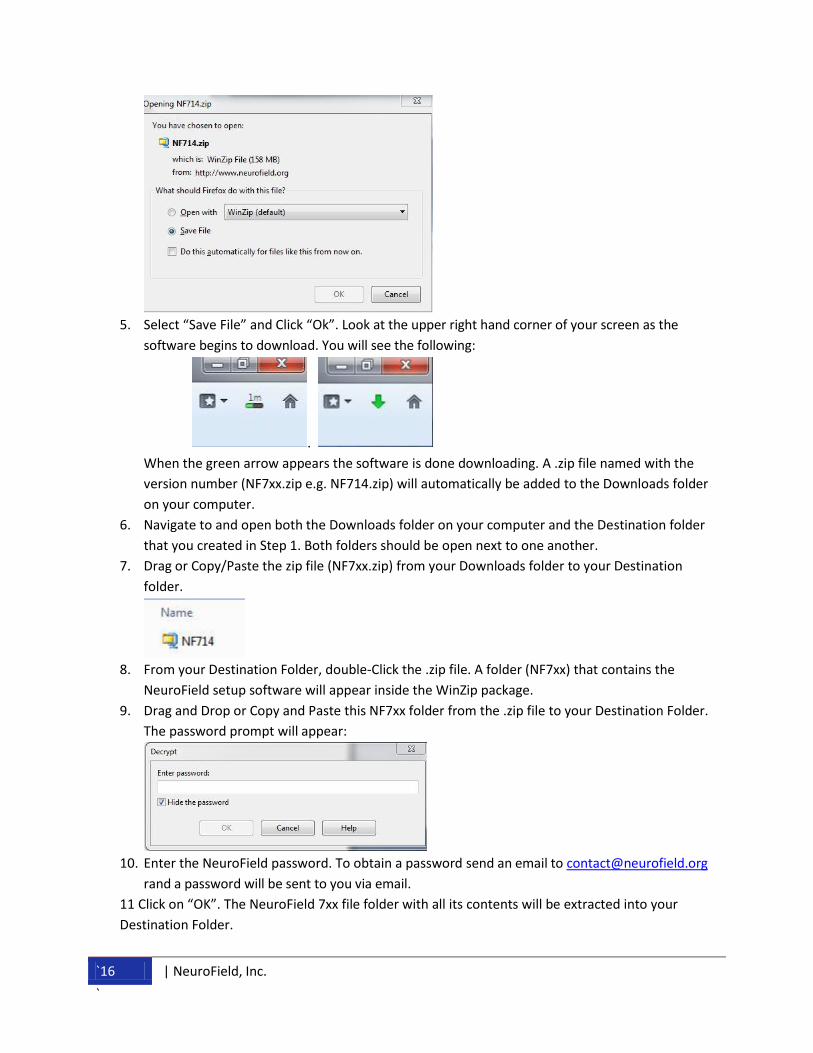
5. Select “Save File” and Click “Ok”. Look at the upper right hand corner of your screen as the
software begins to download. You will see the following:
.
When the green arrow appears the software is done downloading. A .zip file named with the
version number (NF7xx.zip e.g. NF714.zip) will automatically be added to the Downloads folder
on your computer.
6. Navigate to and open both the Downloads folder on your computer and the Destination folder
that you created in Step 1. Both folders should be open next to one another.
7. Drag or Copy/Paste the zip file (NF7xx.zip) from your Downloads folder to your Destination
folder.
11 | NeuroField, Inc.
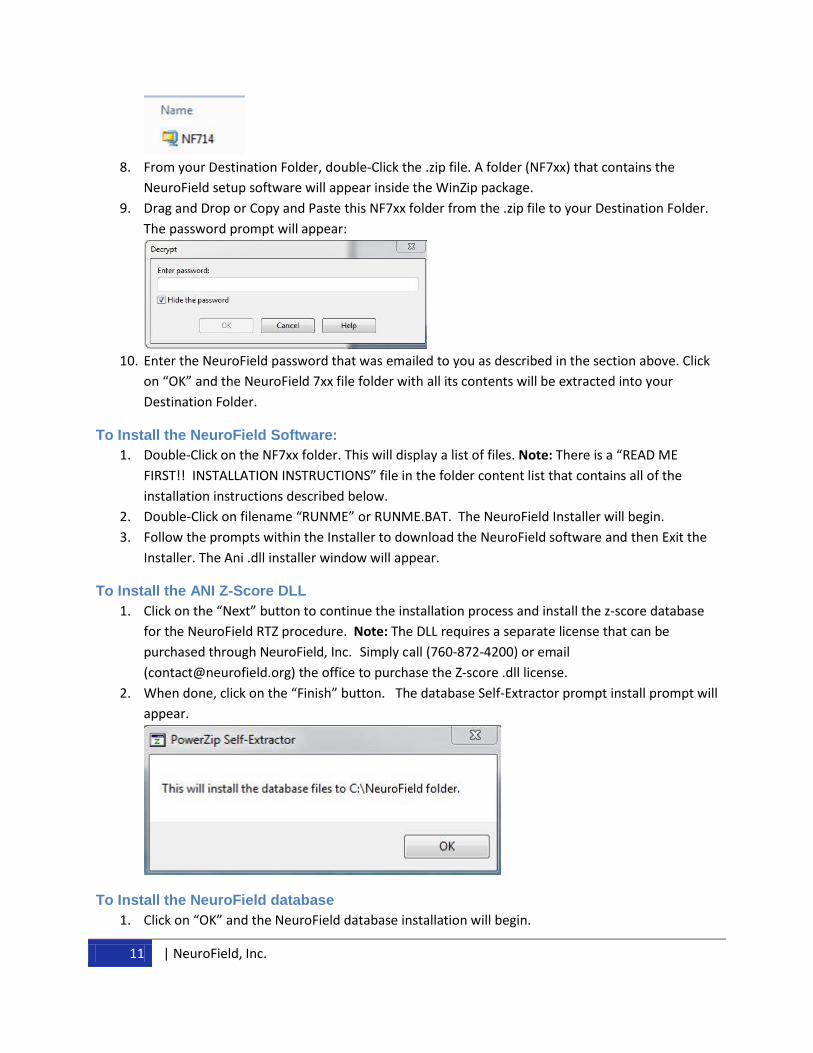
8. From your Destination Folder, double-Click the .zip file. A folder (NF7xx) that contains the
NeuroField setup software will appear inside the WinZip package.
9. Drag and Drop or Copy and Paste this NF7xx folder from the .zip file to your Destination Folder.
The password prompt will appear:
10. Enter the NeuroField password that was emailed to you as described in the section above. Click
on “OK” and the NeuroField 7xx file folder with all its contents will be extracted into your
Destination Folder.
To Install the NeuroField Software:
1. Double-Click on the NF7xx folder. This will display a list of files. Note: There is a “READ ME
FIRST!! INSTALLATION INSTRUCTIONS” file in the folder content list that contains all of the
installation instructions described below.
2. Double-Click on filename “RUNME” or RUNME.BAT. The NeuroField Installer will begin.
3. Follow the prompts within the Installer to download the NeuroField software and then Exit the
Installer. The Ani .dll installer window will appear.
To Install the ANI Z-Score DLL
1. Click on the “Next” button to continue the installation process and install the z-score database
for the NeuroField RTZ procedure. Note: The DLL requires a separate license that can be
purchased through NeuroField, Inc. Simply call (760-872-4200) or email
([email protected]) the office to purchase the Z-score .dll license.
2. When done, click on the “Finish” button. The database Self-Extractor prompt install prompt will
appear.
To Install the NeuroField database
1. Click on “OK” and the NeuroField database installation will begin.
`12 | NeuroField, Inc.
`
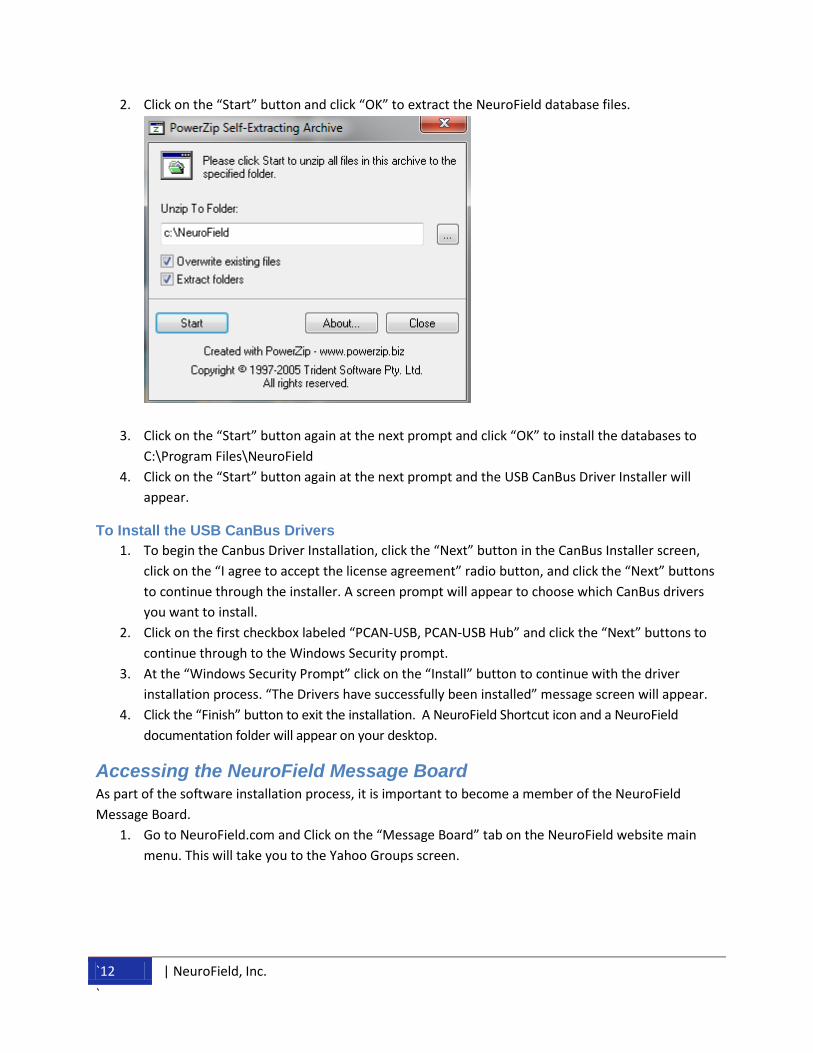
2. Click on the “Start” button and click “OK” to extract the NeuroField database files.
3. Click on the “Start” button again at the next prompt and click “OK” to install the databases to
C:\Program Files\NeuroField
4. Click on the “Start” button again at the next prompt and the USB CanBus Driver Installer will
appear.
To Install the USB CanBus Drivers
1. To begin the Canbus Driver Installation, click the “Next” button in the CanBus Installer screen,
click on the “I agree to accept the license agreement” radio button, and click the “Next” buttons
to continue through the installer. A screen prompt will appear to choose which CanBus drivers
you want to install.
2. Click on the first checkbox labeled “PCAN-USB, PCAN-USB Hub” and click the “Next” buttons to
continue through to the Windows Security prompt.
3. At the “Windows Security Prompt” click on the “Install” button to continue with the driver
installation process. “The Drivers have successfully been installed” message screen will appear.
4. Click the “Finish” button to exit the installation. A NeuroField Shortcut icon and a NeuroField
documentation folder will appear on your desktop.
Accessing the NeuroField Message Board As part of the software installation process, it is important to become a member of the NeuroField
Message Board.
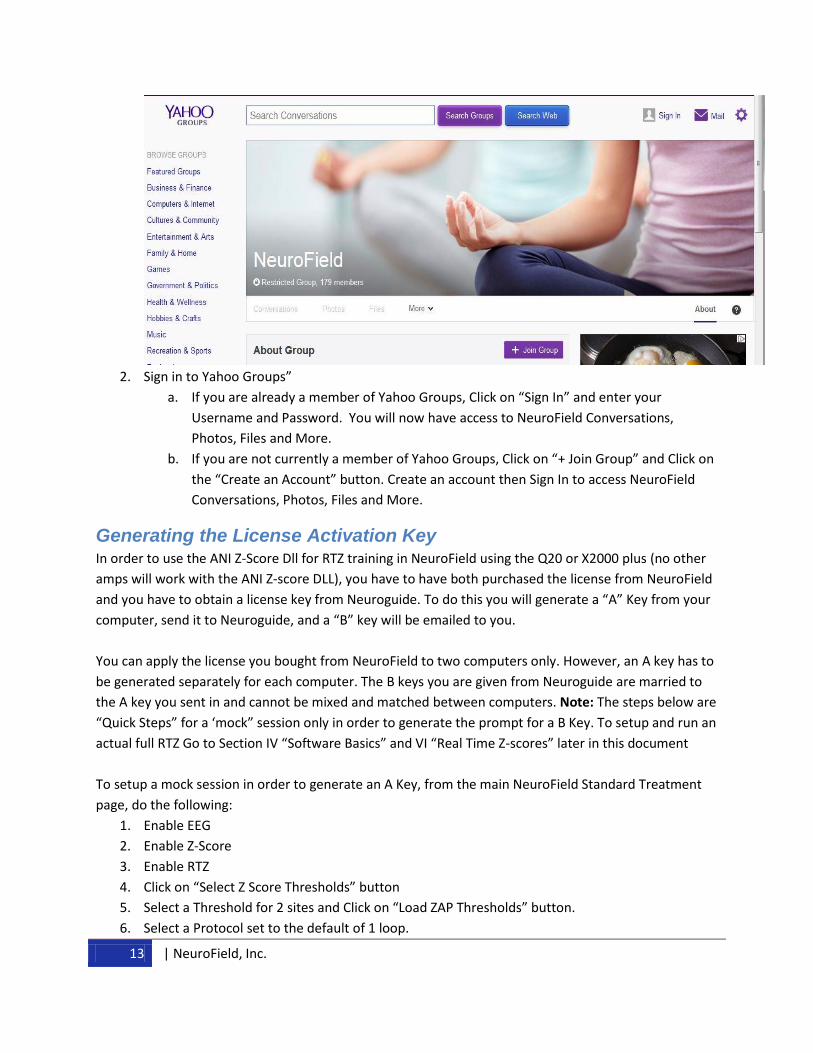
1. Go to NeuroField.com and Click on the “Message Board” tab on the NeuroField website main
menu. This will take you to the Yahoo Groups screen.
13 | NeuroField, Inc.
2. Sign in to Yahoo Groups”
a. If you are already a member of Yahoo Groups, Click on “Sign In” and enter your
Username and Password. You will now have access to NeuroField Conversations,
Photos, Files and More.
b. If you are not currently a member of Yahoo Groups, Click on “+ Join Group” and Click on
the “Create an Account” button. Create an account then Sign In to access NeuroField
Conversations, Photos, Files and More.
Generating the License Activation Key In order to use the ANI Z-Score Dll for RTZ training in NeuroField using the Q20 or X2000 plus (no other
amps will work with the ANI Z-score DLL), you have to have both purchased the license from NeuroField
and you have to obtain a license key from Neuroguide. To do this you will generate a “A” Key from your
computer, send it to Neuroguide, and a “B” key will be emailed to you.
You can apply the license you bought from NeuroField to two computers only. However, an A key has to
be generated separately for each computer. The B keys you are given from Neuroguide are married to
the A key you sent in and cannot be mixed and matched between computers. Note: The steps below are
“Quick Steps” for a ‘mock” session only in order to generate the prompt for a B Key. To setup and run an
actual full RTZ Go to Section IV “Software Basics” and VI “Real Time Z-scores” later in this document
To setup a mock session in order to generate an A Key, from the main NeuroField Standard Treatment
page, do the following:
1. Enable EEG
2. Enable Z-Score
3. Enable RTZ
4. Click on “Select Z Score Thresholds” button
5. Select a Threshold for 2 sites and Click on “Load ZAP Thresholds” button.
6. Select a Protocol set to the default of 1 loop.
`14 | NeuroField, Inc.
`
7. Click the “Start Standard Treatment” button to run the mock session. Note: You need to actually
Start an RTZ session so that you can generate the prompt to Create an A Key
8. Click on “I agree” at the License Agreement prompt and the “Create A Key” window will appear.
9. Click on the “Create a Key” button and an A Key will be generated.
10. Send an email as directed in the prompt.
11. Once you received the “B” key from Neuroguide, follow steps 1 – 8 above and enter the “B” key
code and click “Ok”.
Next, you will need to setup your X3000/Q20 hardware. Proceed to the “Hardware Setup” Chapter and
“Setting up X3000 or Q20 Device” section of this manual.
Upgrading the Software The instructions in this section pertain only if you have already installed a previous 7.x.x version of
NeuroField, and you want to now upgrade to the latest release from say, “NeuroField 7.0.0 ” to
“NeuroField 7.1.4”. Note: If this is your first tine installing NeuroField software, go to the Section above
titled, “Installing the 7.x.x Software for the 1st Time”.
To upgrade to a new version, you will need to:
Backup and store your existing patient database
Uninstall the current version on your desktop
Install the latest version of the software
Transfer your existing Patient History to the new database.
Note: When upgrading to 7.x.x, you will not need to install the canbus drivers and you will not
always need to install a new version of the Z-Score DLL file as you have previously installed it.
You will simply exit out of the installation at this point. If there is a change to the .DLL file and a
new installation is required, it will be included in the Upgrade .zip package.
To Back Up and Store Existing Patient Database:
1. Launch the current version of the NeuroField software you have been using.
2. Click on the “Backup Databases” button on the left side bar. Should something go wrong with
the upgrade process, this will save a copy of your patient database.
3. Answer “Yes” at the “Database Backup” prompt and your patients’ database will be copied.
4. If you launched NeuroField in Step 1 of these instructions using version 6.x or earlier, you will
need to rename then move your patient database backup file to a new folder. To do this follow
steps 4a – h below. If you have already upgraded to 7.x.x and launched NeuroField using 7.0.x or
later in Step 1 above, continue on to Step 5.
If currently using NeuroField 6.x or earlier:
a. Navigate to C:\NFDBBackup. The database backup from version 6.x is stored here. Check
this folder for an existing “PatientsOld” file from a previous upgrade. You can only have
one at a time, so if one exists either delete it or move it to a new folder.
b. Right click on “Patients.mdb” (you may or may not see the extension mdb. If you don’t
that is ok, proceed with the instructions).
c. Choose “Rename” and type in “PatientsOld
15 | NeuroField, Inc.
d. Press enter to store your patient database under a new name.
e. Right-Click on the file “patientsold.mdb file you just renamed and Select “Copy”
f. Navigate to C:\NeuroField\NeuroFielddata\PatientData\
g. Right-Click in the “PatientData” folder and paste patientsold.mdb
h. Proceed to the next section titled “To Uninstall” the software.
5. If currently using NeuroField 7.0 or later:
a. Browse to C:\NeuroField\NeuroFielddata\PatientData\. The Patient.mdb database is
located in this folder. The database backup from Step 3 is here. Check this folder for an
existing “PatientsOld” file from a previous upgrade. You can only have 1, so if one exists
either delete it or move it to a new folder.
b. Right click on “Patients.mdb” (you may or may not see the extension mdb. If you don’t
that is ok, proceed with the instructions).
c. Choose “Rename” and type in “PatientsOld” to change the current Patient database
name.
d. Press enter to store your patient database under a new name and proceed to uninstall.
To Uninstall the Existing 7.x.x Full Version:
1. From the Windows Start Menu, Select “Control Panel”
2. From the Control Panel, Select “Program and Features.”
3. Double-Click on the NeuroField Icon
4. Answer “Yes”, when prompted “Are you sure you want to completely remove NeuroField and all
of its components?”
Note: If you see a message alerting you to “Remove Shared Files”, answer, “Remove None”.
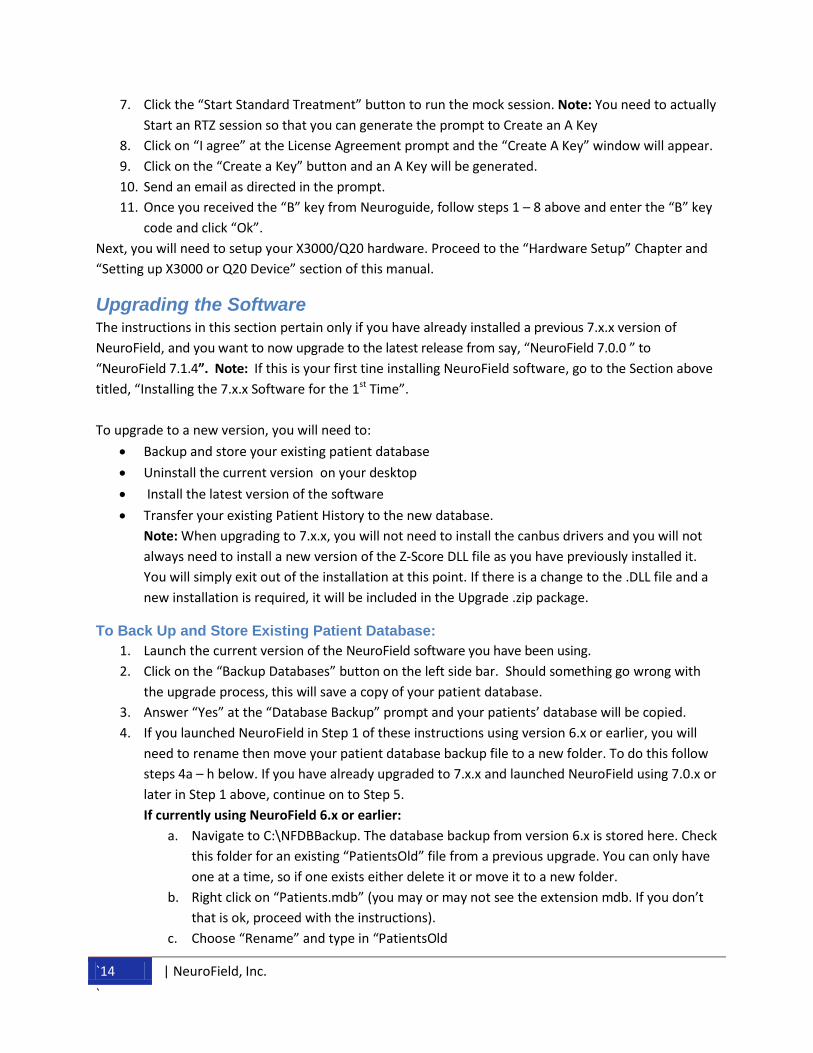
To Download the Latest Software:
1. Create a folder on your Computer and name it the NeuroField software version number you are
downloading, i.e. NF714. This will be the Destination folder for your downloaded files.
2. Login to the NeuroField website at www.NeuroField.com
3. Click on the “Downloads” tab on the main NeuroField Menu Bar. “NeuroField Software
Download Zip” link will appear.
4. Click on the “Download Zip” link and a prompt will appear:
`16 | NeuroField, Inc.
`
5. Select “Save File” and Click “Ok”. Look at the upper right hand corner of your screen as the
software begins to download. You will see the following:
.
When the green arrow appears the software is done downloading. A .zip file named with the
version number (NF7xx.zip e.g. NF714.zip) will automatically be added to the Downloads folder
on your computer.
6. Navigate to and open both the Downloads folder on your computer and the Destination folder
that you created in Step 1. Both folders should be open next to one another.
7. Drag or Copy/Paste the zip file (NF7xx.zip) from your Downloads folder to your Destination
folder.
8. From your Destination Folder, double-Click the .zip file. A folder (NF7xx) that contains the
NeuroField setup software will appear inside the WinZip package.
9. Drag and Drop or Copy and Paste this NF7xx folder from the .zip file to your Destination Folder.
The password prompt will appear:
10. Enter the NeuroField password. To obtain a password send an email to [email protected]
rand a password will be sent to you via email.
11 Click on “OK”. The NeuroField 7xx file folder with all its contents will be extracted into your
Destination Folder.

17 | NeuroField, Inc.
To Install the Upgrade:
4. Double-Click on the NF7xx folder. This will display a list of files.
5. Double-Click on filename “RUNME” or RUNME.BAT. The NeuroField Installer will begin.
6. Follow the prompts within the Installer to download the NeuroField software and then Exit the
Installer. Note: if the upgrade version requires a new .dll, the Ani .dll installer window will
appear. Follow the instructions on the screen to install the new .dll.
Since this is an upgrade, you will not need to install the NeuroField database or to install the ANI .dll
files. Simply exit out of the installation and transfer you patient database.
To Transfer Patient History to the New Database:
1. Start the NeuroField program and on the Main Menu bar Click on “Help”.
2. Choose “Database Updater” from the Help options, and the Updater Program will open and load
your database information.
3. Click on the “Transfer to New Database” button. Your patient data will be transferred to your
new database. Then click on the “Close” button.
4. Click on “Select Patient” button on the left side bar. Verify that your patient data is there. If it is
then you are done with the update process.
5. Click on “Backup Databases” button on the left side bar to save your new database.
Technical Assistance NeuroField, Inc. provides technical assistance for installation and hardware problems. New NeuroField
users receive two technical support sessions for free upon the purchase of an X3000 or Q20 systems for
the purpose if installing and/or troubleshooting the NeuroField software. Technical support is available
through the NeuroField, Inc. website message board. Technical support can also be purchased by the ½
hour for $75.00. To schedule a technical support session call the NeuroField office at 760-872-4200 and
make an appointment.
All new users are encouraged to become members of the NeuroField Yahoo Group. To become a
member of the Yahoo Group send a request via email to Dr. Dogris at [email protected].
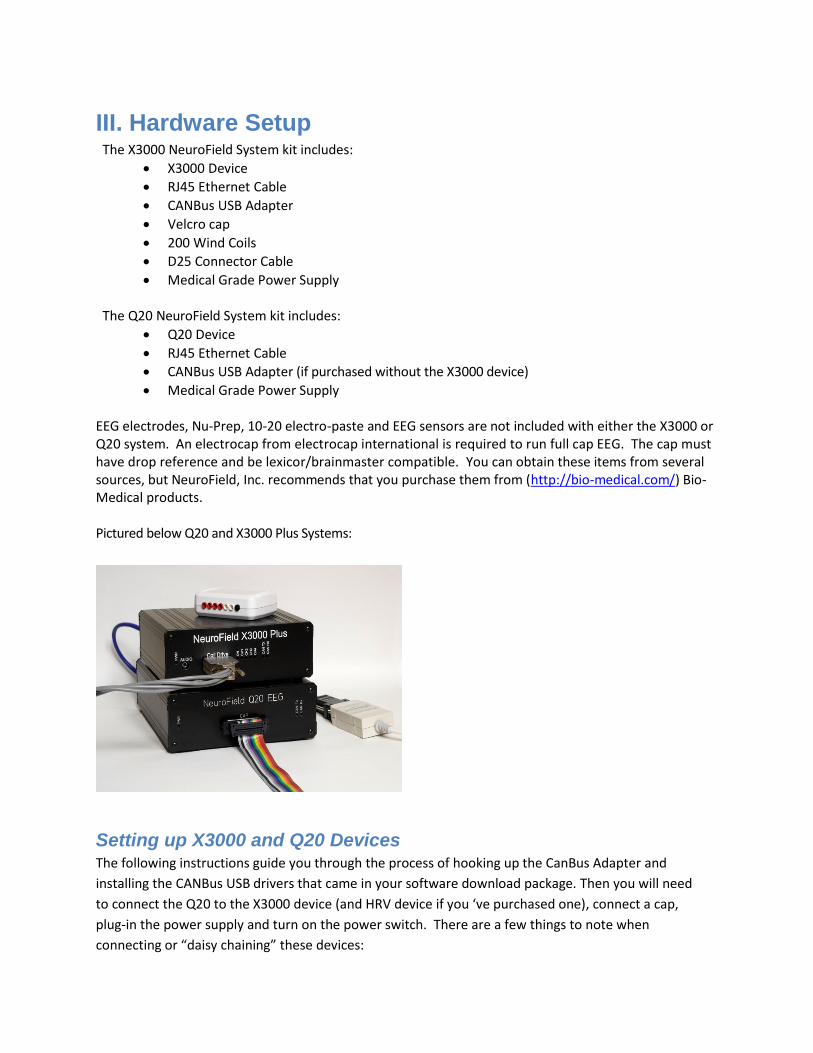
III. Hardware Setup The X3000 NeuroField System kit includes:
X3000 Device
RJ45 Ethernet Cable
CANBus USB Adapter
Velcro cap
200 Wind Coils
D25 Connector Cable
Medical Grade Power Supply The Q20 NeuroField System kit includes:
Q20 Device
RJ45 Ethernet Cable
CANBus USB Adapter (if purchased without the X3000 device)
Medical Grade Power Supply
EEG electrodes, Nu-Prep, 10-20 electro-paste and EEG sensors are not included with either the X3000 or Q20 system. An electrocap from electrocap international is required to run full cap EEG. The cap must have drop reference and be lexicor/brainmaster compatible. You can obtain these items from several sources, but NeuroField, Inc. recommends that you purchase them from (http://bio-medical.com/) Bio-Medical products. Pictured below Q20 and X3000 Plus Systems:
Setting up X3000 and Q20 Devices The following instructions guide you through the process of hooking up the CanBus Adapter and
installing the CANBus USB drivers that came in your software download package. Then you will need
to connect the Q20 to the X3000 device (and HRV device if you ‘ve purchased one), connect a cap,
plug-in the power supply and turn on the power switch. There are a few things to note when
connecting or “daisy chaining” these devices:
19 | NeuroField, Inc.
The Q20 on its own is not a Stim Unit and will not be recognized in NeuroField without the X3000
attached. However, you can use it as a stand-alone amp in Neuroguide to collect EEG data. See
Section titled “Using the Q20 in Neuroguide” later in this document.
When using the Q20 as an Amp for acquisition only, the X3000 should be turned off.
When you connect a Q20 to the X3000 (and HRV if you have it/or X2000 and Plus unit), you have
what is called a “daisy chain,” where multiple devices are wired together in sequence. As a result, it is
recommended to plug the Canbus into the Q20 and turn on the devices in this order:
Q20 first
X3000 second
HRV third (if purchased)
This will ensure proper communication with the units when launching the NeuroField software.
To Connect CANBus USB Adapter
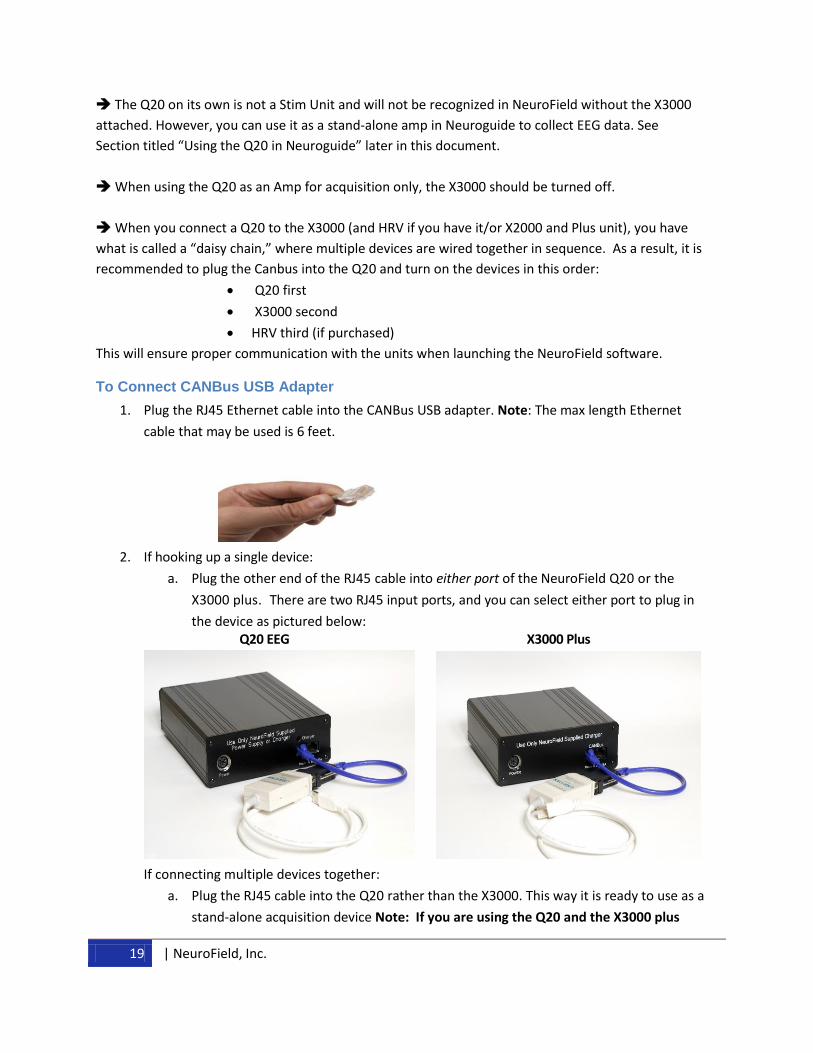
1. Plug the RJ45 Ethernet cable into the CANBus USB adapter. Note: The max length Ethernet
cable that may be used is 6 feet.
2. If hooking up a single device:
a. Plug the other end of the RJ45 cable into either port of the NeuroField Q20 or the
X3000 plus. There are two RJ45 input ports, and you can select either port to plug in
the device as pictured below: Q20 EEG X3000 Plus
If connecting multiple devices together:
a. Plug the RJ45 cable into the Q20 rather than the X3000. This way it is ready to use as a
stand-alone acquisition device Note: If you are using the Q20 and the X3000 plus
`20 | NeuroField, Inc.
`
together for Stim and RTZ, CONNECT ONLY ONE CANBus USB adapter!!!! See Section
“To Connect the Q20 to 3000 Plus” below for further connection instructions and
pictures of the finished setup using multiple devices.
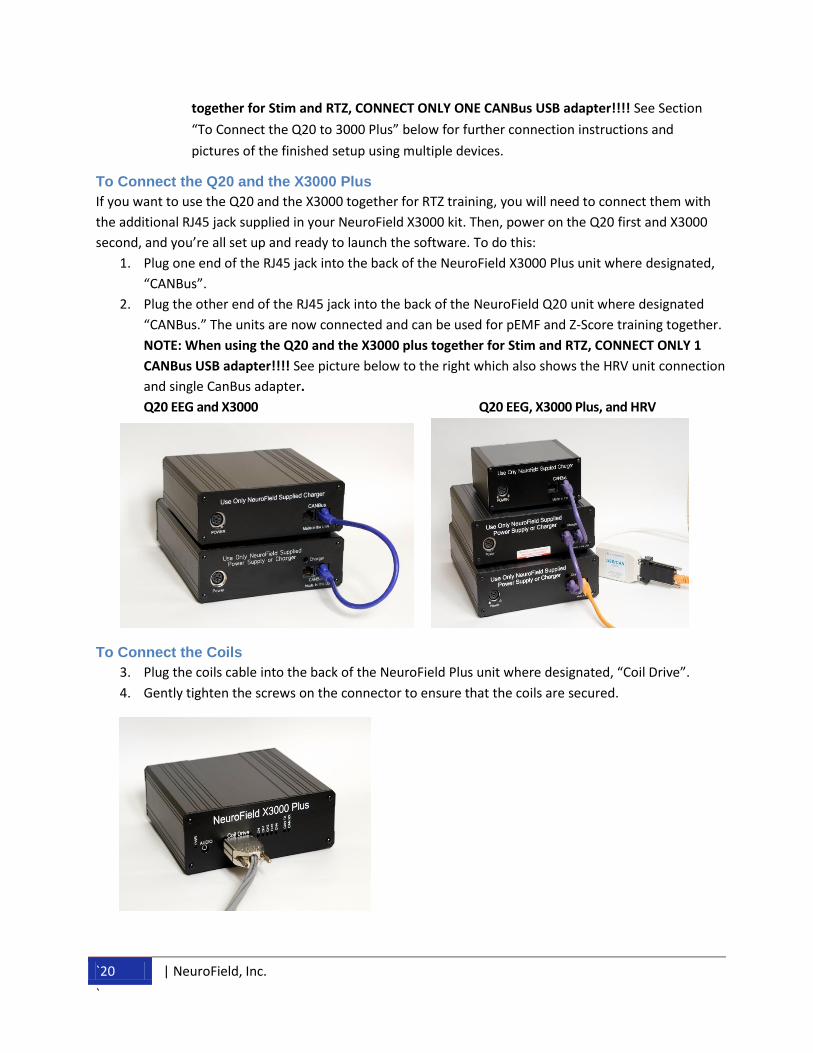
To Connect the Q20 and the X3000 Plus
If you want to use the Q20 and the X3000 together for RTZ training, you will need to connect them with
the additional RJ45 jack supplied in your NeuroField X3000 kit. Then, power on the Q20 first and X3000
second, and you’re all set up and ready to launch the software. To do this:
1. Plug one end of the RJ45 jack into the back of the NeuroField X3000 Plus unit where designated,
“CANBus”.
2. Plug the other end of the RJ45 jack into the back of the NeuroField Q20 unit where designated
“CANBus.” The units are now connected and can be used for pEMF and Z-Score training together.
NOTE: When using the Q20 and the X3000 plus together for Stim and RTZ, CONNECT ONLY 1
CANBus USB adapter!!!! See picture below to the right which also shows the HRV unit connection
and single CanBus adapter.
Q20 EEG and X3000 Q20 EEG, X3000 Plus, and HRV
To Connect the Coils
3. Plug the coils cable into the back of the NeuroField Plus unit where designated, “Coil Drive”.
4. Gently tighten the screws on the connector to ensure that the coils are secured.
21 | NeuroField, Inc.
Using and Connecting a Cap NeuroField supports the use of a cap for 19-Channel training and uses the Lexicor/Brainmaster D25
pinout on the Q20 units. If you own those caps with that connector, they will work! Note: EEG amps all
have different pinouts on the D25 connector. Any caps other than the Electro-Cap noted below, which
is approved for use with the Q20 amp, must be evaluated and approved for use. Please contact
NeuroField, Inc. for further information on cap evaluation and approval.
To Order a Cap and Ear Electrodes
Caps can be purchased from Electro-Cap International, Inc. http://www.electro-cap.com/
1. When ordering you must ask for a specific type of cap and ear electrodes. The caps and ear
electrodes that work with the Q20 are coded as:
Cap Code# = E1-LEX-L,M, or S. The L, M or S designates the size of the cap so you
need to choose one of those letters for each cap size you order.
Ear Electrodes Code# = E5 9S-DROPS. These are very short “drop-down” ear
electrodes and are important to order over the longer ones as they help to minimize
noise. Note: If you own a Deymed Cap, Electro-Cap will make a Converter for you so you do
not have to buy all new caps.
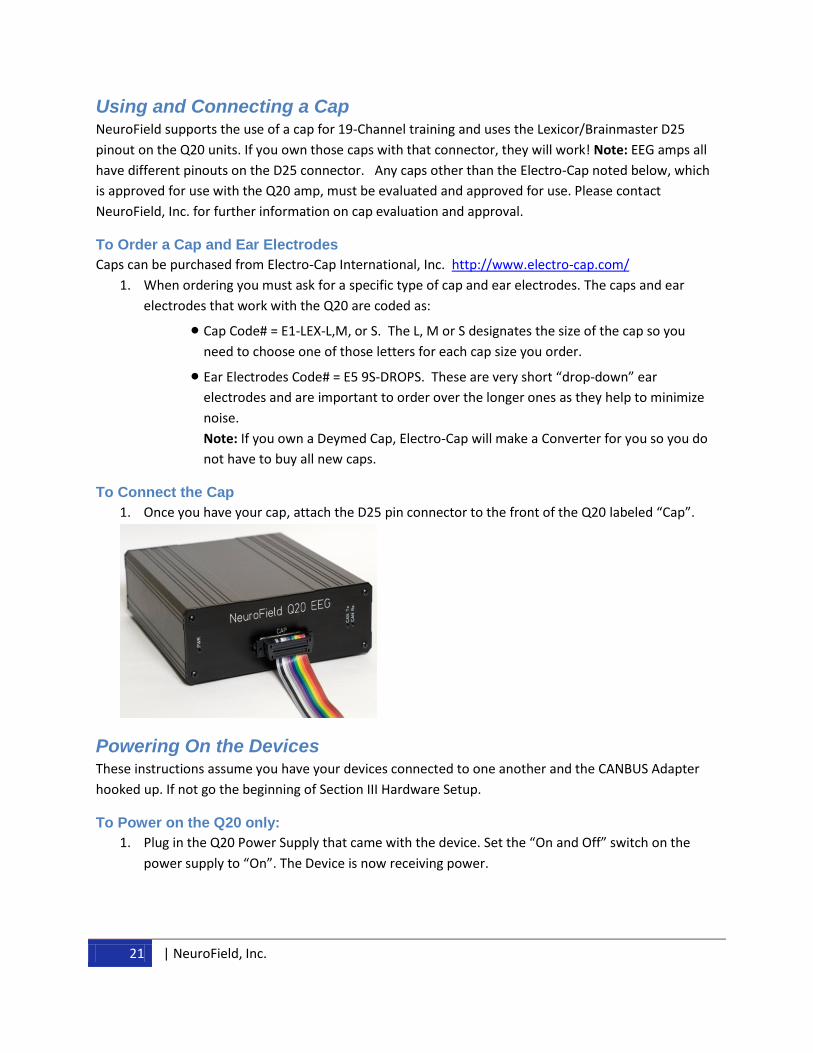
To Connect the Cap
1. Once you have your cap, attach the D25 pin connector to the front of the Q20 labeled “Cap”.
Powering On the Devices These instructions assume you have your devices connected to one another and the CANBUS Adapter
hooked up. If not go the beginning of Section III Hardware Setup.
To Power on the Q20 only:
1. Plug in the Q20 Power Supply that came with the device. Set the “On and Off” switch on the
power supply to “On”. The Device is now receiving power.
`22 | NeuroField, Inc.
`
To Power on the Q20 and X3000 (And HRV if purchased)
When these devices are all connected together, they form a “daisy chain”, and it is important to power
them on in sequence:
1. Turn on Q20 First. Plug in the Q20 Power Supply that came with the device. Set the “On and Off”
switch on the power supply to “On”. The Device is now receiving power.
2. Turn on the X3000 Second. Plug in the X3000 Power Supply that came with the device. Set the
“On and Off” switch on the power supply to “On”. The Device is now receiving power.
3. If you have an HRV device, Power it on Third.
You are now ready to launch the NeuroField Software!
IV. Software Basics This section is meant to teach you the basic information that is needed to use the NeuroField software.
However, it is necessary to attend a formal training by Dr. Nicholas Dogris in order to learn how to use
the system for clinical purposes.
Starting the Program
In order to run 19 channel training you must have a Q20 EEG device and a X3000 Plus or X2000/X1000
with a Plus unit. All the units must be properly connected. Turn on the X3000/Q20 by flipping the
switch on the power supply before starting the program. If the unit has been disconnected or is not on
when starting the program, you must power up your NeuroField device and be sure your CanBus
adapter is plugged into the device before proceeding. See “Section III Hardware Setup” for further
details.
When you are ready to start the program, you will need to select a database, ensure the unit is found,
and then start the main program.
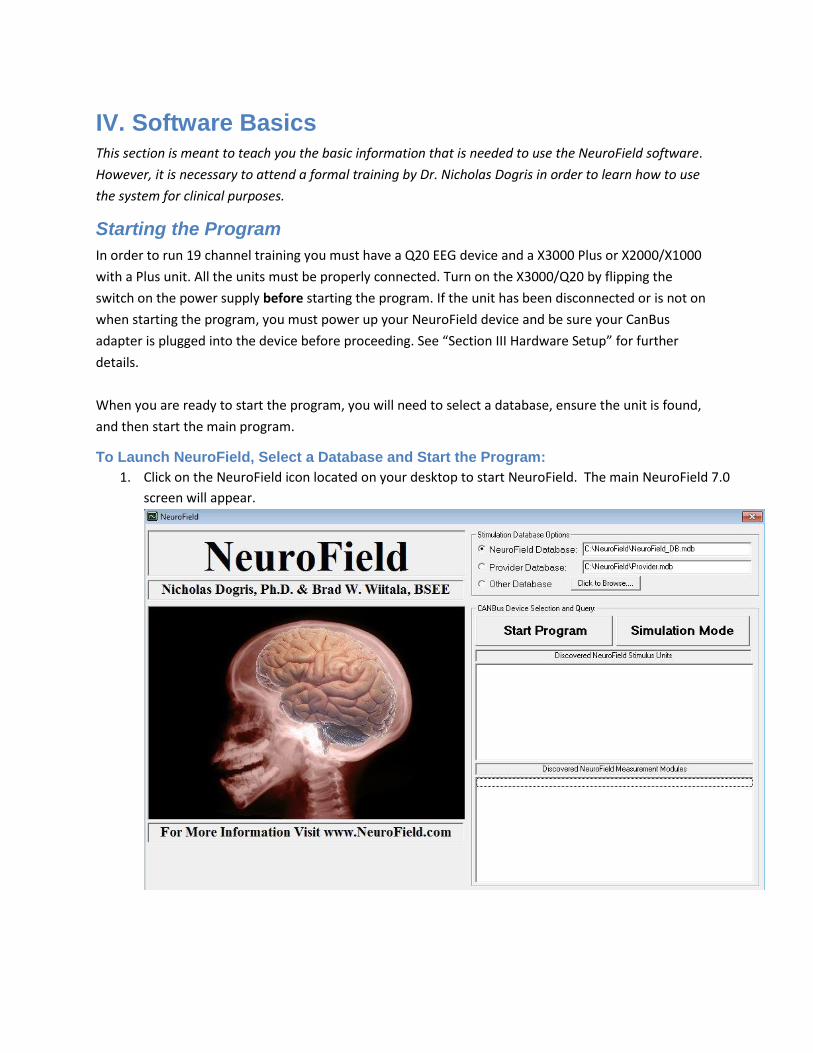
To Launch NeuroField, Select a Database and Start the Program:
1. Click on the NeuroField icon located on your desktop to start NeuroField. The main NeuroField 7.0
screen will appear.
`24 | NeuroField, Inc.
`
Note: During installation, the NeuroField shortcut placed on your desktop is set to “Run as
Administrator.” If you are having problems launching the program some operating systems may
cause this to get reset. If this is the case, check the shortcut setting. To do this:
a. Right-click on the NeuroField Icon.
b. Select “Properties”
c. Select the “Compatibility” Tab
d. Under the “Privilege Level” section make sure the “Run this program as
Administrator.”
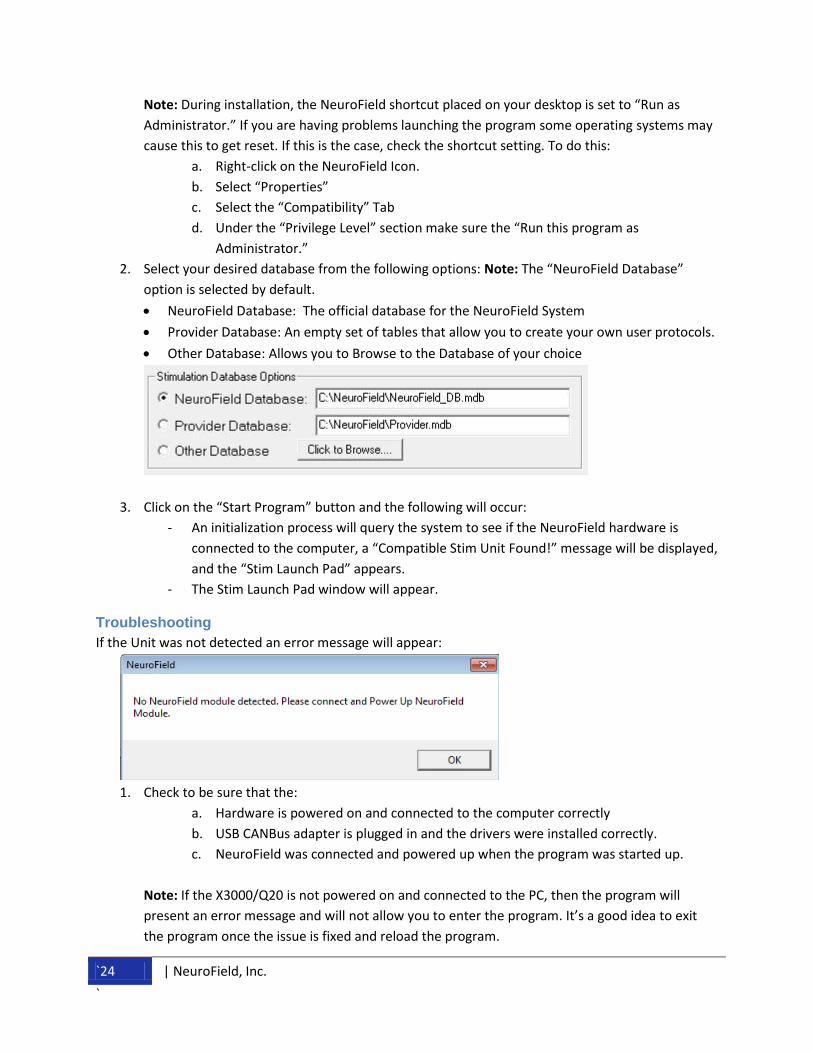
2. Select your desired database from the following options: Note: The “NeuroField Database”
option is selected by default.
NeuroField Database: The official database for the NeuroField System
Provider Database: An empty set of tables that allow you to create your own user protocols.
Other Database: Allows you to Browse to the Database of your choice
3. Click on the “Start Program” button and the following will occur:
- An initialization process will query the system to see if the NeuroField hardware is
connected to the computer, a “Compatible Stim Unit Found!” message will be displayed,
and the “Stim Launch Pad” appears.
- The Stim Launch Pad window will appear.
Troubleshooting
If the Unit was not detected an error message will appear:
1. Check to be sure that the:
a. Hardware is powered on and connected to the computer correctly
b. USB CANBus adapter is plugged in and the drivers were installed correctly.
c. NeuroField was connected and powered up when the program was started up.
Note: If the X3000/Q20 is not powered on and connected to the PC, then the program will
present an error message and will not allow you to enter the program. It’s a good idea to exit
the program once the issue is fixed and reload the program.
25 | NeuroField, Inc.
Entering and Selecting a Patient NeuroField was designed to store patient data quickly and efficiently AND to be paperless. The data is
stored in the Patient.mdb database located in the NeuroField folder. Note: Remember to Backup your
data at least once a month by clicking on the “Backup Databases” button. This will save a copy of your
database in a folder called C:\DBBackup.
To begin treatment, you will need to first Enter the new patient into the database, and then Select
that patient from your list.
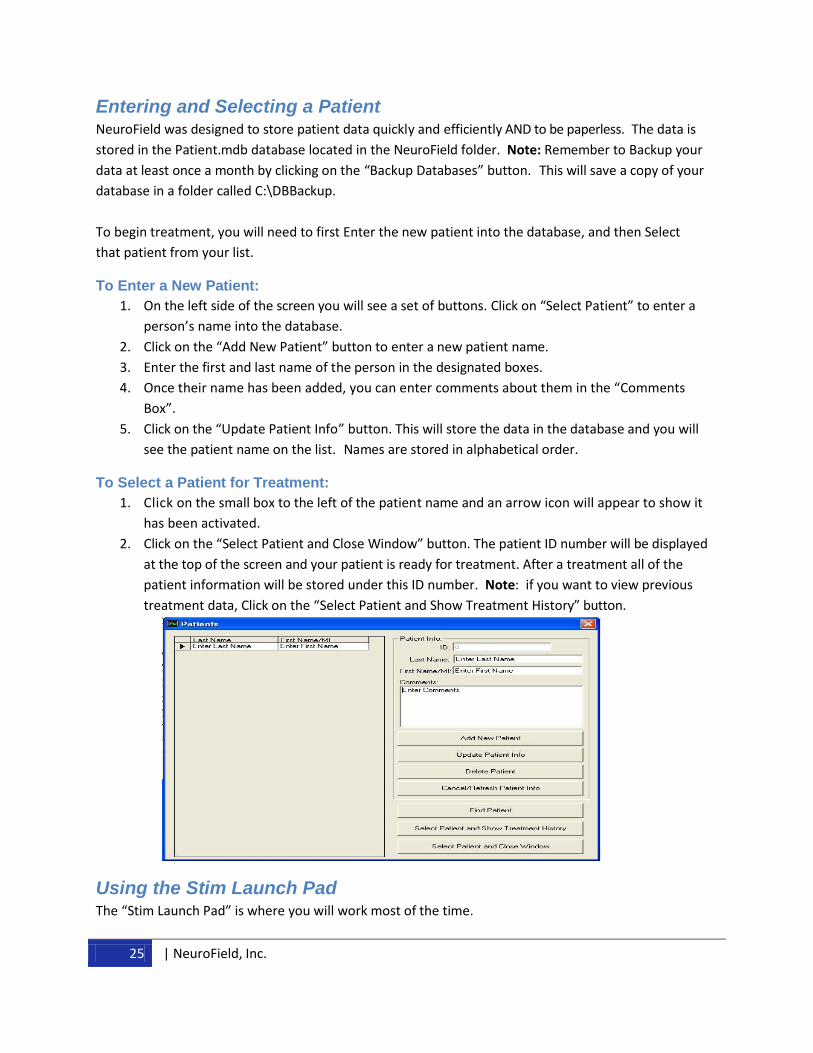
To Enter a New Patient:
1. On the left side of the screen you will see a set of buttons. Click on “Select Patient” to enter a
person’s name into the database.
2. Click on the “Add New Patient” button to enter a new patient name.
3. Enter the first and last name of the person in the designated boxes.
4. Once their name has been added, you can enter comments about them in the “Comments
Box”.
5. Click on the “Update Patient Info” button. This will store the data in the database and you will
see the patient name on the list. Names are stored in alphabetical order.
To Select a Patient for Treatment:
1. Click on the small box to the left of the patient name and an arrow icon will appear to show it
has been activated.
2. Click on the “Select Patient and Close Window” button. The patient ID number will be displayed
at the top of the screen and your patient is ready for treatment. After a treatment all of the
patient information will be stored under this ID number. Note: if you want to view previous
treatment data, Click on the “Select Patient and Show Treatment History” button.
Using the Stim Launch Pad The “Stim Launch Pad” is where you will work most of the time.
`26 | NeuroField, Inc.
`
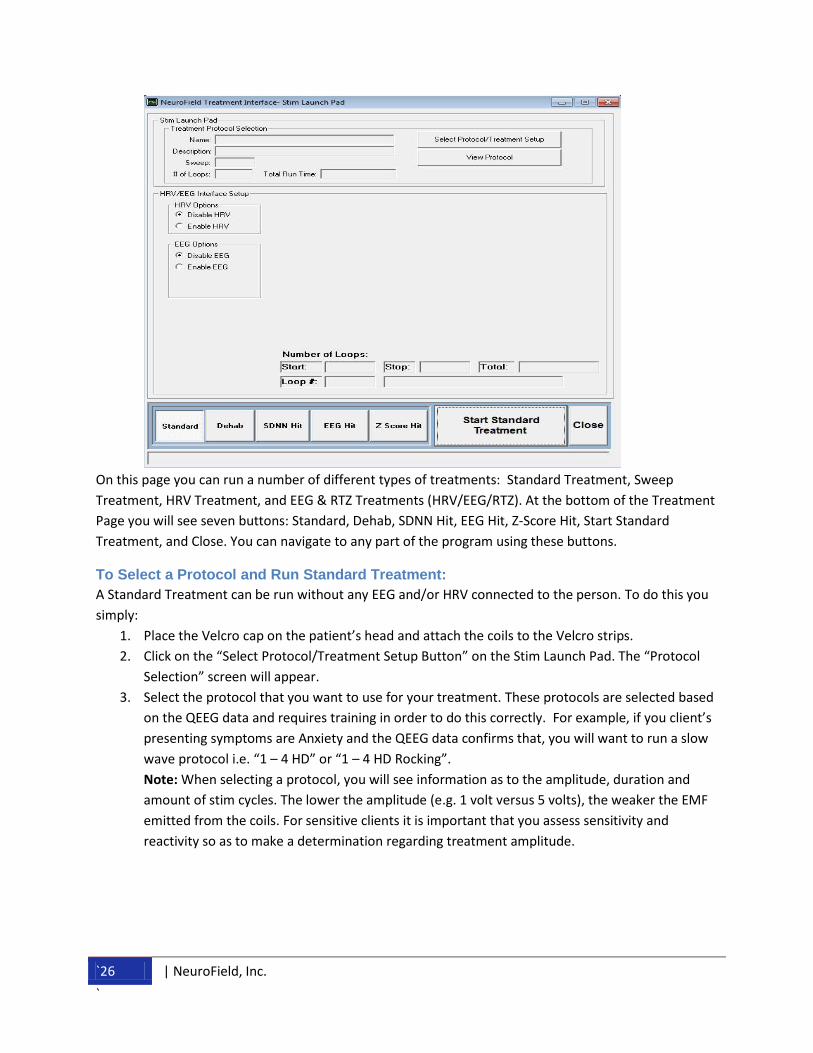
On this page you can run a number of different types of treatments: Standard Treatment, Sweep
Treatment, HRV Treatment, and EEG & RTZ Treatments (HRV/EEG/RTZ). At the bottom of the Treatment
Page you will see seven buttons: Standard, Dehab, SDNN Hit, EEG Hit, Z-Score Hit, Start Standard
Treatment, and Close. You can navigate to any part of the program using these buttons.
To Select a Protocol and Run Standard Treatment:
A Standard Treatment can be run without any EEG and/or HRV connected to the person. To do this you
simply:
1. Place the Velcro cap on the patient’s head and attach the coils to the Velcro strips.
2. Click on the “Select Protocol/Treatment Setup Button” on the Stim Launch Pad. The “Protocol
Selection” screen will appear.
3. Select the protocol that you want to use for your treatment. These protocols are selected based
on the QEEG data and requires training in order to do this correctly. For example, if you client’s
presenting symptoms are Anxiety and the QEEG data confirms that, you will want to run a slow
wave protocol i.e. “1 – 4 HD” or “1 – 4 HD Rocking”.
Note: When selecting a protocol, you will see information as to the amplitude, duration and
amount of stim cycles. The lower the amplitude (e.g. 1 volt versus 5 volts), the weaker the EMF
emitted from the coils. For sensitive clients it is important that you assess sensitivity and
reactivity so as to make a determination regarding treatment amplitude.
27 | NeuroField, Inc.
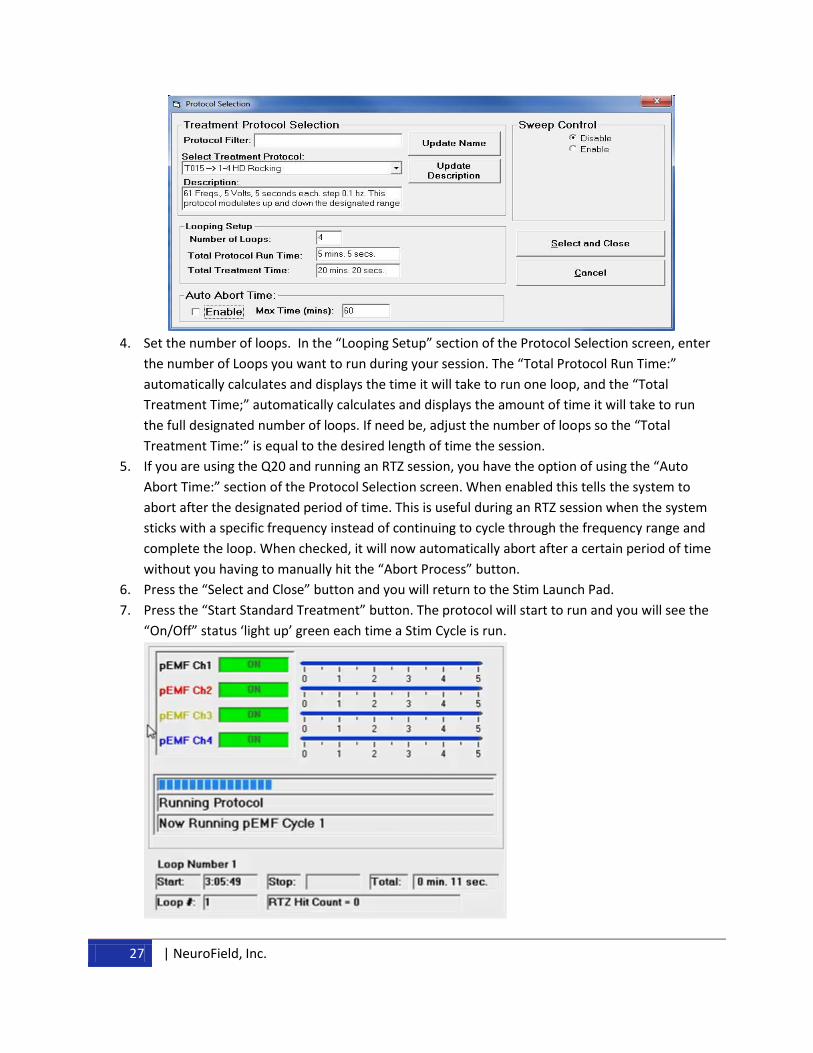
4. Set the number of loops. In the “Looping Setup” section of the Protocol Selection screen, enter
the number of Loops you want to run during your session. The “Total Protocol Run Time:”
automatically calculates and displays the time it will take to run one loop, and the “Total
Treatment Time;” automatically calculates and displays the amount of time it will take to run
the full designated number of loops. If need be, adjust the number of loops so the “Total
Treatment Time:” is equal to the desired length of time the session.
5. If you are using the Q20 and running an RTZ session, you have the option of using the “Auto
Abort Time:” section of the Protocol Selection screen. When enabled this tells the system to
abort after the designated period of time. This is useful during an RTZ session when the system
sticks with a specific frequency instead of continuing to cycle through the frequency range and
complete the loop. When checked, it will now automatically abort after a certain period of time
without you having to manually hit the “Abort Process” button.
6. Press the “Select and Close” button and you will return to the Stim Launch Pad.
7. Press the “Start Standard Treatment” button. The protocol will start to run and you will see the
“On/Off” status ‘light up’ green each time a Stim Cycle is run.
`28 | NeuroField, Inc.
`
8. Proceed to the following sections of this manual to learn more about setting up the software for
RTZ or Stim-Only NeuroField sessions. If you want to run a:
a. Stim Only session using either the X3000 or X2000, proceed to Section V
b. 19 Channel RTZ session using the Q20, proceed to Section VI
c. 1 to 4 Channel RTZ session using the Q20, proceed to Section VII
d. 2 Channel RTZ Session using the X2000, proceed to Section VIII
To Abort a Protocol:
1. Click on the “Abort Process” button on the lower right hand corner of the screen.
Note: The abort process will not always happen immediately. The protocol will be aborted as
soon as the current stim cycle that was in process when the button was clicked is completed.
To Exit the Program:
1. Click on the “Exit Program” button on the lower right hand corner of the screen.
Using Sweep Control In the Protocol Selection Screen, you will see a section called “Sweep Control”. Here you can apply a
dithering or sweep effect to the frequencies for protocols located in any NeuroField database. For
example, a sweep of 5Hz applied to a fixed protocol number of 10 Hz would result in NeuroField
sweeping through the fixed frequency, making 10Hz the median number in the sweep and giving stims
beginning at 8Hz and ending at 12Hz.
In addition, the Sweep Controls can be a nice short cut to change the amplitude and duration values of
pre-set protocols in NeuroField. This saves an enormous amount of time and makes giving specific
patient-oriented treatments efficient. Values entered here will override the pre-set protocol settings, so
protocols can be adapted on-the-fly to the needs of the patient. F or example, if there is a protocol you
want to use that is pre-set to 5 volts ( i.e. “T001 --> 0.31 - 1 Hz, 5 v, step 0.01”) and your patient is
showing signs of sensitivity, you can change the Amplitude to 2.5 volts in the sweep controls and a 5 volt
protocol now becomes a 2.5 volt protocol.
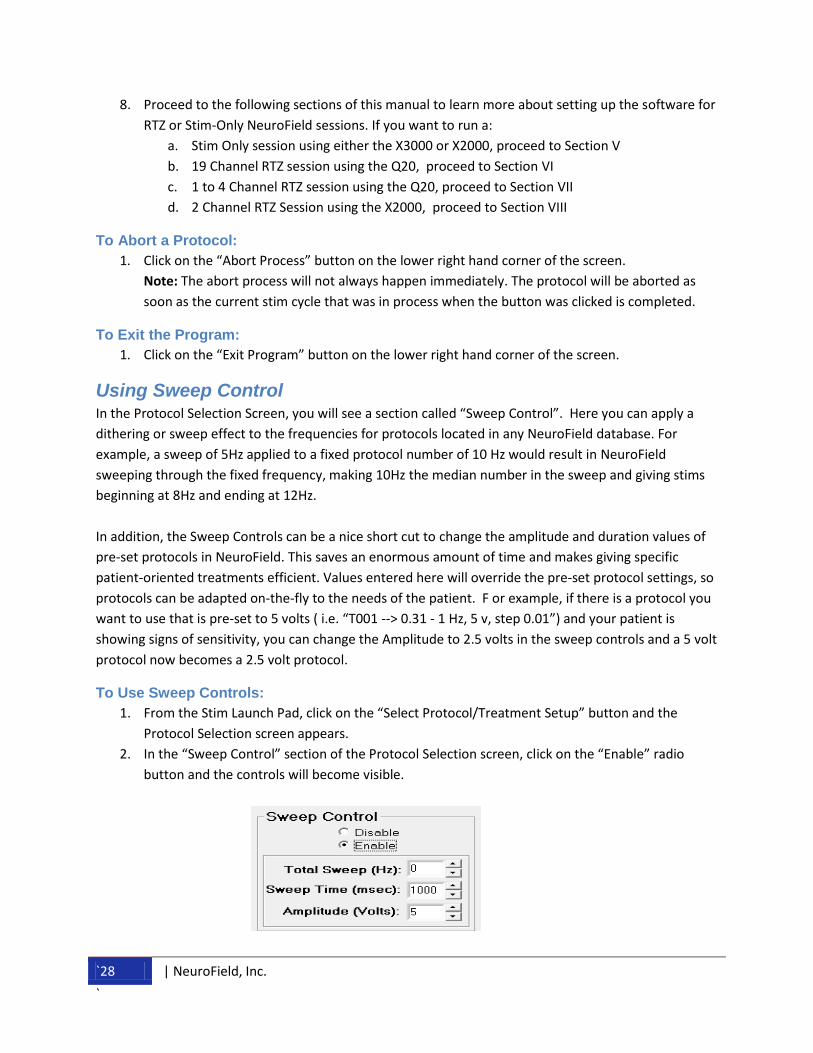
To Use Sweep Controls:
1. From the Stim Launch Pad, click on the “Select Protocol/Treatment Setup” button and the
Protocol Selection screen appears.
2. In the “Sweep Control” section of the Protocol Selection screen, click on the “Enable” radio
button and the controls will become visible.
29 | NeuroField, Inc.
3. Enter the “Total Sweep” value you would like to use and the protocol will sweep through additional frequencies. In almost all cases the most you would want to sweep will be between 3-5 Hz. You can also leave the frequency value at zero for the purpose of simply customizing pre-set protocols. Note: The Total Sweep is hardly ever used since the HD protocols do such a good job, but it is there if you want it.
4. Enter the “Duration”. This can be between 100 msec to 60000 msec. Values must be entered in
milliseconds. Note: 1,000 msec equals one second.
5. Enter the “Voltage”. This can be between .00008 (800 microvolts) to 5 volts. Note: The higher
the voltage the stronger the EMF produced in the NeuroField coils.
To Customize a Pre-Set Protocol:
The Sweep Controls can be used to easily customize NeuroField’s pre-set protocols to adapt to the
needs of the patient receiving the treatment. To modify a pre-set protocol on-the-fly for your patient:
1. Click on the “Enable” radio button and the controls will become visible.
2. Leave “Total Sweep” at 0.
3. Change” Duration” to a new Stim time. For example, when using a preset protocol with a 1
second stim, change the “Duration” to 3,000 msec to make it a 3 sec Stim protocol.
4. And/Or Change the “Voltage” to what better suits your patient.
The values changed here will override the preset values in the protocol you are using. Also, NeuroField
will give you an error if you go below the minimum capabilities of the system. If you give it a 5hz sweep
on .311hz protocol, you will get an error message. If you are going to sweep through something make
sure the room is there to be able to do it.
Using the Main Program Side Bar There are several buttons on the side bar on the left side of the main program screen.
View History Button:
Once your protocol has finished running, you can then open the Patient History page and view the
session, write comments about your client and/or the session, or print a hard copy.
1. Click on the “View History” button after the protocol is complete and the Treatment History
page pops up. Here you will see all the treatment history for every person you have treated with
NeuroField. The patient ID, date, time and protocol will be displayed.
2. Highlight any treatment listed and in the “Special Comments for Selected Treatment” area of the
page write any notes that may pertain to the client or the session.
3. Click on the “Update Treatment Data” button. This will save the note and link it with the
specific patient and session. When you review the treatment history all of this information will
be instantly available to you.
4. Click on the “Print Window” button and the selected patient history will print out.
The “Load Database” Button:
This allows you to load different databases including the Provider and other user databases. To load a
database:
`30 | NeuroField, Inc.
`
1. Click on the “Close” button located on the lower right corner of the Standard Page and it will
Close.
2. Click on the “Load Database” button on the side bar. A message box will open instructing you to
close all open windows.
3. Click “Ok” and the “Database Selection” window will open.
4. Select the database that you want to use and Click Ok. The database will load and take you back
to the Standard Page.
The “Backup and Restore Database” Buttons:
Allow you to save your provider and patient databases into a folder called NFDBBackup on your hard drive located at C:\NFDBbackup. This is for backup purposes only. Should you lose your databases you can restore them back into your working NeuroField folder by selecting restore database. However, in order for this function to work you must first backup the databases.
The Remaining Buttons:
The Cal/Test HRV, View HRV, Stim and HRV, HRV Only, Stim Only and Detailed Spectrum Buttons open different NeuroField interfaces in an arranged fashion. This is for the purpose of viewing data quickly and easily. The HRV Summary, EEG Summary, Z Score Summary, EEG Hit List and Z Score Interface buttons
maximize and minimize each of these windows. Each of the windows will be minimized when the EEG or
HRV functions are used.
Using the Dehabituator The "Dehabituator" is a random number generator that allows you to give four random frequencies
simultaneously per stim cycle. The purpose of the Dehabituator is to disentrain deregulated absolute
power, coherence and phase in the brain. This allows the brain to re-calibrate itself in an effort to
correct pathological brain states. The Dehabituator can be used as a stand-alone treatment or as a
‘priming’ tool to prepare the brain for EEG Neurofeedback.
When using the Dehabituator the:
Number of Stim Cycles, Frequency, Duration, and Amplitude can all be set to:
- Fixed Values or
- Random Values
Maximum amount of Stim cycles that can be randomized per session is 10,000.
Frequency range is limited to .31-300,000Hz.
Duration range is limited to 100-60,000 milliseconds.
Amplitude range is limited to 0.0008-5 volts.
Note: The Dehabituator has many uses and settings. It is recommended that you attend an advanced
training to learn these advanced treatment techniques.
To Start the Dehabituator – Using Fixed Values:
1. Click on the “Dehab” button on the Standard Page and the Dehabituator Page will appear. It
contains:
31 | NeuroField, Inc.
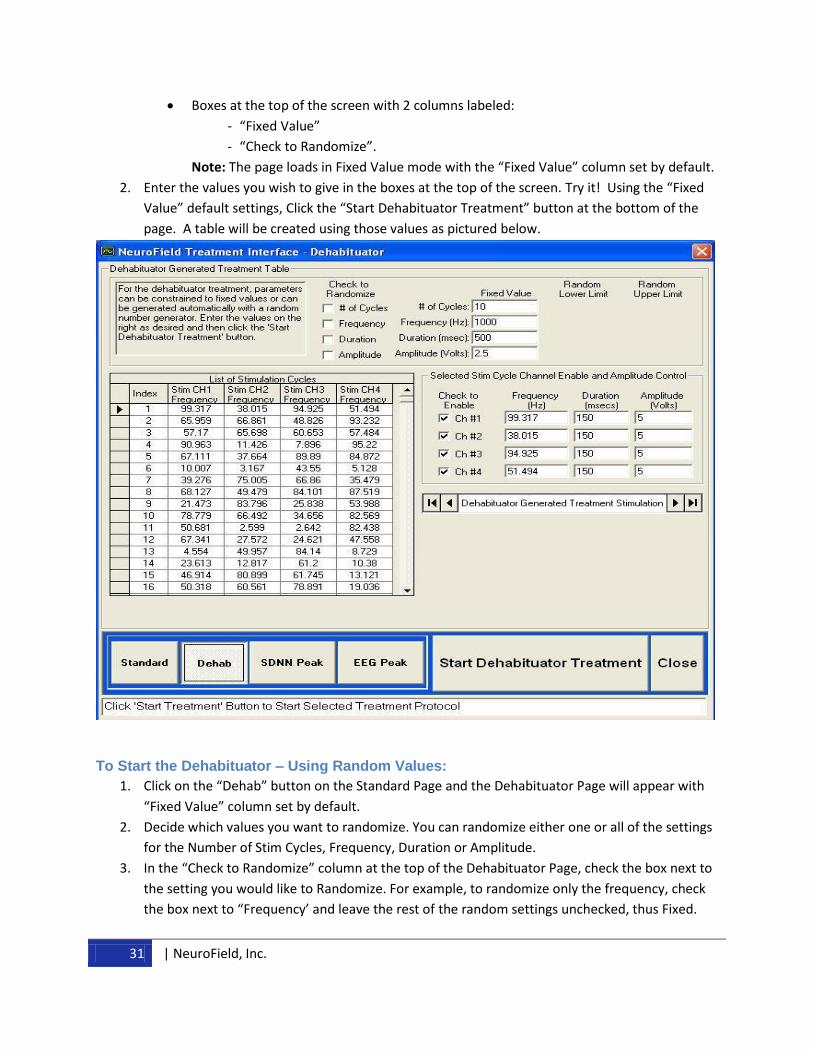
Boxes at the top of the screen with 2 columns labeled:
- “Fixed Value”
- “Check to Randomize”.
Note: The page loads in Fixed Value mode with the “Fixed Value” column set by default.
2. Enter the values you wish to give in the boxes at the top of the screen. Try it! Using the “Fixed
Value” default settings, Click the “Start Dehabituator Treatment” button at the bottom of the
page. A table will be created using those values as pictured below.
To Start the Dehabituator – Using Random Values:
1. Click on the “Dehab” button on the Standard Page and the Dehabituator Page will appear with
“Fixed Value” column set by default.
2. Decide which values you want to randomize. You can randomize either one or all of the settings
for the Number of Stim Cycles, Frequency, Duration or Amplitude.
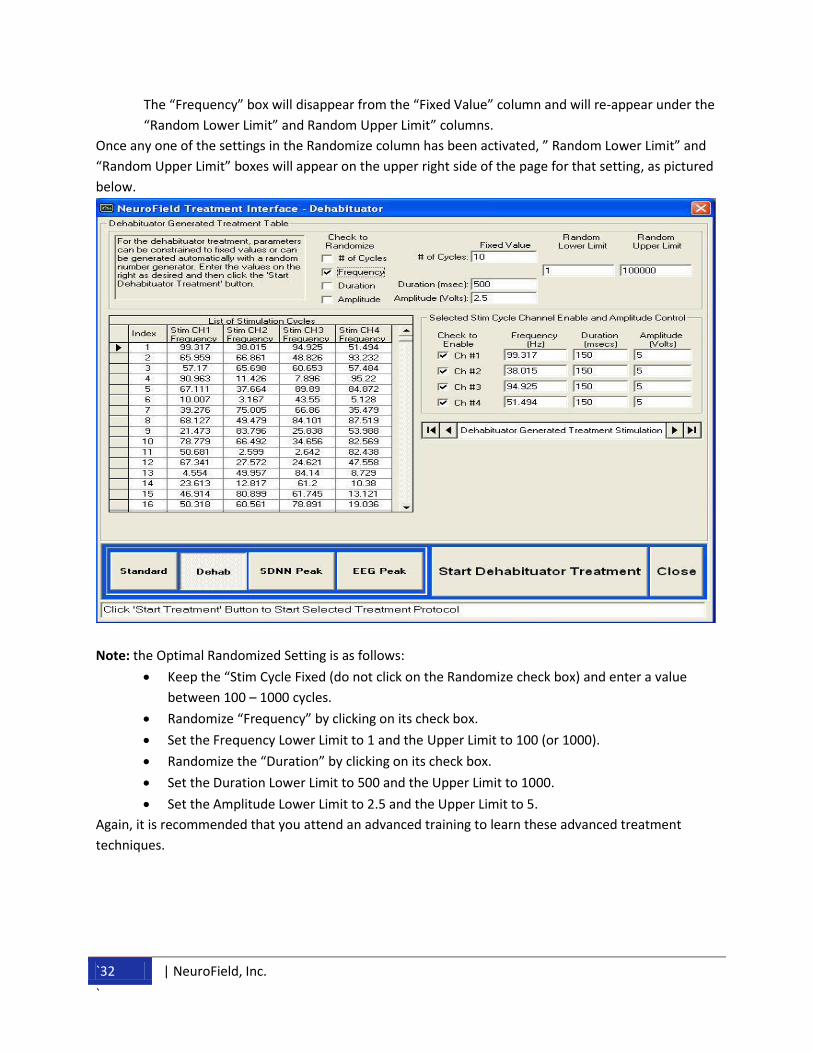
3. In the “Check to Randomize” column at the top of the Dehabituator Page, check the box next to
the setting you would like to Randomize. For example, to randomize only the frequency, check
the box next to “Frequency’ and leave the rest of the random settings unchecked, thus Fixed.
`32 | NeuroField, Inc.
`
The “Frequency” box will disappear from the “Fixed Value” column and will re-appear under the
“Random Lower Limit” and Random Upper Limit” columns.
Once any one of the settings in the Randomize column has been activated, ” Random Lower Limit” and
“Random Upper Limit” boxes will appear on the upper right side of the page for that setting, as pictured
below.
Note: the Optimal Randomized Setting is as follows:
Keep the “Stim Cycle Fixed (do not click on the Randomize check box) and enter a value
between 100 – 1000 cycles.
Randomize “Frequency” by clicking on its check box.
Set the Frequency Lower Limit to 1 and the Upper Limit to 100 (or 1000).
Randomize the “Duration” by clicking on its check box.
Set the Duration Lower Limit to 500 and the Upper Limit to 1000.
Set the Amplitude Lower Limit to 2.5 and the Upper Limit to 5.
Again, it is recommended that you attend an advanced training to learn these advanced treatment
techniques.
33 | NeuroField, Inc.
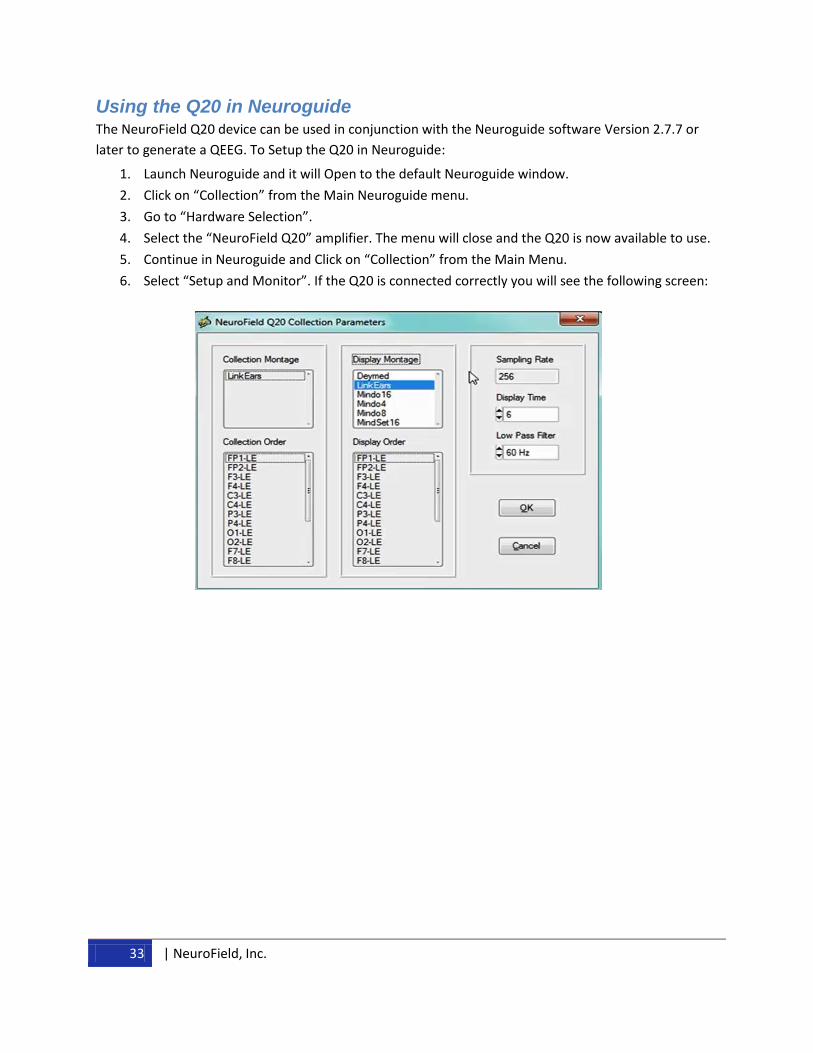
Using the Q20 in Neuroguide The NeuroField Q20 device can be used in conjunction with the Neuroguide software Version 2.7.7 or
later to generate a QEEG. To Setup the Q20 in Neuroguide:
1. Launch Neuroguide and it will Open to the default Neuroguide window.
2. Click on “Collection” from the Main Neuroguide menu.
3. Go to “Hardware Selection”.
4. Select the “NeuroField Q20” amplifier. The menu will close and the Q20 is now available to use.
5. Continue in Neuroguide and Click on “Collection” from the Main Menu.
6. Select “Setup and Monitor”. If the Q20 is connected correctly you will see the following screen:

V. NeuroField Stim-Only NeuroField Stim-Only can be run using both the X3000 Plus or the X2000 or X1000 with a Plus Unit. Stim-
Only allows you to run a protocol as a standalone treatment by giving a stim without using the RTZ EEG
measurements. You simply load up the proper protocol and loop it multiple times to drive the brain at a
specific frequency. This can be done without engaging the client in operant conditioning, as the brain
will mimic the pEMF frequency and begin running at that speed. In other words, if the brain is given an
EMF of 1 Hz, it will start to run or oscillate at 1 Hz. Thus, the pEMF itself is a form of entrainment.
For example, if you have a client with excessive high beta and they are given stims in the low frequency
range such as at 0.31 –1hz or using the 1 – 4 HD Rocking protocol, it can reduce anxiety dramatically on
its own without running Neurofeedback. Or, in the case of ADHD kids, giving the 15-19 HD protocol
looped over the regions where the QEEG indicates excessive slow wave activity will make a big impact
very quickly. Note: In many situations it is also important that learning take place, so pairing this
treatment with LORETA Neurofeedback using 19 channel and the Q20 or 1 – 4 Channel and the Q20 with
a Breakout Box can be even more effective. Knowing when to do so is crucial, and it is strongly
recommended that you participate in a training class before using the Stim-Only or any of the
NeuroField techniques.
Please remember one simple rule with this procedure. This process takes a lot of energy from the body
and will deplete your client. Imagine running on a treadmill for long periods of time without eating or
drinking fluids to maintain your strength. You will run out of gas and will not be able to work out. The
same goes for this treatment. It is important to encourage people to eat healthy protein and drink
plenty of water pre and post sessions. This gives the brain the energy it needs to stabilize itself.
Reviewing the QEEG
It is important to know that acquisition of the QEEG data is essential in making this process work
correctly. Having the brain map and knowing where the excess and deficiencies are is crucial in
determining which areas of the brain to work on, and it makes all the difference in treatment results.
Dr. Dogris offers several trainings per year in different locations around the United States. He also
offers online consultations and mentoring to learn these skills and procedures. Dr. Dogris uses the
Neuroguide QEEG software to aquire, edit and analyze EEG data. You can learn more about
Neuroguide by going to the www.appliedneuroscience.com website.
So, once you have received the proper training, use the QEEG data along with the presenting
symptoms from your client to guide you in protocol frequency selection and coil placement. There are
several ways to look at a QEEG map, and for the purpose of this exercise, we will use the Z Scored
Summary page and the Z-Scored FFT Absolute Power 1Hz Bin maps to identify the treatment area. Also,
as an example, we will be using a client with the presenting symptom of severe anxiety and a brain map
with excessive high beta.
35 | NeuroField, Inc.
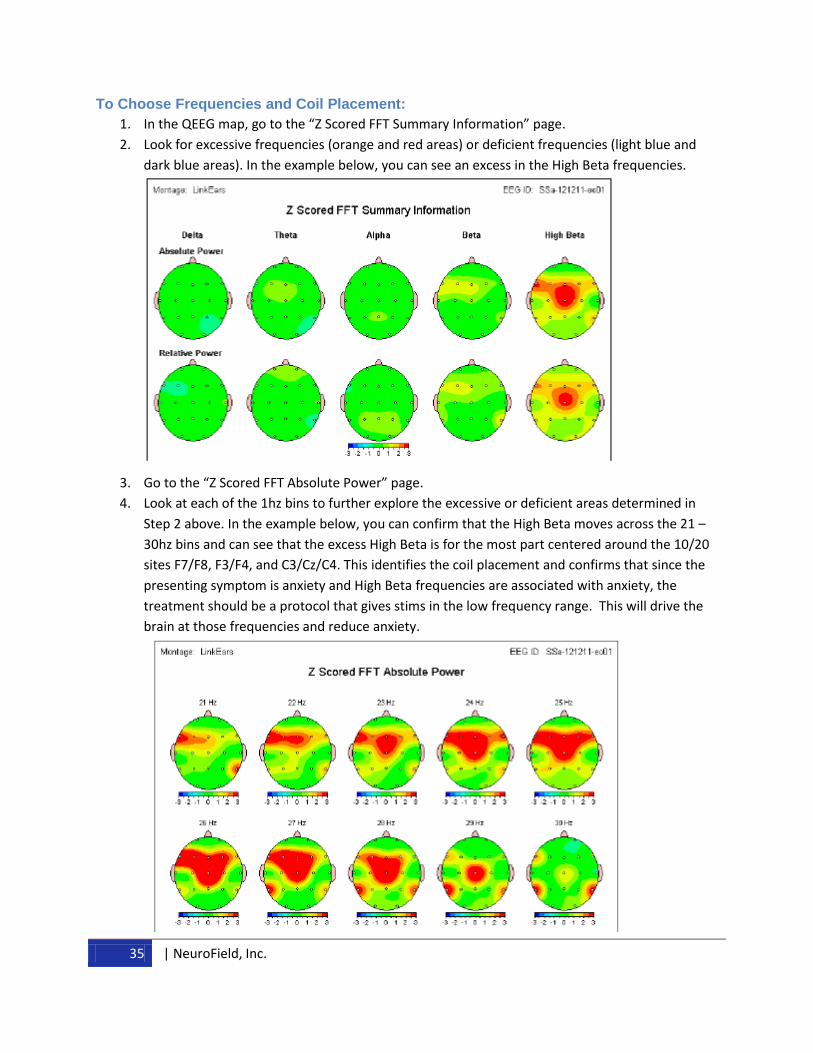
To Choose Frequencies and Coil Placement:
1. In the QEEG map, go to the “Z Scored FFT Summary Information” page.
2. Look for excessive frequencies (orange and red areas) or deficient frequencies (light blue and
dark blue areas). In the example below, you can see an excess in the High Beta frequencies.
3. Go to the “Z Scored FFT Absolute Power” page.
4. Look at each of the 1hz bins to further explore the excessive or deficient areas determined in
Step 2 above. In the example below, you can confirm that the High Beta moves across the 21 –
30hz bins and can see that the excess High Beta is for the most part centered around the 10/20
sites F7/F8, F3/F4, and C3/Cz/C4. This identifies the coil placement and confirms that since the
presenting symptom is anxiety and High Beta frequencies are associated with anxiety, the
treatment should be a protocol that gives stims in the low frequency range. This will drive the
brain at those frequencies and reduce anxiety.
`36 | NeuroField, Inc.
`
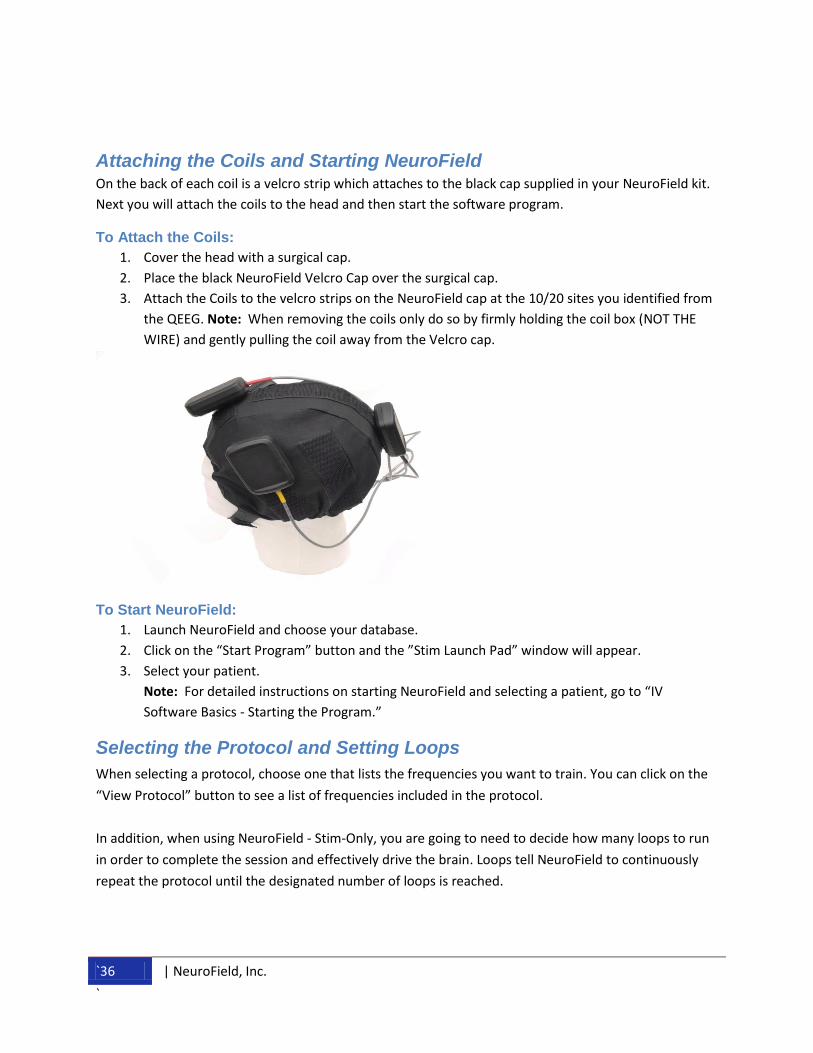
Attaching the Coils and Starting NeuroField On the back of each coil is a velcro strip which attaches to the black cap supplied in your NeuroField kit.
Next you will attach the coils to the head and then start the software program.
To Attach the Coils:
1. Cover the head with a surgical cap.
2. Place the black NeuroField Velcro Cap over the surgical cap.
3. Attach the Coils to the velcro strips on the NeuroField cap at the 10/20 sites you identified from
the QEEG. Note: When removing the coils only do so by firmly holding the coil box (NOT THE
WIRE) and gently pulling the coil away from the Velcro cap.
To Start NeuroField:
1. Launch NeuroField and choose your database.
2. Click on the “Start Program” button and the ”Stim Launch Pad” window will appear.
3. Select your patient.
Note: For detailed instructions on starting NeuroField and selecting a patient, go to “IV
Software Basics - Starting the Program.”
Selecting the Protocol and Setting Loops
When selecting a protocol, choose one that lists the frequencies you want to train. You can click on the
“View Protocol” button to see a list of frequencies included in the protocol.
In addition, when using NeuroField - Stim-Only, you are going to need to decide how many loops to run
in order to complete the session and effectively drive the brain. Loops tell NeuroField to continuously
repeat the protocol until the designated number of loops is reached.
37 | NeuroField, Inc.
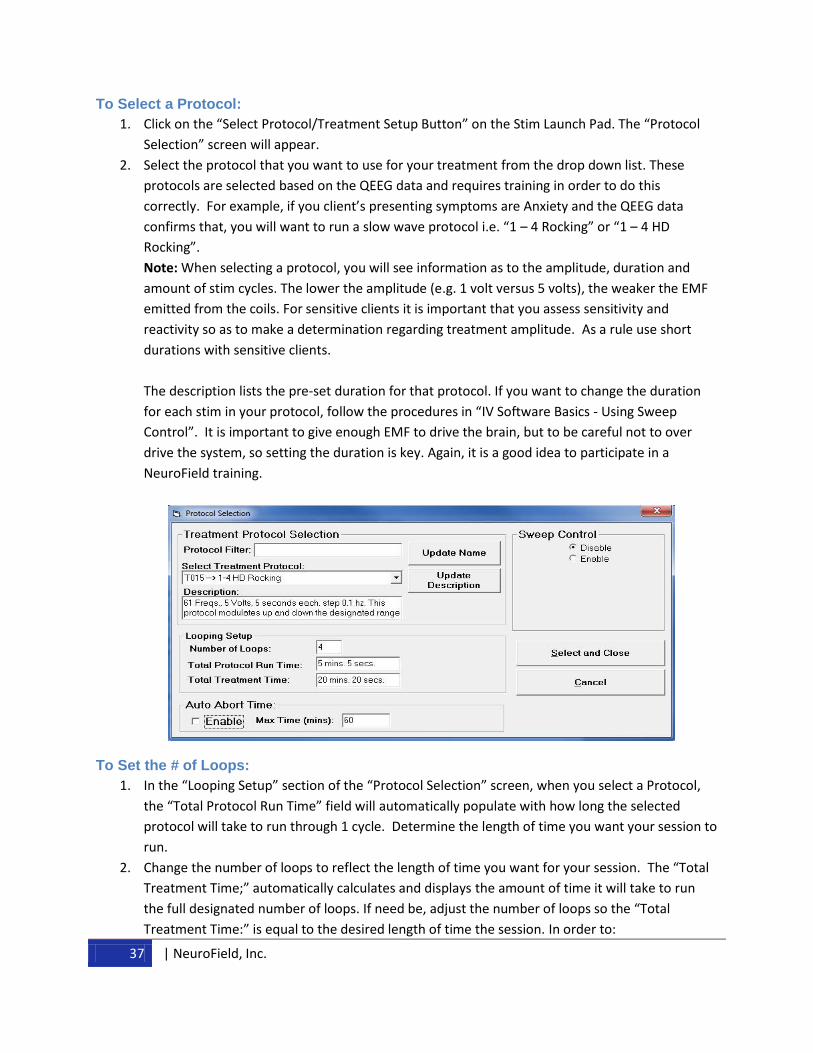
To Select a Protocol:
1. Click on the “Select Protocol/Treatment Setup Button” on the Stim Launch Pad. The “Protocol
Selection” screen will appear.
2. Select the protocol that you want to use for your treatment from the drop down list. These
protocols are selected based on the QEEG data and requires training in order to do this
correctly. For example, if you client’s presenting symptoms are Anxiety and the QEEG data
confirms that, you will want to run a slow wave protocol i.e. “1 – 4 Rocking” or “1 – 4 HD
Rocking”.
Note: When selecting a protocol, you will see information as to the amplitude, duration and
amount of stim cycles. The lower the amplitude (e.g. 1 volt versus 5 volts), the weaker the EMF
emitted from the coils. For sensitive clients it is important that you assess sensitivity and
reactivity so as to make a determination regarding treatment amplitude. As a rule use short
durations with sensitive clients.
The description lists the pre-set duration for that protocol. If you want to change the duration
for each stim in your protocol, follow the procedures in “IV Software Basics - Using Sweep
Control”. It is important to give enough EMF to drive the brain, but to be careful not to over
drive the system, so setting the duration is key. Again, it is a good idea to participate in a
NeuroField training.
To Set the # of Loops:
1. In the “Looping Setup” section of the “Protocol Selection” screen, when you select a Protocol,
the “Total Protocol Run Time” field will automatically populate with how long the selected
protocol will take to run through 1 cycle. Determine the length of time you want your session to
run.
2. Change the number of loops to reflect the length of time you want for your session. The “Total
Treatment Time;” automatically calculates and displays the amount of time it will take to run
the full designated number of loops. If need be, adjust the number of loops so the “Total
Treatment Time:” is equal to the desired length of time the session. In order to:
`38 | NeuroField, Inc.
`
Reduce Anxiety - You will select a lower frequency protocol such as “1-4 HD” to drive
the brain in that direction, away from higher frequencies over the treatment area.
Improve Attention - You will select a higher frequency protocol such as “15-19 HD” to
drive the brain in that direction, away from slower frequencies over the treatment area.
In this example, there is a great deal of High Beta, so we will select the “0.31 – 1Hz 5v step 0.01”
(ultra slow) protocol to lower high beta. You can also use 1 - 4 HD Rocking protocol. Again, to
get a good working knowledge of the NeuroField protocols, it is a good idea to participate in a
NeuroField training.
Important Note: DO NOT USE OR DELETE the DeHabituator Protocol. You will never need to
select the DeHabituator protocol. It is in there only because it is required in order to use the
Dehabituator itself and store the random number. You run the Dehabituator only from the
Dehabituator tab.
3. Notice that you can enable the “Sweep Controls” here for your session. For step by step
instructions for Using the Sweep Controls go to “IV Software Basics - Using Sweep Controls”
earlier in this manual.
4. Once you have selected your Protocols and set the number of loops, click on the “Select and
Close” button and you will return to the Stim Launch Pad.
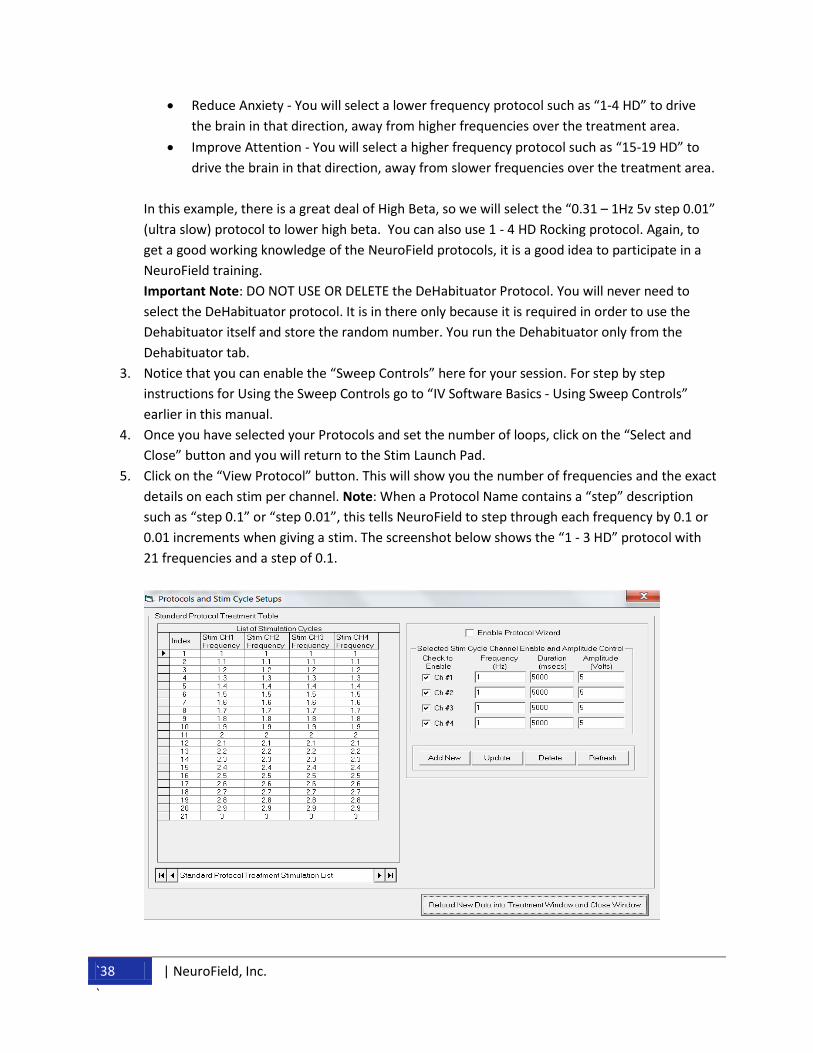
5. Click on the “View Protocol” button. This will show you the number of frequencies and the exact
details on each stim per channel. Note: When a Protocol Name contains a “step” description
such as “step 0.1” or “step 0.01”, this tells NeuroField to step through each frequency by 0.1 or
0.01 increments when giving a stim. The screenshot below shows the “1 - 3 HD” protocol with
21 frequencies and a step of 0.1.
39 | NeuroField, Inc.
Running the Stim-Only Session When the protocol has been selected, and the number of loops has been calculated, the protocol is
ready to go.
To Run Stim-Only:
1. Click on the “Start Standard Treatment” button. The Stim cycle begins and you can view the
status of each stim. NeuroField tells you:
What Stim Cycle you are on.
The time you started the Protocol.
How many seconds have elapsed since you started the protocol.
The “Running Protocol Loop Number” will list the current loop number and the “Present
Loop Number” box will also reflect current loop for the session.
2. When the Protocol is over, the NeuroField Stim status indicators will disappear. You can then
Click on the “View History” button on the Menu Sidebar to see your treatment details and
patient information which is saved electronically. You can also add session notes.
VI. Real Time Z-Scores (RTZ) using Q20 - 19 Channels The newest innovation in the NeuroField toolset is called the Real Time Z-Score (RTZ) procedure using a
combination of 19 channels of EEG with the Q20 and pEMF frequencies generated from the X3000 or
X2000/1000 with a Plus unit. The RTZ procedure is a norm-referenced, pEMF biofeedback procedure in
which a pEMF frequency is given, EEG is measured, and Z-Score data is generated. If the Z-Score falls
within the Z-Score range set by the user, then the same pEMF is given again until the Z-Score no longer
meets the Z-Score previously set. In essence, the RTZ procedure guides the brain to a regulated level of
functioning using norm referenced Z-Score data. The RTZ 19 channel training can be used with any of
the NeuroField protocols. Note: NeuroField uses the Neuroguide database to generate norm referenced
data.
The DLL used in the RTZ procedure requires a separate license that can be purchased through
NeuroField, Inc. Simply call or email the office to purchase a Z-Score license. If you have already
purchased a license, you must activate it with a License Key. Refer to Chapter II “Software Installation”.
There you will find a section titled “Generating the License Key”.
This procedure is an advanced skill that requires training and experience to conduct. It is strongly
recommended that you participate in a NeuroField training before using this technique. Dr. Dogris uses
the Neuroguide Brain Atlas (www.appliedneuroscience.com) to determine which sites in the brain are
deregulated. Neuroguide uses a normative database that generates Z-Score data QEEG brain maps.
Through clinical analysis and the acquisition of both neurophysiological and clinical data, a set of
hypotheses can be formed to determine which areas of the brain to work on. Dr. Dogris offers several
trainings per year in different locations around the United States. He also offers online consultations and
mentoring to learn these skills and procedures. However, there are also many other skilled professionals
who also offer similar services and can be found at www.ISNR.org or www.AAPB.org as well.
Prepping for RTZ – 19 Channel When prepping a patient for RTZ you will use a QEEG Cap. It is important that you have purchased the
correct cap and ear electrodes. See “III Hardware Setup – Using and Connecting a Cap” earlier in this
manual to ensure you have an approved cap. It is also suggested that you attend a training to learn the
proper procedures to Gel a cap and to ensure there are good connections (impedances). Note:
Individual 19 channel surface electrode connectors have been omitted on the Q20. Go to “VII Q20 RTZ –
1 to 4 Channels” for surface electrode details and instructions.
To Attach the QEEG Cap and the NeuroField Cap/Coils:
1. Plug the D25 Din connector on the cap into the Front of the Q20 unit where the pin connector is
marked “Cap.”
2. Place the Cap on the head along with ear electrodes and apply the gel.
3. Cover the 19 channel QEEG Cap with a surgical cap.
4. Plug the coils into the front of the X3000 or X2000 plus unit where it is marked “Coil Drive”.
41 | NeuroField, Inc.
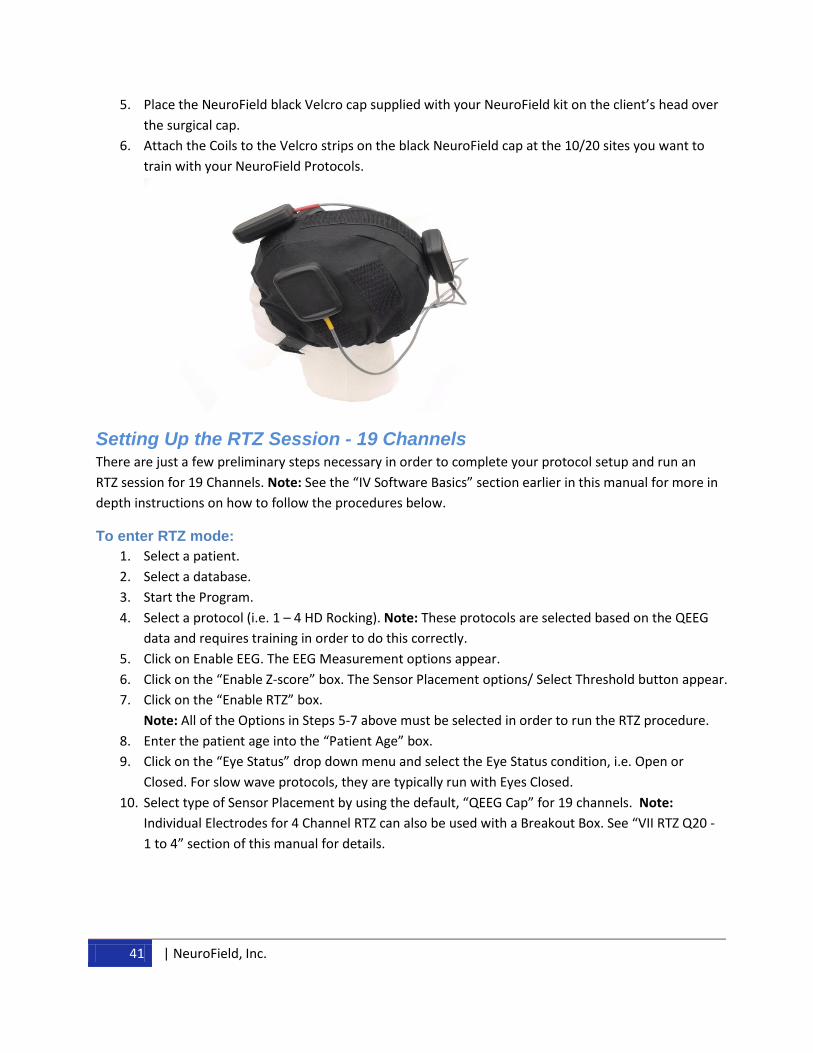
5. Place the NeuroField black Velcro cap supplied with your NeuroField kit on the client’s head over
the surgical cap.
6. Attach the Coils to the Velcro strips on the black NeuroField cap at the 10/20 sites you want to
train with your NeuroField Protocols.
Setting Up the RTZ Session - 19 Channels There are just a few preliminary steps necessary in order to complete your protocol setup and run an
RTZ session for 19 Channels. Note: See the “IV Software Basics” section earlier in this manual for more in
depth instructions on how to follow the procedures below.
To enter RTZ mode:
1. Select a patient.
2. Select a database.
3. Start the Program.
4. Select a protocol (i.e. 1 – 4 HD Rocking). Note: These protocols are selected based on the QEEG
data and requires training in order to do this correctly.
5. Click on Enable EEG. The EEG Measurement options appear.
6. Click on the “Enable Z-score” box. The Sensor Placement options/ Select Threshold button appear.
7. Click on the “Enable RTZ” box.
Note: All of the Options in Steps 5-7 above must be selected in order to run the RTZ procedure.
8. Enter the patient age into the “Patient Age” box.
9. Click on the “Eye Status” drop down menu and select the Eye Status condition, i.e. Open or
Closed. For slow wave protocols, they are typically run with Eyes Closed.
10. Select type of Sensor Placement by using the default, “QEEG Cap” for 19 channels. Note:
Individual Electrodes for 4 Channel RTZ can also be used with a Breakout Box. See “VII RTZ Q20 -
1 to 4” section of this manual for details.
`42 | NeuroField, Inc.
`
Setting-up Thresholds NeuroField provides a number of “Canned Thresholds” for you to easily “Select and Go!” When setting
up the Z-Score thresholds, you can choose to use the provided Preset Threshold setups from the drop
down menu list. Or, you can customize your own setups.
To Use a Pre-Set Threshold:
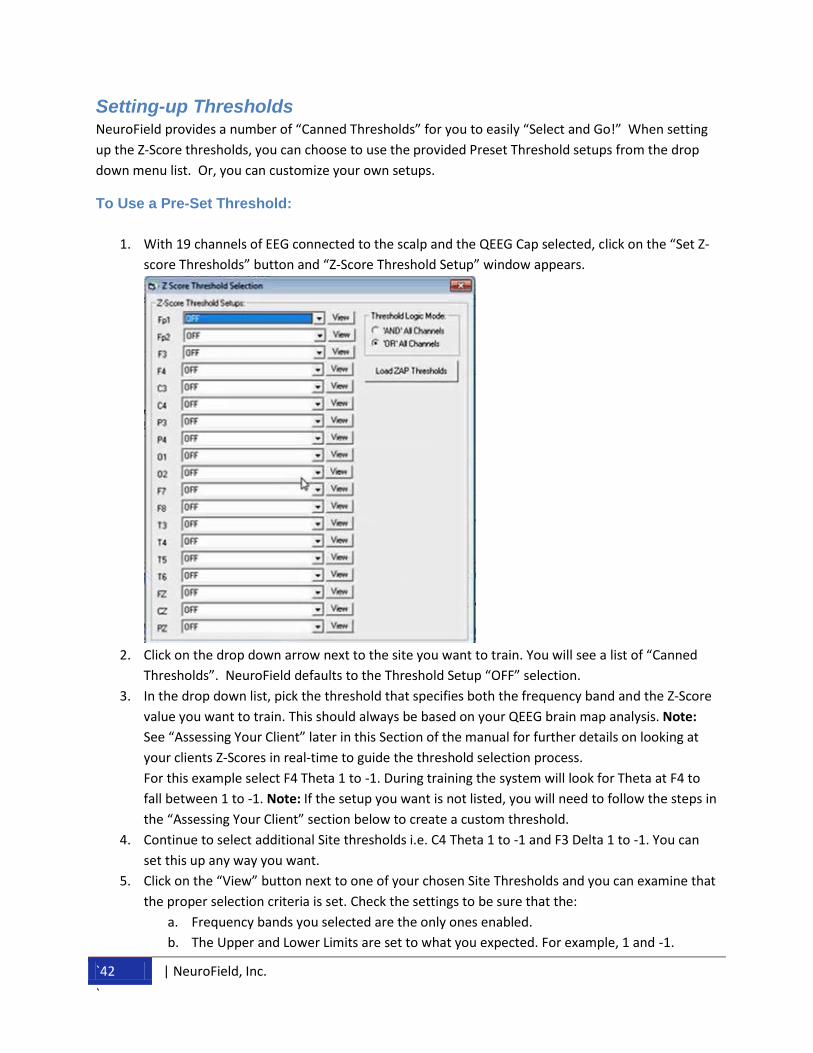
1. With 19 channels of EEG connected to the scalp and the QEEG Cap selected, click on the “Set Z-
score Thresholds” button and “Z-Score Threshold Setup” window appears.
2. Click on the drop down arrow next to the site you want to train. You will see a list of “Canned
Thresholds”. NeuroField defaults to the Threshold Setup “OFF” selection.
3. In the drop down list, pick the threshold that specifies both the frequency band and the Z-Score
value you want to train. This should always be based on your QEEG brain map analysis. Note:
See “Assessing Your Client” later in this Section of the manual for further details on looking at
your clients Z-Scores in real-time to guide the threshold selection process.
For this example select F4 Theta 1 to -1. During training the system will look for Theta at F4 to
fall between 1 to -1. Note: If the setup you want is not listed, you will need to follow the steps in
the “Assessing Your Client” section below to create a custom threshold.
4. Continue to select additional Site thresholds i.e. C4 Theta 1 to -1 and F3 Delta 1 to -1. You can
set this up any way you want.
5. Click on the “View” button next to one of your chosen Site Thresholds and you can examine that
the proper selection criteria is set. Check the settings to be sure that the:
a. Frequency bands you selected are the only ones enabled.
b. The Upper and Lower Limits are set to what you expected. For example, 1 and -1.
43 | NeuroField, Inc.
6. Click on the “Update Threshold Setting” and “Return to Threshold Selection” button to go back
to the “Threshold Setup” screen.
To Set the Logic Mode:
1. In the “Threshold Logic Mode” section of the “Threshold Setup” screen, select your logic mode.
Note: The program defaults to the “OR” logic mode. How this works is that after an EMF
stimulation is given, the EEG is recorded and Z-scores are generated for all 19 sites. The system
then determines which, if any, of the sites achieve the designated threshold. In the example
above, with the three thresholds set to F4 Theta 1 to -1, C4 Theta 1 to -1 and F3 Delta 1 to -1,
you have two choices for your threshold logic:
a. “OR” meaning that any one of the Z-Scores at the selected sites can come within
threshold range to create a “Hit”. For example, if F3 Delta does not fall within 1 to -1,
then the next site F4 is examined for Theta 1 to -1 and then to C4 Theta 1 to -1. If any
one of these sites achieves the threshold then NeuroField will count it as a “Hit”. This
says, if F3 Delta, or F4 Theta, or C4 Theta is 1 to -1, give it a hit.
b. “AND” meaning that all of the Z-Scores at the selected sites must come within
threshold range simultaneously in order for a hit to occur. This is a more stringent
threshold as it requires that all of the chosen sites/frequency bands Z-Scores must
achieve whatever threshold values you chose. This says, if F3 Delta and F4 Theta and C4
Theta is 1 – 1, give it a hit.
2. Click on the “Load ZAP Thresholds” button and the Window will close.
3. You are now ready to start a session. Continue to the section below titled, “Running an RTZ
Session.”
It is important to monitor your session and determine if your Preset Threshold setup is effective. If you
notice that the patient is finding it very difficult to (or may never) meet the Threshold criteria and get a
Hit, your preset threshold is too low (or too hard). For example, if the preset Theta threshold is set to 1
to -1 limits but during the session your client consistently hits Theta of say 2.5 in the upper range, you’ll
need to follow the steps in this next section to assess your clients Z-scores, create a custom threshold
for F4 Theta, and raise the limits to, say 2 and -2.
Assessing Your Client Before setting up the Z-Score Thresholds, it is a good idea to first scan the EEG and assess your client.
This will allow you to get a real-time Z-Score reading and assess the client’s Z-score range for better
Threshold control during the session. To do this you will run a Scan.
To Run a Scan:
1. On the NeuroField Main Menu, Click on “NeuroField Interfaces” and Select “NeuroField EEG
Interface” and “NeuroField 20-Channel.
2. Click on the “Scan“ in the top right corner of the screen. The Z-Score 19-channel tabular will
appear and EEG will be measured. All 19 channels with populate with Z-score data. For more
information on the Z-Score tabular.
Every 8 seconds NeuroField scans another round of EEG until you abort the process.
`44 | NeuroField, Inc.
`
Because the data is overwritten with each scan, you can see the changes in real-time. This allows you to
find a consistent pattern of Z-Score outliers in a particular frequency band and make an estimation of
the current Z-Score frequency band(s) you wish to threshold.
To Determine Which Frequency Band(s) and Z-Score Range to use:
1. In the Z-Score Tabular window, find the Frequencies with the most deviant Z-Scores, either Red
(excessive) or Blue (deficient).
2. Within those frequency bands find the Z-Scores that are the largest outliers (highest numbers
either + or -).
3. Look at your QEEG Z-Score Map data and determine if what you see in the Tabular is a
consistent finding with the Q.
Note: Sometimes in mapping you get data that is not consistent. You may think that a Q
is always going to be constant every single time, but sometimes it is not. However, if you
have a client with a consistent pathology it should show itself consistently, or if you
have a client with clearly deviant Z-Scores at the time of the session and you’re sure it’s
not artifact, that’s a good place to start as well.
Note: If you are looking at the Neuroguide Maps where your client has a Z-Score of 3
standard deviations and you run Z-score Neurofeedback, you will notice that the
standard deviation will be close to half of that, say usually roughly 1.5. So if you have a
map of someone with 3.0 Z-scores, make the assumption that it will be around 1.5 in
NeuroField when making the comparisons.
4. Make a note of the frequency band and the outlier numbers determined above. You will use this
data in the “To Setup a Custom Threshold” section below. For example, if High Beta comes
consistently high (red) at Channel 1 and Channel 2, and shows outliers of (1.84, 1.75, etc.):
Note High Beta as your frequency band to Threshold.
Note 1 to -1 as your upper and lower limits to Threshold
5. Click on “Abort Process” button on the bottom right of your screen to stop the EEG acquisition.
Note: Again, you must abort the process before leaving or it will continue to scan. When you
abort the scan, it will complete whatever scan is in process and then perform the abort.
After assessing your clients QEEG, you may find that preset drop down list does not contain a setup
that matches your criteria. For example, you may want to train more than one frequency band at a
particular site or the threshold limits appropriate for your client are not listed as a threshold. So, you
can easily create a custom Threshold.
To Setup a Custom Threshold:
1. Click on the “Select Z Score Thresholds” button from the Stim Launch Pad.
2. Click on the drop down arrow next to the channel/site you want to threshold. For this example
choose F4 and you will see a list of “Canned Thresholds”.
3. Scroll down to the end of the list and select the first option for “Empty”. This will bring up an
empty threshold for you to customize.
45 | NeuroField, Inc.
4. Click on the” View” button for F4. You will now see the “ZAP Threshold Setup” screen appear.
Here you can enable any of the frequency bands for a given site and set the Z-Score range
anywhere between 1 to – 1 and 6 to -6. This is a very versatile and powerful control for your
thresholds.
5. First change the Name of your Setup in the “Name” field at the top of your screen. You can give
it the name of your client or a more generic name for the frequency band itself. For this
example we want to only change the upper and lower limits of the Theta frequency band at F4,
so you will name it: “Theta 2.0 to -2.0” Note: You can add a description if you like. This is
particularly useful if you are making a custom threshold for a specific client.
6. In the “ZAP Threshold Settings” section of the “Z-Score Threshold Setup” screen, notice that
next to each frequency band is a check box that enables or disables it. If the box is not checked,
it means that the frequency for the selected Channel (F4 in this example) is “Disabled”. Since the
selected Threshold Setup was “Empty”, all the frequency bands are unchecked (or disabled) by
default.
7. Enable the Frequency Bands you want to customize for your RTZ session by simply checking the
box next to the desired band. You can check multiple bands if desired, but remember the more
bands you choose the more difficult it will be to meet the criteria and get a “Hit”. If you make
multiple selections here really evaluate the most effective Logic mode and you may want to use
the “OR” option. For this example, we will only enable Theta.
8. Change the ZAP Upper and Lower threshold settings to 2 to -2 by entering a number in each of
the respective boxes. Note: You don’t have to enter a lower range. If the QEEG shows that
there is no deficiency, you can leave the setting at 0.
9. Click on the “Update This Threshold Setting” button and now the threshold is enabled.
10. Click on the “Return to Threshold Selection” button. Your custom threshold setup will now
appear in the “Z-Score Thresholds Setups” drop down list for F4. You can then View it and see
your Setup.
11. Repeat Steps 1 – 10 above for additional sites.
You have now completed setting up your custom ZAP Thresholds for RTZ training.
Running an RTZ Session – 19 Channels Before running the RTZ session, get the client to relax:
Feet on the floor
Eyes looking forward or relaxed if closed
Jaw loose and tongue floating (not pressed against roof of their mouth)
If adult, train with Eyes Closed or Open depending on what procedure is being used. If child, play
a DVD with no talking.
Note: Keep in mind that these protocols can take anywhere from 20 – 45 minutes to complete. It is
important that after the treatment has started, you monitor the session. It is recommended to check in
with the client every 10 minutes as the protocol commences. If the person reports any discomfort, abort
the procedure and stop the session.
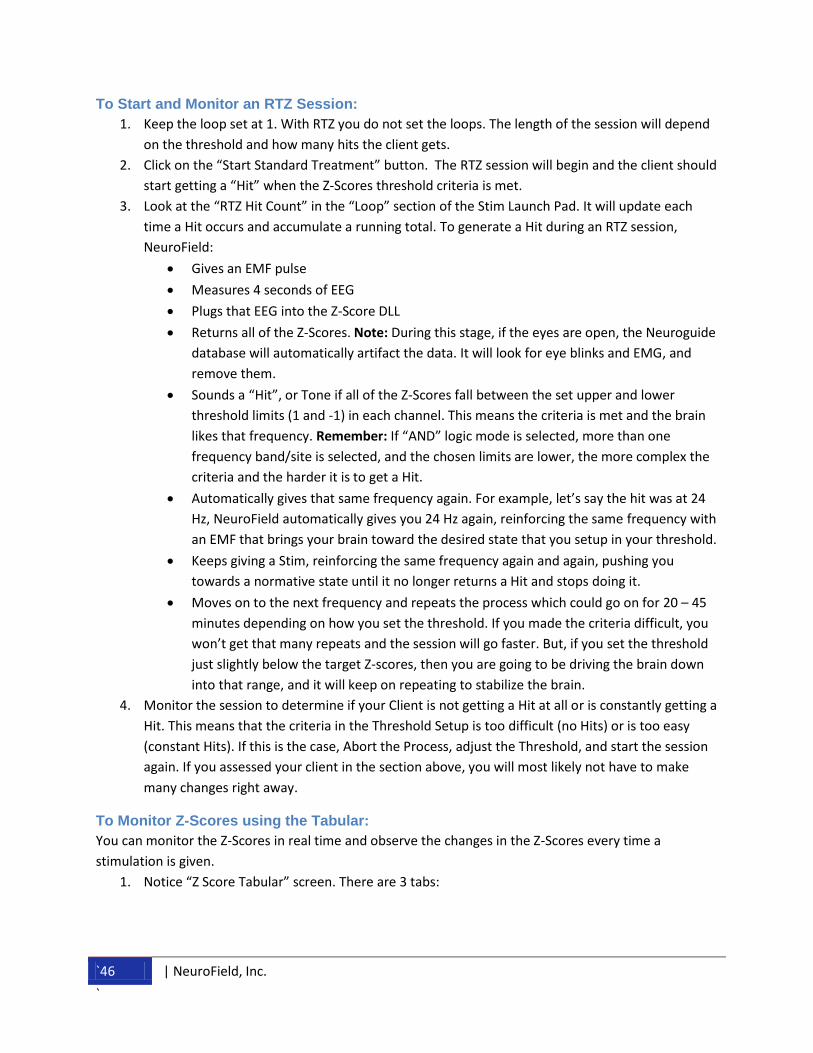
`46 | NeuroField, Inc.
`
To Start and Monitor an RTZ Session:
1. Keep the loop set at 1. With RTZ you do not set the loops. The length of the session will depend
on the threshold and how many hits the client gets.
2. Click on the “Start Standard Treatment” button. The RTZ session will begin and the client should
start getting a “Hit” when the Z-Scores threshold criteria is met.
3. Look at the “RTZ Hit Count” in the “Loop” section of the Stim Launch Pad. It will update each
time a Hit occurs and accumulate a running total. To generate a Hit during an RTZ session,
NeuroField:
Gives an EMF pulse
Measures 4 seconds of EEG
Plugs that EEG into the Z-Score DLL
Returns all of the Z-Scores. Note: During this stage, if the eyes are open, the Neuroguide
database will automatically artifact the data. It will look for eye blinks and EMG, and
remove them.
Sounds a “Hit”, or Tone if all of the Z-Scores fall between the set upper and lower
threshold limits (1 and -1) in each channel. This means the criteria is met and the brain
likes that frequency. Remember: If “AND” logic mode is selected, more than one
frequency band/site is selected, and the chosen limits are lower, the more complex the
criteria and the harder it is to get a Hit.
Automatically gives that same frequency again. For example, let’s say the hit was at 24
Hz, NeuroField automatically gives you 24 Hz again, reinforcing the same frequency with
an EMF that brings your brain toward the desired state that you setup in your threshold.
Keeps giving a Stim, reinforcing the same frequency again and again, pushing you
towards a normative state until it no longer returns a Hit and stops doing it.
Moves on to the next frequency and repeats the process which could go on for 20 – 45
minutes depending on how you set the threshold. If you made the criteria difficult, you
won’t get that many repeats and the session will go faster. But, if you set the threshold
just slightly below the target Z-scores, then you are going to be driving the brain down
into that range, and it will keep on repeating to stabilize the brain.
4. Monitor the session to determine if your Client is not getting a Hit at all or is constantly getting a
Hit. This means that the criteria in the Threshold Setup is too difficult (no Hits) or is too easy
(constant Hits). If this is the case, Abort the Process, adjust the Threshold, and start the session
again. If you assessed your client in the section above, you will most likely not have to make
many changes right away.
To Monitor Z-Scores using the Tabular:
You can monitor the Z-Scores in real time and observe the changes in the Z-Scores every time a
stimulation is given.
1. Notice “Z Score Tabular” screen. There are 3 tabs:
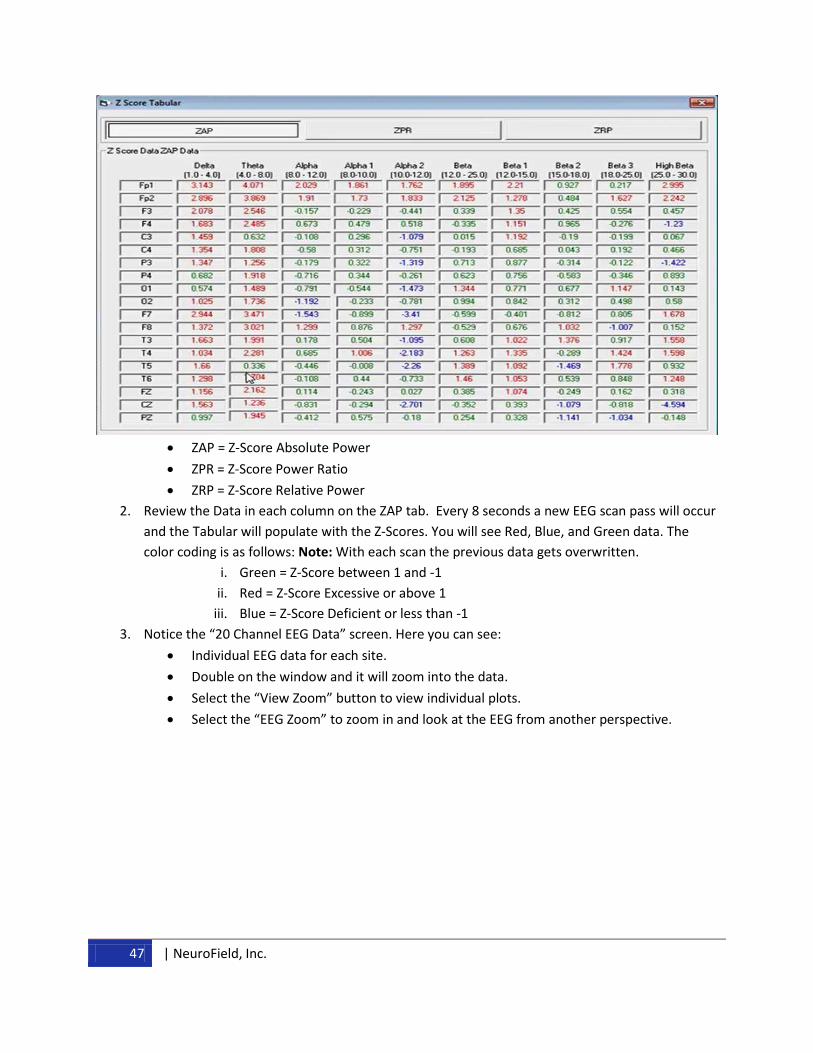
47 | NeuroField, Inc.
ZAP = Z-Score Absolute Power
ZPR = Z-Score Power Ratio
ZRP = Z-Score Relative Power
2. Review the Data in each column on the ZAP tab. Every 8 seconds a new EEG scan pass will occur
and the Tabular will populate with the Z-Scores. You will see Red, Blue, and Green data. The
color coding is as follows: Note: With each scan the previous data gets overwritten.
i. Green = Z-Score between 1 and -1
ii. Red = Z-Score Excessive or above 1
iii. Blue = Z-Score Deficient or less than -1
3. Notice the “20 Channel EEG Data” screen. Here you can see:
Individual EEG data for each site.
Double on the window and it will zoom into the data.
Select the “View Zoom” button to view individual plots.
Select the “EEG Zoom” to zoom in and look at the EEG from another perspective.
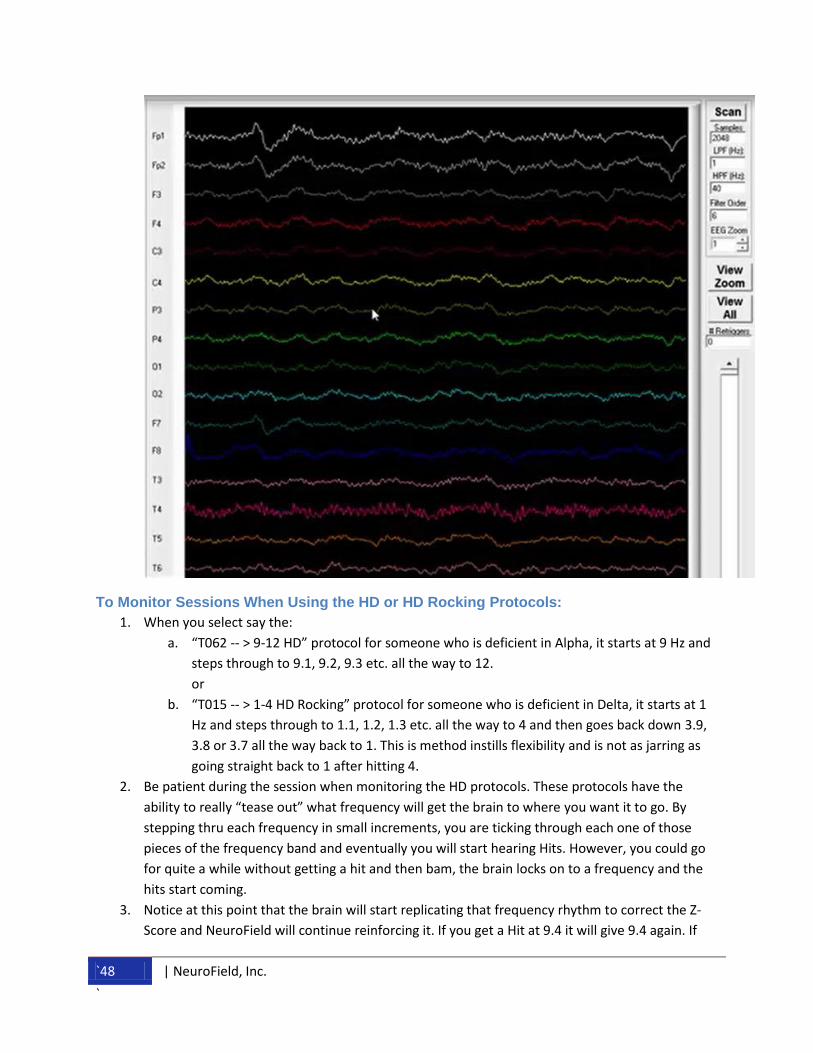
`48 | NeuroField, Inc.
`
To Monitor Sessions When Using the HD or HD Rocking Protocols:
1. When you select say the:
a. “T062 -- > 9-12 HD” protocol for someone who is deficient in Alpha, it starts at 9 Hz and
steps through to 9.1, 9.2, 9.3 etc. all the way to 12.
or
b. “T015 -- > 1-4 HD Rocking” protocol for someone who is deficient in Delta, it starts at 1
Hz and steps through to 1.1, 1.2, 1.3 etc. all the way to 4 and then goes back down 3.9,
3.8 or 3.7 all the way back to 1. This is method instills flexibility and is not as jarring as
going straight back to 1 after hitting 4.
2. Be patient during the session when monitoring the HD protocols. These protocols have the
ability to really “tease out” what frequency will get the brain to where you want it to go. By
stepping thru each frequency in small increments, you are ticking through each one of those
pieces of the frequency band and eventually you will start hearing Hits. However, you could go
for quite a while without getting a hit and then bam, the brain locks on to a frequency and the
hits start coming.
3. Notice at this point that the brain will start replicating that frequency rhythm to correct the Z-
Score and NeuroField will continue reinforcing it. If you get a Hit at 9.4 it will give 9.4 again. If
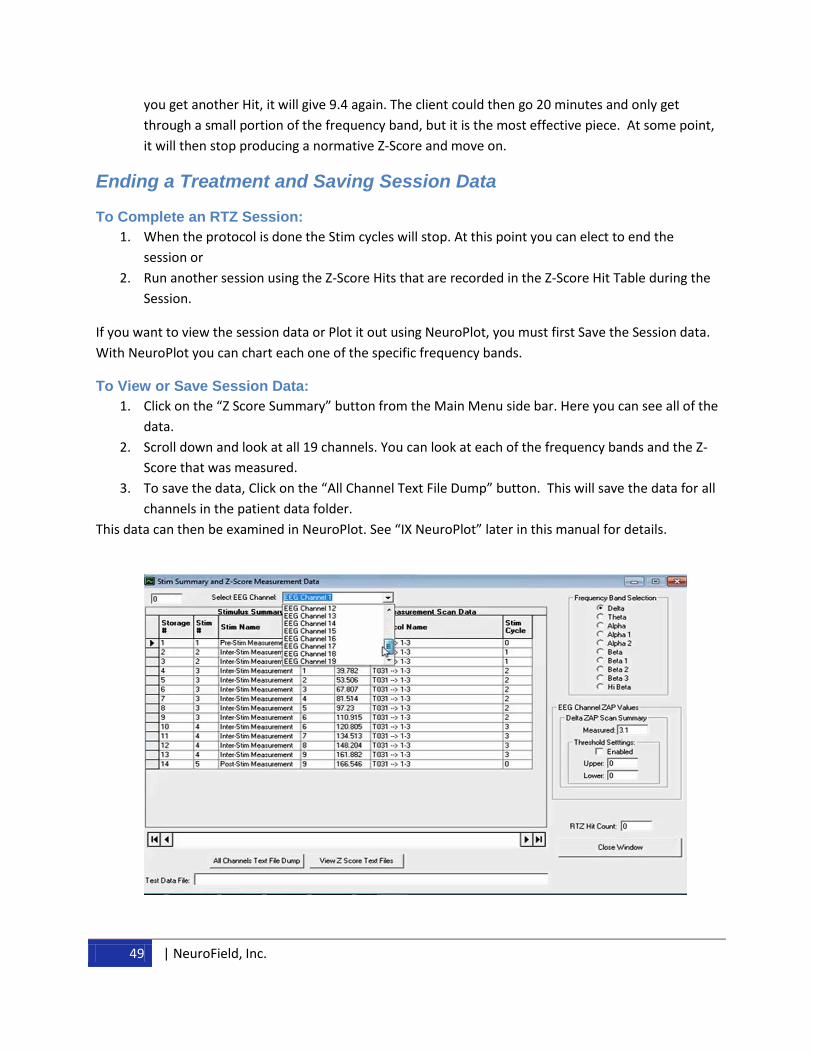
49 | NeuroField, Inc.
you get another Hit, it will give 9.4 again. The client could then go 20 minutes and only get
through a small portion of the frequency band, but it is the most effective piece. At some point,
it will then stop producing a normative Z-Score and move on.
Ending a Treatment and Saving Session Data
To Complete an RTZ Session:
1. When the protocol is done the Stim cycles will stop. At this point you can elect to end the
session or
2. Run another session using the Z-Score Hits that are recorded in the Z-Score Hit Table during the
Session.
If you want to view the session data or Plot it out using NeuroPlot, you must first Save the Session data.
With NeuroPlot you can chart each one of the specific frequency bands.
To View or Save Session Data:
1. Click on the “Z Score Summary” button from the Main Menu side bar. Here you can see all of the
data.
2. Scroll down and look at all 19 channels. You can look at each of the frequency bands and the Z-
Score that was measured.
3. To save the data, Click on the “All Channel Text File Dump” button. This will save the data for all
channels in the patient data folder.
This data can then be examined in NeuroPlot. See “IX NeuroPlot” later in this manual for details.
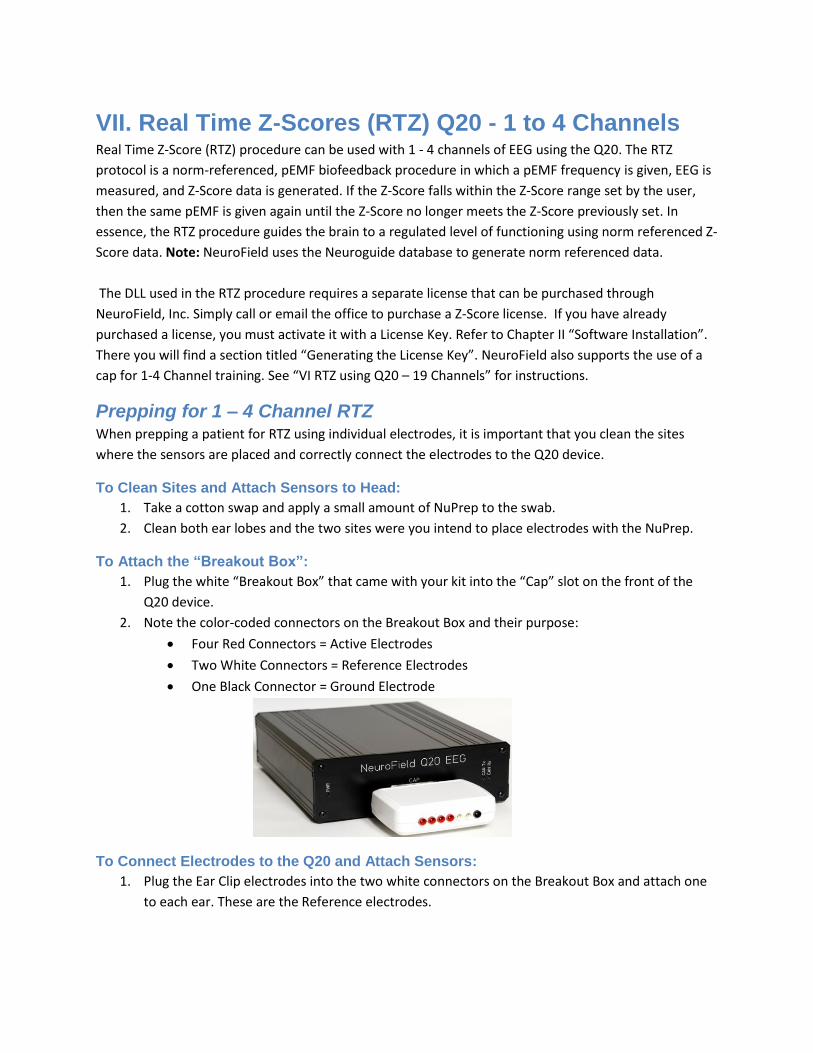
VII. Real Time Z-Scores (RTZ) Q20 - 1 to 4 Channels Real Time Z-Score (RTZ) procedure can be used with 1 - 4 channels of EEG using the Q20. The RTZ
protocol is a norm-referenced, pEMF biofeedback procedure in which a pEMF frequency is given, EEG is
measured, and Z-Score data is generated. If the Z-Score falls within the Z-Score range set by the user,
then the same pEMF is given again until the Z-Score no longer meets the Z-Score previously set. In
essence, the RTZ procedure guides the brain to a regulated level of functioning using norm referenced Z-
Score data. Note: NeuroField uses the Neuroguide database to generate norm referenced data.
The DLL used in the RTZ procedure requires a separate license that can be purchased through
NeuroField, Inc. Simply call or email the office to purchase a Z-Score license. If you have already
purchased a license, you must activate it with a License Key. Refer to Chapter II “Software Installation”.
There you will find a section titled “Generating the License Key”. NeuroField also supports the use of a
cap for 1-4 Channel training. See “VI RTZ using Q20 – 19 Channels” for instructions.
Prepping for 1 – 4 Channel RTZ When prepping a patient for RTZ using individual electrodes, it is important that you clean the sites
where the sensors are placed and correctly connect the electrodes to the Q20 device.
To Clean Sites and Attach Sensors to Head:
1. Take a cotton swap and apply a small amount of NuPrep to the swab.
2. Clean both ear lobes and the two sites were you intend to place electrodes with the NuPrep.
To Attach the “Breakout Box”:
1. Plug the white “Breakout Box” that came with your kit into the “Cap” slot on the front of the
Q20 device.
2. Note the color-coded connectors on the Breakout Box and their purpose:
Four Red Connectors = Active Electrodes
Two White Connectors = Reference Electrodes
One Black Connector = Ground Electrode
To Connect Electrodes to the Q20 and Attach Sensors:
1. Plug the Ear Clip electrodes into the two white connectors on the Breakout Box and attach one
to each ear. These are the Reference electrodes.
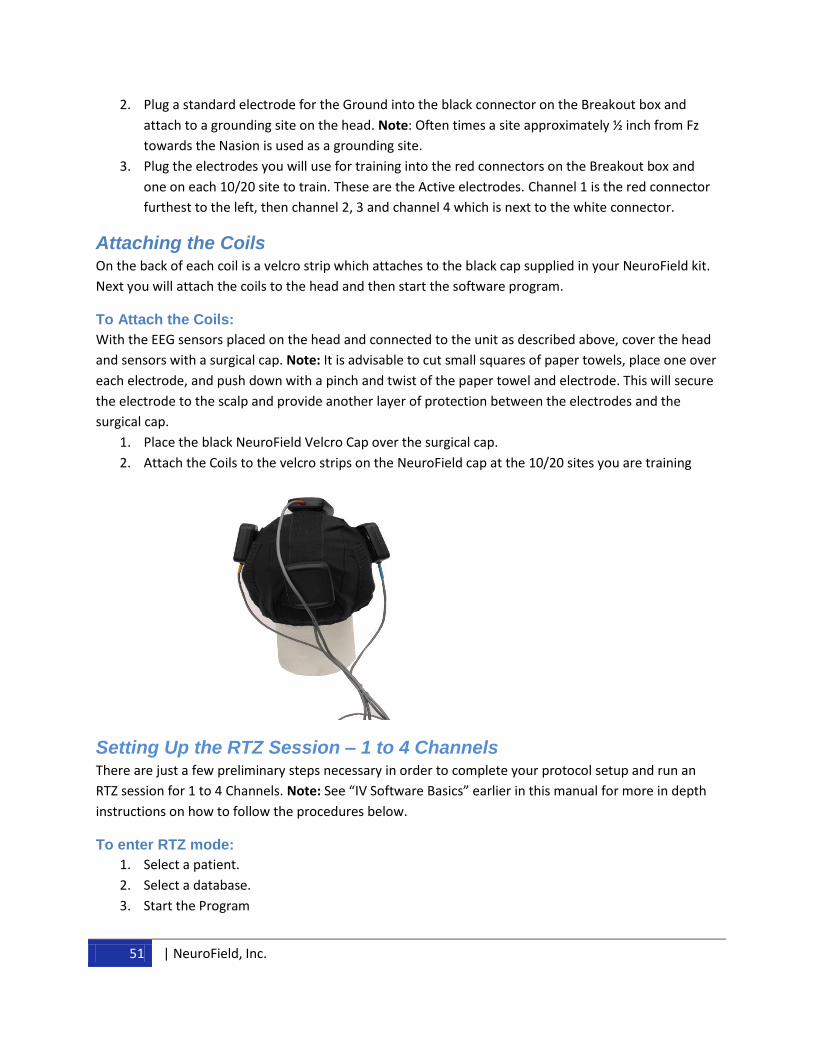
51 | NeuroField, Inc.
2. Plug a standard electrode for the Ground into the black connector on the Breakout box and
attach to a grounding site on the head. Note: Often times a site approximately ½ inch from Fz
towards the Nasion is used as a grounding site.
3. Plug the electrodes you will use for training into the red connectors on the Breakout box and
one on each 10/20 site to train. These are the Active electrodes. Channel 1 is the red connector
furthest to the left, then channel 2, 3 and channel 4 which is next to the white connector.
Attaching the Coils On the back of each coil is a velcro strip which attaches to the black cap supplied in your NeuroField kit.
Next you will attach the coils to the head and then start the software program.
To Attach the Coils:
With the EEG sensors placed on the head and connected to the unit as described above, cover the head
and sensors with a surgical cap. Note: It is advisable to cut small squares of paper towels, place one over
each electrode, and push down with a pinch and twist of the paper towel and electrode. This will secure
the electrode to the scalp and provide another layer of protection between the electrodes and the
surgical cap.
1. Place the black NeuroField Velcro Cap over the surgical cap.
2. Attach the Coils to the velcro strips on the NeuroField cap at the 10/20 sites you are training
Setting Up the RTZ Session – 1 to 4 Channels There are just a few preliminary steps necessary in order to complete your protocol setup and run an
RTZ session for 1 to 4 Channels. Note: See “IV Software Basics” earlier in this manual for more in depth
instructions on how to follow the procedures below.
To enter RTZ mode:
1. Select a patient.
2. Select a database.
3. Start the Program
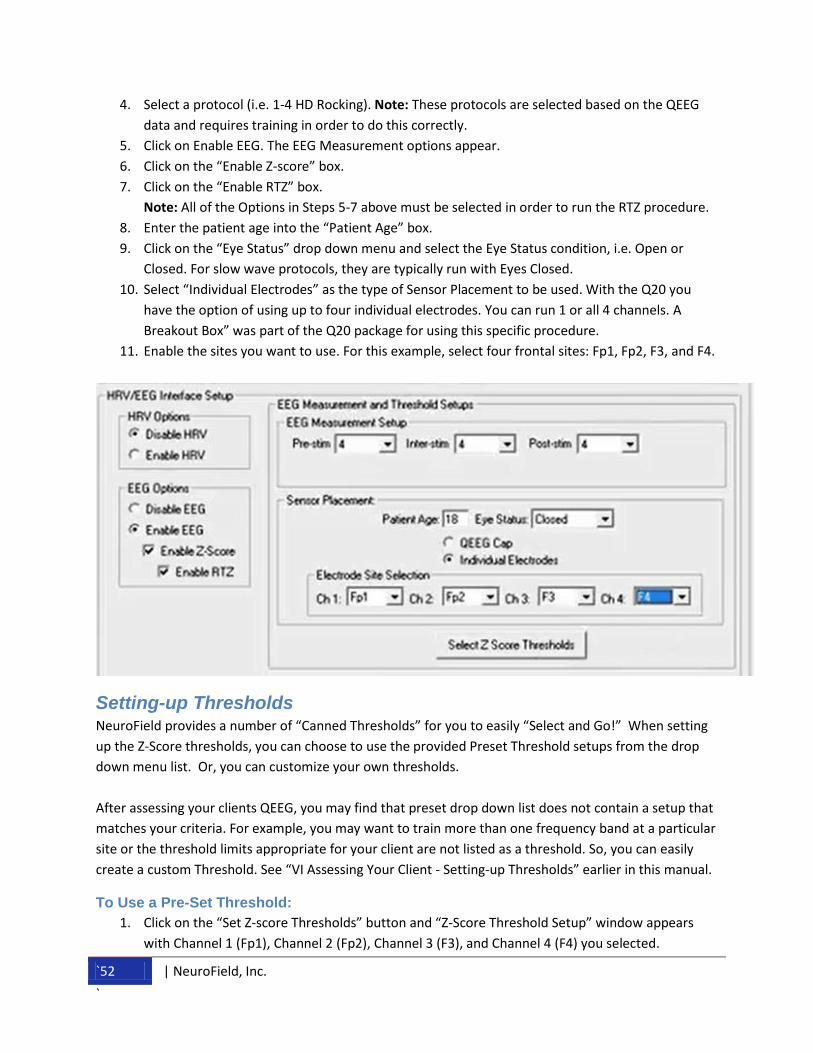
`52 | NeuroField, Inc.
`
4. Select a protocol (i.e. 1-4 HD Rocking). Note: These protocols are selected based on the QEEG
data and requires training in order to do this correctly.
5. Click on Enable EEG. The EEG Measurement options appear.
6. Click on the “Enable Z-score” box.
7. Click on the “Enable RTZ” box.
Note: All of the Options in Steps 5-7 above must be selected in order to run the RTZ procedure.
8. Enter the patient age into the “Patient Age” box.
9. Click on the “Eye Status” drop down menu and select the Eye Status condition, i.e. Open or
Closed. For slow wave protocols, they are typically run with Eyes Closed.
10. Select “Individual Electrodes” as the type of Sensor Placement to be used. With the Q20 you
have the option of using up to four individual electrodes. You can run 1 or all 4 channels. A
Breakout Box” was part of the Q20 package for using this specific procedure.
11. Enable the sites you want to use. For this example, select four frontal sites: Fp1, Fp2, F3, and F4.
Setting-up Thresholds NeuroField provides a number of “Canned Thresholds” for you to easily “Select and Go!” When setting
up the Z-Score thresholds, you can choose to use the provided Preset Threshold setups from the drop
down menu list. Or, you can customize your own thresholds.
After assessing your clients QEEG, you may find that preset drop down list does not contain a setup that
matches your criteria. For example, you may want to train more than one frequency band at a particular
site or the threshold limits appropriate for your client are not listed as a threshold. So, you can easily
create a custom Threshold. See “VI Assessing Your Client - Setting-up Thresholds” earlier in this manual.
To Use a Pre-Set Threshold:
1. Click on the “Set Z-score Thresholds” button and “Z-Score Threshold Setup” window appears
with Channel 1 (Fp1), Channel 2 (Fp2), Channel 3 (F3), and Channel 4 (F4) you selected.
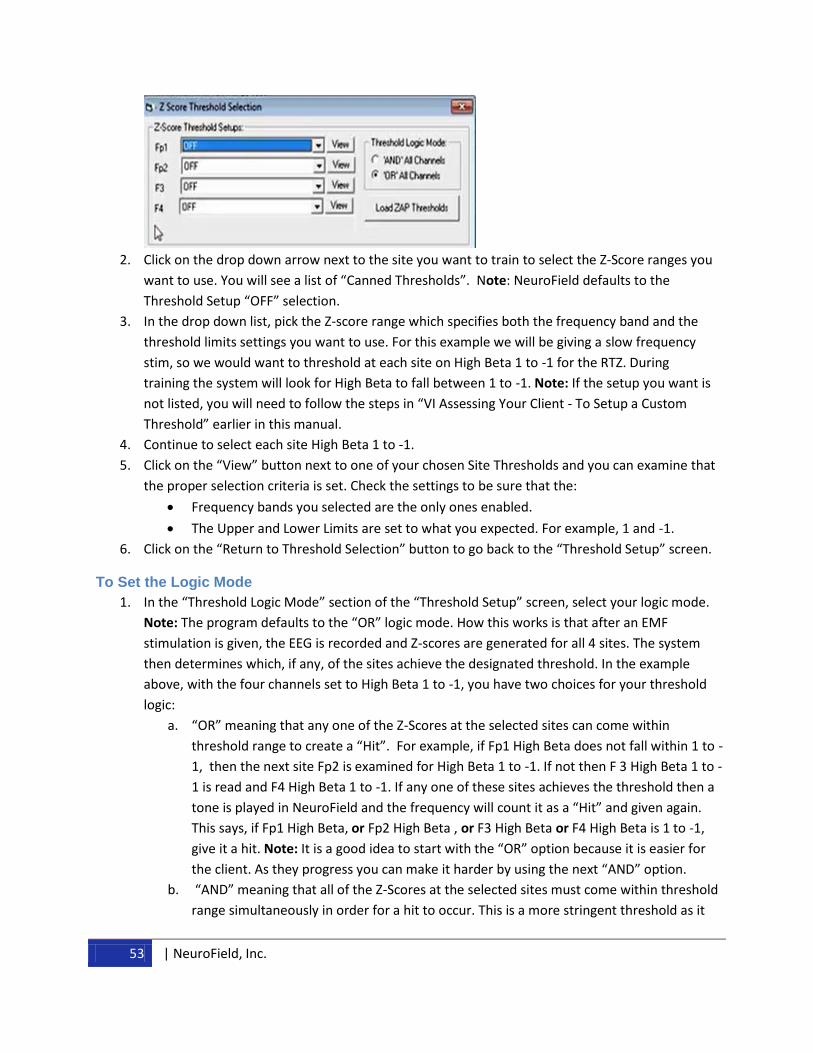
53 | NeuroField, Inc.
2. Click on the drop down arrow next to the site you want to train to select the Z-Score ranges you
want to use. You will see a list of “Canned Thresholds”. Note: NeuroField defaults to the
Threshold Setup “OFF” selection.
3. In the drop down list, pick the Z-score range which specifies both the frequency band and the
threshold limits settings you want to use. For this example we will be giving a slow frequency
stim, so we would want to threshold at each site on High Beta 1 to -1 for the RTZ. During
training the system will look for High Beta to fall between 1 to -1. Note: If the setup you want is
not listed, you will need to follow the steps in “VI Assessing Your Client - To Setup a Custom
Threshold” earlier in this manual.
4. Continue to select each site High Beta 1 to -1.
5. Click on the “View” button next to one of your chosen Site Thresholds and you can examine that
the proper selection criteria is set. Check the settings to be sure that the:
Frequency bands you selected are the only ones enabled.
The Upper and Lower Limits are set to what you expected. For example, 1 and -1.
6. Click on the “Return to Threshold Selection” button to go back to the “Threshold Setup” screen.
To Set the Logic Mode
1. In the “Threshold Logic Mode” section of the “Threshold Setup” screen, select your logic mode.
Note: The program defaults to the “OR” logic mode. How this works is that after an EMF
stimulation is given, the EEG is recorded and Z-scores are generated for all 4 sites. The system
then determines which, if any, of the sites achieve the designated threshold. In the example
above, with the four channels set to High Beta 1 to -1, you have two choices for your threshold
logic:
a. “OR” meaning that any one of the Z-Scores at the selected sites can come within
threshold range to create a “Hit”. For example, if Fp1 High Beta does not fall within 1 to -
1, then the next site Fp2 is examined for High Beta 1 to -1. If not then F 3 High Beta 1 to -
1 is read and F4 High Beta 1 to -1. If any one of these sites achieves the threshold then a
tone is played in NeuroField and the frequency will count it as a “Hit” and given again.
This says, if Fp1 High Beta, or Fp2 High Beta , or F3 High Beta or F4 High Beta is 1 to -1,
give it a hit. Note: It is a good idea to start with the “OR” option because it is easier for
the client. As they progress you can make it harder by using the next “AND” option.
b. “AND” meaning that all of the Z-Scores at the selected sites must come within threshold
range simultaneously in order for a hit to occur. This is a more stringent threshold as it
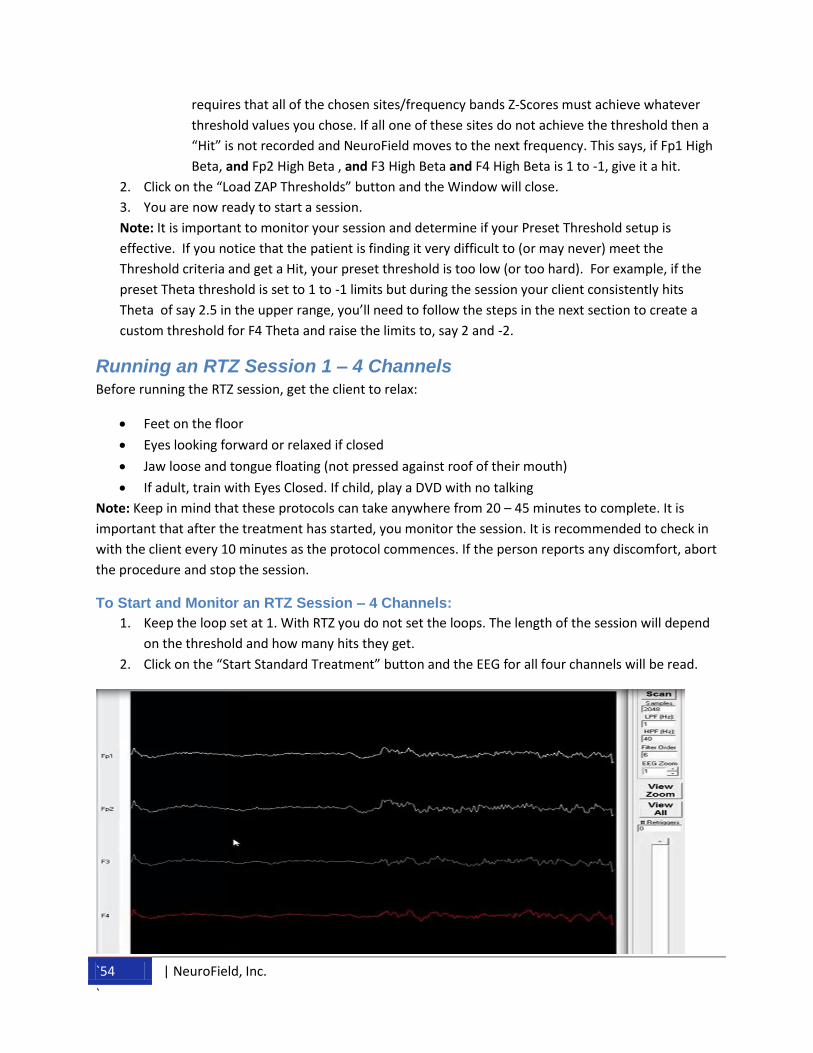
`54 | NeuroField, Inc.
`
requires that all of the chosen sites/frequency bands Z-Scores must achieve whatever
threshold values you chose. If all one of these sites do not achieve the threshold then a
“Hit” is not recorded and NeuroField moves to the next frequency. This says, if Fp1 High
Beta, and Fp2 High Beta , and F3 High Beta and F4 High Beta is 1 to -1, give it a hit.
2. Click on the “Load ZAP Thresholds” button and the Window will close.
3. You are now ready to start a session.
Note: It is important to monitor your session and determine if your Preset Threshold setup is
effective. If you notice that the patient is finding it very difficult to (or may never) meet the
Threshold criteria and get a Hit, your preset threshold is too low (or too hard). For example, if the
preset Theta threshold is set to 1 to -1 limits but during the session your client consistently hits
Theta of say 2.5 in the upper range, you’ll need to follow the steps in the next section to create a
custom threshold for F4 Theta and raise the limits to, say 2 and -2.
Running an RTZ Session 1 – 4 Channels Before running the RTZ session, get the client to relax:
Feet on the floor
Eyes looking forward or relaxed if closed
Jaw loose and tongue floating (not pressed against roof of their mouth)
If adult, train with Eyes Closed. If child, play a DVD with no talking
Note: Keep in mind that these protocols can take anywhere from 20 – 45 minutes to complete. It is
important that after the treatment has started, you monitor the session. It is recommended to check in
with the client every 10 minutes as the protocol commences. If the person reports any discomfort, abort
the procedure and stop the session.
To Start and Monitor an RTZ Session – 4 Channels:
1. Keep the loop set at 1. With RTZ you do not set the loops. The length of the session will depend
on the threshold and how many hits they get.
2. Click on the “Start Standard Treatment” button and the EEG for all four channels will be read.
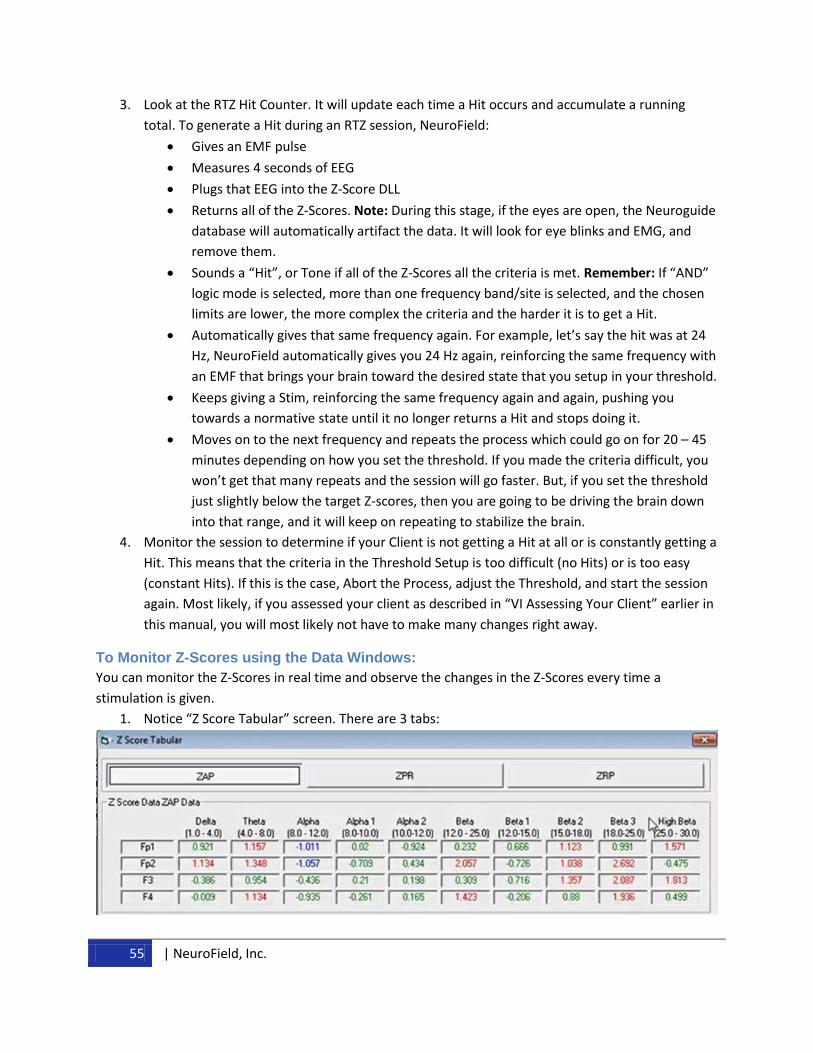
55 | NeuroField, Inc.
3. Look at the RTZ Hit Counter. It will update each time a Hit occurs and accumulate a running
total. To generate a Hit during an RTZ session, NeuroField:
Gives an EMF pulse
Measures 4 seconds of EEG
Plugs that EEG into the Z-Score DLL
Returns all of the Z-Scores. Note: During this stage, if the eyes are open, the Neuroguide
database will automatically artifact the data. It will look for eye blinks and EMG, and
remove them.
Sounds a “Hit”, or Tone if all of the Z-Scores all the criteria is met. Remember: If “AND”
logic mode is selected, more than one frequency band/site is selected, and the chosen
limits are lower, the more complex the criteria and the harder it is to get a Hit.
Automatically gives that same frequency again. For example, let’s say the hit was at 24
Hz, NeuroField automatically gives you 24 Hz again, reinforcing the same frequency with
an EMF that brings your brain toward the desired state that you setup in your threshold.
Keeps giving a Stim, reinforcing the same frequency again and again, pushing you
towards a normative state until it no longer returns a Hit and stops doing it.
Moves on to the next frequency and repeats the process which could go on for 20 – 45
minutes depending on how you set the threshold. If you made the criteria difficult, you
won’t get that many repeats and the session will go faster. But, if you set the threshold
just slightly below the target Z-scores, then you are going to be driving the brain down
into that range, and it will keep on repeating to stabilize the brain.
4. Monitor the session to determine if your Client is not getting a Hit at all or is constantly getting a
Hit. This means that the criteria in the Threshold Setup is too difficult (no Hits) or is too easy
(constant Hits). If this is the case, Abort the Process, adjust the Threshold, and start the session
again. Most likely, if you assessed your client as described in “VI Assessing Your Client” earlier in
this manual, you will most likely not have to make many changes right away.
To Monitor Z-Scores using the Data Windows:
You can monitor the Z-Scores in real time and observe the changes in the Z-Scores every time a
stimulation is given.
1. Notice “Z Score Tabular” screen. There are 3 tabs:
`56 | NeuroField, Inc.
`
ZAP = Z-Score Absolute Power
ZPR = Z-Score Power Ratio
ZRP = Z-Score Relative Power
2. Review the Data in each column on the ZAP tab. Every 8 seconds a new EEG scan pass will occur
and the Tabular will populate with the Z-Scores. You will see Red, Blue, and Green data. The
color coding is as follows: Note: With each scan the previous data gets overwritten.
i. Green = Z-Score between 1 and -1
ii. Red = Z-Score Excessive or above 1
iii. Blue = Z-Score Deficient or less than -1
3. Notice the “4 Channel EEG Data” screen. Here you can see:
Individual EEG data for each site.
Double on the window and it will zoom into the data
Select the “View Zoom” button to select individual plots. Zoom in and look at the EEG
from another perspective.
To Monitor Sessions When Using the HD or HD Rocking Protocols:
1. When you select say the:
a. “T062 -- > 9-12 HD” protocol for someone who is deficient in Alpha, it starts at 9 Hz and
steps through to 9.1, 9.2, 9.3 etc. all the way to 12.
or
b. “T015 -- > 1-4 HD Rocking” protocol for someone who is deficient in Delta, it starts at 1
Hz and steps through to 1.1, 1.2, 1.3 etc. all the way to 4 and then goes back down 3.9,
3.8 or 3.7 all the way back to 1. This is method instills flexibility and is not as jarring as
going straight back to 1 after hitting 4.
2. Be patient during the session when monitoring the HD protocols. These protocols have the
ability to really “tease out” what frequency will get the brain to where you want it to go. By
stepping thru each frequency in small increments, you are ticking through each one of those
pieces of the frequency band and eventually you will start hearing Hits. However, you could go
for quite a while without getting a hit and then bam, the brain locks on to a frequency and the
hits start coming.
3. Notice at this point that the brain will start replicating that frequency rhythm to correct the Z-
Score and NeuroField will continue reinforcing it. If you get a Hit at 9.4 it will give 9.4 again. If
you get another Hit, it will give 9.4 again. The client could then go 20 minutes and only get
through a small portion of the frequency band, but it is the most effective piece. At some point,
it will then stop producing a normative Z-Score and move on.
Ending a Treatment and Saving Session Data
To Complete an RTZ Session:
1. When the protocol is done the Stim cycles will stop. At this point you can elect to end the
session or

57 | NeuroField, Inc.
2. Run another session using the Z-Score Hits that are recorded in the Z-Score Hit Table during the
Session.
If you want to view the session data or Plot it out using NeuroPlot, you must first Save the Session data.
With NeuroPlot you can chart each one of the specific frequency bands.
To View or Save Session Data:
1. Click on the “Z Score Summary” button from the Main Menu side bar. Here you can see all of the
data.
2. Scroll down and look at all 4 channels. You can look at each of the frequency bands and the Z-
Score that was measured.
3. To Save the data, Click on the “All Channel Text File Dump” button. This will save the data for all
channels in the patient data folder.
This data can then be examined in NeuroPlot. See “IX NeuroPlot” later in this manual for details.
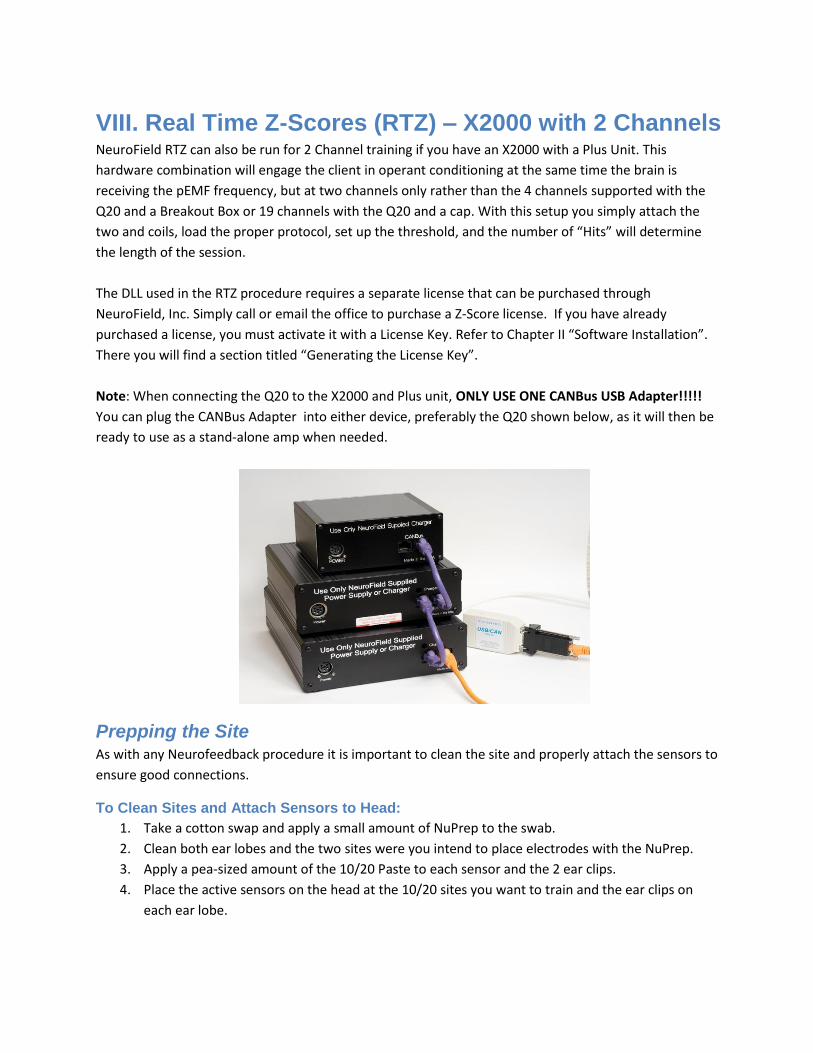
VIII. Real Time Z-Scores (RTZ) – X2000 with 2 Channels NeuroField RTZ can also be run for 2 Channel training if you have an X2000 with a Plus Unit. This
hardware combination will engage the client in operant conditioning at the same time the brain is
receiving the pEMF frequency, but at two channels only rather than the 4 channels supported with the
Q20 and a Breakout Box or 19 channels with the Q20 and a cap. With this setup you simply attach the
two and coils, load the proper protocol, set up the threshold, and the number of “Hits” will determine
the length of the session.
The DLL used in the RTZ procedure requires a separate license that can be purchased through
NeuroField, Inc. Simply call or email the office to purchase a Z-Score license. If you have already
purchased a license, you must activate it with a License Key. Refer to Chapter II “Software Installation”.
There you will find a section titled “Generating the License Key”.
Note: When connecting the Q20 to the X2000 and Plus unit, ONLY USE ONE CANBus USB Adapter!!!!!
You can plug the CANBus Adapter into either device, preferably the Q20 shown below, as it will then be
ready to use as a stand-alone amp when needed.
Prepping the Site As with any Neurofeedback procedure it is important to clean the site and properly attach the sensors to
ensure good connections.
To Clean Sites and Attach Sensors to Head:
1. Take a cotton swap and apply a small amount of NuPrep to the swab.
2. Clean both ear lobes and the two sites were you intend to place electrodes with the NuPrep.
3. Apply a pea-sized amount of the 10/20 Paste to each sensor and the 2 ear clips.
4. Place the active sensors on the head at the 10/20 sites you want to train and the ear clips on
each ear lobe.
59 | NeuroField, Inc.
Note: It is advisable to cut small squares of paper towels, place one over each electrode, and
push down with a pinch and twist of the paper towel and electrode. This will secure the
electrode to the scalp and provide another layer of protection.
To Connect the Sensors to the X2000 - True Linked Ears:
1. With a pea-sized amount of 10/20 paste on each sensor and ear clip, attach them to the head
and ears:
2 active sensors on the 10/20 sites you will be training
1 ground sensor on the grounding site
2 ear clips, one on each ear
2. Plug the active sensors on the head into the ports labeled A1 and A2 on the back of the X2000
unit.
3. Plug the mastoid sensor into the port labeled GND.
4. Remove the white linker if it is attached.
5. Connect one ear electrode to the port labeled REF1 and the other ear electrode to the port
labeled REF2.
This creates a true linked ear connection with NeuroField.
Attaching the Coils On the back of each coil is a velcro strip which attaches to the black cap supplied in your NeuroField kit.
Next you will attach the coils to the head and then start the software program.
To Attach the Coils:
1. With the EEG sensors placed on the head and connected to the unit cover the sensors with a
small piece of
2. Cover the head and sensors with a surgical cap.
3. Place the black NeuroField Velcro Cap over the surgical cap.
3. Attach the Coils to the velcro strips on the NeuroField cap at the 10/20 sites you are training.
Setting Up the RTZ Session – 2 Channels There are just a few preliminary steps necessary in order to complete your protocol setup and run an
RTZ session for 2 Channels. Note: See “IV Software Basics” earlier in this manual for more in depth
instructions on how to follow the procedures below.
To enter RTZ mode:
1. Select a patient.
2. Select a database.
3. Start the Program
4. Select a protocol (i.e. 1-4 HD Rocking). Note: These protocols are selected based on the QEEG
data and requires training in order to do this correctly.
5. Click on Enable EEG. The EEG Measurement options appear.
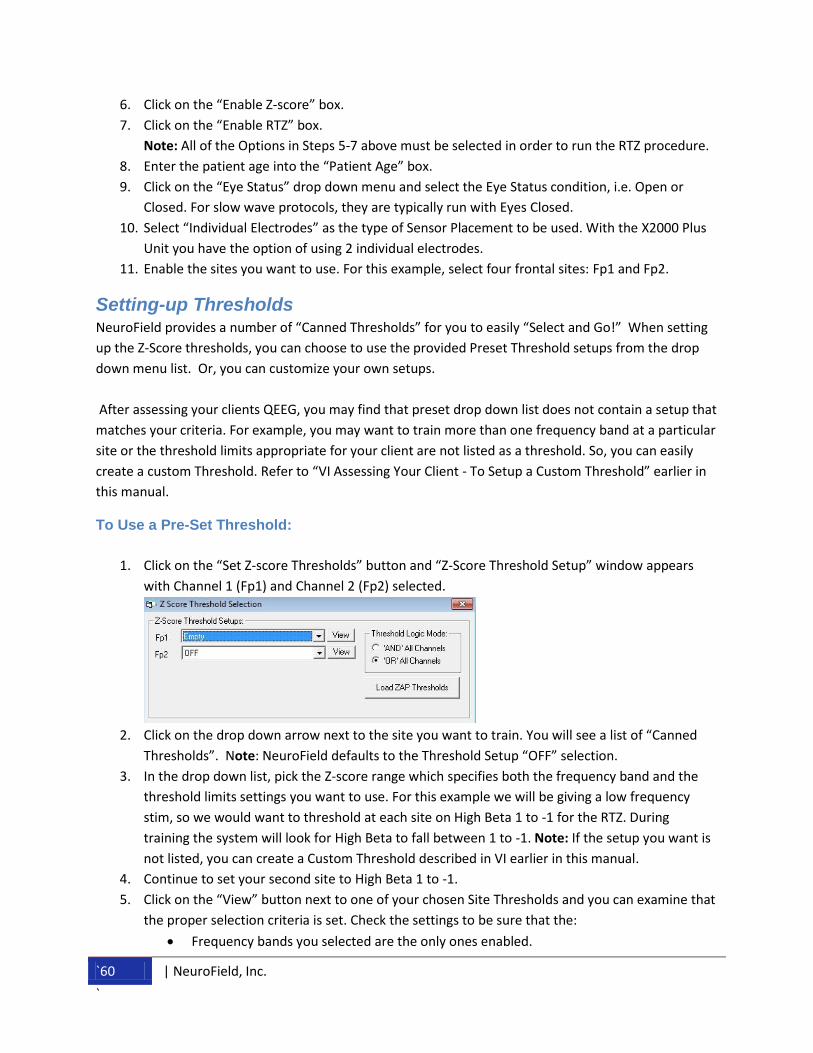
`60 | NeuroField, Inc.
`
6. Click on the “Enable Z-score” box.
7. Click on the “Enable RTZ” box.
Note: All of the Options in Steps 5-7 above must be selected in order to run the RTZ procedure.
8. Enter the patient age into the “Patient Age” box.
9. Click on the “Eye Status” drop down menu and select the Eye Status condition, i.e. Open or
Closed. For slow wave protocols, they are typically run with Eyes Closed.
10. Select “Individual Electrodes” as the type of Sensor Placement to be used. With the X2000 Plus
Unit you have the option of using 2 individual electrodes.
11. Enable the sites you want to use. For this example, select four frontal sites: Fp1 and Fp2.
Setting-up Thresholds NeuroField provides a number of “Canned Thresholds” for you to easily “Select and Go!” When setting
up the Z-Score thresholds, you can choose to use the provided Preset Threshold setups from the drop
down menu list. Or, you can customize your own setups.
After assessing your clients QEEG, you may find that preset drop down list does not contain a setup that
matches your criteria. For example, you may want to train more than one frequency band at a particular
site or the threshold limits appropriate for your client are not listed as a threshold. So, you can easily
create a custom Threshold. Refer to “VI Assessing Your Client - To Setup a Custom Threshold” earlier in
this manual.
To Use a Pre-Set Threshold:
1. Click on the “Set Z-score Thresholds” button and “Z-Score Threshold Setup” window appears
with Channel 1 (Fp1) and Channel 2 (Fp2) selected.
2. Click on the drop down arrow next to the site you want to train. You will see a list of “Canned
Thresholds”. Note: NeuroField defaults to the Threshold Setup “OFF” selection.
3. In the drop down list, pick the Z-score range which specifies both the frequency band and the
threshold limits settings you want to use. For this example we will be giving a low frequency
stim, so we would want to threshold at each site on High Beta 1 to -1 for the RTZ. During
training the system will look for High Beta to fall between 1 to -1. Note: If the setup you want is
not listed, you can create a Custom Threshold described in VI earlier in this manual.
4. Continue to set your second site to High Beta 1 to -1.
5. Click on the “View” button next to one of your chosen Site Thresholds and you can examine that
the proper selection criteria is set. Check the settings to be sure that the:
Frequency bands you selected are the only ones enabled.
61 | NeuroField, Inc.
The Upper and Lower Limits are set to what you expected. For example, 1 and -1.
6. Click on the “Return to Threshold Selection” button to go back to the “Threshold Setup” screen.
To Set the Logic Mode:
1. In the “Threshold Logic Mode” section of the “Threshold Setup” screen, select your logic mode.
Note: The program defaults to the “OR” logic mode. How this works is that after an EMF
stimulation is given, the EEG is recorded and Z-scores are generated for both sites. The system
then determines which, if any, of the sites achieve the designated threshold. In the example
above, with the two channels set to High Beta 1 to -1, you have two choices for your threshold
logic:
a. “OR” meaning that any one of the Z-Scores at the selected sites can come within
threshold range to create a “Hit”. For example, if Fp1 High Beta does not fall within 1 to
-1, then the next site Fp2 is examined for High Beta 1 to -1. If either one of these sites
achieves the threshold then a tone is played in NeuroField and the frequency will count
it as a “Hit” and give it again. This says, if Fp1 High Beta, or Fp2 High Beta is 1 to -1, give
it a hit.
b. “AND” meaning that all of the Z-Scores at the selected sites must come within threshold
range simultaneously in order for a hit to occur. This is a more stringent threshold as it
requires that all of the chosen sites/frequency bands Z-Scores must achieve whatever
threshold values you chose. If all one of these sites do not achieve the threshold then a
a “Hit” is not recorded and NeuroField moves to the next frequency. This says, if Fp1
High Beta, and Fp1 High Beta is 1 to -1, give it a hit
2. Click on the “Load ZAP Thresholds” button and the Window will close.
3. You are now ready to start a session. Continue to the section below titled, “Running an RTZ
Session.”
Note: It is important to monitor your session and determine if your Preset Threshold setup is
effective. If you notice that the patient is finding it very difficult to (or may never) meet the
Threshold criteria and get a Hit, your preset threshold is too low (or too hard). For example, if the
preset Theta threshold is set to 1 to -1 limits but during the session your client consistently hits
Theta of say 2.5 in the upper range, you will need to create a custom threshold as described in “VI
Assessing Your Client – To Setup a Custom Threshold” earlier in this manual.
Running an RTZ Session – 2 Channels Before running the RTZ session, get the client to relax:
Feet on the floor
Eyes looking forward or relaxed if closed
Jaw loose and tongue floating (not pressed against roof of their mouth)
If adult, train with Eyes Closed. If child, play a DVD with no talking
Note: Keep in mind that these protocols can take anywhere from 20 – 45 minutes to complete. It is
important that after the treatment has started, you monitor the session. It is recommended to check in
`62 | NeuroField, Inc.
`
with the client every 10 minutes as the protocol commences. If the person reports any discomfort, abort
the procedure and stop the session.
To Start and Monitor an RTZ Session:
1. Keep the loop set at 1. With RTZ you do not set the loops. The length of the session will depend
on the threshold and how many hits they get.
2. Click on the “Start Standard Treatment” button. The RTZ session will begin and the client should
start getting a “Hit”.
3. Look at the RTZ Hit Counter. It will update each time a Hit occurs and accumulate a running
total. To generate a Hit during an RTZ session, NeuroField:
Gives an EMF pulse
Measures 4 seconds of EEG
Plugs that EEG into the Z-Score DLL
Returns all of the Z-Scores. Note: During this stage, if the eyes are open, the Neuroguide
database will automatically artifact the data. It will look for eye blinks and EMG, and
remove them.
Sounds a “Hit”, or Tone if all of the Z-Scores fall between the set upper and lower
threshold limits (1 and -1) in each channel. This means the criteria is met and the brain
likes that frequency. Remember: If “AND” logic mode is selected, more than one
frequency band/site is selected, and the chosen limits are lower, the more complex the
criteria and the harder it is to get a Hit.
Automatically gives that same frequency again. For example, let’s say the hit was at 24
Hz, NeuroField automatically gives you 24 Hz again, reinforcing the same frequency with
an EMF that brings your brain toward the desired state that you setup in your threshold.
Keeps giving a Stim, reinforcing the same frequency again and again, pushing you
towards a normative state until it no longer returns a Hit and stops doing it.
Moves on to the next frequency and repeats the process which could go on for 20 – 45
minutes depending on how you set the threshold. If you made the criteria difficult, you
won’t get that many repeats and the session will go faster. But, if you set the threshold
just slightly below the target Z-scores, then you are going to be driving the brain down
into that range, and it will keep on repeating to stabilize the brain.
4. Monitor the session to determine if your Client is not getting a Hit at all or is constantly getting a
Hit. This means that the criteria in the Threshold Setup is too difficult (no Hits) or is too easy
(constant Hits). If this is the case, Abort the Process, adjust the Threshold, and start the session
again.
To Monitor Z-Scores using the Data Windows:
You can monitor the Z-Scores in real time and observe the changes in the Z-Scores every time a
stimulation is given.
1. Notice “Z Score Tabular” screen. There are 3 tabs:
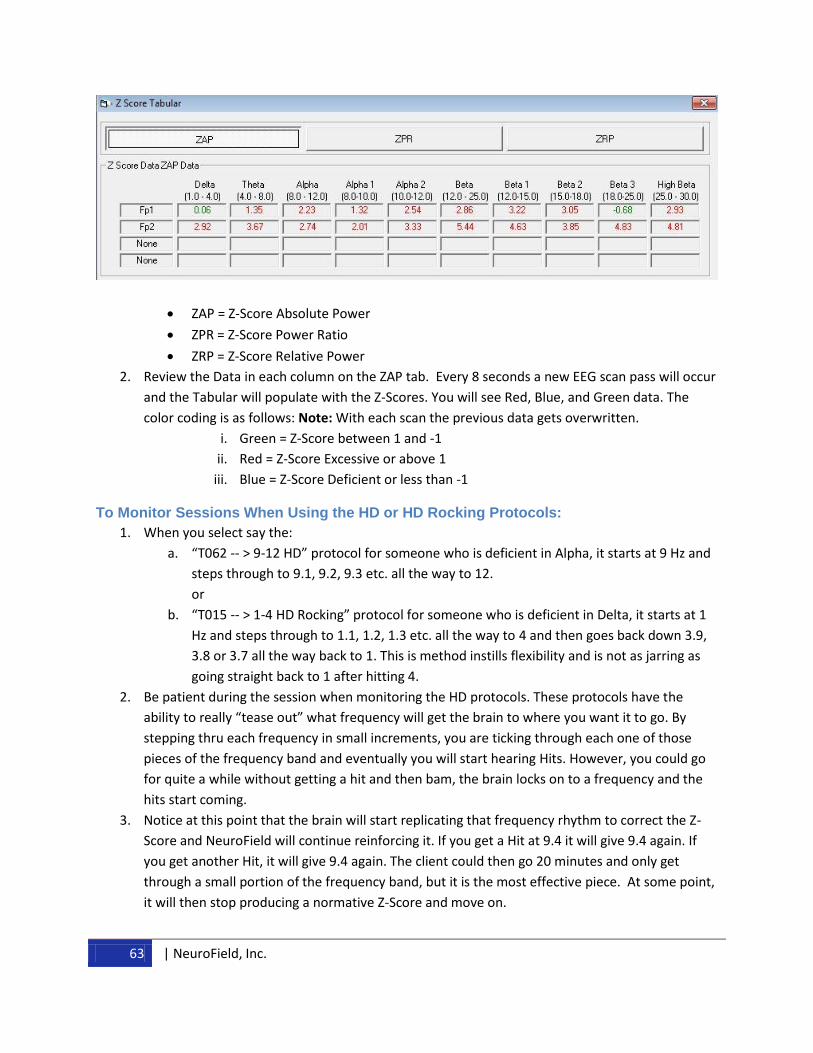
63 | NeuroField, Inc.
ZAP = Z-Score Absolute Power
ZPR = Z-Score Power Ratio
ZRP = Z-Score Relative Power
2. Review the Data in each column on the ZAP tab. Every 8 seconds a new EEG scan pass will occur
and the Tabular will populate with the Z-Scores. You will see Red, Blue, and Green data. The
color coding is as follows: Note: With each scan the previous data gets overwritten.
i. Green = Z-Score between 1 and -1
ii. Red = Z-Score Excessive or above 1
iii. Blue = Z-Score Deficient or less than -1
To Monitor Sessions When Using the HD or HD Rocking Protocols:
1. When you select say the:
a. “T062 -- > 9-12 HD” protocol for someone who is deficient in Alpha, it starts at 9 Hz and
steps through to 9.1, 9.2, 9.3 etc. all the way to 12.
or
b. “T015 -- > 1-4 HD Rocking” protocol for someone who is deficient in Delta, it starts at 1
Hz and steps through to 1.1, 1.2, 1.3 etc. all the way to 4 and then goes back down 3.9,
3.8 or 3.7 all the way back to 1. This is method instills flexibility and is not as jarring as
going straight back to 1 after hitting 4.
2. Be patient during the session when monitoring the HD protocols. These protocols have the
ability to really “tease out” what frequency will get the brain to where you want it to go. By
stepping thru each frequency in small increments, you are ticking through each one of those
pieces of the frequency band and eventually you will start hearing Hits. However, you could go
for quite a while without getting a hit and then bam, the brain locks on to a frequency and the
hits start coming.
3. Notice at this point that the brain will start replicating that frequency rhythm to correct the Z-
Score and NeuroField will continue reinforcing it. If you get a Hit at 9.4 it will give 9.4 again. If
you get another Hit, it will give 9.4 again. The client could then go 20 minutes and only get
through a small portion of the frequency band, but it is the most effective piece. At some point,
it will then stop producing a normative Z-Score and move on.
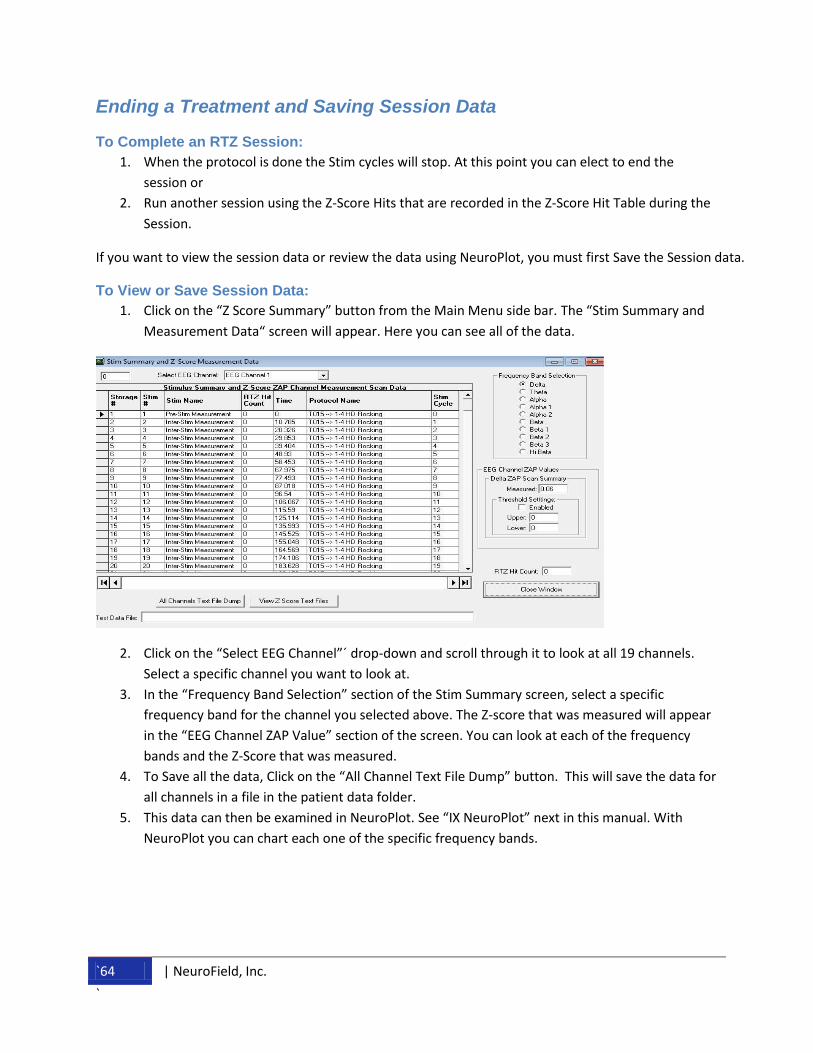
`64 | NeuroField, Inc.
`
Ending a Treatment and Saving Session Data
To Complete an RTZ Session:
1. When the protocol is done the Stim cycles will stop. At this point you can elect to end the
session or
2. Run another session using the Z-Score Hits that are recorded in the Z-Score Hit Table during the
Session.
If you want to view the session data or review the data using NeuroPlot, you must first Save the Session data.
To View or Save Session Data:
1. Click on the “Z Score Summary” button from the Main Menu side bar. The “Stim Summary and
Measurement Data“ screen will appear. Here you can see all of the data.
2. Click on the “Select EEG Channel”´ drop-down and scroll through it to look at all 19 channels.
Select a specific channel you want to look at.
3. In the “Frequency Band Selection” section of the Stim Summary screen, select a specific
frequency band for the channel you selected above. The Z-score that was measured will appear
in the “EEG Channel ZAP Value” section of the screen. You can look at each of the frequency
bands and the Z-Score that was measured.
4. To Save all the data, Click on the “All Channel Text File Dump” button. This will save the data for
all channels in a file in the patient data folder.
5. This data can then be examined in NeuroPlot. See “IX NeuroPlot” next in this manual. With
NeuroPlot you can chart each one of the specific frequency bands.
IX. NeuroField HRV – Body Protocols
Nogier Frequencies The NeuroField system was designed to run protocols for the body as well as the brain. It can be used to
target specific frequencies that effect changes in the body relating to pain, bone injury, inflammation
etc. Using NeuroField in this way allows you to work with the whole person not just the brain, and often
times it has been shown that when you stabilize the body, especially the gut, then the brain all of
sudden begins to regulate itself. This has also been shown to facilitate better tolerance of subsequent
neurofeedback training.
Body protocols are run using the Nogier Frequencies. Paul Nogier was a physician in France who in the
1950’s and 1960’s developed a system of frequencies based on what he coined “Auricular Therapy” or
acupuncture treatment on the ear. Nogier spent 30 years of his life devising a system of seven basic
frequencies that correspond to every chakra system in the body. These frequencies, some of which have
proven to be very effective for pain, have been tested over the last 50 years and have been shown to be
extremely safe and effective.
One method for using the 7 Nogier frequencies in NeuroField is to use the HRV sensor device and
muscle test the heart. This is not HRV variability training, but rather a procedure to build protocols from
the Nogier database that are customized for a particular client. This is done by first measuring the body's
responses to receiving stimulations using the HRV sensor and then running the Nogier frequencies the
body like the most. The idea behind this is that if the body wants a particular frequency then the heart
rate variability will increase. And, if the body gets the particular Nogier frequency that it wants, this
facilitates clients finding relief from their symptoms.
Another method is to simply use a built-in protocol from the Nogier database on the body in the area of
complaint, for example bone, tissue, nerve, or inflammation. A very common use of built-in Nogier
protocols on the body is “B – gastrointestinal and metabolic (Low)” over the gut. Nogier linked 4.75 hz
to the gastrointestinal and metabolic system in the body. If this frequency is given over the gut, it can
help relieve toxins and a number of different ailments such as auto immune issues, asthma, allergies.
Research has also shown that 4.75 hz inserted over the gut stimulates a serotonin release. This
facilitates a neurotransmitter release and clients have reported feeling better as a result of just getting
this protocol. Note: This procedure is an intermediate to advanced skill that requires training and
experience to conduct. It is strongly recommended that you participate in a NeuroField training before
using this technique.
HRV-Nogier Custom Protocols – An Overview Heart rate variability (HRV) is the variation in the time interval between heart beats and it is calculated
by measuring the standard deviation from normal to normal beats (SDNN). It is theorized that the HRV
system is measuring energy that the body wants, as evidenced by increases in the SDNN. A pEMF
`66 | NeuroField, Inc.
`
frequency can be delivered and heart rate variability measured via either of the following NeuroField
systems:
Q20 with a breakout box, an X3000, and a stand-alone HRV unit
or the
X2000 and Plus unit with HRV built-in
Overview – Selecting the Nogier Protocol
Nogier frequencies respond to every major energy system in the body. So, for instance, if a client has a
bad shoulder, coils are placed over the shoulder, a protocol containing all seven Nogier frequencies is
run, and stims are given to the body for each frequency. After each stim cycle, NeuroField measures 4
seconds of HRV and then moves on to the next frequency. When all seven frequencies have been given,
they are reviewed by the clinician, and the frequency with the highest variability is chosen as the
frequency the body wants. That frequency is then matched to a corresponding protocol in the Nogier
database and selected as the protocol to run for that particular client. Note: Step-by-step instructions
on how to select and run a Nogier protocol are detailed in the sections below.
Overview – Scanning the Nogier Protocol for “Hits”
Next, the selected Nogier protocol is fine-tuned even further and customized for the client by running it
for just 1 loop to determine which of the specific frequencies within that selected Nogier protocol the
body wants. NeuroField takes the first frequency, gives a stim and measures heart rate variability
changes. If HRV goes up 10 milliseconds above baseline, then it is considered a “hit” or a “yes” response
from the body. Then that frequency causing the variability change is put into a table, and NeuroField
moves on to the next frequency. This process is repeated until the entire Nogier protocol is run for 1
loop and a table with all the hits is generated.
Overview – Running the Nogier Protocol with only the “Hits”
Lastly, only the “hits” or the frequencies that the body responded to are given. The number of loops is
set (depending on the number of frequencies included in the table} to as many loops as necessary to
give a session for 30 – 50 minutes. Note: The HRV portion of NeuroField is for working with the body
only. And, it may be used on any part of the body except for the heart. Do not run NeuroField over the
heart.
In addition, there are some people for whom HRV, even on the body, is not an appropriate modality.
Clients with any type of heart condition, especially if they are wearing a pacemaker which is designed to
take control of pacing the heart, should not receive an HRV treatment. You can work with clients who
have high blood pressure, but don’t put the coils over the heart. Work with the brain instead to bring
down high beta which usually causes blood pressure to drop. With other clients who have very low
blood pressure or have a weak heart, it may be difficult to get a heartbeat at all and HRV may not work
for them. There are also some people with very thick skin, and the heartbeat will not break through. This
is rare, but it does happen.
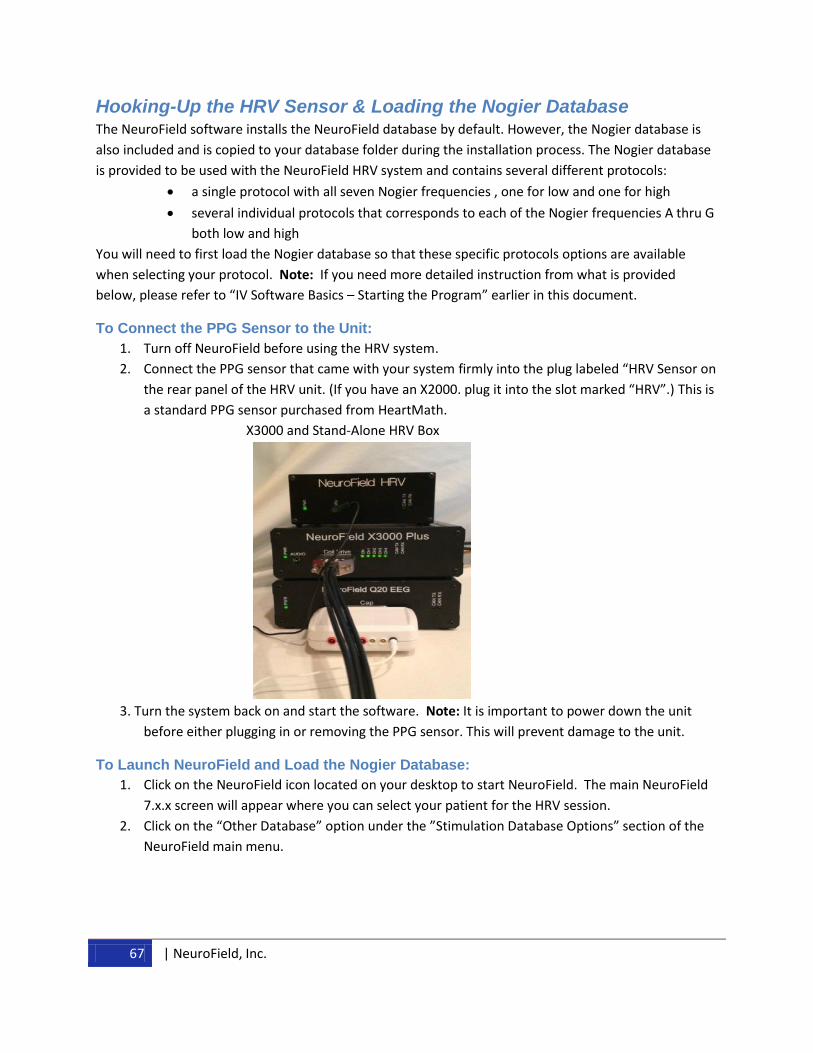
67 | NeuroField, Inc.
Hooking-Up the HRV Sensor & Loading the Nogier Database The NeuroField software installs the NeuroField database by default. However, the Nogier database is
also included and is copied to your database folder during the installation process. The Nogier database
is provided to be used with the NeuroField HRV system and contains several different protocols:
a single protocol with all seven Nogier frequencies , one for low and one for high
several individual protocols that corresponds to each of the Nogier frequencies A thru G
both low and high
You will need to first load the Nogier database so that these specific protocols options are available
when selecting your protocol. Note: If you need more detailed instruction from what is provided
below, please refer to “IV Software Basics – Starting the Program” earlier in this document.
To Connect the PPG Sensor to the Unit:
1. Turn off NeuroField before using the HRV system.
2. Connect the PPG sensor that came with your system firmly into the plug labeled “HRV Sensor on
the rear panel of the HRV unit. (If you have an X2000. plug it into the slot marked “HRV”.) This is
a standard PPG sensor purchased from HeartMath.
X3000 and Stand-Alone HRV Box
3. Turn the system back on and start the software. Note: It is important to power down the unit
before either plugging in or removing the PPG sensor. This will prevent damage to the unit.
To Launch NeuroField and Load the Nogier Database:
1. Click on the NeuroField icon located on your desktop to start NeuroField. The main NeuroField
7.x.x screen will appear where you can select your patient for the HRV session.
2. Click on the “Other Database” option under the ”Stimulation Database Options” section of the
NeuroField main menu.
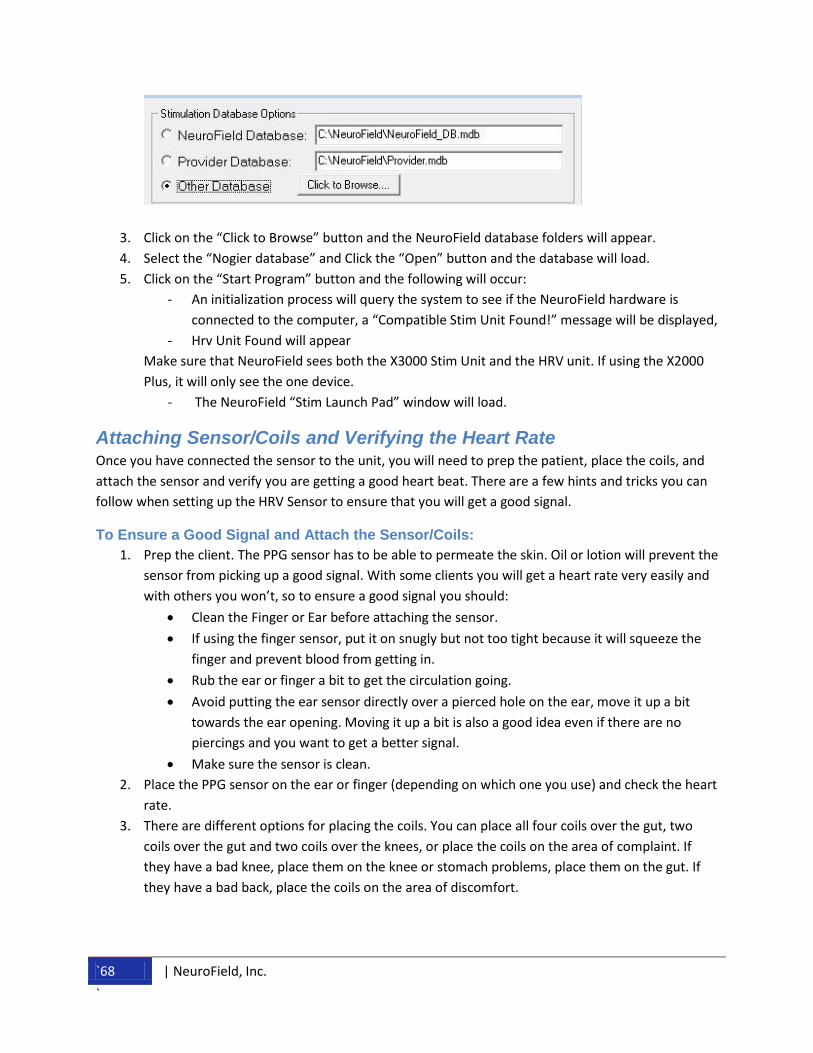
`68 | NeuroField, Inc.
`
3. Click on the “Click to Browse” button and the NeuroField database folders will appear.
4. Select the “Nogier database” and Click the “Open” button and the database will load.
5. Click on the “Start Program” button and the following will occur:
- An initialization process will query the system to see if the NeuroField hardware is
connected to the computer, a “Compatible Stim Unit Found!” message will be displayed,
- Hrv Unit Found will appear
Make sure that NeuroField sees both the X3000 Stim Unit and the HRV unit. If using the X2000
Plus, it will only see the one device.
- The NeuroField “Stim Launch Pad” window will load.
Attaching Sensor/Coils and Verifying the Heart Rate Once you have connected the sensor to the unit, you will need to prep the patient, place the coils, and
attach the sensor and verify you are getting a good heart beat. There are a few hints and tricks you can
follow when setting up the HRV Sensor to ensure that you will get a good signal.
To Ensure a Good Signal and Attach the Sensor/Coils:
1. Prep the client. The PPG sensor has to be able to permeate the skin. Oil or lotion will prevent the
sensor from picking up a good signal. With some clients you will get a heart rate very easily and
with others you won’t, so to ensure a good signal you should:
Clean the Finger or Ear before attaching the sensor.
If using the finger sensor, put it on snugly but not too tight because it will squeeze the
finger and prevent blood from getting in.
Rub the ear or finger a bit to get the circulation going.
Avoid putting the ear sensor directly over a pierced hole on the ear, move it up a bit
towards the ear opening. Moving it up a bit is also a good idea even if there are no
piercings and you want to get a better signal.
Make sure the sensor is clean.
2. Place the PPG sensor on the ear or finger (depending on which one you use) and check the heart
rate.
3. There are different options for placing the coils. You can place all four coils over the gut, two
coils over the gut and two coils over the knees, or place the coils on the area of complaint. If
they have a bad knee, place them on the knee or stomach problems, place them on the gut. If
they have a bad back, place the coils on the area of discomfort.
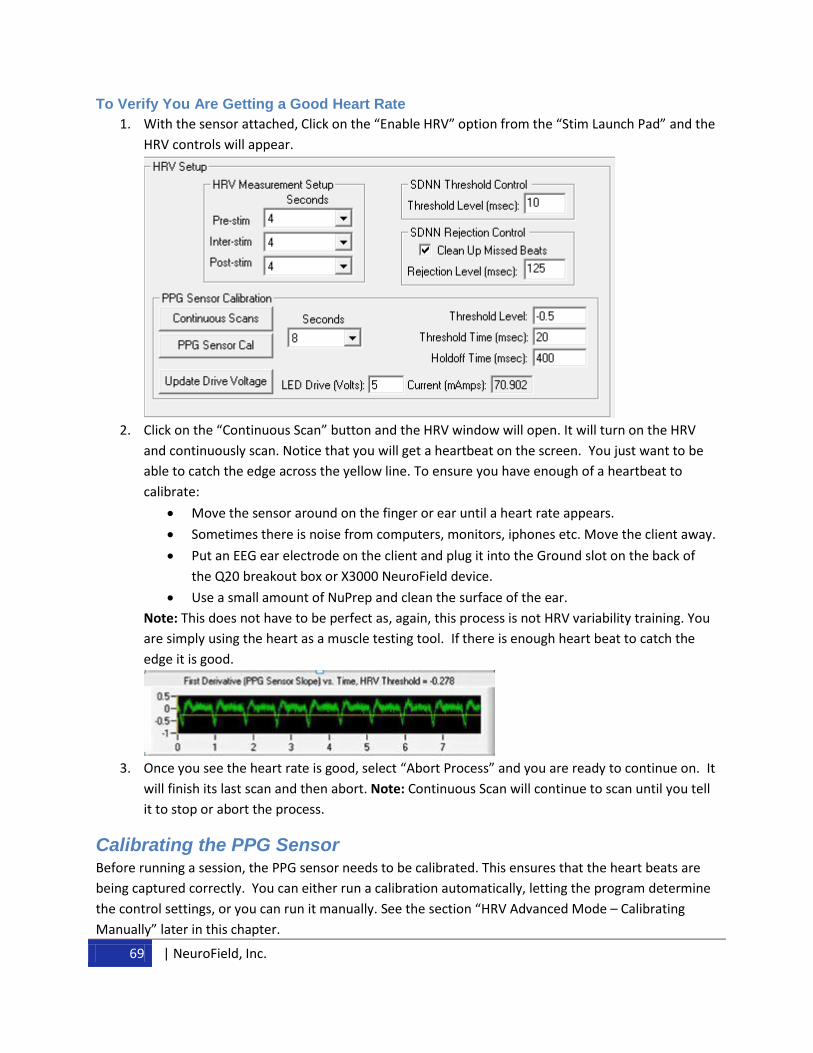
69 | NeuroField, Inc.
To Verify You Are Getting a Good Heart Rate
1. With the sensor attached, Click on the “Enable HRV” option from the “Stim Launch Pad” and the
HRV controls will appear.
2. Click on the “Continuous Scan” button and the HRV window will open. It will turn on the HRV
and continuously scan. Notice that you will get a heartbeat on the screen. You just want to be
able to catch the edge across the yellow line. To ensure you have enough of a heartbeat to
calibrate:
Move the sensor around on the finger or ear until a heart rate appears.
Sometimes there is noise from computers, monitors, iphones etc. Move the client away.
Put an EEG ear electrode on the client and plug it into the Ground slot on the back of
the Q20 breakout box or X3000 NeuroField device.
Use a small amount of NuPrep and clean the surface of the ear.
Note: This does not have to be perfect as, again, this process is not HRV variability training. You
are simply using the heart as a muscle testing tool. If there is enough heart beat to catch the
edge it is good.
3. Once you see the heart rate is good, select “Abort Process” and you are ready to continue on. It
will finish its last scan and then abort. Note: Continuous Scan will continue to scan until you tell
it to stop or abort the process.
Calibrating the PPG Sensor Before running a session, the PPG sensor needs to be calibrated. This ensures that the heart beats are
being captured correctly. You can either run a calibration automatically, letting the program determine
the control settings, or you can run it manually. See the section “HRV Advanced Mode – Calibrating
Manually” later in this chapter.
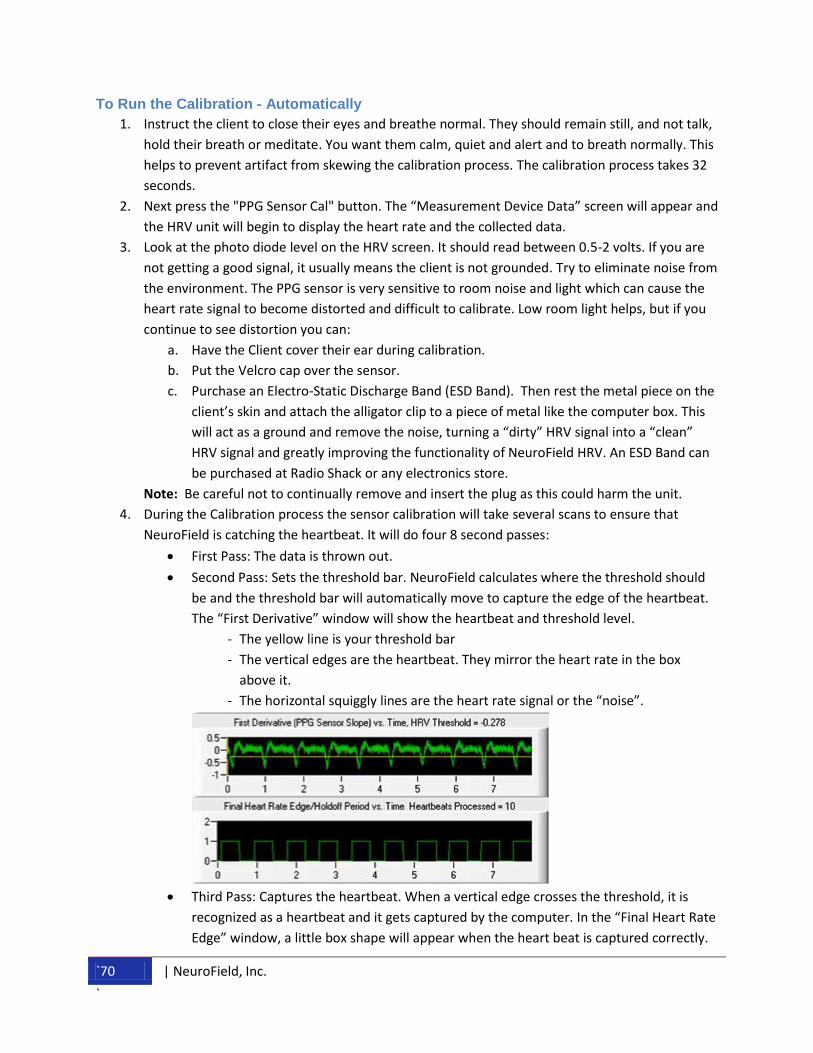
`70 | NeuroField, Inc.
`
To Run the Calibration - Automatically
1. Instruct the client to close their eyes and breathe normal. They should remain still, and not talk,
hold their breath or meditate. You want them calm, quiet and alert and to breath normally. This
helps to prevent artifact from skewing the calibration process. The calibration process takes 32
seconds.
2. Next press the "PPG Sensor Cal" button. The “Measurement Device Data” screen will appear and
the HRV unit will begin to display the heart rate and the collected data.
3. Look at the photo diode level on the HRV screen. It should read between 0.5-2 volts. If you are
not getting a good signal, it usually means the client is not grounded. Try to eliminate noise from
the environment. The PPG sensor is very sensitive to room noise and light which can cause the
heart rate signal to become distorted and difficult to calibrate. Low room light helps, but if you
continue to see distortion you can:
a. Have the Client cover their ear during calibration.
b. Put the Velcro cap over the sensor.
c. Purchase an Electro-Static Discharge Band (ESD Band). Then rest the metal piece on the
client’s skin and attach the alligator clip to a piece of metal like the computer box. This
will act as a ground and remove the noise, turning a “dirty” HRV signal into a “clean”
HRV signal and greatly improving the functionality of NeuroField HRV. An ESD Band can
be purchased at Radio Shack or any electronics store.
Note: Be careful not to continually remove and insert the plug as this could harm the unit.
4. During the Calibration process the sensor calibration will take several scans to ensure that
NeuroField is catching the heartbeat. It will do four 8 second passes:
First Pass: The data is thrown out.
Second Pass: Sets the threshold bar. NeuroField calculates where the threshold should
be and the threshold bar will automatically move to capture the edge of the heartbeat.
The “First Derivative” window will show the heartbeat and threshold level.
- The yellow line is your threshold bar
- The vertical edges are the heartbeat. They mirror the heart rate in the box
above it.
- The horizontal squiggly lines are the heart rate signal or the “noise”.
Third Pass: Captures the heartbeat. When a vertical edge crosses the threshold, it is
recognized as a heartbeat and it gets captured by the computer. In the “Final Heart Rate
Edge” window, a little box shape will appear when the heart beat is captured correctly.
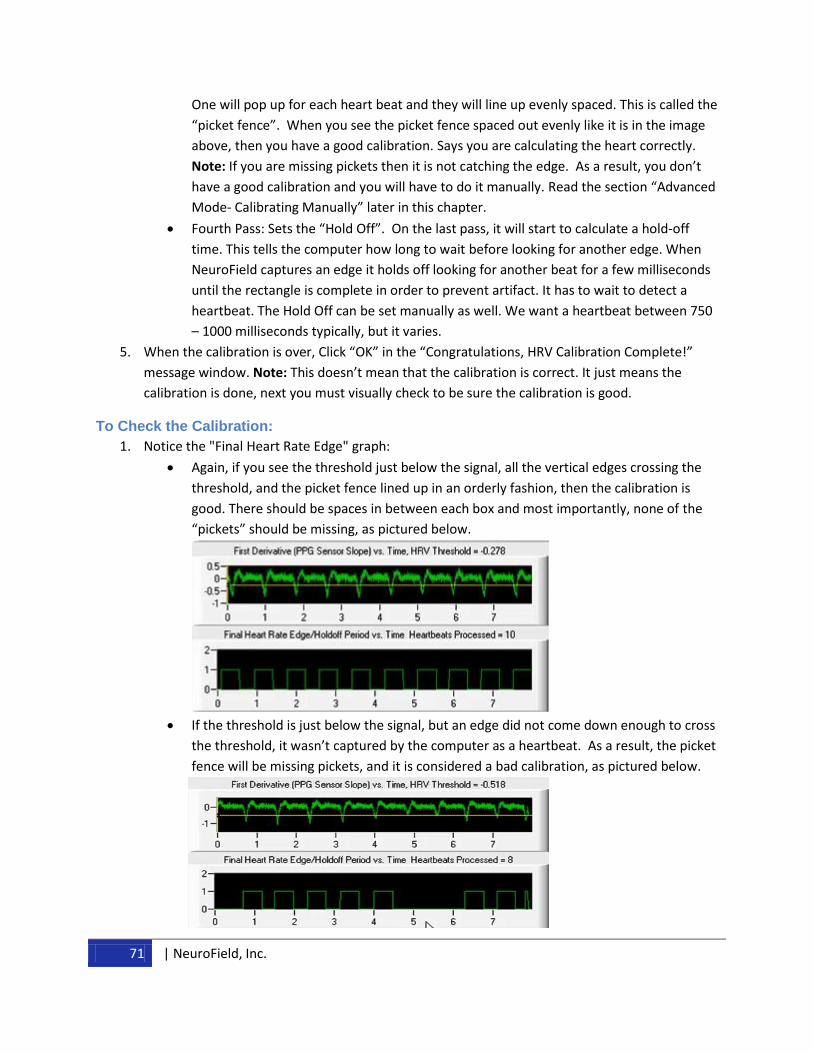
71 | NeuroField, Inc.
One will pop up for each heart beat and they will line up evenly spaced. This is called the
“picket fence”. When you see the picket fence spaced out evenly like it is in the image
above, then you have a good calibration. Says you are calculating the heart correctly.
Note: If you are missing pickets then it is not catching the edge. As a result, you don’t
have a good calibration and you will have to do it manually. Read the section “Advanced
Mode- Calibrating Manually” later in this chapter.
Fourth Pass: Sets the “Hold Off”. On the last pass, it will start to calculate a hold-off
time. This tells the computer how long to wait before looking for another edge. When
NeuroField captures an edge it holds off looking for another beat for a few milliseconds
until the rectangle is complete in order to prevent artifact. It has to wait to detect a
heartbeat. The Hold Off can be set manually as well. We want a heartbeat between 750
– 1000 milliseconds typically, but it varies.
5. When the calibration is over, Click “OK” in the “Congratulations, HRV Calibration Complete!”
message window. Note: This doesn’t mean that the calibration is correct. It just means the
calibration is done, next you must visually check to be sure the calibration is good.
To Check the Calibration:
1. Notice the "Final Heart Rate Edge" graph:
Again, if you see the threshold just below the signal, all the vertical edges crossing the
threshold, and the picket fence lined up in an orderly fashion, then the calibration is
good. There should be spaces in between each box and most importantly, none of the
“pickets” should be missing, as pictured below.
If the threshold is just below the signal, but an edge did not come down enough to cross
the threshold, it wasn’t captured by the computer as a heartbeat. As a result, the picket
fence will be missing pickets, and it is considered a bad calibration, as pictured below.
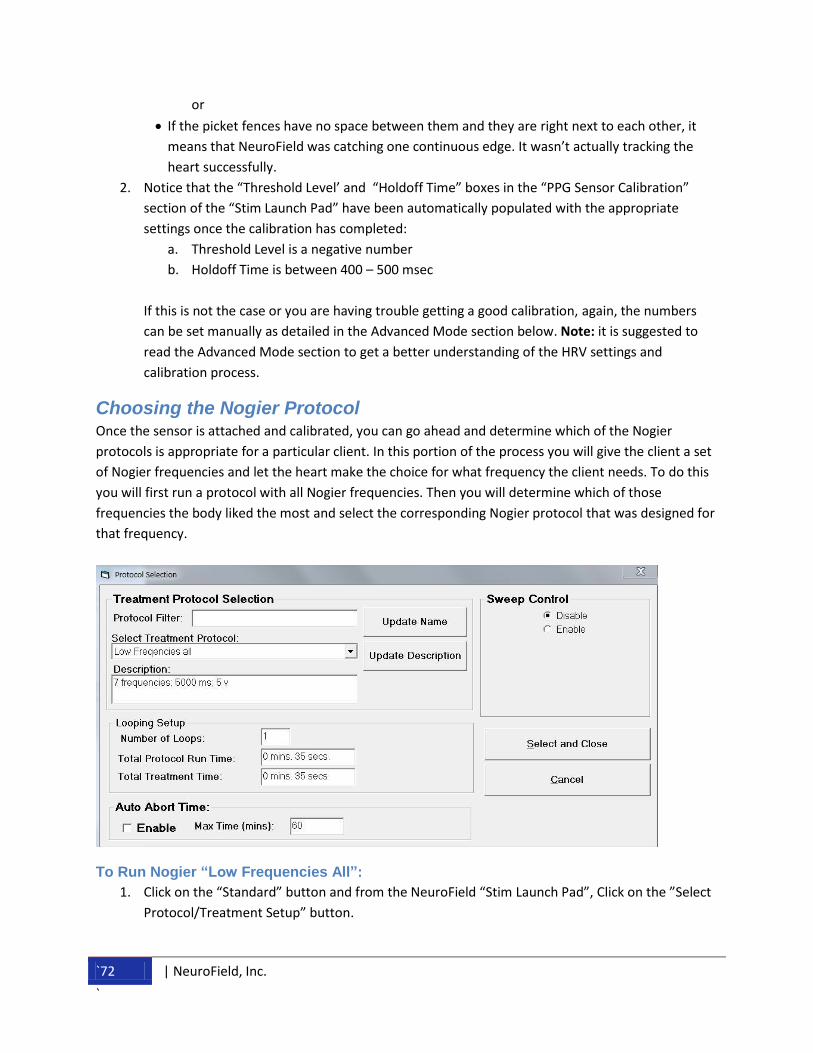
`72 | NeuroField, Inc.
`
or
If the picket fences have no space between them and they are right next to each other, it
means that NeuroField was catching one continuous edge. It wasn’t actually tracking the
heart successfully.
2. Notice that the “Threshold Level’ and “Holdoff Time” boxes in the “PPG Sensor Calibration”
section of the “Stim Launch Pad” have been automatically populated with the appropriate
settings once the calibration has completed:
a. Threshold Level is a negative number
b. Holdoff Time is between 400 – 500 msec
If this is not the case or you are having trouble getting a good calibration, again, the numbers
can be set manually as detailed in the Advanced Mode section below. Note: it is suggested to
read the Advanced Mode section to get a better understanding of the HRV settings and
calibration process.
Choosing the Nogier Protocol Once the sensor is attached and calibrated, you can go ahead and determine which of the Nogier
protocols is appropriate for a particular client. In this portion of the process you will give the client a set
of Nogier frequencies and let the heart make the choice for what frequency the client needs. To do this
you will first run a protocol with all Nogier frequencies. Then you will determine which of those
frequencies the body liked the most and select the corresponding Nogier protocol that was designed for
that frequency.
To Run Nogier “Low Frequencies All”:
1. Click on the “Standard” button and from the NeuroField “Stim Launch Pad”, Click on the ”Select
Protocol/Treatment Setup” button.
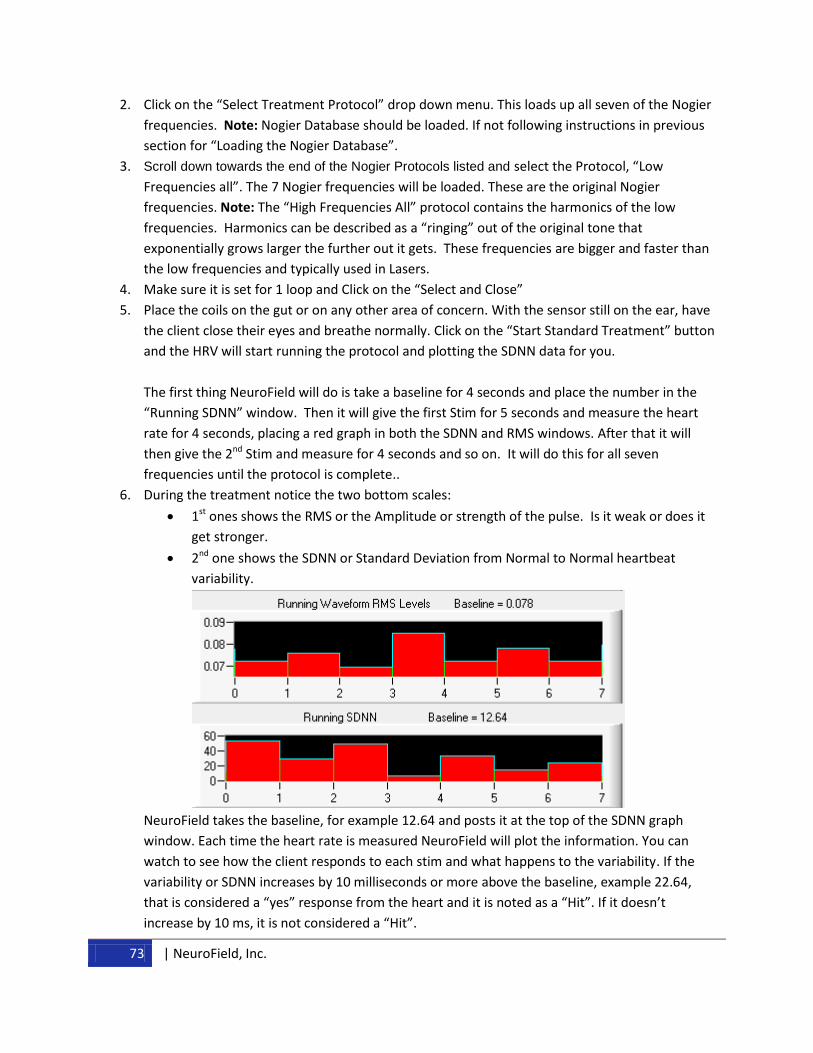
73 | NeuroField, Inc.
2. Click on the “Select Treatment Protocol” drop down menu. This loads up all seven of the Nogier
frequencies. Note: Nogier Database should be loaded. If not following instructions in previous
section for “Loading the Nogier Database”.
3. Scroll down towards the end of the Nogier Protocols listed and select the Protocol, “Low
Frequencies all”. The 7 Nogier frequencies will be loaded. These are the original Nogier
frequencies. Note: The “High Frequencies All” protocol contains the harmonics of the low
frequencies. Harmonics can be described as a “ringing” out of the original tone that
exponentially grows larger the further out it gets. These frequencies are bigger and faster than
the low frequencies and typically used in Lasers.
4. Make sure it is set for 1 loop and Click on the “Select and Close”
5. Place the coils on the gut or on any other area of concern. With the sensor still on the ear, have
the client close their eyes and breathe normally. Click on the “Start Standard Treatment” button
and the HRV will start running the protocol and plotting the SDNN data for you.
The first thing NeuroField will do is take a baseline for 4 seconds and place the number in the
“Running SDNN” window. Then it will give the first Stim for 5 seconds and measure the heart
rate for 4 seconds, placing a red graph in both the SDNN and RMS windows. After that it will
then give the 2nd Stim and measure for 4 seconds and so on. It will do this for all seven
frequencies until the protocol is complete..
6. During the treatment notice the two bottom scales:
1st ones shows the RMS or the Amplitude or strength of the pulse. Is it weak or does it
get stronger.
2nd one shows the SDNN or Standard Deviation from Normal to Normal heartbeat
variability.
NeuroField takes the baseline, for example 12.64 and posts it at the top of the SDNN graph
window. Each time the heart rate is measured NeuroField will plot the information. You can
watch to see how the client responds to each stim and what happens to the variability. If the
variability or SDNN increases by 10 milliseconds or more above the baseline, example 22.64,
that is considered a “yes” response from the heart and it is noted as a “Hit”. If it doesn’t
increase by 10 ms, it is not considered a “Hit”.
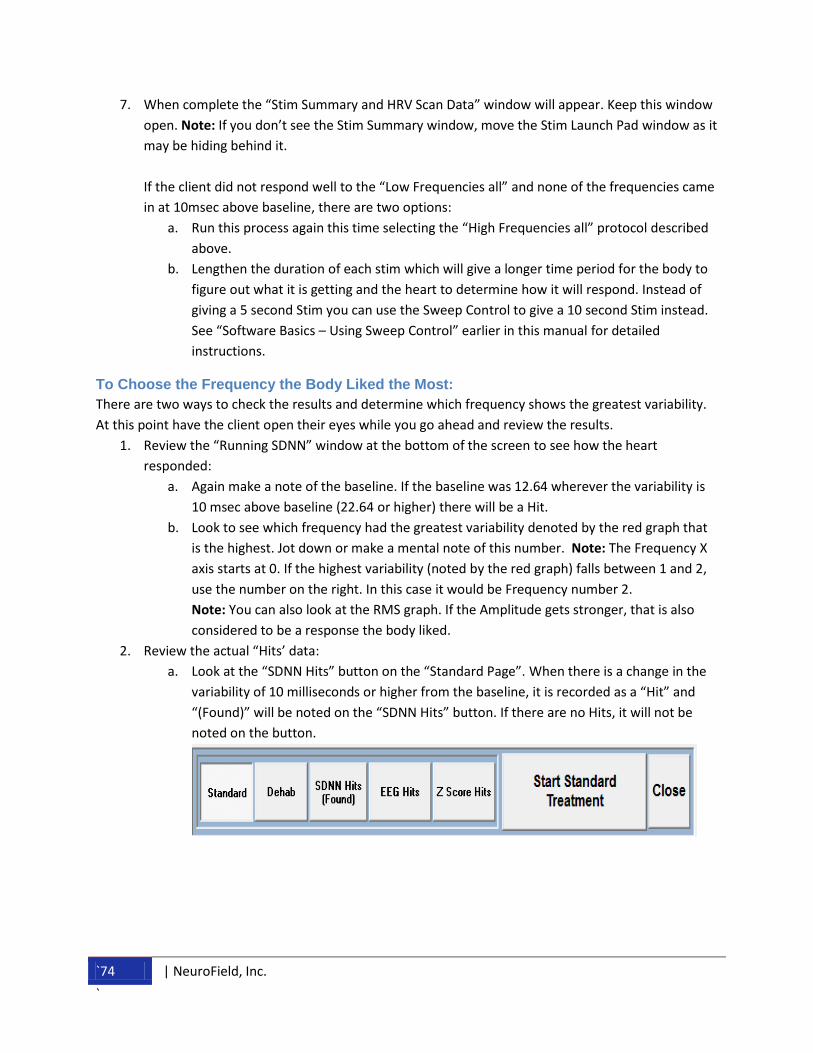
`74 | NeuroField, Inc.
`
7. When complete the “Stim Summary and HRV Scan Data” window will appear. Keep this window
open. Note: If you don’t see the Stim Summary window, move the Stim Launch Pad window as it
may be hiding behind it.
If the client did not respond well to the “Low Frequencies all” and none of the frequencies came
in at 10msec above baseline, there are two options:
a. Run this process again this time selecting the “High Frequencies all” protocol described
above.
b. Lengthen the duration of each stim which will give a longer time period for the body to
figure out what it is getting and the heart to determine how it will respond. Instead of
giving a 5 second Stim you can use the Sweep Control to give a 10 second Stim instead.
See “Software Basics – Using Sweep Control” earlier in this manual for detailed
instructions.
To Choose the Frequency the Body Liked the Most:
There are two ways to check the results and determine which frequency shows the greatest variability.
At this point have the client open their eyes while you go ahead and review the results.
1. Review the “Running SDNN” window at the bottom of the screen to see how the heart
responded:
a. Again make a note of the baseline. If the baseline was 12.64 wherever the variability is
10 msec above baseline (22.64 or higher) there will be a Hit.
b. Look to see which frequency had the greatest variability denoted by the red graph that
is the highest. Jot down or make a mental note of this number. Note: The Frequency X
axis starts at 0. If the highest variability (noted by the red graph) falls between 1 and 2,
use the number on the right. In this case it would be Frequency number 2.
Note: You can also look at the RMS graph. If the Amplitude gets stronger, that is also
considered to be a response the body liked.
2. Review the actual “Hits’ data:
a. Look at the “SDNN Hits” button on the “Standard Page”. When there is a change in the
variability of 10 milliseconds or higher from the baseline, it is recorded as a “Hit” and
“(Found)” will be noted on the “SDNN Hits” button. If there are no Hits, it will not be
noted on the button.
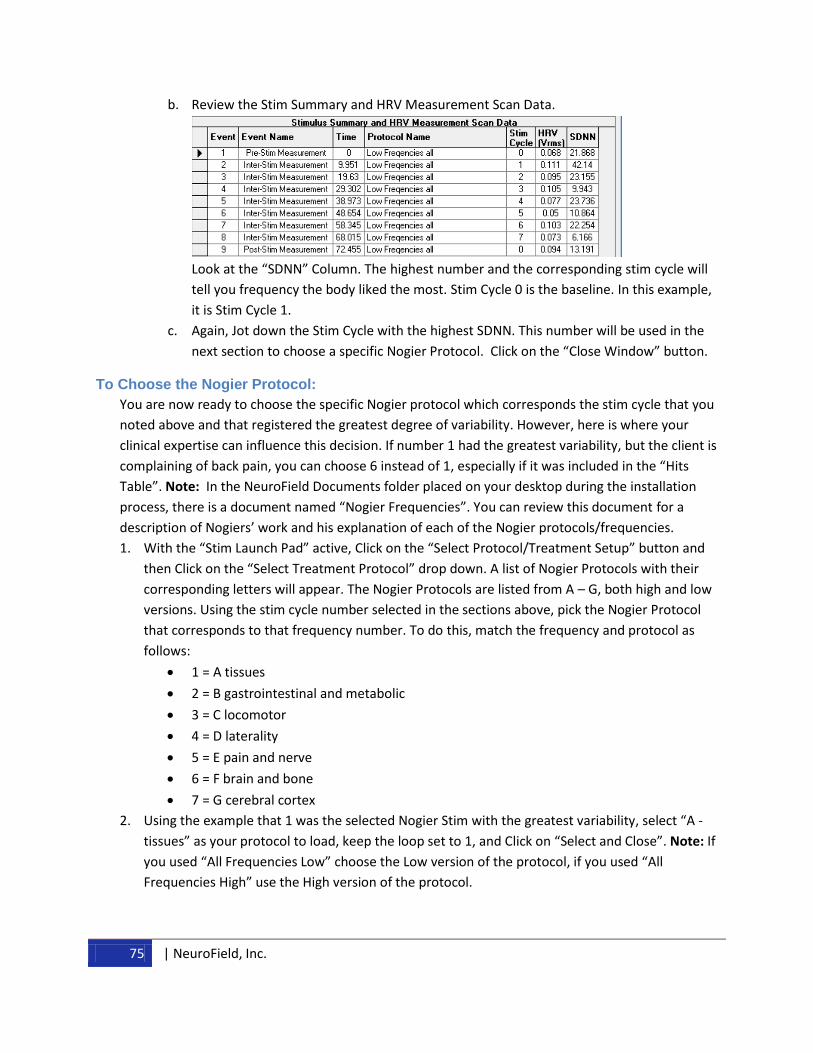
75 | NeuroField, Inc.
b. Review the Stim Summary and HRV Measurement Scan Data.
Look at the “SDNN” Column. The highest number and the corresponding stim cycle will
tell you frequency the body liked the most. Stim Cycle 0 is the baseline. In this example,
it is Stim Cycle 1.
c. Again, Jot down the Stim Cycle with the highest SDNN. This number will be used in the
next section to choose a specific Nogier Protocol. Click on the “Close Window” button.
To Choose the Nogier Protocol:
You are now ready to choose the specific Nogier protocol which corresponds the stim cycle that you
noted above and that registered the greatest degree of variability. However, here is where your
clinical expertise can influence this decision. If number 1 had the greatest variability, but the client is
complaining of back pain, you can choose 6 instead of 1, especially if it was included in the “Hits
Table”. Note: In the NeuroField Documents folder placed on your desktop during the installation
process, there is a document named “Nogier Frequencies”. You can review this document for a
description of Nogiers’ work and his explanation of each of the Nogier protocols/frequencies.
1. With the “Stim Launch Pad” active, Click on the “Select Protocol/Treatment Setup” button and
then Click on the “Select Treatment Protocol” drop down. A list of Nogier Protocols with their
corresponding letters will appear. The Nogier Protocols are listed from A – G, both high and low
versions. Using the stim cycle number selected in the sections above, pick the Nogier Protocol
that corresponds to that frequency number. To do this, match the frequency and protocol as
follows:
1 = A tissues
2 = B gastrointestinal and metabolic
3 = C locomotor
4 = D laterality
5 = E pain and nerve
6 = F brain and bone
7 = G cerebral cortex
2. Using the example that 1 was the selected Nogier Stim with the greatest variability, select “A -
tissues” as your protocol to load, keep the loop set to 1, and Click on “Select and Close”. Note: If
you used “All Frequencies Low” choose the Low version of the protocol, if you used “All
Frequencies High” use the High version of the protocol.
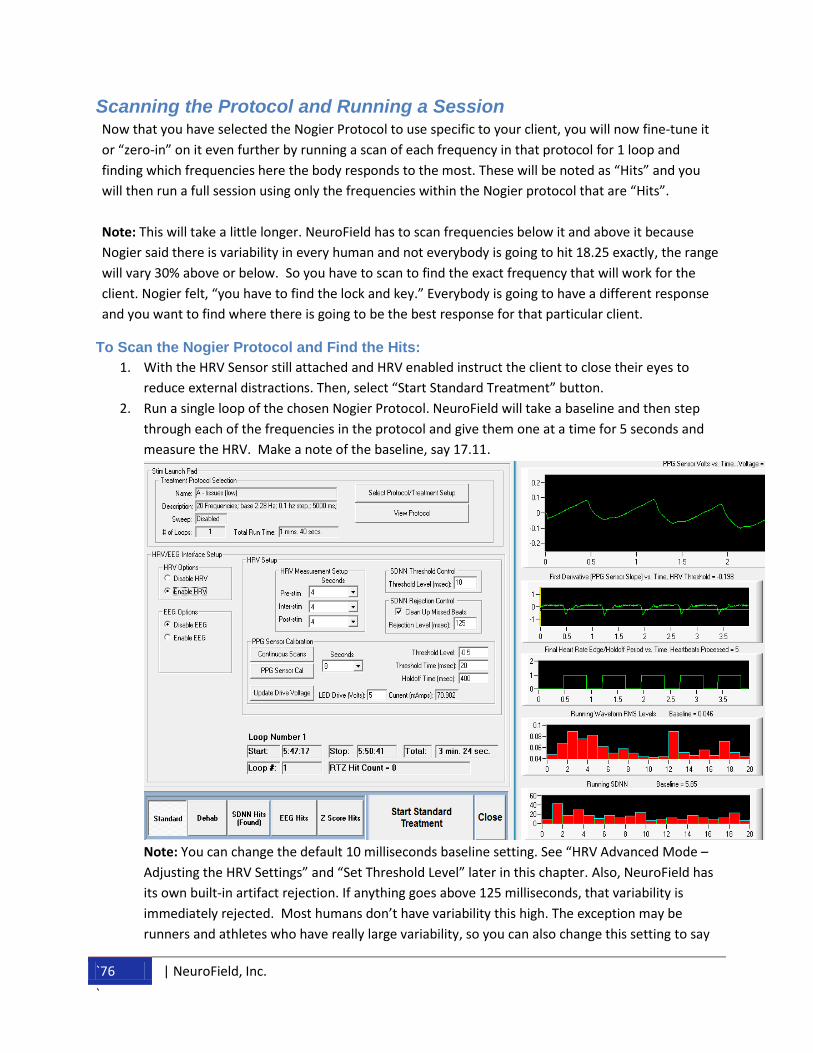
`76 | NeuroField, Inc.
`
Scanning the Protocol and Running a Session Now that you have selected the Nogier Protocol to use specific to your client, you will now fine-tune it
or “zero-in” on it even further by running a scan of each frequency in that protocol for 1 loop and
finding which frequencies here the body responds to the most. These will be noted as “Hits” and you
will then run a full session using only the frequencies within the Nogier protocol that are “Hits”.
Note: This will take a little longer. NeuroField has to scan frequencies below it and above it because
Nogier said there is variability in every human and not everybody is going to hit 18.25 exactly, the range
will vary 30% above or below. So you have to scan to find the exact frequency that will work for the
client. Nogier felt, “you have to find the lock and key.” Everybody is going to have a different response
and you want to find where there is going to be the best response for that particular client.
To Scan the Nogier Protocol and Find the Hits:
1. With the HRV Sensor still attached and HRV enabled instruct the client to close their eyes to
reduce external distractions. Then, select “Start Standard Treatment” button.
2. Run a single loop of the chosen Nogier Protocol. NeuroField will take a baseline and then step
through each of the frequencies in the protocol and give them one at a time for 5 seconds and
measure the HRV. Make a note of the baseline, say 17.11.
Note: You can change the default 10 milliseconds baseline setting. See “HRV Advanced Mode –
Adjusting the HRV Settings” and “Set Threshold Level” later in this chapter. Also, NeuroField has
its own built-in artifact rejection. If anything goes above 125 milliseconds, that variability is
immediately rejected. Most humans don’t have variability this high. The exception may be
runners and athletes who have really large variability, so you can also change this setting to say

77 | NeuroField, Inc.
150 or 175. See “SDNN Rejection Control” in the “HRV Advanced Mode – Adjusting the HRV
Settings” section later in this Chapter.
3. When done the “Stim Summary” table appears where you can see all of the data. Some of the
frequencies may not be there as a result of artifact rejection and NeuroField pulled them out. If
there are any “Hits” that went above the baseline, the “SDNN Hits” button includes “(Found)”.
Note: You can dump this data to a file to view it in NeurPlot and see a single trend line.
4. Click on the “Close Window” button. You are now ready to run the protocol and give only the
frequencies that were a hit.
To Run the Nogier Protocol – Hits Only Full Session:
1. You now have your treatment protocol and you are done with the HRV measurement process.
You have muscle tested the heart and pulled the frequencies you want out of the protocol. With
the coils placed on the body you are now ready to run a session, giving only the frequencies that
are” Hits”. Click on the “Standard” button if you are not already at the “Stim Launch Pad”.
2. On the Standard Page click on the “HRV” radio button to disable HRV and remove the HRV
Sensor. You will now run a regular NeuroField session.
3. Click on the “SDNN Hits (Found) button. The “Results Table” page will appear listing the Stim
Cycles that were registered as a Hit or a “Yes” response from muscle testing the heart. In this
table you can see which ones came in as a Hit. These are all the frequencies that the body
wanted. Again, some are not there and got removed as part of the artifact rejection described
above. Note: There may be several or there may only be two.
4. Notice that the HRV Loops will default to 1 and tell you how long it will take to run 1 loop. The
traditional amount of time for running Body protocols is typically 30 to 50 minutes.
5. Increase the number of loops to equal the amount of time you’d like for the session, at least 30
minutes.

`78 | NeuroField, Inc.
`
6. Click “Start SDNN Peak Treatment” button. It will continue to loop through only the few
frequencies that are “Hits” for 30 minutes. During this time you can give the client a magazine or
a movie. Or, you can talk to them. During therapy a person will start to relax and talk about
what is going on. Often times they will feel more disinhibited and more willing to get into an
open state.
7. Once the session has completed, instruct the client to drink a lot of water and make sure they
hydrate well. Their body may detox and eliminate toxins from the gut, however do not make
any suggestions such as that they may suddenly have strong eliminations because it doesn’t
happen with everybody. Also, if it does most people can handle it.
Quick Start – Using HRV-Nogier Body Protocols:
To Quickly Setup and Run HRV-Nogier Protocols:
1. Make sure the ear and finger are clean and attach the Sensor to person. Note: Plug HRV PPG
Sensor into NeuroField X2000 or HRV Unit FIRST BEFORE turning on the device. Otherwise you
may harm the electronics.
2. Select the Patient.
3. Instruct Client to close eyes, breath normally and to stay still.
4. Enable HRV.
5. Click on Continuous Scan and check to be sure there is a good heart rate. Abort Process.
6. Click on PPG Sensor Cal to automatically calibrate.
7. Examine Sensor Cal outcome and if HRV is not being tracked correctly, make manual
adjustments (described in Step 12 Below).
8. Run Nogier “Low Frequencies All” and note the frequency the body liked the most from the Stim
Summary table.
9. Choose the Nogier Protocol that matches the frequency noted in Step 8.
10. Run the chosen Nogier Protocol for 1 loop scanning for “Hits”.
11. Run the “Hits only” from the Nogier Protocol for a full session, looping for 30 – 50 minutes.
12. Manual Adjustment Tips: (For details see section “HRV Advanced Mode – Calibrating Manually”
later in this chapter.)
79 | NeuroField, Inc.
The Threshold Level will ALWAYS be a NEGATIVE Number.
To LOWER the Threshold change the threshold level to a larger negative number.
To RAISE the threshold change the threshold number to a smaller negative number.
The Hold off time should be around 400-500 msec. If the auto calibration process
produces a hold off time of 150-200 it is probably incorrect.
When the calibration is correct you will see the ‘picket fence’ on the Final Heart Rate
Edge graph.
Setup HRV measurement durations. Using the defaults is efficient for most cases.
Setup SDNN Threshold Level. Using the defaults is efficient for most cases.
Setup SDNN Rejection Control. Using the defaults is efficient for most cases.
Run Protocol.
When HRV Protocol is complete look at the SDNN Peak Button. If there are hits it will tell
you so.
Using HRV Custom vs Built-in Nogier Protocols Using HRV to pin point the exact frequency and run a custom protocol that the client’s body responds to
the most is one way to run body protocols in NeuroField. The other very effective treatment is to simple
choose a built-in Nogier protocol that Paul Nogier determined to be effective for a specific body
complaint. Even though the HRV method does drill down to build a custom frequency protocol, it also
extends out the time to run just one protocol. So when choosing between the two methods, keep that in
mind. There is a certain amount of time management that you have to balance when working with a
client and it does takes a while to find the frequency, get the hits and run the hits.
Once you get good at using body protocols, however, you can go and directly use a specific built-in
Nogier protocol. There are a lot of times where you will get a big bang for the buck by simply using these
protocols. If you know a person has gut issues then you don’t need to do a screening of all 7
frequencies. Just go to the Nogier database and choose” B–gastrointestinal and metabolic (low)”. If a
client talks about a bone or joint issue, you can use either the E-pain and nerve” or the “F-brain and
bone” protocols that are both good for pain. For more detailed information on the use of built-in Nogier
protocols, refer to the “Nogier Frequencies” document located in the NeuroField Documents folder
placed on the desktop during installation.
But, if you are not really sure what to do, introduce all 7 frequencies and see what the heart does. One
suggestion is to find the HRV custom protocol for your client as part and of their initial intake or on the
first day of training so you have that information in your too l box to use as needed. Run it a couple of
times to see how it does and then switch to built-in Nogier protocols as needed.
HRV Advanced Mode - Adjusting the HRV Settings Once the sensor is attached and calibrated, you can use the default settings or you can go ahead and
manually change the settings as needed.
`80 | NeuroField, Inc.
`
To Setup HRV Stim Options:
1. In the “HRV Setup” on the Left side of the “Stim Launch Pad” choose your “HRV During Stim
Options”, either “Pre and Post HRV” or “Full Stim Cycle HRV”:
“Pre and Post HRV” – Enables pre and post protocol monitoring. It works as follows:
- HRV is measured.
- Full protocol is given.
- HRV is measured again after the entire Protocol has completed.
“Full Stim Cycle HRV” – Enables stim by stim monitoring. It works as follows:
- HRV baseline is taken.
- Stim is given for the 1st frequency.
- HRV is measured briefly.
- Stim is given again for the next frequency
- HRV is measured briefly. This continues to the next frequency until the entire
protocol is completed.
- Another Baseline taken again.
Note: “Disable HRV/EEG” option simply disables the HRV module and is the default setting
when the program loads.
To Setup Measurement Duration and Threshold Level:
1. In the” HRV Setup” section of the “Stim Launch Pad”, set the “HRV Measurement”. This is the
amount of time to use for measuring baseline and increases in HRV. The default settings
typically used are:
Pre-Stim = 4 seconds (this is the baseline)
Inter-Stim = 4 seconds
Post- Stim = 4 seconds
2. Set the “Threshold Level (msec)” in the “SDNN Threshold Control” box. The default setting
typically used is a 10 msec increase. This is the amount of time HRV must increase above the
baseline for the frequency to be interpreted as a “yes” response by the body or a “Hit”.
Note: The Threshold Level can only be seen in the “HRV Setup” section when the “Full Stim
Cycle HRV” option is enabled.
After the baseline is taken during Pre-Stim, NeuroField begins to look for increases in HRV above
the pre-treatment baseline. This is done by calculating the SDNN or Standard Deviation from
Normal to Normal heartbeat. If SDNN increases above the baseline by the amount set in the
“Threshold Level”, then the frequency is registered as a “Hit”, meaning the body liked that
frequency. Frequencies that register a “Hit” are then saved in a table called the “SDNN Hit”
table.
For example, when using the default values, in order to accept a frequency as a "Hit", the SDNN
must be 10 milliseconds or greater than the Pre-Stim baseline SDNN:
If Pre-Stim baseline is 25.35 msec and the
Threshold level is set to 10 msec, add the two together.
81 | NeuroField, Inc.
A “Hit” is Registered when the Heart Rate Variability is 35.35msec or greater.
You can change the threshold and make the “Hit” responses more or less stringent by setting
the threshold to monitor increases or decreases in the SDNN:
To monitor increases in SDNN set the threshold using positive numbers above zero.
To monitor decreases in SDNN set the threshold to negative numbers below zero (for
example, -10).
To Setup SDNN Rejection Control:
1. The default setting is 125 milliseconds. This is the amount of time allowed before a
measurement is rejected by the system.
Some clients may move and create an artifact that causes an increase in the SDNN or they may
hold their breath which causes the SDNN to go higher and forces the heart to become variable.
Normal range has been found to be:
10 or 15 - 90
Athletes tend to have a higher SDNN between 150 - 175
125 is an upper-end number that has been found to work for most people
2. You can also uncheck, “Clean Up Missed Beats” and it will turn off Rejection Control.
HRV Advanced Mode – Calibrating Manually
To Run the Calibration – Manually
If automatic calibration has trouble getting a good calibration, you can run the calibration manually. In
the “PPG Sensor Calibration” section of the “Stim Launch Pad”, the numbers correspond to the HRV
“Measurement Device Data Screen” as follows:
“Threshold Level” = Yellow Threshold bar in the “First Derivative” window.
“Holdoff Time” = “Final Heart Rate Edge/Holdoff Period” window.
Threshold Level
The number in the “Threshold Level” box should always be set to a negative number. The value
set here:
- Determines the position of Yellow Threshold bar on the vertical axis in the “First
Derivative” window.
- Lowers the Threshold bar when set to a higher negative number.
- Raises the Threshold bar when set to a number closer to zero or a lower negative number.
The closer the bar is set to zero, the closer it is to the “noise” associated with the heart. You only
want to capture the peak of every heartbeat which is where SDNN is measured. So the
Threshold Level should be set where the bar is just below the main signal (noise) and the vertical
edge of the heartbeat just crosses over the bar. If the Threshold Level is set either too high or
too low you will not get a correct calibration. Note: Again, the Threshold Level must always be
set to a negative number. If set:
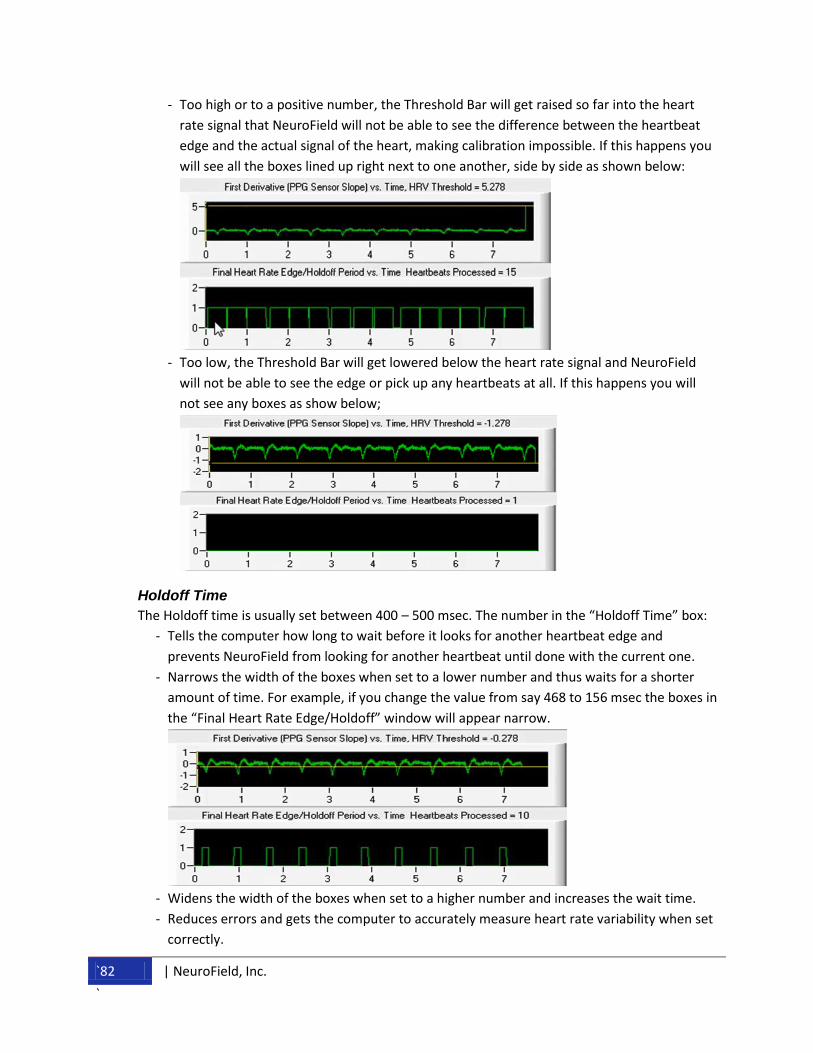
`82 | NeuroField, Inc.
`
- Too high or to a positive number, the Threshold Bar will get raised so far into the heart
rate signal that NeuroField will not be able to see the difference between the heartbeat
edge and the actual signal of the heart, making calibration impossible. If this happens you
will see all the boxes lined up right next to one another, side by side as shown below:
- Too low, the Threshold Bar will get lowered below the heart rate signal and NeuroField
will not be able to see the edge or pick up any heartbeats at all. If this happens you will
not see any boxes as show below;
Holdoff Time
The Holdoff time is usually set between 400 – 500 msec. The number in the “Holdoff Time” box:
- Tells the computer how long to wait before it looks for another heartbeat edge and
prevents NeuroField from looking for another heartbeat until done with the current one.
- Narrows the width of the boxes when set to a lower number and thus waits for a shorter
amount of time. For example, if you change the value from say 468 to 156 msec the boxes in
the “Final Heart Rate Edge/Holdoff” window will appear narrow.
- Widens the width of the boxes when set to a higher number and increases the wait time.
- Reduces errors and gets the computer to accurately measure heart rate variability when set
correctly.

83 | NeuroField, Inc.
To begin the manual calibration process, you want the threshold bar to drop below where NeuroField
can see a signal so you can gradually raise it into a good range and capture the heartbeat.
1. Set the Number in the “Threshold Level” box to a high negative number, for example from -2.77
to -3.277.
2. Click in the “Threshold Time” box to get the computer to accept the new setting and then click
on the “Continuous Scan” button. In the HRV “Measurement Device Data Screen”:
The Yellow Threshold bar will drop to the value you set in Step 1 above, -3.277 and rest
below the heartbeat edge.
The “Final HeartRate Edge” window will not display any boxes.
Note: NeuroField will continue to scan the Heart Rate Variability until you select the “Abort
Process” button in the lower right hand portion of the screen.
3. Start raising the bar:
a. Lower the negative number in the “Threshold Level” box toward zero, for example, from
-3.277 to -2.277.
b. Click in the “Threshold Time” box to accept the new setting and notice the Yellow
Threshold bar in the “First Derivative” window. When it gets to the end of the scan, it
will check for the value in the “Threshold Level” box and the Threshold bar will raise up
to -2.277 on the vertical axis. As NeuroField continues to scan, the Threshold can be
changed “on the fly”.
c. Continue to lower the “Threshold Level” number to raise the bar until NeuroField
captures the heartbeat when the vertical edges cross over the threshold and boxes
begin to appear in the “Final Heart Rate Edge” window. For example, set it to -1.277 and
then to -0.277.
4. Click in the “Hold-Off Time” box to change the number here to be between 400-500 msec.
5. Abort the Process once you have a “Picket Fence” on the “Final Heart Rate Edge” graph and the
pickets are spaced appropriately. When it gets to the end of a scan, NeuroField will abort and
you are ready to run a session.
Calibration should not take more than 2 or 3 minutes. If it is taking longer than that, then something is
wrong. Either, there is too much noise in the room, the client is not grounded correctly, there is some
kind of debris on the finger or the ear, or you may have a person who is not appropriate for HRV.
X. NeuroPlot NeuroPlot is a Microsoft Excel spreadsheet that is designed to graph the data collected from your
NeuroField sessions. For example, when using NeuroPlot for data collected during an RTZ Session, you
can review all 19 channels of EEG data across the 10 different frequency bands that the Applied
Neuroscience .dll monitors.
With this data you can evaluate the brain’s response to stimulation at any given channel and see the
trend of the Z-scores throughout the session, with the goal being to aim towards a Z-Score of Zero.
Each plot graphically displays how the brain naturally tries to re-calibrate and normalize itself as it is
shown how to do so with each NeuroField stim cycle. As you will experience, it is very rare to see a plot
with a trend that goes outside of the normative range. It usually corrects pretty quickly!
NeuroPlot can also be used to review HRV sessions. For full details on running an HRV session see “X.
NeuroField HRV – X2000” later in this manual.
Note: To use NeuroPlot you must have Microsoft Excel installed on your computer.
Prepping for NeuroPlot After an RTZ protocol has completed, the data is available for review. However, the data must first be
saved to a text file and this can easily be done within NeuroField.
To Dump Data to Text File:
1. Select a Patient if you don’t already have an active patient.
2. Run a Z-Score protocol to completion if you haven’t already done so.
3. Click on the “Z-Score Summary” button from the “Main Menu SideBar”.
4. Click on the “All Channels Text File Dump” button from the Summary Page to save the data to a
text file. You can examine the data here in NeuroField as it is available for review in this window
if you want to see it immediately. However, it is easier to review the data using NeuroPlot.
5. Note the ID number of the patient in the .txt file. It will be needed when you look for the data later.
6. Minimize or quit the NeuroField program.
Opening NeuroPlot and Enabling Macros
To Open NeuroPlot:
After an RTZ protocol has completed and the data has been dumped to a text file, the data is available
for review using NeuroPlot.
1. Double click on the NeuroPlot icon installed on your desktop. This will start Microsoft Excel and
display the following window:

85 | NeuroField, Inc.
To Enable Excel Macros:
Often times you will get the following message when you launch NeuroPlot using Excel 2010:
1. Click on the “Enable Editing” button next to the Protected View .This will bring up the following
message:
2. Click on the “Enable Content” button next to the Security Warning .This will complete the launch
of NeuroPlot.
It is possible that your version is an earlier version of Microsoft Excel and will not present the “Enable
Editing” button when the software is launched. Instead you may see a security warning at the top of the
page saying “Some active content has been disabled”.
1. Click on the “Options” button next to the security warning. This will open the security options
window.
2. Click on “Enable this content”
3. Click “Ok”.
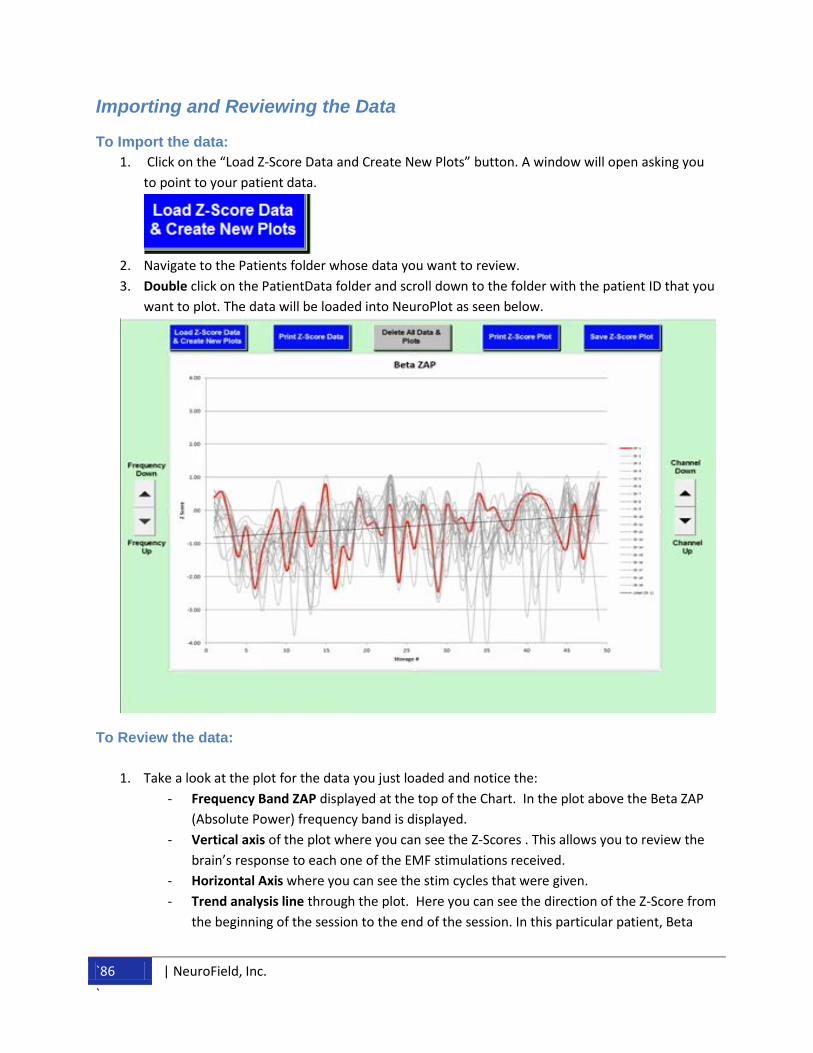
`86 | NeuroField, Inc.
`
Importing and Reviewing the Data
To Import the data:
1. Click on the “Load Z-Score Data and Create New Plots” button. A window will open asking you
to point to your patient data.
2. Navigate to the Patients folder whose data you want to review.
3. Double click on the PatientData folder and scroll down to the folder with the patient ID that you
want to plot. The data will be loaded into NeuroPlot as seen below.
To Review the data:
1. Take a look at the plot for the data you just loaded and notice the:
- Frequency Band ZAP displayed at the top of the Chart. In the plot above the Beta ZAP
(Absolute Power) frequency band is displayed.
- Vertical axis of the plot where you can see the Z-Scores . This allows you to review the
brain’s response to each one of the EMF stimulations received.
- Horizontal Axis where you can see the stim cycles that were given.
- Trend analysis line through the plot. Here you can see the direction of the Z-Score from
the beginning of the session to the end of the session. In this particular patient, Beta
87 | NeuroField, Inc.
was low and you can see from the trend line that the Z-scores did increase for Beta from
the beginning to the end of the session.
- Channel Up and Down Arrows allow you to select each specific channel, i.e. Channel 1 is
Fp1. In the above screenshot you can see that Beta at Fp1 did increase.
4. Move the “Channel Down” arrow buttons to select different channels. You will see the red
highlight move to reflect the brain’s stimulation response during the length of the session for
the newly selected channel. This allows you to see what the result was as the treatment
progressed.
5. Quit Excel and you can save your data for later review.
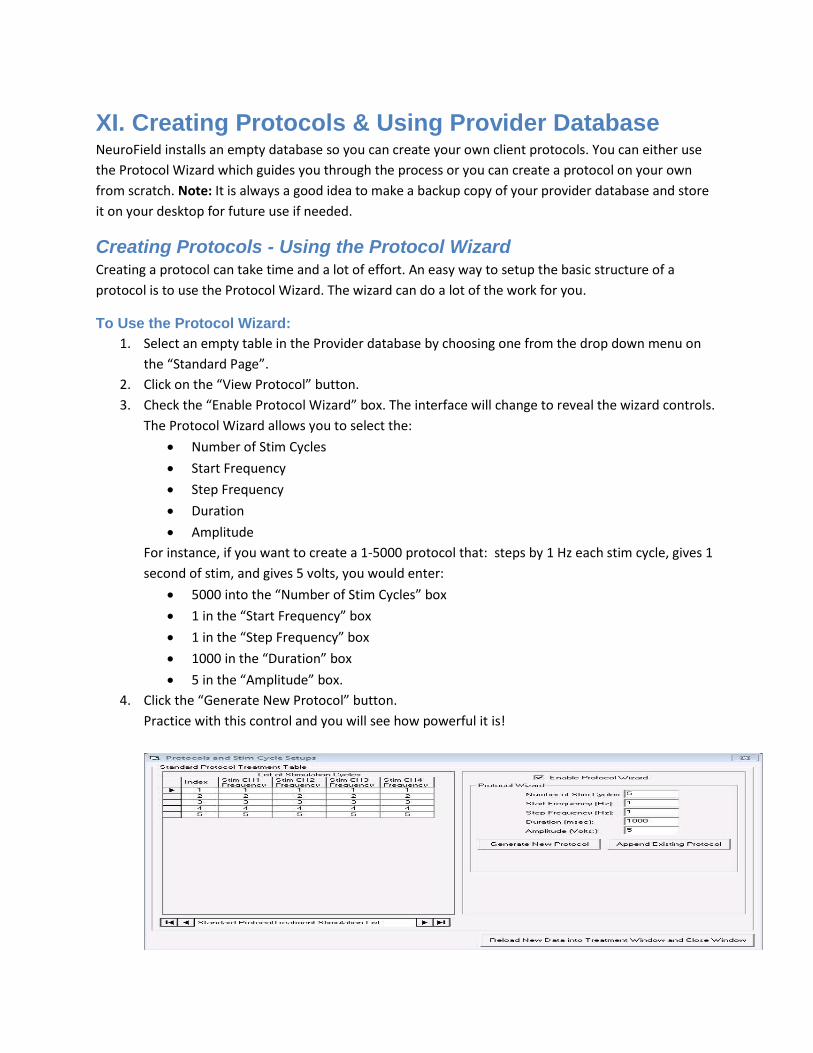
XI. Creating Protocols & Using Provider Database NeuroField installs an empty database so you can create your own client protocols. You can either use
the Protocol Wizard which guides you through the process or you can create a protocol on your own
from scratch. Note: It is always a good idea to make a backup copy of your provider database and store
it on your desktop for future use if needed.
Creating Protocols - Using the Protocol Wizard Creating a protocol can take time and a lot of effort. An easy way to setup the basic structure of a
protocol is to use the Protocol Wizard. The wizard can do a lot of the work for you.
To Use the Protocol Wizard:
1. Select an empty table in the Provider database by choosing one from the drop down menu on
the “Standard Page”.
2. Click on the “View Protocol” button.
3. Check the “Enable Protocol Wizard” box. The interface will change to reveal the wizard controls.
The Protocol Wizard allows you to select the:
Number of Stim Cycles
Start Frequency
Step Frequency
Duration
Amplitude
For instance, if you want to create a 1-5000 protocol that: steps by 1 Hz each stim cycle, gives 1
second of stim, and gives 5 volts, you would enter:
5000 into the “Number of Stim Cycles” box
1 in the “Start Frequency” box
1 in the “Step Frequency” box
1000 in the “Duration” box
5 in the “Amplitude” box.
4. Click the “Generate New Protocol” button.
Practice with this control and you will see how powerful it is!
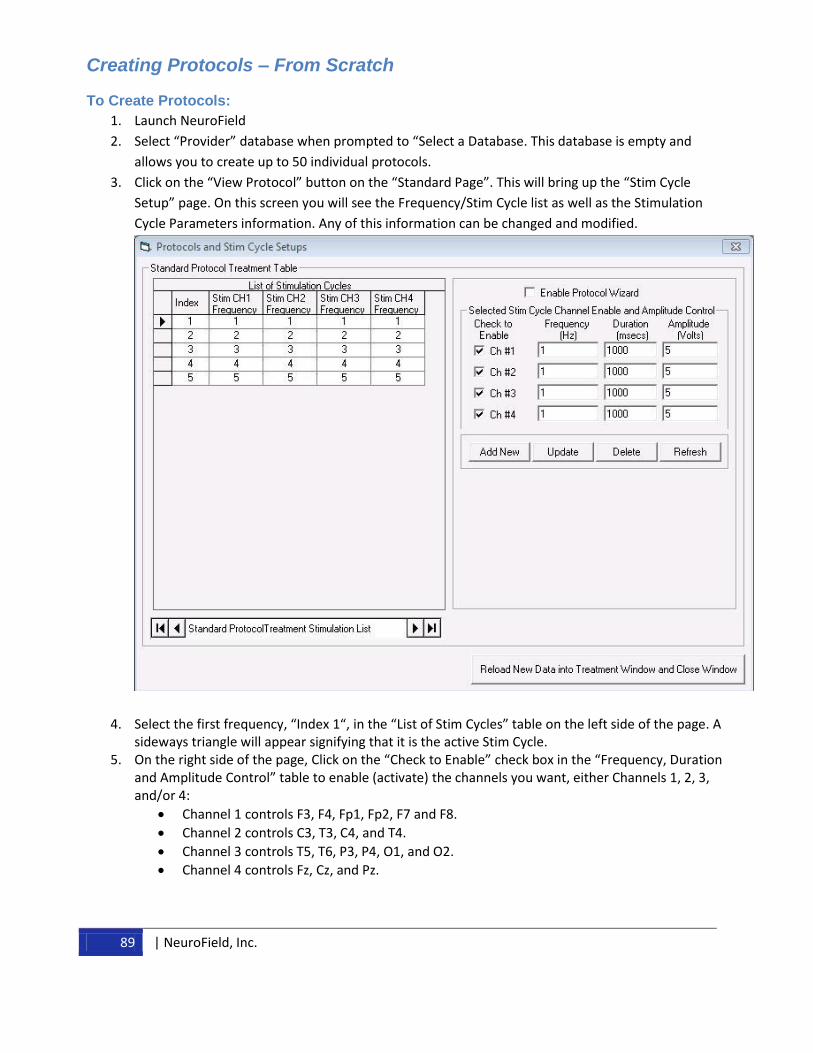
89 | NeuroField, Inc.
Creating Protocols – From Scratch
To Create Protocols:
1. Launch NeuroField
2. Select “Provider” database when prompted to “Select a Database. This database is empty and
allows you to create up to 50 individual protocols.
3. Click on the “View Protocol” button on the “Standard Page”. This will bring up the “Stim Cycle
Setup” page. On this screen you will see the Frequency/Stim Cycle list as well as the Stimulation
Cycle Parameters information. Any of this information can be changed and modified.
4. Select the first frequency, “Index 1“, in the “List of Stim Cycles” table on the left side of the page. A sideways triangle will appear signifying that it is the active Stim Cycle.
5. On the right side of the page, Click on the “Check to Enable” check box in the “Frequency, Duration and Amplitude Control” table to enable (activate) the channels you want, either Channels 1, 2, 3, and/or 4:
Channel 1 controls F3, F4, Fp1, Fp2, F7 and F8.
Channel 2 controls C3, T3, C4, and T4.
Channel 3 controls T5, T6, P3, P4, O1, and O2.
Channel 4 controls Fz, Cz, and Pz.
`90 | NeuroField, Inc.
`
6. Click on the “Frequency” box in the “Frequency, Duration and Amplitude Control” table and enter the values that you want for each enabled channel. NeuroField can give frequencies from 1Hz to 100,000Hz reliably.
7. Click on the “Duration” box for each enabled channel and enter the Duration of time that you would like the channel to be active. Time is programmed in milliseconds with 1000 milliseconds equal to 1 second. You can program time from 1-60 seconds.
8. Click on the “Amplitude” box and select the Amplitude you want for each channel enabled. Amplitude is the amount of power that you send through the cap. It can be set from 800 (0.0008) microvolts to 5 volts.
9. Click on the “Update” button to save the setup. 10. To setup the next Stim Cycle, Click on the next frequency from the list in the table on the left side
of the screen. The sideways triangle will move down to designate the next active Stim Cycle. Note: Each Stim Cycle must be setup individually.
11. Repeat Steps 5 – 9 above. 12. Once you have completed setting up each Stim Cycle, Click on the “Reload New Data into the
Treatment and Close Window” button. This will take you back to the” Standard Page”. 13. Click on the “Edit Name” button and name the protocol that you created. 14. Enter a description into the “Description” box. 15. Click on the “update” button next to it. The data is now saved, and the next time you open this
database the protocol will be available for use.

91 | NeuroField, Inc.
XII. NeuroField Contraindications Most people who use NeuroField have no side effects. Since 2008 over 50 licensed health care
professionals have evaluated the NeuroField effect which has resulted in the following list of indications
and contraindications for treatment:
1. The most common reported effect from NeuroField is a person becoming ‘wired’ or ‘tired.’ A
person may feel an abundance of energy or may feel compelled to sleep after a treatment. It is
important that the person is informed of this potential side effect and that they do not operate
heavy machinery or drive a motor vehicle immediately after a treatment. Most people who have
this side effect feel it within an hour after treatment. This effect is usually short lived and resolves
itself in one to two hours.
2. NeuroField can cause capillary dilation which can feel like a headache. This effect usually resolves
itself within one to two hours after a treatment. However, if it does not do so then a person is
directed to take a over the counter pain reliever such as Tylenol. This effect has not been reported
to occur longer than 24-72 hours. Should this occur longer than 72 hours then the person should
be directed to see their physician.
3. As a rule beginning NeuroField users should NOT give treatment to people diagnosed with seizure
disorder unless they have clinical supervision with an experienced NeuroField provider and have
attended an advanced training. You can use NeuroField on people with seizure but you MUST NOT
give stims less than 10 Hz otherwise you may trigger a seizure. The 15-100 or 10-100 protocols
work best with this population.
4. Do NOT use NeuroField on pregnant women.
5. Do NOT use NeuroField on people with Pacemakers.
6. Do NOT use NeuroField on people who have any metal attached to or inserted on or in the head.
7. Do NOT use NeuroField on children less than 3 years of age until you have practiced with the
system on clients for at least one year and have attended one basic and advanced training along
with seeking professional supervision with an experienced NeuroField provider.
8. Do NOT use NeuroField on anyone if they have the flu, a cold or any type of acute bacterial
infection. 9. Be mindful of people who are taking medications. NeuroField can have an impact on medication
effectiveness making them stronger and more potent. Most people who take medication respond
with no problems to NeuroField treatment. However, it has been reported that people who take
blood thinners have experienced a more potent effect from the medication.
10. People who have a history of PTSD may have an abreaction. Make sure to assess this and be ready
to intervene should the need arise. This may require a referral to a licensed therapist who is
trained in EMDR or similar traumatic disorder treatment.
11. People with significant personality disorders may respond to NeuroField with intense mood
changes. This may require a referral to a licensed therapist who is trained in EMDR or similar
traumatic disorder treatment.
12. Do NOT give NeuroField for more than 50 minutes per day on the head. You can use it on other
parts of the body up to three times a day.

`92 | NeuroField, Inc.
`
13. Do NOT EVER attach the NeuroField cap to the scalp with electro paste. You will inject electricity
into the person with the potential of causing harm.

93 | NeuroField, Inc.
XIII. Legal
NeuroField is not a medical device. NeuroField is not intended to be used for the diagnosis of medical
problems and does not diagnose medical problems. NeuroField is intended for the use of stress
reduction and relaxation. NeuroField, Inc. does not make any claims that this device can cure, heal, or
medically treat disease. It is critical that you DO NOT ATTACH THE CAP TO ANYONE USING CONDUCTIVE
PASTE, ELECTRO GEL, OR BY ANY OTHER MEANS. Attaching the cap to a person using conductive paste
could cause serious harm to the person and may damage the NeuroField System. Attaching the cap will
result in your warranty being invalidated and is not supported in any fashion by NeuroField, Inc. Using
NeuroField outside of the methods explained in this manual may result in a suspension of the license
granting usage of the NeuroField system.
There is limited testing completed on this device and it should be considered experimental with
clients signing an informed consent form indicating that they understand the experimental status of
NeuroField. People who have pacemakers should not be treated with the NeuroField System.
NeuroField is only made available to licensed professionals for experimental use.
NeuroField X3000/Q20, Copyright 2008-2013. All protocols distributed in the NeuroField software, the
electronics design of the X3000/Q20 and method of treatment delivery are the property of NeuroField
Inc. All Rights Reserved. Distribution of this software is prohibited and can only be used with
permission from NeuroField, Inc.
XIV. License Agreement
By installing and/or using NeuroField (the "Software"), you agree to be bound by the terms of this
license agreement. If you do not agree to the terms and conditions of this license agreement, do not
install or use the Software. This agreement is between you ("you") and NeuroField, Inc. (the "author").
This license agreement may not be altered or changed at any time by the author without prior notice.
1. GRANT OF LICENSE
You have permission to use this Software for your own personal, professional, or home use. You must to
be a licensed health professional in order to use NeuroField. You do NOT have permission to modify,
distribute, defragment, decompile, reverse engineer, or copy this Software or any element of the
Software by any electronic or non-electronic methods. All title, ownership rights and intellectual
property rights in and to the Software and any and all copies thereof are owned by the author. The
Software, including, without limitation, all code, media, sound, video, animation, models, textures,
images, text, screens, derivative works and all other elements of the Software may not be copied,
resold, rented, leased, distributed, or used for any commercial purpose without prior written permission
from the author.
2. NO WARRANTY/LIABILITY
You agree the author is held harmless and is not liable for any special, incidental, indirect, punitive, or
consequential damages, injury, lost revenue, lost data, or harm whatsoever arising out of the use,
misuse, inability to use, sale, registration, production, creation, development, or removal of this
Software or any element of the Software. You use this Software at your own risk. No warranty or
guarantee of any kind is expressed or implied. You agree the author and any other party involved with
the production, creation, distribution, sale, or development of this Software or any element of the
Software will not be liable for any reason under any circumstance. In no event shall the author's total
liability to you for all damages and losses exceed the amount paid by you for the Software.
No advice or information, whether oral or written, obtained by you from the author or any other party
involved with the production, creation, distribution, sale, or development of this Software shall create
any warranty not expressly stated herein.
3. GENERAL PROVISIONS
If any condition or provision in this license agreement is held by a court of competent jurisdiction to be
invalid, void, or unenforceable, the remaining conditions and provisions will continue in full force
without being impaired or invalidated in any way. This license agreement will be governed by the laws of
the State of California. With respect to every matter arising under this license agreement, you consent
to the exclusive jurisdiction and venue of the state and federal courts sitting in Bishop, California.
Any permissions granted herein are provided on a temporary basis and can be withdrawn by the author
at any time without notice. All rights not expressly granted are reserved.

95 | NeuroField, Inc.
You hereby acknowledge that you have read and understand the foregoing license agreement and agree
that the action of installing or using the Software is an acknowledgment of your agreement to be bound
by the terms and conditions of the license agreement contained herein.
Copyright © 2008-2013 NeuroField, Inc. All rights reserved.
XV. Contact Information & RMA’s & Troubleshooting
Contact Info:
Email: [email protected]
Mailing Address:
Nicholas Dogris, Ph.D.
NeuroField, Inc.
PO Box 506
Bishop, CA 93515
Physical Address:
NeuroField, Inc.
536 W. Line Street, Ste A
Bishop, CA 93514
Phone 760-872-4200
Fax 760-873-8007
Official NeuroField Website: www.NeuroField.com
RMA’s
If you experience problems with your NeuroField device that requires repair you are required to call
NeuroField, Inc and speak to a technical support representative. If it is determined that your system
requires repair you will be given a RMA number and instructed to send your system in for repairs to the
NeuroField office. NeuroField, Inc. will not be responsible for systems that are sent in without an RMA
number. Shipping and repairs for systems that are not under warranty are the responsibility of the
system owner.
Recommended