Quick Start Guidefor the NeptuNe™ Sound processor
For additional information about the operation of your processor, refer to the Neptune Sound processor user Guide.
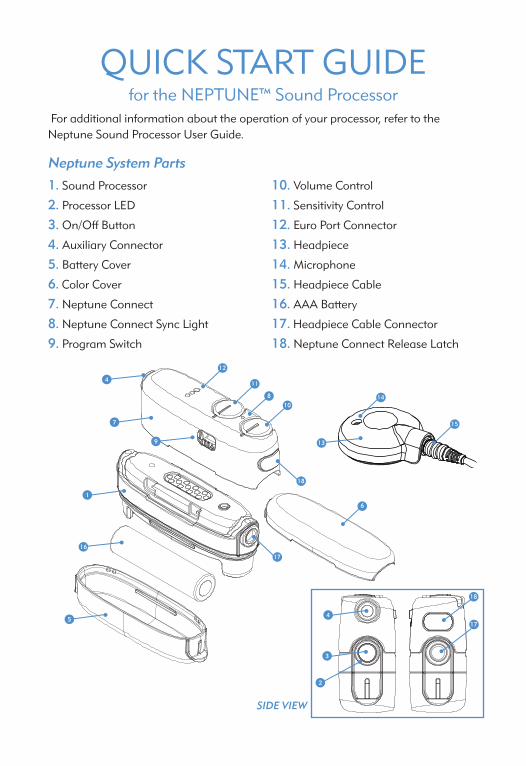
Neptune System Parts1. Sound processor
2. processor Led
3. On/Off Button
4. auxiliary connector
5. Battery cover
6. color cover
7. Neptune connect
8. Neptune connect Sync Light
9. program Switch
10. Volume control
11. Sensitivity control
12. euro port connector
13. Headpiece
14. Microphone
15. Headpiece cable
16. aaa Battery
17. Headpiece cable connector
18. Neptune connect release Latch
6
18
17
13
14
15
10
17
18
8
11
12
7
4
9
1
16
54
3
2
SIDE VIEW
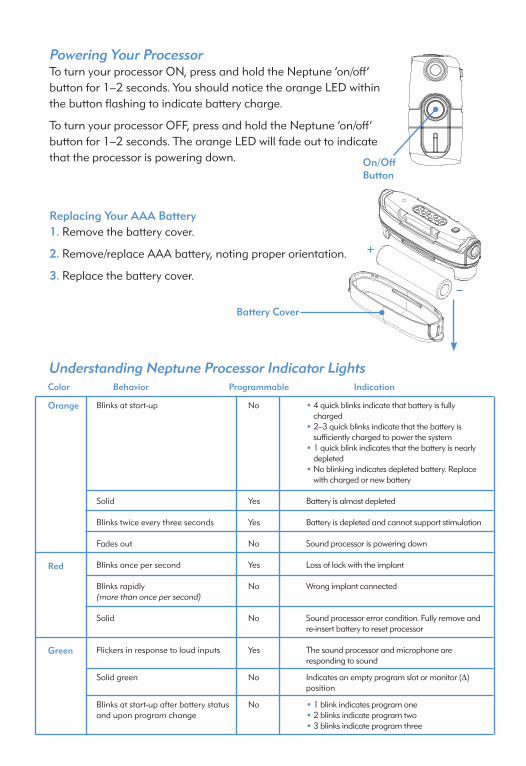
Powering Your Processorto turn your processor ON, press and hold the Neptune ‘on/off’ button for 1–2 seconds. You should notice the orange Led within the button flashing to indicate battery charge.
to turn your processor OFF, press and hold the Neptune ‘on/off’ button for 1–2 seconds. the orange Led will fade out to indicate that the processor is powering down.
Replacing Your AAA Battery1. remove the battery cover.
2. remove/replace aaa battery, noting proper orientation.
3. replace the battery cover.
Understanding Neptune Processor Indicator Lights
Battery Cover
Color Behavior Programmable Indication
Orange
Red
Green
• 4 quick blinks indicate that battery is fully charged
• 2–3 quick blinks indicate that the battery is sufficiently charged to power the system
• 1 quick blink indicates that the battery is nearly depleted
• No blinking indicates depleted battery. replace with charged or new battery
Battery is almost depleted
Battery is depleted and cannot support stimulation
Sound processor is powering down
Loss of lock with the implant
Wrong implant connected
Sound processor error condition. Fully remove and re-insert battery to reset processor
the sound processor and microphone are responding to sound
indicates an empty program slot or monitor (∆) position
• 1 blink indicates program one• 2 blinks indicate program two• 3 blinks indicate program three
Blinks at start-up No
Solid Yes
Blinks twice every three seconds Yes
Fades out No
Blinks once per second Yes
Blinks rapidly No (morethanoncepersecond)
Solid No
Flickers in response to loud inputs Yes
Solid green No
Blinks at start-up after battery status Noand upon program change
+
_
On/Off Button
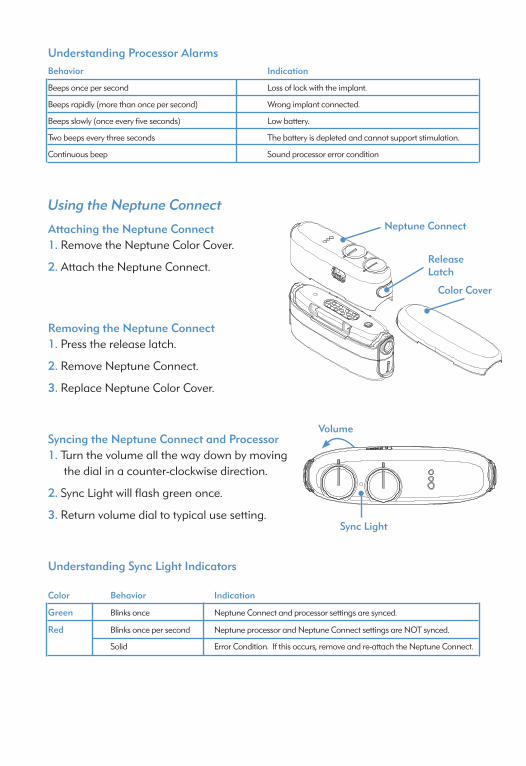
Understanding Processor AlarmsBehavior Indication
Beeps once per second Loss of lock with the implant.
Beeps rapidly (more than once per second) Wrong implant connected.
Beeps slowly (once every five seconds) Low battery.
two beeps every three seconds the battery is depleted and cannot support stimulation.
continuous beep Sound processor error condition
Using the Neptune Connect
Attaching the Neptune Connect1. remove the Neptune color cover.
2. attach the Neptune connect.
Removing the Neptune Connect1. press the release latch.
2. remove Neptune connect.
3. replace Neptune color cover.
Syncing the Neptune Connect and Processor1. turn the volume all the way down by moving
the dial in a counter-clockwise direction.
2. Sync Light will flash green once.
3. return volume dial to typical use setting.
Understanding Sync Light Indicators
Color Behavior Indication
Green Blinks once Neptune connect and processor settings are synced.
Red Blinks once per second Neptune processor and Neptune connect settings are NOt synced.
Solid error condition. if this occurs, remove and re-attach the Neptune connect.
Neptune Connect
Color Cover
Release Latch
Volume
Sync Light
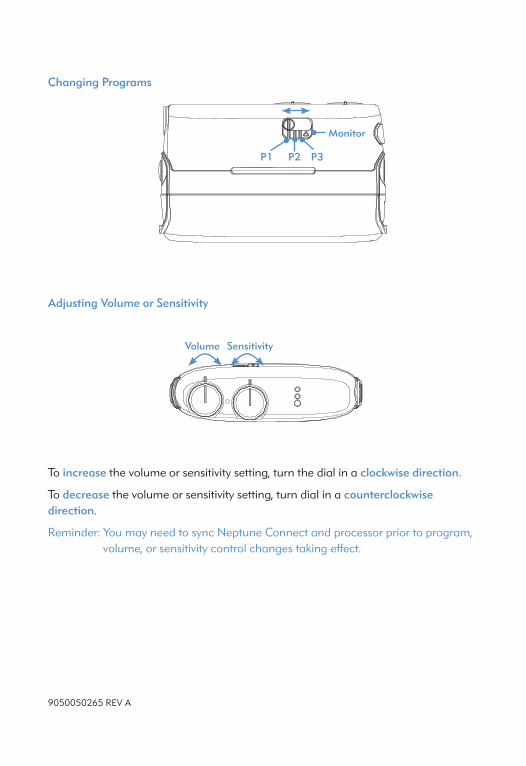
Changing Programs
Adjusting Volume or Sensitivity
to increase the volume or sensitivity setting, turn the dial in a clockwise direction.
to decrease the volume or sensitivity setting, turn dial in a counterclockwise direction.
reminder: You may need to sync Neptune connect and processor prior to program, volume, or sensitivity control changes taking effect.
9050050265 reV A
P1 P2 P3
Monitor
Volume Sensitivity
Recommended