Microsoft Exchange MailboxEmail Software Setup Guide
Microsoft Exchange Mailbox Setup guide
Page 1 of 17
Microsoft Exchange Mailbox Setup Guide
Setting up a Microsoft Exchange mailbox only takes a few minutes. You can set up any
email software to send and receive email from your mailbox. This guide will show you step
by step how to set up the most common mail clients to work with your new mailbox.
Software Covered in this Guide
Outlook 2007
Outlook 2003
Mac Mail (see note below)
Thunderbird (see note below)
Note: To get the full benefit of your Microsoft Exchange mailbox you should use Microsoft Outlook 2003 or 2007. However, it is possible to connect to a Microsoft Exchange mailbox in other software, such as Thunderbird or Mac Mail, using the IMAP protocol.
Before you start
Before you set up your email software, there are certain things you will need. These are
• Email software (Outlook 2003 or 2007 is recommended)
• An Internet connection.
• The Microsoft Exchange server name (this will look something like EXCH-BE04).
• Your username (This is the same as the email address for your new mailbox).
• The password for the mailbox.
Microsoft Exchange Mailbox Setup guide
Page 2 of 17
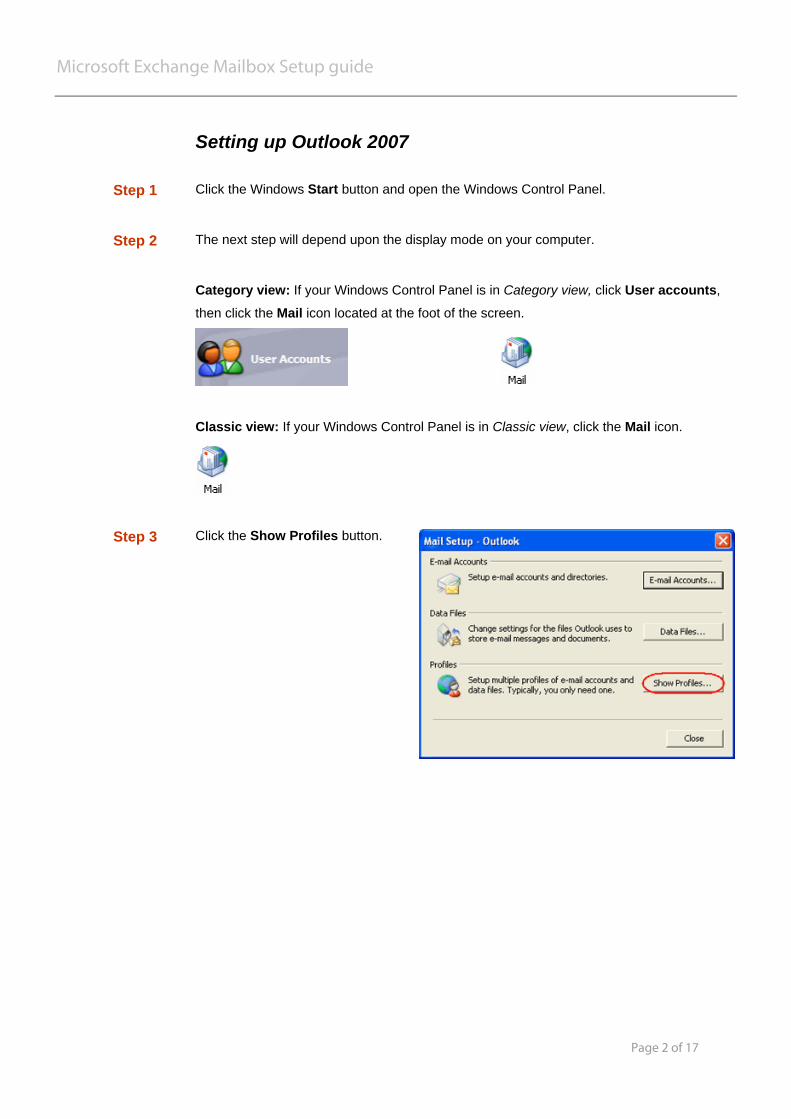
Setting up Outlook 2007
Step 1 Click the Windows Start button and open the Windows Control Panel.
Step 2 The next step will depend upon the display mode on your computer.
Category view: If your Windows Control Panel is in Category view, click User accounts,
then click the Mail icon located at the foot of the screen.
Classic view: If your Windows Control Panel is in Classic view, click the Mail icon.
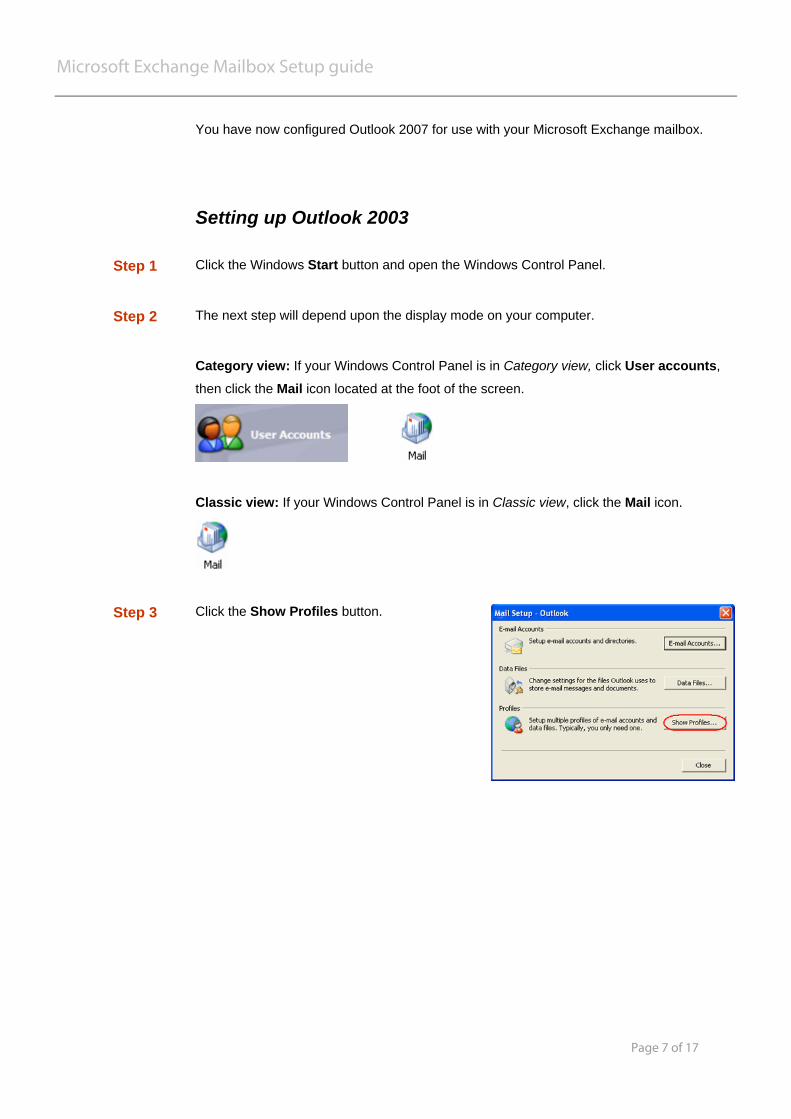
Step 3 Click the Show Profiles button.
Microsoft Exchange Mailbox Setup guide
Page 3 of 17
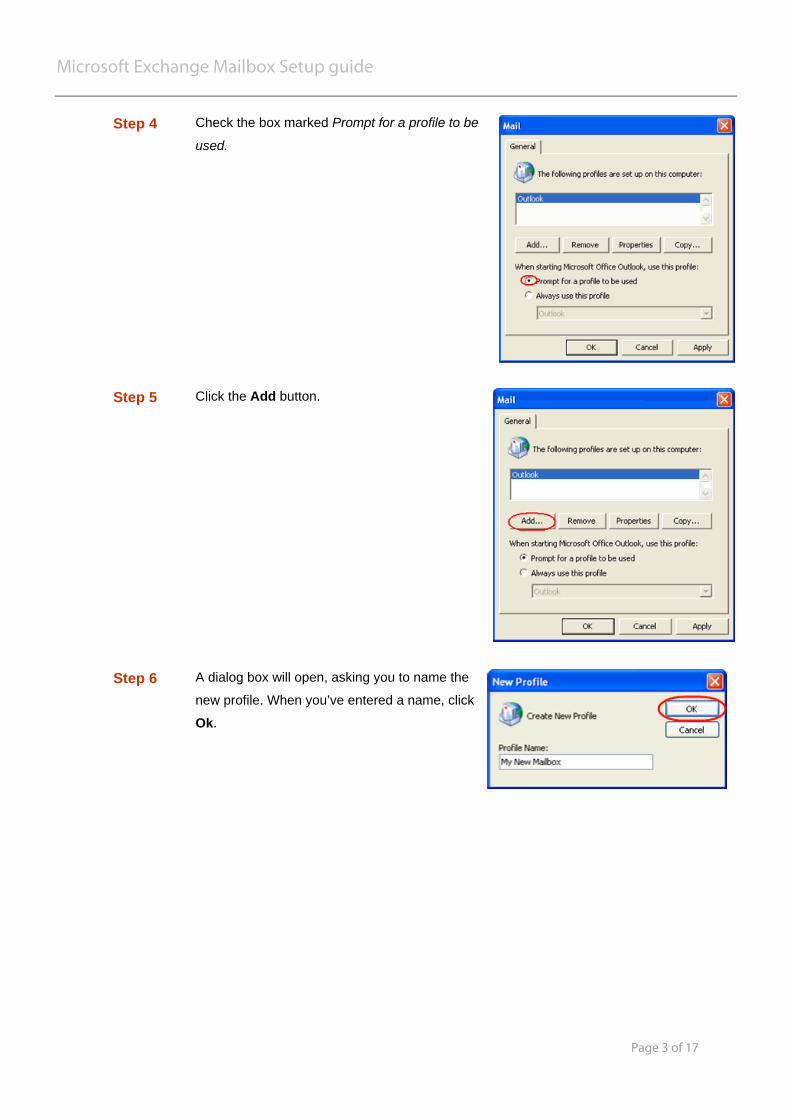
Step 4 Check the box marked Prompt for a profile to be
used.
Step 5 Click the Add button.
Step 6 A dialog box will open, asking you to name the
new profile. When you’ve entered a name, click
Ok.
Microsoft Exchange Mailbox Setup guide
Page 4 of 17
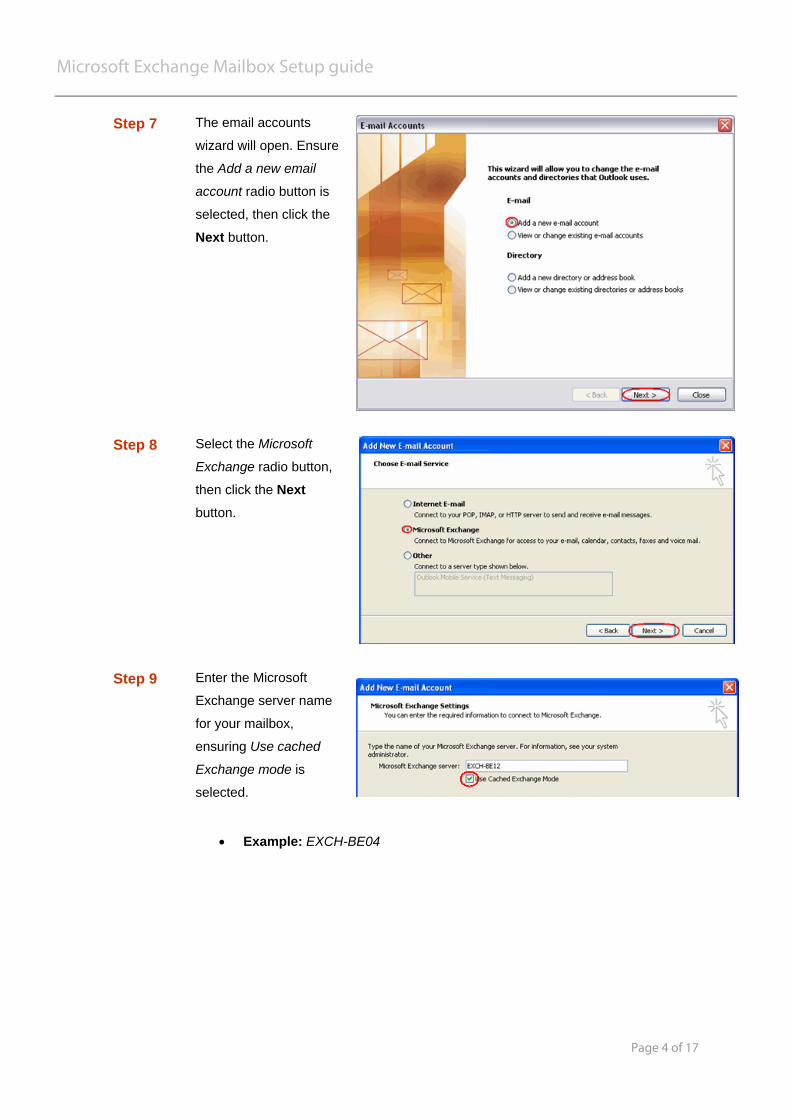
Step 7 The email accounts
wizard will open. Ensure
the Add a new email
account radio button is
selected, then click the
Next button.
Step 8 Select the Microsoft
Exchange radio button,
then click the Next button.
Step 9 Enter the Microsoft
Exchange server name
for your mailbox,
ensuring Use cached
Exchange mode is
selected.
• Example: EXCH-BE04
Microsoft Exchange Mailbox Setup guide
Page 5 of 17
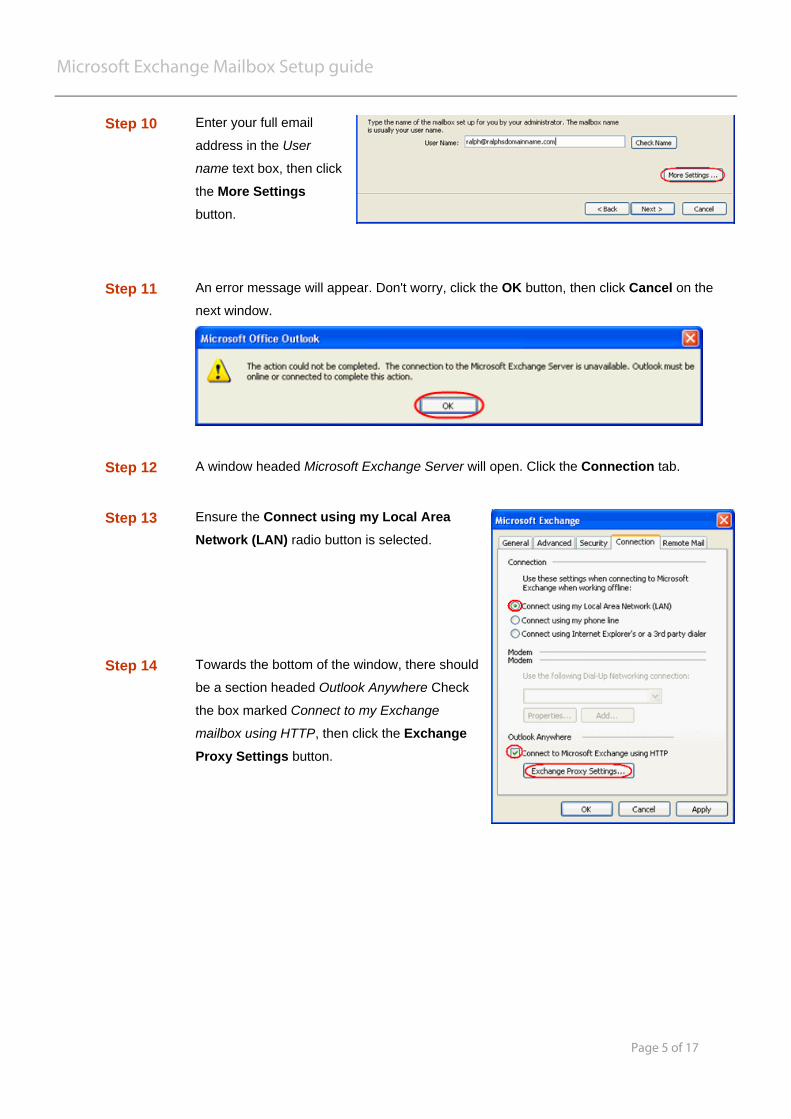
Step 10 Enter your full email
address in the User
name text box, then click
the More Settings
button.
Step 11 An error message will appear. Don't worry, click the OK button, then click Cancel on the
next window.
Step 12 A window headed Microsoft Exchange Server will open. Click the Connection tab.
Step 13 Ensure the Connect using my Local Area Network (LAN) radio button is selected.
Step 14 Towards the bottom of the window, there should
be a section headed Outlook Anywhere Check
the box marked Connect to my Exchange
mailbox using HTTP, then click the Exchange Proxy Settings button.
Microsoft Exchange Mailbox Setup guide
Page 6 of 17
Note: If the Exchange Anywhere section is not shown, you need to upgrade to the latest version of Windows XP or Windows 2003.
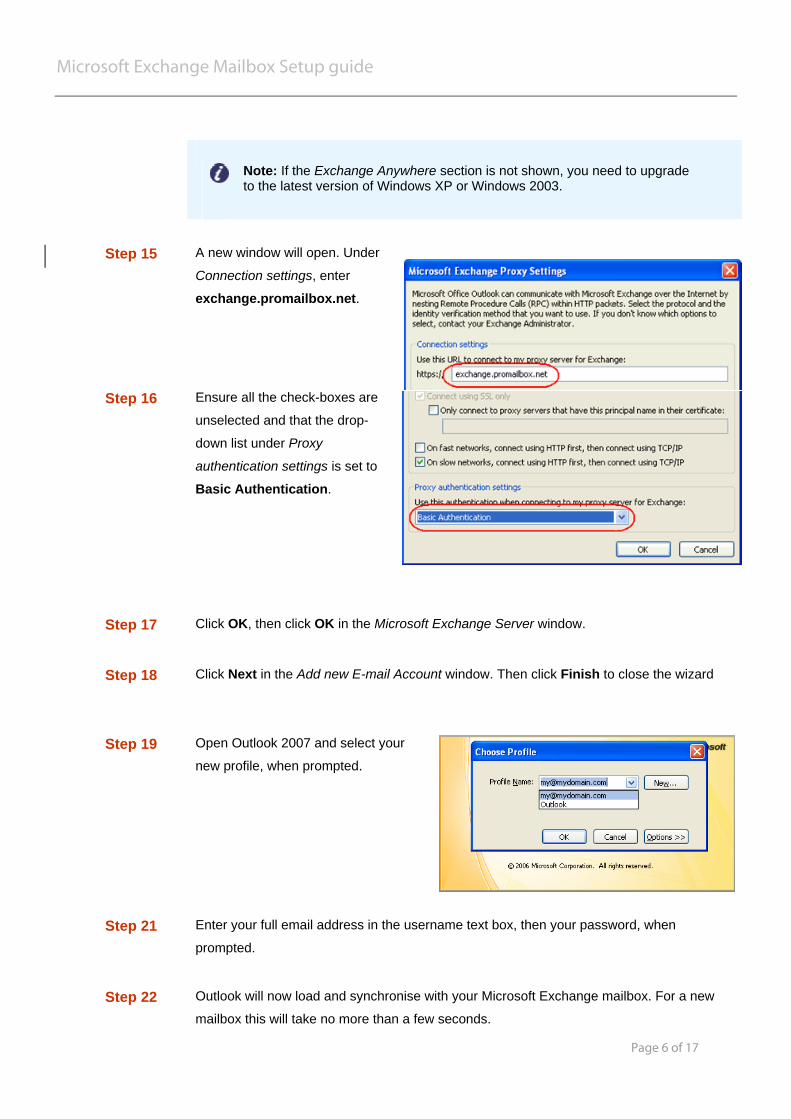
Step 15 A new window will open. Under
Connection settings, enter
exchange.promailbox.net.
Step 16 Ensure all the check-boxes are
unselected and that the drop-
down list under Proxy
authentication settings is set to
Basic Authentication.
Step 17 Click OK, then click OK in the Microsoft Exchange Server window.
Step 18 Click Next in the Add new E-mail Account window. Then click Finish to close the wizard
Step 19 Open Outlook 2007 and select your
new profile, when prompted.
Step 21 Enter your full email address in the username text box, then your password, when
prompted.
Step 22 Outlook will now load and synchronise with your Microsoft Exchange mailbox. For a new
mailbox this will take no more than a few seconds.
Microsoft Exchange Mailbox Setup guide
Page 7 of 17
You have now configured Outlook 2007 for use with your Microsoft Exchange mailbox.
Setting up Outlook 2003
Step 1 Click the Windows Start button and open the Windows Control Panel.
Step 2 The next step will depend upon the display mode on your computer.
Category view: If your Windows Control Panel is in Category view, click User accounts,
then click the Mail icon located at the foot of the screen.
Classic view: If your Windows Control Panel is in Classic view, click the Mail icon.
Step 3 Click the Show Profiles button.
Microsoft Exchange Mailbox Setup guide
Page 8 of 17
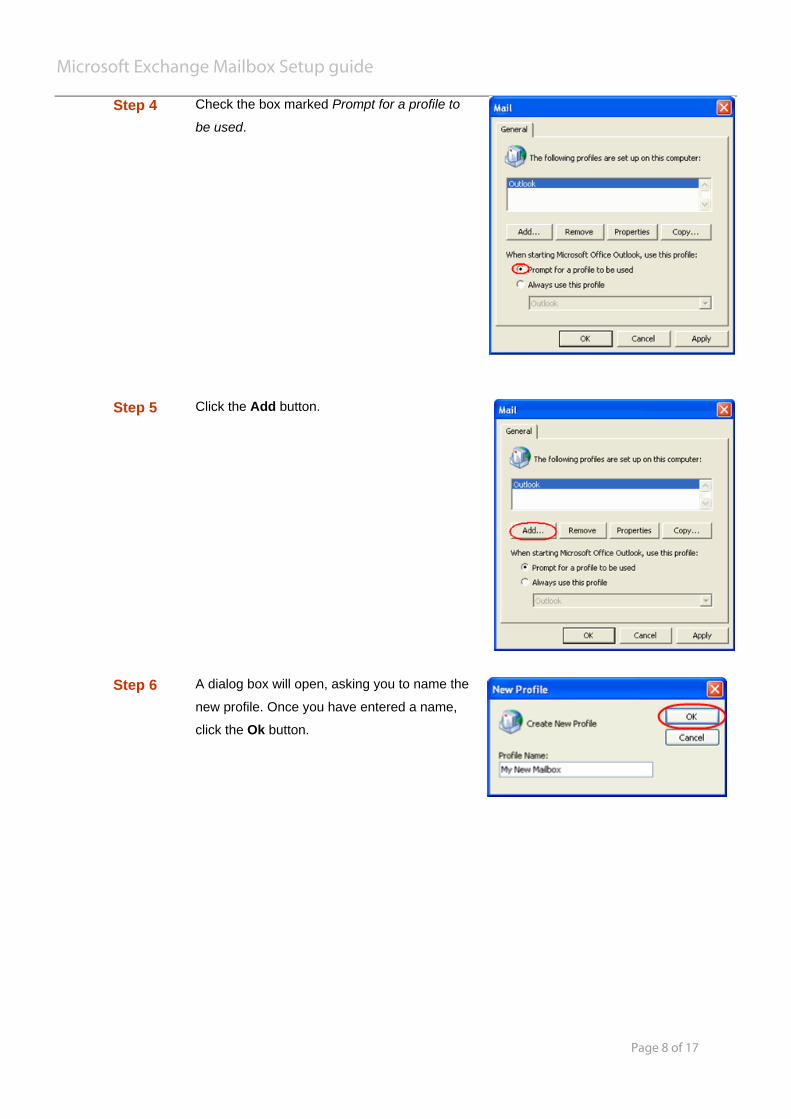
Step 4 Check the box marked Prompt for a profile to
be used.
Step 5 Click the Add button.
Step 6 A dialog box will open, asking you to name the
new profile. Once you have entered a name,
click the Ok button.
Microsoft Exchange Mailbox Setup guide
Page 9 of 17
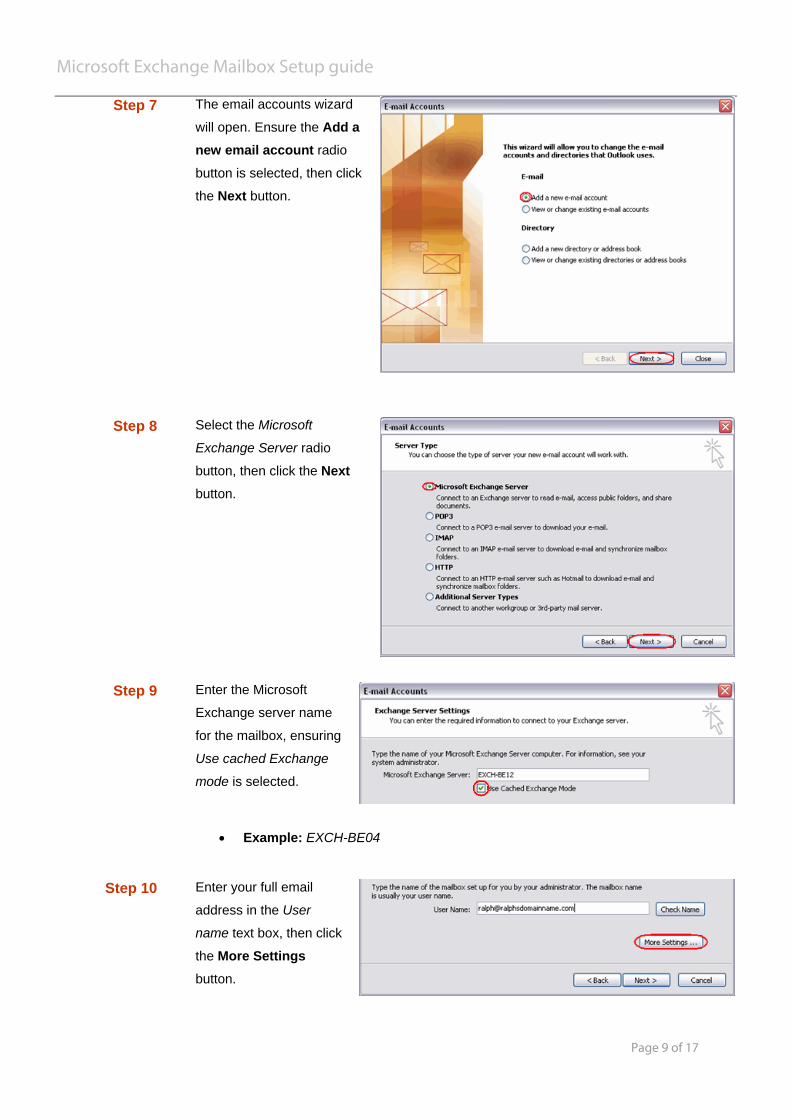
Step 7 The email accounts wizard
will open. Ensure the Add a new email account radio
button is selected, then click
the Next button.
Step 8 Select the Microsoft
Exchange Server radio
button, then click the Next button.
Step 9 Enter the Microsoft
Exchange server name
for the mailbox, ensuring
Use cached Exchange
mode is selected.
• Example: EXCH-BE04
Step 10 Enter your full email
address in the User
name text box, then click
the More Settings
button.
Microsoft Exchange Mailbox Setup guide
Page 10 of 17
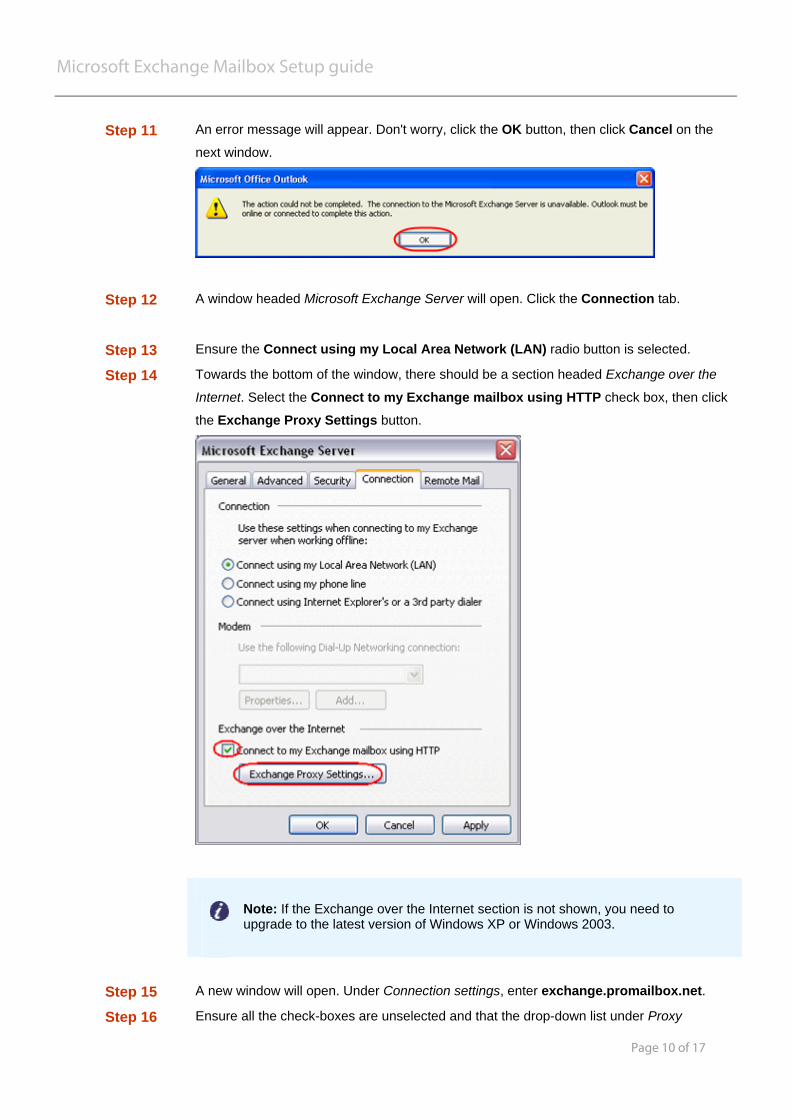
Step 11 An error message will appear. Don't worry, click the OK button, then click Cancel on the
next window.
Step 12 A window headed Microsoft Exchange Server will open. Click the Connection tab.
Step 13 Ensure the Connect using my Local Area Network (LAN) radio button is selected.
Step 14 Towards the bottom of the window, there should be a section headed Exchange over the
Internet. Select the Connect to my Exchange mailbox using HTTP check box, then click
the Exchange Proxy Settings button.
Note: If the Exchange over the Internet section is not shown, you need to upgrade to the latest version of Windows XP or Windows 2003.
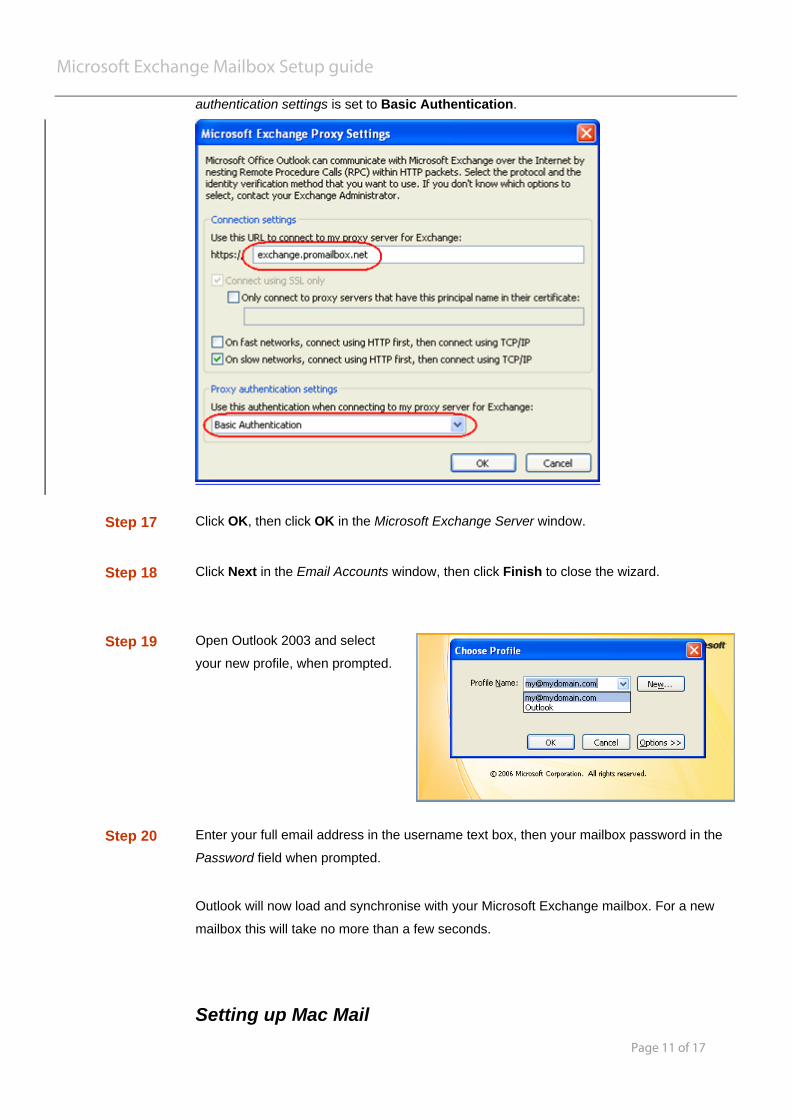
Step 15 A new window will open. Under Connection settings, enter exchange.promailbox.net.
Step 16 Ensure all the check-boxes are unselected and that the drop-down list under Proxy
Microsoft Exchange Mailbox Setup guide
Page 11 of 17
authentication settings is set to Basic Authentication.
Step 17 Click OK, then click OK in the Microsoft Exchange Server window.
Step 18 Click Next in the Email Accounts window, then click Finish to close the wizard.
Step 19 Open Outlook 2003 and select
your new profile, when prompted.
Step 20 Enter your full email address in the username text box, then your mailbox password in the
Password field when prompted.
Outlook will now load and synchronise with your Microsoft Exchange mailbox. For a new
mailbox this will take no more than a few seconds.
Setting up Mac Mail
Microsoft Exchange Mailbox Setup guide
Page 12 of 17
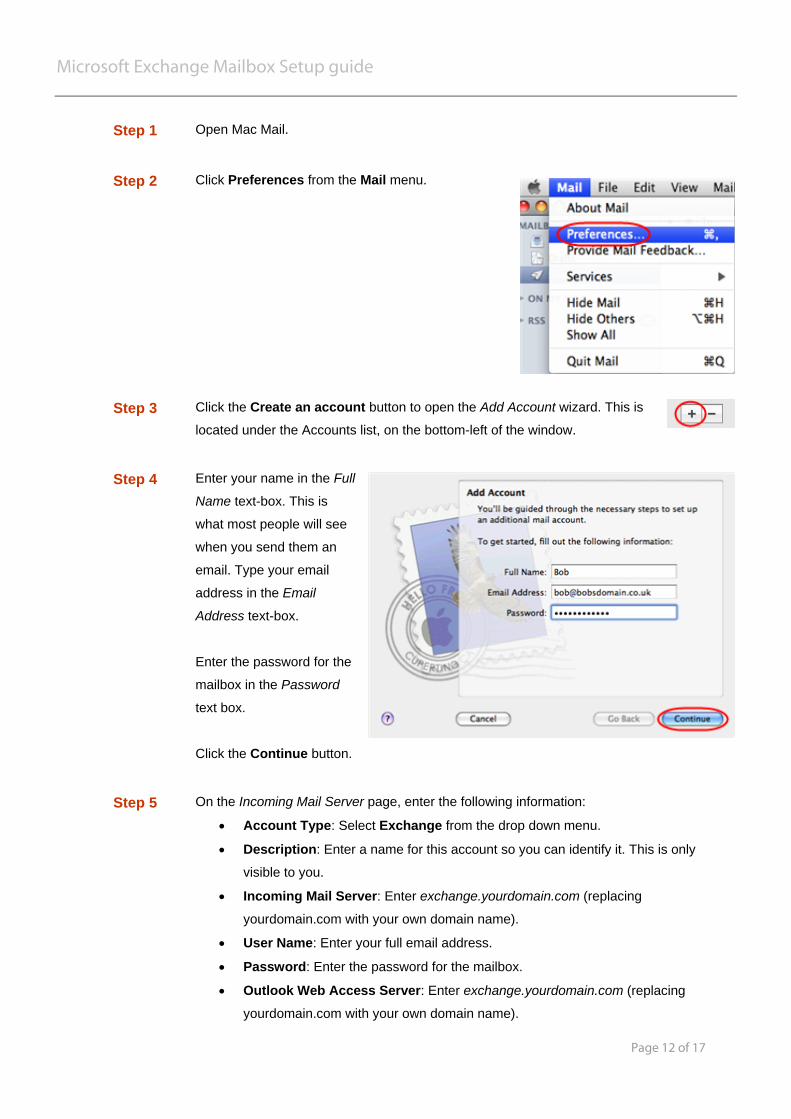
Step 1 Open Mac Mail.
Step 2 Click Preferences from the Mail menu.
Step 3 Click the Create an account button to open the Add Account wizard. This is
located under the Accounts list, on the bottom-left of the window.
Step 4 Enter your name in the Full
Name text-box. This is
what most people will see
when you send them an
email. Type your email
address in the Email
Address text-box.
Enter the password for the
mailbox in the Password
text box.
Click the Continue button.
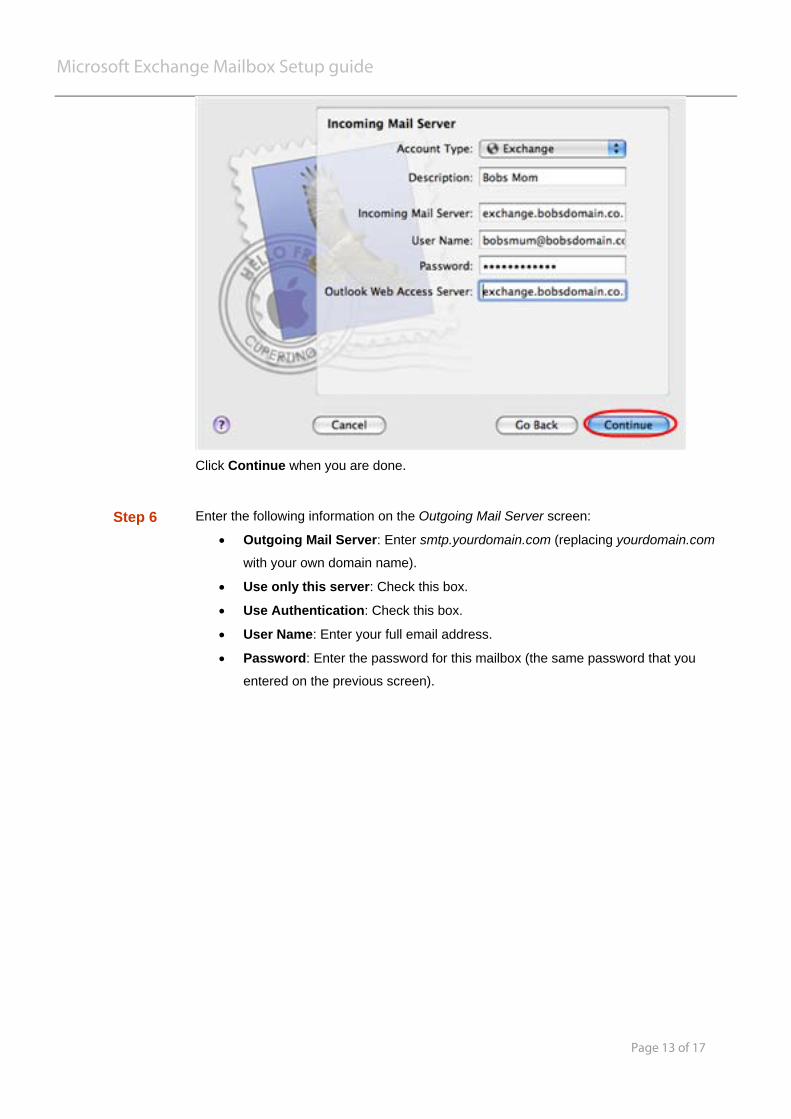
Step 5 On the Incoming Mail Server page, enter the following information:
• Account Type: Select Exchange from the drop down menu.
• Description: Enter a name for this account so you can identify it. This is only
visible to you.
• Incoming Mail Server: Enter exchange.yourdomain.com (replacing
yourdomain.com with your own domain name).
• User Name: Enter your full email address.
• Password: Enter the password for the mailbox.
• Outlook Web Access Server: Enter exchange.yourdomain.com (replacing
yourdomain.com with your own domain name).
Microsoft Exchange Mailbox Setup guide
Page 13 of 17
Click Continue when you are done.
Step 6 Enter the following information on the Outgoing Mail Server screen:
• Outgoing Mail Server: Enter smtp.yourdomain.com (replacing yourdomain.com
with your own domain name).
• Use only this server: Check this box.
• Use Authentication: Check this box.
• User Name: Enter your full email address.
• Password: Enter the password for this mailbox (the same password that you
entered on the previous screen).
Microsoft Exchange Mailbox Setup guide
Page 14 of 17
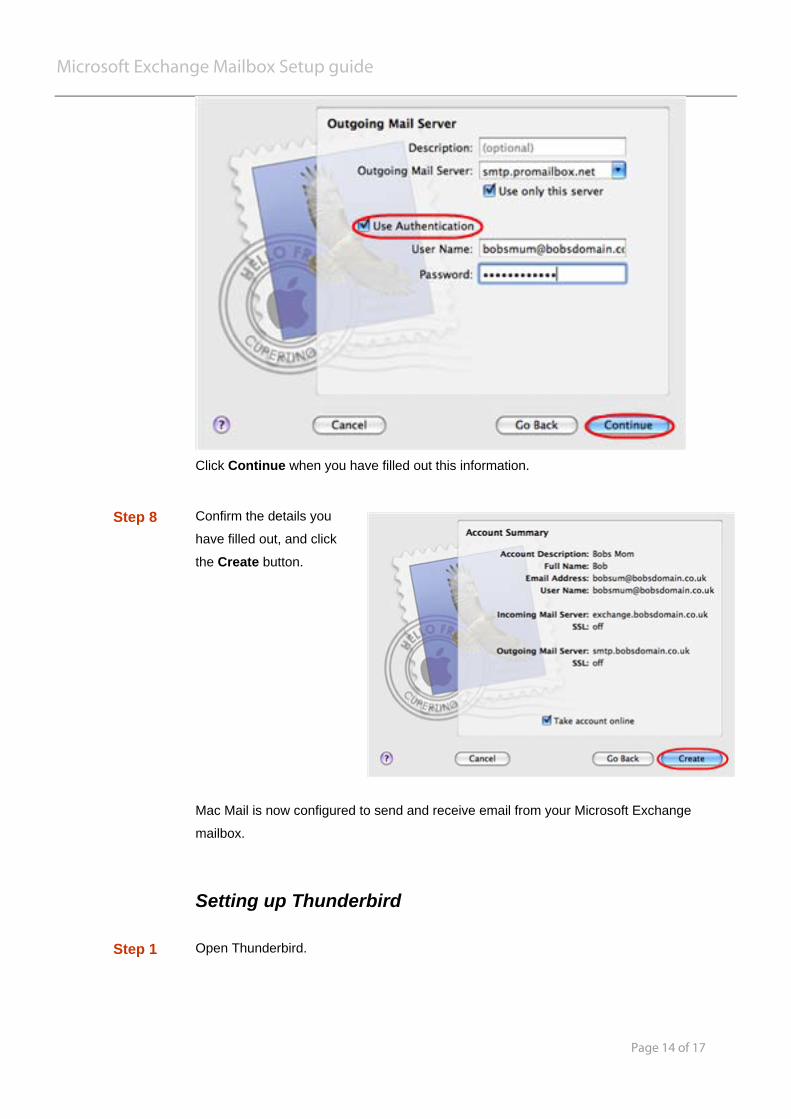
Click Continue when you have filled out this information.
Step 8 Confirm the details you
have filled out, and click
the Create button.
Mac Mail is now configured to send and receive email from your Microsoft Exchange
mailbox.
Setting up Thunderbird
Step 1 Open Thunderbird.
Microsoft Exchange Mailbox Setup guide
Page 15 of 17
Quick tip: When you open Thunderbird for the first time, and you already
have mailboxes set up using other email software, Thunderbird's Import
Wizard may offer to import your email account settings. If you choose not to
import settings from another email programme, the Account Wizard will
open. This guide takes you through setting up your Microsoft Exchange
mailbox using the Thunderbird Account Wizard.
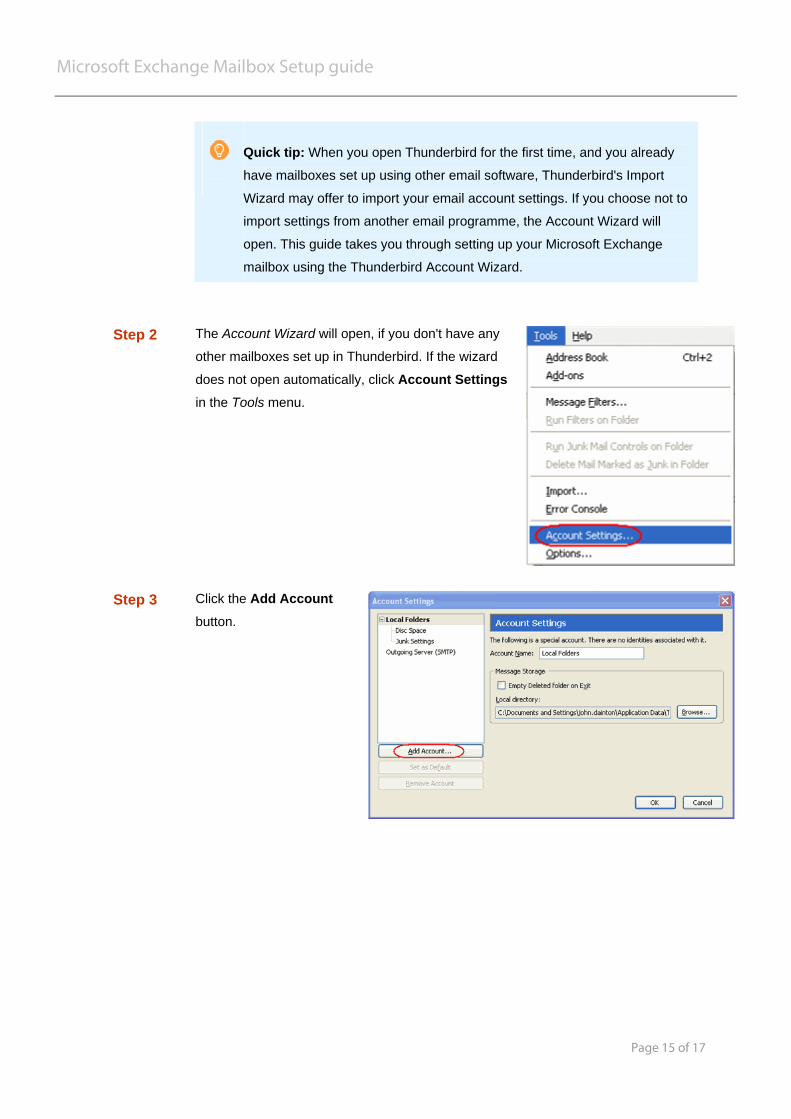
Step 2 The Account Wizard will open, if you don't have any
other mailboxes set up in Thunderbird. If the wizard
does not open automatically, click Account Settings
in the Tools menu.
Step 3 Click the Add Account button.
Microsoft Exchange Mailbox Setup guide
Page 16 of 17
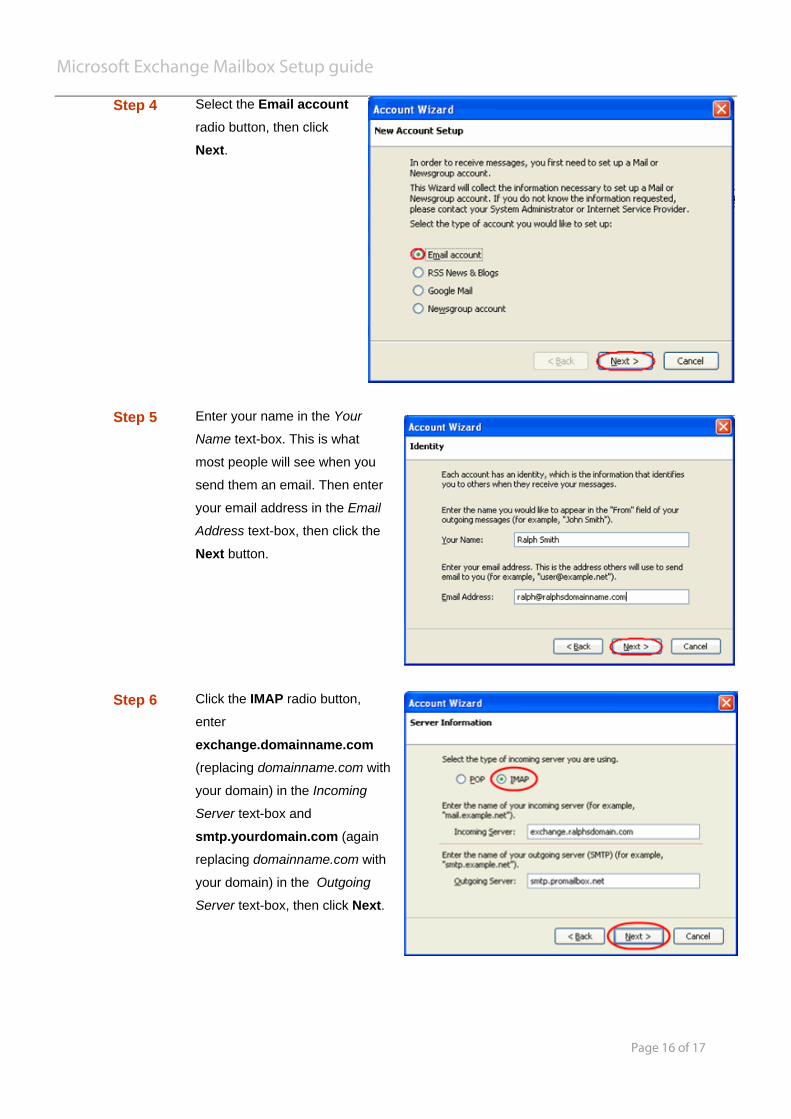
Step 4 Select the Email account radio button, then click
Next.
Step 5 Enter your name in the Your
Name text-box. This is what
most people will see when you
send them an email. Then enter
your email address in the Email
Address text-box, then click the
Next button.
Step 6 Click the IMAP radio button,
enter
exchange.domainname.com
(replacing domainname.com with
your domain) in the Incoming
Server text-box and
smtp.yourdomain.com (again
replacing domainname.com with
your domain) in the Outgoing
Server text-box, then click Next.
Microsoft Exchange Mailbox Setup guide
Page 17 of 17
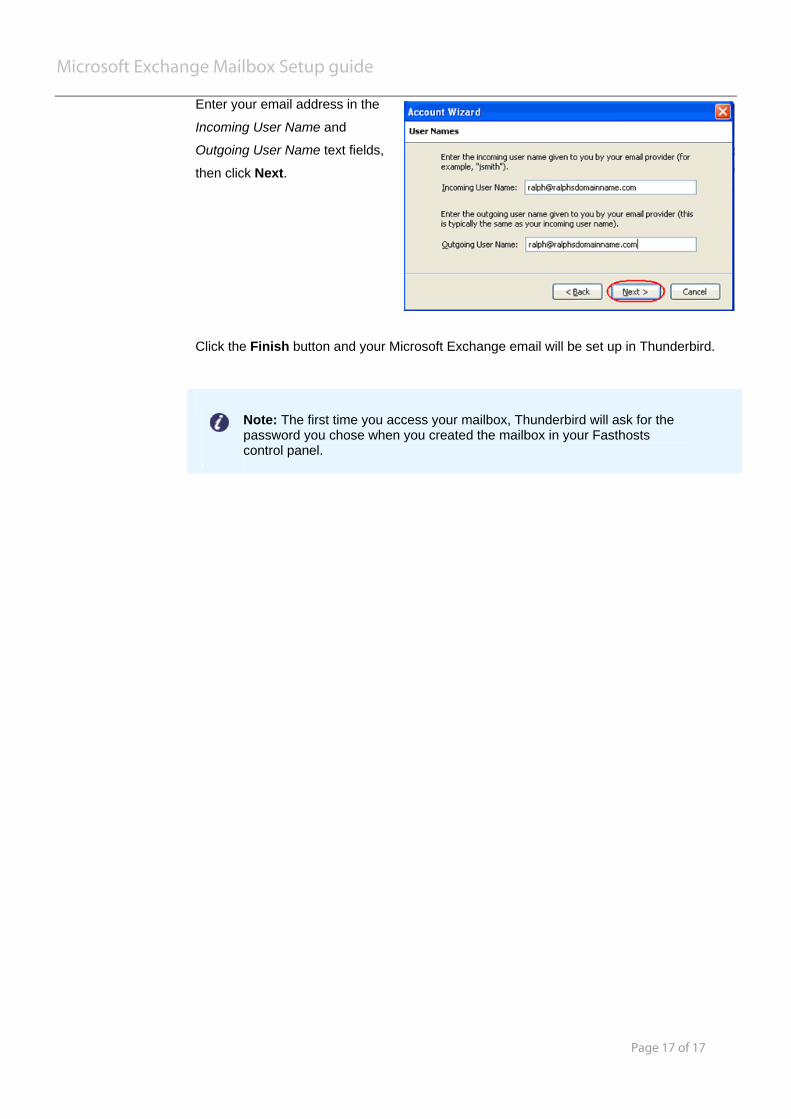
Enter your email address in the
Incoming User Name and
Outgoing User Name text fields,
then click Next.
Click the Finish button and your Microsoft Exchange email will be set up in Thunderbird.
Note: The first time you access your mailbox, Thunderbird will ask for the password you chose when you created the mailbox in your Fasthosts control panel.
Recommended