Microsoft Access 2007 / 2010 Troubleshooting Guide for CIMS and SDVVF
Purpose:
This document serves as a guide to troubleshoot some common Microsoft Access configuration settings
that may cause problems with CIMS and / or SDVVF applications. These instructions are applicable to
Access 2007 and 2010. CIMS / SDVVF applications do not currently work with Access 2013. If you have
Access 2013 installed on your computer then you should download the Access 2003 runtime from the
DCJS website at: http://www.dcjs.virginia.gov/victims/cims/
Jump to CIMS Application Issues Section
CIMS / SDVVF Installation Directories Not in Microsoft Access Trust Center – Trusted Locations
If the installation directories for CIMS / SDVVF are not added to the Microsoft Access Trust Center –
Trusted Locations then they will not run properly. Follow the steps below to determine if your copy of
CIMS or SDVVF are in the trusted locations list.
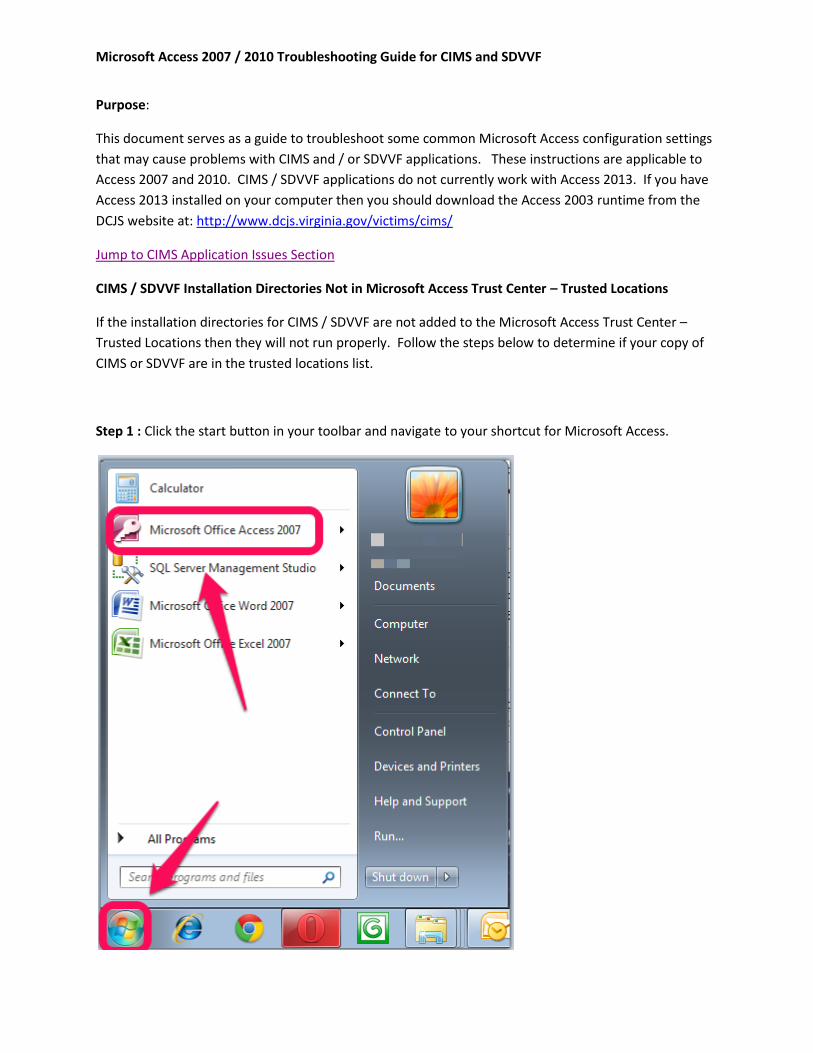
Step 1 : Click the start button in your toolbar and navigate to your shortcut for Microsoft Access.
Microsoft Access 2007 / 2010 Troubleshooting Guide for CIMS and SDVVF
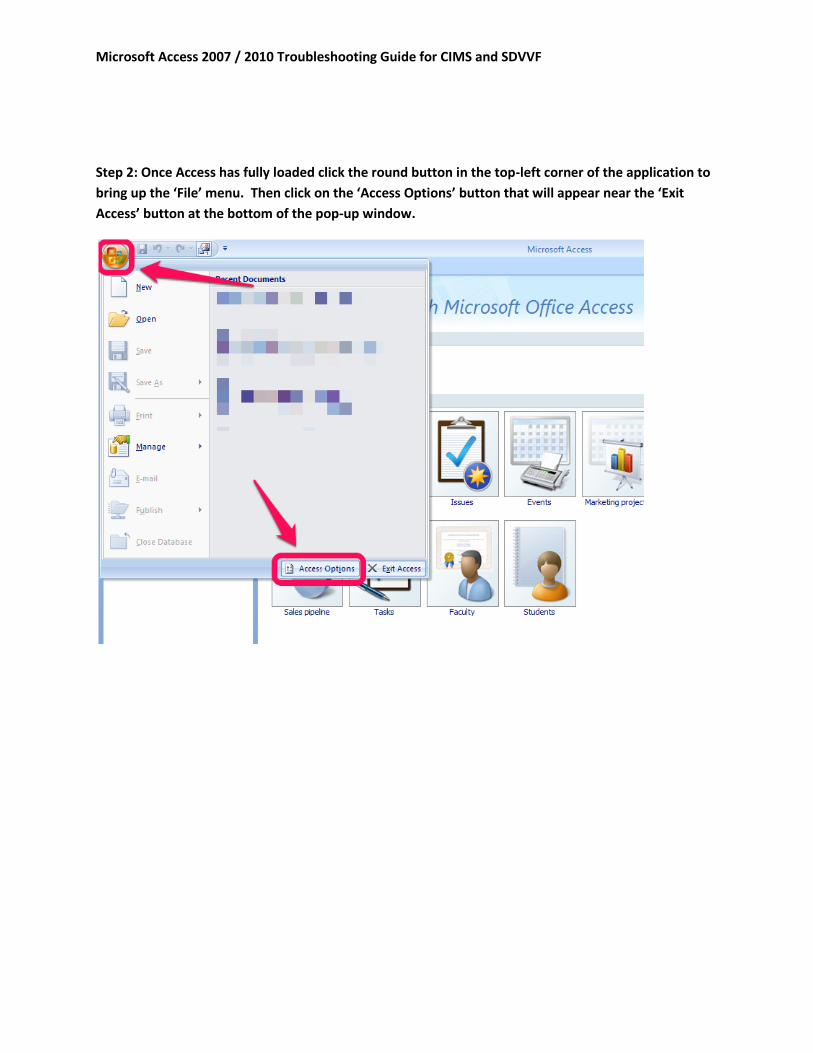
Step 2: Once Access has fully loaded click the round button in the top-left corner of the application to
bring up the ‘File’ menu. Then click on the ‘Access Options’ button that will appear near the ‘Exit
Access’ button at the bottom of the pop-up window.
Microsoft Access 2007 / 2010 Troubleshooting Guide for CIMS and SDVVF
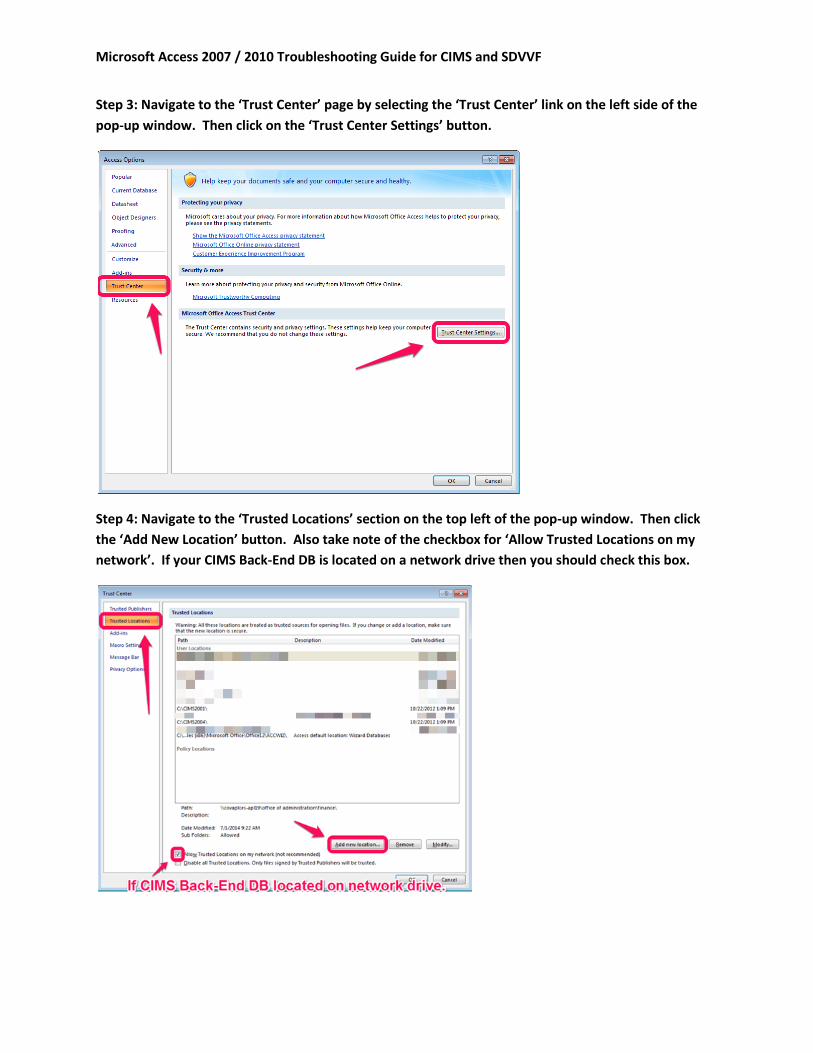
Step 3: Navigate to the ‘Trust Center’ page by selecting the ‘Trust Center’ link on the left side of the
pop-up window. Then click on the ‘Trust Center Settings’ button.
Step 4: Navigate to the ‘Trusted Locations’ section on the top left of the pop-up window. Then click
the ‘Add New Location’ button. Also take note of the checkbox for ‘Allow Trusted Locations on my
network’. If your CIMS Back-End DB is located on a network drive then you should check this box.
Microsoft Access 2007 / 2010 Troubleshooting Guide for CIMS and SDVVF
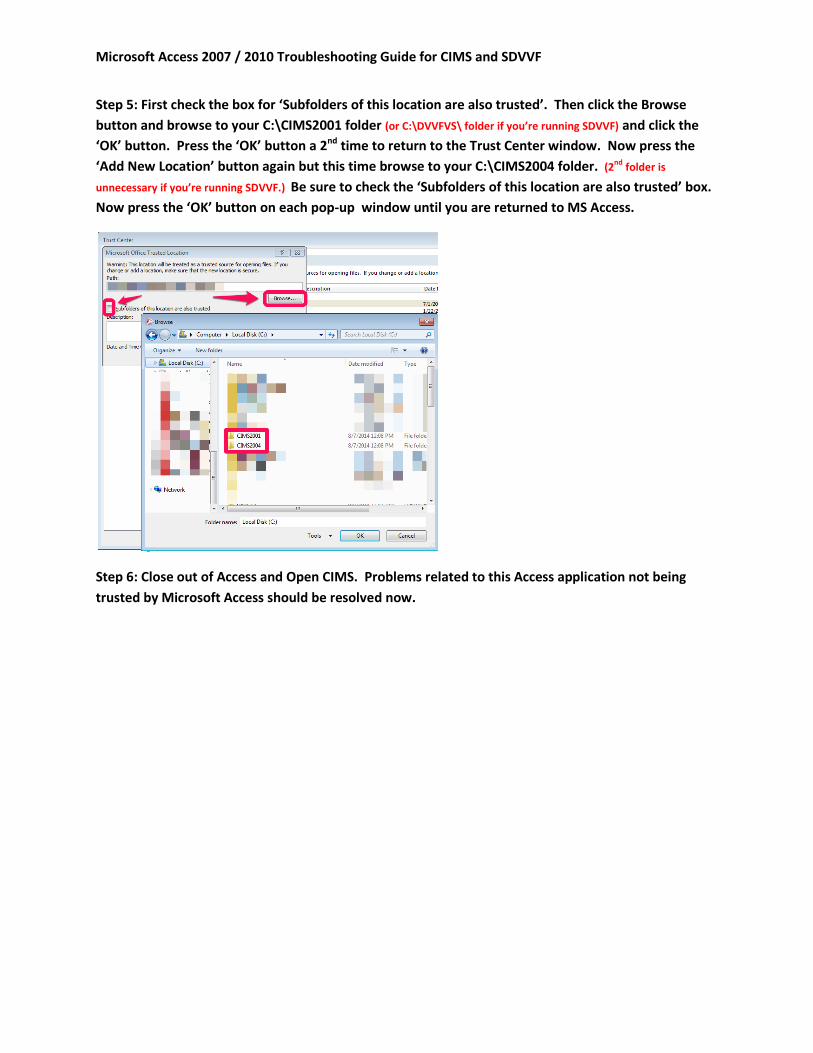
Step 5: First check the box for ‘Subfolders of this location are also trusted’. Then click the Browse
button and browse to your C:\CIMS2001 folder (or C:\DVVFVS\ folder if you’re running SDVVF) and click the
‘OK’ button. Press the ‘OK’ button a 2nd time to return to the Trust Center window. Now press the
‘Add New Location’ button again but this time browse to your C:\CIMS2004 folder. (2nd folder is
unnecessary if you’re running SDVVF.) Be sure to check the ‘Subfolders of this location are also trusted’ box.
Now press the ‘OK’ button on each pop-up window until you are returned to MS Access.
Step 6: Close out of Access and Open CIMS. Problems related to this Access application not being
trusted by Microsoft Access should be resolved now.
Microsoft Access 2007 / 2010 Troubleshooting Guide for CIMS and SDVVF
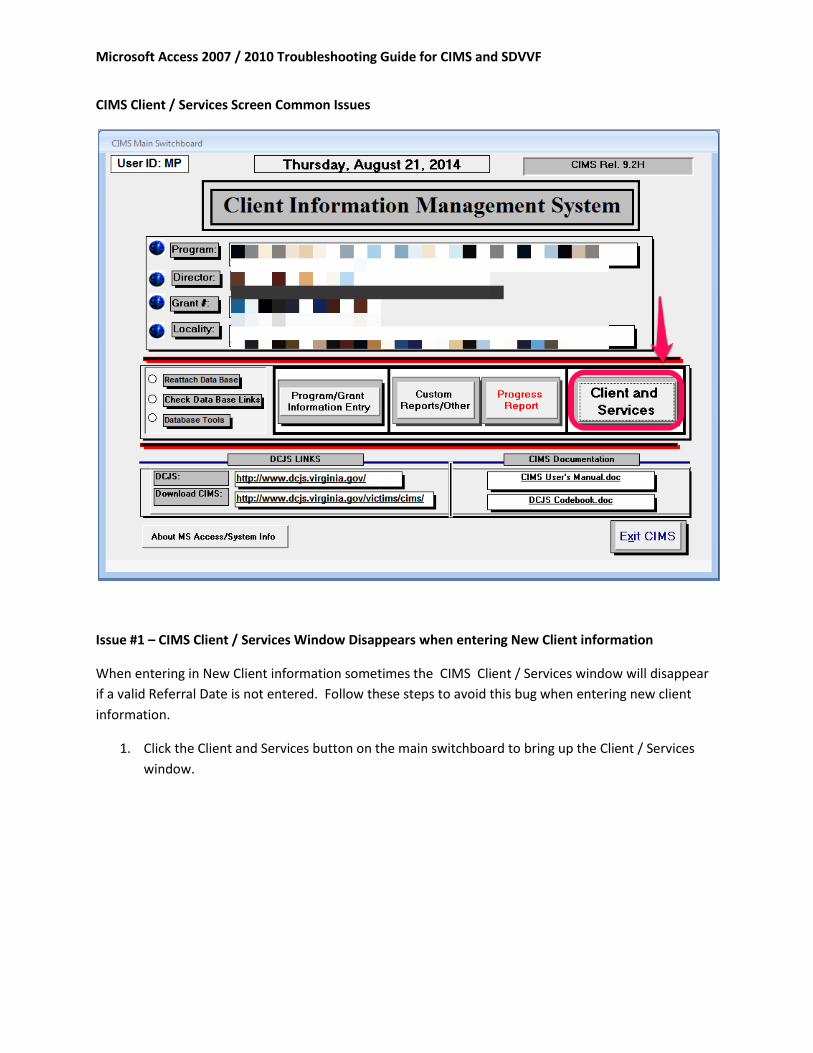
CIMS Client / Services Screen Common Issues
Issue #1 – CIMS Client / Services Window Disappears when entering New Client information
When entering in New Client information sometimes the CIMS Client / Services window will disappear
if a valid Referral Date is not entered. Follow these steps to avoid this bug when entering new client
information.
1. Click the Client and Services button on the main switchboard to bring up the Client / Services
window.
Microsoft Access 2007 / 2010 Troubleshooting Guide for CIMS and SDVVF
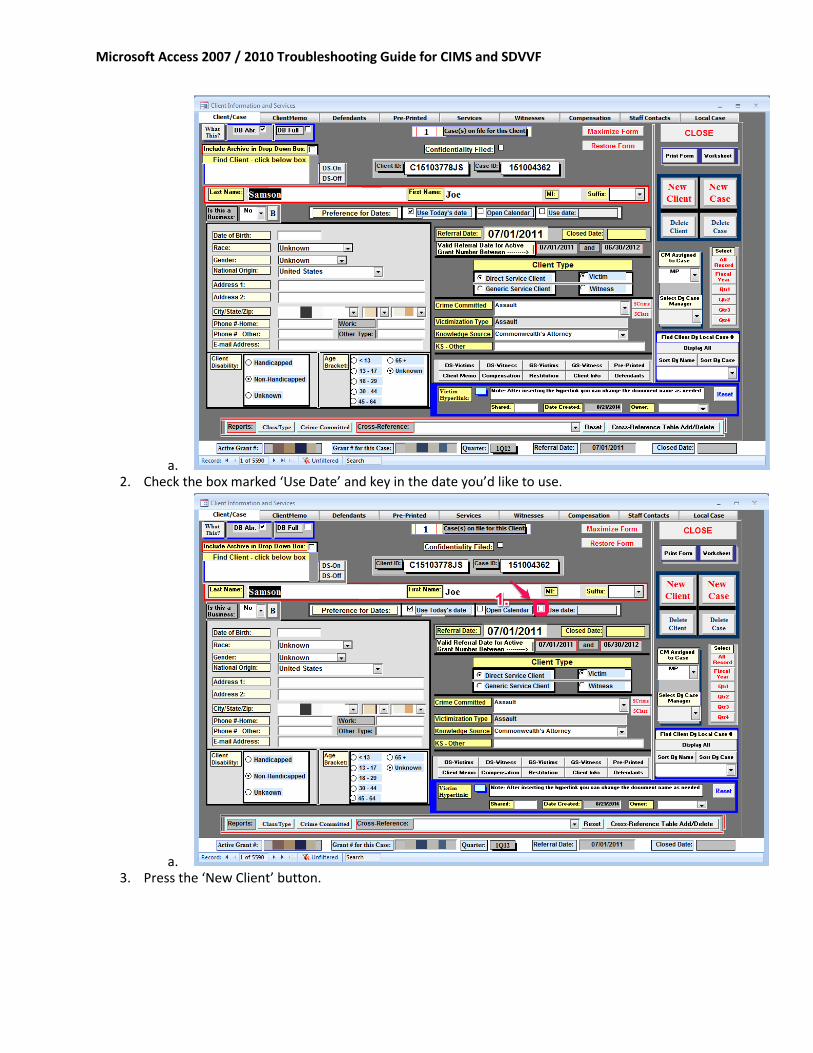
a. 2. Check the box marked ‘Use Date’ and key in the date you’d like to use.
a. 3. Press the ‘New Client’ button.
Microsoft Access 2007 / 2010 Troubleshooting Guide for CIMS and SDVVF
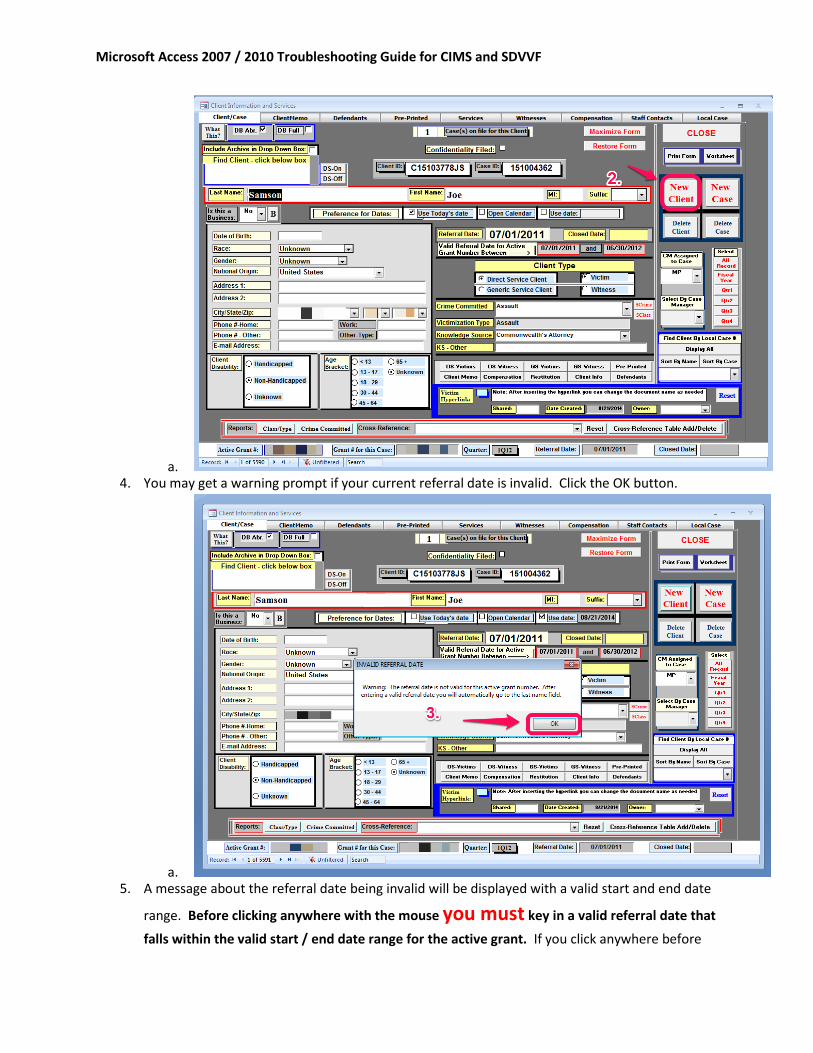
a. 4. You may get a warning prompt if your current referral date is invalid. Click the OK button.
a. 5. A message about the referral date being invalid will be displayed with a valid start and end date
range. Before clicking anywhere with the mouse you must key in a valid referral date that
falls within the valid start / end date range for the active grant. If you click anywhere before
Microsoft Access 2007 / 2010 Troubleshooting Guide for CIMS and SDVVF
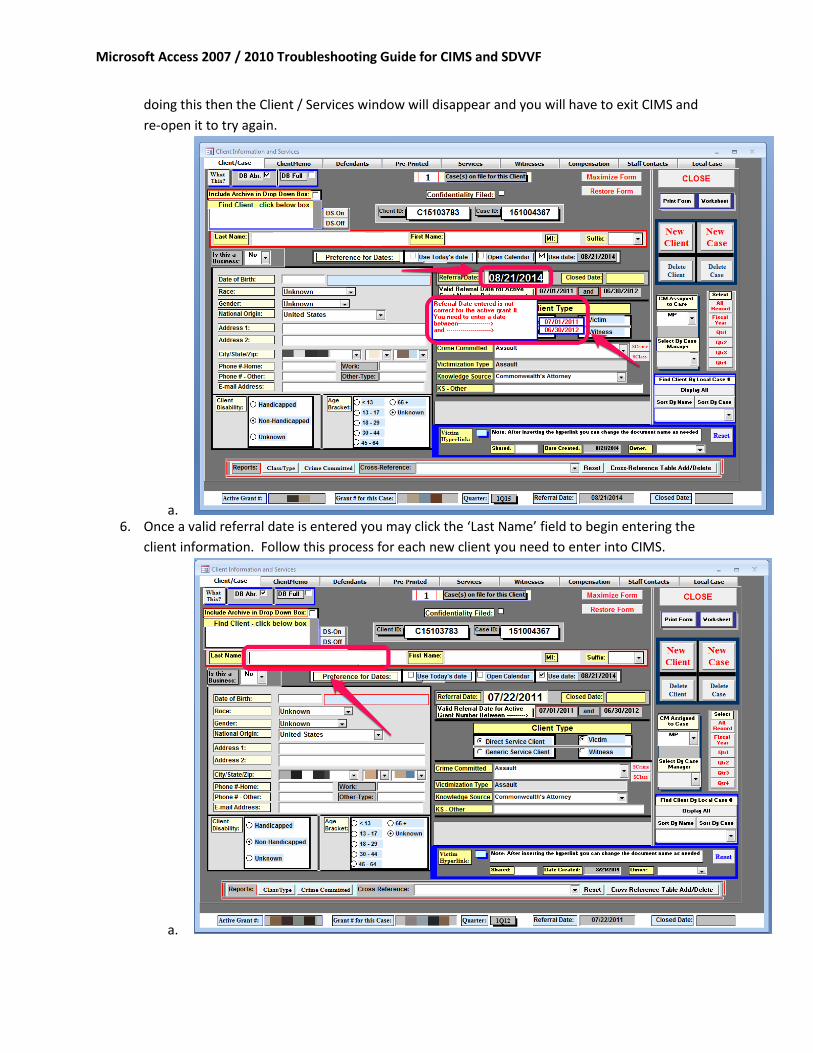
doing this then the Client / Services window will disappear and you will have to exit CIMS and
re-open it to try again.
a. 6. Once a valid referral date is entered you may click the ‘Last Name’ field to begin entering the
client information. Follow this process for each new client you need to enter into CIMS.
a.
Recommended