3-59 Corbett Hall – University of Alberta Edmonton, AB T6G 2G4 Ph: (780) 492-5422 Fx: (780) 492-1696 Email: [email protected]
Published citation:
Adams, K., & David, B.-L. (2013). Making Hands-on Activities for Everyone: Math and the
Lego Mindstorms Robot. Retrieved from Edmonton, Alberta:
Making “Hands-
On” Activities for
Everyone
Math and
The Lego
Mindstorm
Robot
Kim Adams
1,2 and Bonnie Lynn David
2
1Faculty of Rehabilitation Medicine, University of Alberta
2Glenrose Rehabilitation Hospital, Edmonton, Alberta
The authors would like to acknowledge the generous help of: Katelyn Loshny and Christopher
Truscott
© Adams and David, 2013
2
Contents Introduction ............................................................................................................................................. 2
Communication Modalities ....................................................................................................................... 3
How to Help Students with Physical Delays and/or Communication Delays Count ...................................... 6
Strategies When Using the Robot .............................................................................................................. 6
Training Protocol ..................................................................................................................................... 8
Alberta Program of Studies...................................................................................................................... 10
GRADE 1 .......................................................................................................................................... 10
GRADE 2 .......................................................................................................................................... 11
GRADE 3 .......................................................................................................................................... 13
GRADE 1 Comparing Objects ................................................................................................................................. 14
Comparing Lengths ................................................................................................................................ 17
Ordering Lengths .................................................................................................................................... 20
GRADE 2 Comparing Length and Distance ............................................................................................................. 23
Estimating Lengths and Choosing Units ................................................................................................... 32
Using One Copy of a Unit ....................................................................................................................... 37
GRADE 3 Using a Ruler ......................................................................................................................................... 42
Estimating and Measuring with Centimetres ....................................................................................... 47
Estimating and Measuring in Metres ........................................................................................................ 51
Introduction As a means of including students with physical disabilities into math activities, we have paired a
Lego Mindstorm Robot (NXT or EV3) with adapted Math Makes Sense activities. The Lego
Robot is controlled via Bluetooth, allowing the student direct control of the Robot using
available remote control devices. The adapted activities focus on the students independently

3
using the Robot in measuring activities similar to those being done by their peers. By providing a
means for the student to actively manipulate standard and non-standard units, it is believed that
students with physical disabilities will gain a better understanding of measurement concepts. We
also strongly believe that the Lego Robot is a viable option for providing “hands-on”
opportunities for students with physical disabilities in many other academic learning activities as
a means of increasing their participation and understanding. For more information, see: Adams,
K., & Cook, A. (2013). Access to hands-on mathematics measurement activities using robots
controlled via speech generating devices: Three case studies. Disability and Rehabilitation:
Assistive Technology (Early On-line).
Communication Modalities During the math activities, students are expected to indicate choice, answer questions, direct,
predict, and make statements. How does a student with communication difficulties participate in
this important component of these activities? ANSWER: Staff must provide the student with
multi-modal ways of communicating. Below is a list of possible communication modality
options.
NOTE: When considering a communication modality, it is important to balance the cognitive-
linguistic load of the activity with the type of response required. If the activity is cognitively and
linguistically challenging or new, the modality should require minimal physical effort or less
conscious energy to perform. For example, when the student is driving the robot to line up their
measurement units (a task with a high cognitive load), the communication modality selected
should be relatively easy or ‘automatic’ for him/her to perform (e.g. two-hand choice making or
eye gaze).
MODEL, MODEL, MODEL: The student will benefit from observing adult modeling as the language and the modality(s) with
which s/he is expected to use or emulate is new. Staff must repeatedly model the use of the
language and communication modality throughout the math activities and optimally, in a variety
of contexts across the school day. Students model what they see and will learn to use a variety of
modalities if these are modeled for them in authentic contexts.
1. Non-verbal Yes/No
If the individual has a reliable means of signaling YES and NO (for e.g.
shaking/nodding his/her head, blinking, vocalizations, etc.,) she/he can use this signal
to answer yes/no questions, indicate agreement/disagreement or confirm a choice.
2. Eye gaze or Pointing
If the individual is unable to directly select an item, picture symbol, word, etc., via finger
pointing, eye gaze or pointing is a quick and less physically demanding means of
indication. Once the individual indicates a choice, staff needs to provide feedback (for
e.g. I see that you are looking at ____) and wait for confirmation (a YES/NO signal).
YOUTUBE video: YOUTUBE video: http://www.youtube.com/watch?v=JEt4BswSl7U

4
a. Two Hand Choice Making
This approach involves naming 2 choices and staff using their hands as place holders
for each choice. The student indicates their choice selection via eye gaze. For
example, when asking the student where to start measuring an object, staff could ask
“top” or “bottom” while indicating that her right hand represents top and her left
hand represents bottom. If the student looks at the staff’s right hand, she/he then
clarifies: “You picked top, right?”
b. Sticky Notes
Key words or phrases could be written on sticky notes and arranged around the
student’s communication device, wheelchair tray or desk and accessed via eye gaze
or pointing. Key phrases could include generic math terms (e.g. longer, shorter, same
as, etc.,) as well as “survival vocabulary” (e.g. I need help, I don’t understand, Please
repeat, Fix it, etc.)
c. E-Tran
An eye-gaze or “e-tran” board allows for multiple
symbols to be displayed at a time, thereby
increasing the selection set of words for the
student and staff to model and use.
The student gazes at symbols or pictures, words,
etc., attached to a transparent frame (see below) in
order to make a selection. Staff then “reads” the
eye gaze from the other side of the frame and gives feedback.
Resource website:
http://www.bridgeschool.org/transition/multimodal/eye_gaze_boards.php
3. Individual Key Word/Phrase Board
Similar to a word wall, key words and phrases can be placed on the student’s individual
word board. Words or phrases that could be used by the student to direct, comment or
demonstrate understanding. These words would be arranged in grid format on a manila
tag board. Symbols could be added to phrases or words that not part of the student’s
sight word vocabulary. Words or phrases chosen for the board could include vocabulary
5
relating to the math activities (long, short, same) AND core words (put, want, get, help).
Temporary words could be added to the individual Key Word Board using Sticky Notes
(ex. Color words for the cars or strings).
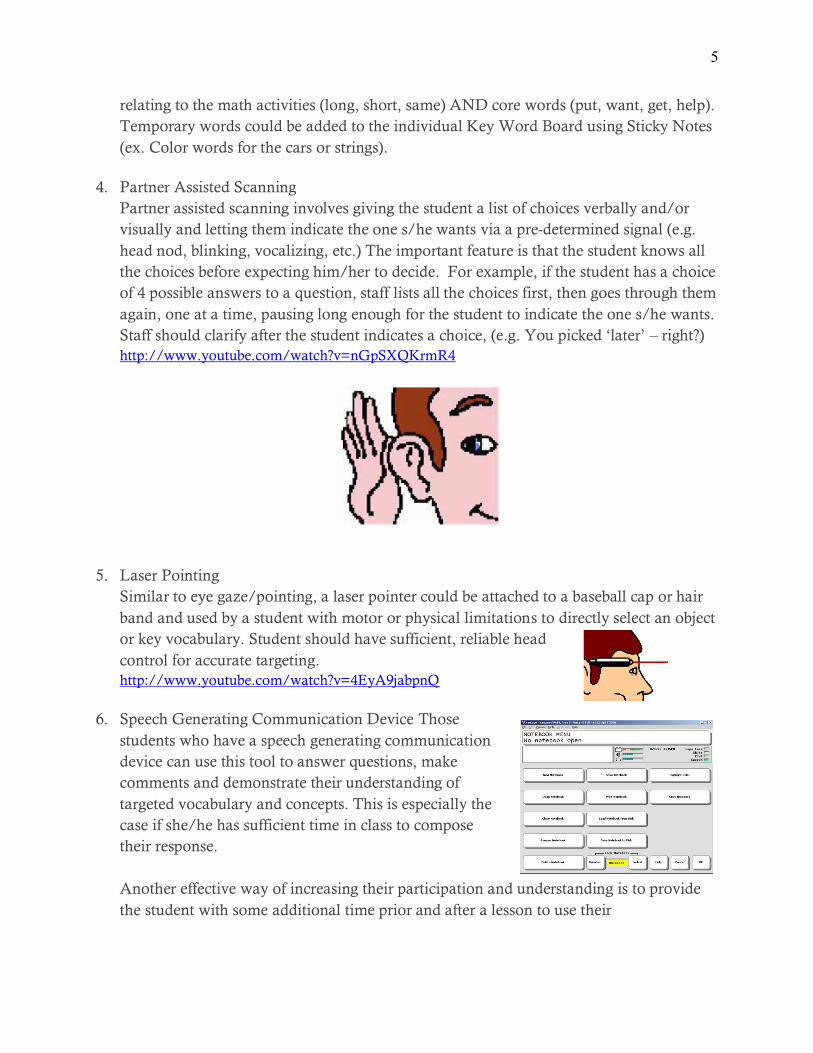
4. Partner Assisted Scanning
Partner assisted scanning involves giving the student a list of choices verbally and/or
visually and letting them indicate the one s/he wants via a pre-determined signal (e.g.
head nod, blinking, vocalizing, etc.) The important feature is that the student knows all
the choices before expecting him/her to decide. For example, if the student has a choice
of 4 possible answers to a question, staff lists all the choices first, then goes through them
again, one at a time, pausing long enough for the student to indicate the one s/he wants.
Staff should clarify after the student indicates a choice, (e.g. You picked ‘later’ – right?)
http://www.youtube.com/watch?v=nGpSXQKrmR4
5. Laser Pointing
Similar to eye gaze/pointing, a laser pointer could be attached to a baseball cap or hair
band and used by a student with motor or physical limitations to directly select an object
or key vocabulary. Student should have sufficient, reliable head
control for accurate targeting.
http://www.youtube.com/watch?v=4EyA9jabpnQ
6. Speech Generating Communication Device Those
students who have a speech generating communication
device can use this tool to answer questions, make
comments and demonstrate their understanding of
targeted vocabulary and concepts. This is especially the
case if she/he has sufficient time in class to compose
their response.
Another effective way of increasing their participation and understanding is to provide
the student with some additional time prior and after a lesson to use their
6
communication device to predict, plan, review or make a statement. Many devices have
notebooks (see illustration) that can be used to save and collect written messages.
How to Help Students with Physical Delays and/or Communication Delays Count Staff points to the objects while the student counts in their head (Inner Voice)
Staff points to the while the student counts aloud
If the number is 5 or less, student may be able to count independently by looking at the
objects (use Communication Modalities above as possible means for student to provide
the answer)
Use a number line, with staff tracing finger along the numbers. Student can indicate
number choice by looking at staff
Put number cards next to each non-standard unit as the staff counts
Strategies When Using the Robot As the wheels on the Robot are controlled by different motors, the wheels may behave
differently causing the Robot to move off course. Staff should gently push the Robot to
correct its path
Aligning the Robot into the correct position requires precise driving skills that students
may not have. When students have attempted to correctly position the Robot, but
continue to have difficulty, staff can position the Robot by picking it up and moving it
into position. Staff should confirm with the student that the new position is where they
want the Robot to be placed. (eg. Is the Robot at the Baseline?)
Students have control of the Gripper and can open and close it independently. At time
Gripper may not grasp the block correctly, staff can make adjustments to the object
within the Gripper
The spool attached to the peg at the back of the Robot works best when the string is
carefully wound with no overlap. Staff may also need to add slack to the string when the
Robot is driving
7
The activities suggest many ways the student can participate using the Robot. For some
students completing the activities as suggested may take longer than planned. Staff may
need to provide more assistance with certain portions of an activity (Eg. When using the
Gripper with non-standard units, staff may want to pick up the Robot and position it
back at the starting position and bring the next non-standard unit to the Robot. VS The
student driving the Robot to the pile of non-standard units and then driving to the
starting position.)

8
Training Protocol
All Grade Levels
Students with physical may have limited levels of experience controlling IR devices (including Lego Robots) using their
communication device, therefore training needs to done prior
performing the math activities. This training will assist the
student in developing sufficient competencies in controlling the Robot before adding an academic expectation to the task.
The Robot Training Protocol is designed so that students can
learn the skills required for performing the subsequent math activities with the Robot (e.g., maneuvering in two dimensions,
manipulating items, and switching between Robot and
communication modalities). Domains are introduced one at a
time: first Robot control only, and then Robotic control with manipulation of items.
The protocol consists of familiarization sessions, and slalom
and obstacle course sessions. Students may need three to four sessions of 30 to 60 minutes for each training activity. After
training is completed, a warm-up session, using the Robot prior
to each math activity is recommended. The grade and activity number is indicated next to the Training Tasks that are needed
for those activities.
Familiarization Session The student can spend time learning Robotic control by learning each Robot command one at a time (e.g. forward,
reverse, left, right) through a variety of tasks. Repeat the tasks
until the student has good Robot control. The tasks can be changed by placing toy animals or Mr. Potato Head parts
instead of blocks, and the student drives to them to select them.
Materials • Robot with gripper
• Blocks or obstacles
• Straws (mounted on blocks)
Task 1
• Student moves the Robot forward until it knocks over a
stack of blocks. The student could press and hold their
forward command selection to move the Robot forward and
then release the switch to stop. See Figure 1
Task 2 • Student helps build a stack of blocks. They need to stop
9
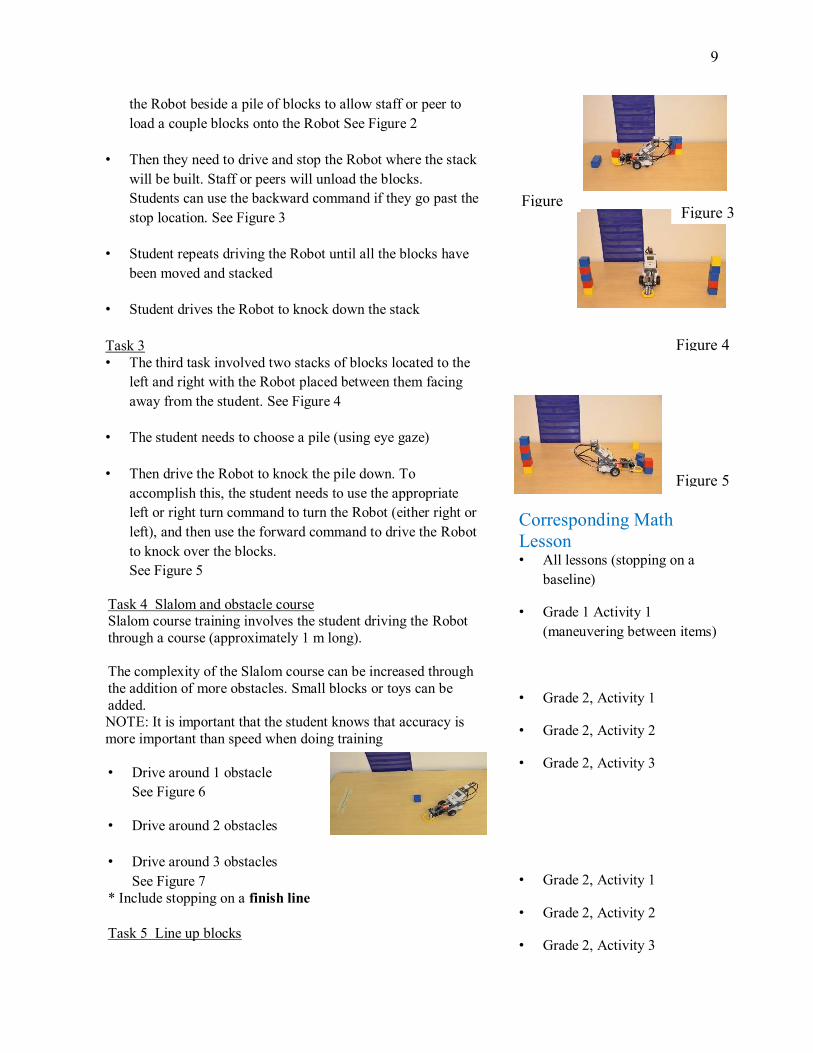
the Robot beside a pile of blocks to allow staff or peer to
load a couple blocks onto the Robot See Figure 2
• Then they need to drive and stop the Robot where the stack
will be built. Staff or peers will unload the blocks.
Students can use the backward command if they go past the
stop location. See Figure 3
• Student repeats driving the Robot until all the blocks have
been moved and stacked
• Student drives the Robot to knock down the stack
Task 3
• The third task involved two stacks of blocks located to the
left and right with the Robot placed between them facing
away from the student. See Figure 4
• The student needs to choose a pile (using eye gaze)
• Then drive the Robot to knock the pile down. To
accomplish this, the student needs to use the appropriate
left or right turn command to turn the Robot (either right or
left), and then use the forward command to drive the Robot
to knock over the blocks.
See Figure 5
Task 4 Slalom and obstacle course Slalom course training involves the student driving the Robot
through a course (approximately 1 m long).
The complexity of the Slalom course can be increased through
the addition of more obstacles. Small blocks or toys can be
added. NOTE: It is important that the student knows that accuracy is
more important than speed when doing training
• Drive around 1 obstacle
See Figure 6
• Drive around 2 obstacles
• Drive around 3 obstacles
See Figure 7
* Include stopping on a finish line
Task 5 Line up blocks
Corresponding Math
Lesson • All lessons (stopping on a
baseline)
• Grade 1 Activity 1
(maneuvering between items)
• Grade 2, Activity 1
• Grade 2, Activity 2
• Grade 2, Activity 3
• Grade 2, Activity 1
• Grade 2, Activity 2
• Grade 2, Activity 3
Figure
1
Figure
2 Figure 3
Figure 4
Figure 5

10
• Drive around 2 obstacles while:
o At the starting position,
grasping
a block placed in the
gripper by the staff, then release the block at the finish line
o Drive back to the
starting position to grasp
another block
o Drive the second block
and release it lined up
tip-to-tip with
the previous block See Figure 8
Task 6 Line up blocks with straws • At the starting position, grasp a
straw
(mounted on a block) placed in the gripper by the staff, then release the block at the finish line
• Drive back to the starting
position to grasp another straw
• Drive the second straw and
release it lined up tip-to-tip
with the previous straw
See Figure 9
Task 7 Using the pen in a straight line
• Lift the pen up and down to make a dotted line
• Grade 2, Activity 3
Alberta Program of Studies
Mathematics K – 9, 2007
GRADE 1
General Outcome
Use direct and indirect measurement to solve problems.
Figure 7
Figure
9
Figure
8
Figure
6
11
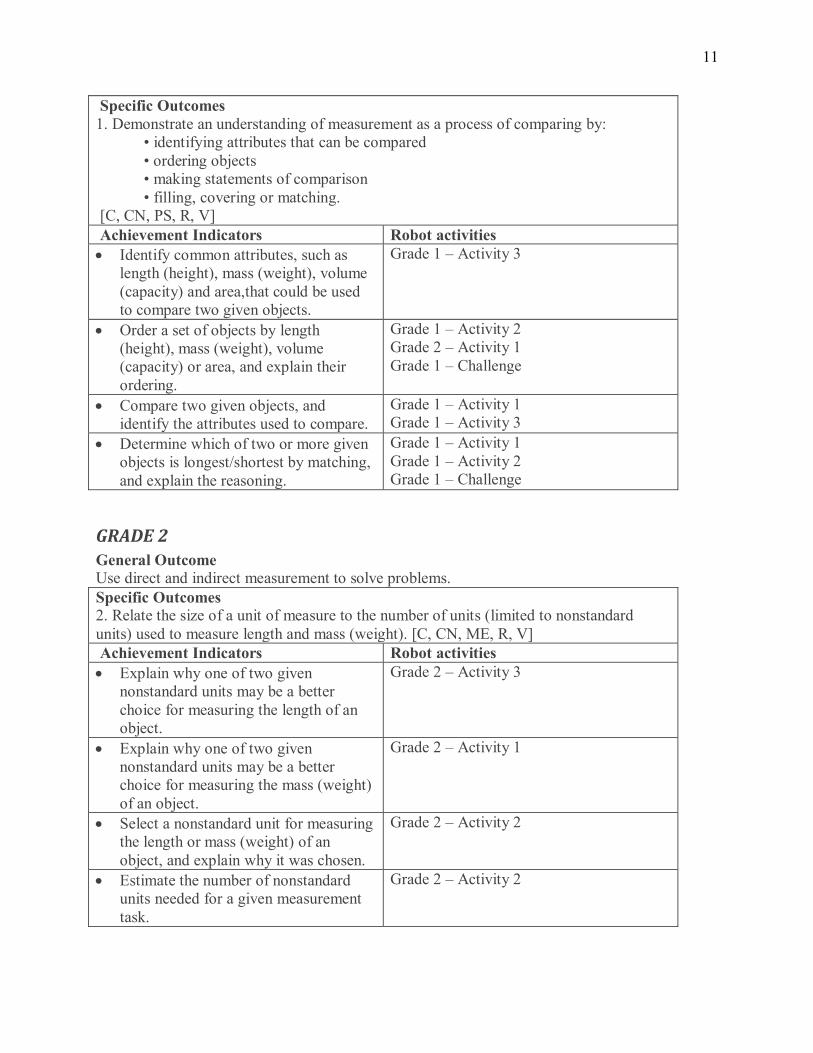
Specific Outcomes
1. Demonstrate an understanding of measurement as a process of comparing by:
• identifying attributes that can be compared
• ordering objects
• making statements of comparison
• filling, covering or matching.
[C, CN, PS, R, V]
Achievement Indicators Robot activities
Identify common attributes, such as
length (height), mass (weight), volume
(capacity) and area,that could be used
to compare two given objects.
Grade 1 – Activity 3
Order a set of objects by length
(height), mass (weight), volume
(capacity) or area, and explain their
ordering.
Grade 1 – Activity 2
Grade 2 – Activity 1
Grade 1 – Challenge
Compare two given objects, and
identify the attributes used to compare.
Grade 1 – Activity 1
Grade 1 – Activity 3
Determine which of two or more given
objects is longest/shortest by matching,
and explain the reasoning.
Grade 1 – Activity 1
Grade 1 – Activity 2
Grade 1 – Challenge
GRADE 2
General Outcome
Use direct and indirect measurement to solve problems.
Specific Outcomes
2. Relate the size of a unit of measure to the number of units (limited to nonstandard
units) used to measure length and mass (weight). [C, CN, ME, R, V]
Achievement Indicators Robot activities
Explain why one of two given
nonstandard units may be a better
choice for measuring the length of an
object.
Grade 2 – Activity 3
Explain why one of two given
nonstandard units may be a better
choice for measuring the mass (weight)
of an object.
Grade 2 – Activity 1
Select a nonstandard unit for measuring
the length or mass (weight) of an
object, and explain why it was chosen.
Grade 2 – Activity 2
Estimate the number of nonstandard
units needed for a given measurement
task.
Grade 2 – Activity 2

12
Specific Outcomes
3. Compare and order objects by length, height, distance around and mass (weight), using
nonstandard units, and make statements of comparison. [C, CN, ME, R, V]
Achievement Indicators Robot activities
Estimate, measure and record the
length, height, distance around or mass
(weight) of a given object, using
nonstandard units.
Grade 2 – Activity 2
Compare and order the measure of two
or more objects in ascending or
descending order, and explain the
method of ordering.
Grade 2 – Activity 1
Grade 3 – Activity 1
Grade 3 – Activity 2
Specific Outcomes Specific Outcomes
4. Measure length to the nearest nonstandard unit by:
• using multiple copies of a unit
• using a single copy of a unit (iteration process). [C, ME, R, V]
Achievement Indicators Robot activities
Explain why overlapping or leaving
gaps does not result in accurate
measures.
Grade 2 – Activity 1,2 and 3
Count the number of nonstandard units
required to measure the length of a
given object, using a single copy or
multiple copies of a unit.
Grade 2 – Activity 2
Grade 3 – Activity 1
Grade 3 – Activity 2
Estimate and measure a given object,
using multiple copies of a nonstandard
unit and using a single copy of the
same unit many times, and explain the
results.
Grade 2 – Activity 2
Grade 3 – Activity 1
Grade 3 – Activity 2
Estimate and measure, using
nonstandard units, a given length that is
not a straight line.
Grade 2 – Activity 3
Specific Outcomes Specific Outcomes
5. Demonstrate that changing the orientation of an object does not alter the measurements
of its attributes. [C, R, V]
Achievement Indicators Robot activities
Measure a given object, change the
orientation, re-measure, and explain the
results.
Grade 2 – Activity 3

13
GRADE 3
General Outcome
Use direct and indirect measurement to solve problems.
Specific Outcomes
3. Demonstrate an understanding of measuring length (cm, m) by:
• selecting and justifying referents for the units cm and m
• modeling and describing the relationship
between the units cm and m
• estimating length, using referents
• measuring and recording length, width and height. [C, CN, ME, PS, R, V]
Achievement Indicators Robot activities
Provide a personal referent for one
centimetre, and explain the choice.
Grade 3 – Activity 2
Grade 3 – Activity 3
Provide a personal referent for one
metre, and explain the choice
Grade 3 – Activity 3
Match a given standard unit to a given
referent.
Grade 2 – Activity 1
Grade 3 – Activity 2
Grade 3 – Activity 3
Show that 100 cm is equivalent to 1 m
by using concrete materials.
Grade 3 – Activity 3
Estimate the length of an object, using
personal referents.
Grade 2 – Activity 2
Grade 3 – Activity 2
Grade 3 – Activity 3
Determine and record the length and
width of a given 2-D shape.
Grade 2 – Activity 3
Grade 3 – Activity 1
Grade 3 – Activity 2
Grade 3 – Activity 3
Determine and record the length, width
or height of a given 3-D object.
Grade 3 – Activity 1
Grade 3 – Activity 2
Grade 3 – Activity 3
Draw a line segment of a given length,
using a ruler.
Grade 3 – Activity 1
[C] Communication [PS] Problem
Solving
[CN] Connections [R] Reasoning
[ME] Mental Mathematics [T] Technology
and Estimation [V] Visualization

14
Comparing Objects
Math
Grade1
Activity 1 (Adapted with
permission from Math Makes
Sense 1 Unit 4 Launch, Pearson
Education Canada, 2007)
Objective • To compare the length of multiple objects to one common
referent object
Warm Up
Robot • Training Protocols (see Training Protocol)
Vocabulary (see Communication Modalities for different communication
modalities that students may use to respond, comment, or ask
questions) • Introduce vocabulary (long/longer, short/shorter,
same/difference)
• Model pathways on communication device or
communication modalities for responding using the
vocabulary
• As words are introduced, display the words where the
student can see them (you may want to have student select
through eye gaze or pointing)
Main Activity (see Communication Modalities for different communication
modalities that students may use to respond, comment, or ask questions throughout the activity)
Introduce
Staff • Chooses an object from referent objects, then select an item
from the comparison objects
• Models and talks through comparing if it is longer than,
Materials • Robot with gripper
• Common objects divided into
2 groups (mounted on blocks)
1) Referent Object (craft
sticks, paper clips, straws,
toothpicks) 2) Comparison Objects
(scissors, tape, book, Lego
block, ruler, tack)
• Signs: Longer than, Shorter
than, Same as (on
construction paper)
• Paper to write answers on
Additional Activities
This activity can be extended
to support the understanding of
the concept • Student chooses a referent
object, then drives the robot
on a table to compare other
objects (ex. the size of peers’
drinks, pencils etc.)

15
shorter than, same as
• Models reporting if object is shorter than, same as, longer
than the referent object
• Staff puts a different referent object and comparison object
side by side and lined up
Student
• Indicates their choice (using selected pathway on
communication device or communication modality)
Robot
Staff • Places an object in front of student
• Grasps selected referent object with the robot.
• It’s best to drive the robot from Left to Right in front of
student (or Right to Left depending on student
preferences). This will make it easier for them to line up
the baseline, and clearly see the differences in length
• Explains how the robot will help with comparing the
referent object to other objects
• Demonstrates and models:
Driving the robot alongside each object. Using vocabulary
to compare the objects
Student • Grasps a different referent object placed in the gripper by
staff. See Figure 1 and 2
• Predicts if the object on the table will be shorter than,
same as, or longer than, the referent object
• Controls the robot to drive alongside the object. If needed,
staff can move the comparison object closer to reduce the
amount of navigation needed. See Figure 3
• Using any communication modality, identifies whether the
object is shorter than, same as, or longer than, the object
on the robot. Repeats comparison with other objects
Closing
After student has completed the activity, ask:
Figure 1
Figure 2
Figure 3

16
• What did you compare?
• What did you find out? Creates a comparison response (ex.
longer than tape dispenser) for staff to scribe onto the chart
17
Comparing Lengths
Math
Grade1
Activity (Adapted with
permission from Math Makes
Sense 1 Unit 4 Lesson 1, Pearson
Education Canada, 2007)
OBJECTIVE
• Compare the lengths of objects to one common referent
Warm Up
Robot • Training Protocols (see Training Protocol)
Vocabulary (see Communication Modalities for different communication modalities that students may use to respond, comment, or ask
questions) • Introduce vocabulary (long/longer, short/shorter,
same/difference, baseline/matchup) using Word Wall
chart
• Model pathways on communication device or
communication modalities for responding using the
vocabulary
Main Activity (see Communication Modalities for different communication
modalities that students may use to respond, comment, or ask
questions throughout the activity) Introduce
Staff • Chooses 6 objects (2 longer than, 2 shorter than, and 2
same as the unsharpened pencil)
• Predicts which item is the same size as the unsharpened
pencil
• Models and talks through by holding the first object
alongside the pencil and matching up the “baseline”.
Emphasize “baseline”: placing the end of the pencil
alongside the end of the object (baseline)
Materials • Robot with gripper
• Referent: unsharpened pencil
• 3 bins (labeled: shorter than,
longer than, and same)
• Classroom items (markers,
tape, a glue stick, scissors,
paper towel roll, Lego,
notebook) mounted on blocks
(minimum of 2 for each (longer
than, same as, shorter than)
• Word Wall list

18
NOTE: A clear ruler can be used to mark the baseline on
both objects • Compares results with prediction
Student • Chooses an object by communication modality and staff
places in front of student
• Predicts if object is the same, longer or shorter than the
unsharpened pencil. Staff compared the objects. NOTE:
Staff should intentionally not use a common baseline and
encourage the student to direct them to line up the objects
using a baseline
Robot
Staff • Places objects along the side of the table
• Tapes the bins and matching labels in 3 distinct areas
hanging off the table See Figure 1
• Explains how the robot will help with comparing a chosen
object to the objects placed on the table
• Demonstrates and models (if needed):
1. Grasping an object with the robot and driving alongside the unsharpened pencil
2. Using vocabulary to compare the objects
3. Driving to the appropriate bin 4. Releasing the object in or near the bin
Student
• Drives to and grasps a comparison object with the robot
from left to right or right to left, depending on students
preferences
• Drives the robot alongside the unsharpened pencil. See
Figure 2
Staff
• If the student has difficulty driving the robot to line up the
two objects with a similar baseline, ask them if you can
Figure 1
Figure 2

19
make adjustments so that they have a similar baseline.
*Reinforce concept of baseline. This will allow them to
line up the baseline, and more clearly see the differences
in length
• Drives the object to the appropriate bin. See Figure 3
• Releases the object in or near the bin
Closing • Staff removes each item (one at a time) from the bins and
measures them against the unsharpened pencil for the
student to view. Together, determine if the object was
categorized appropriately
• Make sentences with the word wall words
Figure 3
20
Ordering Lengths
Math
Grade1
Activity 3 (Adapted with
permission from Math Makes
Sense 1 Unit 4 Lesson 2, Pearson
Education Canada, 2007)
OBJECTIVE
• Relating the concepts of distance and length
• Measuring the length/distances of toy cars with string
• Ordering objects according to length
Warm Up
Robot • Training Protocols (see Training Protocols)
Vocabulary (see Communication Modalities for different communication
modalities that students may use to respond, comment, or ask
questions) • Review vocabulary (long/longer, short/shorter,
same/difference) using Word Wall chart
• Quick review: Draw two lines of different lengths and in
different colors. Ask the student to make a statement using
the Word wall words and/or device (ex. The blue line is
shorter)
• Introduce new vocabulary words (Far/farther/furthest,
long/longer/longest, short/shorter/shortest)
• Model pathways on communication device or
communication modalities for responding using the
vocabulary
• As words are introduced, display the words where the
student can see them
• Provide examples of when words are used (to measure
things that travel). Provide one example of an object that
travels (ex. Bus). Ask student if they know of other objects
Materials • Robot with gripper
• String/yarn on spools (3
different colors, if desired)
• Scissors
• Ramp
• Toy Cars
• Masking Tape
• Word wall list

21
that travel.
Main Activity (see Communication Modalities for different communication
modalities that students may use to respond, comment, or ask
questions throughout the activity) Introduce
Staff • Explains that the robot will help us determine which toy car
travels the furthest
• Selects 3 toy cars and predicts which car will travel the
furthest.
Robot
Staff • Models and talks through using the robot to release each
car at the top of the ramp.
• Emphasizing the start of the ramp is the baseline.
• Talks through and asks student how to solve the problem of
the cars hitting each other and changing where they
stopped. SOLUTION: Place a piece of tape, to indicate
where the car stopped
• Talks through and expands on which car went the furthest.
Student • Selects three toy cars
• Predicts which car will travel the furthest
• Using the robot gripper, grasps a car at the top of the ramp.
Releases the car. See Figure 1
• Directs the staff to place a marker or piece of tape
to indicate where the car stopped. See Figure 2
• Repeats with two remaining cars. See Figure 3
Staff
• Comparing the distance the cars travelled using string
1. Staff: Places spool of yarn on the back of the
robot. Tapes the end to the bottom of the ramp.
See Figure 4
2. Student: Drives the Robot to the location
Figure
1
Figure
2
Figure
3 Figure 2.

22
marked with a piece of tape. See Figure 5
Staff may need to help unwind the string from
spool of yarn
3. Staff: Cuts the string and labels it.
4. Repeat for other 2 cars and marked locations
Staff
• Attaches one of the measured strings to the back of the
Robot
Student
• Drives the robot pulling the string behind. Stops the robot
where they want to create a baseline to measure the 3
strings
• Repeat for the other 2 strings (can use different color yarn,
if desired)
Staff: If needed, emphasize the concept of lining up the string on the baseline. The use of a clear ruler may be
needed to mark the baseline.
Closing Staff
• Asks student which car went the furthest and how they
know.
• Talks through and expands on how to tell which car went
the furthest.
• Directs staff to match Word wall words to label the string
(far, further, and farthest)
• Makes sentences with Word wall words
Figure 4
Figure 5

23
Comparing Length and Distance
Math
Grade1
Challenge (Adapted with
permission from Math Makes
Sense 1 Unit 4 Lesson 3, Pearson
Education Canada, 2007) a
Objectives • “Using” objects to solve a problem about comparing lengths
• Relating the concepts of distance and length
• Ordering lengths and distances from shortest to
longest/farthest
Warm Up
Robot • Training Protocol (see Training Protocols)
Vocabulary (see Communication Modalities for different communication modalities that students may use to respond, comment, or ask
questions) • Introduce vocabulary (farther, farthest, longer, longest,
short, shorter, same, different, how long, baseline= match
line)
• Model pathways on communication device or
communication modalities for responding using the
vocabulary
• As words are introduced, display the words where the
student can see them (you may want to have student select
through eye gaze or pointing)
Main Activity (see Communication Modalities for different communication
modalities that students may use to respond, comment, or ask
questions throughout the activity) Introduce
Materials • Robot with gripper
• 3 different colors of
String/Yarn
• Scissors
• Masking Tape
• Drawing sheet/Paper
• Word Wall Words
Additional Activities • Student draws pathways after
practicing using the Robot
pen on a scrap piece of paper.
Then measures the pathways
with Robot and string. See
Figure 1
• Student draws 3 different
pathways then the Staff or
other student measures and
compares the lengths

24
Staff • Refers back to the previous lesson: “Ordering Lengths” by
asking,
The red car went further than the blue car. “Which car would have a longer string?”
• Explains that instead of measuring the paths of cars, they
will be measuring the paths/sidewalks of people and/or
animals (what is drawn)
Student • Predicts which pathway/sidewalk is the longest
• Responds to questions,
“Why do you think it would be hard to guess which path is
longer?” (The paths are not straight)
“What so you think we can use to measure these paths?”(String)
Robot
Staff • Explains how to measure pathways with string attached to
the back of the Robot
• Asks students to measure one of the paths with the Robot.
See Figure 2
“Where should you start taping the string?” “Where should you stop measuring?”
Student • Begins measuring one pathway by unwinding string with the
Robot, indicating to the Staff where to tape. See Figure 3 &
4
Staff
• May need to untangle string or reinforce baseline concepts
Student
• Follows the same steps for other path using a different
colored string. See Figure 5 & 6
Figure 1
Figure 2
Figure 3
Figure 4

25
• Once both paths are measured, responds to,
“What should be our next step?” (Straighten out the string
paths)
Staff
• Since the strings are long, you may want to leave them taped
to the start position and only pull the ends straight
Closing
After student has completed the activity, ask: • Which character/animal travelled the farthest distance? How
do you know that?
Figure 5
Figure 6
26
Measuring &
Comparing
Lengths
Math
Grade2
Activity 1 (Adapted with
permission from Math Makes
Sense 2 Unit 4 Lesson 3, Pearson
Education Canada, 2008)
Objective • Measure length to the nearest non-standard unit using
multiple copies of a unit, and compare and order objects by
length and height using non-standard units
Warm Up Robot • Training Protocols (see page x)
Vocabulary
(see Communication Modalities for different communication
modalities that students may use to respond, comment or ask
questions)
• Introduce vocabulary (How tall? = Height, How long? =
Length)
• Model pathways on the communication device or
communication modalities for responding using the
vocabulary
• As words are introduced, display the words where the
students can see them
Main Activity (see Communication Modalities for different communication
modalities that students may use to respond, comment or ask
questions throughout the activity)
Introduce
Staff • Displays the gingerbread man and craft sticks/straws
• Asks student to predict how many craft sticks/straws tall
the gingerbread man is
Materials • Robot with gripper
• Non-standard units (craft
sticks or if preferred,
straws) mounted on blocks
• String on a bobbin (2
different colors of string)
• Scissors
• Sticky Tack
• Giant Gingerbread man (Use
template- LM7 (pg. 75)
enlarged to approx. 120 cm)
• Signs: How long?, length,
How tall?, height (Printed on
construction paper)
Additional Activities Using Snap Cubes as
measurement tools • Ask the student if it would be
easier to measure using Snap
Cubes instead of craft
27
• Records the student’s prediction
• Determins the baseline:
1. Where should we place the first craft sticks/straws?
2. With chosen communication modality student chooses
to start measuring at “Top of the Head” or “Bottom of
the Foot”
stick/straws? Yes, they link
so there are no gaps or
overlaps
Have the student choose and
measure 2 other objects (ex.
Stapler, marker, hole
puncher) they could measure
using Snap Cubes
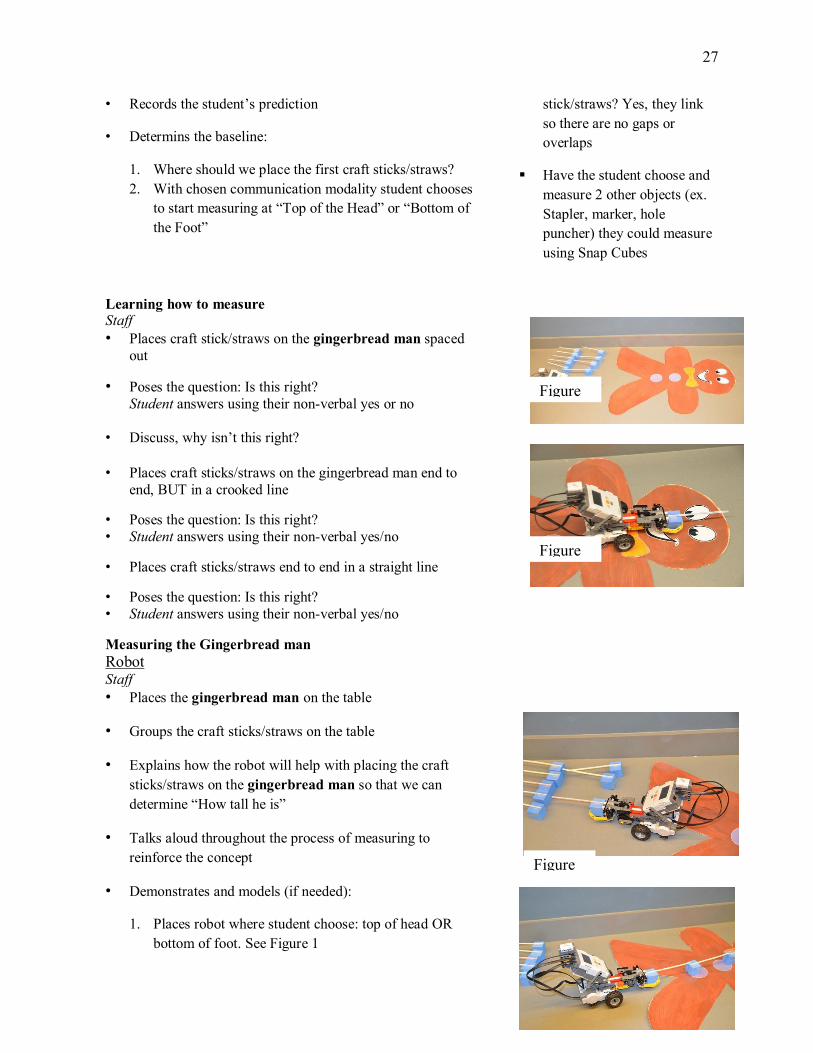
Learning how to measure Staff
• Places craft stick/straws on the gingerbread man spaced
out
• Poses the question: Is this right? Student answers using their non-verbal yes or no
• Discuss, why isn’t this right?
• Places craft sticks/straws on the gingerbread man end to
end, BUT in a crooked line
• Poses the question: Is this right?
• Student answers using their non-verbal yes/no
• Places craft sticks/straws end to end in a straight line
• Poses the question: Is this right?
• Student answers using their non-verbal yes/no
Measuring the Gingerbread man
Robot Staff
• Places the gingerbread man on the table
• Groups the craft sticks/straws on the table
• Explains how the robot will help with placing the craft
sticks/straws on the gingerbread man so that we can
determine “How tall he is”
• Talks aloud throughout the process of measuring to
reinforce the concept
• Demonstrates and models (if needed):
1. Places robot where student choose: top of head OR
bottom of foot. See Figure 1
Figure
1
Figure
2
Figure
3
28
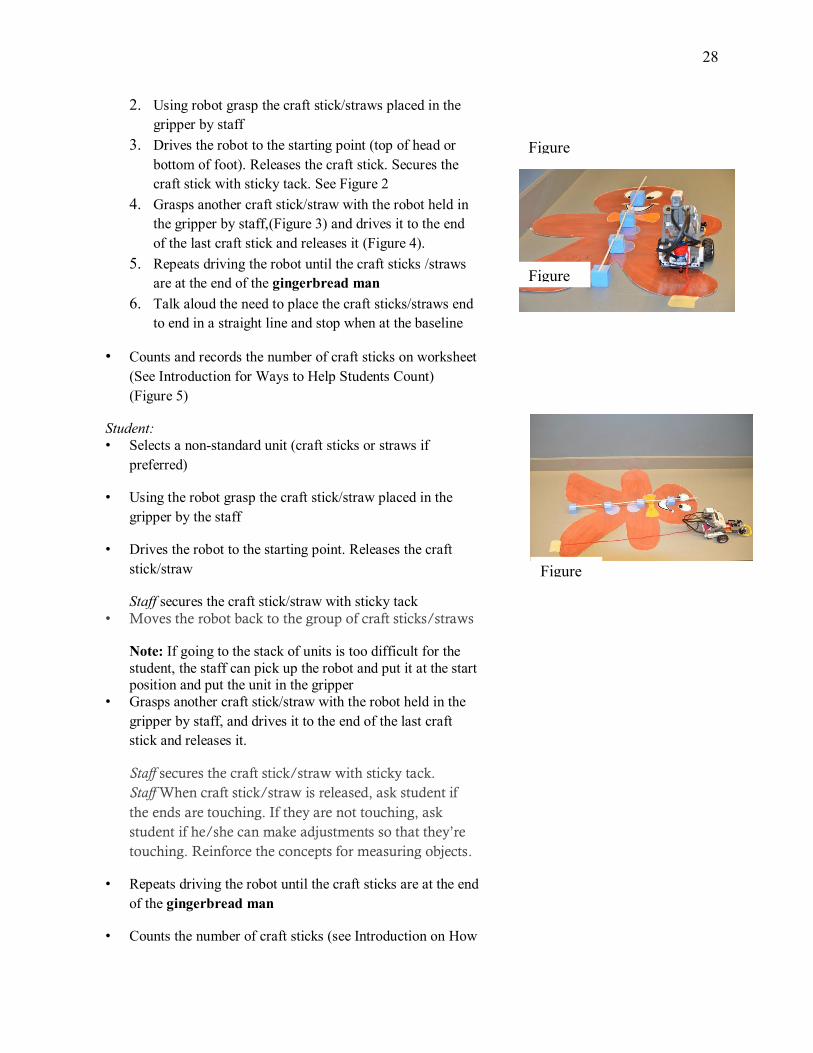
2. Using robot grasp the craft stick/straws placed in the
gripper by staff
3. Drives the robot to the starting point (top of head or
bottom of foot). Releases the craft stick. Secures the
craft stick with sticky tack. See Figure 2
4. Grasps another craft stick/straw with the robot held in
the gripper by staff,(Figure 3) and drives it to the end
of the last craft stick and releases it (Figure 4).
5. Repeats driving the robot until the craft sticks /straws
are at the end of the gingerbread man
6. Talk aloud the need to place the craft sticks/straws end
to end in a straight line and stop when at the baseline
• Counts and records the number of craft sticks on worksheet
(See Introduction for Ways to Help Students Count)
(Figure 5)
Student:
• Selects a non-standard unit (craft sticks or straws if
preferred)
• Using the robot grasp the craft stick/straw placed in the
gripper by the staff
• Drives the robot to the starting point. Releases the craft
stick/straw
Staff secures the craft stick/straw with sticky tack
• Moves the robot back to the group of craft sticks/straws
Note: If going to the stack of units is too difficult for the
student, the staff can pick up the robot and put it at the start position and put the unit in the gripper
• Grasps another craft stick/straw with the robot held in the
gripper by staff, and drives it to the end of the last craft
stick and releases it.
Staff secures the craft stick/straw with sticky tack.
Staff When craft stick/straw is released, ask student if
the ends are touching. If they are not touching, ask
student if he/she can make adjustments so that they’re
touching. Reinforce the concepts for measuring objects.
• Repeats driving the robot until the craft sticks are at the end
of the gingerbread man
• Counts the number of craft sticks (see Introduction on How
Figure
4
Figure
5
Figure
6

29
to Count)
Discussion
• Staff displays the gingerbread man on the bulletin board,
asks the student can you measure with the craft sticks on
the bulletin board? NO
We can represent gingerbread man’s height with string • Staff places gingerbread man on the table again
• Uses the robot to unwind string along the height of the
gingerbread man. See Figure 6
Staff
• Attaches the bobbin with string to the robot
• Tapes one end of the string to the starting location on the
gingerbread man
Student
• Drives the robot with the string along the same path as the
craft sticks
Staff may need to assist with unwinding the string from the
spool
Staff
• Cuts the string
• Places each craft stick/straw alongside the string
• Verifies that the length of string measured in craft sticks is
the same as length of gingerbread man in craft sticks
Student
• Counts the number of craft sticks. Verifies it is the same as
what was written on the worksheet.
Staff • Labels the string (Name: Gingerbread, # of craft sticks )
Measuring the Student
• Poses the question: Can we measure you using the Robot
and craft sticks? NO, people are not flat
• What strategy can we use to make it easy to measure your
height in craft sticks?
• Staff cuts a piece of string the same length as student

30
• Have the student predict how many craft sticks tall they
think they are. Records the prediction.
Student:
1. Selects a non-standard unit (craft stick or if preferred
straws)
2. The robot grasps the craft stick placed in the gripper by
the staff
3. Drives the robot to the starting point of the string.
Releases the craft stick.
Staff secures the craft stick with sticky tack and moves
the robot back to the group of craft sticks.
4. Grasps another craft stick with the robot held in the
gripper by staff, and drives it to the end of the last craft
stick and releases it.
Staff secures the craft stick with sticky tack.
Staff When craft stick is released, ask student if the
ends are touching. If they are not touching, ask student if he/she can make adjustments so that they’re
touching. Reinforce the concepts for measuring objects.
5. Repeats driving the robot until the craft sticks are at the
end of the string
6. Counts the number of craft sticks (see Introduction on
How to Count)
Staff: • Writes the number on the worksheet
• Labels the string (Name: Student, Prediction, # of Craft
sticks)
• Repeat for another student
Closing • Complete and display the worksheet
• Using the worksheet
o Who is the tallest?
o How do you know he/she is the tallest? (It has
the largest number)
o Who is the shortest?

31
o How do you know? (It has the smallest
number)

32
Estimating Lengths and Choosing Units
Math
Grade2
Activity 2 (Adapted with
permission from Math Makes Sense
2 Unit 4 Lesson 4, Pearson
Education Canada, 2008)
Objective
• Estimate, measure, and compare lengths, selecting
appropriate non-standard units, and relate the size of unit
used to the number of units needed
Warm Up Robot
• Training Protocols (see Training Protocols)
Vocabulary (see Communication Modalities for different communication
modalities that students may use to respond, comment or ask
questions)
• Introduce vocabulary (How tall? = Height, How long? =
Length)
• Model pathways on the communication device or
communication modalities for responding
• As words are introduced, display the words where the
students can see them.
Preparation
• Program the Robot for Part 1 to have giant and baby steps
(See Controlling and Programming the Robots)
Main Activity (see Communication Modalities for different communication
modalities that students may use to respond, comment or ask questions throughout the activity)
Introduce Staff
• explains to student the goal of the game is to determine
the most appropriate size of Robot step to get from Start
Materials • Robot with gripper
• Non-standard units (straw or
toothpicks) mounted on
blocks
• String and Spool
• Optional: Magnetic Rods
mounted on blocks
• Scissors
• Markers and tape
• Chart to write results on
worksheet

33
to Finish (From one end of the table to the other)
without going off the table
• Demonstrates the Robot steps:
1. Robot Giant step (Robot program g) = forward for
2 seconds
2. Robot Baby step (Robot program b) = forward
• Places back of robot at end of table
Student
• Drives to the other end of the table by choosing Giant Steps
or Baby Steps
Staff
• Asks student which step he/she would like to make, then
changes to that program to make to run on the robot
• Reviews how student had to choose the long units at
beginning of race, and short units close to end of table
Part 1: Estimating and Measuring Staff • Explains they are going to find out whose giant step is the
longest
• Review: How string was used to represent the length of an
object (Gingerbread man and person)
• Explains we need a piece of string the same length as the
Robot Giant step and Robot Baby Step
Robot
Staff:
• Attaches the spool of string to the Robot.
See Figure 1
• Tapes down the end of the string to the start line
Student:
• Drives the Robot one Robot Giant Step
Staff:
• Cuts the string at the spool. Labels string and tape to
the table
Figure
1

34
• Repeat for Robot Baby Step. See Figure 2
Discussion: Robot Giant Step
Staff asks:
• What non-standard unit could be use to measure the
length of the Robot Giant Step? (Straws or
toothpicks). Why? (Because you don’t have to use as
many)
Note: If student has already demonstrated that they
know the concepts of lining up tip to tip, use magnetic rods because they snap together and makes
it easier to line up the units)
Then explain: Though straws may be more appropriate to measure, it is recommended that the
magnetic rods be used because they snap together,
making it easier to line up tip to tip.
• Estimate: How many units (straws, rods) will it take
to measure the Giant Robot step?
• Staff records answer on worksheet
Measure the string representing the Robot Giant step Staff • places robot at end of string
Student
• Using the robot, grasps the rod placed in the gripper
by the staff, and drives to the appropriate location
(start of string), then releases the rod.
Staff secures the rod with sticky tack so it stands up
and moves the Robot back to start position. See
Figure 3
• Using the Robot, grasps another rod held in the
gripper by staff, and drives it to the end of the first
rod and releases it. See Figure 4
Staff helps to snap the rods together
• Repeats driving the Robot carrying rods until the end
of the strand of attached rods is close to the end of
the Robot Giant Step
• Counts the number of rods in the strand (See How to
Count in Introduction)
Figure 2
Figure
3
35
Staff writes the number on the worksheet
Discussion: Robot Baby Step • What non-standard unit be use to measure the length
of the Robot Baby Step (Toothpicks). Why? (The
other units are too large)
• Estimate: How many toothpicks will it take to
measure the Robot Baby Step?
• Staff record answer on worksheet
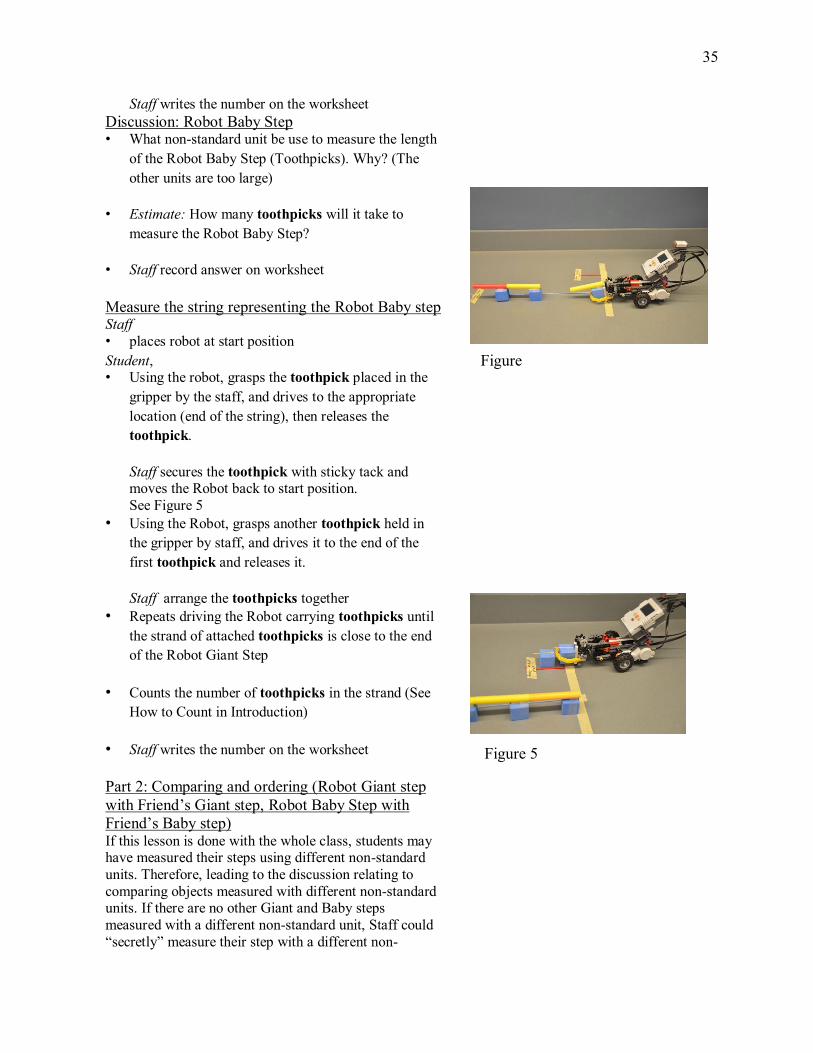
Measure the string representing the Robot Baby step Staff
• places robot at start position
Student, • Using the robot, grasps the toothpick placed in the
gripper by the staff, and drives to the appropriate
location (end of the string), then releases the
toothpick.
Staff secures the toothpick with sticky tack and moves the Robot back to start position.
See Figure 5
• Using the Robot, grasps another toothpick held in
the gripper by staff, and drives it to the end of the
first toothpick and releases it.
Staff arrange the toothpicks together
• Repeats driving the Robot carrying toothpicks until
the strand of attached toothpicks is close to the end
of the Robot Giant Step
• Counts the number of toothpicks in the strand (See
How to Count in Introduction)
• Staff writes the number on the worksheet
Part 2: Comparing and ordering (Robot Giant step
with Friend’s Giant step, Robot Baby Step with
Friend’s Baby step) If this lesson is done with the whole class, students may have measured their steps using different non-standard
units. Therefore, leading to the discussion relating to
comparing objects measured with different non-standard units. If there are no other Giant and Baby steps
measured with a different non-standard unit, Staff could
“secretly” measure their step with a different non-
Figure
4
Figure 5

36
standard unit.
Discussion
• Can we compare the measurement of the Robot
Giant Step (ex. 9 rods) with the measurement of a
Friend’s Giant Step (ex. 4 straws)? (No)
• Why not? (Units are not the same)
• What do we need to do so that we can compare their
measurements? (Measure the Friend’s step using the
same unit that we use to measure the Robot’s step)
o Measure the Friend’s Giant Step and
Friend’s Baby Step with the Robot
(same as above)
o Record results on the worksheet
Closing
• Display the worksheet
• Using the worksheet, whose Giant Step is longest?
o How do you know which one is the
longest? (It has the largest number)
o Which one is the shortest? How do you
know? (It has the smallest number)
37
Using One Copy of a Unit
Math
Grade2
Activity 3 (Adapted with
permission from Math Makes
Sense 2 Unit 4 Lesson 5, Pearson
Education Canada, 2008)
Objective • To measure length by using a single copy of a non-standard
unit, estimate and measure a length that is not a straight
line, and show that orientation does not affect length
Warm Up
Robot • Training Protocols (see Training Protocol)
Main Activity (see Communication Modalities for different communication
modalities that students may use to respond, comment, or ask questions throughout the activity)
Preparation • For measuring with one copy of a unit, the robot can be
programmed to move ahead one unit (see Controlling and
Programming the Robot)
Introduce • Choose a random object in the classroom. Ask the student:
“what non-standard unit is best for measuring the object?”
(Paperclip, toothpick, straw, rod, etc.)
• Ask student to estimate the length in that unit
• Demonstrate measuring the item using multiple copies of
the unit
• Ask: “What if I only have 1 copy of the chosen unit? How
could I measure the length?” (You could use the same unit
over and over)
• Demonstrate measuring the item using only one copy of the
unit, marking the end of the unit each time you move it
Materials • Robot
with gripper
with pen
• Non-standard unit
(paperclip, toothpick)
(Mounted on blocks)
• 2 Pipe cleaners
• Blank paper and scotch tape

38
along
• Before counting the number of units marked, ask:
o Should the measurement with multiple copies
be the same as the measurement with the single
copy? (YES)
o Why? (We used the same unit both times)
• Count the length of units of the object. If the two
measurements are different, ask WHY? (There were
gaps/overlaps with multiple units)
Discussion • Today we are going to measure snakes made out of pipe
cleaners. Most snakes can move in an S-shape or wavy
shape, but some snakes like a Boa, sometimes travel with
their body straight.
• We will measure the straight snake and wavy snake using
copies of a unit and using a single unit
The Snakes
Student
• Selects two different colored pipe cleaners to represent the
straight snake and wavy snake
Staff: Tape the pipe cleaners to the paper (Cover the entire pipe cleaner with tape so it is easy to drive the robot over
top of it). Label the pipe cleaner that will represent the
straight snake. Bend the second pipe cleaner in an S shape to represent the wavy snake. Label the S-shaped pipe
cleaner. See Figure 1
Note: Staff may opt to make the curvy snake an easier
shape for the student to measure with the robot (e.g. a wide open C)
• Estimates the length in the unit for both the straight and
wavy snake
• Staff Records estimations on the worksheet
Robot
Measuring the Straight Snake We will measure the straight snake twice. First, using the robot
and gripper and multiple copies of the unit. Secondly, using the
robot and pen and a single copy of the unit. NOTE: a distance of specific units (i.e. Toothpick, paper clip)
Figure 1

39
should be programmed into the robot)
Using Multiple Copies of a Unit Student:
• Using the robot, grasps the unit placed in the gripper by the
staff, and drives to the appropriate location (end of straight
snake), then releases the unit.
Staff secures the unit with sticky tack and moves the robot
back to the group of the units. See Figure 2 • Grasps another unit placed in the gripper by staff, and
drives it to the end of the previous unit (block) and releases
it. See Figure 3
Staff secures it with sticky tack.
Staff: To assist with lining up units, ask student if the ends of the units are touching. If they are not touching, ask them
if you can make adjustments so that they’re touching.
Reinforce the concepts for measuring • Repeats driving the robot carrying units until the unit are at
the end of the straight snake.
• Counts the units (See in Introduction, for Ways to Help
Count)
Staff records number of units on the worksheet Using a Single Copy of a Unit:
Staff
• Program the robot the distance travelled to represent
specific units (Toothpick, paperclip) (See Controlling and
Programming the Robots)
• Shows student that the program makes the robot go
forward the same length of the unit
Student:
• Places the pen in the gripper
• Drives the robot to the end of the straight snake
• Makes a pen mark by putting the pen down, then up again.
See Figure 4
• Selects the appropriate program to move the robot forward
one unit length (Staff selects that program and runs it on
the robot)
• Makes a pen mark.
• Repeats until the robot reaches the end of the straight
Figure 3
Figure 2

40
snake. Ending with a pen mark
• Counts the number of units
Staff record results on worksheet
Robot: Part 2 Measuring the Wavy Snake We will measure the wavy snake twice; the first time using the
robot and gripper, and multiple copies of the unit, the second time using the robot and pen and a single copy of the unit
NOTE: a distance of specific units (i.e. Toothpick, paper clip)
should be programmed into the Robot Using a Single Copy of a Unit:
Since curvy snake requires fine robot control staff can help
student by placing the robot so the student only has to drive
straight. See Figure 5. Student:
• Drives the robot to the closest end of the wavy snake.
• Makes a pen mark by putting the pen down, then up again
• Turns the robot slightly towards the snake
• Selects the appropriate program to move the Robot forward
one unit length
• Makes a pen mark
• Repeats until the robot has reached the end of the wavy
snake. Makes a pen mark
• Counts the units
Staff records results on the worksheet Using Multiple Copies of a Unit:
Note: Since curvy snake requires fine robot control staff can
help student(s) by placing the robot so the student only has to drive straight
Student:
• Using the robot, grasps the unit (block) placed in the
gripper by the staff, and drives to the appropriate location
(end of the wavy snake), then releases the unit.
Staff takes the unit off the block and places it next to the
snake where the student had placed it
• Grasps another unit (block) held in the gripper by staff, and
drives it to the end of the previous unit and releases it. See
Figure 4
Staff: To assist with lining up units, ask student if the ends of the units are lined up. If they are not lined up, ask them
Figure 2
Figure 4
Figure 5

41
if you can make adjustment so that they are touching.
Reinforce the concepts for measuring Staff takes the unit off the block and places it next to the
snake and lined up tip to tip. See Figure 5
• Repeats driving the robot with the units until the unit are at
the end of the wavy snake.
• Counts the units (See in Introduction, Ways to Help
Counting)
Staff records results on the worksheet
Closing
• Display the worksheet
Discussion
• What did you notice about your measurements? (The wavy
snake and straight snake are the same length)
• Was it easier to estimate the length of the straight snake or
wavy snake? (Straight snake)
• Was it easier to measure with 1 copy of a unit or multiple
copies of a unit? (1 copy)
• Does the measurement stay the same when the snakes
change directions? (Yes)
42
Using a Ruler
Math
Grade 3
Activity 1 (Adapted with
permission from Math Makes
Sense 3 Unit 4 Lesson 4, Pearson
Education Canada, 2009)
Warm Up Robot
• Training Protocol (see Training Protocol)
Vocabulary
(see Communication Modalities for different communication
modalities that students may use to respond, comment, or ask
questions) • Introduce vocabulary words (ruler, estimate, centimeter,
length, How long? = Length, height, How tall? = Height)
• Model pathways on communication device or
communication modalities for responding using the
vocabulary.
• As words are introduced, display the words where the
student can see them
Main Activity Introduce
Using a consistent measurement tool Discussion:
• How could we find out how long this table is? (We could
line up straws, blocks, craft sticks)
• Which tools are best for this job? (Straws, because we
would need fewer of them)
• Is it OK for everyone to use a different measurement tool?
(No, we would have different numbers)
Materials • Scissors
• Objects to measure: E.g.,
desktop, markers and (thin)
geometric shapes
• Strip of tag board (4cm by 40
cm)
• Green and red strips of paper
(2cm by 5 cm) mounted on
blocks
• Glue
• Robot (see building
instructions)
With tagboard
Ruler
With a cm Ruler
(line up O with
joint in gripper)
With pen (placed
into the hole within
the centre of a
block) placed in the
gripper
• Signs for: Ruler, Estimate,
Centimeter, Length, How
long?, Height (printed on
construction paper)

43
• Posit it Durable page tabs
• Tape to help secure rulers
Robot
Create a Tag board Ruler • We will make a ruler so we all have the same non-standard
units to measure with.
• Staff: Tape the tag board background to the table
Student
• Grasps the strip of paper (Chooses green or red) placed in
the gripper by the staff. See Figure 1
• Drives to the appropriate location (far end of the tagboard
ruler), then releases the piece of strip paper. See Figure 2.
Staff discusses with student the benefit of securing the
piece with glue. Staff takes off the strip of paper from the
block and secures it to the tag board with glue.
Staff helps line up with the baseline Staff moves the Robot back to the group of strips of paper,
if needed. • Grasps the other colored strip of paper held in the gripper
by staff, and drives it to the end of the last strip of paper
and releases it.
Staff: When colored strip is released, ask student if the ends
are lined up. If they are not lined up, ask him/her if you can make adjustments so that they’re lined up. Reinforce the
concepts for measuring objects. Staff secures the strip of
paper with glue. See Figure 3.
• Student repeats driving the Robot until the colored strip is
at the end of the tagboard strip
Use the Tagboard Ruler to Measure Discussion:
What can we do to our ruler so that we don’t have
to count the strips? (Put numbers on the ruler) See
Figure 4
For items shorter than the ruler
Figure
1
Figure 2
Figure 3
Figure
4
44
Staff
• Attaches the Tagboard ruler on the side of the robot (See
Building Instructions, Attaching Rulers to robot) Figure 4
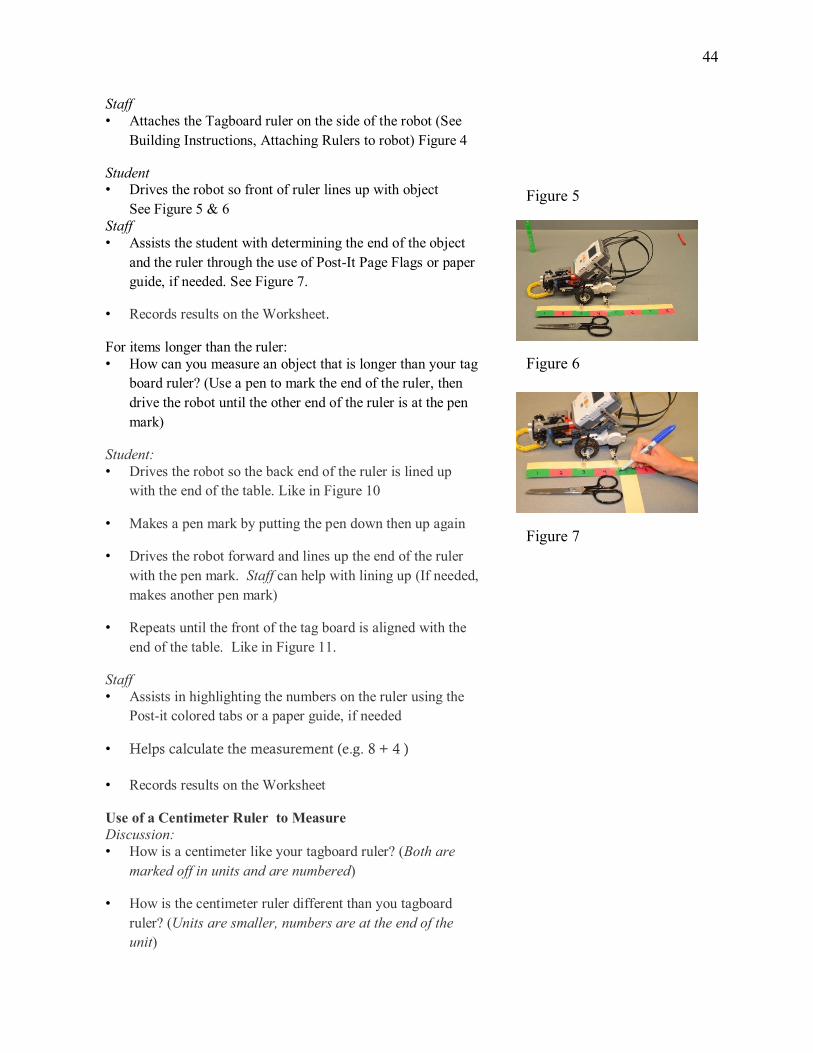
Student • Drives the robot so front of ruler lines up with object
See Figure 5 & 6
Staff
• Assists the student with determining the end of the object
and the ruler through the use of Post-It Page Flags or paper
guide, if needed. See Figure 7.
• Records results on the Worksheet.
For items longer than the ruler:
• How can you measure an object that is longer than your tag
board ruler? (Use a pen to mark the end of the ruler, then
drive the robot until the other end of the ruler is at the pen
mark)
Student:
• Drives the robot so the back end of the ruler is lined up
with the end of the table. Like in Figure 10
• Makes a pen mark by putting the pen down then up again
• Drives the robot forward and lines up the end of the ruler
with the pen mark. Staff can help with lining up (If needed,
makes another pen mark)
• Repeats until the front of the tag board is aligned with the
end of the table. Like in Figure 11.
Staff
• Assists in highlighting the numbers on the ruler using the
Post-it colored tabs or a paper guide, if needed
• Helps calculate the measurement (e.g. 8 + 4 )
• Records results on the Worksheet
Use of a Centimeter Ruler to Measure Discussion:
• How is a centimeter like your tagboard ruler? (Both are
marked off in units and are numbered)
• How is the centimeter ruler different than you tagboard
ruler? (Units are smaller, numbers are at the end of the
unit)
Figure 5
Figure 6
Figure 7
45
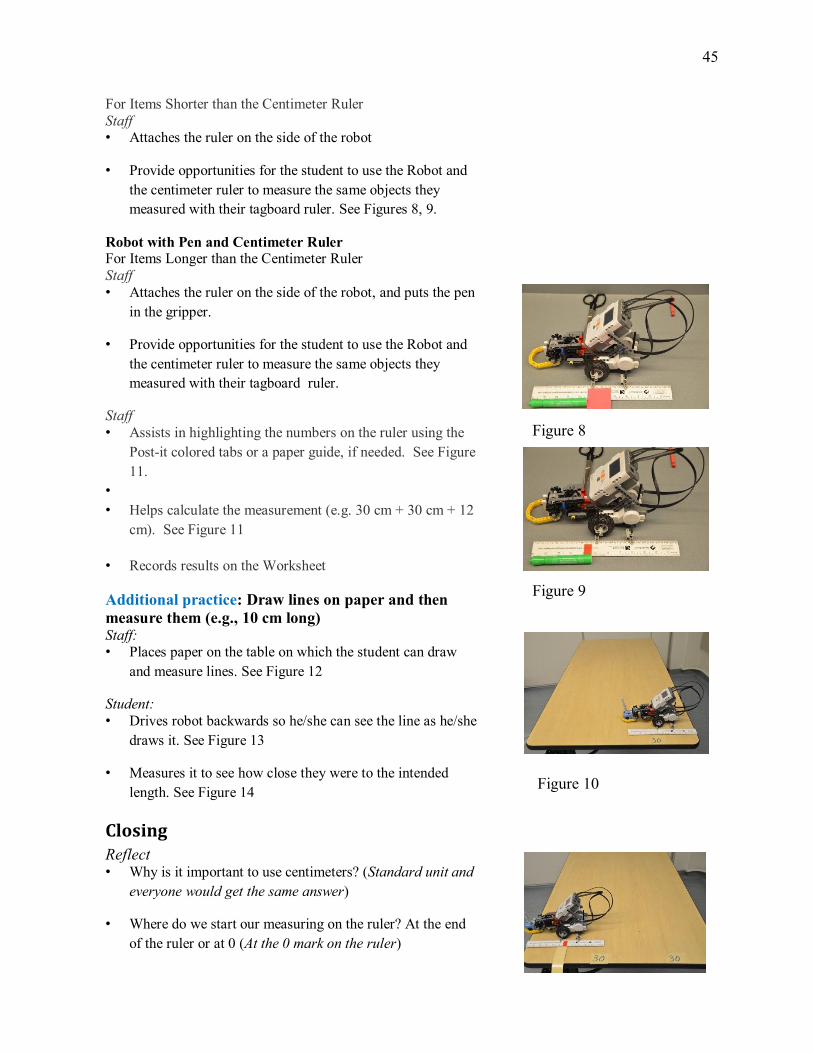
For Items Shorter than the Centimeter Ruler
Staff • Attaches the ruler on the side of the robot
• Provide opportunities for the student to use the Robot and
the centimeter ruler to measure the same objects they
measured with their tagboard ruler. See Figures 8, 9.
Robot with Pen and Centimeter Ruler For Items Longer than the Centimeter Ruler
Staff
• Attaches the ruler on the side of the robot, and puts the pen
in the gripper.
• Provide opportunities for the student to use the Robot and
the centimeter ruler to measure the same objects they
measured with their tagboard ruler.
Staff
• Assists in highlighting the numbers on the ruler using the
Post-it colored tabs or a paper guide, if needed. See Figure
11.
•
• Helps calculate the measurement (e.g. 30 cm + 30 cm + 12
cm). See Figure 11
• Records results on the Worksheet
Additional practice: Draw lines on paper and then
measure them (e.g., 10 cm long) Staff: • Places paper on the table on which the student can draw
and measure lines. See Figure 12
Student:
• Drives robot backwards so he/she can see the line as he/she
draws it. See Figure 13
• Measures it to see how close they were to the intended
length. See Figure 14
Closing Reflect • Why is it important to use centimeters? (Standard unit and
everyone would get the same answer)
• Where do we start our measuring on the ruler? At the end
of the ruler or at 0 (At the 0 mark on the ruler)
Figure 8
Figure 9
Figure 10

46
Additional Activities Students may benefit from additional experiences with
measuring height
Figure 11
Figure 12
Figure 13
Figure 14

47
Estimating and Measuring with Centimetres
Math
Grade 3
Activity 2 (Adapted with
permission from Math Makes
Sense 3 Unit 4 Lesson 5, Pearson
Education Canada, 2009)
Warm Up
Robot • Training Protocol (see Training Protocols)
Vocabulary (see Communication Modalities for different communication modalities that students may use to respond, comment or ask
questions)
• Introduce vocabulary words (ruler, measuring tape, height, length, width, centimetre, referent)
• Model pathways on communication device or communication modalities
• As words are introduced, display the words where the student can see them
Main Activity (see Communication Modalities for different communication
modalities that students may use to respond, comment or ask questions throughout the activity)
Introduce
Using a consistent measurement tool Discussion
• Ask student(s) to estimate the length of a pencil
• Demonstrate lining up the ruler with the 0 at the start of the pencil
• Model and talk aloud the process of determining
between which two numbers on the ruler the pencil ends (ex. length should not be an exact number, ex. 12.3 cm so say it's between 12 and 13 centimetres)
• Talk through to determining that the pencil is closer to
Materials • Classroom objects (paper
clips, scissors, a shoe, marker, pen, poster)
• Robot (see building instructions for how to attach these items)
Centimeter ruler (30
centimeters Measuring tape held at
back of robot
• Signs for: Ruler, measuring
tape, estimate,
centimetres, width height,
length, longer, shorter, referent (printed on construction paper)
• Post-it Durable page flags
• Masking tape
48
the 12 centimetres and reporting that the pencil is a
little more than 12 centimetres.
• Using a chart, fill in the information about the pencil,
including the estimation, and measurement
• How is a measuring tape like your ruler? (Marked off in centimeters, can be used to measure longer objects)
Robot
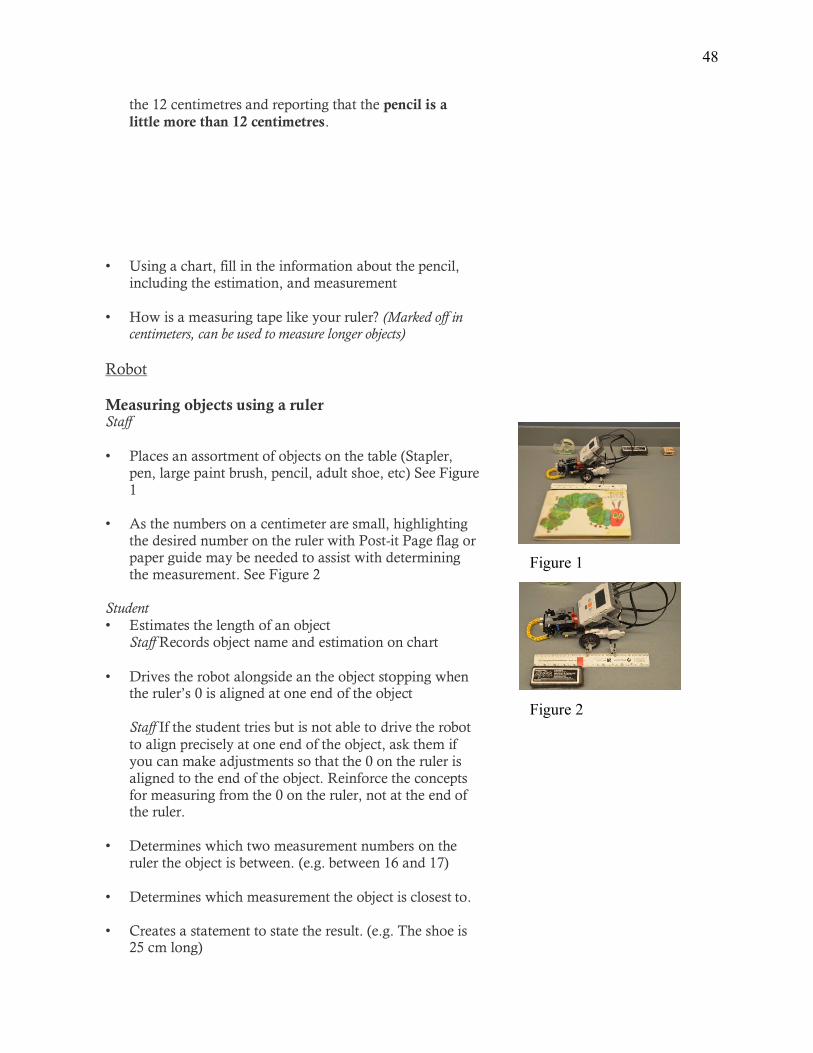
Measuring objects using a ruler Staff
• Places an assortment of objects on the table (Stapler, pen, large paint brush, pencil, adult shoe, etc) See Figure 1
• As the numbers on a centimeter are small, highlighting
the desired number on the ruler with Post-it Page flag or paper guide may be needed to assist with determining
the measurement. See Figure 2 Student
• Estimates the length of an object Staff Records object name and estimation on chart
• Drives the robot alongside an the object stopping when the ruler’s 0 is aligned at one end of the object Staff If the student tries but is not able to drive the robot
to align precisely at one end of the object, ask them if you can make adjustments so that the 0 on the ruler is
aligned to the end of the object. Reinforce the concepts for measuring from the 0 on the ruler, not at the end of the ruler.
• Determines which two measurement numbers on the ruler the object is between. (e.g. between 16 and 17)
• Determines which measurement the object is closest to.
• Creates a statement to state the result. (e.g. The shoe is 25 cm long)
Figure 1
Figure 2

49
Staff Records results on the worksheet
• Repeat and measure the width of the object
Measuring objects using a measuring tape Staff:
• Chooses an assortment of longer objects (Window, bench, poster, backpack)
• Attaches the measuring tape to the back of the robot See Figure 3
Note: When choosing objects to measure with the measuring tape, ensure that the student is able to adequately see both the object and control the robot
Student:
• Estimates the length of an object Staff Records object name and estimation on chart
• Drives the robot alongside an object with the end of the measuring tape aligned to one end of the object
Note: If the student is not able to drive the robot to align the measuring tape precisely at one end of the object, ask them if you can make adjustments so that the 0 on the
measuring tape starts at the end of the object. Reinforce the concepts for measuring from the 0 on the measuring tape, if needed. Staff Tapes the start of the measuring tape along the baseline of the object. See Figure 4.
• Drives the robot to the other end of the object Staff Assists in highlighting the numbers on the
measuring tape using the Post-it colored tabs, if needed As the numbers on a measuring tape are small and may
not be at a level where the student is able to read them, highlighting the desired number with Post-it colored tape or marking the end position of the object on the measuring tape, may be needed to assist with measuring. See Figure 4
• Determines which two measurement numbers the object is between (e.g. 15 and 16)
• Determines which measurement the object is closest to
Additional Activities Students may benefit from
additional experiences with
measuring objects and comparing objects to specified measurements
Figure 3
Figure 4

50
• Creates a statement to demonstrate the result
Staff Records results on the worksheet
Closing
Connect • How could we use the measurements that we did to help
us estimate the measurement of other objects? ( Use an
object’s measurement to help us estimate another object’s
measurement. E.g. the marker is 13 centimetres and my hand is a little smaller than the marker.)

51
Estimating and Measuring in Metres
Math
Grade 3
Activity 3 (Adapted with
permission from Math Makes
Sense 3 Unit 4 Lesson 6, Pearson
Education Canada, 2009)
Warm Up Robot
• Training Protocol (see Training Protocol)
Vocabulary
(see Communication Modalities for different communication
modalities that students may use to respond, comment, or ask
questions)
• Introduce vocabulary words (How tall = Height, How long?
= Length)
• Model pathways on their communication device
communication modalities.
• As words are introduced, display the words where the
student can see them.
Main Activity (see Communication Modalities for different communication
modalities that students may use to respond, comment or ask questions throughout the activity)
Introduce
Using different measuring tools Discussion
• What are some things you might measure with a metre stick? (longer objects: chalkboards or hallways)
• What are some things that are:
Shorter than a metre? (my arm, the top of my desk)
Taller than a metre? (Tree, school, house)
Materials • Base Ten Rods on blocks
• Robot (see building instructions for how to attach)
With a centimetre
ruler (30 centimetres)
With a metre stick attached (
With pen (placed into
the hole within the
centre of a block) in
gripper
• Signs for: ruler, metre stick,
estimate, centimetre, metre
, How long?, width,
height, length, longer, shorter, referent (printed on construction paper)
52
ROBOT
Comparing a metre to centimeters
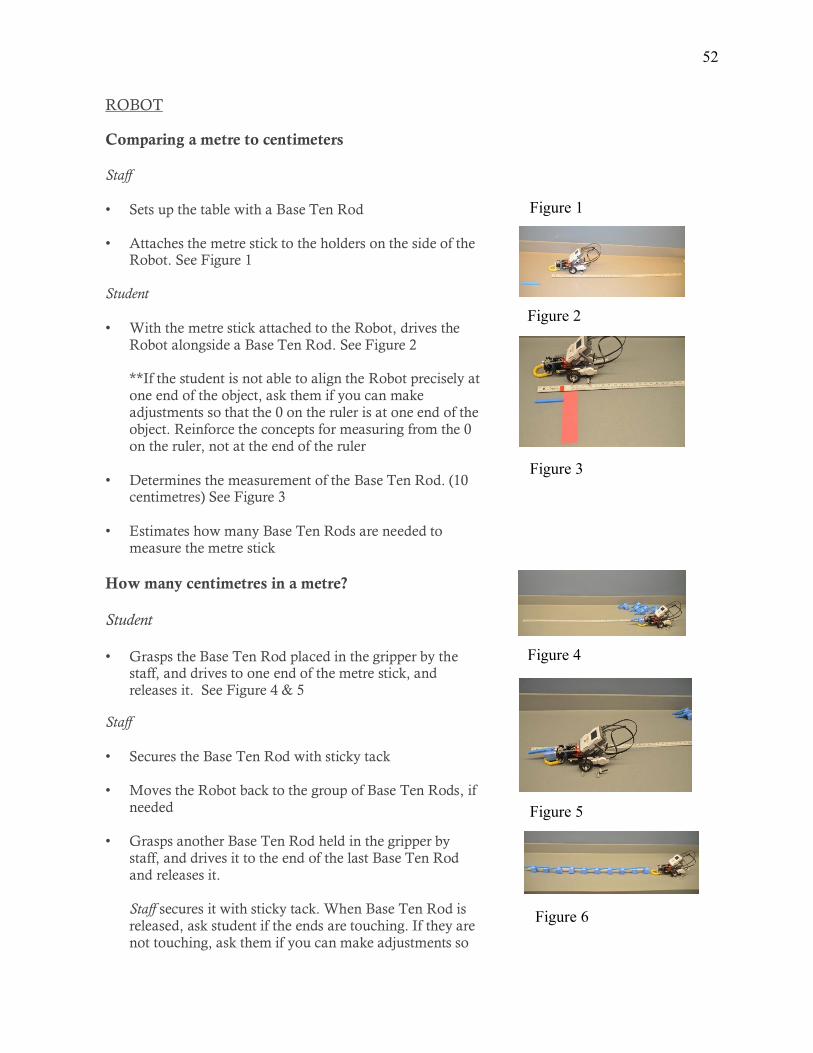
Staff
• Sets up the table with a Base Ten Rod
• Attaches the metre stick to the holders on the side of the Robot. See Figure 1
Student
• With the metre stick attached to the Robot, drives the Robot alongside a Base Ten Rod. See Figure 2
**If the student is not able to align the Robot precisely at one end of the object, ask them if you can make adjustments so that the 0 on the ruler is at one end of the object. Reinforce the concepts for measuring from the 0 on the ruler, not at the end of the ruler
• Determines the measurement of the Base Ten Rod. (10 centimetres) See Figure 3
• Estimates how many Base Ten Rods are needed to measure the metre stick
How many centimetres in a metre?
Student
• Grasps the Base Ten Rod placed in the gripper by the
staff, and drives to one end of the metre stick, and releases it. See Figure 4 & 5
Staff
• Secures the Base Ten Rod with sticky tack
• Moves the Robot back to the group of Base Ten Rods, if needed
• Grasps another Base Ten Rod held in the gripper by
staff, and drives it to the end of the last Base Ten Rod
and releases it. Staff secures it with sticky tack. When Base Ten Rod is released, ask student if the ends are touching. If they are not touching, ask them if you can make adjustments so
Figure 1
Figure 2
Figure 3
Figure 4
Figure 5
Figure 6
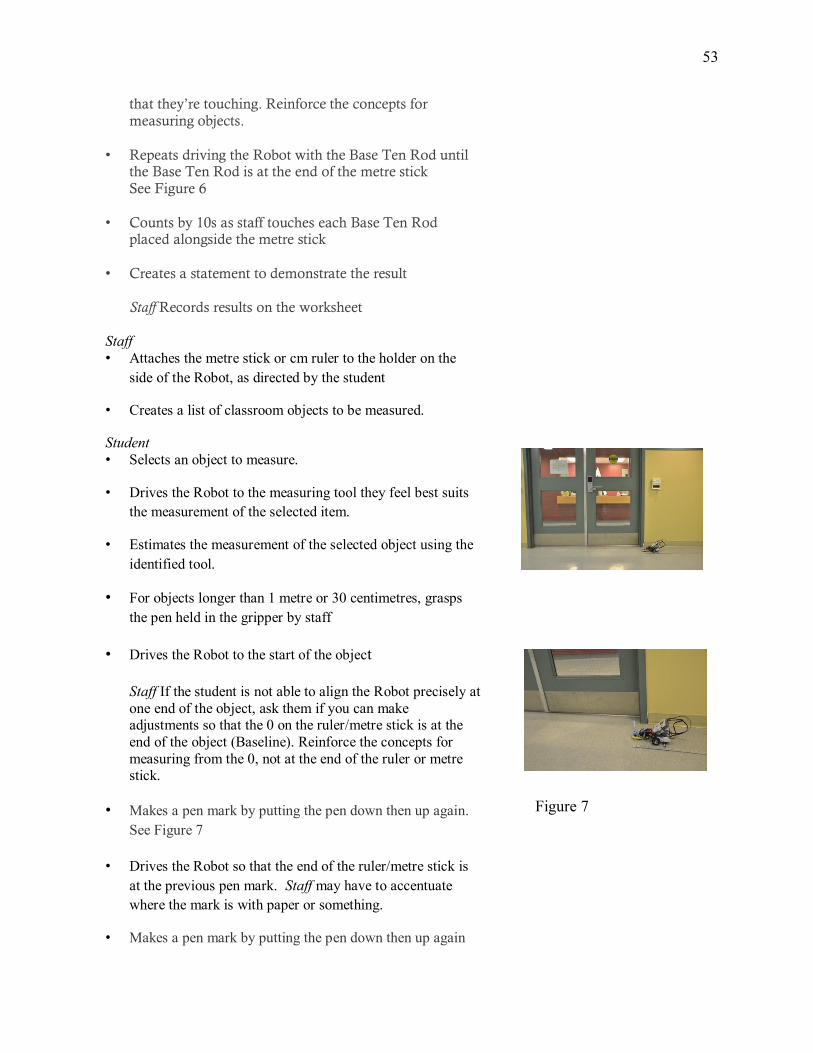
53
that they’re touching. Reinforce the concepts for measuring objects.
• Repeats driving the Robot with the Base Ten Rod until the Base Ten Rod is at the end of the metre stick See Figure 6
• Counts by 10s as staff touches each Base Ten Rod placed alongside the metre stick
• Creates a statement to demonstrate the result Staff Records results on the worksheet
Staff
• Attaches the metre stick or cm ruler to the holder on the
side of the Robot, as directed by the student
• Creates a list of classroom objects to be measured.
Student
• Selects an object to measure.
• Drives the Robot to the measuring tool they feel best suits
the measurement of the selected item.
• Estimates the measurement of the selected object using the
identified tool.
• For objects longer than 1 metre or 30 centimetres, grasps
the pen held in the gripper by staff
• Drives the Robot to the start of the object
Staff If the student is not able to align the Robot precisely at
one end of the object, ask them if you can make adjustments so that the 0 on the ruler/metre stick is at the
end of the object (Baseline). Reinforce the concepts for
measuring from the 0, not at the end of the ruler or metre stick.
• Makes a pen mark by putting the pen down then up again.
See Figure 7
• Drives the Robot so that the end of the ruler/metre stick is
at the previous pen mark. Staff may have to accentuate
where the mark is with paper or something.
• Makes a pen mark by putting the pen down then up again
Figure 7
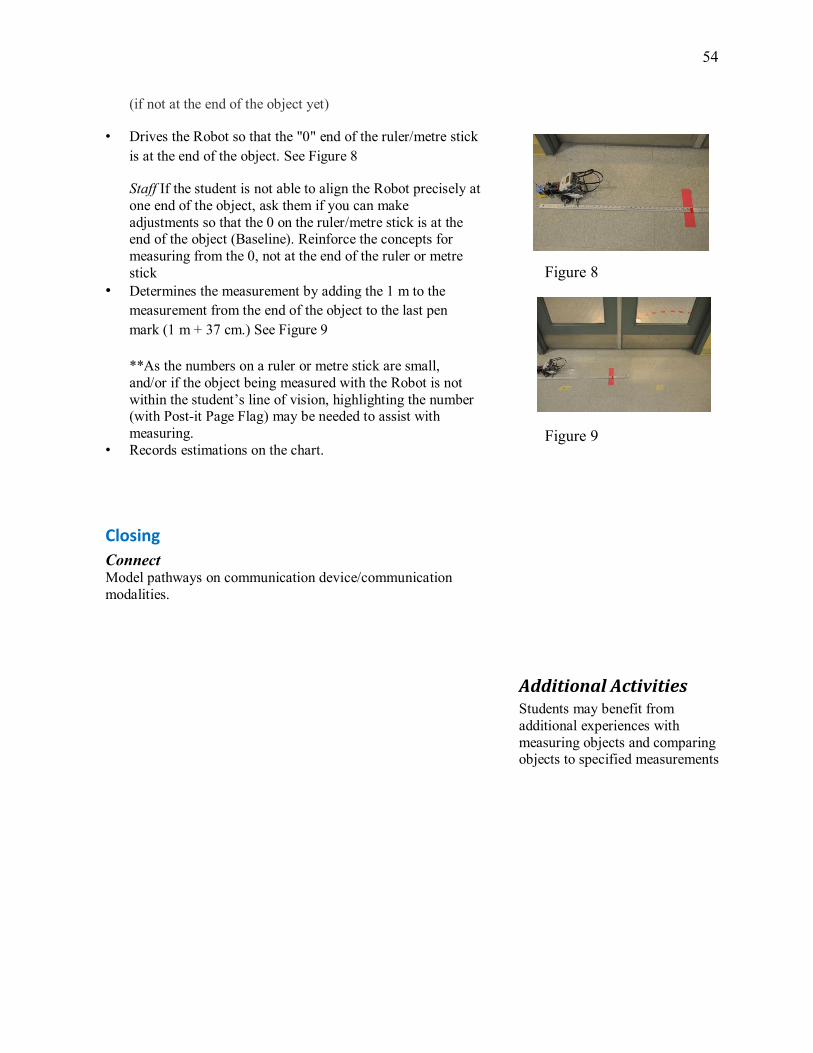
54
(if not at the end of the object yet)
• Drives the Robot so that the "0" end of the ruler/metre stick
is at the end of the object. See Figure 8
Staff If the student is not able to align the Robot precisely at
one end of the object, ask them if you can make
adjustments so that the 0 on the ruler/metre stick is at the end of the object (Baseline). Reinforce the concepts for
measuring from the 0, not at the end of the ruler or metre
stick
• Determines the measurement by adding the 1 m to the
measurement from the end of the object to the last pen
mark (1 m + 37 cm.) See Figure 9
**As the numbers on a ruler or metre stick are small,
and/or if the object being measured with the Robot is not
within the student’s line of vision, highlighting the number (with Post-it Page Flag) may be needed to assist with
measuring.
• Records estimations on the chart.
Closing
Connect Model pathways on communication device/communication
modalities.
Additional Activities Students may benefit from
additional experiences with
measuring objects and comparing objects to specified measurements
Figure 8
Figure 9
Recommended