ORTHOBYTES
The use of computers, computer programs, and other computerized equipment to assist in the orthodontic practice will be reported under this section of the American Journal of Orthodontics and Dentofacial Orthopedics, Manuscripts, comments, and reprint requests, unless otherwise noted, may be submitted to Dr. Martin Abelson, 14720 N. Shotgun PI., Tucson, AZ 85737.
Making slides for orthodontic presentations
Demetrios J. Halazonetis, DMD, Msa Athens, Greece
It has not been long since slides for scientific meetings were
produced with press-apply lettering or even a typewriter. Color
schemes were limited to a uniform blue background with white
text, or a black background with text in various colors, painted
by hand on the slide. Nowadays, the possibilities of design are
virtually endless, and the quality of the slides is only limited by
artistic inclination and computer knowledge. The purpose of
this article is to show examples of what can be achieved with
the use of a computer to produce scientific slides and to guide
the reader through the basic functions of a presentation design
program.
The computer program that will be described is Microsoft
PowerPoint, running under Microsoft Windows. It is one of the
most widely used programs for slide creation and can be easily
mastered by a relative novice. PowerPoint can help you create
slides, overhead transparencies, handouts of your presentation,
notes to help you deliver the presentation, and can be used for
'running' the presentation if it is given on a computer screen or
with a computer display projector. In this article, we are going to discuss only the slide creation capabilities, because slides are
still the most common mode of presenting a lecture. Once slide creation is mastered, the other features of PowerPoint will seem
easy to understand.
THE BASICS
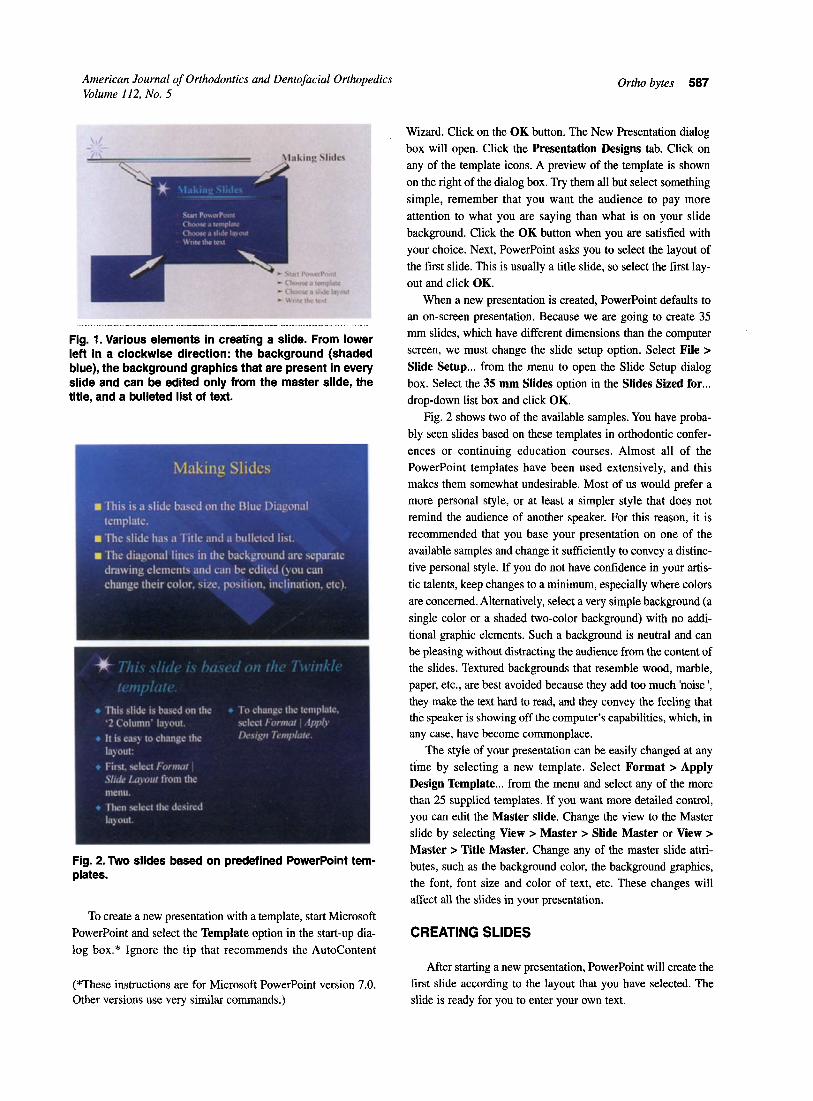
Fig. 1 shows the main elements that usually comprise an orthodontic presentation slide. The background can be a single
color or it can be shaded, changing gradually from one color to
another. It can contain a picture or some graphic elements, such
as lines, squares, or circles. The background determines to a
large extent the artistic style of the slides and should be chosen
carefully. The text of the slide may contain the title, a subtitle,
a bulleted or numbered list of items, and a short descriptive
aIn private practice. Reprint requests to: D. Halazonetis, 6 Menandrou Street, Kifisia 145 61, Greece, email: [email protected] and web site: http://w4u.eexLgr/-dhal Copyright © 1998 by the American Association of Orthodontists. 0889-5406/98/$5.00 + 0 8/1/89484
paragraph.
Various aspects of the text can be changed, including the
character font, the size of the characters, and the color of the
text. In addition, a slide may contain an intraoral or extraoral
photograph that was entered into the computer with a scanner, video camera, or digital camera, a graph prepared with a statis
tics program, a table of numbers prepared with a spreadsheet
program or a word-processor, and a drawing created with the
drawing tools of PowerPoint or with those of a dedicated draw
ing program.
Usually, we would want all slides of our presentation to look
alike. PowerPoint helps us maintain a consistent visual style
with the concept of the Master Slide. The master slide is a slide
that will never be shown at the presentation but is used as a tem
plate for all the other slides. We can define a background color,
a text font and size, a text color, and other visual attributes for the master slide; all the slides of our presentation will pick up
these attributes from the master slide. This scheme is very con
venient because, in addition to ensuring a consistent look, it saves considerable time when creating each new slide, and it makes it extremely easy to change the visual style of the whole
presentation by changing the style of just one slide.
STARTING A NEW PRESENTATION
When PowerPoint starts, it gives you three options to create a new presentation: the AutoContent Wizard, the option to create a presentation based on a template, or a blank presentation.
The AutoContent Wizard is an automatic tool that will help you
get started by creating a few slides for you, depending on the
type of your presentation and some choices that you make about
the visual style. The Wizard may seem helpful for the beginner,
but the resulting slides are not especially suited for an ortho
dontic presentation and usually need so many changes that it is more expedient to start from scratch. A presentation based on a
template is nothing more than a blank presentation, whose master slide is based on one of the more than 25 available samples. These samples are a good place to start because they have been
created by professional artists, and they have a balanced look
regarding colors, fonts, and sizes. To create a new presentation with a template, start Microsoft
586 American Journal of Orthodontics and Dentofacial OrthopedicsIMay 1998
American Journal of Orthodontics and Dentofacial Orthopedics Volume 112, No.5
Fig. 1. Various elements in creating a slide. From lower left in a clockwise direction: the background (shaded blue), the background graphics that are present in every slide and can be edited only from the master slide, the title, and a bulleted list of text.
Fig. 2. Two slides based on predefined PowerPoint templates.
To create a new presentation with a template, start Microsoft
PowerPoint and select the Template option in the start-up dia
log box. * Ignore the tip that recommends the AutoContent
(*These instructions are for Microsoft PowerPoint version 7.0. Other versions use very similar commands.)
Ortho bytes 587
Wizard. Click on the OK button. The New Presentation dialog
box will open. Click the Presentation Designs tab. Click on
any of the template icons. A preview of the template is shown
on the right of the dialog box. Try them all but select something
simple, remember that you want the audience to pay more
attention to what you are saying than what is on your slide
background. Click the OK button when you are satisfied with
your choice. Next, PowerPoint asks you to select the layout of
the first slide. This is usually a title slide, so select the first lay
out and click OK.
When a new presentation is created, PowerPoint defaults to
an on-screen presentation. Because we are going to create 35
mm slides, which have different dimensions than the computer
screen, we must change the slide setup option. Select File > Slide Setup ... from the menu to open the Slide Setup dialog
box. Select the 35 mm Slides option in the Slides Sized for ... drop-down list box and click OK.
Fig. 2 shows two of the available samples. You have proba
bly seen slides based on these templates in orthodontic confer
ences or continuing education courses. Almost all of the
PowerPoint templates have been used extensively, and this
makes them somewhat undesirable. Most of us would prefer a
more personal style, or at least a simpler style that does not
remind the audience of another speaker. For this reason, it is
recommended that you base your presentation on one of the
available samples and change it sufficiently to convey a distinc
tive personal style. If you do not have confidence in your artis
tic talents, keep changes to a minimum, especially where colors
are concerned. Alternatively, select a very simple background (a
single color or a shaded two-color background) with no addi
tional graphic elements. Such a background is neutral and can
be pleasing without distracting the audience from the content of
the slides. Textured backgrounds that resemble wood, marble,
paper, etc., are best avoided because they add too much 'noise',
they make the text hard to read, and they convey the feeling that the speaker is showing off the computer's capabilities, which, in
any case, have become commonplace.
The style of your presentation can be easily changed at any
time by selecting a new template. Select Format > Apply Design Template ... from the menu and select any of the more
than 25 supplied templates. If you want more detailed control,
you can edit the Master slide. Change the view to the Master
slide by selecting View > Master > Slide Master or View > Master> Title Master. Change any of the master slide attri
butes, such as the background color, the background graphics,
the font, font size and color of text, etc. These changes will
affect all the slides in your presentation.
CREATING SLIDES
After starting a new presentation, PowerPoint will create the
first slide according to the layout that you have selected. The
slide is ready for you to enter your own text.
588 Ortho bytes
To enter text for a title or a bulleted list, simply click with
your mouse and start typing. If you have already decided on the
content of the slides, the time to create a text presentation will
depend entirely on your typing speed.
Subsequent slides are easily created by selecting the desired
slide layout. PowerPoint comes with 24 predefined layouts for
you to choose. Each layout creates a slide with placeholders for
a title, bulleted text, pictures, tables, graphs, and other objects.
Filling-in these placeholders is mostly a simple matter of typing
the text or selecting a picture from the images in your hard disk.
PowerPoint comes with a number of clip-art images that you
can place on your slides, but these, again, have been used too
often and they have become familiar even to noncomputer
users. If you have the time and inclination, you can create your
own drawings using PowerPoint drawing tools. These are not
up to the standards of dedicated drawing programs but can
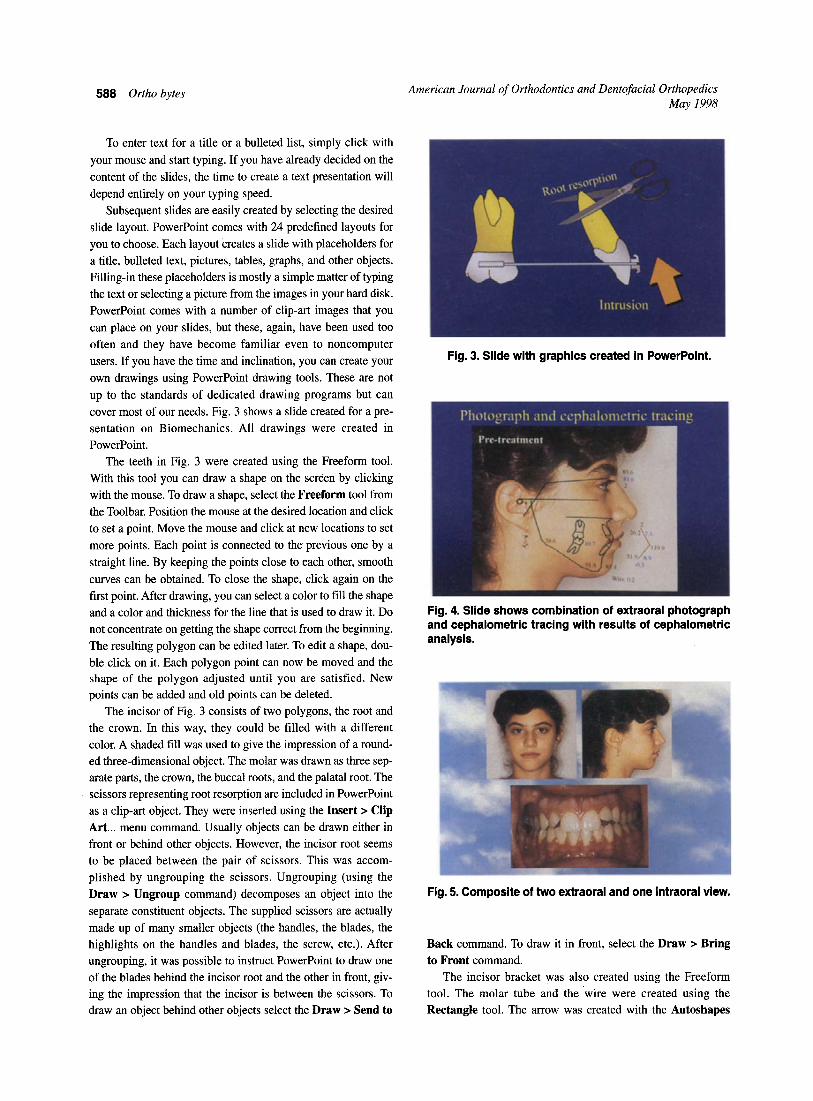
cover most of our needs. Fig. 3 shows a slide created for a pre
sentation on Biomechanics. All drawings were created in
PowerPoint. The teeth in Fig. 3 were created using the Freeform tool.
With this tool you can draw a shape on the screen by clicking
with the mouse. To draw a shape, select the Freeform tool from
the Toolbar. Position the mouse at the desired location and click
to set a point. Move the mouse and click at new locations to set
more points. Each point is connected to the previous one by a
straight line. By keeping the points close to each other, smooth
curves can be obtained. To close the shape, click again on the
first point. After drawing, you can select a color to fill the shape
and a color and thickness for the line that is used to draw it. Do
not concentrate on getting the shape correct from the beginning.
The resulting polygon can be edited later. To edit a shape, dou
ble click on it. Each polygon point can now be moved and the shape of the polygon adjusted until you are satisfied. New points can be added and old points can be deleted.
The incisor of Fig. 3 consists of two polygons, the root and
the crown. In this way, they could be filled with a different
color. A shaded fill was used to give the impression of a rounded three-dimensional object. The molar was drawn as three sep
arate parts, the crown, the buccal roots, and the palatal root. The
scissors representing root resorption are included in PowerPoint
as a clip-art object. They were inserted using the Insert> Clip Art ... menu command. Usually objects can be drawn either in
front or behind other objects. However, the incisor root seems
to be placed between the pair of scissors. This was accom
plished by ungrouping the scissors. Ungrouping (using the
Draw > Ungroup command) decomposes an object into the
separate constituent objects. The supplied scissors are actually
made up of many smaller objects (the handles, the blades, the
highlights on the handles and blades, the screw, etc.). After ungrouping, it was possible to instruct PowerPoint to draw one
of the blades behind the incisor root and the other in front, giv
ing the impression that the incisor is between the scissors. To draw an object behind other objects select the Draw> Send to
American Journal of Orthodontics and Dentofacial Orthopedics May 1998
Fig. 3. Slide with graphics created in PowerPoint.
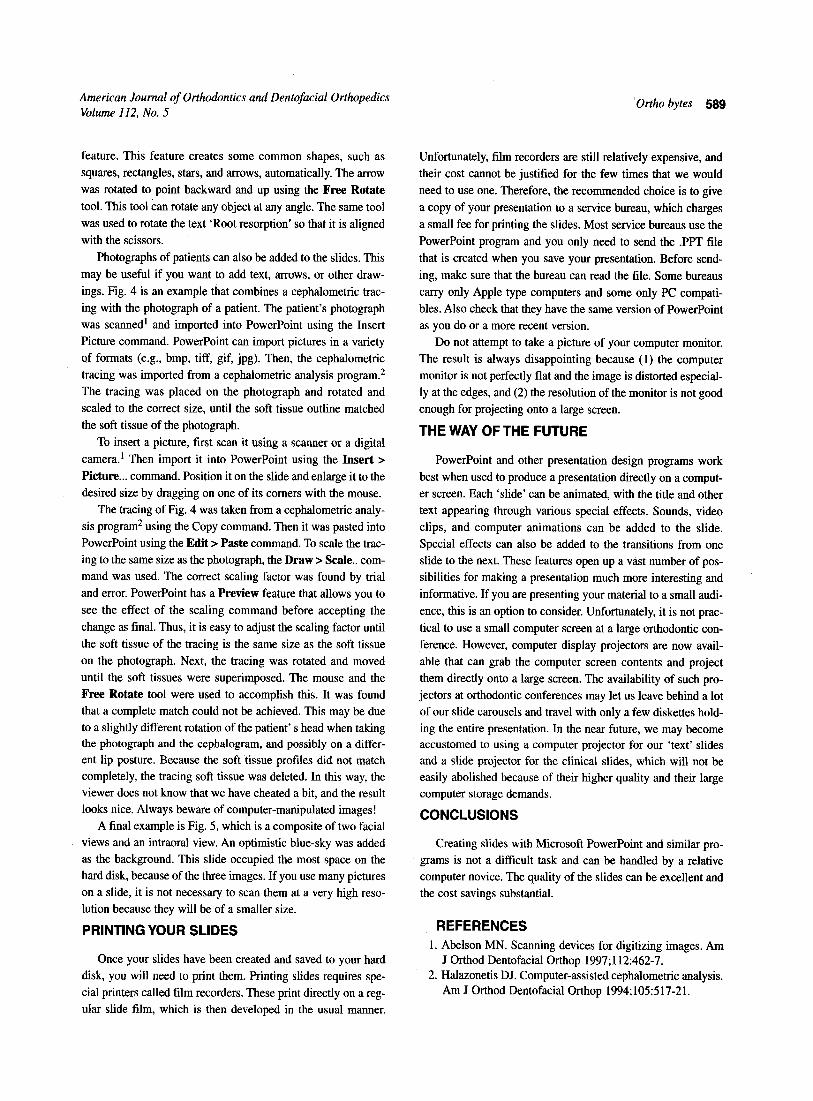
Fig. 4. Slide shows combination of extraoral photograph and cephalometric tracing with results of cephalometric analysis.
Fig. 5. Composite of two extraoral and one intraoral view.
Back command. To draw it in front, select the Draw> Bring to Front command.
The incisor bracket was also created using the Freeform tool. The molar tube and the wire were created using the
Rectangle tool. The arrow was created with the Autoshapes
American Journal of Orthodontics and Dentofacial Orthopedics Volume 112, No.5
feature. This feature creates some common shapes, such as
squares, rectangles, stars, and arrows, automatically. The arrow
was rotated to point backward and up using the Free Rotate tool. This tool can rotate any object at any angle. The same tool
was used to rotate the text 'Root resorption' so that it is aligned
with the scissors.
Photographs of patients can also be added to the slides. This
may be useful if you want to add text, arrows, or other draw
ings. Fig. 4 is an example that combines a cephalometric trac
ing with the photograph of a patient. The patient's photograph
was scanned 1 and imported into PowerPoint using the Insert
Picture command. PowerPoint can import pictures in a variety
of formats (e.g., bmp, tiff, gif, jpg). Then, the cephalometric
tracing was imported from a cephalometric analysis program.2
The tracing was placed on the photograph and rotated and
scaled to the correct size, until the soft tissue outline matched
the soft tissue of the photograph.
To insert a picture, first scan it using a scanner or a digital
camera. 1 Then import it into PowerPoint using the Insert > Picture ... command. Position it on the slide and enlarge it to the
desired size by dragging on one of its comers with the mouse.
The tracing of Fig. 4 was taken from a cephalometric analy
sis program2 using the Copy command. Then it was pasted into
PowerPoint using the Edit> Paste command. To scale the trac
ing to the same size as the photograph, the Draw> Scale .. com
mand was used. The correct scaling factor was found by trial
and error. PowerPoint has a Preview feature that allows you to
see the effect of the scaling command before accepting the
change as final. Thus, it is easy to adjust the scaling factor until
the soft tissue of the tracing is the same size as the soft tissue
on the photograph. Next, the tracing was rotated and moved
until the soft tissues were superimposed. The mouse and the
Free Rotate tool were used to accomplish this. It was found
that a complete match could not be achieved. This may be due
to a slightly different rotation of the patient's head when taking the photograph and the cephalogram, and possibly on a different lip posture. Because the soft tissue profiles did not match
completely, the tracing soft tissue was deleted. In this way, the
viewer does not know that we have cheated a bit, and the result looks nice. Always beware of computer-manipulated images!
A final example is Fig. 5, which is a composite of two facial
views and an intraoral view. An optimistic blue-sky was added
as the background. This slide occupied the most space on the
hard disk, because of the three images. If you use many pictures
on a slide, it is not necessary to scan them at a very high reso
lution because they will be of a smaller size.
PRINTING YOUR SLIDES
Once your slides have been created and saved to your hard
disk, you will need to print them. Printing slides requires spe
cial printers called film recorders. These print directly on a reg
ular slide film, which is then developed in the usual manner.
'Ortho bytes 589
Unfortunately, film recorders are still relatively expensive, and
their cost cannot be justified for the few times that we would
need to use one. Therefore, the recommended choice is to give
a copy of your presentation to a service bureau, which charges
a small fee for printing the slides. Most service bureaus use the
PowerPoint program and you only need to send the .PPT file
that is created when you save your presentation. Before send
ing, make sure that the bureau can read the file. Some bureaus
carry only Apple type computers and some only PC compati
bles. Also check that they have the same version of PowerPoint
as you do or a more recent version.
Do not attempt to take a picture of your computer monitor.
The result is always disappointing because (l) the computer
monitor is not perfectly flat and the image is distorted especial
ly at the edges, and (2) the resolution of the monitor is not good
enough for projecting onto a large screen.
THE WAY OF THE FUTURE
PowerPoint and other presentation design programs work
best when used to produce a presentation directly on a comput
er screen. Each 'slide' can be animated, with the title and other
text appearing through various special effects. Sounds, video
clips, and computer animations can be added to the slide.
Special effects can also be added to the transitions from one
slide to the next. These features open up a vast number of pos
sibilities for making a presentation much more interesting and
informative. If you are presenting your material to a small audi
ence, this is an option to consider. Unfortunately, it is not prac
tical to use a small computer screen at a large orthodontic con
ference. However, computer display projectors are now avail
able that can grab the computer screen contents and project
them directly onto a large screen. The availability of such pro
jectors at orthodontic conferences may let us leave behind a lot
of our slide carousels and travel with only a few diskettes hold
ing the entire presentation. In the near future, we may become accustomed to using a computer projector for our 'text' slides and a slide projector for the clinical slides, which will not be
easily abolished because of their higher quality and their large
computer storage demands.
CONCLUSIONS
Creating slides with Microsoft PowerPoint and similar pro
grams is not a difficult task and can be handled by a relative
computer novice. The quality of the slides can be excellent and
the cost savings substantial.
REFERENCES 1. Abelson MN. Scanning devices for digitizing images. Am
J Orthod Dentofacial Orthop 1997;112:462-7. 2. Halazonetis DJ. Computer-assisted cephalometric analysis.
Am J Orthod Dentofacial Orthop 1994;105:517-21.
Recommended