© 2013 F+W Media, Inc All rights reserved
www.fwmedia.com
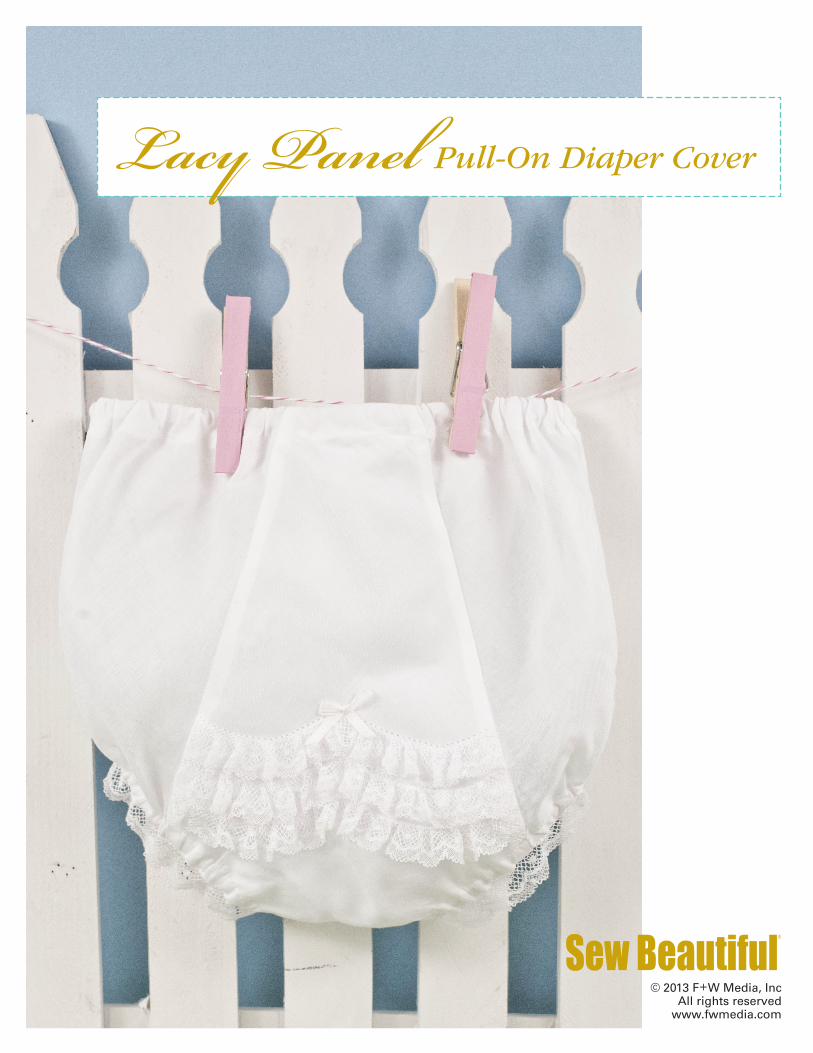
Lacy Panel Pull-On Diaper Cover
© 2013 F+W Media, Inc | www.fwmedia.com 2
Lacy Panel Pull-On Diaper Cover
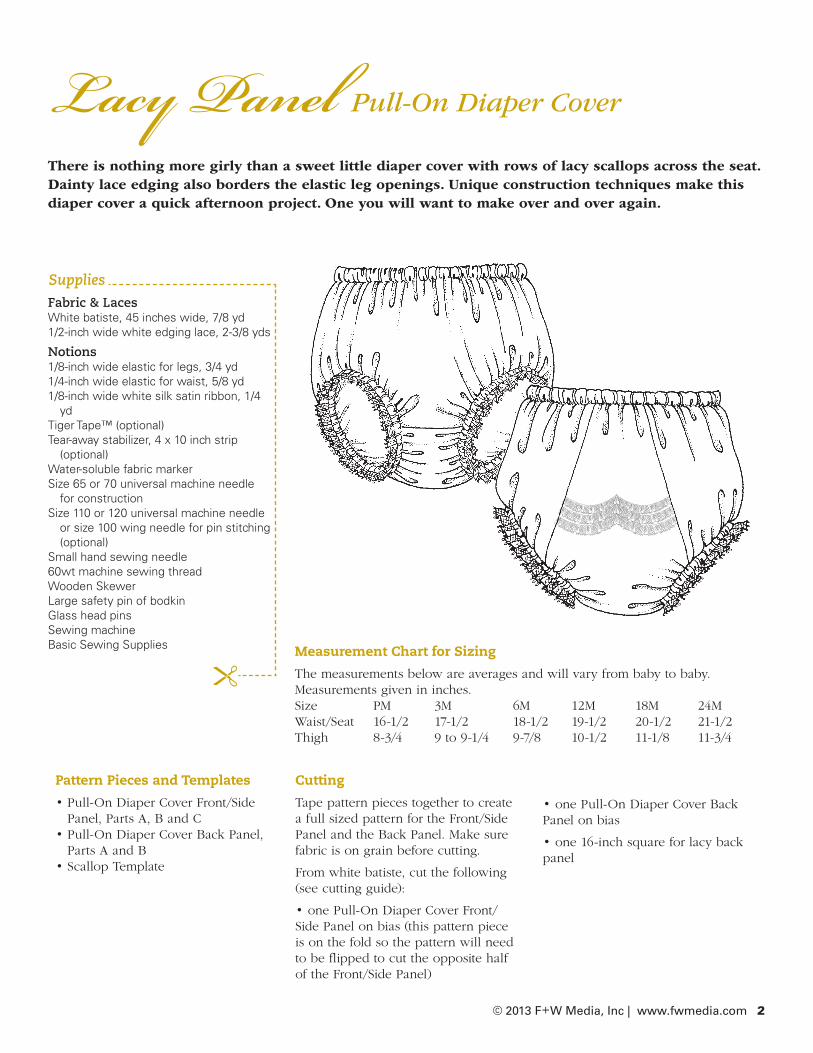
There is nothing more girly than a sweet little diaper cover with rows of lacy scallops across the seat. Dainty lace edging also borders the elastic leg openings. Unique construction techniques make this diaper cover a quick afternoon project. One you will want to make over and over again.
Measurement Chart for Sizing
The measurements below are averages and will vary from baby to baby. Measurements given in inches.Size PM 3M 6M 12M 18M 24M Waist/Seat 16-1/2 17-1/2 18-1/2 19-1/2 20-1/2 21-1/2Thigh 8-3/4 9 to 9-1/4 9-7/8 10-1/2 11-1/8 11-3/4
Fabric & Laces White batiste, 45 inches wide, 7/8 yd1/2-inch wide white edging lace, 2-3/8 yds
Notions1/8-inch wide elastic for legs, 3/4 yd1/4-inch wide elastic for waist, 5/8 yd1/8-inch wide white silk satin ribbon, 1/4
ydTiger Tape™ (optional)Tear-away stabilizer, 4 x 10 inch strip
(optional)Water-soluble fabric markerSize 65 or 70 universal machine needle
for constructionSize 110 or 120 universal machine needle
or size 100 wing needle for pin stitching (optional)
Small hand sewing needle60wt machine sewing threadWooden SkewerLarge safety pin of bodkinGlass head pinsSewing machineBasic Sewing Supplies
Supplies
Pattern Pieces and Templates
• Pull-On Diaper Cover Front/Side Panel, Parts A, B and C• Pull-On Diaper Cover Back Panel, Parts A and B• Scallop Template
Cutting
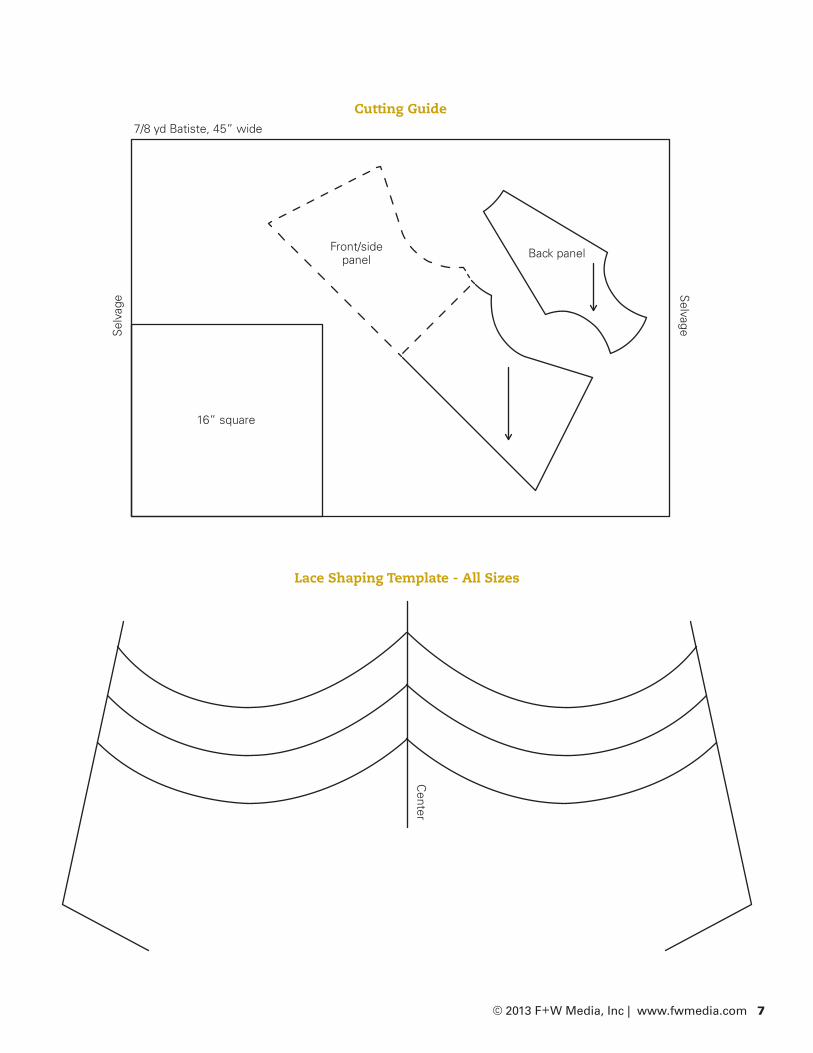
Tape pattern pieces together to create a full sized pattern for the Front/Side Panel and the Back Panel. Make sure fabric is on grain before cutting.
From white batiste, cut the following (see cutting guide):
• one Pull-On Diaper Cover Front/Side Panel on bias (this pattern piece is on the fold so the pattern will need to be flipped to cut the opposite half of the Front/Side Panel)
• one Pull-On Diaper Cover Back Panel on bias
• one 16-inch square for lacy back panel
© 2013 F+W Media, Inc | www.fwmedia.com 3
DIRECTIONS
Please read through all directions before beginning.
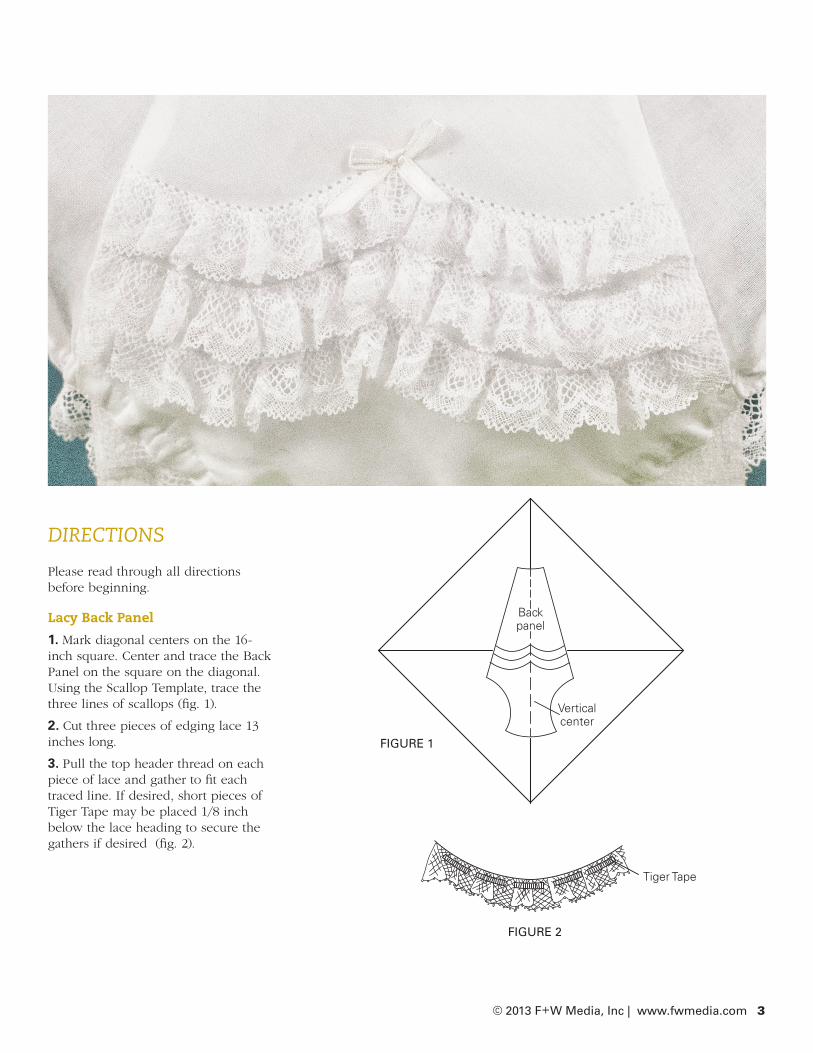
Lacy Back Panel
1. Mark diagonal centers on the 16-inch square. Center and trace the Back Panel on the square on the diagonal. Using the Scallop Template, trace the three lines of scallops (fig. 1).
2. Cut three pieces of edging lace 13 inches long.
3. Pull the top header thread on each piece of lace and gather to fit each traced line. If desired, short pieces of Tiger Tape may be placed 1/8 inch below the lace heading to secure the gathers if desired (fig. 2).
Back panel
Verticalcenter
FIGURE 1
Tiger Tape
FIGURE 2
© 2013 F+W Media, Inc | www.fwmedia.com 4
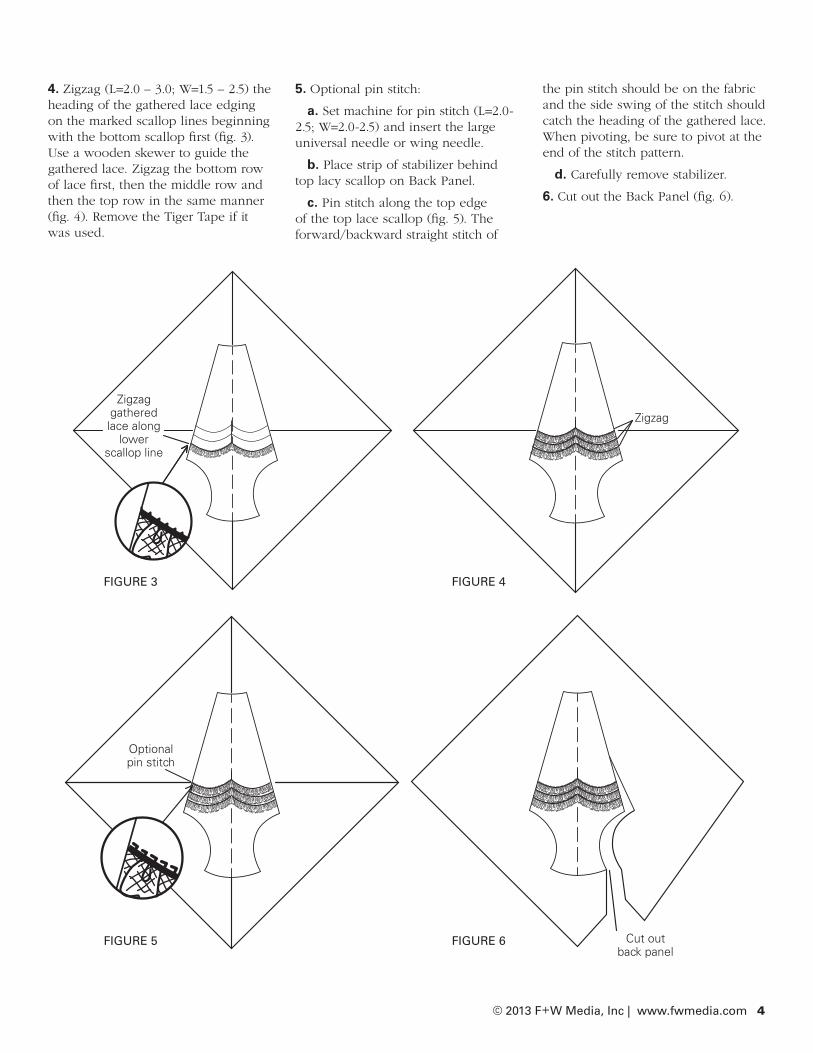
4. Zigzag (L=2.0 – 3.0; W=1.5 – 2.5) the heading of the gathered lace edging on the marked scallop lines beginning with the bottom scallop first (fig. 3). Use a wooden skewer to guide the gathered lace. Zigzag the bottom row of lace first, then the middle row and then the top row in the same manner (fig. 4). Remove the Tiger Tape if it was used.
5. Optional pin stitch:
a. Set machine for pin stitch (L=2.0-2.5; W=2.0-2.5) and insert the large universal needle or wing needle.
b. Place strip of stabilizer behind top lacy scallop on Back Panel.
c. Pin stitch along the top edge of the top lace scallop (fig. 5). The forward/backward straight stitch of
the pin stitch should be on the fabric and the side swing of the stitch should catch the heading of the gathered lace. When pivoting, be sure to pivot at the end of the stitch pattern.
d. Carefully remove stabilizer.
6. Cut out the Back Panel (fig. 6).
Zigzag gathered lace along
lower scallop line
FIGURE 3
FIGURE 5
FIGURE 4
FIGURE 6 Cut out back panel
Zigzag
Optional pin stitch
© 2013 F+W Media, Inc | www.fwmedia.com 5
Diaper Cover Construction
All seams are 1/2 inch unless otherwise noted. Trim seams to 1/4 inch.
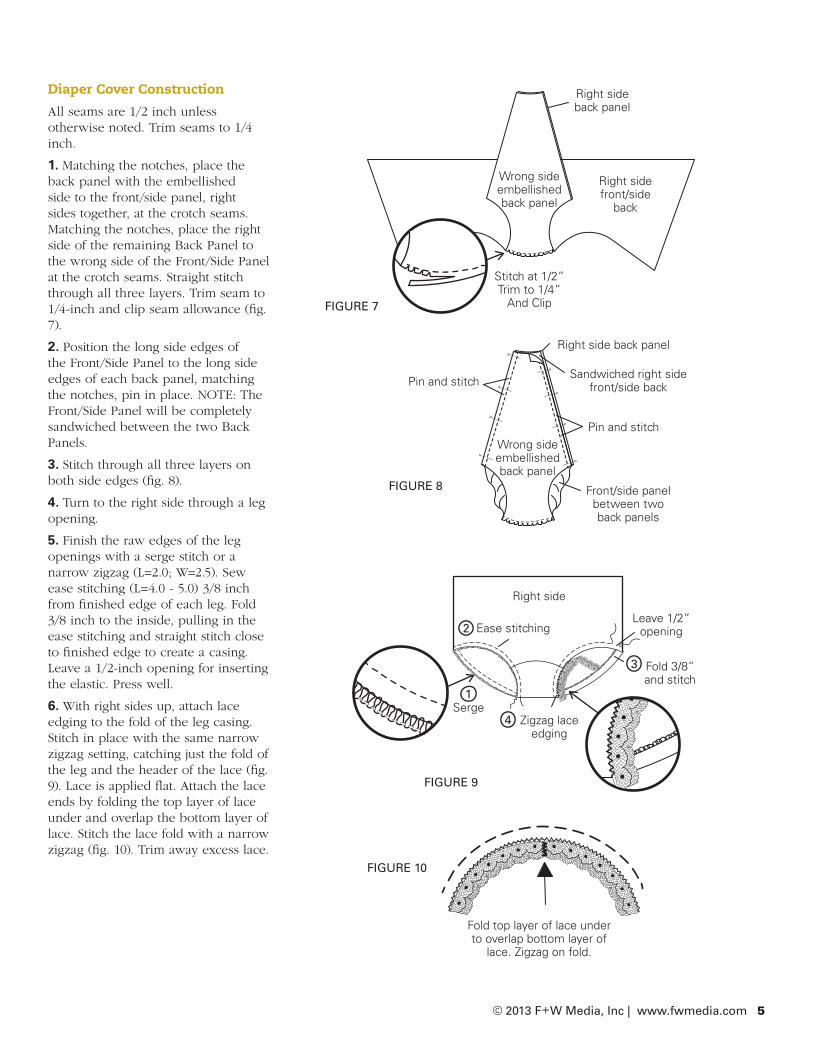
1. Matching the notches, place the back panel with the embellished side to the front/side panel, right sides together, at the crotch seams. Matching the notches, place the right side of the remaining Back Panel to the wrong side of the Front/Side Panel at the crotch seams. Straight stitch through all three layers. Trim seam to 1/4-inch and clip seam allowance (fig. 7).
2. Position the long side edges of the Front/Side Panel to the long side edges of each back panel, matching the notches, pin in place. NOTE: The Front/Side Panel will be completely sandwiched between the two Back Panels.
3. Stitch through all three layers on both side edges (fig. 8).
4. Turn to the right side through a leg opening.
5. Finish the raw edges of the leg openings with a serge stitch or a narrow zigzag (L=2.0; W=2.5). Sew ease stitching (L=4.0 - 5.0) 3/8 inch from finished edge of each leg. Fold 3/8 inch to the inside, pulling in the ease stitching and straight stitch close to finished edge to create a casing. Leave a 1/2-inch opening for inserting the elastic. Press well.
6. With right sides up, attach lace edging to the fold of the leg casing. Stitch in place with the same narrow zigzag setting, catching just the fold of the leg and the header of the lace (fig. 9). Lace is applied flat. Attach the lace ends by folding the top layer of lace under and overlap the bottom layer of lace. Stitch the lace fold with a narrow zigzag (fig. 10). Trim away excess lace.
Right side back panel
Right sidefront/side
back
Wrong sideembellishedback panel
Stitch at 1/2”Trim to 1/4”
And ClipFIGURE 7
Right side back panel
Sandwiched right sidefront/side back
Pin and stitch
Front/side panel between two back panels
Pin and stitch
Wrong side embellished back panel
FIGURE 8
Right side
Ease stitching
SergeZigzag lace
edging
Leave 1/2” opening
Fold 3/8” and stitch
FIGURE 9
Fold top layer of lace under to overlap bottom layer of
lace. Zigzag on fold.
FIGURE 10
1
2
3
4
© 2013 F+W Media, Inc | www.fwmedia.com 6
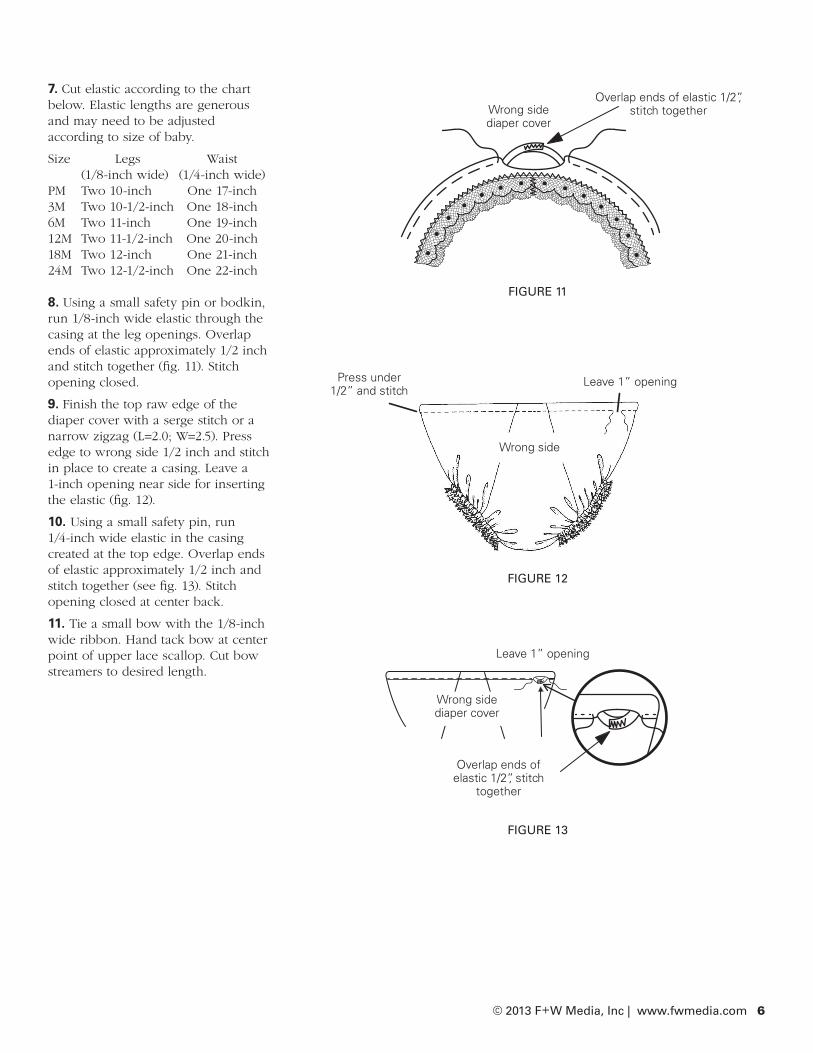
7. Cut elastic according to the chart below. Elastic lengths are generous and may need to be adjusted according to size of baby.
Size Legs Waist (1/8-inch wide) (1/4-inch wide)PM Two 10-inch One 17-inch3M Two 10-1/2-inch One 18-inch 6M Two 11-inch One 19-inch 12M Two 11-1/2-inch One 20-inch 18M Two 12-inch One 21-inch 24M Two 12-1/2-inch One 22-inch 8. Using a small safety pin or bodkin, run 1/8-inch wide elastic through the casing at the leg openings. Overlap ends of elastic approximately 1/2 inch and stitch together (fig. 11). Stitch opening closed.
9. Finish the top raw edge of the diaper cover with a serge stitch or a narrow zigzag (L=2.0; W=2.5). Press edge to wrong side 1/2 inch and stitch in place to create a casing. Leave a 1-inch opening near side for inserting the elastic (fig. 12).
10. Using a small safety pin, run 1/4-inch wide elastic in the casing created at the top edge. Overlap ends of elastic approximately 1/2 inch and stitch together (see fig. 13). Stitch opening closed at center back.
11. Tie a small bow with the 1/8-inch wide ribbon. Hand tack bow at center point of upper lace scallop. Cut bow streamers to desired length.
Overlap ends of elastic 1/2”, stitch togetherWrong side
diaper cover
FIGURE 11
FIGURE 12
FIGURE 13
Press under 1/2” and stitch
Leave 1” opening
Wrong side
Leave 1” opening
Wrong sidediaper cover
Overlap ends of elastic 1/2”, stitch
together
© 2013 F+W Media, Inc | www.fwmedia.com 7
Cutting Guide
Lace Shaping Template - All Sizes
7/8 yd Batiste, 45” wide
16” square
Sel
vage
Selvage
Front/sidepanel Back panel
Center
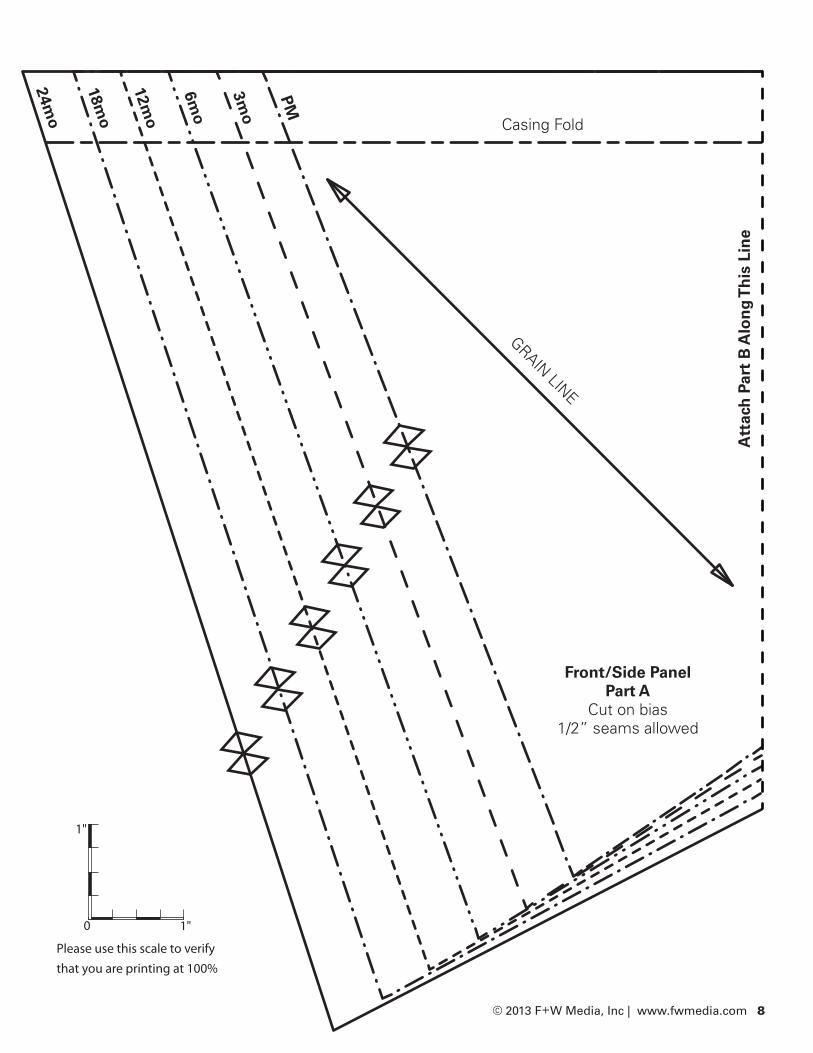
© 2013 F+W Media, Inc | www.fwmedia.com 8
Att
ach
Par
t B
Alo
ng
Th
is L
ine
Casing Fold
GRAIN LINE
Front/Side PanelPart A
Cut on bias1/2” seams allowed
PM
3mo
6mo
12mo
18mo
24mo
0 1"
1"
Please use this scale to verify that you are printing at 100%

© 2013 F+W Media, Inc | www.fwmedia.com 9
GRAIN LINE
Front/Side PanelPart B
Cut on bias1/2” seams allowed
Att
ach
Par
t C
Alo
ng
Th
is L
ineA
ttach Part A
Alo
ng
Th
is Line
Casing Fold
0 1"
1"
Please use this scale to verify that you are printing at 100%
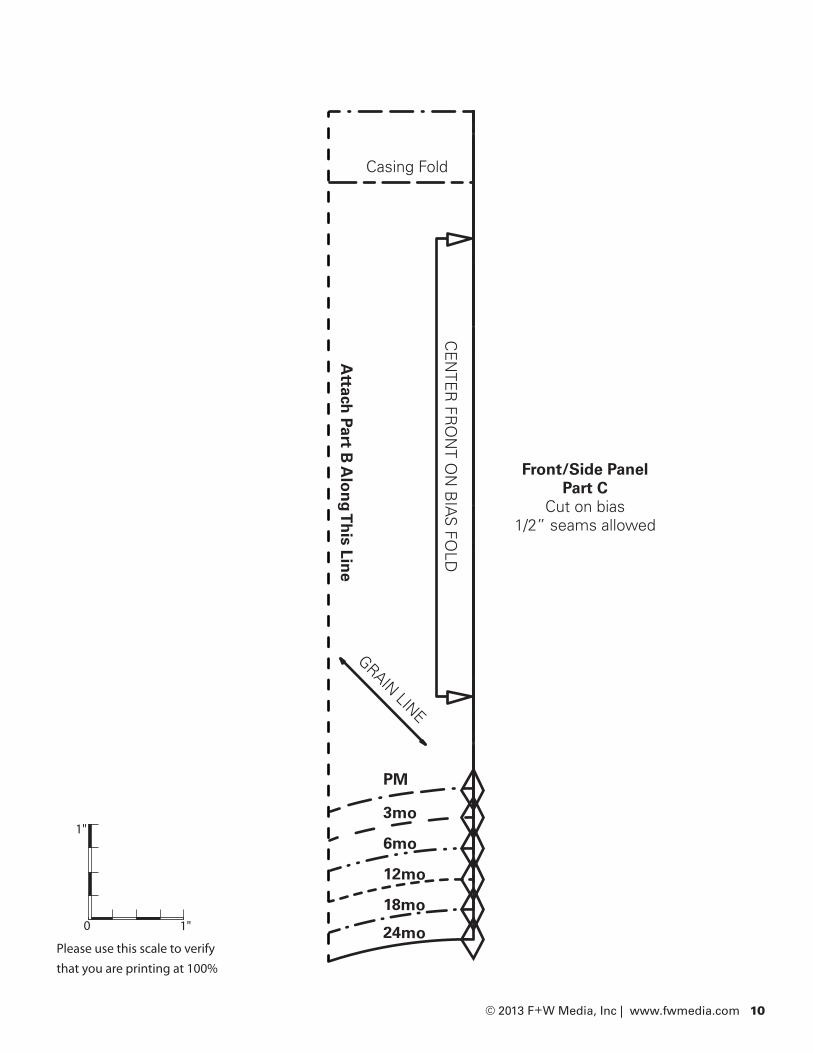
© 2013 F+W Media, Inc | www.fwmedia.com 10
Attach
Part B A
lon
g T
his Lin
e
Casing Fold
PM
3mo
6mo
12mo
18mo
24mo
CE
NTE
R FR
ON
T ON
BIA
S FO
LD
GRAIN LINE
Front/Side PanelPart C
Cut on bias1/2” seams allowed
0 1"
1"
Please use this scale to verify that you are printing at 100%
© 2013 F+W Media, Inc | www.fwmedia.com 11
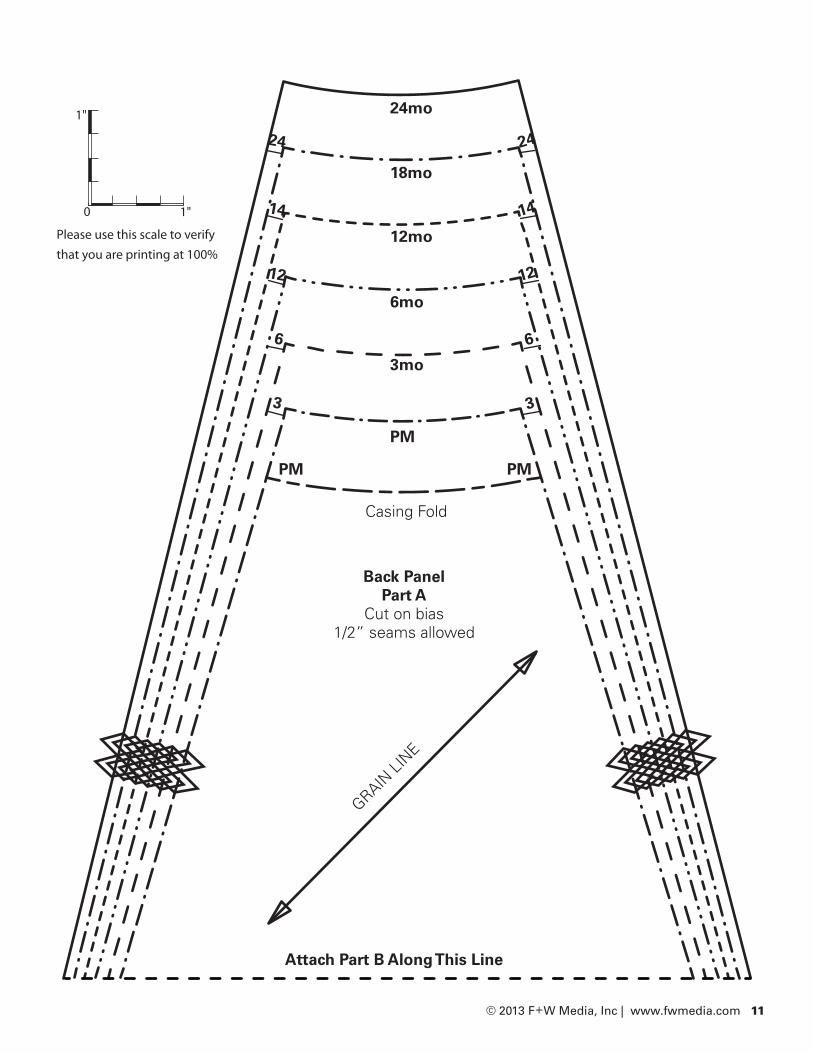
Attach Part B Along This Line
GRAIN LI
NE
Back PanelPart A
Cut on bias1/2” seams allowed
Casing Fold
PM
3mo
6mo
12mo
18mo
24mo
PM PM
3 3
6 6
12 12
14 14
24 24
0 1"
1"
Please use this scale to verify that you are printing at 100%
© 2013 F+W Media, Inc | www.fwmedia.com 12
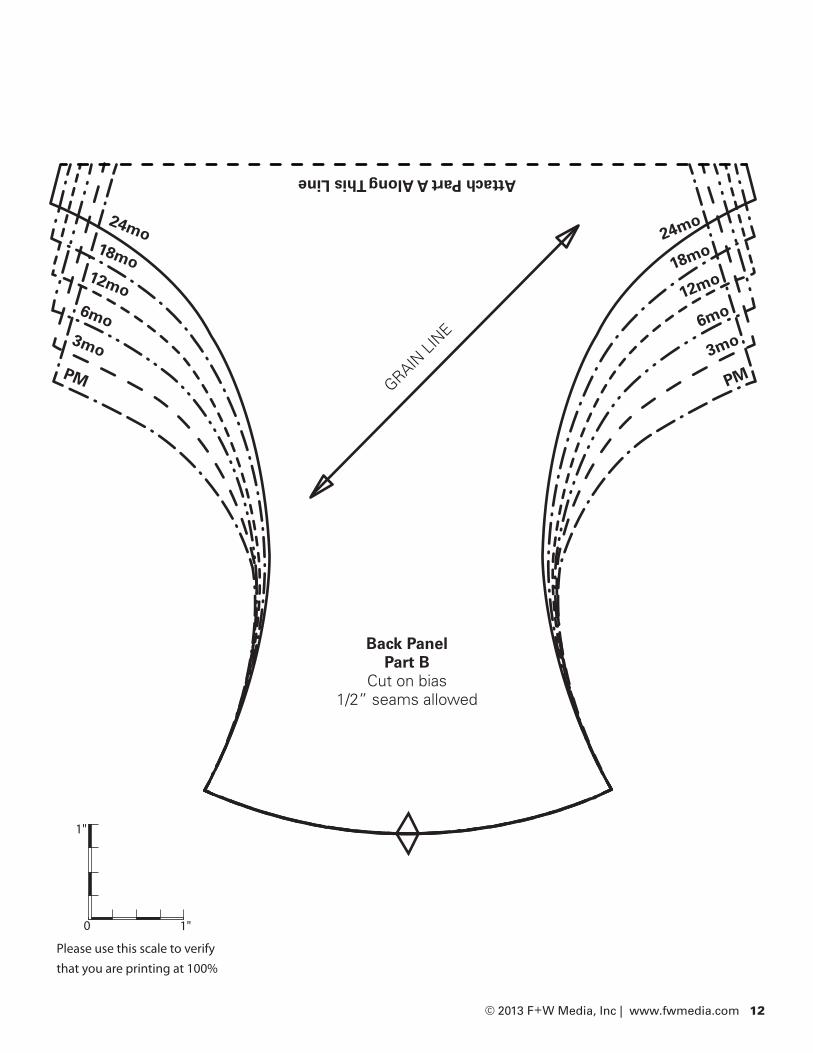
Back PanelPart B
Cut on bias1/2” seams allowed
GRAIN LI
NE
Attach Part A Along This Line
PM
3mo
6mo
12mo
18mo
24mo
PM
3mo6mo
12mo18mo
24mo
0 1"
1"
Please use this scale to verify that you are printing at 100%
Recommended