About us
{Gom Dat Viet} is the leading brand of terracotta in Vietnam. Our clay bricks and roofing tiles are manufactured byDong
Trieu Brick & Tile J.S.C while Cotto tiles are manufactured by Vietnamese Ceramic J.S.C.
{Gom Dat Viet} products are made of well-known clay sources in Quang Ninh province, processed with modernproduction
line, applied advanced technology from Europe and controlled by experienced technicians.
Widely distributed in 63 provinces, cities and exported to many regions such as: ASEAN, EU, Middle East, Australia, NZ, China,
Japan, Korean..., {Gom Dat Viet} products are not only prestigious in the local market but also pleasant to use .Customers could
easily select suitable products for their project and shall be satisfied when using
{Gom Dat Viet} products.
We are always pay high attention to high quality products and production stability to maintain the
environment friendly. We also diversify models of invention in order to make your life most comfortable
selecting products and to maximize the aesthetics in your piece of work.
With motto {Clients' Satisfaction is our success} we always pursue innovation and creation to meet various customer needs,
and we deeply believe that {Gom Dat Viet} will bring a luxuriously cosy home to everyone.
www. gomdatviet .com . vn 2 3

Flooring construction guide
01
- Sprinkle the laying surface to be good under pressure.
Use water pipe and mark some points.
Modem: DV03 - Size (mm): 200 x 200 x 12; 250 x 250 x 12 300 x
300 x 12; 400 x 400 x 14; 500 x 500 x14 - Weight (kg/pc): 0,8; 1,5; 2,1; 4,5; 6,8
-Using quantity (v/m2
) - Amount (pcs/m2
): 25; 16; 11; 6; 4
05
- Laying tiles follow design market, make some exact
tiles first then continue with others.
02
- Make mortar with proportion of 3 sand and 1cement
to ensure perfect surface, not too dry, not too wet.
03
.
- Drop mortar into the surface, do not cover marked
points.
04
.
- Use rular to make the incline surface, thickness of
mortar from 02-03 cm.
06
- Drop cementwater before laying tiles to make
adhesive surface between tiles and mortar.
07
- Laying tiles on cement water, be sure that all tiles
are the same shape of base line. Leave a space from
8-10mm depends on size of product
08
- Use rubber hammer to revise dimension between
each tile, to ensure adhesiveness between tiles and
mortar. Continue with other tiles. If there is not
enough space for full shape of tile in the corner, you
can measure and cut tile to cover all surface.
www. gomdatviet .com .vn 4 5

GUIDE FOR DV03
Modem: DV03
09
- Make mortar for space between tiles, one part of sand
and one part of cement, put water slowly to create
good mortar. Besides, can use white cement, cutted
tiles, colorful tile to make more beautiful surface.
13
. - Photo of space between tiles.
10
- After at least 10 hours , tiles and mortar are adhesive,
you can drop mortar into space between tiles.
11
- Use tool to take enough mortar, avoid mortar
fall into surface of tiles.
12
- To create beautiful space between tiles , you can
make smooth mortar in flat or semi-circle. Clean mortar fall on tiles
14
- Cleaning surface is the last important step to maintain
natural color of products. You can do it after 24 – 36
hours, belong to weather condition as long as space
between tiles are hardly dry. Pour out water on the
surface, use wiper or brusher to clean up.
15
.
- Photo before cleaning.
16
- Photo after cleaning.
www. gomdatviet .com .vn 6 7

DIMENSION OF FLOORING
STT Name of product Size Amount (v/m2
)
1
200x200x12 25
Floor tile 200
2
200x250x12 20
Floor tile 200x250
3
250x250x12 16
Floor tile 250
4
300x300x12 11
Floor tile 300
5
400x400x14 6
Floor tile 400
6
200x400x14 12
Floor tile 200x400
7
500x500x14 4
Floor tile 500
8
608x608x14 3
Floor tile 608
- Do not use too dry or too wet mortar
- Do not let mortar fall into surface of products in long time, must use wiper to clean as soon as possible
- Surface after finishing must be flat, space between tiles are straight, good shape, and mortar not fall into surface.
- Tile after finishing must have natural color, clean.
- Choose tiles in the same range of color, size (Pay attention in code of manufactor).
- If surface is large, must let one space of 1.5-2 cm without mortar each 36 m2 to keep expansion.
NOTE:
- Products are waterproofed so that mortar on surface of tiles can be clean with wiper and water before 24-36hours.
Do not let oil or chemicals fall into surface.
- Must clean surface after 24 hours flooring but not later than 36 hours. If do it too early, mortar is not dry enough,
mortar can be slough. If do it too late, it is hard to clean mortar fall onto surface of tile .
- Never use any chemical to clean or whiten mortar fall onto surface of tiles.
www. gomdatviet .com .vn 8 9
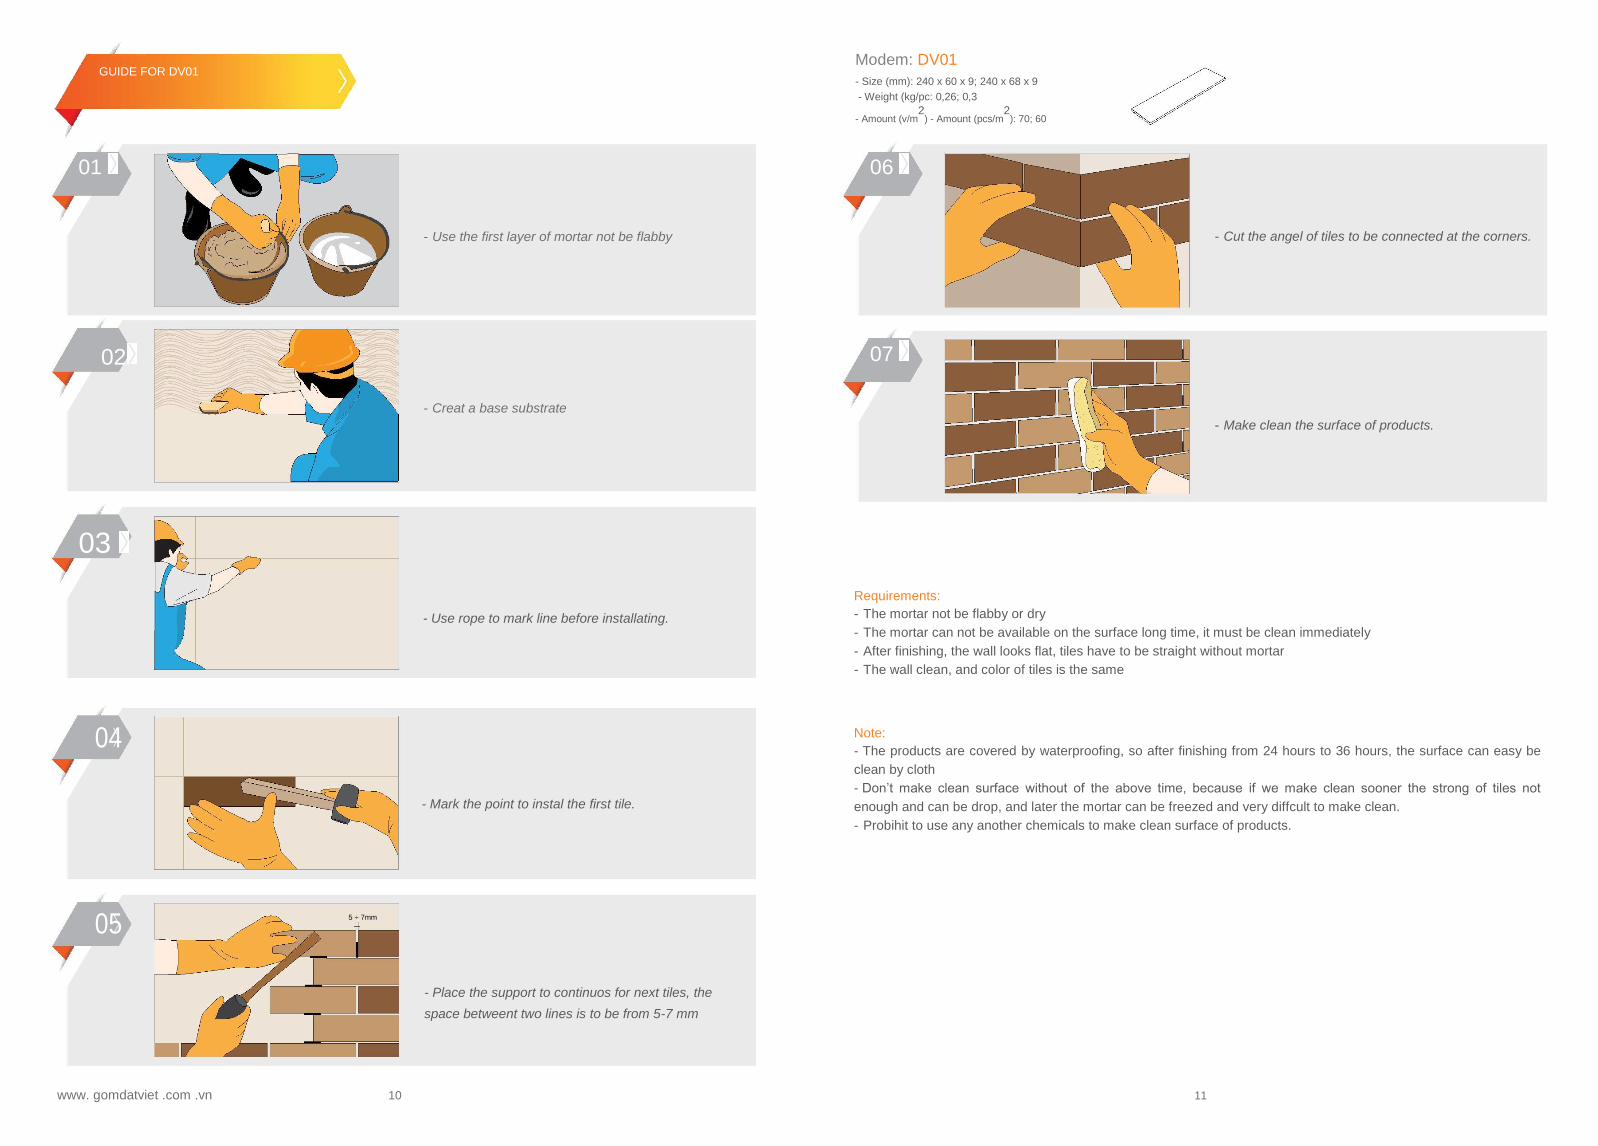
GUIDE FOR DV01
Modem: DV01 - Size (mm): 240 x 60 x 9; 240 x 68 x 9
- Weight (kg/pc: 0,26; 0,3
- Amount (v/m2
) - Amount (pcs/m2
): 70; 60
01
02
- Use the first layer of mortar not be flabby
- Creat a base substrate
06
07
- Cut the angel of tiles to be connected at the corners.
- Make clean the surface of products.
03
- Use rope to mark line before installating.
04
- Mark the point to instal the first tile.
05 5 ÷ 7mm
- Place the support to continuos for next tiles, the
space betweent two lines is to be from 5-7 mm
Requirements: - The mortar not be flabby or dry - The mortar can not be available on the surface long time, it must be clean immediately - After finishing, the wall looks flat, tiles have to be straight without mortar - The wall clean, and color of tiles is the same
Note: - The products are covered by waterproofing, so after finishing from 24 hours to 36 hours, the surface can easy be
clean by cloth
- Don’t make clean surface without of the above time, because if we make clean sooner the strong of tiles not
enough and can be drop, and later the mortar can be freezed and very diffcult to make clean.
- Probihit to use any another chemicals to make clean surface of products.
www. gomdatviet .com .vn 10 11

01 01
02 02
03 03 04
05
06 www.gomdatviet.com.vn 12 13
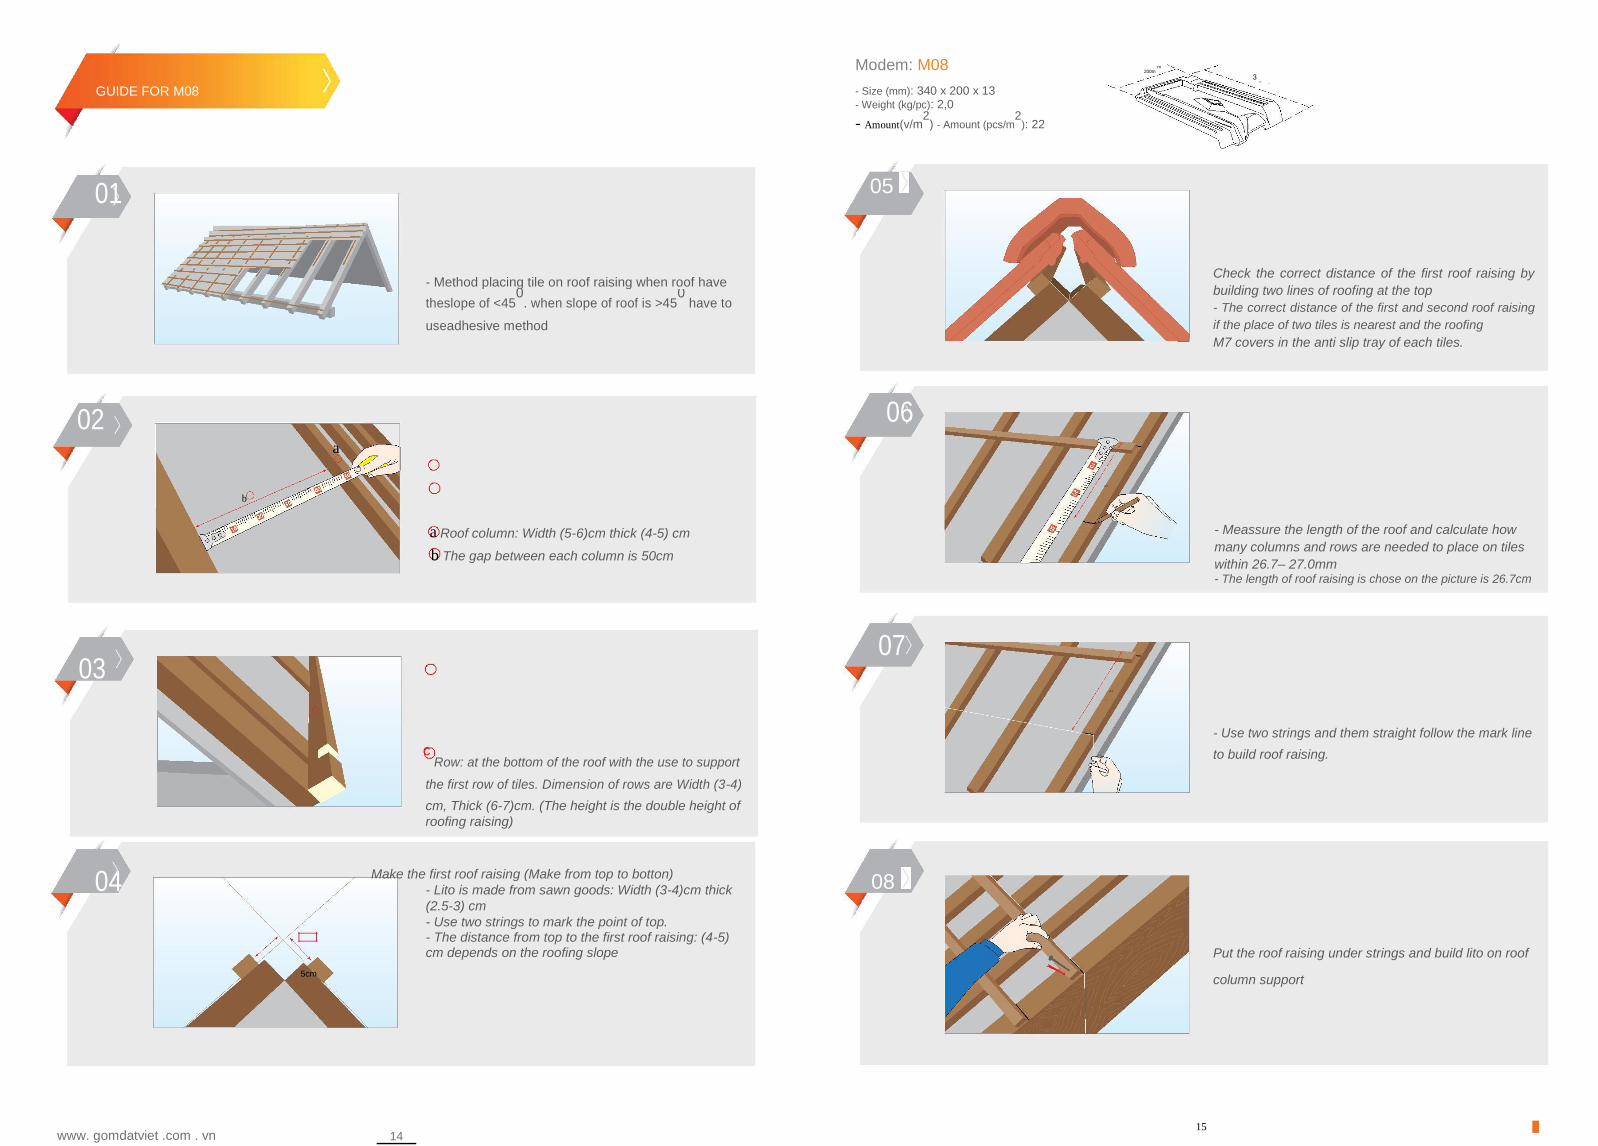
GUIDE FOR M08
Modem: M08 m
200m
3
40 mm - Size (mm): 340 x 200 x 13 - Weight (kg/pc): 2,0
- Amount(v/m2
) - Amount (pcs/m2
): 22
01
- Method placing tile on roof raising when roof have
theslope of <450
. when slope of roof is >450
have to
useadhesive method
05
Check the correct distance of the first roof raising by
building two lines of roofing at the top - The correct distance of the first and second roof raising
if the place of two tiles is nearest and the roofing M7 covers in the anti slip tray of each tiles.
02
a
b
a Roof column: Width (5-6)cm thick (4-5) cm
b The gap between each column is 50cm
03
c
c
Row: at the bottom of the roof with the use to support
the first row of tiles. Dimension of rows are Width (3-4)
cm, Thick (6-7)cm. (The height is the double height of
roofing raising)
06
267m
m
- Meassure the length of the roof and calculate how
many columns and rows are needed to place on tiles
within 26.7– 27.0mm
- The length of roof raising is chose on the picture is 26.7cm
07
267m
m
- Use two strings and them straight follow the mark line
to build roof raising.
04 Make the first roof raising (Make from top to botton)
- Lito is made from sawn goods: Width (3-4)cm thick
(2.5-3) cm
- Use two strings to mark the point of top.
- The distance from top to the first roof raising: (4-5) cm depends on the roofing slope
5cm
08
Put the roof raising under strings and build lito on roof
column support
www. gomdatviet .com . vn 14 15
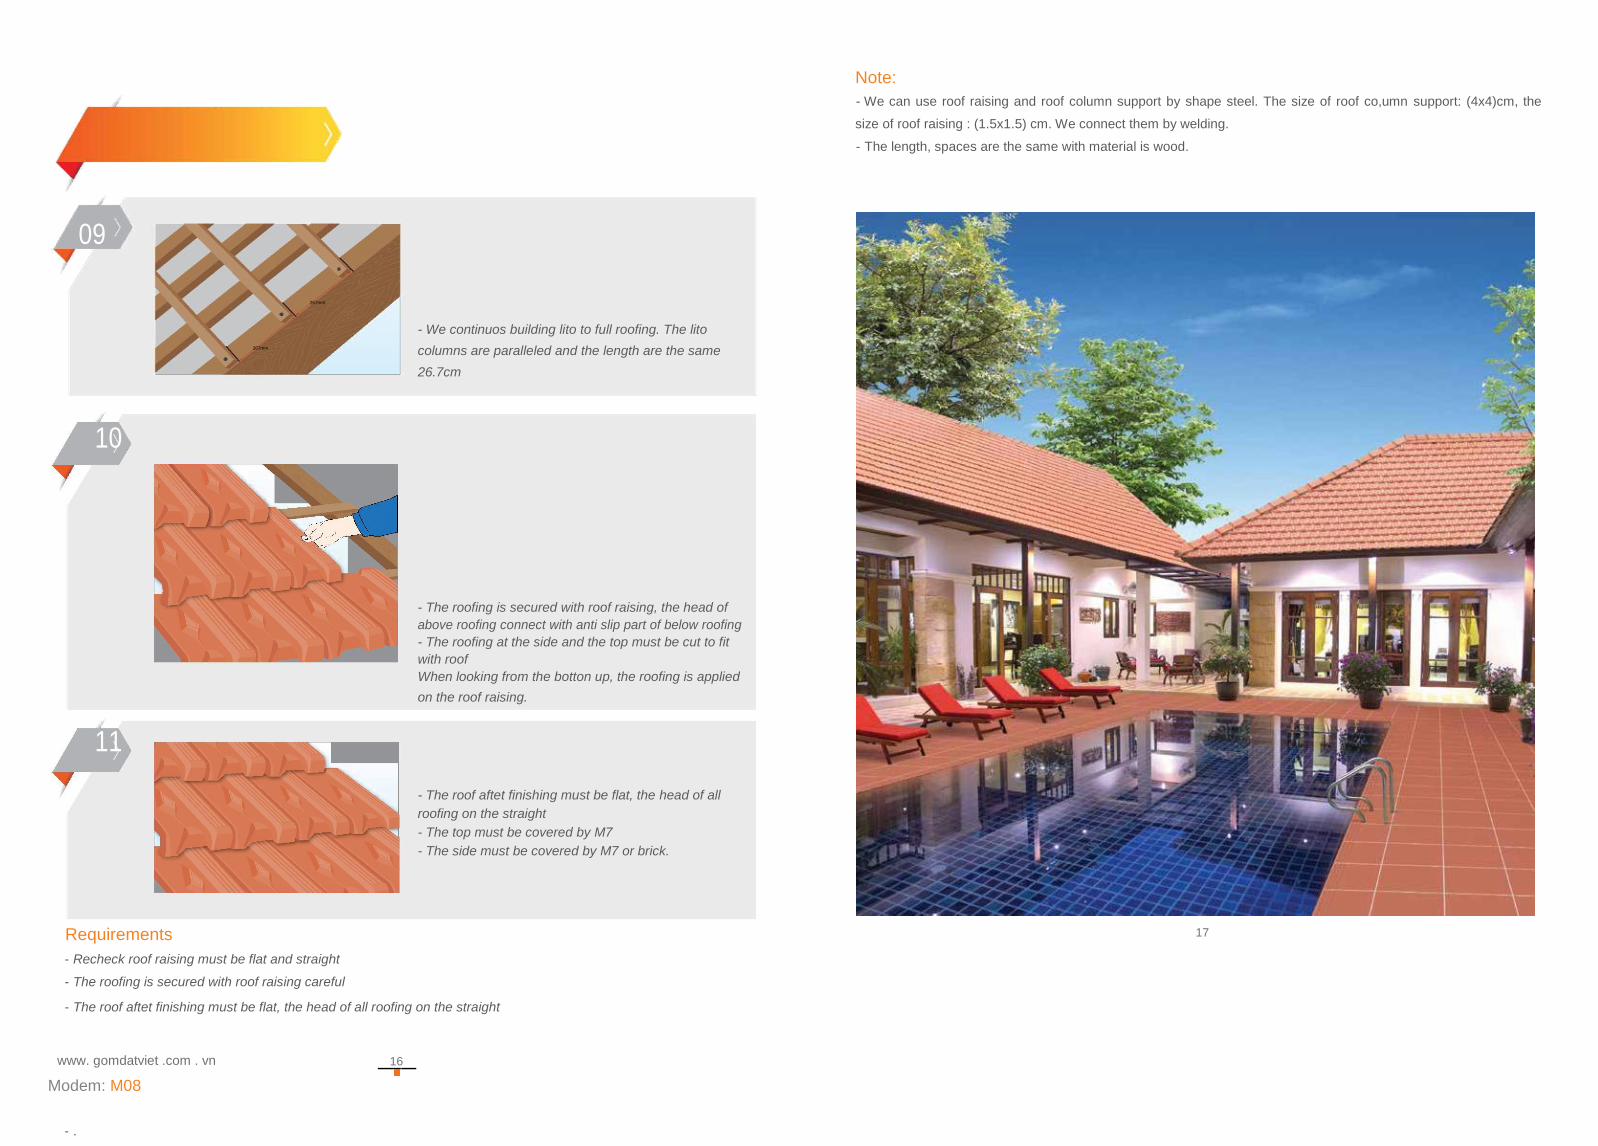
09
267mm
267mm
- We continuos building lito to full roofing. The lito
columns are paralleled and the length are the same
26.7cm
10
- The roofing is secured with roof raising, the head of
above roofing connect with anti slip part of below roofing
- The roofing at the side and the top must be cut to fit
with roof
When looking from the botton up, the roofing is applied
on the roof raising.
11
- The roof aftet finishing must be flat, the head of all
roofing on the straight
- The top must be covered by M7 - The side must be covered by M7 or brick.
Requirements
- Recheck roof raising must be flat and straight
- The roofing is secured with roof raising careful
- The roof aftet finishing must be flat, the head of all roofing on the straight
www. gomdatviet .com . vn 16
Modem: M08
- .
Note:
- We can use roof raising and roof column support by shape steel. The size of roof co,umn support: (4x4)cm, the
size of roof raising : (1.5x1.5) cm. We connect them by welding.
- The length, spaces are the same with material is wood.
17

GUIDE FOR M11
01
02
03
- Place the first row from the bottom up with the slope from 15 to 20. The nose give out 1/3 the length of roofing tiles. - Place 2 roofing tiles at the gable using a wire to make a straight line - Use the cement mortar plaster in the under face of tile and paste on the roof. - Separate row and place roofing tiles following the row, each row has width about 1.5m. - Using a wire from the top of the roof to down is to make the row.
Use the cement mortar plaster the under face of tile
and paste onto the roof - Use the cement mortar paste on the screen tile, use equipment to brush the cement mortar follow the pitch of roof, with the mortar thickness enough is not spilled onto the tile’surface
Modem: M11
- Size (mm): 150 x 150 x 11 - Weight (kg/pc): 0,45
- Amount (pcs/m2
): 85
05
06
.
Paste the following row is to similar with above steps
until the end of the row and pull straight up to the roof
top. After finishing this row then move to other row
until cover all roofing tiles.
.
Position between 02 rows is to put the tiles in the
middle gap of 2 staggered rows. - The location between the gable and roof top is seal
by cutting tiles according vacancies.
- roof top is covered by medium 240 roof tiles - cover the gable by the medium 240, M24 roof tiles
or brick.
04 www. gomdatviet .com .vn
-
- Place 2 roofing tiles at 2 gable and adjust that distance
between the nose of back row and front row is about 7cm - Use a wire make straight lines between 2 the front nose, - plaster the cement mortar then place tiles immediately,
place tiles exactly in a straight line of the wire, the nose
of back tiles row located in the middle 2 tiles of front row.
18
Technical request
- Placing the roof tiles are not disproportion..
- Roof to straight, flat under the slope, the tip of the tile located on the 1 line. .
Note
Can stick M11 roofing tiles on screen or on concrete roofs. - If M11 roofing tiles pasted on the screen roofing tiles, the screen tiles must stick firstly, then paste M11 roofing tiles later ,
- If stuck on the concrete roof, the concrete class must be old enough to stable, then paste
- In addition, the M11 roofing tile cover on screen roofing tiles, to avoid cement going into the slot tile, using the dry
cement to fulfil the screen roofing tile before paste M11 roofing tiles.
19

GUIDE FOR M09
01
Apply the pasting method on timber line when the roof
slope≤ 40.If the roof slope is >40, we must use stickers
method like perforated or clinch.
02
Pasting the timber line:
a Using wood line with: Large (6 ÷ 7) cm; thick (3 ÷ 4) cm
b The distance between two the timber line : (40 ÷ 50) cm
c The first timber line have size: large (15 ÷ 18)cm,
thickness (4 ÷ 5) cm.
Modem: M09 - Size (mm): 270 x 200 x 15 - Weight (kg/pc): 1,6 Amount (v/m
2) - Amount (pcs/m
2): 40
04
11cm
Use a tape measure evenly divided and marked
placement the timber line rows. The distance between
the timber line rows have equal and range from
(10 ÷11) cm
05
11cm .
Making a straight line between two marked points
03
3
c m
11cm
. Measure and divide distance between the timber line
06
Place the timber line under the rope, stick the timber
line on the big wood line.
4 cm
- the timber line make from wood ( clippings wood, lead
wood ...) with size: large (3 ÷ 4) cm thick (2.5 ÷ 3) cm - Firstly, stick the two upper and lower the timber line
rows of the roof. The first timber line row from the top
of the roof (3 ÷ 4) cm.
The under timber line from bottom row (4 ÷ 5) cm. - Measure the distance between the two upper and
lower rows is to divide
the same distance between the rows.
07
11cm
m
11c
Do the same until full of the roof. The timber line make
a flat screen on the roof. The timber line rows keep a
distance equal about (10 ÷ 11) cm.
www. gomdatviet .com . vn 20
21
GUIDE FOR M09
08
Modem: M09 Pasting the roofing tile from gable to middle, from
bottom to top
- The notch of roof stick stable into the timber line - the after row place on 2/3 before rows, sole other, the nose
of behind roof tiles place between two before roof tiles - The roofing tiles fit together. - The location of the gable and top roof were pasted by
cutting products follow size of the vacant position.
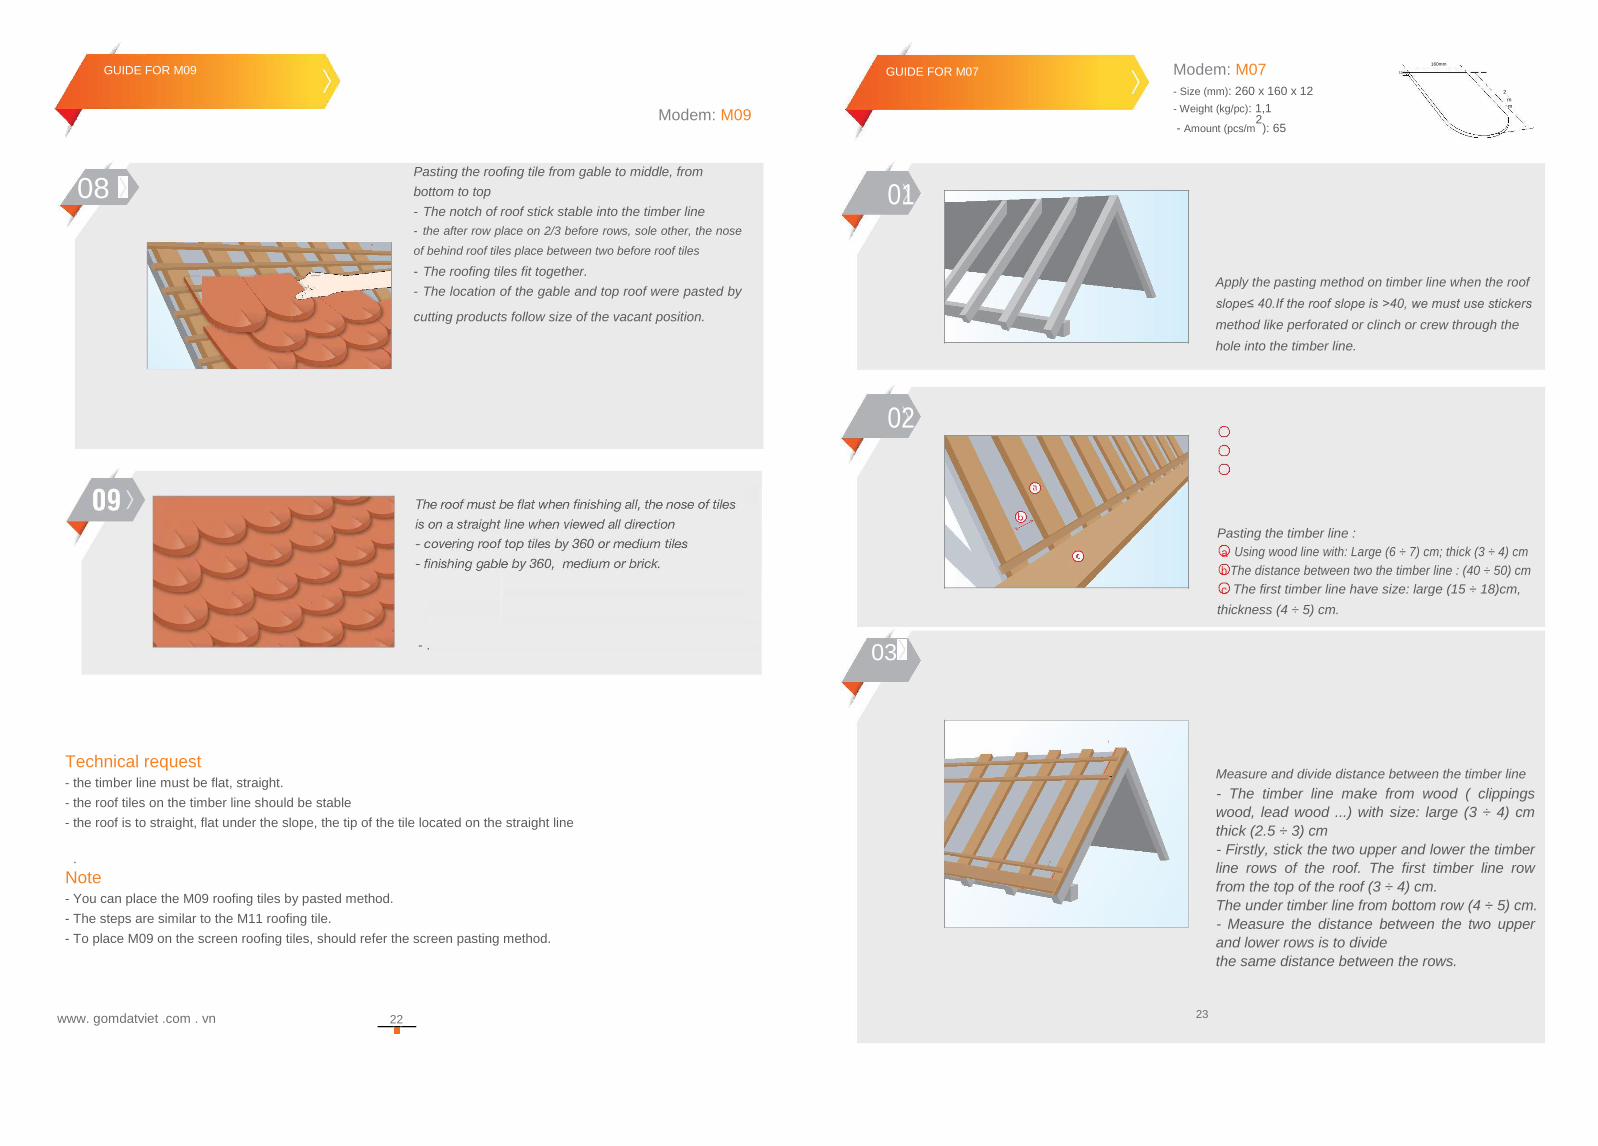
GUIDE FOR M07 Modem: M07 160mm
12mm
- Size (mm): 260 x 160 x 12 2
6
0
- Weight (kg/pc): 1,1 m
m
- Amount (pcs/m2
): 65
01
Apply the pasting method on timber line when the roof
slope≤ 40.If the roof slope is >40, we must use stickers
method like perforated or clinch or crew through the
hole into the timber line.
02
Pasting the timber line :
a Using wood line with: Large (6 ÷ 7) cm; thick (3 ÷ 4) cm
b The distance between two the timber line : (40 ÷ 50) cm
c The first timber line have size: large (15 ÷ 18)cm,
thickness (4 ÷ 5) cm.
- .
03
Technical request - the timber line must be flat, straight. - the roof tiles on the timber line should be stable - the roof is to straight, flat under the slope, the tip of the tile located on the straight line
.
Note - You can place the M09 roofing tiles by pasted method. - The steps are similar to the M11 roofing tile. - To place M09 on the screen roofing tiles, should refer the screen pasting method.
3 cm
8c m
4
c m
Measure and divide distance between the timber line - The timber line make from wood ( clippings
wood, lead wood ...) with size: large (3 ÷ 4) cm
thick (2.5 ÷ 3) cm - Firstly, stick the two upper and lower the timber
line rows of the roof. The first timber line row
from the top of the roof (3 ÷ 4) cm. The under timber line from bottom row (4 ÷ 5) cm. - Measure the distance between the two upper
and lower rows is to divide the same distance between the rows.
www. gomdatviet .com . vn 22
23
GUIDE FOR M07
Modem: M07
04 08
8cm
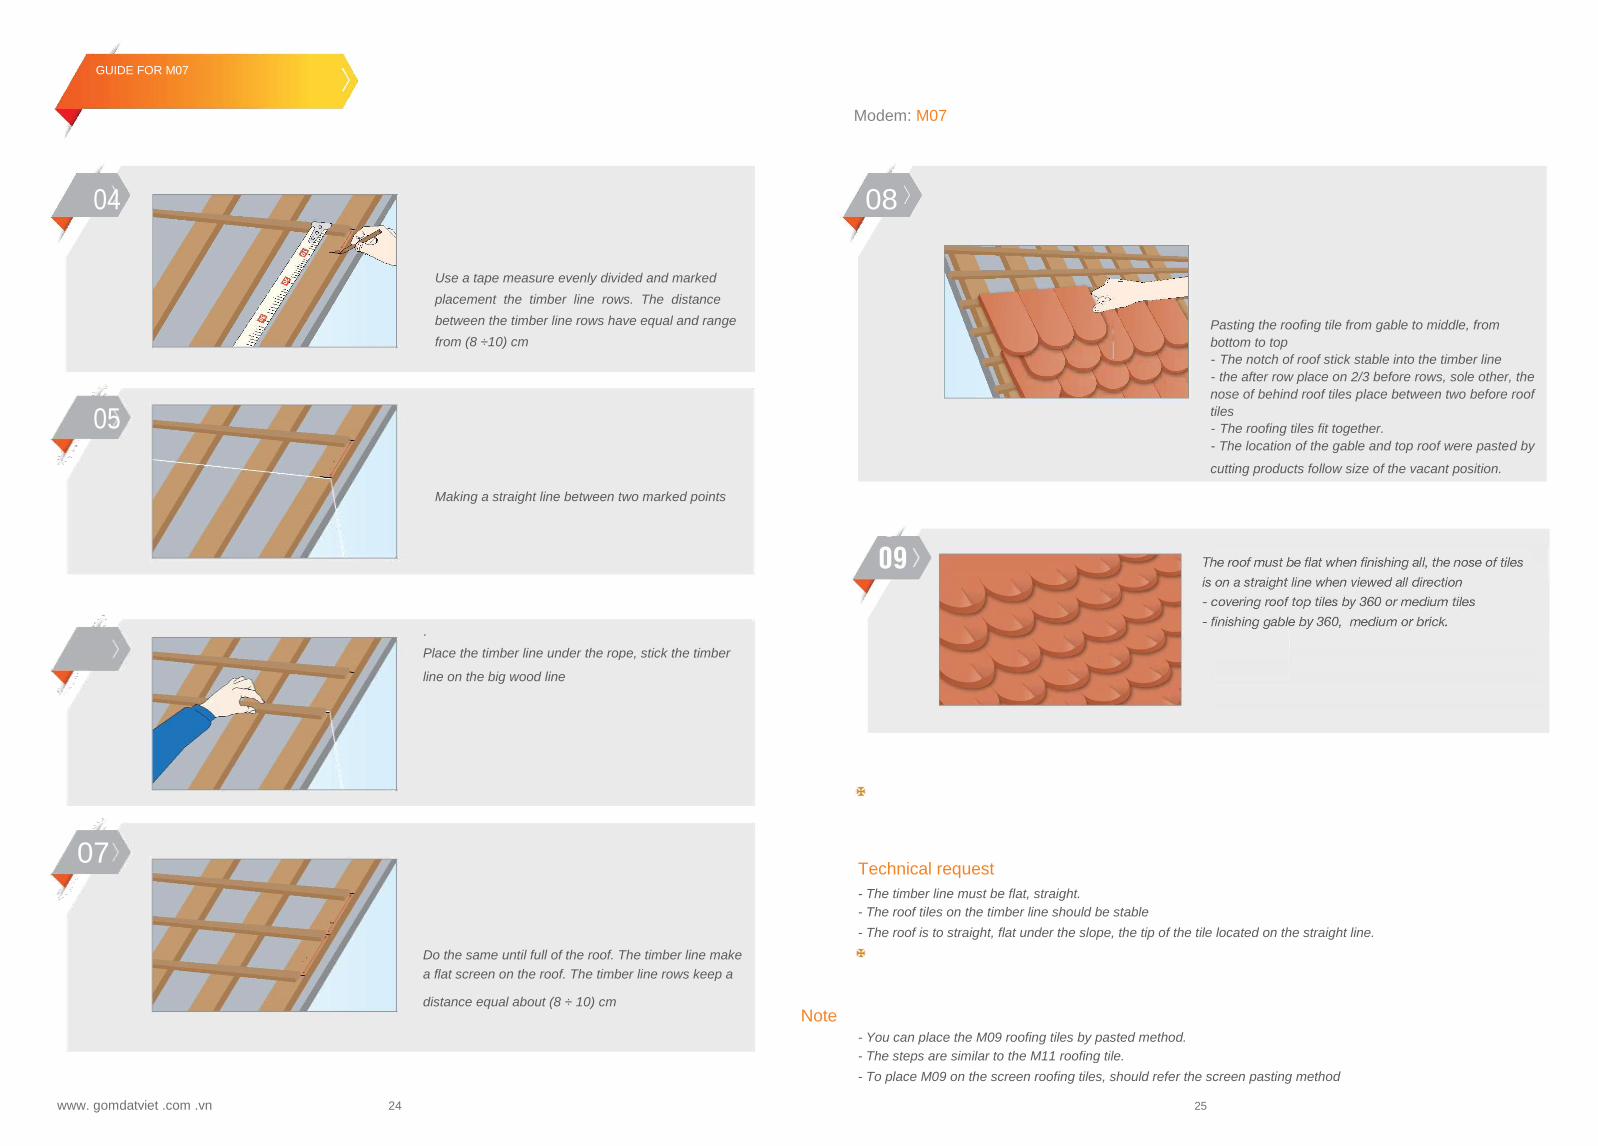
Use a tape measure evenly divided and marked
placement the timber line rows. The distance
between the timber line rows have equal and range
from (8 ÷10) cm
05
8c
m
Making a straight line between two marked points
09
Pasting the roofing tile from gable to middle, from
bottom to top - The notch of roof stick stable into the timber line - the after row place on 2/3 before rows, sole other, the
nose of behind roof tiles place between two before roof
tiles
- The roofing tiles fit together. - The location of the gable and top roof were pasted by
cutting products follow size of the vacant position.
06
.
Place the timber line under the rope, stick the timber
line on the big wood line
07
Technical request
- The timber line must be flat, straight.
8cm
- The roof tiles on the timber line should be stable
- The roof is to straight, flat under the slope, the tip of the tile located on the straight line.
m Do the same until full of the roof. The timber line make
8c
a flat screen on the roof. The timber line rows keep a
distance equal about (8 ÷ 10) cm
Note
- You can place the M09 roofing tiles by pasted method.
- The steps are similar to the M11 roofing tile.
- To place M09 on the screen roofing tiles, should refer the screen pasting method
www. gomdatviet .com .vn 24 25
GUIDE FOR M06
01
02
03
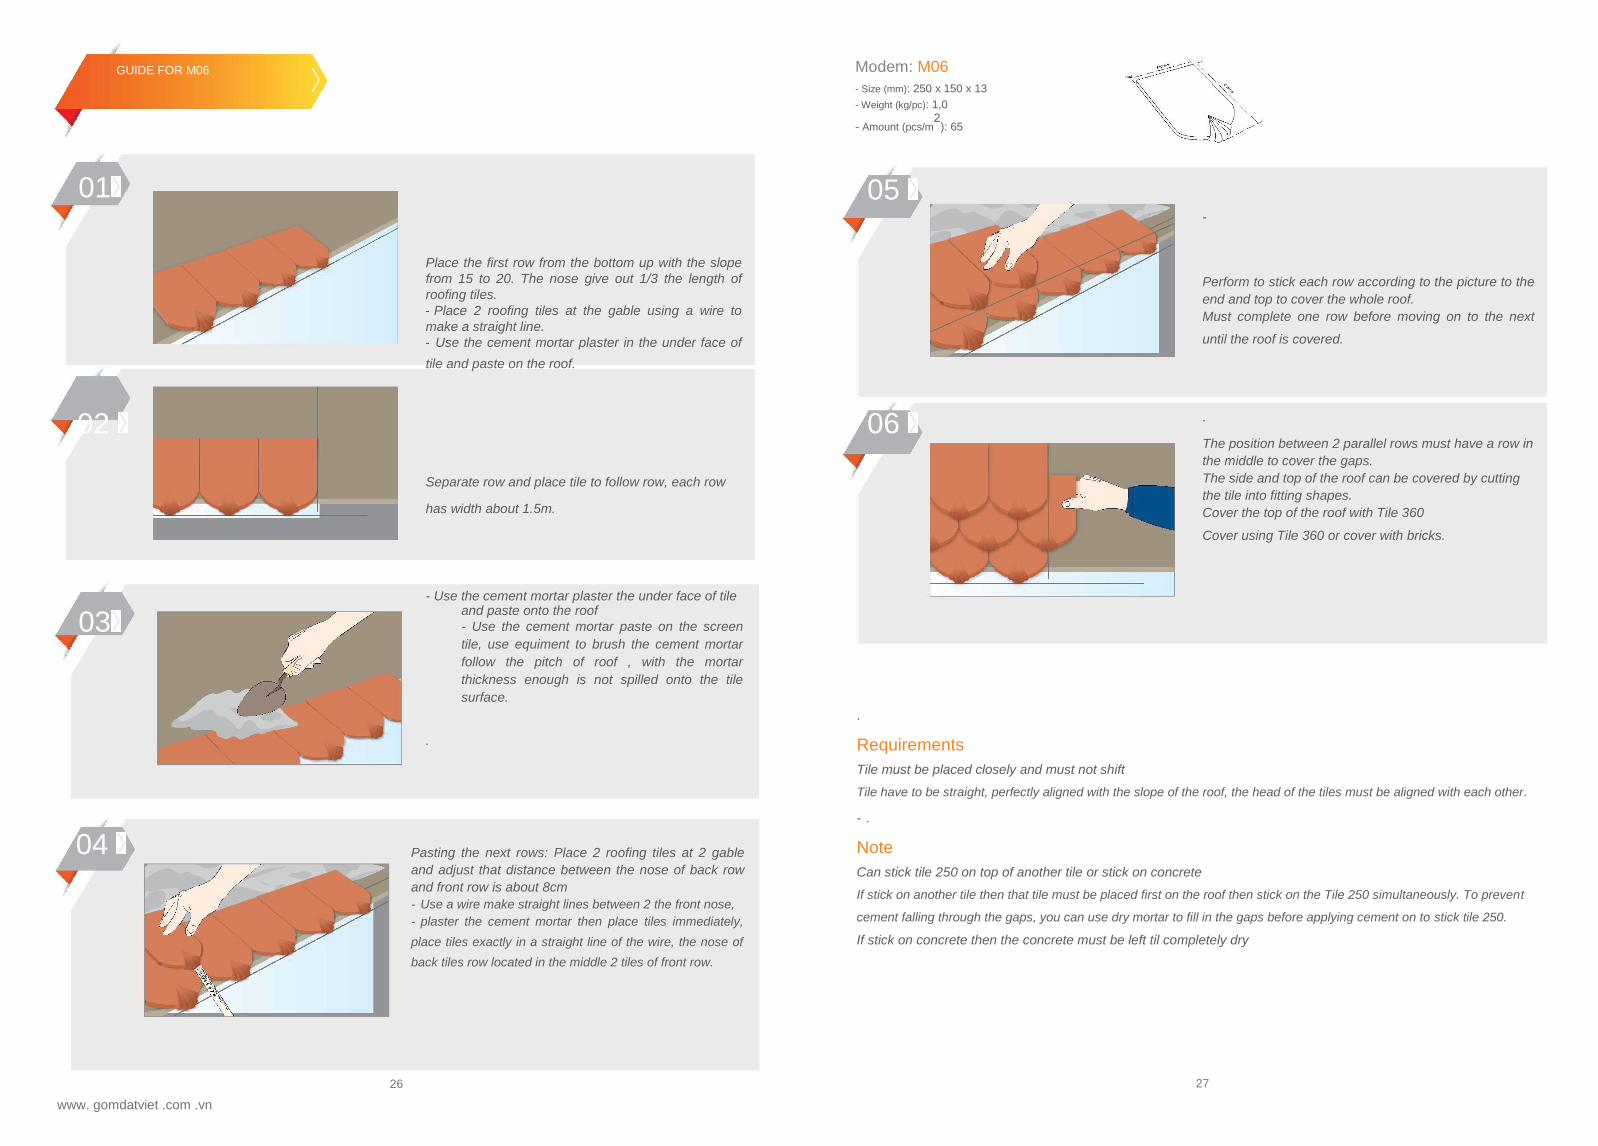
Place the first row from the bottom up with the slope
from 15 to 20. The nose give out 1/3 the length of
roofing tiles. - Place 2 roofing tiles at the gable using a wire to
make a straight line.
- Use the cement mortar plaster in the under face of
tile and paste on the roof.
Separate row and place tile to follow row, each row
has width about 1.5m.
- Use the cement mortar plaster the under face of tile and paste onto the roof - Use the cement mortar paste on the screen
tile, use equiment to brush the cement mortar
follow the pitch of roof , with the mortar
thickness enough is not spilled onto the tile
surface.
Modem: M06 - Size (mm): 250 x 150 x 13
- Weight (kg/pc): 1,0 - Amount (pcs/m
2): 65
05
06
-
Perform to stick each row according to the picture to the
end and top to cover the whole roof. Must complete one row before moving on to the next
until the roof is covered.
. The position between 2 parallel rows must have a row in
the middle to cover the gaps. The side and top of the roof can be covered by cutting
the tile into fitting shapes. Cover the top of the roof with Tile 360
Cover using Tile 360 or cover with bricks.
04
www. gomdatviet .com .vn
.
Pasting the next rows: Place 2 roofing tiles at 2 gable
and adjust that distance between the nose of back row
and front row is about 8cm - Use a wire make straight lines between 2 the front nose, - plaster the cement mortar then place tiles immediately,
place tiles exactly in a straight line of the wire, the nose of
back tiles row located in the middle 2 tiles of front row.
26
.
Requirements Tile must be placed closely and must not shift Tile have to be straight, perfectly aligned with the slope of the roof, the head of the tiles must be aligned with each other. - .
Note Can stick tile 250 on top of another tile or stick on concrete If stick on another tile then that tile must be placed first on the roof then stick on the Tile 250 simultaneously. To prevent
cement falling through the gaps, you can use dry mortar to fill in the gaps before applying cement on to stick tile 250. If stick on concrete then the concrete must be left til completely dry
27
GUIDE FOR M48
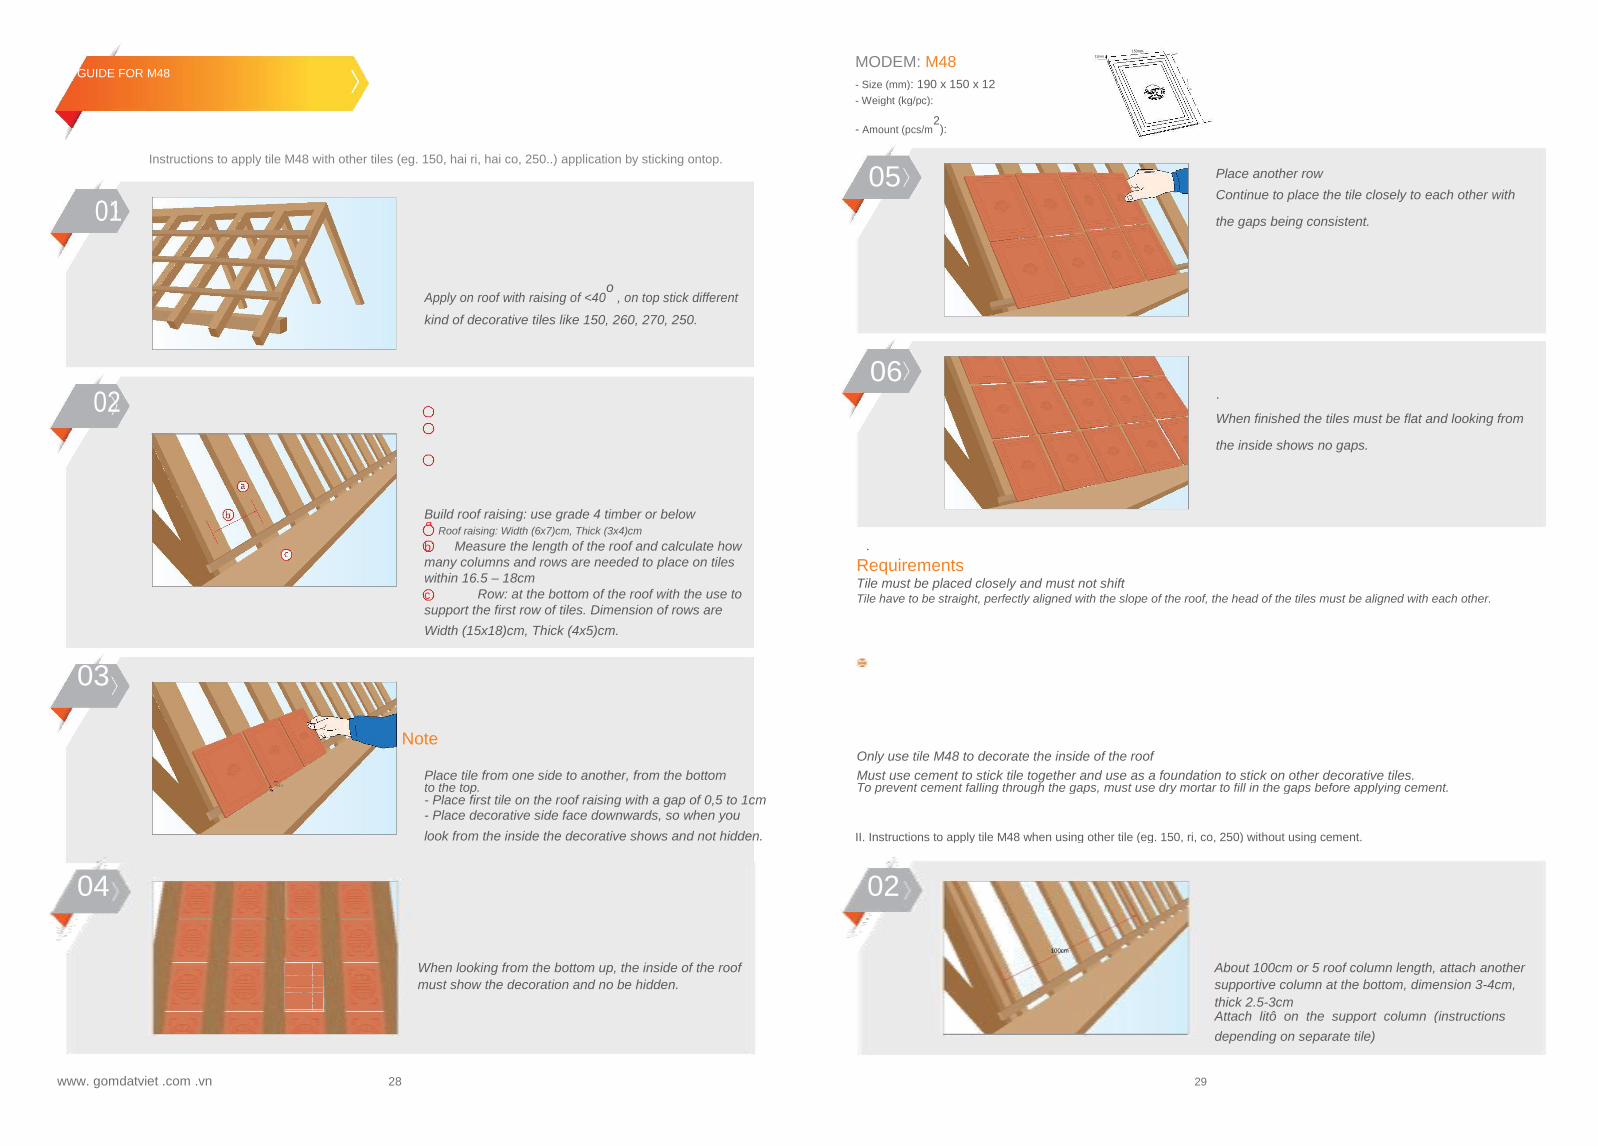
Instructions to apply tile M48 with other tiles (eg. 150, hai ri, hai co, 250..) application by sticking ontop.
01
Apply on roof with raising of <40o
, on top stick different
kind of decorative tiles like 150, 260, 270, 250.
02
Build roof raising: use grade 4 timber or below
a
Roof raising: Width (6x7)cm, Thick (3x4)cm
MODEM: M48 150mm
12mm
- Size (mm): 190 x 150 x 12 1
9 0 m
m
- Weight (kg/pc):
- Amount (pcs/m2
):
05
06
Place another row Continue to place the tile closely to each other with
the gaps being consistent.
. When finished the tiles must be flat and looking from
the inside shows no gaps.
b Measure the length of the roof and calculate how many columns and rows are needed to place on tiles within 16.5 – 18cm c Row: at the bottom of the roof with the use to support the first row of tiles. Dimension of rows are
Width (15x18)cm, Thick (4x5)cm.
.
Requirements Tile must be placed closely and must not shift Tile have to be straight, perfectly aligned with the slope of the roof, the head of the tiles must be aligned with each other.
03
Note
Place tile from one side to another, from the bottom
Only use tile M48 to decorate the inside of the roof
cm Must use cement to stick tile together and use as a foundation to stick on other decorative tiles.
0.5÷1 to the top. To prevent cement falling through the gaps, must use dry mortar to fill in the gaps before applying cement.
- Place first tile on the roof raising with a gap of 0,5 to 1cm
- Place decorative side face downwards, so when you
look from the inside the decorative shows and not hidden. II. Instructions to apply tile M48 when using other tile (eg. 150, ri, co, 250) without using cement.
04 02
100cm
When looking from the bottom up, the inside of the roof
About 100cm or 5 roof column length, attach another
must show the decoration and no be hidden. supportive column at the bottom, dimension 3-4cm,
thick 2.5-3cm
Attach litô on the support column (instructions
depending on separate tile)
www. gomdatviet .com .vn 28 29

M14 DUIDE
Type: 1
01
Method placing tile on roof litô when roof have slope of
<40o
. when slope of roof is >40o have to use adhesive
method.
02
20cm Build roof column support use grade 4 timber or below.
12cm a Roof column: Width 6x7cm thick 3x4 cm
b The gap between each column is 20cm, the gap of
the two edge column is 12cm. separate each column
from the middle of the roof outwards to both sides.
c Row: at the bottom of the roof with the use to
support the first row of tiles. Dimension of rows are
Width (15x18)cm, Thick (4x5)cm.
03
16cm
Place tile from one side to another, from the bottom to
5÷6cm
the top.
- Place negative tile on two columns, place positive tile
ontop. (5x6cm)
- The first row of tiles must be secured using bolts.
- If stick on concrete then have to use cement.
- Apply roofing the rest of the rows like the first until
cover roof, must finish bottom row first before moving
to top row.
MODEM: M14 220mm
- Size (mm): 100 x 220 x 10
20
0m
m
- Weight (kg/pc): 1,5
1 0 m m
- Amount (pcs/m2
): 40
05
.
- Apply side of roofing with soft cement, make sure
the tiles or aligned in straight line.
06
- Use wet towel to clean any cement residue on tile.
Requirements Tile must be placed closely and must not shift Tile have to be straight, perfectly aligned with the slope of the roof, the head of the tiles must be aligned with each other.
Note Only apply negative, positive formation when the slope is <40o. when slope if >40o have to use sticky method. First row of tile must be secured using bolts.
www. gomdatviet .com .vn 30 31

M14 GUIDE
Type: 2
01
Method placing tile on roof litô when roof have slope of
<40o
. when slope of roof is >40o
have to use adhesive
method.
02
22cm Build roof column support use grade 4 timber or below.
22cm a Roof column: Width 6x7cm thick 3x4 cm
b The gap between each column is 22cm separate
each column from the middle of the roof outwards to
both sides.
c Row: at the bottom of the roof with the use to support
the first row of tiles. Dimension of rows are Width
(15x18)cm, Thick (4x5)cm.
03
22 cm
Place first tile on, then place next one to have the two
between 22cm apart.
Place rest of tile to finish roof, make sure all tile are
straight line
04
.
22 cm - Place smaller version of tile negative and positive
formation using soft cement.
M∑ hi÷u: M14 220mm
- Size (mm): 100 x 220 x 10
20
0m
m
- Weight (kg/pc): 1,5
1 0 m m
- Amount (pcs/m2
): 40
05
- .
- Continue to place the next column, from top to bottom
06 -
- Place side tile with negative and positive formation
then the first row have to be secure with bolt.
07
- Use wet towel to clean any cement residue on tile. - .
Requirements Tile must be placed closely and must not shift Tile have to be straight, perfectly aligned with the slope of the roof, the head of the tiles must be aligned with each other.
Note
Only apply negative, positive formation when the slope is <40o
. when slope if >40o
have to use sticky
method. First row of tile must be secured using bolts.
www. gomdatviet .com .vn 32 33

Typical Building
1
Recommended