Installation instructions for JM1 Jerry Can Mount for Toyota FJ Cruiser
It is highly recommended that you use a thread lock compound such as Loctite brand on all threads to
keep them from vibrating loose.
Please read these instructions entirely before starting.
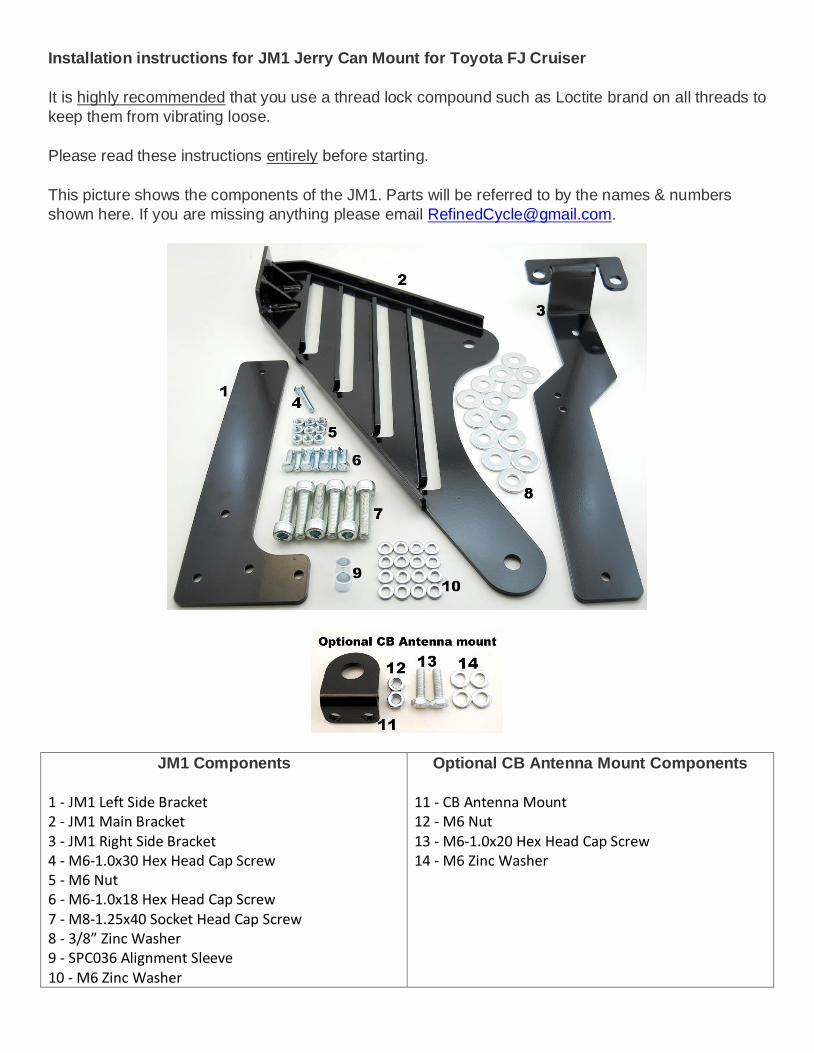
This picture shows the components of the JM1. Parts will be referred to by the names & numbers
shown here. If you are missing anything please email [email protected].
JM1 Components
1 - JM1 Left Side Bracket 2 - JM1 Main Bracket 3 - JM1 Right Side Bracket 4 - M6-1.0x30 Hex Head Cap Screw 5 - M6 Nut 6 - M6-1.0x18 Hex Head Cap Screw 7 - M8-1.25x40 Socket Head Cap Screw 8 - 3/8” Zinc Washer 9 - SPC036 Alignment Sleeve 10 - M6 Zinc Washer
Optional CB Antenna Mount Components
11 - CB Antenna Mount 12 - M6 Nut 13 - M6-1.0x20 Hex Head Cap Screw 14 - M6 Zinc Washer

Remove your spare tire, cover and camera if
applicable and disconnect the camera wire
from the spare mount if there is one
connected to it.
Remove the two bolts and the two nuts
holding the spare tire carrier to your door.
When you remove the carrier, there will be 4
rubber washers on the bolts or stuck to the
paint surface. Carefully peel them off, you
will re-use them.
If you are lucky, the studs will come out with
the nuts.

If you aren’t so lucky the nut will come off
and the stud will remain. No worries, there
are options. First, put some WD40 or other
thread lube on the stud. If you have access
to the star shaped tool for the end of the
stud, use that to remove the stud. If not,
head to the dealership OR get some vise
grips. If it is still stubborn, you can grind the
end square to get a better grip. If you have
access to a welder, an easy solution is to
thread the nut back on a few turns, then weld
the nut to the stud, in the middle so you don’t
mess up the hex edges. Then just use your
socket to turn the stud out. Don’t worry, you
won’t re-use them.
Remove this middle plastic piece….it just
snaps off. It’s easier to do with the door
open.
Support the door. Two people are always
great and it will make this installation easier,
but it can be done by yourself with a little
ingenuity. I used my spare to brace the
weight of the door. I don’t officially
recommend this, I’m just saying it worked
really well for me.

Remove the hinge bolts. (Again, make sure
the door is firmly supported, it is heavy!)
Place a 3/8” Zinc Washer and an SPC036
Alignment Sleeve onto 2 of the M8-1.25x40
Socket Head Cap Screws as shown.
Insert the JM1 Left Side Bracket through the
hinge as shown. You will need to tilt it at
different angles to fish it through, but it will
go.

Line up the holes of the Left Side Bracket to
the hinge and use the M8 Screws with
Washers and Sleeves to connect the
Bracket. Make sure the Alignment Sleeves
go into the alignment holes on the Left Side
Bracket AND the hinge. Do NOT tighten yet.
Place an M6 Washer onto the M6-1.0x30
Hex Head Cap Screw.
Insert it into this hole and make sure it goes
all the way into the hole in the hinge. You
may need to jiggle the Bracket to get the
holes to line up.

Now tighten these Screws.
Apply some thread lock to the M8-1.0x30
Screw previously inserted and secure with an
M6 Washer and Nut.
Place a 3/8” Zinc Washer on the remaining
four M8-1.25x40 Socket Head Cap Screws.

Insert them into the spare carrier.
Place the JM1 Main Bracket onto the two
Screws on the left side of the carrier.
Place a 3/8” Zinc Washer and one of the
rubber washers removed earlier onto the
back side of those two Screws.

On the other two Screws on the right side of
the spare tire carrier, place THREE 3/8” Zinc
Washers and one of the rubber washers
removed earlier onto each one.
Being careful not to let the carrier or the Main
Bracket touch the paint, thread all 4 Screws
into the carrier mounting holes on the door.
Thread them most of the way, but leave them
loose enough that you can move the Main
Bracket up and down.
Place M6 Washers onto seven M6-1.0x18
Hex Head Cap Screws.

Insert 3 of them here.
Place the JM1 Ride Side Bracket onto the
Screws and thread 3 M6 Washers and Nuts
onto them and only finger tighten at this time.
Put the “basket” in place and insert the 4
remaining M6 Screws with Washers into the
corner holes.
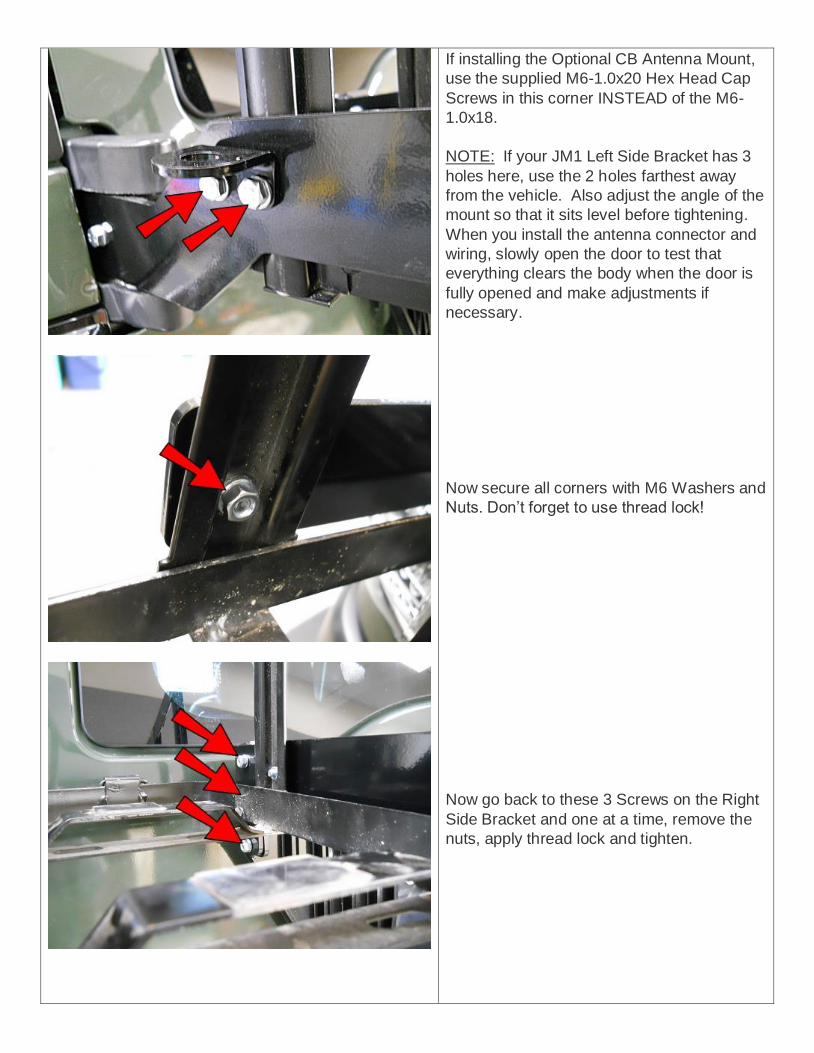
If installing the Optional CB Antenna Mount,
use the supplied M6-1.0x20 Hex Head Cap
Screws in this corner INSTEAD of the M6-
1.0x18.
NOTE: If your JM1 Left Side Bracket has 3
holes here, use the 2 holes farthest away
from the vehicle. Also adjust the angle of the
mount so that it sits level before tightening.
When you install the antenna connector and
wiring, slowly open the door to test that
everything clears the body when the door is
fully opened and make adjustments if
necessary.
Now secure all corners with M6 Washers and
Nuts. Don’t forget to use thread lock!
Now go back to these 3 Screws on the Right
Side Bracket and one at a time, remove the
nuts, apply thread lock and tighten.

Finally, tighten these Screws completely.
Note: Since they are on a rubber washer,
they will not feel completely tight, so just get
them very snug.
It is recommended that at this point you
double check that ALL connections are tight.
Replace your spare and camera and that’s it!
Depending on what kind of Jerry Can you have, you may want to pad the inside of the “basket” to
keep it from rattling.
Enjoy! And remember….Not all who wander are lost!
Recommended