ILC Multimedia Classroom User’s Guide Technology Services – ITS Revised: June 2009 San Jacinto College South
ILC Classroom Operation Guide
ILC Multimedia Classroom User’s Guide Technology Services – ITS Revised: June 2009 San Jacinto College South
CONTENTS Getting to Know the ILC Classroom ................................................................................................................ 1
System ........................................................................................................................................................ 2 System Description .................................................................................................................................. 2 System Operation .................................................................................................................................... 2
Touch Panel Screens .................................................................................................................................. 3 Main Page ................................................................................................................................................ 3 Control Panel Screen ............................................................................................................................... 4 Source Select Buttons ............................................................................................................................. 5 Volume Buttons ....................................................................................................................................... 5 Exit/Shutdown .......................................................................................................................................... 6
Equipment ................................................................................................................................................... 7 Opening the Teaching Podium ................................................................................................................ 7 Opening the Media Cabinet ..................................................................................................................... 7 Playing a Video Tape ............................................................................................................................... 7 Using the Rack PC .................................................................................................................................. 8 Using the Document Camera ................................................................................................................... 9 Using a Laptop Computer .......................................................................................................................10 Satellite ...................................................................................................................................................11
Training and Technical Support ..................................................................................................................11 Training and Technical Support ..............................................................................................................11
Troubleshooting ..........................................................................................................................................12 Troubleshooting ......................................................................................................................................12
Getting to Know the ILC Classroom
ILC Classroom Training
ILC Multimedia Classroom User’s Guide Technology Services – ITS Revised: June 2009 San Jacinto College South
Getting to Know the ILC Classroom
Learning Module Objectives
Log into the ILC A/V System.
Operate the Control Panel Screen in order to select various sources.
Shutdown the A/V System.
Operate the various pieces of equipment in the ILC Classroom.
Connect a laptop to the Teaching Podium.
Use various file storage capabilities in the classroom.
ILC Multimedia Classroom User’s Guide Technology Services – ITS Revised: June 2009 San Jacinto College South
System
System Description
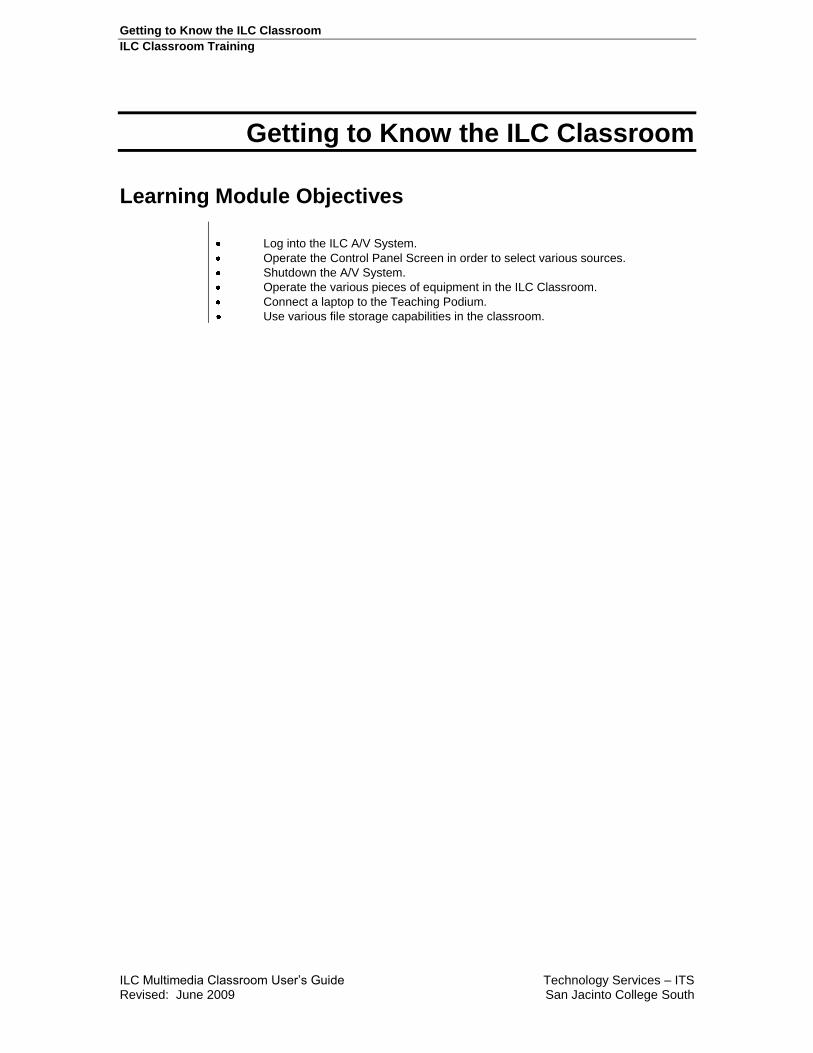
The classroom A/V system is comprised of two ceiling-mounted video projectors, two wall-mounted speakers, two projection screens, an equipment credenza containing a PC, VCR, printer, audio/video switcher, amplifier, and a teaching credenza containing a touch panel control system, wireless keyboard, and document camera. Note: System with automatically shut down after 3 hours if the touch panel is not used.
Separate signals can be sent to each of the two projectors. The room audio follows the last source selected.
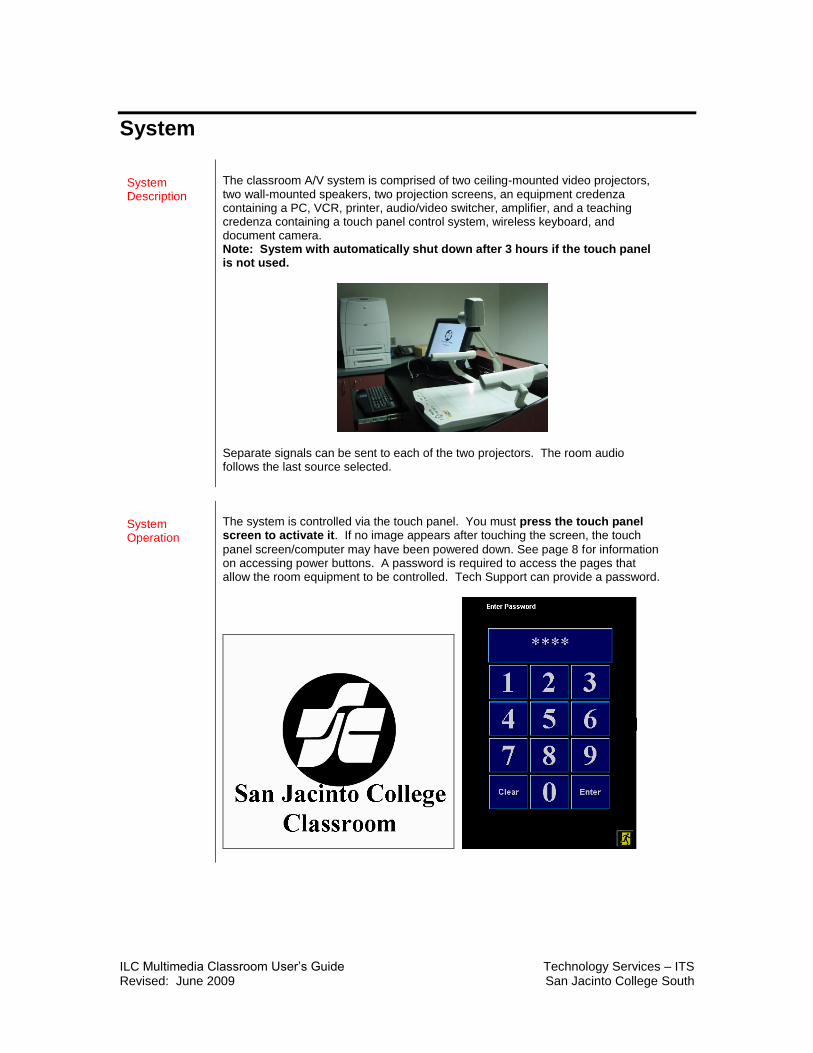
System Operation
The system is controlled via the touch panel. You must press the touch panel screen to activate it. If no image appears after touching the screen, the touch
panel screen/computer may have been powered down. See page 8 for information on accessing power buttons. A password is required to access the pages that allow the room equipment to be controlled. Tech Support can provide a password.
Getting to Know the ILC Classroom
ILC Classroom Training
ILC Multimedia Classroom User’s Guide Technology Services – ITS Revised: June 2009 San Jacinto College South
Touch Panel Screens
Main Page
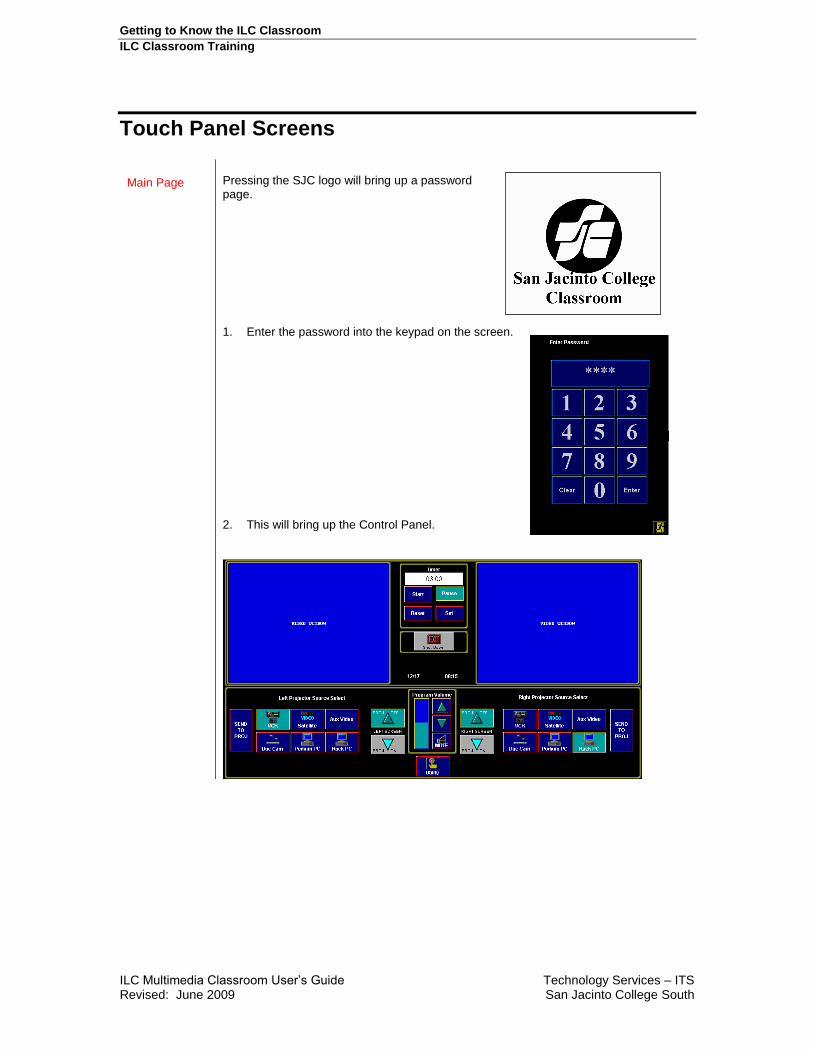
Pressing the SJC logo will bring up a password page.
1. Enter the password into the keypad on the screen.
2. This will bring up the Control Panel.
Getting to Know the ILC Classroom
ILC Classroom Training
ILC Multimedia Classroom User’s Guide Technology Services – ITS Revised: June 2009 San Jacinto College South
Control Panel Screen
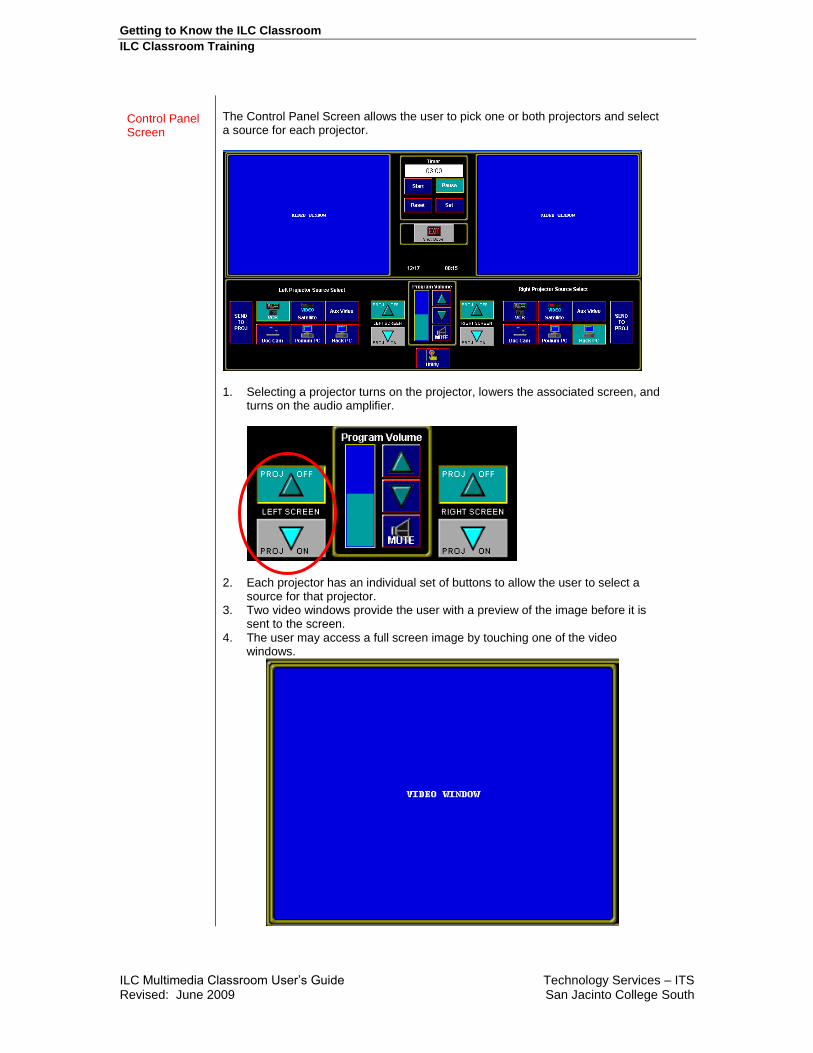
The Control Panel Screen allows the user to pick one or both projectors and select a source for each projector.
1. Selecting a projector turns on the projector, lowers the associated screen, and
turns on the audio amplifier.
2. Each projector has an individual set of buttons to allow the user to select a source for that projector.
3. Two video windows provide the user with a preview of the image before it is sent to the screen.
4. The user may access a full screen image by touching one of the video windows.
Getting to Know the ILC Classroom
ILC Classroom Training
ILC Multimedia Classroom User’s Guide Technology Services – ITS Revised: June 2009 San Jacinto College South
Source Select Buttons
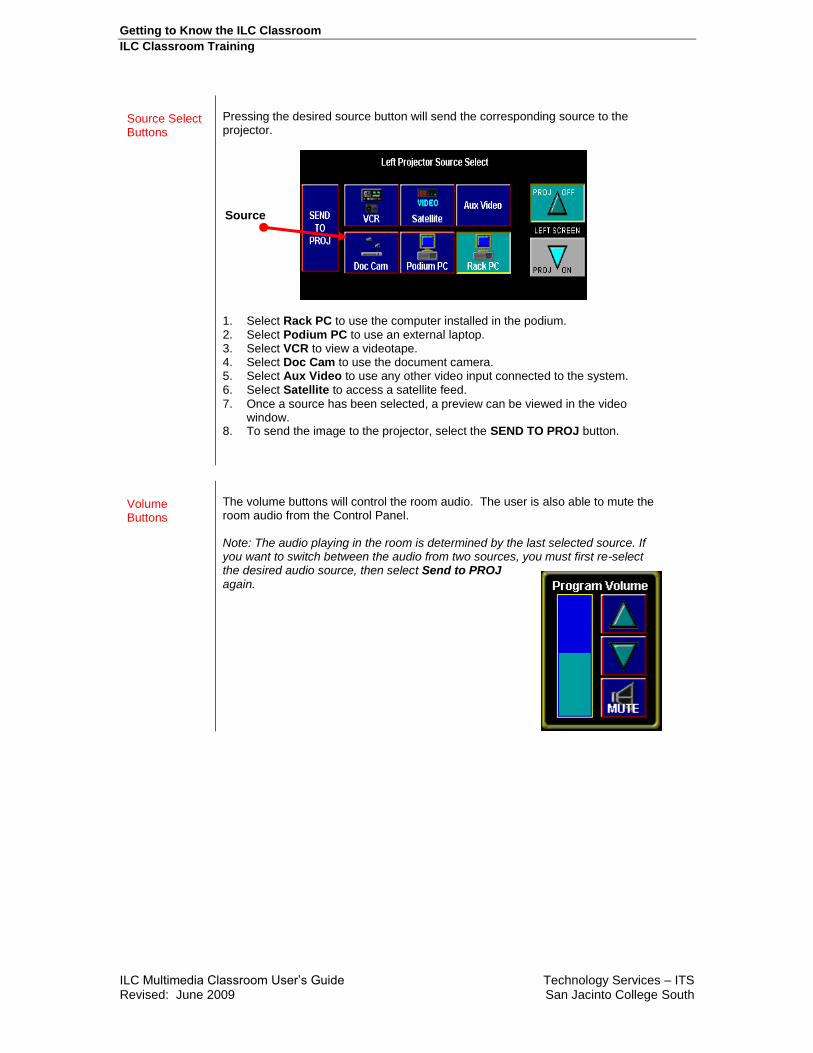
Pressing the desired source button will send the corresponding source to the projector.
1. Select Rack PC to use the computer installed in the podium. 2. Select Podium PC to use an external laptop. 3. Select VCR to view a videotape. 4. Select Doc Cam to use the document camera. 5. Select Aux Video to use any other video input connected to the system. 6. Select Satellite to access a satellite feed.
7. Once a source has been selected, a preview can be viewed in the video window.
8. To send the image to the projector, select the SEND TO PROJ button.
Volume Buttons
The volume buttons will control the room audio. The user is also able to mute the room audio from the Control Panel. Note: The audio playing in the room is determined by the last selected source. If you want to switch between the audio from two sources, you must first re-select the desired audio source, then select Send to PROJ again.
Source
Getting to Know the ILC Classroom
ILC Classroom Training
ILC Multimedia Classroom User’s Guide Technology Services – ITS Revised: June 2009 San Jacinto College South
Exit/Shutdown
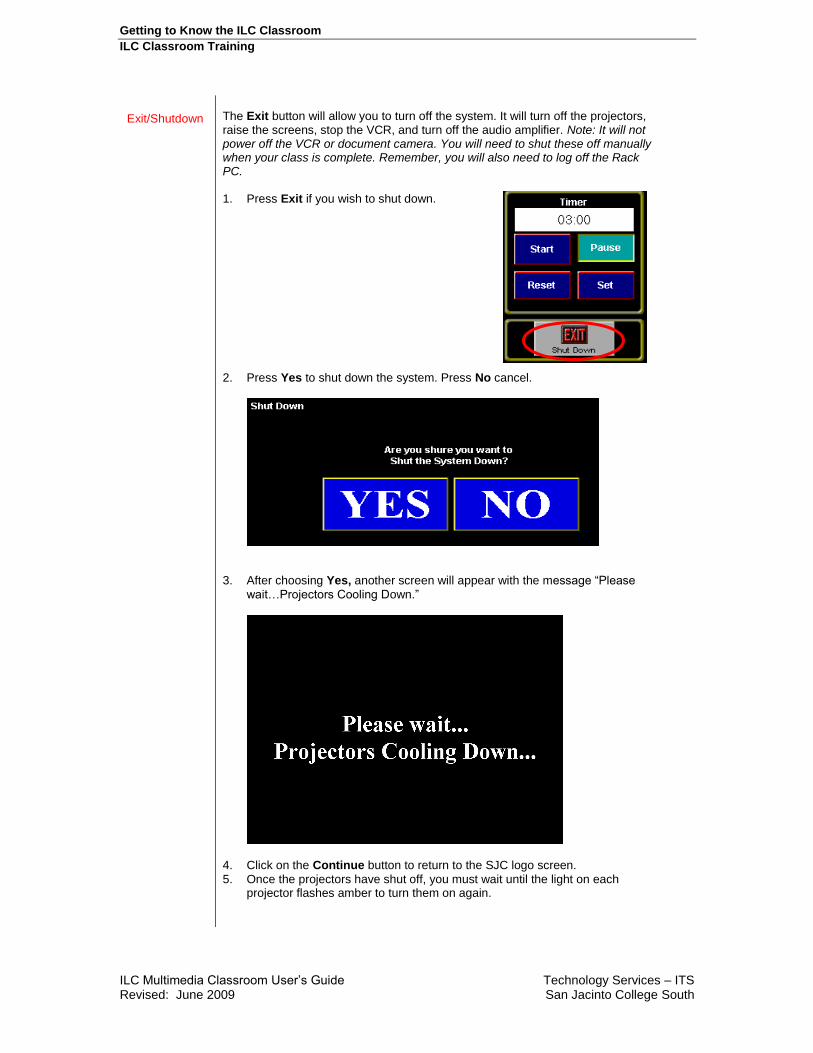
The Exit button will allow you to turn off the system. It will turn off the projectors, raise the screens, stop the VCR, and turn off the audio amplifier. Note: It will not power off the VCR or document camera. You will need to shut these off manually when your class is complete. Remember, you will also need to log off the Rack PC. 1. Press Exit if you wish to shut down.
2. Press Yes to shut down the system. Press No cancel.
3. After choosing Yes, another screen will appear with the message “Please
wait…Projectors Cooling Down.”
4. Click on the Continue button to return to the SJC logo screen.
5. Once the projectors have shut off, you must wait until the light on each projector flashes amber to turn them on again.

Getting to Know the ILC Classroom
ILC Classroom Training
ILC Multimedia Classroom User’s Guide Technology Services – ITS Revised: June 2009 San Jacinto College South
Equipment
Opening the Teaching Podium
The teaching podium has two access doors. There is some space in the teaching podium to temporarily store class materials. The Touch Panel Screen and document camera are located on top of the teaching podium. 1. Pull the keyboard tray out to access the wireless keyboard. 2. The keyboard contains a touch pad mouse. 3. The wireless keyboard may be moved to other locations in the room.
Opening the Media Cabinet
The media cabinet has three access doors. The Rack PC can be accessed from the right side door. The VCR can be accessed from the center door. The left door on the credenza will be kept locked as it contains controls for the A/V equipment in the room (TV tuner, A/V switcher, etc.). A printer can be found on top of the equipment credenza.
Playing a Video Tape
A. Operate the VCR:
1. Insert a videotape into the cassette compartment of the VCR. The VCR power comes on automatically.
B. Select VCR on the Control Panel screen. C. When VCR is selected an additional “pop-up” window will appear to give the user control of the VCR functions (Play, Stop, Pause, Rewind, Forward).
Cassette
Compartment
Getting to Know the ILC Classroom
ILC Classroom Training
ILC Multimedia Classroom User’s Guide Technology Services – ITS Revised: June 2009 San Jacinto College South
Using the Rack PC
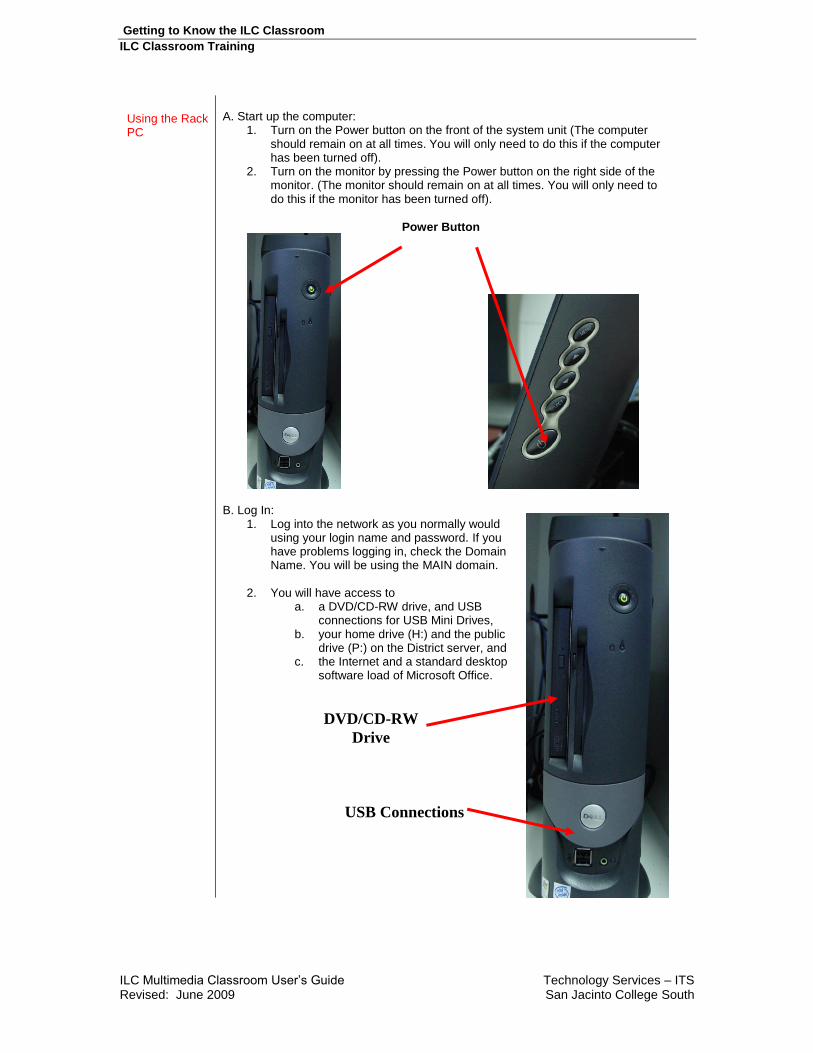
A. Start up the computer:
1. Turn on the Power button on the front of the system unit (The computer should remain on at all times. You will only need to do this if the computer has been turned off).
2. Turn on the monitor by pressing the Power button on the right side of the monitor. (The monitor should remain on at all times. You will only need to do this if the monitor has been turned off).
B. Log In: 1. Log into the network as you normally would
using your login name and password. If you have problems logging in, check the Domain Name. You will be using the MAIN domain.
2. You will have access to a. a DVD/CD-RW drive, and USB
connections for USB Mini Drives, b. your home drive (H:) and the public
drive (P:) on the District server, and c. the Internet and a standard desktop
software load of Microsoft Office.
Power Button
DVD/CD-RW
Drive
USB Connections
Getting to Know the ILC Classroom
ILC Classroom Training
ILC Multimedia Classroom User’s Guide Technology Services – ITS Revised: June 2009 San Jacinto College South
C. Log Off:
1. Remove any media you used (USB Connections, CD, etc.). 2. Log off the computer. Do not shut down the computer or monitor.
Using the Document Camera
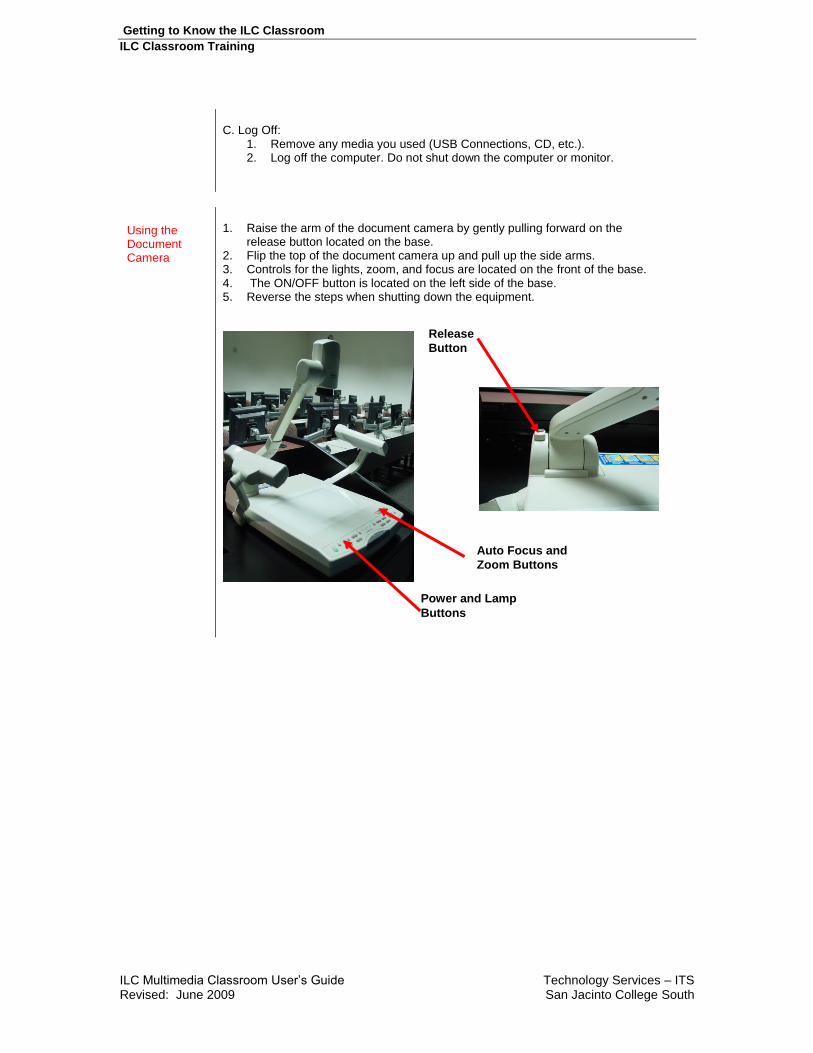
1. Raise the arm of the document camera by gently pulling forward on the
release button located on the base. 2. Flip the top of the document camera up and pull up the side arms. 3. Controls for the lights, zoom, and focus are located on the front of the base. 4. The ON/OFF button is located on the left side of the base. 5. Reverse the steps when shutting down the equipment.
Release
Button
Auto Focus and
Zoom Buttons
Power and Lamp
Buttons
Getting to Know the ILC Classroom
ILC Classroom Training
ILC Multimedia Classroom User’s Guide Technology Services – ITS Revised: June 2009 San Jacinto College South
Using a Laptop Computer
A. Connecting the laptop to the podium:
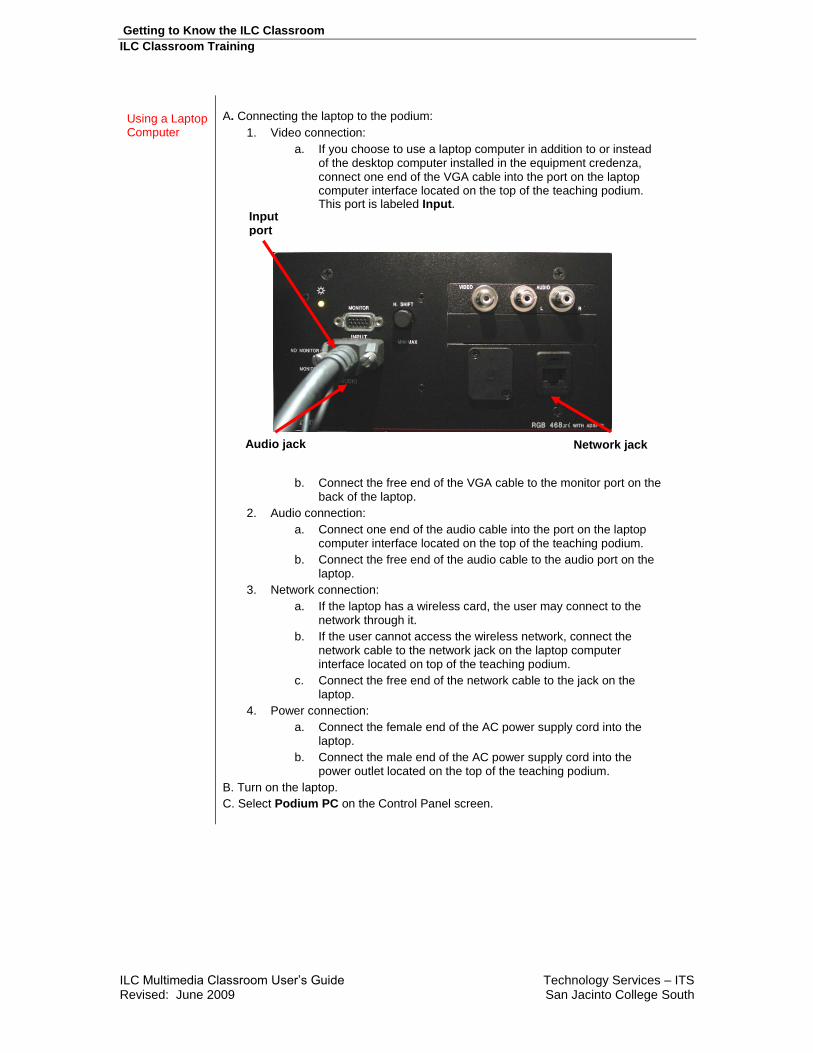
1. Video connection:
a. If you choose to use a laptop computer in addition to or instead of the desktop computer installed in the equipment credenza, connect one end of the VGA cable into the port on the laptop computer interface located on the top of the teaching podium. This port is labeled Input.
b. Connect the free end of the VGA cable to the monitor port on the back of the laptop.
2. Audio connection:
a. Connect one end of the audio cable into the port on the laptop computer interface located on the top of the teaching podium.
b. Connect the free end of the audio cable to the audio port on the laptop.
3. Network connection:
a. If the laptop has a wireless card, the user may connect to the network through it.
b. If the user cannot access the wireless network, connect the network cable to the network jack on the laptop computer interface located on top of the teaching podium.
c. Connect the free end of the network cable to the jack on the laptop.
4. Power connection:
a. Connect the female end of the AC power supply cord into the laptop.
b. Connect the male end of the AC power supply cord into the power outlet located on the top of the teaching podium.
B. Turn on the laptop.
C. Select Podium PC on the Control Panel screen.
Input port
Audio jack Network jack
Getting to Know the ILC Classroom
ILC Classroom Training
ILC Multimedia Classroom User’s Guide Technology Services – ITS Revised: June 2009 San Jacinto College South
Satellite
1. Log-in on the touch panel. 2. Turn on the Projectors. 3. Select Satellite from the touch panel. The Satellite controls will appear in
the Touch Panel preview window. 4. Set the channel number on the tuner. This channel will be assigned by
the Tech Support. You may enter the channel via the up and down buttons or the numeric keypad. Press enter when complete.
5. If the signal is available, the image will appear in the preview window. 6. Press SEND to send image to the projector screen. 7. To operate the audio level, use the Program Audio on the touch panel
Training and Technical Support
Training and Technical Support
Please do not hesitate to contact Tech Support (281 998 6137) in advance to discuss your needs so that arrangements to connect and test your A/V equipment can be made ahead of your class meeting.
Please contact Technical Support to:
Report issues with hardware setup Report issues with software Report equipment failure Report network or internet issues Reserving additional equipment Schedule ILC Classroom Multimedia training

Getting to Know the ILC Classroom
ILC Classroom Training
ILC Multimedia Classroom User’s Guide Technology Services – ITS Revised: June 2009 San Jacinto College South
Troubleshooting
Troubleshooting
Monitor will not “wake up.”
1. Rub finger across the screen. A light tap will not always “wake up” the monitor.
2. If the monitor still won’t “wake up,” press the ON/OFF button located
on the lower right side of the Touch panel monitor.
Problems logging into the Touch Panel System:
1. Double-check that you have entered the code correctly. 2. Once you have entered the code, press the Enter button for a few
seconds. The keypad will flash “Granted” to indicate that you have successfully logged into the system
To toggle between the Touch Panel Controls and the computer monitor: 1. First, choose Rack PC. 2. Then, touch the Preview Pane to get the full-screen computer
monitor. 3. Touch the monitor screen again to return to the Touch Panel
Controls. No signal from the Rack PC.
1. Check to make sure the Rack PC is on. If it isn’t, press the Power
button located on the front of the machine. 2. Tap the Space bar on the keyboard to “wake up” the Rack PC.
No light on the Document Camera/ No signal from Document Camera:
1. Check the Power button located on the left side of the Document
Camera. The indicator light will be green if the Document camera is on.
2. Check to make sure that the Lens cap is removed. 3. Press the Lamp button and then wait for a few seconds. Either the
Side Lights or the Backlight will come on. 4. To change the light source, press the Lamp button again. 5. Make sure the Document Camera is in XGA mode.
No signal from Podium/Laptop PC:
1. Check the VGA cable connections at your laptop and at the Laptop interface.
2. Check to make sure your Laptop is sending a signal to the interface. This is done by holding the Fn key and hitting the CRT/LCD function button. When the Laptop interface is receiving a signal from the laptop, a green light will appear on the interface.
3. Check Horizontal Position knob on the Laptop interface. This knob
will shift the image left or right and sometimes completely off the screen.
No signal from Satellite Tuner:
1. Ensure that the channel of the Tuner is set to the channel on the Modulator in the Satellite Head
end room. 2. Check to make sure the Satellite V-Tune is on.
No VCR controls operable on the Touch Panel:
1. Check to see if the VCR is on. 2. Close the cabinet door. Fluorescent lighting can affect the IR signal.
Getting to Know the ILC Classroom
ILC Classroom Training
ILC Multimedia Classroom User’s Guide Technology Services – ITS Revised: June 2009 San Jacinto College South
No audio:
1. Audio always follows the last data source sent to the projector. If you have selected another data source after selecting the audio source, the audio will disappear.
2. Re-select the Send to Proj button on the Touch Panel for the audio
source (i.e. VCR, Rack PC). 3. If that doesn’t work, check the Program Volume controls on the
Touch Panel. Raise or lower the volume and make sure Mute is off. 4. If there is still a problem, check to make sure the SurgeX unit (at the
bottom of the rack that has the VCR) is powered on. The SurgeX should always be in the On position.
5. Check to make sure the volume on the Symetrix 420 power amp is at 5 and that the amp is not muted.
6. In Robotel equipped rooms (SILC 11202 & 11220) check to make sure the Robotel system is on. The Rack PC audio is routed through the Robotel system. In the Robotel rooms there is a device mounted underneath the teaching desk below the Document camera. This device has a switch with a built in green light. This is the Robotel power switch that should be in the on position so that the Rack PC audio will be sent to the room speakers. For further troubleshooting, check the Robotel Headphone interface that is mounted underneath the teaching desk near the Rack PC’s at the teaching desk. There should be a Red audio line (L109) with a mini-headphone jack plugged into the Aux Output of the Robotel Headphone interface.
If the Proj Off button is accidentally selected:
1. Wait approximately 5 minutes for the projector to cool down. 2. Press the Proj On button to re-activate the projector and the screen.
3. DO NOT use these buttons to shut down the system as they will only turn off the projector but will not shut down the Touch Panel.
At the end of class:
1. Log off the Rack PC as you would log out of your office PC. DO NOT SHUT DOWN THE RACK PC.
2. Shut down the system by pressing the Exit button and then pressing Yes.
Recommended