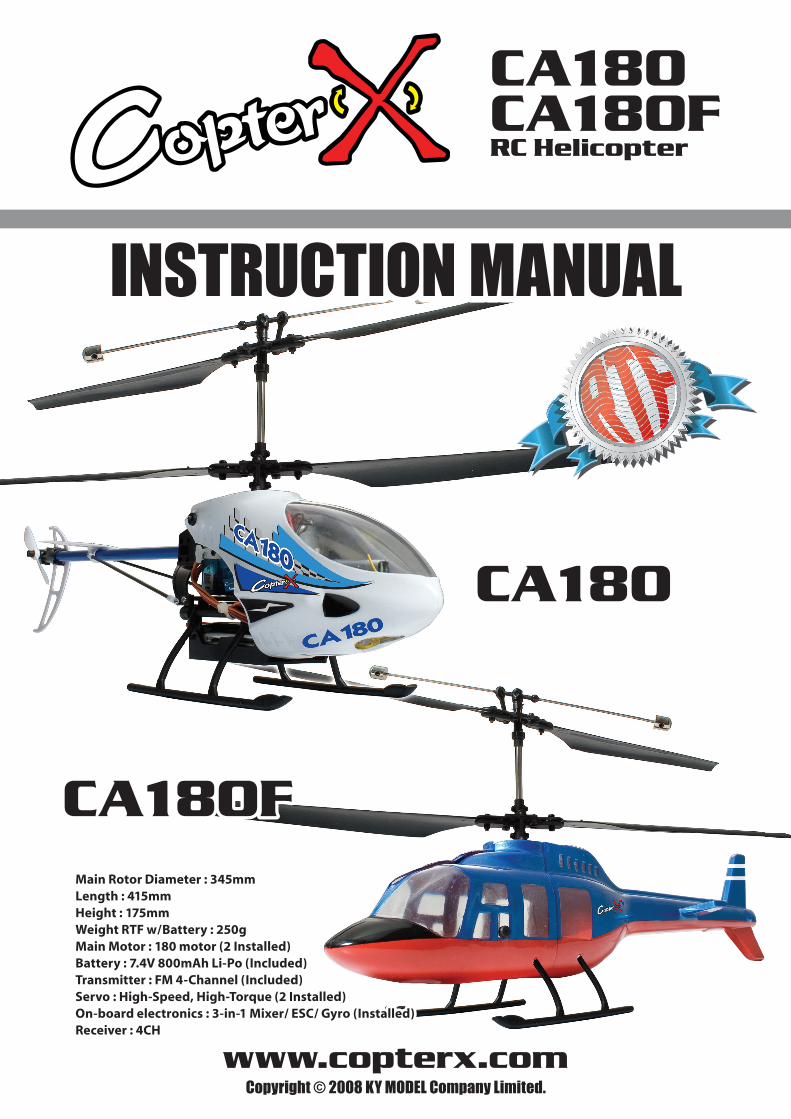
CA180CA180FRC Helicopter
www.copterx.comCopyright © 2008 KY MODEL Company Limited.
INSTRUCTION MANUALINSTRUCTION MANUAL
CA180
CA180F
CA180
CA180FMain Rotor Diameter : 345mmLength : 415mmHeight : 175mmWeight RTF w/Battery : 250gMain Motor : 180 motor (2 Installed)Battery : 7.4V 800mAh Li-Po (Included)Transmitter : FM 4-Channel (Included)Servo : High-Speed, High-Torque (2 Installed)On-board electronics : 3-in-1 Mixer/ ESC/ Gyro (Installed)Receiver : 4CH
Main Rotor Diameter : 345mmLength : 415mmHeight : 175mmWeight RTF w/Battery : 250gMain Motor : 180 motor (2 Installed)Battery : 7.4V 800mAh Li-Po (Included)Transmitter : FM 4-Channel (Included)Servo : High-Speed, High-Torque (2 Installed)On-board electronics : 3-in-1 Mixer/ ESC/ Gyro (Installed)Receiver : 4CH
01
MENUTable of Content . . . . . . . . . . . . . . . . . . . . . . . . . . . . . . . . . . . . . . . . . . . . . . . . . . . . . . . . . . . . . . . . . . . . . . . . . . .
1. Introduction and Safety Guidelines . . . . . . . . . . . . . . . . . . . . . . . . . . . . . . . . . . . . . . . . . . . . . . . . . . .
2. Package Contents / Radio Operation . . . . . . . . . . . . . . . . . . . . . . . . . . . . . . . . . . . . . . . . . . . . . . . . . .
3. Battery Usage . . . . . . . . . . . . . . . . . . . . . . . . . . . . . . . . . . . . . . . . . . . . . . . . . . . . . . . . . . . . . . . . . . . . . . . . . . .
4. Operation and Fine Tuning of the Model . . . . . . . . . . . . . . . . . . . . . . . . . . . . . . . . . . . . . . . . . . . . . . .
5. Basic Control . . . . . . . . . . . . . . . . . . . . . . . . . . . . . . . . . . . . . . . . . . . . . . . . . . . . . . . . . . . . . . . . . . . . . . . . . . . .
6. Flying . . . . . . . . . . . . . . . . . . . . . . . . . . . . . . . . . . . . . . . . . . . . . . . . . . . . . . . . . . . . . . . . . . . . . . . . . . . . . . . . . . . .
7. CA180 / CA180F Parts List . . . . . . . . . . . . . . . . . . . . . . . . . . . . . . . . . . . . . . . . . . . . . . . . . . . . . . . . . . . . . .
1
2
4
6
6
9
9
12
CA180 / CA180FRC Helicopter
CA180 / CA180FRC Helicopter
1. IntroductionCopterX CA180 / CA180F is a ready-to-fly (RTF) micro electric powered helicopter. It is designed for both new and experienced pilots who enjoy flying RC helicopters.
The coaxial counter-rotating blades make it fly stably and easily. You will enjoy many outstanding features, including pre-installed main motors, servo, receiver and 3-in-1 control unit with mixer, ESC & gyro. With the included 4-channel FM transmitter, 2-cell 800mAh Li-Po battery pack and DC charger, you will have precise control for hover, forward, backward and more than 15 minutes flying time per charge.
Please make sure to read through this manual completely for tips on battery safety and charging, control checks and flying.
Use protective eyewear when operating a model with rapidly rotating parts. Main and tail rotors turn really fast and can be very dangerous if closed to the face.
Keep away from children. The model is made from many small and possibly sharp parts. Operate and store model away from children to avoid the possibility of inges-tion of helicopter pieces.
Handle parts with care as they are fragile and may break under excessive stress. Be careful with small parts as they can be sharp and may cause a cut.
Do not store model or electronic parts in high temperature or humid places for an extended period of time as damage or deformation of the model can be resulted.
Always disconnect the battery when it is not in use or after use to avoid battery leaking or overheating.
02
SAFE OPERATION GUIDELINES
Warning: Always turn the transmitter ON first before connecting the battery. If the transmitter is OFF when connecting the battery, the helicopter may have unpredictable response.
The information in this manual is important as it is used for understanding the helicopter and its components. This information is also valuable for keeping you safe.
CA180 / CA180FRC Helicopter
Only use batteries designed for the CA180 model helicopters from KY Model Company Limited. Always connect the batteries with the correct polarity, otherwise electronic parts could be damaged.
Keep away from spinning rotors. Standing too close to the helicopters in operation puts you at risk of being cut by the rotor blades. Keep a distance of roughly 2 meters between you and the model.
Keep fingers and hands away from rotating blades, moving gears and moving parts as they may cause injury. Obstructing moving parts during operation may lead to serious damage to the model.
Batteries and motors become hot after operation. Allow them a few minutes to cool down before touching batteries or motors directly after flying.
The antenna of the radio should be extended at all times during operation so the signal can be compromised. Do not cut the antenna mounted on the radio as doing so will influence the signal.
Do not operate model with other R/C models in the same band/frequency as interference of signals will be caused.
Do not operate model near traffic, children and crowds. This may cause accident or injury.
Do not operate model in dirty, sandy or wet conditions.
Do not operate model during bad weather, such as rain, wind and snow.
Avoid operating model near pets as pet hair can get sucked in to the rotor.
Only use KY Model Company Limited replacement and optional parts. Do not modify the design of the model.
Do not clean model with thinner, alcohol or other chemicals as this may warp or deform the model. Simply wipe the pieces with a dry cloth if they get dirty.
03

CA180 / CA180FRC Helicopter
2. Package Contents / Radio Operation
04
Items IncludedCA180 /CA180F is 100% Ready To Fly. Below is a list of all the components required to operate the model.
Electric Parts
1 x CA180 / *CA180F (CA180 shown here)
1 x 4CH Radio Transmitter1 x Li-po Battery1 x Li-po Charger1 x Power Adaptor (Placed under foam box)
2 x Servo (Elevator Servo + Aileron Servo)2 x Motor1 x Li-po Battery1 x 3-in-1 Controller1 x Receiver
*Full-covered canopy is used for CA180F
Aileron Servo
Elevator Servo
3-in-1 Controller
Battery
Motor1
Motor2
Receiver
CA180 / CA180FRC Helicopter
05
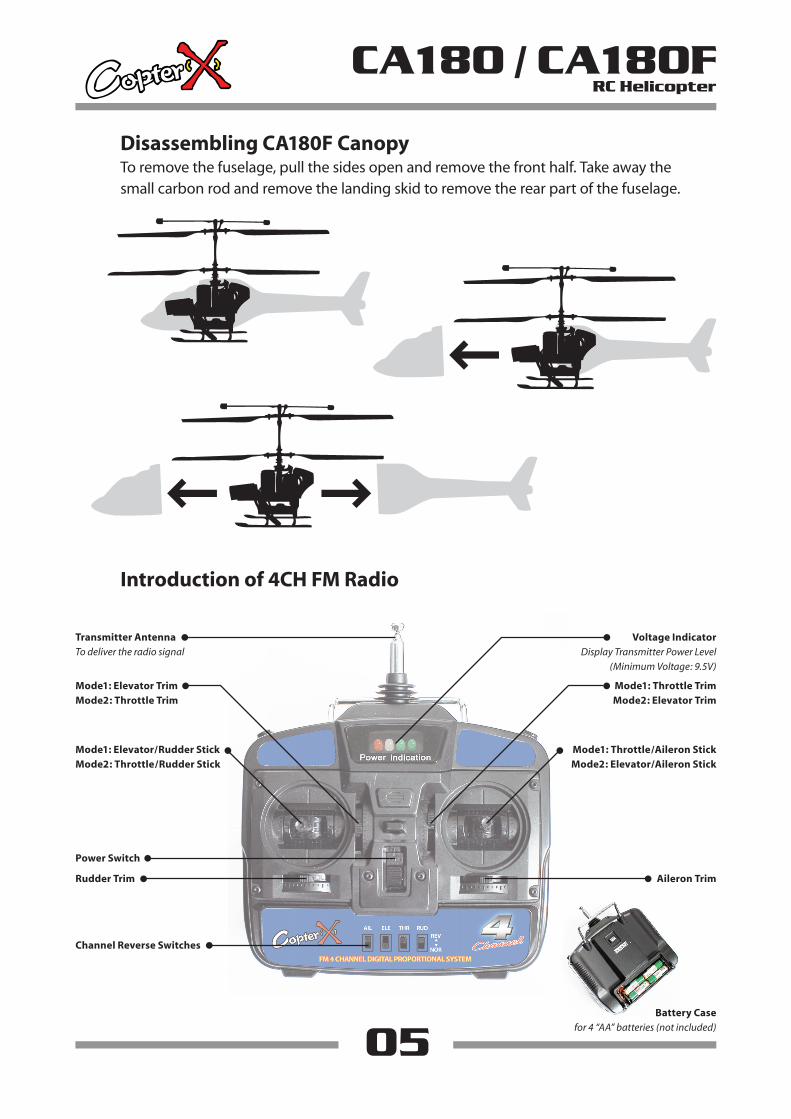
Disassembling CA180F CanopyTo remove the fuselage, pull the sides open and remove the front half. Take away the small carbon rod and remove the landing skid to remove the rear part of the fuselage.
Introduction of 4CH FM Radio
Transmitter AntennaTo deliver the radio signal
Mode1: Elevator TrimMode2: Throttle Trim
Mode1: Throttle TrimMode2: Elevator Trim
Mode1: Throttle/Aileron StickMode2: Elevator/Aileron Stick
Mode1: Elevator/Rudder StickMode2: Throttle/Rudder Stick
Power Switch
Voltage IndicatorDisplay Transmitter Power Level
(Minimum Voltage: 9.5V)
Rudder Trim Aileron Trim
Channel Reverse Switches
Battery Casefor 4 “AA” batteries (not included)
CA180 / CA180FRC Helicopter
06
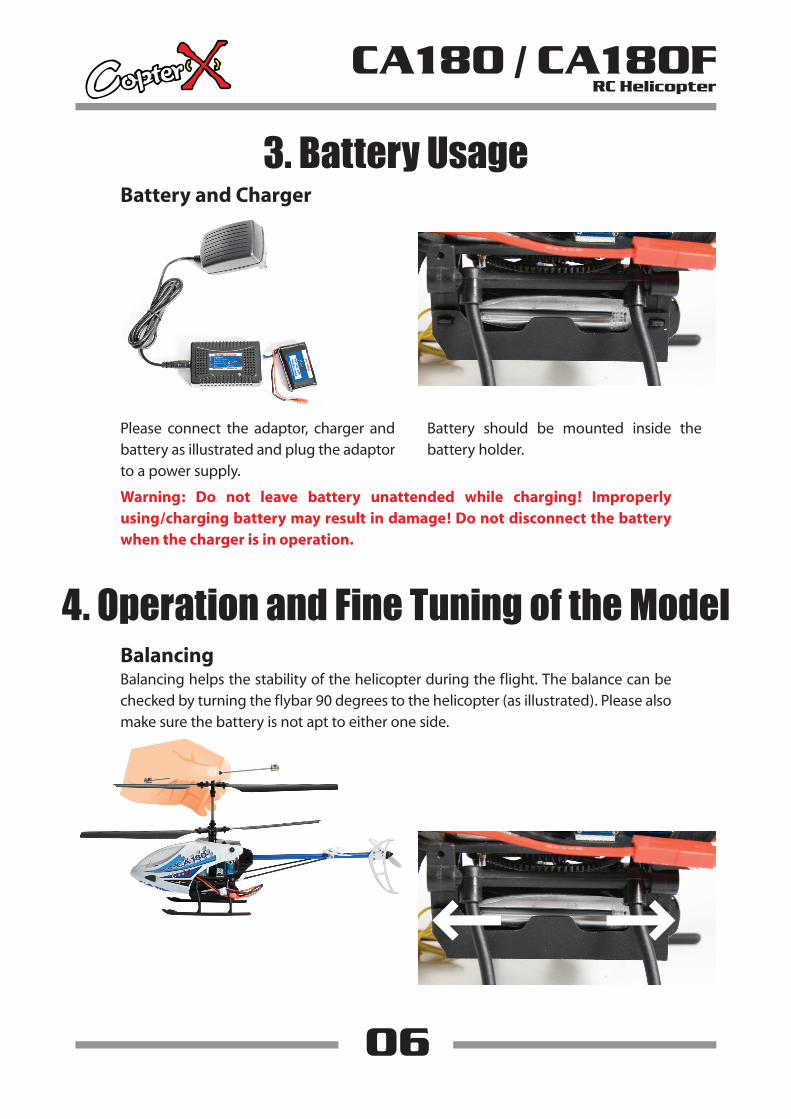
Battery and Charger
Please connect the adaptor, charger and battery as illustrated and plug the adaptor to a power supply.
Battery should be mounted inside the battery holder.
Warning: Do not leave battery unattended while charging! Improperly using/charging battery may result in damage! Do not disconnect the battery when the charger is in operation.
BalancingBalancing helps the stability of the helicopter during the flight. The balance can be checked by turning the flybar 90 degrees to the helicopter (as illustrated). Please also make sure the battery is not apt to either one side.
3. Battery Usage
4. Operation and Fine Tuning of the Model
1
2
3
4
5
CA180 / CA180FRC Helicopter
07
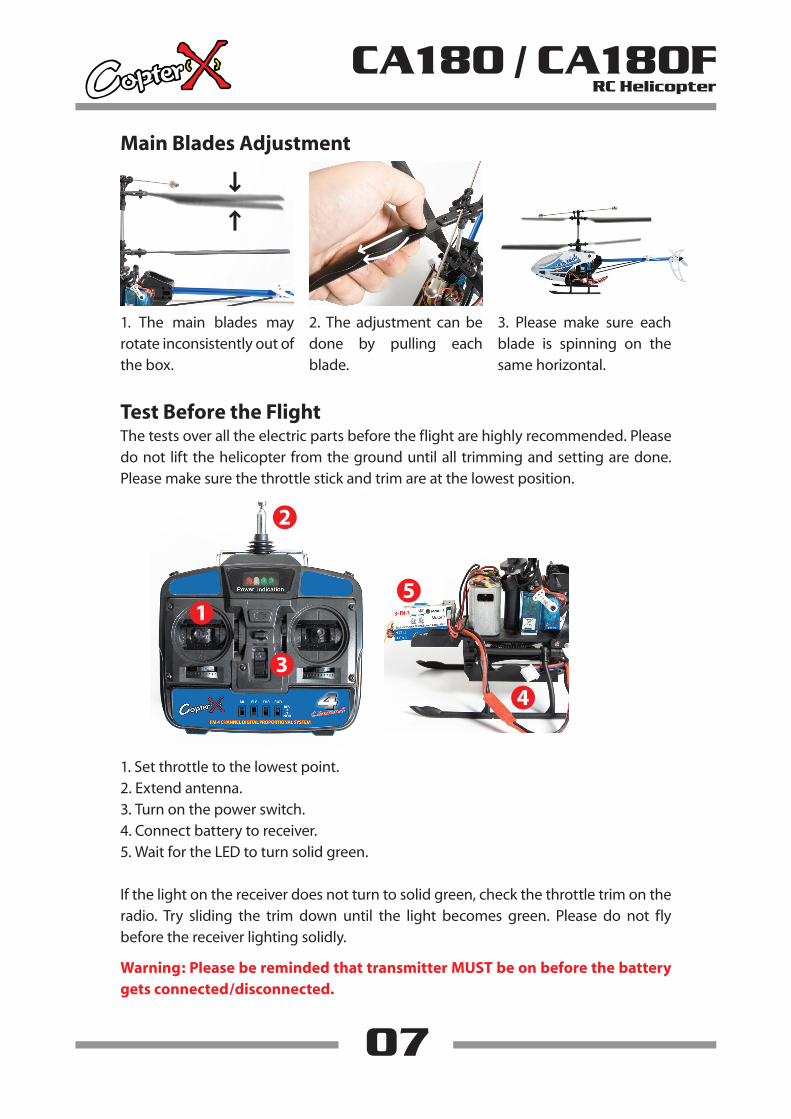
Main Blades Adjustment
1. The main blades may rotate inconsistently out of the box.
2. The adjustment can be done by pulling each blade.
3. Please make sure each blade is spinning on the same horizontal.
Test Before the FlightThe tests over all the electric parts before the flight are highly recommended. Please do not lift the helicopter from the ground until all trimming and setting are done. Please make sure the throttle stick and trim are at the lowest position.
1. Set throttle to the lowest point.2. Extend antenna.3. Turn on the power switch.4. Connect battery to receiver.5. Wait for the LED to turn solid green.
If the light on the receiver does not turn to solid green, check the throttle trim on the radio. Try sliding the trim down until the light becomes green. Please do not fly before the receiver lighting solidly.
Warning: Please be reminded that transmitter MUST be on before the battery gets connected/disconnected.
CA180 / CA180FRC Helicopter
08
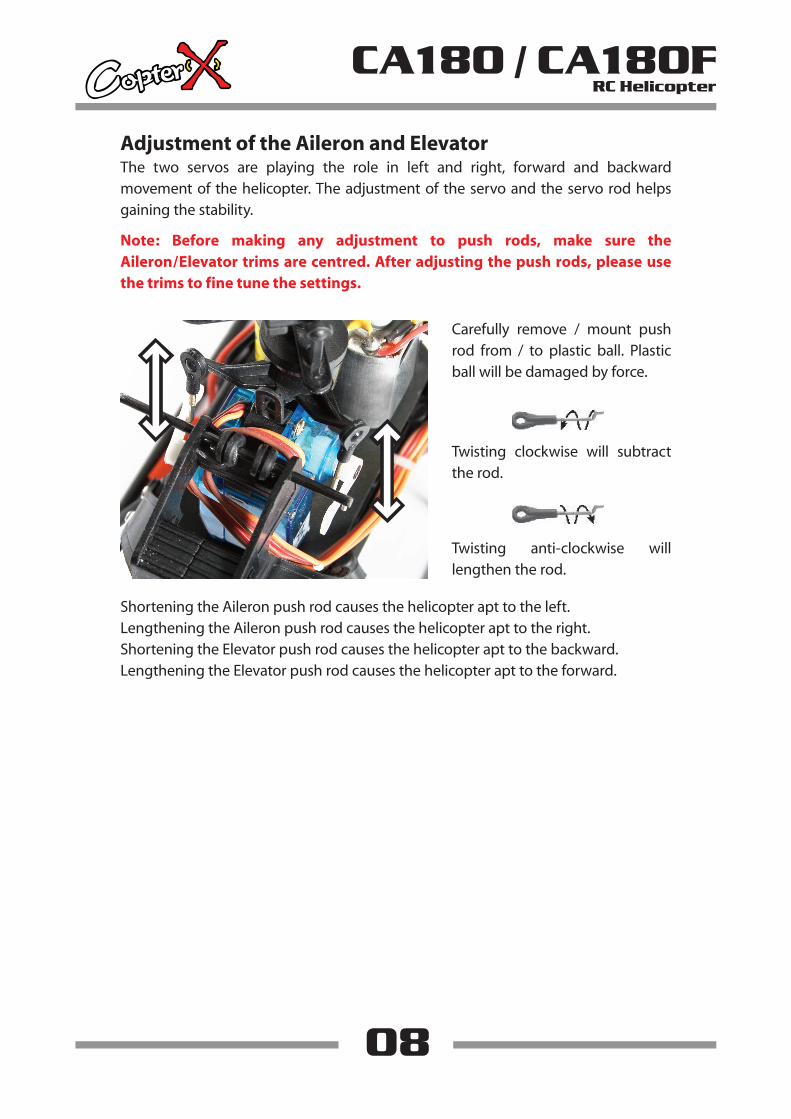
Adjustment of the Aileron and ElevatorThe two servos are playing the role in left and right, forward and backward movement of the helicopter. The adjustment of the servo and the servo rod helps gaining the stability.
Carefully remove / mount push rod from / to plastic ball. Plastic ball will be damaged by force.
Twisting clockwise will subtract the rod.
Twisting anti-clockwise will lengthen the rod.
Shortening the Aileron push rod causes the helicopter apt to the left.Lengthening the Aileron push rod causes the helicopter apt to the right.Shortening the Elevator push rod causes the helicopter apt to the backward.Lengthening the Elevator push rod causes the helicopter apt to the forward.
Note: Before making any adjustment to push rods, make sure the Aileron/Elevator trims are centred. After adjusting the push rods, please use the trims to fine tune the settings.
CA180 / CA180FRC Helicopter
09
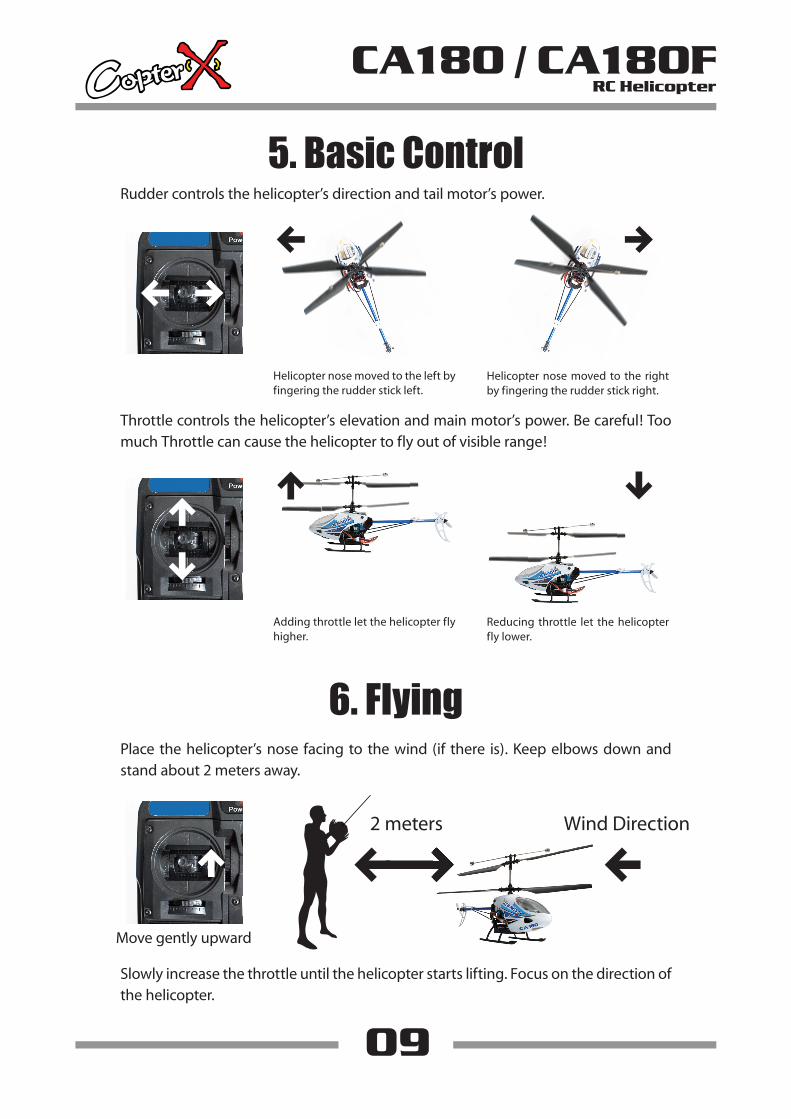
Throttle controls the helicopter’s elevation and main motor’s power. Be careful! Too much Throttle can cause the helicopter to fly out of visible range!
Helicopter nose moved to the left by fingering the rudder stick left.
Helicopter nose moved to the right by fingering the rudder stick right.
Adding throttle let the helicopter fly higher.
Reducing throttle let the helicopter fly lower.
Rudder controls the helicopter’s direction and tail motor’s power.
Place the helicopter’s nose facing to the wind (if there is). Keep elbows down and stand about 2 meters away.
Slowly increase the throttle until the helicopter starts lifting. Focus on the direction of the helicopter.
Move gently upward
2 meters Wind Direction
5. Basic Control
6. Flying
CA180 / CA180FRC Helicopter
10
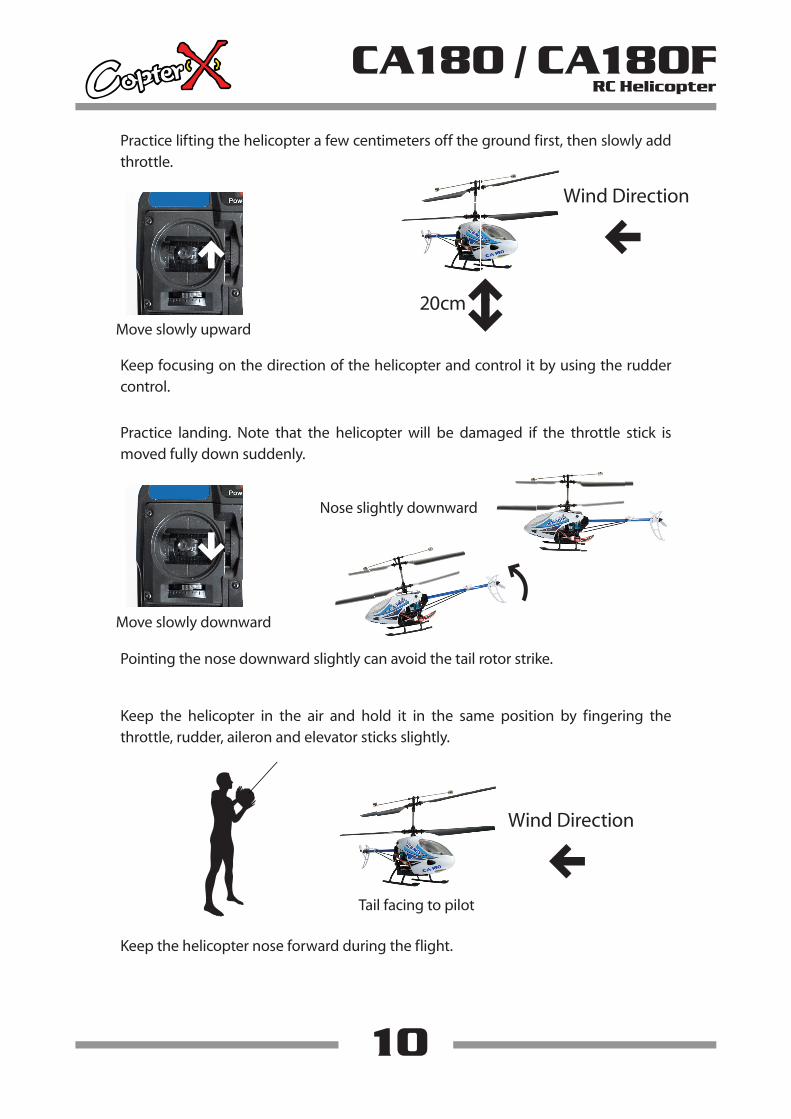
Practice lifting the helicopter a few centimeters off the ground first, then slowly add throttle.
Practice landing. Note that the helicopter will be damaged if the throttle stick is moved fully down suddenly.
Pointing the nose downward slightly can avoid the tail rotor strike.
Keep focusing on the direction of the helicopter and control it by using the rudder control.
Move slowly upward
Move slowly downward
Nose slightly downward
20cm
Wind Direction
Keep the helicopter in the air and hold it in the same position by fingering the throttle, rudder, aileron and elevator sticks slightly.
Keep the helicopter nose forward during the flight.
Tail facing to pilot
Wind Direction
CA180 / CA180FRC Helicopter
11
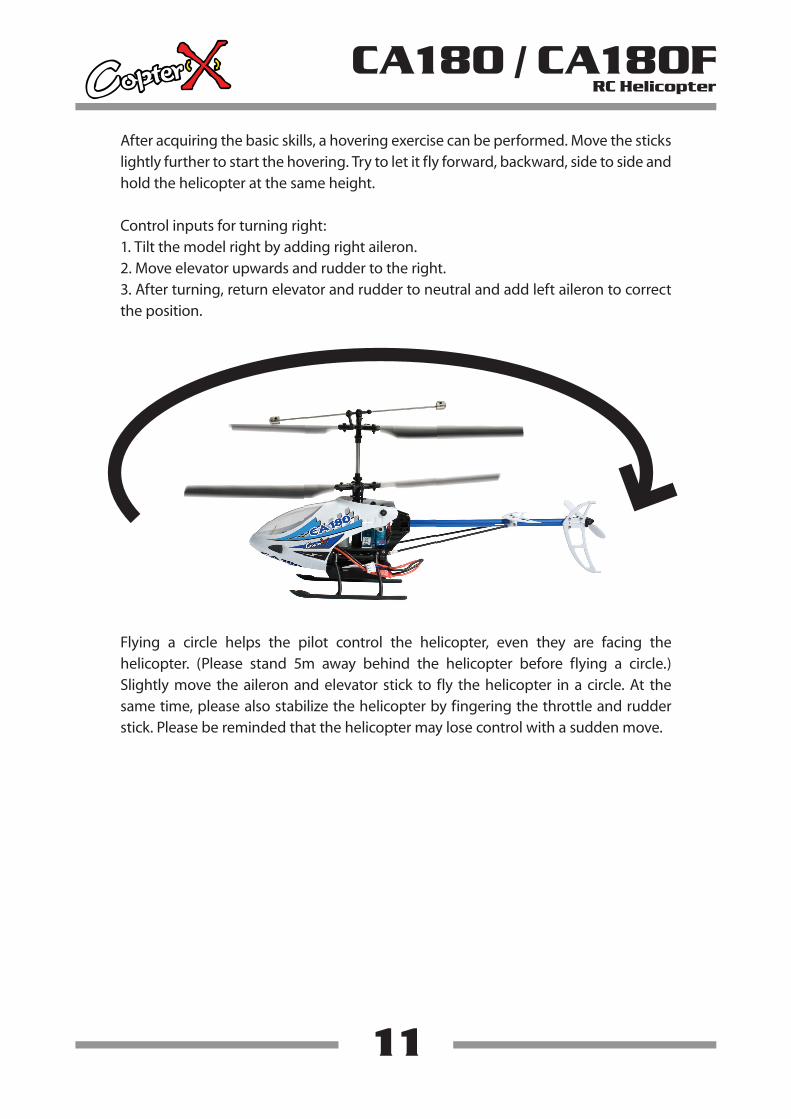
After acquiring the basic skills, a hovering exercise can be performed. Move the sticks lightly further to start the hovering. Try to let it fly forward, backward, side to side and hold the helicopter at the same height.
Control inputs for turning right:1. Tilt the model right by adding right aileron.2. Move elevator upwards and rudder to the right.3. After turning, return elevator and rudder to neutral and add left aileron to correct the position.
Flying a circle helps the pilot control the helicopter, even they are facing the helicopter. (Please stand 5m away behind the helicopter before flying a circle.) Slightly move the aileron and elevator stick to fly the helicopter in a circle. At the same time, please also stabilize the helicopter by fingering the throttle and rudder stick. Please be reminded that the helicopter may lose control with a sudden move.
CA180 / CA180FRC Helicopter
12
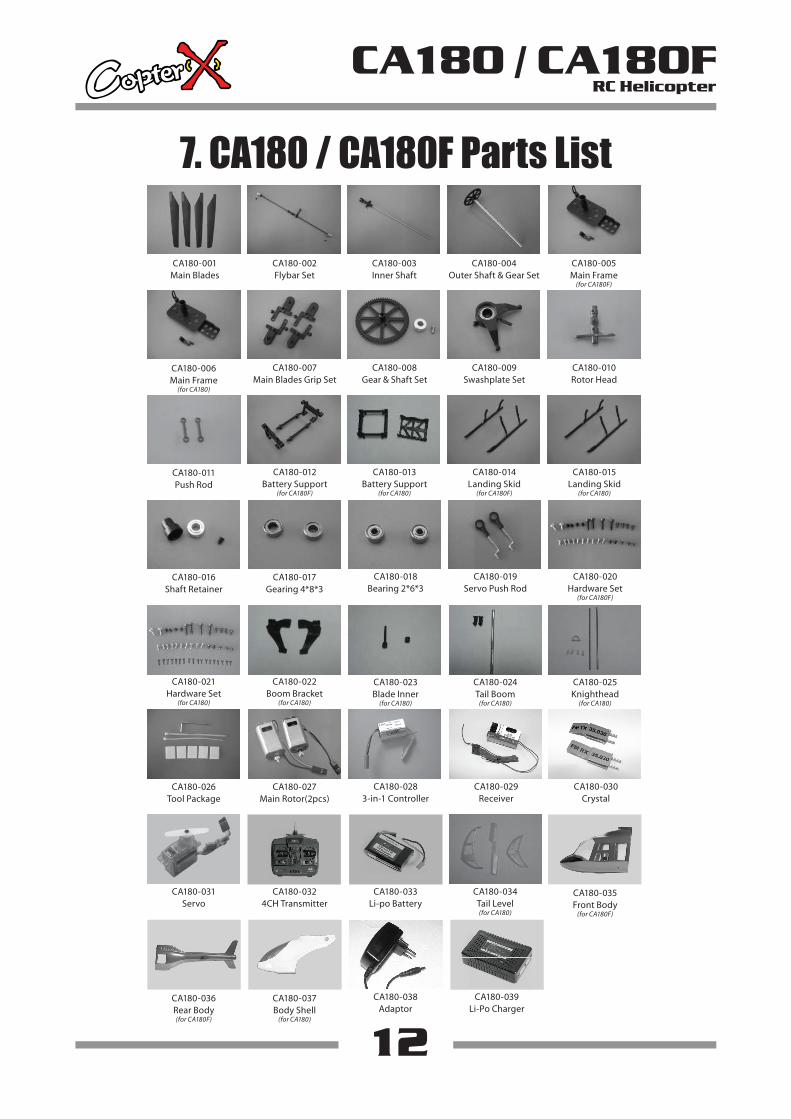
CA180-001Main Blades
CA180-002Flybar Set
CA180-003Inner Shaft
CA180-004Outer Shaft & Gear Set
CA180-005Main Frame
(for CA180F)
CA180-006Main Frame
(for CA180)
CA180-007Main Blades Grip Set
CA180-008Gear & Shaft Set
CA180-009Swashplate Set
CA180-010Rotor Head
CA180-011Push Rod
7. CA180 / CA180F Parts List
CA180-012Battery Support
(for CA180F)
CA180-013Battery Support
(for CA180)
CA180-014Landing Skid
(for CA180F)
CA180-015Landing Skid
(for CA180)
CA180-016Shaft Retainer
CA180-036Rear Body(for CA180F)
CA180-017Gearing 4*8*3
CA180-018Bearing 2*6*3
CA180-019Servo Push Rod
CA180-020Hardware Set
(for CA180F)
CA180-021Hardware Set
(for CA180)
CA180-022Boom Bracket
(for CA180)
CA180-023Blade Inner
(for CA180)
CA180-024Tail Boom
(for CA180)
CA180-025Knighthead
(for CA180)
CA180-026Tool Package
CA180-027Main Rotor(2pcs)
CA180-0283-in-1 Controller
CA180-035Front Body
(for CA180F)
CA180-031Servo
CA180-0324CH Transmitter
CA180-029Receiver
CA180-030Crystal
CA180-033Li-po Battery
CA180-034Tail Level(for CA180)
CA180-037Body Shell
(for CA180)
CA180-038Adaptor
CA180-039Li-Po Charger

www.copterx.comCopyright © 2008 KY MODEL Company Limited.
Recommended


![Citizen (Berea, Ky.). (Berea, KY) 1910-05-12 [p ]](https://img.pdfslide.us/doc/110x75/629c16c1f849cf47726518b3/citizen-berea-ky-berea-ky-1910-05-12-p-.jpg)