IBM
Tivoli
Risk
Manager
Administrator’s
Guide
Version
4.2
GC32-1323-00
���


IBM
Tivoli
Risk
Manager
Administrator’s
Guide
Version
4.2
GC32-1323-00
���

Note:
Before
using
this
information
and
the
product
it
supports,
read
the
information
in
Appendix
D,
“Notices,”
on
page
233.
First
Edition
(October
2003)
This
edition
applies
to
version
4,
release
2,
of
Tivoli
Risk
Manager
and
to
all
subsequent
releases
and
modifications
until
otherwise
indicated
in
new
editions.
©
Copyright
International
Business
Machines
Corporation
2003.
All
rights
reserved.
US
Government
Users
Restricted
Rights
–
Use,
duplication
or
disclosure
restricted
by
GSA
ADP
Schedule
Contract
with
IBM
Corp.
Contents
Preface
.
.
.
.
.
.
.
.
.
.
.
.
.
. vii
Who
Should
Read
This
Book
.
.
.
.
.
.
.
. vii
What
This
Book
Contains
.
.
.
.
.
.
.
.
. vii
Publications
.
.
.
.
.
.
.
.
.
.
.
.
.
. viii
IBM
Tivoli
Risk
Manager
Library
.
.
.
.
.
. viii
Prerequisite
Publications
.
.
.
.
.
.
.
.
. viii
Related
Publications
.
.
.
.
.
.
.
.
.
. ix
Accessing
Publications
Online
.
.
.
.
.
.
. ix
IBM
Tivoli
Risk
Manager
Product
Information
.
. x
Accessibility
.
.
.
.
.
.
.
.
.
.
.
.
.
. x
Contacting
Software
Support
.
.
.
.
.
.
.
.
. x
Conventions
Used
in
This
Book
.
.
.
.
.
.
.
. xi
Typeface
Conventions
.
.
.
.
.
.
.
.
.
. xi
Naming
Conventions
.
.
.
.
.
.
.
.
.
. xi
Operating
System
Differences
.
.
.
.
.
.
. xii
Chapter
1.
Introduction
.
.
.
.
.
.
.
. 1
Tivoli
Risk
Manager
Topology
and
Architecture
.
. 2
Event
Sources
.
.
.
.
.
.
.
.
.
.
.
.
. 3
Event
Adapters
.
.
.
.
.
.
.
.
.
.
.
. 4
Tivoli
Risk
Manager
Clients
.
.
.
.
.
.
.
. 6
Tivoli
Risk
Manager
Event
Server
.
.
.
.
.
. 6
Tivoli
Risk
Manager
Console
.
.
.
.
.
.
. 10
Tivoli
Risk
Manager
Historical
Reporting
.
.
. 12
Overview
of
Tivoli
Risk
Manager
Security
Event
Processing
.
.
.
.
.
.
.
.
.
.
.
.
.
.
. 12
Detect
.
.
.
.
.
.
.
.
.
.
.
.
.
.
. 13
Filter
and
Summarize
.
.
.
.
.
.
.
.
.
. 13
First-Level
Correlation
.
.
.
.
.
.
.
.
.
. 14
Second-Level
Correlation
.
.
.
.
.
.
.
.
. 15
Information
Displayed
at
the
Tivoli
Enterprise
Console
.
.
.
.
.
.
.
.
.
.
.
.
.
.
.
. 16
Console
Usage
Scenario
.
.
.
.
.
.
.
.
. 16
Incident
Event
Types
.
.
.
.
.
.
.
.
.
.
. 35
Unique
Combinations
of
Source,
Destination,
and
Category
(SrcDstCat)
.
.
.
.
.
.
.
.
.
. 35
Unique
Combinations
of
Source
and
Category
(SrcCat)
.
.
.
.
.
.
.
.
.
.
.
.
.
.
. 35
Unique
Combinations
of
Destination
and
Category
(DstCat)
.
.
.
.
.
.
.
.
.
.
. 35
Unique
Combinations
of
Source
and
Destination
(SrcDst)
.
.
.
.
.
.
.
.
.
.
.
.
.
.
. 35
Unique
Value
for
Category
(Cat)
.
.
.
.
.
. 36
Unique
Value
for
Source
(Src)
.
.
.
.
.
.
. 36
Unique
Value
for
Destination
(Dst)
.
.
.
.
. 36
Chapter
2.
Event
Server
.
.
.
.
.
.
. 39
Configuring
Correlation
.
.
.
.
.
.
.
.
.
. 39
Incidents
and
Incident
Groups
.
.
.
.
.
.
.
. 39
Tivoli
Risk
Manager
Correlation
Components
.
.
. 40
Configuring
the
Event
Server
.
.
.
.
.
.
.
. 40
Advanced
Configuration
.
.
.
.
.
.
.
.
. 40
Performance
Considerations
.
.
.
.
.
.
.
.
. 45
Customize
the
BAROC
List
.
.
.
.
.
.
.
. 46
Set
Event
Cache
Size
.
.
.
.
.
.
.
.
.
. 46
Filtering
Attributes
.
.
.
.
.
.
.
.
.
.
. 47
Set
Instance
Count
on
Agent
Senders
.
.
.
.
. 47
Tivoli
Risk
Manager
BAROC
Files
.
.
.
.
.
. 47
Chapter
3.
Database
.
.
.
.
.
.
.
.
. 51
Database
Structure
.
.
.
.
.
.
.
.
.
.
.
. 51
Tivoli
Enterprise
Console
Databases
.
.
.
.
. 51
Tivoli
Enterprise
Console
Tables
and
Views
.
.
. 51
Tivoli
Risk
Manager
Tables
and
Views
.
.
.
. 51
Event
Archive
Table
Creation
.
.
.
.
.
.
. 52
Database
Maintenance
and
Support
.
.
.
.
.
. 56
Tivoli
Risk
Manager
Database
Utilities
.
.
.
. 56
Tivoli
Enterprise
Console
Data
Management
Utilities
.
.
.
.
.
.
.
.
.
.
.
.
.
.
. 58
RIM
Support
Utilities
.
.
.
.
.
.
.
.
.
. 58
Chapter
4.
Agent
.
.
.
.
.
.
.
.
.
. 61
Overview
.
.
.
.
.
.
.
.
.
.
.
.
.
.
. 61
Agent
Configuration
.
.
.
.
.
.
.
.
.
.
. 63
Top-Level
Configuration
File
(rmagent.xml)
.
. 63
Queues
and
Event
Persistence
.
.
.
.
.
.
. 67
Second-Level
Configuration
Files
.
.
.
.
.
. 67
Relationship
of
the
Configuration
Files
.
.
.
.
. 72
Client
System
Configuration
.
.
.
.
.
.
.
. 72
Event
Server
System
Configuration
.
.
.
.
. 73
Distributed
Correlation
Server
System
Configuration
.
.
.
.
.
.
.
.
.
.
.
. 74
Gateway
System
Configuration
.
.
.
.
.
.
. 75
Administering
the
Tivoli
Risk
Manager
Agent
.
.
. 76
Starting
and
Stopping
the
Agent
.
.
.
.
.
. 76
Managing
the
Agent
Queues
.
.
.
.
.
.
. 78
Managing
Agent
DNS
Processing
.
.
.
.
.
. 79
Creating
and
Managing
Secure
Sockets
Layer
Keystores
.
.
.
.
.
.
.
.
.
.
.
.
.
. 79
Stashing
Passwords
.
.
.
.
.
.
.
.
.
.
. 80
Secure
Sockets
Layer
Usage
Information
.
.
.
.
. 80
Setting
Up
JDBC
Drivers
.
.
.
.
.
.
.
.
.
. 80
Chapter
5.
Engine
Configuration
.
.
.
. 81
Event
Pre-Normalization
.
.
.
.
.
.
.
.
.
. 81
Attribute
Mapping
.
.
.
.
.
.
.
.
.
.
. 82
DNS
Look-up
.
.
.
.
.
.
.
.
.
.
.
.
. 82
Event
Normalization
.
.
.
.
.
.
.
.
.
.
. 83
Identifying
Event
Classes
.
.
.
.
.
.
.
.
. 84
Assigning
Class
Category
.
.
.
.
.
.
.
.
. 84
Identifying
Known
Systems
.
.
.
.
.
.
.
. 84
Identifying
Trusted
Systems
.
.
.
.
.
.
.
. 85
Identifying
Known
Sensors
.
.
.
.
.
.
.
. 85
Linking
Events
.
.
.
.
.
.
.
.
.
.
.
. 86
Setting
Timestamp
Variability
Allowance
.
.
. 86
Additional
Attributes
Adjustments
.
.
.
.
.
. 87
Heartbeat
Monitoring
.
.
.
.
.
.
.
.
.
.
. 87
Advanced
Configuration
.
.
.
.
.
.
.
.
. 87
Chapter
6.
Event
Summarization
.
.
.
. 89
©
Copyright
IBM
Corp.
2003
iii

Overview
.
.
.
.
.
.
.
.
.
.
.
.
.
.
. 89
Identifying
a
Summarized
Event
.
.
.
.
.
.
. 89
Out-of-the-Box
Client
Configuration
.
.
.
.
.
. 89
Understanding
Summarization
Rules
.
.
.
.
.
. 90
Configuring
Summary
Rules
.
.
.
.
.
.
.
.
. 92
Updating
An
Existing
Summary
Rule
.
.
.
.
. 92
Creating
New
Summary
Rules
.
.
.
.
.
.
. 93
Activating
Your
Changes
.
.
.
.
.
.
.
.
. 93
Sample
Event
Summarization
Processing
.
.
.
. 94
Chapter
7.
Incident-Based
Correlation
95
Overview
.
.
.
.
.
.
.
.
.
.
.
.
.
.
. 95
What
is
an
incident?
.
.
.
.
.
.
.
.
.
. 95
What
is
the
rm_Level
attribute?
.
.
.
.
.
. 95
What
is
a
sliding-window?
.
.
.
.
.
.
.
. 95
What
is
a
class
category?
.
.
.
.
.
.
.
.
. 95
What
types
of
incidents
are
there?
.
.
.
.
.
. 96
What
events
contribute
to
an
incident?
.
.
.
. 97
Can
an
event
contribute
to
more
than
one
incident?
.
.
.
.
.
.
.
.
.
.
.
.
.
. 97
How
is
the
severity
of
an
incident
set?
.
.
.
. 97
How
Do
I
Stop
a
Specific
Event
Class
From
Contributing
to
Incident-Based
Correlation?
.
. 98
Incident-Based
Correlation
Processing
.
.
.
.
. 98
Incident-Based
Correlation
XML
Syntax
.
.
.
.
. 99
Incident-Based
Correlation
Action
Functions
.
.
. 100
Customizing
Incident-Based
Correlation
Rules
.
. 101
Configuring
Incident-Based
Correlation
Rules
.
. 102
Updating
an
Existing
Incident-Based
Correlation
Rules
File
.
.
.
.
.
.
.
.
.
.
.
.
.
. 102
Creating
a
New
Incident-Based
Correlation
Rules
File
.
.
.
.
.
.
.
.
.
.
.
.
.
. 103
Activating
Changes
to
the
Incident-Based
Correlation
Rules
File
.
.
.
.
.
.
.
.
. 105
Extending
Incident-Based
Correlation
with
Customer
ID
Attribute
Enablement
.
.
.
.
.
. 105
Chapter
8.
Web
Application
.
.
.
.
. 107
Functional
Overview
.
.
.
.
.
.
.
.
.
.
. 107
Global
Security
and
UTF-8
.
.
.
.
.
.
.
.
. 109
Accessing
the
Web
Application
from
the
Tivoli
Enterprise
Console
.
.
.
.
.
.
.
.
.
.
. 110
Introduction
to
the
Web
Application
Graphical
User
Interface
.
.
.
.
.
.
.
.
.
.
.
.
.
.
. 111
Event
Details
.
.
.
.
.
.
.
.
.
.
.
.
. 113
System
Information
.
.
.
.
.
.
.
.
.
.
. 118
Advisor
.
.
.
.
.
.
.
.
.
.
.
.
.
.
. 120
Advisor
Rules
File
.
.
.
.
.
.
.
.
.
.
. 120
Static
Text
Web
Page
.
.
.
.
.
.
.
.
.
. 129
URL
Web
Page
.
.
.
.
.
.
.
.
.
.
.
. 131
Run
Program
Web
Page
.
.
.
.
.
.
.
.
. 133
Web
Page
.
.
.
.
.
.
.
.
.
.
. 136
Chapter
9.
Reports
.
.
.
.
.
.
.
.
. 139
What
Are
Tivoli
Risk
Manager
Crystal
Reports?
139
Firewall
Management
Reports
.
.
.
.
.
.
. 139
Intrusion
Detection
Reports
.
.
.
.
.
.
. 139
Risk
Assessment
Reports
.
.
.
.
.
.
.
. 140
Event
Management
Reports
.
.
.
.
.
.
. 140
Virus
Management
Reports
.
.
.
.
.
.
.
. 142
Setting
Up
an
ODBC
Data
Source
Connection
.
. 142
DB2®
.
.
.
.
.
.
.
.
.
.
.
.
.
.
. 143
Oracle
.
.
.
.
.
.
.
.
.
.
.
.
.
.
. 145
Sybase
.
.
.
.
.
.
.
.
.
.
.
.
.
.
. 145
Microsoft
SQL
Server
.
.
.
.
.
.
.
.
.
. 146
Updating
Crystal
Reports
to
Use
Your
ODBC
Connection
.
.
.
.
.
.
.
.
.
.
.
.
. 146
How
Do
Tivoli
Risk
Manager
Crystal
Reports
Work?
.
.
.
.
.
.
.
.
.
.
.
.
.
.
.
. 147
Create
the
Tivoli
Risk
Manager
Archive
Table
147
Running
Tivoli
Risk
Manager
Crystal
Reports
147
Crystal
Reports
Runtime
Engine
.
.
.
.
.
.
. 149
Chapter
10.
Tasks
.
.
.
.
.
.
.
.
. 151
Tivoli
Tasks
.
.
.
.
.
.
.
.
.
.
.
.
.
. 151
How
to
Create
and
Customize
Tasks
.
.
.
.
. 151
Tasks
for
Linux
and
UNIX-Based
Systems
.
.
.
. 152
Tasks
for
Windows
Systems
.
.
.
.
.
.
.
. 152
Tasks
for
the
Event
Server
.
.
.
.
.
.
.
.
. 153
Tasks
for
the
Agent
.
.
.
.
.
.
.
.
.
.
. 154
Tasks
for
Event
Management
.
.
.
.
.
.
.
. 154
Tasks
for
Check
Point
FireWall-1
.
.
.
.
.
.
. 155
Tasks
for
Cisco
Secure
PIX
Firewall
.
.
.
.
.
. 155
Tasks
for
Cisco
Secure
IDS
.
.
.
.
.
.
.
.
. 156
Tasks
for
Network
IDS
.
.
.
.
.
.
.
.
.
. 156
Chapter
11.
Web
Intrusion
Detection
157
Supported
Web
Servers
.
.
.
.
.
.
.
.
.
. 158
Perl
Support
.
.
.
.
.
.
.
.
.
.
.
.
.
. 159
Starting
Web
IDS
.
.
.
.
.
.
.
.
.
.
.
. 159
Running
Web
IDS
as
a
Service
on
a
Windows
System
.
.
.
.
.
.
.
.
.
.
.
.
.
. 160
Access
Log
Rollover
Support
.
.
.
.
.
.
.
. 161
The
sig.nefarious
Signatures
File
.
.
.
.
.
.
. 161
Parser
Engine
.
.
.
.
.
.
.
.
.
.
.
. 161
Pattern
Engine
.
.
.
.
.
.
.
.
.
.
.
. 162
Suspicion
Engine
.
.
.
.
.
.
.
.
.
.
. 162
Trust
Engine
.
.
.
.
.
.
.
.
.
.
.
.
. 163
Skip
Engine
.
.
.
.
.
.
.
.
.
.
.
.
. 163
The
Web
IDS
Configuration
File
.
.
.
.
.
.
. 163
Editing
the
Web
IDS
Configuration
File
.
.
. 164
Configuring
Web
IDS
Log
File
Access
for
Rollover
Support
.
.
.
.
.
.
.
.
.
.
. 166
Web
Server
Specific
Configuration
.
.
.
.
.
. 167
Configuring
Web
Servers
That
Use
the
Common
Log
Format
.
.
.
.
.
.
.
.
.
.
.
.
. 167
Configuring
the
Apache
Web
Server
.
.
.
.
. 168
Configuring
IBM
Tivoli
Access
Manager
WebSEAL
Server
.
.
.
.
.
.
.
.
.
.
. 168
Configuring
the
Sun
ONE
Web
Server
.
.
.
. 168
Configuring
the
Microsoft
Internet
Information
Server
.
.
.
.
.
.
.
.
.
.
.
.
.
.
. 168
Specifying
Log
File
Format
and
Values
.
.
.
. 169
Editing
Signatures
.
.
.
.
.
.
.
.
.
.
.
. 172
Configuring
Web
IDS
for
Use
with
the
Tivoli
Risk
Manager
EIF
.
.
.
.
.
.
.
.
.
.
.
.
. 173
Configuring
Web
IDS
for
Use
with
the
Event
Monitor
.
.
.
.
.
.
.
.
.
.
.
.
.
.
. 174
Configuring
the
Event
Monitor
to
Capture
Web
IDS
Events
.
.
.
.
.
.
.
.
.
.
.
.
. 174
iv
IBM
Tivoli
Risk
Manager:
Administrator’s
Guide
Managing
Web
IDS
.
.
.
.
.
.
.
.
.
.
. 177
Analyzing
Web
Attack
Events
.
.
.
.
.
.
. 177
Adding
or
Removing
Signature
Classes
.
.
. 178
Adding
or
Removing
Web
Attack
Signatures
178
Combining
and
Refining
Pattern
Tests
.
.
.
. 179
Adding
or
Removing
Suspicious
Hosts
.
.
.
. 180
Specifying
the
Type
of
Suspicious
Activity
.
.
. 180
Adding
or
Removing
Trusted
Signatures
.
.
. 180
Tuning
the
Threshold
and
Decay
Values
.
.
. 181
Chapter
12.
Network
Intrusion
Detection
.
.
.
.
.
.
.
.
.
.
.
.
. 183
Supported
Adapters
.
.
.
.
.
.
.
.
.
.
. 184
Network
IDS
Event
Correlation
.
.
.
.
.
.
. 186
Network
IDS
Alerts
.
.
.
.
.
.
.
.
.
.
. 186
Configuring
Network
IDS
.
.
.
.
.
.
.
.
. 187
Network
IDS
Tivoli
Risk
Manager
Tasks
.
.
.
. 187
Starting
the
Network
IDS
Adapter
.
.
.
.
. 187
Stopping
the
Network
IDS
Adapter
.
.
.
.
. 188
Managing
Network
IDS
.
.
.
.
.
.
.
.
.
. 188
Starting
Network
IDS
Automatically
with
the
startnids
Command
.
.
.
.
.
.
.
.
.
. 188
Updating
the
Signatures
File
.
.
.
.
.
.
. 188
Testing
for
Promiscuous
Operation
.
.
.
.
. 189
Omitting
IP
Addresses
.
.
.
.
.
.
.
.
. 189
Obtaining
the
Host
Name
.
.
.
.
.
.
.
. 189
Logging
Network
IDS
Alerts
and
Information
.
. 189
Configuring
Network
IDS
for
Use
with
the
Tivoli
Risk
Manager
EIF
.
.
.
.
.
.
.
.
.
.
.
. 190
Configuring
Network
IDS
for
Use
with
the
Event
Monitor
.
.
.
.
.
.
.
.
.
.
.
.
.
.
. 191
Configuring
the
Event
Monitor
to
Capture
Network
IDS
Events
.
.
.
.
.
.
.
.
.
. 191
The
nids
Command
.
.
.
.
.
.
.
.
.
.
. 193
Appendix
A.
Event
Integration
Facility
Sender
and
Receiver
Keywords
.
.
. 195
Keywords
.
.
.
.
.
.
.
.
.
.
.
.
.
. 195
Appendix
B.
Database
Archive
Configuration
.
.
.
.
.
.
.
.
.
.
. 205
Database
Archiver
Keywords
.
.
.
.
.
.
.
. 205
JDBC
Classpath
Settings
.
.
.
.
.
.
.
.
.
. 206
Appendix
C.
Secure
Socket
Layer
Introduction
and
iKeyman
.
.
.
.
.
. 209
Secure
Sockets
Layer
Overview
.
.
.
.
.
.
. 209
Digital
Certificates
.
.
.
.
.
.
.
.
.
.
. 209
How
SSL
Works
.
.
.
.
.
.
.
.
.
.
. 214
Tivoli
Risk
Manager
and
SSL
.
.
.
.
.
.
.
. 217
Default
Keystore
Files
.
.
.
.
.
.
.
.
. 217
Storing
SSL
Passwords
.
.
.
.
.
.
.
.
. 217
Planning
Considerations
.
.
.
.
.
.
.
.
. 218
SSL
Configuration
Files
.
.
.
.
.
.
.
.
. 219
TrustStores
.
.
.
.
.
.
.
.
.
.
.
.
. 220
Managing
Digital
Certificates
with
Keytool
.
.
. 220
Managing
Digital
Certificates
with
iKeyman
.
.
. 222
Starting
iKeyman
.
.
.
.
.
.
.
.
.
.
. 222
Creating
a
Key
Database
.
.
.
.
.
.
.
. 222
Creating
a
Self-Signed
Digital
Certificate
for
Testing
.
.
.
.
.
.
.
.
.
.
.
.
.
. 224
Adding
a
CA
Root
Digital
Certificate
.
.
.
. 225
Deleting
a
CA
Root
Digital
Certificate
.
.
.
. 226
Copying
Certificates
from
One
Key
Database
to
Another
.
.
.
.
.
.
.
.
.
.
.
.
.
. 226
Requesting
a
Digital
Certificate
.
.
.
.
.
. 228
Receiving
a
Digital
Certificate
.
.
.
.
.
.
. 229
Deleting
a
Digital
Certificate
.
.
.
.
.
.
. 230
Changing
a
Key
Database
Password
.
.
.
.
. 230
Appendix
D.
Notices
.
.
.
.
.
.
.
. 233
Trademarks
.
.
.
.
.
.
.
.
.
.
.
.
.
. 234
Glossary
.
.
.
.
.
.
.
.
.
.
.
.
. 237
Index
.
.
.
.
.
.
.
.
.
.
.
.
.
.
. 241
Contents
v

vi
IBM
Tivoli
Risk
Manager:
Administrator’s
Guide
Preface
This
book
describes
how
to
install,
configure,
and
manage
IBM®
Tivoli®
Risk
Manager.
This
guide
also
provides
an
overview
for
each
IBM
Tivoli
Risk
Manager
component.
Who
Should
Read
This
Book
You
should
have
prior
knowledge
of
the
Tivoli
Management
Framework
and
the
Tivoli
Enterprise
Console,
and
of
installing
and
using
third-party
intrusion-detection
applications.
IBM
Tivoli
Risk
Manager
is
an
implementer
of
network
security
policies,
specifically
intrusion-detection
systems
(IDS).
You
need
a
working
knowledge
of
network
security
and
a
solid
grasp
of
Transmission
Control
Protocol/Internet
Protocol
(TCP/IP),
fundamental
networking
concepts,
and
routed
networks.
What
This
Book
Contains
See
the
IBM
Tivoli
Risk
Manager
Release
Notes
for
changes
to
the
product
and
this
guide.
v
Chapter
1,
“Introduction,”
on
page
1
provides
an
overview
of
the
Tivoli
Risk
Manager
product
and
components.
v
Chapter
2,
“Event
Server,”
on
page
39
describes
Tivoli
Enterprise
Console
correlation,
including
correlation
terms,
processes,
and
management
tasks.
v
Chapter
3,
“Database,”
on
page
51
describes
how
to
use
the
Tivoli
Risk
Manager
database.
v
Chapter
4,
“Agent,”
on
page
61
describes
the
Tivoli
Risk
Manager
Agent.
v
Chapter
5,
“Engine
Configuration,”
on
page
81
describes
the
various
options
that
can
be
configured
in
the
agent’s
engine
component.
v
Chapter
6,
“Event
Summarization,”
on
page
89
describes
the
purpose
of
event
summarization.
It
is
used
to
reduce
the
network
traffic
while
minimizing
the
loss
of
information.
v
Chapter
7,
“Incident-Based
Correlation,”
on
page
95
describes
how
to
configure
incident-based
correlation.
v
Chapter
8,
“Web
Application,”
on
page
107
describes
how
to
use
the
Tivoli
Enterprise
Console
to
view
Tivoli
Risk
Manager
information.
v
Chapter
9,
“Reports,”
on
page
139
summarizes
IBM
Tivoli
Data
Warehouse
and
Crystal
Reports
for
enterprise
risk
management.
v
Chapter
10,
“Tasks,”
on
page
151
introduces
the
Tivoli
Risk
Manager-provided
Tivoli
Risk
Manager
tasks.
v
Chapter
11,
“Web
Intrusion
Detection,”
on
page
157
describes
Web
Intrusion
Detection
System
(Web
IDS),
a
Tivoli
Risk
Manager-provided
sensor.
v
Chapter
12,
“Network
Intrusion
Detection,”
on
page
183
describes
the
Network
Intrusion
Detection
(Network
IDS)
option.
v
Appendix
A,
“Event
Integration
Facility
Sender
and
Receiver
Keywords,”
on
page
195
provides
information
about
keywords
used
to
configure
Agent
configuration
files
to
send
and
receive
events.
©
Copyright
IBM
Corp.
2003
vii

v
Appendix
B,
“Database
Archive
Configuration,”
on
page
205
provides
reference
information
about
keywords
for
database
archive
configuration
files
v
Appendix
C,
“Secure
Socket
Layer
Introduction
and
iKeyman,”
on
page
209
provides
SSL
information
and
how
SSL
interacts
with
Tivoli
Risk
Manager.
This
guide
also
contains
a
glossary
of
intrusion-detection
and
security-related
terminology
and
an
index.
Publications
This
section
includes
the
following
Publication
information:
v
Tivoli
Risk
Manager
Library
v
Prerequisite
Publications
v
Related
Publications
v
Accessing
Publications
Online
v
Tivoli
Risk
Manager
Online
Information
Read
the
descriptions
of
the
Tivoli
Risk
Manager
library,
the
prerequisite
publications,
and
the
related
publications
to
determine
which
publications
you
might
find
helpful.
After
you
determine
the
publications
you
need,
refer
to
the
instructions
for
accessing
publications
online.
IBM
Tivoli
Risk
Manager
Library
The
publications
in
the
Tivoli
Risk
Manager
library
are:
v
The
IBM
Tivoli
Risk
Manager
Administrator’s
Guide
Version
4.2,
describes
how
to
configure,
and
manage
Tivoli
Risk
Manager.
This
guide
also
provides
an
overview
for
each
Tivoli
Risk
Manager
component.
v
The
IBM
Tivoli
Risk
Manager
Adapters
Guide
Version
4.2
provides
detailed
descriptions
for
the
currently
available
IBM
Tivoli
Risk
Manager
adapters.
v
The
IBM
Tivoli
Risk
Manager
Command
Reference
Version
4.2
describes
commands
used
to
administer
Tivoli
Risk
Manager.
v
The
IBM
Tivoli
Risk
Manager
Installation
Guide
Version
4.2
contains
information
on
planning
your
product
deployment,
including
topics
such
as
network
topology
and
installing
prerequisite
software
and
describes
how
to
install
and
configure
the
Tivoli
Risk
Manager
product
and
components.
v
The
IBM
Tivoli
Risk
Manager
Problem
Determination
Guide
Version
4.2
contains
consistent,
complete,
and
clear
problem
determination
processes
and
examples
to
assist
in
determining
why
Tivoli
Risk
Manager
is
malfunctioning.
v
The
IBM
Tivoli
Risk
Manager
Read
Me
First
Card
Version
4.2
directs
you
on
how
to
access,
and
the
intended
purpose
and
audience
of
the
Tivoli
Risk
Manager
documentation.
v
The
IBM
Tivoli
Risk
Manager
Release
Notes
Version
4.2
contains
last
minute
information
on
the
installation
and
administration
of
the
Tivoli
Risk
Manager
product.
Prerequisite
Publications
To
use
the
information
in
this
book
effectively,
you
must
have
some
prerequisite
knowledge,
which
you
can
obtain
from
the
following
publications:
v
Tivoli
Management
Framework
Planning
for
Deployment
Guide,
Tivoli
Management
Framework
Enterprise
Installation
Guide,
Tivoli
Management
Framework
User’s
Guide,
and
Tivoli
Management
Framework
Reference
Manual
viii
IBM
Tivoli
Risk
Manager:
Administrator’s
Guide

These
books
provide
detailed
information
about
the
desktop,
managed
nodes,
administrators,
policy
regions,
profiles,
notices,
tasks,
scheduling,
and
command-line
interface
(CLI)
commands.
v
IBM
Tivoli
Enterprise
Console
User’s
Guide
This
guide
provides
detailed
information
about
using
the
Tivoli
Enterprise
Console.
Related
Publications
Information
related
to
Tivoli
Risk
Manager
is
available
in
the
following
publications:
v
IBM
Tivoli
Enterprise
Console
Rule
Builder’s
Guide
This
guide
provides
detailed
information
about
how
to
write
and
integrate
new
rules.
v
Tivoli
Event
Integration
Facility
User’s
Guide
This
guide
discusses
how
to
develop
your
own
event
adapters
using
the
Event
Integration
Facility
(EIF).
These
event
adapters
are
tailored
to
your
network
environment
and
your
specific
needs.
v
IBM
Tivoli
Enterprise
Console
Reference
Manual
This
book
provides
details
on
the
command-line
commands.
v
IBM
Tivoli
Enterprise
Console
Adapters
Guide
This
guide
provides
detailed
descriptions
for
the
currently
available
Tivoli
Enterprise
Console
adapters.
v
Tivoli
Management
Framework
4.1
Task
Library
Language
Developer’s
Guide
This
guide
provides
detailed
information
on
how
to
create
and
customize
tasks.
v
The
Tivoli
Software
Library
provides
a
variety
of
Tivoli
publications
such
as
white
papers,
datasheets,
demonstrations,
redbooks,
and
announcement
letters.
The
Tivoli
Software
Library
is
available
on
the
Web
at:
http://www.ibm.com/software/tivoli/library/
v
The
Tivoli
Software
Glossary
includes
definitions
for
many
of
the
technical
terms
related
to
Tivoli
software.
The
Tivoli
Software
Glossary
is
available,
in
English
only,
from
the
Glossary
link
on
the
left
side
of
the
Tivoli
Software
Library
Web
page
http://www.ibm.com/software/tivoli/library/
Accessing
Publications
Online
The
publications
for
this
product
are
available
online
in
Portable
Document
Format
(PDF)
or
Hypertext
Markup
Language
(HTML)
format,
or
both
in
the
Tivoli
software
library:
http://www.ibm.com/software/tivoli/library
To
locate
product
publications
in
the
library,
click
the
Product
manuals
link
on
the
left
side
of
the
Library
page.
Then,
locate
and
click
the
name
of
the
product
on
the
Tivoli
software
information
center
page.
Product
publications
include
release
notes,
installation
guides,
user’s
guides,
administrator’s
guides,
and
developer’s
references.
Note:
To
ensure
proper
printing
of
publications,
select
the
Fit
to
page
check
box
in
the
Adobe
Acrobat
window
(which
is
available
when
you
click
File
→Print).
Preface
ix

IBM
Tivoli
Risk
Manager
Product
Information
IBM®
Tivoli®
customers
can
find
online
information
for
Tivoli
security
products
and
for
Tivoli
Risk
Manager.
Tivoli
Risk
Manager
Adapters
are
now
available
to
customers
through
the
Tivoli
Risk
Manager
Support
Web
site
and
are
no
longer
included
on
the
product
CD.
This
allows
new
and
improved
adapters
to
be
distributed
independently
from
new
releases
of
Tivoli
Risk
Manager
and
allows
customers
to
download
only
the
adapters
they
require.
For
Tivoli
Risk
Manager
Adapters,
up-to-date
product
updates
including
sensor
signatures,
and
service
information
about
Tivoli
Risk
Manager,
go
to:
http://www.ibm.com/software/sysmgmt/products/
support/IBMTivoliRiskManager.html
For
information
about
the
Tivoli
Risk
Manager
product,
go
to:
http://www.ibm.com/software/sysmgmt/products/risk-mgr.html
For
information
about
other
Tivoli
security
management
products,
go
to:
http://www.ibm.com/software/sysmgmt/
Accessibility
Accessibility
features
help
a
user
who
has
a
physical
disability,
such
as
restricted
mobility
or
limited
vision,
to
use
software
products
successfully.
The
major
accessibility
features
in
this
product
enable
users
to
do
the
following:
v
Use
assistive
technologies,
such
as
screen-reader
software
and
a
digital
speech
synthesizer,
to
hear
what
is
displayed
on
the
screen.
Consult
the
product
documentation
of
the
assistive
technology
for
details
on
using
those
technologies
with
this
product.
v
Magnify
what
is
displayed
on
the
screen.
In
addition,
the
product
documentation
has
been
modified
to
include
features
to
aid
accessibility:
v
All
documentation
is
available
in
both
HTML
and
convertible
formats
to
give
the
maximum
opportunity
for
users
to
apply
screen-reader
software.
v
All
images
in
the
documentation
are
provided
with
alternative
text
so
that
users
with
vision
impairments
can
understand
the
contents
of
the
images.
Contacting
Software
Support
Before
contacting
IBM
Tivoli
Software
support
with
a
problem,
refer
to
the
IBM
Tivoli
Software
support
Web
site
at:
http://www.ibm.com/software/sysmgmt/products/support/
If
you
need
additional
help,
contact
software
support
by
using
the
methods
described
in
the
IBM
Software
Support
Guide
at
the
following
Web
site:
http://techsupport.services.ibm.com/guides/handbook.html
The
guide
provides
the
following
information:
v
Registration
and
eligibility
requirements
for
receiving
support
v
Telephone
numbers,
depending
on
the
country
in
which
you
are
located
v
A
list
of
information
you
should
gather
before
contacting
customer
support
x
IBM
Tivoli
Risk
Manager:
Administrator’s
Guide

Conventions
Used
in
This
Book
In
this
book,
a
Windows®
system
is
a
computer
system
that
uses
the
Windows
NT®,
Windows
2000,
or
the
Windows
XP
operating
systems.
A
UNIX
system
is
a
computer
system
that
uses
a
UNIX™
operating
system
such
as
the
AIX®,
Linux,
HP-UX,
or
the
Solaris
Operating
Environment
(hereinafter
referred
to
as
Solaris)
operating
systems.
Typeface
Conventions
The
following
typeface
conventions
are
used
in
this
reference:
Bold
Lowercase
commands
or
mixed
case
commands
that
are
difficult
to
distinguish
from
surrounding
text,
keywords,
parameters,
options,
and
objects
are
in
bold.
Italics
Variables,
titles
of
publications,
and
special
words
or
phrases
that
are
emphasized
are
in
italic.
Monospace
Code
examples,
command
lines,
screen
output,
file
and
directory
names
that
are
difficult
to
distinguish
from
surrounding
text,
system
messages,
text
that
the
user
must
type,
and
values
for
arguments
or
command
options
are
in
monospace.
Naming
Conventions
The
following
naming
conventions
are
used
in
this
book:
Linux
for
PowerPC
Term
used
when
you
are
running
Linux
on
iSeries
and
pSeries
hardware
systems.
RMINSTDIR
The
Tivoli
Risk
Manager
installation
location
that
includes
the
RISKMGR
subdirectory
on
your
system.
For
example,
on
a
Solaris
system,
the
default
installation
directory
would
be
/opt/RISKMGR
Solaris
Operating
Environment
Referred
to
as
Solaris.
UNIX-based
Term
used
when
referring
to
AIX,
HP-UX,
and
Solaris
systems.
Tivoli
Risk
Manager
Agent
Referred
to
as
the
agent.
Tivoli
Risk
Manager
Client
Referred
to
as
the
client.
Tivoli
Risk
Manager
Distributed
Correlation
Server
Referred
to
as
the
distributed
correlation
server.
Tivoli
Risk
Manager
Gateway
Referred
to
as
the
gateway.
Tivoli
Risk
Manager
Event
Server
Referred
to
as
the
event
server.
Tivoli
Risk
Manager
Event
Monitor
Referred
to
as
the
event
monitor.
Tivoli
Enterprise
Console
user
interface
Referred
to
as
the
event
console.
Preface
xi

Operating
System
Differences
This
book
uses
the
UNIX
convention
for
specifying
environment
variables
and
for
directory
notation.
When
using
the
Windows
command
line,
replace
$variable
with
%variable%
for
environment
variables
and
replace
each
forward
slash
(/)
with
a
backslash
(\)
in
directory
paths.
If
you
are
using
the
bash
shell
on
a
Windows
system,
you
can
use
the
UNIX
conventions.
xii
IBM
Tivoli
Risk
Manager:
Administrator’s
Guide

Chapter
1.
Introduction
Today,
corporations
are
deploying
a
variety
of
security
solutions,
such
as
firewalls,
intrusion
detection
systems,
anti-virus
software,
and
access
control
mechanisms.
They
use
these
security
solutions
as
part
of
their
overall
security
strategy
to
achieve
the
simple
objective
of
letting
the
good
guys
in
and
keeping
the
bad
guys
out.
Security
policies
implemented
at
the
network
level,
host
level,
and
application
level
allow
access
to
only
authorized
users,
applications,
and
systems.
Yet,
businesses
still
face
ever
increasing
risks
from
virus
threats,
unauthorized
access,
and
denial
of
service
attacks
that
target
the
enterprise.
Threats
can
originate
internally
from
within
the
enterprise
or
externally
from
the
Internet.
Informal
surveys
suggest
that
almost
half
of
the
internal
threats
are
malicious
and
the
other
half
are
accidental
and
arise
from
improperly
configured
systems
or
weak
security
policies.
To
effectively
guard
against
these
different
threats
requires
an
enterprise
view
of
security.
This
coordinated
approach
can
harness
the
intelligence
across
the
different
security
checkpoints
within
the
enterprise.
Enterprise
risk
management
seeks
to
accomplish
the
following
broad
objectives:
v
Provide
a
simple,
easy-to-use
enterprise
security
console
to
monitor,
view,
and
manage
security
alerts
across
the
enterprise.
This
approach
enables
companies
to
identify
and
manage
threats
and
vulnerabilities
throughout
the
enterprise.
This
ensures
that
access
to
networks,
systems,
applications,
and
desktops
is
consistent
with
enterprise
security
policies.
v
Enable
system
administrators
to
precisely
identify
different
types
of
threats
and
attacks
using
advanced
correlation
techniques,
so
corporations
can
identify
patterns
of
intrusions,
eliminate
clutter,
reduce
false-positive
alerts,
and
quickly
identify
real
security
threats
to
speed
response
time.
v
Centralized
correlation
and
management
of
attacks,
threats,
and
suspicious
activity
will
provide
a
broader
view
of
activity
in
the
enterprise.
This
is
essential
because
intrusion
detection
systems
often
create
large
numbers
of
alerts,
and
alerts
produced
by
different
intrusion
detection
systems
(or
applications)
are
often
related
to
the
same
root
cause.
Patterns
identified
by
centralized
correlation
often
provide
information
that
is
needed
to
track
down
the
actual
root
cause.
v
Provide
a
variety
of
predefined
reaction
tasks
to
quickly
resolve
urgent
security
issues,
such
as
denial
of
service
attacks,
viruses,
or
unauthorized
accesses.
Predefined
tasks
include
revoking
user
accounts
on
servers,
reconfiguring
a
firewall,
disabling
compromised
services
and
managing
information
that
is
captured
in
the
Tivoli
Risk
Manager
archive
database.
v
Integrate
with
multi-vendor
security
products
to
provide
a
comprehensive
security
management
environment.
v
Leverage
integration
with
the
full
range
of
the
Tivoli
network,
system,
and
security
management
products
to
take
long-term
corrective
actions
and
constantly
improve
enterprise
security
policies.
v
Provide
reporting
of
information
for
analysis
of
intrusion
events
that
might
occur
on
a
customer’s
system.
Tivoli
Risk
Manager
is
an
open,
cross-platform,
standards-based
enterprise
management
platform
that
enables
customers
to
manage
security
intrusions
and
vulnerabilities
across
networks,
hosts,
operating
systems,
applications,
servers,
and
desktops.
Increasingly,
attacks
and
intrusions
target
the
enterprise
as
a
whole,
not
just
as
a
subsystem.
©
Copyright
IBM
Corp.
2003
1

Customers
can
leverage
their
existing
investments
in
the
Tivoli
Enterprise
Console
and
Tivoli
Management
Framework
to
seamlessly
implement
enterprise
risk
management
as
a
subset
of
traditional
enterprise
management.
Tivoli
Risk
Manager
can
manage
a
broad
range
of
security
technologies
and
products
that
are
widely
deployed
within
the
enterprise:
Events
and
alerts
from
firewalls,
routers,
network,
and
host-based
intrusion
detection
systems,
host
system
security,
antivirus
systems,
and
desktop
security
systems.
Using
advanced
correlation
techniques,
Tivoli
Risk
Manager
significantly
reduces
clutter
and
repetition
by
aggregating
and
summarizing
thousands
of
alerts,
reducing
false
positives,
and
enabling
system
administrators
to
identify
threats
through
correlation,
alert
aggregation,
and
summarization.
Severe
alerts
(attacks,
unauthorized
access,
suspicious
activities,
and
policy
violations)
can
be
responded
to
with
automatic
tasks,
such
as
updating
firewall
policies,
disabling
a
user
account
or
resetting
hostile
Transmission
Control
Protocol
(TCP)
connections.
In
order
to
position
Tivoli
Risk
Manager
within
a
typical
e-business
environment
and
understand
the
necessary
infrastructure,
see
the
IBM
Tivoli
Risk
Manager
Installation
Guide
for
planning
information.
Tivoli
Risk
Manager
Topology
and
Architecture
A
high-level
view
of
the
logical
components
of
a
Tivoli
Risk
Manager
deployment
is
shown
in
Figure
1
on
page
3:
2
IBM
Tivoli
Risk
Manager:
Administrator’s
Guide

The
primary
logical
components
will
typically
include
the
following:
v
Event
Sources
v
Event
Adapters
v
Tivoli
Risk
Manager
Clients
v
Tivoli
Risk
Manager
Event
Server
(Tivoli
Enterprise
Console
Event
Server)
v
Tivoli
Risk
Manager
Consoles
v
Tivoli
Risk
Manager
Historical
Reporting
Event
Sources
Tivoli
Risk
Manager
gathers
possible
intrusion-attempt
information
and
other
security-related
alerts
from
a
variety
of
event
sources.
Event
sources
include
intrusion
detection
sensors
(IDS),
firewalls,
applications,
and
operating
systems.
These
event
sources
are
referred
to
as
sensors.
Tivoli
Risk
Manager
provides
a
variety
of
techniques
for
capturing
this
information,
and
then
forwarded
to
a
Tivoli
Risk
Manager
server
for
correlation,
display
on
a
real-time
console,
and
storage
in
a
relational
database
for
recording
purposes.
In
addition
to
supporting
a
wide
variety
of
third-party
sensors,
applications,
and
operating
systems,
Tivoli
Risk
Manager
includes
a
set
of
intrusion
detection
sensors:
Applications
IDS
WEB IDS
SNMP Trap
File
Syslog FIFO
Win Event Log
Database
Custom
Tivoli Enterprise
Console Adapter
Custom Adapter
Tivoli Risk Manager Agent as ClientAlert/Msg
Sources
Logging
Mechanisms
Event
Receiver
Port
Event
Monitor
Tivoli Risk
Manager
EIF API
Tivoli Enterprise
Console Adapter
Summarize
Transport
OS
Tivoli Enterprise Console Server
Tivoli Risk Manager Agent as aCorrelation Server
Tivoli Risk Manager
Crystal Reports
TEDWEvent
Repository
ETL1
Tivoli
Inventory
DB
ETL2
Data
Mart
Console
Browser
Event Details
Advisor
System Information
WebSphere
Tivoli Risk Manager Servlet
Event Details
Advisor
System Information
NIDS
Launch
Figure
1.
Logical
Components
of
a
Tivoli
Risk
Manager
Deployment
Chapter
1.
Introduction
3
Web-based
Intrusion-detection
Sensor
Tivoli
Risk
Manager
includes
the
Web
Intrusion
Detection
System
(Web
IDS)
sensor
that
detects
Web
server
attacks
and
other
suspicious
activity.
Network-based
Intrusion-detection
Sensor
Tivoli
Risk
Manager
includes
the
Network
Intrusion
Detection
System
(Network
IDS)
sensor
that
detects
network-based
attacks
and
suspicious
activity.
See
Chapter
11,
“Web
Intrusion
Detection,”
on
page
157
and
Chapter
12,
“Network
Intrusion
Detection,”
on
page
183
for
more
information
about
Tivoli
Risk
Manager
sensors.
Event
Adapters
An
event
adapter
is
the
software
component
responsible
for
capturing
relevant
information
from
an
event
source,
mapping
it
into
a
Tivoli
Risk
Manager
event,
and
then
forwarding
the
event.
Tivoli
Risk
Manager
supports
several
different
forms
of
event
adapters.
v
Custom
adapters
v
Tivoli
Enterprise
Console
adapters
v
Tivoli
Risk
Manager
event
monitor
Custom
Adapters
A
custom
event
adapter
is
required
when
the
event
source
or
sensor
uses
a
non-standard
mechanism
for
logging
alerts
such
as
a
programming
API
specific
to
that
sensor.
A
custom
event
adapter
is
designed
to
interact
directly
with
a
sensor
to
acquire
events.
Typically,
custom
adapters
utilize
a
simple
event
submission
API
provided
by
Tivoli
Risk
Manager
to
pass
sensor
events
directly
to
the
agent
for
formatting,
summarization
and
transport
to
an
event
server.
This
event
submission
API
is
the
Tivoli
Risk
Manager
Event
Integration
Facility
and
is
incorporated
as
part
of
the
client.
Most
Tivoli
Risk
Manager
custom
event
adapters,
such
as
the
Tivoli
Risk
Manager
adapter
for
Cisco
Secure
IDS,
provide
XML
files
that
contain
the
formatting
information
used
by
the
event
adapter
to
extract
information
from
the
event
source.
Custom
event
adapters
are
installed
on
the
same
host
system
as
the
client.
Tivoli
Enterprise
Console
Adapters
General-purpose
Tivoli
Enterprise
Console
adapters
are
designed
to
extract
information
from
system
logs
(or
Simple
Network
Management
Protocol
(SNMP)
traps),
format
the
information
into
Tivoli
Risk
Manager
events,
and
then
forward
the
events
to
a
local
agent
for
summarization
and
transport
to
an
event
server.
Tivoli
Risk
Manager
provides
format
(.fmt)
or
class
definition
statement
(.cds)
files
that
contain
the
formatting
information
used
by
the
Tivoli
Enterprise
Console
adapter
to
extract
information
from
the
event
source.
The
.fmt
or
.cds
files
are
provided
for
a
variety
of
event
sources
including
intrusion
detection
sensors,
firewalls,
applications,
and
operating
systems.
Tivoli
Enterprise
Console
adapters
are
typically
installed
on
the
same
host
system
as
the
client.
Tivoli
Management
Framework
(TME)
Tivoli
Enterprise
Console
adapters
can
be
used
to
capture
information
from
events
sources
but
must
forward
information
directly
to
the
Tivoli
Enterprise
Console
event
server
and
bypass
the
summarization
capability
within
the
client.
Tivoli
Risk
Manager
recommends
the
use
of
non-TME
Tivoli
Enterprise
Console
adapters
to
capture
information
from
event
sources
and
forward
this
information
to
the
local
client
for
summarization
and
transport.
For
more
information
about
specific
Tivoli
Enterprise
Console
adapters,
see
the
IBM
Tivoli
Risk
Manager
Adapters
Guide.
4
IBM
Tivoli
Risk
Manager:
Administrator’s
Guide

Tivoli
Risk
Manager
Event
Monitor
The
Tivoli
Risk
Manager
Event
Monitor
(event
monitor)
is
designed
to
extract
information
from
a
variety
of
event
sources.
Then
formats
the
information
into
Tivoli
Risk
Manager
events,
and
forwards
the
events
to
a
local
agent
for
summarization
and
transport
to
an
event
server.
Supported
event
sources
include:
v
Files
v
Windows
Event
Logs
v
Relational
database
tables
v
Named
pipe
queues
The
event
monitor
utilizes
XML
files
that
contain
the
formatting
information
to
extract
information
from
the
event
source.
XML
files
are
provided
for
a
variety
of
event
sources
including
intrusion
detection
sensors
(IDS),
firewalls,
applications,
and
operating
systems.
The
event
monitor
is
installed
as
an
integral
part
of
the
client.
Using
the
event
monitor
for
capturing
and
creating
events
has
several
advantages
as
an
event
adapter
over
the
Tivoli
Enterprise
Console
adapter
including:
v
The
event
monitor
is
integrated
with
the
client
(and
other
Tivoli
Risk
Manager
roles,
such
as
the
distributed
correlation
server,
event
server,
and
gateway)
and
is
installed
with
the
client.
A
Tivoli
Enterprise
Console
adapter
is
configured,
managed
and
installed
separately.
v
The
event
monitor
configuration
wizard
will
automatically
configure
an
instance
of
the
event
monitor
to
gather
information
from
an
event
source.
The
Tivoli
Enterprise
Console
adapter
configuration
requires
a
series
of
manual
steps.
v
The
event
monitor
configuration
wizard
will
automatically
configure
the
event
monitor
to
perform
multithreaded
monitoring
of
multiple
event
sources
on
the
same
system.
To
set
up
multiple
instances
of
a
Tivoli
Enterprise
Console
adapter
on
Linux
and
UNIX-based
systems
requires
complex
installation
and
setup.
Multiple
instances
of
Tivoli
Enterprise
Console
adapters
are
not
supported
on
Windows
systems.
v
The
event
monitor
using
XML
files
used
for
formatting
is
more
efficient
than
a
Tivoli
Enterprise
Console
adapter
using
.fmt
files
when
dealing
with
hundreds
or
thousands
of
format
patterns.
v
The
event
monitor
can
select
information
from
a
table
in
a
relational
database.
Tivoli
Enterprise
Console
adapters
do
not
have
this
capability.
Several
Tivoli
Risk
Manager
adapters
use
this
feature.
v
Tivoli
Risk
Manager
includes
the
wrmfmt2xml
command
to
convert
a
pre-existing
.fmt
file
into
the
XML
representation
used
by
the
event
monitor.
The
event
monitor
does
not
provide
support
for
SNMP-based
event
sources.
The
Tivoli
Enterprise
Console
adapter
must
be
used
when
monitoring
event
sources
generating
SNMP
traps.
Tivoli
Risk
Manager
adapters
that
monitor
SNMP
event
sources
include
the
Tivoli
Risk
Manager
adapter
for
ISS
RealSecure
and
adapter
for
Cisco
Routers.
For
more
information
about
specific
Tivoli
Risk
Manager
adapters,
see
the
IBM
Tivoli
Risk
Manager
Adapters
Guide.
For
more
information
on
the
wrmfmt2xml
command,
see
the
IBM
Tivoli
Risk
Manager
Command
Reference.
Chapter
1.
Introduction
5

Tivoli
Risk
Manager
Clients
The
client
provides
key
capabilities
and
is
typically
deployed
in
conjunction
with
an
adapter
or
a
sensor.
The
features
provided
by
the
client
include:
v
The
client
includes
the
event
monitor
as
an
integral
component.
The
event
monitor
is
installed
as
an
integral
part
of
the
client.
The
event
monitor
is
designed
to
extract
information
from
a
variety
of
event
sources.
Then
formats
the
information
into
Tivoli
Risk
Manager
Tivoli
Enterprise
Console
events,
and
forwards
the
events
to
a
local
agent
for
summarization
and
transport
to
an
event
server.
v
The
client
provides
a
variety
of
transport
choices
for
sending
the
events
to
a
Tivoli
Risk
Manager
server.
These
include
simple
socket-based
communications
as
well
as
secure
communications
as
provided
by
Tivoli
Management
Framework
and
Secure
Socket
Layer
(SSL)
communications.
v
The
client
provides
a
summarization
feature
that
aggregates
duplicate
or
similar
events.
Instead
of
sending
potentially
large
floods
of
duplicate
events
to
the
server,
the
summarization
feature
forwards
a
relatively
small
number
of
summarized
events.
This
reduces
network
traffic,
the
load
on
the
server,
and
the
volume
of
information
that
is
stored
in
the
relational
event
repository.
v
The
client
provides
message
formatting
facilities
(using
XML-based
formatting
files).
The
formatting
facilities
are
exploited
by
many
custom
adapters
and
sensors
(including
the
Cisco
Secure
IDS
adapter,
and
Check
Point™
FireWall-1®
adapter).
Tivoli
Risk
Manager
sensors
(including
Web
IDS
and
Network
IDS),
and
by
the
event
monitor.
v
The
client
provides
flexibility
in
terms
of
event
filtering
and
routing
events
to
multiple
servers
or
event
destinations,
including
relational
databases.
v
The
client
provides
a
very
simple
event
submission
API
for
use
by
custom
event
adapters.
You
can
use
this
API
to
develop
your
own
Tivoli
Risk
Manager-compatible
adapter.
See
Chapter
4,
“Agent,”
on
page
61
for
more
client
information.
Agent-less
Mode
The
agent
supports
what
is
often
called
agent-less
mode.
For
example,
if
one
or
more
servers
are
reporting
their
security
alerts
to
a
syslog
server
on
a
centralized
system,
the
client
can
be
deployed
on
the
syslog
server
to
capture
the
security
alerts.
The
event
monitor
component
imbedded
in
the
client
can
be
used
to
intercept
and
forward
alerts
from
the
syslog
server
to
the
event
server.
In
addition,
if
non-TME
Tivoli
Risk
Manager
adapters
are
deployed
on
a
variety
of
systems,
these
non-TME
Tivoli
Risk
Manager
adapters
can
be
configured
to
route
their
events
to
a
single
client.
The
client
can
be
used
to
summarize
these
events
prior
to
forwarding
them
to
a
server.
Tivoli
Risk
Manager
Event
Server
In
the
most
straightforward
deployment,
a
single
Tivoli
Enterprise
Console
server
hosts
the
Tivoli
Risk
Manager
correlation
server
functions.
This
means
that
the
Tivoli
Enterprise
Console
functions
and
one
Tivoli
Risk
Manager
correlation
engine
are
on
one
machine,
that
is
known
as
the
event
server.
The
event
server
participates
in
a
Tivoli
Management
Region
(TMR).
It
also
uses
the
services
provided
by
the
Tivoli
Management
Framework
as
well
as
a
relational
database
interface.
The
Tivoli
Enterprise
Console
provides
the
following
components:
v
The
Tivoli
Enterprise
Console
server,
that
applies
prolog-based
rules
to
received
events
6
IBM
Tivoli
Risk
Manager:
Administrator’s
Guide
v
The
Tivoli
Enterprise
Console
event
console
server,
that
manages
the
distributed
consoles
v
The
Tivoli
Enterprise
Console
event
console
v
The
Adapter
Configuration
Facility
(ACF),
used
to
deploy
and
administer
Tivoli
Enterprise
Console
adapters
through
the
TMR.
v
Tivoli
Enterprise
Console
adapters
By
installing
the
event
server
component
on
a
Tivoli
Enterprise
Console
server,
the
Tivoli
Enterprise
Console
server
is
instrumental
in
performing
the
Tivoli
Risk
Manager
correlation
functions.
Tivoli
Risk
Manager
adapters
and
clients
forward
Tivoli
Risk
Manager
Tivoli
Enterprise
Console
events
to
the
event
server
for
real-time
correlation
as
well
as
for
capture
in
the
relational
database.
The
events
received
by
the
Tivoli
Enterprise
Console
server
will
be
displayed
on
the
event
console.
In
addition,
the
Tivoli
Risk
Manager
correlation
technology
implements
a
two-level
correlation
process,
that
produces
two
types
of
alarms.
These
alarms
are
created
in
the
form
of
Tivoli
Enterprise
Console
events
and
are
displayed
on
the
event
console:
v
Incidents
v
Incident
Groups
Incidents
are
created
by
the
Tivoli
Risk
Manager
state-based
correlation
engine.
Incidents
are
created
by
using
a
patented
time-based
sliding-window
algorithm
for
detecting
suspicious
patterns
of
activity.
Each
time
a
particular
pattern
of
suspicious
activity
exceeds
a
configured
threshold
within
a
configured
time
period,
an
incident
is
created
and
forwarded
to
the
Tivoli
Enterprise
Console
prolog
correlation
engine,
where
Tivoli
Risk
Manager
rules
perform
additional
aggregation.
This
second
level
of
aggregation
creates
Incident
Group
events,
that
represent
aggregations
of
Incidents
that
are
shown
in
Figure
2
on
page
8.
Chapter
1.
Introduction
7
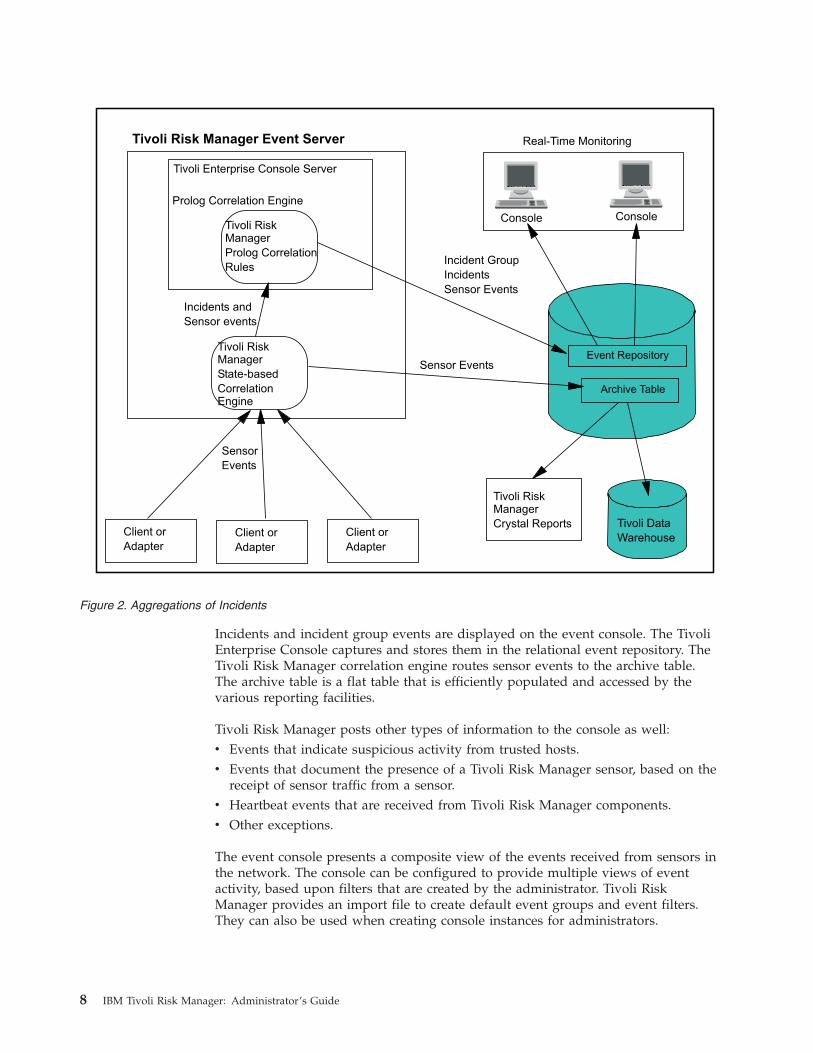
Incidents
and
incident
group
events
are
displayed
on
the
event
console.
The
Tivoli
Enterprise
Console
captures
and
stores
them
in
the
relational
event
repository.
The
Tivoli
Risk
Manager
correlation
engine
routes
sensor
events
to
the
archive
table.
The
archive
table
is
a
flat
table
that
is
efficiently
populated
and
accessed
by
the
various
reporting
facilities.
Tivoli
Risk
Manager
posts
other
types
of
information
to
the
console
as
well:
v
Events
that
indicate
suspicious
activity
from
trusted
hosts.
v
Events
that
document
the
presence
of
a
Tivoli
Risk
Manager
sensor,
based
on
the
receipt
of
sensor
traffic
from
a
sensor.
v
Heartbeat
events
that
are
received
from
Tivoli
Risk
Manager
components.
v
Other
exceptions.
The
event
console
presents
a
composite
view
of
the
events
received
from
sensors
in
the
network.
The
console
can
be
configured
to
provide
multiple
views
of
event
activity,
based
upon
filters
that
are
created
by
the
administrator.
Tivoli
Risk
Manager
provides
an
import
file
to
create
default
event
groups
and
event
filters.
They
can
also
be
used
when
creating
console
instances
for
administrators.
Tivoli Risk Manager Event Server
Console Console
Tivoli Enterprise Console Server
Tivoli RiskManager
State-based
CorrelationEngine
Real-Time Monitoring
Event Repository
Tivoli RiskManager
Crystal Reports Tivoli Data
Warehouse
Tivoli RiskManager
Prolog Correlation
Rules
Prolog Correlation Engine
Incidents and
Sensor events
Client or
Adapter
Client or
Adapter
Client or
Adapter
Sensor
Events
Archive Table
Incident Group
Incidents
Sensor Events
Sensor Events
Figure
2.
Aggregations
of
Incidents
8
IBM
Tivoli
Risk
Manager:
Administrator’s
Guide

Distributed
Correlation
The
event
server
is
an
essential
component
of
a
Tivoli
Risk
Manager
deployment.
The
event
server
provides
both
the
console
and
the
aggregation
rules
that
generate
the
incident
groups.
The
first-level
correlation
process
that
creates
incidents
can
be
deployed
in
a
distributed
fashion,
as
shown
in
Figure
3,
by
installing
one
or
more
Tivoli
Risk
Manager
distributed
correlation
servers
in
your
network.
Each
distributed
correlation
server
is
responsible
for
a
portion
of
the
network’s
event
traffic.
The
server
performs
the
incident-based
correlation
on
its
portion
of
the
event
traffic,
forwards
incident
alerts
and
sensor
events
to
the
event
server
for
second-level
correlation,
and
is
displayed
on
the
console.
Consider
the
following
when
deciding
whether
or
not
to
deploy
distributed
correlation
servers
in
your
environment:
v
It
provides
a
load-balancing
mechanism
for
correlation,
when
dealing
with
extremely
high
volumes
of
events.
v
It
can
be
used
to
dedicate
correlation
servers
to
logically
grouped
sensors
and
adapters,
based
on
things
such
as
network
topology
and
location.
The
grouping
might
also
be
done
based
on
organizational
boundaries.
v
It
can
also
be
used
to
provide
redundancy
in
your
correlation
infrastructure.
A
variety
of
configuration
options
are
available
when
distributing
the
Tivoli
Risk
Manager
correlation
engines
in
this
way.
For
example,
instead
of
forwarding
all
Tivoli Risk Manager Event Server
Console Console
Tivoli Risk Manager
State-based
Correlation
Engine
Real-Time Monitoring
Event Repository
Tivoli Risk Manager
Crystal Reports Tivoli Data
Warehouse
Tivoli RiskManager
Prolog Correlation
Rules
Prolog Correlation Engine
Incident and
Sensor Events
Client or
Adapter
Sensor
Events
Archive Table
State-based
Correlation
Engine
Client or
Adapter
Client or
Adapter
Client or
Adapter
Client or
Adapter
Sensor
Events
Distributed
Correlation Server
State-based
Correlation
Engine
Distributed
Correlation Server
State-based
Correlation
Engine
Distributed
Correlation Server
Incident Group
Incidents
Sensor Events
Sensor Events
Figure
3.
Incident-Based
Correlation
that
is
Deployed
in
a
Distributed
Fashion
Chapter
1.
Introduction
9

sensor
events
to
the
top-level
event
server,
only
incident
events
are
forwarded.
Using
this
approach,
only
incidents
and
incident
groups
will
appear
on
the
event
console,
significantly
reducing
the
event
processing
load
on
the
event
server.
Distributed
correlation
servers
can
also
be
configured
to
route
sensor
events
directly
into
the
Tivoli
Risk
Manager
archive
table,
where
they
can
be
accessed
using
the
Web
access
feature
supported
by
Tivoli
Enterprise
Console
and
Tivoli
Risk
Manager.
See
Chapter
8,
“Web
Application,”
on
page
107
for
more
Web
Application
information.
Tivoli
Risk
Manager
Console
A
Tivoli
Risk
Manager
administrator
monitors
the
Tivoli
Enterprise
Console
for
incidents,
incident
groups,
and
individual
sensor
events
(in
particular,
high-severity
sensor
events).
Incident
events
and
incident
group
events
represent
the
results
of
correlation,
and
aggregation
of
correlation
results,
respectively.
The
Tivoli
Enterprise
Console
is
highly
configurable,
and
can
be
customized
to
provide
multiple
views
of
the
information
collected
by
Tivoli
Risk
Manager,
as
well
as
the
events
generated
by
Tivoli
Risk
Manager’s
correlation
process.
Standalone
Java
and
Web-based
versions
of
the
Tivoli
Enterprise
Console
are
also
supported.
Tivoli
Risk
Manager
Web
Application
Tivoli
Risk
Manager
provides
a
Web
application
that
extends
the
capability
of
the
Tivoli
Enterprise
Console.
The
Tivoli
Risk
Manager
Web
Application
consists
of
three
functions,
that
provide
three
different
sources
of
information:
v
Event
Details
The
Event
Details
function
displays
detailed
information
about
incident
events,
incident
group
events,
and
individual
sensor
events.
An
incident
event
is
generated
by
Tivoli
Risk
Manager
correlation
rules,
as
the
result
of
processing
what
may
be
large
numbers
of
events
received
from
sensors
and
applications
(known
as
sensor
events).
Incident
events
are
further
aggregated
at
the
event
server
into
incident
group
events.
By
selecting
an
incident
event
on
the
Tivoli
Enterprise
Console
and
clicking
the
Information
button,
Event
Details
provides
access
to
the
set
of
sensor
events
that
contributed
to
the
creation
of
the
selected
incident
event.
Similarly,
Event
Details
provides
access
to
the
set
of
incident
events
that
contributed
to
a
selected
incident
group
event
(as
well
as
the
sensor
events
that
contributed
to
the
selected
incident
group
event).
v
Advisor
Tivoli
Risk
Manager
collects
and
correlates
alerts
from
a
diverse
set
of
sensors,
firewalls,
applications,
and
operating
systems.
It
is
often
essential
that
an
organization’s
administrators,
with
varying
expertise
levels,
evaluate
and
respond
to
security
breaches
in
a
consistent,
policy-driven
fashion.
The
Advisor
provides
a
mechanism
for
security
administrators
to
access
pre-defined
and
accumulated
knowledge
that
has
been
developed
by
experienced
and
savvy
members
of
the
organization.
The
information
and
suggested
actions
provided
by
the
Advisor
function
are
based
on
a
set
of
rules,
that
provide
a
programmatic
way
to
ensure
consistent
access
to
information
and
consistent
responses
to
perceived
threats.
To
access
the
information
and
suggested
actions
associated
with
an
event
(per
the
Advisor
rule
set),
select
the
event
on
the
even
console
and
click
the
Information
button.
For
example,
an
Advisor
rule
can
provide
direct
access
to
the
Common
Vulnerabilities
and
Exposures
(CVE)
Web
page,
that
provides
salient
details
about
the
exposure.
In
addition,
for
a
particular
exposure
or
signature,
an
Advisor
rule
may
recommend
that
be
sent
to
a
specific
supervisor.
For
additional
information
about
building
a
library
of
Advisor
rules,
see
“Advisor”
on
page
120.
10
IBM
Tivoli
Risk
Manager:
Administrator’s
Guide

v
System
Information
Proper
analysis
of
a
security
threat
may
depend
on
access
to
in-depth
information
about
the
target
or
source
of
the
suspicious
activity.
System
Information
provides
direct
access
to
software
information
and
hardware
information
that
is
collected
by
the
Tivoli
Inventory
application.
Tivoli
Inventory
is
a
component
of
the
Tivoli
Configuration
Manager
suite
of
applications.
For
example,
Tivoli
Risk
Manager
can
detect
a
Code
Red
attack
being
directed
at
a
Web
server
in
your
enterprise
and
may
represent
it
as
a
single
incident
event
on
the
Tivoli
Enterprise
Console.
By
selecting
the
incident
event
on
the
console
and
clicking
the
Information
button,
you
gain
access
to
the
System
Information
function
and
can
mine
the
Tivoli
Inventory
database
for
hardware
and
software
information
about
the
target
of
the
Code
Red
attack.
Continuing
the
example,
if
the
target
system
is
running
an
Apache
web
server
on
a
Linux
operating
system,
the
administrator
can
determine
that
the
attack
is
suspicious,
but
will
not
cause
harm
to
the
target
system.
The
following
figure
provides
a
high-level
view
of
the
placement
of
the
Tivoli
Risk
Manager
Web
Application
function
within
a
Tivoli
Risk
Manager
deployment.
See
Chapter
8,
“Web
Application,”
on
page
107
for
more
Web
Application
information.
Tivoli Enterprise Console Server
Tivoli Risk Manager Agent as a
Correlation Server
Sensor Events
Incident Events
Incident Group Events
Tivoli
Inventory
DB
Console
Browser
Event Details
Advisor
System Information
WebSphere
Tivoli Risk Manager Servlet
Event Details
Advisor
System Information
Launch
Custom Advisor Rules
Event Repository
Figure
4.
Web
Application
within
a
Tivoli
Risk
Manager
Deployment
Chapter
1.
Introduction
11
Tivoli
Risk
Manager
Historical
Reporting
The
Crystal
Reports
component
of
Tivoli
Risk
Manager
provides
twenty-two
compiled
reports
that
provide
information
for
analysis
of
the
kinds
of
intrusion
events
that
might
occur
on
a
customer’s
system.
The
compiled
Crystal
Reports
provided
with
Tivoli
Risk
Manager
include
Firewall
Management
Reports,
Intrusion
Detection
Reports,
Risk
Assessment
Reports,
Event
Management
Reports,
and
Virus
Management
Reports.
The
Compiled
Reports
format
allows
you
to
run
reports
without
having
the
Crystal
Reports
Designer
installed
on
the
system.
Note:
You
must
purchase
and
install
the
Crystal
Reports
Designer
if
you
want
to
create
or
edit
Crystal
Reports.
See
Chapter
9,
“Reports,”
on
page
139
for
more
information
on
historical
reporting.
Overview
of
Tivoli
Risk
Manager
Security
Event
Processing
The
following
sections
provide
a
logical
overview
of
the
processing
that
occurs
in
a
Tivoli
Risk
Manager
environment
when
an
attack
(or
other
suspicious
behavior)
is
detected.
In
this
logical
view,
there
are
four
stages
in
the
processing:
1.
Detect
An
intrusion-detection
sensor
or
application
detects
suspicious
activity
or
an
otherwise
interesting
security-related
action.
Based
on
the
configuration
or
policy
of
the
sensor
(or
application),
an
alert
is
logged.
2.
Filter
and
Summarize
A
Tivoli
Risk
Manager
adapter
intercepts
the
sensor’s
alert,
maps
it
into
a
Tivoli
Risk
Manager
event
and
routes
it
to
the
client,
that
might
aggregate
duplicate
events
and
provide
additional
filtering.
After
filtering
and
aggregation,
resulting
events
are
forwarded
to
a
Tivoli
Risk
Manager
correlation
server.
3.
First-level
correlation
The
Tivoli
Risk
Manager
correlation
server
uses
a
state-based
correlation
engine
to
search
for
patterns
of
activity.
As
particular
levels
of
suspicious
activity
are
detected,
the
Tivoli
Risk
Manager
correlation
engine
produces
Incident
events.
An
Incident
represents
a
snapshot
of
a
suspicious
activity
pattern
that
occurred
within
a
specified
time
period.
Incident
events
are
forwarded
to
the
top-level
Tivoli
Risk
Manager
correlation
engine
for
further
processing.
This
top-level
correlation
engine
is
located
on
a
Tivoli
Enterprise
Console
server.
4.
Second-level
correlation
The
top-level
correlation
process
runs
in
the
Tivoli
Enterprise
Console
prolog-based
correlation
engine,
and
performs
further
aggregation
on
Incidents,
as
received
from
one
or
more
state-based
Tivoli
Risk
Manager
correlation
engines.
The
results
of
this
aggregation
take
the
form
of
incident
group
events,
that
represent
aggregations
of
Incidents.
The
Figure
5
on
page
13
depicts
a
typical
attack
scenario,
using
the
Web
IDS
sensor
for
illustration
purposes.
12
IBM
Tivoli
Risk
Manager:
Administrator’s
Guide

In
this
example,
the
Web
IDS
sensor
and
the
client
(with
summarization)
are
deployed
on
the
same
system.
Similarly,
the
state-based
correlation
and
prolog
correlation
rules
are
deployed
together
on
the
event
server.
The
first-level
correlation
performed
by
the
state-based
correlation
engine
can
also
be
deployed
on
one
or
more
Tivoli
Risk
Manager
correlation
engines,
that
feed
Incidents
to
the
event
server.
Each
of
the
four
logical
stages
of
processing
are
explained
in
more
detail
below.
Detect
The
sensor
or
application
performs
detection
of
suspicious
activity
and
threats.
In
many
cases,
a
sensor
provides
its
own
level
of
intelligence
in
terms
of
determining
when
to
produce
an
alert.
It
might
use
signatures,
a
knowledge-base,
or
built-in
rules
and
policies
to
perform
its
own
thresholding,
aggregation,
and
so
on.
For
example,
a
Network
IDS
tool
can
be
configured
to
report
a
port
scan
when
a
host
attempts
to
touch
10
or
more
ports
on
a
server
in
a
short
time
period.
Filter
and
Summarize
The
clients
are
used
to
summarize
numerous
duplicate
or
similar
events.
This
is
an
essential
element
of
event
processing
in
many
environments.
Certain
types
of
Figure
5.
Tivoli
Risk
Manager
When
an
Attack
is
Detected
Chapter
1.
Introduction
13

sensors
produce
an
extensive
amount
of
event
traffic,
much
of
it
redundant.
The
ability
to
summarize
event
floods
without
loss
of
important
information
is
critical,
for
various
reasons:
v
Network
traffic
can
be
reduced
significantly
v
Load
on
the
correlation
servers
is
reduced
significantly
v
Load
on
the
database
server
is
reduced
significantly
v
Database
footprint
is
reduced
significantly
A
set
of
summarization
rule
files
controls
the
summarization
process.
New
summarization
rules
are
deployed
at
the
client
to
provide
summarization
for
new
applications
and
sensors.
The
client
also
can
be
tuned
to
filter
out
low-severity
or
other
less
interesting
alerts.
First-Level
Correlation
The
state-based
Tivoli
Risk
Manager
correlation
engine
supports
two
correlation
techniques:
v
Linked
events
v
Pattern
matching
that
is
based
on
source,
destination,
attack
classification,
and
optionally,
a
customer
ID.
Linked
Events
A
sequence
of
events
that
are
produced
by
a
sensor
might
be
linked
together.
When
the
second
linked
event
is
received,
the
correlation
engine
might
raise
the
severity
of
the
second
linked
event.
An
example
of
the
utility
is
the
ability
to
link
events
in
Web
IDS.
When
Web
IDS
reports,
for
example,
a
suspicious
Common
Gateway
Interface
(CGI)
request,
the
event
is
associated
with
an
appropriate
severity
level.
However,
if
the
suspicious
CGI
request
is
actually
successful,
then
it
is
appropriate
to
significantly
raise
the
severity
of
the
second
event.
Pattern
Matching
The
Tivoli
Risk
Manager
correlation
process
analyzes
all
incoming
Tivoli
Risk
Manager
sensor
events
and
searches
for
patterns.
When
suspicious
activity
is
detected
as
a
result
of
the
search
for
patterns,
the
Tivoli
Risk
Manager
correlation
engine
produces
an
alert,
referred
to
as
an
incident.
Incidents,
along
with
sensor
events,
will
be
displayed
on
the
Tivoli
Enterprise
Console
as
Tivoli
Enterprise
Console
events.
Incident
creation
is
based
on
the
following
keys
(obtained
or
derived
from
information
in
each
sensor
event):
v
Classification,
or
category,
of
the
received
events
v
Source
host
of
the
suspicious
activity
v
Destination
host
of
the
suspicious
activity
(the
resource
being
accessed),
as
reported
in
the
received
events
v
Customer
Identification
(An
optional
element
for
correlation
purposes)
Various
types
of
incidents
might
be
produced,
depending
on
the
type
of
patterns
that
are
detected.
Table
1
describes
the
type
of
incidents
that
might
be
produced
using
the
default
correlation
rules:
Table
1.
Types
of
Incidents
Produced
Type
Key1
Key2
Key3
Description
Category,
Source,
Destination
Category
Source
Destination
Represents
specific
activity
that
is
targeted
from
a
single
source
host,
to
a
single
destination
host,
in
a
given
category.
14
IBM
Tivoli
Risk
Manager:
Administrator’s
Guide
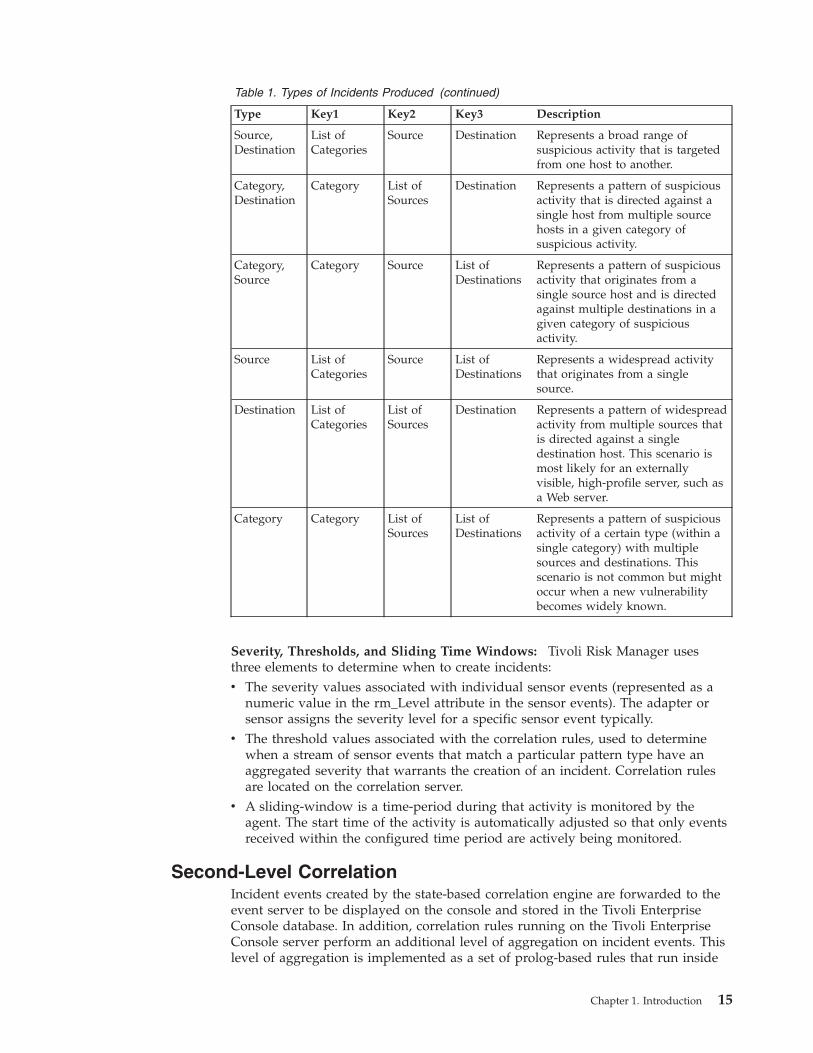
Table
1.
Types
of
Incidents
Produced
(continued)
Type
Key1
Key2
Key3
Description
Source,
Destination
List
of
Categories
Source
Destination
Represents
a
broad
range
of
suspicious
activity
that
is
targeted
from
one
host
to
another.
Category,
Destination
Category
List
of
Sources
Destination
Represents
a
pattern
of
suspicious
activity
that
is
directed
against
a
single
host
from
multiple
source
hosts
in
a
given
category
of
suspicious
activity.
Category,
Source
Category
Source
List
of
Destinations
Represents
a
pattern
of
suspicious
activity
that
originates
from
a
single
source
host
and
is
directed
against
multiple
destinations
in
a
given
category
of
suspicious
activity.
Source
List
of
Categories
Source
List
of
Destinations
Represents
a
widespread
activity
that
originates
from
a
single
source.
Destination
List
of
Categories
List
of
Sources
Destination
Represents
a
pattern
of
widespread
activity
from
multiple
sources
that
is
directed
against
a
single
destination
host.
This
scenario
is
most
likely
for
an
externally
visible,
high-profile
server,
such
as
a
Web
server.
Category
Category
List
of
Sources
List
of
Destinations
Represents
a
pattern
of
suspicious
activity
of
a
certain
type
(within
a
single
category)
with
multiple
sources
and
destinations.
This
scenario
is
not
common
but
might
occur
when
a
new
vulnerability
becomes
widely
known.
Severity,
Thresholds,
and
Sliding
Time
Windows:
Tivoli
Risk
Manager
uses
three
elements
to
determine
when
to
create
incidents:
v
The
severity
values
associated
with
individual
sensor
events
(represented
as
a
numeric
value
in
the
rm_Level
attribute
in
the
sensor
events).
The
adapter
or
sensor
assigns
the
severity
level
for
a
specific
sensor
event
typically.
v
The
threshold
values
associated
with
the
correlation
rules,
used
to
determine
when
a
stream
of
sensor
events
that
match
a
particular
pattern
type
have
an
aggregated
severity
that
warrants
the
creation
of
an
incident.
Correlation
rules
are
located
on
the
correlation
server.
v
A
sliding-window
is
a
time-period
during
that
activity
is
monitored
by
the
agent.
The
start
time
of
the
activity
is
automatically
adjusted
so
that
only
events
received
within
the
configured
time
period
are
actively
being
monitored.
Second-Level
Correlation
Incident
events
created
by
the
state-based
correlation
engine
are
forwarded
to
the
event
server
to
be
displayed
on
the
console
and
stored
in
the
Tivoli
Enterprise
Console
database.
In
addition,
correlation
rules
running
on
the
Tivoli
Enterprise
Console
server
perform
an
additional
level
of
aggregation
on
incident
events.
This
level
of
aggregation
is
implemented
as
a
set
of
prolog-based
rules
that
run
inside
Chapter
1.
Introduction
15

the
Tivoli
Enterprise
Console
correlation
engine.
Aggregation
of
incident
events
results
in
the
creation
of
Incident
Group
events.
Information
Displayed
at
the
Tivoli
Enterprise
Console
This
section
describes
how
Tivoli
Risk
Manager
sensor
events
and
alarms
are
displayed
on
the
event
console.
Sensor
events
represent
the
raw
events,
generated
by
sensors
and
forwarded
to
the
event
server.
Alarms
are
known
as:
v
Incidents
v
Incident
groups
Incidents
are
events
that
are
produced
by
the
Tivoli
Risk
Manager
correlation
process.
Incidents
represent
bursts
of
suspicious
activity,
as
detected
over
a
relatively
short
period
of
time
(for
example,
5
or
10
minutes),
where
the
suspicious
activity
matches
patterns
defined
in
the
correlation
rules,
and
exceeds
thresholds
(also
defined
in
the
rules).
The
Tivoli
Risk
Manager
correlation
process
runs
on
the
event
server.
In
addition,
the
Tivoli
Risk
Manager
correlation
process
can
be
distributed
to
one
or
more
distributed
correlation
servers,
then
forward
incidents
to
the
event
server.
Incident
group
events
are
produced
by
special
Tivoli
Risk
Manager
rules
that
are
loaded
in
the
event
server
prolog
correlation
engine.
Incident
groups
represent
aggregations
of
incident
events,
and
thus
are
representative
of
sustained
suspicious
activity.
Console
Usage
Scenario
To
help
you
visualize
the
information
available
on
the
event
console,
this
section
will
lead
you
through
a
scenario
based
on
the
use
of
the
following
event
sources:
v
Tivoli
Risk
Manager
Web
Intrusion
Detection
System
(Web
IDS)
v
Tivoli
Risk
Manager
Adapter
for
Check
Point™
FireWall-1®
v
Tivoli
Risk
Manager
Adapter
for
Windows
Host
Intrusion
Detection
For
more
information
on
the
Adapter
for
Windows
Host
Intrusion
Detection
and
the
Adapter
for
Check
Point
FireWall-1,
see
the
IBM
Tivoli
Risk
Manager
Adapters
Guide.
In
this
scenario,
two
Web
servers
are
actively
monitored
using
Web
IDS.
A
brief
description
of
what
happens
when
a
Web-based
attack
occurs
is
provided.
The
scenario
also
provides
details
on
using
the
event
console
to
view
the
intrusion-detection
events
produced
by
Web
IDS,
and
the
incidents
and
incident
group
events
produced
by
the
Tivoli
Risk
Manager
correlation
process.
The
scenario
is
extended
to
include
suspicious
information
detected
by
a
firewall
and
Host
IDS
adapters.
What
happens
when
Web
IDS
detects
an
attack
(or
otherwise
suspicious
activity)
against
a
Web
server?
The
Tivoli
Risk
Manager
Web
IDS
sensor
analyzes
the
access
log
files
generated
by
a
Web
server
in
order
to
detect
suspicious
activity
that
is
directed
at
the
Web
server.
The
Web
IDS
sensor
uses
a
knowledge-based
approach
to
detect
suspicious
behavior,
utilizing
a
set
of
signatures
that
when
detected,
might
represent
suspicious
activity.
The
set
of
signatures
is
extensive
and
is
used
to
detect
a
wide
range
of
possible
attacks.
The
signature
file
can
be
customized,
so
it
can
be
tuned
to
meet
the
needs
of
a
particular
environment.
When
Web
IDS
detects
suspicious
activity,
a
Tivoli
Risk
Manager
Tivoli
Enterprise
Console
event
is
16
IBM
Tivoli
Risk
Manager:
Administrator’s
Guide

produced,
and
is
routed
to
the
event
server
(or
a
distributed
correlation
server,
then
forwards
correlation
results
to
an
event
server).
In
the
scenario
described
here,
Web
IDS
has
detected
attacks
that
are
directed
at
an
Apache
Web
server
(named
Apache1)
and
has
posted
multiple
IDS
events
to
the
event
server.
When
the
correlation
engine
running
on
the
event
server
receives
these
Web
IDS
events,
they
are
analyzed.
The
goal
is
to
detect
patterns
of
suspicious
activity
above
and
beyond
the
information
contained
in
each
individual
event
(as
produced
by
the
various
Web
IDS
sensors).
The
value
of
this
correlation
process
only
increases
as
information
is
received
from
other
types
of
sensors
and
adapters,
that
are
being
used
to
monitor
other
resources
in
the
enterprise.
The
Tivoli
Risk
Manager
correlation
engine
uses
the
following:
v
The
severity
of
the
activity,
as
reported
in
the
event
(a
numeric
value,
reported
in
the
rm_Level
attribute).
v
The
volume
of
the
activity.
v
The
timing
of
the
activity.
A
larger
volume
of
activity
in
a
shorter
time-period
may
be
more
significant
than
lower
rates
of
activity
spread
over
a
greater
time
period.
But
obviously
this
is
not
always
the
case.
In
addition,
the
following
keys
are
used
by
the
correlation
engine
to
detect
patterns
of
suspicious
activity:
v
A
categorization
of
the
suspicious
activity
(for
example,
Web
attack,
Trojan
Horse,
Denial
of
Service,
Virus
found,
and
so
on)
v
Source
of
the
attack,
typically
expressed
as
a
host
name
or
Internet
Protocol
(IP)
address
v
Destination
of
the
attack,
typically
expressed
as
a
host
name
or
IP
address
v
Customer
ID
(optional,
not
engaged
by
default)
The
Tivoli
Risk
Manager
correlation
engine
aggregates
events
based
on
the
first
three
data
keys
and
combinations
of
these
keys
and
then
generates
incident
events,
that
represent
alarms
raised
by
the
correlation
engine.
The
Tivoli
Risk
Manager
correlation
engine
routes
these
incident
events
to
the
Tivoli
Enterprise
Console
server,
and
the
events
are
displayed
on
the
administrator’s
console.
As
noted
before,
the
Tivoli
Risk
Manager
correlation
engine
is
always
located
on
the
event
server,
and
optionally
on
one
or
more
additional
systems
as
distributed
correlation
servers.
Tivoli
Enterprise
Console
Event
Groups
Event
groups
are
used
to
provide
different
filtered
views
of
the
events
that
have
been
collected
by
the
event
server.
Tivoli
Risk
Manager
provides
a
default
set
of
pre-defined
event
group
definitions
that
provide
different
views
of
the
events
collected
by
Tivoli
Risk
Manager
from
sensors
and
adapters,
and
the
events
generated
by
Tivoli
Risk
Manager
itself.
Figure
6
on
page
18
provides
a
view
of
the
event
console
Summary
Chart
View,
that
displays
a
graphical
representation
of
the
various
Tivoli
Risk
Manager
events.
Chapter
1.
Introduction
17

The
RM_TrustedHost
group
is
populated
using
a
filter
that
includes
events
that
are
produced
when
a
correlation
server
detects
a
new
instance
of
a
trusted
host.
Suspicious
activity
originating
from
a
host
designated
as
trusted
will
not
be
correlated
and
will
not
contribute
to
the
production
of
incidents
and
incident
group
events.
For
example,
if
a
network
administrator
runs
network
vulnerability
scans
on
a
regular
basis,
and
you
do
not
want
this
activity
interpreted
as
suspicious
activity
by
the
correlation
engine,
you
can
designate
the
administrator’s
host
as
trusted.
The
RM_SensorEvent
group
is
populated
using
a
filter
that
includes
sensor
events
collected
from
Tivoli
Risk
Manager
sensors
and
adapters.
The
filter
excludes
events
that
are
generated
by
Tivoli
Risk
Manager,
such
as
incidents,
trusted
host
events,
and
error
events.
The
RM_Sensor
group
is
populated
using
a
filter
that
includes
events
produced
when
a
Tivoli
Risk
Manager
correlation
server
detects
for
the
first
time
the
presence
of
an
instance
of
a
specific
sensor
on
a
specific
host.
In
other
words,
each
time
a
Tivoli
Risk
Manager
correlation
server
discovers
a
new
sensor
instance,
an
event
is
generated
(of
class
name
RM_Sensor).
The
RM_IncidentGroup
group
is
populated
using
a
filter
that
includes
all
Tivoli
Risk
Manager
incident
group
events.
The
RM_Incident
group
is
populated
using
a
filter
that
includes
all
Tivoli
Risk
Manager
incident
events.
Figure
6.
Tivoli
Enterprise
Console
Summary
Chart
View
18
IBM
Tivoli
Risk
Manager:
Administrator’s
Guide
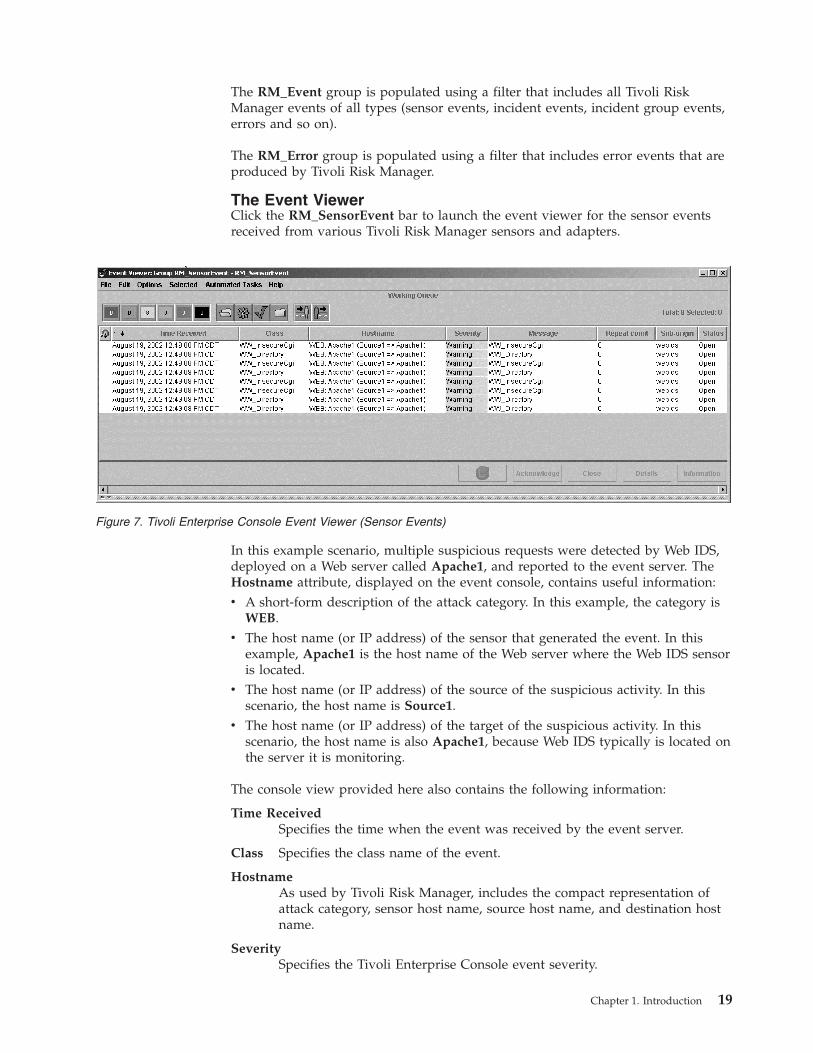
The
RM_Event
group
is
populated
using
a
filter
that
includes
all
Tivoli
Risk
Manager
events
of
all
types
(sensor
events,
incident
events,
incident
group
events,
errors
and
so
on).
The
RM_Error
group
is
populated
using
a
filter
that
includes
error
events
that
are
produced
by
Tivoli
Risk
Manager.
The
Event
Viewer
Click
the
RM_SensorEvent
bar
to
launch
the
event
viewer
for
the
sensor
events
received
from
various
Tivoli
Risk
Manager
sensors
and
adapters.
In
this
example
scenario,
multiple
suspicious
requests
were
detected
by
Web
IDS,
deployed
on
a
Web
server
called
Apache1,
and
reported
to
the
event
server.
The
Hostname
attribute,
displayed
on
the
event
console,
contains
useful
information:
v
A
short-form
description
of
the
attack
category.
In
this
example,
the
category
is
WEB.
v
The
host
name
(or
IP
address)
of
the
sensor
that
generated
the
event.
In
this
example,
Apache1
is
the
host
name
of
the
Web
server
where
the
Web
IDS
sensor
is
located.
v
The
host
name
(or
IP
address)
of
the
source
of
the
suspicious
activity.
In
this
scenario,
the
host
name
is
Source1.
v
The
host
name
(or
IP
address)
of
the
target
of
the
suspicious
activity.
In
this
scenario,
the
host
name
is
also
Apache1,
because
Web
IDS
typically
is
located
on
the
server
it
is
monitoring.
The
console
view
provided
here
also
contains
the
following
information:
Time
Received
Specifies
the
time
when
the
event
was
received
by
the
event
server.
Class
Specifies
the
class
name
of
the
event.
Hostname
As
used
by
Tivoli
Risk
Manager,
includes
the
compact
representation
of
attack
category,
sensor
host
name,
source
host
name,
and
destination
host
name.
Severity
Specifies
the
Tivoli
Enterprise
Console
event
severity.
Figure
7.
Tivoli
Enterprise
Console
Event
Viewer
(Sensor
Events)
Chapter
1.
Introduction
19

Message
A
brief
description
of
the
event.
Typically
includes
the
signature
associated
with
the
event.
Repeat
Count
Set
to
a
non-zero
value
if
the
event
is
a
summarized
event
as
generated
by
the
client
summarization
facility.
A
non-zero
value
(+1)
represents
the
number
of
individual
sensor
events
that
are
represented
by
the
summary
event.
A
value
of
zero
indicates
that
the
event
is
not
a
summarized
event.
Each
summarized
event
also
has
an
rm_Level
value,
that
is
computed
by
multiplying
the
repeat_count
+1
by
the
rm_Level
value
associated
with
the
first
event
in
the
summarized
sequence.
For
example,
a
summary
event
with
a
repeat_count
value
of
299
and
a
default
rm_Level
of
0.5
has
its
rm_Level
attribute
set
to
150.0.
Sub-origin
The
name
of
the
sensor
or
adapter.
In
this
example,
Sub-origin
is
set
to
webids.
Status
Specifies
the
Tivoli
Enterprise
Console
event
status.
By
default,
Tivoli
Risk
Manager
leaves
the
events
in
open
status.
See
“Closing
Sensor
Events”
on
page
43
for
details
about
configuring
the
event
server
to
automatically
close
sensor
events
as
they
are
received.
See
“Tivoli
Risk
Manager
Database
Utilities”
on
page
56
for
information
about
using
the
wrmdbclose
utility
to
schedule
the
closing
of
sensor
events.
Note:
The
specific
attributes
can
be
customized,
as
can
their
position
on
the
viewer.
You
can
customize
your
event
viewer
to
include
other
Tivoli
Enterprise
Console
attributes,
such
as
the
following:
Origin
The
IP
address
of
the
adapter
that
produced
the
sensor
event.
Adapter
Host
The
host
name
of
the
adapter
that
produced
the
sensor
event.
Incident
Events
(Phase
1)
Return
to
the
Tivoli
Enterprise
Console
Summary
Chart
View,
Figure
6
on
page
18,
and
by
clicking
on
the
RM_Incident
event
group
it
would
display
the
event
viewer
showing
all
Tivoli
Risk
Manager
Incidents.
Figure
8.
Tivoli
Enterprise
Console
Event
Viewer
(Incident
Events)
20
IBM
Tivoli
Risk
Manager:
Administrator’s
Guide

Continuing
with
the
scenario,
Figure
8
on
page
20
shows
that
a
SrcDstCat
Incident
(class=RM_Src_DstCat_Incident)
has
been
generated
by
the
correlation
engine
in
response
to
receipt
of
the
set
of
sensor
events,
as
was
shown
in
the
previous
RM_SensorEvent
event
group
view.
Again,
the
Hostname
attribute,
as
displayed
on
the
event
console,
contains
useful
information
in
a
very
compact
form:
v
A
short-form
description
of
the
attack
category.
In
this
example,
the
category
is
WEB.
v
The
host
name
(or
IP
address)
of
the
source
of
the
suspicious
activity.
In
this
scenario,
the
host
name
is
Source1.
v
The
host
name
(or
IP
address)
of
the
target
of
the
suspicious
activity.
In
this
scenario,
the
host
name
is
Apache1.
The
console
view
provided
here
also
contains
the
following
information:
Time
Received
Specifies
the
time
when
the
incident
event
was
received
by
the
event
server.
Class
Specifies
the
class
name
of
the
event.
Hostname
As
used
by
Tivoli
Risk
Manager,
includes
the
compact
representation
of
attack
category,
destination
host
name,
and
source
host
name.
Severity
Specifies
the
Tivoli
Enterprise
Console
event
severity.
Message
A
brief
message
that
indicated
the
attack
falls
within
the
WEB
category.
It
also
describes
it
as
suspicious
activity
from
a
host
called
Source1
targeted
at
a
host
called
Apache1.
Repeat
Count
The
repeat
count
value
of
5
indicates
that
five
sensor
events
actually
contributed
to
this
particular
incident
event.
Because
eight
events
were
actually
received
in
a
short
time
period,
with
the
same
source,
destination
and
attack
category,
this
implies
that
receipt
of
five
of
the
events
was
sufficient
to
exceed
the
configured
threshold
and
trigger
the
creation
of
an
incident
event.
The
additional
three
sensor
events
may
contribute
to
an
additional
incident
event
later,
if
Web
IDS
produces
additional
events
for
this
particular
source
and
destination
within
the
configured
time
window.
This
incident
event
provides
essential
information
about
the
set
of
events
that
are
produced
by
the
Web
IDS
sensor.
This
incident
event
indicates:
v
A
number
of
sensor
events
were
received
and
correlated
that
indicate
a
single
source
host
(Source1)
was
the
origin
of
Web-related
activity,
directed
against
a
single
destination
Web
server
(Apache1).
v
The
sensor
events
that
contributed
to
this
incident
were
received
within
the
designated
time
window
and
exceeded
the
thresholds.
The
size
of
the
time
window
and
the
threshold
are
both
defined
in
the
correlation
rules.
v
The
correlation
rules
also
specified
that
this
level
of
activity
should
produce
an
incident
with
a
severity
of
Critical.
Chapter
1.
Introduction
21

Additional
details
about
the
incident
event
can
be
obtained
by
selecting
the
desired
incident
and
double-clicking
on
the
selected
event.
This
action
will
bring
up
a
details
view
of
the
selected
event,
as
shown
in
the
following
figure:
This
details
view
provides
other
information
that
might
be
of
interest,
including:
rm_CategoryDisplayNames
A
more
descriptive
form
of
the
attack
category,
in
this
case
″Web
Attack″.
The
short
form
is
in
rm_CategoryTokens.
rm_CustomerID
If
correlation
is
being
performed
on
a
customer
(or
organization)
basis,
the
Figure
9.
Incident
Details
View
22
IBM
Tivoli
Risk
Manager:
Administrator’s
Guide

rm_CustomerID
attribute
would
reflect
the
specific
customer
ID
associated
with
the
sensor
events
that
contributed
to
the
incident.
In
this
example,
the
default
value
of
″NA″
is
set.
rm_Level
The
aggregated
severity
level
of
the
set
of
sensor
events
that
contributed
to
the
incident.
In
this
example,
the
value
is
11.0.
rm_Signatures
List
of
unique
signatures
obtained
from
the
set
of
contributing
sensor
events.
rm_Sensors
A
list
of
unique
sensor
or
host
name
pairs
from
contributing
events
were
received.
Each
element
in
this
is
actually
the
sensor
type
concatenated
with
the
sensor’s
host
name
(in
this
case
webids
and
Apache1).
rm_WindowSize
The
size
of
the
sliding
window
used
to
control
the
creation
of
this
incident.
In
this
example,
6000000
milliseconds
(100
minutes)
is
being
used.
In
addition
to
this
details
view,
you
can
directly
access
the
sensor
events
that
contributed
to
an
individual
incident
event
by
selecting
an
incident
event
and
pressing
the
Information
button.
A
Web
browser
opens
with
a
view
of
the
contributing
sensor
events.
See
the
IBM
Tivoli
Risk
Manager
Installation
Guide
for
information
about
setting
up
and
using
this
application.
Incident
Group
Events
(Phase
1)
Return
to
the
Tivoli
Enterprise
Console
Summary
Chart
View,
Figure
6
on
page
18,
and
by
clicking
on
the
RM_IncidentGroup
event
group
it
would
display
the
event
viewer
showing
all
Tivoli
Risk
Manager
Incident
Group
events.
Continuing
with
the
scenario,
Figure
10
shows
that
a
SrcDstCat
Incident
Group
(class=RM_SrcDstCat_IncidentGroup)
has
been
generated
by
the
second-level
correlation
process
that
occurs
at
the
Tivoli
Enterprise
Console
event
server
in
response
to
receipt
of
one
or
more
incident
events.
In
this
case,
this
incident
group
event
was
generated
because
the
single
incident
event
triggered
the
incident
group
thresholds
configured
at
the
event
server.
Figure
10.
Tivoli
Enterprise
Console
Event
Viewer
(Incident
Group
Events)
Chapter
1.
Introduction
23

As
for
sensor
and
incident
events,
the
Hostname
attribute
for
incident
group
events
contains
useful
information
in
a
compact
form:
v
A
short-form
description
of
the
attack
category.
In
this
example,
the
category
is
WEB.
v
The
host
name
(or
IP
address)
of
the
source
of
the
suspicious
activity.
In
this
scenario,
the
host
name
is
Source1.
v
The
host
name
(or
IP
address)
of
the
target
of
the
suspicious
activity.
In
this
scenario,
the
host
name
is
Apache1.
The
console
view
provided
here
also
contains
the
following
information:
Time
Received
Specifies
the
time
when
the
incident
group
event
was
received
by
the
event
server.
Class
Specifies
the
class
name
of
the
event.
Hostname
As
used
by
Tivoli
Risk
Manager,
includes
the
compact
representation
of
attack
category,
source
host
name,
and
destination
host
name.
Severity
Specifies
the
Tivoli
Enterprise
Console
event
severity.
Message
A
brief
message
that
indicated
the
attack
falls
within
the
WEB
category.
It
also
describes
it
as
suspicious
activity
from
a
host
called
Source1
targeted
at
a
host
called
Apache1.
Repeat
Count
The
repeat
count
value
of
1
indicates
that
a
single
incident
event
has
contributed
to
this
particular
incident
group
event.
Note
that
the
repeat
count
will
increase
if
the
suspicious
activity
continues,
and
additional
incident
events
are
produced
and
contribute
to
this
incident
group
event.
Additional
details
about
the
incident
group
event
can
be
viewed
by
selecting
the
desired
incident
group
and
double-clicking
on
the
selected
event.
A
details
view
of
the
selected
event
opens,
as
shown
in
the
following
figure:
24
IBM
Tivoli
Risk
Manager:
Administrator’s
Guide

This
details
view
provides
other
information
that
might
be
of
interest,
including:
rm_CategoryDisplayNames
A
more
descriptive
form
of
the
attack
category,
in
this
case
″Web
Attack″.
The
short
form
is
in
rm_CategoryTokens.
rm_CustomerID
If
correlation
is
being
performed
on
a
customer
(or
organization)
basis,
the
rm_CustomerID
attribute
would
reflect
the
specific
customer
ID
associated
with
the
incident
events
that
contributed
to
the
Group.
In
this
example,
the
default
value
of
″N/A″
is
set.
If
there
is
more
than
one
rm_CustomerID
attribute
from
the
contributing
incidents,
it
will
be
represented
with
an
″*″.
Figure
11.
Incident
Group
Details
View
Chapter
1.
Introduction
25

rm_CombinedLevel
The
aggregated
severity
level
of
the
set
of
incident
events
that
contributed
to
the
incident.
In
this
example,
the
value
is
1.100000e+01.
rm_HighestLevel
The
highest
rm_Level
of
contributing
incidents.
In
this
example,
the
value
is
1.100000e+01.
rm_LastLevel
The
rm_Level
of
the
most
recently
received
incident
contributing
to
the
Group.
In
this
example,
the
value
is
1.100000e+01.
rm_Metric
Specifies
whether
the
metric
for
creating
and
maintaining
this
incident
group
event
is
based
on
the
aggregated
severity
level
(rm_Level)
or
the
count
of
incidents.
rm_Sensors
A
list
of
unique
sensor
or
host
name
pairs
from
contributing
events
were
received.
Each
element
in
this
is
actually
the
sensor
type
concatenated
with
the
sensor’s
host
name
(in
this
case
webids
and
Apache1).
rm_Signatures
List
of
unique
signatures
obtained
from
the
set
of
contributing
incident
events.
In
addition
to
this
details
view,
you
can
directly
access
the
incident
and
sensor
events
that
contributed
to
an
individual
incident
group
event
by
selecting
an
incident
group
event
and
clicking
the
Information
button.
A
Web
browser
opens
with
a
view
of
the
contributing
incident
and
sensor
events.
See
the
IBM
Tivoli
Risk
Manager
Installation
Guide
for
information
about
setting
up
and
using
this
application.
Adding
More
Web
IDS
Events
to
the
Scenario:
Figure
12
on
page
27
provides
a
view
of
the
event
console’s
Summary
Chart
View
after
additional
Web
IDS
events
are
received
at
the
event
server.
The
sample
scenario
now
depicts
a
broadening
of
the
attack,
where
the
Web
IDS
sensor
is
located
on
a
second
Web
server,
IBMHTTP1,
and
detects
suspicious
activity
from
the
same
source
host,
Source1.
26
IBM
Tivoli
Risk
Manager:
Administrator’s
Guide
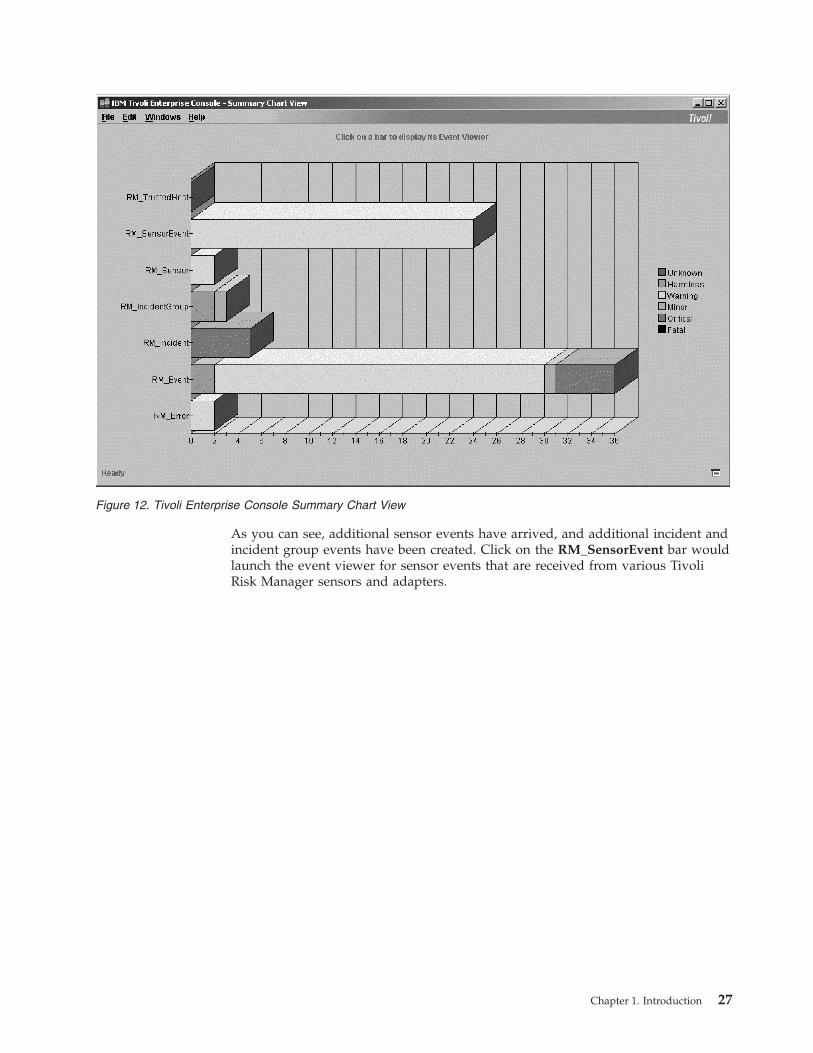
As
you
can
see,
additional
sensor
events
have
arrived,
and
additional
incident
and
incident
group
events
have
been
created.
Click
on
the
RM_SensorEvent
bar
would
launch
the
event
viewer
for
sensor
events
that
are
received
from
various
Tivoli
Risk
Manager
sensors
and
adapters.
Figure
12.
Tivoli
Enterprise
Console
Summary
Chart
View
Chapter
1.
Introduction
27

In
this
example,
multiple
suspicious
requests
were
detected
by
two
instances
of
Web
IDS
and
reported
to
the
event
server.
The
suspicious
activity
from
Source1
is
now
directed
against
two
different
Web
servers,
Apache1,
and
IBMHTTP1.
Incident
Events
(Phase
2)
Return
to
the
Tivoli
Enterprise
Console
Summary
Chart
View,
Figure
6
on
page
18,
and
by
clicking
on
the
RM_Incident
event
group
it
would
display
the
event
viewer
showing
all
Tivoli
Risk
Manager
Incidents.
Figure
13.
Tivoli
Enterprise
Console
Event
Viewer
(Sensor
Events)
Figure
14.
Tivoli
Enterprise
Console
Event
Viewer
(Incident
Events)
28
IBM
Tivoli
Risk
Manager:
Administrator’s
Guide

Continuing
with
the
scenario,
Figure
14
on
page
28
shows
that
five
incident
events
now
appear
on
the
console:
v
Two
additional
SrcDstCat
incidents
that
reflect
snapshots
of
sustained
activity
directed
from
Source1
against
Apache1.
v
A
new
SrcDstCat
incident
that
reflects
a
flurry
of
new
activity
directed
from
Source1
against
IBMHTTP1.
v
A
single
SrcCat
incident,
reflecting
the
fact
that
Source1
is
using
a
single
category
of
attack
against
multiple
Web
servers.
This
particular
incident
represents
the
broadening
scope
of
the
attack
against
multiple
systems
in
the
enterprise.
At
this
point,
the
SrcCat
incident
(class
=
RM_SrcCat_Incident)
becomes
the
focus
of
attention.
Additional
details
about
the
SrcCat
incident
group
event
can
be
obtained
by
selecting
the
desired
incident
group
and
double-clicking
on
the
selected
event.
This
will
bring
up
a
details
view
of
the
selected
event.
For
an
example
of
the
incident
details
view,
see
Figure
9
on
page
22.
Information
that
might
be
of
interest
in
the
details
view:
rm_DestinationTokens
A
list
of
host
names
(or
IP
addresses)
that
represent
the
targets
of
the
attack.
rm_Signatures
List
of
unique
signatures
obtained
from
the
set
of
contributing
sensor
events.
In
addition
to
this
details
view,
you
can
directly
access
the
sensor
events
that
contributed
to
an
individual
incident
event
by
selecting
an
incident
event
and
clicking
the
Information
button.
This
will
load
a
Web
browser
with
a
view
of
the
contributing
sensor
events.
See
the
IBM
Tivoli
Risk
Manager
Installation
Guide
for
information
about
setting
up
and
using
this
application.
Incident
Group
Events
(Phase
2)
Return
to
the
Tivoli
Enterprise
Console
Summary
Chart
View,
Figure
6
on
page
18,
and
by
clicking
on
the
RM_IncidentGroup
event
group
it
would
display
the
event
viewer
showing
all
Tivoli
Risk
Manager
Incident
Group
events.
Figure
15.
Tivoli
Enterprise
Console
Event
Viewer
(Incident
Group
Events)
Chapter
1.
Introduction
29
Continuing
with
the
scenario,
Figure
15
on
page
29
shows
that
three
incident
group
events
now
appear
on
the
console:
v
Two
SrcDstCat
incident
group
events
reflect
the
two
separate
flurry
of
attacks:
–
Source1
attacking
Apache1
–
Source1
attacking
IBMHTTP1
Note
that
the
additional
incident
events
seen
on
the
Incident
Event
viewer
are
also
reflected
here.
Instead
of
creating
additional
incident
group
events,
the
incidents
continue
to
be
aggregated
into
the
existing
incident
group
event.
There
are
a
couple
of
clues
that
this
is
happening:
–
The
repeat_count
associated
with
the
incident
group
event
has
been
incremented
to
3
(since
three
separate
Incident
events
are
represented
by
this
single
incident
group
event.
–
The
severity
of
the
incident
group
has
been
escalated
to
Minor.v
A
single
SrcCat
incident
group
event,
reflecting
the
fact
that
the
source
is
using
a
single
category
of
attack
against
a
range
of
Web
servers.
This
incident
flags
the
broadening
scope
of
the
attack
against
multiple
systems
in
the
enterprise.
Focusing
on
the
SrcCat
incident
group
(class
=
RM_SrcCat_IncidentGroup)
might
become
more
productive
than
tracking
additional
incidents
related
to
this
attack.
Additional
incidents
related
to
this
attack
will
be
created
in
the
incident
view.
However,
these
new
incidents,
as
they
occur,
will
be
folded
into
existing
incident
group
events,
possibly
increasing
severity,
adding
knowledge
in
terms
of
signatures,
and
targeted
hosts.
To
view
additional
details
about
the
SrcCat
incident
group
event,
double-click
on
the
desired
event.
This
will
bring
up
the
details
view.
For
an
example
of
the
incident
group
details
view,
see
Figure
11
on
page
25.
Information
that
might
be
of
interest
in
the
details
view:
rm_DestinationTokens
A
list
of
host
names
(or
IP
addresses)
that
represent
the
targets
of
the
attack.
rm_Signatures
A
list
of
unique
signatures
obtained
from
the
set
of
contributing
incident
events.
In
addition
to
this
details
view,
you
can
directly
access
the
incident
events
and
sensor
events
that
contributed
to
an
individual
incident
group
event
by
selecting
a
specific
incident
group
event
and
clicking
the
Information
button.
This
will
load
a
Web
browser
with
a
view
of
the
contributing
sensor
events.
See
the
IBM
Tivoli
Risk
Manager
Installation
Guide
for
information
about
setting
up
and
using
this
application.
Adding
Firewall
and
Host
IDS
Events
to
the
Scenario:
Figure
16
on
page
31
provides
a
view
of
the
event
console’s
Summary
Chart
View
after
additional
events
are
received
at
the
event
server.
The
example
scenario
now
includes
events
collected
from
an
adapter
monitoring
a
firewall,
and
an
adapter
monitoring
activity
on
a
host
system.
30
IBM
Tivoli
Risk
Manager:
Administrator’s
Guide

In
this
scenario,
additional
sensor
events
have
arrived,
and
additional
incident
and
incident
group
events
have
been
created.
Clicking
on
the
RM_SensorEvent
bar
would
launch
the
event
viewer
for
sensor
events
received
from
various
Tivoli
Risk
Manager
sensors
and
adapters.
Figure
16.
Tivoli
Enterprise
Console
Summary
Chart
View
Chapter
1.
Introduction
31
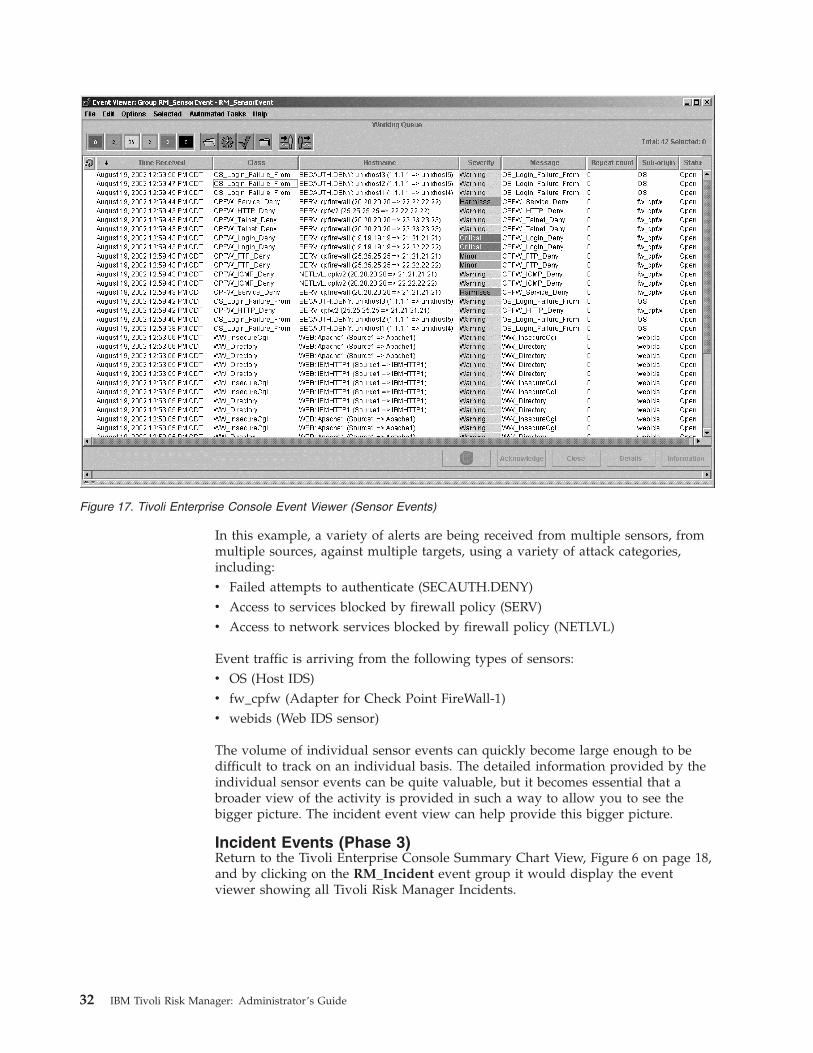
In
this
example,
a
variety
of
alerts
are
being
received
from
multiple
sensors,
from
multiple
sources,
against
multiple
targets,
using
a
variety
of
attack
categories,
including:
v
Failed
attempts
to
authenticate
(SECAUTH.DENY)
v
Access
to
services
blocked
by
firewall
policy
(SERV)
v
Access
to
network
services
blocked
by
firewall
policy
(NETLVL)
Event
traffic
is
arriving
from
the
following
types
of
sensors:
v
OS
(Host
IDS)
v
fw_cpfw
(Adapter
for
Check
Point
FireWall-1)
v
webids
(Web
IDS
sensor)
The
volume
of
individual
sensor
events
can
quickly
become
large
enough
to
be
difficult
to
track
on
an
individual
basis.
The
detailed
information
provided
by
the
individual
sensor
events
can
be
quite
valuable,
but
it
becomes
essential
that
a
broader
view
of
the
activity
is
provided
in
such
a
way
to
allow
you
to
see
the
bigger
picture.
The
incident
event
view
can
help
provide
this
bigger
picture.
Incident
Events
(Phase
3)
Return
to
the
Tivoli
Enterprise
Console
Summary
Chart
View,
Figure
6
on
page
18,
and
by
clicking
on
the
RM_Incident
event
group
it
would
display
the
event
viewer
showing
all
Tivoli
Risk
Manager
Incidents.
Figure
17.
Tivoli
Enterprise
Console
Event
Viewer
(Sensor
Events)
32
IBM
Tivoli
Risk
Manager:
Administrator’s
Guide

Continuing
with
the
scenario,
Figure
18
shows
a
growing
list
of
eleven
Incident
events
on
the
console.
A
variety
of
SrcDstCat
incidents
are
shown,
each
indicating
correlated
activity
between
specific
pairs
of
sources
and
destinations,
using
a
single
category
of
suspicious
activity.
The
SrcCat
Incidents
reflecting
Source1’s
attack
against
multiple
web
servers
remains
on
the
console
as
well.
We
also
see
a
series
of
SrcDstCat
Incidents
that
reflect
multiple
unsuccessful
attempts
by
a
system
with
IP
address
1.1.1.1
to
authenticate
on
two
hosts,
unixhost4
and
unixhost5.
The
fact
that
1.1.1.1
is
attempting
to
logon
to
multiple
systems
is
reflected
by
the
SrcCat
Incidents,
that
are
useful
to
see
the
broadening
scope
of
the
authentication
activity.
In
addition,
a
Cat
Incident
has
been
created,
reflecting
the
Service
Attack
activity
(short
name
of
SERV)
between
a
variety
of
sources
and
destinations.
This
particular
Cat
incident
was
created
before
more
specific
Incidents
since
the
threshold
for
the
broader
Incident
triggered
before
the
more
specific
Incidents.
Incidents
for
the
NETLVL
events
(seen
on
the
SensorEvent
console
view)
have
not
been
created
yet,
because
thresholds
have
not
been
triggered.
To
see
more
details
about
the
information
represented
by
the
most
recently
generated
Cat
incident
event,
select
this
event
and
click
the
Details
button
(or
double-click
on
the
event).
This
will
bring
up
a
details
view
of
the
selected
event.
For
an
example
of
the
incident
details
view,
see
Figure
9
on
page
22.
Information
that
might
be
of
interest
in
the
details
view:
rm_DestinationTokens
A
list
of
host
names
(or
IP
addresses)
that
represent
the
targets
of
the
attack.
rm_Sensors
A
list
of
host
names
(or
IP
addresses)
that
represent
the
sensors
reporting
the
activity.
Figure
18.
Tivoli
Enterprise
Console
Event
Viewer
(Incident
Events)
Chapter
1.
Introduction
33
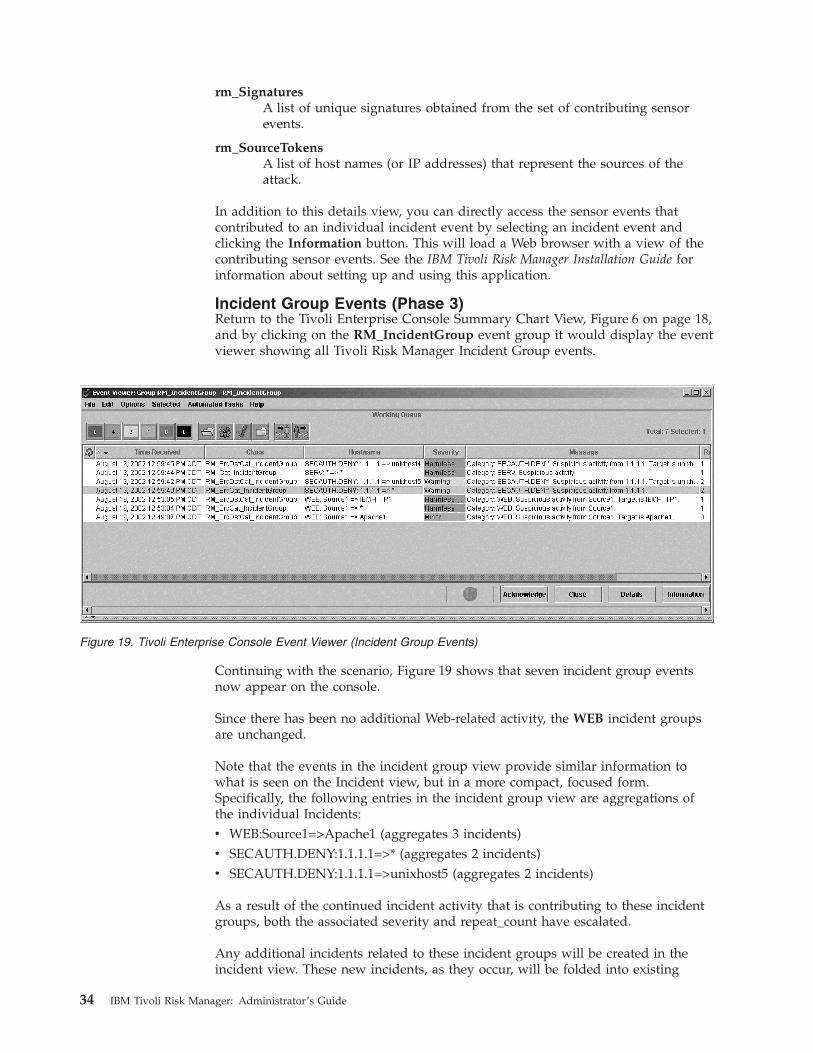
rm_Signatures
A
list
of
unique
signatures
obtained
from
the
set
of
contributing
sensor
events.
rm_SourceTokens
A
list
of
host
names
(or
IP
addresses)
that
represent
the
sources
of
the
attack.
In
addition
to
this
details
view,
you
can
directly
access
the
sensor
events
that
contributed
to
an
individual
incident
event
by
selecting
an
incident
event
and
clicking
the
Information
button.
This
will
load
a
Web
browser
with
a
view
of
the
contributing
sensor
events.
See
the
IBM
Tivoli
Risk
Manager
Installation
Guide
for
information
about
setting
up
and
using
this
application.
Incident
Group
Events
(Phase
3)
Return
to
the
Tivoli
Enterprise
Console
Summary
Chart
View,
Figure
6
on
page
18,
and
by
clicking
on
the
RM_IncidentGroup
event
group
it
would
display
the
event
viewer
showing
all
Tivoli
Risk
Manager
Incident
Group
events.
Continuing
with
the
scenario,
Figure
19
shows
that
seven
incident
group
events
now
appear
on
the
console.
Since
there
has
been
no
additional
Web-related
activity,
the
WEB
incident
groups
are
unchanged.
Note
that
the
events
in
the
incident
group
view
provide
similar
information
to
what
is
seen
on
the
Incident
view,
but
in
a
more
compact,
focused
form.
Specifically,
the
following
entries
in
the
incident
group
view
are
aggregations
of
the
individual
Incidents:
v
WEB:Source1=>Apache1
(aggregates
3
incidents)
v
SECAUTH.DENY:1.1.1.1=>*
(aggregates
2
incidents)
v
SECAUTH.DENY:1.1.1.1=>unixhost5
(aggregates
2
incidents)
As
a
result
of
the
continued
incident
activity
that
is
contributing
to
these
incident
groups,
both
the
associated
severity
and
repeat_count
have
escalated.
Any
additional
incidents
related
to
these
incident
groups
will
be
created
in
the
incident
view.
These
new
incidents,
as
they
occur,
will
be
folded
into
existing
Figure
19.
Tivoli
Enterprise
Console
Event
Viewer
(Incident
Group
Events)
34
IBM
Tivoli
Risk
Manager:
Administrator’s
Guide

incident
group
events,
possibly
increasing
severity,
adding
knowledge
in
terms
of
signatures,
and
targeted
hosts.
To
see
additional
details
about
any
incident
group,
double-click
on
the
desired
incident
group
event.
For
example,
selecting
the
SECAUTH.DENY:1.1.1.1=>*
incident
group
event
will
bring
up
the
details
view.
For
an
example
of
the
incident
group
details
view,
see
Figure
11
on
page
25.
Incident
Event
Types
There
are
seven
types
of
incident
events
that
are
created
by
the
Tivoli
Risk
Manager
correlation
engine
when
suspicious
activity
is
detected.
The
seven
default
types
are
described
below.
Note
that
each
type
of
incident
is
controlled
by
a
separate
rule,
and
is
produced
independently
of
other
types
of
incidents.
Unique
Combinations
of
Source,
Destination,
and
Category
(SrcDstCat)
As
the
correlation
engine
receives
input
from
a
variety
of
sources
(in
the
form
of
sensor
events),
it
tracks
all
unique
combinations
of
Source,
Destination
and
Category
attributes.
Whenever
the
event
activity
for
a
specific
combination
of
Source,
Destination
and
Category
exceeds
the
threshold
within
the
configured
time
window,
an
incident
event
is
produced.
If
and
when
additional
events
are
received
for
the
unique
combination
of
Source,
Destination
and
Category,
tracking
continues
for
that
combination.
An
incident
of
this
type
represents
very
focused
activity.
Unique
Combinations
of
Source
and
Category
(SrcCat)
The
correlation
engine
tracks
all
unique
combinations
of
Source
attributes
and
Category
attributes,
while
simply
aggregating
associated
values
for
Destination.
Whenever
the
event
activity
for
a
specific
combination
of
Source
and
Category
exceeds
the
threshold
within
the
configured
time
window,
an
incident
event
is
produced.
If
and
when
additional
events
are
received
for
the
unique
combination
of
Source
and
Category,
tracking
continues
for
that
combination.
Incidents
of
this
type
represent
very
focused
activity
from
a
single
source,
directed
against
multiple
targets.
In
our
example
here,
an
incident
of
this
type
might
be
indicative
of
a
single
hacker
launching
Web-based
attacks
against
several
enterprise
Web
servers.
Unique
Combinations
of
Destination
and
Category
(DstCat)
The
correlation
engine
tracks
all
unique
combinations
of
Destination
attributes
and
Category
attributes,
while
simply
aggregating
associated
values
for
Source.
Whenever
the
event
activity
for
a
specific
combination
of
Destination
and
Category
exceeds
the
threshold
within
the
configured
time
window,
an
incident
event
is
produced.
If
and
when
additional
events
are
received
for
the
unique
combination
of
Destination
and
Category,
tracking
continues
for
that
combination.
Incidents
of
this
type
represent
very
focused
activity
against
a
single
destination
host,
launched
from
multiple
sources.
They
might
be
indicative
of
a
hacker
staging
an
attack
from
multiple
hosts
against
a
single
Web
server
in
an
enterprise.
Unique
Combinations
of
Source
and
Destination
(SrcDst)
The
correlation
engine
tracks
all
unique
combinations
of
Source
attributes
and
Destination
attributes,
while
simply
aggregating
associated
values
for
Category.
Chapter
1.
Introduction
35
Whenever
the
event
activity
for
a
specific
combination
of
Source
and
Destination
exceeds
the
threshold
within
the
configured
time
window,
an
incident
event
is
produced.
If
and
when
additional
events
are
received
for
the
unique
combination
of
Source
and
Destination,
tracking
continues
for
that
combination.
These
types
of
incidents
represent
a
broader
range
of
activity
between
a
specific
pair
of
source
hosts
and
destination
hosts.
A
single
particular
incident
might
be
indicative
of
a
hacker
staging
an
array
of
attacks
from
a
single
source
against
a
single
destination.
If
the
same
source
launches
the
broad
attack
against
two
different
destinations,
two
or
more
different
incidents
of
this
type
might
be
produced.
Unique
Value
for
Category
(Cat)
The
correlation
engine
tracks
all
unique
categorizations
of
suspicious
activity,
while
simply
aggregating
associated
values
for
Source
and
Destination.
Whenever
the
event
activity
for
a
specific
value
for
Category
exceeds
the
threshold
within
the
configured
time
window,
an
incident
event
is
produced.
If
and
when
additional
events
are
received
for
the
particular
value
of
Category,
tracking
continues
for
that
Category.
Incidents
of
this
type
represent
a
specific
type
of
suspicious
activity,
launched
between
a
variety
of
Sources
and
a
variety
of
Destinations.
These
types
of
incidents
represent
a
broader
range
of
activity
of
a
specific
type,
launched
between
multiple
Sources
and
Destinations.
An
incident
of
this
type
might
indicate
a
situation
where
a
new
type
of
attack
is
published,
and
multiple
members
of
the
hacker
community
are
exercising
the
new
attack.
If
two
different
types
of
attacks
are
being
exercised
in
the
same
way,
two
or
more
different
incidents
of
this
type
may
be
produced.
Unique
Value
for
Source
(Src)
The
correlation
engine
tracks
all
unique
values
for
Source,
while
simply
aggregating
associated
values
for
Category
and
Destination.
Whenever
the
event
activity
for
a
specific
value
for
Source
exceeds
the
threshold
within
the
configured
time
window,
an
incident
event
is
produced.
If
and
when
additional
events
are
received
for
the
particular
value
of
Source,
tracking
continues
for
that
Source.
These
types
of
incidents
represent
a
broader
range
of
activity,
launched
from
a
single
Source
against
multiple
Destinations.
An
incident
of
this
type
might
indicate
a
situation
where
single
hacker
is
launching
a
range
of
attacks
against
many
servers
in
an
enterprise.
If
two
different
hackers
are
launching
broad-based
attacks
against
a
range
of
servers,
two
or
more
different
incidents
of
this
type
may
be
produced.
Unique
Value
for
Destination
(Dst)
The
correlation
engine
tracks
all
unique
values
for
Destination,
while
simply
aggregating
associated
values
for
Category
and
Source.
Whenever
the
event
activity
for
a
specific
value
for
Destination
exceeds
the
threshold
within
the
configured
time
window,
an
incident
event
is
produced.
If
and
when
additional
events
are
received
for
the
particular
value
of
Destination,
tracking
continues
for
that
Destination.
These
types
of
incidents
represent
a
broader
range
of
activity,
launched
from
multiple
Sources
against
a
single
Destination.
An
incident
of
this
type
might
36
IBM
Tivoli
Risk
Manager:
Administrator’s
Guide

indicate
a
situation
where
a
broad,
concerted
attack
has
been
launched
against
one
of
your
web
servers.
If
two
broad-based
attacks
are
being
launched
against
two
of
your
Web
servers,
two
or
more
different
incidents
of
this
type
may
be
produced.
Chapter
1.
Introduction
37

38
IBM
Tivoli
Risk
Manager:
Administrator’s
Guide

Chapter
2.
Event
Server
Each
sensor
that
you
have
installed
in
your
network
monitors
a
single
resource,
such
as
a
host
or
a
router,
or
a
network
of
resources.
When
activity
is
detected,
each
sensor
generates
information
in
the
form
of
events
(also
called
alerts)
that
are
routed
to
an
event
server.
Each
of
these
events
represents
an
individual
occurrence
of
a
suspicious
activity
or
security-related
problem
that
the
sensor
has
detected.
Tivoli
Risk
Manager
analyzes
the
incoming
Tivoli
Risk
Manager
events
and
searches
for
patterns
of
activity.
Suspicious
activity
or
problems,
that
are
detected
as
a
result
of
the
search
for
patterns,
are
referred
to
as
incidents.
Incidents
are
displayed
on
the
Tivoli
Enterprise
Console
as
events.
The
incidents
are
routed
to
the
Tivoli
Risk
Manager
event
server
where
they
are
analyzed
and
displayed
on
the
Tivoli
Enterprise
Console
as
events.
The
analysis
at
the
event
server
creates
incident
group
events
that
are
displayed
on
the
Tivoli
Enterprise
Console.
The
process
of
identifying
incidents
and
incident
groups
is
referred
to
as
correlation.
The
correlation
process
reduces
redundancy
and
operator
overload
by
sifting
through
intrusion-detection
information
from
multiple
sensors
and
presenting
the
relevant
information
in
a
concise
format.
Configuring
Correlation
v
The
configuration
of
the
correlation
processing
that
identifies
incidents
is
described
in
Chapter
7,
“Incident-Based
Correlation,”
on
page
95.
v
The
configuration
of
the
correlation
process
that
identifies
incident
groups
is
described
later
in
this
chapter.
See
the
IBM
Tivoli
Risk
Manager
Problem
Determination
Guide
for
errors
that
might
occur
during
correlation
or
as
the
result
of
errors
in
configuration
files.
Incidents
and
Incident
Groups
The
event
server
monitors
incident
(RM_Incident)
events
at
the
Tivoli
Enterprise
Console
server
with
Tivoli
Risk
Manager
event
classes
and
prolog
rules.
The
event
server
can
be
configured
to
generate
incident
group
(RM_IncidentGroup)
events
when
RM_Incident
events
are
received
from
a
distributed
correlation
server
or
the
incident-based
correlation
engine
that
is
running
on
the
event
server.
RM_IncidentGroup
classes
are
as
follows:
RM_SrcDstCat_IncidentGroup
Generated
when
RM_SrcDstCat_Incident
events
reach
the
specified
threshold.
RM_SrcDst_IncidentGroup
Generated
when
RM_SrcDst_Incident
events
reach
the
specified
threshold.
RM_SrcCat_IncidentGroup
Generated
when
RM_SrcCat_Incident
events
reach
the
specified
threshold.
RM_DstCat_IncidentGroup
Generated
when
RM_DsCat_Incident
events
reach
the
specified
threshold.
©
Copyright
IBM
Corp.
2003
39

RM_Src_IncidentGroup
Generated
when
RM_Src_Incident
events
reach
the
specified
threshold.
RM_Cat_IncidentGroup
Generated
when
RM_Cat_Incident
events
reach
the
specified
threshold.
Tivoli
Risk
Manager
Correlation
Components
Tivoli
Risk
Manager
servers
include
the
following
components:
v
Agent
v
.baroc
files
v
List
(.lst)
configuration
files
v
.xml
and
.conf
configuration
files
The
Event
Server
also
includes:
v
Prolog
(.pro)
configuration
files
v
Rules
(.rls)
files
Configuring
the
Event
Server
The
configuration
settings
for
the
Tivoli
Risk
Manager
event
server
are
included
in
the
prolog
configuration
file,
RMINSTDIR/etc/tec/rules/riskmg_config.pro.
To
activate
changes
you
make
in
this
file,
use
the
rmcorr_cfg
command.
See
the
IBM
Tivoli
Risk
Manager
Command
Reference
for
details
on
using
this
command.
See
the
IBM
Tivoli
Risk
Manager
Installation
Guide
for
basic
event
server
configuration
information.
Advanced
Configuration
After
installing
and
performing
the
required
configuration
on
the
event
server,
you
can
change
your
prolog
configuration
settings
and
configure
the
list
(.lst)
files.
Changing
Prolog
Configuration
Settings
You
can
change
the
prolog
configuration
settings
by
editing
the
prolog
configuration
file,
riskmgr_config.pro.
The
riskmgr_config.pro
configuration
file,
is
located
in
the
RMINSTDIR/etc/tec/rules
directory.
Note:
This
file
is
a
prolog
source
file.
Statements
in
the
prolog
are
referred
to
as
predicates.
You
must
be
careful
to
ensure
that
you
use
correct
prolog
syntax.
This
means:
v
Each
entry
must
be
terminated
with
a
period
(
.
).
v
Strings
should
be
enclosed
with
single
quotation
marks
(’
’).
v
Real
numbers
must
not
end
with
a
period
(
.
),
but
should
be
followed
by
’.0’
.
For
example,
25
must
be
written
as
25.0
v
The
underscore
character
(
_
)
acts
as
a
wildcard.
v
The
order
of
the
predicates
is
important
especially
for
threshold
settings.
Be
sure
to
specify
the
more
specific
definitions
first,
followed
by
the
more
generic
definitions.
To
activate
the
changes
you
make
to
the
prolog
configuration
file,
use
the
rmcorr_cfg
-reconfig
command.
See
the
IBM
Tivoli
Risk
Manager
Command
Reference
for
details
on
using
this
command.
40
IBM
Tivoli
Risk
Manager:
Administrator’s
Guide
See
the
following
sections
to
set
the
configuration
options:
v
“Disabling
Incident
Group
Creation”
v
“Setting
Incident
Group
Thresholds”
v
“Setting
the
Incident
Group
Severity
Minimum”
on
page
42
v
“Closing
Sensor
Events”
on
page
43
v
“Determine
Processes
for
Non-TME
Event
Handling”
on
page
43
Disabling
Incident
Group
Creation
You
can
configure
the
event
server
to
not
create
RM_IncidentGroup
events
using
the
disable_incident_group_creation
predicate.
Valid
parameters
are:
ALL
Incident
group
creation
is
completely
disabled.
Cat
Incident
group
creation
is
disabled
for
RM_Cat_Incident
events.
Dst
Incident
group
creation
is
disabled
for
RM_Dst_Incident
events.
DstCat
Incident
group
creation
is
disabled
for
RM_DstCat_Incident
events.
NONE
Incident
group
creation
is
fully
enabled.
This
is
the
default
value.
Src
Incident
group
creation
is
disabled
for
RM_Src_Incident
events.
SrcCat
Incident
group
creation
is
disabled
for
RM_SrcCat_Incident
events.
SrcDst
Incident
group
creation
is
disabled
for
RM_SrcDst_Incident
events.
SrcDstCat
Incident
group
creation
is
disabled
for
RM_SrcDstCat_Incident
events.
Note:
By
default,
incident
group
creation
is
enabled.
Setting
Incident
Group
Thresholds
You
can
control
the
creation
of,
and
severity
assigned
to
the
incident
group
events
using
the
set_incidentgroup_threshold
predicate.
set_incidentgroup_threshold(type,
metric,
harmless,
warning,
minor,
critical,
cust).
where:
type
Cat
This
threshold
is
for
RM_Cat_IncidentGroup
events.
Dst
This
threshold
is
for
RM_Dst_IncidentGroup
events.
DstCat
This
threshold
is
for
RM_DstCat_IncidentGroup
events.
Src
This
threshold
is
for
RM_Src_IncidentGroup
events.
SrcCat
This
threshold
is
for
RM_SrcCat_IncidentGroup
events.
SrcDst
This
threshold
is
for
RM_SrcDst_IncidentGroup
events.
SrcDstCat
This
threshold
is
for
RM_SrcDstCat_IncidentGroup
events.
Chapter
2.
Event
Server
41
underscore
(
_
)
This
threshold
is
for
all
RM_IncidentGroup
events.
metric
level
Metric
will
be
the
combined
rm_Level
of
the
contributing
RM_Incident
events.
count
Metric
will
be
the
number
of
RM_Incident
events
contributing
to
the
RM_IncidentGroup.
harmless
The
numeric
threshold
that
the
RM_IncidentGroup
event
will
be
created
with
severity=’HARMLESS’.
warning
The
numeric
threshold
that
the
RM_IncidentGroup
event
will
be
created
with
severity=’WARNING’.
minor
The
numeric
threshold
that
the
RM_IncidentGroup
event
will
be
created
with
severity=’MINOR’.
critical
The
numeric
threshold
that
the
RM_IncidentGroup
event
will
be
created
with
severity=’CRITICAL’.
cust
This
is
optional
and
is
typically
specified
when
there
is
a
need
to
create
incident
groups.
If
specified,
cust
is
matched
with
the
rm_CustomerID
attribute
of
the
RM_Incident
events
received
at
the
Tivoli
Enterprise
Console
server.
Because
cust
is
a
string
value,
it
must
be
enclosed
in
single
quotation
marks
in
the
set_incidentgroup_threshold
predicate.
To
ensure
that
incident
group
events
are
processed
for
rm_CustomerID
that
do
not
have
a
specific
threshold
setting,
you
should
be
sure
to
specify
at
least
one
set_incident_group_threshold
predicate
with
no
cust
value.
Example
settings
with
cust
specified:
set_incidentgroup_threshold(_,’level’,5.0,10.0,30.0,50.0,’ABC
Inc’).
set_incidentgroup_threshold(_,’level’,1.0,10.0,30.0,50.0,’ZYX
Corp’).
set_incidentgroup_threshold(_,’level’,20.0,40.0,60.0,100.0).
Note:
Incident
group
events
are
generated
when
the
metric
reaches
the
harmless
setting.
It
is
recommended
that
you
use
the
same
metric
for
all
incident
group
processing.
However,
you
are
not
required
to
do
so.
If
you
have
a
mix
of
metric
settings
in
your
thresholds
that
results
in
thresholds
for
both
metrics
being
set,
then
the
level
threshold
specified
is
used
for
correlation.
Setting
the
Incident
Group
Severity
Minimum
Using
the
highest_incident_severity_is_minimum_incidentgroup_severity
predicate,
you
can
direct
the
Tivoli
Risk
Manager
event
server
to
set
the
RM_IncidentGroup
severity
to
be
no
lower
than
the
severity
associated
with
contributing
RM_Incident
events.
When
enabled,
your
RM_IncidentGroup
events
might
have
a
severity
higher
than
the
threshold
setting.
Valid
parameters
are:
’yes’
or
’no’.
To
ensure
that
the
RM_IncidentGroup
event
severity
is
at
least
as
high
as
the
severity
of
the
represented
incident
events
specify:
highest_incident_severity_is_minimum_incidentgroup_severity(’yes’)
42
IBM
Tivoli
Risk
Manager:
Administrator’s
Guide

To
disable
this
function,
specify:
highest_incident_severity_is_minimum_incidentgroup_severity(’no’)
Closing
Sensor
Events
Using
the
close_sensor_events
predicate,
you
can
direct
the
Tivoli
Risk
Manager
event
server
to
close
RM_SensorEvents
that
have
been
sent
to
your
Tivoli
Enterprise
Console
server.
The
RM_SensorEvents
must
have
been
″normalized″
by
a
Tivoli
Risk
Manager
correlation
server
(agent)
to
be
affected
by
this
predicate.
Valid
parameters
are:
’yes’
or’no’.
For
example,
close_sensor_events(’no’)
close_sensor_events(’yes’)
Determine
Processes
for
Non-TME
Event
Handling
In
a
well-configured
system,
your
non-TME
adapters
and
sensors
should
route
their
events
to
a
Tivoli
Risk
Manager
correlation
agent.
Because
it
is
not
possible
to
route
events
from
your
TME
adapters
to
a
Tivoli
Risk
Manager
correlation
agent,
events
from
TME
adapters
are
automatically
routed
to
the
local
Tivoli
Risk
Manager
correlation
agent.
You
can
specify
how
you
want
events
routed
from
a
non-TME
adapter
or
sensor
directly
to
the
Tivoli
Risk
Manager
event
server
using
the
non_TME_event_handling
predicate.
Valid
parameters
are:
’correlate’,
’drop’,
and
’ignore’.
where:
’correlate’
The
non-TME
RM_SensorEvent
events
are
routed
to
the
Tivoli
Risk
Manager
correlation
agent
that
is
specified
in
the
rmlocal.conf
file
of
your
Tivoli
Enterprise
Console
rule
base.
Unless
you
have
changed
the
rmlocal.conf
file,
the
default
settings
will
cause
the
events
to
be
routed
to
the
local
Tivoli
Risk
Manager
correlation
agent.
This
is
the
default
behavior.
’drop’
The
non-TME
RM_SensorEvent
events
will
not
be
routed
to
the
Tivoli
Risk
Manager
correlation
agent,
and
therefore
will
not
contribute
to
incident
identification.
Such
events
will
not
be
available
for
viewing
on
the
event
console
and
will
not
be
entered
in
the
Tivoli
Enterprise
Console
database.
’ignore’
The
non-TME
RM_SensorEvent
events
will
not
be
routed
to
the
Tivoli
Risk
Manager
correlation
agent,
and
therefore
will
not
contribute
to
incident
identification.
Such
events
will
be
available
for
viewing
on
the
event
console
and
will
be
in
the
Tivoli
Enterprise
Console
database.
The
default
behavior
is
’correlate’.
For
example,
non_TME_event_handling(’correlate’).
non_TME_event_handling(’drop’).
non_TME_event_handling(’ignore’).
Chapter
2.
Event
Server
43

Configuring
the
List
Files
The
list
files
are
configuration
files
used
by
the
rmcorr_cfg
command.
The
list
files
are
as
follows:
v
RMINSTDIR/etc/riskmgr_baroc.lst
-
list
of
active
BAROC
files
This
file
is
used
by
the
agent.
v
RMINSTDIR/etc/riskmgr_rules.lst
-
list
of
active
rules
files
v
RMINSTDIR/etc/riskmgr_pro.lst
-
list
of
active
prolog
files
v
RMINSTDIR/etc/riskmgr_cfg.lst
-
list
of
active
prolog
configuration
files
Configuring
the
riskmgr_baroc.lst
File:
See
“Customize
the
BAROC
List”
on
page
46
for
information
on
customizing
the
riskmgr_baroc.lst
file.
Configuring
the
riskmgr_rules.lst
File:
If
you
have
custom
Tivoli
Enterprise
Console
rules
that
you
want
active
in
your
Tivoli
Risk
Manager
rule
base,
add
your
rules
to
the
riskmgr_rules.lst
file.
1.
Add
the
file
to
the
end
of
riskmgr_rules.lst.
2.
Place
your
rules
(.rls)
file
in
the
RMINSTDIR/etc/tec/rules
directory.
Notes:
1.
A
sample
rules
file
showing
how
to
enable
RM_SensorEvent
events
to
be
used
with
Tivoli
NetView
is
included
with
the
event
server.
To
enable
it,
add
hostname_remap.rls
to
the
riskmgr_rules.lst
file.
2.
To
activate
changes
you
have
made
to
the
riskmgr_rules.lst
file,
use
the
rmcorr_cfg
–update
command.
See
the
IBM
Tivoli
Risk
Manager
Command
Reference
for
details
on
using
this
command.
Configuring
the
riskmgr_pro.lst
File:
Do
NOT
change
the
riskmgr_pro.lst
file.
It
is
intended
only
for
use
by
Customer
Support.
Configuring
the
riskmgr_cfg.list
File:
This
file
names
the
prolog
configuration
files
that
are
used
by
the
rule
base.
If
you
have
custom
prolog
for
your
custom
rules,
you
can
include
your
prolog
file
in
riskmgr_cfg.lst.
1.
Add
the
file
to
the
end
of
riskmgr_cfg.lst.
2.
Place
your
prolog
(.pro)
file
in
the
RMINSTDIR/etc/tec/rules
directory.
Note:
To
activate
changes
you
have
made
to
the
riskmgr_cfg.lst
file,
use
the
rmcorr_cfg
–update
command.
See
the
IBM
Tivoli
Risk
Manager
Command
Reference
for
details
on
using
this
command.
Configuring
the
Rules
Files
The
rules
(.rls)
files
contain
the
Tivoli
Enterprise
Console
rules
that
are
included
in
your
rule
base.
The
rule
files
are
as
follows
v
RMINSTDIR/etc/tec/rules/riskmanager.rls
v
RMINSTDIR/etc/tec/rules/boot.rls
v
RMINSTDIR/etc/tec/rules/hostname_remap.rls
Configuring
the
riskmanager.rls
file:
The
riskmanager.rls
file
contains
rules
to:
v
Route
RM_SensorEvent
events
that
have
not
been
included
in
correlation
to
the
local
agent.
v
Perform
Incident
Group
processing.
44
IBM
Tivoli
Risk
Manager:
Administrator’s
Guide

Do
NOT
make
changes
to
the
riskmanager.rls
file.
If
you
need
to
have
custom
rules
for
Tivoli
Risk
Manager
sensor
or
incident
events,
you
can
write
your
own
rules
file
and
include
it
in
the
Tivoli
Risk
Manager
rule
base.
See
“Configuring
the
riskmgr_rules.lst
File”
on
page
44
for
information
relating
to
adding
a
rules
file
to
the
rule
base.
Configuring
the
boot.rls
file:
The
boot.rls
file
contains
rules
to:
v
Activate
the
configuration
options
specified
in
the
riskmanager_config.pro
file.
v
Ensure
the
Tivoli
Risk
Manager
rules
and
configuration
settings
are
active.
If
not,
an
RM_InputError
event
will
be
generated
at
the
Tivoli
Enterprise
Console
server.
Do
NOT
make
changes
to
the
boot.rls
file.
If
you
need
to
have
custom
rules
run
when
the
Tivoli
Enterprise
Console
server
starts,
you
can
write
your
own
rules
file
and
include
it
in
the
Tivoli
Risk
Manager
rule
base.
See
“Configuring
the
riskmgr_rules.lst
File”
on
page
44
for
information
on
adding
a
rules
file
to
the
rule
base.
Configuring
the
hostname_remap.rls
file:
The
hostname_remap.rls
file
is
a
sample
rules
file
containing
rules
to:
v
Set
the
hostname
attribute
of
fully-processed
RM_SensorEvent
events
to
the
rm_SensorHostname
attribute
value.
v
Set
the
adapter_host
attribute
to
the
composite
string
that
Tivoli
Risk
Manager
sets
as
the
hostname
attribute.
The
rules
in
hostname_remap.rls
file
are
not
active
by
default.
See
“Configuring
the
riskmgr_rules.lst
File”
on
page
44
for
information
on
enabling
the
rules
contained
in
hostname_remap.rls.
Enable
the
rules
in
hostname_remap.rls
if
you
use
Tivoli
NetView
to
respond
to
Tivoli
Risk
Manager
sensor
events
or
if
you
frequently
use
tasks
in
response
to
Tivoli
Risk
Manager
sensor
events.
Tivoli
Risk
Manager
sets
a
composite
string
as
the
hostname
attribute
to
allow
the
attack
information
to
be
viewed
on
the
event
console.
This
composite
string
contains:
v
The
attack
category
v
The
source
of
the
attack
v
The
destination
of
the
attack
You
can
modify
the
hostname_remap.rls
file
to
remap
the
composite
string
to
attributes
other
than
adapter_host.
Use
the
rmcorr_cfg
–update
command
to
active
any
changes
you
made
to
the
hostname_remap.rls
file.
See
the
IBM
Tivoli
Risk
Manager
Command
Reference
for
details
on
using
this
command.
Performance
Considerations
Configuration
options
of
the
Tivoli
Enterprise
Console
server
and
the
Tivoli
Risk
Manager
event
server
might
affect
the
Tivoli
Risk
Manager
event
server
performance.
For
example,
the
event
cache
size
affects
the
rule
processing
performance
because
it
limits
the
number
of
events
actively
being
processed
by
the
rule
base.
Chapter
2.
Event
Server
45

Customize
the
BAROC
List
1.
Remove
any
unneeded
.baroc
files
that
are
specified
in
the
RMINSTDIR/etc/riskmgr_baroc.lst
file.
This
file
contains
a
set
of
.baroc
files
that
are
loaded
by
the
event
server.
You
can
remove
the
.baroc
files
for
any
adapter
or
sensor
that
you
will
not
deploy
in
your
network.
For
example,
if
you
are
not
using
the
old
Netranger
adapter
or
the
ISS
RealSecure
adapter,
remove
the
following
from
the
riskmgr_baroc.lst
file:
netranger.baroc
realsecure.baroc
2.
Position
the
adapters
with
the
highest
event
volume
ahead
of
the
other
adapter
.baroc
files.
3.
Add
additional
BAROC
files
for
adapters
that
you
will
use
in
your
network.
Notes:
1.
Do
not
remove
or
reposition
the
first
four
entries
in
the
riskmgr_baroc.lst
file.
root.baroc
tec.baroc
riskmanager.baroc
sensor_abstract.baroc
2.
You
can
reposition,
but
not
remove
the
rmagent.baroc
entry
from
the
riskmgr_baroc.lst
file.
3.
To
activate
changes
you
have
made
to
the
riskmgr_baroc.lst
file,
use
the
rmcorr_cfg
–update
command.
See
the
IBM
Tivoli
Risk
Manager
Command
Reference
for
details
on
using
this
command.
Set
Event
Cache
Size
In
the
Tivoli
Enterprise
Console
environment,
rules
are
applied
to
events
that
are
stored
in
an
event
cache.
When
the
cache
fills
up,
events
are
purged
or
they
are
no
longer
processed
by
the
rules.
A
full
event
cache
affects
correlation
results
so
check
the
size
of
the
event
cache.
To
check
the
size
of
the
Tivoli
Enterprise
Console
event
cache
on
your
Tivoli
Enterprise
Console
or
Tivoli
Risk
Manager
server
use
the
wlsesvrcfg
command
that
is
part
of
the
Tivoli
Enterprise
Console
product.
See
the
IBM
Tivoli
Enterprise
Console
Reference
Manual
for
details
on
using
this
command.
The
recommended
value
for
the
size
of
the
Tivoli
Enterprise
Console
event
cache
size
is
3000
entries.
To
change
the
size
of
the
event
cache,
type
the
following:
wsetesvrcfg
-c
3000
Note:
If
your
event
cache
size
is
not
configured
properly,
the
Tivoli
Enterprise
Console
server
might
clean
the
cache
to
allow
the
active
rules
to
process
events
being
received.
When
the
cache
is
cleaned
in
this
fashion,
the
Tivoli
Enterprise
Console
server
issues
a
TEC_Notice
event
with
the
message
filed
set
to
″Rule
Cache
full:
forced
cleaning″.
When
a
forced
cache
cleaning
occurs:
v
Processing
of
existing
incident
group
events
might
appear
to
stop.
This
occurs
if
an
existing
RM_IncidentGroup
event
does
not
receive
additional
events
to
contribute
to
its
processing.
v
Duplication
of
incident
group
events
might
occur
in
your
event
repository.
Duplication
takes
place
if
additional
events
that
contribute
to
the
incident
group
arrive
at
the
server.
The
duplication
occurs
because
the
original
instance
of
the
RM_IncidentGroup
event
has
been
removed
from
46
IBM
Tivoli
Risk
Manager:
Administrator’s
Guide

the
cache
and
is
therefore
no
longer
being
processed
by
the
rules.
The
original
RM_IncidentGroup
will
not
be
updated
(see
previous
bullet).
Filtering
Attributes
You
can
filter
your
attributes
so
they
are
not
sent
to
the
Tivoli
Enterprise
Console
server.
At
your
agent
and
distributed
correlation
server
you
can
add
an
attribute
to
the
eif_sender.conf
file
to
configure
it
not
to
send
some
extended
slots
to
the
Tivoli
Enterprise
Console
server.
See
the
RMINSTDIR/etc/templates/sensorevent/attributefilter.xml
file
for
an
example
of
this
filtering.
For
example,
attributefilter=filename
Set
Instance
Count
on
Agent
Senders
If
you
have
a
high-volume
of
event
data,
it
is
possible
that
one
of
your
senders
might
become
backlogged.
You
will
notice
the
queue
size
growing
when
you
use
the
wrmqueue
–l
command.
See
the
IBM
Tivoli
Risk
Manager
Command
Reference
for
details
on
using
this
command.
You
can
tune
Tivoli
Risk
Manager
to
use
multiple
threads
to
process
your
events
on
such
senders.
To
do
this,
edit
the
rmagent.xml
file
and
add
instanceCount="number"
to
the
sender.
For
example,
<sender
name="eif_sender"
class="com..."
instance
Count="8">
Tivoli
Risk
Manager
BAROC
Files
Each
adapter
and
sensor
includes
a
BAROC
file
that
describes
the
classes
of
events
that
it
supports.
The
adapter
or
sensor
typically
does
not
use
the
BAROC
file,
but
serves
as
a
mandatory
link
between
the
adapter
and
event
server.
The
Tivoli
Enterprise
Console
and
Tivoli
Risk
Manager
correlation
server
must
load
the
BAROC
file
before
they
can
understand
events
that
are
received
from
an
adapter
or
sensor.
BAROC
files
usually
have
an
extension
of
.baroc.
Tivoli
Risk
Manager
provides
a
list
of
known
BAROC
files
that
are
loaded
by
default.
This
file,
RMINSTDIR/etc/riskmgr_baroc.lst,
is
shared
between
the
rmcorr_cfg
command,
when
working
with
your
rule
base,
and
the
Tivoli
Risk
Manager
correlation
agent,
that
uses
it
to
determine
what
BAROC
files
to
activate
for
correlation.
The
Tivoli
Risk
Manager
BAROC
files
contain
a
hierarchy
of
event
classes.
All
event
classes
inherit
from
the
EVENT
class.
All
Tivoli
Risk
Manager
event
classes
inherit
from
RM_Event.
Tivoli
Risk
Manager
top-level,
abstract
classes,
and
the
component
event
classes
are
defined
in
the
BAROC
files
located
in
the
RMINSTDIR/etc/baroc
subdirectory.
Table
2
describes
the
BAROC
files
included
with
Tivoli
Risk
Manager.
Table
2.
BAROC
Files
BAROC
File
Name
Type
of
Classes
cpfw.baroc
The
adapter
for
Check
Point
FireWall–1
event
classes.
Also,
these
event
classes
define
some
generic
firewall
events.
The
classes
in
this
file
depend
on
classes
in
the
sensor_abstract.baroc
file.
Chapter
2.
Event
Server
47

Table
2.
BAROC
Files
(continued)
BAROC
File
Name
Type
of
Classes
crouter_snmp.baroc
The
adapter
for
Cisco
Routers
event
classes.
Also,
these
event
classes
define
the
generic
router
events.
This
file
contains
Cisco
router
class
derivatives.
The
classes
in
this
file
depend
on
classes
in
the
sensor_abstract.baroc
file.
csids.baroc
The
adapter
for
Cisco
Secure
IDS
event
classes.
The
classes
in
this
file
depend
on
the
classes
in
the
sensor_abstract.baroc
file.
generic.baroc
General
purpose
classes
used
to
facilitate
rapid
adapter
development.
The
classes
defined
in
this
file
depend
upon
those
defined
in
the
sensor_abstract.baroc
file.
nids.baroc
The
Tivoli
Risk
Manager
Network
IDS
event
classes.
The
classes
in
this
file
depend
on
classes
in
the
sensor_abstract.baroc
file.
os.baroc
The
adapter
for
Host
IDS
event
classes.
The
classes
in
this
file
depend
on
classes
in
the
sensor_abstract.baroc
file.
Note:
The
BAROC
file
is
deprecated.
The
Host
IDS
adapters
currently
use
event
classes
defined
in
generic.baroc
os_linux.baroc
The
adapter
for
Host
IDS
on
Linux.
The
event
classes
in
this
file
depend
on
classes
from
the
os.baroc
file.
Note:
The
BAROC
file
is
deprecated.
The
Host
IDS
adapters
currently
use
event
classes
defined
in
generic.baroc
os_unix.baroc
The
adapter
for
Host
IDS
event
classes
on
UNIX
(AIX
and
Solaris)
operating
systems.
The
classes
in
this
file
depend
on
the
classes
in
the
os.baroc
file.
Note:
The
BAROC
file
is
deprecated.
The
Host
IDS
adapters
currently
use
event
classes
defined
in
generic.baroc
os_windows.baroc
The
adapter
for
Host
IDS
on
a
Windows
system.
The
event
classes
in
this
file
depend
on
classes
from
os.baroc.
Note:
The
BAROC
file
is
deprecated.
The
Host
IDS
adapters
currently
use
event
classes
defined
in
generic.baroc
pix.baroc
The
adapter
for
Cisco
Secure
PIX
Firewall
event
classes.
Also,
these
event
classes
define
some
generic
firewall
events.
The
classes
in
this
file
depend
on
classes
in
the
sensor_abstract.baroc
file.
realsecure.baroc
The
adapter
for
ISS
RealSecure
host-based
and
network-based
event
classes.
The
classes
in
this
file
depend
on
the
classes
in
the
sensor_abstract.baroc
file.
riskmanager.baroc
The
Tivoli
Risk
Manager
classes
used
for
correlation.
rmagent.baroc
Events
related
to
the
agent
activity
and
configuration.
The
classes
in
this
file
depend
on
classes
in
the
sensor_abstract.baroc
file.
rmvirus.baroc
The
adapter
for
Norton
AntiVirus
event
classes
and
the
adapter
for
the
McAfee
Alert
Manager.
Also,
these
event
classes
define
the
generic
antivirus
events.
The
event
classes
in
this
file
depend
on
classes
in
the
sensor_abstract.baroc
file.
sensor_abstract.baroc
The
top-level,
sensor-related
abstract
classes.
Do
not
send
instances
of
these
classes
to
the
Tivoli
Enterprise
Console.
The
classes
in
this
file
depend
on
the
classes
in
the
riskmgr.baroc
file.
48
IBM
Tivoli
Risk
Manager:
Administrator’s
Guide

Table
2.
BAROC
Files
(continued)
BAROC
File
Name
Type
of
Classes
webids.baroc
The
Web
IDS
event
classes.
The
classes
in
this
file
depend
on
the
classes
in
the
sensor_abstract.baroc
file.
Chapter
2.
Event
Server
49

50
IBM
Tivoli
Risk
Manager:
Administrator’s
Guide

Chapter
3.
Database
The
Tivoli
Risk
Manager
database
is
the
repository
of
all
events
processed
by
Tivoli
Risk
Manager.
This
chapter
details
the
database
structure
and
how
to
maintain
your
database.
Database
Structure
The
Tivoli
Risk
Manager
database
consists
of
the
following:
v
The
Tivoli
Enterprise
Console
Database
v
The
Tivoli
Enterprise
Console
tables
and
views
v
The
Tivoli
Risk
Manager
tables
and
views
Tivoli
Enterprise
Console
Databases
Tivoli
Risk
Manager
uses
the
same
database
as
Tivoli
Enterprise
Console,
named
TEC
on
all
the
supported
databases
For
Tivoli
Risk
Manager
database
support
information,
see
IBM
Tivoli
Risk
Manager
Release
Notes.
Tivoli
Enterprise
Console
Tables
and
Views
The
Tivoli
Enterprise
Console
database
tables
and
schema
are
listed
in
the
IBM
Tivoli
Enterprise
Console
Reference
Manual.
These
can
be
grouped
into:
v
The
Reception
Log
table
–
that
is
the
tec_t_evt_rec_log
table.
v
The
Event
Repository
tables
–
that
comprises
the
tec_t_evt_rep,
tec_t_slots_evt,
and
tec_t_task_evt
tables
v
Tables
and
views
for
the
event
console
–
the
objects
are
the
tec_v_console_list
view
and
the
tec_t_consoles,
tec_t_operators,
tec_t_event_groups,
tec_t_eg_whrclause,
tec_t_assign_op,
and
tec_t_assign_eg
tables.
v
Tables
for
the
Tivoli
Enterprise
Console
rules
processing
–
the
objects
are
the
tec_t_isa,
tec_t_enumerations,
tec_t_status_event,
and
tec_t_status_task
tables
v
Other
tables
and
views,
that
are
not
used
by
Tivoli
Risk
Manager.
Tivoli
Risk
Manager
Tables
and
Views
Tivoli
Risk
Manager
adds
database
objects
to
the
Tivoli
Enterprise
Console
database
for
four
purposes:
1.
Event
archiving
2.
Web
Application
3.
Online
reports
(Crystal
Reports)
4.
Tivoli
Enterprise
Data
Warehouse
(TEDW)
©
Copyright
IBM
Corp.
2003
51

The
objects
added
by
Tivoli
Risk
Manager
are
shown
in
Table
3.
Table
3.
Tivoli
Risk
Manager
Tables,
Views
and
Other
Database
Objects
Table
or
View
Description
rm_t_arc41
Tivoli
Risk
Manager
event
archive
table.
Events
are
archived
here
by
the
Database
Archiver
in
the
Tivoli
Risk
Manager
agent
component.
The
event
archive
is
used
by
the
Web
Application,
Online
Reports
(Crystal
Reports),
or
Tivoli
Enterprise
Data
Warehouse
(TEDW).
rm_v_inc
View
from
the
Tivoli
Enterprise
Console
Event
Repository
tables
that
includes
all
Tivoli
Risk
Manager
Incident
events
and
their
extended
slots
(defined
in
class
RM_Incident).
The
incident
view
is
used
by
the
Web
Application
to
display
incident
events
that
contribute
to
an
incident
group.
rm_v_inc_sub
View
from
the
Tivoli
Enterprise
Console
Event
Repository
tables
that
includes
a
subset
of
slots
from
all
Tivoli
Risk
Manager
Incident
events.
The
subset
incident
view
selects
the
primary
key
(server
handle,
event
handle,
reception
timestamp),
event
status
and
incident
group
ID.
This
view
is
used
by
the
database
utilities
to
close
incident
events
that
contribute
to
an
incident
group.
rm_v_inc_grp
View
from
the
Tivoli
Enterprise
Console
Event
Repository
tables
that
includes
all
Tivoli
Risk
Manager
Incident
Group
events
and
their
extended
slots
(defined
in
class
RM_IncidentGroup).
rm_v_inc_grp_sub
View
from
the
Tivoli
Enterprise
Console
Event
Repository
tables
that
includes
a
subset
of
slots
from
all
Tivoli
Risk
Manager
incident
group
events.
The
subset
incident
group
view
selects
the
primary
key
(server
handle,
event
handle,
reception
timestamp),
event
status,
incident
group
ID
and
timestamp
of
the
last
incident
in
the
group.
This
view
is
used
by
the
database
utilities
to
close
incident
events
that
contribute
to
an
incident
group.
Event
Archive
Table
Creation
As
with
the
Tivoli
Enterprise
Console,
after
you
install
the
event
server,
you
must
create
the
Tivoli
Risk
Manager
database
objects.
For
information
on
creating
the
archive
table,
see
the
IBM
Tivoli
Risk
Manager
Installation
Guide.
Note:
If
you
plan
on
using
the
following
features
of
Tivoli
Risk
Manager
you
are
required
to
create
the
archive
table.
v
Event
archiving
v
Web
Application
v
Online
reports
(Crystal
Reports)
v
Tivoli
Enterprise
Data
Warehouse
(TEDW)
Archive
Table
Definition
The
archive
table
(rm_t_arc41)
definition
is
based
on
a
subset
of
columns
from
the
core
Tivoli
Enterprise
Console
table
(tec_t_evt_rep)
and
selected
Tivoli
Risk
Manager-specific
slots
from
the
Tivoli
Enterprise
Console
slot
table
(tec_t_slots_evt).
Table
4
on
page
53
describes
the
columns
in
the
archive
table
and
indicates
their
origin
in
the
Tivoli
Enterprise
Console
Event
Repository
database.
Columns
taken
from
the
event
table
(tec_t_evt_rep)
have
the
same
column
name
in
the
archive
table,
except
where
indicated
in
the
origin
Table
column.
Columns
taken
from
the
slot
table
(tec_t_slots_evt)
give
the
slot
name
in
parentheses.
52
IBM
Tivoli
Risk
Manager:
Administrator’s
Guide

Tabl
e
4.
Col
umns
in
the
Arc
hive
Tabl
e
and
the
Orig
in
in
the
Tiv
oli
Ent
erpr
ise
Con
sole
Eve
nt
Rep
osito
ry
Dat
abas
e
Col
um
n
Nam
e
Dat
atyp
e
Ori
gin
Tab
le
(Slo
t)
Des
crip
tion
SER
VE
R_H
ND
L
Inte
ger
tec_
t_ev
t_re
p
Uni
que
ID
for
Tivo
li
Ent
erpr
ise
Con
sole
serv
er
(par
t
of
even
t
reco
rd
key)
DA
TE
_RE
CE
PTIO
N
Inte
ger
tec_
t_ev
t_re
p
Coo
rdin
ated
Uni
vers
al
Tim
e
(UT
C)
of
even
t
rece
ptio
n,
expr
esse
d
in
seco
nds
sinc
e
Janu
ary
1,
1970
(par
t
of
even
t
reco
rd
key)
.
EV
EN
T_H
ND
L
Inte
ger
tec_
t_ev
t_re
p
Uni
que
ID
for
even
ts
wit
h
the
sam
e
dat
e_re
cept
ion
valu
e
(par
t
of
even
t
reco
rd
key)
TIM
EST
AM
P32
Inte
ger
tec_
t_sl
ots_
evt
(rm
_Tim
esta
mp3
2)
Coo
rdin
ated
Uni
vers
al
Tim
e
(UT
C)
of
even
t
gene
rati
on,
expr
esse
d
in
seco
nds
sinc
e
Janu
ary
1,
1970
.
TIM
E_E
VE
NT
Tim
esta
mp
*
tec_
t_sl
ots_
evt
(rm
_Tim
esta
mp3
2)
Dat
e
and
tim
e
of
even
t
(UT
C)
CL
ASS
Var
char
(64)
tec_
t_ev
t_re
p
Eve
nt
clas
s
nam
e
VE
RSI
ON
Var
char
(32)
tec_
t_sl
ots_
evt
(rm
_Ver
sion
)
Tivo
li
Ris
k
Man
ager
rele
ase
+
CM
VC
vers
ion
num
ber
for
exam
ple,
″4.1
_1.2
″
EV
EN
T_T
YPE
Var
char
(16)
tec_
t_ev
t_re
p
(SU
B_S
OU
RC
E)
Type
of
Tivo
li
Ris
k
Man
ager
even
t
(ID
S
or
Mis
cella
neou
s)
AB
STR
AC
T
Var
char
(128
)
tec_
t_ev
t_re
p
(HO
STN
AM
E)
Com
posi
te
fiel
d
of
sens
or
host
nam
e
+
des
tina
tion
host
nam
e
+
sour
ce
host
nam
e
+
even
t
cate
gory
MSG
Var
char
(255
)
tec_
t_ev
t_re
p
Des
crip
tive
mes
sage
dis
play
ed
on
the
Tivo
li
Ent
erpr
ise
Con
sole
CO
RR
EL
AT
ED
Var
char
(5)
tec_
t_sl
ots_
evt
(rm
_Cor
rela
te)
Was
an
even
t
used
by
the
corr
elat
ion
engi
ne
to
det
erm
ine
if
an
inci
den
t
exis
ts?
Two
poss
ible
valu
es:
yes
or
no.
CO
RR
EL
ATO
R_H
OST
Var
char
(128
)
tec_
t_sl
ots_
evt
(rm
_Cor
rela
ted
ByA
gent
)
Hos
t
that
perf
orm
ed
corr
elat
ion,
or
’N/
A’
if
no
corr
elat
ion.
CO
RR
_LE
VE
L
Rea
l
tec_
t_sl
ots_
evt
(rm
_Lev
el)
Num
eric
spec
ific
atio
n
of
even
t
seve
rity
used
for
thre
shol
d
com
puta
tion
s
dur
ing
even
t
corr
elat
ion
SEV
ER
ITY
Var
char
(16)
tec_
t_ev
t_re
p
Seve
rity
leve
l
of
even
t
RE
PEA
T_C
OU
NT
Inte
ger
tec_
t_ev
t_re
p
Num
ber
of
repe
at
occu
rren
ces
of
the
sam
e
even
t
AD
APT
ER
_HO
ST
Var
char
(128
)
tec_
t_ev
t_re
p
Nam
e
of
host
that
the
even
t
adap
ter
that
repo
rted
the
even
t
is
inst
alle
d.
SEN
SOR
_TY
PE
Var
char
(32)
tec_
t_ev
t_re
p
(SU
B_O
RIG
IN)
Sens
or
type
(net
rang
er,
web
ids,
and
so
on)
of
repo
rtin
g
host
Chapter
3.
Database
53

Tabl
e
4.
Col
umns
in
the
Arc
hive
Tabl
e
and
the
Orig
in
in
the
Tiv
oli
Ent
erpr
ise
Con
sole
Eve
nt
Rep
osito
ry
Dat
abas
e
(con
tinue
d)
Col
um
n
Nam
e
Dat
atyp
e
Ori
gin
Tab
le
(Slo
t)
Des
crip
tion
SEN
SOR
_HO
STN
AM
E
Var
char
(128
)
tec_
t_sl
ots_
evt
(rm
_Sen
sorH
ostn
ame)
Nam
e
of
host
repo
rtin
g
even
t
SEN
SOR
_IPA
DD
R
Var
char
(32)
tec_
t_ev
t_re
p
(OR
IGIN
)
IP
add
ress
of
host
repo
rtin
g
Eve
nt
SEN
SOR
_OS
Var
char
(32)
tec_
t_sl
ots_
evt
(rm
_Sen
sorO
S)
Type
of
oper
atin
g
syst
em
on
host
whe
re
sens
or
is
inst
alle
d
SEN
SOR
_TO
KE
N
Var
char
(128
)
rm_S
enso
rTok
en
Val
ue
assi
gned
dur
ing
even
t
norm
aliz
atio
n
to
a
stri
ng
that
iden
tifi
es
the
sens
or
(or
adap
ter)
type
and
the
host
nam
e
that
the
sens
or
(or
adap
ter)
is
runn
ing.
The
rm_S
enso
rTok
en
uniq
uely
iden
tifi
es
the
sens
or
that
iden
tifi
ed
the
even
t.
SRC
_TO
KE
N
Var
char
(128
)
tec_
t_sl
ots_
evt
(rm
_Sou
rceH
ostn
ame
or
rm_S
ourc
eIPA
dd
r)
Nor
mal
ized
nam
e
of
host
iden
tifi
ed
as
sour
ce
of
intr
usio
n
even
t.
Usu
ally
host
nam
e,
if
it
is
def
ined
,
or
IP
add
ress
.
SRC
_HO
STN
AM
E
Var
char
(128
)
tec_
t_sl
ots_
evt
(rm
_Sou
rceH
ostn
ame)
Nam
e
of
host
iden
tifi
ed
as
sour
ce
of
intr
usio
n
even
t
SRC
_IPA
DD
R
Var
char
(32)
tec_
t_sl
ots_
evt
(rm
_Sou
rceI
PAd
dr)
IP
add
ress
of
host
iden
tifi
ed
as
sour
ce
of
intr
usio
n
even
t
SRC
_PO
RT
Var
char
(16)
tec_
t_sl
ots_
evt
(rm
_Src
Port
)
Hos
t
port
num
ber
(or
nam
e)
iden
tifi
ed
as
sour
ce
of
intr
usio
n
even
t
DST
_TO
KE
N
Var
char
(128
)
tec_
t_sl
ots_
evt
(rm
_Des
tina
tion
Hos
tnam
e
or
rm_D
esti
nati
onIP
Ad
dr)
Nor
mal
ized
nam
e
of
host
iden
tifi
ed
as
targ
et
of
intr
usio
n
even
t.
Usu
ally
host
nam
e,
if
it
is
def
ined
,
or
IP
add
ress
.
DST
_HO
STN
AM
E
Var
char
(128
)
tec_
t_sl
ots_
evt
(rm
_Des
tina
tion
Hos
tnam
e)
Nam
e
of
host
iden
tifi
ed
as
targ
et
of
intr
usio
n
even
t
DST
_IPA
DD
R
Var
char
(32)
tec_
t_sl
ots_
evt
(rm
_Des
tina
tion
IPA
dd
r)
IP
add
ress
of
host
iden
tifi
ed
as
targ
et
of
intr
usio
n
even
t
DST
_PO
RT
Var
char
(16)
tec_
t_sl
ots_
evt
(rm
_Dst
Port
)
Hos
t
port
num
ber
(or
nam
e)
iden
tifi
ed
as
targ
et
intr
usio
n
even
t
SIG
NA
TU
RE
Var
char
(255
)
tec_
t_sl
ots_
evt
(rm
_Sig
natu
re)
Des
crip
tive
stri
ng
iden
tify
ing
intr
usio
n
even
t
CL
ASS
_CA
T_D
ESC
Var
char
(64)
tec_
t_sl
ots_
evt
(rm
_Cla
ssC
ateg
oryD
escr
ipti
on)
Des
crip
tion
of
cate
gory
used
for
even
t
corr
elat
ion
CL
ASS
_CA
T
Var
char
(16)
tec_
t_sl
ots_
evt
(rm
_Cla
ssC
ateg
ory)
Shor
t
nam
e
of
cate
gory
used
for
even
t
corr
elat
ion
PRO
TOC
OL
Var
char
(32)
tec_
t_sl
ots_
evt
(rm
_Pro
toco
l)
Com
mun
icat
ions
prot
ocol
in
use
SER
VIC
E
Var
char
(32)
tec_
t_sl
ots_
evt
(rm
_Ser
vice
nam
e)
Nam
e
of
serv
ice
(Tel
net,
FTP,
and
so
on)
asso
ciat
ed
wit
h
the
intr
usio
n
even
t
54
IBM
Tivoli
Risk
Manager:
Administrator’s
Guide
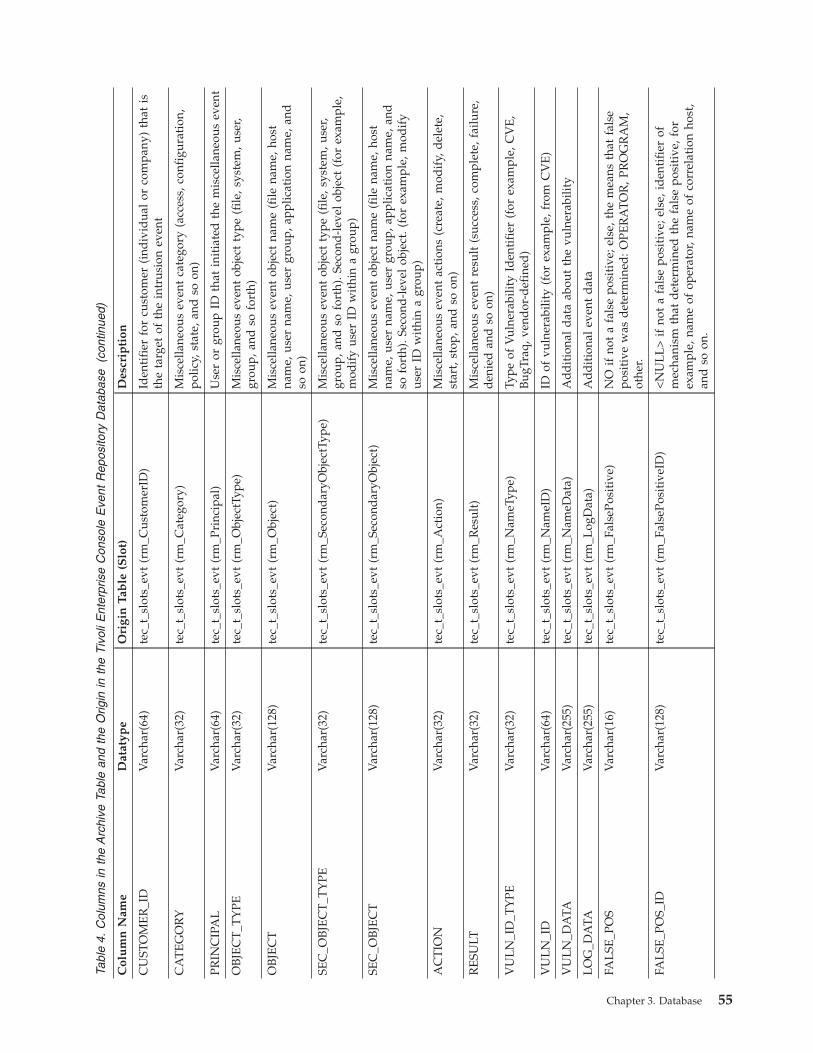
Tabl
e
4.
Col
umns
in
the
Arc
hive
Tabl
e
and
the
Orig
in
in
the
Tiv
oli
Ent
erpr
ise
Con
sole
Eve
nt
Rep
osito
ry
Dat
abas
e
(con
tinue
d)
Col
um
n
Nam
e
Dat
atyp
e
Ori
gin
Tab
le
(Slo
t)
Des
crip
tion
CU
STO
ME
R_I
D
Var
char
(64)
tec_
t_sl
ots_
evt
(rm
_Cus
tom
erID
)
Iden
tifi
er
for
cust
omer
(ind
ivid
ual
or
com
pany
)
that
is
the
targ
et
of
the
intr
usio
n
even
t
CA
TE
GO
RY
Var
char
(32)
tec_
t_sl
ots_
evt
(rm
_Cat
egor
y)
Mis
cella
neou
s
even
t
cate
gory
(acc
ess,
conf
igur
atio
n,
polic
y,
stat
e,
and
so
on)
PRIN
CIP
AL
Var
char
(64)
tec_
t_sl
ots_
evt
(rm
_Pri
ncip
al)
Use
r
or
grou
p
ID
that
init
iate
d
the
mis
cella
neou
s
even
t
OB
JEC
T_T
YPE
Var
char
(32)
tec_
t_sl
ots_
evt
(rm
_Obj
ectT
ype)
Mis
cella
neou
s
even
t
obje
ct
type
(file
,
syst
em,
user
,
grou
p,
and
so
fort
h)
OB
JEC
T
Var
char
(128
)
tec_
t_sl
ots_
evt
(rm
_Obj
ect)
Mis
cella
neou
s
even
t
obje
ct
nam
e
(file
nam
e,
host
nam
e,
user
nam
e,
user
grou
p,
appl
icat
ion
nam
e,
and
so
on)
SEC
_OB
JEC
T_T
YPE
Var
char
(32)
tec_
t_sl
ots_
evt
(rm
_Sec
ond
aryO
bjec
tTyp
e)
Mis
cella
neou
s
even
t
obje
ct
type
(file
,
syst
em,
user
,
grou
p,
and
so
fort
h).
Seco
nd-l
evel
obje
ct
(for
exam
ple,
mod
ify
user
ID
wit
hin
a
grou
p)
SEC
_OB
JEC
T
Var
char
(128
)
tec_
t_sl
ots_
evt
(rm
_Sec
ond
aryO
bjec
t)
Mis
cella
neou
s
even
t
obje
ct
nam
e
(file
nam
e,
host
nam
e,
user
nam
e,
user
grou
p,
appl
icat
ion
nam
e,
and
so
fort
h).
Seco
nd-l
evel
obje
ct.
(for
exam
ple,
mod
ify
user
ID
wit
hin
a
grou
p)
AC
TIO
N
Var
char
(32)
tec_
t_sl
ots_
evt
(rm
_Act
ion)
Mis
cella
neou
s
even
t
acti
ons
(cre
ate,
mod
ify,
del
ete,
star
t,
stop
,
and
so
on)
RE
SULT
Var
char
(32)
tec_
t_sl
ots_
evt
(rm
_Res
ult)
Mis
cella
neou
s
even
t
resu
lt
(suc
cess
,
com
plet
e,
failu
re,
den
ied
and
so
on)
VU
LN
_ID
_TY
PE
Var
char
(32)
tec_
t_sl
ots_
evt
(rm
_Nam
eTyp
e)
Type
of
Vul
nera
bilit
y
Iden
tifi
er
(for
exam
ple,
CV
E,
Bug
Traq
,
vend
or-d
efin
ed)
VU
LN
_ID
Var
char
(64)
tec_
t_sl
ots_
evt
(rm
_Nam
eID
)
ID
of
vuln
erab
ility
(for
exam
ple,
from
CV
E)
VU
LN
_DA
TA
Var
char
(255
)
tec_
t_sl
ots_
evt
(rm
_Nam
eDat
a)
Ad
dit
iona
l
dat
a
abou
t
the
vuln
erab
ility
LO
G_D
ATA
Var
char
(255
)
tec_
t_sl
ots_
evt
(rm
_Log
Dat
a)
Ad
dit
iona
l
even
t
dat
a
FAL
SE_P
OS
Var
char
(16)
tec_
t_sl
ots_
evt
(rm
_Fal
sePo
siti
ve)
NO
if
not
a
fals
e
posi
tive
;
else
,
the
mea
ns
that
fals
e
posi
tive
was
det
erm
ined
:
OPE
RA
TOR
,
PRO
GR
AM
,
othe
r.
FAL
SE_P
OS_
ID
Var
char
(128
)
tec_
t_sl
ots_
evt
(rm
_Fal
sePo
siti
veID
)
<N
UL
L>
if
not
a
fals
e
posi
tive
;
else
,
iden
tifi
er
of
mec
hani
sm
that
det
erm
ined
the
fals
e
posi
tive
,
for
exam
ple,
nam
e
of
oper
ator
,
nam
e
of
corr
elat
ion
host
,
and
so
on.
Chapter
3.
Database
55
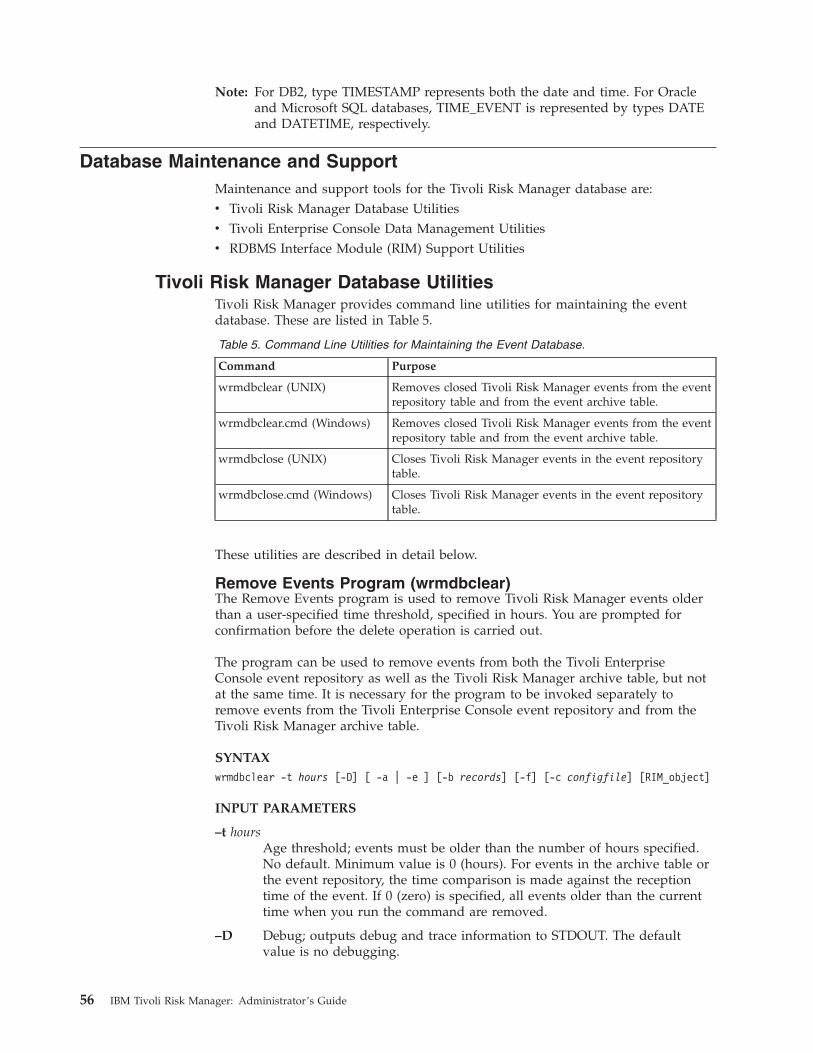
Note:
For
DB2,
type
TIMESTAMP
represents
both
the
date
and
time.
For
Oracle
and
Microsoft
SQL
databases,
TIME_EVENT
is
represented
by
types
DATE
and
DATETIME,
respectively.
Database
Maintenance
and
Support
Maintenance
and
support
tools
for
the
Tivoli
Risk
Manager
database
are:
v
Tivoli
Risk
Manager
Database
Utilities
v
Tivoli
Enterprise
Console
Data
Management
Utilities
v
RDBMS
Interface
Module
(RIM)
Support
Utilities
Tivoli
Risk
Manager
Database
Utilities
Tivoli
Risk
Manager
provides
command
line
utilities
for
maintaining
the
event
database.
These
are
listed
in
Table
5.
Table
5.
Command
Line
Utilities
for
Maintaining
the
Event
Database.
Command
Purpose
wrmdbclear
(UNIX)
Removes
closed
Tivoli
Risk
Manager
events
from
the
event
repository
table
and
from
the
event
archive
table.
wrmdbclear.cmd
(Windows)
Removes
closed
Tivoli
Risk
Manager
events
from
the
event
repository
table
and
from
the
event
archive
table.
wrmdbclose
(UNIX)
Closes
Tivoli
Risk
Manager
events
in
the
event
repository
table.
wrmdbclose.cmd
(Windows)
Closes
Tivoli
Risk
Manager
events
in
the
event
repository
table.
These
utilities
are
described
in
detail
below.
Remove
Events
Program
(wrmdbclear)
The
Remove
Events
program
is
used
to
remove
Tivoli
Risk
Manager
events
older
than
a
user-specified
time
threshold,
specified
in
hours.
You
are
prompted
for
confirmation
before
the
delete
operation
is
carried
out.
The
program
can
be
used
to
remove
events
from
both
the
Tivoli
Enterprise
Console
event
repository
as
well
as
the
Tivoli
Risk
Manager
archive
table,
but
not
at
the
same
time.
It
is
necessary
for
the
program
to
be
invoked
separately
to
remove
events
from
the
Tivoli
Enterprise
Console
event
repository
and
from
the
Tivoli
Risk
Manager
archive
table.
SYNTAX
wrmdbclear
-t
hours
[-D]
[
-a
|
-e
]
[-b
records]
[-f]
[-c
configfile]
[RIM_object]
INPUT
PARAMETERS
–t
hours
Age
threshold;
events
must
be
older
than
the
number
of
hours
specified.
No
default.
Minimum
value
is
0
(hours).
For
events
in
the
archive
table
or
the
event
repository,
the
time
comparison
is
made
against
the
reception
time
of
the
event.
If
0
(zero)
is
specified,
all
events
older
than
the
current
time
when
you
run
the
command
are
removed.
–D
Debug;
outputs
debug
and
trace
information
to
STDOUT.
The
default
value
is
no
debugging.
56
IBM
Tivoli
Risk
Manager:
Administrator’s
Guide

–a
Only
events
in
the
Tivoli
Risk
Manager
archive
table
are
removed.
The
default
value
is
off.
–e
Only
Tivoli
Risk
Manager
events
in
the
Tivoli
Enterprise
Console
event
repository
are
removed.
The
default
value
is
on.
–b
records
Deprecated:
A
database
commit
is
performed
after
every
n
number
of
records
are
deleted.
The
default
value
is
100
records.
Specifying
this
option
has
no
effect
on
the
operation
of
the
command.
–f
Forces
removal;
does
not
display,
″Are
you
sure?″
prompt.
The
default
value
is
off.
–c
configfile
Allows
you
to
optionally
specify
a
configuration
file
that
contains
database
configuration
data
for
a
database
that
is
different
from
the
one
installed
and
configured
with
Tivoli
Risk
Manager.
The
data
in
the
file
must
be
in
the
same
format
as
the
db_sender.conf
file.
The
fully
specified
filename
must
be
entered
as
a
parameter.
If
this
parameter
is
not
specified,
the
version
of
the
db_sender.conf
file
in
the
RMADHOME/etc
directory
is
used
to
acquire
the
database
configuration
information.
RIM_object
Deprecated:
RIM
database
where
events
are
stored.
The
default
value
is
tec.
Specifying
this
option
has
no
effect
on
the
operation
of
the
command.
For
more
information
about
this
command,
see
the
IBM
Tivoli
Risk
Manager
Command
Reference.
Close
Events
Program
(wrmdbclose)
The
Close
Events
program
can
be
used
to
close
all
Tivoli
Risk
Manager
events
older
than
a
user-specified
threshold.
When
used
to
close
incident
group
events,
the
program
also
closes
all
contributing
incident
events.
In
addition,
it
sends
a
special
event,
RM_CloseIncidentGroups,
to
the
event
server
so
that
any
existing
correlation
facts
pertaining
to
the
incident
groups
are
purged
from
the
Tivoli
Enterprise
Console
cache.
One
of
the
attributes
included
in
this
special
event
is
a
shared
secret
key
that
is
obtained
from
the
RMINSTDIR/etc/tec/rules/riskmgr_flush.dat
file.
Run
this
command
only
from
the
Tivoli
Enterprise
Console
server
because
it
must
have
access
to
the
file
containing
a
shared
secret.
SYNTAX
wrmdbclose
-t
hours
[-D]
[-e
|
-g
|
-h
|
-i
|
-r
|
-s]
[-c
configfile]
[RIM_object]
INPUT
PARAMETERS
–t
hours
Age
threshold;
incidents
and
events
must
be
older
than
the
number
of
hours
specified.
No
default.
Minimum
value
is
0
(hours),
that
means
close
all
events.
For
incidents
and
incident
groups,
the
time
comparison
is
made
against
the
time
of
the
last
contributing
event
or
incident,
respectively.
For
sensor
events,
the
time
comparison
is
made
against
the
reception
time
of
the
event.
–D
Debug;
outputs
debug
and
trace
information
to
STDOUT.
The
default
value
is
no
debugging.
Chapter
3.
Database
57
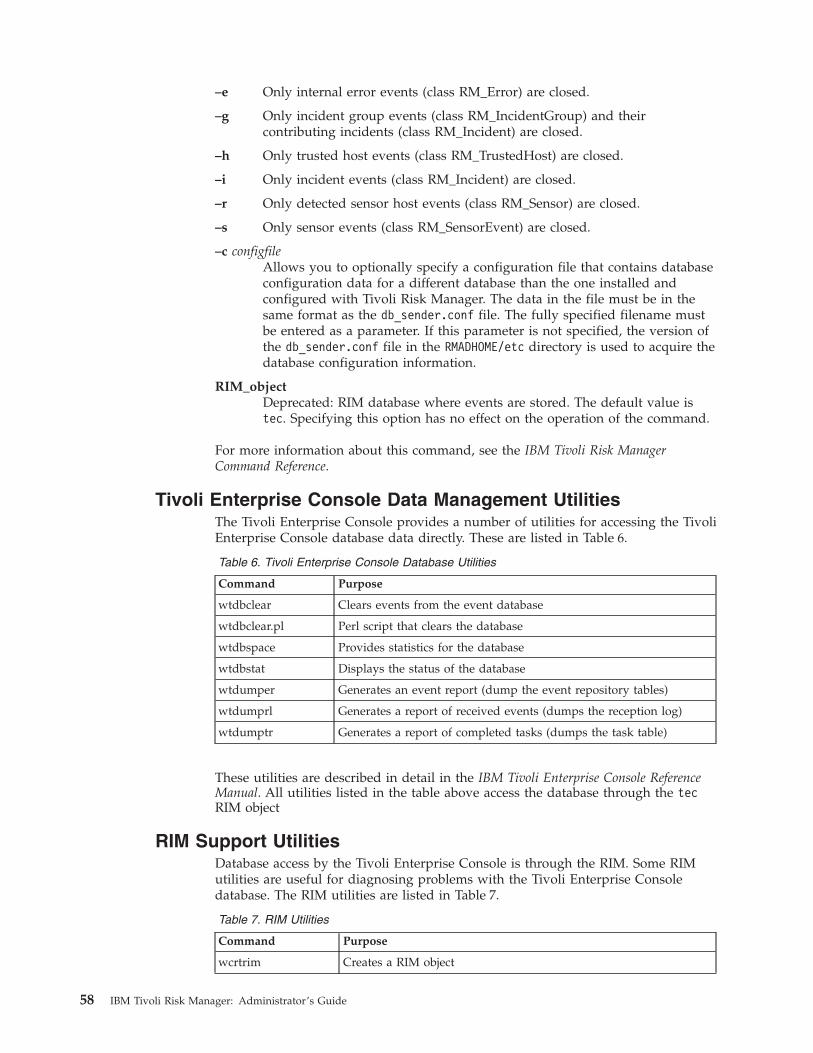
–e
Only
internal
error
events
(class
RM_Error)
are
closed.
–g
Only
incident
group
events
(class
RM_IncidentGroup)
and
their
contributing
incidents
(class
RM_Incident)
are
closed.
–h
Only
trusted
host
events
(class
RM_TrustedHost)
are
closed.
–i
Only
incident
events
(class
RM_Incident)
are
closed.
–r
Only
detected
sensor
host
events
(class
RM_Sensor)
are
closed.
–s
Only
sensor
events
(class
RM_SensorEvent)
are
closed.
–c
configfile
Allows
you
to
optionally
specify
a
configuration
file
that
contains
database
configuration
data
for
a
different
database
than
the
one
installed
and
configured
with
Tivoli
Risk
Manager.
The
data
in
the
file
must
be
in
the
same
format
as
the
db_sender.conf
file.
The
fully
specified
filename
must
be
entered
as
a
parameter.
If
this
parameter
is
not
specified,
the
version
of
the
db_sender.conf
file
in
the
RMADHOME/etc
directory
is
used
to
acquire
the
database
configuration
information.
RIM_object
Deprecated:
RIM
database
where
events
are
stored.
The
default
value
is
tec.
Specifying
this
option
has
no
effect
on
the
operation
of
the
command.
For
more
information
about
this
command,
see
the
IBM
Tivoli
Risk
Manager
Command
Reference.
Tivoli
Enterprise
Console
Data
Management
Utilities
The
Tivoli
Enterprise
Console
provides
a
number
of
utilities
for
accessing
the
Tivoli
Enterprise
Console
database
data
directly.
These
are
listed
in
Table
6.
Table
6.
Tivoli
Enterprise
Console
Database
Utilities
Command
Purpose
wtdbclear
Clears
events
from
the
event
database
wtdbclear.pl
Perl
script
that
clears
the
database
wtdbspace
Provides
statistics
for
the
database
wtdbstat
Displays
the
status
of
the
database
wtdumper
Generates
an
event
report
(dump
the
event
repository
tables)
wtdumprl
Generates
a
report
of
received
events
(dumps
the
reception
log)
wtdumptr
Generates
a
report
of
completed
tasks
(dumps
the
task
table)
These
utilities
are
described
in
detail
in
the
IBM
Tivoli
Enterprise
Console
Reference
Manual.
All
utilities
listed
in
the
table
above
access
the
database
through
the
tec
RIM
object
RIM
Support
Utilities
Database
access
by
the
Tivoli
Enterprise
Console
is
through
the
RIM.
Some
RIM
utilities
are
useful
for
diagnosing
problems
with
the
Tivoli
Enterprise
Console
database.
The
RIM
utilities
are
listed
in
Table
7.
Table
7.
RIM
Utilities
Command
Purpose
wcrtrim
Creates
a
RIM
object
58
IBM
Tivoli
Risk
Manager:
Administrator’s
Guide
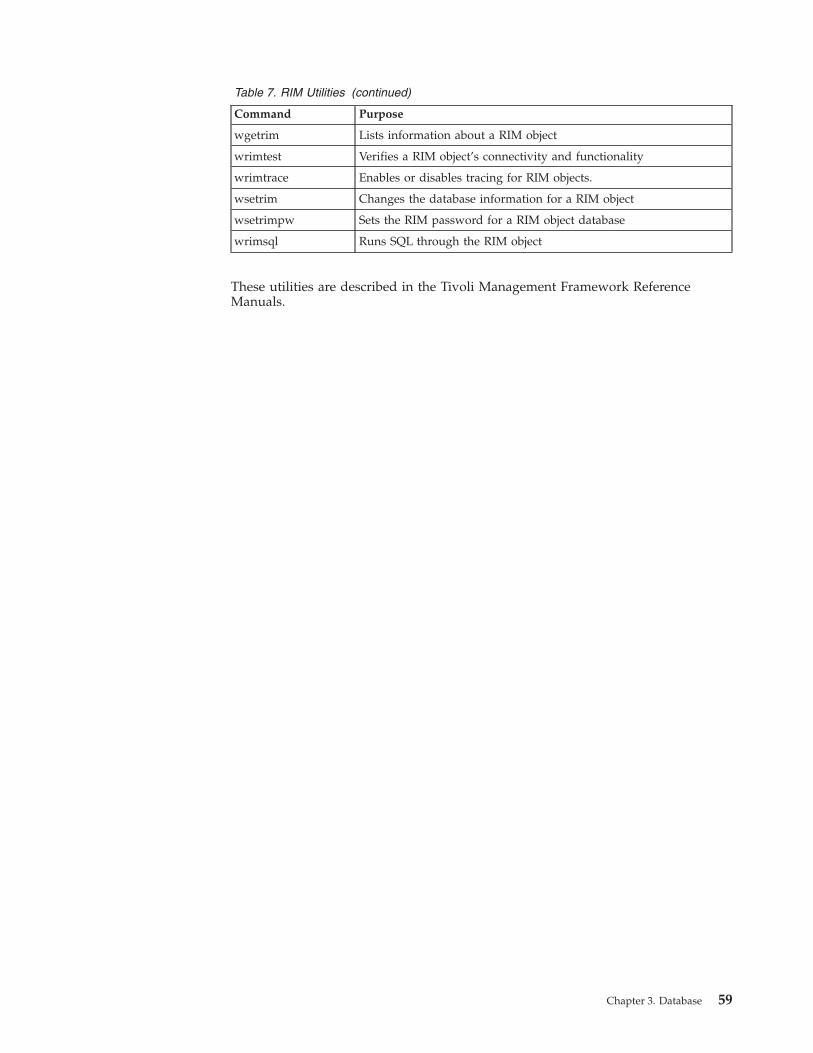
Table
7.
RIM
Utilities
(continued)
Command
Purpose
wgetrim
Lists
information
about
a
RIM
object
wrimtest
Verifies
a
RIM
object’s
connectivity
and
functionality
wrimtrace
Enables
or
disables
tracing
for
RIM
objects.
wsetrim
Changes
the
database
information
for
a
RIM
object
wsetrimpw
Sets
the
RIM
password
for
a
RIM
object
database
wrimsql
Runs
SQL
through
the
RIM
object
These
utilities
are
described
in
the
Tivoli
Management
Framework
Reference
Manuals.
Chapter
3.
Database
59

60
IBM
Tivoli
Risk
Manager:
Administrator’s
Guide

Chapter
4.
Agent
The
agent
is
a
component
of
Tivoli
Risk
Manager
event
server,
client,
distributed
correlation
server,
and
gateway.
The
agent
is
a
Java
application
that
runs
as
a
Linux
daemon
and
UNIX-based
system
daemon
or
as
a
Windows
service.
The
agent
is
configured
differently
depending
on
the
system
configuration
you
chose
during
installation.
By
default,
the
Tivoli
Risk
Manager
installation
program
will
create
the
appropriate
agent
configuration
to
support
the
system
selections
made
during
the
installation
process.
This
chapter
provides
information
that
will
help
you:
v
Understand
the
agent
v
Configuration
elements
of
the
agent
v
Administer
the
agent
after
it
is
installed
and
automatically
configured
v
Develop
customized
configurations
of
the
agent.
The
agent
provides
flexibility
in
terms
of
the
routing
and
filtering
events
both
within
the
agent
and
between
the
agent
and
remote
event
destinations.
Create
a
customized
configuration
to
take
advantage
of
this
flexibility.
Overview
The
agent
is
an
event
router
that
includes
a
correlation
engine.
The
agent
can
modify
events
it
receives
as
well
as
create
new
events
based
upon
received
event
information
or
monitored
system
resources.
The
agent's
configuration
determines
the
processing
that
the
agent
does
with
events
it
receives
or
generates.
Each
agent
is
configured
with
a
set
of
sources,
destinations,
and
connectors.
Additionally,
filters
and
an
engine
can
be
configured
for
the
agent.
Except
for
connectors,
each
of
the
settings
is
identified
by
a
unique
name.
Sources
Each
source
definition
defines
a
subcomponent
of
the
agent
that
receives
events
from
an
event
source
or
generates
events
as
part
of
the
subcomponent
processing.
Events
can
be
received
using
a
variety
of
event
protocols,
including
unauthenticated
sockets,
and
SSL.
The
Tivoli
Risk
Manager
event
monitor
is
an
example
of
a
subcomponent
that
identifies
and
generates
events.
An
agent
can
have
multiple
sources
configured.
Destinations
Each
destination
definition
defines
a
subcomponent
of
the
agent
that
sends
events
to
one
or
more
receiving
application.
The
receiving
application
can
be
another
Tivoli
Risk
Manager
system,
a
Tivoli
Enterprise
Console
server,
or
a
relational
database.
An
agent
can
have
multiple
destinations
configured.
Engine
An
engine
definition
defines
the
subcomponent
of
the
agent
that
performs
event
analysis
and
correlation.
The
engine
can
be
configured
to
perform
simple
event
summarization
(the
default
configuration
at
the
client)
or
to
perform
Tivoli
Risk
Manager
correlation
(the
default
configuration
at
the
server).
The
agent
can
have
at
most
one
engine
defined.
Connections
Each
connector
defines
an
event
path
between
two
subcomponents
of
the
©
Copyright
IBM
Corp.
2003
61
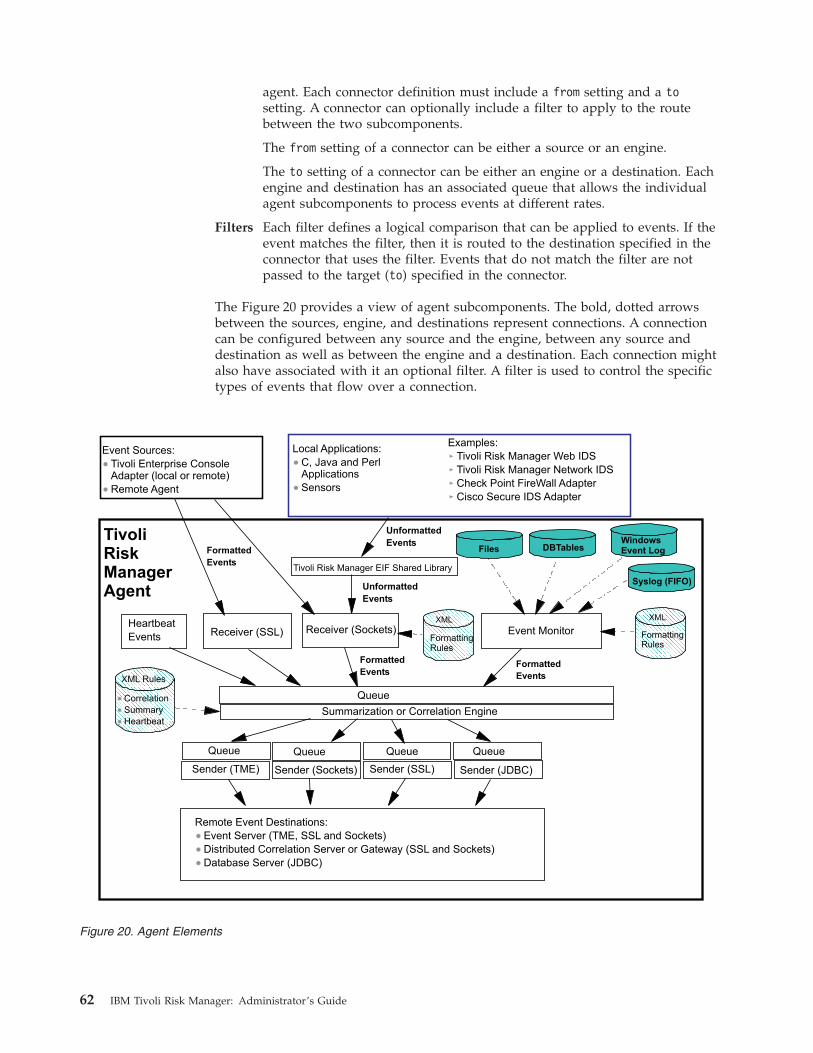
agent.
Each
connector
definition
must
include
a
from
setting
and
a
to
setting.
A
connector
can
optionally
include
a
filter
to
apply
to
the
route
between
the
two
subcomponents.
The
from
setting
of
a
connector
can
be
either
a
source
or
an
engine.
The
to
setting
of
a
connector
can
be
either
an
engine
or
a
destination.
Each
engine
and
destination
has
an
associated
queue
that
allows
the
individual
agent
subcomponents
to
process
events
at
different
rates.
Filters
Each
filter
defines
a
logical
comparison
that
can
be
applied
to
events.
If
the
event
matches
the
filter,
then
it
is
routed
to
the
destination
specified
in
the
connector
that
uses
the
filter.
Events
that
do
not
match
the
filter
are
not
passed
to
the
target
(to)
specified
in
the
connector.
The
Figure
20
provides
a
view
of
agent
subcomponents.
The
bold,
dotted
arrows
between
the
sources,
engine,
and
destinations
represent
connections.
A
connection
can
be
configured
between
any
source
and
the
engine,
between
any
source
and
destination
as
well
as
between
the
engine
and
a
destination.
Each
connection
might
also
have
associated
with
it
an
optional
filter.
A
filter
is
used
to
control
the
specific
types
of
events
that
flow
over
a
connection.
FormattingRules
Local Applications:
C, Java and PerlApplications
Sensors
Receiver (Sockets)Receiver (SSL)
XML Rules
Sender (TME) Sender (Sockets) Sender (SSL) Sender (JDBC)
Summarization or Correlation Engine
Event Sources:
Tivoli Enterprise ConsoleAdapter (local or remote)
Remote Agent
TivoliRiskManagerAgent
Tivoli Risk Manager EIF Shared Library
Remote Event Destinations:
Event Server (TME, SSL and Sockets)
Distributed Correlation Server or Gateway (SSL and Sockets)
Database Server (JDBC)
Correlation
Summary
Heartbeat
Heartbeat
Events
Queue
Queue Queue Queue Queue
Formatted
Events
Formatted
Events
Unformatted
Events
Event Monitor FormattingRules
Files DBTables
Syslog (FIFO)
Unformatted
Events
Examples:
Tivoli Risk Manager Web IDS
Tivoli Risk Manager Network IDS
Check Point FireWall Adapter
Cisco Secure IDS Adapter
Formatted
Events
WindowsEvent Log
XML XML
Figure
20.
Agent
Elements
62
IBM
Tivoli
Risk
Manager:
Administrator’s
Guide

Agent
Configuration
The
agent
configuration
information
is
located
in
the
RMINSTDIR/etc
directory.
The
top-level
configuration
file
for
the
agent
is
the
rmagent.xml
file.
This
file
references
other
configuration
files
that
are
actively
used
by
the
agent
subcomponents.
The
second-level
configuration
files
are
also
located
in
the
RMINSTDIR/etc
directory.
Top-Level
Configuration
File
(rmagent.xml)
The
top-level
configuration
file,
rmagent.xml,
contains
the
definitions
for
the
active
subcomponents
(source,
engine,
or
destination)
of
the
agent
and
specifies
the
event
paths
between
the
subcomponents.
The
subcomponent
definitions
typically
include
a
reference
to
a
separate
configuration
file.
These
second-level
configuration
files
define
the
behavior
associated
with
the
subcomponent.
Subcomponent
Definitions
(Sources,
Destinations,
and
Engines)
Each
subcomponent
definition
must
contain
the
following
elements:
v
A
unique
name
v
A
valid
class
v
Zero
or
more
configuration
settings
specifying
a
key
with
an
associated
value
The
class
specified
for
each
subcomponent
is
the
actual
Java
class
name
of
the
component
that
performs
the
required
event
processing.
For
example,
the
following
can
be
defined
in
the
rmagent.xml
file
as
a
source.
This
source
receives
events
into
the
agent.
The
configuration
file
for
this
source
is
/IBM/RISKMGR/etc/eif_receiver.conf.
<source
name="eif_receiver"
class="com.tivoli.RiskManager.Agent.Transports.Receivers.rmaEifReceiver">
<set
key="RMA_conf"
value="/IBM/RISKMGR/etc/eif_receiver.conf"/>
</source>
Continuing
the
example,
the
following
can
be
defined
in
the
rmagent.xml
file
as
a
destination.
This
destination
forwards
events
to
another
system.
The
configuration
file
for
this
destination
is
/IBM/RISKMGR/etc/eif_sender.conf.
<destination
name="eif_sender"
class="com.tivoli.RiskManager.Agent.Transports.Senders.rmaEifSender">
<set
key="RMA_conf"
value="/IBM/RISKMGR/etc/eif_sender.conf"/>
</destination>
Additionally,
destinations
can
be
configured
to
have
an
instanceCount
setting.
Using
an
instanceCount
greater
than
one
causes
multiple
instances
of
the
destination
class
to
be
created.
Each
instance
runs
in
its
own
thread,
that
allows
for
overlapping
of
event
processing.
Your
agent
might
experience
improved
through
put
if
you
specify
an
instanceCount
for
the
normal
event
destination
classes:
v
com.tivoli.RiskManager.Agent.Transports.Senders.rmaEifSender
v
com.tivoli.RiskManager.Agent.Transports.Senders.rmaArchiveDBSender
For
example,
to
have
four
threads
processing
events
on
the
eif_sender:
<destination
name="eif_sender"
class="com.tivoli.RiskManager.Agent.Transports.Senders.rmaEifSender"
instanceCount="4">
<set
key="RMA_conf"
value="/IBM/RISKMGR/etc/eif_sender.conf"/>
</destination>
Chapter
4.
Agent
63
Available
Classes
The
following
values
are
valid
to
use
as
the
class
setting
for
source
components:
v
com.tivoli.RiskManager.Agent.Transports.Receivers.rmaEifReceiver
v
com.tivoli.RiskManager.Agent.Transports.Receivers.rmaMonitorReceiver
v
com.tivoli.RiskManager.Agent.Transports.Receivers.rmaHeartBeat
The
following
values
are
valid
to
use
as
the
class
setting
for
the
engine
component:
v
com.tivoli.RiskManager.Agent.Engine.Engine
The
following
values
are
valid
to
use
as
the
class
setting
for
destination
components:
v
com.tivoli.RiskManager.Agent.Transports.Senders.rmaEifSender
v
com.tivoli.RiskManager.Agent.Transports.Senders.rmaArchiveDBSender
v
com.tivoli.RiskManager.Agent.Transports.Senders.rmaSendToFile
v
com.tivoli.RiskManager.Agent.Transports.Senders.rmaSendToStdout
v
com.tivoli.RiskManager.Agent.Transports.Senders.rmaSendToStderr
Notes:
1.
Typically
the
rmaSendToFile,
rmaSendToStdout,
and
rmaSendToStderr
destination
classes
are
used
only
to
assist
in
diagnosing
problems
that
are
encountered
by
the
agent.
2.
Do
not
specify
instanceCount
greater
than
one
for
the
diagnostic
destination
classes.
This
will
cause
unpredictable
behavior.
3.
The
classes
listed
above
are
included
in
the
default
installation
of
the
agent.
You
can
have
additional
classes
available
at
your
installation.
For
example,
there
are
adapters
that
include
classes
that
are
configured
as
agent
source
components.
The
documentation
that
is
provided
with
your
adapters
should
describe
the
adapter
configuration.
Linking
the
Agent
Subcomponents
(Connectors)
Connectors
define
an
event
paths
between
two
subcomponents
of
the
agent.
Each
connector
definition
must
contain
the
following
elements:
v
from
v
to
A
connector
might
also
include
the
following
elements:
v
withfilter
v
priority
The
from
setting
of
a
connector
can
be
either
a
source
or
an
engine.
The
unique
name
of
the
source
or
engine
is
specified
as
the
from
name=value.
The
to
setting
of
a
connector
can
be
either
an
engine
or
a
destination.
The
unique
name
of
the
engine
or
destination
is
specified
as
the
to
name=value.
The
withfilter
setting
of
a
connector
specifies
the
unique
name
of
a
filter.
The
priority
setting
of
a
connector
specifies
the
priority
of
events
passing
through
the
connector.
Valid
priority
settings
are
normal
and
high.
You
can
specify
multiple
filtered
connectors
between
the
same
two
subcomponents,
and
you
can
set
the
priority
to
high
for
events
matching
a
specific
filter.
This
would
cause
events
matching
the
specific
filter
to
be
processed
at
the
destination
at
a
higher
priority
than
events
processed
at
normal
priority.
If
you
do
create
multiple
connectors
64
IBM
Tivoli
Risk
Manager:
Administrator’s
Guide

between
the
same
two
subcomponents,
you
must
verify
that
your
filters
are
defined
properly
or
your
events
could
be
routed
to
the
same
subcomponent
more
than
once.
For
example,
the
following
connector
specifies
an
event
path
between
a
source
named
eif_receiver
and
an
engine
named
summary_engine.
<connector>
<from
name="eif_receiver"/>
<to
name="summary_engine"/>
</connector>
Similarly,
the
following
connector
conditionally
routes
events
that
are
produced
by
the
engine
named
correlation
to
the
destination
named
db_sender.
In
this
case,
a
filter
named
DB_Sender
is
applied
to
the
event
path.
If
events
processed
by
the
engine
do
not
match
this
filter,
they
are
not
routed
to
the
destination.
<connector>
<from
name="correlation"/>
<to
name="db_sender"/>
<withfilter
name="DB_Sender"/>
</connector>
The
following
example
demonstrates
using
the
connector
priority
specification
to
send
both
incidents
and
non-incident
events
to
the
same
sender
named
eif_sender
from
an
engine
named
correlation
with
incident
events
being
processed
at
high
priority.
<connector
priority="high">
<from
name="correlation"/>
<to
name="eif_sender"/>
<withfilter
name="Incidents"/>
</connector>
<connector>
<from
name="correlation"/>
<to
name="eif_sender"/>
<withfilter
name="nonIncidents"/>
</connector>
Filters
Filters
are
uniquely
named
components
that
are
associated
with
connectors.
The
filtering
process
can
be
based
on
combinations
of
event
class
name,
attribute
values,
and
event
class
inheritance.
Please
note
that
filtering
based
upon
class
inheritance
requires
knowledge
of
the
class
hierarchy
as
defined
in
the
Tivoli
Risk
Manager
BAROC
files.
Typically,
only
the
Tivoli
Risk
Manager
event
server
(installed
on
the
Tivoli
Enterprise
Console
server)
and
the
distributed
correlation
server
include
these
BAROC
files.
Filters
support
the
basic
logic
structures
using
<AND>,
<OR>
and
<NOT>
tags,
that
can
be
nested.
Nested
within
the
basic
logic
structure
tags,
you
can
specify
that
events
must
match:
v
event
class
names
v
attribute
values
v
event
class
inheritance
Specifying
a
class
name
filter
component
To
specify
that
an
event
must
match
a
classname,
use
the
<classname>
tag.
The
<classname>
tag
is
specified
as
follows:
Chapter
4.
Agent
65

<classname
matchtype=[contains
|
equals
|
startswith]
value="class
name"
/>
For
example,
to
specify
that
you
want
only
events
whose
classname
starts
with
"WW_"
to
pass
this
filter,
specify
the
following:
<classname
matchtype="startswith"
value="WW_"
/>
Specifying
an
attribute
value
filter
component
To
specify
that
an
event
must
have
a
specific
attribute
setting,
use
the
<field>
tag.
The
<field>
tag
is
specified
as
follows:
<field
name="attribute
name"
matchtype=[contains
|
equals
|
startswith]
value="class
name"
/>
For
example,
to
specify
that
you
want
only
events
whose
severity
is
CRITICAL
to
pass
this
filter,
specify
the
following:
<field
name="severity"
matchtype="equals"
value="CRITICAL"
/>
Specifying
a
class
inheritance
filter
component
To
specify
that
an
event
must
inherit
from
a
specific
event
class,
use
the
<isa>
tag.
The
<isa>
tag
is
specified
as
follows:
<isa
value="parent
class
name"
/>
For
example,
if
you
want
only
events
that
inherit
from
RM_Incident
to
pass
this
filter,
specify
the
following:
<isa
value="RM_Incident"
/>
If
you
use
an
<isa>
tag
at
an
agent
that
does
not
have
class
hierarchy
information,
only
events
whose
classname
exactly
matches
the
value
setting
will
pass
the
filter.
What
do
the
classes
do
(Source,
Destination,
Engine)
?
v
com.tivoli.RiskManager.Agent.Transports.Receivers.rmaEifReceiver
This
class
receives
events
over
a
socket.
The
socket
can
be
either
unsecure
or
secured
with
SSL.
v
com.tivoli.RiskManager.Agent.Transports.Receivers.rmaMonitorReceiver
This
class
extracts
information
from
a
variety
of
sources
and
formats
the
information
into
Tivoli
Risk
Manager
events.
See
the
IBM
Tivoli
Risk
Manager
Adapters
Guide
for
information
on
using
the
Tivoli
Risk
Manager
event
monitor.
v
com.tivoli.RiskManager.Agent.Transports.Receivers.rmaHeartBeat
This
class
generates
a
heartbeat
event,
RM_HeartBeat,
at
the
specified
frequency.
v
com.tivoli.RiskManager.Agent.Engine.Engine
This
class
summarizes,
normalizes,
and
correlates
events.
v
com.tivoli.RiskManager.Agent.Transports.Senders.rmaEifSender
This
class
sends
events
to
a
remote
application
using
various
protocols.
Available
protocols
include,
socket,
SSL
socket,
and
TME.
v
com.tivoli.RiskManager.Agent.Transports.Senders.rmaArchiveDBSender
This
class
routes
events
to
the
Tivoli
Risk
Manager
archive
table.
This
class
uses
JDBC
to
insert
information
into
the
archive
table.
v
com.tivoli.RiskManager.Agent.Transports.Senders.rmaSendToFile
66
IBM
Tivoli
Risk
Manager:
Administrator’s
Guide

This
class
routes
events
to
an
ASCII
file.
This
class
is
typically
used
for
diagnosing
problems
that
are
encountered
by
the
agent.
v
com.tivoli.RiskManager.Agent.Transports.Senders.rmaSendToStdout
This
class
routes
events
to
the
system
standard
output.
This
class
is
typically
used
for
diagnosing
problems
that
are
encountered
by
the
agent.
v
com.tivoli.RiskManager.Agent.Transports.Senders.rmaSendToStderr
This
class
routes
events
to
the
system-standard
error
output.
This
class
is
typically
used
for
diagnosing
problems
encountered
by
the
agent.
Note:
The
rmaSendToStdout
and
rmaSendToStderr
diagnostic
classes
display
their
output
to
the
console.
See
“Starting
and
Stopping
the
Agent”
on
page
76
for
information
on
starting
the
agent
from
the
command
line.
Queues
and
Event
Persistence
Each
subcomponent
of
the
agent
that
is
referenced
in
the
rmagent.xml
file
as
a
to
setting
in
a
connector
has
a
queue
associated
with
its
processing.
Events
that
the
subcomponent
needs
to
process
are
put
on
the
associated
queue
by
the
subcomponent
specified
as
the
from
setting
in
the
connector.
The
processing
subcomponent
removes
the
events
from
the
queue
when
it
is
ready
to
process
events.
By
default,
the
events
are
persisted
to
disk
when
they
are
placed
on
a
queue.
When
the
processing
subcomponent
completes
its
task,
the
event
is
removed
from
disk.
You
can
configure
both
engine
and
destination
component
queues
to
not
persist
events
to
a
disk.
To
turn
off
persistence,
edit
the
rmagent.xml
file
and
add
persist="no"
to
the
subcomponent
definition.
For
example,
<destination
name="eif_sender"
class="com.tivoli.RiskManager.Agent.Transports.Senders.rmaEifSender"
persist="no"
>
</destination>
Why
would
you
turn
off
persistence?
The
processing
might
be
faster
since
you
bypass
writing
event
data
to
disk
and
removing
it
later.
Why
would
you
NOT
turn
off
persistence?
v
Your
system
does
not
have
unlimited
memory
available
to
the
agent.
If
the
events
are
not
persisted
to
disk,
they
must
be
maintained
in
memory.
v
You
do
not
want
to
lose
events
if
an
unexpected
error
condition
causes
the
agent
to
terminate.
With
persistence
off,
you
might
lose
event
data.
Should
you
turn
off
persistence?
The
option
to
turn
off
persistence
is
deprecated.
You
are
strongly
encouraged
to
use
the
default,
persist="yes"for
all
of
your
agent’s
queues.
Second-Level
Configuration
Files
The
rmagent.xml
file
is
a
file
that
brings
together
the
various
elements
of
the
agent.
As
shown
in
the
previous
section,
the
rmagent.xml
file
contains
the
source,
destination,
engine,
connector,
and
filtered
destinations
needed
for
the
agent
to
perform
it’s
configured
role.
Each
source,
destination,
and
engine
typically
includes
Chapter
4.
Agent
67

its
own
configuration
file.
By
convention,
these
second-level
configuration
files
have
a
suffix
of
.conf
and
referenced
in
the
rmagent.xml
file
as
the
RMA_conf
parameter
setting.
v
sending
and
receiving
events
v
event
analysis
and
correlation
v
archiving
events
to
a
database
table
v
producing
heartbeat
events
v
capturing
information
from
event
sources
Second-Level
Configuration
Files
for
Sending
and
Receiving
Events
Classes
using
this
type
of
configuration
file
include:
v
com.tivoli.RiskManager.Agent.Transports.Receivers.rmaEifReceiver
v
com.tivoli.RiskManager.Agent.Transports.Senders.rmaEifSender
These
configuration
files
contain
the
definitions
needed
to
send
or
receive
events
over
Tivoli
Enterprise
Console
protocols,
that
include
SOCKET,
SSL,
and
TME.
The
configuration
parameters
that
are
contained
in
this
type
of
second-level
configuration
file
are
defined
in
Appendix
A,
“Event
Integration
Facility
Sender
and
Receiver
Keywords,”
on
page
195.
You
can
also
specify
an
attributeFilter=<filename>
setting
for
the
rmaEifSender
component
to
minimize
the
number
of
extended
attributes
that
are
included
with
the
event
being
sent
to
your
Tivoli
Enterprise
Console
server.
You
would
selectively
filter
attributes
if
you
have
configured
your
Tivoli
Risk
Manager
to
send
events
to
the
Tivoli
Risk
Manager
archive
table
and
do
not
need
the
specific
attributes
to
be
included
at
your
event
console.
You
can
also
use
filter
attributes
if
your
Tivoli
Enterprise
Console
database
grows
too
quickly
or
your
Tivoli
Enterprise
Console
server
experiences
performance
degradation
when
the
extended
attributes
are
included
with
the
events.
To
specify
that
an
attribute
is
not
to
be
included
with
the
event
data
sent
to
the
Tivoli
Enterprise
Console,
specify
forward="no"
in
the
attributeFilter
file.
The
processing
of
the
settings
in
the
attributeFilter
XML
file
is
from
the
top
down.
The
following
is
an
example
of
an
XML
file
that
contains
the
definition
of
attributes
to
filtered,
forward="no".
<filterAttributes>
<filter
name="ALL_RM_SensorEvents">
<AND>
<isa
value="RM_SensorEvent"
/>
</AND>
</filter>
<forEvents
matchingFilter="ALL_RM_SensorEvents">
<attribute
name="severity"
forward="yes"
/>
<attribute
name="source"
forward="yes"
/>
<attribute
name="sub_source"
forward="yes"
/>
<attribute
name="sub_origin"
forward="yes"
/>
<attribute
name="origin"
forward="yes"
/>
<attribute
name="hostname"
forward="yes"
/>
<attribute
name="msg"
forward="yes"
/>
<attribute
name="status"
forward="no"
/>
<attribute
name="adapter_host"
forward="yes"
/>
<attribute
name="repeat_count"
forward="yes"
/>
<attribute
name="rm_Timestamp"
forward="yes"
/>
<attribute
name="rm_Timestamp32"
forward="no"
/>
<attribute
name="rm_TimestampFmt"
forward="no"
/>
<attribute
name="rm_Version"
forward="no"
/>
68
IBM
Tivoli
Risk
Manager:
Administrator’s
Guide

<attribute
name="rm_Correlate"
forward="yes"
/>
<attribute
name="rm_CorrelatedByAgent"
forward="no"
/>
<attribute
name="rm_Level"
forward="yes"
/>
<attribute
name="rm_SensorType"
forward="no"
/>
<attribute
name="rm_SensorHostname"
forward="no"
/>
<attribute
name="rm_SensorToken"
forward="yes"
/>
<attribute
name="rm_SensorIPAddr"
forward="no"
/>
<attribute
name="rm_SensorPID"
forward="yes"
/>
<attribute
name="rm_SensorOS"
forward="no"
/>
<attribute
name="rm_SourceToken"
forward="yes"
/>
<attribute
name="rm_SourceHostname"
forward="no"
/>
<attribute
name="rm_SourceIPAddr"
forward="no"
/>
<attribute
name="rm_SrcPort"
forward="no"
/>
<attribute
name="rm_SpoofedSourceKnown"
forward="no"
/>
<attribute
name="rm_DestinationToken"
forward="yes"
/>
<attribute
name="rm_DestinationHostname"
forward="no"
/>
<attribute
name="rm_DestinationIPAddr"
forward="no"
/>
<attribute
name="rm_DstPort"
forward="no"
/>
<attribute
name="rm_Signature"
forward="yes"
/>
<attribute
name="rm_Description"
forward="no"
/>
<attribute
name="rm_Priority"
forward="no"
/>
<attribute
name="rm_ClassCategory"
forward="no"
/>
<attribute
name="rm_ClassCategoryDescription"
forward="no"
/>
<attribute
name="rm_Protocol"
forward="no"
/>
<attribute
name="rm_Servicename"
forward="no"
/>
<attribute
name="rm_CustomerID"
forward="no"
/>
<attribute
name="rm_Category"
forward="no"
/>
<attribute
name="rm_Principal"
forward="no"
/>
<attribute
name="rm_ObjectType"
forward="no"
/>
<attribute
name="rm_Object"
forward="no"
/>
<attribute
name="rm_SecondaryObjectType"
forward="no"
/>
<attribute
name="rm_SecondaryObject"
forward="no"
/>
<attribute
name="rm_Action"
forward="no"
/>
<attribute
name="rm_Result"
forward="no"
/>
<attribute
name="rm_NameType"
forward="no"
/>
<attribute
name="rm_NameID"
forward="no"
/>
<attribute
name="rm_NameData"
forward="no"
/>
<attribute
name="rm_LogData"
forward="no"
/>
<attribute
name="rm_FalsePositive"
forward="no"
/>
<attribute
name="rm_FalsePositiveID"
forward="no"
/>
<attribute
name="rm_Comment"
forward="no"
/>
<attribute
name="rm_PortCount"
forward="no"
/>
<attribute
name="rm_ICMPCode"
forward="no"
/>
<attribute
name="rm_ICMPType"
forward="no"
/>
<attribute
name="rm_Reason"
forward="no"
/>
<attribute
name="rm_Toolname"
forward="no"
/>
<attribute
name="rm_Content"
forward="no"
/>
<attribute
name="rm_File"
forward="no"
/>
<attribute
name="rm_ThirdHost"
forward="no"
/>
<attribute
name="rm_ThirdPort"
forward="no"
/>
<attribute
name="rm_User"
forward="no"
/>
<attribute
name="rm_Password"
forward="no"
/>
<attribute
name="rm_Domain"
forward="no"
/>
<attribute
name="rm_Community"
forward="no"
/>
<attribute
name="rm_Trojan"
forward="no"
/>
<attribute
name="rm_OID"
forward="no"
/>
<attribute
name="rm_Command"
forward="no"
/>
<attribute
name="rm_Args"
forward="no"
/>
<attribute
name="rm_LocalUser"
forward="no"
/>
<attribute
name="rm_RemoteUser"
forward="no"
/>
<attribute
name="rm_Address"
forward="no"
/>
<attribute
name="rm_Url"
forward="no"
/>
<attribute
name="rm_Cgi"
forward="no"
/>
<attribute
name="rm_PtyInfo"
forward="no"
/>
<attribute
name="rm_PID"
forward="no"
/>
<attribute
name="rm_Name"
forward="no"
/>
<attribute
name="rm_State"
forward="no"
/>
Chapter
4.
Agent
69

<attribute
name="rm_HUsername"
forward="no"
/>
<attribute
name="rm_HUserID"
forward="no"
/>
<attribute
name="rm_HUserDomain"
forward="no"
/>
<attribute
name="rm_HUPurpose"
forward="no"
/>
<attribute
name="rm_HUAdditional"
forward="no"
/>
<attribute
name="rm_HUTUAccountname"
forward="no"
/>
<attribute
name="rm_HUTUAccountID"
forward="no"
/>
<attribute
name="rm_HUTUAccountDomain"
forward="no"
/>
<attribute
name="rm_HUTUPurpose"
forward="no"
/>
<attribute
name="rm_HUTUAdditional"
forward="no"
/>
<attribute
name="rm_HUTProcessID"
forward="no"
/>
<attribute
name="rm_HUTProcessname"
forward="no"
/>
<attribute
name="rm_HUTFilename"
forward="no"
/>
<attribute
name="rm_HUTAccessFlags"
forward="no"
/>
<attribute
name="rm_SystemSuccess"
forward="no"
/>
<attribute
name="rm_SystemFailure"
forward="no"
/>
<attribute
name="rm_LogonSuccess"
forward="no"
/>
<attribute
name="rm_LogonFailure"
forward="no"
/>
<attribute
name="rm_ObjectAccessS"
forward="no"
/>
<attribute
name="rm_ObjectAccessF"
forward="no"
/>
<attribute
name="rm_PrivilegeUseS"
forward="no"
/>
<attribute
name="rm_PrivilegeUseF"
forward="no"
/>
<attribute
name="rm_DetailedTrackingS"
forward="no"
/>
<attribute
name="rm_DetailedTrackingF"
forward="no"
/>
<attribute
name="rm_PolicyChangeS"
forward="no"
/>
<attribute
name="rm_PolicyChangeF"
forward="no"
/>
<attribute
name="rm_AccountMgmtS"
forward="no"
/>
<attribute
name="rm_AccountMgmtF"
forward="no"
/>
</forEvents>
</filterAttributes>
Second-Level
Configuration
Files
for
Event
Analysis
and
Correlation:
Classes
using
this
type
of
configuration
file
include:
v
com.tivoli.RiskManager.Agent.Engine.Engine
These
configuration
files
contain
the
definitions
used
by
the
Tivoli
Risk
Manager
state-based
correlation
engine
to
analyze
and
correlate
events.
The
default
configuration
file
associated
with
the
engine
depends
upon
the
system
configuration
of
the
agent.
v
A
client’s
engine
definition
will
refer
to
a
summary
engine
configuration
file,
summary_engine.conf,
that
includes
a
set
of
parameters
identifying
individual
summary
rule
files.
See
Chapter
6,
“Event
Summarization,”
on
page
89
for
more
information
about
using
and
developing
summarization
rules.
v
An
event
server’s
engine
definition
will
reference
an
incident
engine
configuration
file,
incident_engine.conf,
that
includes
a
set
of
parameters
that
are
additional
configuration
files.
For
example,
the
following
can
be
included
in
the
incident_engine.conf
file.
–
rules=/IBM/RISKMGR/etc/incident_rules.xml
–
rules=/IBM/RISKMGR/etc/monitor_heartbeat_rules.xml
–
barocfiles=/IBM/RISKMGR/etc/riskmgr_baroc.lst
–
categoryfile=/IBM/RISKMGR/etc/categories.xml
–
attributemap=/IBM/RISKMGR/etc/attributemap.xml
–
hostsfile=/IBM/RISKMGR/etc/hosts.xml
–
sensorsfile=/IBM/RISKMGR/etc/sensors.xml
–
linkedeventsfile=/IBM/RISKMGR/etc/linkedevents.xml
–
jittertime=86400
70
IBM
Tivoli
Risk
Manager:
Administrator’s
Guide

See
Chapter
2,
“Event
Server,”
on
page
39
for
more
information
about
configuring
the
incident-based
correlation
engine
and
the
use
of
BAROC
files.
See
“Heartbeat
Monitoring”
on
page
87
for
more
information
about
heartbeat
monitoring
and
the
action
to
take
when
heartbeat
events
are
not
received
in
a
timely
fashion.
Second-Level
Configuration
Files
for
Archiving
Events
to
a
Database
Table:
Classes
using
this
type
of
configuration
file
include:
v
com.tivoli.RiskManager.Agent.Transports.Senders.rmaArchiveDBSender
The
configuration
file
associated
with
the
database
sender
is
db_sender.conf.
See
Appendix
B,
“Database
Archive
Configuration,”
on
page
205
for
more
information
on
configuring
the
database
sender
component.
Second-Level
Configuration
Files
for
Producing
Heart
Beat
Events:
Classes
using
this
type
of
configuration
file
include:
v
com.tivoli.RiskManager.Agent.Transports.Receivers.rmaHeartBeat
The
configuration
file
associated
with
a
heartbeat
is
the
heartbeat.conf
file.
See
“Heartbeat
Monitoring”
on
page
87
for
more
information
about
heartbeat
monitoring
and
the
action
to
take
when
heartbeat
events
are
not
received
in
a
timely
fashion.
Second-Level
Configuration
Files
for
Capturing
Information
From
Event
Sources:
Classes
using
this
type
of
configuration
file
include:
v
com.tivoli.RiskManager.Agent.Transports.Receivers.rmaMonitorReceiver
This
configuration
file
is
associated
with
capturing
information
from
event
sources
using
the
event
monitor
is
defined
as
adaptername.conf
where
adaptername
represents
a
name
associated
with
an
individual
event
source
or
adapter.
See
the
IBM
Tivoli
Risk
Manager
Adapters
Guide
for
more
information
about
configuring
an
instance
of
the
event
monitor.
Other
Configuration
Files
In
addition
to
the
configuration
files
referenced
in
the
rmagent.xml
file,
there
are
two
ancillary
configuration
files
used
by
the
agent.
These
files
are
located
in
the
RMINSTDIR/etc
directory.
rmad.conf
This
file
contains
two
types
of
configuration
information:
v
The
agent’s
administrative
port,
RmagentPort.
The
default
RmagentPort
is
5531.
This
port
is
used
by
local
administrative
utilities,
such
as
wrmqueue
and
wrmadmin,
to
communicate
with
the
agent.
See
the
IBM
Tivoli
Risk
Manager
Command
Reference
for
details
on
using
these
commands.
v
The
Tivoli
Risk
Manager
EIF
API
uses
information
in
this
file
to
control
its
connections
to
the
agent’s
event
reception
port.
Applications
using
the
Tivoli
Risk
Manager
EIF
API
are
essentially
adapters
that
submit
events
from
the
local
application
to
the
agent
for
processing.
v
The
Tivoli
Risk
Manager
EIF
API
obtains
the
agent’s
event
reception
port
(type=SOCKET)
value
by
scanning
eif_receiver.conf
and
local_only_receiver.conf
for
the
port
used
by
the
agent
to
receive
events
over
the
SOCKET
protocol.
v
Default
parameters
values
in
the
rmad.conf
file
include:
–
ConnectionMode=connection_oriented
–
BufEvtPath=c:\IBM\RISKMGR\persistence\rmeif.cache
(for
example)
Chapter
4.
Agent
71

See
Appendix
A,
“Event
Integration
Facility
Sender
and
Receiver
Keywords,”
on
page
195
for
more
information
on
these
parameters
and
others
that
might
be
set
in
the
rmad.conf
file.
rmclasspath.conf
This
file
defines
the
set
of
Java
jar
files
that
need
to
be
included
in
the
agent’s
class
path.
Typically,
there
is
no
need
to
customize
this
file.
However,
certain
additional
adapters
might
require
that
you
add
their
jar
file
to
this
file.
Also,
you
might
need
to
modify
the
zip
or
jar
file
used
for
JDBC
if
you
upgrade
your
database.
On
the
Tivoli
Enterprise
Console
server,
there
is
an
additional
configuration
file,
rmlocal.conf.
The
Tivoli
Risk
Manager
prolog
rules
use
the
values
in
this
file
to
route
unprocessed
Tivoli
Risk
Manager
sensor
events
to
the
local
agent.
The
port
specified
in
rmlocal.conf
must
match
a
valid
port
on
the
agent.
That
is,
the
same
port
specified
in
either
in
local_only_receiver.conf
or
eif_receiver.conf
must
be
set
in
the
rmlocal.conf
file.
Relationship
of
the
Configuration
Files
The
following
diagrams
show
the
relationship
of
the
configuration
files
for
the
various
default
system
configurations.
v
Client
v
Event
Server
v
Distributed
Correlation
Server
v
Gateway
Client
System
Configuration
Figure
21
on
page
73
depicts
a
typical
configuration
for
a
client.
72
IBM
Tivoli
Risk
Manager:
Administrator’s
Guide
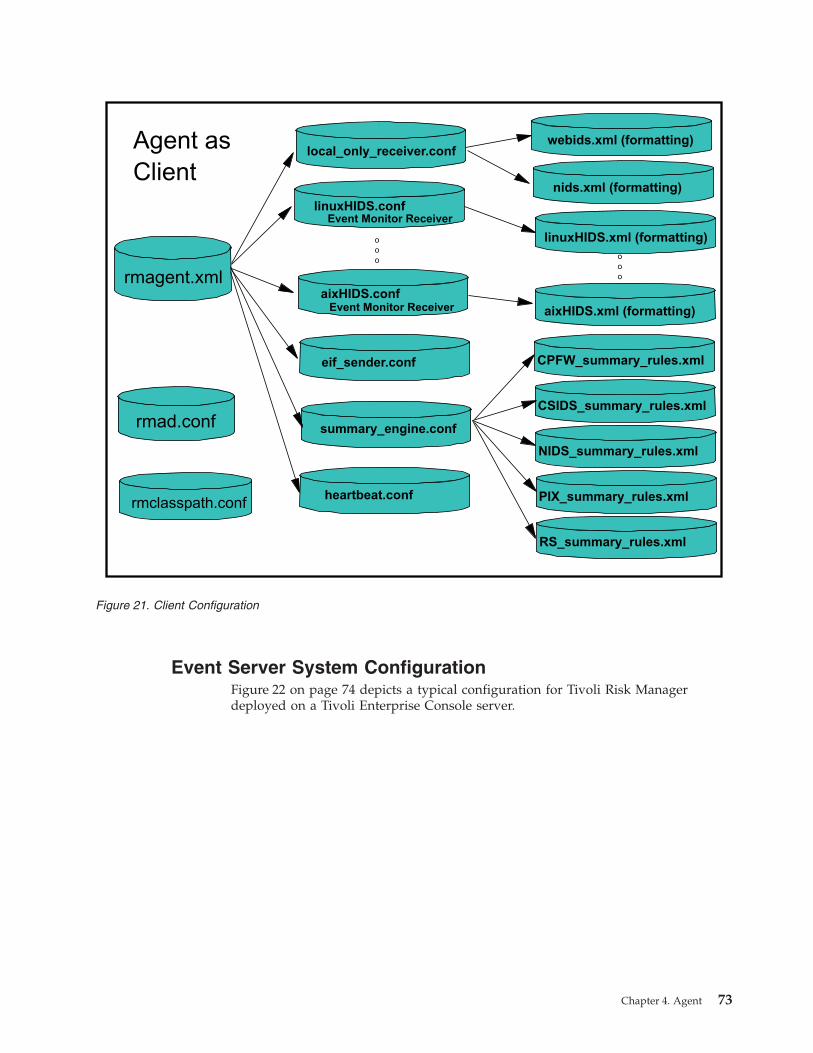
Event
Server
System
Configuration
Figure
22
on
page
74
depicts
a
typical
configuration
for
Tivoli
Risk
Manager
deployed
on
a
Tivoli
Enterprise
Console
server.
rmagent.xml
local_only_receiver.conf
linuxHIDS.conf
eif_sender.conf
summary_engine.confrmad.conf
rmclasspath.conf
CPFW_summary_rules.xml
CSIDS_summary_rules.xml
NIDS_summary_rules.xml
PIX_summary_rules.xml
RS_summary_rules.xml
Agent as
Client
webids.xml (formatting)
nids.xml (formatting)
heartbeat.conf
linuxHIDS.xml (formatting)
o
o
o
aixHIDS.conf
o
o
o
aixHIDS.xml (formatting)
Event Monitor Receiver
Event Monitor Receiver
Figure
21.
Client
Configuration
Chapter
4.
Agent
73

Distributed
Correlation
Server
System
Configuration
Figure
23
on
page
75
depicts
a
typical
configuration
for
a
distributed
correlation
server.
rmagent.xml
local_only_receiver.conf
db_sender.conf
rmad.conf
rmclasspath.conf
riskmgr_baroc.lst
attributemap.xml
hosts.xml
sensors.xml
linkedevents.xml
Agent as
EventServer
webids.xml (formatting)
nids.xml (formatting)
heartbeat.conf
incident_rules.xml
monitor_heartbeat.xml
incident_sender.conf
nonincident_sender.conf
incident_engine.conf
Deployed on aTivoli EnterpriseConsole Server
rmlocal.conf
eif_receiver.conf
Figure
22.
Event
Server
Configuration
74
IBM
Tivoli
Risk
Manager:
Administrator’s
Guide
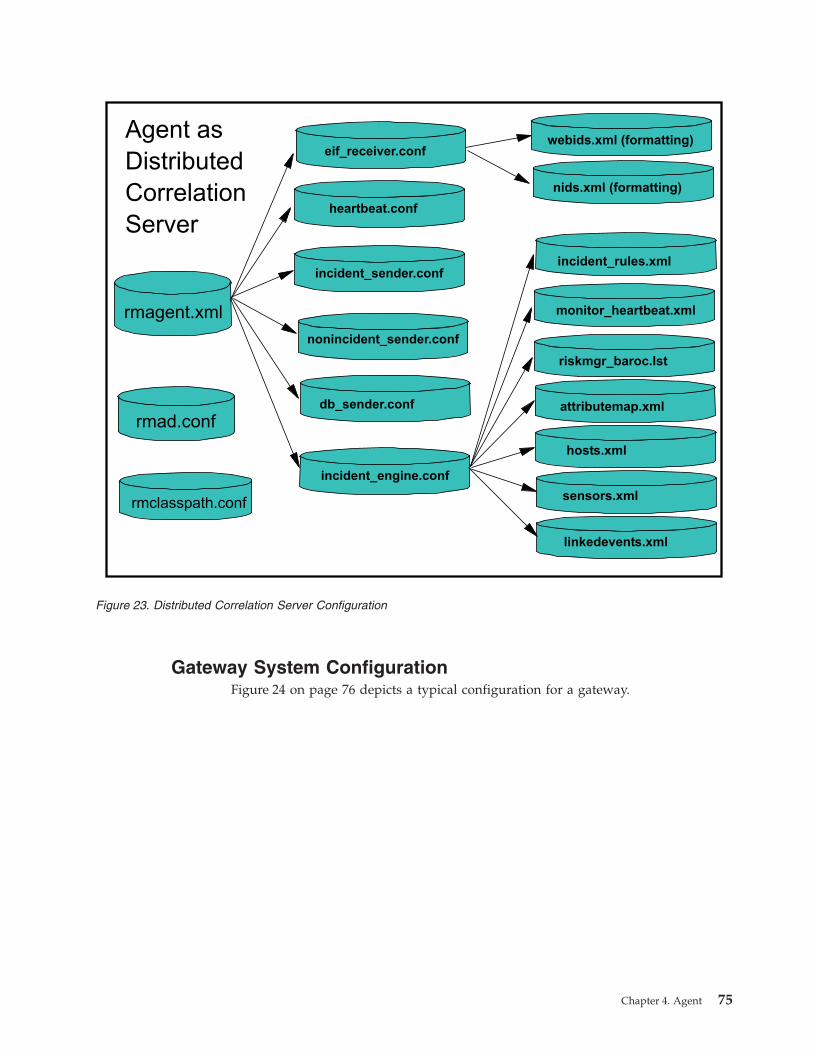
Gateway
System
Configuration
Figure
24
on
page
76
depicts
a
typical
configuration
for
a
gateway.
rmagent.xml
eif_receiver.conf
db_sender.conf
rmad.conf
rmclasspath.conf
riskmgr_baroc.lst
attributemap.xml
hosts.xml
sensors.xml
linkedevents.xml
Agent as
Distributed
Correlation
Server
webids.xml (formatting)
nids.xml (formatting)
heartbeat.conf
incident_rules.xml
monitor_heartbeat.xml
incident_sender.conf
nonincident_sender.conf
incident_engine.conf
Figure
23.
Distributed
Correlation
Server
Configuration
Chapter
4.
Agent
75

Administering
the
Tivoli
Risk
Manager
Agent
The
agent
includes
a
set
of
commands
to
do
the
following:
v
“Starting
and
Stopping
the
Agent”
v
“Managing
the
Agent
Queues”
on
page
78
v
“Managing
Agent
DNS
Processing”
on
page
79
v
“Creating
and
Managing
Secure
Sockets
Layer
Keystores”
on
page
79
v
“Stashing
Passwords”
on
page
80
Starting
and
Stopping
the
Agent
Use
the
wrmadmin
command
to
manage
the
agent.
This
command
is
available
on
all
operating
systems
supported
by
the
agent,
and
provides
the
capability
of
obtaining
status,
starting
and
stopping
individual
components,
and
terminating
and
restarting
the
agent.
See
the
rmagent.xml
file
for
specific
component
names.
For
more
information
on
this
file,
see
“Top-Level
Configuration
File
(rmagent.xml)”
on
page
63.
rmagent.xml
eif_receiver.conf
eif_sender.conf
rmad.conf
rmclasspath.conf
Agent as
Gateway
webids.xml (formatting)
nids.xml (formatting)
heartbeat.conf
Figure
24.
Gateway
Configuration
76
IBM
Tivoli
Risk
Manager:
Administrator’s
Guide

On
Linux
and
UNIX-based
systems,
you
must
set
up
the
Tivoli
Risk
Manager
environment
by
running:
.
/etc/Tivoli/rma_eif_env.sh
SYNTAX
wrmadmin
[-i
]
[-r
component
name
...
]
[-s
component
name
...
[
-k]
INPUT
PARAMETERS
–i
or
–info
Displays
version
information
and
status
of
individual
agent
components
(active
or
inactive).
For
example,
when
using
the
–i
option
you
might
see
the
following
status
information
displayed
for
a
running
agent:
Tivoli
Risk
Manager
Component
Status
==========================================
Receivers
eif_receiver:
Running
heartbeat:
Stopped
Engines
correlation:
Unknown
Destinations
db_sender:
Failed
Retrying
eif_sender:
Instance
1
of
3:
Running
Instance
2
of
3:
Failed
Retrying
Instance
3
of
3:
Running
where:
Running
The
specified
Tivoli
Risk
Manager
component
is
running.
Stopped
The
specified
Tivoli
Risk
Manager
component
has
stopped.
Failed
Retrying
The
specified
Tivoli
Risk
Manager
component
has
encountered
an
error
in
processing
and
is
retrying.
Unknown
The
status
of
the
specified
Tivoli
Risk
Manager
component
is
unknown.
–r
component
name
or
–restart
component
name
Stops
and
then
restarts
one
or
more
of
the
agent
components.
If
there
is
no
component
name
specified,
the
agent
will
be
stopped
and
restarted.
This
option
is
used
to
activate
agent
configuration
changes.
The
–i
option
will
automatically
run
when
using
the
–r
option.
–s
component
name
or
–stop
component
name
Stops
one
or
more
of
the
agent
components.
The
–i
option
will
automatically
run
when
using
the
–s
option.
–k
or
–kill
Terminates
the
agent
daemon.
Use
this
option
for
a
shutdown.
Notes:
1.
See
the
rmagent.xml
file
for
specific
component
names.
For
more
information
on
this
file,
see
“Top-Level
Configuration
File
(rmagent.xml)”
on
page
63.
Chapter
4.
Agent
77

2.
Component
name
refers
to
the
sources,
destination,
or
engine
name
defined
in
the
rmagent.xml
configuration
file.
3.
When
the
rmcorr_cfg
command
is
used
to
update
the
Tivoli
Risk
Manager
event
server
on
the
Tivoli
Enterprise
Console
server,
the
agent
will
automatically
restart.
Both
the
Tivoli
Enterprise
Console
server
and
the
agent
are
stopped
and
restarted
when
the
–install,
–update
and
–reconfig
options
are
used
with
the
rmcorr_cfg
command.
See
IBM
Tivoli
Risk
Manager
Command
Reference
for
details
on
using
this
command.
On
Windows
systems,
you
can
also
stop
and
start
the
agent
using
the
following
commands:
net
stop
rmagent
net
start
rmagent
For
more
information
on
this
command,
see
the
IBM
Tivoli
Risk
Manager
Command
Reference.
Managing
the
Agent
Queues
Use
the
wrmqueue
command
to
monitor
and
manage
the
agent
queues.
Each
subcomponent
of
the
agent
that
is
referenced
in
the
rmagent.xml
file
as
a
to
setting
in
a
connector
has
an
a
queue
associated
with
its
processing.
Events
that
the
subcomponent
needs
to
process
are
put
on
the
associated
queue
by
the
subcomponent
specified
as
the
from
setting
in
the
connector.
The
processing
subcomponent
removes
the
events
from
the
queue
when
it
is
ready
to
process
events.
If
the
processing
subcomponent
is
not
able
to
keep
up
with
the
event
flow,
the
number
of
events
in
the
queue
will
grow.
Queue
information
is
maintained
in
the
following
directories:
v
RMINSTDIR/persistence/engines
(queues
for
any
engines)
v
RMINSTDIR/persistence/senders
(queues
for
any
sender
destinations)
SYNTAX
wrmqueue
[-h
|
-l
|
-p
|
-x]
queue_name
INPUT
PARAMETERS
–h
or
–help
Displays
a
help
message.
–l
or
–list
Lists
the
name,
number
of
events,
and
types
of
all
queues.
–p
or
–purge
Clears
one
specific
queue
(specified
on
the
command-line).
–x
or
–purgeall
Clears
the
queue.
OUTPUT
Returns
a
simple
text-based
table
detailing
the
results
of
the
request.
If
listing
queues,
the
table
consists
of
queue
names,
the
number
of
events
in
each
queue,
and
the
type
of
each
queue.
If
purging
queues,
the
table
consists
of
queue
names,
the
number
of
events
purged,
and
the
amount
of
time
it
took
to
purge
each
queue.
USAGE
78
IBM
Tivoli
Risk
Manager:
Administrator’s
Guide

At
least
one
option
must
be
specified.
If
the
–p
option
is
specified,
it
must
be
accompanied
by
a
queue
name.
When
using
the
–p
and
–x
options
please
note
that
events
in
the
purged
queues
will
be
lost.
When
purging
a
queue
it
will
remove
all
unprocessed
events
from
the
queue.
Purged
events
will
no
longer
be
processed.
For
more
information
on
this
command,
see
the
IBM
Tivoli
Risk
Manager
Command
Reference.
Managing
Agent
DNS
Processing
Use
the
wrmdns
command
to
display
and
control
the
Tivoli
Risk
Manager
DNS.
This
is
configured
in
the
agent’s
engine
component
configuration
file
with
the
RMA_conf
parameter.
Tivoli
Risk
Manager
event
correlation
matches
the
source
and
target
of
attacks
using
a
tokenized
identifier
of
the
machines
involved.
The
tokenized
identifier
is
either
the
host
name,
preferably
fully-qualified,
or
the
IP
address
of
the
machine.
Since
dynamically
assigned
IP
addresses
are
becoming
increasingly
prevalent,
consistently
identifying
a
single
machine
is
an
increasingly
difficult
task.
To
assist
in
properly
identifying
a
machine
(creating
the
correct
tokenized
identifier),
Tivoli
Risk
Manager
provides
an
optional
interface
to
your
local
DNS
to
map
selected
IP
addresses
to
fully-qualified
host
names.
By
default,
the
agent
does
not
map
IP
addresses
to
host
names.
SYNTAX
wrmdns
[-listcache
|-clearcache
|-statistics
|-resolve
ipaddr
|
-on
|-off]
INPUT
PARAMETERS
-listcache
Lists
the
contents
of
the
DNS
cache.
-statistics
Displays
performance
statistics
from
the
DNS
cache
-clearcache
Clears
the
DNS
cache.
-resolve
ipaddr
Provides
DNS
resolution
on
a
single
IP
address
-on
Turns
on
DNS
resolution.
The
default
value
is
off.
-off
Turns
off
DNS
resolution.
For
more
information
on
this
command,
see
the
IBM
Tivoli
Risk
Manager
Command
Reference.
Creating
and
Managing
Secure
Sockets
Layer
Keystores
See,
Appendix
C,
“Secure
Socket
Layer
Introduction
and
iKeyman,”
on
page
209
for
information
on
SSL,
iKeyman,
and
Keytool.
Chapter
4.
Agent
79

Stashing
Passwords
Use
the
wrmstashpw
command
to
convert
a
clear-text
password
into
an
obfuscated
form
and
store
it
in
a
file.
It
is
also
used
to
stash
passwords
for
SSL,
JDBC,
Web
Application,
and
the
Tivoli
Risk
Manager
event
server.
SYNTAX
wrmstashpw
filename
[password]
INPUT
PARAMETERS
filename
Filename
where
obfuscated
password
is
stored.
password
A
clear
text
password.
If
not
supplied,
enter
a
new
password
at
prompt.
For
more
information
on
this
command,
see
the
IBM
Tivoli
Risk
Manager
Command
Reference.
Secure
Sockets
Layer
Usage
Information
See
Appendix
C,
“Secure
Socket
Layer
Introduction
and
iKeyman,”
on
page
209
for
Secure
Sockets
Layer
(SSL)
overview
information.
Setting
Up
JDBC
Drivers
In
order
for
an
event
server
or
distributed
correlation
server
to
archive
Tivoli
Risk
Manager
events
to
the
Tivoli
Risk
Manager
archive
table,
the
agent
must
be
configured
properly
to
use
a
JDBC
driver.
The
JDBC
driver
is
used
to
communicate
with
the
RDBMS.
The
installation
program
will
prompt
for
the
proper
parameters
for
setting
up
the
JDBC
driver
connection.
For
information
on
setting
up
JDBC
drivers,
see
Appendix
B,
“Database
Archive
Configuration,”
on
page
205.
For
more
information
on
JDBC
driver
paths,
see
the
IBM
Tivoli
Risk
Manager
Installation
Guide.
80
IBM
Tivoli
Risk
Manager:
Administrator’s
Guide

Chapter
5.
Engine
Configuration
This
chapter
will
help
you
understand
the
various
options
that
can
be
configured
in
the
agent’s
engine
component.
The
engine
component
definition
specified
in
RMINSTDIR/etc/rmagent.xml
uses
Java
class,
com.tivoli.RiskManager.Agent.Engine.Engine.
It
requires
a
RMA_conf
parameter,
that
includes
the
file
name
of
the
engine’s
component
configuration
file.
If
the
RMA_conf
parameter
is
not
specified,
the
engine
does
not
perform
any
event
analysis,
but
instead
passes
events
it
receives
on
to
any
destinations
connected
to
the
engine.
The
engine’s
component
configuration
file
that
contains
the
RMA_conf
parameter
will
contain
zero
or
more
rules=<filename>
lines.
The
rules
filename
specifies
the
XML
file
that
defines
the
type
of
processing
the
engine
will
perform
on
the
events
it
receives.
There
are
three
types
of
processing
that
the
engine
can
perform:
v
“Heartbeat
Monitoring”
on
page
87
v
Chapter
6,
“Event
Summarization,”
on
page
89
v
Chapter
7,
“Incident-Based
Correlation,”
on
page
95
Additionally,
the
engine
can
be
configured
to
perform
event
pre-normalization
and
event
normalization
of
Tivoli
Risk
Manager
events.
Tivoli
Risk
Manager
events
that
the
engine
processes
inherit
from
the
RM_SensorEvent
class
defined
in
the
sensor_abstract.baroc
file.
Since
the
full
event
normalization
process
requires
knowledge
of
the
event
class
hierarchy,
its
processing
is
restricted
to
agents
installed
as
a
Tivoli
Enterprise
Console
server
and
as
Tivoli
Risk
Manager
distributed
correlation
servers.
Errors
that
are
identified
during
Tivoli
Risk
Manager
event
normalization
typically
result
in
the
generation
of
an
RM_Error
or
RM_InputError
event
that
is
routed
to
the
Tivoli
Enterprise
Console
server.
The
attributes
of
each
such
event
contain
the
details
of
the
problem
encountered.
Most
errors
identified
during
event
normalization
indicate
a
configuration
problem
with
an
adapter
or
sensor.
These
error
events
will
be
available
for
review
on
the
Tivoli
Enterprise
Console.
Event
Pre-Normalization
If
specified
in
the
engine’s
component
configuration
file
that
contains
the
RMA_conf
parameter,
the
engine
will
adjust
event
attributes
based
upon
the
settings.
The
options
available
to
all
agent
engines
are:
v
attributemap=<filename>
v
dnsResolver=[on|off]
v
dnsNameServers=[ipaddr,,,]
v
dnsRequestTimeout=[milliseconds]
v
dnsSourceHostFilter=[ipaddr/mask,,,]
v
dnsDestinationHostFilter=[ipaddr/mask,,,]
v
dnsSensorHostFilter=[ipaddr/mask,,,]
v
dnsTTL=[milliseconds]
©
Copyright
IBM
Corp.
2003
81
v
dnsCacheSize=[#
of
entries]
Attribute
Mapping
The
filename
specified
as
the
attribute
map
contains
one
or
more
definitions
of
changes
to
be
made
to
the
event
based
upon
the
event’s
content.
You
can
specify
setting
an
attribute
to
a
specific
value
when
zero
or
more
attributes
contain
specific
values.
You
can
use
the
keyword,
$CLASSNAME$,
as
the
field
value
to
specify
using
the
event
class
name.
All
comparisons
for
attribute
mapping
treat
the
values
as
strings.
This
means
that
there
are
no
numeric
comparisons,
so
″10.0″
is
not
equal
to
″10″.
For
example,
if
you
want
to
set
the
severity
attribute
to
CRITICAL
for
all
events
whose
sensor
type
is
csids
and
whose
rm_Level
is
5.0,
specify
the
following
in
the
attributemap
file:
<attributemap>
<setattr
field="severity"
value="CRITICAL"
/>
<whenattr
field="rm_SensorType"
value="csids"
/>
<whenattr
field="rm_Level"
value="5.0"
/>
</attributemap>
Notes:
1.
The
attribute
names
must
exactly
match
the
name
in
the
BAROC
file.
2.
You
must
ensure
that
the
values
specified
are
appropriate
for
the
attribute
specified.
For
example,
use
a
real
value
for
the
rm_Level
attribute.
3.
You
must
ensure
that
your
mappings
pertain
only
to
events
you
intended,
by
using
a
valid
combination
of
whenattr
settings.
Mapping
whenattr
conditions
must
all
be
true
(logical
AND)
in
order
for
the
mapping
to
occur.
If
only
one
whenattr
condition
needs
to
be
true
(logical
OR),
then
create
a
separate
attributemap
entry
for
each
of
the
whenattr
conditions.
4.
It
is
possible
to
change
the
classname
using
the
$CLASSNAME$
keyword.
DNS
Look-up
When
configured
and
enabled,
DNS
will
be
used
to
map
IP
addresses
to
fully-qualified
host
names
for
selected
attributes
in
events
processed
by
the
agent.
The
DNS
configuration
values
are
set
in
the
engine’s
component
configuration
file
that
contains
the
RMA_conf
parameter.
If
DNS
mapping
is
enabled
and
successful
for
a
given
IP
address,
Tivoli
Risk
Manager
events
can
have
their
rm_SensorHostname,
rm_SourceHostname,
and
rm_DestinationHostname
set
to
the
fully-qualified
values
associated
with
the
corresponding
IP
addresses
contained
within
the
event.
If
the
agent
is
running
on
a
Tivoli
Enterprise
Console
server
or
on
a
Tivoli
Risk
Manager
distributed
correlation
server,
DNS
lookup
is
performed
if
the
IP
address
is
not
listed
as
a
known
host
in
either
hostfile
or
sensorsfile.
You
can
use
the
wrmdns
command
to
make
temporary
changes
to
an
agent’s
use
of
DNS.
To
make
persistent
changes
to
the
agent’s
use
of
DNS,
set
the
following
configuration
options
in
the
engine’s
component
configuration
file
specified
by
the
RMA_conf
parameter:
v
dnsResolver=[on|off]
The
default
value
is
off.
Set
this
to
on
to
enable
the
DNS
look-up
described
above.
v
dnsNameServers=[ipaddr,,,]
82
IBM
Tivoli
Risk
Manager:
Administrator’s
Guide

Specify
the
DNS
name
servers.
If
no
servers
are
specified,
the
DNS
resolver
attempts
to
discover
any
DNS
servers
configured
on
the
local
system.
Note:
It
is
recommended
that
you
set
this
parameter
because
there
is
no
guarantee
that
the
DNS
server
self
discovery
will
be
successful
and
the
DNS
resolution
will
not
be
available
without
it.
v
dnsRequestTimeout=[milliseconds]
DNS
request
timeout.
The
default
value
is
one
second
(1000
milliseconds).
v
dnsSourceHostFilter=[ipaddr/mask,,,]
This
parameter
is
used
to
further
filter
DNS
resolution
on
IP
addresses
and
subnet
masks.
If
set,
the
application
will
perform
DNS
resolution
for
only
those
source
host
addresses
that
fall
within
the
ipaddr/mask
specification.
Each
ipaddr/mask
specified
can
define
a
range
of
IP
addresses.
For
example,
69.205.101.1/255.255.255.0
specifies
a
range
of
hosts
from
69.205.101.1
through
69.205.101.254.
If
set
to
zero
(0)
then
no
filters
are
applied,
that
is,
all
requests
for
DNS
resolution
are
honored
for
this
data
element.
You
might
also
use
the
exclamation
point
(!)
to
indicate
negative
notation.
For
example,
!0
would
imply
that
no
DNS
resolution
for
this
data
element
will
occur.
Likewise,
for
ipaddr/mask
combinations,
the
exclamation
point
(!)
can
be
used
to
indicate
that
DNS
resolution
would
not
occur
to
source
host
addresses
that
fall
within
the
specification.
Testing
ipaddr/mask
combinations
are
performed
sequentially.
That
is,
there
is
no
ability
to
build
complex
filter
combinations
by
″ANDing″
filters
together.
Filter
analysis
stops
as
soon
as
a
true
condition
is
met.
The
dnsSourceHostFilter
setting
relates
to
setting
the
rm_SourceHostname
attribute
of
Tivoli
Risk
Manager
events
to
a
fully-qualified
host
name.
v
dnsDestinationHostFilter=[ipaddr/mask,,,]
See
dnsSourceHostFilter
above.
This
setting
relates
to
setting
the
rm_DestinationHostname
attribute
of
Tivoli
Risk
Manager
events
to
a
fully-qualified
host
name.
v
dnsSensorHostFilter=[ipaddr/mask,,,]
See
dnsSourceHostFilter
above.
This
setting
relates
to
setting
the
rm_SensorHostname
attribute
of
Tivoli
Risk
Manager
events
to
a
fully-qualified
host
name.
v
dnsTTL=[milliseconds]
The
time-to-live
(TTL)
is
needed
to
control
the
accumulation
of
stale
data
in
the
DNS
cache.
With
the
widespread
use
of
DHCP,
it
might
be
desirable
to
refresh
cached
entries
on
a
frequent
basis.
v
dnsCacheSize=[#
of
entries]
Set
the
maximum
cache
size.
Event
Normalization
In
addition
to
the
configurations
available
to
all
engines
in
the
previous
sections,
engines
at
the
Tivoli
Enterprise
Console
server
and
the
Tivoli
Risk
Manager
distributed
correlation
servers
have
the
following
normalization
configuration
options:
v
barocfiles=<filename>
v
categoryfile=<filename>
v
hostfile=<filename>
v
sensorsfile=<filename>
v
linkedeventsfile=<filename>
Chapter
5.
Engine
Configuration
83

v
jittertime=[milliseconds]
Event
normalization
is
performed
prior
to
correlation.
Inserting
events
into
the
Tivoli
Risk
Manager
archive
table
requires
that
the
events
be
successfully
normalized
before
they
are
written
to
the
archive
table.
Identifying
Event
Classes
The
filename
specified
by
barocfiles=<filename>
contains
a
list
of
BAROC
files
that
are
available
for
the
Tivoli
Risk
Manager
engine
to
use
to
normalize
the
events
it
receives.
The
BAROC
files
define
the
event
class
hierarchy
and
define
the
attributes
of
each
event
class.
See
Chapter
2,
“Event
Server,”
on
page
39
for
more
information
about
configuring
the
incident-based
correlation
engine
and
the
use
of
BAROC
files.
In
the
list
file,
DO
NOT
change
the
following
entries
because
they
define
the
top-level
event
classes
that
are
required
by
the
agent
to
properly
identify
Tivoli
Risk
Manager
events:
v
root.baroc
v
tec.baroc
v
riskmanager.baroc
v
sensor_abstract.baroc
Assigning
Class
Category
Class
category
is
assigned
to
each
Tivoli
Risk
Manager
sensor
event.
The
filename
specified
as
categoryfile=<filename>
contains
the
class
category
definitions
used
to
make
this
assignment.
You
can
edit
the
categoryfile
to
add
or
change
any
entries
that
are
appropriate
for
your
network.
Because
the
category
assignment
is
used
as
one
of
the
primary
attributes
for
incident-based
correlation,
it
is
important
that
you
use
the
same
cateforyfile
at
all
Tivoli
Risk
Manager
server-role
agents
in
your
network.
Each
category
definition
must
contain
a
token,
description,
and
topclass
value.
If
there
are
specific
events
that
belong
to
the
category,
but
whose
class
hierarchy
would
result
in
it
being
assigned
to
a
different
category,
the
class
should
be
specified
in
the
members
list.
Sample
category
assignment:
<category
token="DOS"
description="Denial
of
Service"
topclass=
"RM_TDoS"
members="RS_Imap_Overflow
"CSIDS_NetBios_OOB_Data"
/>
Identifying
Known
Systems
You
can
define
the
known
systems
in
your
network
to
ensure
that
the
agent
is
able
to
correctly
match
sensor,
source,
and
destination
attributes
within
your
system
whether
the
RM_SensorEvent
events
contain
the
host
name
or
IP
address.
Some
adapters
and
sensors
set
only
the
host
name,
others
set
only
the
IP
address,
and
some
set
both
values
in
the
event.
If
you
know
that
you
are
using
adapters
or
sensors
that
set
only
host
name
or
IP
address,
you
might
consider
predefining
your
systems.
If
you
know
that
you
use
aliases
or
have
multihomed
systems,
you
should
identify
these
to
the
agent.
84
IBM
Tivoli
Risk
Manager:
Administrator’s
Guide

Regardless
of
whether
or
not
you
predefine
your
system
hosts,
every
effort
is
made
to
correctly
match
the
source,
sensor,
and
destination
values
as
part
of
event
normalization.
Examples:
To
define
a
host
with
an
IP
address
of
1.1.1.1
and
hostname
of
tivoli.domain.com,
specify
the
following
in
the
hostsfile:
<host
ipaddr="1.1.1.1"
hostname="tivoli.domain.com"
/>
To
define
a
host
with
hostname
my.machine1.com
and
IP
addresses
of
1.1.111.11
and
1.1.111.12
,
specify
the
following
in
the
hostsfile:
<host
ipaddr="1.1.111.11"
hostname="my.machine1.com"/>
<host
ipaddr="1.1.111.12"
hostname="my.machine1.com"/>
To
define
alias
names
of
my.machine2.com
and
othermachine2.com
for
IP
address
1.1.111.13,
specify
the
following
in
the
hostsfile:
<host
ipaddr="1.1.111.13"
hostname="my.machine2.com"/>
<host
ipaddr="1.1.111.13"
hostname="othermachine2.com"/>
Identifying
Trusted
Systems
In
addition
to
identifying
systems
that
are
known
in
your
environment,
you
can
also
identify
systems
that
you
trust
in
the
hostfile.
Identifying
a
system
as
a
trusted
host
means
that
you
do
not
want
activity
originating
from
the
system
to
contribute
to
incident-based
correlation.
For
example,
if
your
trust
host
named
my.machine2.com
with
an
IP
address
of
1.1.111.12,
specify
the
following
in
hostfile:
<trusted_host
ipaddr="1.1.111.12"
hostname="my.machine2.com"
/>
The
trusted
host
mapping
uses
the
host
name
mapping
to
ensure
all
possible
naming
conventions
are
included.
For
example,
if
the
hostsfile
contains:
...
<host
ipaddr
=
"1.1.111.12"
hostname
=
"my.machine2.com"
/>
<host
ipaddr
=
"1.1.111.12"
hostname
=
"othermachine2com"
/>
<trusted_host
ipaddr
=
"1.1.111.12"
hostname
=
"my.machine2.com"
/>
...
Events
with
source
of
either
of
the
aliases,
my.machine2.com
or
othermachine2.com,
would
not
contribute
to
incident-based
correlation
because
the
source
is
trusted.
Identifying
Known
Sensors
As
part
of
event
processing,
the
agent
identifies
any
new
sensors
sending
events
to
the
agent.
By
default,
when
an
event
is
received
from
a
previously
unknown
adapter
or
sensor,
the
engine
will
generate
an
RM_Sensor
event
that
will
be
viewable
on
your
console.
You
can
predefine
your
known
adapters
and
sensors
in
the
sensorsfile.
In
this
file,
you
can
specify:
v
Known
sensors
and
adapters
v
Adapter
types
that
the
RM_Sensor
events
should
have
a
severity
of
HARMLESS
instead
of
the
default
value,
WARNING
v
Adapter
types
that
the
RM_Sensor
events
should
not
be
generated
Chapter
5.
Engine
Configuration
85

Examples:
If
you
have
a
Network
IDS
adapter
on
host
name,
my.machine2.com,
with
IP
address
1.1.111.12,
you
can
add
the
following
sensors
file:
<sensor
sensortype="NIDS"
ipaddr="1.1.111.12"
hostname="my.machine2.com"
/>
To
specify
that
RM_Sensor
events
for
your
Web
IDS
adapters
have
a
HARMLESS
severity,
specify
the
following
in
the
sensorsfile:
<downgrade_sensor_creation
sensortype="webids"
/>
To
disable
the
generation
of
RM_Sensor
events
for
your
Web
IDS
adapters,
specify
the
following
in
the
sensorsfile:
<ignore_sensor_creation
sensortype="webids"
/>
Linking
Events
As
part
of
the
event
processing,
the
agent
can
identify
events
that
are
related
to
previously
received
events
and
adjust
the
rm_Level
attribute
before
including
the
second
event
in
incident-based
correlation.
For
example,
when
a
WW_SuspiciousCgi
event
is
followed
by
a
WW_Success
event
matching
the
WW_SuspiciousCgi
attempt,
the
WW_Success
should
be
considered
more
serious
than
usual.
Linking
events
depends
upon
the
order
the
events
are
received,
and
specific
attributes
matching
within
the
events.
The
definitions
for
linking
events
are
in
a
file
specified
with
the
RMA_conf
parameter
of
the
agent’s
engine
component.
linkedeventsfile=<fully-qualified
file
name
of
a
file
containing
information
about
related
events>
You
specify;
the
sensortype,
discardTime,
firstEvent,
secondEvent,
increment,
and
matchingAttributes
for
each
pair
of
linked
events.
DiscardTime
is
the
maximum
time
in
seconds
that
can
pass
between
receiving
the
firstEvent
and
the
secondEvent.
For
example,
to
define
a
link
between
WW_SuspiciousCgi
and
WW_Success
events
received
within
two
minutes
from
Web
IDS
adapters
when
the
rm_SensorToken
and
webids_requid
attributes
of
the
two
events
match,
specify
the
following
in
the
linkedevents
file:
<sensortype
name
="webids"
discardTime
=
"120">
<linkedevents
firstEvent
=
"WW_SuspiciousCgi"
secondEvent
=
"WW_Success"
increment
=
"25.0"
matchingAttributes
=
"rm_SensorToken
webids_requid"
/>
</sensortype>
Setting
Timestamp
Variability
Allowance
As
part
of
event
monitoring,
the
agent
monitors
the
flow
of
events.
Each
event
has
a
timestamp
associated
with
it.
In
a
well-functioning
environment,
there
will
usually
not
be
a
large
gap
between
the
events
that
are
processed
by
the
agent.
If
the
time
period
between
events
is
larger
than
the
configured
timestamp
variability
allowance,
an
event
will
be
generated
to
warn
you
of
the
variation.
The
error
event
will
be
viewable
on
your
console.
The
error
event
could
indicate
that
the
clocks
within
your
network
are
not
synchronized.
It
could
also
indicate
that
event
flow
has
encountered
a
problem
from
one
or
more
of
the
deployed
adapters
or
sensors.
86
IBM
Tivoli
Risk
Manager:
Administrator’s
Guide

You
specify
the
allowable
timestamp
variance
with
the
RMA_conf
parameter
of
the
agent’s
engine
component
when
the
agent
is
installed
as
a
server.
For
example,
you
specify
the
allowable
timestamp
variance
with
the
RMA_conf
parameter
of
the
agent’s
engine
component
as
follows.
jittertime=86400
where
86400
is
the
number
of
seconds
variance.
One
day
is
86400
seconds.
Additional
Attributes
Adjustments
In
addition
to
the
modifications
described
previously,
Tivoli
Risk
Manager
assigns
default
values
that
are
specified
in
the
BAROC
files
and
makes
the
following
adjustments
to
each
RM_SensorEvent:
Sensor
Event
Descriptions
rm_Timestamp32
Adjusted
to
GMT
rm_Timestamp
Assigned
from
rm_Timestamp32
rm_SensorToken
Assigned
rm_SourceToken
Assigned
rm_DestinationToken
Assigned
origin
If
not
set
by
adapter,
set
to
rm_SensorIPAddr
suborigin
Set
to
rm_SensorType
hostname
Assigned
value
in
the
following
format:
"category:
sensor_token(
source_token
=>
destination_token)"
msg
If
not
set
by
adapter,
set
to
rm_Signature
value
rm_Level
Adjusted
for
summarized
events
rm_AgentNormalized
Set
to
true
if
normalization
is
successful
Heartbeat
Monitoring
Tivoli
Risk
Manager
self-monitors
the
agents
deployed
in
your
network
and
warns
you
when
an
agent
becomes
inactive.
The
warning
is
an
RMAgent_Inactive
event
generated
at
one
of
your
correlation
servers.
RMAgent_Inactive
events
are
included
in
the
Tivoli
Enterprise
Console
database
and
viewed
on
the
console.
By
default,
each
agent
is
configured
to
generate
RMAgent_HeartBeat
events.
Each
correlation
server
is
configured
to
monitor
the
RMAgent_HeartBeat
events
and
generate
RMAgent_Inactive
events
when
an
agent
stops
sending
regular
RMAgent_HeartBeat
events.
By
default,
there
will
be
an
RM_Sensor
event
created
to
represent
each
agent
that
generates
RMAgent_HeartBeat
events.
The
RMAgent_HeartBeat
events
are
not
typically
forwarded
to
your
Tivoli
Enterprise
Console
server
or
database.
Advanced
Configuration
This
section
describes
configuration
steps
that
are
optional,
if
you
want
to
customize
heartbeat
monitoring
beyond
the
default
configuration.
Advanced
configuration
steps
for
heartbeat
monitoring
are:
v
“Configuring
the
Correlation
Server
to
Monitor
Heartbeat
Events”
on
page
88
v
“Configuring
the
Agent
to
Generate
Heartbeat
Events”
on
page
88
Chapter
5.
Engine
Configuration
87

v
“Disabling
Generation
of
Heartbeat
Events”
v
“Disabling
Monitoring
of
Heartbeat
Events”
Configuring
the
Correlation
Server
to
Monitor
Heartbeat
Events
Your
correlation
servers
will
monitor
RMAgent_HeartBeat
events
that
are
received
from
agents
that
forward
their
events
to
the
correlation
server.
To
enable
the
correlation
server
agent
to
monitor
the
heartbeat,
ensure
that
there
is
a
rule
similar
to
the
following
enabled
in
the
file
specified
by
the
RMA_conf
parameter
of
the
active
engine:
Configuring
the
Agent
to
Generate
Heartbeat
Events
The
RMAgent_HeartBeat
events
are
generated
on
each
agent
whose
primary
configuration
file
defines
a
receiver
with
class,
com.tivoli.RiskManager.Agent.Transports.Receivers.rmaHeartBeat.
The
time
interval
(in
milliseconds)
for
the
heartbeat
events
is
specified
in
the
file
specified
by
the
RMA_conf
parameter
of
the
sender.
For
example:
RMINSTDIR/etc/rmagent.xml:
...
<receiver
name="heartbeat"
class="com.tivoli.RiskManager.Agent.Transports.Receivers.rmaHeartBeat">
<set
key="RMA_conf"
value="RMINSTDIR/etc/heartbeat.conf"
/>
</receiver>
...
RMINSTDIR/etc/heartbeat.conf:
...
time=360000
...
Disabling
Generation
of
Heartbeat
Events
To
disable
the
generation
of
the
heartbeat
events,
remove
the
receiver
with
class,
com.tivoli.RiskManager.Agent.Transports.Receivers.rmaHeartBeat,
from
the
agent
configuration
file,
RMINSTDIR/etc/rmagent.xml.
Remove
all
connectors
referencing
the
heartbeat.
Disabling
Monitoring
of
Heartbeat
Events
To
disable
the
monitoring
of
heartbeat
events
at
a
correlation
server,
remove
the
reference
to
the
rules
file
that
contains
the
rule
to
monitor
heartbeat
events.
If
your
RMAgent_HeartBeat
events
are
not
processed
by
a
correlation
server
that
monitors
heartbeats,
the
RMAgent_HeartBeat
events
might
appear
on
your
event
console
and
database.
88
IBM
Tivoli
Risk
Manager:
Administrator’s
Guide

Chapter
6.
Event
Summarization
Some
of
the
devices
that
are
monitored
by
Tivoli
Risk
Manager
adapters
generate
a
large
number
of
events
that
represent
a
set
of
very
similar
activity.
For
example,
some
sensors
present
a
single
port
scan
as
one
event
per
port
scanned.
To
minimize
event
traffic,
with
minimal
loss
of
information,
the
agent
can
summarize
similar
events.
This
chapter
provides
information
that
will
help
you:
v
Identify
a
summarized
event
v
Understand
the
event
summarization
rules
v
Configure
event
summarization
rules
Overview
As
described
in
Chapter
5,
“Engine
Configuration,”
on
page
81,
one
of
the
functions
provided
by
the
Tivoli
Risk
Manager
agent’s
engine
component
is
event
summarization.
Event
summarization
is
the
process
used
by
the
agent’s
engine
to
identify
very
similar
events
that
occur
within
a
short
time
period
and
map
the
set
of
events
into
a
single
event.
This
minimizes
network
event
traffic
and
space
in
the
Tivoli
Enterprise
Console
database
tables
and
the
Tivoli
Risk
Manager
archive
table.
Identifying
a
Summarized
Event
A
summary
event
is
a
RM_SensorEvent
whose
repeat_count
attribute
is
set
to
a
value
greater
than
zero.
The
repeat_count
attribute
value
is
one
less
than
the
number
of
original
events
that
are
represented
by
the
summary
event.
For
example,
a
summary
event
whose
repeat_count
attribute
is
nine
represents
ten
very
similar
individual
events.
By
convention,
Tivoli
Risk
Manager
sets
the
msg
attribute
of
summary
events
to
a
value
starting
with
the
word,
SUMMARY,
to
assist
in
identifying
a
summary
event.
Out-of-the-Box
Client
Configuration
When
the
agent
is
deployed
in
the
client
role,
the
engine
is
automatically
configured
to
perform
event
summarization
for
the
following
Tivoli
Risk
Manager
adapters:
v
Check
Point
FireWall-1
(CPFW_summary_rules.xml)
v
Cisco-Secure
IDS
(CSIDS_summary_rules.xml)
v
NIDS
(NIDS_summary_rules.xml)
v
PIX
(PIX_summary_rules.xml)
v
Real
Secure
(RS_summary_rules.xml)
By
default,
the
client
engine’s
secondary
configuration
file
is
RMINSTDIR/etc/summary_engine.conf.
The
summary_engine.conf
file
contains
a
rules=
line
enabled
for
each
of
the
above
mentioned
adapters.
The
default
summary
rules
definition
files
are
also
in
the
RMINSTDIR/etc
directory.
If
you
do
not
have
one
or
more
of
the
adapters
where
default
summary
rules
are
provided,
you
can
comment
out
with
the
pound
sign
(#)
or
remove
unneeded
rules=<filename>
lines
from
RMINSTDIR/etc/summary_engine.conf
file.
©
Copyright
IBM
Corp.
2003
89
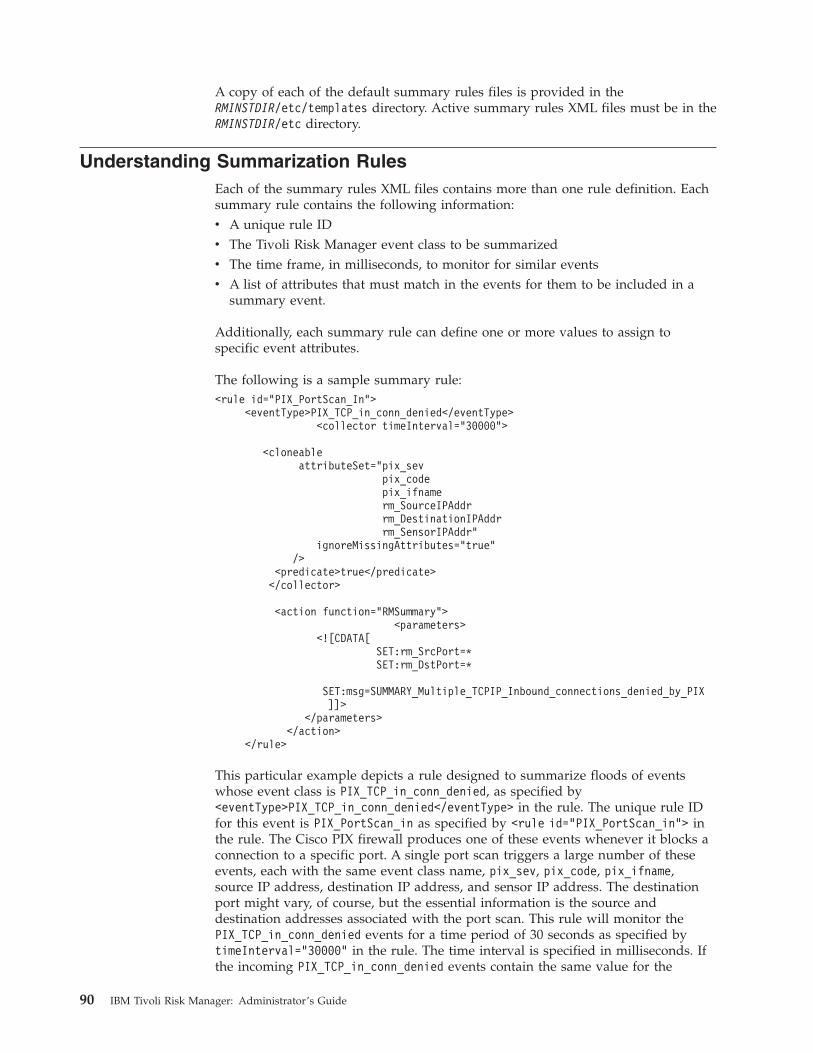
A
copy
of
each
of
the
default
summary
rules
files
is
provided
in
the
RMINSTDIR/etc/templates
directory.
Active
summary
rules
XML
files
must
be
in
the
RMINSTDIR/etc
directory.
Understanding
Summarization
Rules
Each
of
the
summary
rules
XML
files
contains
more
than
one
rule
definition.
Each
summary
rule
contains
the
following
information:
v
A
unique
rule
ID
v
The
Tivoli
Risk
Manager
event
class
to
be
summarized
v
The
time
frame,
in
milliseconds,
to
monitor
for
similar
events
v
A
list
of
attributes
that
must
match
in
the
events
for
them
to
be
included
in
a
summary
event.
Additionally,
each
summary
rule
can
define
one
or
more
values
to
assign
to
specific
event
attributes.
The
following
is
a
sample
summary
rule:
<rule
id="PIX_PortScan_In">
<eventType>PIX_TCP_in_conn_denied</eventType>
<collector
timeInterval="30000">
<cloneable
attributeSet="pix_sev
pix_code
pix_ifname
rm_SourceIPAddr
rm_DestinationIPAddr
rm_SensorIPAddr"
ignoreMissingAttributes="true"
/>
<predicate>true</predicate>
</collector>
<action
function="RMSummary">
<parameters>
<![CDATA[
SET:rm_SrcPort=*
SET:rm_DstPort=*
SET:msg=SUMMARY_Multiple_TCPIP_Inbound_connections_denied_by_PIX
]]>
</parameters>
</action>
</rule>
This
particular
example
depicts
a
rule
designed
to
summarize
floods
of
events
whose
event
class
is
PIX_TCP_in_conn_denied,
as
specified
by
<eventType>PIX_TCP_in_conn_denied</eventType>
in
the
rule.
The
unique
rule
ID
for
this
event
is
PIX_PortScan_in
as
specified
by
<rule
id="PIX_PortScan_in">
in
the
rule.
The
Cisco
PIX
firewall
produces
one
of
these
events
whenever
it
blocks
a
connection
to
a
specific
port.
A
single
port
scan
triggers
a
large
number
of
these
events,
each
with
the
same
event
class
name,
pix_sev,
pix_code,
pix_ifname,
source
IP
address,
destination
IP
address,
and
sensor
IP
address.
The
destination
port
might
vary,
of
course,
but
the
essential
information
is
the
source
and
destination
addresses
associated
with
the
port
scan.
This
rule
will
monitor
the
PIX_TCP_in_conn_denied
events
for
a
time
period
of
30
seconds
as
specified
by
timeInterval="30000"
in
the
rule.
The
time
interval
is
specified
in
milliseconds.
If
the
incoming
PIX_TCP_in_conn_denied
events
contain
the
same
value
for
the
90
IBM
Tivoli
Risk
Manager:
Administrator’s
Guide

attributes
specified
in
the
attributeSet
of
the
rule
as
the
original
event,
then
they
are
aggregated
into
a
single
summary
event.
This
sample
rule
also
specifies
that
the
resulting
summary
event
will
have
the
following
attributes
set
as
follows:
v
rm_SrcPort
will
contain
the
wildcard
character
(*)
to
signify
that
more
than
one
value
can
be
associated
with
the
attribute.
v
rm_DstPort
will
also
contain
the
wildcard
character
(*)
v
msg
will
contain:
–
SUMMARY:Multiple
TCPIP
Inbound
connections
denied
by
PIX
The
resulting
summary
event
will
have
the
same
event
class
name,
PIX_TCP_in_conn_denied,
as
the
individual
events.
If
the
agent
does
not
receive
any
events
matching
the
first
event,
then
it
forwards
the
original
event
after
the
time
period
has
expired.
Things
to
note
about
the
syntax
of
the
summary
event
rules:
v
When
setting
the
msg
attribute
of
the
summary
event,
use
underscore
characters
instead
of
spaces
in
the
rule.
The
resulting
summary
event
will
have
the
first
underscore
character
that
is
replaced
with
a
colon
(:)
and
subsequent
underscore
characters
that
are
replaced
with
a
space.
Follow
the
Tivoli
Risk
Manager
convention
of
setting
your
message
to
start
with
SUMMARY
to
further
assist
you
in
identifying
a
summary
event.
v
The
ignoreMissingAttributes="true"
specification
after
the
attributeSet
tells
the
engine
to
aggregate
events
that
do
not
contain
one
or
more
of
the
attributeSet
attributes.
In
the
previous
sample,
if
an
event
was
received
without
the
pix_ifname
attribute
specified,
it
would
be
matched
to
similar
events
that
are
also
missing
that
specific
attribute.
If
you
do
not
specify
ignoreMissingAttributes="true",
then
events
missing
one
or
more
of
the
attributes
would
not
be
summarized.
v
The
<predicate>true</predicate>
specification
is
required
and
typically
should
not
be
changed
for
summary
rules.
v
The
rules
file
is
an
XML
file.
You
can
use
standard
XML
comments
within
the
rules
file.
v
The
event
attributes
specified
in
the
attributeSet
as
well
as
in
the
SET:
parameters
must
be
attributes
that
are
defined
for
the
event
class.
During
the
summarization
process,
the
attribute
names
are
not
verified
against
the
BAROC
file
definitions
because
the
BAROC
files
are
not
typically
available
to
the
client.
In
particular,
if
you
SET:
an
attribute
that
is
not
defined,
then
the
Tivoli
Enterprise
Console
server
will
reject
the
summary
event.
The
attribute
names
and
the
event
class
names
are
case
sensitive.
v
The
event
class
name
must
match
identically
with
a
valid
event
class
as
defined
in
the
adapters
BAROC
file.
If
you
specify
the
event
class
incorrectly,
the
agent
will
not
be
able
to
summarize
the
events.
v
The
values
set
for
any
SET:attribute
must
be
valid
for
the
specific
attribute.
If
the
value
set
is
not
valid,
the
Tivoli
Enterprise
Console
server
will
reject
the
event.
v
The
client
holds
the
first
event
whose
class
matches
an
enabled
summary
rule
for
the
timeInterval
period.
If
you
specify
a
large
time
interval,
you
might
notice
a
delay
between
when
the
event
is
generated
by
the
adapter
and
when
it
is
received
at
your
Tivoli
Enterprise
Console
server
or
written
to
your
Tivoli
Risk
Manager
archive
table.
Chapter
6.
Event
Summarization
91

Configuring
Summary
Rules
You
can
do
the
following
to
your
summary
rule
file:
v
“Updating
An
Existing
Summary
Rule”
v
“Creating
New
Summary
Rules”
on
page
93
v
“Activating
Your
Changes”
on
page
93
Updating
An
Existing
Summary
Rule
You
can
change
an
existing
summary
rule
or
add
a
rule
to
an
existing
rules
file
for
an
additional
event
class.
For
example,
you
might
notice
that
you
are
receiving
several
summary
events
for
a
port
scan
and
want
to
further
reduce
your
event
flow
for
that
specific
attack
type.
To
reduce
the
number
of
summary
events
for
the
specific
attack:
v
Make
note
of
the
time
period
the
attack
typically
spans
v
Make
note
of
the
event
class
v
At
your
client,
edit
the
appropriate
summary
rules
XML
file
–
Modify
the
rule
associated
with
the
specific
event
class
to
change
the
timeInterval
setting
to
be
more
appropriate
for
your
environment.
For
example,
if
you
notice
that
you
are
receiving
ten
summary
events
for
one
port
scan
using
the
default
time
interval
of
30
seconds.
Change
the
time
interval
to
300
seconds
(300000
milliseconds)
to
potentially
reduce
the
scan
to
one
summary
event.
Or
you
might
only
need
to
reduce
the
number
of
summary
events
by
half,
in
that
case
you
would
probably
specify
a
time
interval
of
60
seconds
(60000
milliseconds).
If
you
notice
that
an
adapter
with
a
summary
rules
XML
file
already
defined
is
generating
a
flood
of
events
of
a
type
that
has
no
rule
defined,
add
a
rule
for
that
specific
event
type.
Edit
the
summary
rules
XML
file
associated
with
your
adapter,
and
add
a
new
rule
specification.
Review
the
sample
summary
rule
on
page
90
and
refer
to
existing
rules
in
the
XML
file
for
the
syntax
of
a
summary
rule.
Before
creating
a
new
summary
rule,
examine
the
event
attributes
of
an
event
that
might
be
a
good
candidate
for
a
new
summary
rule.
If
the
event
has
one
or
more
attributes
whose
individual
values
are
required
to
diagnose
attack
particulars,
you
should
reconsider
implementing
a
summary
rule
for
the
event
class
because
the
resulting
summary
event
will
contain
exactly
one
of
the
values.
Remember,
the
goal
of
the
summarization
process
is
to
reduce
event
traffic
without
loss
of
relevant
information.
You
must
ensure
that
any
rule
you
define
does
not
cause
the
loss
of
important
information.
Prior
to
adding
a
new
rule,
make
note
of
the
following:
v
The
event
class
name
v
Attributes
names
that
you
require
to
match
as
part
of
a
summary
event
v
Attribute
names
that
you
want
to
set
in
the
summary
event
v
The
type
of
each
attribute
you
want
to
set
in
the
summary
event.
Attribute
types
are
defined
in
the
BAROC
files.
v
The
expected
time
period
of
the
event
flood
Add
the
new
rule
definition
in
the
summary
rules
XML
file,
being
careful
to
include
the
rule
within
the
rules
tags
in
the
XML
file.
Before
activating
your
changes,
be
sure
to
check
the
following:
92
IBM
Tivoli
Risk
Manager:
Administrator’s
Guide
v
You
have
specified
a
unique
rule
ID
v
You
have
correctly
specified
the
event
class
name
v
You
have
correctly
specified
the
event
attribute
names
v
Any
SET:attribute
specifications
use
values
that
are
valid
for
the
attribute.
For
example,
you
must
not
set
an
INTEGER
or
REAL
type
attribute
to
the
wildcard
character
(*)
since
it
is
not
numeric.
If
you
do,
your
Tivoli
Enterprise
Console
server
will
reject
the
event
with
a
PARSING_ERROR.
See
“Activating
Your
Changes”
for
information
on
verifying
and
activating
your
summary
rules
changes.
Creating
New
Summary
Rules
You
can
create
your
own
summary
rules
XML
files
to
contain
summary
rules
for
events
in
your
environment.
It
is
strongly
recommended
that
you
use
an
existing
summary
rules
XML
file
as
a
template
for
any
new
summary
rules
XML
files
that
you
create.
See
“Updating
An
Existing
Summary
Rule”
on
page
92
for
a
sample
summary
rule
and
refer
to
the
rule
definitions
in
an
existing
summary
rules
XML
file
for
the
syntax
of
a
summary
rule.
Follow
the
process
of
creating
a
new
summary
rule
as
defined
in
“Updating
An
Existing
Summary
Rule”
on
page
92.
See
“Activating
Your
Changes”
for
information
on
verifying
and
activating
your
rules.
Activating
Your
Changes
Before
activating
any
changes
made
to
the
summary
rules
XML
files,
verify
that
you
have
not
introduced
any
syntax
errors
in
the
file.
Use
the
checkrules
command
to
validate
the
syntax
of
your
changes.
If
there
is
a
syntax
error
in
your
summary
rules
XML
file,
the
agent
will
ignore
the
rules
in
the
file
and
continue
processing.
This
means
that
a
syntax
error
in
your
summary
rules
XML
file
does
not
cause
the
agent
to
stop
processing.
Instead
the
agent
will
process
the
events
as
if
there
was
no
summarization
rule
defined
for
them.
Once
you
have
verified
the
syntax
of
your
new
or
updated
summary
rules
XML
file,
verify
that
the
engine’s
component
configuration
file
with
the
RMA_conf
parameter
contains
a
rules=
line
specifying
your
summary
rules
XML
file.
See
the
IBM
Tivoli
Risk
Manager
Command
Reference
for
details
on
using
the
checkrules
command.
Use
the
wrmadmin
command
to
activate
your
changes.
You
can
stop
and
restart
the
agent
using
the
wrmadmin
–restart
command,
or
you
can
stop
and
restart
the
agent’s
engine
component
as
follows:
1.
Stop
the
engine
using
the
wrmadmin
–s
summary_engine
command.
2.
Restart
the
engine
using
the
wrmadmin
–r
summary_engine
command.
See
the
IBM
Tivoli
Risk
Manager
Command
Reference
for
more
details
on
using
the
wrmadmin
command.
Chapter
6.
Event
Summarization
93
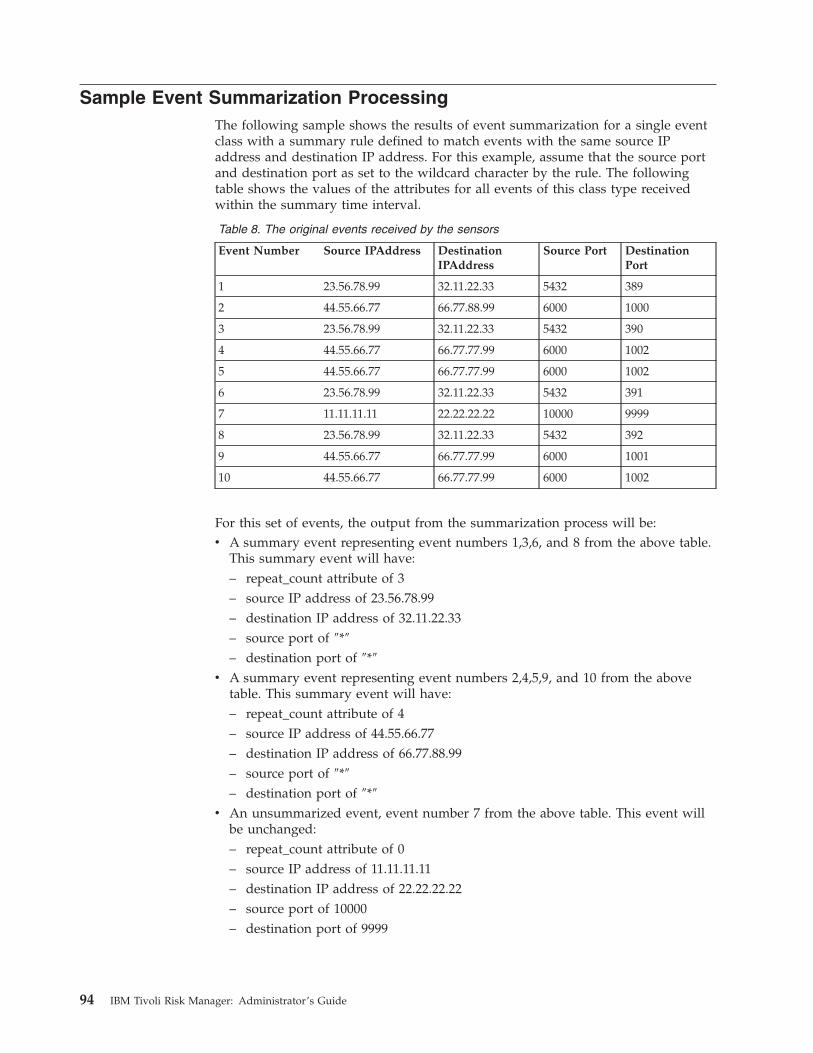
Sample
Event
Summarization
Processing
The
following
sample
shows
the
results
of
event
summarization
for
a
single
event
class
with
a
summary
rule
defined
to
match
events
with
the
same
source
IP
address
and
destination
IP
address.
For
this
example,
assume
that
the
source
port
and
destination
port
as
set
to
the
wildcard
character
by
the
rule.
The
following
table
shows
the
values
of
the
attributes
for
all
events
of
this
class
type
received
within
the
summary
time
interval.
Table
8.
The
original
events
received
by
the
sensors
Event
Number
Source
IPAddress
Destination
IPAddress
Source
Port
Destination
Port
1
23.56.78.99
32.11.22.33
5432
389
2
44.55.66.77
66.77.88.99
6000
1000
3
23.56.78.99
32.11.22.33
5432
390
4
44.55.66.77
66.77.77.99
6000
1002
5
44.55.66.77
66.77.77.99
6000
1002
6
23.56.78.99
32.11.22.33
5432
391
7
11.11.11.11
22.22.22.22
10000
9999
8
23.56.78.99
32.11.22.33
5432
392
9
44.55.66.77
66.77.77.99
6000
1001
10
44.55.66.77
66.77.77.99
6000
1002
For
this
set
of
events,
the
output
from
the
summarization
process
will
be:
v
A
summary
event
representing
event
numbers
1,3,6,
and
8
from
the
above
table.
This
summary
event
will
have:
–
repeat_count
attribute
of
3
–
source
IP
address
of
23.56.78.99
–
destination
IP
address
of
32.11.22.33
–
source
port
of
″*″
–
destination
port
of
″*″
v
A
summary
event
representing
event
numbers
2,4,5,9,
and
10
from
the
above
table.
This
summary
event
will
have:
–
repeat_count
attribute
of
4
–
source
IP
address
of
44.55.66.77
–
destination
IP
address
of
66.77.88.99
–
source
port
of
″*″
–
destination
port
of
″*″
v
An
unsummarized
event,
event
number
7
from
the
above
table.
This
event
will
be
unchanged:
–
repeat_count
attribute
of
0
–
source
IP
address
of
11.11.11.11
–
destination
IP
address
of
22.22.22.22
–
source
port
of
10000
–
destination
port
of
9999
94
IBM
Tivoli
Risk
Manager:
Administrator’s
Guide
Chapter
7.
Incident-Based
Correlation
When
Tivoli
Risk
Manager
is
installed
on
an
event
server
and
a
distributed
correlation
server,
the
agent
performs
incident-based
correlation.
Incident-based
correlation
is
the
process
of
identifying
and
creating
RM_Incident
events
using
the
information
from
the
RM_SensorEvent
events
received
by
the
agent.
In
this
context,
an
RM_SensorEvent
is
any
event
produced
by
a
Tivoli
Risk
Manager
adapter
or
sensor.
The
agent
monitors
the
events
received
to
determine
if
the
activity
within
your
network
has
reached
a
level
that
your
network
administrator
should
be
alerted.
This
chapter
provides
information
that
will
help
you
understand:
v
Incident-based
correlation
processing
v
Incident-based
correlation
XML
syntax
v
Incident-based
correlation
action
functions
v
Customizing
incident-based
correlation
rules
v
Configuring
incident-based
correlation
rules
v
Extending
incident-based
correlation
with
customer
ID
attribute
enablement
Overview
This
section
describes
common
questions
about
incidents.
What
is
an
incident?
An
incident
is
an
event
representing
a
set
of
RM_SensorEvents
with
combined
rm_Level
attributes
that
have
reached
the
configured
threshold
within
the
configured
sliding-window
time
frame.
As
part
of
incident
identification,
the
agent
also
monitors
the
following:
v
The
source
of
the
activity
v
The
destination
(or
target)
of
the
activity
v
The
class
category
of
the
activity
What
is
the
rm_Level
attribute?
The
rm_Level
attribute
is
a
value
assigned
to
each
RM_SensorEvent
by
the
adapter
or
sensor
that
generated
the
event.
What
is
a
sliding-window?
In
this
context,
a
sliding-window
is
a
time-period
during
activity
that
is
monitored
by
the
agent.
The
start
time
of
the
activity
is
automatically
adjusted
so
that
only
events
received
within
the
configured
time
period
are
actively
being
monitored.
What
is
a
class
category?
A
class
category
is
an
association
of
RM_SensorEvent
events
with
a
known
type
of
intrusion
activity.
A
class
category
is
assigned
to
each
RM_SensorEvent
based
upon
the
type
of
activity
represented
by
the
event.
The
assignment
of
class
category
is
typically
based
upon
the
inheritance
hierarchy
of
the
event.
Specific
event
classes
can
be
assigned
to
a
category
separate
from
its
inheritance
hierarchy.
Table
9
on
page
96
shows
the
default
class
categories:
©
Copyright
IBM
Corp.
2003
95

Table
9.
Default
Class
Categories
Category
Name
Description
CMD
Command-Level
Activity
CONFIG
Configuration
Change
Activity
DOS
Denial
of
Service
Activity
HOSTLVL
Host-Level
Activity
IDSLVL
IDS
Level
Activity
INSTALL
Installation
Activity
MISCLVL
Miscellaneous
Level
Activity
NETLVL
Network-Level
Attack
NETMAN
Network
Management
Activity
NOMAPPING
Catchall
Event,
Uncategorized
Note:
Events
assigned
to
this
category
indicate
that
an
adapter
or
sensor
does
not
contain
a
specific
signature
for
the
event.
The
adapter
or
sensor
event
formatting
file
may
be
updated
to
categorize
the
event
more
specifically.
RESOURCE
Resource
Alert
SECADMIN
Security
Administration
Activity
SECACCESS.ALLOW
Access
Allowed
Activity
SECACCESS.DENY
Access
Denied
Activity
SECAUTH.ALLOW
Authentication
Allowed
Activity
SECAUTH.DENY
Authentication
Denied
Activity
SERV
Service
Attack
SERVCMP
Service
Compromise
STATECHG
State
Change
Activity
SYSERROR
System
Error
TDOS
Targeted
Denial-of-Service
TOPLVL
Category
Top
Level.
Note:
Events
assigned
to
this
category
indicate
that
an
adapter
or
sensor
does
not
contain
a
specific
signature
for
the
event.
The
adapter
or
sensor
event
formatting
file
may
be
updated
to
categorize
the
event
more
specifically.
TROJ
Trojan
Horse
Activity
USER
User-Level
Activity
VIRUS
Virus
Activity
WEB
Web
Attack
See
“Assigning
Class
Category”
on
page
84
for
more
information
on
configuring
class
category
assignments.
What
types
of
incidents
are
there?
Table
10
on
page
97
describes
the
RM_Incident
events
that
represent
suspicious
activity
within
the
network.
96
IBM
Tivoli
Risk
Manager:
Administrator’s
Guide
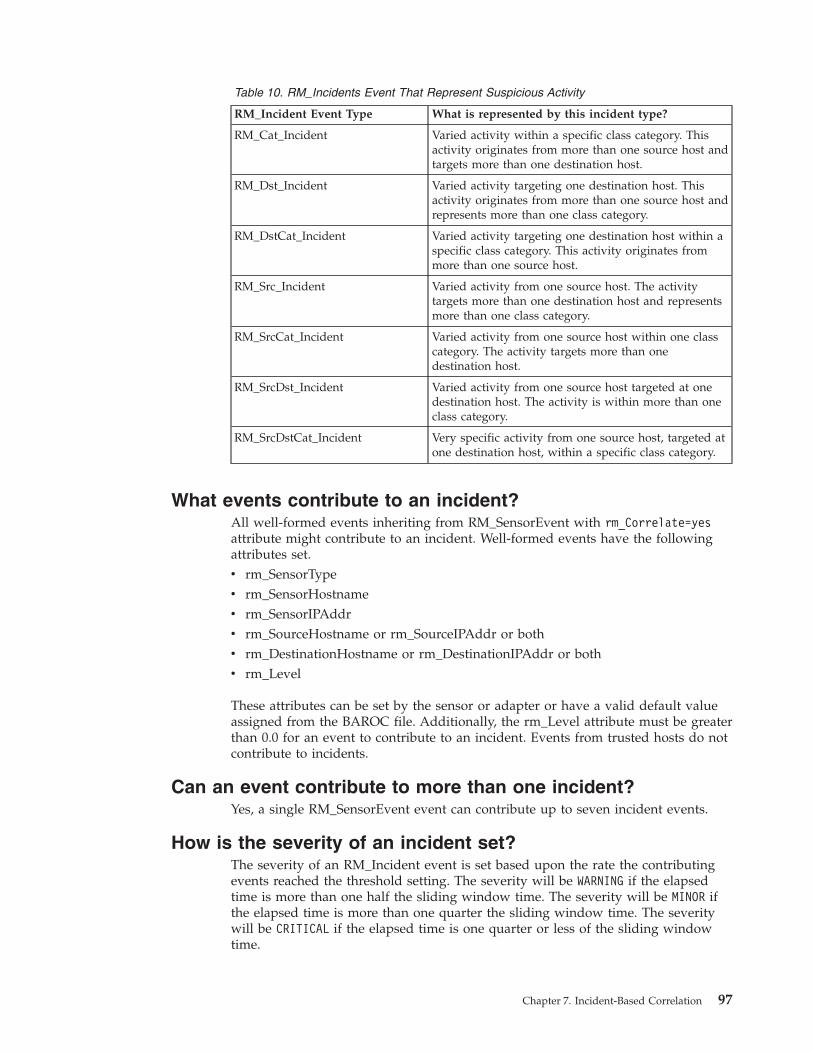
Table
10.
RM_Incidents
Event
That
Represent
Suspicious
Activity
RM_Incident
Event
Type
What
is
represented
by
this
incident
type?
RM_Cat_Incident
Varied
activity
within
a
specific
class
category.
This
activity
originates
from
more
than
one
source
host
and
targets
more
than
one
destination
host.
RM_Dst_Incident
Varied
activity
targeting
one
destination
host.
This
activity
originates
from
more
than
one
source
host
and
represents
more
than
one
class
category.
RM_DstCat_Incident
Varied
activity
targeting
one
destination
host
within
a
specific
class
category.
This
activity
originates
from
more
than
one
source
host.
RM_Src_Incident
Varied
activity
from
one
source
host.
The
activity
targets
more
than
one
destination
host
and
represents
more
than
one
class
category.
RM_SrcCat_Incident
Varied
activity
from
one
source
host
within
one
class
category.
The
activity
targets
more
than
one
destination
host.
RM_SrcDst_Incident
Varied
activity
from
one
source
host
targeted
at
one
destination
host.
The
activity
is
within
more
than
one
class
category.
RM_SrcDstCat_Incident
Very
specific
activity
from
one
source
host,
targeted
at
one
destination
host,
within
a
specific
class
category.
What
events
contribute
to
an
incident?
All
well-formed
events
inheriting
from
RM_SensorEvent
with
rm_Correlate=yes
attribute
might
contribute
to
an
incident.
Well-formed
events
have
the
following
attributes
set.
v
rm_SensorType
v
rm_SensorHostname
v
rm_SensorIPAddr
v
rm_SourceHostname
or
rm_SourceIPAddr
or
both
v
rm_DestinationHostname
or
rm_DestinationIPAddr
or
both
v
rm_Level
These
attributes
can
be
set
by
the
sensor
or
adapter
or
have
a
valid
default
value
assigned
from
the
BAROC
file.
Additionally,
the
rm_Level
attribute
must
be
greater
than
0.0
for
an
event
to
contribute
to
an
incident.
Events
from
trusted
hosts
do
not
contribute
to
incidents.
Can
an
event
contribute
to
more
than
one
incident?
Yes,
a
single
RM_SensorEvent
event
can
contribute
up
to
seven
incident
events.
How
is
the
severity
of
an
incident
set?
The
severity
of
an
RM_Incident
event
is
set
based
upon
the
rate
the
contributing
events
reached
the
threshold
setting.
The
severity
will
be
WARNING
if
the
elapsed
time
is
more
than
one
half
the
sliding
window
time.
The
severity
will
be
MINOR
if
the
elapsed
time
is
more
than
one
quarter
the
sliding
window
time.
The
severity
will
be
CRITICAL
if
the
elapsed
time
is
one
quarter
or
less
of
the
sliding
window
time.
Chapter
7.
Incident-Based
Correlation
97

How
Do
I
Stop
a
Specific
Event
Class
From
Contributing
to
Incident-Based
Correlation?
Any
class
that
inherits
from
RM_SensorEvent
can
contribute
to
incident-based
correlation.
You
can
disable
an
event’s
contribution
to
incident
processing
by
setting
its
rm_Correlate
attribute
to
no.
To
change
the
default
rm_Correlate
value
for
a
specific
event:
1.
Edit
the
BAROC
file
that
contains
the
class
that
you
want
to
modify.
2.
Specify
the
value
you
want
to
use
for
the
event’s
rm_Correlate.
a.
To
disable
correlation:
rm_Correlate:
default=’no’;
b.
To
enable
correlation:
rm_Correlate:
default=’yes’;
3.
Update
the
Tivoli
Enterprise
Console
and
server
agent
using
the
rmcorr_cfg
–update
command.
See
the
IBM
Tivoli
Risk
Manager
Command
Reference
for
details
on
using
this
command.
4.
Verify
that
your
Tivoli
Risk
Manager
BAROC
files
are
at
the
same
level
throughout
the
network.
Some
adapters
might
allow
you
to
set
the
rm_Correlate
value
for
a
specific
instance
of
the
adapter.
For
example,
if
the
adapter
uses
an
the
XML
file
used
for
formatting
,
you
could
change
the
mappings
in
the
XML
file
to
assign
the
value
you
want.
See
the
documentation
provided
with
the
adapter
that
you
want
to
reconfigure.
Incident-Based
Correlation
Processing
As
described
in
Chapter
5,
“Engine
Configuration,”
on
page
81,
one
of
the
functions
provided
by
the
Tivoli
Risk
Manager
agent’s
engine
component
is
incident-based
correlation.
Incident-based
correlation
is
the
process
used
by
the
agent’s
engine
to
identify
related
security
activity
and
generate
an
RM_Incident
event
when
significant
activity
is
detected.
By
default,
the
agent
on
the
Tivoli
Enterprise
Console
server
and
distributed
correlator
the
engine’s
secondary
configuration
file
is
RMINSTDIR/etc/incident_engine.conf.
The
incident_engine.conf
file
contains
rules=RMINSTDIR/etc/incident_rules.xml.
The
rules
defined
in
RMINSTDIR/etc/incident_rules.xml
contain
the
default
incident-based
correlation
rules.
The
engine
identifies
that
it
is
to
perform
incident-based
correlation
when
there
is
an
XML
rule
using
the
keyword
CorrelationEvent
as
the
type
of
event
used
by
the
rule.
When
a
Tivoli
Risk
Manager
sensor
event
(RM_SensorEvent)
is
processed
by
an
engine
configured
to
perform
incident-based
correlation,
the
engine:
v
Normalizes
the
event
(if
it
has
not
already
been
normalized)
v
Creates
a
temporary
event
with
the
attributes
used
by
incident-based
correlation
from
the
event
v
Routes
the
normalized
event
to
the
connectors
defined
for
the
engine
v
Uses
the
temporary
event
for
incident-based
correlation
processing
v
When
an
incident
event
is
generated,
the
engine
routes
it
to
the
connectors
defined
for
the
engine
98
IBM
Tivoli
Risk
Manager:
Administrator’s
Guide

Incident-Based
Correlation
XML
Syntax
The
default
incident_rules.xml
file
contains
seven
rules
for
producing
RM_Incident
events.
Each
incident
rule
contains:
v
A
unique
rule
ID
v
The
CorrelationEvent
keyword
is
specified
as
the
eventType
v
A
threshold
indicating
the
aggregated
rm_Level
attributes
of
the
original
RM_SensorEvents
v
A
time
interval
specifying
in
milliseconds
the
sliding-time
window
to
monitor
the
events
v
An
attributeSet
indicating
the
original
event
attributes
are
to
be
used
by
the
rule
to
identify
that
the
original
RM_SensorEvents
will
contribute
to
the
aggregation
v
An
action
function
specifying
the
type
of
RM_Incident
the
rule
will
generate
when
the
threshold
is
crossed
The
valid
action
functions
are
described
in
Table
11.
Table
11.
Valid
Actions
Action
Function
Action
Performed
CatIncident
Generates
an
RM_Cat_Incident
event.
If
there
is
no
variance
in
the
source
or
destination
of
the
contributing
events,
no
incident
event
is
generated.
DstCatIncident
Generates
an
RM_DstCat_Incident
event.
If
there
is
no
variance
in
the
source
of
the
contributing
events,
no
incident
is
generated.
DstIncident
Generates
an
RM_Dst_Incident
event.
If
there
is
no
variance
in
the
source
or
category
of
the
contributing
events,
no
incident
event
is
generated.
SrcCatIncident
Generates
an
RM_SrcCat_Incident
event.
If
there
is
no
variance
in
the
destination
of
the
contributing
events,
no
incident
is
generated.
SrcDstCatIncident
Generates
RM_SrcDstCat_Incident
event.
SrcDstIncident
Generates
an
RM_SrcDst_Incident.
If
there
is
no
variance
in
the
category
attribute
of
the
events
being
processed,
no
incident
event
is
generated.
SrcIncident
Generates
an
RM_Src_Incident
event.
If
there
is
no
variance
in
the
destination
or
category
of
the
contributing
events,
no
incident
is
generated.
The
following
is
a
sample
incident-based
correlation
rule:
<rule
id="RM.Incident.DstCat">
<!--
Each
rule
must
have
a
unique
id
-->
<eventType>CorrelationEvent</eventType>
<threshold
thresholdCount="10"
<!--
threshold
of
rm_Level
attribute
aggregation
that
will
cause
the
creation
of
the
RM_Incident
event
-->
timeInterval="600000"
<!--
Sliding
time
window
size
in
milliseconds
-->
timeIntervalMode="slideWindow"
<!--
Use
the
sliding
window
method.
Do
NOT
change
this
-->
triggerMode="allEvents"
<!--
Do
NOT
change
this
value
-->
>
<cloneable
attributeSet="rm_DestinationToken
rm_CategoryToken"
<!--
The
attributeSet
lists
the
attributes
of
the
events
that
must
match
for
Chapter
7.
Incident-Based
Correlation
99
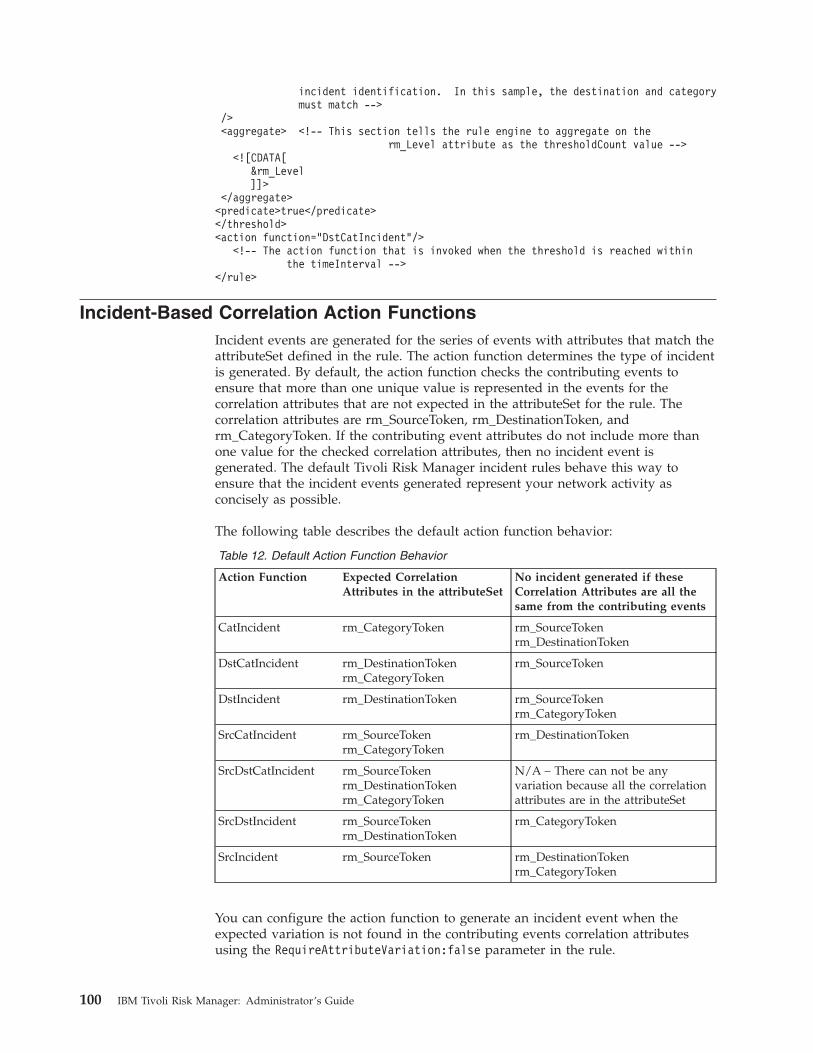
incident
identification.
In
this
sample,
the
destination
and
category
must
match
-->
/>
<aggregate>
<!--
This
section
tells
the
rule
engine
to
aggregate
on
the
rm_Level
attribute
as
the
thresholdCount
value
-->
<![CDATA[
&rm_Level
]]>
</aggregate>
<predicate>true</predicate>
</threshold>
<action
function="DstCatIncident"/>
<!--
The
action
function
that
is
invoked
when
the
threshold
is
reached
within
the
timeInterval
-->
</rule>
Incident-Based
Correlation
Action
Functions
Incident
events
are
generated
for
the
series
of
events
with
attributes
that
match
the
attributeSet
defined
in
the
rule.
The
action
function
determines
the
type
of
incident
is
generated.
By
default,
the
action
function
checks
the
contributing
events
to
ensure
that
more
than
one
unique
value
is
represented
in
the
events
for
the
correlation
attributes
that
are
not
expected
in
the
attributeSet
for
the
rule.
The
correlation
attributes
are
rm_SourceToken,
rm_DestinationToken,
and
rm_CategoryToken.
If
the
contributing
event
attributes
do
not
include
more
than
one
value
for
the
checked
correlation
attributes,
then
no
incident
event
is
generated.
The
default
Tivoli
Risk
Manager
incident
rules
behave
this
way
to
ensure
that
the
incident
events
generated
represent
your
network
activity
as
concisely
as
possible.
The
following
table
describes
the
default
action
function
behavior:
Table
12.
Default
Action
Function
Behavior
Action
Function
Expected
Correlation
Attributes
in
the
attributeSet
No
incident
generated
if
these
Correlation
Attributes
are
all
the
same
from
the
contributing
events
CatIncident
rm_CategoryToken
rm_SourceToken
rm_DestinationToken
DstCatIncident
rm_DestinationToken
rm_CategoryToken
rm_SourceToken
DstIncident
rm_DestinationToken
rm_SourceToken
rm_CategoryToken
SrcCatIncident
rm_SourceToken
rm_CategoryToken
rm_DestinationToken
SrcDstCatIncident
rm_SourceToken
rm_DestinationToken
rm_CategoryToken
N/A
–
There
can
not
be
any
variation
because
all
the
correlation
attributes
are
in
the
attributeSet
SrcDstIncident
rm_SourceToken
rm_DestinationToken
rm_CategoryToken
SrcIncident
rm_SourceToken
rm_DestinationToken
rm_CategoryToken
You
can
configure
the
action
function
to
generate
an
incident
event
when
the
expected
variation
is
not
found
in
the
contributing
events
correlation
attributes
using
the
RequireAttributeVariation:false
parameter
in
the
rule.
100
IBM
Tivoli
Risk
Manager:
Administrator’s
Guide

For
example:
...
<action
function="SrcIncident"
>
<parameters>
<![CDATA[
RequireAttributeVariation:false
]]>
</parameters>
</action>
For
example,
you
might
want
to
configure
the
action
this
way
if
you
want
an
incident
generated
whenever
a
specific
host
is
the
source
of
an
attack
and
you
do
not
want
to
write
seven
rules
(one
rule
for
each
action
function)
for
the
specific
host.
Customizing
Incident-Based
Correlation
Rules
The
predicate
portion
of
the
rule
determines
the
events
that
will
be
used
by
the
rule
to
trigger
the
action
function.
The
default
is
<predicate>true</predicate>
that
means
that
all
events
with
matching
values
for
the
attributes
specified
in
the
attributeSet
will
be
used
by
the
rule.
If
you
change
the
predicate
to
be
more
selective,
then
only
events
with
attributes
matching
the
specified
predicate
criteria
will
be
used
by
the
rule.
The
following
table
shows
predicate
values
that
are
valid
for
attributes
defined
as
STRING
to
the
correlation
engine.
For
the
correlation
engine
only,
Tivoli
Risk
Manager
defines
all
attributes
except
rm_Level
as
STRING.
Tivoli
Risk
Manager
defines
the
rm_Level
attribute
as
a
floating
point
number.
The
predicate
settings
can
include
the
following
logical
operators
for
STRING
attributes:
Specification
Meaning
Description
==
Equals
The
specified
attributes
contains
the
string
value
specified
!=
Not
equal
The
specified
attribute
contains
a
value
that
is
not
identical
to
the
value
specified
startsWith(&attributeName,″startValue″)
Starts
with
The
specified
attribute
is
set
to
value
that
starts
with
the
″startValue″
specified
endsWith(&attributeName,″endValue″)
Ends
with
The
specified
attribute
is
set
to
a
value
that
ends
with
the
″endValue″
specified
iceq(&attributeName,″value″)
Ignore
case
equality
The
specified
attribute
is
set
to
a
value
that
matches
″value″
regardless
of
case.
icne(&attributeName,″value″)
Ignore
case
not
equal
The
specified
attribute
is
set
to
a
value
that
does
not
match
″value″
regardless
of
case.
&&
Logical
AND
Logically
ANDs
the
two
expressions
around
it
||
Logical
OR
Logically
ORs
the
two
expressions
around
it
Chapter
7.
Incident-Based
Correlation
101

The
following
comparison
functions
can
be
used
within
the
predicate
setting
for
float
values
for
the
rm_Level
attribute:
Specification
Meaning
Description
==
Numeric
Equals
For
example
to
specify
that
rm_Level
must
equal
3.0:
&rm_Level==
3.0
!=
Numeric
not
equal
For
example
to
specify
that
rm_Level
must
not
be
3.0:
&rm_Level!=3.0
<
Numeric
less
than
For
example
to
specify
that
rm_Level
be
less
than
4.0:
&rm_Level
<
4.0
<=
Numeric
less
than
or
equal
For
example,
to
specify
that
rm_Level
be
less
than
or
equal
to
4.0:
&rm_Level
<=
4.0
>
Numeric
greater
than
For
example,
to
specify
that
rm_Level
be
greater
than
4.0:
&rm_Level
>
4.0
>=
Numeric
greater
than
or
equal
For
example,
to
specify
that
rm_Level
be
greater
than
or
equal
to
4.5:
&rm_Level
>=
4.5
For
example,
if
you
want
only
events
that
are
in
a
category
starting
with
″SERV″.
And
whose
rm_Level
attribute
is
between
1.0
and
100.0
to
contribute
to
your
rule,
you
could
specify
the
following
predicate:
<predicate>
<![CDATA[
startsWith(&rm_CategoryToken,"SERV.")
&&
(&rm_Level>=1.0
&&
&rm_Level
<=100.0)
]]>
</predicate>
Configuring
Incident-Based
Correlation
Rules
You
can
do
the
following
to
your
incident-based
correlation
rules
files:
v
“Updating
an
Existing
Incident-Based
Correlation
Rules
File”
v
“Creating
a
New
Incident-Based
Correlation
Rules
File”
on
page
103
v
“Activating
Changes
to
the
Incident-Based
Correlation
Rules
File”
on
page
105
Updating
an
Existing
Incident-Based
Correlation
Rules
File
You
can
make
simple
updates
to
your
incident-based
correlation
rules
to
change:
v
Threshold
level
an
incident
event
is
created
v
The
time
interval
for
monitoring
the
activity
v
To
include
a
specific
value
for
an
attribute
in
the
resulting
incident
event
To
change
the
threshold
level,
edit
the
specified
rule
file
and
change
the
thresholdCount
setting
in
the
rule.
To
change
the
time
interval
for
monitoring
the
activity,
edit
the
specified
rule
file
and
change
the
timeInterval
setting
to
the
appropriate
value.
To
include
a
specific
value
for
an
attribute
in
the
resulting
incident
event,
you
can
add
parameters
to
the
action
section
of
the
rule.
102
IBM
Tivoli
Risk
Manager:
Administrator’s
Guide

Setting
an
Attribute
to
a
Specific
Value
If
you
want
an
attribute
of
your
RM_Incident
event
to
be
set
to
a
specific
value,
specify
parameters
to
the
action
function.
For
example,
if
you
want
the
severity
set
to
CRITICAL
for
your
RM_SrcDst_Incident
events,
set
the
parameters
as
follows:
...
<action
function="SrcDstIncident">
<parameters>
<![CDATA[
SET:severity=CRITICAL
]]>
</parameters>
</action>
...
Specify
only
valid
event
attribute
names
and
values.
If
you
want
to
set
the
msg
attribute
with
a
value
containing
spaces,
use
underscore
(
_
)
characters
where
you
want
the
spaces.
For
example:
...
<action
function="SrcDstIncident">
<parameters>
<![CDATA[
SET:msg=Your_customized_message_goes_here
]]>
</parameters>
</action>
...
See
“Activating
Changes
to
the
Incident-Based
Correlation
Rules
File”
on
page
105
for
information
on
verifying
and
activating
your
XML
rules
changes.
Creating
a
New
Incident-Based
Correlation
Rules
File
You
might
want
to
create
new
incident-based
correlation
rules
to:
v
Have
different
threshold
settings
for
a
particular
category
v
Monitor
activity
from
a
specific
host
A
copy
of
incident_rules.xml
is
provided
in
the
RMINSTDIR/etc/templates
directory.
Specifying
Different
Thresholds
For
Unique
Event
Categories
After
analyzing
your
typical
system
event
flow,
you
might
discover
that
there
are
specific
event
classes
that
you
want
to
monitor
more
closely.
While
it
seems
reasonable
to
simply
change
the
eventType
to
a
specific
event
class
name
in
the
rule,
doing
so
will
cause
your
specific
event
class
events
to
be
discarded
at
the
correlation
server.
Instead,
you
can
create
rules
for
specific
categories.
This
might
involve
creating
your
own
class
category
and
assigning
specific
event
classes
to
the
new
class
category.
See
“Assigning
Class
Category”
on
page
84
for
details
on
creating
a
new
class
category.
Also,
consider
changing
the
default
rm_Level
attribute
of
the
specific
events.
For
example,
you
can
identify
that
events
that
are
in
category
SERV.ALLOW
are
of
interest
to
you,
you
could
add
rules
similar
to
the
following
to
your
rules
file:
<rule
id="RM.Incident.SrcDstCat.SERV.ALLOW"
>
<eventType>CorrelationEvent</eventType>
<threshold
thresholdCount="100"
timeInterval="600000"
timeIntervalMode="slideWindow"
triggerMode="allEvents"
>
<cloneable
attributeSet="rm_SourceToken
rm_DestinationToken
Chapter
7.
Incident-Based
Correlation
103

rm_CategoryToken"
/>
<aggregate><!CDATA[
&rm_Level]]>
<predicate>
<![CDATA[
&rm_CategoryToken=="SERV.ALLOW"
]]>
</predicate>
</threshold>
<action
funtion="SrcDstCatIncident">
<parameter>
<![CDATA[SET:severity="CRITICAL"
]]>
</parameter>
</action>
</rule>
<rule
id="RM.Incident.Cat.SERV.ALLOW">
<eventType>CorrelationEvent</eventType>
<threshold
thresholdCount="100"
timeInterval="600000"
timeIntervalMode="slideWindow"
triggerMode="allEvents">
<cloneable
attributeSet="rm_CategoryToken"
/>
<aggregate><![CDATA[
&rm_Level
]]>
<predicate>
<![CDATA[&rm_CategoryToken=="SERV.ALLOW"
]]>
</predicate>
</threshold>
<action
function="CatIncident">
<parameter>
<![CDATA[SET:severity="CRITICAL"
]]>
</parameter>
</action>
</rule>
Presuming
that
you
did
not
remove
the
original
incident
rules,
the
events
in
the
SERV.ALLOW
category
will
still
contribute
to
incidents
created
by
the
original
rules.
If
you
do
not
want
events
in
the
SERV.ALLOW
category
to
contribute
to
the
original
incident
rules,
you
can
specify
this
by
changing
<predicate>true</predicate>
in
the
original
rule
to:
<predicate>
<![CDATA[&rm_CategoryToken!="SERV.ALLOW"
]]>
</predicate>
Monitoring
Activity
Targeting
A
Specific
Host
As
part
of
monitoring
your
system
security
events,
you
might
notice
that
a
particular
machine
is
frequently
the
target
of
suspicious
activity.
You
can
create
a
rule
to
generate
an
incident
event
rather
quickly
when
this
machine
is
targeted
again.
For
example,
the
following
rule
will
generate
an
RM_Dst_Incident
event
when
host
"abc.our.domain"
is
the
target
from
any
source
with
a
combined
rm_Level
of
5.0
or
more
within
a
one
minute
time
period:
<rule
id="ABC.HIT_AGAIN">
<eventType>CorrelationEvent</eventType>
<threshold
thresholdCount="5"
timeInterval="6000"
timeIntervalMode="slideWindow"
triggerMode="allEvents">
<cloneable
attributeSet="rm_DestinationToken"
/>
<aggregate><![CDATA[
&rm_Level
]]></aggregate>
<predicate>&rm_DestinationToken=="abc.our.domain"</predicate>
</threshold>
<action
function="DstIncident">
<parameters><
]]>
</parameters>
</action>
</rule>
See
“Activating
Changes
to
the
Incident-Based
Correlation
Rules
File”
for
information
on
verifying
and
activating
your
XML
rules
changes.
Activating
Changes
to
the
Incident-Based
Correlation
Rules
File
Before
activating
any
changes
you
have
made
to
the
incident
rules
XML
files,
you
should
verify
that
you
have
not
introduced
any
syntax
errors
in
the
file.
Use
the
checkrules
command
to
validate
the
syntax
of
your
changes.
If
there
is
a
syntax
error
in
your
summary
rules
XML
file,
the
agent
will
ignore
the
rules
in
the
file
and
continue
processing.
This
means
that
a
syntax
error
in
your
rules
XML
file
does
not
cause
the
agent
to
stop
processing.
Instead
the
agent
will
process
the
events
as
if
there
was
no
rule
defined
for
them.
See
the
IBM
Tivoli
Risk
Manager
Command
Reference
for
more
details
on
using
the
checkrules
command.
Once
you
have
verified
the
syntax
of
your
new
or
updated
rules
XML
file,
verify
that
the
engine’s
component
configuration
file
with
the
RMA_conf
parameter
contains
a
rules=
line
specifying
your
rules
XML
file.
Use
the
wrmadmin
command
to
activate
your
changes.
You
can
stop
and
restart
the
agent
using
the
wrmadmin
–restart
command
or
you
can
stop
and
restart
the
agent’s
engine
component
as
follows:
1.
Stop
the
engine
using
the
wrmadmin
–s
summary_engine
command.
2.
Restart
the
engine
using
the
wrmadmin
–r
summary_engine
command.
See
the
IBM
Tivoli
Risk
Manager
Command
Reference
for
more
details
on
using
the
wrmadmin
command.
Extending
Incident-Based
Correlation
with
Customer
ID
Attribute
Enablement
The
following
procedures
document
how
to
enable
the
customer
ID
attribute,
and
use
it
to
correlate
IBM
Tivoli
Risk
Manager
events.
To
enable
the
event
server
to
aggregate
events
using
the
customer
ID
attribute,
rm_CustomerID,
perform
the
following
steps
on
each
server:
1.
Copy
the
following
file
to
the
RMINSTDIR/etc
directory,
where
RMINSTDIR
is
the
IBM
Tivoli
Risk
Manager
installation
directory:
RMINSTDIR/etc/templates/provider_incident_rules.xml
2.
Review
the
file
to
ensure
that
the
threshold
settings,
and
all
other
settings,
are
correct
for
your
environment.
3.
Edit
the
correlation
engine’s
configuration
file
with
the
RMA_conf
parameter
to
activate
the
rules
in
the
RMINSTDIR/etc/provider_incident_rules.xml
file.
To
do
this,
add
(or
change)
the
file
to
include
the
following
line:
rules=RMINSTDIR/etc/provider_incident_rules.xml
Chapter
7.
Incident-Based
Correlation
105
4.
See
“Activating
Changes
to
the
Incident-Based
Correlation
Rules
File”
on
page
105
for
information
on
how
to
verify
your
changes
to
the
rules
file
and
restart
the
agent.
After
the
provide_incident_rules.xml
file
has
been
updated
and
activated,
the
customer
ID
attribute
must
be
set
in
the
RM_SensorEvent
events
to
fully
enable
incident
creation
on
a
per
customer
basis.
Depending
on
the
type
of
adapters
deployed,
there
are
several
options
for
setting
the
customer
ID
attribute:
v
For
logfile
type
adapters,
the
XML
file
used
for
formatting
can
be
edited
to
include
setting
the
attribute
to
the
correct
value
-
usually
at
the
base
level
event
class.
v
For
any
adapter,
an
attribute
map
definition
can
be
added
to
the
correlation
engine’s
configuration
file
with
the
RMA_conf
parameter.
This
is
accomplished
by
adding
an
entry
to
set
the
rm_CustomerID
attribute.
The
agent
must
be
restarted
to
activate
this
change.
v
For
any
adapter,
edit
the
BAROC
file
and
add
a
default
setting
for
the
rm_CustomerID
attribute.
At
the
Tivoli
Enterprise
Console
server,
this
type
of
change
should
be
activated
by
entering
the
following
command:
rmcorr_cfg
–update
For
other
event
servers,
restart
the
agent
using
the
following
command:
wrmadmin
–r
See
the
IBM
Tivoli
Risk
Manager
Command
Reference
for
details
on
using
the
rmcorr_cfg
and
wrmadmin
commands.
106
IBM
Tivoli
Risk
Manager:
Administrator’s
Guide

Chapter
8.
Web
Application
Tivoli
Risk
Manager
4.2
includes
a
Web
Application
for
Tivoli
Risk
Manager
incident
and
incident
group
events.
These
applications
allow
you
to
do
the
following:
v
Create
policies
and
recommendations
for
incidents
and
incident
groups
v
View
additional
information
about
the
individual
Tivoli
Risk
Manager
incident
events
v
View
a
list
of
sensor
events
that
have
contributed
to
a
Tivoli
Risk
Manager
incident
v
View
a
list
of
contributing
incidents
for
incident
groups
v
View
information
stored
in
the
Tivoli
Inventory
database
about
the
systems
associated
with
the
incidents
and
incident
groups
The
Web
Application
contains
three
applications,
Event
Details,
System
Information,
and
Advisor.
These
applications
allow
you
to
perform
the
previously
listed
functions.
Functional
Overview
The
Web
applications
are
Web-browser
based
applications
built
using
Tivoli
Presentation
Services
Toolkit
(PS),
Java
Server
Pages
(JSP)
and
Java
Servlet
technologies.
These
technologies
are
used
to
present
a
common
console
to
the
user.
The
console
uses
the
following
roles:
rmeventdetails,
rmadvisor
and
rmsysteminfo.
The
rmeventdetails
role
allows
the
user
to
access
the
Event
Details
application.
The
rmadvisor
role
allows
the
user
to
access
the
Advisor
application.
The
rmsysteminfo
role
allows
the
user
to
access
the
System
Information
application.
The
Tivoli
Risk
Manager
Web
Application
install
will
assign
all
these
roles
to
the
WebSphere
administrator.
The
administrator
can
modify
these
roles
using
the
WebSphere
administration
console
to
grant
Tivoli
Risk
Manager
Web
Application
access
to
other
users
and
groups.
To
change
role
to
user(s)
or
group(s)
mappings
for
the
Tivoli
Risk
Manager
Web
applications,
use
the
following
steps:
1.
On
the
WebSphere
administrative
console,
select
Application
→Enterprise
Application
→
IBMTivoliRiskManager4.2
→Map
security
roles
to
users/groups.
2.
Select
the
roles
that
you
want
to
modify
the
membership
and
click
Lookup
Users/Lookup
groups:
Perform
a
search
to
get
the
list
of
users
Available.
This
will
perform
a
search
to
get
the
list
of
users.
3.
The
list
of
available
users
is
displayed.
Select
the
users
you
want
to
modify
from
the
Available
list,
and
move
them
to
the
Selected
list.
After
making
all
modifications,
click
OK.
4.
Click
the
Save
link
at
the
top
of
the
screen.
5.
Click
the
Save
button.
The
application
server
needs
to
be
restarted.
The
RmWeb.properties
file
contains
the
Web-application
specific
information,
such
as
database
connection
information
for
Event
Details
and
System
information,
and
SMTP
server
information
for
the
Advisor.
The
install
will
update
this
file
with
the
database
connection
information
and
SMTP
server
information
during
configuration
of
the
Web
Application.
If
the
database
connection
information,
such
as
user
ID
and
or
password,
need
to
be
updated
after
the
Tivoli
Risk
Manager
Web
application
installation
run
the
wrmstashpw
command
to
obfuscate
the
password
©
Copyright
IBM
Corp.
2003
107

and
enter
the
file
name
in
the
RmWeb.properties
file,
you
can
edit
the
file
and
update
the
corresponding
entries.
See
the
IBM
Tivoli
Risk
Manager
Command
Reference
for
details
using
this
command.
This
file
gets
installed
under
the
WEB-INF
directory.
For
example:
$WAS_HOME/installedApps/$NODE/
IBMTivoliRiskManagerWebApp42.ear/
rmwebapp42.war/WEB-INF
Where
$WAS_HOME
is
the
WebSphere
installation
directory,
and
$NODE
refers
to
the
name
of
the
managed
server.
The
application
server
will
need
to
be
restarted
for
the
changes
to
take
effect.
The
contents
of
this
file
are:
//
Indicates
if
the
Event
Details
is
configured.
EventDetailsConfig
=
true
//
The
JDBC
URL
for
the
Event
Details
TEC
database.
//
Syntax:
protocol:driver:subname:
Example:
jdbc:db2://foo.ibm.com:6789/tec
EventDetailsTecDbUrl
=
jdbc:db2://foo.ibm.com:6789/tec
//
The
class
name
of
the
driver
for
the
Event
Details
TEC
Database
EventDetailsTecDbDriver
=
COM.ibm.db2.jdbc.net.DB2Driver
//
Event
Details
TEC
Database
user
ID
Example:
db2
EventDetailsTecDbUser
=
db2
//
Event
Details
TEC
Database
password
file
EventDetailsTecDbPasswordFile
=
c:/IBM/RISKMGR/etc/stashDBED.pwd
//
Max
number
of
connections
that
need
to
established
for
the
pool
for
Event
//
Details
TEC
Database
EventDetailsTecDbMaxConnections
=
10
//
The
JDBC
URL
for
the
Event
Details
Risk
Manager
Archive
database.
//
Syntax:
protocol:driver:subname:
//
Example:
jdbc:db2://foo.ibm.com:6789/tec
EventDetailsRmArchiveDbUrl
=
//
The
class
name
of
the
driver
for
the
Event
Details
Risk
Manager
Archive
//
Database.
Example:
COM.ibm.db2.jdbc.net.DB2Driver
EventDetailsRmArchiveDbDriver
=
//
Event
Details
Risk
Manager
Archive
Database
user
ID
Example:
db2
EventDetailsRmArchiveDbUser
=
//
Event
Details
Risk
Manager
Archive
Database
password
file
EventDetailsRmArchiveDbPasswordFile
=
//
Max
number
of
connections
that
need
to
established
for
the
pool
for
Event
//
Details
Risk
Manager
Archive
Database
EventDetailsRmArchiveDbMaxConnections
=
//
Indicates
if
the
advisor
is
configured.
AdvisorConfig
=
true
//
Name
of
the
Rules
file
for
Advisor
AdvisorRuleFile
=
AdvisorRules.xml
//
The
priorities
AdvisorHighestTitlePriority
=
1
AdvisorLowestTitlePriority
=
100
AdvisorDefaultTitlePriority
=
50
//
Name
of
the
server
AdvisorSMTPServer
=
us.ibm.com
//
Indicates
if
the
System
Information
is
configured.
SystemInfoConfig
=
true
108
IBM
Tivoli
Risk
Manager:
Administrator’s
Guide

//
The
JDBC
URL
for
the
System
Information
database.
//
Syntax:
protocol:driver:subname
//
Example:
jdbc:db2://foo.ibm.com:6789/inv_db
SystemInfoDbUrl
=
jdbc:db2://foo.ibm.com:6789/inv_db
//
The
class
name
of
the
driver
for
System
Information
Database
//
Example:
COM.ibm.db2.jdbc.net.DB2Driver
SystemInfoDbDriver
=
COM.ibm.db2.jdbc.net.DB2Driver
//
System
Information
Database
user
ID
Example:
invtiv
SystemInfoDbUser
=
invtiv
//
System
Information
Database
password
SystemInfoDbPasswordFile
=
c:/IBM/RISKMGR/etc/stashDBSI.pwd
//
Max
number
of
connections
that
need
to
established
for
the
pool
for
System
//
Information
Database
SystemInfoDbMaxConnections
=
10
Global
Security
and
UTF-8
The
Tivoli
Risk
Manager
Web
Application
requires
that
global
security
is
enabled
in
the
WebSphere
Application
Server.
The
UTF-8
encoding
needs
to
be
enabled
for
multi-language
support.
Global
security
and
UTF-8
encoding
must
be
done
by
the
user
manually.
The
global
security
needs
to
be
enabled
before
installing
the
Web
application,
and
UTF-8
must
be
enabled
for
multi-language
support
to
work.
WebSphere
global
security
needs
to
be
enabled
to
allow
only
authorized
users
to
administer
WebSphere
using
the
administrative
console
During
Tivoli
Risk
Manager
Web
Application
installation,
you
will
be
prompted
for
the
WebSphere
administrator
user
ID
and
password.
This
user
will
be
given
access
to
all
the
roles.
Use
the
following
steps
to
enable
global
security:
Note:
The
following
example
uses
the
Local
OS
as
the
user
registry.
To
use
other
user
registries,
refer
to
WebSphere
Application
Server
documentation.
1.
Global
security
needs
to
be
enabled
on
WebSphere
Application
Server
with
the
local
operating
system
as
the
user
registry,
using
the
following
steps:
a.
After
the
WebSphere
Application
Server
has
been
started,
start
the
administrative
console
using
a
browser
with
the
following
URL:
http://yourhost.domain:9090/admin
Where
yourhost.domain
is
the
host
and
domain
name
for
the
machine
running
WebSphere
Application
Server.
If
you
are
using
a
non-default
port
for
the
WebSphere
Application
Server
console,
then
substitute
that
number
for
9090
above.
If
security
is
currently
disabled,
log
in
with
any
user
ID.
b.
Next,
configure
the
user
registry
by
selecting
Security→
User
Registries
→Local
OS
in
the
left-hand
pane.
Enter
a
Server
User
ID
and
Server
User
Password
on
the
Local
OS
User
Registry
window.
Enter
a
valid
user
ID
in
the
LocalOS
registry
that
is
part
of
the
Administrators
group
on
the
WebSphere
Application
Server.
This
user
ID
must
have
the
Act
as
part
of
operating
system
privilege
on
Windows
systems,
or
be
root
or
have
root
authority
on
Linux
and
UNIX-based
systems.
Click
Apply.
To
save
the
configuration,
click
Save
in
the
menu
bar
at
the
top.
When
the
Save
panel
appears,
click
Save
again.
c.
Click
Security→Global
Security
in
the
left-hand
pane.
The
Global
Security
window
is
displayed.
Select
the
Enabled
check
box,
and
deselect
the
Enforce
Java
2
Security
check
boxes;
these
two
items
are
the
first
two
items.
Chapter
8.
Web
Application
109

d.
Click
Apply
or
OK
to
save
your
changes.
To
save
the
configuration,
click
Save
in
the
menu
bar
at
the
top.
When
the
Save
panel
appears,
click
Save
again.2.
Before
restarting
the
WebSphere
Application
Server,
log
off
of
the
administrative
console.
You
can
log
off
by
selecting
Logout
in
the
top
menu
bar.
3.
Stop
the
server
by
using
a
command
prompt
in
the
WebSphere
Application
Server/bin
directory
and
entering
the
following
command:
stopServer
server_name
4.
Restart
the
server
in
a
secure
mode
by
entering
the
following
command:
startServer
server_name
–username
<Server
User
ID>
-password
<Server
User
Password>
5.
Once
the
WebSphere
Application
Server
has
security
enabled,
you
will
not
be
able
to
stop
the
server
again
without
specifying
an
administrative
user
ID
and
password.
To
stop
the
server
once
security
is
enabled,
enter
the
following
command:
stopServer
server_name
-username
<Server
User
ID>
-password
<Server
User
Password>
To
use
multiple
language
encoding
support,
you
must
configure
an
application
server
with
UTF-8
encoding
enabled.
Use
the
following
steps
to
configure
the
application
server
with
UTF-8
encoding
enabled:
1.
Log
in
to
the
WebSphere
Application
Server
administrative
console.
Click
Servers→Application
Servers.
2.
On
the
Application
Server
window,
click
on
the
name
of
the
server
you
want
enabled
for
UTF-8.
3.
On
the
settings
page
for
the
selected
application
server,
click
Process
Definition.
4.
On
the
Process
Definition
window,
click
Java
Virtual
Machine.
5.
On
the
Java
Virtual
Machine
window,
enter
-Dclient.encoding.override=UTF-8
for
Generic
JVM
Arguments
and
click
OK.
6.
Click
Save
on
the
console
task
bar.
7.
Restart
the
application
server.
Accessing
the
Web
Application
from
the
Tivoli
Enterprise
Console
In
order
for
the
Web
Application
to
work
properly,
the
following
requirements
must
be
satisfied:
v
You
must
configure
the
event
console,
as
described
in
the
Web
Applications
chapter
in
the
IBM
Tivoli
Risk
Manager
Installation
Guide.
v
You
must
define
an
incident
view
in
the
database
used
by
Tivoli
Enterprise
Console,
as
described
in
the
Web
Applications
chapter
in
the
IBM
Tivoli
Risk
ManagerInstallation
Guide.
Use
the
Tivoli
Enterprise
Console
to
access
the
Tivoli
Risk
Manager
Web
Application.
The
Tivoli
Enterprise
Console
needs
to
be
configured
to
access
the
Web
Application.
Use
the
following
steps
to
configure
the
Tivoli
Enterprise
Console
so
that
you
can
use
the
Tivoli
Risk
Manager
Web
Application:
1.
On
the
Tivoli
Enterprise
Console,
select
Windows→Configuration.
2.
Click
on
Consoles,
and
select
Console
Preferences.
3.
Click
on
Web
Server
and
then
select
the
Use
Other
Web
Server
radio
button.
110
IBM
Tivoli
Risk
Manager:
Administrator’s
Guide

4.
Enter
the
Server
URL.
The
server
URL
is
the
host
name
where
the
IBM
HTTP
Server
and
WebSphere
are
installed.
5.
Enter
the
Server
Port.
The
server
port
is
the
port
where
the
IBM
HTTP
server
is
listening;
the
default
is
80.
6.
On
Console
Preferences,
expand
Web
Server
and
click
on
Event
Information.
Select
the
Enable
radio
button.
7.
Enter
the
Program
Path.
The
program
path
is
the
path
to
the
cgi-bin
PERL
script:
/riskmgr/cgi-bin/rmweb.pl
Click
OK.
The
Tivoli
Enterprise
Console
server
is
now
configured.
View
the
Tivoli
Risk
Manager
Web
Application
from
the
Tivoli
Enterprise
Console.
From
the
Summary
Chart
View,
you
select
the
Event
Viewer
for
either
RM_Incident
or
RM_IncidentGroup.
Use
the
following
steps
to
view
the
Tivoli
Risk
Manager
Web
Application:
1.
From
the
Tivoli
Risk
Manager
RM_Incident
Event
Viewer,
select
the
incident
to
be
displayed.
2.
Click
the
Information
button.
Alternatively,
you
can
right-click
to
display
a
pop-up
menu
shown
in
Figure
25,
and
then
select
the
Information
option.
Introduction
to
the
Web
Application
Graphical
User
Interface
The
screens
shown
here
are
intended
to
convey
a
general
view
of
the
Tivoli
Risk
Manager
Web
Application
graphical
user
interface.
The
Web
Application
graphical
user
interface
is
made
up
of
three
main
areas,
the
Portfolio,
the
Banner,
and
the
Workspace.
An
example
of
the
Tivoli
Risk
Manager
Web
Application
graphical
user
interface
follows.
Figure
25.
The
Tivoli
Enterprise
Console
Event
Viewer
Shows
Information
about
the
Attack
Chapter
8.
Web
Application
111

The
Portfolio
is
the
area
of
the
screen
where
you
can
find
the
actions
that
you
have
the
proper
authority
to
access;
these
actions
are
Event
Details,
System
Information,
and
Advisor.
The
Banner
area
is
in
the
upper
part
of
the
screen
where
a
product
or
company
logo
can
appear
that
is
specific
to
the
logged
on
user.
The
Workspace
area
is
in
the
middle
of
the
screen,
and
is
where
the
user’s
work
will
appear
for
a
given
action.
The
Workspace
will
also
display
the
″Welcome
page″
by
default
when
a
user
logs
in.
Note:
You
will
not
see
the
″Welcome
page″
or
the
Portfolio
area
if
you
only
have
access
to
System
Information.
The
Tivoli
Risk
Manager
Web
Application
contains
a
robust,
and
dynamic
online
help
system.
You
access
this
system
by
clicking
on
the
question
mark
icon,
″?″,
in
the
upper,
right-hand
corner
of
the
Workspace.
After
clicking
the
icon,
the
system
will
automatically
display
the
online
help
topic
associated
with
the
window
you
are
currently
displaying.
These
topics
will
explain
the
overall
purpose
of
the
window,
and
of
any
entry
fields
or
buttons
the
window
contains.
The
topic
will
also
have
links
to
additional
topics
that
contain
information
about
tasks
that
can
be
accomplished
in
your
current
window,
and
reference
topics
that
help
explain
any
advanced
concepts.
The
help
system
also
contains
a
search
feature,
and
a
topic
index,
that
may
be
used
to
search
for
specific
topics.
The
search
window
can
accept
partial
entries
and
wild
cards.
The
first
screen
you
will
see
when
you
start
the
Tivoli
Risk
Manager
Web
Application
is
the
Sign
On
window.
This
screen
is
used
to
ensure
security,
and
to
determine
what
Web
application
you
will
have
access
to.
This
screen
has
two
entry
fields:
User
Name
and
Password.
These
fields
are
both
″required″
fields.
Throughout
the
entire
Tivoli
Risk
Manager
Web
Application,
all
required
fields
will
Figure
26.
Tivoli
Risk
Manager
Web
Application
Graphical
User
Interface
112
IBM
Tivoli
Risk
Manager:
Administrator’s
Guide

have
an
asterisk
next
to
the
title,
and
the
entry
field
will
have
a
yellow
background.
An
example
of
the
Sign
On
window
follows.
Once
the
Sign
On
window
is
displayed,
you
must
enter
a
valid
user
ID
and
password
in
the
User
Name
and
Password
fields
and
click
OK.
If
the
Sign
On
process
can
not
be
completed,
you
will
see
an
error
message
of
Incorrect
user
ID
or
Password.
Please
see
error
message
appendix
of
the
IBM
Tivoli
Risk
Manager
Problem
Determination
Guide
for
more
information
on
how
to
correct
this
error.
Event
Details
The
Event
Details
application
allows
you
to
view
additional
information
about
the
individual
Tivoli
Risk
Manager
incident
events,
view
a
list
of
sensor
events
that
have
contributed
to
a
Tivoli
Risk
Manager
incident,
and
view
a
list
of
contributing
incidents
for
incident
groups.
There
are
currently
seven
types
of
incidents,
and
seven
types
of
incident
groups.
You
select
the
incident
or
incident
group
that
you
want
more
information
on
in
the
Tivoli
Enterprise
Console,
and
then
click
the
Information
button.
In
order
to
understand
that
information
displayed
by
the
Event
Details
application,
you
must
understand
the
differences
and
relationships
between
sensor
events,
incidents,
and
incident
groups.
A
sensor
event
is
a
single
event
reported
by
a
Tivoli
Risk
Manager
sensor/adapter
to
a
Tivoli
Risk
Manager
server.
It
contains
many
attributes
including:
date/time,
event
class,
originating
host,
severity,
descriptive
message,
and
others.
An
incident
is
an
accumulation
of
sensor
events
occurring
within
a
limited
time
window,
on
the
order
of
5
to
20
minutes.
In
order
for
an
incident
to
be
created,
a
severity
level
threshold
must
be
exceeded
within
the
time
window.
The
severity
level
is
the
accumulation
of
the
severity
levels
in
all
the
contributing
sensor
events.
For
a
sensor
event
to
contribute
to
an
incident,
the
event
must
match
previous
events
on
one
or
more
of
three
attributes:
event
Figure
27.
Sign
On
Window
Chapter
8.
Web
Application
113

category
(or
family),
source
host,
destination
host.
An
incident
has
fewer
attributes
than
a
sensor
event.
These
attributes
include:
begin
window
timestamp,
end
window
timestamp,
aggregated
severity
level,
threshold
severity
level,
list
of
sensors,
list
of
signatures,
list
of
source
hosts,
list
of
destination
hosts,
list
of
categories.
Each
new
incident
also
contributes
to
an
incident
group.
Incidents
that
share
the
same
matching
attributes
with
previous
incidents
are
added
to
the
previously
created
incident
group.
A
new
incident
group
is
created
from
incidents
that
have
no
matching
attributes
in
common
with
previous
incidents.
There
are
five
windows
in
the
Event
Details
application.
The
Event
Details
—
Events
window
is
used
to
create
customized
queries
that
return
specific
sensor
event
information
on
the
sensor
event
that
make
up
an
incident
or
incident
group.
An
example
of
the
Event
Details
—
Events
window
follows.
The
Event
Details
—
Events
Results
window
displays
the
sensor
event
information
that
matches
the
query
created
using
the
Event
Details
-
Events
window
in
a
table.
An
example
of
the
Event
Details
—
Events
Results
window
follows.
Figure
28.
Event
Details
—
Events
Window
114
IBM
Tivoli
Risk
Manager:
Administrator’s
Guide
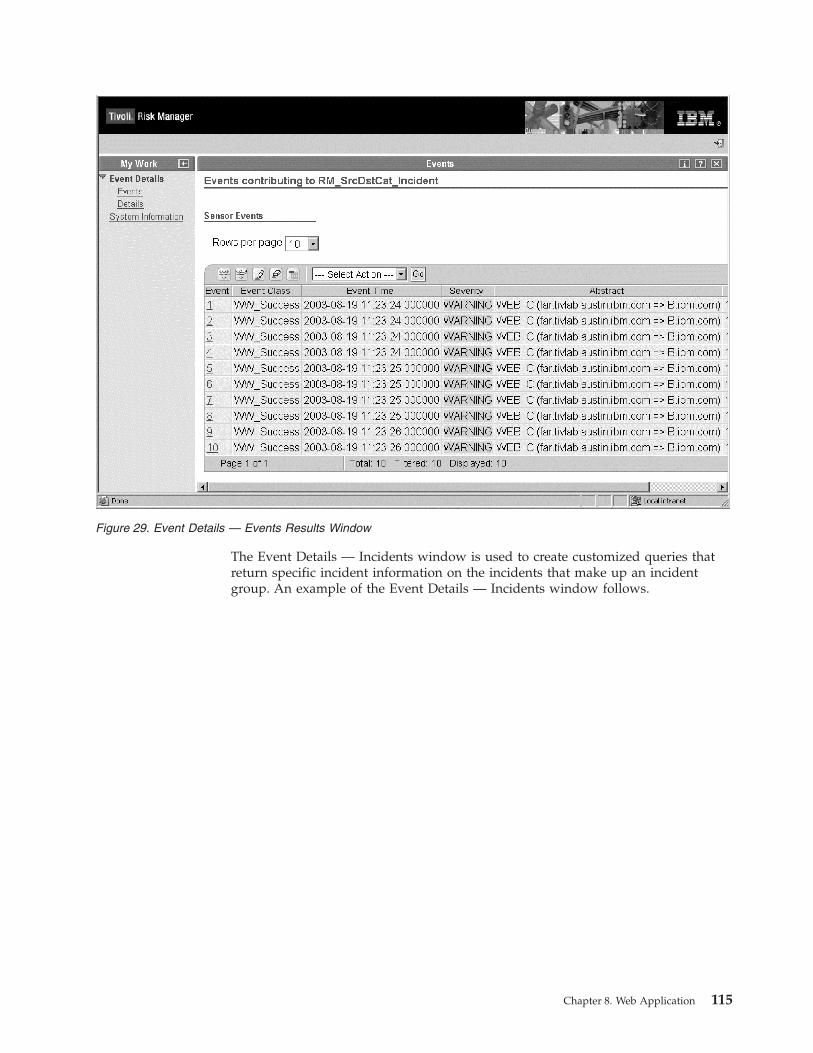
The
Event
Details
—
Incidents
window
is
used
to
create
customized
queries
that
return
specific
incident
information
on
the
incidents
that
make
up
an
incident
group.
An
example
of
the
Event
Details
—
Incidents
window
follows.
Figure
29.
Event
Details
—
Events
Results
Window
Chapter
8.
Web
Application
115
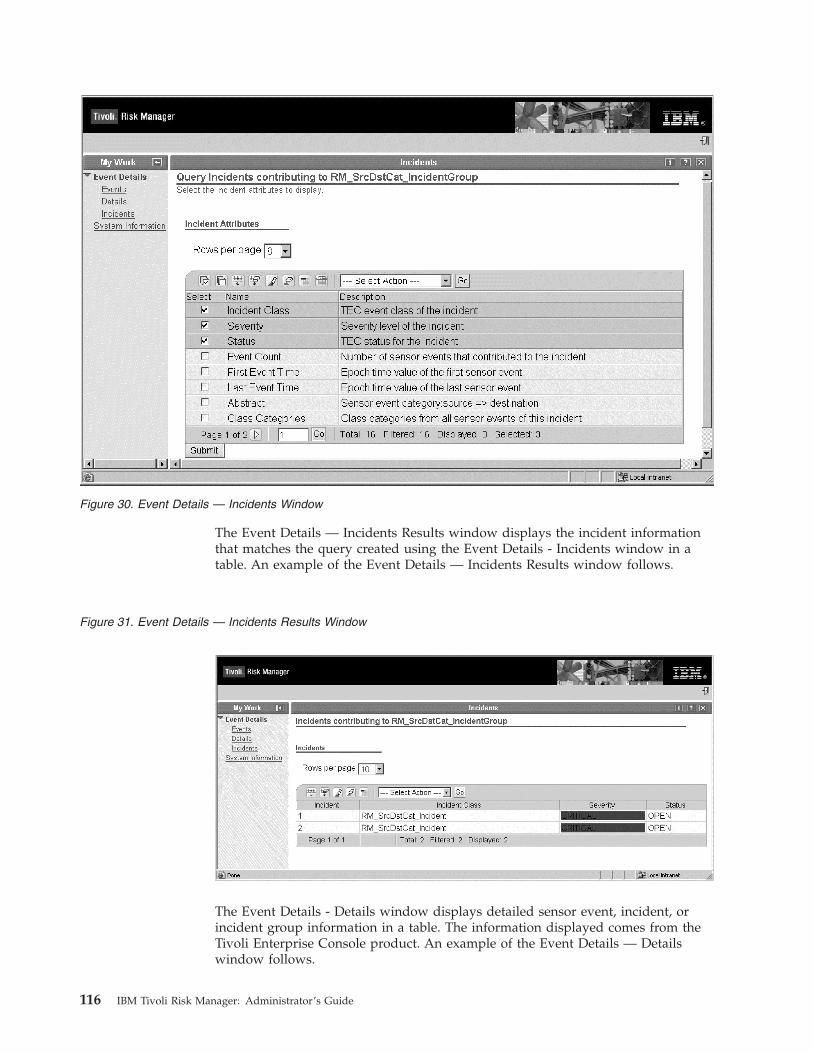
The
Event
Details
—
Incidents
Results
window
displays
the
incident
information
that
matches
the
query
created
using
the
Event
Details
-
Incidents
window
in
a
table.
An
example
of
the
Event
Details
—
Incidents
Results
window
follows.
The
Event
Details
-
Details
window
displays
detailed
sensor
event,
incident,
or
incident
group
information
in
a
table.
The
information
displayed
comes
from
the
Tivoli
Enterprise
Console
product.
An
example
of
the
Event
Details
—
Details
window
follows.
Figure
30.
Event
Details
—
Incidents
Window
Figure
31.
Event
Details
—
Incidents
Results
Window
116
IBM
Tivoli
Risk
Manager:
Administrator’s
Guide
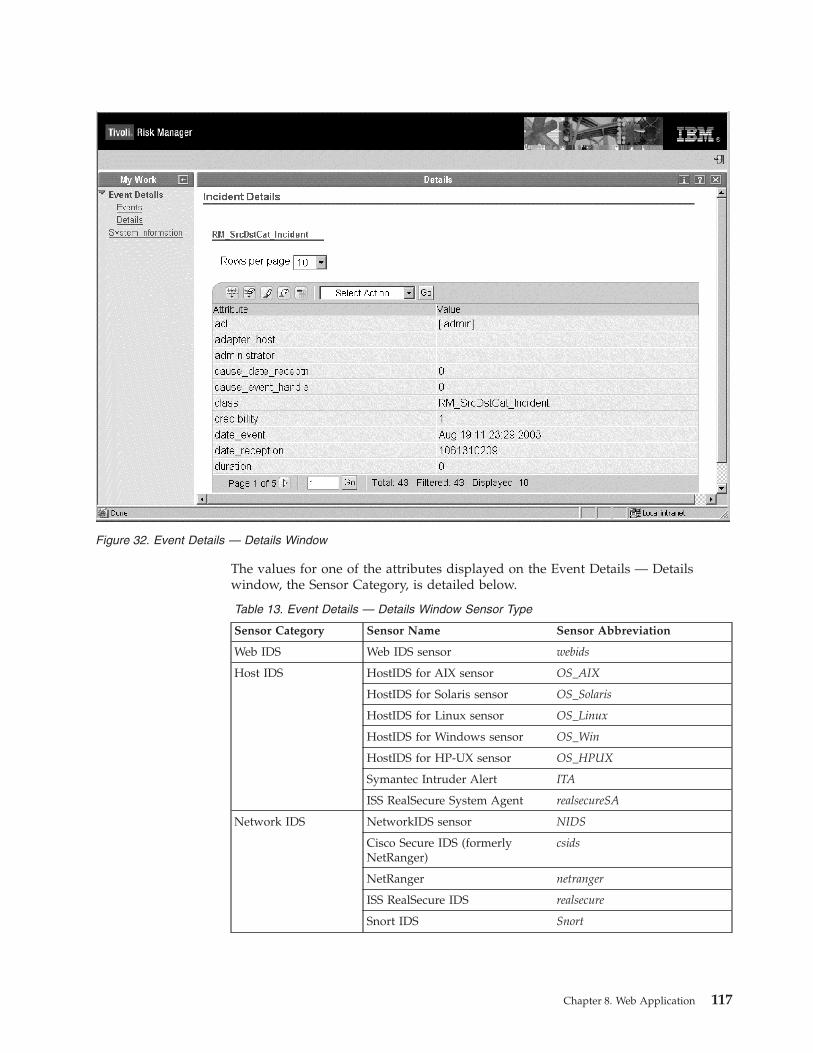
The
values
for
one
of
the
attributes
displayed
on
the
Event
Details
—
Details
window,
the
Sensor
Category,
is
detailed
below.
Table
13.
Event
Details
—
Details
Window
Sensor
Type
Sensor
Category
Sensor
Name
Sensor
Abbreviation
Web
IDS
Web
IDS
sensor
webids
Host
IDS
HostIDS
for
AIX
sensor
OS_AIX
HostIDS
for
Solaris
sensor
OS_Solaris
HostIDS
for
Linux
sensor
OS_Linux
HostIDS
for
Windows
sensor
OS_Win
HostIDS
for
HP-UX
sensor
OS_HPUX
Symantec
Intruder
Alert
ITA
ISS
RealSecure
System
Agent
realsecureSA
Network
IDS
NetworkIDS
sensor
NIDS
Cisco
Secure
IDS
(formerly
NetRanger)
csids
NetRanger
netranger
ISS
RealSecure
IDS
realsecure
Snort
IDS
Snort
Figure
32.
Event
Details
—
Details
Window
Chapter
8.
Web
Application
117

Table
13.
Event
Details
—
Details
Window
Sensor
Type
(continued)
Sensor
Category
Sensor
Name
Sensor
Abbreviation
Firewall
CheckPoint™
Firewall-1®
fw_cpfw
Cisco
Secure
PIX
FW
fw_pix
IBM
SecureWay
Firewall
fw_ibm
CyberGuard
Firewall
fw_CyberGuard
NetScreen
Firewall
fw_NetScreen
Zone
Alarm
Personal
Firewall
fw_zafw
Microsoft
Windows
XP
Firewall
fw_xpfw
Tiny
Personal
Firewall
fw_tpfw
Router
Cisco
Routers
CiscoRouter
AntiVirus
Symantec
AntiVirus
AV_Symantec
McAfee
Alert
Manager
AV_McAfee
Trend
Micro
Control
Manager
AV_TrendMicroControlManager
Wireless
Wireless
Security
Auditor
WSA
Access
Control
IBM
Tivoli
Access
Manager
AM4.1
Privacy
Management
IBM
Tivoli
Privacy
Manager
PM1.1
Database
Oracle
Enterprise
Server
DB_Oracle
IBM
DB2
Universal
Database
DB_MSSQL
Management
Points/Other
ISS
RealSecure
SiteProtector
(Management
Point
for
ISS
RealSecure
Sensors)
ISS
SiteProtector
or
variable
based
on
SENSORNAME
field
Enterasys
Dragon
Server
(Management
Point
for
Enterasys
Dragon
Sensors)
Dragon
OpenSSH
Secure
Shell
openSHH
System
Information
An
incident
is
generated
by
Tivoli
Risk
Manager
correlation
rules
that
are
applied
against
a
stream
of
incoming
sensor
events.
If
a
set
of
sensor
events
arriving
within
a
certain
time
window
have
characteristics
that
match
the
correlation
rules,
an
incident
is
created.
If
the
incident
relates
to
a
previously
created
incident
group,
the
incident
group
is
augmented
with
the
new
information
from
the
new
incident.
Stored
within
the
incident,
or
incident
group,
data
from
the
host
name
or
IP
address
of
the
source
system,
the
destination
system,
and
the
systems
where
the
sensor
is
located.
Some
of
these
host
names
and
IP
addresses
may
actually
be
the
same
system,
or
they
could
also
be
four
different
systems.
System
Information
allows
an
administrator
to
view
specific
information
pertaining
to
these
systems.
It
uses
the
Tivoli
Inventory
database
from
IBM
Tivoli
Configuration
Manager.
System
Information
will
only
work
if
the
Inventory
database
and
Tivoli
Configuration
Manager
are
present.
A
predefined
subset
of
Tivoli
Inventory
database
name
attributes
from
within
these
views
has
been
selected
to
be
displayed
by
System
Information:
computer,
operating
system,
IP
address,
computer
memory,
system
partitions,
installed
software,
native
software,
and
network
card.
For
more
information
on
these
views
see
the
IBM
Tivoli
Configuration
Manager
product
documentation.
118
IBM
Tivoli
Risk
Manager:
Administrator’s
Guide

The
System
Information
application
has
two
windows,
the
System
Information
window
and
the
System
Information
—
Results
window.
The
System
Information
window
allows
you
to
select
a
system
address
category,
and
then
an
IP
address
or
host
name
to
display
Tivoli
Inventory
database
information
about
that
system.
The
System
Information
-
Results
window
displays
the
results
of
your
search
for
system
information.
The
results
will
contain
information
found
in
the
Tivoli
Inventory
database;
if
a
line
is
blank
there
was
no
data
for
that
particular
field.
Figure
33.
System
Information
Window
Chapter
8.
Web
Application
119
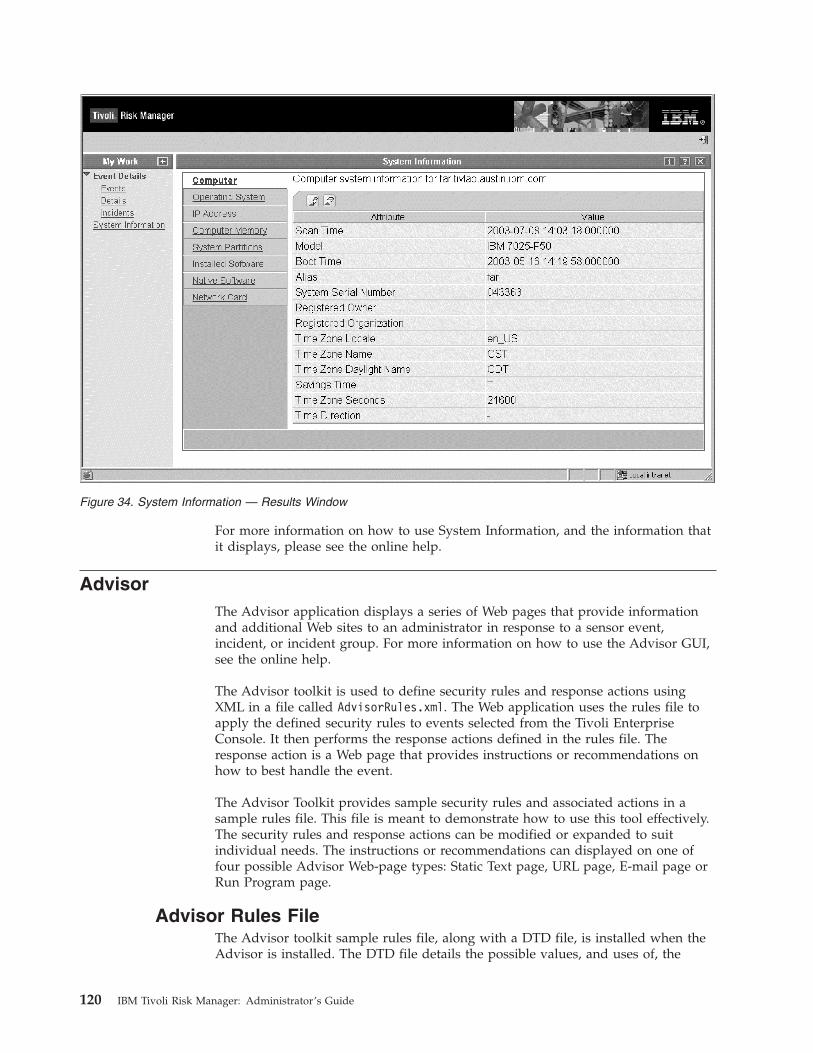
For
more
information
on
how
to
use
System
Information,
and
the
information
that
it
displays,
please
see
the
online
help.
Advisor
The
Advisor
application
displays
a
series
of
Web
pages
that
provide
information
and
additional
Web
sites
to
an
administrator
in
response
to
a
sensor
event,
incident,
or
incident
group.
For
more
information
on
how
to
use
the
Advisor
GUI,
see
the
online
help.
The
Advisor
toolkit
is
used
to
define
security
rules
and
response
actions
using
XML
in
a
file
called
AdvisorRules.xml.
The
Web
application
uses
the
rules
file
to
apply
the
defined
security
rules
to
events
selected
from
the
Tivoli
Enterprise
Console.
It
then
performs
the
response
actions
defined
in
the
rules
file.
The
response
action
is
a
Web
page
that
provides
instructions
or
recommendations
on
how
to
best
handle
the
event.
The
Advisor
Toolkit
provides
sample
security
rules
and
associated
actions
in
a
sample
rules
file.
This
file
is
meant
to
demonstrate
how
to
use
this
tool
effectively.
The
security
rules
and
response
actions
can
be
modified
or
expanded
to
suit
individual
needs.
The
instructions
or
recommendations
can
displayed
on
one
of
four
possible
Advisor
Web-page
types:
Static
Text
page,
URL
page,
page
or
Run
Program
page.
Advisor
Rules
File
The
Advisor
toolkit
sample
rules
file,
along
with
a
DTD
file,
is
installed
when
the
Advisor
is
installed.
The
DTD
file
details
the
possible
values,
and
uses
of,
the
Figure
34.
System
Information
—
Results
Window
120
IBM
Tivoli
Risk
Manager:
Administrator’s
Guide

entries
in
the
rules
file.
The
sample
rules
file
is
enabled
by
default
in
the
Web
application
RmWeb.properties
configuration
file
in
the
AdvisorRulesFile
section;
AdvisorRuleFile=AdvisorRules.xml
To
use
a
different
rules
file,
or
more
than
one
rules
file,
update
the
AdvisorRulesFile
section
of
the
RmWeb.properties
configuration
file.
For
example,
AdvisorRuleFile
=
rule.xml,
rule2.xml,
ruleN.xml
Both
of
these
files
are
located
in
the
same
directory:
<WebSphereinstdir>/IBMTivoliRiskManagerWebApp42.ear/rmwebapp42.war/WEB-INF
where
<WebSphereinstdir>
is
the
WebSphere
Application
Server
installation
location.
There
are
three
main
components
of
the
Advisor
rules
file:
list
of
filters,
list
of
rules,
and
list
of
actions
(Web
pages
to
display).
Each
of
these
three
components
use
unique
IDs
to
differentiate
their
entries
from
other
entries
within
the
same
component,
as
well
as
from
different
components.
List
of
Filters
The
filters
use
logical
operators
in
conjunction
with
a
a
user–defined
set
of
known
event
attribute
values.
It
is
these
attribute
names
and
their
expected
values
that
are
then
compared
to
the
actual
event
attribute
values.
If
an
event
meets
the
criteria
set
forth
by
the
filter,
then
it
will
be
acted
upon
by
the
Advisor
using
the
other
entries
in
the
rules
file.
The
filters
support
the
use
of
AND,
OR,
XOR
and
NOT
logical
operators.
The
event
attributes
used
for
comparison
have
the
following
key
names:
classname
attribute
login
eventtime
The
classname
key
name
is
used
to
define
the
type
of
event,
for
example,
CSIDS_Route_Down.
The
value
used
for
comparison
may
be
an
exact
match,
or
may
describe
the
beginning
text,
end
text,
or
even
a
subset.
The
valid
comparisons
for
classname
are:
startswith
endswith
equals
contains
For
example,
the
classname
value
to
search
for
may
be
startswith
CSIDS
or
contains
Route.
The
attribute
key
name
can
be
any
event
attribute
name,
and
may
use
one
of
the
following
possible
comparisons:
notnull
null
contains
equals
equalsignorecase
startswith
endswith
numeric_equal
Chapter
8.
Web
Application
121

numeric_greater
numeric_less
numeric_greater_equal
numeric_less_equal
The
login
value
is
the
operating
system
log
in
ID,
and
only
an
exact
match
is
permitted.
Theeventtime
is
specified
as
follows:
hours:min:seconds.
The
eventtime
can
occur
before
a
particular
time,
after
a
particular
time,
or
between
the
hours
of
the
start
and
end
time.
These
filter
key
names
can
be
used
for
sensor
events,
incidents,
or
incident
groups.
Attributes
specified
during
agent
correlation
attribute
mapping
are
valid
filter
attributes,
for
example
a
comparison
of
the
rm_CustomerID.
An
example
of
a
filter
with
a
unique
ID
of
″route_down″
that
looks
for
an
exact
match
between
an
event
type
called
CSIDS_Route_Down
and
the
filter’s
classname
of
CSIDS_Route_Down
follows.
<filter
id="route_down">
<AND>
<classname
matchtype="equals"
value="CSIDS_Route_Down"/>
</AND>
</filter>
The
next
example
contains
a
filter
with
an
ID
of
cve_link
that
uses
the
″OR″
and
″AND″
logical
operators
and
the
classname
and
attribute
filter
key
names.
The
cve_link
filter
specifies
that
only
events
originating
from
either
NIDS
or
Web
IDS
are
valid
events.
Any
definitions
residing
between
the
OR
tags
indicate
that
only
one
of
those
filter
definitions
must
be
satisfied
in
order
for
the
OR
to
resolve
to
true.
The
filter
provides
further
comparisons
between
the
AND
tags.
These
comparisons
are
for
specific
event
attributes
keys,
rm_NameType
and
rm_NameID.
These
keys
must
exist
and
the
text
string
stored
for
rm_NameType
must
exactly
match
″CVE″
and
the
value
stored
for
rm_NameID
may
be
anything
value
but
″null″.
<filter
id="cve_link">
<AND>
<OR>
<classname
matchtype="startswith"
value="WW_"/>
<classname
matchtype="startswith"
value="NIDS_"/>
</OR>
<attribute
id="rm_NameType"
matchtype="equals"
value="CVE"/>
<attribute
id="rm_NameID"
matchtype="notnull"/>
</AND>
</filter>
To
demonstrate
the
filtering
feature
for
time
and
for
numeric
comparisons,
the
example
below
defines
the
filter’s
criteria
as
any
critical
event
arriving
between
5
PM
and
9
AM
the
next
morning
with
a
rm_Level
value
greater
than
5.
<filter
id="after_hours>
<AND>
122
IBM
Tivoli
Risk
Manager:
Administrator’s
Guide

<attribute
id="severity"
matchtype="equals"
value="CRITICAL"/>
<eventtime
matchtype="between"
start="17:00:00"
end="09:00:00"/>
<attribute
id="rm_Level"
matchtype="numeric_greater"
value="5.0"/>
</AND>
</filter>
To
illustrate
the
use
of
the
″NOT″
operator,
the
filter
definition
below
specifies
that
an
authorized
user
modifying
the
firewall
policy
would
be
ignored,
but
any
other
user
modifying
the
firewall
policy
would
meet
this
filter’s
criteria.
<filter
id="cpfw_change_policy">
<AND>
<classname
matchtype="equals"
value="CPFW_Control"/>
<NOT>
<attribute
id="rm_SourceHostname"
matchtype="contains"
value="<SysAdminInfo>"/>
</AND>
</filter>
Where
<SysAdminInfo>
is
the
system
administrator
information.
Since
different
members
of
a
team
can
have
different
levels
of
responsibilities
or
authority,
filtering
on
a
log
in
ID
can
be
beneficial.
The
example
below
demonstrates
how
to
selectively
provide
information
to
a
particular
user.
Specifically,
the
filter
is
triggered
if
the
user
is
logged
in
as
Admin5
and
if
the
alert
indicates
that
someone
is
attempting
to
FTP
repeatedly
into
a
system
with
the
incorrect
user
ID.
<filter
id="cpfw_ftp_deny">
<AND>
<classname
matchtype="equals"
value="CPFW_FTP_Deny"/>
<attribute
id="cpfw_additional_info"
matchtype="notnull"/>
<login
id="Admin5"/>
</AND>
</filter>
List
of
Rules
A
rule
defines
one
or
more
filters
whose
criteria
must
be
met
in
order
to
perform
an
action.
As
with
filters,
each
rule
has
a
unique
ID.
The
components
of
a
rule
are
matchfilter
and
withaction.
The
matchfilter
component
provides
either
a
single
filter
ID
or
a
list
of
filter
IDs.
When
a
list
of
filter
IDs
is
provided,
then
each
filter
specified
must
meet
all
criteria
in
order
for
the
associated
action
to
be
performed.
The
withaction
component
defines
the
action
to
be
performed,
that
is
to
display
a
single
Web
page
or
a
list
of
Web
pages.
Below
is
an
example
of
a
rule
called
cve_recommendations,
that
defines
a
single
filter
ID
called
cve_link.
When
the
cve_link
filter
criteria
is
met,
the
action
ID
of
goto_cve_site
causes
a
single
Web
page
to
be
displayed.
Chapter
8.
Web
Application
123

<rule
id="cve_recommendations">
<matchfilter
id="cve_link"/>
<withaction
id="goto_cve_site"/>
</rule>
The
next
example
rule
demonstrates
the
use
of
multiple
filters
and
multiple
actions.
Note
that
multiple
filters,
or
multiple
actions,
are
separated
from
each
other
by
a
comma.
<rule
id="crit_after_hours">
<matchfilter
id="after_house,
cpfw_change_policy"/>
<withaction
id="notify_after_hours,
restore_firewall_policy"/>
</rule>
List
of
Actions
An
action
is
the
display
of
a
Web
page.
There
are
four
predefined
templates:
the
Static
Text
page,
the
URL
page,
the
page,
or
the
Run
Program
page.
While
the
same
Web
page
can
be
specified
for
multiple
rules,
only
one
copy
of
a
specific
Web
page
will
be
displayed
in
the
Web
application
task
list
even
if
there
are
multiple
rules
specifying
that
same
Web
page.
In
other
words,
if
two
rules
specify
the
Web
page
to
contact
XYZ,
and
both
of
those
rules
are
triggered
at
the
same
time,
only
one
Web
page
to
contact
XYZ
will
be
listed
in
the
Web
application
task
list.
However,
it
is
possible
to
have
more
than
one
Web
page
listed
in
the
Web
application
task
list
if
the
action
IDs
for
those
Web
pages
are
different.
For
example,
one
Web
page
may
be
to
contact
XYZ,
and
another
Web
page
would
be
to
open
a
trouble
ticket.
The
definition
of
these
two
Web
pages
would
require
two
different
action
IDs,
and
would
therefore
be
considered
unique;
both
Web
pages
could
be
simultaneously
listed
in
the
Web
application
task
list.
The
actions
specify
how
to
display
the
information
provided
in
the
predefined
template
Web
pages.
Each
action
has
a
unique
ID.
Each
of
the
four
predefined
template
Web
pages
can
display
a
title,
titleLayout
and
content
region
of
the
Web
page.
The
title
is
the
text
displayed
on
both
the
title
bar
and
the
portfolio
region.
See
Figure
26
on
page
112
for
an
example
of
the
portfolio
region.
The
titleLayout
is
the
text
on
the
page
that
serves
as
the
title
for
the
content
region.
The
content
area
provides
a
detailed
message
of
what
a
user
should
do.
For
example
in
the
image
below,
the
title
is
View
CVE
Recommendations,
the
titleLayout
is
set
to
Click
on
the
link
below
to
view
more
details
about
the
alert,
and
the
content
region
is
set
to
a
hyperlink
with
the
corresponding
text
of
CVE
Link
124
IBM
Tivoli
Risk
Manager:
Administrator’s
Guide
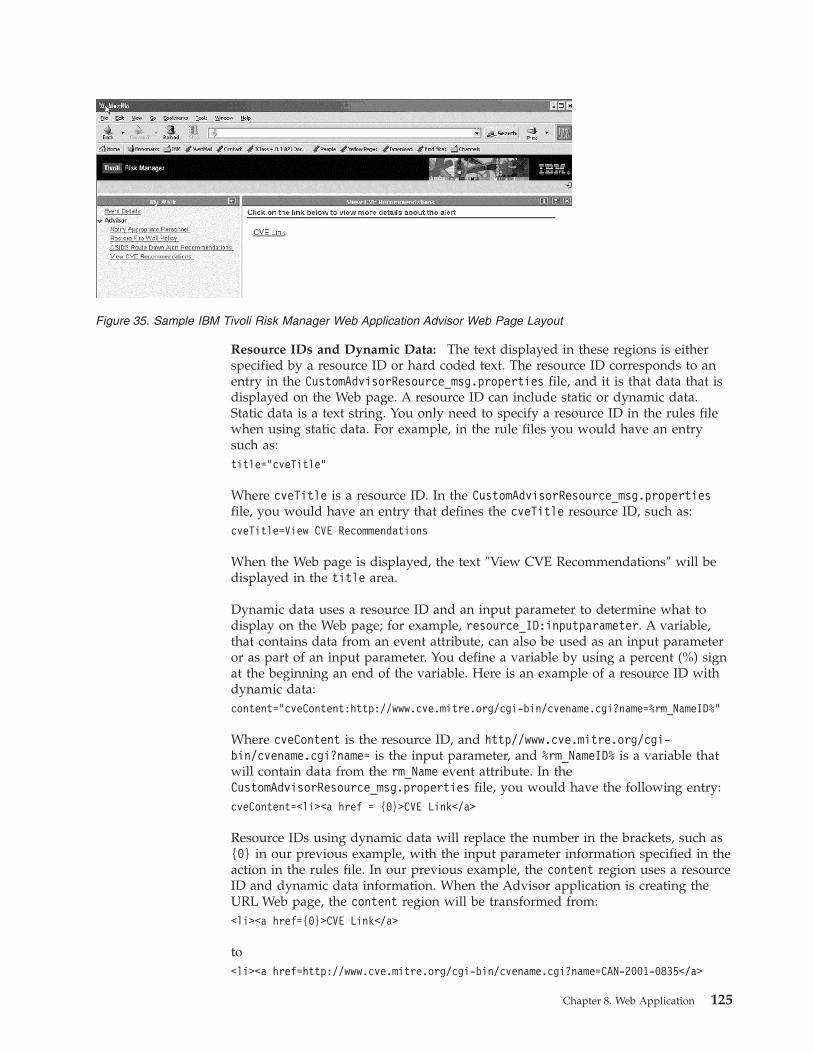
Resource
IDs
and
Dynamic
Data:
The
text
displayed
in
these
regions
is
either
specified
by
a
resource
ID
or
hard
coded
text.
The
resource
ID
corresponds
to
an
entry
in
the
CustomAdvisorResource_msg.properties
file,
and
it
is
that
data
that
is
displayed
on
the
Web
page.
A
resource
ID
can
include
static
or
dynamic
data.
Static
data
is
a
text
string.
You
only
need
to
specify
a
resource
ID
in
the
rules
file
when
using
static
data.
For
example,
in
the
rule
files
you
would
have
an
entry
such
as:
title="cveTitle"
Where
cveTitle
is
a
resource
ID.
In
the
CustomAdvisorResource_msg.properties
file,
you
would
have
an
entry
that
defines
the
cveTitle
resource
ID,
such
as:
cveTitle=View
CVE
Recommendations
When
the
Web
page
is
displayed,
the
text
″View
CVE
Recommendations″
will
be
displayed
in
the
title
area.
Dynamic
data
uses
a
resource
ID
and
an
input
parameter
to
determine
what
to
display
on
the
Web
page;
for
example,
resource_ID:inputparameter.
A
variable,
that
contains
data
from
an
event
attribute,
can
also
be
used
as
an
input
parameter
or
as
part
of
an
input
parameter.
You
define
a
variable
by
using
a
percent
(%)
sign
at
the
beginning
an
end
of
the
variable.
Here
is
an
example
of
a
resource
ID
with
dynamic
data:
content="cveContent:http://www.cve.mitre.org/cgi-bin/cvename.cgi?name=%rm_NameID%"
Where
cveContent
is
the
resource
ID,
and
http//www.cve.mitre.org/cgi-bin/cvename.cgi?name=
is
the
input
parameter,
and
%rm_NameID%
is
a
variable
that
will
contain
data
from
the
rm_Name
event
attribute.
In
the
CustomAdvisorResource_msg.properties
file,
you
would
have
the
following
entry:
cveContent=<li><a
href
=
{0}>CVE
Link</a>
Resource
IDs
using
dynamic
data
will
replace
the
number
in
the
brackets,
such
as
{0}
in
our
previous
example,
with
the
input
parameter
information
specified
in
the
action
in
the
rules
file.
In
our
previous
example,
the
content
region
uses
a
resource
ID
and
dynamic
data
information.
When
the
Advisor
application
is
creating
the
URL
Web
page,
the
content
region
will
be
transformed
from:
<li><a
href={0}>CVE
Link</a>
to
<li><a
href=http://www.cve.mitre.org/cgi-bin/cvename.cgi?name=CAN-2001-0835</a>
Figure
35.
Sample
IBM
Tivoli
Risk
Manager
Web
Application
Advisor
Web
Page
Layout
Chapter
8.
Web
Application
125

The
HTML
tag
of
<li>
is
a
bulleted
list
character,
and
the
HTML
anchor
tag
<a
href={0}>CVE
Link</a>
represents
hyperlink
information.
The
{0}
is
a
placeholder
for
dynamic
data,
and
is
usually
replaced
with
a
URL
address.
The
action
in
our
example
specifies
that
the{0}
should
be
replaced
with
http://www.cve.mitre.org/cgi-bin/cvename.cgi?name=%rm_NameID%.
The
event
attribute
key
name
of
%rm_NameID%
is
replaced
with
that
event
attribute’s
value.
For
example,
if
the
rm_NameID
event
attribute
contains
the
value
″CAN-2001-0835,″
then
the
hyperlink
provided
on
the
URL
Web
page
would
be
displayed
as
http://www.cve.mitre.org/cgi-bin/cvename.cgi?name=CAN-2001-0835.
When
a
user
clicks
on
the
this
hyperlink,
they
would
be
redirected
to
the
CVE
Web
page
that
describes
the
CAN-2001-0835
vulnerability.
While
the
previous
example
of
dynamic
data
only
lists
one
input
parameter,
multiple
input
parameters
can
be
used
and
they
are
separated
from
each
other
by
a
colon.
For
example,
a
resource
ID
that
uses
multiple
dynamically
obtained
input
values
would
be
expressed
as
ResourceID:inputParm1:inputParm2:inputParmN.
The
corresponding
CustomAdvisorResource_msg.properties
file
would
have
an
entry
of
ResourceID=Message
text
containing
three
input
parameters
of
{0},
{1}
and
{2}.
The
first
input
parameter
would
be
used
in
place
of
{0},
the
second
in
place
of
{1},
and
the
third
in
place
of
{2}
The
following
is
an
example
of
an
action
that
one
could
define
in
the
rules
file.
The
example
defines
an
URL
Web
page,
and
uses
resource
IDs
defined
in
the
CustomAdvisorResource_msg.properties
file
to
specify
the
text
to
display.
The
UrlPage
action
uniquely
identified
as
goto_cve_site
below
uses
resource
IDs
with
no
dynamic
data
for
the
title
and
titleLayout,
and
uses
a
resource
ID
to
display
dynamic
data
for
the
content
region.
<urlPage
id="goto_cve_site"
title="cveTitle"
titleLayout="cveTitleLayout"
content="cveContent:http//www.cve.mitre.org/cgi-bin/cvename.cgi?name=%rm_NameID%"
Prioritizing
Web
Pages
in
the
Task
List:
Since
more
than
one
type
of
Web
page
can
exist
in
the
task
list,
a
means
to
prioritize
the
Web
page
order
is
needed.
The
Advisor
toolkit
provides
the
capability
to
prioritize
multiple
Web
pages
in
the
Web
application
task
list.
In
order
for
the
Advisor
application
to
accurately
prioritize
the
Web
pages,
the
Advisor
application
must
know
the
lowest
and
highest
values
in
order
to
determine
if
the
Web
pages
should
be
ordered
in
ascending
or
descending
order.
The
definitions
for
highest
and
lowest
priority
default
values
are
specified
in
the
Web
application
configuration
file,
RmWeb.properties.
For
example:
AdvisorHighestTitlePriority
=
1
AdvisorLowestTitlePriority
=
100
AdvisorDefaultTitlePriority
=
50
The
actions
provide
a
key
name
called
titlePriority
that
accepts
a
numeric
value
that
is
used
to
define
the
priority
value.
Once
the
list
of
Web
pages
to
display
in
the
task
list
has
been
identified,
the
titlePriority
settings
will
determine
the
listing
order
for
those
Web
pages
in
the
task
list.
If
the
titlePriority
information
is
missing
from
an
action
definition,
then
the
default
priority
value
is
used.
If
the
Web
application
configuration
file
does
not
set
a
default
value
but
instead
sets
the
highest
and
lowest
priority
value,
then
the
default
value
will
be
the
mean
of
the
highest
and
lowest
values.
If
either
the
highest
priority
or
lowest
priority
value
is
missing
then
the
titlePriority
feature
is
disabled,
and
then
any
value
specified
for
an
action’s
titlePriority
is
ignored.
126
IBM
Tivoli
Risk
Manager:
Administrator’s
Guide

The
following
is
an
example
of
the
user
specifying
the
priority
ranges
in
the
configuration
file
and
then
implementing
those
priority
levels
in
the
rules
file.
You
would
make
the
following
entries
in
the
RmWeb.properties
file:
AdvisorHighestTitlePriority
=
1
AdvisorLowestTitlePriority
=
100
AdvisorDefaultTitlePriority
=
50.0
You
would
make
the
following
entries
in
the
AdvisorRules.xml
in
the
action
definition:
<staticTextPage
id="1"
title="myTitle"
titleLayout="myDescription"
content="myDetails"
titlePriority="25"
/>
<staticTextPage
id="2"
title="myTitle2"
titleLayout="myDescription2"
content="myDetails2"
titlePriority="100"
/>
<staticTextPage
id="3"
title="myTitle3"
titleLayout="myDescription3"
content="myDetails3"
/>
<staticTextPage
id="4"
title="myTitle4"
titleLayout="myDescription4"
content="myDetails4"
titlePriority="75"
/>
If
the
four
Web
pages
defined
above
were
to
be
listed
in
the
task
list,
the
order
would
be
1,
3,
4
and
2.
Since
the
highest
priority
level
was
specified
in
the
RmWeb.properties
file
as
the
value
1,
and
the
lowest
priority
level
was
specified
as
100,
the
Advisor
application
organizes
the
order
of
the
Web
pages
in
ascending
order.
Since
ID
3
did
not
specify
a
titlePriority,
then
the
default
priority
value
of
50
specified
in
the
RmWeb.properties
file
was
used
as
the
titlePriority
value
for
that
particular
Web
page.
Note:
This
function
is
only
available
in
the
Advisor
application.
Customizing
Web
Pages:
The
Run
Program
and
pages
have
entry
fields
that
can
be
customized
using
the
action
definition.
The
Run
Program
Web
page
has
a
Command
entry
field
used
to
enter
the
program
to
be
run.
It
also
has
an
Environment
settings
entry
field
for
any
required
program
environment
values.
Use
the
program
value
of
the
action
definition
to
customize
the
Command
entry
field.
Use
the
programEnv
value
to
customize
the
Environment
settings
entry
field
of
the
action
definition.
The
Web
page
has
entry
fields
for
a
list
of
recipients,
(To,
CC,
and
BCC),
an
subject
line,
and
a
text
area
for
the
body
of
the
e-mail.
These
entry
fields
are
can
be
customized
to
provide
the
user
with
default
values.
Use
the
sendTo
value
of
the
action
definition
to
customize
the
To
entry
field.
Use
the
sendCC
value
of
the
action
definition
to
customize
the
CC
entry
field.
Use
the
sendBCC
value
of
the
action
definition
to
customize
the
BCC
entry
field.
Use
the
sendSubject
value
of
the
action
definition
to
customize
the
Subject
entry
field.
Use
the
sendBody
value
of
the
action
definition
to
customize
the
Body
Chapter
8.
Web
Application
127

text
area.
The
one
entry
field
that
can
not
be
customized
is
the
From
entry
field.
The
value
of
this
field
must
be
entered
manually
by
the
user
in
the
From
entry
field
when
sending
an
E-mail.
If
default
values
for
these
entry
fields
are
not
defined
in
the
action,
then
when
the
Web
page
is
created
those
entry
fields
will
be
blank.
If
a
user
changes
the
value
for
an
entry
field,
the
default
entry
field
value
specified
in
the
rules
file
can
be
restored
by
pressing
the
Reset
button.
See
the
“Run
Program
Web
Page”
on
page
133
and
Web
Page”
on
page
136
sections
of
this
chapter
for
further
information
on
how
to
customize
these
Web
pages.
Special
Characters:
If
a
text
string
displayed
on
the
Web
page
requires
a
special
character
like
double
quotes,
then
the
single
quote
XML
tag
(")
must
be
used
at
the
beginning
and
end
of
the
hard
coded
string.
The
double
quoted
string
displayed
on
the
Web
page
is
now
embedded
in
hard
coded
string.
For
example,
if
the
Web
page
needs
to
display
the
text:
My
"friend"
Bob
will
be
joining
us.
This
text
would
be
represented
in
the
action
definition
as
the
following:
content="'My
"friend"
Bob
will
be
joining
us.'"
Some
characters
have
specific
meaning
in
an
XML
file,
and
therefore
they
must
be
replaced
with
the
XML
tag
equivalent
in
order
to
avoid
XML
parsing
errors.
Below
is
a
list
of
XML
tags
that
required
an
XML
tag
equivalent:
XML
Tag
Equivalent
Character
&
&
<
<
>
>
&apos:
’
"
″
Using
Non-English
Text
in
Web
Pages:
To
provide
Web
pages
in
various
languages,
you
are
required
to
use
resource
IDs
and
corresponding
text
strings
in
the
CustomAdvisorResource_msg.properties
file.
Text
that
has
been
created
locally
for
display
on
the
Web
pages
will
be
stored
in
a
default
resource
file
called
CustomAdvisorResource_msg.properties.
To
use
translated
versions
of
this
file,
the
translated
text
will
reside
in
resource
files
with
the
naming
convention
of
CustomAdvisorResource_msg_xx.properties
where
xx
is
the
language
and/or
in
resource
files
with
the
naming
convention
of
CustomerAdvisorResource_msg_xx_yy.properties
where
xx
is
the
language
and
yy
is
the
country.
The
following
is
a
list
language
values:
v
de
v
es
v
fr
v
it
v
ja
v
ko
v
zh_CN
v
zh_TW
v
pt_BR
128
IBM
Tivoli
Risk
Manager:
Administrator’s
Guide

These
files
are
located
in
the
IBMTivoliRiskManagerWebApp42.ear\rmwebapp42.war
directory.
A
sample
CustomAdvisorResource_msg.properties
file
is
shipped
with
the
product,
and
is
placed
in
this
directory.
The
resource
IDs
in
the
sample
properties
file
will
correspond
to
resource
IDs
specified
in
the
sample
AdvisorRules.xml
file,
thus
providing
a
way
to
keep
the
rules
logic
separate
from
the
translatable
text
and
providing
a
concrete
example.
When
multiple
message
properties
files
exist,
the
country
and
language
of
the
client
browser
will
be
used
to
determine
what
file
should
be
used
for
translated
text.
First,
a
search
attempting
to
match
the
client
browser’s
country
and
language
setting
occurs
and
if
a
matching
CustomAdvisorResource_msg_xx_yy.properties
file
is
found,
then
the
resource
IDs
specified
for
the
action
will
be
extracted
from
this
file.
If
the
client
browser’s
country
language
specification
does
not
match
the
list
of
properties
files,
then
a
search
for
a
less
stringent
match
will
occur.
This
next
search
attempts
to
match
the
client
browser’s
language
setting,
and
if
the
matching
CustomAdvisorResource_msg_xx.properties
file
is
found,
then
the
resource
IDs
specified
in
this
file
will
be
extracted.
However,
if
client
browser’s
language
does
not
match
any
of
the
properties
file,
then
the
default
message
file
will
be
used.
Static
Text
Web
Page
The
Static
Text
Web
page
is
one
of
the
four
predefined
Web
page
templates.
The
static
text
information
will
either
be
hard
coded
text
that
is
specified
in
an
action
definition
in
the
Advisor
rules
file,
or
it
will
be
obtained
from
a
resource
file
called
CustomAdvisorResource_msg.properties.
One
or
more
resource
IDs
can
be
listed
for
the
static
text
Web
page.
A
resource
ID
may
contain
a
single
sentence
or
a
complete
paragraph.
You
can
also
insert
information
from
an
event
into
the
text;
for
example;
shutdownPort=Shut
down
the
port
for
{0}.
Note
that
if
the
text
associated
with
the
resource
ID
expands
more
than
one
line,
add
a
forward
slash
(
\
)
to
indicate
that
the
text
continues
to
another
line.
The
{0}
will
be
replaced
by
the
value
stored
in
the
attribute,
such
as
rm_DestinationToken.
It
is
also
possible
to
use
HTML
tags
and
Java
script
to
customize
the
content
region
of
the
Static
Text
Web
page.
Here
is
an
example
of
using
an
event
type
attribute
for
filter
criteria,
and
then
using
an
action
to
generate
a
Static
Text
Web
page
that
contains
procedures
to
perform
in
response
to
the
alert
information.
The
Advisor
rules
file
has
a
filter
definition
called
route_down
that
looks
for
an
event
type
of
CSIDS_Route_Down.
The
filter
entry
in
the
rules
file
is:
<filter
id"route_down">
<AND>
<classname
matchtype="equals"
value="CSIDS_Route_Down"/>
</AND>
</filter>
The
rule
entry
csids_route_down_recommendationsspecifies
a
single
filter
ID
of
route_down,
and
that
when
that
filter
definition
is
satisfied
then
the
two
Web
pages
specified
under
withaction
will
be
generated
and
displayed
on
the
browser.
<rule
id="csids_route_down_recommendations">
<matchfilter
id="route_down"/>
<withaction
id="view_route_down_rec,notify_route_down_rec"/>
</rule>
Chapter
8.
Web
Application
129

The
action
definitions
listed
above,
view_route_down_rec
and
notify_route_down_rec,
indicate
that
two
Web
pages
will
be
displayed.
The
view_route_down_recaction
is
an
example
of
a
Static
Text
Web
page.
The
notify_route_down_rec
is
an
example
of
an
Web
page.
Since
this
section
is
focusing
on
Static
Text
Web
pages,
only
the
first
action
will
be
explained
in
this
section.
This
example
also
demonstrates
the
use
of
hard
coded
text
instead
of
resource
IDs
for
the
title,
titleLayout,
and
content
regions
of
the
Web
page.
<staticTextPage
id"view_route_down_rec"
title=""CSIDS
Route
Down
Alert
Recommendations""
titleLayout="%rm_Description%"
content=""The
alert
was
triggered
at
%rm_Timestampt%
from
sensor
id
%rm_SensorPID%
perform
procedures
A,
B,
and
C""
/>
The
Web
page
would
look
like
the
following:
If
you
want
to
format
the
data
using
HTML
tags
below
is
an
example
of
the
text
definitions.
While
it
is
possible
to
hard
code
this
information
into
the
rules
file,
the
use
of
the
XML
tags
instead
of
the
quotation
mark
(″),
<and
>
symbols
can
make
the
example
hard
to
understand.
The
action
definition
for
content
would
be:
content="HtmlTable:%rm_Timestamp%:%rm_SensorPID%"
The
CustomAdvisorResource_msg_.properties
file
would
define
HtmlTable
as:
HtmlTable=<table
BORDER="1"
CELLPADDING="3"
CELLSPACING="0">\
<tr
BGCOLOR="#CCCCFF"
CLASS="TableHeadingColor">\
<td
COLSPAN=2><b>Alert
Information</b></td>\
<tr><td><b>Time</b></td><td>
{0}
</td></tr>\
<tr><td><b>Sensor
ID</b><td></td>
{1}
</td></tr>\
<tr><td><b>Procedures
to
perform</b></td><td>A,
B,
C</td></tr></table>\
The
″\″
at
the
end
of
the
line
indicates
that
the
definition
continues
to
the
next
line.
The
Web
page
would
look
like
the
following:
Figure
36.
Static
Text
Web
Page
Example
—
No
Formatting
130
IBM
Tivoli
Risk
Manager:
Administrator’s
Guide

You
can
also
use
Java
script
to
customize
the
content
region.
For
example,
to
display
a
pop-up
window
and
a
message
on
the
Web
page,
set
the
resource
value
to:
JSexample=<SCRIPT
LANGUAGE="javascript">\
alert
("Hi
this
is
an
example
of
using
Java
script");\
document.write("Use
Java
script
to
write
this");</SCRIPT>
URL
Web
Page
The
Advisor
toolkit
provides
a
way
for
you
to
display
a
Web
page
from
another
Web
site
in
the
Web
application
window,
or
use
the
Web
browser’s
option
to
open
it
in
a
separate
window.
Here
is
an
example
of
using
the
event
attribute
values
rm_NameID
and
rm_NameType
to
generate
the
URL
that
will
direct
the
user
to
the
Common
Vulnerabilities
and
Exposures
(CVE)
Web
page.
The
Web
page
will
display
a
description
and
recommendations
for
the
suspicious
event
related
to
the
event
attribute
values.
Let’s
assume
that
rm_NameID=CAN-2001-0835
and
rm_NameType=CVE.
The
URL
to
direct
the
user
would
then
be
http://www.cve.mitre.org/cgi-bin/cvename.cgi?name=CAN-2001-0835.
The
filter
for
this
URL
page
definition
will
be
satisfied
if
an
event
originated
from
either
Web
IDS
or
NIDs,
and
the
event
information
contains
a
CVE
ID,
for
example:
<filter
id="cve_link">
<AND>
<OR>
<classname
matchtype="startswith"
value="WW_"/>
<classname
matchtype="startswith"
value="NIDS_"/>
</OR>
<attribute
id="rm_NameType"
matchtype="equals"
value="CVE"/>
<attribute
id="rm_NameID"
matchtype="notnull"/>
</AND>
</filter>
Figure
37.
Static
Web
Page
Example
—
Formatted
Chapter
8.
Web
Application
131

The
rule
for
this
URL
page
definition
states
that
when
the
criteria
for
the
filter
cve_link
is
met
then
the
Web
page
defined
for
cve_recommendations
is
displayed.
<rule
id="cve_recommendations">
<matchfilter
id="cve_link"/>
<withaction
id="goto_cve_site"/>
</rule>
The
action
for
this
URL
page
definition
states
that
a
URL
Web
page
template
should
be
loaded
with
the
following
information:
<urlPage
id="goto_cve_site"
title="cveTitle"
titleLayout="cveTitleLayout"
content="cveContent:http://www.cve.mitre.org/cgi-bin/cvename.cgi?name=%rm_NameID%"
/>
The
resource
IDs
cveTitle,
cveTitleLayout,
and
cveContent
are
defined
in
the
CustomAdvisorResource_msg.properties
file
as:
cveTitle=View
CVE
Recommendations
cveTitleLayout=Click
on
the
link
below
to
view
more
details
about
the
alert
cveContent=<li><a
href={0}>CVE
Link</a>
The
Web
page
would
look
like
the
following:
After
selecting
the
CVE
Link,
the
Web
page
would
look
like
the
following:
Figure
38.
URL
Web
Page
Example
—
Link
132
IBM
Tivoli
Risk
Manager:
Administrator’s
Guide
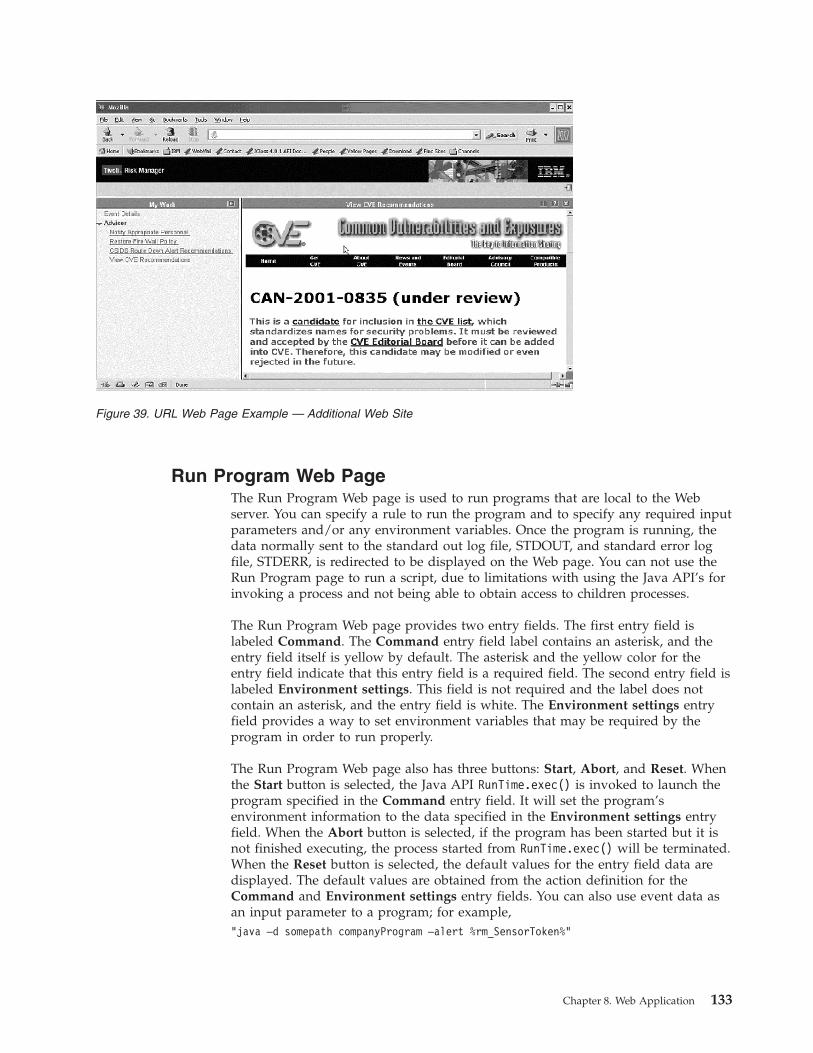
Run
Program
Web
Page
The
Run
Program
Web
page
is
used
to
run
programs
that
are
local
to
the
Web
server.
You
can
specify
a
rule
to
run
the
program
and
to
specify
any
required
input
parameters
and/or
any
environment
variables.
Once
the
program
is
running,
the
data
normally
sent
to
the
standard
out
log
file,
STDOUT,
and
standard
error
log
file,
STDERR,
is
redirected
to
be
displayed
on
the
Web
page.
You
can
not
use
the
Run
Program
page
to
run
a
script,
due
to
limitations
with
using
the
Java
API’s
for
invoking
a
process
and
not
being
able
to
obtain
access
to
children
processes.
The
Run
Program
Web
page
provides
two
entry
fields.
The
first
entry
field
is
labeled
Command.
The
Command
entry
field
label
contains
an
asterisk,
and
the
entry
field
itself
is
yellow
by
default.
The
asterisk
and
the
yellow
color
for
the
entry
field
indicate
that
this
entry
field
is
a
required
field.
The
second
entry
field
is
labeled
Environment
settings.
This
field
is
not
required
and
the
label
does
not
contain
an
asterisk,
and
the
entry
field
is
white.
The
Environment
settings
entry
field
provides
a
way
to
set
environment
variables
that
may
be
required
by
the
program
in
order
to
run
properly.
The
Run
Program
Web
page
also
has
three
buttons:
Start,
Abort,
and
Reset.
When
the
Start
button
is
selected,
the
Java
API
RunTime.exec()
is
invoked
to
launch
the
program
specified
in
the
Command
entry
field.
It
will
set
the
program’s
environment
information
to
the
data
specified
in
the
Environment
settings
entry
field.
When
the
Abort
button
is
selected,
if
the
program
has
been
started
but
it
is
not
finished
executing,
the
process
started
from
RunTime.exec()
will
be
terminated.
When
the
Reset
button
is
selected,
the
default
values
for
the
entry
field
data
are
displayed.
The
default
values
are
obtained
from
the
action
definition
for
the
Command
and
Environment
settings
entry
fields.
You
can
also
use
event
data
as
an
input
parameter
to
a
program;
for
example,
"java
–d
somepath
companyProgram
–alert
%rm_SensorToken%"
Figure
39.
URL
Web
Page
Example
—
Additional
Web
Site
Chapter
8.
Web
Application
133

The
%rm_SensorToken%
variable
will
be
replaced
by
the
actual
value
stored
in
the
attribute
prior
to
invoking
RunTime.exec().
Here
is
an
example
of
a
Run
Program
Web
page
that
specifies
that
a
Java
program
located
on
the
Web
Server
is
to
run
in
response
to
the
alert
information
obtained
from
the
event.
The
Command
entry
field
will
be
preset
to
a
Java
program
called
ourProgramOnWebSphereServer
and
the
program’s
classpath
is
preset
to
-cp
c:\ourCompany.jar.
The
Run
Program
action
definition
also
provides
two
environment
variables,
login
ID
and
a
text
string,
that
are
required
by
the
Java
program
to
run
properly.
The
filter
used
to
display
the
Run
Program
page
will
have
an
ID
of
cpfw_change_policy.
This
filter
determines
whether
a
person
without
the
proper
authority
has
modified
the
firewall
policy.
For
example:
<filter
id="cpfw_change_policy">
<AND>
<classname
matchtype="equals"
value="CPFW_Control"/>
<NOT>
<attribute
id="rm_SourceHostname"
matchtype="contains"
value=".sys3Admin.ourcompany.com"/>
</NOT>
</AND>
</filter>
The
rule
for
the
Run
Program
page
will
have
an
ID
of
restore_policy.
This
rule
specifies
that
an
action
definition
for
the
action
ID
of
restore_firewall_policy
should
be
displayed
when
the
filter
ID
of
cpfw_change_policy
is
met.
For
example:
<rule
id="restore_policy">
<matchfilter
id="cpfw_change_policy"/>
<withaction
id="restore_firewall_policy"/>
</rule>
The
action
for
the
Run
Program
page
will
have
an
ID
of
restore_firewall_policy.
This
action
customizes
the
title,
titleLayout
and
content
regions
of
the
Run
Program
Web
page.
In
addition,
the
two
entry
fields
displayed
on
the
Web
page
are
also
customized.
The
Command
entry
field
displays
the
data
specified
for
the
action
definition’s
program
value.
The
Environment
settings
entry
field
displays
to
the
data
specified
for
the
action
definition’s
programEnv
value.
For
example:
<runProgramPage
id="restore_firewall_policy"
title="restoreFireWallPolicy"
titleLayout="changeDetected"
content="invokeProgram"
program=""java
-cp
c:\ourCompany.jar
ourProgramOnWebSphereServer""
programEnv="&aps;userID=%login%
preference="fast
cars"'"
/>
The
corresponding
resource
IDs
for
restoreFireWallPolicy,
changeDetected,
and
invokeProgram
are
defined
in
the
CustomAdvisorResource_msg.properties
as:
134
IBM
Tivoli
Risk
Manager:
Administrator’s
Guide
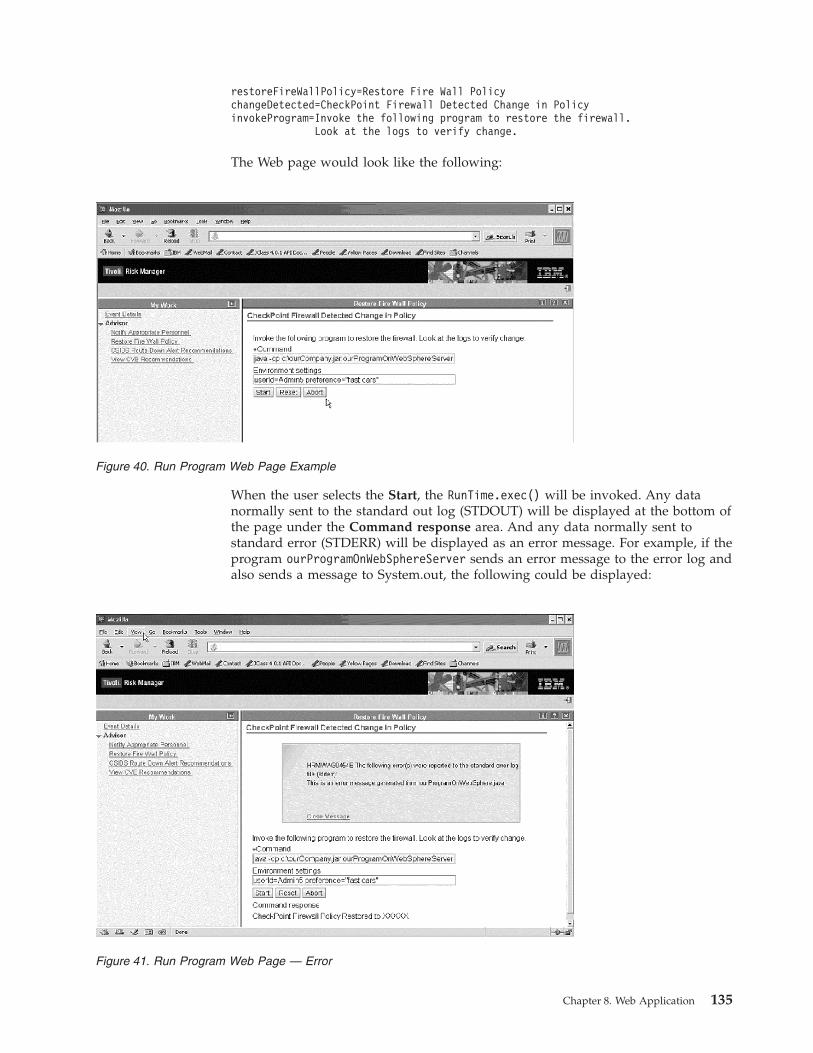
restoreFireWallPolicy=Restore
Fire
Wall
Policy
changeDetected=CheckPoint
Firewall
Detected
Change
in
Policy
invokeProgram=Invoke
the
following
program
to
restore
the
firewall.
Look
at
the
logs
to
verify
change.
The
Web
page
would
look
like
the
following:
When
the
user
selects
the
Start,
the
RunTime.exec()
will
be
invoked.
Any
data
normally
sent
to
the
standard
out
log
(STDOUT)
will
be
displayed
at
the
bottom
of
the
page
under
the
Command
response
area.
And
any
data
normally
sent
to
standard
error
(STDERR)
will
be
displayed
as
an
error
message.
For
example,
if
the
program
ourProgramOnWebSphereServer
sends
an
error
message
to
the
error
log
and
also
sends
a
message
to
System.out,
the
following
could
be
displayed:
Figure
40.
Run
Program
Web
Page
Example
Figure
41.
Run
Program
Web
Page
—
Error
Chapter
8.
Web
Application
135
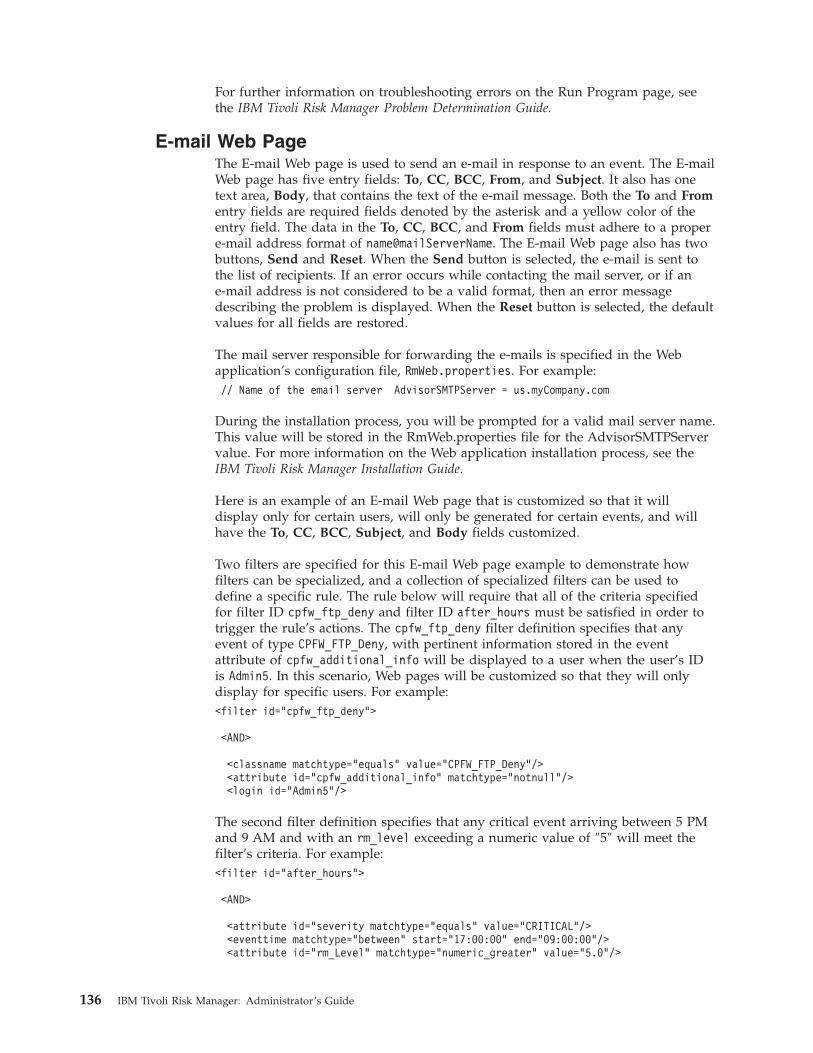
For
further
information
on
troubleshooting
errors
on
the
Run
Program
page,
see
the
IBM
Tivoli
Risk
Manager
Problem
Determination
Guide.
Web
Page
The
Web
page
is
used
to
send
an
in
response
to
an
event.
The
Web
page
has
five
entry
fields:
To,
CC,
BCC,
From,
and
Subject.
It
also
has
one
text
area,
Body,
that
contains
the
text
of
the
message.
Both
the
To
and
From
entry
fields
are
required
fields
denoted
by
the
asterisk
and
a
yellow
color
of
the
entry
field.
The
data
in
the
To,
CC,
BCC,
and
From
fields
must
adhere
to
a
proper
address
format
of
name@mailServerName.
The
Web
page
also
has
two
buttons,
Send
and
Reset.
When
the
Send
button
is
selected,
the
is
sent
to
the
list
of
recipients.
If
an
error
occurs
while
contacting
the
server,
or
if
an
address
is
not
considered
to
be
a
valid
format,
then
an
error
message
describing
the
problem
is
displayed.
When
the
Reset
button
is
selected,
the
default
values
for
all
fields
are
restored.
The
server
responsible
for
forwarding
the
e-mails
is
specified
in
the
Web
application’s
configuration
file,
RmWeb.properties.
For
example:
//
Name
of
the
server
AdvisorSMTPServer
=
us.myCompany.com
During
the
installation
process,
you
will
be
prompted
for
a
valid
server
name.
This
value
will
be
stored
in
the
RmWeb.properties
file
for
the
AdvisorSMTPServer
value.
For
more
information
on
the
Web
application
installation
process,
see
the
IBM
Tivoli
Risk
Manager
Installation
Guide.
Here
is
an
example
of
an
Web
page
that
is
customized
so
that
it
will
display
only
for
certain
users,
will
only
be
generated
for
certain
events,
and
will
have
the
To,
CC,
BCC,
Subject,
and
Body
fields
customized.
Two
filters
are
specified
for
this
Web
page
example
to
demonstrate
how
filters
can
be
specialized,
and
a
collection
of
specialized
filters
can
be
used
to
define
a
specific
rule.
The
rule
below
will
require
that
all
of
the
criteria
specified
for
filter
ID
cpfw_ftp_deny
and
filter
ID
after_hours
must
be
satisfied
in
order
to
trigger
the
rule’s
actions.
The
cpfw_ftp_deny
filter
definition
specifies
that
any
event
of
type
CPFW_FTP_Deny,
with
pertinent
information
stored
in
the
event
attribute
of
cpfw_additional_info
will
be
displayed
to
a
user
when
the
user’s
ID
is
Admin5.
In
this
scenario,
Web
pages
will
be
customized
so
that
they
will
only
display
for
specific
users.
For
example:
<filter
id="cpfw_ftp_deny">
<AND>
<classname
matchtype="equals"
value="CPFW_FTP_Deny"/>
<attribute
id="cpfw_additional_info"
matchtype="notnull"/>
<login
id="Admin5"/>
The
second
filter
definition
specifies
that
any
critical
event
arriving
between
5
PM
and
9
AM
and
with
an
rm_level
exceeding
a
numeric
value
of
″5″
will
meet
the
filter’s
criteria.
For
example:
<filter
id="after_hours">
<AND>
<attribute
id="severity
matchtype="equals"
value="CRITICAL"/>
<eventtime
matchtype="between"
start="17:00:00"
end="09:00:00"/>
<attribute
id="rm_Level"
matchtype="numeric_greater"
value="5.0"/>
136
IBM
Tivoli
Risk
Manager:
Administrator’s
Guide

</AND>
</filter>
The
rule
for
the
page
will
have
an
ID
of
crit_after_hours.
It
specifies
that
if
the
criteria
for
filter
ID
after_hours
and
the
criteria
for
filter
ID
cpfw_ftp_deny
are
met,
then
a
single
Web
page,
as
defined
by
the
action
notify_after_hours,
is
displayed.
For
example:
<rule
id="crit_after_hours">
<matchfilter
id="after_hours,
cpfw_ftp_deny"/>
<withaction
id="notify_after_hours"/>
</rule>
The
action
for
the
page
will
have
an
ID
of
notify_after_hours.
This
action
provides
an
example
of
customizing
the
title,
titleLayout,
content,
sendTo,
sendCC,
sendSubject,
and
sendBody.
For
example:
<sendEmailPage
id="notify_after_hours"
title="notify"
titleLayout="afterHoursAlert"
content="openTroubleTicket"
sendTo="openTroubleTicket"
sendCC="[email protected]"
sendSubject="%msg%"
sendBody="afterHoursEmail:%cpfw_additional_info%:%rm_SourceToken%"
titlePriority="1"
/>
The
text
to
display
on
the
Web
page
is
contained
in
the
resource
ID
definitions
of
notify,
afterHoursAlert,
openTroubleTicket,
and
afterHoursEmail.
These
definitions
are
extracted
from
the
CustomAdvisorResource_msg.properties
file
and
are
defined
as:
notify=Notify
Appropriate
Personnel
openTroubleTicket=Open
Sev
1
trouble
ticket
afterHoursAlert=Critical
Alert
Received
After
Hours
afterHoursEmail={0}
orginating
from
{1}
The
action
has
a
titlePriority
of
1
indicates
that
this
Web
Page
should
be
listed
at
the
beginning
of
the
task
list,
since
the
RmWeb.properties
file
set
AdvisorHighestTitlePriority=1.
More
information
on
how
to
set
Web
page
priorities
can
be
found
in
“Prioritizing
Web
Pages
in
the
Task
List”
on
page
126.
The
Web
page
would
look
like
the
following:
Chapter
8.
Web
Application
137

After
selecting
the
Send
button,
and
if
no
errors
were
encountered,
then
the
following
message
would
be
displayed:
Once
the
Close
Message
link
is
clicked,
the
previous
page
is
displayed
again
with
the
information
stored
in
the
entry
fields
when
the
Send
button
was
selected.
In
order
to
view
the
default
values,
the
Reset
button
must
be
clicked.
Figure
42.
Web
Page
Example
Figure
43.
Web
Page
Example
—
Success
Message
138
IBM
Tivoli
Risk
Manager:
Administrator’s
Guide

Chapter
9.
Reports
The
Crystal
Reports
component
of
Tivoli
Risk
Manager
provides
twenty-two
compiled
reports
that
provide
information
for
analysis
of
intrusion
events
that
might
occur
on
a
customer’s
system.
Before
you
run
the
reports,
you
must
have
a
supported
RDBMS
client
installed
and
configured
on
the
system
that
the
reports
will
run
on.
You
must
also
have
a
working
Open
Database
Connectivity
(ODBC)
connection
set
up
to
the
database
that
the
archive
table
was
created
in.
See
“Setting
Up
an
ODBC
Data
Source
Connection”
on
page
142.
What
Are
Tivoli
Risk
Manager
Crystal
Reports?
Tivoli
Risk
Manager
contains
compiled
reports
created
using
the
Compiled
Reports
feature
of
the
Crystal
Reports
Designer
program.
The
Compiled
Reports
format
allows
you
to
run
reports
without
having
the
Crystal
Reports
Designer
installed
on
the
system.
Note:
You
must
purchase
and
install
the
Crystal
Reports
Designer
if
you
want
to
create
or
edit
Crystal
Reports.
The
compiled
Crystal
Reports
provided
with
Tivoli
Risk
Manager
include
Firewall
Management
Reports,
Intrusion
Detection
Reports,
Risk
Assessment
Reports,
Event
Management
Reports,
and
Virus
Management
Reports.
Firewall
Management
Reports
The
following
reports
are
for
firewall
management:
Denied
Connections
by
Network
Address
(rm_fw_02.exe)
This
report
summarizes
the
number
of
denied
connections
within
the
customer’s
network
categorized
by
the
type
of
connection
denied.
Top
Firewall
Events
(rm_fw_07.exe)
This
report
lists
all
classes
of
firewall-detected
events,
ranked
by
the
number
of
events
in
each
class
and
severity
grouping.
Intrusion
Detection
Reports
The
following
reports
are
for
intrusion
detection:
Intrusion
Events
by
Network
Address
(rm_ids_05.exe)
This
report
displays
the
number
of
IDS
events
categorized
by
event
class
for
each
host
address.
When
the
report
is
displayed,
you
can
view
details
about
each
event.
Top
Attacked
Hosts
(rm_ids_04.exe)
This
report
displays
a
bar
chart
showing
the
top
10
target
hosts
for
intrusion
events.
You
can
expand
the
data
to
display
a
pie
chart
showing
the
distribution
of
events
by
class.
©
Copyright
IBM
Corp.
2003
139

Top
Intruders
(rm_ids_12.exe)
This
report
displays
a
bar
chart
showing
the
top
10
source
hosts
for
intrusion
events.
You
can
expand
the
data
to
display
a
pie
chart
showing
the
distribution
of
events
by
class.
Top
Intrusion
Events
by
Category
(rm_ids_13.exe)
This
report
displays
a
bar
chart
showing
the
top
10
intrusion
event
categories.
Examples
of
event
categories
are:
Web
Attack,
Service
Attack,
IDS
Level
and
so
on.
You
can
expand
the
data
to
display
a
pie
chart
showing
the
distribution
of
events
by
class.
Top
Web
Intrusion
Events
(rm_ids_14.exe)
This
report
displays
a
bar
chart
showing
all
classes
of
Web
intrusion
events
(where
sensor
type
is
’webids’),
ranked
by
the
number
of
events
in
each
class.
Risk
Assessment
Reports
The
following
reports
are
for
risk
assessment:
Access
Violations
by
Network
Address
(rm_ra_01.exe)
This
report
summarizes
denied
access
attempts
within
the
subnetwork
categorized
by
the
class
of
denied
access.
Authentication
Events
by
Network
Address
(rm_ra_02.exe)
This
report
displays
the
number
of
authentication
events
for
each
host
address.
A
summary
chart
at
the
beginning
of
the
report
shows
the
hosts
with
the
most
number
of
authentication
events.
Authentication
events
are
broken
down
into
two
broad
categories:
Allowed
and
Denied.
You
can
double-click
on
an
authentication
category
to
view
a
list
of
individual
events
for
the
selected
host
and
category.
Failed
Login
Attempts
by
Host
and
User
(rm_ra_03.exe)
This
report
displays
failed
login
attempts
by
host.
You
can
use
the
Group
By
parameter
to
view
the
data
from
the
point
of
view
of
destination
hosts
(what
machine
are
you
logging
on
to?)
or
source
hosts
(what
machine
are
logging
in
from?).
A
summary
chart
at
the
beginning
of
the
report
displays
the
top
10
hosts,
ranked
by
number
of
failed
login
attempts.
The
report
text
lists
all
hosts,
ranked
by
number
of
failed
login
attempts.
If
you
double-click
on
a
host
in
the
text
section,
you
can
see
a
pie
chart
showing
the
breakdown
by
user
ID.
If
you
double-click
on
a
slice
of
the
pie
chart,
you
can
see
details
about
each
individual
event.
Event
Management
Reports
The
following
reports
are
for
event
management:
Events
by
Category
(rm_evt_08.exe)
This
report
summarizes
all
events
by
category.
Examples
of
category
names
include
Denial
of
Service,
Network
Level
Attack,
and
Trojan
Horse.
Events
by
Customer
(rm_evt_04.exe)
This
report
displays
a
pie
chart
showing
the
distribution
of
events
by
customer
name.
Customer
name
may
be
a
company
name,
line
of
business,
geography,
department
number
or
any
customer-specific
ID.
You
can
double-click
on
a
customer
name
to
see
a
bar
chart
showing
the
distribution
of
events
by
host
and
class
category.
Finally,
double-click
on
the
desired
segment
of
the
bar
chart
to
see
a
listing
of
individual
events
within
each
host
and
class
category.
140
IBM
Tivoli
Risk
Manager:
Administrator’s
Guide

Events
by
Month
(rm_evt_02.exe)
This
report
displays
a
summary
chart
showing
the
number
of
events
received
each
month,
starting
with
the
beginning
of
the
current
year.
You
can
also
select
last
year
or
the
year
before,
using
the
Year
parameter.
You
can
view
weekly
event
summaries,
by
double-clicking
on
any
month
in
the
chart.
From
the
weekly
summary
chart,
double-click
on
any
week
to
see
event
summaries
by
day.
To
view
a
chronological
listing
of
all
the
events
received
for
a
particular
day,
double-click
on
the
bar
for
that
day.
Events
by
Severity
(rm_evt_03.exe)
This
report
displays
a
pie
chart
showing
the
distribution
of
events
by
severity.
You
can
double-click
on
a
severity
level
to
see
another
pie
chart
showing
the
distribution
of
events
by
class.
Finally,
to
see
a
listing
of
individual
events
within
each
class,
double-click
on
the
desired
class.
Events
for
the
Last
7
Days
(rm_evt_07.exe)
This
report
displays
a
bar
chart
showing
the
number
of
events
for
each
day
in
the
last
7
days.
Each
colored
segment
on
a
bar
represents
the
number
of
events
for
a
particular
sensor
type
group
(see
″Events
per
Day
by
Address
and
Sensor
Types″
below
for
a
description
of
sensor
type
groups).
You
can
double-click
on
a
colored
segment
to
display
an
event
list
for
a
single
day
and
sensor
type
group.
Events
for
the
Last
24
Hours
(rm_evt_24.exe)
This
report
displays
a
chart
showing
the
total
events
by
hour
over
the
last
24
hours,
broken
down
by
sensor
type
groups.
Each
colored
segment
on
a
bar
represents
a
sensor
type
group
(see
″Events
per
Day
by
Address
and
Sensor
Types″
below
for
a
description
of
sensor
type
groups).
You
can
double-click
on
a
segment
to
display
an
event
list
for
a
single
hour
and
sensor
type
group.
Events
per
day
by
Address
and
Sensor
Type
(rm_evt_05.exe)
This
report
displays
the
distribution
of
events
by
sensor
type
across
a
network.
A
summary
3D
chart
shows
the
top
seven
IP
addresses
with
the
most
number
of
events,
categorized
by
sensor
type
groups.
The
text
section
shows
the
number
of
events
received
per
day
at
each
host
in
the
network,
categorized
by
sensor
type
groups.
All
events
originate
from
one
of
the
following
sensor
type
groups:
v
Antivirus
–
Antivirus
sensors
such
as
Norton
and
McAfee.
v
Database
–
Sensors
that
report
on
security-related
access
attempts
and
configuration
changes
to
database
management
systems
(DBMS)
such
as
Oracle
and
DB2.
v
Firewall
–
Firewall
sensors
such
as
Check
Point™
FireWall-1®,
Cisco
Secure
PIX,
IBM
Firewall,
ZoneAlarm.
v
Host
IDS
–
Host-based
sensors
such
as
AIX,
Solaris,
Linux,
Windows,
RealSecure
System
Agent.
v
Network
IDS
–
Network-based
sensors
such
as
NIDS,
Cisco
Router,
Cisco
Secure
IDS,
RealSecure
IDS,
SNORT.
v
Web
IDS
–
Web-based
sensors
such
as
Web
Intrusion
Detection
System
(Web
IDS).
v
Wireless
–
Wireless-based
sensors
such
as
Wireless
Security
Auditor.
Event
Query
(rm_evt_10.exe)
This
report
displays
the
distribution
of
events
by
user
selectable
groups.
You
must
select
a
Primary
and
Secondary
group
parameter
from
the
following
list:
Chapter
9.
Reports
141

v
Destination
Host
v
Source
Host
v
Customers
v
Sensor
Type
v
Sensor
Host
v
Event
Category
v
Event
Class
v
Severity
v
Date
v
Day
of
Week
v
Hour
of
Day
The
default
for
Primary
group
is
Customer;
the
default
for
Secondary
group
is
Destination
Host.
The
report
displays
a
summary
bar
chart
showing
the
top
10
event
counts
within
the
Primary
group.
You
can
double-click
on
a
bar
and
see
a
pie
chart
showing
the
top
15
event
counts
within
the
Secondary
group.
Finally,
you
can
double-click
on
a
slice
in
the
pie
chart
to
see
a
listing
of
all
events
in
selected
group.
Top
Events
(rm_evt_09.exe)
This
report
lists
all
classes
of
events
by
the
number
of
events
in
each
class
and
severity
grouping.
Virus
Management
Reports
The
following
reports
are
for
virus
management:
Antivirus
Scans
and
Updates
(rm_av_10.exe)
This
report
displays
all
hosts
that
have
had
virus
scans
and
signature
updates,
ranked
by
number
of
days
since
the
last
virus
scan.
The
maximum
number
of
days
counted
is
30.
If
a
host
has
not
been
scanned
for
viruses
in
the
last
30
days,
then
it
will
be
assigned
a
value
of
30
days
since
the
last
scan.
A
summary
bar
chart
shows
the
top
10
hosts
that
have
not
been
recently
scanned.
For
each
host,
one
bar
shows
the
number
of
days
since
the
last
scan
and
another
bar
shows
the
number
of
days
since
the
last
update.
In
the
text
section
of
the
report,
you
can
double-click
on
a
host
to
see
a
chronological
list
of
virus
scans
and
signature
updates
for
that
host.
Top
Infected
Hosts
(rm_av_06.exe)
This
report
displays
a
bar
chart
showing
the
top
10
hosts
infected
with
viruses.
You
can
double-click
on
a
host
to
see
a
list
of
viruses
with
date,
time,
antivirus
vendor
name
and
virus
description.
Top
Viruses
(rm_av_02.exe)
This
report
displays
a
pie
chart
showing
the
top
15
virus
signatures.
You
can
double-click
on
a
signature
group
to
view
virus
event
detail,
including
time
of
event,
host
affected,
antivirus
vendor
name
and
a
descriptive
message.
Setting
Up
an
ODBC
Data
Source
Connection
Before
you
create
an
ODBC
connection,
install
and
configure
your
database
client.
Consult
your
database
administrator
for
the
appropriate
client
configuration.
142
IBM
Tivoli
Risk
Manager:
Administrator’s
Guide

After
you
install
and
configure
your
database
client,
set
up
an
ODBC
Data
Source
Connection
to
access
the
Tivoli
Risk
Manager
database
from
the
systems
running
Tivoli
Risk
Manager
Crystal
Reports.
Refer
to
the
following
sections
to
set
up
an
ODBC
data
source
connection
for
your
database.
DB2®
Register
the
DB2
database
with
the
ODBC
driver
manager
as
a
data
source.
On
a
Windows
systems,
you
can
make
the
data
source
available
to
all
users
of
the
system
(a
system
data
source)
or
only
the
current
user
(a
user
data
source).
You
can
use
any
of
the
following
three
methods
to
add
the
data
source;
however,
if
you
installed
the
Client
Configuration
Assistant
(CCA)
when
you
installed
DB2,
it
is
recommended
that
you
use
the
first
method.
Using
the
CCA
to
register
the
DB2
database
as
a
data
source
To
use
the
CCA
to
register
the
DB2
database
as
a
data
source:
1.
Start
the
DB2
Client
Configuration
Assistant
program.
A
list
of
available
DB2
databases
is
displayed.
2.
If
your
database
is
in
the
list,
select
the
database
and
complete
the
following
steps:
a.
Click
Properties.
The
Database
Properties
window
opens.
b.
If
it
is
not
already
selected,
select
the
Register
this
database
for
ODBC
check
box.
On
Windows
systems,
you
can
use
the
radio
buttons
to
add
the
data
source
as
either
a
user
or
system
data
source.
c.
Click
OK.
If
your
database
is
not
in
the
list,
complete
the
following
steps:
a.
Click
Add.
The
Add
Database
SmartGuide
dialog
box
opens.
b.
Select
Manually
configure
a
connection
to
a
DB2
database.
Click
Next.
c.
Enter
the
host
name
and
port
number
of
the
DB2
server.
The
default
port
number
for
DB2
servers
is
50000.
Check
with
your
database
administrator
for
the
proper
port
number.
Do
not
enter
a
service
name.
d.
Click
Next.
e.
Enter
the
name
of
the
database
as
it
is
defined
on
the
server.
The
default
name
is
TEC
for
all
Tivoli
Risk
Manager
installations.
Check
with
your
database
administrator
for
the
proper
database
name.
f.
Enter
an
alias
and
description.
The
alias
can
be
any
name
not
already
used
in
the
CCA
database
list.
The
recommended
name
is
RMDB,
that
is
the
default
data
source
name
used
by
the
Tivoli
Risk
Manager
Crystal
Reports.
g.
Click
Next.
h.
Verify
that
the
Register
this
database
for
ODBC
check
box
is
selected.
i.
Click
Done.
j.
Click
Close
to
finish.
Note:
If
you
want
to
verify
connectivity,
click
Test
Connection
before
you
click
Close
to
finish.
Chapter
9.
Reports
143

Using
the
Microsoft®
32-bit
ODBC
Administration
tool
to
register
the
DB2
database
as
a
data
source
To
use
the
Microsoft
32-bit
ODBC
Administration
tool
to
register
the
DB2
database
as
a
data
source:
1.
From
the
Windows
Control
Panel
for
Windows
NT,
click
ODBC
Data
Sources
to
run
the
ODBC
Administrator
program.
From
the
Windows
Control
Panel
for
Windows
2000,
click
Administrative
Tools
→
Data
Sources
(ODBC)
to
run
the
ODBC
Administrator
program.
2.
On
Windows
systems,
the
list
of
user
data
sources
appears
by
default.
If
you
want
to
add
a
system
data
source,
click
System
DSN
or
select
the
System
DSN
tab
(depending
on
the
platform).
3.
Click
Add.
4.
Double-click
the
IBM
DB2
ODBC
Driver
in
the
list.
If
the
DB2
database
is
in
the
Database
alias
drop-down
list,
then
select
it.
Change
the
Data
source
name
if
desired.
The
recommended
name
is
RMDB,
that
is
the
default
data
source
name
used
by
the
Tivoli
Risk
Manager
Crystal
Reports.
Click
OK
to
finish.
If
the
database
is
not
in
the
drop-down
list,
use
the
following
instructions
to
add
the
database.
a.
Click
Add
or
Add
Database.
The
Add
Database
SmartGuide
dialog
box
opens.
b.
Select
Manually
configure
a
connection
to
a
DB2
database.
Click
Next.
c.
Enter
the
host
name
and
port
number
of
the
DB2
server.
The
default
port
number
for
DB2
servers
is
50000.
Check
with
your
database
administrator
for
the
proper
port
number.
Do
not
enter
a
service
name.
d.
Click
Next.
e.
Enter
the
name
of
the
database
as
it
is
defined
on
the
server.
The
default
name
is
TEC
for
all
Tivoli
Risk
Manager
installations.
Check
with
your
database
administrator
for
the
proper
database
name.
f.
Enter
an
alias
and
description.
The
alias
can
be
any
name
not
already
used
in
the
CCA
database
list.
The
recommended
name
is
RMDB,
that
is
the
default
data
source
name
used
by
the
Tivoli
Risk
Manager
Crystal
Reports.
g.
Click
Next.
h.
Verify
that
the
Register
this
database
for
ODBC
check
box
is
selected.
i.
Click
Done.
j.
Click
Close
to
finish.
Note:
If
you
want
to
verify
connectivity,
click
Test
Connection
before
you
click
Close
to
finish.
Using
the
CATALOG
ODBC
DATA
SOURCE
command
to
register
the
DB2
database
as
a
data
source
To
use
the
CATALOG
ODBC
DATA
SOURCE
command
to
register
the
DB2
database
as
a
data
source:
You
can
issue
the
CATALOG
ODBC
DATA
SOURCE
command
at
the
command-line
processor
on
Windows
systems
to
register
the
DB2
database
with
the
ODBC
driver
manager
as
a
data
source.
For
example,
to
use
this
command
you
can
create
a
command-line
processor
script
to
register
the
required
databases.
Then
144
IBM
Tivoli
Risk
Manager:
Administrator’s
Guide

run
this
script
on
all
of
the
machines
that
require
access
to
the
DB2
databases
through
ODBC.
See
the
CATALOG
[
user
|
system
]
ODBC
DATA
SOURCE
command
in
the
IBM
DB2
UDB
Command
Reference
for
more
information.
Oracle
This
section
describes
how
to
set
up
an
ODBC
connection
to
an
Oracle
database.
During
the
database
client
configuration,
you
need
to
create
a
database
alias
(Net
Service
Name)
for
the
Tivoli
Risk
Manager
database.
Use
this
alias
as
the
data
source
server
name
in
step
7
of
the
following
procedure.
Note:
Contact
your
system
administrator
for
specific
information
to
set
up
your
database
client.
Use
the
Net8
Easy
Configuration
program
to
create
a
database
alias.
After
you
create
an
Oracle
database
alias,
use
the
following
procedure
to
create
an
ODBC
data
source
for
the
Tivoli
Risk
Manager
database.
1.
From
the
Windows
Control
Panel
for
Windows
NT,
click
ODBC
Data
Sources
to
run
the
ODBC
Administrator
program.
From
the
Windows
Control
Panel
for
Windows
2000,
click
Administrative
Tools
→
Data
Sources
(ODBC)
to
run
the
ODBC
Administrator
program.
2.
Select
the
System
DSN
tab.
3.
Click
Add.
4.
Select
Oracle
ODBC
Driver,
and
click
Finish.
5.
Enter
a
name
for
this
ODBC
data
source
in
the
Data
Source
Name
text
box.
The
recommended
name
is
RMDB,
that
is
the
default
data
source
name
used
by
the
Tivoli
Risk
Manager
Crystal
Reports.
6.
Enter
a
description
for
the
data
source
in
the
Description
text
box.
7.
Enter
the
database
Net
Service
Name
in
the
Service
Name
text
box.
Note:
The
database
Net
Service
Name
must
be
the
alias
that
you
gave
to
the
database
when
you
configured
the
database
client.
8.
Enter
the
Tivoli
Risk
Manager
database
user
name
(the
default
is
tec)
in
the
Userid
text
box.
9.
Click
OK
twice
to
save
Data
Source
Name
and
exit
the
ODBC
Administrator.
Sybase
This
section
describes
how
to
set
up
an
ODBC
connection
to
a
Sybase
database.
During
the
database
client
configuration,
you
need
to
create
a
database
alias
for
the
Tivoli
Risk
Manager
database.
Use
this
alias
as
the
data
source
server
name
in
step
7
on
page
146
of
the
following
procedure.
Note:
Contact
your
system
administrator
for
specific
information
to
set
up
your
database
client.
Use
the
Sybase
DSEdit
program
to
create
a
database
alias.
After
you
create
a
Sybase
database
alias,
use
the
following
procedure
to
create
an
ODBC
data
source
for
the
Tivoli
Risk
Manager
database.
1.
From
the
Windows
Control
Panel
for
Windows
NT,
click
ODBC
Data
Sources
to
run
the
ODBC
Administrator
program.
From
the
Windows
Control
Panel
for
Windows
2000,
click
Administrative
Tools
→
Data
Sources
(ODBC)
to
run
the
ODBC
Administrator
program.
Chapter
9.
Reports
145
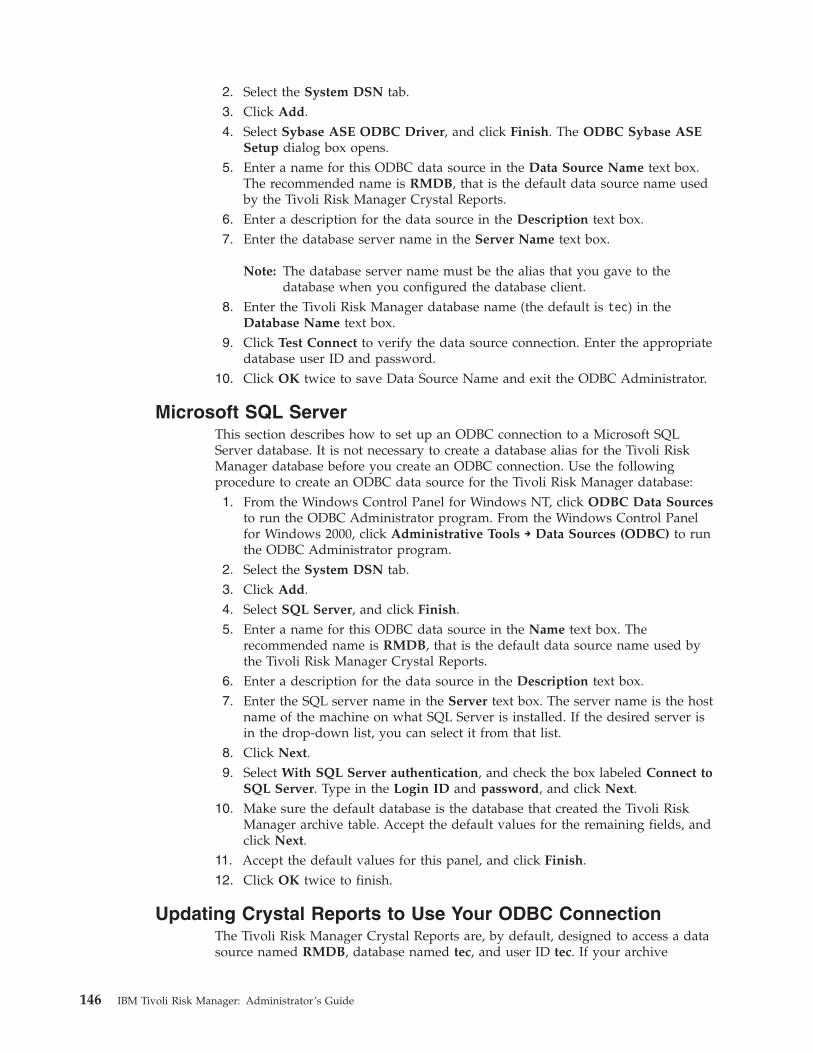
2.
Select
the
System
DSN
tab.
3.
Click
Add.
4.
Select
Sybase
ASE
ODBC
Driver,
and
click
Finish.
The
ODBC
Sybase
ASE
Setup
dialog
box
opens.
5.
Enter
a
name
for
this
ODBC
data
source
in
the
Data
Source
Name
text
box.
The
recommended
name
is
RMDB,
that
is
the
default
data
source
name
used
by
the
Tivoli
Risk
Manager
Crystal
Reports.
6.
Enter
a
description
for
the
data
source
in
the
Description
text
box.
7.
Enter
the
database
server
name
in
the
Server
Name
text
box.
Note:
The
database
server
name
must
be
the
alias
that
you
gave
to
the
database
when
you
configured
the
database
client.
8.
Enter
the
Tivoli
Risk
Manager
database
name
(the
default
is
tec)
in
the
Database
Name
text
box.
9.
Click
Test
Connect
to
verify
the
data
source
connection.
Enter
the
appropriate
database
user
ID
and
password.
10.
Click
OK
twice
to
save
Data
Source
Name
and
exit
the
ODBC
Administrator.
Microsoft
SQL
Server
This
section
describes
how
to
set
up
an
ODBC
connection
to
a
Microsoft
SQL
Server
database.
It
is
not
necessary
to
create
a
database
alias
for
the
Tivoli
Risk
Manager
database
before
you
create
an
ODBC
connection.
Use
the
following
procedure
to
create
an
ODBC
data
source
for
the
Tivoli
Risk
Manager
database:
1.
From
the
Windows
Control
Panel
for
Windows
NT,
click
ODBC
Data
Sources
to
run
the
ODBC
Administrator
program.
From
the
Windows
Control
Panel
for
Windows
2000,
click
Administrative
Tools
→
Data
Sources
(ODBC)
to
run
the
ODBC
Administrator
program.
2.
Select
the
System
DSN
tab.
3.
Click
Add.
4.
Select
SQL
Server,
and
click
Finish.
5.
Enter
a
name
for
this
ODBC
data
source
in
the
Name
text
box.
The
recommended
name
is
RMDB,
that
is
the
default
data
source
name
used
by
the
Tivoli
Risk
Manager
Crystal
Reports.
6.
Enter
a
description
for
the
data
source
in
the
Description
text
box.
7.
Enter
the
SQL
server
name
in
the
Server
text
box.
The
server
name
is
the
host
name
of
the
machine
on
what
SQL
Server
is
installed.
If
the
desired
server
is
in
the
drop-down
list,
you
can
select
it
from
that
list.
8.
Click
Next.
9.
Select
With
SQL
Server
authentication,
and
check
the
box
labeled
Connect
to
SQL
Server.
Type
in
the
Login
ID
and
password,
and
click
Next.
10.
Make
sure
the
default
database
is
the
database
that
created
the
Tivoli
Risk
Manager
archive
table.
Accept
the
default
values
for
the
remaining
fields,
and
click
Next.
11.
Accept
the
default
values
for
this
panel,
and
click
Finish.
12.
Click
OK
twice
to
finish.
Updating
Crystal
Reports
to
Use
Your
ODBC
Connection
The
Tivoli
Risk
Manager
Crystal
Reports
are,
by
default,
designed
to
access
a
data
source
named
RMDB,
database
named
tec,
and
user
ID
tec.
If
your
archive
146
IBM
Tivoli
Risk
Manager:
Administrator’s
Guide

database
uses
different
data
source
name
(DSN),
database
or
user
ID,
when
a
report
is
run
you
will
need
to
enter
your
DSN,
database,
and
user
ID
each
time.
Because
it
can
be
tedious
to
enter
the
same
information
(DSN,
database,
user
ID)
each
time
a
report
is
run,
a
utility
is
available
from
Crystal
Decisions
to
permanently
customize
your
reports
to
use
your
DSN,
database
and
user
ID.
Search
the
Crystal
Decisions
support
Web
site
(http://support.crystaldecisions.com
for
the
Update8x.exe
utility
program.
Download
the
program
and
follow
the
instructions
included
in
the
readme
file
and
the
program
online
help.
How
Do
Tivoli
Risk
Manager
Crystal
Reports
Work?
The
Crystal
Reports
component
for
Tivoli
Risk
Manager
runs
against
a
table
of
archived
events.
Sensors
send
the
events
to
the
agent
to
be
processed.
As
part
of
agent
processing,
the
sensor
events
are
forwarded
to
the
event
archive
table.
This
table
supplies
the
Crystal
Reports
with
the
data
needed
for
the
reports
to
run.
Create
the
Tivoli
Risk
Manager
Archive
Table
You
must
create
the
archive
table
before
using
Crystal
Reports.
See
the
Configuration
chapter
of
the
IBM
Tivoli
Risk
Manager
Installation
Guide
for
information
on
creating
the
Tivoli
Risk
Manager
archive
table.
Running
Tivoli
Risk
Manager
Crystal
Reports
Use
the
following
steps
to
access
Tivoli
Risk
Manager
Crystal
Reports:
1.
From
the
Start
menu,
select
Programs
→
IBM
Tivoli
Risk
Manager
Reports.
2.
From
the
IBM
Tivoli
Risk
Manager
Reports
folder
select
one
of
the
following
sub-folders
for
report
types:
v
Event
Management
v
Firewall
Management
v
Intrusion
Detection
v
Risk
Assessment
v
Virus
Management3.
From
the
sub-folder,
select
the
desired
report
title.
An
initial
report
window
is
displayed.
The
name
of
the
report
will
appear
at
the
top
of
the
window.
4.
Customize
the
report
printing,
viewing,
and
exporting
options
using
the
following
steps:
a.
Select
one
of
the
following
in
the
first
window:
v
the
report
to
a
window
v
Export
the
report
v
the
report
to
a
printer
b.
If
you
choose
to
export
the
report,
select
the
file
format
and
destination
for
the
export
by
selecting
Export
Options.
Export
file
formats
include
comma-separated
text,
Excel,
HTML
and
others.
c.
If
you
choose
to
the
report
to
a
printer,
select
the
printer
and
set
other
printer
options
by
pressing
Printer
Options.
d.
For
all
of
the
report
outputs
listed
above,
any
options
changed
are
permanently
stored
and
do
not
need
to
be
re-entered
the
next
time
you
run
the
report.5.
After
all
values
are
entered,
select
to
print,
view,
or
export
the
report.
A
database
logon
window
is
displayed.
Enter
the
ODBC
Data
source
name
that
was
configured
using
the
steps
in
“Setting
Up
an
ODBC
Data
Source
Chapter
9.
Reports
147

Connection”
on
page
142.
Enter
the
name
of
the
database
on
the
server
in
the
Database
field.
Enter
the
database
administrator
user
ID
and
password
in
the
User
Name
and
Password
fields
and
click
OK.
If
you
follow
the
steps
presented
in
the
“Updating
Crystal
Reports
to
Use
Your
ODBC
Connection”
on
page
146,
then
only
the
password
will
need
to
be
entered.
6.
The
Enter
Parameter
Values
window
is
displayed.
From
the
Parameter
Fields
section
of
the
window
choose
one
of
the
following
parameters.
v
Reporting
Period
v
Date
Range
–
optional
v
Customer
v
Host
If
you
do
not
want
to
select
any
parameters
you
can
click
OK
to
not
filter
any
event
attributes.
If
you
choose
Reporting
Period,
select
a
report
range
from
a
drop
down
list
and
click
OK.
If
you
choose
Date
Range,
enter
the
desired
dates
in
the
start
of
range
and
end
of
range
fields
and
click
OK.
You
can
also
select
from
a
calendar
by
clicking
on
the
arrow
next
to
each
date
field.
If
you
choose
Customer,
enter
the
customer
name
that
will
be
used
to
create
the
specified
report
and
click
OK.
Customer
name
can
be
a
company
name,
line
of
business,
geography,
department
number
or
any
customer-specific
ID.
Wild
card
characters,
for
example
’*’,
’?’,
can
be
used
to
match
multiple
names.
If
you
choose
Host,
enter
the
host
name
or
IP
address
that
will
be
used
to
create
the
specified
report
and
click
OK.
Wild
card
characters,
for
example
’*’,
’?’,
can
be
used
to
match
multiple
names.
If
you
want
to
change
the
default
value
of
any
parameter,
you
must
select
the
parameter
field
in
the
dialog
window
and
enter
the
desired
value.
After
you
have
changed
all
of
the
parameters
values,
then
click
OK.
Do
not
click
OK
after
changing
each
individual
parameter.
If
you
change
the
default
values
for
Reporting
Period
and
Date
Range,
then
the
Reporting
Period
change
is
ignored
and
the
Date
Range
change
is
used.
7.
Your
selected
report
will
be
displayed
in
a
new
window,
be
printed
to
the
selected
printer,
or
be
exported
to
your
selected
location.
If
you
are
viewing
the
report
in
a
new
window,
you
can
navigate
through
it
using
the
page
forward
and
back
icons
in
the
toolbar
at
the
top
of
the
window.
To
view
details
about
a
particular
event
or
report
item,
hold
your
cursor
over
the
data
you
want
further
details
about
and
when
the
cursor
displays
a
magnifying
glass,
double-click
to
display
more
detailed
data.
8.
When
you
are
finished
reviewing
the
report,
close
the
window.
This
action
will
return
you
to
the
initial
report
window.
9.
Select
Done
to
exit
Crystal
Reports
completely.
148
IBM
Tivoli
Risk
Manager:
Administrator’s
Guide

Crystal
Reports
Runtime
Engine
Tivoli
Risk
Manager
provides
the
Crystal
Reports
Runtime
Engine,
that
allows
users
to
preview
and
compiled
Crystal
Reports.
Tivoli
Risk
Manager
does
not
provide
the
Crystal
Reports
Designer
program
that
is
used
to
create
or
edit
Crystal
Reports.
Chapter
9.
Reports
149

150
IBM
Tivoli
Risk
Manager:
Administrator’s
Guide
Chapter
10.
Tasks
Tivoli
Risk
Manager
provides
a
set
of
predefined
Tivoli
tasks
in
the
Risk
Manager
Task
Library.
This
chapter
is
a
quick
reference
for
these
tasks.
More
information
about
tasks
that
are
specific
to
Tivoli
Risk
Manager
adapters
can
be
found
in
the
IBM
Tivoli
Risk
Manager
Adapters
Guide.
Tivoli
Tasks
A
task
is
an
action
that
is
routinely
performed
on
managed
nodes
and
end
points
throughout
the
network.
Each
task
references
a
script,
command,
or
other
executable
file
that
performs
the
work.
A
task
also
defines
the
authorization
role
required
to
run
the
script,
and
the
user
or
group
ID
that
the
task
will
run
as.
Example
tasks
include
those
that
clear
printer
queues,
start
system
backups,
or
perform
Tivoli-supported
operations,
such
as
forwarding
an
event
to
an
Tivoli
Enterprise
Console
event
server.
Variable
values
are
passed
to
a
task
at
execution
time.
The
variable
values
can
come
from
input
parameters
and
execution
options
you
specify,
or
from
event
attributes
available
to
the
task.
Tasks
are
stored
in
a
task
library.
A
task
library
usually
contains
tasks
that
are
closely
related,
such
as
those
that
require
the
same
authorization
role,
or
those
that
help
manage
a
single
product
or
resource.
Tivoli
Risk
Manager
provides
a
set
of
predefined
tasks
in
the
Tivoli
Risk
Manager
Task
Library.
The
name
of
this
task
library,
Risk
Manager
Task
Library,
appears
in
task
dialogs
and
is
used
when
specifying
the
task
library
from
a
command
line.
Tivoli
Risk
Manager
tasks
let
you
react
to
identified
risks
or
manage
system
components.
Tivoli
Risk
Manager
installs
the
task
library
in
the
default
Tivoli
Enterprise
Console
policy
region,
TEC–Region.
Tivoli
Risk
Manager
tasks
are
supported
only
on
Tivoli
end
points.
See
Tivoli
Framework
documentation
for
more
information
on
installing
and
configuring
a
Tivoli
end
point.
How
to
Create
and
Customize
Tasks
The
Risk
Manager
Task
Library
is
defined
as
a
task
language
library
file
(tll
file),
rmt_tasks.tll
and
is
built
during
Tivoli
Risk
Manager
installation
by
running
the
event
server
configuration
script,
rmcorr_cfg.
If
changes
are
made
to
this
task
library
file,
the
task
library
can
be
rebuilt
using
the
following
command:
rmcorr_cfg
–tasklib
Details
of
scripts,
commands,
or
other
executables
called
by
each
task
can
be
found
by
viewing
this
file.
For
information
on
tll
files
and
creating
and
customizing
tasks,
see
the
Tivoli
Management
Framework
publication
Task
Library
Language
Developer’s
Guide.
©
Copyright
IBM
Corp.
2003
151

Tasks
for
Linux
and
UNIX-Based
Systems
To
use
a
Tivoli
Risk
Manager
task
to
perform
standard
Linux
and
UNIX-based
system
tasks:
1.
On
the
Tivoli
desktop,
click
TEC–Region
and
then
click
Risk
Manager
Task
Library.
2.
Click
the
Tivoli
Risk
Manager
task
that
you
want
to
perform
from
the
following
list:
Unix_Deactivate_User_Account
Use
this
Tivoli
Risk
Manager
task
to
specify
a
user
ID
to
deactivate
the
user’s
account.
Unix_Kill_Process
Use
this
Tivoli
Risk
Manager
task
to
specify
the
process
ID
(PID)
for
the
process
that
you
want
to
stop.
Unix_List_Active_Processes
Use
this
Tivoli
Risk
Manager
task
to
list
an
active
process
specified
by
the
name
of
the
application
process
ID
(PID).
If
no
process
ID
is
specified
as
an
input
filter,
all
active
processes
are
listed.
Unix_Run_Command
Use
this
Tivoli
Risk
Manager
task
to
enter
the
Linux
or
UNIX–based
system
command
that
you
want
to
run.
Tasks
for
Windows
Systems
To
use
a
Tivoli
Risk
Manager
task
to
perform
a
standard
Windows
system
task:
1.
On
the
Tivoli
desktop,
click
TEC–Region
and
then
click
Risk
Manager
Task
Library.
2.
Click
the
Tivoli
Risk
Manager
task
that
you
want
to
perform
from
the
following
list:
Windows_Deactivate_User_Account
Use
this
Tivoli
Risk
Manager
task
to
specify
a
Windows
system
user
ID
in
order
to
deactivate
the
user’s
account.
For
Windows
systems,
you
can
control
whether
or
not
security
events
are
captured
by
the
system.
The
following
two
tasks
let
you
enable
or
disable
the
auditing
of
security
events
on
Windows
system
end
points.
The
rmt_ntaudit.exe
program
must
be
installed
on
the
system
to
be
audited
in
the
RMINSTDIR\bin
directory
to
support
these
tasks.
This
program
is
provided
on
the
Tivoli
Risk
Manager
event
server
in
the
RMINSTDIR\etc\tec\tasks
directory.
This
program
is
distributed
to
the
systems
to
be
audited
using
the
Tivoli
Enterprise
Console
Adapter
Configuration
Facility
(ACF).
Installing
the
program
with
ACF
is
described
in
the
IBM
Tivoli
Enterprise
Console
User’s
Guide.
Windows_Disable_Event_Auditing
Use
this
Tivoli
Risk
Manager
task
to
disable
event
auditing
on
a
Windows
system.
This
Tivoli
Risk
Manager
task
requires
the
rmt_ntaudit.exe
executable
to
be
installed
on
the
Windows
system
where
this
task
will
be
run.
Windows_Enable_Event_Auditing
Use
this
Tivoli
Risk
Manager
task
to
enable
event
auditing
on
a
152
IBM
Tivoli
Risk
Manager:
Administrator’s
Guide

Windows
system.
This
Tivoli
Risk
Manager
task
requires
the
rmt_ntaudit.exe
executable
to
be
installed
on
the
Windows
system
where
this
task
will
be
run.
Task
Arguments
include:
Select
a
success
or
failure
value:
v
Success
and
Failure
v
Success
v
Failure
v
Neither
Success
nor
Failure
Select
an
event
type:
v
Logon
and
Logoff
v
File
and
Object
Access
v
Use
of
User
Rights
v
User
and
Group
Management
v
Security
Policy
Changes
v
Restart,
Shutdown,
and
System
v
Process
Tracking
Windows_List_Active_Services
Use
this
Tivoli
Risk
Manager
task
to
list
the
Windows
system
services
that
are
active
on
a
Windows
system.
Windows_Run_Command
Use
this
Tivoli
Risk
Manager
task
to
run
a
Windows
system
command
using
cmd.exe.
Windows_Start_Service
Use
this
Tivoli
Risk
Manager
task
to
specify
the
name
of
a
Windows
system
service
that
you
want
to
start
using
NET
START.
For
example,
if
you
want
to
start
the
Apache
Web
server,
specify
apache
as
the
service
name.
Or,
if
you
want
to
start
the
adapter
for
Check
Point
FireWall-1,
specify
rma_cpfw
as
the
service
name.
Windows_Stop_Service
Use
this
Tivoli
Risk
Manager
task
to
specify
the
name
of
a
Windows
system
service
that
you
want
to
stop
using
NET
STOP.
Tasks
for
the
Event
Server
Tivoli
Risk
Manager
provides
the
following
Tivoli
Risk
Manager
tasks
for
viewing
the
status
of
the
Tivoli
Risk
Manager
event
server.
RM_Component_View_Status_for_Unix
Use
this
Tivoli
Risk
Manager
task
to
display
the
current
status
of
the
Tivoli
Risk
Manager
components
active
on
the
Tivoli
Enterprise
Console
server.
This
task
must
run
on
the
Tivoli
Risk
Manager
server.
RM_Component_View_Status_for_Windows
Use
this
Tivoli
Risk
Manager
task
to
display
the
current
status
of
the
Tivoli
Risk
Manager
components
active
on
the
Tivoli
Enterprise
Console
server.
This
task
must
run
on
the
Tivoli
Risk
Manager
server.
Output
will
be
similar
to
the
following
example:
Chapter
10.
Tasks
153
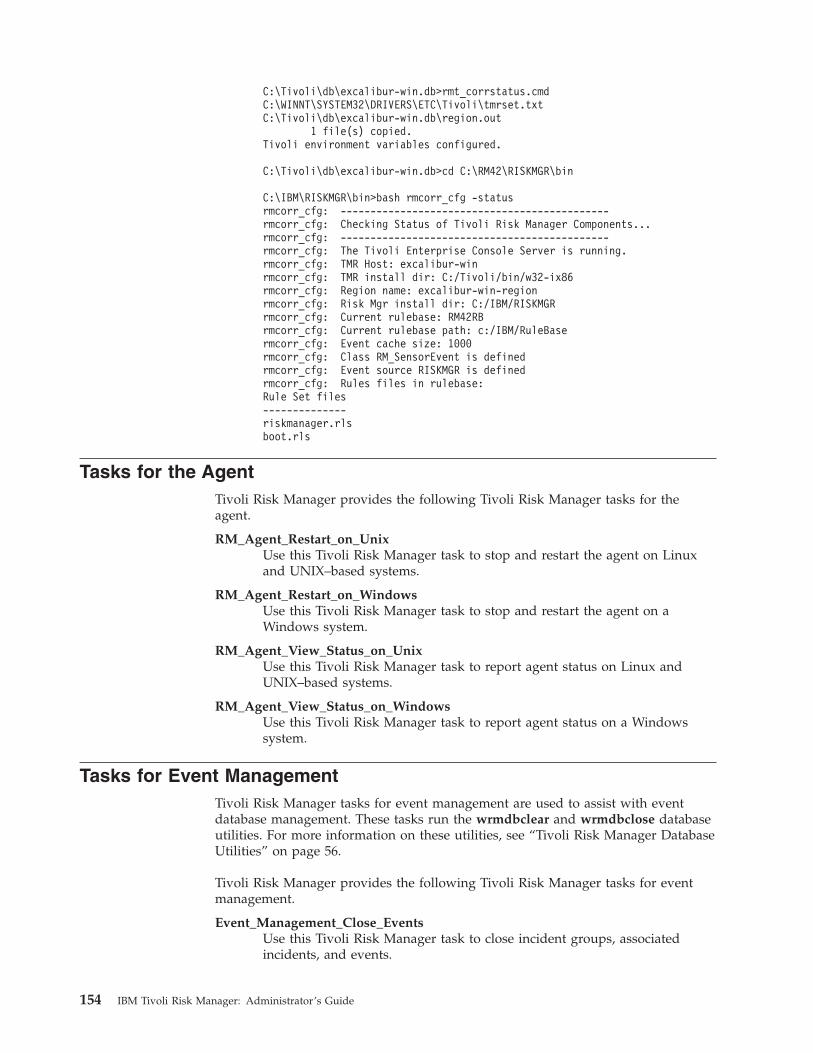
C:\Tivoli\db\excalibur-win.db>rmt_corrstatus.cmd
C:\WINNT\SYSTEM32\DRIVERS\ETC\Tivoli\tmrset.txt
C:\Tivoli\db\excalibur-win.db\region.out
1
file(s)
copied.
Tivoli
environment
variables
configured.
C:\Tivoli\db\excalibur-win.db>cd
C:\RM42\RISKMGR\bin
C:\IBM\RISKMGR\bin>bash
rmcorr_cfg
-status
rmcorr_cfg:
---------------------------------------------
rmcorr_cfg:
Checking
Status
of
Tivoli
Risk
Manager
Components...
rmcorr_cfg:
---------------------------------------------
rmcorr_cfg:
The
Tivoli
Enterprise
Console
Server
is
running.
rmcorr_cfg:
TMR
Host:
excalibur-win
rmcorr_cfg:
TMR
install
dir:
C:/Tivoli/bin/w32-ix86
rmcorr_cfg:
Region
name:
excalibur-win-region
rmcorr_cfg:
Risk
Mgr
install
dir:
C:/IBM/RISKMGR
rmcorr_cfg:
Current
rulebase:
RM42RB
rmcorr_cfg:
Current
rulebase
path:
c:/IBM/RuleBase
rmcorr_cfg:
Event
cache
size:
1000
rmcorr_cfg:
Class
RM_SensorEvent
is
defined
rmcorr_cfg:
Event
source
RISKMGR
is
defined
rmcorr_cfg:
Rules
files
in
rulebase:
Rule
Set
files
--------------
riskmanager.rls
boot.rls
Tasks
for
the
Agent
Tivoli
Risk
Manager
provides
the
following
Tivoli
Risk
Manager
tasks
for
the
agent.
RM_Agent_Restart_on_Unix
Use
this
Tivoli
Risk
Manager
task
to
stop
and
restart
the
agent
on
Linux
and
UNIX–based
systems.
RM_Agent_Restart_on_Windows
Use
this
Tivoli
Risk
Manager
task
to
stop
and
restart
the
agent
on
a
Windows
system.
RM_Agent_View_Status_on_Unix
Use
this
Tivoli
Risk
Manager
task
to
report
agent
status
on
Linux
and
UNIX–based
systems.
RM_Agent_View_Status_on_Windows
Use
this
Tivoli
Risk
Manager
task
to
report
agent
status
on
a
Windows
system.
Tasks
for
Event
Management
Tivoli
Risk
Manager
tasks
for
event
management
are
used
to
assist
with
event
database
management.
These
tasks
run
the
wrmdbclear
and
wrmdbclose
database
utilities.
For
more
information
on
these
utilities,
see
“Tivoli
Risk
Manager
Database
Utilities”
on
page
56.
Tivoli
Risk
Manager
provides
the
following
Tivoli
Risk
Manager
tasks
for
event
management.
Event_Management_Close_Events
Use
this
Tivoli
Risk
Manager
task
to
close
incident
groups,
associated
incidents,
and
events.
154
IBM
Tivoli
Risk
Manager:
Administrator’s
Guide
Event_Management_Remove_Events
Use
this
Tivoli
Risk
Manager
task
to
remove
closed
events
in
the
Tivoli
Enterprise
Console
event
repository
and
Tivoli
Risk
Manager
archive
table.
Note:
The
Event
Management
tasks
are
also
defined
as
jobs,
configured
to
run
on
the
Tivoli
Enterprise
Console
server.
Tasks
for
Check
Point
FireWall-1
Tivoli
Risk
Manager
provides
the
following
Tivoli
Risk
Manager
tasks
for
this
adapter:
CheckPoint_FW-1_Manage_by_IP_Address
Use
this
Tivoli
Risk
Manager
task
to
send
Suspicious
Activity
Monitor
(SAM)
requests
to
the
SAM
Server
in
a
Check
Point
FireWall-1
system.
CheckPoint_FW-1_Manage_by_Source_and_Destination
Use
this
Tivoli
Risk
Manager
task
to
send
SAM
requests
to
the
SAM
Server
in
a
Check
Point
FireWall-1
system.
CheckPoint_Start_Firewall_Adapter_on_Linux
Use
this
Tivoli
Risk
Manager
task
to
start
the
Check
Point
FireWall-1
adapter
on
your
selected
target
hosts.
CheckPoint_Start_Firewall_Adapter_on_Solaris
Use
this
Tivoli
Risk
Manager
task
to
start
the
Check
Point
FireWall-1
adapter
on
your
selected
target
hosts.
CheckPoint_Start_Firewall_Adapter_on_Windows
Use
this
Tivoli
Risk
Manager
task
to
start
the
Check
Point
FireWall-1
adapter
on
your
selected
target
hosts.
CheckPoint_Stop_Firewall_Adapter_on_Linux
Use
this
Tivoli
Risk
Manager
task
to
stop
the
Check
Point
FireWall-1
adapter
on
your
selected
target
hosts.
CheckPoint_Stop_Firewall_Adapter_on_Solaris
Use
this
Tivoli
Risk
Manager
task
to
stop
the
Check
Point
FireWall-1
adapter
on
your
selected
target
hosts.
CheckPoint_Stop_Firewall_Adapter_on_Windows
Use
this
Tivoli
Risk
Manager
task
to
stop
the
Check
Point
FireWall-1
adapter
on
your
selected
target
hosts.
See
the
IBM
Tivoli
Risk
Manager
Adapters
Guide
for
more
information.
Tasks
for
Cisco
Secure
PIX
Firewall
Tivoli
Risk
Manager
provides
the
following
Tivoli
Risk
Manager
tasks
for
this
adapter:
PIX_Configure_Firewall_Access
Use
this
Tivoli
Risk
Manager
task
to
modify
the
configuration
of
the
PIX
Firewall
so
that
connections
can
be
blocked
(both
existing
and
new)
or
unblocked
(allowed
to
be
established
again).
PIX_Show_Firewall_Configuration
Use
this
Tivoli
Risk
Manager
task
to
display
the
current
configuration
of
the
PIX
Firewall.
You
can
use
it
to
verify
the
implementation
of
your
site’s
security
policy.
Chapter
10.
Tasks
155

PIX_Configure_Firewall_Logging
Use
this
Tivoli
Risk
Manager
task
to
modify
the
configuration
of
the
PIX
Firewall
for
logging.
See
the
IBM
Tivoli
Risk
Manager
Adapters
Guide
for
more
information.
Tasks
for
Cisco
Secure
IDS
Tivoli
Risk
Manager
provides
the
following
Tivoli
Risk
Manager
tasks
for
this
adapter:
Cisco_Configure_DataFeed_Component
Use
this
Tivoli
Risk
Manager
task
to
configure
the
Cisco
Secure
IDS
DataFeed
adapter
client.
Cisco_Start_Secure_IDS_Adapter_on_Linux
Use
this
Tivoli
Risk
Manager
task
to
start
the
Cisco
Secure
IDS
adapter
on
your
selected
target
hosts.
Cisco_Start_Secure_IDS_Adapter_on_Solaris
Use
this
Tivoli
Risk
Manager
task
to
start
the
Cisco
Secure
IDS
adapter
on
your
selected
target
hosts.
Cisco_Start_Secure_IDS_Adapter_on_Windows
Use
this
Tivoli
Risk
Manager
task
to
start
the
Cisco
Secure
IDS
adapter
on
your
selected
target
hosts.
Cisco_Stop_Secure_IDS_Adapter_on_Linux
Use
this
Tivoli
Risk
Manager
task
to
stop
the
Cisco
Secure
IDS
adapter
on
your
selected
target
hosts.
Cisco_Stop_Secure_IDS_Adapter_on_Solaris
Use
this
Tivoli
Risk
Manager
task
to
stop
the
Cisco
Secure
IDS
Adapter
on
your
selected
target
hosts.
Cisco_Stop_Secure_IDS_Adapter_on_Windows
Use
this
Tivoli
Risk
Manager
task
to
stop
the
Cisco
Secure
IDS
Adapter
on
your
selected
target
hosts.
See
the
IBM
Tivoli
Risk
Manager
Adapters
Guide
for
more
information.
Tasks
for
Network
IDS
Tivoli
Risk
Manager
provides
the
following
Tivoli
Risk
Manager
tasks
for
this
adapter:
NIDS_Start_Adapter
Use
this
Tivoli
Risk
Manager
task
to
start
the
Network
IDS
adapter
on
your
selected
target
hosts.
NIDS_Stop_Adapter
Use
this
Tivoli
Risk
Manager
task
to
stop
the
Network
IDS
adapter
on
your
selected
target
hosts.
156
IBM
Tivoli
Risk
Manager:
Administrator’s
Guide
Chapter
11.
Web
Intrusion
Detection
The
Web
Intrusion
Detection
System
(Web
IDS)
analyzes
the
access
log
files
generated
by
a
Web
server.
It
analyzes
these
files
to
detect
Web
server
attacks.
A
Web
server
keeps
track
of
requests
in
an
access
log
file.
The
access
log
files
produced
by
Web
servers
contain
the
requests
that
are
posted
to
the
Web
server
as
well
as
status
information
that
is
generated
by
the
Web
server.
Web
IDS
reads
the
Web
server’s
access
log
file.
Depending
on
the
Web
server,
the
access
log
entries
are
formatted
using
a
specific
format.
One
of
the
most
common
formats
is
the
common
log
format
(CLF)
used
by
the
Apache
Servers
and
the
Sun
ONE
Web
Servers.
Extended
common
log
format
(ECLF)
is
also
supported
because
the
first
part
of
the
log
entry
conforms
to
CLF,
and
Web
IDS
ignores
additional
fields
at
the
end.
For
a
complete
list
of
supported
log
formats,
see
Table
14
on
page
158.
If
your
Web
server
is
not
listed
in
“Supported
Web
Servers”
on
page
158
and
the
access
log
file
deviates
from
CLF,
but
is
written
in
ASCII
and
contains
the
required
data
needed
for
proper
signature
matching,
the
Web
IDS
configuration
file
can
be
modified
to
add
a
description
of
this
new
format
to
ensure
Web
IDS
can
accurately
read
and
process
the
Web
server
requests.
To
specify
the
access
log
file
format,
you
must
configure
your
Web
server
for
the
correct
format.
Web
IDS
uses
a
knowledge-based
approach
to
detect
malicious
behavior.
By
defining
general
signatures
of
Web
server
attacks,
Web
IDS
can
detect
a
wide
range
of
attacks.
Attack
signatures
can
be
simple
text
strings
(such
as
phf),
or
they
can
be
Perl
regular
expressions,
for
example:
(?i)count\.cgi
Tivoli
Risk
Manager
includes
a
sig.nefarious
file
that
contains
signatures
for
Web
server
attacks.
Use
Web
IDS
if
you
have
a
Web
server
to
do
the
following:
v
Analyze
in
either
real-time
mode
or
in
batch
mode:
real-time
mode
All
new
log
entries
in
the
access
log
files
are
read.
Analysis
is
performed
as
the
new
log
entries
are
added
into
the
log
file.
For
real-time
mode,
you
must
deploy
Web
IDS
at
each
monitored
Web
server.
Web
IDS
supports
rollover
log
support.
“Configuring
Web
IDS
Log
File
Access
for
Rollover
Support”
on
page
166
explains
how
to
configure
Web
IDS
to
handle
multiple
log
files.
batch
mode
Web
IDS
does
not
need
to
run
at
the
Web
server.
Web
IDS
is
run
explicitly
and
reads
the
log
file
once.
You
can
tune
Web
IDS
to
take
advantage
of
knowledge
that
is
gathered
over
time.
See
“Tuning
the
Threshold
and
Decay
Values”
on
page
181
for
information.
When
attacks
are
discovered,
Web
IDS
generates
events
and
routes
them
to
the
Tivoli
Risk
Manager
for
correlation.
©
Copyright
IBM
Corp.
2003
157
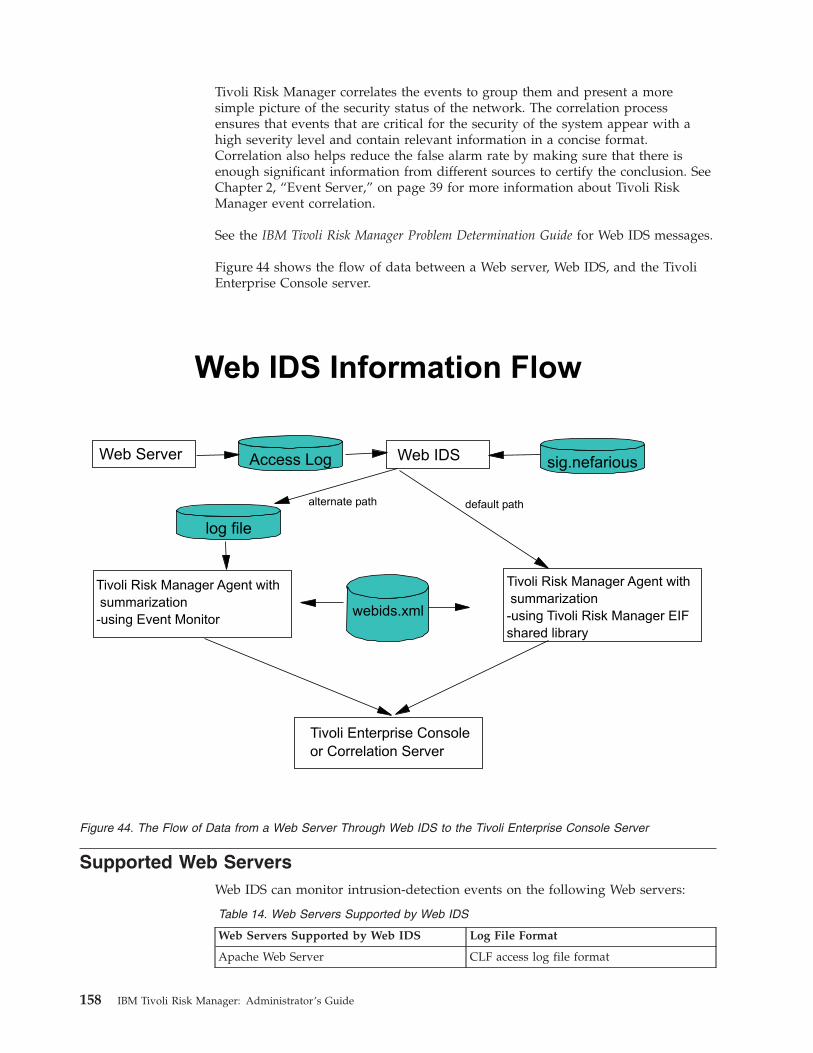
Tivoli
Risk
Manager
correlates
the
events
to
group
them
and
present
a
more
simple
picture
of
the
security
status
of
the
network.
The
correlation
process
ensures
that
events
that
are
critical
for
the
security
of
the
system
appear
with
a
high
severity
level
and
contain
relevant
information
in
a
concise
format.
Correlation
also
helps
reduce
the
false
alarm
rate
by
making
sure
that
there
is
enough
significant
information
from
different
sources
to
certify
the
conclusion.
See
Chapter
2,
“Event
Server,”
on
page
39
for
more
information
about
Tivoli
Risk
Manager
event
correlation.
See
the
IBM
Tivoli
Risk
Manager
Problem
Determination
Guide
for
Web
IDS
messages.
Figure
44
shows
the
flow
of
data
between
a
Web
server,
Web
IDS,
and
the
Tivoli
Enterprise
Console
server.
Supported
Web
Servers
Web
IDS
can
monitor
intrusion-detection
events
on
the
following
Web
servers:
Table
14.
Web
Servers
Supported
by
Web
IDS
Web
Servers
Supported
by
Web
IDS
Log
File
Format
Apache
Web
Server
CLF
access
log
file
format
Web IDS Information Flow
sig.nefariousWeb IDS
Tivoli Enterprise Console
or Correlation Server
webids.xml
log file
Access LogWeb Server
Tivoli Risk Manager Agent with
summarization
-using Tivoli Risk Manager EIF
shared library
Tivoli Risk Manager Agent with
summarization
-using Event Monitor
alternate path default path
Figure
44.
The
Flow
of
Data
from
a
Web
Server
Through
Web
IDS
to
the
Tivoli
Enterprise
Console
Server
158
IBM
Tivoli
Risk
Manager:
Administrator’s
Guide
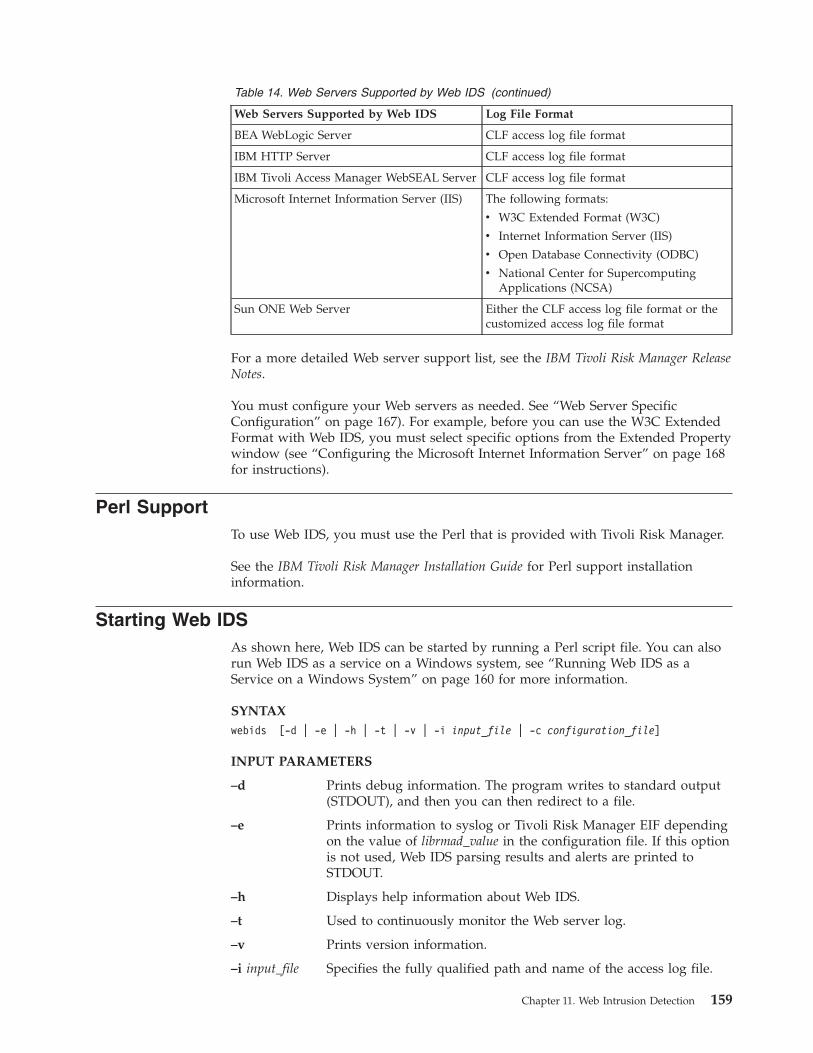
Table
14.
Web
Servers
Supported
by
Web
IDS
(continued)
Web
Servers
Supported
by
Web
IDS
Log
File
Format
BEA
WebLogic
Server
CLF
access
log
file
format
IBM
HTTP
Server
CLF
access
log
file
format
IBM
Tivoli
Access
Manager
WebSEAL
Server
CLF
access
log
file
format
Microsoft
Internet
Information
Server
(IIS)
The
following
formats:
v
W3C
Extended
Format
(W3C)
v
Internet
Information
Server
(IIS)
v
Open
Database
Connectivity
(ODBC)
v
National
Center
for
Supercomputing
Applications
(NCSA)
Sun
ONE
Web
Server
Either
the
CLF
access
log
file
format
or
the
customized
access
log
file
format
For
a
more
detailed
Web
server
support
list,
see
the
IBM
Tivoli
Risk
Manager
Release
Notes.
You
must
configure
your
Web
servers
as
needed.
See
“Web
Server
Specific
Configuration”
on
page
167).
For
example,
before
you
can
use
the
W3C
Extended
Format
with
Web
IDS,
you
must
select
specific
options
from
the
Extended
Property
window
(see
“Configuring
the
Microsoft
Internet
Information
Server”
on
page
168
for
instructions).
Perl
Support
To
use
Web
IDS,
you
must
use
the
Perl
that
is
provided
with
Tivoli
Risk
Manager.
See
the
IBM
Tivoli
Risk
Manager
Installation
Guide
for
Perl
support
installation
information.
Starting
Web
IDS
As
shown
here,
Web
IDS
can
be
started
by
running
a
Perl
script
file.
You
can
also
run
Web
IDS
as
a
service
on
a
Windows
system,
see
“Running
Web
IDS
as
a
Service
on
a
Windows
System”
on
page
160
for
more
information.
SYNTAX
webids
[-d
|
-e
|
-h
|
-t
|
-v
|
-i
input_file
|
-c
configuration_file]
INPUT
PARAMETERS
–d
Prints
debug
information.
The
program
writes
to
standard
output
(STDOUT),
and
then
you
can
then
redirect
to
a
file.
–e
Prints
information
to
syslog
or
Tivoli
Risk
Manager
EIF
depending
on
the
value
of
librmad_value
in
the
configuration
file.
If
this
option
is
not
used,
Web
IDS
parsing
results
and
alerts
are
printed
to
STDOUT.
–h
Displays
help
information
about
Web
IDS.
–t
Used
to
continuously
monitor
the
Web
server
log.
–v
Prints
version
information.
–i
input_file
Specifies
the
fully
qualified
path
and
name
of
the
access
log
file.
Chapter
11.
Web
Intrusion
Detection
159

–c
configuration_file
Specifies
the
fully
qualified
path
and
name
of
the
configuration
file.
The
default
is:
$RMADHOME/etc/webids.cfg
For
example,
to
start
Web
IDS,
have
it
read
from
the
Web
server’s
access
log
(webserver.accesslog),
and
then
send
the
output
to
the
Tivoli
Enterprise
Console
event
log
adapter:
webids
-e
-i
webserver.accesslog
Note:
On
Linux
and
UNIX-based
systems,
you
must
set
up
the
Tivoli
Risk
Manager
environment
by
running:
.
/etc/Tivoli/rma_eif_env.sh
For
more
information
on
using
this
command,
see
the
IBM
Tivoli
Risk
Manager
Command
Reference.
Running
Web
IDS
as
a
Service
on
a
Windows
System
The
Web
IDS
service
(rma_webids)
is
an
additional
program
that
facilitates
the
start
of
Web
IDS
as
a
Windows
Service.
The
Web
IDS
service
uses
the
Event
Integration
Facility
(EIF)
as
an
event–send
mechanism.
Configuring
Web
IDS
as
a
Service
on
a
Windows
System
After
installing
Tivoli
Risk
Manager,
the
Web
IDS
Service
must
be
installed
as
a
Windows
Service
and
configured
to
use
the
Web
IDS
configuration
file.
The
rma_webids
–i
webids
command
will
install
the
Web
IDS
as
a
service
on
a
Windows
system.
f:\>rma_webids
-i
webids
HRMWS0007I:
Attempting
to
install
service:
webids
HRMWS0008I:
Service
installed:
webids
HRMWS0030I:
WebIDS
service
commands:
"e:\IBM\RISKMGR\perl\bin\perl.exe"
"e:\IBM\RISKMGR\bin\webids.bat"
-c
"e:\IBM\RISKMGR\etc\webids.cfg"
-t
-e
syslog
HRMWS0002I:
Exiting...
If
you
have
changed
the
service
name
or
created
more
than
one
service
entry,
be
sure
to
remove
the
correct
entry
using
the
names
originally
specified.
Note:
The
Web
IDS
service
uses
the
following
command
to
run
Web
IDS
as
a
service.
"e:\IBM\RISKMGR\perl\bin\perl.exe"
"e:\IBM\RISKMGR\bin\webids.bat"
-c
"e:\IBM\RISKMGR\etc\webids.cfg"
-t
-e
syslog
The
Rollover
logfile
mechanism
must
be
used
to
specify
the
location
of
the
Web
Servers
HTTP
access
logs.
Also,
it
must
be
configured
to
use
the
Tivoli
Risk
Manager
EIF
to
send
events.
In
order
to
remove
the
Web
IDS
service
,
the
service
name
used
to
install
the
Web
IDS
service
must
be
used
to
uninstall
the
service
(webids
is
the
name
assigned
to
the
service
and
will
be
listed
it
the
Windows
Service
Control
Panel).
rma_webids
–r
webids
f:\>rma_webids
-r
webids
HRMWS0008I:
Attempting
to
remove
service:
webids
HRMWS0011I:
Service
removed:
webids
HRMWS0002I:
Exiting...
160
IBM
Tivoli
Risk
Manager:
Administrator’s
Guide
For
more
information
on
this
command,
see
the
IBM
Tivoli
Risk
Manager
Command
Reference.
Access
Log
Rollover
Support
Web
servers
can
generate
large
amounts
of
access
logs
in
a
relatively
short
amount
of
time.
For
this
reason,
many
Web
servers
can
be
configured
to
rollover
their
logs.
After
a
predefined
file
limit
has
been
reached,
or
a
certain
amount
of
time
has
passed,
the
access
log
will
be
copied
to
an
archive
and
new
log
will
be
started.
Web
IDS
has
the
capability
to
keep
track
of
this
activity
and
continuously
monitor
the
active
log
file.
The
sig.nefarious
Signatures
File
The
Tivoli
Risk
Manager
sig.nefarious
file
stores
the
signatures
for
Web
attacks.
Web
IDS
uses
this
file
to
monitor
Web
servers
for
attacks.
After
installation,
the
default
sig.nefarious
file
is
in
the
RMINSTDIR/etc
directory
on
all
supported
operating
systems.
To
create
your
own
signatures
file,
copy
the
default
signatures
file
provided
when
you
installed
Tivoli
Risk
Manager
or
download
the
most
recent
version
of
the
signatures
file
from
the
Support
Web
site
at:
http://www.ibm.com/software/sysmgmt/products/
support/IBMTivoliRiskManager.html
Parser
Engine
The
parser
engine
provides
instructions
on
how
to
read
the
log
files,
and
it
determines
what
type
of
analysis
to
conduct.
An
example
of
suspicious
activity
might
be
the
hexadecimal
encoding
of
certain
characters.
The
parser
engine
runs
tests
that
evaluate
methods,
strings,
and
protocols
to
find
suspicious
uniform
resource
locator
(URL)
activities,
such
as:
v
Wrong
format
for
the
log
entry,
for
example,
a
missing
field
in
the
log
record
v
Unable
to
understand
or
interpret
the
date
and
time
information
v
Empty
URL
request
v
Bad
URL
format
v
Invalid
hexadecimal
encoding
that
is
used
in
the
URL
request
v
Invalid
hexadecimal
encoding
that
is
used
in
the
query
request
v
Suspicious
hexadecimal
code
that
is
used
in
the
URL
request
v
Suspicious
hexadecimal
code
that
is
used
in
the
query
request
The
classes
are
predefined.
You
cannot
add
or
remove
classes.
The
class
header
follows
this
format:
[class=classname;
level1=count1;
level2=count2;
k=decay_param]
You
can
only
change
these
class
parameters.
v
level1=count1;
v
level2=count2;
v
k=decay_param
Chapter
11.
Web
Intrusion
Detection
161

See
“Tuning
the
Threshold
and
Decay
Values”
on
page
181
for
instructions
on
how
to
tune
the
parser
engine’s
class
parameters.
Pattern
Engine
The
pattern
engine
looks
for
attack
signatures
in
specified
fields
of
the
log
file
entry.
Examples
of
the
types
of
fields
that
the
pattern
engine
searches
are:
v
URL
v
status
v
query
v
method
The
classes,
unlike
in
the
parser
engine,
are
not
predefined
and
can
be
added
or
removed.
The
class
header
follows
this
format:
[class=classname;
field=fieldname;
level1=count1;
level2=count2;
k=decay_param]
This
engine,
like
the
parser
engine,
runs
tests
against
the
log
entry.
If
a
test
raises
a
warning,
additional
tests
can
be
performed
to
determine
whether:
v
A
suspicious
request
also
contains
suspicious
entries
in
the
query
field
v
A
suspicious
request
succeeded
v
A
suspicious
request
contains
any
hexadecimal
encoding
(hex
codes)
For
combined
testing,
the
class
header
follows
this
format:
[class=classname;
field=field;
requires=class;
level1=count1;
level2=count2;
k=decay_param]
For
the
most
up-to-date
intrusion
detection,
add
newly
discovered
attacks
and
vulnerabilities
to
the
list
of
signatures
in
this
file.
Regularly
review
and
track
new
attacks
using
some
of
the
security
community
databases.
To
configure
the
Web
IDS
pattern
engine,
edit
the
sig.nefarious
file’s
pattern
engine
section.
Configuration
tasks
include:
v
“Adding
or
Removing
Web
Attack
Signatures”
on
page
178
v
“Adding
or
Removing
Signature
Classes”
on
page
178
v
“Tuning
the
Threshold
and
Decay
Values”
on
page
181
v
“Combining
and
Refining
Pattern
Tests”
on
page
179
Suspicion
Engine
The
suspicion
engine
tracks
hosts
that
you
identify
as
being
suspicious.
If
a
host
sent
a
request
that
caused
Web
IDS
to
raise
a
warning
or
an
alert,
you
can
add
that
host’s
name
to
the
sig.nefarious
file
to
continue
to
track
this
particular
host.
The
class
header
follows
this
format:
[class=suspiciousHosts;
printLvl=level]
To
configure
Web
IDS,
edit
the
sig.nefarious
file’s
suspicion
engine
section.
Configuration
tasks
include:
v
“Adding
or
Removing
Suspicious
Hosts”
on
page
180
v
“Specifying
the
Type
of
Suspicious
Activity”
on
page
180
162
IBM
Tivoli
Risk
Manager:
Administrator’s
Guide

Trust
Engine
You
can
define
a
specific
set
of
hosts
as
trusted.
When
requests
are
received
from
a
trusted
host,
any
alarms
generated
are
suppressed.
This
suppression
is
useful
when
the
scanning
software
is
used
within
an
enterprise
by
trusted
network
administrators.
Many
false
alarms
are
eliminated.
You
can
define
a
specific
set
of
signatures
as
trusted.
To
detect
variations
of
an
attack,
make
the
attack
signatures
as
generic
as
possible.
However,
when
you
make
the
attack
signatures
too
generic,
false
alarms
can
be
triggered.
The
trust
engine
allows
you
to
reduce
the
number
of
false
alarms.
First,
determine
that
a
signature
can
be
trusted.
Then,
add
this
signature
to
reduce
the
number
of
false
alarms.
The
class
header
follows
this
format:
[class=classname;
field=fieldname;
cancels=class]
For
example:
[class=trustedSig;
field=url;
cancels=all]
/cgi-bin/fortune
/cgi-bin/here
To
configure
Web
IDS,
edit
the
sig.nefarious
file’s
trust
engine
section.
See
“Adding
or
Removing
Trusted
Signatures”
on
page
180
for
more
information.
Skip
Engine
The
Skip
Engine
is
similar
to
the
Trust
Engine.
You
define
a
specific
set
of
signatures
(as
regular
expressions)
to
skip.
Web
IDS
does
not
process
any
request
that
matches
this
pattern.
The
difference
between
the
Skip
Engine
and
the
Trust
Engine
is
subtle,
but
important.
With
the
Trust
Engine,
you
define
signatures
that,
when
matched,
cancel
out
specific
classes
of
alerts.
With
the
Skip
Engine,
if
the
signatures
match,
then
nothing
is
done
with
the
request.
By
default,
Web
IDS
does
not
process
requests
for
GIF
or
JPEG
images
as
suspicious,
because
these
files
will
not
be
the
source
of
attacks.
For
example:
[class=pictures;
field=url]
\.gif$
gif
\.jpg$
jpg
The
Web
IDS
Configuration
File
Web
IDS
provides
a
configuration
file,
webids.cfg,
for
setting
and
configuring
its
options.
This
configuration
file
contains
a
section
for
each
Web
server
that
Tivoli
Risk
Manager
Web
IDS
supports.
Note:
Make
sure
that
you
are
editing
the
correct
section
of
the
configuration
file
for
the
type
of
Web
server
that
you
want
to
configure.
The
default
configuration
is
for
a
Web
server
that
uses
the
Common
Log
Format.
To
change
from
the
default
format
of
CLF
to
another
logfile
format,
comment
out
the
CLF
entries
and
find
the
correct
section
of
the
configuration
file
for
the
type
of
Web
server
that
you
want
to
configure.
Also,
remove
the
pound
sign
(#)
to
uncomment
lines
in
that
section.
You
can
edit
the
Web
IDS
configuration
file
to:
v
Specify
forwarding
events
to
the
system
log
(Linux
and
UNIX-based
systems
syslog
or
the
Windows
Event
Log
adapter)
or
the
Tivoli
Risk
Manager
EIF.
Chapter
11.
Web
Intrusion
Detection
163

v
Specify
fully
qualified
path
information
for
various
components
of
Web
IDS,
for
example,
the
signature
file
or
the
Tivoli
Risk
Manager
EIF
library
file.
v
Provide
an
error-exit
statement.
v
Specify
the
Web
server’s
log
file
syntax.
–
Specify
the
format
of
the
access
log
file
that
it
will
be
reading;
either
deviate
from
or
adhere
to
the
CLF.
–
Specify
acceptable
date
formats.
–
Define
the
dictionary
configuration.
–
Define
the
text
character
used
to
separate
the
key
variables
and
the
Web
server’s
descriptive
terms.
–
Define
the
extraneous
text
to
be
removed.v
Specify
log
file
access
for
rollover
support.
For
complete
information
about
how
to
change
the
configuration
file,
see
“Editing
the
Web
IDS
Configuration
File.”
Editing
the
Web
IDS
Configuration
File
Before
you
begin
editing
the
configuration
file,
see
the
introductory
information
in
“The
Web
IDS
Configuration
File”
on
page
163.
The
webids.cfg
configuration
file
is
an
editable
text
file
that
allows
you
to
customize
the
environment
that
Web
IDS
is
running
in.
This
configuration
file
contains
sections
for
the
Web
servers
that
Tivoli
Risk
Manager
Web
IDS
supports.
Usually
you
do
not
have
to
change
the
variables
in
the
file
because
they
are
set
during
installation.
The
sections
below
list
the
variables
in
the
file.
Note:
Make
sure
that
you
are
editing
the
correct
section
for
the
type
of
Web
server
that
you
want
to
configure.
Changing
the
Locale
Information
When
using
language
files
other
than
U.S.
English,
the
National
Language
Service
(NLS)
path
must
be
set
to
establish
the
locale.
The
default
NLS
path
is
set
automatically
by
the
Web
IDS
installation
and
setup
procedure.
The
nlsPath_value
parameter
is
automatically
set
as
follows:
nls_Path_value
=
nlspath
where
nlspath
is
the
fully
qualified
path
location
to
the
Web
IDS
message
catalog
file,
webids.cat.
For
example,
if
nlsPath_value
is
set
to:
nlsPath_value
=
x:\webids\%L\%N.cat
where
x:
is
the
drive
letter,
both
the
language
variable
(%L)
and
the
message
catalog
file
name
variable
(%N.cat)
are
resolved
at
runtime.
Note:
The
%L
and
%N
must
be
uppercase.
Changing
the
Library
Information
When
Web
IDS
is
using
the
Tivoli
Risk
Manager
EIF
Perl
interface
to
send
events
to
the
Tivoli
Risk
Manager
server,
it
uses
the
value
associated
with
the
librmadPath_value
parameter
in
the
webids.cfg
file
to
locate
the
library.
This
164
IBM
Tivoli
Risk
Manager:
Administrator’s
Guide

parameter
is
set
automatically
by
the
Web
IDS
installation
and
setup
procedure.
For
example,
if
Web
IDS
is
installed
on
a
Windows
system,
the
following
parameters
are
set:
librmad_value=1
librmadPath_value=x:\IBM\RISKMGR\bin
where
librmad_value=1
indicates
that
Web
IDS
is
to
route
its
events
to
Tivoli
Risk
Manager
EIF,
and
librmadPath_value
specifies
the
path
to
the
required
library,
as
installed
with
Tivoli
Risk
Manager
EIF.
Specifying
the
Location
of
the
sig.nefarious
Signatures
File
The
Tivoli
Risk
Manager
sig.nefarious
file
stores
the
signatures
for
Web
attacks.
Web
IDS
uses
this
file
to
monitor
Web
servers
for
attacks.
For
complete
information
about
the
sig.nefarious
file,
see
“The
sig.nefarious
Signatures
File”
on
page
161.
Note:
Do
not
edit
the
original
sig.nefarious
file
that
is
provided
with
Tivoli
Risk
Manager.
Make
a
copy
of
this
file,
rename
it,
and
edit
the
copy.
Edit
the
webids.cfg
configuration
file
to
specify
the
path
and
name
of
the
signatures
file
that
you
want
to
load.
For
example:
signatureFilePath_value
=
Path\SignaturesFileName
where
Path\SignaturesFileName
is
one
of
the
following:
v
The
fully
qualified
path
and
file
name
of
the
default
sig.nefarious
file.
v
The
fully
qualified
path
to
your
own
signatures
file
that
you
created
by
copying,
renaming,
and
changing
the
sig.nefarious
file
provided
with
Tivoli
Risk
Manager.
For
example:
signatureFilePath_value
=
g:\webids\sig.mysignatures
To
download
the
most
current
version
of
sig.nefarious
signatures
file,
see
the
Support
Web
site
at:
http://www.ibm.com/software/sysmgmt/products/
support/IBMTivoliRiskManager.html
Specifying
the
Exit
Information
Specifies
the
number
of
errors,
that
is,
the
access
log
file
entries
that
do
not
match
the
format
expected,
before
exiting
occurs:
exit_value
=
n
Select
from
the
following
values
to
specify
when
to
exit
on
error
conditions:
0
Never
exit.
1
Exit
after
the
first
error.
n
Exit
after
a
specified
number
of
errors
(access
log
file
entries
that
do
not
match
the
format
expected).
The
number
of
access
log
file
errors
cannot
exceed
(2**53)-1.
Specifying
the
Refresh
Information
Specifies
the
number
of
alters
to
gather
before
discarding
all
previously
stored
alter
information.
It
is
recommended
that
the
refresh
value
is
not
less
than
the
largest
Chapter
11.
Web
Intrusion
Detection
165
level2
value
specified
in
the
signature
file.
Web
IDS
will
calculate
a
refresh
value
of
1.5
times
the
largest
level2
value
if
the
refresh_value
is
set
to
1.
refresh_value=0
Refresh
occurs
when:
v
Web
IDS
does
not
discard
stale
alert
info=0
v
Web
IDS
calculates
appropriate
refresh
rate=1
v
Web
IDS
sets
the
refresh
rate
to
number
specified=n
To
configure
Web
IDS
to
clean
up
the
stale
suspicious
request
information,
set
the
refresh_value
attribute
in
the
webids.cfg
file
to
the
proper
setting.
You
can
disable
this
refresh
feature
by
setting
the
refresh_value
to
0.
A
refresh_value
set
to
1
means
that
Web
IDS
will
calculate
the
optimal
refresh
value
and
a
refresh_value
set
to
n
is
the
minimum
number
of
suspicious
requests
received
by
Web
IDS
to
trigger
the
clean
up
of
the
stale
requests.
The
n
number
of
suspicious
requests
should
not
be
smaller
than
the
largest
level2
value.
Specifying
File
Pattern
Information
File
pattern
Specifies
a
regular
expression,
not
a
wildcard,
to
match
against
files.
Therefore,
Web
IDS
can
switch
more
up-to-date
logfiles
as
they
become
available,
without
having
to
restart.
File
path
specifies
the
path
where
Web
IDS
should
look
for
the
logfile.
File
match
specifies
the
whether
this
is
disabled
or
enabled.
this
feature
is
disabled=0
this
feature
is
enabled=1
The
following
is
an
example
of
common
values
to
support
Apache
on
a
Linux
system:
filePattern_value=^access_log.*
filePath_value=/usr/local/apache/logs
fileMatch_value=1
Specifying
the
Resume
Function
Information
Web
IDS
has
the
ability
to
resume
analysis
of
a
file
from
where
it
ended
the
last
time
it
was
running.
This
prevents
duplicating
alerts
each
time
you
run
Web
IDS.
Resume
position
specifies
the
whether
this
is
disabled
or
enabled.
Resuming
is
disabled=0
Resuming
is
enabled=1
The
following
is
an
example
of
the
resume
function:
resumePosition_value=1
On
a
Windows
system,
Web
IDS
must
write
out
the
resume
information
at
certain
intervals.
This
value
specifies
how
many
alerts
must
be
generated
before
this
information
is
saved.
If
this
option
is
missing,
Web
IDS
will
default
to
20.
resumeWindowsInterval_value=20
Configuring
Web
IDS
Log
File
Access
for
Rollover
Support
You
can
schedule
most
Web
servers
to
switch
to
a
different
log
file
after
an
amount
of
time
you
specify,
for
example,
a
day.
Web
IDS
can
also
switch
to
new
log
files
without
exiting.
Edit
the
variables
in
the
webids.cfg
file
that
let
you
specify
log
files.
166
IBM
Tivoli
Risk
Manager:
Administrator’s
Guide

filePattern_value
Specifies
a
regular
expression
for
Web
IDS
to
use
to
find
valid
log
files.
Web
IDS
uses
the
most
recently
modified
file
that
matches
this
pattern.
filePath_value
Specifies
the
directory
where
the
logfiles
are
located.
fileMatch_value
1
Enables
rollover
log
support
0
Disables
rollover
log
support.
Web
IDS
ignores
the
filePattern_value
and
filePath_value
and
specifications.
For
example,
for
an
Apache
Web
server
on
Linux
and
UNIX-based
systems:
filePattern_value
=
access_log.*
filePath_value
=
/usr/local/apache/logs
fileMatch_value
=
1
A
file
specified
on
the
command
line
with
the
–i
option
overrides
the
values
specified
in
the
webids.cfg
file.
However,
if
this
information
is
specified
in
the
configuration
file,
you
do
not
have
to
specify
the
file
name
explicitly
on
the
command
line.
Web
Server
Specific
Configuration
You
must
configure
the
Web
server
access
log
files
before
using
Web
IDS.
Depending
on
the
Web
server,
the
configuration
tasks
include:
v
Configuring
the
following
Web
servers
in
the
CLF:
–
Configuring
the
Apache
Web
Server
–
Configuring
the
IBM
HTTP
Server
–
Configuring
the
IBM
Tivoli
Access
Manager
WebSEALv
Configuring
the
Sun
ONE
Web
Server
v
Configuring
the
Microsoft
Internet
Information
Server
in
the
following
log
file
formats:
–
W3C
–
IIS
–
NCSA
–
ODBC
For
Web
server
support
information,
see
the
IBM
Tivoli
Risk
Manager
Release
Notes.
Configuring
Web
Servers
That
Use
the
Common
Log
Format
Web
servers
that
create
the
access
log
file
by
using
the
CLF
include:
v
Apache
Web
Server
v
IBM
Tivoli
Access
Manager
WebSEAL
v
IBM
HTTP
Server
The
Sun
ONE
Web
Server
allows
you
select
CLF
to
generate
Common
Log
Format
output.
For
additional
configuration
instructions,
see
“Configuring
the
Sun
ONE
Web
Server”
on
page
168.
Chapter
11.
Web
Intrusion
Detection
167

Configuring
the
Apache
Web
Server
On
the
Apache
Web
Server,
the
access
log
file
is
installed
in
the
/logs
directory
during
Apache
installation.
On
Linux
and
UNIX-based
systems,
information
is
written
to
the
access_log
file.
On
a
Windows
system,
information
is
written
to
the
access.log
file.
Configuring
IBM
Tivoli
Access
Manager
WebSEAL
Server
The
Tivoli
Access
Manager
WebSEAL
lets
you
store
requests,
referer,
and
agent
log
records
in
the
same
file.
However,
Web
IDS
understands
only
the
request
log
records.
When
you
configure
WebSEAL,
store
the
request
log
records
in
a
file
separate
from
the
referer
and
agent
information.
You
can
specify
the
file
path
and
names
of
the
location
for
the
three
types
of
log
information
in
the
wand
section
of
the
WebSEAL
configuration
file.
Configuring
the
Sun
ONE
Web
Server
To
configure
your
Sun
ONE
Web
Server:
1.
Run
the
startconsole.sh
script
file
located
in
the
/*/netscape/server4
directory.
This
script
file
starts
the
Administrator’s
tool
in
the
Netscape
Web
browser.
2.
Select
the
Web
server
you
want
to
configure
from
the
Select
a
Server
menu
from
the
Servers
tab
at
the
top
of
the
page.
3.
Click
Manage
to
load
the
new
Web
page.
4.
Click
Status.
5.
Click
Logging
Preferences
to
display
the
access
log
configuration
page.
6.
Select
Domain
Names
to
set
the
type
of
record.
7.
Select
Use
Common
Logfile
Format
to
set
the
type
of
format.
The
default
access
log
file
name
and
location
are:
/*/netscape/server4/https-hostname.domain.com/logs/access
Configuring
the
Microsoft
Internet
Information
Server
Roll
over
support
is
by
default
disabled
in
Web
IDS.
To
ensure
that
the
Microsoft
Internet
Information
Server
(IIS)
stores
all
Web
server
requests
in
one
file,
follow
the
instructions
below:
1.
From
the
IIS
Microsoft
Management
Console,
right
click
the
name
of
the
Web
server.
2.
Choose
Properties
and
select
the
WebSite
tab.
3.
Click
Properties
in
the
logging
section.
4.
Change
the
log
period
to
unlimited
file
size.
After
following
these
instructions,
IIS
will
not
swap
out
logs
but
will
instead
write
to
the
same
file
infinite
times.
To
enable
roll
over
support
requires
updating
the
Web
IDS
configuration
file,
see
“Configuring
Web
IDS
Log
File
Access
for
Rollover
Support”
on
page
166
for
information
and
configuring
IIS
to
set
a
log
period
value.
For
the
IIS
W3C
Extended
Format,
you
must
select
a
minimum
set
of
Extended
Property
options
for
Windows.
You
do
not
need
to
provide
Extended
Property
options
for
the
other
formats
that
IIS
provides,
such
as
National
Center
for
Supercomputing
Applications
(NCSA).
168
IBM
Tivoli
Risk
Manager:
Administrator’s
Guide

You
must
select
the
following
set
of
options
from
the
Extended
Property
window
for
the
W3C
format:
v
Date
v
Time
v
Client
IP
address
v
Method
v
URI
stem
v
URI
query
v
Bytes
sent
v
HTTP
status
v
Protocol
version
If
you
select
any
additional
options,
such
as
Cookie
or
Server
Port,
Web
IDS
removes
information
about
these
options
prior
to
sending
the
information
to
the
Tivoli
Risk
Manager
EIF
or
the
Windows
Event
Log
adapter.
These
options
are
set
to
ignore
in
the
dictionary
definitions
supplied
in
the
W3C
section
of
the
webids.cfg
file.
To
see
the
complete
list
of
Extended
Properties:
1.
Click
Microsoft
Personal
WebServer
→
Internet
Service
Manager.
2.
From
the
console,
select
Default
Web
Site.
3.
Expand
the
icon
for
the
computer
host,
if
necessary.
4.
Click
Properties
→
Active
Log
Format.
5.
From
Active
Log
Format,
click
W3C
Extended
Logfile
Format.
6.
Click
Properties
→
Extended
Properties
tab.
The
options
that
you
select
appear
as
a
comment
line
in
the
log
file.
For
example,
you
might
see:
#Fields:
date
time
c-ip
cs-method
cs-uri-stem
cs-uri-query
sc-status
sc-bytes
cs-version
If
you
do
not
select
the
minimum
list
of
properties,
Web
IDS
flags
the
error.
Then,
Web
IDS
records
the
missing
options
and
the
line
number
in
the
log
file,
and
generates
this
event:
ALERT
:parser(readAccessLog)==>nnnn:Malformed
line
in
the
log
file.
the
other
tests
skipped.
The
log
file
that
the
IIS
server
creates
is
saved
using
the
YYMMDD
format
(for
example
ex000530.log)
in
directory:
c:\winnt\system\logfiles\w3svc1\exYYMMDD.log
If
the
National
Computer
Security
Association
(NCSA)
format
is
used,
the
log
file’s
name
is
ncYYMMDD.log.
Specifying
Log
File
Format
and
Values
Web
servers
that
Web
IDS
supports
can
use
different
log
formats.
For
each
log
format,
different
parameters
values,
as
appropriate
for
the
Web
server
you
want
to
use,
are
defined
in
the
webids.cfg
configuration
file.
Not
every
parameter
listed
applies
to
each
server.
The
configuration
file
is
divided
into
different
sections-each
section
applies
to
a
different
type
of
Web
server
log
format.
Chapter
11.
Web
Intrusion
Detection
169

To
use
the
default
Common
Log
Format
(CLF),
no
action
is
needed
because
the
CLF
default
parameters
are
not
commented
out.
To
use
a
different
Web
server
format
other
than
CLF:
v
Locate
the
Common
Log
Format
section
and
comment
out
the
lines
that
apply
to
the
CLF
by
adding
a
pound
sign
(#)
to
the
beginning
of
each
parameter
value
line.
v
Locate
the
section
that
applies
to
the
log
format
you
want
to
use,
and
remove
the
pound
sign
(#)
that
is
at
the
beginning
of
each
parameter
value
line.
The
following
values,
as
appropriate
for
the
Web
server
you
want
to
use,
are
defined
in
the
webids.cfg
configuration
file:
clf_value
Select
whether
the
logfile
format
should
adhere
or
deviate
from
CLF
standards:
Deviates
from
Common
Log
Format
=
0
Adheres
to
Common
Log
Format
=
1
dictionary_value
Some
Web
servers
provide
a
description
of
the
content
and
the
order
of
the
information
logged
in
the
Web
server’s
log
file.
The
dictionary_value
provides
a
way
for
Web
IDS
to
interpret
the
Web
server’s
naming
convention.
The
Web
server
provides
a
comment
line
that
lists
the
log
entry
fields.
In
order
for
Web
IDS
to
understand
that
comment
line,
Web
IDS
must
be
able
to
equate
the
Web
IDS
key
variables
used
(for
example,
host,
method,
and
so
forth)
with
the
naming
convention
that
is
used
by
the
Web
server.
Web
IDS
key
variables
include:
v
bytes
v
day
v
host
v
hour
v
method
v
min
v
month
v
protocol
v
query
v
rfc
v
sec
v
status
v
timezone
v
user
v
url
v
year
If
the
Web
server
provides
additional
information,
that
does
not
equate
to
a
Web
IDS
key
variable,
then
map
the
Web
server
key
variable
to
the
Web
IDS
term
ignore.
For
example,
the
Microsoft
Internet
Information
Server
W3C
log
file
might
list
the
key
variable
s-sitename
that
does
not
map
to
any
of
the
Web
IDS
key
variables
and,
therefore,
is
set
to
ignore.
See
the
W3C
dictionary_value
for
an
example
of
using
ignore.
170
IBM
Tivoli
Risk
Manager:
Administrator’s
Guide

Note:
If
you
include
a
log
format
in
the
logfile
and
specify
a
dictionary
value
key
in
the
configuration
key,
Web
IDS
uses
that
information
to
figure
out
the
new
logfile
format.
If
you
do
not
specify
a
dictionary
value
or
a
comment
value,
each
request,
that
does
not
conform
to
the
regular
expression
that
Web
IDS
uses
to
break
apart
the
log
entry,
causes
a
warning
event.
For
example,
some
Web
servers
write
the
log
format
as
the
first
line
of
their
log
file
when
running
in
batch
mode.
Whenever
this
occurs,
Web
IDS
generates
the
following
event
because
the
log
entry
does
not
conform
to
the
CLF:
ALERT
:parser(readAccessLog)==><line1>:Malformed
line
in
the
log
file.
the
other
tests
skipped.
dictionary_delim
Lists
the
text
characters
used
to
delimit
Web
IDS
key
variables
and
the
Web
server’s
descriptive
terms.
date_value
Web
servers
use
different
methods
of
specifying
the
date
format.
The
date_value
flag
enables
you
to
specify
the
typical
date
style
for
the
Web
server’s
log
file
format.
You
can
use
the
logPattern_value
to
create
an
intermediate
definition.
The
intermediate
definitions
must
eventually
resolve
to
a
Web
IDS
key
variable
or
variables.
For
an
example,
see
the
intermediate
definition
clfdate_value
for
the
Sun
ONE
Web
server
dictionary_value
statement.
that
uses
day,
month,
and
year.
The
intermediate
definition
uses
that
uses
day,
month,
and
year
to
create
a
new
clfdate_value
with
its
own
delimiter
list,
clfdate_delim.
eofPadded_value
Most
Web
servers
append
the
new
log
entry
to
the
end
of
the
file.
However,
some
Web
servers
create
a
large
static-sized
file
and
insert
the
log
entries
within
the
file
rather
than
append
the
log
entry
to
the
end
of
the
file.
For
example,
the
Microsoft
Internet
Information
Server
creates
the
log
file
with
a
starting
size
of
65,627
bytes
and
each
log
entry
is
inserted
into
the
file
after
the
last
written
line
rather
than
appended
to
the
end
of
the
file.
When
you
invoke
the
webids
program
with
the
tail
function
(webids
-t)
the
eofPadded_value
flag
indicates
where
real-time
updates
to
the
log
file
should
be
read.
Select
where
you
want
the
log
file
entries
written:
Appended
to
the
end
of
file
=
0
Inserted
after
last
written
line
=
1
extraneous_value
Contains
any
text
that
is
consistently
appended
to
the
Web
server’s
description
of
the
log
pattern
content
and
order.
The
extraneous
text
must
be
removed
by
Web
IDS
prior
to
calculating
the
log
pattern
order
to
ensure
that
a
proper
correlation
between
the
log
pattern
elements
and
the
log
pattern
definition.
logPattern_delim
Lists
the
text
characters
used
to
parse
the
Web
server’s
log
file
entries
into
its
subelements
of
host,
URL,
bytes,
and
so
forth.
Make
sure
that
the
delimiters
specified
are
not
likely
to
be
characters
used
within
the
URL
string.
Chapter
11.
Web
Intrusion
Detection
171

In
some
instances,
a
delimiter
used
to
parse
the
string
can
cause
unwanted
results
if
that
delimiter
appears
in
the
other
part
of
the
log
entry.
For
instance,
if
the
date
contains
a
slash
symbol
(/),
the
logPattern_value
would
be
incorrectly
parsed
if
the
logPattern_delim
included
a
slash
symbol
because
the
character
/
is
also
prevalent
in
URLs.
To
avoid
parsing
too
much,
create
an
intermediate
definition
with
its
own
delimiter
list.
Note,
that
intermediate
definitions
must
eventually
resolve
to
a
Web
IDS
key
variable.
For
example,
if
the
logPattern_value
contains
clfdate,
then
clfdate_value
will
resolve
to
the
Web
IDS
key
variables,
day,
month,
and
year,
and
the
clfdate_delim
that
equals
/
will
only
parse
the
substring
equated
with
clfdate
and
not
parse
the
entire
log
entry.
logPattern_value
Ensures
that
Web
IDS
can
dynamically
interpret
the
Web
server’s
log
file
format
any
time
the
Web
server
adds
the
logging
information
comment.
Set
this
value
to:
logPattern_value
=
dictionary
Editing
Signatures
To
create
your
own
signatures
file,
copy
the
default
signatures
file
provided
when
you
installed
Tivoli
Risk
Manager
or
download
the
most
recent
version
of
the
signatures
file
from
the
Support
Web
site
at:
http://www.ibm.com/software/sysmgmt/products/
support/IBMTivoliRiskManager.html
You
must
edit
the
webids.cfg
configuration
file
to
specify
the
new
path
and
name
of
the
signatures
file
that
you
want
to
load.
The
signatureFilePath_value=
value
must
be
set.
Creation
of
signatures
requires
a
knowledge
of
Perl
regular
expressions.
Follow
these
basic
rules
when
creating
or
changing
the
signatures
file:
v
Copy
and
rename
the
original
default
sig.nefarious
file
for
backup.
v
Edit
the
webids.cfg
configuration
file
to
point
to
the
fully
qualified
path
of
your
new
signatures
file.
For
example:
signatureFilePath_value
=
\Fully_Qualified_Path\new_filename
v
A
class
must
consist
of
a
class
header
and
a
list
of
signatures.
v
Put
each
signature
on
a
separate
line.
v
A
signature
line
contains
four
entries:
1.
The
signature,
expressed
in
Perl
regular
expression
syntax
2.
A
text
string
that
represents
the
name
of
the
attack
3.
The
vulnerability
ID
if
it
is
known
4.
The
information
source
of
the
vulnerability,
such
as
CVE
or
Bugtraqv
The
four
entries
are
located
in
four
columns.
For
example:
(?i)showcode\.asp
showcode.asp
[CAN-1999-0737]
[CVE]
v
Do
not
use
a
pound
sign
(#)
as
part
of
your
signature
name
when
defining
new
signatures.
Text
after
the
pound
sign
is
ignored.
v
Web
IDS
ignores
empty
lines.
v
You
can
use
the
same
class
name
only
when
the
classes
are
in
different
engines.
Class
names
must
be
unique
within
each
engine
section.
172
IBM
Tivoli
Risk
Manager:
Administrator’s
Guide

v
Put
similar
attack
signatures
in
the
same
class
because
Web
IDS
reports
only
one
class
(for
example,
put
vulnerable
CGI
programs
in
the
same
class).
v
The
[class=
directive
is
read
downward
in
the
file
until
the
next
[engine=
or
[class=
directive
is
found.
v
Semicolons
(;)
separate
parameters.
The
sig.nefarious
file
has
main
sections;
each
section
contains
signatures
(defined
as
classes).
The
sections
used
in
this
file
correspond
to
the
main
engines.
Configuring
Web
IDS
for
Use
with
the
Tivoli
Risk
Manager
EIF
Web
IDS
is
configured
by
default
to
utilize
a
simple
event
submission
API
provided
by
Tivoli
Risk
Manager
to
pass
sensor
events
directly
to
the
agent
for
formatting,
summarization
and
transport
to
an
event
server.
This
event
submission
API
is
the
Tivoli
Risk
Manager
EIF
and
is
incorporated
as
part
of
the
agent.
Web
IDS
provides
XML
files
used
for
formatting
that
contain
the
formatting
information
used
by
the
agent
to
extract
information
from
Web
IDS
generated
events
and
create
Tivoli
Risk
Manager
events.
During
installation,
the
agent
is
configured
to
enable
formatting
of
Web
IDS
events
by
specifying
the
Web
IDS
XML
file
used
for
formatting
in
the
receiver
configuration
file
on
the
host
where
Web
IDS
is
installed.
On
a
client,
this
configuration
file
is
RMINSTDIR/etc/local_only_receiver.conf.
On
an
event
server
or
distributed
correlation
server,
this
configuration
file
is
RMINSTDIR/etc/eif_receiver.conf.
The
following
is
an
example
of
local_only_receiver.conf
configuration
for
a
client
running
Web
IDS
on
a
Windows
system:
TransportList=t1
t1Type=LOCALONLYSOCKET
t1Channels=c1
c1ServerLocation=yourserver.com
c1Port=5529
BufferEvents=NO
EventDefinitions=C:\IBM\RISKMGR\etc\webids.xml
#
UnmatchedLog=C:\temp\local_only_receiver_webids_unmatch.log
#TraceLevel=ALL
#TraceFileName=C:\temp\local_only_receiver_trace.log
#LogLevel=ALL
#LogFileName=C:\temp\local_only_receiver_msg.log
The
following
is
an
example
of
eif_receiver.conf
configured
for
a
distributed
correlation
server
running
Web
IDS
on
Linux
and
UNIX-based
systems:
TransportList=t1
t1Type=SOCKET
t1Channels=c1
c1ServerLocation=yourserver.com
c1Port=5539
ConnectionMode=connection_oriented
BufferEvents=NO
EventDefinitions=/opt/RISKMGR/etc/webids.xml
#
UnmatchedLog=/opt/RISKMGR/persistence/eif_receiver_webids_unmatch.log
#TraceLevel=ALL
#TraceFileName=/opt/RISKMGR/persistence/eif_receiver_trace.log
Chapter
11.
Web
Intrusion
Detection
173
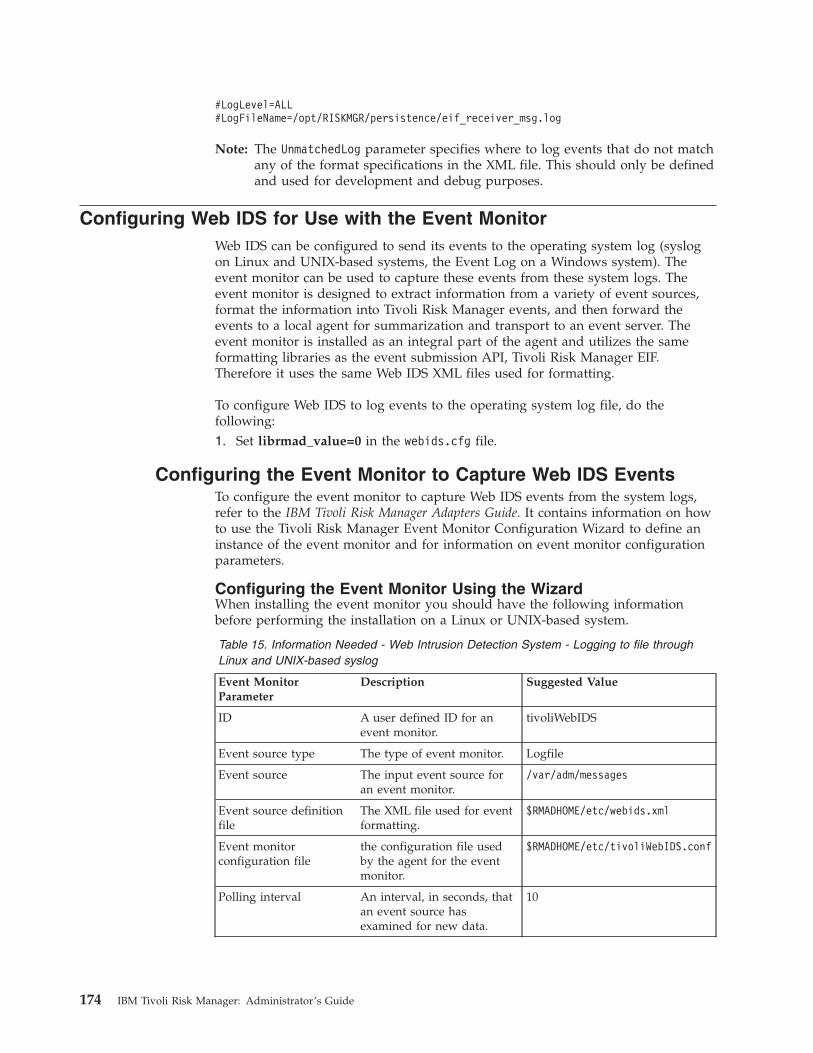
#LogLevel=ALL
#LogFileName=/opt/RISKMGR/persistence/eif_receiver_msg.log
Note:
The
UnmatchedLog
parameter
specifies
where
to
log
events
that
do
not
match
any
of
the
format
specifications
in
the
XML
file.
This
should
only
be
defined
and
used
for
development
and
debug
purposes.
Configuring
Web
IDS
for
Use
with
the
Event
Monitor
Web
IDS
can
be
configured
to
send
its
events
to
the
operating
system
log
(syslog
on
Linux
and
UNIX-based
systems,
the
Event
Log
on
a
Windows
system).
The
event
monitor
can
be
used
to
capture
these
events
from
these
system
logs.
The
event
monitor
is
designed
to
extract
information
from
a
variety
of
event
sources,
format
the
information
into
Tivoli
Risk
Manager
events,
and
then
forward
the
events
to
a
local
agent
for
summarization
and
transport
to
an
event
server.
The
event
monitor
is
installed
as
an
integral
part
of
the
agent
and
utilizes
the
same
formatting
libraries
as
the
event
submission
API,
Tivoli
Risk
Manager
EIF.
Therefore
it
uses
the
same
Web
IDS
XML
files
used
for
formatting.
To
configure
Web
IDS
to
log
events
to
the
operating
system
log
file,
do
the
following:
1.
Set
librmad_value=0
in
the
webids.cfg
file.
Configuring
the
Event
Monitor
to
Capture
Web
IDS
Events
To
configure
the
event
monitor
to
capture
Web
IDS
events
from
the
system
logs,
refer
to
the
IBM
Tivoli
Risk
Manager
Adapters
Guide.
It
contains
information
on
how
to
use
the
Tivoli
Risk
Manager
Event
Monitor
Configuration
Wizard
to
define
an
instance
of
the
event
monitor
and
for
information
on
event
monitor
configuration
parameters.
Configuring
the
Event
Monitor
Using
the
Wizard
When
installing
the
event
monitor
you
should
have
the
following
information
before
performing
the
installation
on
a
Linux
or
UNIX-based
system.
Table
15.
Information
Needed
-
Web
Intrusion
Detection
System
-
Logging
to
file
through
Linux
and
UNIX-based
syslog
Event
Monitor
Parameter
Description
Suggested
Value
ID
A
user
defined
ID
for
an
event
monitor.
tivoliWebIDS
Event
source
type
The
type
of
event
monitor.
Logfile
Event
source
The
input
event
source
for
an
event
monitor.
/var/adm/messages
Event
source
definition
file
The
XML
file
used
for
event
formatting.
$RMADHOME/etc/webids.xml
Event
monitor
configuration
file
the
configuration
file
used
by
the
agent
for
the
event
monitor.
$RMADHOME/etc/tivoliWebIDS.conf
Polling
interval
An
interval,
in
seconds,
that
an
event
source
has
examined
for
new
data.
10
174
IBM
Tivoli
Risk
Manager:
Administrator’s
Guide

Table
15.
Information
Needed
-
Web
Intrusion
Detection
System
-
Logging
to
file
through
Linux
and
UNIX-based
syslog
(continued)
Event
Monitor
Parameter
Description
Suggested
Value
Unmatched
event
log
file
Specifies
a
log
file
that
includes
event
data
that
can
not
be
formatted
by
the
event
definitions
file
by
the
event
monitor.
Value
should
only
be
specified
for
debug
purposes
When
installing
the
event
monitor
you
should
have
the
following
information
before
performing
the
installation
on
a
Windows
system.
Table
16.
Information
Needed
-
Web
Intrusion
Detection
System
-
Logging
to
Windows
Event
Log
Event
Monitor
Parameter
Description
Suggested
Value
ID
A
user
defined
ID
for
an
event
monitor.
tivoliWebIDS
Event
source
type
The
type
of
event
monitor.
Logfile
Event
source
The
input
event
source
for
an
event
monitor.
/var/adm/messages
Event
source
definition
file
The
XML
file
used
for
event
formatting.
%RMADHOME%\etc\webids.nt.xml
Event
monitor
configuration
file
the
configuration
file
used
by
the
agent
for
the
event
monitor.
%RMADHOME%\etc\tivoliWebIDS.conf
Polling
interval
An
interval,
in
seconds,
that
an
event
source
has
examined
for
new
data.
10
Unmatched
event
log
file
Specifies
a
log
file
that
includes
event
data
that
can
not
be
formatted
by
the
event
definitions
file
by
the
event
monitor.
Value
should
only
be
specified
for
debug
purposes
Manually
Configuring
the
Event
Monitor
To
manually
configure
the
Event
Monitor
to
capture
Web
IDS
events,
do
the
following:
1.
Verify
that
the
Web
IDS
XML
file
used
for
formatting
has
been
installed
in
the
RMINSTDIR/etc
directory.
v
webids.xml
for
Linux
and
UNIX-based
systems
v
webids.nt.xml
for
Windows
systems2.
Create
an
event
monitor
configuration
file,
monitor_receiver_webids.conf,
in
the
RMINSTDIR/etc
directory
and
add
the
following:
Linux
and
UNIX-based
systems:
RMMonitorList=A1
A1Type=LogFile
A1PollingInterval=10
A1Source=/var/log/messages
A1EventDefinitions=/opt/RISKMGR/etc/webids.xml
#A1UnmatchedEventLog=/opt/RISKMGR/persistence/
Chapter
11.
Web
Intrusion
Detection
175
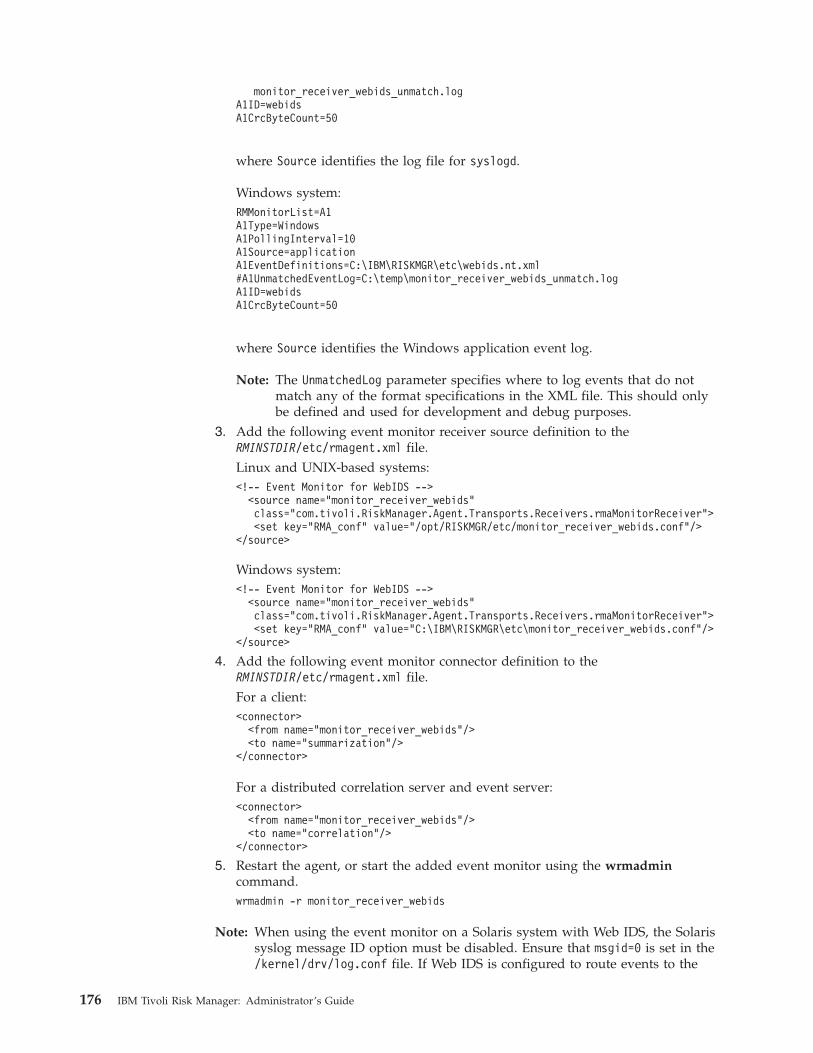
monitor_receiver_webids_unmatch.log
A1ID=webids
A1CrcByteCount=50
where
Source
identifies
the
log
file
for
syslogd.
Windows
system:
RMMonitorList=A1
A1Type=Windows
A1PollingInterval=10
A1Source=application
A1EventDefinitions=C:\IBM\RISKMGR\etc\webids.nt.xml
#A1UnmatchedEventLog=C:\temp\monitor_receiver_webids_unmatch.log
A1ID=webids
A1CrcByteCount=50
where
Source
identifies
the
Windows
application
event
log.
Note:
The
UnmatchedLog
parameter
specifies
where
to
log
events
that
do
not
match
any
of
the
format
specifications
in
the
XML
file.
This
should
only
be
defined
and
used
for
development
and
debug
purposes.
3.
Add
the
following
event
monitor
receiver
source
definition
to
the
RMINSTDIR/etc/rmagent.xml
file.
Linux
and
UNIX-based
systems:
<!--
Event
Monitor
for
WebIDS
-->
<source
name="monitor_receiver_webids"
class="com.tivoli.RiskManager.Agent.Transports.Receivers.rmaMonitorReceiver">
<set
key="RMA_conf"
value="/opt/RISKMGR/etc/monitor_receiver_webids.conf"/>
</source>
Windows
system:
<!--
Event
Monitor
for
WebIDS
-->
<source
name="monitor_receiver_webids"
class="com.tivoli.RiskManager.Agent.Transports.Receivers.rmaMonitorReceiver">
<set
key="RMA_conf"
value="C:\IBM\RISKMGR\etc\monitor_receiver_webids.conf"/>
</source>
4.
Add
the
following
event
monitor
connector
definition
to
the
RMINSTDIR/etc/rmagent.xml
file.
For
a
client:
<connector>
<from
name="monitor_receiver_webids"/>
<to
name="summarization"/>
</connector>
For
a
distributed
correlation
server
and
event
server:
<connector>
<from
name="monitor_receiver_webids"/>
<to
name="correlation"/>
</connector>
5.
Restart
the
agent,
or
start
the
added
event
monitor
using
the
wrmadmin
command.
wrmadmin
-r
monitor_receiver_webids
Note:
When
using
the
event
monitor
on
a
Solaris
system
with
Web
IDS,
the
Solaris
syslog
message
ID
option
must
be
disabled.
Ensure
that
msgid=0
is
set
in
the
/kernel/drv/log.conf
file.
If
Web
IDS
is
configured
to
route
events
to
the
176
IBM
Tivoli
Risk
Manager:
Administrator’s
Guide

Tivoli
Risk
Manager
EIF
API,
then
the
msgid
setting
in
the
/kernel/drv/log.conf
file
is
not
relevant.
Managing
Web
IDS
The
following
tasks
can
be
performed
by
an
administrator
to
manage
Web
IDS:
v
Analyzing
Web
Attack
Events
v
Adding
or
Removing
Signature
Classes
v
Adding
or
Removing
Web
Attack
Signatures
v
Combining
and
Refining
Pattern
Tests
v
Adding
or
Removing
Suspicious
Hosts
v
Specifying
the
Type
of
Suspicious
Activity
v
Adding
or
Removing
Trusted
Signatures
v
Tuning
the
Threshold
and
Decay
Values
Analyzing
Web
Attack
Events
Web
IDS
provides
information
if
the
attacks
it
checks
for
are
well
known.
The
following
is
an
example
of
captured
information:
956066584_1
some.host.org
-
-
[03/May/2001:03:42:23
+0000]
"GET
/cgi-bin/test-cgi
HTTP/1.1"
500
345
WARNING
:
pattern(serverError)
==>
5xx
WARNING
:
pattern(cgi)
==>
test-cgi
ALERT
:
pattern(cgi)
==>
class
’cgi’:
lvl=1.00
>=
1!
DECODED
:
REQUEST
:
GET
/cgi-bin/test-cgi
HTTP/1.1
HOST/USR:
some.host.org
-
-
STATUS
:
500
BYTES
:
345
METHOD
:
GET
URL
:
/cgi-bin/test-cgi
QUERY
:
VERSION
:
1.1
DATE
:
03/May/2001:03:42:23
+0000
-------------------------------------------
Web
IDS
captures
requests
from
a
host
when
an
alarm
is
raised
because
of
a
request
from
that
host.
You
can
then
analyze
this
captured
information
and
decide
whether
or
not
to
define
any
new
signatures
or
classes
of
signatures
in
the
signature
database
(sig.nefarious
file).
Attacks
not
found
in
the
database
can
go
completely
unnoticed.
Knowledge-based
systems
need
regular
updates
to
the
database.
For
the
most
up-to-date
intrusion
detection,
add
newly
discovered
attacks
and
vulnerabilities
to
the
list
of
signatures
in
the
sig.nefarious
file.
Review
and
track
new
attacks
regularly
by
using
some
of
the
security
community
databases
maintained
just
for
this
purpose.
Two
examples
of
such
databases
are:
v
The
Bugtraq
Web
site:
http://www.securityfocus.com
v
The
Common
Vulnerabilities
Enumeration
(CVE)
Web
site:
http://www.cve.mitre.org
Chapter
11.
Web
Intrusion
Detection
177

You
must
analyze
this
captured
information
manually
and
determine
what
actions
you
must
take
to
correct
the
problem.
Adding
or
Removing
Signature
Classes
The
engine
pattern
section
of
the
sig.nefarious
file
contains
groups
of
signatures
(classes)
that
look
for
patterns
of
attack
signatures
in
the
fields
of
the
log
entry.
A
single
access
is
reported
as
a
warning.
You
must
specify
the
field
name
as
part
of
the
class
definition
when
creating
a
new
class.
To
add
or
remove
a
class
of
Web
attack
signatures:
1.
Go
to
the
ENGINE
PATTERN
section
of
sig.nefarious.
2.
To
add
a
class,
add
the
following
to
the
file:
a.
[class=classname;
field=fieldname;
level1=count1;
level2=count2;
k=decay_param]
where:
class=classname
A
unique
name
for
a
signature
specified
in
the
pattern
engine.
field=fieldname
The
fields
against
the
signatures
have
to
match.
Valid
fields
for
the
pattern
engine
are:
host,
method,
url,
status,
or
query.
level1=count1
See
“Adjusting
the
Level
Counters”
on
page
182
for
information.
level2=count2
See
“Adjusting
the
Level
Counters”
on
page
182
for
information.
Be
sure
to
add
comment
lines
that
explain
the
new
class
of
signatures.
Each
comment
line
must
begin
with
a
pound
sign
(#).3.
To
remove
an
existing
class
of
signatures,
delete
the
lines
that
define
the
class
of
signatures
that
you
want
to
remove.
4.
Save
and
close
this
file.
For
example:
[class=directory;
field=url;
level1=2;
level2=1;
k=1000]
#
Some
servers
are
sensitive
to
directory
tricks
like
specifying
/./
#
in
the
path
name.
/\.\./
/\.\
Adding
or
Removing
Web
Attack
Signatures
To
add
or
remove
a
Web
attack
signature:
1.
Edit
the
sig.nefarious
file.
2.
Go
to
the
ENGINE
PATTERN
section
of
this
file.
3.
Find
the
appropriate
class
section,
such
as
[class=cgi;
field=url;
4.
Do
one
of
the
following:
a.
Create
a
new
signature
by
adding
a
four-column
signature
line
similar
to:
178
IBM
Tivoli
Risk
Manager:
Administrator’s
Guide
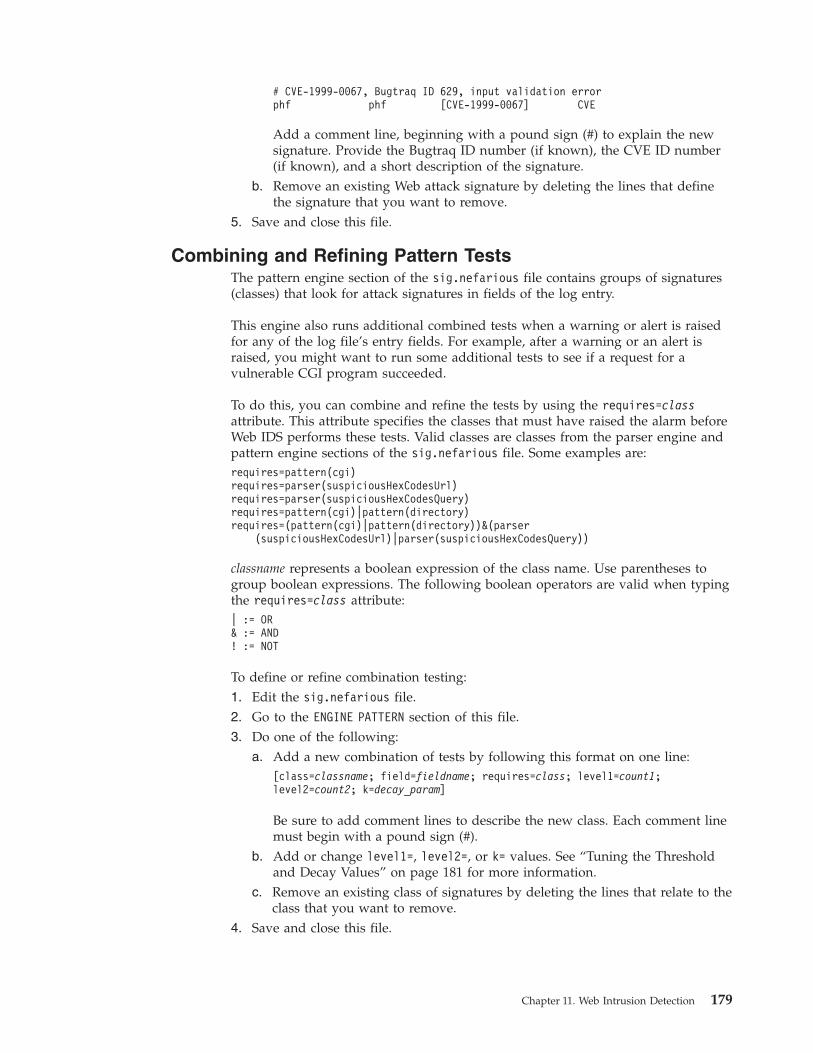
#
CVE-1999-0067,
Bugtraq
ID
629,
input
validation
error
phf
phf
[CVE-1999-0067]
CVE
Add
a
comment
line,
beginning
with
a
pound
sign
(#)
to
explain
the
new
signature.
Provide
the
Bugtraq
ID
number
(if
known),
the
CVE
ID
number
(if
known),
and
a
short
description
of
the
signature.
b.
Remove
an
existing
Web
attack
signature
by
deleting
the
lines
that
define
the
signature
that
you
want
to
remove.5.
Save
and
close
this
file.
Combining
and
Refining
Pattern
Tests
The
pattern
engine
section
of
the
sig.nefarious
file
contains
groups
of
signatures
(classes)
that
look
for
attack
signatures
in
fields
of
the
log
entry.
This
engine
also
runs
additional
combined
tests
when
a
warning
or
alert
is
raised
for
any
of
the
log
file’s
entry
fields.
For
example,
after
a
warning
or
an
alert
is
raised,
you
might
want
to
run
some
additional
tests
to
see
if
a
request
for
a
vulnerable
CGI
program
succeeded.
To
do
this,
you
can
combine
and
refine
the
tests
by
using
the
requires=class
attribute.
This
attribute
specifies
the
classes
that
must
have
raised
the
alarm
before
Web
IDS
performs
these
tests.
Valid
classes
are
classes
from
the
parser
engine
and
pattern
engine
sections
of
the
sig.nefarious
file.
Some
examples
are:
requires=pattern(cgi)
requires=parser(suspiciousHexCodesUrl)
requires=parser(suspiciousHexCodesQuery)
requires=pattern(cgi)|pattern(directory)
requires=(pattern(cgi)|pattern(directory))&(parser
(suspiciousHexCodesUrl)|parser(suspiciousHexCodesQuery))
classname
represents
a
boolean
expression
of
the
class
name.
Use
parentheses
to
group
boolean
expressions.
The
following
boolean
operators
are
valid
when
typing
the
requires=class
attribute:
|
:=
OR
&
:=
AND
!
:=
NOT
To
define
or
refine
combination
testing:
1.
Edit
the
sig.nefarious
file.
2.
Go
to
the
ENGINE
PATTERN
section
of
this
file.
3.
Do
one
of
the
following:
a.
Add
a
new
combination
of
tests
by
following
this
format
on
one
line:
[class=classname;
field=fieldname;
requires=class;
level1=count1;
level2=count2;
k=decay_param]
Be
sure
to
add
comment
lines
to
describe
the
new
class.
Each
comment
line
must
begin
with
a
pound
sign
(#).
b.
Add
or
change
level1=,
level2=,
or
k=
values.
See
“Tuning
the
Threshold
and
Decay
Values”
on
page
181
for
more
information.
c.
Remove
an
existing
class
of
signatures
by
deleting
the
lines
that
relate
to
the
class
that
you
want
to
remove.4.
Save
and
close
this
file.
Chapter
11.
Web
Intrusion
Detection
179
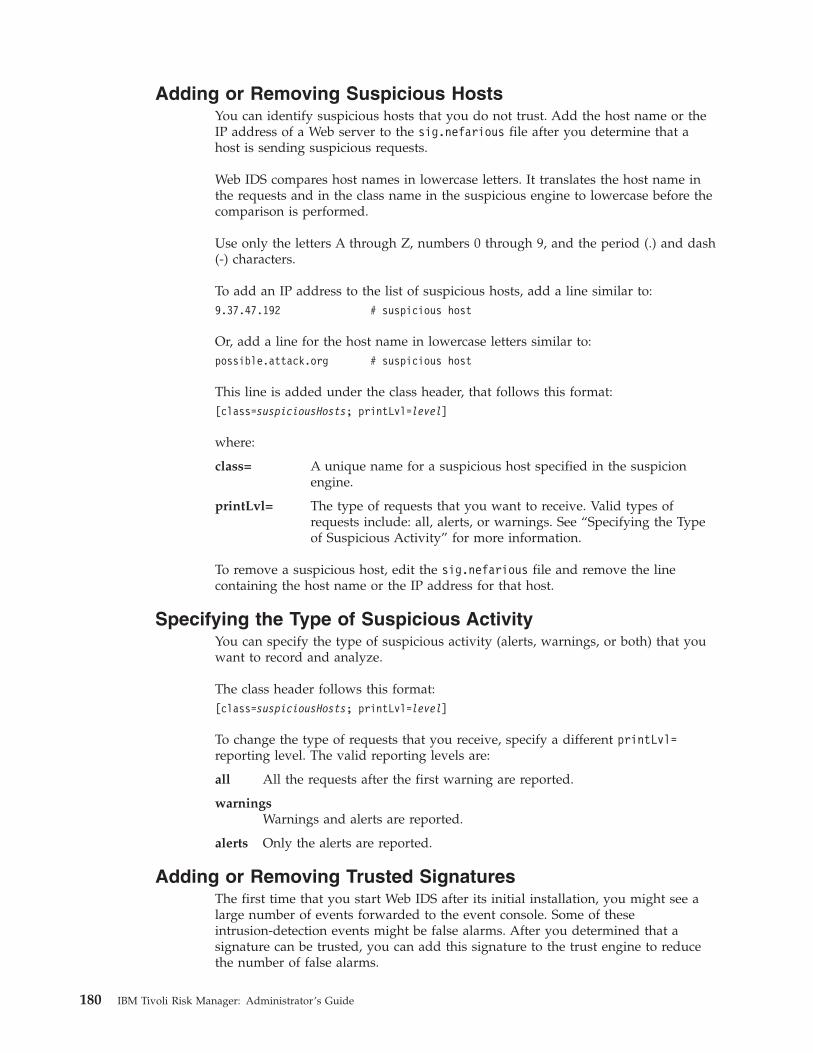
Adding
or
Removing
Suspicious
Hosts
You
can
identify
suspicious
hosts
that
you
do
not
trust.
Add
the
host
name
or
the
IP
address
of
a
Web
server
to
the
sig.nefarious
file
after
you
determine
that
a
host
is
sending
suspicious
requests.
Web
IDS
compares
host
names
in
lowercase
letters.
It
translates
the
host
name
in
the
requests
and
in
the
class
name
in
the
suspicious
engine
to
lowercase
before
the
comparison
is
performed.
Use
only
the
letters
A
through
Z,
numbers
0
through
9,
and
the
period
(.)
and
dash
(-)
characters.
To
add
an
IP
address
to
the
list
of
suspicious
hosts,
add
a
line
similar
to:
9.37.47.192
#
suspicious
host
Or,
add
a
line
for
the
host
name
in
lowercase
letters
similar
to:
possible.attack.org
#
suspicious
host
This
line
is
added
under
the
class
header,
that
follows
this
format:
[class=suspiciousHosts;
printLvl=level]
where:
class=
A
unique
name
for
a
suspicious
host
specified
in
the
suspicion
engine.
printLvl=
The
type
of
requests
that
you
want
to
receive.
Valid
types
of
requests
include:
all,
alerts,
or
warnings.
See
“Specifying
the
Type
of
Suspicious
Activity”
for
more
information.
To
remove
a
suspicious
host,
edit
the
sig.nefarious
file
and
remove
the
line
containing
the
host
name
or
the
IP
address
for
that
host.
Specifying
the
Type
of
Suspicious
Activity
You
can
specify
the
type
of
suspicious
activity
(alerts,
warnings,
or
both)
that
you
want
to
record
and
analyze.
The
class
header
follows
this
format:
[class=suspiciousHosts;
printLvl=level]
To
change
the
type
of
requests
that
you
receive,
specify
a
different
printLvl=
reporting
level.
The
valid
reporting
levels
are:
all
All
the
requests
after
the
first
warning
are
reported.
warnings
Warnings
and
alerts
are
reported.
alerts
Only
the
alerts
are
reported.
Adding
or
Removing
Trusted
Signatures
The
first
time
that
you
start
Web
IDS
after
its
initial
installation,
you
might
see
a
large
number
of
events
forwarded
to
the
event
console.
Some
of
these
intrusion-detection
events
might
be
false
alarms.
After
you
determined
that
a
signature
can
be
trusted,
you
can
add
this
signature
to
the
trust
engine
to
reduce
the
number
of
false
alarms.
180
IBM
Tivoli
Risk
Manager:
Administrator’s
Guide
The
class
header
follows
this
format:
[class=classname;
field=fieldname;
cancels=class]
where:
class=classname
A
unique
name
for
a
signature
class
specified
in
the
trust
engine.
field=fieldname
The
fields
against
the
signatures
have
to
match.
Valid
fields
for
the
trust
engine
are:
host,
method,
url,
or
query.
cancels=class
The
warnings
or
alerts
are
not
reported
(cancelled)
if
a
matching
signature
is
found
for
the
class
specified.
Valid
keywords
for
classes
to
cancel
include:
all
Cancels
all
matching
alerts
and
warnings.
engine_name(class_name)
Cancels
matching
alerts
and
warnings
for
the
engine
name
and
class
name
specified.
engine_name(class_name),engine_name(class_name)
Cancels
matching
alerts
and
warnings
for
a
list
of
engine
names
and
class
names,
each
one
separated
by
a
comma
(,).
Some
examples
include:
[class=trustedHosts;
field=host;
cancels=all]
friendly\.computer\.org
[class=linuxDistr;
field=url;
cancels=pattern(cgi),pattern(file)]
^\~linus/mirror/linux
Tuning
the
Threshold
and
Decay
Values
Tivoli
Risk
Manager
Web
IDS
differentiates
between
two
types
of
alarms:
warnings
and
alerts.
A
warning
is
considered
less
severe
than
an
alert
and
is
usually
not
reported
to
the
Tivoli
Enterprise
Console
event
console.
After
a
certain
number
of
the
same
type
of
warnings,
the
warning
turns
into
an
alert.
For
example,
certain
types
of
Web
server
attacks
become
alerts
only
after
a
certain
number
of
the
same
suspicious
request
is
observed,
such
as
repeated
unsuccessful
authentication
requests
that
are
submitted
from
the
same
host.
You
can
configure
Web
IDS
to
specify
how
fast
a
warning
becomes
an
alert
by
adjusting
the
following
class
parameters:
v
level1
v
level2
v
k
If
you
are
receiving
too
many
alerts
or
too
few
alerts,
then
consider
adjusting
the
class
parameters.
Edit
the
Web
IDS
parser
and
pattern
engine
sections
in
the
sig.nefarious
file
to
adjust
the
class
parameters.
To
tune
information
for
Web
attack
signatures:
1.
Back
up
the
sig.nefarious
file.
2.
Edit
the
sig.nefarious
file.
Chapter
11.
Web
Intrusion
Detection
181

3.
Go
to
the
ENGINE
PATTERN
or
ENGINE
PARSER
section
of
the
file.
4.
Tune
the
level
and
decay
information
by
adjusting
the
level1=,
level2=,
or
k=
values.
See
“Adjusting
the
Level
Counters”
for
more
information.
5.
Add
comment
lines
if
you
want
to
explain
the
new
values.
Each
comment
line
must
begin
with
a
pound
sign
(#).
6.
Save
and
close
this
file.
Adjusting
the
Level
Counters
Tivoli
Risk
Manager
Web
IDS
counts
the
number
of
suspicious
requests
of
the
same
type
until
the
threshold
level
that
you
specify
is
exceeded.
After
a
threshold
is
exceeded,
Web
IDS
issues
an
alert.
The
threshold
levels
that
you
can
specify
and
adjust
include:
level1=count1
The
number
of
suspicious
requests
of
the
same
event
class
type
for
the
same
domain.
The
level1
value
must
be
equal
to
or
higher
than
the
value
for
level2.
level2=count2
The
number
of
suspicious
requests
of
the
same
event
class
type
for
the
same
host.
The
threshold
used
is
based
on
whether
it
is
the
same
domain
or
the
same
host.
Using
this
example
host
name:
www.austin.tivoli.com
v
The
domain
uses
the
level1
threshold:
tivoli.com
v
All
other
parts
of
the
host
name
would
use
level2
thresholds:
www
and
austin
To
adjust
the
level1
or
level2
parameter
values,
edit
the
Web
IDS
ASCII
text
file
sig.nefarious
file
to
define
the
threshold.
Use
any
text
editor
to
change
the
file.
If
this
is
the
first
time
that
you
are
editing
this
file,
make
a
backup
copy
of
the
original
file
before
you
begin.
182
IBM
Tivoli
Risk
Manager:
Administrator’s
Guide
Chapter
12.
Network
Intrusion
Detection
The
Network
Intrusion
Detection
System
(Network
IDS)
is
a
network-based
intrusion-detection
sensor.
See
the
IBM
Tivoli
Risk
Manager
Problem
Determination
Guide
for
Network
IDS
messages.
Network
IDS
listens
to
network
traffic,
waiting
for
signs
of
malicious
activity,
such
as
scans
or
actual
intrusion
attacks.
You
typically
run
Network
IDS
on
a
single
dedicated
machine
just
inside
or
outside
a
firewall
to
watch
for
intrusion
attempts
that
are
coming
in
from
the
Internet.
Network
IDS
runs
on
Linux
and
UNIX-based
systems.
You
can
run
Network
IDS
in
promiscuous
mode
to
watch
traffic
to
or
from
any
node
on
the
network.
Network
IDS
can
also
run
in
a
nonpromiscuous
mode
by
running
on
a
server
where
it
watches
only
the
traffic
that
is
destined
for
that
server.
Using
the
nonpromiscuous
mode
is
useful
in
switched
or
very
fast
networks
where
it
is
not
possible
or
practical
to
try
to
watch
the
traffic
from
a
single
node.
The
Network
IDS
sensor
supports
two
options
for
sending
alerts
to
an
event
server:
v
Send
alerts
directly
by
utilizing
the
Tivoli
Risk
Manager
event
submission
API
incorporated
as
part
of
the
agent.
v
Log
alerts
to
syslog
and
utilize
the
event
monitor
to
capture
and
forward
events.
See
“Logging
Network
IDS
Alerts
and
Information”
on
page
189
for
more
information
on
options
for
logging
Network
IDS
alerts.
Figure
45
on
page
184
depicts
the
two
routing
options
for
sending
Network
IDS
alerts
to
a
server:
©
Copyright
IBM
Corp.
2003
183

Supported
Adapters
The
following
table
lists
supported
network
interfaces
or
devices.
Table
17.
Supported
Devices
Supported
Network
Interfaces
or
Device
Description
Ethernet
Ethernet
is
a
network
standard
IEEE
802.3.
It
is
the
most
widely
used
for
of
local
area
network
(LAN)
communication
and
typically
runs
at
10
megabytes
per
second,
though
newer
systems
use
100
Mbps,
or
even
gigabit
of
transfer.
Fiber
Distributed
Data
Interface
(FDDI)
FDDI
is
a
set
of
American
National
Standards
Institute
(ANSI)
and
Open
Systems
Interconnection
(ISO)
standards
for
data
transmission
on
fiber
optic
lines
in
a
local
area
network
that
can
extend
in
range
up
to
200
km
(124
miles).
Network IDS Information Flow
ids.rulesNetwork IDS
Tivoli Enterprise Console
or Correlation Server
nids.xml
format file
Network Packets
Tivoli Risk Manager Agent
with Summarization
- using RMEIF shared library
Tivoli Risk Manager Agent
with Summarization
- using Event Monitor
log file
alternate path default path
Figure
45.
Sending
Network
IDS
Alerts
to
a
Server
184
IBM
Tivoli
Risk
Manager:
Administrator’s
Guide

Table
17.
Supported
Devices
(continued)
Supported
Network
Interfaces
or
Device
Description
Point-to-Point
Protocol
(PPP)
PPP
is
a
protocol
for
communication
between
two
computers
using
a
serial
interface,
typically
a
personal
computer
connected
by
phone
line
to
a
server.
SLIP
SLIP
is
a
TCP/IP
protocol
used
for
communication
between
two
machines
that
are
previously
configured
for
communication
with
each
other.
Token
Ring
A
token
ring
network
is
a
LAN
where
all
computers
are
connected
in
a
ring
or
star
topology
and
a
binary
digit-
or
token-passing
scheme
is
used
in
order
to
prevent
the
collision
of
data
between
two
computers
that
want
to
send
messages
at
the
same
time.
Note:
For
Network
IDS
some
limitations
apply
on
Linux
for
zSeries
concerning
the
OSA
adapter
configuration.
For
example,
promiscuous
mode
is
not
supported
on
Linux
for
zSeries.
The
following
table
lists
the
supported
network
interfaces
or
devices
in
nonpromiscuous
mode
only
on
Linux
for
zSeries.
Table
18.
Support
Network
Interfaces
or
Devices
in
Nonpromiscuous
Mode
for
Linux
for
zSeries
Supported
Network
Interfaces
or
Device
Description
OSA2
ENTR
Ethernet
-Token
Ring
OSA2
Fast
Ethernet
Fast
Ethernet
100
bits
per
second
OSA
EXPRESS
Fast
Ethernet
Configured
in
non-QDIO
mode.
CHPID
TYPE
-
OSE
-
OSA
Express
Channel
The
following
table
lists
non-supported
network
interfaces
or
devices
for
Network
IDS
on
Linux
for
zSeries.
Table
19.
Non-Supported
Network
Interfaces
or
Devices
for
NIDS
on
Linux
for
zSeries
Network
Interfaces
or
Device
Description
OSA
EXPRESS
Fast
Ethernet
Configured
in
QDIO
mode.
CHPID
TYPE
-
OSD
-
OSA
Direct
Express
Channel
OSA
EXPRESS
Gigabit
Ethernet
Gigabit
Ethernet
1000
bits
per
second
OSA
ATM
Any
type
of
ATM.
Channel
to
Channel
(CTC)
ESCON
fiber
running
between
2
Linux
images.
Hiper
Socket
A
memory
to
memory
connection
between
two
or
more
images
on
the
same
hardware.
IUCV
A
connection
between
two
images
on
the
same
virtual
machine
image.
VLAN
A
connection
between
many
images
on
the
same
virtual
machine
image.
Chapter
12.
Network
Intrusion
Detection
185

Network
IDS
Event
Correlation
Network
IDS
monitors
the
network
for
activity
and
matches
that
activity
to
known
patterns
of
possible
intrusion
(signatures).
When
Network
IDS
finds
a
match,
it
writes
a
message
to
the
system
log.
The
Tivoli
Logfile
adapter
sends
the
events
to
the
event
server.
Tivoli
Risk
Manager
correlates
Network
IDS
events
with
other
events
that
are
coming
from
other
types
of
sensors
to
provide
the
Tivoli
Risk
Manager
administrator
with
a
total
view
of
intrusion-detection
events.
Network
IDS
Alerts
In
Network
IDS,
reportable
alerts
have
the
following
information:
v
A
unique
identifying
number
v
A
severity
level
v
A
text
description
Network
IDS
uses
identification
(ID)
numbers
to
identify
and
distinguish
alerts.
The
ID
numbers
do
not
correspond
to
the
Common
Vulnerability
Entry
(CVE)
numbers
because
Network
IDS
tests
for
security
problems
that
are
more
than
vulnerabilities
(such
as,
configuration
errors,
backdoors,
scanning,
and
so
forth)
and
because
Network
IDS
tries
to
recognize
attacks
generically.
For
example,
Network
IDS
has
three
signatures
that
look
for
typical
buffer
overflow
data.
These
overflow
signatures
catch
hundreds
of
CVE–specific
buffer
overflow
attacks.
Network
IDS
keeps
the
signatures
generic,
even
ones
that
have
not
been
seen
before
and
are
not
registered
in
CVE,
so
that
they
can
catch
any
buffer
overflow.
Because
the
signatures
are
so
general,
Network
IDS
cannot
distinguish
exactly
what
buffer
overflow
vulnerability
is
being
attacked.
In
most
cases,
it
is
more
important
to
know
reliably
that
an
attack
is
taking
place
rather
than
to
know
exactly
what
vulnerability
is
involved.
For
those
Network
IDS
signatures
that
correspond
exactly
to
CVE
entries,
Network
IDS
provides
the
CVE
reference
ID
at
the
beginning
of
the
reporting
string.
You
can
obtain
more
information
for
each
specific
CVE
ID
at:
http://csrc.nist.gov/icat
Network
IDS
specifies
the
severity
levels
as
an
integer
number.
Zero
(0)
represents
the
less
severe
risks
and
the
higher
numbers
represent
the
more
severe
situations.
Each
text
description
for
an
alert
begins
with
a
keyword
that
categorizes
the
alert.
The
categories
of
alerts
are:
Keyword
Description
CVE
A
specific
vulnerability
listed
in
the
CVE
database.
ALERT
A
generic
attack
not
listed
in
CVE.
DOS
A
known
denial
of
service
attack.
SCAN
A
traffic
pattern
that
indicates
pre-attack
reconnaissance.
CONFIG
An
attempt
to
exploit
security-related
configuration
errors.
AUTH
An
authentication
failure
that
might
indicate
an
attack.
186
IBM
Tivoli
Risk
Manager:
Administrator’s
Guide
Keyword
Description
BACKDOOR
Traffic
to
or
from
a
back-door
program.
STEALTH
Traffic
typical
of
known
stealth
attacks.
Network
IDS
has
two
categories
of
detections:
Built-in
alerts
The
built-in
alerts
cover
situations
that
Network
IDS
cannot
detect
by
looking
for
a
simple
pattern
in
the
session
or
packet
data.
These
alerts
require
either
looking
at
stateful
interaction
within
a
protocol
or
analysis
across
multiple
sessions.
Network
IDS
hardcodes
these
tests.
You
cannot
modify
them.
Network
IDS
specifies
the
output
strings
and
severity
level
for
these
built-in
alerts
in
the
ids.msg
file.
Signature-based
alerts
In
signature-based
alerts,
Network
IDS
looks
for
specified
patterns
in
the
packet
or
session
data
stream
in
a
given
protocol
level.
Network
IDS
specifies
the
patterns,
the
alert
priority,
and
the
output
message
for
these
signatures
in
the
ids.rules
file.
For
more
information
on
creating
signatures
for
the
Network
IDS,
see
the
Network
Intrusion
Detection
System
Language
Reference
Guide
available
from
the
Tivoli
Risk
Manager
Support
Files
and
Adapters
Web
site
at:
http://www.ibm.com/software/sysmgmt/products/
support/IBMTivoliRiskManager.html
Tivoli
Risk
Manager
provides
periodic
updates
of
the
ids.rules
file
on
the
Support
Web
site
so
you
can
replace
this
file
with
the
latest
updated
signature
file.
See
“Updating
the
Signatures
File”
on
page
188
for
instructions.
Configuring
Network
IDS
You
can
configure
Network
IDS
locally
or
with
Access
Control
Facility
(ACF).
1.
Edit
the
ids.cfg
configuration
file,
if
necessary.
Use
the
ACF
to
redistribute
it
if
you
configure
at
a
central
location.
2.
Replace
and
update
the
signatures
file
(ids.rules),
if
necessary,
if
an
updated
signatures
file
is
available.
Refer
to
“Updating
the
Signatures
File”
on
page
188
for
instructions.
3.
After
completing
the
configuration,
start
Network
IDS
by
using
the
Tivoli
Risk
Manager-provided
Tivoli
Enterprise
Console
task.
See
“Starting
the
Network
IDS
Adapter.”
Network
IDS
Tivoli
Risk
Manager
Tasks
Tivoli
Risk
Manager
provides
its
own
task
library,
Tivoli
Risk
Manager
Task
Library.
Tivoli
Risk
Manager
installs
the
task
library
in
the
default
Tivoli
Enterprise
Console
policy
region.
Tivoli
Risk
Manager
includes
tasks
to
start
and
stop
Network
IDS.
Starting
the
Network
IDS
Adapter
To
start
Network
IDS:
Chapter
12.
Network
Intrusion
Detection
187

1.
You
must
run
Network
IDS
as
root
if
you
want
to
read
packets
from
a
network
interface.
If
you
read
from
a
dump
file,
you
do
not
need
root
privilege.
2.
On
the
Tivoli
desktop,
click
TEC-Region
and
then
click
Risk
Manager
Task
Library.
3.
Click
the
NIDS_Start_Adapter
Tivoli
Risk
Manager
task.
Stopping
the
Network
IDS
Adapter
To
stop
Network
IDS:
1.
On
the
Tivoli
desktop,
click
TEC-Region
and
then
click
Risk
Manager
Task
Library.
2.
Click
the
NIDS_Stop_Adapter
Tivoli
Risk
Manager
task.
Managing
Network
IDS
The
following
tasks
can
be
performed
by
an
administrator
to
manage
the
Network
IDS:
v
Starting
Network
IDS
Automatically
with
the
startnids
Command
v
Updating
the
Signatures
File
v
Testing
for
Promiscuous
Operation
v
Omitting
IP
Addresses
v
Obtaining
the
Host
Name
Starting
Network
IDS
Automatically
with
the
startnids
Command
Network
IDS
provides
the
startnids
startup
script
that
writes
a
line
to
the
Inittab
file
so
that
Network
IDS
will
start
automatically
even
if
it
stops
before
the
system
is
rebooted.
This
automatic
startup
capability
provides
some
level
of
security
to
the
user
in
knowing
that
Network
IDS
is
always
running
even
after
a
reboot.
See
the
IBM
Tivoli
Risk
Manager
Command
Reference
for
details
using
the
startnids
command.
Updating
the
Signatures
File
Tivoli
Risk
Manager
provides
periodic
updates
to
the
Network
IDS
signatures
file
at
the
Support
Web
site.
To
replace
your
signatures
file
in
a
Tivoli
environment:
1.
Download
the
ids.rules
and
other
required
files
from
the
Support
Web
site:
http://www.ibm.com/software/sysmgmt/products/
support/IBMTivoliRiskManager.html
2.
Use
the
ACF
to
distribute
and
replace
the
old
version
of
the
signatures
file
with
the
new
one.
To
manually
replace
your
signatures
file:
1.
Stop
the
Network
IDS
daemon
by
running
the
following
script
file:
stopnids
2.
Download
the
ids.rules
and
other
required
files
from
the
Support
Web
site:
http://www.ibm.com/software/sysmgmt/products/
support/IBMTivoliRiskManager.html
188
IBM
Tivoli
Risk
Manager:
Administrator’s
Guide
3.
Restart
the
Network
IDS
daemon
by
running
the
following
script
file:
startnids
Testing
for
Promiscuous
Operation
Not
all
network
interfaces
support
promiscuous
mode
operation.
In
particular,
some
ISA
and
some
older
PCMCIA
Token
Ring
cards
do
not
support
promiscuous
sniffing.
You
can
test
your
hardware
for
promiscuous
operation
by
running
the
tcpdump
command
and
looking
for
packets
that
are
not
to
or
from
the
local
host,
and
are
not
multicast
or
broadcast.
Note:
The
open
system
adapter
does
not
support
promiscuous
operation
on
Linux
for
zSeries.
Omitting
IP
Addresses
In
some
cases,
it
can
be
helpful
for
Network
IDS
to
listen
on
a
passive-only
interface,
meaning
an
interface
that
is
not
visible
on
its
segment
and
that
does
not
transmit
any
packets.
One
example
of
a
passive-only
interface
is
one
that
interface
is
connected
passively
to
an
external
(outside
the
firewall)
segment,
and
a
second
interface
is
active
on
an
internal
segment
to
report
Network
IDS
alerts
to
Tivoli
Risk
Manager
inside
the
firewall.
For
Network
IDS
to
run
on
a
passive
interface,
you
must
configure
the
interface
for
up
mode
but
with
no
assigned
Internet
Protocol
(IP)
address.
Use
the
ifconfig
up
command
to
omit
any
IP
address
specification.
While
the
interface
is
in
up
mode,
it
does
not
transmit
any
packets
because
it
has
no
IP
address
information
for
the
network.
Network
IDS
does
not
listen
on
a
down
interface.
Obtaining
the
Host
Name
Network
IDS
tries
to
include
the
sensor
host’s
IP
address
and
fully
qualified
host
name,
for
example,
host.company.com,
in
its
alerts
that
are
sent
to
Tivoli
Risk
Manager.
The
fully
qualified
host
name
is
important
to
Tivoli
Risk
Manager
to
ensure
uniqueness
of
the
alert
source
name.
For
Network
IDS
to
obtain
the
fully
qualified
host
name,
the
local
resolver
must
be
configured
to
return
the
fully
qualified
name
to
a
gethostbyaddr(
)
query.
Normally
you
configure
for
the
local
host
in
the
/etc/hosts
file,
although
it
might
alternately
come
from
Domain
Name
System
(DNS)
or
Network
Information
Services
(NIS)
queries.
See
the
resolver
man
pages
for
details.
Alternately,
this
function
can
be
left
to
the
agent
that
is
also
capable
of
reverse
DNS
resolution
for
the
purposes
of
resolving
IP
addresses
to
fully
qualified
host
names.
Logging
Network
IDS
Alerts
and
Information
Network
IDS
can
send
alert
and
logging
information
to
several
different
locations:
v
Syslog
v
A
local
file
v
The
console
(using
standard
out
for
the
process)
v
Tivoli
Risk
Manager
EIF
You
can
specify
your
choice
of
these
destinations
on
the
command
line,
or
in
the
ids.cfg
configuration
file.
The
ids.cfg
file
sets
the
default
logging
location
or
locations.
You
can
override
the
defaults
in
the
ids.cfg
file
by
using
the
nids
Chapter
12.
Network
Intrusion
Detection
189

command
with
the
-y
or
-e
option
to
force
output
to
syslog
or
EIF
and
the
-q
option
to
turn
off
the
console
output.
When
used
with
Tivoli
Risk
Manager,
you
normally
specify
these
switches
so
that
the
output
goes
to
syslog
or
EIF
to
prevent
Network
IDS
from
creating
any
growing
files
in
the
/usr
directory.
The
default
configuration
in
ids.cfg
file
will
log
information
to
the
Tivoli
Risk
Manager
EIF.
See
the
IBM
Tivoli
Risk
Manager
Command
Reference
for
details
using
the
nids
command.
Configuring
Network
IDS
for
Use
with
the
Tivoli
Risk
Manager
EIF
Network
IDS
is
configured
by
default
to
utilize
a
simple
event
submission
API
provided
by
Tivoli
Risk
Manager
to
pass
sensor
events
directly
to
the
agent
for
formatting,
summarization
and
transport
to
an
event
server.
This
event
submission
API
is
the
Tivoli
Risk
Manager
EIF
and
is
incorporated
as
part
of
the
agent.
Network
IDS
provides
an
XML
file
used
for
formatting
that
contains
the
formatting
information
used
by
the
agent
to
extract
information
from
Network
IDS
generated
events
and
create
Tivoli
Risk
Manager
events.
During
installation,
the
agent
is
configured
to
enable
formatting
of
Network
IDS
events
by
specifying
the
Network
IDS
XML
file
used
for
formatting
in
the
receiver
configuration
file
on
the
host
where
Network
IDS
is
installed.
On
a
client,
this
configuration
file
is
RMINSTDIR/etc/local_only_receiver.conf.
On
an
event
server
or
distributed
correlation
server,
this
configuration
file
is
RMINSTDIR/etc/eif_receiver.conf.
The
following
is
an
example
of
local_only_receiver.conf
configured
for
a
client
running
Network
IDS
on
Linux
and
UNIX-based
systems:
TransportList=t1
t1Type=LOCALONLYSOCKET
t1Channels=c1
c1ServerLocation=yourserver.com
c1Port=5529
BufferEvents=NO
EventDefinitions=/opt/RISKMGR/etc/nids.xml
#
UnmatchedLog=/opt/RISKMGR/persistence/eif_receiver_nids_unmatch.log
#TraceLevel=ALL
#TraceFileName=/opt/RISKMGR/persistence/eif_receiver_trace.log
#LogLevel=ALL
#LogFileName=/opt/RISKMGR/persistence/eif_receiver_msg.log
The
following
is
an
example
of
eif_receiver.conf
configured
as
a
Linux
or
UNIX-based
distributed
correlation
server
running
Network
IDS:
TransportList=t1
t1Type=SOCKET
t1Channels=c1
c1ServerLocation=yourserver.com
c1Port=5539
ConnectionMode=connection_oriented
BufferEvents=NO
EventDefinitions=/opt/RISKMGR/etc/nids.xml
#
UnmatchedLog=/opt/RISKMGR/persistence/eif_receiver_nids_unmatch.log
#TraceLevel=ALL
#TraceFileName=/opt/RISKMGR/persistence/eif_receiver_trace.log
190
IBM
Tivoli
Risk
Manager:
Administrator’s
Guide

#LogLevel=ALL
#LogFileName=/opt/RISKMGR/persistence/eif_receiver_msg.log
Note:
The
UnmatchedLog
parameter
specifies
where
to
log
events
that
do
not
match
any
of
the
format
specifications
in
the
XML
file.
This
should
only
be
defined
and
used
for
development
and
debug
purposes.
Configuring
Network
IDS
for
Use
with
the
Event
Monitor
Network
IDS
can
be
configured
to
send
its
events
to
the
operating
system
log
(syslog
on
Linux
and
UNIX-based
systems).
The
event
monitor
can
be
used
to
capture
these
events
from
these
system
logs.
The
event
monitor
is
designed
to
extract
information
from
a
variety
of
event
sources,
format
the
information
into
Tivoli
Risk
Manager
events,
and
then
forward
the
events
to
a
local
for
summarization
and
transport
to
an
event
server.
The
event
monitor
is
installed
as
an
integral
part
of
the
agent
and
utilizes
the
same
formatting
libraries
as
the
event
submission
API,
Tivoli
Risk
Manager
EIF.
Therefore
it
uses
the
same
Network
IDS
XML
file
used
for
formatting.
To
configure
Network
IDS
to
log
events
to
the
operating
system
log
file,
do
the
following:
1.
Use
the
nids
command
with
the
-y
option
or
edit
the
ids.cfg
file
and
make
appropriate
modifications.
Configuring
the
Event
Monitor
to
Capture
Network
IDS
Events
To
configure
the
event
monitor
to
capture
Network
IDS
events
from
the
system
logs,
refer
to
the
IBM
Tivoli
Risk
Manager
Adapters
Guide
for
information
on
how
to
use
the
Tivoli
Risk
Manager
Event
Monitor
Configuration
Wizard
to
define
an
instance
of
the
event
monitor
and
for
information
on
event
monitor
configuration
parameters.
Configuring
the
Event
Monitor
Using
the
Wizard
When
installing
the
event
monitor
you
should
have
the
following
information
before
performing
the
installation
on
a
Linux
or
UNIX-based
system.
Table
20.
Information
Needed
-
Network
Intrusion
Detection
System
-
Logging
to
file
through
Linux
and
UNIX-based
syslog
Event
Monitor
Parameter
Description
Suggested
Value
ID
A
user
defined
ID
for
an
event
monitor.
tivoliNIDS
Event
source
type
The
type
of
event
monitor.
Logfile
Event
source
The
input
event
source
for
an
event
monitor.
/var/adm/messages
Event
source
definition
file
The
XML
file
used
for
event
formatting.
$RMADHOME/etc/nids.xml
Event
monitor
configuration
file
the
configuration
file
used
by
the
agent
for
the
event
monitor.
$RMADHOME/etc/tivoliNIDS.conf
Polling
interval
An
interval,
in
seconds,
that
an
event
source
has
examined
for
new
data.
10
Chapter
12.
Network
Intrusion
Detection
191

Table
20.
Information
Needed
-
Network
Intrusion
Detection
System
-
Logging
to
file
through
Linux
and
UNIX-based
syslog
(continued)
Event
Monitor
Parameter
Description
Suggested
Value
Unmatched
event
log
file
Specifies
a
log
file
that
includes
event
data
that
can
not
be
formatted
by
the
event
definitions
file
by
the
event
monitor.
Value
should
only
be
specified
for
debug
purposes
Manually
Configuring
the
Event
Monitor
To
manually
configure
the
event
monitor
to
capture
Network
IDS
events,
do
the
following:
1.
Verify
that
the
Network
IDS
XML
file
used
for
formatting
has
been
installed
in
the
RMINSTDIR/etc
directory.
v
nids.xml
for
Linux
and
UNIX-based
systems2.
Create
an
event
monitor
configuration
file,
monitor_receiver_nids.conf,
in
the
RMINSTDIR/etc
directory
and
add
the
following:
Linux
and
UNIX-based
systems:
RMMonitorList=A1
A1Type=LOGFILE
A1PollingInterval=10
A1Source=/var/log/messages
A1EventDefinitions=/opt/RISKMGR/etc/nids.xml
#A1UnmatchedEventLog=/opt/RISKMGR/persistence/monitor_receiver_nids_unmatch.log
A1ID=nids
A1CrcByteCount=50
where
Source
identifies
the
log
file
for
syslogd.
Note:
The
UnmatchedLog
parameter
specifies
where
to
log
events
that
do
not
match
any
of
the
format
specifications
in
the
XML
file.
This
should
only
be
defined
and
used
for
development
and
debug
purposes.
3.
Add
the
following
event
monitor
receiver
source
definition
to
the
RMINSTDIR/etc/rmagent.xml
file.
Linux
and
UNIX-based
systems:
<!--
Event
Monitor
for
NIDS
-->
<source
name="monitor_receiver_webids"
class="com.tivoli.RiskManager.Agent.Transports.Receivers.rmaMonitorReceiver">
<set
key="RMA_conf"
value="/opt/RISKMGR/etc/monitor_receiver_nids.conf"/>
</source>
Windows
system:
<!--
Event
Monitor
for
NIDS
-->
<source
name="monitor_receiver_webids"
class="com.tivoli.RiskManager.Agent.Transports.Receivers.rmaMonitorReceiver">
<set
key="RMA_conf"
value="C:\IBM\RISKMGR\etc\monitor_receiver_nids.conf"/>
</source>
4.
Add
the
following
event
monitor
receiver
source
definition
to
the
RMINSTDIR/etc/rmagent.xml
file.
For
a
client:
<connector>
<from
name="monitor_receiver_nids"/>
<to
name="summarization"/>
</connector>
192
IBM
Tivoli
Risk
Manager:
Administrator’s
Guide

For
a
distributed
correlation
server
or
event
server:
<connector>
<from
name="monitor_receiver_nids"/>
<to
name="correlation"/>
</connector>
5.
Restart
the
agent,
or
start
the
added
event
monitor
using
the
wrmadmin
command.
wrmadmin
-r
monitor_receiver_nids
Note:
When
using
the
event
monitor
on
a
Solaris
system
with
Network
IDS,
the
Solaris
syslog
message
ID
option
must
be
disabled.
Ensure
that
msgid=0
is
set
in
the
/kernel/drv/log.conf
file.
If
Network
IDS
is
configured
to
route
events
to
the
Tivoli
Risk
Manager
EIF
API,
then
the
msgid
setting
in
the
/kernel/drv/log.conf
file
is
not
relevant.
The
nids
Command
To
manually
start
Network
IDS
or
to
use
other
options,
use
the
nids
command.
See
the
IBM
Tivoli
Risk
Manager
Command
Reference
for
details
on
using
this
command.
Chapter
12.
Network
Intrusion
Detection
193

194
IBM
Tivoli
Risk
Manager:
Administrator’s
Guide

Appendix
A.
Event
Integration
Facility
Sender
and
Receiver
Keywords
This
section
provides
reference
information
about
keywords
used
to
configure
agent
configuration
files
to
send
and
receive
events.
These
configuration
files
are
referenced
in
the
rmagent.xml
file,
the
master
agent
configuration
file.
The
configuration
files
specified
as
the
RMA_conf
parameter
value
for
the
Event
Integration
Facility
(EIF)
senders
and
receivers
can
use
the
keywords
described
below.
Specifically,
they
apply
to
sections
in
rmagent.xml
that
are
associated
with
the
following:
v
source
with
class
name
″com.tivoli.RiskManager.Agent.Transports.Receivers.rmaEifReceiver″
v
destination
with
class
name
″com.tivoli.RiskManager.Agent.Transports.Senders.rmaEifSender″
Tivoli
Risk
Manager
uses
the
Tivoli
Enterprise
Console
server’s
EIF
to
send
and
receive
events.
The
information
in
this
section
is
a
reflection
of
the
event
server’s
EIF
facility,
tailored
for
use
in
the
Tivoli
Risk
Manager
environment.
For
example,
when
the
documentation
refers
to
the
″adapter″,
the
agent
is
the
″adapter″,
because
it
is
the
application
sending
and
receiving
events
using
the
event
server’s
Event
Integration
Facility.
For
information
about
other
EIF
configuration
parameters
that
are
not
described
here,
see
the
IBM
Tivoli
Event
Integration
Facility
User’s
Guide.
Keywords
Keywords
use
the
following
format:
keyword=value.
Do
not
use
blank
spaces
in
keyword
statements
unless
enclosed
in
single
quotation
marks.
Do
not
use
class
names
that
are
not
defined
in
a
BAROC
file
with
configuration
options.
Note:
Tivoli
Risk
Manager
does
not
issue
error
messages
for
misspelled
keywords
or
keywords
set
to
a
value
that
is
not
valid.
A
configuration
file
can
contain
the
following
keywords:
BatchCount=number
Specifies
the
number
of
events
to
send
in
one
batch
to
a
destination.
BufEvtMaxSize=kilobytes
Specifies
the
maximum
size,
in
kilobytes,
of
the
cache
file
for
the
event
sender
or
receiver.
The
default
value
is
64.
The
cache
file
stores
events
on
disk
when
the
BufferEvents
keyword
is
set
to
YES.
The
minimum
size
for
the
file
is
8
KB.
File
sizes
specified
below
this
level
are
ignored,
and
8
KB
is
used.
There
is
no
upper
limit
for
the
file
size.
Note:
If
the
cache
file
already
exists,
you
must
delete
the
existing
cache
file
for
any
change
to
the
BufEvtMaxSize
maximum
size
for
keyword
changes
to
take
effect.
The
BufEvtMaxSize
keyword
is
optional.
©
Copyright
IBM
Corp.
2003
195

BufEvtPath=pathname
Specifies
the
full
path
name
of
the
cache
file
for
the
event
sender
or
receiver.
Tivoli
Risk
Manager
will
automatically
create
an
event
cache
file
for
each
event
sender
and
receiver
in
the
Tivoli
Risk
Manager
RMINSTDIR\persistence
directory
if
BufferEvents=YES.
By
default,
BufferEvents=NO.
Unless
you
want
to
change
the
location
of
an
event
cache
file
(and
BufferEvents=YES),
there
is
no
need
to
specify
the
BufEvtPath
parameter.
Note:
If
BufEvtPath
is
used
to
override
the
default
location
for
an
event
sender
or
receiver’s
cache,
it
is
essential
that
each
event
sender
and
receiver
have
a
different
cache
file.
Results
are
unpredictable
if
a
cache
file
is
shared
between
multiple
event
handlers
(senders
and
receivers).
BufferEvents=YES
|
MEMORY_ONLY
|
NO
Specifies
how
event
buffering
is
enabled.
If
BufferEvents
is
set
to
YES,
events
are
stored
in
the
file
specified
by
the
BufEvtPath
keyword.
If
BufEvtPath
is
not
specified,
Tivoli
Risk
Manager
will
create
the
appropriate
cache
file
in
the
Tivoli
Risk
Manager
RMINSTDIR/persistence
directory.
If
BufferEvents
is
set
to
MEMORY_ONLY,
events
are
buffered
in
memory.
If
the
keyword
is
set
to
NO,
events
are
not
stored
or
buffered.
The
value
is
not
case-sensitive.
The
default
value
is
NO.
This
keyword
is
optional.
BufferFlushRate=events_per_minute
Specifies
the
number
of
events
that
are
sent
per
minute.
After
the
lost
connection
is
recovered,
and
there
are
events
in
the
buffer,
the
events
are
sent
at
this
rate
per
minute.
The
default
value
is
zero
(0);
all
events
are
sent
in
one
burst.
The
BufferFlushRate
keyword
is
optional.
ConnectionMode=connection_oriented
|
connection_less
Specifies
the
connection
mode
to
use
to
connect
to
an
event
server
or
the
IBM
Tivoli
Enterprise
Console
gateway.
Valid
values
are
connection_oriented
(or
its
abbreviations
CO
and
co)
and
connection_less.
The
default
value
for
Tivoli
Risk
Manager
is
connection_oriented
or
CO.
When
connection_less
is
specified,
a
new
connection
is
established
(and
discarded)
for
each
event
or
group
of
events
that
is
sent.
When
connection_oriented
or
one
of
its
abbreviations
is
specified,
a
connection
is
established
at
initialization
and
is
maintained
for
all
events
sent.
A
new
connection
is
established
only
if
the
initial
connection
is
lost.
The
connection
is
discarded
when
the
Tivoli
Risk
Manager
agent
is
stopped.
The
ConnectionMode
keyword
is
optional.
Filter
Works
with
the
FilterMode
keyword
to
determine
how
events
are
filtered.
An
event
matches
a
Filter
statement
when
each
attribute=value
pair
in
the
Filter
statement
is
identical
to
the
corresponding
attribute=value
pair
in
the
event.
A
Filter
statement
must
contain
the
event
class,
and
optionally
can
include
any
other
attribute=value
pair
that
is
defined
for
the
event
class.
The
format
of
a
filtering
statement
is
the
following:
Filter:Class=class_name;[attribute=value;...;attribute=value]
196
IBM
Tivoli
Risk
Manager:
Administrator’s
Guide

Each
statement
must
be
on
a
single
line.
The
attributre=value
pair
is
case
sensitive.
This
keyword
is
optional.
LogFileName=pathname
Specifies
the
full
path
name
of
the
log
file
for
the
Java
API.
The
default
location
for
the
file
is
$TIVOLIHOME/tec/eif.log.
If
UseStateCorrelation=YES
,
the
LogFileName
keyword
also
defines
the
path
to
store
the
log
file
for
state
correlation.
Tivoli
Event
Integration
Facility
adds
the
prefix
_sc
to
the
specified
file
name.
The
prefix
differentiates
the
log
file
for
the
Java
API
from
the
log
file
for
state
correlation.
The
default
value
for
the
path
is
$TIVOLIHOME/tec/eif_sc.log.
If
you
specify
a
non-valid
path
name,
the
API
returns
the
following
error:
LOG0014E
Unable
to
open
the
handler
output
file
<filename>.
java.io.FileNotFoundException:<filename>
(The
system
cannot
find
the
path
specified)
This
keyword
is
optional.
LogLevel=level
Specifies
whether
the
Java
API
generates
log
messages
or
not.
By
default,
no
messages
are
generated.
Specify
ALL
to
generate
messages.
If
you
specify
any
other
value
or
no
value,
the
API
does
not
generate
messages.
This
keyword
is
optional.
MaxPacketSize=bytes
Specifies
the
number
of
bytes
to
be
sent
at
the
rate
specified
by
BufferFlushRate.
The
default
value
is
zero
(0),
where
one
event
is
sent
at
a
time.
RmadLogging=YES
|
NO
Specify
RmadLogging=YES
in
thermad.conf
file
to
enable
tracing
for
the
Tivoli
Risk
Manager
EIF
API.
Default
is
set
to
NO.
RMAgentSenderRetryInterval=seconds
Specifies
the
number
of
seconds
between
retries
when
the
destination
server
is
unavailable.
This
is
used
to
control
the
retry
rate
for
Tivoli
Risk
Manager
agent
sender
components
that
send
events
to
an
event
server
using
the
Event
Integration
Facility,
as
well
as
senders
that
insert
events
into
the
Tivoli
Risk
Manager
archive
table
(in
a
relational
database).
For
an
EIF
sender,
the
default
value
is
30
seconds.
For
a
database
sender,
the
default
value
is
120
seconds.
This
is
useful
when
BufferEvents=no,
ConnectionMode=co,
and
EIF
is
not
caching
events
when
the
server
is
unavailable.
Note:
By
default,
the
agent
sets
RetryInterval
to
the
same
value
as
RMAgentSenderRetryInterval.
RMAgentSenderRetryAttempts=integer
Specifies
the
number
of
retries
for
sending
an
event
when
the
destination
server
is
unavailable.
The
number
of
seconds
between
retries
is
specified
by
the
RMAgentSenderRetryInterval
parameter.
If
the
Tivoli
Risk
Manager
agent
cannot
successfully
forward
the
event
after
the
specified
number
of
attempts,
the
event
is
left
on
the
agent
queue
and
the
agent
processes
the
next
event
on
the
queue.
The
default
value
is
zero
(or
0),
which
specifies
to
retry
indefinitely.
Appendix
A.
Event
Integration
Facility
Sender
and
Receiver
Keywords
197
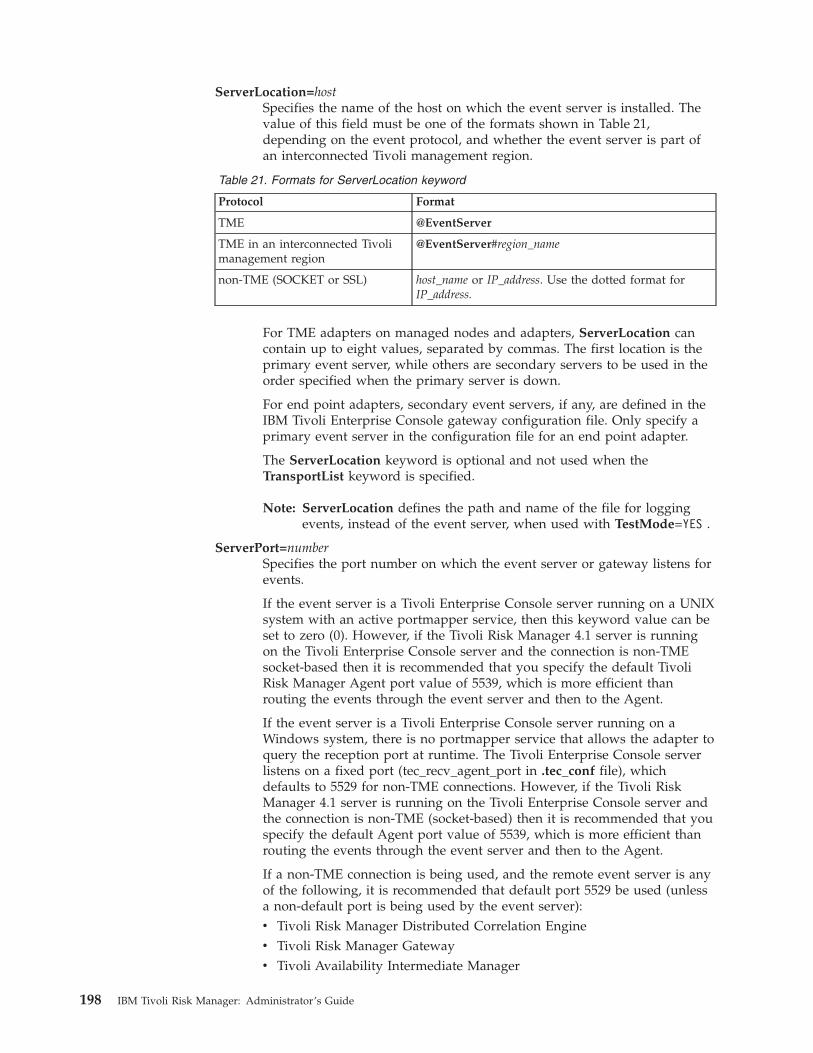
ServerLocation=host
Specifies
the
name
of
the
host
on
which
the
event
server
is
installed.
The
value
of
this
field
must
be
one
of
the
formats
shown
in
Table
21,
depending
on
the
event
protocol,
and
whether
the
event
server
is
part
of
an
interconnected
Tivoli
management
region.
Table
21.
Formats
for
ServerLocation
keyword
Protocol
Format
TME
@EventServer
TME
in
an
interconnected
Tivoli
management
region
@EventServer#region_name
non-TME
(SOCKET
or
SSL)
host_name
or
IP_address.
Use
the
dotted
format
for
IP_address.
For
TME
adapters
on
managed
nodes
and
adapters,
ServerLocation
can
contain
up
to
eight
values,
separated
by
commas.
The
first
location
is
the
primary
event
server,
while
others
are
secondary
servers
to
be
used
in
the
order
specified
when
the
primary
server
is
down.
For
end
point
adapters,
secondary
event
servers,
if
any,
are
defined
in
the
IBM
Tivoli
Enterprise
Console
gateway
configuration
file.
Only
specify
a
primary
event
server
in
the
configuration
file
for
an
end
point
adapter.
The
ServerLocation
keyword
is
optional
and
not
used
when
the
TransportList
keyword
is
specified.
Note:
ServerLocation
defines
the
path
and
name
of
the
file
for
logging
events,
instead
of
the
event
server,
when
used
with
TestMode=YES
.
ServerPort=number
Specifies
the
port
number
on
which
the
event
server
or
gateway
listens
for
events.
If
the
event
server
is
a
Tivoli
Enterprise
Console
server
running
on
a
UNIX
system
with
an
active
portmapper
service,
then
this
keyword
value
can
be
set
to
zero
(0).
However,
if
the
Tivoli
Risk
Manager
4.1
server
is
running
on
the
Tivoli
Enterprise
Console
server
and
the
connection
is
non-TME
socket-based
then
it
is
recommended
that
you
specify
the
default
Tivoli
Risk
Manager
Agent
port
value
of
5539,
which
is
more
efficient
than
routing
the
events
through
the
event
server
and
then
to
the
Agent.
If
the
event
server
is
a
Tivoli
Enterprise
Console
server
running
on
a
Windows
system,
there
is
no
portmapper
service
that
allows
the
adapter
to
query
the
reception
port
at
runtime.
The
Tivoli
Enterprise
Console
server
listens
on
a
fixed
port
(tec_recv_agent_port
in
.tec_conf
file),
which
defaults
to
5529
for
non-TME
connections.
However,
if
the
Tivoli
Risk
Manager
4.1
server
is
running
on
the
Tivoli
Enterprise
Console
server
and
the
connection
is
non-TME
(socket-based)
then
it
is
recommended
that
you
specify
the
default
Agent
port
value
of
5539,
which
is
more
efficient
than
routing
the
events
through
the
event
server
and
then
to
the
Agent.
If
a
non-TME
connection
is
being
used,
and
the
remote
event
server
is
any
of
the
following,
it
is
recommended
that
default
port
5529
be
used
(unless
a
non-default
port
is
being
used
by
the
event
server):
v
Tivoli
Risk
Manager
Distributed
Correlation
Engine
v
Tivoli
Risk
Manager
Gateway
v
Tivoli
Availability
Intermediate
Manager
198
IBM
Tivoli
Risk
Manager:
Administrator’s
Guide
If
an
SSL-based
connection
is
being
used,
and
the
remote
event
server
is
any
of
the
following,
it
is
recommended
that
default
port
5549
be
used
(unless
a
non-default
port
is
being
used
by
the
event
server):
v
Tivoli
Risk
Manager
Tivoli
Enterprise
Console
Server
v
Tivoli
Risk
Manager
Distributed
Correlation
Engine
v
Tivoli
Risk
Manager
Gateway
The
ServerPort
keyword
is
not
used
when
the
TransportList
keyword
is
specified.
TestMode=YES
|
NO
Specifies
whether
test
mode
is
turned
on
or
off.
When
TestMode=YES,
the
ServerLocation
keyword
specifies
the
file
to
which
events
are
logged,
instead
of
being
sent
to
the
event
server.
Valid
values
are
YES
and
NO,
without
regard
to
case.
The
default
is
NO.
The
TestMode
keyword
is
optional.
TraceFileName=pathname
Specifies
the
full
path
name
of
the
trace
file
for
the
Java
API.
The
default
location
of
the
file
is
$TIVOLIHOME/tec/eif.trc.
If
the
UseStateCorrelation
keyword
is
set
to
YES
,
the
TraceFileName
keyword
also
defines
the
path
to
store
tracing
for
state
correlation.
Tivoli
Event
Integration
Facility
adds
the
prefix
to
the
specified
file
name.
The
prefix
differentiates
the
trace
file
for
the
Java
API
from
the
trace
file
for
state
correlation.
The
default
value
for
the
path
is
$TIVOLIHOME/tec/eif_sc.trc.
If
you
specify
a
non-valid
path
name,
the
API
returns
the
following
error:
LOG0014E
Unable
to
open
the
handler
output
file
<filename>.
java.io.FileNotFoundException:
<filename>
(The
system
cannot
find
the
path
specified)
This
keyword
is
optional.
TraceLevel=level
Specifies
whether
the
Java
API
generates
trace
messages
or
not.
By
default,
no
messages
are
generated.
Specify
ALL
to
generate
messages.
If
you
specify
any
other
value
or
no
value,
the
API
does
not
generate
messages.
This
keyword
is
optional.
TransportList=type_name...
Specifies
the
user-supplied
name
of
transport
mechanisms
to
be
used.
When
sending
events,
the
transport
mechanisms
are
used
in
the
order
they
are
specified
in
when
a
failure
occurs
with
the
previous
transport
mechanism.
When
receiving
events,
all
the
transport
mechanisms
are
created
and
used.
This
keyword
is
optional.
The
transport
type
and
channel
for
each
type_name
are
specified
by
the
Channels
and
Type
keywords:
type_nameChannels=channel_name...
Specifies
the
user-supplied
names
of
channels
that
are
used
by
the
transport
mechanism,
which
is
specified
by
the
TransportList
keyword.
This
keyword
is
required.
Appendix
A.
Event
Integration
Facility
Sender
and
Receiver
Keywords
199
type_nameType=LCF
|
SOCKET
|
TME
|
SSL
|
LOCALONLYSOCKET
Specifies
the
transport
type
for
the
transport
mechanism
specified
by
the
TransportList
keyword.
Types
SOCKET
and
SSL
can
be
used
on
any
system.
A
Type
value
of
LCF
is
used
when
using
the
TME
send
event
protocol
on
an
Endpoint.
A
Type
value
of
TME
is
only
used
by
Tivoli
Risk
Manager
when
it
is
installed
on
the
Tivoli
Enterprise
Console
server
to
send
events.
When
TME
is
used,
TMEHost,
TMEPassword
and
TMEUserID
must
also
be
specified.
This
keyword
is
required
when
TransportList
is
used.
The
server
and
port
for
each
channel_name
are
specified
by
the
ServerLocation
and
Port
keywords.
Depending
on
the
Type
specified,
you
also
use
one
or
more
of
the
following
keywords:
channel_namePort=number
Specifies
the
port
number
on
which
the
transport
mechanisms
server
listens
for
the
specified
channel
(set
by
the
Channel
keyword).
See
the
usage
information
for
the
Port
parameters
on
using
the
channel_name
Port
parameter.
channel_nameServerLocation=server[region]
Specifies
the
event
server
name
and
region
on
which
the
transport
mechanisms
server
is
located
for
the
specified
channel
(set
by
the
Channel
keyword).
This
keyword
is
required
when
the
Type
keyword
is
set
to
TME,
LCF,
SOCKET,
LOCALONLYSOCKET,
or
SSL.
See
Table
21
on
page
198
for
valid
formats
of
the
server
and
region
fields.
channel_nameSSLCipherList=cipherList
Specifies
an
explicit
list
of
cipher
suites,
overriding
the
settings
associated
with
SSLSecurityLevel.
Instances
of
SSLCipher
associated
with
the
SSLCipherList
are
used
to
explicitly
specify
the
list
of
enabled
cipher
suites.
See
SSLCipher
on
page
203
for
the
list
of
available
ciphers.
channel_nameSSLKeystore
The
path
of
the
SSL
keystore
file.
This
file
is
typically
used
to
store
personal
certificates,
including
private
keys.
channel_nameSSLKeystorePW
Specifies
the
password
for
the
SSL
keystore
file.
The
password
as
specified
here
is
clear-text.
Tivoli
Risk
Manager
also
provides
the
ability
to
store
and
retrieve
the
password
in
an
obfuscated
representation.
A
Tivoli
Risk
Manager
utility
is
provided
to
take
a
clear-text
password,
obfuscate
it,
and
store
it
in
a
stash
file.
channel_nameSSLKeystorePWFile
Specifies
the
path
to
a
″stash″
file
that
contains
an
obfuscated
representation
of
the
password
used
to
access
the
SSL
keystore
file,
as
specified
with
the
SSLKeystore
parameter.
If
you
change
the
password
in
your
keystore
file,
or
use
a
different
keystore
file,
it
is
necessary
to
reset
the
obfuscated
password
in
the
keystore
password
file.
To
store
the
obfuscated
form
of
a
new
password
in
the
file,
use
the
wrmstashpw
command.
See
the
IBM
Tivoli
Risk
Manager
Command
Reference
for
details
on
using
this
command.
200
IBM
Tivoli
Risk
Manager:
Administrator’s
Guide

channel_nameSSLRequireClientAuthentication
For
server-side
support,
specifies
whether
the
connections
must
include
client
authentication:
v
NO
–
Clients
do
not
need
to
provide
authentication
information
(default).
v
YES
–
Clients
must
provide
authentication
information.
channel_nameSSLSecurityLevel
Specifies
the
level
of
cryptographic
protection
to
be
used
by
the
EIF
SSL
client
or
server,
in
conjunction
with
the
IBM
JSSE
provider.
For
convenience,
levels
of
protection
are
grouped
into
three
classifications,
using
the
following
values:
v
high
v
medium
v
low
If
SSLSecurityLevel
is
not
specified
(and
SSLCipherList
is
not
specified),
the
level
of
cryptographic
protection
defaults
to
high.
When
set
to
high
and
the
configuration
for
EIF
SSL
is
either
a
client
or
server,
the
following
cipher
suites
are
enabled:
v
SSL_RSA_WITH_RC4_128_MD5
v
SSL_RSA_WITH_RC4_128_SHA
v
SSL_
RSA_WITH_3DES_EDE_CBC_SHA
v
SSL_DHE_RSA_WITH_3DES_EDE_CBC_SHA
v
SSL_DHE_DSS_WITH_3DES_EDE_CBC_SHA
When
set
to
medium
and
the
configuration
for
EIF
SSL
is
either
a
client
or
server,
the
following
cipher
suites
are
enabled:
v
SSL_RSA_EXPORT_WITH_RC4_40_MD5
v
SSL_RSA_EXPORT_WITH_DES40_CBC_SHA
v
SSL_RSA_EXPORT_WITH_RC2_CBC_40_MD5
v
SSL_DHE_RSA_EXPORT_WITH_DES40_CBC_SHA
v
SSL_DHE_DSS_EXPORT_WITH_DES40_CBC_SHA
When
set
to
low
and
the
configuration
for
EIF
SSL
is
server,
the
following
cipher
suites
are
enabled.
These
suites
do
not
encrypt
the
payload,
but
do
perform
integrity
checks
to
ensure
that
the
payload
has
not
been
modified
during
transit:
v
SSL_RSA_WITH_NULL_MD5
v
SSL_RSA_WITH_NULL_SHA
v
SSL_DH_anon_WITH_RC4_128_MD5
v
SSL_DH_anon_WITH_DES_CBC_SHA
v
SSL_DH_anon_WITH_3DES_EDE_CBC_SHA
v
SSL_DH_anon_EXPORT_WITH_RC4_40_MD5
v
SSL_DH_anon_EXPORT_WITH_DES40_CBC_SHA
When
set
to
low
and
the
configuration
for
EIF
SSL
is
client,
the
following
cipher
suites
are
enabled.
These
suites
do
not
encrypt
the
payload,
but
do
perform
integrity
checks
to
ensure
that
the
payload
has
not
been
modified
during
transit:
v
SSL_RSA_WITH_NULL_MD5
Appendix
A.
Event
Integration
Facility
Sender
and
Receiver
Keywords
201

v
SSL_RSA_WITH_NULL_SHA
channel_nameSSLTruststore
The
path
of
the
SSL
trust
store
file.
This
file
is
typically
used
to
store
signer
certificates,
which
specify
whether
the
signer
of
the
server’s
certificate
is
to
be
trusted.
The
trust
file
helps
you
manage
which
signers
an
organization
allows
connections
to.
This
enables
clients
and
servers
to
store
their
personal
certificates
(including
private
keys)
in
the
key
store
file
and
all
of
their
signers
in
the
trust
store
file.
If
not
specified,
SSLTruststore
is
set
to
the
value
associated
with
SSLKeystore.
channel_nameSSLTruststorePW=password
Specifies
the
password
for
the
SSL
trust
store
file.
The
password
as
specified
here
is
clear-text.
Tivoli
Risk
Manager
provides
the
ability
to
store
and
retrieve
the
password
in
an
obfuscated
representation.
A
Tivoli
Risk
Manager
utility
is
provided
to
take
a
clear-text
password,
obfuscate
it,
and
store
it
in
a
stash
file.
channel_nameTMEHost=hostname
For
the
Java
API
only,
specifies
the
host
name
of
the
managed
node
where
the
event
server
is
located.
This
is
a
required
keyword
when
the
Type
keyword
is
set
to
TME.
channel_nameTMEPassword=password
Specifies
the
cleartext
password
used
for
sending
events
from
the
agent
to
the
Tivoli
Enterprise
Console
server,
using
the
TME
protocol.
By
default,
Tivoli
Risk
Manager
does
not
use
this
keyword.
The
password
is
stored
in
an
obfuscated
fashion,
in
a
stash
file.
See
TMEPasswordFile
for
more
information.
This
keyword,
or
the
alternative
TMEPasswordFile,
is
required
when
the
Type
keyword
is
set
to
TME.
channel_nameTMEPasswordFile=pathname
Specifies
the
path
to
a
stash
file
that
contains
an
obfuscated
representation
of
the
password
used
for
sending
events
from
the
agent
into
the
Tivoli
Enterprise
Console
server,
using
the
TME
protocol.
If
you
change
the
password
used
to
make
this
connection,
it
is
necessary
to
reset
the
obfuscated
password
in
the
TME
password
stash
file.
To
store
the
obfuscated
form
of
a
new
password
in
the
file,
use
the
wrmstashpw
command.
See
the
IBM
Tivoli
Risk
Manager
Command
Reference
for
details
on
using
this
command.
channel_nameTMEPort=number
Specifies
the
port
number
used
for
sending
events
from
the
agent
to
the
Tivoli
Enterprise
Console
server,
using
the
TME
protocol.
The
default
value
for
this
optional
keyword
is
94.
This
keyword
can
be
used
to
override
the
default
when
the
Type
keyword
is
set
to
TME.
channel_nameTMEUserID=name
Specifies
the
TME
administrator
ID
used
for
sending
events
from
the
agent
to
the
Tivoli
Enterprise
Console
server,
using
the
TME
protocol.
Any
TME
administrator
with
the
user
role
will
suffice.
In
Tivoli
Risk
Manager
environments,
this
parameter
is
automatically
setup
during
installation
to
reference
the
supplied
userid.
This
is
a
required
keyword
when
the
Type
keyword
is
set
to
TME.
202
IBM
Tivoli
Risk
Manager:
Administrator’s
Guide

cipher_listSSLCipher=cipher
Specifies
a
particular
cipher
suite
within
a
list
associated
with
an
SSLCipherList.
In
addition
to
all
of
the
cipher
suites
referenced
in
the
documentation
for
SSLSecurityLevel,
the
following
cipher
suites
are
also
available
when
using
the
IBM
JSSE
provider:
v
SSL_IBM_DH_EKE_EXPORT_WITH_RC4_40_MD5
v
SSL_IBM_DH_EKE_EXPORT_WITH_DES40_CBC_SHA
v
SSL_RSA_WITH_IDEA_CBC_SHA
v
SSL_IBM_DH_EKE_WITH_RC4_128_MD5
v
SSL_IBM_DH_EKE_WITH_DES_CBC_SHA
v
SSL_IBM_DH_EKE_WITH_3DES_EDE_CBC_SHA
Appendix
A.
Event
Integration
Facility
Sender
and
Receiver
Keywords
203

204
IBM
Tivoli
Risk
Manager:
Administrator’s
Guide

Appendix
B.
Database
Archive
Configuration
This
section
provides
reference
information
about
keywords
for
database
archive
configuration
files.
The
two
configuration
files
necessary
for
database
archiving
are:
v
db_sender.conf
v
rmclasspath.conf
The
database
archiver
is
defined
in
rmagent.xml
as
a
destination
with
classname=
"com.tivoli.RiskManager.Agent.Transports.Senders.rmaArchiveDBSender"
and
a
configuration
file
defined
by
the
RMA_conf
parameter.
The
default
database
archive
configuration
file
is
RMINSTDIR/etc/db_sender.conf.
This
file
must
be
configured
with
the
parameters
necessary
for
the
agent
to
connect
to
the
database
containing
the
Tivoli
Risk
Manager
archive
table.
The
parameters
are
described
in
the
following
section.
Database
Archiver
Keywords
The
database
archive
configuration
file
might
contain
the
following
keywords:
ArchiveDBUserid=userid
The
archive
database
userid.
ArchiveDBPasswordFile=passwordfilename
The
stashed
password
of
the
database
user.
ArchiveDBType=
DB2
|
ORACLE
|
MSSQL
|
SYBASE
Specifies
the
database
type.
ArchiveDBPort=databaseportnumber
Port
used
by
the
JDBC
to
communicate
with
the
database.
Common
defaults
are
provided
for
each
database.
ArchiveDBName=databasename
The
name
of
the
database
you
will
use
to
store
Tivoli
Risk
Manager
events
in.
In
most
instances,
you
can
use
the
Tivoli
Enterprise
Console
database
unless
you
want
to
create
a
separate
database
for
archiving
events.
The
database
should
have
be
created
prior
to
running
the
Tivoli
Risk
Manager
installation.
ArchiveDBDescriptionXML=XMLfilename
XML
file
that
describes
the
archive
database
entries.
The
default
value
is
RMINSTDIR/etc/archive_db.xml.
ArchiveDBDriver=JDBCdrivername
JDBC
driver
to
be
used.
DB2:
COM.ibm.db2.jdbc.net.DB2Driver
Oracle:
oracle.jdbc.driver.OracleDriver
Microsoft
SQL:
©
Copyright
IBM
Corp.
2003
205

The
following
is
an
example
for
the
Microsoft
driver.
com.microsoft.jdbc.sqlserver.SQLServerDriver
The
following
is
an
example
for
the
DataDirect
driver.
com.ddtek.jdbc.sqlserver.SQLServerDriver
The
following
is
an
example
for
the
Avenir
driver.
net.avenir.jdbc2.Driver
Sybase:
The
following
is
an
example
for
the
default
Sybase
driver.
com.sybase.jdbc2.jdbc.SybDriver
The
following
is
an
example
for
the
DataDirect
driver.
com.ddtek.jdbc.sqlserver.SybaseDriver
ArchiveDBHostName=hostname
Host
name
where
the
database
resides.
ArchiveJDBCUrl=Urlstring
JDBC
connection
URL.
This
is
used
for
MSSQL
and
Sybase.
Microsoft
SQL:
The
following
is
an
example
for
the
Microsoft
driver.
jdbc:microsoft:sqlserver://acme.com:1433
The
following
is
an
example
for
the
DataDirect
driver.
jdbc:datadirect:sqlserver://acme.com:1433
The
following
is
an
example
for
the
Avenir
driver.
jdbc:avenirdriver://acme.com:1433
Sybase:
The
following
is
an
example
for
the
default
Sybase
driver.
jdbc:sybase:Tds:acme.com:4100
The
following
is
an
example
for
the
DataDirect
driver.
jdbc:datadirect:sybase://acme.com:5000
JDBC
Classpath
Settings
In
order
for
the
JDBC
drivers
to
function,
the
location
of
the
driver
class
files
must
be
known
to
the
agent.
The
information
is
located
in
the
rmclasspath.conf
file,
and
points
to
the
JAR
or
ZIP
files
that
contain
the
database
driver.
DB2:
$DB2PATH/java12/db2java.zip
Oracle:
$ORACLE_HOME/jdbc/lib/classes111.zip
Microsoft
SQL:
206
IBM
Tivoli
Risk
Manager:
Administrator’s
Guide

The
following
is
an
example
for
the
Microsoft
driver.
C:\temp\mssqlserver.jar;C:\temp\msutil.jar;C:\temp\msbase.jar
The
following
is
an
example
for
the
DataDirect
driver.
C:\temp\sqlserver.jar;C:\temp\base.jar;C:\temp\util.jar
Sybase:
C:\sybase\jConnect-5_2\classes\jconn2.jar
Appendix
B.
Database
Archive
Configuration
207

208
IBM
Tivoli
Risk
Manager:
Administrator’s
Guide

Appendix
C.
Secure
Socket
Layer
Introduction
and
iKeyman
Privacy
and
security
are
concepts
that
are
more
critical
than
ever
in
today’s
electronic
business
environment.
Every
business
professional
needs
to
be
concerned
about
security
over
open
communication
networks,
such
as
the
Internet.
It
is
not
enough
to
have
a
secure
Web
site;
you
also
need
to
have
secure
communication
between
Web
sites,
communication
that
cannot
be
monitored
by
outside
parties.
Both
you
and
your
users
need
to
be
confident
that
you
have
a
secure
environment
in
which
to
conduct
your
business.
This
appendix
provides
an
introduction
to
the
concept
of
a
Secure
Sockets
Layer
(SSL),
which
provides
communication
security
for
Tivoli
Risk
Manager
by
using
digital
certificates.
Digital
certificates
are
explained
in
greater
detail
in
“Digital
Certificates.”
Secure
Sockets
Layer
Overview
Secure
communication
requires
encryption,
and
encryption
is
what
the
SSL,
provides:
security
for
the
connection
over
which
you
can
communicate.
SSL
was
developed
jointly
by
Netscape
Communications
and
RSA
Data
Security.
Many
companies
worldwide
have
adopted
SSL
as
their
communication
protocol
of
choice.
In
fact,
many
financial
transactions
on
the
Internet,
including
online
banking,
are
now
conducted
using
SSL.
Because
digital
certificates
are
an
important
component
of
SSL,
this
appendix
consists
of
the
following
sections:
v
“Digital
Certificates”
v
“How
SSL
Works”
on
page
214
v
“Tivoli
Risk
Manager
and
SSL”
on
page
217
v
“Managing
Digital
Certificates
with
Keytool”
on
page
220
v
“Managing
Digital
Certificates
with
iKeyman”
on
page
222
Digital
Certificates
Digital
certificates
allow
unique
identification
of
an
entity;
they
are,
in
essence,
electronic
ID
cards
issued
by
trusted
parties.
Digital
certificates
allow
a
user
to
verify
to
whom
a
certificate
is
issued
as
well
as
the
issuer
of
the
certificate.
Digital
certificates
are
the
vehicle
that
SSL
uses
for
public-key
cryptography.
Public-key
cryptography
uses
two
different
cryptographic
keys:
a
private
key
and
a
public
key.
Public-key
cryptography
is
also
known
as
asymmetric
cryptography,
because
you
can
encrypt
information
with
one
key
and
decrypt
it
with
the
complement
key
from
a
given
public-private
key
pair.
Public-private
key
pairs
are
simply
long
strings
of
data
that
act
as
keys
to
a
user’s
encryption
scheme.
The
user
keeps
the
private
key
in
a
secure
place
(for
example,
encrypted
on
a
computer’s
hard
drive)
and
provides
the
public
key
to
anyone
with
whom
the
user
wants
to
communicate.
The
private
key
is
used
to
digitally
sign
all
secure
communications
sent
from
the
user;
the
public
key
is
used
by
the
recipient
to
verify
the
sender’s
signature.
©
Copyright
IBM
Corp.
2003
209
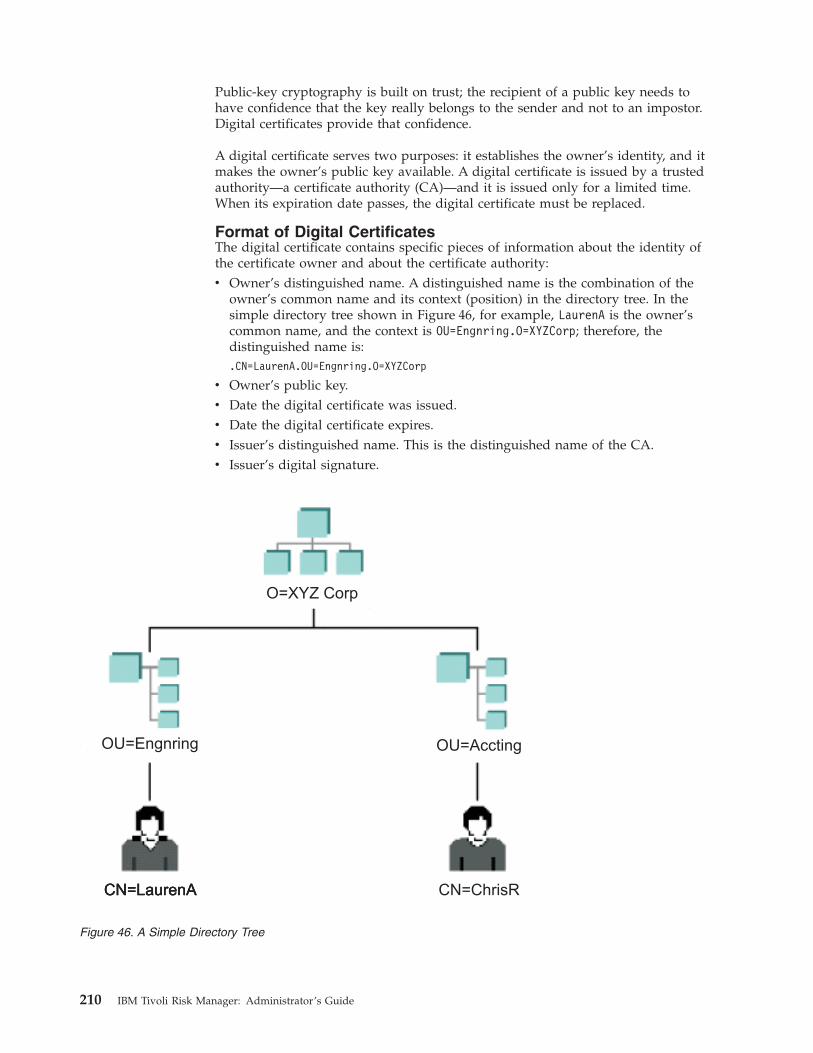
Public-key
cryptography
is
built
on
trust;
the
recipient
of
a
public
key
needs
to
have
confidence
that
the
key
really
belongs
to
the
sender
and
not
to
an
impostor.
Digital
certificates
provide
that
confidence.
A
digital
certificate
serves
two
purposes:
it
establishes
the
owner’s
identity,
and
it
makes
the
owner’s
public
key
available.
A
digital
certificate
is
issued
by
a
trusted
authority—a
certificate
authority
(CA)—and
it
is
issued
only
for
a
limited
time.
When
its
expiration
date
passes,
the
digital
certificate
must
be
replaced.
Format
of
Digital
Certificates
The
digital
certificate
contains
specific
pieces
of
information
about
the
identity
of
the
certificate
owner
and
about
the
certificate
authority:
v
Owner’s
distinguished
name.
A
distinguished
name
is
the
combination
of
the
owner’s
common
name
and
its
context
(position)
in
the
directory
tree.
In
the
simple
directory
tree
shown
in
Figure
46,
for
example,
LaurenA
is
the
owner’s
common
name,
and
the
context
is
OU=Engnring.O=XYZCorp;
therefore,
the
distinguished
name
is:
.CN=LaurenA.OU=Engnring.O=XYZCorp
v
Owner’s
public
key.
v
Date
the
digital
certificate
was
issued.
v
Date
the
digital
certificate
expires.
v
Issuer’s
distinguished
name.
This
is
the
distinguished
name
of
the
CA.
v
Issuer’s
digital
signature.
O=XYZ Corp
OU=Engnring OU=Accting
CN=LaurenACN=LaurenACN=LaurenA CN=ChrisR
Figure
46.
A
Simple
Directory
Tree
210
IBM
Tivoli
Risk
Manager:
Administrator’s
Guide

Figure
47
shows
the
layout
of
a
typical
digital
certificate.
Security
Considerations
for
Digital
Certificates
If
you
send
your
digital
certificate
containing
your
public
key
to
someone
else,
what
keeps
that
person
from
misusing
your
digital
certificate
and
posing
as
you?
The
answer
is
your
private
key.
A
digital
certificate
alone
can
never
be
proof
of
anyone’s
identity.
The
digital
certificate
just
allows
you
to
verify
the
identity
of
the
digital
certificate
owner
by
providing
the
public
key
that
is
needed
to
check
the
digital
certificate
owner’s
digital
signature.
Therefore,
the
digital
certificate
owner
must
protect
the
private
key
that
belongs
to
the
public
key
in
the
digital
certificate.
If
the
private
key
is
stolen,
the
thief
can
pose
as
the
legitimate
owner
of
the
digital
certificate.
Without
the
private
key,
a
digital
certificate
cannot
be
misused.
Certificate
Authorities
and
Trust
Hierarchies
Trust
is
a
very
important
concept
in
digital
certificates.
Each
organization
or
user
must
determine
which
CAs
can
be
accepted
as
trustworthy.
A
user
of
a
security
service
requiring
knowledge
of
a
public
key
generally
needs
to
obtain
and
validate
a
digital
certificate
containing
the
required
public
key.
Receiving
a
digital
certificate
from
a
remote
party
does
not
give
the
receiver
any
assurance
about
the
authenticity
of
the
digital
certificate.
To
verify
that
the
digital
certificate
is
authentic,
the
receiver
needs
the
public
key
of
the
certificate
authority
that
issued
the
digital
certificate.
Owner’sDistinguished Name
Owner’s Public Key
Issuer’s (CA)Distinguished Name
Issuer’s Signature
Figure
47.
Simplified
Layout
of
a
Digital
Certificate
Appendix
C.
Secure
Socket
Layer
Introduction
and
iKeyman
211
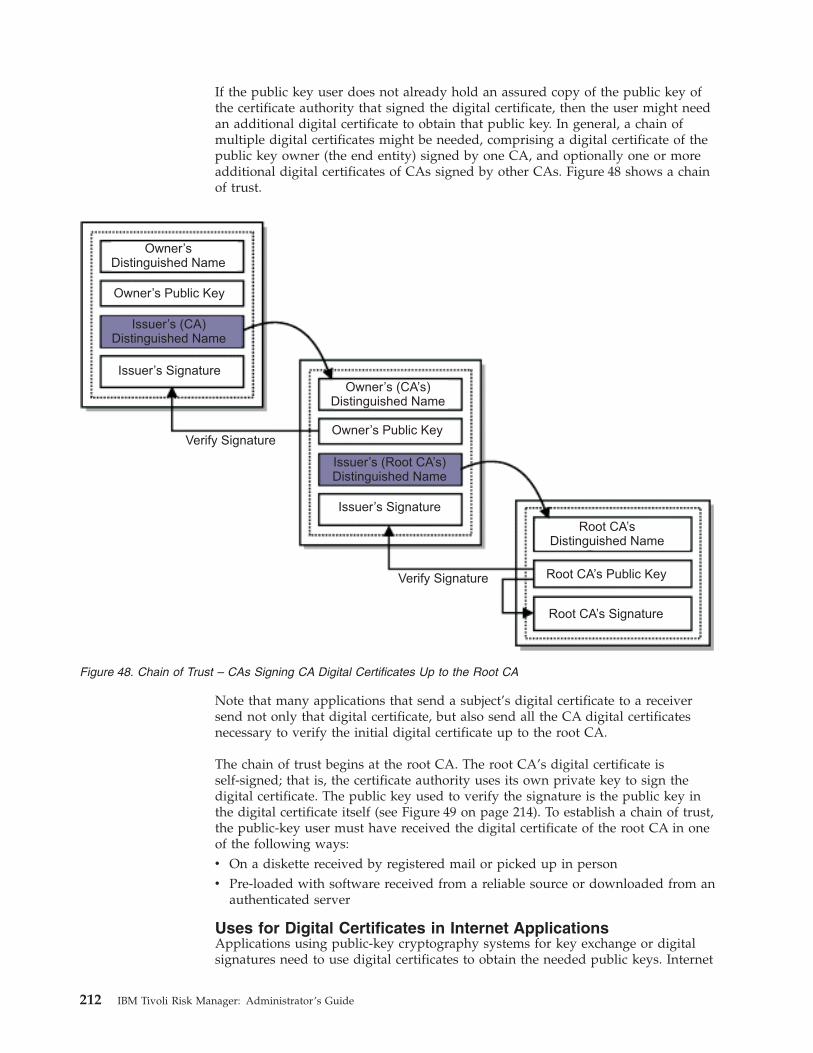
If
the
public
key
user
does
not
already
hold
an
assured
copy
of
the
public
key
of
the
certificate
authority
that
signed
the
digital
certificate,
then
the
user
might
need
an
additional
digital
certificate
to
obtain
that
public
key.
In
general,
a
chain
of
multiple
digital
certificates
might
be
needed,
comprising
a
digital
certificate
of
the
public
key
owner
(the
end
entity)
signed
by
one
CA,
and
optionally
one
or
more
additional
digital
certificates
of
CAs
signed
by
other
CAs.
Figure
48
shows
a
chain
of
trust.
Note
that
many
applications
that
send
a
subject’s
digital
certificate
to
a
receiver
send
not
only
that
digital
certificate,
but
also
send
all
the
CA
digital
certificates
necessary
to
verify
the
initial
digital
certificate
up
to
the
root
CA.
The
chain
of
trust
begins
at
the
root
CA.
The
root
CA’s
digital
certificate
is
self-signed;
that
is,
the
certificate
authority
uses
its
own
private
key
to
sign
the
digital
certificate.
The
public
key
used
to
verify
the
signature
is
the
public
key
in
the
digital
certificate
itself
(see
Figure
49
on
page
214).
To
establish
a
chain
of
trust,
the
public-key
user
must
have
received
the
digital
certificate
of
the
root
CA
in
one
of
the
following
ways:
v
On
a
diskette
received
by
registered
or
picked
up
in
person
v
Pre-loaded
with
software
received
from
a
reliable
source
or
downloaded
from
an
authenticated
server
Uses
for
Digital
Certificates
in
Internet
Applications
Applications
using
public-key
cryptography
systems
for
key
exchange
or
digital
signatures
need
to
use
digital
certificates
to
obtain
the
needed
public
keys.
Internet
Owner’sDistinguished Name
Owner’s Public Key
Issuer’s (CA)Distinguished Name
Issuer’s Signature
Verify Signature
Owner’s (CA’s)Distinguished Name
Owner’s Public Key
Issuer’s (Root CA’s)Distinguished Name
Issuer’s Signature
Verify Signature
Root CA’sDistinguished Name
Root CA’s Public Key
Root CA’s Signature
Figure
48.
Chain
of
Trust
–
CAs
Signing
CA
Digital
Certificates
Up
to
the
Root
CA
212
IBM
Tivoli
Risk
Manager:
Administrator’s
Guide

applications
of
this
kind
are
numerous.
Following
are
brief
descriptions
of
a
few
of
the
commonly
used
Internet
applications
that
use
public-key
cryptography:
SSL
A
protocol
that
provides
privacy
and
integrity
for
communications.
This
protocol
is
used
by
Web
servers
to
provide
security
for
connections
between
Web
servers
and
Web
browsers,
by
the
LDAP
to
provide
security
for
connections
between
LDAP
clients
and
LDAP
servers,
and
by
Tivoli
Risk
Manager
to
provide
security
for
connections
between
the
client
and
a
server.
SSL
uses
digital
certificates
for
key
exchange,
server
authentication,
and
optionally,
client
authentication.
Client
Authentication
Client
authentication
is
an
option
in
SSL
that
requires
a
server
to
authenticate
a
client’s
digital
certificate
before
allowing
the
client
to
log
on
or
access
certain
resources.
The
server
requests
and
authenticates
the
client’s
digital
certificate
during
the
SSL
handshake.
At
that
time
the
server
can
also
determine
whether
it
trusts
the
CA
that
issued
the
digital
certificate
to
the
client.
Secure
Electronic
Many
electronic
systems,
using
standards
such
as
Privacy
Enhanced
(PEM)
or
Secure/Multipurpose
Internet
Extensions
(S/MIME)
for
secure
electronic
mail,
use
digital
certificates
for
digital
signatures
and
for
the
exchange
of
keys
to
encrypt
and
decrypt
messages.
Virtual
Private
Networks
(VPNs)
Virtual
private
networks,
also
called
secure
tunnels,
can
be
set
up
between
firewalls
to
enable
protected
connections
between
secure
networks
over
insecure
communication
links.
All
traffic
destined
to
these
networks
is
encrypted
between
the
firewalls.
The
protocols
used
in
tunneling
follow
the
IP
Security
(IPsec)
standard.
For
the
key
exchange
between
partner
firewalls,
the
Internet
key
exchange
(IKE)
standard,
previously
known
as
ISAKMP/Oakley,
has
been
defined.
The
standards
also
allow
for
a
secure,
encrypted
connection
between
a
remote
client
(for
example,
an
employee
working
from
home)
and
a
secure
host
or
network.
Secure
Electronic
Transaction
(
SET™
)
SET
is
a
standard
designed
for
secure
credit
card
payments
in
insecure
networks
(the
Internet).
Digital
certificates
are
used
for
card
holders
(electronic
credit
cards)
and
merchants.
The
use
of
digital
certificates
in
SET
allows
for
secure,
private
connections
between
card
holders,
merchants,
and
banks.
The
transactions
created
are
secure
and
indisputable,
and
they
cannot
be
forged.
The
merchants
receive
no
credit
card
information
that
can
be
misused
or
stolen.
Digital
Certificates
and
Certificate
Requests
Simplified,
a
signed
digital
certificate
contains
the
owner’s
distinguished
name,
the
owner’s
public
key,
the
certificate
authority’s
(issuer’s)
distinguished
name,
and
the
signature
of
the
certificate
authority
over
these
fields.
A
self-signed
digital
certificate
contains
the
owner’s
distinguished
name,
the
owner’s
public
key,
and
the
owner’s
own
signature
over
these
fields,
as
shown
in
Figure
49
on
page
214.
Appendix
C.
Secure
Socket
Layer
Introduction
and
iKeyman
213
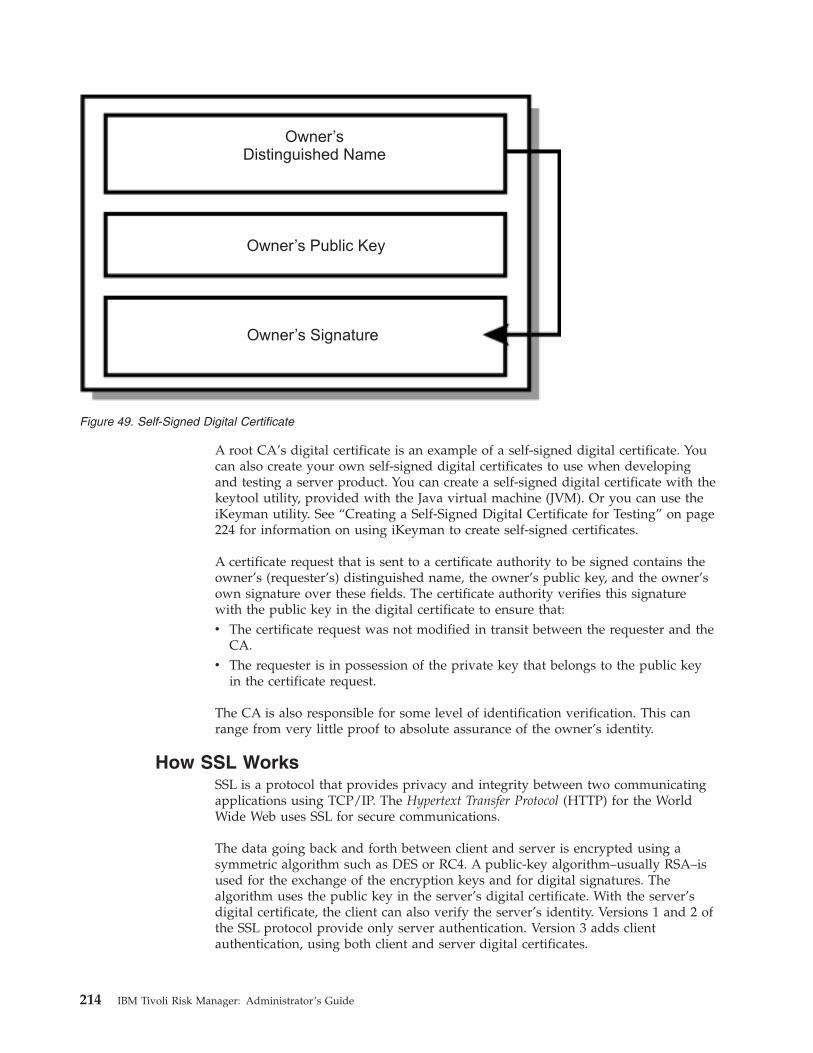
A
root
CA’s
digital
certificate
is
an
example
of
a
self-signed
digital
certificate.
You
can
also
create
your
own
self-signed
digital
certificates
to
use
when
developing
and
testing
a
server
product.
You
can
create
a
self-signed
digital
certificate
with
the
keytool
utility,
provided
with
the
Java
virtual
machine
(JVM).
Or
you
can
use
the
iKeyman
utility.
See
“Creating
a
Self-Signed
Digital
Certificate
for
Testing”
on
page
224
for
information
on
using
iKeyman
to
create
self-signed
certificates.
A
certificate
request
that
is
sent
to
a
certificate
authority
to
be
signed
contains
the
owner’s
(requester’s)
distinguished
name,
the
owner’s
public
key,
and
the
owner’s
own
signature
over
these
fields.
The
certificate
authority
verifies
this
signature
with
the
public
key
in
the
digital
certificate
to
ensure
that:
v
The
certificate
request
was
not
modified
in
transit
between
the
requester
and
the
CA.
v
The
requester
is
in
possession
of
the
private
key
that
belongs
to
the
public
key
in
the
certificate
request.
The
CA
is
also
responsible
for
some
level
of
identification
verification.
This
can
range
from
very
little
proof
to
absolute
assurance
of
the
owner’s
identity.
How
SSL
Works
SSL
is
a
protocol
that
provides
privacy
and
integrity
between
two
communicating
applications
using
TCP/IP.
The
Hypertext
Transfer
Protocol
(HTTP)
for
the
World
Wide
Web
uses
SSL
for
secure
communications.
The
data
going
back
and
forth
between
client
and
server
is
encrypted
using
a
symmetric
algorithm
such
as
DES
or
RC4.
A
public-key
algorithm–usually
RSA–is
used
for
the
exchange
of
the
encryption
keys
and
for
digital
signatures.
The
algorithm
uses
the
public
key
in
the
server’s
digital
certificate.
With
the
server’s
digital
certificate,
the
client
can
also
verify
the
server’s
identity.
Versions
1
and
2
of
the
SSL
protocol
provide
only
server
authentication.
Version
3
adds
client
authentication,
using
both
client
and
server
digital
certificates.
Owner’sDistinguished Name
Owner’s Public Key
Owner’s Signature
Figure
49.
Self-Signed
Digital
Certificate
214
IBM
Tivoli
Risk
Manager:
Administrator’s
Guide

The
SSL
Handshake
An
SSL
connection
is
always
initiated
by
the
client.
At
the
beginning
of
an
SSL
session,
an
SSL
handshake
is
performed.
This
handshake
produces
the
cryptographic
parameters
of
the
session.
A
simplified
overview
of
how
the
SSL
handshake
is
processed
is
shown
in
Figure
50.
This
example
assumes
the
SSL
connection
is
being
established
between
a
Web
browser
and
a
Web
server.
1.
The
client
sends
a
client
“hello”
message
that
lists
the
cryptographic
capabilities
of
the
client
(sorted
in
client
preference
order),
such
as
the
version
of
SSL,
the
cipher
suites
supported
by
the
client,
and
the
data
compression
methods
supported
by
the
client.
The
message
also
contains
a
28-byte
random
number.
2.
The
server
responds
with
a
server
“hello”
message
that
contains
the
cryptographic
method
(cipher
suite)
and
the
data
compression
method
selected
by
the
server,
the
session
ID,
and
another
random
number.
Note:
The
client
and
the
server
must
support
at
least
one
common
cipher
suite,
or
else
the
handshake
fails.
The
server
generally
chooses
the
strongest
common
cipher
suite.
3.
The
server
sends
its
digital
certificate.
(The
server
uses
X.509
V3
digital
certificates
with
SSL.)
If
the
server
uses
SSL
V3,
and
if
the
server
application
(for
example,
the
Web
server)
requires
a
digital
certificate
for
client
authentication,
the
server
sends
a
Client issues secure session request(HTTPS://someserver.org/somedata.html)
Server send X.509 certificate containingserver’s public key.
Client authenticates certificate against list of known CAs. (If CA is unknown, browser cangive user option to accept certificate at user’s risk.)
Client generates random symmetric key andencrypts it using server’s public key.
Client and Server now both know the symmetric key and encrypt end-userdata using symmetric key for duration of session.
Figure
50.
SSL
Handshake
with
Server
Authentication
Appendix
C.
Secure
Socket
Layer
Introduction
and
iKeyman
215

“digital
certificate
request”
message.
In
the
“digital
certificate
request”
message,
the
server
sends
a
list
of
the
types
of
digital
certificates
supported
and
the
distinguished
names
of
acceptable
certificate
authorities.
4.
The
server
sends
a
server
“hello
done”
message
and
waits
for
a
client
response.
5.
Upon
receipt
of
the
server
“hello
done”
message,
the
client
(the
Web
browser)
verifies
the
validity
of
the
server’s
digital
certificate
and
checks
that
the
server’s
“hello”
parameters
are
acceptable.
If
the
server
requested
a
client
digital
certificate,
the
client
sends
a
digital
certificate,
or
if
no
suitable
digital
certificate
is
available,
the
client
sends
a
“no
digital
certificate”
alert.
This
alert
is
only
a
warning,
but
the
server
application
can
fail
the
session
if
client
authentication
is
mandatory.
6.
The
client
sends
a
“client
key
exchange”
message.
This
message
contains
the
pre-master
secret,
a
46-byte
random
number
used
in
the
generation
of
the
symmetric
encryption
keys
and
the
message
authentication
code
(MAC)
keys,
encrypted
with
the
public
key
of
the
server.
If
the
client
sent
a
digital
certificate
to
the
server,
the
client
sends
a
“digital
certificate
verify”
message
signed
with
the
client’s
private
key.
By
verifying
the
signature
of
this
message,
the
server
can
explicitly
verify
the
ownership
of
the
client
digital
certificate.
Note:
An
additional
process
to
verify
the
server
digital
certificate
is
not
necessary.
If
the
server
does
not
have
the
private
key
that
belongs
to
the
digital
certificate,
it
cannot
decrypt
the
pre-master
secret
and
create
the
correct
keys
for
the
symmetric
encryption
algorithm,
and
the
handshake
fails.
7.
The
client
uses
a
series
of
cryptographic
operations
to
convert
the
pre-master
secret
into
a
master
secret,
from
which
all
key
material
required
for
encryption
and
message
authentication
is
derived.
Then
the
client
sends
a
“change
cipher
spec”
message
to
make
the
server
switch
to
the
newly
negotiated
cipher
suite.
The
next
message
sent
by
the
client
(the
“finished”
message)
is
the
first
message
encrypted
with
this
cipher
method
and
keys.
8.
The
server
responds
with
a
“change
cipher
spec”
and
a
“finished”
message
of
its
own.
9.
The
SSL
handshake
ends,
and
encrypted
application
data
can
be
sent.
Digital
Certificates
and
Trust
Chains
with
SSL
Secure
Sockets
Layer
V3
can
use
server
digital
certificates
as
well
as
client
digital
certificates.
As
previously
explained,
server
digital
certificates
are
mandatory
for
an
SSL
session,
while
client
digital
certificates
are
optional,
depending
on
client
authentication
requirements.
The
public
key
infrastructure
(PKI)
used
by
SSL
allows
for
any
number
of
root
certificate
authorities.
An
organization
or
end
user
must
decide
which
CAs
it
will
accept
as
being
trusted.
To
be
able
to
verify
the
server
digital
certificates,
the
client
must
have
possession
of
the
root
CA
digital
certificates
used
by
servers.
If
an
SSL
session
is
about
to
be
established
with
a
server
that
sends
a
digital
certificate
with
root
CA
digital
certificate
that
is
not
defined
in
the
client’s
truststore
file,
the
SSL
session
is
not
established.
To
avoid
this
situation,
import
the
root
CA
digital
certificate
into
your
client
keystore
or
truststore.
If
client
authentication
is
used,
the
server
requires
possession
of
the
root
CA
digital
certificates
used
by
clients.
All
root
CA
digital
certificates
that
are
not
part
of
the
default
server
keystore
must
be
installed
using
the
iKeyman
utility
before
any
216
IBM
Tivoli
Risk
Manager:
Administrator’s
Guide

client
digital
certificates
are
issued
by
these
CAs.
For
more
information
on
iKeyman,
see
“Managing
Digital
Certificates
with
iKeyman”
on
page
222.
Tivoli
Risk
Manager
and
SSL
Tivoli
Risk
Manager
uses
SSL
in
both
the
client
and
server
capacities.
When
a
Tivoli
Risk
Manager
system
is
the
recipient
of
event
traffic
over
SSL
connections,
it
is
running
as
an
SSL
server.
When
a
Tivoli
Risk
Manager
system
is
sending
event
traffic
over
SSL
connections,
it
is
running
as
an
SSL
client.
Configurations
that
are
receiving
events
over
SSL
connections,
and
forwarding
events
over
SSL
are
serving
in
both
roles.
The
SSL
roles
played
by
various
Tivoli
Risk
Manager
configurations
are
listed
here:
v
Client
–
Participates
as
an
SSL
client
v
Distributed
Correlation
Server
–
Participates
as
both
an
SSL
client
and
an
SSL
server,
because
it
is
receiving
event
information
from
the
client,
and
forwarding
event
information
to
an
upstream
server.
v
Event
Server
–
Participates
as
an
SSL
Server
v
Gateway
–
Participates
as
both
an
SSL
client
and
an
SSL
server,
because
it
receives
and
forwards
event
information.
A
particular
Tivoli
Risk
Manager
system
typically
has
a
keystore
for
each
SSL
role.
For
example,
a
client
would
use
a
client
keystore.
A
gateway
or
distributed
correlation
server
would
have
both
a
client
keystore
and
a
server
keystore.
An
event
server
would
have
a
server
keystore
only.
Default
Keystore
Files
When
installing
Tivoli
Risk
Manager,
you
can
use
the
default
client
and
server
keystore
files
that
come
with
Tivoli
Risk
Manager.
By
using
these
files,
you
can
use
SSL
and
establish
secure
connections
between
the
various
Tivoli
Risk
Manager
systems
(including
client
and
server
authentication).
While
this
might
be
convenient
for
getting
Tivoli
Risk
Manager
up
and
running
quickly
and
provides
encrypted
connections,
using
these
files
does
not
establish
a
truly
secure
environment
because
the
private
keys
are
not
truly
private.
The
following
default
keystore
files
are
installed
with
Tivoli
Risk
Manager:
v
RMINSTDIR/etc/SSLclient.jks
v
RMINSTDIR/etc/SSLsvr.jks
The
password
associated
with
these
default
keystore
files
is
riskmgr.
Do
not
use
the
default
keystores
in
production
environments.
Private
keys
and
signed
certificates
should
be
generated
and
used
to
create
the
necessary
keystore
files
for
your
environment.
See
“Planning
Considerations”
on
page
218
for
more
information
on
the
planning
considerations
for
creating
keystores
for
your
environment.
Storing
SSL
Passwords
When
creating
a
secure
SSL
connection,
Tivoli
Risk
Manager
must
have
access
to
the
password
needed
to
access
the
keystore
file.
Instead
of
storing
the
password
in
the
clear
in
a
configuration
file,
the
password
is
stored
in
an
obfuscated
fashion
in
a
stash
file.
Appendix
C.
Secure
Socket
Layer
Introduction
and
iKeyman
217
It
is
essential
that
keystores
and
associated
stash
files
be
protected,
including
the
use
of
appropriate
local
file
system
security.
These
files
should
not
be
shared
with
anyone
you
do
not
trust.
By
convention,
the
name
of
the
stash
file
is
derived
from
the
name
of
the
associated
keystore
file.
For
example,
the
stash
files
associated
with
the
default
keystore
files
are:
v
stashSSLclient.pwd
(associated
with
SSLclient.jks)
v
stashSSLsvr.pwd
(associated
with
SSLsvr.jks)
To
continue
the
example,
if
you
name
a
custom
keyfile
as
foo.jks,
the
associated
stash
file
would
be
called
stashfoo.pwd.
The
associated
stash
file
must
be
located
in
the
same
directory
as
the
associated
keystore
file.
The
wrmstashpw
command
is
provided
to
create
a
stash
file
with
an
obfuscated
password.
When
creating
new
keystores,
or
changing
the
password
of
an
existing
keystore,
use
wrmstashpw
to
build
a
stash
file
with
the
matching
password.
See
the
IBM
Tivoli
Risk
Manager
Command
Reference
for
details
on
using
this
utility.
Planning
Considerations
When
planning
your
SSL
configuration,
consider
the
following:
v
Each
server
requires
a
server
keystore
with
a
private
key
and
an
associated
signed
certificate.
The
certificate
may
be
self-signed
or
signed
by
a
Certification
Authority
(CA).
v
Each
server
should
have
its
own
keystore
with
a
different
private
key
and
associated
signed
certificate.
v
Each
client
requires
a
client
keystore
with
a
CA
certificate
signed
by
the
same
signer
as
the
signed
certificate
in
the
servers
keystore.
v
If
you
plan
on
using
client
authentication,
each
client
keystore
must
contain
a
private
key
and
an
associated
signed
certificate.
The
server’s
keystore
must
include
a
CA
certificate
signed
by
the
same
signer
as
the
signed
certificate
in
the
client
keystore.
v
When
using
client
authentication,
each
client
should
have
its
own
keystore
with
a
different
private
key
and
associated
signed
certificate.
v
Decide
whether
a
Certification
Authority
(CA)
will
be
used
to
sign
your
certificates,
or
self-signed
certificates
will
be
used.
Some
characteristics
associated
with
each
choice
include:
–
Self-signed
certificates:
-
Advantages
v
No
cost
v
No
outside
dependencies
v
Quick
start
v
May
be
appropriate
for
small,
intranet
environments-
Disadvantages
v
More
complex
client
configuration,
because
each
client
must
have
a
keystore
that
contains
a
certificate
for
each
server
with
which
it
communicates.
v
If
self-signed
certificates
are
used
for
the
clients,
then
the
server
for
a
set
of
clients
must
have
a
keystore
that
contains
a
signed
certificate
for
each
and
every
client.–
CA-signed
certificates:
218
IBM
Tivoli
Risk
Manager:
Administrator’s
Guide

-
Advantages
v
Simpler
client
configuration,
often
works
by
default
(if
the
default
client
keystore
contains
the
appropriate
signer
certificate).
Each
client
can
use
the
same
keystore
even
when
multiple
servers
are
in
use.
v
May
be
appropriate
for
internet
eCommerce
environments
and
large
intranet
environments.-
Disadvantages
v
Higher
cost
(might
need
to
purchase
certificates)
v
Certificates
must
be
requested
(there
may
be
a
delay
in
obtaining
the
signed
certificates)
SSL
Configuration
Files
When
a
Tivoli
Risk
Manager
system
is
configured
to
accept
SSL
connections,
a
source
definition
is
needed
in
the
primary
Tivoli
Risk
Manager
configuration
file
(rmagent.xml).
Similarly,
when
a
Tivoli
Risk
Manager
system
is
configured
to
create
outbound
SSL
connections
(to
forward
event
information),
a
destination
definition
is
needed
in
rmagent.xml
as
well.
The
following
example
depicts
the
source
and
destination
definitions
for
an
SSL
receiver
and
SSL
sender,
respectively.
<source
name
=
"eif_receiver"
class
=
"com.tivoli.RiskManager.Agent.Transports.Receivers.rmaEifReceiver">
<set
key="RMA_conf"
value="f:\Program
Files\RISKMGR\etc\eif_receiver.conf"/>
</source>
<destination
name
=
"incident_sender"
class
=
"com.tivoli.RiskManager.Agent.Transports.Senders.rmaEifSender">
<set
key="RMA_conf"
value="f:\Program
Files\RISKMGR\etc\incident_sender.conf"/>
</destination>
The
source
and
destination
definitions
reference
configuration
files
that
contain
the
specific
EIF
configuration
parameters
necessary
to
control
the
EIF
SSL
connections.
In
this
example,
the
eif_receiver.conf
file
typically
contains
the
following
type
of
information.
In
this
example,
gateway1.dev.tivoli.com
is
the
local
host
name
and
client
authentication
is
required
(each
client
must
provide
a
certificate).
This
configuration
file
defines
the
SSL
server
role.
TransportationList=t1
t1Type=SSL
t1Channels=c1
c1ServerLocation=gateway1.tivoli.com
c1Port=5549
c1SSLRequireClientAuthentication=YES
c1SSLKeystore=f:\Program
Files\RISKMGR\etc\SSLsvr.jks
c1SSLKeystorePWFile=f:\Program
Files\RISKMGR\etc\stashSSLsvr.pwd
c1SSLSecurityLevel=HIGH
Similarly,
the
incident_sender.conf
file
might
look
like
this,
where
server1.tivoli.com
is
the
remote
server
to
which
information
will
be
forwarded.
This
configuration
file
defines
the
SSL
client
role.
TransportList=t1
t1Type=SSL
t1Channels=c1
c1ServerLocation=server1.tivoli.com
c1Port=5549
c1SSLKeystore=f:\Program
Files\RISKMGR\etc\SSLclient.jks
c1SSLKeystorePWFile=f:\Program
Files\RISKMGR\etc\stashSSLclient.pwd
c1SSLSecurityLevel=HIGH
Appendix
C.
Secure
Socket
Layer
Introduction
and
iKeyman
219

See
Chapter
4,
“Agent,”
on
page
61
for
more
information
on
configuring
the
agent
and
its
rmagent.xml
file.
See
Appendix
A,
“Event
Integration
Facility
Sender
and
Receiver
Keywords,”
on
page
195
for
more
information
on
configuring
SSL
in
the
individual
EIF
configuration
files.
TrustStores
By
default,
Tivoli
Risk
Manager
stores
the
following
information
in
a
keystore:
v
Key
pairs
and
certificates,
used
for
SSL
authentication
v
Trusted
CA
certificates
(also
known
as
signer
certificates),
used
to
verify
the
identifies
of
other
clients
and
servers
As
an
administrator
of
the
SSL
environment,
you
may
prefer
to
maintain
the
key
pairs
and
certificates
in
keystores
and
maintain
the
CA
certificates
(also
known
as
signer
certificates)
in
a
separate
truststore.
The
trustfile
helps
you
manage
which
signers
an
organization
allows
connections
to.
This
enables
clients
and
servers
to
store
their
personal
certificates
(including
private
keys)
in
the
keystore
file
and
all
of
the
signers
in
the
truststore
file.
If
a
truststore
is
not
specified,
it
is
assumed
that
CA
certificates
are
located
in
the
keystore
file.
In
this
example,
the
server-side
configuration
file
defines
separate
keystore
and
truststore
files.
TransportationList=t1
t1Type=SSL
t1Channels=c1
c1ServerLocation=gateway1.tivoli.com
c1Port=5549
c1SSLRequireClientAuthentication=YES
c1SSLKeystore=f:\IBM\RISKMGR\etc\SSLsvr.jks
c1SSLKeystorePWFile=f:\IBM\RISKMGR\etc\stashSSLsvr.pwd
c1SSLTruststore=f:\IBM\RISKMGR\etc\SSLsvrTrust.jks
c1SSLTruststorePWFile=f:\IBM\RISKMGR\etc\stashSSLsvrTrust.pwd
c1SSLSecurityLevel=HIGH
Managing
Digital
Certificates
with
Keytool
The
Java
Runtime
Environment
(JRE)
used
by
Tivoli
Risk
Manager
provides
keytool,
a
key
and
certificate
management
utility.
Keytool
can
be
used
to
administer
public
and
private
key
pairs
and
associated
certificates.
Keytool
can
also
be
used
to
generate
certificate
requests,
so
commercial
certification
authorities
can
be
used
to
sign
your
certificates.
Tivoli
Risk
Manager
provides
an
alternative
tool,
called
iKeyman.
It
provides
a
graphical
interface
for
managing
certificates
and
keystores.
See
“Managing
Digital
Certificates
with
iKeyman”
on
page
222
for
information
about
using
iKeyman.
The
keytool
utility
is
intended
to
be
run
from
the
command
line,
by
typing
the
following:
keytool
On
UNIX
systems,
keytool
is
typically
located
at:
$JAVA_HOME/bin/keytool
On
Windows
systems,
keytool
is
included
with
the
JRE
installed
with
Tivoli
Risk
Manager,
and
is
located
at:
RMINSTDIR\jre\jre\bin\keytool.exe
220
IBM
Tivoli
Risk
Manager:
Administrator’s
Guide
The
command
line
options
can
be
provided
in
any
order.
Type
keytool
–help
to
see
a
summarized
version
of
keytool’s
usage
information.
On
UNIX
systems,
use
man
keytool
for
detailed
usage
information.
For
more
detailed
keytool
information
see
the
following
Web
resources:
v
http://java.sun.com/j2se/1.3/docs/tooldocs/solaris/keytool.html
(UNIX)
v
http://java.sun.com/j2se/1.3/docs/tooldocs/win32/keytool.html
(Windows)
Shown
here
is
a
sample
script
for
running
keytool.
A
script
of
this
nature
can
be
useful
when
generating
a
large
number
of
certificates
and
keystores
in
a
production
environment.
This
sample
script
is
provided
to
illustrate
typical
usage.
With
appropriate
customizing
it
might
provide
a
model
suitable
for
your
environment.
#!/bin/sh
#
This
sample
script
depicts
the
sequence
of
steps
for
using
keytool
#
to
create
self-signed
client
and
server
certificates
for
use
with
#
Risk
Manager’s
SSL
support.
#
#
Note
that
this
script
assumes
that
private
keys
and
public
certificates
#
are
stored
in
the
same
keystore
file
(client
and
server).
Public
#
certificates
can
be
stored
in
separate,
password-protected
truststores.
#
Setup
common
environment
variables
CLIENT_DNAME="cn=Risk
Manager
Agent
SSL
Sender,ou=Tivoli,o=IBM,c=US"
CLIENT_ALIAS="rma_ssl_sender"
CLIENT_PW="rma_sender_pw"
CLIENT_KEYSTORE="$CLIENT_ALIAS".jks
CLIENT_CERTFILE="$CLIENT_ALIAS".cert
SERVER_DNAME="cn=Risk
Manager
Agent
SSL
Receiver,ou=Tivoli,o=IBM,c=US"
SERVER_ALIAS="rma_ssl_receiver"
SERVER_PW="rma_receiver_pw"
SERVER_KEYSTORE="$SERVER_ALIAS".jks
SERVER_CERTFILE="$SERVER_ALIAS".cert
SERVER_NCAUTH_KEYSTORE="$SERVER_ALIAS"_ncauth.jks
DAYS_VALID=365
set
-x
#
Generate
client’s
keypair
and
keystore
#
Also
creates
a
self-signed
public
key
certificate
for
the
client
#
By
creating
a
keypair,
the
client
can
support
client
authentication
#
when
connecting
to
the
Tivoli
Risk
Manager
server.
If
not
using
client
#
authentication,
it
is
sufficient
to
import
the
server’s
public
#
key
certificate
into
the
client’s
keystore.
keytool
-genkey
-validity
"$DAYS_VALID"
-keypass
"$CLIENT_PW"
\
-dname
"$CLIENT_DNAME"
-alias
"$CLIENT_ALIAS"
\
-keystore
"$CLIENT_KEYSTORE"
-storepass
"$CLIENT_PW"
#
Export
client’s
public
key
certificate
to
a
file
keytool
-export
-keystore
"$CLIENT_KEYSTORE"
-storepass
"$CLIENT_PW"
\
-alias
"$CLIENT_ALIAS"
-rfc
-file
"$CLIENT_CERTFILE"
#
Generate
server’s
keypair
and
keystore
#
Also
creates
a
self-signed
public
key
certificate
for
the
server
#
A
server
always
requires
a
keypair,
unlike
the
client
keytool
-genkey
-validity
"$DAYS_VALID"
-keypass
"$SERVER_PW"
\
-dname
"$SERVER_DNAME"
-alias
"$SERVER_ALIAS"
\
-keystore
"$SERVER_KEYSTORE"
-storepass
"$SERVER_PW"
Appendix
C.
Secure
Socket
Layer
Introduction
and
iKeyman
221

#
Export
server’s
public
key
certificate
to
a
file
keytool
-export
-keystore
"$SERVER_KEYSTORE"
-storepass
"$SERVER_PW"
\
-alias
"$SERVER_ALIAS"
-rfc
-file
"$SERVER_CERTFILE"
#
Import
server’s
public
key
certificate
into
client’s
keystore
as
a
#
new
trusted
certificate.
keytool
-import
-keystore
"$CLIENT_KEYSTORE"
-storepass
"$CLIENT_PW"
\
-alias
"$SERVER_ALIAS"
-file
"$SERVER_CERTFILE"
-noprompt
#
Make
a
copy
of
the
server
keystore
before
adding
the
client’s
certificate
#
This
can
be
used
to
test
the
case
where
no
client
authentication
is
required
cp
"$SERVER_KEYSTORE"
"$SERVER_NCAUTH_KEYSTORE"
#
Import
client’s
public
key
certificate
into
the
server’s
keystore
as
a
#
new
trusted
certificate.
This
is
required
only
when
client
authentication
#
is
required
by
the
server.
keytool
-import
-keystore
"$SERVER_KEYSTORE"
-storepass
"$SERVER_PW"
\
-alias
"$CLIENT_ALIAS"
-file
"$CLIENT_CERTFILE"
-noprompt
Managing
Digital
Certificates
with
iKeyman
The
iKeyman
utility
is
a
tool
you
can
use
to
manage
your
digital
certificates.
With
iKeyman,
you
can
create
a
new
key
database
or
a
test
digital
certificate,
add
CA
roots
to
your
database,
copy
certificates
from
one
database
to
another,
request
and
receive
a
digital
certificate
from
a
CA,
set
default
keys,
and
change
passwords.
The
iKeyman
utility
is
a
part
of
the
IBM
Java
Secure
Socket
Extension
package.
Starting
iKeyman
The
iKeyman
utility
is
installed
with
Tivoli
Risk
Manager.
To
load
iKeyman,
run
the
wrmikeyman
shell
script,
located
in
RMINSTDIR/etc/bin.
UNIX
system:
wrmikeyman
Windows
system:
wrmikeyman.cmd
For
more
information
about
using
this
command,
see
the
IBM
Tivoli
Risk
Manager
Command
Reference.
Creating
a
Key
Database
A
key
database
enables
a
client
application
to
connect
to
those
servers
that
have
digital
certificates
signed
by
those
CAs
for
which
you
have
signed
digital
certificates.
To
create
a
key
file,
follow
these
steps:
1.
Start
iKeyman,
if
it
is
not
already
running.
2.
Click
Key
Database
File
→
New.
The
New
window
is
displayed,
which
will
look
similar
to
the
one
shown
in
Figure
51
on
page
223.
222
IBM
Tivoli
Risk
Manager:
Administrator’s
Guide
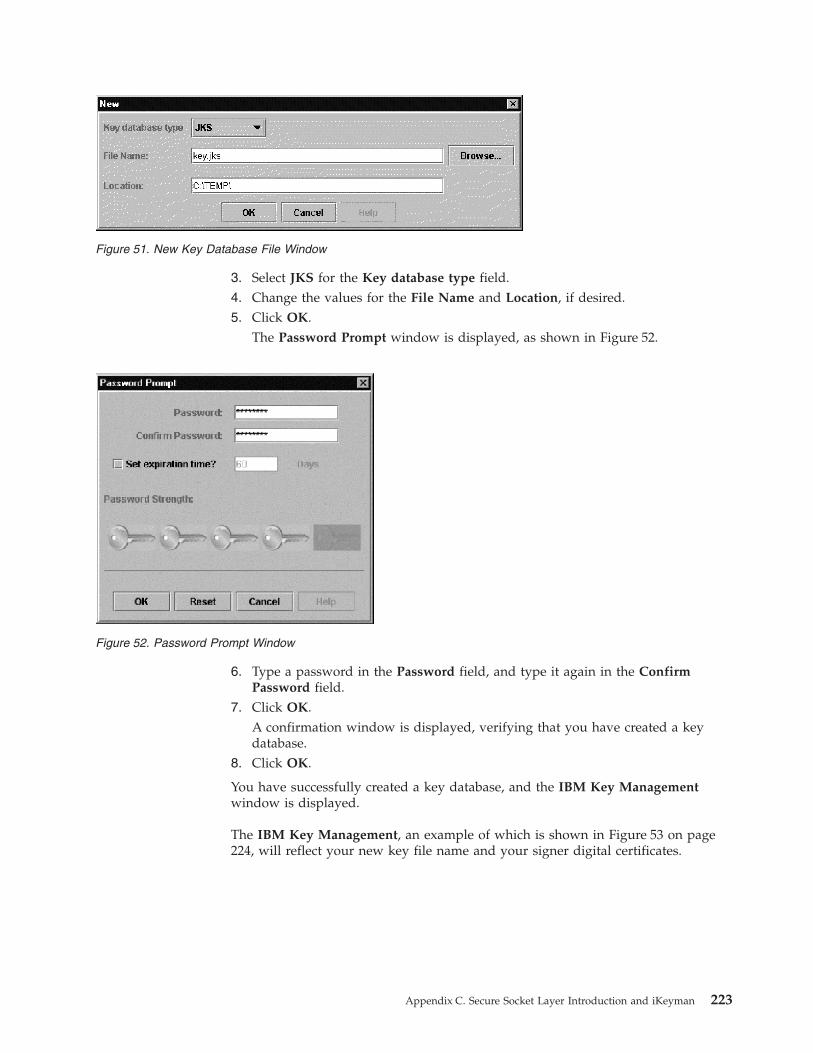
3.
Select
JKS
for
the
Key
database
type
field.
4.
Change
the
values
for
the
File
Name
and
Location,
if
desired.
5.
Click
OK.
The
Password
Prompt
window
is
displayed,
as
shown
in
Figure
52.
6.
Type
a
password
in
the
Password
field,
and
type
it
again
in
the
Confirm
Password
field.
7.
Click
OK.
A
confirmation
window
is
displayed,
verifying
that
you
have
created
a
key
database.
8.
Click
OK.
You
have
successfully
created
a
key
database,
and
the
IBM
Key
Management
window
is
displayed.
The
IBM
Key
Management,
an
example
of
which
is
shown
in
Figure
53
on
page
224,
will
reflect
your
new
key
file
name
and
your
signer
digital
certificates.
Figure
51.
New
Key
Database
File
Window
Figure
52.
Password
Prompt
Window
Appendix
C.
Secure
Socket
Layer
Introduction
and
iKeyman
223

The
following
signer
digital
certificates
are
provided
with
iKeyman:
v
RSA
Secure
Server
CA
v
Thawte
Personal
Premium
CA
v
Thawte
Personal
Freemail
CA
v
Thawte
Personal
Basic
CA
v
Thawte
Premium
Server
CA
v
Thawte
Server
CA
v
VeriSign
Class
1
Public
Primary
CA
v
VeriSign
Class
2
Public
Primary
CA
v
VeriSign
Class
3
Public
Primary
CA
v
VeriSign
Test
CA
Root
Certificate
These
signer
digital
certificates
enable
your
clients
to
connect
to
servers
that
have
valid
digital
certificates
from
these
signers.
Now
that
you
have
created
a
key
database,
you
can
use
it
on
your
client
and
connect
to
a
server
that
has
a
valid
digital
certificate
from
one
of
the
signers.
If
you
need
to
use
a
signer
digital
certificate
that
is
not
on
this
list,
you
need
to
request
it
from
the
CA
and
add
it
to
your
key
database
(see
“Adding
a
CA
Root
Digital
Certificate”
on
page
225).
Note:
The
VeriSign
Test
CA
Root
Certificate
is
a
low-assurance
CA
that
is
included
for
testing
purposes.
You
should
remove
this
root
before
placing
a
key
database
class
into
a
production
application.
Creating
a
Self-Signed
Digital
Certificate
for
Testing
When
you
are
testing
a
production
application,
you
might
not
want
to
purchase
a
true
digital
certificate
until
after
you
are
done
testing
the
product.
With
iKeyman,
Figure
53.
IBM
Key
Management
Window
224
IBM
Tivoli
Risk
Manager:
Administrator’s
Guide
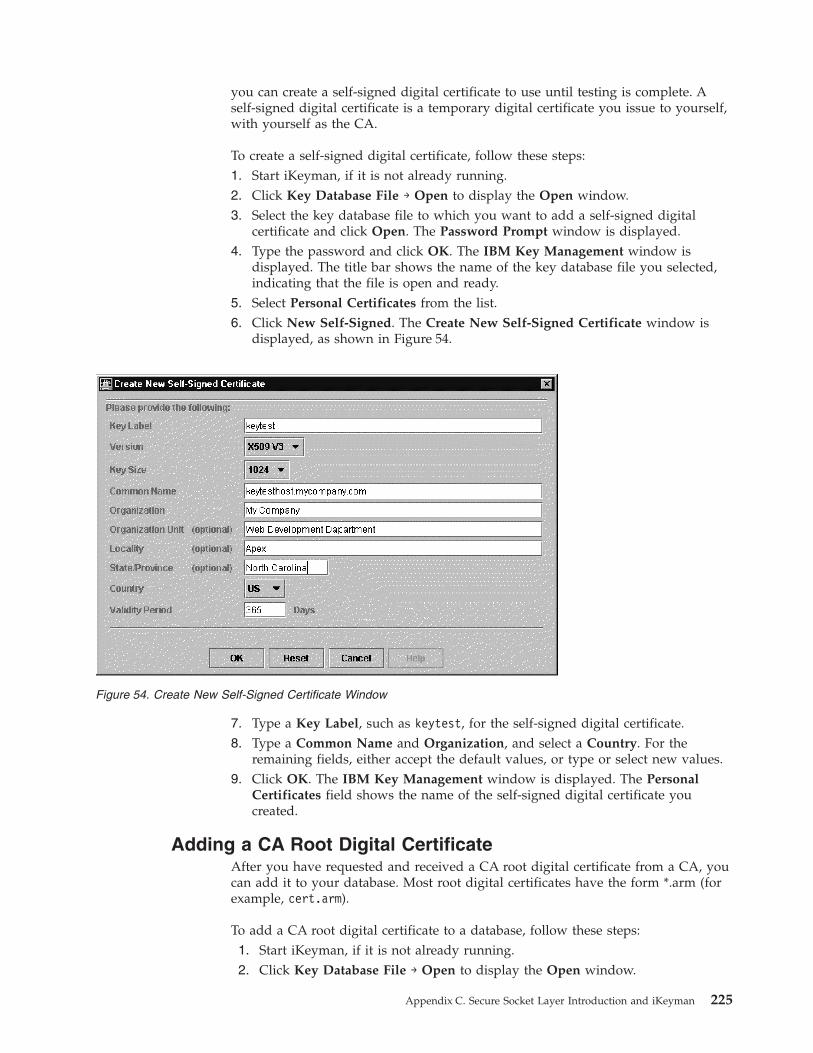
you
can
create
a
self-signed
digital
certificate
to
use
until
testing
is
complete.
A
self-signed
digital
certificate
is
a
temporary
digital
certificate
you
issue
to
yourself,
with
yourself
as
the
CA.
To
create
a
self-signed
digital
certificate,
follow
these
steps:
1.
Start
iKeyman,
if
it
is
not
already
running.
2.
Click
Key
Database
File
→
Open
to
display
the
Open
window.
3.
Select
the
key
database
file
to
which
you
want
to
add
a
self-signed
digital
certificate
and
click
Open.
The
Password
Prompt
window
is
displayed.
4.
Type
the
password
and
click
OK.
The
IBM
Key
Management
window
is
displayed.
The
title
bar
shows
the
name
of
the
key
database
file
you
selected,
indicating
that
the
file
is
open
and
ready.
5.
Select
Personal
Certificates
from
the
list.
6.
Click
New
Self-Signed.
The
Create
New
Self-Signed
Certificate
window
is
displayed,
as
shown
in
Figure
54.
7.
Type
a
Key
Label,
such
as
keytest,
for
the
self-signed
digital
certificate.
8.
Type
a
Common
Name
and
Organization,
and
select
a
Country.
For
the
remaining
fields,
either
accept
the
default
values,
or
type
or
select
new
values.
9.
Click
OK.
The
IBM
Key
Management
window
is
displayed.
The
Personal
Certificates
field
shows
the
name
of
the
self-signed
digital
certificate
you
created.
Adding
a
CA
Root
Digital
Certificate
After
you
have
requested
and
received
a
CA
root
digital
certificate
from
a
CA,
you
can
add
it
to
your
database.
Most
root
digital
certificates
have
the
form
*.arm
(for
example,
cert.arm).
To
add
a
CA
root
digital
certificate
to
a
database,
follow
these
steps:
1.
Start
iKeyman,
if
it
is
not
already
running.
2.
Click
Key
Database
File
→
Open
to
display
the
Open
window.
Figure
54.
Create
New
Self-Signed
Certificate
Window
Appendix
C.
Secure
Socket
Layer
Introduction
and
iKeyman
225

3.
Select
the
key
database
file
to
which
you
want
to
add
a
CA
root
digital
certificate
and
click
Open.
The
Password
Prompt
window
is
displayed.
4.
Type
the
password
and
click
OK.
The
IBM
Key
Management
window
is
displayed.
The
title
bar
shows
the
name
of
the
key
database
file
you
selected,
indicating
that
the
file
is
open
and
ready.
5.
Select
Signer
Certificates
from
the
list.
6.
Click
Add.
The
Add
CA’s
Certificate
from
a
File
window
is
displayed.
7.
Click
Data
type
and
select
a
data
type,
such
as
Base64-encoded
ASCII
data.
8.
Type
a
Certificate
file
name
and
Location
for
the
CA
root
digital
certificate,
or
click
Browse
to
select
the
name
and
location.
9.
Click
OK.
The
Enter
a
Label
window
is
displayed.
10.
Type
a
label
for
the
CA
root
digital
certificate,
such
as
VeriSign
Test
CA
Root
Certificate,
and
click
OK.
The
IBM
Key
Management
window
is
displayed.
The
Signer
Certificates
field
now
shows
the
label
of
the
CA
root
digital
certificate
you
just
added.
Deleting
a
CA
Root
Digital
Certificate
If
you
no
longer
want
to
support
one
of
the
signers
in
your
signer
digital
certificate
list,
you
need
to
delete
the
CA
root
digital
certificate.
Note:
Before
deleting
a
CA
root
digital
certificate,
create
a
backup
copy
in
case
you
later
want
to
re-create
the
CA
root.
To
delete
a
CA
root
digital
certificate
from
a
database,
follow
these
steps:
1.
Start
iKeyman,
if
it
is
not
already
running.
2.
Click
Key
Database
File
→
Open
to
display
the
Open
window.
3.
Select
the
key
database
file
from
which
you
want
to
delete
a
CA
root
digital
certificate
and
click
Open.
The
Password
Prompt
window
is
displayed.
4.
Type
the
password
and
click
OK.
The
IBM
Key
Management
window
is
displayed.
The
title
bar
shows
the
name
of
the
key
database
file
you
selected,
indicating
that
the
file
is
open
and
ready.
5.
Select
Signer
Certificates
from
the
pulldown
list.
6.
Select
the
CA
root
digital
certificate
you
want
to
delete
and
click
Delete.
The
Confirm
window
is
displayed.
7.
Click
Yes.
The
IBM
Key
Management
window
is
displayed.
The
label
of
the
CA
root
digital
certificate
you
just
deleted
no
longer
appears
in
the
Signer
Certificates
field.
Copying
Certificates
from
One
Key
Database
to
Another
When
setting
up
a
private
trust
network
or
using
self-signed
certificates
for
testing
purposes,
you
might
find
it
necessary
to
extract
a
certificate
from
a
database
to
be
added
to
another
database
as
a
signer
or
site
certificate.
Other
times,
you
might
want
to
export
a
personal
certificate
and
import
it
as
a
personal
certificate.
First
scenario:
To
extract
a
certificate
from
the
(source)
key
database
to
be
added
as
a
signer
or
site
certificate
in
the
(target)
key
database,
follow
these
steps:
1.
Start
iKeyman,
if
it
is
not
already
running.
2.
Click
Key
Database
File
→
Open.
The
Open
window
is
displayed.
226
IBM
Tivoli
Risk
Manager:
Administrator’s
Guide
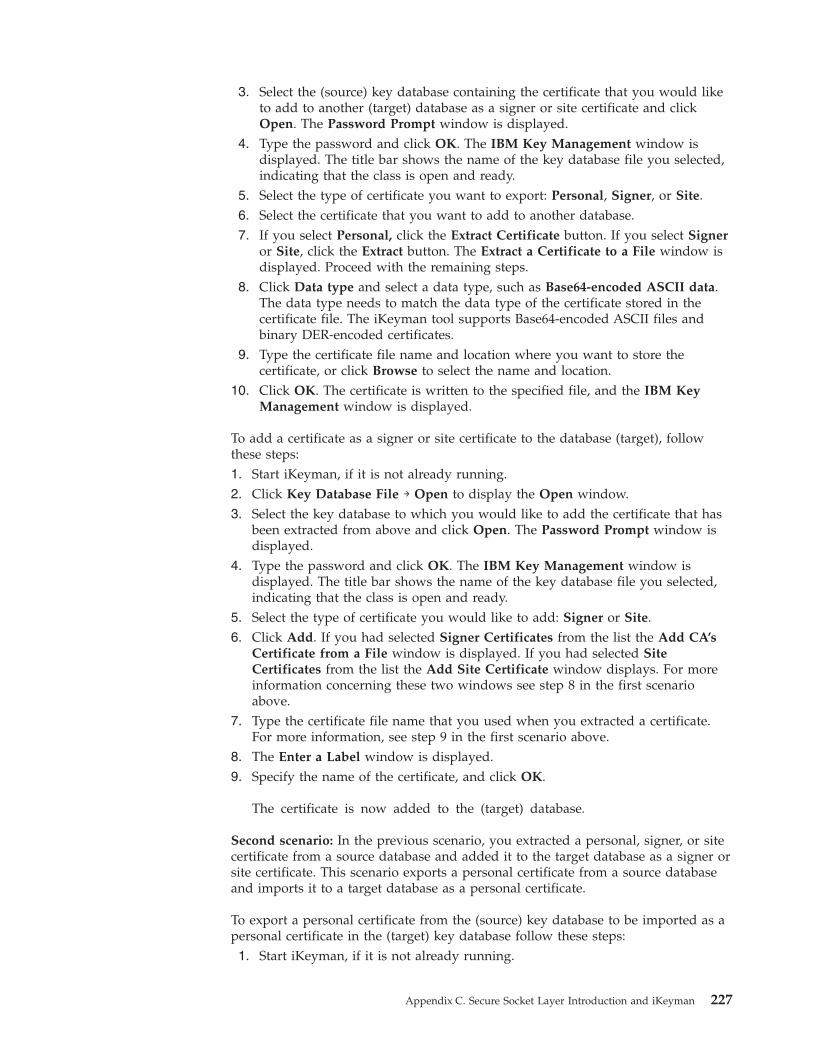
3.
Select
the
(source)
key
database
containing
the
certificate
that
you
would
like
to
add
to
another
(target)
database
as
a
signer
or
site
certificate
and
click
Open.
The
Password
Prompt
window
is
displayed.
4.
Type
the
password
and
click
OK.
The
IBM
Key
Management
window
is
displayed.
The
title
bar
shows
the
name
of
the
key
database
file
you
selected,
indicating
that
the
class
is
open
and
ready.
5.
Select
the
type
of
certificate
you
want
to
export:
Personal,
Signer,
or
Site.
6.
Select
the
certificate
that
you
want
to
add
to
another
database.
7.
If
you
select
Personal,
click
the
Extract
Certificate
button.
If
you
select
Signer
or
Site,
click
the
Extract
button.
The
Extract
a
Certificate
to
a
File
window
is
displayed.
Proceed
with
the
remaining
steps.
8.
Click
Data
type
and
select
a
data
type,
such
as
Base64-encoded
ASCII
data.
The
data
type
needs
to
match
the
data
type
of
the
certificate
stored
in
the
certificate
file.
The
iKeyman
tool
supports
Base64-encoded
ASCII
files
and
binary
DER-encoded
certificates.
9.
Type
the
certificate
file
name
and
location
where
you
want
to
store
the
certificate,
or
click
Browse
to
select
the
name
and
location.
10.
Click
OK.
The
certificate
is
written
to
the
specified
file,
and
the
IBM
Key
Management
window
is
displayed.
To
add
a
certificate
as
a
signer
or
site
certificate
to
the
database
(target),
follow
these
steps:
1.
Start
iKeyman,
if
it
is
not
already
running.
2.
Click
Key
Database
File
→
Open
to
display
the
Open
window.
3.
Select
the
key
database
to
which
you
would
like
to
add
the
certificate
that
has
been
extracted
from
above
and
click
Open.
The
Password
Prompt
window
is
displayed.
4.
Type
the
password
and
click
OK.
The
IBM
Key
Management
window
is
displayed.
The
title
bar
shows
the
name
of
the
key
database
file
you
selected,
indicating
that
the
class
is
open
and
ready.
5.
Select
the
type
of
certificate
you
would
like
to
add:
Signer
or
Site.
6.
Click
Add.
If
you
had
selected
Signer
Certificates
from
the
list
the
Add
CA’s
Certificate
from
a
File
window
is
displayed.
If
you
had
selected
Site
Certificates
from
the
list
the
Add
Site
Certificate
window
displays.
For
more
information
concerning
these
two
windows
see
step
8
in
the
first
scenario
above.
7.
Type
the
certificate
file
name
that
you
used
when
you
extracted
a
certificate.
For
more
information,
see
step
9
in
the
first
scenario
above.
8.
The
Enter
a
Label
window
is
displayed.
9.
Specify
the
name
of
the
certificate,
and
click
OK.
The
certificate
is
now
added
to
the
(target)
database.
Second
scenario:
In
the
previous
scenario,
you
extracted
a
personal,
signer,
or
site
certificate
from
a
source
database
and
added
it
to
the
target
database
as
a
signer
or
site
certificate.
This
scenario
exports
a
personal
certificate
from
a
source
database
and
imports
it
to
a
target
database
as
a
personal
certificate.
To
export
a
personal
certificate
from
the
(source)
key
database
to
be
imported
as
a
personal
certificate
in
the
(target)
key
database
follow
these
steps:
1.
Start
iKeyman,
if
it
is
not
already
running.
Appendix
C.
Secure
Socket
Layer
Introduction
and
iKeyman
227

2.
Click
Key
Database
File
→
Open.
The
Open
window
is
displayed.
3.
Select
the
(source)
key
database
containing
the
certificate
that
you
would
like
to
add
to
another
(target)
key
database
as
a
personal
certificate
and
click
Open.
The
Password
Prompt
window
is
displayed.
4.
Type
the
password
and
click
OK.
The
IBM
Key
Management
window
is
displayed.
The
title
bar
shows
the
name
of
the
key
database
file
you
selected,
indicating
that
the
class
is
open
and
ready.
5.
Select
Personal
Certificates
from
the
list.
6.
Select
the
personal
certificate
you
want
to
export.
7.
Select
the
Export/Import
button
to
transfer
keys
between
the
current
database
and
a
PKCS12
file
or
another
database.
The
Export/Import
Key
window
is
displayed.
8.
Select
Export
from
the
Choose
Action
Type.
9.
Select
Key
File
Type
(for
example,
PKCS12
file)
from
the
list
to
be
exported.
10.
Type
the
certificate
file
name
(for
example,
copy.p12)
that
you
would
like
to
export
and
the
location
where
you
want
to
store
the
certificate,
or
click
Browse
to
select
the
name
and
location
and
click
OK.
The
Password
Prompt
window
is
displayed.
11.
Enter
a
password
for
the
password
file,
confirm
the
password,
and
click
OK.
The
certificate
is
now
extracted
from
the
(source)
database.
To
import
a
personal
certificate
to
the
(target)
key
database,
follow
these
steps:
1.
Start
iKeyman,
if
it
is
not
already
running.
2.
Click
Key
Database
File
→
Open.
The
Open
window
is
displayed.
3.
Select
the
(target)
key
database
to
which
you
would
like
to
import
the
certificate
that
has
been
exported
above
and
click
Open.
The
Password
Prompt
window
is
displayed.
4.
Type
the
password
and
click
OK.
The
IBM
Key
Management
window
is
displayed.
The
title
bar
shows
the
name
of
the
key
database
file
you
selected,
indicating
that
the
class
is
open
and
ready.
5.
Select
the
Personal
Certificates
from
the
list.
6.
If
the
target
key
database
has
no
personal
certificate,
click
the
Import
button
to
import
keys
from
a
PKCS12
file
or
another
database.
The
Import
Key
window
is
displayed.
If
the
target
key
database
has
one
or
more
personal
certificates:
v
Click
the
Export/Import
key
button
and
the
Export/Import
key
window
is
displayed.
v
Select
Import
from
the
Choose
Action
Type.7.
Select
the
same
key
file
type
that
you
specified
from
the
export.
For
more
information,
see
step
10
on
page
227,
and
click
OK.
The
Password
Prompt
window
is
displayed.
8.
Specify
the
password
used
when
you
exported.
For
more
information,
see
step
11
on
page
228
from
the
second
scenario
and
click
OK.
The
certificate
is
now
imported
to
the
(target)
database.
Requesting
a
Digital
Certificate
A
digital
certificate
is
required
to
run
the
SSL-enabled
server
code
and
might
be
required
for
client
applications.
To
acquire
a
digital
certificate,
generate
a
request
using
iKeyman
and
submit
the
request
to
a
CA.
The
CA
will
verify
your
identity
and
send
you
a
digital
certificate.
228
IBM
Tivoli
Risk
Manager:
Administrator’s
Guide

To
request
a
digital
certificate,
follow
these
steps:
1.
Start
iKeyman,
if
it
is
not
already
running.
2.
Click
Key
Database
File
→
Open.
The
Open
window
is
displayed.
3.
Select
the
key
database
file
from
which
you
want
to
generate
the
request
and
click
Open.
The
Password
Prompt
window
is
displayed.
4.
Type
the
password
and
click
OK.
The
IBM
Key
Management
window
is
displayed.
The
title
bar
shows
the
name
of
the
key
database
file
you
selected,
indicating
that
the
file
is
open
and
ready.
5.
Select
Personal
Certificate
Requests
from
the
list.
6.
Click
New.
The
Create
New
Key
and
Certificate
Request
window
is
displayed,
as
shown
in
Figure
55.
7.
Type
a
Key
Label,
such
as
Production
Certificate
for
MyWeb
at
My
Company,
for
the
self-signed
digital
certificate.
8.
Type
a
Common
Name
and
Organization,
and
select
a
Country.
For
the
remaining
fields,
either
accept
the
default
values,
or
type
or
select
new
values.
9.
At
the
bottom
of
the
window,
type
a
name
for
the
file,
such
as
certreq.arm.
10.
Click
OK.
A
confirmation
window
is
displayed,
verifying
that
you
have
created
a
request
for
a
new
digital
certificate.
11.
Click
OK.
The
IBM
Key
Management
window
is
displayed.
The
Personal
Certificate
Requests
field
shows
the
key
label
of
the
new
digital
certificate
request
you
created.
12.
Send
the
file
to
a
CA
to
request
a
new
digital
certificate,
or
cut
and
paste
the
request
into
the
request
forms
of
the
CA’s
Web
site.
Receiving
a
Digital
Certificate
After
the
CA
sends
you
a
new
digital
certificate,
you
need
to
add
it
to
the
key
database
from
which
you
generated
the
request.
To
receive
a
digital
certificate,
follow
these
steps:
Figure
55.
Create
New
Key
and
Certificate
Request
Window
Appendix
C.
Secure
Socket
Layer
Introduction
and
iKeyman
229

1.
Start
iKeyman,
if
it
is
not
already
running.
2.
Click
Key
Database
File
→
Open.
The
Open
window
is
displayed.
3.
Select
the
key
database
file
from
which
you
generated
the
request
and
click
Open.
The
Password
Prompt
window
is
displayed.
4.
Type
the
password
and
click
OK.
The
IBM
Key
Management
window
is
displayed.
The
title
bar
shows
the
name
of
the
key
database
file
you
selected,
indicating
that
the
file
is
open
and
ready.
5.
Select
Personal
Certificates
from
the
list.
6.
Click
Receive.
The
Receive
Certificate
from
a
File
window
is
displayed.
7.
Click
Data
type
and
select
the
data
type
of
the
new
digital
certificate,
such
as
Base64-encoded
ASCII
data.
If
the
CA
sends
the
certificate
as
part
of
an
message,
then
you
might
need
to
cut
and
paste
the
certificate
into
a
separate
file.
8.
Type
the
Certificate
file
name
and
Location
for
the
new
digital
certificate,
or
click
Browse
to
select
the
name
and
location.
9.
Click
OK.
The
Enter
a
Label
window
is
displayed.
10.
Type
a
label,
such
as
RALVS6
Banking
Certificate,
for
the
new
digital
certificate
and
click
OK.
The
IBM
Key
Management
window
is
displayed.
The
Personal
Certificates
field
shows
the
label
of
the
new
digital
certificate
you
added.
Deleting
a
Digital
Certificate
If
you
no
longer
need
one
of
your
digital
certificates,
you
need
to
delete
it
from
your
database.
Note:
Before
deleting
a
digital
certificate,
create
a
backup
copy
in
case
you
later
want
to
re-create
it.
To
delete
a
digital
certificate,
follow
these
steps:
1.
Start
iKeyman,
if
it
is
not
already
running.
2.
Click
Key
Database
File
→
Open.
The
Open
window
is
displayed.
3.
Select
the
key
database
file
from
which
you
want
to
delete
the
digital
certificate
and
click
Open.
The
Password
Prompt
window
is
displayed.
4.
Type
the
password
and
click
OK.
The
IBM
Key
Management
window
is
displayed.
The
title
bar
shows
the
name
of
the
key
database
file
you
selected,
indicating
that
the
file
is
open
and
ready.
5.
Select
Personal
Certificates
from
the
list.
6.
Select
the
digital
certificate
you
want
to
delete
and
click
Delete.
The
Confirm
window
is
displayed.
7.
Click
Yes.
The
IBM
Key
Management
window
is
displayed.
The
label
of
the
digital
certificate
you
just
deleted
no
longer
appears
in
the
Personal
Certificates
field.
Changing
a
Key
Database
Password
The
iKeyman
tool
allows
you
to
change
the
password
associated
with
a
key
database.
To
change
the
password
associated
with
a
key
database,
follow
the
steps
shown
below.
Note:
The
Tivoli
Risk
Manager
agent
configuration
files
that
reference
the
key
database
must
define
the
clear
text
form
of
the
password
(not
recommended),
or
must
reference
a
stash
file
that
contains
an
obfuscated
230
IBM
Tivoli
Risk
Manager:
Administrator’s
Guide
form
of
the
password.
To
create
a
stash
file
that
contains
the
newly
set
password,
use
the
wrmstashpw
command.
See
the
IBM
Tivoli
Risk
Manager
Command
Reference
for
details
on
using
this
utility.
1.
Start
iKeyman,
if
it
is
not
already
running.
2.
Click
Key
Database
File
→
Open.
The
Open
window
is
displayed.
3.
Select
the
key
database
file
in
which
you
want
to
change
the
password
and
click
Open.
The
Password
Prompt
window
is
displayed.
4.
Type
the
password
and
click
OK.
The
IBM
Key
Management
window
is
displayed.
The
title
bar
shows
the
name
of
the
key
database
file
you
selected,
indicating
that
the
file
is
open
and
ready.
5.
Click
Key
Database
File
→
Change
Password.
The
Change
Password
window
is
displayed.
6.
Type
a
new
password
in
the
Password
field,
and
type
it
again
in
the
Confirm
Password
field.
7.
Click
OK.
A
message
in
the
status
bar
indicates
that
the
request
completed
successfully.
Appendix
C.
Secure
Socket
Layer
Introduction
and
iKeyman
231

232
IBM
Tivoli
Risk
Manager:
Administrator’s
Guide
Appendix
D.
Notices
This
information
was
developed
for
products
and
services
offered
in
the
U.S.A.
IBM
may
not
offer
the
products,
services,
or
features
discussed
in
this
document
in
other
countries.
Consult
your
local
IBM
representative
for
information
on
the
products
and
services
currently
available
in
your
area.
Any
reference
to
an
IBM
product,
program,
or
service
is
not
intended
to
state
or
imply
that
only
that
IBM
product,
program,
or
service
may
be
used.
Any
functionally
equivalent
product,
program,
or
service
that
does
not
infringe
any
IBM
intellectual
property
right
may
be
used
instead.
However,
it
is
the
user’s
responsibility
to
evaluate
and
verify
the
operation
of
any
non-IBM
product,
program,
or
service.
IBM
may
have
patents
or
pending
patent
applications
covering
subject
matter
described
in
this
document.
The
furnishing
of
this
document
does
not
give
you
any
license
to
these
patents.
You
can
send
license
inquiries,
in
writing,
to:
IBM
Director
of
Licensing
IBM
Corporation
North
Castle
Drive
Armonk,
NY
10504-1785
U.S.A.
For
license
inquiries
regarding
double-byte
(DBCS)
information,
contact
the
IBM
Intellectual
Property
Department
in
your
country
or
send
inquiries,
in
writing,
to:
IBM
World
Trade
Asia
Corporation
Licensing
2-31
Roppongi
3-chome,
Minato-ku
Tokyo
106,
Japan
The
following
paragraph
does
not
apply
to
the
United
Kingdom
or
any
other
country
where
such
provisions
are
inconsistent
with
local
law:
INTERNATIONAL
BUSINESS
MACHINES
CORPORATION
PROVIDES
THIS
PUBLICATION
“AS
IS”
WITHOUT
WARRANTY
OF
ANY
KIND,
EITHER
EXPRESS
OR
IMPLIED,
INCLUDING,
BUT
NOT
LIMITED
TO,
THE
IMPLIED
WARRANTIES
OF
NON-INFRINGEMENT,
MERCHANTABILITY
OR
FITNESS
FOR
A
PARTICULAR
PURPOSE.
Some
states
do
not
allow
disclaimer
of
express
or
implied
warranties
in
certain
transactions,
therefore,
this
statement
may
not
apply
to
you.
This
information
could
include
technical
inaccuracies
or
typographical
errors.
Changes
are
periodically
made
to
the
information
herein;
these
changes
will
be
incorporated
in
new
editions
of
the
publication.
IBM
may
make
improvements
and/or
changes
in
the
product(s)
and/or
the
program(s)
described
in
this
publication
at
any
time
without
notice.
Any
references
in
this
information
to
non-IBM
Web
sites
are
provided
for
convenience
only
and
do
not
in
any
manner
serve
as
an
endorsement
of
those
Web
sites.
The
materials
at
those
Web
sites
are
not
part
of
the
materials
for
this
IBM
product
and
use
of
those
Web
sites
is
at
your
own
risk.
IBM
may
use
or
distribute
any
of
the
information
you
supply
in
any
way
it
believes
appropriate
without
incurring
any
obligation
to
you.
©
Copyright
IBM
Corp.
2003
233
Licensees
of
this
program
who
wish
to
have
information
about
it
for
the
purpose
of
enabling:
(i)
the
exchange
of
information
between
independently
created
programs
and
other
programs
(including
this
one)
and
(ii)
the
mutual
use
of
the
information
which
has
been
exchanged,
should
contact:
IBM
Corporation
2Z4A/101
11400
Burnet
Road
Austin,
TX
78758
USA
Such
information
may
be
available,
subject
to
appropriate
terms
and
conditions,
including
in
some
cases,
payment
of
a
fee.
The
licensed
program
described
in
this
information
and
all
licensed
material
available
for
it
are
provided
by
IBM
under
terms
of
the
IBM
Customer
Agreement,
IBM
International
Program
License
Agreement,
or
any
equivalent
agreement
between
us.
Any
performance
data
contained
herein
was
determined
in
a
controlled
environment.
Therefore,
the
results
obtained
in
other
operating
environments
may
vary
significantly.
Some
measurements
may
have
been
made
on
development-level
systems
and
there
is
no
guarantee
that
these
measurements
will
be
the
same
on
generally
available
systems.
Furthermore,
some
measurement
may
have
been
estimated
through
extrapolation.
Actual
results
may
vary.
Users
of
this
document
should
verify
the
applicable
data
for
their
specific
environment.
Information
concerning
non-IBM
products
was
obtained
from
the
suppliers
of
those
products,
their
published
announcements
or
other
publicly
available
sources.
IBM
has
not
tested
those
products
and
cannot
confirm
the
accuracy
of
performance,
compatibility
or
any
other
claims
related
to
non-IBM
products.
Questions
on
the
capabilities
of
non-IBM
products
should
be
addressed
to
the
suppliers
of
those
products.
All
statements
regarding
IBM’s
future
direction
or
intent
are
subject
to
change
or
withdrawal
without
notice,
and
represent
goals
and
objectives
only.
This
information
contains
examples
of
data
and
reports
used
in
daily
business
operations.
To
illustrate
them
as
completely
as
possible,
the
examples
include
the
names
of
individuals,
companies,
brands,
and
products.
All
of
these
names
are
fictitious
and
any
similarity
to
the
names
and
addresses
used
by
an
actual
business
enterprise
is
entirely
coincidental.
Trademarks
The
following
terms
are
trademarks
of
International
Business
Machines
Corporation
in
the
United
States,
other
countries,
or
both:
AIX
DB2
IBM
Tivoli
Tivoli
Enterprise
Tivoli
Enterprise
Console
Tivoli
Management
Framework
Tivoli
Management
Environment
234
IBM
Tivoli
Risk
Manager:
Administrator’s
Guide

TME
Tivoli
logo
Tivoli
Ready
zSeries
Microsoft,
Windows,
Windows
NT,
and
the
Windows
logo
are
trademarks
of
Microsoft
Corporation
in
the
United
States,
other
countries,
or
both.
Java
and
all
Java-based
trademarks
and
logos
are
trademarks
or
registered
trademarks
of
Sun
Microsystems,
Inc.
in
the
United
States
and
other
countries.
UNIX
is
a
registered
trademark
of
The
Open
Group
in
the
United
States
and
other
countries.
Intel,
Intel
Inside
(logos),
MMX
and
Pentium
are
trademarks
of
Intel
Corporation
in
the
United
States,
other
countries,
or
both.
SET
and
the
SET
logo
are
trademarks
owned
by
SET
Secure
Electronic
Transaction
LLC.
Crystal
Reports
is
the
technology
of
Crystal
Decisions,
Inc.
Check
Point
is
a
trademark
and
VPN-1
and
FireWall-1
are
registered
trademarks
of
Check
Point
Software
Technologies
Ltd.
Other
company,
product,
and
service
names
may
be
trademarks
or
service
marks
of
others.
Appendix
D.
Notices
235

236
IBM
Tivoli
Risk
Manager:
Administrator’s
Guide

Glossary
administrator.
See
role.
attack.
Any
attempt
by
an
unauthorized
person
to
compromise
the
functionality
of
a
networked
system.
See
also
intrusion
attempt.
attack
signature.
A
string
of
characters
in
the
payload
of
a
network
message
that
indicate
that
the
message
contains
malicious
content,
such
as
a
virus,
Trojan
horse,
or
other
intrusion
activity.
BAROC
file.
Basic
Recorder
of
Objects
in
C
(BAROC)
file.
In
the
event
server,
the
internal
representation
of
the
defined
event
classes.
For
Tivoli
Risk
Manager,
a
BAROC
file
describes
the
classes
of
events
that
are
supported
by
a
type
of
Tivoli
Risk
Manager
adapter.
correlation
engine.
The
Tivoli
Risk
Manager
rules
engine.
See
also
rules
engine.
Denial
of
Service
attacks.
A
type
of
cyber
attack.
EIF.
See
Tivoli
Risk
Manager
Event
Integration
Facility.
end
point
node.
1)
A
Tivoli
client
configured
solely
as
the
target
of
management
operations
in
the
Tivoli
Management
Region
(TMR).
2)
A
node
that
is
at
the
end
of
only
one
branch.
Synonymous
with
peripheral
node.
event.
In
the
Tivoli
environment,
any
significant
change
in
the
state
of
a
system
resource,
network
resource,
or
network
application.
Tivoli
Risk
Manager
You
can
generate
an
event
for
a
problem,
for
the
resolution
of
a
problem,
or
for
the
successful
completion
of
a
task.
Examples
of
events
are
the
normal
starting
and
stopping
of
a
process,
the
abnormal
process
termination,
and
the
server
malfunction.
For
Tivoli
Risk
Manager,
the
events
are
intrusion-detection
events.
event
console.
In
the
Tivoli
environment,
a
graphical
user
interface
(GUI)
that
enables
system
administrators
to
view
and
respond
to
dispatched
events
from
the
event
server.
event
correlation.
The
process
of
analyzing
event
data
to
identify
patterns,
common
causes,
and
root
causes.
Event
correlation
analyzes
incoming
events
for
predefined
states,
using
predefined
rules,
and
against
predefined
relationships.
event
group.
In
the
Tivoli
environment,
a
set
of
events
that
meet
certain
criteria.
An
icon
on
the
event
console
represents
each
event
group.
Tivoli
administrators
can
monitor
event
groups
that
are
relevant
to
their
specific
areas
of
responsibility.
event
group
filter.
In
the
Tivoli
environment,
an
event
group
filter
defines
the
classes,
sources,
and
origins
of
events
for
an
event
group
that
is
filtered
at
the
adapter
level.
event
server.
In
the
Tivoli
environment,
a
central
server
that
processes
events.
The
event
server
creates
an
entry
for
each
incoming
event.
The
event
server
evaluates
the
event
against
a
rule
base
to
determine
whether
it
can
respond
to
or
modify
the
event
automatically.
The
event
server
also
updates
the
event
consoles
with
current
event
information.
If
the
primary
event
server
is
not
available,
send
events
to
a
secondary
event
server.
firewall.
A
host
that
interfaces
the
outside
world
with
the
inside
network
and
lets
only
some
well-defined
data
through.
format
file.
A
format
(.fmt)
file
generates
a
class
definition
statement
(.cds)
file
for
the
Tivoli
Management
Environment
adapters.
Use
the
format
file
to
perform
any
event
class
modifications
for
these
adapters,
and
then
generate
a
new
class
definition
statement
file
from
the
format
file.
For
Tivoli
Risk
Manager,
used
by
the
Tivoli
Management
Environment
adapters
to
match
and
reformat
data
for
transmission
to
the
Tivoli
Enterprise
Console.
graphical
user
interface.
In
the
Tivoli
environment,
the
graphical
user
interface
(GUI)
that
system
administrators
use
to
manage
their
network
computing
environment.
The
Tivoli
Risk
Manager
event
console
uses
the
Tivoli
desktop.
See
also
event
console.
GUI.
See
graphical
user
interface.
host.
In
a
network,
the
processing
unit
in
which
the
data
communication
access
method
resides.
IDS.
See
intrusion
detection
system.
IIS.
See
Internet
Information
Server.
incident.
The
occurrence
of
a
series
of
sensor
events
that
exceed
a
certain
severity
threshold
within
a
specific
amount
of
time
(which
is
configurable).
incident-based
correlation.
The
process
of
identifying
and
creating
RM_Incident
events
using
the
information
contained
in
the
RM_SensorEvent
events
received
by
the
Agent.
incident
group.
A
collection
of
two
or
more
incidents
with
matching
criteria,
which
are
combinations
of
destination
host,
source
host,
category,
or
customer
identifier.
©
Copyright
IBM
Corp.
2003
237

Internet
Information
Server
(IIS).
A
Microsoft
Web
server.
intrusion
attempt.
An
attempt
by
an
unauthorized
person
to
access
or
destroy
a
network
resource.
intrusion
detection
system.
Software
that
detects
attempts
or
successful
attacks
on
monitored
resources
that
are
part
of
a
network
or
host
system.
Java
Runtime
Environment.
Supplies
the
runtime
environment
for
Java
software.
Runs
on
top
of
a
Java
Virtual
Machine
(JVM).
Unless
otherwise
specified,
this
term
applies
to
a
generic
Java
execution
environment
provided
by
a
browser,
Web
server,
or
other
context—not
the
specific
JRE
product
from
Sun.
Java
Virtual
Machine.
The
software
that
supplies
the
system-independent
interfaces
for
Java
software
(including
the
Java
Runtime
Environment).
Use
this
term
to
refer
to
the
actual
Java
Virtual
Machine
and
not
the
Java
Runtime
Environment.
JVM.
See
Java
Virtual
Machine.
JRE.
See
Java
Runtime
Environment.
managed
node.
In
the
Tivoli
environment,
any
managed
resource
on
which
the
Tivoli
Enterprise
Framework
is
installed.
Perl.
Practical
Extraction
and
Report
Language.
priority.
Tivoli
Risk
Manager
assigns
a
priority
to
alarms
for
events
initiated
from
UNIX-based
systems.
For
example,
you
can
set
the
UNIX
syslogd
priority
level
parameter.
Only
use
this
parameter
when
you
route
the
events
to
a
remote
UNIX-based
syslog
daemon
for
subsequent
processing
by
a
Tivoli
Enterprise
Console
adapter.
Prolog.
Programming
in
Logic.
One
programming
language
from
a
family
of
logic
programming
languages.
risk
correlation.
The
process
of
correlating
sensor
events
that
deal
with
suspicious
activity
within
a
Tivoli
Risk
Manager
environment.
See
also
event
correlation.
risk
correlation
engine.
The
component
of
Tivoli
Risk
Manager
that
performs
the
risk
correlation
function.
See
also
risk
correlation.
RMA_conf
parameter.
The
engine
component
specified
in
RMINSTDIR/etc/rmagent.xml
uses
Java
class,
com.tivoli.RiskManager.Agent.Engine.Engine.
It
requires
an
RMA_conf
parameter,
which
contains
the
file
name
of
the
engine’s
configuration
file.
If
there
is
no
RMA_conf
parameter,
the
engine
does
not
perform
any
event
analysis,
but
instead
passes
any
events
it
receives
on
to
any
destinations
connected
to
the
engine.
roles.
Tivoli
Management
Framework
administrator
roles
that
include
super,
senior,
admin,
and
user
roles.
These
roles
are
a
set
of
permissions
that
enable
a
user
to
perform
a
predetermined
set
of
tasks
in
response
to
an
event.
rule.
A
set
of
logical
statements,
expressed
in
XML,
that
enable
the
event
server
to
recognize
relationships
among
events,
during
risk
correlation
and
summarization,
and
to
run
automated
responses
accordingly.
rule
base.
In
the
Tivoli
environment,
a
set
of
rules
as
well
as
the
event
class
definitions
for
which
the
rules
are
written.
The
Tivoli
Enterprise
Console
uses
the
rule
base
in
managing
events.
An
organization
can
create
many
rule
bases,
with
each
rule
base
fulfilling
a
different
set
of
needs
for
network
computing
management.
rules
engine.
The
rules
engine
is
the
heart
of
the
Tivoli
Enterprise
Console.
It
uses
a
set
of
rules
to
determine
if
you
need
to
perform
an
action
on
an
event.
script.
A
logical
structure
representing
a
sequence
of
events.
sensor.
Software
that
monitors
security
networks,
applications,
or
systems
for
security-related
information,
possibly
indicative
of
suspicious
activity.
sensor
event.
An
intrusion
detection
event
that
is
reported
by
an
Tivoli
Risk
Manager
sensor
or
adapter
to
the
Tivoli
Risk
Manager
server.
See
also
event.
sensor
event
adapter.
Software
that
intercepts
information
generated
by
one
or
more
sensors,
filters
the
data,
reformats
the
data
into
an
appropriate
sensor
event,
and
forwards
the
sensor
event
to
Tivoli
Risk
Manager.
severity.
Indicates
the
severity
value
assigned
by
the
application
and
reflected
on
the
event
console.
Typically,
WARNING
is
used
to
designate
low-level
alerts;
MINOR
is
used
to
designate
medium-level
alerts;
and
CRITICAL
is
used
to
designate
high-level
alerts.
The
severity
value
either
can
be
assigned
dynamically
by
the
application
when
the
event
is
sent
to
the
Tivoli
Enterprise
Console,
or
defined
statically
using
event
definitions
in
the
application’s
BAROC
file.
summarization.
The
process
of
aggregating
events
and
then
substituting
the
set
of
events
with
a
much
smaller
number
of
summary
events.
summarization
engine.
The
component
that
performs
the
Tivoli
Risk
Manager
summarization
function.
system
configuration.
In
Tivoli
Risk
Manager,
there
are
four
system
configurations,
event
server,
client,
distributed
correlation
server,
and
gateway.
These
configurations
define
the
purpose
of
different
systems
within
the
Tivoli
Risk
Manager
environment.
238
IBM
Tivoli
Risk
Manager:
Administrator’s
Guide

Tivoli
Enterprise
Console.
A
Tivoli
product
that
collects,
processes,
and
automatically
initiates
corrective
actions
for
system,
application,
network,
and
database
events.
The
Tivoli
Enterprise
Console
provides
a
centralized,
global
view
of
the
network
computing
environment.
Tivoli
Enterprise
Console
event.
A
Tivoli
Enterprise
Console-specific
event.
Tivoli
Management
Framework.
This
software
infrastructure
enables
the
integration
of
systems
management
application
programs
from
Tivoli
and
the
Tivoli
Partners.
The
Framework
includes
the
following:
v
Object
request
broker
(oserv)
v
Distributed
object
database
v
Basic
administration
functions
v
Basic
application
services
v
Basic
desktop
services,
such
as
the
graphical
user
interface
(GUI)
Tivoli
Management
Region.
In
the
Tivoli
Management
Framework,
a
TMR
is
a
server
as
well
as
the
set
of
clients
that
it
serves.
An
organization
can
have
more
than
one
TMR.
A
TMR
addresses
the
physical
connectivity
of
resources,
whereas
a
policy
region
addresses
the
logical
organization
of
resources.
TME.
See
Tivoli
Management
Framework.
TMR.
See
Tivoli
Management
Region.
Tivoli
Risk
Manager
agent.
The
Tivoli
Risk
Manager
component
that
processes
all
categories
of
sensor
events,
summarizes
and
correlates
the
sensor
events,
and
then
sends
the
sensor
events
to
the
Tivoli
Enterprise
Console
or
the
Tivoli
Risk
Manager
server.
The
agent
can
be
configured
to
run
in
a
risk
management
environment
as
a
client,
a
Tivoli
Enterprise
Console
server,
a
distributed
correlation
server,
or
a
gateway.
Tivoli
Risk
Manager
client
system
configuration.
System
configuration
that
can
be
deployed
at
or
near
a
sensor.
Used
to
collect
and
summarize
events
produced
by
adapters
and
sensors.
Tivoli
Risk
Manager
distributed
correlation
server
system
configuration.
System
configuration
that
is
used
to
distribute
the
correlation
process
to
additional
systems
and
off-load
correlation
from
the
Tivoli
Enterprise
Console
server.
Tivoli
Risk
Manager
Event
Integration
Facility.
A
toolkit
that
provides
a
simple
application
programming
interface
(API)
to
enable
customers
and
Tivoli
Partners
to
develop
new
event
adapters
for
Tivoli
Risk
Manager
that
can
forward
events
to
the
Tivoli
Enterprise
Console.
A
customer
can
also
translate
events
from
third-party
or
in-house
applications.
Tivoli
Risk
Manager
event
server
system
configuration.
System
configuration
that
can
be
deployed
on
the
Tivoli
Enterprise
Console
server
itself,
where
centralized
correlation
is
performed.
Tivoli
Risk
Manager
gateway
system
configuration.
System
configuration
that
is
used
to
provide
a
single
system
to
collects
information
from
a
variety
of
adapters
and
sensors,
possibly
through
Tivoli
Risk
Manager
clients.
Uses
a
single
connection
to
forward
information
through
firewall
environments
validation.
The
checking
of
data
for
correctness
or
for
compliance
with
application
standards,
rules,
and
conventions.
vulnerability
assessment
products.
Vulnerability
assessment
products
give
the
system
administrator
reports
of
vulnerable
services
that
are
running
or
reports
of
misconfigurations
by
actively
scanning
the
system.
Glossary
239

240
IBM
Tivoli
Risk
Manager:
Administrator’s
Guide

Index
Aabout
this
guide
vii
access
log
filesconfiguring
167
introducing
157
updating
in
real
time
157,
159
accessibility
x
adapters
4
addingCA
root
digital
certificate
225
signature
classes
178
suspicious
host
definition
180
trusted
signatures
180
Web
attack
signatures
178
adjusting
level
counters
182
Advisoroverview
120
rules
file
120
actions
124
customizing
Web
pages
127
dynamic
data
125
filters
121
internationalization
of
Web
pages
128
prioritizing
Web
page
order
126
resource
IDs
125
rules
123
special
characters
128
agent
61
administration
76
available
classes
64
configuration
files
63,
67,
71
connections
61
control
DNS
79
destinations
61,
63
engine
61,
63
event
submission
API
61
filters
61
generating
heartbeat
events
88
overview
61
queues
61,
78
sources
61,
63
starting
76
stopping
76
agent
elements
62
agent,
sendersset
instance
count
47
alertsNetwork
IDS
186
Network
IDS
built-in
187
analyzingcaptured
information
manually
178
Web
attack
events
177
Web
server
access
logs
157,
159
Apache
Web
Server
168
archiver
keywords
205
asymmetric
cryptography
209
attack
events,
analyzing
177
attributecustomer
ID,
cust
41
authentication,
client
213,
216
BBAROC
class
names
in
configuration
files
195
customize
the
BAROC
list
46
summary
47
BatchCount
keyword
195
blank
spaces
195
BufEvtMaxSize
keyword
195
BufEvtPath
keyword
196
buffer
files
195,
196
BufferEvents
keyword
196
BufferFlushRate
keyword
196
Bugtraq
Web
site
177
built-in
alerts
187
CCA
root
digital
certificateadding
225
deleting
226
cachekeywords
195,
196
rate
to
send
events
196,
197
certificate
authority
(CA)and
digital
certificates
210
and
trust
hierarchies
211
root
CA
212
chain
of
trust
211,
212,
216
changing
a
database
password
230
Channels
keyword
199
class
category
95
CLF
157,
169
clf_value
170
clientagent
61
authentication
213,
216
configuration
72
clientsoverview
6
Close
Events
program
57
combining
sig.nefarious
pattern
tests
179
commandsiKeyman
222
keytool
220
nids
193
rma_webids
160
webids
157,
159
wrmadmin
76
wrmdbclear
56
wrmdbclose
57
wrmdns
79
wrmqueue
78
wrmstashpw
80
common
log
format
169
See
CLF
Common
Vulnerabilities
Enumeration
(CVE)
177
components
40
agent-less
mode
6
components
(continued)clients
6
consoles
10
custom
adapters
4
event
adapters
4
event
monitor
5
event
server
6
event
sources
3
historical
reportingCrystal
Reports
12
Tivoli
Enterprise
Console
adapters
4
web
application
10
configurationaccess
log
files
167
advanced
for
the
Tivoli
Risk
Manager
event
server
40
agent
files
63
agent
second-level
files
67
agent
to
generate
heartbeat
events
88
Apache
Web
Server
168
client
system
72
correlation
39
correlation
server
to
monitor
heartbeat
events
88
distributed
correlation
server
74
Event
Integration
Facility
195
event
server
40,
73
file
keywords
195
files
keywords
195
gateway
system
75
IBM
Tivoli
Access
Manager
WebSEAL
Server
168
incident-based
correlation
95
Microsoft
Internet
Information
Server
168
network
IDS
187
prolog
configuration
settings
40
relationship
of
the
configuration
files
72
SSL
files
219
Sun
ONE
Web
Server
168
Tivoli
Risk
Manager
event
server
39
Web
servers
167
common
log
format
167
configuration
filewebids.cfg
163
configurelist
fileriskmgr_baroc.lst
file
44
riskmgr_cfg.lst
file
44
riskmgr_pro.lst
file
44
riskmgr_rules.lst
file
44
list
file,
.lst
44
rules
file
44
boot.rls
file
45
hostname_remap.rls
file
45
riskmanager.rls
file
44
configuringNetwork
IDS,
event
monitorevents
191
manually
192
©
Copyright
IBM
Corp.
2003
241

configuring
(continued)Network
IDS,
event
monitor
(continued)wizard
191
Web
IDSTivoli
Risk
Manager
EIF
173
Web
IDS,
event
monitorevents
174
manually
175
wizard
174
ConnectionMode
keyword
196
connectionskeywords
196
connectors
64
contents
of
this
book
vii
conventionsnaming
xi
typeface
xi
correlationcomponents
40
monitoring
heartbeat
events
88
process
98
counters,
level
182
creatingkey
database
222
self-signed
digital
certificate
224
cryptographyasymmetric
209
description
209
public-key
209
Crystal
Reportsevent
management
reports
140
firewall
management
reports
139
intrusion
detection
reports
139
overview
139,
147
risk
assessment
reports
140
running
147
Runtime
Engine
149
updating
to
use
your
ODBC
connection
146
virus
management
reports
142
customer
ID
attributeenablement
105
CVEWeb
site
for
entries
186
Ddaemon,
portmapper
199
data
management
utilities
58
databasearchiver
keywords
205
changing
a
password
230
creating
a
key
database
222
database
utilities
56
maintenance
and
support
51,
56
structure
51
DB2setting
up
the
ODBC
data
source
connection
143
decay
values
181
default
incident
event
typescategory
(Cat)
35
destination
(Dst)
35
destination
and
category
(DstCat)
35
source
(Src)
35
source
and
category
(SrcCat)
35
default
incident
event
types
(continued)source
and
destination
(SrcDst)
35
source,
destination
and
category
(SrcDstCat)
35
definingsig.nefarious
pattern
engine
tests
179
deletingCA
root
digital
certificate
226
digital
certificate
230
deploying
Web
IDS
157
dictionary_value
170
digital
certificateadding
a
root
CA
225
and
SSL
and
trust
chains
216
certificate
authority
(CA)
210,
211
deleting
230
deleting
a
root
CA
226
expiration
210
extracting
226
format
210
keytool
220
layout
211
overview
209
purpose
210
receiving
229
requesting
213,
228
RSA
Secure
Server
CA
224
security
considerations
211
self-signed
212,
213,
224
signed
213
signer
224
Thawte
Personal
Basic
CA
224
Thawte
Personal
Freemail
CA
224
Thawte
Personal
Premium
CA
224
Thawte
Premium
Server
CA
224
Thawte
Server
CA
224
uses
212
VeriSign
Class
1
Public
Primary
CA
224
VeriSign
Class
2
Public
Primary
CA
224
VeriSign
Class
3
Public
Primary
CA
224
VeriSign
Test
CA
Root
Certificate
224
digital
signature,
issuer’s
210
disability
x
disablinggeneration
of
heartbeat
events
88
monitoring
of
heartbeat
events
88
distinguished
nameissuer’s
210
owner’s
210
distributed
correlationoverview
9
distributed
correlation
serveragent
61
configuration
74
documentationdocuments
related
to
this
guide
ix
online
information
x
Tivoli
Enterprise
Console
prerequisites
viii
Tivoli
Framework
prerequisites
viii
Tivoli
Risk
Manager
viii
Eelectronic
213
encryption
209
engineparser,
sig.nefarious
file
161,
179
pattern,
sig.nefarious
file
162,
178,
179
rules
81
skip,
sig.nefarious
file
163
suspicion,
sig.nefarious
file
162,
180
trust,
sig.nefarious
file
163,
180,
181
error
messages
195
eventadapters
4
buffer
file
196
handling
43
linking
86
management
reports
140
setting
the
cache
size
46
sources
3
event
adapterscustom
adapters
4
Event
Detailsoverview
113
sensor
type
117
Event
Integration
Facilities
195
event
normalizationassigning
class
category
84
attribute
mapping
82
DNS
look-up
82
event
classes
84
identify
known
sensors
85
identify
known
systems
84
identify
trusted
systems
85
linking
events
86
timestamp
variability
allowance
86
event
persistence
67
event
serveradvanced
configuration
40
prolog
configuration
settings
40
agent
61
configuration
73
configuring
the
Tivoli
Risk
Manager
event
server
39
overview
6
port
number
199
event
sources
3
event
summarizationsummarization
rules
90
extended
properties
for
W3C
format
168
extracting
a
digital
certificate
226
Ffiles
access
log
157
BAROC
195
buffer
196
configuration
195
sensor_abstract.baroc
48
sig.nefarious
172,
179
startconsole.sh
Sun
ONE
Web
Server
script
168
webids
command
159
webids.baroc
49
Filter
keyword
196
242
IBM
Tivoli
Risk
Manager:
Administrator’s
Guide

filtering
attributes
47
filtering
eventskeywords
196
filters
65
firewall
management
reports
139
format
of
digital
certificate
210
Ggateway
agent
61
system
configuration
75
gatewaysIBM
Tivoli
Enterprise
Console
connections
196
guide
organization
vii
Hhandshake
215
heartbeat
monitoringadvanced
configuration
87
agent
to
generate
heartbeat
events
88
correlation
server
to
monitor
heartbeat
events
88
disable
generation
of
heartbeat
events
88
disable
monitoring
of
heartbeat
events
88
configuring
correlation
server
88
disabling
generation
of
events
88
disabling
monitoring
of
heartbeat
events
88
hierarchy
of
trust
211
historical
reportingoverview
12
host
name
retrieval
189
hosts,
suspicious
180
HTTP
214
IIBM
Tivoli
Access
Manager
WebSEAL
Server
168
IKE
standard
213
iKeymanadding
a
CA
root
digital
certificate
225
changing
a
database
password
230
creating
a
key
database
222
creating
a
self-signed
digital
certificate
224
deleting
a
CA
root
digital
certificate
226
deleting
a
digital
certificate
230
extracting
a
digital
certificate
226
overview
222
receiving
a
digital
certificate
229
requesting
a
digital
certificate
228
incident
39,
95
configuring
102
activating
changes
105
existing
102
new
103
correlation
action
functions
100
incident
(continued)correlation
processing
98
customizing
101
disabling
group
creation
41
setting
severity
42
severity
set
97
types
96
XML
syntas
99
incident
groups
39
incident-based
correlationconfiguring
95
linking
events
86
optional
configurationdisable
correlation
process
98
timestamp
variability
allowance
86
incidentsevent,
contribute
97
types
14,
15
installationWeb
IDS
163
introductionNetwork
IDS
183
Network
Intrusion
Detection
System
183
Perl
Support
159
supported
Web
servers
158
Tivoli
Risk
Manager
1
Web
IDS
sig.nefarious
file
172
intrusion
detection
reports
139
IP
Security
213
IPsec
standard
213
issuer’s
distinguished
name
210
JJDBC
classpath
settings
206
JDBC
driverssetting
up
80
Kkey
database
creation
222
pair
209
ring
216
key
pair
209
keytool
220
keywords
195
Llayout
of
digital
certificate
211
LCF
transport
type
200
level
counters
182
Lightweight
Directory
Access
Protocol
(LDAP)
213
linking
events
86
log
filesWeb
IDS
157
log
formatSee
CLF
LogFileName
keyword
197
loggingNetwork
IDS
alerts
189
LogLevel
keyword
197
Mmaintenance
and
support
of
databases
56
managing
Web
IDS
177
combining
and
refining
pattern
tests
179
level
counters
182
signature
classes
178
suspicious
hosts
180
threshold
and
decay
values
181
trusted
signatures
180
type
of
suspicious
activity
180
web
attack
events
177
web
attack
signatures
178
master
secret
216
MaxPacketSize
keyword
197
message
authentication
code
(MAC)
216
Microsoft
Internet
Information
Server
168
Microsoft
SQL
Serversetting
up
the
ODBC
data
source
connection
146
monitoring
heartbeatadvanced
configuration
87
configuring
correlation
server
88
disabling
generation
of
events
88
disabling
monitoring
of
heartbeat
events
88
Nnaming
conventions
xi
Network
IDSalerts
186
built-in
alerts
187
configureevent
monitor
191
Tivoli
Risk
Manager
EIF
190
configuring
187
introducing
183
logging
189
management
tasks
188
nids
command
193
obtaining
the
host
name
189
omitting
IP
addresses
189
promiscuous
operation
189
signature-based
attack
signatures
187
signatures
file,
updating
188
starting
188
starting
the
adapter
187
stopping
the
adapter
188
Tivoli
Enterprise
Console
correlation
186
Network
Intrusion
Detection
Systemintroducing
183
management
tasks
188
Network
Intrusion
Detection
System
(Network
IDS)
3
nids
command
193
non-TME
43
OODBC
data
sourcesetting
up
142
omitting
IP
addresses
189
Index
243

online
helpWeb
Application
112
options
for
webids
159
Oraclesetting
up
the
ODBC
data
source
connection
145
overviewclients
6
consoles
10
distributed
correlation
9
event
normalization
81,
83
event
summarization
89
heartbeat
monitoring
87
historical
reportingCrystal
Reports
12
incident-based
correlation
95
security
event
processing
12,
16
tasks
151
Tivoli
Risk
Manager
1
Tivoli
Risk
Manager
security
event
processing
12
Tivoli
Risk
Manager
topology
and
architecture
2
Tivoli
tasks
151
web
application
10
advisor
10
event
details
10
system
information
10
owner’s
distinguished
name
210
owner’s
public
key
210
Pparser
engine
161,
179
password
stashing
80
password,
changing
for
a
database
230
pattern
engine
162,
178,
179
pattern
tests,
sig.nefarious
179
PEM
213
performance
considerations
45
Perl
Support
159
policy
region
151
port
keyword
200
port
number,
for
event
server
199
portmapper
daemon
199
pre-master
secret
216
preface
information
vii
prerequisitesdocuments
for
using
this
guide
viii
private
key
209,
211
private-public
key
pair
211
product
updates
for
Tivoli
Risk
Manager
x
programswrmdbclear
56
wrmdbclose
57
prolog
configuration
settings
40
promiscuous
operation
189
public
key
209
public
key
infrastructure
(PKI)
216
public
key,
owner’s
210
public-key
cryptography
209
public-private
key
pair
209,
211
publicationTivoli
Risk
Manager
viii
Qqueues
67
Rreceiving
a
digital
certificate
229
refining
sig.nefarious
pattern
tests
179
registering
DB2
as
a
data
source
144
related
documents
of
this
guide
ix
Remove
Events
program
56
removingsignature
classes
178
suspicious
host
definition
180
trusted
signatures
180
Web
attack
signatures
178
requesting
a
digital
certificate
213,
228
RIM
utilities
58
risk
assessment
reports
140
rm_Level
95
rma_webids
160
RmadLogging
keyword
197
RMAGENT.XMLSee
also
agent
top-level
configuration
file
63
root
CA
212
RSA
Secure
Server
CA
224
rulesadvanced
changessetting
attribute,
specific
value
103
engine
81
SS/MIME
213
secure
electronic
213
secure
electronic
transaction
(SET)
213
secure
tunnels
213
security
considerations
211
security
event
processingdetect
12,
13
filter
and
summarize
12,
13
first-level
correlation
12,
14
linked
events
14
overview
12,
16
pattern
matching
14
second-level
correlation
15
second-level
corrleation
12
severity
15
sliding
time
window
15
thresholds
15
security
management
products
from
Tivoli
x
self-signed
digital
certificatecontents
213
creating
224
description
212
sensor
events
43
sensor_abstract.baroc
48
ServerLocation
keyword
198,
200
ServerPort
keyword
198
SET
213
setting
up
the
ODBC
data
source
connection
142
sig.nefariouspattern
tests
179
sig.nefarious
(continued)signatures
file
161
Web
IDS
172
signatures
178
signatures
file
172
editing
172
Network
IDS
188
signed
digital
certificate
213
signer
digital
certificates
224
single
quotation
mark
195
skip
engine
163
sliding-window
95
sockets
200
software
support
x
software,
customer
x
spaces,
blank
195
specifying
type
of
suspicious
activity
180
SSLand
digital
certificates
and
trust
chains
216
configuration
files
219
default
keystore
files
217
definition
213
encryption
209
handshake
215
how
SSL
works
214
overview
209,
214
storing
passwords
217
startconsole.sh
Sun
ONE
Web
Server
script
168
startingNetwork
IDS
188
Web
IDS
159
stashing
passwords
80
state
correlation
cache
196
summarization
rulecreate
93
summarization
rulesunderstanding
90
summary
ofTivoli
Risk
Manager
tasks
151
Web
IDS
tasks
177
summary
rulesconfigure
92
activate
changes
93
creating
new
summary
rule
93
updating
existing
summary
rule
92
Sun
ONE
Server
168
support
and
maintenance
of
databases
56
suspicion
engine
162,
180
suspiciousactivity
157,
180
hosts
157
Sybasesetting
up
the
ODBC
data
source
connection
145
System
Informationoverview
118
Ttables
archive
creation
52
archive
table
definition
52
244
IBM
Tivoli
Risk
Manager:
Administrator’s
Guide

tables
(continued)tables
and
views
51
task
library
151,
187
tasksagent
154
Check
Point
FireWall-1
155
Cisco
Secure
IDS
156
Cisco
Secure
PIX
Firewall
155
create
151
customize
151
event
management
154
event
server
153
introduction
151
Linux
and
UNIX-based
systems
152
management
177
Network
IDS
156
windows
systems
152
TestMode
keyword
199
ThawtePersonal
Basic
CA
224
Personal
Freemail
CA
224
Personal
Premium
CA
224
Premium
Server
CA
224
Server
CA
224
thresholdssetting
group
thresholds
41
tuning
181
timestamp
variability
allowance
86
Tivoli
Enterprise
Consoledata
management
utilities
58
Tivoli
Enterprise
Console
correlationNetwork
IDS
186
Tivoli
Enterprise
Console-Region
policy
region
187
Tivoli
Risk
Managerconfiguring
Apache
Web
Server
168
configuring
IBM
Tivoli
Access
Manager
WebSEAL
Server
168
configuring
SUN
ONE
Web
Server
168
configuring
Web
servers
167
database
utilities
56
introducing
Web
IDS
157
task
library
151
Tivoli
Risk
Manager
and
SSL
217
Tivoli
Risk
Manager
Correlationfor
Web
IDS
157
Tivoli
Risk
Manager
taskssummary
of
151
TME
adaptersusing
with
Web
IDS
157
TME
transport
type
200
topology
and
architectureagent-less
mode
6
clients
6
consoles
10
custom
adapters
4
distributed
correlation
9
event
adapters
4
event
server
6
event
sources
3
historical
reporting
12
overview
2
Tivoli
Enterprise
Console
adapters
4
Tivoli
Risk
Manager
event
monitor,
event
monitor
5
web
application
10
TraceFileName
keyword
199
TraceLevel
keyword
199
TransportList
keyword
199
trust
chainand
digital
certificates
and
SSL
216
description
211,
212
trust
engine
163,
180,
181
trust
hierarchy
211
trusted
signatures
180
TrustStores
220
tuningthreshold
and
decay
values
181
type
of
suspicious
activity
180
typeface
conventions
xi
Uupdates
for
Tivoli
Risk
Manager
x
URLssoftware
support
x
Tivoli
Risk
Manager
product
x
Tivoli
Risk
Manager
updates
and
service
x
Tivoli
security
management
products
x
user
tasks
for
Web
IDS
177
utilities
for
data
management
58
VVeriSign,
Inc.Class
1
Public
Primary
CA
224
Class
2
Public
Primary
CA
224
Class
3
Public
Primary
CA
224
Test
CA
Root
Certificate
224
viewing
information
at
the
Tivoli
Enterprise
Console
16
views
and
tables
51
virtual
private
network
(VPN)
213
virus
management
reports
142
WW3C
format
168
Web
Applicationaccessing
from
Tivoli
Enterprise
Console
110
Advisor
120
enabling
global
security
109
enabling
UTF-8
109
Event
Details
113
sensor
type
117
functional
overview
107
introduction
to
graphical
user
interface
111
multiple
language
support
109
online
help
112
RmWeb.properties
file
108
Sign
On
Window
113
System
Information
118
Web
attackevents
177
signatures
178
Web
IDSaccess
log
files
157
Web
IDS
(continued)adding
or
removing
suspicious
hosts
180
adding
or
removing
trusted
signatures
180
adding
or
removing
Web
attack
signatures
178
adding
signature
classes
178
adjusting
the
level
counters
182
analyzing
Web
attack
events
177
combining
and
refining
pattern
tests
179
configuration
file
163
access
log
rollover
support
166
editing
164
exit
information
165
file
pattern
information
166
library
information
164
locale
information
164
location
of
sig.nefarious
files
165
refresh
information
165
resume
function
information
166
webids.cfg
163
configureevent
monitor
174
configuring
access
log
files
167
configuring
Apache
Web
Server
168
configuring
IBM
Tivoli
Access
Manager
WebSEAL
Server
168
configuring
Microsoft
Internet
Information
Server
168
configuring
Sun
ONE
Web
Server
168
Event
Correlation
157
installing
163
introducing
157
introducing
the
sig.nefarious
file
172
log
file
format,
values
169
managing
177
Perl
prerequisite
159
removing
signature
classes
178
specifying
the
type
of
suspicious
activity
180
starting
159
supported
adapters
184
supported
Web
servers
158
tuning
the
threshold
and
decay
values
181
user
tasks
177
Web
Intrusion
Detection
System
(Web
IDS)
3,
16
category
(Cat)
36
destination
(Dst)
36
destination
and
category
(DstCat)
35
source
(Src)
36
source
and
category
(SrcCat)
35
source
and
destination
(SrcDst)
35
source,
destination
and
category
(SrcDstCat)
35
Web
publicationsTivoli
Risk
Manager
x
Web
serversconfiguring
Apache
Web
Server
168
configuring
IBM
Tivoli
Access
Manager
WebSEAL
Server
168
configuring
Microsoft
IIS
168
Index
245

Web
servers
(continued)configuring
Sun
ONE
Web
Server
168
supported
by
Tivoli
Risk
Manager
158
Web
site
forBugtraq
177
Common
Vulnerabilities
Enumeration
(CVE)
177
CVE
entries
186
webids
159
webids.baroc
49
wrmadmin
76
wrmdbclear
56
wrmdbclose
57
wrmdns
79
wrmqueue
78
wrmstashpw
80
246
IBM
Tivoli
Risk
Manager:
Administrator’s
Guide


����
Printed
in
USA
GC32-1323-00
Recommended