HP ALM Best Practices Series For ALM Practitioners
Upgrade Best Practices
Document Release Date: June 2015
2
Legal Notices
Warranty
The only warranties for HP products and services are set forth in the express warranty statements accompanying such products and services. Nothing herein should be construed as constituting an additional warranty. HP shall not be liable for technical or editorial errors or omissions contained herein.
The information contained herein is subject to change without notice.
Restricted Rights Legend
Confidential computer software. Valid license from HP required for possession, use or copying. Consistent with FAR 12.211 and 12.212, Commercial Computer Software, Computer Software Documentation, and Technical Data for Commercial Items are licensed to the U.S. Government under vendor's standard commercial license.
Copyright Notices
© Copyright 2002 - 2015 Hewlett-Packard Development Company, L.P.
Trademark Notices
Oracle® is a registered trademark of Oracle and/or its affiliates.
Microsoft®, Windows® and Windows® XP are U.S registered trademarks of Microsoft Corporation.
3
Documentation Updates
The title page of this document contains the following identifying information:
• Software Version number, which indicates the software version.
• Document Release Date, which changes each time the document is updated.
• Software Release Date, which indicates the release date of this version of the software.
To check for recent updates or to verify that you are using the most recent edition of a document, go to:
http://h20230.www2.hp.com/selfsolve/manuals
This site requires that you register for an HP Passport and sign in. To register for an HP Passport ID, go to:
http://h20229.www2.hp.com/passport-registration.html
Or click the New users - please register link on the HP Passport login page.
You will also receive updated or new editions if you subscribe to the appropriate product support service. Contact your HP sales representative for details.
4
Support
Visit the HP Software Support web site at:
www.hp.com/go/hpsoftwaresupport
This web site provides contact information and details about the products, services, and support that HP Software offers.
HP Software online support provides customer self-solve capabilities. It provides a fast and efficient way to access interactive technical support tools needed to manage your business. As a valued support customer, you can benefit by using the support web site to: — Search for knowledge documents of interest — Submit and track support cases and enhancement requests — Download software patches — Manage support contracts — Look up HP support contacts — Review information about available services — Enter into discussions with other software customers — Research and register for software training
Most of the support areas require that you register as an HP Passport user and sign in. Many also require an active support contract. To register for an HP Passport ID, go to:
http://h20229.www2.hp.com/passport-registration.html
To find more information about support access levels, go to:
http://h20230.www2.hp.com/new_access_levels.jsp
Contents
1 About HP ALM Upgrade ........................................................... 6
Introduction .............................................................................................................................. 6
Audience .................................................................................................................................... 6
2 Defining ................................................................................. 7
Determine the need for ALM Upgrade .................................................................................... 7
Define upgrade scope and strategy.......................................................................................... 7
Infrastructure upgrade ...................................................................................................... 8 ALM Upgrade ..................................................................................................................... 9
Site upgrade methods ................................................................................................ 10 Site administration structure ................................................................................... 11 Project upgrade methods ........................................................................................... 12
Project configuration and customization ........................................................................ 12
3 Testing ................................................................................. 13
What is a testing environment? ............................................................................................. 13
Why set a testing environment? ............................................................................................ 13
What and how to test? ............................................................................................................ 14
Test project selection ........................................................................................................ 14 Testing strategy ............................................................................................................... 14
Testing environment setup .................................................................................................... 16
Installation mode ............................................................................................................. 16 Post-installation checklist ............................................................................................... 16
Analyzing testing results ....................................................................................................... 17
4 Planning for production upgrade ............................................. 18
Create infrastructure checklist .............................................................................................. 18
Create restriction list ............................................................................................................. 19
Define a project upgrade scheduling plan ............................................................................. 19
Define project contacts ........................................................................................................... 19
Prepare rollback procedure .................................................................................................... 20
Define sanity tests to be performed after upgrade ............................................................... 20
Review post-upgrade checklist ............................................................................................... 21
Prepare training materials and notes for the new version .................................................. 21
Post-upgrade support ............................................................................................................. 21
6
1 About HP ALM Upgrade
Introduction HP Application Lifecycle Management (ALM) empowers IT to manage the core application lifecycle, from requirements through deployment, granting application teams the crucial visibility and collaboration needed for predictable, repeatable, and adaptable delivery of modern applications. Each version of ALM provides a set of new functionalities which help you manage your application management process in the most efficient way.
To achieve the best from each version’s new functionalities using your existing ALM assets, follow the upgrade procedure provided with the product. For more information about the ALM upgrade procedure, see the HP Application Lifecycle Management Installation and Upgrade Guide.
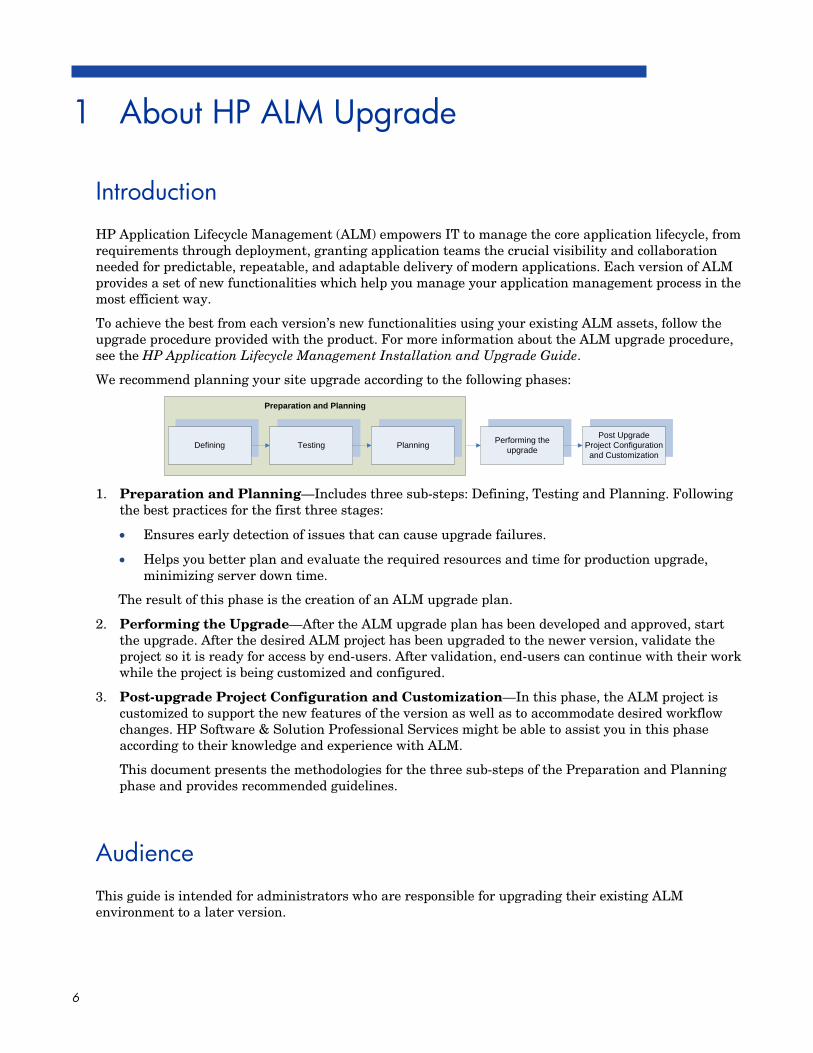
We recommend planning your site upgrade according to the following phases:
DefiningPost Upgrade
Project Configuration and Customization
Performing the upgradePlanningTesting
Preparation and Planning
1. Preparation and Planning—Includes three sub-steps: Defining, Testing and Planning. Following the best practices for the first three stages:
• Ensures early detection of issues that can cause upgrade failures.
• Helps you better plan and evaluate the required resources and time for production upgrade, minimizing server down time.
The result of this phase is the creation of an ALM upgrade plan.
2. Performing the Upgrade—After the ALM upgrade plan has been developed and approved, start the upgrade. After the desired ALM project has been upgraded to the newer version, validate the project so it is ready for access by end-users. After validation, end-users can continue with their work while the project is being customized and configured.
3. Post-upgrade Project Configuration and Customization—In this phase, the ALM project is customized to support the new features of the version as well as to accommodate desired workflow changes. HP Software & Solution Professional Services might be able to assist you in this phase according to their knowledge and experience with ALM.
This document presents the methodologies for the three sub-steps of the Preparation and Planning phase and provides recommended guidelines.
Audience This guide is intended for administrators who are responsible for upgrading their existing ALM environment to a later version.
7
2 Defining
Determine the need for ALM Upgrade Each version of ALM provides a set of new functionalities which help you manage your application management process in the most effective, low cost, efficient way.
When a new ALM version is released it is important, in the first stage, to evaluate the need for it. As part of the evaluation process you should consider:
Is the existing ALM production version still supported? If so, for how long?
Does the new ALM version contain features and fixes that can improve the processes in your organization?
Is it possible to upgrade ALM at a selected time (such as in anticipation of major releases, addition or removal of resources)?
For assistance evaluating the need for upgrading ALM, consult HP Professional Services or Customer Support.
After identifying that there is a need for a new ALM version, define the upgrade scope and strategy.
Define upgrade scope and strategy When defining the upgrade scope and strategy, the following questions should be addressed:
1. Is there a need for infrastructure change?
2. What is the infrastructure change strategy?
3. What is the ALM site and project upgrade strategy?
While answering these questions, decide on the following upgrade strategies:
1. Upgrading the existing production server as opposed to upgrading on a new or different server.
2. Performing a gradual upgrade as opposed to a mass upgrade.
3. Rearranging site administration by using a clean installation as opposed to using existing site administration structures.
The following topics deal with these questions and the upgrade strategies available according to the answers to the above questions
8
Infrastructure upgrade
The upgrade of ALM provides an opportunity for changing and upgrading your environment. These changes might be caused by:
• Changes in the ALM support matrix Review the most updated ALM system configurations (http://www.hp.com/go/TDQC_SysReq), and check the Readme file published with the new ALM version release.
• New or upgraded software versions available.
• Your organization switching to different software or hardware.
The ALM environment is divided into two parts; hardware and software. The hardware contains the physical servers while the software includes the operating system, web server, application server and database.
To plan the upgrade, you will need to evaluate all possible software changes. While evaluating, make sure to consider the following:
- Growth rate of ALM in terms of the number of users, the size of the database and file system repository, and so on.
- Usage changes, such as changes in availability, security, performance, usage of integration tools.
- Usage of other HP products (for example QuickTest Professional) or non-HP products that integrate with ALM, which might have an impact on the infrastructure requirements.
- Changing of policies, for example, the authentication method in ALM.
The HP Customer Support Knowledge Base contains many articles that serve as useful tools to determine the type of environment required for implementing ALM.
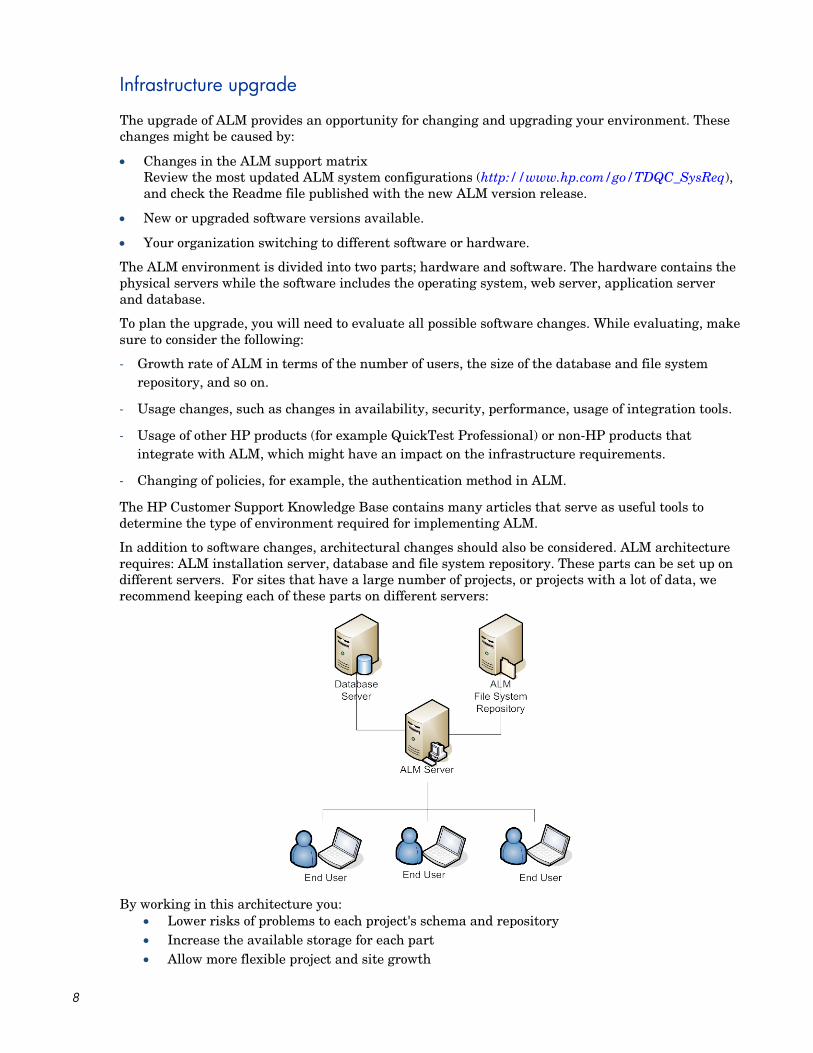
In addition to software changes, architectural changes should also be considered. ALM architecture requires: ALM installation server, database and file system repository. These parts can be set up on different servers. For sites that have a large number of projects, or projects with a lot of data, we recommend keeping each of these parts on different servers:
By working in this architecture you: • Lower risks of problems to each project's schema and repository • Increase the available storage for each part • Allow more flexible project and site growth
9
When designing your physical environment for ALM, there are two key criteria to keep in mind: cost and performance. However, the environment used to implement ALM will most likely be the same configuration as the one your company uses today. Refer to the most updated ALM configurations (http://www.hp.com/go/TDQC_SysReq) to help identify the environment configuration that suits your needs.
Examine the following KPIs (Key Performance Indicators) when making changes to software and hardware environments:
• Number of general maintenance services per month
• Number of general maintenance services per month that do not impact production
• Number of ALM infrastructure services per month
• Number of ALM infrastructure services that impact productivity
• Number of ALM patches applied per year
• Number of ALM patches that impact productivity
• Number of alerts that impact productivity
• Expected growth of ALM usage causing database and repository growth.
ALM Upgrade
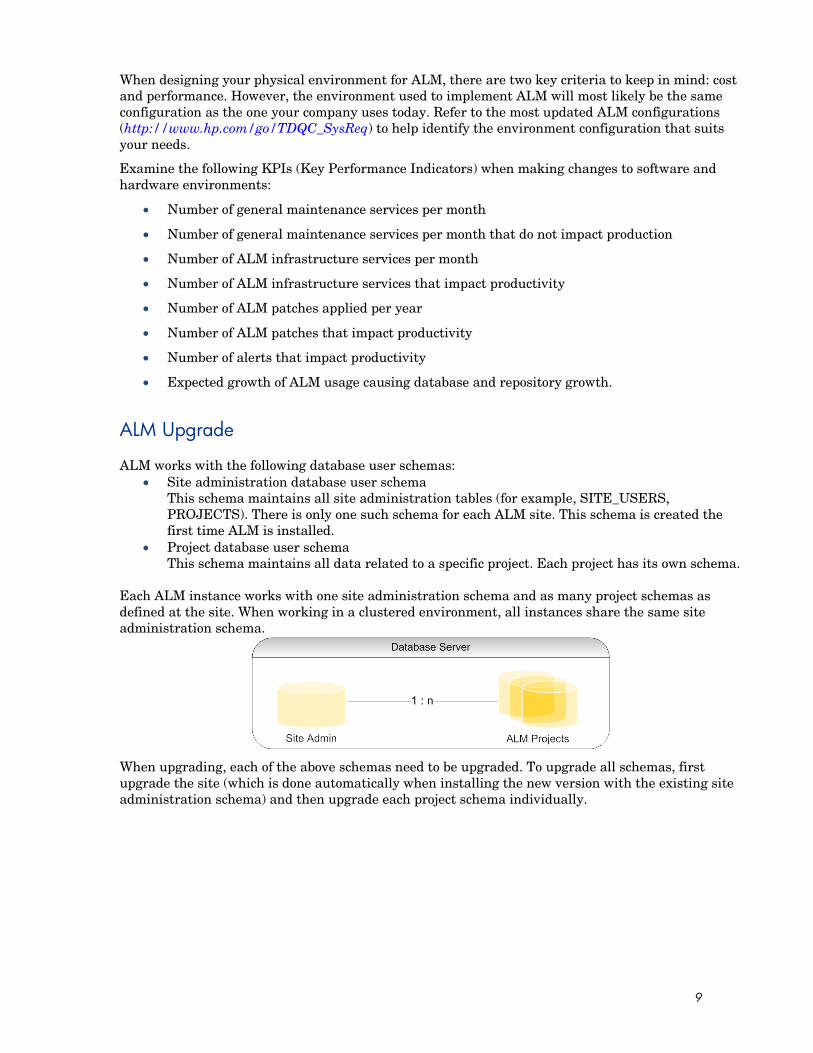
ALM works with the following database user schemas: • Site administration database user schema
This schema maintains all site administration tables (for example, SITE_USERS, PROJECTS). There is only one such schema for each ALM site. This schema is created the first time ALM is installed.
• Project database user schema This schema maintains all data related to a specific project. Each project has its own schema.
Each ALM instance works with one site administration schema and as many project schemas as defined at the site. When working in a clustered environment, all instances share the same site administration schema.
When upgrading, each of the above schemas need to be upgraded. To upgrade all schemas, first upgrade the site (which is done automatically when installing the new version with the existing site administration schema) and then upgrade each project schema individually.
10
Site upgrade methods
The methods for handling the physical upgrade are:
1. Upgrading the same server
2. Upgrading on a new server
Upgrading an existing server is usually done when:
1. New hardware for the server is not available
2. A small number of projects are running
3. The projects are small and low risk
4. Upgrading a test environment
Upgrading on a different server naturally requires a new server for the ALM installation; however it does not require new servers for the file system repository or for the database. When the database and the file system repository are located on different servers, both database and file system repository servers do not require any active changes due to the upgrade.
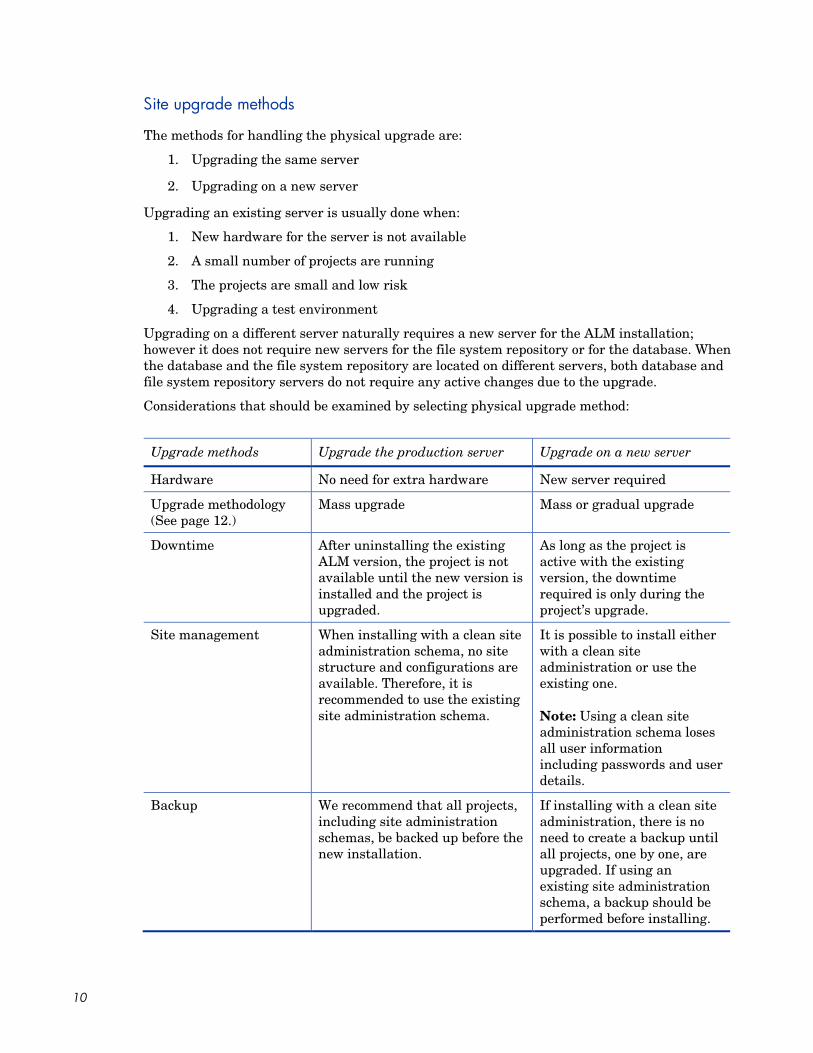
Considerations that should be examined by selecting physical upgrade method:
Upgrade methods Upgrade the production server Upgrade on a new server
Hardware No need for extra hardware New server required
Upgrade methodology (See page 12.)
Mass upgrade Mass or gradual upgrade
Downtime After uninstalling the existing ALM version, the project is not available until the new version is installed and the project is upgraded.
As long as the project is active with the existing version, the downtime required is only during the project’s upgrade.
Site management When installing with a clean site administration schema, no site structure and configurations are available. Therefore, it is recommended to use the existing site administration schema.
It is possible to install either with a clean site administration or use the existing one. Note: Using a clean site administration schema loses all user information including passwords and user details.
Backup We recommend that all projects, including site administration schemas, be backed up before the new installation.
If installing with a clean site administration, there is no need to create a backup until all projects, one by one, are upgraded. If using an existing site administration schema, a backup should be performed before installing.
11
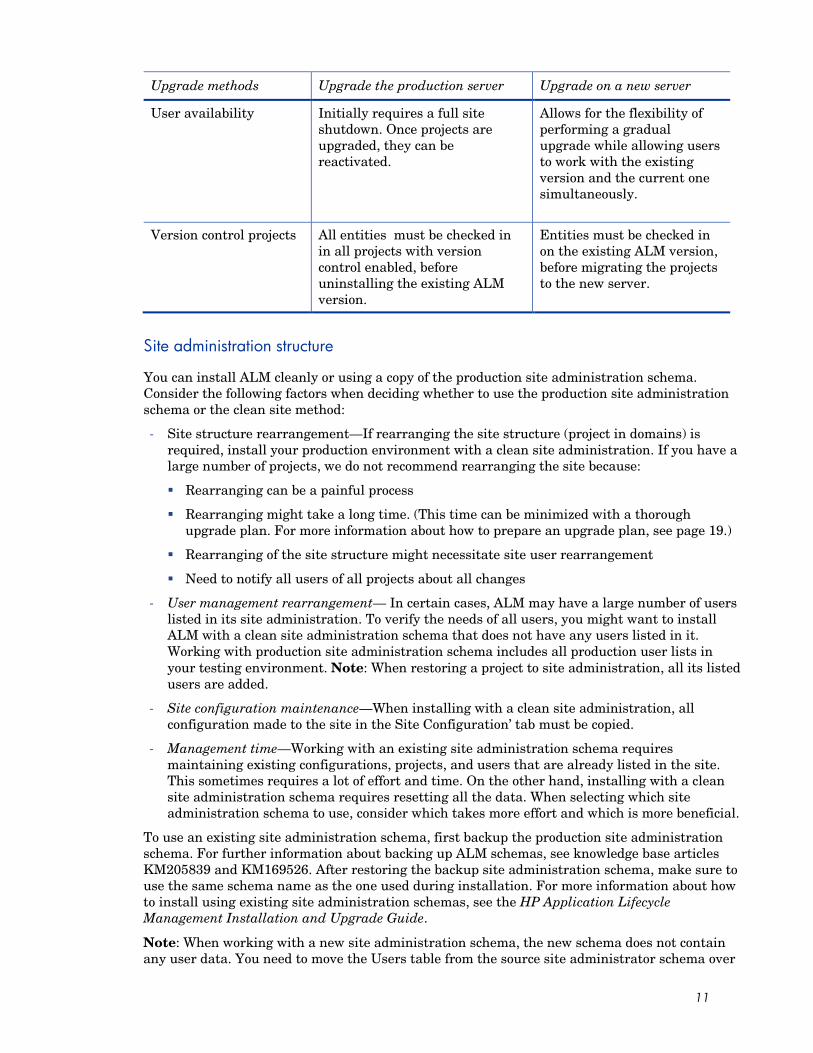
Upgrade methods Upgrade the production server Upgrade on a new server
User availability Initially requires a full site shutdown. Once projects are upgraded, they can be reactivated.
Allows for the flexibility of performing a gradual upgrade while allowing users to work with the existing version and the current one simultaneously.
Version control projects All entities must be checked in in all projects with version control enabled, before uninstalling the existing ALM version.
Entities must be checked in on the existing ALM version, before migrating the projects to the new server.
Site administration structure
You can install ALM cleanly or using a copy of the production site administration schema. Consider the following factors when deciding whether to use the production site administration schema or the clean site method:
- Site structure rearrangement—If rearranging the site structure (project in domains) is required, install your production environment with a clean site administration. If you have a large number of projects, we do not recommend rearranging the site because:
Rearranging can be a painful process
Rearranging might take a long time. (This time can be minimized with a thorough upgrade plan. For more information about how to prepare an upgrade plan, see page 19.)
Rearranging of the site structure might necessitate site user rearrangement
Need to notify all users of all projects about all changes
- User management rearrangement— In certain cases, ALM may have a large number of users listed in its site administration. To verify the needs of all users, you might want to install ALM with a clean site administration schema that does not have any users listed in it. Working with production site administration schema includes all production user lists in your testing environment. Note: When restoring a project to site administration, all its listed users are added.
- Site configuration maintenance—When installing with a clean site administration, all configuration made to the site in the Site Configuration’ tab must be copied.
- Management time—Working with an existing site administration schema requires maintaining existing configurations, projects, and users that are already listed in the site. This sometimes requires a lot of effort and time. On the other hand, installing with a clean site administration schema requires resetting all the data. When selecting which site administration schema to use, consider which takes more effort and which is more beneficial.
To use an existing site administration schema, first backup the production site administration schema. For further information about backing up ALM schemas, see knowledge base articles KM205839 and KM169526. After restoring the backup site administration schema, make sure to use the same schema name as the one used during installation. For more information about how to install using existing site administration schemas, see the HP Application Lifecycle Management Installation and Upgrade Guide.
Note: When working with a new site administration schema, the new schema does not contain any user data. You need to move the Users table from the source site administrator schema over
12
to the target site administration schema and then update the USER_SEQ entry in SEQUENCES table. The value of this index number should be the maximum USER_ID from the Users table.
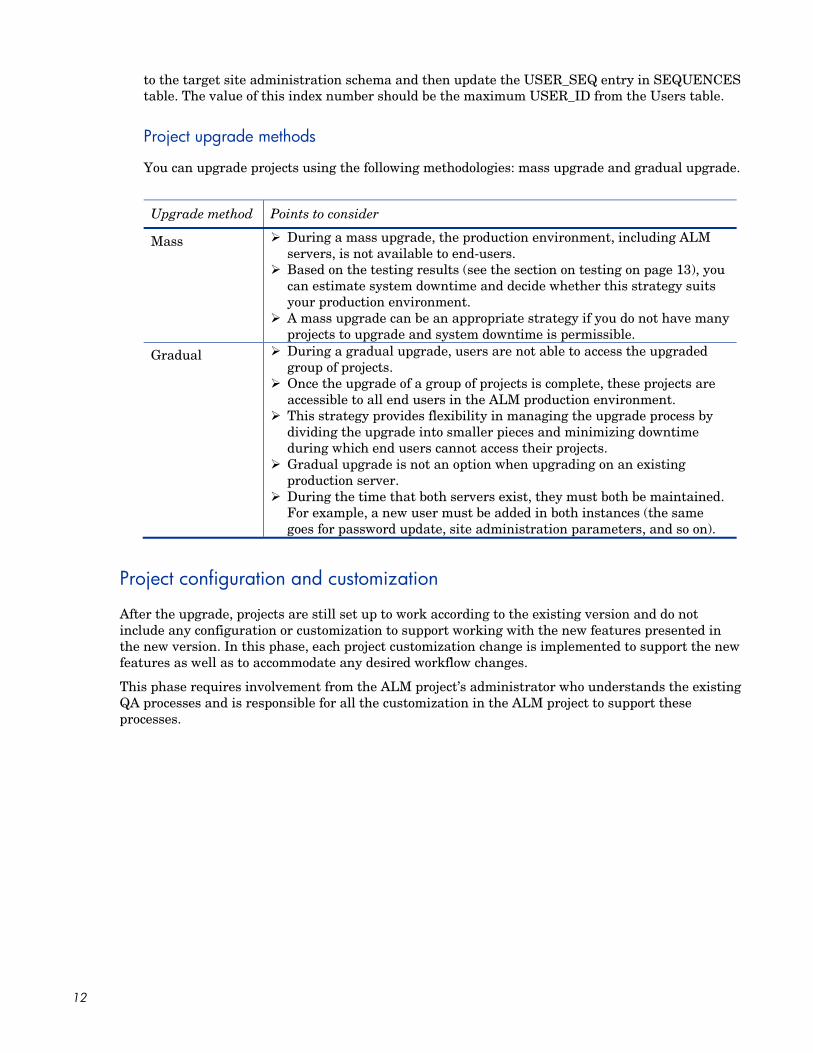
Project upgrade methods
You can upgrade projects using the following methodologies: mass upgrade and gradual upgrade.
Upgrade method Points to consider
Mass During a mass upgrade, the production environment, including ALM servers, is not available to end-users.
Based on the testing results (see the section on testing on page 13), you can estimate system downtime and decide whether this strategy suits your production environment.
A mass upgrade can be an appropriate strategy if you do not have many projects to upgrade and system downtime is permissible.
Gradual During a gradual upgrade, users are not able to access the upgraded group of projects.
Once the upgrade of a group of projects is complete, these projects are accessible to all end users in the ALM production environment.
This strategy provides flexibility in managing the upgrade process by dividing the upgrade into smaller pieces and minimizing downtime during which end users cannot access their projects.
Gradual upgrade is not an option when upgrading on an existing production server.
During the time that both servers exist, they must both be maintained. For example, a new user must be added in both instances (the same goes for password update, site administration parameters, and so on).
Project configuration and customization
After the upgrade, projects are still set up to work according to the existing version and do not include any configuration or customization to support working with the new features presented in the new version. In this phase, each project customization change is implemented to support the new features as well as to accommodate any desired workflow changes.
This phase requires involvement from the ALM project’s administrator who understands the existing QA processes and is responsible for all the customization in the ALM project to support these processes.

13
3 Testing The upgrade process impacts functionality, performance, and compatibility with other HP products (such as HP LoadRunner, HP Performance Center, or HP Business Process Testing) and third-party integrations. Before installing ALM on your production environment, test ALM in a testing environment that reflects your specific configuration.
What is a testing environment? The testing environment is separate from the production environment and precisely reflects it. It simulates the configurations and applications installed on the production system, including the database server, software and production projects. By testing the upgrade in your testing environment, you can get a better picture of the results you can achieve, while identifying and preventing any potential negative impact to your production environment. This testing environment can also be used for evaluating the new version.
Why set a testing environment? - It is advisable to test the upgrade procedure before going live
- If the upgrade fails, no real harm is done since the testing environment is independent of the production environment
- Early identification and detection of product problems
- Good platform for finalizing upgrade plans, resources, and time required for production upgrade
- Platform for evaluating new features and capabilities
- Can be used for creating the new version’s training materials (for more information about creating training for the new version, see the section on new version training and notes on page 21)
14
What and how to test?
Test project selection
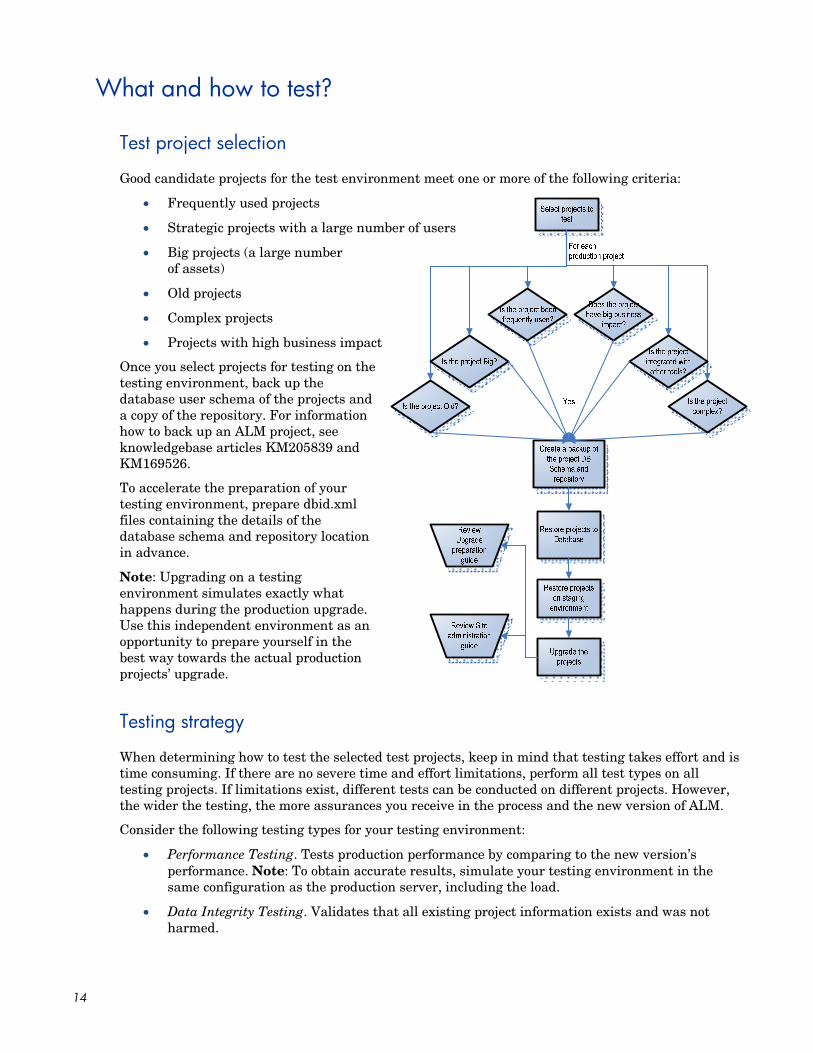
Good candidate projects for the test environment meet one or more of the following criteria:
Frequently used projects
Strategic projects with a large number of users
Big projects (a large number of assets)
Old projects
Complex projects
Projects with high business impact
Once you select projects for testing on the testing environment, back up the database user schema of the projects and a copy of the repository. For information how to back up an ALM project, see knowledgebase articles KM205839 and KM169526.
To accelerate the preparation of your testing environment, prepare dbid.xml files containing the details of the database schema and repository location in advance.
Note: Upgrading on a testing environment simulates exactly what happens during the production upgrade. Use this independent environment as an opportunity to prepare yourself in the best way towards the actual production projects’ upgrade.
Testing strategy
When determining how to test the selected test projects, keep in mind that testing takes effort and is time consuming. If there are no severe time and effort limitations, perform all test types on all testing projects. If limitations exist, different tests can be conducted on different projects. However, the wider the testing, the more assurances you receive in the process and the new version of ALM.
Consider the following testing types for your testing environment:
Performance Testing. Tests production performance by comparing to the new version’s performance. Note: To obtain accurate results, simulate your testing environment in the same configuration as the production server, including the load.
Data Integrity Testing. Validates that all existing project information exists and was not harmed.
15
• Workflow Backward Compatibilities/Regression Testing. Tests organization-defined procedures and actions. For comprehensive regression testing, evaluate each action individually and validate receipt of the correct/expected data.
• End-to-end Testing (E2E). Checks the overall process existence and results. While regression testing is supposed to check each action individually, E2E testing checks entire processes that include one or more actions.
• Usability Testing. Focuses on measuring a human-made product’s capacity to meet its intended purpose.
• New Feature Validation Testing. Using production data and processes, helps you decide whether the new features and capabilities in the new version match your needs and integrate with your existing processes.
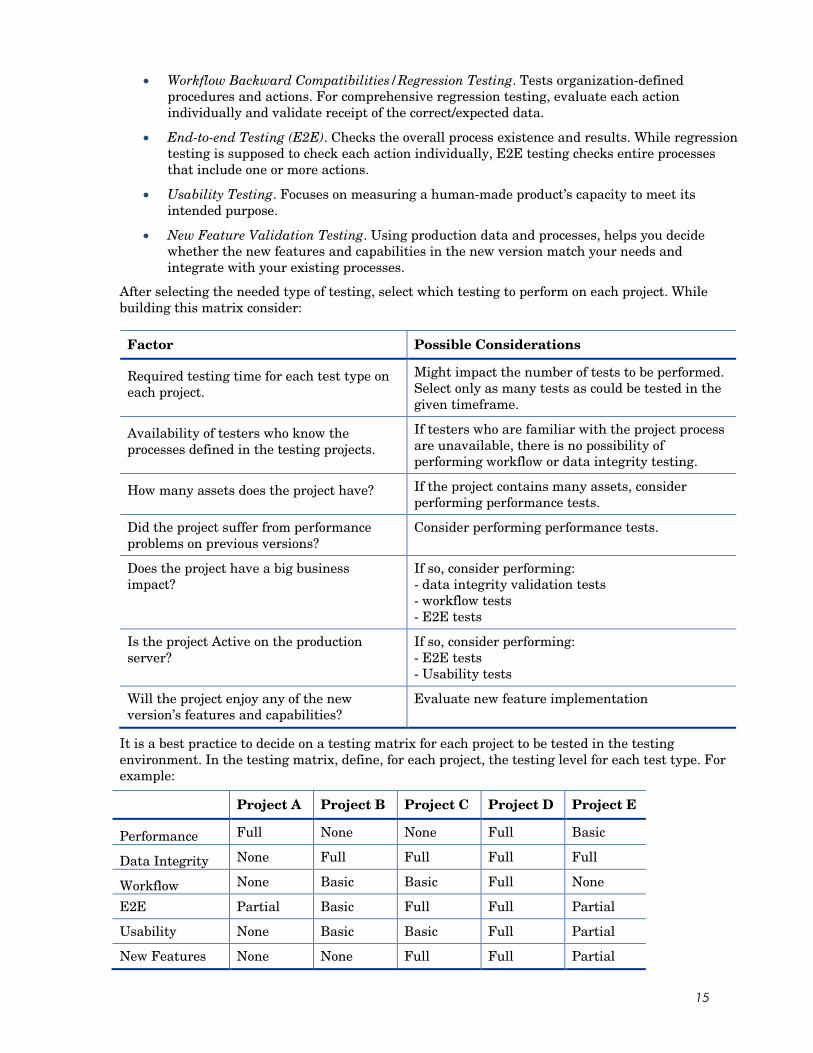
After selecting the needed type of testing, select which testing to perform on each project. While building this matrix consider:
Factor Possible Considerations
Required testing time for each test type on each project.
Might impact the number of tests to be performed. Select only as many tests as could be tested in the given timeframe.
Availability of testers who know the processes defined in the testing projects.
If testers who are familiar with the project process are unavailable, there is no possibility of performing workflow or data integrity testing.
How many assets does the project have? If the project contains many assets, consider performing performance tests.
Did the project suffer from performance problems on previous versions?
Consider performing performance tests.
Does the project have a big business impact?
If so, consider performing: - data integrity validation tests - workflow tests - E2E tests
Is the project Active on the production server?
If so, consider performing: - E2E tests - Usability tests
Will the project enjoy any of the new version’s features and capabilities?
Evaluate new feature implementation
It is a best practice to decide on a testing matrix for each project to be tested in the testing environment. In the testing matrix, define, for each project, the testing level for each test type. For example:
Project A Project B Project C Project D Project E
Performance Full None None Full Basic
Data Integrity None Full Full Full Full
Workflow None Basic Basic Full None
E2E Partial Basic Full Full Partial
Usability None Basic Basic Full Partial
New Features None None Full Full Partial
16
Testing environment setup
Installation mode
Before setting up the testing environment, make sure you have testing resources that test the new version. If no testing resources or server are available, either redefine your upgrade process or go to the next step and set up an upgrade plan.
When installing your site administration schema, decide if you want a production Site Administration schema or a clean one. Consider the following:
- Simulation integrity—The best simulation integrity is to install your testing environment according to your decision to use an existing Site Administration schema or a clean one.
- Full installation testing—Directly driven by the installation method you chose when upgrading production. If the existing production Site Administration schema is used for production upgrade, it is better to test it beforehand in the testing environment to lower installation risks.
- Testing managing convenience—If working with the production site structure, you would probably want to restore the testing projects to the same location in the tree as they are in production (though it is not essential). In such cases, locating the tested projects in the tree and managing them might involve unnecessary work.
- User management—Working with production Site Administration schema in your testing environment includes having all production user lists in your testing environment. Make sure having all users listed in your site does not affect simulation completeness. Note: When restoring a project on a site, all unlisted site users that exist in the project are automatically added to the site user list.
- Management time—Management time directly reflects management convenience. If working with the production site structure is inconvenient, you might consider working with a clean installation. However, even when working with production site structure, you are able to define a domain only for the testing tests which lowers management time but also lowers simulation integrity.
Note: When working with the production Site Administration schema copy, all production domains and projects are listed; however they are not active or accessible. Moreover, for your convenience, consider restoring the projects either in one localized domain or at the same location as they were in the production projects tree, as appropriate for your management and testing.
Post-installation checklist
After installing the testing environment, prepare a checklist to make sure the ALM installation has all needed configurations. This list should contain, among other issues:
• Existence of a license which suits the testing needs
• Database server definition and configuration in ALM Site Administration
• If projects for testing were selected prior to the installation, prepare dbid.xml files for all selected projects. For information on how to restore an ALM project, see the information about restoring projects in the HP Application Lifecycle Management Installation and Upgrade Guide.
• Configuration and installation of integration tools
• Verification of login connection to Site Administration
• Verification that all relevant stakeholders have access to Site Administration

17
• Setting of logs to desired level, which facilitates problem tracking in case problems are encountered
• If a mail server is configured on the production environment, make sure you set one in the testing environment as well. However, avoid sending auto-mails during testing to production users by either resetting all mail addresses in the project or by configuring a different mail server that cannot access production mails. To reset mail addresses, ask for DBA assistance by running the following query on the project schema:
Analyzing testing results To determine if your definitions of the upgrade procedure and testing results match your needs, make sure to validate testing environment results by comparing the functionality and performance in the ALM production version with those of the new version. If you are using HP integrations or third-party tool integrations with ALM, validate backward compatibility of these integrations as well. For example, if you use OTA API functions in scripts, you must run the script after running the upgrade to verify that the new OTA API components installed during the upgrade procedure are still compatible.
If any problems were found, rate them according to risk. For example, a small functionality change that requires workflow adjustment time has a low risk. According to the rating, determine if the upgrade procedure can continue.
UPDATE USERS SET US_MAIL_ADDRESS = ‘’
18
4 Planning for production upgrade The most important stage is to map everything out before you begin. Create a master task list or work plan that can be used to track tasks and verify that no steps are missed.
Write in your work plan all actions that should be taken, timelines, and stakeholders. For example, for backing up project schemas, ask your DBA to provide you with an estimated time frame for this action and define the DBA as a crucial stakeholder. To prevent problems, try to identify problems in advance and supply alternatives. For example, if the DBA might be unavailable, prepare an alternative date or employ someone who can back up the DBA’s part of the work plan.
In your work plan, you might want to include all the steps necessary for the upgrade strategy (mass or gradual upgrade) you have selected. Define each of the stages that take part in it and what the scope of each stage is.
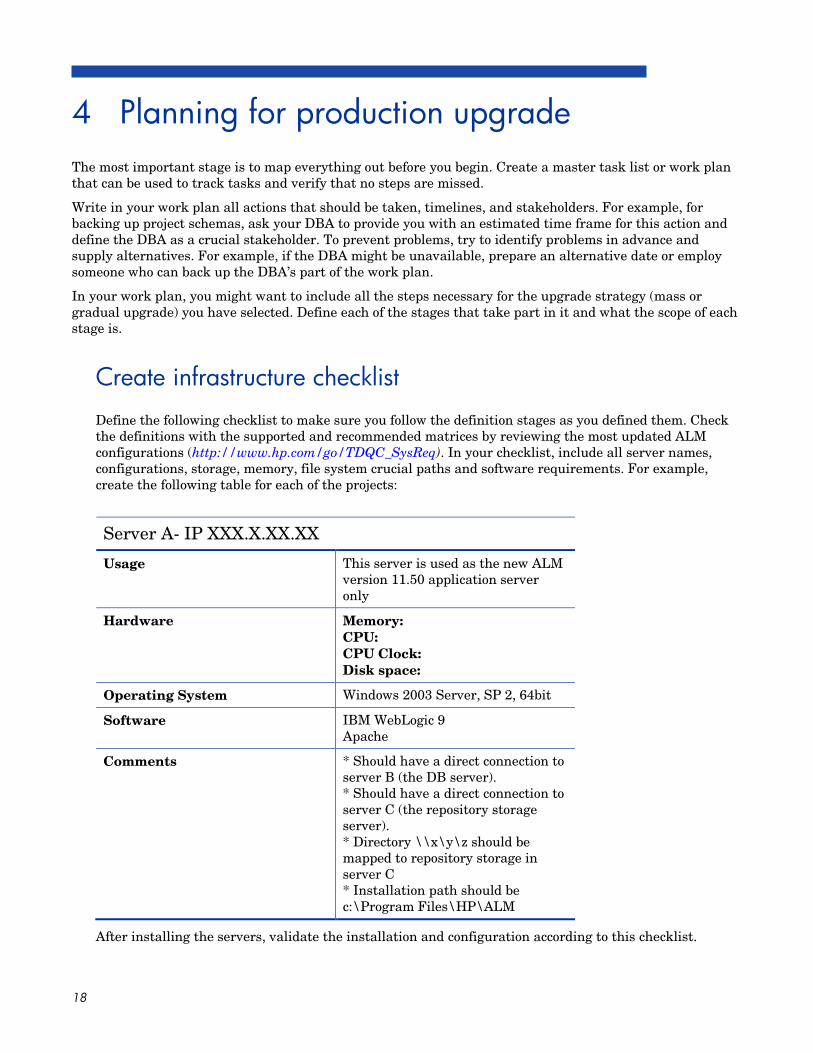
Create infrastructure checklist Define the following checklist to make sure you follow the definition stages as you defined them. Check the definitions with the supported and recommended matrices by reviewing the most updated ALM configurations (http://www.hp.com/go/TDQC_SysReq). In your checklist, include all server names, configurations, storage, memory, file system crucial paths and software requirements. For example, create the following table for each of the projects:
Server A- IP XXX.X.XX.XX
Usage This server is used as the new ALM version 11.50 application server only
Hardware Memory: CPU: CPU Clock: Disk space:
Operating System Windows 2003 Server, SP 2, 64bit
Software IBM WebLogic 9 Apache
Comments * Should have a direct connection to server B (the DB server). * Should have a direct connection to server C (the repository storage server). * Directory \\x\y\z should be mapped to repository storage in server C * Installation path should be c:\Program Files\HP\ALM
After installing the servers, validate the installation and configuration according to this checklist.
19
Create restriction list Create a list of restrictions which you need to address during the upgrade, for example, database authentication password restrictions, security restrictions, and client’s restrictions. Make sure to address each of these in your list and provide a detailed solution.
While creating the restriction list, make sure to address the way ALM is currently deployed on client machines (ALM download mechanism or your own packaging method) and if any preparations or changes should be made.
Define a project upgrade scheduling plan Whether you have decided to do a gradual upgrade or a mass upgrade, you must define a project upgrade scheduling plan. In this plan, you define the projects' priority for a specific timeframe. After determining the projects' upgrade priority, examine the technical and project considerations:
• Technical:
o How risky is the project upgrade?—For example, upgrading an archive project has a very low risk compared to a live project that is heavily used on a daily basis. You might want to start with low risk projects to gain experience and trust in the upgrade process. On the other hand, low risk projects can also be left to the end since often there is no urgency to upgrade them.
o Backup, restore and upgrade time—Either way you look at it, backup, restore, and upgrade actions consume time. For example, make sure not to include in one day so many projects for which just backing up and restoring takes more than one day. Consult with your DBA about the time required for backing up and restoring projects of all sizes in the DB, and measure how long these actions virtually took on your testing environment.
• Project:
o Time consuming—Consult with the project administrator about the planned activities during the upgrade time you have selected. Try to understand if major milestones (for example, a major release or patch testing) are planned.
o Function urgency—Consult with the managers working with the project and the project administrator regarding the new capabilities offered in the new version to understand if and how these capabilities can be implemented in the project. A project which is greatly impacted by one or more of the capabilities should be defined as a priority project for upgrading.
o User dependencies—Doing a gradual upgrade enables having both versions of ALM up and running simultaneously. Users who work in one or more projects might need to log into two or more projects of different versions, which require downloading different ALM client versions. If this is not possible due to client permissions, consider scheduling the upgrade based on user groups using more than one project.
o Version control—For projects with version control enabled, all project entities must be checked in before upgrading the projects. Failing to do so will result in an upgrade failure.
Define project contacts For each of the projects, define one or two contacts to work with about timing and communication during the upgrade process. Make sure to note those contacts as stakeholders in the project upgrade scheduling plan. For a gradual upgrade, clear the timelines for migration with the contacts as it is the contacts’ responsibility to notify the users of the project maintenance before, during, and after the upgrade. We
20
recommend that you include the following details for each of the projects in your project upgrade scheduling plan:
- Domain
- Project name
- Database schema
- Repository location
- Active?
- In use?
- Planned maintenance time
- Upgrade timelines
- Contacts
- Special configurations (for example, a migration with an external tool)
- Customization changes
By establishing this table you can trace your progress while doing the actual upgrade.
Prepare rollback procedure Define a list of possible problems that might occur during the upgrade procedure. To be prepared for these problems, create mitigation plans that lower the associated risks and for each risk, create a result plan. If necessary, create a rollback procedure that facilitates working with the existing environment. This is very important when performing mass upgrade. As a precautionary step, back up all projects and site administration schemas before upgrading. Back up only while the project is deactivated and as close as possible to down-time to allow the maximum working period with the project and minimum data loss. Make sure to assign stakeholders to the rollback procedure plan.
Define sanity tests to be performed after upgrade When the validation of the testing environment is officially completed, define, after considering the testing results, which key areas are affected during the upgrade process. Define these key areas as high risk areas that should be included in sanity tests once the upgrade is completed for each of the projects. In addition, any basic functionality that was used on a frequent basis should also be included as a sanity test for each of the projects.
21
Review post-upgrade checklist After the upgrade, check the following:
- Alert the project contact about the completeness of the project upgrade.
- Verify that you can connect to the projects in Site Administration.
- Ask the users to check that they can log in to all ALM projects using their account.
- Alert your project contact to perform the sanity tests defined earlier.
- Ask the users to perform their routine operations and report feedback such as response time or the occurrence of errors.
- Ask the users to check new features and functionalities within ALM and provide feedback.
- Check the users' group permissions that may be set by default for new features, and modify them if necessary.
- Perform a load test on the testing environment to verify that it can handle the intended number of users.
- If you are using an HP integration or a third-party tool with ALM, validate backward compatibility of the integration and provide feedback.
Prepare training materials and notes for the new version To avoid calls regarding day-to-day usage in ALM and to facilitate a smooth adoption process, you might want to create a release note document that includes the major improvements to functionality, limitations, new feature overviews, and a tips and tricks section. This document should be based on feedback received from the testing stage and ALM release documents such as the HP Application Lifecycle Management User Guide and the What’s New document published with the released ALM version.
Publish your notes and training material before the actual upgrade to avoid accruing extra support cases.
Post-upgrade support While planning the upgrade, remember that after the actual upgrade process, a support period is required in case of problems and if clarifications are needed. Define support contacts and publish their names to the projects users. The contact’s role includes solving problems and supporting functionality questions. They need to be proficient with all of the version’s new functionalities and changes. Consider arranging support training for this purpose.
You might want to consider preparing a defect tracking system during the support period.
Recommended