2
Foreword
How to Use This Guide
Introduction
Step 1: Map Your Current Workflow
Step 2: Put Work on the Board
Step 3: Gather ‘Round the Board
Step 4: Limit Your Work in Process
Step 5: Measure and Learn
Conclusion
Resources
Key Terms
3
4
5
7
10
13
18
21
25
26
27
TABLE OF CONTENTS

3
By 2008, my team and I had learned enough about the benefits of
Kanban to be fascinated by the possibilities. Smoother workflow.
Less waste. Higher productivity. Data to measure and improve. Just
considering Kanban brought us more energy.
On day one, though, we hit our first hurdle. As veterans of
prescriptive work methodologies, we were used to externally
imposed ways of doing things. By nature, Kanban is not
prescriptive. It starts with visualizing the work your team is doing
right now. But, like many people, articulating that effectively didn’t
come naturally to us.
In the years since, I’ve seen that pattern over and over again.
Teams have followed prescriptive rules for so long that they’re
often puzzled by the freedom of Kanban and don’t know where to
start.
The exercises and suggestions in this book are designed to provide
that help. Many are already in use by Kanban coaches around
the world, and most are not things that we came up with at
LeanKit. These are simple but powerful aids to thinking about your
current work and understanding where queues are found, where
bottlenecks may form and where work-in-process (WIP) limits can
increase productivity.
I hope you’ll find these exercises and suggestions helpful as your
team begins its journey of continuous improvement through
Kanban.
Best,
Chris Hefley
CEO, LeanKit
Chris Hefley, CEO and Co-founder of LeanKit, is a practitioner and thought leader in the global Lean/Kanban community. In 2011, he was nominated for the Lean Systems Society’s Brickell Key Award.
After years of coping with “broken” project management systems in the world of software development, Chris helped build LeanKit as a way for teams to become more effective.
Prior to LeanKit, Chris worked with globally distributed teams in leadership positions at HCA Healthcare and IMI Health. He believes in building software and systems that make people’s lives better and transform their relationship with work.
FOREWORD

4
Each step in the Kanban Roadmap comprises these elements.
CORE KANBAN The Kanban principle and concepts upon which the step is based.
LET’S GO
A group activity to make each step an interactive, team-based
journey (includes a materials list, time involved, instructions and a
real-world example).
Observation Point: What team leaders need to be on the
lookout for during team exercises.
Helpful Tips: Extra guidance for the team.
The Bottomline: The main point.
KANBAN BOARD EXAMPLES
In this guide, the following terms are interchangeable:
• board/whiteboard
• lane/a column on the board/a step in your process
• card/sticky note/work item
Timing: Manage Your Expectations
Kanban is less about finding the perfect process and more about continuously improving your process.
It can take as few as six weeks to more like two or three months to complete these exercises with your team. During the first month, you’ll spend the majority of your time observing how your newly visualized process shakes out and solidifies. The next month or two will be more about continuous improvement, which can (and will) repeat indefinitely.
TIP: Teams that are already practicing Agile can include these exercises in their two-week sprints.
HOW TO USE THIS GUIDE
to do DOING Done We include sample boards and cards throught this guide. They’re not the only way of doing things. We encourage your team to make them your own.
5
A (very) Short History of Kanban and How It Works In the late 1940s, Toyota found a better engineering process from
an unlikely source: the supermarket. They noticed that store clerks
restocked a grocery item by their store’s inventory, not their
vendor’s supply.
Only when an item was near sellout did the clerks order more. The
grocers’ “just-in-time” delivery process sparked Toyota engineers
to rethink their methods and pioneer a new approach—a Kanban
system—that would match inventory with demand and achieve
higher levels of quality and throughput.
So how’d they do all that?
In simplest terms, by better communication through visual
management.
Kanban is Japanese for “visual signal” or “card.” Toyota
line-workers used a kanban (i.e., an actual card) to signal steps
in their manufacturing process. The system’s highly visual nature
allowed teams to communicate more easily on what work needed
to be done and when. It also standardized cues and refined
processes, which helped to reduce waste and maximize value.
A new application of Kanban emerged for knowledge work as early
as 2005, and an inquisitive community formed in 2007 around the
leadership of David Anderson, Jim Benson, Corey Ladas and others.
Their resulting body of knowledge was influenced not only by the
Toyota Production System but also by the work of W. Edwards
Deming, Eliyahu Goldratt, Donald Reinertsen and other thought
leaders.
Next: Learn the Kanban core principles.
INTRODUCTION

6
Kanban is now gaining traction as a way to smoothly implement
Agile and Lean management methods in tech and non-tech
companies around the world. Throughout this fresh take, Kanban’s
core elements have remained rooted in the following four
principles:
1. Visualize Work
By creating a visual model of your work and workflow, you can
observe the flow of work moving through your Kanban system.
Making the work visible—along with blockers, bottlenecks
and queues—instantly leads to increased communication and
collaboration.
2. Limit Work in Process
By limiting how much unfinished work is in process, you can reduce
the time it takes an item to travel through the Kanban system. You
can also avoid problems caused by task switching and reduce the
need to constantly reprioritize items.
3. Focus on Flow
By using work-in-process limits and developing team-driven
policies, you can optimize your Kanban system to improve the
smooth flow of work, collect metrics to analyze flow, and even get
leading indicators of future problems by analyzing the flow of work.
4. Continuous Improvement
Once your Kanban system is in place, it becomes the cornerstone
for a culture of continuous improvement. Teams measure their
effectiveness by tracking flow, quality, throughput, lead times and
more. Experiments and analysis can change the system to improve
the team’s effectiveness.
Note: There are many ways to define Kanban. Our intent in listing the core
elements in this manner is not to introduce a new definition but to distill the
common principles.
First up: Learn how to visualize your work.
INTRODUCTION
7
CORE KANBAN
Visualize your workflow.
Unlike other methods that force fit change from the get-go,
Kanban is about evolution, not revolution. It hinges on the
fundamental truth that you can’t get where you want to go without
first knowing where you are.
Your first exercise will help you define your team’s workflow and
show you how to map the process on a whiteboard. Do this not
only with your team but also as a team.
Every team has a process for completing its work, even if the
workflow is as simple as to do, doing, done.
LET’S GO
YOU WILL NEEDYour team, in a room, around a whiteboard. Dry-erase markers. A
pen/pencil and at least five sticky notes for each team member.
TIMEBlock out at least an hour. You might need more time, depending
on the size of your team and the number of your team’s external
touchpoints. Don’t shortchange this part of the process. The
workflow mapping exercise will encapsulate all of the politics of the
group. Many high-value conversations will happen while your team
is mapping out its process.
STEP ONE | MAP YOUR CURRENT WORKFLOW
OBSERVATION POINT
It’s common for team members to debate how the process works and not come to an immediate consensus. See how each person works and thinks. Different personalities may show preference for more or less rigidity. Talk through each reason. Encourage transparency, respect and perspective.

8
ACTIVITY
1. Each team member writes down the top three to five things
that he or she has in process, using one sticky note per work
item. Be granular rather than sky level. “Building the week
view of the new calendar feature” is better than simply writing
“Calendar” on your sticky note. Specifics help the whole team
understand the details of each work item.
2. Each team member picks a sticky note from their selection of
current work items, sticks it to his or her shirt and “becomes”
that piece of work.
3. Figure out where your piece of work is in your team’s process
by asking the following three questions: Where am I right now?
Where did I come from? Where will I go next?
4. Make sure you’ve taken into account not only the work of your
team members but also how work flows into the team from
leaders, customers and other parts of the organization.
Remember, there’s no right or wrong process. There’s only your
team’s process, as simple or as complex as it may be, at this very
moment.
STEP ONE | MAP YOUR CURRENT WORKFLOW
HELPFUL TIPS
Resist the urge to redesign your process.
Notice specific places in your process where the work isn’t really under your control. Maybe it’s waiting on approval from someone outside the team, or a piece of work is in process somewhere else.
Recognize where there are queues in your process and/or where work sits and waits between steps. Include these as steps in your workflow.

9
Now go to the whiteboard, divide it into columns and/or rows, and
write the title of each step in your workflow at the top of a column,
leaving a bit of whiteboard on each side for a “To Do” lane and a
“Done” lane, if they’re not already in your process.
Keep your process on the whiteboard for the next exercises. You’ll
keep building on it.
Where are you right now?
In Development.
Where did you come from?
Planning.
Where will yougo next?
Test.
BOTTOMLINE
Be honest about your workflow. This first step is all about taking a snapshot of how your team works so you can improve the big picture later.
EXAMPLELet’s say you’re on a development team, and your individual work item is “Building the week view of the new calendar feature.”
The answers are the steps in your process. Using the example above, we’ve defined three chronological steps by analyzing just one piece of work:
Planning > In Development > Test
Use each teammate’s answers to define more steps and/or validate the steps you’ve already identified. In the end, you might come up with a process like this:
Plan > Develop > Test > Deploy > Done
Next Step: Put your work on the board.

10
CORE KANBAN
Visualize your work.
Today’s workforce may be armed with retina-worthy smartphones
and tablets, but plenty of information still comes our way as words
on a screen. Emails, spreadsheets, task lists—text is everywhere.
While it fits certain scenarios, textual information is not a one-size-
fits-all communication vehicle. Its effectiveness is lower than you
might think.
It starts with your brain.
A picture is worth a thousand words for scientific reasons: The
brain processes visual information 60,000 times faster than text.
Forty percent of all nerve fibers connected to the brain are linked
to the retina. Visual information comprises 90 percent of the data
that comes to our brain, suggesting that our neurological pathways
might even prefer pictorial displays over text.
Kanban helps you harness the power of visual information by using
sticky notes on a whiteboard to create a “picture” of your work.
Seeing how your work flows within your team’s process lets you
not only communicate status but also give and receive context
for the work. Kanban takes information that typically would be
communicated via words and turns it into brain candy.
Visualizing your work is a critical step.
STEP TWO | PUT WORK ON THE BOARD
OBSERVATION POINT
Kanban is about teams working towards a shared goal. When putting work on the board, avoid dividing work by the person responsible. Instead, group work items together by project, type of work or other process-based identifier.
11
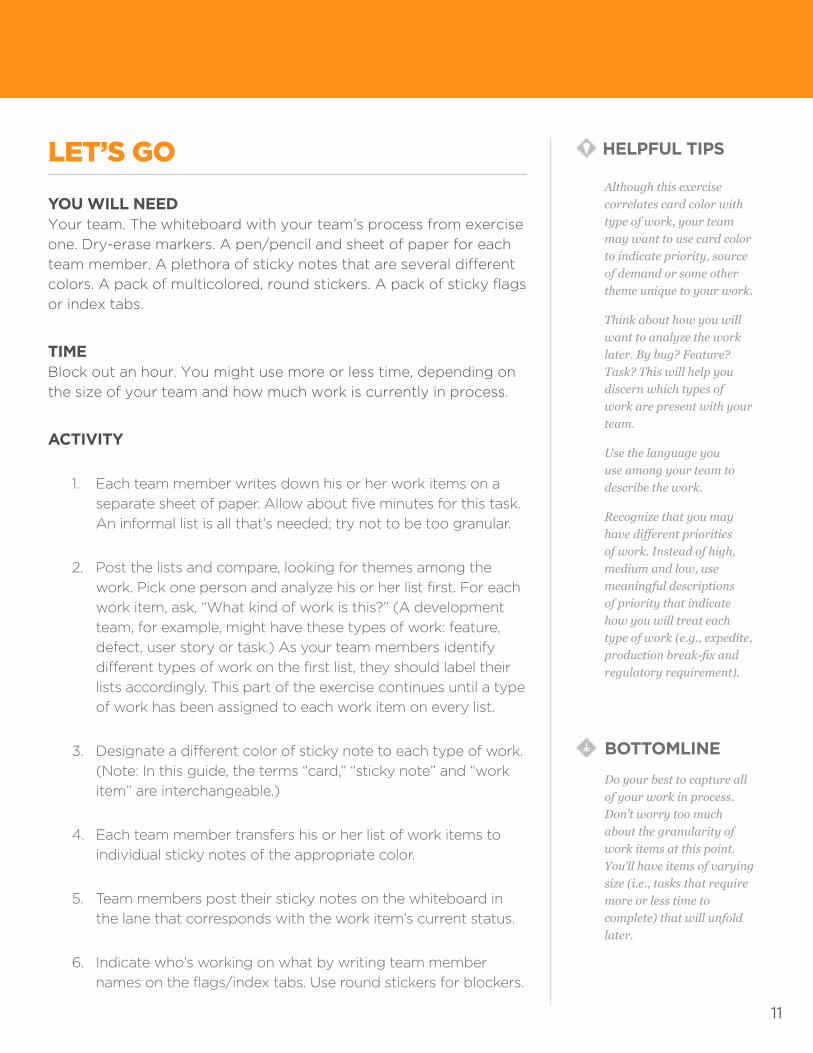
LET’S GO
YOU WILL NEEDYour team. The whiteboard with your team’s process from exercise
one. Dry-erase markers. A pen/pencil and sheet of paper for each
team member. A plethora of sticky notes that are several different
colors. A pack of multicolored, round stickers. A pack of sticky flags
or index tabs.
TIMEBlock out an hour. You might use more or less time, depending on
the size of your team and how much work is currently in process.
ACTIVITY
1. Each team member writes down his or her work items on a
separate sheet of paper. Allow about five minutes for this task.
An informal list is all that’s needed; try not to be too granular.
2. Post the lists and compare, looking for themes among the
work. Pick one person and analyze his or her list first. For each
work item, ask, “What kind of work is this?” (A development
team, for example, might have these types of work: feature,
defect, user story or task.) As your team members identify
different types of work on the first list, they should label their
lists accordingly. This part of the exercise continues until a type
of work has been assigned to each work item on every list.
3. Designate a different color of sticky note to each type of work.
(Note: In this guide, the terms “card,” “sticky note” and “work
item” are interchangeable.)
4. Each team member transfers his or her list of work items to
individual sticky notes of the appropriate color.
5. Team members post their sticky notes on the whiteboard in
the lane that corresponds with the work item’s current status.
6. Indicate who’s working on what by writing team member
names on the flags/index tabs. Use round stickers for blockers.
HELPFUL TIPS
Although this exercise correlates card color with type of work, your team may want to use card color to indicate priority, source of demand or some other theme unique to your work.
Think about how you will want to analyze the work later. By bug? Feature? Task? This will help you discern which types of work are present with your team.
Use the language you use among your team to describe the work.
Recognize that you may have different priorities of work. Instead of high, medium and low, use meaningful descriptions of priority that indicate how you will treat each type of work (e.g., expedite, production break-fix and regulatory requirement).
BOTTOMLINE
Do your best to capture all of your work in process. Don’t worry too much about the granularity of work items at this point. You’ll have items of varying size (i.e., tasks that require more or less time to complete) that will unfold later.
12
STEP TWO | PUT WORK ON THE BOARD
Next Step: Gather ‘round the board.
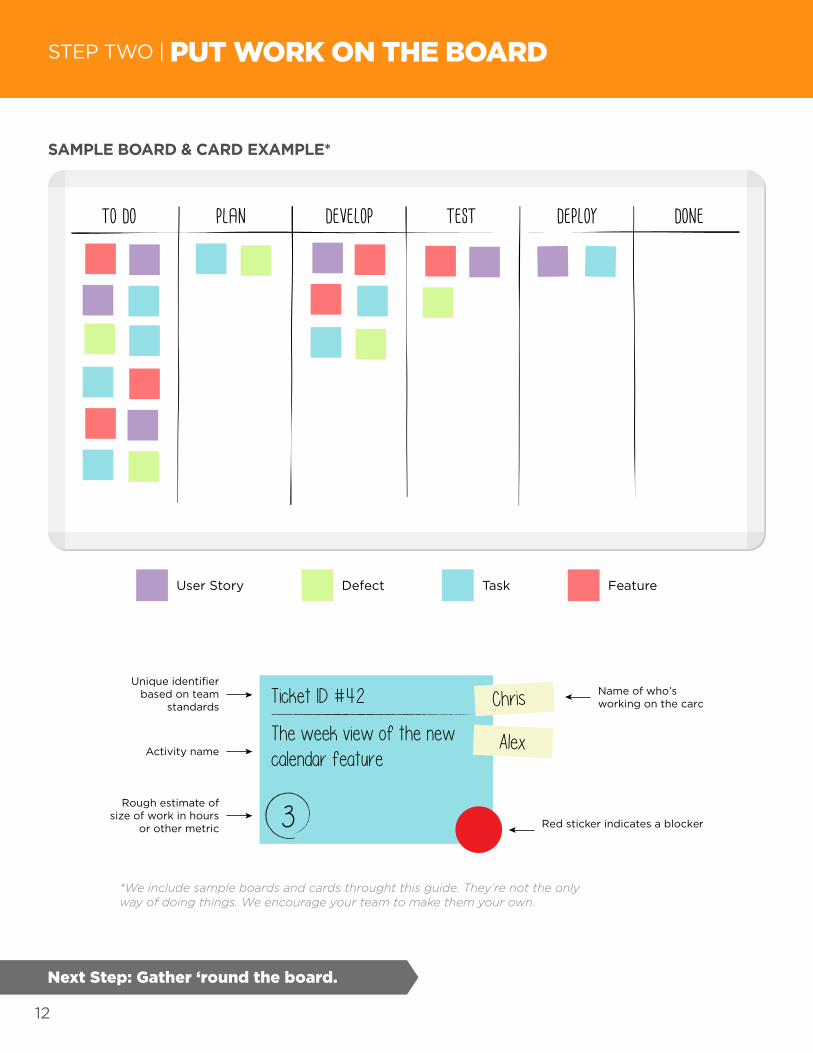
TaskDefectUser Story Feature
to do plan develop test deploy done
SAMPLE BOARD & CARD EXAMPLE*
Ticket ID #42
The week view of the new calendar feature
3
Name of who’sworking on the card
Red sticker indicates a blocker
Unique identifierbased on team
standards
Activity name
Rough estimate ofsize of work in hours
or other metric
Chris
Alex
*We include sample boards and cards throught this guide. They’re not the only way of doing things. We encourage your team to make them your own.
13
CORE KANBAN
Focus on flow.
Now that your work is on the board, it’s time to start moving it.
Work items move across the board, from left to right, as progress
occurs. When a team member is ready to start work on something
new, he or she pulls a new work item into the appropriate lane on
the board.
Treat the board—and all of the work on the board—as an asset
that belongs to the entire team, rather than work items that are
owned by the manager or individual team members. It’s important
to think about the entire board as a single system. It has a purpose
and a capacity, as well as capabilities and interactions. Focus
on managing the flow of work through the system, rather than
directing the work of each team member.
As you look at the board, notice: How does the work flow? Or,
conversely: Where does the work get stuck? The best way to start
observing the flow of work is with routine meetings called daily
standups and weekly retrospectives.
Daily “standups” received their name because teams meet while
standing, rather than sitting, when gathered around a board.
Standing encourages brevity and staying on task.
“Retrospectives” are held on a regular basis (we suggest weekly).
They give the team a focused opportunity to evaluate the health of
the system, make adjustments and devise experiments.
When implemented effectively, standups and retrospectives
are powerful tools for teams that seek transparency and open
collaboration. Without targeted discussion, however, standups can
morph into what’s-on-my-schedule recitations, and retrospectives
can turn into personnel critiques. The next two exercises will help
keep your team focused on the work and the process, while laying
the groundwork for a team culture of continuous improvement.
STEP THREE | GATHER ‘ROUND THE BOARD
OBSERVATION POINT
Traditional leadership often manifests itself in rank-and-file rules of engagement. As a team lead or project manager, you may be tempted to jump in and steer standups and retrospectives. Empower your team members to see the bottlenecks and flow for themselves. The best results come from engaging the entire team.

14
LET’S GO
YOU WILL NEEDYour team, circled around your work on the board. Extra sticky
notes, pens and stickers.
TIMEBlock out 30 minutes for each daily standup during the first couple
of weeks. As you become more familiar with the routine, you’ll
optimize the meeting to a maximum of 15 minutes. Block out
an hour for your first few weekly retrospectives. You might use
more or less time, depending on the size of your team, how much
work is currently in process and if you currently hold standups or
retrospectives.
ACTIVITY
How to Hold a Kanban StandupFor optimal efficiency, team members should update the status
of their work items prior to standup, so everyone sees a current
picture of the work in process.
Each day, a different team member leads the discussion. The leader
begins by “walking the board” from right to left—to focus first on
work items that are closest to completion—and asks of those cards,
“What do we need to do to advance this piece of work?”
Always favor finishing something over starting something new.
When the team views the entire system as belonging to them,
then the most important outcome is for the team/system to get
something all the way to “done.” So when the leader asks, “What
do we need to do to complete this piece of work?”, and a person
assigned to the work answers, “I just need a little help today to
push it over the line,” a team that’s working as one system won’t be
short of volunteers.
STEP THREE | GATHER ‘ROUND THE BOARD
HELPFUL TIPS
Try this exercise even if your team already works with standups and retrospectives. The Kanban format is a bit different than Scrum’s and offers a new vantage point.

15
After walking the board, ask the team:
Q: “Is anyone working on anything that’s not on the board?” A: If no, continue to the next question. If yes, pause to let team
members add work items.
WHY To gain the truest possible understanding of the team’s
workload.
Q: “What are we looking to finish, as a team?” A: Look at business value, encroaching deadlines or your team’s
chosen unit of value to reprioritize or reassign work, as needed.
WHY To reinforce that all work is the team’s work and to help move
prioritized work over the goalline first.
Q. “Can we spot any bottlenecks or other impediments to the flow of work?” A: Look for queues of work, loaded lanes or other indicators of
risks and issues.
WHY To observe both the upstream and downstream ramifications of
stalled flow and to figure out how to get work flowing again.
During the first month of holding standups, it’s likely that you’ll
notice discrepancies in the granularity of work items. Continue to
divide work into smaller tasks and subtasks, as necessary. Look
to have your cards represent not only the units of value that your
team is expected to deliver but also your capacity to deliver them.
The finest of fine-grained tasks may not need to be separate cards
on the board; instead, attach them to the main card as to-do lists or
subtasks. Work items should be small enough to move across the
board at a relatively uniform pace.
HELPFUL TIPS
When is a work item truly done? It should mean that a card will not move backwards after reaching “done.” If it does, add a verification, policy or definition of done to your process.

16
How to Hold a Kanban RetrospectiveAt the end of every week, gather around the board to evaluate
your Kanban system. Observe the flow of work and add a
new question each week. By week four, you’ll be asking four questions.
WEEK 1 Q: Is there any hidden work in process (WIP) that we haven’t gotten onto the board yet? A: Searching for hidden WIP will be an ongoing theme for your first
few weeks. It’s not always evident and can take time to reveal itself.
As you find it, add it to the board. (Stop here, or if in weeks two
through four, move on to question two).
WEEK 2 Q: Can we identify any impediments to the flow of work? A: Look at where work is piling up on the board, where work is
getting blocked, or parts of the workflow that may be “starved”
for something to work on. Discuss ways in which the process or
the team’s policies could be modified to remove impediments to
flow. Even after you finish these exercises, ask this question during
every retrospective. (Stop here, or if in weeks three or four, move
on to question three).
WEEK 3 Q: Are we tracking things at the right level of granularity? A: If some of the work items are so big that they’ll take months
to move across the board, break them down into cards you can
complete in a few days or weeks. If your board is littered with
very small tasks, consider using task lists associated with the card
instead of a card for every small task that must be done in a day.
(Stop here, or if in week four, move on to question four).
WEEK 4 Q: A queue or buffer happens when work is in a holding pattern before it goes to the next step. Are there queues or buffers in your workflow that aren’t represented on the board? A: If yes, add lanes into your process to represent these queues.
Managing the size of queues in your kanban system is a key
success factor to improving the flow of work. Identifying queues
will be an ongoing activity, even after you’ve completed the
exercises in this guide.
STEP THREE | GATHER ‘ROUND THE BOARD
HELPFUL TIPS
You don’t have to wait until a retrospective to make an improvement.
17
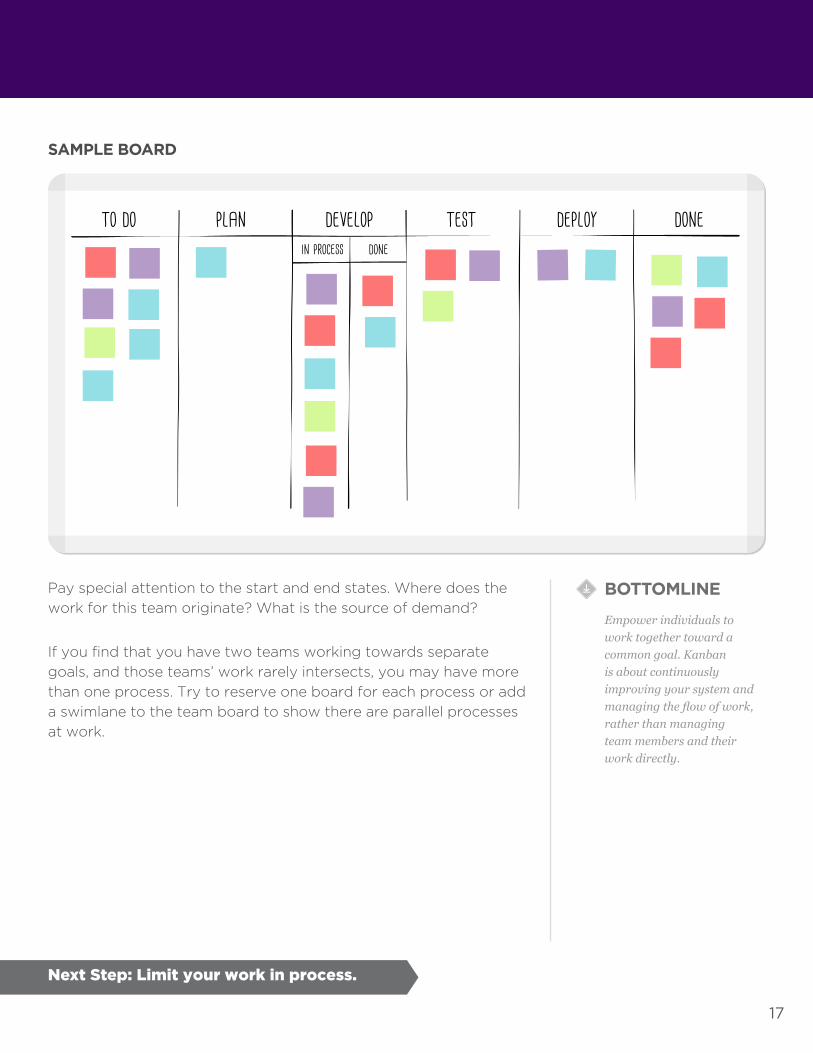
BOTTOMLINE
Empower individuals to work together toward a common goal. Kanban is about continuously improving your system and managing the flow of work, rather than managing team members and their work directly.
to do plan develop test deploy donein process done
Next Step: Limit your work in process.
Pay special attention to the start and end states. Where does the
work for this team originate? What is the source of demand?
If you find that you have two teams working towards separate
goals, and those teams’ work rarely intersects, you may have more
than one process. Try to reserve one board for each process or add
a swimlane to the team board to show there are parallel processes
at work.
SAMPLE BOARD
18
CORE KANBAN
Limit your work in process.
It may sound counterintuitive, but limiting your work in process can
help you finish more work, more quickly. The more you dive into
multiple tasks at once, the less effective you become.
Work in process (WIP) can be defined as all of the tasks you’re
working on right now. Although often revered in today’s culture,
task switching—also known as multitasking or context switching—
has less than glamorous effects. Juggling simultaneous work
doesn’t make you more productive. It just makes you more
distracted.
Each time your attention switches to a different task, your brain
slogs through a neurological warm-up period that prevents you
from being wholly present with your work. Error and delay increase.
The drain of multitasking on the team, as a whole, manifests in
repeatedly reprioritized work. Too much work in process also leads
to larger and larger queues, further decreasing productivity.
The practice of limiting your work in process is what makes this a
Kanban system, rather than a visual to-do list. By using WIP limits,
you can improve the flow of work through the process steps you’ve
defined on your board. Limiting WIP also helps to focus the team’s
attention on shared goals and encourage collaboration. Having less
work in process creates shorter feedback loops within the process
and gives more flexibility to learn from how your work is flowing
through the system, allowing you to make adjustments on the fly.
LET’S GO
YOU WILL NEEDYour team, circled around your work on the board.
TIMEBlock out 30 minutes. You might use more or less time, depending
on the size of your team and how much work is currently in
process.
STEP FOUR | LIMIT YOUR WORK IN PROCESS
OBSERVATION POINT
It’s not important that workers stay busy; it’s important that the work keeps moving.
Hitting a WIP limit isn’t a failure or a problem to be avoided. On the contrary, it’s an opportunity to change your system so it benefits the team and its effectiveness. You should run up against your WIP limits regularly. If you don’t, they’re probably not low enough. Team buy-in is critical; let the team set its own WIP limit.
WIP limits won’t prevent our cultural proclivity for multitasking, but they will show you the detriments that task switching can have on your work.

19
ACTIVITY
1. Consider how of a piece of work flows through your system by
looking at a card that’s recently made it to “Done.” Preferably,
choose a card that several team members worked on while it
moved through most of the defined workflow on your board.
2. Ask: “How long did that card take to complete?” For this
example, let’s say that 10 days passed between the card being
pulled onto the board and reaching the “Done” lane. (This is
known as a card’s cycle time.)
3. Now, ask each person who worked on the card how much
time they spent actively working on it. You’ll probably hear
a much smaller number. For this example, we’ll say that your
team invested a total of six hours of active work. So why did
the card take 10 days to complete? One reason to consider is
queues. When step one was finished, the card waited in line for
1.5 days before anyone picked it up to start step two. The card
continued in this fashion until it reached the “Done” lane. It’s
fairly typical—and sometimes even worse—for a card to spend
85 percent of its time in a queue. Using WIP limits, you can
keep the size of the queues in your process lower, so that each
item moves more quickly from step to step.
Side note: This is why many Kanban teams have acquired a
“no-estimate” reputation. Once you see that asking people to
estimate how much time something will take makes up only a
small percentage of how long it takes to realistically complete
the work, many people feel the freedom to stop estimating
small- to medium-sized tasks and focus instead on improving
throughput of the Kanban system.
4. As a team, identify all of the queues in your process. (Any
place a handoff occurs is most likely a hidden queue.) Now
identify the largest queues.
5. Add a WIP limit to your board to try to reduce the size of one
or more of the largest queues. You may add the WIP limit to
the lane that has the queue, or you may find that adding a WIP
limit to the lane before or after the queue reduces WIP better.
If the queue is a child of some top-level lane, you may consider
HELPFUL TIPS
Kanban seeks to “pull” rather than “push” work through your process.
A push system “pushes” finished work to the next step, whereas a pull system “pulls” work from the preceding step only when it has capacity. Limiting WIP based on capacity (a pull system) can help work flow smoothly through the board at an optimal rate. Pushing large amounts of work into the system clogs it up and slows everything down (and often makes for poor quality, too).

20
putting the WIP limit on the parent lane. In the sample board
above, a WIP limit covers the “Develop” lane so it applies to the
number of cards in both sublanes.
6. If a team member is consistently responsible for too many
work items, experiment with personal WIP limits (e.g., “Jason
has a WIP limit of three. Only three items can be assigned to
him at any one time.”). In general, we recommend process
stage WIP limits, but if there’s a particular person who is often
overloaded, it’s appropriate to use personal WIP limits.
What to do when you run up against the WIP limit When you hit a WIP limit, stop doing the kind of work that adds
to that queue. Instead, let the work continue to flow through the
system. Go help a teammate or work on a task that doesn’t add
WIP on the board. Go run some errands. Start an online class. But
whatever you do, don’t pile on more WIP at this point.
BOTTOMLINE
Limiting work in process is the primary way to modify your Kanban system to improve the flow of work. Reducing the size and number of queues present in the process will lower overall WIP and tend to make the work flow through more smoothly.
to do plan develop (5) test (3) deploy donein process done
To Do Doing Done
HelpDesk System Customization Team
STEP FOUR | LIMIT YOUR WORK IN PROCESS
Next Step: Measure and learn.
SAMPLE BOARD
21
CORE KANBAN
Continuous improvement.
Managing your work via a Kanban system reveals how the work
is flowing through your process. It also gives you the tools to
measure flow and the levers to pull to improve it.
The exercises you’ve gone through so far can lay a foundation for
a team culture of continuous improvement. Now that you’ve tried
your first WIP limits, narrowed down the granularity of your work
items and found as much hidden WIP as possible, it’s time to start
measuring flow.
You’ll start by tracking four simple things: total WIP, blockers,
throughput and lead time.
Total WIP
Total work in process is all of the tasks currently on your Kanban
board. It’s anything that’s been started (by anyone) but not
completely finished. As you start limiting your work in process,
you’ll start seeing this topline number decrease. As a gut check,
divide your total WIP by the number of members on the team to
get an average WIP per person. Does it show that each person is
“doing,” for example, an average of 15 things? Does that seem like
too many?
Blockers
A blocked item can’t move to the next stage in your process
because of an issue. While similar to a bottleneck (both create
delays), a blocker typically signals an unfinished dependency, a
defect or an unavailable skillset. For example, a blocker may arise
when you’ve sought information from an external source and can’t
complete further work until you receive a response.
Focus on three things when measuring blockers: How often are
items blocked? How long do they stay blocked? Where in the
process do blockers happen? In each daily standup, add “1” to the
“blocked days” for that card and note where the block occurred.
STEP FIVE | MEASURE AND LEARN
OBSERVATION POINT
As you get better at analyzing these metrics, you’ll want to segment them by card type, priority or another dimension that’s important to your team. For example, you could say that your lead time for standard priority items is an average of 8.5 days but that your lead time for production break-fix items is 1.8 days.
22
Throughput Throughput is the number of items completed per time period. At
the end of each week, record how many items were completed (i.e.,
moved to “Done” and never moved backwards). Track this number
from week to week to see how changes made in your Kanban
system affect how much total work actually gets done.
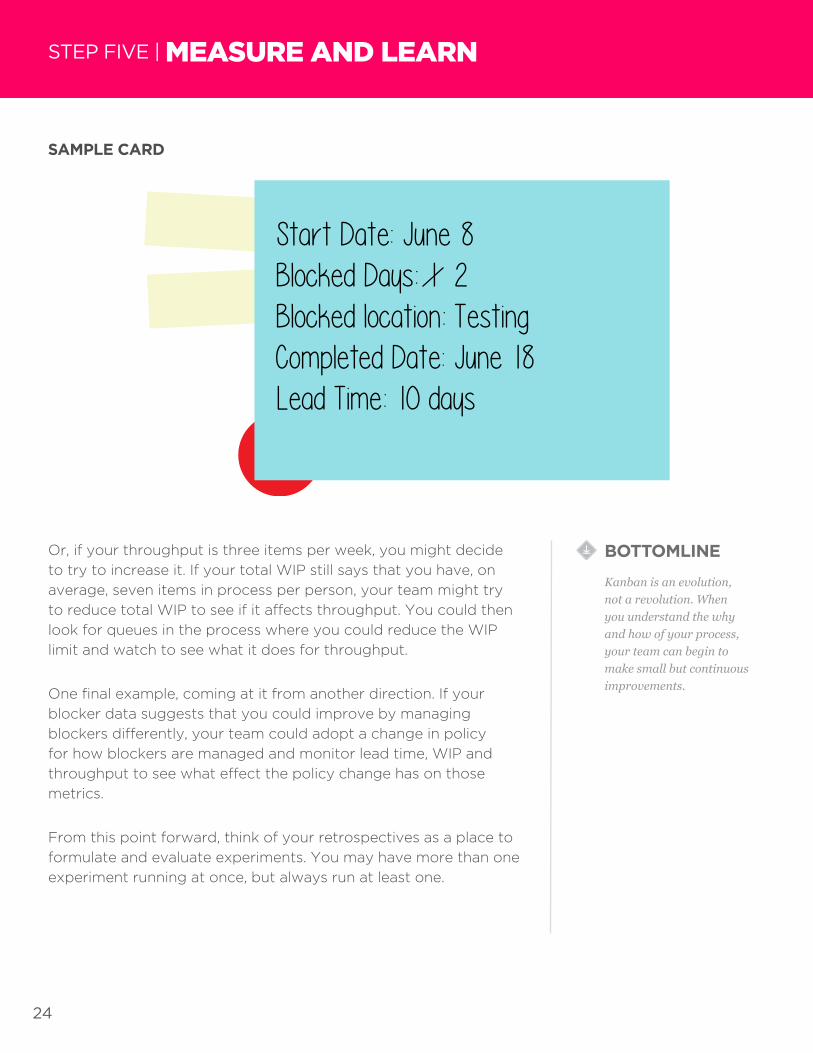
Lead Time
Lead time is how long a card takes to travel across the entire
board. The clock starts when a card is pulled onto the board and
stops when it reaches the “Done” lane. On the back of each card,
record the start date. Then, when the card reaches “Done,” record
the date and calculate how many days (or working days) passed
since its start date (see the example card on page 24).
Many calculations are possible with lead time and throughput
metrics. Keep it simple in the beginning and only record the
average lead time of every card that was finished that week (i.e.,
the cards you counted to measure throughput).
On an ongoing basis, compare these four metrics to see what
effect they have on each other. As you reduce the size of queues
in your system, it should start to reduce your average lead time. As
you experiment with ways to manage blockers more effectively,
you should also see lead time reduced. As you continue to
limit your WIP, and work together as a team to complete work
collaboratively, you should see throughput improve.
LET’S GO
YOU WILL NEEDYour team. On the whiteboard, data collected from the last three to
four weeks since you began recording metrics on the back of the
cards.
TIMEDo this during your weekly retrospective.
STEP FIVE | MEASURE AND LEARN
HELPFUL TIPS
As you continue to seek improvements to your process in the coming months, follow these ideas to keep the energy up among your team:
Focus your experiments and metrics on improving one or more of your team’s capabilities, whether it’s quicker delivery, predictable delivery or the capability to deliver higher quality, measured in lower defect rates and instances of rework.
Continue to encourage team ownership of the process and focus improvement efforts on the Kanban system, rather than individuals.

23
As soon as you’ve finished the exercise in step four, take time
during every weekly retrospective to record data on the back of
your cards for blockers, start date, completed date, throughput and
lead time.
At each weekly retrospective, calculate and record:
• Throughput: the number of cards completed this week
• Lead time for each card (completed date and start date)
• Average lead time for this week
• Cards completed with > 0 blocked days
• Total blocked days
• A list of places where cards were blocked
Tally the above for three to four weeks before beginning this
exercise.
Running Experiments in a Kanban RetrospectiveInstead of asking the four questions from exercise two, you’ll run
experiments out of your retrospectives.
An experiment, in this instance, isn’t much different from a basic
scientific experiment. Evaluate the current state, form a hypothesis,
test the hypothesis with an experiment, measure the result and
then draw a conclusion.
As a team, review your throughput, average lead time, blocker
data and total WIP metrics. Have the team pick one of those four
metrics for your first experiment.
For example, if your average lead time for the past three to four
weeks is 11 days (varying between two and 19), you might decide
to shoot for less than 10 days. If your blocker data suggests that
you might be leaving items blocked longer than necessary, your
experiment might be to modify the way your team responds to
blockers. Perhaps your team will decide to adopt a “stop the line”
mentality; if a card is marked as blocked, it’s “all hands on deck” to
remove the blocker as quickly as possible.
HELPFUL TIPS
Continue to study ways to improve your Kanban system by using the resources section of this guide.
24
STEP FIVE | MEASURE AND LEARN
BOTTOMLINE
Kanban is an evolution, not a revolution. When you understand the why and how of your process, your team can begin to make small but continuous improvements.
Start Date: June 8Blocked Days: 1 2Blocked location: TestingCompleted Date: June 18Lead Time: 10 days
Or, if your throughput is three items per week, you might decide
to try to increase it. If your total WIP still says that you have, on
average, seven items in process per person, your team might try
to reduce total WIP to see if it affects throughput. You could then
look for queues in the process where you could reduce the WIP
limit and watch to see what it does for throughput.
One final example, coming at it from another direction. If your
blocker data suggests that you could improve by managing
blockers differently, your team could adopt a change in policy
for how blockers are managed and monitor lead time, WIP and
throughput to see what effect the policy change has on those
metrics.
From this point forward, think of your retrospectives as a place to
formulate and evaluate experiments. You may have more than one
experiment running at once, but always run at least one.
SAMPLE CARD

25
CONCLUSION
Congratulations. You now have a running Kanban system. You’re visualizing your
work, limiting your work in process, measuring your team’s
effectiveness and beginning a habit of continuous improvement.
A NOTE FROM THE AUTHORS W. Edwards Deming once said, “A bad system will beat a good
person every time.”
At LeanKit, we believe that all people want to do their best work.
We believe that people encounter obstacles that prevent them
from doing great work when systems fail.
When you adopt Kanban to manage your system for work—and
embark on a journey of continuous improvement—you are freeing
people and organizations to do their best work, own the systems in
which they work and collaborate to improve those systems.
You’ve now begun the journey that leads to systems thinking and
continuous improvement so that bad systems are no longer in the
way of good people doing good work.
Next: Learn more from the Resources section.

26
RESOURCES
[WEBINAR]
DESIGNING YOUR KANBAN BOARD TO MAP YOUR PROCESS with Chris Hefley
Creating your first Kanban board isn’t always easy—and you don’t
have to get it 100-percent right. With the help of some good advice
you can build the right foundation to improve incrementally over
time. In this webinar, you’ll learn how to map your process to reflect
your reality as closely as possible, design your board to capture the
right metrics for improvement and address common gotchas such
as wait time and hidden work. Watch the webinar:
leankit.com/blog/map-your-process
About LeanKit
LeanKit is recognized by the Agile and Lean IT community as the most flexible and powerful tool available for implementing visual project management based on Kanban systems. In addition to IT, our customers use LeanKit to manage and collaborate on projects in fields as diverse as engineering, manufacturing, marketing, customer service, technical support and many more. LeanKit was recognized by Gartner, Inc. as a “Cool Vendor” in Program and Portfolio Management (PPM) for 2013.
Since our founding in 2009, we’ve grown to serve more than 250,000 users around the world at companies such as Adobe, DuPont, JetBlue, Nokia, Siemens, Spotify and Steelcase. For more information, visit www.LeanKit.com.
[BOOKS & AUTHOR WEBSITES]
Kanban: Successful Evolutionary Change for Your Technology Business by David J. Anderson (djaa.com)
Personal Kanban: Mapping Work | Navigating Life by Jim
Benson and Tonianne DeMaria Barry (PersonalKanban.com and
ModusCooperandi.com)
The Phoenix Project: A Novel About IT, DevOps, and Helping Your Business Win by Gene Kim (RealGeneKim.me)
Stop Starting, Start Finishing by Arne Roock
(Software-Kanban.de)
[BLOGS] “Kanban Kata” by Håkan Forss (hakanforss.wordpress.com)
“Kanban and Its Flight Levels” by Klaus Leopold
(klausleopold.com/2013/07/kanban-and-its-flight-levels)
“Kanban Maturity Model” by Yuval Yeret
(leansystemssociety.org/mashing-up-kanban-cmmi)
[EDUCATION] LeanKanban University (LeanKanbanUniversity.com)
[GAMES] getKanban Board Game by Russell Healy (getkanban.com)
Online getKanban Game by Dan Vacanti
(getkanban.corporatekanban.com)

27
PULL SYSTEM A work process where each stage only pulls
work into progress when it has capacity to do
so; the opposite of a push system, where work
is assigned and added to a queue, regardless
of capacity.
SOURCE OF DEMAND The business goal that is driving the
requirement for work. The source of demand
is sometimes an external customer and
sometimes an internal business stakeholder.
TASK SWITCHING also known as Context
Switching or Multitasking Shifting attention between multiple pieces
of work. Limiting task switching can allow a
person to work more efficiently by minimizing
the amount of time required to redirect
cognitive function to a new activity.
VISUAL MANAGEMENT A philosophy that work is better managed
through visual systems, such as Kanban,
than text-based lists or spreadsheets. The
philosophy posits that visualizing work as it’s
being done better reveals problems at earlier
stages, leading to lower cost solutions.
WIP LIMIT A constraint that can be applied to either
parts of a workflow (e.g., a process step) or to
an entire workflow to help prevent potential
bottlenecks that hinder the continuous flow of
work in the system.
WORK IN PROCESS (WIP) Work that has been started but is not yet
“done.”
BLOCKER An internal or external factor preventing
progress, thereby limiting the ability for the
work to move from one phase in your process
to the next.
BOTTLENECK A constraint in the system that limits the
flow of work. Identifying bottlenecks makes
it easier to reduce their impact and provides
a mechanism for controlling work flowing
through the process.
HIDDEN WIP Work that a team member is working on but
hasn’t added to the board.
KANBAN SYSTEM A display of visual indicators, namely cards,
that signals what the process needs exactly
when the process needs it. Also: a way to
visualize work and workflow.
PROCESS The series of actions, steps or stages that a
piece of work goes through to be considered
“done.”
PROCESS MAP A visual representation of the steps needed to
complete a piece of work.
PULL MECHANISM The action of pulling work based on the
opportunity and capacity to fulfill the needs of
the system.
KEY TERMS

Recommended