Version 2.0 Page 1
ImageNow
Graduate Admissions
Quick Reference Guide
Note: This Quick Reference Guide is not intended to cover all aspects of the ImageNow system but
rather to highlight those functions and features used on a day to day basis within the Graduate
Admissions office.
Support Contacts
Daniel Bedard, PMP
Project Manager
Administrative Systems Integration ( ASI)
Olsen 100
P: (978) 934-2718 (North) 4227 (South)
Barbara Dougherty
GA ImageNow Specialist
Graduate Admissions
Dugan Hall 110
P (987) 934 4227 (South)
Version 2.0
1. Overview Of ImageNow process for
ImageNow is being implemented in Graduate Admissions for the purposes
application process and eliminating the need for all applications and associated documents to
be printed and physically stored. Capturing and storing documents electronically will greatly
improve the efficiency with which documents and applications are located, viewed and
channeled through the Admissions process.
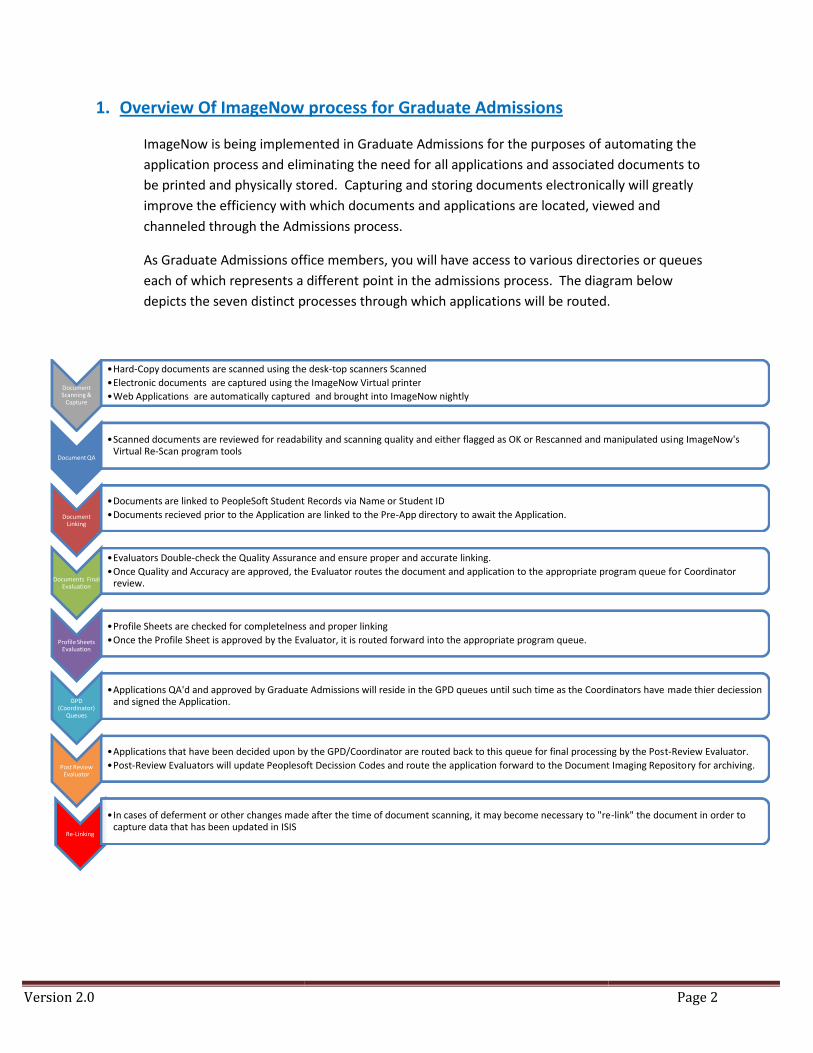
As Graduate Admissions office members,
each of which represents a different
depicts the seven distinct processes
DocumentScanning &
Capture
•Hard-Copy documents are scanned using the desk
•Electronic documents are captured using the ImageNow Virtual printer
•Web Applications are automatically captured and brought into ImageNow nightly
Document QA
•Scanned documents are reviewed for readability and scanning quality and either flagged as OK or Rescanned and manipulated usiVirtual Re-Scan program tools
DocumentLinking
•Documents are linked to PeopleSoft Student Records via Name or Student ID
•Documents recieved prior to the Application are linked to the Pre
Documents FinalEvaluation
•Evaluators Double-check the Quality Assurance and ensure proper and accurate linking.
•Once Quality and Accuracy are approved, the Evaluator routes the document and application to the appropriate program queue foreview.
Profile SheetsEvaluation
•Profile Sheets are checked for completelness and proper linking
•Once the Profile Sheet is approved by the Evaluator, it is routed forward into the appropriate program queue.
GPD(Coordinator)
Queues
•Applications QA'd and approved by Graduate Admissions will reside in the GPD queues until such time as the Coordinators haveand signed the Application.
Post ReviewEvaluator
•Applications that have been decided upon by the GPD/Coordinator are routed back to this queue for final processing by the Pos
•Post-Review Evaluators will update Peoplesoft Decission Codes and route the application forward to the Document Imaging Reposito
Re-Linking
•In cases of deferment or other changes made after the time of document scanning, it may become necessary to "recapture data that has been updated in ISIS
Of ImageNow process for Graduate Admissions
ImageNow is being implemented in Graduate Admissions for the purposes of autom
eliminating the need for all applications and associated documents to
be printed and physically stored. Capturing and storing documents electronically will greatly
improve the efficiency with which documents and applications are located, viewed and
led through the Admissions process.
Admissions office members, you will have access to various directories or queues
each of which represents a different point in the admissions process. The diagram below
seven distinct processes through which applications will be routed.
Copy documents are scanned using the desk-top scanners Scanned
Electronic documents are captured using the ImageNow Virtual printer
Web Applications are automatically captured and brought into ImageNow nightly
Scanned documents are reviewed for readability and scanning quality and either flagged as OK or Rescanned and manipulated usi
Documents are linked to PeopleSoft Student Records via Name or Student ID
Documents recieved prior to the Application are linked to the Pre-App directory to await the Application.
check the Quality Assurance and ensure proper and accurate linking.
Once Quality and Accuracy are approved, the Evaluator routes the document and application to the appropriate program queue fo
Profile Sheets are checked for completelness and proper linking
Once the Profile Sheet is approved by the Evaluator, it is routed forward into the appropriate program queue.
Applications QA'd and approved by Graduate Admissions will reside in the GPD queues until such time as the Coordinators have
Applications that have been decided upon by the GPD/Coordinator are routed back to this queue for final processing by the Pos
Review Evaluators will update Peoplesoft Decission Codes and route the application forward to the Document Imaging Reposito
In cases of deferment or other changes made after the time of document scanning, it may become necessary to "re
Page 2
automating the
eliminating the need for all applications and associated documents to
be printed and physically stored. Capturing and storing documents electronically will greatly
improve the efficiency with which documents and applications are located, viewed and
various directories or queues
process. The diagram below
hrough which applications will be routed.
Scanned documents are reviewed for readability and scanning quality and either flagged as OK or Rescanned and manipulated using ImageNow's
Once Quality and Accuracy are approved, the Evaluator routes the document and application to the appropriate program queue for Coordinator
Applications QA'd and approved by Graduate Admissions will reside in the GPD queues until such time as the Coordinators have made thier deciession
Applications that have been decided upon by the GPD/Coordinator are routed back to this queue for final processing by the Post-Review Evaluator.
Review Evaluators will update Peoplesoft Decission Codes and route the application forward to the Document Imaging Repository for archiving.
In cases of deferment or other changes made after the time of document scanning, it may become necessary to "re-link" the document in order to
Version 2.0 Page 3
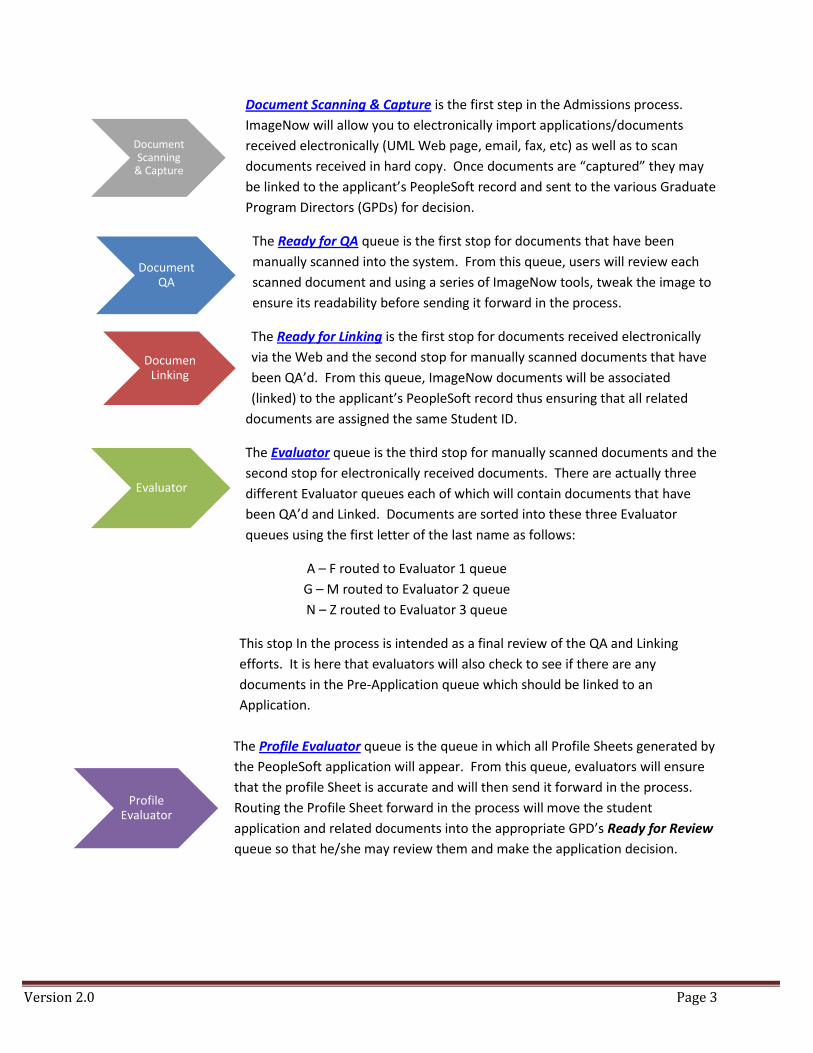
Document Scanning & Capture is the first step in the Admissions process.
ImageNow will allow you to electronically import applications/documents
received electronically (UML Web page, email, fax, etc) as well as to scan
documents received in hard copy. Once documents are “captured” they may
be linked to the applicant’s PeopleSoft record and sent to the various Graduate
Program Directors (GPDs) for decision.
The Ready for QA queue is the first stop for documents that have been
manually scanned into the system. From this queue, users will review each
scanned document and using a series of ImageNow tools, tweak the image to
ensure its readability before sending it forward in the process.
The Ready for Linking is the first stop for documents received electronically
via the Web and the second stop for manually scanned documents that have
been QA’d. From this queue, ImageNow documents will be associated
(linked) to the applicant’s PeopleSoft record thus ensuring that all related
documents are assigned the same Student ID.
The Evaluator queue is the third stop for manually scanned documents and the
second stop for electronically received documents. There are actually three
different Evaluator queues each of which will contain documents that have
been QA’d and Linked. Documents are sorted into these three Evaluator
queues using the first letter of the last name as follows:
A – F routed to Evaluator 1 queue
G – M routed to Evaluator 2 queue
N – Z routed to Evaluator 3 queue
This stop In the process is intended as a final review of the QA and Linking
efforts. It is here that evaluators will also check to see if there are any
documents in the Pre-Application queue which should be linked to an
Application.
The Profile Evaluator queue is the queue in which all Profile Sheets generated by
the PeopleSoft application will appear. From this queue, evaluators will ensure
that the profile Sheet is accurate and will then send it forward in the process.
Routing the Profile Sheet forward in the process will move the student
application and related documents into the appropriate GPD’s Ready for Review
queue so that he/she may review them and make the application decision.
DocumentQA
DocumenLinking
Evaluator
ProfileEvaluator
DocumentScanning
& Capture
Version 2.0 Page 4
The GPD Queues are the queues to which documents are routed when the
Profile Evaluator routes the Profile Sheet forward in the process. Each GPD has
been set up with two separate queues for each of the Plan/SubPlans for which
he/she is responsible. These queues are as follows:
UMLGA Applied & Processing Queues: Queues appended with” ( UMLGA Applied & Processing)”
are used to store the Applications as they are received. Applications remain in this directory
until such time that all of the required documents which make up a complete Application are
relieved and a Profile Sheet is created. The purpose of the Applied and Processing queues is to
allow the GPDs to act on applications even before the complete application packet is received.
UMLGA Ready for Review Queues: Once all of the documents required to complete an
Application are received and a Profile Sheet routed forward, the Application will be moved to
the “UMLGA Ready for Review” queue. It is from this queue that GPDs will approve/deny
applications and return them to the Graduate Admissions office for final processing.
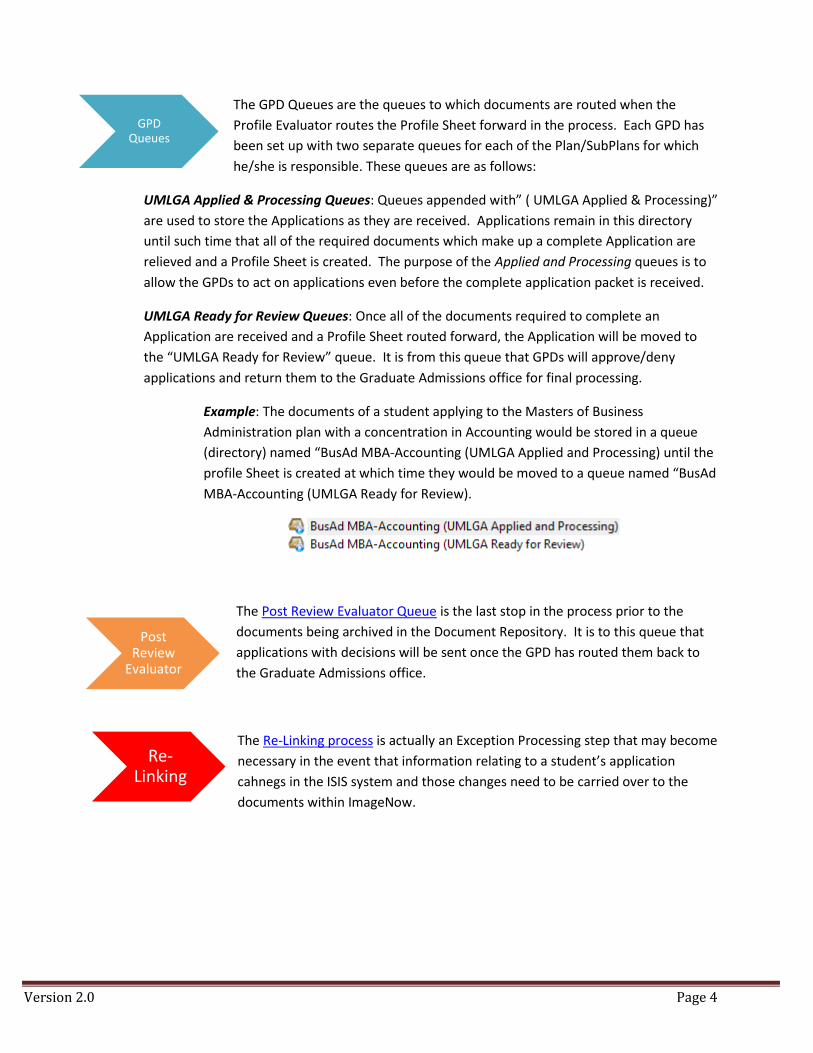
Example: The documents of a student applying to the Masters of Business
Administration plan with a concentration in Accounting would be stored in a queue
(directory) named “BusAd MBA-Accounting (UMLGA Applied and Processing) until the
profile Sheet is created at which time they would be moved to a queue named “BusAd
MBA-Accounting (UMLGA Ready for Review).
The Post Review Evaluator Queue is the last stop in the process prior to the
documents being archived in the Document Repository. It is to this queue that
applications with decisions will be sent once the GPD has routed them back to
the Graduate Admissions office.
The Re-Linking process is actually an Exception Processing step that may become
necessary in the event that information relating to a student’s application
cahnegs in the ISIS system and those changes need to be carried over to the
documents within ImageNow.
GPDQueues
PostReview
Evaluator
Re-Linking
Version 2.0 Page 5
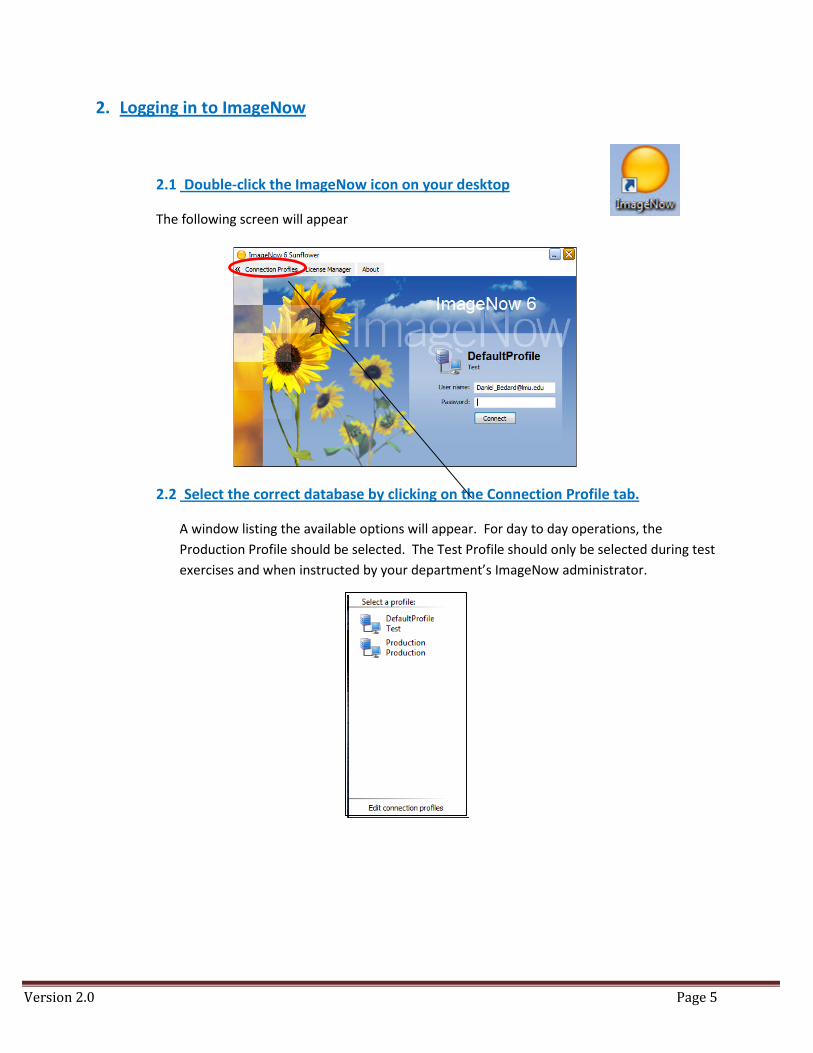
2. Logging in to ImageNow
2.1 Double-click the ImageNow icon on your desktop
The following screen will appear
2.2 Select the correct database by clicking on the Connection Profile tab.
A window listing the available options will appear. For day to day operations, the
Production Profile should be selected. The Test Profile should only be selected during test
exercises and when instructed by your department’s ImageNow administrator.
Version 2.0 Page 6
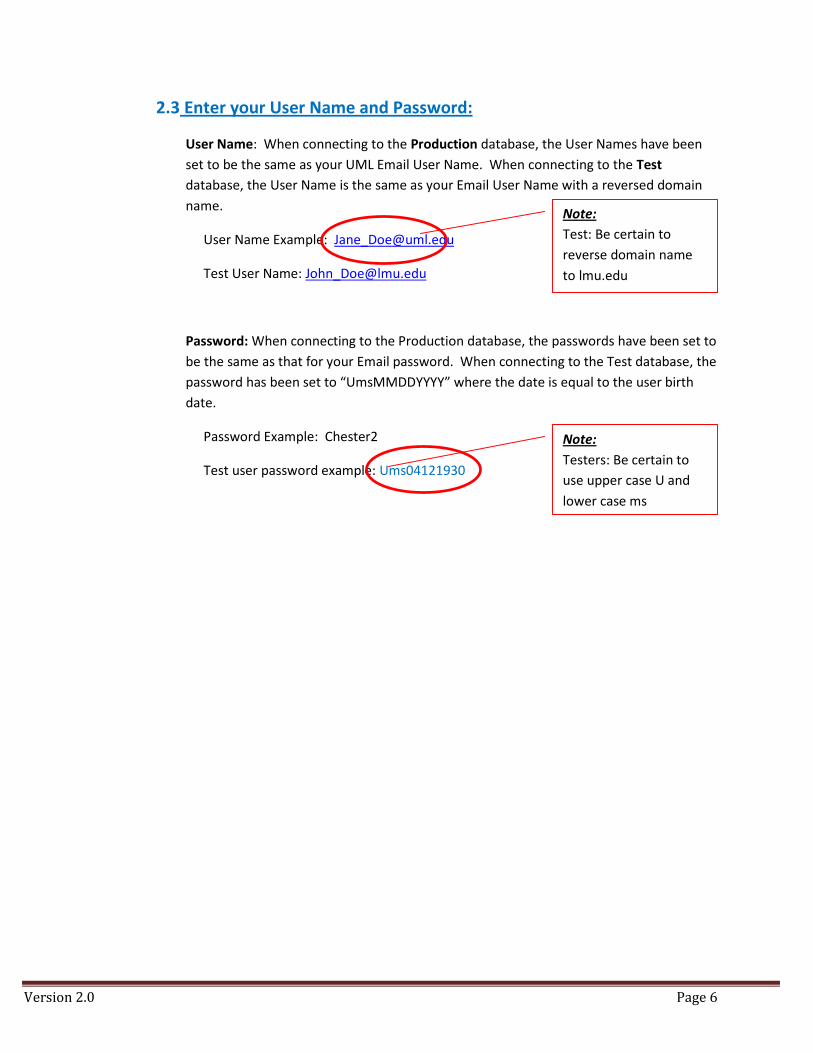
2.3 Enter your User Name and Password:
User Name: When connecting to the Production database, the User Names have been
set to be the same as your UML Email User Name. When connecting to the Test
database, the User Name is the same as your Email User Name with a reversed domain
name.
User Name Example: [email protected]
Test User Name: [email protected]
Password: When connecting to the Production database, the passwords have been set to
be the same as that for your Email password. When connecting to the Test database, the
password has been set to “UmsMMDDYYYY” where the date is equal to the user birth
date.
Password Example: Chester2
Test user password example: Ums04121930
Note:
Test: Be certain to
reverse domain name
to lmu.edu
Note:
Testers: Be certain to
use upper case U and
lower case ms
Version 2.0 Page 7
3. The Screens of ImageNow
There are three basic screens with which you should become familiar; The ImageNow Toolbar,
the ImageNow Explorer and the ImageNow viewer.
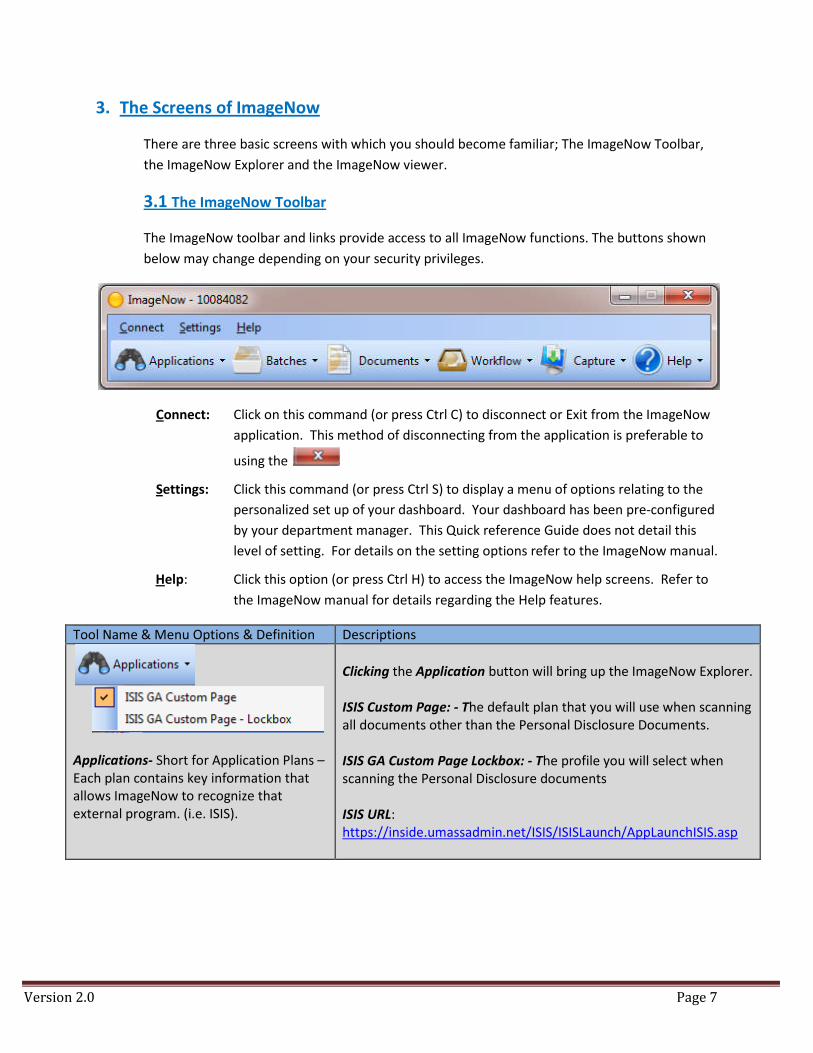
3.1 The ImageNow Toolbar
The ImageNow toolbar and links provide access to all ImageNow functions. The buttons shown
below may change depending on your security privileges.
Connect: Click on this command (or press Ctrl C) to disconnect or Exit from the ImageNow
application. This method of disconnecting from the application is preferable to
using the
Settings: Click this command (or press Ctrl S) to display a menu of options relating to the
personalized set up of your dashboard. Your dashboard has been pre-configured
by your department manager. This Quick reference Guide does not detail this
level of setting. For details on the setting options refer to the ImageNow manual.
Help: Click this option (or press Ctrl H) to access the ImageNow help screens. Refer to
the ImageNow manual for details regarding the Help features.
Tool Name & Menu Options & Definition Descriptions
Applications- Short for Application Plans –Each plan contains key information thatallows ImageNow to recognize thatexternal program. (i.e. ISIS).
Clicking the Application button will bring up the ImageNow Explorer.
ISIS Custom Page: - The default plan that you will use when scanningall documents other than the Personal Disclosure Documents.
ISIS GA Custom Page Lockbox: - The profile you will select whenscanning the Personal Disclosure documents
ISIS URL:https://inside.umassadmin.net/ISIS/ISISLaunch/AppLaunchISIS.asp
Version 2.0 Page 8
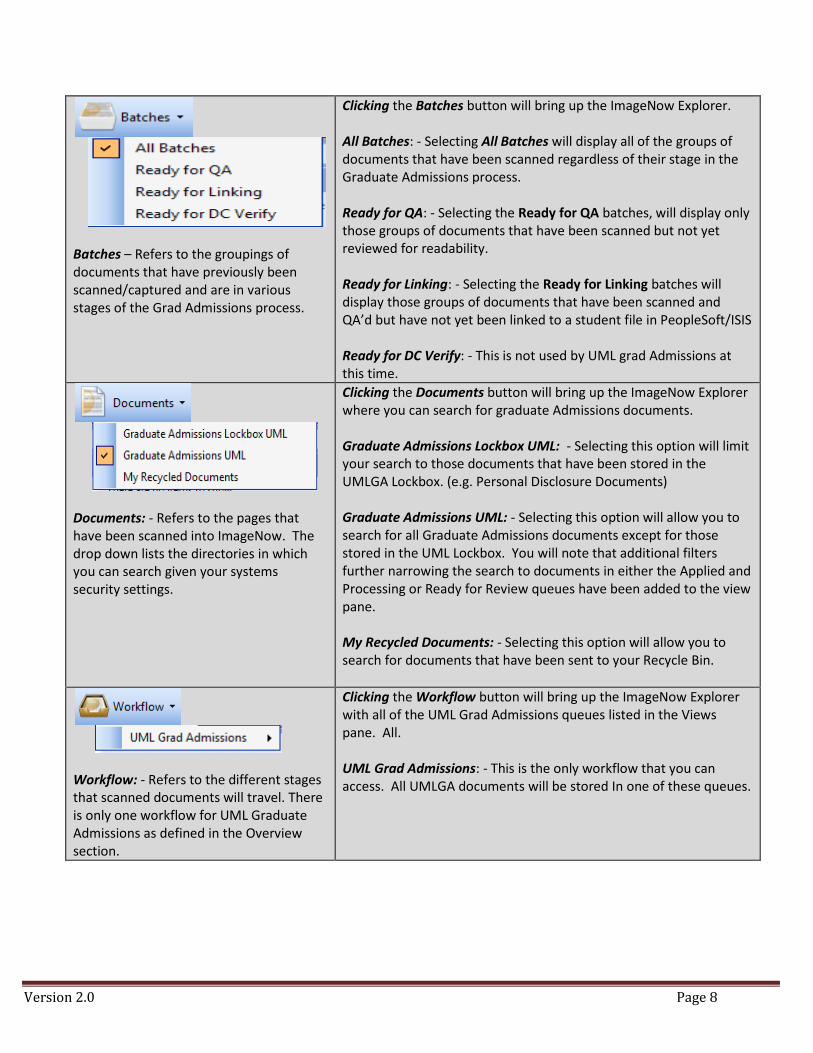
Batches – Refers to the groupings ofdocuments that have previously beenscanned/captured and are in variousstages of the Grad Admissions process.
Clicking the Batches button will bring up the ImageNow Explorer.
All Batches: - Selecting All Batches will display all of the groups ofdocuments that have been scanned regardless of their stage in theGraduate Admissions process.
Ready for QA: - Selecting the Ready for QA batches, will display onlythose groups of documents that have been scanned but not yetreviewed for readability.
Ready for Linking: - Selecting the Ready for Linking batches willdisplay those groups of documents that have been scanned andQA’d but have not yet been linked to a student file in PeopleSoft/ISIS
Ready for DC Verify: - This is not used by UML grad Admissions atthis time.
Documents: - Refers to the pages thathave been scanned into ImageNow. Thedrop down lists the directories in whichyou can search given your systemssecurity settings.
Clicking the Documents button will bring up the ImageNow Explorerwhere you can search for graduate Admissions documents.
Graduate Admissions Lockbox UML: - Selecting this option will limityour search to those documents that have been stored in theUMLGA Lockbox. (e.g. Personal Disclosure Documents)
Graduate Admissions UML: - Selecting this option will allow you tosearch for all Graduate Admissions documents except for thosestored in the UML Lockbox. You will note that additional filtersfurther narrowing the search to documents in either the Applied andProcessing or Ready for Review queues have been added to the viewpane.
My Recycled Documents: - Selecting this option will allow you tosearch for documents that have been sent to your Recycle Bin.
Workflow: - Refers to the different stagesthat scanned documents will travel. Thereis only one workflow for UML GraduateAdmissions as defined in the Overviewsection.
Clicking the Workflow button will bring up the ImageNow Explorerwith all of the UML Grad Admissions queues listed in the Viewspane. All.
UML Grad Admissions: - This is the only workflow that you canaccess. All UMLGA documents will be stored In one of these queues.
Version 2.0 Page 9
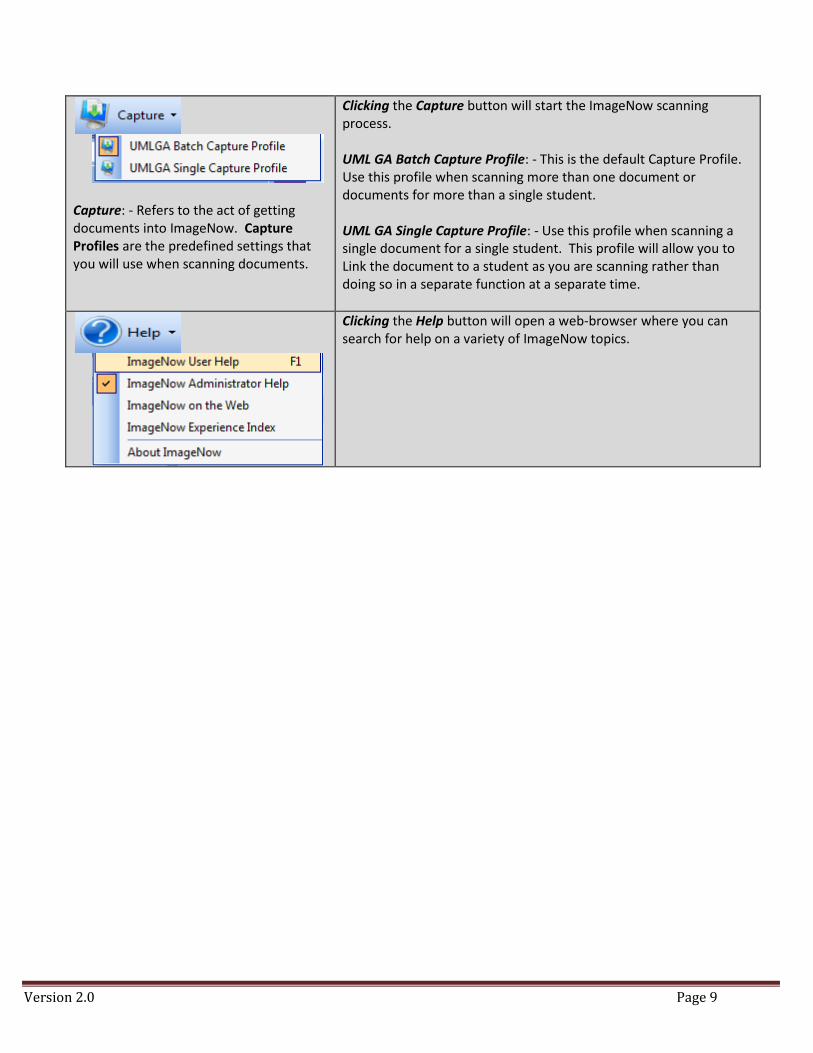
Capture: - Refers to the act of gettingdocuments into ImageNow. CaptureProfiles are the predefined settings thatyou will use when scanning documents.
Clicking the Capture button will start the ImageNow scanningprocess.
UML GA Batch Capture Profile: - This is the default Capture Profile.Use this profile when scanning more than one document ordocuments for more than a single student.
UML GA Single Capture Profile: - Use this profile when scanning asingle document for a single student. This profile will allow you toLink the document to a student as you are scanning rather thandoing so in a separate function at a separate time.
Clicking the Help button will open a web-browser where you cansearch for help on a variety of ImageNow topics.
Version 2.0 Page 10
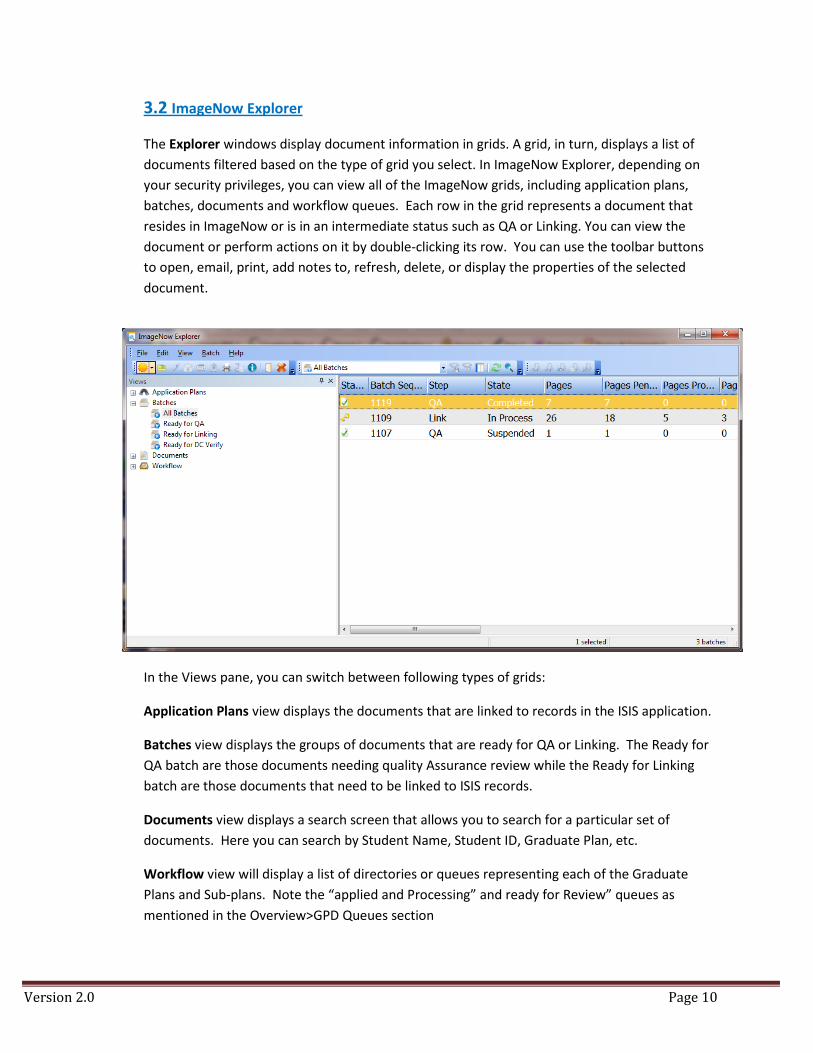
3.2 ImageNow Explorer
The Explorer windows display document information in grids. A grid, in turn, displays a list of
documents filtered based on the type of grid you select. In ImageNow Explorer, depending on
your security privileges, you can view all of the ImageNow grids, including application plans,
batches, documents and workflow queues. Each row in the grid represents a document that
resides in ImageNow or is in an intermediate status such as QA or Linking. You can view the
document or perform actions on it by double-clicking its row. You can use the toolbar buttons
to open, email, print, add notes to, refresh, delete, or display the properties of the selected
document.
In the Views pane, you can switch between following types of grids:
Application Plans view displays the documents that are linked to records in the ISIS application.
Batches view displays the groups of documents that are ready for QA or Linking. The Ready for
QA batch are those documents needing quality Assurance review while the Ready for Linking
batch are those documents that need to be linked to ISIS records.
Documents view displays a search screen that allows you to search for a particular set of
documents. Here you can search by Student Name, Student ID, Graduate Plan, etc.
Workflow view will display a list of directories or queues representing each of the Graduate
Plans and Sub-plans. Note the “applied and Processing” and ready for Review” queues as
mentioned in the Overview>GPD Queues section
Version 2.0 Page 11
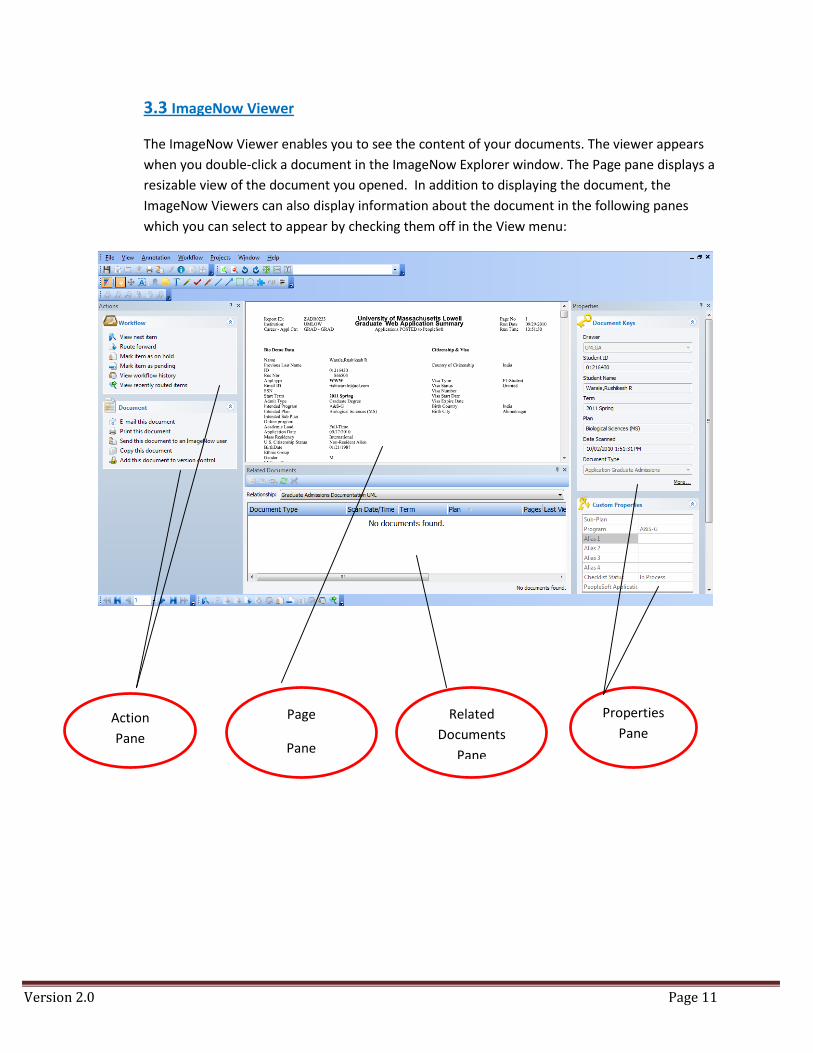
3.3 ImageNow Viewer
The ImageNow Viewer enables you to see the content of your documents. The viewer appears
when you double-click a document in the ImageNow Explorer window. The Page pane displays a
resizable view of the document you opened. In addition to displaying the document, the
ImageNow Viewers can also display information about the document in the following panes
which you can select to appear by checking them off in the View menu:
Action
Pane
Properties
Pane
Related
Documents
Pane
Page
Pane
Version 2.0 Page 12
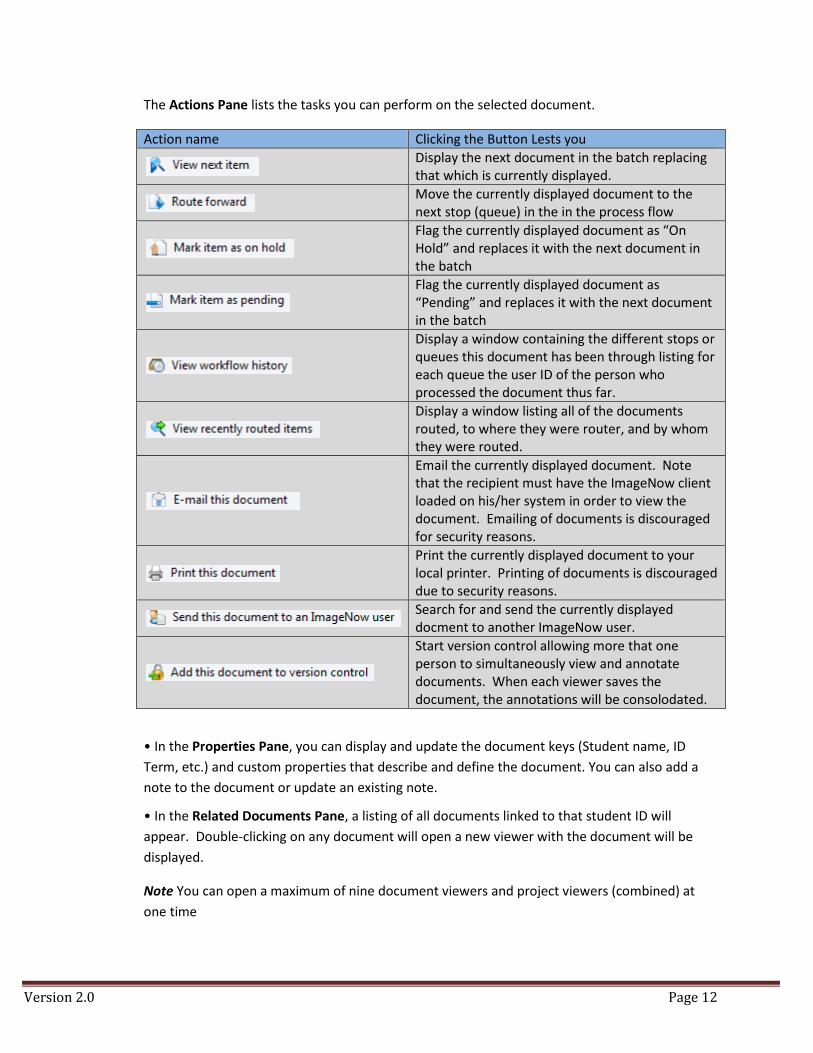
The Actions Pane lists the tasks you can perform on the selected document.
Action name Clicking the Button Lests you
Display the next document in the batch replacingthat which is currently displayed.
Move the currently displayed document to thenext stop (queue) in the in the process flow
Flag the currently displayed document as “OnHold” and replaces it with the next document inthe batch
Flag the currently displayed document as“Pending” and replaces it with the next documentin the batch
Display a window containing the different stops orqueues this document has been through listing foreach queue the user ID of the person whoprocessed the document thus far.
Display a window listing all of the documentsrouted, to where they were router, and by whomthey were routed.
Email the currently displayed document. Notethat the recipient must have the ImageNow clientloaded on his/her system in order to view thedocument. Emailing of documents is discouragedfor security reasons.
Print the currently displayed document to yourlocal printer. Printing of documents is discourageddue to security reasons.
Search for and send the currently displayeddocment to another ImageNow user.
Start version control allowing more that oneperson to simultaneously view and annotatedocuments. When each viewer saves thedocument, the annotations will be consolodated.
• In the Properties Pane, you can display and update the document keys (Student name, ID
Term, etc.) and custom properties that describe and define the document. You can also add a
note to the document or update an existing note.
• In the Related Documents Pane, a listing of all documents linked to that student ID will
appear. Double-clicking on any document will open a new viewer with the document will be
displayed.
Note You can open a maximum of nine document viewers and project viewers (combined) at
one time
Version 2.0 Page 13
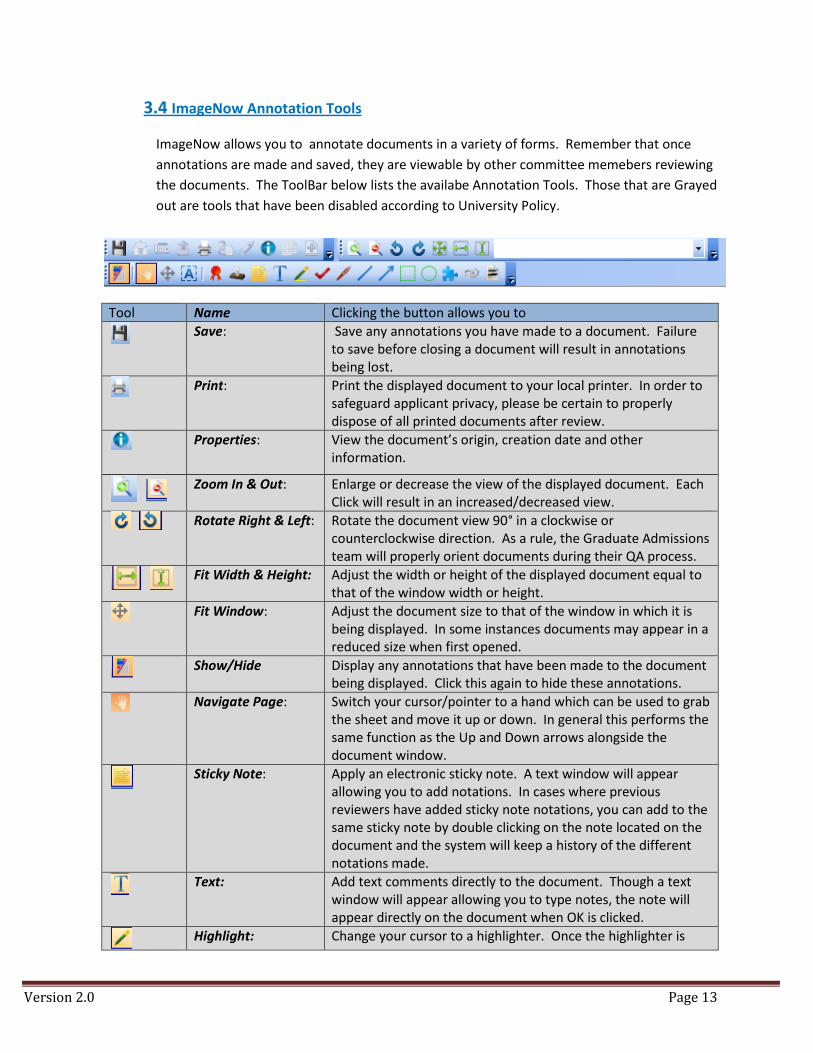
3.4 ImageNow Annotation Tools
ImageNow allows you to annotate documents in a variety of forms. Remember that once
annotations are made and saved, they are viewable by other committee memebers reviewing
the documents. The ToolBar below lists the availabe Annotation Tools. Those that are Grayed
out are tools that have been disabled according to University Policy.
Tool Name Clicking the button allows you to
Save: Save any annotations you have made to a document. Failureto save before closing a document will result in annotationsbeing lost.
Print: Print the displayed document to your local printer. In order tosafeguard applicant privacy, please be certain to properlydispose of all printed documents after review.
Properties: View the document’s origin, creation date and otherinformation.
Zoom In & Out: Enlarge or decrease the view of the displayed document. EachClick will result in an increased/decreased view.
Rotate Right & Left: Rotate the document view 90° in a clockwise orcounterclockwise direction. As a rule, the Graduate Admissionsteam will properly orient documents during their QA process.
Fit Width & Height: Adjust the width or height of the displayed document equal tothat of the window width or height.
Fit Window: Adjust the document size to that of the window in which it isbeing displayed. In some instances documents may appear in areduced size when first opened.
Show/Hide Display any annotations that have been made to the documentbeing displayed. Click this again to hide these annotations.
Navigate Page: Switch your cursor/pointer to a hand which can be used to grabthe sheet and move it up or down. In general this performs thesame function as the Up and Down arrows alongside thedocument window.
Sticky Note: Apply an electronic sticky note. A text window will appearallowing you to add notations. In cases where previousreviewers have added sticky note notations, you can add to thesame sticky note by double clicking on the note located on thedocument and the system will keep a history of the differentnotations made.
Text: Add text comments directly to the document. Though a textwindow will appear allowing you to type notes, the note willappear directly on the document when OK is clicked.
Highlight: Change your cursor to a highlighter. Once the highlighter is
Version 2.0 Page 14
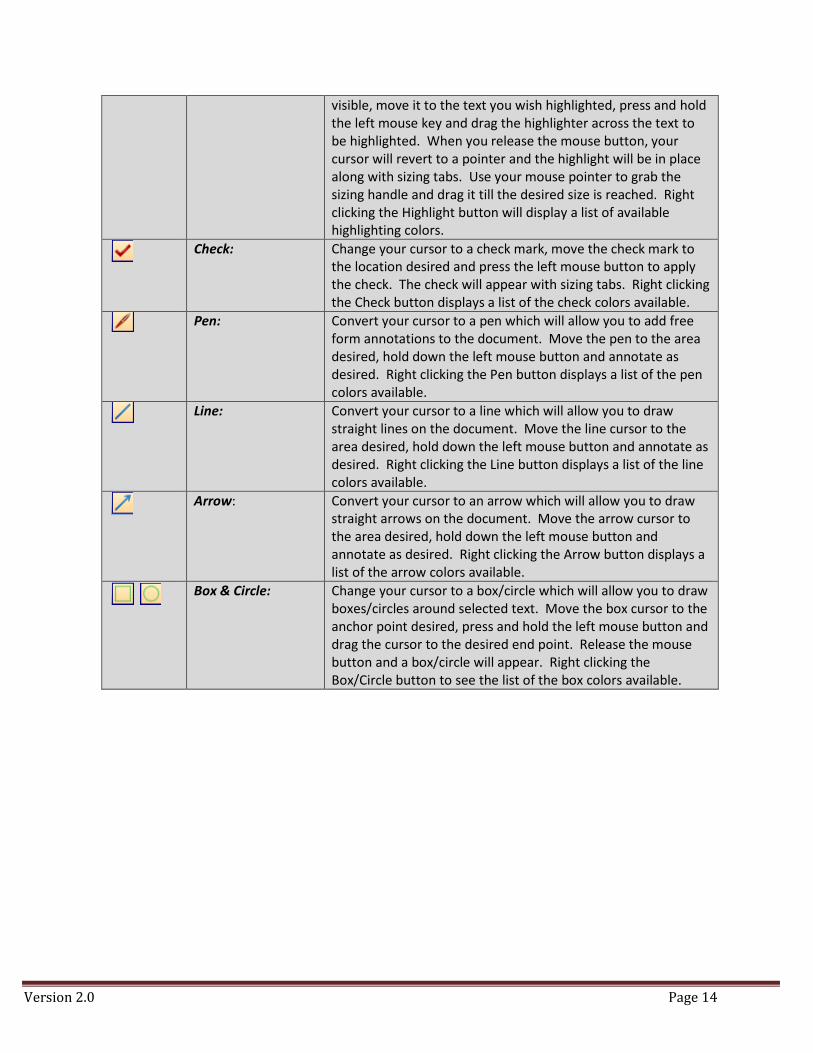
visible, move it to the text you wish highlighted, press and holdthe left mouse key and drag the highlighter across the text tobe highlighted. When you release the mouse button, yourcursor will revert to a pointer and the highlight will be in placealong with sizing tabs. Use your mouse pointer to grab thesizing handle and drag it till the desired size is reached. Rightclicking the Highlight button will display a list of availablehighlighting colors.
Check: Change your cursor to a check mark, move the check mark tothe location desired and press the left mouse button to applythe check. The check will appear with sizing tabs. Right clickingthe Check button displays a list of the check colors available.
Pen: Convert your cursor to a pen which will allow you to add freeform annotations to the document. Move the pen to the areadesired, hold down the left mouse button and annotate asdesired. Right clicking the Pen button displays a list of the pencolors available.
Line: Convert your cursor to a line which will allow you to drawstraight lines on the document. Move the line cursor to thearea desired, hold down the left mouse button and annotate asdesired. Right clicking the Line button displays a list of the linecolors available.
Arrow: Convert your cursor to an arrow which will allow you to drawstraight arrows on the document. Move the arrow cursor tothe area desired, hold down the left mouse button andannotate as desired. Right clicking the Arrow button displays alist of the arrow colors available.
Box & Circle: Change your cursor to a box/circle which will allow you to drawboxes/circles around selected text. Move the box cursor to theanchor point desired, press and hold the left mouse button anddrag the cursor to the desired end point. Release the mousebutton and a box/circle will appear. Right clicking theBox/Circle button to see the list of the box colors available.

Version 2.0 Page 15
4. Document Scanning & Capture
Image Now has been configured toallow several methods of capturing documents.
4.1 Capturing Web Apllications
ImageNow has been interfaced with the UML Web page allowing for Web-Applications to be
automaticlly imported to to ImageNow on a daily basis. Each evening, an automated script
will pick up the applications from the web-site and place them into the Ready forLinking
queue.
4.2 Manually Scanning Documents
To manually scan a document follow these simple steps.
4.2.1 Ensure that the document scanner is turned ON.
Inner circle should be lighted green
4.2.2 Load the documents to be scanned Top Down and Face Down into
the batch feeder
Note: You may also scan single documents using the flat bed of the scanner. To do so,
lift the bed cover and place the document face down on the scanning bed.
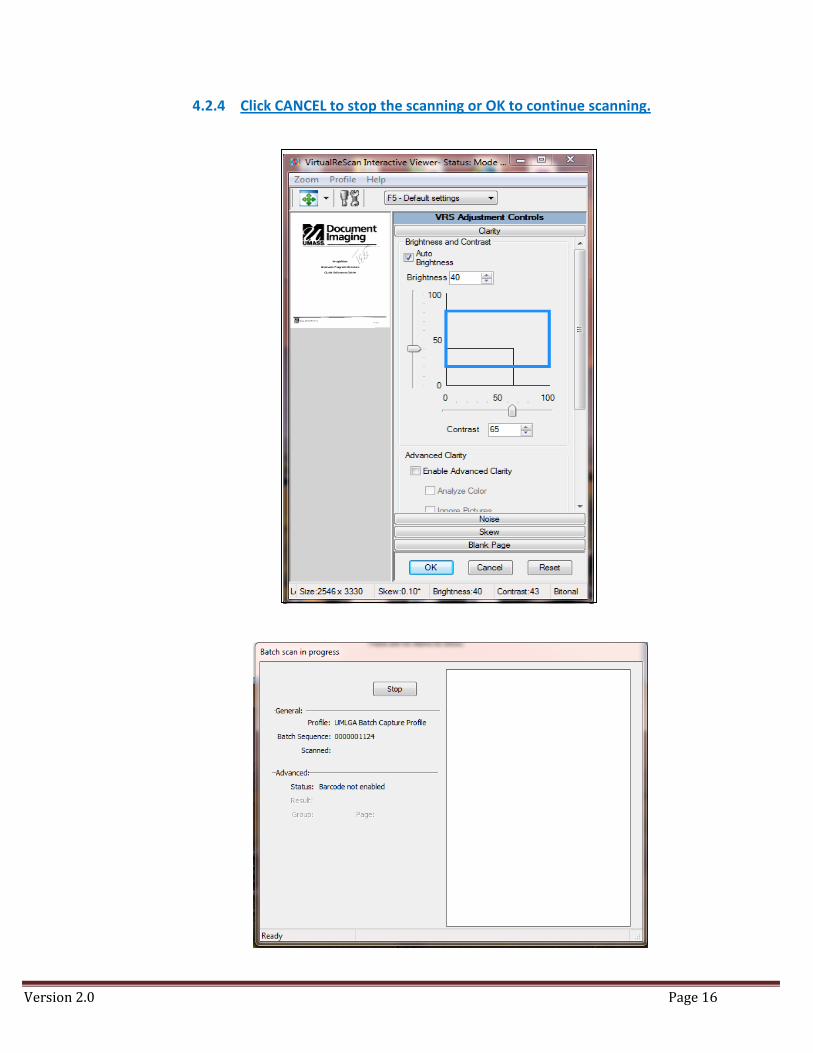
4.2.3 Select the UMLGA Batch Capture Profile from the Capture Menu on the
ToolBar
The following Windows will appear.
Version 2.0 Page 16
4.2.4 Click CANCEL to stop the scanning or OK to continue scanning.
Version 2.0 Page 17
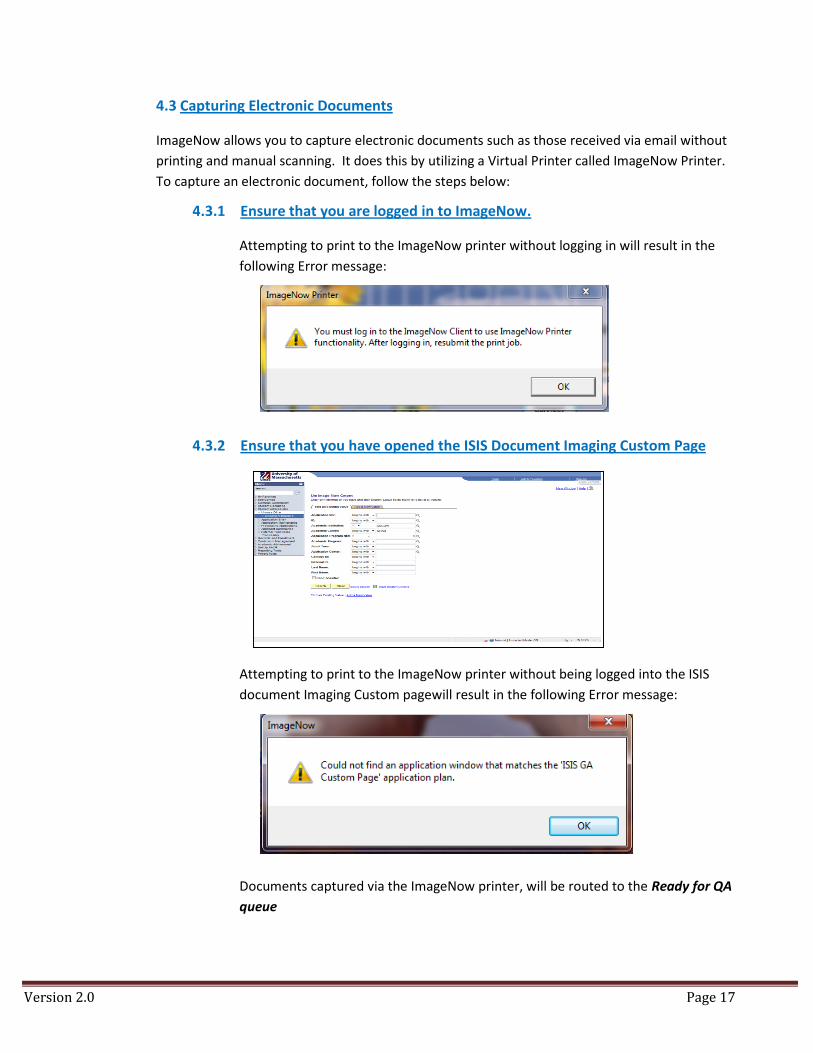
4.3 Capturing Electronic Documents
ImageNow allows you to capture electronic documents such as those received via email without
printing and manual scanning. It does this by utilizing a Virtual Printer called ImageNow Printer.
To capture an electronic document, follow the steps below:
4.3.1 Ensure that you are logged in to ImageNow.
Attempting to print to the ImageNow printer without logging in will result in the
following Error message:
4.3.2 Ensure that you have opened the ISIS Document Imaging Custom Page
Attempting to print to the ImageNow printer without being logged into the ISIS
document Imaging Custom pagewill result in the following Error message:
Documents captured via the ImageNow printer, will be routed to the Ready for QA
queue
Version 2.0 Page 18
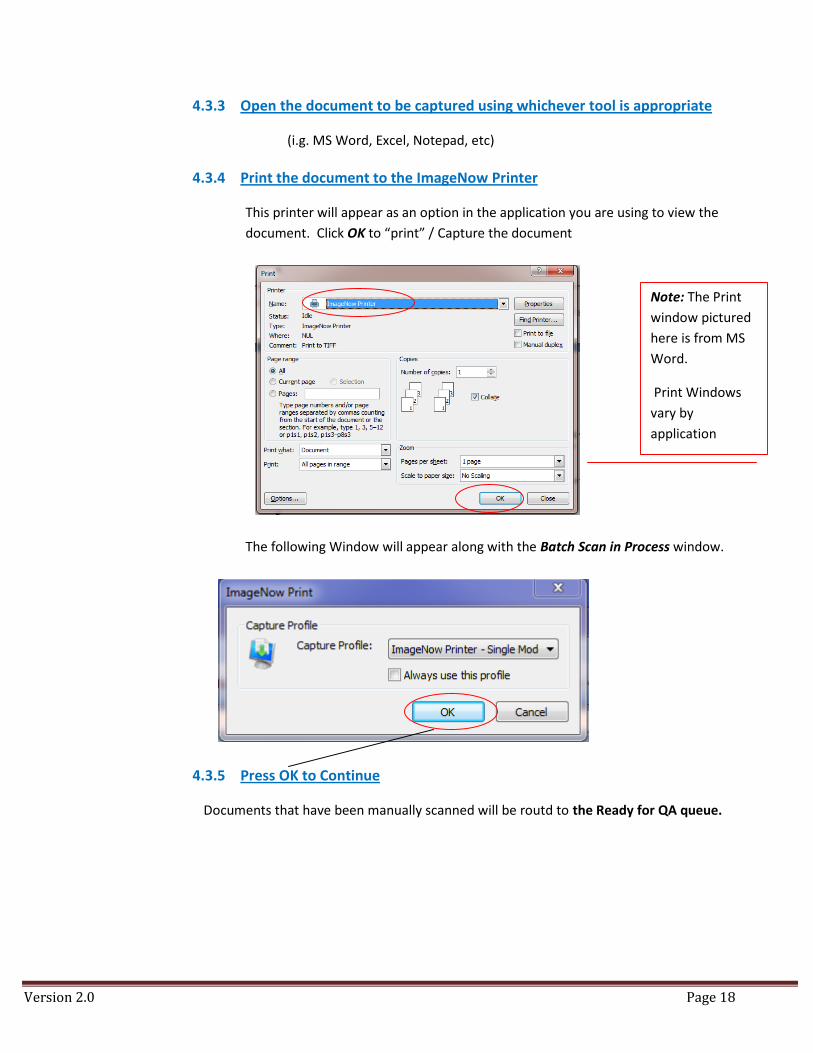
4.3.3 Open the document to be captured using whichever tool is appropriate
(i.g. MS Word, Excel, Notepad, etc)
4.3.4 Print the document to the ImageNow Printer
This printer will appear as an option in the application you are using to view the
document. Click OK to “print” / Capture the document
The following Window will appear along with the Batch Scan in Process window.
4.3.5 Press OK to Continue
Documents that have been manually scanned will be routd to the Ready for QA queue.
Note: The Print
window pictured
here is from MS
Word.
Print Windows
vary by
application
Version 2.0 Page 19
5. Document QA
To ensure the readability of manually scanned documents, ImageNow provides an application
which will allow you to clean up many of the issues that contribute to scanned documents being
illegible. (e.g. watermarks, security backgrounds, discolorization, skewing etc.)
If you recall, as documents are scanned, the first page triggers the VirtualReScan application. It
is this application you will use to QA documents.
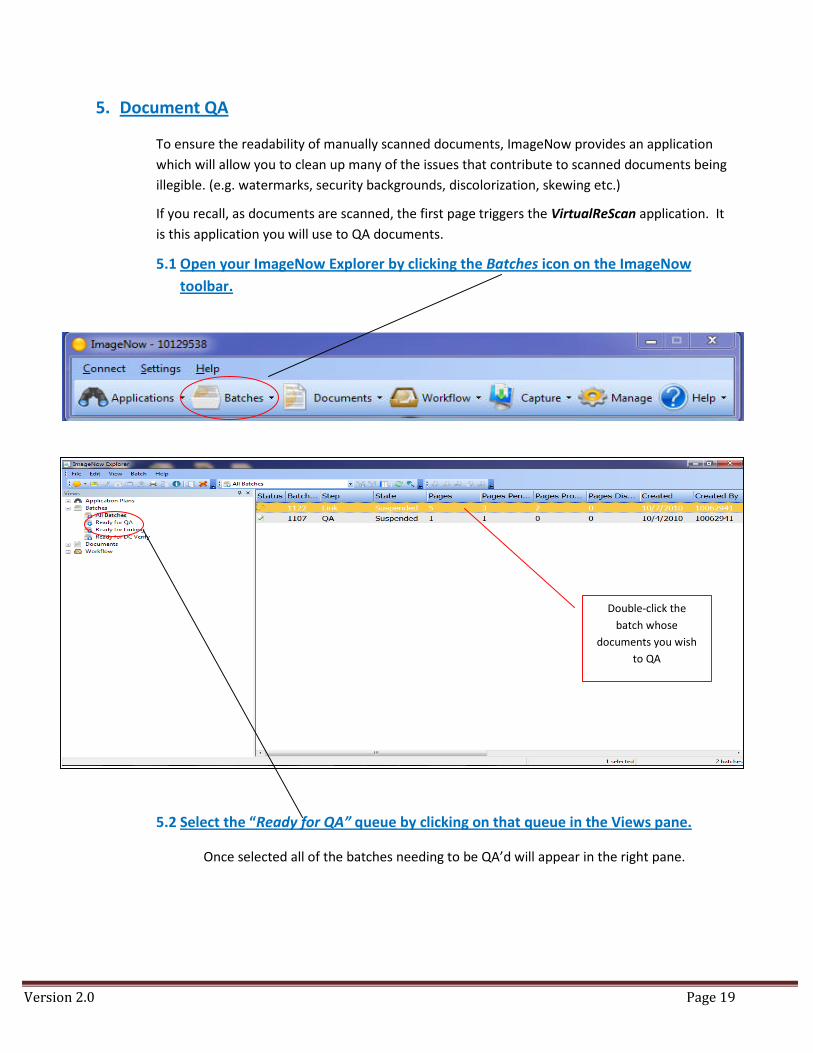
5.1 Open your ImageNow Explorer by clicking the Batches icon on the ImageNow
toolbar.
5.2 Select the “Ready for QA” queue by clicking on that queue in the Views pane.
Once selected all of the batches needing to be QA’d will appear in the right pane.
Double-click the
batch whose
documents you wish
to QA

Version 2.0 Page 20
5.3 Select the batch of documents you wish to QA by double-clicking on the batch.
The ImageNow Viewer will open to display the first of the batch documents.
5.4 Select the appropriate QA action from the left-hand pane.
See descriptin of each available action below.
Batch Processing Actions
Action Name Clicking the Button ……..
Signifies that you deem the document to be readable. Clicking this action willforward the document to the Ready for Linking batch and display the nextdocument to be QA’d.
Signifies that you deem the document to be unreadable and that it must berescanned. Reload the document in the scanner and select this action. Thedocument will be rescanned and the Virtual ReScan (VRS) program will bestarted. See VRS – Cleaning a Document for details.i
Signifies that you deem all documents within that batch as Readable. Selectingthis action will forward all of the documents within this batch t the Ready forLinking queue.
Selecting this action will halt the QA process, mark the batch as Susspendedand return you to the InmageNow Explorer. You may return to QAing thisbatch at any time.
Selecting this action will send the document to the Recycle Bin.
Selecting this action will send the document to the local printer.

Version 2.0 Page 21
VRS - Cleaning a Document
Version 2.0 Page 22
6. Document Linking
Once Documents are scanned and QA’d for readability, they must be linked to the appropreate
student record within PeopleSoft. To link an ImageNow document to a PeoplSoft document, you
will utilize a customized PeopleSoft screen which contains all of the information needed to create
the link.
Note: Documents received prior to an Application are linked to a special PreApp queue and
stored there until the Application is entered into PeopleSoft. See Linking PreApp Documents
below for details.
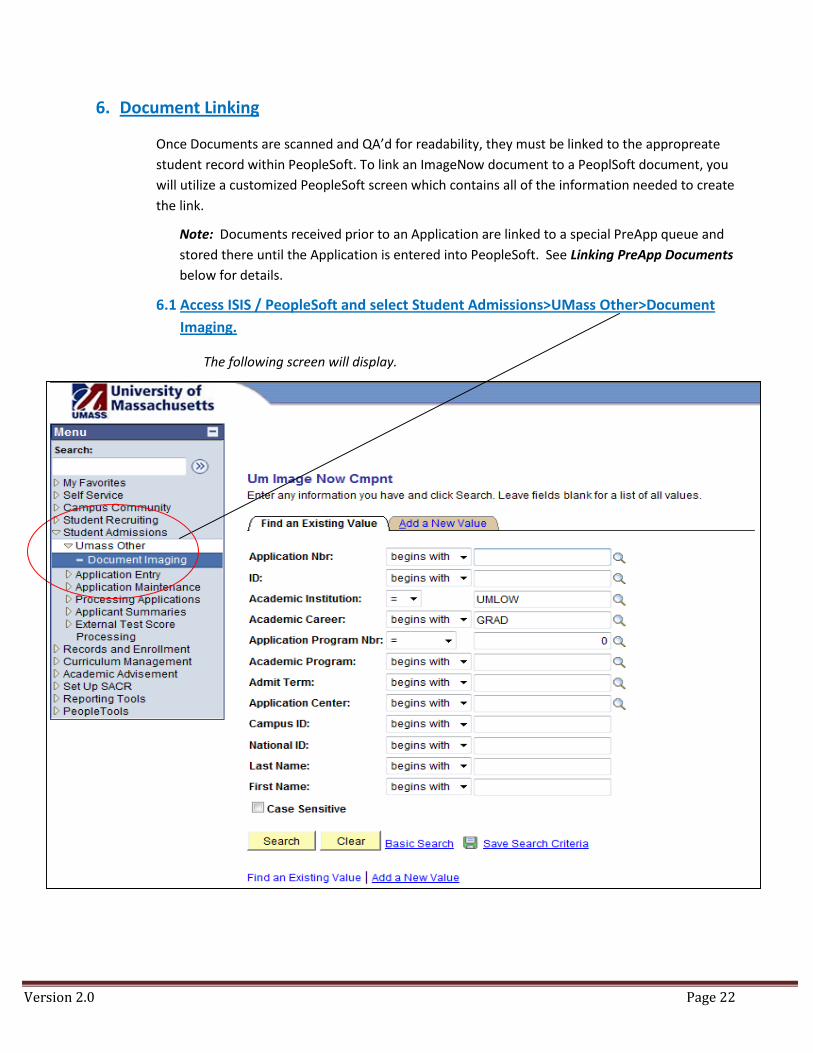
6.1 Access ISIS / PeopleSoft and select Student Admissions>UMass Other>Document
Imaging.
The following screen will display.
Version 2.0 Page 23
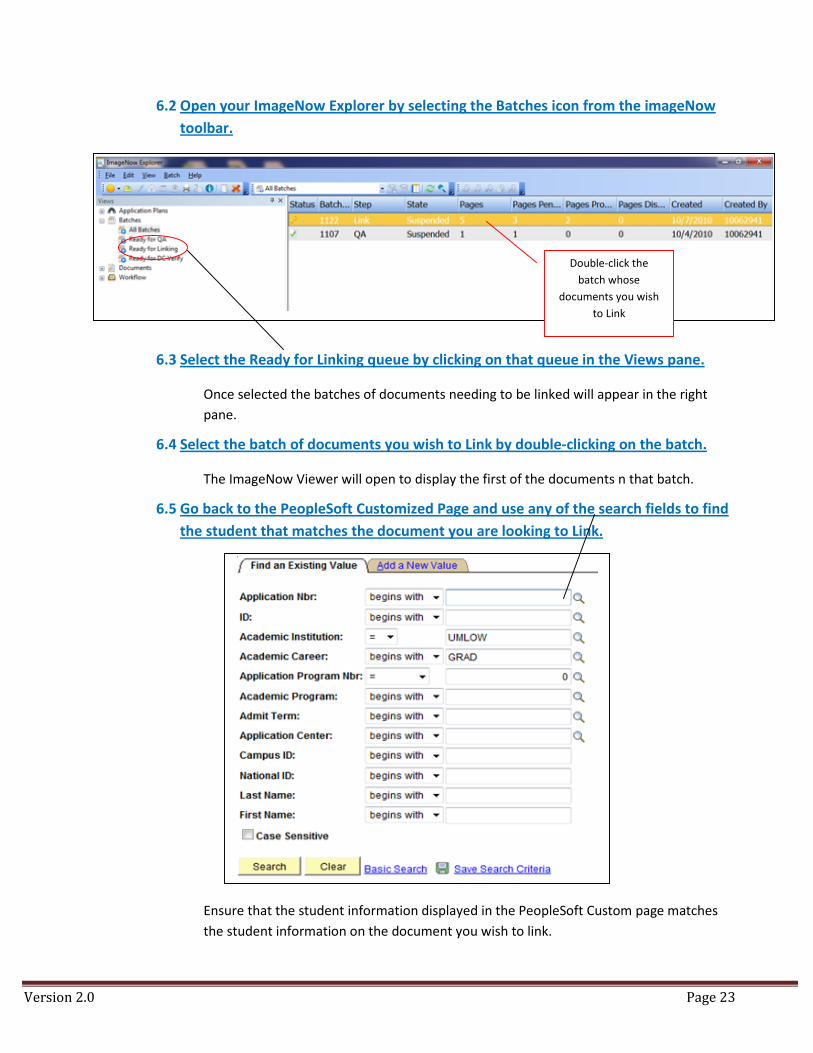
6.2 Open your ImageNow Explorer by selecting the Batches icon from the imageNow
toolbar.
6.3 Select the Ready for Linking queue by clicking on that queue in the Views pane.
Once selected the batches of documents needing to be linked will appear in the right
pane.
6.4 Select the batch of documents you wish to Link by double-clicking on the batch.
The ImageNow Viewer will open to display the first of the documents n that batch.
6.5 Go back to the PeopleSoft Customized Page and use any of the search fields to find
the student that matches the document you are looking to Link.
Ensure that the student information displayed in the PeopleSoft Custom page matches
the student information on the document you wish to link.
Double-click the
batch whose
documents you wish
to Link
Version 2.0 Page 24
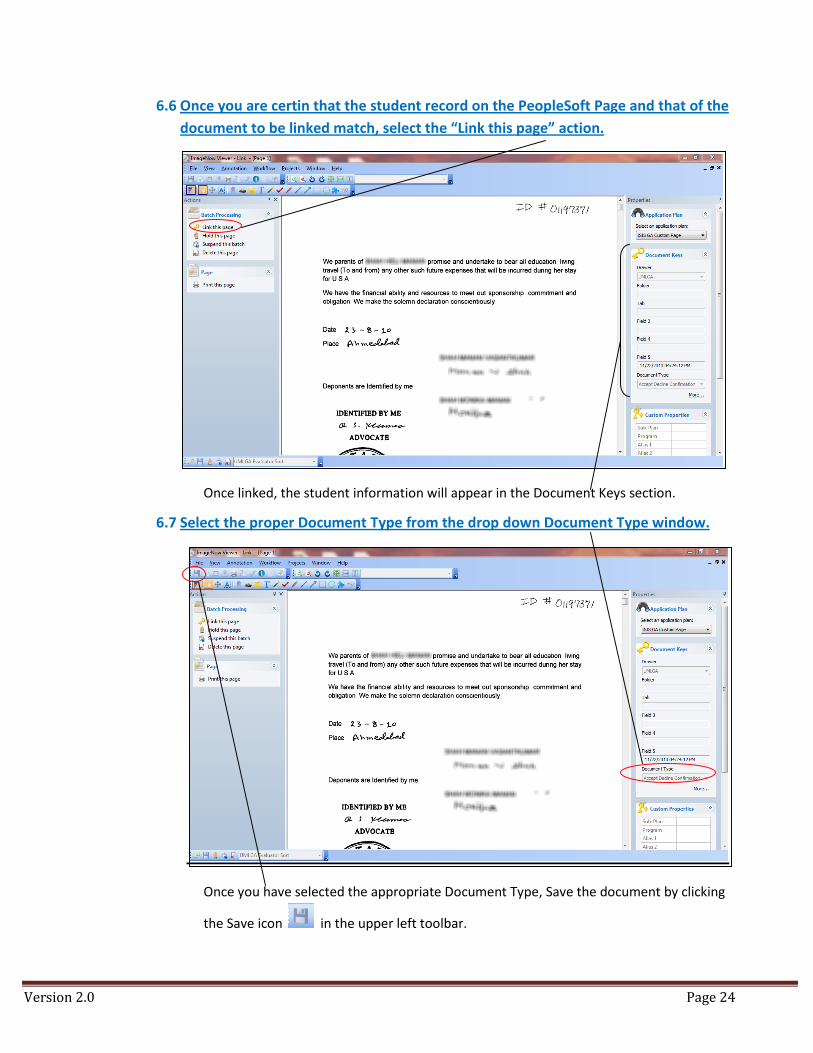
6.6 Once you are certin that the student record on the PeopleSoft Page and that of the
document to be linked match, select the “Link this page” action.
Once linked, the student information will appear in the Document Keys section.
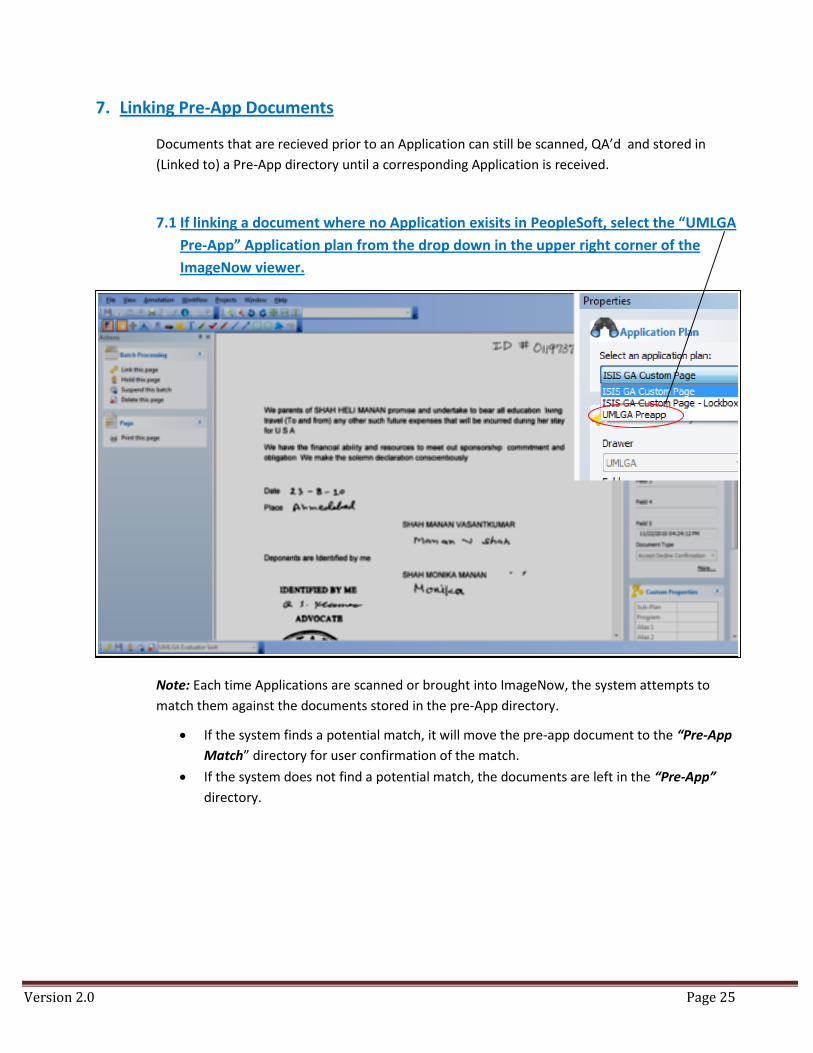
6.7 Select the proper Document Type from the drop down Document Type window.
Once you have selected the appropriate Document Type, Save the document by clicking
the Save icon in the upper left toolbar.
Version 2.0 Page 25
7. Linking Pre-App Documents
Documents that are recieved prior to an Application can still be scanned, QA’d and stored in
(Linked to) a Pre-App directory until a corresponding Application is received.
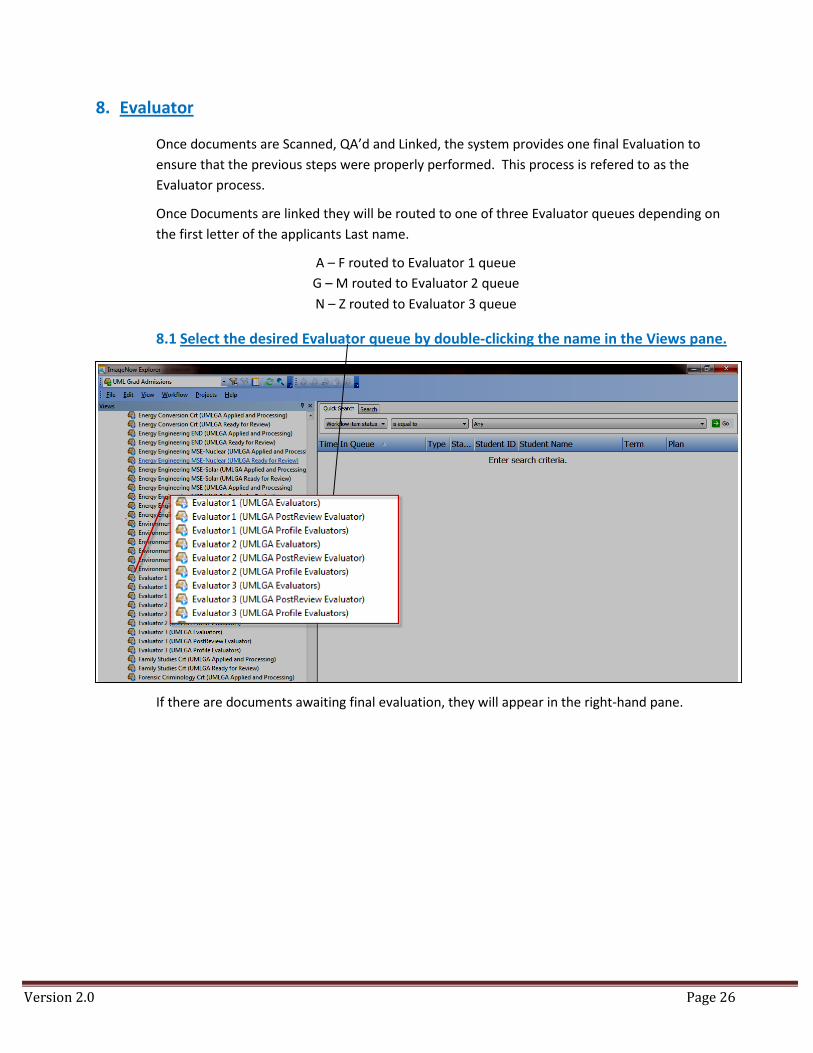
7.1 If linking a document where no Application exisits in PeopleSoft, select the “UMLGA
Pre-App” Application plan from the drop down in the upper right corner of the
ImageNow viewer.
Note: Each time Applications are scanned or brought into ImageNow, the system attempts to
match them against the documents stored in the pre-App directory.
If the system finds a potential match, it will move the pre-app document to the “Pre-App
Match” directory for user confirmation of the match.
If the system does not find a potential match, the documents are left in the “Pre-App”
directory.
Version 2.0 Page 26
8. Evaluator
Once documents are Scanned, QA’d and Linked, the system provides one final Evaluation to
ensure that the previous steps were properly performed. This process is refered to as the
Evaluator process.
Once Documents are linked they will be routed to one of three Evaluator queues depending on
the first letter of the applicants Last name.
A – F routed to Evaluator 1 queue
G – M routed to Evaluator 2 queue
N – Z routed to Evaluator 3 queue
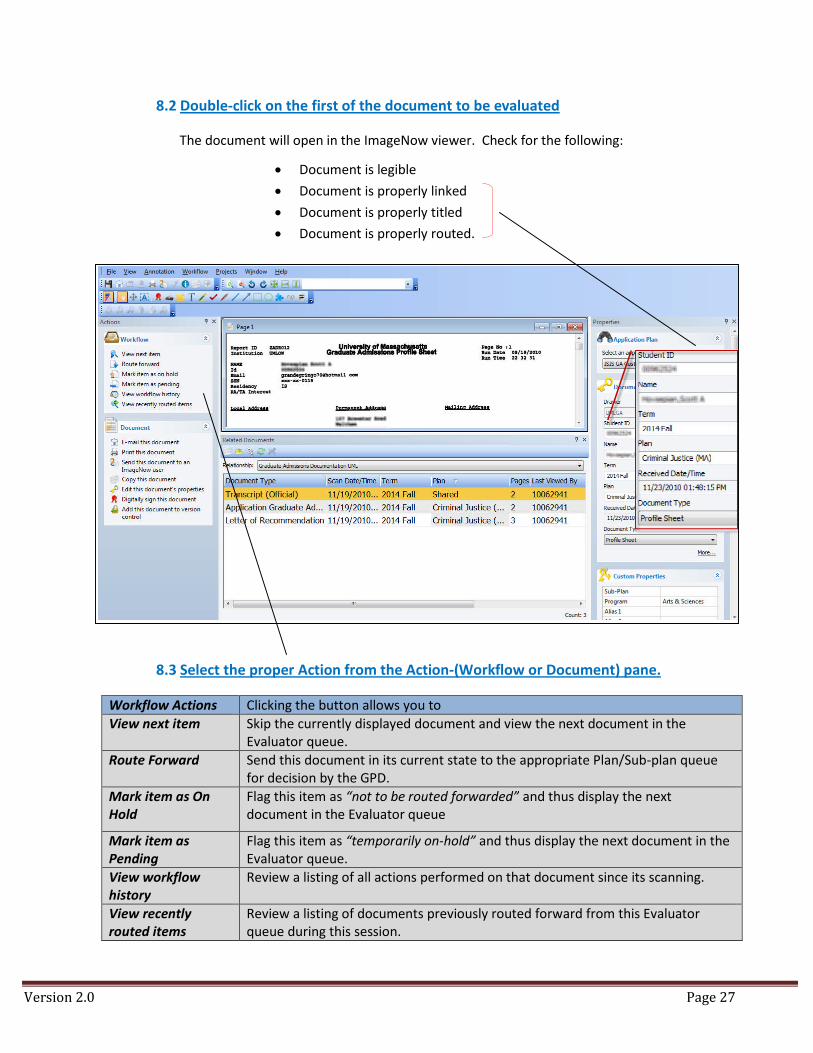
8.1 Select the desired Evaluator queue by double-clicking the name in the Views pane.
If there are documents awaiting final evaluation, they will appear in the right-hand pane.
Version 2.0 Page 27
8.2 Double-click on the first of the document to be evaluated
The document will open in the ImageNow viewer. Check for the following:
Document is legible
Document is properly linked
Document is properly titled
Document is properly routed.
8.3 Select the proper Action from the Action-(Workflow or Document) pane.
Workflow Actions Clicking the button allows you to
View next item Skip the currently displayed document and view the next document in theEvaluator queue.
Route Forward Send this document in its current state to the appropriate Plan/Sub-plan queuefor decision by the GPD.
Mark item as OnHold
Flag this item as “not to be routed forwarded” and thus display the nextdocument in the Evaluator queue
Mark item asPending
Flag this item as “temporarily on-hold” and thus display the next document in theEvaluator queue.
View workflowhistory
Review a listing of all actions performed on that document since its scanning.
View recentlyrouted items
Review a listing of documents previously routed forward from this Evaluatorqueue during this session.
Version 2.0 Page 28
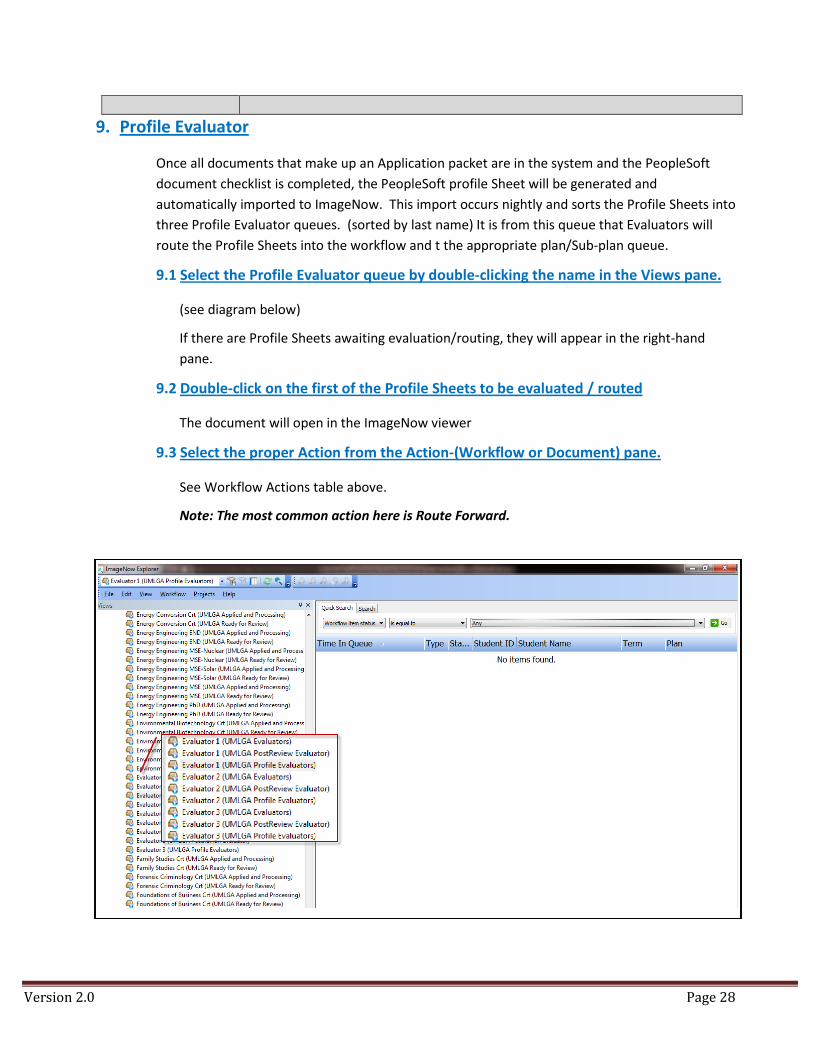
9. Profile Evaluator
Once all documents that make up an Application packet are in the system and the PeopleSoft
document checklist is completed, the PeopleSoft profile Sheet will be generated and
automatically imported to ImageNow. This import occurs nightly and sorts the Profile Sheets into
three Profile Evaluator queues. (sorted by last name) It is from this queue that Evaluators will
route the Profile Sheets into the workflow and t the appropriate plan/Sub-plan queue.
9.1 Select the Profile Evaluator queue by double-clicking the name in the Views pane.
(see diagram below)
If there are Profile Sheets awaiting evaluation/routing, they will appear in the right-hand
pane.
9.2 Double-click on the first of the Profile Sheets to be evaluated / routed
The document will open in the ImageNow viewer
9.3 Select the proper Action from the Action-(Workflow or Document) pane.
See Workflow Actions table above.
Note: The most common action here is Route Forward.
Version 2.0 Page 29
10.Post Review Evaluator
Once the GPD has made a decission and digitally signes the profile Sheet indicating the
Accept/Deny/Accept with Conditions decission, he/she will route the stsdent Application back to
Graduate Admissions. The processed application will reside in one of three Post Review
Evaluator queues (sorted by last name). It is from these quese that Evaluators will open the
profile Sheet, Verify that the GPD signature is present, note the decission and route the
application forward into the Document Repository for achiving.
10.1 Select thePost Review Evaluator queue by double-clicking the name in the Views
pane.
(See diagram above)
If there are Applications returned from GPD’s, they will appear in the right-hand pane.
10.2 Double-click on the first of the Applications to be processed by double-clicking the
application.
The document will open in the ImageNow viewer
10.3 View (and then close) the Related Documents>Profile Sheet:
Ensure that The Digital Signature is present
Note the Decission type (Accepted/Denied/Conditional)
Note the Conditions if any
10.3.1 Update the applicant’s PeopleSoft record with the above information
See PeopleSoft documentation for detail
10.4 Once the Profile Sheet Viewer is closed, the Application will be displayed. Rout it to
the Document Repository by clicking on the Route Forward action in the Workflow
Actions pane.
The next Application in the Post Evaluator queue will automatically display.
Version 2.0 Page 30
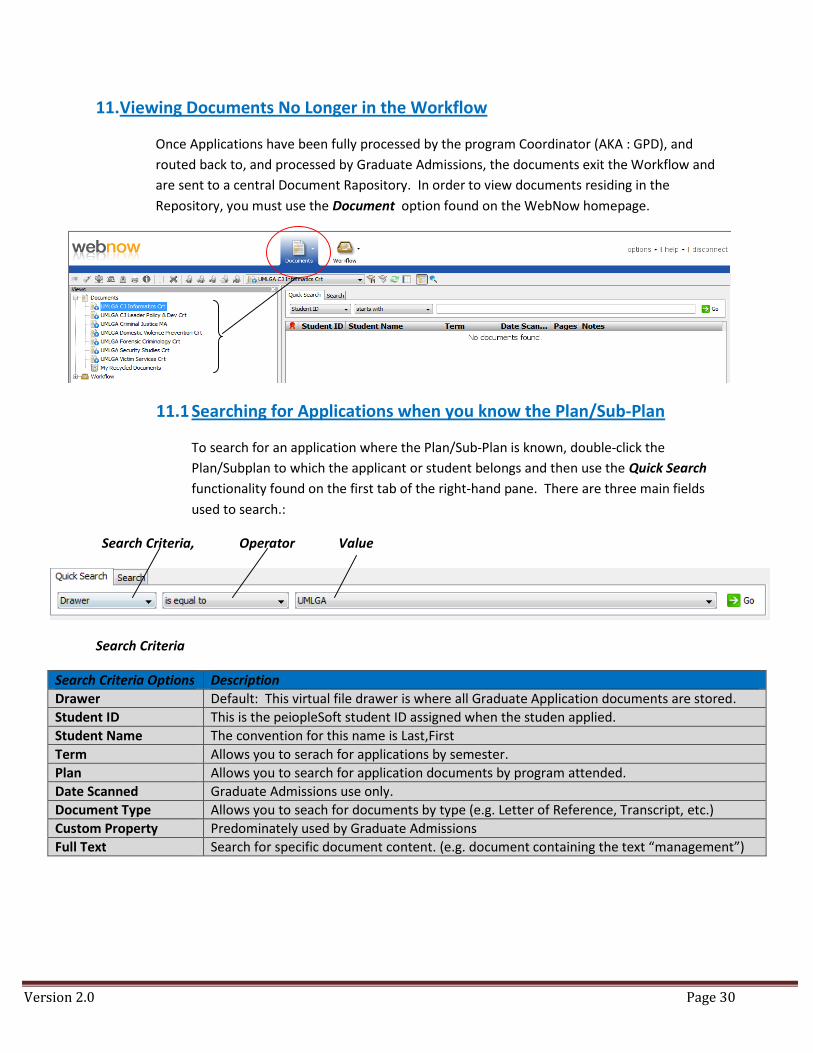
11.Viewing Documents No Longer in the Workflow
Once Applications have been fully processed by the program Coordinator (AKA : GPD), and
routed back to, and processed by Graduate Admissions, the documents exit the Workflow and
are sent to a central Document Rapository. In order to view documents residing in the
Repository, you must use the Document option found on the WebNow homepage.
11.1 Searching for Applications when you know the Plan/Sub-Plan
To search for an application where the Plan/Sub-Plan is known, double-click the
Plan/Subplan to which the applicant or student belongs and then use the Quick Search
functionality found on the first tab of the right-hand pane. There are three main fields
used to search.:
Search Criteria, Operator Value
Search Criteria
Search Criteria Options Description
Drawer Default: This virtual file drawer is where all Graduate Application documents are stored.
Student ID This is the peiopleSoft student ID assigned when the studen applied.
Student Name The convention for this name is Last,First
Term Allows you to serach for applications by semester.
Plan Allows you to search for application documents by program attended.
Date Scanned Graduate Admissions use only.
Document Type Allows you to seach for documents by type (e.g. Letter of Reference, Transcript, etc.)
Custom Property Predominately used by Graduate Admissions
Full Text Search for specific document content. (e.g. document containing the text “management”)
Version 2.0 Page 31
Operators: These options are self explanitory and link the Criteria and the Value
Value: It is here you would enter the specific item on which you want to serach.
(e.g. Student ID, Nme, etc.)
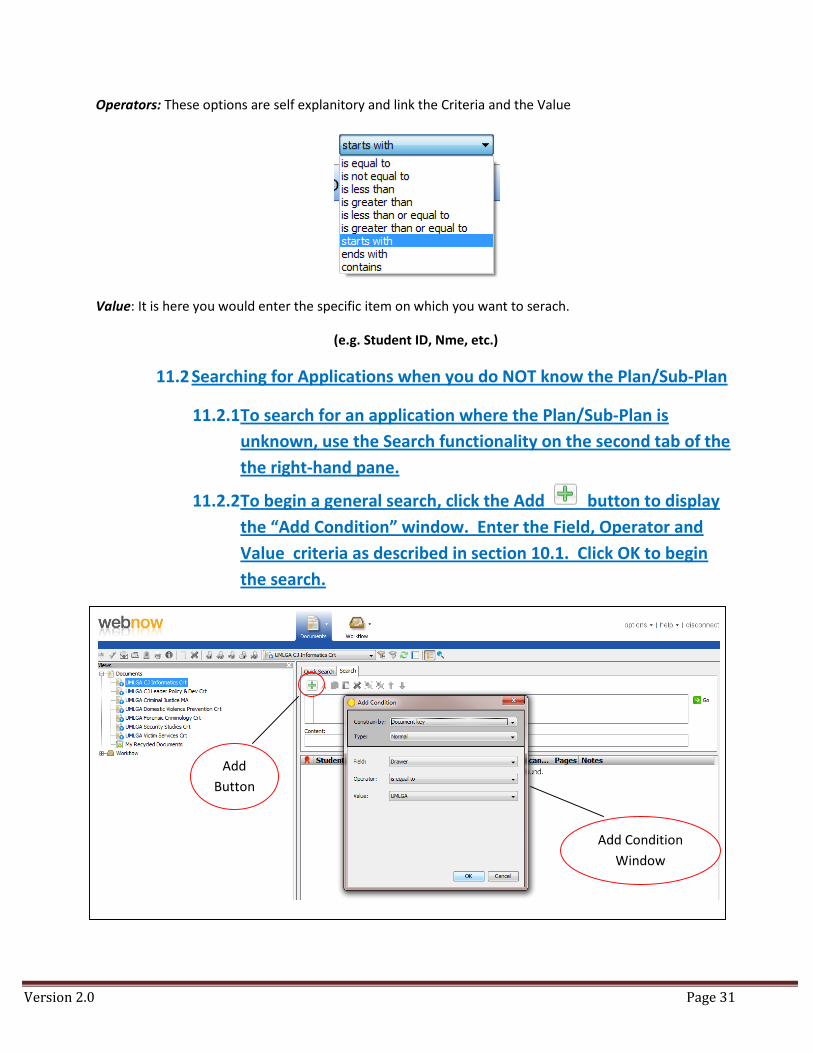
11.2 Searching for Applications when you do NOT know the Plan/Sub-Plan
11.2.1To search for an application where the Plan/Sub-Plan is
unknown, use the Search functionality on the second tab of the
the right-hand pane.
11.2.2To begin a general search, click the Add button to display
the “Add Condition” window. Enter the Field, Operator and
Value criteria as described in section 10.1. Click OK to begin
the search.
Add
Button
Add Condition
Window
Version 2.0 Page 32
12.Re-Linking (Exception Processing)
In the event that changes are made to a documents keys within the ISIS system, it is necessary to
carry those changes forward to the documents stored in ImageNow.
For example, if a student is defered from the Fall 2011 semester to the Spring 2012
semester, the change to Term must not only be made in the ISIS system but also in the
ImageNow system.
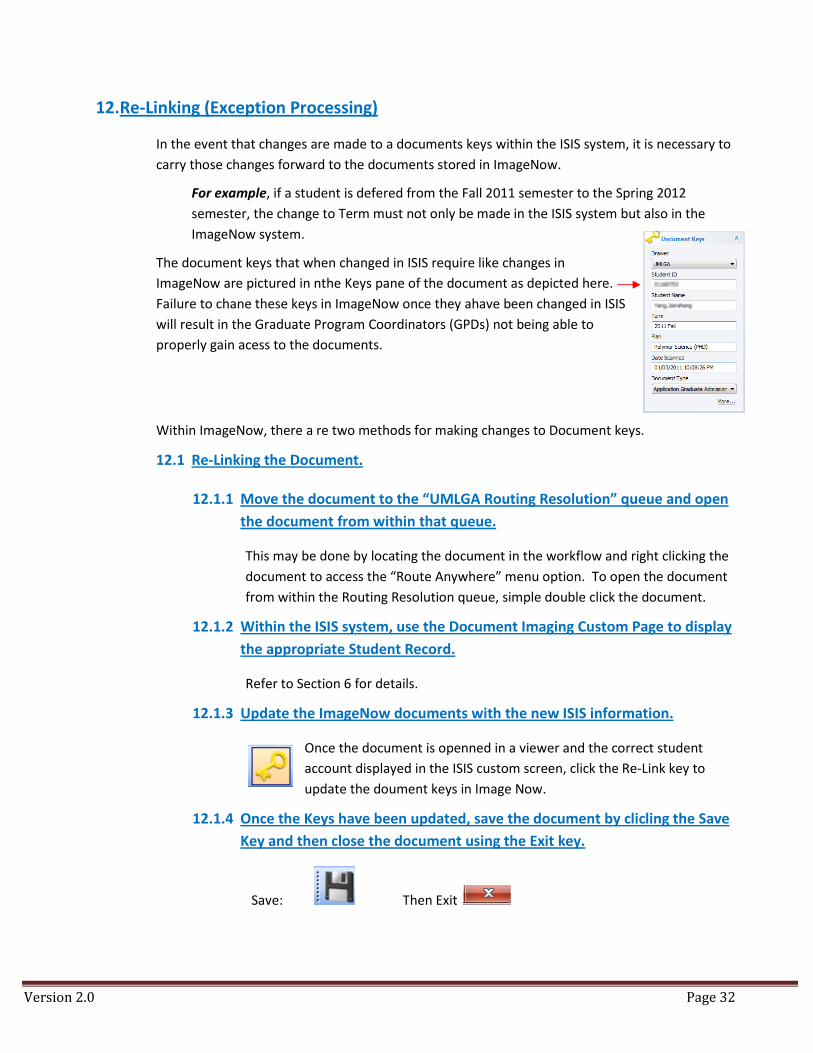
The document keys that when changed in ISIS require like changes in
ImageNow are pictured in nthe Keys pane of the document as depicted here.
Failure to chane these keys in ImageNow once they ahave been changed in ISIS
will result in the Graduate Program Coordinators (GPDs) not being able to
properly gain acess to the documents.
Within ImageNow, there a re two methods for making changes to Document keys.
12.1 Re-Linking the Document.
12.1.1 Move the document to the “UMLGA Routing Resolution” queue and open
the document from within that queue.
This may be done by locating the document in the workflow and right clicking the
document to access the “Route Anywhere” menu option. To open the document
from within the Routing Resolution queue, simple double click the document.
12.1.2 Within the ISIS system, use the Document Imaging Custom Page to display
the appropriate Student Record.
Refer to Section 6 for details.
12.1.3 Update the ImageNow documents with the new ISIS information.
Once the document is openned in a viewer and the correct student
account displayed in the ISIS custom screen, click the Re-Link key to
update the doument keys in Image Now.
12.1.4 Once the Keys have been updated, save the document by clicling the Save
Key and then close the document using the Exit key.
Save: Then Exit
Version 2.0 Page 33
12.2 Editing Document Keys from within Grid.
In cases where there are multiple documents requiring a key update, it may be
easier to edit the dcouments keys directly rather than relinking the individual
documents. Though it may be easier, it is also more risky to change document
keys in the manner as any spelling mistake or mis keystroke will cause the
document to be incorrectly indexed and therefore will not appear to the GPDs as
they should.
12.2.1 Locate the student document using the Documents Search feature ofImageNow.
Refer to Section 11 for details
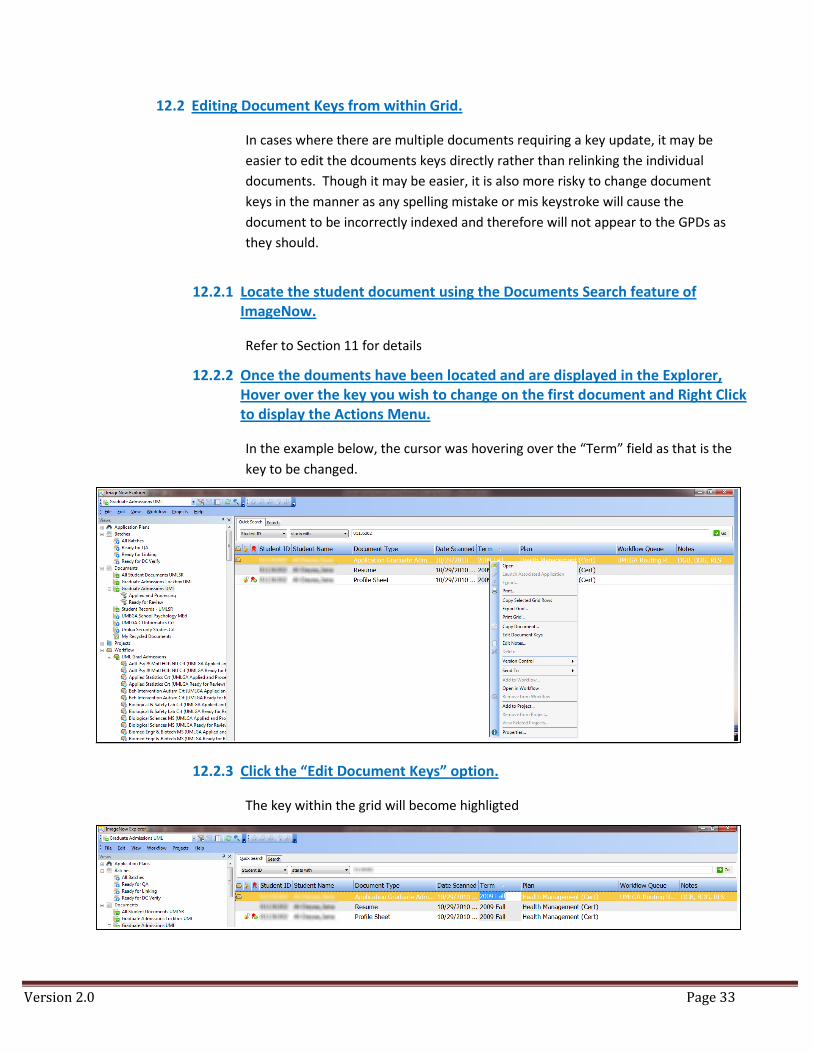
12.2.2 Once the douments have been located and are displayed in the Explorer,Hover over the key you wish to change on the first document and Right Clickto display the Actions Menu.
In the example below, the cursor was hovering over the “Term” field as that is the
key to be changed.
12.2.3 Click the “Edit Document Keys” option.
The key within the grid will become highligted
Version 2.0 Page 34
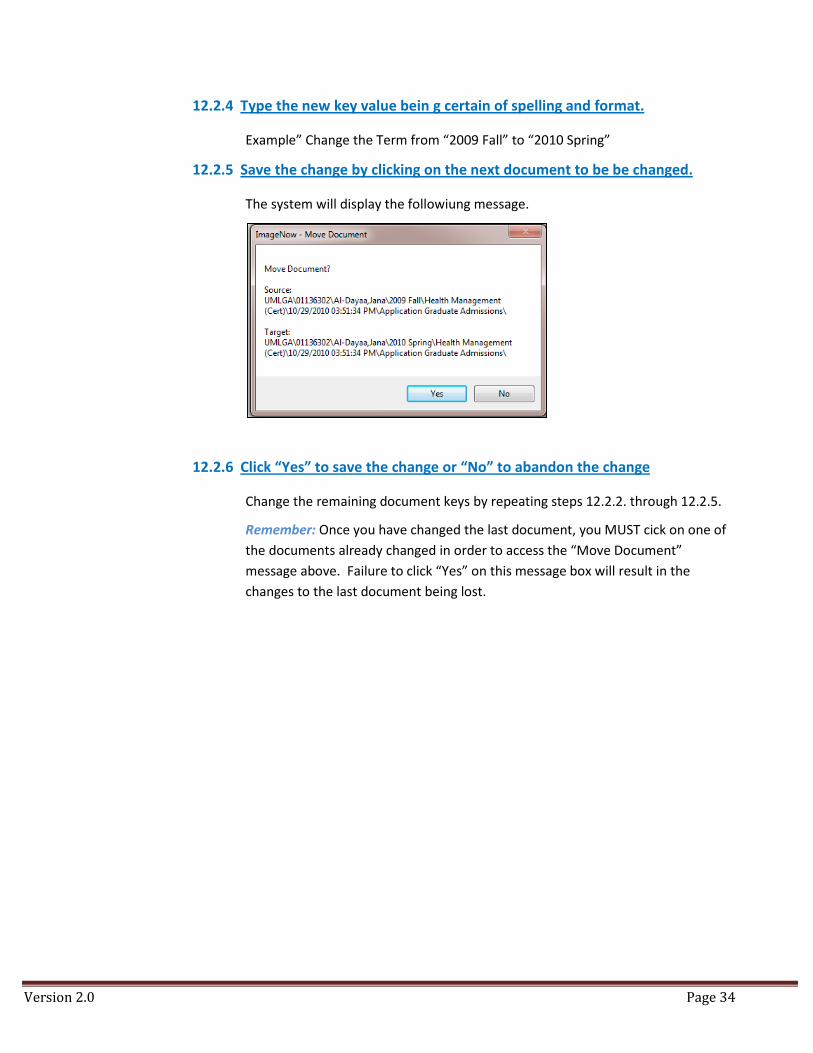
12.2.4 Type the new key value bein g certain of spelling and format.
Example” Change the Term from “2009 Fall” to “2010 Spring”
12.2.5 Save the change by clicking on the next document to be be changed.
The system will display the followiung message.
12.2.6 Click “Yes” to save the change or “No” to abandon the change
Change the remaining document keys by repeating steps 12.2.2. through 12.2.5.
Remember: Once you have changed the last document, you MUST cick on one of
the documents already changed in order to access the “Move Document”
message above. Failure to click “Yes” on this message box will result in the
changes to the last document being lost.
Recommended