Getting Started with Auditors’ Edition of Tally.ERP 9

The information contained in this document is current as of the date of publication and subject to change. Because Tally must respond to changing market conditions, it should not be interpreted to be a commitment on the part of Tally, and Tally cannot guarantee the accuracy of any information presented after the date of publication. The information provided herein is general, not according to individual circumstances, and is not intended to substitute for informed professional advice.
This document is for informational purposes only. TALLY MAKES NO WARRANTIES, EXPRESS OR IMPLIED, IN THIS DOCUMENT AND SHALL NOT BE LIABLE FOR LOSS OR DAMAGE OF WHATEVER NATURE, ARISING OUT OF, OR IN CONNECTION WITH THE USE OF OR INABILITY TO USE THE CONTENT OF THIS PUBLICATION, AND/OR ANY CONDUCT UNDERTAKEN BY PLACING RELIANCE ON THE CONTENTS OF THIS PUBLICATION.
Complying with all applicable copyright and other intellectual property laws is the responsibility of the user. All rights including copyrights, rights of translation, etc., are vested exclusively with TALLY SOLUTIONS PRIVATE LIMITED. No part of this document may be reproduced, translated, revised, stored in, or introduced into a retrieval system, or transmitted in any form, by any means (electronic, mechanical, photocopying, recording, or otherwise), or for any purpose, without the express written permission of Tally Solutions Pvt. Ltd.
Tally may have patents, patent applications, trademarks, copyrights, or other intellectual property rights covering subject matter in this document. Except as expressly provided in any written licence agreement from Tally, the furnishing of this document does not give you any licence to these patents, trademarks, copyrights, or other intellectual property.
© 2011 Tally Solutions Pvt. Ltd. All rights reserved.
Tally, Tally 9, Tally9, Tally.ERP, Tally.ERP 9, Shoper, Shoper 9, Shoper POS, Shoper HO, Shoper 9 POS, Shoper 9 HO, TallyDeveloper, Tally Developer, Tally.Developer 9, Tally.NET, Tally Development Environment, Tally Extender, Tally Integrator, Tally Integrated Network, Tally Service Partner, TallyAcademy & Power of Simplicity are either registered trademarks or trademarks of Tally Solutions Pvt. Ltd. in India and/or other countries. All other trademarks are properties of their respective owners.
Version: Getting Started with Auditors’ Edition of Tally.ERP 9/Release 3.2/July 2011

i
Contents
Introduction ............................................................................................................................................................................. 1
Lesson 1: Creating Tally.NET Auditors ............................................................................................................... 2
1.1 Creating Tally.NET Auditors .....................................................................................................................2
1.1.1 Company Delegation .............................................................................................................................. 6
Lesson 2: Auditing Scenarios in Tally.ERP 9 .................................................................................................... 8
2.1 Audit at CA’s office by accessing local data ...........................................................................................8
2.2 Audit at Client’s place by accessing local data .....................................................................................11
2.3 Audit Remotely by accessing Client's data from anywhere ................................................................13
Lesson 3: Tally.NET Overview ................................................................................................................................. 17
3.1 Configuring Tally.NET features ..............................................................................................................17
3.2 Authorise Tally.NET Auditors .................................................................................................................19
3.3 Create Security Controls ...........................................................................................................................21
3.4 Connect Company to Tally.NET for Remote Auditing .......................................................................24
Lesson 4: Features of Auditors’ Edition ............................................................................................................ 27
4.1 Tax Audit .....................................................................................................................................................27
4.1.1 Form 3CD ............................................................................................................................................. 36
4.2 Statutory Audit ...........................................................................................................................................37
4.2.1 Audit Documentation ............................................................................................................................ 38
Audit Programme .................................................................................................................................. 38
Audit Working Paper ............................................................................................................................. 41
Accounting Standards Checklist ........................................................................................................... 47
Auditing and Assurance Standards Checklist ....................................................................................... 50
4.2.2 Data Analysis ........................................................................................................................................ 52
4.2.3 Auditing ................................................................................................................................................. 53
4.2.4 Audit Journals ....................................................................................................................................... 55
4.2.5 Financial Statements: ........................................................................................................................... 56
Schedule-VI Balance Sheet ................................................................................................................... 57
Schedule-VI Profit & Loss A/c Statement ............................................................................................ 59
4.3 Statutory Compliance ................................................................................................................................60
Introduction
Tally.ERP 9 offers a special Gold Auditors’ Edition, which provides Audit & Compliance capabili-ties, exclusively for Chartered Accountants. The Auditors’ Edition provides the following tools for Chartered Accountants:
Tax Audit Statutory Audit Statutory Compliance
These tools will help in retrieving the relevant information and present them in the required form to help the Auditor to form the opinion. Using Tally.ERP 9, Chartered Accountants can provide the Audit and Compliance services to their clients in the following three scenarios:
Audit at CA’s office by accessing local data
Audit at Client’s place by accessing local data
Audit Remotely by accessing Client’s data from anywhere
1

Lesson 1: Creating Tally.NET Auditors
On successful Activation of Tally.ERP 9 Auditors’ Edition, the Account ID/Email ID (main BAP username) provided during the Activation process is configured as a Tally.NET Auditor (having the Remote Audit & Compliance capabilities). The main BAP user can further create sub-users under him and configure them as Tally.NET Auditors to perform Audit from any where.
1.1 Creating Tally.NET AuditorsTally.NET Auditors can be created from Control Centre feature in Tally.ERP 9.
To create Tally.NET Auditors,
Start Tally.ERP 9
Click on K: Control Centre button in the top button toolbar or press CTRL+K keys
Figure 1.1 Tally.ERP 9 Startup Screen
2

Creating Tally.NET Auditors
The Control Centre Login screen is displayed.
Enter the Account ID/Email ID as it was entered during the License Activation in Your Email ID field
In Your Tally.NET Password field, enter the Account Password sent by e-mail to you as shown:
The Account Password is Automatically generated during the Activation and sent by e-mail to the Email ID provided. You can change the Password by Logging into Control Centre.
Figure 1.2 Control Centre Login Screen
Press Enter to loginThe Control Centre screen is displayed as shown:
Figure 1.3 Control Centre in Tally.ERP 9
3

Creating Tally.NET Auditors
From the Control Centre screen,
Select U: User Management and press Enter
Figure 1.4 User Management Screen
User Management screen displays the list of Tally.NET Users and Tally.NET Auditors created by default.
To create more users, go to the next Line and execute the following steps:
Select Standard User under Security Level field from Security Level drop down listEnter the required Email ID (e.g. [email protected]) in the Tally.NET ID
fieldSet Tally.NET User field to NoSet Tally.NET Auditor field to YesSet Status field to Active
4

Creating Tally.NET Auditors
Figure 1.5 Completed User Management Screen
Press Enter to save the User (Tally.NET Auditor). Similarly, you can create more users.
Security level: Default options are Standard and Owner. Standard User has limited permission and he cannot change his settings or create new users. Owner has full permission and he can create new users.
Tally.NET ID: A valid Email ID should be entered in this field.
Tally.NET User: This option should be set to Yes if you want the user to work asTally.NET User.
Tally.NET Auditor: This option should be set to Yes if you want the user to work as Tally.NET Auditor and have access to Audit & Compliance features.
Status: The Status should be selected as Active for the user to work.
The Password for [email protected] will be emailed to the respective Email ID.
5

Creating Tally.NET Auditors
1.1.1 Company Delegation
The Companies which have provided the access to an auditor can be delegated to the articles (sub articles) for conducting the remote audit.
To Delegate the Companies, which have authorised the auditor,
Press Alt+Y or click on Y: Company Delegation button in the Control Centre
The Company Delegation screen appears as displayed:
Figure 1.6 Company Delegation Screen
Press Enter on Alt+A or click on A: Add User
Select the auditor from the List of Users from your own account or select Other User to add users from any other account. (each serial is treated as Account)
Select the name of account in the Account Name field
Select the required access type from the list of Access Type
Allow All: Should be selected to delegate all companies which have authorised the auditor
Allow Specific: Should be selected to further select the required Company for delega-tion
Deny Specific: Should be selected to allow all company access, except the one for which access is denied.
6

Creating Tally.NET Auditors
The completed Company Delegation subs screen is displayed as shown:
Figure 1.7 Company Delegation Screen
Press Enter to accept and save.
Press Alt+F1 to view the details of the Companies which are delegated for auditing as shown:
Figure 1.8 Company Delegation in Detailed Mode
The delegated Companies cannot be further delegated by the sub articles. Tally.ERP 9 allows only one level of delegation.
7

Lesson 2: Auditing Scenarios in Tally.ERP 9
Tally.ERP 9 provides auditing and compliance capabilities exclusively for Chartered Accountants and makes the Audit and Compliance tools available in the following scenarios for the Chartered Accountants:
Audit at CA’s office by accessing local data
Audit at the Client’s place by accessing local data
Audit Remotely by accessing the Client’s data from anywhere
2.1 Audit at CA’s office by accessing local data
The Auditors’ Edition includes Audit & Compliance capabilities as a default feature without any dependency on Tally.NET for Authentication. When the Client’s data is locally available at CA’s office, the Auditor can perform the Audit or Verification as the Tax Audit, Statutory Audit and Statutory Compliance features are available by default.
Go to Gateway of Tally > Alt+F3: Company Info. > Select Company
or
From Company Info. > Select Company
Tally.ERP 9 displays the List of Companies along with the Company number
8
Auditing Scenarios in Tally.ERP 9
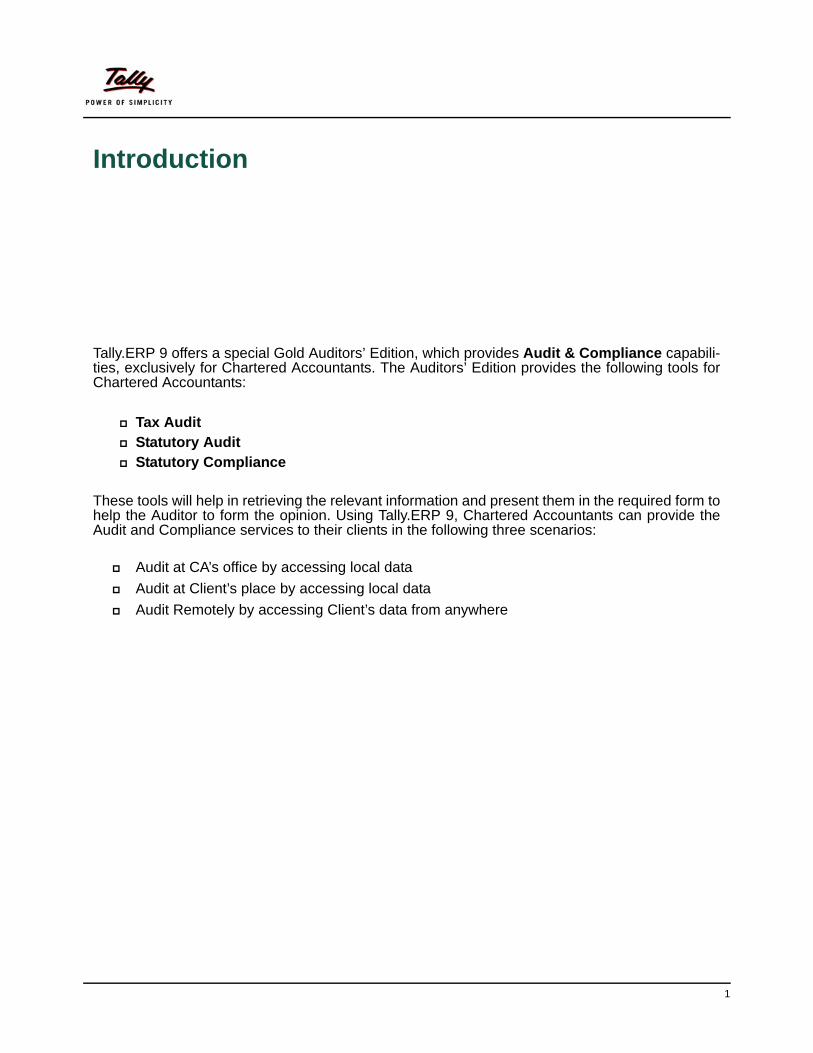
Select the company to be audited and press Enter
Figure 2.1 Company Selection Screen
The Company Login screen is displayed as shown:
Figure 2.2 Company Login Screen
Enter the User Name and Password provided by the Client.
If the Client’s company is not password protected, then you will have to make it password protected by enabling the security feature in the Company Master. (Gateway of Tally > Alt+F3 + Alter).
9

Auditing Scenarios in Tally.ERP 9
The completed Company Login screen is displayed as shown:
Figure 2.3 Completed Login screen
Press Enter to Load the Company
Figure 2.4 Gateway of Tally (for Auditors’ Edition of Tally.ERP 9)
Tally.ERP 9 displays the Auditors’ License in the Information panel at the bottom of the screen and the Audit & Compliance menu is available by default, when the Auditor accesses the client’s data from his local machine (where Auditors’ Edition of Tally.ERP 9 is installed). The Auditor can start using the Tax Audit, Statutory Audit and Statutory Compliance Tools.
10

Auditing Scenarios in Tally.ERP 9
2.2 Audit at Client’s place by accessing local data
When the Auditor wants to use the Auditors’ License from the Clients Office to provide the Audit or Compliance Service, an Internet Connection and Tally.NET subscription are required. The Client should have authorised the Chartered Accountant as a Tally.NET Auditor for the Company for which Audit needs to be performed. For more details on the Authorisation process read the chapter Tally.NET Overview.
In this scenario, Tally.NET is used to Authenticate the Auditor to get the Auditors’ License on the Client’s Tally.ERP 9. The Auditor can then open the Company and perform Audit or Verification in the same way as it is done in the Auditor’s office with Local data using the Auditor’s License.
The Auditor should have a valid Tally.NET subscription to perform Audit in this scenario.
To start the Audit, execute the following steps.
Go to Gateway of Tally > Company Info. > Select Company
Tally.ERP 9 displays the List of Companies along with the Company number
Figure 2.5 List of Companies for Selection
Select the company to be audited and press Enter
11

Auditing Scenarios in Tally.ERP 9
Tally prompts for User Name and password
Figure 2.6 CA Login Screen
Specify the CA User Name (Remote User Name) and Password, as explained in the ear-lier chapter
Type [email protected] in the Name of the User fieldType the password in the Password fieldPress Enter
The Gateway of Tally screen is displayed as shown:
Figure 2.7 Auditors’ Edition of Tally.ERP 9 (Remote Authentication)
Once the Chartered Accountant logs in using his authorised (BAP) user name and password, Tally.ERP 9 displays the Remote Auditor Serial No along with the client’s Tally.ERP 9 license Serial Number.
12

Auditing Scenarios in Tally.ERP 9
2.3 Audit Remotely by accessing Client's data from anywhereWhen the Auditor wants to provide Audit and Compliance services from his office (or from any other remote location) and access the Client’s Data Remotely, the internet connection and valid Tally.NET subscription is a must for both the Auditor and the Client. The Client should have authorized the Chartered Accountant as Tally.NET Auditor and Connect the Company to Tally.NET at the time of Audit/Verification process. The Auditor will Login as Remote User and provide the Auditor’s Username and Password to view the Companies that are available for Audit (Connected) belonging to various Client’s based on the Access provided.
For information on Authorising the Remote Auditor and Connecting the Client Company to Tally.NET, refer to Tally.NET Overview chapter.
The process of Remote Audit is as shown:
Start Tally.ERP 9
Go to Company Info. screen
The Auditor can fetch the Auditors’ Edition License on Educational version of Tally.ERP 9 also.
13

Auditing Scenarios in Tally.ERP 9
Figure 2.8 Company Info screen
Select Login as Remote User and press Enter
The Remote Login screen is displayed as shown:
Figure 2.9 Remote Login screen
In the Remote Login screen,
Enter the BAP username in the Your Email ID fieldEnter the password in the Your Tally.NET Password field
14

Auditing Scenarios in Tally.ERP 9
The completed Remote Login screen is displayed as shown:
Figure 2.10 Completed Remote Login screen
Press Enter to login Remotely
The Remote Company selection screen is displayed as shown:
Figure 2.11 Remote Company Selection screen
Select the required Remote company and press Enter to Load the Company
The Remote Company selection screen displays the List of Remote Companies which have authorised the Chartered Accountant to access from a Remote location.
15

Auditing Scenarios in Tally.ERP 9
On successful login, the Gateway of Tally screen is displayed as shown:
Figure 2.12 Gateway of Tally with Remote Login
You can view the Remote User details on the left side. The Information Panel displays the remote Serial Number for the Auditor (BAP User). You can click on Audit & Compliance menu to start experiencing the Power of Remote.
Remote Auditing can be performed successfully on the Educational Version of Tally.ERP 9 also.
16

Lesson 3: Tally.NET Overview
Tally.NET (to be read as TallyNET) is an enabling framework which establishes a connection through which the remote user (or Remote Auditor) can access the Client's data without copying / transferring the data. Tally.NET is a default feature of the product and provides a host of capabili-ties.
By default Tally.NET is enabled in Tally.ERP 9, however, certain configurations have to be setup to get the company connected for the Remote Access. The following steps need to be executed at the Client of the required Company:
1. Configuring Tally.NET features2. Authorise Tally.NET Auditors’3. Security Controls for Tally.NET Auditors’4. Connect Company to Tally.NET for Remote Access
3.1 Configuring Tally.NET features
To configure the Company for Tally.NET features,
Go to Gateway of Tally > F11: Features > F4: Tally.NET Features
In the Registration Details section,
Type the required Connect name for the Company (e.g. Global Enterprises) in the Connect Name field (Tally.ERP 9 allows to specify company name to be connected / made available as per the user requirements)
Type the required name (e.g. Rajesh) in Contact Person Name field Type the contact number (e.g. 9909968650) in Contact Number field
In Connect for Remote Access section,
Select Yes for Allow to Connect CompanySelect Yes for Connect on Load
17

Tally.NET Overview
SMS Access Details options can be skipped if SMS is not used.
The completed Tally.NET Features screen is displayed as shown.
Figure 3.1 Completed Tally.NET Features screen
Press Enter to accept.
Connect Name: The user can specify any Connect Name for the Company to be connected.
Contact Person Name: The name of the Contact person should be entered who should is responsible for connecting the Company to Tally.NET
Contact Number: The name of the contact person should be provided for the person who is responsible for connecting the company to Tally.NET
Allow to Connect Company: This option allows the user to enable the Com-pany to get connected for remote access.
Connect on Load: This allows the company to get connected by default when the company is loaded.
18

Tally.NET Overview
3.2 Authorise Tally.NET Auditors
To Authorise the Tally.NET Auditors, execute the following steps:
Go to Gateway of Tally > Alt+F3: Company Info. > Security Control
The Security Control screen is displayed as shown:
Figure 3.2 Security Control menu
Select Users and Passwords and press Enter
It is mandatory to enable Security Control in the Company Creation master for Tally.NET features to be available in Tally.ERP 9. In case Security Control feature is not enabled, go to the Company Alteration (Alt+F3) screen and enable the same before proceeding further.
19

Tally.NET Overview
The List of Users for Company is displayed as shown:
Figure 3.3 List of Users for the Company
Select Tally.Net Auditor from the Security List
Enter the BAP user name (e.g. [email protected]) in Name of User field
Password field will be skipped
Type Yes in Allow Remote Access field to allow the user to access data from a remote location
Type No in the field Allow Local TDL, so that the user does not execute TDL files available on the remote computer
Type No in the field Allow SMS Access, so that the user does not access the SMS facility.
Select End of List.
20

Tally.NET Overview
Figure 3.4 User Authorisation screen
Accept to allow remote access to the user.
3.3 Create Security Controls
By default, Tally.NET Auditor is created and authorised in the capacity of Owner, thereby having complete access to the company data. However, the Client can allow /disallow access to a menu/report by altering the Security Levels.
To create security controls for Tally.Net Auditor, execute the following steps shown.
Go to Gateway of Tally > press Alt + F3: Company Info. > Security Control > Types of Security
In the Security Levels screen, select Tally.NET Auditor
In the Security Levels sub screen for Tally.NET Auditor
By default Tally.NET Auditor appears in the Name of Security Level field
The registered CA User name will be provided to the customer/client from their Chartered Accountant/ Auditor.
Allow Remote Access should be set to Yes, only if you want your Auditor to access your data remotely for Auditing.
21

Tally.NET Overview
By default Tally.NET Auditor will Use the Basic Facilities of an Owner, which has full access on the company data. You can also select Tally.Net Auditor from Security List which has similar properties
Figure 3.5 Security Level for Tally.Net Auditor
By default Days allowed for Backdated Vouchers is set to 0The Cut-off date for Back Dated Vouchers is left emptySet No to Set/Alter rules for Print Before Save optionSet Yes to Allow to Connect Company, if you want the Tally.NET Auditor to Connect
the Company to Tally.NETSet No to Use Tally.NET AuthenticationSet Yes to Use Tally.NET Auditor Authentication
In Disallow the Following Facilities:
Select End of List from Type of AccessIn Allow the Following Facilities:
Select Full Access from Type of AccessSelect Audit Listings from List of Reports
22

Tally.NET Overview
Figure 3.6 Security Levels for Tally.NET Auditor
Select End of List from Type of Access and return to Security Levels for Company screen
Press Enter.
Accept to save the access controls for Tally.NET Auditor.
If you want to deny access to certain reports for Auditor you can select the type of access and select the required reports in the Security Levels screen.
23

Tally.NET Overview
3.4 Connect Company to Tally.NET for Remote Auditing
To enable the Auditor to Log in as Remote Auditor, the Client needs to Connect the required Company to Tally.NET.
To connect a Company to Tally.NET, execute the following steps:
Go to Gateway of Tally
Click on F4: Connect or press F4.
The Company Info menu is displayed as shown:
Figure 3.7 Company Info menu
Select the Company that needs to be connected from the List of Companies and press Enter
24

Tally.NET Overview
The completed Connect Companies to Tally.NET screen is displayed as shown:
Figure 3.8 Remote Company Login
Press Enter to Connect.
The Company should be connected to Tally.NET during the Remote Auditing process for the Auditor to view the required reports and post Audit comments.
The Connect Companies to Tally.NET screen will not be displayed if a single company loaded. In this case, the loaded company directly Connects to Tally.NET you click on F4: Connect or press F4.
25

Tally.NET Overview
On establishing a successful connection, the status is displayed in the Calculator panel available in the Information Panel. Click on the Calculator Panel to view the complete message as shown:
Figure 3.9 Tally.NET Connection status
The Client needs to ensure that the Company is connected to Tally.NET during the Remote Audit process for the Auditor to check various reports and post the Audit Remarks.
26

Lesson 4: Features of Auditors’ Edition
Auditors’ Edition comprises of the following features which will help the Auditors in improving the efficiency while providing the Audit & Compliance services to the Clients.
Tax Audit tool as per section 44AB of IT Act and printing of:
Form 3CDForm 3CAForm 3CB
Statutory Audit tool to perform Audit as per the requirements of Company’s Act
Audit DocumentationData AnalysisAuditingAudit JournalsFinancial Statements in Schedule-VI format
Statutory Compliance tool for regular compliance services
4.1 Tax Audit
Tax Audit feature helps in ensuring that the books of accounts and other records are properly maintained, in order to reflect the true income of the assessee and to facilitate the Tax Auditor to carry out the verification and generate required Annexure and Forms.
The key features of Tax Audit tool in Tally.ERP 9 are listed below:
Extracting financial and quantitative information required for Tax Audit (under Sec. 44AB)
Displaying relevant data for Audit based on Clause requirement for the following Clauses:
Clause 16Clause 17(h)Clause 18Clause 21Clause 24(a) & 24(b)Clause 27
27

Features of Auditors’ Edition
Instant Statistics on Audit Listings (Vouchers which are Audited and Unaudited. Vouchers which are marked as Under Observation, Need Clarification and Vouchers which are Clari-fied by the Client and altered by the client after audit)
Provides facility to record Audit Remarks using Audit Note
Provision to mark Vouchers for clarification / Verification from Clients
Provides facility to post corrections and reviews remotely
Tracking any alteration / modification to vouchers post Audit
Generate Annexures to Form 3CD
Printing of Form 3CD along with Annexure I and II
Printing of Form 3CA and Form 3CB
To view the Tax Audit Dashboard,
Go to Gateway of Tally > Audit & Compliance > 44AB Audit
The Tax Audit Dashboard appears as shown below:
Figure 4.1 Tax Audit Dashboard
The Tax Audit dashboard screen shows total number of vouchers available for Audit (Unaudited), number of Vouchers Audited, number of Vouchers To be re-audited and Audit Complete informa-tion for each Clause.
28

Features of Auditors’ Edition
Clause No.: Displays the Clause number as it appears in Form 3CD.
Audit Type: Provides brief description on the respective Clause.
Unaudited: Displays the total number of unaudited vouchers for each clause.
Audited: Displays the total number of Audited Vouchers for each clause.
Under Observation: Displays the total number of Vouchers marked as Under Observation for each Clause. The Auditor can mark a Voucher as Under Observation for further study or for his Superior's help. The Auditor or his superior can highlight the respective column to drill down to view the Under Observation Summary for each Clause.
Need Clarification: Displays the total number of Vouchers marked for Clarification from the Client. This will help the Auditor to keep track of the total number of Vouchers that are pending for Clarification from the Client. The Auditor can highlight the respective column to view the Need Clarification Summary for each Clause.
Clarified (To be re-audited): Displays the total number for Vouchers which are Clarified by the Client for each Clause. The Auditor can highlight the respective column to view the Clarified Vouchers.
Altered (To be re-audited): Displays the total number of Vouchers that are Altered by the Client post Audit. The Auditor can highlight the respective column to view the Re-Audit Summary for the respective Clauses.
Audit Complete?: Displays the Audit completion status for each Clause as entered by the Auditor using the F9: Save Audit button.
The Auditor can click on any Clause in the Tax Audit dashboard to perform the Audit for the respective Clause.
To Audit the Cash Payments made by the Client,
Press Enter on Amounts inadmissible u/s 40A(3)
The Voucher Count shown under the Unaudited Column also contains the Vouchers which are shown under the Under Observation, Need Clarification, Clarified and Altered columns.
If the Client alters any Audited Vouchers after the Audit Complete is set to Yes.The Audit Complete status will automatically change to blank for the respective Clause.
29

Features of Auditors’ Edition
The Cash Payments screen is displayed as shown:
Figure 4.2 Cash Payments screen -1
The Cash Payments screen displays all the Cash Payment Vouchers irrespective of any limit. You can specify the per day aggregate values in the F11: Tax Audit Rules or F12: Configure screens and the above report will list down only those transactions where the per day aggregate value exceeds the specified limit.
Press F11: Features
In the Tax Audit Rules screen,
Set Show Aggregate for the Day to Yes
30

Features of Auditors’ Edition
Specify 20,000 in Show Aggregate Amounting more than field as shown:
Figure 4.3 F11: Tax Rules screen
Press Ctrl+A to save the changesThe Cash Payments screen with per day aggregate more than 20,000 is displayed as shown:
Figure 4.4 Cash Payments - showing per day aggregate more than 20,000
31

Features of Auditors’ Edition
From the above report you can still filter some more payments which are allowed under Rule 6DD. In the above screen Advance Tax payment can be removed from by following the process given below:
Press Ctrl+F9 or click on Ctrl+F9: Master button
Select Advance Tax from the List of Ledgers and press Enter
Specify the details as shown in the screen displayed below:
Figure 4.5 Configuring expenses allowed under Rule 6DD
You can specify the Rule 6DD exceptions for a period as shown above or forever by not specifying any dates in the From and To fields.
32

Features of Auditors’ Edition
The Cash Payments after filtering the expenses allowed under Rule 6DD is displayed as shown:
Figure 4.6 Updated Cash Payments screen
The above screen displays only required Cash Payments which can be further investigated by the Auditor. The Auditor can drill down into each ledger Vouchers and decide to allow or disallow any transactions. The Transactions which are marked as disallowed will appear in the Annexure to Clause 17(h), which can be annexed with Form 3CD.
To audit the Cash Payments transactions,
33

Features of Auditors’ Edition
Select the required Ledger and press Enter
Figure 4.7 Ledger Vouchers report
Bring the cursor to the required Voucher and press Enter
In the Audit Details screen,
Selected Audit Status as DisallowedAmount field is prefilled with Voucher value this can be changed if requiredSpecify your remarks in the Audit Note field
To select more than one transactions, press Spacebar on the required transactions and press F9.
34

Features of Auditors’ Edition
The completed Audit Details screen is displayed as shown:
Figure 4.8 Audit Details screen
Press Enter to save
Similarly, other transactions can be audited. After auditing, you can press Alt+P from Cash Payments screen to print the Annexure to Clause 17(h) as shown:
Figure 4.9 Print Configuration screen for Annexure to Clause 17(h)
Set the option Print as Annexure to Yes
Press Enter to print the Annexure
If you have selected multiple Vouchers for Audit, then use Ctrl+A key combinations to save the Audit Details for all the Vouchers.
35
Features of Auditors’ Edition
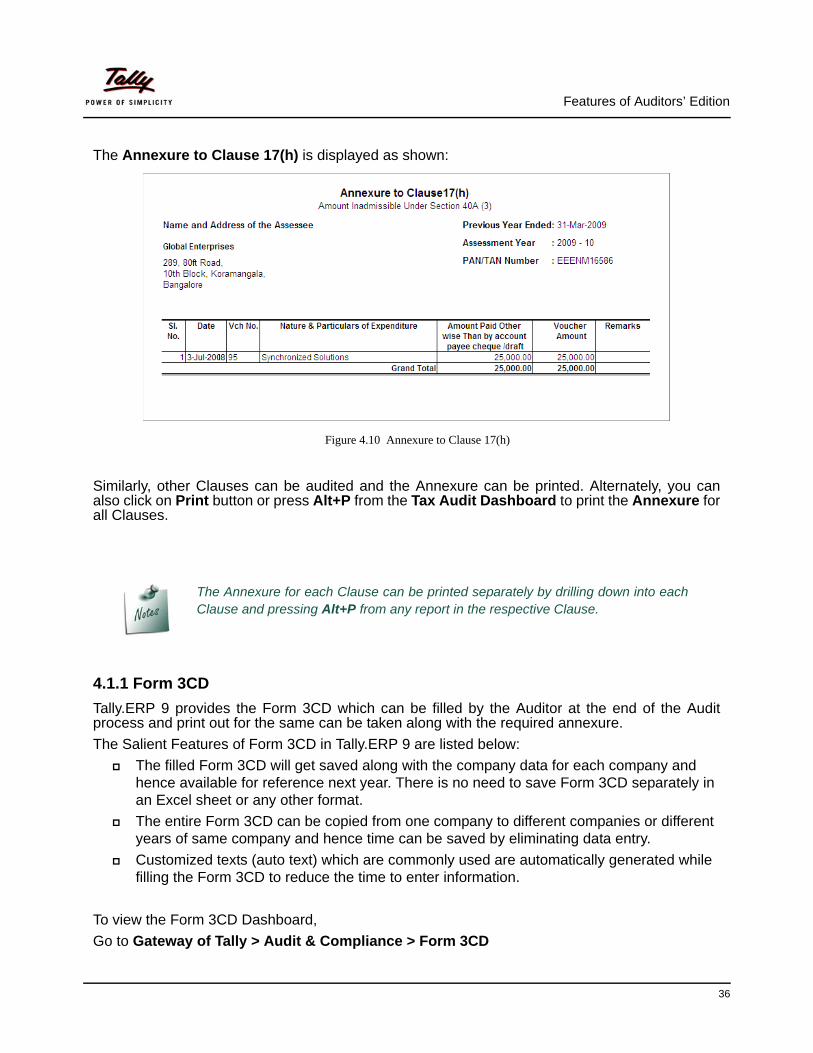
The Annexure to Clause 17(h) is displayed as shown:
Figure 4.10 Annexure to Clause 17(h)
Similarly, other Clauses can be audited and the Annexure can be printed. Alternately, you can also click on Print button or press Alt+P from the Tax Audit Dashboard to print the Annexure for all Clauses.
4.1.1 Form 3CD
Tally.ERP 9 provides the Form 3CD which can be filled by the Auditor at the end of the Audit process and print out for the same can be taken along with the required annexure.
The Salient Features of Form 3CD in Tally.ERP 9 are listed below:
The filled Form 3CD will get saved along with the company data for each company and hence available for reference next year. There is no need to save Form 3CD separately in an Excel sheet or any other format.
The entire Form 3CD can be copied from one company to different companies or different years of same company and hence time can be saved by eliminating data entry.
Customized texts (auto text) which are commonly used are automatically generated while filling the Form 3CD to reduce the time to enter information.
To view the Form 3CD Dashboard,
Go to Gateway of Tally > Audit & Compliance > Form 3CD
The Annexure for each Clause can be printed separately by drilling down into each Clause and pressing Alt+P from any report in the respective Clause.
36

Features of Auditors’ Edition
The Form 3CD Dashboard in Tally.ERP 9 is displayed as shown:
Figure 4.11 Form 3CD dashboard
The Auditor can drill down on the Clause no. column on the left side and enter the required infor-mation and save it.
Once the Form 3CD is filled completely, the Auditor can click on P: Print button or press Alt+P to print the Form 3CD along with Annexure I and Annexure II.
Similarly, Form 3CA and Form 3CB can also be printed.
4.2 Statutory AuditThe Statutory Audit tool is aimed at providing the necessary tools to investigate Audit data by comparing the same with the previous year’s data that is available in the same company or a separate company.
The Auditor can generate the required Financial Statements like Balance Sheet and Profit & Loss Account statement that needs to be submitted to the stake holders as per the format prescribed in Company’s act.
This tool is divided into the following sections:
Audit Documentation
Audit Programme
37

Features of Auditors’ Edition
Audit Working PaperAccounting Standards ChecklistAuditing and Assurance Standards Checklist
Audit & Analysis
Data AnalysisAuditing
Audit Journals
Financial Statements
Schedule-VI Balance SheetSchedule-VI Profit & Loss A/c
4.2.1 Audit Documentation
Audit Documentation helps in planning the audit activity, preparing of audit working paper and check list for Accounting standards and Auditing and Assurance Standards.
4.2.1.1 Audit Programme
Creation of a detailed Audit Programme is a compulsory pre-audit planning activity which includes of preparing of audit checklist based on the industry type, allocation of resources, identifying the time required for audit etc. Tally.ERP 9 now provides the facility to create a detailed Audit Programme along with the required features and also record the post audit comments. All this will remain in Tally.ERP 9 itself along with the Clients data for future reference if needed.
To create Audit Programme,
Go to Gateway of Tally > Audit & Compliance > Audit Programme
Set the option Set / Alter Client & Auditor Details to Yes
Specify the details for Client and Audit firm as shown:
Figure 4.12 Audit Programme- Auditor and Client Details
38

Features of Auditors’ Edition
Press Enter and create the checklist for Audit along with the resource names and time required for audit for each area.
The completed Audit Programme screen appears as shown:
Figure 4.13 Completed Audit programme screen
Press Enter to save the Audit Programme.
Press Alt+P to print the Audit Programme which can be taken to the Client’s place for refer-ence.
The Audit Programme contains the default checklist which is used widely to conduct the Auditing. The other Audit areas can be added to this list or removed from this list as required by you based on the industry type.
The details for Extent of Verification and Verification Remarks can be entered after the actual audit completion activity.
39

Features of Auditors’ Edition
The printed Audit Programme is displayed as shown:
Figure 4.14 Printed Audit Programme
40

Features of Auditors’ Edition
4.2.1.2 Audit Working Paper
The auditor should document the matters which are important in providing evidence that the audit was carried out in accordance with the basic principles. Working Papers aid in the planning and performance; supervision and review; and provide evidence of the audit work performed to support the auditor’s opinion.
Tally.ERP 9 provides a facility to generate Audit Working Papers with a click of a button. It also extends the facility to dynamically generate report specific Audit Working Papers with details such as audit activity, record date and time, auditor/article's user name, sampling applied, working Note etc.
To enable Audit Working Paper the option Enable Audit Working Paper is provided in the F5: Audit Features screen.
Figure 4.15 Enabling Audit Working Paper
On setting this option to Yes, the working note can be entered during or after audit and audit working paper can be generated along with these working/audit notes.
Audit Working Note
During audit the facility is provided to enter the working note at the Company, Masters (Ledger/Stock Item/Groups/Stock Groups) and Vouchers level. Based on reports the relevant working notes will be displayed. The note entered can be viewed in the current year and configured to be stored for display in the next year as reference. In the Audit & Analysis dashboard of Statutory Audit, the working note can be entered using the tools:
Verification of Chart of Accounts
Verification of Stock Items
Verification of Balances
41

Features of Auditors’ Edition
Analytical Procedures
Pending Documents
Periodic Payments and Receipts
Repeated Transactions
Relative Size Factor
Other Analysis
Verification of Voucher, Related Party Transactions, Forex Transactions, MSME Transac-tions, Salary / Wages Payments
Providing/Adding Working Note Details in Audit Working Paper
1. Enter Working Note Details
To enter the Working Note
Go to Gateway of Tally > Audit & Compliance > Audit & Analysis > Verification of Chart of Accounts > Accounts squared-off during the year
Click on W: Working Note or press Alt+W keys to specify the working note details at Company or Group or Ledger o Level. The details provided in working note will be captured in Audit Working Paper along with the details of User Name, Working Note Date & Time, Status, Note etc.
In Working Note Details screen
Details for: In this field select the level for which Working Note to be entered.
Company: On selection of Company as the Level cursor will move to Audit Note field to enter the details.
Group: On selection of group based on the ledger selected, displays the list of Parent Groups for defining the Working Note
Figure 4.16 Selection of Level to enter the Working Note
Ledger: Selection of level - Ledger, application will default the ledger for which the auditor wants to enter the Working Note
Working Note: In this field enter the working note details.
42

Features of Auditors’ Edition
For Future Reference: By default this option will be set to No. Set the option to Yes, if the auditor wants to carry forward the working Note to the next audit period. If the option For Future Reference is set to Yes the Working Note details will be displayed in Audit Work-ing Paper of Current as well as Next Audit Period.
Figure 4.17 Completed Working Note Details screen
Similarly you can enter the working note from different audit tools and the working note entered will be captured in Audit Working Paper.
2. Copy Audit/Verify Details to Audit Working Paper
The Audit Notes entered during Verification/Audit can also be copied to Audit Working Paper.
To copy the Audit Notes to Audit Working Paper
Go to Gateway of Tally > Audit & Compliance > Audit & Analysis > Verification of Vouchers > select the Voucher and press enter to view Voucher Register
Select the vouchers for Audit and click on F9: Audit or press Alt+F9 to view Audit Details screen
In Audit Details screen
Audit Status: In this field select the appropriate audit status
Audit Note: In this field enter the audit note details
Copy Audit Details to Audit Working Paper: By default this option will be set to No. Set the option to Yes, if the auditor wants to copy the Audit Note to Audit Working Paper.
Figure 4.18 Audit Details Screen
43

Features of Auditors’ Edition
To generate Audit Working Paper
Go to Gateway of Tally > Audit & Compliance > Audit Documentation > Audit Working Paper
Figure 4.19 Audit Working Paper
The Audit Working Paper is divided into three parts:
Company Note: This section displays Company Level notes entered by the aditor(s)/arti-cle(s) during audit along with the Name of the person who added the Working Note.
Masters Note: This section displays Masters (Groups/Ledgers/Stock Group/Stock Item) Level notes entered by the aditor(s)/article(s) during audit along with Group Name, Scope, Status, Note and the Name of the person who added the Working Note.
Voucher Note: This section displays Vouchers Level notes entered by the aditor(s)/arti-cle(s) during audit along with Voucher Date, Ledger Name, Voucher Number, Scope, Sta-tus, Note and the Name of the person who added the Working Note.
The F12: Configuration of Audit Working Paper provides the facility to filter the report based on:
Working note level (company or masters or vouchers)
Sorting methods to show working / audit notes in the increasing or decreasing order of ledger, group, stock group and stock item names, transaction amount, date-time, users and scope of audit
Note type-wise filtering facility with Audit / Verify, Future Reference and working note.
44

Features of Auditors’ Edition
The Audit Working Paper configured to view only the Company Note is displayed as shown
Figure 4.20 Audit Working Paper Configured to view Company Note
Tally.ERP 9 provides the capability to define/add working note and generate report specific Audit Working Papers such as Ledger Vouchers, Verification of Chart of Accounts, Verifica-tion of Stock Items, MSME Transactions, Forex Transactions, Salary/Wages payments, etc.
45

Features of Auditors’ Edition
Report specific Audit Working Paper is displayed as shown:
Figure 4.21 Audit Working Paper for Related Party Payments
Security Level capability is also enhanced to give access to update, alter, delete Working Note, print /display of Audit Working Paper to article(s)/users.
Audit Working Paper Access Type:
Create - Allows only to add Working Notes.
Alter - Allows to add and alter Working Notes
Full Access - Allows to add, alter, delete the working Note and change F11: Features.
Access Type - Create and Alter will not allow the article(s) to Disable/Enable Audit Working Paper in F11: Features.
46

Features of Auditors’ Edition
4.2.1.3 Accounting Standards Checklist
Accounting Standards Checklist displays all the Accounting Standards (ASs) listed by the Institute of Chartered Accountant of India (ICAI). This report helps the auditors/articles in marking the Accounting Standards applicable and complied status for a company, along with Remarks.
To view the Accounting Standards checklist
Go to Gateway of Tally > Audit & Compliance > Audit Documentation > Accounting Standards
Figure 4.22 Accounting Standard Checklist
Auditor can mark the appropriate Accounting Standards by setting Yes or No in Applicable and Compiled columns.
47

Features of Auditors’ Edition
The completed Accounting Standards checklist is displayed as below
Figure 4.23 Completed Accounting Standard Checklist
The Accounting Standards can be printed and taken by the auditor(s)/article(s) while conducting the audit for reference.
To print the Accounting Standards,
Press Alt+P from Accounting Standards screen
In the Accounting Standards Printing screen press Enter or click on Yes to print the Accounting Standards
The option None can be used by an auditor/article when he decides to leave a par-ticular Accounting Standards as blank for further clarification or to resume the update of checklist later.
The Accounting Standards is also provided for Clients under Audit & Compliance Info menu (Display > Statements of Accounts), from where the users can mark the applicable Accounting Standards.
48

Features of Auditors’ Edition
The Print Preview of Accounting Standards Checklist is displayed as shown:
Figure 4.24 Print Preview of Accounting Standard Checklist
49

Features of Auditors’ Edition
4.2.1.4 Auditing and Assurance Standards Checklist
Auditing and Assurance Standards Checklist displays all the Auditing and Assurance Standards (AASs) in line with Standards on Auditing (SAs) listed by the Institute of Chartered Accountant of India (ICAI). This report helps the auditors/articles in marking the Auditing and Assurance Standards applicable and complied status for a company, along with Remarks.
To view the Auditing and Assurance Standards Checklist
Go to Gateway of Tally > Audit & Compliance > Audit Documentation > Auditing and Assurance Standards
Auditor can mark the appropriate Auditing and Assurance Standards by setting Yes or No in Appli-cable and Compiled columns.
The completed Auditing and Assurance Standards Checklist is displayed as below
Figure 4.25 Completed Auditing and Assurance Standards Checklist
The option None can be used by an auditor/article when he decides to leave a par-ticular Accounting Standards as blank for further clarification or to resume the update of checklist later.
50

Features of Auditors’ Edition
The Auditing and Assurance Standards can be printed and taken by the auditor(s)/article(s) while conducting the audit for reference.
To print the Auditing and Assurance Standards,
Press Alt+P from Auditing and Assurance Standards screen
In the Auditing and Assurance Standards Printing screen press Enter or click on Yes to print the Auditing and Assurance Standards
Page - 1
Figure 4.26 Print Preview of Auditing and Assurance Standards Checklist
51

Features of Auditors’ Edition
4.2.2 Data Analysis
Data Analysis consists of the following tools, which will help in highlighting the exceptions that the Auditor will be interested to verify:
Verification of Chart of Accounts: will help the Auditor to understand and scrutinize the Chart of Accounts by comparing with the previous Year Chart of Accounts and will draw attention for all exceptional cases such as Master which as Discontinued, Newly Created, Regrouped etc. The Auditors can also mark the Ledgers as Verified to track the Ledgers which are pending for Verification.
Verification of Stock Items: Will help the Auditor to check the Stock Items available and will draw attention for the exceptional items such as negative stocks, difference in balances etc. by comparing with the previous years Stock Items list.
Verification of Balances: Will help the Auditor to check the difference in Opening Bal-ances and Transaction details by highlighting the exceptions. The Negative Cash balance and Ledger Balance variance reports can also be generated.
Analytical Procedures: Will help the auditor to Compare various Groups/Ledgers/Cost Category/Cost Centres or cross compare to draw various trends and obtain the Variance for further investigation.
Pending Documents: Provides the details of the pending bills, Sales Orders & Purchase Orders and Receivable & Payable during the selected year.
Statutory Payments: Will help the Auditor to find if the necessary Statutory payments were made on time or not. This will also help to find the details of the Amount Payable, Paid and Balances if any.
Periodic Payments and Receipts: This report displays the details of periodic payments or receipts for all the ledgers selected by the Auditor and provides a comparison with the pre-vious years payments and receipts. The report provides the frequency and amount varia-tions as compared to the previous year.
Repeated Value Transactions: This report displays the transactions where the same value is repeated more than once for the same Ledger. This is aimed at finding the fictional Vouchers which are passed by the Client without any proper supporting as the trend is sup-pose to repeat.
Relative Size Factor report: This report displays the Relative Size Factor analysis for the all the Ledger Vouchers which is obtained by dividing the highest value transaction with the second highest transaction.This report is aimed at rectifying these errors:
Data entry mistakesAlterations in decimalsWrong PostingsWrong coding with masters (vendors, customers, employees, etc.)Revenue items charged to capital accounts and vice versaExcess payments in payroll
Other Analysis
Inter Bank Transactions - Will display all the transactions carried out between the Banks during the audit period along with Voucher Type, Voucher Number, Debit &
52

Features of Auditors’ Edition
Credit balances, Instrument Date, Bank Date, Number of Days delayed, Audit Status and Audit Note.
Cash Withdrawals/ Deposits to Bank - Will display the bank ledgers from which the cash is withdrawn or deposits are made. This report also displays the Total Amount of transaction and the Number of vouchers through which the withdrawal or deposits are made during the selected year.
Fixed Assets Analysis: This report displays the details of the Fixed Assets Ledgers with the following information:
i. Opening Balance of the Assets brought forward from the previous year
ii. Accumulated Depreciation for the Assets if separate Ledger is created for each Asset
iii. Number of days for the Assets purchased/procured during the Audit Year with the option to classify as less than 180 days and more than 180 days. The relevant Purchase entries are also available for scrutiny.
iv. Closing Balance for each Fixed Assets at Group and Ledger level.
The above report can be exported to Excel and the Depreciation can be computed for each asset.
Transaction on holiday - This report displays all the transactions recorded on Weekly Off or Declared Holidays in the Audit Year.
Highest and Lowest Value Transactions - This report provides ledger wise Highest and Lowest value transactions carried out during the selected period along with Differ-ence Range and Difference Range Percentage details.
Pending Advances - This report displays the ledgers for which the advances made (Loan given) are pending during the Audit Year.
Stale Cheque /Instruments - This report displays the Bank Ledgers with stale cheque/ Instruments. This report also displays the Total amount and count of stale cheques/ Instruments. To filter the transactions in this report, by default 6 months has been set as Validity Period for Cheques/Instruments. The Stale Cheques/instruments report checks for the instruments which are falling above the Validity Period by comparing Bank Date with Instrument Date of the transactions.
Once the Auditor finishes verifying the data using the above tools, he can mark the status in the Verification Complete? column to Yes.
4.2.3 Auditing
The Auditing section provides the facility to the Auditors to Vouch the transactions and enter the required Audit remarks.
Verification of Vouchers: Option to apply the recommended Sampling methods and do the Auditing for the Sampled Vouchers or all Vouchers is provided.
Related Party Transactions: Option to check and Audit the vouchers of Ledgers marked as Related Party is provided.
53

Features of Auditors’ Edition
Forex Transactions: Option to check and audit the transactions involving multi currency is provided.
Micro, Small and Medium Enterprises (MSME) Transactions: Auditor can check and audit the Outstanding Payments for the parties identified as MSME’s. The Payments which were made after 45 days can also be tracked using this report.
Salary / Wages Payments: Auditor can check the Head count details and Salary Pay-ments details for all the employees and option to audit these transactions is provided.
Though the Auditing section provide the list of all Vouchers for Audit, the tool provides the flexibil-ity to Audit any transaction from anywhere.
The Auditors’ Edition provides the facility to the Auditors’ to raise the Clarification Note and obtain necessary clarifications from the Client. The tool also tracks the Vouchers which are altered after the Audit completion.
To view the Data Analysis and Auditing reports,
Go to Gateway of Tally > Audit & Compliance > Audit & Analysis
The Statutory Audit Dashboard appears as shown:
Figure 4.27 Statutory Audit Dashboard
The drill down from Total and Audited columns will display all and Audited Vouchers respectively. While the drill down from the Under Observation, Need Clarification, Clarified (To be re-
54

Features of Auditors’ Edition
audited) and Altered (To be re-audited) columns will display the Vouchers with the respective Audit Status.
The Statutory Audit Dashboard also displays the percentage of sampled Vouchers to total Vouchers and Sampled Vouchers to Audited Vouchers.
For more information on sampling methods and configuration, refer to the Tally.ERP 9 Reference Manual (Help file).
4.2.4 Audit Journals
The Audit Journals report displays and provides the facility to pass the Finalisation, Appropria-tion and Provision Entries which are required to finalise the Books of Accounts.
These entries can be passed using the following appropriation types using the F7: Audit Jrnlbutton:
Appropriation: This Appropriation Type should be used to record the Appropriation entries such as Dividend, Dividend Tax, Reserve and Surplus etc. The entries passed with the Appropriation flag will appear below the heading Appropriations under the Amount Availa-ble for Appropriations in the Schedule-VI Profit & Loss A/c.
Depreciation Provisions: This Appropriation Type should be selected to record the Depreciation entries which will appear as Depreciation under Profit/(Loss) before Interest, Depreciation and Tax in the Schedule-VI Profit & Loss A/c.
Finalisation Entries: This Appropriation Type should be used to pass the entries that will not affect the Profit/(Loss) before Interest, Depreciation and Tax in the Schedule-VI Profit & Loss A/c. Profit & Loss A/c Ledger is not available for selection when this flag is selected in the Audit Journal creation.
Interest Provision: This Appropriation Type should be selected to record the provisional entries for Interest which will appear as Interest under Profit/(Loss) before Interest, Depre-ciation and Tax in the Schedule-VI Profit & Loss A/c.
Prior Period Item: This Appropriation Type can be used to record the entries that will affect the Profit/(Loss) before Interest, Depreciation and Tax in the Schedule-VI Profit & Loss A/c.
Tax Provisions: This Appropriation Type should be selected to record the provisional entries for Tax which will appear as Provision for Taxation under Profit/(Loss) before Tax in the Schedule-VI Profit & Loss A/c.
Others: This Appropriation Type should be selected for all other entries. If the Client has passed any entry using the Profit & Loss A/c Ledger it will appear under Others in the Audit Journals report. The Auditor needs to correct these entries by selecting the required Appro-priation flag.
Sampled column displays the count of Sampled Vouchers along with the Percent-age. It also displays Voucher Type- and Ledger-Wise sampled vouchers count
Ledger-wise count displayed in Brackets indicates the number of Ledgers partici-pated in the sampled vouchers.
55

Features of Auditors’ Edition
The entries with the Others flag will appear above the Profit/(Loss) Carried to Balance Sheet in Red colour to grab the attention.
The Audit Journals report with these entries is displayed as shown:
Figure 4.28 Audit Journals
4.2.5 Financial Statements:
Using Auditors’ Edition of Tally.ERP 9 the Financial Statements can be prepared as per the Schedule VI requirements as specified in Companies Act. The following reports can be generated using this tool in the Schedule VI format:
Balance Sheet
Profit & Loss Statement
The salient features for the Schedule VI reports are listed below:
Schedule-VI Balance Sheet
Can be generated with a single clickTally Default Groups (Business Groups) are mapped to Schedule VI groupings by
default.Can be further regrouped as required (User defined)Flexible Schedule numberingGeneration of SchedulesExport to Excel for further formatting if required.
56

Features of Auditors’ Edition
Schedule-VI Profit and Loss A/c
Sales & Income Groups are mapped to INCOME by defaultExpenses & Purchase Groups are mapped to EXPENDITUREOption to rename INCOME & EXPENDITURE is provided to support all industriesFlexibility to regroup within INCOME & EXPENDITUREFlexible Schedule numberingGeneration of SchedulesExport to Excel for further formatting if required.
4.2.5.1 Schedule-VI Balance Sheet
To generate the Balance Sheet in the required Schedule VI format,
Go to Gateway of Tally > Audit & Compliance > Financial Statements > Balance Sheet
The schedule VI Balance Sheet is displayed as shown:
Figure 4.29 Schedule VI Balance Sheet
To generate the Balance sheet with previous year figures, load the previous year data if it is in a different Company.
57

Features of Auditors’ Edition
Click on Ctrl+F3: Compare Cmp or press Ctrl+F3
Figure 4.30 Compare Company screen
Select the required Previous Year Company and press Enter
Figure 4.31 Schedule VI Balance Sheet with two years data
All the default Tally Groups are mapped to the Schedule VI titles to generate the above Financial Statements. The Auditor can further re-classify these Groups as per the requirement without affecting the Client’s data.
Flexibility has been provided to rearrange either Groups or Ledgers so that the required Schedule -VI Balance Sheet can be generated. Please refer to Tally.ERP 9 reference manual (help file) for more information.
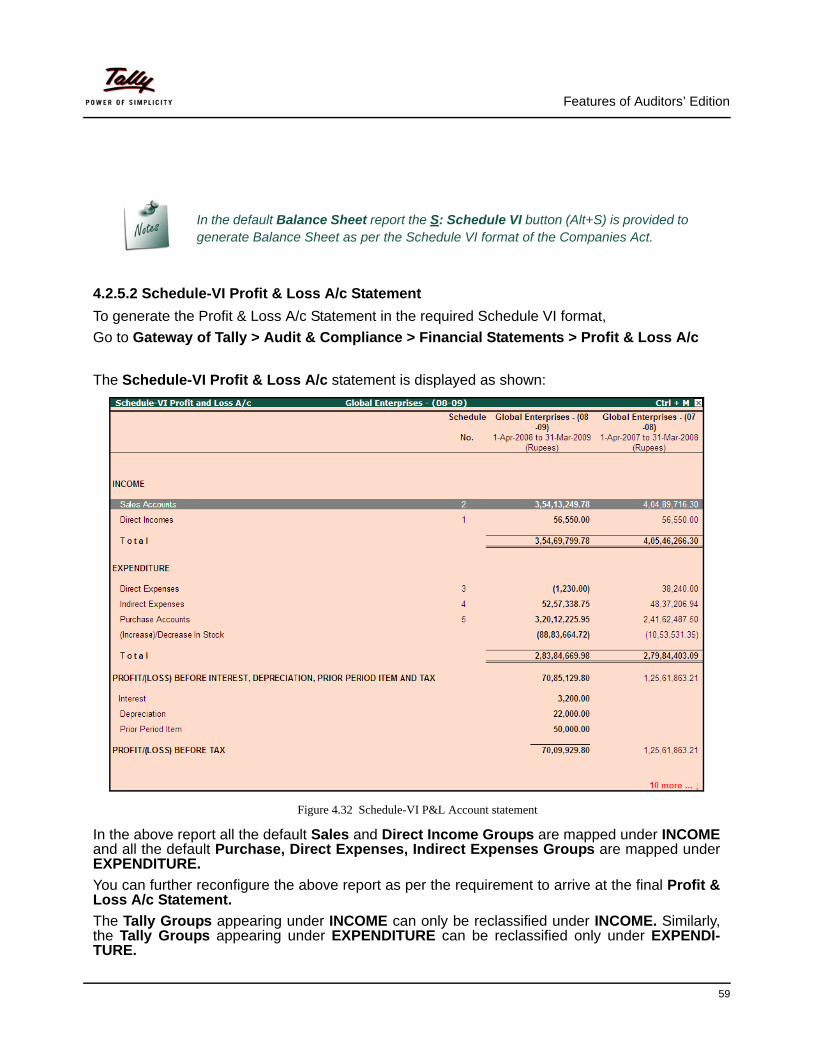
58
Features of Auditors’ Edition
4.2.5.2 Schedule-VI Profit & Loss A/c Statement
To generate the Profit & Loss A/c Statement in the required Schedule VI format,
Go to Gateway of Tally > Audit & Compliance > Financial Statements > Profit & Loss A/c
The Schedule-VI Profit & Loss A/c statement is displayed as shown:
Figure 4.32 Schedule-VI P&L Account statement
In the above report all the default Sales and Direct Income Groups are mapped under INCOMEand all the default Purchase, Direct Expenses, Indirect Expenses Groups are mapped under EXPENDITURE.
You can further reconfigure the above report as per the requirement to arrive at the final Profit & Loss A/c Statement.
The Tally Groups appearing under INCOME can only be reclassified under INCOME. Similarly, the Tally Groups appearing under EXPENDITURE can be reclassified only under EXPENDI-TURE.
In the default Balance Sheet report the S: Schedule VI button (Alt+S) is provided to generate Balance Sheet as per the Schedule VI format of the Companies Act.
59

Features of Auditors’ Edition
Flexibility has been provided to rearrange either Groups or Ledgers so that the required Schedule -VI P&L A/c can be generated. Please refer to Tally.ERP 9 reference manual (help file) for more information.
In the default Balance Sheet report the S: Schedule VI button (Alt+S) is provided to generate Balance Sheet as per the Schedule VI format of the Companies Act.
In the default Profit & Loss Account report the S: Schedule VI button (Alt+S) is provided to generate Profit & Loss Account as per the Schedule VI format of the Companies Act
4.3 Statutory Compliance
The Statutory Compliance feature in the Auditors’ edition will help the Auditors’ to provide the Compliance services for various direct and indirect taxation modules on a regular basis.
The salient features for Statutory Compliance tool are listed below:
Taxation based in-built rules to classify the Masters and Vouchers as Possibly Incorrect (not created as per the recommended setup for each Taxation)
Reasons for Possibly Incorrect Masters and Vouchers
Auditor can concentrate only on Possibly Incorrect and save time
No need for 100% verification of Masters and Vouchers (for other than Possibly Incorrect)
Taxation based Payable & Paid information
Taxation based Due Dates
Random verification of In Accordance Masters and Vouchers
Provision to raise Clarification on Master and Vouchers from Clients
Provides facility to record Verification Remarks using Verification Note
To view the Statutory Compliance Dashboard,
Go to Gateway of Tally > Audit & Compliance > Statutory Compliance
In the default Profit & Loss Account report the S: Schedule VI button (Alt+S) is provided to generate Profit & Loss Account as per the Schedule VI format of the Companies Acts.
60

Features of Auditors’ Edition
The Statutory Compliance Summary screen appears as displayed below:
Figure 4.33 Statutory Compliance Summary
The Statutory Compliance Summary is divided into two sections:
1. The first section displays the number of Ledgers and Vouchers and classifies them into following: Total: Displays the total number of Ledgers/Vouchers
Possibly Incorrect (to be Verified): Displays the number of Ledgers/Vouchers which are not created/passed as per the setup recommended by Tally.ERP 9 for selected Statutes.
Marked for Clarification/Correction: Displays the number of Ledgers /Vouchers for which the clarification is asked from Client or correction is suggested.
In Accordance: Displays the number of Ledgers/Vouchers that are created/passed as per the recommended setup in Tally.ERP 9 for the selected Statutes.
Others/Non Statutory: Displays all other Ledgers /Vouchers that does not belongs to the selected Statutes.
The number of Ledgers/Vouchers that are marked Verified will appear in the brackets next to the total number of Ledgers/Vouchers in each column except Possibly Incorrect (to be Verified) and Marked for Clarification/Correction.
61

Features of Auditors’ Edition
2. The second section shows the Statutory Payment Details for the selected period along with pending payments and due dates etc.
Tax payable: Displays the total tax payable for the selected period.
Tax paid: Displays the total tax paid during the selected period.
Balance Tax: Displays the pending tax payment based on the Tax payable and Tax Paid amounts during the selected period.
Due on: Displays the last date of making the tax payment for the selected period if there is any balance tax to be paid.
The Auditor can drill down from the first section to view the Ledger Masters and Ledgers Vouchers and perform the Audit and save the Verification remarks. The drill down from Possibly Incorrect (to be Verified) will display the reasons for the non compliance.
The drill down from the second section displays the Computation reports for each statute.
The due date for the selected statue is shown based on the due date specified in the F11: Audit Features screen.
62
Recommended


![Getting Started with Tally.ERP 9[1].pdf](https://img.pdfslide.us/doc/110x75/577cdf3d1a28ab9e78b0c355/getting-started-with-tallyerp-91pdf.jpg)


![Getting Started With Tally.erp 9[1]](https://img.pdfslide.us/doc/110x75/577d2fbb1a28ab4e1eb2818b/getting-started-with-tallyerp-91.jpg)